Scan to register
bellakitchenware.com
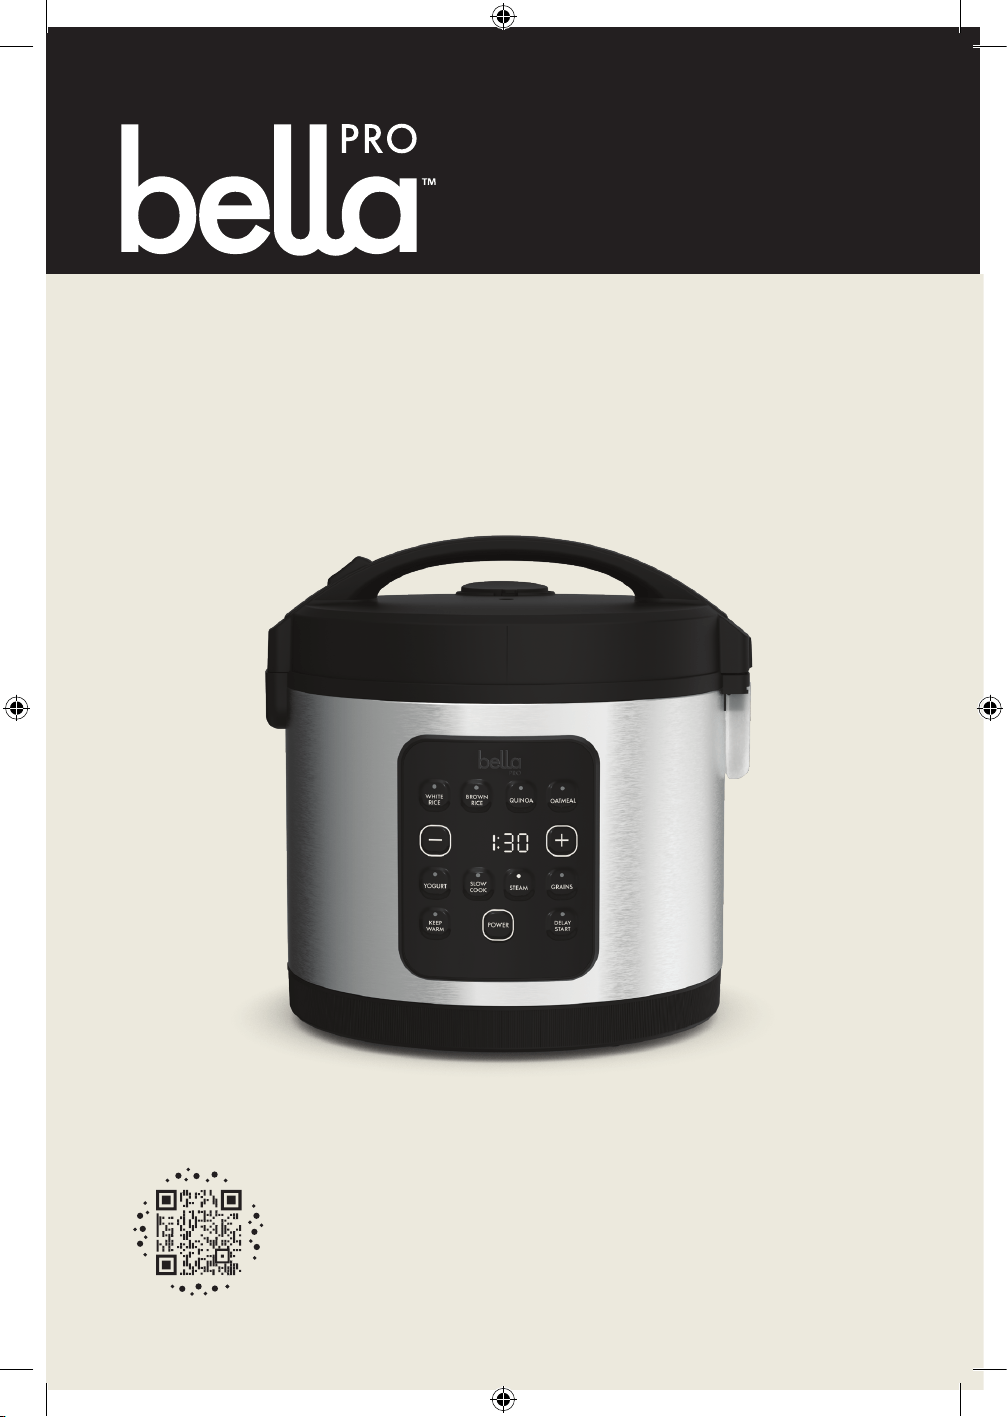
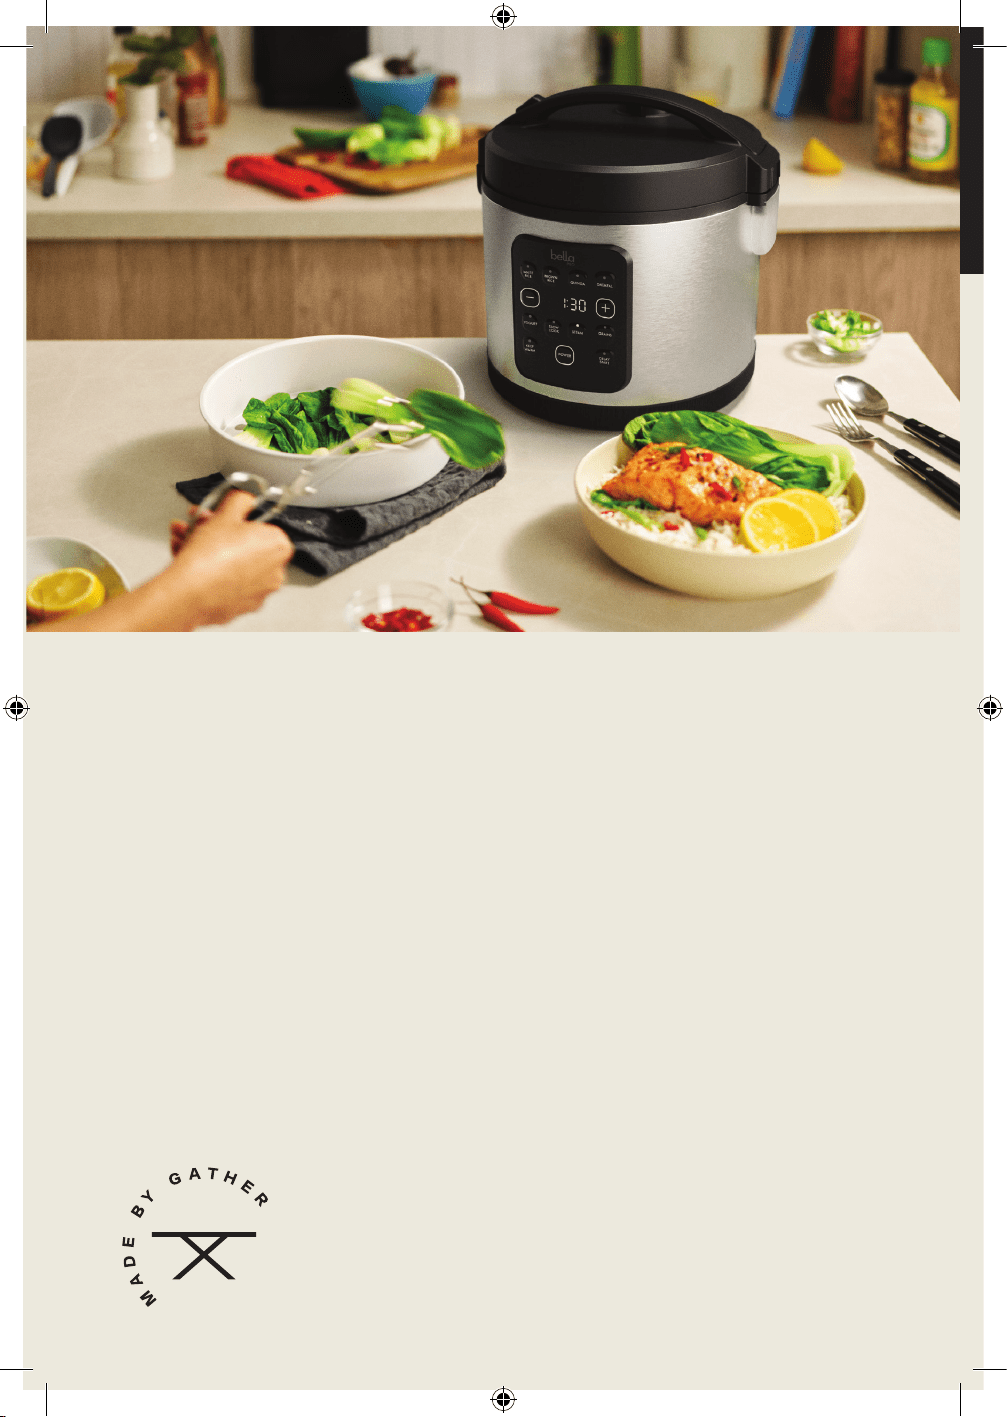
Digital Rice Cooker
&Food Steamer
Instruction Manual
90226_BellaPro_BestBuy_20 Cup Digital_RiceCooker_IM V4 R1.indd 190226_BellaPro_BestBuy_20 Cup Digital_RiceCooker_IM V4 R1.indd 1 2024-05-28 5:20 PM2024-05-28 5:20 PM

90226_BellaPro_BestBuy_20 Cup Digital_RiceCooker_IM V4 R1.indd 290226_BellaPro_BestBuy_20 Cup Digital_RiceCooker_IM V4 R1.indd 2 2024-05-28 5:20 PM2024-05-28 5:20 PM

1
TABLE OF CONTENTS
IMPORTANT SAFEGUARDS ....................................................................................................................................................2
ADDITIONAL IMPORTANT SAFEGUARDS ........................................................................................................................3
NOTES ON THE PLUG .............................................................................................................................................................4
NOTES ON THE CORD ...........................................................................................................................................................4
PLASTICIZER WARNING ........................................................................................................................................................4
ELECTRIC POWER .....................................................................................................................................................................4
GETTING TO KNOW YOUR 20 CUP DIGITAL RICE COOKER ....................................................................................5
CONTROL PANEL ......................................................................................................................................................................5
BEFORE USING FOR THE FIRST TIME ................................................................................................................................ 6
OPERATING INSTRUCTIONS ............................................................................................................................................... 6
WHITE RICE, BROWN RICE, QUINOA AND GRAINS .................................................................................................. 6
WHITE RICE, BROWN RICE, GRAINS AND QUINOA FUNCTION CHART ........................................................... 6
WHITE RICE COOKING CHART ........................................................................................................................................... 7
LONG GRAIN WHITE RICE COOKING CHART ..............................................................................................................8
LONG GRAIN BROWN RICE COOKING CHART ...........................................................................................................8
COOKING RICE: HINTS FOR BEST RESULTS ....................................................................................................................8
QUINOA .......................................................................................................................................................................................8
GRAINS ........................................................................................................................................................................................ 9
STEAM, YOGURT, SLOW COOK, OATMEAL FUNCTION CHARTS .......................................................................... 9
STEAM .........................................................................................................................................................................................10
YOGURT ...................................................................................................................................................................................... 10
BASIC PLAIN YOGURT PREPARATION .............................................................................................................................. 11
SLOW COOK .............................................................................................................................................................................. 11
SLOW COOKING: HINTS FOR BEST RESULTS ................................................................................................................ 11
OATMEAL ................................................................................................................................................................................... 12
24 HR. DELAY TIMER ............................................................................................................................................................... 12
10 HR. KEEP WARM .................................................................................................................................................................12
USER MAINTENANCE INSTRUCTIONS ..........................................................................................................................13
CARE & CLEANING INSTRUCTIONS ............................................................................................................................... 13
CLEANING THE STEAM VENT ...........................................................................................................................................14
STORING INSTRUCTIONS ..................................................................................................................................................14
LIMITED TWO-YEAR WARRANTY ......................................................................................................................................15
90226_BellaPro_BestBuy_20 Cup Digital_RiceCooker_IM V4 R1.indd 190226_BellaPro_BestBuy_20 Cup Digital_RiceCooker_IM V4 R1.indd 1 2024-05-28 5:20 PM2024-05-28 5:20 PM

2
IMPORTANT SAFEGUARDS
When using electrical appliances, basic safety precautions should always be
followed including the following:
1. READ ALL INSTRUCTIONS.
2. Do not touch hot surfaces. Use handles or knobs.
3. To protect against electrical shock, do not immerse cord, plugs or base unit in
water or other liquid.
4. This appliance is not intended for use by persons (including children) with
reduced physical, sensory or mental capabilities, or lack of experience and
knowledge, unless they have been given supervision or instruction concerning
use of the appliance by a person responsible for their safety.
5. Close supervision is necessary when any appliance is used by or near children.
6. To disconnect, press POWER, then remove plug from the wall outlet.
7. Unplug from outlet when not in use and before cleaning. Allow to cool before
cleaning or storing this appliance.
8. Do not operate any appliance with a damaged cord or plug or aer the
appliance malfunctions or has been damaged in any manner.
9. The use of accessory attachments not recommended by the appliance
manufacturer may cause injuries.
10. Do not use outdoors.
11. Do not let the cord hang over edge of table or counter, or touch hot surfaces,
as you may trip and fall or cause the hot contents of the rice cooker to spill and
possibly cause burns or injuries.
12. Do not place on or near a hot gas or electric burner, or in a heated oven.
13. Extreme caution must be used when moving an appliance containing hot oil or
other hot liquids.
WARNING: Use caution when opening lid. Steam escapes as soon as the lid
is opened. Never place your face or hands over the Rice Cooker when opening
the lid. Always use oven mitts when handling the hot cooking pot.
14. Never yank the cord to disconnect the appliance from the outlet, it could
damage the cord. Instead, grasp the plug and pull to disconnect.
15. Do not use appliance for other than intended use.
16. When programming 24 HR. DELAY TIMER for longer than 2 hours, for food
safety, do not place perishable foods in the cooking pot.
17. intended for counter-top use only.
WARNING: Spilled food can cause serious burns. Keep appliance and cord
away from children. Never drape cord over edge of counter, never use outlet
below counter, and never use with an extension cord.
FOR HOUSEHOLD USE ONLY
SAVE THESE INSTRUCTIONS
90226_BellaPro_BestBuy_20 Cup Digital_RiceCooker_IM V4 R1.indd 290226_BellaPro_BestBuy_20 Cup Digital_RiceCooker_IM V4 R1.indd 2 2024-05-28 5:20 PM2024-05-28 5:20 PM

3
ADDITIONAL IMPORTANT
SAFEGUARDS
CAUTION HOT SURFACES: This appliance generates heat and escaping steam
during use. Proper precautions must be taken to prevent the risk of burns,
res or other injury to persons or damage to property.
1. A person who has not read and understood all operating and safety
instructions is not qualied to operate this appliance. All users of this appliance
must read and understand this instruction manual before operating or cleaning
this appliance.
2. If this appliance falls or accidentally becomes immersed in water,
unplug it from the wall outlet immediately. Do not reach into the water!
3. Unplug from outlet when not in use and before cleaning. To avoid electric
shock, never immerse or rinse this appliance in water or any other liquid.
4. When using this appliance, provide adequate air space above and on all sides
for air circulation. Do not operate this appliance while it is touching or near
curtains, wall coverings, clothing, dishtowels or other ammable materials.
5. Do not place this Rice Cooker directly under kitchen wall cabinets when in use,
as it produces steam. Avoid reaching over the steam valve while in use.
6. To reduce the risk of re, do not leave this appliance unattended during use.
7. If this appliance begins to malfunction during use, press POWER,
then immediately unplug the cord. Do not use or attempt to repair the
malfunctioning appliance!
8. The cord to this appliance should only be plugged into a 120V AC electrical
outlet.
9. Do not use this appliance in an unstable position.
10. Do not use the cooking pot if dented, bent, or damaged.
11. Avoid electric shock by unplugging the Rice Cooker before washing or adding
water.
12. Never use the cooking pot on a gas or electric cooktop or on an open ame.
13. CAUTION: Never operate the Rice Cooker when the cooking pot is empty.
14. Do not leave the plastic rice paddle or rice measuring cup in the cooking pot
while the Rice Cooker is in use.
15. To avoid burns, stay clear of the steam vent during cooking.
16. WARNING: Use caution when opening lid. Steam escapes as soon as the lid
is opened. Never place your face or hands over the Rice Cooker when opening
the lid. Always use oven mitts when handling the hot cooking pot.
17. To reduce the risk of electric shock, cook only in the cooking pot. Do not pour
liquid directly into the Rice Cooker body.
18. Do not use while standing in a damp area.
19. Never use sharp objects inside the cooking pot as this will damage the
non-stick coating.
20. IMPORTANT: Always remove and clean the steam vent aer preparing
oatmeal or porridge-like stews. Follow the detailed instructions in
the Care & Cleaning section of this instruction manual.
90226_BellaPro_BestBuy_20 Cup Digital_RiceCooker_IM V4 R1.indd 390226_BellaPro_BestBuy_20 Cup Digital_RiceCooker_IM V4 R1.indd 3 2024-05-28 5:20 PM2024-05-28 5:20 PM

4
NOTES ON THE PLUG
This appliance has a polarized plug (one blade is wider than the other).
To reduce the risk of electric shock, this plug will t in a polarized outlet only
one way. If the plug does not t fully into the outlet, reverse the plug. If it still does
not t, contact a qualied electrician. Do not modify the plug in any way.
NOTES ON THE CORD
A short power-supply cord (or detachable power-supply cord) is to be provided
to reduce the risk resulting from becoming entangled in or tripping over a longer
cord. Do not use an extension cord with this product.
PLASTICIZER WARNING
CAUTION: To prevent Plasticizers from migrating to the nish of the countertop
or tabletop or other furniture, place NON-PLASTIC coasters or place mats between
the appliance and the nish of the countertop or tabletop. Failure to do so may
cause the nish to darken; permanent blemishes may occur or stains can appear.
ELECTRIC POWER
If the electrical circuit is overloaded with other appliances, your appliance may
not operate properly. It should be operated on a separate electrical circuit from
other appliances.
90226_BellaPro_BestBuy_20 Cup Digital_RiceCooker_IM V4 R1.indd 490226_BellaPro_BestBuy_20 Cup Digital_RiceCooker_IM V4 R1.indd 4 2024-05-28 5:20 PM2024-05-28 5:20 PM
5
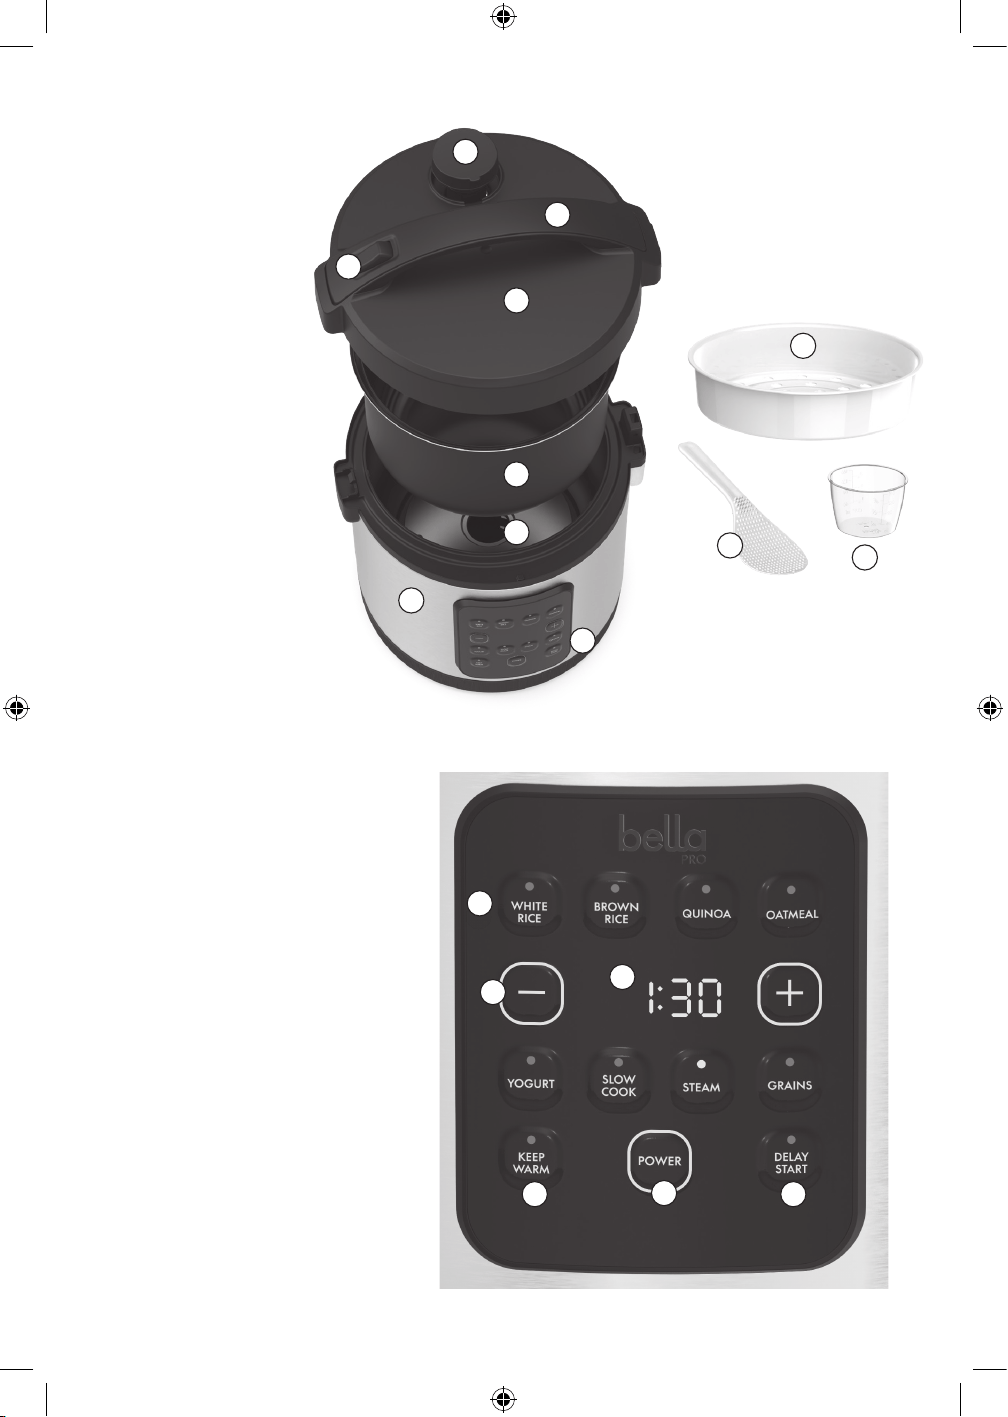
GETTING TO KNOW YOUR 20 CUP DIGITAL RICE COOKER
Product may vary slightly from illustration
1. Hinged Lid
2. Lid Lock Button
3. Lid Handle
4. Steam Vent
5. Non-Stick Cooking Pot
6. Heating Tray
7. Base Unit
8. Control Panel
9. Steam Tray
10. Rice Measuring Cup
11. Rice Paddle
12. Polarized Plug (not shown)
CONTROL PANEL
1. POWER
2. 8 Function Buttons with Indicator Lights
3. Digital TIME Display
4. + / - Buttons
5. KEEP WARM Button with Indicator Light
6. DELAY TIMER Button with Indicator Light
1
1
5
6
7
8
9
10
11
2
3
4
1
2
3
4
5 6
90226_BellaPro_BestBuy_20 Cup Digital_RiceCooker_IM V4 R1.indd 590226_BellaPro_BestBuy_20 Cup Digital_RiceCooker_IM V4 R1.indd 5 2024-05-28 5:20 PM2024-05-28 5:20 PM

6
BEFORE USING FOR THE FIRST TIME
1. Remove all packaging from the Rice Cooker. Remove any labels from the outer surfaces.
2. Grasp the handle, press and hold the lid lock button while liing the hinged lid. Remove Rice Cooker
accessories and the cooking pot. Remove and discard packaging.
3. Wash cooking pot, steam tray, rice measuring cup and rice paddle in warm, soapy water. Never use abrasive
cleansers or scouring pads as they can damage the nish of both the cooking pot and base unit.
Rinse and dry well.
NOTE: The cooking pot, steam tray, rice measuring cup and rice paddle are dishwasher safe.
DO NOT IMMERSE THE BASE UNIT OF THE RICE COOKER IN WATER OR ANY OTHER LIQUID!
IMPORTANT: Be careful not to dent the bottom of the cooking pot. To work properly and produce the best
cooking results, the cooking pot must t snugly on top of the thermostat.
4. Replace the clean cooking pot. Store rice measuring cup and rice paddle and steam tray inside the Rice Cooker,
if desired. Close the lid. An audible sound can be heard as the lid locks securely.
5. Never place liquid in the base unit. Place liquids into the cooking pot only.
6. Never plug in the Rice Cooker without rst placing the cooking pot inside the base unit.
OPERATING INSTRUCTIONS
WARNING:
1. Open the Rice Cooker lid.
2. Following recipe directions, add ingredients to the cooking pot. Rotate the cooking pot slightly to make sure
it is well seated on the thermostat.
3. Close the lid. An audible sound can be heard as the lid locks securely.
4. Plug the Rice Cooker into a 120V AC electrical outlet. The Rice Cooker will sound 1 tone, the control panel
indicator lights will illuminate briey, then darken. 4 dashes ( ---- ) will appear and remain on the digital
display until further action.
WHITE RICE, BROWN RICE, QUINOA AND GRAINS
There are 2 pre-programmed RICE options: WHITE RICE, BROWN RICE. All varieties of rice can be used including
basmati, wild rice, black rice, Arborio, risotto, brown, long and short grains, pre-boiled and quick cooking rice,
including instant whole grains.
IMPORTANT: Rice, Quinoa and Grains function(s) have no preset TIME and cannot be adjusted. WHITE RICE, BROWN
RICE TIMES are determined by weight of rice and water during cooking.
24 HR. DELAY TIMER: Following the detailed instructions in the 24 HR. DELAY TIMER section of this instruction manual,
you can program the DELAY TIMER to begin cooking white, brown rice and quinoa automatically within a specied
time. Aer rice, quinoa or grains is cooked, the Rice Cooker will advance to a 10 HR. KEEP WARM for perfect serving.
IMPORTANT: You may press Keep warm at any time during any cooking cycle to advance Keep Warm function.
WHITE RICE, BROWN RICE, GRAINS AND QUINOA FUNCTION CHART
COOKING FUNCTION Keep Warm Delay Timer
White Rice 10 hrs. 24 hrs.
Brown Rice 10 hrs. 24 hrs.
Grains 10 hrs. 24 hrs.
Quinoa 10 hrs. 24 hrs.
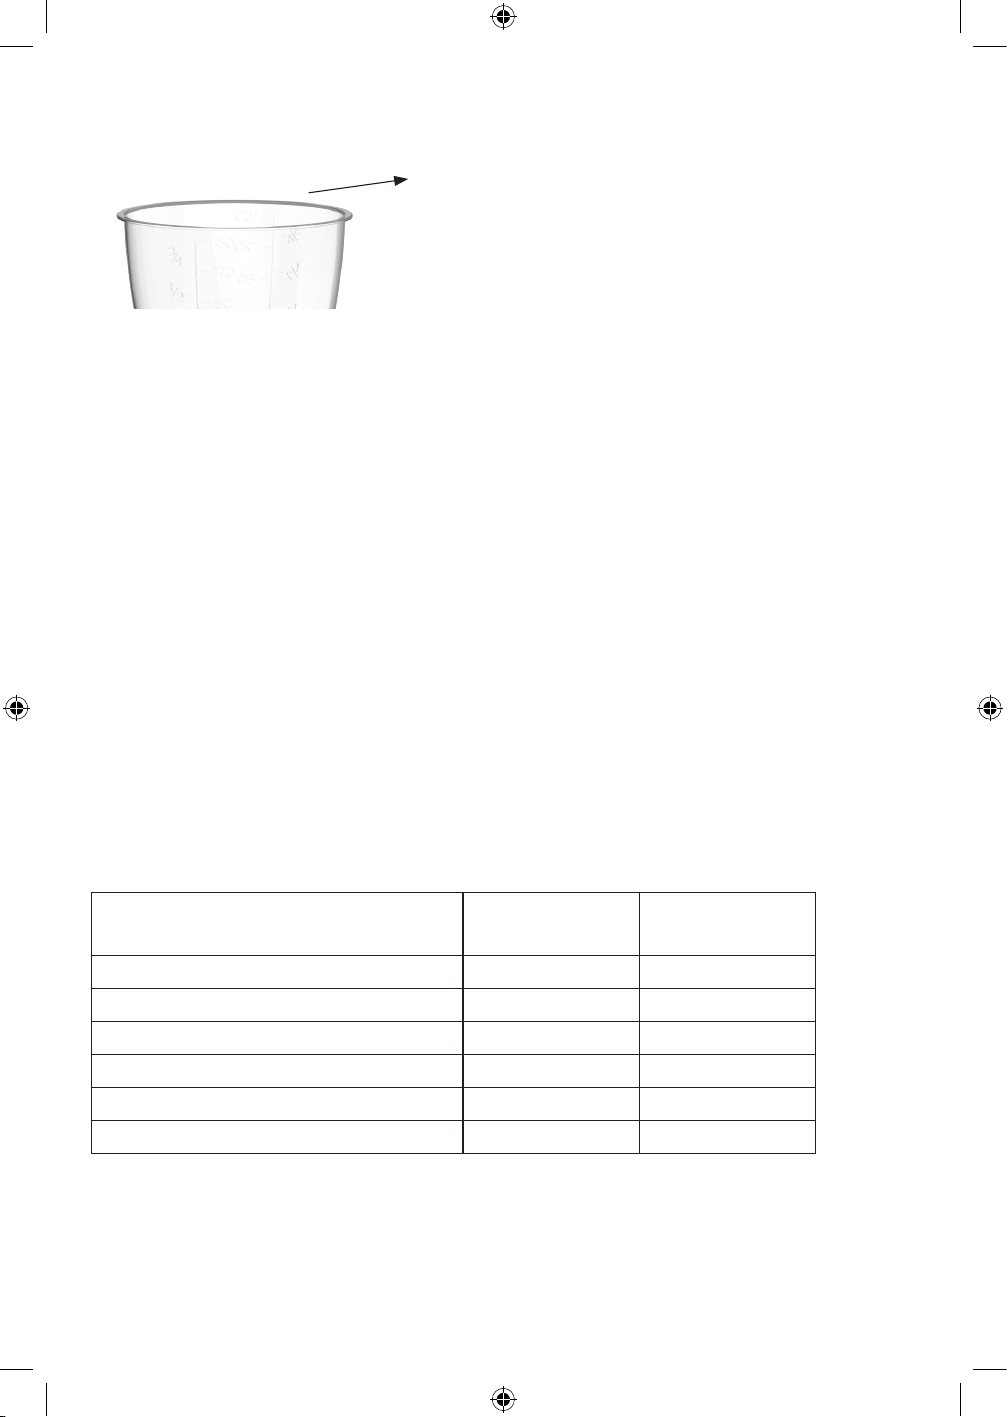
1. A 6 oz./180 ml (3/4 cup) rice measuring cup is included with your Rice Cooker. Measure the amount of raw rice
that you would like to cook. When measuring, cups should be level and lled.
NOTE: Depending on the type of rice, 1 (6 oz.) rice measuring cup of raw rice cooks to approximately 2 (8 oz.)
cups of cooked rice. This 20 cup Rice Cooker has the capacity to cook up to 10 rice measuring cups of raw rice.
2. To rinse rice, pour the desired amount of raw rice into a colander/strainer. Rinse until the rinse water runs clear.
3. For estimated raw rice to water/cooking liquid quantities, please refer to the RICE COOKING CHARTS that
follow.
4. Place the washed rice into the cooking pot; then add the corresponding amount of cooking liquid. To prepare
20 cups of cooked rice, please put in 10 cups of uncooked rice. Then add water to the 10-level line inside the
cooking pot. (See Figure 2.)
Figure 2
Use the rice measuring cup provided to measure 10 cups of rice.
Rinse, if desired.
Add raw rice to the inner pot.
Add water to the 10-cup line.
5. Close and lock lid.
6. Plug the Rice Cooker into a 120V AC electrical outlet. The Rice Cooker will sound 1 tone, the control panel
indicator lights will illuminate briey, then darken. 4 dashes (----) will appear and remain on the digital
display.
7. Press the WHITE RICE, BROWN RICE button. When the button is pressed, the light above the active button will
begin to ash.
8. Press the POWER button. The indicator light will illuminate . A steam graphic will rotate continuously as the
Rice Cooker heats.
NOTE: If the POWER button has not been pressed, aer 30 seconds of inactivity, the Rice Cooker will return
to standby; the control panel will darken. 4 dashes (----) will appear and remain on the digital display until
a function button is pressed.
9. At the end of the RICE cooking cycle, 5 audible tones signal cooking is completed. The KEEP WARM indicator
light will illuminate as the Rice Cooker automatically advances to a 10 HR. KEEP WARM cycle.
10. For uer rice, allow the cooked rice stand for 10 minutes before stirring or removing to allow the steam to
nish the cooking process.
WARNING: Use caution when opening the lid. Steam escapes as soon as the lid is opened. Never place your
face or hands over the Rice Cooker when carefully opening the lid.
11. Use the rice paddle provided or any other non-metal long-handle utensil to scoop and mix the rice well.
Allow all steam to escape.
12. Using oven mitts, carefully remove the cooking pot from the Rice Cooker. Do not touch the base unit or cooking
pot until they have cooled completely.
13. Allow the Rice Cooker to cool completely before cleaning.
14. Unplug the Rice Cooker when not in use.
NOTE: Aer cooking rice, some rice cooking liquid may pool under the lid at the top of the unit around the
cooking pot. This is normal. Use a paper towel or kitchen cloth to clean aer every use. Use a small brush or
cotton swab if necessary.
WHITE RICE COOKING CHART
RAW WHITE RICE Water Level Approx. Cooked Yield
(cups)
4 rice measuring cups to 4-cup line 6 to 8
5 rice measuring cups to 5-cup line 9 to 12
6 rice measuring cups to 6-cup line 11 to 14
7 rice measuring cups to 7-cup line 13 to 16
8 rice measuring cups to 8-cup line 15 to 18
10 rice measuring cups to 10-cup line 17 to 20
90226_BellaPro_BestBuy_20 Cup Digital_RiceCooker_IM V4 R1.indd 690226_BellaPro_BestBuy_20 Cup Digital_RiceCooker_IM V4 R1.indd 6 2024-05-28 5:20 PM2024-05-28 5:20 PM
7
4. Place the washed rice into the cooking pot; then add the corresponding amount of cooking liquid. To prepare
20 cups of cooked rice, please put in 10 cups of uncooked rice. Then add water to the 10-level line inside the
cooking pot. (See Figure 2.)
Figure 2
Use the rice measuring cup provided to measure 10 cups of rice.
Rinse, if desired.
Add raw rice to the inner pot.
Add water to the 10-cup line.
5. Close and lock lid.
6. Plug the Rice Cooker into a 120V AC electrical outlet. The Rice Cooker will sound 1 tone, the control panel
indicator lights will illuminate briey, then darken. 4 dashes (----) will appear and remain on the digital
display.
7. Press the WHITE RICE, BROWN RICE button. When the button is pressed, the light above the active button will
begin to ash.
8. Press the POWER button. The indicator light will illuminate . A steam graphic will rotate continuously as the
Rice Cooker heats.
NOTE: If the POWER button has not been pressed, aer 30 seconds of inactivity, the Rice Cooker will return
to standby; the control panel will darken. 4 dashes (----) will appear and remain on the digital display until
a function button is pressed.
9. At the end of the RICE cooking cycle, 5 audible tones signal cooking is completed. The KEEP WARM indicator
light will illuminate as the Rice Cooker automatically advances to a 10 HR. KEEP WARM cycle.
10. For uer rice, allow the cooked rice stand for 10 minutes before stirring or removing to allow the steam to
nish the cooking process.
WARNING: Use caution when opening the lid. Steam escapes as soon as the lid is opened. Never place your
face or hands over the Rice Cooker when carefully opening the lid.
11. Use the rice paddle provided or any other non-metal long-handle utensil to scoop and mix the rice well.
Allow all steam to escape.
12. Using oven mitts, carefully remove the cooking pot from the Rice Cooker. Do not touch the base unit or cooking
pot until they have cooled completely.
13. Allow the Rice Cooker to cool completely before cleaning.
14. Unplug the Rice Cooker when not in use.
NOTE: Aer cooking rice, some rice cooking liquid may pool under the lid at the top of the unit around the
cooking pot. This is normal. Use a paper towel or kitchen cloth to clean aer every use. Use a small brush or
cotton swab if necessary.
WHITE RICE COOKING CHART
RAW WHITE RICE Water Level Approx. Cooked Yield
(cups)
4 rice measuring cups to 4-cup line 6 to 8
5 rice measuring cups to 5-cup line 9 to 12
6 rice measuring cups to 6-cup line 11 to 14
7 rice measuring cups to 7-cup line 13 to 16
8 rice measuring cups to 8-cup line 15 to 18
10 rice measuring cups to 10-cup line 17 to 20
90226_BellaPro_BestBuy_20 Cup Digital_RiceCooker_IM V4 R1.indd 790226_BellaPro_BestBuy_20 Cup Digital_RiceCooker_IM V4 R1.indd 7 2024-05-28 5:20 PM2024-05-28 5:20 PM
8
LONG GRAIN WHITE RICE COOKING CHART
Use the rice measuring cup (provided) to measure rice.
Raw rice and water/liquid volume may be adjusted to taste on subsequent rice cookings.
Allow 25 to 60 minutes (depending on the quantity being cooked) to cook white rice.
RAW LONG GRAIN WHITE RICE Water Level Approx. Cooked Yield
(cups)
4 rice measuring cups to 4-cup line 8
5 rice measuring cups to 5-cup line 10
6 rice measuring cups to 6-cup line 12
7 rice measuring cups to 7-cup line 14
8 rice measuring cups to 8-cup line 16
10 rice measuring cups to 10-cup line 18
LONG GRAIN BROWN RICE COOKING CHART
Allow 60 to 90 minutes (depending on the quantity being cooked) to cook white rice.
RAW LONG GRAIN BROWN RICE Water Level Approx. Cooked Yield
(cups)
4 rice measuring cups to 5-cup line 8 to 11
5 rice measuring cups to 6-cup line 10 to 12
6 rice measuring cups to 7-cup line 12 to 14
7 rice measuring cups to 8-cup line 14 to 16
8 rice measuring cups to 9-cup line 16 to 18
COOKING RICE: HINTS FOR BEST RESULTS
• If your rice is dry or hard/chewy when the Rice Cooker advances to 10 HR. KEEP WARM, additional water and
cooking time will soen the rice. Depending on how dry your rice is, add 1/2 to 1 cup of water and stir through.
• When the Rice Cooker advances to KEEP WARM, open the lid and stir the rice to check the consistency. If
cooked rice is soggy, close the lid and continue to KEEP WARM for 10 to 30 minutes as needed. Unlock and li
the lid; stir periodically to release excess moisture.
• When a recipe calls for salt, use kosher salt. It has no impurities or additives and dissolves easily. Increase the
recipe quantity to 1-1/2 times more kosher salt than table salt.
• Stocks, broths, and bullion can be used in place of water to add avor and improve texture when cooking rice.
• When cooking wild rice, add 25% to 50% more water to cook thoroughly. Follow package instructions.
QUINOA
White, red or black, quinoa is an excellent addition to any meal. Use fresh quinoa in salad bowls, power breakfast
bowls, soups, vegetable dishes, even desserts.
IMPORTANT: The QUINOA function has no preset TIME and cannot be adjusted. QUINOA TIME is determined by
weight of quinoa and water during cooking.
24 HR. DELAY TIMER: Following the detailed instructions in the 24 HR. DELAY TIMER section of this instruction manual,
you can program the DELAY TIMER to begin cooking quinoa automatically within a specied time. Aer quinoa is
cooked, the Rice Cooker will advance to 10 HR. KEEP WARM for serving.
IMPORTANT: You may press KEEP WARM at any time during any cooking cycle to advance KEEP WARM function.
1. If desired, rinse quinoa for 2 minutes in a ne mesh strainer to remove its natural bitter-tasting outer coating.
2. To prepare 3 cups of cooked quinoa, add 1 cup of dry quinoa to 2 cups water or broth to the cooking pot. Stir.
3. Close and lock lid.
4. Plug the Rice Cooker into a 120V AC electrical outlet. The Rice Cooker will sound 1 tone, the control panel
indicator lights will illuminate briey, then darken. 4 dashes (----) will appear and remain on the digital
display.
5. Press the QUINOA button. The QUINOA indicator light will begin to ash
90226_BellaPro_BestBuy_20 Cup Digital_RiceCooker_IM V4 R1.indd 890226_BellaPro_BestBuy_20 Cup Digital_RiceCooker_IM V4 R1.indd 8 2024-05-28 5:20 PM2024-05-28 5:20 PM
9
6. Press the POWER button. The indicator light will illuminate. A steam graphic will rotate continuously as the Rice
Cooker heats.
7. At the end of the QUINOA cooking cycle, 5 audible tones signal cooking is completed. The KEEP WARM
indicator light will illuminate as the Rice Cooker automatically advances to a 10 HR. KEEP WARM cycle.
GRAINS
Many ancient grains such as amaranth, farro, spelt, buckwheat and millet oer many health benets as well as great
avor and texture.
IMPORTANT: The Grain function has no preset TIME and cannot be adjusted. Grains TIME is determined by weight
of grains and water during cooking.
24 HR. DELAY TIMER: Following the detailed instructions in the 24 HR. DELAY TIMER section of this instruction manual,
you can program the DELAY TIMER to begin cooking grain automatically within a specied time. Aer Grain is cooked,
the appliance will advance to 10 HR. KEEP WARM for serving.
IMPORTANT: You may press KEEP WARM at any time during any cooking cycle to advance KEEP WARM function.
1. If desired, rinse the grain for 2 minutes in a ne mesh strainer to remove its natural bitter-tasting outer coating.
2. Follow grains cooking chart depending of the desired amount and type of grains you want to cook. Add the
correct amount of grains and water.
3. Close and lock lid.
4. Plug the Rice Cooker into a 120V AC electrical outlet. The Rice Cooker will sound 1 tone, the control panel
indicator lights will illuminate briey, then darken. 4 dashes (----) will appear and remain on the digital display.
5. Press the Grain button. The Grain indicator light will begin to ash
6. Press the POWER button. The indicator light will illuminate. A steam graphic will rotate continuously as the Rice
Cooker heats.
7. At the end of the GRAINS cooking cycle, 5 audible tones signal cooking is completed. The KEEP WARM
indicator light will illuminate as the Rice Cooker automatically advances to a 10 HR. KEEP WARM cycle.
Type of Grain Grain Ratio Liquid ratio Cooked amount
Buckwheat 1 cup 2 cups 4 cups
Lentils (Brown and Greens) 1 cup 3 cups 2 cups
Barley 1 cup 2 ½ cups – 3 cups 3 ½ cups
Bulgur 1 cup 1.5 cup 3 cups
Millet 1 cup 2 cups 4 cups
Bean 1 cup 2 cups 2 cups
Farro 1 cup 2 ½ cups 2 ½ cups
Spelt 1 cup 3 cups 3 cups
Amaranth 1 cup 2 cups 3 ½ cups
STEAM, YOGURT, SLOW COOK, OATMEAL FUNCTION CHARTS
1. Following recipe directions, add ingredients to the clean cooking pot.
2. When the STEAM, YOGURT, SLOW COOK or OATMEAL button is pressed, the light above the active button
will begin to ash, the default TIME will appear on the digital display.
COOKING FUNCTION Default time adjustable range 10 hr. keep warm
Steam 1:00 0:10 - 1:30 10 hrs.
Yogurt 8:00 6:00 - 12:00 ----
Slow cook 3:00 2:00 - 6:00 10 hrs.
Oatmeal 1:10 0:30 - 2:00 10 hrs.
10 Hr. Keep warm 0:00 10 hrs.
To adjust TIME for your recipe, press the + or - button until the desired TIME is displayed. See Function Chart.
NOTE: Press and hold the + or - button to fast increase or decrease TIME.
90226_BellaPro_BestBuy_20 Cup Digital_RiceCooker_IM V4 R1.indd 990226_BellaPro_BestBuy_20 Cup Digital_RiceCooker_IM V4 R1.indd 9 2024-05-28 5:20 PM2024-05-28 5:20 PM

10
3. Press the POWER button. The active indicator light will illuminate as cooking begins. TIME will count down.
4. Unlock and li the lid at any time to check the progress of cooked food. If cooking is completed before TIME
reaches 0:00, turn your Programmable Rice Cooker OFF by pressing POWER. Then remove plug from the wall
outlet.
5. At the end of the cooking cycle, when TIME reaches 0:00, 5 audible tones signal cooking is completed.
6. When using the STEAM, SLOW COOK or OATMEAL function, the KEEP WARM indicator light will illuminate
as Rice Cooker automatically advances to a 10 HR. KEEP WARM cycle.
IMPORTANT: You may press KEEP WARM at any time during any cooking cycle to advance to keep warm
function.
STEAM
Use the STEAM function for steaming fresh or frozen vegetables as well as fresh sh and
shellsh.
24 HR. DELAY TIMER: Following the detailed instructions in the 24 HR. DELAY TIMER section of this instruction manual,
you can program the DELAY TIMER to begin to STEAM automatically within a specied time.
CAUTION: NEVER use 24 HR. DELAY TIMER to cook perishable ingredients such as fresh sh, beef, or poultry.
Aer STEAM, the Rice Cooker will advance to a 10 HR. KEEP WARM cycle for serving.
Preparing Vegetables for Steam
• Peel vegetables when appropriate, or scrub them well. Keep in mind that hard vegetables such as potatoes
and beets hold their shape better when the peel is le intact.
• Vegetables may be cooked whole or chopped into pieces. The larger the pieces, the longer food will take
to cook.
• Vegetables with the same cooking time may be cooked together.
Basic Vegetable / Meat / Fish Steaming Technique
1. Pour 1-1/2 cups water or steaming liquid into the removable cooking pot. Insert the removable cooking pot into
the base unit.
2. Add the steam tray to the top of the cooking pot. Arrange food in the steam tray.
3. Close and lock lid.
4. Plug the Rice Cooker into a 120V AC electrical outlet. The Rice Cooker will sound 1 tone, the control panel
indicator lights will illuminate briey, then darken. 4 dashes (----) will appear and remain on the digital display.
5. Press the STEAM button. The STEAM indicator light will begin to ash, 1 hour (1:00) will ash on the digital
display.
6. To adjust TIME for your recipe, press the + or - button until the desired TIME is displayed, from 10 minutes (0:10)
to 1 hour 30 minutes (1:30), in 5 minute increments.
NOTE: Press and hold the + or - button to fast increase or decrease TIME.
7. Press the POWER button. The indicator light will illuminate as cooking begins. TIME will count down.
8. At 0:00, 5 audible tones signal cooking is completed. The KEEP WARM indicator light will illuminate as Rice
Cooker automatically advances to a 10 HR. KEEP WARM cycle.
WARNING: Use caution when opening lid. Steam escapes as soon as the lid is opened. Never place your face
or hands over the Rice Cooker when opening the lid. Always use oven mitts when handling the hot cooking pot.
9. Check the condensation tray aer the STEAM function is used. Simply slide out to remove, rinse and replace.
YOGURT
Preparing homemade yogurt in your Digital Rice Cooker is both simple and convenient.
• Experiment with various types of milk, non-dairy soy, coconut, or any nut milks. Be creative with classic and
fresh avor additions and combinations: vanilla bean, coee, chocolate, cinnamon, jam, fresh fruit, frozen fruit,
granola.
• Velvety and luscious, use plain fresh yogurt to make Tzaziki cucumber and other cream based dips, salad
dressings, frozen yogurt, smoothies, baked goods.
• There are several ways to produce a thicker, Greek-style yogurt.
• Use Greek yogurt as starter.
• Add yogurt starter culture.
• Add powdered milk.
• Line a strainer with cheesecloth and place over a bowl. Pour the yogurt into the lined strainer. Store in the
refrigerator to drain for 6 hours or overnight.
HINT: Save enough plain yogurt as a starter for your next batch. Store in an airtight container in the freezer for
future use.
90226_BellaPro_BestBuy_20 Cup Digital_RiceCooker_IM V4 R1.indd 1090226_BellaPro_BestBuy_20 Cup Digital_RiceCooker_IM V4 R1.indd 10 2024-05-28 5:20 PM2024-05-28 5:20 PM

11
BASIC PLAIN YOGURT PREPARATION
1. To prepare basic plain yogurt, add 4 tablespoons of room temperature plain or Greek yogurt (with active
cultures) as starter and 4-1/4 cups (1 liter) room temperature, whole fat milk to the clean cooking pot.
Use a plastic or wooden spoon to stir.
IMPORTANT: Both milk and starter yogurt culture MUST be at room temperature.
IMPORTANT: NEVER use metal utensils when preparing fresh yogurt.
2. Close and lock lid.
3. Plug the Rice Cooker into a 120V AC electrical outlet. The Rice Cooker will sound 1 tone, the control panel
indicator lights will illuminate briey, then darken. 4 dashes (----) will appear and remain on the digital
display.
4. Press the YOGURT button. The YOGURT indicator light will begin to ash, 8 hours (8:00) will ash on the digital
display.
5. To adjust TIME for your recipe, press the + or - button until the desired TIME is displayed, from 6 hours (6:00)
to 12 hours (12:00).
NOTE: Press and hold the + or - button to fast increase or decrease the TIME in 30 minute increments.
6. Press the POWER button. The indicator light will illuminate as cooking begins. TIME will count down.
7. At 0:00, 5 audible tones signal cooking is completed. The Rice Cooker will Istandby; the control panel will
darken. 4 dashes (----) will appear and remain on the digital display.
SLOW COOK
1. Place food to be slow cooked into the removable cooking pot.
IMPORTANT: Do not ll the cooking pot higher than the 10-cup line inside the cooking pot when cooking
vegetables or whole pieces of meat. Do not cook with food content below the 2-cup line inside the cooking pot.
24 HR. DELAY TIMER: Following the detailed instructions in the 24 HR. DELAY TIMER section of this instruction
manual, you can program the DELAY TIMER to begin cooking in slow cook mode automatically within a
specied time. Aer slow cooking is cooked, the Rice Cooker will advance to 10 HR. KEEP WARM for perfect
serving.
2. Close and lock lid.
3. Plug the Rice Cooker into a 120V AC electrical outlet. The Rice Cooker will sound 1 tone, the
control panel indicator lights will illuminate briey, then darken. 4 dashes ( ---- ) will appear and remain
on the digital display.
4. Press the SLOW COOK button. The SLOW COOK indicator light will begin to ash, 3 hours (3:00) will ash
on the digital display.
5. To adjust TIME for your recipe, press the + or - button until the desired TIME is displayed, from 2 hours (2:00)
to 6 hours (6:00).
NOTE: Press and hold the + or - button to fast increase or decrease the TIME in 10 minute increments.
6. Press the POWER button. The indicator light will illuminate as cooking begins. TIME will count down.
IMPORTANT: For best results, open the lid to check on food, stir contents, add food or liquids during cooking.
Lower and lock lid and continue cooking.
7. At 0:00, 5 audible tones signal cooking is completed.
8. The KEEP WARM indicator light will illuminate as Rice Cooker automatically advances to a 10 HR. KEEP WARM
cycle.
SLOW COOKING: HINTS FOR BEST RESULTS
• Less tender, cheaper cuts of meat are better candidates for slow cooking than more expensive varieties.
• Slow cooked meats will not brown. Browning fatty meats prior to adding to the cooking pot will reduce the
amount of fat and help to preserve color while adding richer avor.
• Whole herbs and spices avor better in slow cooking than crushed or ground.
• If a recipe results in too much liquid at the end of the cooking time, continue to cook 1 hour (1:00). Check every
15 minutes. Aer about 30 to 45 minutes the amount of liquid will be reduced.
• When cooking soups or stews, allow a 2-inch space between the food and the top of the cooking pot, to allow
ingredients to simmer.
• Recipes that call for uncooked meat and vegetables require 3 to 4 hours.
• Foods cut into uniform pieces will cook faster and more evenly than foods le whole such as roast or poultry.
• Root vegetables such as carrots, potatoes, turnips and beets require longer cooking time than many meats.
POWER Be sure to place them on the bottom of the Rice Cooker and cover them with liquid.
• Add fresh dairy products (milk, sour cream or yogurt) prior to serving. Evaporated milk or condensed creamed
soups may be added at the start of cooking.
90226_BellaPro_BestBuy_20 Cup Digital_RiceCooker_IM V4 R1.indd 1190226_BellaPro_BestBuy_20 Cup Digital_RiceCooker_IM V4 R1.indd 11 2024-05-28 5:20 PM2024-05-28 5:20 PM

12
OATMEAL
24 HR. DELAY TIMER: Following the detailed instructions in the 24 HR. DELAY TIMER section of this instruction manual,
you can program the DELAY TIMER to begin cooking oatmeal automatically. Wake up to warm, creamy, homemade
stone-ground, old-fashioned or steel cut oatmeal. Enjoy a delicious, lling, and heart-healthy start for your day.
Embellish with chopped apples, cinnamon, maple syrup, honey, brown sugar, milk of your choice, fruit
preserves, nuts, chia seeds, wheat berries. Aer oatmeal is cooked, the Rice Cooker will advance to a 10 HR. KEEP
WARM for serving.
IMPORTANT: Always remove and clean the steam vent aer preparing oatmeal or porridge-like stews. Follow the
detailed instructions in the Care & Cleaning section of this instruction manual.
1. To prepare 4 cups of cooked steel-cut oatmeal, add 3-1/2 cups water or milk and 1 cup steel cut oats to the
cooking pot. Stir.
2. Close and lock lid.
NOTE: When preparing larger quantities, it is advisable to increase the TIME by 15 minutes.
3. Plug the Rice Cooker into a 120V AC electrical outlet. The Rice Cooker will sound 1 tone, the control panel
indicator lights will illuminate briey, then darken. 4 dashes (----) will appear and remain on the digital
display.
4. Press the OATMEAL button. The OATMEAL indicator light will begin to ash, 1 hour 10 minutes (1:10) will ash on
the digital display.
5. To adjust TIME for your recipe, press the + or - button until the desired TIME is displayed, from 30 minutes
(0:30) to 2 hours (2:00).
NOTE: Press and hold the + or - button to fast increase or decrease the TIME in 5 minute increments.
6. Press the POWER button. The indicator light will illuminate as cooking begins. TIME will count down.
7. At 0:00, 5 audible tones signal cooking is completed. The KEEP WARM indicator light will illuminate as the Rice
Cooker automatically advances to a 10 HR. KEEP WARM cycle.
8. Cooked oats can be refrigerated in an airtight container for up to 1 week and reheated on the stovetop or in the
microwave.
IMPORTANT: Aer preparing oatmeal, always remove and clean the steam vent following the detailed
instructions in the Care & Cleaning section of this instruction manual.
24 HR. DELAY TIMER
24 HR. DELAY TIMER is an option for WHITE RICE, BROWN RICE, STEAM, OATMEAL, QUINOA and SLOW COOKER.
Use the 24 HR. DELAY TIMER to program your Digital Rice Cooker to cook oatmeal overnight in time for breakfast,
steam vegetables while you are out, or cook and hold warm, steamy rice in time for lunch or dinner.
NOTE: Do not use perishable ingredients such as fresh milk, eggs, cheese, onions, fresh fruit or yogurt when using
the 24 HR. DELAY TIMER.
1. Following your recipe, place ingredients into the removable cooking pot.
2. Plug the Rice Cooker into a 120V AC electrical outlet. The Rice Cooker will sound 1 tone, the control panel
indicator lights will illuminate briey, then darken. 4 dashes (----) will appear and remain on the digital display.
3. Press the WHITE RICE, BROWN RICE, STEAM, OATMEAL, QUINOA and SLOW COOKER button. The light
above the active button will begin to ash.
4. Press 24 HR. DELAY TIMER. 1 hour (1:00) will ash on the digital display.
5. To adjust DELAY TIME for your recipe, press the + or - button until the desired DELAY TIME is displayed,
from 1 hour (1:00) to 24 hours (24:00).
6. Press the POWER button. Both the active WHITE RICE, BROWN RICE, STEAM, OATMEAL, QUINOA and SLOW
COOKER and the DELAY TIME indicator lights will illuminate. DELAY TIME will count down.
NOTE: If the POWER button has not been pressed, aer 30 seconds of inactivity, the Rice Cooker will return
to standby; the control panel will darken. 4 dashes (----) will appear and remain on the digital display until a
function button is pressed.
7. At the end of the programmed DELAY TIME, when TIME reaches 0:00, cooking will begin.
10 HR. KEEP WARM
Use the 10 HR. KEEP WARM function independently for serving.
1. Place food for serving into the removable cooking pot.
2. Plug the Rice Cooker into a 120V AC electrical outlet. The Rice Cooker will sound 1 tone, the control panel
indicator lights will illuminate briey, then darken. 4 dashes (----) will appear and remain on the digital
display.
3. Press the KEEP WARM button. The KEEP WARM indicator light will illuminate. 0:00 will appear on the digital
display as the Rice Cooker TIME counts UP to 10 hours (10:00).
IMPORTANT: You may press Keep warm at any time during any cooking cycle to advance Keep Warm function.
90226_BellaPro_BestBuy_20 Cup Digital_RiceCooker_IM V4 R1.indd 1290226_BellaPro_BestBuy_20 Cup Digital_RiceCooker_IM V4 R1.indd 12 2024-05-28 5:20 PM2024-05-28 5:20 PM

13
USER MAINTENANCE INSTRUCTIONS
This appliance requires little maintenance. It contains no user serviceable parts. Do not try
to repair it yourself. Any servicing requiring disassembly other than cleaning, must be
performed by a qualied appliance repair technician.
1. Be careful not to dent the cooking pot, especially the bottom. To work properly and produce the best cooking
results, the cooking pot must t snugly on top of the thermostat.
2. DO NOT let loose grains of rice or other food particles fall into the bottom of the base unit because they
might prevent the thermostat from tting tightly against the bottom of the cooking pot and cause inadequate
cooking.
3. Use the plastic rice paddle or a wooden spoon to stir and remove food from the cooking pot. NEVER use any
metal utensils.
4. Never use abrasive cleansers or scouring pads because they can damage the nish of both the cooking pot and
base unit.
5. Never pour liquid into the base unit or immerse it in water.
CARE & CLEANING INSTRUCTIONS
CAUTION: NEVER IMMERSE THE RICE COOKER BODY OR CORD IN WATER OR OTHER LIQUID.
PLEASE NOTE: It is normal to have a brown ‘rice crust’ coating the bottom layer of the cooking pot when the rice
has nished cooking and steaming.
1. Unplug the Rice Cooker from the wall outlet. Allow the unit to cool before cleaning or storing.
2. Check the condensation tray, located on the side of the handle. Slide down and out to remove, rinse and
replace.
3. Clean the Rice Cooker aer every use. NEVER immerse the base unit or power cord in water.
4. Fill the cooking pot with warm water and allow to soak. Wash the cooking pot, steam tray, rice measuring cup
and rice paddle in warm, soapy water.
NOTE: The cooking pot, steam tray, rice measuring cup and rice paddle are dishwasher safe.
5. Rinse and dry well.
6. Wipe the Rice Cooker base unit with a so, slightly damp cloth or sponge.
90226_BellaPro_BestBuy_20 Cup Digital_RiceCooker_IM V4 R1.indd 1390226_BellaPro_BestBuy_20 Cup Digital_RiceCooker_IM V4 R1.indd 13 2024-05-28 5:20 PM2024-05-28 5:20 PM
14
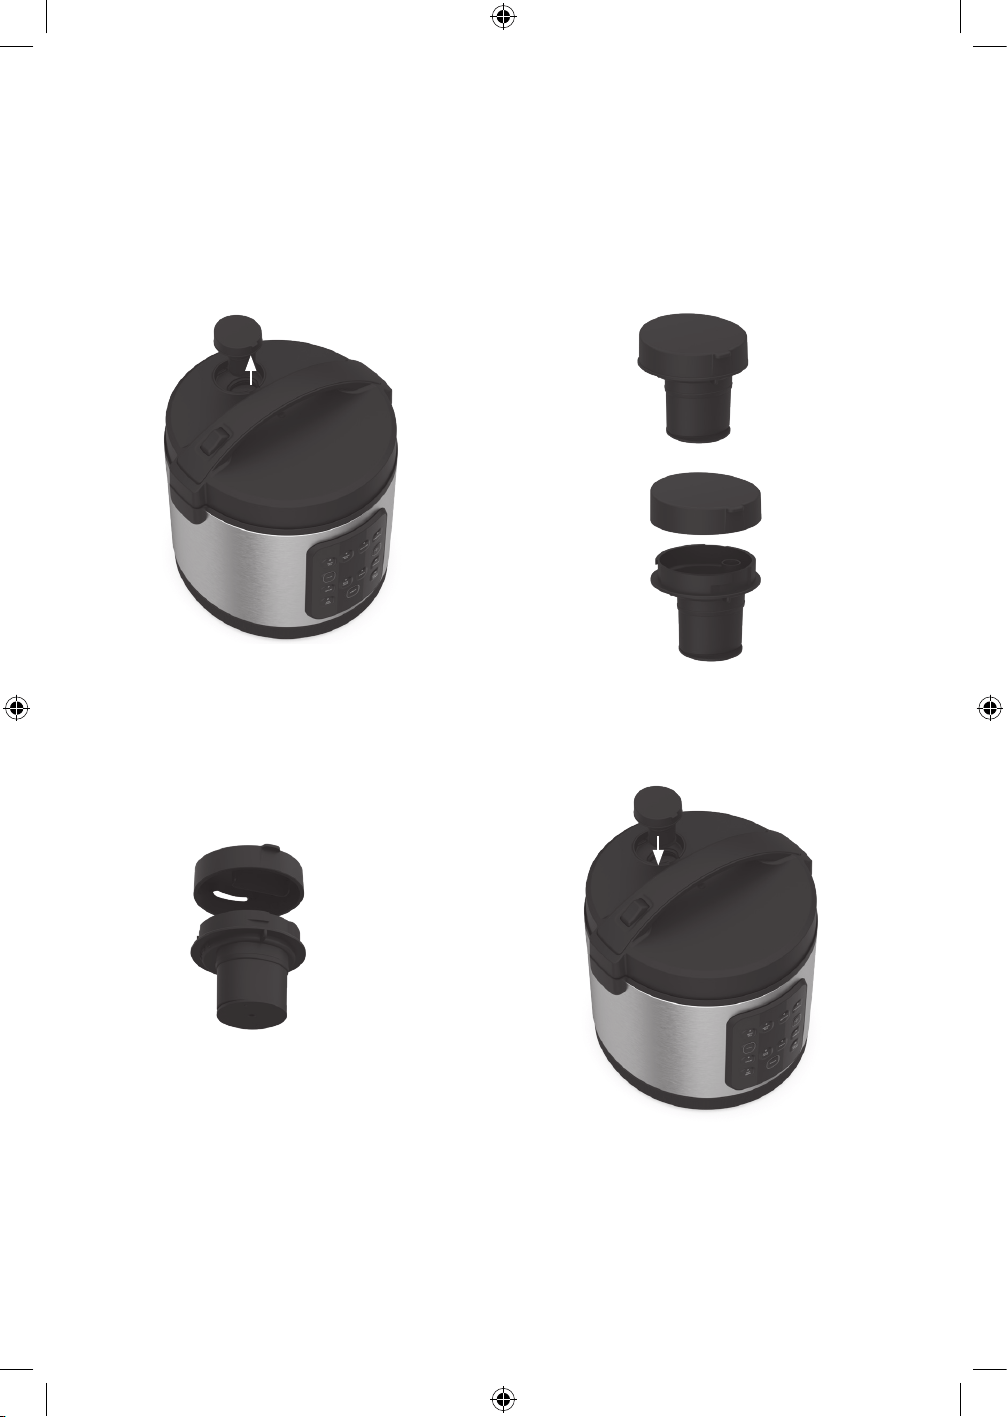
CLEANING THE STEAM VENT
1. Always remove and clean the steam vent aer preparing oatmeal or porridge-like stews. Turn and gently pull
the steam vent (with gasket) up and out of the lid. (See Figure 3.)
2. Pull to remove the rubber gasket’s stem from the steam vent. (See Figure 4.) Rinse under warm water. Clean
both the black vent and the rubber gasket using a scrubbing sponge and mild dishwashing liquid. A small
toothbrush may be helpful in removing oatmeal residue. Rinse both sides of the rubber gasket well.
3. Snap the rubber gasket’s stem into the steam vent center hole. (See Figure 5.)
4. Turn the assembled steam vent until it ts easily into the lid. Check to make sure the tab on the steam vent aligns
with the notch on the lid. (See Figure 6.)
STORING INSTRUCTIONS
1. Make sure all parts are clean and dry before storing.
2. Place Rice Cooker accessories inside the clean cooking pot. Store unit its box or in a clean, dry place.
3. Never store Rice Cooker while it is hot or wet.
4. Never wrap cord tightly around the appliance; keep it loosely coiled.
Figure 3
Figure 5
Figure 4
Figure 6
90226_BellaPro_BestBuy_20 Cup Digital_RiceCooker_IM V4 R1.indd 1490226_BellaPro_BestBuy_20 Cup Digital_RiceCooker_IM V4 R1.indd 14 2024-05-28 5:20 PM2024-05-28 5:20 PM

15
SENSIO Inc. hereby warrants that for a period of TWO YEARS from the date of purchase,
this product will be free from mechanical defects in material and workmanship, and
for 90 days in respect to non-mechanical parts. At its sole discretion, SENSIO Inc. will
either repair or replace the product found to be defective, or issue a refund on the
product during the warranty period.
The warranty is only valid for the original retail purchaser from the date of initial retail
purchase and is not transferable. Keep the original sales receipt, as proof of purchase is
required to obtain warranty validation. Retail stores selling this product do not have the
right to alter, modify, or in any way revise the terms and conditions of the warranty.
EXCLUSIONS:
The warranty does not cover normal wear of parts or damage resulting from any of the
following: negligent use of the product, use of improper voltage or current, improper
routine maintenance, use contrary to the operating instructions, disassembly, repair, or
alteration by anyone other than qualied SENSIO Inc. personnel. Also, the warranty
does not cover Acts of God such as re, oods, hurricanes, or tornadoes.
SENSIO Inc. shall not be liable for any incidental or consequential damages caused
by the breach of any express or implied warranty. Apart from the extent prohibited
by applicable law, any implied warranty of merchantability or tness for a particular
purpose is limited in time to the duration of the warranty. Some states, provinces or
jurisdictions do not allow the exclusion or limitation of incidental or consequential
damages, or limitations on how long an implied warranty lasts, and therefore, the
above exclusions or limitations may not apply to you. The warranty covers specic legal
rights which may vary by state, province and/or jurisdiction.
HOW TO OBTAIN WARRANTY SERVICE:
You must contact Customer Service at our toll-free number: 1-866-832-4843.
A Customer Service Representative will attempt to resolve warranty issues over the
phone. If the Customer Service Representative is unable to resolve the problem, you will
be provided with a case number and asked to return the product to SENSIO Inc. Attach
a tag to the product that includes: your name, address, daytime contact telephone
number, case number, and description of the problem. Also, include a copy of the
original sales receipt. Carefully package the tagged product with the sales receipt,
and send it (with shipping and insurance prepaid) to SENSIO Inc.’s address. SENSIO
Inc. shall bear no responsibility or liability for the returned product while in transit to
SENSIOInc.’s Customer Service Center.
LIMITED TWO-YEAR WARRANTY
90226_BellaPro_BestBuy_20 Cup Digital_RiceCooker_IM V4 R1.indd 1590226_BellaPro_BestBuy_20 Cup Digital_RiceCooker_IM V4 R1.indd 15 2024-05-28 5:20 PM2024-05-28 5:20 PM

90226_BellaPro_BestBuy_20 Cup Digital_RiceCooker_IM V4 R1.indd 1690226_BellaPro_BestBuy_20 Cup Digital_RiceCooker_IM V4 R1.indd 16 2024-05-28 5:20 PM2024-05-28 5:20 PM

90226_BellaPro_BestBuy_20 Cup Digital_RiceCooker_IM V4 R1.indd 1790226_BellaPro_BestBuy_20 Cup Digital_RiceCooker_IM V4 R1.indd 17 2024-05-28 5:20 PM2024-05-28 5:20 PM
For customer service questions or comments
1-866-832-4843 / help@bellahousewares.com
Made in China
Sensio Inc.
dba Made by Gather
TM
New York, NY 10016/USA
90226 R. 0
90226_BellaPro_BestBuy_20 Cup Digital_RiceCooker_IM V4 R1.indd 1890226_BellaPro_BestBuy_20 Cup Digital_RiceCooker_IM V4 R1.indd 18 2024-05-28 5:20 PM2024-05-28 5:20 PM