

USER MANUAL
Before using, please read the operating instructions carefully to
ensure proper application and achieve satisfactory results.
KoolMore Vending Machine
Models: KM-VMRT-50-B, KM-VMRT-50-BR, KM-VMNT-50-B, KM-
VMNT-50-BR, KM-VMRWT-48BR
VENDING MACHINE
Stay informed with the latest information for your
KoolMore Appliance.
Scan the QR code above to access the most recent user manual
on our website, which is constantly being updated and improved.
If you need any assistance or have questions, our customer support
team is here to help.
P- 718-576-6342 E- [email protected]
Please write down the model number and serial number below for future reference. Both numbers are located on the
rating label on the back of your unit or inside of the unit and are needed to obtain warranty service. You may also want to
staple your receipt to this manual as it is the proof of your purchase and may also be needed for service under warranty.
Model Number: ______________________________________
Serial Number: _______________________________________
Date of Purchase: ____________________________________
To better serve you, please do the following before contacting customer service:
If you received a damaged product, immediately contact the retailer or dealer that sold you the product.
Read and follow this instruction manual carefully to help you install, use, and maintain your unit.
Refer to the Troubleshooting section of this manual as it will help you diagnose and solve many common issues.
Please write your password before setup!
If the password is forgotten please contact customer service and we will help
you reset the machine.

3
Contents
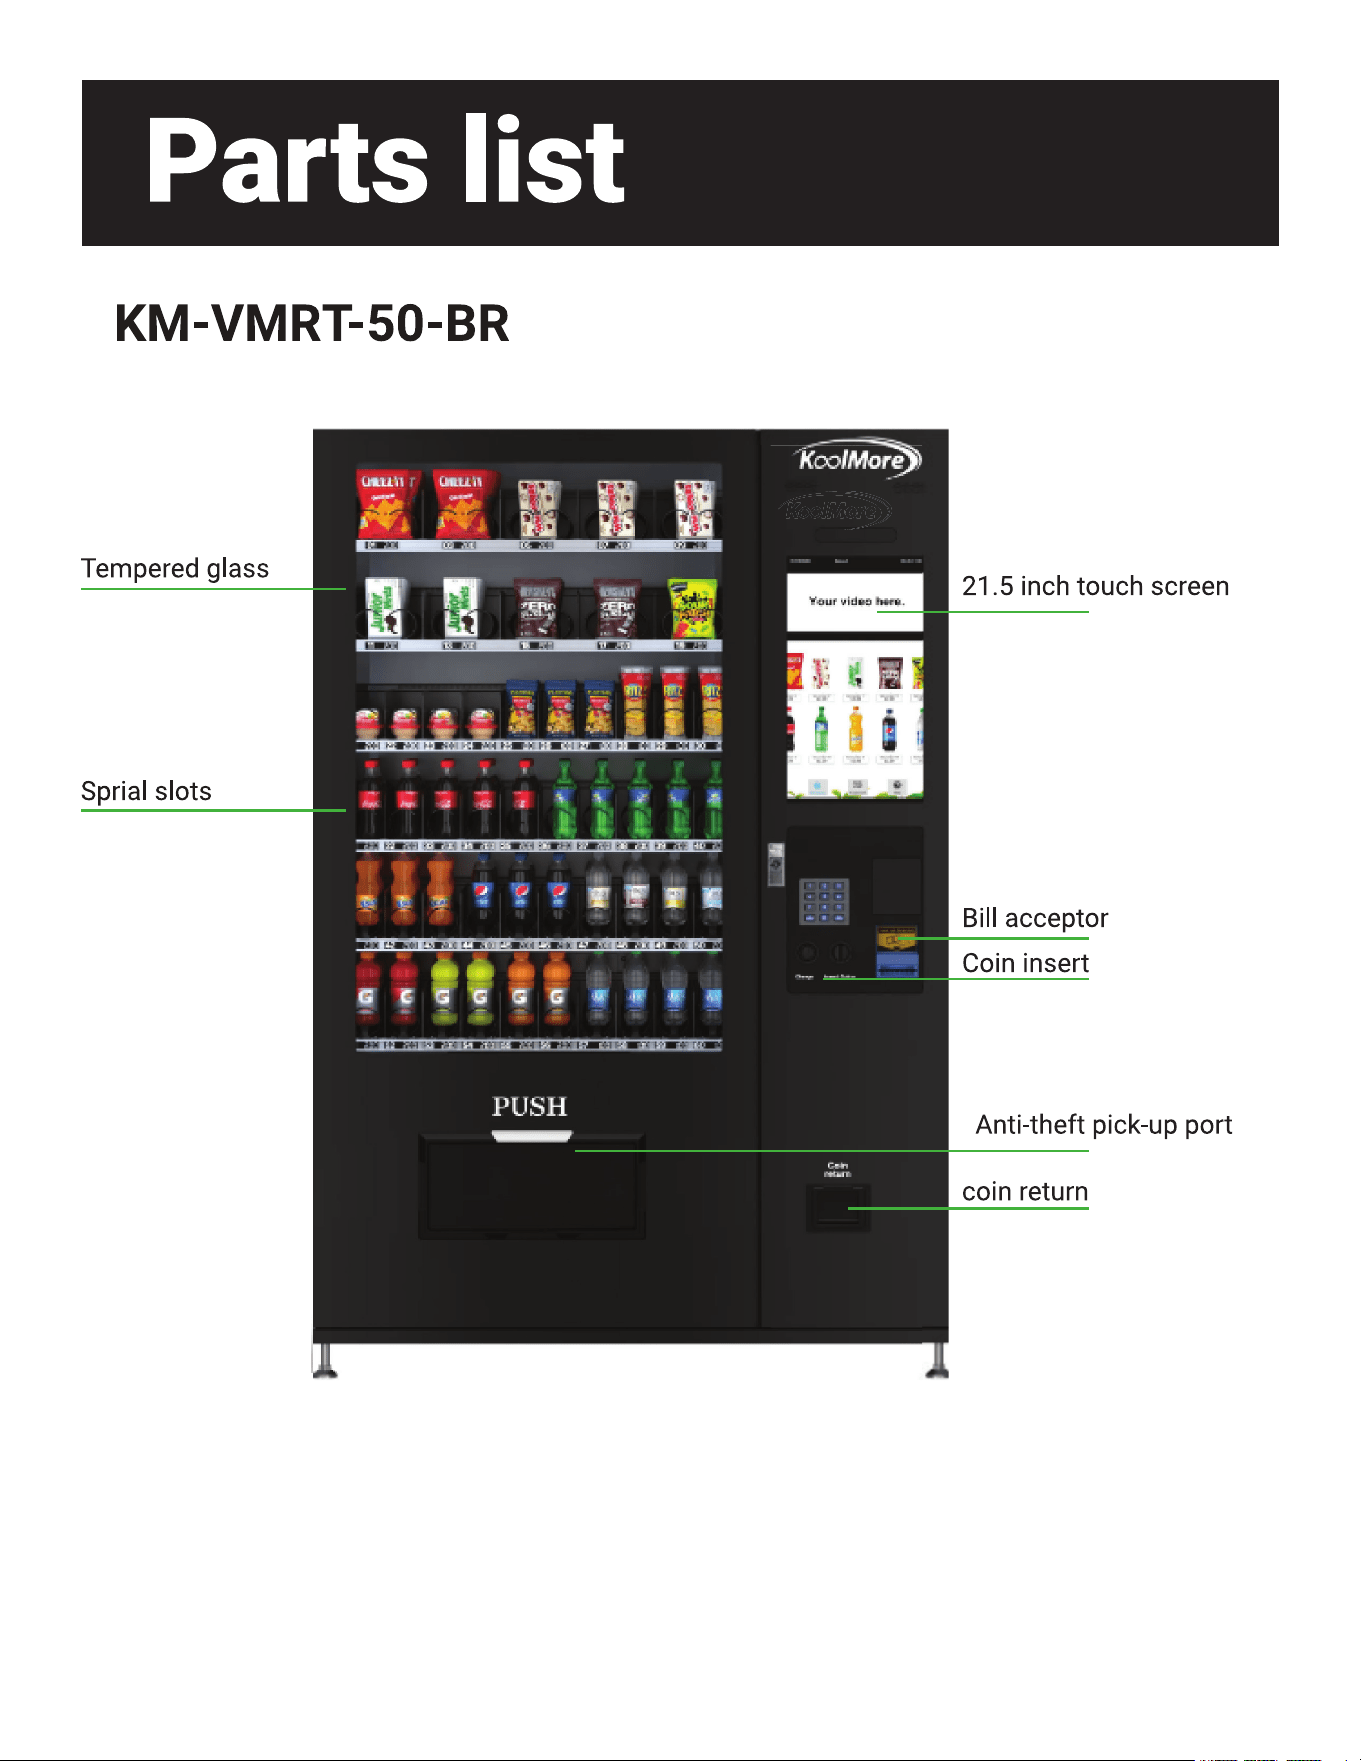
Parts list ........................................................ 4
Nayax Credit Card Reader Onboarding ....... 6
Safety ............................................................. 7
Setup ............................................................ 8
Programing ....................................................................... 11
Login Backend System ....................................................... 11
Backend System Homepage .
Slot Products Management .
Load Products to Slots ................................................... 12
Set Slot Product Price .................................................... 12
Maintain Slot Product Info ............................................. 14
/I] ƼIPHW MRTYXW
How to Add Images to the Product Image Library ............... 17
Product Dispensing Test ...................................... 18
7LSTTMRK -RXIVJEGI 'SRƼKYVEXMSR
Slot Management ........................................................... 21
Refrigerating and Heating .......................................... 22
Advertisement Management .......................................... 24
7IX 6IQMRHMRK 1IWWEKIW
Pickup with APP Pick-up Code ................................. 26
Serial Port Settings.
Password Management .................................................... 27
Error Diagnosing ................................................................... 28
Machine Parameters
2IX[SVO (IXIGXMSR
Payment Settings .............................................................. 30
%KI:IVMƼGEXMSR
Data Backup and Software Management ........................ 33
Machine Debugging
Status Query Settings ........................................................ 38
0E]IV,IMKLX7IXXMRK)PIZEXSV8IWXMRK
Voltage & Current Setting ........................................... 40
Engineer Slot Test.
Driver.
Serial Tool ............................................................................. 41
Advanced Setup
Merge Two Slots ............................................................... 42
Replace the spiral and adjust motor plug.
Adjust the price tag.
Merge Belt Slots ............................................................ 44
4VSKVEQXLI'SQFMREXMSRMRXLI%RHVSMH7]WXIQ
Adjust Tray Height.
Adjust the height of the slide rails.
Program the Tray Height and Elevator .................................. 46
Layer Height Setting.
Elevator Testing .................................................................... 47
Accessories
Install Reader ........................................................................ 48
-RWXEPP'SMR%GGITXIV
-RWXEPP 1SHIQ
Notes for Refrigerators
0IEOEKI4VSXIGXMSR
Maintenance
Cleaning
'PIERMRKERH-RWTIGXMSR7GLIHYPI
Troubleshooting .............................. 53
Warranty ........................................ 55
4

5
6
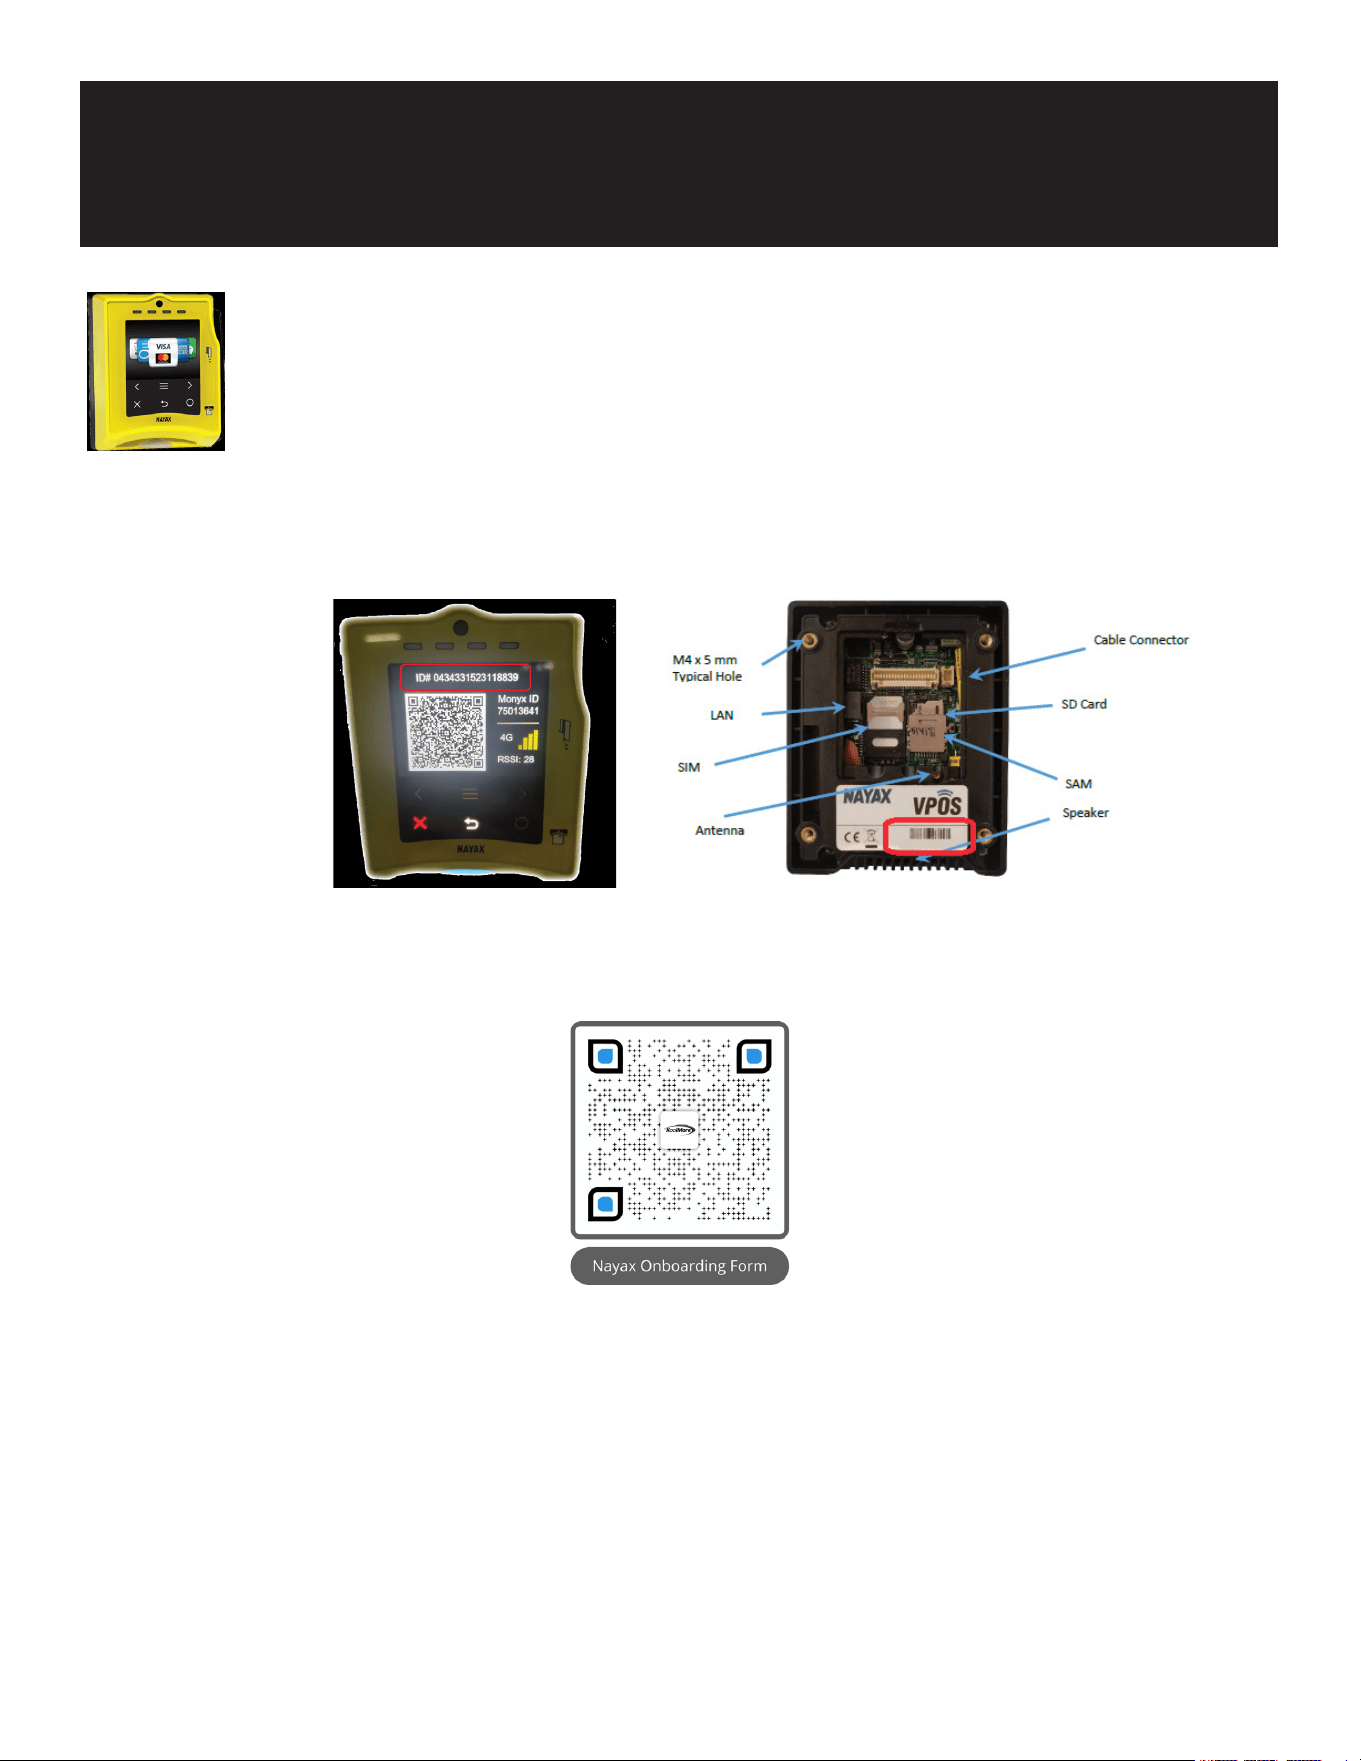
NAYAX CREDIT CARD READER ONBOARDING
Your Koolmore vending machine comes equipped with a Nayax
Credit Card Reader, providing a convenient way to accept card
payments.
To begin the registration and onboarding process with Nayax, follow these simple steps:
0SGEXI=SYV7IVMEP2YQFIV-(=SYGERƼRHXLIWIVMEPRYQFIVSRXLI2E]E\HIZMGIWGVIIR
Alternatively, the serial number is also located on the back of the device.
2. Access the Onboarding Form: Scan the QR code below with your smartphone's camera or QR
code reader app. This will take you directly to the "NAYAX ONBOARDING FORM" within the
KoolMore website.
'SQTPIXIERH7YFQMXXLI*SVQ*MPPMRXLIVIUYMVIHƼIPHWMRGPYHMRK]SYVGSQTER]REQI
phone number, email address, and the serial number of the Nayax Credit Card Reader, then
submit the form. The Nayax onboarding team will receive your information.
4. Wait for Contact: A representative from Nayax will contact you to guide you through the
setup process.
7XEVX%GGITXMRK'EVH4E]QIRXW;MXLXLIGVIHMXGEVHVIEHIVWIXYT]SYGERFIKMREGGITXMRK
credit card payments through your KoolMore vending machine.
For assistance or further questions, please don't hesitate to reach out to our customer service
team. We're here to ensure your vending machine experience is as seamless as possible.

7
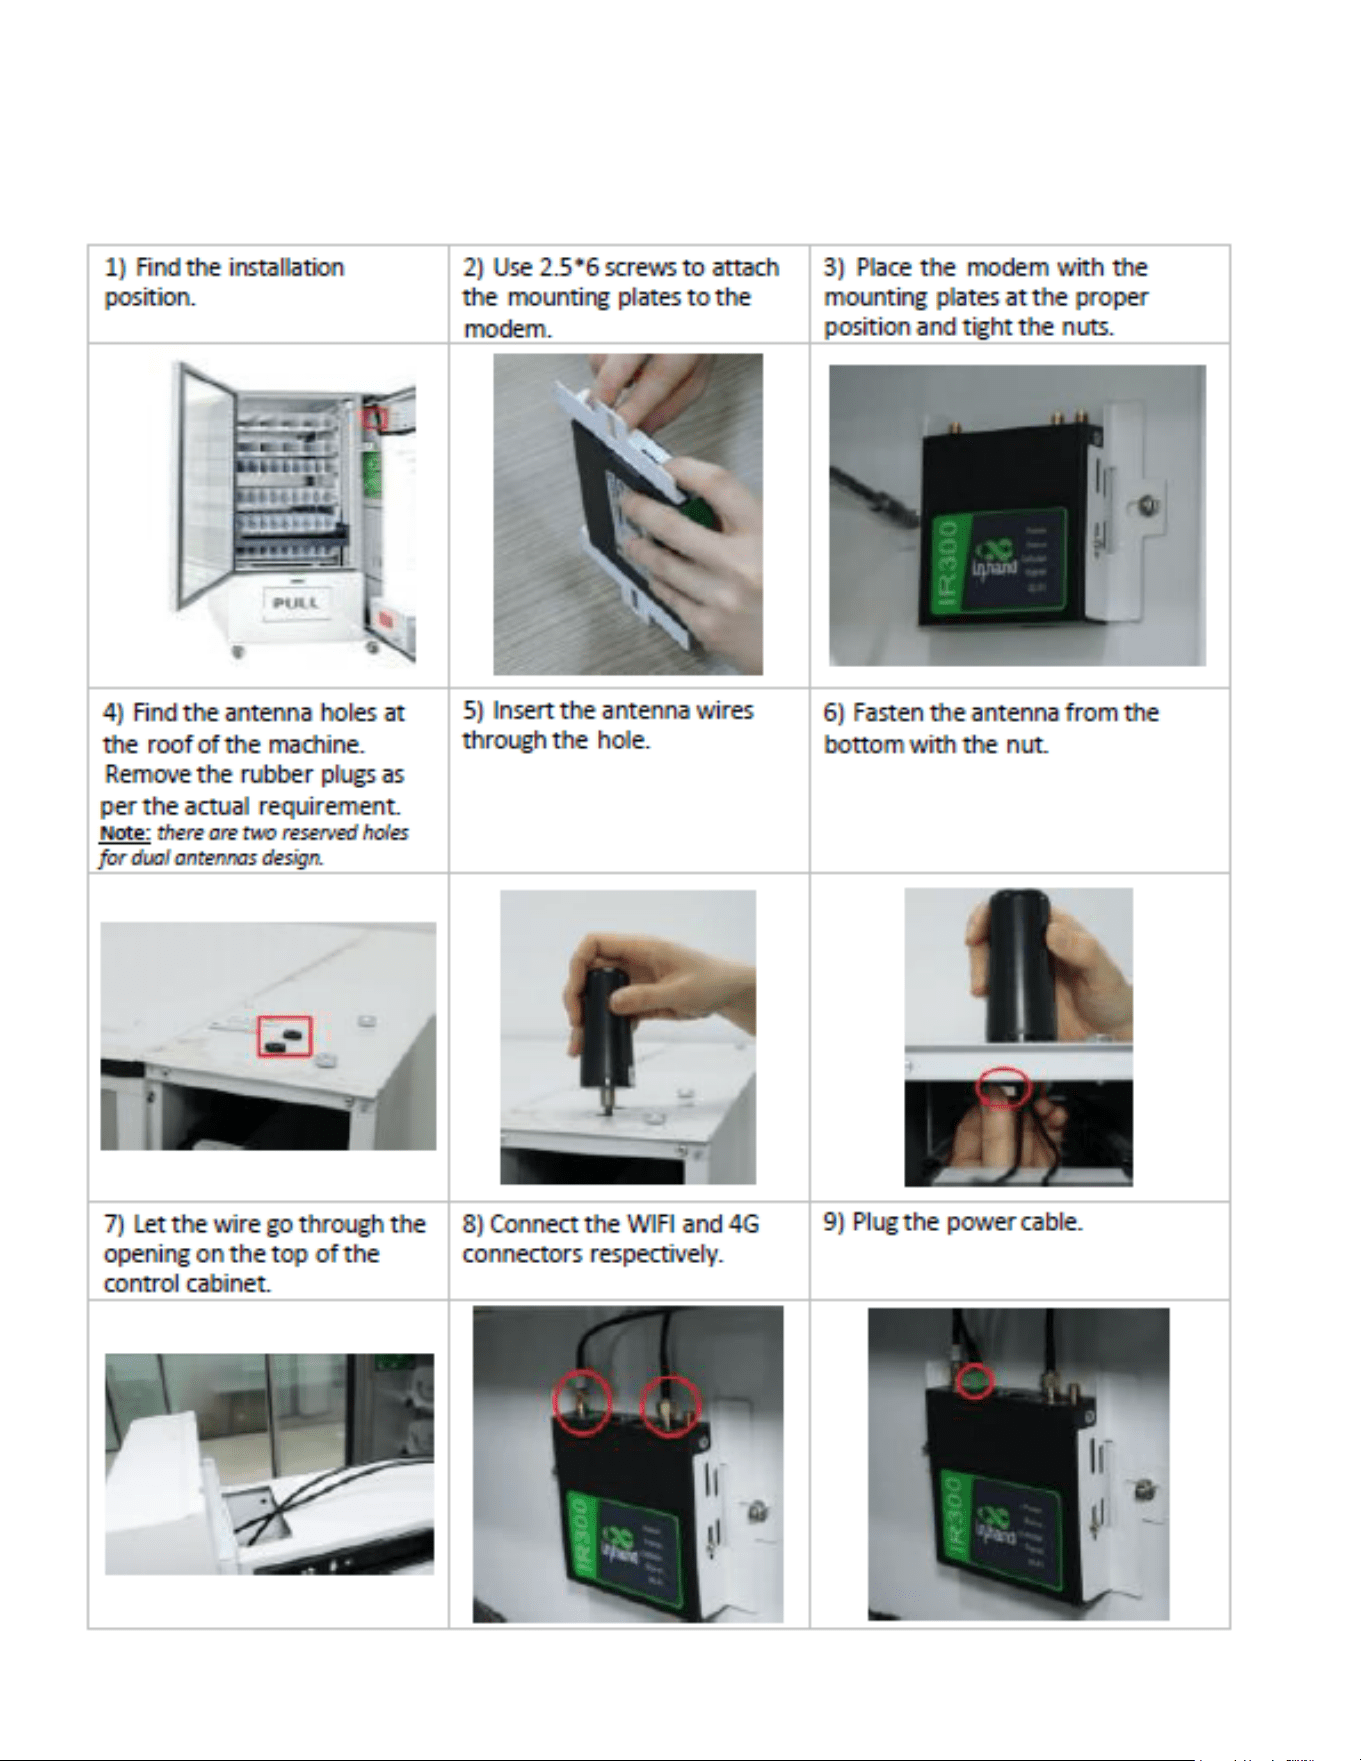
8LIQEGLMRISTIVEXIWSRETS[IVWYTTP]SJ:%',^[MXLEGYVVIRXVEXMRKSJ%
Please note that operating the machine without required voltage may result in startup issues, compressor burnout, or abnormal
noise.
Ensure the use of a three-pronged plug and ensure proper grounding.
Do not remove the third prong intended for grounding, as this poses a risk of electric shock.
Prevent wire damage.
E%ZSMHTYPPMRKXLITPYKF]XLI[MVIƼVQP]KVEWTXLITPYK[LIRVIQSZMRKMX
b) Ensure wires are not trapped under the machine or intentionally stepped on.
c) Exercise caution when moving the machine away from the wall to prevent wire rolling or stepping.
d) Cease use of worn or damaged wires and send them to the designated repair site for servicing.
Please unplug the machine under the following conditions to prevent electric shock during cleaning, repairing, or replacing spare
parts.
Repairing works shall be conducted by professional technician.
Use one hand to pull the door handle and the other hand to retrieve items from inside.
Be mindful of the door to avoid injury. Children should use the machine under the supervision of adults.
-JXLIWYTTP]GSVHMWHEQEKIHMXQYWXFIVITPEGIHF]XLIQERYJEGXYVIVMXWWIVZMGIEKIRXSVWMQMPEVP]UYEPMƼIHTIVWSRWMRSVHIVXS
EZSMHELE^EVH
(SRSXWXSVII\TPSWMZIWYFWXERGIWWYGLEWEIVSWSPGERW[MXLEƽEQQEFPITVSTIPPERXMRXLMWETTPMERGI
Children should be supervised to ensure that they do not play with the appliance.
This appliance can be used by children aged 8 and above, and people with reduced physical, sensory or mental capabilities or lack
of experience and knowledge but have been given supervision or instruction concerning use of the appliance in a safe way and
YRHIVWXERHXLILE^EVHWMRZSPZIH'LMPHVIRWLEPPRSXTPE][MXLXLIETTPMERGI'PIERMRKERHYWIVQEMRXIRERGIWLEPPRSXFIGSRHYGXIH
by children without supervision.
This appliance is intended to be used in similar applications such as airport, train station, hospital, shopping mall, factory, residen-
tial area, etc.
8LIETTPMERGIWLEPPRSXFIMRWXEPPIHEXSYXHSSVTPEGI-XWLEPPFIMRWXEPPIHMRELSVM^SRXEPTSWMXMSR
The appliance is not allowed to immerse in water for cleaning, nor be cleaned by a water jet.
-JXLIMRWYPEXMSRJSEQPE]IVSJVIJVMKIVEXMSRW]WXIQMWƽEQQEFPIXLIHYQTIHQEGLMRIWLSYPHFIVIG]GPIHF]UYEPMƼIHGSQTER]SV
individual.
Safety

8
Setup
Preparation before Setup
Upon receiving the machine, please inspect the packaging carefully. If it is damaged, kindly contact our costomer service
for assistance right away.
Before proceeding, remove all packaging materials, including wooden cases, cartons, adhesive tape, foam, and protective
ƼPQ
)RWYVIXLEXXLIKVSYRH[LIVIXLIQEGLMRISTIVEXIWMWƼVQERHWQSSXL
Keep the machine away from heat sources and direct sunlight to maintain optimal performance.
Position the machine in an area with good ventilation, ensuring there is at least 8 inches of space around the machine.
Avoid placing the machine in damp or splash-prone areas. Clean any water stains and dirt with a soft cloth to prevent rust
or deterioration of electrical insulation performance.
Avoid placing the machine in excessively cold environments, and refrain from using it outdoors or in rainy conditions.
Machine Stabilization Period:
After installation, wait for at least 30 minutes before connecting the power supply to ensure proper operation. If refrigera-
XMSRMWVIUYMVIHEPPS[XLIQEGLMRIXSWXERHWXMPPJSVLSYVWFIJSVILERHXSTVIZIRXGSQTVIWWSVHEQEKI
Caution
Power supply of the machine must be dedicated socket, if not, the machine can’t work. Otherwise exist serious security
risks.
General Setup Process
Step 1: Plan for the usage
Plan the products to be loaded in advance and draft the slot type, height, or combination if necessary.
Step 2: Connect to Power
The power plug must be connected to a reliable, solid, and grounded power supply.
Step 3: Load Products
Load the products following the loading instructions.
Step 4: Program the Machine
'SRƼKYVIXLITVSHYGXWƅMRJSTVMGIWMRZIRXSVMIWXIQTIVEXYVIERHSXLIVWIXXMRKWMRXLIQEREKIQIRXW]WXIQ
Step 5: Load Change Money
Add change coin and banknotes (if applicable).
9
1. Connect to power
%XXLIPIJXWMHISJXLIQEGLMRIƅWFEGOƼRHFYRHPIHTS[IVGSVHERHOI]W
Plug the power cord in an electrically grounded power outlet.
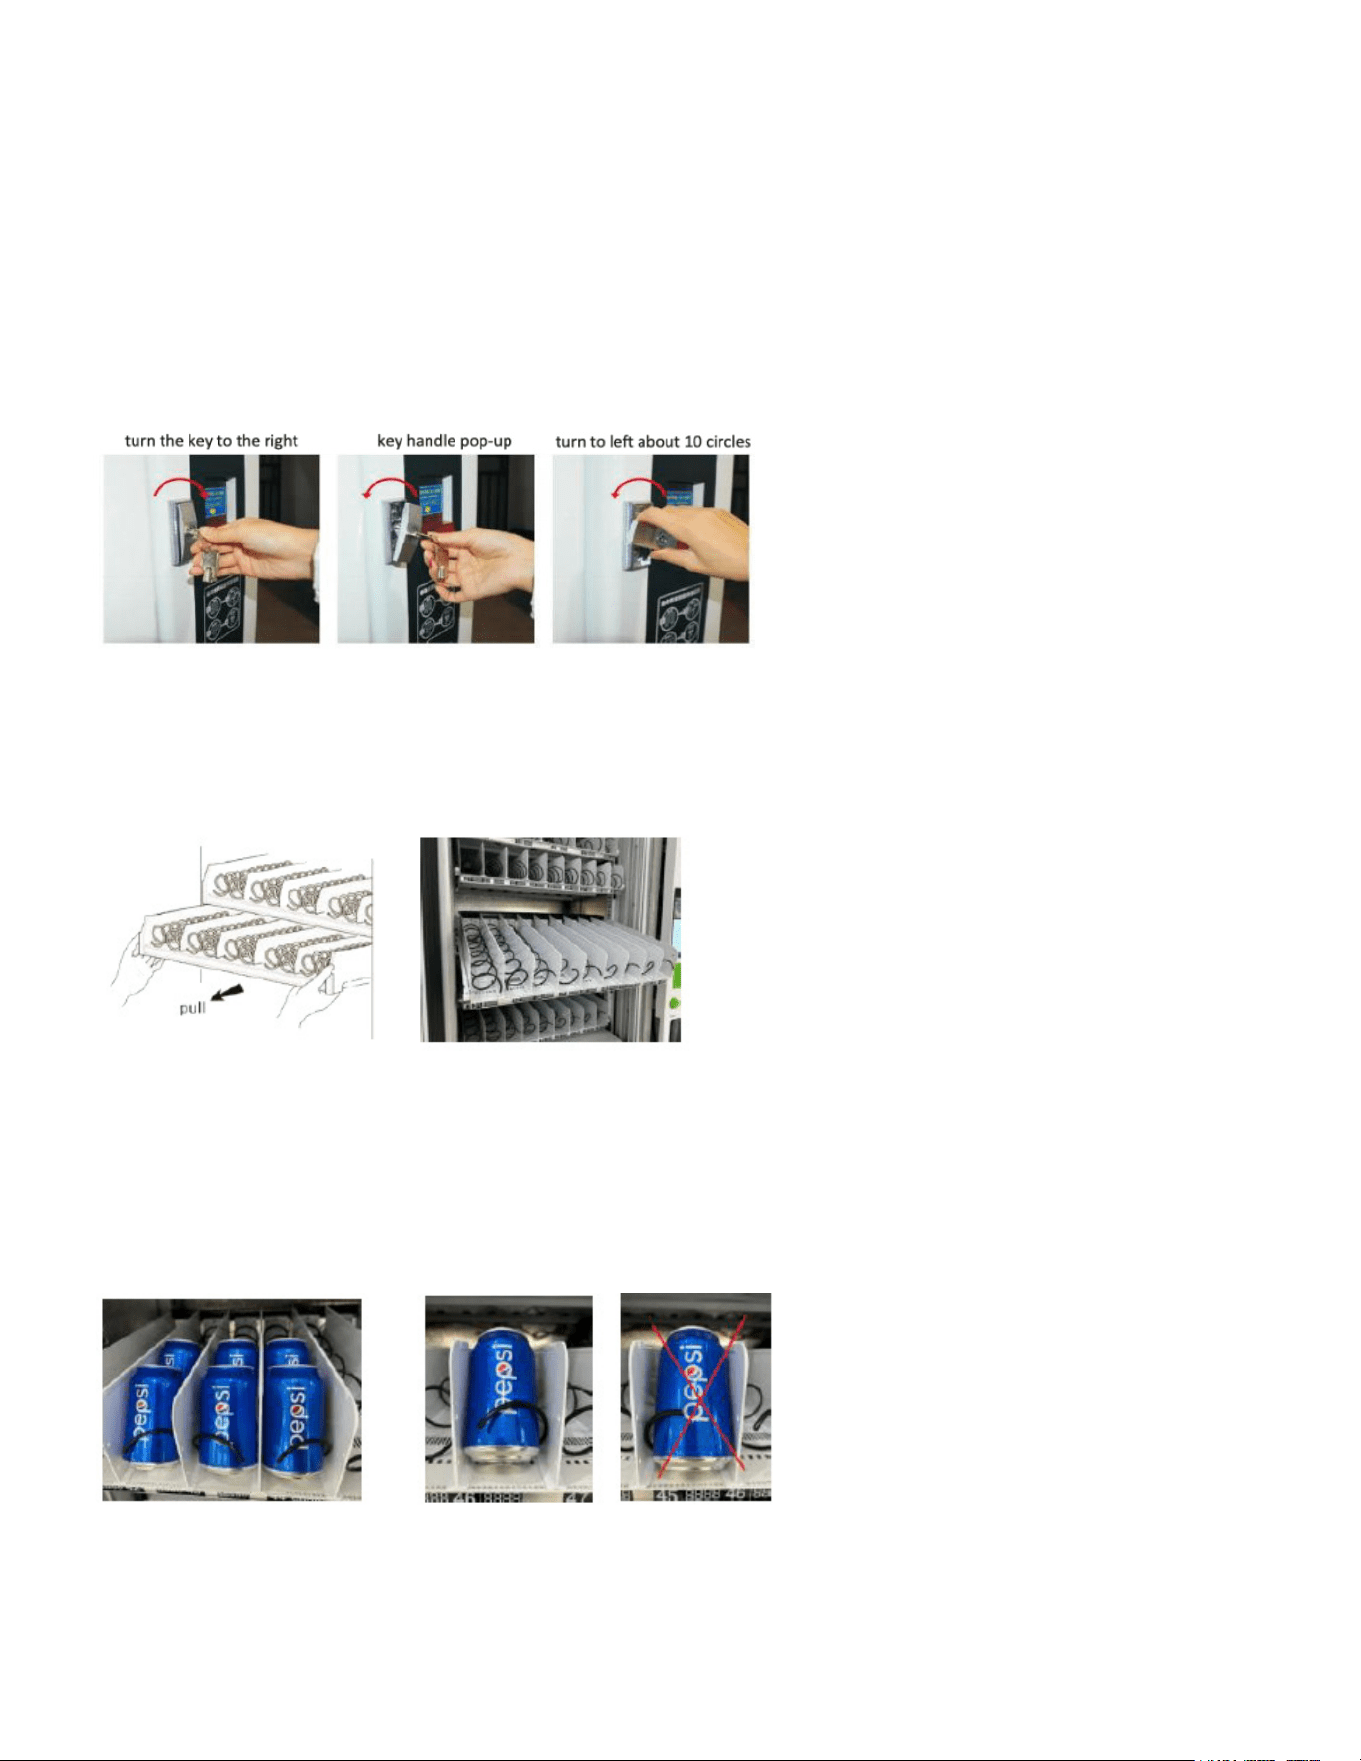
2. Unlock the door
Insert the key into the keyhole, turn the key to the right side (clockwise direction), the lock handle will automatically pop-
up. Pulling out the lock handle and turn it to the left side (anticlockwise direction) about ten circles, open the door as
pictures show.
Load products
3.1 Spiral Slots
For spiral slots, pull out the tray and put the products from front to back.
• 8LIXVE]GERFILERKIHHS[R[EVHJSVEFSYXqJSVXLIGSRZIRMIRGIXSPSEHERHSVKERM^IXLITVSHYGXWEXXLIFEGO-
side.
• 4PIEWIGLSSWIXLIWYMXEFPIWTMVEPJSVZEVMSYWWM^IWSJTVSHYGXW
• For the goods are not mentioned here, please test before you sell to get the best placement.
• The products should lean backward.
• The single slot, left rotate spiral end should point at 3 o’clock, and right rotate spiral end at 3 o’clock position.
• For merged slots, the spirals should be facing down at 6 o’clock.
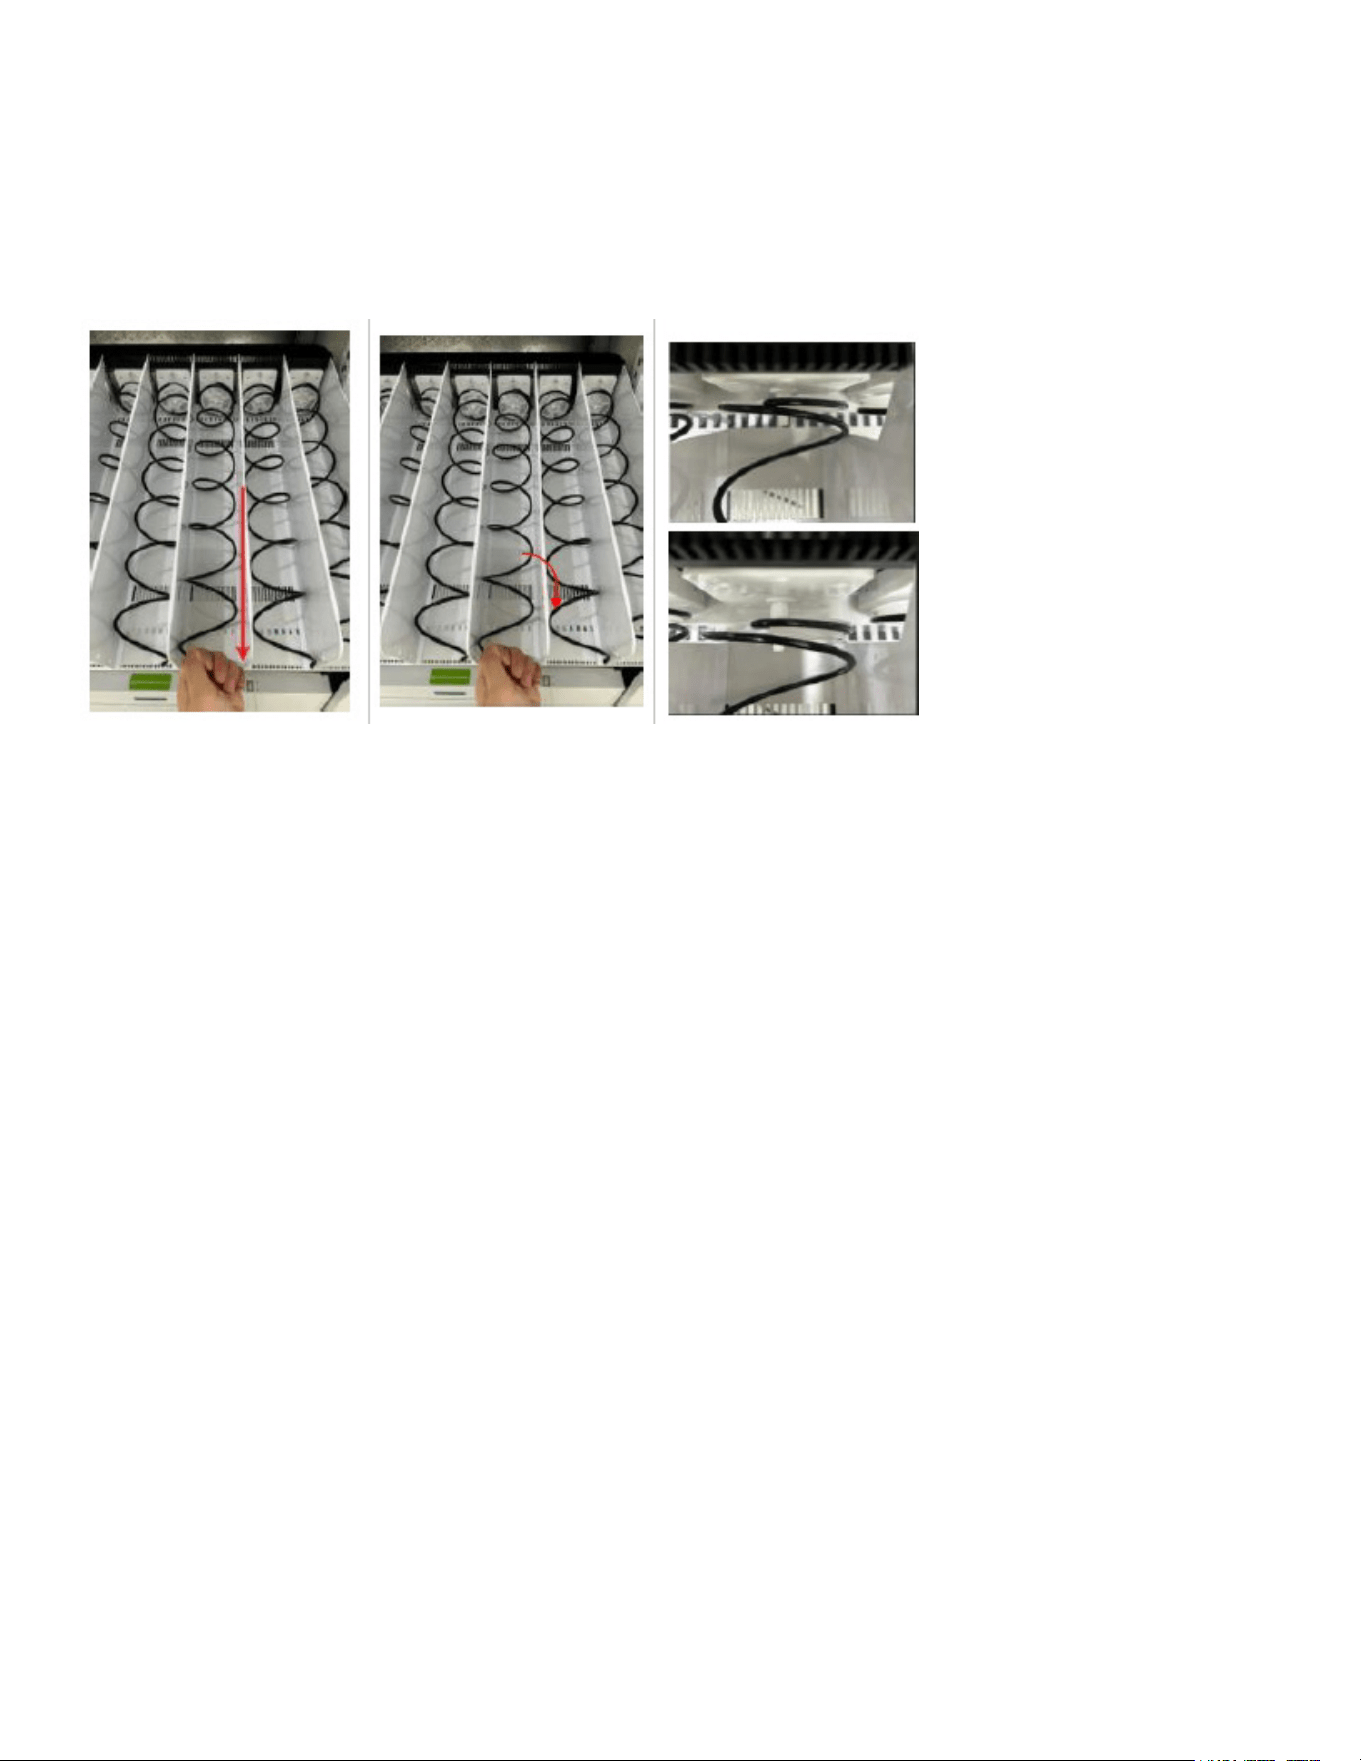
10
Hold the end of the spiral and
pull out the spiral vertically.
(Can feel the elasticity at the
backside.)
Rotate the spiral to the desired
position. Release the spiral.
Comparison of spiral in default
position and pull-out position.
Guide: How to rotate the spiral to change the position.
Practices that should be avoided when loading spiral slot:
• The top of the goods should not touch the upper tray.
• 8LIKSSHƅW[MHXLWLSYPHRSXI\GIIHXLI[MHXLSJXLIWTMVEPWPSX
• The goods should not be too small to be held by the spiral.
• The product is too thick for the spiral spacing.
• The product should not reach out of the tray. It will effect elevator movement.
• After push back the tray, the spiral may rebounce upward, causing the bottle to slip out.
Push the tray drawer back to the bottom until you hear a thump. Before closing the door, please lightly pull out the tray to
IRWYVIMXMWWIGYVIP]Ƽ\IHMRTPEGI
Belt Slots
Place the product directly on the tray. Not recommend to pull out the tray to load products because uneven tray may result
MRTVSHYGXWUYII^IMWWYI
8LIWMRKPIFIPXWPSXMWEZEMPEFPIJSVKSSHWHYIXSFIPXPMQMXIHFIEVMRKGETEGMX]OKJSVWMRKPIOKJSVHYEPFIPXWPSX
And product thickness should be greater than 3 inches to stand stable on the belt. Wrong practices should be avoided
when loading beltslot:
The product is too small compared with the belt width.
The product isn’t placed at the center of the belt.
The unusual light product may be rotated on beltslot and activate the light sensor by mistake.
Thin product may fall backward on the beltslot.
If a product leans against it’s front one. They may drop together.
The longitudinal length of the food should < 6 inches. Otherwise may activate the light sensor before the good is fully
moved out.
11
Programing
Login Backend System
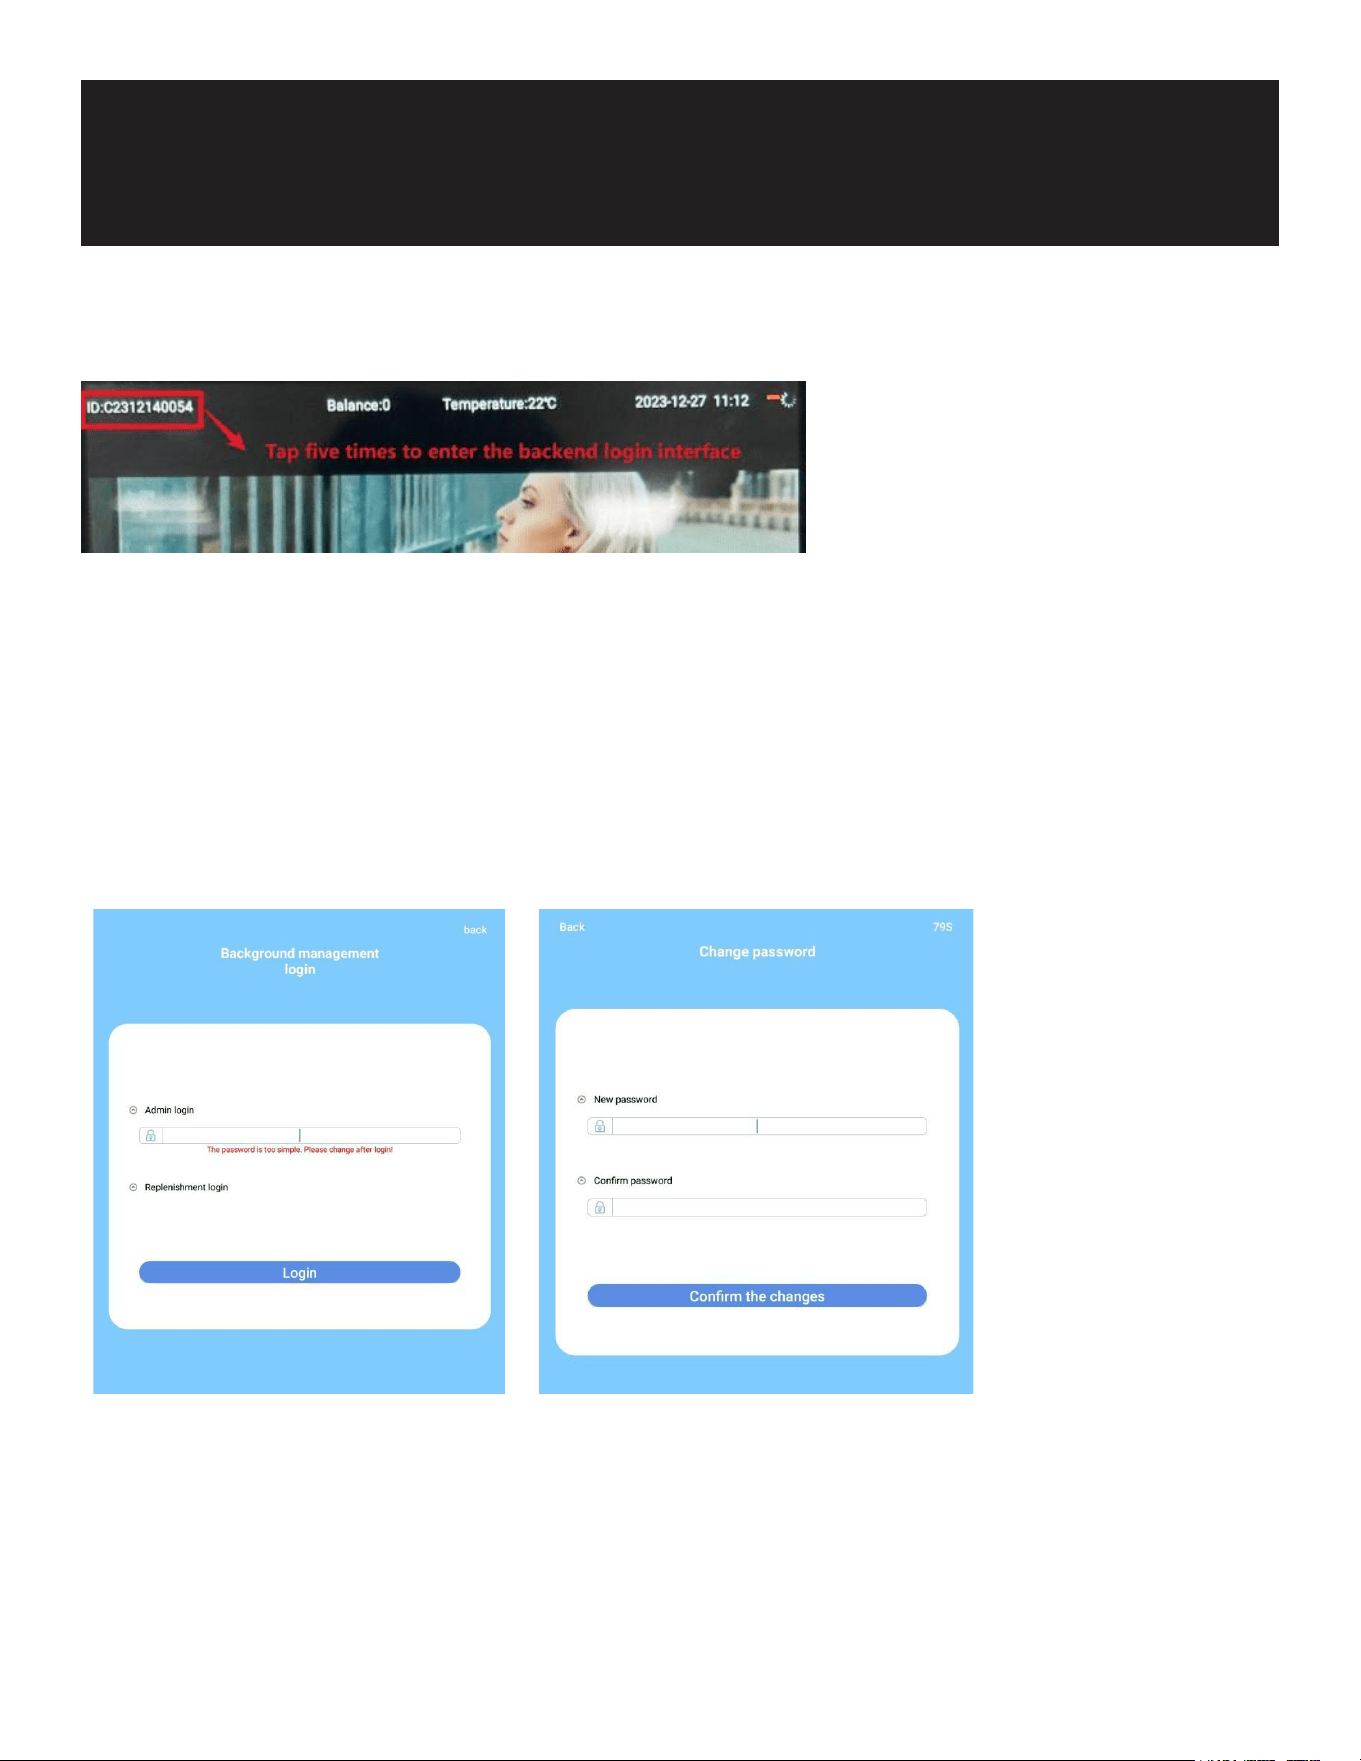
ƈ8ETXLIQEGLMRI-(MRXLIXSTPIJXGSVRIVƼZIXMQIWXSHMWTPE]XLIPSKMRMRXIVJEGI
If you see a red prompt saying, ‘The password is too simple. Please change after login!’, enter the password ‘000000’.
The system will then direct you to the change password interface. Once you change the password, the red prompt will no
longer appear.
Alternatively, you can enter the default password ‘888888’ for urgent access.
Using the default password ‘888888’ will allow you to enter the management system without prompting a password
change.
Note: The software will be locked after three consecutive invalid password attempts. To unlock it, reboot the machine.”
12
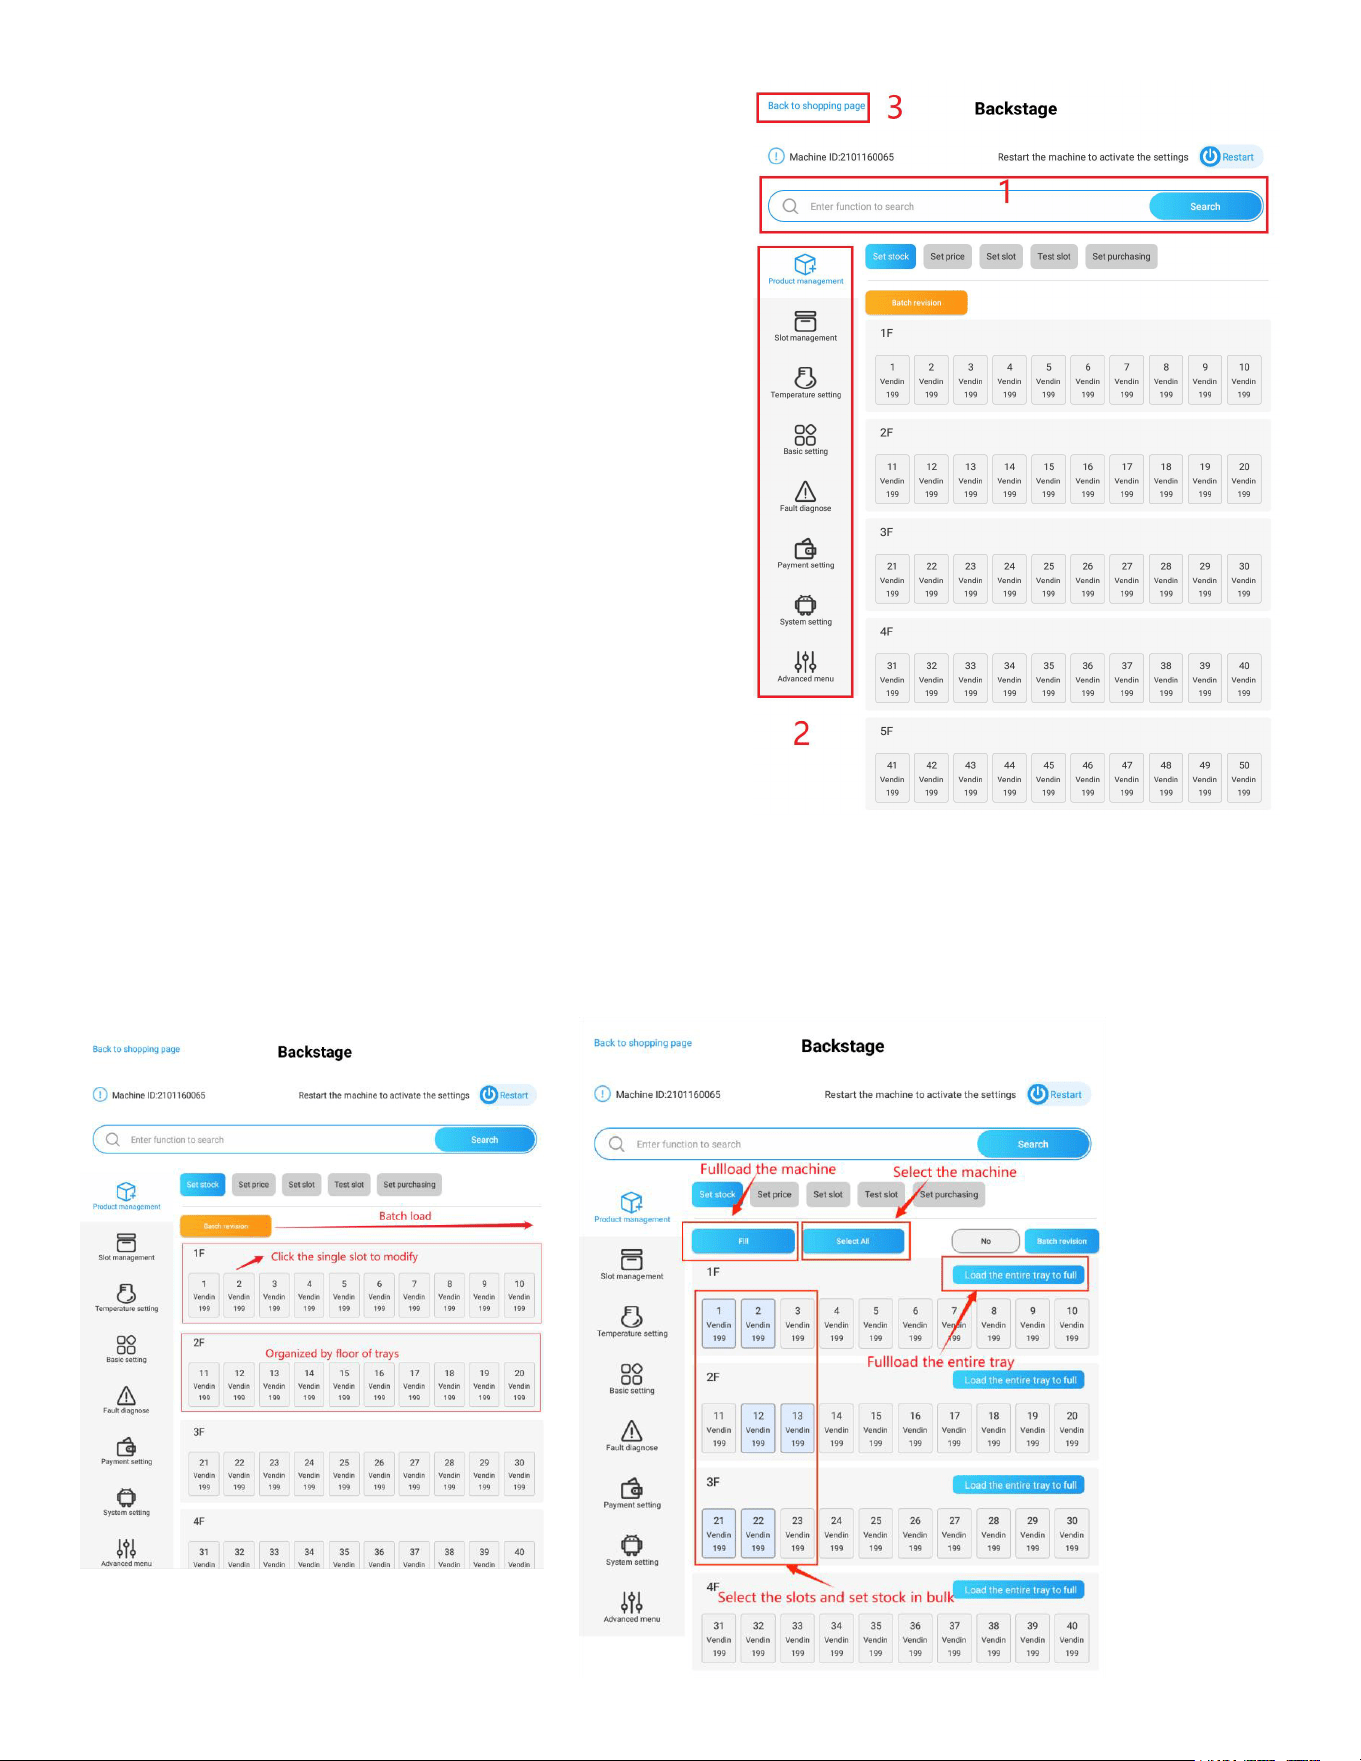
Backend System Homepage
• Click the search box to access and search for various functions.
• Functions are grouped into themed tags for easy navigation.
• 8SVIXYVRXSXLIWLSTTMRKMRXIVJEGIEJXIVW]WXIQGSRƼKYVEXMSR
use the “Back to Shopping Page” button located in the top-left
corner.
• 8LIQSWXGSQQSRP]YWIHJYRGXMSRWEVITVMSVMXM^IHERHETTIEV
ƼVWXMRXLIQIRY
2SXI8SETTP]GLERKIWXSXLIWPSXGSRƼKYVEXMSRSV[LIREHHMRKE
bill validator or coin changer, restart the machine.
Slot Products Management
%JXIVPSKKMRKMRXSXLIFEGOIRHW]WXIQXLIƼVWXJYRGXMSRXEFƈ0SEH
Products,” is displayed by default in the KM-VMRTW-60EBR.
In this section, you can manage the following functions by clicking
the respective buttons at the top:
“Set Stock” “Set Price” “Set Slot” “Test Slot” “Set Purchasing”
Load Products to Slots
In the “Set Stock” page, you can modify the stock levels for the slots.
Loading options:
Load Single Slot: Press the slot number to revise its stock in the pop-up panel.
Load Batch Slots: Press the “Batch Revision” button to switch to the batch revision page.
Load Multiple Slots: Select multiple slots to modify, then press the “Batch Revision” button. (Slots from different trays can
be selected.)
Load the Entire Tray: Press the “Load the Entire Tray to Full” button.
Load the Entire Machine: Press the “Full Load the Machine” button.
13
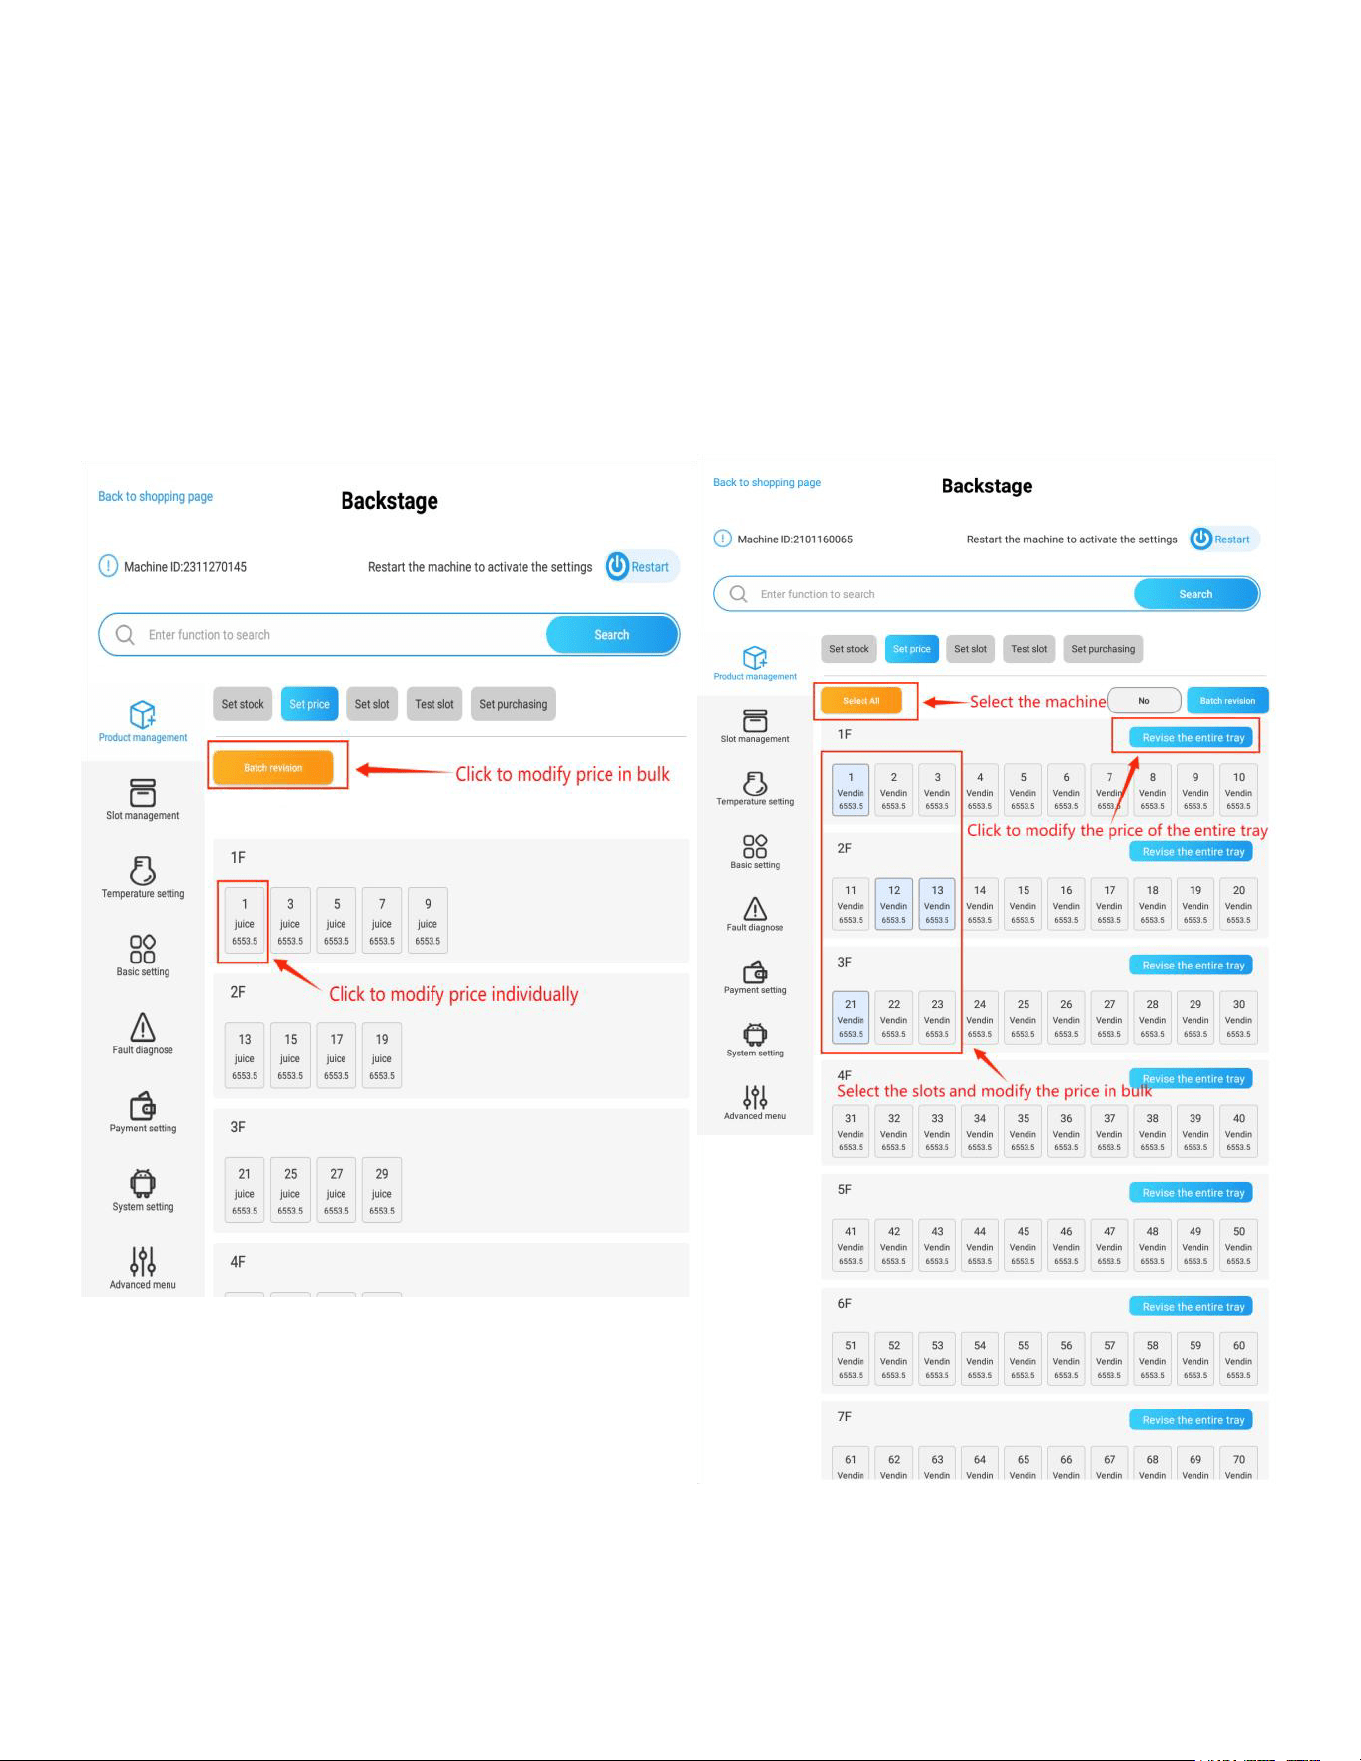
Set Slot Product Price
In the “Set Price” page, you can manage the prices of products. The operations are similar to those for loading products.
Price Setting Options:
Set Single Slot Price: Press the slot number to revise its price in the pop-up panel.
Set Batch Slots Price: Press the “Batch Revision” button to switch to the batch revision page.
Set Multiple Slots Prices: Select multiple slots to modify, then press the “Batch Revision” button. (Slots from different trays
can be selected.)
Set Price for an Entire Tray: Press the “Revise the Entire Tray” button.
2SXI%JXIVGSQTPIXMRKTVMGIVIZMWMSRWGPMGOXLIƈ&EGOƉFYXXSRXSGSRƼVQGLERKIW
14
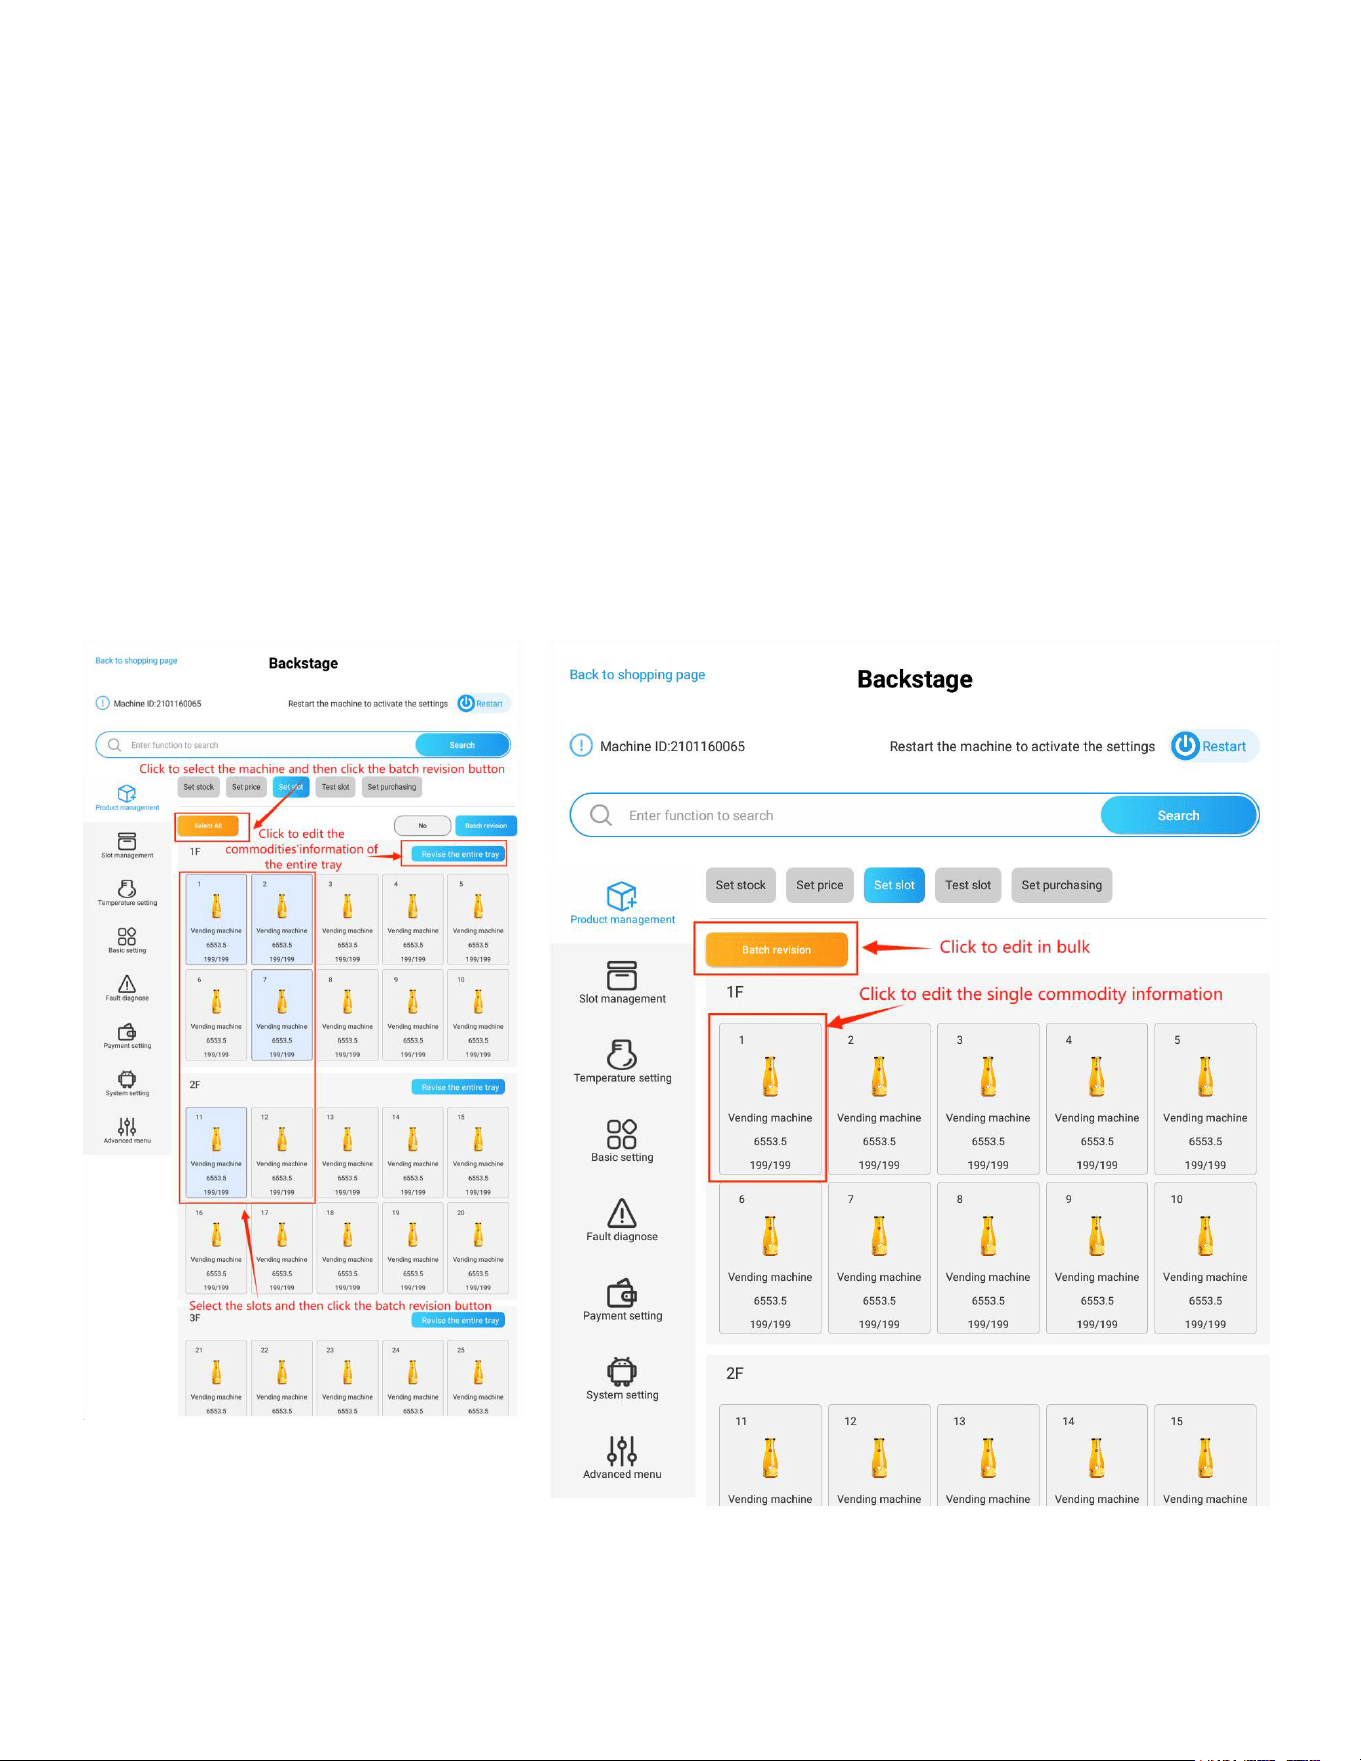
Maintain Slot Product Info
-RXLI7IX7PSXTEKI]SYGERQEREKIXLITVSHYGXMRJSVQEXMSRJSVIEGLWPSX8LIZMI[MWSVKERM^IHF]
slot number.
'SRƼKYVMRK4VSHYGX-RJS
'SRƼKYVI7MRKPI7PSX4VSHYGX-RJS'PMGOSREWMRKPIWPSXJVEQIXSGSRƼKYVIXLITVSHYGXMRJSVQEXMSR
JSVXLEXWTIGMƼGWPSX
'SRƼKYVI&EXGL7PSX4VSHYGX-RJS
Click the "Batch Revision" button to enable the batch revision feature.
Select slots individually, use the “Revise the Entire Tray” option, or press the “Select All” button to
choose the desired slots.
Click "Revise in Batch" to update the information collectively for the selected slots.

15
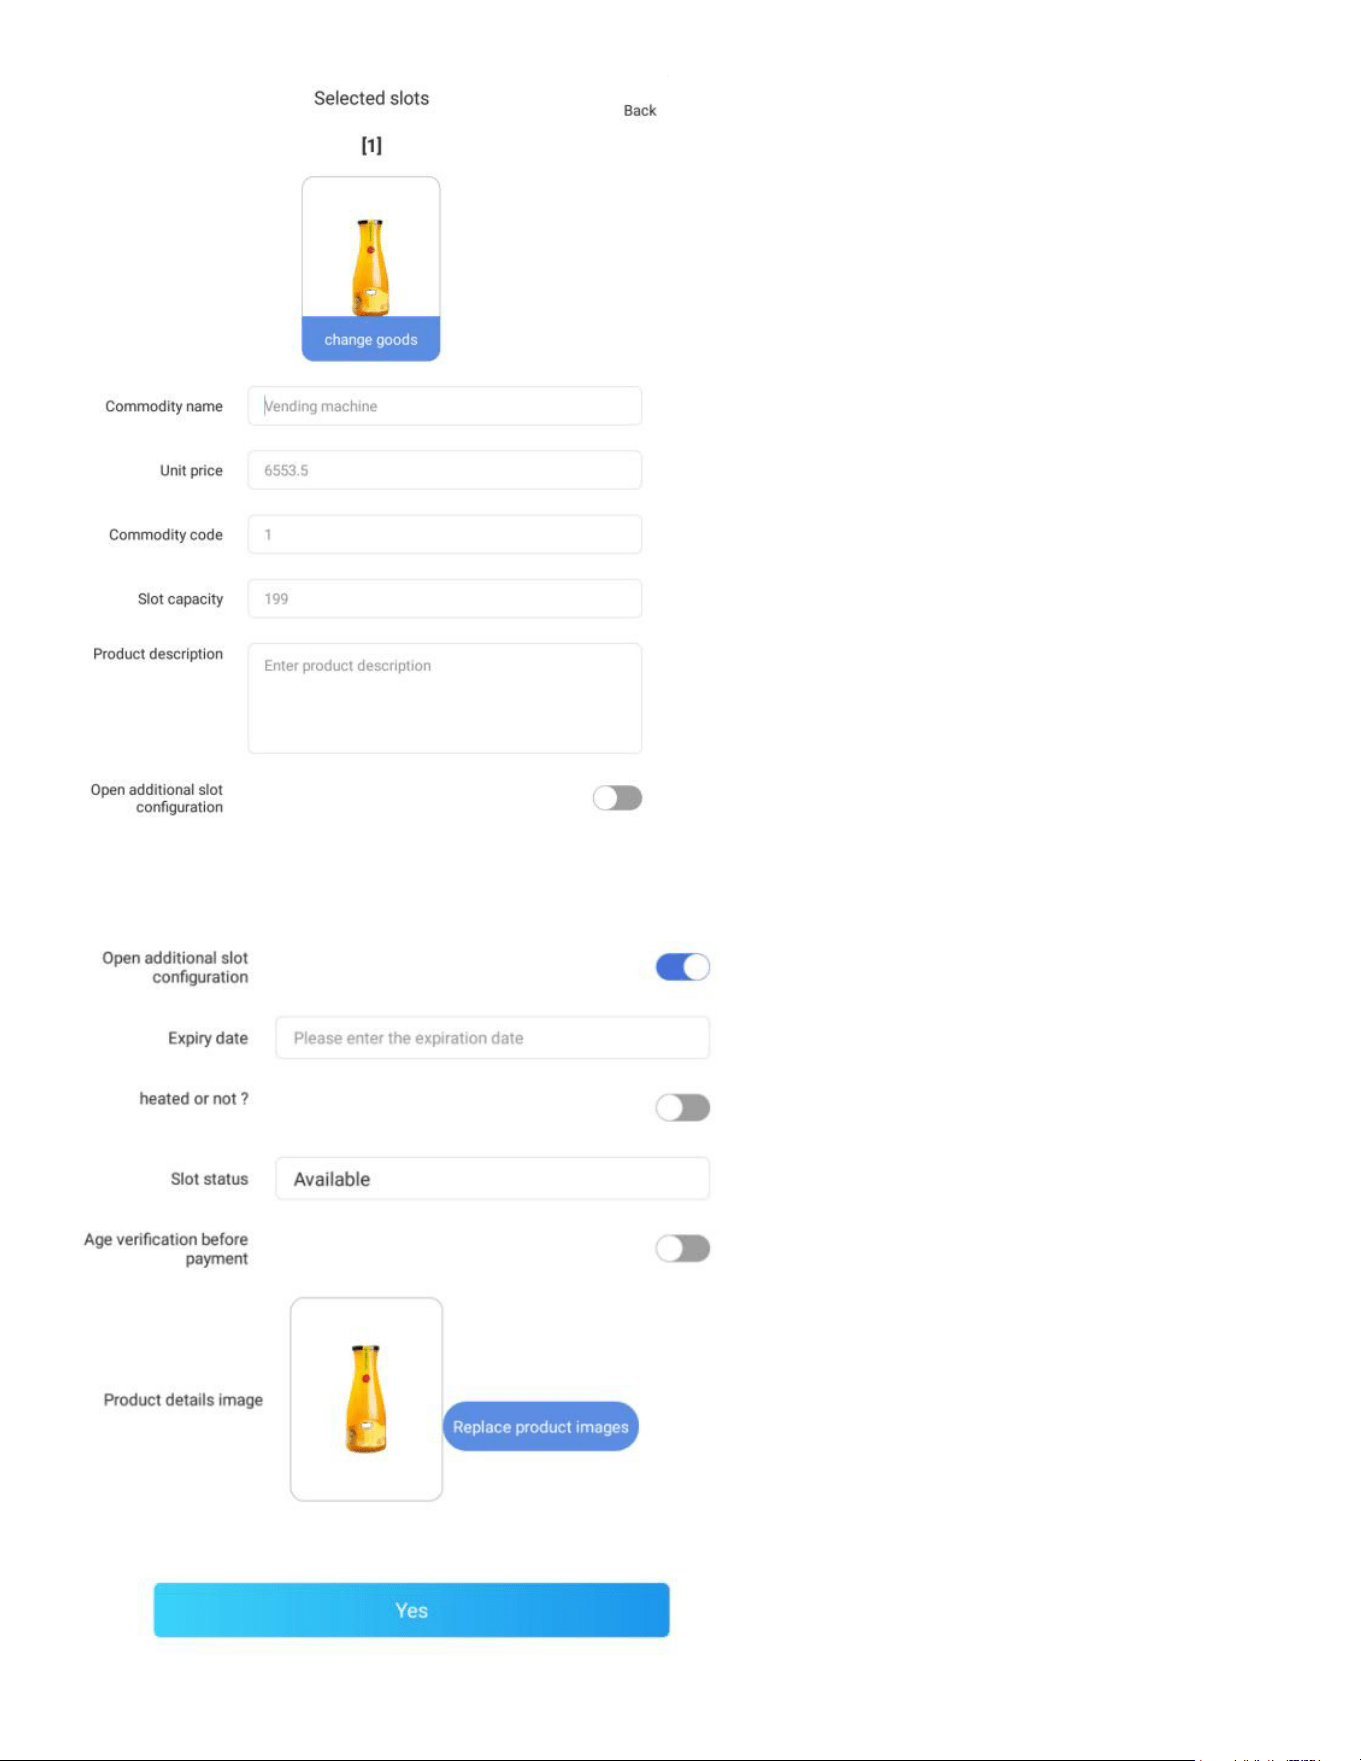
No. Basic Settings Description Instruction
1 Commodity Name Name of the product
2 Unit price Price of the product You can also set it at the “Set price” page
3 Commodity Code Customized product
code
When multiple slots are the same product,
you can set selling mode as per this code.
See more details in Set purchasing feature
in section 2.3.5
4 Slot capacity Qty of product that can
be placed in the slot
Default and max value is 199
5 Product description Descriptions of the
product
This description can be displayed in KM-
VMRWT-66EBR, currently not available in
KM-VMRTW-60EBR.
Additional Slot
FRQ¿JXUDWLRQ
6 Expiry date Expiry date of the
product shelf life
The slot will be locked and won’t display in
shopping menu when expired.
7 Slot status Hide/Available/Have no
goods
8 Product details image Picture of the product* Please refer to the introduction below
/I]ƼIPHWMRTYXW
16
17
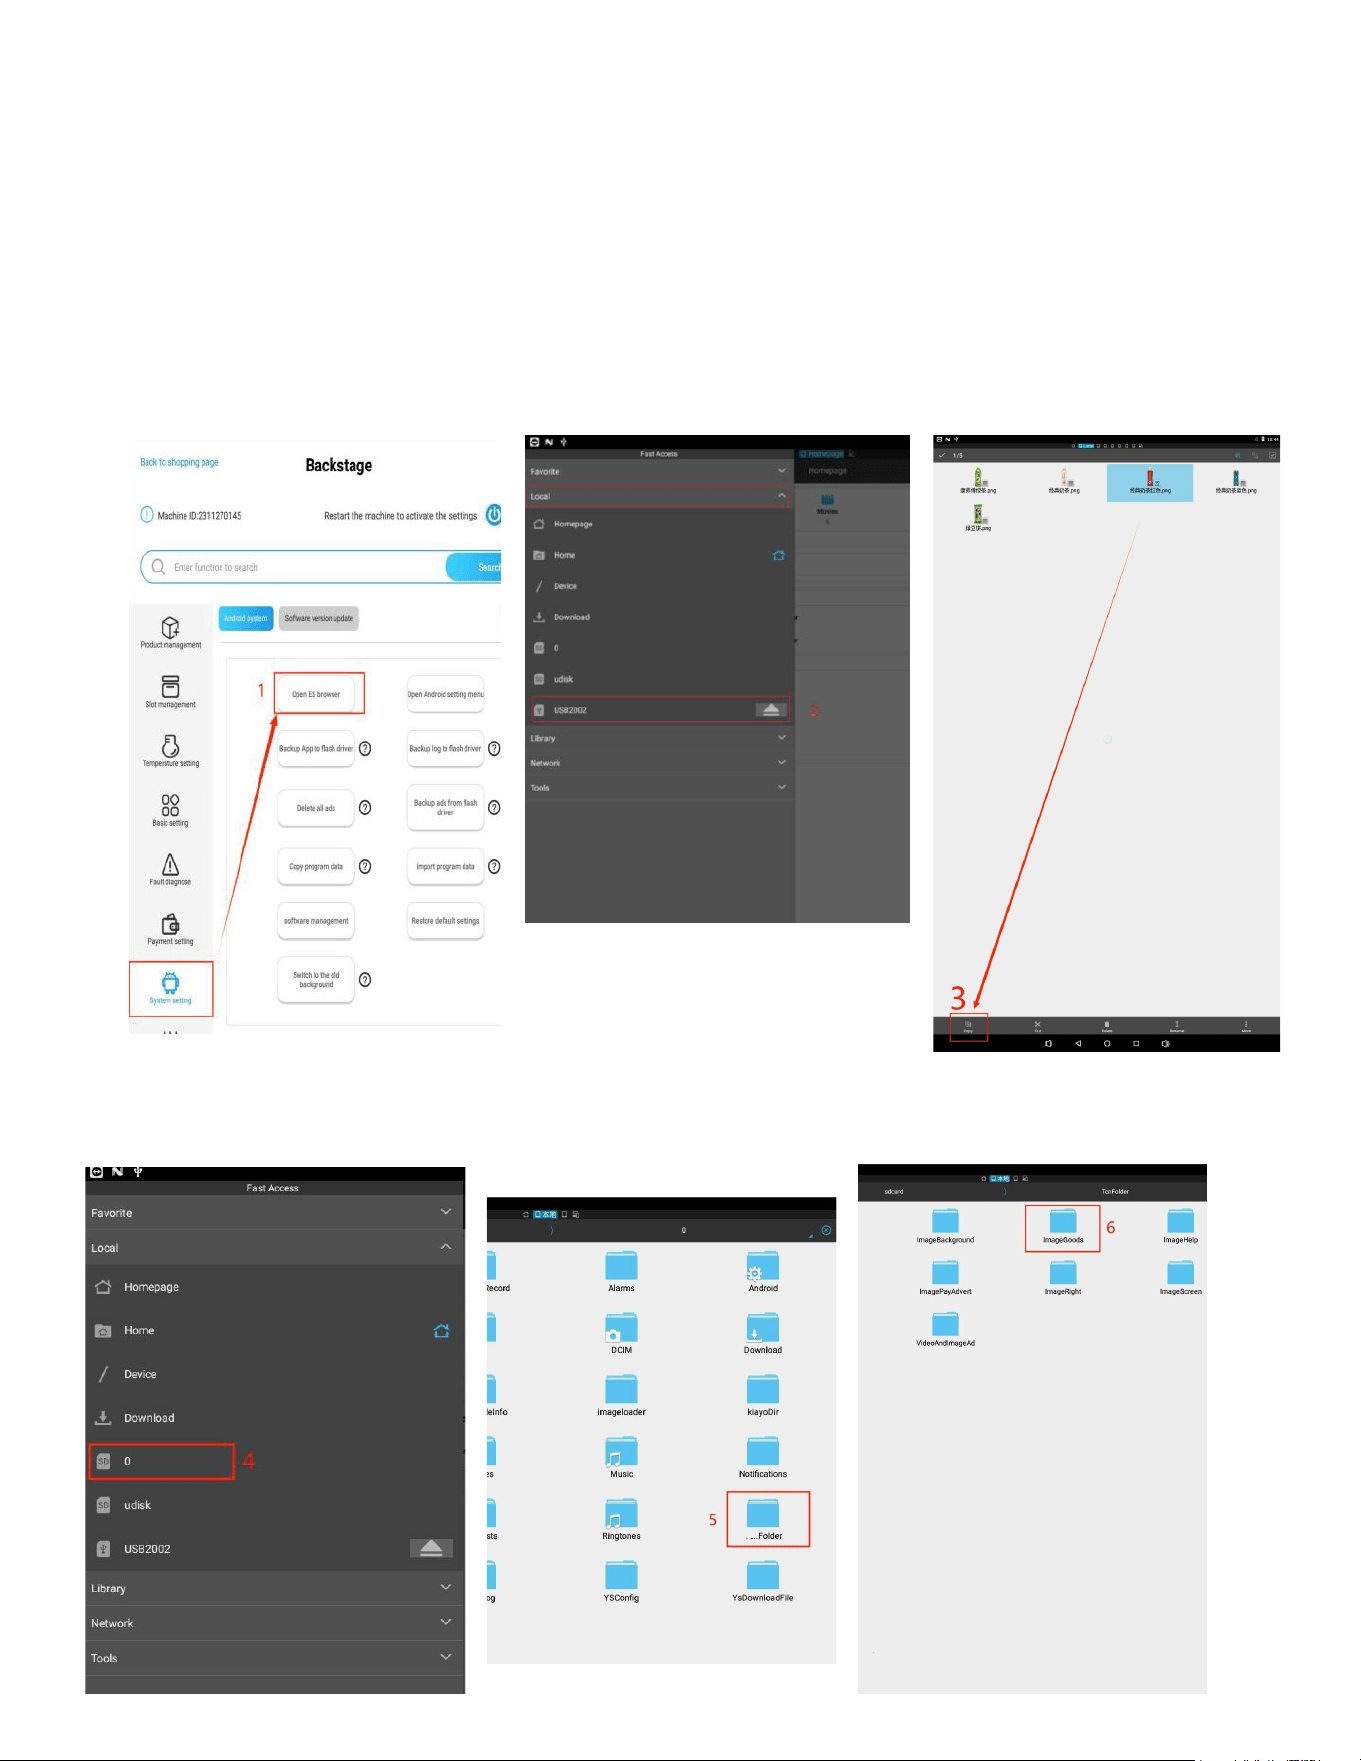
How to Add Images to the Product Image Library:
Save the product images you want to add to the library onto a USB drive and plug it into the USB inter-
face of the tablet.
1. Navigate to the “Android system” section and press the “Open ES Browser” button to launch the ES
Browser.
2. -RXLI)7&VS[WIVTVIWWXLIXLVIILSVM^SRXEPPMRIWMRXLIXSTPIJXGSVRIVXLIRGPMGOXLIƈ0SGEPƉXEF
and select “USB drive” to access the USB memory.
3. Long press the picture in your USB device to select it, and then press the “Copy” button in the bot-
tom navigation bar.
4. Click the “SD card” tab to return to the system storage directory.
Find and open the “KMFolder.”
6. Inside the “KMFolderƉƼRHERHSTIRXLIƈ-QEKI+SSHWƉJSPHIV
KM

18
7. Click the “Paste” button to paste the copied picture into the folder.
8. The picture is now successfully copied into the product image library.
=SYGERƼRHXLIMQEKIMRXLIPMFVEV][LIR]SYIHMXXLITVSHYGXMRJSVQEXMSR
Note: Customers can also use the “Koolmore Vending Machine Management System” (backend) to
GSRƼKYVITVSHYGXMRJSVQEXMSR%JXIVIHMXMRKTVSHYGXMRJSMRXLIFEGOIRHXLIYWIVRIIHWXSWYFQMX
XLIGLERKIWJSVVIZMI[8IGLWYTTSVXQYWXVIZMI[ERHETTVSZIXLIETTPMGEXMSRFIJSVIXLIGSRƼKYVIH
information takes effect in the machine.
Product Dispensing Test
Accessing the Test Slot Page:
• Press the “Test Slot” button to display the slot test page. This section is designed to test the slot
dispensing motion, meaning the spiral of the selected slot will rotate a full circle (using the spiral
slot as an example).
Testing Options:
• Test Single Slot: Press the single slot tab to activate the test. The screen will display the test sta-
tus and results.
• Test Batch Slots: Press the “Batch Test” button to switch to the batch test page.
• Test Multiple Slots: Select multiple slots, then press the “Batch Test” button. (Slots from different
trays can be selected.) The slots will perform the test in order.
• Test the Entire Tray: Press the “Test the Entire Tray” button to test all slots in a tray.
• Test the Entire Machine: Press the “Test the Entire Machine” button to test all slots in the machine.
Error Handling:
If an error code appears during testing, click the “Clear Error” button to remove it. If the error reap-
pears, inspect the machine for issues.

19
Cargo Lane Collaboration:
Clicking this button will reset all springs in the machine to their initial positions.
Note:
When testing slots, a prompt will appear as described. If you test a slot with no products in it, the pho-
toelectric detection board in the elevator may not detect an item dropping from the slot, causing the
machine to display error 80. You will need to clear the error if you wish to test the slot again.
7LSTTMRK-RXIVJEGI'SRƼKYVEXMSR
8LIƈ7IX4YVGLEWMRKƉWIGXMSRMWYWIHXSGSRƼKYVIXLIWLSTTMRKMRXIVJEGITEVEQIXIVWMRGPYHMRKTVMGI
currency, price decimal, language, and more.
Price Unit: Press the drop-down menu to select the price currency. The default is set to “$.”
Price Decimal Point: Set the decimal point for the product price. This is typically set to 2.
Number of Slots Digit:8LMWMWYWYEPP]WIXEWSRIHMKMX-JWIXXSX[SHMKMXWRYQFIVW[MPPHMWTPE]EW
Language Settings: Select the display language for the interface.
Failed Attempts to Lock the Machine (9: Unlock Machine)'SRƼKYVIXLIRYQFIVSJJEMPIHEXXIQTXW
that will lock the machine. When the machine is locked, it won’t be able to sell products. Setting this
XSQIERWXLIQEGLMRI[MPPRIZIVPSGO
20
Temperature Mode: Set the temperature unit to either °C or °F.
Full Screen Mode: When enabled, the navigation bar at the bottom of the screen will be hidden. This
feature is only available when the UI type is set to “0~default” in the “Android System Setting -> Quick
Setup Guide -> UI Type” section.
Paging Display: When enabled, the shopping product lists will be displayed in pages.
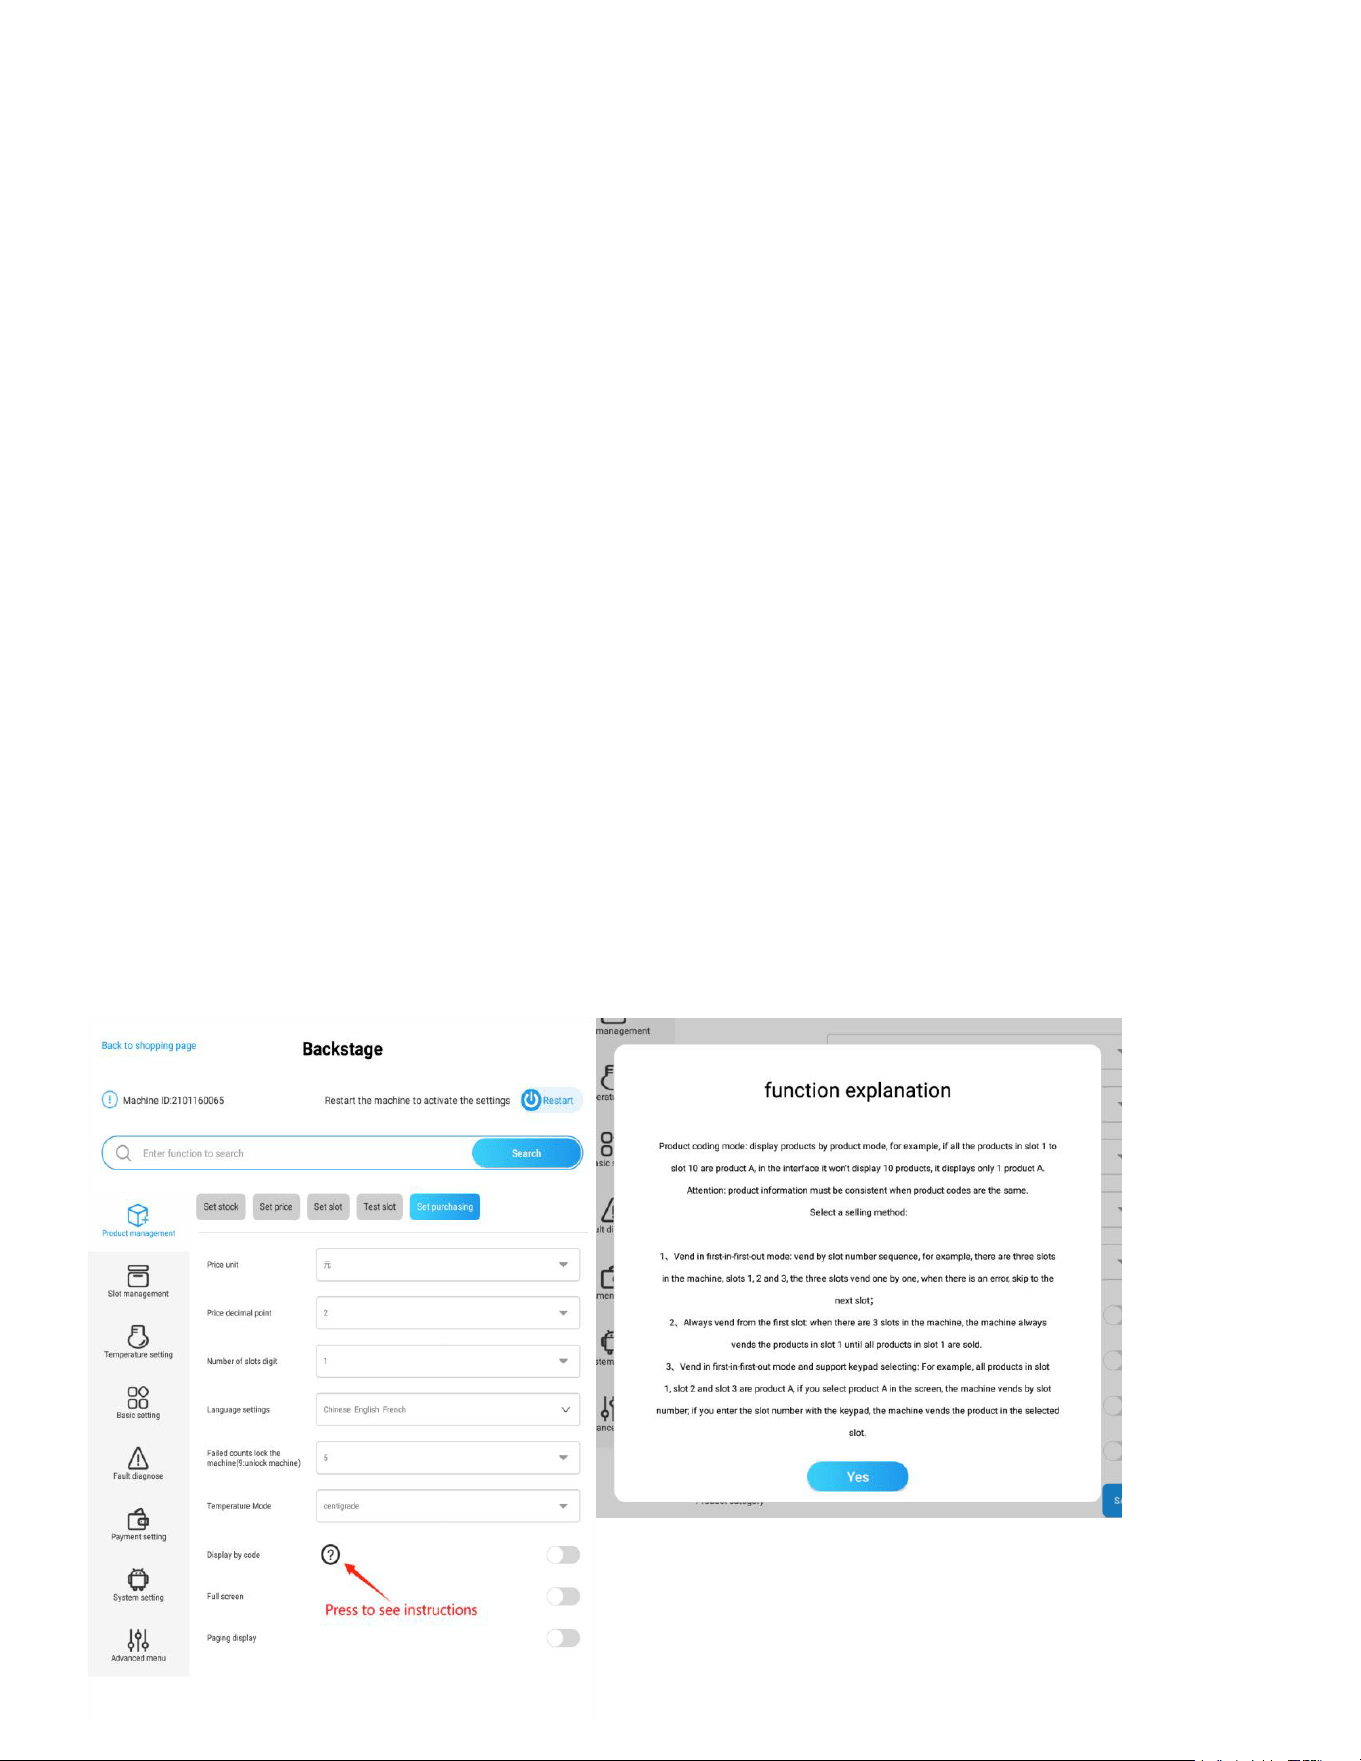
Display by Code: If multiple slots sell the same product, you can activate this mode. This will result in
a single product selection tab for that product being displayed on the shopping interface.
Note:
+TWUWTIZHYXXMFWNSLYMJXFRJUWTIZHYHTIJYMJUWTIZHYNSKTWRFYNTSRZXYGJHTSXNXYJSY9MJHTSܪLZ-
ration of product codes is explained in section 1.3, “Maintain Slot Product Info.”
Selling Modes: When this mode is enabled, you must select one of the following selling modes:
Vending First-In-First-Out Mode:
• Products are dispensed according to the slot number sequence. For example, if there are three
slots (1, 2, and 3), the slots will vend one by one. If an error occurs with a slot, the machine will
skip to the next slot.
Always Vend from the First Slot:
• 8LIQEGLMRI[MPPEP[E]WWIPPXLITVSHYGXJVSQXLIƼVWXWPSXERH[MPPRSXHMWTIRWIJVSQWYGGIWWMZI
WPSXWYRXMPXLIƼVWXWPSXMWWSPHSYX
Vending First-In-First-Out Mode with Keypad Support:
• For example, if all products in slots 1, 2, and 3 are the same (e.g., Product A), selecting Product A
on the screen will cause the machine to vend by slot number. However, if you enter a slot number
using the keypad, the machine will vend the product from the selected slot.
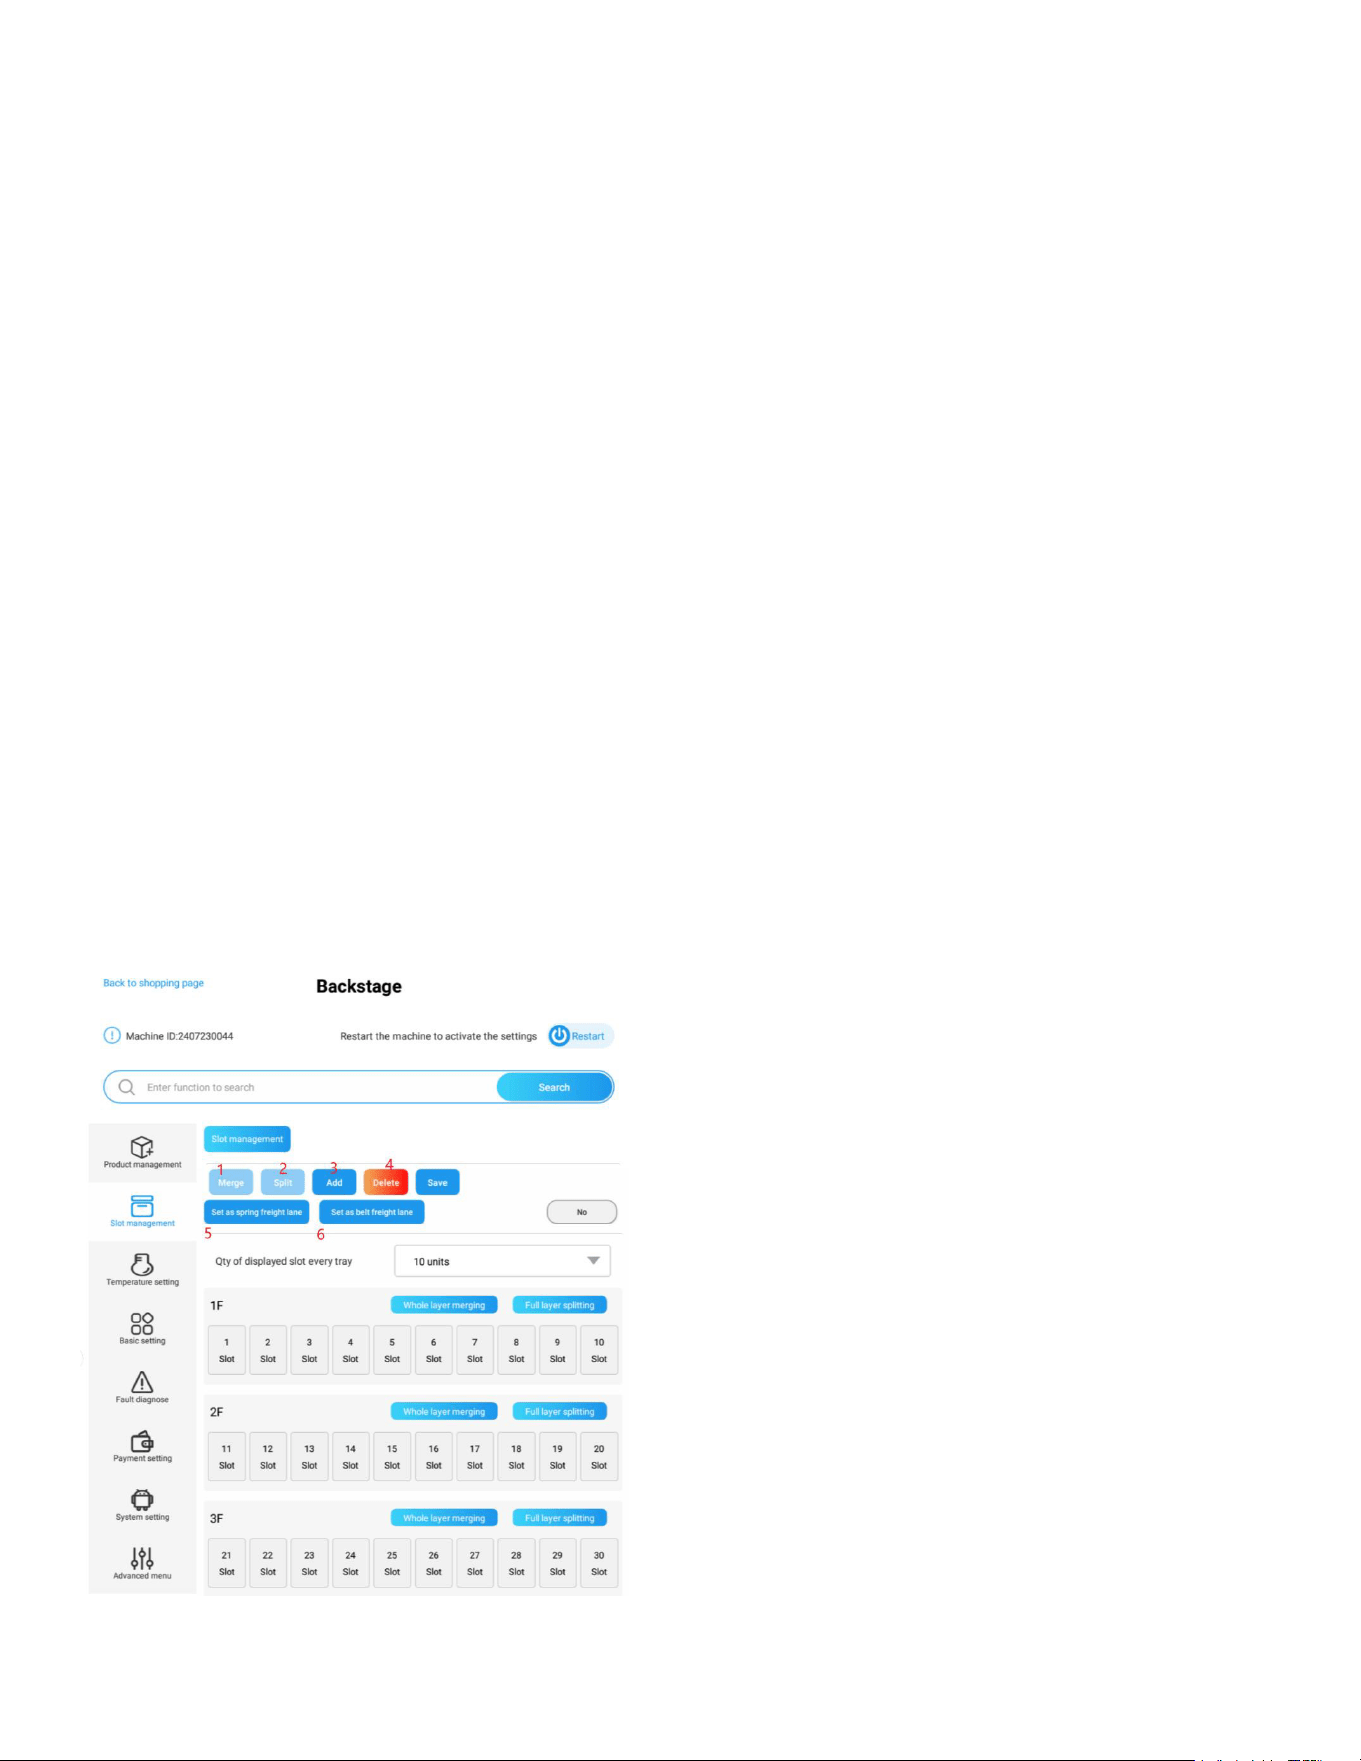
Slot Management
21
To accommodate larger products, you can merge slots as needed. Debugging staff can also manage
the status of slots when replacing a driver board or slot.
Slot Management Actions:
Merge Slots:
Choose neighboring slots, then press “Merge” to combine them. Use the “Whole Layer Merging” but-
ton to merge all slots in a tray. (Slots from different trays cannot be merged.)
Split Slots:
Select double-slot or merged slots and split them back into single slots. Use the “Full Layer Splitting”
button to split all slots in a tray.
Add Slots:
Manually add a slot if it is not displayed on the driver board for a newly added tray.
Delete Slots:
Remove unnecessary or non-existing slots.
Transform to Spring Slot:
Select the slot(s), then press the button “Set as Spring Freight Lane” to change the slot type.
Transform to Belt Slot:
Select the slot(s), then press the button “Set as Belt Freight Lane” to change the slot type.
Note: Remember to click “Save” to preserve the settings, and restart the machine to activate them.
22
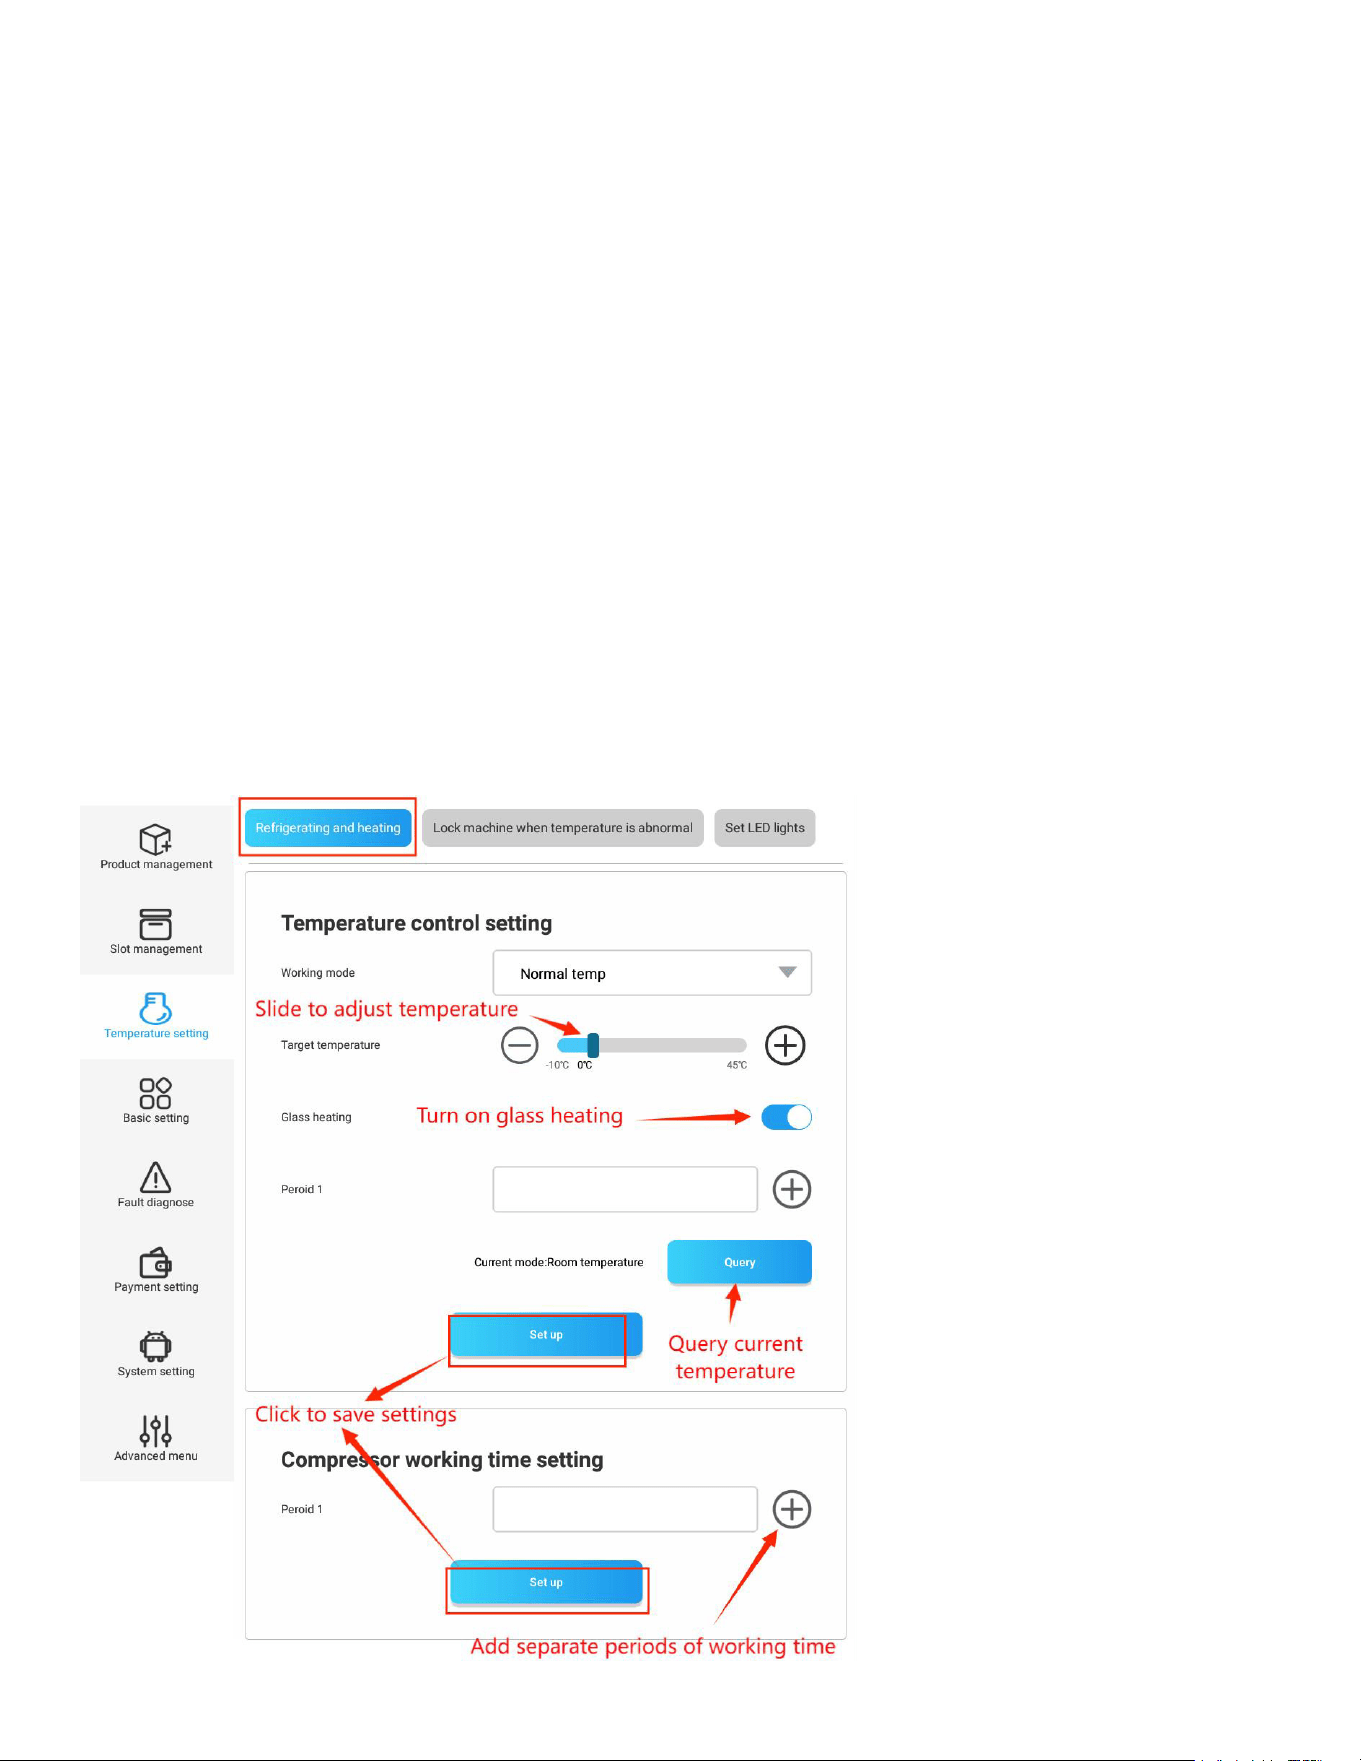
Refrigerating and Heating
Refrigerating and Heating Settings
Working Mode:
Select the desired mode: Refrigeration, Heating, or Normal Temperature. Use the slider to set the spe-
GMƼGXIQTIVEXYVI
Glass Heating:
Activate the Glass Heating function to prevent fog from forming on the front glass door. You can cus-
XSQM^IXLILIEXMRKXMQIFEWIHSR]SYVRIIHW
Temperature Query:
Click “Query” to view the current temperature under the selected mode.
Compressor Working Time:
=SYGERGSRƼKYVIXLIGSQTVIWWSVXSSTIVEXIHYVMRKWTIGMƼGTIVMSHWJSVIRIVK]WEZMRKTYVTSWIW
such as from 08:00 to 18:00 (daytime).
Note:
Ensure the “Glass Heating” function is turned on when the “Refrigeration” mode is selected. Otherwise,
fog may appear on the glass.

23
Lock Machine When Temperature is Abnormal
To prevent product spoilage caused by high interior temperatures, this feature allows the machine to
EYXSQEXMGEPP]PSGOMJXLIMRXIVMSVXIQTIVEXYVII\GIIHWEWTIGMƼIHXLVIWLSPH
'SRƼKYVEXMSR3TXMSRW
Temperature Threshold:
Set the temperature above which the machine will be locked.
Temperature Time Select:
Specify the period of time within which, if the temperature fails to drop to the set level, the machine
will be locked.
Lock Mode:
0 – Lock Mode: When an abnormality occurs, the entire machine will be locked, preventing any prod-
uct sales.
1 – Cargo Mode: When an abnormality occurs, only the faulty slot will be locked, preventing sales
from that slot, while the rest of the machine remains operational.
Note: Ensure that the refrigerating mode is activated before enabling this feature.
Example:
• )REFPIXLIQEGLMRIƅWVIJVMKIVEXMSRJIEXYVIERHWIXXLIVIJVMKIVEXMSRXIQTIVEXYVIXSq*
7IXXLIXIQTIVEXYVIXLVIWLSPHXSq*XMQIXSQMRYXIWERHPSGOQSHIXS
-RXLMWGEWIMJXLIQEGLMRIGERRSXGSSPHS[RXSq*q*q*[MXLMRQMRYXIWXLIQE-
chine will be locked.
If the lock mode is set to 1, and the “Over-temperature Lock Cargo Lane” feature is enabled for
WTIGMƼGWPSXWMRXLI7IX7PSXTEKIXLSWIWPSXW[MPPFIPSGOIHERHYREFPIXSWIPPTVSHYGXW[LMPISXL-
er slots will remain unaffected.
24
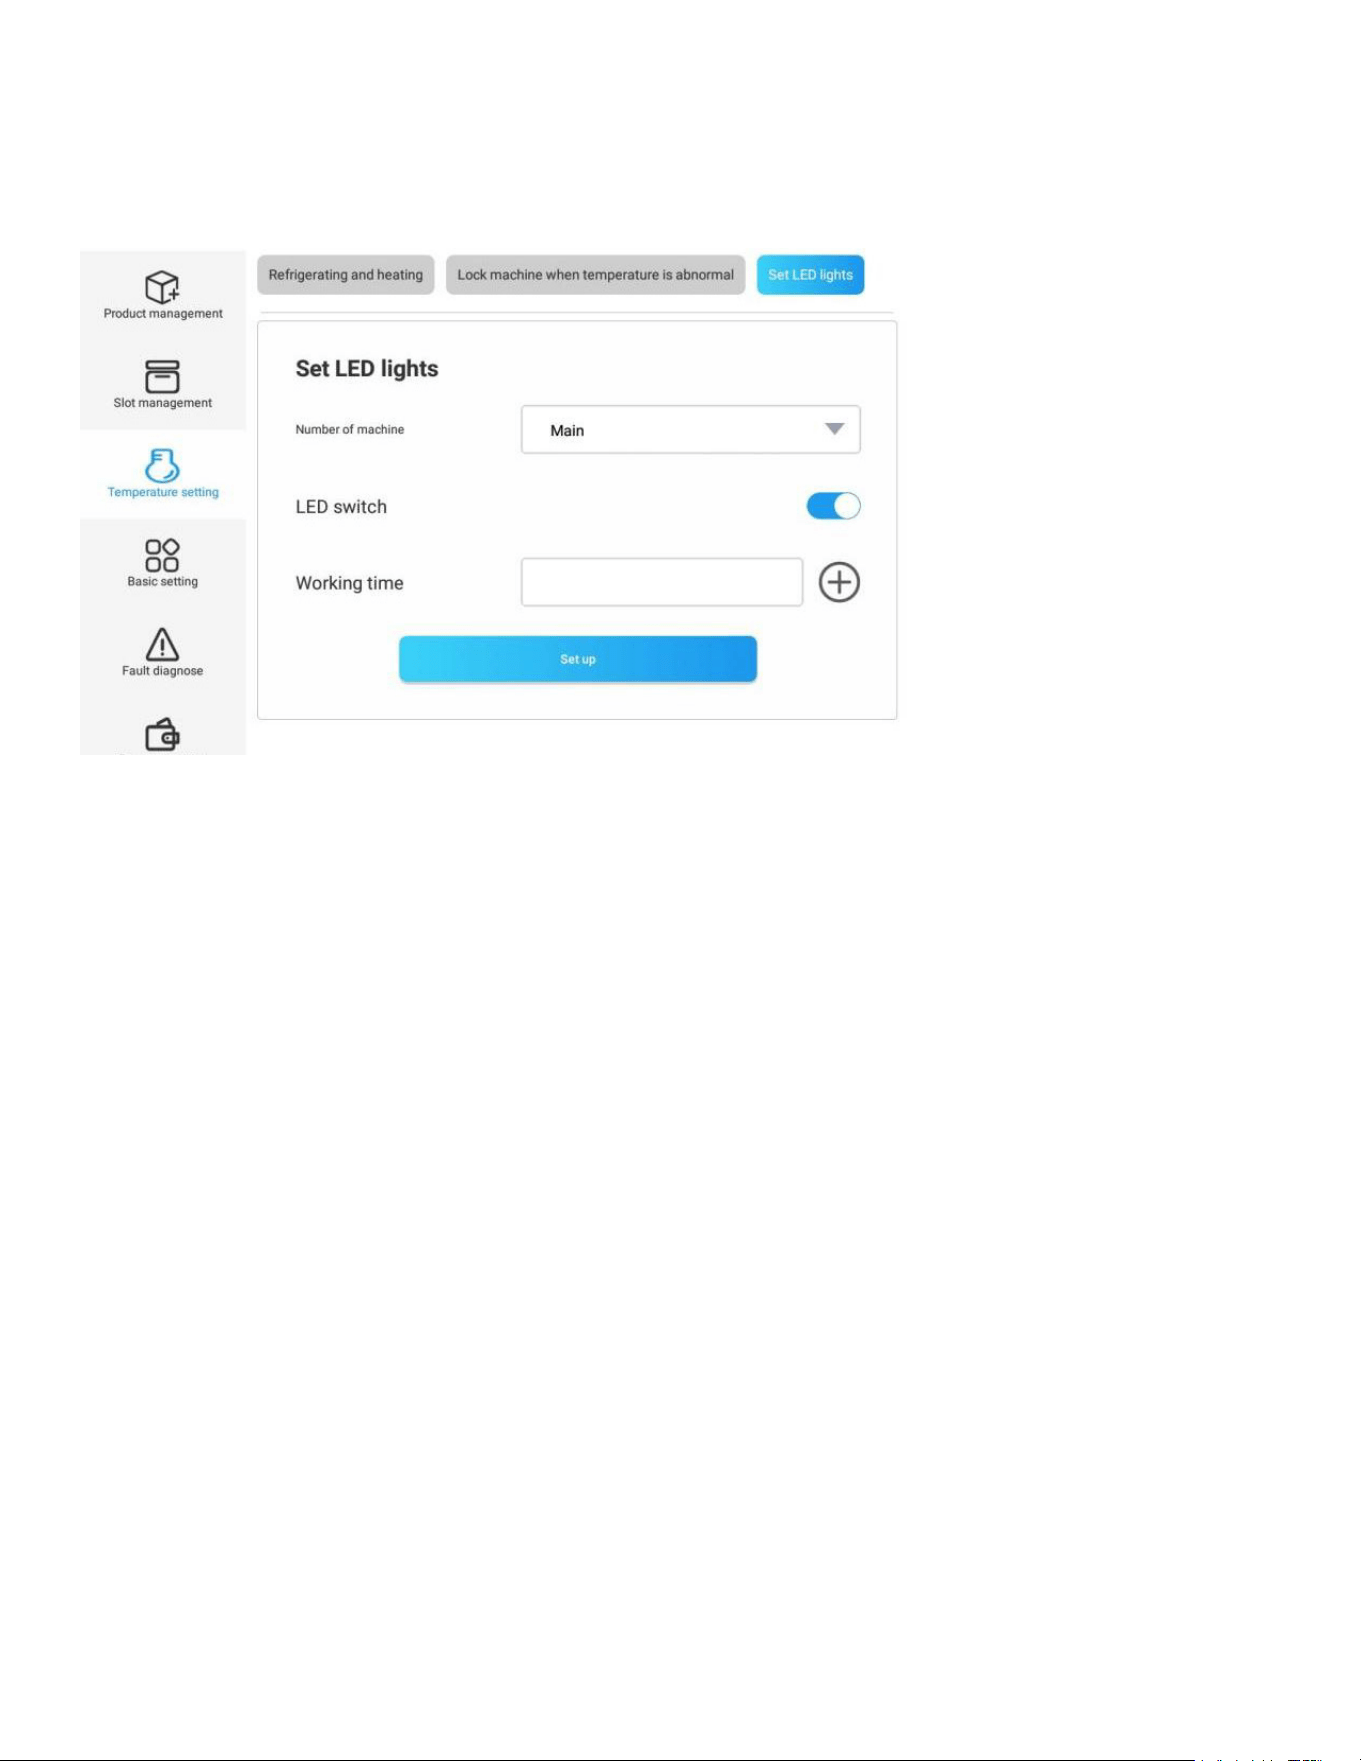
LED lights
Save energy by setting the working time of the LED light.
• 'SRXVSPXLI323**SJXLI0)(PMKLXW
• 'YWXSQM^IXLI[SVOMRKXMQISJXLI0)(PMKLX
• Set sections of discontinuous working periods by clicking the “plus” button.
Basic Information Setting
Advertisement Management
Manage the content displayed in the advertisement positions on the machine.
Advertisement Settings:
Scrolling Content:
This is the text displayed at the bottom of the shopping interface. Typically, you can place the custom-
er service number or a welcome message here.
Interval for Picture Playback:
When multiple standby images are available, you can set the interval time for each image here.
8LIWXERHF]MQEKIMWHMWTPE]IHMRJYPPWGVIIR[LIRXLIQEGLMRIMWMHPIERHXLIWXERHEVHWM^IMW
1080x1870 pixels.
Standby Advertising Display:
When this feature is enabled, an advertisement can be shown after a certain number of seconds
when there is no user interaction on the screen.
Full-Screen Standby Video Display:
When enabled, the advertisement video for the machine’s standby status (not the advertisement on
the shopping page) will be displayed in full-screen mode.
Start Time in Standby:
Set the number of seconds after which the screen will show a standby image or video if there is no
operation.

25
Welcome Settings:
Set a greeting message that will be accompanied by a sound prompt when a customer activates the
shopping page.
Advertising Settings: Standby Advertising Display: Ensure the image
WM^IMW\TM\IPW
For methods to update the content of the advertisements, please refer to the sections “Delete all ads”
ERHƈ&EGOYTEHWJVSQƽEWLHVMZIƉMRWIGXMSR%RHVSMH7]WXIQ
Set Reminding Messages
This section allows you to set necessary reminder messages that appear when customers interact
with the screen.
Settings:
• Pay Effective Time: Set the waiting time for payment after a product is selected. If payment is not
made within this period, the screen will automatically return to the product list page.
• 4E]QIRX8MTW'YWXSQM^IVIQMRHIVWXLEXETTIEVEJXIVEGYWXSQIVWIPIGXWETVSHYGXSRXLIWLST-
ping page. For example: “Please insert coins” or “Please tap your card.” (This feature is available
SRP][LIRXLIQEGLMRIƅWƈ9-X]TIƉMWGSRƼKYVIHEWƈƉ8LMWTEVEQIXIVGERFIGLIGOIHMRXLI%R-
droid system under the “Quick Setup” section.)
Do Not Display Balance Prompt: When enabled, the balance prompt on the shopping page will not
be displayed.
• Audio Prompt: When enabled, the machine will broadcast a voice prompt when a slot is selected,
GERGIPIHSVGSRƼVQIH-XMWRSXVIGSQQIRHIHXSIREFPIXLMWJIEXYVIFIGEYWIXLIWPSXRYQFIV[MPP
be pronounced in Chinese only, and the voice may not always be clear enough for the end user.)
• 7SPH3YX4VSQTX6IZMWMRK'YWXSQM^IXLIVIQMRHIVQIWWEKIXLEXETTIEVW[LIRETVSHYGXMWWSPH
out.
• /I]FSEVH3TXMSR8I\X7IXXMRKW(IƼRIXLIREQIHMWTPE]IHJSVXLIOI]FSEVHWYGLEWƈ/I]FSEVHƉ
“Please enter,” or use other languages.
• /I]FSEVH)RXIV4VSQTX'SRƼKYVITVSQTXWJSVOI]FSEVHMRTYXJSVI\EQTPIƈ4PIEWIIRXIVXLI
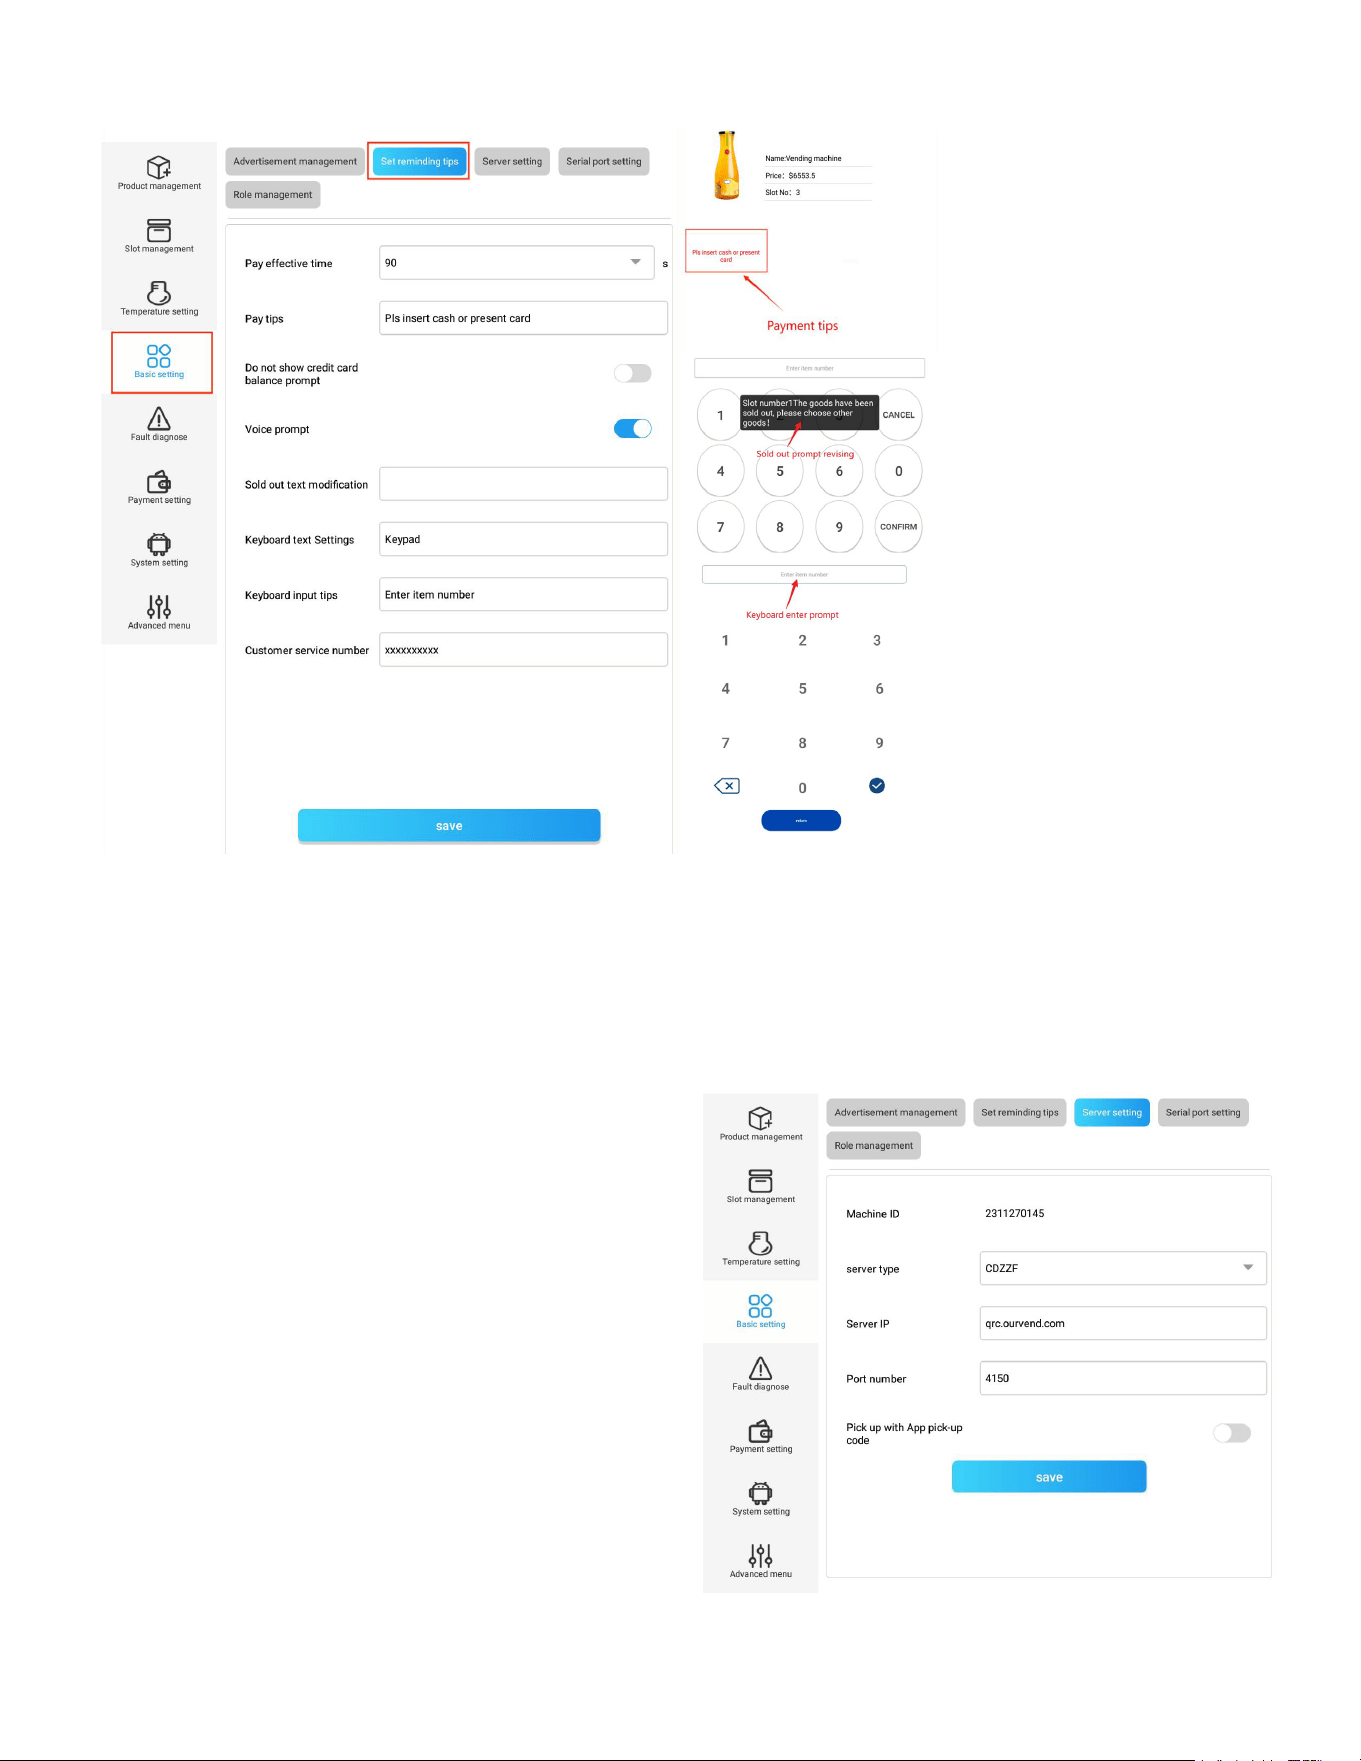
26
product number” when the customer presses a key.
Server Setting
'SRƼKYVIXLIWIVZIVX]TIWIVZIV-4ERH4SVX-(XSIREFPITVSTIVGSQQYRMGEXMSRFIX[IIRXLIXEFPIX
ERHXLIZIRHMRKQEGLMRIFEGOIRHW]WXIQ*SVWTIGMƼGTEVEQIXIVWTPIEWIGSRWYPX[MXL]SYVZIRHMRK
machine supplier.
Features:
Pickup with APP Pick-up Code:
This feature allows customers to pick up gifts using
a pick-up code during promotional activities without
making a payment.
Note:
It is not recommended to change server-related
parameters during daily use. If adjustments are nec-
essary, please contact the KoolMore tech support
team.
27
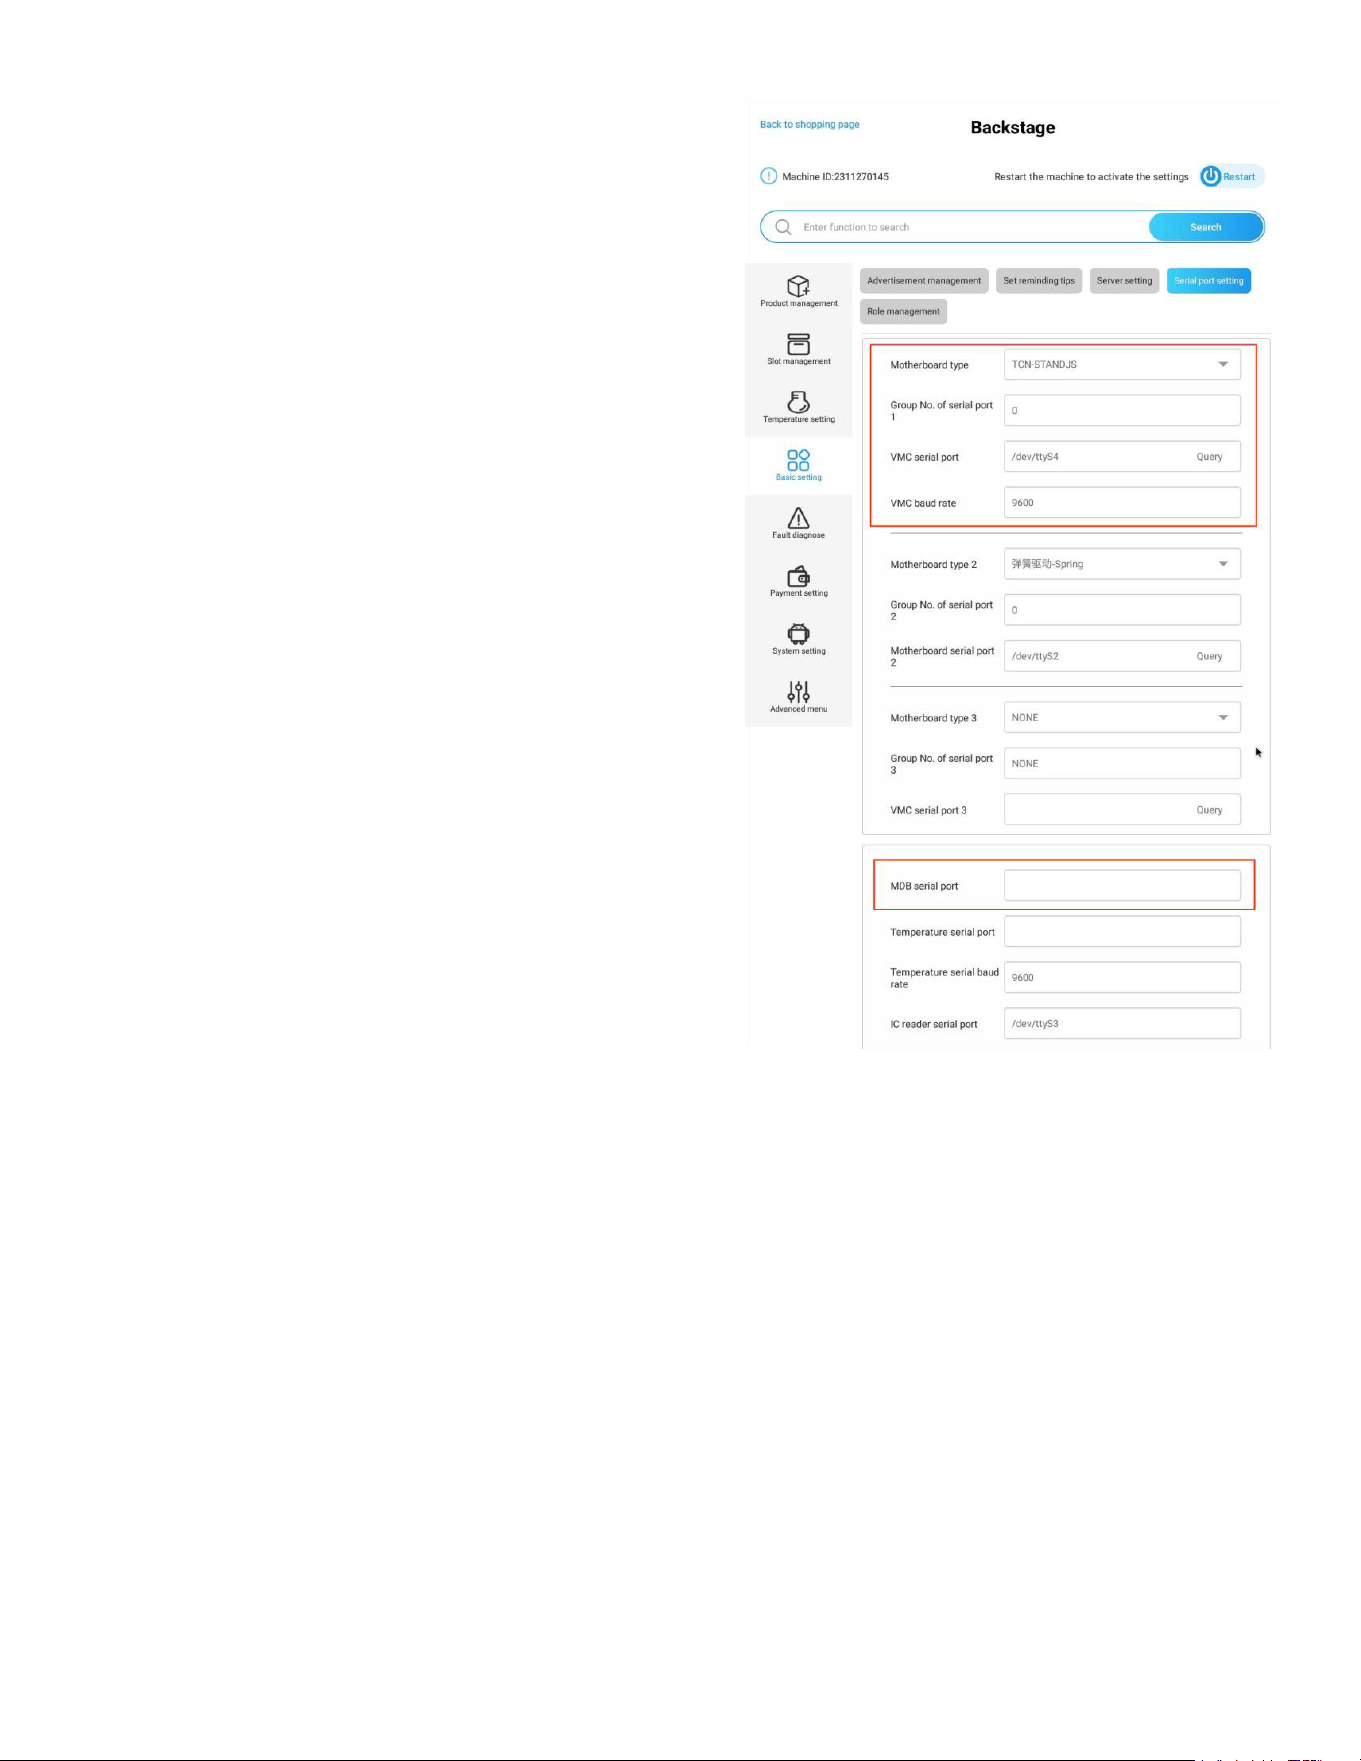
Serial Port Settings
Select the correct serial ports and set the appropriate
parameters to ensure the machine functions and com-
municates properly.
Settings:
Motherboard Type:
Choose the appropriate type based on your machine’s
GSRƼKYVEXMSRIKWTMVEPIPIZEXSV7WLETIH
Group No. of Serial Port: Set to 0 (default). Please do
not change this setting.
VMC Serial Port: Select the appropriate port based on
XLIEGXYEPGSRƼKYVEXMSRSJ]SYVQEGLMRI
:1'&EYH6EXI7IXXSHIJEYPX4PIEWIHSRSX
change this setting.
MDB Serial Port: Select the appropriate port based on
XLIEGXYEPGSRƼKYVEXMSRSJ]SYVQEGLMRI
Note: It is not recommended to change serial port-relat-
ed parameters during daily use. If changes are neces-
sary, please contact the KoolMore tech support team.
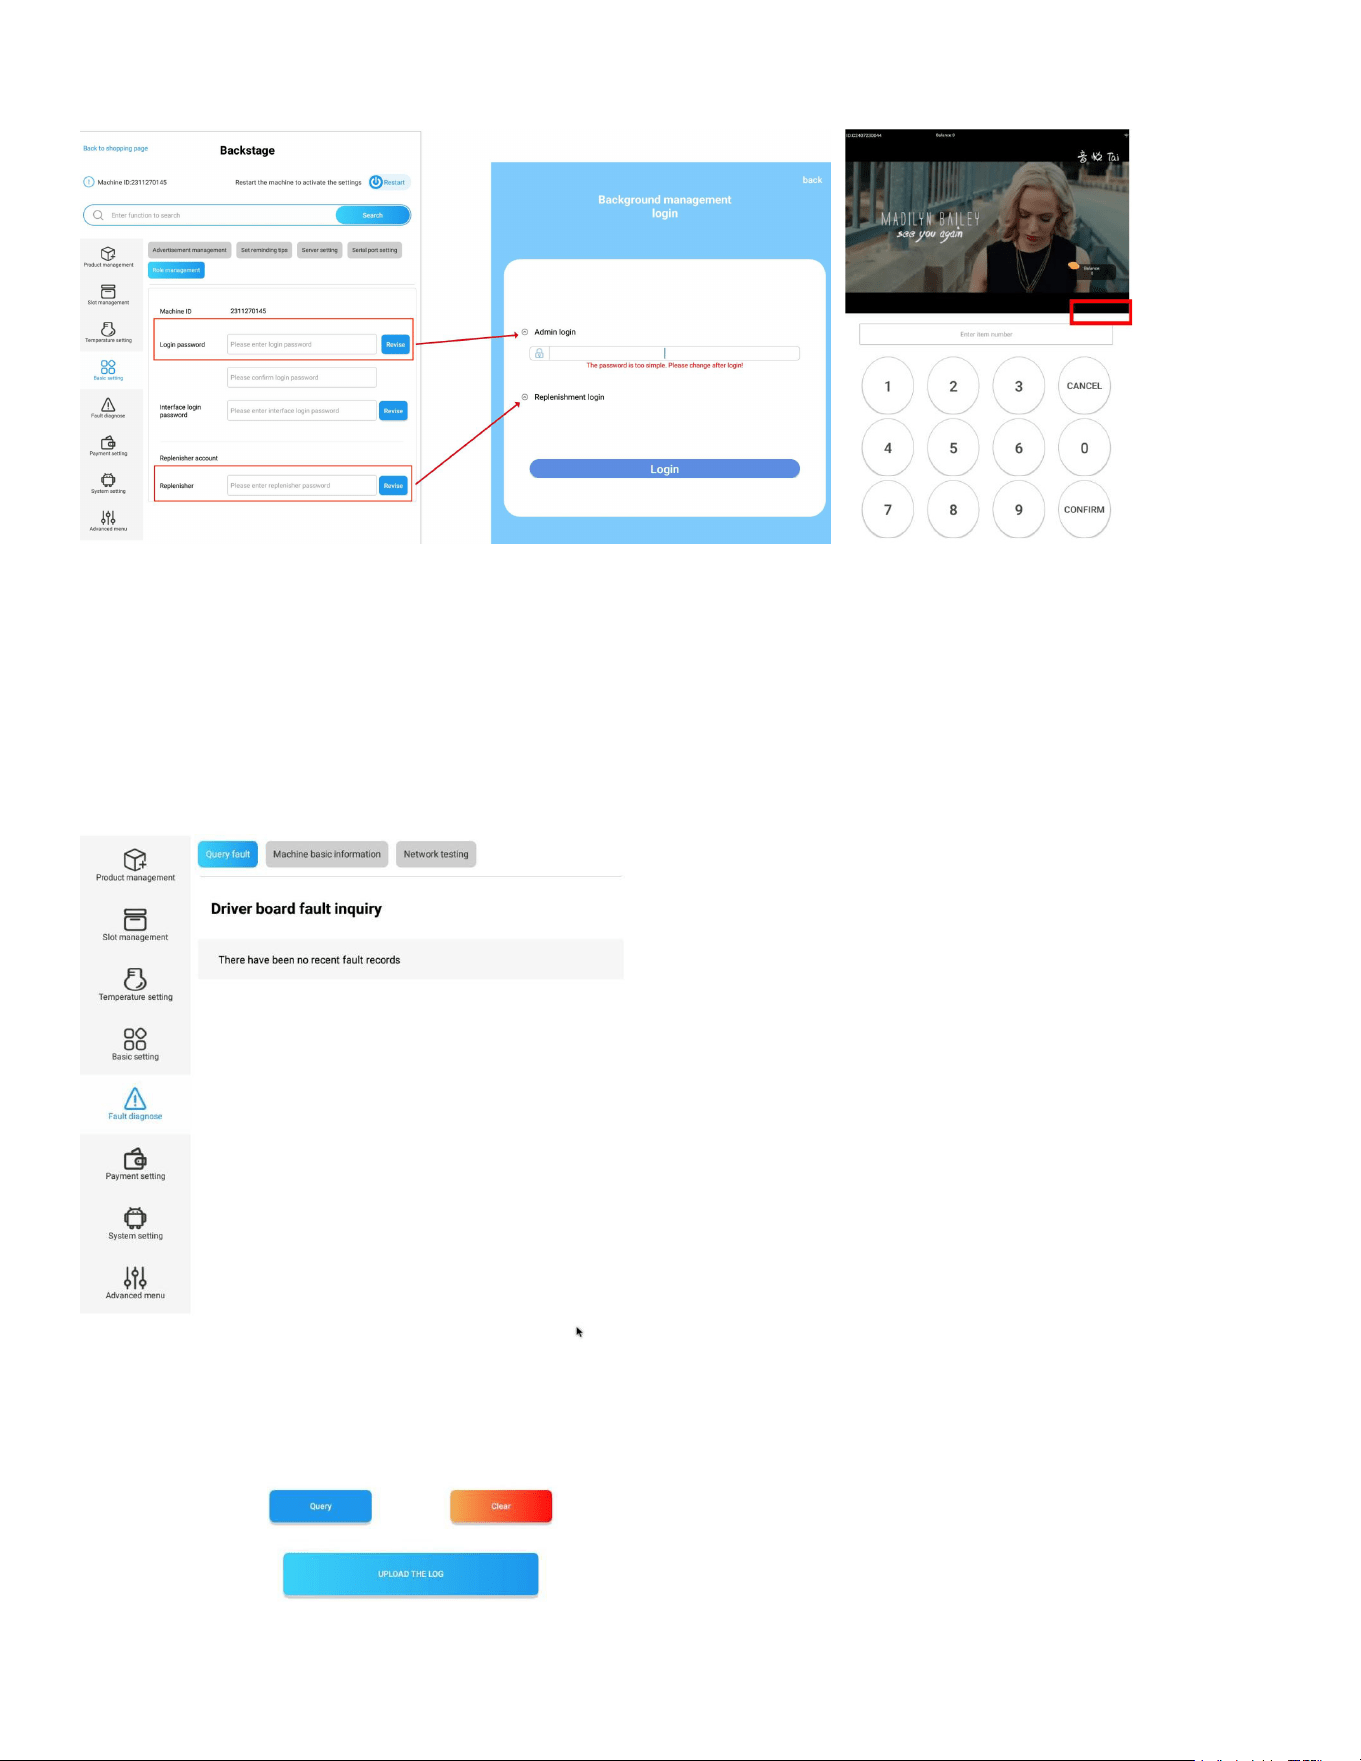
Password Management
This section allows you to revise the administrator password or reset the staff password.
Roles and Passwords:
Login Password:
For the Admin account.
Replenisher:
For the Replenishment account.
Interface Login Password:
'PMGOXLIƈ1EGLMRI-(ƉƼZIXMQIWXSEGGIWWXLIQEREKIQIRXW]WXIQXLIVIMWELMHHIRQIXLSHXS
IRXIVXLIW]WXIQ)RXIVXLIGSHISRXLIWGVIIRXLIRPSRKTVIWWXLIXSTVMKLXGSVRIVSJXLI
WIPIGXMSREVIEXSNYQTXSXLIPSKMRTEKI8LITEWW[SVHJSVXLMWGERFIGSRƼKYVIHYRHIVXLIƈ-RXIVJEGI
Login Password” parameter.
28
Note: When logging in via the Replenisher account, the user will not have access to the Slot Manage-
ment, Payment (Method) Settings, and Advanced Menu (Machine Debugging) sections.
Error Diagnosing
Query Fault
• Display the latest 20 errors.
• Click the “clear error” button to clear the errors.
29
• Upload the log to server for technical support.
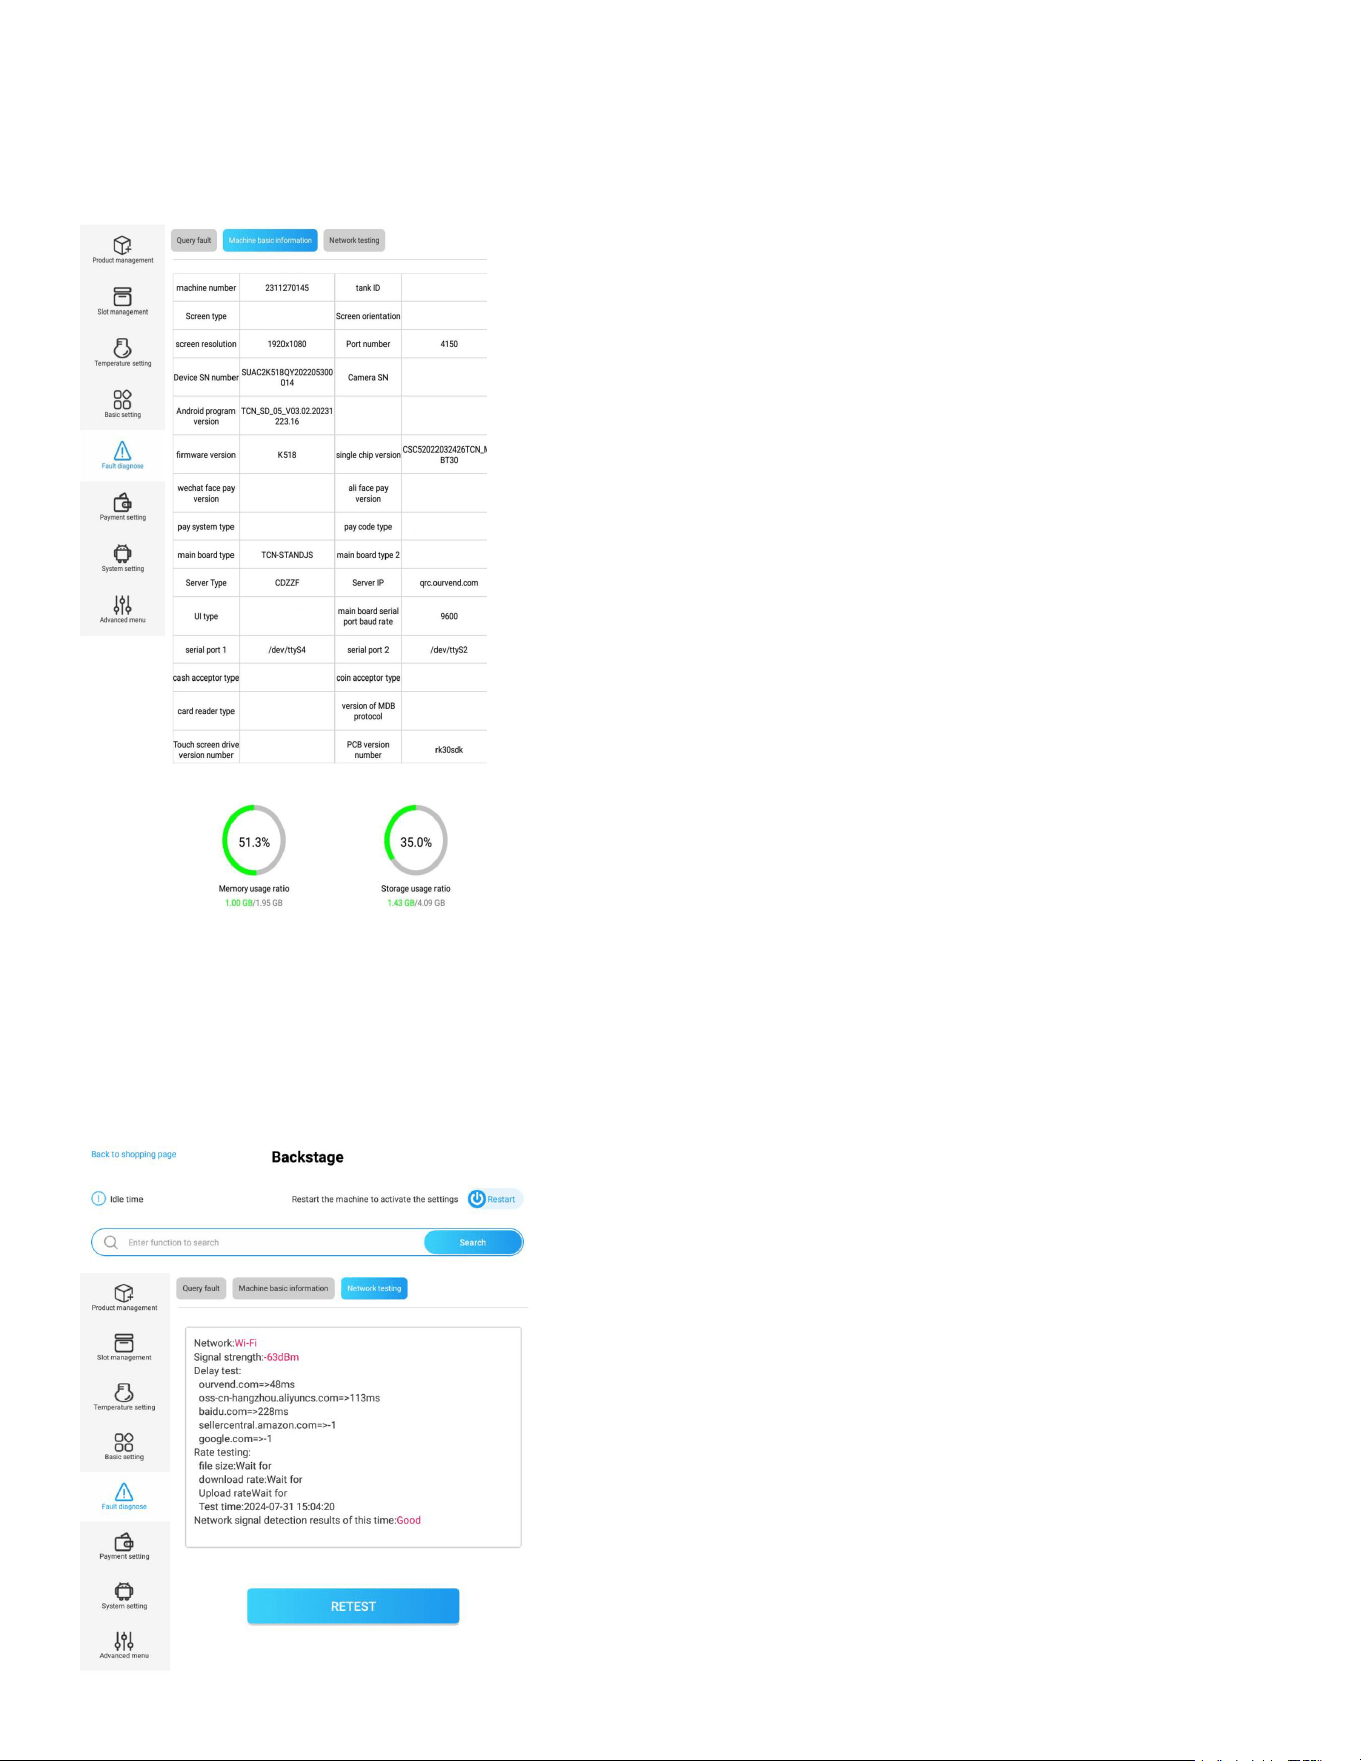
Machine Parameters
View the basic information, operation data and parameters of the machine.
1EGLMRIRYQFIVWGVIIRX]TI72RYQFIV%RHVSMHTVSKVEQZIVWMSRƼVQ[EVIZIVWMSRWIVZIVX]TI
and storage usage ratio, etc.
Network Detection
Test the network connection.
Click “Start Testing” to test the network connection, each round testing last around 30s,and overall
network status info will be displayed after detection.
30
3TYJ\MJSRFHMNSJNXTKܫNSJYMJWJ\TSѣYUWTRUYFS^NSKTNSYMJUFLJFKYJWIJYJHYNTS
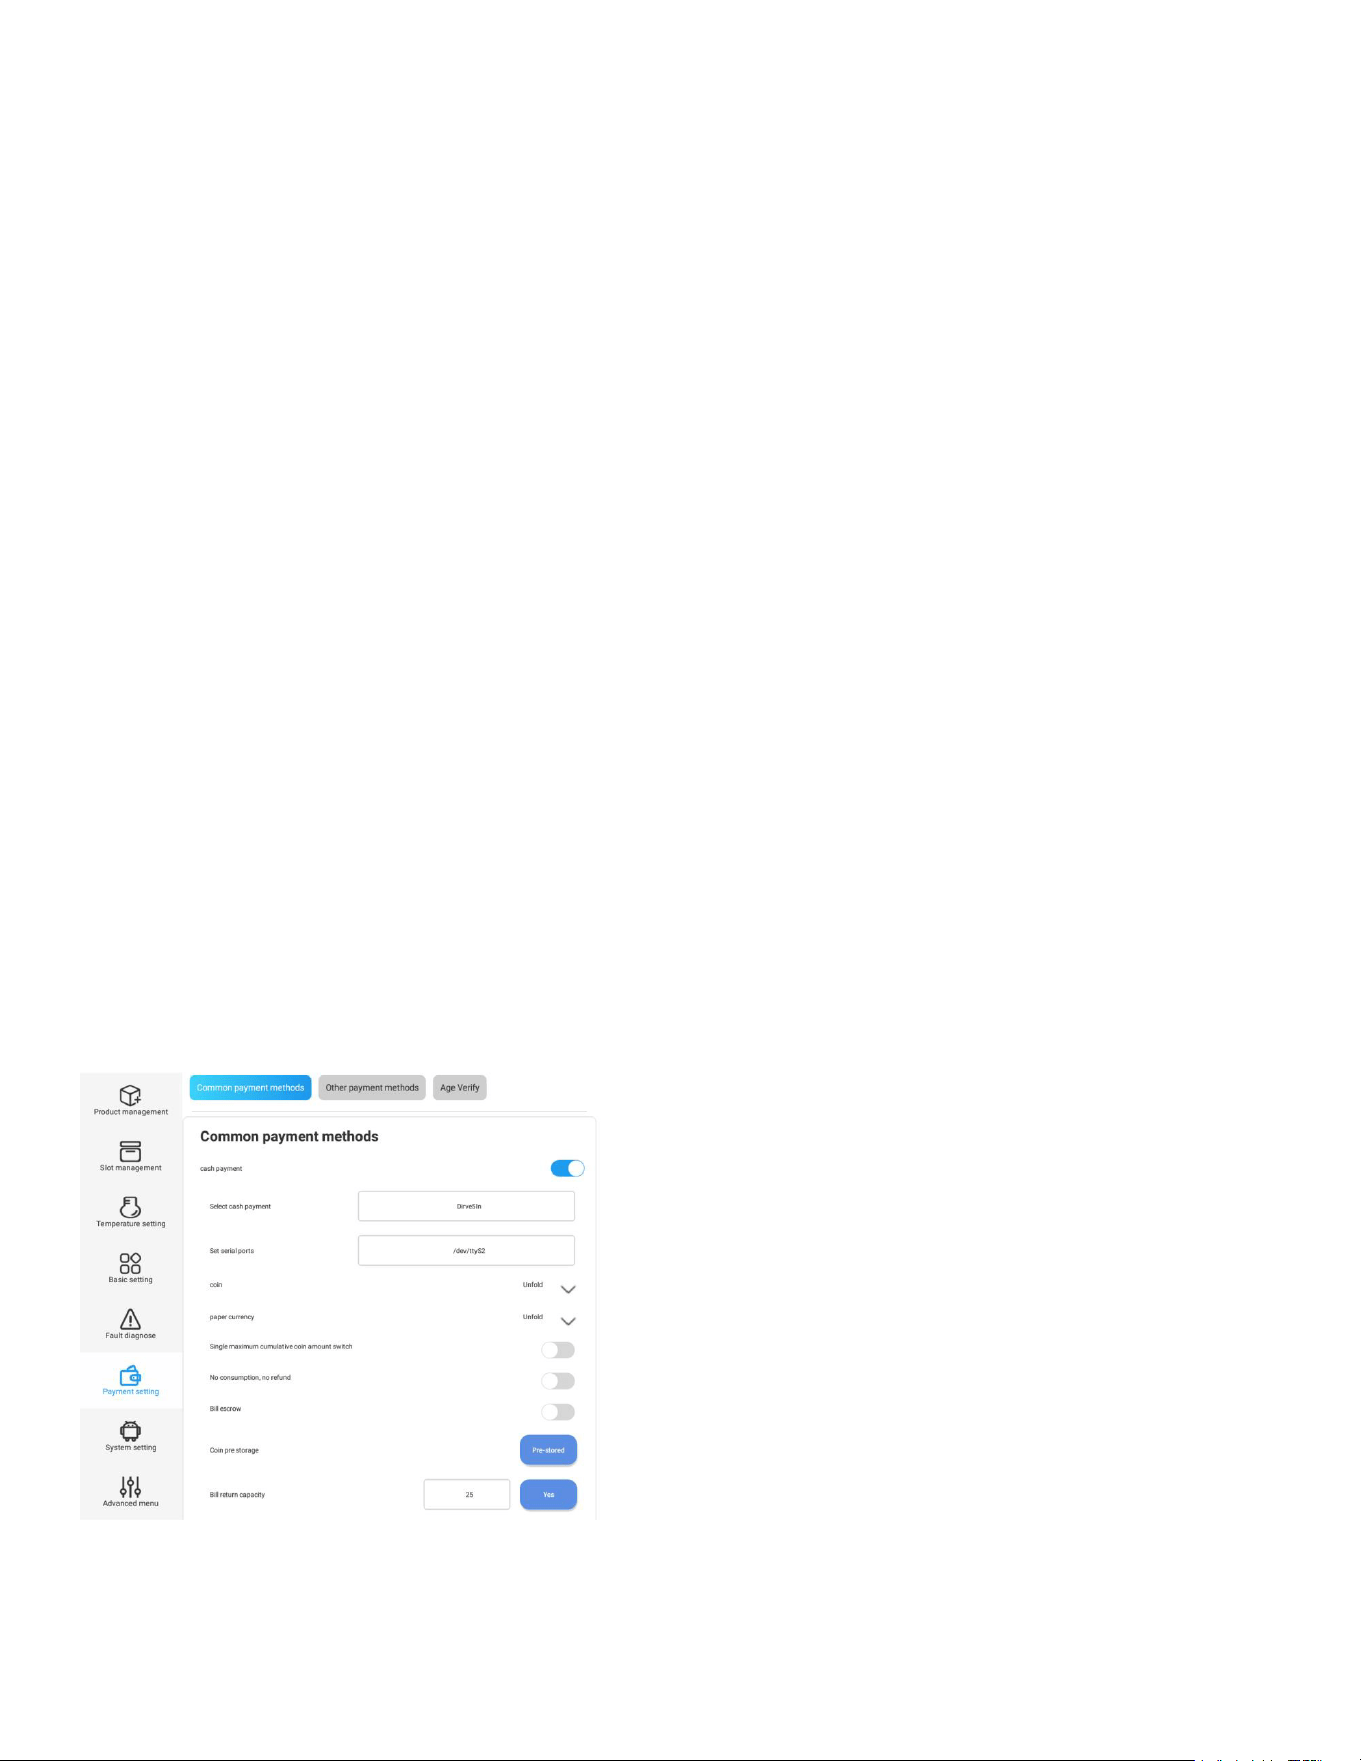
Payment Settings
Common Payment Methods
Cash Payment:
Must be enabled when bank card, bill, and coin payment options are equipped in the machine.
7IPIGX'EWL4E]QIRX8LMWTEVEQIXIVMWWIXXSƈ(VMZI-RƉ4PIEWIGSRXEGX/SSPQSVIXIGLWYTTSVXFI-
JSVIQEOMRKER]QSHMƼGEXMSRW
7IX7IVMEP4SVXW8LMWTEVEQIXIVMWWIXXSƈHIZXX]7ƉF]HIJEYPX4PIEWIGSRXEGX/SSPQSVIXIGLWYT-
TSVXFIJSVIQEOMRKER]QSHMƼGEXMSRW
Coin:
Unfold this section to see all parameters, including:
Support Coin (Bill) Denomination: In some cases, when a coin changer is equipped, clicking the empty
area between the parameter and the “>” button will reveal additional parameters allowing the user to
set the allowed denominations.
Open Change: This must be enabled when a coin changer is equipped in the machine.
Paper Money:
Unfold this section to see all parameters, including:
Support Bill Denomination: This functions similarly to “Support Coin Denomination” as mentioned
above.
Support Denomination of Refund: This also functions similarly to “Support Coin Denomination.” The
parameter becomes available when the bill acceptor can provide change.
One-Click Empty Banknote Change Box: Works in conjunction with “Support Denomination of Refund.”

31
Single Maximum Cumulative Coin Amount Switch:
This setting controls the maximum cash amount that a user can insert in a single purchase. When
enabled, an additional parameter, “Maximum Credit $,” will appear, allowing you to set the value (de-
fault is $20). This feature helps prevent customers from using large denomination bills (e.g., $100) to
purchase low-value items (e.g., $1) and receiving a large amount of change.
Manual Change:
When enabled, the user must press the “Change” button on the machine to receive change.
No Vend (Consumption), No Refund:
When enabled, users must use the bills or coins they have inserted to make a purchase. They cannot
receive their money back without making a purchase.
Bill Escrow (Temporary Banknotes):
When enabled, if a customer inserts a bill before selecting a product, the machine will temporarily
store the bill, and the inserted amount will be displayed as “Balance” on the shopping page. If the
customer decides not to make a purchase, they can press the “Change” button to retrieve the inserted
bill(s).
Cash Pre-storage (Coin Deposit):
In cases where the machine is equipped with a bill acceptor or coin changer that can give change, this
JIEXYVIEPPS[WTVIPSEHMRKSJFMPPSVGSMRGLERKIWMRXLIEGGITXSVGLERKIV
Bill Return Capacity (Changeable Balance Capacity):
This setting controls the acceptable quantity for the “Bill Escrow” feature mentioned above. If the
cumulative quantity exceeds the set value, the bill(s) will be deposited directly into the cashbox of the
bill acceptor.
32
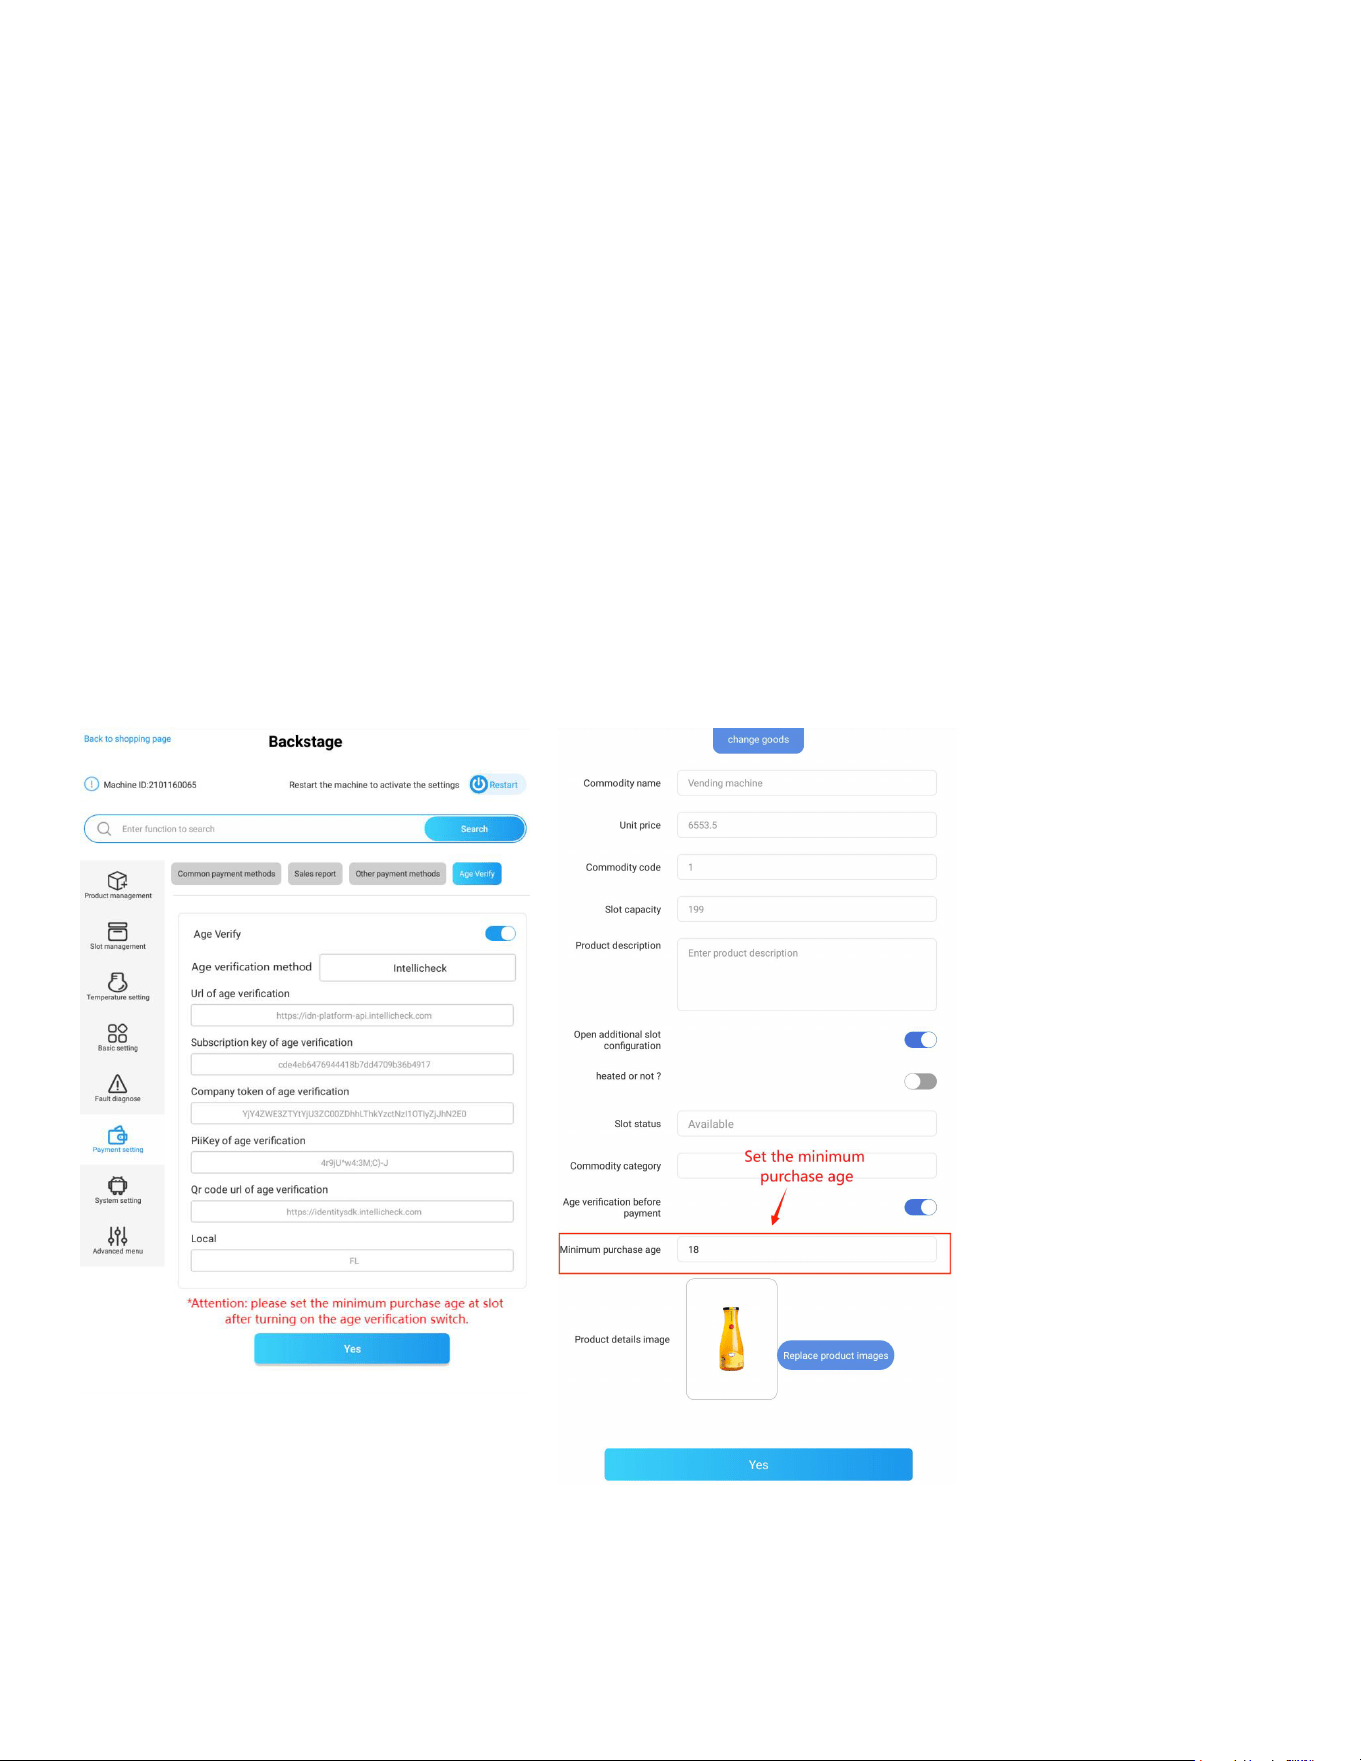
%KI:IVMƼGEXMSR
)REFPMRK%KI:IVMƼGEXMSR
%JXIVXYVRMRKSRXLIEKIZIVMƼGEXMSRW[MXGL]SYGERWIPIGXXLIGSVVIWTSRHMRKEKIZIVMƼGEXMSRQIXLSH
MRGPYHMRK('1GEVHVIEHIVZIVMƼGEXMSRSV-RXIPPMGLIGOEKIMHIRXMƼGEXMSR
9WMRK('1%KI6IGSKRMXMSR:IVMƼGEXMSR
8SYWI('1ZIVMƼGEXMSRƼVWXGSRRIGXXLIETTVSTVMEXIGEVHVIEHIV8LIRWIXXLITYVGLEWIEKIPMQMX
JSVIEGLWPSXFIJSVITE]QIRX%JXIVGSRƼKYVEXMSRVIWXEVXXLIQEGLMRIJSVXLIGLERKIWXSXEOIIJJIGX
9WMRK-RXIPPMGLIGO%KI:IVMƼGEXMSR
8SYWI-RXIPPMGLIGOXYVRSRXLIEKIZIVMƼGEXMSRW[MXGLIRXIVXLIVIUYMVIHGSRƼKYVEXMSRTEVEQIXIVW
click OK, and restart the machine to activate the changes. When returning to the shopping interface,
EJXIVWIPIGXMRKXLIKSSHWEREKIZIVMƼGEXMSRTSTYT[MRHS[[MPPETTIEV9WI]SYVQSFMPITLSRIXS
WGERXLI56GSHIJSPPS[IHF]WGERRMRK]SYVJEGI[MXL]SYVTLSRIXSGSQTPIXIXLIEKIZIVMƼGEXMSR
process.
33
Data Backup and Software Management
In the "Android System" section, you can manage various general functions of the Android system.
This includes backing up system data to other devices, uploading data and materials to the system,
managing installed apps, and updating the software version.
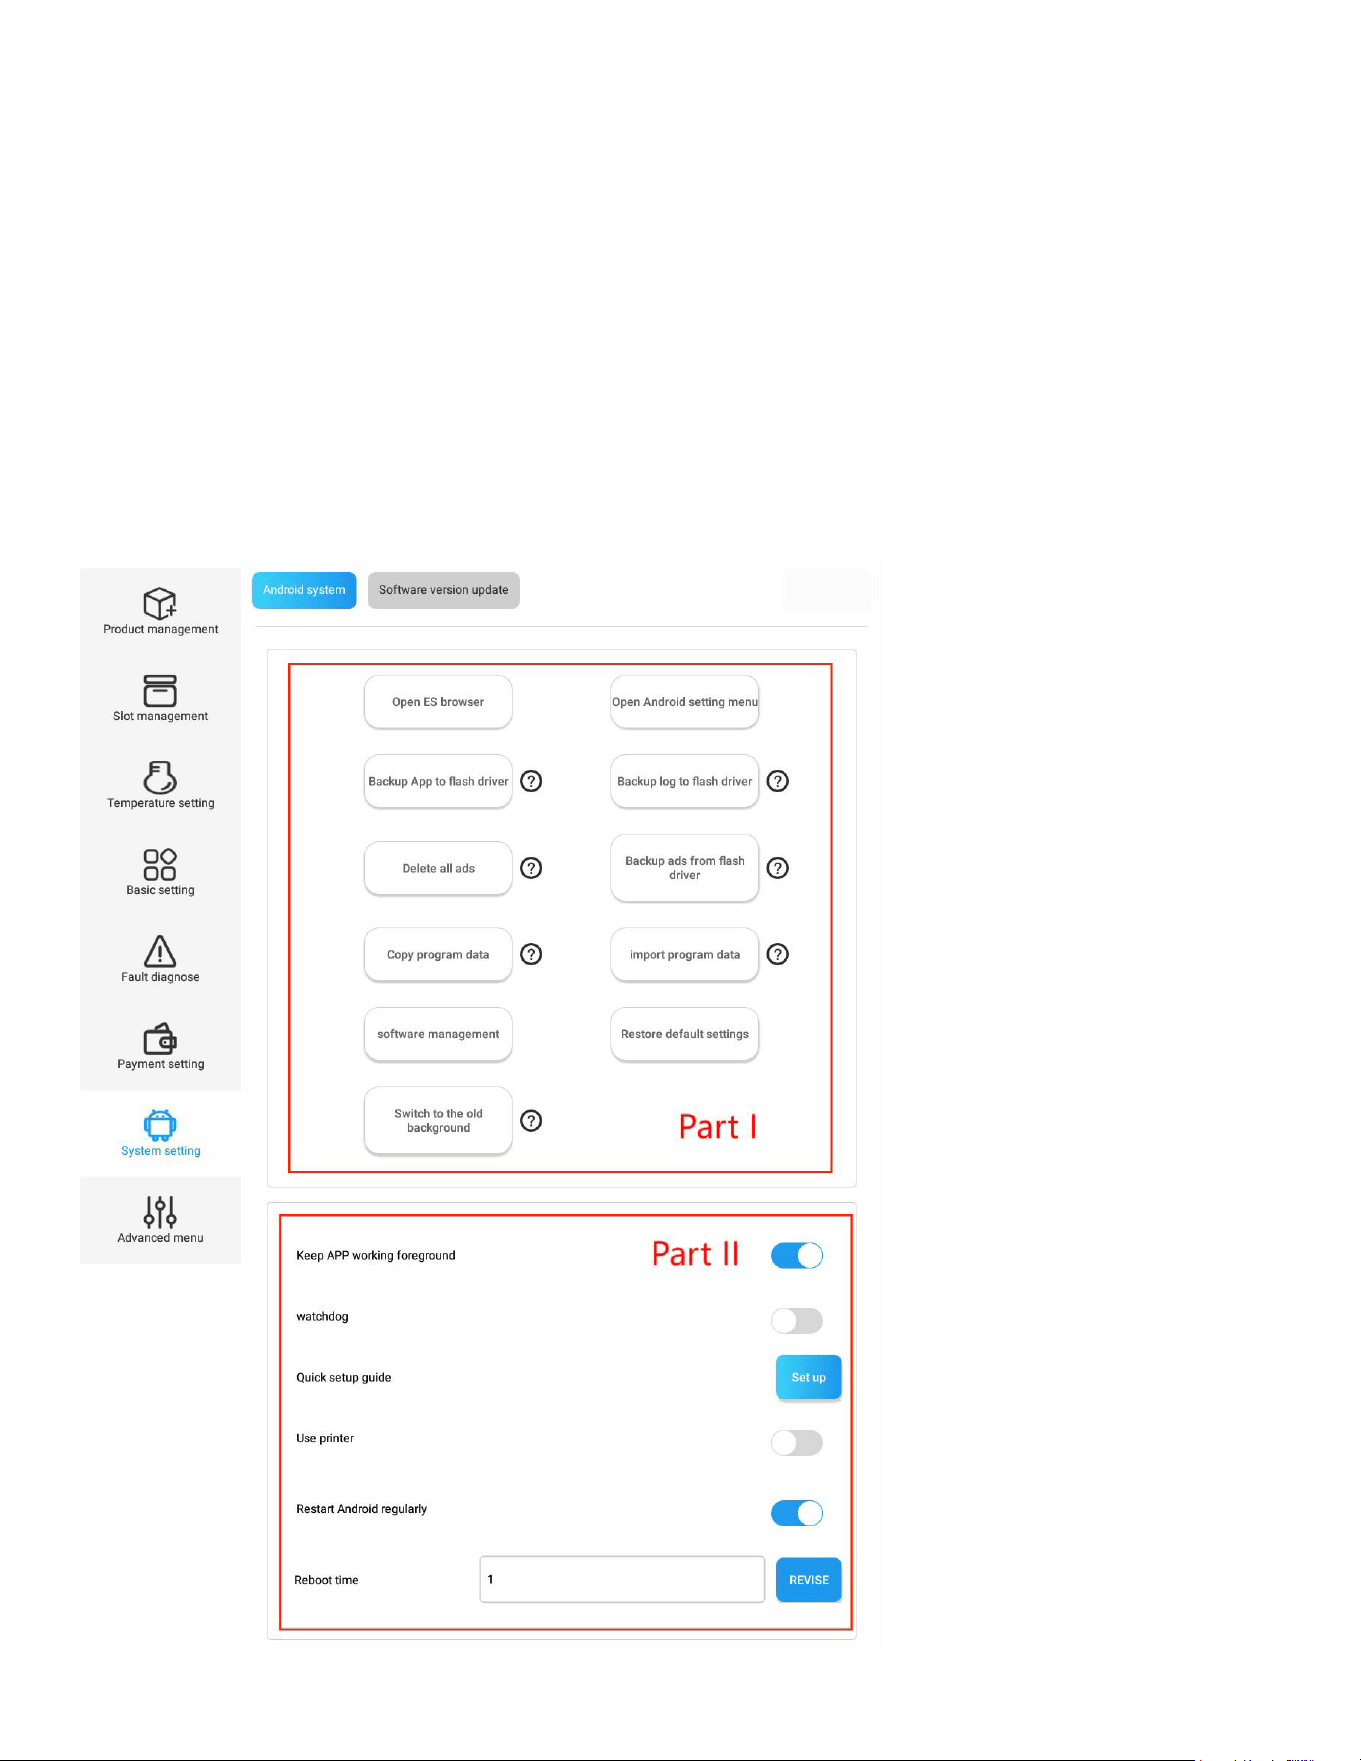
Android System
This section provides shortcuts to commonly used Android functions, allowing you to:
Upload, backup, or delete data from storage.
Manage internet connection settings.
Adjust visual and audio settings.
Perform other general system management tasks.
34
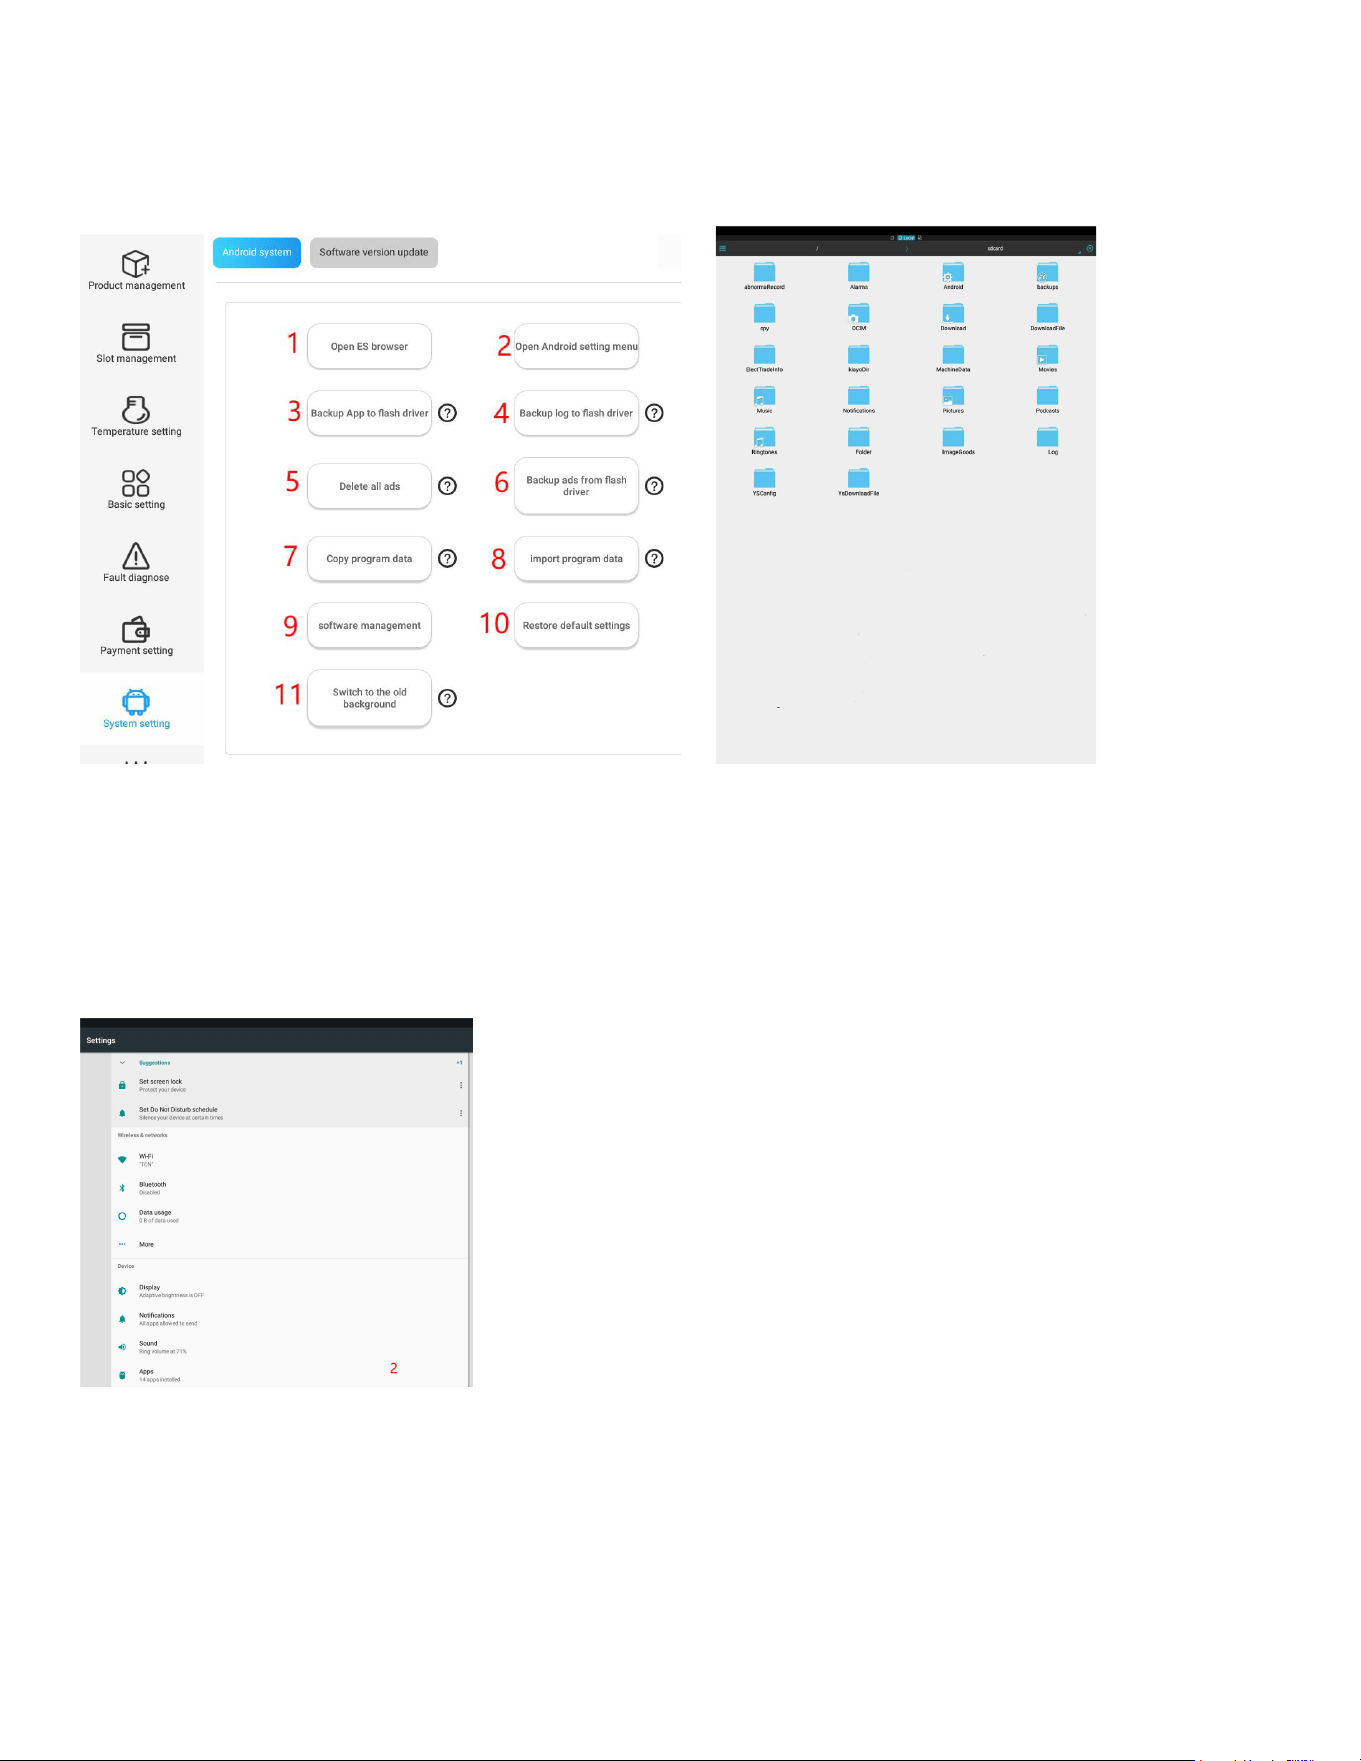
Part 1
1. 3TIR)7FVS[WIV2EZMKEXIXSXLI%RHVSMHƼPIQEREKIVJSVW]WXIQƼPIERHƽEWLHVMZI
management.
2. Open Android setting menu: Access settings for internet, display, language, audio, and other
TLSRIPMOIGSRƼKYVEXMSRW
3. &EGOYT%44XSƽEWLHVMZIV-RWIVXEƽEWLHVMZI4VIWWXLMWFYXXSRERHMX[MPPKIRIVEXIERI[
/1*SPHIVETOJSPHIVMRXLIƽEWLHVMZI%JXIVFEGOMRKYTXLI%44GERFIMRWXEPPIHMRERI[
QEGLMRIZMEXLIƽEWLHVMZI
4. &EGOYTPSKXSƽEWLHVMZIV-RWIVXEƽEWLHVMZI'PMGOƈ&EGOYTPSKWƉERHXLIPSKW[MPPFIFEGOIHYT
XSERI[JSPHIVREQIHƈ/10SKƉMRXLIƽEWLHVMZI
Delete all ads: press this button to delete all ads in the following folders and the machine will
display the default advertising video. Please exercise caution.
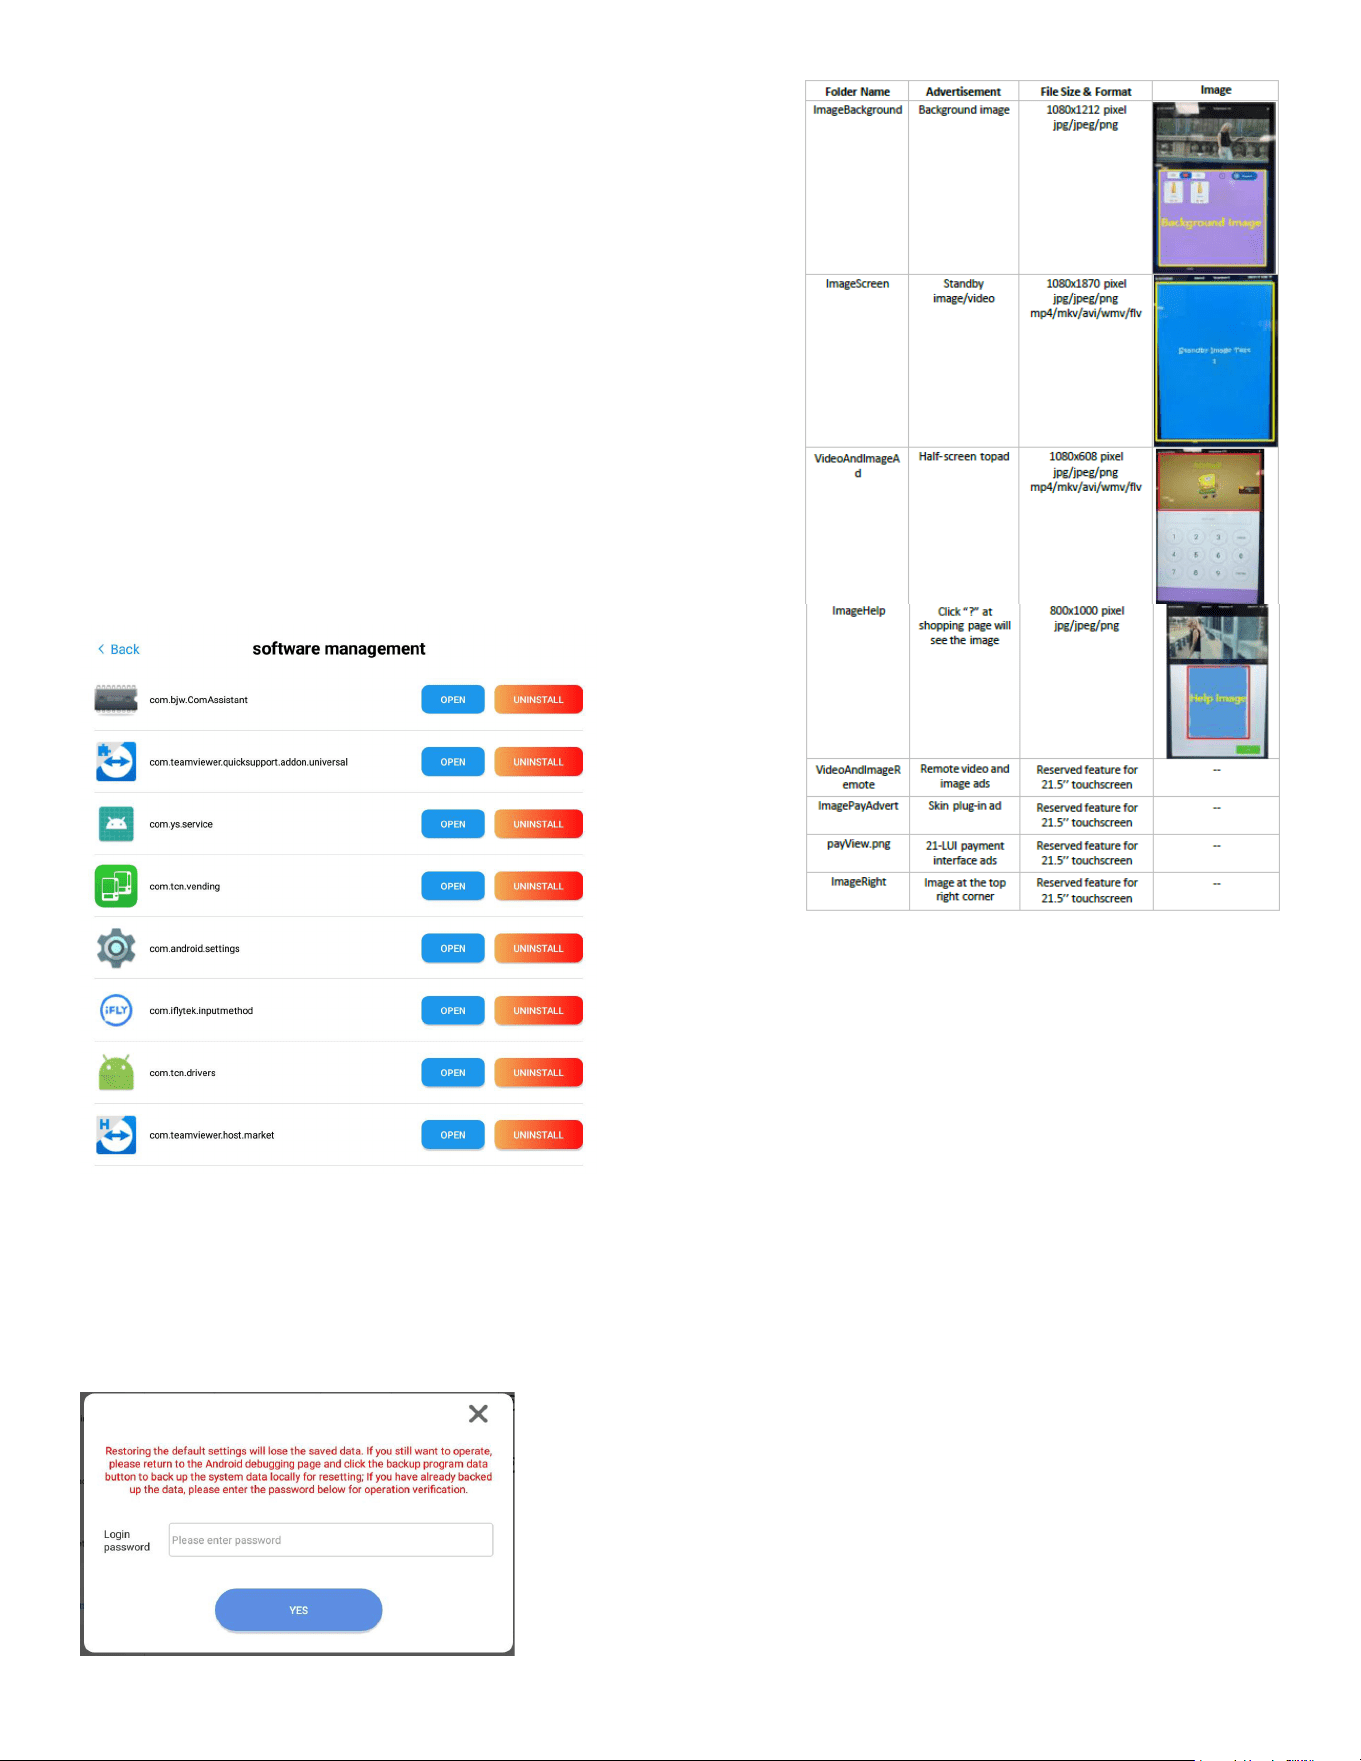
6. &EGOYTEHWJVSQƽEWLHVMZIV*MVWX]SYRIIHXSGVIEXIMR]SYVƽEWLHVMZIE/1*SPHIVJSPHIV
containing the sub-folders same as above table. Second, put advertisement materials into
GSVVIWTSRHMRKWYFJSPHIVW8LMVHMRWIVXXLIƽEWLHVMZIXSQEGLMRI*MREPP]TVIWWXLMWFYXXSR8LI
ads will be copied to corresponding folders in the machine system. Restart the system, you will
WIIEHWHMWTPE]MRTSWMXMSREWGSRƼKYVIH
7. 'ST]4VSKVEQ(EXE%JXIVTVIWWXLMWFYXXSRXLIW]WXIQ[MPPFEGOXLIHEXEXSXLI=7'SRƼKJSPHIV
KMKM
KM
35
8. Import Program Data: First create a folder named
ƈ=7'SRƼKƉMR]SYVƽEWLHVMZI8LIRTPYKMXXSXLIQEGLMRI
Press this button, the program data will be backed up to
XLIƽEWLHVMZI
Software management: to view, open, and uninstall the
installed Apps.
10. Restore default settings: Enter the advanced menu
with the admin password, the machine will clear all
parameters and will recover factory settings. Please
exercise caution.
Switch to the old background: Click this button, you will be
directed to the shopping interface,when re-entering the back-
end system you will enter the old-version page. Conversely,
by selecting “Switch to new version” button, exiting, and re-
enter, you will transition to the new version.
Part II
Keep APP Working in Foreground:
Enabling this function ensures that the vending APP remains in the foreground of the Android
system. This prevents the vending APP from being closed by Android’s self-checking or acceleration
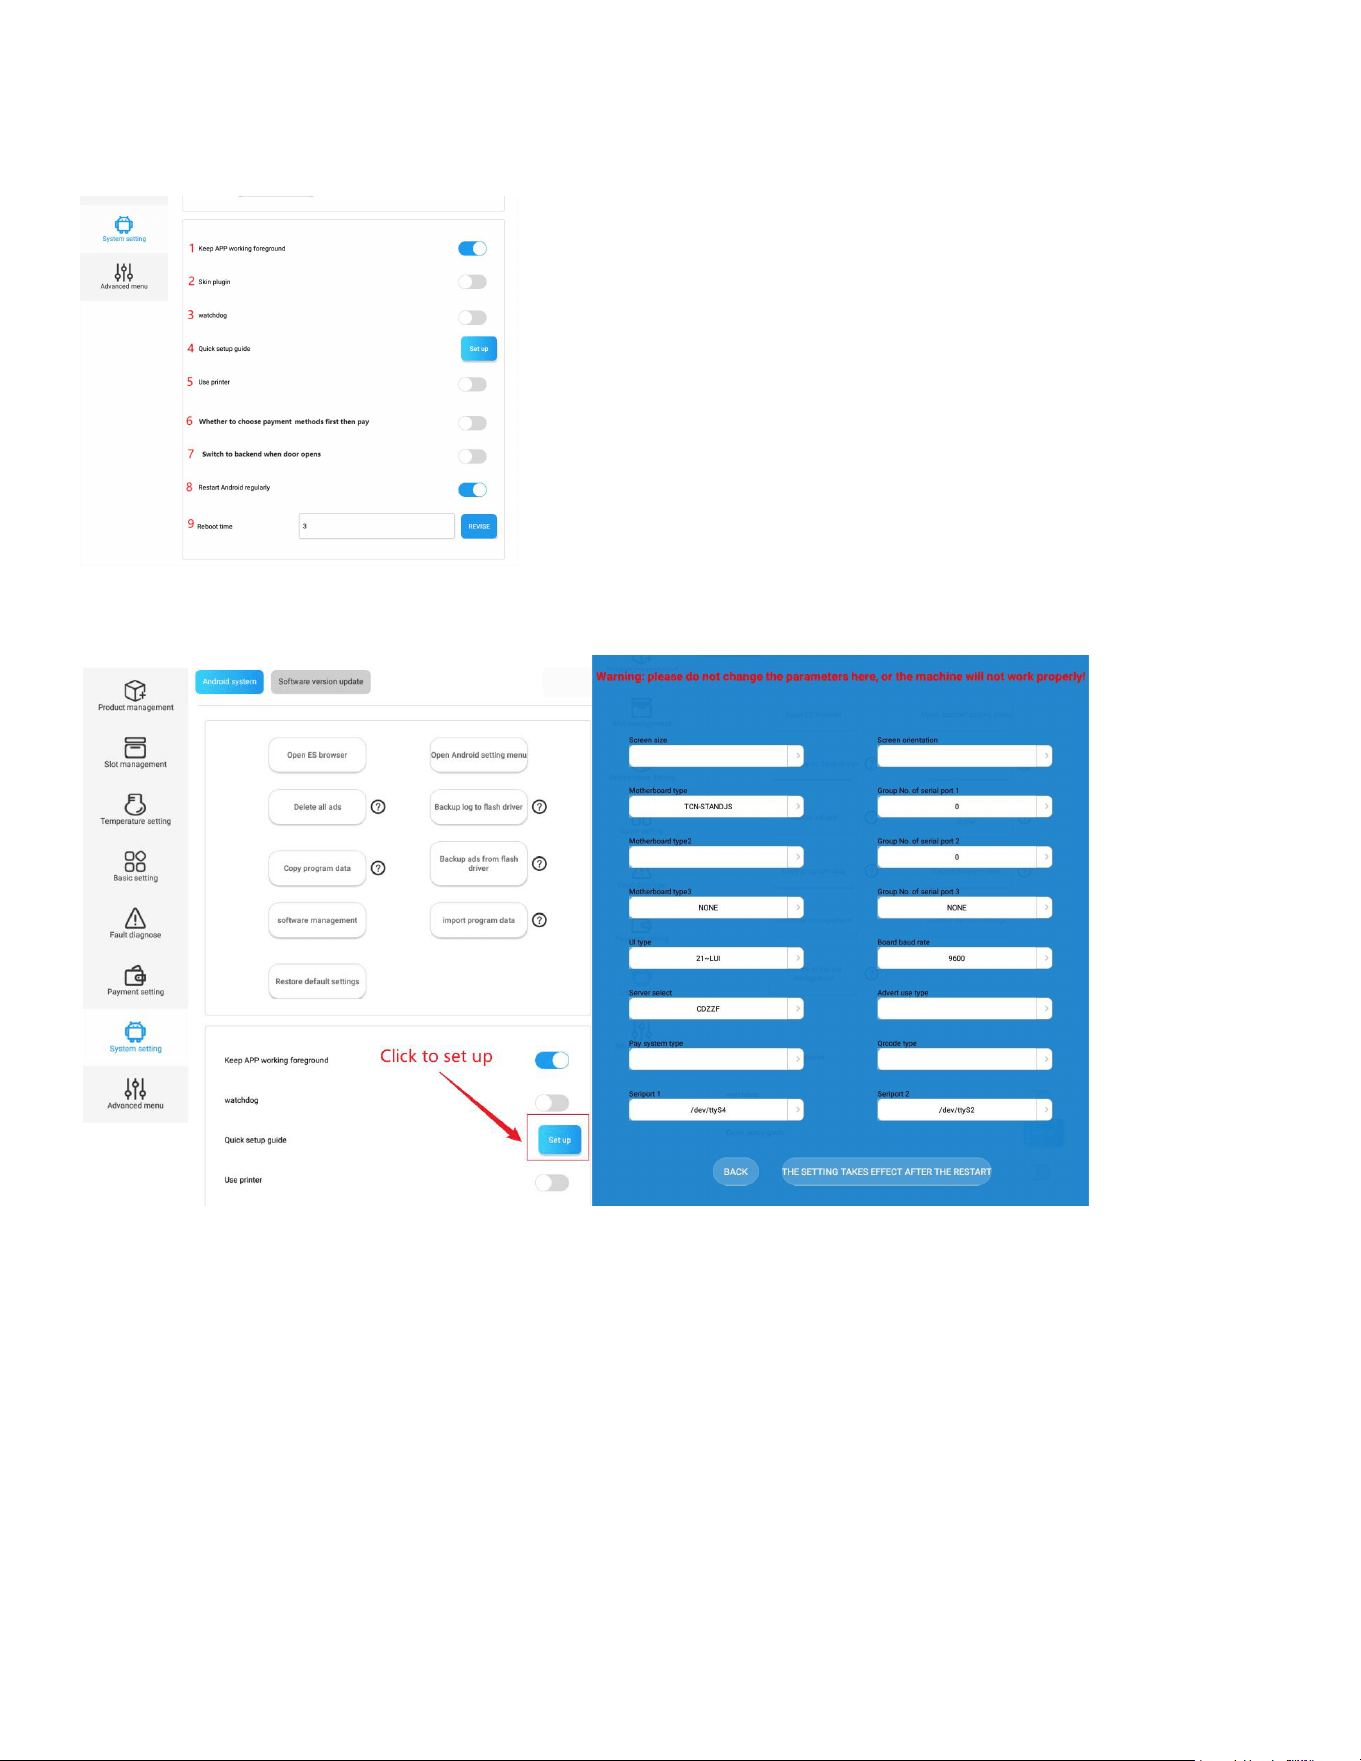
36
mechanisms.
Note: If this function is enabled, the system may automatically switch back to the vending app while
you are working on other apps. You can temporarily disable this feature if needed.
Quick setup guide: Enabling this function grants access to a quick setup page containing multiple
commonly used setup menus for debugging engineer.
Use Printer:
This is a reserved feature for vending machines equipped with a printer.
Choose Payment Methods First, Then Pay:
After activation, consumers must select a payment method before proceeding with the payment. If
not activated, payment can be made directly without selecting a method. (Note: This function is only
applicable to UI 6.)
Switch to Backend When Door Opens:
After activation, whenever the door is opened, the screen will automatically switch to the Android
backend login interface.
Restart Android Regularly:
6IKYPEVP]VIWXEVXMRKXLI%RHVSMHW]WXIQGERLIPTIRLERGIW]WXIQTIVJSVQERGIERHƽYMHMX]

37
Reboot Time:
8LMWTEVEQIXIVFIGSQIWEZEMPEFPISRP]EJXIVIREFPMRKƈ6IWXEVX%RHVSMH6IKYPEVP]Ɖ-XHIƼRIWXLIXMQI
of day the system will restart, for example, setting it to “4” will restart the system at 4:00 AM server
time.
Software Version Update
The new software version for the Android system will be published and issued to the Android system
from the backend. The latest software version will be displayed in this section, and you can click
“Update to the Latest Version” to upgrade. Alternatively, you can manually update the program to a
WTIGMƼGZIVWMSRF]MRWIVXMRKEƽEWLHVMZIMRXSXLIQEGLMRI
=SYGEREPWSYTKVEHIXLIQEWXIVQEGLMRIHVMZIFSEVHWPEZIHVMZIFSEVHSVƼZIMRGLWGVIIR
motherboard by using the corresponding buttons.
Note: The availability of update buttons depends on the model of your machine.
38
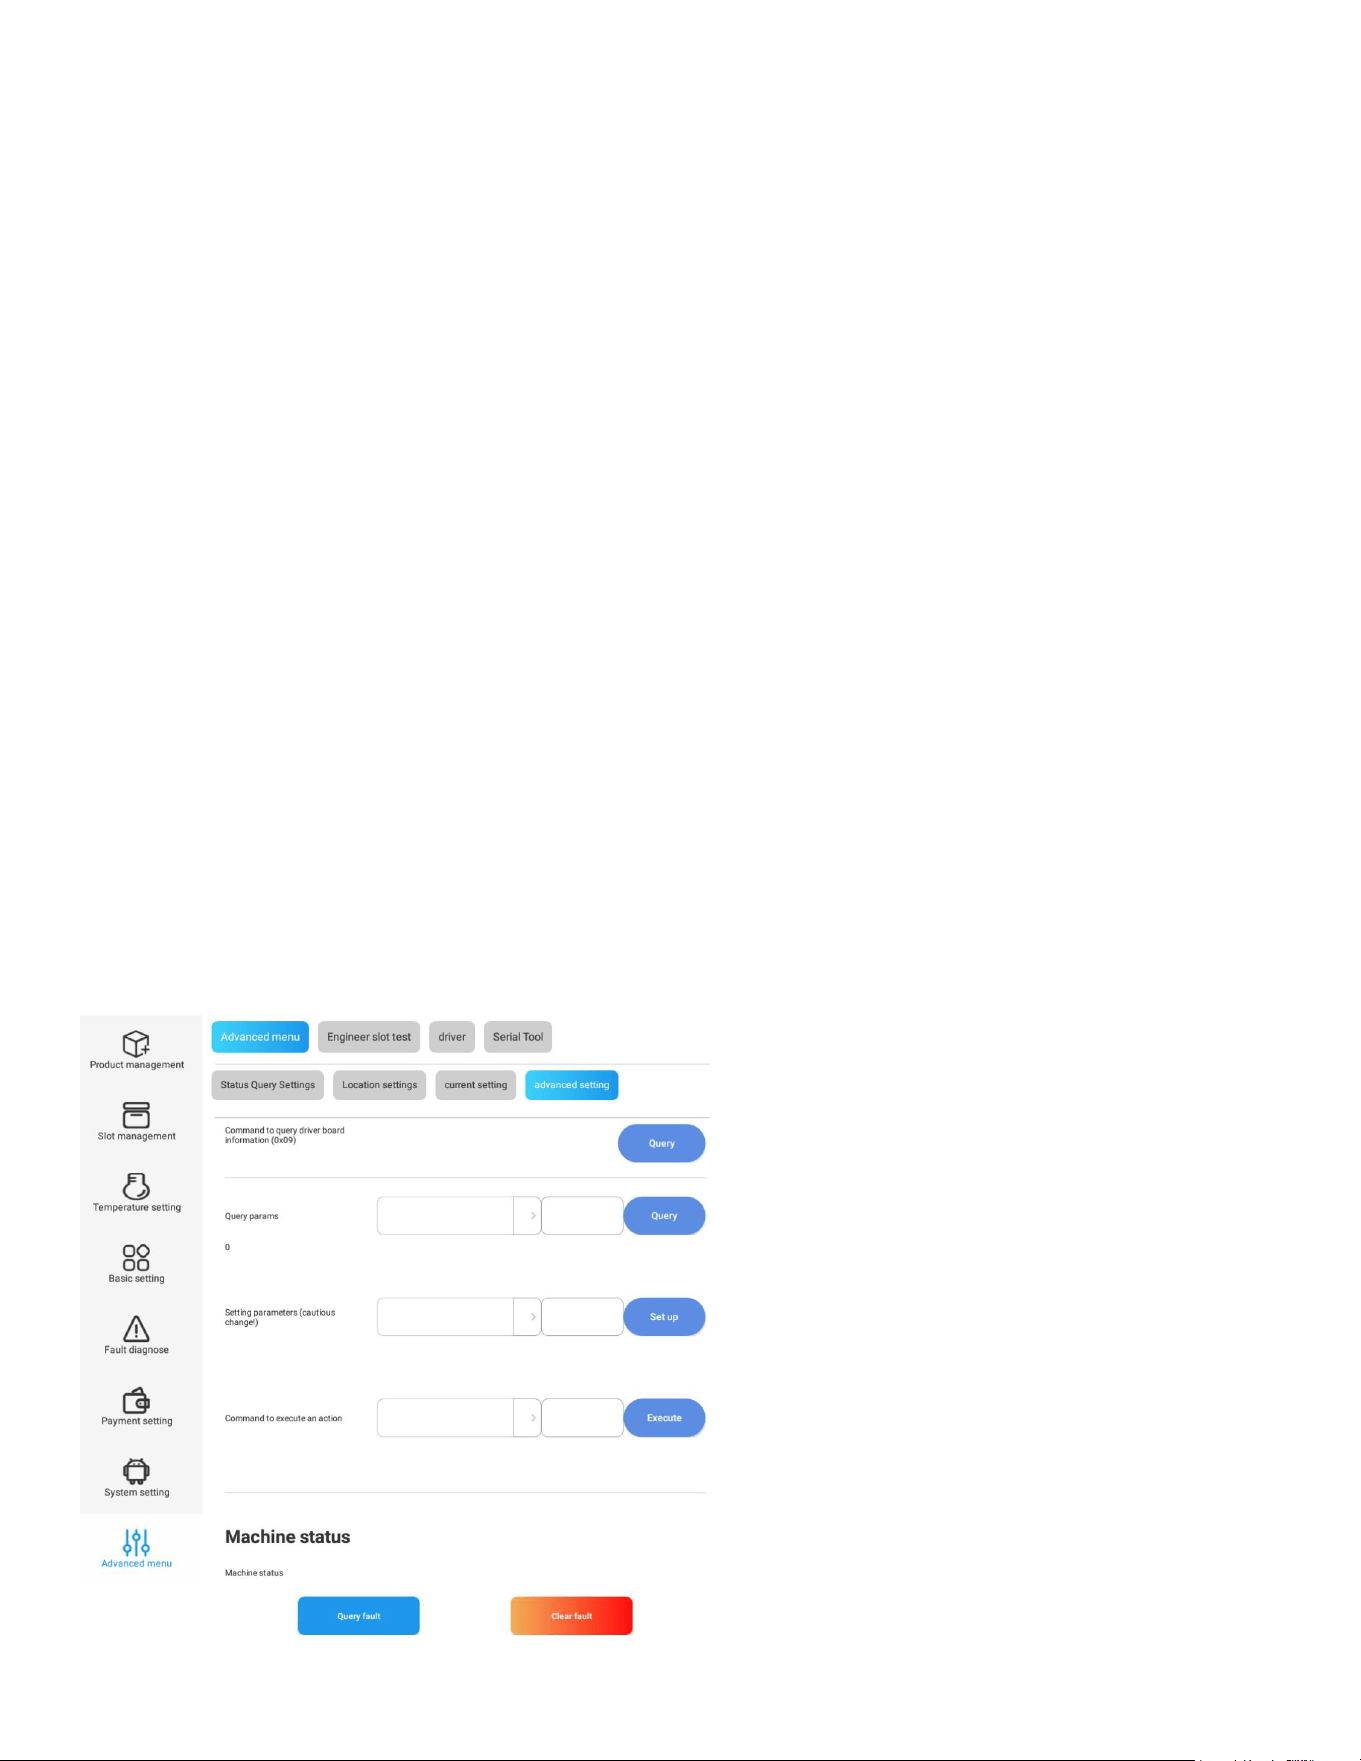
Machine Debugging (Advanced Menu)
This section is intended for professionals and provides quick access to machine debugging
STIVEXMSRWWMQMPEVXSERIRKMRIIVMRKQIRY;LIRERIRKMRIIVTIVJSVQWQEGLMRIJIEXYVIZIVMƼGEXMSR
they can focus their operations in this section, which consolidates commonly used debugging setups.
It is not recommended to use features in this section for regular machine setup.
Machine Debugging (Advanced Menu)
Note: The interface and enabled functions may vary depending on the model. Some models require a
password to enter this section; the default password is 202010.
Status Query Settings:
5YIV]4EVEQIXIVW9WIVWGERWIPIGXEWTIGMƼGTEVEQIXIVJVSQXLIPMWXERHGPMGOƈ5YIV]ƉXSZMI[MXW
current value.
7IX4EVEQIXIVW9WIVWGERWIPIGXEWTIGMƼGTEVEQIXIVJVSQXLIPMWXERHGPMGOƈ7IXYTƉXSGLERKIMXW
value. Since this section is part of the engineering menu, it is not recommended to make changes
without professional guidance.
Machine Status:
7MQMPEVXSXLIJIEXYVIQIRXMSRIHMRWIGXMSRƈ5YIV]*EYPXƉXLMWEPPS[WXLIYWIVXSGLIGOXLIGYVVIRX
status of the machine.
Optical Inspection Status:
This feature checks if there are any items in the pick-up area. If an item is detected, “Available” will
be displayed; otherwise, it will display “Sold out.” Additionally, it can check the elevator status, where
“Sold out” indicates that there are no errors with the elevator.
39
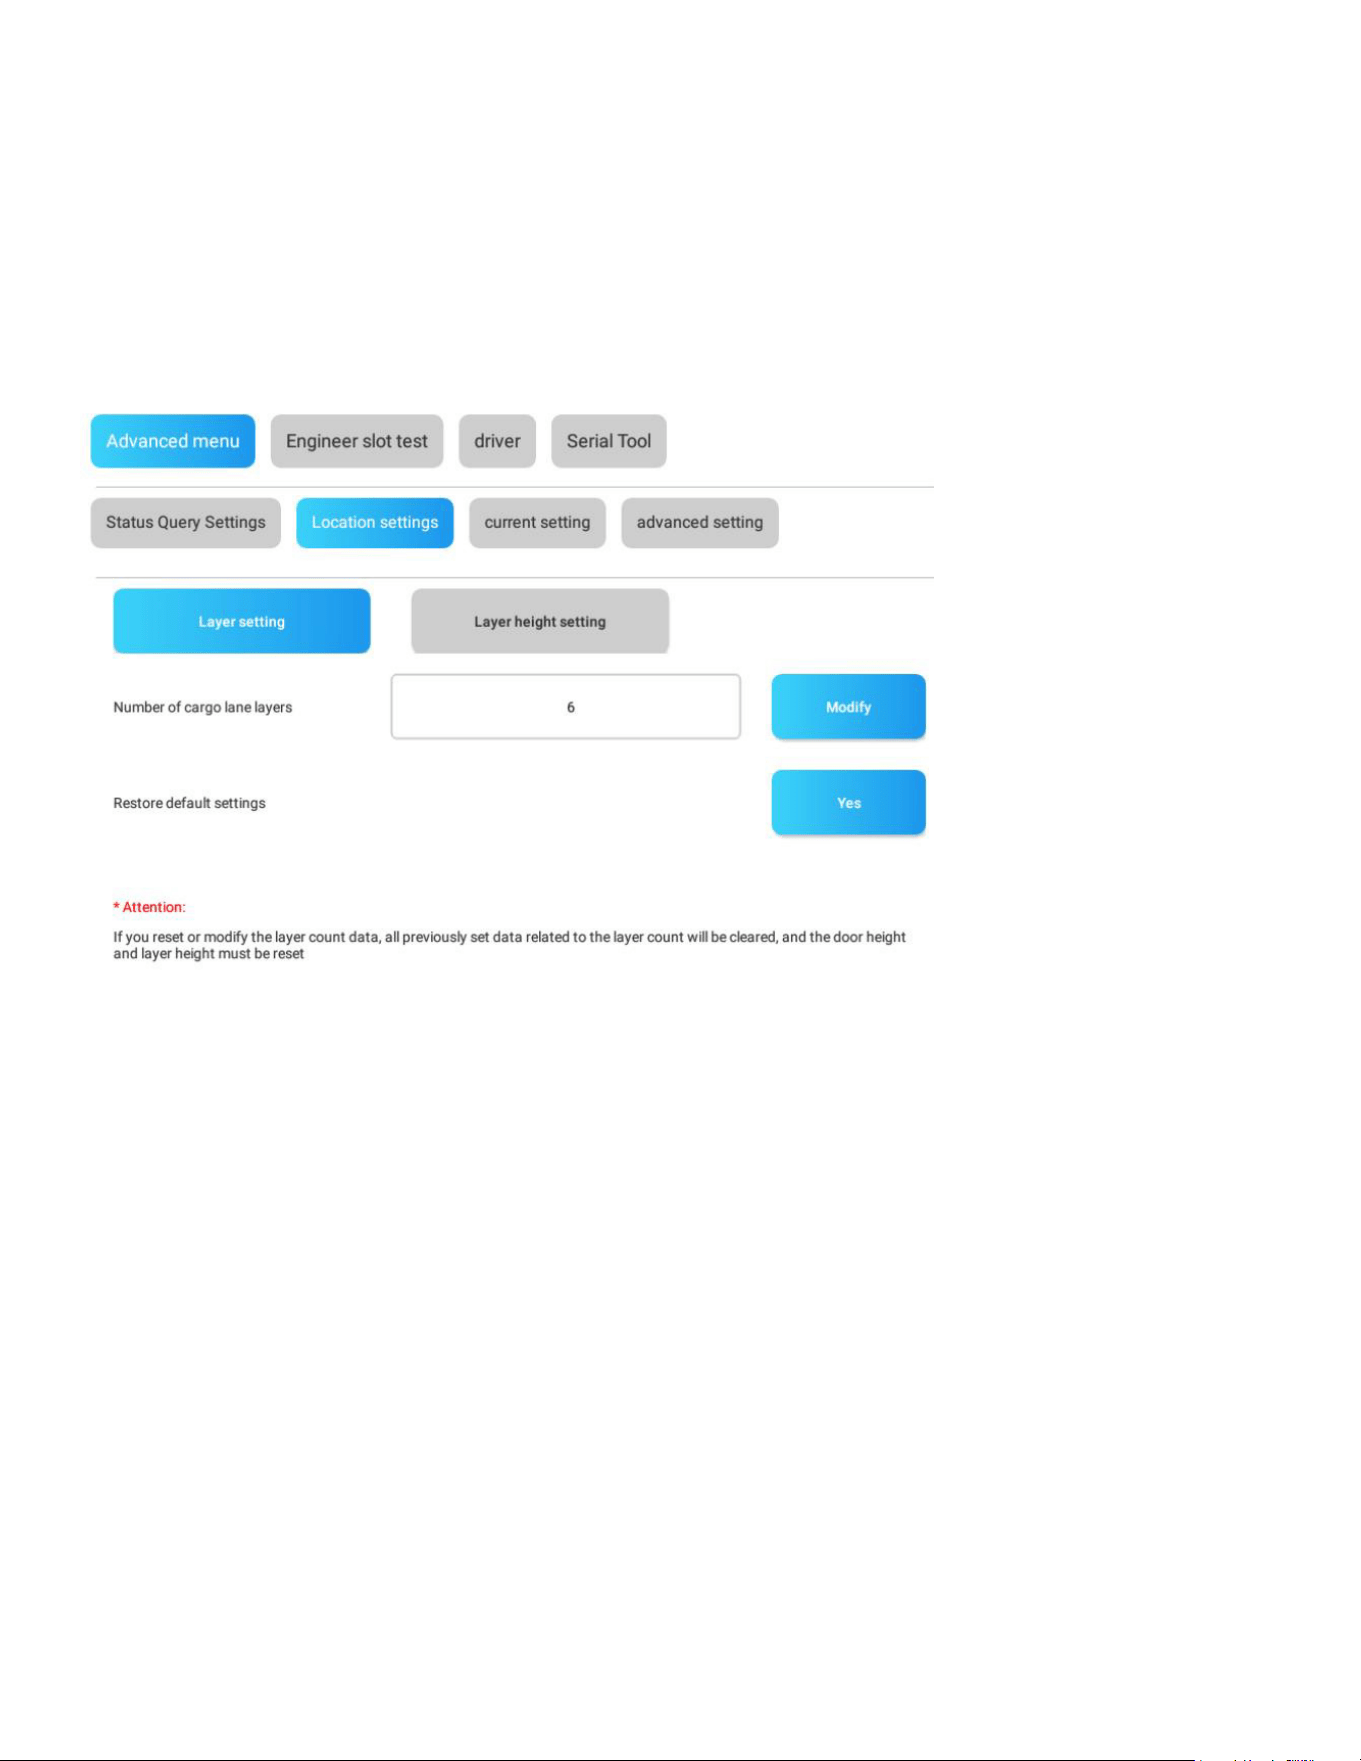
Elevator & Slot Height Adjustment (Location Settings)
This section allows you to test the movement of the elevator, adjust its height for each layer, and
verify if the layer height aligns with the elevator’s movement.
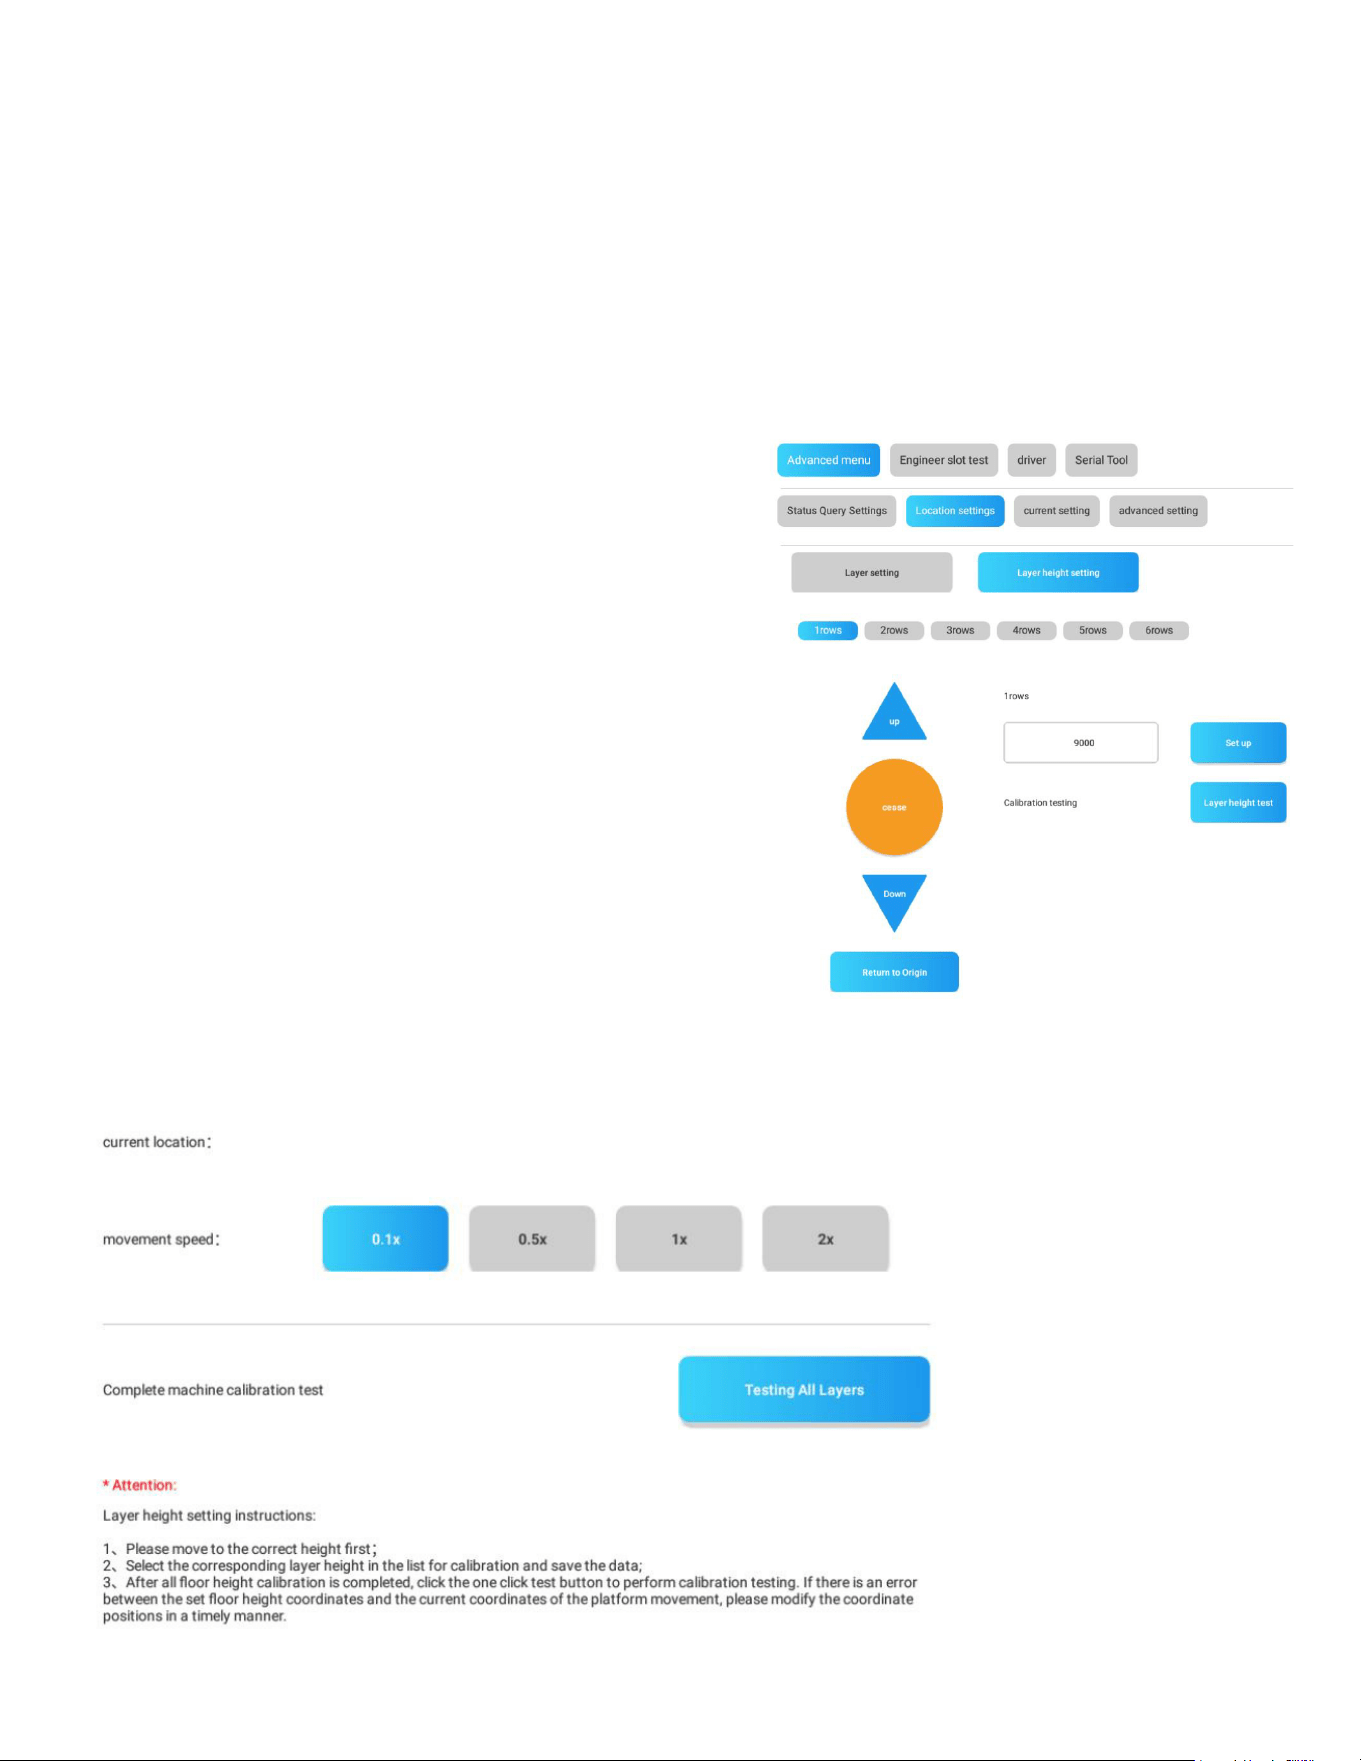
Layer Setting:
7IXXLIRYQFIVSJPE]IVWMRWXEPPIHERHGSRƼKYVIHMRXLIQEGLMRI8LMWMWX]TMGEPP]YWIH[LIREHHMRK
or removing layers from the machine.
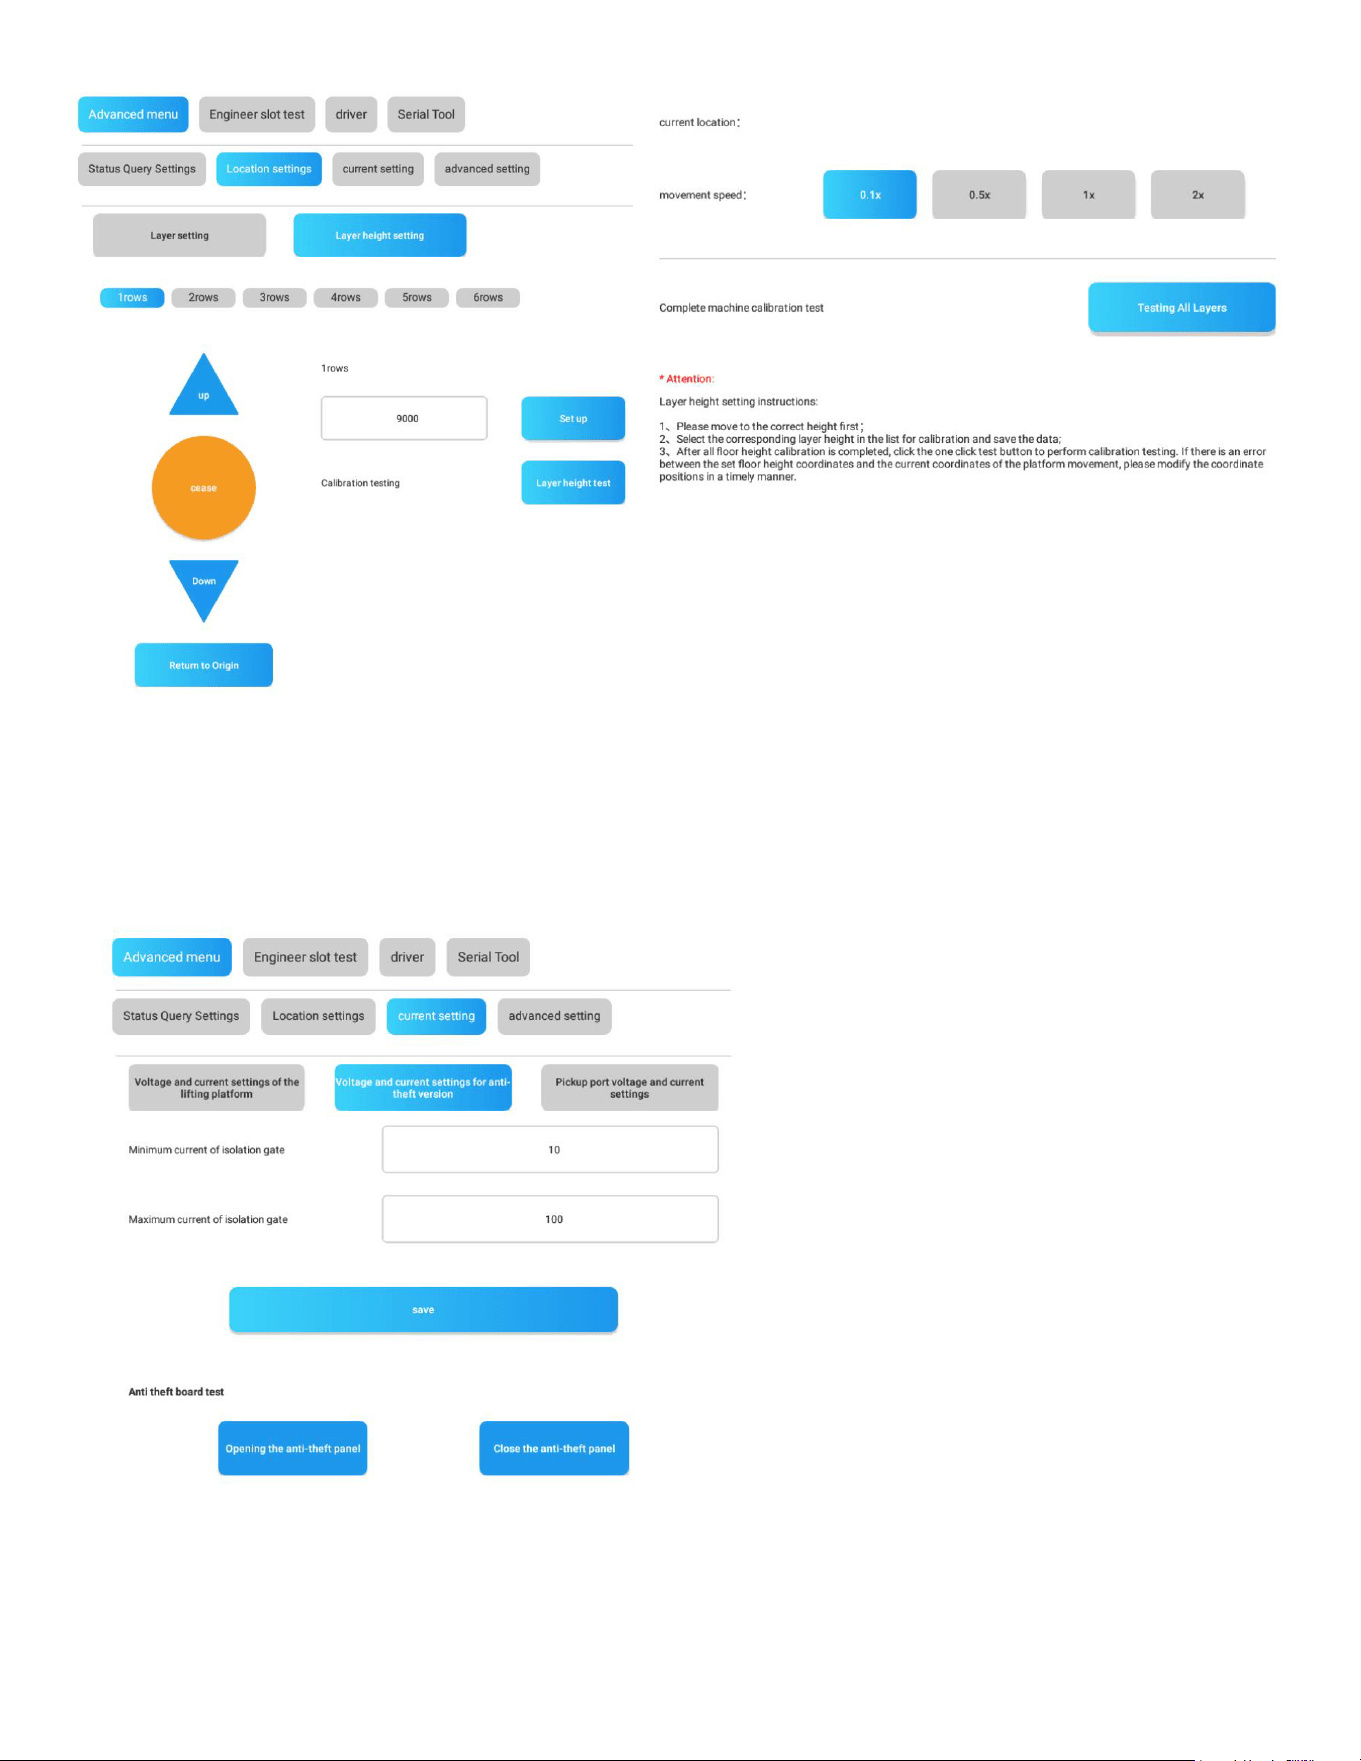
Layer Height Setting & Elevator Testing:
Elevator Testing:
Press “Up” Button: The elevator will move upward.
Press “Down” Button: The elevator will move downward.
Press “Cease” Button: The elevator will stop moving.
Press “Return to Origin” Button: The elevator will return to its initial position.
Speed Adjustment: Adjust the elevator movement speed by pressing the speed selection buttons.
Layer Height Adjustment and Testing:
Select the Layer: Choose the layer to be tested.
Input the Height (mm): Enter the desired height in millimeters.
Press “Setup” Button: Set the height for the selected layer.
4VIWWƈ0E]IV,IMKLX8IWXƉ&YXXSR8LIIPIZEXSV[MPPQSZIXSXLIGSRƼKYVIHLIMKLX
Complete Machine Calibration Test:
Press “Testing All Layers” Button: This will test the calibration of the elevator across all layers of slots
in the entire machine.
40
Voltage & Current Setting (Current Setting)
In this section, you can set the minimum and maximum voltage and current for the elevator, anti-theft
plate, and pickup door. Since this section is part of the engineering menu, it is not recommended to
make changes without professional guidance.
41
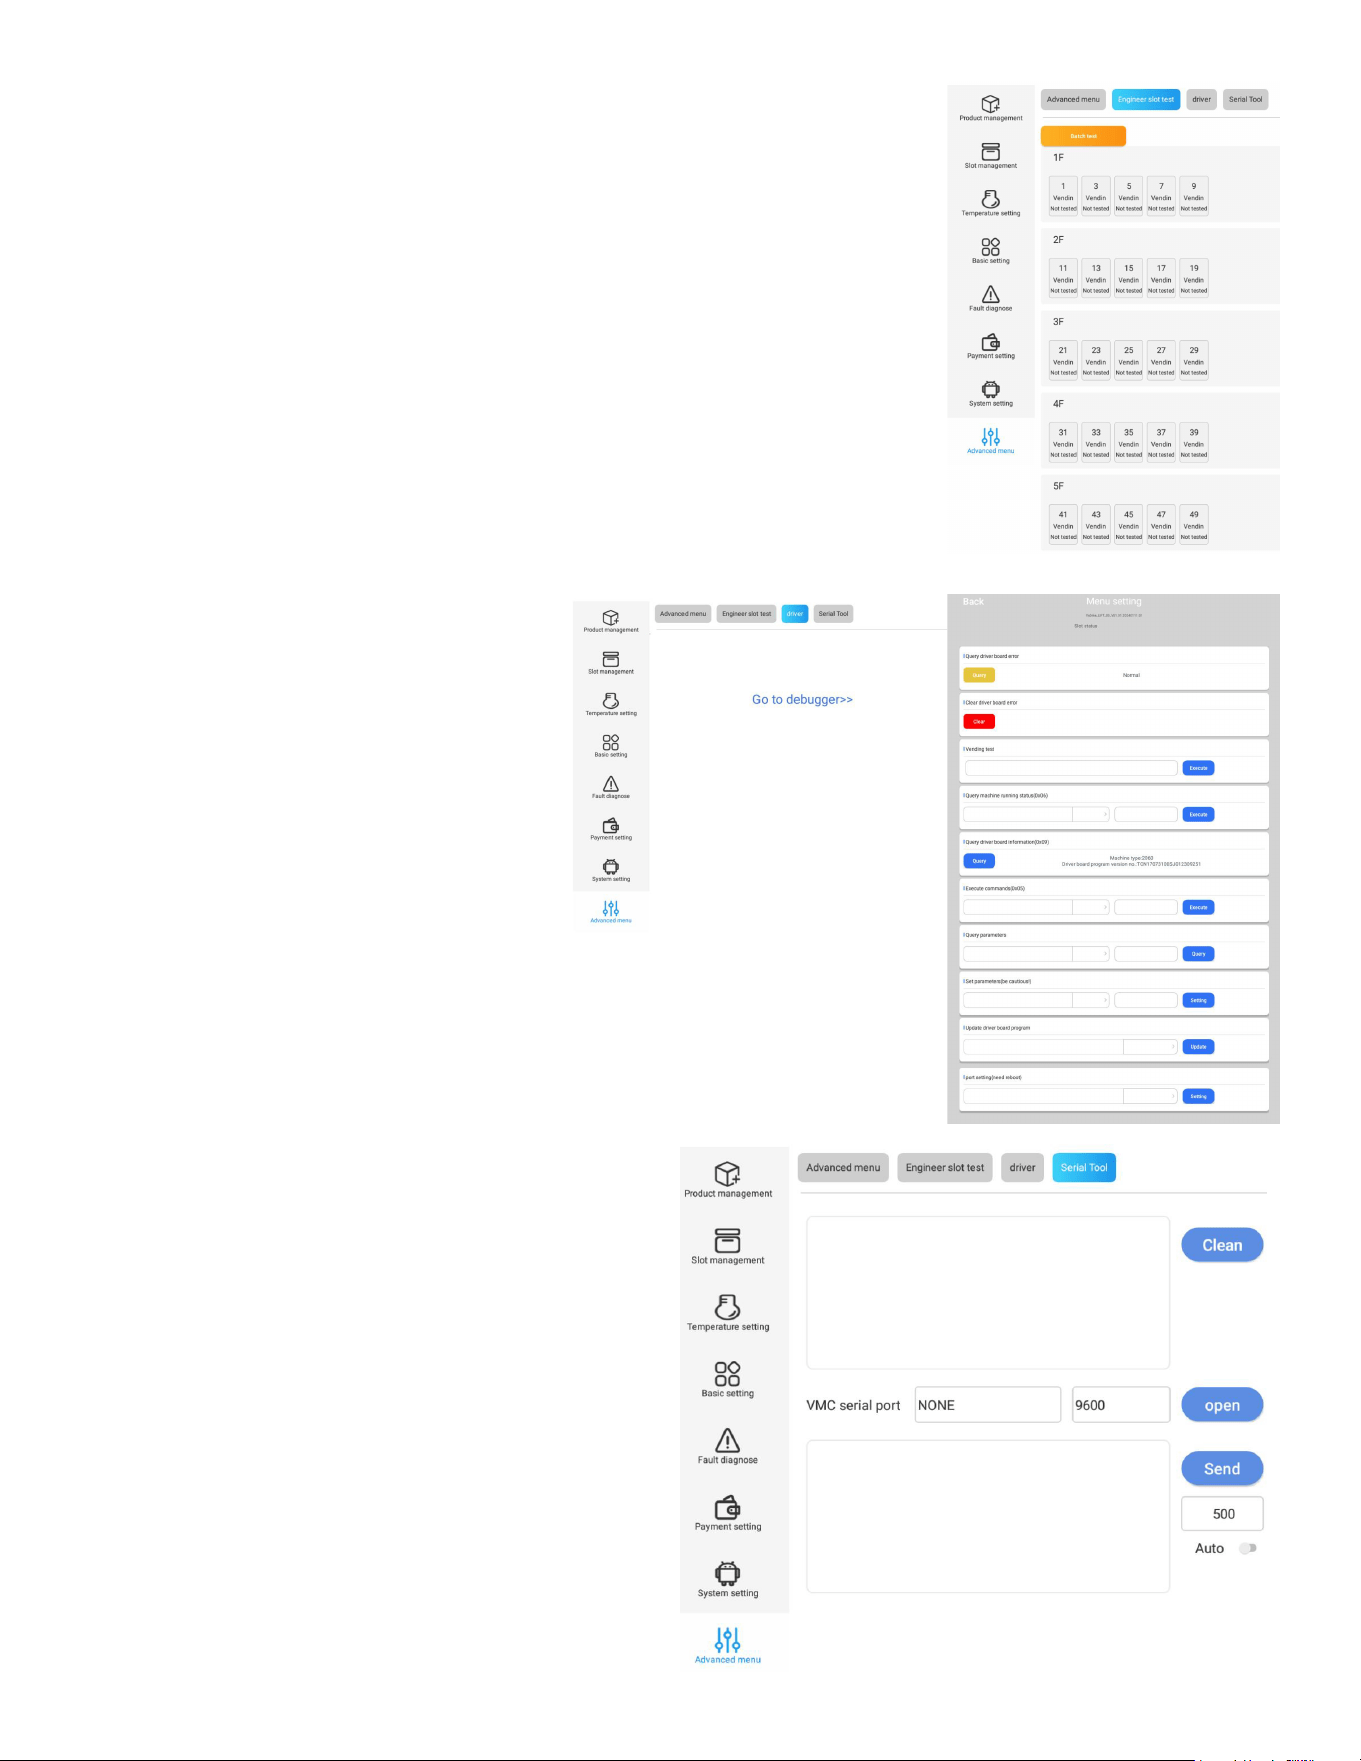
Engineer Slot Test
Quick access for engineer to test slot dispensing, similar feature same as
described in section
1.1 Load Products to Slots of Chapter 2.
Driver
In this section, click “Go to debugger”,
you will open the page for drive board
debugging.
Engineer can query and clear the drive
board error, execute command and test,
etc.
Serial Tool
In this section is reserved for technician
maintenance, belongs to engineering part, not
recommend
to modify without professional guidance.
42
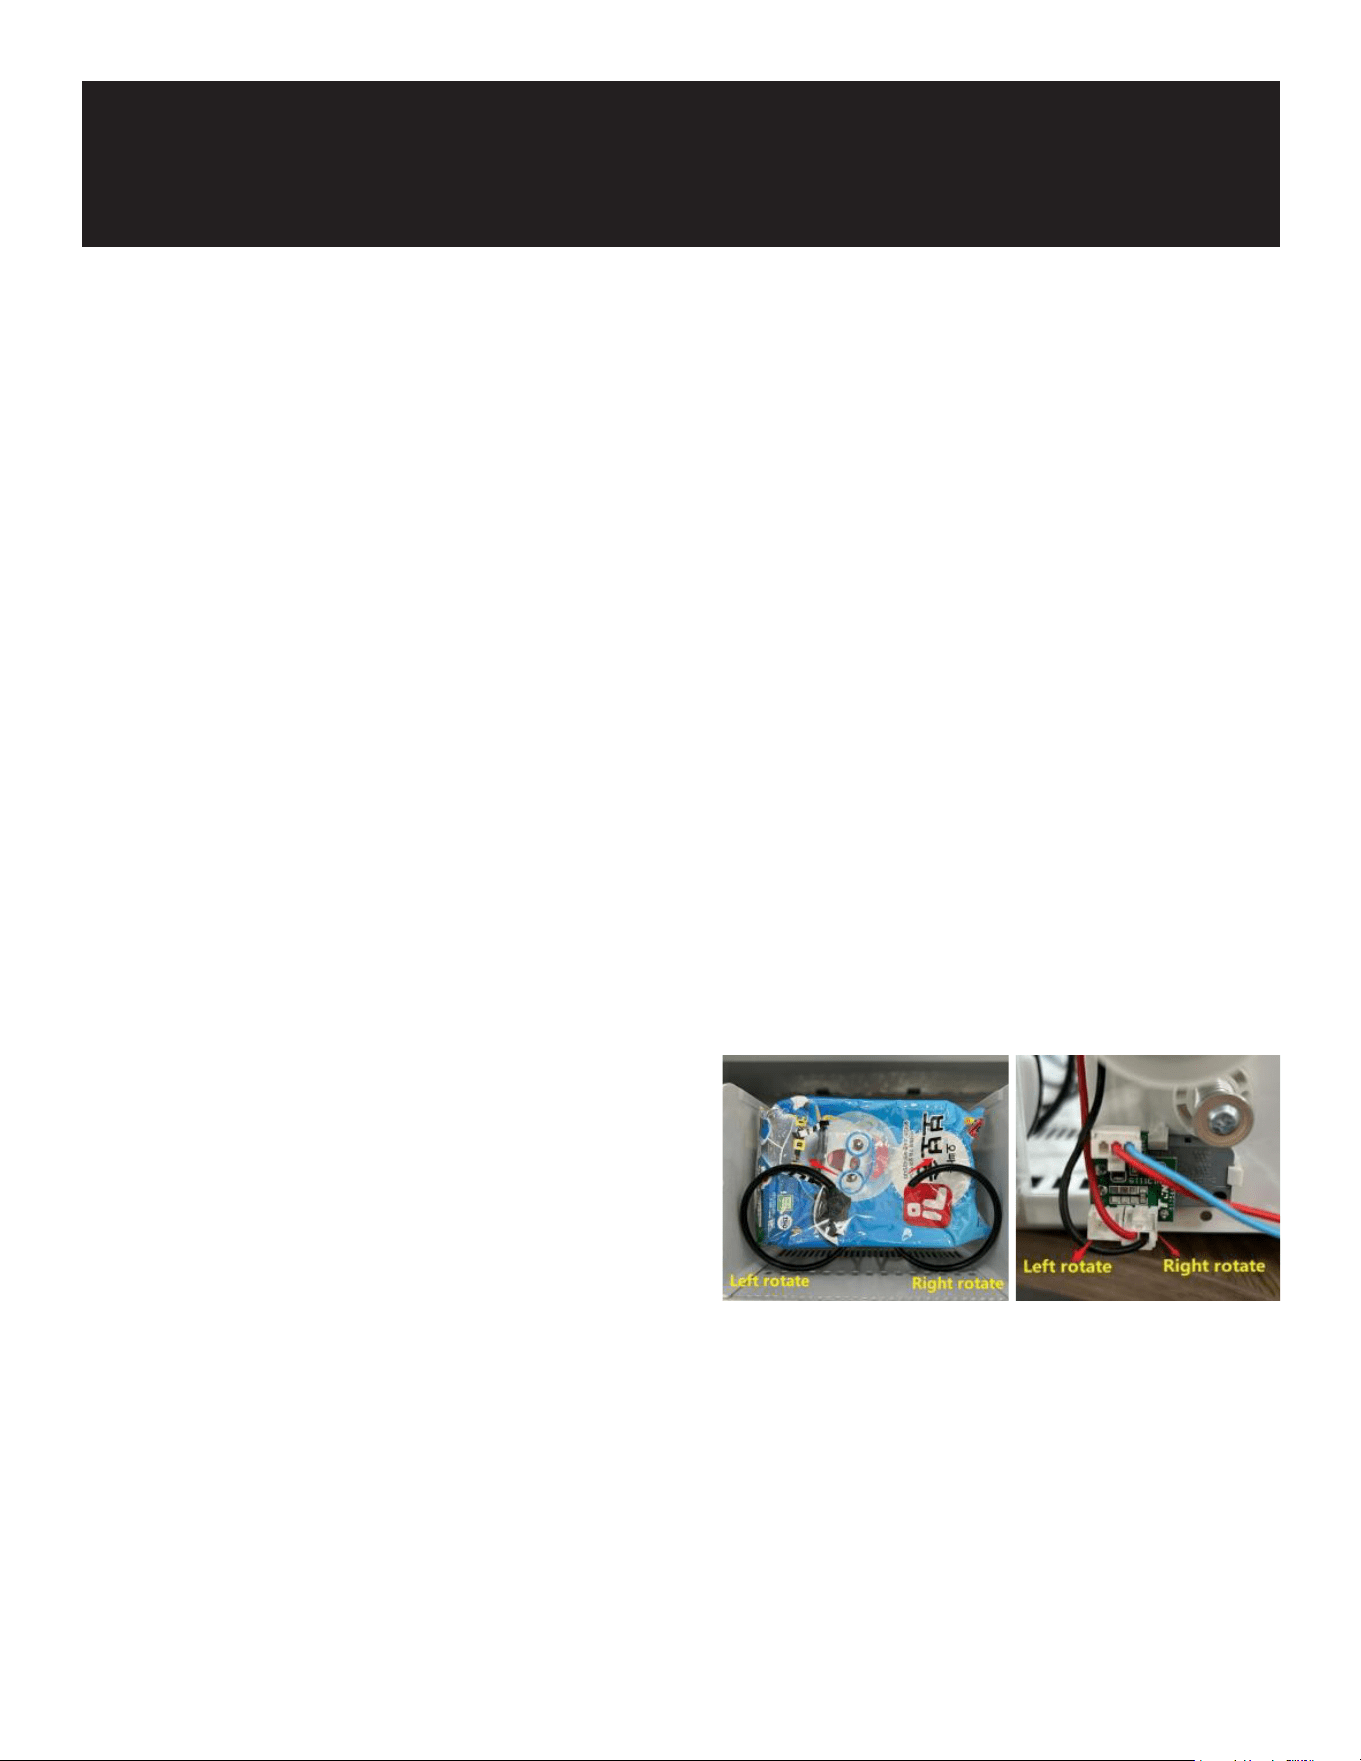
Merge Two Slots
Merge Spiral Slots
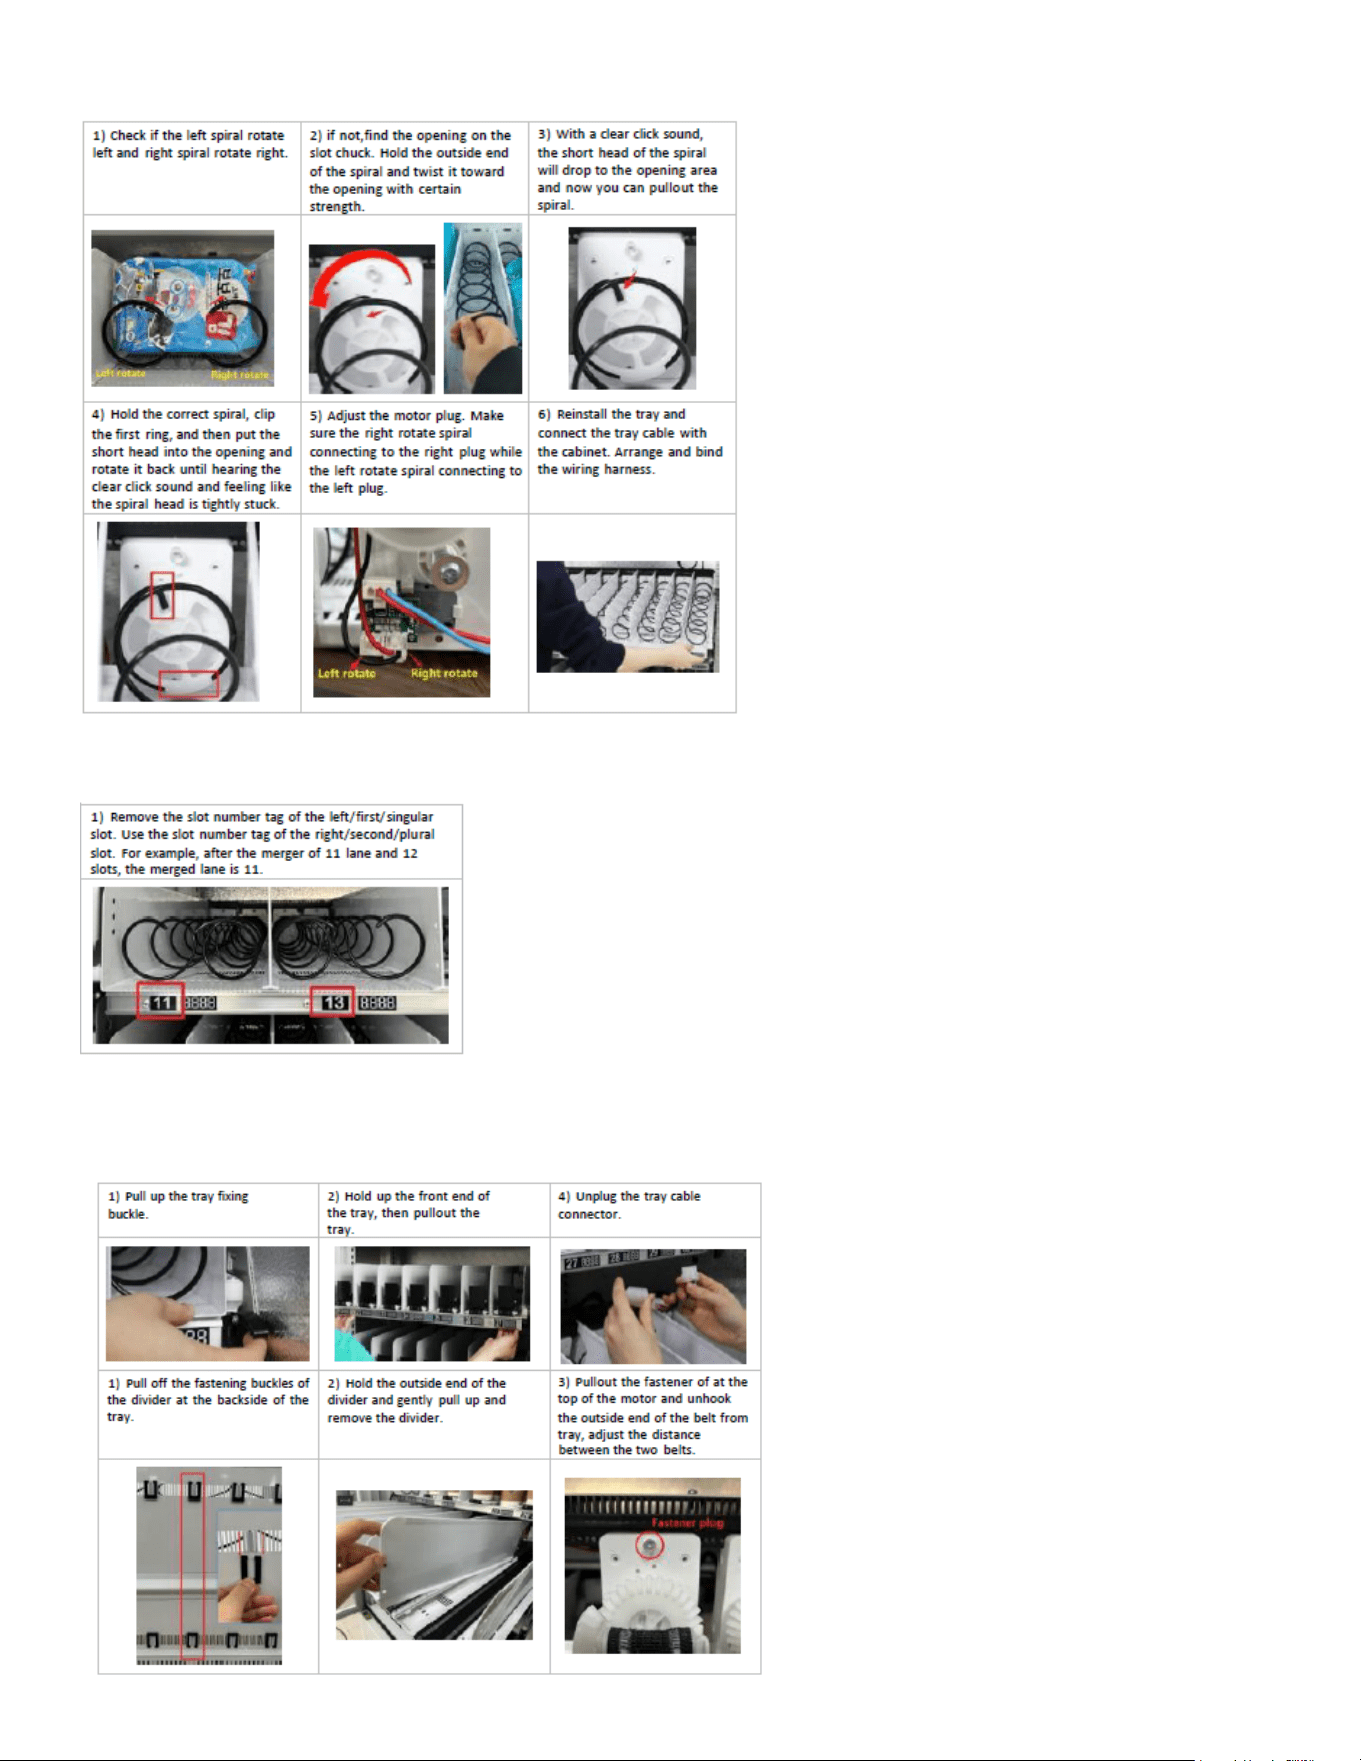
Principles for Merging:
Ensure the left spiral rotates to the left, and the right spiral rotates to the right.
Verify that the motor plug matches the rotation direction of the spiral.
General Steps:
Power Off the Machine: Ensure the machine is turned off before proceeding.
Remove the Tray: Pull out the tray where the slots to be combined are located.
Remove the Divider Board: Take out the divider board between the slots.
Check and Replace the Spiral if Necessary: Ensure the spirals are correctly positioned and replace
them if needed.
Adjust the Motor Plug if Necessary: Make sure the motor plug aligns with the spiral’s rotation
direction.
%HNYWXXLI4VMGI8EK9THEXIXLITVMGIXEKXSVIƽIGXXLIGSQFMRIHWPSX
Reinstall the Tray: Place the tray back into the machine.
4VSKVEQXLI'SQFMREXMSRMRXLI%RHVSMH7]WXIQ'SRƼKYVIXLIQIVKIHWPSXWMRXLIW]WXIQWIXXMRKW
Test the Setup: Run a test to ensure the combined slots function correctly.
3TYJX9MJXNSLZQFWXQTYXMTZQIGJYMJQJKYTWܪWXY
slot, and the plural slot should be the right or second
slot. For example, slots 1 & 2, 3 & 4, or 5 & 6 can be
combined. Only adjacent slots can be combined.Slots
from different trays cannot be merged.
Advanced Setup
43
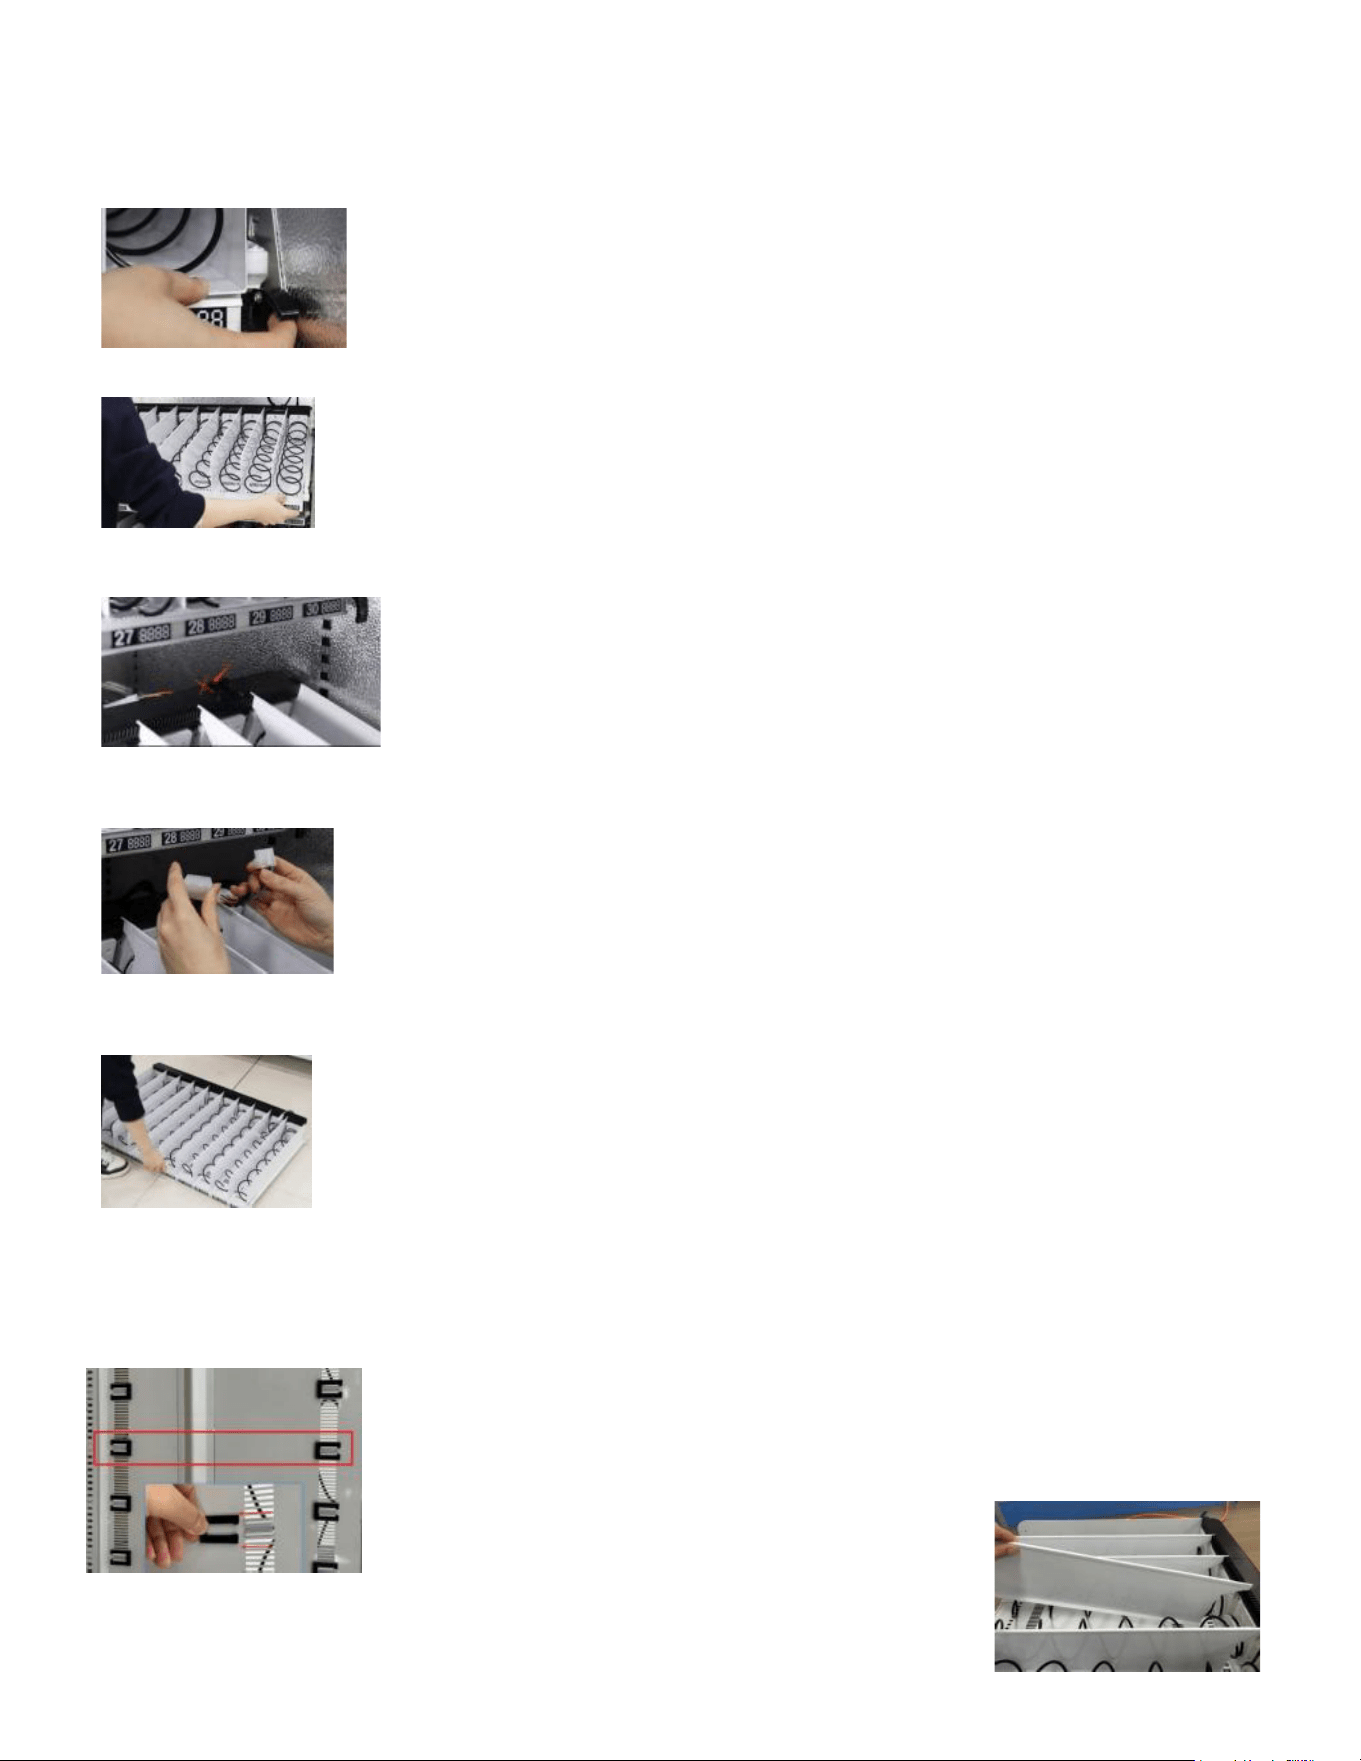
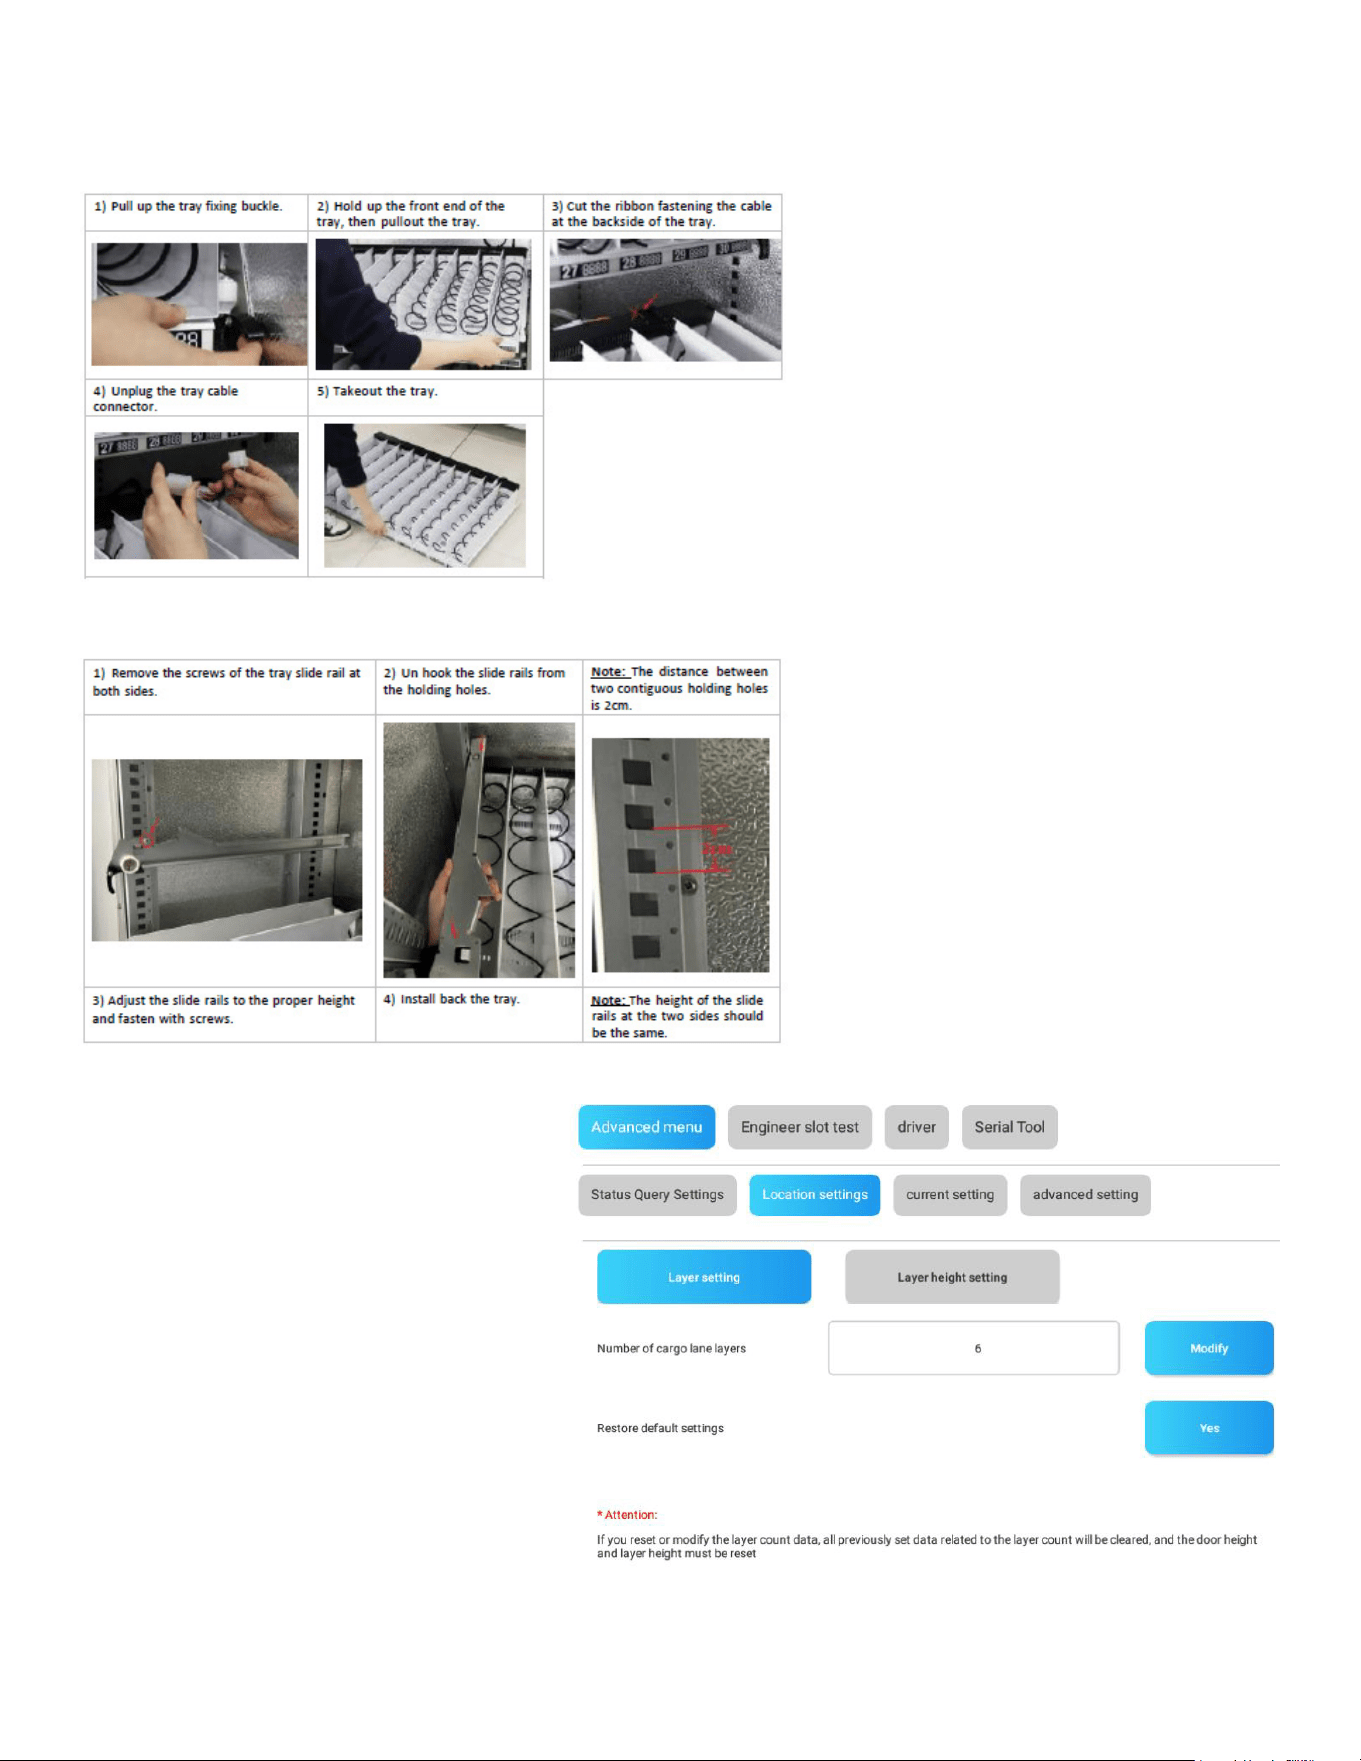
Power Off the Machine
Move out the tray
0MJXYTXLIXVE]Ƽ\MRKFYGOPI
2) Hold up the front end of the tray, then pullout the tray.
3) Cut the ribbon fastening the cable at the backside of the tray.
4) Unplug the tray cable connector.
8EOISYXXLIXVE]
Remove the divider
1) Pull off the fastening buckles of the divider at the backside of the tray.
2) Hold the outside end of the divider and gently pull up and remove the
divider.
44
Replace the spiral and adjust motor plug
Adjust the price tag
Merge Belt Slots
1) Pull out the tray

45
Program the Combination in the Android System
Login:
Use the admin account and password to log in to the Android vending machine management system.
Navigate to Slot Management:
From the left menu, select the “Slot Management” section.
Slot Management Actions:
Merge Slots: Choose neighboring slots that you want to merge, then press the “Merge” button to
combine them. You can also use the “Whole Layer Merging” button to merge all slots on a tray. (Note:
Slots from different trays cannot be merged.)
Split Slots: Select a double-slot or merged slots and press the “Split” button to separate them into
individual slots. The “Full Layer Splitting” button can be used to split all slots on a tray.
Add Slots: Manually add a slot if it is not displayed on the driver board for a newly added tray.
Delete Slots: Remove unnecessary or non-existent slots from the system.
Transform to Spring Slot: Select the slot(s) you want to change, then press the “Set as Spring Freight
Lane” button.
Transform to Belt Slot: Select the slot(s) you want to change, then press the “Set as Belt Freight Lane”
button.
Note: Remember to click “Save” to preserve the settings and restart the machine to activate the
changes.
46
Adjust Tray Height
Move out the tray
Adjust the height of the slide rails
Program the Tray Height and Elevator
Login the Android management system
with admin account. Navigate to
“Machine Debugging” section
by the main menu at the left side. In this
section you can test the movement of the
elevator, adjust the
elevator height to each layer, test if the
layer height is collaborated with the
movement of the elevator,
etc.
Layer setting: set how many layers are
MRWXEPPIHERHGSRƼKYVIHMRXLIQEGLMRI
Usually used when you
add layers to or remove layers from the
machine.
47
Layer Height Setting
Layer Height Adjustment and Testing:
Select the Layer: Choose the layer that you want to test.
Input the Height: Enter the desired height.
4VIWWXLIƈ7IXYTƉ&YXXSR'SRƼKYVIXLILIMKLXJSVXLIWIPIGXIHPE]IV
4VIWWXLIƈ0E]IV,IMKLX8IWXƉ&YXXSR8LIIPIZEXSV[MPPQSZIXSXLIGSRƼKYVIHLIMKLXJSVXIWXMRK
Elevator Testing:
Press “Up” Button: The elevator will move upward.
Press “Down” Button:The elevator will move downward.
Press “Cease” Button: The elevator will stop moving.
Press “Return to Origin” Button: The elevator will return to
its initial position.
Adjust Movement Speed: Modify the elevator’s movement
speed by pressing the speed selection buttons.
Complete Machine Calibration Test:
Press “Testing All Layers” Button:
This will test the calibration of the elevator with all layers
of slots throughout the entire machine.
48
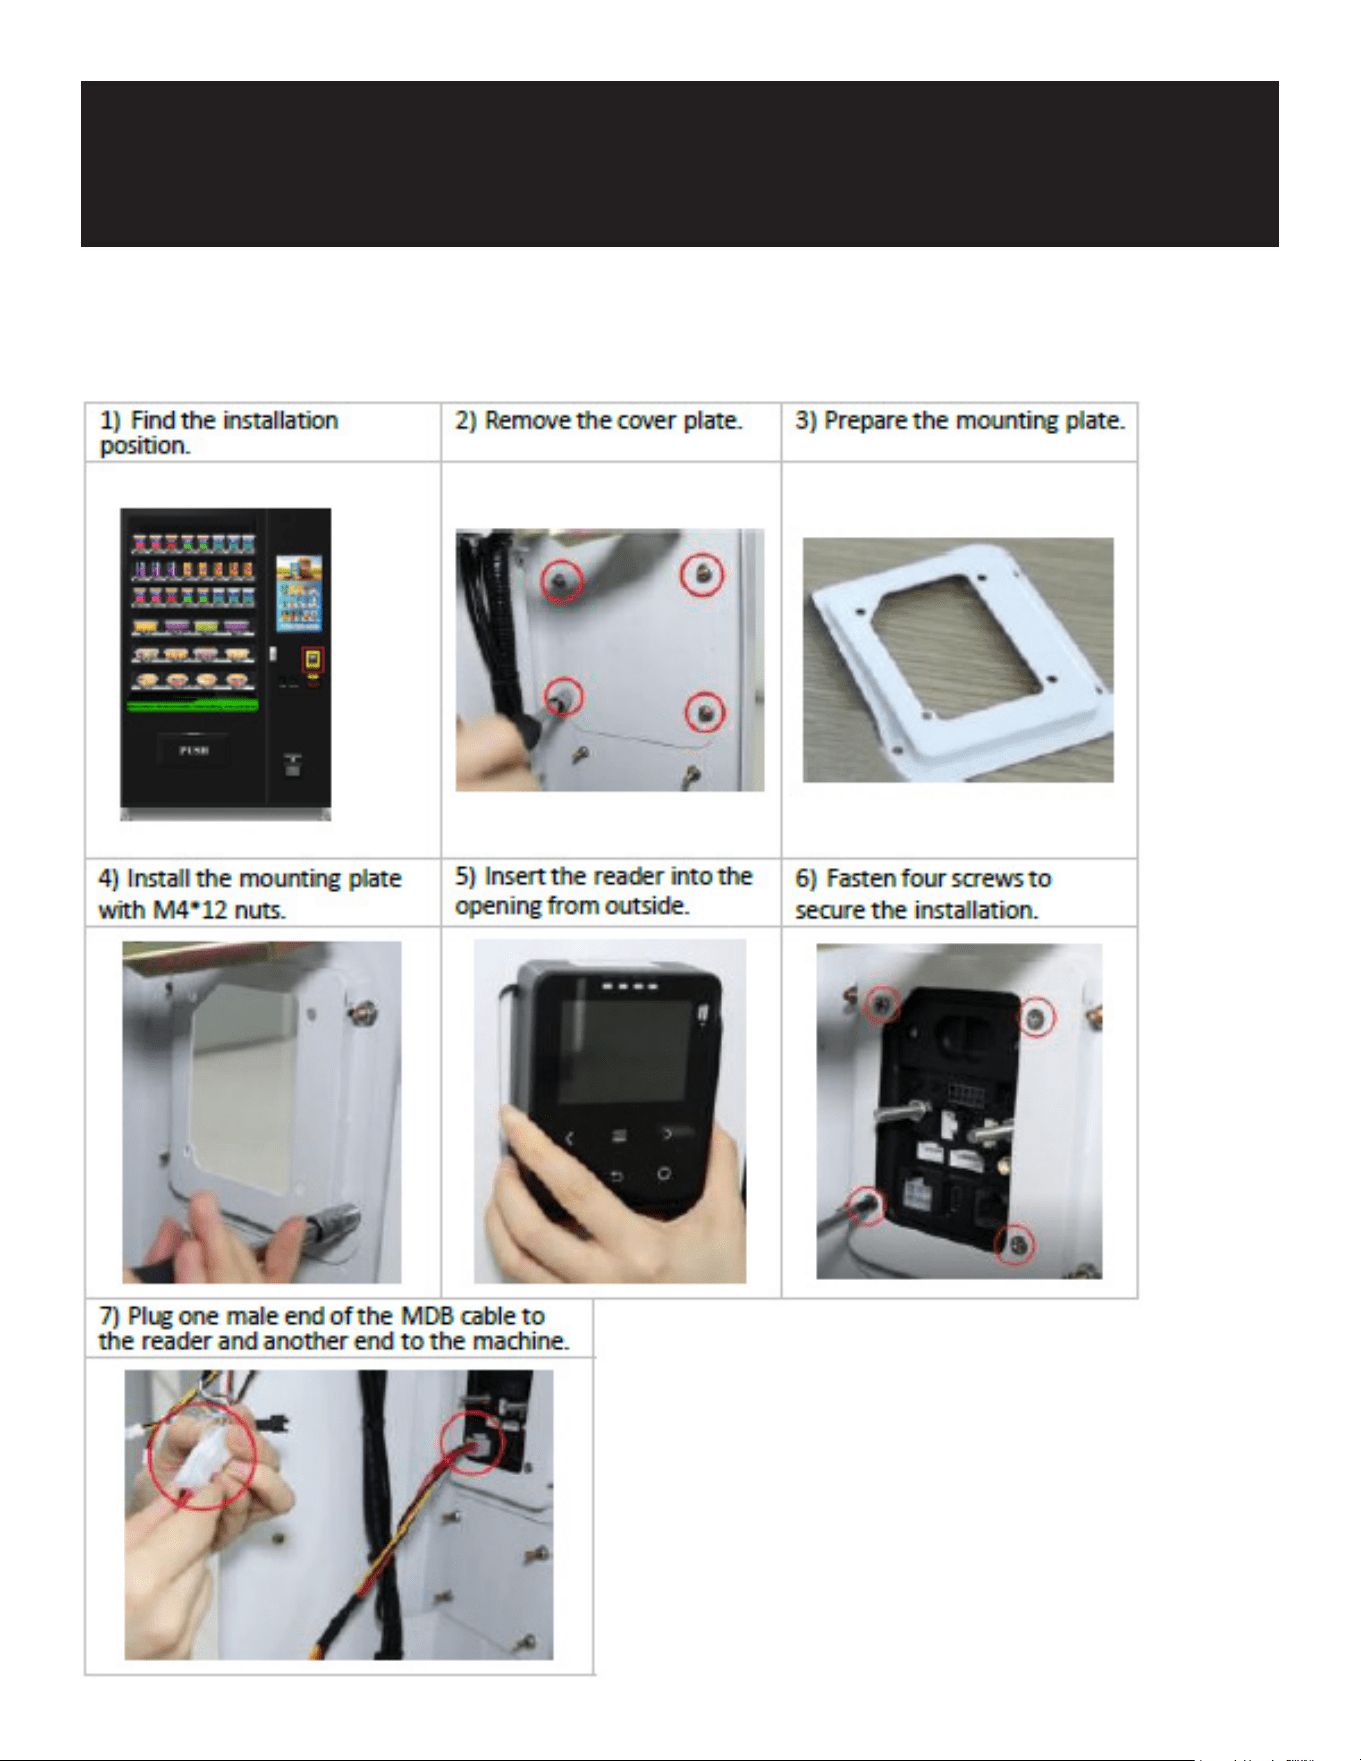
Install Reader
Accessories
49
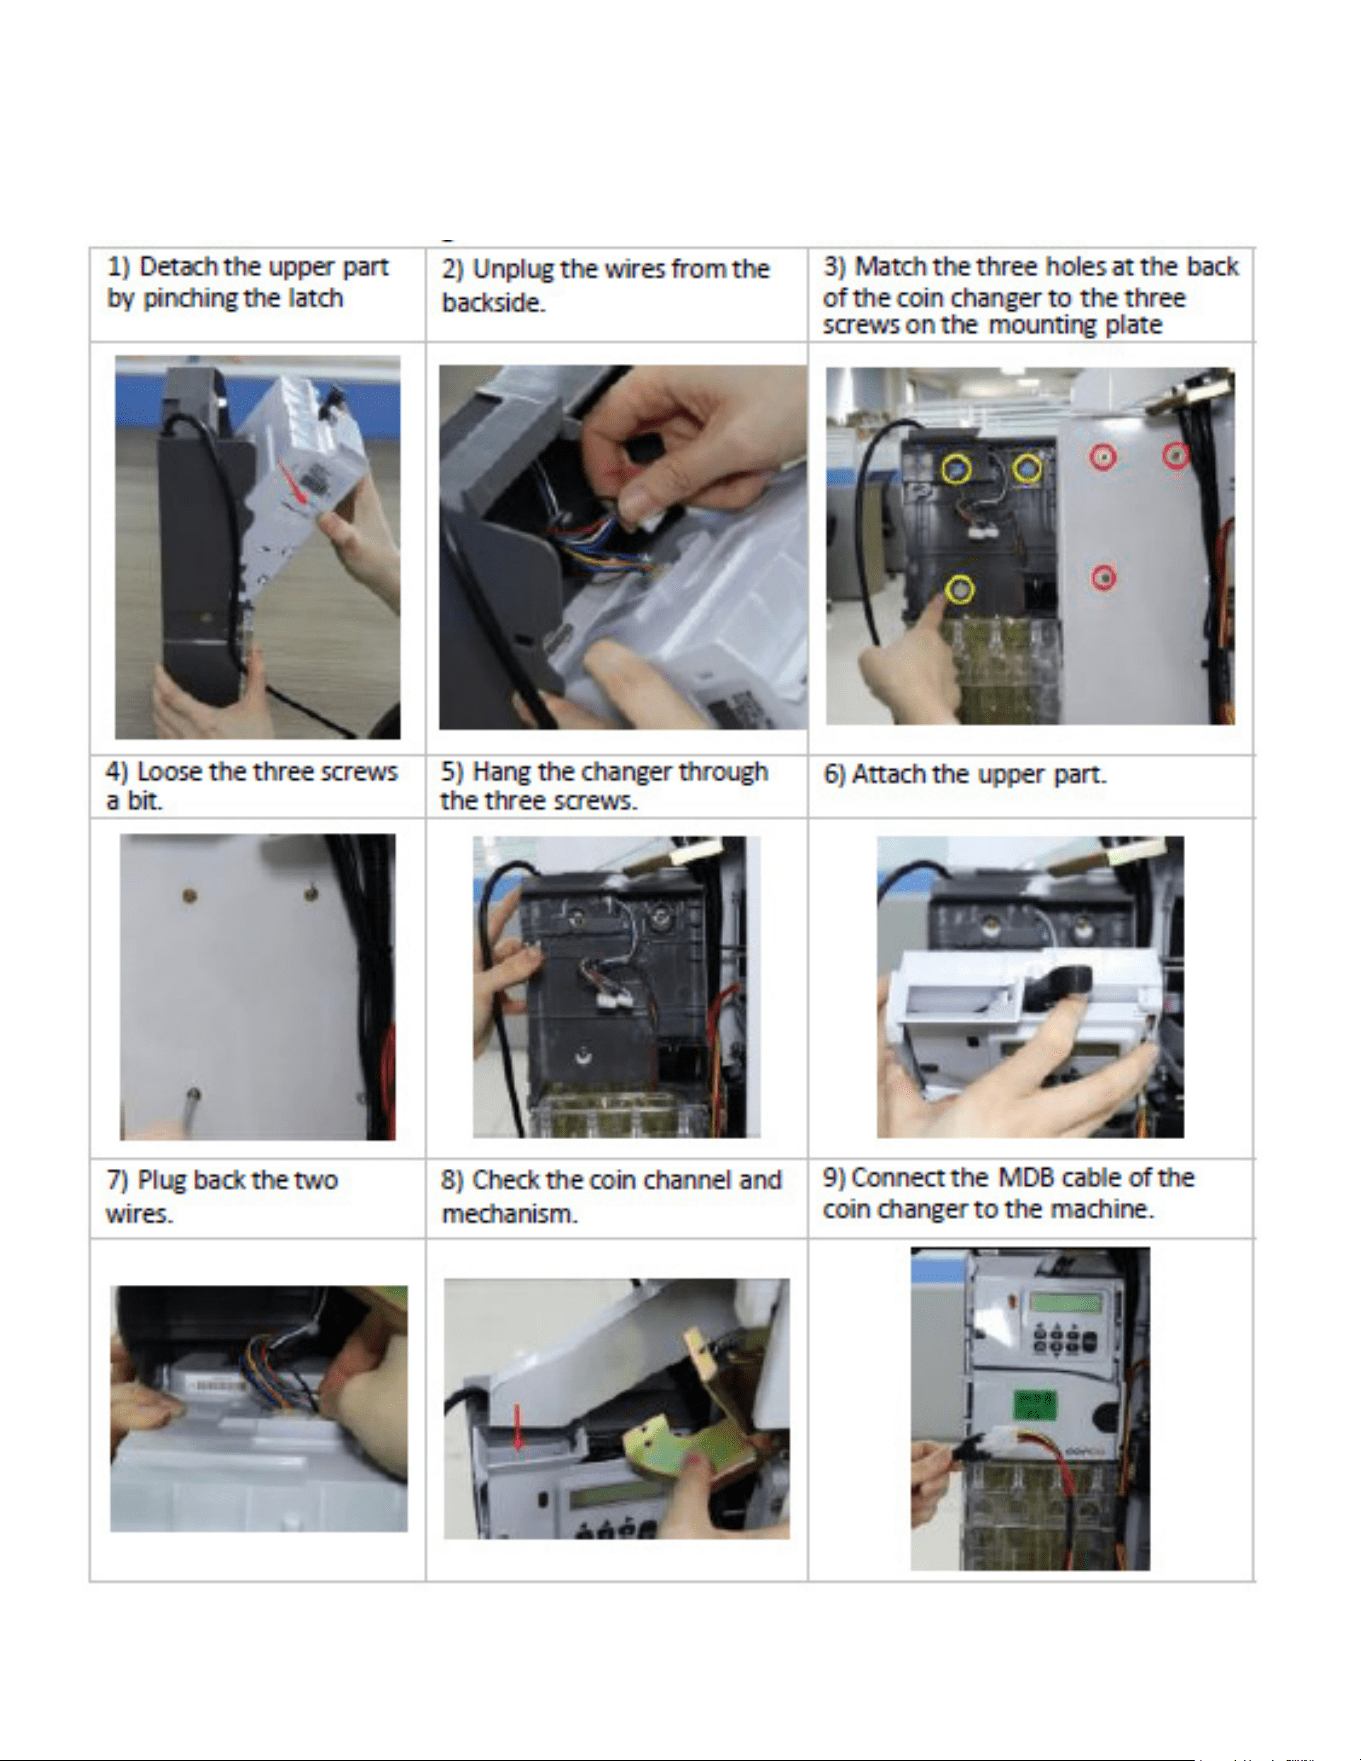
Coin Accepter
50
Install Modem
51
Notes for Refrigerators
1. The door of the refrigerator must be closed tightly and there should be no gap, otherwise it will
cause frosting;
2. The pallet rack should be kept in a slightly active state, and must be checked each time when the
goods
EVIPSEHIHXSIRWYVIXLEXXLIVEGOMWRSXJVS^IRF]MGIMXMWJSVFMHHIRXSTVIWWPMJXERHLMXXLIVEGO[MXL
force; it is forbidden to place heavy objects on the rack, otherwise the weighing module may be dam-
aged;
3. Do not push the elevator mechanism up and down by force, otherwise it will cause machine
to break.
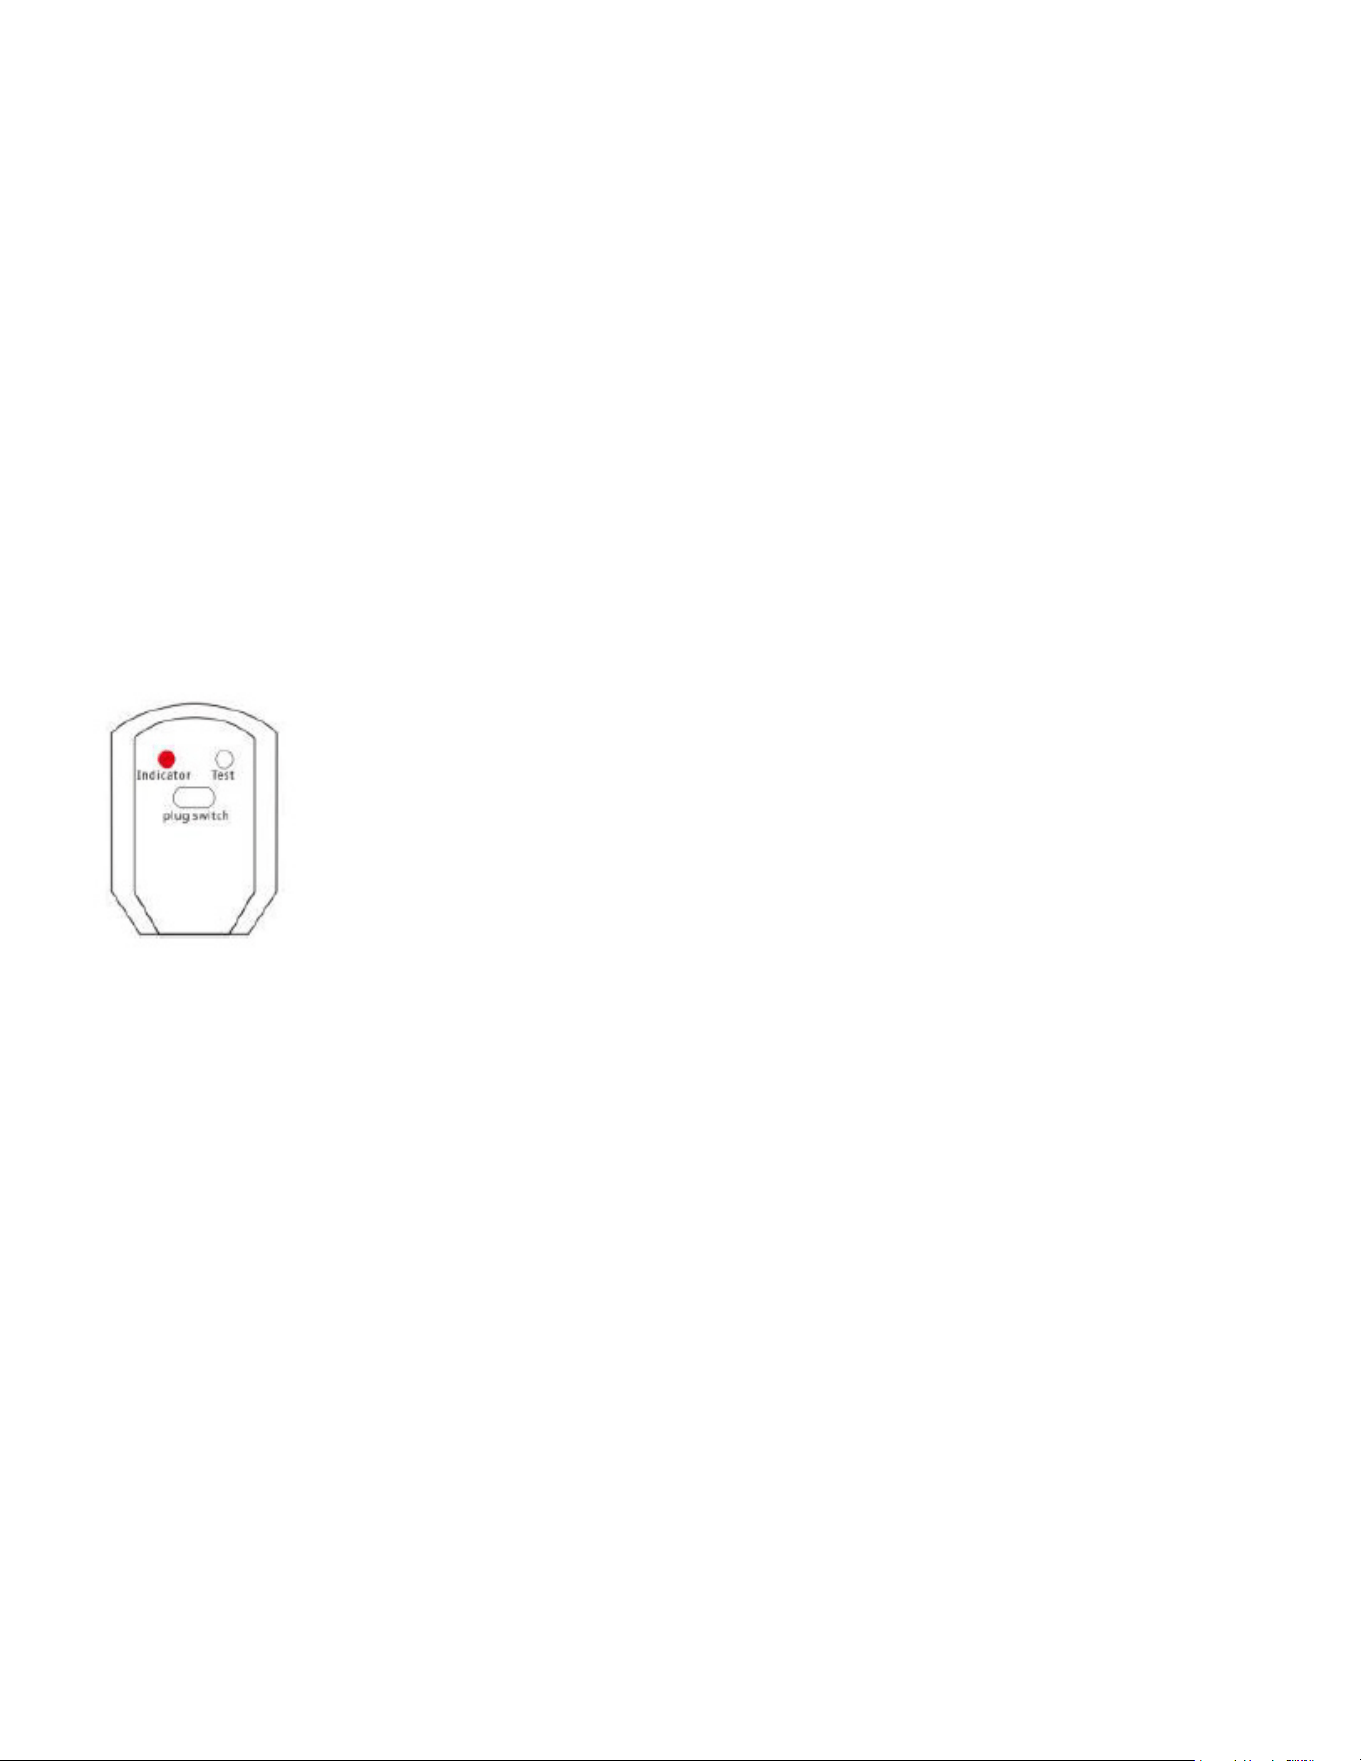
Leakage Protection
1) Press the test button on the power plug. The power indicator is off and at the sametime, the
machine should power off. Perform this test every month.
2) If the test result is normal, wait for 3 minutes before pressing the plug switch to turn on the
power.
52
Cleaning
General Dusting:
When the machine is dusty, wipe it with a dry cloth.
For Severe Dirt:
Use a cloth dampened with water or a diluted neutral deter-
gent solution for cleaning.
Avoid Harsh Cleaners:
Do not use organic solvents, acids, or alkaline liquids to clean
the machine, as they may cause the panel to crack.
Chemical Solvents Warning:
Avoid using chemical solvents like paint thinners or banana water to remove dirt from the vending
machine to prevent accidents.
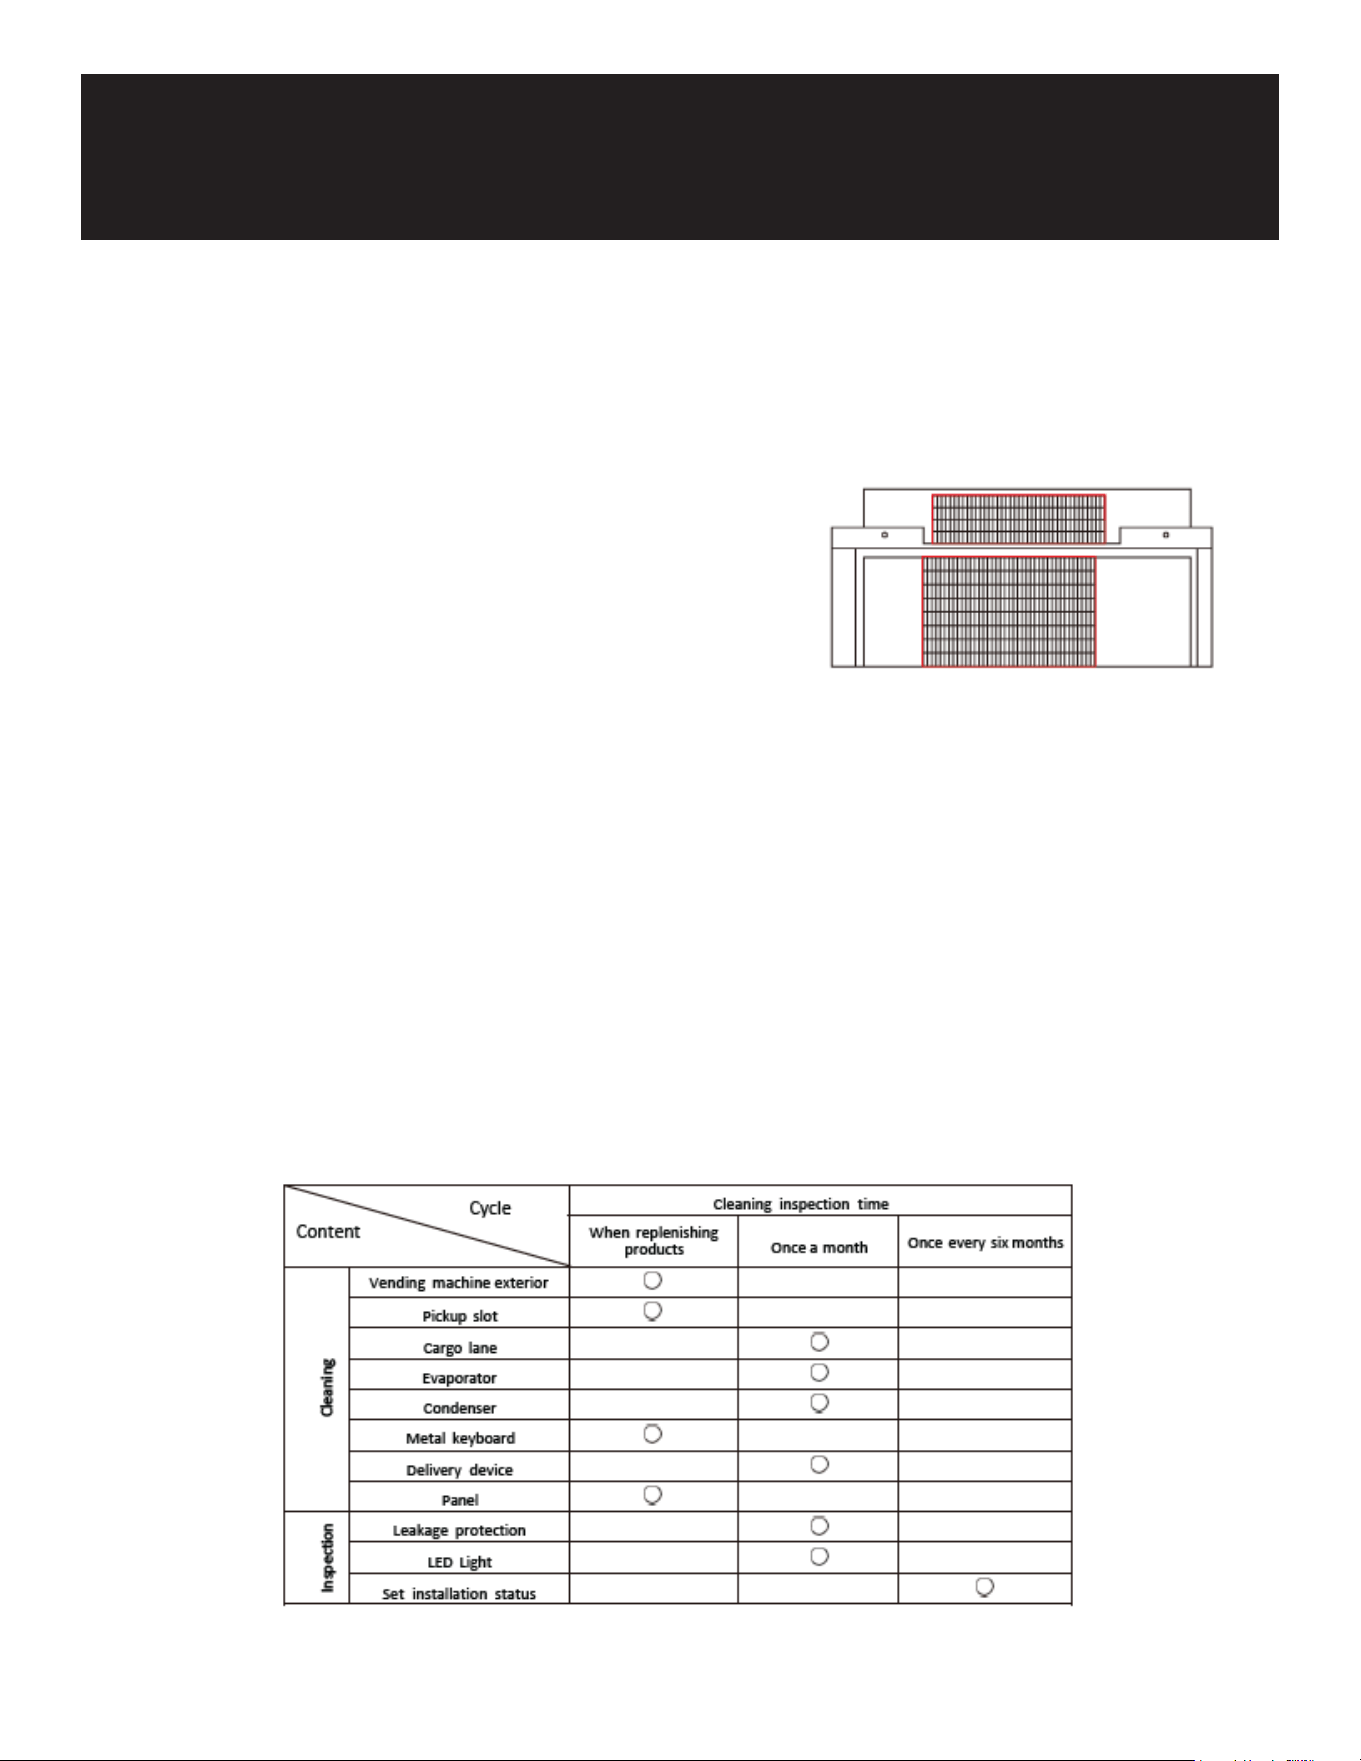
Evaporator and Condenser Maintenance:
Clean the evaporator and condenser with water on a monthly basis. If necessary, rinse with water.
(Refer to the "Refrigerator Cleaning Guide" sticker on the machine for detailed instructions.)
Dust Removal:
8SGPIERHYWXJVSQXLIQEGLMRISTIRXLIHSSVHMWGSRRIGXXLITS[IVTPYKERHVIQSZIXLIFI^IPSV
cargo bucket. Then, use a non-metallic brush to clean along the radiator gap.
Cleaning and Inspection Schedule
Maintenance

53
Fault Possible Causes Approach
The machine has no
power.
- The power switch is not turned on - Turn on the machine power switch.
- The fuse burned out - Check the machine to make sure it is not short-circuited and
UHSODFHWKHIXVHZLWKRQHRIWKHVDPHVSHFL¿FDWLRQV
7KHOHDNDJHSURWHFWLRQVZLWFKLVR - Ensure that no leakage occurs and turn on the leakage
protection switch.
- The power plug cable is damaged - Contact professionals to replace the power cable.
- 220V power is not connected - Check power supply lines to ensure the 220V power supply is
normally connected.
Not connected to the
internet
- No Signal 3RZHURDQGUHVWDUWWKHPDFKLQH
- Check if the antenna connection is installed correctly and
ensure the antenna extension cable is intact.
- Ensure the antenna is placed on top of the machine.
5HSODFHWKHGDWDFDUGZLWKRQHIURPDGLHUHQWRSHUDWRUQRW
supporting TELECOM for the time being).
&KDQJHWKHSRVLWLRQRIWKHPDFKLQHWKHUHPD\EHQRQHWZRUN
signal in that area).
([FHVVLYHGDWDÀRZRUGRZQWLPHRIWKHFDUG - Recharge the data fee.
Data card locked - Data card locked - Contact the card issuer to unlock the card; the data card can
RQO\EHERXQGWRWKHVSHFL¿HGPDFKLQHRWKHUZLVHWKHFDUGPD\
be locked.
Lighting strip does not
work
- Lighting strip not turned on - Turn on the lighting strip.
- Loose contact of the lighting strip - Check the sockets of the lighting strip and re-plug the sockets.
Unable to choose cargo
lane
- Cargo lane interface not cleared up - Clear up cargo lane failures.
Delivery failure - The cloud background is inconsistent with the product code set in
the machine.
- Match the cloud background and the machine's product
encoding settings, or contact after-sales support for help.
- Product size does not match the cargo lane - Replace goods with those matching the cargo lane size, or
DGMXVWWKHFDUJRODQHWR¿WWKHDSSURSULDWHVL]HRIJRRGV
- Cargo lane capacity setting error - Clear the cargo lane failures and reset the correct cargo lane
capacity.
The machine does not
refrigerate
- Refrigeration not enabled 7XUQRQWKHUHIULJHUDWLRQUHIHUWR6HW7HPSHUDWXUH&RQWURO
0RGHLQWKHPDQXDOIRUGHWDLOV
- Long-term use of the machine may lead to wear - Contact after-sales support and add refrigerant.
- Too much dust in the condenser &OHDQWKHFRQGHQVHUZLWKDQRQPHWDOOLFEUXVKSD\DWWHQWLRQ
to regular maintenance and cleaning).
Failure to reach the preset
temperature
- Not enough time to cool the goods - Cool goods in advance when they are expected to be popular.
7KHPDFKLQHLVSODFHGZKHUHWKHWHPSHUDWXUHLVWRRGLUHFWHJ
sunlight or other heat sources around the machine)
- Change the placement environment to avoid direct sunlight or
heat sources.
- Poor ventilation of the machine - Ensure there is a clearance of 20 cm or more from the rear
and the left and right sides of the machine, and ensure good
ventilation around the machine.
Not accept coins The power supply of the coin system is abnormal 1. Check whether the MDB line is in good contact.
2. Check whether there is DC24V access to the coin changer and
bill validator.
Software disabled 1. The enable of bill type is not on, turn on the corresponding
enables.
Troubleshooting

54
2. The enable of bill type is not on, turn on the corresponding
enables.
%HVXEMHFWHGWRKLJKIUHTXHQF\LQWHUIHUHQFHHJDQWHQQDHWF Remove high frequency interference.
Installation of coin system is abnormal 1. The coin changer is not hanging correctly; reinstall the coin
changer.
2. The coin return button of the coin changer cannot be pressed,
which leads to no recovery. Open the coin return press plate to
ensure that the coin return button can recover normally.
Dirty coin passage Clean the passage of the coin system.
No coin recycle can be detected If the trouble cannot be eliminated by reinstalling the coin
recycle, please return the coin changer for repair.
Do not accept large nomination notes 1. Set the limit value of put-in amount too low, reset the limit of
put-in amount.
2. Set the acceptable value of use too high, the user may empty
the coin exchange after purchasing the goods, resulting in the
follow-up users who cannot get change.
Failure of bill jammed Clear up the jammed bill.
No change Abnormal power supply 1. Check whether the MDB line is in good contact.
2. Check whether the coin system has DC24V access.
Software disabled 1. The coin changer switch is not turned on.
2. Bill temporary storage switch is not on.
There's no money in the coin recycle 5H¿OOFRLQV
No change due to the low exchange setting is wrong When the value of put-in bills is too large, the setting of no
change low value limit is too low. It is necessary to reset no
change low value limit when importing large amounts of bills.
No change for bills (PSW\WKHELOOFKDQJHUDQGUH¿OOWKHFRLQV
The coin recyclables are selected in the coin recycle, and if they are
ejected, reload the coins.
1. Check whether the surface of the coin is deformed or
attached with foreign matter; and change the coins with foreign
matter.
7KHFRLQFKDQJHUKDVDSUREOHPRUELOOMDPWKHLQGLFDWRUOLJKWRQ
WKHFRLQUHWXUQLQJVORWÀDVKHV
2. Check whether the coin recycler is detached. If it is detached,
please reinstall the coin recycle.
3. The base of the coin changer return claw is damaged or not
¿WLIGDPDJHGSOHDVHUHWXUQWRWKHIDFWRU\IRUUHSDLU

55
WARRANTY
Koolmore Supply, Inc. extends a limited warranty to the original purchaser, guaranteeing that this Koolmore
product is free from manufacturing defects in material or workmanship for one year from the date of
purchase.
Should you discover any such defect within the warranty period, Koolmore Supply, Inc., reserves the right to
repair or replace the product without charge, or to cover the cost of replacement parts and repair labor needed
to correct defects present at the time of purchase or resulting from regular usage, when the appliance has been
installed, operated, and maintained as per the instructions provided.
At its sole discretion, Koolmore Supply Inc. may decide to replace the product. In such an event, your replace-
ment appliance will carry the warranty for the remaining term of the original unit's warranty period.
This warranty is valid exclusively to the original purchaser of the product and only applicable within the United
States. The warranty commences from the date of original consumer purchase. Proof of the original purchase
date will be required to obtain service under this warranty.
Under this limited warranty, your sole and exclusive remedy will be product repair, as outlined above. All
services must be provided by a Koolmore-designated service company.
To claim warranty or request repair service:
Email support@koolmore.com. Please include your name, address, phone number, warranty repair request,
and a copy of your proof of purchase receipt. Alternatively, visit koolmore.com and use the contact us page. A
Koolmore customer service representative will promptly arrange service for your appliance.
We thank you for choosing Koolmore.
This limited warranty will not cover:
1. Failure of the product to perform during power failures or interruptions,
or due to inadequate electrical service.
2. Damage incurred during transportation or handling.
3. Damage caused by accidents, vermin, lightning, winds, re, oods, or acts of God.
4. Damage resulting from accidents, alterations, misuse, abuse, improper installation, repair, or maintenance.
This includes using any external device that alters or converts the voltage or frequency of
electricity.
5. Unauthorized product modications, repairs by unauthorized centers, or use of non-approved
replacement parts.
6. Abnormal cleaning and maintenance not aligned with the user's manual.
7. Use of incompatible accessories or components.
8. Any costs associated with repairs or replacements under these excluded circumstances shall be the
responsibility of the consumer.