Model: SGR-PPS2000-3 PRO
Benutzerhandbuch
V1.5
All-in-one Grid Powerstation
User Manual

Inhaltsverzeichnis
1. Sicherheitshinweise
2. Wichtige Hinweise
3. Vorwort
4. Inhalt der Verpackung
5. App herunterladen
6. Installationsliste
7. Anwendung
7.1 Manueller Netzbetrieb
7.2 MIG-Timing-Modus
7.4 Smart MIG-Modus
7.3 Auto MIG SOC Modus
7.5 AC-Ladezeit
7.6 Intelligenter Lademodus
7.7 Netzunabhängiger Betrieb
2
3
4
4
5
5
6
6
7
8
9
11
13
15
Deutsche Fassung:Seite 1-29
English Version: Page 30-58
Safety Caution
Important Tips
Preface
Package Contents
Download App
Installation list
Application
Manual on-grid Mode
MIG Timing Mode
Smart MIG Mode
Auto MIG SOC Mode
AC Charging Timing Mode
Smart Charging Mode
O-Grid Mode
31
32
33
33
34
34
35
35
36
37
38
40
42
44
Table of Contents

8. Technische Spezifikation
9. Produktübersicht
9.1 Inhalt des Bildschirms
9.2 Tastensteuerung
10. Aufrufen des netzgekoppelten Modus
11. Möglichkeiten des Aufladens
11.1 AC-Wandaufladung
11.2 DC-Laden im Fahrzeug
11.3 Solares Aufladen
12. Allgemeine Fehlerbehebung
13. FAQS und Lösungen
14. Wartung und Lagerung
15. Garantie & Kundendienst
16. VORSICHT
18
19
20
20
22
24
24
24
25
27
27
29
29
29
Technical Specication
Product Overview
Display Screen Contents
Button Controls
47
48
49
49
Entering Grid-Connected Mode
Ways to Recharge
AC Wall Charging
DC Vehicle Charging
Solar Charging
Common Trouble Shooting
FAQS and Solutions
Maintenance and Storage
Warranty & Customer Service Support
CAUTION
51
53
53
53
54
56
56
58
58
58


Das Produkt wurde unter Beachtung internationaler Sicherheitsnormen
entwickelt und geprüft. Wie bei allen elektrischen oder elektronischen
Geräten verbleiben trotz sorgfältiger Konstruktion Restrisiken. Um
Personen- und Sachschäden zu vermeiden und einen dauerhaften Betrieb
des Produktes zu gewährleisten, lesen Sie dieses Kapitel sorgfältig durch und
beachten Sie jederzeit alle Sicherheitshinweise.
Lesen Sie alle aktuellen Dokumente sorgfältig durch, bevor Sie das Produkt
installieren, benutzen oder warten. Die Dokumentation kann sich im Laufe
der Zeit ändern.
1.Dieser Powerstation hat eine eingebaute Lithiumbatterie, die sehr
empfindlich auf hohe Temperaturen reagiert - halten Sie sie von
Wärmequellen wie Feuer oder anderen Hitzequellen fern.
2.Befolgen Sie die Anweisungen in diesem Handbuch, um alle Ladekabel
korrekt anzuschließen. Verwenden Sie keine Kabel anderer Hersteller.
Falsche Anschlüsse können das Gerät beschädigen und sogar zu einem
Stromschlag führen.
3.Berühren Sie im Standby-Modus keine spannungsführenden Teile, es
besteht die Gefahr eines Stromschlags.
4.Bewegen Sie das Gerät nicht, während es in Betrieb ist, da sonst die
Gefahr eines Stromausfalls besteht.
5.Das Gerät von Feuchtigkeit und Wasser fernhalten.
6.Das Gerät nicht zerlegen, in der Mikrowelle erhitzen, durchbohren,
verbrennen oder Fremdkörper in die Powerstation einführen.
7.Das Gerät nicht zerdrücken, verbiegen, zerkleinern, fallen lassen oder
schwere Gegenstände darauf stellen.
8.Verwenden Sie das Produkt nicht, wenn es beschädigt oder durchbohrt
ist.
9.Seien Sie immer bereit. Laden Sie das Gerät alle drei Monate auf, auch
wenn es nicht benutzt wird.
10.Beim Anschluss an das Stromnetz und die Photovoltaikkomponenten die
Komponenten und Funktionen der Photovoltaikanlage verstehen,
sicherstellen, dass alle elektrischen Anschlüsse, Spannung und Stromstärke
den Normen entsprechen, und sicherstellen, dass die Powerstation während
des gesamten Anschlussvorgangs ausgeschaltet ist.
1.Sicherheitshinweise
— 2 —

— 3 —
2. Wichtige Hinweise
"MIG" ist die Abkürzung für "Micro Inverter for Grid-connected". MIG
bezieht sich auf den Mikro-Netzanschlussmodus.
Um zu vermeiden, dass sich die elektrische Verbindung löst und
Sicherheitsvorfälle verursacht, stellen Sie sicher, dass das Gerät in einer
festen Position steht und bewegen Sie es nicht willkürlich, wenn es sich im
Mikro-Netzanschlussmodus befindet.
Die PV-Solaranlage ist netzgekoppelt. Bitte prüfen Sie, ob dies in Ihrer
Region erlaubt ist. Je nach Region kann eine behördliche Genehmigung
vor oder nach der Installation erforderlich sein.
Das Produkt sollte vor direkter Sonneneinstrahlung geschützt werden, um
einen schnellen Temperaturanstieg zu vermeiden.
Dieses Produkt ist mit speziell entwickelten Smart Plugs kompatibel,
einschließlich Smart Charging und Smart MIG Plugs. Diese Smart Plugs
müssen separat beim Gerätehändler erworben werden. Anderweitig
erworbene Smart Plugs können nicht verwendet werden.
Bitte prüfen Sie vor der Installation, welches Zubehör Sie benötigen, da
einige Zubehörteile separat erworben werden müssen.
Nach der Installation laden Sie bitte zuerst die App herunter.

— 4 —
1.Vielen Dank, dass Sie sich für diese netzgekoppelte Powerstation
entschieden haben. Es kann frei zwischen netzgekoppeltem und
netzunabhängigem Betrieb umgeschaltet werden und ist für einen
Multi-Szenario-Einsatz.
2.Die Powerstation kann als netzgekoppelte Powerstation eingesetzt
werden, es speichert Energie aus Solarzellen in der Powerstation. Es kann
auch an das Stromnetz angeschlossen werden, um den Haushalt mit
Strom zu versorgen und dem Benutzer zu helfen, Stromkosten zu sparen.
3.Die tragbare Powerstation kann an Wechselstromsteckdosen,
Solarmodule und Gleichstromquellen angeschlossen werden und ist so
konzipiert, dass sie elektronische Geräte sowohl in Notfällen als auch
unterwegs mit Strom versorgt.
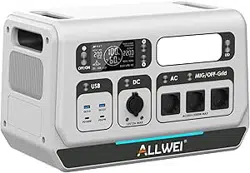
4.Sie ist mit Wechselstromsteckdosen, 12-V-Gleichstromausgängen, einem
Kfz-Anschluss, einem Typ-C-Anschluss und schnell aufladbaren
USB-3.0-Anschlüssen ausgestattet.
5.Perfekt für Outdoor-Abenteuer und als Backup für zu Hause. den meisten
elektronischen Geräten wie Drohnen, Projektoren, Kaffeemaschinen,
Mixern, Kühlschränken, Ventilatoren, Mikrowellen usw. kompatibel.
6.Die Powerstation ist auch für Camping geeigne. Sie funktioniert gut, wenn
es darum geht, elektrische Geräte im Freien aufzuladen, z. B. für die
Stromversorgung in der Nacht, die medizinische Stromversorgung und die
Energiespeicherung im Haushalt.
3. Vorwort
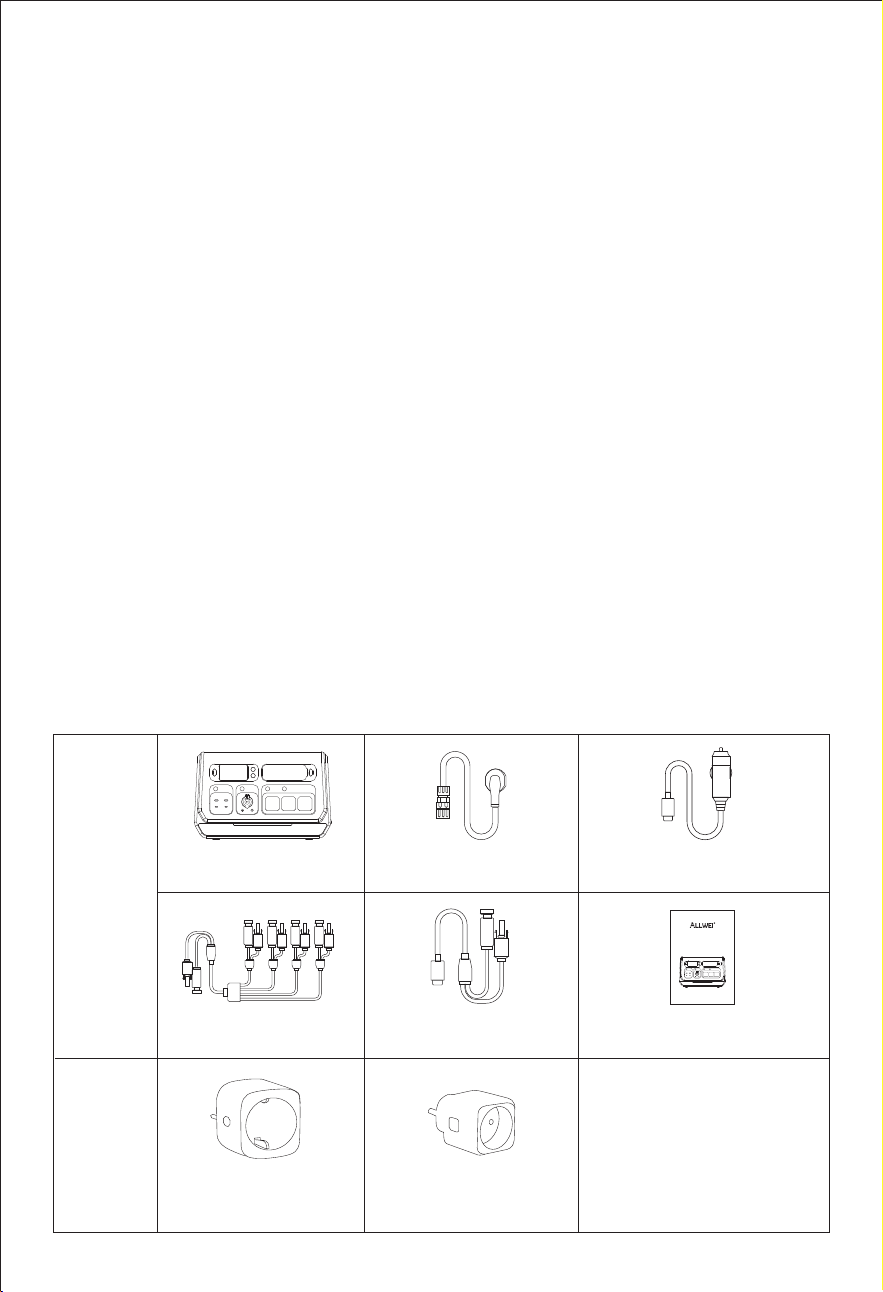
4. Inhalt der Verpackung
1*Bedienungsanleitung
1*AC-Netzkabel 1*DC-Kabel
1*MC4-Kabel
1*PV-Stecker
SGR-PPS2000-3 PRO
Smart Ladegerät
Smart MIG-Stecker
Hinweis:
Inhalt der
Packung
Optionales
Zubehör
Hinweis:
Diese speziellen Smart
Plugs müssen separat
beim Händler gekauft
werden. Anderswo
erworbene Smart Plugs
funktionieren nicht.
Model: SGR-PPS2000-3 PRO
Benutzerhandbuch
V1.5
All-in-one Grid Powerstation
User Manual
— 5 —
Bitte suchen Sie die App "Wonderfree" im App Store (iOS: App Store;
Android: Google Play) auf Ihrem Handy und laden Sie sie herunter.
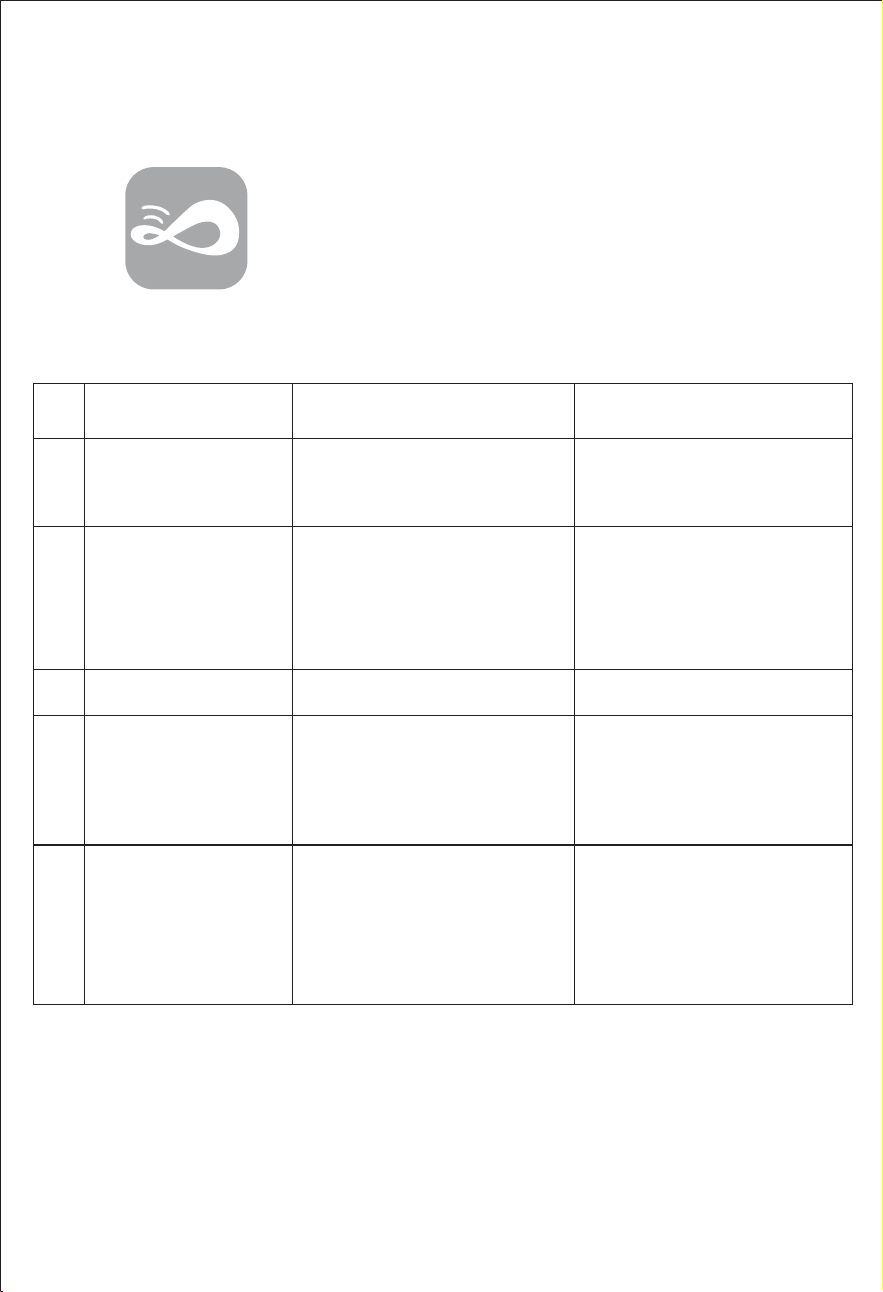
5. App herunterladen
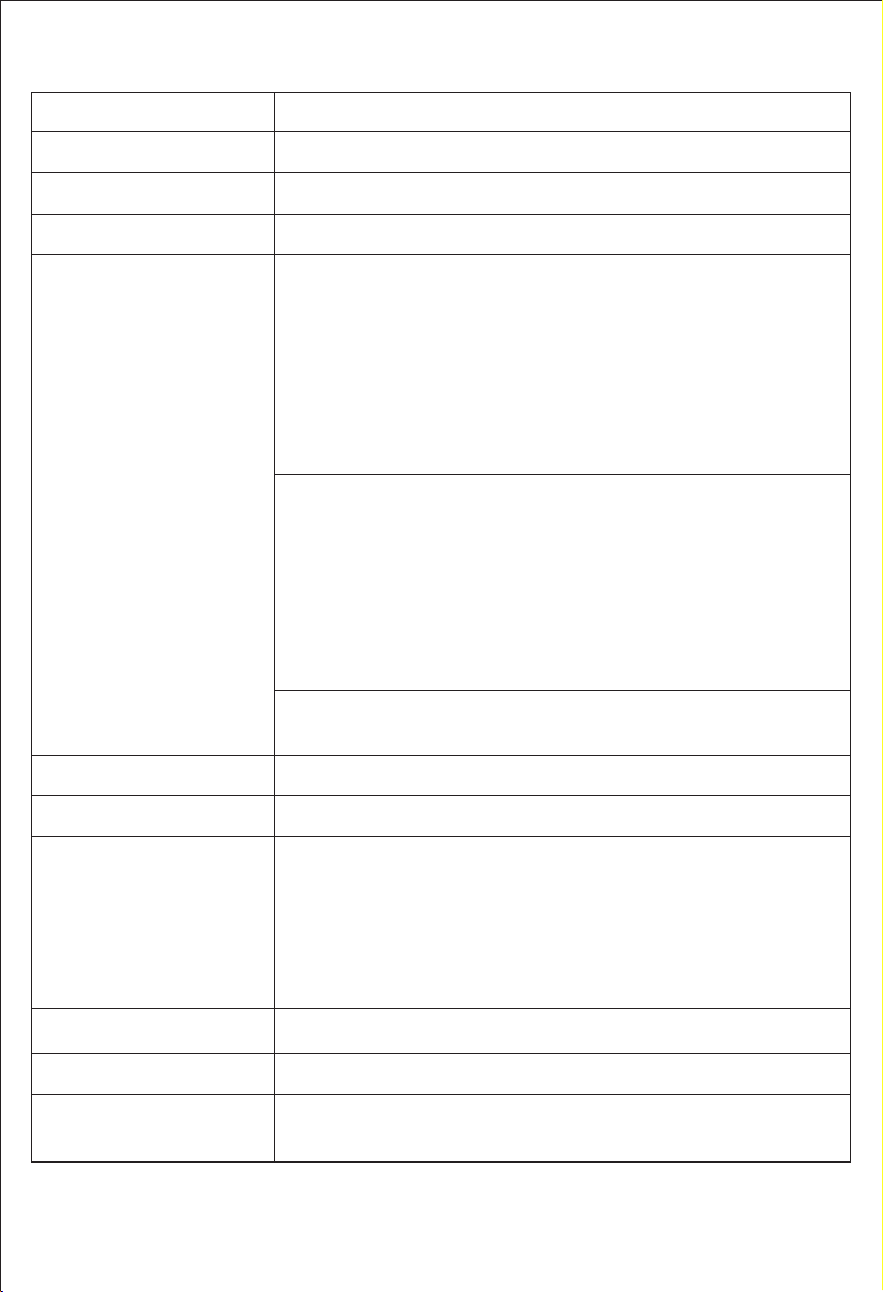
6. IInstallationsliste
Nr.
Name Beschreibung
Teil einer Grundausstattung /
Optional (nicht enthalten)
Solarmodul
Die maximale
PV-Systemspannung
beträgt 100 V.
Nicht enthalten
PV-Steckverbinder
Zur Herstellung einer
Verbindung
zwischen
dem SGR-PPS2000-3 PRO
und Solarmodulen
(unterstützt bis zu 4
Solarmodule).
Enthalten
SGR-PPS2000-3 PRO
Hauptgerät
Enthalten
Smart Ladegerät
Zur Verwendung mit einer
installierten
Photovoltaikanlage in
Verbindung mit dem
SGR-PPS2000-3 PRO
(unterstützt bis zu 1 Gerät).
Smart MIG-Stecker
Zur Messung des
Stromverbrauchs von
Haushaltsgeräten und
drahtlose Verbindung mit
dem SGR-PPS2000-3 PRO zur
den Stromverbrauch zu
optimieren (unterstützt bis zu
5 Geräte).
Nicht im Lieferumfang
enthalten.
Bitte separat beim
Gerätehändler erwerben.
1
2
3
4
5
Nicht im Lieferumfang
enthalten.
Bitte separat beim
Gerätehändler erwerben.
— 6 —
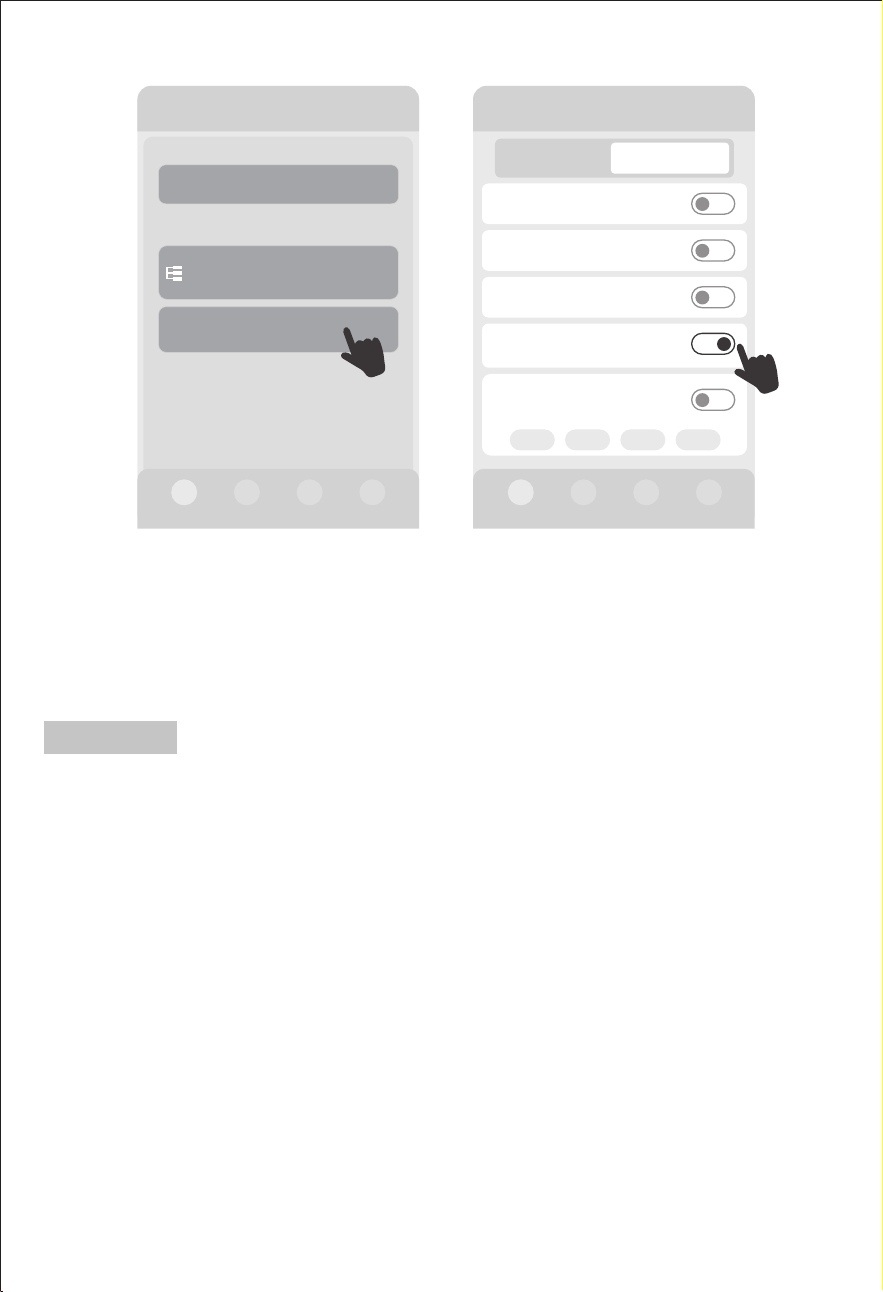
7.1 Manueller Netzbetrieb
7. Anwendung
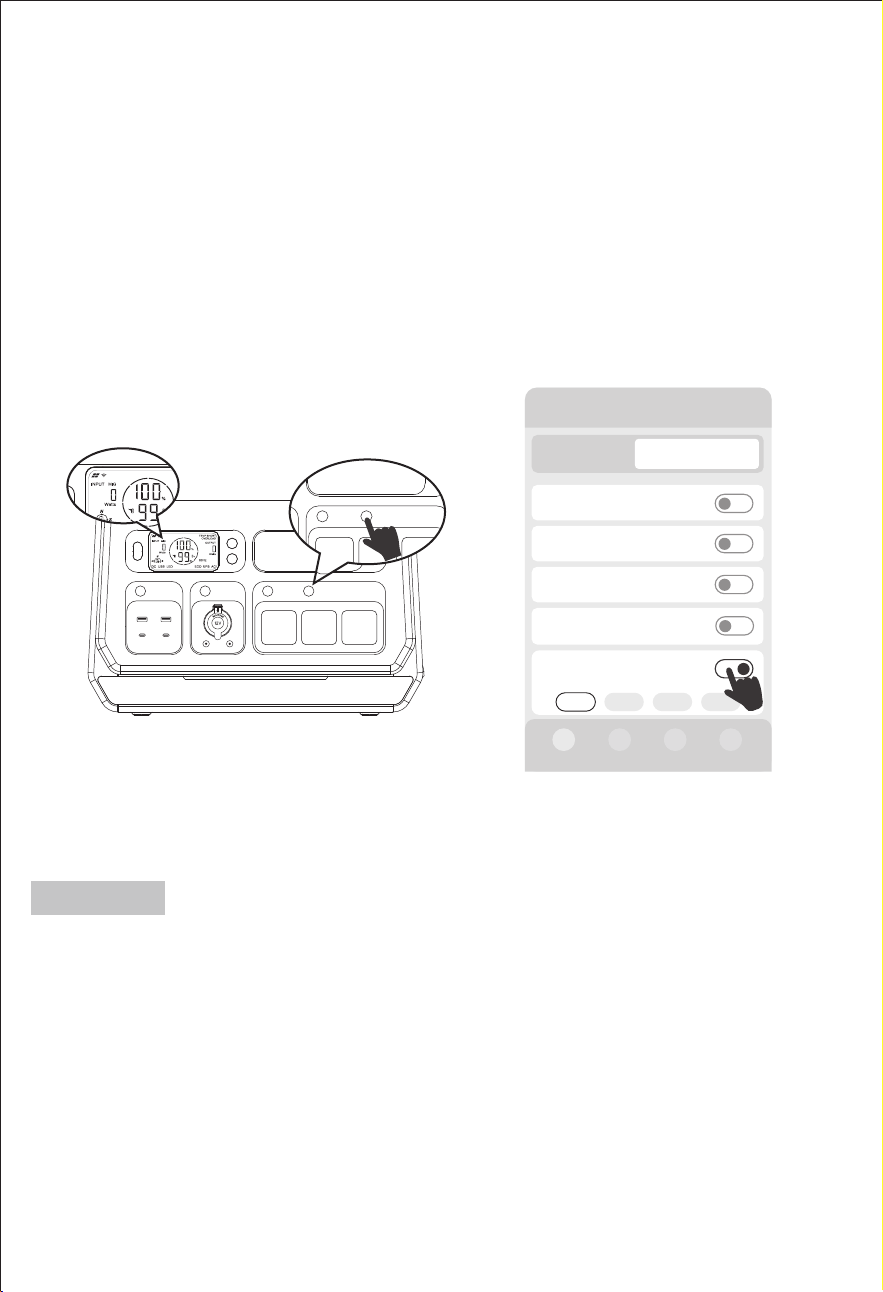
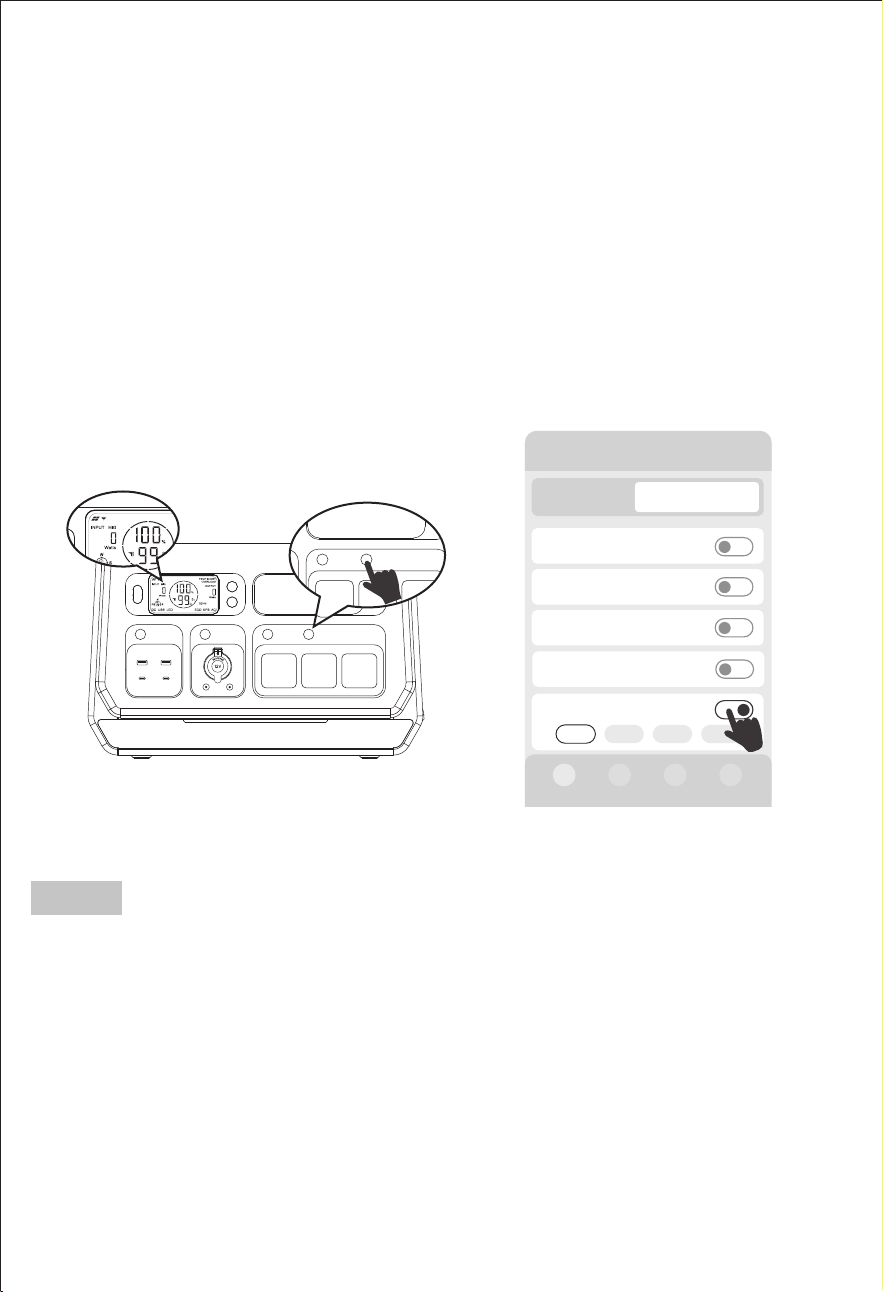
Schalten Sie den Netzbetrieb über die Taste "MIG/OFF-Grid" am Gerät oder
"Manuelle Netzanbindung ein/aus" in der Applikation ein oder aus.
Drücken Sie die Taste "MIG/OFF-Grid" am Gerät, die Standardleistung für
den Netzbetrieb beträgt 200 W.
Nach erfolgreicher Verbindung mit der Anwendung finden Sie die Option
"Manuelle Netzanbindung ein/aus" im Statusbereich "Ausgang" auf der Seite
"Device", um die Netzanschlussleistung auszuwählen. Es gibt vier Optionen
für die
Netzanschlussleistung: 200W / 400W / 600W / 800W.
漧Bei manueller Netzschaltung (Taste "MIG/OFF-Grid" am Gerät oder
"Manuelle Netzanbindung ein/aus" in der App drücken) wird die
Zeitmessung automatisch beendet.
漨Bei manuellem Netzanschluss (Drücken der Taste "MIG/Off grid" am
Gerät oder "Manuelle Netzanbindung ein/aus" in der App) wird die
Smart-MIG-Funktion automatisch beendet.
Hinweis:
AC MIG/OFF-Grid
AC MIG/OFF-Grid
2000-3 PRO
Eingang 0W
AC ein/aus
DC ein/aus
USB ein/aus
Gerät
Ausgang 200W
Manuelle
Netzanbindung ein/
aus
200W 400W 600W 800W
200W
0W
0W
Smart MlG ein/aus
0W
— 7 —
漧Ein schlechtes Netzsignal vom Gerät beeinträchtigt die Leistung der
Timing-Aufgaben.
漨Die Netzanschlussfunktion und die Ladefunktion des Gerätes können nicht
gleichzeitig verwendet werden.
漩Bei Verwendung dieser Funktion müssen die Schalter Smart Charging und
Smart MIG ausgeschaltet sein.
漪Wenn sich die Funktionen "MIG-Zeitsteuerung" und "AC-Ladezeitsteuer-
ung" überschneiden, hat die Funktion "MIG-Zeitsteuerung" Vorrang.
漫Bei manuellem Netzbetrieb (Taste "MIG/OFF-Grid" am Gerät oder "Manu-
elle Netzanbindung ein/aus " in der App drücken) wird die Zeitsteuerung
automatisch beendet.
漬Wenn der Batteriestand des Gerätes < 10 % ist, wird die Netzverbindung
beendet.
漭 Der AC-Schalter und alle AC-Ausgangsbuchsen funktionieren im Netz-
verbindungsmodus nicht.
* Während der eingestellten Zeit der zeitgesteuerten Netzverbindung stellen
Sie bitte sicher, dass das Netz normal ist, das Gerät an das Stromnetz anges-
chlossen ist und das Stromnetz in einem normalen Zustand ist, damit diese
Funktion funktioniert.
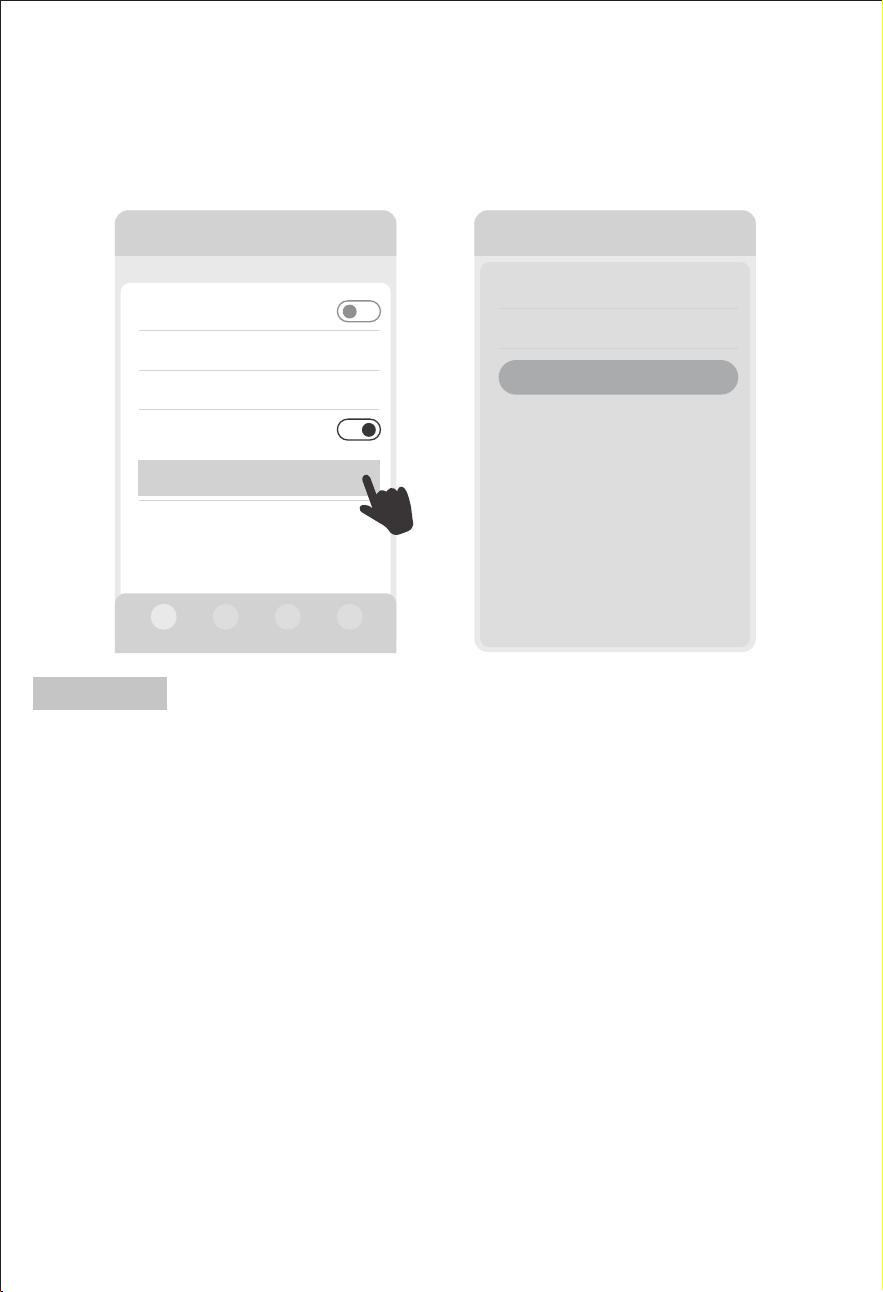
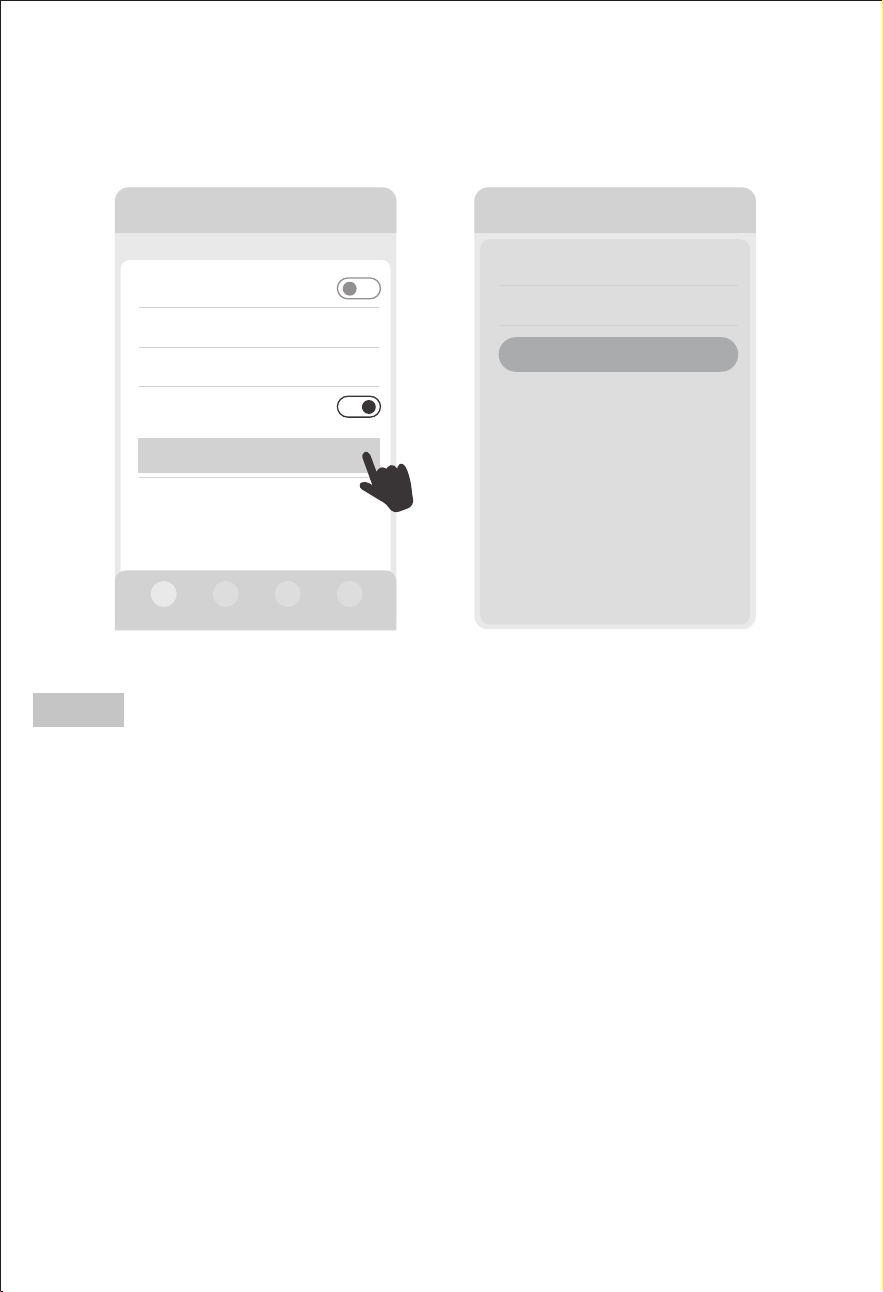
>
>
Timer Einstellungen
Zeitraum
Leistung
>
>100W
00:00-00:00
Speichern
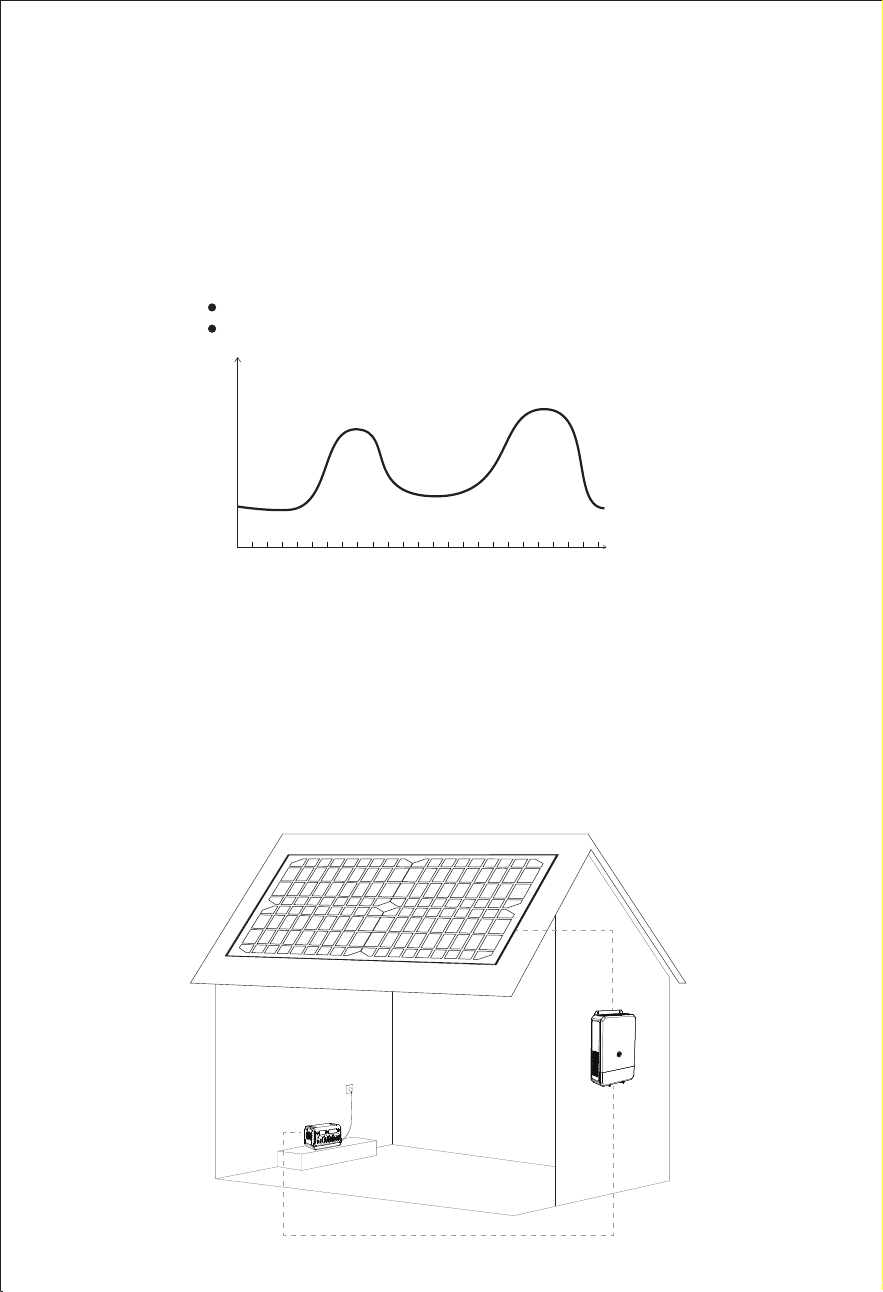
7.2 MIG-Timing-Modus
Diese Funktion ermöglicht die Einstellung des Zeitraums und der Leistung
des Netzanschlusses. Der Benutzer kann mehrere Sätze mit
unterschiedlichen Netzanschlusszeiten und Netzanschlussleistungen
hinzufügen.
Andere Einstellungen
DC Standy Zeit >
Gerät Standby Zeit
Wechselrichter ECO ein/aus
>
MIG Zeitschalter An/Aus
Andere
Timer Einstellungen
>
Allgemeine Einstellungen
01h00min
01h00min
Hinweis:
— 8 —
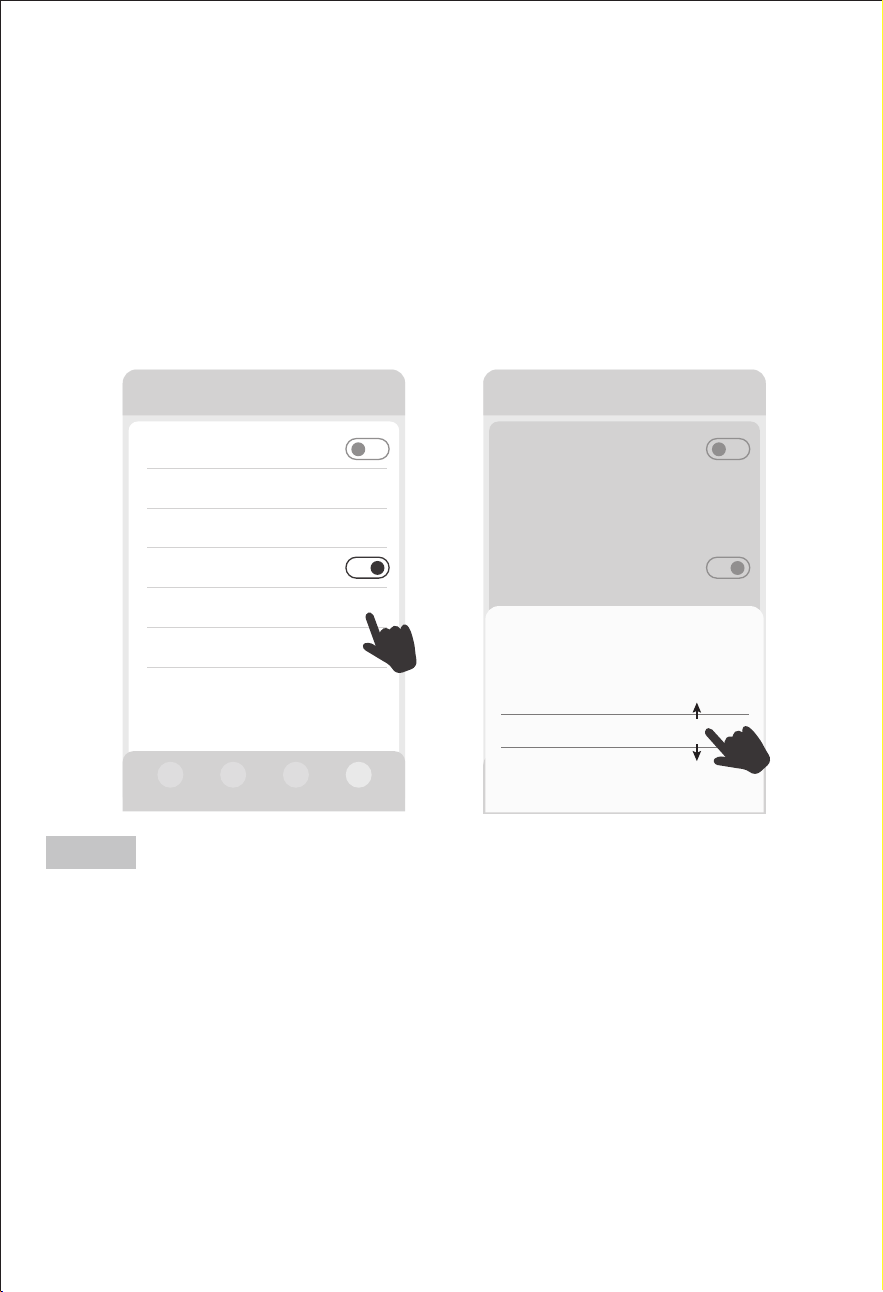
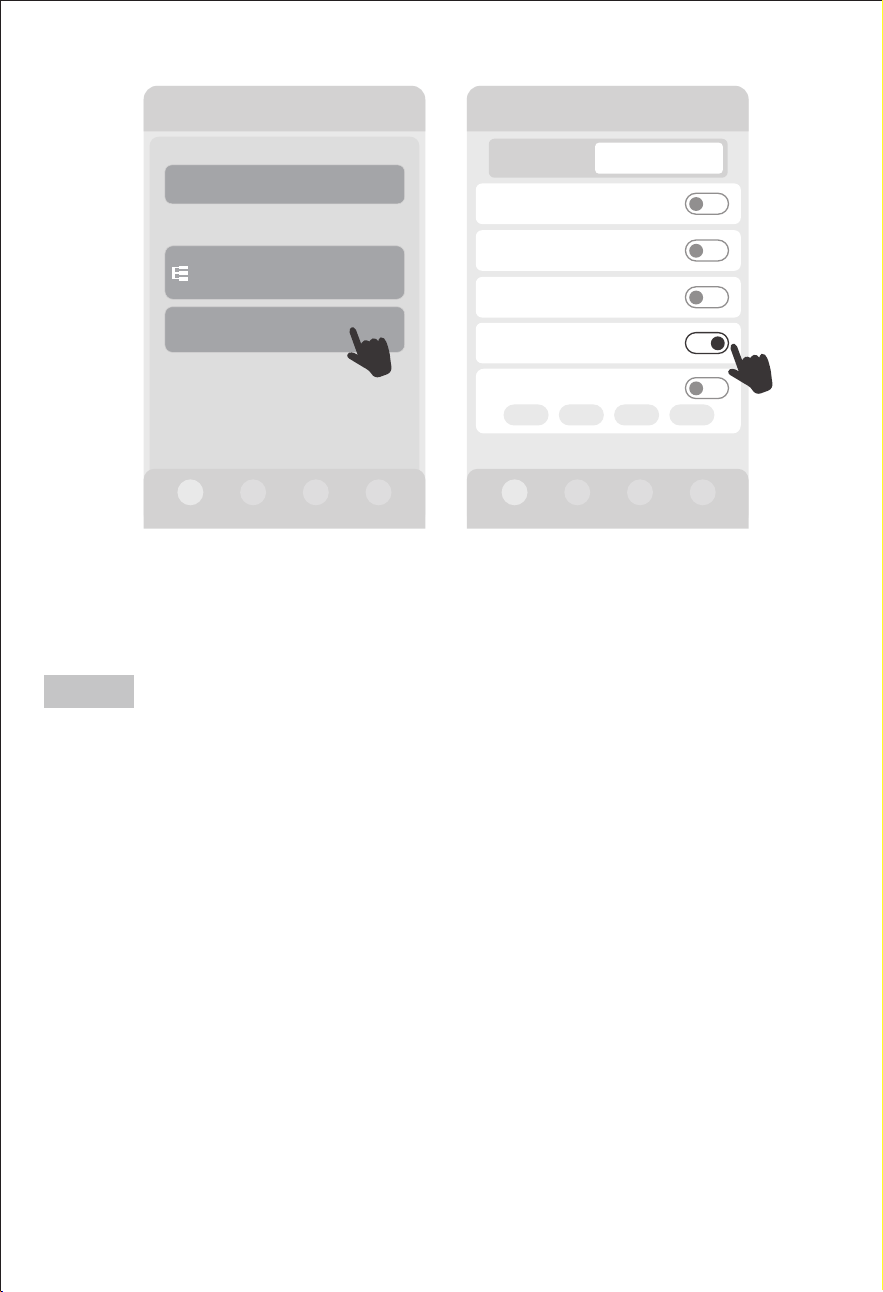
7.3 Auto MIG SOC Modus
“Auto MIG SOC ein/aus”:
Die Funktion Auto MIG SOC kann ein- oder ausgeschaltet werden. Wenn
dieser Schalter eingeschaltet ist, erscheint und blinkt das Symbol "MIG"
auf dem Bildschirm des Geräts.
“Auto MIG SOC-Einstellung”:
Im Solarladezustand können die Kapazitätspunkte für den Beginn und
das Ende von Auto MIG SOC eingestellt werden.
Stellen Sie zum Beispiel 95 % Start und 90 % Ende ein: Wenn die Solarener-
gie das Gerät auf 95% auflädt, beginnt das Gerät automatisch mit der
1HW]HLQVSHLVXQJZHQQGLH.DSD]LWlWVWRSSWGDV*HUlWDXWRPD-
tisch die Netzeinspeisung.
漧%ğýĽýŮƚēýıŅşşýĵŮýVýğŦŮųĽēƋŅĽ灒ųŮŅ\D<d灒ýĽŮŦşŢğóěŮùýŢVýğŦŮųĽēùýŢ
ŅĵÖŢŦŮŢŅĻųĽùŸòýŢŦŮýğēŮĽğóěŮ滽滵滵ª澳ªýĽĽùğýŅĵÖŢŦŮŢŅĻýŢƚýųēųĽēěŏěýŢğŦŮ
ÖĵŦ滽滵滵ª澴ƌğŢùùğýŸòýŢŦóěŸŦŦğēýVýğŦŮųĽēƚųĻVÖùýĽùýŦ<ýŢåŮŦƋýŢƌýĽùýŮ澳
漨DĽĽýŢěÖĵòùýŦýğĽēýŦŮýĵĵŮýĽVýğŦŮųĽēŦòýŢýğóěŦĒŸŢùýĽÖųŮŅĻÖŮğŦóěýĽ
^ýŮƚÖĽŦóěĵųŦŦğŦŮùÖŢÖųĒƚųÖóěŮýĽ澴ùÖŦŦùÖŦ<ýŢåŮùųŢóěŅĵÖŢýĽýŢēğý
ÖųĒēýĵÖùýĽƌğŢùųĽùÖĽùÖŦŮŢŅĻĽýŮƚÖĽēýŦóěĵŅŦŦýĽğŦŮ澴ųĽù^ýŮƚŦŮŢŅĻğĻ
ĽŅŢĻÖĵýĽ¸ųŦŮÖĽùğŦŮ澴ùÖĻğŮùğýŦý;ųĽıŮğŅĽĒųĽıŮğŅĽğýDž澳
漩ªýĽĽùğý)ğĽŦŮýĵĵųĽē灒\D<ğĻğĽē灒ŅùýŢ灒ųŮŅ\D<d灒ýDŽŅĵēŢýğóěýğĽēýŦŮýĵĵŮ
ƌųŢùý澴ēýěŮùÖŦ<ýŢåŮğĽùğýªÖDžýƚýğŮĒŸŢùýĽ^ýŮƚÖĽŦóěĵųŦŦ澴ųĽùùÖŦƒĻòŅĵ
灒\D<灒ýŢŦóěýğĽŮųĽùòĵğĽıŮÖųĒùýĻV%ùýŦ<ýŢåŮŦ澳ªýĽĽùýŢ^ýŮƚÖĽŦóěĵųŦŦ
ƌğŢıŦÖĻƌğŢù澴òĵýğòŮùÖŦƒĻòŅĵ灒\D<灒ýğĽēýŦóěÖĵŮýŮ澳
Andere Einstellungen
DC Standy Zeit >
Gerät Standby Zeit
Wechselrichter ECO ein/aus
>
Auto MIG SOC ein/aus
Auto MIG SOC
Einstellung
95%-90% >
Softwareversion
Andere
>
>
Andere Einstellungen
Others
DC Standy Zeit
Gerät Standby Zeit
Wechselrichter ECO ein/aus
Auto MIG SOC ein/aus
ON-Grid time setting 23:45-00:45
Screen standby time >
Auto MlG
SOC Einstellung
Abbruch
Start(%) End(%)
Bestätigen
95 90
94 89
96 91
97 92
>
>
Hinweis:
— 9 —
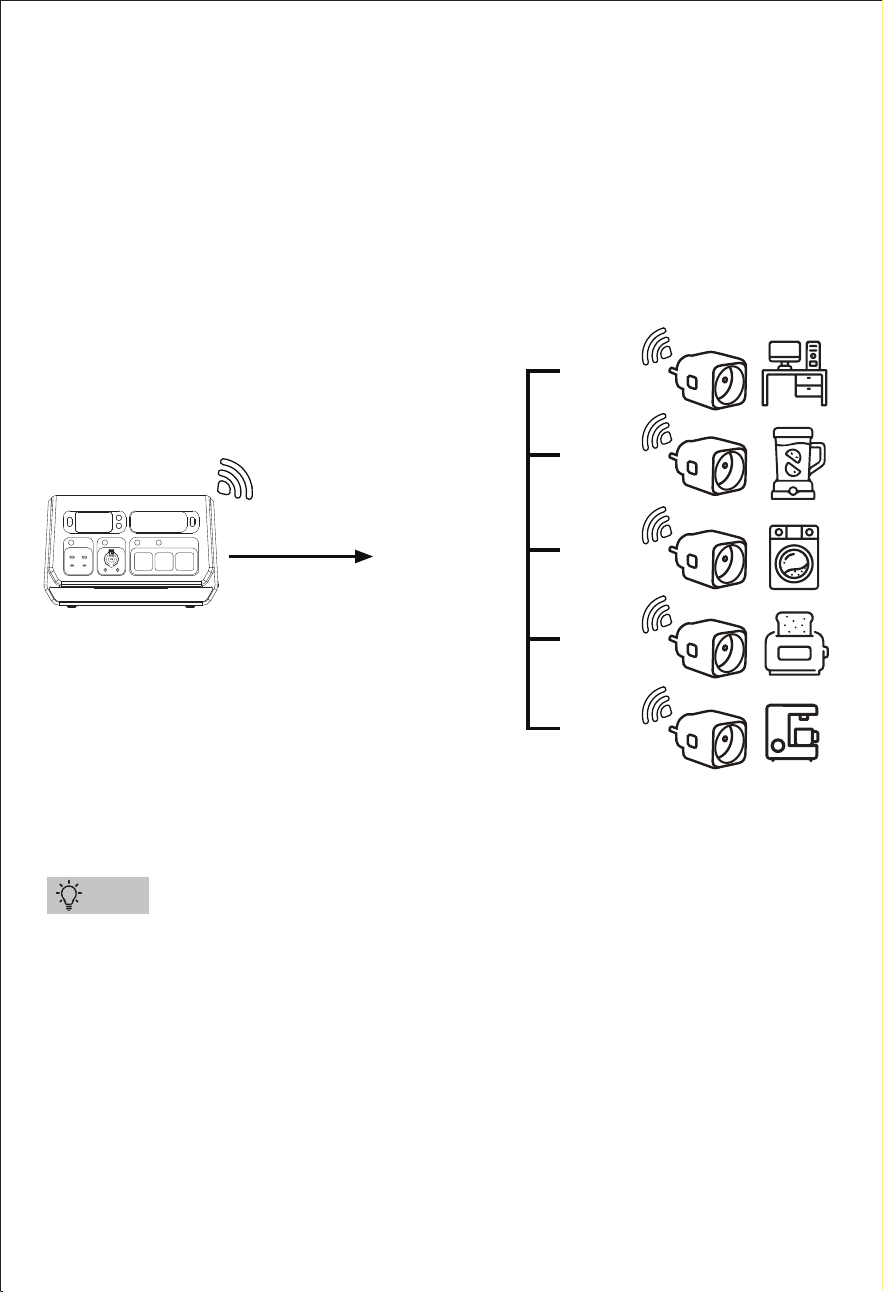
7.4 Smart MIG-Modus
漧Bis zu fünf intelligente MIG-Stecker können hier hinzugefügt werden.
漨Diese Stecker müssen separat beim Gerätehändler erworben werden.
Anderswo erworbene Smart Plugs können nicht verwendet werden.
漩Bitte kombinieren Sie das Gerät mit Haushaltsgeräten, um diese Funk-
tion nutzen zu können.
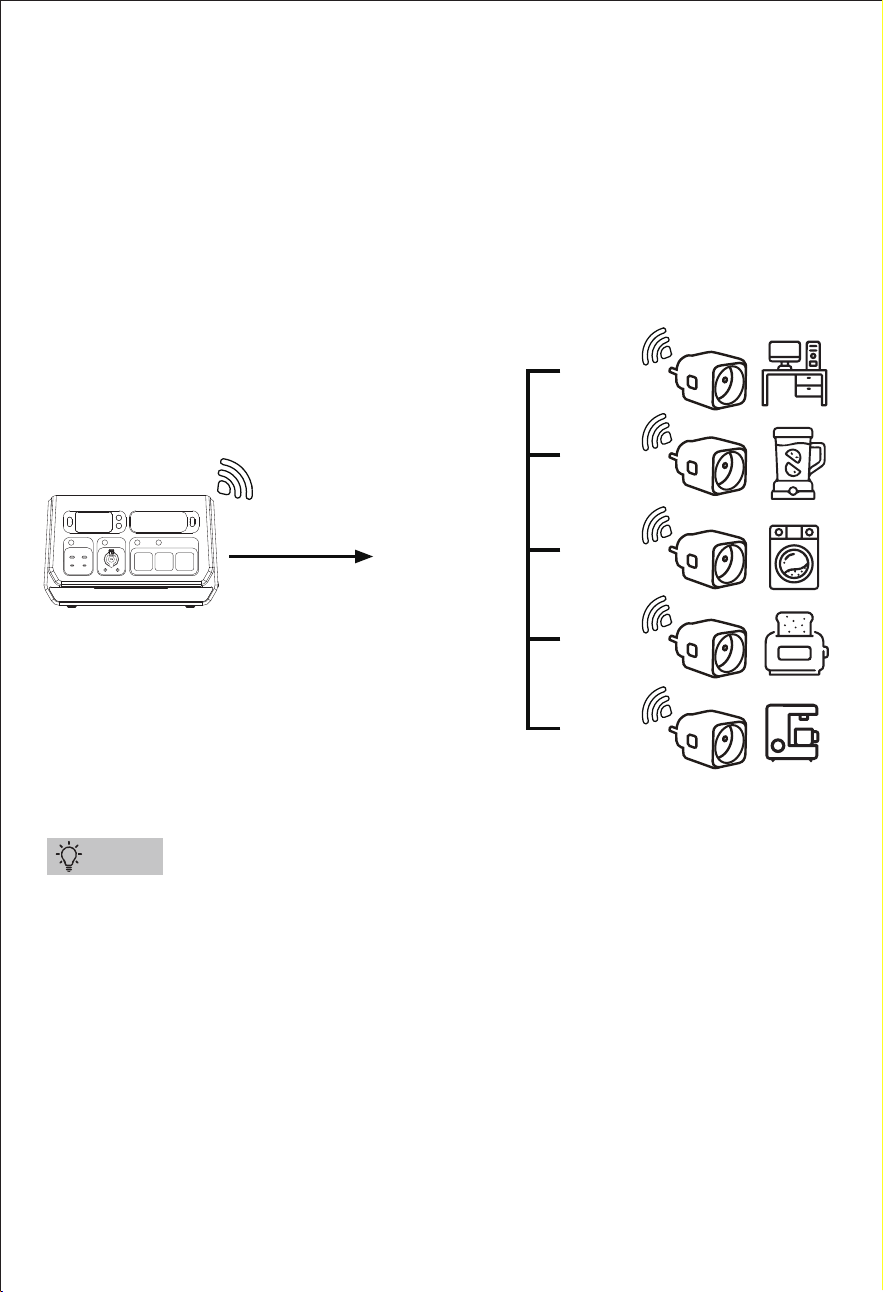
Diese Funktion erfordert die Verwendung spezieller intelligenter
MIG-Stecker, die in der Geräteanwendung gebunden und hinzugefügt
werden müssen.
Diese intelligenten MIG-Stecker werden verwendet, um den Stromver-
brauch von Geräten zu sammeln. Die Powerstation passt die Netzan-
schlussleistung automatisch entsprechend an, um eine genauere
Netzanschlussleistung zu erzielen und den Energiespareffekt zu
verbessern (siehe folgendes Diagramm).
Tipps
SGR-PPS2000-3 PRO
AC Netzstrom
Netzanschlussleistung
800W Max
100W
200W
500W
700W
滽滵滵ª
— 10 —
漧Um Energie zu sparen, kann die Smart MIG Funktion nur funktionieren,
wenn die Smart MIG Leistung > 100 W ist.
漨 Die Funktion Smart MIG hat Vorrang vor den Funktionen Smart
Charging, AC Timing Charging und Timing MIG.
漩 (Drücken der Taste "MIG/OFF-Grid" am Gerät oder "Manuelle Netzan-
bindung ein/aus" in der App) und der AC-Lademodus der App beenden
automatisch die smart MIG-Funktion.
漪Wenn der Ladezustand der Gerätebatterie < 10% ist, wird die Netz-
verbindung unterbrochen.
漫 Wenn Anwender in Deutschland eine Netzleistung von mehr als 800 W
verwenden, müssen sie dies den zuständigen Behörden melden und von
einem Fachmann installieren lassen.
漬Der AC-Schalter und alle AC-Ausgangsbuchsen funktionieren nicht im
Netzbetrieb.
* Beim Drücken der Taste "MIG/OFF-Grid" wird der AC-Ausgang automa-
tisch abgeschaltet, während die DC- und USB-Ausgänge sowie die
LED-Funktion nicht beeinträchtigt werden.
>
>
2000-3 PRO
Steckdose
Intelligente Steckdose (0/1)
+ Steckdose hinzufügen
Steckdosen Gesamtleistung
Smart-Grid Seitensteckdose(0/5)
+ Steckdose hinzufügen
0W
2000-3 PRO
Eingang 27OW
AC ein/aus
DC ein/aus
USB ein/aus
Ausgang 302W
Manuelle
Netzanbindung ein/
aus
200W 400W 600W 800W
0W
0W
0W
Gerät
Smart MlG ein/aus
302W
Hinweis:
“Manuelle Netzanbindung ein/aus”:
Schaltet die Smart MIG-Funktion ein oder aus. (Dieses Symbol
kann nur auf der App angezeigt werden, nachdem der intelligente
MIG-Stecker gebunden wurde, ansonsten wird es nicht auf der App
angezeigt.)
— 11 —
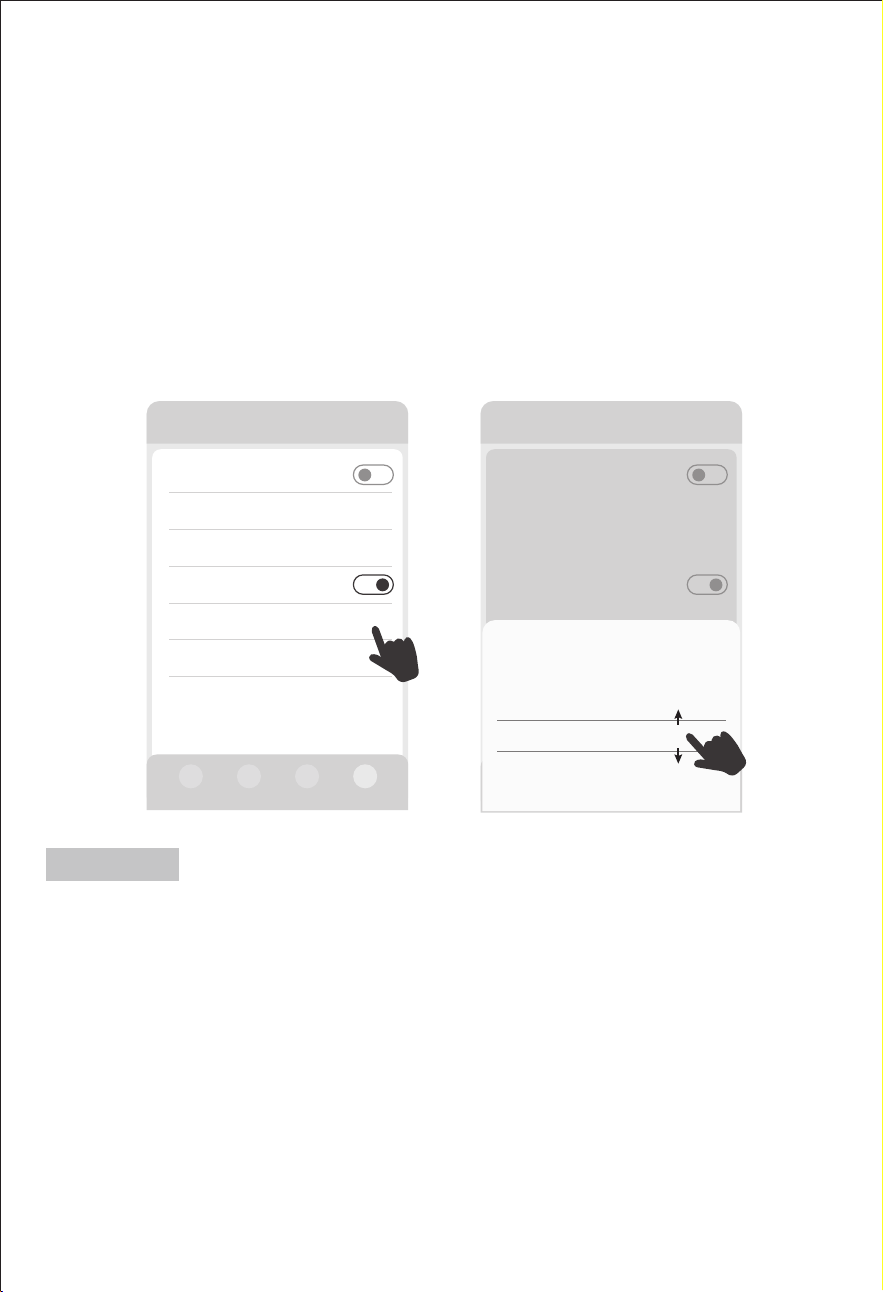
7.5 AC-Ladezeit
Mit dieser Funktion können Sie die Zeitdauer und die Ladeleistung des AC-Ladevor-
gangs einstellen. Der Benutzer kann vier verschiedene AC-Ladezeiten und AC-Lade-
leistungen einstellen.
漨Er kann in Verbindung mit einer Aufdach-Photovoltaikanlage eingesetzt werden,
um den von der Aufdach-Photovoltaikanlage erzeugten Strom zu speichern und
ihn dann zur Energieeinsparung in Spitzenverbrauchszeiten an das Hausnetz anzus-
chließen. (Wie zu nutzen: Mit der Anwendung des netzgekoppelten Photovol-
taik-Wechselrichters kann die minimale Stromerzeugungsleistung des Systems in
verschiedenen Zeitabschnitten ermittelt werden, dann kann die Netzladeleistung in
verschiedenen Zeitabschnitten mit dieser AC-Timing-Ladefunktion dieser Powersta-
tion eingestellt werden. Es ist darauf zu achten, dass die Stromerzeugungsleistung
des netzgekoppelten PV-Wechselrichters nicht überschritten wird).
Anwendung
Zeit(Std.)
€/kwh
0 1 2 3 4 5 6 7 8 9 10 11 12 13 14 15 16 17 18 19 20 21 22 23 24
漧Wird normalerweise in Gebieten mit unterschiedlichen Strompreisen verwendet,
wobei der Energiespeicher dann geladen wird, wenn der Strom am billigsten ist,
und die Netzeinspeisung dann erfolgt, wenn der Strompreis am höchsten ist.
Netzeinspeisung bei hohen Strompreisen
AC-Laden bei niedrigen Strompreisen
— 12 —
漧Ein schlechtes Netzsignal des Gerätes beeinträchtigt die Leistung der Zeitmessung.
② Die Netz- und die Ladefunktion des Gerätes können nicht gleichzeitig verwendet
werden.
③ Bei Verwendung dieser Funktion müssen die Schalter Smart Charging und Smart
MIG ausgeschaltet sein.
④ Wenn sich die Funktionen "MIG-Zeitsteuerung" und "AC-Ladezeitsteuerung"
überschneiden, hat die Funktion "MIG-Zeitsteuerung" Vorrang.
⑤ Bei manuellem Laden (Blitztaste am Gerät oder App AC-Lademodus drücken)
wird die Zeitmessung automatisch beendet.
* Während des eingestellten Zeitraums der AC-Ladezeitmessung muss sichergestellt
sein, dass die Netzspannung normal ist, das Gerät an das Stromnetz angeschlossen
ist und sich das Stromnetz in einem normalen Zustand befindet, damit diese Funktion
funktioniert.
Andere Einstellungen
DC Standy Zeit >
Gerät Standby Zeit
Wechselrichter ECO ein/aus
>
MIG Zeitschalter An/Aus
AC Zeitschalter
aufladen ein/aus
Andere
Allgemeine Einstellungen
>
Timer Einstellungen
01h00min
01h00min
Timer Einstellungen
Time period
Zeitraum
>
>100W
00:00 - 00:00
Speichern
Hinweis:

— 13 —
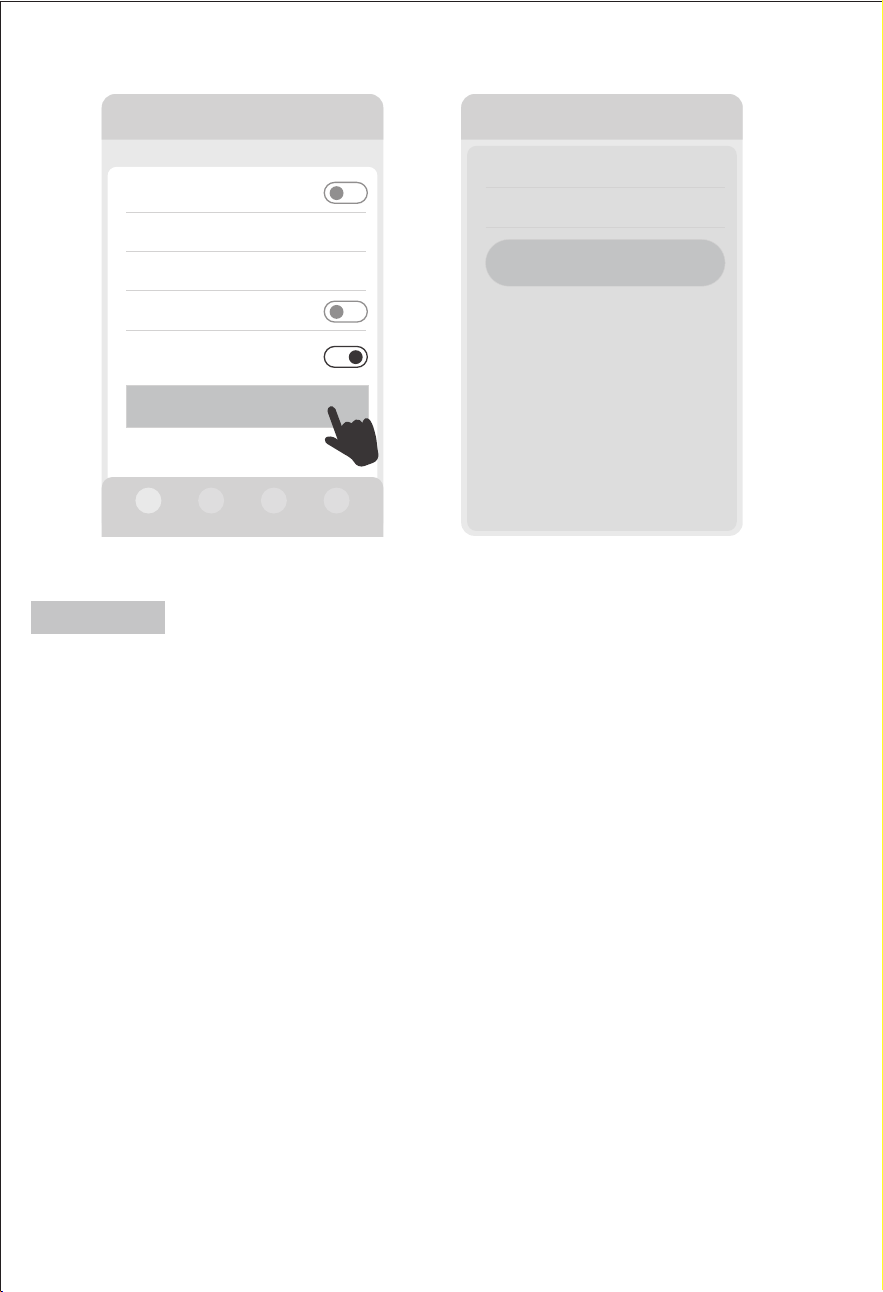
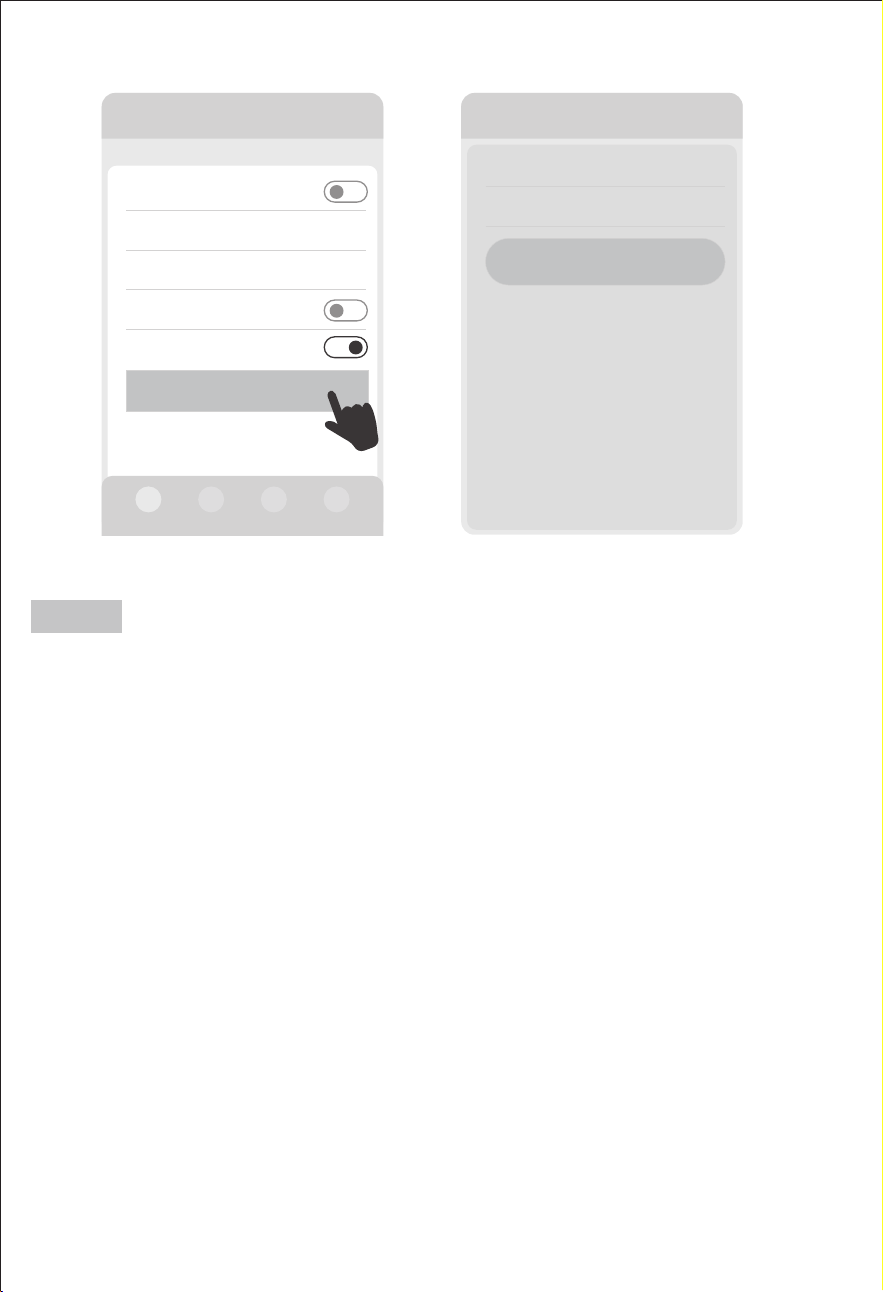
7.6 Intelligenter Lademodus
Um diese Funktion nutzen zu können, muss das Gerät mit einer Balkon-Photovol-
taikanlage kombiniert werden. Um diese Funktion nutzen zu können, speichert das
Gerät die Energie aus der Photovoltaikanlage des Microgrids in der Powerstation.
Für diese Funktion ist ein spezieller intelligenter Ladestecker erforderlich, den Sie bitte
in der App des Geräts einbinden und hinzufügen.
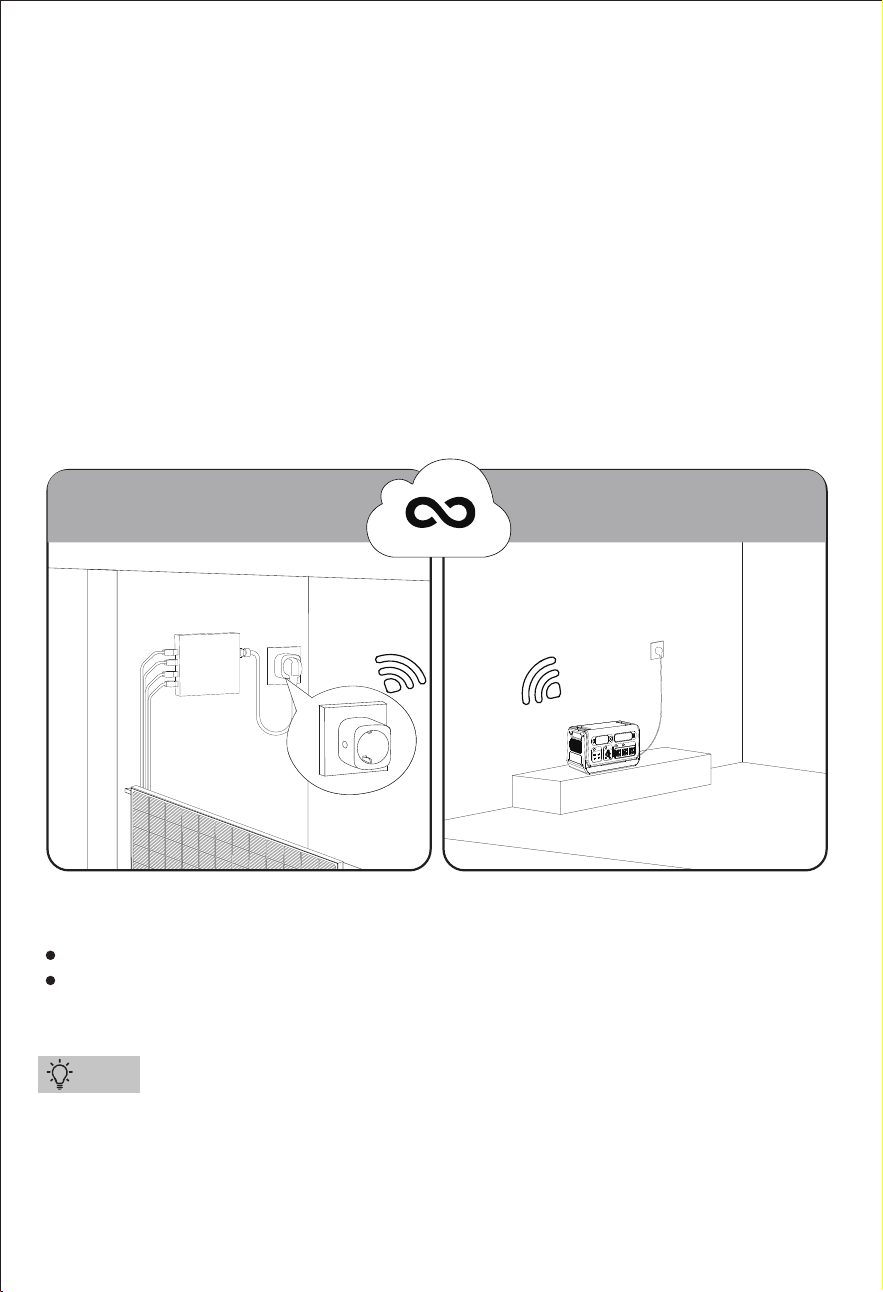
Dieser intelligente Ladestecker sammelt die Produktionsdaten vom Balkon
Mikro-Wechselrichter und übermittelt sie an die Cloud-Plattform. Die Cloud Plattform
sendet die Daten an die Powerstation zurück. Nachdem die Powerstation die Daten
von der Cloud-Plattform erhalten hat, startet es automatisch den Ladevorgang
nach einer Reihe von Auswertungslogiken. Außerdem steuert es die Ladeleistung so,
dass sie geringer ist als die Ladeleistung der Cloud-Plattform. Außerdem steuert es
die Ladeleistung so, dass sie geringer ist als die Erzeugungsleistung des Photovol-
taik-Mikro-Wechselrichters auf dem Balkon, wodurch sichergestellt wird, dass die
Powerstation niemals Strom aus dem Haushaltsnetz verbraucht.
漧Hier kann nur eine intelligente Ladebuchse hinzugefügt werden.
漨Dieser Stecker muss separat beim Gerätehändler erworben werden. Anderswo
gekaufte Smart Plugs können nicht verwendet werden.
Daten zur Stromerzeugung
sammeln
Intelligente Steuerung
des Ladevorgangs
Balkon/Terrasse Abstellraum/Garage
Intelligenter
Stecker
Cloud-Plattform
Tipps
Kein direkter Anschluss an das installierte PV-Mikronetz.
Die von der Balkon-PV-Anlage erzeugte Energie kann über eine beliebige
Steckdose im selben WiFi-Bereich bezogen werden.

— 14 —
漧Um Energie zu sparen, kann die intelligente Ladefunktion nur funktionieren,
wenn die intelligente Ladeleistung > 100W ist.
漨 Die intelligente Ladefunktion hat Vorrang vor der AC-Timing-Ladefunktion und
der MIG-Timing-Funktion.
漩Die intelligente MIG-Funktion hat Vorrang vor der intelligenten Ladefunktion.
漪Die manuelle Netzanschlussfunktion (Drücken der Taste "MIG/OFF-Grid" am
Gerät oder "Manuelle Netzanbindung ein/aus" in der App) und die manuelle
Ladefunktion (Drücken der Blitztaste oder des AC-Lademodus in der App) haben
Vorrang vor der intelligenten Ladefunktion.
>
>
2000-3 PRO
Steckdose
Intelligente Steckdose (0/1)
+ Steckdose hinzufügen
Steckdosen Gesamtleistung
Smart-Grid Seitensteckdose(0/5)
+ Steckdose hinzufügen
0W
2000-3 PRO
DC/Solar Leistung
DC/Solar Strom
Intelligentes
Aufladen ein/aus
Ausgang 0W
0W
0.0A
700W
Gerät
AC Lademodus 0W
Normal Schnell Langsam
Eingang 700W
Hinweis:
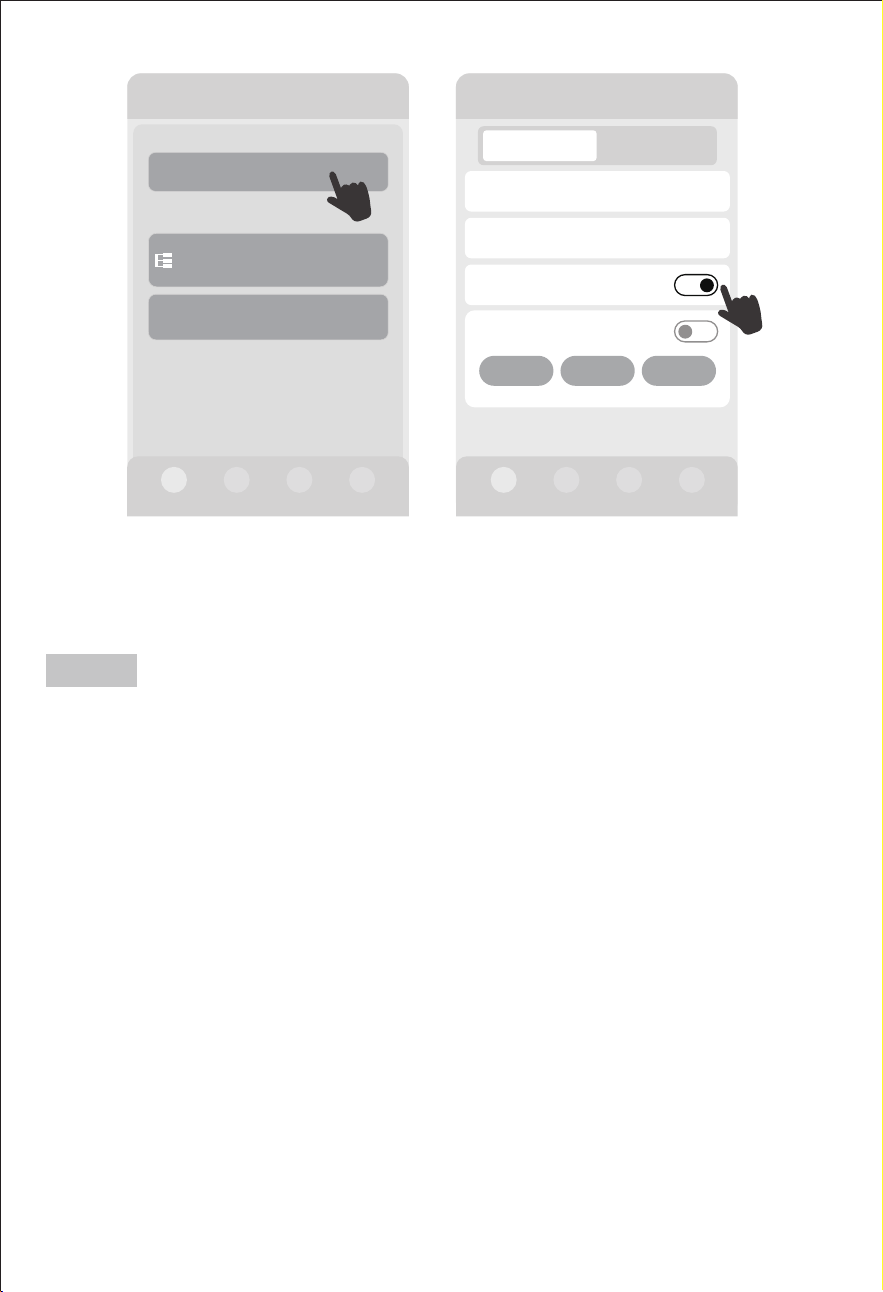
“Intelligentes Aufladen ein/aus”:
Schaltet die intelligente Ladefunktion ein oder aus.
(Dieses Symbol kann nur in der App angezeigt werden, nachdem der
intelligente Ladestecker verbunden wurde, andernfalls wird es nicht in der
App angezeigt.)
— 15 —
7.7 Netzunabhängiger Betrieb
漧Nachdem das Gerät von einer Wi-Fi-Umgebung getrennt wurde, muss es 3-5
Minuten warten, bevor es über Bluetooth mit Ihrem Telefon verbunden werden kann.
漨 Bitte stellen Sie sicher, dass Ihr Telefon und das Gerät nicht mehr als 10 Meter
voneinander entfernt sind und sich keine Hindernisse dazwischen befinden.
漩Das Gerät muss möglicherweise neu gestartet werden, bevor es über Bluetooth
mit Ihrem Telefon verbunden werden kann (ein Neustart des Geräts führt nicht zum
Trennen der Verbindung).
ŏAußenverwendung
Im netzunabhängigen Modus unterstützt diese Powerstation das gleichzeitige Laden
und Entladen, und Sie können Ihre Geräte betreiben, während die Powerstation
aufgeladen wird.
Dieses Gerät unterstützt die Verbindung mit dem Mobiltelefon im Freien (oder an
Orten ohne Wi-Fi). Die Verbindungsschritte sind die gleichen wie oben beschrieben.
Methode 1: Verbinden Sie Ihr Telefon mit dem Hotspot eines anderen Telefons und
verbinden Sie auch das Gerät mit diesem Hotspot, um das Gerät im Freien (oder an
Orten ohne Wi-Fi) zu verbinden.
Methode 2: Wenn Sie das Gerät bereits über 2.4G Wi-Fi mit Ihrem Telefon in Innen-
räumen verbunden haben und die Verbindung nicht getrennt haben, können Sie
das Gerät über Bluetooth mit Ihrem Telefon verbinden, wenn Sie das Gerät im Freien
(oder an Orten ohne Wi-Fi) verwenden möchten.
Hinweis:
— 16 —
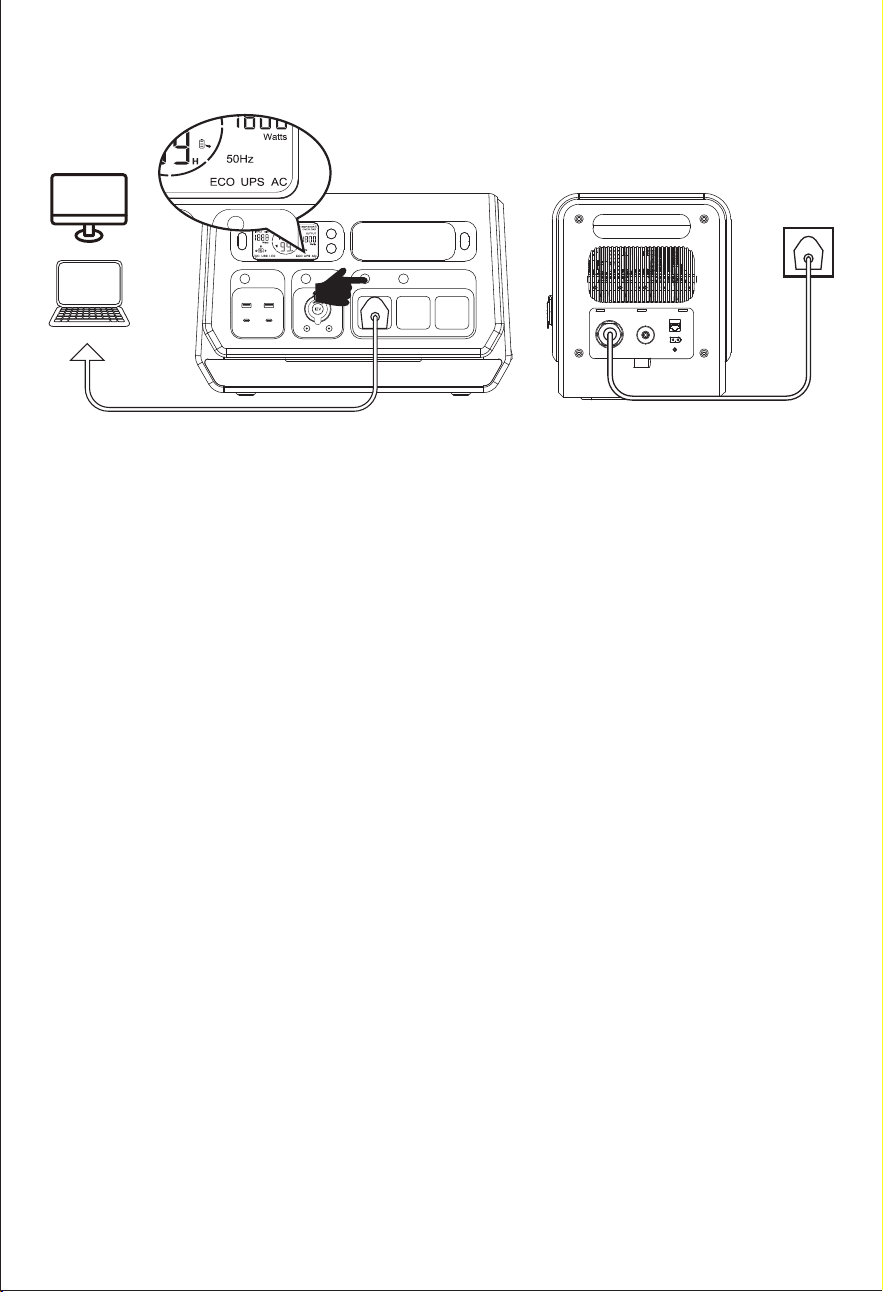
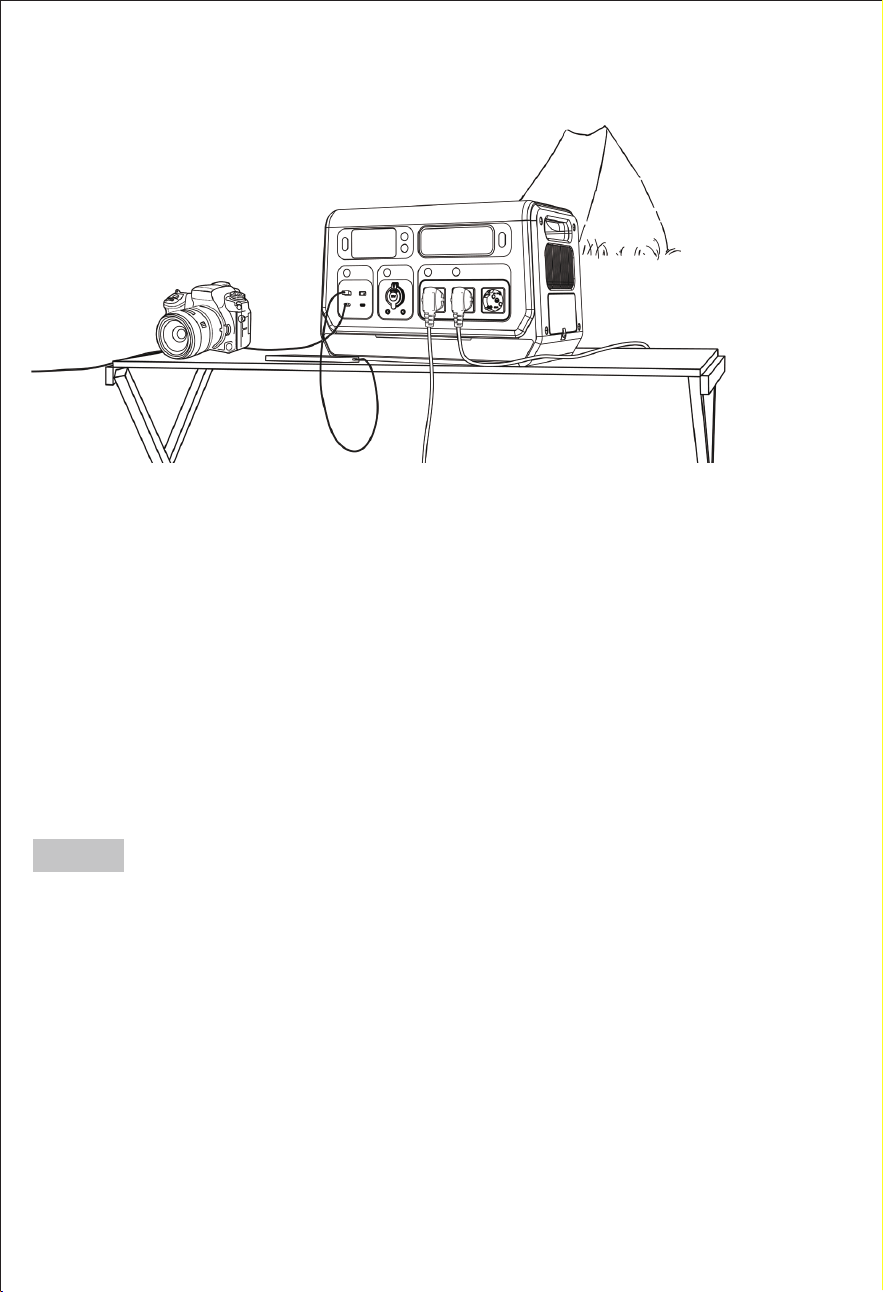
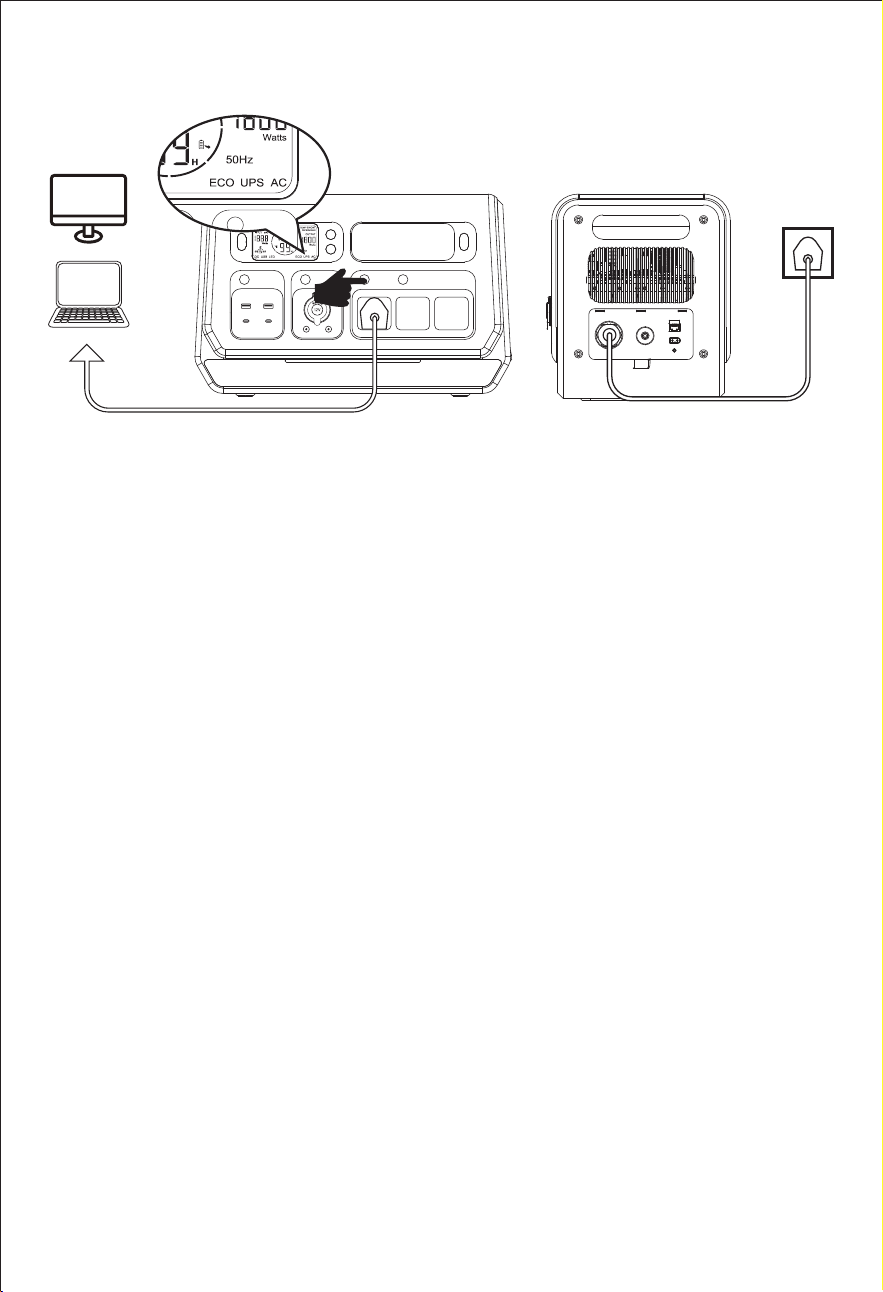
USV-Bypass-Modus: Schließen Sie die Powerstation an das Wechselstromnetz an,
schalten Sie dann den Wechselstromausgang ein und die Anzeige "USV" "AC"
erscheint. In diesem Modus unterstützt der Wechselstrom direkt die Lasten an
den Wechselstromausgängen und lädt das Gerät auf.
Hinweis: Max. Ausgangsleistung: 1800W.
Im USV-Bypass-Modus wird die AC-Ausgangsleistung vorrangig zur Verfügung
gestellt, die überschüssige Leistung wird zum Laden der Powerstation verwen-
det.
Der Wechselrichter ist im USV-Bypass-Modus deaktiviert. Das Gerät wechselt nur
in diesen Modus, wenn es mit dem AC-Netz verbunden ist UND der AC-Ausgang
eingeschaltet ist.
ŏUSV
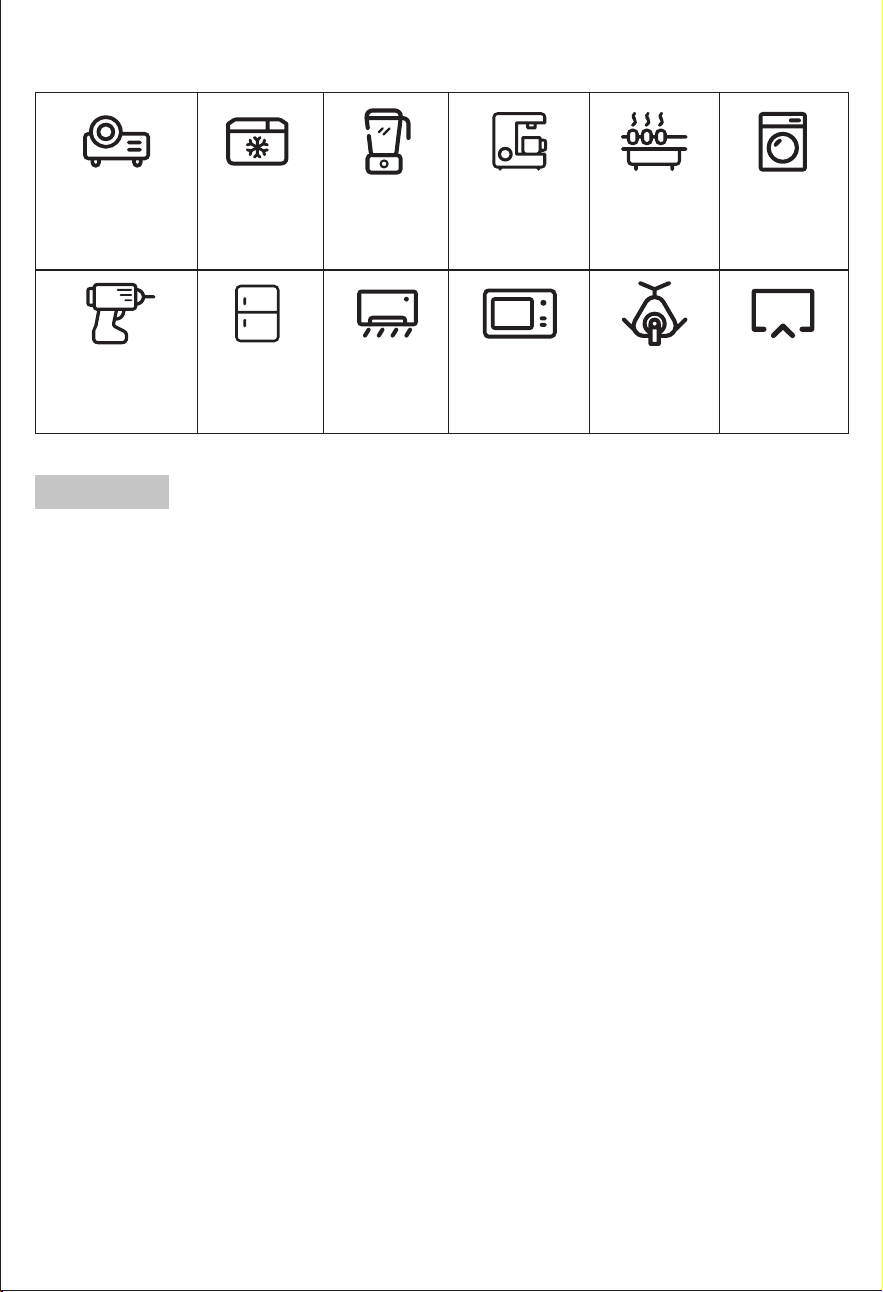
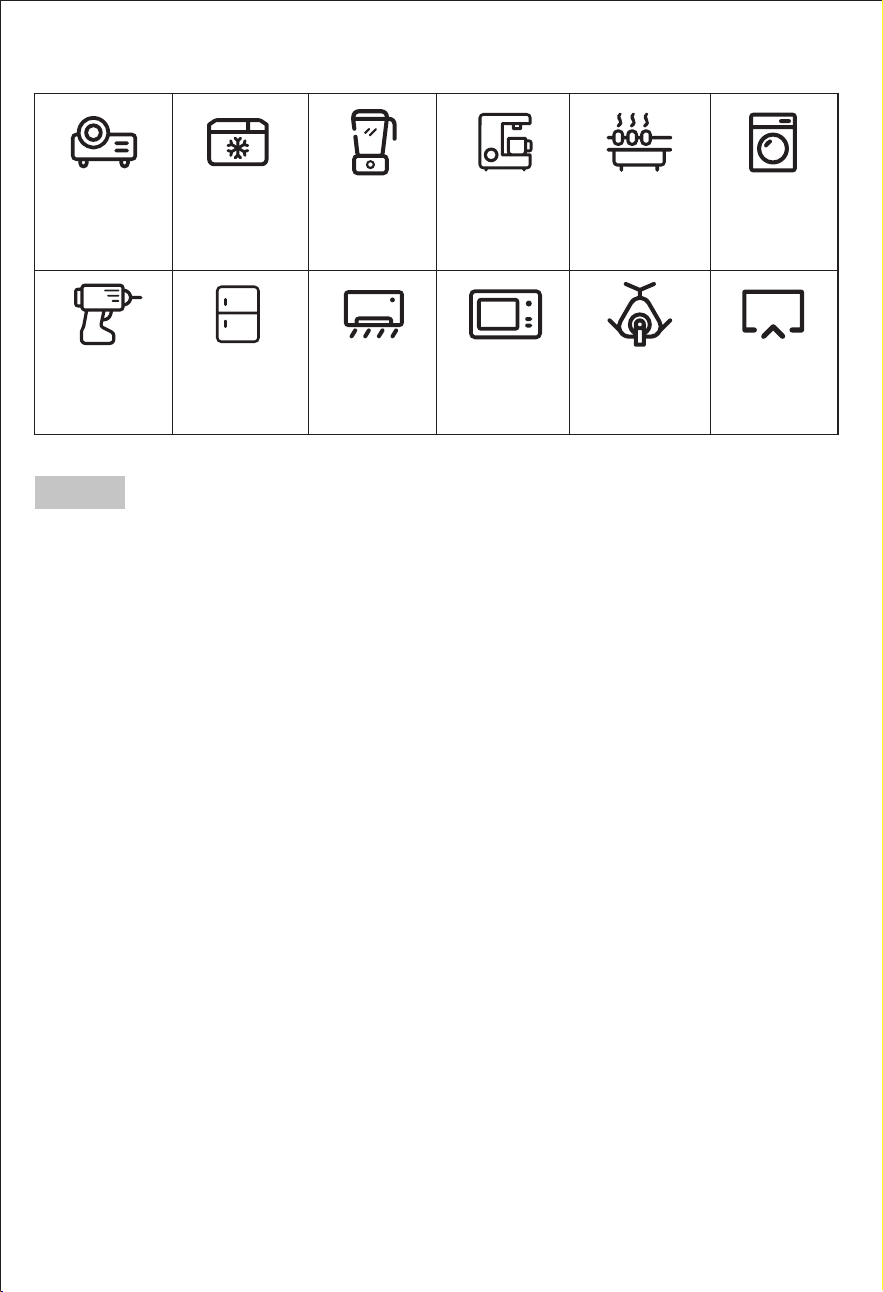
Projektor
18,4 Std.
(100W)
*Mini-Kühler
20.5 Std.
(90W)
Mixer
6.1 Std.
(300W)
Kaffeemaschine
3.4 Std.
(550W)
Elektrischer Grill
1.2 Std.
(1600W)
Waschmaschine
3.7 Std.
(500W)
Handbohrmaschine
31 Std.
(60W)
*Kühlschrank
3.5-24 Std.
(520W)
*Klimaanlage
1.6 Std.
(1150W)
Mikrowellengerät
1.6 Std.
(1160W)
CPAP
46 Std.
(40W)
FERNSEHER
17 Std.
(110W)
— 17 —
漧Laufzeit=2048Wh*90%(Umwandlungswirkungsgrad)/Leistung (Watt) Ihres Geräts.
Laufzeit =2048*90% Umwandlungswirkungsgrad / Gerätenennleistung z.B. Wenn Sie
HLQH0LNURZHOOHPLW:EHWUHLEHQEHWUlJWGLH/DXI]HLW:Kê:§
1,8432Std.
漨Unterstützt alle elektronischen Geräte mit weniger als 2200 Watt.
漩Die oben genannten Ladezeiten sind nur als Richtwerte zu verstehen. Die tatsäch-
liche Nutzungszeit hängt von der Leistung der angeschlossenen Geräte ab.
Lebensdauer der Geräte
Hinweis:
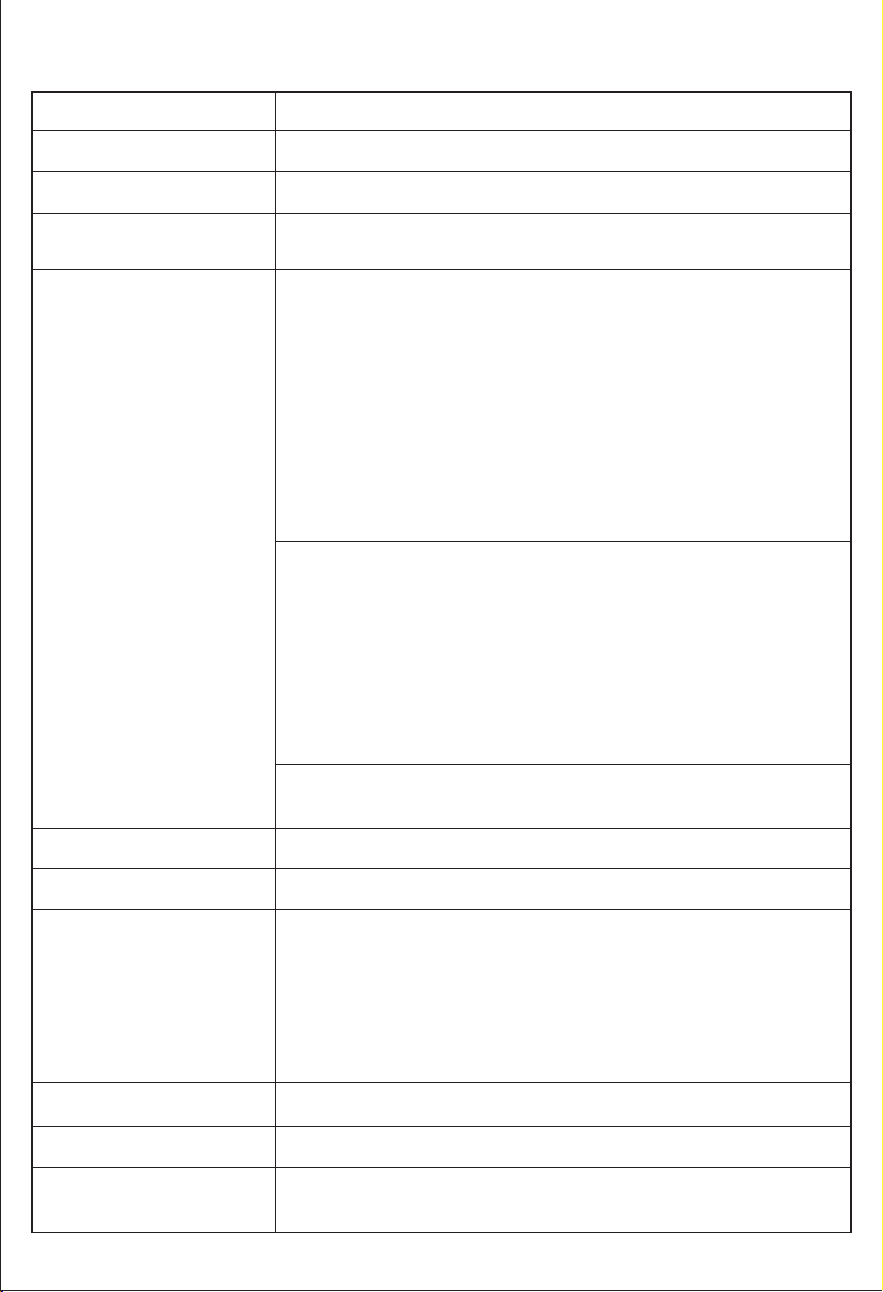
8. Technische Spezifikation
Batteriekapazität
AC-Eingang Ladeleistung
Auto-Eingang Aufladung
Ausgangsanschluss
LED-Licht
Sicherheit
Gewicht & Größe
3W MAX, 3 Stufen (L/M/H einstellbar) mit SOS-Funktion
AC-Ausgangswellenform
Reine Sinuswelle
Kurzschluss
Über-Strom
Über-Spannung
Unter-Spannung
Über-Last
Über-Temperatur
1*Zigarettenanzünder 13,8V/12A Max + 2*DC5521
Nennausgang 13,8V/5A Max (insgesamt 12A Max)
3*AC Ausgang: 230V, 50Hz
Netzunabhängige Ausgangsleistung: 2200W, Peak 4400W
Netzgekoppelte Ausgangsleistung: 230V AC, 50Hz, 800W, 3.5A
Max Hinweis: Um die Batterieleistung zu schützen, wenn die
%DWWHULH:HQQGLH%DWWHULHNDSD]LWlWLVWZLUGGHU$&$XV-
gang im netzunabhängigen Modus ausgeschaltet; Wenn die
%DWWHULHNDSD]LWlWLVWZHUGHQGLH'&XQG86%$XVJlQJH
im netzunabhängigen Modus ausgeschaltet; Wenn die
%DWWHULHNDSD]LWlWLVWZLUGGHUQHW]JHEXQGHQH$XVJDQJ
im netzgebundenen Modus ausgeschaltet.
USB-Ausgang 1: QC18W Max
(5V2.4A&9V2A&12V1.5A)
USB-Ausgang 2: QC18W Max
(5V2.4A&9V2A&12V1.5A)
USB Typ-C 1: PD100W
(5V3A&9V3A&12V3A&15V3A&20V5A)
USB Typ-C 2: PD27W
(5V3A&9V3A&12V2.25A&15V1.8A&20V1.35A)
LiFePO4 2048Wh±5%(40Ah/51.2V)
PV 18-100V/20A 1200W Max
Ladetemperatur: 0~40˫(32~104˭)
Entladetemperatur: -10~40˫(14~104˭)
Umgebungstemperatur
Betriebstemperatur
Solareingang
Ladeleistung
DC 12-24V/10A 240W Max
AC 174-264V/1500W Max.
PDO'2'
24.2kgs/53.4lbs 465*260*295mm/18.31in*10.24in*11.61in
Batterie Lebensdauer
— 18 —
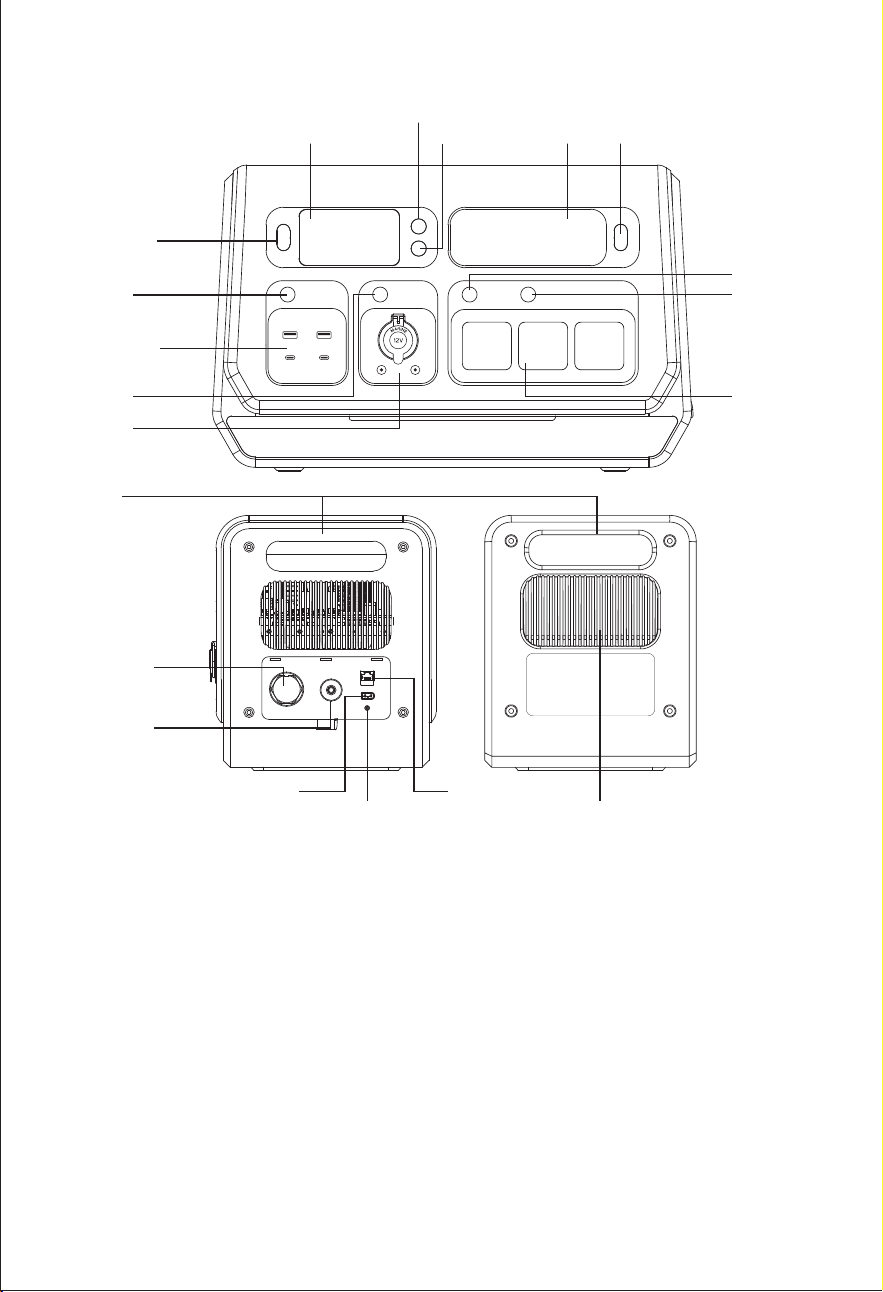
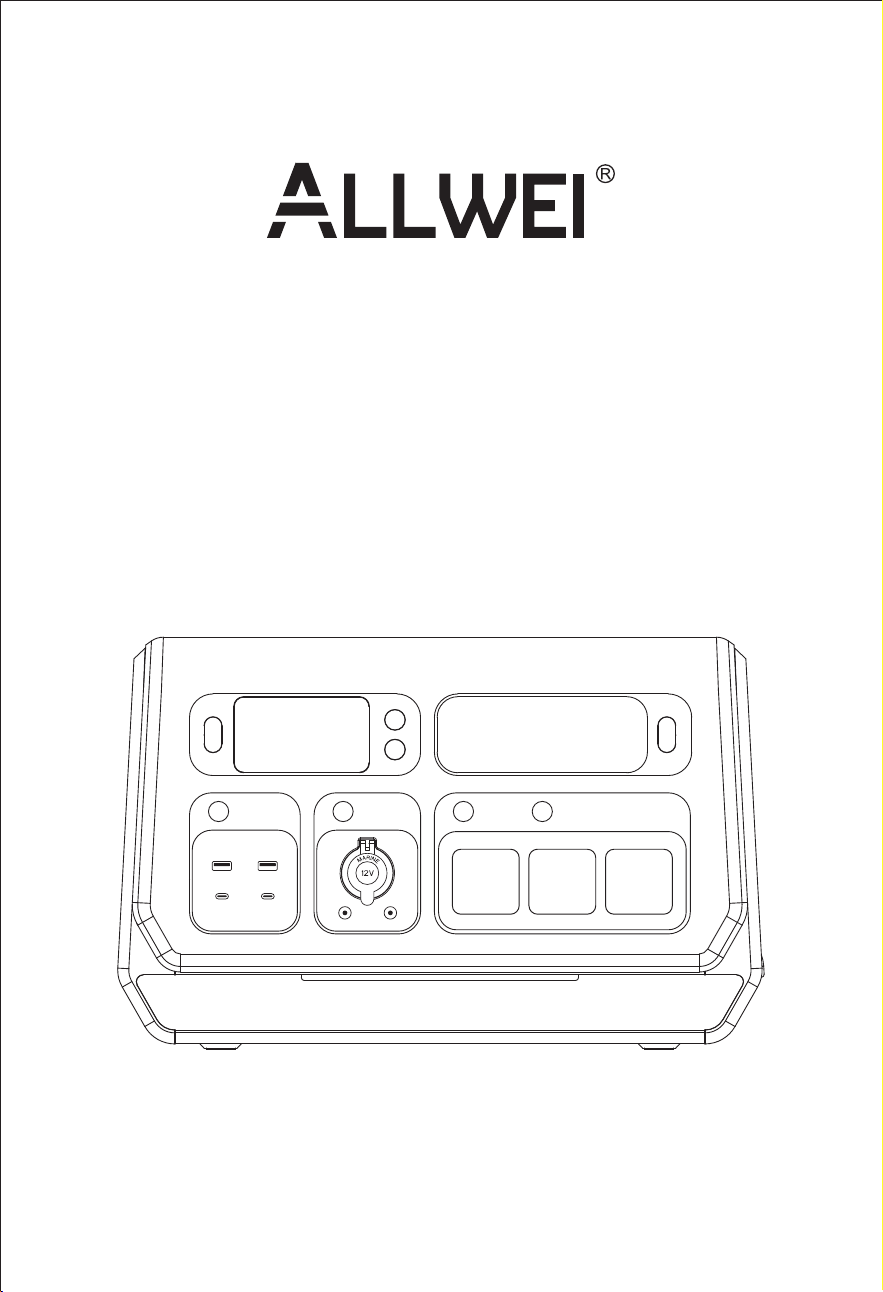
9. Produktübersicht
*The circuit breaker is an electrical safety switch designed to protect your
equipment from damage caused by overcurrent or short circuit. When the AC
output exceeds 2400W in invert mode or when the AC output exceeds 15A in
UPS mode, it will automatically trip. Press it once to reset the unit after these
symptoms disappear.
*Der Erdungsanschluss ist für einige elektrische Geräte vorgesehen, die geerdet
werden müssen.
*Der CT/485-Anschluss ist für den Kundendienst oder das Hinzufügen weiterer
Funktionen in der Zukunft vorgesehen.
— 19 —
PV18-100V/20A CT/485
Erdungsanschluss
230VAC/50Hz
15A MAX
Stromkreisschutz
250VAC/15A
KuhlungLufte
ON/OFF-Taste
LCD
WiFi-Taste
Power-Taste
LED
AC-Taste
MIG/Off-Grid
Button
USB-Taste
Handgriff
DC-Ausgang
12V/12A
AC-Ausgang
2200W Max
USB-A QC3.0*2
USB-C PD100W
USB-C PD27W
DC Taste
LED Taste
9.1 Inhalt des Bildschirms
1
2
3
4
5
6
14
15
16
17181920
7 8 9
10
11 12
13
Solarpanel-Eingangsanzeige
LED-Anzeige
Prozentsatz der
verbleibenden Batterie
Eingangsstatus-Anzeige
Verbleibende Nutzungszeit oder
Verbleibende Ladezeit (Stunde)
Ausgangsleistung
AC-Ausgangsanzeige
UPS-Funktions-Anzeige
DC-Ausgangs-Anzeige
USB-Ausgangsanzeige
Eingangsleistung
Anzeige für den Lademodus
(Q, N, S)
Ausgangsstatus-Anzeige
Temperature Warning
1
2
3
4
5
6
14
15
16
17
18
19
20
7
8
9
10
11
12
13
WiFi-Anzeige
Anzeige der ECO-Funktion
Ausgangsfrequenz
Kurzschluss-Warnung
Überlast-Warnung
MIG/Off-Grid Funktionsanzeige
漧*Die verbleibende Nutzungszeit hängt von der Echtzeit-Ausgangsleistung
der geladenen Geräte ab.
Die verbleibenden Stunden geben die verbleibende Lade-/Entladezeit an.
Wenn gleichzeitig geladen und entladen wird, wird vorrangig die
verbleibende Entladezeit angezeigt.
*(Die verbleibende Zeit kann Fehler enthalten und die Daten dienen nur als
Referenz).
9.2 Tastensteuerung
— 20 —
Hinweis:
漨Allgemeine Angaben zum MIG-Symbol
Kein MIG-Symbol auf dem Bildschirm
Das "MIG"-Symbol blinkt
"MIG"-Symbol bleibt eingeschaltet
Der Grid-Verbindungsmodus ist nicht aktiviert.
Der Grid-Verbindungsmodus ist aktiviert und
muss noch aktiviert werden.
Der Modus "Grid-Verbindung" ist aktiviert.
漩Ein-/Ausschalten
Drücken Sie kurz auf die Ein/Aus-Taste, um die Powerstation ein- oder auszus-
chalten.
Hinweis: Dieses Gerät kann durch Drücken der Ein/Aus-Taste ausgeschaltet
werden, wenn es sich im Netzbereitschaftsmodus befindet. Wenn das Netz oder
die PV-Anlage geladen wird, kann dieses Gerät nicht ausgeschaltet werden
und muss den Ladezustand verlassen, um ausgeschaltet zu werden.
— 21 —

Den Schalter "MIG/OFF-Grid" einschalten, auf dem Bildschirm erscheint das
Symbol "MIG". Es zeigt an, dass der netzgekoppelte Modus aktiviert ist. In der
Zwischenzeit können Sie den MIG-Modus auch über die Optionen "Manuelle
Netzanbindung ein/aus","Smart MlG ein/aus", "MIG Zeitschalter An/Aus" , "Auto
MIG SOC Ein/Aus" aktivieren, nachdem Sie sich erfolgreich mit der Anwendung
verbunden haben (siehe folgende Abbildung).
10. Aufrufen des netzgekoppelten Modus
— 22 —
AC MIG/OFF-Grid
AC MIG/OFF-Grid
"MIG/OFF-Grid" Schalter
"MIG/OFF-Grid" Schalter
Manuelle Netzanbindung ein/aus
Manuelle Netzanbindung ein/aus
Smart MlG ein/aus
Smart MlG ein/aus
2000-3 PRO
Eingang 200W
AC ein/aus
DC ein/aus
USB ein/aus
Ausgang 302W
Manuelle
Netzanbindung ein/
aus
200W 400W 600W 800W
0W
0W
0W
Gerät
Smart MlG ein/aus
302W
2000-3 PRO
Eingang 0W
AC ein/aus
DC ein/aus
USB ein/aus
Ausgang 200W
Manuelle
Netzanbindung ein/
aus
200W 400W 600W 800W
200W
0W
0W
Smart MlG ein/aus
0W
Gerät
— 23 —
Wenn das Symbol "MIG" im Bereich EINGANG zusammen mit dem Leistungswert
im Bereich AUSGANG angezeigt wird, ist dies die netzgekoppelte Ausgangsleis-
tung und der LCD-Bildschirm zeigt die photovoltaische Eingangsleistung im
Bereich EINGANG an.
MIG Zeitschalter An/Aus
MIG Zeitschalter An/Aus
Andere Einstellungen
DC Standy Zeit >
Gerät Standby Zeit
Wechselrichter ECO ein/aus
>
MIG Zeitschalter An/Aus
Andere
Timer Einstellungen
>
Allgemeine Einstellungen
01h00min
01h00min
Andere Einstellungen
DC Standy Zeit >
Gerät Standby Zeit
Wechselrichter ECO ein/aus
>
Auto MIG SOC Ein/Aus
Auto MIG SOC
Einstellung
95%-90% >
Softwareversion
Andere
Auto MIG SOC Ein/Aus
Auto MIG SOC Ein/Aus
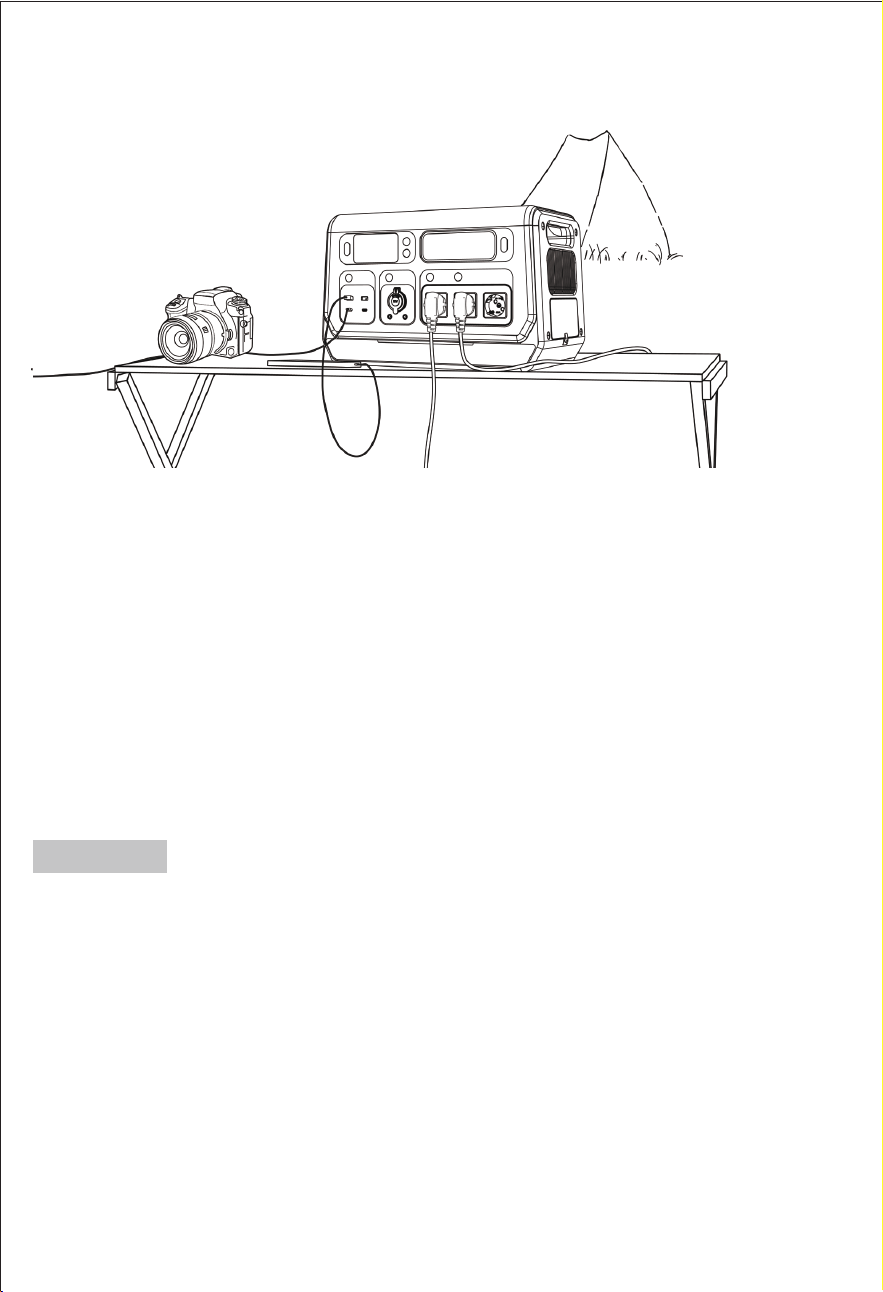
11. Möglichkeiten des Aufladens
11.1 AC-Wandaufladung
11.2 DC-Laden im Fahrzeug
Beim Aufladen in einem 12-Volt-Auto müssen Sie zunächst die Powerstation
einschalten und das Gerät nach dem Einschalten des Netzschalters über das
Autoladekabel direkt an den Zigarettenanzünder des Fahrzeugs anschließen.
Wenn der Ladevorgang beginnt, können Sie den Wechselstromschalter
wieder ausschalten und das Gerät weiterhin über den Zigarettenanzünderan-
schluss aufladen.
12V Autoaufladung
14-16 Stunden
24V Autoladung
7-8 Stunden
Der Zigarettenanzünderstecker MUSS vollständig in die Zigarettenanzünderbuchse
des Gerätes eingesteckt sein.
S: Geräuschloser Lademodus
6-7 Stunden
N: Normaler Lademodus
4-5 Stunden
Q: Schnell Lademodus
1,5-2 Stunden
Bitte schließen Sie das Netzkabel an und drücken Sie die Taste “ ” an der
Vorderseite des Geräts, um den Ladevorgang zu starten. Der voreingestellte
Lademodus dieses Geräts ist "N" (normaler Lademodus). Sie können mit der
Taste zu anderen Lademodi wechseln. Dieses Gerät unterstützt die Auswahl
von '(Q)Schnell-Lademodus', '(N)Normal-Lademodus' und '(S)Stiller Lademodus',
und Sie können in der Anwendung auch den AC-Lademodus auswählen. Es
unterstützt auch die Funktion "AC-Ladezeit" in der App.
— 24 —
2000-3 PRO
DC/Solar Leistung
DC/Solar Strom
Ausgang 0WEingang 1400W
0W
0.0A
AC Lademodus
Normal
1400W
Schnell
Langsam
Gerät
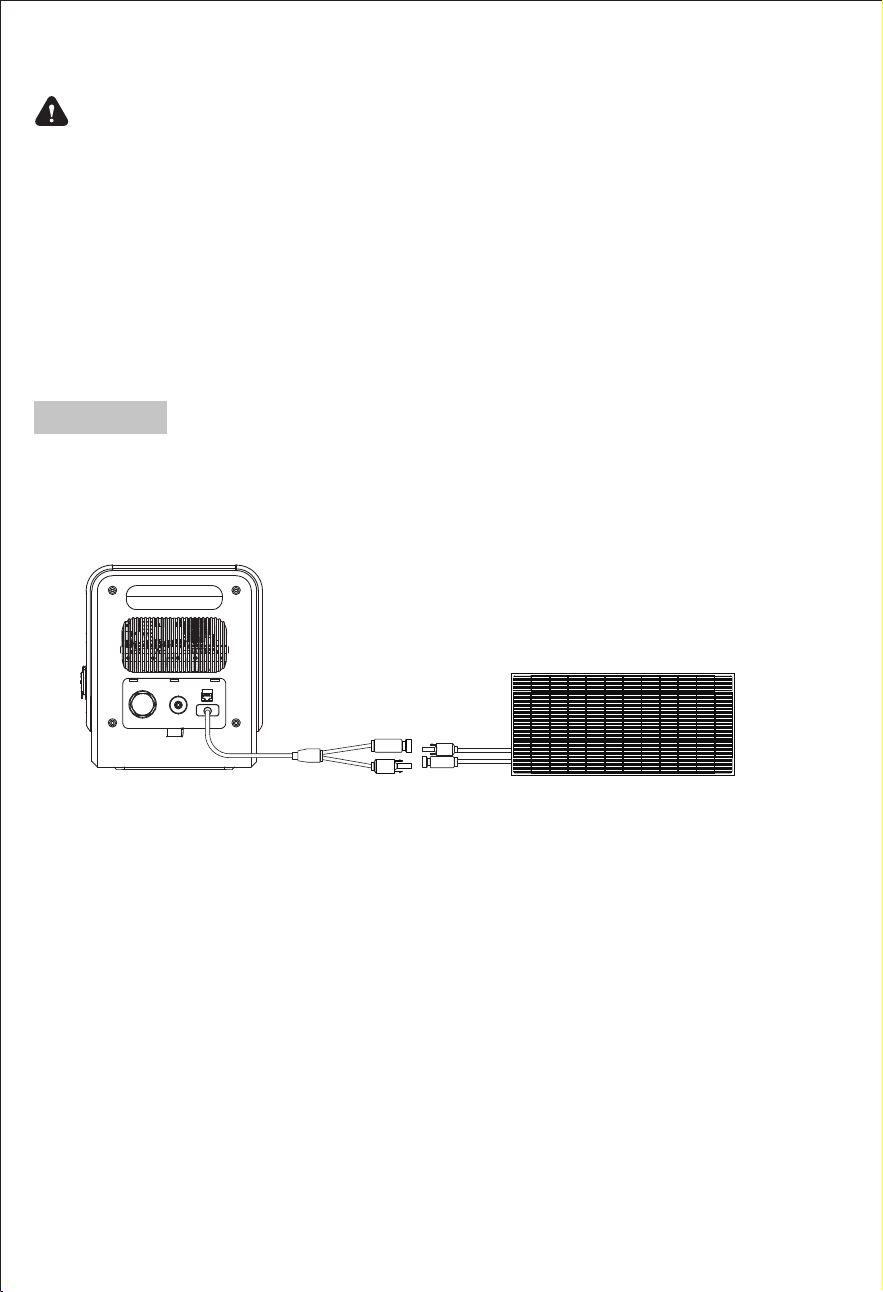
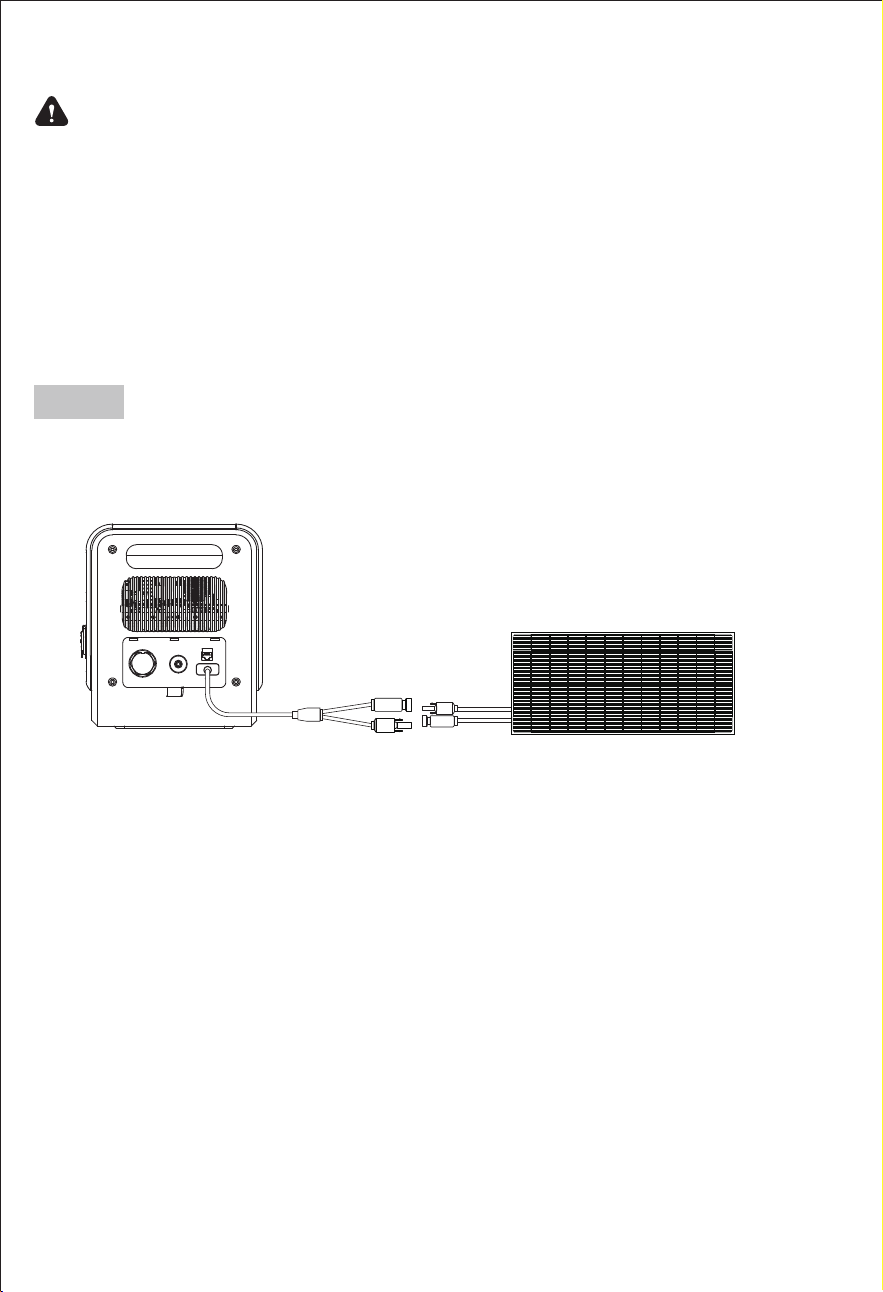
11.3 Solares Aufladen
Bitte stellen Sie sicher, dass Ihre Solarmodule die Leerlaufspannung von
DC18-100V einhalten. Die maximale Eingangsleistung der Powerstation
beträgt 1200W.
1*400W Sonnenkollektor
2) Vergewissern Sie sich, dass die Spannung aller in Reihe geschalteten
Solarmodule gleich ist, und versuchen Sie, denselben Typ von Solarmodul zu
verwenden.
Sicherheitsvorkehrungen beim Aufladen
1) Laden Sie diese Powerstation nicht mit einer höheren Spannung als
DC100V auf; verwenden Sie nur kompatible Solarmodule.
4) Bitte stellen Sie sicher, dass Ihre Solarmodule nur die Powerstation aufladen,
sie dürfen nicht gleichzeitig andere photovoltaische Geräte aufladen.
3) Bitte setzen Sie die Powerstation während des Aufladens in einer Umge-
bung mit hohen Temperaturen nicht dem indirekten Sonnenlicht aus.
— 25 —
Hinweis:
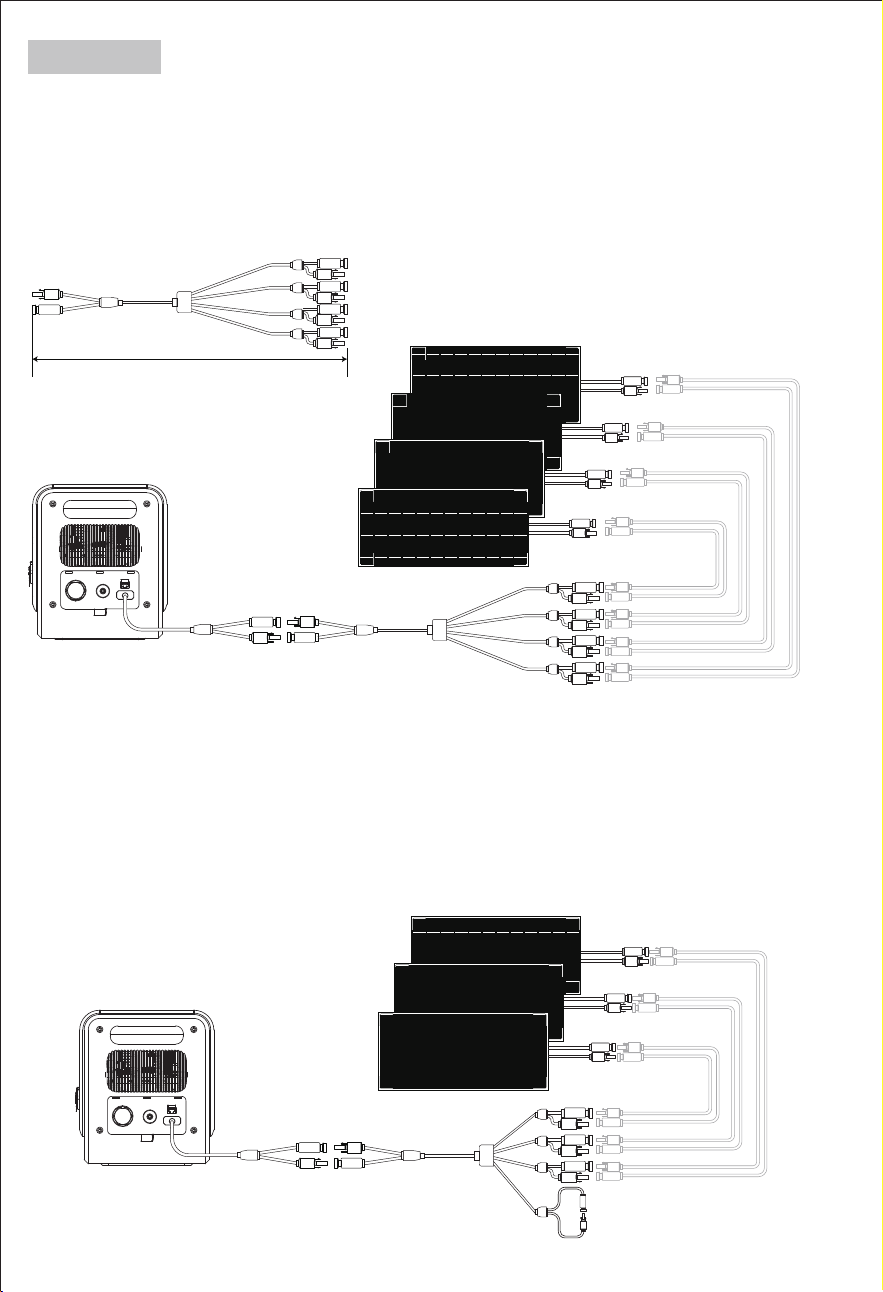
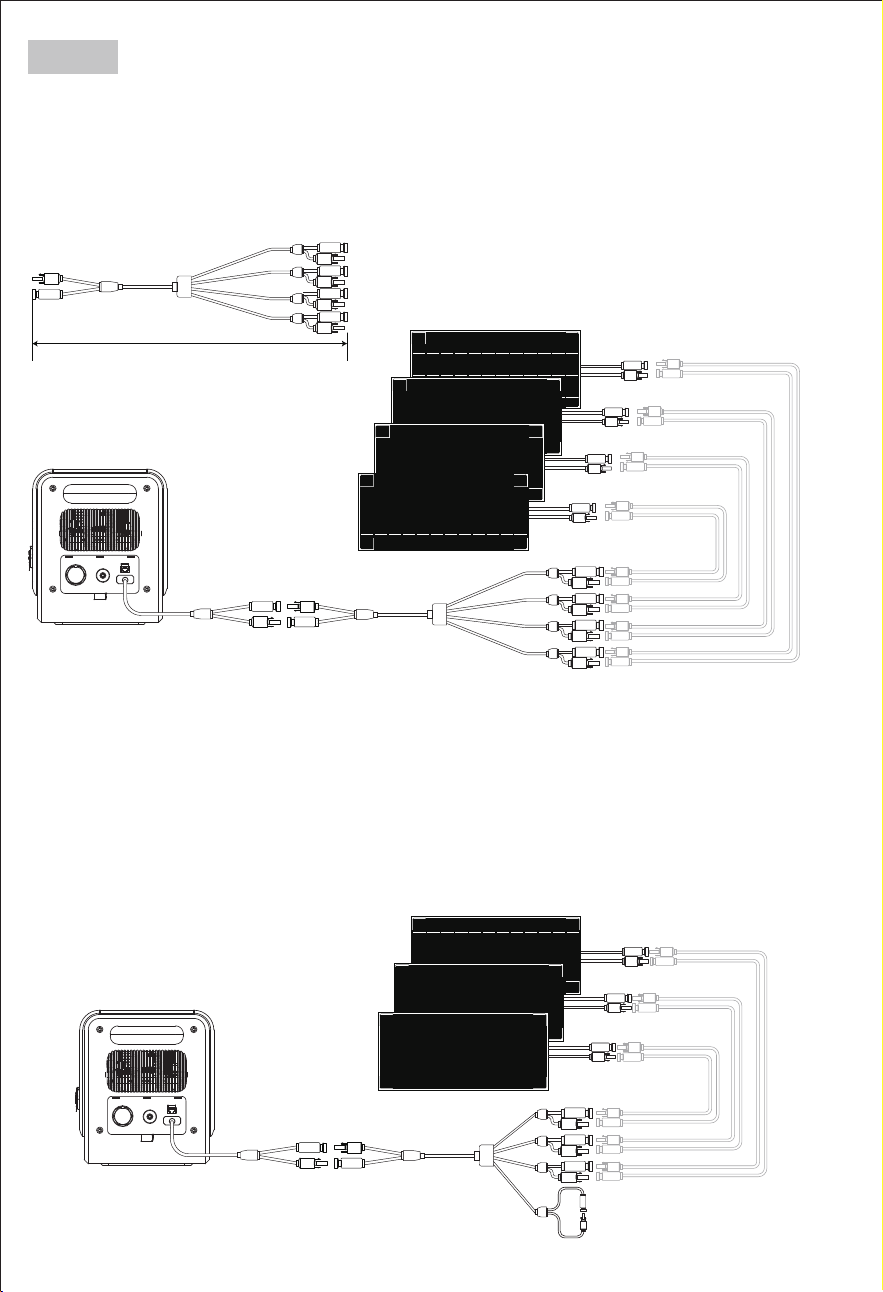
3*400W-Solarmodul
500mm
4*400W Solarmodul
Wenn Sie zwei oder mehr Solarmodule anschließen möchten, verwenden Sie
bitte die PV-Serienverbinder für die Verbindung.
Wenn Sie beispielsweise ein Solarmodul mit einer Arbeitsspannung von 18 V
verwenden, können Sie maximal 4 Solarmodule gleichzeitig in Reihe schalten.
Wenn Sie z. B. ein Solarmodul mit einer Betriebsspannung von 24 V verwenden,
können Sie maximal 3 Solarmodule gleichzeitig in Reihe schalten.
Wenn es ungenutzte Anschlüsse am Photovoltaik-Stecker gibt, verbinden Sie
bitte beide Enden des MC4. Andernfalls funktioniert das Laden über die Solarzel-
len nicht.(Bitte beachten Sie folgendes Diagramm).
Solarmodul Verlängerungskabel
(Separat zu kaufen)
Solarmodul Verlängerungskabel
(separat zu kaufen)
PV Verbinder
— 26 —
Hinweis:

12. Allgemeine Fehlerbehebung
Gerät kann nicht über eine
AC-Steckdose aufgeladen
werden
AC-Ladefehler
1.Vergewissern Sie sich, dass Sie das
Original-Netzkabel verwenden.
2.Überprüfen Sie, ob der Netzstecker richtig
eingesteckt ist.
Wenn Sie keine Lösung finden, wenden Sie
sich bitte an unseren Kundendienst.
1.Bitte stellen Sie sicher, dass der Solarladean-
schluss gemäß der Bedienungsanleitung
korrekt ist.
2. Bitte stellen Sie sicher, dass die Spezifikation
des angeschlossenen Solarmoduls dem
angegebenen Standard entspricht.
3. Bitte stellen Sie sicher, dass das Solarmodul
unter Sonnenlicht geladen wird.
4. Wenn Sie das Problem nicht lösen können,
wenden Sie sich bitte an unseren Kundend-
ienst.
Beheben Sie das Problem, indem Sie den
Stecker ziehen oder elektrische Geräte
entfernen, das Produkt kann sich nach einem
Neustart selbst reparieren.
Sollte das Problem weiterhin bestehen,
wenden Sie sich bitte an unseren Kundend-
ienst.
DC-Solar-Ladefehler
Das Gerät kann nicht über das
Solarpanel aufgeladen werden
LCD-Bildschirmsymbol blinkt
"AC"
"DC" "USB"
Überstromschutz
Kurzschlussschutz
Überspannungsschutz
Unterspannungsschutz
Überlastungsschutz
Hochtemperatur-Warnung
Die Powerstation kann sich nach Abkühlung
der Batterie selbst wieder einschalten.
Hochtemperatur-Symbol
erscheint ständig
Störung
Beschreibung
Types Solutions
13. FAQS und Lösungen
1.Warum müssen wir eine Balkon-PV-Anlage installieren?
Wenn diese Powerstation als Balkon-PV-Powerstation verwendet wird, speichert es
die Energie von den Sonnenkollektoren in der Powerstation. Es kann an das S
tromnetz angeschlossen werden, um den Haushalt mit Strom zu versorgen und den
Nutzern zu helfen, Stromkosten zu sparen.
2.Warum stoppt das Gerät, wenn die Batteriekapazität auf 3% abfällt?
8PGLH%DWWHULHOHLVWXQJ]XVFKW]HQZHQQGLH%DWWHULHNDSD]LWlWLVWZLUGGHU
$&$XVJDQJLP2II*ULG0RGXVDEJHVFKDOWHWZHQQGLH%DWWHULHNDSD]LWlWLVW
werden die DC&USB-Ausgänge im Off-Grid-Modus abgeschaltet; wenn die
%DWWHULHNDSD]LWlWLVWZLUGGHU2Q*ULG$XVJDQJLP2Q*ULG0RGXV
abgeschaltet.
3.Mit welchen Solarmodulen ist die Powerstation kompatibel?
Dieses Produkt hat einen Eingangsspannungsbereich von 18-100V, und Sie können
Solarmodule je nach Ihren Anforderungen und der Größe der Installationsfläche
frei kombinieren. Hinweis: Unabhängig davon, wie viele Solarmodule in Reihe
geschaltet werden, muss die gesamte Leerlaufspannung bei Reihenschaltung unter
96 V liegen.
Dieses Produkt verfügt über ein intelligentes Temperaturkontrollsystem, eingebaute
Lüfter helfen unserem Produkt eine bessere Kühlung und einen sicheren Gebrauch zu
erhalten, ein leichtes Geräusch ist während des Gebrauchs oder Aufladens normal.
4.Warum gibt es Geräusche während des Betriebs oder beim Laden?
— 27 —

Das hängt davon ab, ob Sie sich im netzunabhängigen oder netzgekoppelten
Modus befinden.
Im netzunabhängigen Modus unterstützt das Gerät das gleichzeitige Laden und
Entladen, und Sie können andere Geräte aufladen, während Sie diese Powerstation
aufladen.
Im netzgekoppelten Modus können die AC-Ladefunktion und die netzgekoppelte
Funktion nicht gleichzeitig verwendet werden, da die Eingangs- und Ausgangsan-
schlüsse die gleichen sind.
5.Kann ich diese Powerstation aufladen, während ein Gerät angeschlossen ist?
Nein, es kann nicht als Starthilfe für ein Fahrzeug verwendet werden.
Es kann jedoch als Stromquelle für Autos verwendet werden. Mit einem separat
erhältlichen Netzkabel kann das Auto aufgeladen werden.
6.Kann das Gerät als Starthilfe für ein Auto verwendet werden?
8.Ist diese Powerstation wasserdicht?
Nein, bitte NICHT längere Zeit in feuchter Umgebung lagern. Bitte lagern Sie es an
einem trockenen und kühlen Ort.
9.Kann ich diese Powerstation bei Minustemperaturen benutzen oder aufladen?
Die Temperaturbereiche für diese Powerstation sind wie folgt:
AC-Aufladung: 0熙-40熑(32熒-104熒); Entladung: -10熑-40熑(14熒-104熒); Lagerung:
-20熑-60熑(-4熒-140熒).
Technisch gesehen ist es möglich, unter diesen Bedingungen elektrische Geräte zu
betreiben.
— 28 —
7.warum schaltet sich der ausgang des gerätes nach einer gewissen Zeit automatisch
ab, wenn der stromverbrauch niedrig ist?
Die Standby-Zeit und die Ausgangsleistung können in der App eingestellt werden, um
zu verhindern, dass die Batterie verbraucht wird, wenn vergessen wird, den Ausgang
während der Nutzung auszuschalten.
Wenn die ermittelte Ausgangsleistung des Wechselrichters während der eingestellten
(&2=HLWNRQWLQXLHUOLFKGHUHLQJHVWHOOWHQ(&2/HLVWXQJEOHLEWVFKDOWHWGDV6\VWHP
automatisch in den Wechselrichter-Standby-Modus. Beispiel: Die ECO-Leistung ist auf
5 W und die Zeit auf 5 Minuten eingestellt. In diesem Fall wechselt das System
automatisch in den Wechselrichter-Standby-Modus, wenn die AC-Ausgangsleistung 5
0LQXWHQODQJNRQWLQXLHUOLFK:EOHLEW
Wenn die erkannte Ausgangsleistung der DC- und USB-Anschlüsse während der
HLQJHVWHOOWHQ=HLWNRQWLQXLHUOLFK:EOHLEWVFKDOWHWGDV6\VWHPGLH'&XQG
USB-Schalter automatisch aus.
Wenn die Zeit beispielsweise auf 01 Stunde 00 Minuten eingestellt ist, schaltet das
System den USB- oder DC-Schalter automatisch aus, wenn die Ausgangsleistung des
86%RGHU'&$QVFKOXVVHV6WXQGHODQJNRQWLQXLHUOLFK:EOHLEW
Wartung und Lagerung
1.Wenn das Gerät längere Zeit nicht benutzt wird, schalten Sie es aus und ziehen Sie den Netza-
dapter aus der Steckdose. 2.
2. Laden Sie das Gerät bei längerer Lagerung alle 3 Monate auf 80% der Kapazität auf.
3. Wenn die Akkukapazität auf 20 % absinkt, laden Sie die Powerstation rechtzeitig auf, um die
Lebensdauer des Akkus zu verlängern.
4. Reinigen Sie das Gerät vorsichtig und gründlich mit einem trockenen Tuch.
5. NIEMALS Gegenstände auf das Gerät stellen, weder während der Lagerung noch während des
Betriebs.
6. Lagern Sie das Gerät an einem trockenen und kühlen Ort mit einer Temperatur zwischen -20
熑~60熑 und einer Luftfeuchtigkeit von 20%~85%RH.=
7. Vermeiden Sie den Kontakt mit korrosiven Substanzen, Feuer und Wärmequellen.
Garantie & Kundendienst
TVielen Dank, dass Sie sich für unsere tragbare 2200W-Not-Powerstation entschieden haben.
Für die tragbare Not-Powerstation gilt eine Garantie von 24 Monaten ab dem Datum des
ursprünglichen Kaufs.
Die Garantie deckt Material- und Herstellungsfehler ab, bevor sie an Dritte geliefert wird. Diese
Garantie gilt nicht für: Defekte oder Schäden, die durch unsachgemäßen Gebrauch der
Produkte, unbefugte Änderung, Demontage oder Betrieb nicht in Übereinstimmung mit den
offiziellen Anweisungen oder Handbüchern.
Wenn Sie nach dem Kauf Fragen haben oder weitere technische Unterstützung benötigen,
wenden Sie sich bitte direkt an den Händler, bei dem Sie das Produkt gekauft haben.
a) Die interne Batterie nicht überladen. Siehe Bedienungsanleitung.
b) In der Nähe der POWERSTATION nicht rauchen, kein Streichholz anzün
den und keine Funken erzeugen.
c) Laden Sie den internen Akku nur in einem gut belüfteten Bereich auf.
d) Gefahr eines Stromschlags. Schließen Sie das Gerät nur an ordnungs-
gemäß geerdete Steckdosen an.
e) Verletzungsgefahr für Personen. Verwenden Sie das Produkt nicht,
wenn das Netzkabel oder die Batteriekabel in irgendeiner Weise
beschädigt sind.
f) Vor Feuchtigkeit und Nässe schützen. Benutzen Sie das Gerät nicht im
Freien, wenn es regnet.
VORSICHT
— 29 —


The product has been designed and tested strictly according to the
international safety requirements. As with all electrical or electronical
devices, there are residual risks despite careful construction. To prevent
personal injury and property damage and to ensure long-term operation of
the product, read this section carefully and observe all safety information at
all times.
Read all up-to-date documents carefully before installing, using or servicing
the product. Documentation is subject to change over time.
1.This power station has a built in lithium battery which is highly sensitive to
high temperature - Keep it away from heat sources like direct fire or any
heat sources.
2.Please follow the instructions in this manual to correctly connect all
charging cables. Do not use third-party cables. Any incorrect connections
may damage the machine and even pose an electric shock hazard.
3.Do not touch the live components in standby mode, there may be a risk
of electric shock.
4.Do not move the machine while it is operating, there may be a risk of
electric leakage.
5.Keep away from moisture or water.
6.Do not disassemble, microwave, puncture, incinerate or insert foreign
objects into the power station.
7.Do not crush, bend, shred, drop or place heavy objects on top of the
device.
8.Do not use the product if damaged or punctured.
9.Always be prepared - Charge the unit every three months also if it is not
used.
10.When connecting to the grid and photovoltaic components, please
understand the components and functions of the photovoltaic system,
ensure that all electrical connections, voltage, and current meet standards,
and ensure that the power station is turned off during the entire connection
process.
1.Safety Caution
— 31 —

— 32 —
2. Important Tips
"MIG" is the abbreviation of "Micro Inverter for Grid-connected". MIG
refers to micro grid connection mode.
In order to prevent the power connection from becoming loose and
causing safety incidents, please ensure the unit in a fixed position and
do not move it arbitrarily when in micro grid connection mode.
The solar PV system is grid-tied. Please check if it is allowed in your area.
Depending on the region, official approval may be required before or
after installation.
The product should be protected from direct sunlight to prevent rapid
temperature increase.
This product is compatible with specifically designated smart plugs,
including smart charging and smart MIG plugs. These smart plugs need
to be purchased separately from the device dealer. Smart plugs
purchased elsewhere cannot be used.
Please check the required accessories before installation, as some
accessories need to be purchased separately.
After the installation, please download the App first.
— 33 —
1.Thank you for purchasing this power station with grid connection
function.It can freely switch both on-grid and off-grid modes, and be
used for multi-scenario application.
2.The power station can be used as the grid power station, it stores energy
from solar panels in the power station. And it can connect to the grid to
provide power to the household, aiming to help users save on electricity
bills.
3.The portable power station can connect to AC wall outlets, solar panels,
and DC power sources and is designed to keep your electronic devices
powered both during an emergency and while on the go.
4.It comes equipped with AC outlets, 12V DC output ports, a car port,
Type-C port and fast charging USB ports 3.0 for your convenience.
5.Perfect for outdoor adventures and home backup, it is compatible with
most electronic devices such as drones, projector, coffee maker, blender,
refrigerator, cooling fan, microwave etc.
6.The power station is also suitable for camping and works well in keeping
outdoor electrical appliances charged for uses such as night time power
supply, medical power supply and household electricity storage.
3. Preface
4. Package Contents
1*User Manual
1*AC Power Cord 1*DC Cable
1*MC4 Cable
1*PV Connectors
SGR-PPS2000-3 PRO
Smart Charging
Plug
Smart MIG Plug
Note
What’s in
the Box
Optional
accessories
Note:
These dedicated smart
plugs need to be
purchased separately
from the device dealer.
Smart plugs purchased
elsewhere cannot be
used.
Model: SGR-PPS2000-3 PRO
Benutzerhandbuch
V1.5
All-in-one Grid Powerstation
User Manual

— 34 —
Please search for the App "Wonderfree" in the App store (iOS: App Store;
Android: Google Play) on your mobile phone and download it.
5. Download App
6. Installation list
No
Name Description
Part of a basic set /
Optional (not included)
Solar Panel
The maximum PV system
voltage is 100V.
Not included
PV Connectors
To establish a connection
between the
SGR-PPS2000-3 PRO and
solar panels (supports up
to 4 solar panels).
Included
SGR-PPS2000-3 PRO
Main Unit
Included
Smart Charging Plug
To be used with an installed
photovoltaic system in
conjunction with the
SGR-PPS2000-3 PRO
(supports up to 1 unit).
Not included.
Please purchase separately
from the device dealer.
Smart MIG Plug
To measure the power
consumption of household
appliances and wirelessly
connection with the
SGR-PPS2000-3 PRO to
optimize energy usage
(supports up to 5 units).
Not included.
Pls purchase separately from
the device dealer.
1
2
3
4
5
— 35 —
7.1 Manual on-grid Mode
7. Application
Turn on or off on-grid mode through the device's “MIG/OFF-Grid”button
or"Manual on-grid on/off" in the App.
Press the “MIG/OFF-Grid” button on the device, the default grid-connected
power is 200W.
To select different micro grid-connected power levels, you need to use the
App.After successfully connecting to the App, find the "Manual on-grid
on/off" in"Output" status section of "Device" page to select grid-connected
power. There are four grid-connected power options: 200W / 400W / 600W /
800W.
漧When performing a manual on-grid operation (press the "MIG/OFF-Grid"
button on the device or "Manual on-grid on/off " in App), the timing task
will automatically terminate.
漨Manual grid connection (press the "MIG/OFF-Grid" button on the device
or "Manual on-grid on/off " in App) will automatically exit the smart MIG
function.
Note
AC MIG/OFF-Grid
AC MIG/OFF-Grid
2000-3 PRO
Input 0W
AC on/off
DC on/off
USB on/off
Device
Output 200W
Manual on-grid on/off
200W 400W 600W 800W
200W
0W
0W
Smart MIG on/off
0W
— 36 —
漧Poor network signal of the device will affect the performance of timing
tasks.
漨The device's grid connection function and charging function cannot be
used simultaneously.
漩When using this function, smart charging and smart MIG switches need to
be turned off.
漪When the task of "MIG timing" and the "AC charging timing" overlap, the
"MIG timing" task takes priority.
漫When performing a manual on-grid operation (press the "MIG/OFF-Grid"
button on the device or "Manual on-grid on/off " in App), the timing task will
automatically terminate.
漬When the device's battery level is < 10%, it will stop grid connection.
漭The AC switch and all AC output outlets will not work in grid connection
mode.
* During the set time period of timing grid connection, please ensure that
the network is normal, the device is connected to mains power, and the
mains power is in normal state to make this function work.
>
>
Timing Settings
Time period
Power
>
>100W
00:00-00:00
Save
7.2 MIG Timing Mode
This function can set the time period and power of grid connection. Users
can add multiple sets of different grid connection time periods and
grid-connected power.
Note
Other Settings
DC standby time >
Device standby time
ECO on/off
>
MIG timing on/off
Others
Timing setting
>
General Settings
01h00min
01h00min
— 37 —
7.3 Auto MIG SOC Mode
"Auto MIG SOC on/off":
The Auto MIG SOC function can be turned on or off. If this switch is
turned on, "MIG" icon will appear and flash in the device’s display
screen.
"Auto MIG SOC setting": In the solar charging state, the capacity points
for the start and the end of Auto MIG SOC can be set.
For example, set 95% start and 90% end: When solar energy charges the
device to
95%, the device will automatically start grid-connected output; When the
FDSDFLW\WKHGHYLFHZLOODXWRPDWLFDOO\VWRSJULGFRQQHFWHG
output.
The grid-connected power of "Auto MIG SOC" is equal to the power of
solar power
generation and does not exceed 800W. If the solar power generation is
higher than
800W, the excess power will be used to charge the device.
Ύ Within the set capacity range for automatic grid connection, please
ensure that the device is charging by solar energy and connected to the
mains power, and the mains power is in normal state to make this function
work.
Ώ When "MIG timing" or "Auto MIG SOC" setting is set successfully, the
device enters the waiting period for the grid connection, and "MIG" icon
will appear and flash in the device's LCD; When the grid connection takes
effect, "MIG" icon will stay on.
Note
Other Settings
DC standby time >
Device standby time
ECO on/off
>
Auto MIG SOC on/off
Auto MIG SOC setting 95%-90% >
Device software version
Others
>
>
Other Settings
Others
DC standby time
Device standby time
ECO on/off
Auto MIG SOC on/off
ON-Grid time setting 23:45-00:45
Screen standby time >
Auto MIG SOC settingCancel
Start(%) Stop(%)
Confirm
95 90
94 89
96 91
97 92
>
>
— 38 —
7.4 Smart MIG Mode
漧Up to five smart MIG plugs can be added here.
漨These plugs needs to be purchased separately from the device dealer.
Smart plugs purchased elsewhere cannot be used.
漩Please combine the device with household appliances to use this
function.
This function requires the dedicated smart MIG plugs to be used,pls bind
and add them in the device App.
These smart MIG plugs are used to collect the power consumption of
appliances,the power station automatically adjusts the grid connection
power correspondingly, achieving a more precise grid connection
power to enhance energy-saving effects (Please refer to the following
diagram).
Tips
SGR-PPS2000-3 PRO
AC mains power
grid-connected
power 800W Max
100W
200W
500W
700W
滽滵滵ª
— 39 —
漧For energy-saving purposes, the smart MIG function can only work when
the smart MIG power is > 100W.
漨The smart MIG function takes priority over the smart charging, AC timing
charging, and timing MIG functions.
漩(press the "MIG/OFF-Grid" button on the device or "Manual on-grid
on/off " in App) and App AC charging mode will automatically exit the
smart MIG function.
漪When the device's battery level is < 10%, it will stop grid connection.
漫The AC switch and all AC output outlets will not work in grid connection
mode.
* When turn on “MIG/Off grid”button, the AC output will automatically turn
off, and DC and USB outputs and LED function will not be affected.
Note
>
>
2000-3 PRO
Plug
Smart charging plug(0/1)
+Add a smart plug
Total power of smart plugs
Smart on-grid plug(0/5)
+Add a smart plug
0W
2000-3 PRO
Input 270W
AC on/off
DC on/off
USB on/off
Output 302W
Manual on-grid on/off
200W 400W 600W 800W
0W
0W
0W
Device
Smart MIG on/off 302W
"Smart MIG on/off": Turn on or off the smart MIG function. This switch can
only be turned on after binding the smart MIG plug, otherwise it cannot
be turned on.

— 40 —
7.5 AC Charging Timing Mode
This function can set time period and the charging power of AC charging timing.
Users can add four sets of different AC charging time periods and AC charging
power.
漨It can be applied in conjunction with a rooftop photovoltaic system to store the
electricity generated by the rooftop photovoltaic system, and then connect it to
the home grid for energy-saving use during peak electricity consumption periods.
(How to use: Through the App of the photovoltaic grid-connected inverter, the
minimum power generation power of the system in different time periods can be
obtained, then the mains charging power in different time periods can be set
through this AC timing charging function of this power station. Pls make it not
exceed the power generation power of the photovoltaic grid-connected inverter)
Application
Time(Hrs)
€/kwh
0 1 2 3 4 5 6 7 8 9 10 11 12 13 14 15 16 17 18 19 20 21 22 23 24
漧It usually applied in areas with differential electricity pricing, charging for energy
storage when electricity is cheapest, and grid feed when electricity prices are
highest.
Grid connection during high electricity prices
AC charging during lower electricity prices
— 41 —
漧Poor network signal of the device will affect the performance of timing tasks.
漨The device's grid connection function and charging function cannot be used
simultaneously.
漩When using this function, smart charging and smart MIG switches need to be
turned off.
漪When the task of "MIG timing" and the "AC charging timing" overlap, the "MIG
timing" task takes priority.
漫When performing a manual charging operation (press lightning button on the
device or App AC charging mode), the timing task will automatically terminate.
* During the set time period of AC charging timing, please ensure that the network is
normal, the device is connected to mains power, and the mains power is in normal
state to make this function work.
Other Settings
DC standby time >
Device standby time
ECO on/off
>
MIG timing on/off
AC charging timing on/off
Others
General Settings
>
Timing setting
01h00min
01h00min
Timing setting
Time period
Power
>
>100W
00:00 - 00:00
Save
Note
— 42 —
7.6 Smart Charging Mode
Please combine the device with the balcony photovoltaic system to use
this function,it stores energy from micro grid PV system into the power station.
This function requires a dedicated smart charging plug to be used,pls bind and add
them in the device App.
This smart charging plug collects the generation data from the balcony
photovoltaic micro inverter and transmits it to the cloud platform. The cloud
platform then feeds the data back to the power station. Upon receiving the data
from the cloud platform, the power station automatically initiates charging after a
series of judgment logic. It also controls the charging power to be less than the
generation power of the balcony photovoltaic micro inverter, ensuring that the
power station never consumes electricity from the household grid.
漧Only one smart charging socket can be added here.
漨This plug needs to be purchased separately from the device dealer. Smart plugs
purchased elsewhere cannot be used.
Collect Power
Generation Data
Control Charging
Intelligently
Balcony/Terrace Storage Room/Garage
Smart Plug
Cloud Platform
Tips
Not involve a direct connection to the installed micro grid PV system.
Get the energy generated by the balcony PV through any wall socket within
the same WiFi area.
— 43 —
漧For energy-saving purposes, the smart charging function can only work when
the smart charging power is > 100W.
漨The smart charging function takes priority over the AC timing charging and
MIG timing functions.
漩The smart MIG function takes priority over the smart charging function.
漪Manual grid connection function (press the "MIG/OFF-Grid
" button on the device or "Manual on-grid on/off " in App) and manual charging
function (press the lightning button or App AC charging mode) take priority over
smart charging function.
Note
>
>
2000-3 PRO
Plug
Smart charging plug(0/1)
+Add a smart plug
Total power of smart plugs
Smart on-grid plug(0/5)
+Add a smart plug
0W
2000-3 PRO
DC/Solar power
DC/Solar current
Smart charging on/off
Output 0W
0W
0.0A
700W
Device
AC charging mode 0W
N-Charging Q-Charging S-Charging
Input 700W
"Smart charging on/off": Turn on or off the smart charging function.(This
icon can only be showed on the App after binding the smart charging
plug, otherwise it won't be showed on the App).
— 44 —
7.7 Off-Grid Mode
漧After the device is disconnected from a Wi-Fi environment, it needs to wait for
3-5 minutes before connecting through Bluetooth on your phone.
漨Please ensure that your phone and the device is within 10m and there are no
obstacles in between.
漩The device may need to be restarted before connecting through Bluetooth
on your phone (restarting the device will not cause the device to be unbound).
ŏOutdoor Usage
In off-grid mode, this power station supports charging and discharging at the same
time, and you can run your devices while charging this power station.
This device supports mobile phone connection outdoors (or in places without Wi-Fi).
The connection steps are the same as the above.
Method 1: Connect your phone to the hotspot of another phone and also connect
the device to this hotspot, which fulfills the need for connecting the device outdoors
(or in places without Wi-Fi).
Method 2: If you has already connected the device through a 2.4G Wi-Fi by your
phone indoors and has not unbound it, you can connect the device through
Bluetooth on your phone when moving the device outdoors (or in places without
Wi-Fi) for use.
Note
— 45 —
UPS Bypass Mode: Connect the power station with the AC power, then turn on
the AC output, and the‘UPS’‘AC’will be on display. When on this mode, the AC
power will directly support the loads on AC output ports and charge the unit.
Note: Max. output power: 1800W.
The UPS Bypass Mode prioritizes providing AC output power, then the excess
power will supply for charging the power station.
The AC inverter is disabled under UPS Bypass Mode. The unit won’t enter this
mode unless connecting with AC power AND turning on the AC output.
ŏUPS
Projector
18.4 Hrs
(100W)
*Mini Cooler
20.5 Hrs+
(90W)
Blender
6.1 Hrs
(300W)
Coffee Maker
3.4 Hrs
(550W)
Electric Grill
1.2 Hrs
(1600W)
Washer
3.7 Hrs
(500W)
Hand Drill
31 Hrs
(60W)
*Refrigerator
3.5-24 Hrs+
(520W)
*Air Conditioner
1.6 Hrs+
(1150W)
Microwave
1.6 Hrs
(1160W)
CPAP
46 Hrs
(40W)
TV
17 Hrs
(110W)
— 46 —
漧Run time=2048Wh*90%(conversion rate)/Your device's power(Watts). Running time
=2048*90% conversion rate / Device Rated Power
e.g. ,If your run a 1,000W microwave oven with it, the running time
ZLOOEH:Kê:§KUV
漨Support all electronic devices less than 2200 Watts.
漩The above charging times are calculated as a reference guide only. The actual
usage time will depend on the power of the connected devices.
Usage time of devices
Note
8. Technical Specification
Battery Capacity
AC Input Charging
Car Input Charging
Output Port
LED Light
Safety Protection
Weight&Size
3W MAX, 3 Levels (L/M/H Adjustable) with SOS function
AC Output Waveform
Pure Sine Wave
Short-Circuit
Over-Current
Over-Voltage
Low-Voltage
Over-Load
Over-Temperature
1*Cigarette Lighter 13.8V/12A Max + 2*DC5521 Rated Output
13.8V/5A Max (Total 12A Max)
3*AC Output: 230V, 50Hz
Off Grid Output Power: 2200W, Peak 4400W
Grid-connected Output Power: 230V AC, 50Hz, 800W, 3.5A Max
Note: To protect battery performance,when the battery
FDSDFLW\$&RXWSXWZLOOEHRIILQRIIJULGPRGH:KHQWKH
EDWWHU\FDSDFLW\'&86%RXWSXWVZLOOEHRIILQLQRIIJULG
PRGH:KHQWKHEDWWHU\FDSDFLW\LVWKHRQJULGRXWSXW
will be turned off in on-grid mode.
USB Output 1: QC18W Max
(5V2.4A&9V2A&12V1.5A)
USB Output 2: QC18W Max
(5V2.4A&9V2A&12V1.5A)
USB Type-C 1: PD100W
(5V3A&9V3A&12V3A&15V3A&20V5A)
USB Type-C 2: PD27W
(5V3A&9V3A&12V2.25A&15V1.8A&20V1.35A)
LiFePO4 2048Wh±5%(40Ah/51.2V)
PV 18-100V/20A 1200W Max
Charge Temperature: 0~40˫(32~104˭)
Discharge Temperature: -10~40˫(14~104˭)
Environmental Operating
Temperature
Solar Input Charging
DC 12-24V/10A 240W Max
AC 174-264V/1500W Max
WLPHV'2'
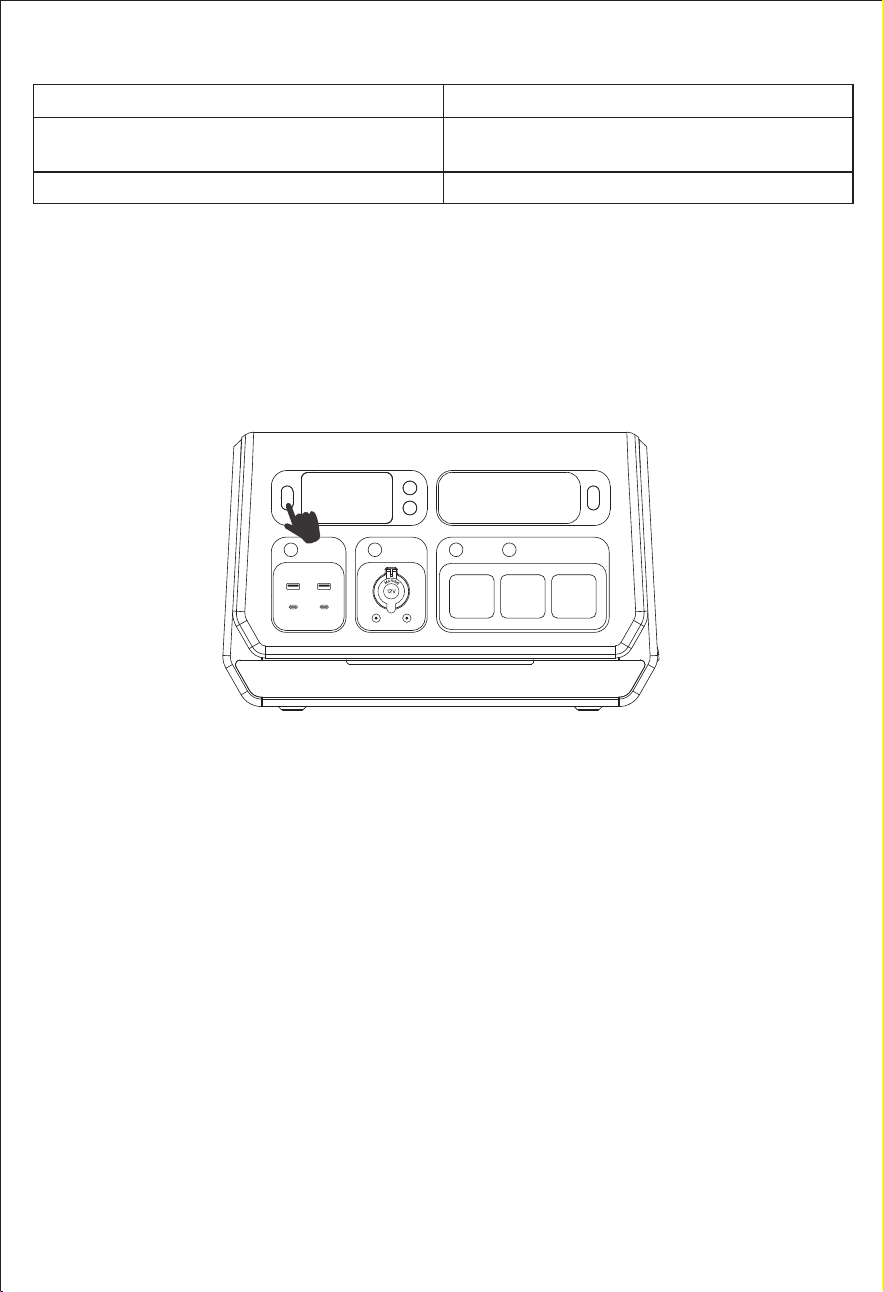
24.2kgs/53.4lbs 465*260*295mm/18.31in*10.24in*11.61in
Battery Cycle Life
— 47 —

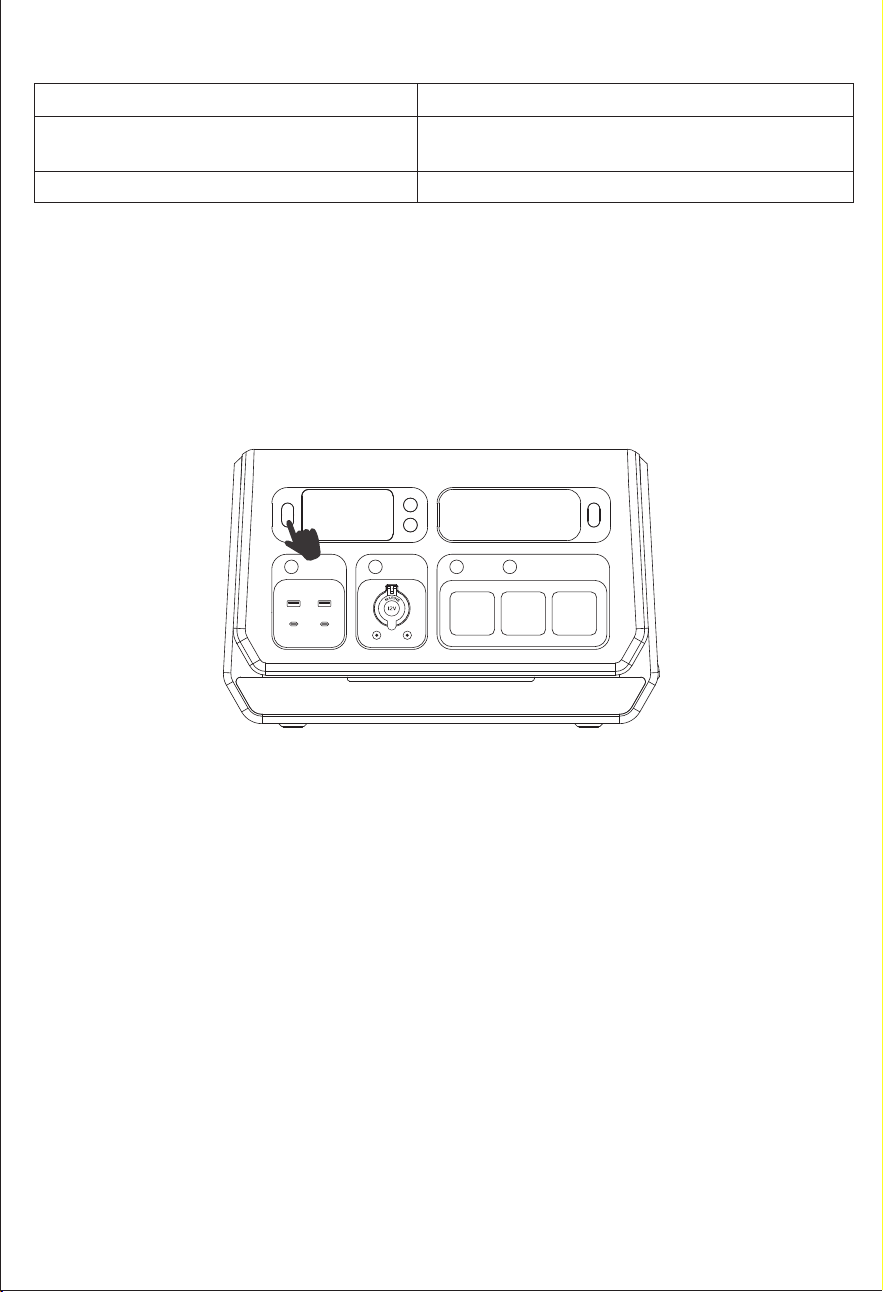
9. Product Overview
*The circuit protector is an electrical safety switch designed to protect your
unit from damage caused by over-current or short circuit. When the AC output
exceeds 2400W under the invert mode or when the AC output exceeds 15A
under the UPS mode, it will trip automatically. Press it once to reset the unit after
these symptoms cleared.
*Grounding port is for some electrical appliances that require grounding.
*CT/485 port is for after-sales service or adding other functions in the future.
Cooling Fan
ON/OFF Button
LCD
WiFi Button
Power Button
LED
AC Button
MIG/Off-Grid
Button
USB Button
Handle
DC Output
12V/12A
AC output
2200W Max
USB-A QC3.0*2
USB-C PD100W
USB-C PD27W
DC Button
LED Button
PV18-100V/20A
Grounding Port
CT/485
230VAC/50Hz
15A MAX
Circuit Protector
250VAC/15A
— 48 —

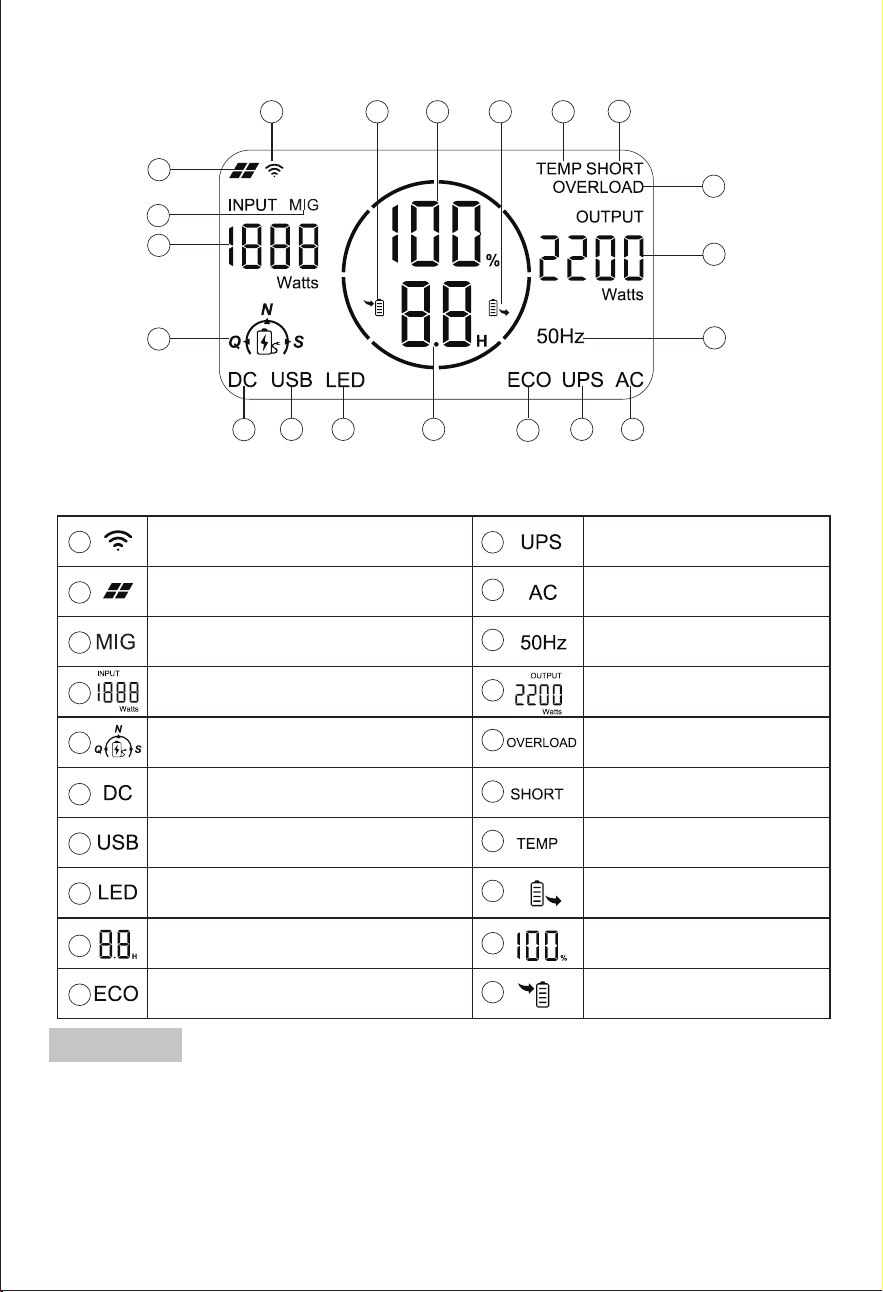
9.1 Display Screen Contents
1
2
3
4
5
6
14
15
16
17181920
7 8 9
10
11 12
13
Solar Panel Input Indicator
LED Indicator
Remaining Battery
Percentage
Input State Indicator
Remaining Usage Time or
Remaining Charging Time(Hour)
Output Power
AC Output Indicator
UPS Function Indicator
DC Output Indicator
USB Output Indicator
Input Power
Charging Mode Indicator(Q,N,S)
Output State Indicator
Temperature Warning
1
2
3
4
5
6
14
15
16
17
18
19
20
7
8
9
10
11
12
13
WiFi Indicator
ECO Function Indicator
Output Frequency
Short-circuit Warning
Overload Warning
MIG/Off-Grid Function Indicator
漧*The remaining usage time depends on the real-time output wattage of the
loaded devices.
The remaining hours tells the remaining charge/discharge time.
It will prioritize displaying the remaining discharge time when charging and
discharging simultaneously.
*(The remaining time may has errors and the data is for reference only.)
9.2 Button Controls
— 49 —
Note
漨Common states about MIG icon
No MIG icon on the screen
“MIG”icon is flashing
“MIG”icon stays on
The Grid connection mode not enabled.
The Grid connection mode is enabled
and pending activation.
The Grid connection mode is active.
漩Powering on/off
Short press the on/off button to turn on or turn off the power station.
Note: This device can be turned off by pressing the on/off button in mains
standby mode. When the mains or PV is charging, this device cannot be shut
down and needs to exit the charging state in order to shut down.
— 50 —
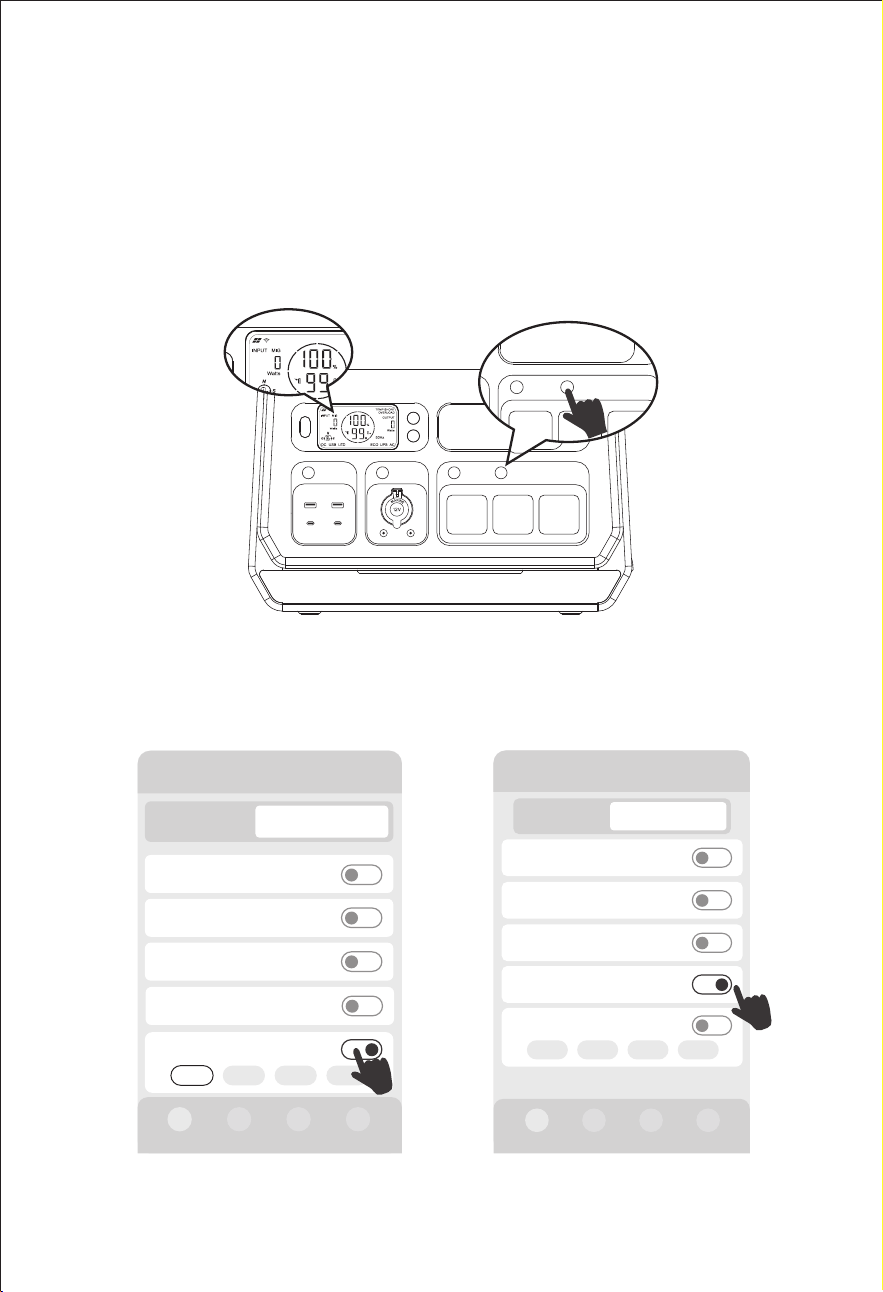
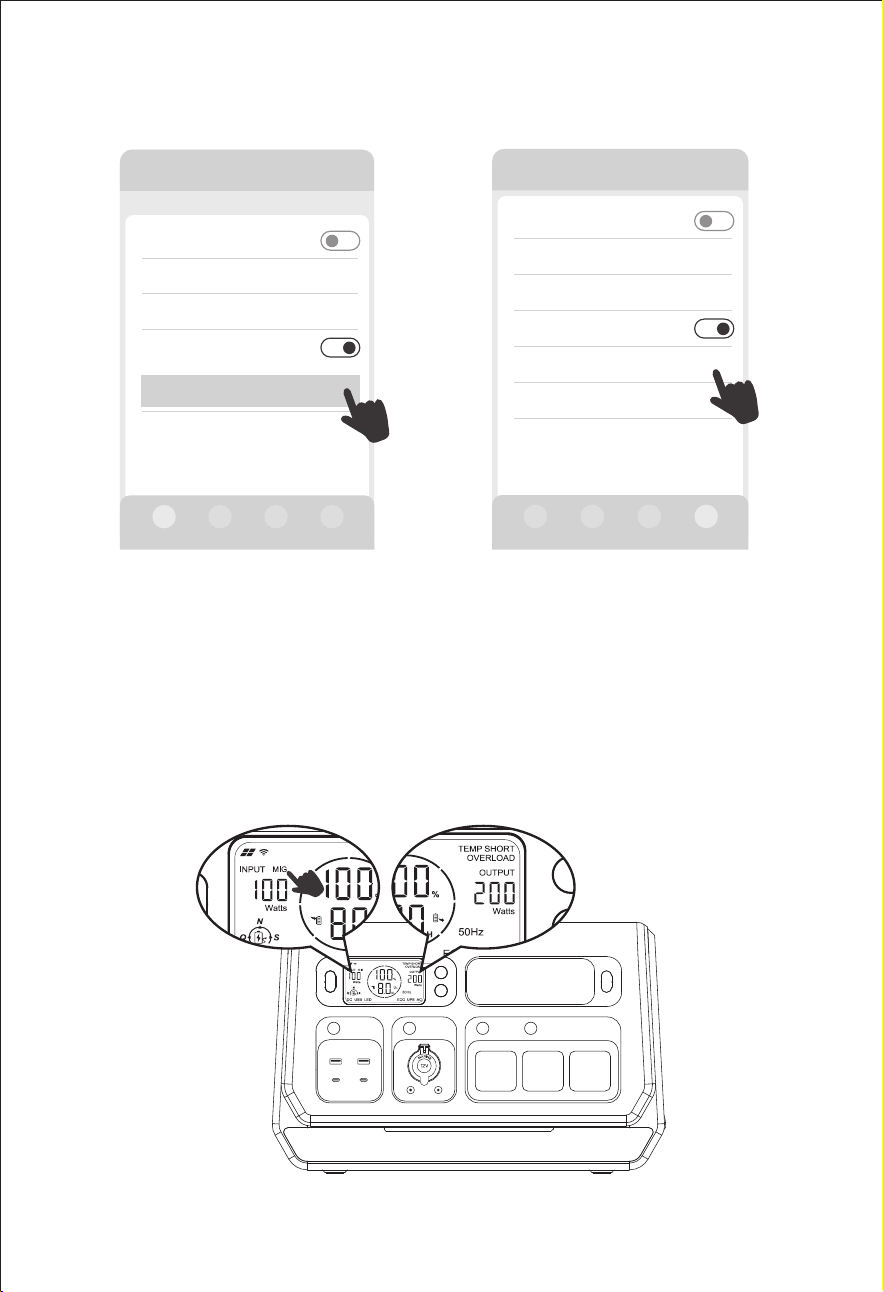
Turn on the "MIG/OFF-Grid" switch, then the screen displays the "MIG" icon. It
indicates the grid connection mode is enabled.
Meanwhile, you can also enable MIG mode through the "Manual on-grid
on/off","Smart MIG on/off", "MIG timing on/off" and "Auto MIG SOC on/off"
after successfully connecting to the App.(Please refer to the following
diagram)
10. Entering Grid-Connected Mode
— 51 —
AC MIG/OFF-Grid
AC MIG/OFF-Grid
"MIG/OFF-Grid" switch
"MIG/OFF-Grid" switch
Manual on-grid on/off
Manual on-grid on/off
Smart MIG on/off
Smart MIG on/off
2000-3 PRO
Input 270W
AC on/off
DC on/off
USB on/off
Output 302W
Manual on-grid on/off
200W 400W 600W 800W
0W
0W
0W
Device
Smart MIG on/off 302W
2000-3 PRO
Input 0W
AC on/off
DC on/off
USB on/off
Device
Output 200W
Manual on-grid on/off
200W 400W 600W 800W
200W
0W
0W
Smart MIG on/off
0W
— 52 —
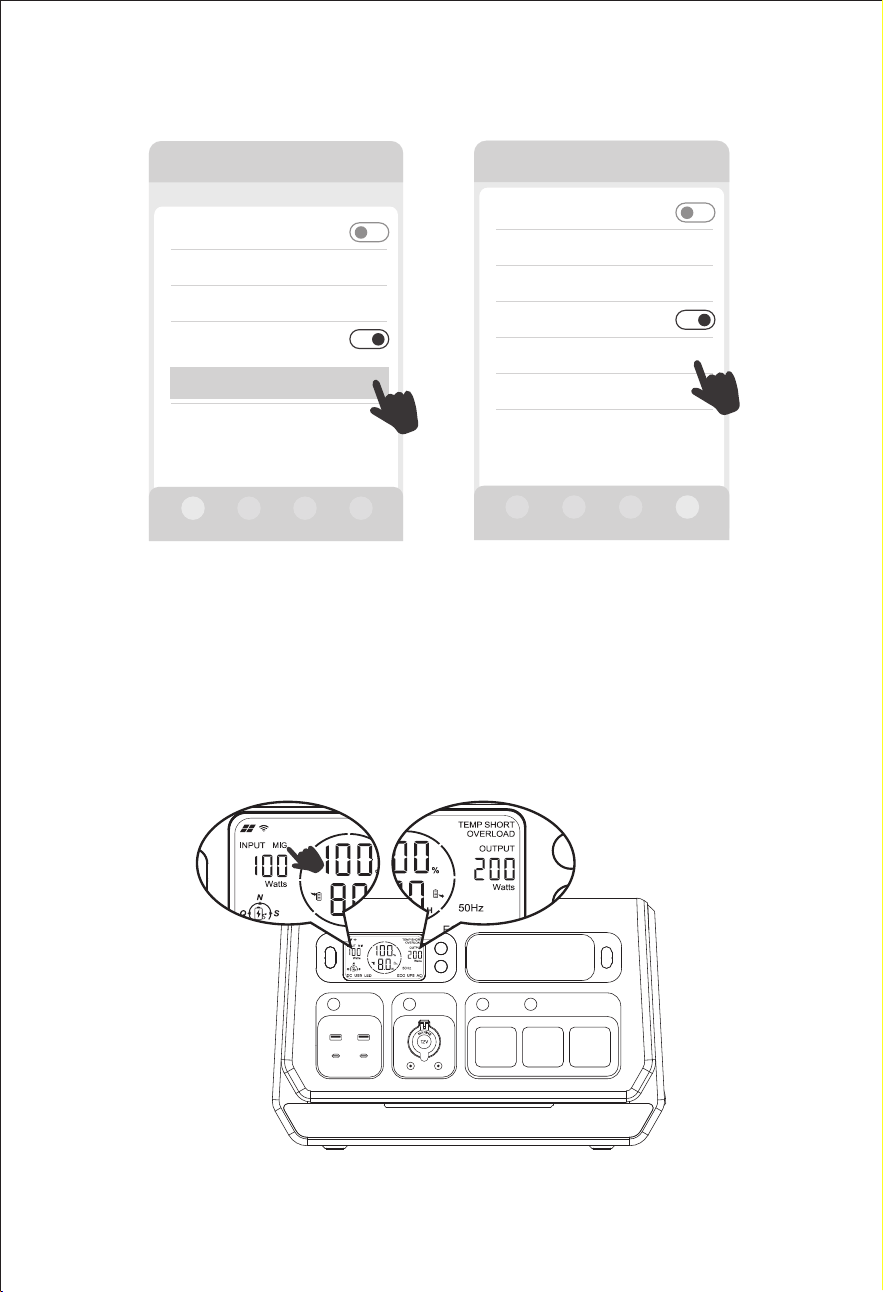
When the screen displays the “MIG” icon in the INPUT section, along with the
power value in the OUTPUT section, it indicates the grid-connected output
power and the LCD screen displays solar photovoltaic input power in the
INPUT section.
MIG timing on/off
MIG timing on/off
Other Settings
DC standby time >
Device standby time
ECO on/off
>
MIG timing on/off
Others
Timing setting
>
General Settings
01h00min
01h00min
Other Settings
DC standby time >
Device standby time
ECO on/off
>
Auto MIG SOC on/off
Auto MIG SOC setting 95%-90% >
Device software version
Others
Auto MIG SOC on/off
Auto MIG SOC on/off
11. Ways to Recharge
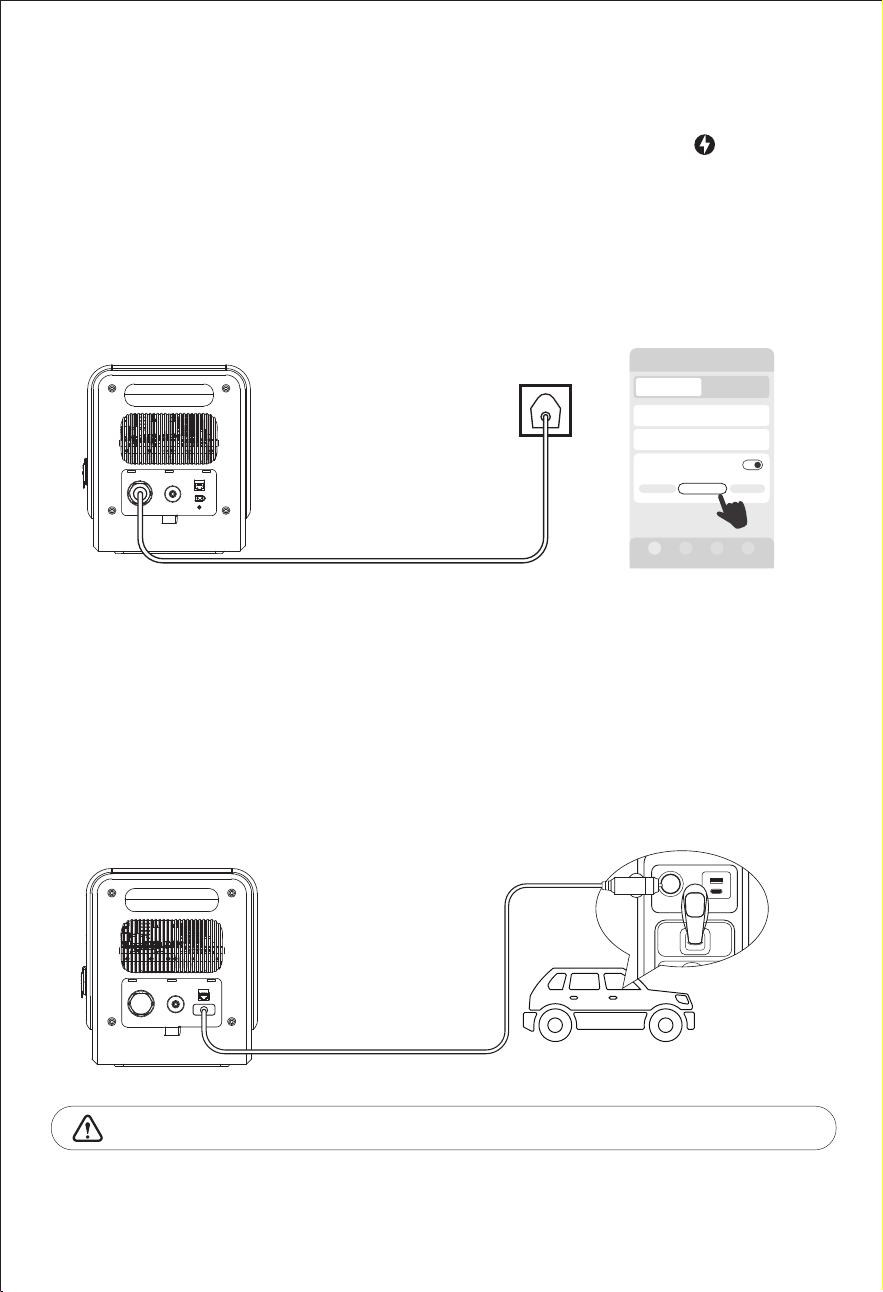
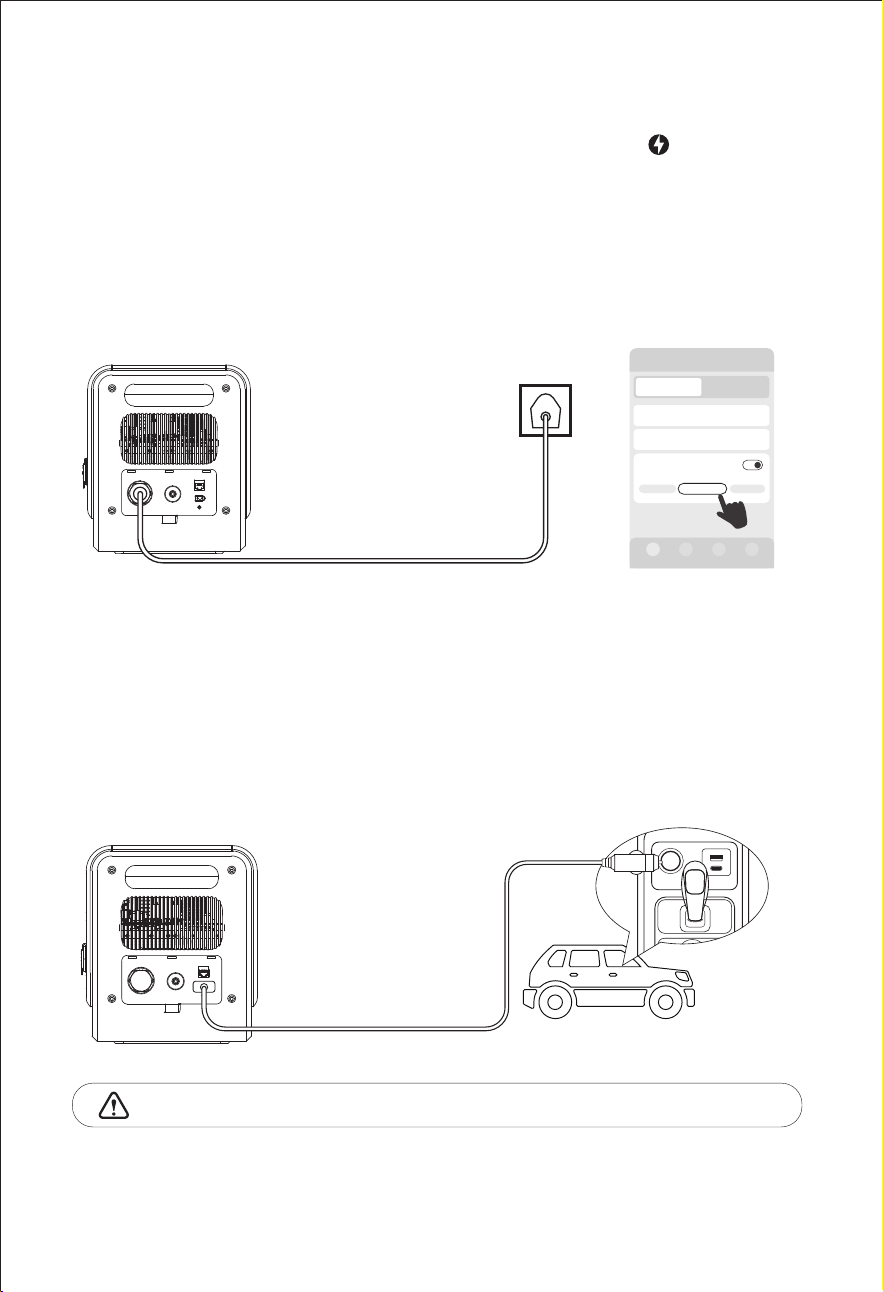
11.1 AC Wall Charging
11.2 DC Vehicle Charging
When charging in a 12V car, you need to turn on the powerstation first, and
connect the unit directly to the vehicle plug-in cigarette lighter port via the
car charging cable for charging after turning on the AC switch.
When the charging starts, you can turn off the AC switch again and keep the
product charging with the cigarette lighter port.
12V Car Charging
14-16 Hours
24V Car Charging
7-8 Hours
Cigarette lighter MUST be fully inserted into the lighter port of the machine.
S: Silent Charging Mode
6-7 Hours
N: Normal Charging Mode
4-5 Hours
Q: Quick Charging Mode
1.5-2 Hours
Please connect the AC power cord, and press the button" "on the
unit's front panel to start charging. This device default charging mode is ‘N’
(Normal-Charging mode). You can switch to other charging modes using the
button. This device supports selecting '(Q)Quick-Charging Mode',
'(N)Normal-Charging Mode' and '(S)Silent-Charging Mode', and you can also
select AC charging mode in the App. It supports "AC charging timing" function
in the App as well.
— 53 —
2000-3 PRO
DC/Solar power
DC/Solar current
Output 0WInput 1400W
0W
0.0A
AC charging mode
N-Charging
1400W
Q-Charging
S-Charging
Device
11.3 Solar Charging
Please make sure your solar panels comply with Open Circuit Voltage of
DC18-100V. The Max Solar Input Power of the power station is 1200W.
1*400W Solar Panel
2) Please ensure that the voltage of all solar panels connected in series is the
same, and try to use the same type of solar panel.
Safety Precautions When Charging
1) Do not charge this power station with a voltage higher than DC100V; only
use compatible solar panel.
4) Please ensure that your solar panels only charge the power station, they
are prohibited from charging other photovoltaic equipment simultaneously.
3) Please don't put the power station in direct sunlight while charging in the
high temperature environment.
— 54 —
Note
3*400W Solar Panel
500mm
4*400W Solar Panel
When you want to connect two or more solar panels, please use the PV
series connectors for the connection.
For example, when using a solar panel with a working voltage of 18V, it can
support a maximum of 4 solar panels connected in series simultaneously.
For example, when using a solar panel with a working voltage of 24V, it can
support a maximum of 3 solar panels connected in series simultaneously.
When there are unused connectors on the photovoltaic connector, please
connect both ends of the MC4. Otherwise, solar charging will not work.(Please
refer to the following diagram)
Solar panel extension cable
(Purchase separately)
Solar panel extension cable
(Purchase separately)
PV Connectors
Note
— 55 —

12. Common Trouble Shooting
Unit can not charging
from AC wall outlets
AC charging fault
1.Please ensure to use original AC power cord.
2.Please check if the AC wall plug is
correct connection.
If not solved, please contact our after-sales
service.
1.Please ensure solar charging connection
is correct under user manual.
2.Please ensure connected solar panel
specification is meet specified standard.
3.Please ensure solar panel charging under
sunlight environment.
4.If not solved, please contact our
after-sales service.
Resolve the problem by pulling out plug or
remove electrical devices, the product can
recover itself after re-start.
If not solved, please contact our after-sales
service.
DC solar charging fault
Unit can not charging
from solar panel
LCD Screen icon flash
"AC"
"DC"
"USB"
Over-current protection
Short circuit protection
Over-voltage protection
Low-voltage protection
Over-Load protection
High-temperature
warning
Power station can recover itself after
battery cooled.
High-temperature icon
continuous appears
Failure Description Types Solutions
13. FAQS and Solutions
1.Why we need to install a balcony PV power system?
When this power station used as a balcony PV power station, it stores energy from
solar panels in the power station. And it can connect to the grid to provide power to
the household, aiming to help users save on electricity bills.
2.Why does it stop working when the battery capacity drops to 3%?
7RSURWHFWEDWWHU\SHUIRUPDQFHZKHQWKHEDWWHU\FDSDFLW\$&RXWSXWZLOO
EHRIILQRIIJULGPRGH:KHQWKHEDWWHU\FDSDFLW\'&86%RXWSXWVZLOOEHRII
LQLQRIIJULGPRGH:KHQWKHEDWWHU\FDSDFLW\LVWKHRQJULGRXWSXWZLOOEH
turned off in on-grid mode.
3.Which solar panels can match the power station?
This product has an input operating voltage range of 18-100V, and you can freely
combine solar panels based on your requirements and the installation area's size.
Note:No matter how many solar panels are connected in series, the total open-
circuit voltage when connected in series must be less than 96V.
This product with intelligent temperature control system, built-in fans help our product
to get better cooling and securing usage, slight noise is normal during using or
charging.
4.Why is there any sound during use or charging?
— 56 —

This depends on the off-grid or grid-connected mode.
When in off-grid mode, the device supports charging and discharging at the same
time, and you can charge other devices while charging this power station.
When in grid-connected mode, the AC charging function and the grid-connected
function cannot be used at the same time because the input and output
connections are the same port.
5.Can I charge this power station while a device is plugged in?
No, it cannot be used to jump start a vehicle.
However, it can be used as power supply for automobiles. You can recharge the
car via a power supply cord, which is available for purchase separately.
6.Can it be used to jump start a car?
8.Is this power station waterproof?
No, please DO NOT store it in a humid environment for a long time.
Please store it in a dry and cool place.
9.Can I use or charge this power station in sub-zero temperatures?
Temperature ranges for this power station are:
AC Charging: 0熙-40熑(32熒-104熒); Discharge: -10熑-40熑(14熒-104熒); Storage:
-20熑-60熑(-4熒-140熒).
Technically,it can power electrical devices under such situations, but please avoid
charging it.
— 57 —
7.Why does the output for the low-power device automatically turn off after a
period of time?
This is to avoid battery consumption caused by forgetting to turn off the output
during use.The standby time and output power can be set in the App.
,IWKHGHWHFWHGLQYHUWHURXWSXWSRZHUFRQWLQXRXVO\UHPDLQVWKHVHW(&2SRZHU
during the set ECO time, the system will automatically enter inverter standby mode.
For example, suppose the ECO power is set to 5W and the time is set to 5 minutes. In
that case, the system will automatically enter inverter standby mode when the AC
RXWSXWSRZHUFRQWLQXRXVO\UHPDLQV:IRUPLQXWHV
,IWKHGHWHFWHGRXWSXWSRZHURIWKH'&DQG86%SRUWVFRQWLQXRXVO\UHPDLQV:
during the set time, the system will automatically turn off the DC and USB switches.
For example, if the time is set to 01 hour 00 minutes, the system will automatically turn
off the USB or DC switch when the output power of the USB or DC port continuously
UHPDLQV:IRUKRXU
Maintenance and Storage
1.When not using the unit for extended periods of time, power off the unit and disconnect the AC
adapter from the outlet.
2.Charge the unit to 80% capacity every 3 months for long-term storage.
3.When the battery capacity drops to 20%, recharge the power station in time to extend the
battery life.
4.Clean the unit with a dry cloth gently and carefully.
5.DO NOT stack anything on top of the unit either in storage or in use.
6.Store it in a dry and cool place with temperature range between -20℃~60℃,
and humidity 20%~85%RH.
7.Avoid contact with corrosive substances fire and heat sources.
Warranty & Customer Service Support
Thanks for purchasing our 2200W portable emergency power station. The portable power
station is covered a warranty of 24 months from the date of its original purchasing.
The warranty covers material and manufacturing defects prior to being shipped to third
parties. This warranty does not apply: Any defects or damages caused by misuse of
products, unauthorized modification, dis-assembly or operation not in accordance with the
official instructions or manuals.
If you have any after-sales questions or need further technical assistance, please feel free
to contact the dealer where you purchased directly.
a) Do not overcharge the internal battery. See instruction manual.
b) Do not smoke, strike a match or cause a spark in the vicinity of the
POWER STATION.
c) Only charge the internal battery in a well ventilated area.
d) Risk of Electric Shock. Connect only to properly grounded outlets.
e) Risk of Injury to Persons. Do not use this product if the power cord or the
battery cables are damaged in any way.
f) Keep away from moisture or water. Do not use outdoors on rainy days.
CAUTION
— 58 —