
Epson
®
SureColor
®
F1070 User's Guide


3
Contents
SureColor F1070 User's Guide ................................................................................................................... 9
Introduction to Your Printer...................................................................................................................... 10
Printer Features ................................................................................................................................. 10
Optional Equipment and Replacement Parts................................................................................. 11
Available Software ............................................................................................................................. 12
Notations Used in the Documentation ................................................................................................ 13
Printer Part Locations......................................................................................................................... 14
Product Parts - Front/Side ............................................................................................................. 14
Product Parts - Inside .................................................................................................................... 15
Using the Control Panel ..................................................................................................................... 16
Control Panel................................................................................................................................. 17
Changing the LCD Screen Language............................................................................................ 21
Selecting the Date and Time ......................................................................................................... 21
Administrator Password Instructions .................................................................................................. 22
Printer Usage Guidelines.......................................................................................................................... 24
Installation Space............................................................................................................................... 25
Using Your product............................................................................................................................. 26
Storing Your product .......................................................................................................................... 27
Handling Ink and Cleaning Packs....................................................................................................... 28
Handling White Ink ............................................................................................................................. 29
Handling T-shirts (Media) ................................................................................................................... 30
Handling Pre-treatment Solution ........................................................................................................ 31
Precautions When Printing on Film .................................................................................................... 31
Wi-Fi or Wired Networking........................................................................................................................ 32
Network Security Recommendations ................................................................................................. 32
Wi-Fi Infrastructure Mode Setup......................................................................................................... 33
Selecting Wireless Network Settings from the Control Panel ........................................................ 34
Wi-Fi Direct Mode Setup .................................................................................................................... 35
Enabling Wi-Fi Direct Mode........................................................................................................... 36
Wi-Fi Protected Setup (WPS)............................................................................................................. 37

4
Using WPS to Connect to a Network ............................................................................................. 37
Printing a Network Status Sheet......................................................................................................... 38
Printing a Network Connection Report ............................................................................................... 38
Network Connection Report Codes and Messages....................................................................... 39
Changing or Updating Network Connections ..................................................................................... 44
Accessing the Web Config Utility................................................................................................... 44
Changing a USB Connection to a Wi-Fi Connection...................................................................... 45
Changing a Wi-Fi Connection to a Wired Network Connection...................................................... 45
Connecting to a New Wi-Fi Router ................................................................................................ 46
Disabling Wi-Fi Features ............................................................................................................... 46
Basic Printing ............................................................................................................................................ 47
Overview of the Printing Process ....................................................................................................... 47
Required Equipment (Printing on T-shirts) ......................................................................................... 49
Required Equipment (Printing on Film) .............................................................................................. 51
Pre-treating a T-shirt .......................................................................................................................... 52
Pre-treatment Solution Safety Precautions.................................................................................... 52
Preparing the Pre-treatment Solution ............................................................................................ 53
Filtering the Cotton Pre-treatment Solution ................................................................................... 57
Diluting the Pre-treatment Solution................................................................................................ 62
Pre-treating a T-shirt with a Roller ................................................................................................. 62
Pre-treating a T-shirt with a Pre-treatment Machine ...................................................................... 64
Fixing the Pre-treatment Solution (Heat Press) ............................................................................. 65
Creating Your Design ......................................................................................................................... 66
Data Creation and Transmission Guidelines ................................................................................. 66
Printable Area for Each Platen ...................................................................................................... 67
Preparing Your Printer........................................................................................................................ 69
Attaching the Grip Pad to the Platen.............................................................................................. 69
Removing the Grip Pad from the Platen ........................................................................................ 72
Installing the Platen ....................................................................................................................... 74
Loading a T-shirt ................................................................................................................................ 77
Loading a T-shirt on the Grip Pad.................................................................................................. 78
Loading a T-shirt on the Platen...................................................................................................... 88
Loading a Sleeve on the Sleeve Platen ......................................................................................... 99

5
Loading Film on the Platen............................................................................................................... 103
Starting a Print Job........................................................................................................................... 104
Cancelling a Print Job ...................................................................................................................... 105
Finishing a T-shirt............................................................................................................................. 105
Removing a Printed T-shirt.......................................................................................................... 106
Fixing the Ink ............................................................................................................................... 106
Fixing Conditions (Heat Press) ............................................................................................... 107
Fixing Conditions (Heat Tunnel).............................................................................................. 108
Performing Post-processing for Film ................................................................................................ 109
Printing from a USB Memory Device ..................................................................................................... 110
USB Memory Device Requirements................................................................................................. 110
Connecting and Printing from a USB Memory Device ...................................................................... 111
Using the Control Panel Menus.............................................................................................................. 113
Accessing the Printer's Menus ......................................................................................................... 113
Basic Settings Menu......................................................................................................................... 113
Printer Settings Menu....................................................................................................................... 115
Maintenance Menu........................................................................................................................... 116
Network Settings Menu .................................................................................................................... 117
Media Settings ................................................................................................................................. 118
Maintenance Settings....................................................................................................................... 120
Printer Status Menu.......................................................................................................................... 121
Supply Status Menu ........................................................................................................................ 121
Maintenance............................................................................................................................................. 123
Maintenance Guidelines................................................................................................................... 123
When to Maintain Your Product ....................................................................................................... 124
Maintenance Safety Instructions ...................................................................................................... 128
Print Head Maintenance................................................................................................................... 129
Performing a Nozzle Check......................................................................................................... 130
Cleaning the Print Head............................................................................................................... 132
Print Head Alignment ....................................................................................................................... 133
Aligning the Print Head................................................................................................................ 134
Shaking and Replacing Ink Packs.................................................................................................... 136
Ink Pack Safety Instructions ........................................................................................................ 136

6
Shaking the Ink Packs ................................................................................................................. 137
Replacing the Ink Packs .............................................................................................................. 139
Replacing the Maintenance Box....................................................................................................... 144
Replacing the Head Maintenance Set.............................................................................................. 145
Replacing the Wiper Unit.................................................................................................................. 146
Using the Ink Cleaning Solution ....................................................................................................... 147
Cleaning Around the Print Head....................................................................................................... 149
Cleaning the Suction Cap................................................................................................................. 151
Cleaning the Sensor Cover .............................................................................................................. 153
Cleaning Inside the Printer ............................................................................................................... 156
Cleaning the Platen Without a Grip Pad ........................................................................................... 160
Changing the Printer Mode .............................................................................................................. 161
Disposing of Used Consumables and Optional Parts....................................................................... 163
Moving or Transporting the Product ..................................................................................................... 164
Moving the Printer ............................................................................................................................ 165
Setting Up the Printer After Transport .............................................................................................. 171
Storing the Printer ............................................................................................................................ 172
Solving Problems .................................................................................................................................... 175
Product Status Messages ................................................................................................................ 175
Solving Printer Problems.................................................................................................................. 179
Printer Does Not Turn On ............................................................................................................ 180
LCD Screen Shuts Off ................................................................................................................. 180
Red Light Shines Inside the Printer ............................................................................................. 180
Forgot the Administrator Password ............................................................................................. 180
Solving Printing Problems ................................................................................................................ 180
Nothing Prints.............................................................................................................................. 181
Cannot Print Over a Network....................................................................................................... 181
Print Head Moves But Nothing Prints .......................................................................................... 182
Printing Is Slow or Stops Intermittently ........................................................................................ 183
Platen Height Error Is Displayed While Printing........................................................................... 183
Cannot Access the USB Memory Device .................................................................................... 184
Solving Print Quality Problems......................................................................................................... 184
Nozzle Check Pattern Prints Incorrectly ...................................................................................... 184

7
Overall Print Quality Is Poor ........................................................................................................ 185
Lines Are Misaligned ................................................................................................................... 187
Grainy or Unclear Printout ........................................................................................................... 188
White Ink Quality Is Poor ............................................................................................................. 189
Ink Stains Appear Outside the Printed Areas............................................................................... 190
Printer Status Sheet or Logs Print Incorrectly.............................................................................. 191
Uninstall Your Product Software....................................................................................................... 191
Uninstalling Product Software - Windows.................................................................................... 192
Uninstalling Product Software - Mac............................................................................................ 193
Where to Get Help (U.S. and Canada) ............................................................................................. 193
Where to Get Help (Latin America)................................................................................................... 194
Technical Specifications ........................................................................................................................ 196
Windows System Requirements ...................................................................................................... 196
Mac System Requirements .............................................................................................................. 197
Printer Specifications ....................................................................................................................... 197
Supported Media Specifications....................................................................................................... 198
Ink Specifications ............................................................................................................................. 198
Dimension Specifications ................................................................................................................. 199
Electrical Specifications ................................................................................................................... 200
Environmental Specifications ........................................................................................................... 201
Interface Specifications .................................................................................................................... 201
Network Interface Specifications ...................................................................................................... 202
Cleaning Ink Supply Unit Specifications ........................................................................................... 203
Pre-treatment Solution Specifications .............................................................................................. 204
Ink Cleaning Solution Specifications ................................................................................................ 205
Safety and Approvals Specifications ................................................................................................ 205
Notices ..................................................................................................................................................... 206
Important Safety Instructions............................................................................................................ 206
List of Safety Symbols on the Product ......................................................................................... 206
General Product Safety Instructions ............................................................................................ 207
LCD Screen Safety Instructions................................................................................................... 211
Wireless Connection Safety Instructions ..................................................................................... 211
FCC Compliance Statement............................................................................................................. 211

8
Binding Arbitration and Class Waiver ............................................................................................... 213
Trademarks...................................................................................................................................... 216
Copyright Notice............................................................................................................................... 217
A Note Concerning Responsible Use of Copyrighted Materials................................................... 217
Copyright Attribution.................................................................................................................... 218

9
SureColor F1070 User's Guide
Welcome to the SureColor F1070 User's Guide.
For a printable PDF copy of this guide, click here.

10
Introduction to Your Printer
Refer to these sections to learn more about your printer and this manual.
Printer Features
Available Software
Notations Used in the Documentation
Printer Part Locations
Using the Control Panel
Administrator Password Instructions
Printer Features
The Epson SureColor F1070 printer includes these special features:
Purpose Built
• High-quality printing using PrecisionCore printhead
• 250 ml ink supply units (ink packs)
Reliability
• PrecisionCore MicroTFP printhead offers Precision Droplet Control
• Nozzle Verification Technology detects nozzle condition and adjusts print quality
• Built-in White ink circulation system to improve White ink performance and reduce maintenance
• Built-in automatic fabric wiper system automatically cleans the surface of the print head nozzles for
consistent print quality
High Resolution
• UltraChrome DG2 pigment ink optimized for textile printing for smooth gradations and high color
reproducibility
• High-density white printing using White ink and pre-treatment solution developed specially for Epson
pigment ink textile printers
Easy-to-use setup and operation features
• Automatic garment thickness optimization
• User-friendly design allows you to perform all everyday operations from the front of the printer and
check operating status through the transparent printer cover

11
• Large, easy-to-read, 4.3-inch, color LCD touchscreen
• PC-free, direct printing from a commercially available USB 2.0 memory device connected to the
printer
• Easy-to-use Garment Creator 2 software
Optional Equipment and Replacement Parts
Parent topic: Introduction to Your Printer
Optional Equipment and Replacement Parts
U.S. and Canada:
You can purchase genuine Epson ink, paper, and accessories from an Epson authorized reseller. To
find the nearest reseller, visit proimaging.epson.com (U.S.) or proimaging.epson.ca (Canada), select
your product series and product, and click the Where to Buy button. Or call 800-GO-EPSON (800-463-
7766) in the U.S. or 800-807-7766 in Canada.
In addition to the accessories listed below, 1-year, 2-year, and 4-year extended service plans are
available.
Latin America:
You can purchase genuine Epson ink, paper, and accessories from an Epson authorized reseller. To
find the nearest reseller, visit latin.epson.com or call your nearest Epson sales office.
Note: Availability of accessories varies by country.
Option or part Part number
Cleaning ink pack (250 ml) C13T55G900
Cotton pre-treatment solution (5 liter) C13T43R300
Maintenance liquid pack (250 ml) C13T55AB20
Maintenance box C13S400215
Wiper unit C13S210142
Head maintenance set C13S210144
Small garment platen (10 × 12 inches [25.4 × 30.5 cm]) C12C939031
Extra small garment platen (7 × 8 inches [17.8 × 20.3 cm]) C12C933951
Sleeve platen (4 × 4 inches [10.2 × 10.2 cm]) C12C939051

12
Option or part Part number
Small platen grip pad C13S210120
Grip pad tool C12C934151
UltraChrome DG2 ink pack - Black (250 ml) T55A120
UltraChrome DG2 ink pack - Cyan (250 ml) T55A220
UltraChrome DG2 ink pack - Magenta (250 ml) T55A320
UltraChrome DG2 ink pack - Yellow (250 ml) T55A420
UltraChrome DG2 ink pack - White (250 ml) T55AA20
Parent topic: Printer Features
Available Software
The table below provides an overview of the software available for your product.
You can download and install the necessary software from the Epson website using the instructions on
the Start Here sheet. For detailed information about the software on your system, see the software help.
Note: Printer drivers are not provided for this product. You need to download Garment Creator 2 or a
software RIP from the Epson website in order to print. An internet connection is required to obtain the
product software.
Software Description
Garment Creator 2 Allows you to load images created with commercially available
drawing software, set the position and size of the image according to
the platen size, and then create print jobs. You can send created
jobs to the printer or save them to your computer. See the Garment
Creator 2 manual for more details.
Garment Creator EasyPrint
System (Windows only)
Allows you to create a hot holder for printing. By simply copying an
image file to the hot folder, you can automatically create a print job
and send it to the printer. This is useful when frequently printing
using the same print and layout settings. Install this software on the
computer on which Garment Creator 2 is installed.
Epson Edge Dashboard Allows you to manage the status of multiple printers and easily copy
custom paper settings from one printer to another.

13
Software Description
Epson Software Updater Periodically checks for software updates and then notifies you and
installs the software if an update is available. You can select the
interval for update checks and make settings for receiving update
notifications. In addition to driver updates, also allows you to update
product firmware and previously installed applications, and install
additional software that is compatible with the printer.
Epson communication drivers
(Windows only)
Epson communication drivers must be installed if you are using
Epson Edge Dashboard and Garment Creator 2, or if your computer
and printer are connected by USB and you are using commercially
available RIP software.
EpsonNet Config SE Software to configure the initial settings of the network or change
network settings universally when installing or relocating Epson
printers and scanners. Visit the Epson website to download and run
EpsonNet Config SE. See the online Administrator's Guide for more
information.
Install Navi This is the software installer. During installation, you can access a
wizard that assists you with making the settings for connecting to a
network.
Web Config Pre-installed software that allows you to access your printer from a
web browser via a network, and perform administrative functions
such as checking ink levels, updating firmware, configuring network
and advanced security settings, and editing custom paper settings
that can then be exported to a file or imported to another printer. Also
provides an e-mail notification function to inform you when printer
errors occur.
Note: For Mac users, EPSON Software Updater only receives updates for software (such as Garment
Creator 2), not firmware. For firmware updates, check Epson Edge Dashboard and update as
necessary. See the Epson Edge Dashboard manual for details.
Parent topic: Introduction to Your Printer
Notations Used in the Documentation
Follow the guidelines in these notations as you read your documentation:
• Warnings must be followed carefully to avoid bodily injury.
14
• Cautions must be observed to avoid damage to your equipment.
• Notes contain important information about your printer.
• Tips contain additional printing information.
Parent topic: Introduction to Your Printer
Printer Part Locations
Check the printer part illustrations to learn about the parts on your printer.
Product Parts - Front/Side
Product Parts - Inside
Parent topic: Introduction to Your Printer
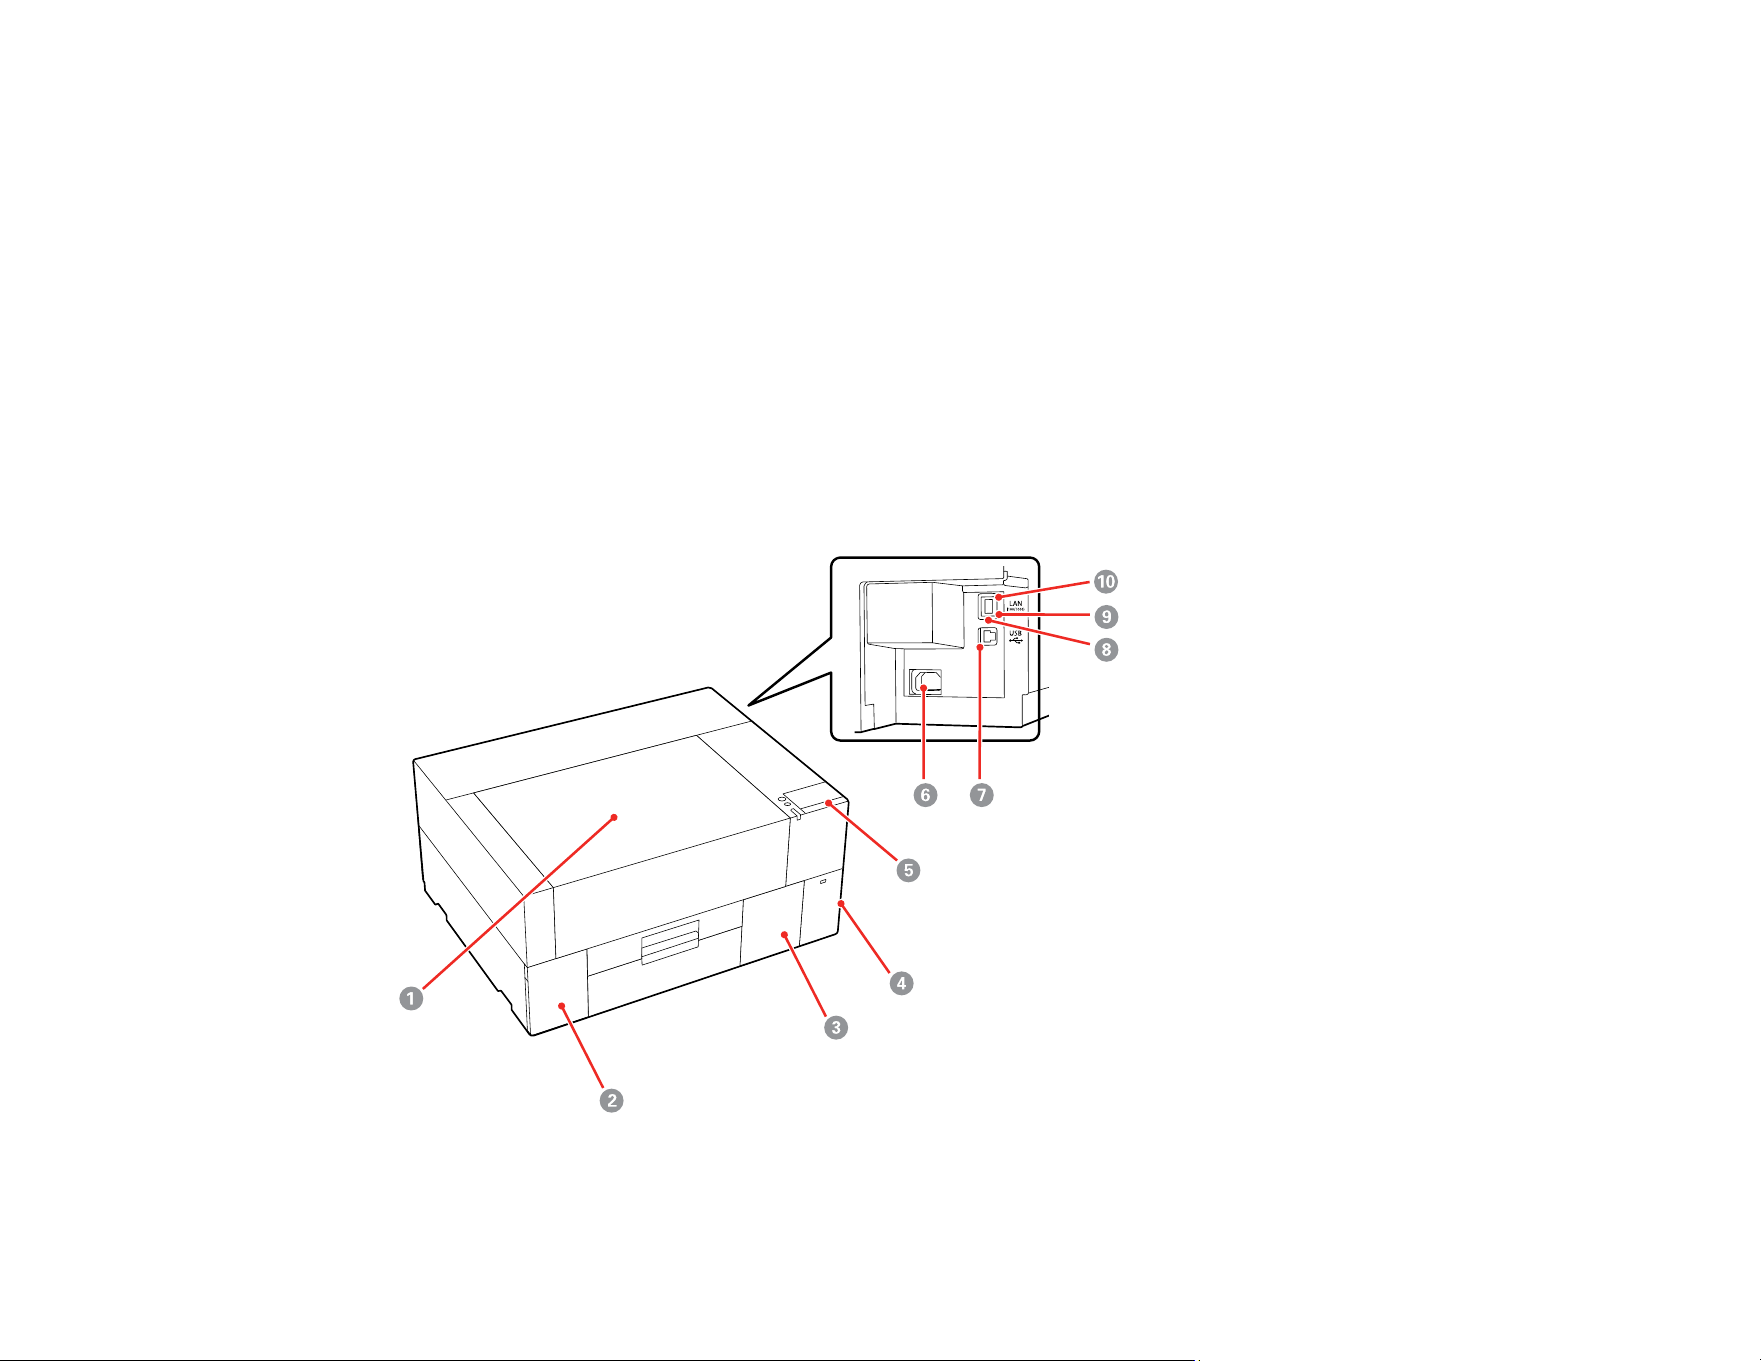
Product Parts - Front/Side
1 Printer cover
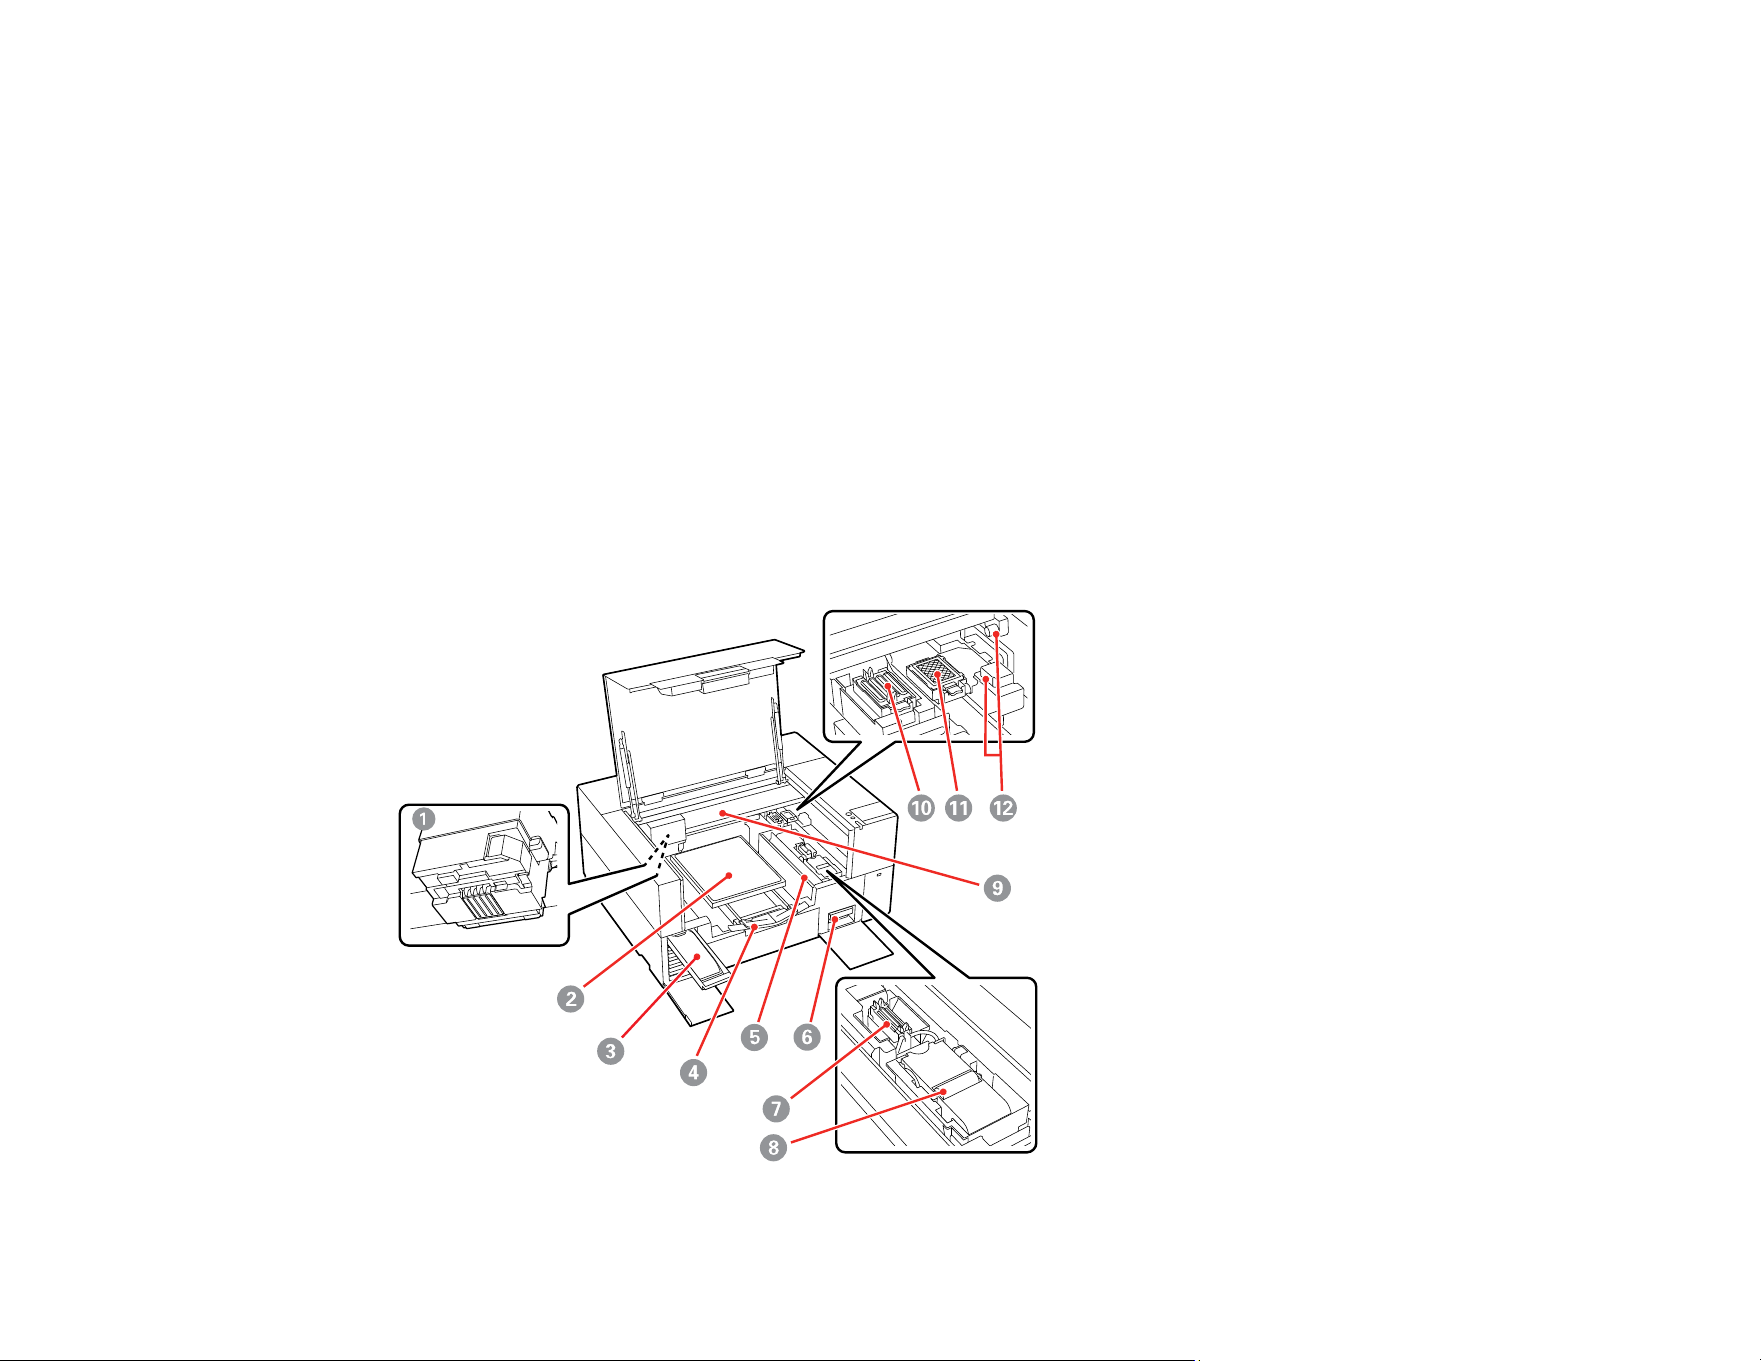

16
1 Print head
2 Platen
3 Ink tray
4 Adjustable platen hanger (to hang platen frame)
5 Loading guard
Note: Do not place objects on this guard. Objects may get caught in the guard when it is opened
or closed, which could damage the product.
6 Maintenance box
7 Suction cap
8 Wiper unit
9 Gantry
Note: Do not apply weight to the top plate of the gantry. Printing cannot be performed correctly if
the top plate is bent or damaged.
10 Capping station
11 Flushing Pad
12 Sensor covers (left and right)
Parent topic: Printer Part Locations
Using the Control Panel
See these sections to learn about the control panel and select control panel settings.
Control Panel
Changing the LCD Screen Language
Selecting the Date and Time
Parent topic: Introduction to Your Printer
17
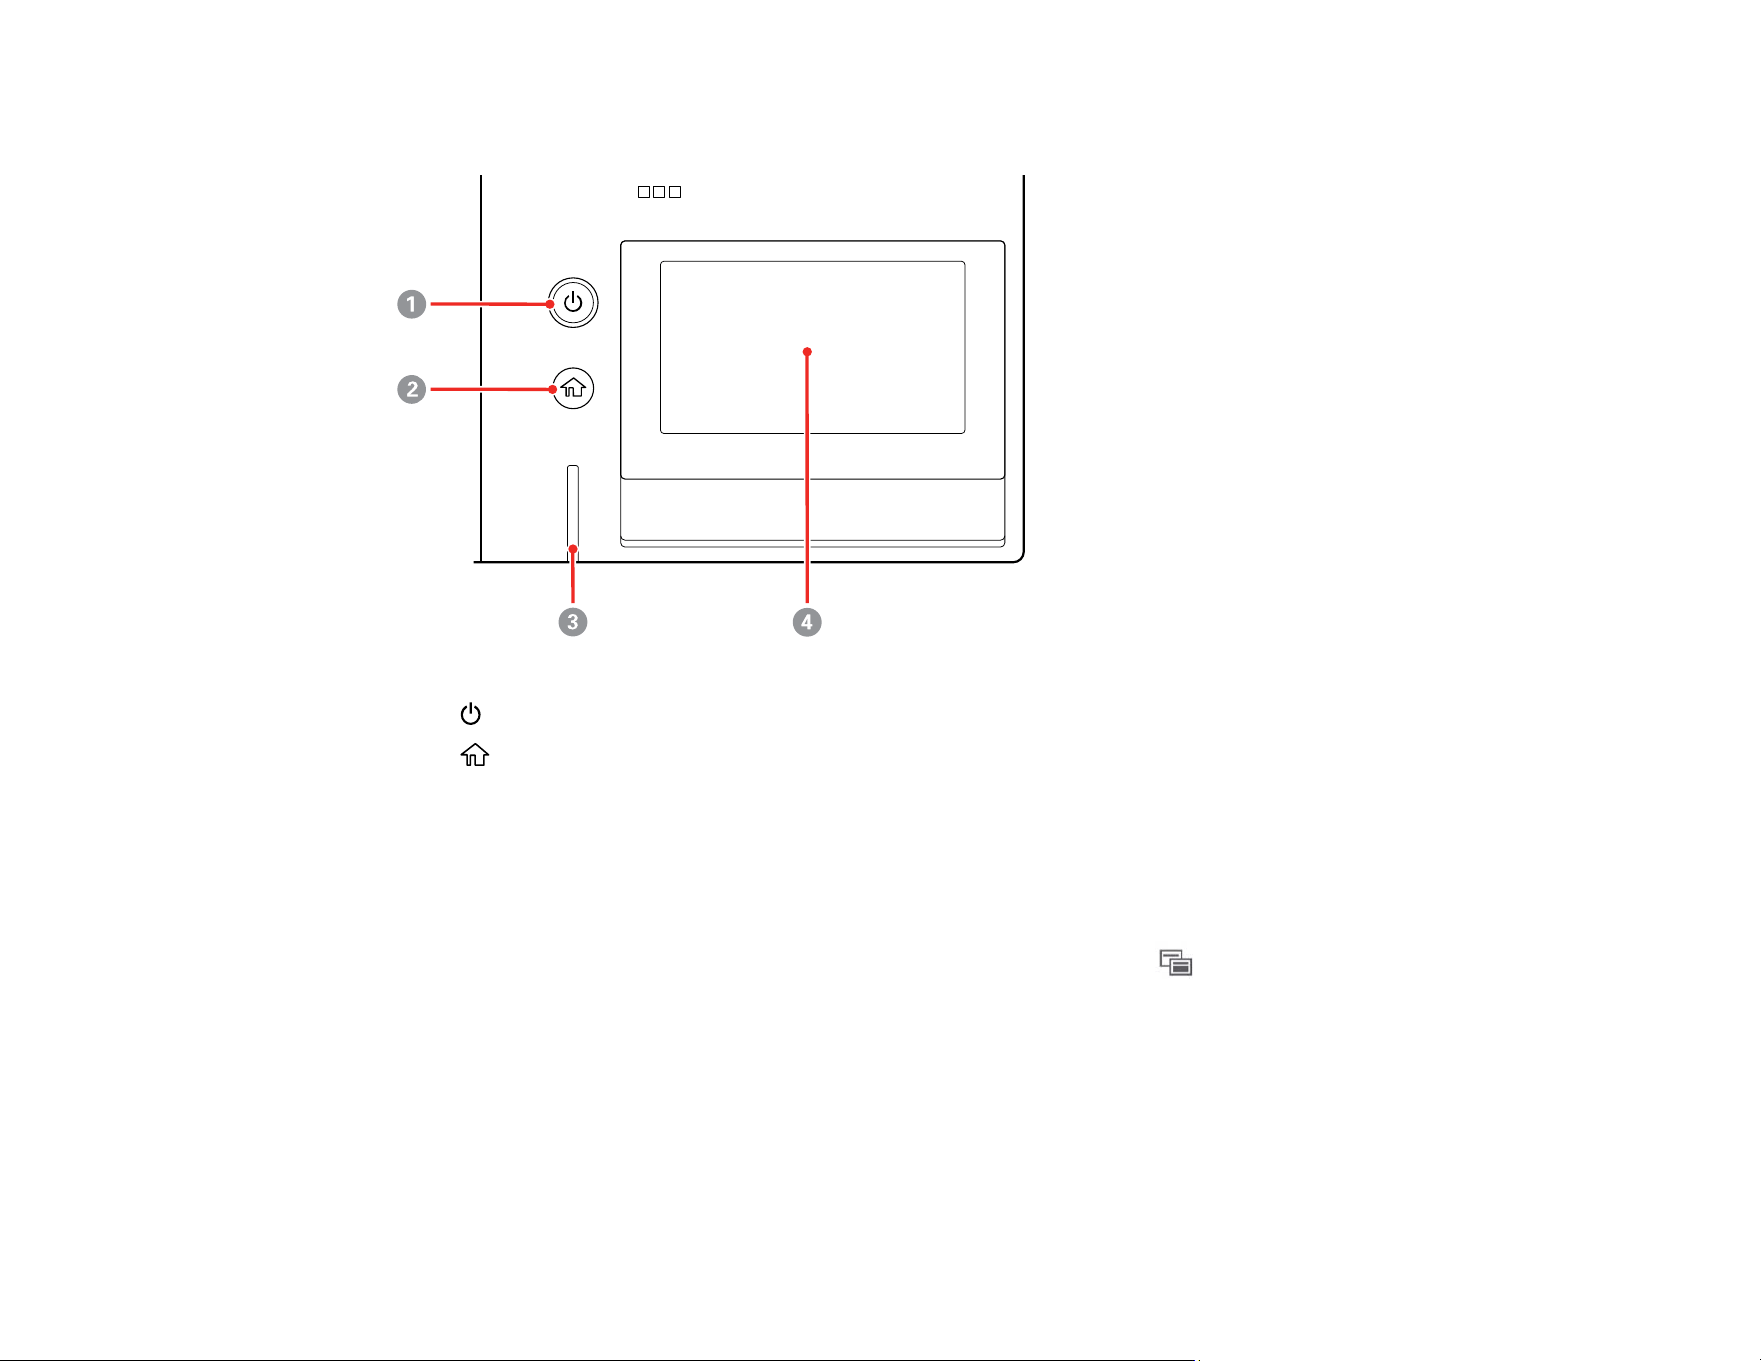
Control Panel
1
power button
2
home icon
3 Error alert light; check the control panel for error details when lit
4 LCD touchscreen
LCD Screen
Note: When a print job has been sent to the printer, you can select the screen switching icon to
toggle between the job preview screen and the Home screen.
18
Home Screen
1 Access menu items
2 Displays the printer's status, error messages, and other information
3 Displays the current media setting
4 Displays the amount of ink remaining
The abbreviation below each bar indicates the ink color.
WH: White
CL: Cleaning ink pack
BK: Black
Y: Yellow
M: Magenta
C: Cyan
ML: Maintenance Liquid
When the notification icon is displayed, the corresponding ink color is running low. Tap the
display area to check the model number of the ink pack.
When the shake ink icon is displayed, it is time to shake the corresponding ink pack.
When the cleaning icon is displayed, the cleaning pack unit is installed.

19
5 Footer (displays temperature, humidity, time, and available buttons)
When the notification icon is displayed, the temperature around the printer exceeds
approximately 86˚F (30˚C). If you continue to use the product while this is displayed, automatic
maintenance cleanings may become more frequent. Reduce the room temperature or temporarily
stop printing to reduce the temperature around the print head.
6 Displays the status of consumables
The bar levels get lower as replacement time approaches.
: Displays the amount of space remaining in the maintenance box
When the notification icon is displayed, the maintenance box is almost full. Tap the display
area to check the maintenance box model number.
: Displays the status of the wiper unit
When the notification icon is displayed, it is almost time to replace the wiper unit. Tap the
display area to check the wiper unit model number.
: Displays the status of the head maintenance set (flushing pad)
When the notification icon is displayed, it is almost time to replace the flushing pad. Tap the
display area to check the head maintenance set model number.
7 Periodic Cleaning setting status
Tap the display area to perform periodic cleaning before the scheduled time.
8 Time before next automatic cleaning
Tap the display area to view the time remaining before maintenance cleaning is performed, or to
perform maintenance cleaning before the scheduled time.
9 Platen Gap setting status
10 Printer status
When the notification icon is displayed at the top of the icon ( ), tap the icon and select
Message List to view the notifications.
11 Online manual icon
Displays a QR code that links to product videos

20
12 Displays the Maintenance menu
You can check and clean the print head nozzles, replace consumables, and clean parts.
13 USB memory device status
Tap the icon to print or delete print jobs in the USB memory device. (Only enabled when a USB
memory device is connected.)
14 Network status icons; select to switch the network connection status
: No Ethernet or Wi-Fi connection
: Ethernet connection established
: No Wi-Fi connection
: Wi-Fi network error or the product is searching for a connection
: Wi-Fi connection established; the number of bars indicates signal strength
: No Wi-Fi Direct (Simple AP) connection
: Wi-Fi Direct (Simple AP) connection established
15 Turns the internal light on or off; turn on to check print in progress
Job Preview Screen
When a print job is sent to the printer, the home screen changes to the job preview screen (below on the
left).
Note: You can also select General Settings > Basic Settings > Screen Customization > Print
Standby Screen to change the display when receiving a print job.

21
1 Displays a preview image of the current print job
2 Displays the current print settings
3 Select to start printing
4 Select to cancel the print job
5 Switches the screen display
When a print job has been sent to the printer, you can select the screen switching icon to toggle
between the information screen (the display on the right) and the job preview screen (the display
on the left). This button is only enabled when a print job has been received.
Parent topic: Using the Control Panel
Changing the LCD Screen Language
You can change the language used on the LCD screen.
1. Press the home button, if necessary.
2. Select the Menu icon.
3. Select General Settings > Basic Settings > Language.
4. Select a language.
5. Press the home button to exit.
Parent topic: Using the Control Panel
Selecting the Date and Time
Before using your product, select the current date, time, and daylight saving phase in your area, and
choose your preferred date and time format.
Note: This setting can be locked by an administrator. If you cannot access or change this setting,
contact your administrator for assistance.
1. Press the home button, if necessary.
2. Select the Menu icon.
3. Select General Settings > Basic Settings > Date/Time Settings.
4. Select Date/Time.
22
5. Select the date format you want to use.
6. Use the on-screen keyboard to enter the current date and select OK.
7. Select the time format you want to use.
8. Use the on-screen keyboard to enter the current time and select OK.
9. Select Daylight Saving Time and select either On (Summer) or Off (Winter).
10. Press the home button to exit.
Parent topic: Using the Control Panel
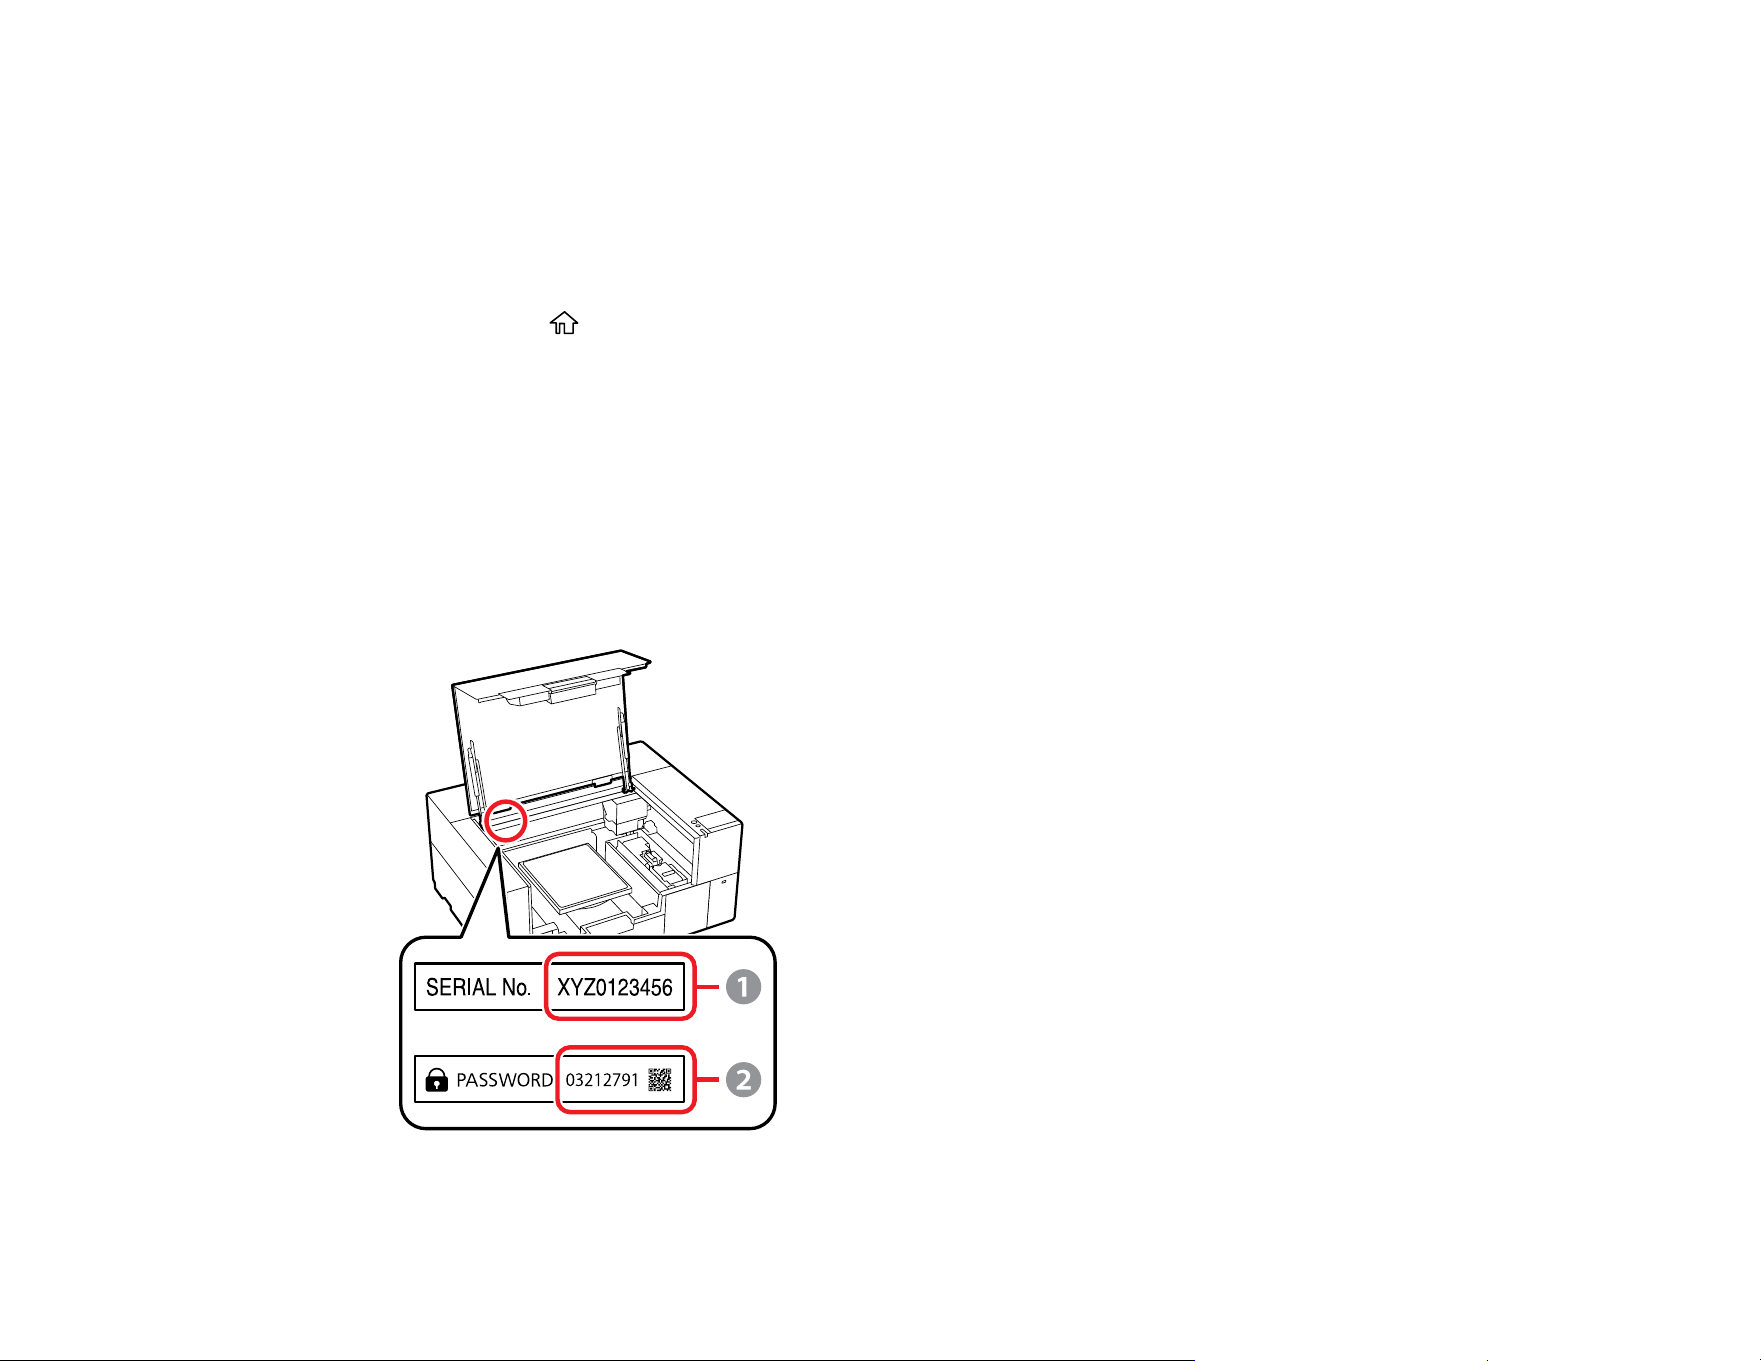
Administrator Password Instructions
You can set an administrator password to prevent unauthorized access or changes to general product
settings and network settings stored in the product when connecting to a network.
The default value of the administrator password is printed on the product's label. The label is located on
the side where the cover is opened, the back, or the bottom, depending on the product. We recommend
that you change the initial password before you start using your product. (The default user name is
blank.)

23
1 The default administrator password is the product's serial number when only one label is attached
2 The default administrator password when multiple labels are attached
You must enter the current administrator password when performing the following operations:
• Updating your product's firmware from a computer or smart device
• Accessing the advanced security settings in Web Config
• Changing your product's network settings
• Using applications that can change the product's settings
• Changing the administrator password
You can change the administrator password from Web Config. The new password must be 8 characters
or more. If you restore the product to default settings, the administrator password resets to the product
serial number.
Note: If you forget the password or inadvertently set it, contact Epson for assistance.
Parent topic: Introduction to Your Printer

24
Printer Usage Guidelines
Follow the guidelines in these sections as you use your printer, consumables, and print media.
Installation Space
Using Your product
Storing Your product
Handling Ink and Cleaning Packs
Handling White Ink
Handling T-shirts (Media)
Handling Pre-treatment Solution
Precautions When Printing on Film
Related references
Environmental Specifications
Related topics
Maintenance
25
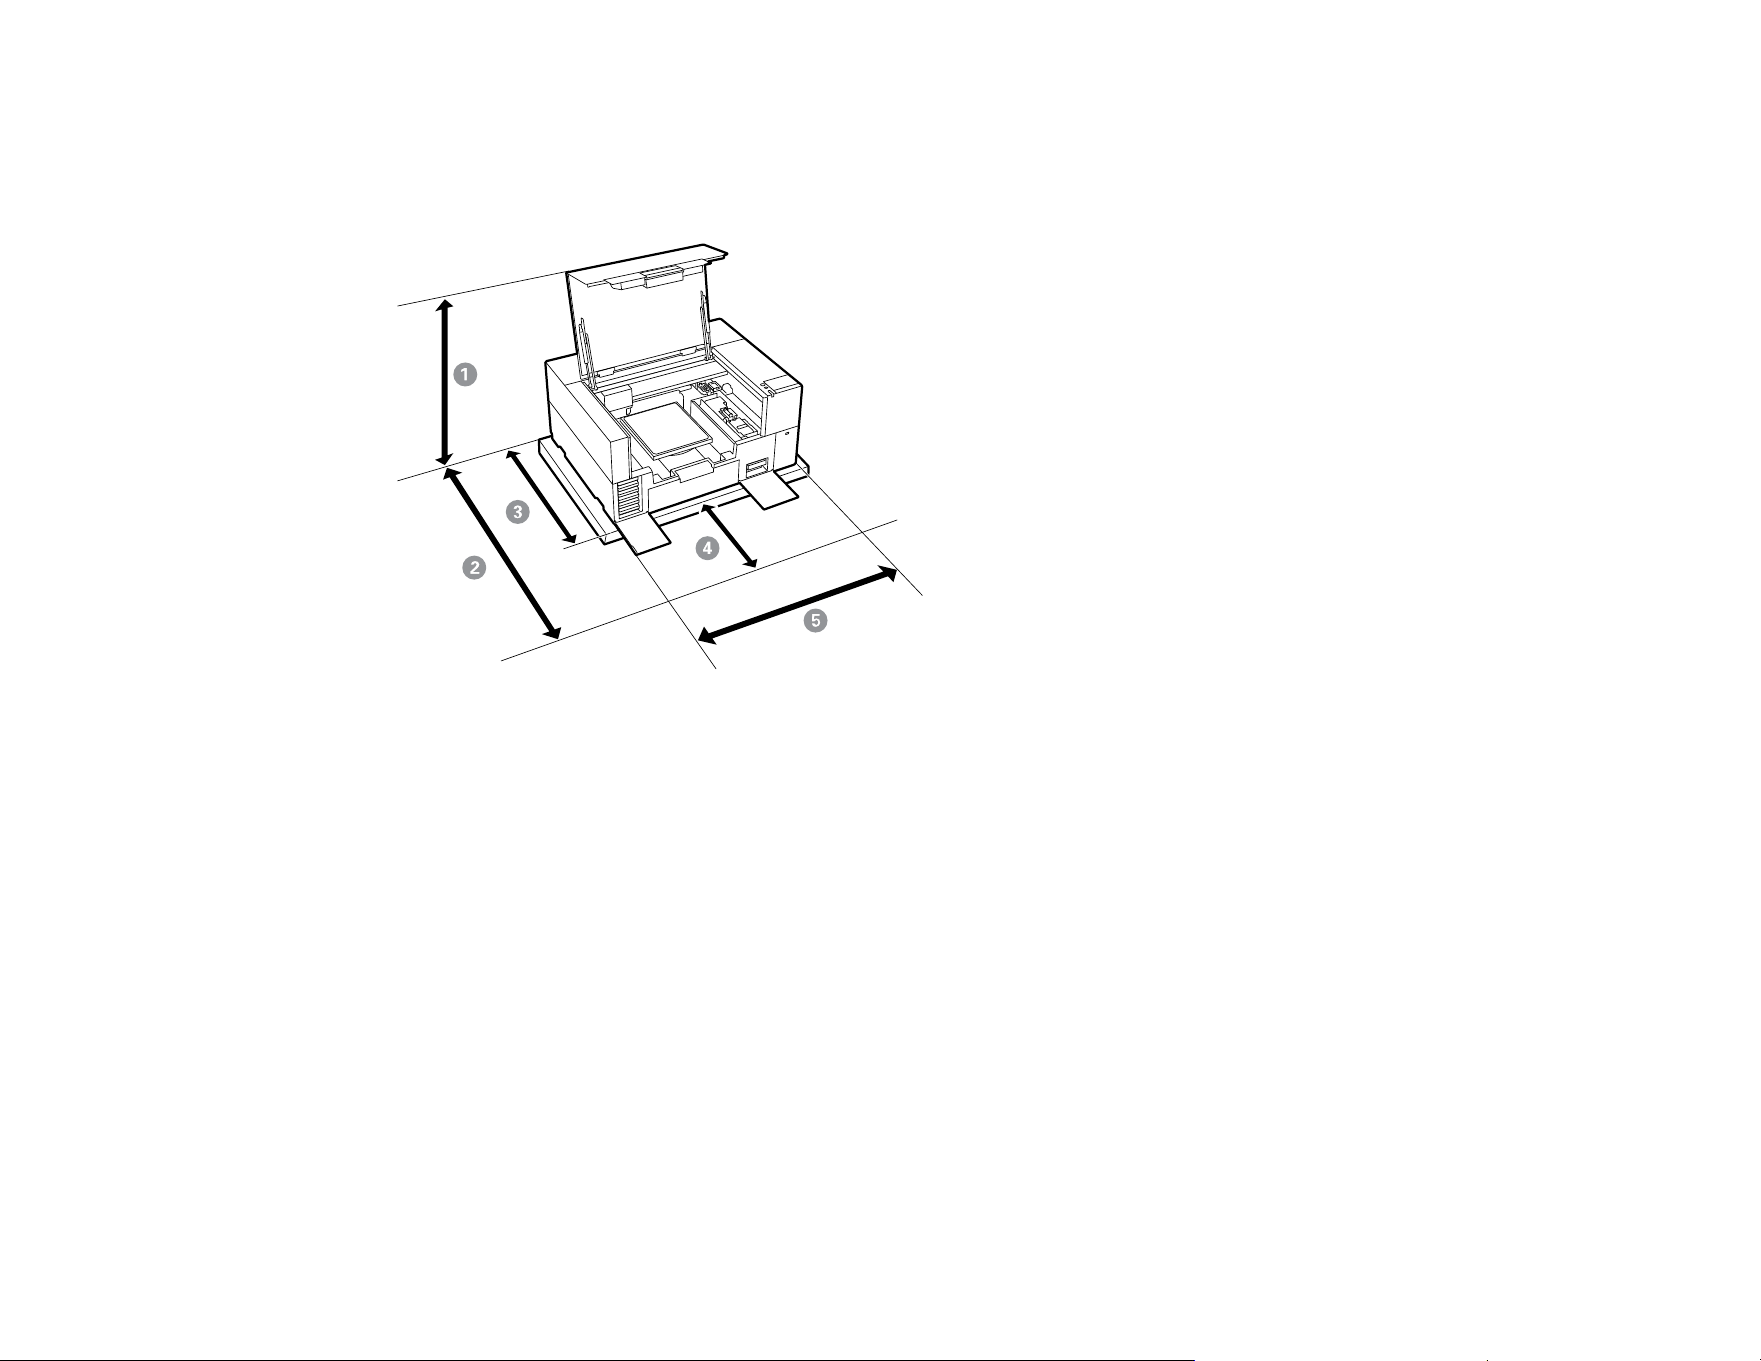
Installation Space
Make sure that you clear the following amount of working space so that you can eject paper and replace
consumables as necessary for your model.
1 Approximately 37 in. (940 mm)
2 Approximately 47.2 in. (1200 mm)
3 27.6 in. (700 mm)
4 19.7 in. (500 mm)
5 Approximately 35.4 in. (900 mm)
Choose a location for the product that is near a dedicated wall outlet where the power cord can be easily
unplugged.
Make sure to place the product on a flat, stable surface that meets the following conditions:
• Capable of supporting approximately 187 lb. (85 kg) without wobbling
• Between 23.6 to 31.5 in. (600 to 800 mm) off the ground
• At least 27.55 in. (700 mm) in depth

26
• Wider than the space between the rubber feet on the bottom of the product
Parent topic: Printer Usage Guidelines
Using Your product
Follow these guidelines as you use your product:
• Operate the product only within the specified operating temperature and humidity range.
• Check to make sure you maintain the specified humidity range, especially in dry areas, air conditioned
environments, or under direct sunlight.
• Do not install the product next to heat sources or directly in the path of exhaust from a ventilator, air
conditioner, or treatment machine. Failure to observe this precaution could result in the print head
nozzles drying and clogging.
• If an error occurs and the product is turned off without first resolving the error, the print head may not
be capped on the right side, which may cause the print head to dry out. If an error occurs causing the
product to turn off, turn on the power until capping is performed automatically.
• When the product is on, do not disconnect the power cable or cut the power at a power strip or circuit
breaker. The print head may not be capped properly. If this occurs, turn on the power until capping is
performed automatically.
• Do not remove ink packs while the product is operating or a malfunction may occur.
• Maintenance, such as cleaning and replacing consumables, must be performed according to usage
frequency or at recommended intervals. Print quality declines if maintenance is not performed.
• Do not move the gantry or the platen manually. Otherwise, a malfunction may occur.

27
• To keep the print head in optimum operating condition, maintenance is performed when the product is
turned on. If the product is turned on and off frequently, more ink is consumed in each maintenance
operation. We recommend leaving the power on to reduce ink consumption.
Note: To keep the print head in the optimum operating condition, ink and cleaning liquid are also used in
maintenance operations such as head cleaning in addition to printing. You can turn off some automatic
maintenance operations from the product's control panel.
Parent topic: Printer Usage Guidelines
Storing Your product
Follow these guidelines if you need to store your product for a long period:
• If there are no white ink supply units loaded in the product and the product will not be used (and will be
switched off) for an extended period, use an optional cleaning ink supply unit and perform long-term
storage maintenance. Otherwise, it may be impossible to clear clogging in the print head. See the link
below for more information.
• We recommend that you turn on the product at least once a week if the product is not used for a long
time without performing the prolonged storage operation. If you do not print for a long time, the print
head nozzles may become clogged. Maintenance cleaning is automatically performed after the
product is turned on. Maintenance cleaning helps prevent clogging in the print head and maintains
print quality. Do not turn the product off until maintenance cleaning is complete.
• If you do not use the product for a long time, make sure you perform a nozzle check before printing. If
clogged nozzles are detected, clean the print head.
• Do not remove the maintenance box even when the product is turned off. Otherwise, waste ink may
dry and solidify inside the printer.
• Make sure that the print head has been capped (the print head is positioned on the left side) before
storing the product. If it is left uncapped for a long time, the print quality may decline, and it may be
impossible to clear clogged nozzles. If the print head is not capped, turn the product on, check that
capping has been performed, and then turn the product off.
• Close all the covers on the product to prevent dust and debris from getting in. If the product will be not
be used for an extended period of time, protect it with an anti-static cloth or other cover. The print head
nozzles can become clogged if dust gets on the print head, and you may not be able to print properly.
Parent topic: Printer Usage Guidelines
Related references
Handling Ink and Cleaning Packs
Handling White Ink

28
Related tasks
Performing a Nozzle Check
Storing the Printer
Related topics
Maintenance
Handling Ink and Cleaning Packs
Follow these guidelines as you handle the ink and cleaning packs:
• Extra ink is required to charge the print head nozzles the first time the product is used. Be sure to have
replacement ink packs ready.
• Store ink packs at room temperature and away from direct sunlight.
• To ensure print quality, use ink packs before the expiration date printed on the packaging or within 1
year of installing them.
• Allow ink and cleaning packs that have been stored at low temperatures for an extended period of time
to return to room temperature over a period of four hours before use.
• Do not touch the IC chips on the ink packs.
• The IC chip on each ink pack stores information, such as ink levels, to allow the ink pack to be used
after being removed and re-installed.
• Install ink packs into all the trays in the ink unit or the printer cannot print.
• Do not leave the printer without ink packs installed in all the trays, even when the printer is not in use.
The ink in the printer may dry out.
• If you remove an ink pack before it is empty, wipe off any ink from the ink supply port using a wide
cleaning stick from the maintenance kit. If ink dries on the supply port, the ink pack may leak when it is
reinstalled. Also make sure that the supply port is free of dust when storing ink packs (the port does
not need to be capped since there is a valve inside).
• Removed ink packs may have ink around the ink supply port, so be careful not to stain any surfaces
with ink.
• Do not dismantle or remodel ink packs. You may not be able to print properly.
• Do not drop ink packs or subject them to impacts. It may cause ink to leak.
• Periodically remove and thoroughly shake ink supply units that are loaded in the printer. Shake color
ink packs once a month and shake white ink packs once every 24 hours. You do not need to shake the
Cleaning Liquid or Maintenance Liquid packs.

29
Note: To maintain the quality of the print head, the printer stops printing before ink packs are completely
expended. The ink packs may contain recycled materials; this does not affect printer functions or
performance.
Parent topic: Printer Usage Guidelines
Related references
Handling White Ink
Related topics
Shaking and Replacing Ink Packs
Handling White Ink
Follow these guidelines as you handle the white ink packs:
• White ink particles may settle in the ink system, which must be maintained. Do not print without
maintaining the White ink system; print quality may decline or the printer may not work properly.
• Remove the White ink packs at the start of every working day or every 24 hours, and shake them well
before reinstalling them.
• Keep a spare ink pack on hand when printing using Dark Color T-Shirt (Standard) mode or Dark Color
T-Shirt (White) mode in Garment Creator 2. These modes print using White ink over the entire printing
area, so White ink may run out faster than the other colors.
• When storing ink packs, lay them down flat and keep them level. If you store ink packs standing
upright, shaking the ink packs may not sufficiently clear the sedimentation.
• If White ink packs are loaded in the product and the product will not be used for more than two weeks,
use an optional cleaning ink pack and perform long-term storage maintenance. Otherwise, it may be
impossible to clear clogging in the print head. See the link below for more information.
Note: White ink is consumed during maintenance even when printing only with color ink. To preserve
White ink, you can turn off some of the automatic maintenance operations performed by the printer
from the printer’s control panel.
Parent topic: Printer Usage Guidelines
Related tasks
Storing the Printer
Changing the Printer Mode

30
Related topics
Shaking and Replacing Ink Packs
Handling T-shirts (Media)
Follow these guidelines as you handle and store printed T-shirts:
• Avoid storing T-shirts in direct sunlight, or in locations that are subject to excessive dust, heat, or
humidity. If T-shirts are stored in a hot place after printing, the printed surface may soften and become
sticky.
• Do not dry clean printed T-shirts.
• Turn printed T-shirts inside out before washing and let them dry inside out.
• Do not use a tumble dryer.
• Do not use bleach. It may cause discoloration.
• Do not iron directly onto the printed surface.
• Do not use organic solvents, such as alcohol.
• Do not rub the printed surface against vinyl or chloride-based artificial leather. The colors may transfer
to the leather.
• Do not rub surfaces printed with color ink against surfaces printed with White ink; the color may
transfer. If this happens, use a soft cloth or brush with a small amount of household detergent to wipe
away the transferred color.
• If you have applied pre-treatment solution and fixed the ink, we recommend soaking the T-shirt in
water and washing it before wearing it to remove any remaining traces of pre-treatment solution.
• If traces of the pre-treatment solution are visible, try washing the shirt in water; however, the effects
depend on the T-shirt material.
• If pre-treatment solution is applied to a white or light-colored T-shirt, the treated side may turn yellow.
Print soon after applying the pre-treatment solution and wash in water. Avoid direct sunlight if you
store the T-shirt without printing.
Parent topic: Printer Usage Guidelines
Related topics
Pre-treating a T-shirt

31
Handling Pre-treatment Solution
Follow these guidelines as you handle and store pre-treatment solution:
• We recommend that the pre-treatment solution be stored at room temperature, out of direct sunlight,
and used before the expiration date printed on the packaging.
• If white coagulation occurs during storage of the cotton pre-treatment solution, filter it to remove the
coagulation before use. If you do not filter out the coagulation before using the pre-treatment solution,
the print results will be uneven.
Parent topic: Printer Usage Guidelines
Related tasks
Filtering the Cotton Pre-treatment Solution
Precautions When Printing on Film
Observe these precautions when printing on Digital-Transfer-Film:
• Select White ink mode as the Printer Mode to select Film as the job creation mode in Garment Creator
2. The powder will not stick to the film unless White ink is used when printing. Printers used in High
speed color mode cannot print on film because White ink is not available.
• Do not apply pre-treatment solution to the media. White ink is used in film printing but does not require
pre-treatment.
• Use a platen that is larger than the film. If you use a platen that is smaller than the film, the
overhanging parts could be pushed up and the job will not be printed correctly. Also, the edges of the
film may strike against the print head and be damaged.
• Do not allow powder to enter the printer. Do not apply powder near the printer. If powder gets inside
the printer, it may cause the printer to malfunction.
• Make sure you check the precautions in the instructions provided with the film and powder in advance.
Parent topic: Printer Usage Guidelines

32
Wi-Fi or Wired Networking
See these sections to use your product on a Wi-Fi or wired network.
Network Security Recommendations
Wi-Fi Infrastructure Mode Setup
Wi-Fi Direct Mode Setup
Wi-Fi Protected Setup (WPS)
Printing a Network Status Sheet
Printing a Network Connection Report
Changing or Updating Network Connections
Network Security Recommendations
To help deter unauthorized access to your product over a network, you should protect your network
environment using appropriate security measures.
Security measures such as these can help deter threats such as loss of user data, use of telephone and
fax lines, and other intrusions:
• Enable security on your wireless LAN
Enable the appropriate security on the wireless LAN you plan to use with your product. Network
security such as a network password can deter interception of traffic over the wireless LAN. Your
router may already have a default password enabled by your Internet service provider (ISP). See your
ISP and router documentation for instructions on how to change the default password and better
secure your network.
• Connect your product only to a network protected by a firewall
Connecting your product directly to the Internet may leave it vulnerable to security threats. Instead,
connect it to a router or other network connection protected by a firewall. Your router may already
have a firewall set up by your Internet service provider; check with your ISP for confirmation. For best
results, set up and use a private IP address for your network connection.
• Change the default administrator password on your product
If your product has an option to set an administrator password, change the default administrator
password to deter access by unauthorized users to personal data stored on your product, such as IDs,
passwords, and contact lists.
Parent topic: Wi-Fi or Wired Networking
33
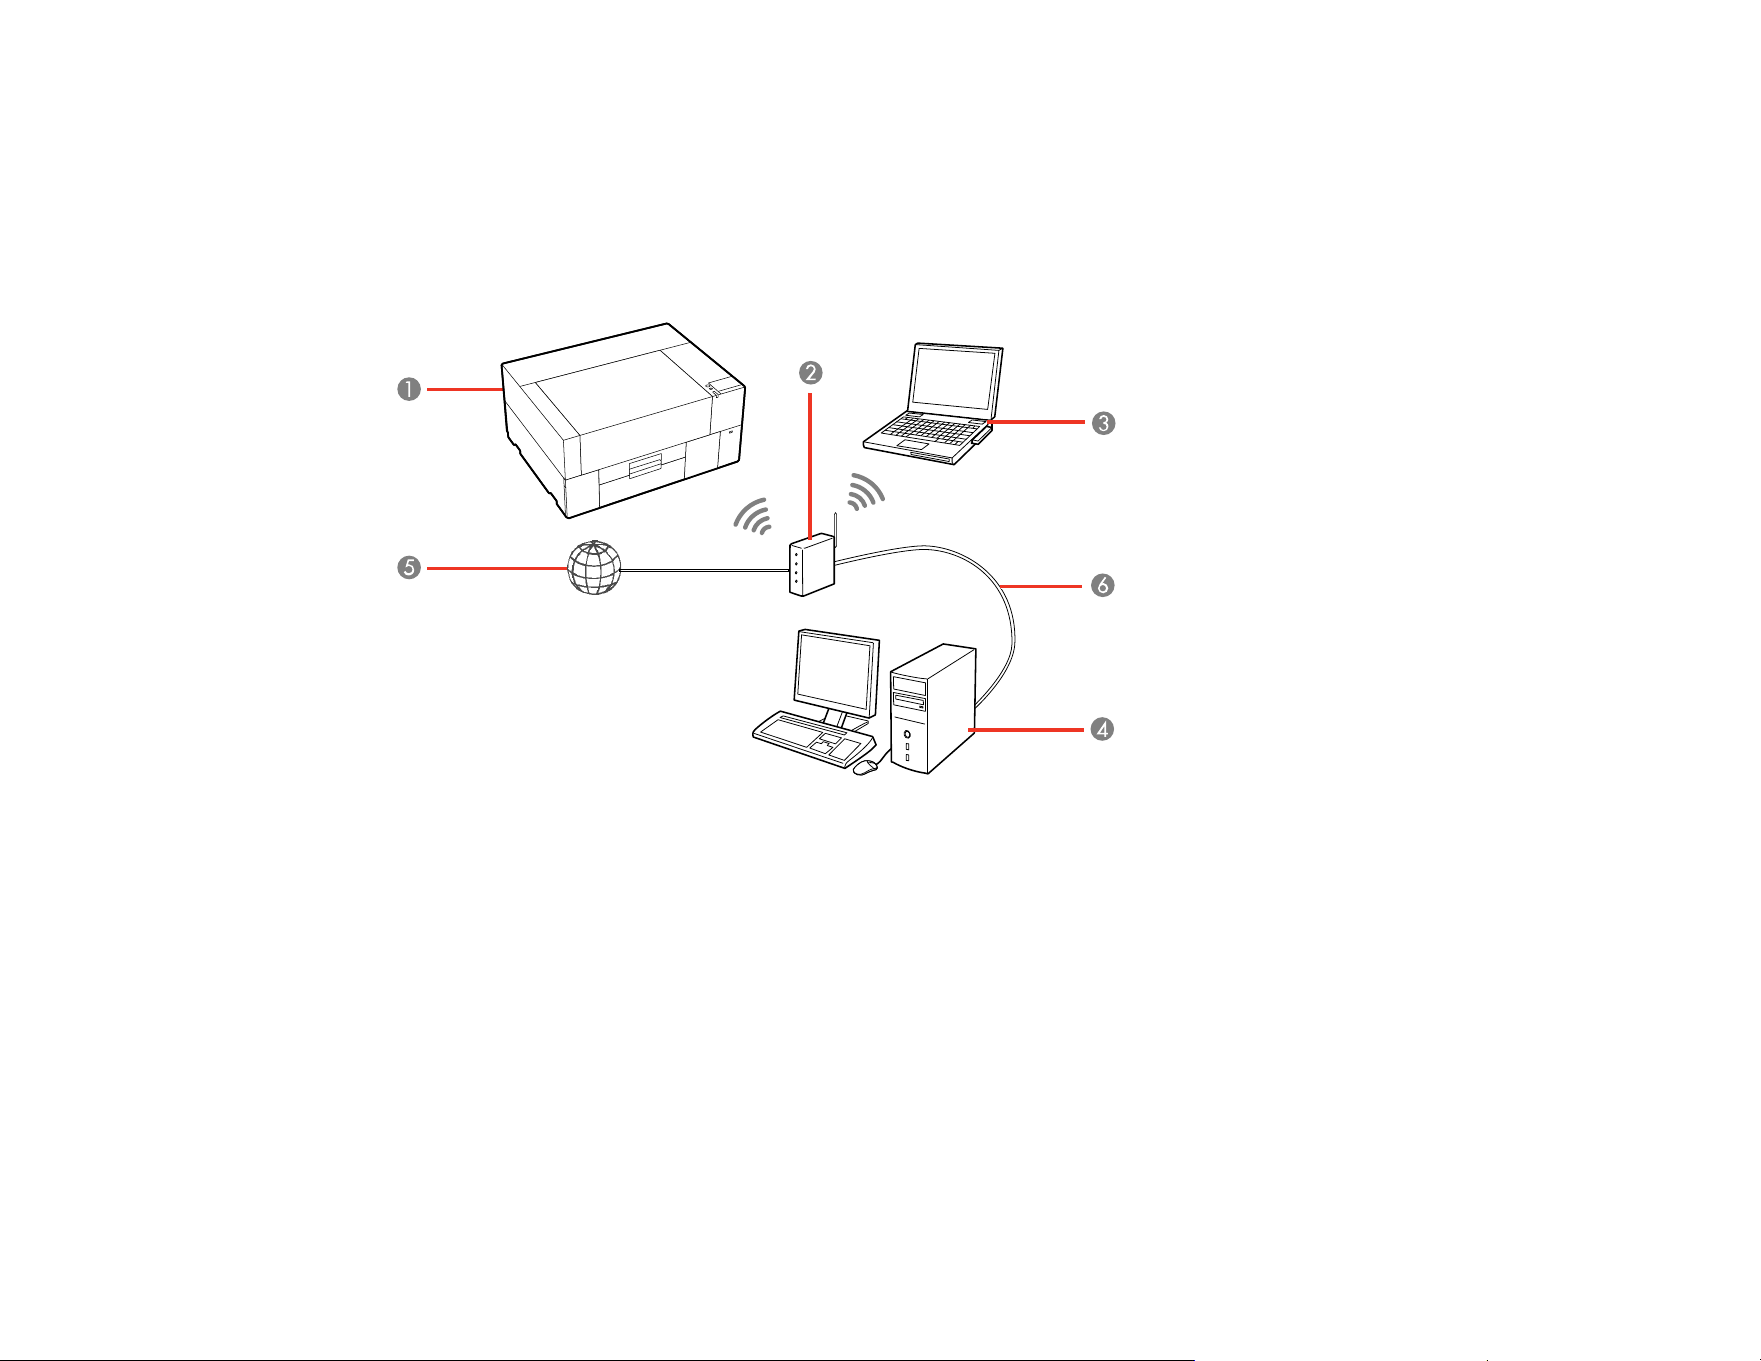
Wi-Fi Infrastructure Mode Setup
You can set up your product to communicate with your computer using a wireless router or access point.
The wireless router or access point can be connected to your computer over a wireless or wired network.
Note: You cannot connect to a wired and wireless network at the same time.
1 Epson product
2 Wireless router or access point
3 Computer with a wireless interface
4 Computer
5 Internet
6 Ethernet cable (used only for wired connection to the wireless router or access point)
Selecting Wireless Network Settings from the Control Panel
Parent topic: Wi-Fi or Wired Networking

34
Selecting Wireless Network Settings from the Control Panel
You can select or change wireless network settings using your product control panel.
To install your product on a wireless network, install the necessary software by downloading it from the
Epson website. The installer program guides you through network setup.
Note: This setting can be locked by an administrator. If you cannot access or change this setting,
contact your administrator for assistance.
1. Press the home button, if necessary.
2. Select the network icon.
Note: Icon may look different depending on connection status.
3. Select Router > Start Setup or Change Settings > Wi-Fi Setup Wizard.
Note: If you are switching to a wireless connection from a wired network connection, select Router >
Change to Wi-Fi Connection > Yes > Wi-Fi Setup Wizard.
4. Select the name of your wireless network or select Enter Manually to enter the name manually. Use
the on-screen keyboard to enter your network name.
Note: If you enter the wireless network manually, select Available for Password, and then enter the
password.
5. Select the Enter Password field and enter your wireless password using the on-screen keyboard.
Note: The network name and password are case sensitive. Be sure to correctly enter uppercase and
lowercase letters, and numeric or special characters.
6. Select OK when you finish entering your password.
7. Confirm the displayed network settings and select Start Setup to save them.
A message appears when setup is complete.
8. Do one of the following:
• If setup was successful, select OK to exit or wait for the message to disappear.
• If setup was unsuccessful, select Connection Check and follow the instructions on the screen.
35
9. Press the home button to exit.
You see the Wi-Fi icon on the LCD screen and should be able to connect to your product directly
from your computer or device, and then print. If you are printing from a computer, make sure you
installed the network software from the Epson website.
Note: If you don't see the Wi-Fi icon, you may have selected the wrong network name or entered
the password incorrectly. Repeat these steps to try again.
Parent topic: Wi-Fi Infrastructure Mode Setup
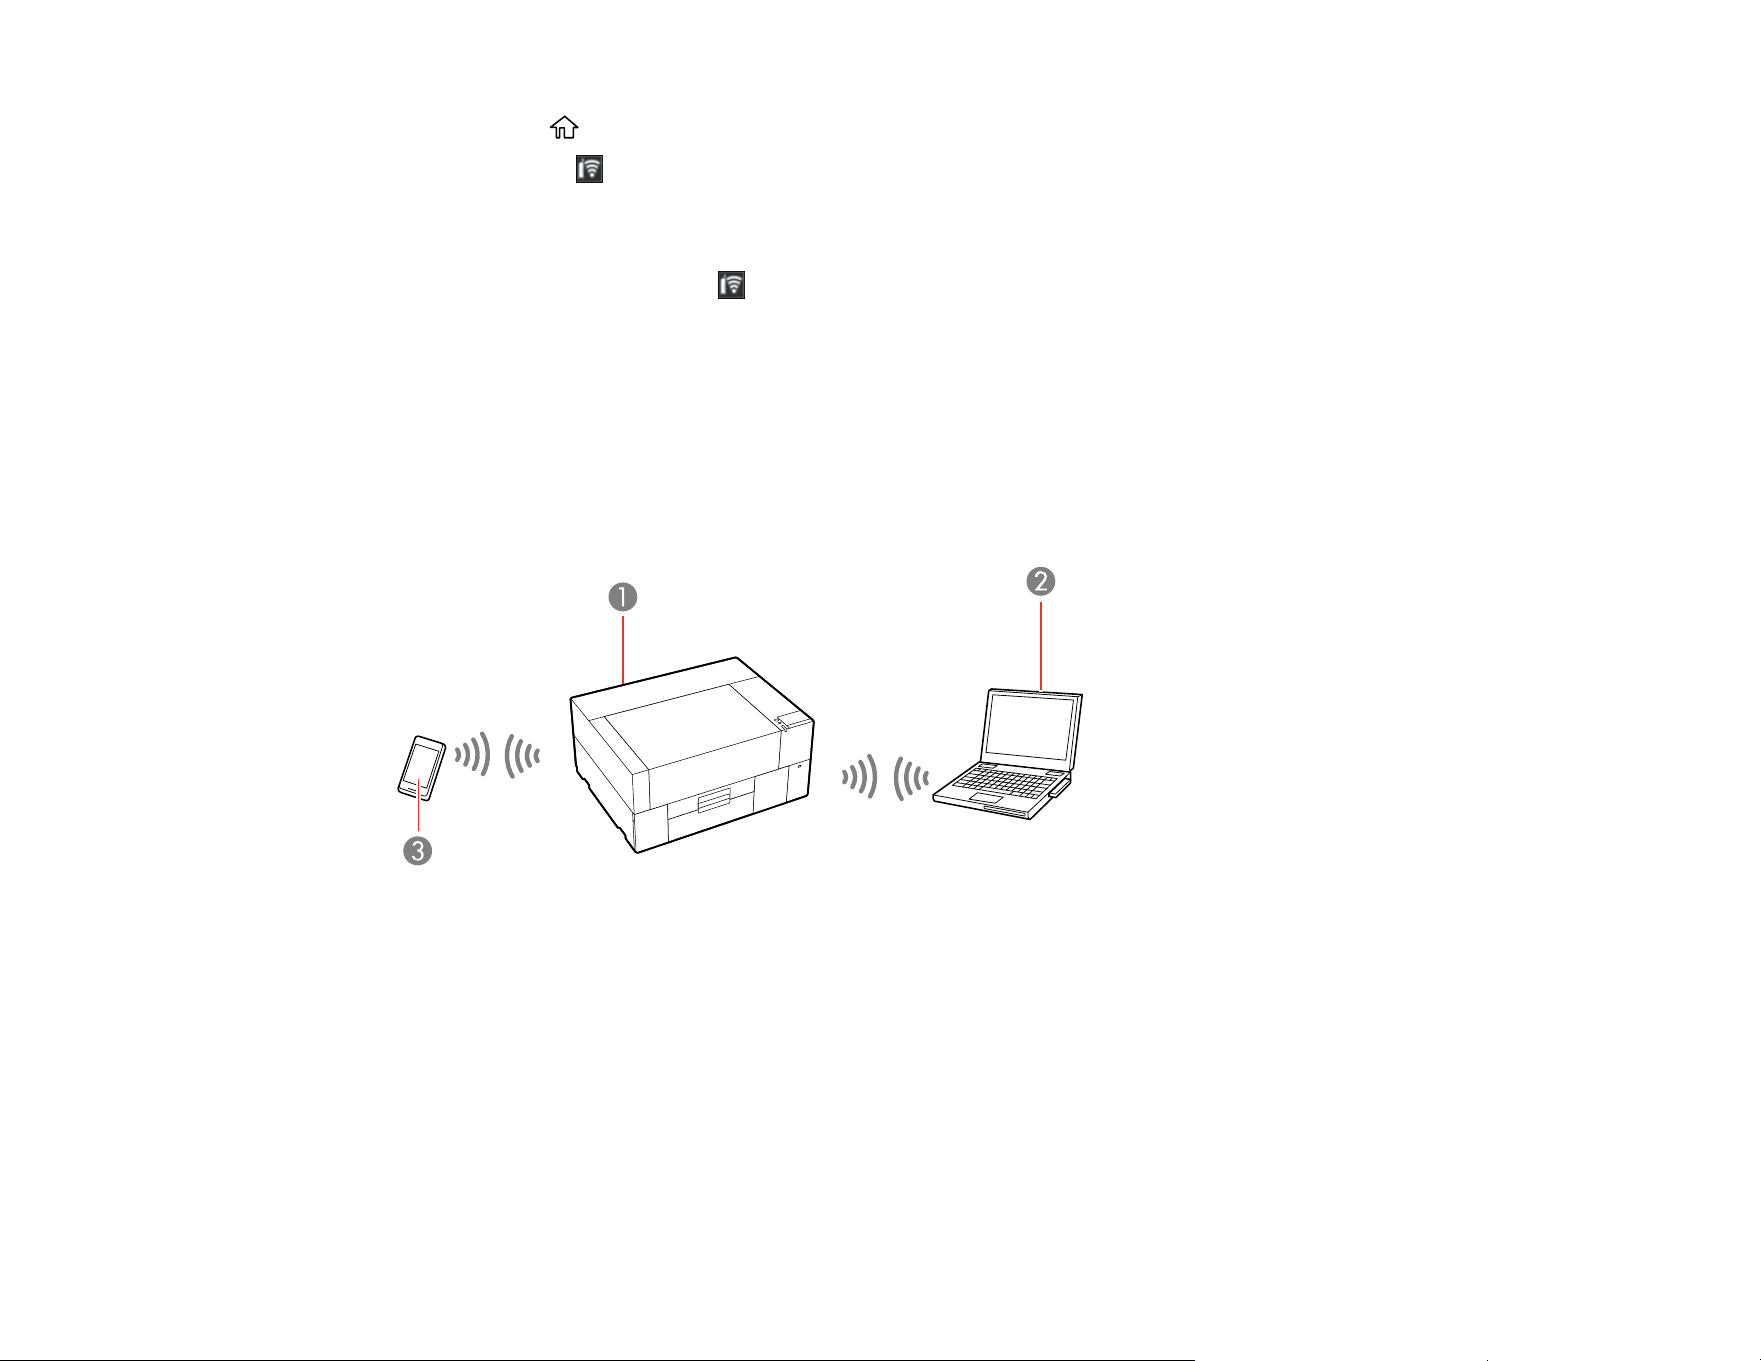
Wi-Fi Direct Mode Setup
You can set up your product to communicate directly with your computer or another device without
requiring a wireless router or access point. In Wi-Fi Direct Mode, the product itself acts as a network
access point for up to 8 devices.
1 Epson product
2 Computer with a wireless interface
3 Other wireless device
Enabling Wi-Fi Direct Mode
Parent topic: Wi-Fi or Wired Networking

36
Enabling Wi-Fi Direct Mode
You can enable Wi-Fi Direct mode to allow direct communication between your product and computer or
other devices without a wireless router or access point.
Note: This setting can be locked by an administrator. If you cannot access or change this setting,
contact your administrator for assistance.
1. Press the home button, if necessary.
2. Select the network icon.
Note: Icon may look different depending on connection status.
3. Select Wi-Fi Direct > Start Setup > Connect to Computer > Start Setup.
Wi-Fi Direct is enabled, and the Wi-Fi network name (SSID) and password are displayed.
Note: If Wi-Fi Direct is already enabled, the network name (SSID), password, number of connected
devices, and general procedures for setting up other devices are displayed.
4. Use your computer or wireless device to select the Wi-Fi network name (SSID) displayed on the
LCD screen, then enter the password shown.
5. When a connection is established, select Complete to finish.
6. Select Close on the LCD screen to close the network connection settings screen or press the
home button to exit.
You see the Wi-Fi Direct icon on the LCD screen and should be able to connect to your product
directly from your computer or device, and then print. If you are printing from a computer, make sure
you installed the network software from the Epson website.
Note: If you don't see the Wi-Fi Direct icon on the LCD screen, you may have selected the wrong
network name or entered the password incorrectly. Repeat these steps to try again.
Any connected devices will be disconnected when you turn off the printer. To reconnect after turning the
printer back on, repeat these steps.
Parent topic: Wi-Fi Direct Mode Setup

37
Wi-Fi Protected Setup (WPS)
If your network uses a WPS-enabled wireless router or access point, you can quickly connect your
product to the network using Wi-Fi Protected Setup (WPS).
Note: To check if your router is WPS-enabled, look for a button labeled WPS on your router or access
point. If there is no hardware button, there may be a virtual WPS button in the software for the device.
Check your network product documentation for details.
Using WPS to Connect to a Network
Parent topic: Wi-Fi or Wired Networking
Using WPS to Connect to a Network
If you have a WPS-enabled wireless router or access point, you can use Wi-Fi Protected Setup (WPS) to
connect your product to the network.
Note: This setting can be locked by an administrator. If you cannot access or change this setting,
contact your administrator for assistance.
1. Press the home button, if necessary.
2. Select the network icon.
Note: Icon may look different depending on connection status.
3. Select Router > Start Setup or Change Settings > Push Button Setup (WPS).
4. Hold down the WPS button on your wireless router until the security light flashes.
5. Select Start Setup on the LCD screen within two minutes of activating WPS on your router.
If connection was successful, a confirmation message appears. Select Close or wait for the
message to time out. If connection was unsuccessful, an error message appears. Select OK or
Close and repeat these steps to try again.
6. Press the home button to exit.
You see the Wi-Fi icon on the LCD screen and should be able to connect to your product directly
from your computer or device, and then print. If you are printing from a computer, make sure you
installed the product software from the Epson website.

38
Note: If you don't see the Wi-Fi icon, restart the access point, move it closer to the printer, and
repeat these steps to try again. If it still does not work, print a network connection report and check
the solution.
Parent topic: Wi-Fi Protected Setup (WPS)
Printing a Network Status Sheet
You can print a network status sheet to help you determine the causes of any problems you may have
using your product on a network.
Before you begin, make sure paper is loaded in the product.
1. Select the Menu icon.
2. Select General Settings > Network Settings > Network Status.
3. Select Print Status Sheet > Print.
Examine the settings shown on the network status sheet to diagnose any problems you have.
Parent topic: Wi-Fi or Wired Networking
Printing a Network Connection Report
You can print a network connection report to view solutions to any problems you may have using your
product on a network.
1. Press the home button, if necessary.
2. Select the network icon.
Note: Icon may look different depending on connection status.
3. Select Connection Check.
The connection check starts.
Examine the error codes and solutions shown on the network connection report.
Network Connection Report Codes and Messages
Parent topic: Wi-Fi or Wired Networking
39
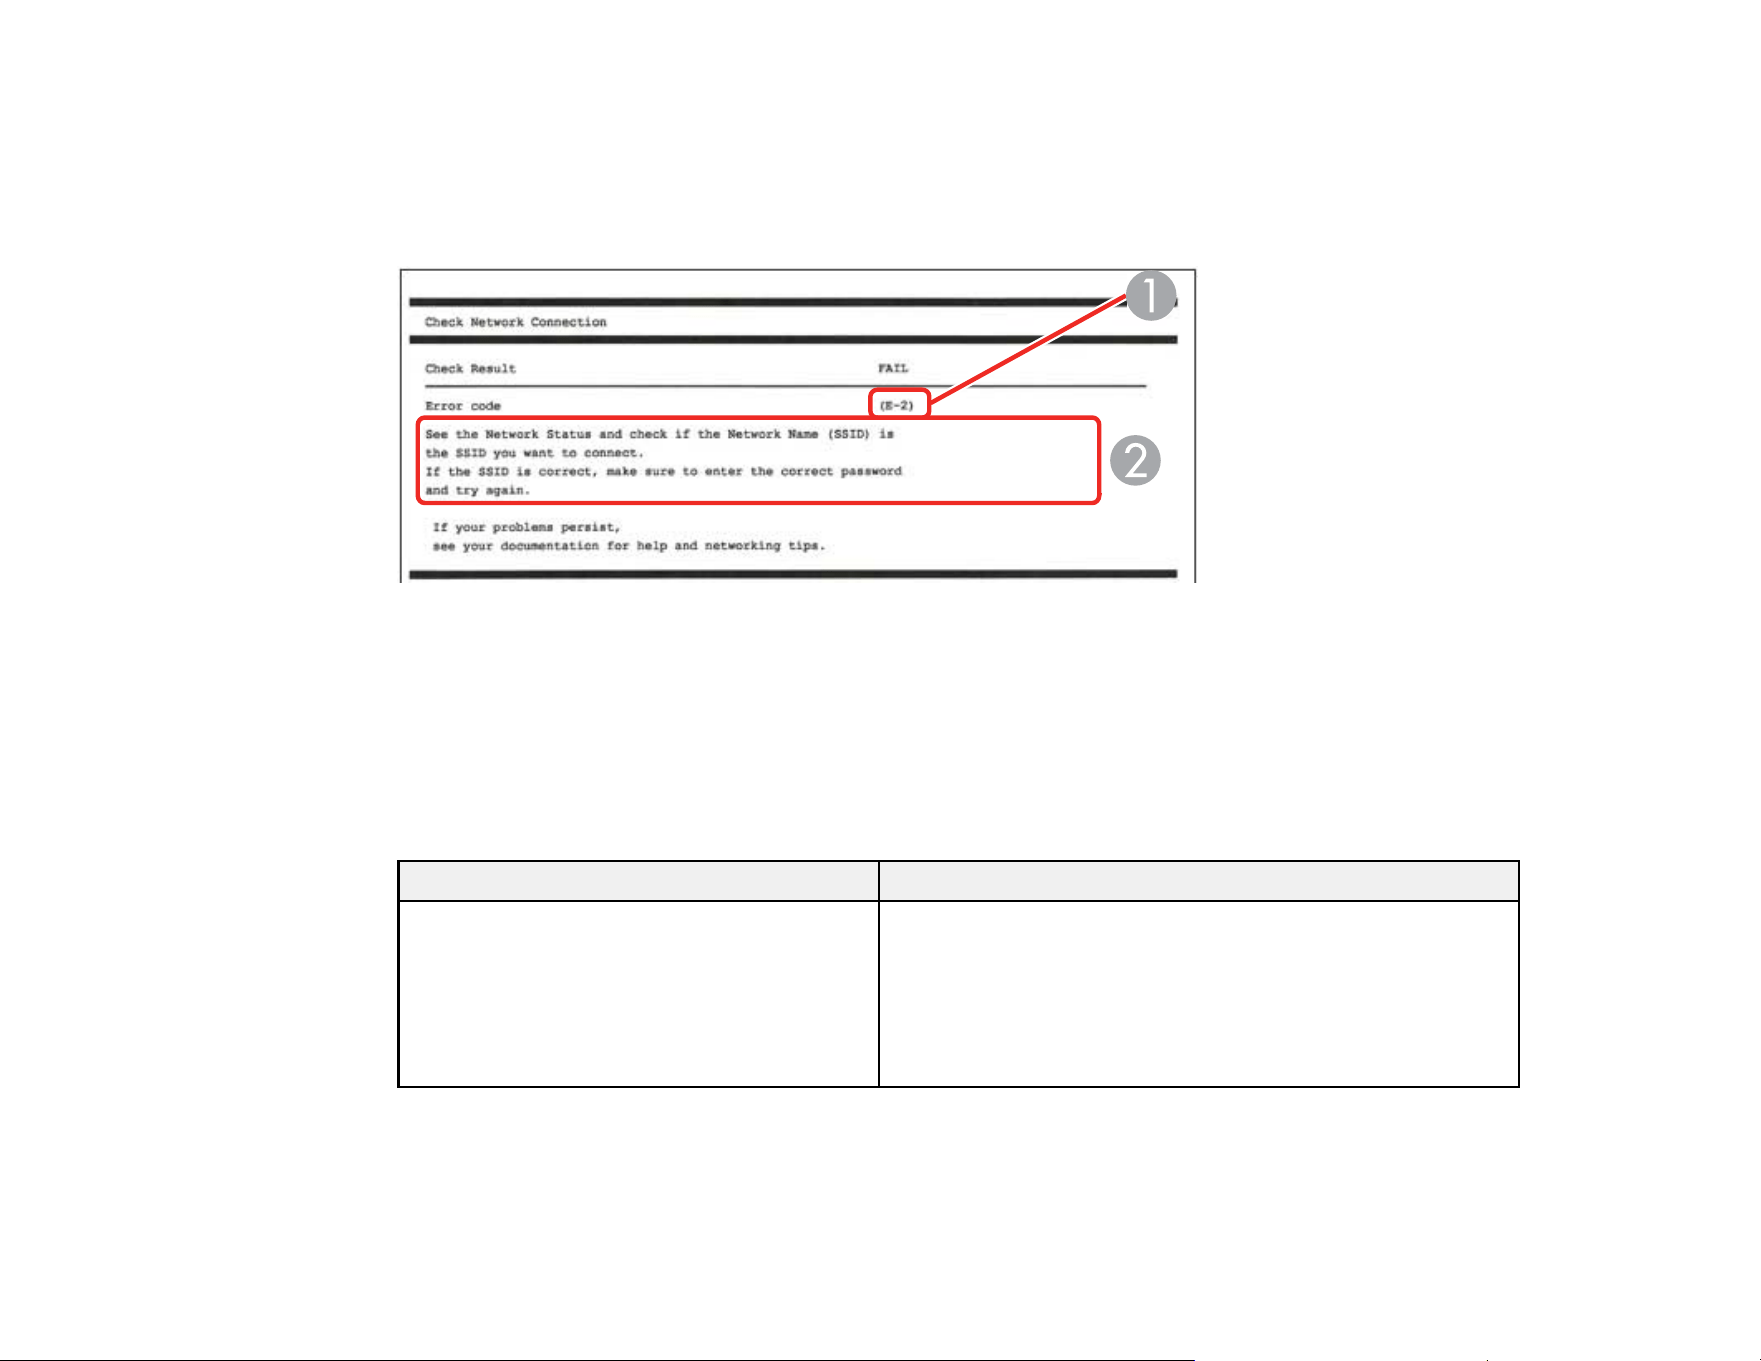
Network Connection Report Codes and Messages
Check the error codes and messages on the network connection report to solve problems you may
encounter with network connections. The tables here list solutions to problems based on the error codes
and messages that may appear at the top of the report.
1 Error code
2 Message
Note: Error codes and messages listed here may not all apply to your product.
Error Codes and Messages
Error code and message Solution
E-1
Confirm that the network cable is
connected and network devices such as a
hub, router, or access point are turned on.
Make sure your router, access point, and/or hub are
turned on, and the network cable is securely connected to
your device and your product.
If you are trying to set up Wi-Fi, remove the network cable
and set up Wi-Fi again. Ethernet and Wi-Fi cannot be
connected at the same time.

40
Error code and message Solution
E-2, E-3, or E-7
No wireless network names (SSID) found.
Confirm that the router/access point is
turned on and the wireless network (SSID)
is set up correctly. Contact your network
administrator for assistance.
No wireless network names (SSID) found.
Confirm that the wireless network name
(SSID) of the PC you wish to connect is set
up correctly. Contact your network
administrator for assistance.
Entered security key/password does not
match the one set for your router/access
point. Confirm security key/password.
Contact your network administrator for
assistance.
Check the following:
• Make sure your router or access point is turned on and
is correctly connected to your computer or network
device.
• Turn off the router or access point, wait about 10
seconds, and turn it on again.
• Move your product closer to your router or access point,
and remove any obstacles between them. Also move
your product away from devices such as wireless
phones or microwaves.
• Confirm that the SSID shown on the network
connection report matches the label on your router or
access point. Also make sure your SSID uses only
ASCII characters and symbols, or your product cannot
display the SSID correctly.
• If you are trying to connect using the WPS push button
method, make sure your router or access point supports
it.
• If you are using a network password, check the label on
your router or access point to confirm that you are using
the correct password, or check with your network
administrator or router/access point documentation.
• If you are connecting to a smart device that generates
an SSID, check the device documentation for the SSID
and password you should use.
• If your wireless connection suddenly disconnects, and
another smart device was added to the network using a
WPS push button method, or your network was set up
using a non-WPS push button method, try downloading
and installing your product software again.

41
Error code and message Solution
E-5
Security mode (e.g. WEP, WPA) does not
match the current setting of the printer.
Confirm security mode, and contact the
network administrator for assistance.
If the security on your router or access point is not one of
the following types, change the type of security on your
router or access point and reset your product's network
settings.
• WEP-64 bit (40 bit)
• WEP-128 bit (104 bit)
• WPA PSK (TKIP/AES); also known as WPA Personal
• WPA2 PSK (TKIP/AES); also known as WPA2 Personal
• WPA3-SAE (AES)
• WPA2/WPA3-Enterprise
E-6
MAC address of your printer may be
filtered. Check whether your router/access
point has restrictions such as MAC address
filtering. See the documentation of the
router/access point or contact your network
administrator for assistance.
If your router or access point has MAC address filtering
enabled, register your product's MAC address so it is not
filtered. Locate the MAC address on the network
connection report and check your router or access point
documentation for instructions.
If your router or access point is using shared
authentication with WEP security, confirm that you are
using the correct authentication key and index.
If your router or access point limits the number of
connected devices, raise the connection limit. See your
router or access point documentation for instructions.
E-8
Incorrect IP address is assigned to the
printer. Confirm IP address setup of the
network device (hub, router, or access
point). Contact your network administrator
for assistance.
If your product's Obtain IP Address setting is set to Auto,
enable DHCP on your router or access point. If it is set to
Manual, the IP address may be out of range or on a
different network segment; set a valid IP address using
your product control panel or the Web Config utility.
You can also try turning off your product and the router or
access point, waiting about 10 seconds, and turning them
on again.

42
Error code and message Solution
E-9
Confirm the connection and network setup
of the PC or other device. Connection using
the EpsonNet Setup is available. Contact
your network administrator for assistance.
Make sure your computer or network device are turned
on. Also make sure that you can access the Internet and
other devices on the same network from the devices you
are trying to connect to your product.
If you still cannot connect to your product, turn off your
router or access point, wait about 10 seconds, and turn it
on again. Download and install your product software
again to reset your network settings.
E-10
Confirm IP address, subnet mask, and
default gateway setup. Connection using
the EpsonNet Setup is available. Contact
your network administrator for assistance.
Make sure other devices on the network are turned on and
do the following:
• If your product's Obtain IP Address setting is set to
Manual, check the IP address, subnet mask, and
default gateway addresses on the network connection
report to see if they are correct. If not, correct the
settings.
• If DHCP is enabled, set your product's Obtain IP
Address setting to Auto. If you want to use the DHCP-
assigned address as a static address, set the Obtain IP
Address setting to Manual, enter the product's IP
address as listed on the network connection report, and
set the subnet mask to 255.255.255.0.
If you still cannot connect to your product, turn off your
router or access point, wait about 10 seconds, and turn it
on again.
E-11
Setup is incomplete. Confirm default
gateway setup. Connection using the
EpsonNet Setup is available. Contact your
network administrator for assistance.
If you set your product's TCP/IP Setup setting to Manual,
check that the default gateway address listed on the
network connection report is correct. Also turn on the
device that is set as the default gateway.
Note: You can check the product’s default gateway
address in Wired LAN/Wi-Fi Status on the product's LCD
screen.
43
Error code and message Solution
E-12
Confirm the following:
-Entered security key/password is correct
-Index of the security key/password is set to
the first number
-IP address, subnet mask, or default
gateway setup is correct
Contact your network administrator for
assistance.
Make sure other devices on the network are turned on and
do the following:
• Make sure the IP address, subnet mask, and default
gateway addresses are correct, if you are entering them
manually.
• Confirm that the subnet mask and default gateway
addresses for other devices are the same.
• Make sure the IP address does not conflict with other
devices.
If you still cannot connect to your product, do the
following:
• Turn off your router or access point, wait about 10
seconds, and turn it on again.
• Download and install your product software again to
reset your network settings.
• If your router or access point uses WEP security with
several registered passwords, make sure that the first
registered password is set on your product.
E-13
Confirm the following:
-Entered security key/password is correct
-Index of the security key/password is set to
the first number
-Connection and network setup of the PC
or other device is correct
Contact your network administrator for
assistance.
Make sure your router, access point, and/or hub are
turned on. Also make sure the TCP/IP setup on your
router, access point, and/or hub is not set manually; this
may cause your product's network settings to differ from
the manually set up devices.
If you still cannot connect to your product, do the
following:
• Turn off your router or access point, wait about 10
seconds, and turn it on again.
• Download and install your product software again to
reset your network settings.
• If your router or access point uses WEP security with
several registered passwords, make sure that the first
registered password is set on your product.

44
Network Environment Messages
Message Solution
The Wi-Fi environment needs to be
improved. Turn the wireless router off and
then turn it on. If the connection does not
improve, see the documentation for the
wireless router.
Move your product closer to your router or access point,
and remove any obstacles between them. Then turn off
your router or access point, wait about 10 seconds, and
turn it back on again. If you still cannot connect to your
product, check the documentation that came with your
router or access point for solutions.
*No more devices can be connected.
Disconnect one of the connected devices if
you want to add another one.
You can connect up to 8 computers or other devices to
your product using a Wi-Fi Direct (Simple AP) connection.
If you want to add another device, disconnect an existing
connected device first.
The same SSID as Wi-Fi Direct exists in
the environment. Change the Wi-Fi Direct
SSID if you cannot connect a smart device
to the printer.
Change the Wi-Fi Direct SSID. You can change the
network name after "DIRECT-XX-". The custom name
must be 22 characters or less.
Parent topic: Printing a Network Connection Report
Changing or Updating Network Connections
See these sections to change or update how your product connects to a network.
Accessing the Web Config Utility
Changing a USB Connection to a Wi-Fi Connection
Changing a Wi-Fi Connection to a Wired Network Connection
Connecting to a New Wi-Fi Router
Disabling Wi-Fi Features
Parent topic: Wi-Fi or Wired Networking
Accessing the Web Config Utility
You can select your product's network settings and confirm its operating status using a web browser.
You do this by accessing your product's built-in Web Config utility from a computer or other device that is
connected to the same network as your product.
1. Print a network status sheet.
2. Locate the IP address for your product that is listed on the network status sheet.

45
3. On a computer or other device connected to the same network as your product, open a web
browser.
4. Enter your product's IP address into the address bar and press Enter.
You see the available Web Config utility options.
Note: The administrator password is required to access the full capabilities of the Web Config utility.
The default password is located on the label attached to the left edge inside the printer cover. The
default user name is blank.
Parent topic: Changing or Updating Network Connections
Changing a USB Connection to a Wi-Fi Connection
If you have already connected your product to your computer using a USB connection, you can change
to a Wi-Fi connection.
1. Disconnect the USB cable from your product.
2. Uninstall your product software.
3. Download and install your product software from the Epson website using the instructions on the
Start Here sheet.
Parent topic: Changing or Updating Network Connections
Changing a Wi-Fi Connection to a Wired Network Connection
If you have already connected your product to your computer wirelessly, you can change to a wired
network connection if necessary.
1. Press the home button, if necessary.
2. Select the icon.
Note: Icon may look different depending on connection status.
3. Select Description.
4. Select Wired LAN Connection Method > Start Setup.
The Wi-Fi connection is disabled and a confirmation message appears. Select OK and then press
the home button to exit.
5. Connect one end of an Ethernet network cable to the product's LAN port.

46
6. Connect the other end to any available LAN port on your router or access point.
Parent topic: Changing or Updating Network Connections
Connecting to a New Wi-Fi Router
If you change the wireless router you have been using on your network, you need to update your
product's Wi-Fi connection to the new router.
1. Do one of the following:
• Windows: Uninstall your product software.
• Mac: Go to the next step.
2. Download and install your product software from the Epson website using the instructions on the
Start Here sheet.
Parent topic: Changing or Updating Network Connections
Disabling Wi-Fi Features
You may need to disable your product's Wi-Fi features if you change your network connection type or
need to solve a problem with your network connection.
Note: Before disabling Wi-Fi features, make a note of your product's SSID (network name) and
password.
Note: This setting can be locked by an administrator. If you cannot access or change this setting,
contact your administrator for assistance.
1. Press the home button, if necessary.
2. Select the network icon.
Note: Icon may look different depending on connection status.
3. Select Router > Change Settings > Others > Disable Wi-Fi.
4. Select Start Setup to disable Wi-Fi.
Parent topic: Changing or Updating Network Connections

47
Basic Printing
Refer to these sections to learn how to perform basic print functions.
Overview of the Printing Process
Required Equipment (Printing on T-shirts)
Required Equipment (Printing on Film)
Pre-treating a T-shirt
Creating Your Design
Preparing Your Printer
Loading a T-shirt
Loading Film on the Platen
Starting a Print Job
Cancelling a Print Job
Finishing a T-shirt
Performing Post-processing for Film
Overview of the Printing Process
This section explains the basic workflow for using your product to print on T-shirts or Digital-Transfer-
Film.
Printing on a T-shirt
1. Preparing the Required Equipment
Prepare the equipment you need for printing.
2. Preparing the Printer
Turn on the printer and make sure it is functioning properly.
3. Creating and Sending Your Garment Design
Create your graphics in a design software and use the Garment Creator 2 software to send it to the
printer.
4. Pre-treating the T-shirt
When printing with White ink on cotton media, apply pre-treatment solution to the T-shirt before
printing and make sure the pre-treatment solution is completely dry before printing. If the T-shirt is
creased, use a heat press to smooth it.

48
5. Attaching the Platen and Grip Pad
Attach the platen or grip pad (if necessary) to the printer.
6. Loading the T-shirt (Media)
Load the T-shirt onto the platen or grip pad.
7. Printing
Check that the job has been received and the printer's screen has switched to the preview display
before you start printing.
8. Removing the T-shirt
Remove the T-shirt from the platen or grip pad.
9. Post-treating the T-shirt
Fix the ink to the T-shirt.
Printing on Digital-Transfer-Film
1. Preparing the Printer
Turn on the printer and make sure it is functioning properly.
2. Creating and Sending Your Design
Create your graphics in a design software and use the Garment Creator 2 software to send it to the
printer.
3. Loading the Film
Attach the platen to the printer, then load the film onto the platen.
4. Printing
Check that the job has been received and the printer's screen has switched to the preview display
before you start printing.
5. Removing the Film
Remove the film from the platen.
6. Post-processing the Film
Perform post-processing for the printed film and media to complete the printed product.
Note: The steps for post-processing can vary depending on the specific parts and devices you are
using with your product. Make sure you check the instructions provided with the film and powder you
are using, and consult your dealer and supplier for more information.

49
Parent topic: Basic Printing
Related references
Required Equipment (Printing on T-shirts)
Required Equipment (Printing on Film)
Related tasks
Preparing Your Printer
Starting a Print Job
Removing a Printed T-shirt
Loading Film on the Platen
Performing Post-processing for Film
Related topics
Pre-treating a T-shirt
Loading a T-shirt
Creating Your Design
Finishing a T-shirt
Required Equipment (Printing on T-shirts)
To print on a T-shirt using this printer, you need the equipment listed here, depending on your print
project.
Platen (provided with the printer or optional item)
The printer comes with a small size platen. There are two other types of platens available in different
sizes.
Grip pad tool (included with printer)
This shirt smoothing tool is used to remove slack and creases when loading a T-shirt on a platen.
T-shirts (commercially available)
For best results, use a T-shirt that is 100% cotton with thick and tightly-woven (ringspun) material, or
a T-shirt that is 50/50 poly cotton blend or tri-blend. Printing on materials with high polyester content
may result in more subdued colors. Since the print quality cannot always be guaranteed for some
types of fabric, perform a test print first.
Heat press (commercially available)
A heat press is required before you can print on a T-shirt. A heat press is used to remove creases
from T-shirts, pressing down standing fibers on T-shirts before printing to help prevent nozzle clogs,
and to fix the pre-treatment solution and ink. Your heat press needs to be larger than your platen and
able to sustain a temperature of 338 °F (170 °C) or more for 90 seconds. Check the accuracy of your

50
heat press temperature with a probe; temperatures exceeding 356 °F may result in dull colors. For
best results, use a heat press with a piece of parchment (silicone) paper or a Teflon (fluoro-resin)
sheet at low pressure to allow the steam to escape.
Heat tunnel (commercially available)
A heat tunnel is used to fix the ink after printing. A heat tunnel is not necessary if you have a heat
press.
Heat-resistant release sheet (commercially available)
A heat-resistant release sheet is placed over the T-shirt to prevent any pre-treatment solution or ink
from sticking to the heat press. You can use parchment (silicone) paper, Teflon (fluoro-resin) sheets,
or other types of heat-resistant material. Parchment (silicone) sheets tend to produce a matte effect
and fluoro-resin sheets tend to produce a glossy effect. You can also use the sheet with the grip pad
tool to load T-shirts on a platen covered with a grip pad.
Heat-resistant fabric (commercially available)
Use heat-resistant fabric to fix ink to uneven areas near seams, such as around sleeves. For best
results, use the same type of fabric as the T-shirt.
Pre-treatment solution (available from Epson)
Pre-treatment solution is necessary for printing White ink on cotton T-shirts, or when printing 50/50
poly cotton blend or tri-blend T-shirts. Perform a test print to determine which pre-treatment solution
best suits your needs. For best results, use a paint roller or sprayer to apply pre-treatment solution to
the T-shirt.
Note: Using non-Epson pre-treatment solution may yield poor color, image quality, or washability.
Note: The cotton pre-treatment solution must be diluted with distilled water at a 1:2 ratio.
Pre-treatment roller set (commercially available)
A paint roller can be used to apply the pre-treatment solution to the T-shirt, and makes it easier to
apply the solution to uneven areas such as pockets. The tray is used to allow the pre-treatment
solution to soak into the roller. Choose a paint roller made of short polyester fiber with excellent liquid
absorption and release, and one whose handle is made of rust-resistant aluminum. Use a tray to
allow the pre-treatment solution to soak into the roller. When using a paint roller, make sure to apply
the pre-treatment solution evenly, or the white print quality may not be as bright or printed colors may
appear distorted.
Distilled water (commercially available)
Distilled or purified water is used to dilute the pre-treatment solution and to clean sensor covers.
Pre-treatment machine (commercially available)
A pre-treatment machine is used to apply the pre-treatment solution onto the T-shirt. Using a pre-
treatment machine is quicker and easier than using a paint roller; however, more of the pre-treatment

51
solution may be used because of overspray. For best results, we recommend an electric sprayer that
allows you to spray a fine mist. Check in advance if the solution can be applied properly according to
the pre-treatment solution and pre-treatment conditions.
Sticky tape or lint roller (commercially available)
Use sticky tape or a lint roller to remove lint from the print surface of the T-shirt. Take care not to pull
fibers up from the T-shirt.
Hard roller (commercially available)
Use a hard roller to press the fibers flat on the print surface of the T-shirt before printing. Make sure
that you prepare a separate hard roller from the pre-treatment solution roller.
Parent topic: Basic Printing
Related references
Optional Equipment and Replacement Parts
Related topics
Pre-treating a T-shirt
Required Equipment (Printing on Film)
To print on a sheet of Digital-Transfer-Film using this printer, we recommend the equipment listed here,
depending on your print project.
Note: The equipment you need can vary depending on the specific parts and devices you are using and
the media you are transferring onto. Make sure you check the instructions provided with the film and
powder you are using, and consult your dealer and supplier for more information.
Platen (provided with the printer or optional item)
The printer comes with a small size platen. Do not use a sleeve platen.
Heat press (commercially available)
A heat press is used in post-processing to heat the film, transfer the image, and fix ink to the media.
Digital-Transfer-Film and powder (commercially available)
Make sure you check the instructions for the film and powder you are using.
Heat-resistant release sheet (commercially available)
A heat-resistant release sheet is placed over the film or media to prevent any ink from sticking to the
heat press. You can use parchment (silicone) paper, Teflon (fluoro-resin) sheets, or other types of
heat-resistant material. Parchment (silicone) sheets tend to produce a matte effect and fluoro-resin
sheets tend to produce a glossy effect.

52
Opaque adhesive tape (commercially available)
Use tape to secure the film to the platen.
Note: Using transparent tape may cause head striking.
A tray larger than the film (commercially available)
Place the film in the tray when applying powder.
Sieve/powder shaker (commercially available)
Use to evenly apply powder to the printed film and help avoid lumps.
Mask and protective eyewear (commercially available)
Use to help prevent powder from getting into your eyes and mouth.
Parent topic: Basic Printing
Pre-treating a T-shirt
If you are printing with White ink on a cotton or blends T-shirt, pre-treatment solution must be applied to
the T-shirt.
Follow the instructions in these sections to prepare your T-shirt for printing.
Pre-treatment Solution Safety Precautions
Preparing the Pre-treatment Solution
Filtering the Cotton Pre-treatment Solution
Diluting the Pre-treatment Solution
Pre-treating a T-shirt with a Roller
Pre-treating a T-shirt with a Pre-treatment Machine
Fixing the Pre-treatment Solution (Heat Press)
Parent topic: Basic Printing
Pre-treatment Solution Safety Precautions
If you are printing with White ink, pre-treatment solution must be applied to the T-shirt. Observe these
precautions when applying the pre-treatment solution:
• Make sure you are in a well-ventilated area when applying pre-treatment solution.
• Only prepare as much solution as necessary for the current job. If you prepare more than required, the
extra solution may harden.

53
• Always wear protective eyewear, gloves, and a mask when applying the pre-treatment solution. If pre-
treatment solution comes in contact with your skin or enters your eyes or mouth, take the following
actions:
• If you get pre-treatment solution on your skin, immediately wash it off using plenty of soap and
water. Consult a physician if your skin is irritated or discolored.
• If pre-treatment solution gets in your eyes, rinse immediately with water. Failure to observe this
precaution could result in bloodshot eyes or mild inflammation. If problems persist, consult a
physician.
• If pre-treatment solution gets in your mouth, consult a physician immediately. If swallowed, do not
induce vomiting and consult a physician immediately. If vomiting is induced, solution may get caught
in the trachea which can be dangerous.
• Store the pre-treatment solution out of the reach of children.
• After working with the pre-treatment solution, wash your hands thoroughly and gargle.
• Store the pre-treatment solution at room temperature and away from direct sunlight.
• Do not store the pre-treatment solution in high or freezing temperatures.
• If pre-treatment solution gets stuck to the print head, it could cause the printer to malfunction and print
quality to decline. Make sure that solution does not stick to the inside of the printer by accident when
performing maintenance.
• Do not put waste pre-treatment solution in the waste ink bottle as it will solidify if mixed with waste ink.
Caution: Pre-treatment solution is classified as industrial waste and must be disposed of by an industrial
waste disposal company according to local laws and regulations. When handing over the pre-treatment
solution to an industrial waste disposal company, make sure you include these safety precautions.
Parent topic: Pre-treating a T-shirt
Preparing the Pre-treatment Solution
Prepare the pre-treatment solution for application to the T-shirts.

54
1. To attach the tap, cut the cardboard along the perforations and remove the tap from inside the
cardboard box.
2. Pull the cap section out of the hole in the cardboard.
Note: Make sure you pull the cap section out of the hole in the cardboard. If the cap is opened
without being pulled out, the pre-treatment solution may spill out.
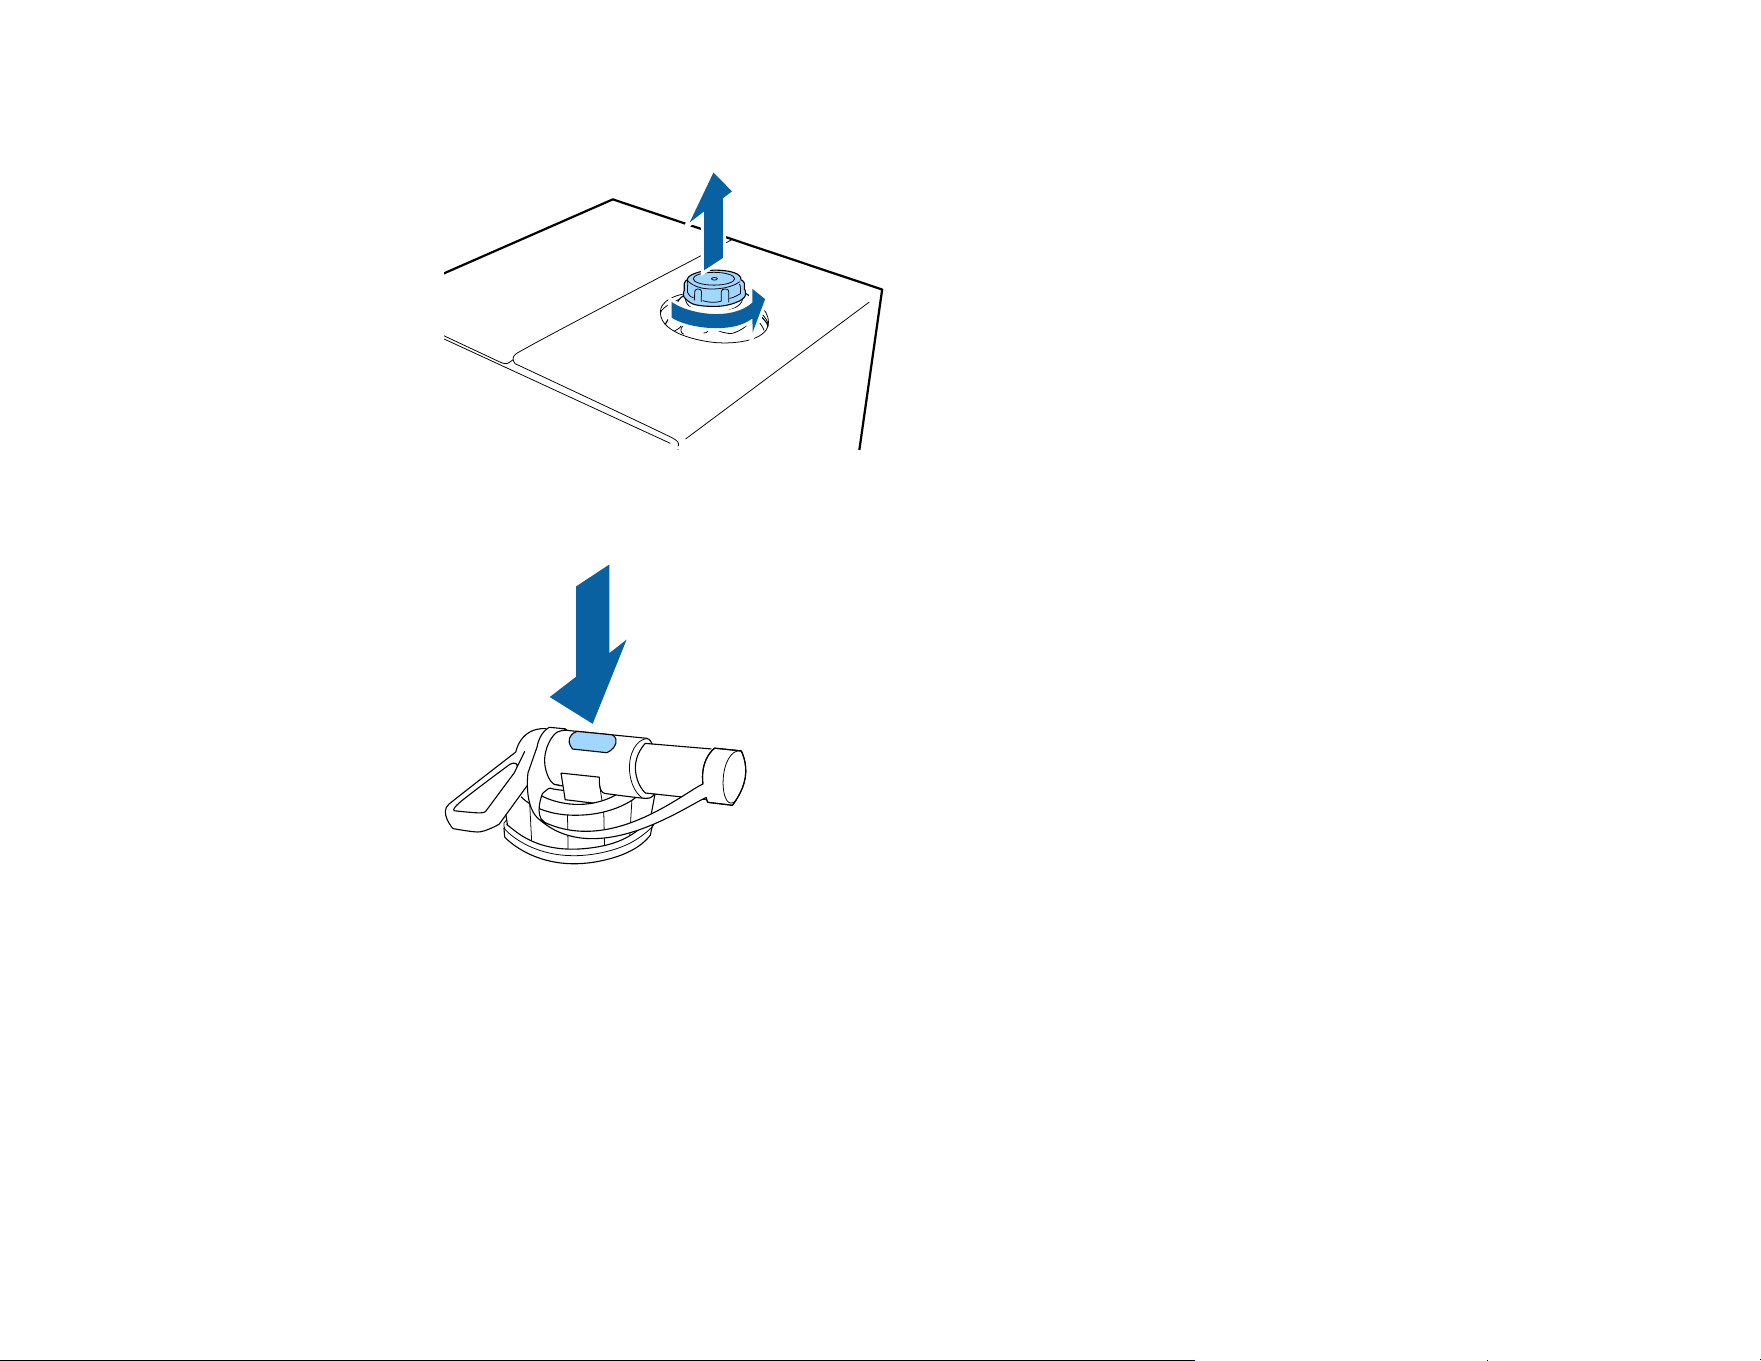
55
3. Remove the cap.
4. Remove the tap from the bag and turn the tap's handle section until the hole is visible as shown.
Note: If you cannot see the hole or if the tap is damaged, contact Epson.
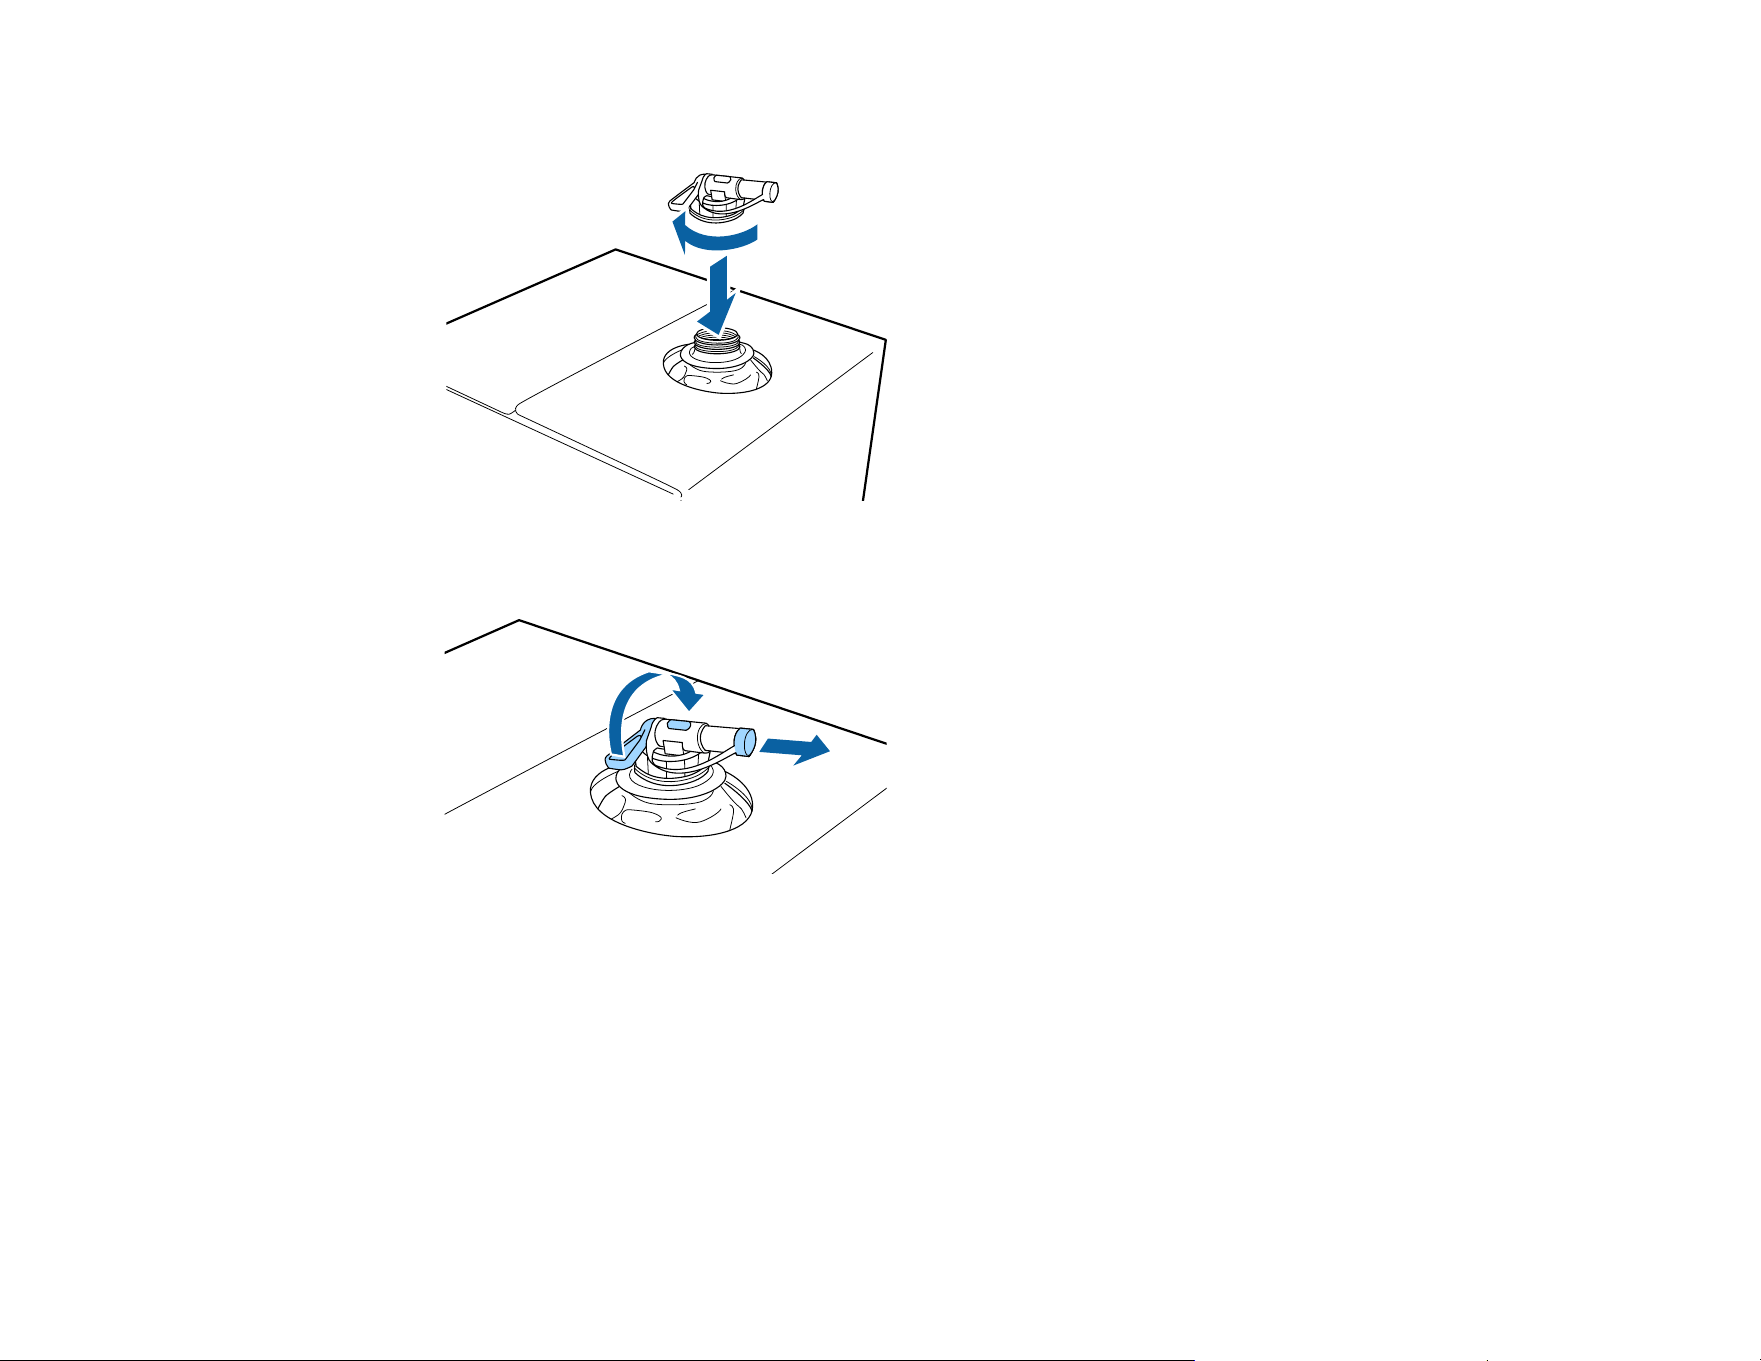
56
5. Attach the tap.
6. Remove the cap from the end of the tap and turn the lever until the hole is facing down.
7. To pour the solution, tilt the cardboard box and pour the pre-treatment solution into the desired
container.
8. When you have finished pouring the solution, put the cap back on the end of the tap.
9. Store the cardboard box with the tap side facing up.
Parent topic: Pre-treating a T-shirt
Related references
Where to Get Help (U.S. and Canada)
Where to Get Help (Latin America)
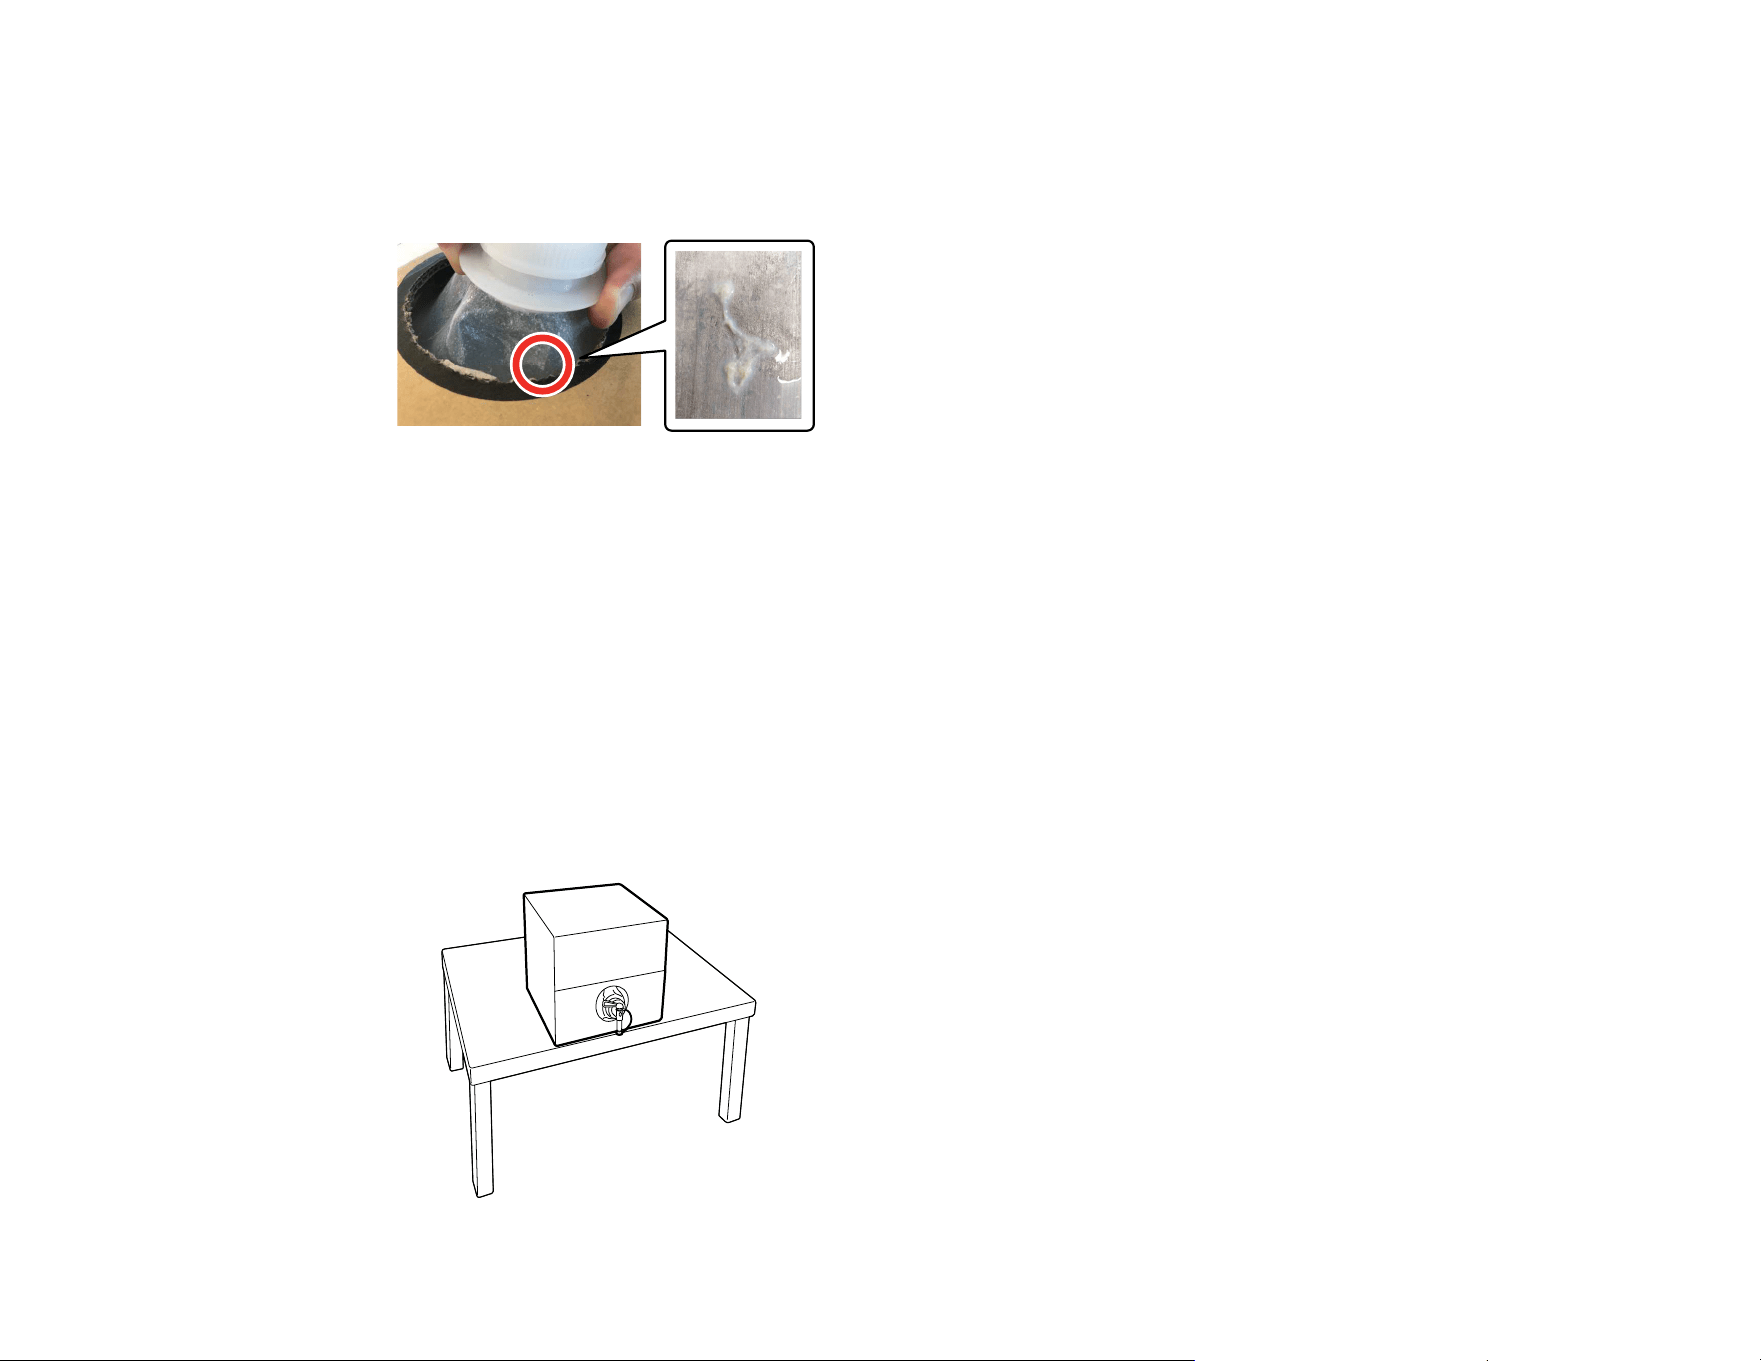
57
Filtering the Cotton Pre-treatment Solution
Coagulation may develop in the cotton pre-treatment solution during storage and can cause uneven print
results if the solution is used. If you see coagulation, filter the pre-treatment solution before using it.
You need the following:
• A dedicated funnel
• A filter
• A bottle for filtration with a capacity of at least one liter (a bottle with measurement markings is
recommended)
Note:
• Use filtered pre-treatment solution within four days.
• Make sure you filter the solution within the operating temperature range of the pre-treatment solution.
1. Place the pre-treatment solution container at the edge of a table with its spout pointing down.
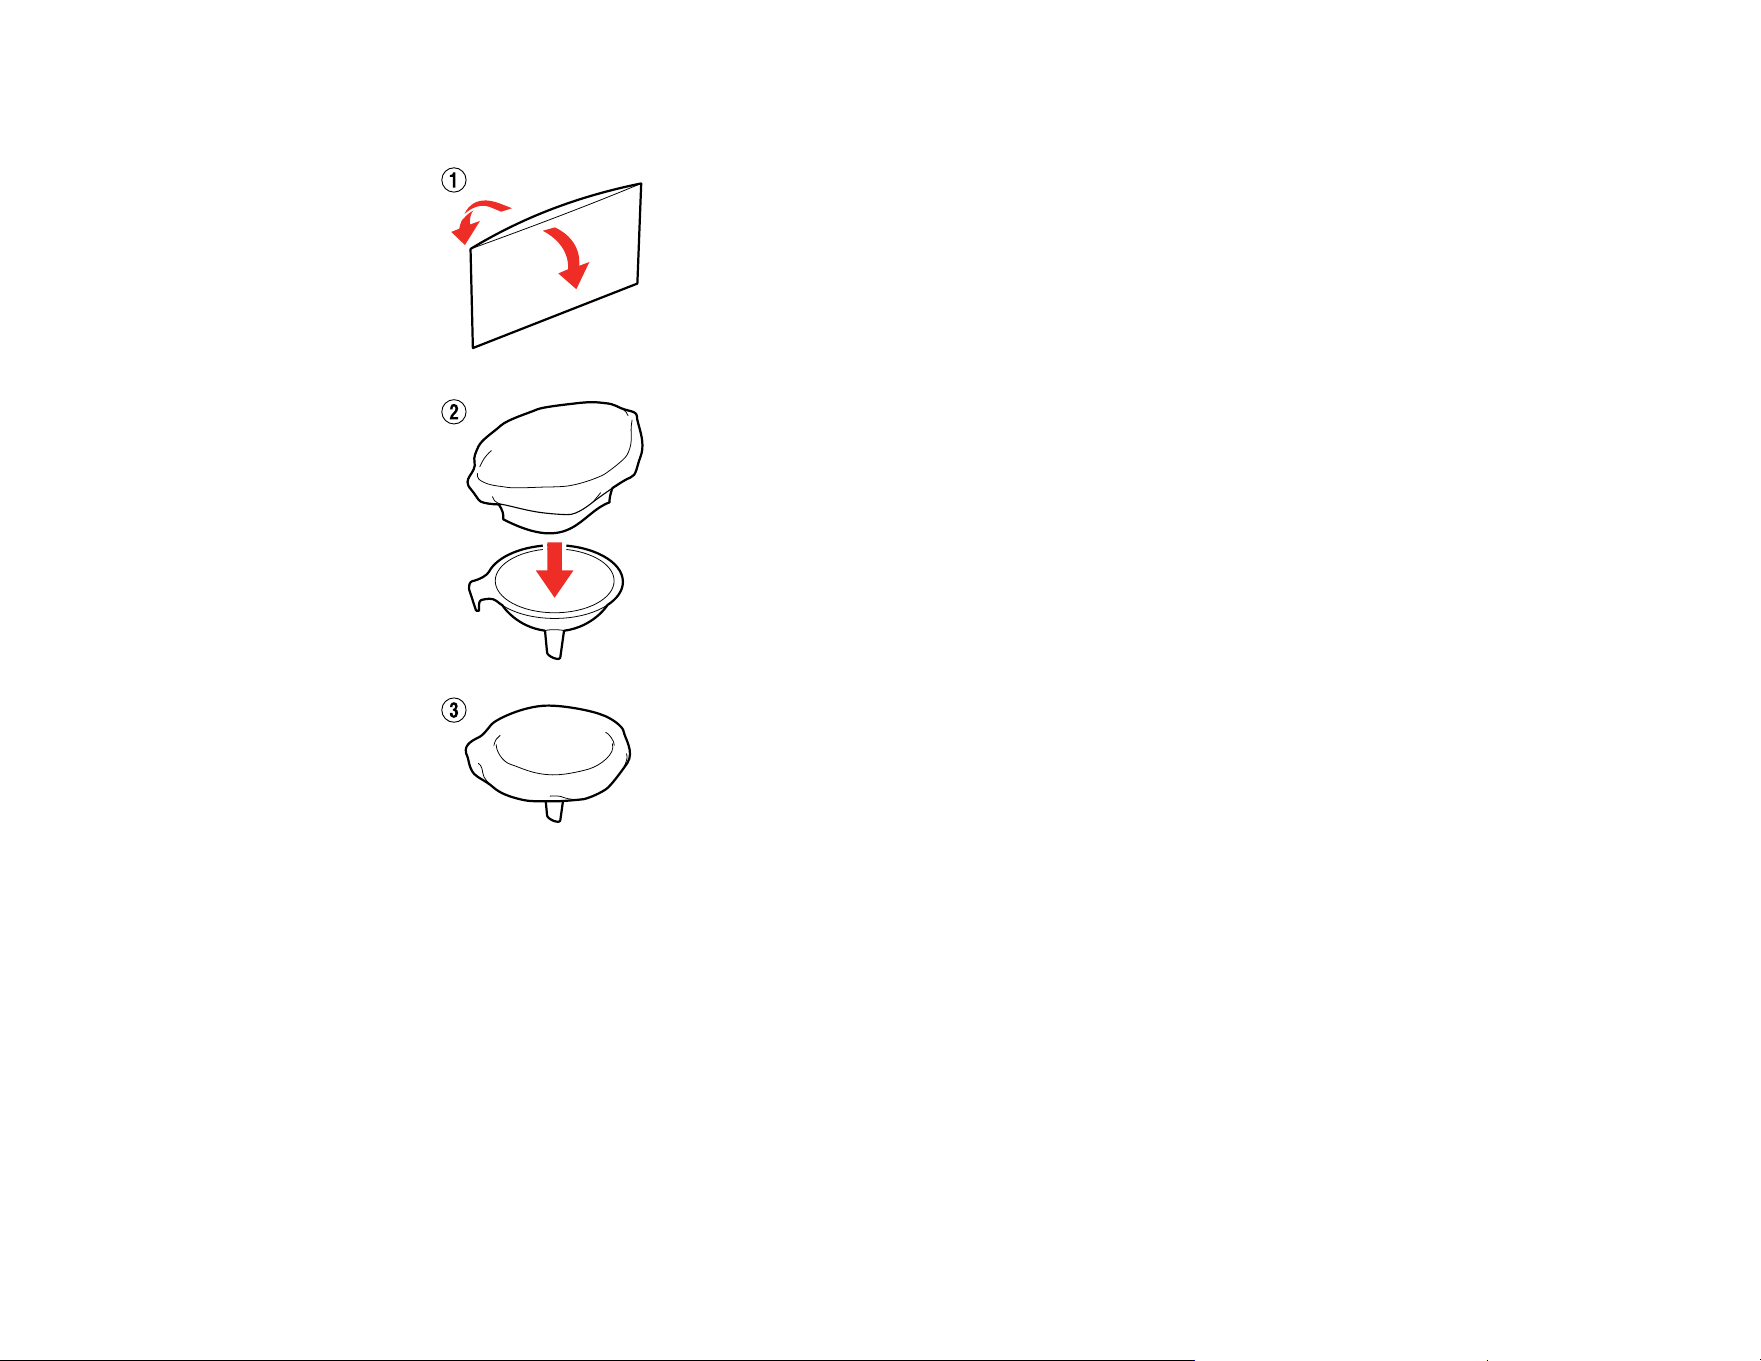
58
2. Open up a new filter and place it over the funnel as shown.
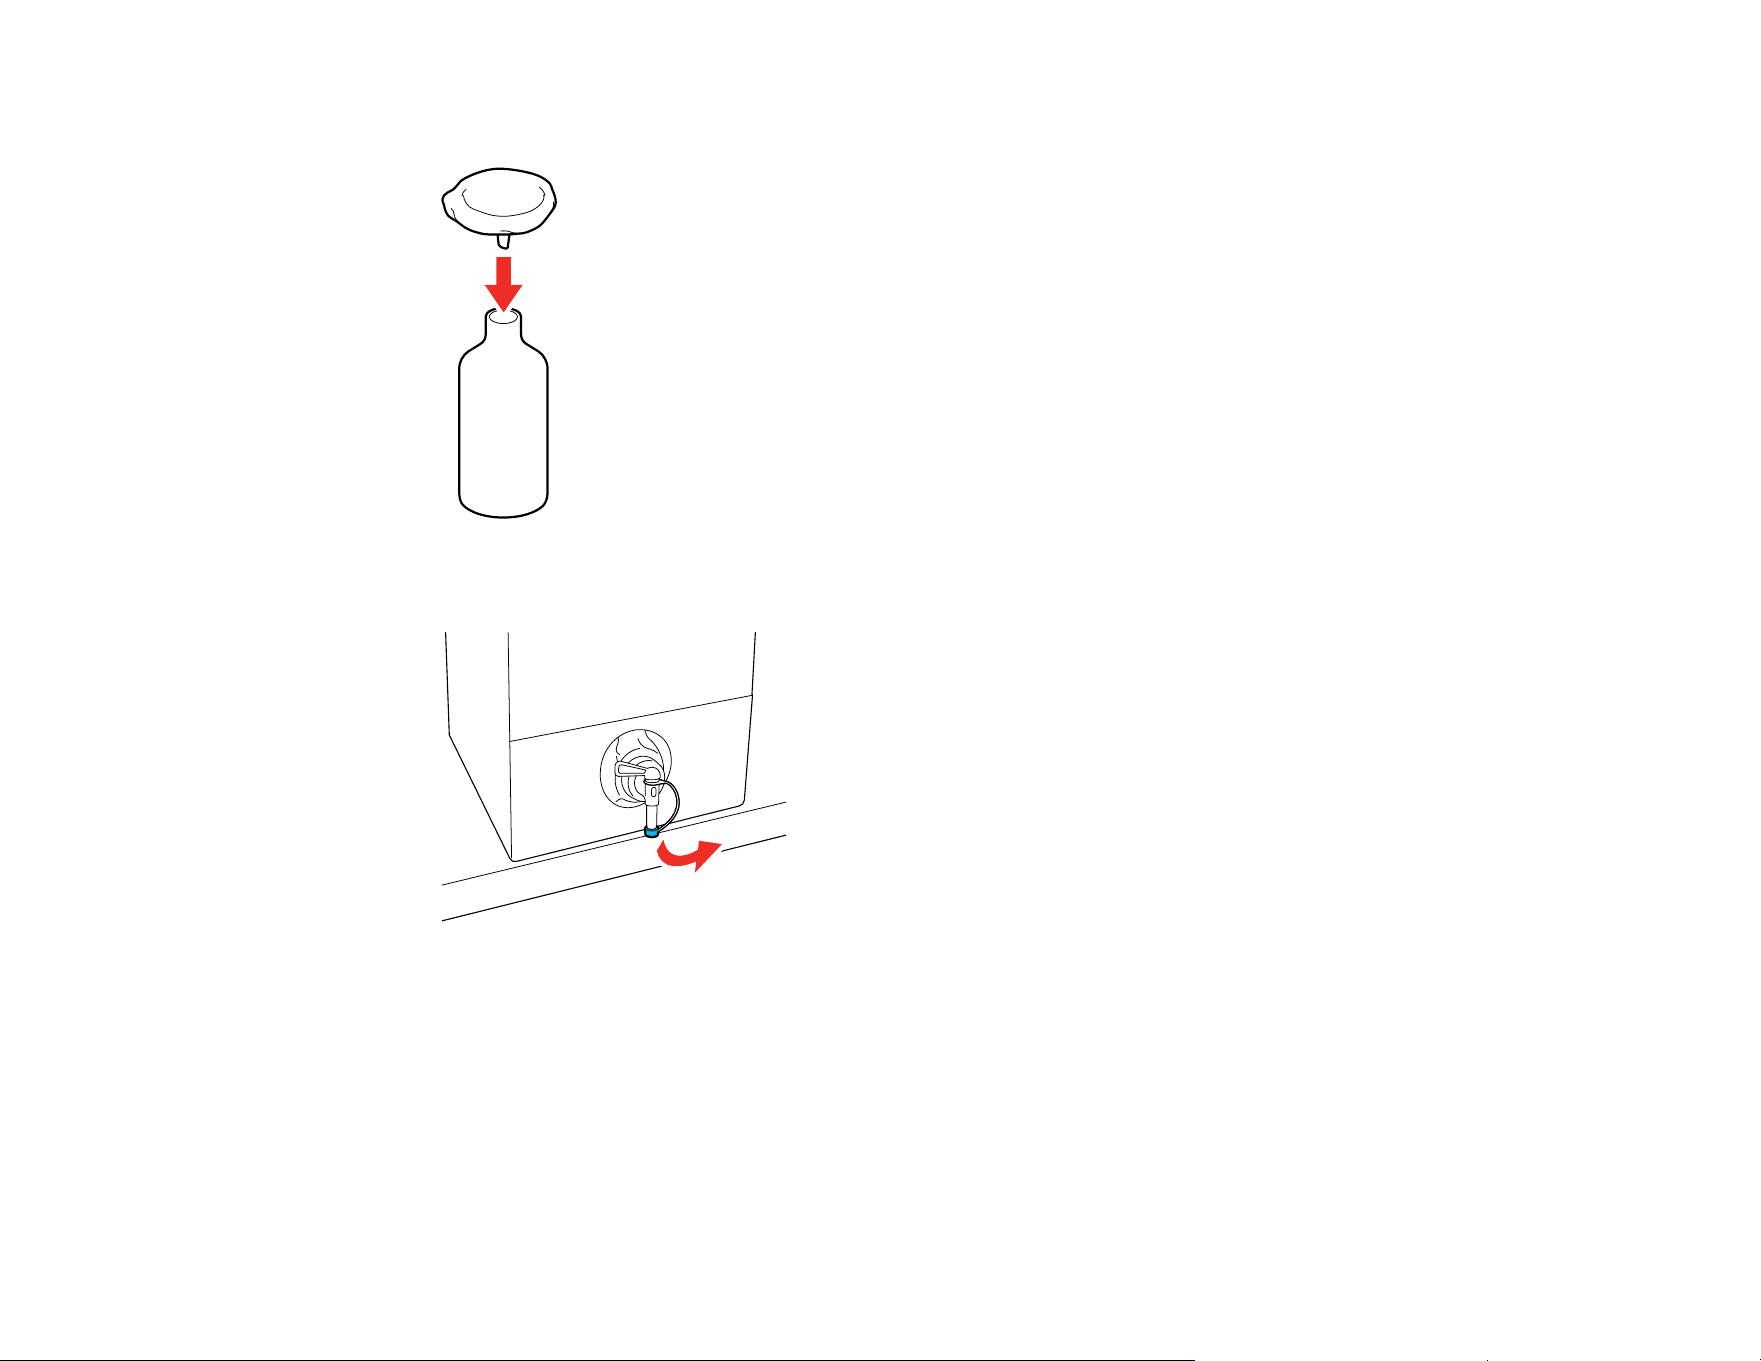
59
3. Insert the funnel into the mouth of the bottle.
4. Remove the cap from the spout of the pre-treatment solution.
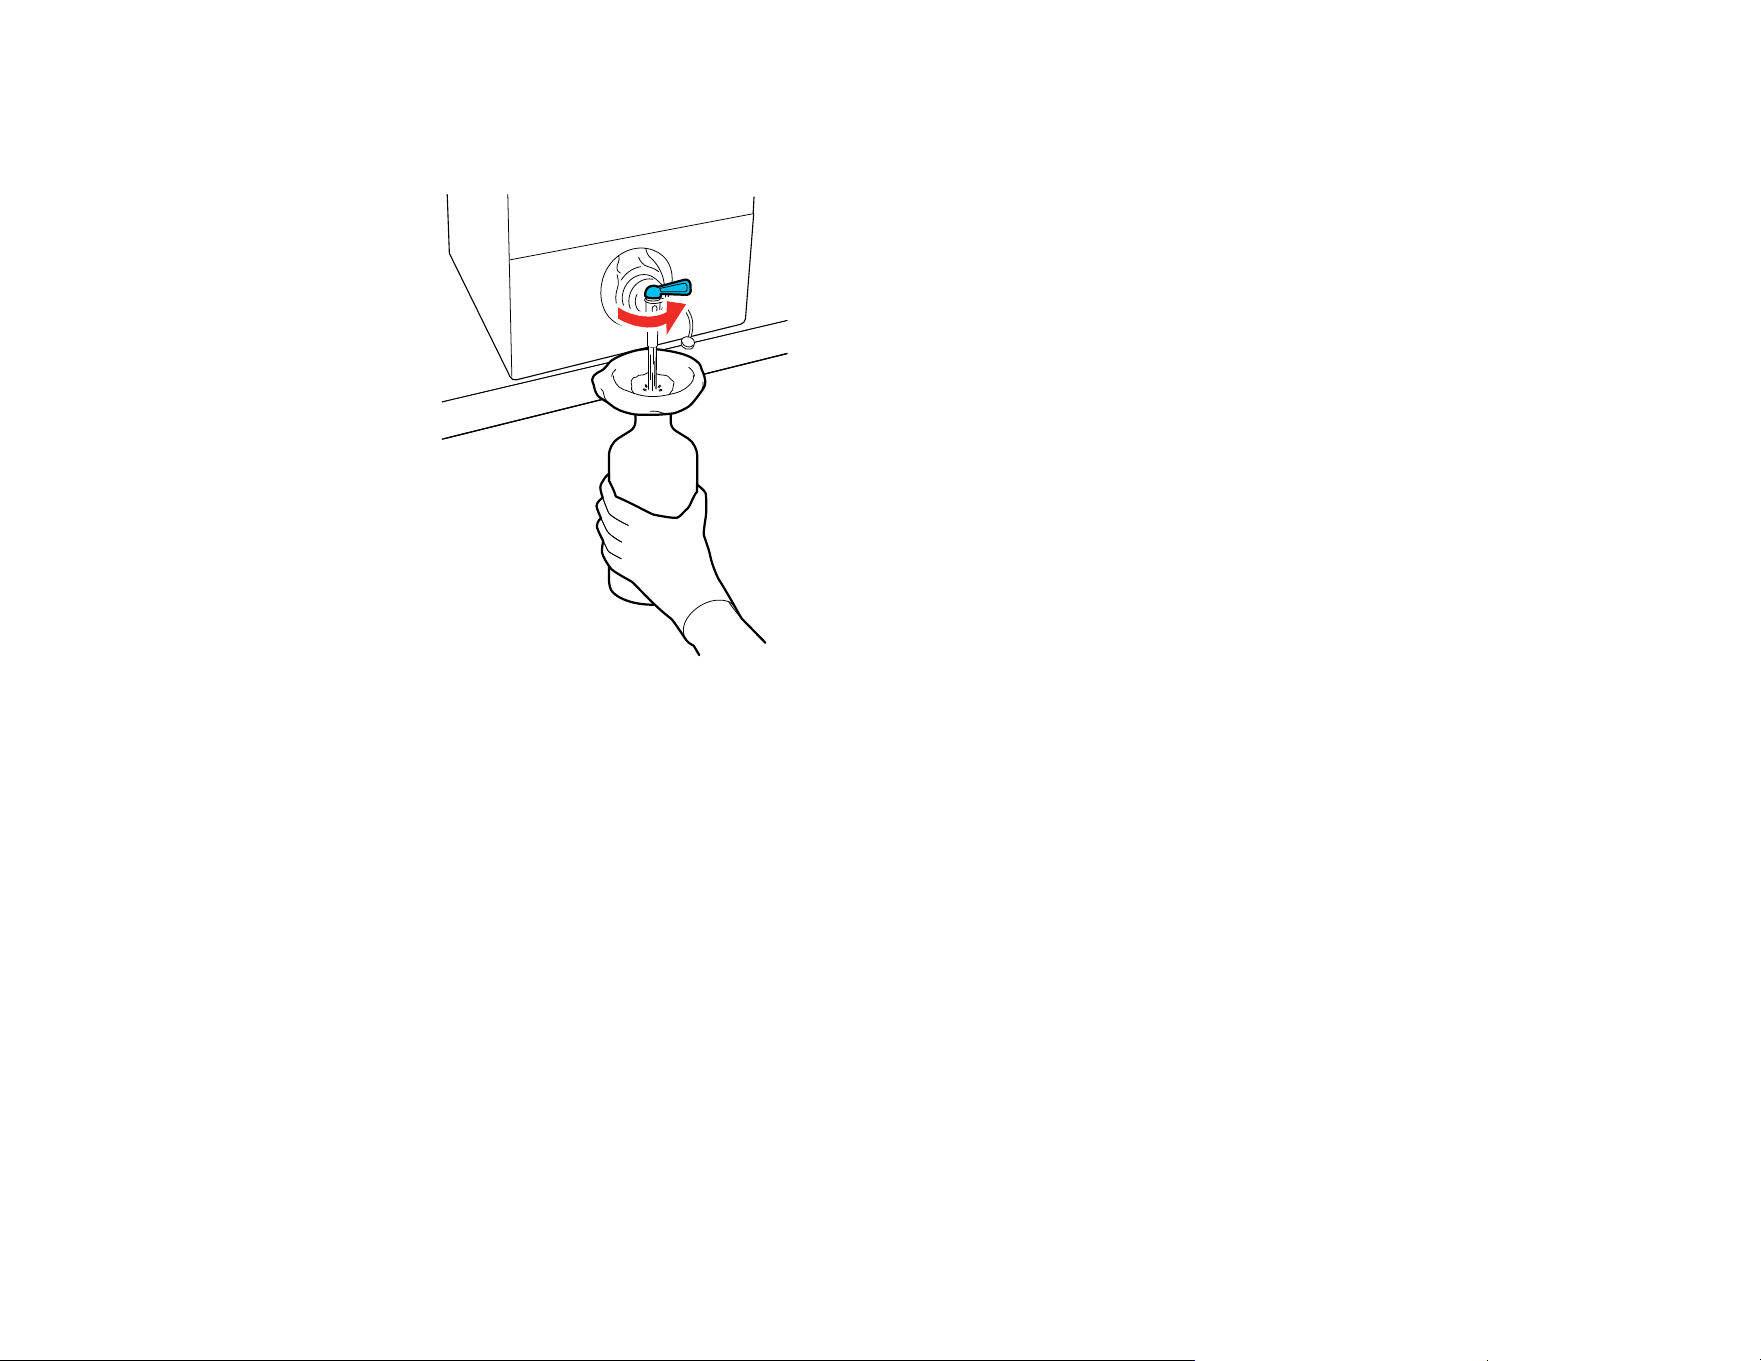
60
5. Open the lever and carefully pour one liter of the pre-treatment solution through the filter into the
bottle.
Note: Be careful not to overfill the funnel and filter with the pre-treatment solution. If there is only a
small amount left in the container, carefully tip the container forward to pour it out.
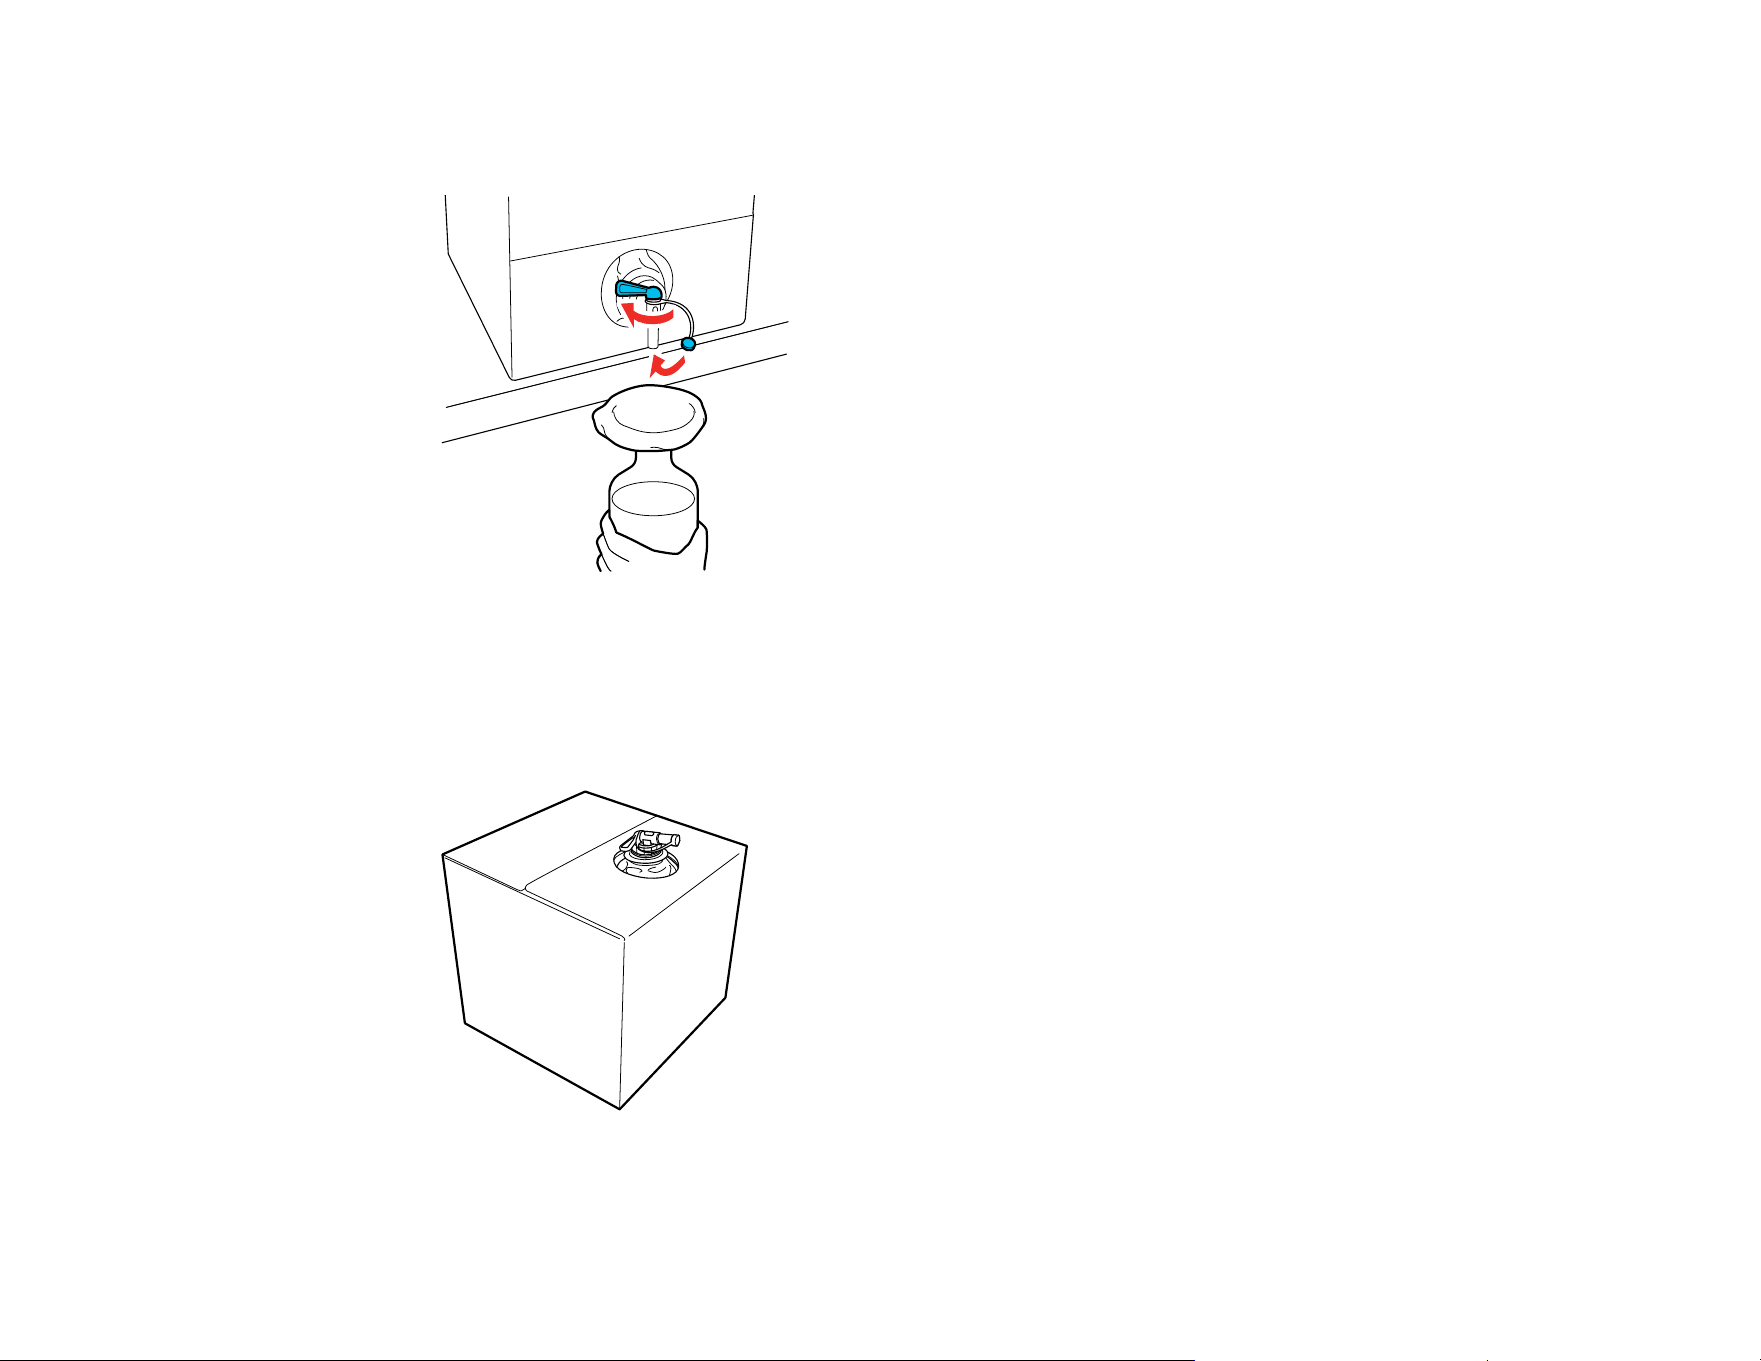
61
6. Once you have poured out a liter of solution, or the container is empty, close the lever and replace
the spout cap.
7. Transfer the filtered pre-treatment solution to the intended container for use.
If you want to filter more pre-treatment solution, replace the filter with a new one and repeat the
steps.
8. Store the container of pre-treatment solution with the spout at the top as shown.

62
9. Rinse the used funnel and bottle with water and then wipe the funnel dry with a soft, dry cloth.
Note: If you are using tap water to rinse the funnel and bottle, make sure you use distilled or pure
water at the end. Some components in tap water can cause coagulation.
Parent topic: Pre-treating a T-shirt
Related references
Handling Pre-treatment Solution
Diluting the Pre-treatment Solution
If you are applying a pre-treatment solution to a T-shirt, you will need to dilute it with distilled or purified
water.
Cotton pre-treatment
Caution: If you do not dilute the cotton pre-treatment solution, or it is not diluted enough, it leaves
noticeable traces on the T-shirt or the printed surface cracks after washing. If the pre-treatment solution
is too weak, White ink does not adhere to the fabric and standing fibers may not be adequately flattened,
resulting in uneven print results.
Start with a 1:2 ratio of pre-treatment solution to water. Before applying pre-treatment solution to the
entire T-shirt, test it on a non-visible area.
Parent topic: Pre-treating a T-shirt
Related references
Fixing the Pre-treatment Solution (Heat Press)
Pre-treating a T-shirt with a Roller
To prevent colored T-shirt fibers on the roller from sticking to other T-shirts, use a different roller for each
color.
Note: Apply approximately 0.5 ounces (15 grams) of pre-treatment solution to printing areas of letter-
/A4-size. Do not apply too much pre-treatment liquid; otherwise, the print quality may decline. Depending
on the properties of the T-shirt material, traces of the pre-treatment solution may be visible after fixing
the ink if the solution was applied using a roller. If this happens, try applying the pre-treatment solution
with a machine instead.
1. Fill the tray with diluted pre-treatment solution and dip the roller in it.

63
2. Spread out the T-shirt on a flat surface.
3. Use sticky tape (or a lint roller) to remove lint from the area where you will apply the pre-treatment
solution.
4. Squeeze the pre-treatment solution out of the roller by pressing it against the edge of the tray.
5. Apply the solution evenly in both directions as shown to an area larger than the target print area. It is
important to finish in the shoulder-to-shoulder direction; this aligns the fabric fibers to the direction of
the print head movement.
6. Fix the pre-treatment solution with a heat press and parchment (silicone) paper.
Note: The T-shirt fibers must be pressed flat to produce even whiteness. Even if you use a heat
tunnel to fix the ink, use a heat press with parchment (silicone) paper to fix the pre-treatment solution
before printing.
Parent topic: Pre-treating a T-shirt
Related references
Fixing the Pre-treatment Solution (Heat Press)
Diluting the Pre-treatment Solution

64
Pre-treating a T-shirt with a Pre-treatment Machine
Since pre-treatment machine models may vary in operation and controls, you should consult the pre-
treatment machine documentation.
Warning: Depending on the type of sprayer used, the machine may create a mist when applying the
pre-treatment solution. Wear a mask, protective eyewear, and gloves, and make sure the area is well
ventilated. The solution mist could also enter the printer and cause a malfunction or damage the product.
If necessary, install the pre-treatment machine in a location away from the printer.
Note: Apply approximately 0.5 ounces (15 grams) of pre-treatment solution to printing areas of letter-
/A4-size. Do not apply too much pre-treatment liquid; otherwise, the print quality may decline.
1. Pour the diluted pre-treatment solution into the pre-treatment machine as directed by the
manufacturer.
2. Spread out the T-shirt on a flat surface.
3. Use sticky tape (or a lint roller) to remove lint from the area where you will apply the pre-treatment
solution.
4. Place the T-shirt on the pre-treatment machine platen.
5. Set the controls to adequately cover the desired printed area with pre-treatment solution. (On 1 to
100 dial controls, this may be 30 to 45.) We recommend applying the pre-treatment solution to an
area larger than the target print area.
Note: You can apply the solution evenly by running the roller over the treated area.

65
6. Fix the pre-treatment solution with a heat press with parchment (silicone) paper.
Note: The T-shirt fibers must be pressed flat to produce even whiteness. If you use a heat tunnel to
fix the ink, use a heat press for a short period of time at high pressure to flatten the T-shirt fibers
before printing.
Parent topic: Pre-treating a T-shirt
Related references
Fixing the Pre-treatment Solution (Heat Press)
Diluting the Pre-treatment Solution
Fixing the Pre-treatment Solution (Heat Press)
If you are using a heat tunnel to fix the ink, you must use a heat press before printing to remove creases
from the T-shirt and to fix the pre-treatment solution. Always place a heat-resistant release sheet, such
as parchment (silicone) paper, between the T-shirt and the heat press.
Note: Do not wet the T-shirt or leave it in a humid location for a long time after fixing the pre-treatment
solution, or White ink may absorb into the wet sections and cause poor print quality. If the T-shirt is left
for an extended period of time in a humid location, press it for 5 to 10 seconds with parchment (silicone)
paper just before printing.
The fixing conditions vary depending on the amount of pre-treatment solution used. The following
guidelines are approximate.
Note: If the pre-treatment solution is not completely dry after the suggested amount of time, extend the
duration while carefully checking if the pre-treatment solution is dry. Make sure the T-shirt is completely
dry before loading it for printing; otherwise, the print quality may decline.
Application area size Temperature Time Pressure
Letter/A4 and smaller 338 °F (170 °C) 45 seconds 6.1 Psi (4.2 N/cm
2
)
Larger than letter/A4 45–90 seconds
Application area size Temperature Time Pressure
Letter/A4 and smaller 266 °F (130 °C) 60 seconds 4.4 Psi (3.0 N/cm
2
)
Larger than letter/A4 60 seconds

66
Note: Optimum conditions may vary depending on the type of heat press used; make sure to test in
advance to determine the correct conditions for your heat press. If traces of the pre-treatment solution
are visible, try washing the T-shirt in water. However, the effects depend on the T-shirt material.
Parent topic: Pre-treating a T-shirt
Creating Your Design
After creating the data, use the Garment Creator 2 software to transmit it to the printer.
U.S. and Canada: Visit your product's support website at epson.com/support (U.S.) or epson.ca/support
(Canada) and select your product to download the Garment Creator 2 software and utilities.
Latin America: Visit your product's support website at latin.epson.com/support and select your product
to download the Garment Creator 2 software and utilities.
Follow the guidelines in these sections when creating your design.
Data Creation and Transmission Guidelines
Printable Area for Each Platen
Parent topic: Basic Printing
Data Creation and Transmission Guidelines
When creating data and transmitting it to the printer using Garment Creator 2, follow these guidelines:
• For best results, select sRGB colors when creating data to be printed. sRGB colors are closer to the
actual print results.
• You can print in these formats from Garment Creator 2: TIFF, JPEG, PNG, BMP.
• You can transmit data only when the printer is not printing.
• If you are printing on film, make sure to select Film as the job creation mode in Garment Creator 2.
• While the printer is receiving data, only these operations are possible:
• Turning off the power
• Moving the platen
• Cancelling a print job
Note: When a USB memory device is connected to the printer, printing starts after saving the data to the
USB memory device. This saves you from having to send data again when printing data repeatedly. If
you continue to send data while a USB memory device is connected to the printer, the previous data is
overwritten.
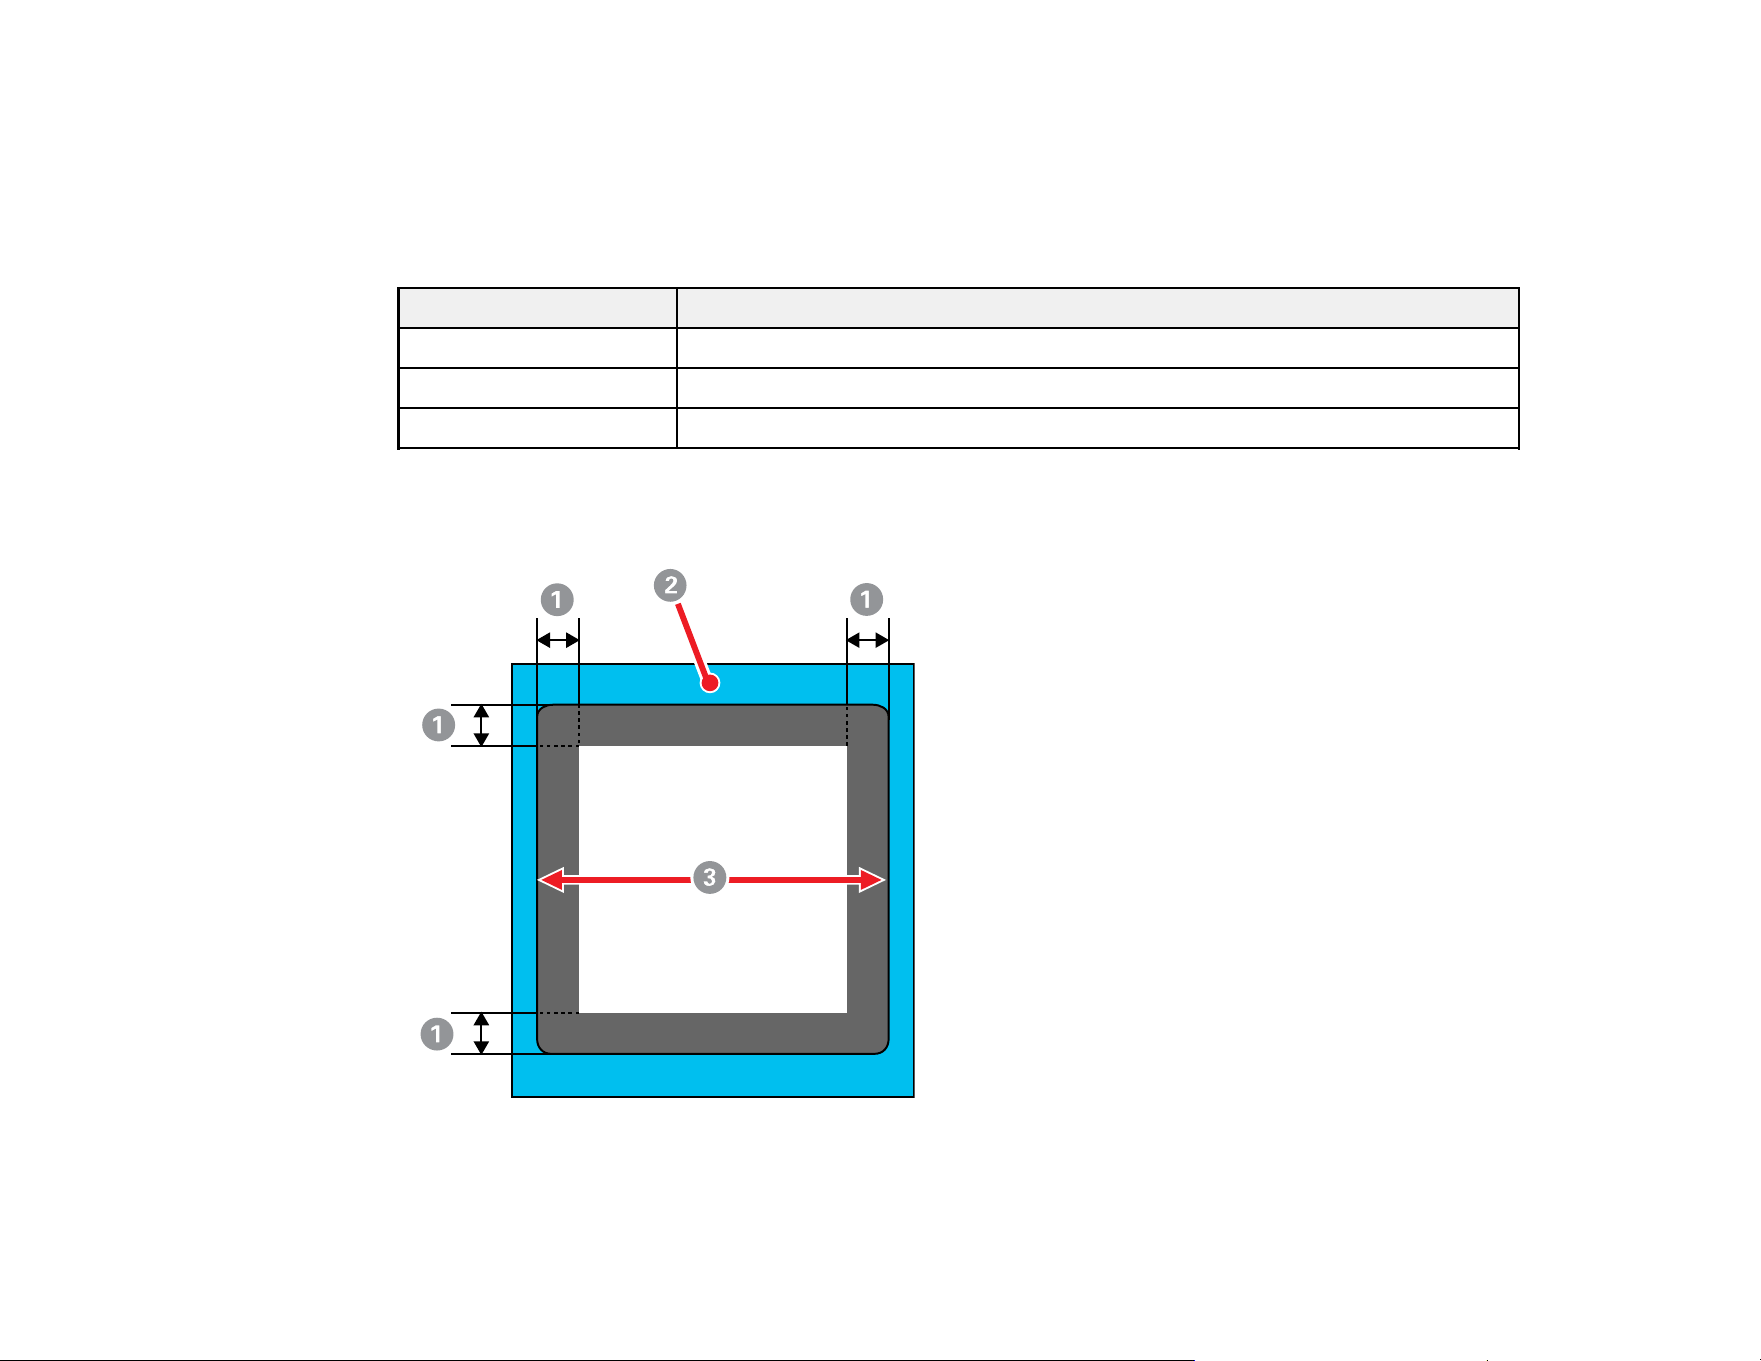
67
Parent topic: Creating Your Design
Printable Area for Each Platen
Each platen provides a different size of printable area. You do not need the platen frame when a grip pad
is attached to the platen.
Platen size Printable area
Small 10 inch × 12 inch (254 mm × 305 mm)
Extra small 7 inch × 8 inch (178 mm × 203 mm)
Sleeve 4 inch × 4 inch (102 mm × 102 mm)
Inside the platen frame, you cannot print on the areas shown in gray.
Sleeve platen
1 0.47 inch (12 mm) margins
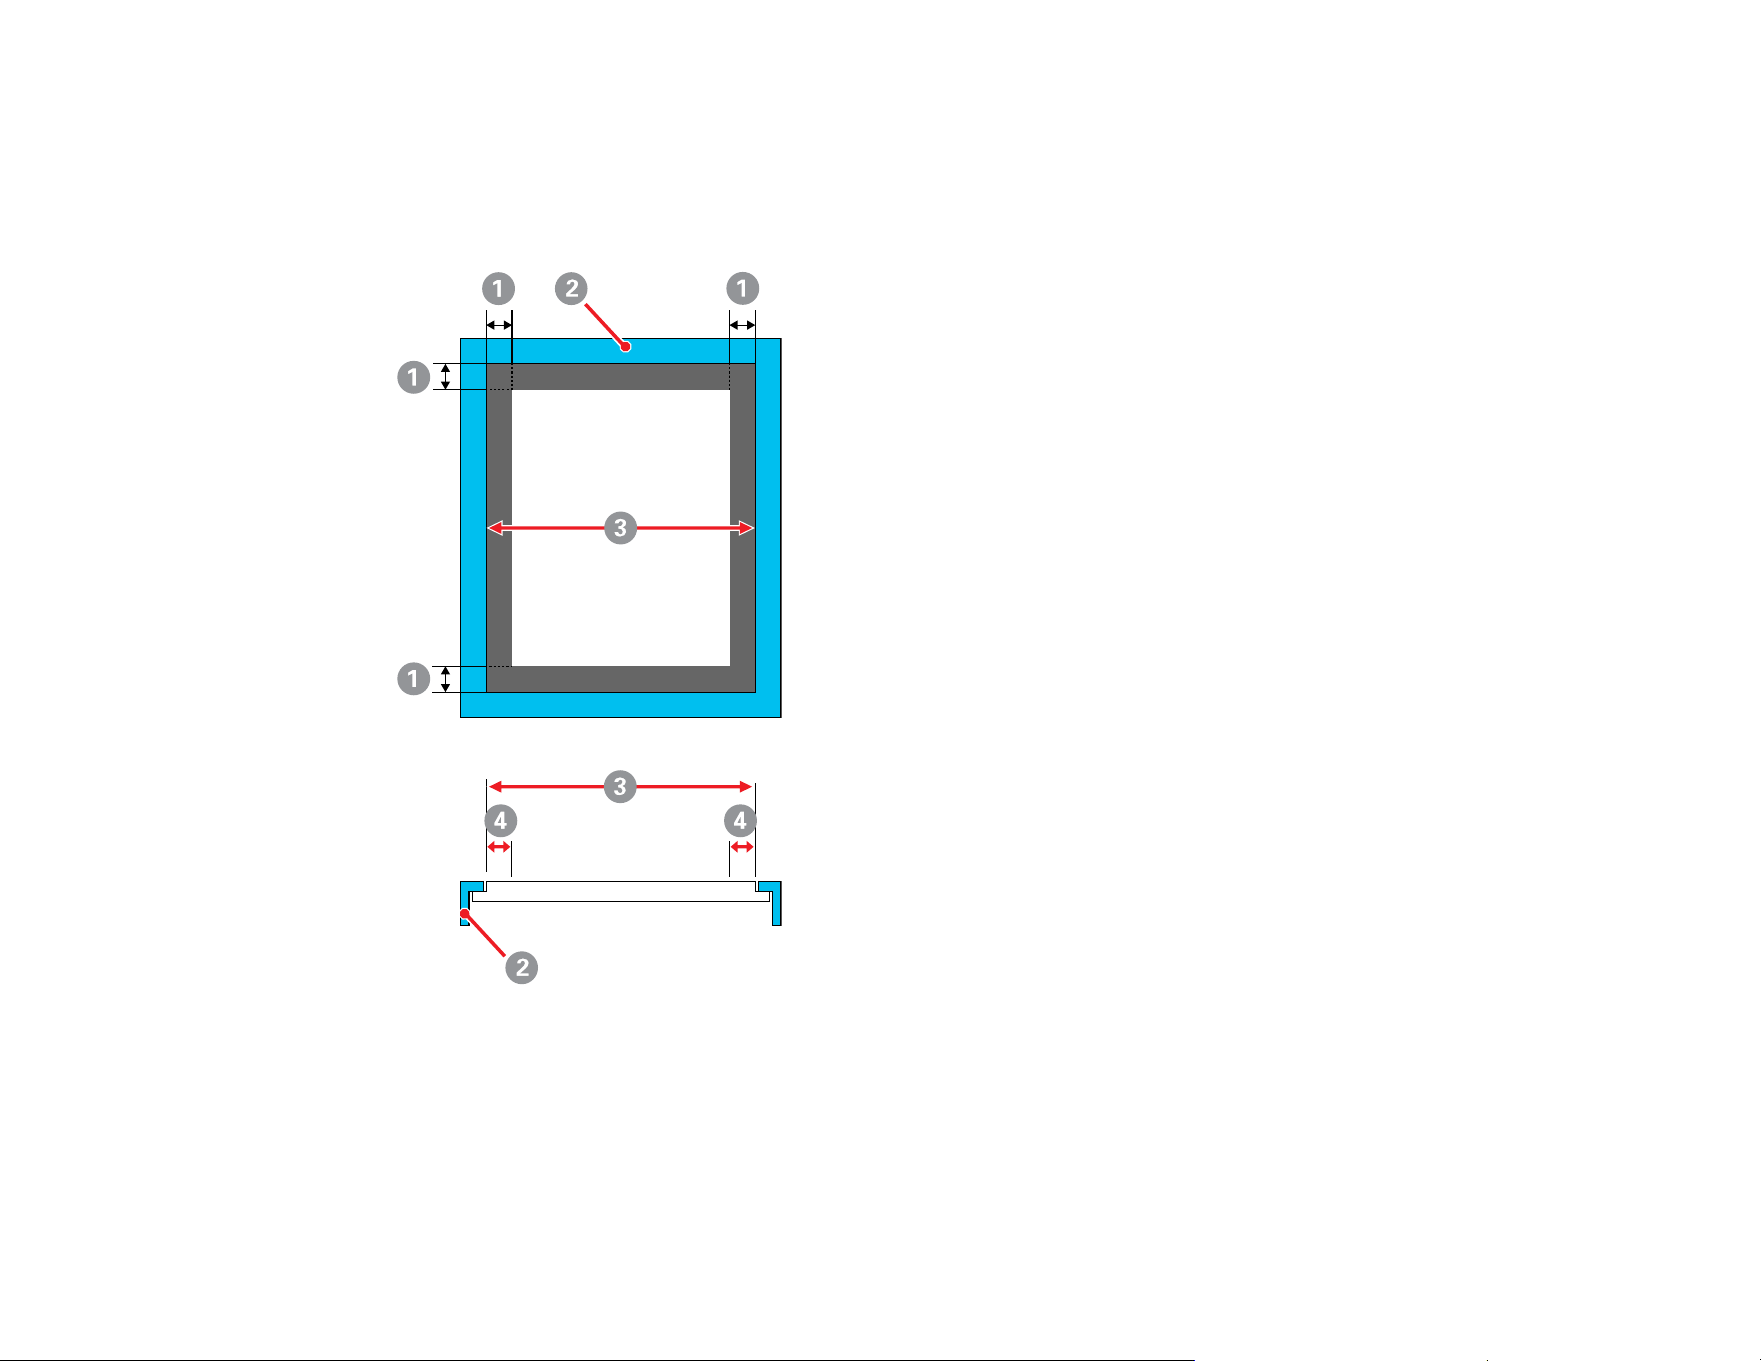
68
2 Platen frame
3 Printable area
Small/extra small platen
1 0.24 inch (6 mm) margins
2 Platen frame
3 Printable area
4 You cannot print on this area

69
Parent topic: Creating Your Design
Preparing Your Printer
Before transmitting print data from the Garment Creator 2 software, check the printer's status and make
sure that the print head nozzles are not clogged.
Perform a nozzle check to check for clogged nozzles and run a cleaning if necessary.
Note: If you are printing on film, make sure to use a platen without a grip pad or frame. If a frame is
attached to the platen, remove the frame. If a grip pad covered platen or a sleeve platen is attached,
replace it with a platen without a grip pad. Also make sure that the film is completely flat on the platen
and secured with opaque adhesive tape.
Attaching the Grip Pad to the Platen
Removing the Grip Pad from the Platen
Installing the Platen
Parent topic: Basic Printing
Related tasks
Performing a Nozzle Check
Attaching the Grip Pad to the Platen
A grip pad prevents the T-shirt from moving around during printing and can reduce print misalignment.
We recommend attaching a grip pad to the platen supplied with the printer. You do not need the platen
frame when a grip pad is attached to the platen.
A small-size grip pad is included for the small-size hanger platen that comes with the printer. Other grip
pad sizes are available for optional platens.
Note: Do not attach grip pads to extra small garment or sleeve platens.
Caution: If using a grip pad to print on thin fabric with a polyester blend ratio of 50% or more, ink may
bleed through to the grip pad.
70
1. Peel off one section on the back of the grip pad backing as shown.
2. Place the platen on a flat surface, align the corners of the grip pad so that they are slightly inside the
corners of the platen, and then set the adhesive side of the grip pad to the platen.
Note: Do not allow the corners of the grip pad where the backing has not been removed to protrude
past the edges of the other side of the platen.
71
3. Gently press on the section of the grip pad where the backing was removed to adhere it to the
platen.
4. Carefully lift the grip pad and peel off the other two sections of the grip pad backing.
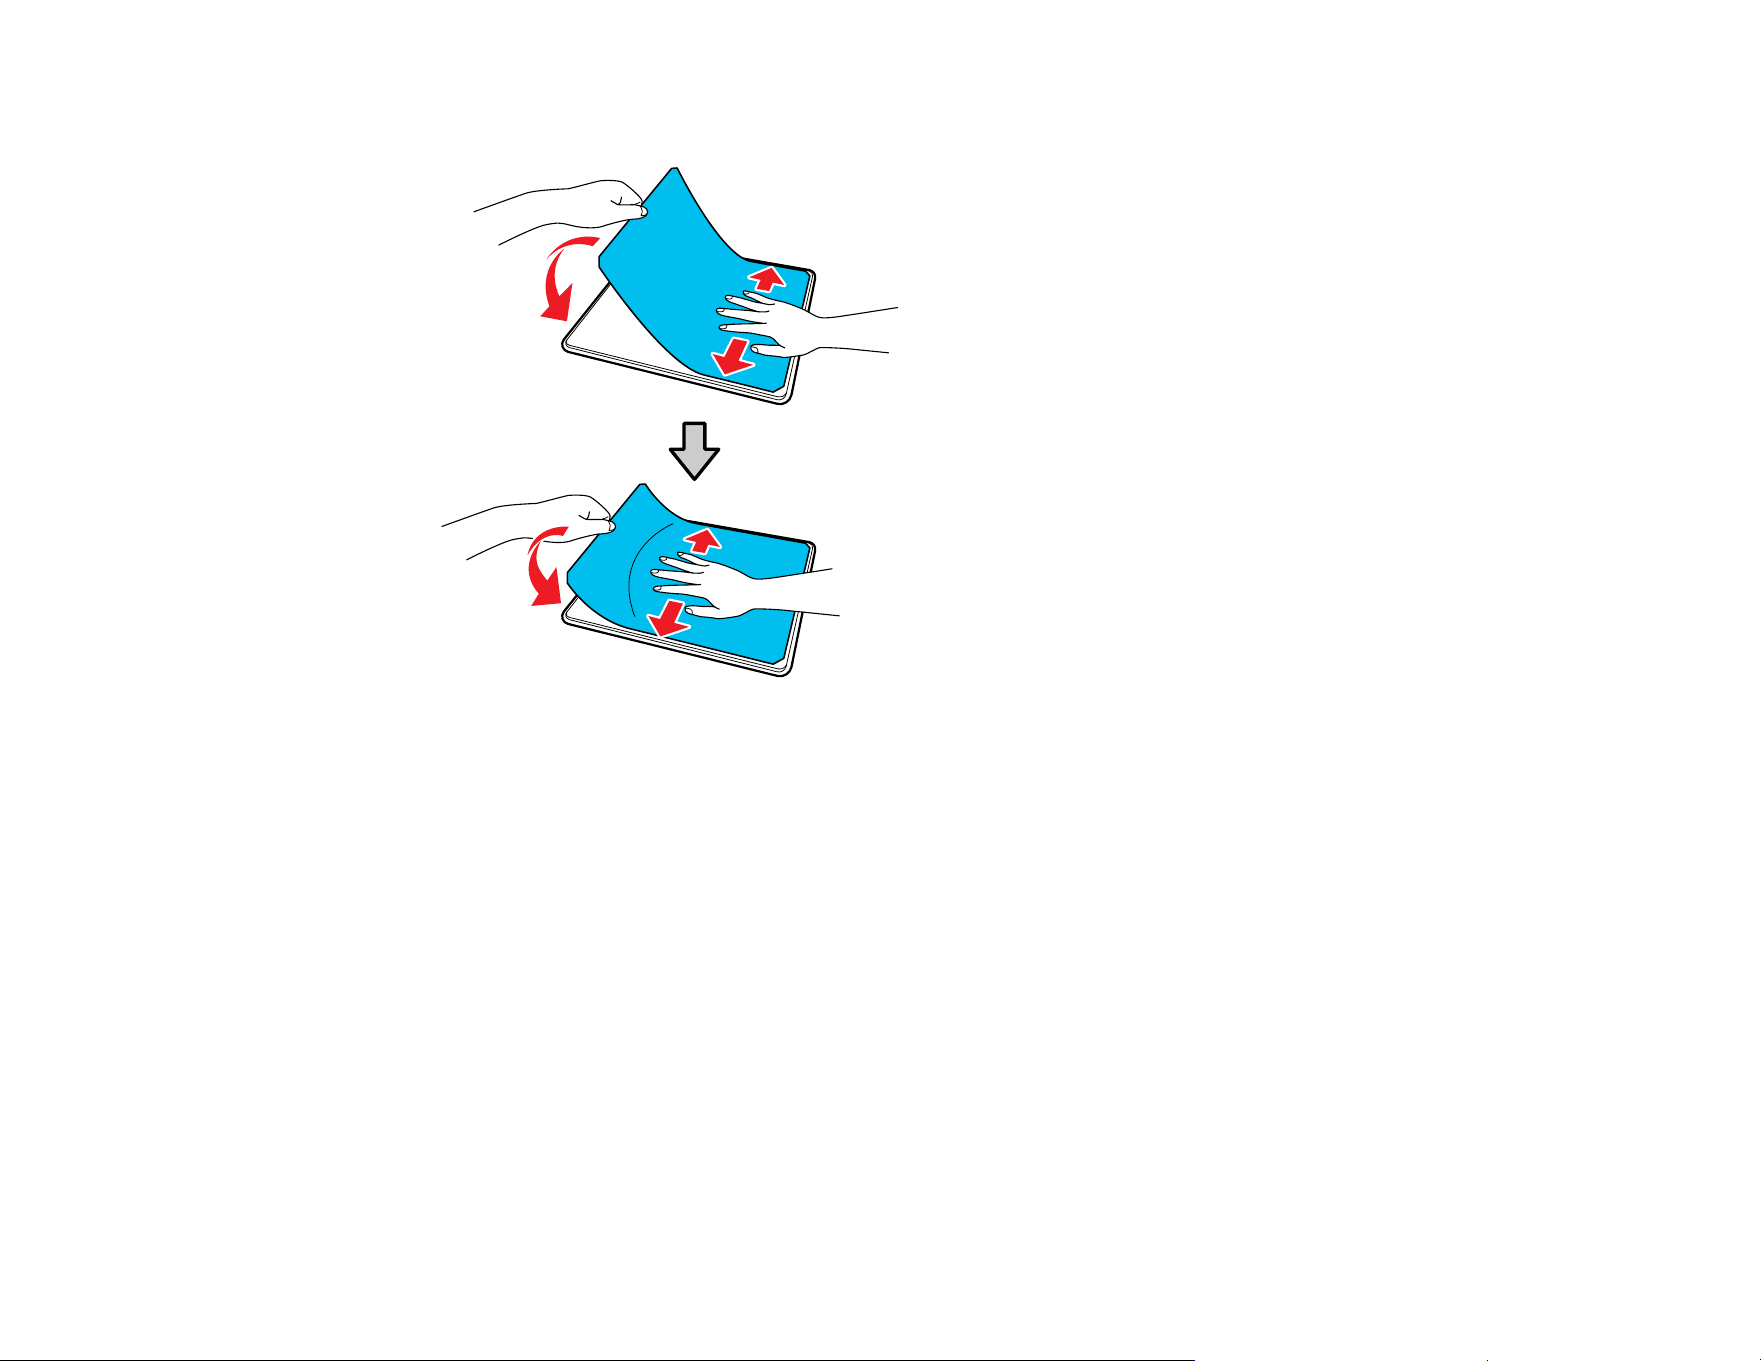
72
5. Carefully adhere the rest of the grip pad to the platen and rub each section to adhere it.
Parent topic: Preparing Your Printer
Related references
Optional Equipment and Replacement Parts
Related tasks
Removing the Grip Pad from the Platen
Loading a T-shirt on the Grip Pad
Removing the Grip Pad from the Platen
You can remove the grip pad from the platen.
Grip pads that have been on the platen for a long time may be hard to peel off. You can use a
commercially available spatula to assist in removal.
Caution: Do not apply hot air to soften the glue. You can damage the platen or other parts.
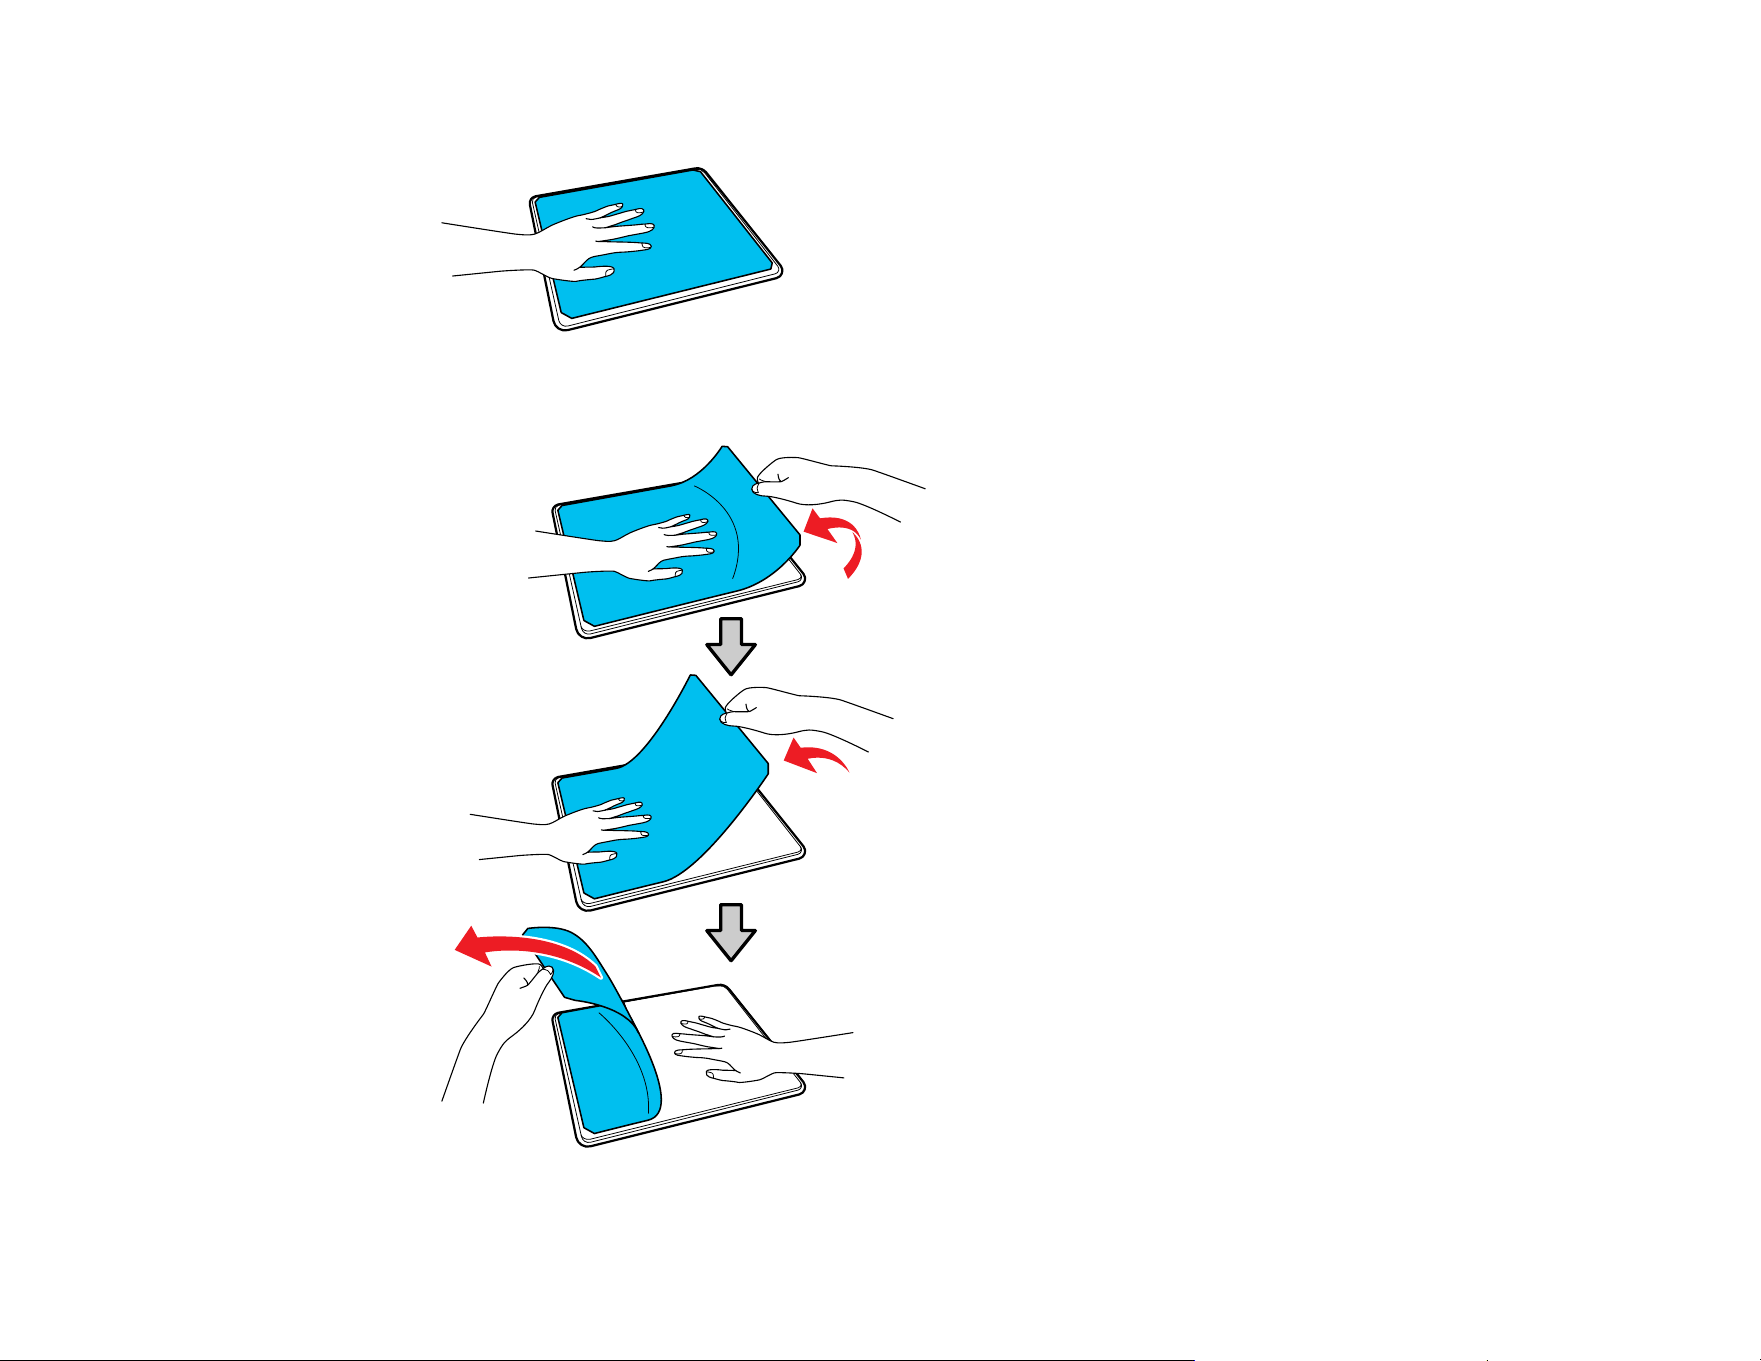
73
1. Place the platen on a flat surface and hold it down with one hand.
2. Using your other hand, peel off the grip pad.
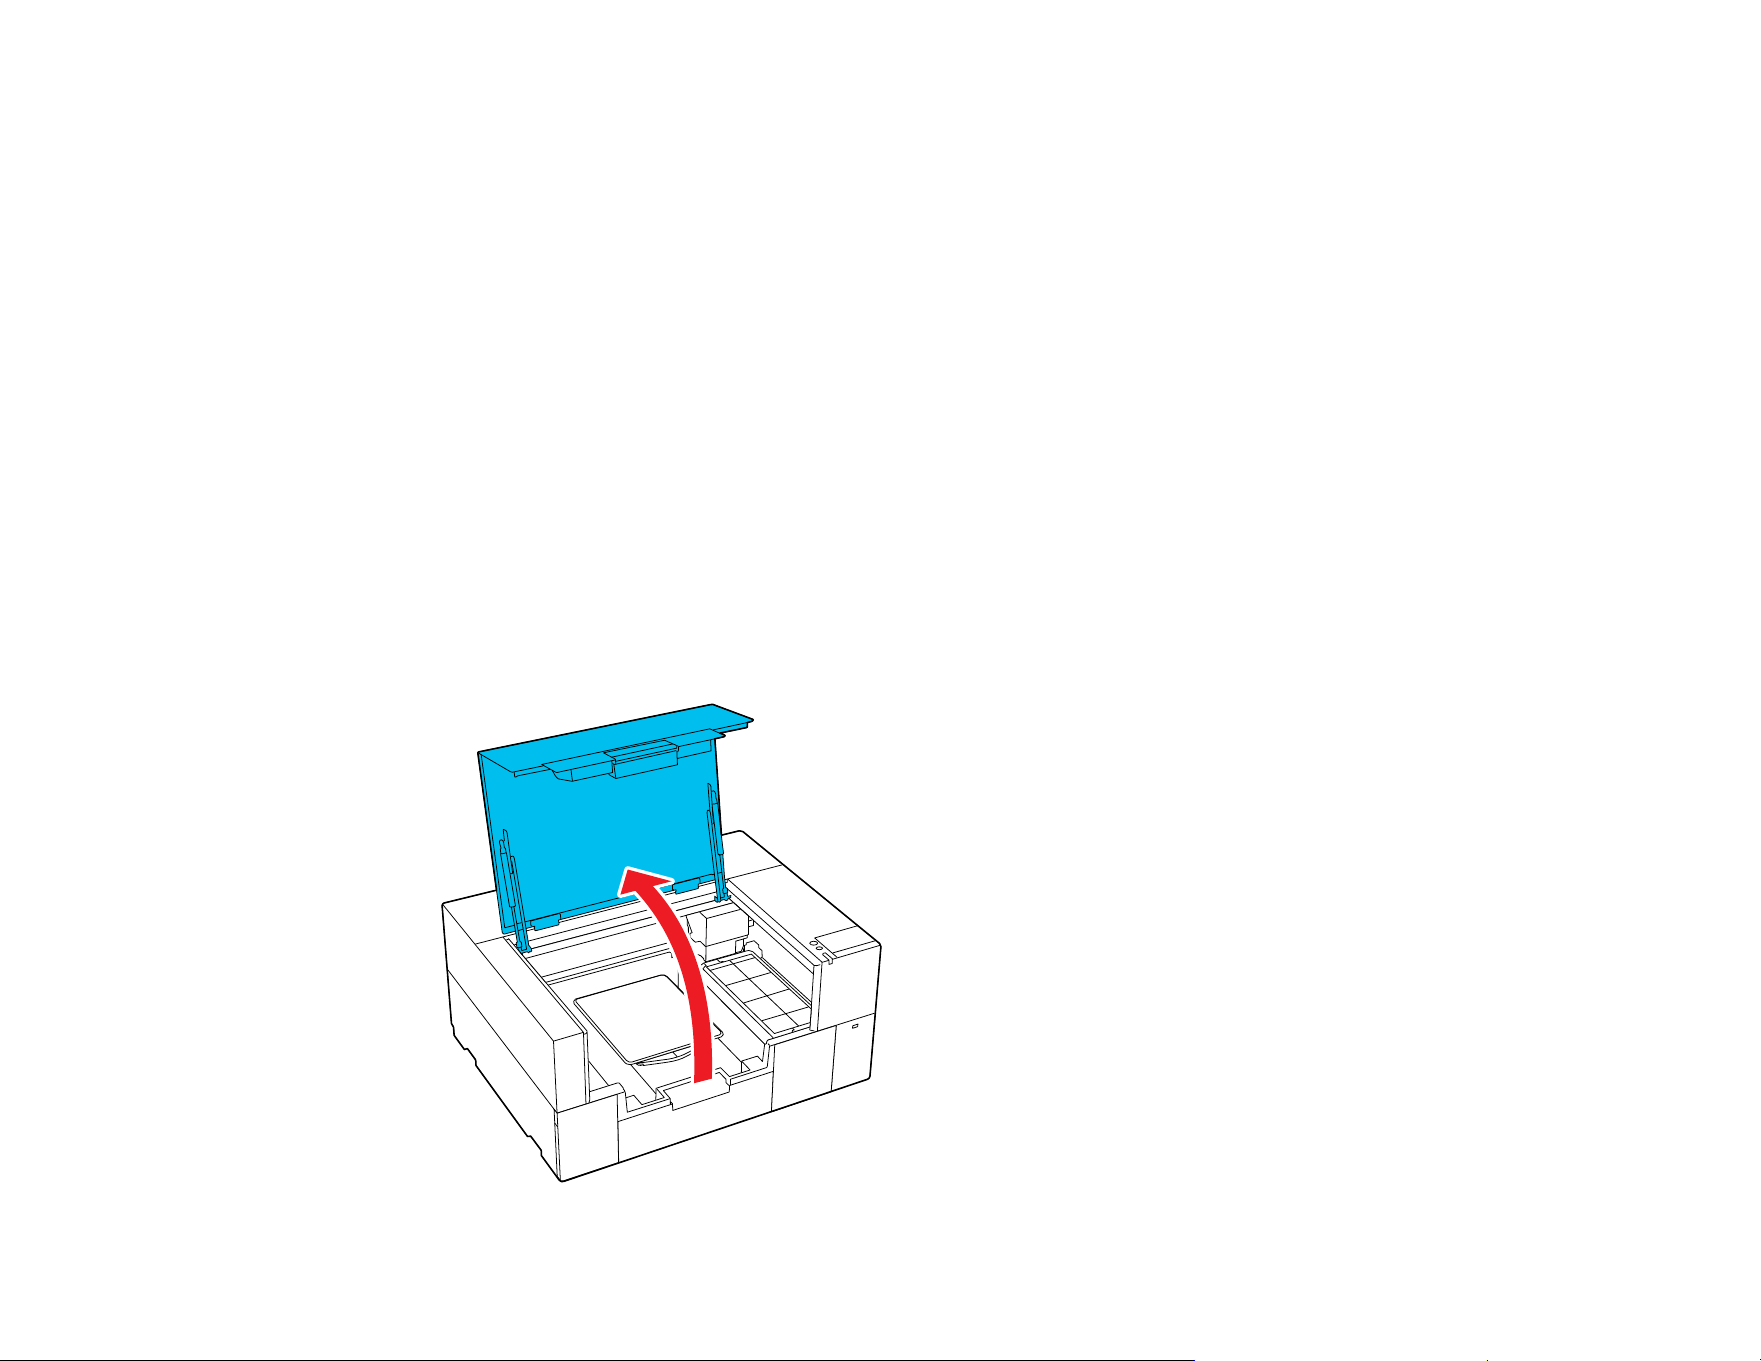
74
If any glue remains on the platen, soak a soft cloth in diluted neutral detergent, wring it out thoroughly,
and wipe off the glue.
Caution: Do not use solvents such as alcohol to remove the glue. You can damage, warp, or discolor
the platen or other parts.
Parent topic: Preparing Your Printer
Related tasks
Attaching the Grip Pad to the Platen
Installing the Platen
After you have removed or attached grip pads as necessary, you can install a platen on the printer.
Note: If you are printing on film, do not use a sleeve platen or grip pads, and make sure that you use a
platen that is larger than the film. If you use a platen that is smaller than the film, the overhanging parts
could be pushed up and the job will not be printed correctly. Also, the edges of the film may strike against
the print head and be damaged.
1. Make sure the printer is on, then open the printer cover.

75
2. Store the adjustable platen hanger if it is extended.
3. If you are replacing a platen, grip the left and right side of the platen and lift it straight up to remove it.
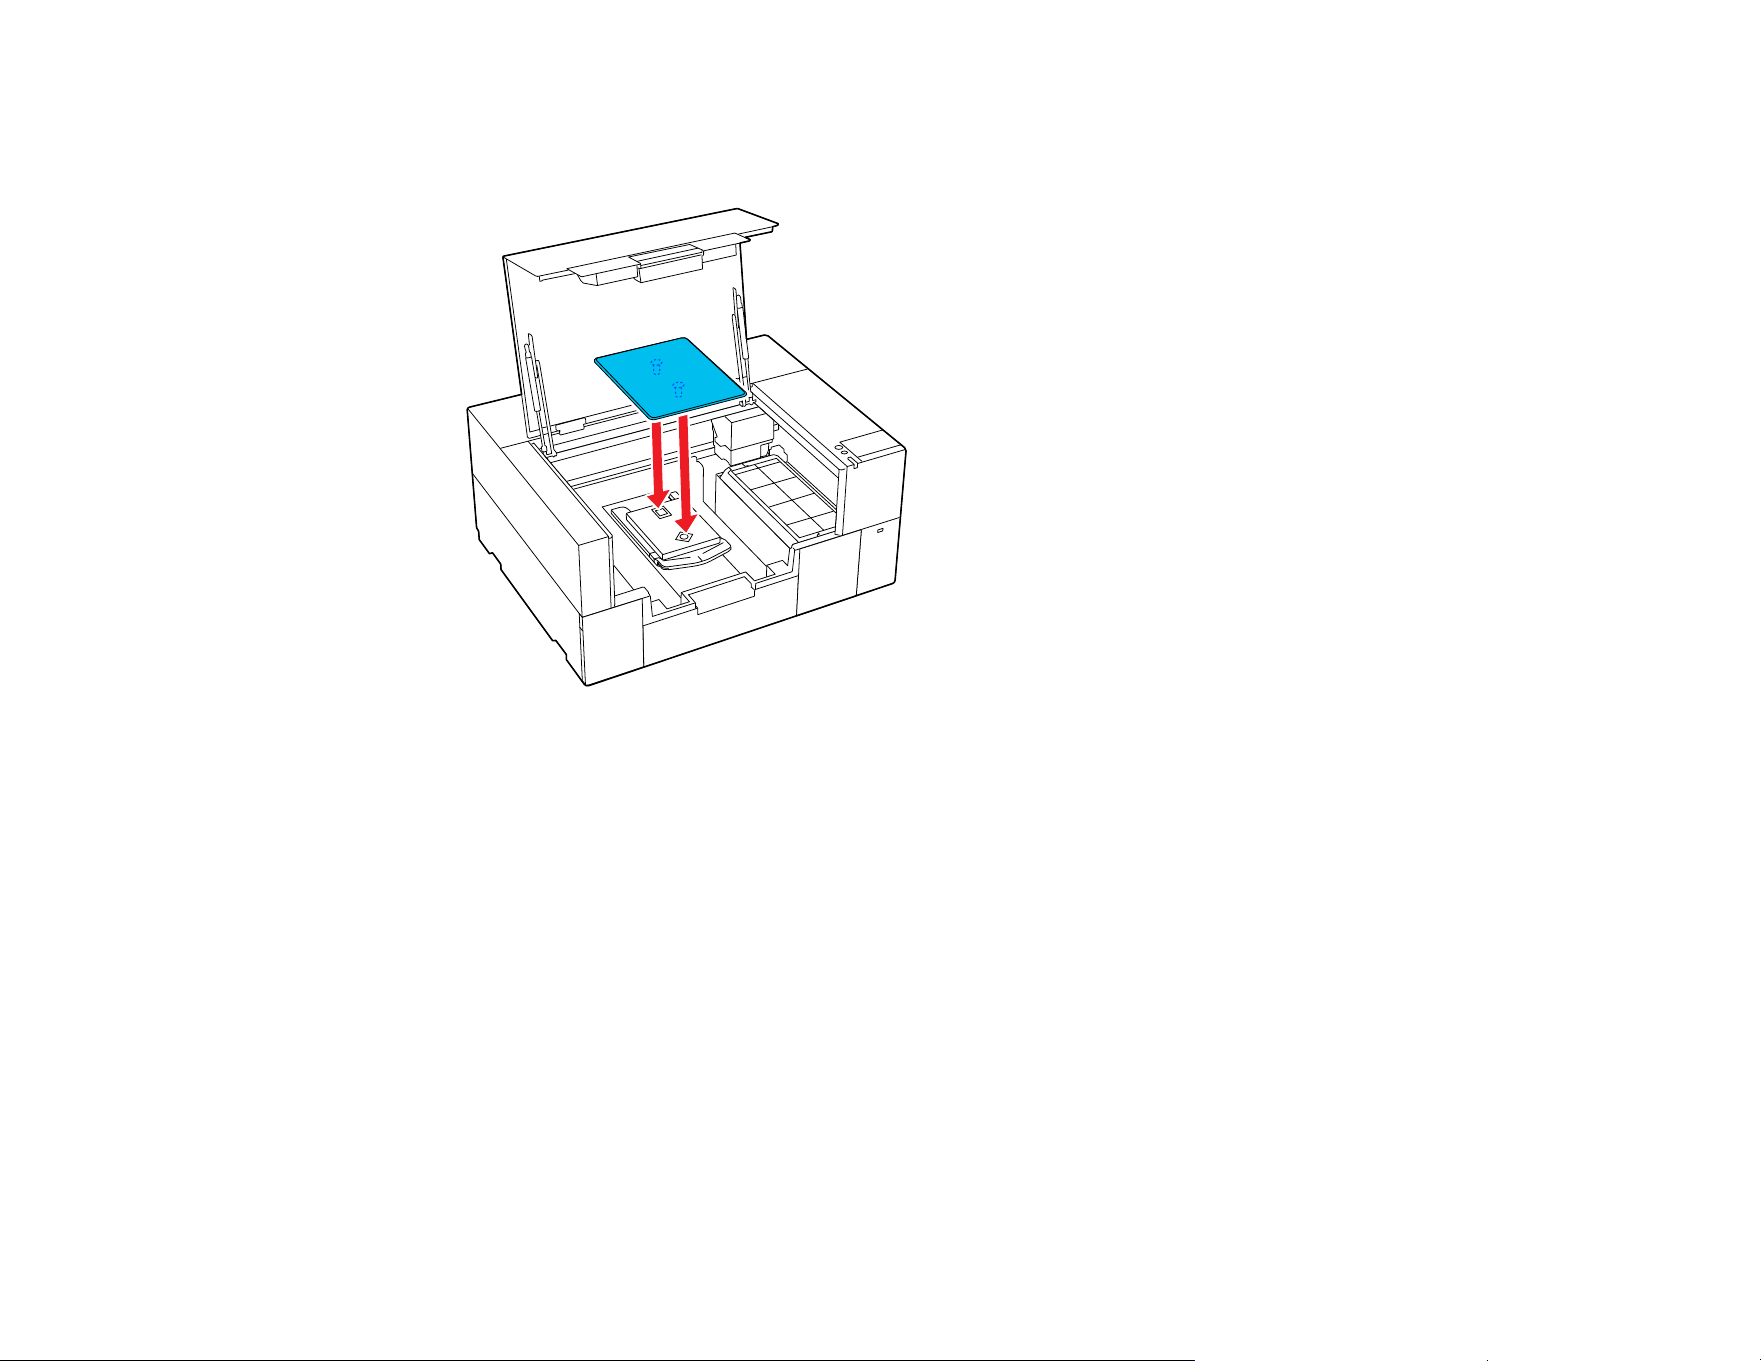
76
4. Align the platen to fit into the holes in the base and place the platen on the printer.
• Small/extra-small platen
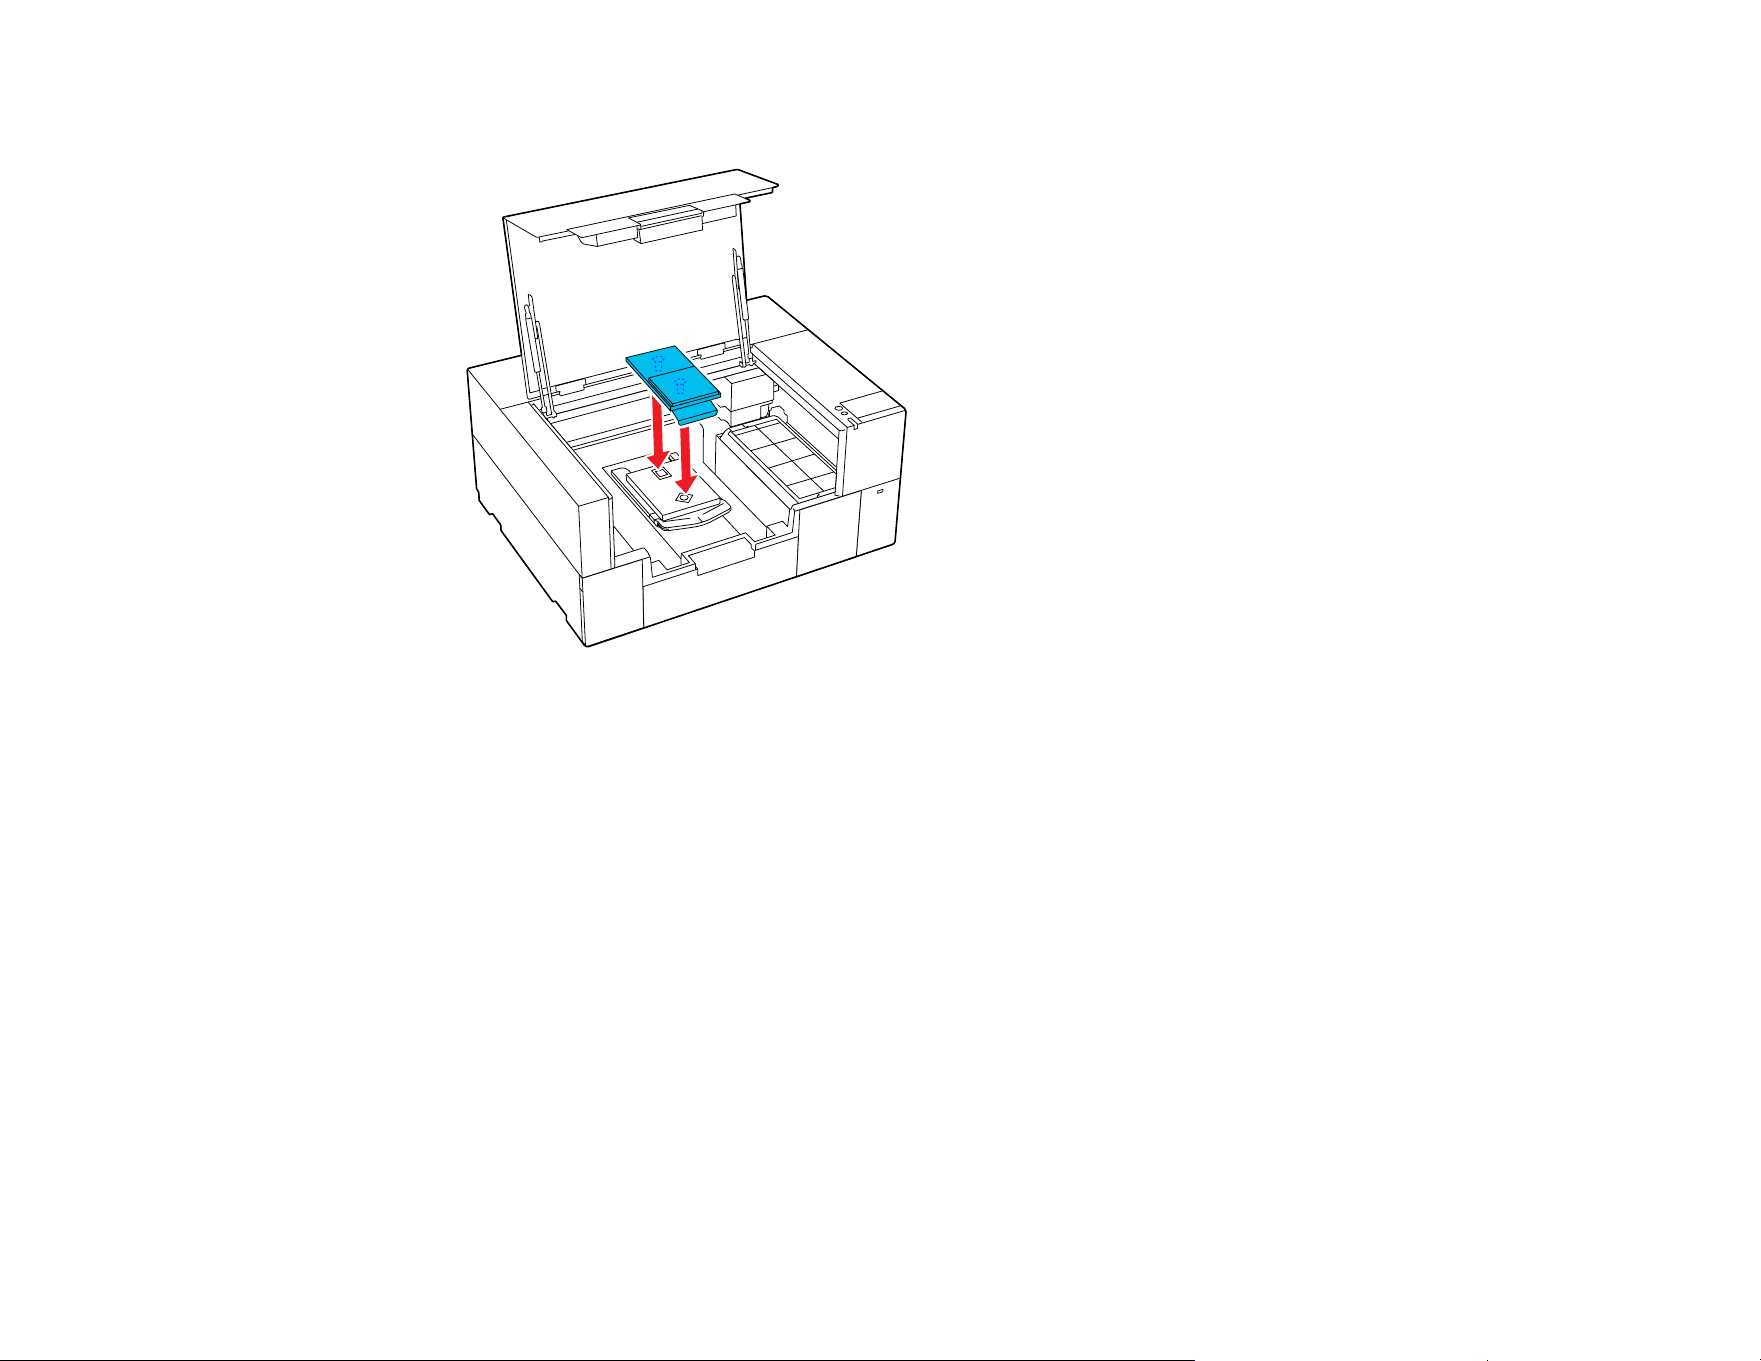
77
• Sleeve platen
5. After installing a platen of a different size, perform a head alignment.
Parent topic: Preparing Your Printer
Related references
Optional Equipment and Replacement Parts
Related tasks
Aligning the Print Head
Loading a T-shirt
Refer to these sections to load a T-shirt into the printer.
If you notice any creases on the T-shirt, use a heat press to iron them out before loading the shirt. If
there is any lint or fiber on the printed surface, remove it with sticky tape or a lint roller.
Caution: Do not load polyester T-shirts on a platen that is covered with a grip pad; otherwise, the fabric
of the platen may be stained with ink while printing.
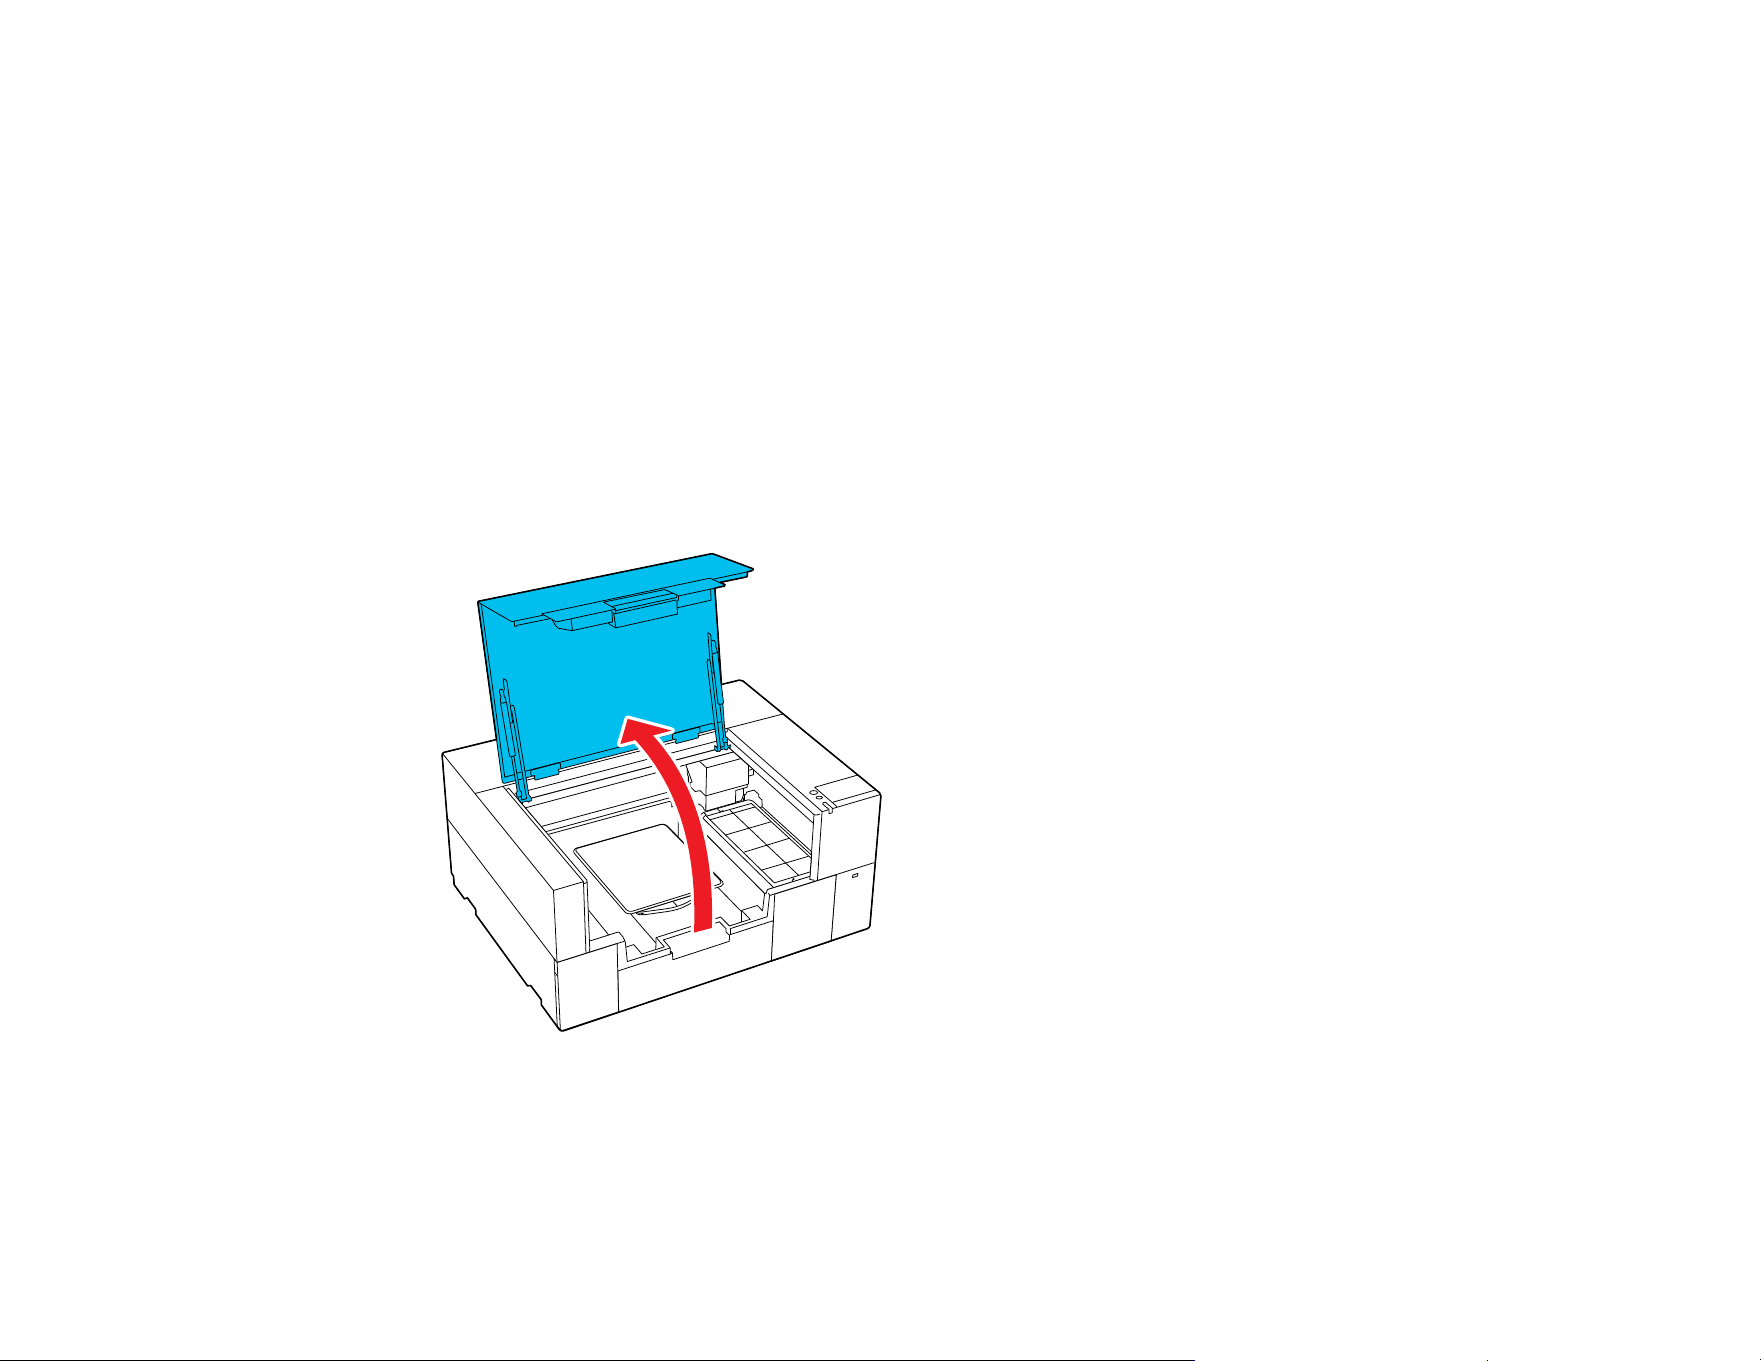
78
Loading a T-shirt on the Grip Pad
Loading a T-shirt on the Platen
Loading a Sleeve on the Sleeve Platen
Parent topic: Basic Printing
Loading a T-shirt on the Grip Pad
Before printing, carefully load a T-shirt on the platen with a grip pad attached. Do not use the platen
frame with the grip pad.
Note: Make sure that the correct platen is installed on the printer and the platen frame is removed.
1. Turn on the printer, if necessary.
2. Open the printer cover.

79
3. Pull out the adjustable platen hanger until the tip extends beyond the printer, then expand the sides
as shown.

80
4. Slide the hem of the T-shirt over the platen from the front.
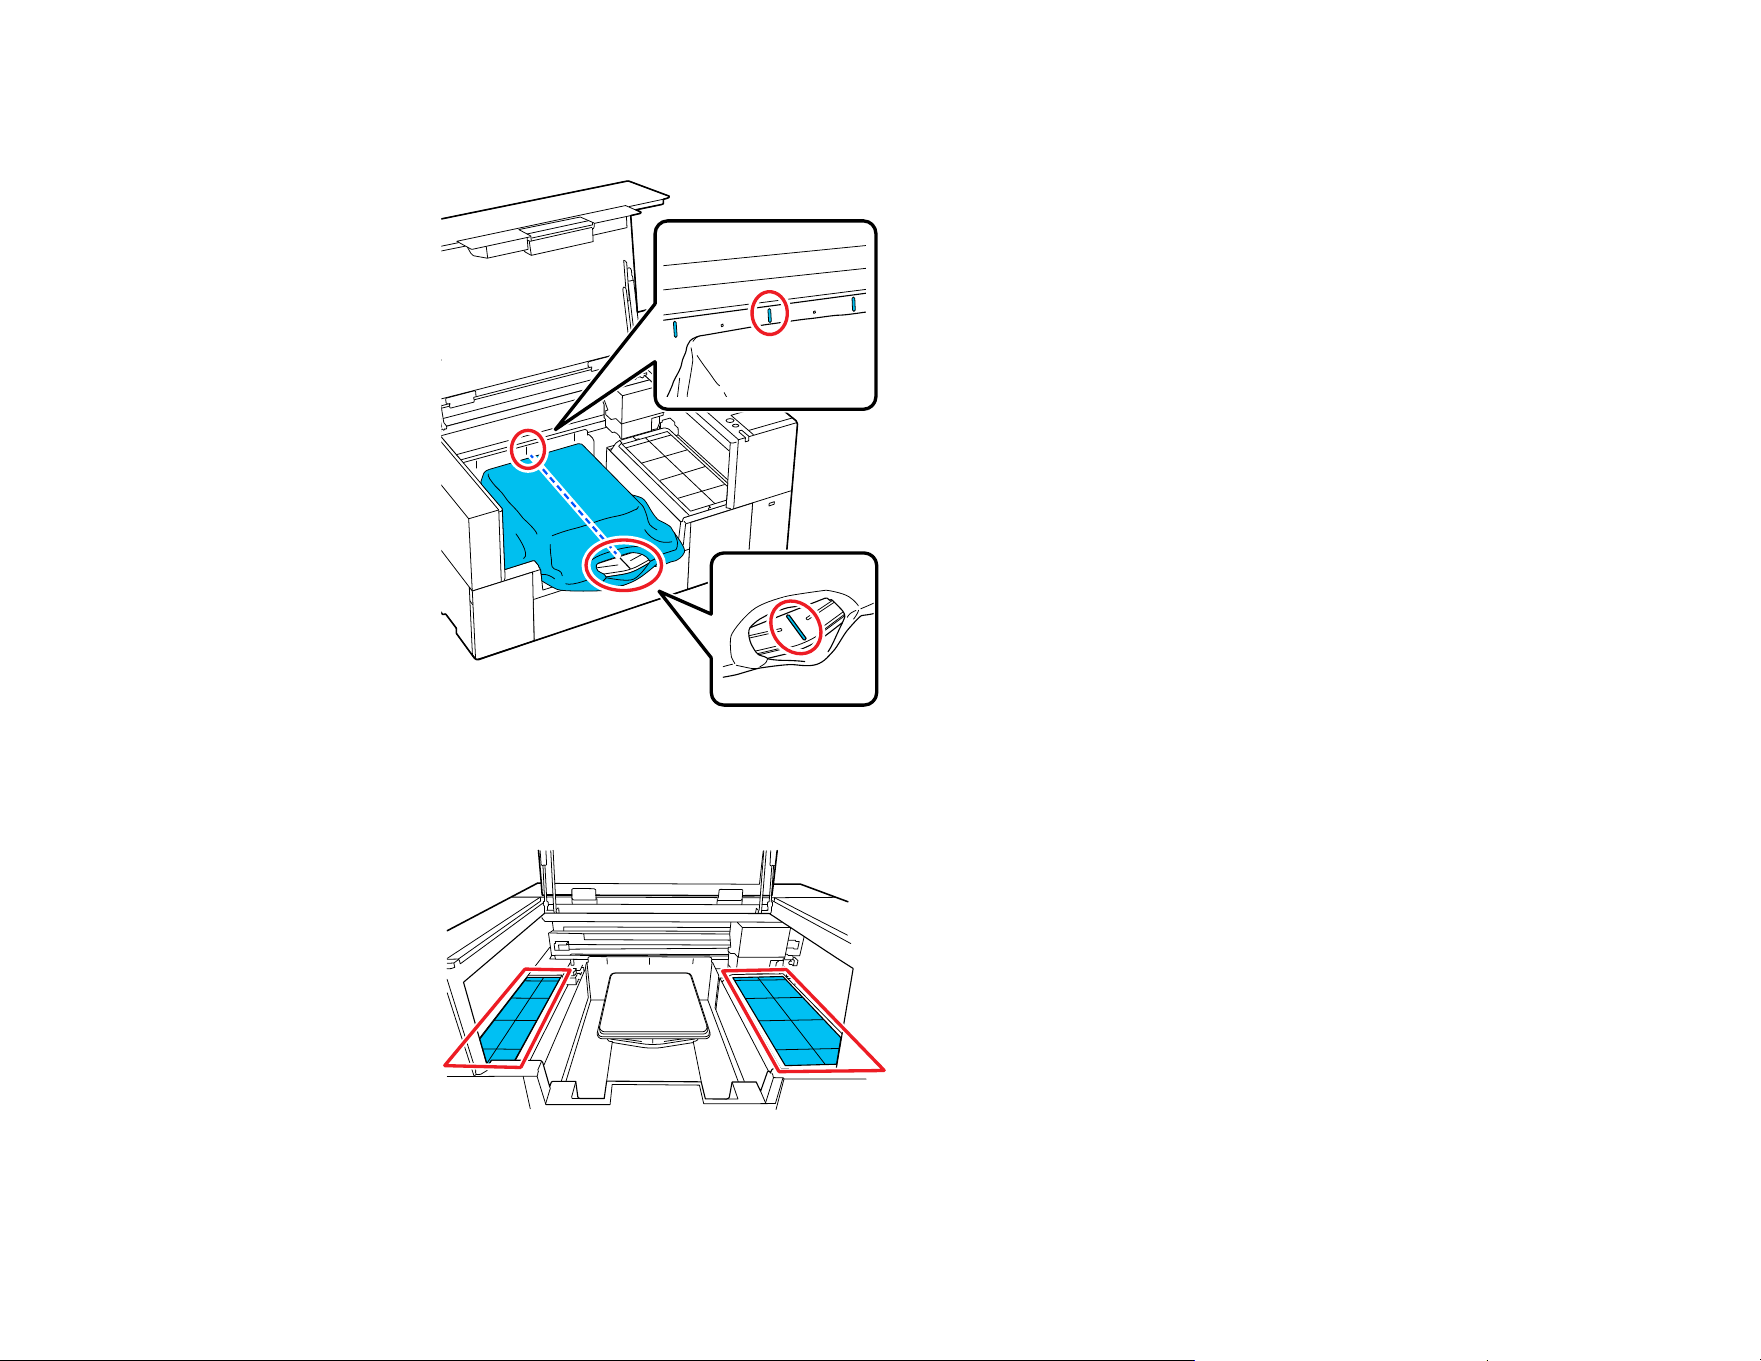
81
Note: The line inside the frame in the illustration below indicates the center of the platen.
5. Adjust the T-shirt according to the print position. You can use the grid on the loading guard as a
guide for the loading position.

82
Since the grid is symmetrical, you can perform horizontal alignment by simply aligning the sleeves or
sides of the T-shirt with the same squares on the left and right.
Note: If you frequently print on the same garment type, mark the aligned squares with a sticker so
you can easily load the garment in the same position the next time.
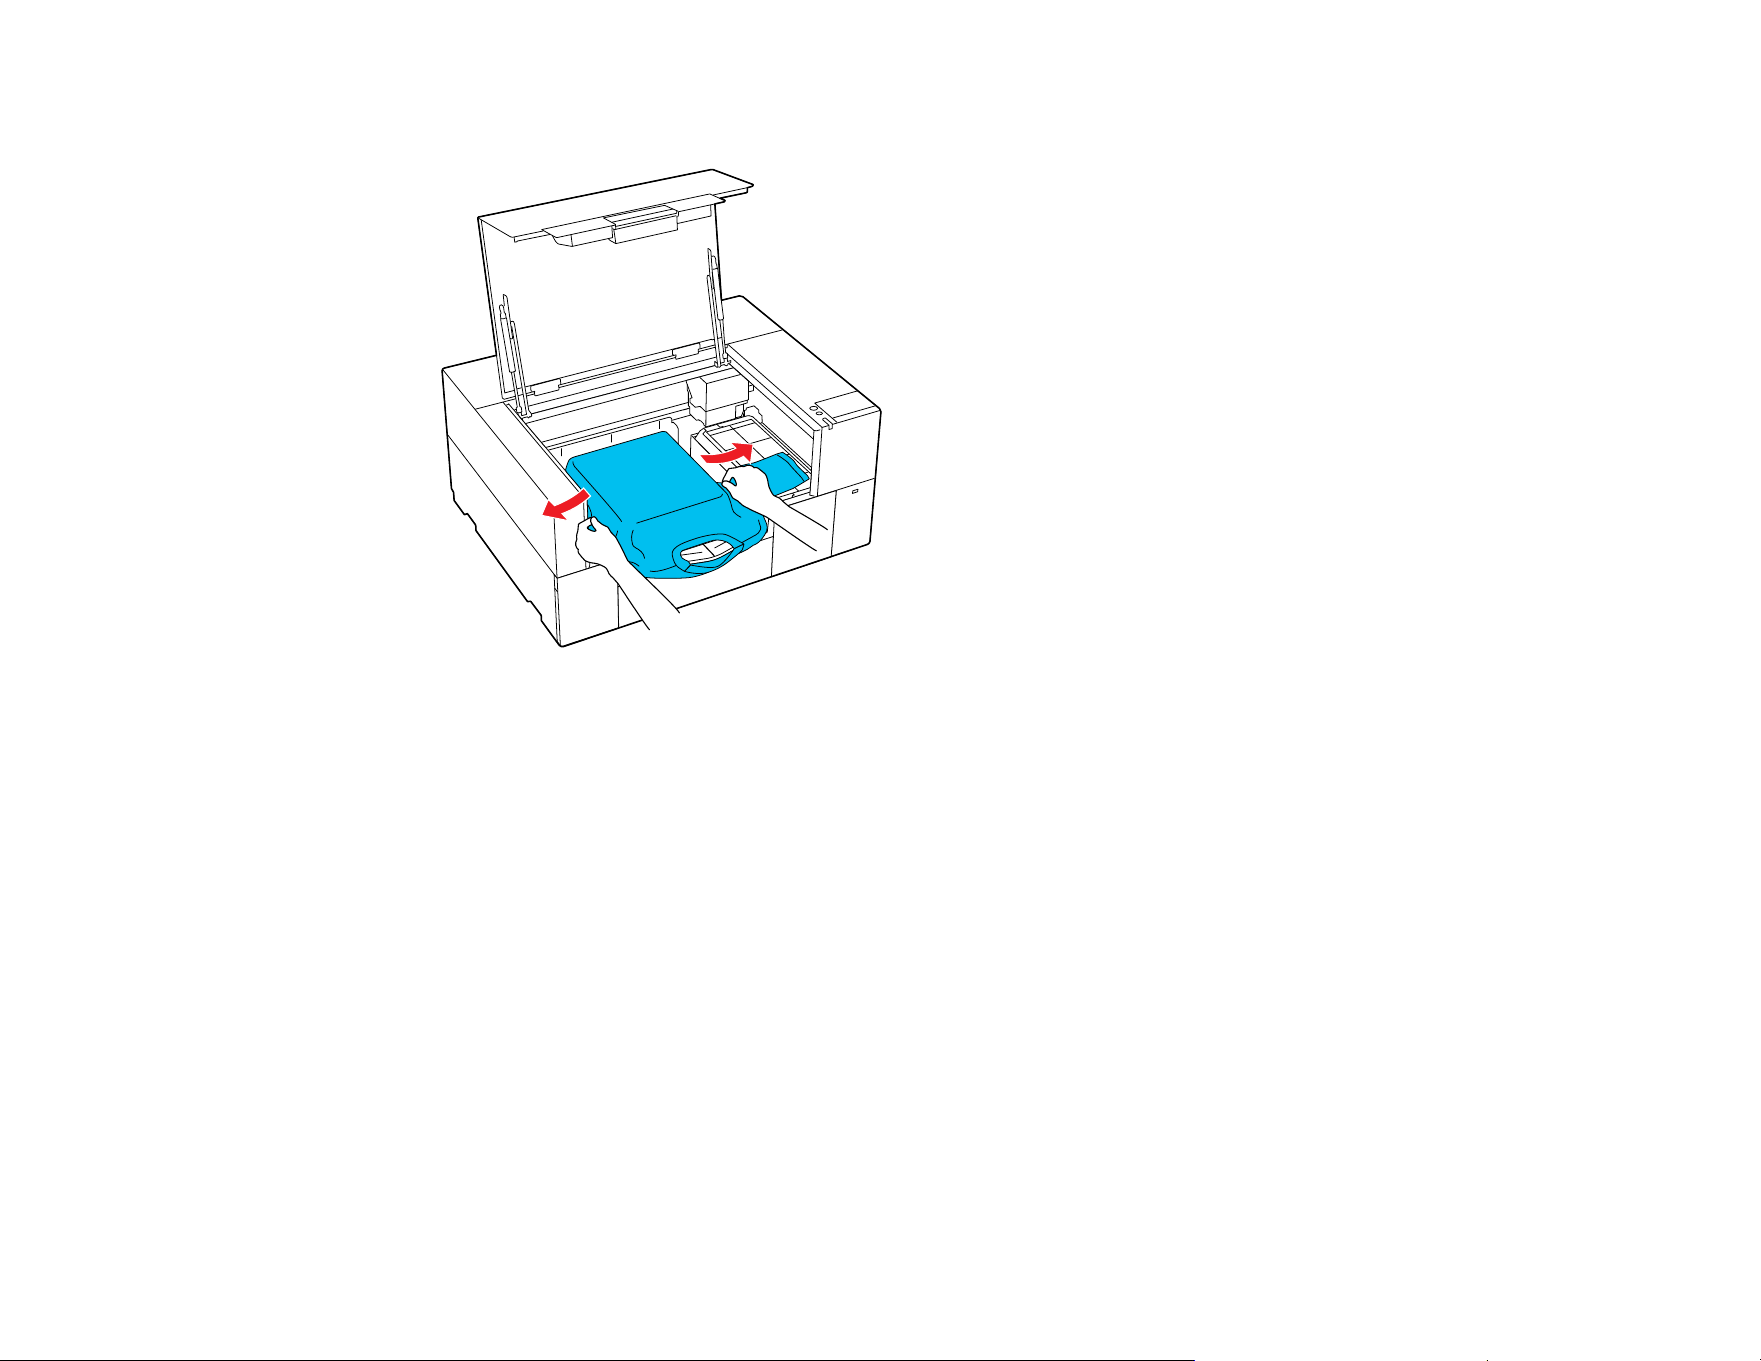
83
6. Gently pull the T-shirt over the edges of the grip pad to flatten it.
Note: Do not pull too hard on the T-shirt. If the T-shirt is stretched too much, the print quality may
decline and the white under-base print may extend outside the image.
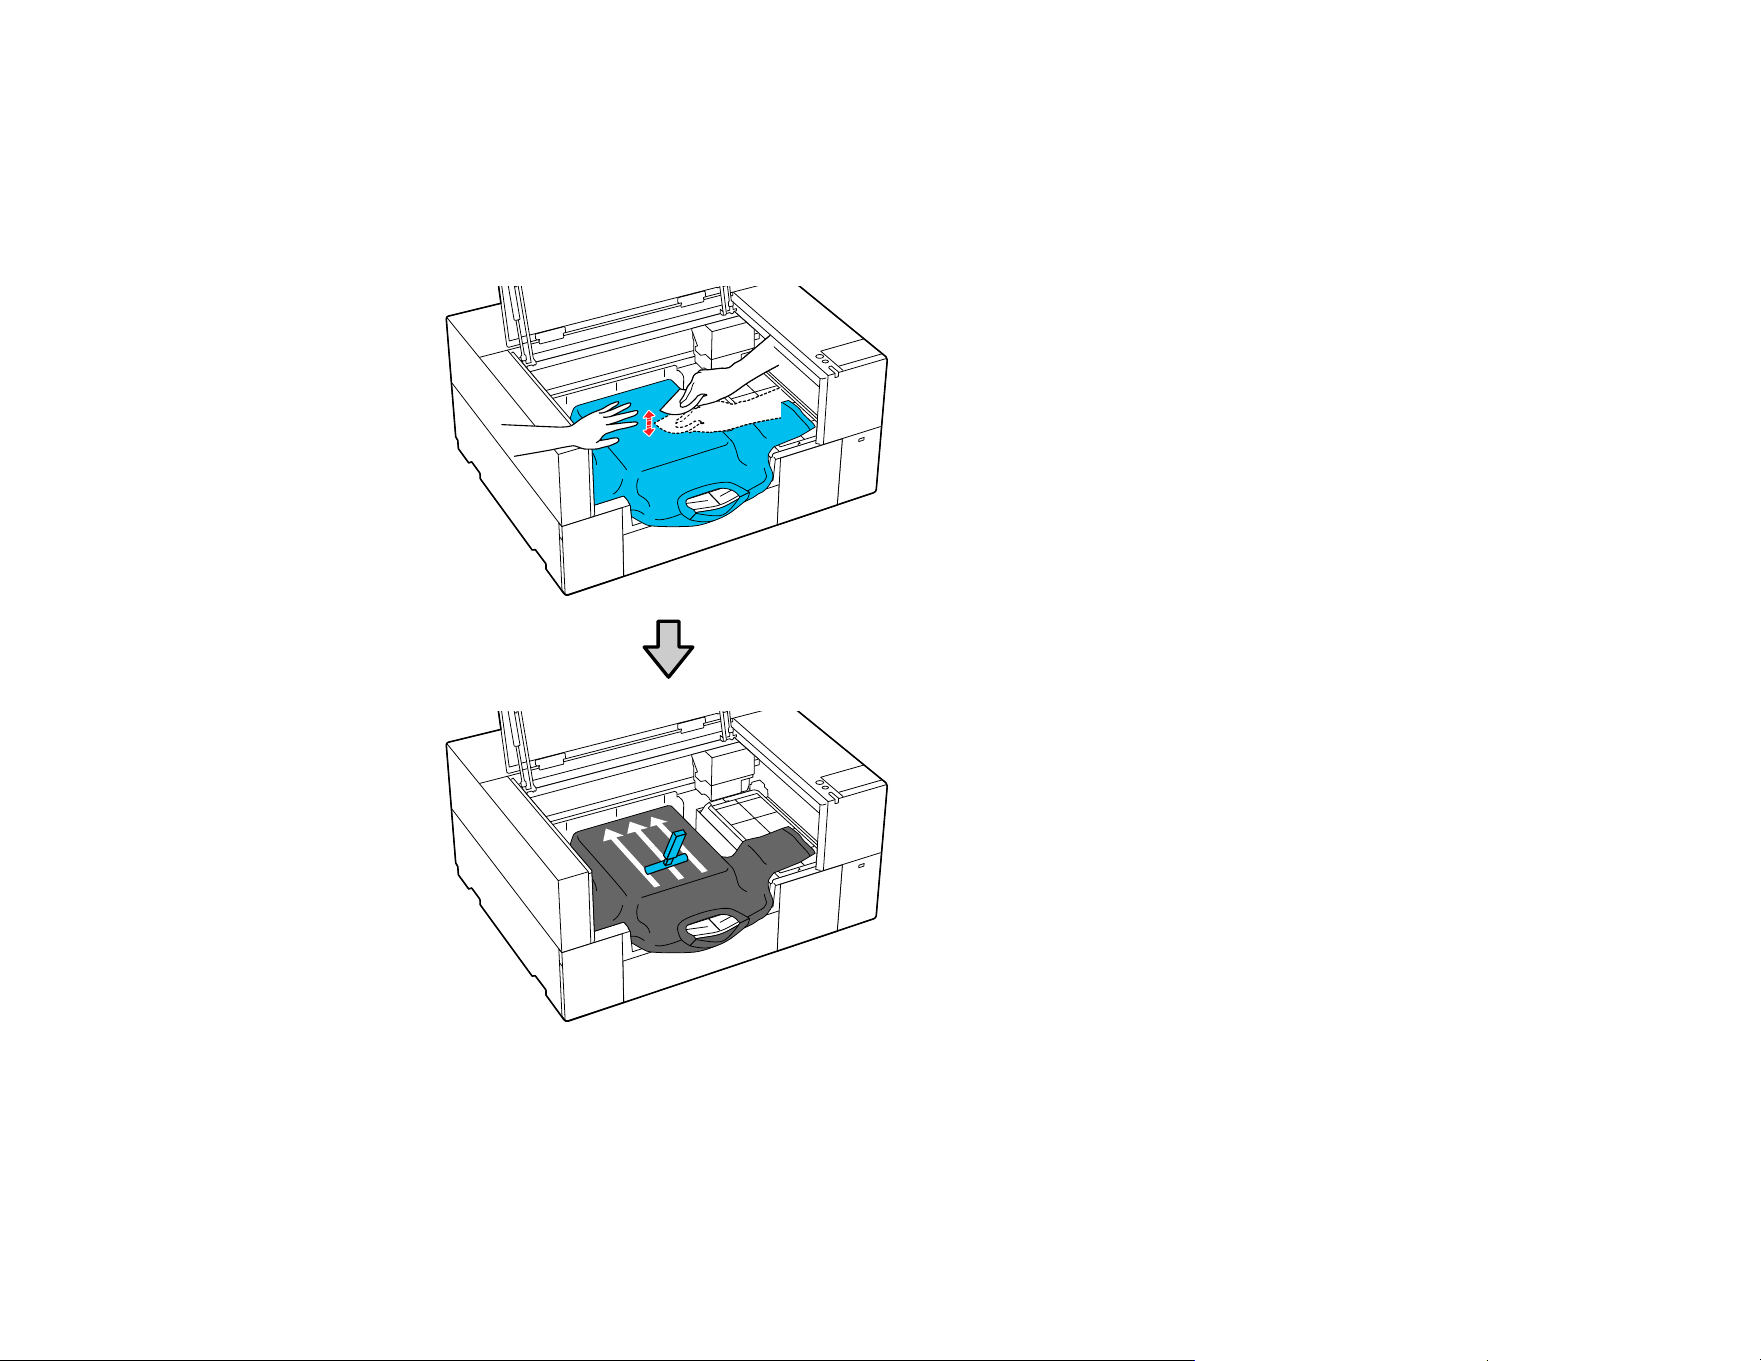
84
7. Remove any lint from the printing surface and press the fibers flat.
Note: There may be lint on the T-shirt if you have not applied pre-treatment solution. Use a lint roller
or sticky tape to remove the lint and then press the fibers flat using a hard roller. Lint and fibers may
stick to the print head and stain other areas.
8. Remove any slack or creases from the printing surface and make it flat.
Note: The printer detects the highest part of the garment surface. If there are any wrinkles, creases,
or slack, the distance between the print head and the print surface may increase and quality may

85
decline. Stretch the shirt to remove the slack, however, do not stretch it so much that the printed
image will be distorted.
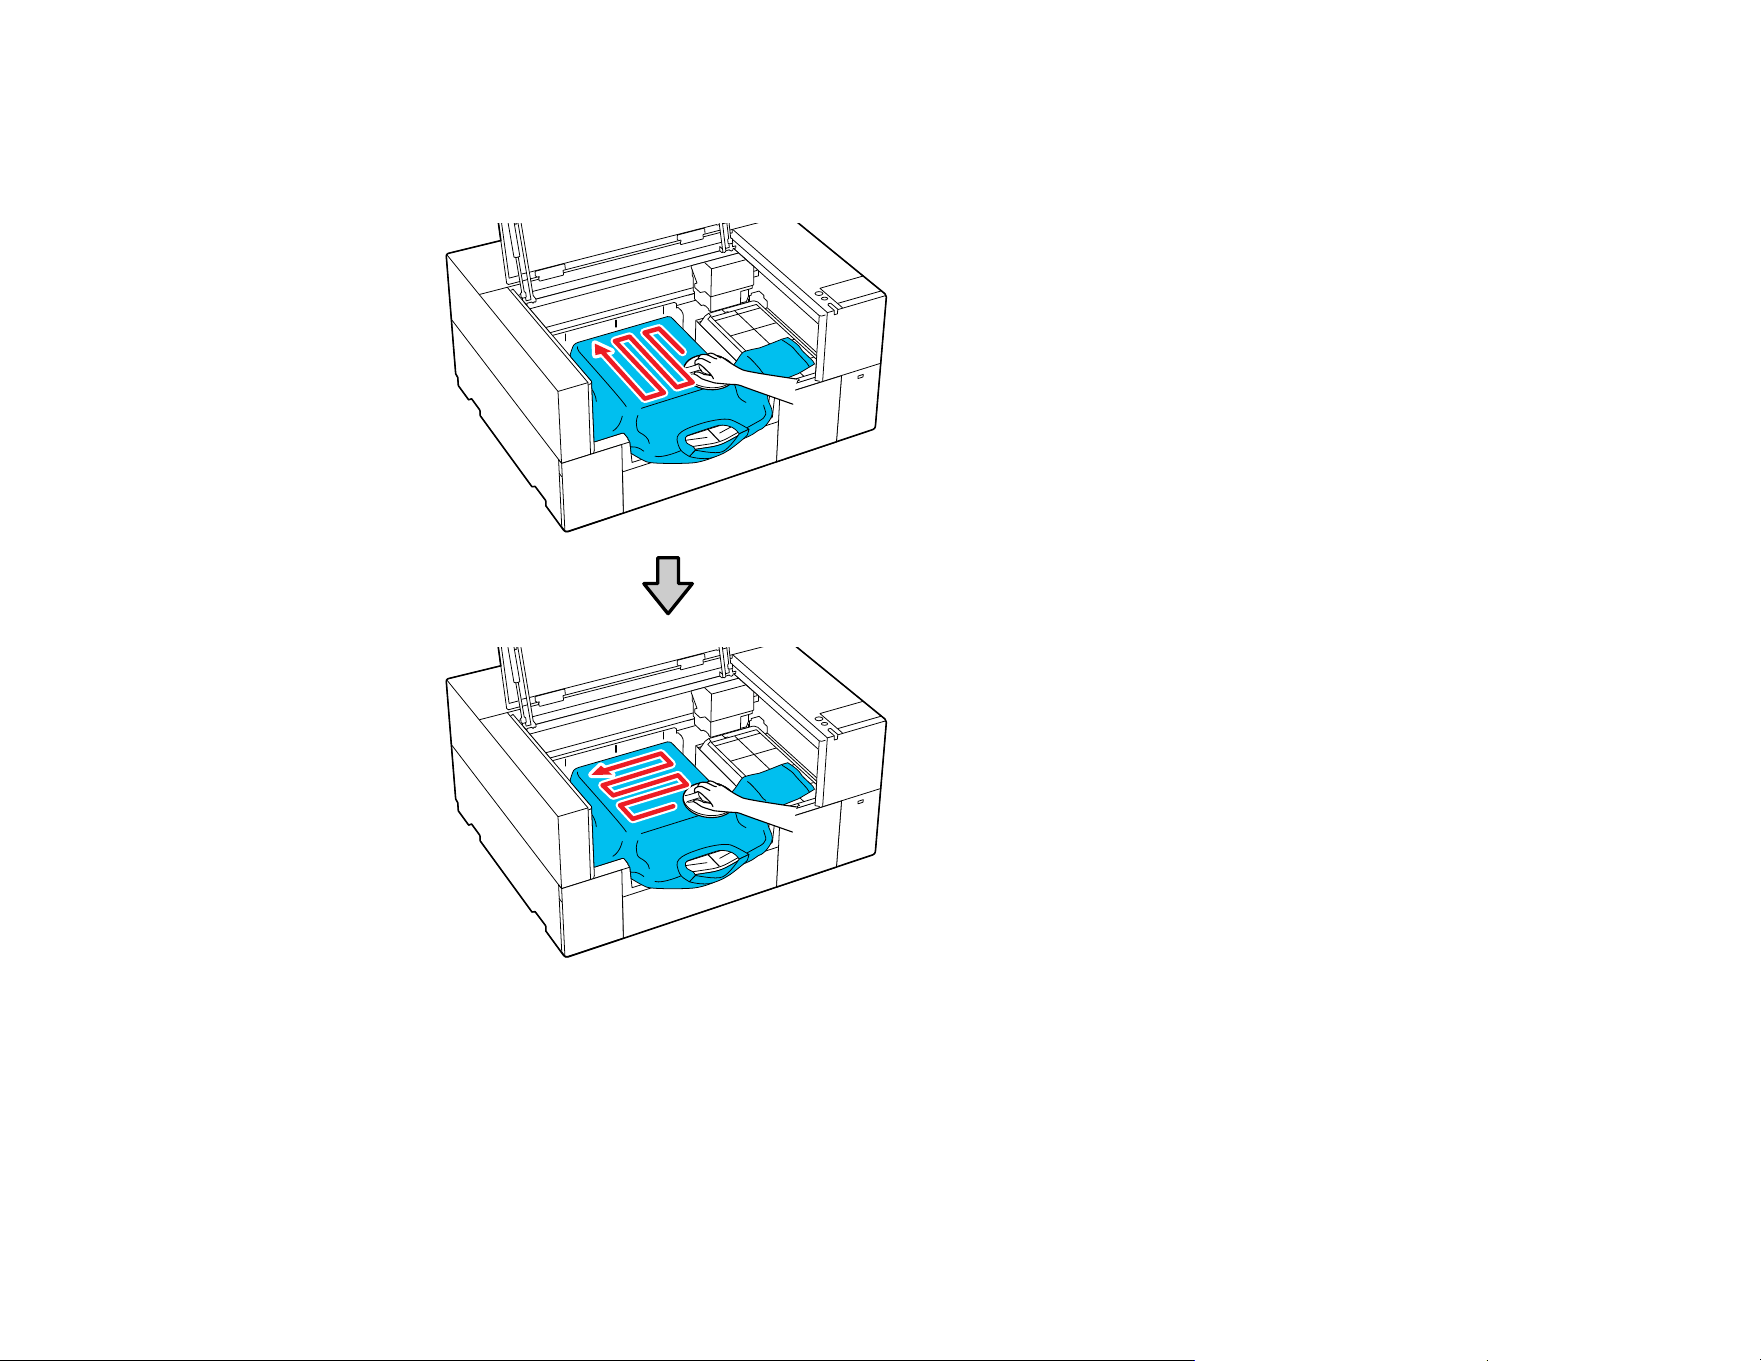
86
9. Gently press the T-shirt with the grip pad tool and move the grip pad tool across the T-shirt vertically
and horizontally from the edges as shown to flatten the printing surface. Repeat as needed to
remove any slack or creases from the surface.
Note: If the grip pad tool gets dirty, wipe it with a damp cloth.
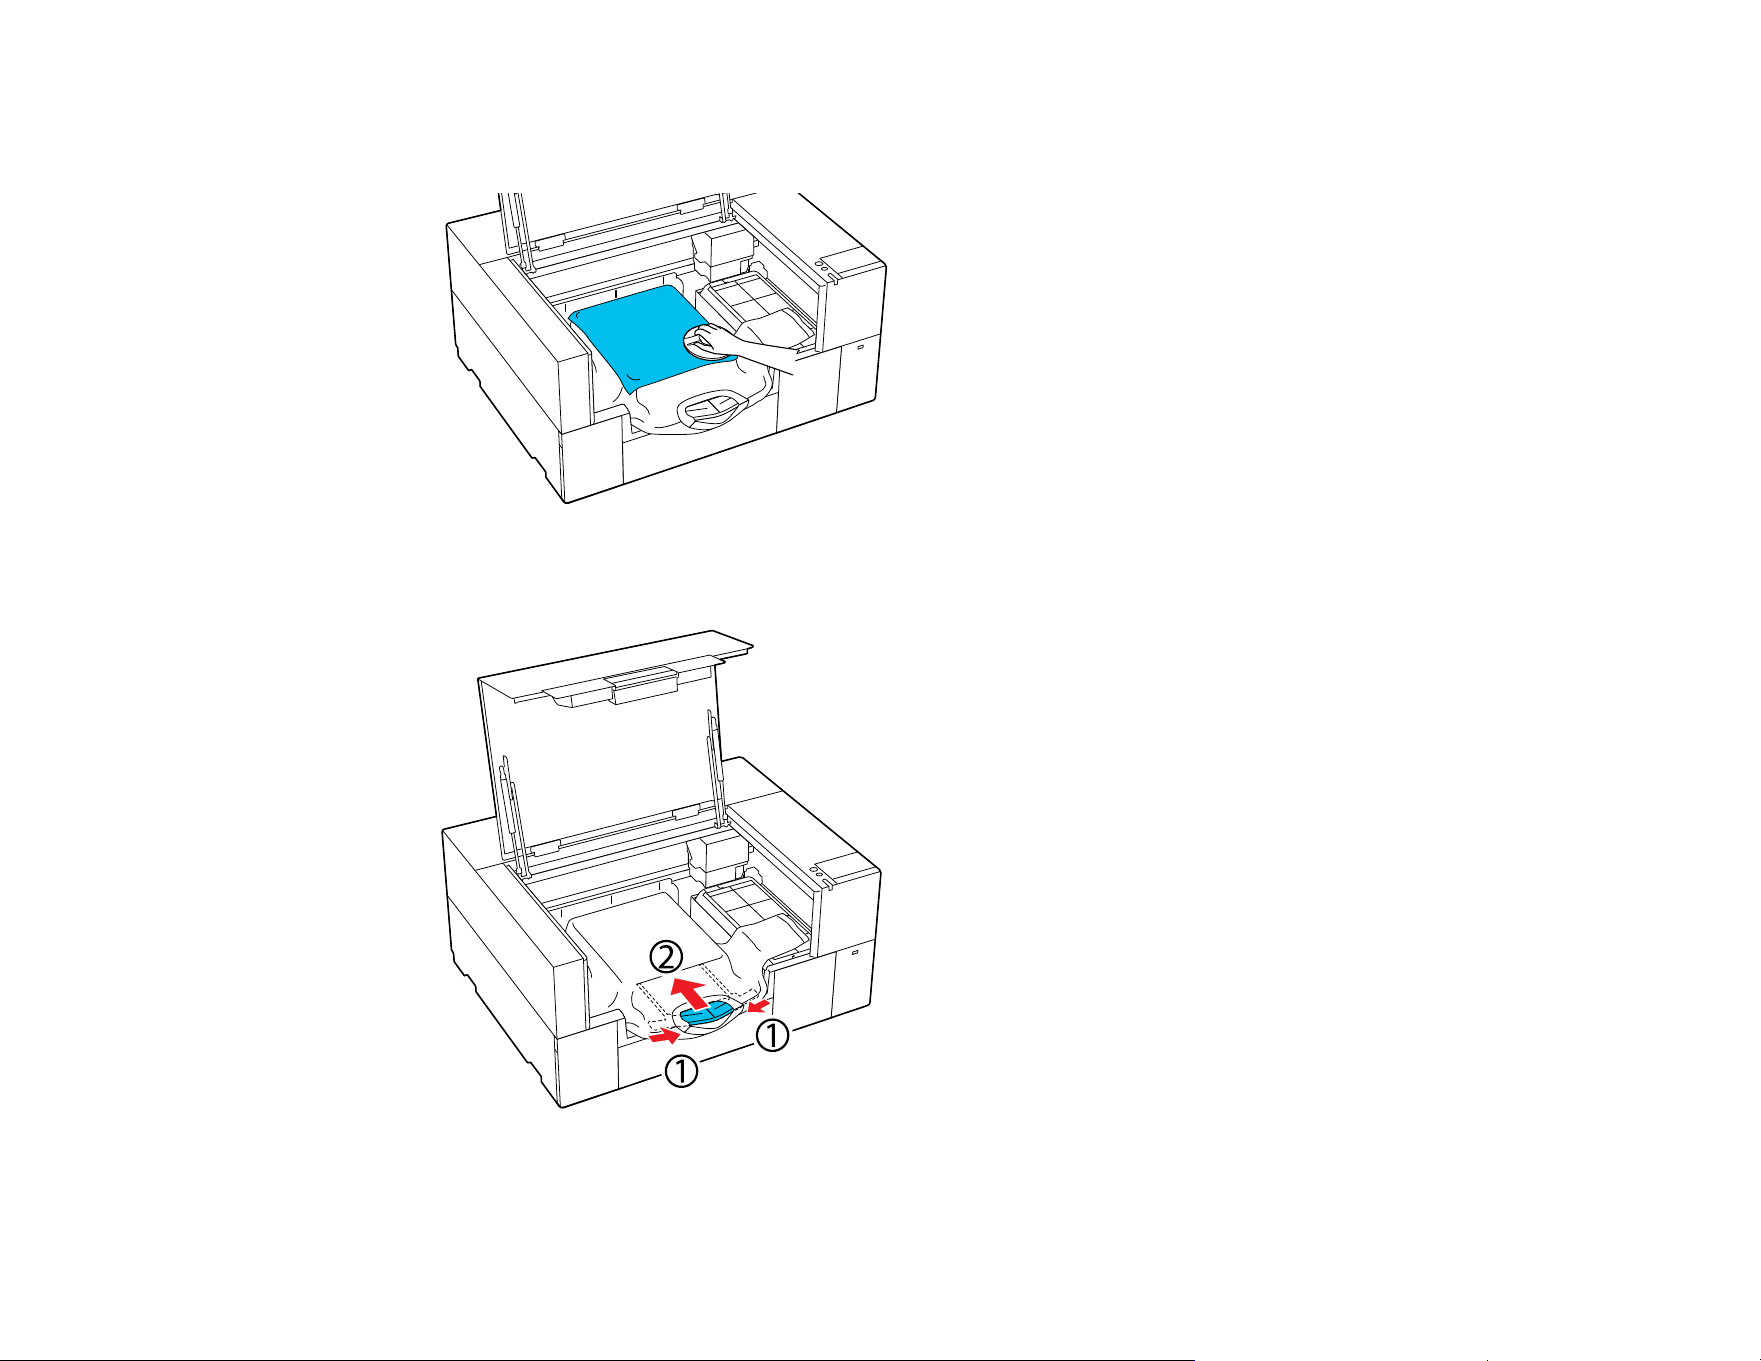
87
Note: If the T-shirt is coated with pre-treatment liquid or the grip pad tool catches on the fabric, you
can use a heat-resistant release sheet with the grip pad tool as shown.
10. Store the adjustable platen hanger.
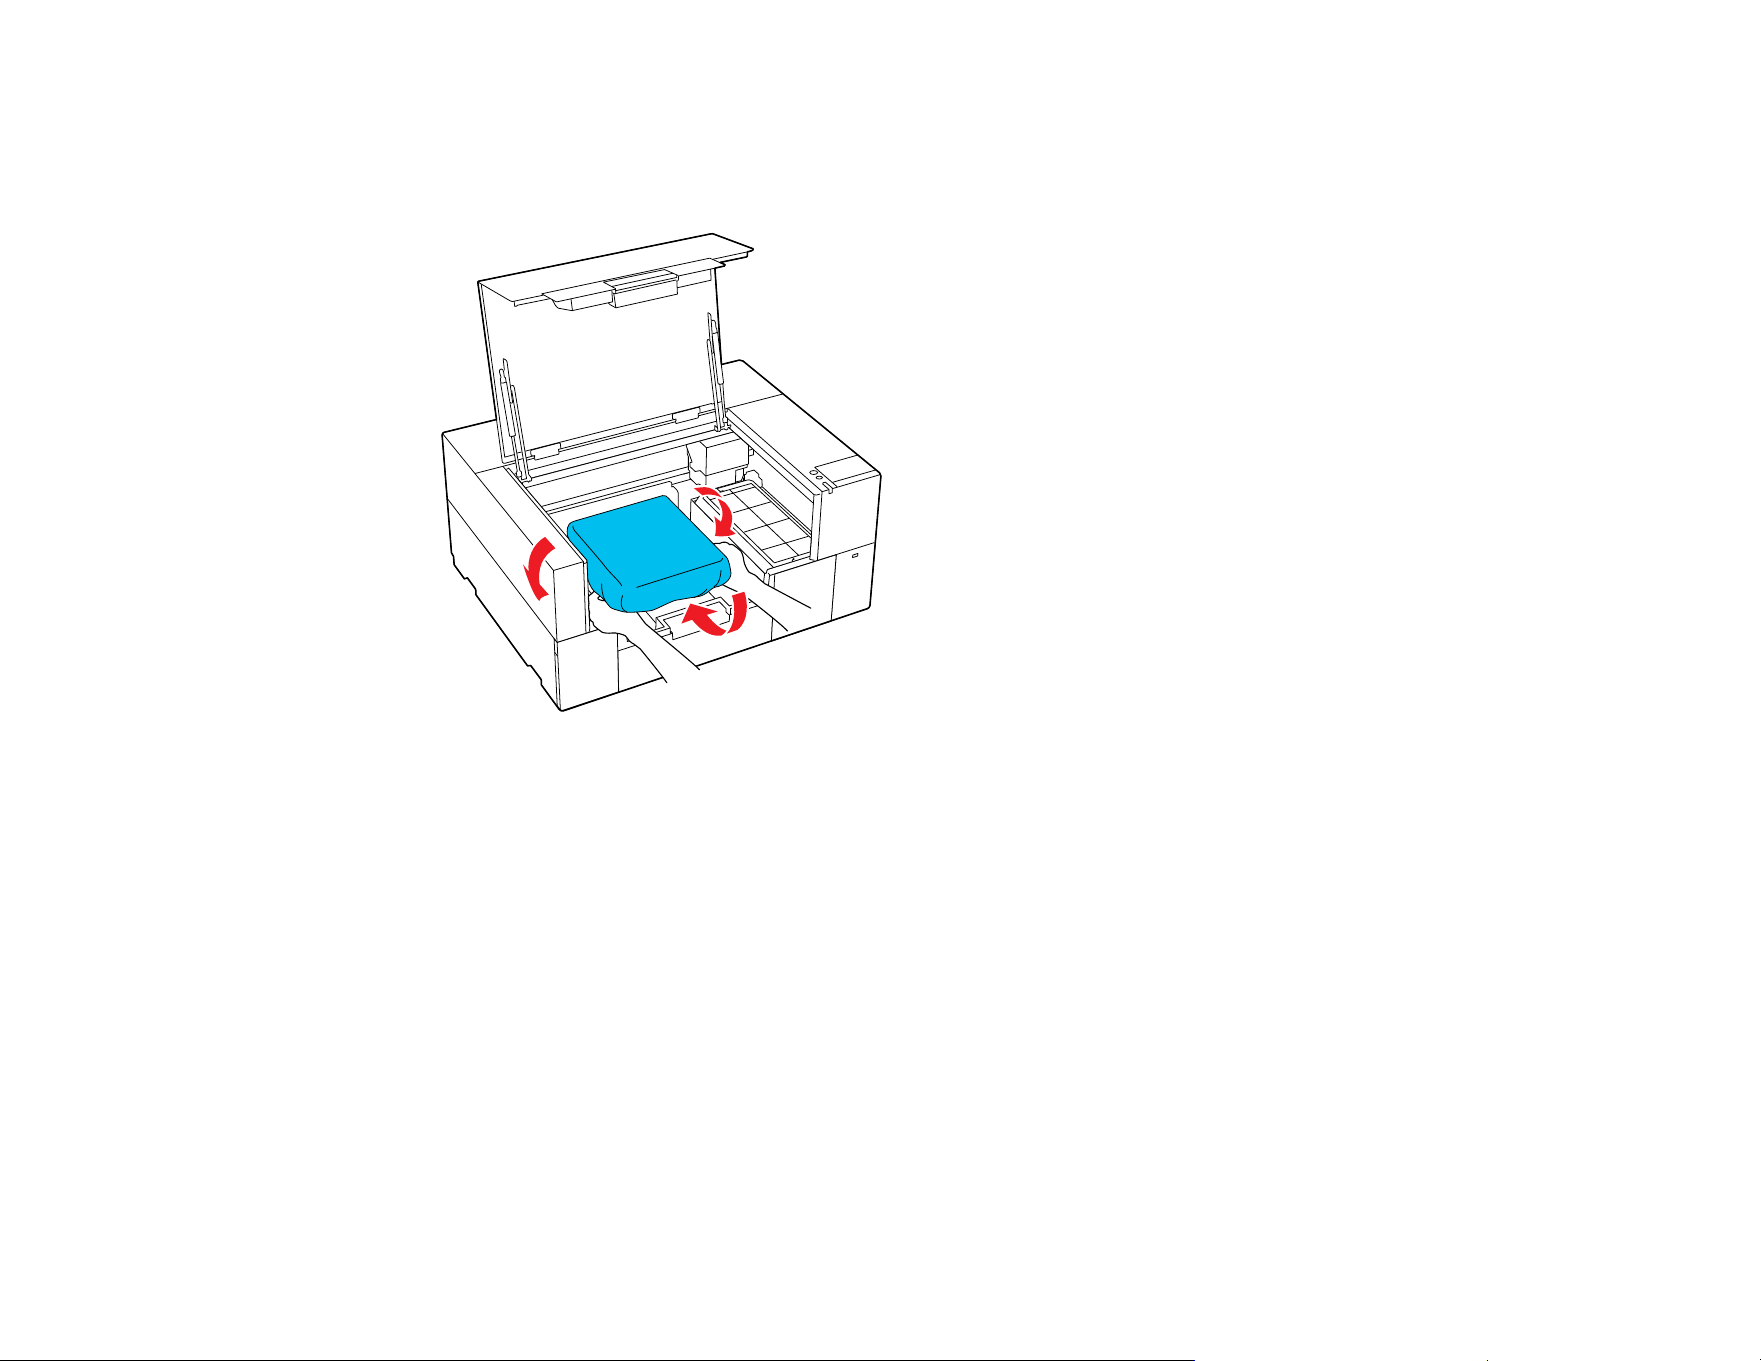
88
11. Tuck the T-shirt around the platen so that it does not drape over the base.
Note: If the garment extends beyond the platen, the printer cover will not close.
Note: Be careful that the fabric does not get wrapped around the hanger and stretched out. Printing
with the fabric stretched too much may cause printing defects.
12. Close the printer cover.
Parent topic: Loading a T-shirt
Related tasks
Attaching the Grip Pad to the Platen
Loading a T-shirt on the Platen
Before printing, carefully load a T-shirt on the platen using a platen frame.
Note: Make sure that the correct platen is installed on the printer.
1. Turn on the printer, if necessary.
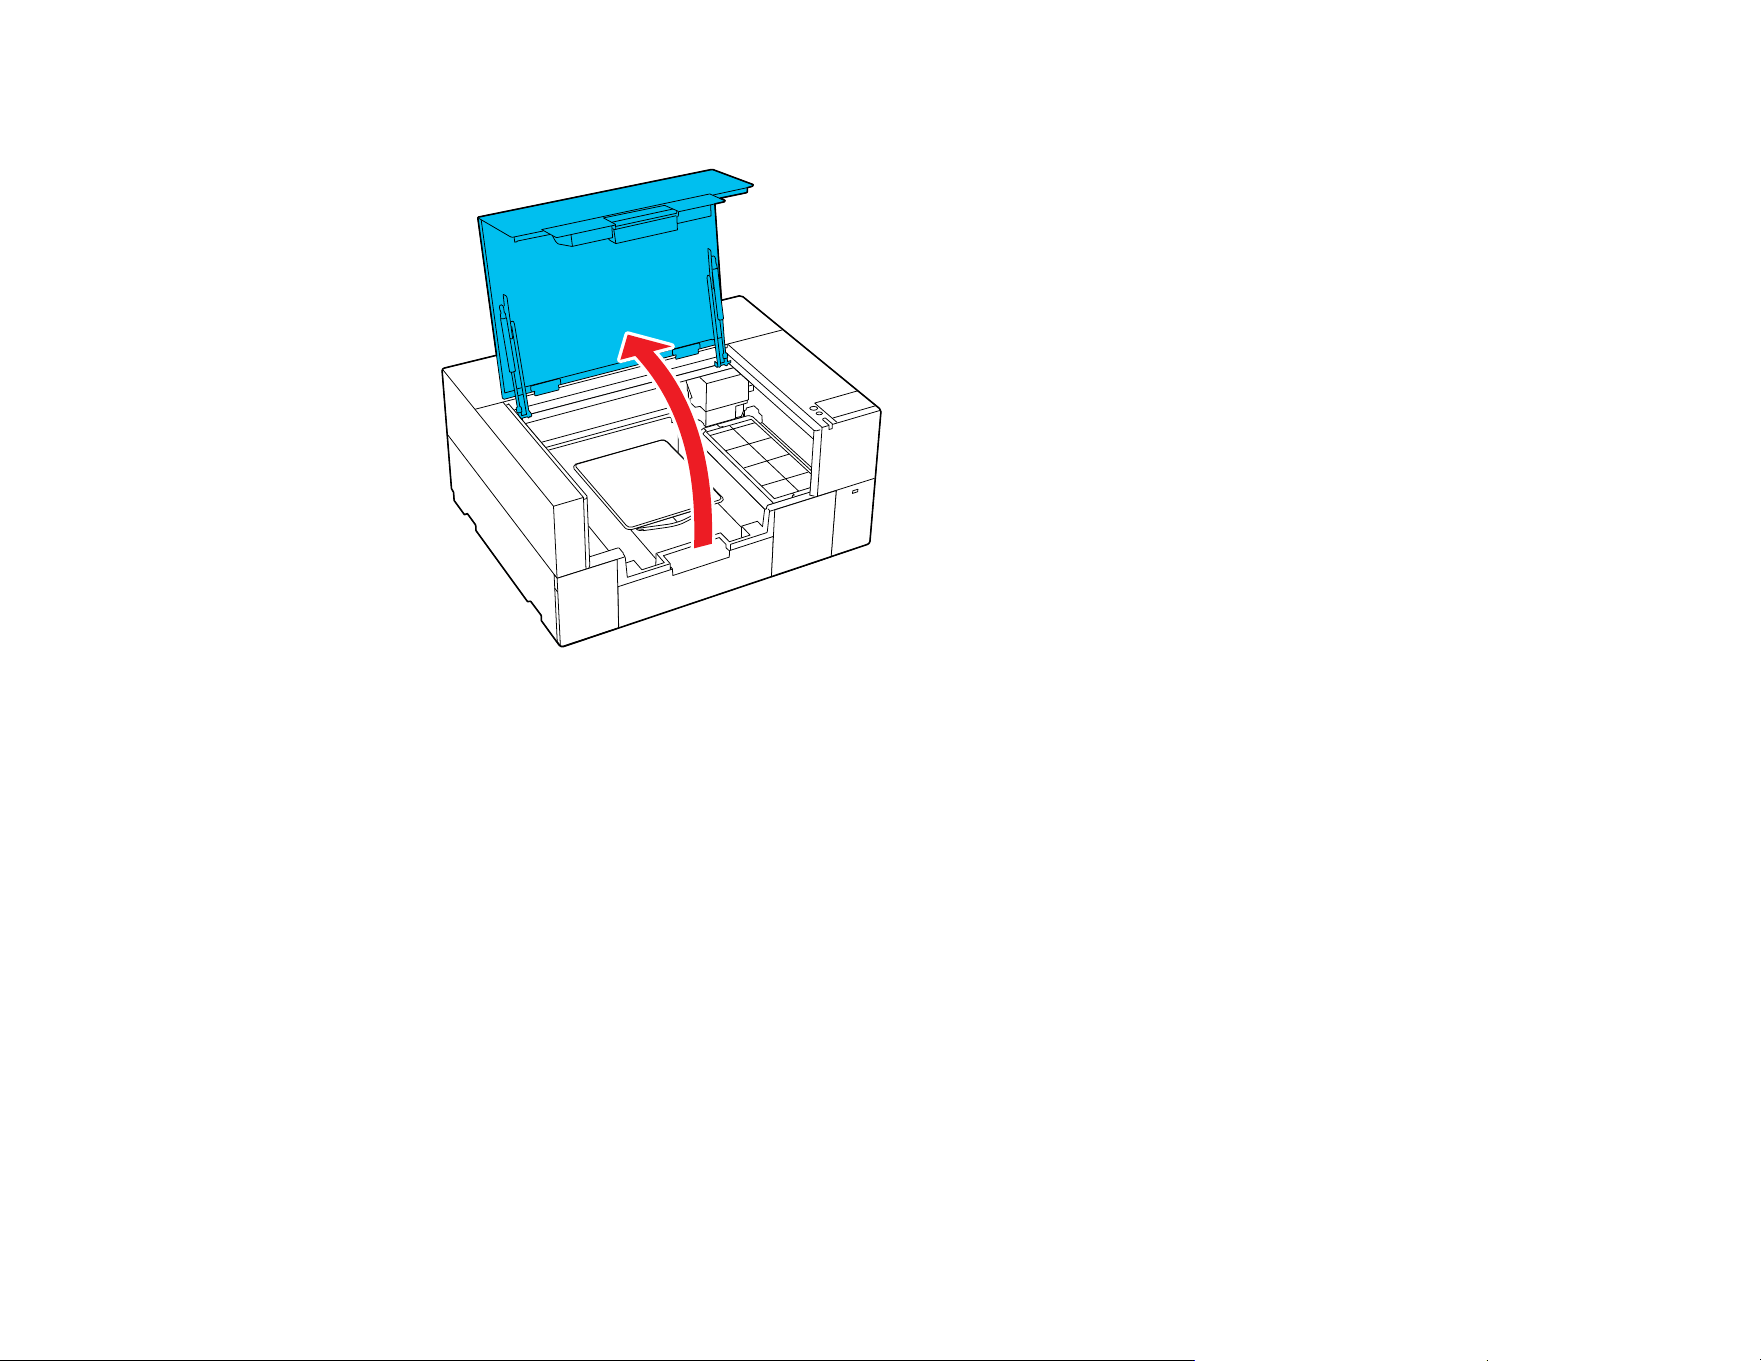
89
2. Open the printer cover.
3. Confirm that the platen is installed and remove the platen frame, if necessary.
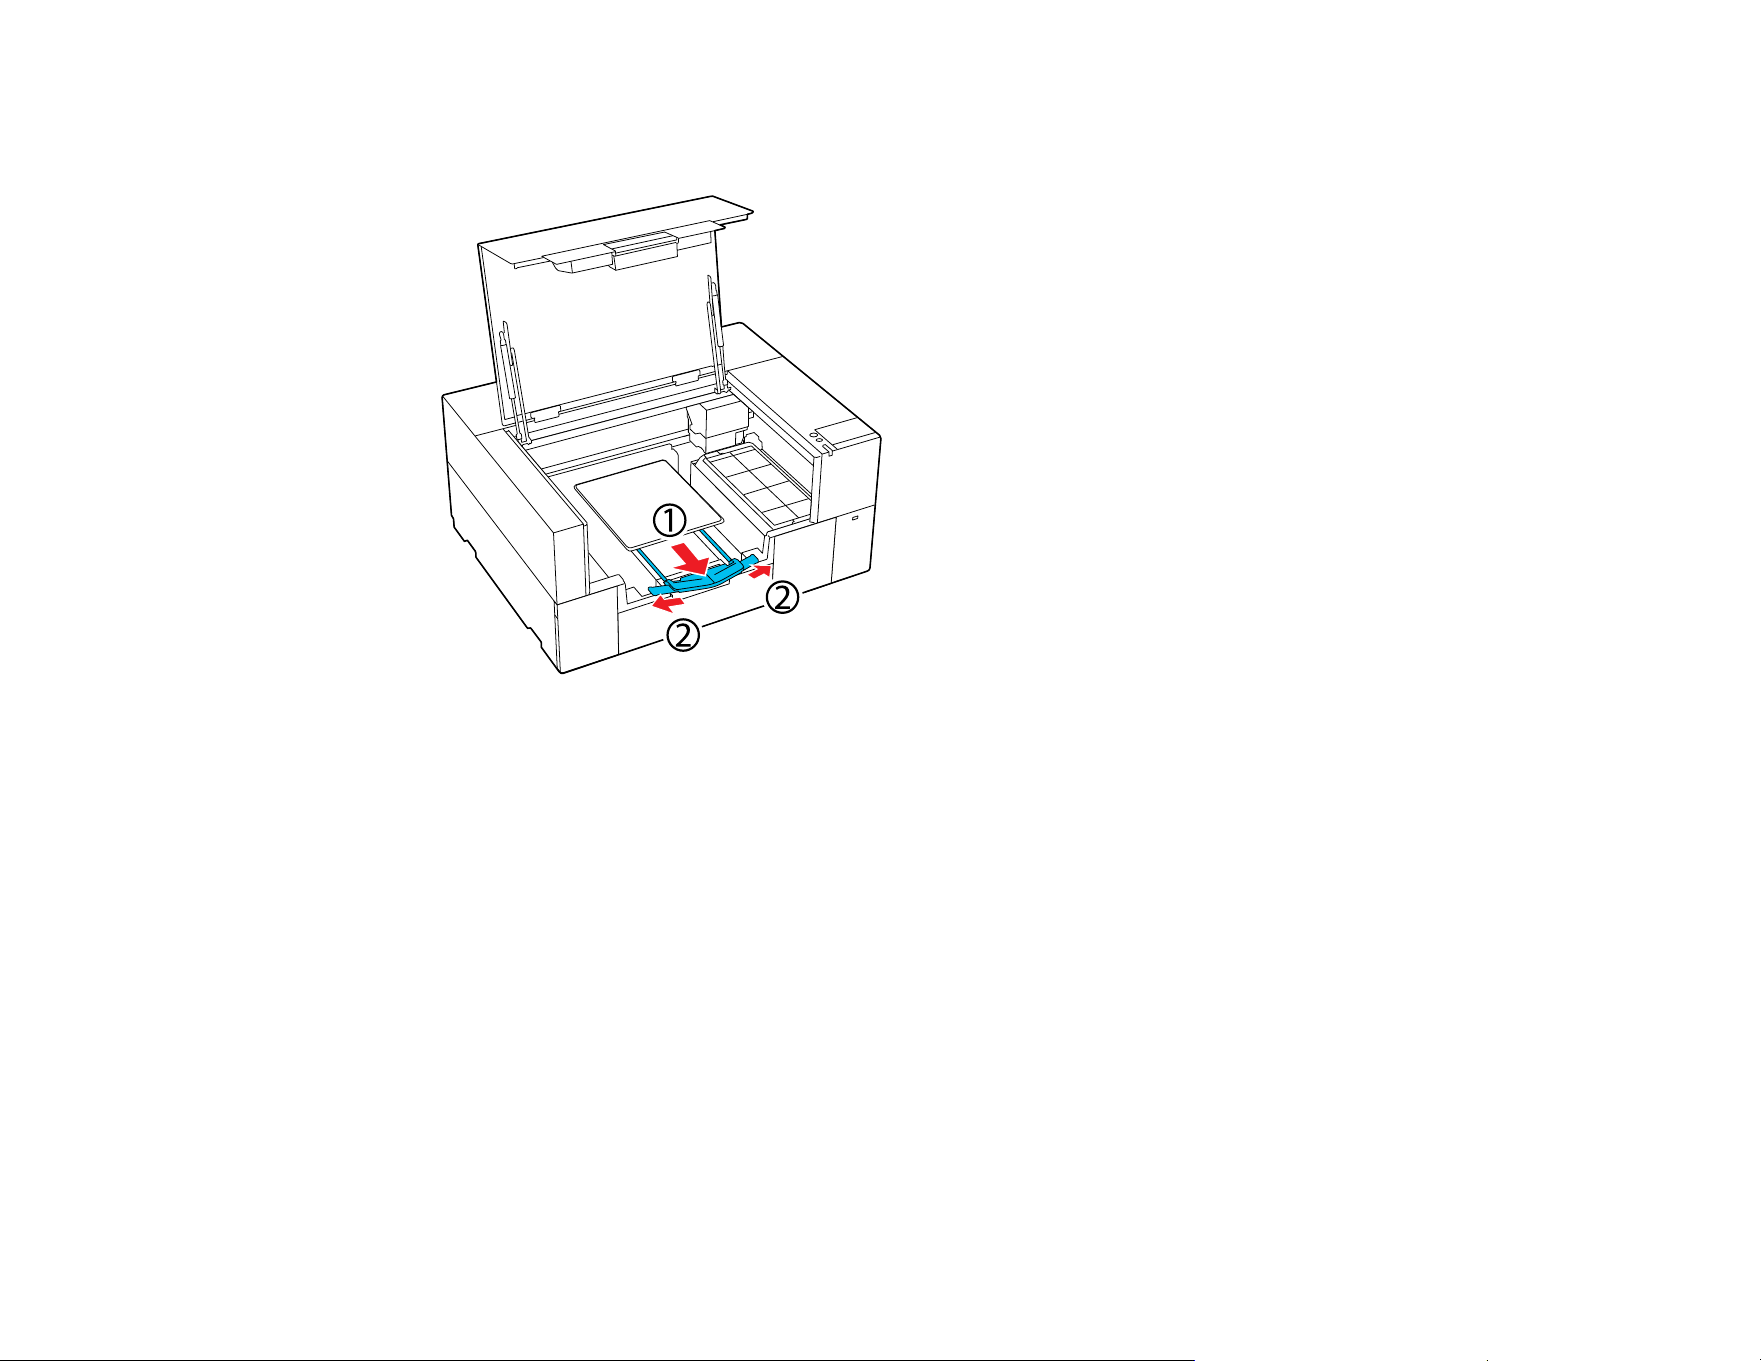
90
4. Pull out the adjustable platen hanger until the tip extends beyond the printer, then expand the sides
as shown.

91
5. Slide the hem of the T-shirt over the platen from the front.

92
Note: The line inside the frame in the illustration below indicates the center of the platen.
6. Adjust the T-shirt according to the print position. You can use the grid on the loading guard as a
guide for the loading position.
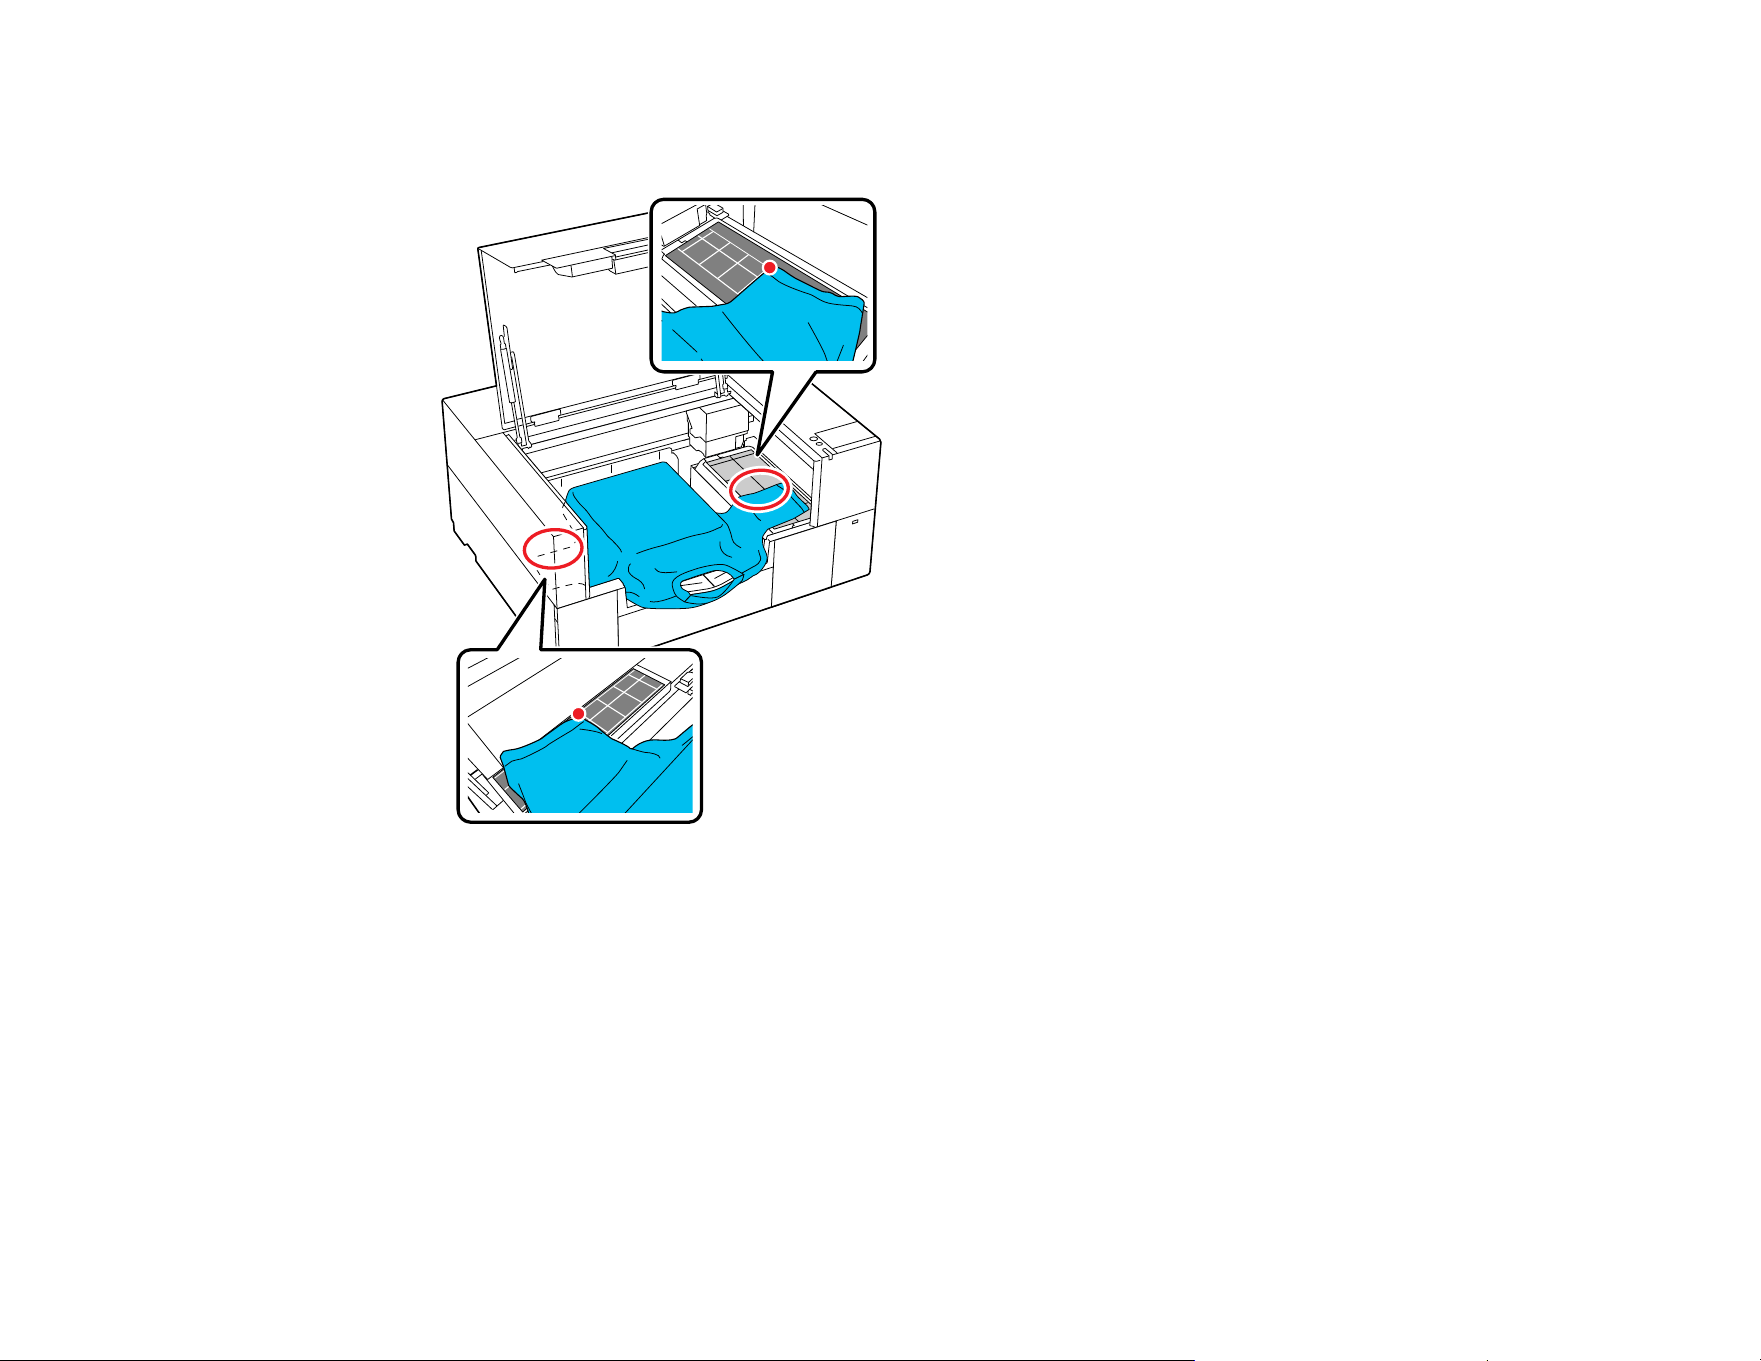
93
Since the grid is symmetrical, you can perform horizontal alignment by simply aligning the sleeves or
sides of the T-shirt with the same squares on the left and right.
Note: If you frequently print on the same garment type, mark the aligned squares with a sticker so
you can easily load the garment in the same position the next time.
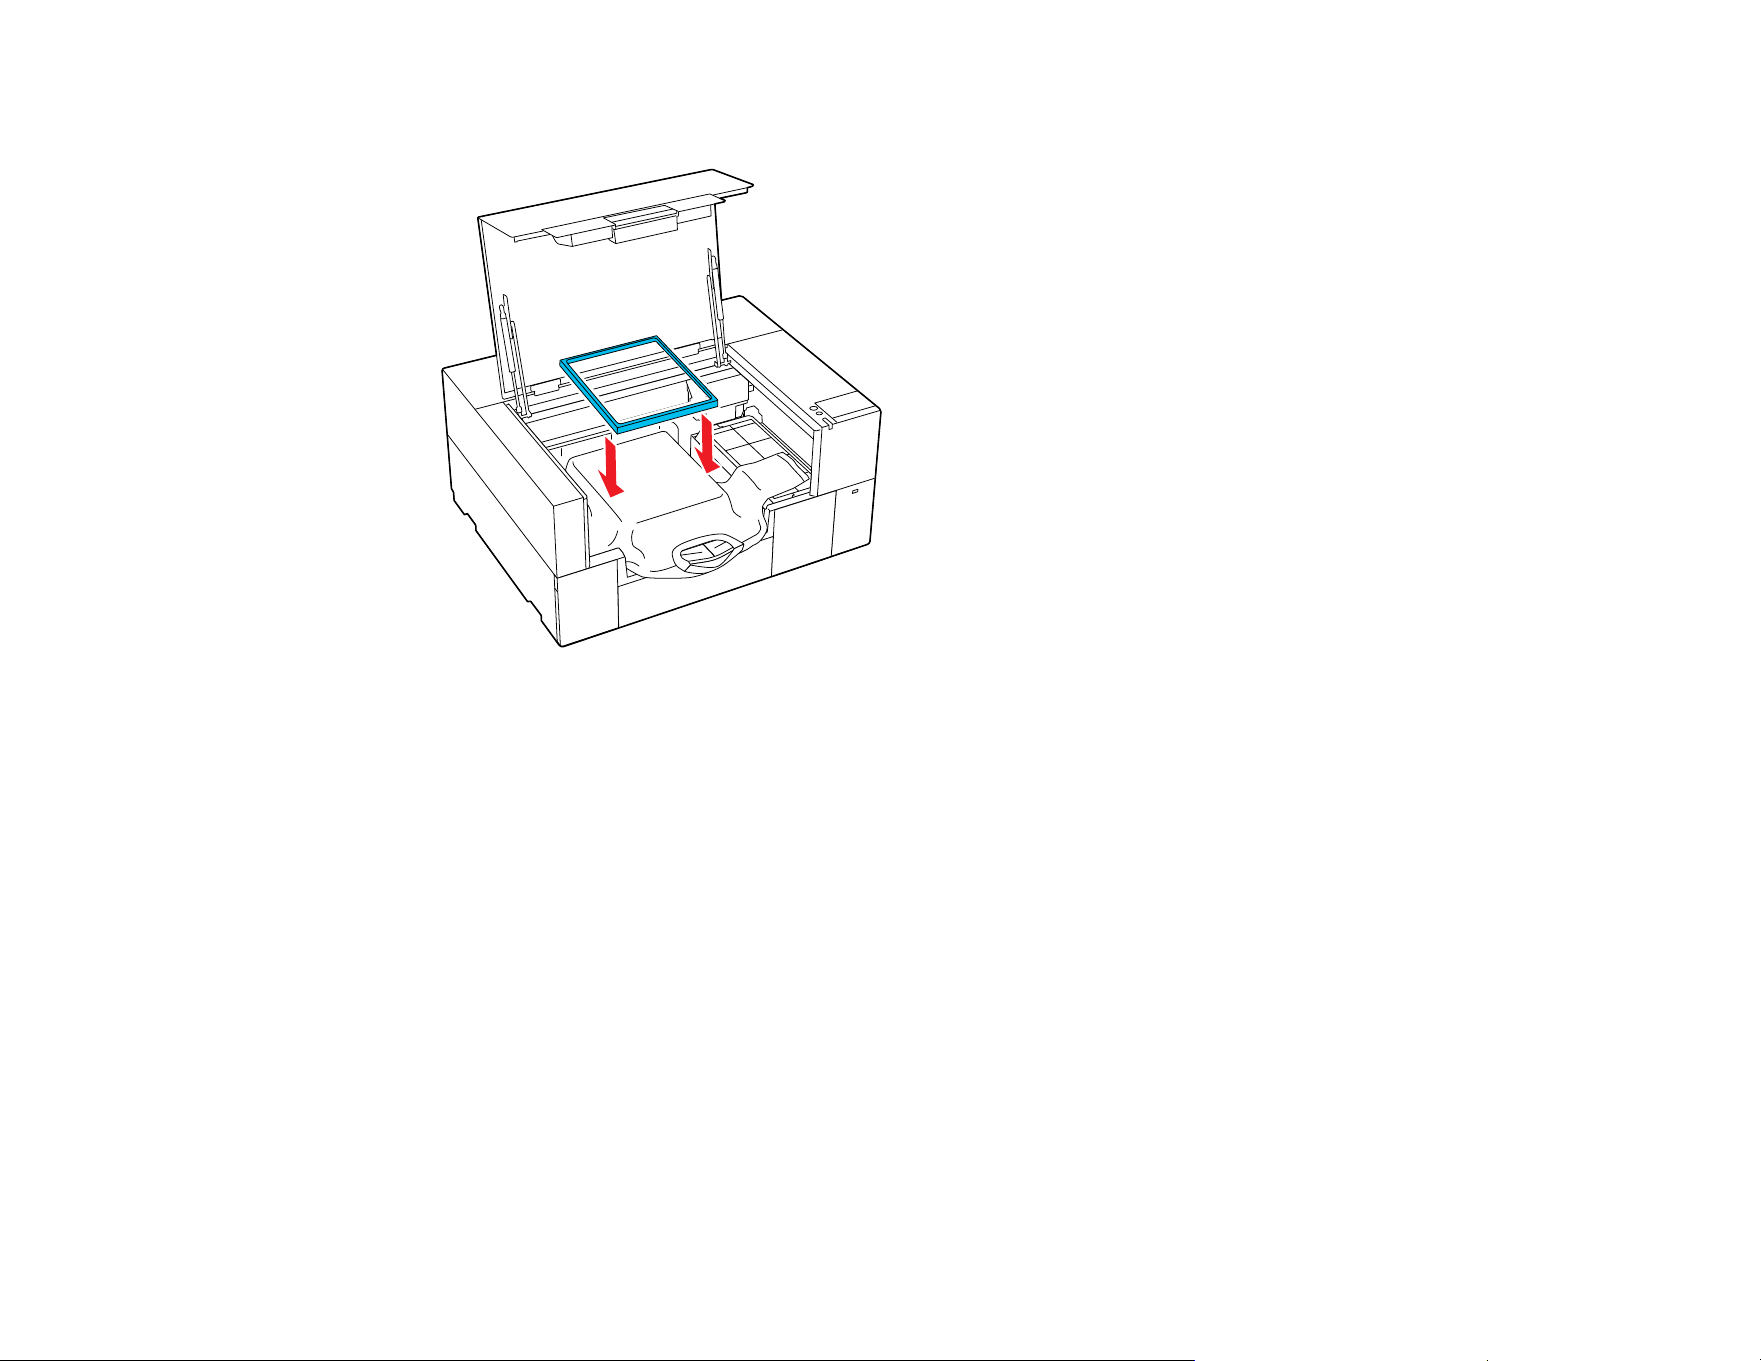
94
7. Replace the platen frame.

95
8. Remove any lint from the printing surface and press the fibers flat.
Note: There may be lint on the T-shirt if you have not applied pre-treatment solution. Use a lint roller
or sticky tape to remove the lint and then press the fibers flat using a hard roller. Lint and fibers may
stick to the print head and stain other areas.
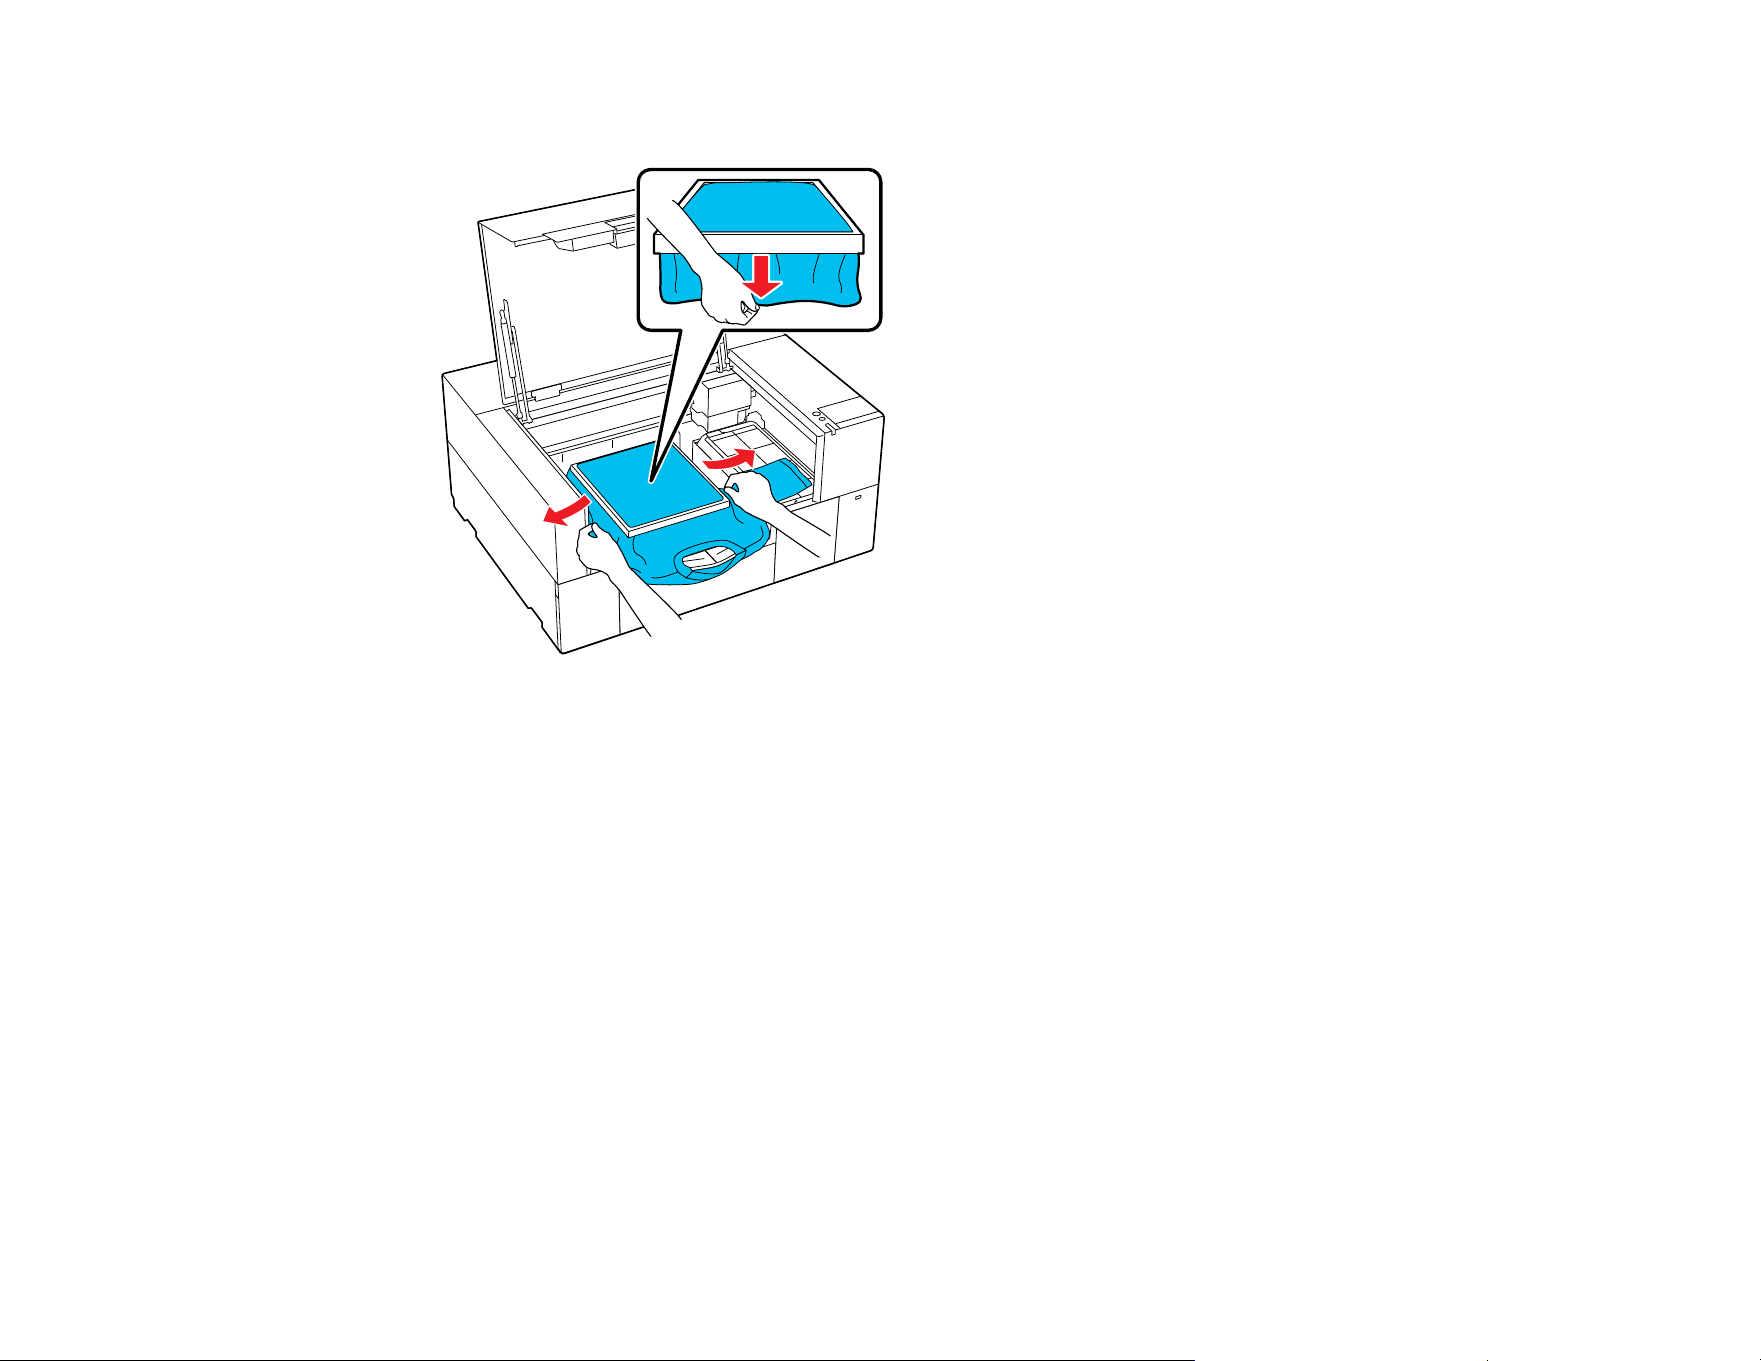
96
9. Gently pull the edges of the T-shirt outside of the frame to remove any slack.
Note: The printer detects the highest part of the garment surface. If there are any wrinkles, creases
or slack near the inside edge of the frame, the distance between the print head and the print surface
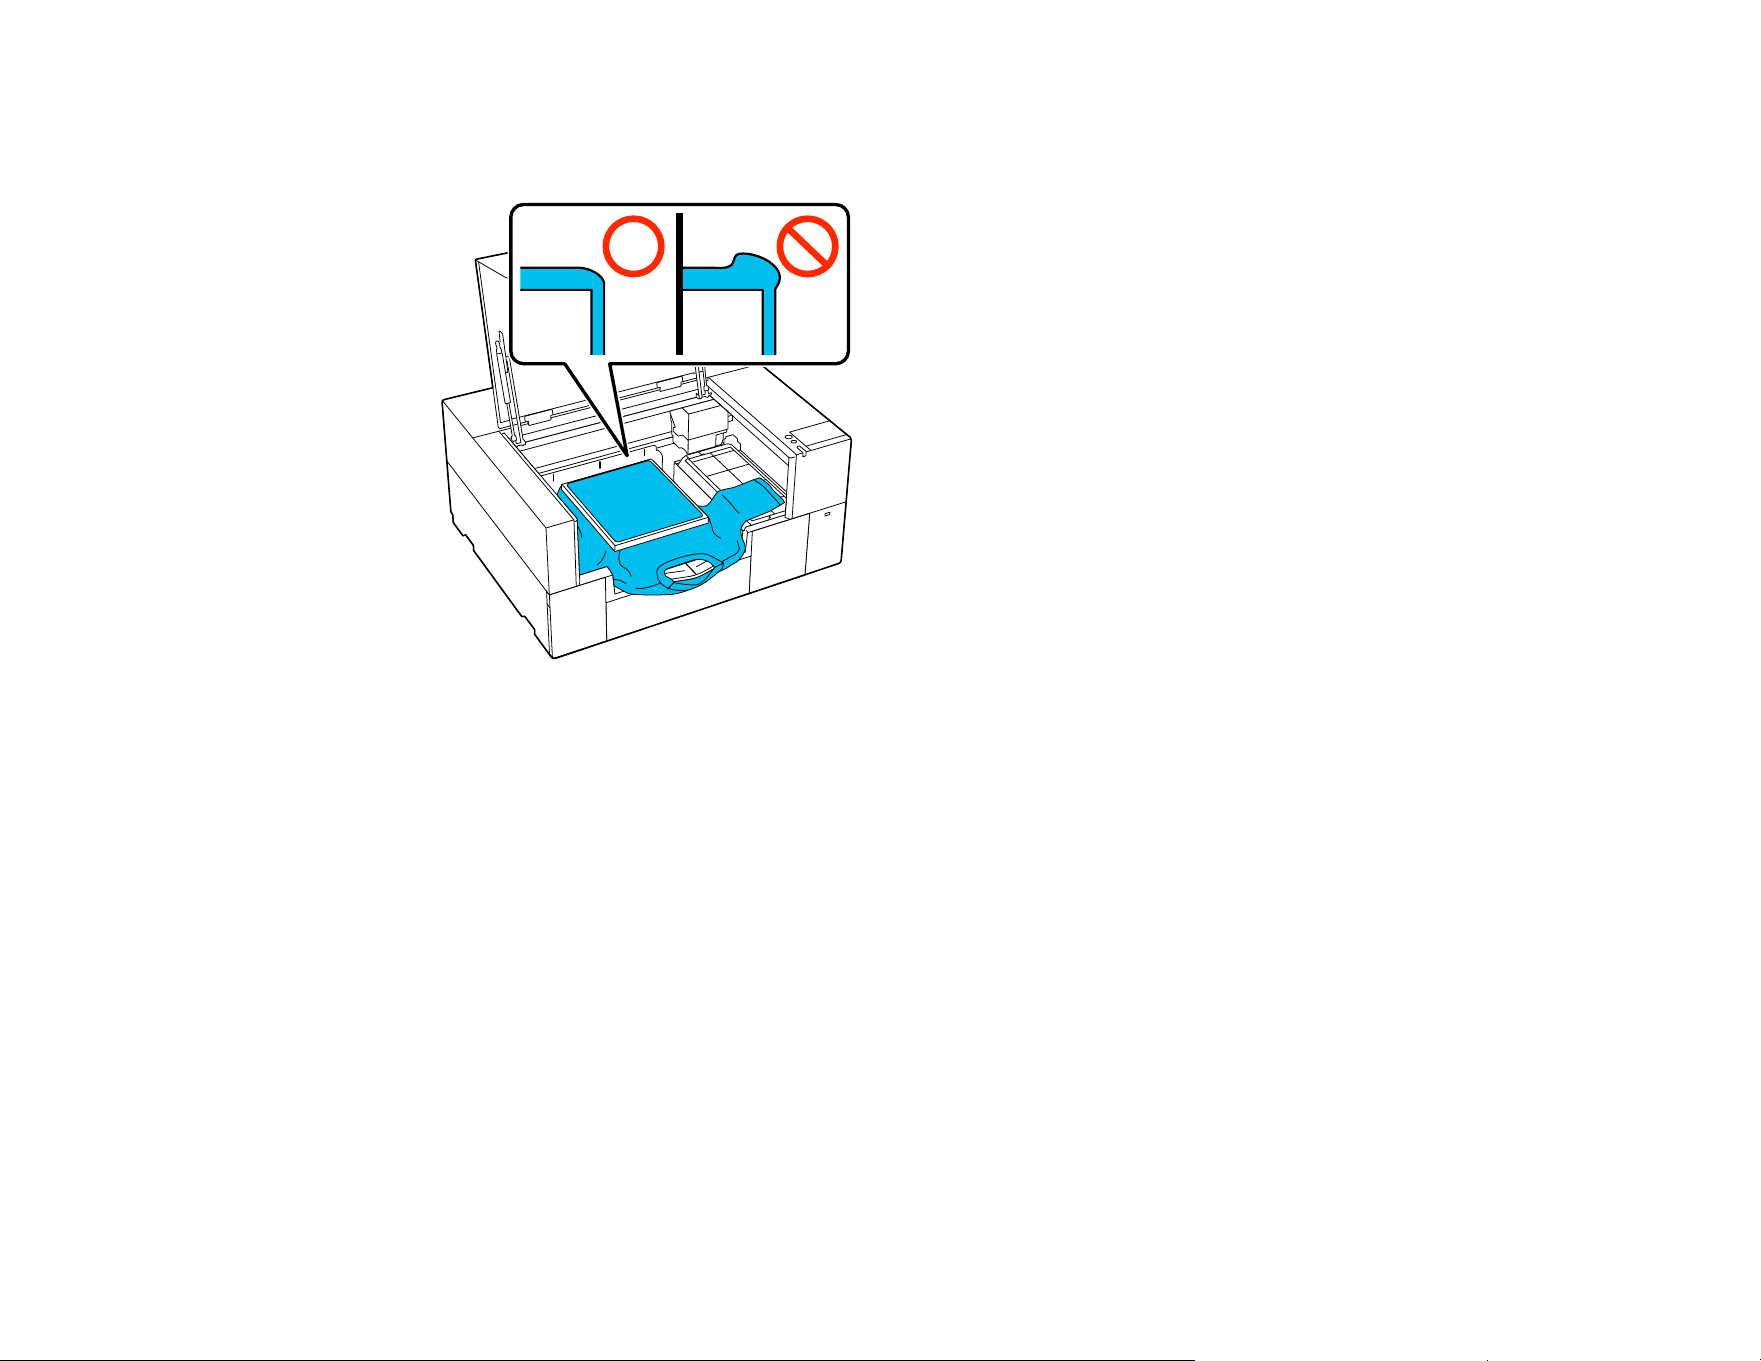
97
may increase and print quality may decline. Stretch the T-shirt to remove the slack, however, do not
stretch the T-shirt so much that the printed image will be distorted.
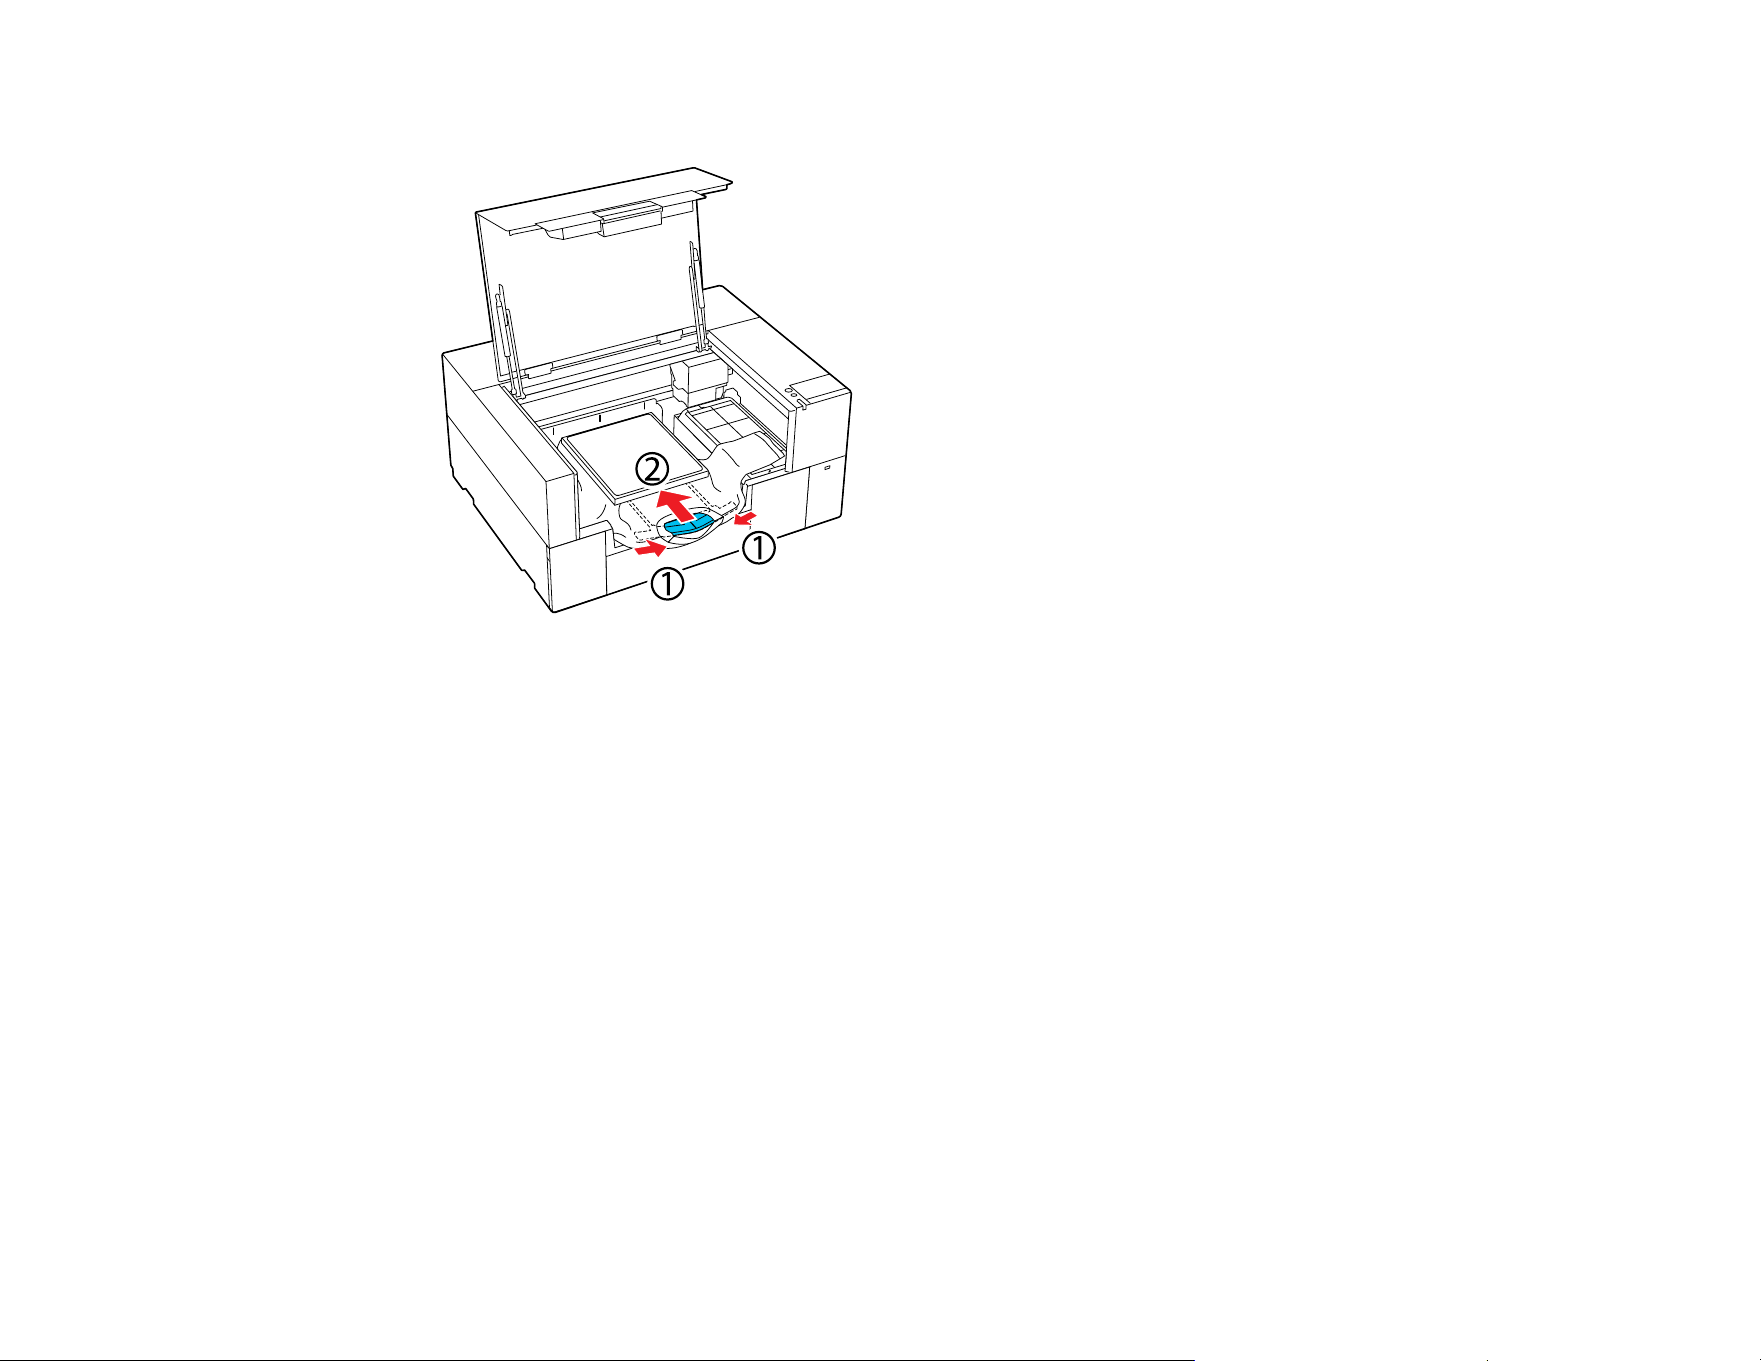
98
10. Store the adjustable platen hanger.
11. Press down the frame of the platen so that it does not become loose.
Note: Using the platen frame to place the garment surface under a suitable amount of tension can
reduce swelling of the garment surface during printing.

99
12. Tuck the garment around and under the frame so that it does not drape over the base.
Note: If the garment extends beyond the platen, the printer cover will not close.
13. Close the printer cover.
Parent topic: Loading a T-shirt
Loading a Sleeve on the Sleeve Platen
Before printing, carefully load a sleeve onto the sleeve platen.
Note: Make sure that the sleeve platen is installed on the printer.
1. Turn on the printer, if necessary.

100
2. Open the printer cover.
3. Remove the platen frame, if necessary.

101
4. Slide the sleeve over the platen. Load the T-shirt so that the side seams and sleeve seams are not
on the top. If there are raised sections, such as seams, an error may occur or the print quality may
decline.
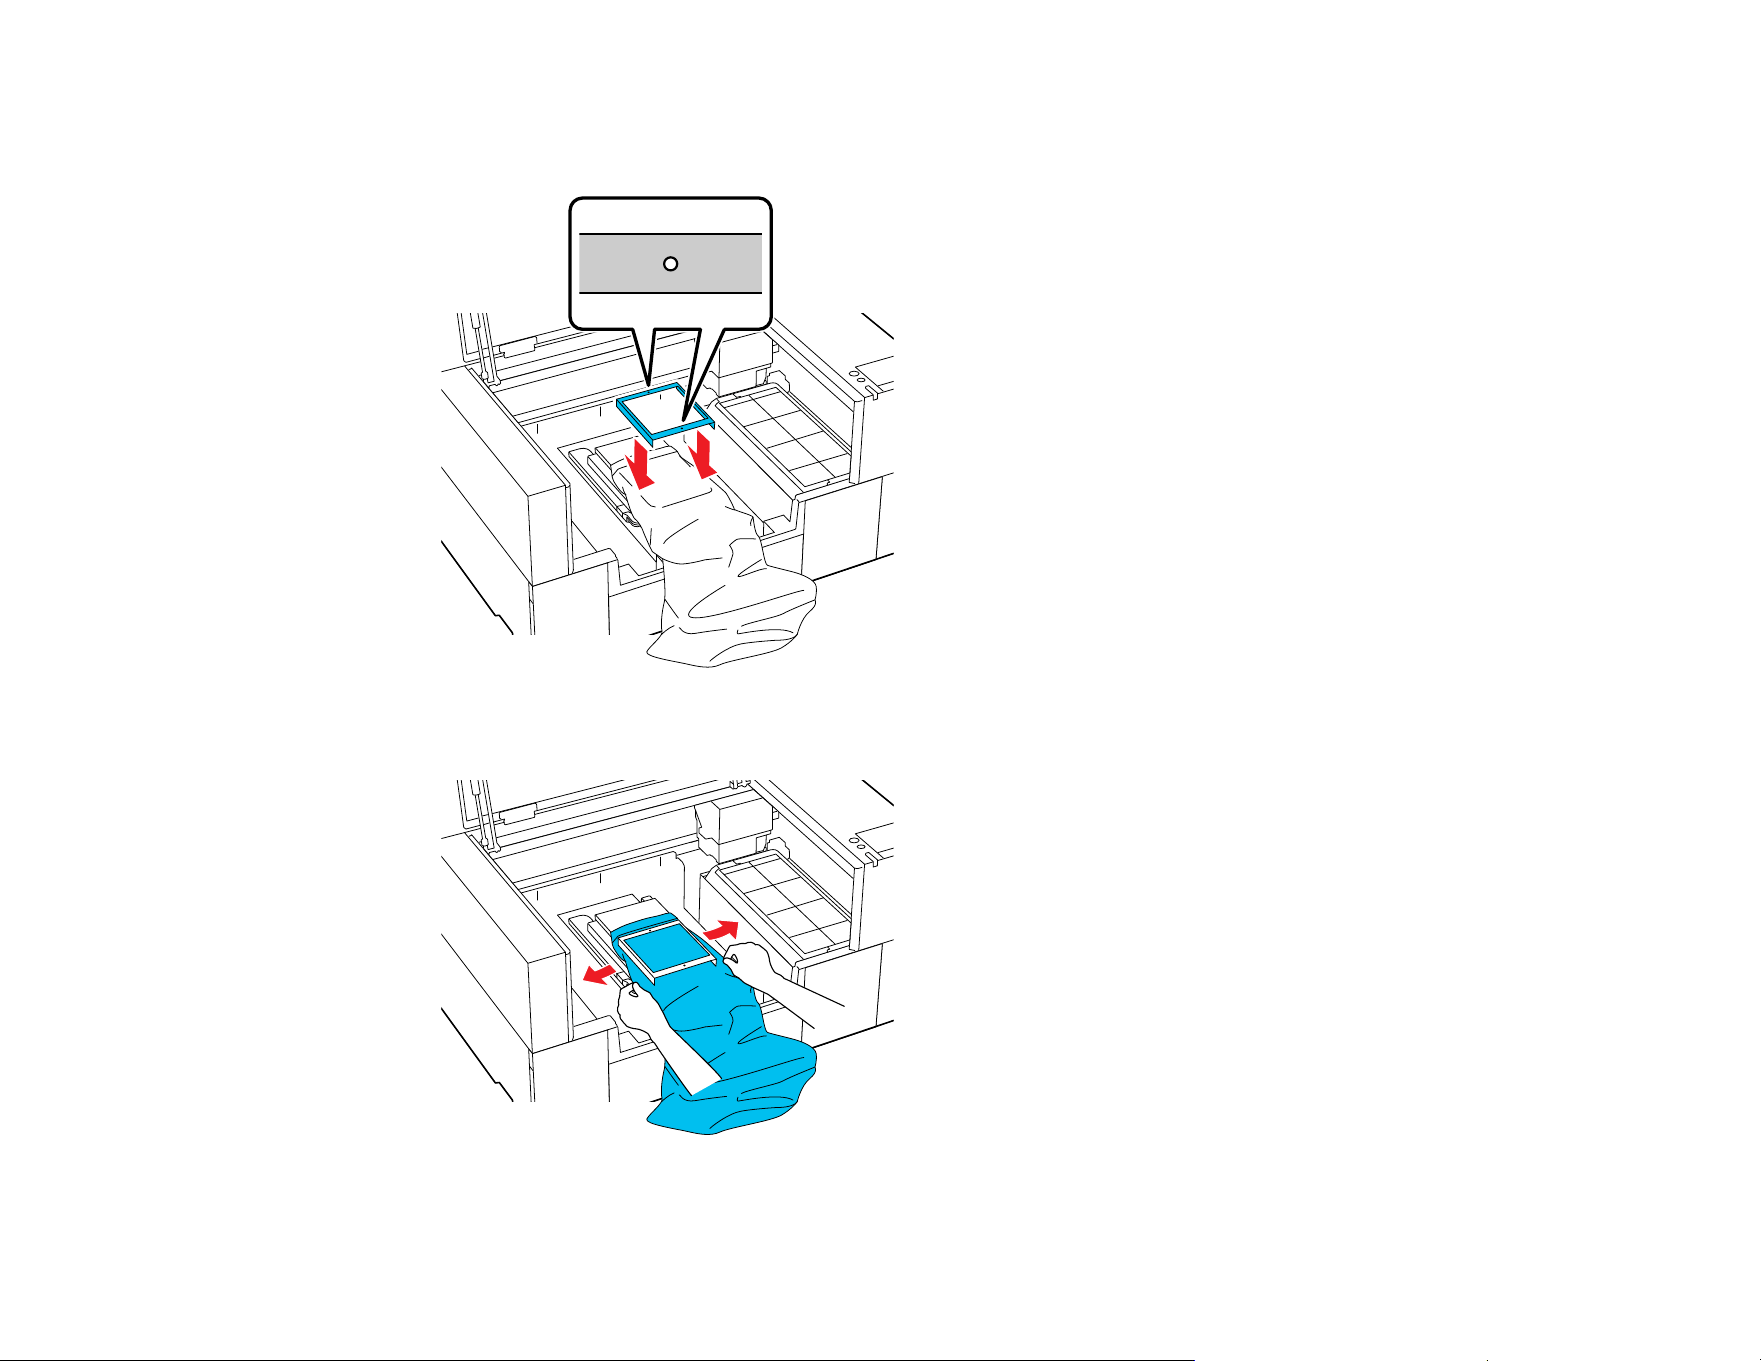
102
5. Flatten the printing surface and attach the platen frame. Load it so that the small holes in the frame
are at the front and back.
6. Gently pull the edges of the sleeve outside of the frame to remove any slack.
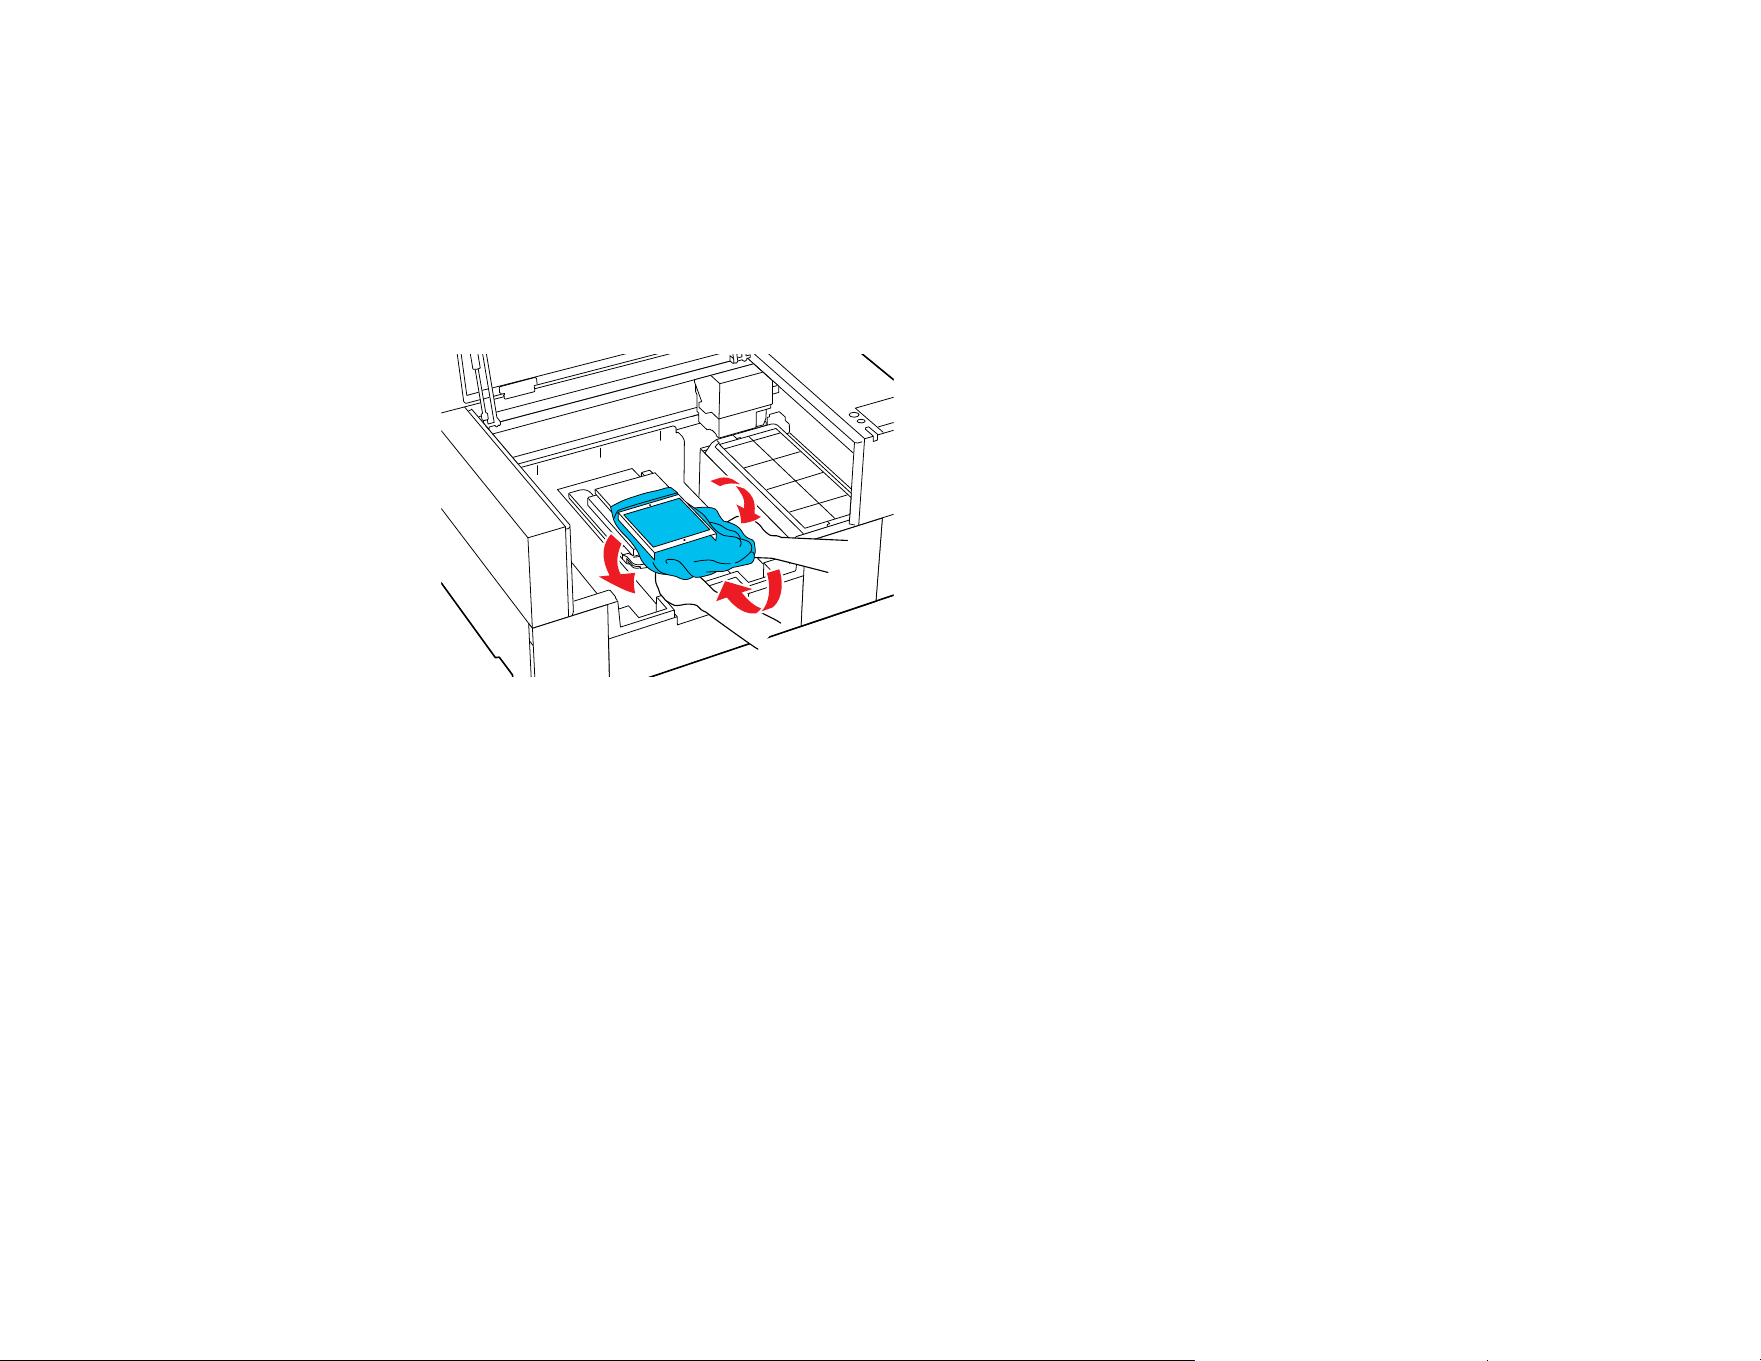
103
Note: Do not pull the sleeve too much; otherwise, the print quality may decline, and any white
under-base print may extend outside of the image.
7. Press down the frame of the platen so that it does not become loose.
8. Tuck the garment around and under the frame so that it does not drape over the base.
Note: If the garment extends beyond the platen, the printer cover will not close.
Parent topic: Loading a T-shirt
Related references
Optional Equipment and Replacement Parts
Loading Film on the Platen
Before printing, carefully load a sheet of Digital-Transfer-Film on the platen.
Note: Make sure that the correct platen is installed on the printer. If a sleeve platen or grip pad covered
platen is installed, replace it.
1. Turn on the printer, if necessary.
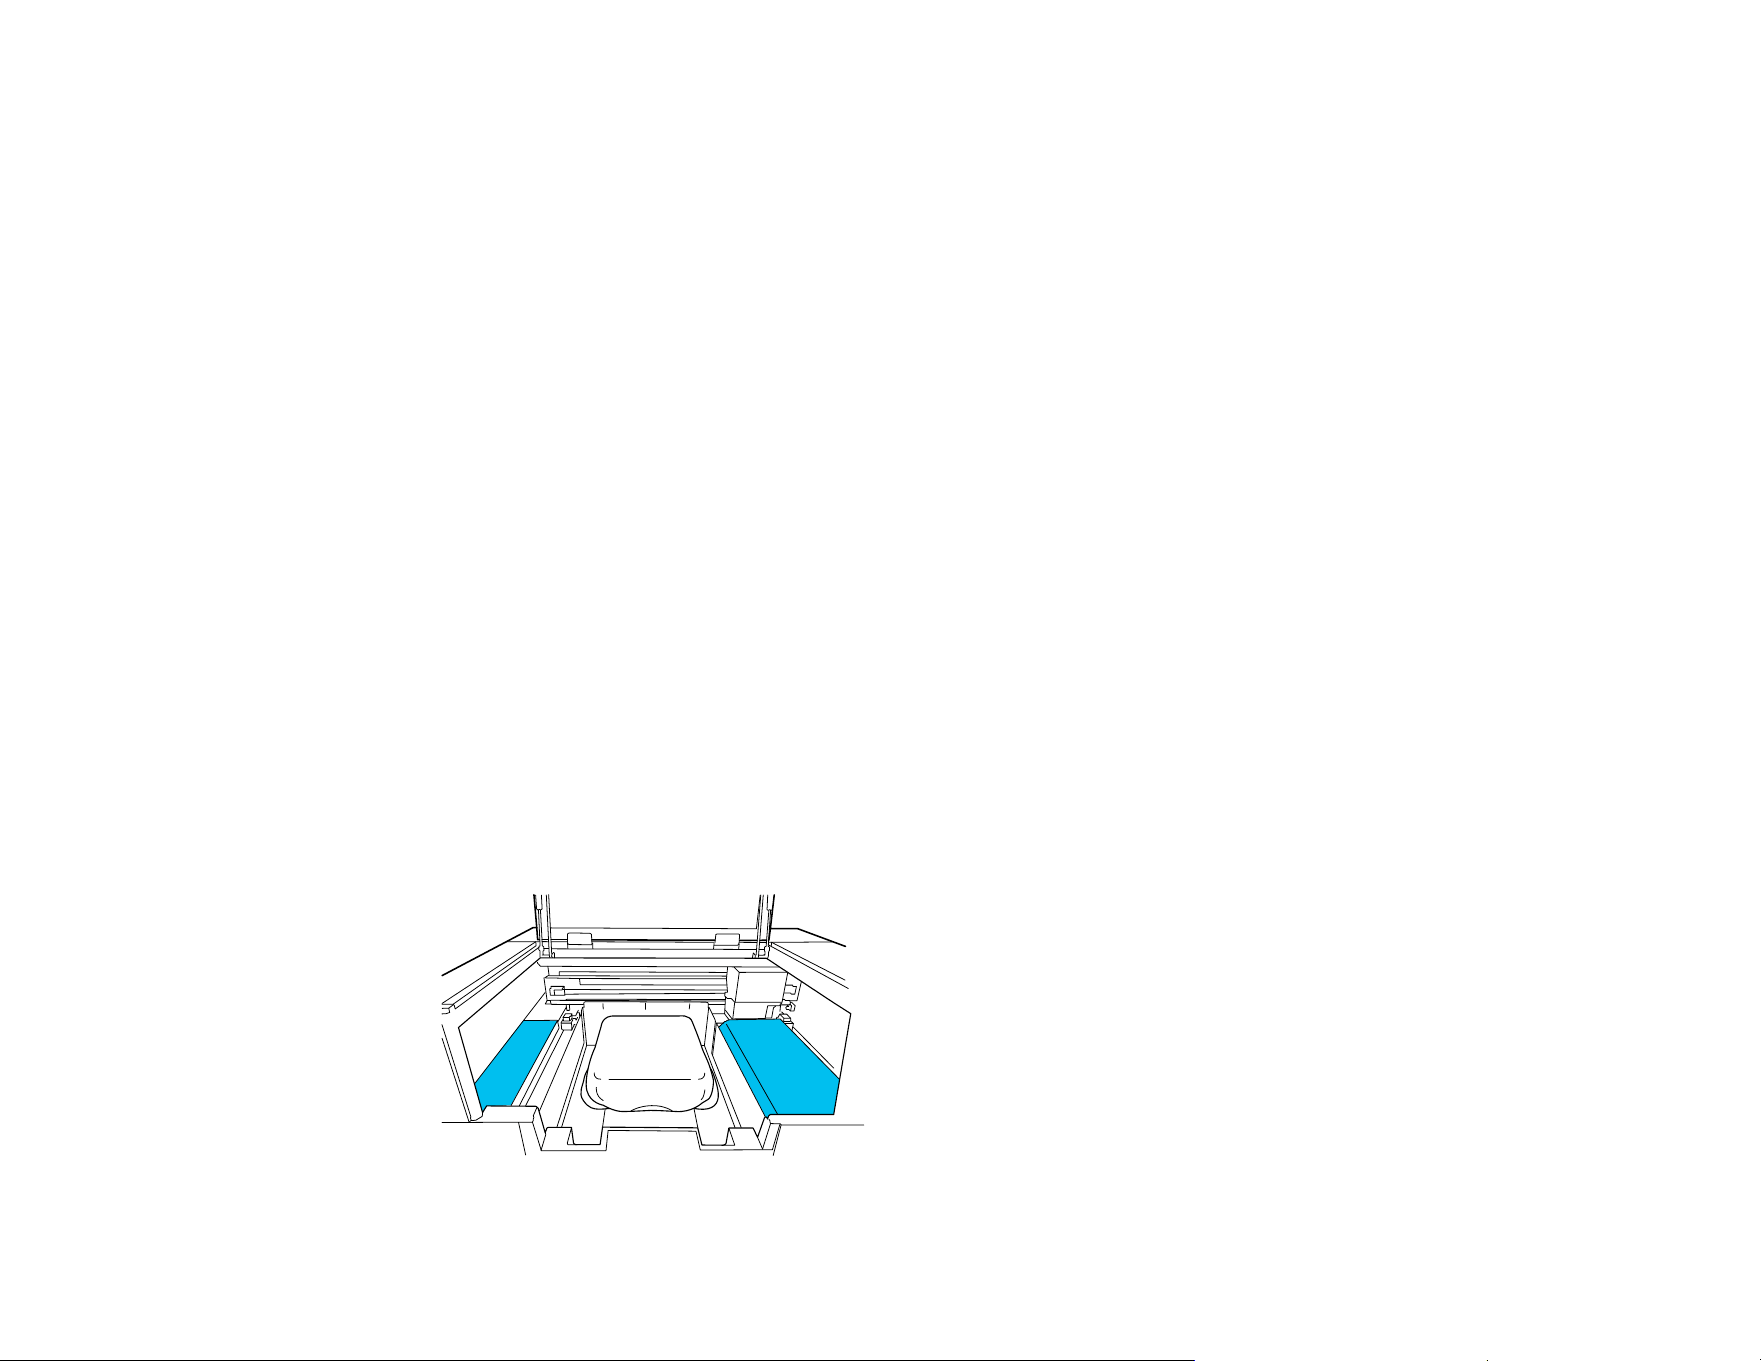
104
2. Remove the platen frame, if necessary.
3. Check the preview of the print job in Garment Creator 2 and load the film on the platen. Make sure to
place the film so that you avoid printing beyond the edges of the film.
Note: The top of the preview display area is the front of the printer (the part with the hanger if you
are using a hanger platen).
4. Secure the film to the platen using opaque tape.
Note: Do not use clear tape to secure the film. If parts of the clear tape peel off, they may rub against
the print head during printing.
Parent topic: Basic Printing
Related references
Required Equipment (Printing on Film)
Related tasks
Installing the Platen
Starting a Print Job
When the printer has finished receiving data, a preview appears on the printer's screen.
1. Check that the shirt or film is loaded correctly.
Note: Do not leave any objects on the loading guard (the shaded areas shown in the illustration).
Objects placed here may get caught in the cover or fall into the printer and cause damage.

105
2. Select Start on the LCD screen.
To reprint the job, select Menu > Reprint, and then enter the number of prints and select Done.
When the preview appears on the LCD screen, select Start.
Note: Reprint data is not overwritten until a new job is sent to the printer. Reprint data is not deleted until
the USB memory stick is removed or the printer is turned off. If saving reprint data fails, an error
message is displayed when you select Reprint. Reprint data is not saved if the following occurs:
• The USB memory stick is corrupt
• There is not enough space on the USB memory stick or the maximum number of files is reached
• The USB memory stick was removed from the printer while data was being written/read
• Printing was canceled before printing was complete
Parent topic: Basic Printing
Cancelling a Print Job
You can cancel a print job or cancel data that is being received by the printer using the printer's control
panel.
Note: You cannot cancel printing from the Garment Creator 2 software once the computer has finished
sending data to the printer. See the Garment Creator 2 online help for more details.
1. Select Pause from the status display on the LCD screen.
2. Select Cancel.
Printing stops immediately and data is deleted.
Note: You can stop a job by clicking Cancel on the screen that is displayed while the job is being
sent from Garment Creator 2. If a job being sent from the computer to the printer has finished
sending, cancel it at the printer.
Parent topic: Basic Printing
Finishing a T-shirt
Follow the instructions in these sections to remove your T-shirt from the printer and fix the ink.
Removing a Printed T-shirt

106
Fixing the Ink
Parent topic: Basic Printing
Removing a Printed T-shirt
After you print an image on a T-shirt, remove it from the printer.
Caution: Do not touch the printed surface when you handle the T-shirt; the ink is still wet.
1. Remove the platen frame, if necessary.
2. Hold the T-shirt by the shoulders and carefully remove it from the platen; the ink is still wet and can
be easily smudged.
3. Use a heat press or a heat tunnel to fix the ink on the T-shirt.
Parent topic: Finishing a T-shirt
Related topics
Fixing the Ink
Fixing the Ink
After printing on a shirt, you must fix the ink using a heat press or a heat tunnel. If the ink is not
sufficiently fixed, colors may come out in the wash or when rubbed.
Note: If you have applied pre-treatment solution, we recommend washing the shirt before wearing it.
When using a heat-press, it is best to insert a heat-resistant sheet between the fabric and the heating
element. When using a heat press on shirts that have plastic buttons or zippers, place a heat-resistant
sheet over the buttons or zippers to prevent them from being damaged by direct exposure to the heat
press.

107
If the printing is near the seams, such as on sleeves, the ink may not be sufficiently fixed due to the
difference of levels in the seams. We recommend using a heat-resistant sheet above and below the T-
shirt to reduce the difference in levels.
When using a heat press to fix ink to polyester T-shirts, the heat press can be soiled with ink due to the
properties of the fabric. If necessary, clean the heat press or load a release sheet before pressing the
shirt.
Fixing conditions differ between the heat press and the heat tunnel. Optimum conditions vary depending
on the type of heat press or heat tunnel used and the amount of ink, so use the values in these sections
only as a guide.
Fixing Conditions (Heat Press)
Fixing Conditions (Heat Tunnel)
Parent topic: Finishing a T-shirt
Fixing Conditions (Heat Press)
The conditions under which you must fix the ink with a heat press differ between White ink and color ink.
Make sure that you meet these conditions for fixing the ink.
Optimum conditions vary depending on the type of heat press. Test and check the results in advance to
determine the correct pressure.
Cotton, 50/50 cotton poly blend, and tri-blend T-shirts

108
Ink type Time Temperature Pressure
Color 45 seconds 338 °F (170 °C) 6.1 Psi (4.2 N/cm
2
)
White
Larger than A4 size with
White ink
Up to 90 seconds
Note: If the ink is not completely dry after 90 seconds, extend the duration while carefully checking if the
pre-treatment solution is dry.
Note: If you are not printing with White ink and the ink is not completely dry after 30 seconds, extend the
duration while carefully checking if the pre-treatment solution is dry.
Parent topic: Fixing the Ink
Fixing Conditions (Heat Tunnel)
Optimum conditions vary depending on the heat tunnel. Test and check the results in advance to
determine the correct temperature and duration.
Cotton, 50/50 cotton poly blend, and tri-blend T-shirts
Note: The temperature in the tables here refer to the temperature of the fixing surface of the T-shirt, not
the internal temperature of the heat tunnel. If the surface of the T-shirt exceeds 356 °F (180 °C), the T-
shirt and the print surface may change color.
Fixing color ink
Type of heat tunnel Temperature Time
Batch 320 °F (160 °C) 3.5 to 5 minutes
Conveyer 3.5 to 4.5 minutes
Fixing White ink
Type of heat tunnel Temperature Time
Batch 320 °F (160 °C) 5 minutes
Conveyer 4.5 minutes
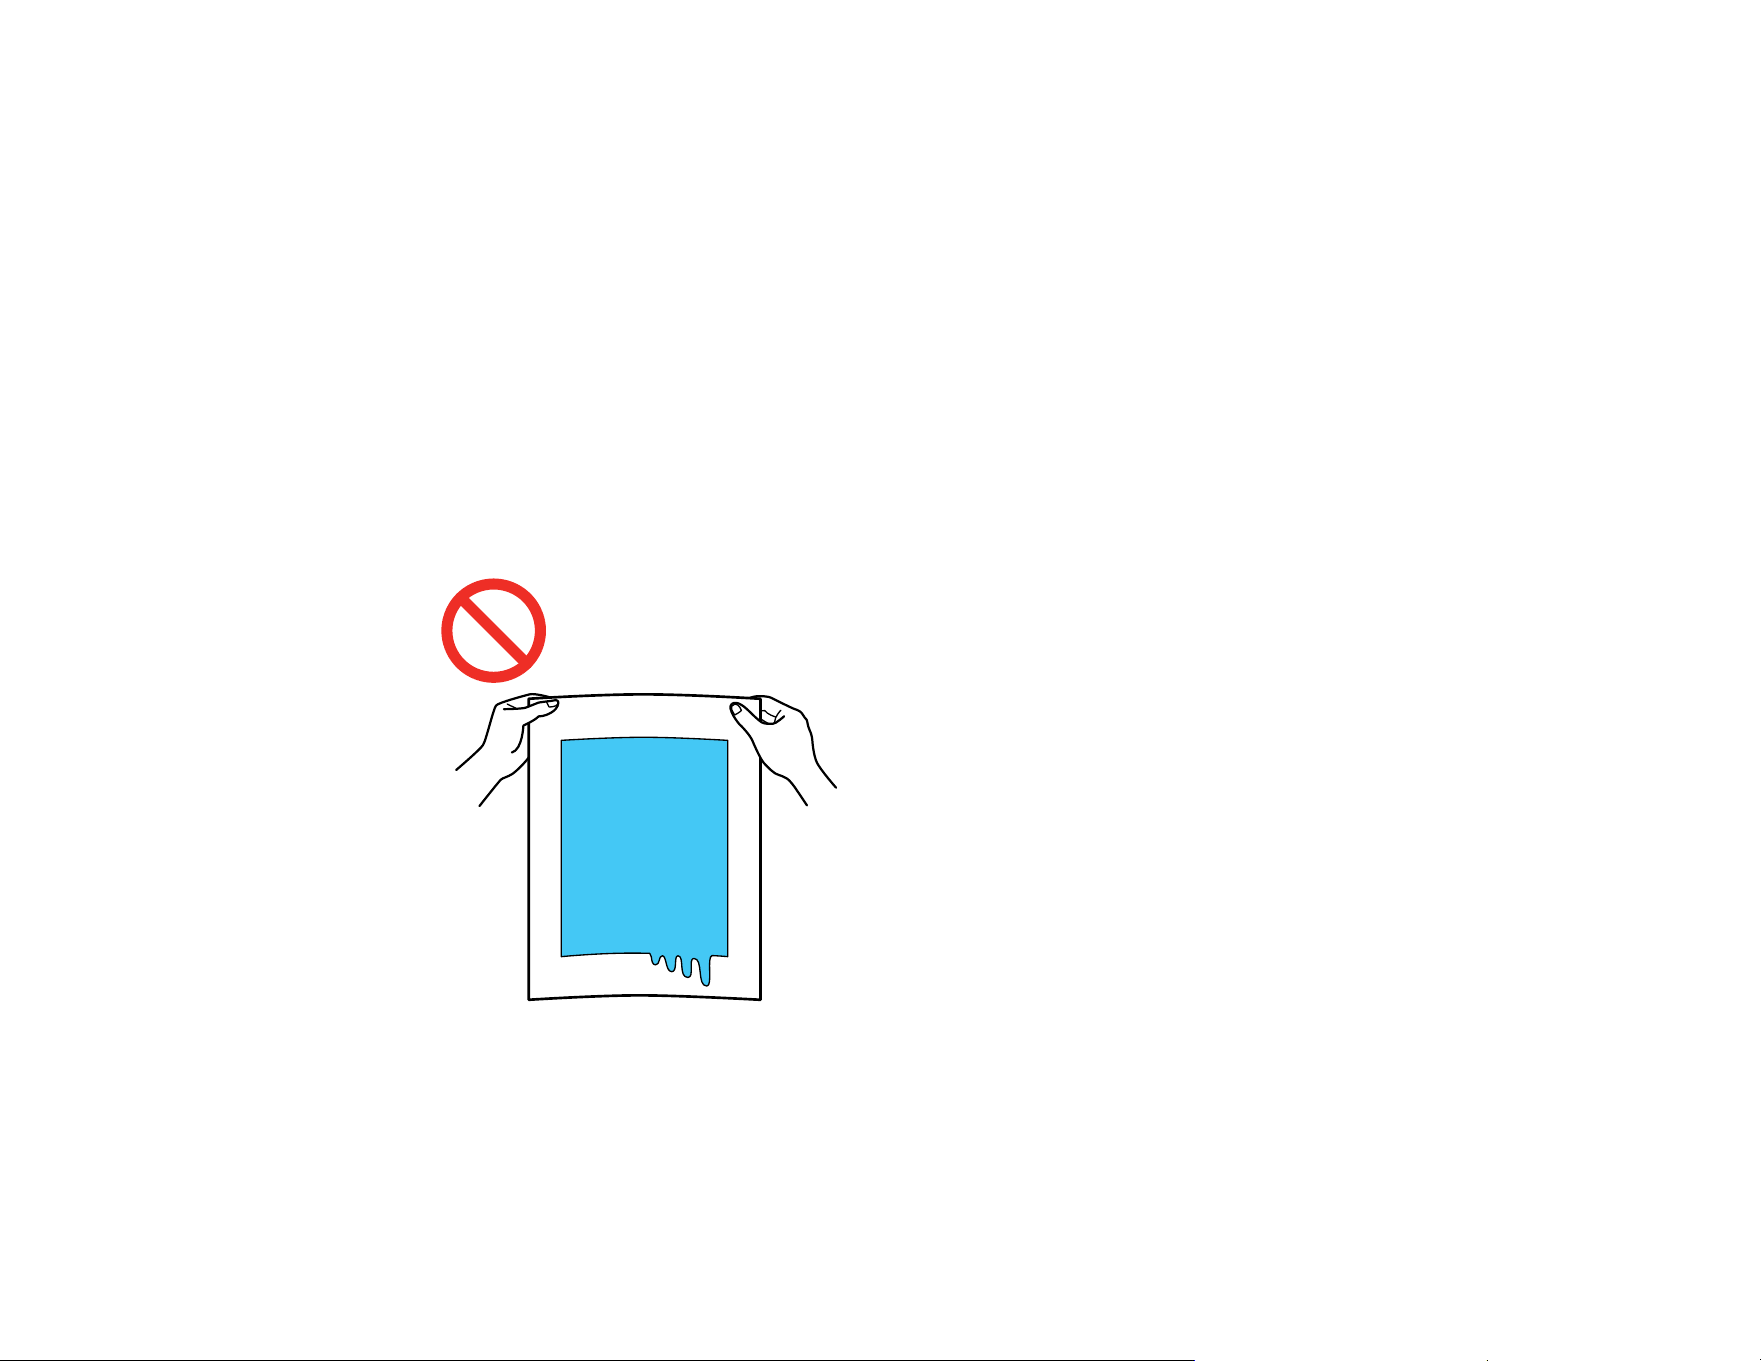
109
Parent topic: Fixing the Ink
Performing Post-processing for Film
After you print your design on a sheet of film, remove it from the printer and perform post-processing to
transfer it to your desired media.
Note: The steps for post-processing can vary depending on the type of film and powder you are using,
the media you are transferring the design to, the specific equipment you are using to fix the ink, and even
the amount of ink used. Make sure you check the instructions provided with the film and powder you are
using, and consult your dealer and supplier for more information.
1. Remove the printed film from the platen.
Note: If you did not select Film as the job creation mode in Garment Creator 2, excess ink may run
on the film sheet. Check that you selected Film as the job creation mode to avoid using excess ink.
2. Once the film has been removed, perform post-processing to transfer it to your media.
Caution: Do not apply powder near the printer.
Parent topic: Basic Printing

110
Printing from a USB Memory Device
You can connect a USB memory device to the printer and print jobs saved from Garment Creator 2. You
can also save print jobs to a USB memory device that is connected to your computer or to the printer.
Note: When a USB memory device is connected to the printer, the last print data sent from Garment
Creator 2 is automatically saved to the USB memory device as temporary reprint data with the filename
Epson_repeat_print.prn. If there is a misprint or you run out of media, you can repeat printing simply by
operating the printer without having to send the print job again. See the Garment Creator 2 online help
for more details on saving data.
USB Memory Device Requirements
Connecting and Printing from a USB Memory Device
USB Memory Device Requirements
Make sure your USB memory device meets these requirements.
Note: Connections that use an extension cable, a USB hub, or a card reader cannot be guaranteed.
• FAT device compatible with Windows
• Format type: FAT, FAT 32, or exFAT
• No security functions such as encryption or passwords
• Memory capacity: Up to 2TB
• Partitions: 1
Requirements for data
• Data name: Up to 255 single-byte characters
• Data size: Up to 4GB
• Number of data items: Up to 999 (.prn files only)
Note: The printer only searches the root folder on the USB memory device for files with a .prn file
extension. If the data is saved in a sub-folder or named with a different file extension, it does not display
when the USB memory device is connected to the printer.
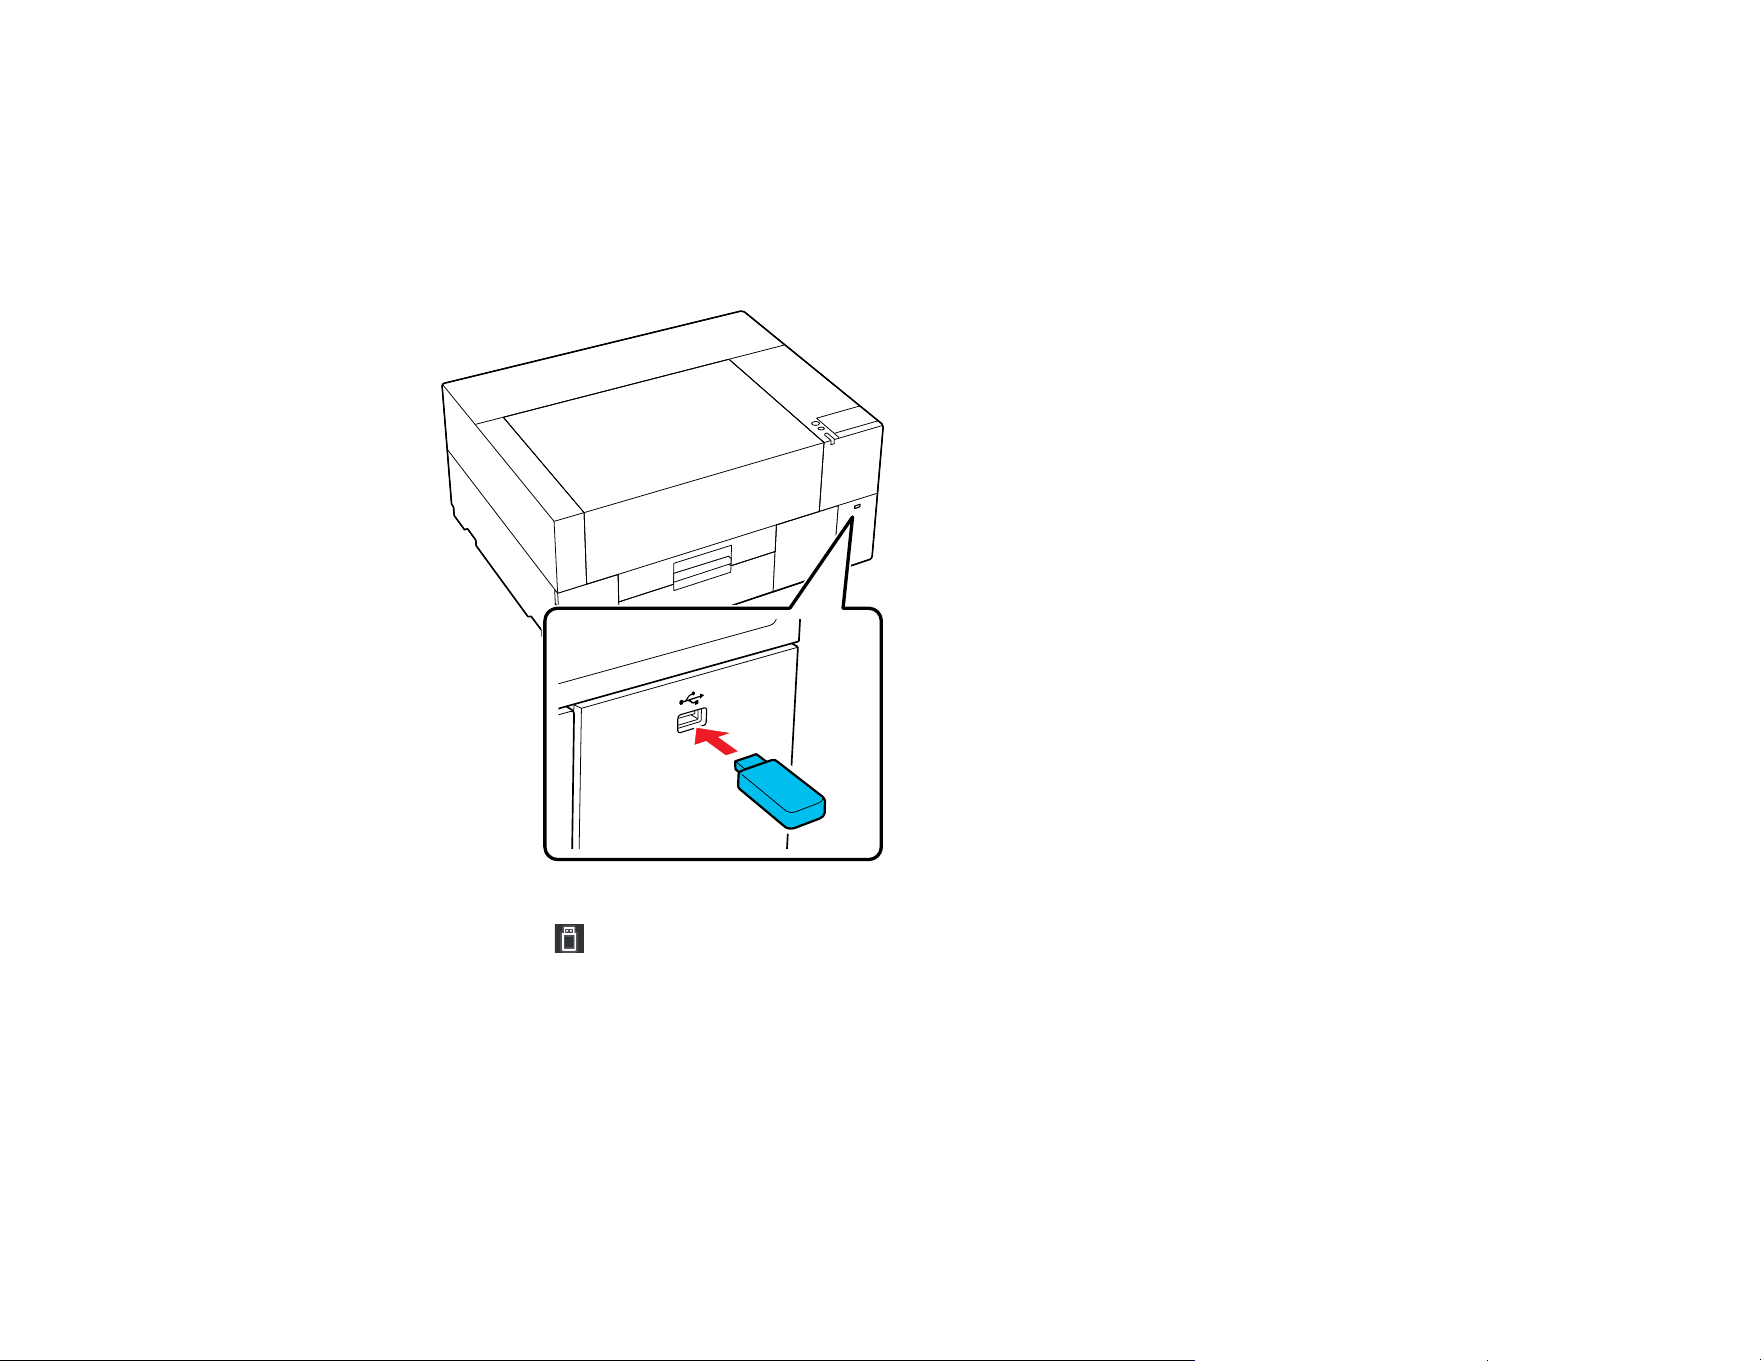
111
Parent topic: Printing from a USB Memory Device
Connecting and Printing from a USB Memory Device
You can print jobs saved from Garment Creator 2 to a USB memory device connected to your printer.
1. Connect the USB memory device containing the saved data to the USB memory device port.
2. Select the USB icon on the LCD screen.
3. Select Print.
4. Select the file you want to print.
A preview of the file appears.
5. Select the number of copies on the screen and select Done.
Note: If you want the print head to only print in the first direction, select Uni-Directional as the Head
Move Direction setting.
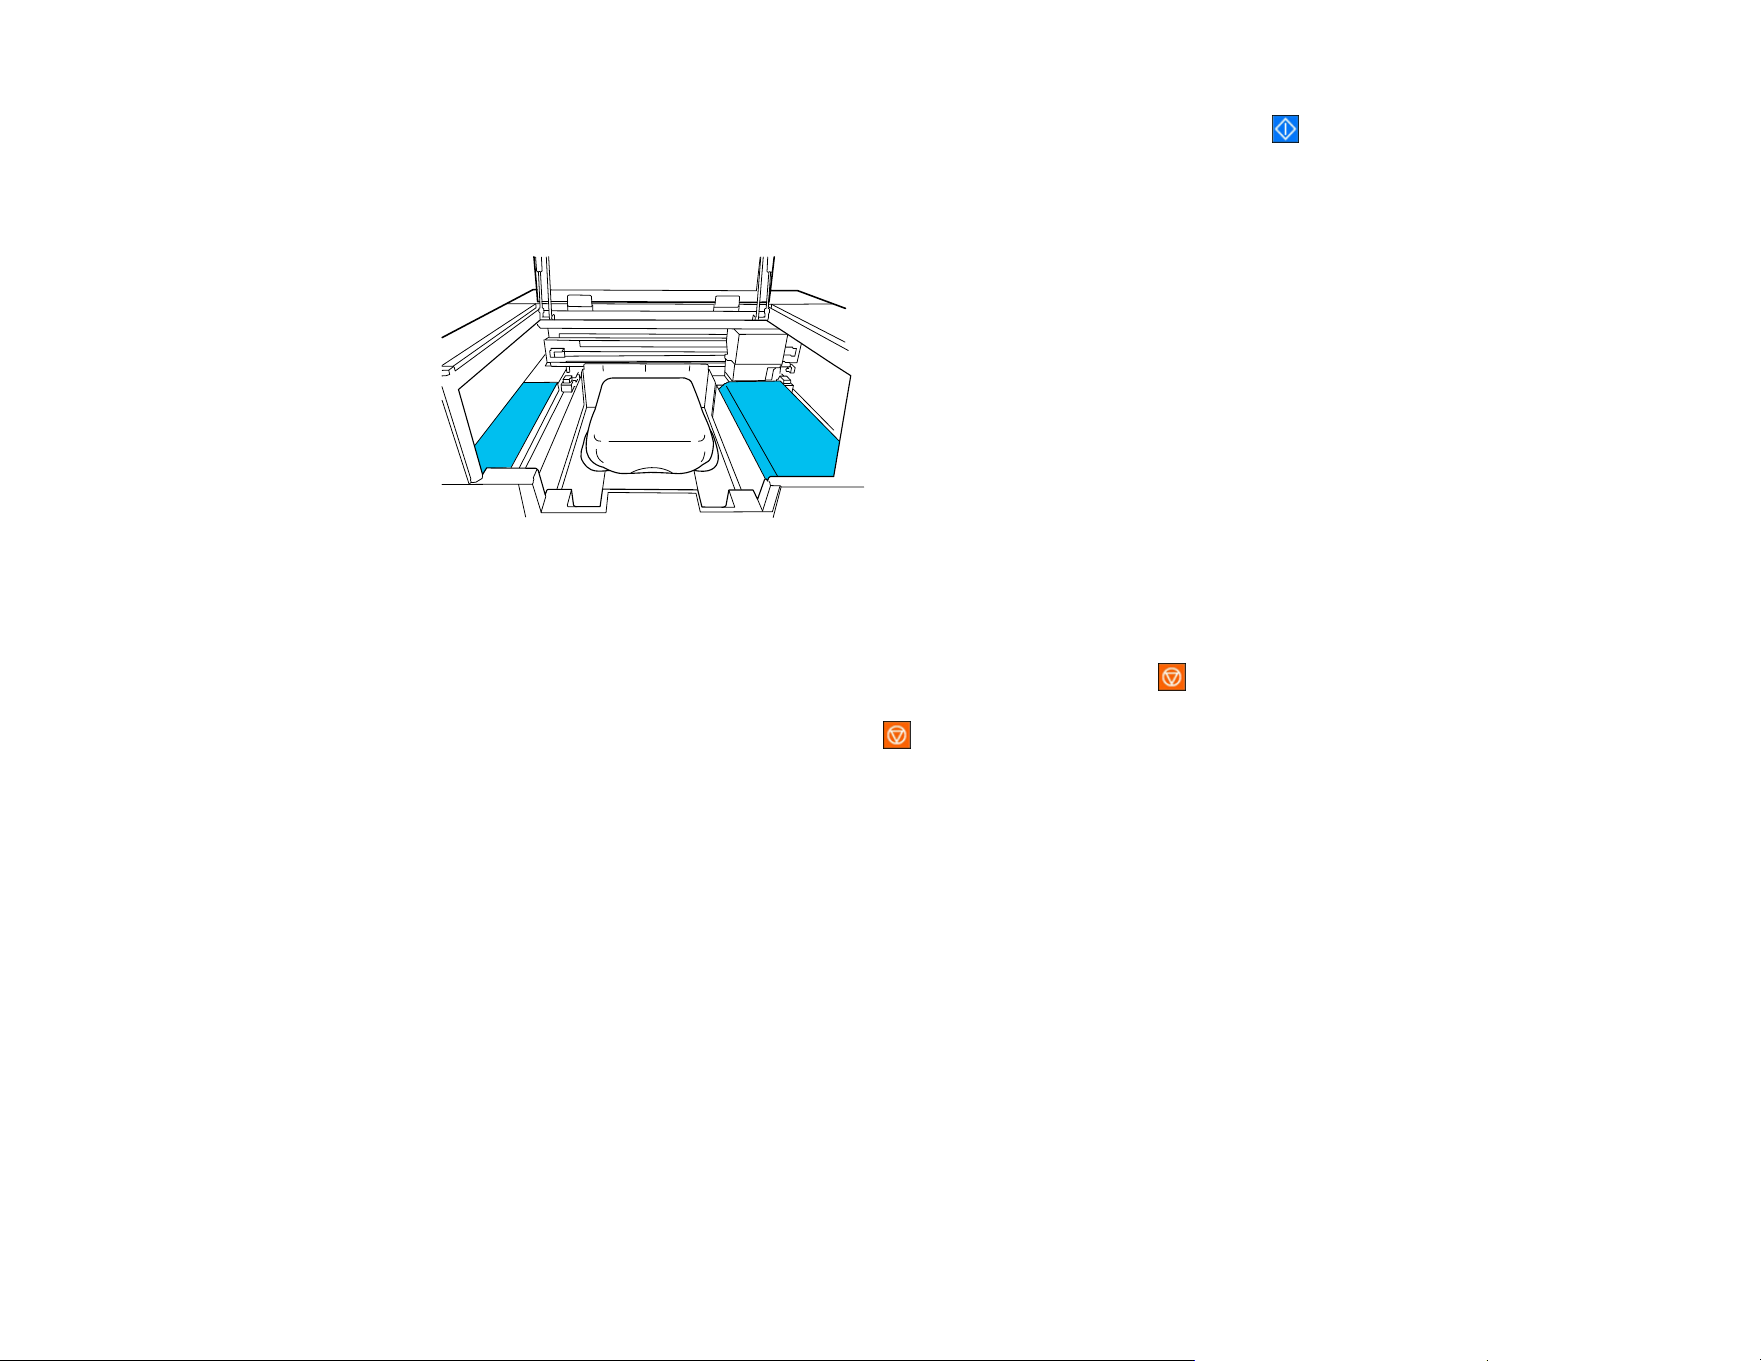
112
6. When the preview is on the screen, load the shirt on the platen and select the Start icon.
Note: Do not leave any objects in the shaded areas shown in the illustration. Objects placed here
may get caught in the cover or fall into the printer and cause damage.
Once the specified number of garments are printed, a list of print jobs appears on the printer's
screen.
Note: To change the number of garments while printing, select the icon on the screen, and then
change the number of prints and select Done. To print a different job before the specified number of
garments are finished printing, select the icon on the screen, then on the preview screen press
the back arrow to return to the print jobs list.
To delete data from a USB memory device, repeat step 3, select Delete, and then select the data you
want to delete. Follow the instructions on the LCD screen to continue.
Parent topic: Printing from a USB Memory Device
Related tasks
Cancelling a Print Job
Related topics
Loading a T-shirt
113
Using the Control Panel Menus
Follow the instructions in these sections to access the printer menu system and select settings.
Accessing the Printer's Menus
Basic Settings Menu
Printer Settings Menu
Maintenance Menu
Network Settings Menu
Media Settings
Maintenance Settings
Printer Status Menu
Supply Status Menu
Accessing the Printer's Menus
You can use the printer menus to adjust the settings that control how your printer works.
1. Select the home icon, if necessary.
2. Select the Menu icon.
3. Press the up or down arrow to scroll through the menus, or swipe up or down on the LCD screen.
Note: To return to the previous screen, press the left arrow button.
4. Press the up or down arrow to move through the settings, or swipe up or down on the LCD screen.
5. To select a setting, select OK any time the OK option is displayed. You can also select a setting to
toggle it on or off.
6. When you finish changing settings on a menu, press the left arrow button to go back or select the
home icon on the control panel to completely exit the menu.
Parent topic: Using the Control Panel Menus
Basic Settings Menu
Select the Menu icon > General Settings > Basic Settings to customize various display and power
settings.

114
Setting Options Description
LCD Brightness 1 to 9 Adjusts LCD screen brightness
Sounds Button Press Adjusts the volume of control panel
sounds
Completion Notice Adjusts the volume of the following
notification events:
• When the job has finished printing
and the media is ready to be
removed
• When a print job is saved to a USB
memory
Ready Notice Adjusts the volume of printer alerts
Warning Notice Adjusts the volume and repetition of
notifications for maintenance and
replacement of consumables
Error Tone Adjusts the volume and repetition of
error notifications
Sound Type Adjusts the type of control panel
sounds
Sleep Timer Off
On
Select the amount of time until the
printer enters sleep mode (1 to 240
minutes)
Circuit Breaker Interlock
Startup
Off
On
Select whether to turn the printer on or
off when the breaker switch is
operated
Date/Time Settings Date/Time Enter the date and time
Daylight Saving Time Select the daylight saving option
Time Difference Sets the time difference for
coordinated universal time (UTC)
Language Various languages Select the language used on the LCD
screen
Screen Customization Various options Customizes the Home screen display
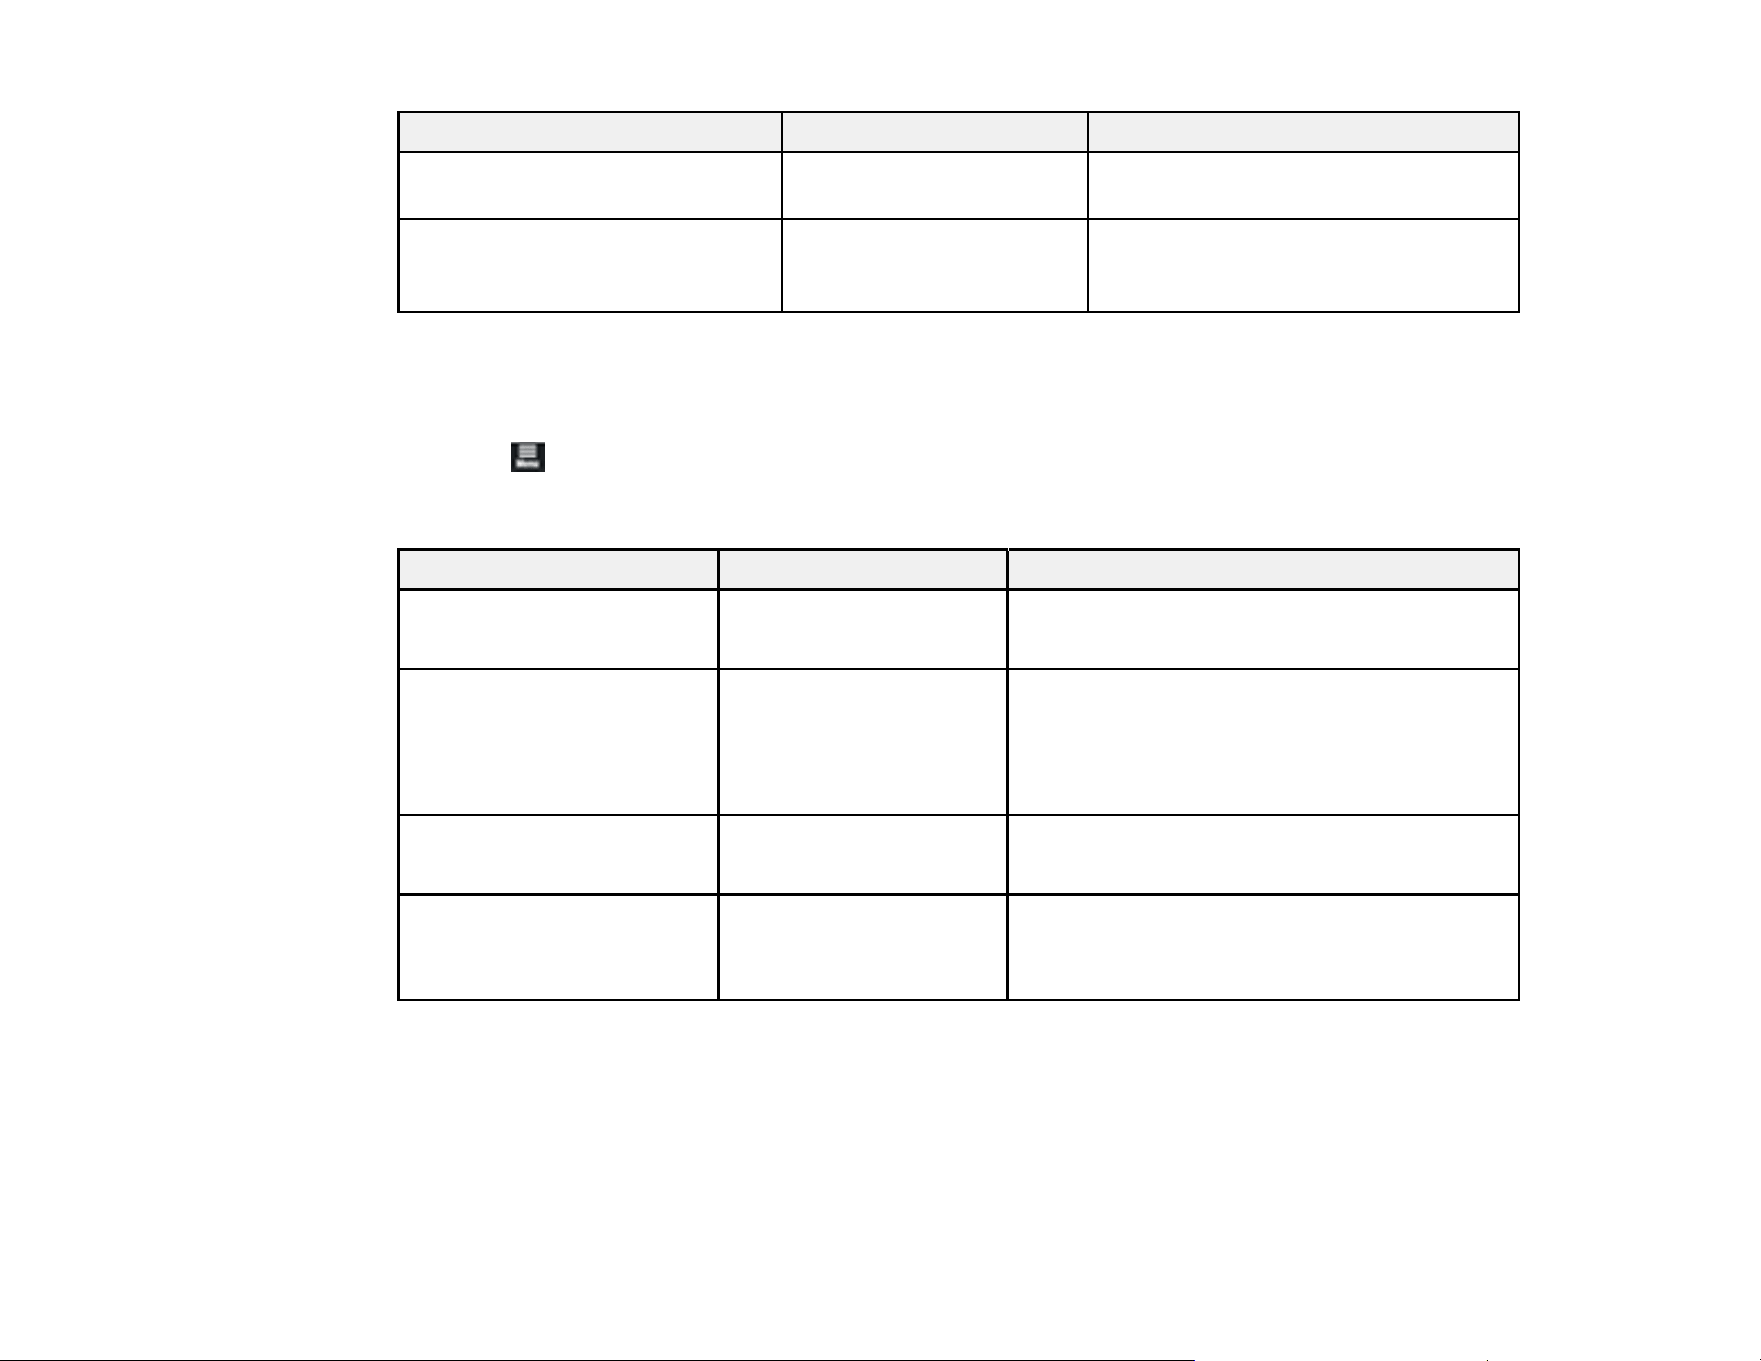
115
Setting Options Description
Keyboard Various options Select the keyboard displayed on the
LCD screen
Unit Settings Length Unit
Temperature
Select the unit for length and
temperature displayed on the LCD
screen
Parent topic: Using the Control Panel Menus
Printer Settings Menu
Select the Menu icon > General Settings > Printer Settings to customize paper and printing
options.
Setting Options Description
Printer Mode White ink mode
Color ink mode
Select the ink mode for the printer
Head Movement Range Data Width
Printer Width
Sets the range of print head movement.
Select Data Width to increase the print speed
by restricting movement to the printed area.
Select Printer Width if you want more even
print results.
Inside Light Auto
Manual
Select whether the inside light turns on and off
automatically
Restore Default Settings Network Settings
Clear All Data and
Settings
Select one of the options to return values to
their default settings
Parent topic: Using the Control Panel Menus
Related tasks
Changing the Printer Mode
116
Maintenance Menu
Select the Maintenance or Menu icon > Maintenance to run nozzle checks, cleaning cycles, and
other maintenance operations.
Caution: Follow the instructions in the topic links below the table to use these menu settings correctly.
Setting Options Description
Print Head Nozzle Check Pattern Type
Print Position
Platen Type
Select to run the nozzle check utility
and inspect the printed pattern to
determine if you need to clean the print
head. Set the nozzle check settings
according to the platen you are using
and the desired pattern type.
Note: Pattern Type is only displayed
when the printer is in White ink mode.
Head Cleaning Auto Cleaning
Cleaning (Light)
Cleaning (Medium)
Cleaning (Heavy)
Select Auto Cleaning to automatically
check for clogged nozzles and then
perform head cleaning with the
appropriate strength. If clogs are not
cleared, choose one of the following:
• Cleaning (Light): run this level of
cleaning first
• Cleaning (Medium): run this level of
cleaning if the light level left faint or
missing ink in your printouts
• Cleaning (Heavy): run this level of
cleaning if the light and medium
levels still left faint or missing ink in
your printouts
Replace Maintenance Parts Maintenance Box
Wiper Unit
Head Maintenance Set
Select if you need to replace the
maintenance box, wiper unit, or head
cleaning set before a message
appears telling you to replace it on the
LCD screen
117
Setting Options Description
Cleaning the Maintenance
Parts
Around the Head
Suction Cap
Sensor Cover
Select to move the platen and print
head to the maintenance position for
the selected cleaning option
Keeping Preparation — Perform if you are storing the printer for
a long time (one month or more)
Parent topic: Using the Control Panel Menus
Related references
Optional Equipment and Replacement Parts
Related tasks
Performing a Nozzle Check
Cleaning the Print Head
Storing the Printer
Cleaning the Suction Cap
Cleaning Around the Print Head
Cleaning the Sensor Cover
Network Settings Menu
Select the Menu icon > General Settings > Network Settings to configure your printer's network
settings.
Setting Options Description
Wi-Fi Setup Router Displays the available Wi-Fi connection
methods (Wi-Fi Setup Wizard, Push Button
Setup(WPS), Others)
Wi-Fi Direct Select Connect to Computer to enable Wi-Fi
Direct and display the SSID and password for
the printer, or Change to change the network
name, password, and other settings
Wired LAN Setup — Select to change from a Wi-Fi connection to a
wired LAN connection.

118
Setting Options Description
Network Status Wired LAN/Wi-Fi Status Displays current communication status and
connection settings
Wi-Fi Direct Status Displays the number of connected devices
and connection settings
Print Status Sheet Prints the current network connection
information
Connection Check — Confirms the network status. You can also
print a connection check report.
Advanced Various settings Displays advanced information, such as
TCP/IP settings. You can enable or disable
other network settings.
Parent topic: Using the Control Panel Menus
Media Settings
Settings on the Media Settings menu let you customize various adjustments for media types. You can
access the menu directly by selecting Media on the LCD screen.
Current Settings
Setting Options Description
Media 01 to 30 Select a registered media settings
entry
Platen Gap Auto
Manual
Change the platen gap settings
Print Adjustments options
119
Setting Options Description
Print Head Alignment Standard
Micro Adjust
Select to run the head alignment utility
to correct grainy or blurry print results
by realigning the print head for each
platen size
Note: This does not affect your print
results if you set uni-directional printing
for the print job.
Media Feed Adjustment -1.00% to 1.00% Adjust how far (width) the platen feeds
between each movement of the print
head
When the banding colors are dark,
change the values to the + side; when
the colors are faint (whitish), change
them to the - side. First set 0.1% (or
-0.1%), and check the printout, then do
further adjustments as needed.
Media Management options
Setting Option Description
01 XXXXXX to 30 XXXXXX Change Name
Platen Gap
Change details for registered media
settings
• Select Change Name to edit the
name of a registered media setting
entry
• Select Platen Gap to adjust the
distance between the media and the
print head. Select Auto to have the
printer automatically detect the
surface of the media, or select
Manual to manually set the platen
gap.
Parent topic: Using the Control Panel Menus
120
Related tasks
Aligning the Print Head
Maintenance Settings
Select the Menu icon > General Settings > Maintenance Setting to customize various
maintenance settings.
Setting Options Description
Cleaning Setting Threshold of Clogged
Nozzles
Max Retry Cleaning
Count
Threshold of Clogged Nozzles sets
the number of clogged nozzles at
which head cleaning should be
performed. When Color ink mode is
selected, set a value from 1 to 2. When
White ink mode is selected, set a value
from 1 to 2400.
Max Retry Cleaning Count sets the
number of times maintenance is
repeated if nozzles are still clogged
after cleaning the print head.
Actions Beyond Threshold of
Missing Nozzles
Stop Printing
Show Alert
Auto Cleaning
Set what the printer should do when
the Threshold of Clogged Nozzles is
exceeded
• Stop Printing displays a message
on the LCD screen and stops
printing
• Show Alert displays a message on
the LCD screen but continues
printing
• Auto Cleaning performs
maintenance before printing starts
Periodic Cleaning Scheduled
Print Page
Off
Set the timing at which to perform
periodic head cleanings

121
Setting Options Description
Power On Cleaning On
Off
Set whether the printer automatically
performs head cleaning when it is
turned on
Parent topic: Using the Control Panel Menus
Related tasks
Performing a Nozzle Check
Cleaning the Print Head
Printer Status Menu
Settings on the Printer Status menu let you display information about your printer's current status.
Setting Options Description
Firmware Version — Displays the firmware version of
the printer
Printer Name — Displays the name of the printer
set in Epson Edge Dashboard
Fatal Error Log — Displays fatal error information
Operation Report Total Print Numbers
Total Carriage Pass
Displays the total number of the
selected option
Parent topic: Using the Control Panel Menus
Supply Status Menu
Settings on the Supply Status menu let you display information about the current status of your printer's
consumables.
Setting Description
Ink supply unit Displays the remaining ink levels and ink part
numbers
Maintenance Box Displays the amount of free space remaining in the
maintenance box and the model number


123
Maintenance
See the instructions in these sections to maintain your printer for optimum results.
Maintenance Guidelines
When to Maintain Your Product
Maintenance Safety Instructions
Print Head Maintenance
Print Head Alignment
Shaking and Replacing Ink Packs
Replacing the Maintenance Box
Replacing the Head Maintenance Set
Replacing the Wiper Unit
Using the Ink Cleaning Solution
Cleaning Around the Print Head
Cleaning the Suction Cap
Cleaning the Sensor Cover
Cleaning Inside the Printer
Cleaning the Platen Without a Grip Pad
Changing the Printer Mode
Disposing of Used Consumables and Optional Parts
Maintenance Guidelines
To maintain optimum print quality, you need to periodically perform various maintenance tasks, and
clean and replace parts.
Before cleaning the suction cap, replacing the head cleaning set, disposing of waste ink, cleaning
around the print head, cleaning the platen, or cleaning the sensor covers, have the following equipment
handy:
• Gloves (commercially available)
• Protective eyewear (commercially available)
• Maintenance kit (one kit supplied)
• Cleaning wipes (included with printer and commercially available)
• Tweezers (included with printer)

124
• Metal or plastic tray (commercially available) for holding used cleaning items
• Soft cloth
Parent topic: Maintenance
Related references
Optional Equipment and Replacement Parts
When to Maintain Your Product
See the guidelines here to determine when to perform maintenance operations on your product, or
replace or refill consumables. If maintenance is not performed, print quality may decline, the printer's
service life may be reduced, or you may be liable for the cost of any repairs. Always perform
maintenance when a message is displayed on the screen. If you need to perform an operation, use the
links at the end of this topic.
Note: You can set up certain maintenance operations to run automatically using settings on your product
control panel.
Cleaning Schedule
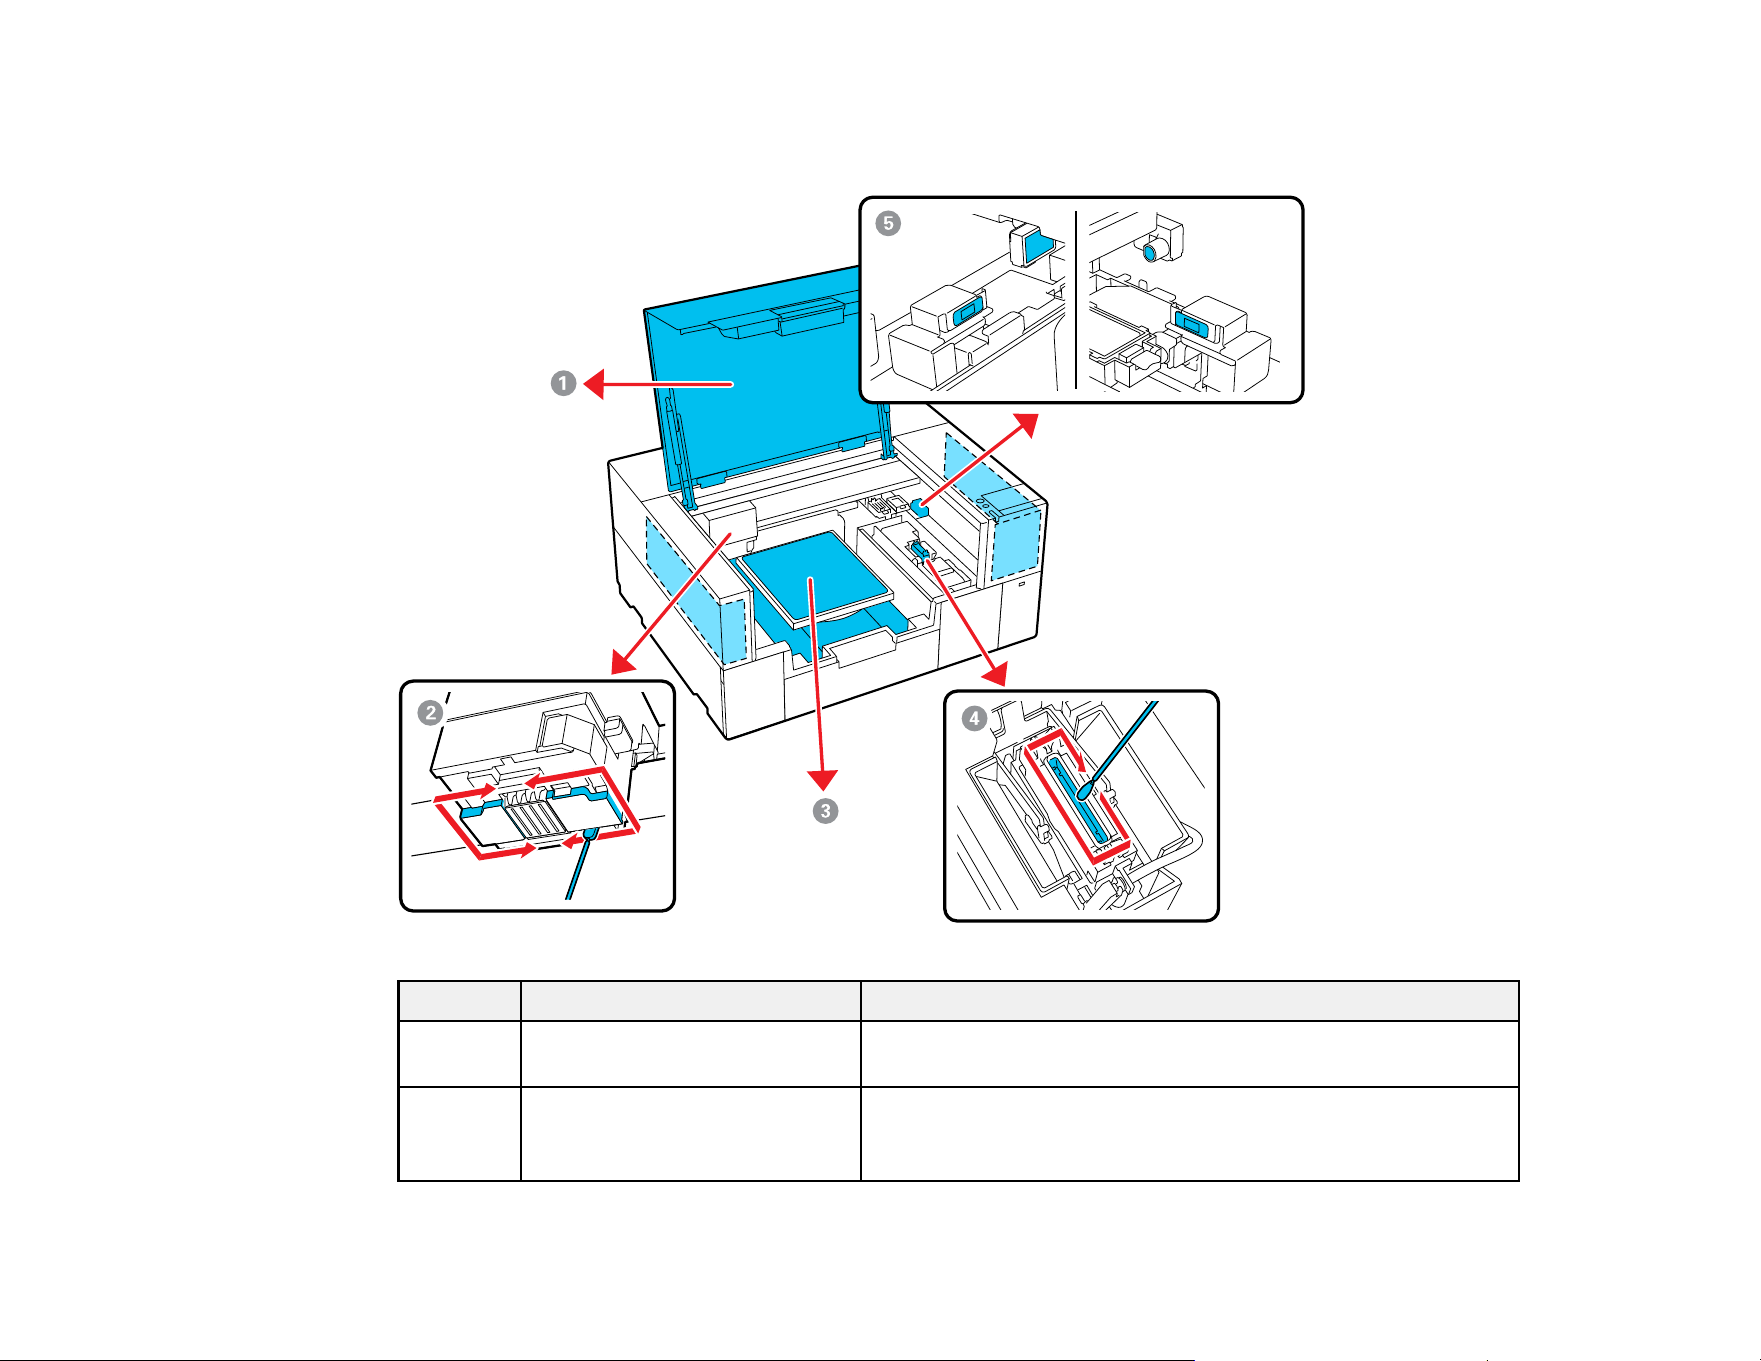
125
Do not clean any parts other than those shown in the illustration below, or touch any parts other than
those indicated. Doing so may damage the printer or prevent it from printing correctly.
Number Area to clean Frequency
1 The exterior case or inside the
printer cover
As needed
2 Around the print head When printing is not performed normally even after head
cleaning, or when the print surface and other areas are dirty
after cleaning the suction cap

126
Number Area to clean Frequency
3 Platen without a grip pad As needed
4 Suction cap When you see a message on the LCD screen to clean the
suction cap
1
, or when there are ink stains on the print
surface of the T-shirt
5 Sensor cover When you see a message on the LCD screen to clean the
sensor cover
1
1
If this message is displayed frequently, contact Epson support.
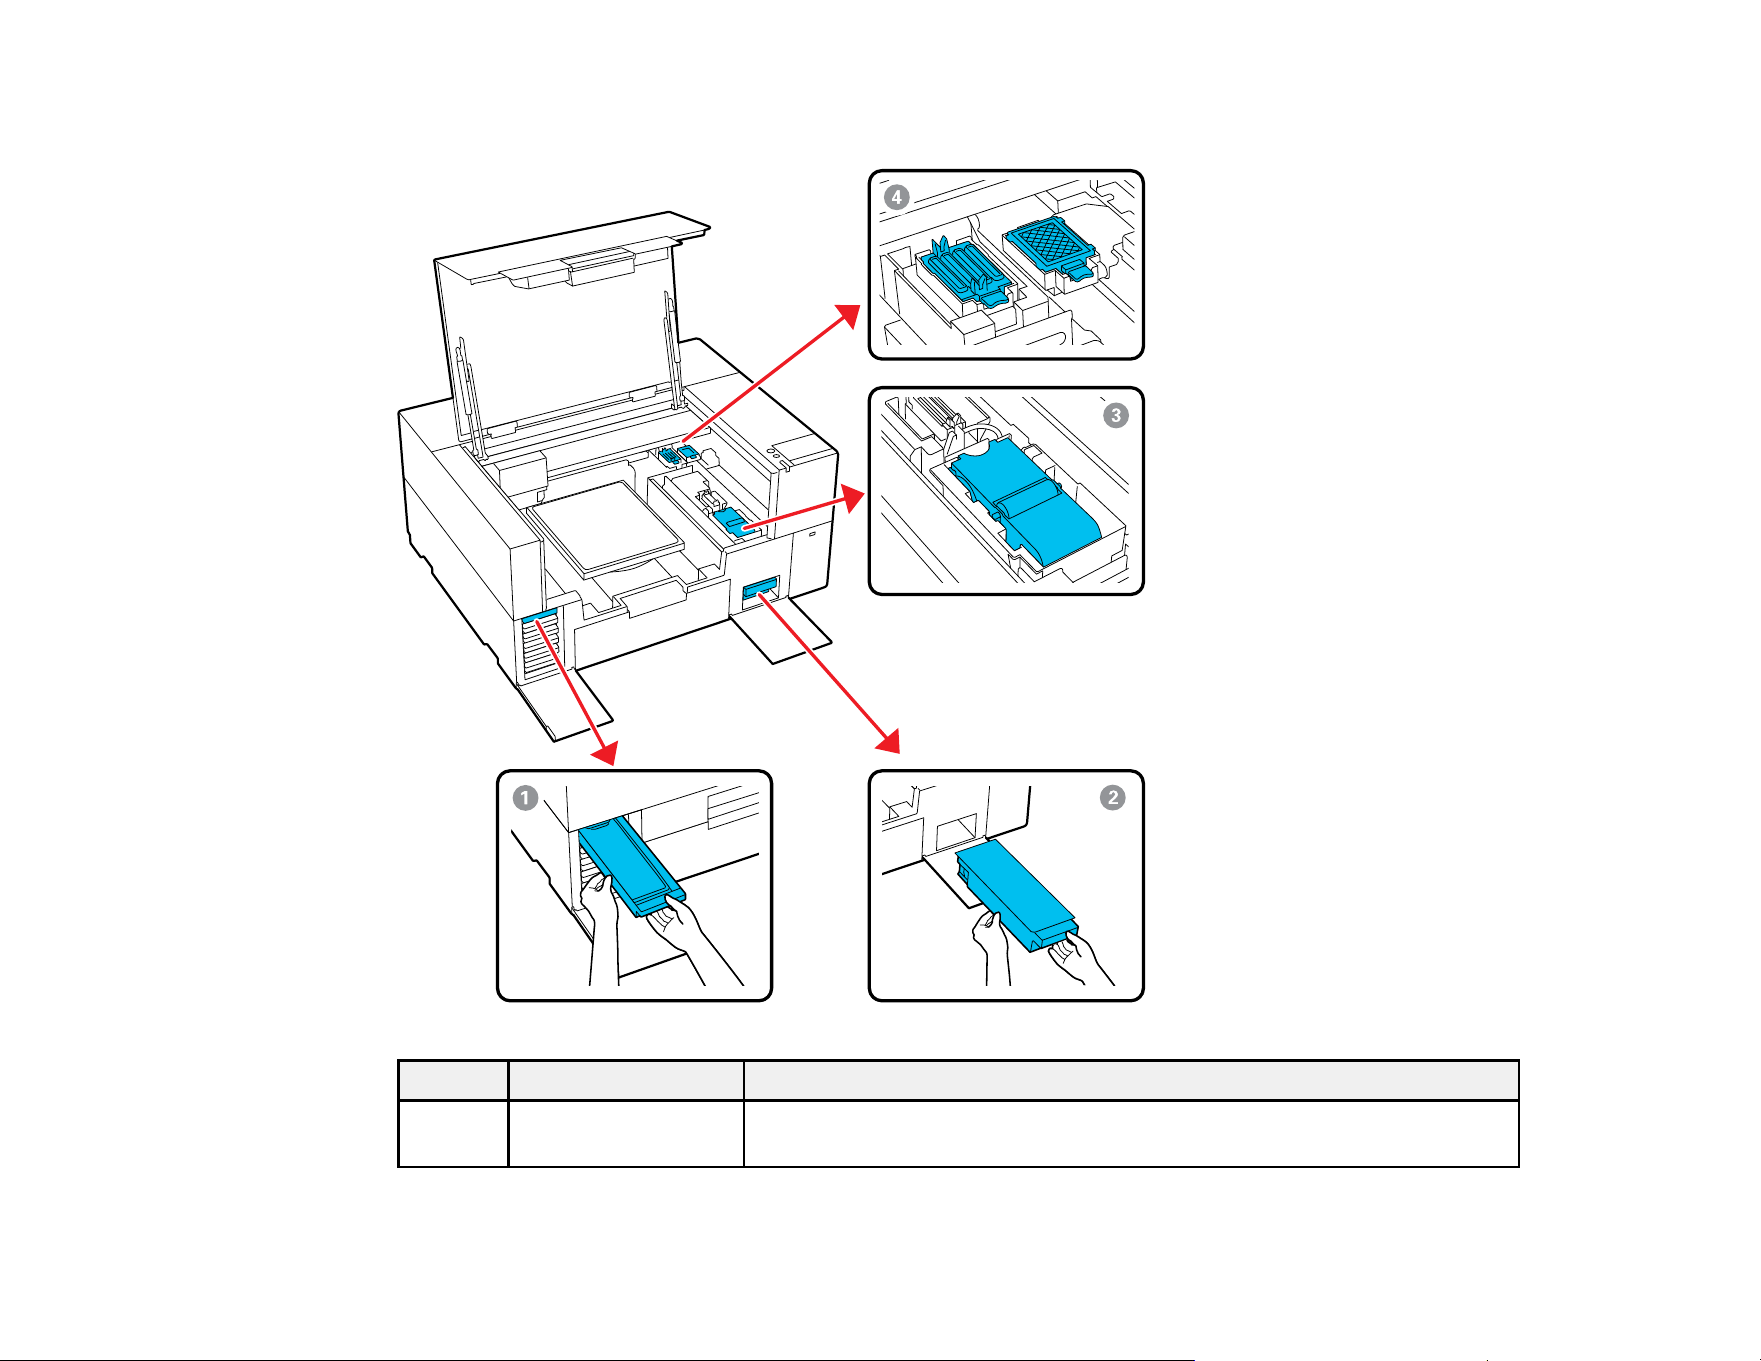
127
Consumables and Parts Replacement Schedule
Number Part to replace Frequency
1 Ink pack When you see a message on the LCD screen to replace the ink supply
unit
128
Number Part to replace Frequency
2 Maintenance box When a prepare and replacement message is displayed on the LCD
screen
3 Wiper unit
4 Head Maintenance
Set (flushing pad
and capping station)
Other Maintenance Schedules
Procedure Frequency
Remove and shake ink packs
When the shake ink icon is displayed above an ink pack; daily for
the White ink packs
Check for clogged nozzles Each time you print, or when horizontal banding appears on printout
Clean print head When any clogs are found after a nozzle check, or when printouts are
blurred or sections are missing
Pre-storage maintenance When you will turn off the printer and not use it for a long time
Change printer mode When White ink is not used for a specified period of time or when
White ink is used again
Parent topic: Maintenance
Maintenance Safety Instructions
When performing any printer maintenance procedures, follow these safety instructions:
• Always wear protective eyewear, gloves, and a mask when performing printer maintenance. Should
any waste ink or ink cleaner come in contact with your skin or enter your eyes or mouth, immediately
take the following actions:
• If fluid gets on to your skin, immediately wash it off using plenty of soap and water. Consult a
physician if the skin appears irritated or discolored.
• If fluid gets in your eyes, rinse immediately with water. Failure to observe this precaution could
result in bloodshot eyes or mild inflammation. If problems persist, consult a physician.
• If fluid gets in your mouth, consult a physician immediately.
• If fluid is swallowed, do not induce vomiting and consult a physician immediately. If vomiting is
induced, fluid may get caught in the trachea which can be dangerous.

129
• Store ink packs, waste ink, ink cleaner, and cleaning ink packs out of the reach of children.
• Wash your hands thoroughly after performing any maintenance procedure.
• Remove any loaded T-shirt from the printer before starting periodic cleaning.
• Touch a metal object before starting operations to disperse any static electricity.
• Do not touch the carriage shaft inside the printer. This may cause an operational error or a
malfunction.
• To prevent the print head from drying out, finish cleaning the suction cap and replacing the head
cleaning set within 10 minutes. After 10 minutes, the printer displays a message.
• Do not touch any parts or circuit boards other than the parts you are maintaining. This may cause a
malfunction or decline in print quality.
• Always use new cleaning swabs to avoid getting the printer parts dirty.
• Do not touch the tip of the cleaning swab with your hand. Oils on your hand may compromise cleaning
ability.
• Use only distilled water to clean specified areas. Do not use tap water.
• Do not wipe the suction cap or the capping station with organic solvents such as alcohol; otherwise,
you may damage the print head.
Parent topic: Maintenance
Related tasks
Removing a Printed T-shirt
Cleaning the Suction Cap
Print Head Maintenance
You need to maintain the print head if you notice print quality has declined or when a message appears
telling you that maintenance is needed. Print head maintenance keeps the print head in optimum
condition to ensure the best print quality.
Perform the following maintenance as necessary:
• Nozzle Check: Check for clogged nozzles before large print jobs or if you have not used the printer for
an extended period of time. Inspect the printed check pattern and clean the print head if you notice
faint or missing areas.
• Head Cleaning: Clean the print head if you notice faint printing or gaps in the printed result. This
cleans the surface of the print head to improve the print quality.

130
Note: If you have been using the printer in Color ink mode for more than two months, a message
appears prompting you to clean the print head to help prevent nozzles that are not being used from
clogging. When you see a message like this, clean the print head as soon as possible.
Performing a Nozzle Check
Cleaning the Print Head
Parent topic: Maintenance
Performing a Nozzle Check
To maintain optimum print quality, perform a nozzle check before printing.
Note: If Platen Gap is set to Manual in the Media Settings menu, change the setting to Auto before
loading the media.
1. Open the printer cover and remove the platen frame.
2. Load media onto the platen you are using:
• For S size platens, use A4- or letter-size.
• For XS size platens, use one sheet in 7.1 inch × 7.9 inch (180 mm × 200 mm) size.
• For sleeve platens, use one sheet in 3.9 inch × 3.9 inch (100 mm × 100 mm) size.
Note: The type of media depends on the Printer Mode you are using. For White ink mode, use
transparent media, such as OHP film, or colored paper. For Color ink mode, use plain paper. If you
are using the medium grooved platen, use thick paper. If you do not have thick paper, use a different
platen.
3. Position the media on the platen:
• For S and XS size platens, load media on the front right-side of the platen.
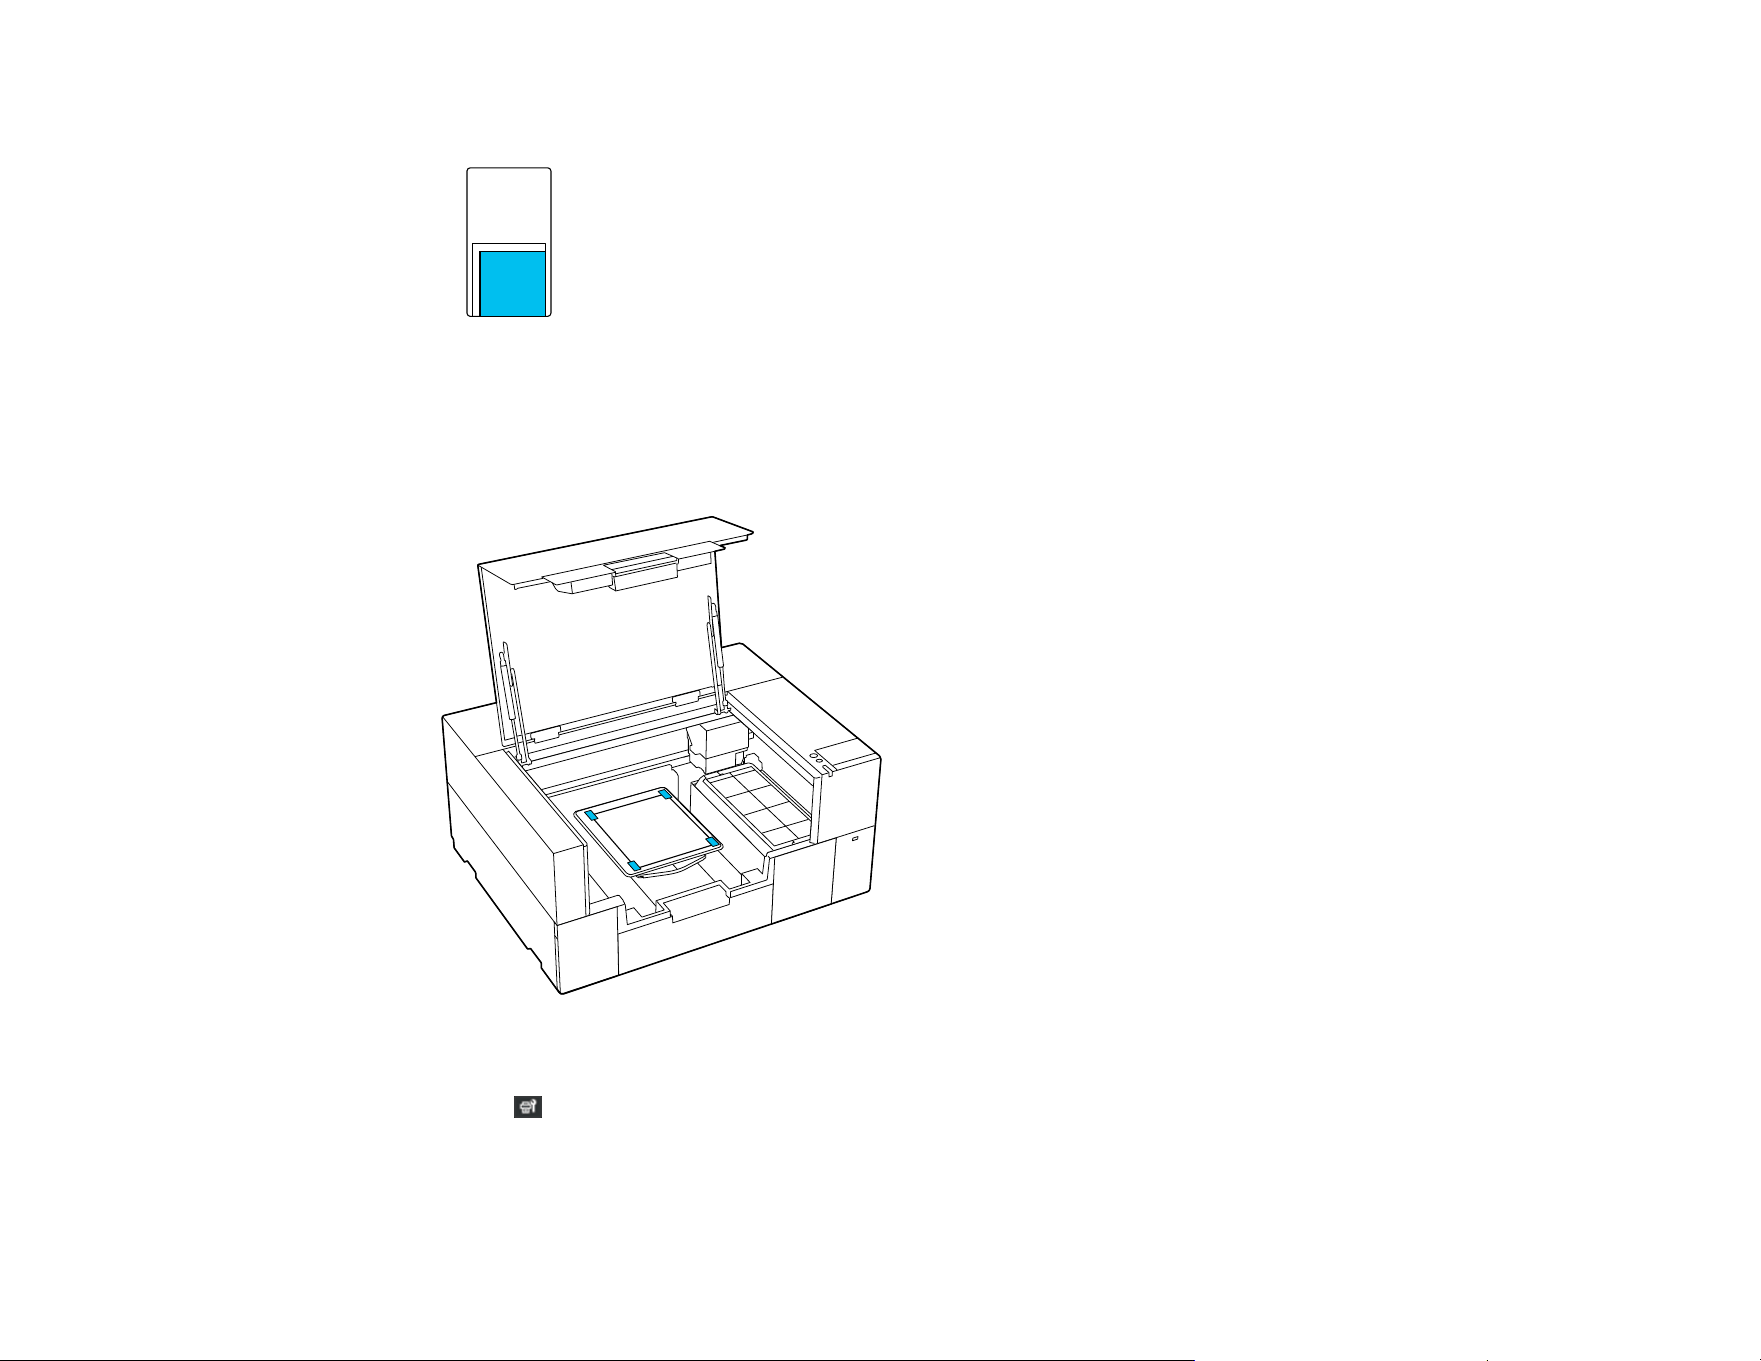
131
• For sleeve platens, load media in front right-side of the raised section.
Note: Make sure to place the media in the correct position for the platen you are using or the platen
may be soiled with ink.
4. Secure the corners with tape.
5. Close the printer cover.
6. Select Maintenance > Print Head Nozzle Check.
7. Confirm that the pattern and platen settings match the type of nozzle check you want to perform.
Select Print Settings and make any changes, if necessary.

132
8. Select Start.
The nozzle check pattern prints onto the paper.
9. Remove the paper and check the printed pattern:
• If there are no gaps in the pattern, the nozzles are clean.
• If there are gaps in the pattern, clean the print head.
10. Replace the platen frame.
Parent topic: Print Head Maintenance
Related tasks
Cleaning the Print Head
Cleaning the Print Head
If printouts are faint or have gaps, you should clean the print head to clear the clogged nozzles. Clean
the print head only if print quality declines or image colors are incorrect, and when a message appears
telling you maintenance is needed. Ink is consumed for all colors or selective color channels, depending
on the cleaning method selected.
You can select from Auto Cleaning or three levels of manual head cleaning:
• Start with Auto Cleaning. If the clogs are not cleared, run manual head cleaning in order from light to
heavy.
• If you cannot clear the clogged nozzles after cleaning with the light or medium level several times,
check the condition of the suction cap and, if necessary, clean it before using the heavy cleaning level.

133
1. Make sure the printer is turned on and then select Maintenance > Head Cleaning on the control
panel.
2. Select a cleaning method:
• If you select Auto Cleaning, go to step 5.
• If you select one of the manual cleaning options, go to the next step.
3. Confirm the nozzle rows for cleaning based off of the check pattern and then select the appropriate
cleaning option:
• Selected Nozzles: Select this option when you see faint printing or gaps in a specific row of
nozzles in the check pattern. You can select multiple nozzle rows, if necessary.
• All Nozzles: Select this option when you see faint printing or gaps in all rows of nozzles in the
check pattern. Go to step 5.
4. On the LCD screen, select the nozzle rows for cleaning and then select OK.
A confirmation message appears.
5. Select Start.
Head cleaning starts. When it is complete, a confirmation message appears.
6. Select Yes to print a nozzle check pattern to confirm that the nozzles are cleared.
If clogging is cleared, you are done. If some nozzles are still clogged, return to step 1 and run
Cleaning (Light). If nozzles are still clogged, run the next higher level of cleaning. If nozzles are still
clogged after cleaning the print head several times, the edges around the print head may be soiled.
Clean around the print head.
Parent topic: Print Head Maintenance
Related tasks
Performing a Nozzle Check
Cleaning the Suction Cap
Cleaning Around the Print Head
Print Head Alignment
A gap between the print head and the T-shirt may cause ink misalignment that produces grainy or blurry
printouts. This occurs due to the environmental temperature and humidity, inertial force of the print head
movements, direction of the print head movement, and thickness and texture of the media. Ink
misalignment can also occur if the platen feed varies for some reason.
To correct this problem, perform the following procedures from the printer's control panel as necessary:

134
Note: Before performing any adjustments, make sure the nozzles are not clogged and clean the print
head, if necessary.
• Standard (when printouts contain vertical lines or faint text)
• Micro Adjust (to fine-tune adjustments after head alignment)
Note: If you are using the medium grooved platen or the sleeve platen, or when the print surface of the
media is not flat, perform Micro Adjust before a Standard adjustment.
Aligning the Print Head
Parent topic: Maintenance
Aligning the Print Head
If your printouts are grainy or blurry and contain vertical lines or faint text, you can realign the print head
for each platen size and each ink color.
Note: Before making any adjustments, select the registered media setting number you wish to save the
settings to. Redo the adjustments if you change the Platen Gap setting to Manual.
1. Make sure the platen and media you want to make adjustments for are loaded.
2. Confirm the currently selected media settings on the printer's LCD screen.
Note: If you want to save the adjustments to a different media setting, select Media on the screen,
and then select Current Settings > Media. Select the media setting you wish to save the
adjustments to and then select the home icon.
3. Select Media on the screen and then select Print Adjustments > Print Head Alignment.
4. Select either Standard or Micro Adjust and then do one of the following:
• If you selected Standard, go to the next step.
• If you selected Micro Adjust, go to step 8.
5. Select the items to adjust according to the color of the media being used and then select Start.
The check pattern is printed.
135
6. Look at each printed check pattern, and choose the number that corresponds to the thinnest line.
Note: You may see more than one row of patterns.
For example, in the image here, -1 is the best line.
7. Do one of the following:
• If you selected Standard, input the adjustment values for all of the lines you selected and then
select OK. A confirmation screen appears.
• If you are selected Micro Adjust, input values from +10 to -10. We recommend first setting both
adjustment values to +1 and -1 and then printing. Make further adjustments based on the value
that improved image quality.
8. If you selected Standard, check the results and select OK to save the adjustments to the media
setting.

136
If image quality has not improved after making adjustments, do one of the following:
• If you selected Standard to make adjustments, try using Micro Adjust.
• If you selected Micro Adjust to make adjustments, try setting the Platen Gap setting to Manual.
Otherwise, you can try printing the with Uni-Directional (Low Speed) setting enabled in Garment
Creator 2. You can also repeat printing or print a job from a USB memory stick and select Uni-
Directional as the Head Move Direction setting from the printer's preview screen.
Parent topic: Print Head Alignment
Related topics
Loading a T-shirt
Shaking and Replacing Ink Packs
See these sections to shake and replace the ink packs.
Ink Pack Safety Instructions
Shaking the Ink Packs
Replacing the Ink Packs
Parent topic: Maintenance
Ink Pack Safety Instructions
• Keep cleaning packs, maintenance box, ink cleaner, pre-treatment liquid and ink packs out of the
reach of children and do not drink the ink.
• Do not shake the ink packs or cleaning ink supply units too forcefully. Doing so may cause them to
leak.
• Do not disassemble the ink packs, maintenance box, or cleaning ink supply unit.
• Wear protective eyewear, gloves, and a mask when performing maintenance.
• Should ink touch your skin or enter your eyes or mouth, immediately take the following actions:
• If fluid touches your skin, wash it off immediately with large volumes of soapy water. Consult a
physician if the skin appears irritated or discolored.
• If fluid gets in your eyes, rinse immediately with water. Failure to observe this precaution could
result in bloodshot eyes or mild inflammation. If problems persist, consult with a physician.
• If swallowed, do not induce vomiting and consult with a physician as soon as possible.
• If fluid gets in your mouth, consult a physician as soon as possible.
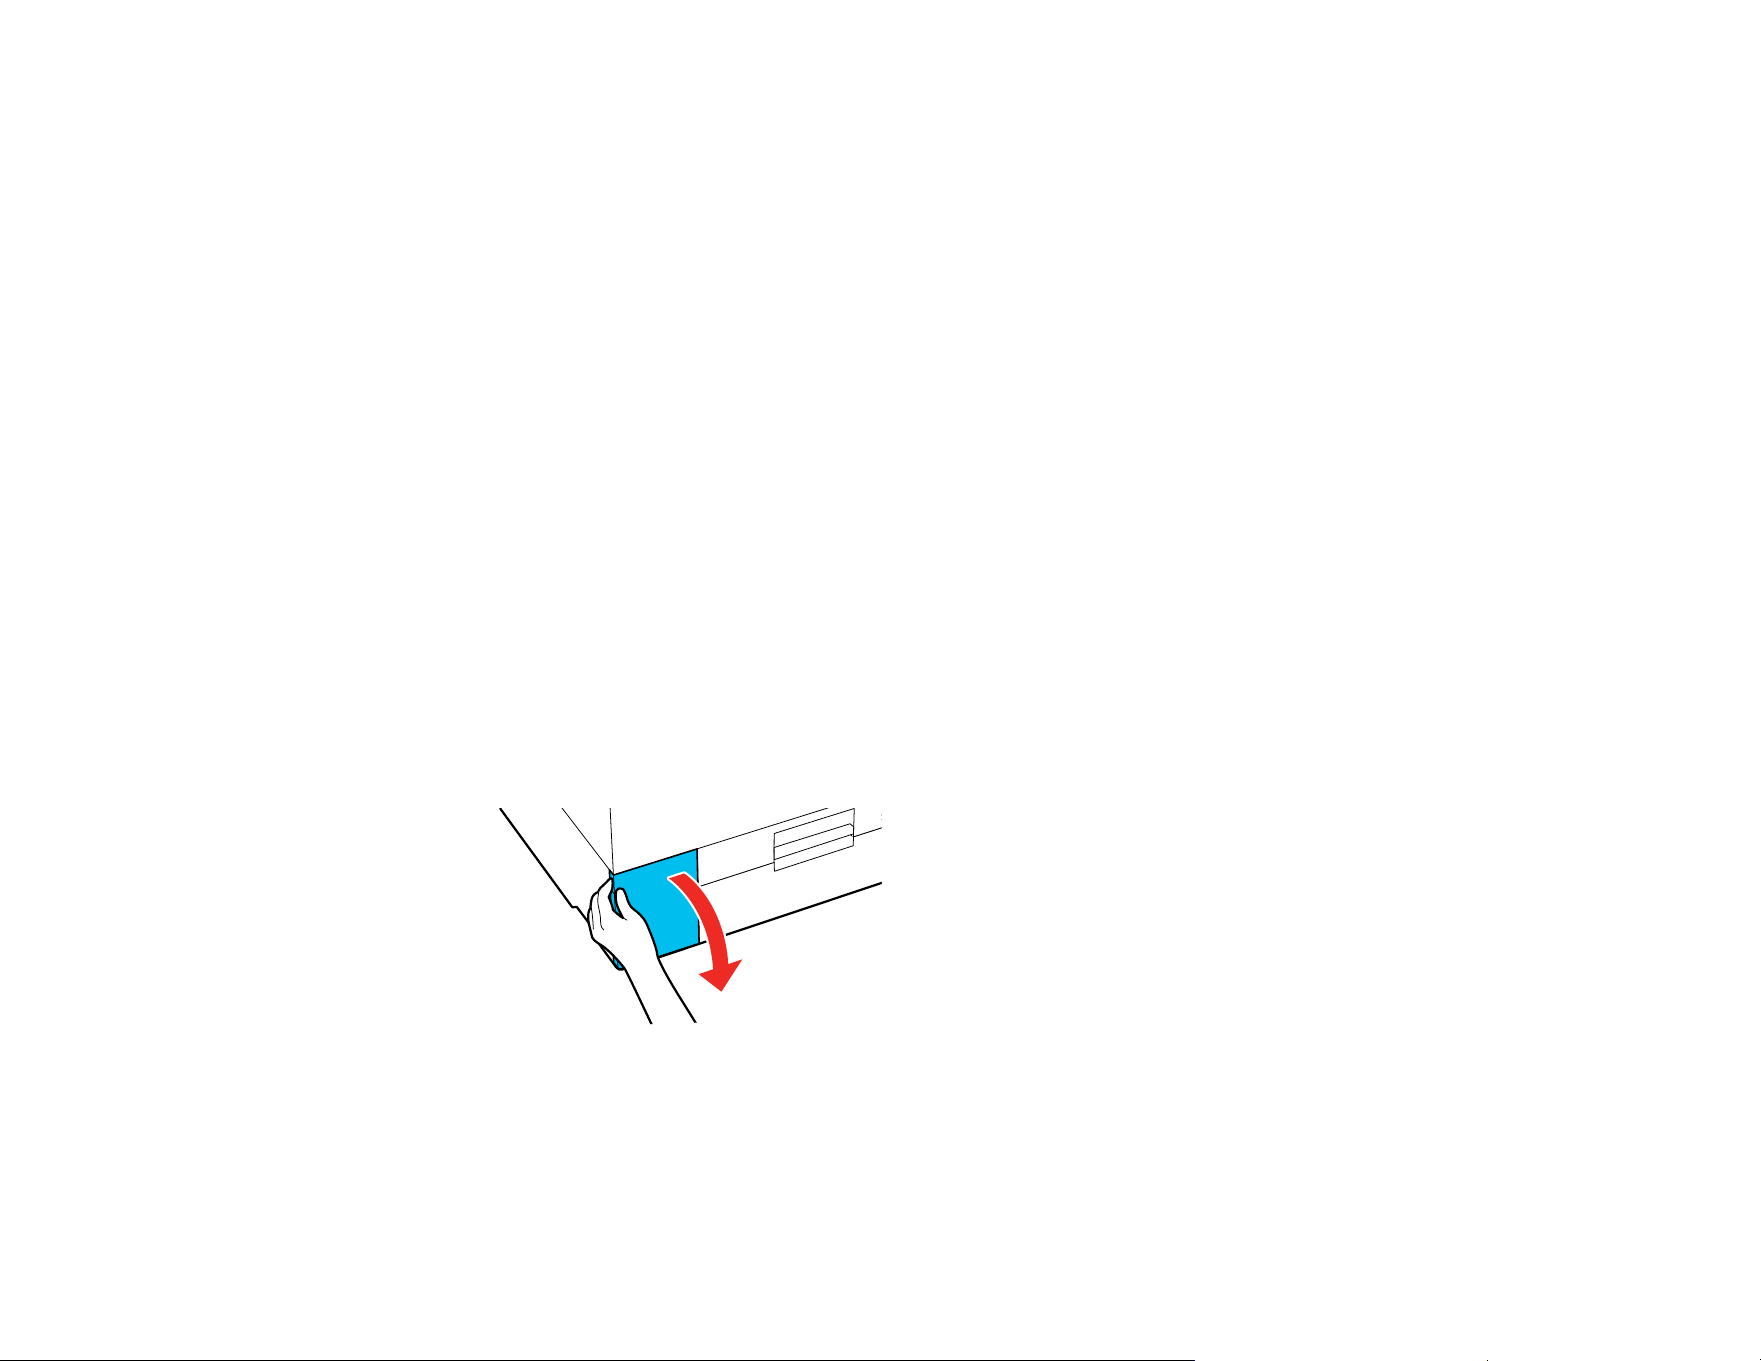
137
Parent topic: Shaking and Replacing Ink Packs
Shaking the Ink Packs
To maintain print quality, periodically shake the ink supply units after installing them, and especially
when you see a message on the printer's LCD screen telling you to shake the ink. Shake the White ink
supply units once a day, and shake the color ink supply units once a month.
Caution: Be careful handling the ink packs as there may be ink around the ink supply port.
Warning: If ink gets on your skin, wash it thoroughly with plenty of soap and water. If ink gets into your
eyes, flush them immediately with water. If ink gets into your mouth, spit it out and see a doctor right
away. Keep ink packs out of the reach of children.
Note: If a message is displayed telling you that it is time to shake the ink, you can view the procedure on
the LCD screen. Select the message on the screen, select it again from the Message List screen, and
then select How To... on the Information screen.
Note: If Close is displayed in the top left corner of the screen, you can close the screen and shake later.
If Close is not displayed, you cannot perform any operations, including printing, until the ink supply unit
has been shaken.
1. Make sure the product is turned on.
2. Open the ink cover.
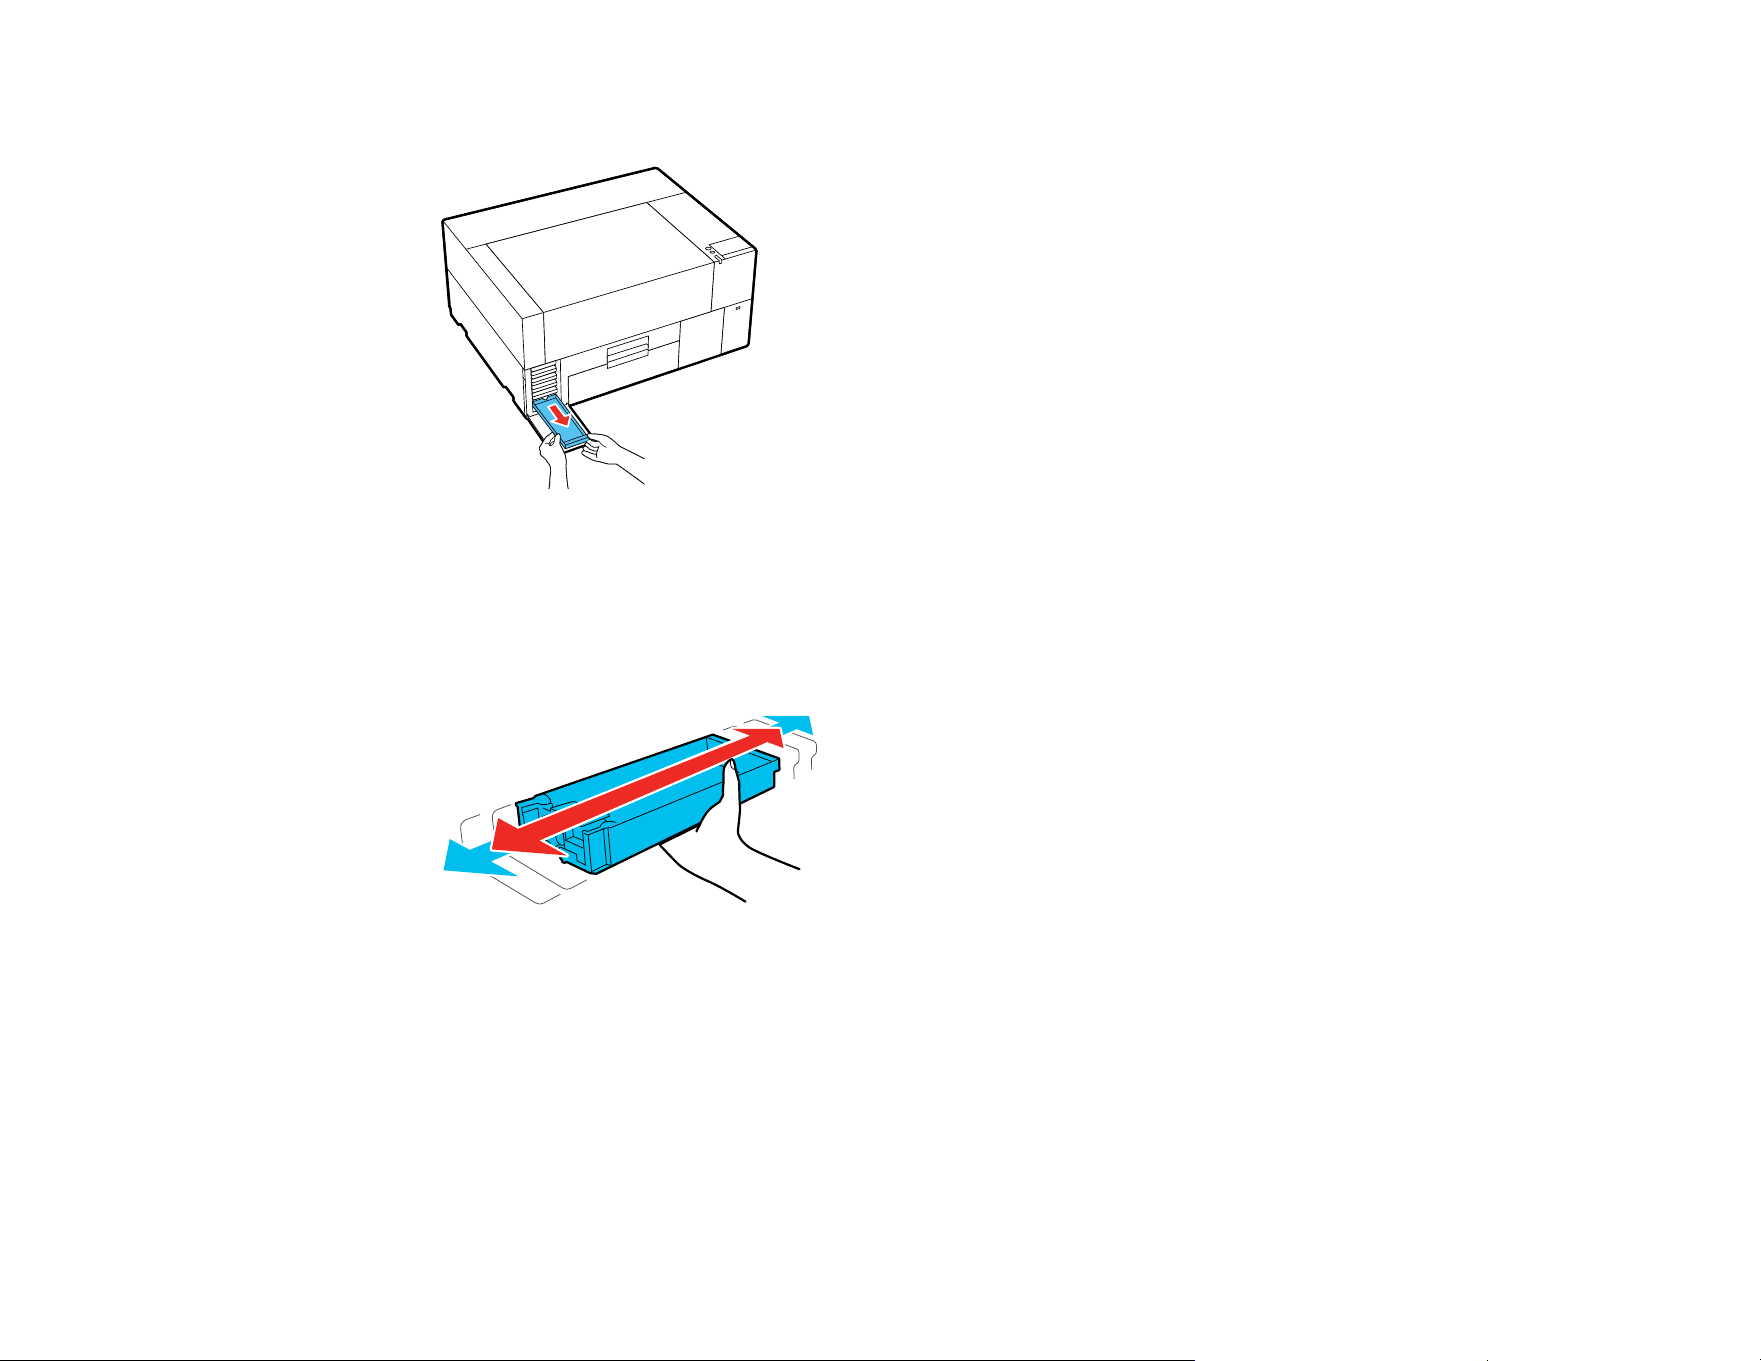
138
3. Pull one of the ink trays out of the printer.
Caution: Place your hand on the bottom of the tray while removing it. If you use only one hand, the
weight of the tray may cause it to fall and damage the ink pack.
4. While the ink pack is in the tray, carefully shake it as shown. Shake white ink packs about 10 times
and shake other color ink packs 5 times.
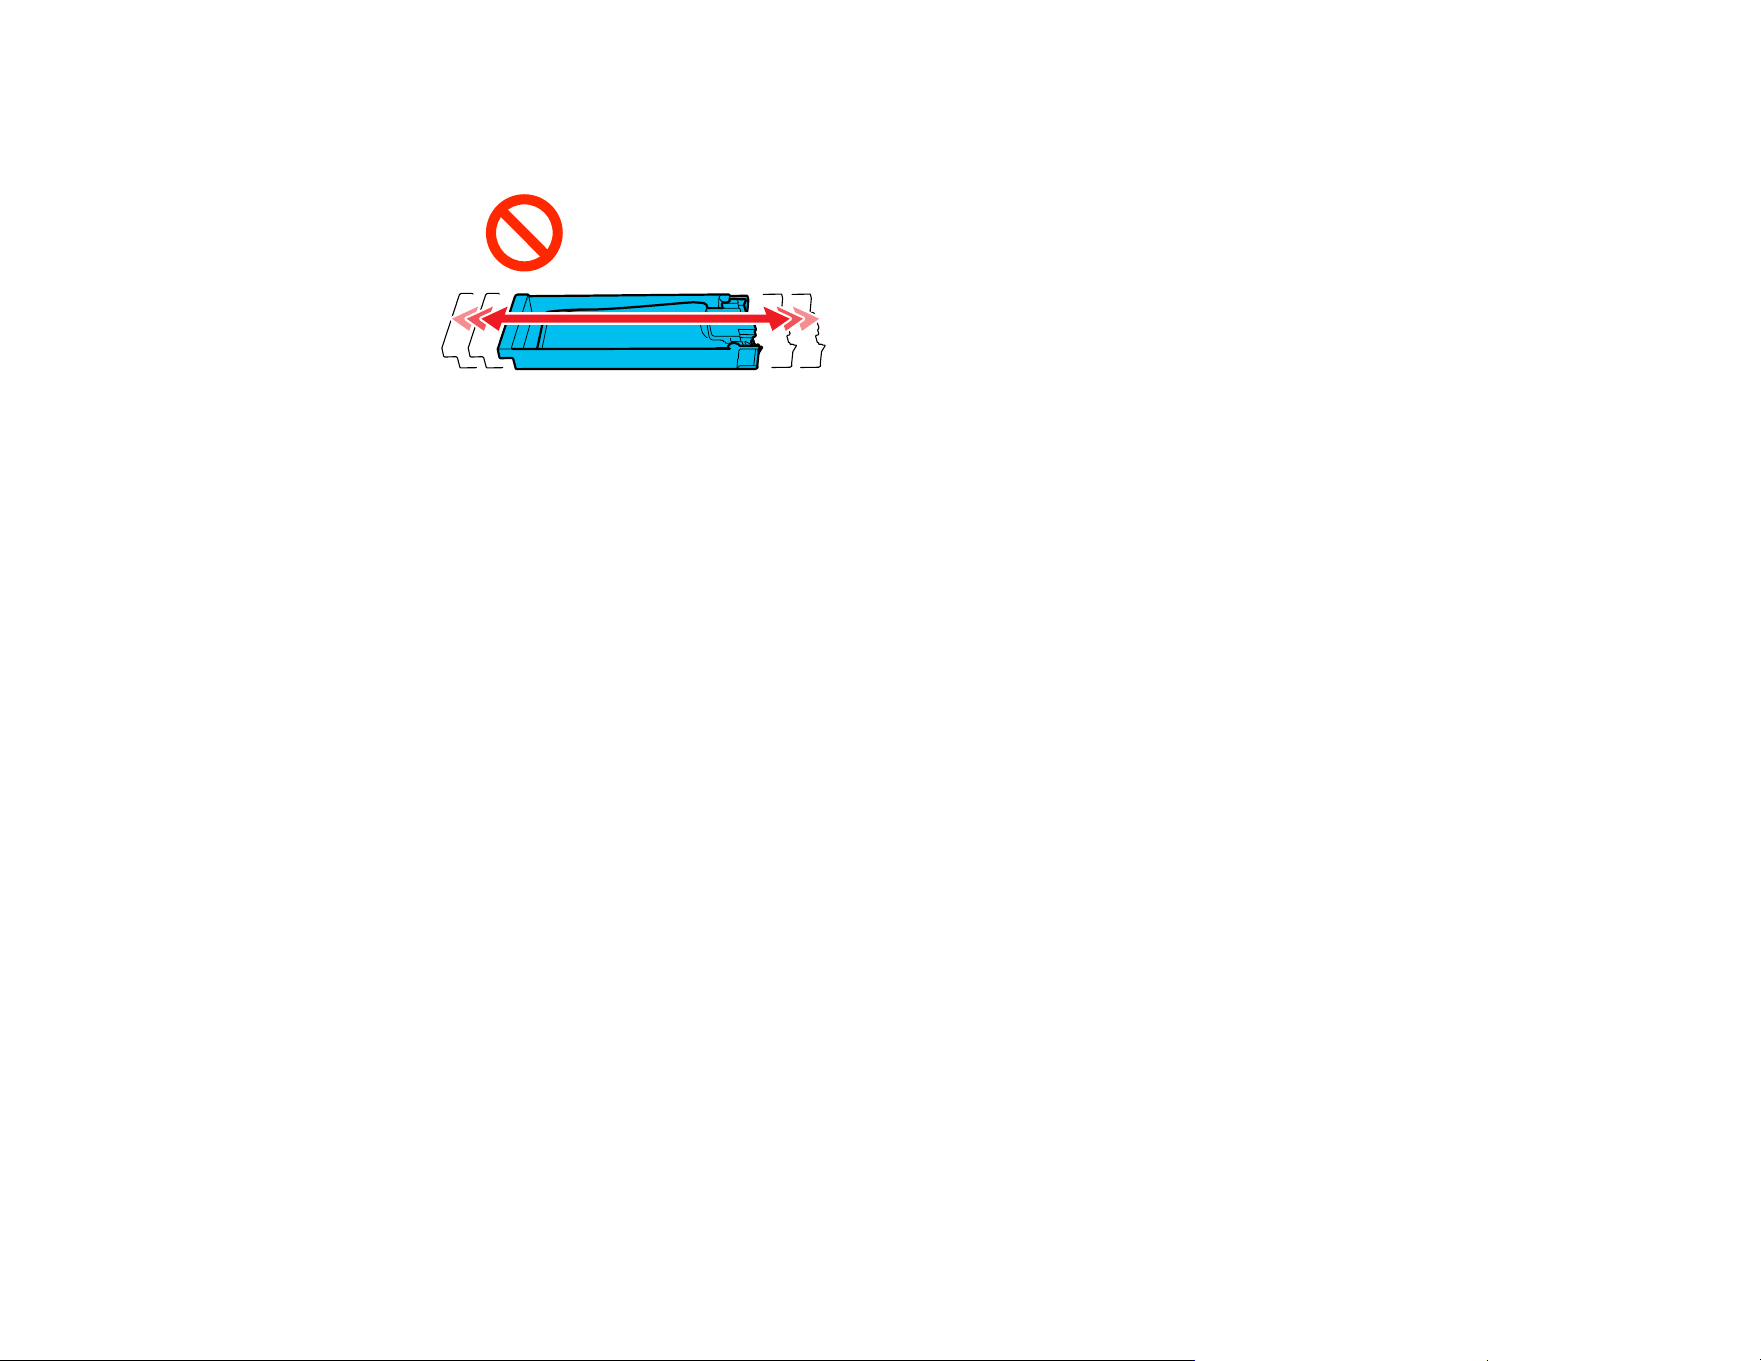
139
Caution: Do not shake or swing the ink pack or the ink tray containing the ink pack with too much
force or the ink may leak.
5. Insert the ink tray back into its slot in the printer.
6. Repeat these steps for any other ink packs that need shaking.
Parent topic: Shaking and Replacing Ink Packs
Related references
Ink Pack Safety Instructions
Handling Ink and Cleaning Packs
Handling White Ink
Replacing the Ink Packs
Make sure you have your replacement ink packs handy before you begin. You must install new ink packs
immediately after removing the old ones.
Note: Replace all expended ink packs. You cannot print if any of the ink packs are expended or any ink
trays are empty. You can replace an expended ink pack during printing, however, colors may look
different depending on how the ink dries. To avoid this, replace the ink pack before printing. You can still
use the removed ink pack for future prints until it is expended.
Note: This printer is designed for use with Epson ink packs only, not third-party ink packs or ink. Other
brands of ink supplies are not compatible and, if described as compatible, may not function properly or
continuously.
The included initial ink packs are designed for reliable printer setup and cannot be used as replacement
ink packs or resold. After setup, the remaining ink is available for printing. Yields are based on ISO
24711 in default mode, printing continuously. Yields vary due to print images, settings, and
temperatures. Printing infrequently or primarily with one color reduces yields. All ink packs must be
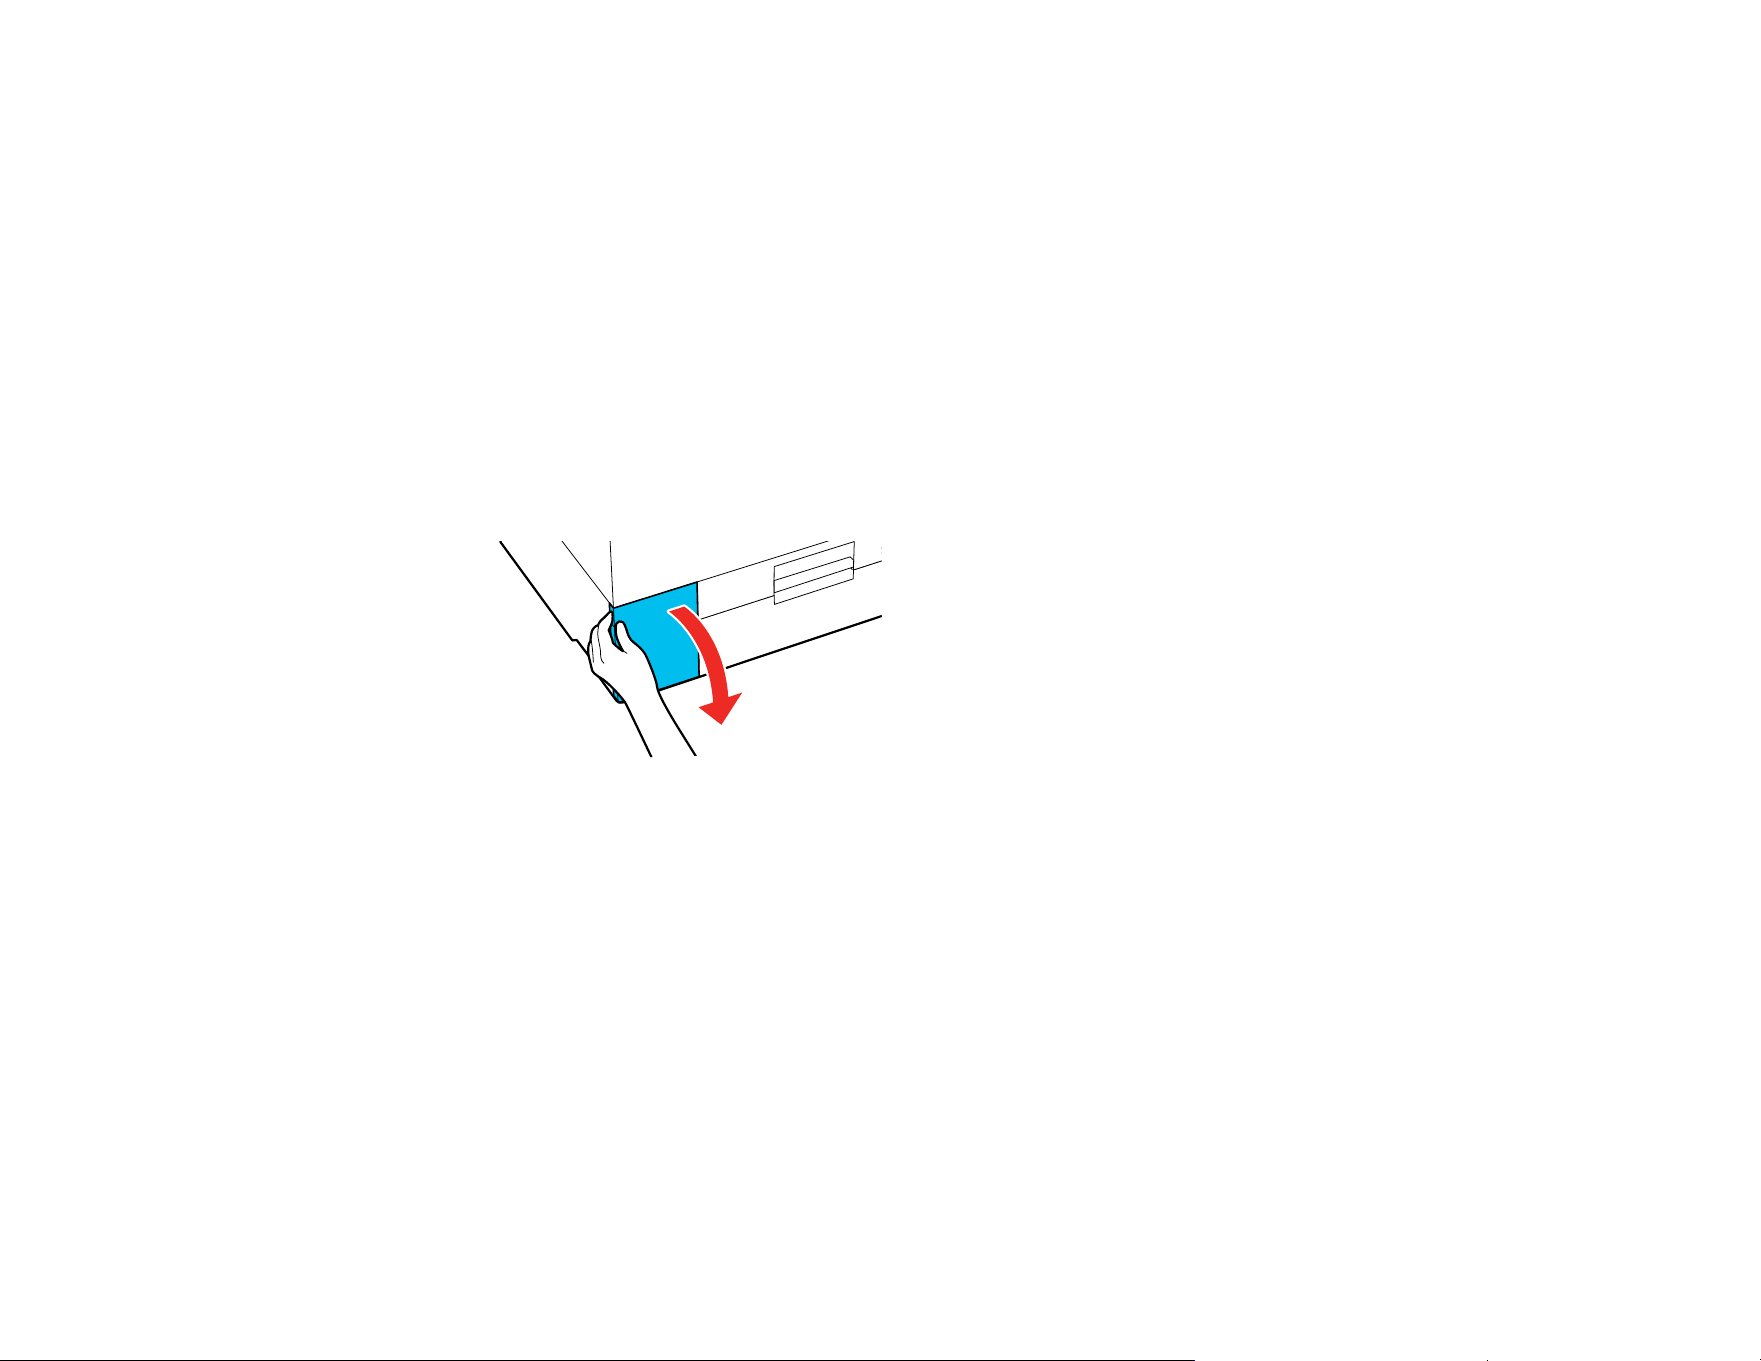
140
installed with ink for printing and printer maintenance. For print quality, some ink remains in replaced ink
packs.
Caution: Leave your old ink packs in the ink unit until you are ready to replace them to prevent the print
head nozzles from drying out. Do not open ink packs until you are ready to install the ink. If you see a
message to replace the White ink packs, replace the ink pack immediately or the printer may be
damaged.
Note: If a message is displayed telling you that it is time to replace an ink supply unit, you can view the
replacement steps on the LCD screen. Select the message on the screen, select it again from the
Message List screen, and then select How To... on the Information screen.
1. Make sure the product is turned on.
2. Open the ink cover.
Note: You can also select How To... on the LCD screen to see the replacement steps.
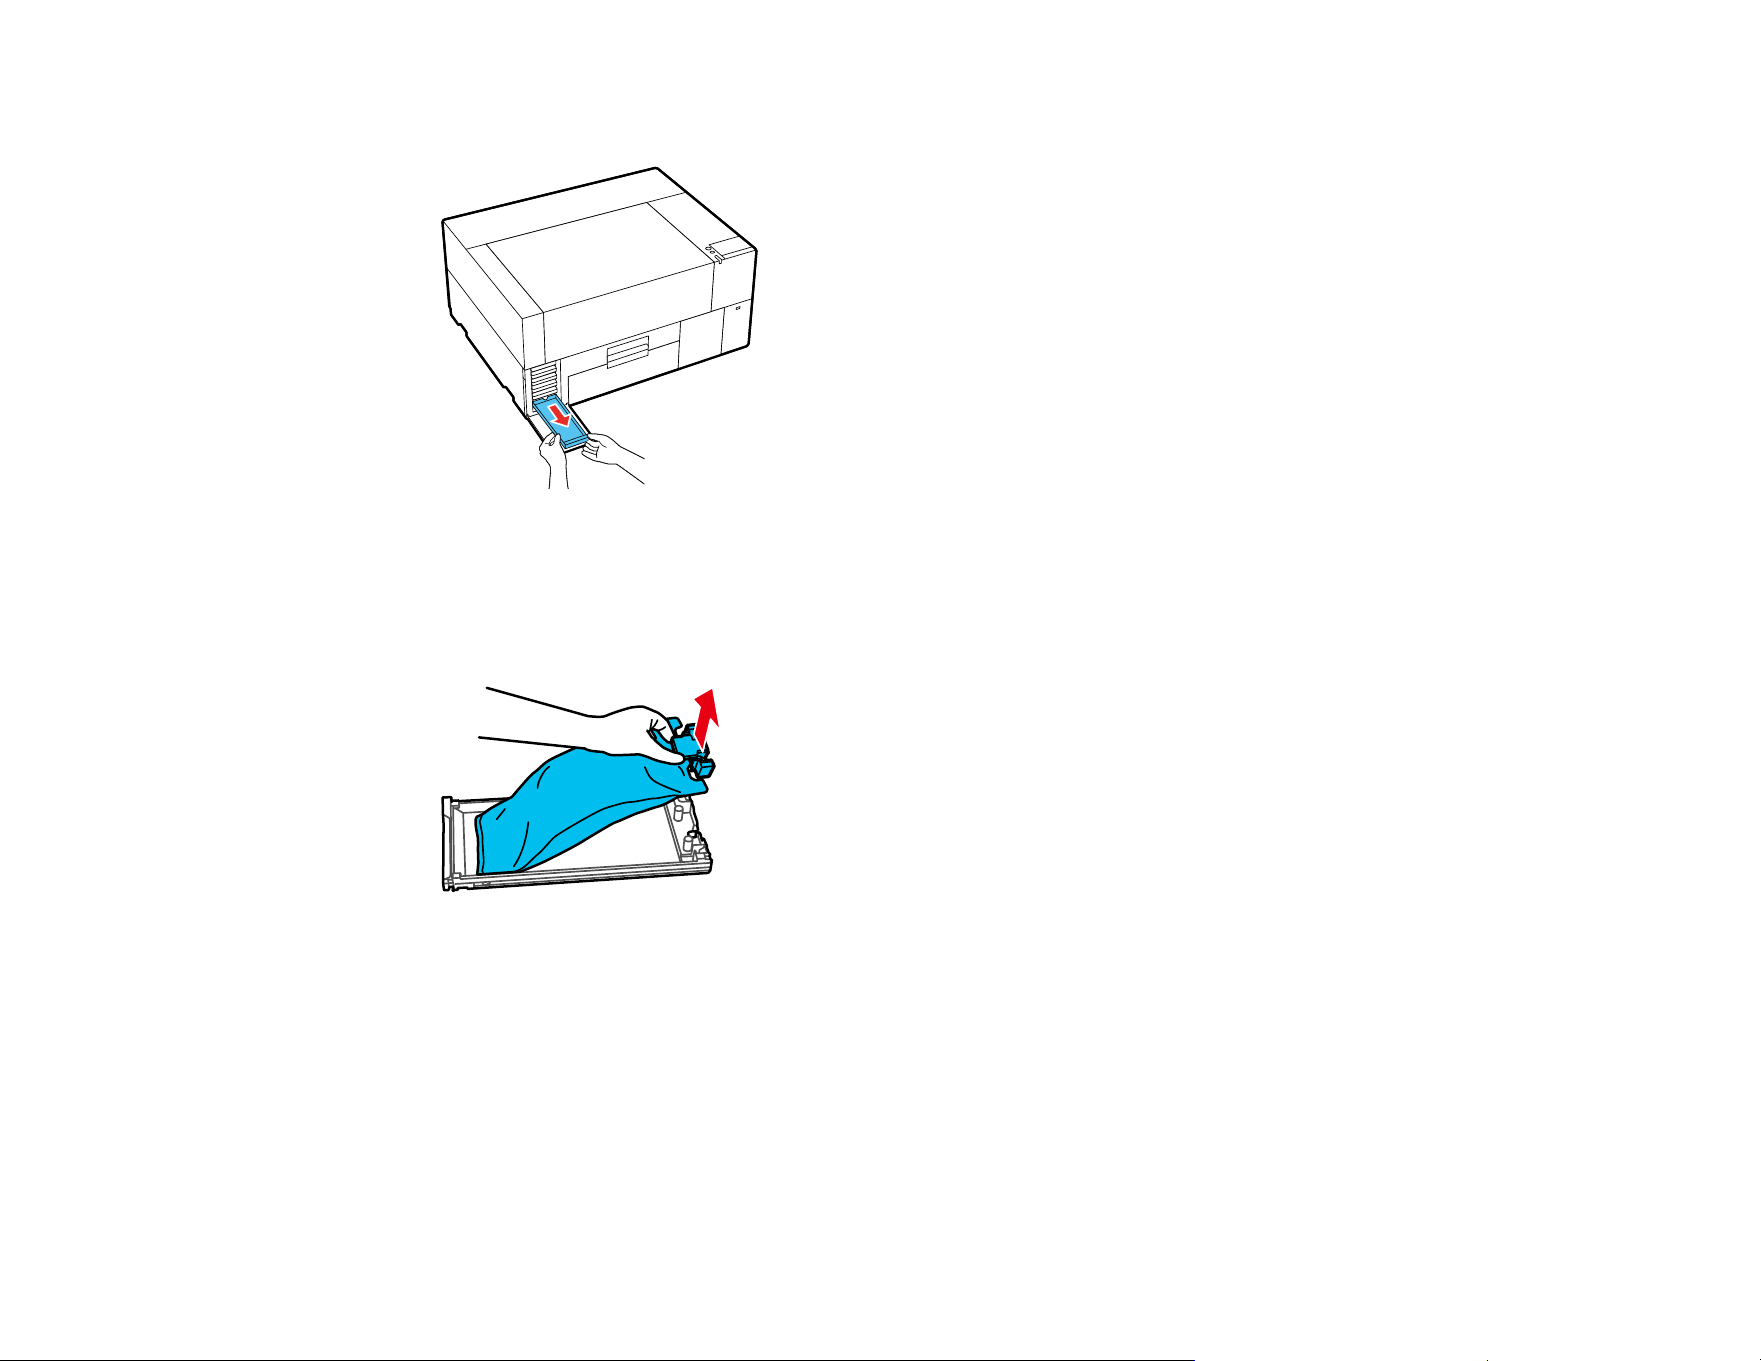
141
3. Pull out the ink tray for the ink pack that you are replacing.
Caution: Place your hand on the bottom of the tray while removing it. If you use only one hand, the
weight of the tray may cause it to fall and damage the ink pack.
4. Lift the expended ink pack out of the tray.
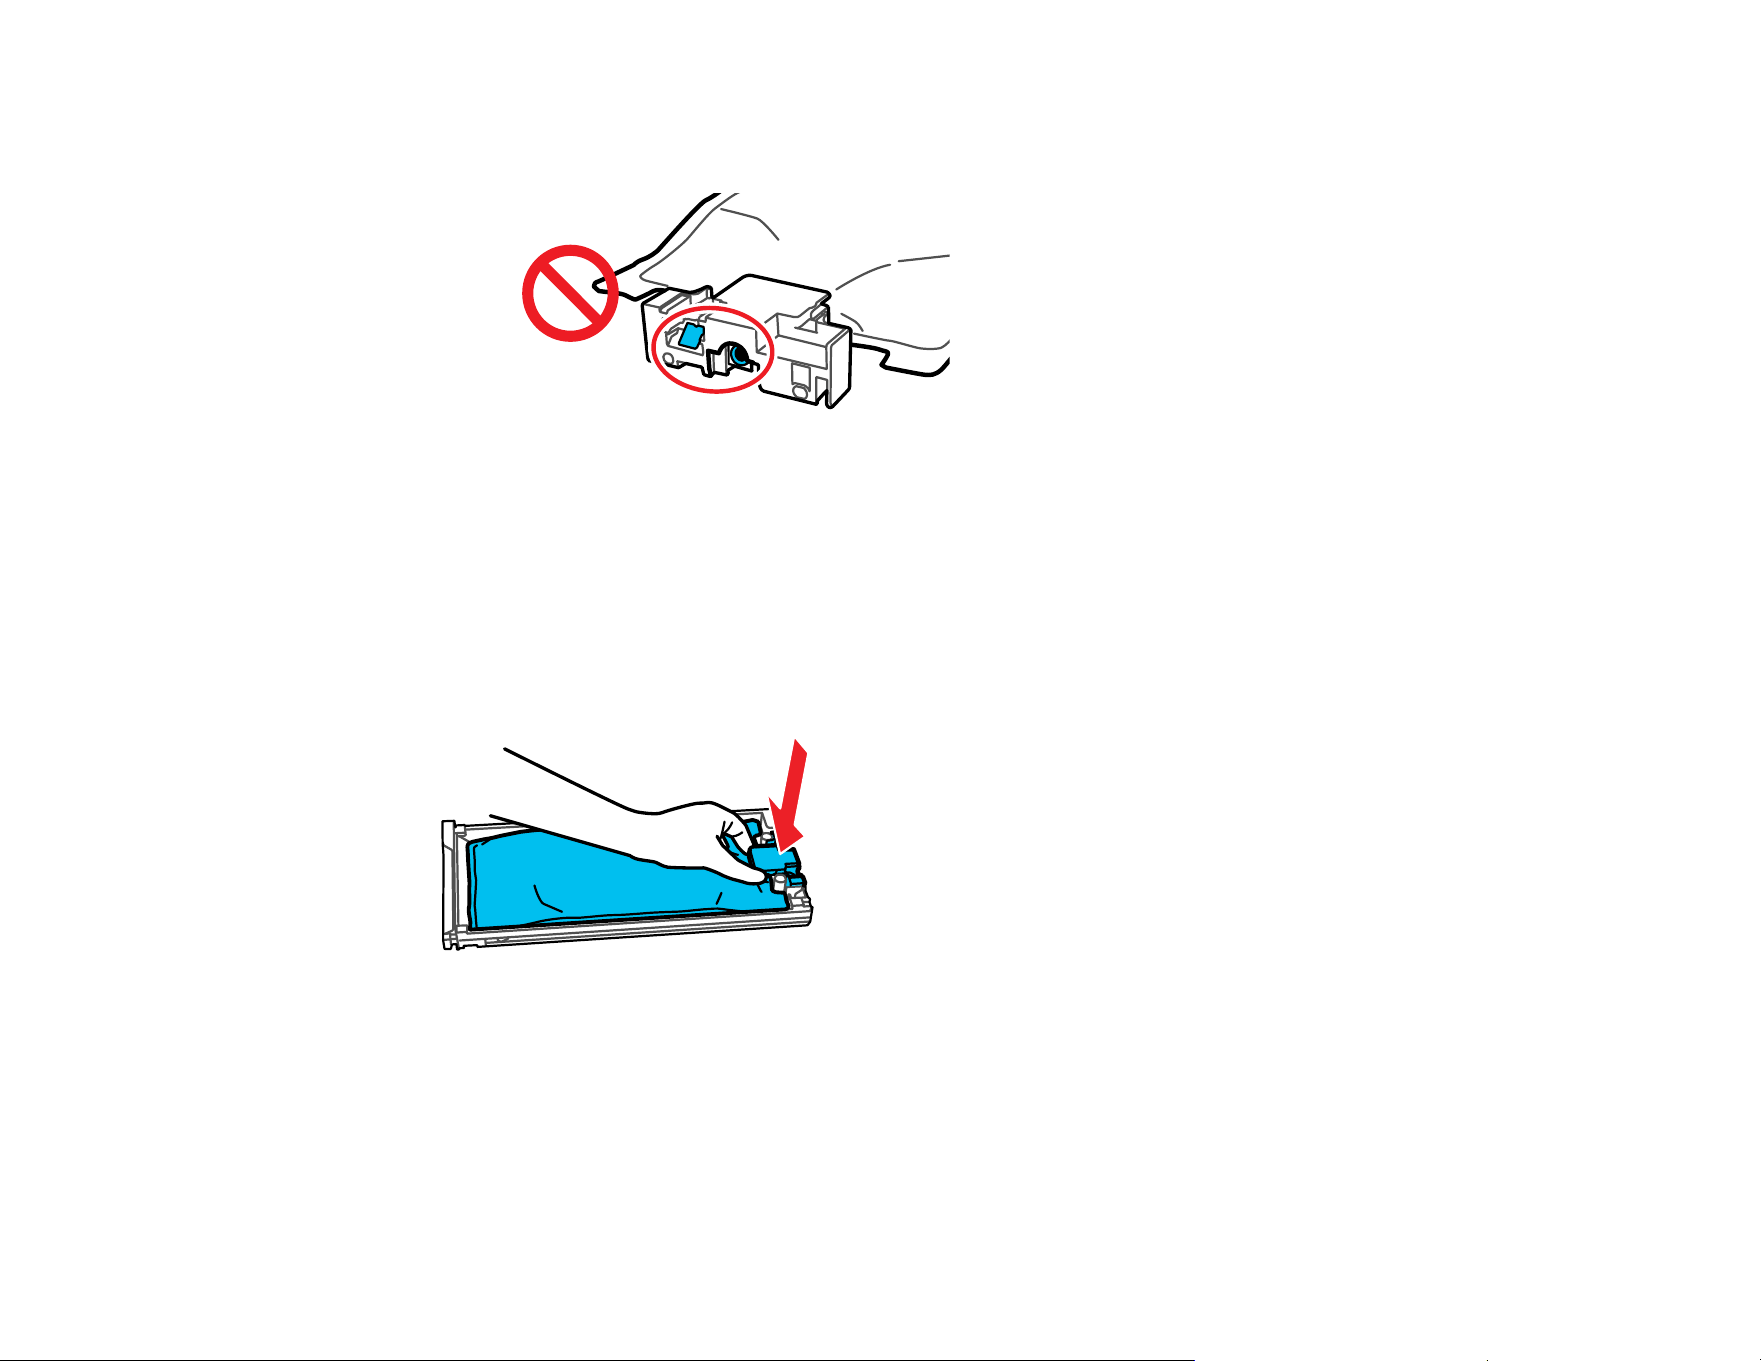
142
Caution: Be careful handling the ink pack as there may be ink around the ink supply port. Do not
touch the areas on the ink pack shown below.
Warning: If ink gets on your skin, wash it thoroughly with plenty of soap and water. If ink gets into
your eyes, flush them immediately with water. If ink gets into your mouth, spit it out and see a doctor
right away. If ink is swallowed, do not induce vomiting and contact a doctor immediately. Keep ink
packs out of the reach of children.
5. Place the new ink pack in the tray and push it down as shown.
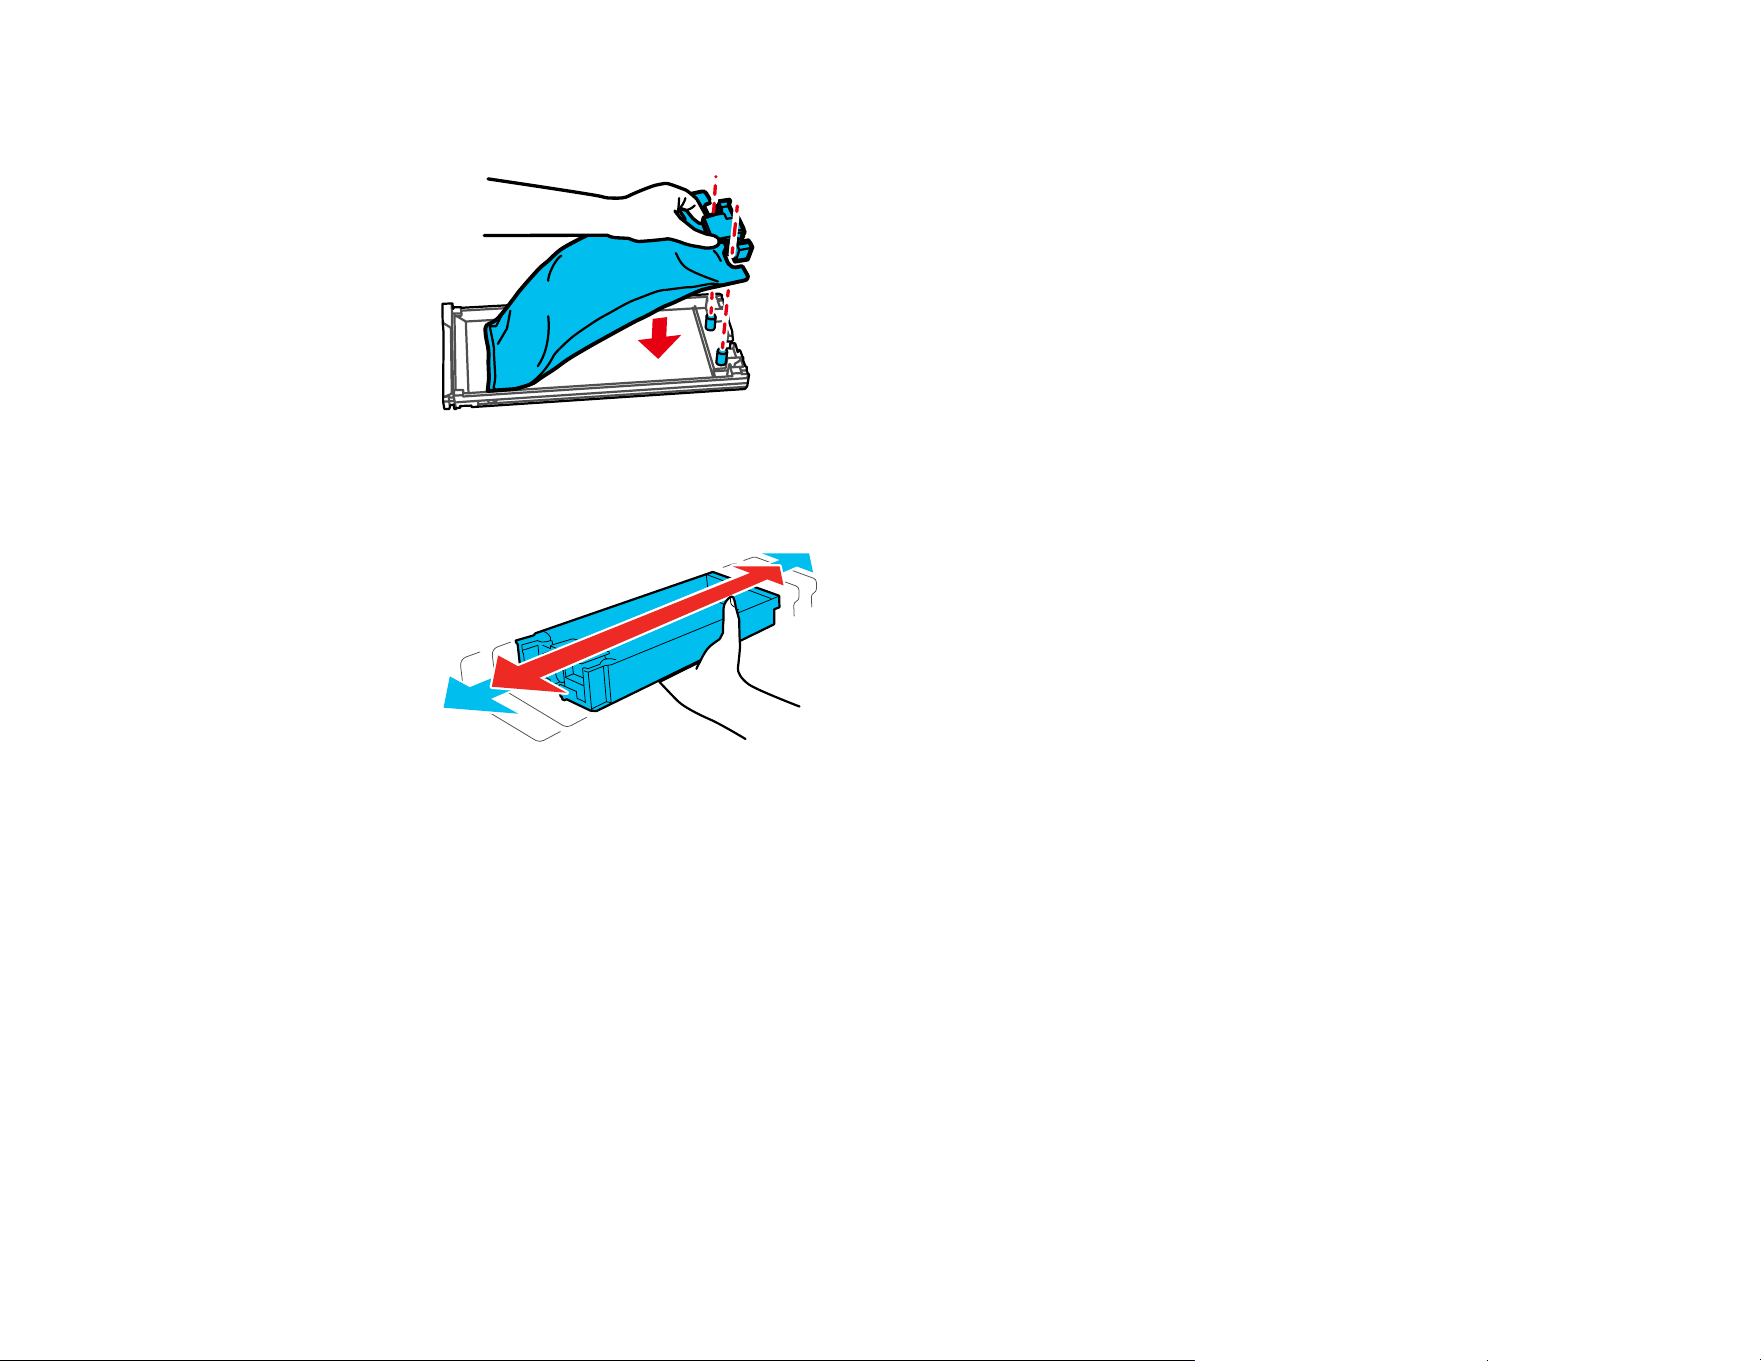
143
Caution: Make sure the ink pack fits onto the pegs and is aligned with the top of the tray.
6. While the ink pack is in the tray, carefully shake it as shown. Shake white ink packs about 50 times
and shake other color ink packs 20 times.
7. Match the color on the ink pack label with the color for the slot on the printer, then insert the ink tray
into the slot and push it in firmly.
Caution: The ink packs are keyed to fit into the correct color slot. If you cannot insert the ink tray all
the way, do not force it. Make sure the ink pack color matches the color for the slot on the printer.
8. Repeat these steps for any other ink packs that need replacing.
Note: Dispose of used ink packs carefully. Do not take the used ink pack apart or try to refill it.
9. When you are done replacing ink packs, close any open ink covers on the printer.

144
10. Follow the instructions on the LCD screen to begin ink charging.
Note: Do not turn off the printer, open any covers, or try to perform any other operations while the
printer is charging or you'll waste ink.
Your product begins charging the ink delivery system. A message appears on the LCD screen when
ink replacement is complete.
Parent topic: Shaking and Replacing Ink Packs
Related references
Optional Equipment and Replacement Parts
Ink Pack Safety Instructions
Handling Ink and Cleaning Packs
Handling White Ink
Replacing the Maintenance Box
The maintenance box stores ink that gets flushed from the system during maintenance operations such
as head cleaning. Replace the maintenance box when you see a message on the LCD screen to do so.
Note: You can also replace the maintenance box at any time by selecting Maintenance > Replace
Maintenance Parts > Maintenance Box.
Caution: When replacing the maintenance box, always wear the gloves included in the maintenance kit.
1. Select How to... to view the steps and follow the on-screen instructions.
2. Dispose of the maintenance box according to your local laws and statutes.
Note: Do not touch the IC chip on the maintenance box. Doing so may prevent normal operation
and printing. Do not tilt the maintenance box until you have placed the used maintenance box in the
bag and sealed it firmly closed. Failure to observe this precaution could cause ink to leak.
Parent topic: Maintenance
Related references
Optional Equipment and Replacement Parts
Related topics
Disposing of Used Consumables and Optional Parts

145
Replacing the Head Maintenance Set
Replace the head maintenance set when you see a message on the LCD screen to do so.
Note: The printer tracks amounts consumed using the replacement counter and displays a message
when the counter reaches the warning level. If you replace the head maintenance set according to the
message, the counter is cleared automatically. If you replace it before the message is displayed, make
sure to initiate replacement from the printer's menu ( Maintenance > Replace Maintenance Parts >
Head Maintenance Set). Otherwise, the replacement counter will not operate correctly.
1. Turn on the printer, if necessary.
2. Do one of the following:
• If the message appears on the LCD screen telling you the head maintenance set is at the end of
its service life, select OK.
• If you want to replace the head maintenance set before the message appears, select
Maintenance > Replace Maintenance Parts > Head Maintenance Set.
3. Select Start.
The print head moves to the maintenance position and a confirmation message appears.
Caution: Do not move the print head manually. A malfunction may occur.
4. Select How To... to view the steps and follow the on-screen instructions.
Note: A buzzer sounds 10 minutes after the print head moves to the maintenance position. Select
OK to continue cleaning. The buzzer sounds again after 10 minutes. Nozzles can be clogged if more
time passes, so finish cleaning as soon as possible.
5. Replace all of the parts of the head maintenance set in the following order:
• Capping station
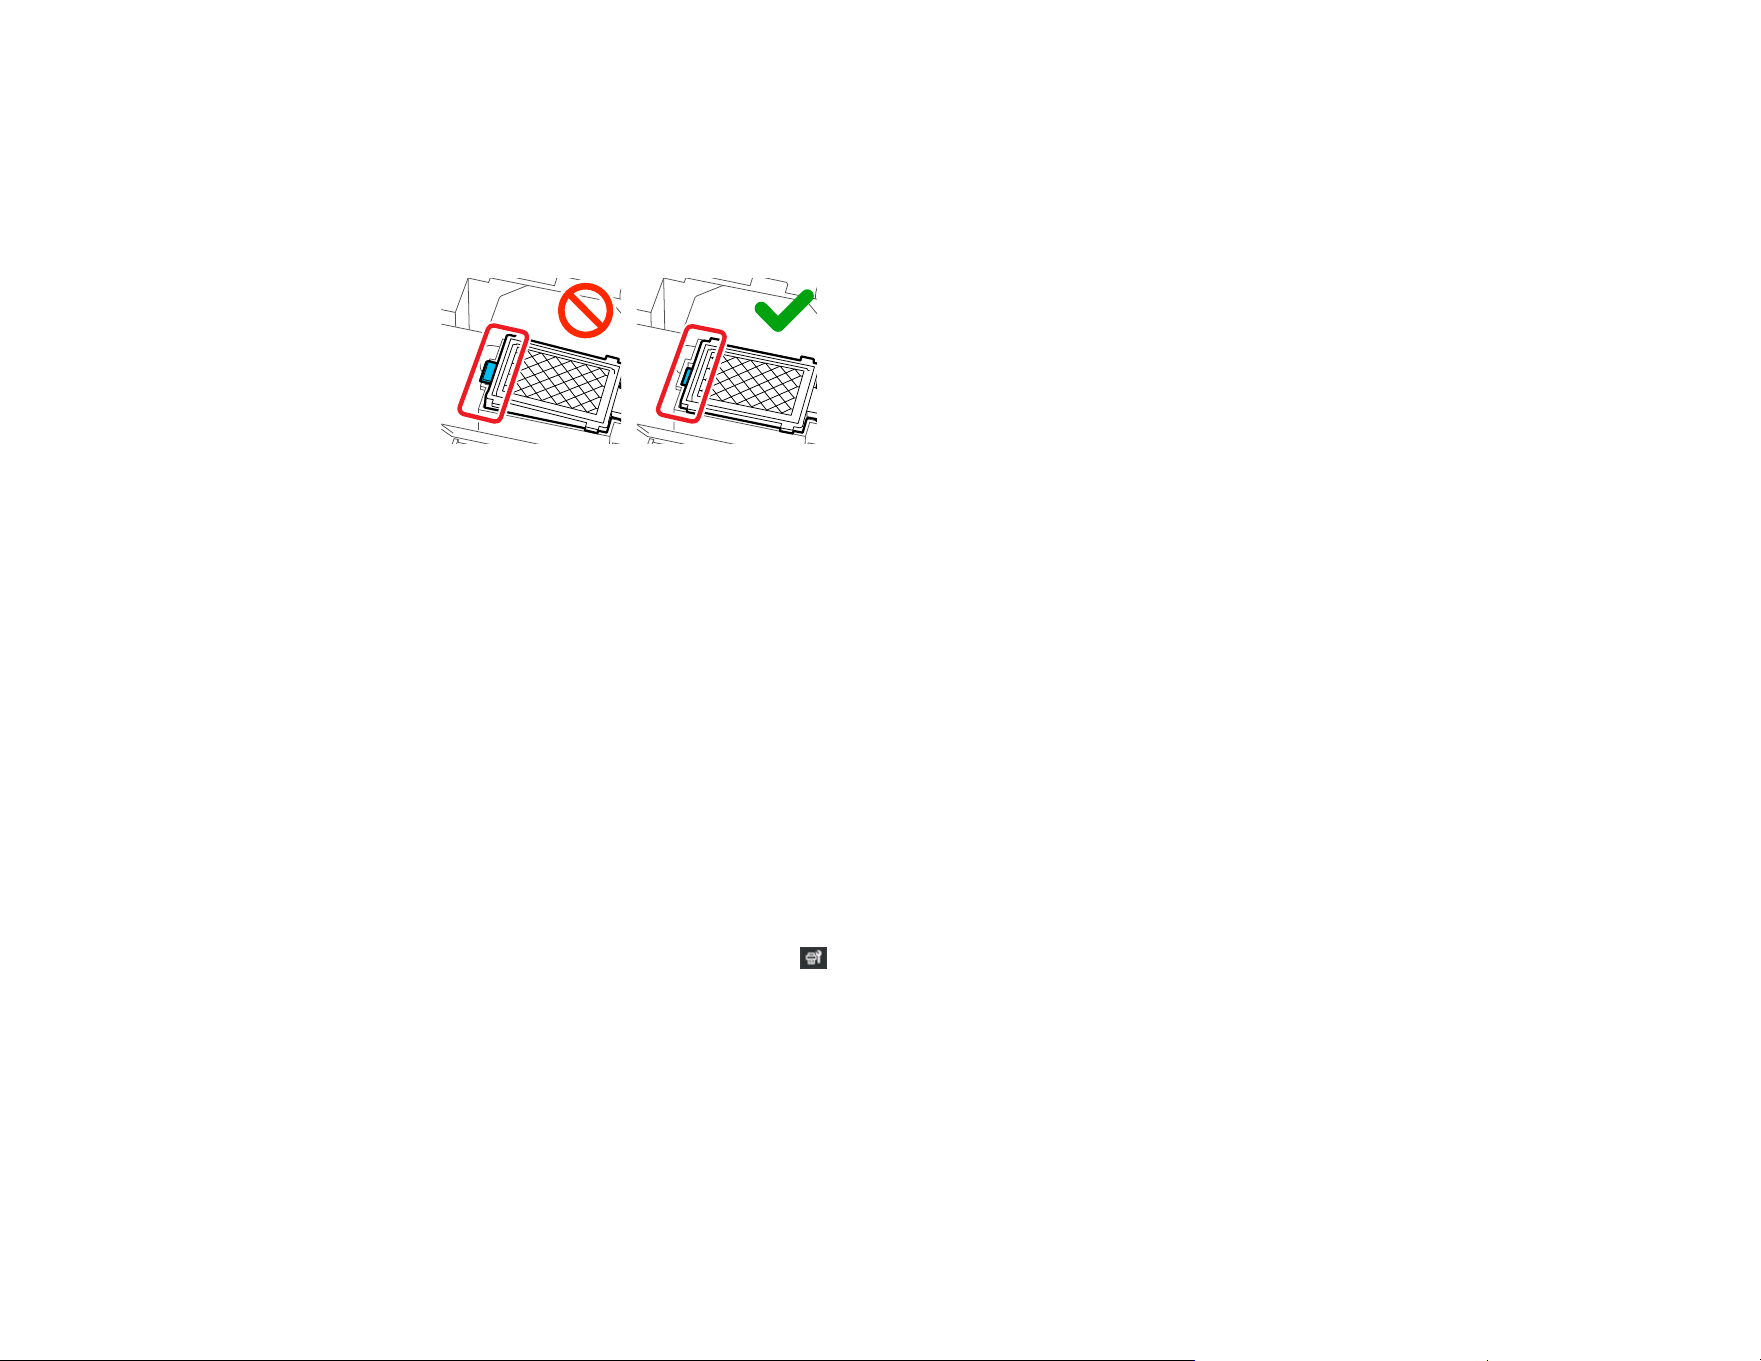
146
• Flushing pad
Caution: Lift the flushing pad carefully as ink could spray out if it is raised with too much force. After
replacing the flushing pad, make sure that it is installed correctly. If the hooks are raised when
printing, the print head could be damaged.
Note: You cannot print if the parts are not replaced.
Parent topic: Maintenance
Related references
Optional Equipment and Replacement Parts
Related topics
Disposing of Used Consumables and Optional Parts
Replacing the Wiper Unit
Replace the head wiper unit when you see a message on the LCD screen to do so.
Note: The printer tracks amounts consumed using the replacement counter and displays a message
when the counter reaches the warning level. If you replace the wiper unit according to the message, the
counter is cleared automatically. If you replace it before the message is displayed, make sure to initiate
replacement from the printer's menu ( Maintenance > Replace Maintenance Parts > Wiper Unit).
Otherwise, the replacement counter will not operate correctly.
1. Turn on the printer, if necessary.
2. Do one of the following:
• If the message appears on the LCD screen telling you the wiper unit is at the end of its service life,
select OK.

147
• If you want to replace the wiper unit before the message appears, select Maintenance >
Replace Maintenance Parts > Wiper Unit.
3. Select Start.
4. Select How To... to view the steps and follow the on-screen instructions.
Parent topic: Maintenance
Using the Ink Cleaning Solution
Use the ink cleaning solution to clean around the suction cap and print head, clean the platen without a
grip pad, clean the sensor cover, and clean inside the printer.
Caution: Always wear gloves when using ink cleaning solution, and follow these safety instructions:
• Use the ink cleaning solution to clean only the parts mentioned above or you could damage the
printer.
• If cleaning solution gets on to your skin, immediately wash it off using plenty of soap and water.
Consult a physician if the skin appears irritated or discolored.
• If cleaning solution gets in your eyes, rinse immediately with water. Failure to observe this precaution
could result in bloodshot eyes or mild inflammation. If problems persist, consult a physician.
• If cleaning solution gets in your mouth, consult a physician immediately.
• If cleaning solution is swallowed, do not induce vomiting and consult a physician immediately. If
vomiting is induced, fluid may get caught in the trachea which can be dangerous.
• Depending on the usage and storage environment, the ink cleaning solution may change color after
opening.
• If you notice that the cleaning solution has changed color or emits a bad odor, stop using it and open a
new maintenance kit.
• Close the cleaning solution lid securely after use, and store it out of reach of children. Avoid storing it
in locations subject to high temperatures, high humidity, and direct sunlight.
• Do not use ink cleaning solution that has already been used to clean something else. Using dirty ink
cleaning solution causes stains.
• Used ink cleaning solution is classified as industrial waste. Dispose of it in the same way as waste ink.
• Wash your hands thoroughly after using the cleaning solution.
1. Remove the lid and the airtight seal from the ink cleaning solution bottle.
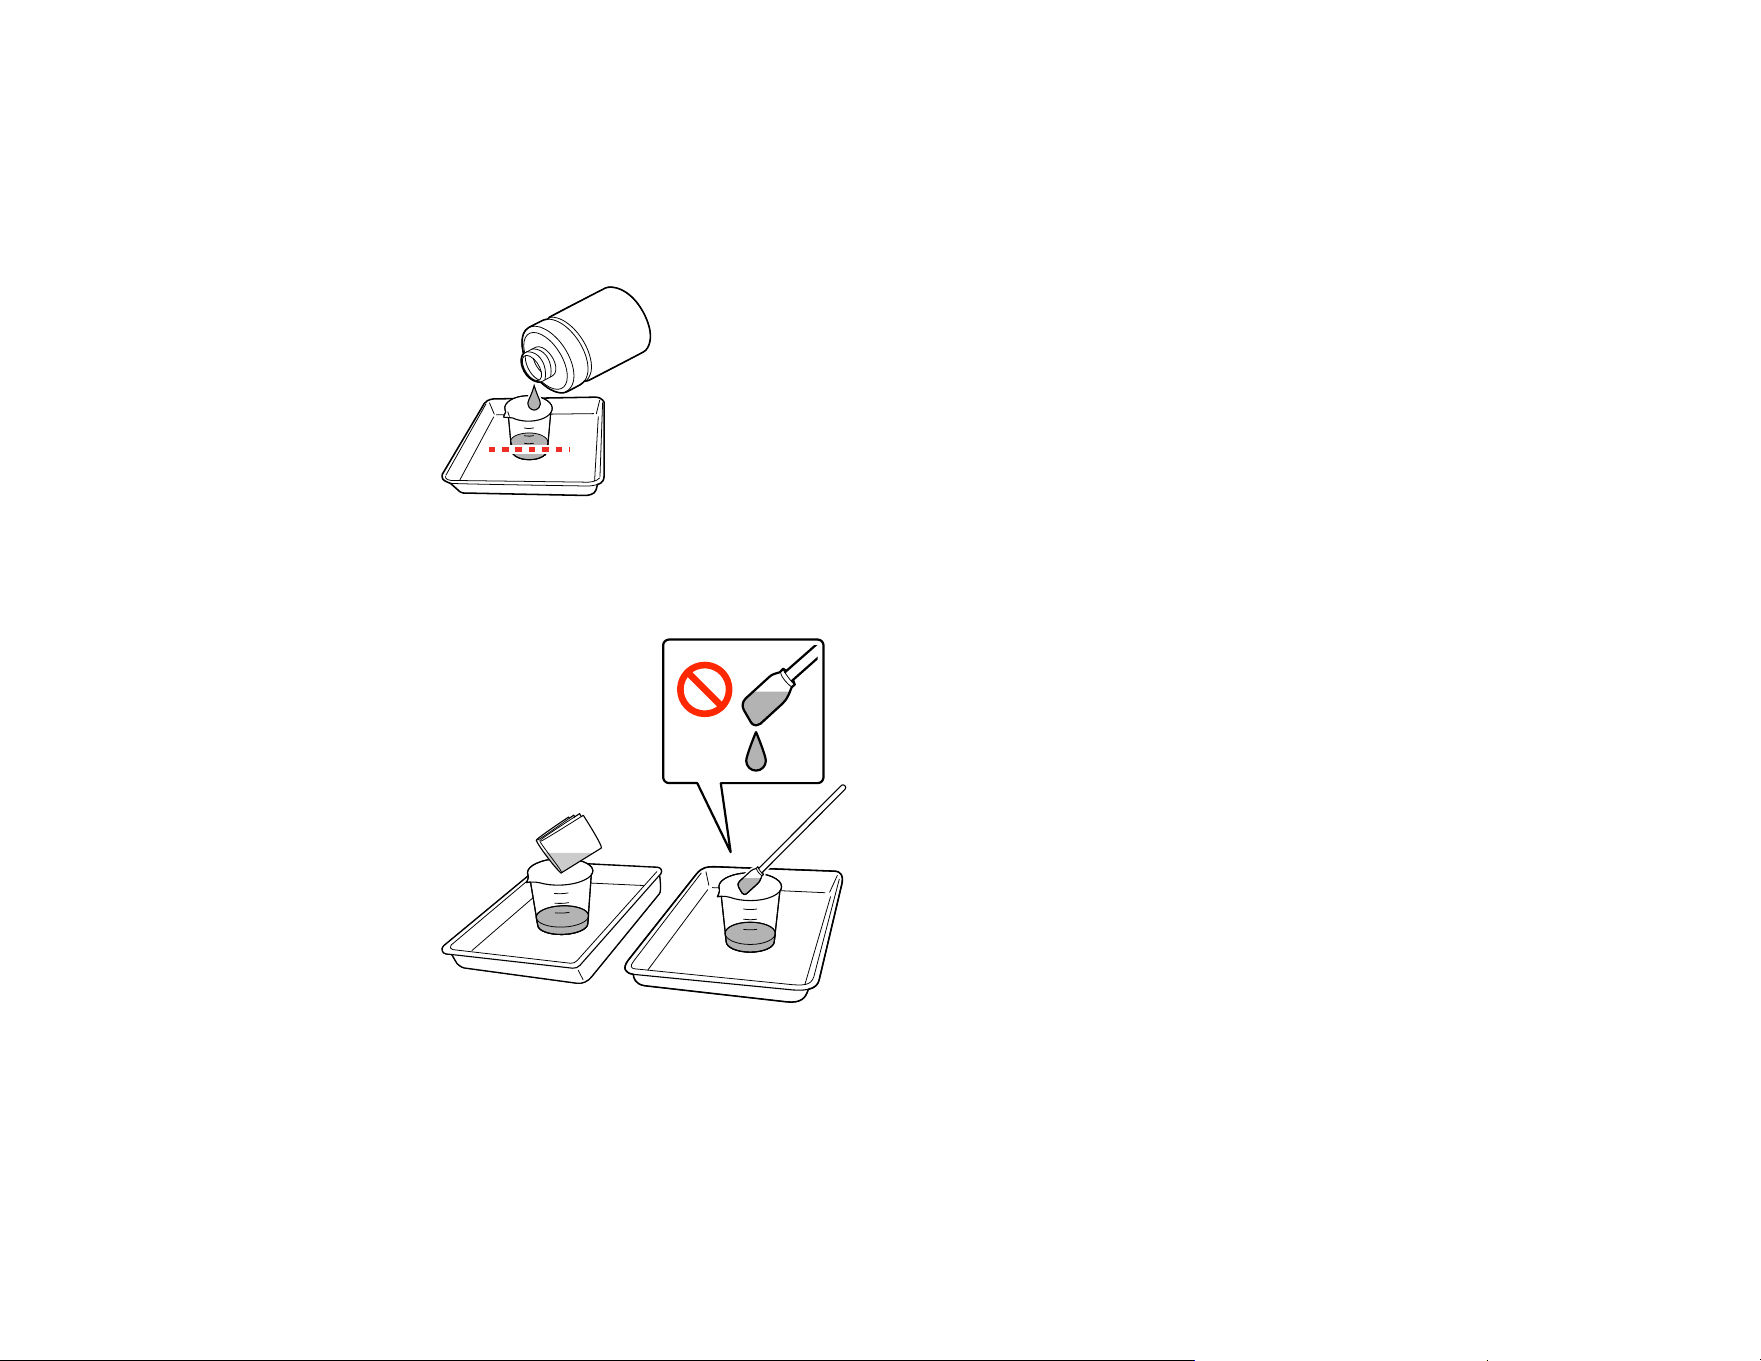
148
2. Place the cup supplied with the maintenance kit on a tray and pour a small amount of ink cleaning
solution into the cup.
Note: If you are cleaning the sensor cover, pour about 0.15 ounce (5 ml) into the cup (about halfway
to the bottom line).
3. Place a cleaning swab or cleaning wipe in the ink cleaning solution and let it soak in. Make sure that
the solution does not drip from the cleaning swab or cleaning wipe when you remove it from the cup.
Parent topic: Maintenance
Related tasks
Cleaning the Suction Cap
Cleaning Around the Print Head
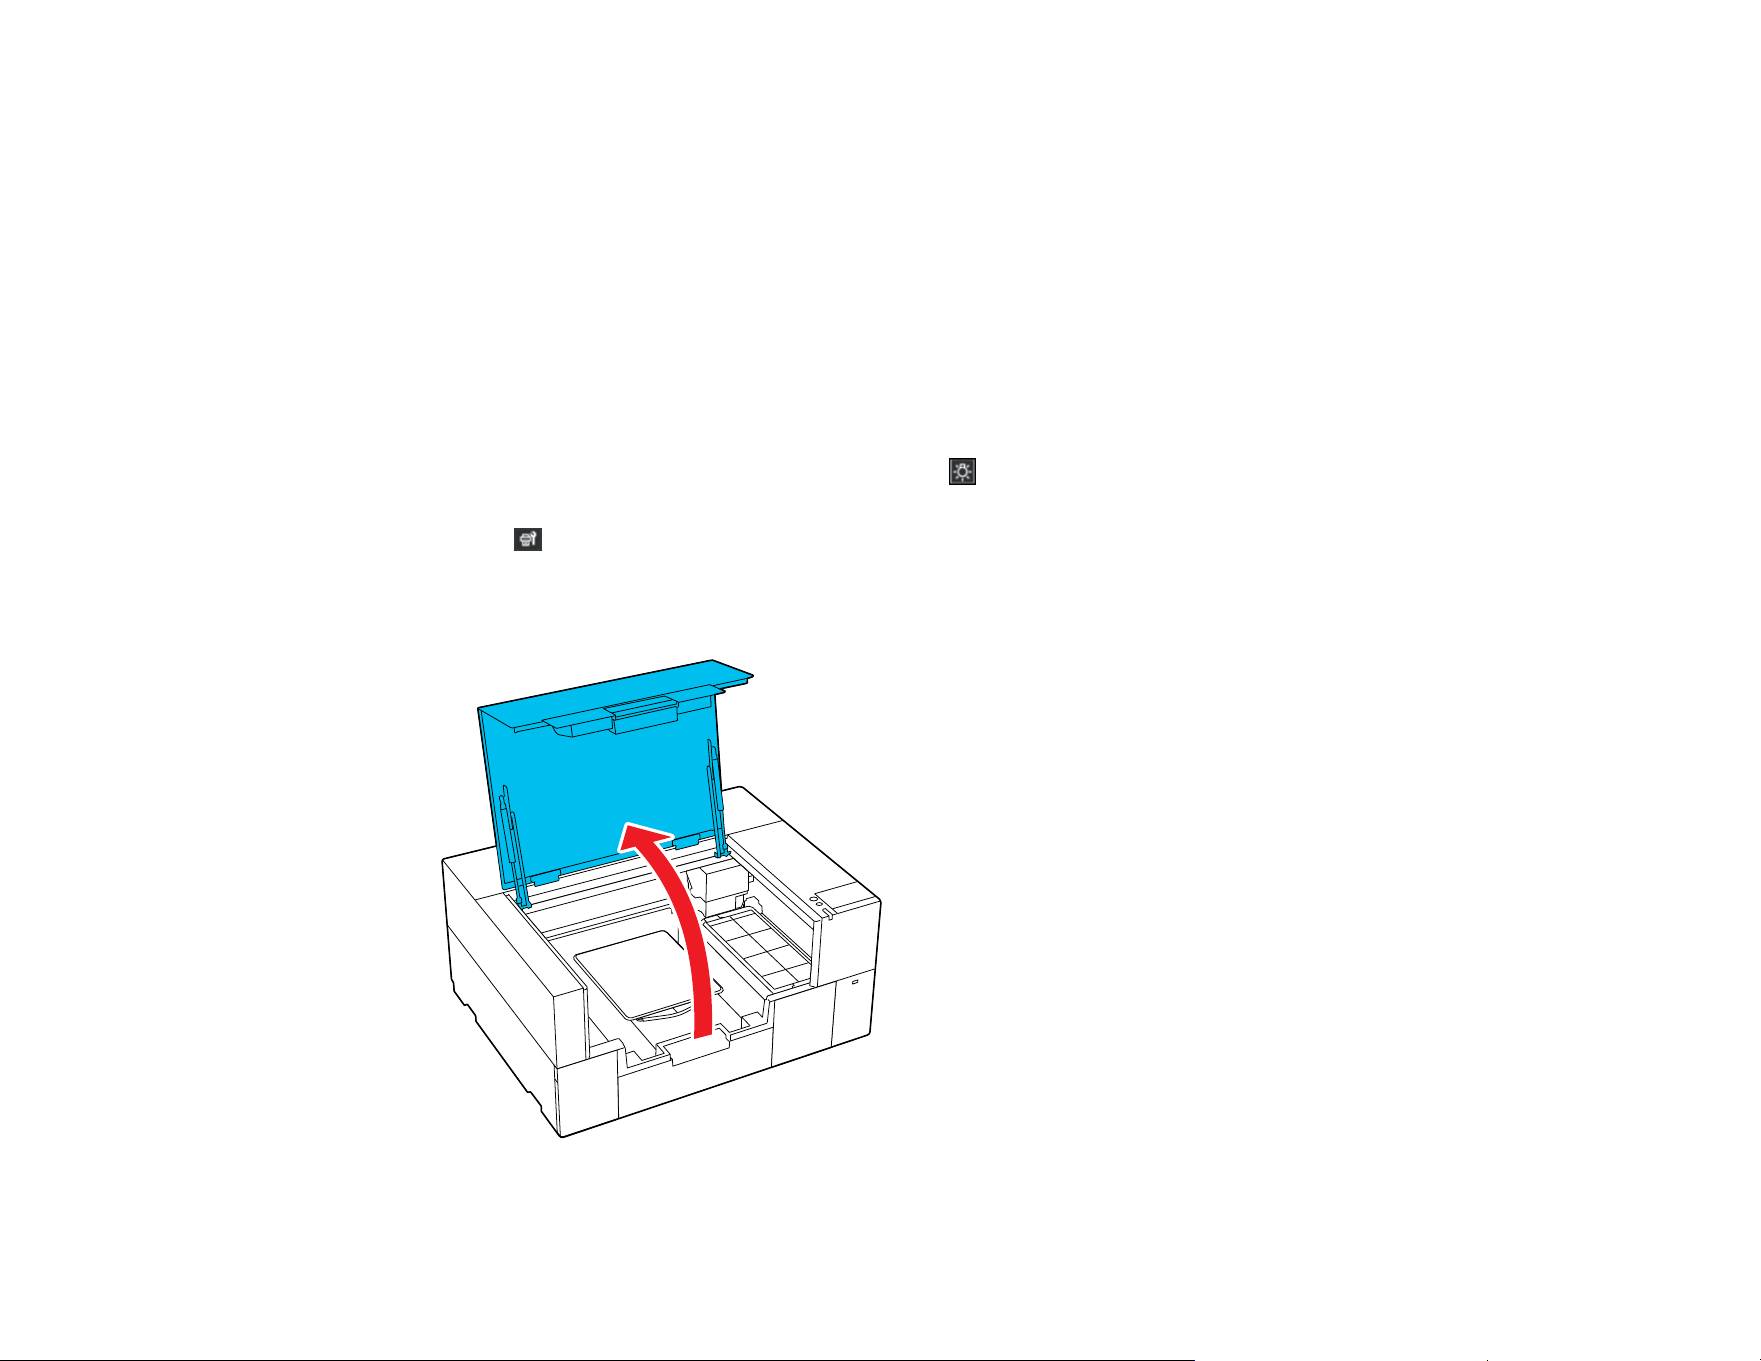
149
Related topics
Disposing of Used Consumables and Optional Parts
Cleaning Around the Print Head
Clean around the print head to remove any lint or fibers that have accumulated around the print head
nozzles.
Note: If it is difficult to remove dirt around the print head, rinse the dirty cleaning stick with ink cleaning
solution and try again. If the cleaning stick is still dirty, replace it with a new one.
1. Let the ink cleaning solution soak into a new large cleaning swab.
2. Make sure the printer is on, and then select the inside light icon on the LCD screen to turn on the
lights inside the printer.
3. Select Maintenance > Cleaning the Maintenance Parts > Around the Head.
4. Read the message on the LCD screen and then select Next.
5. Open the printer cover.

150
6. Grip the platen on the left and right sides, then lift it straight up to remove it.
7. Close the printer cover.
8. Read the message on the LCD screen and then select Start.
The print head moves to the maintenance position.
Caution: Do not move the print head manually. A malfunction may occur.
Note: A buzzer sounds 10 minutes after the print head moves to the maintenance position. Select
OK to continue cleaning. The buzzer sounds again after 10 minutes. Nozzles can be clogged if more
time passes, so finish cleaning as soon as possible.
9. Select How To... to view the steps on the LCD screen.
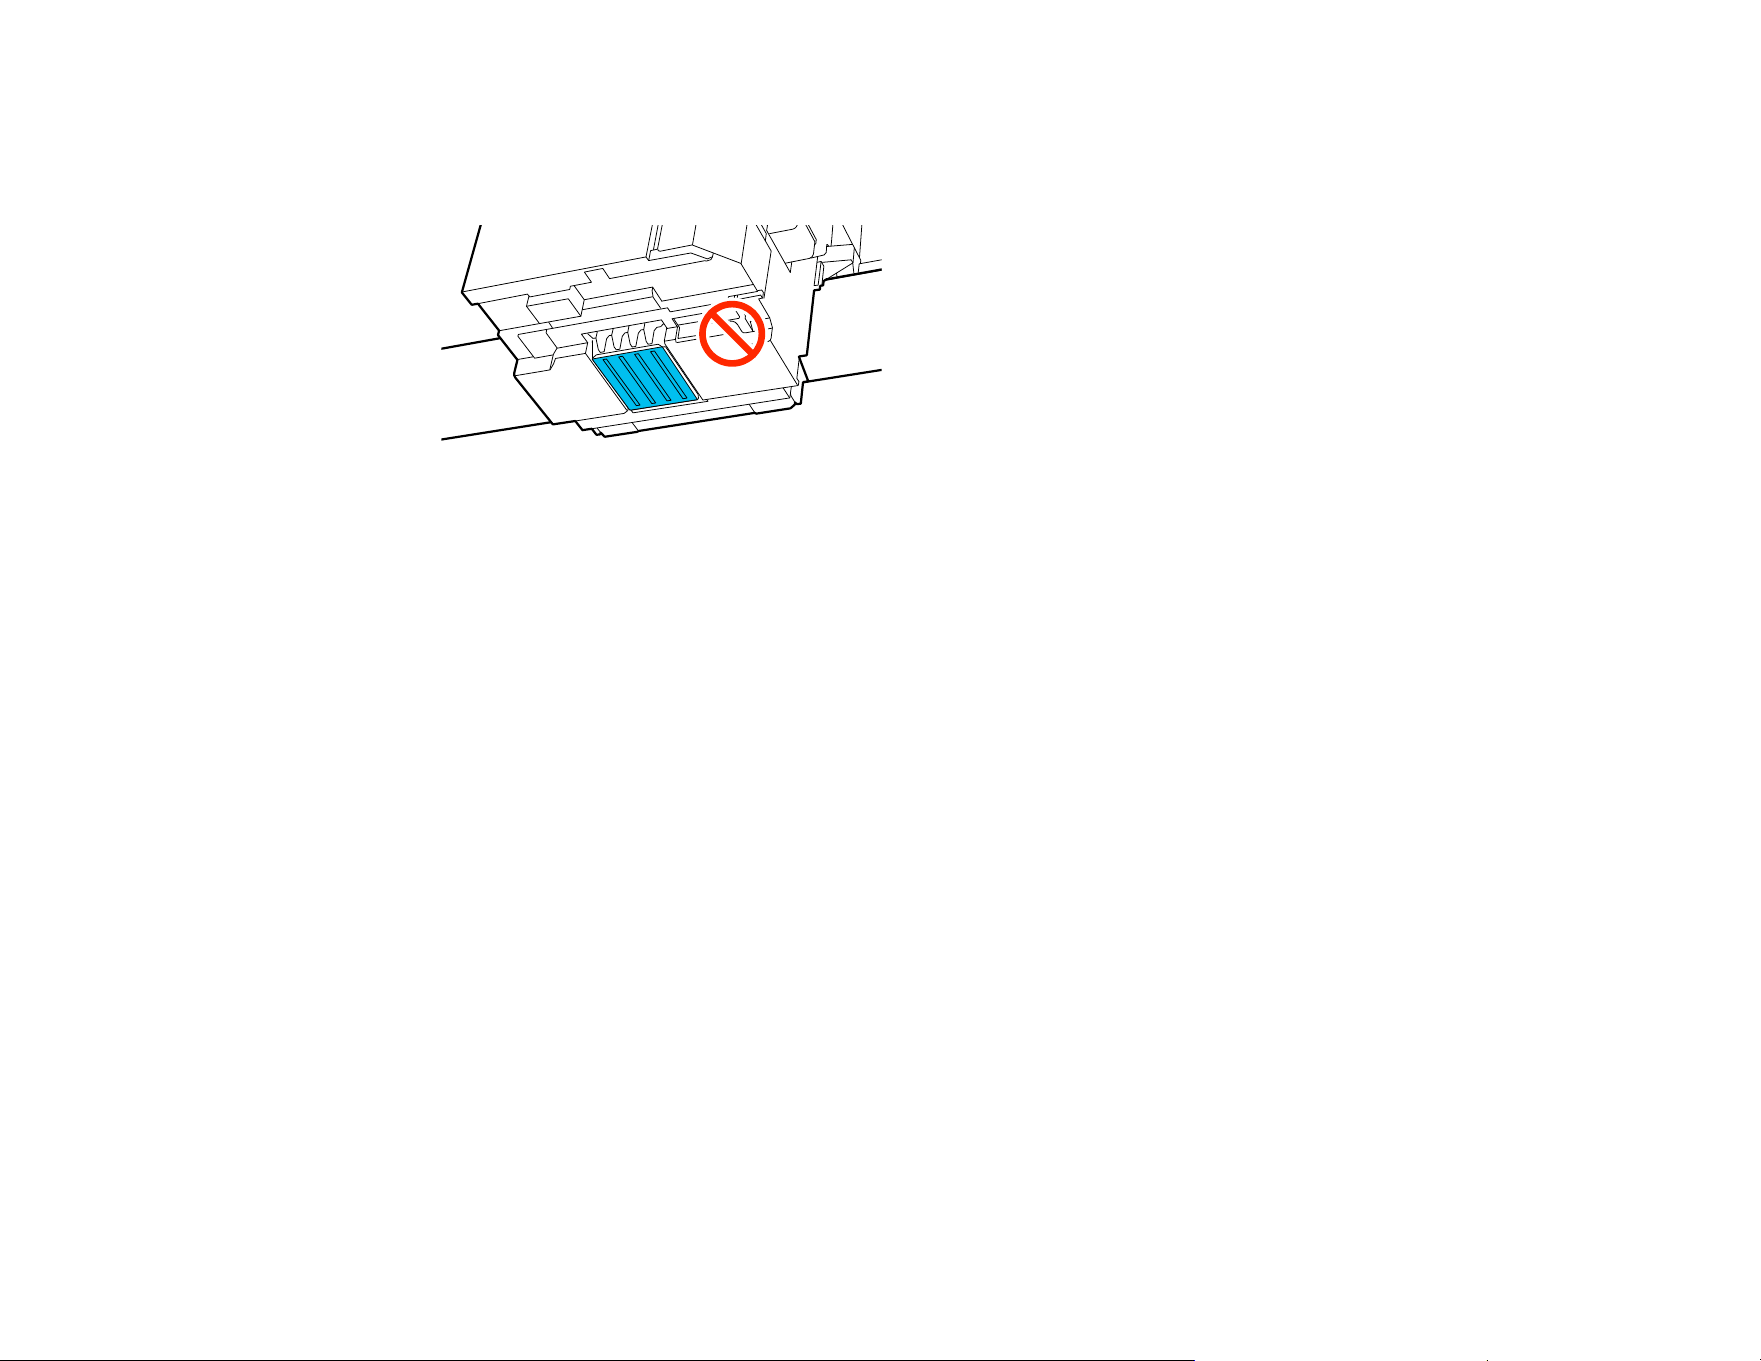
151
10. Follow the on-screen instructions to clean around the print head.
Note: Do not touch the nozzle surfaces with the cleaning stick.
11. After cleaning is finished, select Done on the LCD screen.
The print head returns to its normal position.
12. Perform a nozzle check.
Parent topic: Maintenance
Related tasks
Using the Ink Cleaning Solution
Performing a Nozzle Check
Cleaning the Suction Cap
You need to clean the suction cap whenever you see a message on the LCD screen or if the printing
surface is soiled with ink. You may also need to clean the suction cap if you experience difficulty cleaning
nozzles after performing a nozzle check. Even if the message is not displayed, follow the steps here to
clean the suction cap.
Caution:
• Do not rub the cap section hard. Any scratches may cause air leaks, preventing print head cleaning
from being performed correctly.
• Carefully wipe off any dirt from the edges of the suction cap until you can see the color of the cap. If
dirt is left around the edges, it creates a gap between the cap and the print head that causes a
decrease in suction strength and the print head nozzles can become clogged. If it is difficult to remove

152
the dirt, rinse the dirty cleaning stick with ink cleaning solution and then clean it again. If the cleaning
stick is too dirty, use a new one.
Note: If you continue to use the printer without cleaning the suction cap, the ink nozzles may clog and
print quality may decline.
1. Turn on the printer, if necessary.
2. Select Maintenance > Cleaning the Maintenance Parts > Suction Cap.
A confirmation message appears.
3. Select Start on the LCD screen.
The head moves to the maintenance position.
Caution: Do not move the print head manually. A malfunction may occur.
Note: A buzzer sounds 10 minutes after the print head moves to the maintenance position. Select
OK to continue cleaning. The buzzer sounds again after 10 minutes. Nozzles can be clogged if more
time passes, so finish cleaning as soon as possible.
4. Select How To... to view the steps and follow the on-screen instructions.
Caution: Use only the supplied plastic tweezers. Be careful not to damage the suction cap. If the
suction cap is damaged, air may leak and the print head may become dry or difficult to clean.
5. Select Done.
The print head returns to its normal position.
Parent topic: Maintenance
Related references
Optional Equipment and Replacement Parts
Related tasks
Using the Ink Cleaning Solution
Performing a Nozzle Check
Related topics
Disposing of Used Consumables and Optional Parts
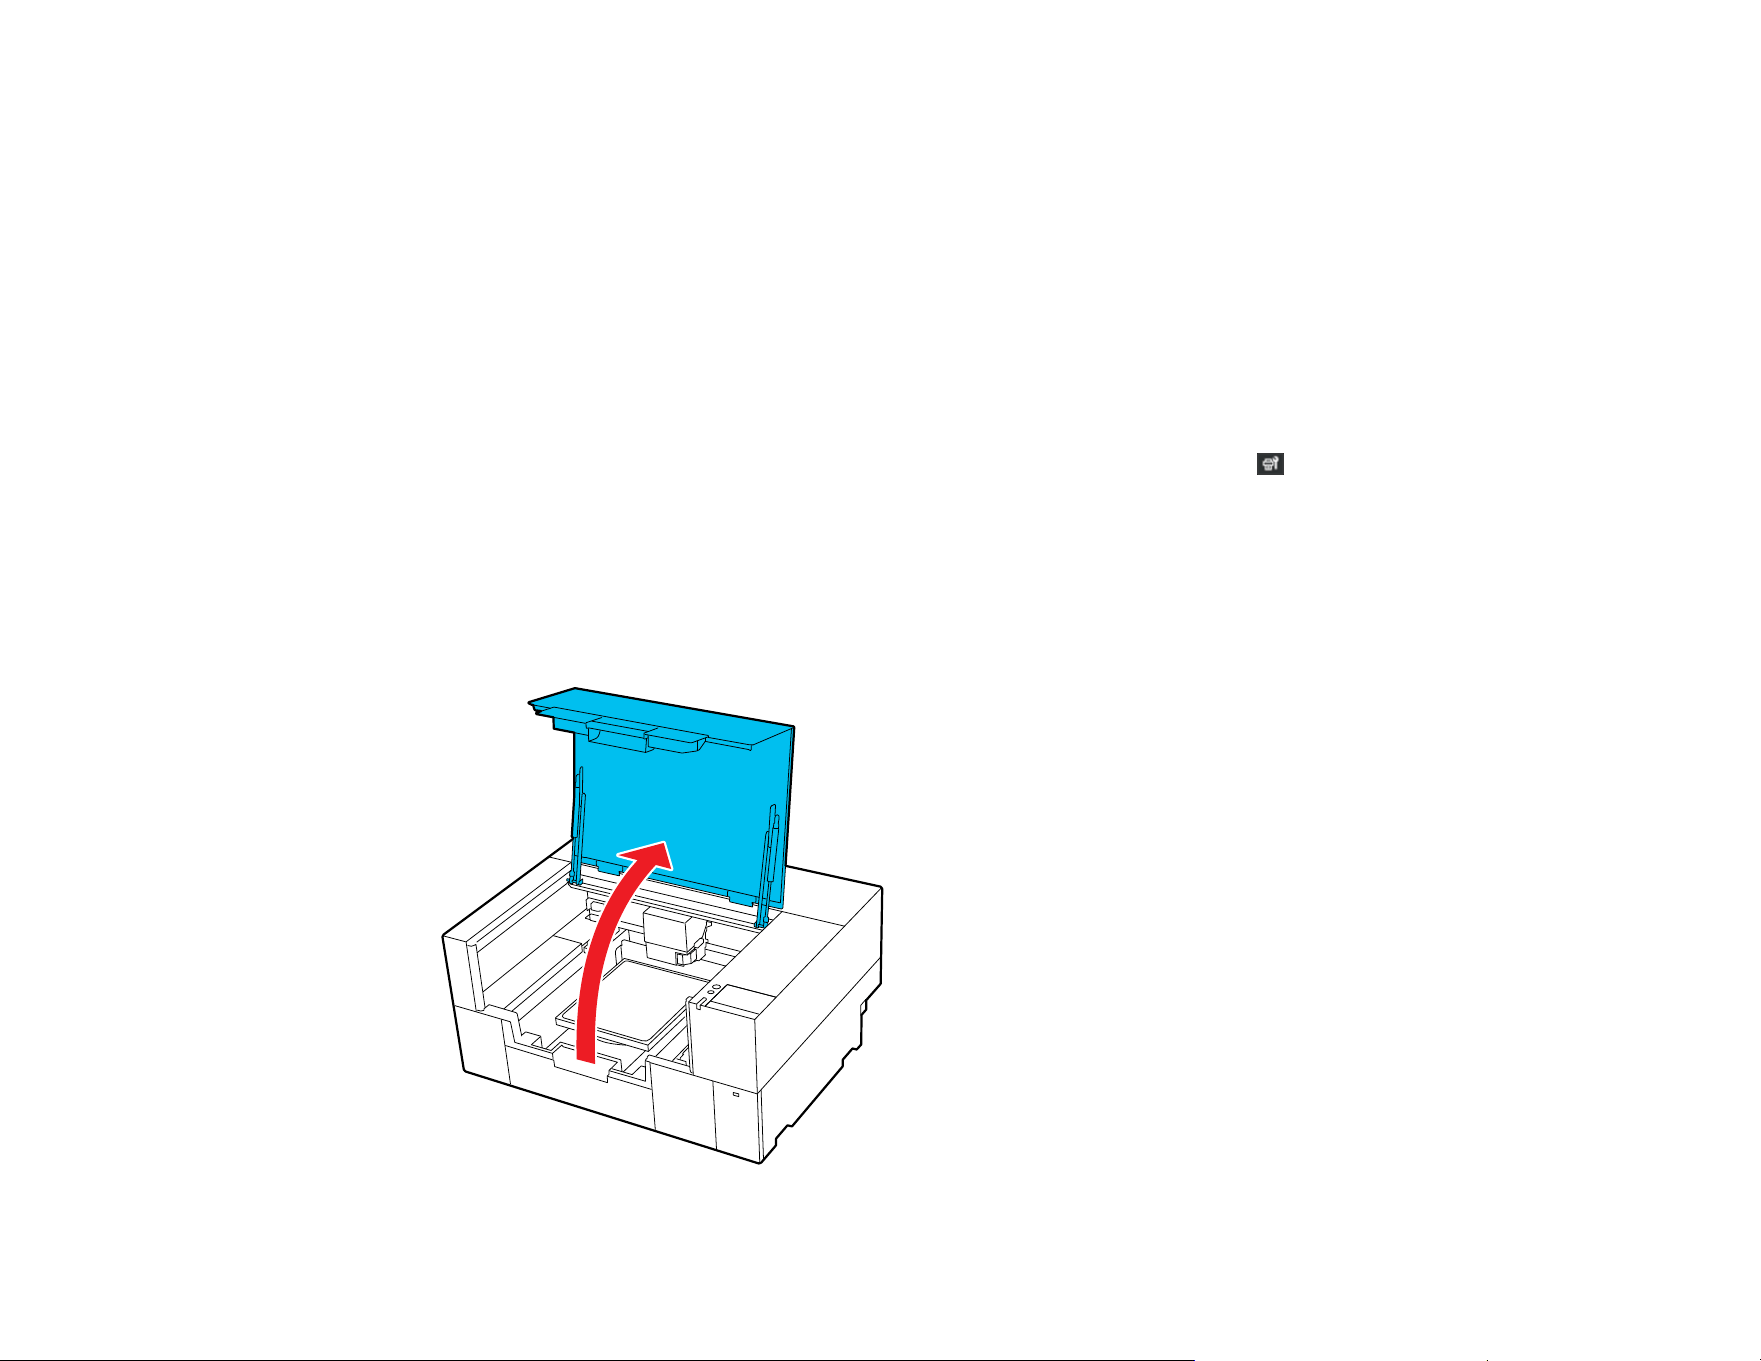
153
Cleaning the Sensor Cover
Clean the sensor cover when you see a message on the LCD screen to do so.
Note: If you continue to use the printer without cleaning the sensor cover, the printer may not detect the
position of the platen and you cannot print.
1. Turn on the printer, if necessary.
2. Do one of the following:
• If a message appears on the LCD screen prompting you to clean the sensor cover, select the
message and then select Cleaning.
• If you want to clean the sensor cover before the message appears, select Maintenance >
Cleaning the Maintenance Parts > Sensor Cover.
A confirmation message is displayed.
3. Select Start.
The print head moves to the maintenance position.
4. Open the printer cover.
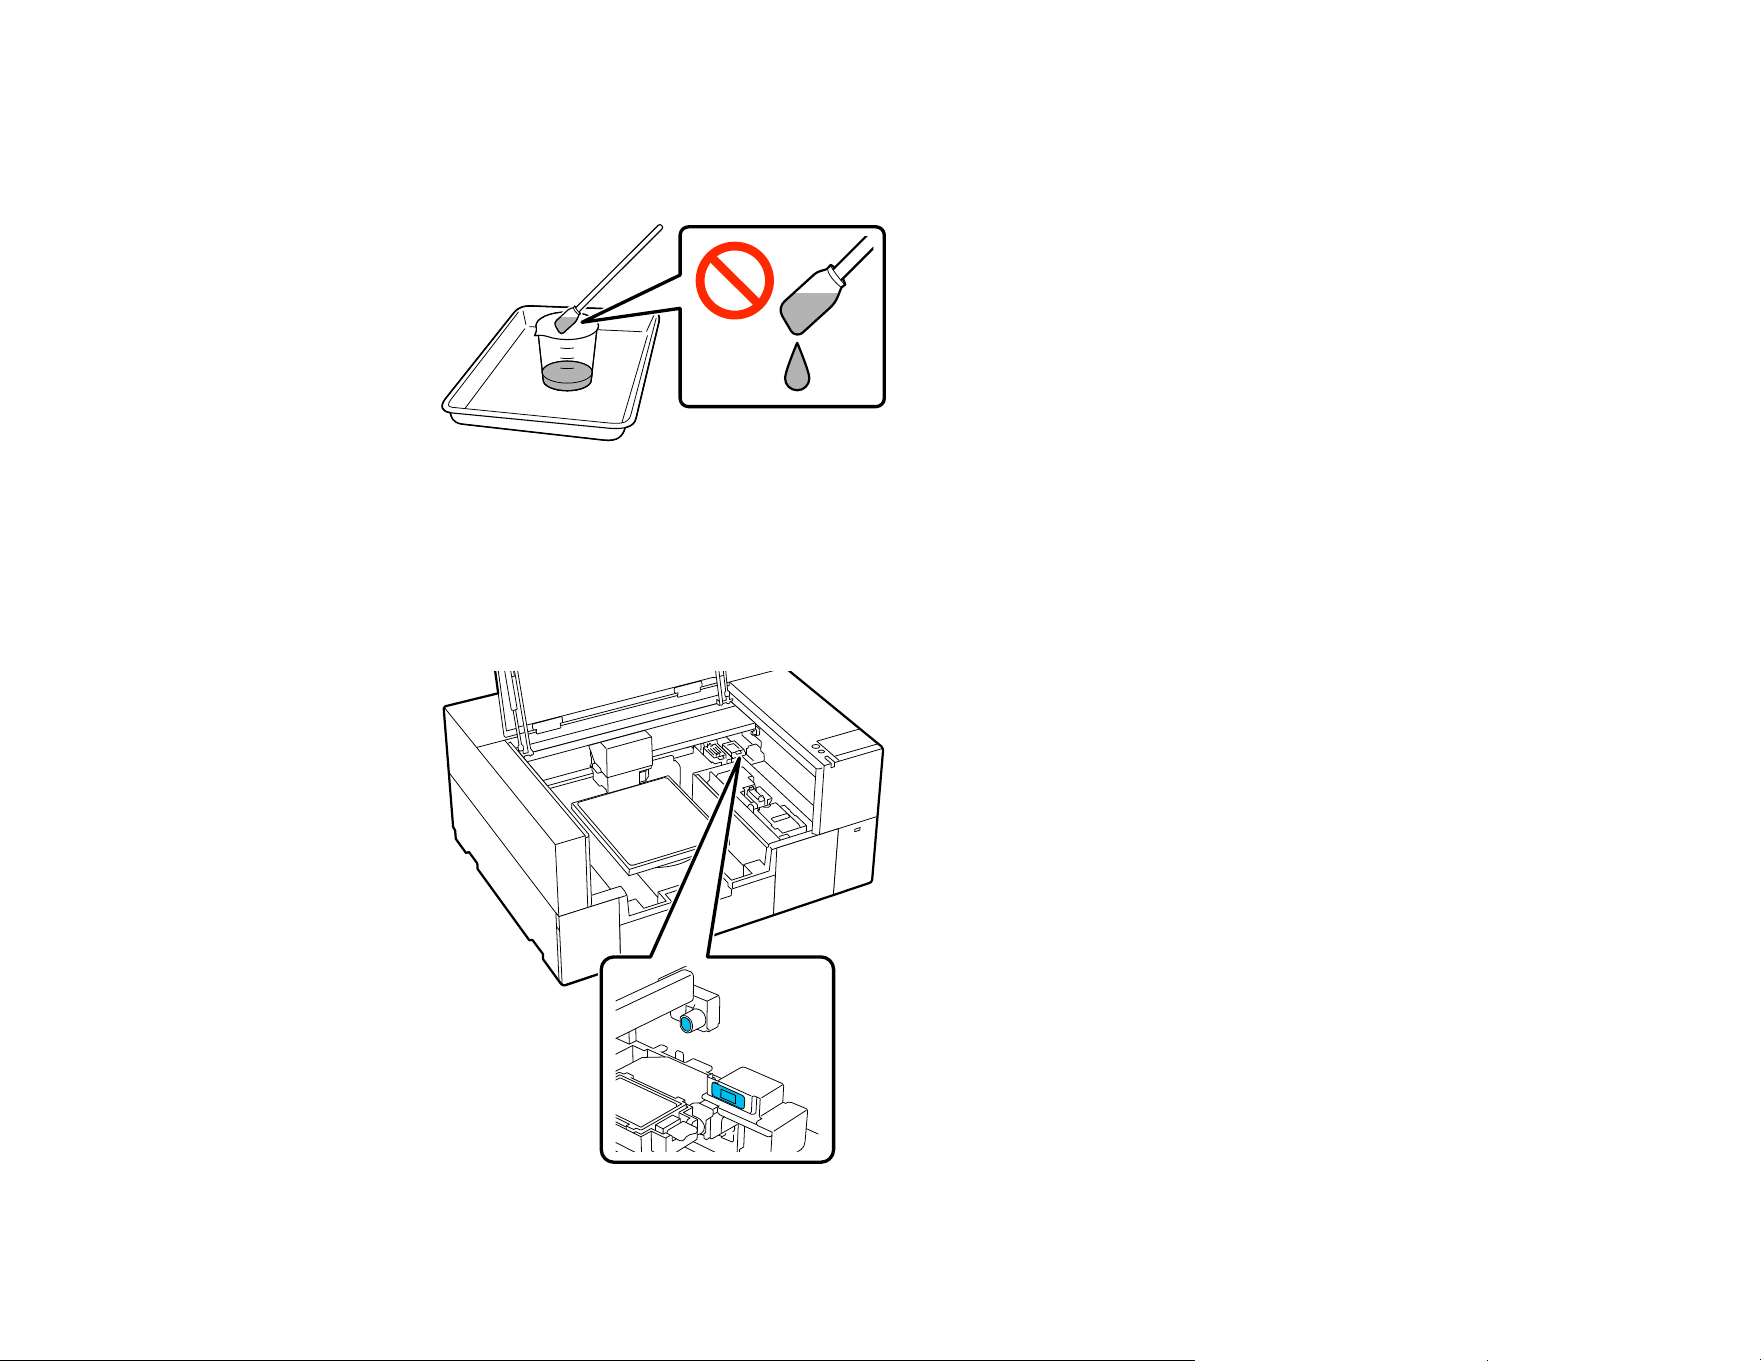
154
5. Fill the cup supplied with the maintenance kit with pure water and place a cleaning swab in the cup
and let it soak in. Make sure that the solution does not drip from the cleaning swab or cleaning wipe
when you remove it from the cup.
6. Lightly dampen the two sensor covers on the right side (the areas shown in the illustration) with a
cleaning stick soaked in pure water.
Note: Do not press or rub the sensor cover too hard, or it may be damaged. Also be careful not to let
water drip into the printer.

155
7. Use a new cleaning stick to wipe away any dirt. Wipe with the cleaning stick until there is no more
dirt.
8. Repeat steps 6 and 7 to clean the two sensor covers on the left side (the areas shown in the
illustration).
Note: If the ink stains cannot be removed completely, use ink cleaning solution instead of water.
9. When you finish cleaning both sensor covers, select Done on the LCD screen.
10. Read the on-screen messages and then select OK.
The print head returns to its normal position.
If a message that the sensor cover cannot be recognized is displayed, repeat these steps to perform the
cleaning again. If the message appears repeatedly, make sure that the stand on which the printer is
installed is level. The printer cannot operate correctly if it is installed on a stand with an uneven or
distorted surface.
Parent topic: Maintenance

156
Related references
Optional Equipment and Replacement Parts
Related tasks
Using the Ink Cleaning Solution
Related topics
Disposing of Used Consumables and Optional Parts
Cleaning Inside the Printer
Clean inside the printer if ink stains or other dirt inside the printer cover or the exterior case make it hard
to see inside the printer.
1. Turn off the printer and make sure that the screen turns off, then unplug the power cable.
2. Open the printer cover.
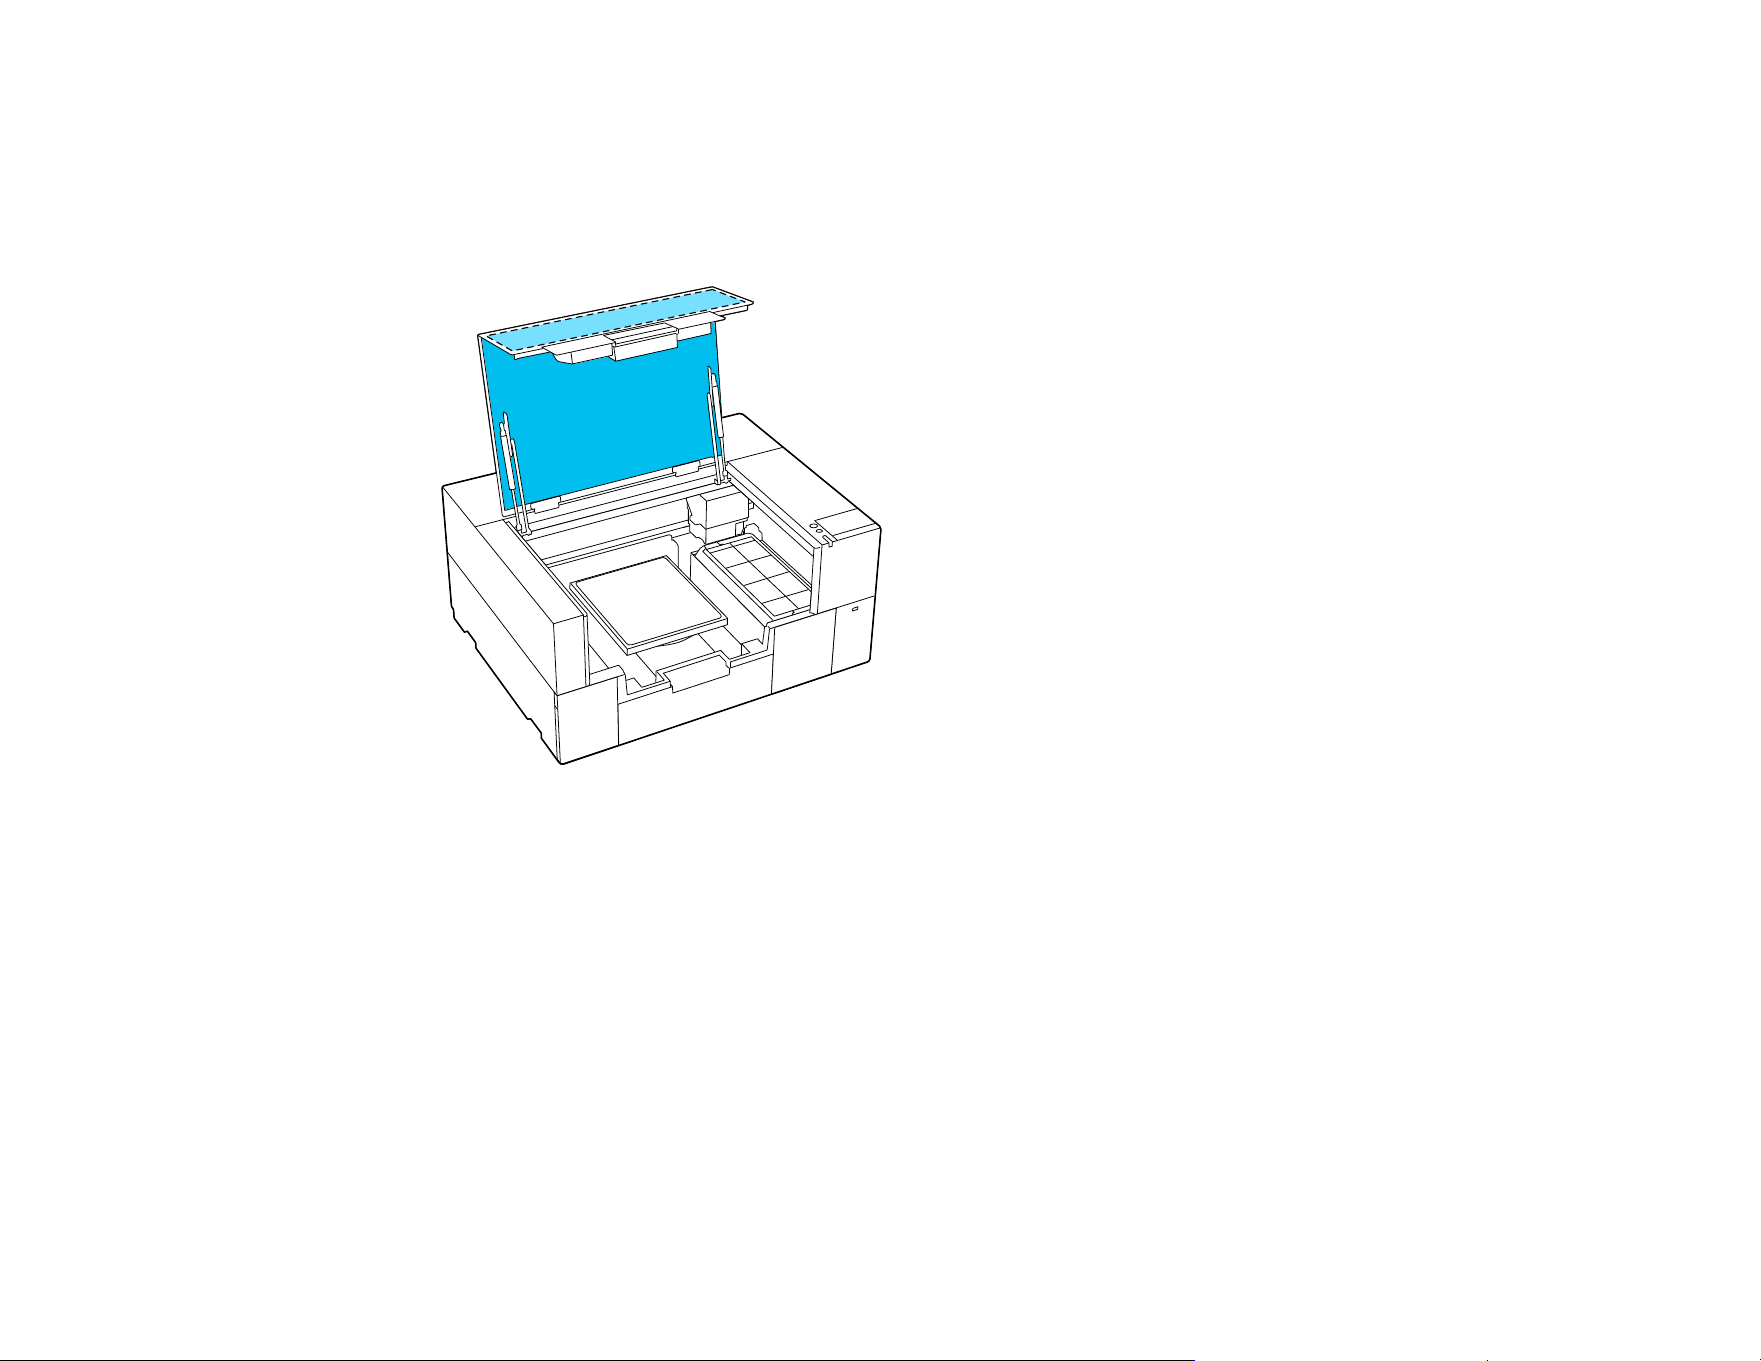
157
3. Wipe away any dirt from the inside of the printer cover using a cleaning wipe that has been soaked in
water and thoroughly wrung out.
Note: If the stains cannot be removed completely by wiping with water alone, use diluted neutral
detergent instead of water.
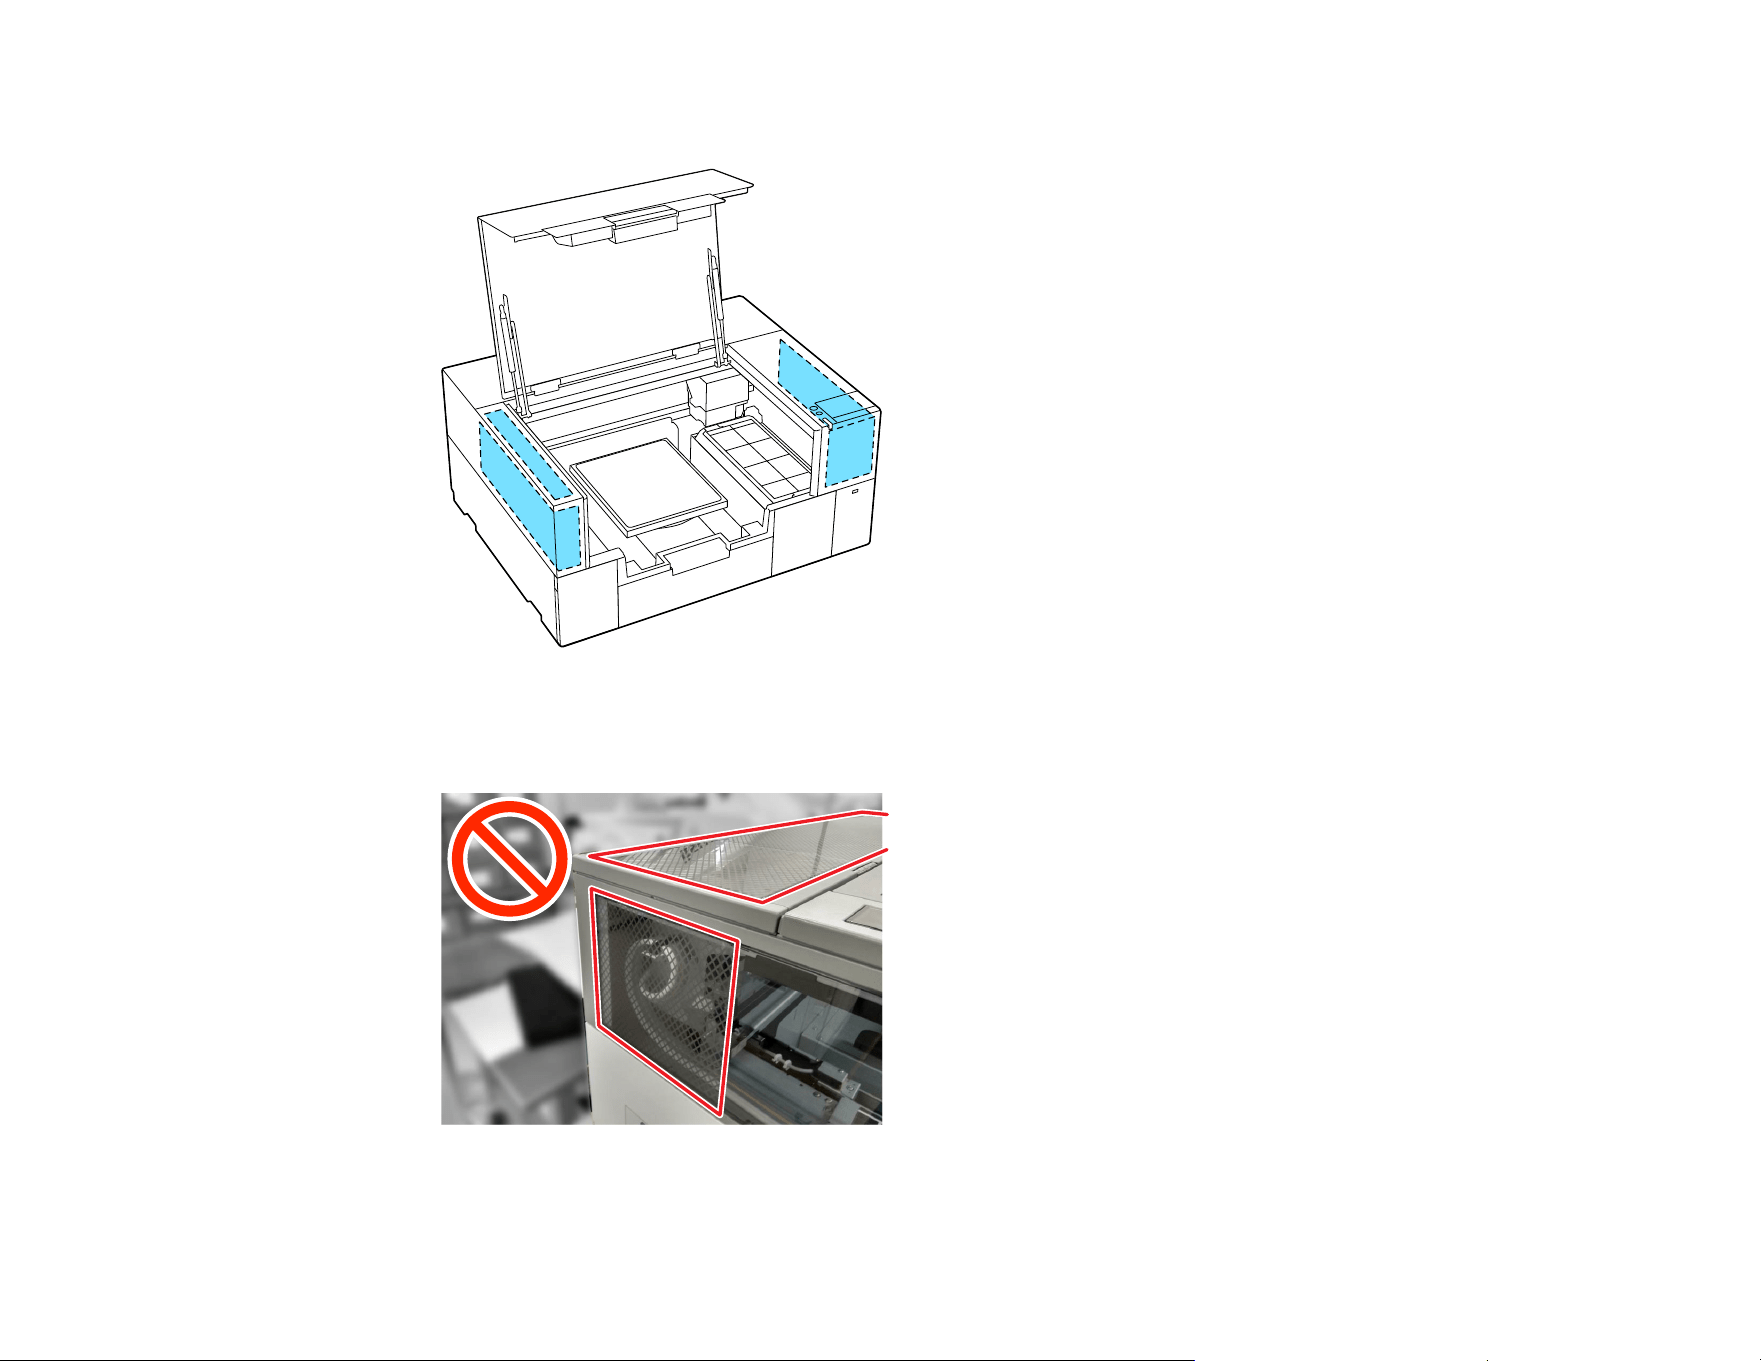
158
4. Wipe away any dirt inside the transparent parts of the exterior case indicated in the illustration below.
Caution: Do not clean the cross-hatched areas shown below. If you place your hands inside the
back of the printer, an injury could occur.
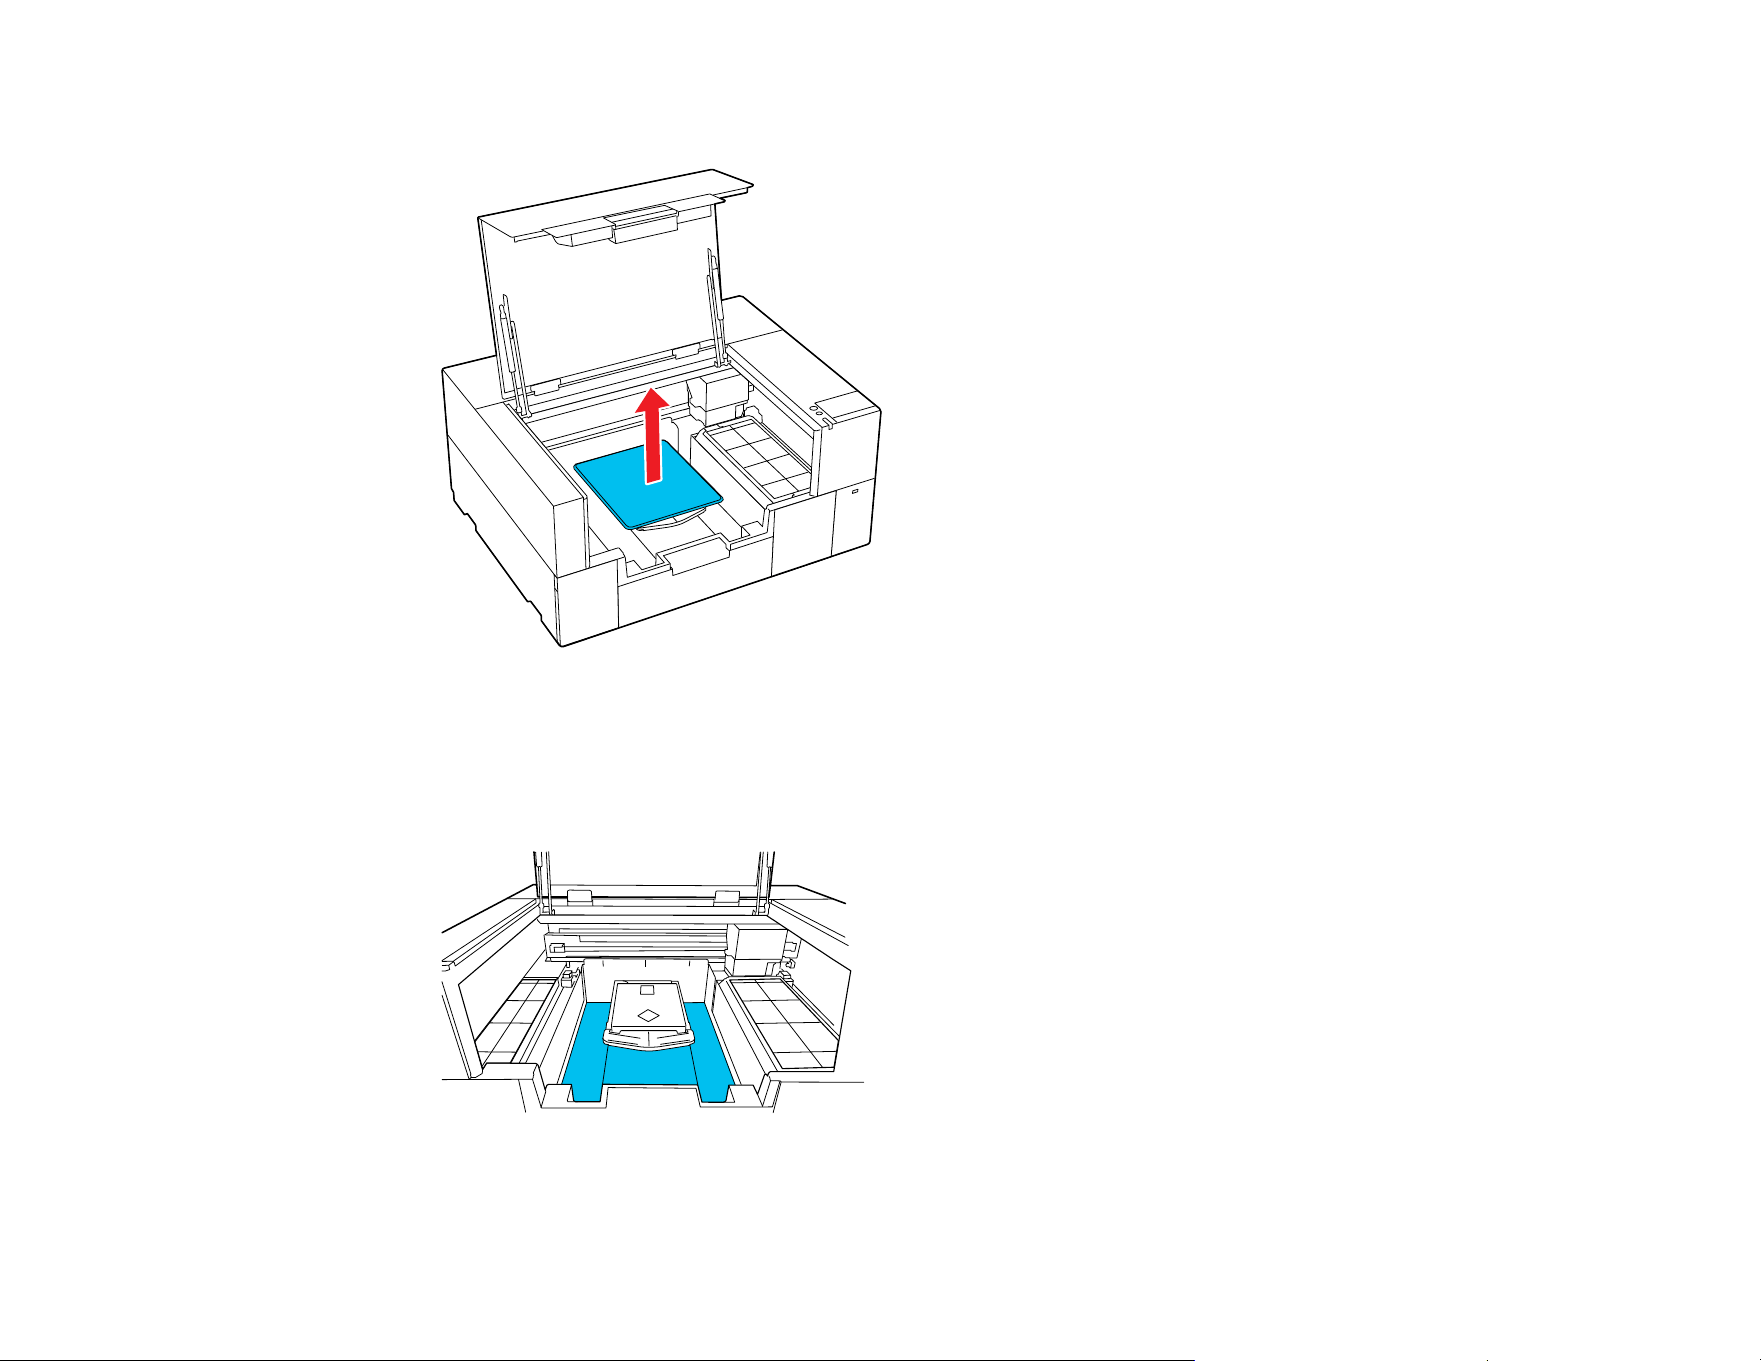
159
5. Grip the platen on the left and right sides, then lift it straight up to remove it.
6. Use a cleaning wipe that has been soaked in water and thoroughly wrung out to wipe away any dust
and ink stains around the platen attachment area indicated in the illustration.
Note: Using the printer when this area is dirty may cause dust or ink stains to stick to the garment.
7. After cleaning is finished, replace the platen and close the printer cover.
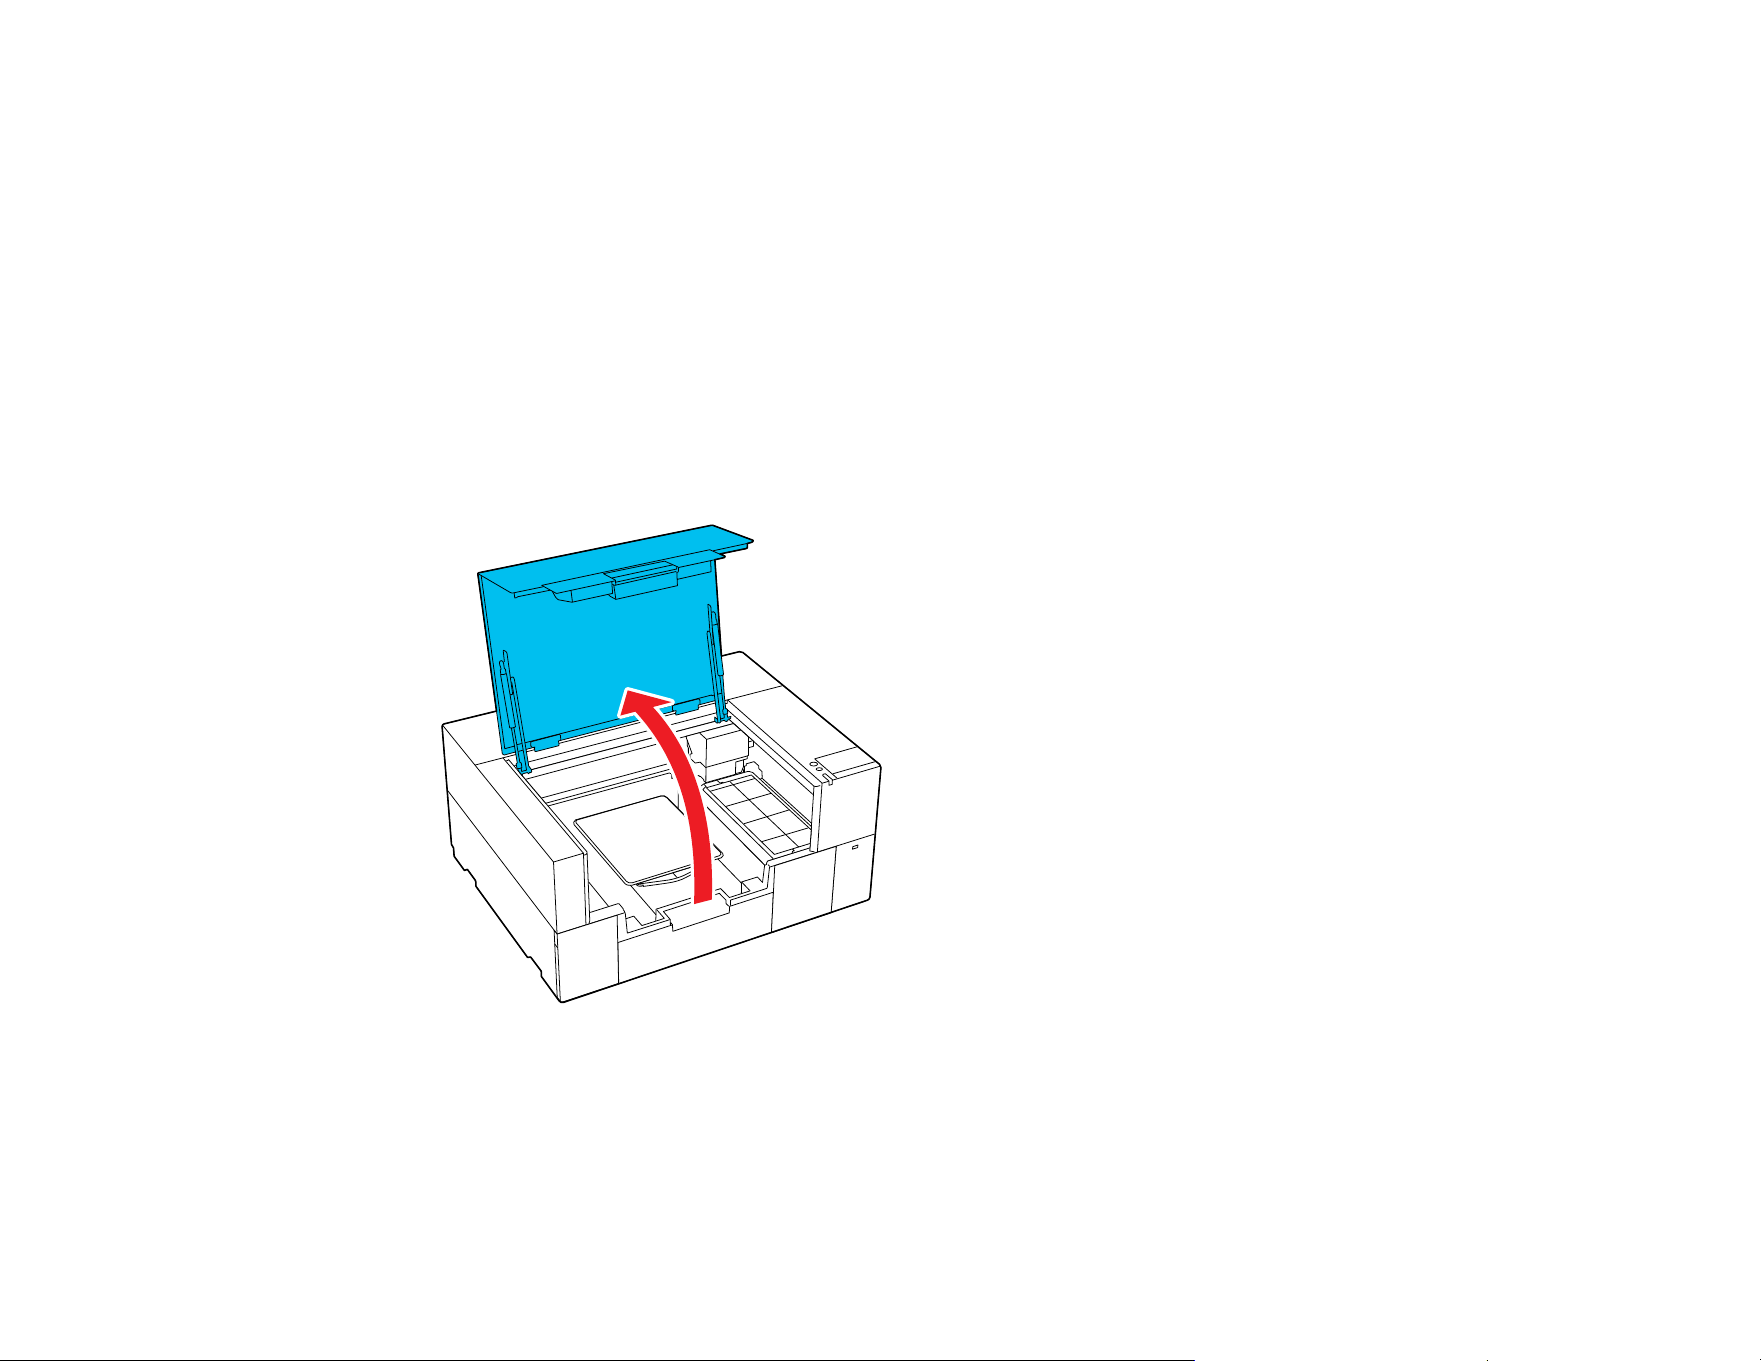
160
Parent topic: Maintenance
Related tasks
Using the Ink Cleaning Solution
Cleaning the Platen Without a Grip Pad
If the platen without a grip pad is dirty, follow these steps to wipe off the dirt.
Note: When printing on polyester T-shirts, the platen can be easily soiled with ink. If this happens, wipe
the platen off before it has a chance to dry.
1. Turn off the printer and make sure that the screen turns off, then unplug the power cable.
2. Open the printer cover.
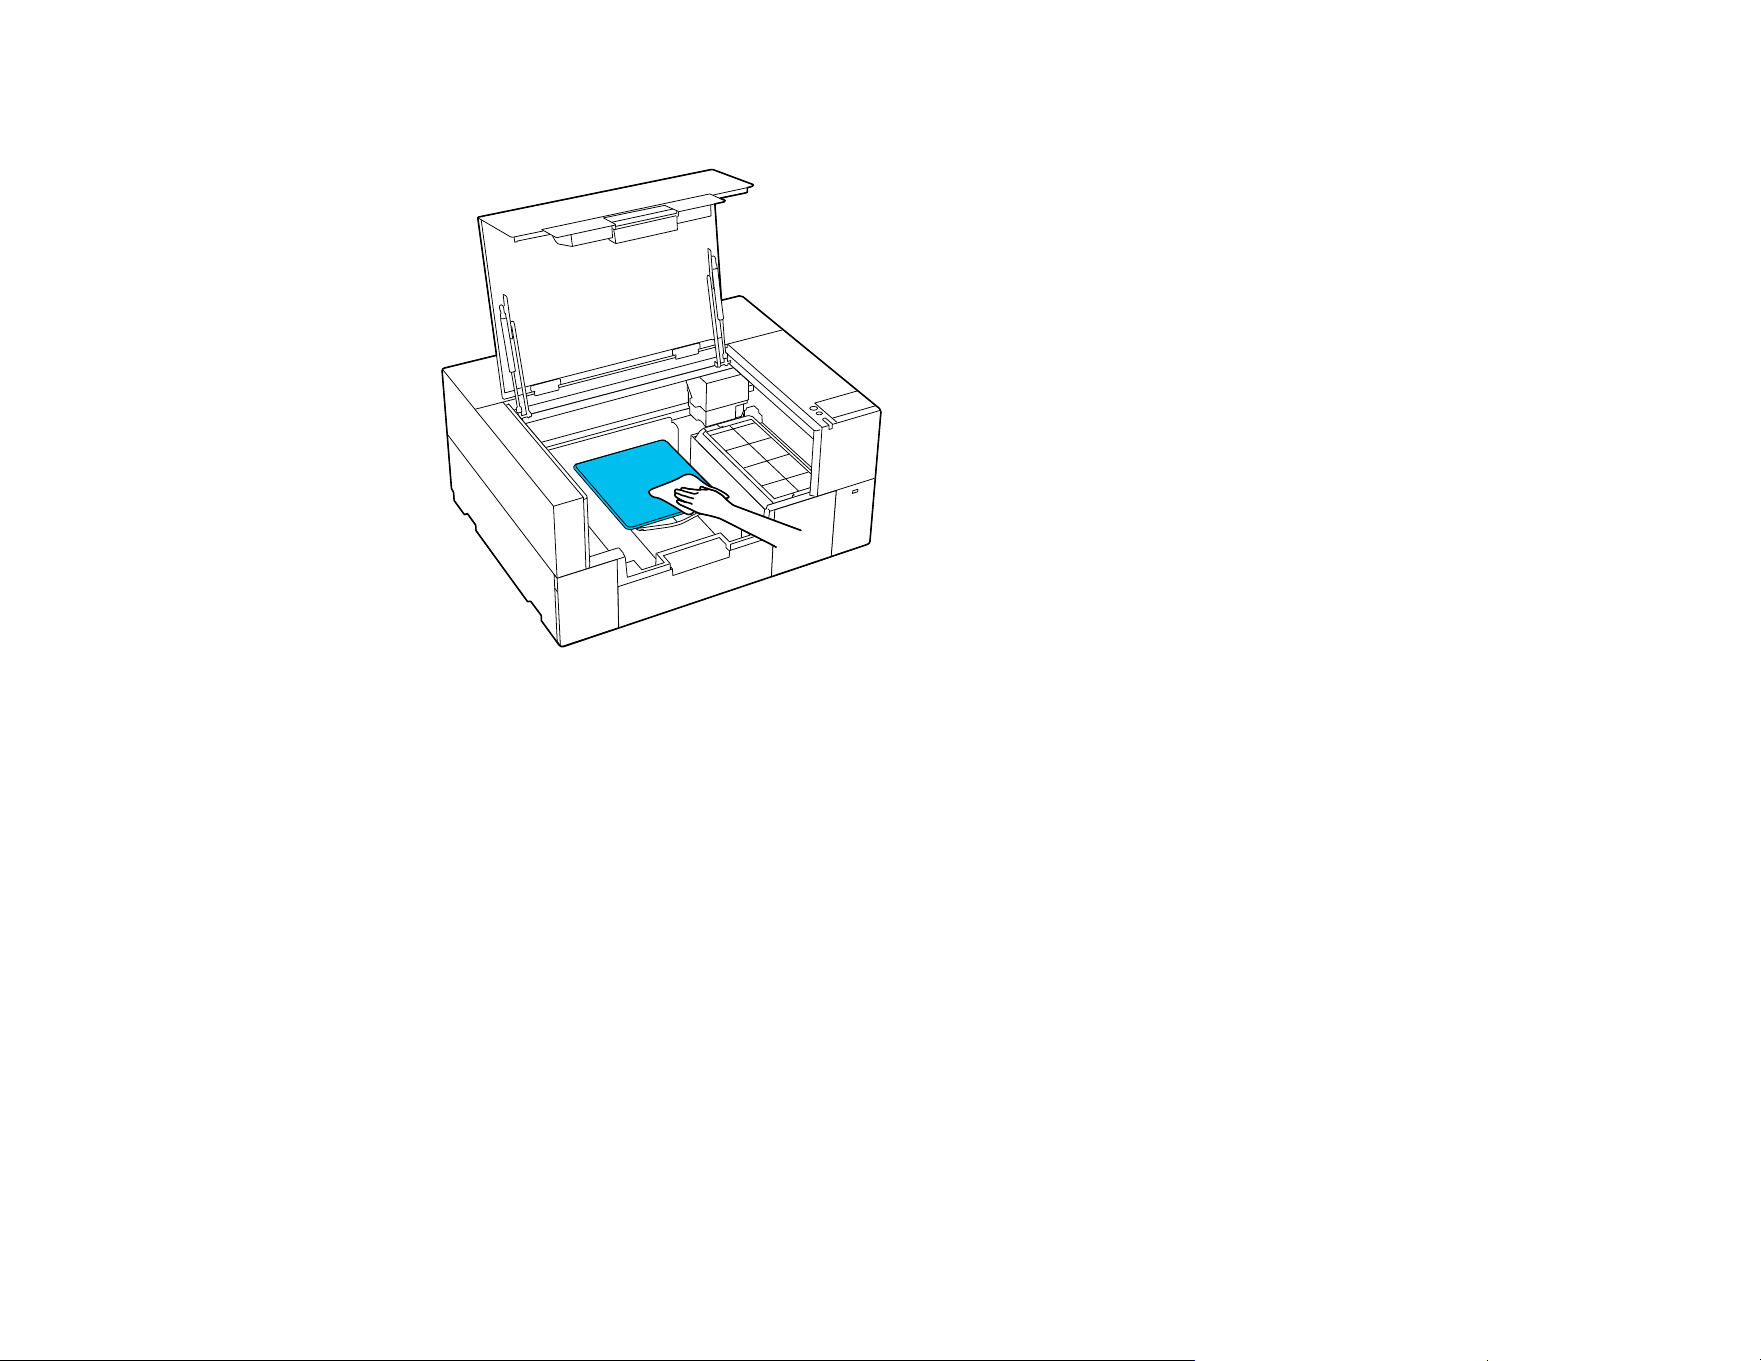
161
3. Wipe the platen with a soft, clean cloth to carefully remove any dust or dirt.
Note: If the dirt is difficult to remove, use a soft, clean cloth dampened with water and a small
amount of ink cleaning solution or detergent and wrung tight. After that, dry the platen with a soft
cloth.
4. Close the printer cover.
Parent topic: Maintenance
Related tasks
Using the Ink Cleaning Solution
Changing the Printer Mode
Change the printer's color mode if you will not use White ink for a longer period of time and when using
White ink in the printer again.
Note: When you switch to White ink mode after using Color ink mode for a long time, the density of the
White ink may be low. See the link below.

162
Preparation
Depending on the color mode you are changing to, prepare the following:
• If you are changing from Color ink mode to White ink mode, you need one White ink pack.
• If you are changing from Color ink mode to White ink mode for the first time, you need an ink charging
unit. It is not required for the second and subsequent changes.
• If you are changing from White ink mode to Color ink mode, you need one cleaning liquid pack.
Note: Except for White ink and cleaning liquid ink packs, prepare new ink when ink packs are running
low.
1. Turn on the printer, if necessary.
2. Select Maintenance > General Settings > Printer Settings > Printer Mode.
3. Follow the on-screen instructions and then select Start.
Note: Select How To... on the screen to view the steps.
When the change is complete, the settings screen is displayed.
Note: If you switched from White ink mode to Color ink mode, clean the ink supply port for the White
ink packs you removed before storing them. Lightly touch the corner of a wide cleaning stick from the
supplied Maintenance Kit to the ink supply port to absorb any ink. You do not need to wipe off the ink
and make sure you do not forcefully press or move the cleaning stick.
Parent topic: Maintenance
Related references
Ink Pack Safety Instructions
Handling Ink and Cleaning Packs
Optional Equipment and Replacement Parts
White Ink Quality Is Poor
Related tasks
Storing the Printer

163
Disposing of Used Consumables and Optional Parts
Dispose of used consumables (such as maintenance boxes, pre-treatment solution, cleaning solution,
and empty ink packs) and optional parts according to your local laws and regulations, and always use an
industrial waste disposal company. See the guidelines in this section.
Caution: Ink cleaning solution is classified as industrial waste. Dispose of the cleaning solution
according to your local laws and regulations such as entrusting it to an industrial waste disposal
company. When handing over the pre-treatment solution to the industrial waste disposal company, make
sure you include the Safety Data Sheet found on Epson's support website. To download it, visit
epson.com/support/sds (U.S. and Latin America) or epson.ca/support/sds (Canada) and select your
product. (Safety Data Sheets are available in English only.)
The following items are classified as industrial waste when they have been used with ink or pre-
treatment solution:
• Cleaning sticks
• Wipes
• Soft cloth
• Ink cleaner
• Maintenance box
• Wiper unit
• Capping station
• Flushing pad
• Media after printing
• Empty ink packs, cleaning liquid packs, and used pre-treatment solution containers
• Funnel filters
Parent topic: Maintenance
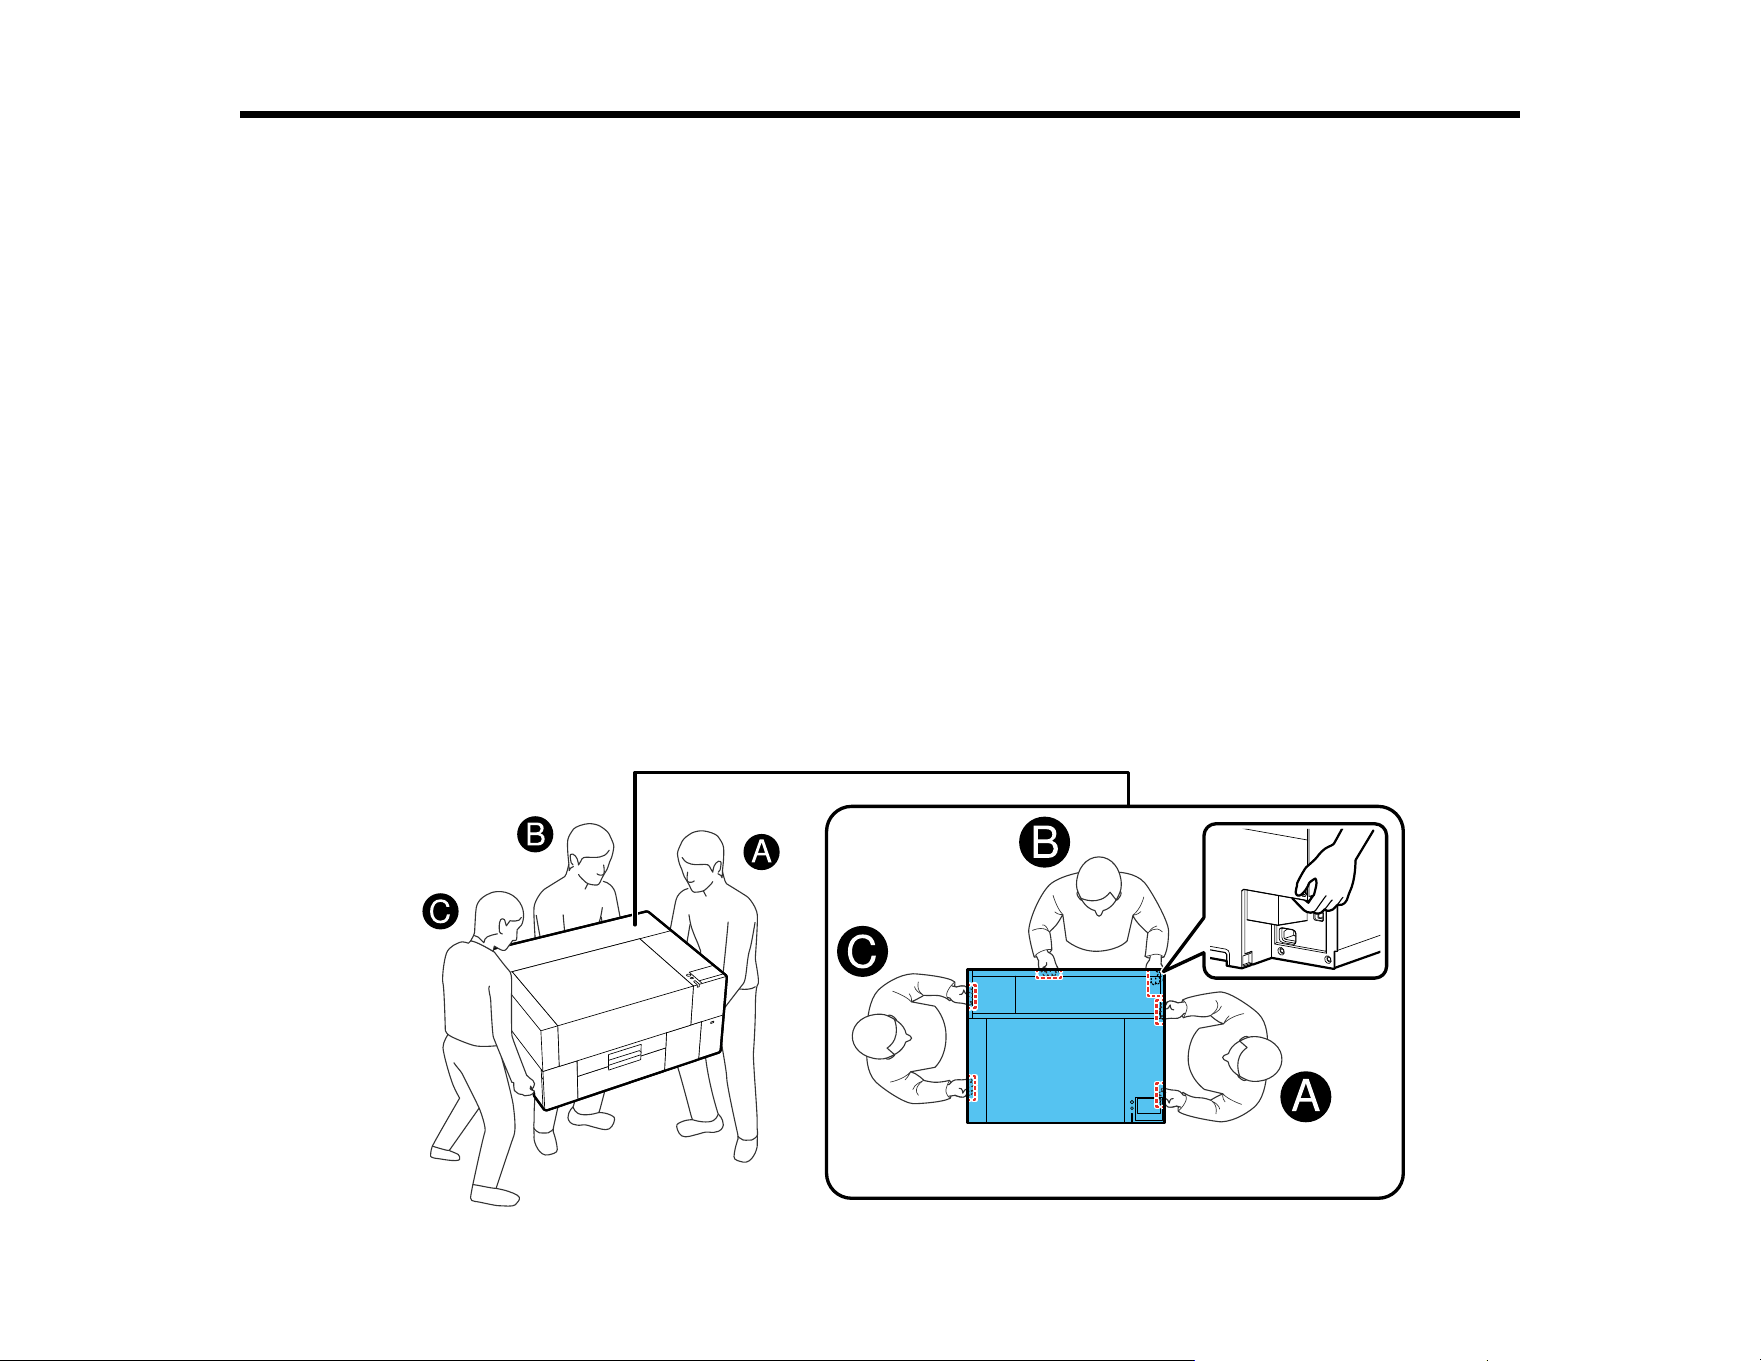
164
Moving or Transporting the Product
Follow the instructions in these sections to prepare and move the product, and set it back up after
moving it. When transporting the product, protect it from shock and vibration by packing it using the
packing materials it came with.
If the product will be in transit and out of use for longer than two weeks, you should also prepare the
product for storage. See the link below.
Caution:
• Leave the ink supply units (ink packs) and maintenance box installed, or the nozzles may clog or ink
may leak.
• Do not tilt the product, stand it on its side, or turn it upside down or ink may leak.
• Do not attempt to carry the product on your own. The product should be packed and moved by three
people.
• When lifting the product, make sure you use the correct lifting posture. All three people should lift the
product at the same time or the product may tip over and cause an injury.
• When moving the product, do not tilt it more than 10°.
• When lifting the product, touch only the necessary areas and grip it where indicated in the illustration
below. There are recessed hand holds on the bottom of the product.

165
Moving the Printer
Setting Up the Printer After Transport
Storing the Printer
Moving the Printer
You can move the printer across the room or to another room on the same floor, or transport it to another
building or location as described here.
Prepare the following items for transportation:
Transportation supports (2) and screws
If the transportation supports are not installed before moving the printer, vibrations during
transportation may damage the gantry and prevent it from printing correctly.
Allen key
Use the Allen key supplied with your printer to install and remove the transportation supports.
Labels (2)
Four sheets of 20 labels are supplied with your printer; you can use one sheet for 10 transports. Use
two labels to secure the loading guard.
Note: If the loading guard is not secured with the labels, vibrations during transportation may damage
the loading guard preventing it from opening and closing correctly.
Gloves
Wear the protective gloves included in the maintenance kit when removing the wiper unit.
Plastic bag
Use a commercially available plastic bag to store the removed wiper unit until you are ready to
resume use.
Cleaning ink packs
The number of cleaning ink packs you need varies depending on the length of time the printer is not
used.
• Prepare one cleaning ink pack if the printer will not be used for two weeks or more but less than
one month.
• Prepare five cleaning ink packs if the printer will not be used for one month or more.
Maintenance box
Prepare a new maintenance box if there is an insufficient amount of free space in the currently
installed maintenance box.
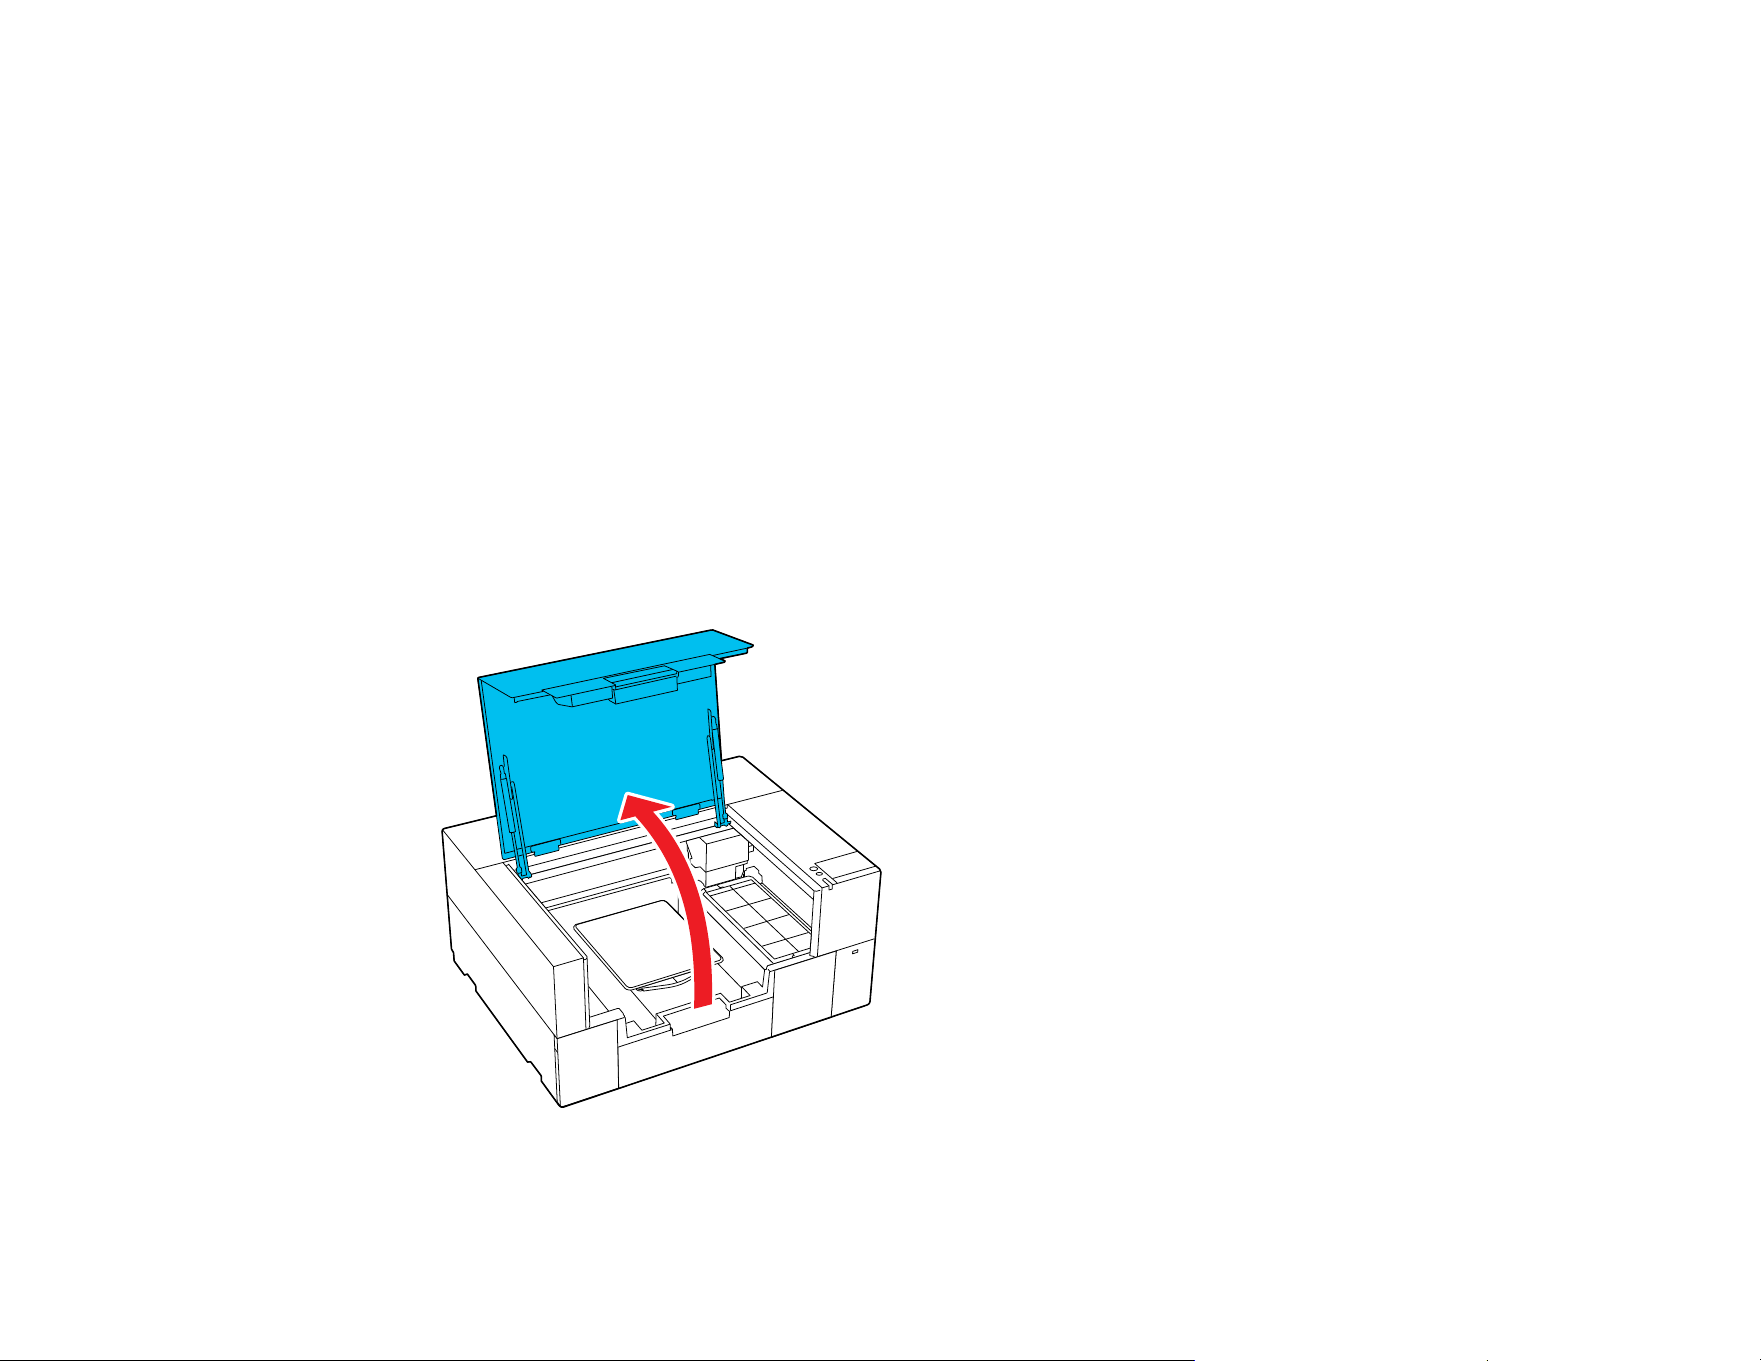
166
1. Press the power button while the printer is on and select one of the following options:
• Moving or transporting the printer: If the printer will not be turned on for a while after turning it
off, you also need to select the following items according to the current printer mode and the
length of time the printer will not be used.
• Not turning on the printer for more than 2 weeks: Select this option when White ink mode is
selected and the printer will not be turned on for more than two weeks. Depending on how long the
printer will not be used, you may need to change the Printer Mode or perform other necessary
pre-storage maintenance.
• Not turning on the printer for more than 1 month: Select this option when Color ink mode is
selected and the printer will not be turned on for more than one month. You can now perform the
necessary maintenance for long-term storage.
2. Press Start and follow the on-screen instructions to prepare for transport.
When preparations are complete, a message is displayed instructing you to turn off the printer.
3. Turn off the printer and make sure that the screen turns off, then unplug the power cable.
4. Open the printer cover.

167
5. Grip the platen on the left and right sides and then lift it straight up to remove it.
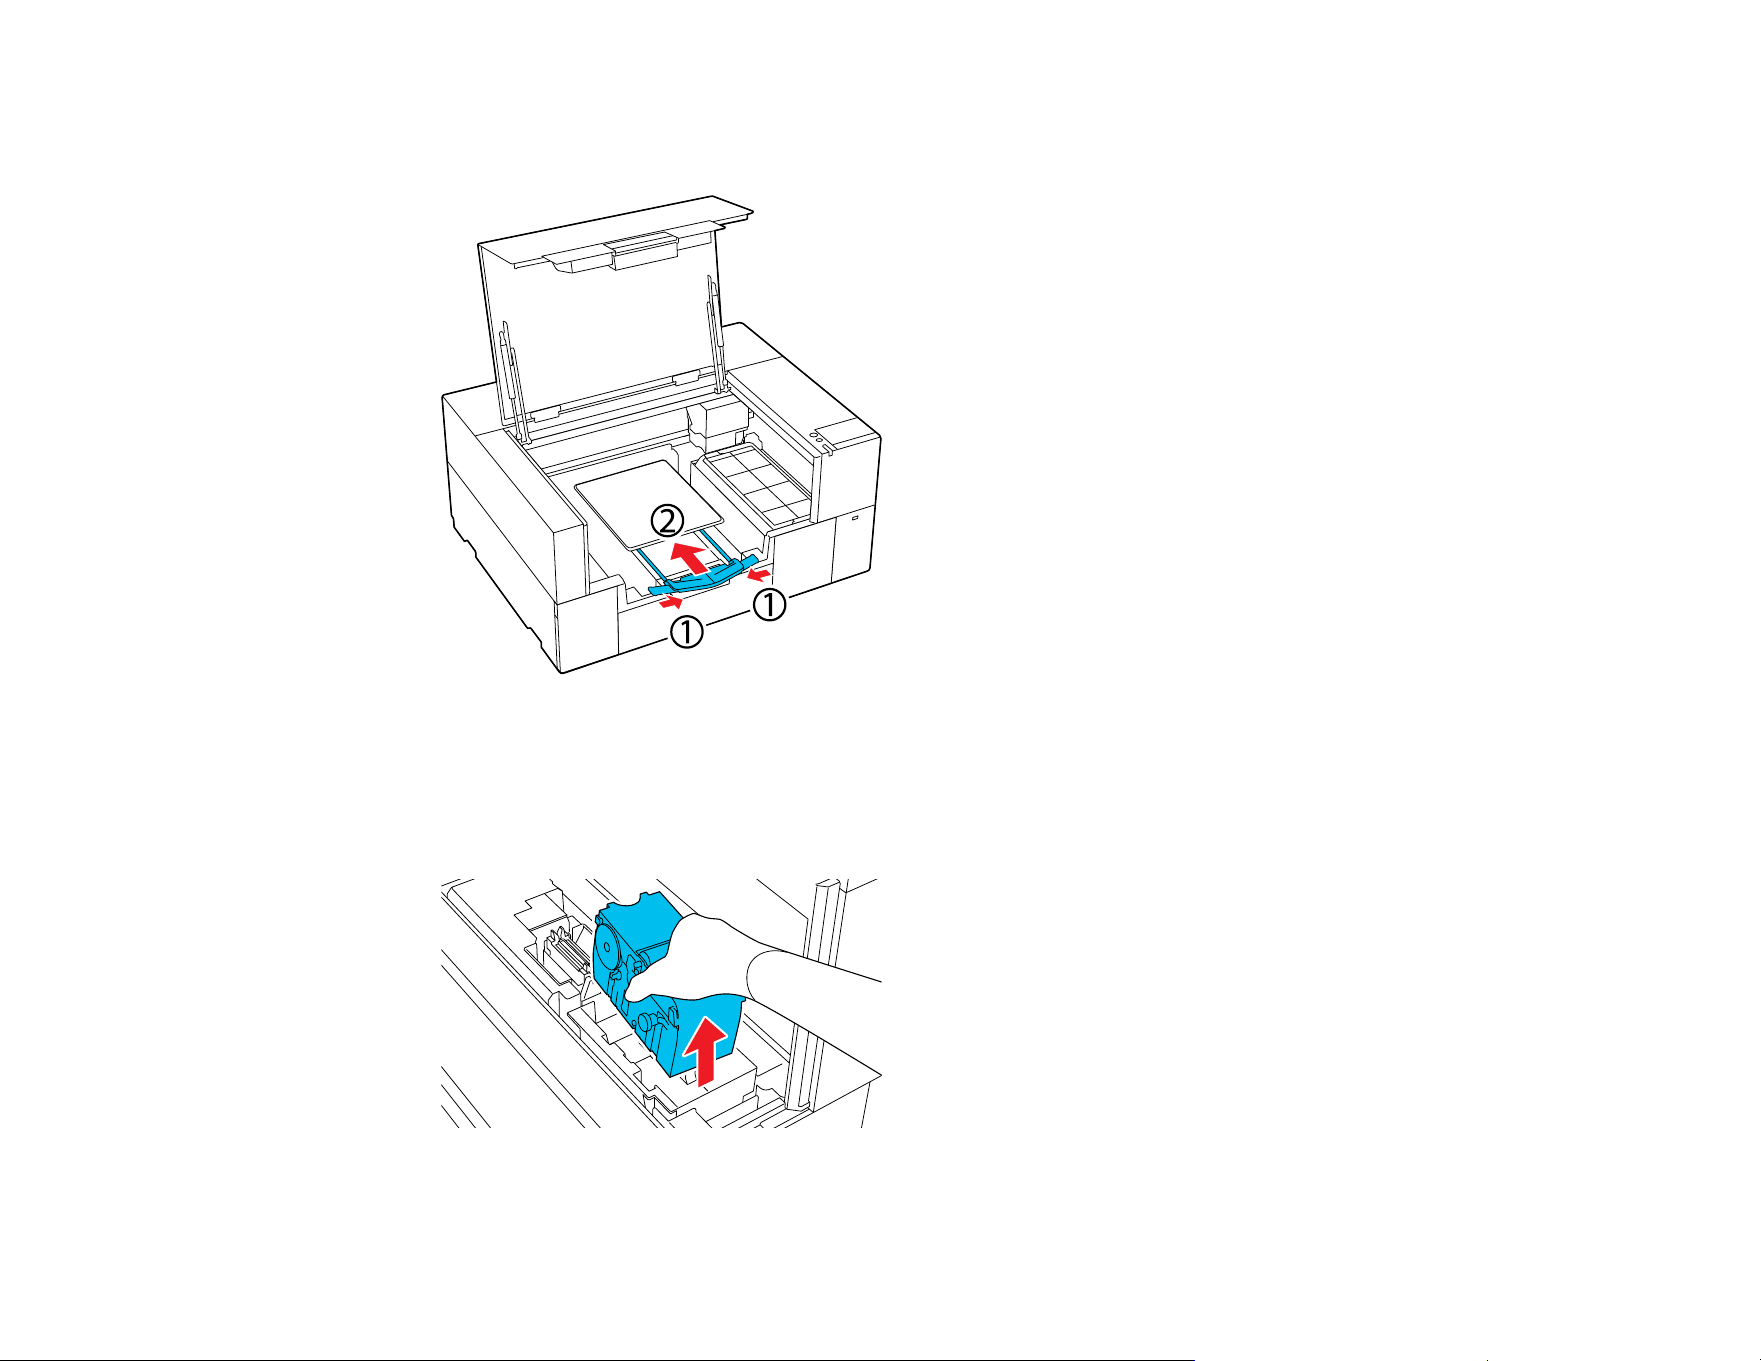
168
6. Make sure that the sides of the adjustable platen hanger are folded, and the hanger is pushed
securely into the base.
7. Wear the gloves supplied in the Maintenance Kit and remove the wiper unit.
Note: The wiper unit can be reinstalled and used again after transporting; store it in a plastic bag to
prevent it from being damaged or lost during transportation.
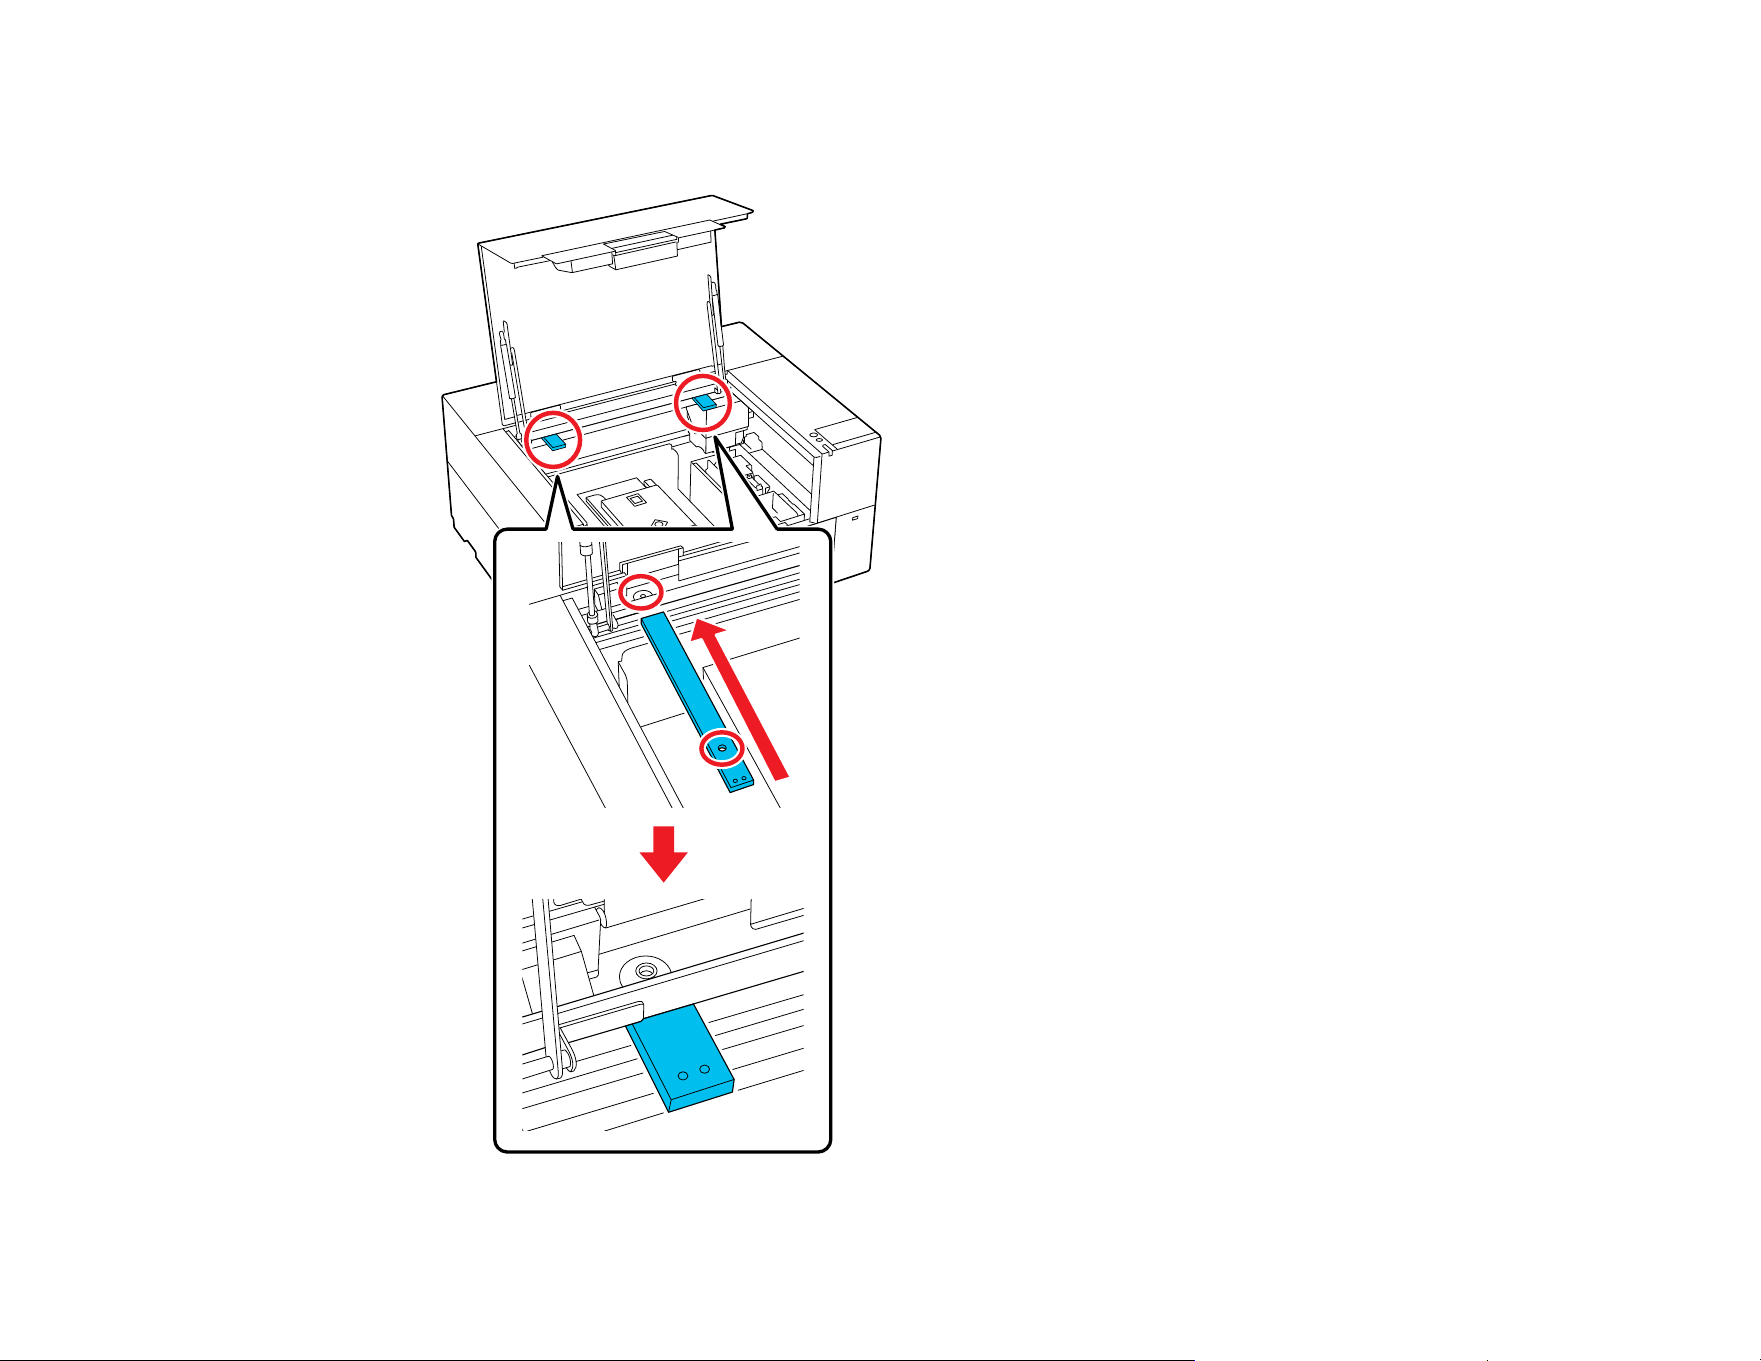
169
8. Re-install the transportation supports that you removed during initial setup and secure them with the
screws.
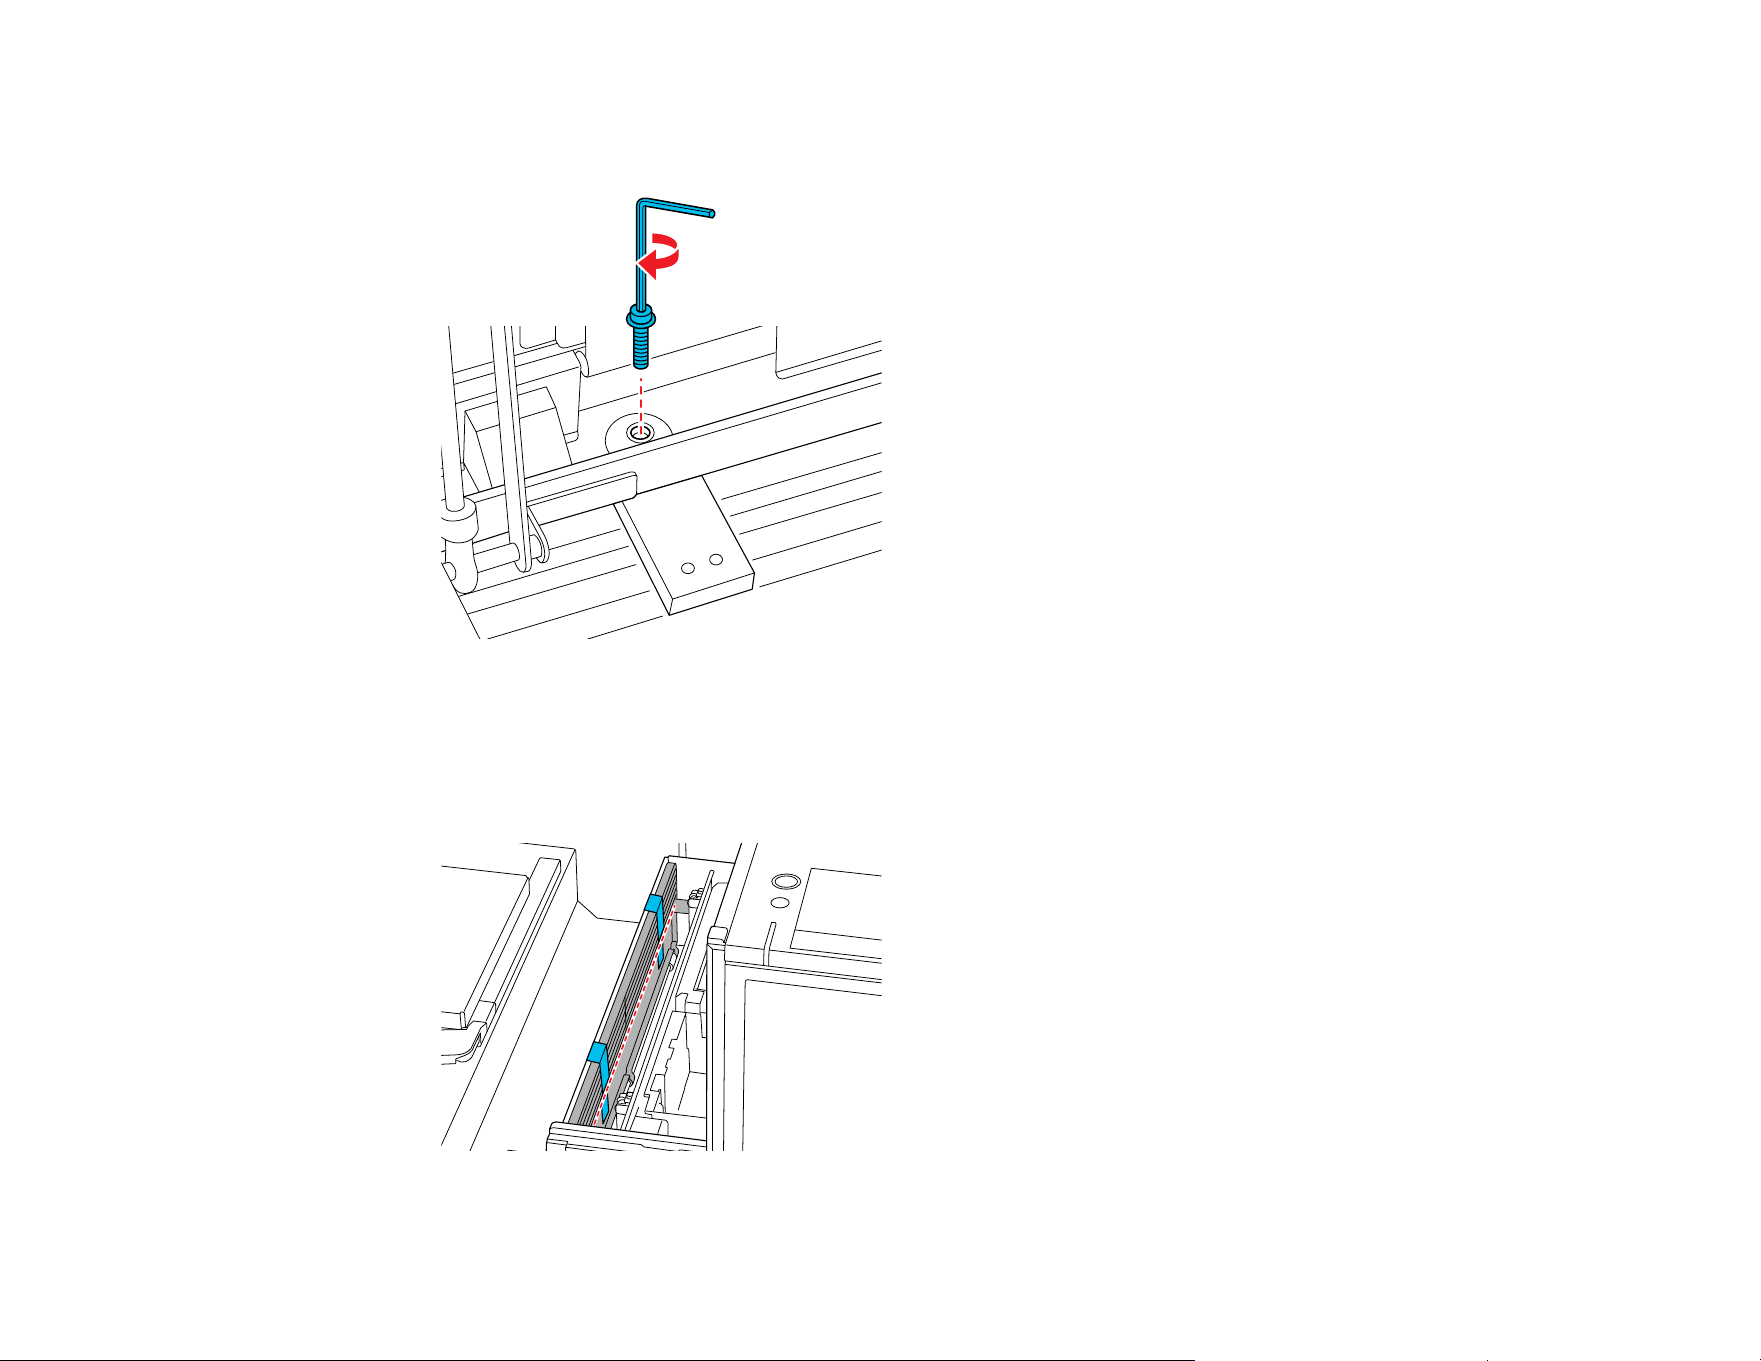
170
9. Insert the screws removed during unpacking into the screw holes and secure them with the Allen
key.
10. Use the supplied labels to secure the loading guard at the two locations shown in the illustration.
Attach the labels so that they extend below the dashed line on the inside surface of the loading
guard. If the labels are stuck above the dashed line, they may peel off due to vibrations during
transportation.
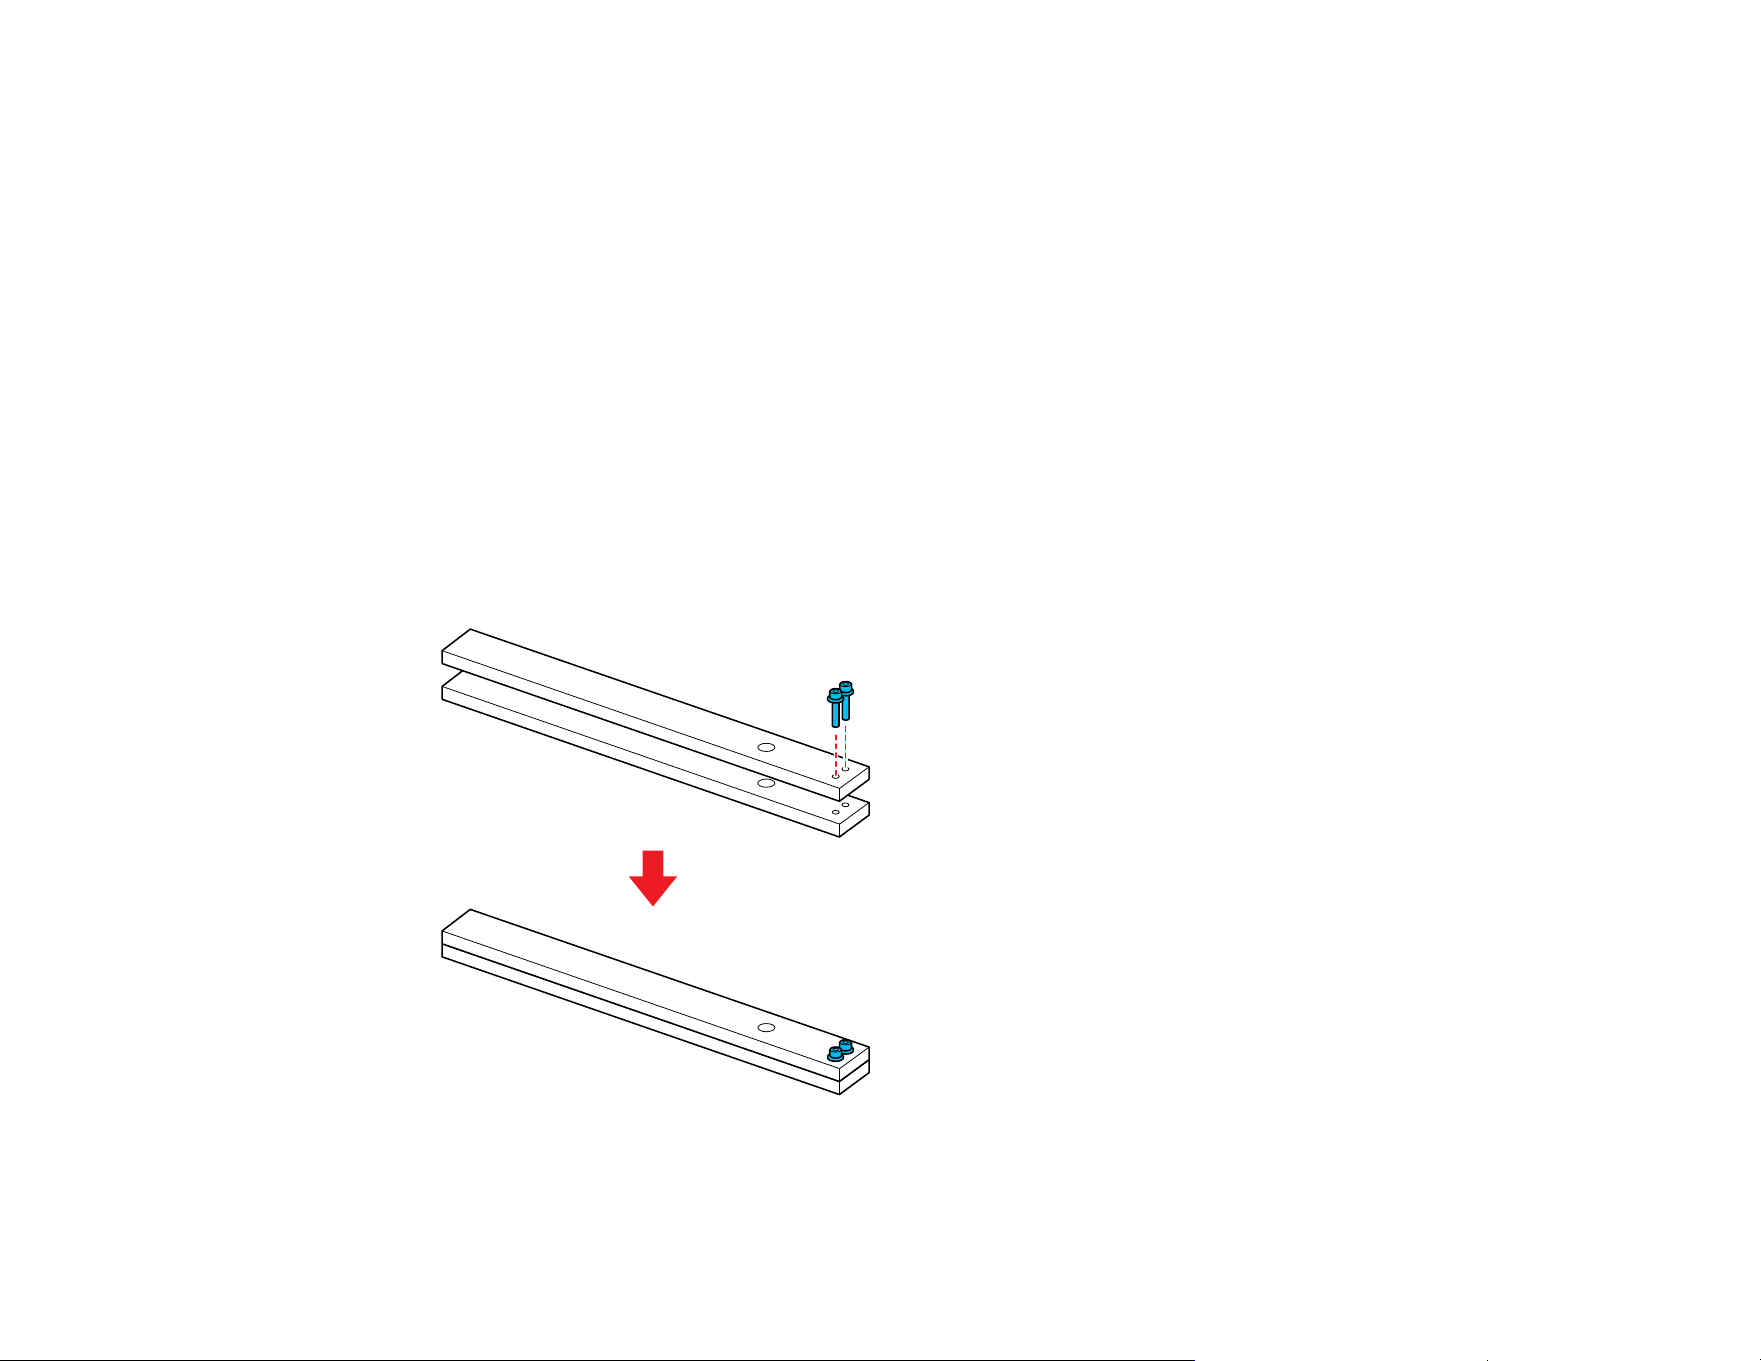
171
11. Close the printer cover.
Parent topic: Moving or Transporting the Product
Related tasks
Setting Up the Printer After Transport
Setting Up the Printer After Transport
Follow these steps to set up the printer after moving it. See the Start Here sheet for detailed information.
Note: If more than two weeks have passed since you made preparations for moving or transporting,
drain the cleaning liquid and refill the ink before resuming use.
1. Verify that the location is suitable for installation.
2. Remove the transportation supports and labels you attached during preparation.
Note: You can use the screws to attach the two supports together for storage.
3. Install all the items that were removed, including the cables.

172
4. Install the platen you want to use.
5. Connect the power cable to an electrical outlet and turn on the printer.
6. Perform a nozzle check and confirm that there are no clogged nozzles.
7. Align the print head and check the print quality.
Parent topic: Moving or Transporting the Product
Related tasks
Performing a Nozzle Check
Aligning the Print Head
Installing the Platen
Storing the Printer
If you will not use the printer for an extended period of time with the power off, you must properly prepare
it for storage. You must change the ink packs to cleaning ink packs if the planned period of non-
operation is one month or more.
Caution: If you do not change the ink packs to cleaning ink packs before storing the printer, it may be
impossible to clear clogs in the print head when the printer is turned back on. If you do not print for a long
time and do not perform pre-storage maintenance, turn on the printer at least once every seven days.
Before you begin the storage operation, gather the necessary number of cleaning ink packs and a new
maintenance box. You may need new ink and cleaning ink packs depending on the amount of ink and
cleaning liquid remaining. Prepare extra ink and cleaning ink packs as a precaution.
1. Do one of the following:
• If the printer is in White ink mode and you will not use it for between two weeks and one month,
change the printer mode to Color ink mode. See the link below.
• If you will not use the printer for one month or longer, go to the next step.
2. Turn on the printer, if necessary.
3. Select Maintenance > Keeping Preparation.
Note: You can also select Not turning on the printer for more than 2 weeks on the LCD screen
when turning off the printer.
4. Read the on-screen messages and then select Start.
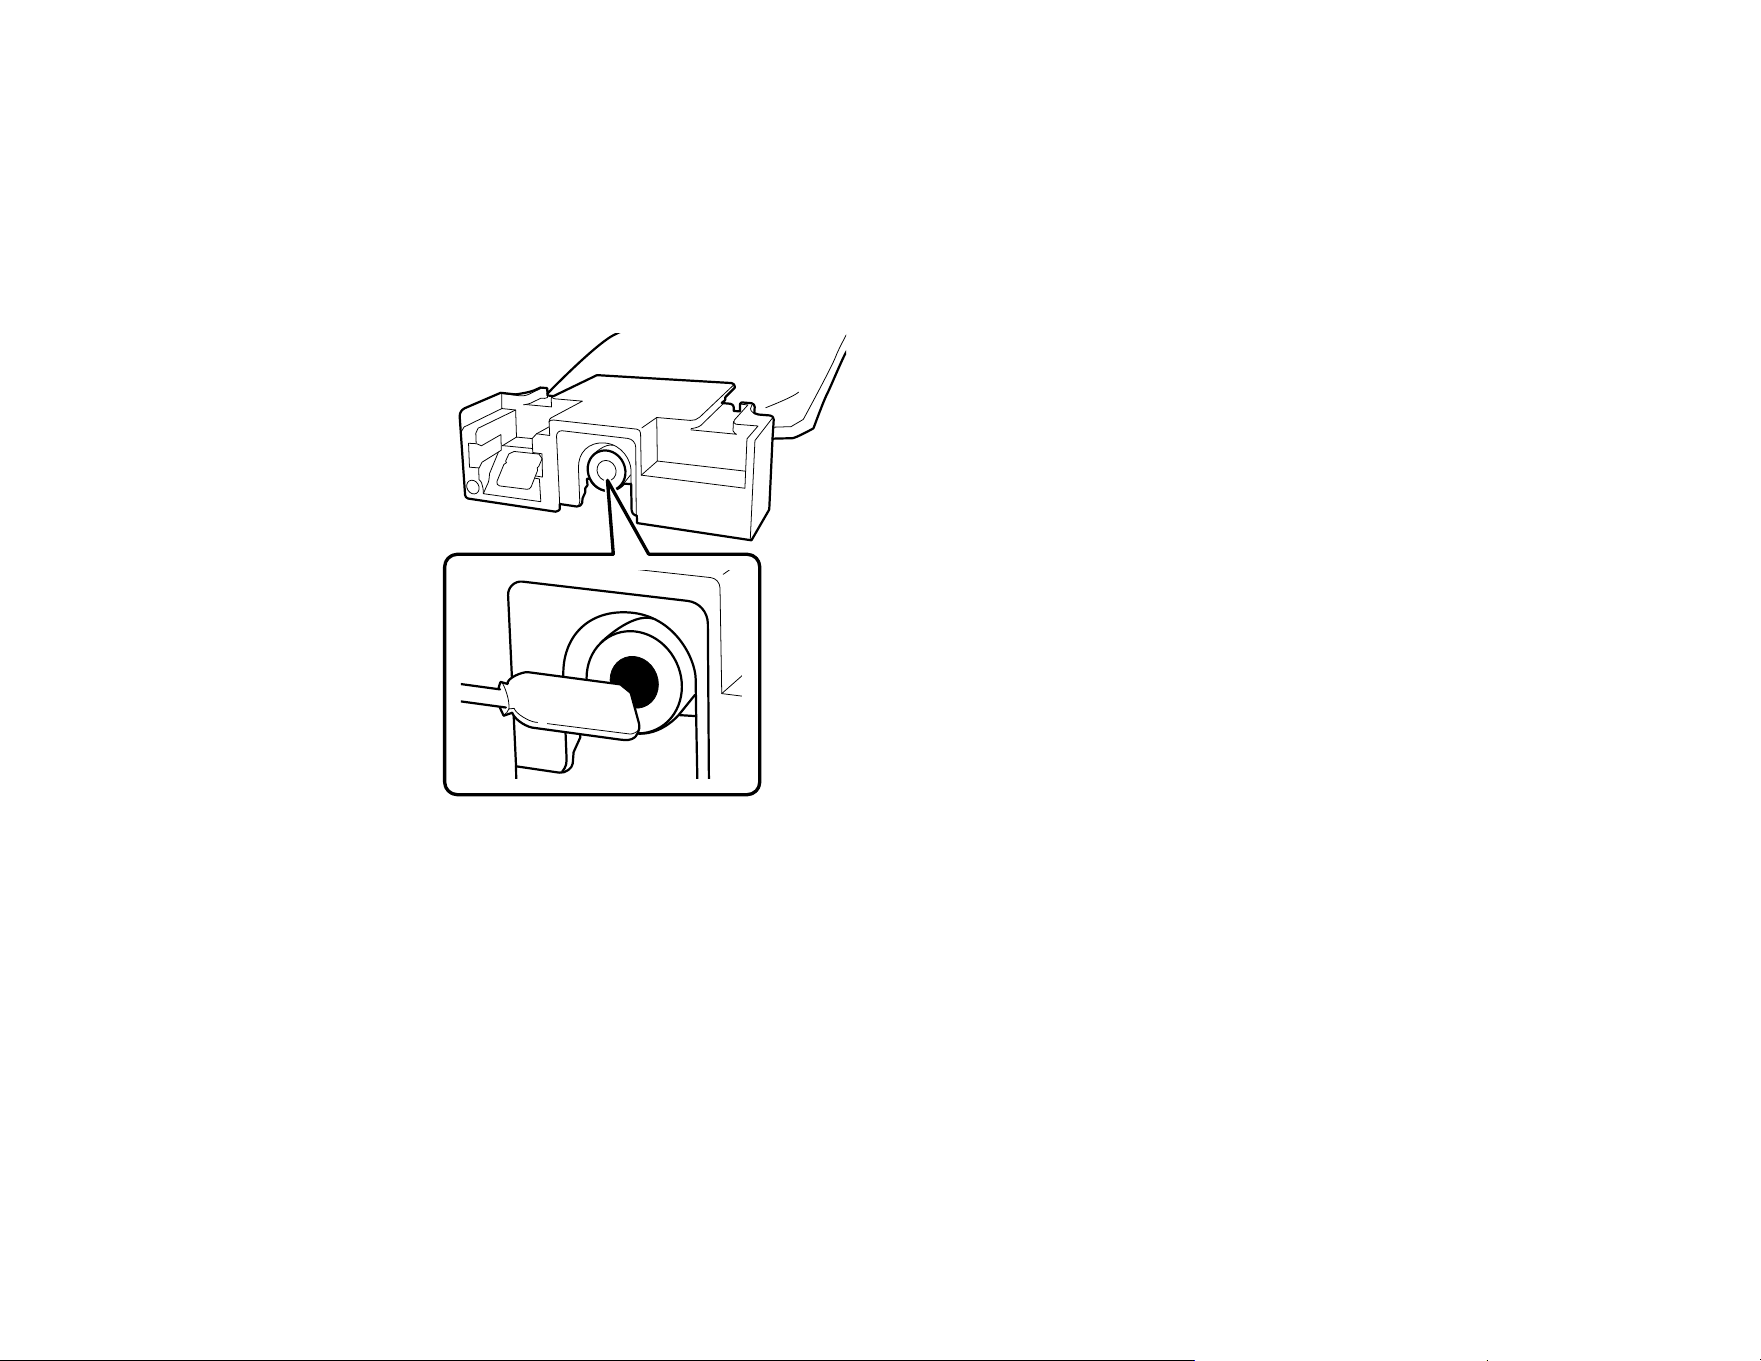
173
5. Select How To... on the LCD screen and follow the on-screen instructions to perform the procedure.
Note: Before storing any ink packs you removed from the printer, clean off any ink stuck to the ink
supply ports. Lightly touch the corner of a wide cleaning stick from the supplied Maintenance Kit to
the ink supply port to absorb any ink. Use a new cleaning stick for each color to avoid mixing colors.
You do not need to wipe off the ink and make sure you do not forcefully press or move the cleaning
stick.
6. When a message appears that confirms replacement is complete, turn off the printer.
7. When you turn on the printer after the storage period, follow the instructions on the control panel to
install and charge the ink packs and to install a new maintenance box.
Note:
• Select How To... on the screen to view the steps.
• Have new ink packs on hand as a precaution.
• When White ink mode is selected after restarting the printer, the density of White ink may be low.
See the link below.
Parent topic: Moving or Transporting the Product

175
Solving Problems
Check these sections for solutions to problems you may have using your product.
Product Status Messages
Solving Printer Problems
Solving Printing Problems
Solving Print Quality Problems
Uninstall Your Product Software
Where to Get Help (U.S. and Canada)
Where to Get Help (Latin America)
Product Status Messages
You can often diagnose problems with your product by checking the messages or icons on its LCD
screen.
LCD screen message Condition/solution
It is time to clean the
sensor cover.
The surface of the sensor cover is dirty. Clean the sensor cover immediately;
otherwise, printing may not be performed at the appropriate head height.
The sensor cover cannot
be recognized.
The media outside of the
platen area is too high
and may strike the print
head.
Open the printer cover
and place the media
again.
Press "OK" after
checking.
Check the following and then select OK:
• Make sure the Platen Gap setting is suitable for the thickness of the
loaded media.
• Make sure there are no wrinkles on the surface of the loaded media.
Reload the media so that it is flat.
• Remove anything that has fallen into the printer.
If the problem persists, confirm that the stand on which the printer is installed
is level. The printer cannot operate correctly if it is installed on a stand with
an uneven or distorted surface.

176
LCD screen message Condition/solution
Cannot move the gantry.
Open the printer cover,
then check for and
remove any obstructions
around the gantry.
See your documentation
for details.
Press "OK" after
checking.
Check the following and then select OK:
• Remove anything that has fallen around the gantry.
• Make sure that media outside the printable area is arranged so that it does
not interfere with the movable range of the base.
• Check that the transportation supports and labels have been removed.
If the problem persists, the gantry may be malfunctioning. Contact Epson for
support.
Cannot move the
loading guard. Open the
printer cover, then check
for and remove any
obstructions around the
loading guard.
See your documentation
for details.
Press "OK" after
checking.
Check the following and then select OK:
• Remove anything that is on top of or inside the loading guard.
• Check that the transportation supports and labels have been removed.
If the problem persists, the loading guard may be malfunctioning. Contact
Epson for support.
Printing canceled
because the print head
might strike the media.
Open the printer cover,
remove the media, and
then press "OK".
See your documentation
for details.
If this error occurs after printing using white ink, set the Platen Gap to
Manual and print again.
If the problem persists, confirm that the stand on which the printer is installed
is level. The printer cannot operate correctly if it is installed on a stand with
an uneven or distorted surface.

177
LCD screen message Condition/solution
The media surface is too
high. Check the
following and place the
media again.
• Make sure there are
no wrinkles or dust on
the media surface
• Make sure the media
thickness is 25 mm or
less
Press "Complete" after
checking.
If the problem persists after reloading the media, confirm that the stand on
which the printer is installed is level. The printer cannot operate correctly if it
is installed on a stand with an uneven or distorted surface.
The print head may
strike the media.
Either change the
settings for the "Platen
Gap" or reload the
media, and then press
[OK].
Make sure the Platen Gap setting is suitable for the media you are using.
If the problem persists, confirm that the stand on which the printer is installed
is level. The printer cannot operate correctly if it is installed on a stand with
an uneven or distorted surface.
Failed to inspect the
condition of nozzles.
Cannot run "Auto
Cleaning".
Select cleaning strength
manually and run.
The printer has exceeded the temperature at which normal operation is
guaranteed. Adjust the temperature of the room and start again.
No reprint data found.
A memory device or
USB memory stick is
required to reprint.
See your documentation
for details.
You cannot reprint a print job unless a USB memory device is connected to
the printer.

178
LCD screen message Condition/solution
Cannot use the inserted
Memory Device.
For details, see your
documentation.
Check the following:
• The USB memory device may be corrupt. Use a different USB memory
device.
• There is not enough free space on the USB memory device or the
maximum number of readable files (999) has been exceeded. Delete any
unnecessary files or use a different USB memory device.
• The USB memory device was removed from the printer while data was
being written or read. Before removing the USB memory device, make
sure that the light on the device is not flashing or on.
The combination of the
IP address and the
subnet mask is invalid.
For details, see your
documentation.
Enter the correct values for the IP address and the default gateway. Check
with your network administrator if you do not know the correct values.
Recovery Mode The printer restarted in recovery mode because the firmware update failed.
Make sure the computer and printer are connected via USB and try updating
the firmware again.
Maintenance Request:
Replace Parts Soon
(maintenance request
code)
A part used in the printer is nearing or at the end of its service life. Contact
your dealer or Epson for support and provide them with the displayed
maintenance request code. The error persists until you replace the requested
part. If you continue to use the printer, a printer error will occur.
Maintenance Request:
End of Parts Service Life
(maintenance request
code)

179
LCD screen message Condition/solution
Printer error.
Turn the power off and
on again.
If the problem persists,
contact Epson Support.
(service code)
An error message occurs when:
• The power cable is not connected securely
• An error occurs that cannot be cleared
When a printer error occurs, the printer automatically stops printing. Turn off
the printer, disconnect the power cable from both the outlet and the printer,
and then reconnect them. Turn the printer on and off several times. If the
same error message is displayed on the LCD screen, contact Epson for
support and provide them with the displayed service code.
Parent topic: Solving Problems
Related references
Where to Get Help (U.S. and Canada)
Where to Get Help (Latin America)
Optional Equipment and Replacement Parts
Environmental Specifications
Related tasks
Performing a Nozzle Check
Cleaning the Print Head
Cleaning the Sensor Cover
Related topics
Printing from a USB Memory Device
Solving Printer Problems
Check these sections if you have problems operating your product.
Printer Does Not Turn On
LCD Screen Shuts Off
Red Light Shines Inside the Printer
Forgot the Administrator Password
Parent topic: Solving Problems

180
Printer Does Not Turn On
If the printer does not turn on, try these solutions:
• Make sure the power cable is securely connected.
• Make sure the power outlet works by connecting the power cable for another electronic device.
Parent topic: Solving Printer Problems
LCD Screen Shuts Off
If the LCD screen shuts off intermittently, the printer may be in sleep mode. Try these solutions:
• Press any of the buttons on the control panel to reactivate the display. Then perform a hardware
operation such as opening the printer cover or sending a job to the printer.
• You can adjust the delay time before the product enters sleep mode in the Basic Settings menu.
Parent topic: Solving Printer Problems
Related references
Basic Settings Menu
Red Light Shines Inside the Printer
The red light always shines inside the printer. This is normal.
Parent topic: Solving Printer Problems
Forgot the Administrator Password
The preset value for the administrator password is the product serial number. Check the label on the
back of the product to locate the serial number. We recommend that you change the preset password as
soon as possible to prevent unauthorized access.
If you forgot the administrator password you created during network setup, contact Epson for support.
Parent topic: Solving Printer Problems
Related references
Where to Get Help (U.S. and Canada)
Where to Get Help (Latin America)
Solving Printing Problems
Check these sections if you have problems printing with your product.

181
Nothing Prints
Cannot Print Over a Network
Print Head Moves But Nothing Prints
Printing Is Slow or Stops Intermittently
Platen Height Error Is Displayed While Printing
Cannot Access the USB Memory Device
Parent topic: Solving Problems
Nothing Prints
If you have sent a print job and nothing prints, try these solutions:
• Make sure your printer is turned on.
• Make sure there are no error messages on the product's LCD screen.
• Make sure any interface cables are connected securely at both ends. If you have a spare cable, try
connecting with the spare cable.
• Check the model and specifications of the interface cable to see if the cable is appropriate for your
computer and printer.
• If you connected your printer to a USB hub, make sure it is a first-tier hub. If it still does not print,
connect your printer directly to your computer instead of the hub.
• Make sure the USB hub is recognized correctly on the computer. Disconnect all USB hubs from the
computer and connect the printer directly to the computer's USB port.
• Make sure the USB cable length does not exceed 10 feet (3 m).
• Make sure the cable is not broken or bent.
Parent topic: Solving Printing Problems
Related references
Interface Specifications
Related topics
Printing from a USB Memory Device
Cannot Print Over a Network
If you cannot print over a network, try these solutions:
• Make sure that your printer is turned on.

182
• If you are using TCP/IP, make sure the printer's IP address is set correctly for your network. If your
network does not assign IP addresses using DHCP, set the IP address manually.
• Check your wired LAN router or access point to see if the LED for the port to which your printer is
connected is on or flashing. If the link LED is off, try the following:
• Make sure the Ethernet cable is securely connected to your printer and to your router, access point,
switch, or hub.
• Try connecting your printer to a different port or a different router, access point, switch, or hub.
• Try connecting with a different Ethernet cable.
• Try printing to your printer from another computer on the network.
• Try connecting your printer directly to the computer using a USB cable.
Parent topic: Solving Printing Problems
Related references
Where to Get Help (U.S. and Canada)
Where to Get Help (Latin America)
Interface Specifications
Print Head Moves But Nothing Prints
If the print head is moving and nothing prints, try these solutions:
• Print a nozzle check pattern and then clean the print head, if necessary. If there are still clogged
nozzles, clean the suction cap and around the print head and then clean the print head again and
check if the clogged nozzles were cleared. If the problem remains, contact your dealer or Epson for
support.
Note: Use a transparent sheet when you are printing a nozzle check pattern with White ink. If you are
using Color ink mode, it is difficult to see the cleaning liquid rows in the nozzle check pattern. There is
no problem if the cleaning liquid rows are the only rows you cannot see.
• Make sure the platen gap is set correctly. The printer cannot print if the platen is too far from the print
head. If Platen Gap is set to Manual, check that the Value setting is suitable for the type of media you
are using.
Parent topic: Solving Printing Problems
Related references
Where to Get Help (U.S. and Canada)
Where to Get Help (Latin America)

183
Related tasks
Performing a Nozzle Check
Cleaning the Suction Cap
Cleaning Around the Print Head
Printing Is Slow or Stops Intermittently
If printing is slow or stops in the middle of a print job, try these solutions:
• Make sure Print Direction is set to Bi-Direction (High Speed) in the Garment Creator 2 software.
• Make sure the pre-treatment solution has completely dried; otherwise, the printing surface may
become damp and swell up, causing an error to occur and printing to stop.
• If you are using a platen without a grip pad and the print job requires a large amount of ink, the print
surface may swell up with ink. An error may occur and printing may stop. If you are using a platen with
a frame, try removing the frame. This will allow any slack or creases in the printed surface to spread to
the outer edges and solve the problem. If you remove the frame, you also need to reduce the width of
the White ink in the software so that the white under-base print does not extend beyond the image. Be
careful not to touch the T-shirt while printing as it can be easily moved out of position.
• If you print from a USB memory device with a slow reading speed (4.63MB per sec or less), the print
head stops during printing and then continues. Use a USB memory device with a faster reading
speed.
Parent topic: Solving Printing Problems
Related topics
Printing from a USB Memory Device
Platen Height Error Is Displayed While Printing
If a platen height error is displayed on the LCD screen during printing, try these solutions:
• If the image you are printing requires a large amount of ink, the platen height position sensor may
cause an error to appear on the LCD screen. If the T-shirt is loaded on a platen with a frame, remove
the frame and load the T-shirt so that it is flat. You should also reduce the width of any White ink in
Garment Creator 2 or another RIP software you are using so that any white under-base print does not
extend outside of the image. Be careful not to touch the T-shirt during printing as it can easily move
out of position.
• Check that the pre-treatment solution is completely dry and reload the T-shirt on the platen.
• The printer's sensor may be reacting to an uneven media surface, or the media surface has slack or is
creased. Try reloading the media so that is flat.

184
• Make sure the installed platen supports the thickness of the media you are using
Parent topic: Solving Printing Problems
Cannot Access the USB Memory Device
The USB memory device is not read by just inserting it into the printer's USB port. Select the USB
icon on the Home screen and then select your operation.
Make sure files on the USB memory device are saved in the root folder. Only prn files are displayed
when the device is connected to the printer.
Parent topic: Solving Printing Problems
Related topics
Printing from a USB Memory Device
Solving Print Quality Problems
Check these sections if you have problems with print quality.
Nozzle Check Pattern Prints Incorrectly
Overall Print Quality Is Poor
Lines Are Misaligned
Grainy or Unclear Printout
White Ink Quality Is Poor
Ink Stains Appear Outside the Printed Areas
Printer Status Sheet or Logs Print Incorrectly
Parent topic: Solving Problems
Nozzle Check Pattern Prints Incorrectly
If the nozzle check pattern does not print correctly, try these solutions:
• Clean the print head and print the check pattern again. If cleaning the print head several times does
not solve the problem, clean the suction cap.
• If the printer has not been used for a long time, nozzles may be dried and clogged. Turn the printer on
at least once every seven days to prevent the nozzles from clogging.
• Lint may have adhered to the platen near the print head. Clean the area using the maintenance kit.
• Check to see if cleaning ink supply units are installed in Color ink mode. If so, the rows printed with the
cleaning liquid are difficult to see.

185
• If you are printing the nozzle check pattern on paper in White ink mode, the rows printed with white ink
are difficult to see. Try printing on a transparent sheet to confirm the nozzle check pattern using White
ink.
Parent topic: Solving Print Quality Problems
Related tasks
Performing a Nozzle Check
Cleaning the Suction Cap
Cleaning Around the Print Head
Cleaning the Print Head
Related topics
Shaking and Replacing Ink Packs
Overall Print Quality Is Poor
If you notice that your print quality is uneven, too light, too dark, or there are lines in the print (banding),
try these solutions:
• Run a nozzle check to see if any of the print head nozzles are clogged. Then clean the print head, if
necessary.
• If the print surface is too far from the print head, the following problems may occur:
• Lines in the image (banding)
• Edges of the image are blurry
• Text and straight lines are duplicated
• Image is grainy
Make sure the Platen Gap setting is suitable for the platen and media types you are using.
• If you are printing on film, make sure Platen Gap is set to Auto, and that the film is completely flat on
the platen and secured with opaque adhesive tape.
• If you are printing on film and print quality is poor even after printing under the same conditions as a
previous film print job, the print surface may not be correctly detected. Load the film so that it is flat
and make sure it is not curled, warped, damaged, or bent in any way, and that the tape is not peeling
or lifted.
• If there is any fuzz on the print surface, it could contact the print head and cause nozzles to clog. Use
a heat press immediately before printing to flatten any fuzz on the media.

186
• If the printed surface is soiled, try cleaning the suction cap and around the print head. When you load
media on the platen, remove any lint with a lint roller or sticky tape and press the fibers flat by using a
hard roller.
• Align the print head. If you are printing on film, select Dark Media to align White ink with CMYK inks
on dark garments and Digital-Transfer-Film. Select Light Media to align CMYK inks on light-color
garments.
• Perform a feed adjustment.
• If the T-shirt you are printing on easily absorbs ink, ink may not remain on the surface of the T-shirt
and slight misalignment may appear if bidirectional printing is enabled. If this occurs, align the print
head. If the problem is still not resolved, try selecting Uni-Direction (Low Speed) as the Print
Direction setting in the Garment Creator 2 software. To repeat printing or to print a job from a USB
memory stick that has already been set to Bi-Direction (High Speed), set Head Move Direction to
Uni-Directional on the preview screen.
• Make sure your ink packs have not expired. For best results, use ink packs before the expiration date
printed on the package (within a year of installation in the printer). Replace expired ink packs with new
ones.
• Make sure you are using genuine Epson ink supply units (ink packs). If you use non-Epson ink packs,
printouts may be faint, or the color of the printed image may be uneven because the remaining ink
level is not correctly detected.
• Shake the ink packs thoroughly before installing them in the printer. To maintain optimum print quality,
remove and shake the installed White ink pack at the start of every working day or when a message is
displayed. Shake the color ink packs once a month.
• Compare the printed result with the image on your computer screen. Since monitors and printers
produce colors differently, printed colors and screen colors do not always look the same.
• Make sure that the printer cover is closed during printing.
• Check the ink levels on the LCD screen. Replace any ink packs that are low on ink.
• Adjust the print quality settings in the Garment Creator 2 software to a higher quality setting.
• Adjust the density of the White ink in the Garment Creator 2 software.
• Make sure the pre-treatment solution is not too diluted. If the pre-treatment solution has been diluted
too much, the solidity of the White ink is weakened and the edges of the image may be blurred. Try
reducing the density of the White ink in the Garment Creator 2 software or use a stronger pre-
treatment solution.
• Before applying pre-treatment solution, make sure you remove any lint from the fabric surface using a
lint roller or sticky tape; otherwise, uneven print results can occur.

187
• Make sure you are uniformly applying the correct amount of pre-treatment solution. Applying too much
or too little, or applying it unevenly can cause uneven print results.
• If you are printing on cotton T-shirts, uneven print quality may occur if the pre-treatment solution is too
weak. Standing fibers may not be flattened sufficiently and can shift during printing or fixing. Adjust the
dilution ratio of the pre-treatment solution.
• If you are printing on polyester T-shirts, unevenness may occur depending on the fabric, even if the
pre-treatment solution is applied correctly. Try increasing the temperature when fixing the pre-
treatment solution.
• If you are printing vivid colors, try setting Quality for Color Print Quality or White Print Quality in the
Garment Creator 2 software.
Parent topic: Solving Print Quality Problems
Related references
Optional Equipment and Replacement Parts
Media Settings
Diluting the Pre-treatment Solution
Related tasks
Performing a Nozzle Check
Cleaning the Suction Cap
Cleaning Around the Print Head
Cleaning the Print Head
Aligning the Print Head
Related topics
Shaking and Replacing Ink Packs
Loading a T-shirt
Lines Are Misaligned
If vertical ruled lines are misaligned in your print, try these solutions:
• Align the print head and save the adjustments to a registered media setting.
• Change the Platen Gap setting to Manual.
• You may see lines in prints created using the Auto (bi-directional) setting, depending on the
unevenness of the shirt's surface. If this occurs, align the print head. If lines are still misaligned even
after aligning the print head, set the Head Move Direction setting to Uni-Directional in the Garment

188
Creator 2 software or the printer's menus. If lines are still visible, adjust the print quality settings in the
Garment Creator 2 software.
Parent topic: Solving Print Quality Problems
Related references
Media Settings
Related tasks
Aligning the Print Head
Grainy or Unclear Printout
If your printouts are grainy or unclear, try these solutions:
• Clean the suction cap.
• Run a nozzle check to see if any of the print head nozzles are clogged. Then clean the print head, if
necessary.
• Change the Platen Gap setting to Manual.
• Clean the surface of the T-shirt. Remove any lint with sticky tape or a lint roller, and press the fibers
flat with a hard roller when you load a T-shirt on the platen.
• You may need to increase the image resolution or print at a smaller size (optimum image resolution is
360 dpi); see your software documentation for instructions.
• If you are printing over a USB connection and printing does not stop or printed text is corrupted, make
sure you are only using one RIP software open.
Parent topic: Solving Print Quality Problems
Related references
Media Settings
Related tasks
Aligning the Print Head
Performing a Nozzle Check
Cleaning the Suction Cap
Cleaning Around the Print Head
Cleaning the Print Head

189
White Ink Quality Is Poor
If you notice that the White ink is uneven, too dark, too light, blurry, or unclear, try these solutions:
• To maintain optimum print quality, remove and shake the installed White ink packs at the start of every
working day or every 24 hours (or when a message is displayed).
• Run a nozzle check to see if any of the print head nozzles are clogged. Then clean the print head, if
necessary.
• Align the print head.
• Adjust the density of the White ink in the Garment Creator 2 software.
• Make sure the pre-treatment solution is applied evenly or the printed results will be uneven.
• Make sure the pre-treatment solution is not too diluted. If the pre-treatment solution has been diluted
too much, the solidity of the White ink is weakened and the edges of the image may be blurred. Try
reducing the density of the White ink in the Garment Creator 2 software or make the pre-treatment
solution stronger.
• Make sure to dry the shirt completely after pre-treatment. If the shirt is left for an extended period, dry
it for several seconds using a heat press before printing.
• Check the temperature and pressure of the heat press. The temperature of the heat press decreases
when you press a T-shirt that has had pre-treatment solution applied. When pressing several T-shirts
in succession, check that the temperature of the heat press is not too low. Whiteness becomes
uneven if the pressure is insufficient since the T-shirt does not dry completely and the fibers are not
pressed flat.
• Make sure your White ink packs have not expired. For best results, use ink packs before the expiration
date printed on the package (within a year of installation in the printer). Replace expired packs with
new ones.
• If the under-base white shows outside the main image area, adjust the print area of the under-base
white in the Garment Creator 2 software.
• If you are printing on film and the under-base white shows outside the main image area, make sure
you are printing on the correct side of the sheet and the job is intended for printing on film. If you
confirm that both of those items are correct, increase the Reduce White Area setting in Garment
Creator 2. See the Garment Creator 2 online help for more details.
• Try printing on a different type of garment. White quality can vary depending on the quality of the
cotton and ratio of polyester in a garment.
• If there is still not enough white or the white is uneven, try the following:
1. Run Cleaning (Heavy) on the white nozzles (Menu > Maintenance > Head Cleaning > Cleaning
(Heavy) > Select Nozzles). Select all the WH rows and then select OK.

190
2. If the problem still remains after running the cleaning once or twice, change the printer mode to
Color ink mode, and then back to White ink mode.
3. If changing the printer mode does not resolve the issue, contact your dealer or Epson for support.
Parent topic: Solving Print Quality Problems
Related references
Where to Get Help (U.S. and Canada)
Where to Get Help (Latin America)
Handling White Ink
Media Settings
Diluting the Pre-treatment Solution
Related tasks
Performing a Nozzle Check
Cleaning the Suction Cap
Cleaning Around the Print Head
Cleaning the Print Head
Aligning the Print Head
Changing the Printer Mode
Related topics
Pre-treating a T-shirt
Shaking and Replacing Ink Packs
Ink Stains Appear Outside the Printed Areas
If you notice ink stains outside of the printed area of the T-shirt, there may be residual ink on the platen's
frame or top plate or lint and ink may have built up on the print head. Check the frame and platen and
clean them, if necessary.
Note: Transfer the printed T-shirt to the heat press with care; the ink is wet and can smudge.
If you notice stains developing over time outside of the printed areas, it may be caused by residual dye
from dark-colored T-shirts transferred to white or light-colored T-shirts when using a heat press. The
residual dye then reacts with perspiration and sunlight and can discolor. Clean the press surface and use
a release sheet on top and under the T-shirt when pressing. Use new sheets or use them according to
the color of the T-shirt. If you have placed cloth on top and under the T-shirt, place the sheets in the

191
positions shown below. If you have placed cloth on top and under the T-shirt, replace it with new cloth or
use a different cloth according to the color of the T-shirt.
Components in the cotton pre-treatment solution may coagulate during storage. The coagulated
components can stick to the fabric and cause unevenness. Filter the solution to remove any coagulation
before using it.
Parent topic: Solving Print Quality Problems
Related tasks
Cleaning Around the Print Head
Cleaning the Platen Without a Grip Pad
Filtering the Cotton Pre-treatment Solution
Cleaning Inside the Printer
Printer Status Sheet or Logs Print Incorrectly
If the printer status sheet and log are printed beyond the edges of your paper, make sure you are printing
with a medium size (standard) platen.
Parent topic: Solving Print Quality Problems
Related tasks
Installing the Platen
Uninstall Your Product Software
If you have a problem that requires you to uninstall and re-install your software, follow the instructions for
your operating system.
Uninstalling Product Software - Windows
Uninstalling Product Software - Mac

192
Parent topic: Solving Problems
Uninstalling Product Software - Windows
You can uninstall and then re-install your printer software to solve certain problems.
1. Turn off the product.
2. Disconnect any interface cables.
3. Close all applications running on your computer.
4. Do one of the following:
• Windows 11: Click , then search for Settings and select it. Select Apps or System > Apps &
features. Then select the program you want to uninstall and select Uninstall.
• Windows 10: Right-click and select Control Panel > Programs > Programs and Features.
Select the uninstall option for your Epson product, then select Uninstall/Change.
Note: If you see a User Account Control window, click Yes or Continue.
Select your product again, if necessary, then select OK, and click Yes to confirm the
uninstallation.
• Windows 8.x: Navigate to the Apps screen and select Control Panel > Programs > Programs
and Features. Select the uninstall option for your Epson product, then select Uninstall/Change.
Note: If you see a User Account Control window, click Yes or Continue.
Select your product again, if necessary, then select OK, and click Yes to confirm the
uninstallation.
5. Restart your computer, then re-install your software.
Note: If re-installing your product software does not solve a problem, contact Epson support.
Parent topic: Uninstall Your Product Software
Related references
Where to Get Help (U.S. and Canada)
Where to Get Help (Latin America)

193
Uninstalling Product Software - Mac
In most cases, you do not need to uninstall your product software before re-installing it. However, you
can download the Uninstaller utility from the Epson support website to uninstall your product software as
described here.
Note: If re-installing your product software does not solve a problem, contact Epson support.
1. To download the Uninstaller utility, visit epson.com/support (U.S.), epson.ca/support (Canada), or
latin.epson.com/support (Latin America) and select your product.
2. Click Downloads.
3. Select your operating system, click Utilities, locate the Uninstaller utility, and click Download. (If
you do not see an Uninstaller utility, search for "Uninstaller" using the site search field.)
4. Run the file you downloaded.
5. Double-click the Uninstaller icon.
6. In the Epson Uninstaller screen, select the checkbox for each software program you want to
uninstall.
7. Click Uninstall.
8. Follow the on-screen instructions to uninstall the software.
9. Reinstall your product software.
Note: If you uninstall the printer driver and your product name remains in the Print & Fax, Print & Scan,
or Printers & Scanners window, select your product name and click the – (remove) icon to remove it.
Parent topic: Uninstall Your Product Software
Related references
Where to Get Help (U.S. and Canada)
Where to Get Help (Latin America)
Where to Get Help (U.S. and Canada)
Epson provides technical support and information on the installation, configuration, and operation of
professional printing products through the Epson Preferred Limited Warranty Plan. Dial (888) 377-6611,
7 a.m. to 4 p.m., Pacific Time, Monday through Friday. Days and hours of support are subject to change
without notice.

194
Note: If you experience difficulty with the toll-free number, call (562) 276-1305 (U.S.).
Before you call, make sure you have your printer serial number and proof of purchase.
Visit epson.com/support (U.S.) or epson.ca/support (Canada) and select your product for solutions to
common problems. You can download drivers, firmware, and documentation, get FAQs and
troubleshooting advice, or e-mail Epson with your questions.
Note: For help using any other software on your system, see the documentation for that software for
technical support information.
Purchase Supplies and Accessories
You can purchase genuine Epson ink, paper, and accessories from an Epson authorized reseller. To
find the nearest reseller, visit proimaging.epson.com (U.S.) or proimaging.epson.ca (Canada), select
your product series and product, and click the Where to Buy button. Or call 800-GO-EPSON (800-463-
7766) in the U.S. or 800-807-7766 in Canada.
Parent topic: Solving Problems
Where to Get Help (Latin America)
If you need additional help with your Epson product, contact Epson.
Epson provides these technical support services:
Internet Support
Visit Epson's support website at latin.epson.com/support for solutions to common problems. You can
download drivers and documentation, get FAQs and troubleshooting advice, or e-mail Epson with your
questions.
Speak to a Support Representative
Before you call Epson for support, please have the following information ready:
• Product name
• Product serial number (located on a label on the product)
• Proof of purchase (such as a store receipt) and date of purchase
• Computer configuration
• Description of the problem
Then call:

195
Country Telephone
Argentina (54 11) 5167-0300
0800-288-37766
Bolivia* 800-100-116
Brazil 0800-007-5000
Chile (56 2) 2484-3400
Colombia Bogota: (57 1) 602-4751
Other cities: 01-8000-915235
Costa Rica 800-377-6627
Ecuador* 1-800-000-044
El Salvador* 800-6570
Guatemala* 1-800-835-0358
Mexico Mexico City: (52 55) 1323-2052
Other cities: 800-087-1080
Nicaragua* 00-1-800-226-0368
Panama* 00-800-052-1376
Paraguay 009-800-521-0019
Peru Lima: (51 1) 418-0210
Other cities: 0800-10126
Uruguay 00040-5210067
* Contact your local phone company to call this toll-free number from a mobile phone.
If your country does not appear in the list, contact the sales office in the nearest country. Toll or long
distance charges may apply.
Purchase Supplies and Accessories
You can purchase genuine Epson ink, paper, and accessories from an Epson authorized reseller. To
find the nearest reseller, visit latin.epson.com or call your nearest Epson sales office.
Parent topic: Solving Problems

196
Technical Specifications
These sections list the technical specifications for your product.
Note: Epson offers a recycling program for end of life Epson products. Please go to this site (U.S.) or
this site (Canada) for information on how to return your Epson products for proper disposal.
Windows System Requirements
Mac System Requirements
Printer Specifications
Supported Media Specifications
Ink Specifications
Dimension Specifications
Electrical Specifications
Environmental Specifications
Interface Specifications
Network Interface Specifications
Cleaning Ink Supply Unit Specifications
Pre-treatment Solution Specifications
Ink Cleaning Solution Specifications
Safety and Approvals Specifications
Windows System Requirements
To use your product and its software, your computer should meet these requirements.
Microsoft Windows OS
version
(64-bit compatible)
Windows 8.1*, Windows 10*, Windows 11
CPU Intel Core2Duo 2.5 GHz or more
Memory 1GB or more
Hard disk space
available
2GB or more
Display resolution 1280 × 1024 or higher

197
Connection method USB, Ethernet, or Wi-Fi
* Does not support Garment Creator 2
Note: For the latest product software available for your operating system, visit the Epson support site at
epson.com/support (U.S.), epson.ca/support (Canada), or latin.epson.com/support (Latin America),
select your product, and select Downloads.
Parent topic: Technical Specifications
Mac System Requirements
To use your product and its software, your Mac should meet these requirements.
OS X version macOS 10.12.x or later
CPU Intel Core2Duo 2.5 GHz or more
Memory 1 GB or more
Hard disk space
available
2 GB or more
Display resolution 1280 ×1024 or higher
Connection method USB, Ethernet, or Wi-Fi
Note: For the latest product software available for your operating system, visit the Epson support site at
epson.com/support (U.S.), epson.ca/support (Canada), or latin.epson.com/support (Latin America),
select your product, and select Downloads.
Parent topic: Technical Specifications
Printer Specifications
Printing method On-demand ink jet

198
Nozzle configuration White Ink Mode:
White: 400 nozzles × 2
Color: 400 nozzles × 4 colors
Color Ink Mode:
400 nozzles × 4 colors
Resolution 2400 × 1200 dpi maximum
Control code ESC/P raster (undisclosed command)
Platen feed method Gantry type
Built-in memory 1GB
Parent topic: Technical Specifications
Supported Media Specifications
Thickness XS/S platen (without grip pad): 0.98 inches (25 mm) or less
S platen (with grip pad): 0.94 inches (24 mm) or less
Sleeve platen: 0.39 inches (10 mm) or less
Weight 3.31 lb (1.5 kg) or less
Material Fabric with a cotton blend ratio of 50 to 100% (100% cotton, thick
fabric with a high weave density recommended)
Fabric with a polyester blend of 50 to 100% (100% polyester
recommended)
Note: Apply pre-treatment solution when printing on polyester T-
shirts or when printing white ink on cotton T-shirts.
Parent topic: Technical Specifications
Ink Specifications
Note: This printer is designed for use with Epson ink packs only, not third-party ink packs or ink. Other
brands of ink supplies are not compatible and, if described as compatible, may not function properly or
continuously.

199
The included initial ink packs are designed for reliable printer setup and cannot be used as replacement
ink packs or resold. After setup, the remaining ink is available for printing. Yields are based on ISO
24711 in default mode, printing continuously. Yields vary due to print images, settings, and
temperatures. Printing infrequently or primarily with one color reduces yields. All ink packs must be
installed with ink for printing and printer maintenance. For print quality, some ink remains in replaced ink
packs.
Type Dedicated ink supply units (ink packs)
UltraChrome DG2 ink
Use by date See the expiration date printed on the package (when stored at
normal temperatures)
Print quality guarantee After installation: 1 year
Temperature Operating: 50 to 95 °F (10 to 35 °C)
Storage (in package and after installation in printer):
–4 to 104 °F (–20 to 40 °C); within 4 days at –4 °F (–20 °C) and 1
month at 104 °F (40 °C)
Transporting (in package):
–4 to 140 °F (–20 to 60 °C); within 4 days at –4 °F (–20 °C), 1 month
at 104 °F (40 °C), and 72 hours at 140 °F (60 °C)
Dimensions Width: 3.2 inches (81 mm)
Depth: 11.7 inches (296 mm)
Height: 1.1 inches (27 mm)
Capacity 8.5 ounces (250 ml)
Note: Do not refill the ink.
Parent topic: Technical Specifications
Dimension Specifications
Height 16.8 inches (426 mm)
Printer cover open: 36.9 inches (937 mm)

200
Width 35.4 inches (899 mm)
Depth 27.5 inches (699 mm)
Weight
(approximately)
156.5 lb (71 kg)
(with supplied platen installed; not including ink supply units)
Parent topic: Technical Specifications
Electrical Specifications
Rated voltage AC 100 to 240 V
Rated frequency range 50/60 Hz
Rated current 1.4 A
Power consumption Printing: 40 W (approximately)
Ready mode: 20 W (approximately)
Sleep mode: 6 W (approximately)
Power off mode: 0.2 W (approximately)
Parent topic: Technical Specifications

201
Environmental Specifications
Temperature Operating: 50 to 95 °F (10 to 35 °C)
Operating (recommended): 59 to 77 °F (15 to 25 °C)
Storage (before unpacking):
–4 to 104 °F (–20 to 40 °C); within 120 hours at 140 °F (60 °C) and 1
month at 104 °F (40 °C)
Storage (after unpacking):
–4 to 104 °F (–20 to 40 °C); within 1 month at 104 °F (40 °C)
Note:
• To ensure the colors you want to print, maintain a constant room
temperature of 59 to 77 ˚F (15 to 25 ˚C).
• Make sure you use the printer at an altitude of 6561 feet (2000 m)
or less.
Humidity
(non-condensing)
Operating: 20 to 80% RH
Operating (recommended): 40 to 60% RH
Storage: 5 to 85% RH
Parent topic: Technical Specifications
Interface Specifications
USB Interface Front: High-Speed USB port compatible with USB 2.0 specification
(for connection of non-encrypted USB drive for printing)
Rear: SuperSpeed USB port compatible with USB 3.0 specification
Type B (USB port for computer)

202
Ethernet Standards IEEE802.3i (10BASE-T)
IEEE802.3u (100BASE-TX)
IEEE802.3ab (1000BASE-T)
IEEE802.3az (supports energy-saving models); connected device
should comply with IEEE802.3az standards
Note: Use a category 5e or higher shielded twisted pair cable for all
interfaces.
Parent topic: Technical Specifications
Network Interface Specifications
Wi-Fi
Standards IEEE802.11b/g/n; IEEE802.11n (2.4 GHz, HT20 only)
IEEE802.11a/n/ac (5 GHz)
Securities WEP (64/128bit)
WPA-PSK (TKIP)
WPA2-PSK (AES) (complies with WPA2 standards with support for
WPA/WPA2 Personal)
WPA3-SAE
WPA2-Enterprise (AES) (EAP-TLS/PEAPTLS/PEAPMSCHAPv2/EAP-
TTLS)
WPA3-Enterprise
Frequency range IEEE802.11b/g: 2.4 GHz
IEEE802.11n: 2.4 GHz (HT20 only)
IEEE 802.11a/n/ac: 5 GHz
Communication mode Infrastructure
Wi-Fi Direct (Simple AP) (not supported for IEEE802.11b)

203
Network Printing
Protocols/Functions
Windows:
• EpsonNet Print (IPv4 only)
• Standard TCP/IP (IPv4/IPv6)
• WSD Printing (IPv4/IPv6)
• IPP Printing (IPv4/IPv6)
Mac:
• Bonjour (IPv4/IPv6)
• IPP Printing (IPv4/IPv6)
Security Protocols SSL/TLS (HTTPS Server/Client, IPPS)
IEEE802.1X
IPsec/IP Filtering
SMTPS (STARTTLS, SSL/TLS)
SNMPv3
Ethernet
Standards IEEE802.3i (10BASE-T)
IEEE802.3u (100BASE-TX)
IEEE802.3az (Energy Efficient Ethernet); connected device should
comply with IEEE802.3az standards
Note: Use a category 5e or higher shielded twisted pair cable for all interfaces.
Warning: To prevent radio interference to the licensed service, this device is intended to be operated
indoors and away from windows to provide maximum shielding. Equipment (or its transmit antenna) that
is installed outdoors is subject to licensing.
Parent topic: Technical Specifications
Cleaning Ink Supply Unit Specifications
Expiration date See the date printed on the package; at normal temperature

204
Temperature Operating:
50 to 95 °F (10 to 35 °C)
Storage (in package and after installation in printer):
–4 to 104 °F (–20 to 40 °C); within 4 days at –4 °F (–20 °C) and 1
month at 104 °F (40 °C)
Transporting (in package):
–4 to 140 °F (–20 to 60 °C); within 4 days at –4 °F (–20 °C), 1 month
at 104 °F (40 °C), and 72 hours at 140 °F (60 °C)
Dimensions Width: 3.2 inches (81 mm)
Depth: 11.7 inches (296 mm)
Height: 1.1 inches (27 mm)
Capacity 8.5 ounces (250 ml)
Parent topic: Technical Specifications
Pre-treatment Solution Specifications
Expiration date See the date printed on the package; at normal temperature
Temperature Operating:
50 to 95 °F (10 to 35 °C)
Storage (in package):
–4 to 104 °F (–20 to 40 °C); within 4 days at –4 °F (–20 °C) and 1
month at 104 °F (40 °C)
Transporting (in package):
–4 to 140 °F (–20 to 60 °C); within 4 days at –4 °F (–20 °C), 1 month
at 104 °F (40 °C), and 72 hours at 140 °F (60 °C)
Capacity 1.3 gal (5 L), 5.29 gal (20 L)
Dimensions (box) 5.29 gal (20 L): 11.8 inches (300 mm) × 11.8 inches (300 mm) × 11.8
inches (300 mm)
1.3 gal (5 L): 7.5 inches (190 mm) × 7.5 inches (190 mm) × 7.5
inches (190 mm)

205
Parent topic: Technical Specifications
Ink Cleaning Solution Specifications
Expiration date See the date printed on the package; at normal temperature
Temperature Operating:
50 to 95 °F (10 to 35 °C)
Storage (in package):
–4 to 104 °F (–20 to 40 °C); within 4 days at –4 °F (–20 °C) and 1
month at 104 °F (40 °C)
Transporting (in package):
–4 to 140 °F (–20 to 60 °C); within 4 days at –4 °F (–20 °C), 1 month
at 104 °F (40 °C), and 72 hours at 140 °F (60 °C)
Capacity 5 ounces (150 ml)
Parent topic: Technical Specifications
Safety and Approvals Specifications
United States Safety: UL62368-1
EMC: FCC part 15 Subpart B class A
Canada Safety: CAN/CSA C22.2 No. 62368-1
EMC: ISED ICES-003 Class A
Note: This is a class A product. In a domestic environment, this product may cause radio interference in
which case the user may be required to take adequate measures.
Parent topic: Technical Specifications
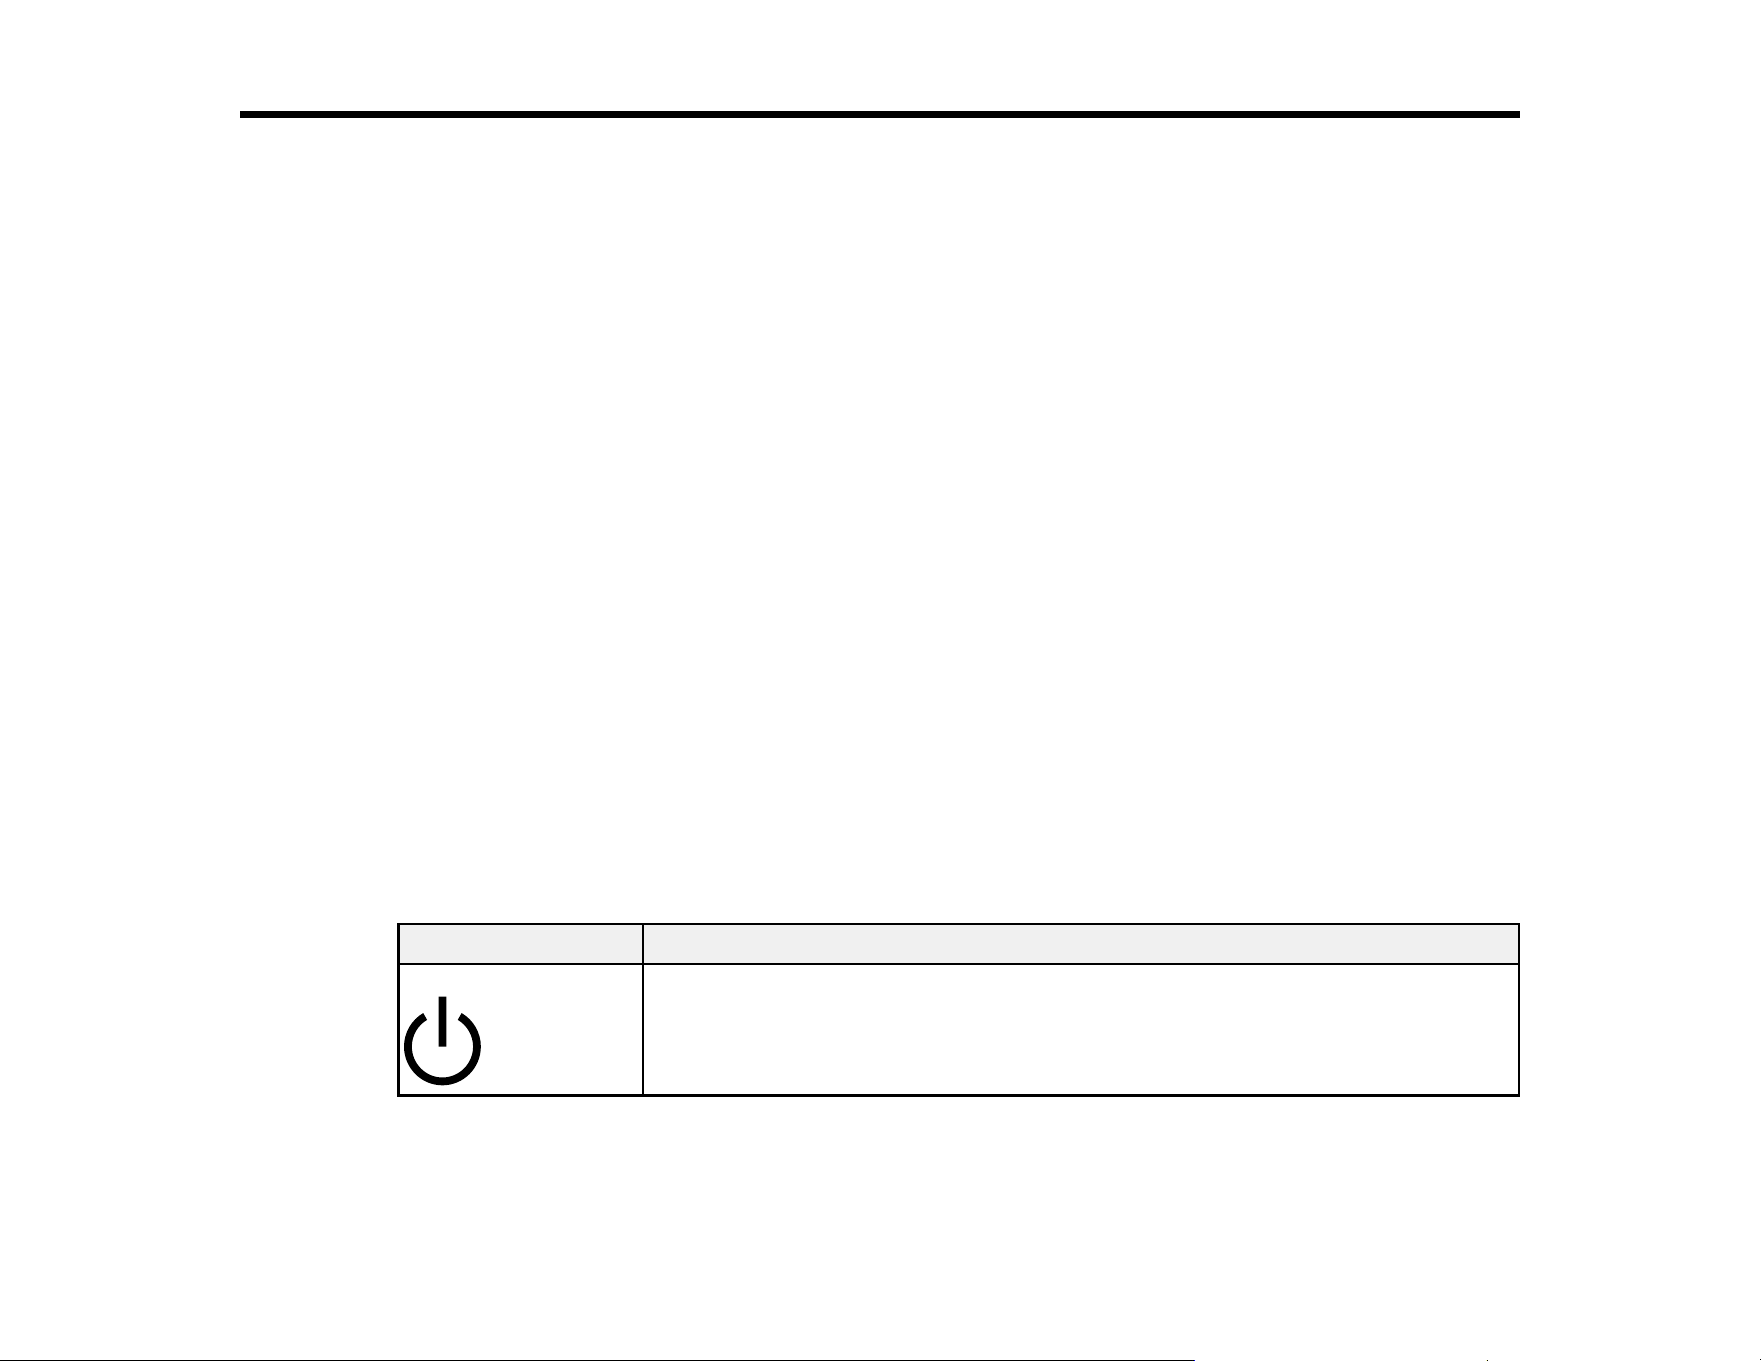
206
Notices
Check these sections for important notices about your product.
Note: Epson offers a recycling program for end of life Epson products. Please go to this site (U.S.) or
this site (Canada) for information on how to return your Epson products for proper disposal.
Important Safety Instructions
FCC Compliance Statement
Binding Arbitration and Class Waiver
Trademarks
Copyright Notice
Important Safety Instructions
Before using your Epson product, read and follow these safety instructions.
List of Safety Symbols on the Product
General Product Safety Instructions
LCD Screen Safety Instructions
Wireless Connection Safety Instructions
Parent topic: Notices
List of Safety Symbols on the Product
The following table lists the meaning of the safety symbols labeled on the product. Make sure that you
completely understand the meaning of symbols on this product before using it.
Symbol Description
Stand-by
To identify the switch or switch position by means of which part of the product is
switched on in order to bring it into the stand-by condition.
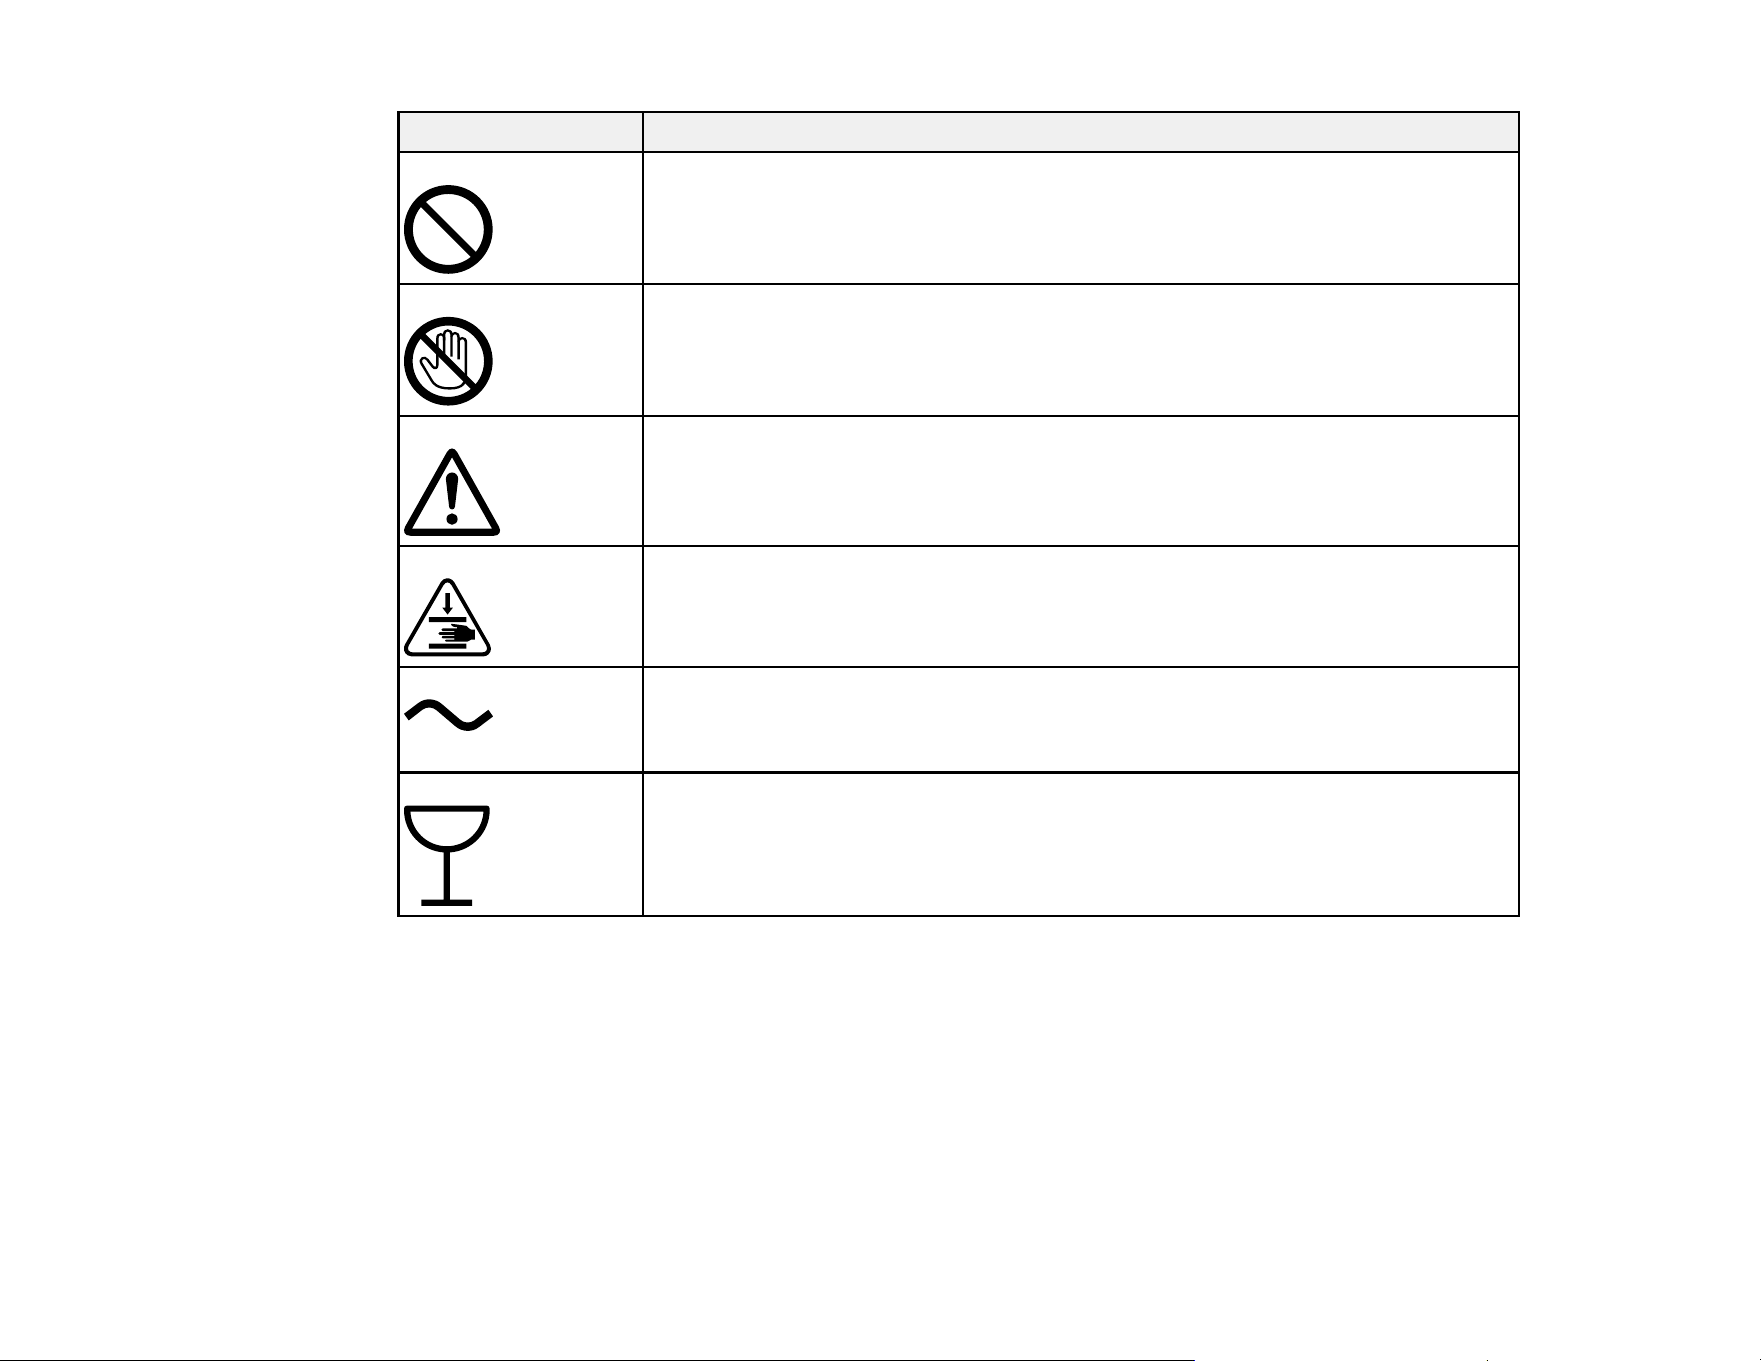
207
Symbol Description
General prohibition
To identify actions or operations that are prohibited.
Contact prohibition
To indicate injury that could occur due to touching a specific part of the
equipment.
Caution, risk of danger
To identify general caution when using the product.
Caution, keep hands clear
To identify a part of the product that should not be touched.
Alternating current
To indicate on the rating plate that the product is suitable for alternating current
only; to identify relevant terminals.
Delicate items
To identify a part of the product that should be handled with special care.
Parent topic: Important Safety Instructions
General Product Safety Instructions
• Be sure to follow all warnings and instructions marked on the product.
• Except as specifically explained in your documentation, do not attempt to service the product yourself.
• Do not install or store the product in an unstable location or a location subject to vibrations from other
equipment. The product could fall or tip over and cause an injury.

208
• Do not install the product in locations subject to oily smoke and dust, or in locations subject to humidity
or where it could easily get wet. An electric shock or fire could occur.
• Keep children away from this product, otherwise injury may occur.
• Place the product on a flat, stable surface that extends beyond its base in all directions. It will not
operate properly if it is tilted or at an angle.
• Leave enough room around the product for sufficient ventilation. Do not block or cover openings in the
cabinet or insert objects through the slots.
• Do not tilt the product more than 10 degrees in any direction while moving it. Doing so may cause the
product to fall and cause damage or personal injury.
• Avoid locations that are subject to rapid changes in heat or humidity, shocks or vibrations, or dust.
• To ensure the colors you want to print, maintain a constant room temperature of 59 to 77 ˚F (15 to 25
˚C).
• Do not place or store the product outdoors.
• Do not place the product near excessive heat sources or in direct sunlight.
• Do not cover the product with a cloth or install it in a location with poor ventilation.
• Do not attempt to move the product alone; three people are required to move the product.
• When lifting the product, make sure you lift with your hands at the correct locations; otherwise, the
product may fall or you may be injured. See the link below or the Start Here sheet for details on lifting
the product.
• Use correct posture when lifting the product.
• Make sure to remove all packing materials from the product and installation area.
• When placing the product on a stand with casters, make sure the casters are secured before you
perform any work so that they do not move. If the stand moves while you are performing any work, it
could cause an injury.
• Do not use the product in locations with volatile substances such as alcohol or thinner, or near naked
flames. An electric shock or fire could occur.
• Do not use the product if it is giving off smoke or if you notice any abnormal odors or noises. An
electric shock or fire could occur. If any abnormalities occur, turn off the power and unplug the power
cable immediately, then contact your dealer or Epson Support.
• Do not spill liquid on the product or use the product with wet hands.
• Do not insert or unplug the plug with wet hands.

209
• Do not use aerosol products that contain flammable gases inside or around the product. Doing so may
cause fire.
• Keep the product away from potential sources of electromagnetic interference, such as loudspeakers
or the base units of cordless telephones.
• When connecting the product to a computer or other device with a cable, ensure the correct
orientation of the connectors. Each connector has only one correct orientation. Inserting a connector
in the wrong orientation may damage both devices connected by the cable.
• Use only the type of power source indicated on the product's label.
• Use only the power cord that comes with the product. Use of another cord may cause fires or shock.
Do not use the cord with any other equipment. Do not modify the cord.
• Place the product near a wall outlet where the plug can be easily unplugged.
• Make sure the plug is fully inserted into the outlet.
• Connect your product to a properly grounded power outlet. Avoid plugging the product into an outlet
on the same circuit as a photo copier or air control system that regularly switches on and off, or on an
outlet controlled by a wall switch or timer.
• Do not route the power cord near heaters or other heat sources.
• Be sure your power cable meets relevant safety standards of the area where you plan to use it.
• Do not connect the power cable to a power strip or a multi-outlet extension cord; otherwise an electric
shock or fire could occur. Supply power directly from a household power outlet (100 V AC).
• Do not let the power cable become damaged or frayed. Place it to avoid abrasions, cuts, fraying,
crimping, and kinking. Do not place objects on top of it and do not allow it to be stepped on or run over.
Be careful to keep the cord straight at each end.
• Do not modify the power cable. Do not place anything heavy on the power cable. Do not bend, twist, or
pull forcefully on the power cable.
• If you use an extension cord with the product, make sure the total ampere rating of the devices
plugged into the extension cord does not exceed the cord's ampere rating. Also, make sure the total
ampere rating of all devices plugged into the wall outlet does not exceed the wall outlet's ampere
rating.
• If damage occurs to the plug, replace the cord set or consult a qualified electrician. If there are fuses in
the plug, make sure you replace them with fuses of the correct size and rating.
• Unplug the product and refer servicing to qualified service personnel under the following conditions: if
the power cord or plug is damaged; if liquid has entered the product; if the product has been dropped
or the cabinet damaged; if the product does not operate normally or exhibits a distinct change in
performance. Adjust only those controls that are covered by the operating instructions.

210
• Only route the cables as indicated in the Start Here sheet. When connecting cables or optional
accessories, make sure they are installed in the correct direction and that you follow the procedures
exactly.
• If any foreign objects or liquids enter the printer, stop using it immediately. An electric shock or fire
could occur. Turn off the power and unplug the power cable immediately and then contact your dealer
or Epson Support.
• Always turn off the product using the power button, and wait until the power light stops flashing before
unplugging the product or cutting off power to the electrical outlet.
• If you will not be using the product for a long period, unplug the power cord from the electrical outlet.
• When unplugging the plug, grip the plug itself; do not pull the power cord.
• Unplug the plug regularly and clean between the blades and around the base of the blades. If the plug
is plugged in for an extended period of time, dust collects around the base of the blades and a short
circuit or fire could occur.
• Do not use the plug if dust or any other foreign objects have adhered to the plug; otherwise an electric
shock or fire could occur.
• Do not put your hands inside the product and be careful not to trap your hands or fingers when
opening or closing the product cover.
• Do not touch the flat white cable or any areas marked with a do not touch label.
• Do not disassemble anything except as indicated in the product's documentation.
• Do not touch any areas inside the product except for those indicated in the product's documentation;
otherwise, you may be shocked or burned.
• Do not sit on the product or place heavy objects on top of it.
• Do not insert or drop metallic or flammable items into the openings on the product.
• Before storing the product, make sure the print head is positioned at the far right.
• When storing or transporting the product, do not tilt it, stand it on its side, or turn it upside down;
otherwise ink may leak.
Note: The lithium batteries in this product contain Perchlorate Material - special handling may apply.
Click here for details.
Parent topic: Important Safety Instructions
Related references
Where to Get Help (U.S. and Canada)

211
Where to Get Help (Latin America)
LCD Screen Safety Instructions
• Use only a dry, soft cloth to clean the LCD screen. If it is very dirty, soak a soft cloth with some diluted
neutral detergent, wring it out thoroughly, wipe off the dirt, and then dry it with a dry, soft cloth. Do not
use volatile chemicals such as thinner, benzene, or alcohol. Doing so may damage the panel surface.
• Touch the panel with your finger. The panel only reacts when you touch it with your finger.
• If the LCD screen is damaged, contact Epson. If the liquid crystal solution gets on your skin,
immediately wipe it off and then wash the area with large volumes of soapy water. If the liquid crystal
solution gets into your eyes, flush them with water for at least 15 minutes and see a doctor
immediately. If the liquid crystal solution gets in your mouth, rinse your mouth out with water and see a
doctor immediately. If swallowed, drink a large amount of water, induce vomiting, and see a doctor
immediately.
• Do not press too hard on the LCD screen or subject it to heavy impacts.
• Do not use a pointy or sharp object, such as a pen or your fingernail, to operate the LCD screen.
• If the LCD screen chips or cracks, do not touch or attempt to remove the broken pieces; contact Epson
for support.
• Do not subject your product to sudden changes in temperature or humidity; this may cause
condensation to develop inside the LCD screen and degrade its performance.
• The LCD screen may contain a few small bright or dark spots, and may display uneven brightness.
These are normal and do not indicate the screen is damaged in any way.
Parent topic: Important Safety Instructions
Wireless Connection Safety Instructions
Radio waves from this product may adversely affect the operation of medical equipment or automatically
controlled devices, such as pacemakers, automatic doors or fire alarms. When using this product near
such devices or inside a medical facility, follow the directions from authorized staff members at the
facility, and follow all posted warnings and directions on the device to avoid causing an accident.
Parent topic: Important Safety Instructions
FCC Compliance Statement
WARNING: This is a Class A product. In a domestic environment this product may cause radio
interference, in which case the user may be required to take adequate measures.

212
This equipment has been tested and found to comply with the limits for a Class A digital device, pursuant
to Part 15 of the FCC Rules. These limits are designed to provide reasonable protection against harmful
interference when the equipment is operated in a commercial environment. This equipment generates,
uses, and can radiate radio frequency energy and, if not installed and used in accordance with the
instruction manual, may cause harmful interference to radio communications. Operation of this
equipment in a residential area is likely to cause harmful interference in which case the user will be
required to correct the interference at his own expense.
FCC CAUTION: Changes or modifications not expressly approved by the party responsible for
compliance could void the user’s authority to operate the equipment.
This transmitter must not be co-located or operated in conjunction with any other antenna or transmitter.
This device complies with part 15 of FCC Rules and Innovation, Science and Economic Development
Canada’s license-exempt RSSs. Operation is subject to the following two conditions: (1) this device may
not cause harmful interference, and (2) this device must accept any interference received, including
interference that may cause undesired operation.
Le présent appareil est conforme à la partie 15 des règles de la FCC et aux normes des CNR
d'Innovation, Sciences et D éveloppment économique Canada applicables aux appareils radio exempts
de licence. L'exploitation est autorisée aux deux conditions suivantes : (1) l'appareil ne doit pas produire
de brouillage, et (2) l'appareil doit accepter tout brouillage subi, même si le brouillage est susceptible
d'en compromettre le fonctionnement.
This equipment has been tested and found to comply with the limits for a Class B digital device, pursuant
to part 15 of the FCC Rules. These limits are designed to provide reasonable protection against harmful
interference in a residential installation. This equipment generates, uses and can radiate radio frequency
energy and, if not installed and used in accordance with the instructions, may cause harmful interference
to radio communications. However, there is no guarantee that interference will not occur in a particular
installation. If this equipment does cause harmful interference to radio or television reception, which can
be determined by turning the equipment off and on, the user is encouraged to try to correct the
interference by one or more of the following measures:
• Reorient or relocate the receiving antenna.
• Increase the separation between the equipment and receiver.
• Connect the equipment into an outlet on a circuit different from that to which the receiver is connected.
• Consult the dealer or an experienced radio/TV technician for help.
This equipment complies with FCC/ISED radiation exposure limits set forth for an uncontrolled
environment and meets the FCC radio frequency (RF) Exposure Guidelines and RSS-102 of the ISED
radio frequency (RF) Exposure rules. This equipment should be installed and operated keeping the
radiator at least 7.9 inches (20 cm) or more away from person’s body.

213
Cet équipement est conforme aux limites d’exposition aux rayonnements énoncées pour un
environnement non contrôlé et respecte les règles les radioélectriques (RF) de la FCC lignes directrices
d'exposition et d’exposition aux fréquences radioélectriques (RF) CNR-102 de l’ISED. Cet équipement
doit être installé et utilisé en gardant une distance de 20 cm ou plus entre le radiateur et le corps humain.
To prevent radio interference to the licensed service, this device is intended to be operated indoors and
away from windows to provide maximum shielding. Equipment (or its transmit antenna) that is installed
outdoors is subject to licensing.
For Canadian Users
The device for operation in the band 5150–5250 MHz is only for indoor use to reduce the potential for
harmful interference to co-channel mobile satellite systems; Users should also be advised that high-
power radars are allocated as primary users (i.e. priority users) of the bands 5250-5350 MHz and 5650-
5850 MHz and that these radars could cause interference and/or damage to LE-LAN devices.
Les dispositifs fonctionnant dans la bande de 5 150 à 5 250 MHz sont réservés uniquement pour une
utilisation à l'intérieur afin de réduire les risques de brouillage préjudiciable aux systèmes de satellites
mobiles utilisant les mêmes canaux. Les utilisateurs devraient aussi être avisés, d’une part, que les
utilisateurs de radars de haute puissance sont désignés utilisateurs principaux (c.-à-d., qu'ils ont la
priorité) des bandes de 5 250 à 5 350 MHz et de 5 650 à 5 850 MHz et, d’autre part, que ces radars
pourraient causer du brouillage et/ou des dommages aux dispositifs de RL-EL.
Parent topic: Notices
Binding Arbitration and Class Waiver
1. DISPUTES, BINDING INDIVIDUAL ARBITRATION, AND WAIVER OF CLASS ACTIONS AND
CLASS ARBITRATIONS
1.1 Disputes. The terms of this Section 1 shall apply to all Disputes between you and Epson. The term
"Dispute" is meant to have the broadest meaning permissible under law and includes any dispute, claim,
controversy or action between you and Epson arising out of or relating to this Agreement, Epson
branded products (hardware and including any related software), or other transaction involving you and
Epson, whether in contract, warranty, misrepresentation, fraud, tort, intentional tort, statute, regulation,
ordinance, or any other legal or equitable basis. "DISPUTE" DOES NOT INCLUDE IP CLAIMS, or more
specifically, a claim or cause of action for (a) trademark infringement or dilution, (b) patent infringement,
(c) copyright infringement or misuse, or (d) trade secret misappropriation (an "IP Claim"). You and Epson
also agree, notwithstanding Section 1.6,that a court, not an arbitrator, may decide if a claim or cause of
action is for an IP Claim.
1.2 Binding Arbitration. You and Epson agree that all Disputes shall be resolved by binding arbitration
according to this Agreement. ARBITRATION MEANS THAT YOU WAIVE YOUR RIGHT TO A JUDGE
OR JURY IN A COURT PROCEEDING AND YOUR GROUNDS FOR APPEAL ARE LIMITED.

214
Pursuant to this Agreement, binding arbitration shall be administered by JAMS, a nationally recognized
arbitration authority, pursuant to its code of procedures then in effect for consumer related disputes, but
excluding any rules that permit joinder or class actions in arbitration (for more detail on procedure, see
Section 1.6 below). You and Epson understand and agree that (a) the Federal Arbitration Act (9 U.S.C.
§1, et seq.) governs the interpretation and enforcement of this Section 1, (b) this Agreement
memorializes a transaction in interstate commerce, and (c) this Section 1 shall survive termination of this
Agreement.
1.3 Pre-Arbitration Steps and Notice. Before submitting a claim for arbitration, you and Epson agree to
try, for sixty (60) days, to resolve any Dispute informally. If Epson and you do not reach an agreement to
resolve the Dispute within the sixty (60) days), you or Epson may commence an arbitration. Notice to
Epson must be addressed to: Epson America, Inc., ATTN: Legal Department, 3131 Katella Ave., Los
Alamitos, CA 90720 (the "Epson Address"). The Dispute Notice to you will be sent to the most recent
address Epson has in its records for you. For this reason, it is important to notify us if your address
changes by emailing us at [email protected] or writing us at the Epson Address above. Notice of
the Dispute shall include the sender's name, address and contact information, the facts giving rise to the
Dispute, and the relief requested (the "Dispute Notice"). Following receipt of the Dispute Notice, Epson
and you agree to act in good faith to resolve the Dispute before commencing arbitration.
1.4 Small Claims Court. Notwithstanding the foregoing, you may bring an individual action in the small
claims court of your state or municipality if the action is within that court's jurisdiction and is pending only
in that court.
1.5 WAIVER OF CLASS ACTIONS AND CLASS ARBITRATIONS. YOU AND EPSON AGREE THAT
EACH PARTY MAY BRING DISPUTES AGAINST THE OTHER PARTY ONLY IN AN INDIVIDUAL
CAPACITY, AND NOT AS A PLAINTIFF OR CLASS MEMBER IN ANY CLASS OR
REPRESENTATIVE PROCEEDING, INCLUDING WITHOUT LIMITATION FEDERAL OR STATE
CLASS ACTIONS, OR CLASS ARBITRATIONS. CLASS ACTION LAWSUITS, CLASS-WIDE
ARBITRATIONS, PRIVATE ATTORNEY-GENERAL ACTIONS, AND ANY OTHER PROCEEDING
WHERE SOMEONE ACTS IN A REPRESENTATIVE CAPACITY ARE NOT ALLOWED.
ACCORDINGLY, UNDER THE ARBITRATION PROCEDURES OUTLINED IN THIS SECTION, AN
ARBITRATOR SHALL NOT COMBINE OR CONSOLIDATE MORE THAN ONE PARTY'S CLAIMS
WITHOUT THE WRITTEN CONSENT OF ALL AFFECTED PARTIES TO AN ARBITRATION
PROCEEDING.
1.6 Arbitration Procedure. If you or Epson commences arbitration, the arbitration shall be governed by
the rules of JAMS that are in effect when the arbitration is filed, excluding any rules that permit arbitration
on a class or representative basis (the "JAMS Rules"), available at http://www.jamsadr.com or by calling
1-800-352-5267, and under the rules set forth in this Agreement. All Disputes shall be resolved by a
single neutral arbitrator, and both parties shall have a reasonable opportunity to participate in the
selection of the arbitrator. The arbitrator is bound by the terms of this Agreement. The arbitrator, and not
any federal, state or local court or agency, shall have exclusive authority to resolve all disputes arising
out of or relating to the interpretation, applicability, enforceability or formation of this Agreement,

215
including any claim that all or any part of this Agreement is void or voidable. Notwithstanding this broad
delegation of authority to the arbitrator, a court may determine the limited question of whether a claim or
cause of action is for an IP Claim, which is excluded from the definition of "Disputes" in Section 1.1
above. The arbitrator shall be empowered to grant whatever relief would be available in a court under
law or in equity. The arbitrator may award you the same damages as a court could, and may award
declaratory or injunctive relief only in favor of the individual party seeking relief and only to the extent
necessary to provide relief warranted by that party's individual claim. In some instances, the costs of
arbitration can exceed the costs of litigation and the right to discovery may be more limited in arbitration
than in court. The arbitrator's award is binding and may be entered as a judgment in any court of
competent jurisdiction.
You may choose to engage in arbitration hearings by telephone. Arbitration hearings not conducted by
telephone shall take place in a location reasonably accessible from your primary residence, or in Orange
County, California, at your option.
a) Initiation of Arbitration Proceeding. If either you or Epson decides to arbitrate a Dispute, both parties
agree to the following procedure:
(i) Write a Demand for Arbitration. The demand must include a description of the Dispute and the amount
of damages sought to be recovered. You can find a copy of a Demand for Arbitration at
http://www.jamsadr.com ("Demand for Arbitration").
(ii) Send three copies of the Demand for Arbitration, plus the appropriate filing fee, to: JAMS, 500 North
State College Blvd., Suite 600 Orange, CA 92868, U.S.A.
(iii) Send one copy of the Demand for Arbitration to the other party (same address as the Dispute
Notice), or as otherwise agreed by the parties.
b) Hearing Format. During the arbitration, the amount of any settlement offer made shall not be disclosed
to the arbitrator until after the arbitrator determines the amount, if any, to which you or Epson is entitled.
The discovery or exchange of non-privileged information relevant to the Dispute may be allowed during
the arbitration.
c) Arbitration Fees. Epson shall pay, or (if applicable) reimburse you for, all JAMS filings and arbitrator
fees for any arbitration commenced (by you or Epson) pursuant to provisions of this Agreement.
d) Award in Your Favor. For Disputes in which you or Epson seeks $75,000 or less in damages exclusive
of attorney's fees and costs, if the arbitrator's decision results in an award to you in an amount greater
than Epson's last written offer, if any, to settle the Dispute, Epson will: (i) pay you $1,000 or the amount
of the award, whichever is greater; (ii) pay you twice the amount of your reasonable attorney's fees, if
any; and (iii) reimburse you for any expenses (including expert witness fees and costs) that your attorney
reasonably accrues for investigating, preparing, and pursuing the Dispute in arbitration. Except as
agreed upon by you and Epson in writing, the arbitrator shall determine the amount of fees, costs, and
expenses to be paid by Epson pursuant to this Section 1.6d).

216
e) Attorney's Fees. Epson will not seek its attorney's fees and expenses for any arbitration commenced
involving a Dispute under this Agreement. Your right to attorney's fees and expenses under Section
1.6d) above does not limit your rights to attorney's fees and expenses under applicable law;
notwithstanding the foregoing, the arbitrator may not award duplicative awards of attorney's fees and
expenses.
1.7 Opt-out. You may elect to opt-out (exclude yourself) from the final, binding, individual
arbitration procedure and waiver of class and representative proceedings specified in this
Agreement by sending a written letter to the Epson Address within thirty (30) days of your assent
to this Agreement (including without limitation the purchase, download, installation of the
Software or other applicable use of Epson Hardware, products and services) that specifies (i)
your name, (ii) your mailing address, and (iii) your request to be excluded from the final, binding
individual arbitration procedure and waiver of class and representative proceedings specified in
this Section 1. In the event that you opt-out consistent with the procedure set forth above, all
other terms shall continue to apply, including the requirement to provide notice prior to litigation.
1.8 Amendments to Section 1. Notwithstanding any provision in this Agreement to the contrary, you
and Epson agree that if Epson makes any future amendments to the dispute resolution procedure and
class action waiver provisions (other than a change to Epson's address) in this Agreement, Epson will
obtain your affirmative assent to the applicable amendment. If you do not affirmatively assent to the
applicable amendment, you are agreeing that you will arbitrate any Dispute between the parties in
accordance with the language of this Section 1 (or resolve disputes as provided for in Section 1.7, if you
timely elected to opt-out when you first assented to this Agreement).
1.9 Severability. If any provision in this Section 1 is found to be unenforceable, that provision shall be
severed with the remainder of this Agreement remaining in full force and effect. The foregoing shall not
apply to the prohibition against class or representative actions as provided in Section 1.5. This
means that if Section 1.5 is found to be unenforceable, the entire Section 1 (but only Section 1)
shall be null and void.
Parent topic: Notices
Trademarks
EPSON
®
, PrecisionCore
®
, SureColor
®
, and UltraChrome
®
are registered trademarks, and the EPSON
logo is a registered logomark of Seiko Epson Corporation.
Epson Preferred
SM
is a service mark of Epson America, Inc.
Apple, Mac, macOS, and OS X are trademarks of Apple Inc., registered in the U.S. and other countries.
Microsoft and Windows are trademarks of the Microsoft group of companies.
General Notice: Other product names used herein are for identification purposes only and may be
trademarks of their respective owners. Epson disclaims any and all rights in those marks.

217
Parent topic: Notices
Copyright Notice
All rights reserved. No part of this publication may be reproduced, stored in a retrieval system, or
transmitted in any form or by any means, electronic, mechanical, photocopying, recording, or otherwise,
without the prior written permission of Seiko Epson Corporation. The information contained herein is
designed only for use with this Epson product. Epson is not responsible for any use of this information as
applied to other products.
Neither Seiko Epson Corporation nor its affiliates shall be liable to the purchaser of this product or third
parties for damages, losses, costs, or expenses incurred by purchaser or third parties as a result of:
accident, misuse, or abuse of this product or unauthorized modifications, repairs, or alterations to this
product, or (excluding the U.S.) failure to strictly comply with Seiko Epson Corporation's operating and
maintenance instructions.
Seiko Epson Corporation shall not be liable for any damages or problems arising from the use of any
options or any consumable products other than those designated as Original Epson Products or Epson
Approved Products by Seiko Epson Corporation.
Seiko Epson Corporation shall not be held liable for any damage resulting from electromagnetic
interference that occurs from the use of any interface cables other than those designated as Epson
approved Products by Seiko Epson Corporation.
This information is subject to change without notice.
A Note Concerning Responsible Use of Copyrighted Materials
Copyright Attribution
Parent topic: Notices
A Note Concerning Responsible Use of Copyrighted Materials
Epson encourages each user to be responsible and respectful of the copyright laws when using any
Epson product. While some countries' laws permit limited copying or reuse of copyrighted material in
certain circumstances, those circumstances may not be as broad as some people assume. Contact your
legal adviser for any questions regarding copyright law.
Parent topic: Copyright Notice