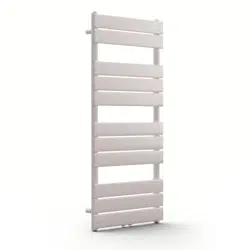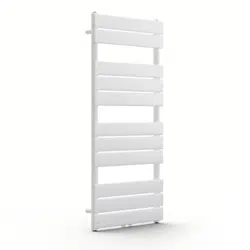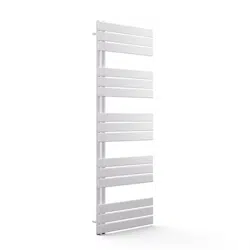
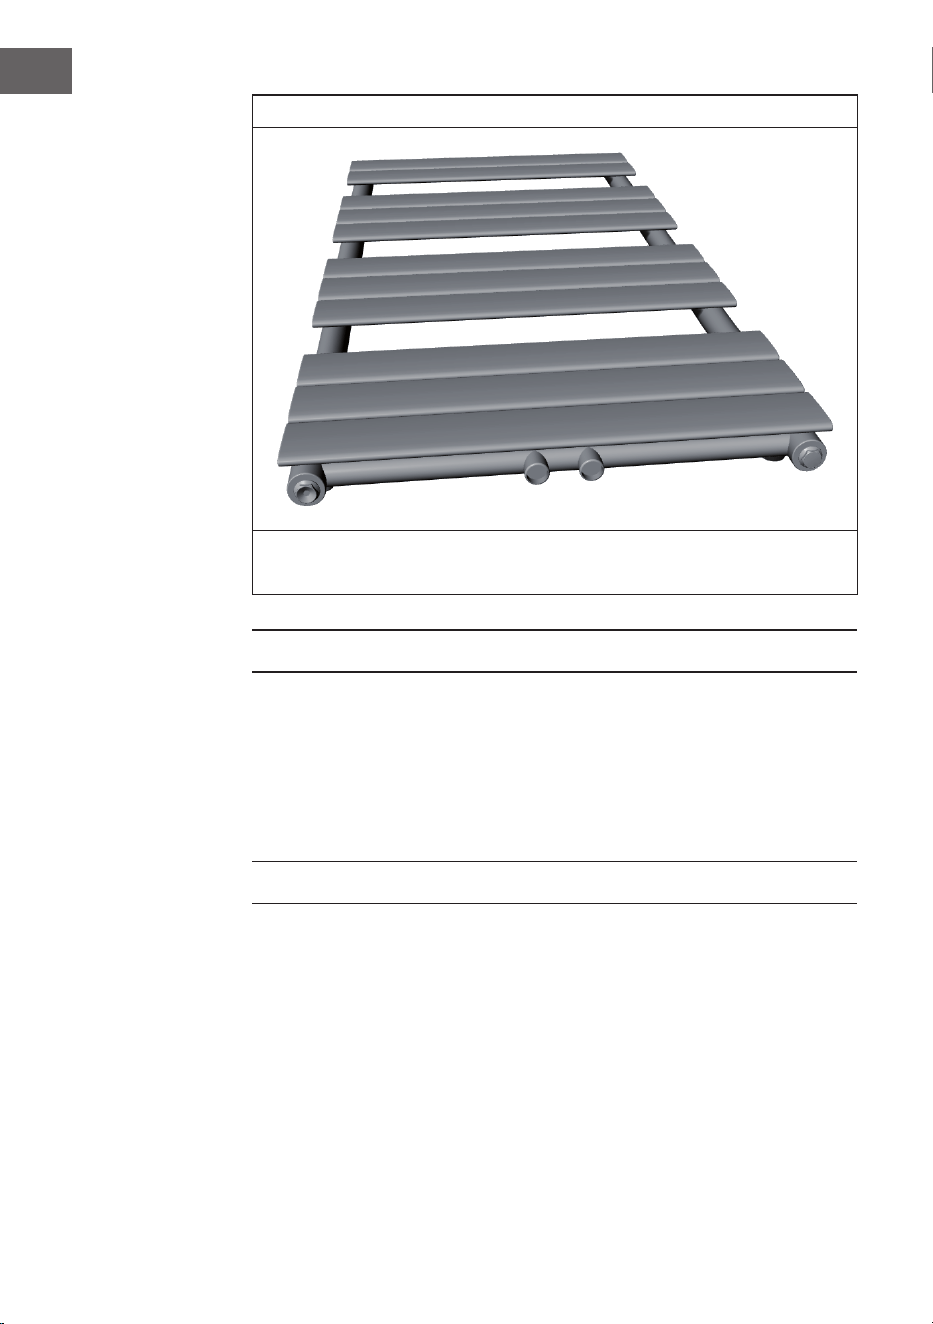
Fairmont
Heizkörper
Radiator
Radiateur
Radiador
Radiatore
10045417 10045418 10045419

3
DE
Sehr geehrter Kunde,
wir gratulieren Ihnen zum Erwerb Ihres Gerätes.
Lesen Sie die folgenden Hinweise sorgfältig durch und
befolgen Sie diese, um möglichen Schäden vorzubeugen.
Für Schäden, die durch Missachtung der Hinweise und
unsachgemäßen Gebrauch entstehen, übernehmen wir
keine Haftung. Scannen Sie den folgenden QR-Code,
um Zugriff auf die aktuellste Bedienungsanleitung und
weitere Informationen rund um das Produkt zu erhalten:
INHALTSVERZEICHNIS
Sicherheitshinweise 4
Erforderliche Werkzeuge 5
Lieferumfang 5
Installation 6
Nach der Installation 10
Reinigung und Pege 10
Fehlersuche und Fehlerbehebung 11
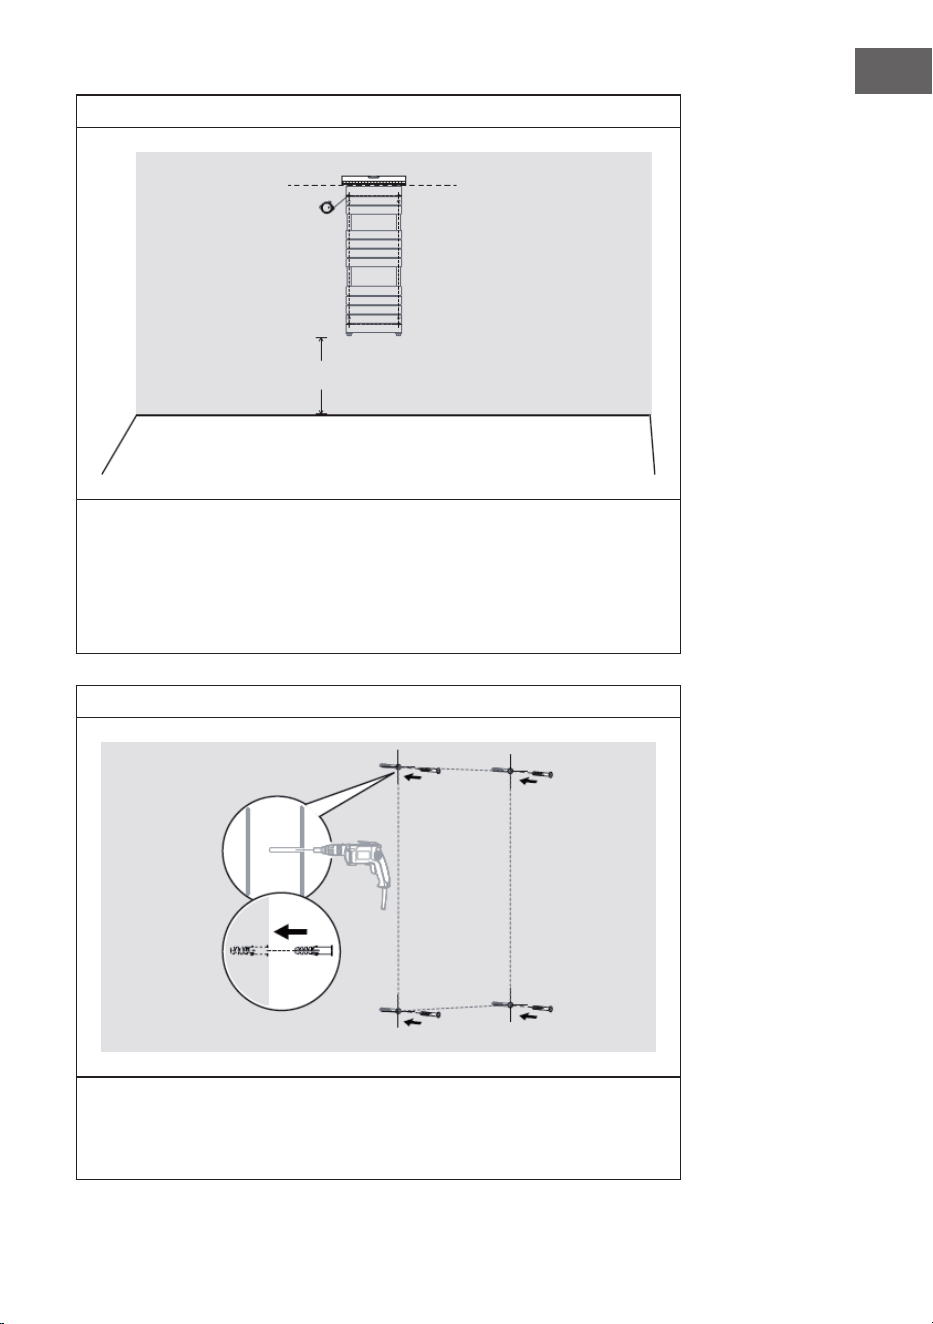
TECHNISCHE DATEN
Artikelnummer 10045417, 10045418, 10045419
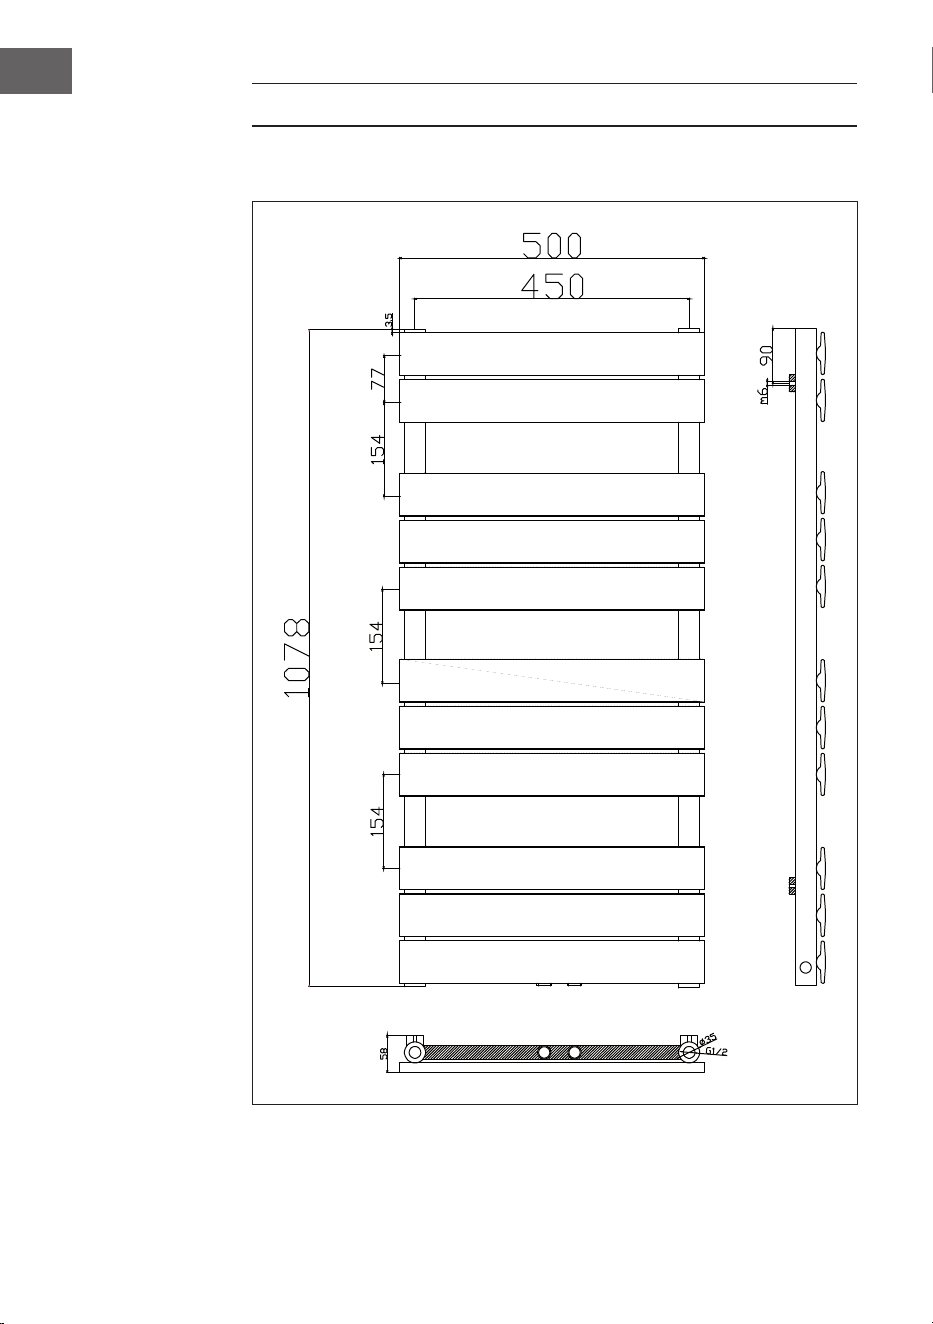
Maße (H x B) 107 x 50 cm
HERSTELLER & IMPORTEUR (UK)
Hersteller:
Chal-Tec GmbH, Wallstraße 16, 10179 Berlin, Deutschland.
Importeur für Großbritannien:
Berlin Brands Group UK Limited
PO Box 42
272 Kensington High Street
London, W8 6ND
United Kingdom
English 13
Français 23
Español 33
Italiano 43

4
DE
SICHERHEITSHINWEISE
• Befolgen Sie die Installationsanweisungen sorgfältig, um sicherzustellen,
dass das Gerät ordnungsgemäß an der Wand befestigt ist.
• Um eine mögliche Brandgefahr zu vermeiden, ist es wichtig, dass das Gerät
in Übereinstimmung mit den in der Anleitung angegebenen Vorgaben
montiert wird.
• Der Heizkörper ist nur für die Verwendung in Innenräumen vorgesehen.
Stellen Sie den Heizkörper nicht in einer Dusche, einem Dampfbad oder an
einem anderen Ort auf, an dem das Gerät Wasser ausgesetzt sein könnte.
Hinweise zur Kindersicherheit
• Beachten Sie, dass Sie für die Sicherheit Ihres Kindes zu Hause zu 100%
selbst verantwortlich sind. Sobald der Heizkörper installiert ist, kann er zu
einer Gefahr für Kinder werden, da
a) dieser Heizkörper nicht dafür ausgelegt ist, unangemessenes
zusätzliches Gewicht, wie das eines Kindes, zu tragen, und
b) der Heizkörper während des Gebrauchs heiß wird.
• Aus diesem Grund dürfen Kinder nicht auf dem Heizkörper oder den
Heizschienen klettern, danach greifen oder damit spielen, da dies zu
Unfällen oder Verletzungen führen kann , z.B. durch Hitze, Herunterfallen
oder Abreißen des Heizkörpers von der Wand.
Hinweise zur Installation
• Beachten Sie alle örtlichen Vorschriften für Sanitärinstallationen und
Gebäude.
• Schließen Sie die Hauptwasserleitung.
• Lesen Sie diese Anleitung sorgfältig durch, um eine ordnungsgemäße
Installation sicherzustellen.
• Vergewissern Sie sich, dass die nachfolgend aufgeführten Teile im
Lieferumfang enthalten sind.
Hinweise zur Verwendung
• Der Heizkörper darf nur mit Wasser befüllt werden, das eine Temperatur
unter 100 °C hat.
Temperatur: 0 °C < t < 100 °C
• Wenn die Temperatur 48 °C übersteigt, bringen Sie ein Warnschild in der
Nähe des Produkts an, um Unfälle durch Verbrennungen oder Brand zu
vermeiden.
Hinweis: Fällt die Umgebungstemperatur unter 1 °C, lassen Sie das Wasser
ab, um ein Einfrieren zu verhindern.

5
DE
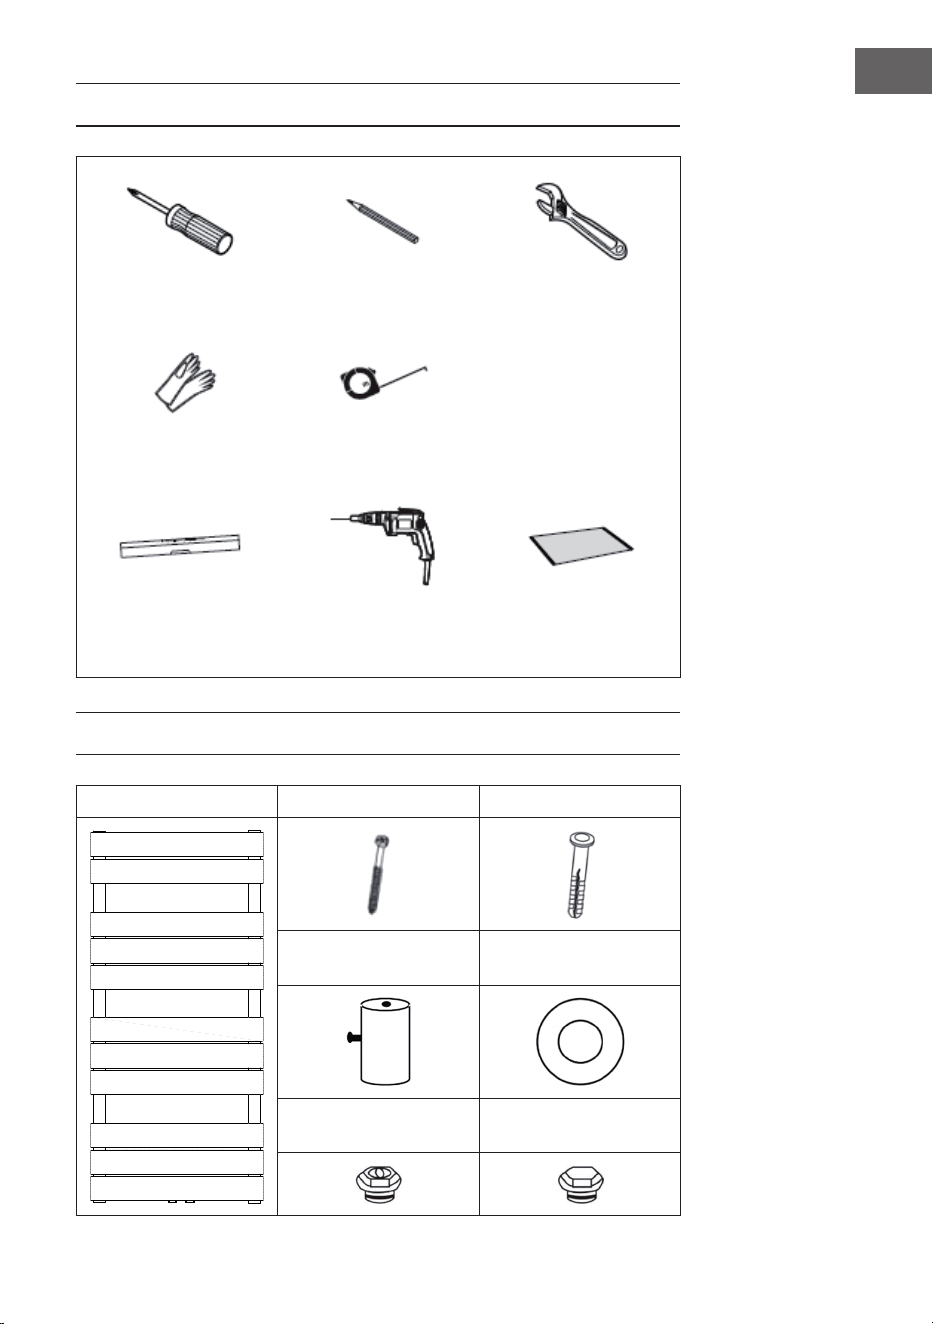
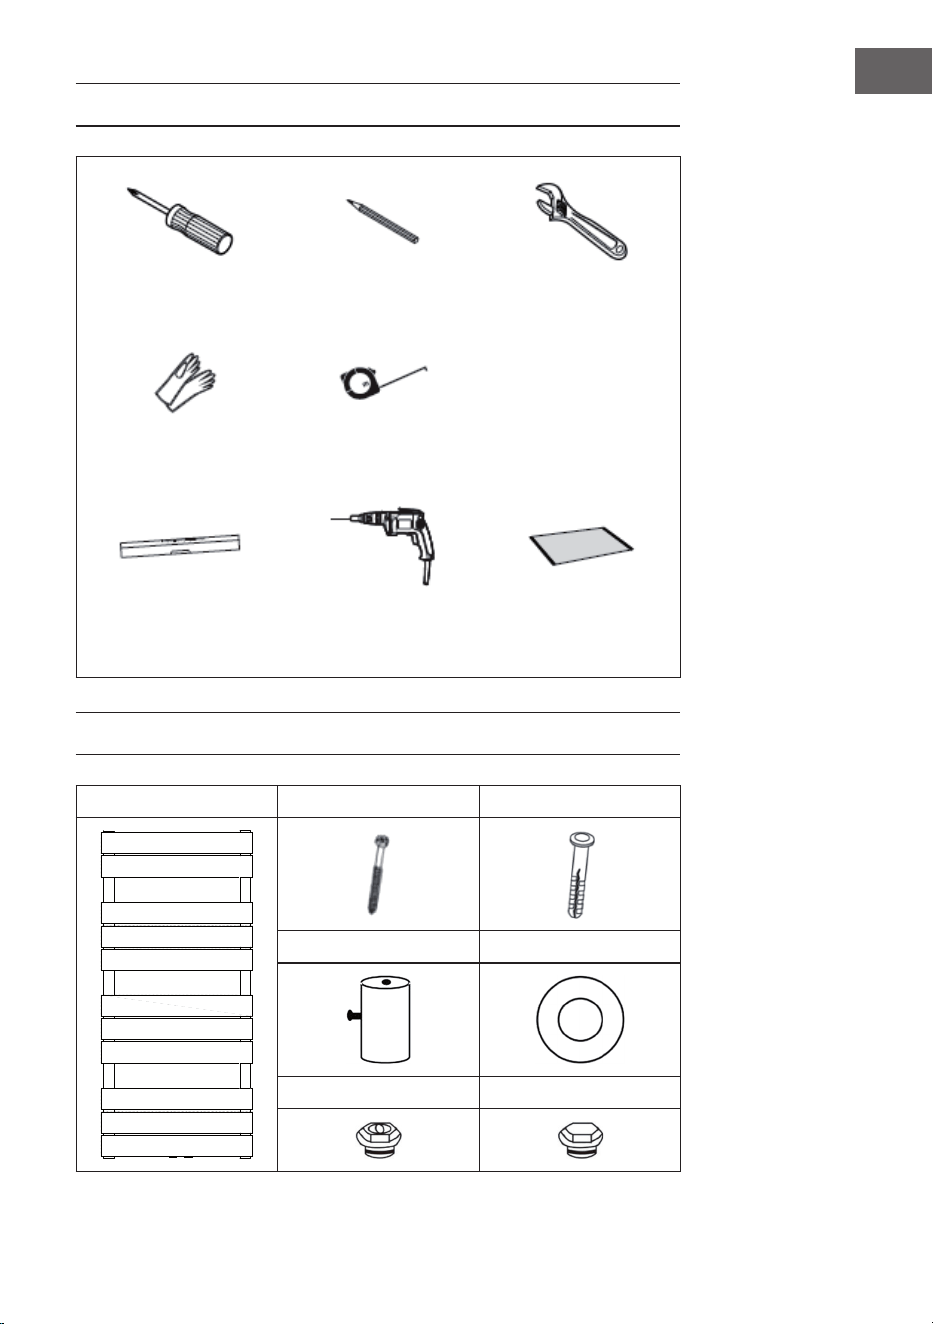
ERFORDERLICHE WERKZEUGE
LIEFERUMFANG
Heizkörper (1x) Lange Schraube (4x) Dübel (4x)
Wandhalterung (4x) Gummischeibe (2x)
Entlüfter (1x) Blindstopfen (3x)
Schraubendreher Bleistift Verstellbarer
Schraubenschlüssel
Handschuhe Bandmaß
Wasserwaage Elektrische
Bohrmaschine
Malervlies
6
DE
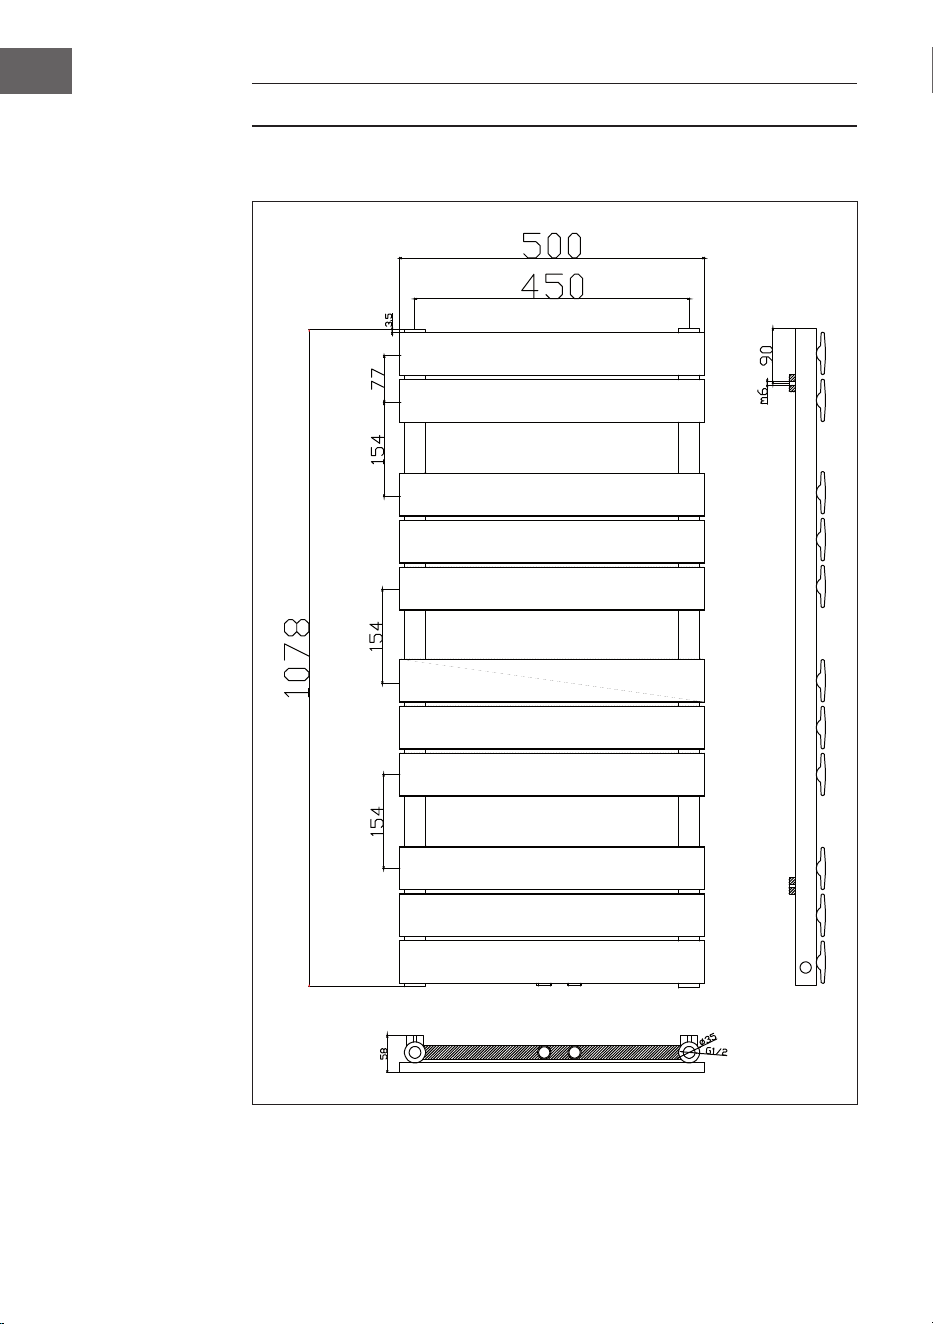
INSTALLATION
Abmessungen des Heizkörpers Fairmont

7
DE
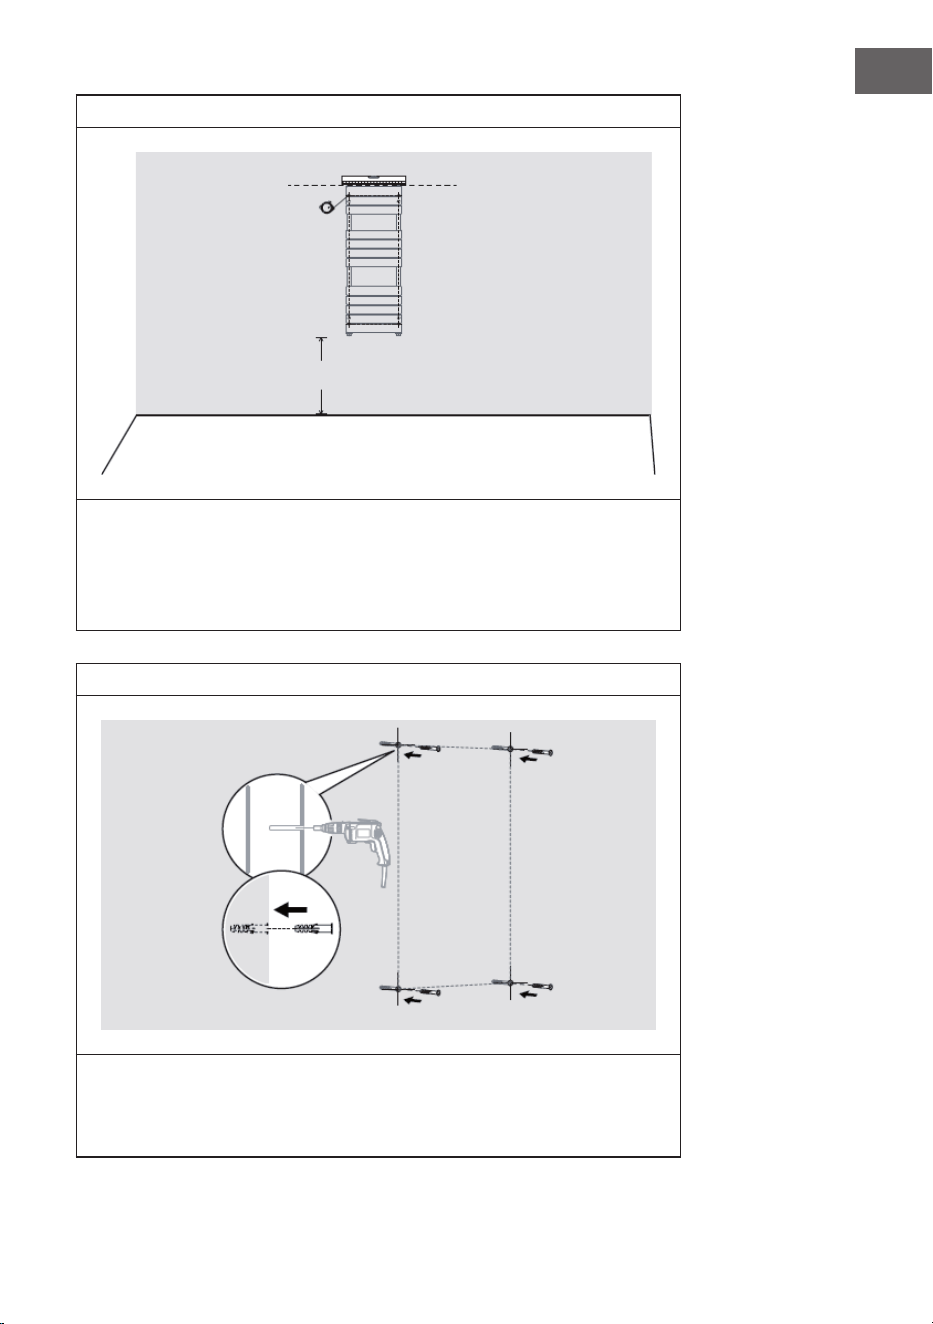
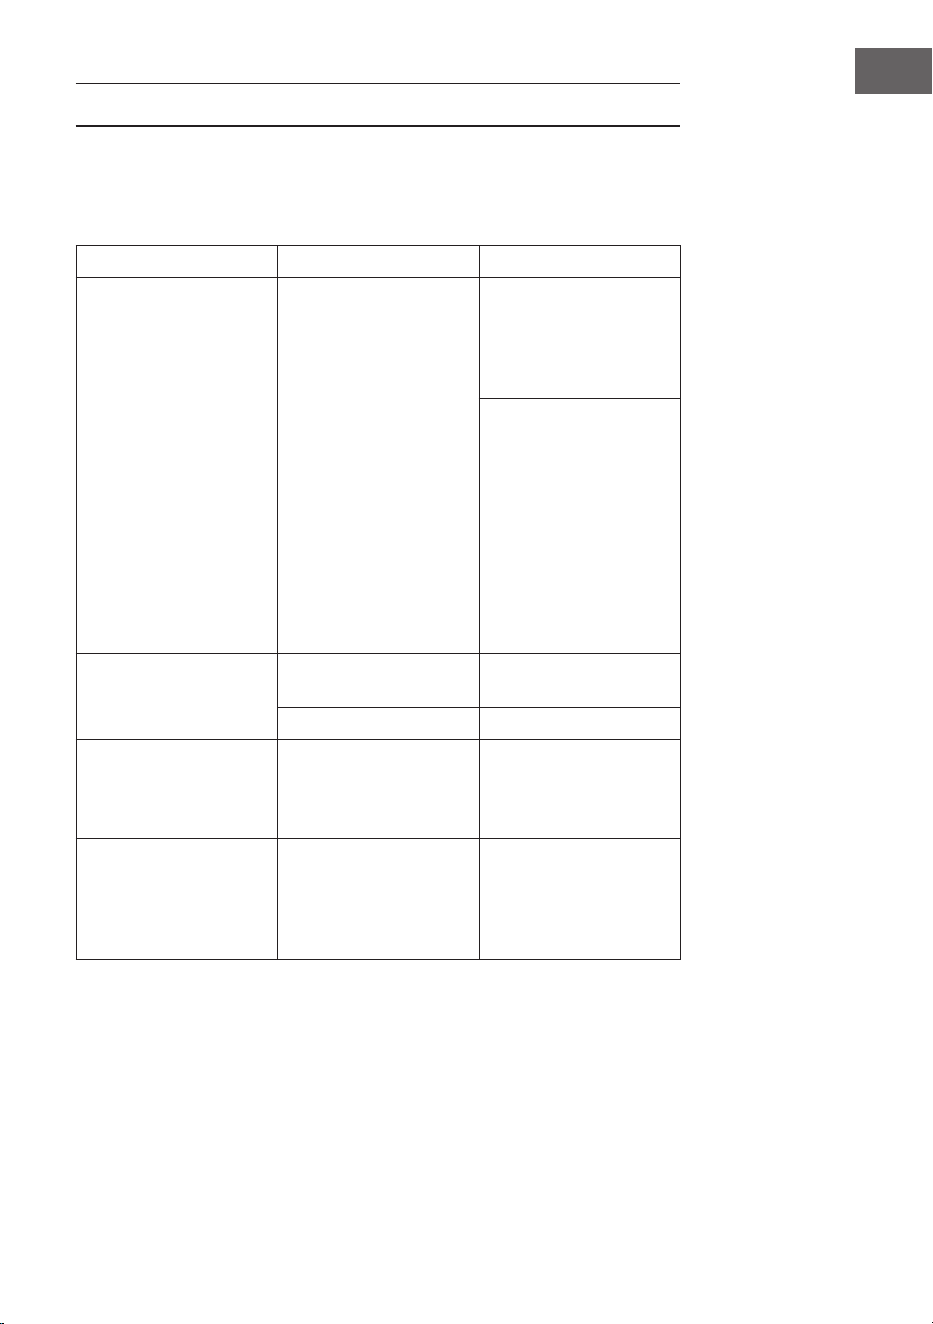
Schritt 1
• Positionieren Sie den Heizkörper an der gewünschten Stelle, prüfen Sie
die waagerechte Ausrichtung und markieren Sie vier gleiche Positionen
für die Halterungen.
• Achten Sie darauf, dass der Heizkörper senkrecht montiert wird.
• Legen Sie vor der Installation ein Malervlies auf den Boden, um den
Verlust von Kleinteilen zu vermeiden.
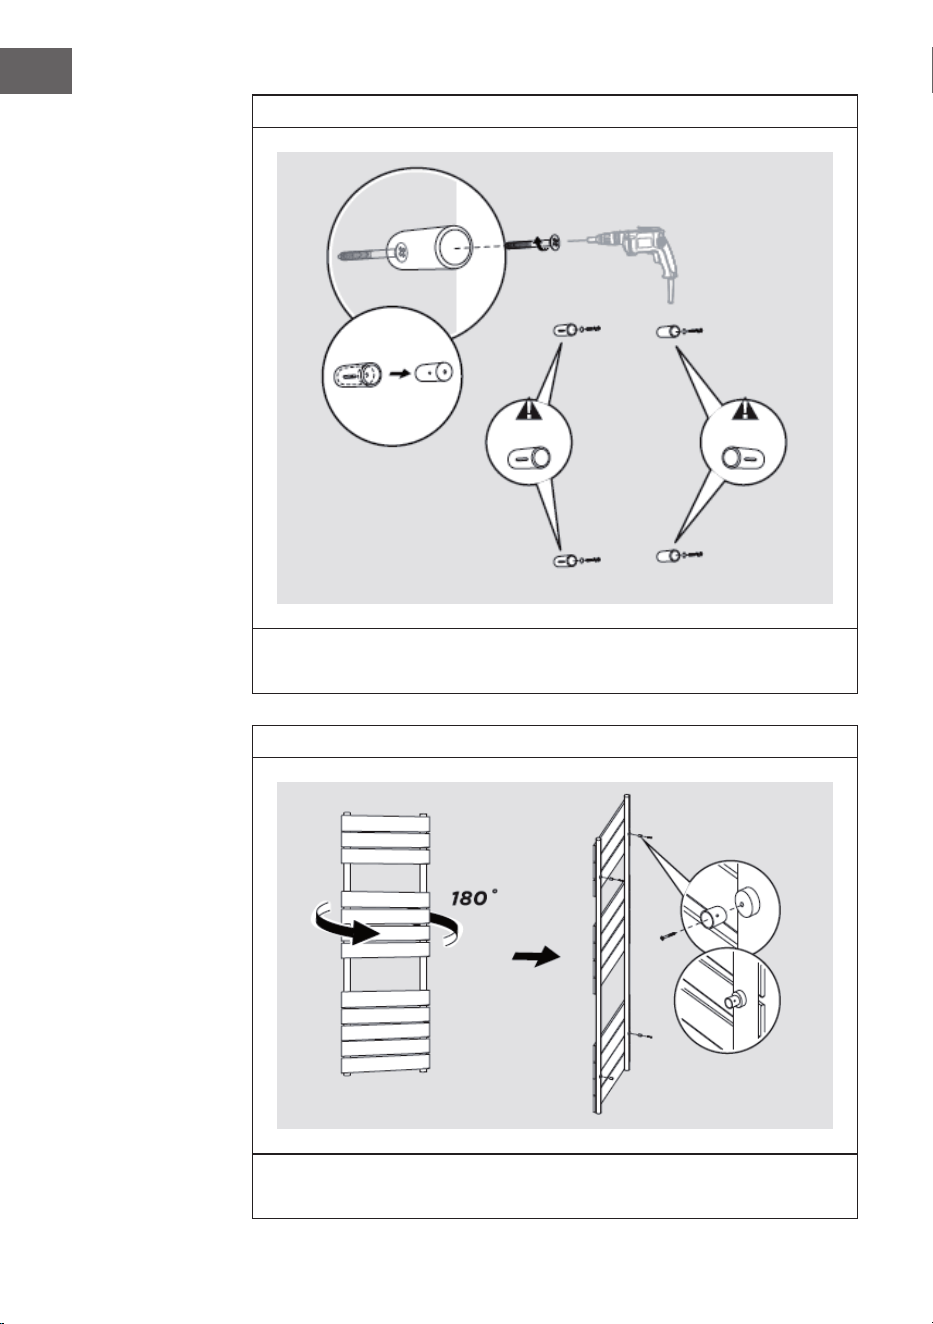
Schritt 2
• Bohren Sie Löcher in die Wand und setzen Sie Dübel ein.
Hinweis: Für Zwischendecken oder Ständerwände können Sie in einem
Baumarkt andere Befestigungen erwerben.
Lassen Sie genügend Platz für den Einbau von
Ventilen und/oder thermostatischen Reglern.
8
DE
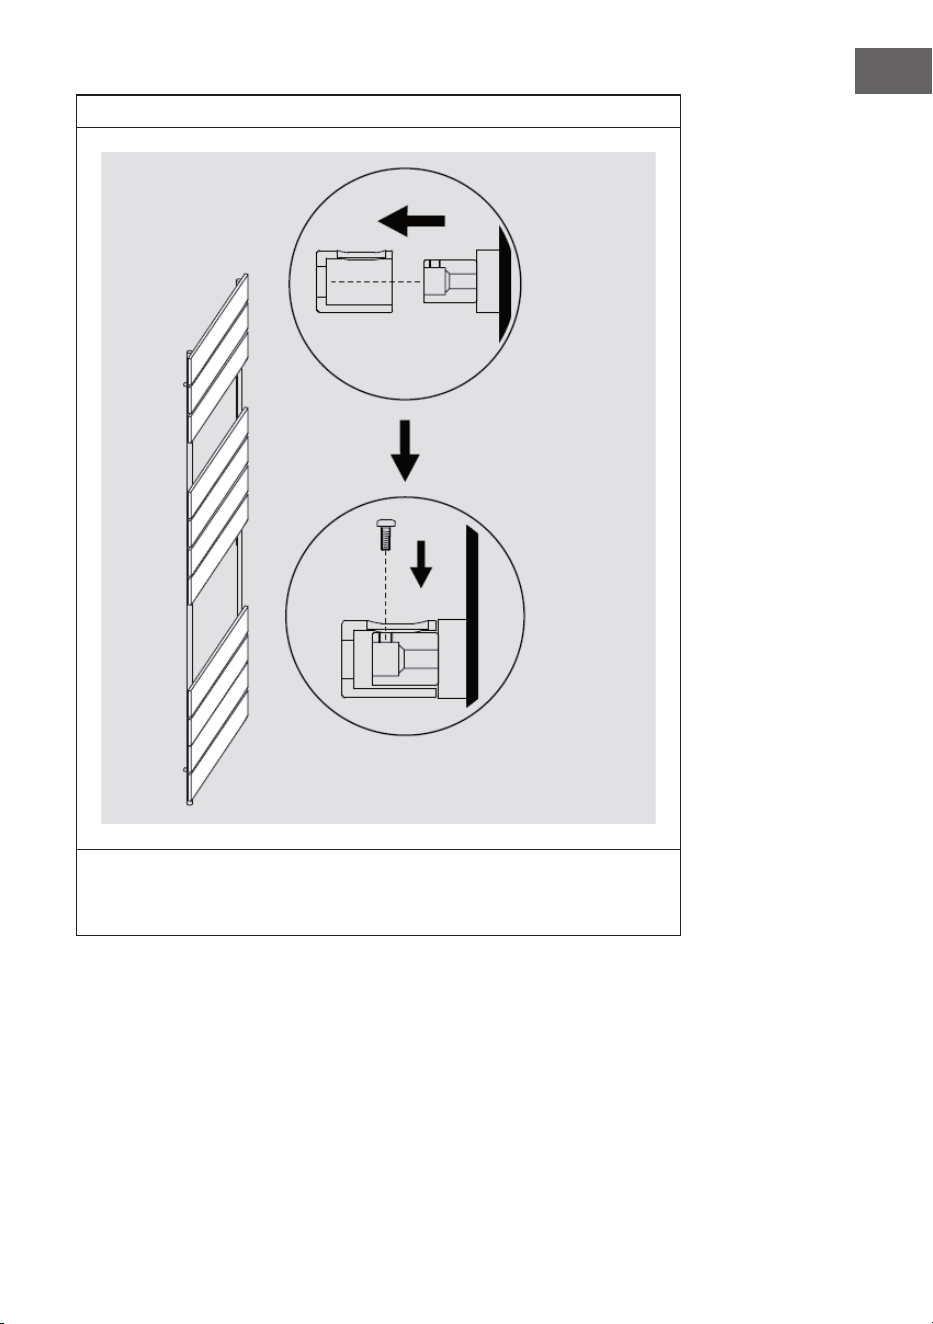
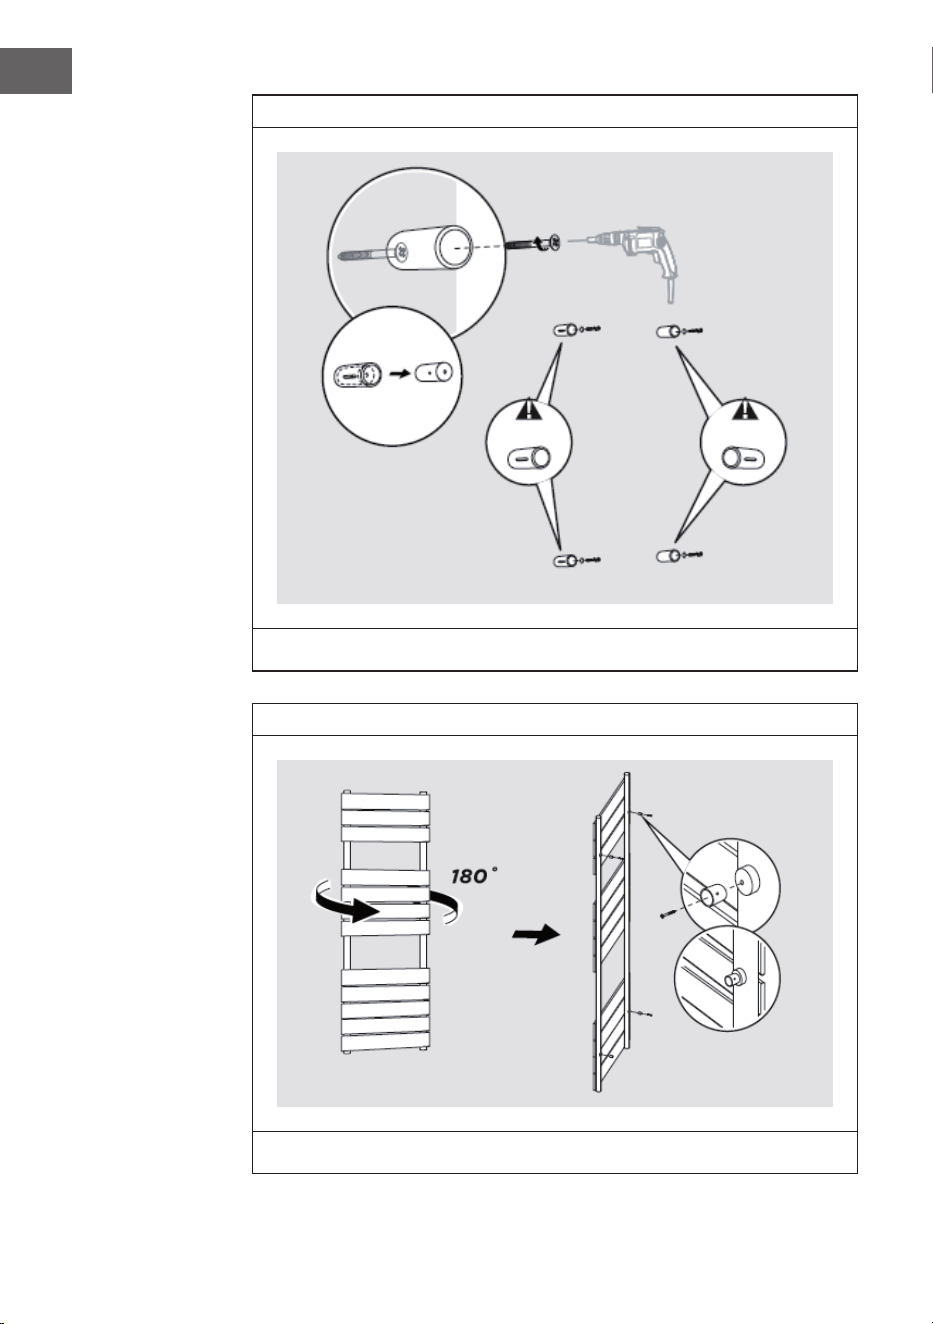
Schritt 3
• Trennen Sie die beiden Halterungsteile und befestigen Sie das größere
an der Wand.
Schritt 4
• Befestigen Sie das kleinere Halterungsteil an der Rückseite des
Heizkörpers.
Bohrung
links
Bohrung
rechts

9
DE
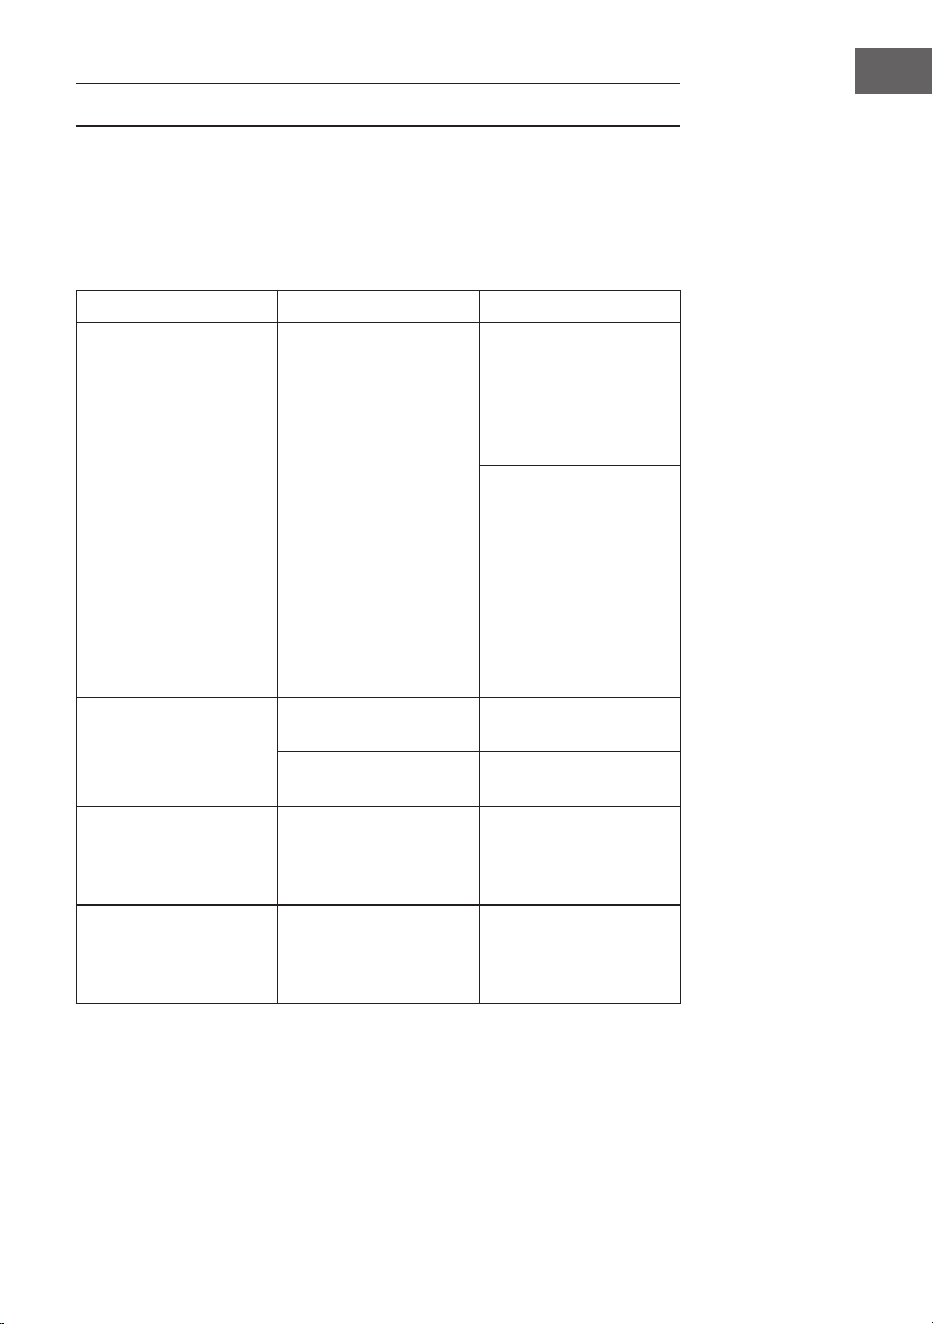
Schritt 5
• Bringen Sie den Heizkörper an der Wand an, indem Sie die Halterungen
ausrichten, und ziehen Sie die kleine Schraube fest, wenn er in Position
ist.
• Schließen Sie den Heizkörper an Ihr Zentralheizungssystem an.

10
DE
Option
• Optional können Sie den Heizkörper auch über die Unterseite an Ihr
Zentralheizungssystem anschließen.
NACH DER INSTALLATION
• Verwenden Sie einen Schraubendreher, um den Entlüfter zu öffnen.
Öffnen Sie das Ventil und lassen Sie das Wasser in den Heizkörper
strömen.
• Prüfen Sie alle Anschlüsse auf Dichtheit.
• Wenn das Wasser aus dem Entlüfter austritt, bendet sich keine Luft mehr
im Rohr.
• Schließen Sie den Entlüfter mit einem Schraubendreher und drehen Sie
das Ventil auf. Der Heizkörper ist nun betriebsbereit.
REINIGUNG UND PFLEGE
• Wischen Sie die Oberäche mit einem weichen, feuchten Tuch sauber.
• Verwenden Sie niemals Scheuermittel für dieses Produkt, da diese die
Oberäche beschädigen.
• Heizkörper sind aus Stahl gefertigt und sollten daher nicht mit ätzenden
oder scheuernden Reinigungsmitteln gereinigt werden.
11
DE
FEHLERSUCHE UND FEHLERBEHEBUNG
Wenn Ihr Heizkörper nicht funktioniert, kann Ihnen die Kenntnis
grundlegender Fehlerbehebungsmaßnahmen bei Heizkörpern den Stress
und die Schwierigkeiten ersparen, die ein nicht funktionierender Heizkörper
mit sich bringt. Hier nden Sie einen Leitfaden zur Lösung der häugsten
Probleme im Zusammenhang mit Heizkörpern.
Problem Ursache Lösung
Kalte Stellen am
Heizkörper
Das Wasser ießt
nicht richtig durch den
Heizkörper
Stellen Sie sicher, dass
sich keine Luft im
Heizkörper bendet.
„Entlüften“ Sie den
Heizkörper, um die Luft
abzulassen.
Stellen Sie sicher, dass
das Ventil vollständig
geöffnet ist, damit das
Wasser frei ießen
kann. Bei manchen
Heizkörpern ist eine
Umleitung erforderlich,
damit das Wasser
richtig um das Gerät
herum ießen kann.
Leck am Heizkörper Die Ventilmutter ist
locker.
Ziehen Sie die
Ventilmutter fest.
Schweißfehler Tauschen Sie den
Heizkörper aus.
Pfeifgeräusche oder
zischendes Wasser
Der Heizkörper wurde
bei der Installation
nicht korrekt
ausgerichtet.
Neuinstallation
Klirrendes Geräusch Der Heizkörper wurde
an einem Ort installiert,
der keine Ausdehnung
der Rohre zulässt.
Neuinstallation

13
EN
Dear customer,
Congratulations on your purchase. Please read the
following instructions carefully and follow them to
prevent potential damage. We accept no liability for
damage caused by disregarding the instructions or
improper use. Please scan the QR code to access the
latest operating instructions and for further information
about the product.
CONTENTS
Safety instructions 14
Required tools 15
Scope of delivery 15
Installation 16
After installation 20
Cleaning and care 20
Troubleshooting 21
TECHNICAL DATA
Article number 10045417, 10045418, 10045419
Dimensions (H x W) 107 x 50 cm
MANUFACTURER & IMPORTER (UK)
Manufacturer:
Chal-Tec GmbH, Wallstrasse 16, 10179 Berlin, Germany.
Importer for Great Britain:
Berlin Brands Group UK Limited
PO Box 42
272 Kensington High Street
London, W8 6ND
United Kingdom

14
EN
SAFETY INSTRUCTIONS
• Follow the installation instructions carefully to ensure that the unit is
properly attached to the wall.
• To avoid a possible re hazard, it is important that the appliance is installed
in accordance with the specications given in the instructions .
• The radiator is intended for indoor use only. Do not place the heater in a
shower, steam room or any other place where it may be exposed to water.
Child safety tips
• Please note that you are 100% responsible for the safety of your child
at home. As soon as the radiator is installed, it can become a danger for
children, as
(a) that radiator is not designed to support unreasonable additional
weight, such as that of a child; and
b) the radiator becomes hot during use.
• For this reason, children must not climb on, reach for or play with the
radiator or the heating rails as this can lead to accidents or injuries, e.g.
due to heat, falling down or tearing the radiator off the wall.
Installation instructions
• Observe all local regulations for sanitary installations and buildings.
• Close the main water pipe.
• Read these instructions carefully to ensure proper installation.
• Make sure that the parts listed below are included in the scope of delivery.
Instructions for use
• The radiator must only be lled with water that has a temperature below
100 °C.
Temperature: 0 °C < t < 100 °C
• If the temperature exceeds 48 °C, place a warning sign near the product to
prevent accidents due to burns or re.
Note: If the ambient temperature drops below 1 °C, drain the water to
prevent freezing.

15
EN
REQUIRED TOOLS
SCOPE OF DELIVERY
Radiator (1x) Long screw (4x) Dowel (4x)
Wall mount (4x) Rubber washer (2x)
Air vent (1x) Blanking plug (3x)
Screwdriver Pencil Adjustable
Spanner
Gloves Tape measure
Spirit level Electrical
Drill
Painter's eece

16
EN
INSTALLATION
Dimensions of the Fairmont radiator

17
EN
Step 1
• Position the radiator in the desired place, check the horizontal
alignment and mark four equal positions for the brackets.
• Make sure that the radiator is mounted vertically.
• Before installation, place a painter's eece on the oor to prevent the
loss of small parts.
Step 2
• Drill holes in the wall and insert dowels.
Note: For false ceilings or stud walls, you can purchase other xings at a DIY
store.
Leave enough space for the installation of
valves and/or thermostatic regulators.

18
EN
Step 3
• Separate the two bracket parts and attach the larger one to the wall.
Step 4
• Attach the smaller bracket piece to the back of the radiator.
Bore hole
left
Bore hole
right
19
EN
Step 5
• Attach the radiator to the wall by aligning the brackets and tighten the
small screw when it is in position.
• Connect the radiator to your central heating system.

20
EN
Option
• Optionally, you can also connect the radiator through the bottom to
your central heating system.
AFTER INSTALLATION
• Use a screwdriver to open the air vent. Open the valve and let the water
ow into the radiator.
• Check all connections for leaks.
• When the water comes out of the air vent, there is no more air in the pipe.
• Close the air vent with a screwdriver and turn the valve open. The radiator
is now ready for operation.
CLEANING AND CARE
• Wipe the surface clean with a soft damp cloth.
• Never use abrasive cleaners on this product as these will damage the
surface.
• Radiators are made of steel and should therefore not be cleaned with
corrosive or abrasive cleaning agents.
21
EN
TROUBLESHOOTING
If your radiator is not working, knowing basic radiator troubleshooting can
save you the stress and hassle that a non-working radiator can bring. Here,
you will nd a guide to solving the most common problems associated with
radiators.
Problem Cause Solution
Cold spots on the
radiator
The water is not
owing properly
through the radiator
Make sure that there
is no air in the radiator.
"Bleed" the radiator to
release the air.
Make sure that the
valve is fully open so
that the water can ow
freely. Some radiators
require a diversion to
allow the water to ow
properly around the
unit.
Radiator leak The valve nut is loose. Tighten the valve nut.
Welding defects Replace the radiator.
Whistling noises or
hissing water
The radiator was not
correctly aligned during
installation.
New installation
Clanking noise The radiator has been
installed in a location
that does not allow for
expansion of the pipes.
New installation


23
FR
Cher client, chère cliente,
Toutes nos félicitations pour l’acquisition de ce nouvel
appareil. Lisez attentivement les consignes suivantes et
suivez-les pour éviter d'éventuels dommages. Nous ne
saurions être tenus pour responsables des dommages
dus au non-respect des consignes et à la mauvaise
utilisation de l’appareil. Scannez le QR-Code pour
obtenir la dernière version du mode d'emploi ainsi que
d'autres informations concernant le produit :
SOMMAIRE
Consignes de sécurité 24
Outils nécessaires 25
Contenu de l’emballage 25
Installation 26
Après l’installation 30
Nettoyage et entretien 30
Identication et résolution des problèmes 31
FICHE TECHNIQUE
Numéro d'article 10045417, 10045418, 10045419
Dimensions (H x L) 107 x 50 cm
FABRICANT ET IMPORTATEUR (GB)
Fabricant :
Chal-Tec GmbH, Wallstraße 16, 10179 Berlin, Allemagne.
Importateur pour la Grande-Bretagne:
Berlin Brands Group UK Ltd
PO Box 42
272 Kensington High Street
London, W8 6ND
United Kingdom

24
FR
CONSIGNES DE SÉCURITÉ
• Suivez attentivement les instructions d'installation pour vous assurer une
xation correcte de l'appareil au mur.
• An d'éviter un éventuel risque d'incendie, il est important que l'appareil
soit monté conformément aux spécications indiquées dans le manuel.
• Le radiateur est destiné à un usage intérieur uniquement. Ne placez pas le
radiateur dans une douche, un hammam ou tout autre endroit où l'appareil
pourrait être exposé à l'eau.
Conseils pour la sécurité des enfants
• Notez que vous êtes responsable de la sécurité de votre enfant à la maison
à 100%. Une fois installé, le radiateur peut devenir un danger pour les
enfants, car
a) ce radiateur n'est pas conçu pour supporter un poids supplémentaire
déraisonnable, tel que celui d'un enfant, et que
b) le radiateur devient chaud pendant l'utilisation.
• Pour cette raison, les enfants ne doivent pas grimper, saisir ou jouer avec le
radiateur ou les rails chauffants, car cela pourrait entraîner des accidents
ou des blessures, par ex. en raison de la chaleur, la chute ou l'arrachement
du radiateur du mur.
Consignes d'installation
• Respectez toutes les réglementations locales relatives aux installations
sanitaires et aux bâtiments.
• Fermez la conduite d'eau principale.
• Lisez attentivement ces instructions an de garantir une installation
correcte.
• Assurez-vous que les pièces mentionnées ci-dessous sont incluses dans la
livraison.
Remarques sur l'utilisation
• Le radiateur ne doit être rempli qu'avec de l'eau dont la température est
inférieure à 100 °C
Température : 0 °C < t < 100 °C
• Si la température dépasse 48 °C, placez une étiquette d'avertissement à
proximité du produit an d'éviter tout accident dû à des brûlures ou à un
incendie.
Remarque : si la température ambiante descend en dessous de 1 °C, videz
l'eau pour éviter qu'elle ne gèle.
25
FR
OUTILS NÉCESSAIRES
CONTENU DE L'EMBALLAGE
Radiateur (1x) Vis longue (4x) Chevilles (4x)
Support mural (4x)
Rondelle en
caoutchouc (2x)
Bouchon de purge (1x) Bouchon obturateur
(3x)
Tournevis Crayon Réglable
Clé plate
Gants Mètre à ruban
Niveau à bulle Électrique
Perceuse
Toile de protection

26
FR
INSTALLATION
Dimensions du radiateur Fairmont

27
FR
Étape 1
• Positionnez le radiateur à l'endroit souhaité, vériez l'alignement
horizontal et marquez quatre positions pour les supports.
• Veillez à ce que le radiateur soit monté verticalement.
• Avant l'installation, placez une toile de rénovation sur le sol an d'éviter
de perdre de petites pièces.
Étape 2
• Percez des trous dans le mur et insérez des chevilles.
Remarque : pour les faux plafonds ou les parois à montants, vous pouvez
acheter d'autres xations dans un magasin de bricolage.
Laissez sufsamment d'espace pour
l'installation des vannes et/ou de thermostats
thermostatiques.

28
FR
Étape 3
• Séparez les deux parties du support et xez la plus grande au mur.
Étape 4
• Fixez le plus petit support à l'arrière du radiateur.
Perçage
gauche
Perçage
droite

29
FR
Étape 5
• Fixez le radiateur au mur en alignant les supports et serrez la petite vis
lorsqu'il est en place.
• Raccordez le radiateur à votre système de chauffage central.
30
FR
Facultatif
• En option, vous pouvez également raccorder le radiateur à votre sys-
tème de chauffage central par le dessous.
APRÈS L'INSTALLATION
• Utilisez un tournevis pour ouvrir la soupape de purge. Ouvrez la vanne et
laissez l'eau s'écouler dans le radiateur.
• Vérier l'étanchéité de tous les raccords.
• Lorsque l'eau sort de la soupape de purge, il n'y a plus d'air dans le tuyau.
• Fermez la soupape de purge à l'aide d'un tournevis et ouvrez la vanne. Le
radiateur est désormais prêt à fonctionner.
NETTOYAGE ET ENTRETIEN
• Essuyez la surface avec un chiffon doux et humide.
• N'utilisez jamais de produits abrasifs sur ce produit, car ils endommagent
la surface.
• Les radiateurs sont fabriqués en acier et ne doivent donc pas être nettoyés
avec des produits corrosifs ou abrasifs.
31
FR
IDENTIFICATION ET RÉSOLUTION DES
PROBLÈMES
Si votre radiateur ne fonctionne pas, connaître les procédures de dépannage
de base des radiateurs peut vous éviter le stress et les difcultés qu'engendre
un radiateur qui ne fonctionne pas. Vous trouverez ici un guide pour résoudre
les problèmes les plus courants liés aux radiateurs.
Problème Cause Solution
Zones froides sur le
radiateur
L'eau ne circule pas
correctement dans le
radiateur
Assurez-vous qu'il
n'y a pas d'air dans le
radiateur. "Purgez" le
radiateur pour évacuer
l'air.
Assurez-vous
que la vanne est
complètement ouverte
pour que l'eau puisse
s'écouler librement.
Certains radiateurs
nécessitent une
dérivation pour que
l'eau puisse circuler
correctement autour
de l'appareil.
Fuite au niveau du
radiateur
L'écrou de la valve est
desserré.
Serrez l'écrou de la
valve.
Défauts de soudure Remplacez le radiateur.
Sifements ou
sifements d'eau
Le radiateur n'a pas été
correctement aligné
lors de l'installation.
Réinstallation
Bruit de cliquetis Le radiateur a été
installé à un endroit
qui ne permet pas la
dilatation des tuyaux.
Nouvelle installation


33
ES
Estimado cliente:
Le felicitamos por la adquisición de este producto. Lea
atentamente el siguiente manual y siga cuidadosamente
las instrucciones de uso con el n de evitar posibles
daños. La empresa no se responsabiliza de los daños
ocasionados por un uso indebido del producto o por
haber desatendido las indicaciones de seguridad.
Escanee el siguiente código QR para obtener acceso al
manual de usuario más reciente y otra información sobre
el producto.
ÍNDICE
Indicaciones de seguridad 34
Herramientas necesarias 35
Contenido del envío 35
Instalación 36
Después de la instalación 40
Limpieza y cuidado 40
Detección y reparación de anomalías 41
DATOS TÉCNICOS
Número del artículo 10045417, 10045418, 10045419
Dimensiones (alto x ancho) 107 x 50 cm
FABRICANTE E IMPORTADOR (REINO UNIDO)
Fabricante:
Chal-Tec GmbH, Wallstraße 16, 10179 Berlín, Alemania.
Importador para Gran Bretaña:
Berlin Brands Group UK Limited
PO Box 42
272 Kensington High Street
London, W8 6ND
Reino Unido

34
ES
INDICACIONES DE SEGURIDAD
• Siga atentamente las instrucciones de instalación para asegurarse de que
el aparato queda bien jado a la pared.
• Para evitar un posible riesgo de incendio, es importante que instale el
aparato de acuerdo con las especicaciones indicadas en las instrucciones .
• El radiador está destinado exclusivamente para interiores, no coloque
el radiador en duchas, baños de vapor o cualquier otro lugar donde el
aparato pueda estar expuesto al agua.
Indicaciones de seguridad infantil
• Recuerde que la seguridad de su hijo en casa es 100% su responsabilidad.
Desde el momento de instalación del radiador, puede resultar peligroso
para los niños, ya que
a) el radiador no esté diseñado para soportar un peso adicional no
razonable, como el de un niño; y
b) el radiador se calienta durante el uso.
• Por este motivo, los niños no deben subirse, agarrar o jugar con el radiador
o las aletas de calefacción, ya que puede provocar accidentes o lesiones
como, porejemplo, por el calor, por caerse o por arrancar el radiador de la
pared.
Indicaciones sobre la instalación
• Respete todas las normas locales sobre instalaciones sanitarias y edicios.
• Cierre la tubería principal.
• Lea atentamente estas instrucciones para garantizar una instalación
correcta.
• Asegúrese de que las piezas enumeradas a continuación se encuentren en
el paquete.
Indicaciones de uso
• Para rellenar el radiador, utilice agua con una temperatura inferior a
100°C.
Temperatura: 0 °C < t < 100 °C
• Si la temperatura supera los 48 °C, coloque una señal de advertencia cerca
del aparato para evitar accidentes por quemaduras o incendios.
Nota: Si la temperatura ambiente desciende por debajo de 1 °C, drene el
agua para evitar que se congele.
35
ES
HERRAMIENTAS NECESARIAS
CONTENIDO DEL ENVÍO
Radiador (1x) Tornillo largo (4x) Taco (4x)
Soporte de pared (4x) Arandela de goma (2x)
Purgador (1x) Tapón ciego (3x)
Destornillador Lápiz Llave inglesa
ajustable
Guantes Cinta métrica
Nivel de burbuja Taladro
eléctrico
Fieltro de pintor

36
ES
INSTALACIÓN
Dimensiones del radiador Fairmont
37
ES
Paso 1
• Coloque el radiador en el lugar deseado, compruebe la alineación
horizontal y marque cuatro puntos iguales para los soportes.
• Asegúrese de montar el radiador verticalmente.
• Antes de la instalación, coloque una tela de pintor en el suelo para evitar
la pérdida de piezas pequeñas.
Paso 2
• Perfore la pared e inserte los tacos.
Nota: Para los falsos techos o las paredes con tabiques, puede adquirir
sujeción adicional en la ferretería.
Deje espacio suciente para la instalación de
válvulas o reguladores termostáticos.
38
ES
Paso 3
• Separe las dos partes del soporte y je la más grande a la pared.
Paso 4
• Coloque la parte más pequeña en la parte trasera del radiador.
Perforación
izquierda
Perforación
derecha

39
ES
Paso 5
• Fije el radiador a la pared alineando los soportes y apriete el tornillo
corto cuando esté colocado.
• Conecte el radiador a su sistema de calefacción central.

40
ES
Opción
• Si lo desea, también puede conectar el radiador a su sistema de calefac-
ción central a través de la parte inferior.
DESPUÉS DE LA INSTALACIÓN
• Utilice un destornillador para abrir el oricio de ventilación. Abra la
válvula para que el agua uya al radiador.
• Compruebe que las conexiones no tengan fugas.
• Cuando el agua salga por el purgador, no quedará aire en la tubería.
• Cierre el oricio de ventilación con un destornillador y abra la válvula. El
radiador ya está listo para su puesta en marcha.
LIMPIEZA Y CUIDADO
• Limpie la supercie con un paño suave y húmedo.
• No utilice nunca limpiadores abrasivos con este aparato, ya que dañarían
la supercie.
• Los radiadores son de acero y, por tanto, no deben limpiarse con productos
de limpieza corrosivos o abrasivos.

41
ES
DETECCIÓN Y REPARACIÓN DE ANOMALÍAS
De no funcionar el radiador, saber cómo solucionar problemas a nivel básico
puede ahorrarle el estrés y la molestia que conlleva un radiador inoperativo.
Aquí encontrará una guía de soluciones a las anomalías más comunes de los
radiadores.
Anomalía Causa Solución
Gotas fríos en el
radiador
El agua no uye
correctamente por el
radiador
Asegúrese de que no
hay aire en el radiador.
«Purgue» el radiador
para sacar el aire.
Asegúrese de que
la válvula esté
completamente
abierta para que el
agua pueda uir sin
obstáculos. Algunos
radiadores requieren
una desviación para
que el agua uya
correctamente por la
unidad.
Fuga en el radiador La tuerca de la válvula
está suelta.
Apriete la tuerca de la
válvula.
Defectos de soldadura Sustituya el radiador.
Ruidos de silbidos o
siseos del agua
El radiador no se alineó
correctamente durante
la instalación.
Vuelva a instalar el
aparato
Tintineo El radiador se ha
instalado en un lugar
que no permite la
expansión de las
tuberías.
Nueva instalación


43
IT
Gentile cliente,
La ringraziamo per l'acquisto del dispositivo. La preghiamo
di leggere attentamente le seguenti indicazioni e di
seguirle per evitare eventuali danni. Non ci assumiamo
alcuna responsabilità per danni scaturiti da una mancata
osservanza delle indicazioni relative alla sicurezza e da
un uso improprio del dispositivo. Scansionare il codice
QR seguente per accedere al manuale d'uso più attuale
e ricevere informazioni sul prodotto.
INDICE
Avvertenze di sicurezza 44
Attrezzi necessari 45
Volume di consegna 45
Installazione 46
Dopo l’installazione 50
Pulizia e manutenzione 50
Ricerca e correzione degli errori 51
DATI TECNICI
Numero articolo 10045417, 10045418, 10045419
Dimensioni (AxL) 107 x 50 cm
PRODUTTORE E IMPORTATORE (UK)
Produttore:
Chal-Tec GmbH, Wallstraße 16, 10179 Berlino, Germania.
Importatore per la Gran Bretagna:
Berlin Brands Group UK Limited
PO Box 42
272 Kensington High Street
London, W8 6ND
United Kingdom

44
IT
AVVERTENZE DI SICUREZZA
• Seguire attentamente le istruzioni di installazione per ssare
correttamente il dispositivo alla parete.
• Per evitare un possibile rischio di incendio, è importante che il dispositivo
sia installato rispettando le indicazioni fornite nelle istruzioni .
• Il radiatore è progettato per l'uso in locali al chiuso. Non posizionare il
radiatore in una doccia, in un bagno turco o in qualsiasi altro luogo esposto
all'acqua.
Consigli per la sicurezza dei bambini
• Tenere presente che la responsabilità per la sicurezza dei bambini in casa
ricade al 100% sull'utente. Subito dopo l'installazione, il radiatore può
diventare un pericolo per i bambini perché:
(a) non è progettato per sostenere un peso aggiuntivo irragionevole, come
quello di un bambino; e
b) il radiatore si surriscalda durante l'uso.
• Per questo motivo, i bambini non devono arrampicarsi, salire sopra o
giocare con il radiatore o gli elementi riscaldanti, poiché possono risultare
incidenti o lesioni, ad esempio a causa del calore, della caduta o del
distaccamento del radiatore dalla parete.
Note per l'installazione
• Rispettare tutte le norme locali per gli impianti sanitari e gli edici.
• Chiudere il condotto principale dell'acqua.
• Leggere attentamente queste istruzioni per garantire una corretta
installazione.
• Assicurarsi che le parti elencate di seguito siano incluse nella confezione.
Note sull'utilizzo
• Il radiatore deve essere riempito solo con acqua a una temperatura
inferiore ai 100 °C.
Temperatura: 0 °C < t < 100 °C
• Se la temperatura supera i 48 °C, posizionare un avvertimento di pericolo
vicino al prodotto per evitare incidenti causati da ustioni o da incendi.
Nota: se la temperatura ambiente scende sotto 1 °C, scaricare l'acqua per
evitare il congelamento.

45
IT
ATTREZZI NECESSARI
VOLUME DI CONSEGNA
Radiatore (1x) Viti lunghe (4x) Tasselli (4x)
Supporti a parete (4x) Gommini (2x)
Sato dell'aria (1x) Tappi (3x)
Cacciavite Matita Chiave regolabile
Guanti Metro a nastro
Livella ad acqua Trapano elettrico
-
Telo protettivo
46
IT
INSTALLAZIONE
Dimensioni del radiatore Fairmont
47
IT
1° passaggio
• Posizionare il radiatore nel punto desiderato, controllare se è
perfettamente allineato e segnare quattro posizioni uguali per i
supporti.
• Assicurarsi che il radiatore sia montato in verticale.
• Prima dell'installazione, posizionare un telo protettivo sul pavimento
per evitare di perdere i componenti più piccoli.
2° passaggio
• Praticare dei fori nella parete e inserire i tasselli.
Nota: per i controsoftti o le pareti con tubolari, è possibile acquistare altri
elementi ssanti presso un negozio di bricolage.
Lasciare spazio sufciente per l'installazione di
valvole e/o regolatori termostatici.

48
IT
3° passaggio
• Separare le due parti del supporto e ssare quella più grande alla parete.
4° passaggio
• Fissare la parte più piccola del supporto al lato posteriore del radiatore.
Foro
a sinistra
Foro
a destra

49
IT
5° passaggio
• Fissare il radiatore alla parete allineando i supporti e stringere la vite
piccola quando è in posizione.
• Collegare il radiatore all'impianto centrale di riscaldamento.

50
IT
Opzione
• Opzionalmente, è possibile collegare il radiatore all'impianto centrale di
riscaldamento anche dal lato inferiore.
DOPO L'INSTALLAZIONE
• Utilizzare un cacciavite per aprire lo sato dell'aria. Aprire la valvola e far
uire l'acqua nel radiatore.
• Controllare che i collegamenti non presentino perdite.
• Quando l'acqua esce dallo sato, non c'è più aria nel tubo.
• Chiudere lo sato con un cacciavite e aprire la valvola. Il radiatore è ora
pronto all'uso.
PULIZIA E MANUTENZIONE
• Pulire la supercie con un panno sofce inumidito.
• Non utilizzare mai detergenti abrasivi su questo prodotto per non
danneggiarne la supercie.
• I radiatori sono in acciaio e non devono pertanto essere puliti con
detergenti corrosivi o abrasivi.
51
IT
RICERCA E CORREZIONE DEGLI ERRORI
Se il radiatore non funziona, la capacità di risolvere alcuni semplici problemi
può evitare stress e fastidi. Qui è disponibile una guida per risolvere i problemi
più comuni legati ai radiatori.
Problema Causa Soluzione
Punti freddi sul
radiatore
L'acqua non scorre
correttamente nel
radiatore
Assicurarsi che non vi
sia aria nel radiatore.
Satare il radiatore
per eliminare l'aria
all'interno.
Assicurarsi che
la valvola sia
completamente
aperta afnché
l'acqua possa scorrere
liberamente. Alcuni
radiatori richiedono
una deviazione
per consentire
all'acqua di scorrere
correttamente.
Perdita del radiatore Il dado della valvola è
allentato.
Serrare il dado della
valvola.
Difetti di saldatura Sostituire il radiatore.
Rumori di schi o sibili
d'acqua
Il radiatore non
è stato allineato
correttamente durante
l'installazione.
Ripetere l'installazione
Rumore di
sferragliamento
Il radiatore è stato
installato in una
posizione che non
consente l'espansione
dei tubi.
Ripetere l'installazione