

OPERATOR’S MANUAL
80V BRUSHLESS 21"
SELF-PROPELLED MOWER
To Reduce The Risk Of Injury, User Must Read
CAUTION
And Understand Operator’s Manual. Save These Instructions For
Future Reference.
270-1157
2500394ME
LMB455

TABLE OF CONTENTS
Safety Symbols ........................................................................................................... Page 2
Safety Instructions ...................................................................................................... Page 3
Overview ..................................................................................................................... Page 8
Specications ............................................................................................................. Page 8
Assembly .................................................................................................................... Page 9
Operation .................................................................................................................. Page 12
Maintenance ............................................................................................................ Page 14
Troubleshooting ........................................................................................................ Page 16
Note .......................................................................................................................... Page 17
Warranty ................................................................................................................... Page 18
Page 2
SAFETY SYMBOLS
Some of the following symbols may be used on this product. Please study them and learn their
meaning. Proper interpretation of these symbols will allow you to operate the product better and
safer.
Symbol Explanation
Precautions that involve your safety.
To reduce the risk of injury, user must read instruction manual.
CAUTION — Do not stare at operating lamp
Danger — Keep hands and feet away.
WARNING — Beware of thrown objects — keep bystanders away.
WARNING — Keep hand and feet away from the blades.
WARNING — Disconnect all batteries before maintenance.

Page 3
SAFETY INSTRUCTIONS
The purpose of safety symbols is to attract our attention to possible dangers. The safety
symbols, and the explanations with them, deserve your careful attention and understanding.
The symbol warnings do not by themselves eliminate any danger. The instructions and
warnings they give are no substitutes for proper accident prevention measures.
Failure to obey this safety warning CAN result in death or serious
injury to yourself or to others. Always follow the safety precautions to reduce the risk of
fire, electric shock and personal injury.
WARNING
Failure to obey this safety warning MAY result in personal injury
to yourself or others or property damage. Always follow the safety precautions to reduce
the risk of fire, electric shock and personal injury.
CAUTION
Failure to obey this warning WILL result in death or serious injury
to yourself or to others. Always follow the safety precautions to reduce the risk of fire,
electric shock and personal injury.
DANGER
Be sure to read and understand all safety instructions in
this manual, including all safety alert symbols such as “DANGER”, “WARNING” and
“CAUTION”, before using this power tool. Failure to follow all instructions listed below
may result in electric shock, fire and/or serious personal injury.
WARNING
SYMBOL MEANING
SAFETY ALERT SYMBOL:
Indicates DANGER, WARNING, OR CAUTION. May be used
in conjunction with other symbols or pictographs.

Page 4
SAFETY INSTRUCTIONS
IMPORTANT SAFETY
INSTRUCTIONS
READ ALL INSTRUCTIONS
BEFORE USING (THIS POWER
TOOL)
WARNING
Read and
understand all instructions before using
this product. Failure to follow all
instructions listed below may result in
electric shock, fire, and/or serious
personal injury. Save all warnings and
instructions for future reference:
1) Work area safety
a) To avoid bystander contact with the
moving blade or a thrown object injury,
keep the area of operation clear of all
bystanders, particularly small children.
Stop the lawnmower and any attachment(s)
if anyone enters the area.
Contact with the
moving blade or thrown objects may result in
serious personal injury or death.
b) Only operate the lawnmower in daylight
or good artificial light.
Dark areas invite
accidents.
c) Do not operate lawnmowers in
explosive atmospheres, such as in the
presence of flammable liquids, gases or
dust.
Lawnmowers create sparks which may
ignite the dust or fumes.
d) Do not use the lawnmower in bad
weather conditions, especially when there
is a risk of lightning.
This decreases the risk
of being struck by lightning.
e) Thoroughly inspect the area where the
lawnmower is to be used and remove all
stones, sticks, wires, bones, and other
foreign objects.
Thrown objects can cause
personal injury.
2) Electrical safety
a) Do not expose the lawnmower to rain or
wet conditions.
Water entering a lawnmower
may increase the risk of electric shock.
3) Personal safety
a) Use personal protective equipment.
Always wear eye protection.
Protective
equipment will reduce personal injuries.
b) Dress properly. Do not wear loose
clothing or jewelery.
Keep your hair and
clothing away from moving parts. Loose
clothes, jewelery or long hair can be caught in
moving parts.
c) While operating the lawnmower, always
wear long trousers.
Exposed skin increases
the likelihood of injury from thrown objects.
d) While operating the lawnmower, always
wear non-slip and protective footwear.
Do
not operate the lawnmower when barefoot
or wearing open sandals. This reduces the
chance of injury to the feet from contact with
the moving blade
e) Prevent unintentional starting. Ensure
the switch is in the off-position before
connecting to power source and/or
batteries, picking up or carrying the
lawnmower.
Carrying a lawnmower with
your nger on the switch or energizing a
lawnmower that has the switch on invites
accidents.
f
) Remove any adjusting key or wrench
before turning the lawnmower on.
A
wrench or a key left attached to a rotating
part of the lawnmower may result in personal
injury.
g) Keep proper footing and balance at
all times.
This enables better control of the
lawnmower in unexpected situations.
h) Stay alert, watch what you are doing
and use common sense when operating
a lawnmower
. Do not use a lawnmower
while you are tired or under the inuence of
drugs, alcohol or medication. A moment of
inattention while operating a lawnmower may
result in serious personal injury.
i) Do not let familiarity gained from
frequent use of lawnmower allow you
to become complacent and ignore
lawnmower safety principles.
A careless
action can cause severe injury within a
fraction of a second.
j) To avoid operator blade contact or a
thrown object injury, stay in the operator
zone behind the lawnmower handles.
Blade contact or thrown objects may result in
serious personal injury
k) Do not touch blades and other
hazardous moving parts while they are
still in motion.
This reduces the risk of injury
from moving parts.
4) Lawnmower use and care
a) Use the lawnmower and accessories in

Page 5
accordance with these instructions, taking
into account the working conditions
and the work to be performed.
Use of the
lawnmower for operations different from those
intended may result in a hazardous situation.
b) Before using the lawnmower, always
visually inspect to see that the blade(s)
and the blade(s) assembly are properly
secured and not worn or damaged.
Loose,
worn, or damaged parts may increase the risk
of injury.
c) Keep guards and other safety devices in
place, properly mounted, and in working
order.
A guard or other safety device that is
loose, damaged, or is not functioning correctly
may result in personal injury.
d) Keep all cooling air inlets clear of
debris.
Blocked air inlets and debris may
result in overheating or risk of re.
e) Do not use the lawnmower if the switch
does not turn it on and off.
Any lawnmower
that cannot be controlled with the switch is
dangerous and must be repaired.
f) Do not operate the lawnmower in wet
grass. Walk, never run.
This reduces the
risk of slipping and falling which may result in
personal injury.
g) Do not operate the lawnmower on
excessively steep slopes.
This reduces
the risk of loss of control, slipping and falling
which may result in personal injury.
h) Do not force the lawnmower. Use the
correct lawnmower for your application.
The correct lawnmower will do the job
better and safer at the rate for which it was
designed.
i) Be aware of the mower and attachment
discharge direction and do not point the
mower discharge at anyone.
Thrown objects
can cause personal injury.
j) Use extreme caution when reversing
or pulling the lawnmower towards you.
Always be aware of your surroundings.This
reduces the risk of tripping during operation.
k) When working on slopes, always be
sure of your footing, always work across
the face of slopes, never up or down and
exercise extreme caution when changing
direction.
This reduces the risk of loss of
control, slipping and falling which may result
in personal injury.
SAFETY INSTRUCTIONS
l) Operate the disabling device and/or
remove all battery packs, if removable,
from the lawnmower before making any
adjustments, changing accessories, or
storing the lawnmower.
Such preventive
safety measures reduce the risk of starting
the lawnmower accidentally.
m) Keep handles and grasping surfaces
dry, clean and free from oil and grease.
Slippery handles and grasping surfaces do
not allow for safe handling and control of the
lawnmower in unexpected situations.
n) Check the grass catcher frequently for
wear or deterioration.
A worn or damaged
grass catcher may increase the risk of
personal injury.
o) Before removing the grass catcher, turn
off the motor and wait until the blade(s)
comes to a complete stop.
The cutting
blade(s continues to rotate after the blade
control is released. Never place any part of
the body in the blade(s) area until you are
certain the motor is off and the blade(s) has
stopped rotating.Contact with the moving
cutting blade(s) may result in serious personal
injury.
p) Before unclogging the chute, turn off
the motor, wait until the blade(s) comes
to a complete stop, operate the disabling
device and/or remove all batteries, if
removable.
The cutting blade(s) continues
to rotate after the blade control is released.
Never place any part of the body in the
blade(s) area until you are certain the motor
is off and the blade(s) has stopped rotating.
Contact with the moving cutting blade(s) may
result in serious personal injury.
q) Before cleaning or inspecting the
lawnmower, turn off the motor, wait
until the blade(s) comes to a complete
stop, operate the disabling device and/
or remove all batteries if removable.
Accidental contact with the moving blade and
moving parts may result in personal injury.
r) Maintain the lawnmower and
accessories.
Check for misalignment or
binding of moving parts, breakage of parts
and any other condition that may affect the
lawnmower’s operation. If damaged, have
the lawnmower repaired before use. Many
accidents are caused by poorly maintained
lawnmowers.
s) Store idle lawnmowers out of the reach

Page 6
SAFETY INSTRUCTIONS
of children and do not allow persons
unfamiliar with the lawnmower or these
instructions to operate the lawnmower.
Lawnmowers are dangerous in the hands of
untrained users.
5) Battery lawnmower use and care
a) Use lawnmowers only with specifically
designated battery packs.
Use of any other
battery packs may create a risk of injury and
re.
b) Recharge only with the charger
specified by the manufacturer.
A charger
that is suitable for one type of battery pack(s)
may create a risk of re when used with
another battery pack(s).
c) Follow all charging instructions and do
not charge the battery pack(s) or
lawnmower outside the temperature range
specified in the instructions.
Charging
improperly or at temperatures outside the
specied range may damage the battery and
increase the risk of re.
d) Do not use a battery pack or lawnmower
that is damaged or modified.
Damaged or
modied batteries may exhibit unpredictable
behaviour resulting in re, explosion or risk of
injury.
e) Do not expose a battery pack(s) or
lawnmower to fire or excessive
temperature.
Exposure to re or temperature
above 130 °C (265°F) may cause explosion.
f) Under abusive conditions, liquid may be
ejected from the battery(ies); avoid
contact.
If contact accidentally occurs,
fush with water. If liquid econtacts eyes,
additionally seek medical help. Liquid ejected
from the battery(ies) may cause irritation or
burns.
g) When battery packs are not in use, keep
them away from other metal objects, like
paper clips, coins, keys, nails, screws or
other small metal objects that can make a
connection from one terminal to another.
Shorting the battery terminals together may
cause burns or a re.
6) Service
a) Have your lawnmower serviced by a
qualified repair person using only identical
replacement parts.
This will ensure that the
safety of the lawnmower is maintained. Use
of parts which do not meet the original
equipment specications may lead to
improper performance and compromise
safety.
b) Never service damaged battery packs.
Service of battery packs should only be
performed by the manufacturer or authorized
service providers.
SAFETY FEATURES ON THE PRODUCT
• Ensure that the safety hardware on the
product is functioning properly before use.
• Regularly inspect the safety hardware, and
if any defects are found, please contact
your nearest service center immediately.
CHECK THE CUTTING DECK
The cutting deck is designed to reduce
vibrations in the product and minimize the risk
of injury from the blade.
• To ensure safe operation of the mower, it's
important to inspect the cutting deck for any
damages, such as cracks.
GRASS CATCHER
The grass catcher prevents injury to the
operator from the rotating blade. The grass
catcher wears during operation, so it is
important to inspect it regularly for damages
such as tears or holes. If there is any
damage, replace it immediately with a grass
catcher approved by the manufacturer.
BLADE ACTIVATION LEVER
• The blade activation lever starts the motor.
When the lever is released, the motor stops.
• It's important to perform regular checks on
the blade activation lever. To do this, power
on the motor and then release the lever. If
the motor doesn't stop within 3 seconds,
there may be an issue with the lever. In this
case, it's recommended to have an approved
service center adjust the lever.
BATTERY SAFETY
Refer to the Battery Operator Manual for
warning instructions before you use the
product.
BATTERY CHARGER SAFETY
Refer to the Battery Charger Operator Manual
for warning instructions before you use the
product.
SAFETY INSTRUCTIONS FOR
MAINTENANCE
• To prevent accidental start during

Page 7
varies depending on how often you do this
type of work. To reduce your exposure to
these chemicals, work in a well-ventilated
area, and work with approved safety
equipment, such as dust masks that are
specially to lter out microscopic particles.
SAVE THESE INSTRUCTIONS
maintenance, always turn off the product
and remove the battery. Wait for at least 5
seconds before starting any maintenance
work.
• Follow the maintenance instructions
correctly to increase the product's lifetime
and reduce the risk of accidents. Professional
repairs must be done by a technician at an
approved service center.
• Only perform the maintenance tasks
listed in the operator's manual. Any other
maintenance work should be done by a
technician.
• Wear heavy-duty gloves when using the
cutting equipment to prevent injuries from the
sharp blade.
• Keep the cutting edges clean and sharp for
optimal and safe performance.
• If you are experiencing difculties with
maintenance, have a service technician
conduct regular inspections of the product
and make any necessary adjustments and
repairs.
• Replace any damaged, worn, or broken
parts immediately.
• Follow the manufacturer's instructions when
changing accessories. Only use accessories
approved by the manufacturer.
• When not in use, store the product, battery,
and battery charger in a dry, indoor, and
locked area. Keep the product, battery, and
battery charger out of the reach of children
and unauthorized persons.
PROPOSITION 65
This product contains a chemical known to
the state of California to cause cancer, birth
defects or other reproductive harm. Some
dust created by power sanding, sawing,
grinding, drilling, and other construction
activities contains chemicals known to cause
cancer, birth defects or other reproductive
harm. Some examples of these chemicals
are:
• Lead from lead-based paints;
• Crystalline silica from bricks and cement
and other masonry products;
• Arsenic and chromium from chemically
treated lumber.
Your risk of exposure to these chemicals
SAFETY INSTRUCTIONS
Page 8
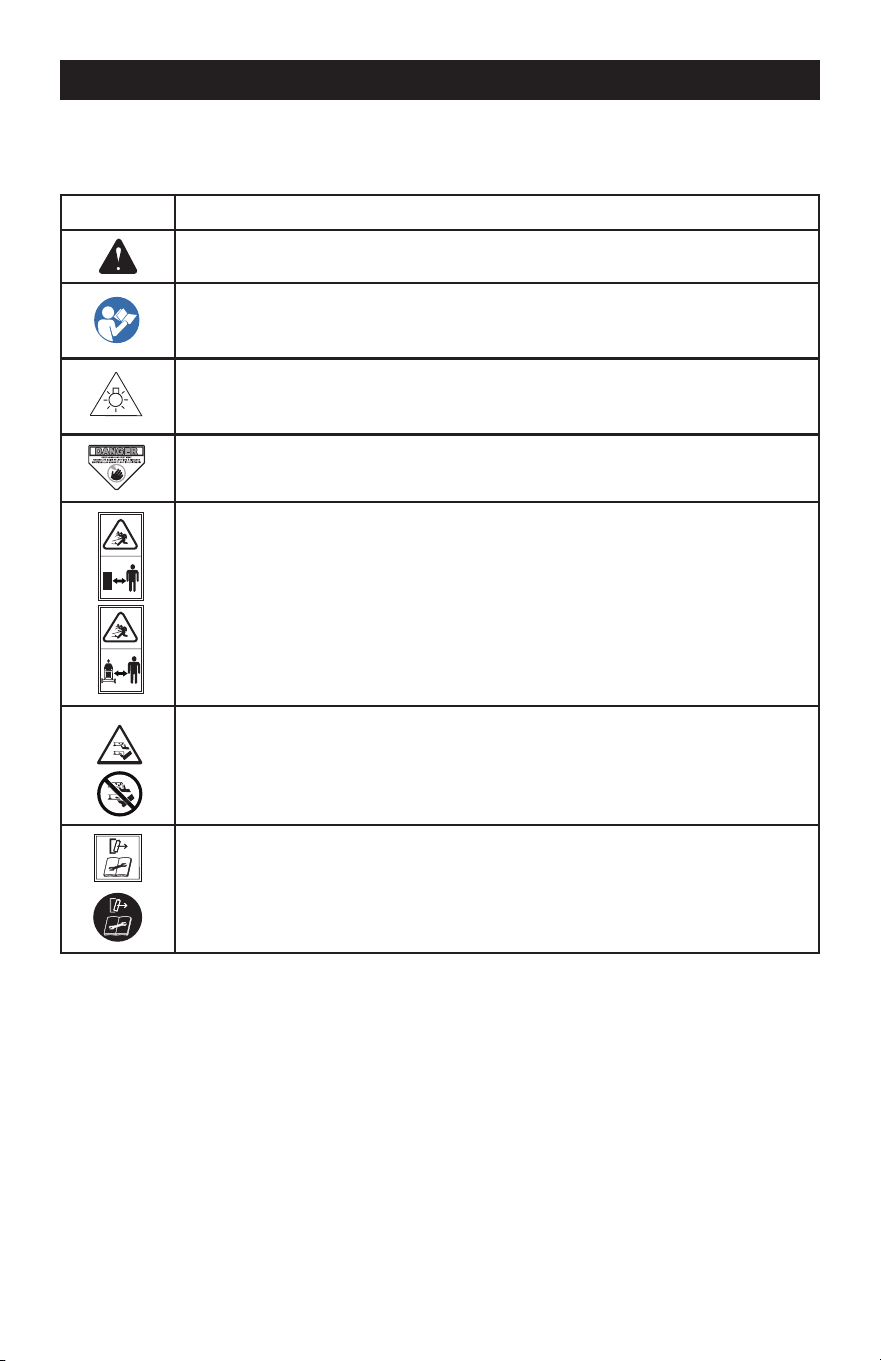
OVERVIEW
SPECIFICATIONS
Type Cordless, battery operated
Motor 80V Brushless
No load speed 2800 RPM/ / 3200 RPM
Height adjustments 1.3 - 4” (3.3 - 10.16 cm)
Self-propelled speed 2.3-5.2 fps (0.7-1.6 m/s)
Functions 3-in-1 Mulch & Rear Bag & Side Discharge
Weight (Without Battery) 65 lbs (29.5 kg)
The recommended ambient temperature range:
Item Temperature
Mower storage temperature range 14°F (-10°C) - 104°F (40°C)
Mower operation temperature range 32°F (0°C) - 104°F (40°C)
Battery charging temperature range 39°F (4°C) - 104°F (40°C)
Charger operation temperature range 39°F (4°C) - 113°F (45°C)
Battery storage temperature range
1year: 32°F (0°C) - 73°F (23°C)
3 months: 32°F (0°C) - 113°F (45°C)
1 months: 32°F (0°C) - 140°F (60°C)
Battery discharging temperature range 6.8°F (-14°C) - 113°F (45°C)
Mulch plug
Side discharge chute
Start button
Start handle
Upper handle
Lower handle hole
Lower handle
Rear discharge flap
Battery door
Height adjustment lever
LED headlight
Side discharge chute
Grass catcher
Self-propel drive lever
Page 9
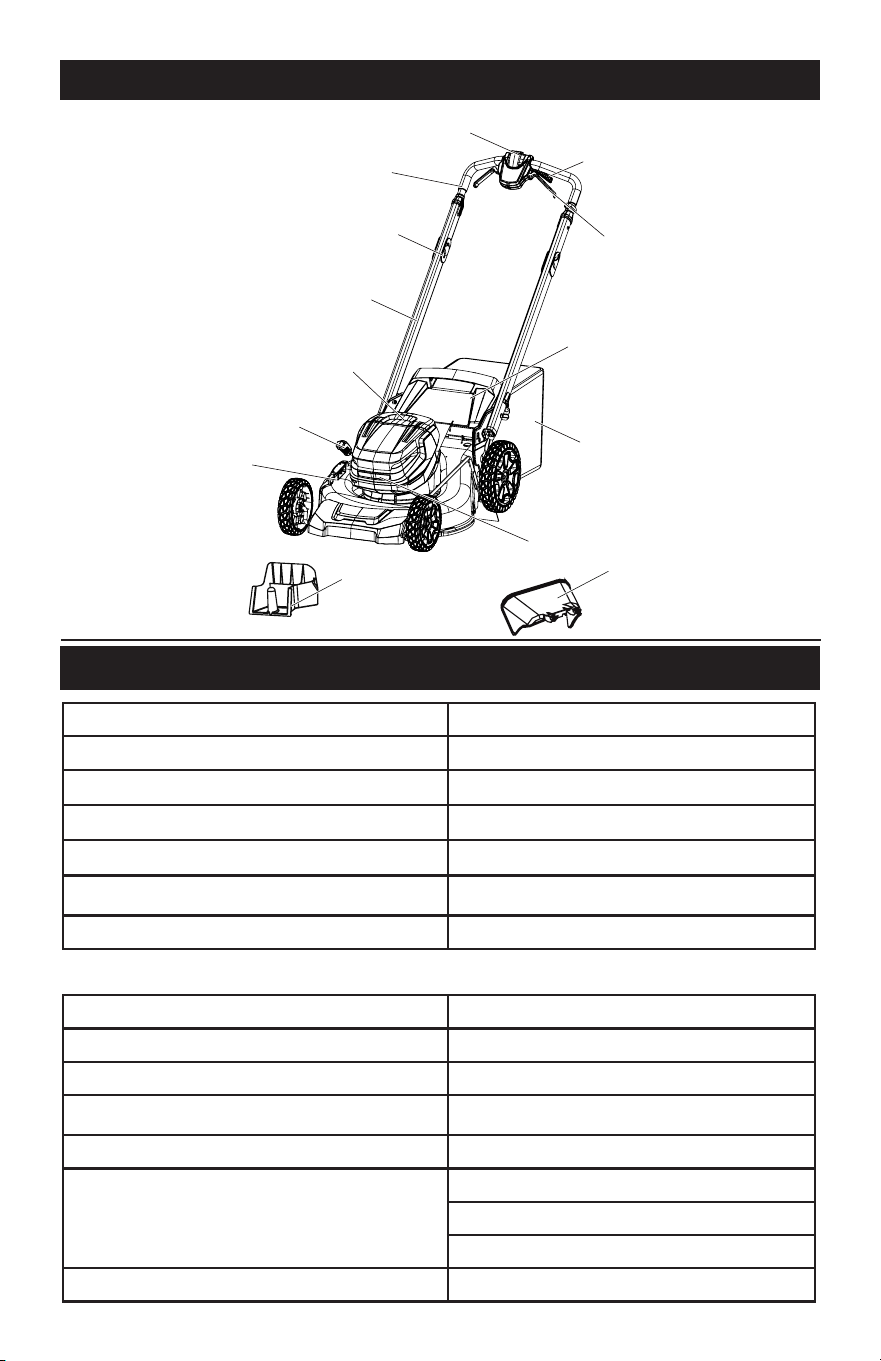
INSTALL THE LOWER HANDLE
Handle hole
Handle pin
1. Pull up on the handle holes to release the
lower handles.
2. Fold the lower handle up until the handle
pins lock into position.
NOTE:
Make sure that the two handle pins
are in the same position.
INSTALL THE GRASS CATCHER
Door rod
Door rod
Rear discharge flap
Hooks
3
1. Remove the mulch plug from behind the
rear discharge ap.
2. Remove the side discharge chute.
3. Open the rear discharge fIap and hold it.
4. Hold the the grass catcher by its handle
and engage the hooks on the door rod.
5. Close the rear discharge fIap.
ASSEMBLY
UNPACKING
This product requires assembly.
• Carefully remove the product and any
accessories from the box. Make sure that all
items listed in the package contents section
are included.
• Inspect the product carefully to make sure
no breakage or damage occurred during
shipping.
Do not discard the packing material until you
have carefully inspected and satisfactorily
operated the product.
• If any parts are damaged or missing, please
call 1-844-MSTR4CE (844-678-7423) for
assistance.
UNFOLD THE UPPER HANDLE
WARNING
Do not damage the
cable while installing the upper handle.
1. Place the mower upright in vertical position.
2. Remove the packing material from the
cable.
3. Remove the rubber edge guard from the
upper handle.
4. Insert the upper handle into the lower
handle.
5. Put the bolts through the holes and
tighten with the nuts, using a Philips head
screwdriver (not included).
Lower handle
Upper handle
Bolt
Bolt
Nuts
- FIG
Page 10
ASSEMBLY
SETTING THE CUTTING HEIGHT
The machine can be set to dierent blade
heights
Height adjustment lever
6
1. Pull the height adjustment lever rearward
to increase the cutting height.
2. Pull the height adjustment lever forward to
decrease the cutting height.
INSTALL THE BATTERY PACK
WARNING
• If the battery pack or charger is
damaged, replace the battery pack or
the charger.
• Stop the machine and wait until the
motor stops before you install or
remove the battery pack.
• Read, know, and follow the instructions
in the battery and charger manual.
NOTE:
The machine has an automatic switch
function that lets the other battery work when
the rst cannot operate.
1. Open the battery door.
2. Align the ribs on the battery pack with the
grooves in the battery compartment.
INSTALL THE MULCH PLUG
Rear discharge flap
Mulch plug
4
1. Remove the grass catcher.
2. Open the rear discharge fIap and hold it.
3. Hold the mulch plug by its handle and t it
in the discharge chute.
4. Close the rear discharge fIap.
INSTALL THE SIDE DISCHARGE
CHUTE
Pivot
5
CAUTION
When you use the
side discharge
chute,
• Do not install the grass catcher.
• Keep the mulch plug installed.
1. Open the side discharge fIap and hold it.
2. Line up the recesses of the side discharge
chute below the pivot.
3. Close the side discharge ap.
7
Battery door
Battery
Safety key
Battery
release button
Side discharge door
Side discharge chute

Page 11
ASSEMBLY
3. Push the battery pack into the battery
compartment until the battery pack locks
into place.
4. When you hear a click, the battery pack is
installed.
5. Close the battery door.
NOTE:
The motor starts only when you put in
the safety key.
REMOVE THE BATTERY PACK
1. Open the battery door.
2. Remove the safety key.
3. Push and hold the battery release button.
4. Remove the battery pack from the
machine.
Page 12
WARNING
Wear eye protection
during operation.
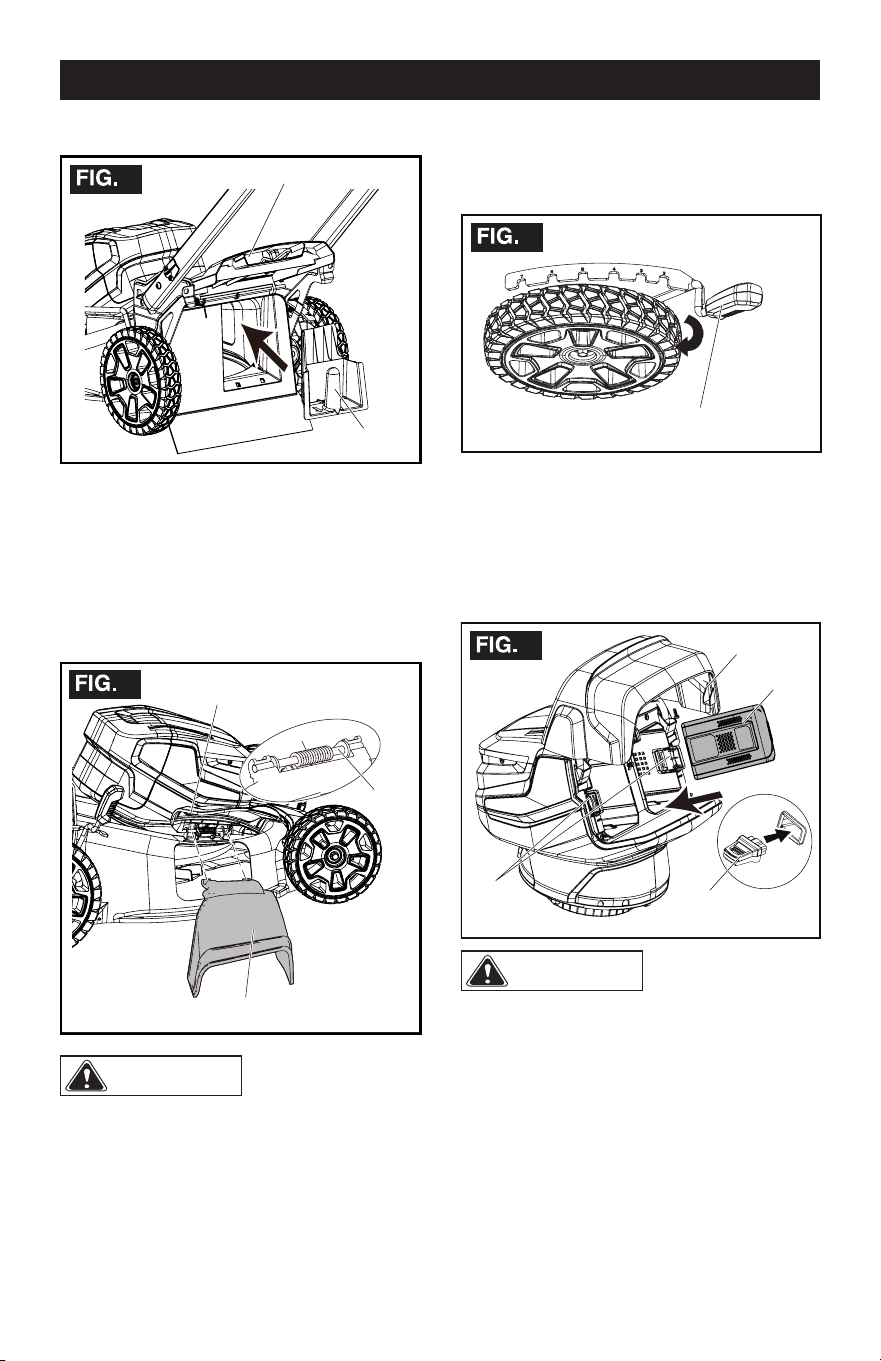
START THE MACHINE
TURBO
TURBO
Start handle
Start button
Battery capacity indicator
Turbo button
8
1. Make sure safety key is inserted into slot.
2. Push and hold the start button.
3. While you hold the start button, grab the start
handles in the direction of the handle bar.
4. Once the machine has started, you can
release the start button.
5. Press the Turbo button to speed up to 3,200
RPM.
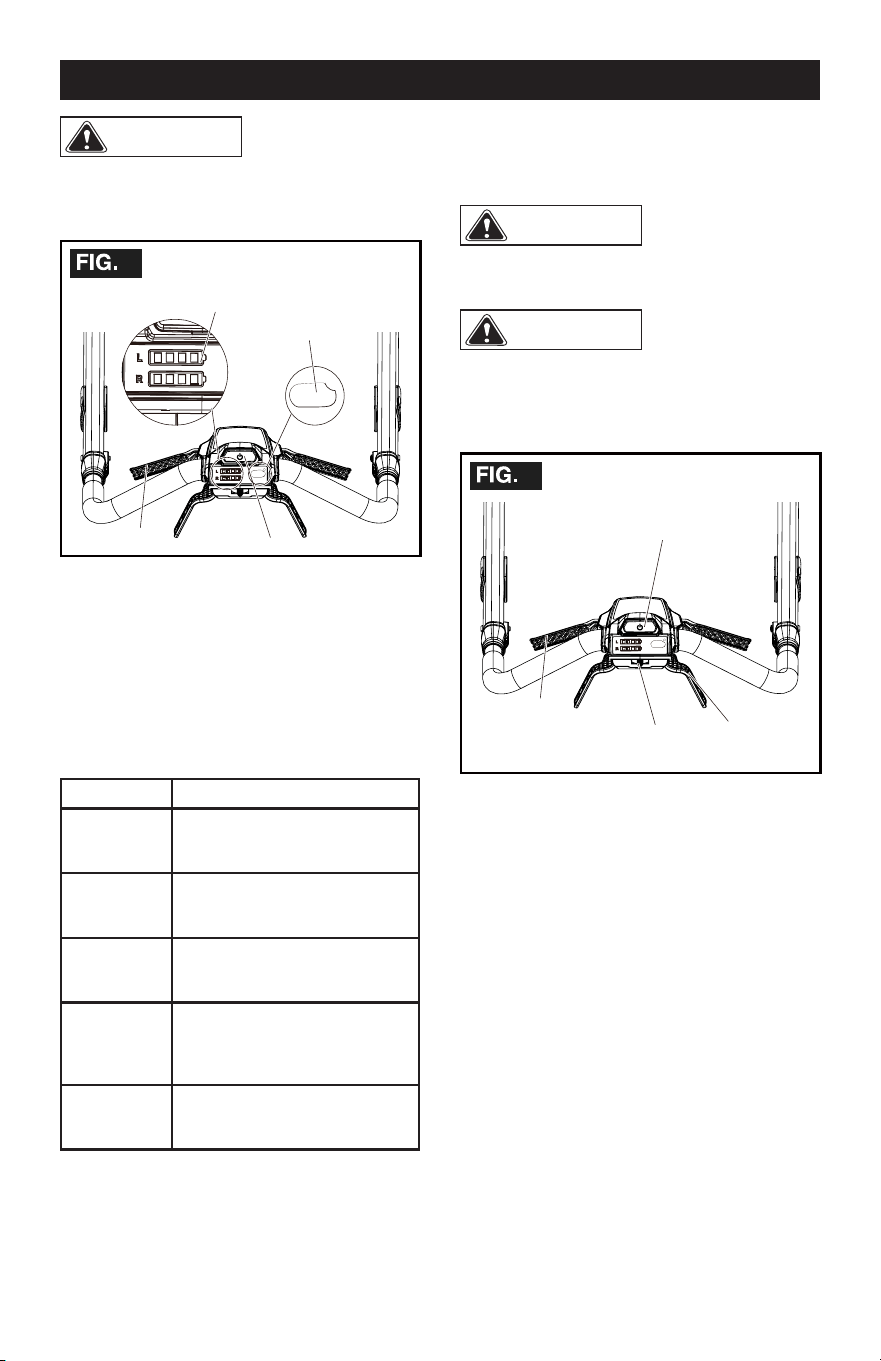
Battery capacity indicator
- Light - Capacity
- 4
Green
Lights
- The battery is above 80%
capacity
- 3
Green
Lights
- The battery is between
80% and 60% capacity
- 2
Green
Lights
- The battery is at between
60% and 40% capacity
- 1
Blinking
Green
Lights
- The battery is between
40% and 20% capacity
- Lights
go out
- The battery is less than
10% capacity and requires
charging immediately
STOP THE MACHINE
1. Release the start handle to stop the
machine.
Wait until the
blade fully stops
before you start
the machine again. Do not quickly turn the
machine o and on.
WARNING
Always remove the
safety key and
battery pack after you complete the work.
OPERATE THE SELF-PROPEL
DRIVE SYSTEM
TURBO
Start handle
Start button
9
Self-propel
drive lever
Speed
control
1. Start the machine.
2. While you hold the start handles, grab either
of the drive levers and pull towards the
handle bar.
3. Hold the start handles and the drive levers
at the same time.
4. Release either set of start handle and drive
lever from the same side.
5. Adjust the speed control with your free
hand.
• Slide the speed control button in the
direction of the Rabbit Symbol to
increase the speed.
• Pull the speed control button in the
direction of the Turtle Symbol to
decrease the speed.
6. Release the drive levers to close the self-
propel system.
To engage the self-propel drive system
while the mower is not running:
• Press and hold the start button, then pull up
on the drive lever.
OPERATION
WARNING
Page 13
LED HEADLIGHTS
Start button
Start handle
LED headlight
10
Self-
propel
drive
lever
1. When the mower is ready to start, you may
grab the start handle or the self-propel
lever to turn on the LED headlights.
2. Release the start handles and self-propel
levers to turn off the headlights.
EMPTY THE GRASS CATCHER
1. Stop the machine.
2. Remove the safety key.
3. Remove the battery pack.
4. Open the rear discharge door and hold it.
5. Hold the grass catcher by its handle and
unhook it from the door rod.
6. Close the rear discharge door.
7. Empty the grass catcher.
OPERATE ON SLOPES
WARNING
Do not mow on the
slopes with incline
more than 15°. If you are not comfortable,
do not mow on a slope.
• Do not go up and down on a slope, mow
across the face of the slope. Be careful
when you change the direction on a slope.
• Monitor the holes, ruts, rocks, and other
hidden objects that can cause you to fall.
Remove all obstacles such as rocks and
tree limbs.
• Make sure that your footing is stable. If you
are out of balance, release the start handle
immediately.
• Do not mow near drop-os, ditches, or
embankments.
OPERATION TIPS
• Do not try to override the operation of the
start button or start handles.
OPERATION
• Do not tilt the machine when you start it.
• Do not put hands or feet near or below the
turning parts.
• Keep the discharge chute clean.
• Do not cut wet grass.
• Higher blade height is necessary for new
or thick grass.
• Clean the bottom of the mower deck after
each use.
• Remove grass clippings, leaves, dirt, and
other debris.
Page 14
WARNING
Remove the safety
key and battery pack from the machine
before maintenance.
WARNING
Keep the motor
and battery pack free from grass, leaves
or too much grease.
CAUTION
Use only approved
replacement parts.
CAUTION
Do not let brake
uids, gasoline, petroleum-based materi-
als touch the plastic parts. Chemicals can
cause damage to the plastic, and make the
plastic unserviceable.
CAUTION
Do not use strong
solvents or detergents on the plastic
housing or components.
GENERAL MAINTENANCE
• Before each use, examine the machine for
damaged, missing, or loose parts such as
screws, nuts, bolts and caps.
• Tighten correctly all the fasteners and caps.
• Clean the machine with a dry cloth. Do not
use water.
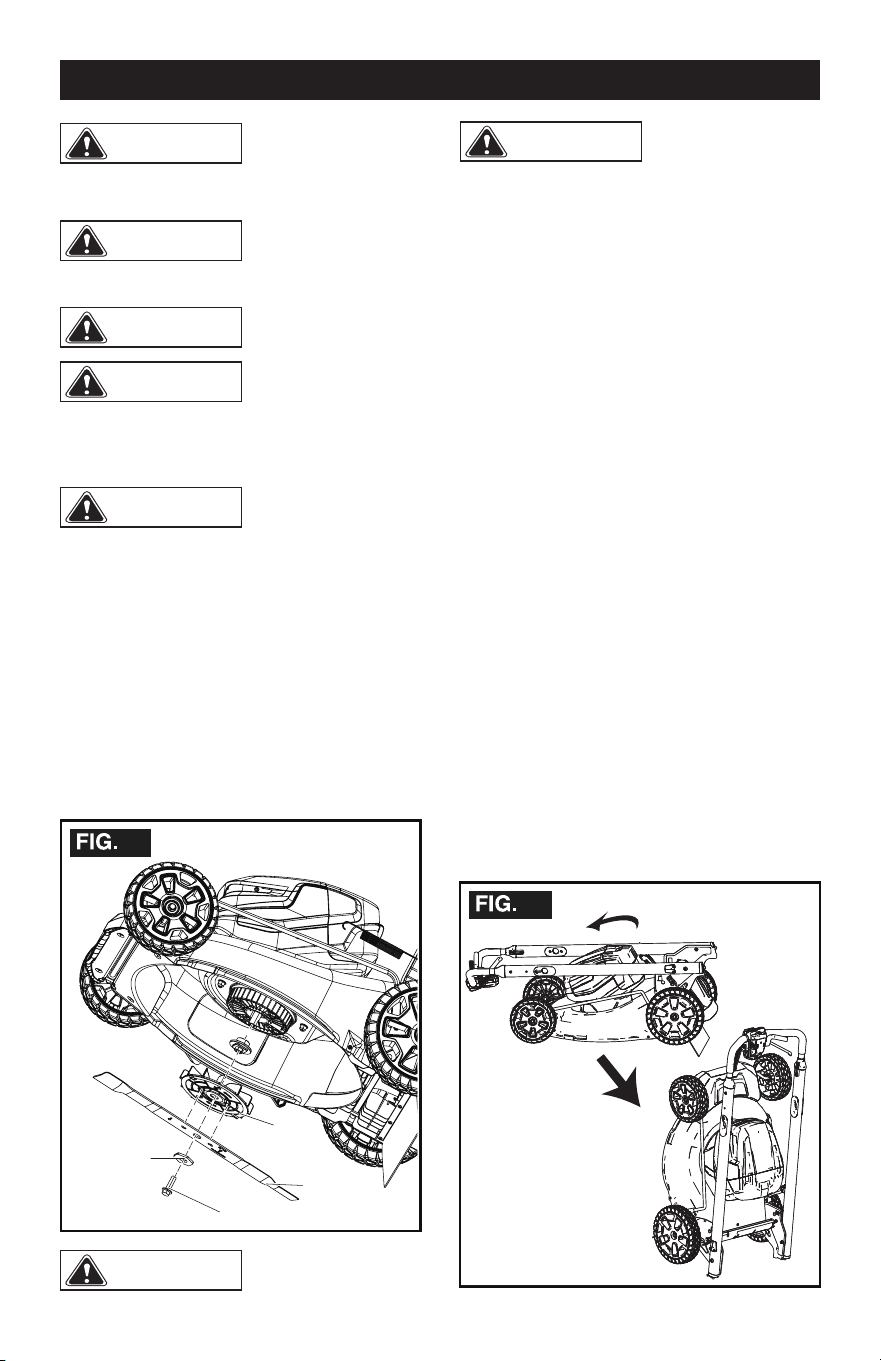
REPLACE THE BLADE
Screw
Spacer
Blade
Fan
11
WARNING
Use only approved
replacement
blades.
WARNING
Wear heavy gloves
or wind cloth
around the blade
when you touch the blade.
1. Stop the machine.
2. Make sure that the blade is fully stopped.
3. Remove the safety key and battery pack.
4. Turn the machine to its side.
5. Use a piece of wood to prevent the
movement of the blade.
6. Remove the mounting screw and spacer
with a wrench or socket.
7. Remove the blade and fan.Install the new
blade. Make sure that the arrows on the
fan engage the holes in the blade.
8. Put in the spacer and tighten the mounting screw.
9. Recommended tightening torque: 24-27
ft.lbs. 33-37 N.m.
STORE THE MACHINE
• Remove the safety key.
• Remove the battery pack(s).
• Clean the machine before storage.
• Make sure the motor is not hot when you
store the machine.
• Make sure that the machine does not have
loose or damaged parts. If it is necessary,
follow these instructions:
• Replace the damaged parts.
• Tighten the bolts.
• Speak to a person at an approved service
center.
• Store the machine in a dry area.
• Make sure that children cannot come near
the machine.
VERTICAL STORAGE
12
MANITENANCE

Page 15
MAINTENANCE
1. Remove the grass catcher.
2. Remove the battery and safety key.
3. Pull through the handle holes to fold away
the handles.
4. Lock the handles into position.
5. Stand the machine on end and make sure
that the brackets touch the oor.

Page 16
PROBLEM POSSIBLE CAUSE SOLUTION
The handle is not in
position.
The bolts are not
engaged correctly.
Adjust the height of the handle and make sure
that the bolts and nuts are aligned correctly.
The machine does
not start.
The battery capacity
is low.
Charge the battery pack.
The start handle is
defective.
Replace the start handle.
The battery key is not
put in.
Put in the battery key.
The machine cuts
grass unevenly.
The lawn is rough. Examine the mowing area.
The blade height is
not set correctly.
Move the wheels to a higher position.
The machine does
not mulch correctly.
Wet grass clippings
are attached to the
deck.
Wait until the grass dries before mowing.
The mulch plug is
missing.
Install the mulch plug.
The machine is
hard to push.
The grass is too tall,
or the blade height is
too low.
Increase the blade height.
The grass catcher
and the blade drags
in thick grass.
Empty the grass clippings from the grass
catcher.
There is a high
vibration in the
machine.
The blade is
unbalanced and worn.
Replace the blade.
The motor shaft is
bent.
1. Stop the motor.
2. Remove the safety key and battery pack.
3.Disconnect the power source.
4. Inspect for damage.
5. Repair the machine before you start it again.
The machine stops
during mowing.
The blade height is
too low.
Increase the blade height.
The battery pack is
out of power.
Charge the battery pack.
Grass clippings are
attached to the deck
or the blade.
Remove the battery pack and check the deck.
Operation
temperature of the
machine is too high.
Cool the machine.
TROUBLESHOOTING

Page 17
NOTE

SAVE YOUR RECEIPTS
THIS WARRANTY IS VOID WITHOUT THEM
80V BRUSHLESS 21" MOWER
WARRANTY
4-YEAR LIMITED WARRANTY
This MASTERFORCE™ brand power tool carries our famous No Hassle 4-Year Limited
Warranty to the original purchaser. If, during normal use, this MASTERFORCE™ power
tool breaks or fails due to a defect in material or workmanship within four (4) years from
the date of original purchase, simply bring the tool with the original sales receipt back
to your nearest MENARDS
®
retail store. At its discretion, MASTERFORCE™ agrees
to have the tool or any defective part(s) repaired or replaced with the same or similar
MASTERFORCE™ product or part free of charge, within the stated warranty period,
when returned by the original purchaser with original sales receipt. Not withstanding the
foregoing, this limited warranty does not cover any damage that has resulted from abuse
or misuse of the Merchandise. This warranty: (1) excludes expendable parts including
but not limited to blades, brushes, belts, bits, light bulbs, and/or batteries; (2) shall be
void if this tool is used for commercial and/or rental purposes; and (3) does not cover any
losses, injuries to persons/property or costs. This warranty does give you specific legal
rights and you may have other rights, which vary from state to state. Be careful, tools
are dangerous if improperly used or maintained. Seller’s employees are not qualified
to advise you on the use of this merchandise. Any oral representation(s) made will not
be binding on seller or its employees. The rights under this limited warranty are to the
original purchaser of the merchandise and may not be transferred to any subsequent
owner. This limited warranty is in lieu of all warranties, expressed or implied including
warranties or merchantability and fitness for a particular purpose. Seller shall not be
liable for any special, incidental, or consequential damages. The sole exclusive remedy
against the seller will be for the replacement of any defects as provided herein, as long
as the seller is willing or able to replace this product or is willing to refund the purchase
price as provided above. For insurance purposes seller is not allowed to demonstrate
any of these power tools for you.
For questions / comments, technical assistance or repair parts -
Please call toll free at: 1-844-678-7423 (M-F 8am - 6pm)
Page 18

© 2020 Menard, Inc., Eau Claire, WI 54703 8/2023