
Technical Support and E-Warranty Certificate www.vevor.com/support
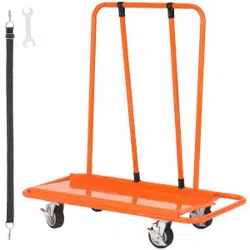
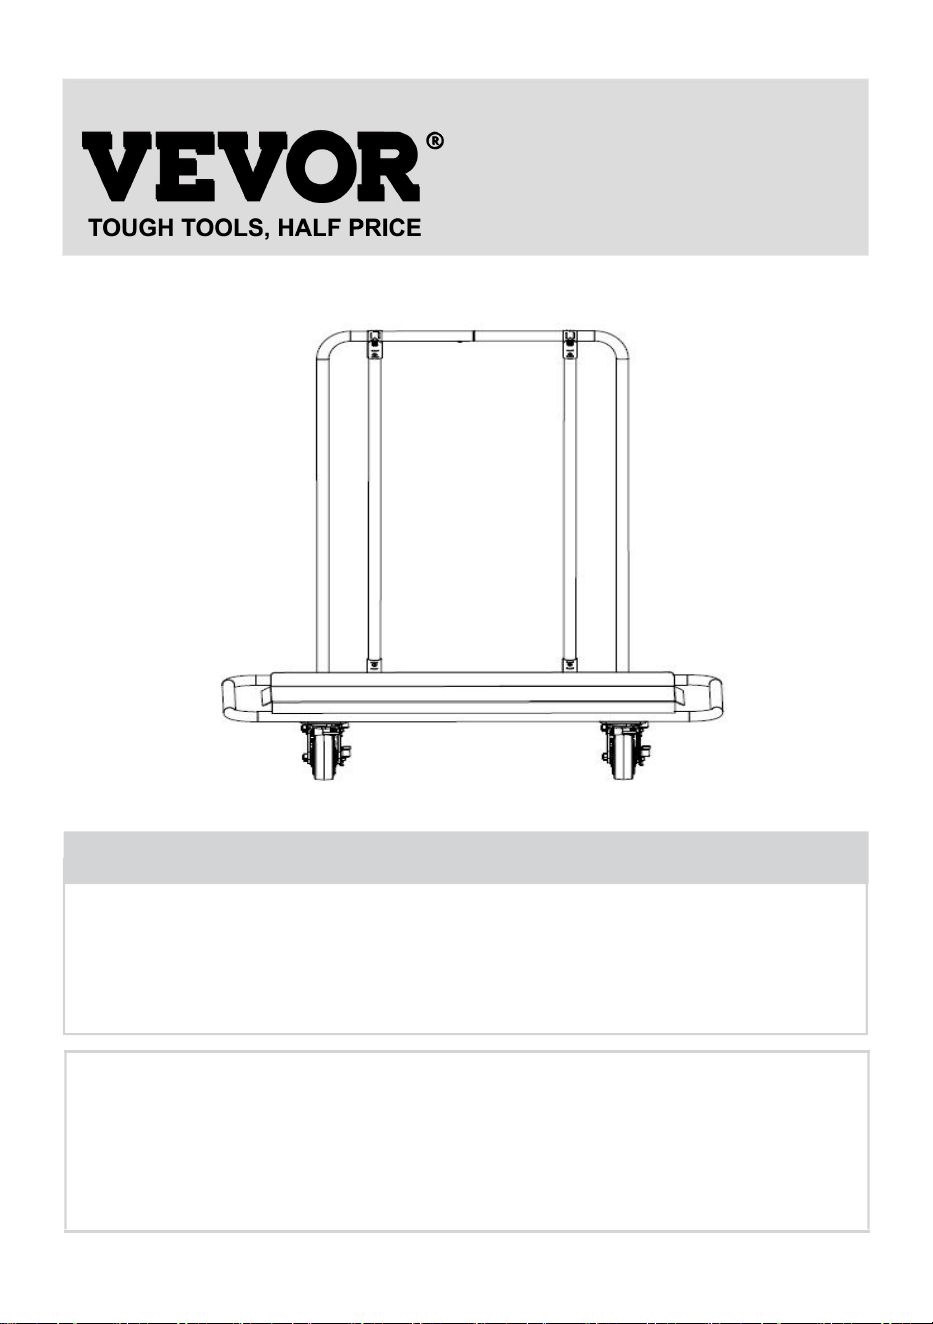
PANEL CARTS
USER MANUAL
MODEL:PW1360
We continue to be committed to provide you tools with competitive price.
"Save Half", "Half Price" or any other similar expressions used by us only represents an
estimate of savings you might benefit from buying certain tools with us compared to the major
top brands and does not necessarily mean to cover all categories of tools offered by us. You
are kindly reminded to verify carefully when you are placing an order with us if you are
actually saving half in comparison with the top major brands.

- 1 -
MODEL:PW1360
Have product questions? Need technical support? Please feel free to
contact us:
Technical Support and E-Warranty Certificate
www.vevor.com/support
NEED HELP? CONTACT US!
This is the original instruction, please read all manual instructions
carefully before operating. VEVOR reserves a clear interpretation of our
user manual. The appearance of the product shall be subject to the
product you received. Please forgive us that we won't inform you again if
there are any technology or software updates on our product.
PANEL CARTS

- 2 -
SAFETY INSTRUCTION AND PRECAUTIONS
WARNING:
Read this material before using this product. Failure to do so can result in
serious injury.
Assembly precautions
1.Assemble only according to these instructions. Improper assembly can
create hazards.
2. Wear ANSI-approved safety goggles and heavy-duty work gloves during
assembly.
3.Keep assembly area clean and well lit.
4.Keep bystanders out of the area during assembly.
5.Do not assemble when tired or when under the influence of alcohol,
drugs or medication.
6.Weight capacity and other product capabilities apply to properly and
completely assembled product only.
7.Assemble on a flat, level, hard and smooth surface capable of safely
supporting a fully loaded panel cart.
Use precautions
TO PREVENT SERIOUS INJURY AND DEATH FROM TIPPING:
1. DO NOT SIT, STAND OR CLIMB ON THIS ITEM.
2. This product is not a toy. Do not allow children to play with or near this
item.
3. Do not exceed weight capacities, evenly distributed from bottom up. Be
aware of dynamic loading! Sudden load movement may briefly create
excess load causing product failure.
4. Use only on a flat, level, hard and smooth surface capable of safely
supporting a fully loaded panel cart.
5. Use as intended only. To prevent tipping, push/pull using supplied
handle only. Do not lift while loaded.
6. Inspect before every use; do not use if parts are loose or damaged.
SAVE THESE INSTRUCTIONS
- 3 -
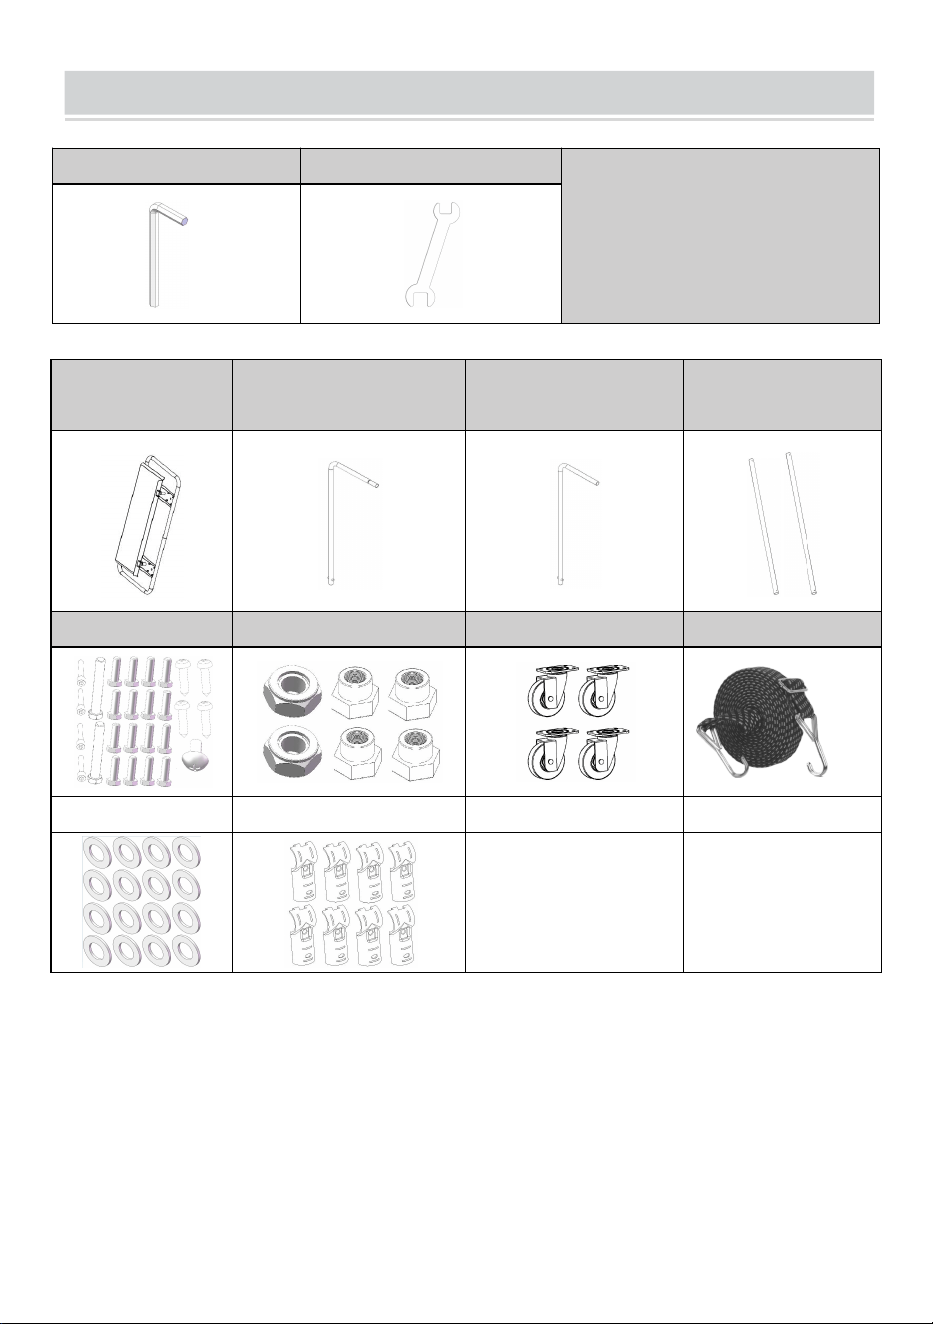
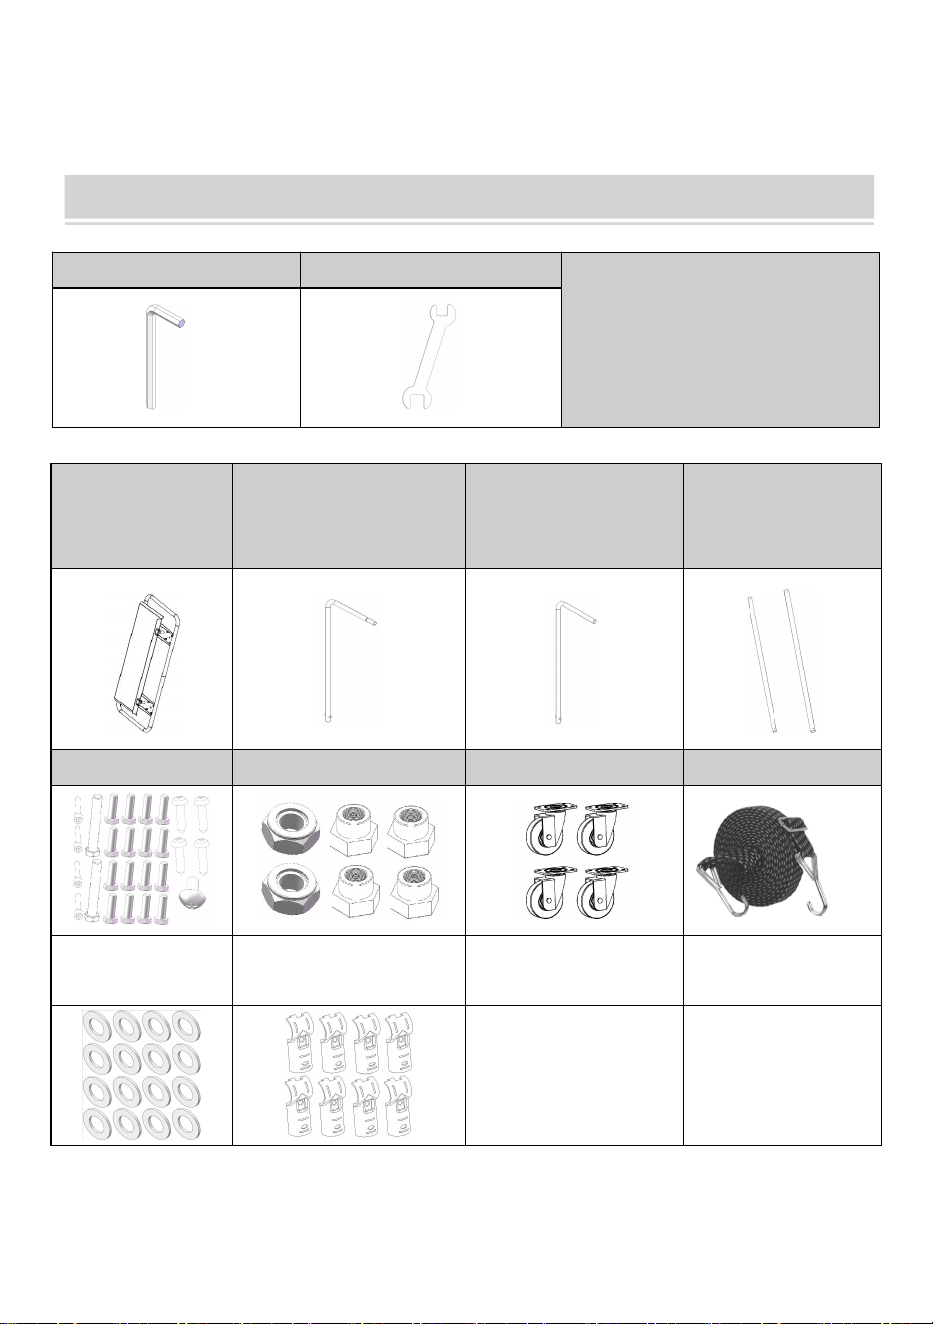
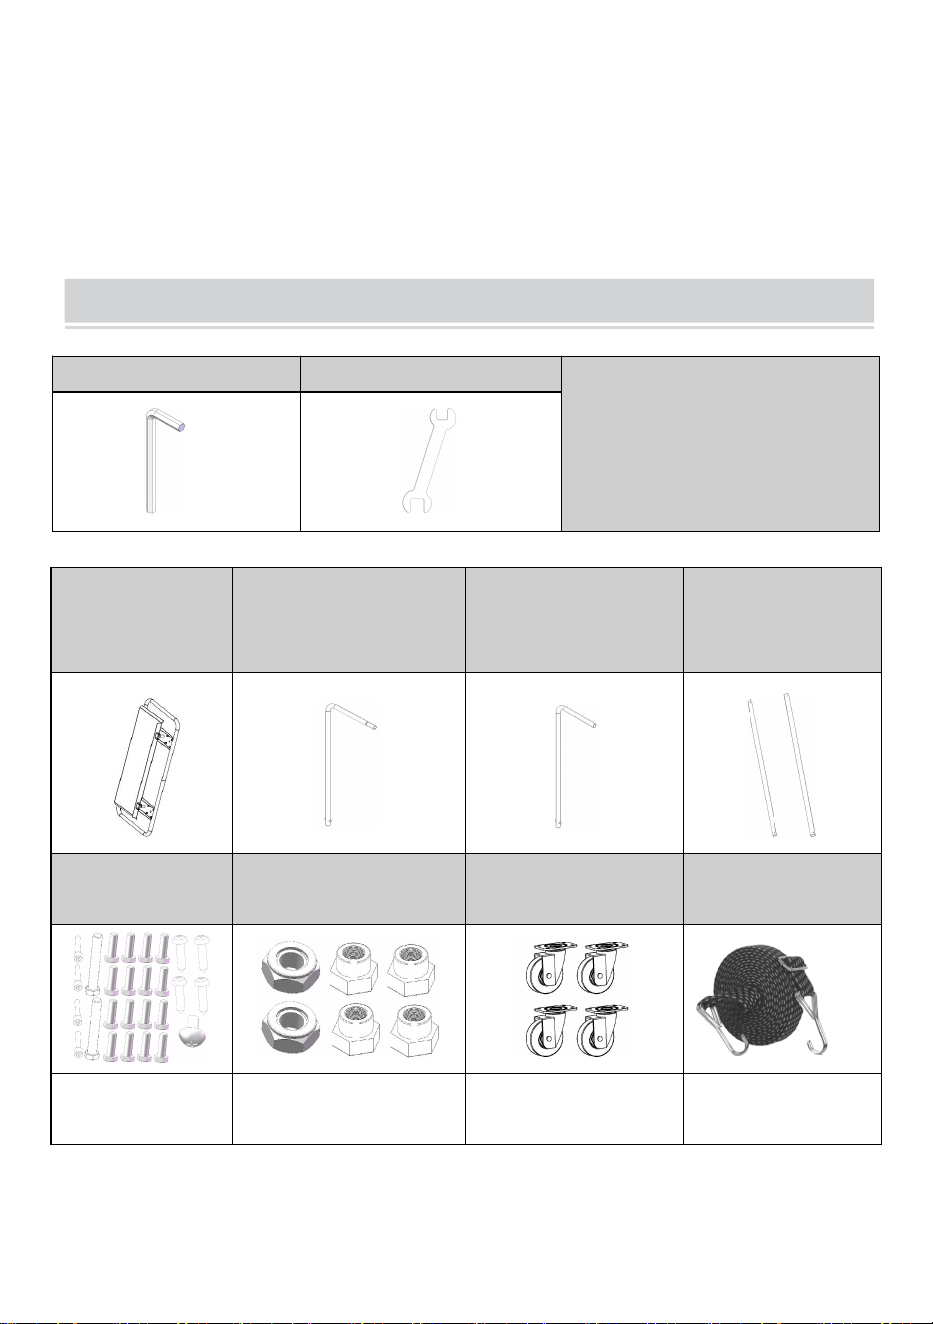
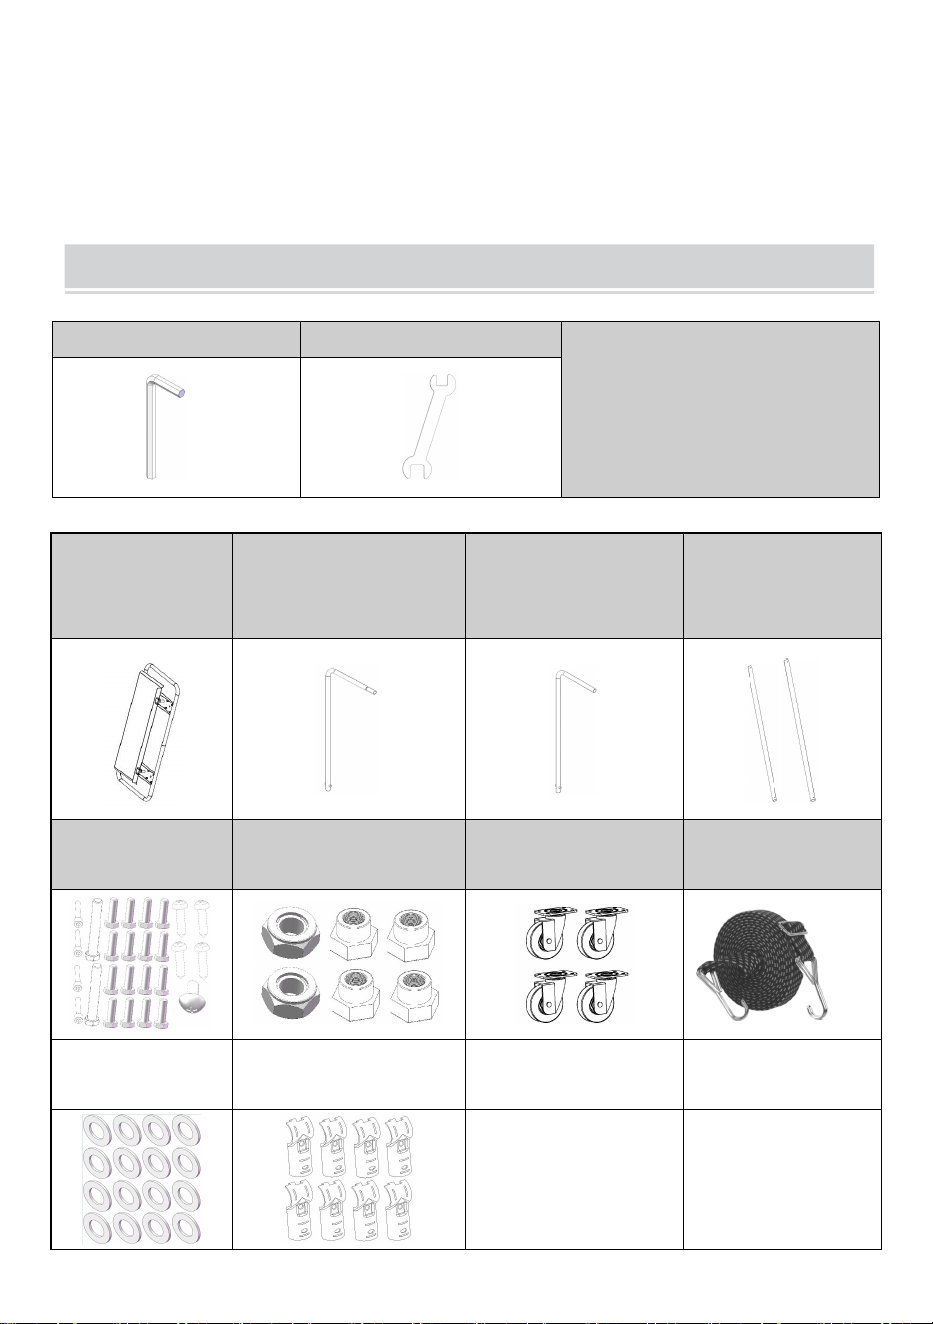
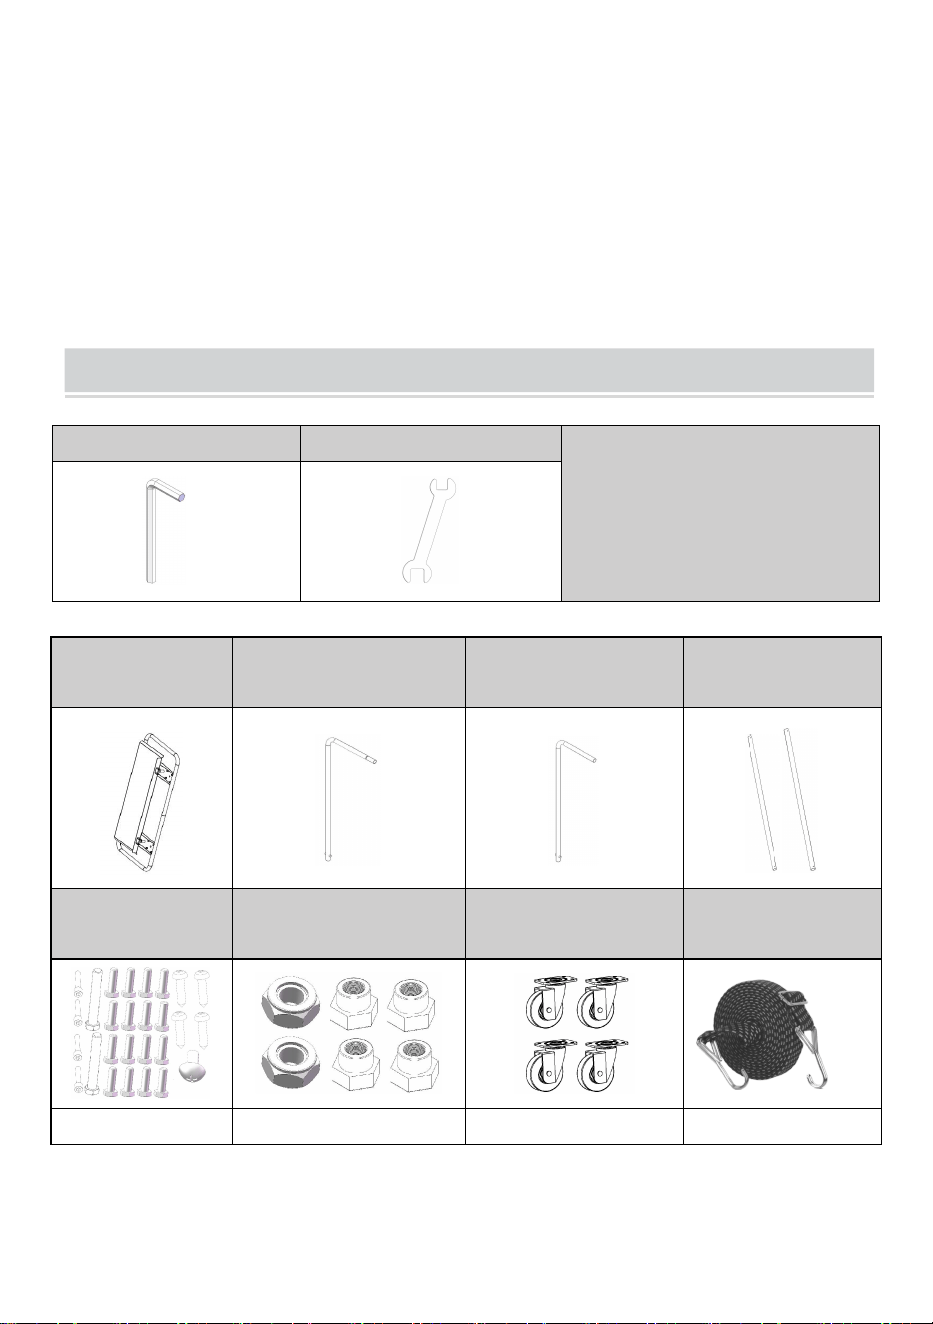
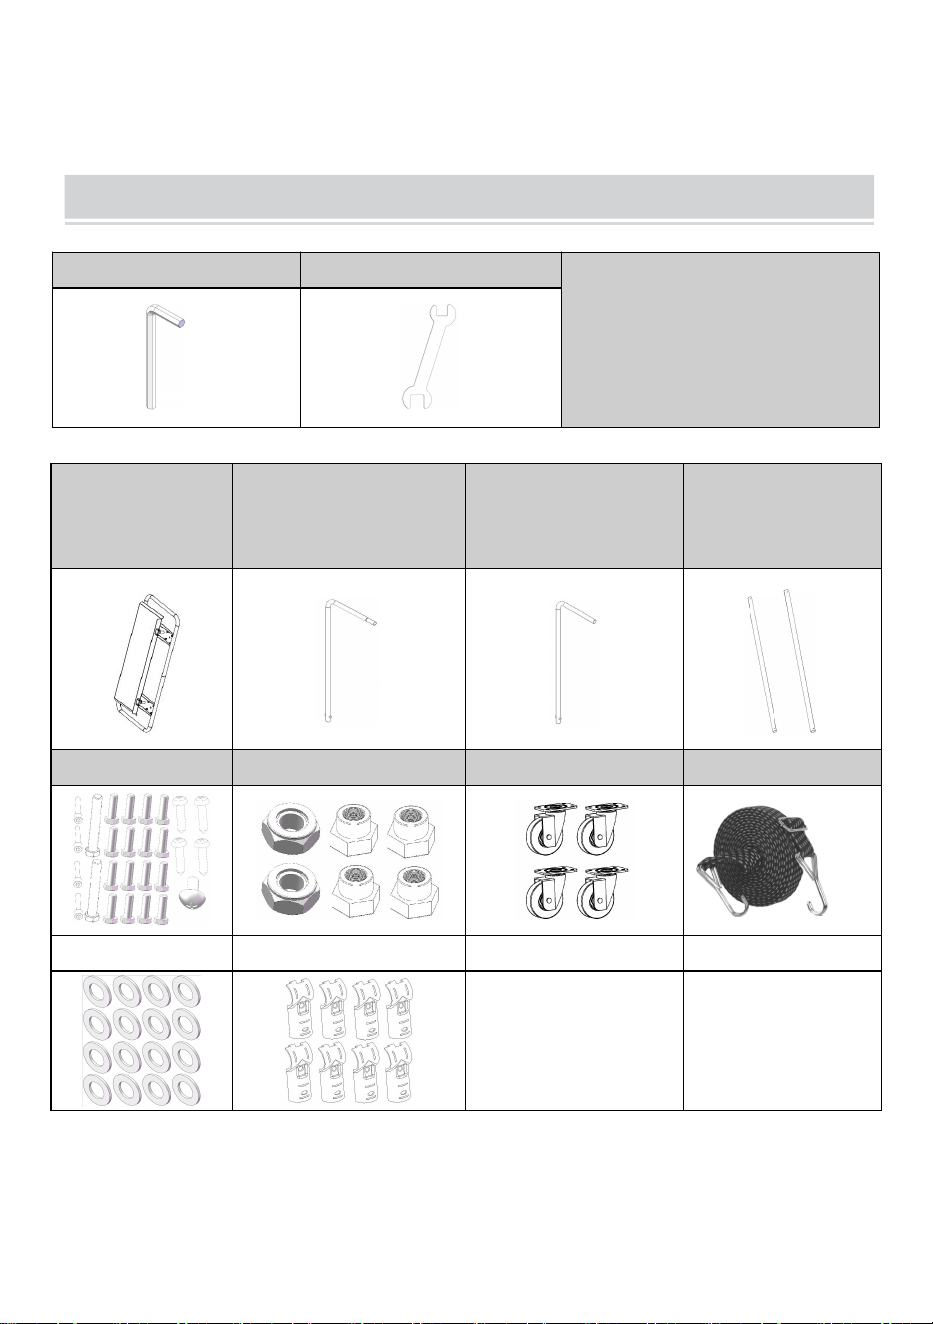
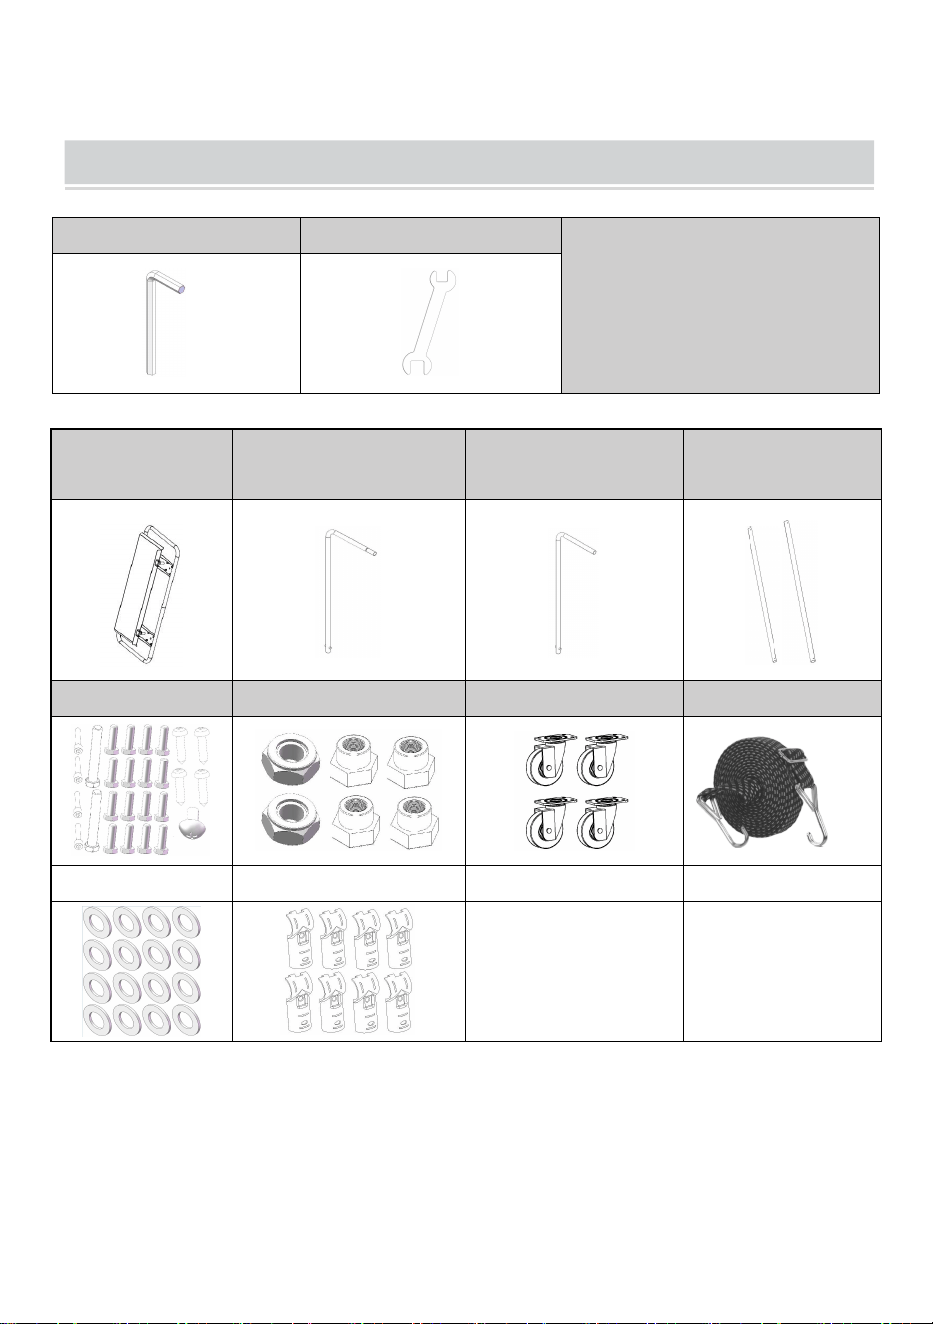
TOOL REQUIRED FOR INSTALLATION
1-Trolley base
2-
Left armrest
3-
Right armrest
4-
Handrail
connecting rod
5-Screw
6-Nuts
7-SwivelCaster
8-Polyester strap
9-Washer
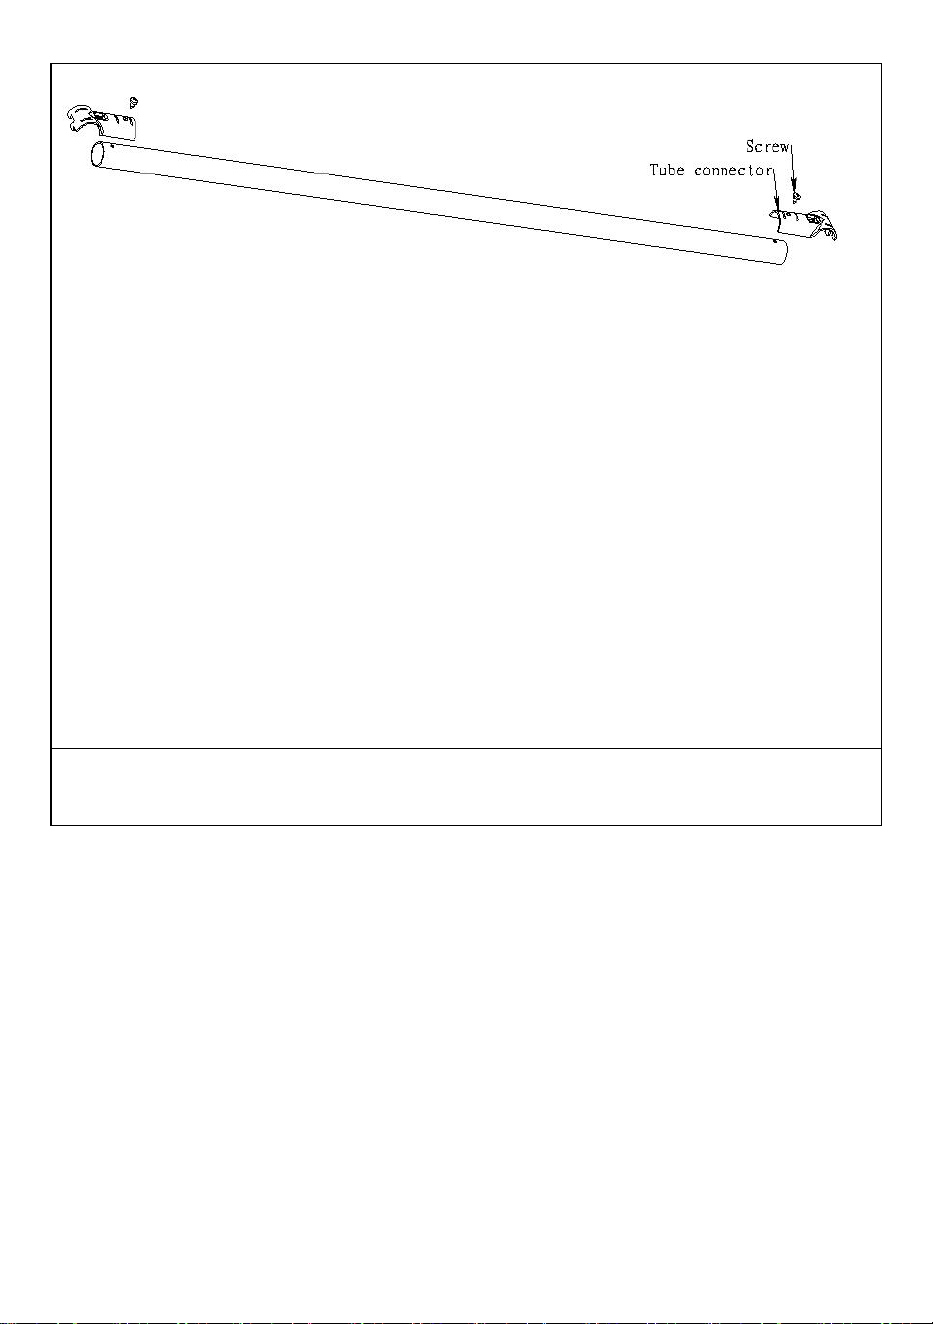
10-Tube connector
Allen key
Wrench
Note: The tools included with
this product.

- 4 -
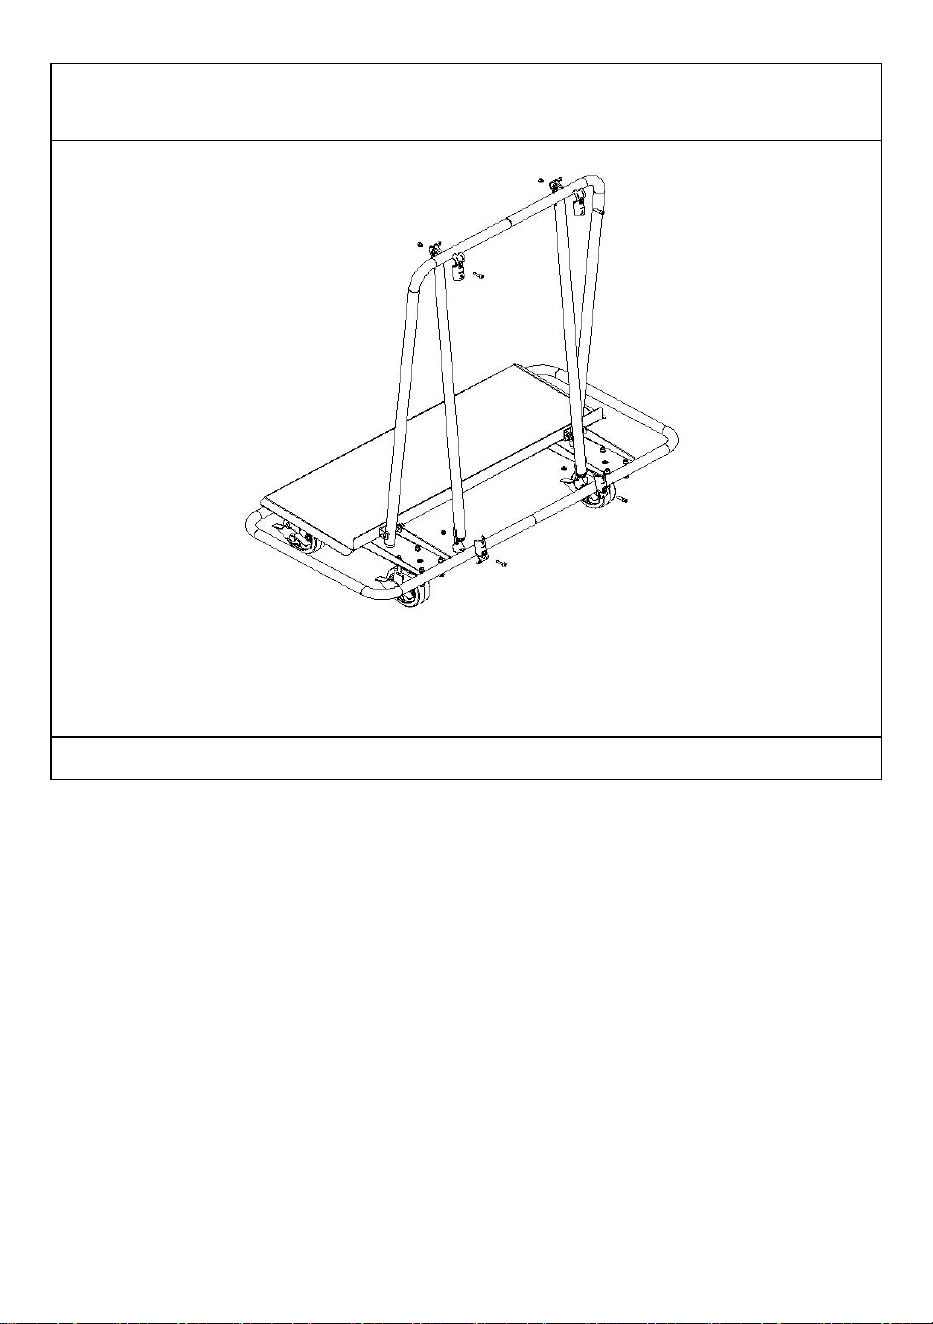
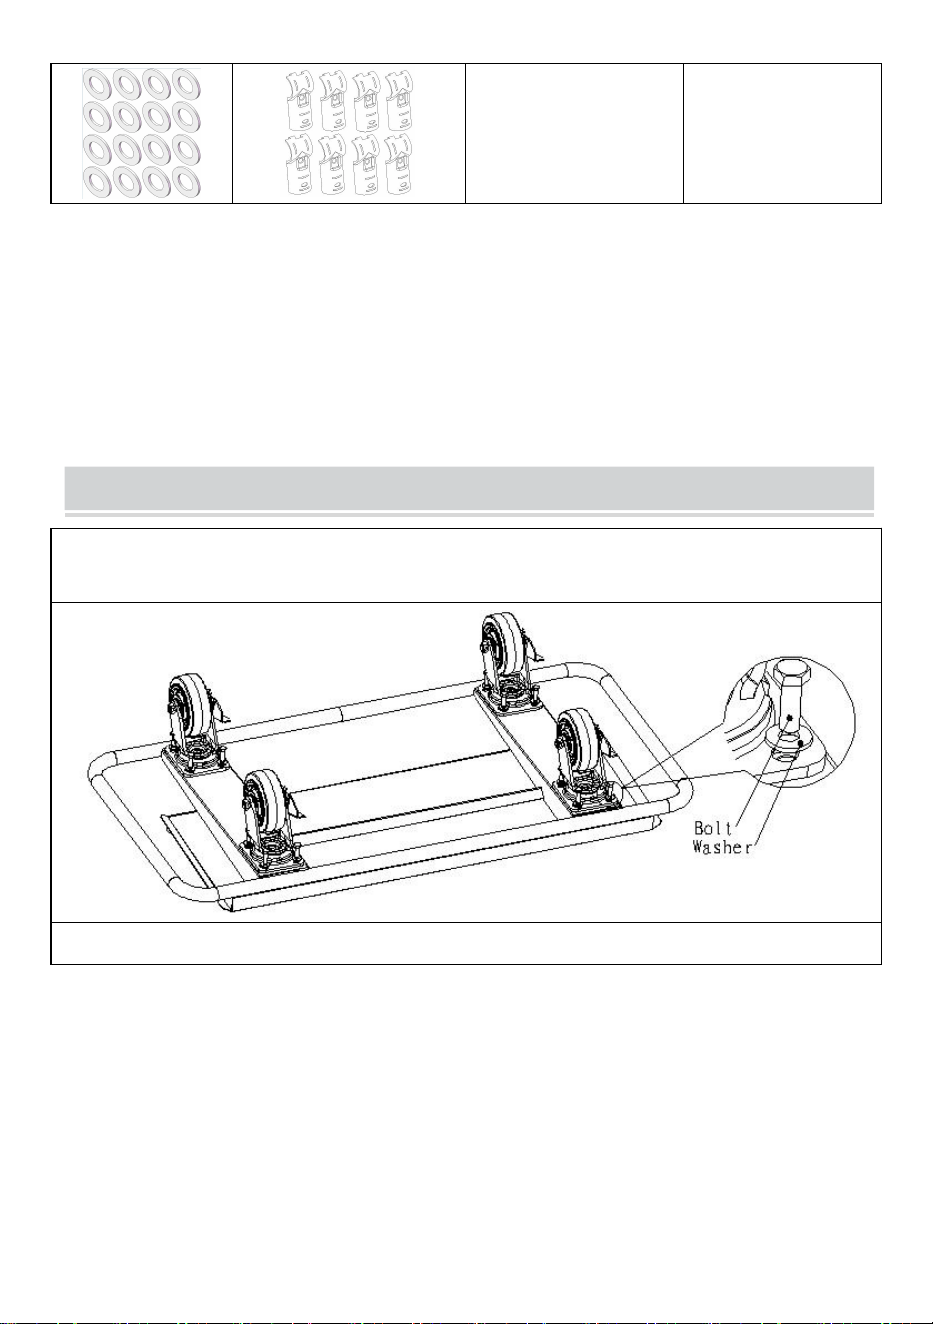
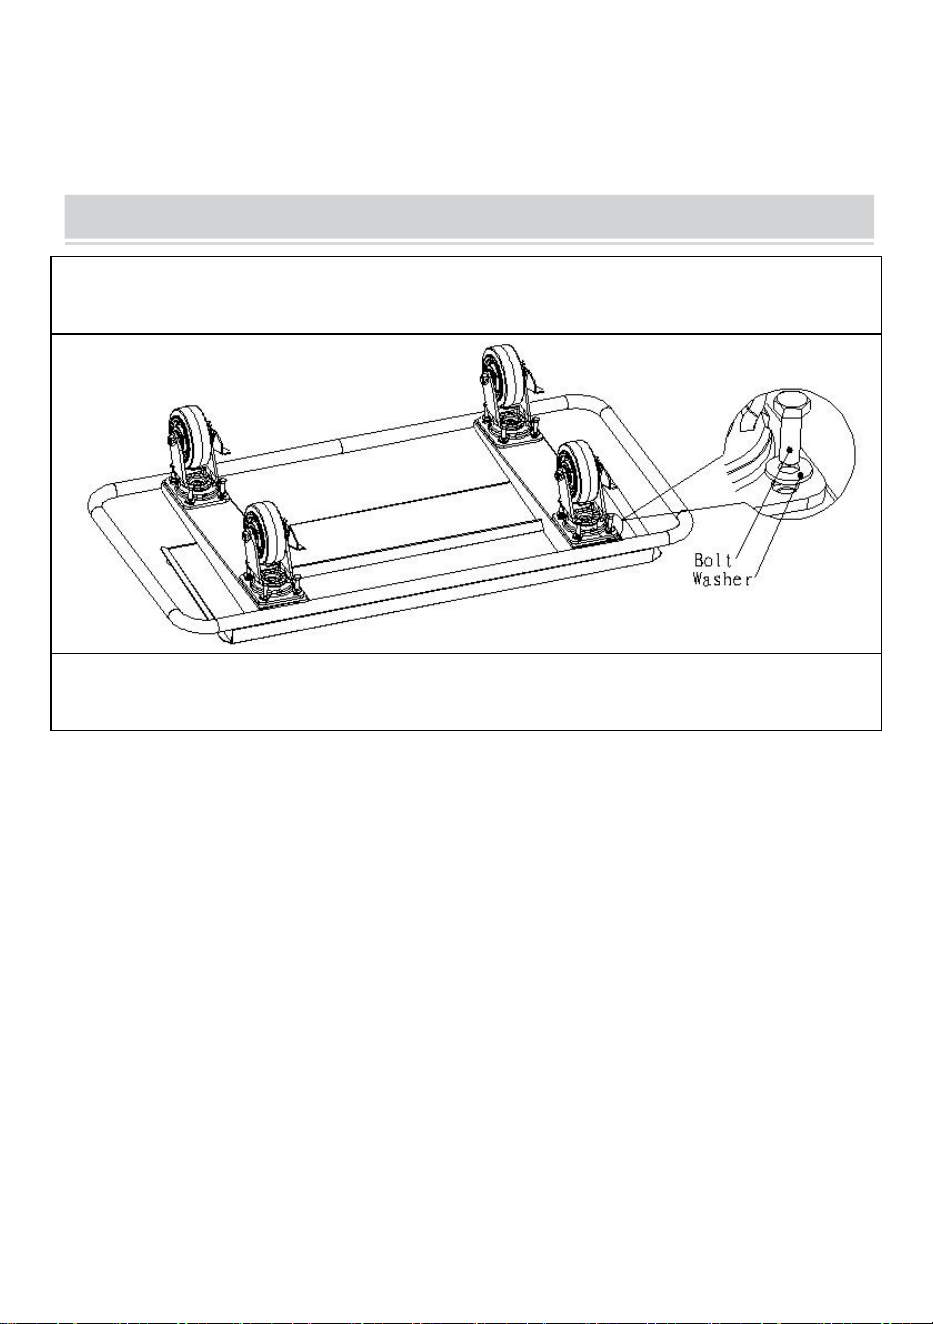
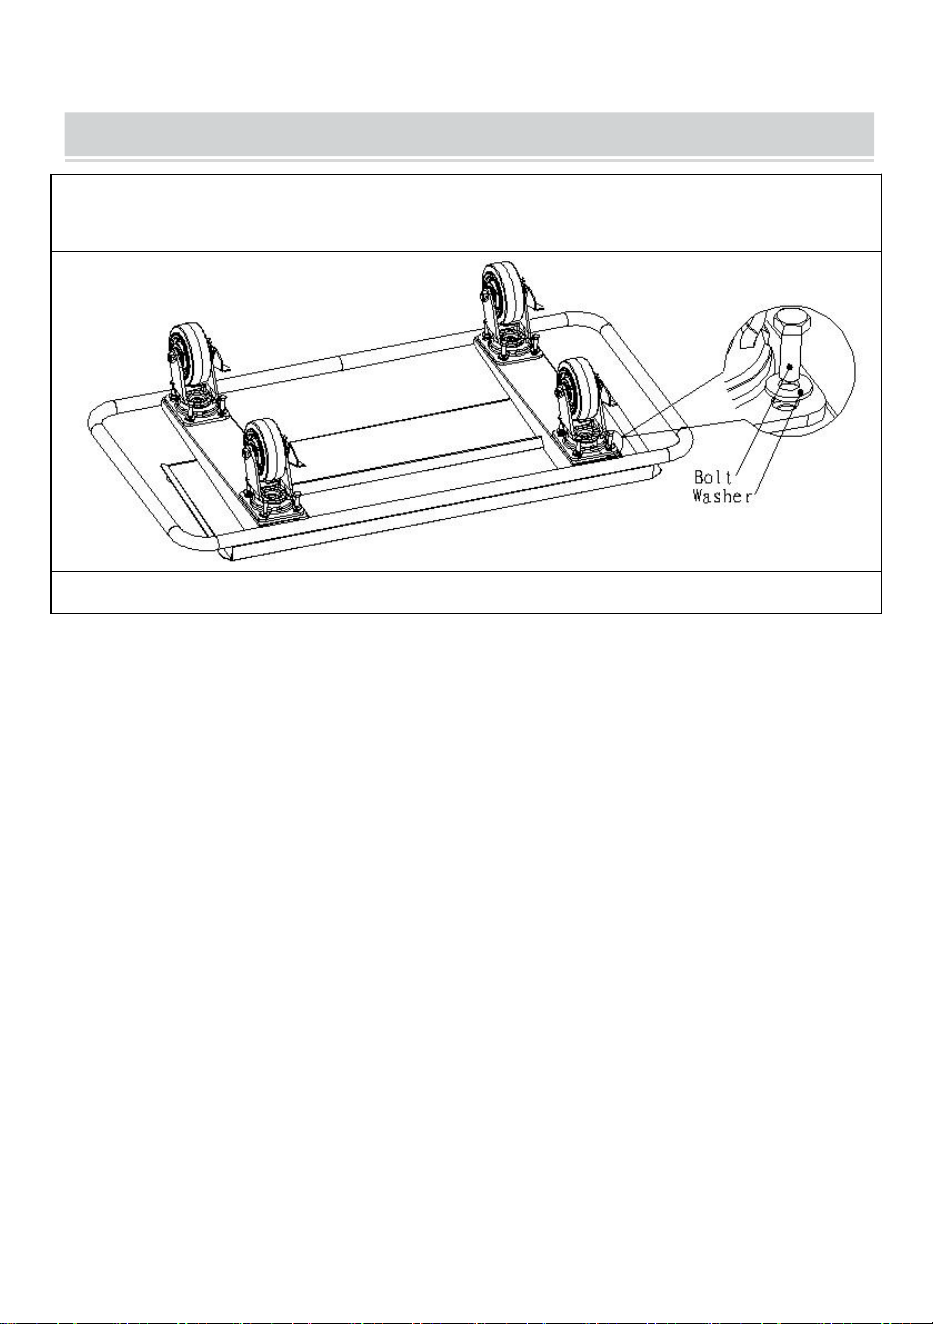
ASSEMBLY
1.Install the wheels from the frame facing up and strengthen them with M8x20
bolts and washers.
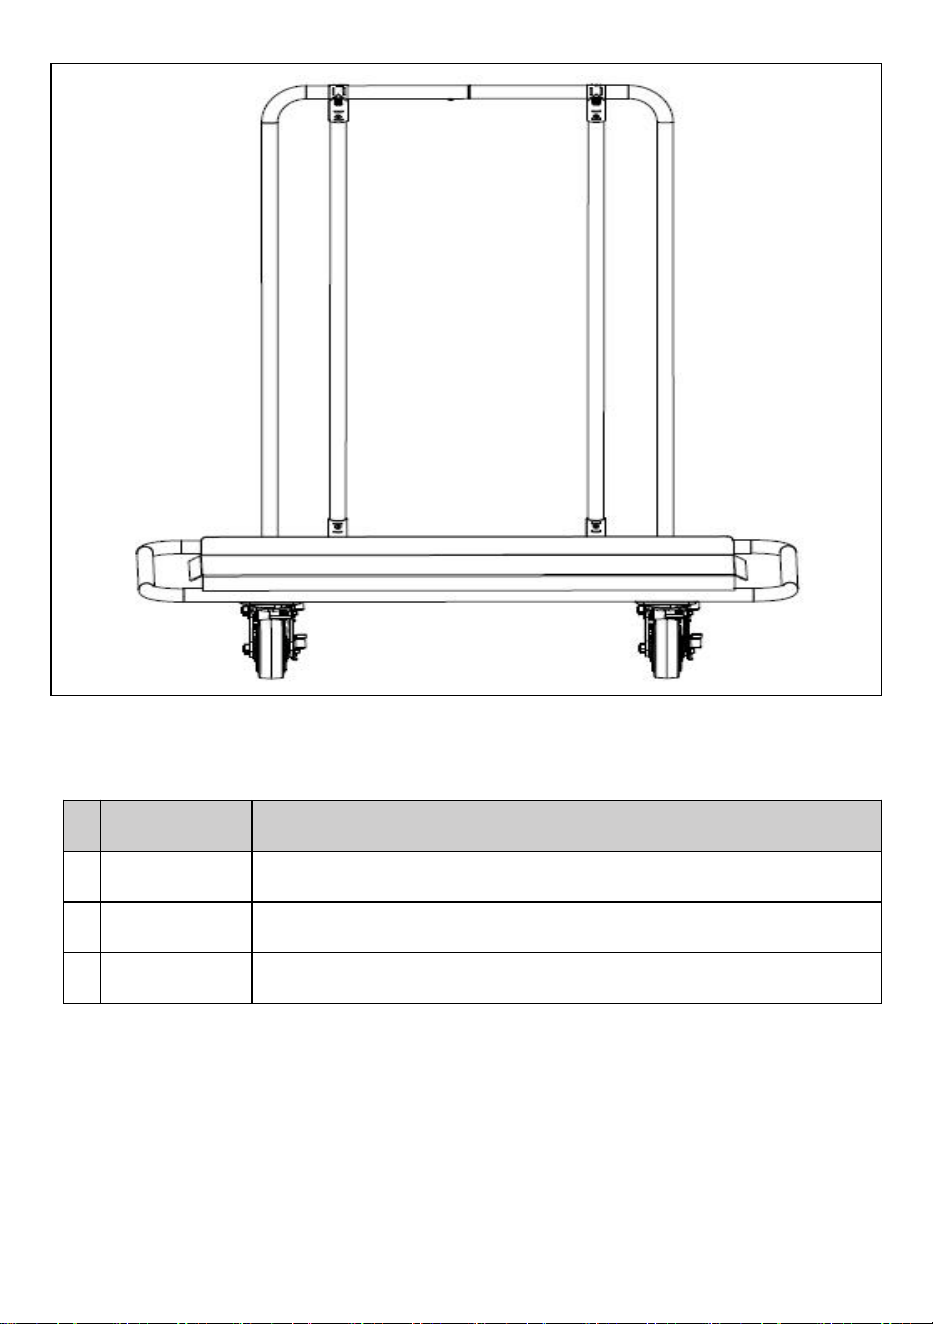
2.Install the one side tube connector on the connect tube with the screws as shown.
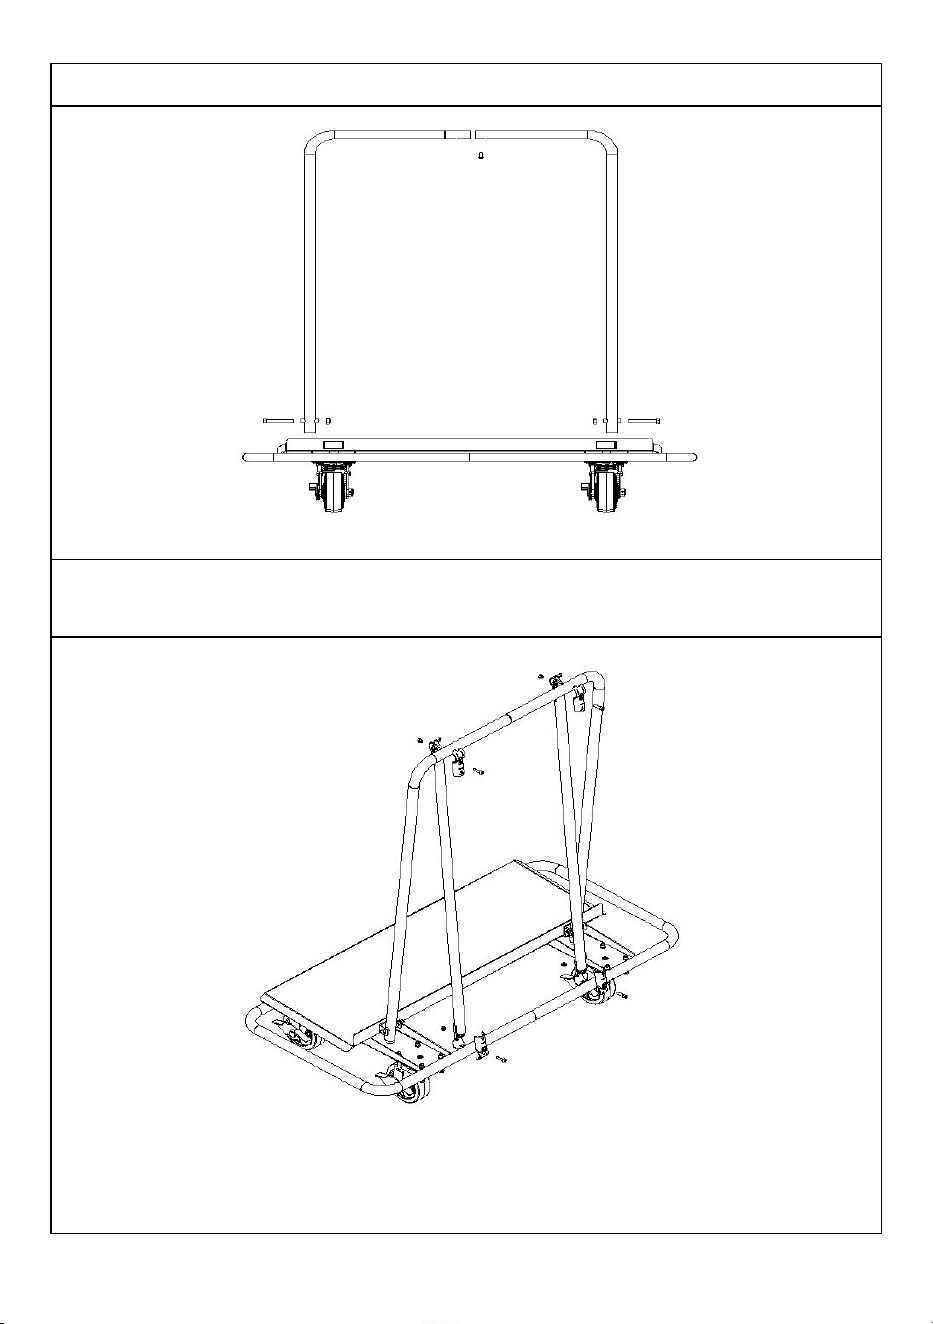
- 5 -
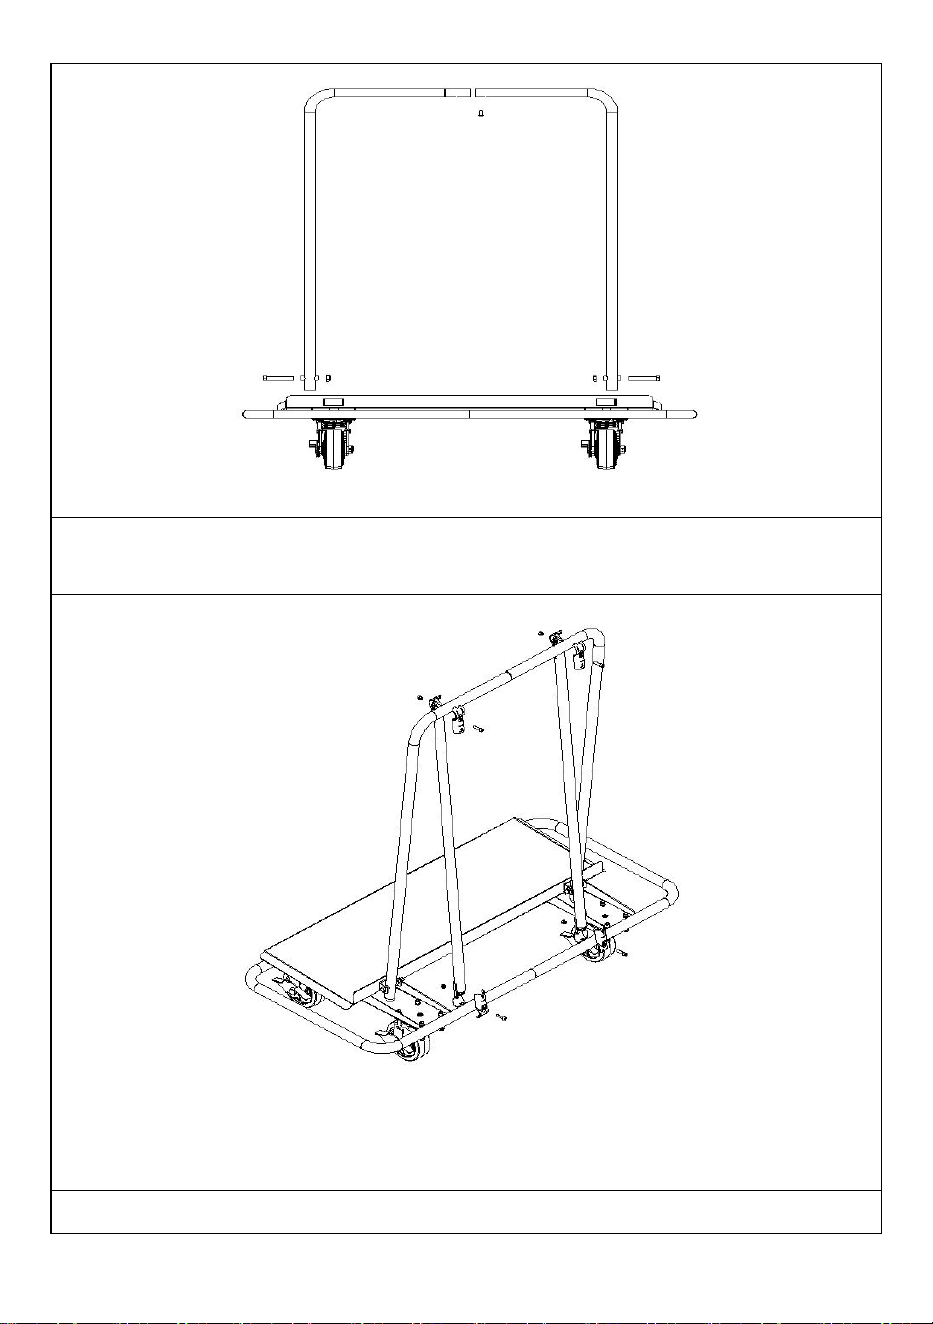
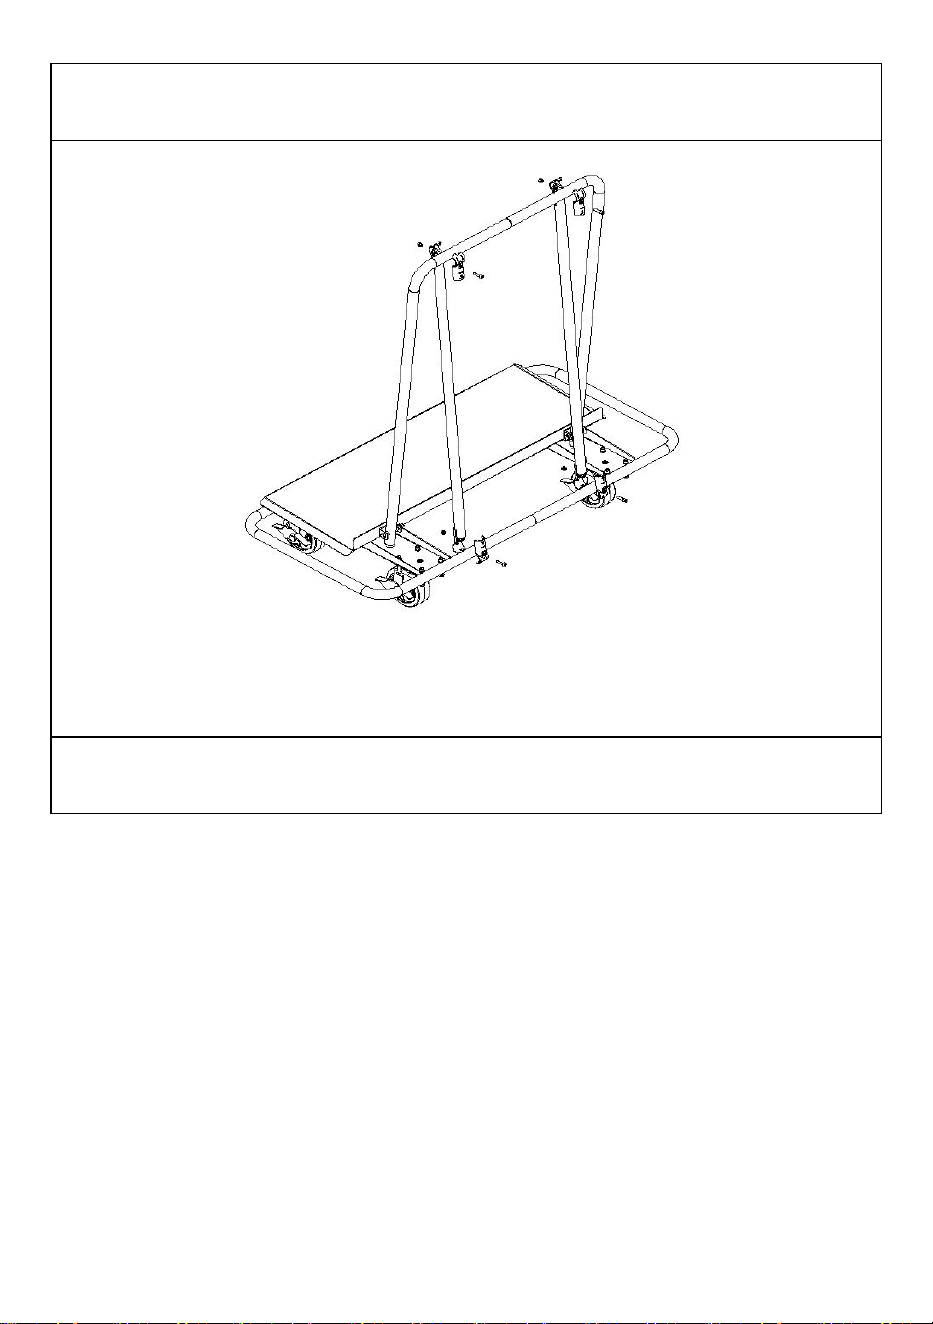
3.Install the armrest on the base and install the screws.
4.Connect the two connect tubes between the armrest and the base and lock them
with the other side tube connectors and screws.
- 6 -
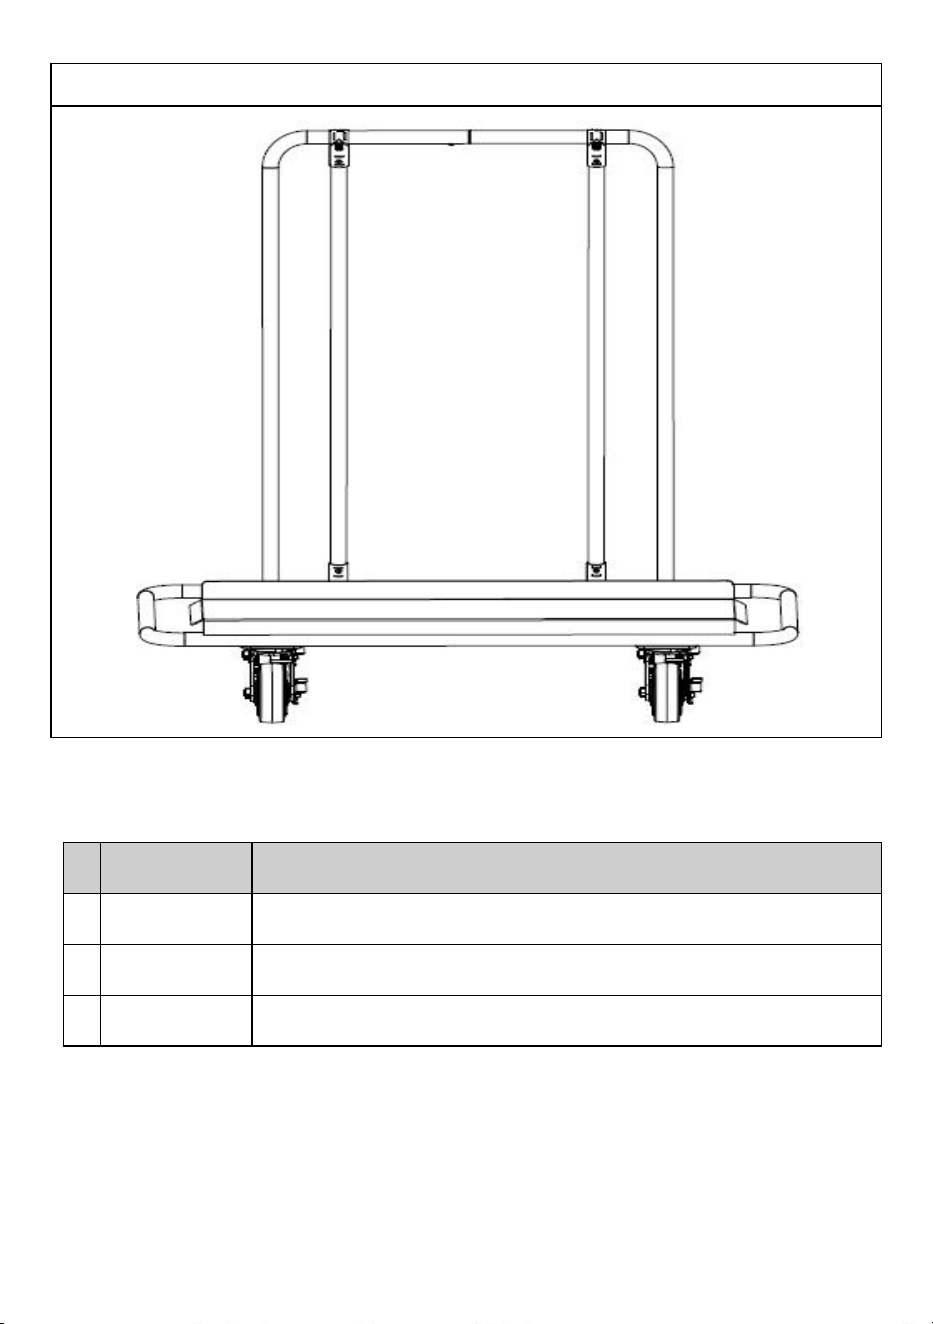
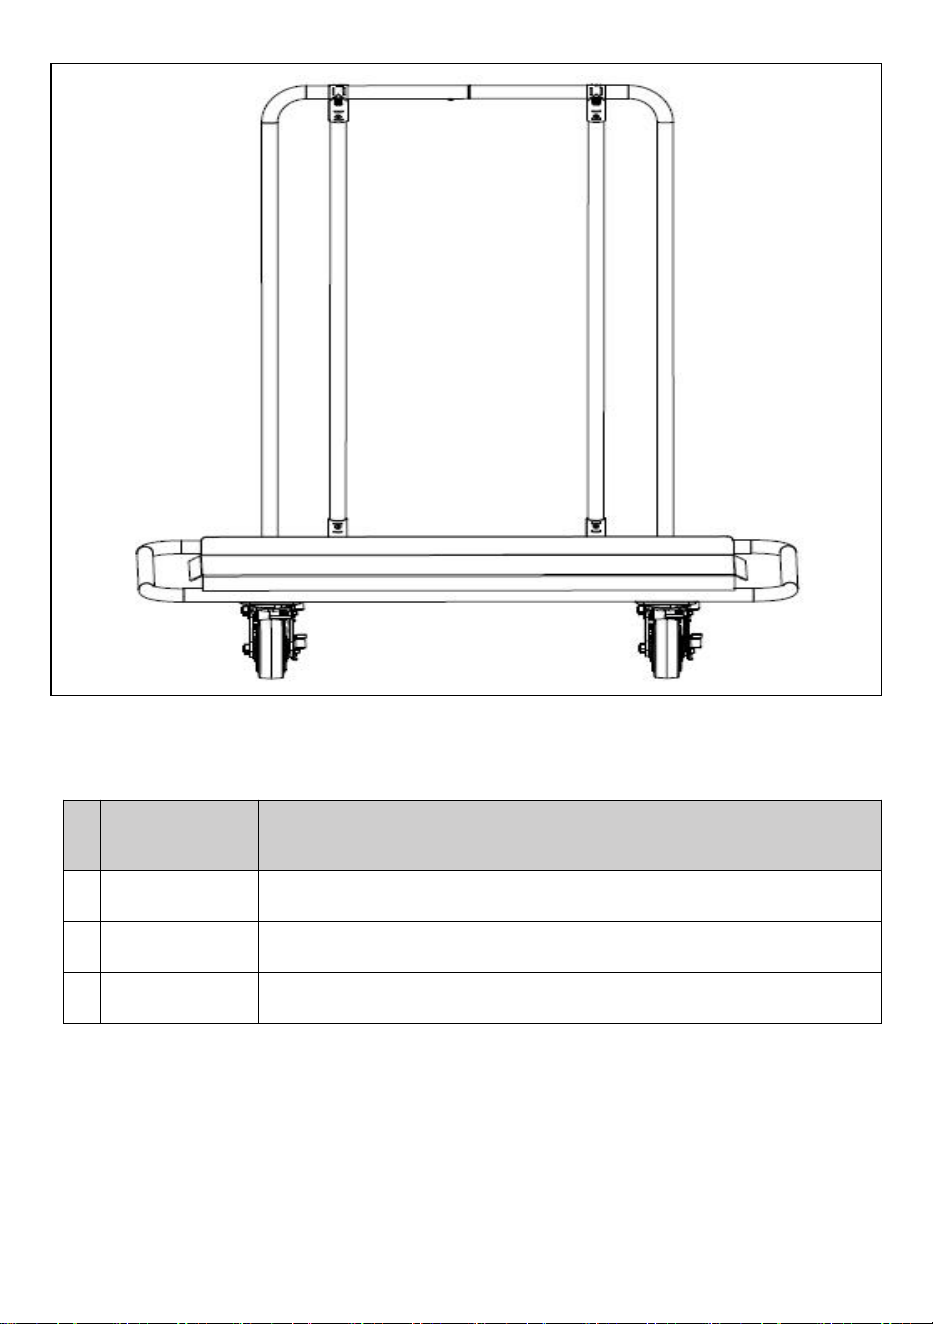
5.Assembly completed.
Items
Description
1
Name
Panel carts
2
Model
PW1360
3
Parameter
Load(Max):3000LBS , Wheel:5"


- 2 -
Technique Certificat d'assistance et de garantie électronique
www.vevor.com/support
CHARIOTS À PANNEAUX
MANUEL D'UTILISATION
MODÈLE: PW1360
We continue to be committed to provide you tools with competitive price.
"Save Half", "Half Price" or any other similar expressions used by us only represents an
estimate of savings you might benefit from buying certain tools with us compared to the major
top brands and does not necessarily mean to cover all categories of tools offered by us. You
are kindly reminded to verify carefully when you are placing an order with us if you are
actually saving half in comparison with the top major brands.

- 1 -
MODÈLE: PW1360
Have product questions? Need technical support? Please feel free to
contact us:
Technical Support and E-Warranty Certificate
www.vevor.com/support
NEED HELP? CONTACT US!
This is the original instruction, please read all manual instructions
carefully before operating. VEVOR reserves a clear interpretation of our
user manual. The appearance of the product shall be subject to the
product you received. Please forgive us that we won't inform you again if
there are any technology or software updates on our product.
PANEL CARTS

- 2 -
SAFETY INSTRUCTION AND PRECAUTIONS
AVERTISSEMENT:
Lisez ce document avant d'utiliser ce produit. Le non-respect de ces
instructions peut entraîner des blessures graves.
Précautions de montage
1. Assembler uniquement selon ces instructions. Un assemblage incorrect
peut créer des dangers.
2. Portez des lunettes de sécurité approuvées ANSI et des gants de travail
robustes pendant l'assemblage.
3. Gardez la zone de montage propre et bien éclairée.
4. Gardez les spectateurs hors de la zone pendant l’assemblage.
5. Ne montez pas lorsque vous êtes fatigué ou sous l'influence de l'alcool,
de drogues ou de médicaments.
6. La capacité de poids et les autres capacités du produit s'appliquent
uniquement au produit correctement et complètement assemblé.
7. Assemblez sur une surface plane, de niveau, dure et lisse capable de
supporter en toute sécurité un chariot à panneaux entièrement chargé .
Précautions d'emploi
POUR ÉVITER LES BLESSURES GRAVES ET LA MORT RÉSULTANT
DU BASCULEMENT :
1. NE PAS S'ASSEOIR, SE TENIR DEBOUT OU GRIMPER SUR CET
ARTICLE.
2. Ce produit n'est pas un jouet. Ne laissez pas les enfants jouer avec ou à
proximité de cet article.
3. Ne pas dépasser les limites de poids, réparties uniformément de bas en
haut. Attention aux charges dynamiques ! Un mouvement de charge
soudain peut brièvement créer une charge excessive entraînant une
défaillance du produit.
4. Utiliser uniquement sur une surface plane, horizontale, dure et lisse
capable de supporter en toute sécurité un chariot à panneaux

- 3 -
entièrement chargé .
5. Utiliser uniquement comme prévu. Pour éviter tout basculement,
poussez/tirez uniquement à l'aide de la poignée fournie. Ne pas soulever
lorsqu'il est chargé.
6. Inspectez avant chaque utilisation ; ne pas utiliser si des pièces sont
desserrées ou endommagées.
CONSERVEZ CES INSTRUCTIONS
TOOL REQUIRED FOR INSTALLATION
2-Base de
chariot
2-
Accoudoir gauche
3 -
Accoudoir droit
4 -
Bielle de main
courante
5-Vis
6- Noix
7 - Roulette
pivotante
8- Sangle en
polyester
9-Rondelle
Connecteur à 10
tubes
Clé Allen
Clé
Remarque : les outils inclus
avec ce produit.

- 4 -
ASSEMBLY
1.Installez les roues du cadre vers le haut et renforcez-les avec des boulons
M8x20 et des rondelles .
2. Installez le connecteur de tube d'un côté sur le tube de connexion avec les vis comme
indiqué .
- 5 -
3. Installez l
’
accoudoir sur la base et installez les vis.
- 6 -
4. Connectez les deux tubes de connexion entre l'accoudoir et la base et
verrouillez-les avec les autres connecteurs de tube latéraux et les vis.
5 .Assemblage terminé.

- 7 -
Articles
Description
1
Nom
Chariots à panneaux
2
Modèle
PW1360
3
Paramètre
Charge (max.) : 3 000 lb, roue : 5 po


- 2 -
Technisch Support und E-Garantie-Zertifikat www.vevor.com/support
PLATTENWAGEN
BENUTZERHANDBUCH
MODELL: PW1360
We continue to be committed to provide you tools with competitive price.
"Save Half", "Half Price" or any other similar expressions used by us only represents an
estimate of savings you might benefit from buying certain tools with us compared to the major
top brands and does not necessarily mean to cover all categories of tools offered by us. You
are kindly reminded to verify carefully when you are placing an order with us if you are
actually saving half in comparison with the top major brands.

- 1 -
MODELL: PW1360
Have product questions? Need technical support? Please feel free to
contact us:
Technical Support and E-Warranty Certificate
www.vevor.com/support
NEED HELP? CONTACT US!
This is the original instruction, please read all manual instructions
carefully before operating. VEVOR reserves a clear interpretation of our
user manual. The appearance of the product shall be subject to the
product you received. Please forgive us that we won't inform you again if
there are any technology or software updates on our product.
PANEL CARTS

- 2 -
SAFETY INSTRUCTION AND PRECAUTIONS
WARNUNG:
Lesen Sie dieses Material, bevor Sie dieses Produkt verwenden.
Andernfalls kann es zu schweren Verletzungen kommen.
Vorsichtsmaßnahmen bei der Montage
1. Nur gemäß dieser Anleitung zusammenbauen. Unsachgemäße
Montage kann Gefahren verursachen.
2. Tragen Sie während der Montage eine ANSI-geprüfte Schutzbrille und
strapazierfähige Arbeitshandschuhe.
3. Halten Sie den Versammlungsbereich sauber und gut beleuchtet.
4. Halten Sie während der Montage unbeteiligte Zuschauer vom Bereich
fern.
5. Nicht zusammenbauen, wenn Sie müde sind oder unter dem Einfluss
von Alkohol, Drogen oder Medikamenten stehen.
6. Gewichtskapazität und andere Produkteigenschaften gelten nur für
ordnungsgemäß und vollständig montierte Produkte.
Plattenwagen sicher tragen kann .
Vorsichtsmaßnahmen treffen
UM SCHWERE VERLETZUNGEN UND TOD DURCH KIPPEN ZU
VERMEIDEN:
1. Setzen, stellen oder klettern Sie nicht auf diesen Gegenstand.
2. Dieses Produkt ist kein Spielzeug. Erlauben Sie Kindern nicht, mit
diesem Produkt zu spielen oder sich in seiner Nähe aufzuhalten.
3. Überschreiten Sie die Gewichtskapazität nicht und verteilen Sie sie
gleichmäßig von unten nach oben. Achten Sie auf dynamische
Belastung! Plötzliche Lastbewegungen können kurzzeitig zu einer
Überlastung führen, die zu Produktausfällen führt.
Plattenwagen sicher tragen kann .
5. Nur bestimmungsgemäß verwenden. Um ein Umkippen zu verhindern,
drücken/ziehen Sie nur mit dem mitgelieferten Griff. Nicht unter Last
heben.
- 3 -
6. Vor jedem Gebrauch prüfen; nicht verwenden, wenn Teile lose oder
beschädigt sind.
BEWAHREN SIE DIESE ANWEISUNGEN AUF
TOOL REQUIRED FOR INSTALLATION
3-Trolley-Basis
2-
Linke Armlehne
3 -
Rechte
Armlehne
4 -
Verbindungsstan
ge für Handlauf
5-Schrauben
6- Nüsse
7 - Lenkrolle
8- Polyesterband
9-Unterlegsch
eibe
10-Rohrverbinder
Inbusschlüssel
Schlüssel
Hinweis: Die Werkzeuge sind
im Lieferumfang dieses
Produkts enthalten.

- 4 -
ASSEMBLY
Sie diese mit M8x20-Schrauben und Unterlegscheiben .
2.Installieren Sie den einseitigen Rohrverbinder mit den Schrauben wie gezeigt am
Verbindungsrohr .

- 5 -
3. Montieren Sie die Armlehne an der Basis und bringen Sie die Schrauben an.

- 6 -
4. Verbinden Sie die beiden Verbindungsrohre zwischen Armlehne und Basis und
verriegeln Sie sie mit den anderen seitlichen Rohrverbindern und Schrauben.
5. Montage abgeschlossen.

- 7 -
Artikel
Beschreibung
1
Name
Plattenwagen
2
Modell
PW1360
3
Parameter
Belastung (max.): 3000 Pfund, Rad: 5 Zoll


- 2 -
Tecnico Supporto e certificato di garanzia elettronica www.vevor.com/support
CARRELLI A PANNELLO
MANUALE D'USO
MODELLO: PW1360
We continue to be committed to provide you tools with competitive price.
"Save Half", "Half Price" or any other similar expressions used by us only represents an
estimate of savings you might benefit from buying certain tools with us compared to the major
top brands and does not necessarily mean to cover all categories of tools offered by us. You
are kindly reminded to verify carefully when you are placing an order with us if you are
actually saving half in comparison with the top major brands.
- 1 -
MODELLO: PW1360
Have product questions? Need technical support? Please feel free to
contact us:
Technical Support and E-Warranty Certificate
www.vevor.com/support
NEED HELP? CONTACT US!
This is the original instruction, please read all manual instructions
carefully before operating. VEVOR reserves a clear interpretation of our
user manual. The appearance of the product shall be subject to the
product you received. Please forgive us that we won't inform you again if
there are any technology or software updates on our product.
PANEL CARTS

- 2 -
SAFETY INSTRUCTION AND PRECAUTIONS
AVVERTIMENTO:
Leggere questo materiale prima di utilizzare questo prodotto. La mancata
osservanza di questa precauzione può causare gravi lesioni.
Precauzioni di montaggio
1. Assemblare solo secondo queste istruzioni. Un assemblaggio improprio
può creare pericoli.
2. Durante il montaggio, indossare occhiali di sicurezza omologati ANSI e
guanti da lavoro resistenti.
3. Mantenere l'area di assemblaggio pulita e ben illuminata.
4. Tenere gli astanti fuori dall'area durante l'assemblaggio.
5. Non riunirsi quando si è stanchi o sotto l'effetto di alcol, droghe o
farmaci.
6. La capacità di peso e le altre caratteristiche del prodotto si applicano
solo al prodotto correttamente e completamente assemblato.
7. Montare su una superficie piana, livellata, dura e liscia, in grado di
sostenere in modo sicuro un carrello portapannelli completamente
carico .
Usare precauzioni
PER PREVENIRE LESIONI GRAVI E MORTALI DOVUTE AL
RIBALTAMENTO:
1. NON SEDERSI, STARE IN PIEDI O ARRAMPICARSI SU QUESTO
ARTICOLO.
2. Questo prodotto non è un giocattolo. Non permettere ai bambini di
giocare con o vicino a questo articolo.
3. Non superare le capacità di peso, distribuite uniformemente dal basso
verso l'alto. Siate consapevoli del carico dinamico! Un movimento
improvviso del carico può creare brevemente un carico eccessivo,
causando il guasto del prodotto.
4. Utilizzare solo su una superficie piana, livellata, dura e liscia in grado di
sostenere in modo sicuro un carrello portapannelli completamente
- 3 -
carico .
5. Utilizzare solo come previsto. Per evitare il ribaltamento, spingere/tirare
utilizzando solo la maniglia in dotazione. Non sollevare mentre è carico.
6. Ispezionare prima di ogni utilizzo; non utilizzare se alcune parti sono
allentate o danneggiate.
SALVA QUESTE ISTRUZIONI
TOOL REQUIRED FOR INSTALLATION
4-Base del
carrello
2-
Bracciolo sinistro
3 -
Bracciolo
destro
4 -
Biella di
collegamento del
corrimano
5-Vite
6- Noci
7 - Ruota girevole
8- Cinturino in
poliestere
9-Rondella
Connettore a 10
tubi
Chiave a brugola
Chiave
Nota: gli strumenti sono
inclusi in questo prodotto.

- 4 -
ASSEMBLY
1. Installare le ruote dal telaio rivolto verso l'alto e rinforzarle con bulloni M8x20 e
rondelle .
2. Installare il connettore del tubo laterale sul tubo di collegamento con le viti come
mostrato .

- 5 -
3. Installare il bracciolo sulla base e avvitare le viti.

- 6 -
4. Collegare i due tubi di collegamento tra il bracciolo e la base e bloccarli con gli
altri connettori laterali e le viti.
5. Assemblaggio completato.

- 7 -
Elementi
Descrizione
1
Nome
Carrelli a pannello
2
Modello
PW1360
3
Parametro
Carico (max): 3000 libbre, ruota: 5"


- 2 -
Técnico Soporte y certificado de garantía electrónica www.vevor.com/support
CARROS DE PANELES
MANUAL DEL USUARIO
MODELO: PW1360
We continue to be committed to provide you tools with competitive price.
"Save Half", "Half Price" or any other similar expressions used by us only represents an
estimate of savings you might benefit from buying certain tools with us compared to the major
top brands and does not necessarily mean to cover all categories of tools offered by us. You
are kindly reminded to verify carefully when you are placing an order with us if you are
actually saving half in comparison with the top major brands.

- 1 -
MODELO: PW1360
Have product questions? Need technical support? Please feel free to
contact us:
Technical Support and E-Warranty Certificate
www.vevor.com/support
NEED HELP? CONTACT US!
This is the original instruction, please read all manual instructions
carefully before operating. VEVOR reserves a clear interpretation of our
user manual. The appearance of the product shall be subject to the
product you received. Please forgive us that we won't inform you again if
there are any technology or software updates on our product.
PANEL CARTS

- 2 -
SAFETY INSTRUCTION AND PRECAUTIONS
ADVERTENCIA:
Lea este material antes de utilizar este producto. No hacerlo puede
provocar lesiones graves.
Precauciones de montaje
1. Realice el montaje únicamente de acuerdo con estas instrucciones. Un
montaje inadecuado puede generar peligros.
2. Use gafas de seguridad aprobadas por ANSI y guantes de trabajo
resistentes durante el montaje.
3. Mantenga el área de reunión limpia y bien iluminada.
4. Mantenga a los transeúntes fuera del área durante el montaje.
5. No realizar el montaje cuando se encuentre cansado o bajo la influencia
de alcohol, drogas o medicamentos.
6. La capacidad de peso y otras capacidades del producto se aplican
únicamente a productos ensamblados de forma correcta y completa.
7.Montar sobre una superficie plana, nivelada, dura y lisa capaz de
soportar de forma segura un carro de paneles completamente cargado .
Tome precauciones
PARA EVITAR LESIONES GRAVES Y LA MUERTE POR VUELCO:
1. NO SE SIENTA, SE PARE NI SE SUBA SOBRE ESTE ARTÍCULO.
2. Este producto no es un juguete. No permita que los niños jueguen con
este artículo ni cerca de él.
3. No exceda las capacidades de peso, distribuidas uniformemente de
abajo hacia arriba. ¡Tenga cuidado con la carga dinámica! El
movimiento repentino de la carga puede generar brevemente un exceso
de carga y provocar fallas en el producto.
4. Úselo únicamente sobre una superficie plana, nivelada, dura y lisa
capaz de soportar de forma segura un carrito de paneles
completamente cargado.
5. Utilícelo únicamente según lo previsto. Para evitar que se vuelque,
- 3 -
empuje o tire utilizando únicamente el mango suministrado. No levantar
mientras esté cargado.
6. Inspeccione antes de cada uso; no utilice si las piezas están sueltas o
dañadas.
GUARDE ESTAS INSTRUCCIONES
TOOL REQUIRED FOR INSTALLATION
5-Base del
carro
2-
Apoyabrazos
izquierdo
3 -
Apoyabrazos
derecho
4 -
Biela de
conexión del
pasamanos
5 tornillos
6- Nueces
7 - Rueda giratoria
8- Correa de
poliéster
9-Arandela
Conector de 10
tubos
Llave Allen
Llave inglesa
Nota: Las herramientas están
incluidas con este producto.

- 4 -
ASSEMBLY
desde el marco hacia arriba y refuércelas con pernos M8x20 y arandelas .
2. Instale el conector del tubo de un lado en el tubo de conexión con los tornillos como se
muestra .

- 5 -
3. Instale el apoyabrazos en la base e instale los tornillos.
- 6 -
4. Conecte los dos tubos de conexión entre el apoyabrazos y la base y bloquéelos
con los conectores y tornillos del otro tubo lateral .
5.Montaje completado.
- 7 -
Elementos
Descripción
1
Nombre
Carros de paneles
2
Modelo
PW1360
3
Parámetro
Carga (máx.): 3000 libras, rueda: 5"


- 2 -
Techniczny Wsparcie i certyfikat gwarancji elektronicznej www.vevor.com/support
WÓZKI PANELOWE
INSTRUKCJA OBSŁUGI
MODEL: PW1360
We continue to be committed to provide you tools with competitive price.
"Save Half", "Half Price" or any other similar expressions used by us only represents an
estimate of savings you might benefit from buying certain tools with us compared to the major
top brands and does not necessarily mean to cover all categories of tools offered by us. You
are kindly reminded to verify carefully when you are placing an order with us if you are
actually saving half in comparison with the top major brands.

- 1 -
MODEL: PW1360
Have product questions? Need technical support? Please feel free to
contact us:
Technical Support and E-Warranty Certificate
www.vevor.com/support
NEED HELP? CONTACT US!
This is the original instruction, please read all manual instructions
carefully before operating. VEVOR reserves a clear interpretation of our
user manual. The appearance of the product shall be subject to the
product you received. Please forgive us that we won't inform you again if
there are any technology or software updates on our product.
PANEL CARTS

- 2 -
SAFETY INSTRUCTION AND PRECAUTIONS
OSTRZEŻENIE:
Przeczytaj ten materiał przed użyciem tego produktu. Nieprzestrzeganie
tego może spowodować poważne obrażenia.
Środki ostrożności podczas montażu
1. Montaż należy wykonywać wyłącznie zgodnie z niniejszą instrukcją.
Nieprawidłowy montaż może stwarzać zagrożenia.
2. Podczas montażu należy nosić okulary ochronne z atestem ANSI oraz
wytrzymałe rękawice robocze.
3. Utrzymuj miejsce zgromadzenia w czystości i zapewnij dobre
oświetlenie.
4. Nie dopuść, aby osoby postronne przebywały w pobliżu podczas
montażu.
5. Nie przychodź na spotkania, jeśli jesteś zmęczony lub pod wpływem
alkoholu, narkotyków lub leków.
6. Podane parametry dotyczące nośności i innych parametrów produktu
odnoszą się wyłącznie do produktu prawidłowo i kompletnie
zmontowanego.
7. Montaż należy wykonać na płaskiej, równej, twardej i gładkiej
powierzchni, która będzie w stanie bezpiecznie utrzymać w pełni
załadowany wózek panelowy .
Stosuj środki ostrożności
ABY ZAPOBIEC POWAŻNYM OBRAŻENIOM I ŚMIERCI
SPOWODOWANEJ PRZEWRÓCENIEM:
1. NIE SIADAJ, NIE STÓJ ANI NIE WSPINAJ SIĘ NA TYM
PRZEDMIOCIE.
2. Ten produkt nie jest zabawką. Nie pozwalaj dzieciom bawić się tym
przedmiotem ani przebywać w jego pobliżu.
3. Nie przekraczaj nośności, równomiernie rozłożonej od dołu do góry.
Uważaj na obciążenie dynamiczne! Nagły ruch ładunku może na krótko
spowodować nadmierne obciążenie, powodując awarię produktu.
- 3 -
4. Używać wyłącznie na płaskiej, równej, twardej i gładkiej powierzchni,
która może bezpiecznie utrzymać w pełni załadowany wózek panelowy .
5. Używać wyłącznie zgodnie z przeznaczeniem. Aby zapobiec
przewróceniu, należy pchać/ciągnąć wyłącznie za dołączony uchwyt. Nie
podnoś, gdy jesteś obciążony.
6. Przed każdym użyciem należy dokonać kontroli; nie należy używać
urządzenia, jeśli jakieś części są luźne lub uszkodzone.
ZAPISZ TE INSTRUKCJE
TOOL REQUIRED FOR INSTALLATION
6-Podstawa
wózka
2-
Podłokietnik lewy
3 -
Podłokietnik
prawy
4 -
Łącznik
poręczy
5-śrubowy
6- Orzechy
7 - Obrotowe
kółka
8- Pasek
poliestrowy
9-Podkładka
Złącze 10-rurowe
Klucz imbusowy
Klucz
Uwaga: Narzędzia dołączone
do produktu.
- 4 -
ASSEMBLY
1. Zamontuj koła ramą do góry i wzmocnij je śrubami M8x20 i podkładkami .
2. Zamontuj łącznik rury jednostronnej na rurze łączącej za pomocą śrub, jak pokazano .

- 5 -
3. Zamontuj podłokietnik na podstawie i przykręć śruby.
- 6 -
4. Połącz dwie rurki łączące podłokietnik z podstawą i zablokuj je za pomocą
łączników rurek po drugiej stronie oraz śrub.
5. Montaż uko
ń
czony.

- 7 -
Rzeczy
Opis
1
Nazwa
Wózki panelowe
2
Model
PW1360
3
Parametr
Obciążenie (maks.): 3000 funtów, koło: 5 cali


- 2 -
Technisch Ondersteuning en E-garantiecertificaat www.vevor.com/support
PANEELWAGENS
GEBRUIKERSHANDLEIDING
MODEL: PW1360
We continue to be committed to provide you tools with competitive price.
"Save Half", "Half Price" or any other similar expressions used by us only represents an
estimate of savings you might benefit from buying certain tools with us compared to the major
top brands and does not necessarily mean to cover all categories of tools offered by us. You
are kindly reminded to verify carefully when you are placing an order with us if you are
actually saving half in comparison with the top major brands.

- 1 -
MODEL: PW1360
Have product questions? Need technical support? Please feel free to
contact us:
Technical Support and E-Warranty Certificate
www.vevor.com/support
NEED HELP? CONTACT US!
This is the original instruction, please read all manual instructions
carefully before operating. VEVOR reserves a clear interpretation of our
user manual. The appearance of the product shall be subject to the
product you received. Please forgive us that we won't inform you again if
there are any technology or software updates on our product.
PANEL CARTS

- 2 -
SAFETY INSTRUCTION AND PRECAUTIONS
WAARSCHUWING:
Lees dit materiaal voordat u dit product gebruikt. Als u dit niet doet, kan dit
leiden tot ernstig letsel.
Voorzorgsmaatregelen bij de montage
1. Monteer alleen volgens deze instructies. Onjuiste montage kan gevaren
opleveren.
2. Draag tijdens de montage een ANSI-goedgekeurde veiligheidsbril en
stevige werkhandschoenen.
3. Zorg ervoor dat de montageplek schoon en goed verlicht is.
4. Houd omstanders uit de buurt tijdens de montage.
5. Ga niet in de winkel staan als u moe bent of onder invloed van alcohol,
drugs of medicijnen.
6. Het draagvermogen en andere producteigenschappen gelden alleen
voor een correct en volledig gemonteerd product.
paneelkar veilig kan dragen .
Neem voorzorgsmaatregelen
OM ERNSTIG LETSEL EN DE DOOD DOOR KANTELEN TE
VOORKOMEN:
1. NIET OP DIT INRICHTING ZITTEN, STAAN OF ER OP HANGEN.
2. Dit product is geen speelgoed. Laat kinderen niet met of in de buurt van
dit item spelen.
3. Overschrijd de gewichtscapaciteit niet, gelijkmatig verdeeld van onder
naar boven. Wees u bewust van dynamische belasting! Plotselinge
belastingbewegingen kunnen kortstondig overmatige belasting
veroorzaken, wat kan leiden tot productfalen.
4. Gebruik het apparaat alleen op een vlak, egaal, hard en glad oppervlak
dat een volledig beladen paneelwagen veilig kan dragen .
5. Gebruik het product alleen zoals bedoeld. Om kantelen te voorkomen,
duwt of trekt u alleen met behulp van de meegeleverde handgreep. Niet
tillen als het geladen is.
- 3 -
6. Controleer het apparaat voor elk gebruik. Gebruik het niet als er
onderdelen loszitten of beschadigd zijn.
BEWAAR DEZE INSTRUCTIES
TOOL REQUIRED FOR INSTALLATION
7-Trolley basis
2-
Linker armsteun
3 -
Rechter
armsteun
4 -
Verbindingsstan
g van de leuning
5-Schroef
6- Noten
7 - Zwenkwiel
8- Polyesterband
9-Ring
10-buisconnector
Inbussleutel
Moersleutel
Let op: het gereedschap is bij
dit product inbegrepen.
- 4 -
ASSEMBLY
1. Monteer de wielen vanaf het frame naar boven en verstevig ze met M8x20
bouten en ringen .
2. Monteer de ene zijbuisconnector op de verbindingsbuis met de schroeven zoals
afgebeeld .

- 5 -
3. Plaats de armleuning op de basis en draai de schroeven vast.

- 6 -
4. Verbind de twee verbindingsbuizen tussen de armleuning en de basis en zet ze
vast met de andere zijbuisconnectoren en schroeven.
5. Montage voltooid.

- 7 -
Ik ben
Beschrijving
1
Naam
Paneelwagens
2
Model
PW1360
3
Parameter
Belasting (Max): 3000LBS, Wiel: 5"


- 2 -
Teknisk Support och e-garanticertifikat www.vevor.com/support
PANELVAGNAR
ANVÄNDARMANUAL
MODELL: PW1360
We continue to be committed to provide you tools with competitive price.
"Save Half", "Half Price" or any other similar expressions used by us only represents an
estimate of savings you might benefit from buying certain tools with us compared to the major
top brands and does not necessarily mean to cover all categories of tools offered by us. You
are kindly reminded to verify carefully when you are placing an order with us if you are
actually saving half in comparison with the top major brands.

- 1 -
MODELL: PW1360
Have product questions? Need technical support? Please feel free to
contact us:
Technical Support and E-Warranty Certificate
www.vevor.com/support
NEED HELP? CONTACT US!
This is the original instruction, please read all manual instructions
carefully before operating. VEVOR reserves a clear interpretation of our
user manual. The appearance of the product shall be subject to the
product you received. Please forgive us that we won't inform you again if
there are any technology or software updates on our product.
PANEL CARTS

- 2 -
SAFETY INSTRUCTION AND PRECAUTIONS
VARNING:
Läs detta material innan du använder denna produkt. Underlåtenhet att
göra det kan resultera i allvarliga skador.
Försiktighetsåtgärder vid montering
1. Montera endast enligt dessa instruktioner. Felaktig montering kan skapa
faror.
2. Bär ANSI-godkända skyddsglasögon och kraftiga arbetshandskar vid
montering.
3. Håll monteringsområdet rent och väl upplyst.
4. Håll åskådare borta från området under monteringen.
5. Sätt dig inte ihop när du är trött eller påverkad av alkohol, droger eller
medicin.
6. Viktkapacitet och andra produktegenskaper gäller endast för korrekt och
färdigmonterad produkt.
7. Montera på en plan, jämn, hård och slät yta som säkert kan bära upp en
fullastad panelvagn .
Använd försiktighetsåtgärder
FÖR ATT FÖRHINDRA ALLVARLIGA SKADA OCH DÖDSFALL VID
VÄTTNING:
1. SIT, STÅ ELLER KLITRERA INTE PÅ DETTA FÖREMÅL.
2. Denna produkt är inte en leksak. Låt inte barn leka med eller nära detta
föremål.
3. Överskrid inte viktkapaciteten, jämnt fördelad nedifrån och upp. Var
uppmärksam på dynamisk laddning! Plötsliga laströrelser kan kortvarigt
skapa överbelastning som orsakar produktfel.
4. Använd endast på en plan, jämn, hård och slät yta som säkert kan bära
en fullastad panelvagn .
5. Använd endast på avsett sätt. För att förhindra tippning, tryck/dra endast
med det medföljande handtaget. Lyft inte när den är lastad.
6 . Inspektera före varje användning; Använd inte om delar är lösa eller
- 3 -
skadade.
SPARA DESSA INSTRUKTIONER
TOOL REQUIRED FOR INSTALLATION
8-Vagnbotten
2-
Vänster armstöd
3 -
Höger armstöd
4 -
Ledstång
vevstång
5-skruv
6- Nötter
7 - SwivelCaster
8- Polyesterband
9-Bricka
10-rörskontakt
Insexnyckel
Rycka
Obs: Verktygen som
medföljer denna produkt.
- 4 -
ASSEMBLY
1. Montera hjulen från ramen uppåt och förstärk dem med M8x20 bultar och
brickor .
2. Montera den ena sidans rörkoppling på anslutningsslangen med skruvarna enligt bilden .

- 5 -
3. Montera armstödet på basen och montera skruvarna.

- 6 -
4 .Anslut de två kopplingsrören mellan armstödet och basen och lås dem med de
andra sidorörsanslutningarna och skruvarna.
5. Montering klar.
- 7 -
Jag tems
Beskrivning
1
Namn
Panelvagnar
2
Modell
PW1360
3
Parameter
Belastning (max):3000LBS, hjul:5"

