USER
GUIDE
A commitment to:
Belling RangeFRRNHU'HOX[H,1'
Date:

To contact Belling about your appliance, please call:
Customer Care Helpline
AU - 1 800 444 357
NZ - 09 274 8265
To register your appliance by mail:
Please complete the warranty card
and return to theaddress supplied
To register your appliance online:
AU - www.belling.com.au
NZ - www.belling.co.nz
To contact us by email:
AU - [email protected]
NZ - [email protected]
7RSXUFKDVHDGGLWLRQDOVSDUHSDUWVDQGDFFHVVRULHVYLVLWRXUZHEVLWHRQZZZEHOOLQJFRPDX
Calls are charged at the basic rate, please check with your telephone service provider for exact charges
'XULQJWKH\HDUJXDUDQWHHSHULRG\RXUDSSOLDQFHDVVSHFLILHGRQ\RXUZDUUDQW\UHJLVWUDWLRQFDUG
your appliance is protected against electrical and mechanical breakdown. To register your
appliance, please call the number shown above, register online or complete the registration card
included.
Please ensure that you have available your appliance model number and serial number. For full
terms & conditions of the manufacturer’s guarantee, refer to the website.
Our policy is one of constant development and improvement, therefore we cannot guarantee the
VWULFWDFFXUDF\RIDOORIRXULOOXVWUDWLRQVDQGVSHFL¿FDWLRQV&KDQJHVPD\KDYHEHHQPDGH
subsequent to publishing.
AU - Glen Dimplex Australia PTY LTD, /DNHYLHZ'ULYH, Scoresby VIC 3179
NZ - Glen Dimplex New Zealand Ltd, 38 Harris Road, East Tamaki, Auckland, New Zealand
GB - Great Britain
IE - Ireland
DE - Germany
ES - Spain
FR - France
IT - Italy
PL - Poland
NL - Netherlands
SE - Sweden
CN - China
NZ - New Zealand ;
AU - Australia ;
Countries of destination:

INTRODUCTION PG 4
SAFETY PG 5
USING YOUR APPLIANCE PG 9
USING THE HOB PG 14
USING THE GRILL PG 24
USING THE TOP OVEN PG 26
USING THE MAIN OVEN - ELECTRIC PG 28
USING THE OVEN/GRILL - MULTIFUNCTION USING PG 34
USING THE OVEN - SLOW COOK PG 43
USING THE SPLITTER - 90CM DELUXE ONLY PG 45
CLOCK PROGRAMMER PG 49
USING YOUR APPLIANCE PG 54
CLEANING YOUR APPLIANCE PG 60
INSTALLATION INSTRUCTIONS PG 61
BEFORE INSTALLATION PG 62
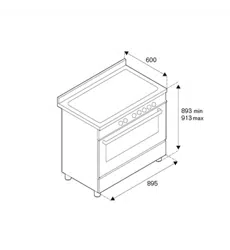
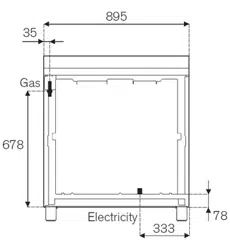
DIMENSIONS AND CLEARANCES PG 64
CONNECT TO THE ELECTRICITY AND GAS SUPPLY PG 66
COMMISSIONING PG 68
USING YOUR APPLIANCE PG 69
TECHNICAL DATA PG 75
MANUFACTURER GUARANTEE PG 76
&217(176
3*
3*
3*
3*
3*
3*
3*
3*
3*
3*
3*
3*
3*
3*
3*
6$)(7<
86,1*<285$33/,$1&(
86,1*7+(+2%
86,1*7+(*5,//
86,1*7+(72329(1
86,1*7+(0$,129(1(/(&75,&
86,1*7+(29(1*5,//08/7,)81&7,2186,1*
7+(29(16/2:&22.
86,1*7+(63/,77(5&0'(/8;(21/<
,167$//$7,21,16758&7,216
5(*8/$7,2167$1'$5'6
%()25(,167$//$7,21
',0(16,216$1'&/($5$1&(6
&211(&7727+((/(&75,&,7<$1'*$66833/<
&200,66,21,1*
86,1*<285$33/,$1&(
7(&+1,&$/'$7$
3*
3*

Thank you for buying this British-built appliance from us.
This user guide book is designed to help you through each step of owning your new product.
Please read it carefully before you start using your appliance, as we have endeavored to answer as
many questions as possible, and provide you with as much support as we can.
General information and User Guides are available from our website.
,I\RXVKRXOG¿QGVRPHWKLQJPLVVLQJIURP\RXUSURGXFWRUKDYHDQ\TXHVWLRQVWKDWDUHQRWFRYHUHGLQ
this user guide, please contact us (see contact information inside the front cover).
7KLVXQLWPXVWEHLQVWDOOHGE\DFRPSHWHQWHOHFWULFLDQTXDOL¿HGWHFKQLFLDQ,QUHJLRQVZKHUHDSSOLFDEOH
SOHDVHUHWDLQ\RXU&HUWL¿FDWHRI&RPSOLDQFH
Disposal of Packaging Material
The packaging materials used with this appliance can be recycled. Please dispose of the packaging
materials in the correct manner.
INTRODUCTION

SAFETY
WARNING
During use the appliance becomes hot. Care should be taken to
avoid touching heating elements.
7KLVDSSOLDQFHLVQRWLQWHQGHGIRUXVHE\SHUVRQVLQFOXGLQJ
FKLOGUHQZLWKUHGXFHGSK\VLFDOVHQVRU\RUPHQWDOFDSDELOLWLHVRU
ODFNRIH[SHULHQFHDQGNQRZOHGJHXQOHVVWKH\KDYHEHHQJLYHQ
VXSHUYLVLRQRULQVWUXFWLRQFRQFHUQLQJXVHRIWKHDSSOLDQFHE\D
SHUVRQUHVSRQVLEOHIRUWKHLUVDIHW\<RXQJFKLOGUHQVKRXOGEH
VXSHUYLVHGWRHQVXUHWKDWWKH\GRQRWSOD\ZLWKWKHDSSOLDQFH
Do not use harsh abrasive cleaners or sharp metal scrapers to
clean the oven door glass or the hob, since they can scratch the
surface, which may result in shattering of the glass.
Do not use a steam cleaner on any cooking range, hob or oven
appliance.
,I\RXDSSOLDQFHLVILWWHGZLWKDOLGDQ\VSLOODJHVKRXOGEHUHPRYHG
from the lid before opening. The hob surface should be allowed to
FRROEHIRUHFORVLQJWKHOLGLIILWWHG
Metallic objects such as knives, forks, spoons and lids should not
be placed on the hob surface since they can get hot.
7RDYRLGHOHFWULFVKRFNHQVXUHWKDWWKHDSSOLDQFHLVVZLWFKHGRႇ
before replacing the lamp.
The appliance is not intended to be operated by means of an
external timer or separate control system.
Unattended cooking on a hob with fat or oil can be dangerous and
PD\UHVXOWLQILUH
1(9(5WU\WRH[WLQJXLVKDILUHZLWKZDWHUEXWVZLWFKRIIWKH
DSSOLDQFHDQGWKHQFRYHUWKHIODPHZLWKDOLGRUGDPSFORWK
'DQJHURIILUH'RQRWVWRUHLWHPVRQWKHFRRNLQJVXUIDFHV
Only use hob guards designed by the manufacturer of the cooking
appliance or indicated by the manufacturer of the appliance inthe
instructions for use as suitable or hob guards incorporated inthe
appliance. The use of inappropriate hob guards can cause
accidents.
,IWKHFRRNHULVSODFHGRQDEDVHPHDVXUHVKDYHWREHWDNHQWR
SUHYHQWWKHDSSOLDQFHVOLSSLQJIURPWKHEDVH

SAFETY
,IWKHKREVXUIDFHLVFUDFNHGEURNHQRUVKDWWHUHGVZLWFKRIIWKH
appliance to avoid the possibility of electric shock and call for a
service engineer’s visit.
Never put items directly on the base of the oven or cover the oven
with foil, as this can cause the base element to overheat.
Accessible parts may become hot when the grill is in use. Children
should be kept away.
'RQRWVWRUHRUXVHIODPPDEOHOLTXLGVRULWHPVLQWKHYLFLQLW\RIWKLV
appliance.
DO NOT USE OR STORE FLAMMABLE MATERIALS IN OR
NEAR THIS APPLIANCE.
DO NOT SPRAY AEROSOLS IN THE VICINITY OF THIS
APPLIANCE WHILE IT IS IN OPERATION.
DO NOT MODIFY THIS APPLIANCE.
D
O NOT PLACE ARTICLES ON OR AGAINST THEAPPLIANCE.
Servicing shall be carried out only by authorised personnel.
Do not use this appliance as a room or space heater.
:KHUHWKLVDSSOLDQFHLVLQVWDOOHGLQPDULQHFUDIWRULQFDUDYDQVLW
VKDOOQRWEHXVHGDVDVSDFHKHDWHU
$OZD\VVZLWFKRII\RXUDSSOLDQFHDQGDOORZLWWRFRROGRZQEHIRUH
you clean any part of it.
7KHVZLWFKLQWKHIL[HGZLULQJPXVWEHLQVWDOOHGLQDFFRUGDQFHZLWK
WKHZLULQJUXOHV
Although every care has been taken to ensure this appliance has
no sharp edges, we recommend that you wear protective gloves
when installing and moving this appliance. This will prevent injury.
7KLVDSSOLDQFHPXVWEHILWWHGWRDVZLWFKSURYLGLQJDOOSROH
disconnection with a minimum contact separation of 3mm.
&RQQHFWLRQVKRXOGEHPDGHZLWKDVXLWDEOHIOH[LEOHFDEOHZLWKD
minimum temperature of 70
o
C.
CAUTION
This appliance must not be installed behind a decorative door in
order to avoid overheating.
The cooking process has to be supervised. A short term cooking
process has to be supervised continuously.
The use of a gas cooking appliance results in the production of

SAFETY
heat, moisture and products of combustion in the room in which
it is installed. Ensure that the kitchen is well ventilated especially
when the appliance is in use: keep natural ventilation holes open
or install a mechanical ventilation device (mechanical extractor
hood). Prolonged intensive use of the appliance may call for
additional ventilation, for example opening of a window, or more
HႇHFWLYHYHQWLODWLRQIRUH[DPSOHLQFUHDVLQJWKHOHYHORIPHFKDQLFDO
ventilation where present.
This appliance is for cooking purposes only. It must not be used for
other purposes, for example room heating.
(Gas through glass models only) In case of hotplate glass
EUHDNDJHVKXWLPPHGLDWHO\RႇDOOEXUQHUVDQGDQ\HOHFWULFDO
heating element and isolate the appliance from the power supply,
do not touch the appliance surface, do not use the appliance.
Ensure shelving is correctly installed. See the sections on the shelf
runners and shelf location within this book.
Fire Safety Advice
,I\RXGRKDYHD¿UHLQWKHNLWFKHQGRQ¶WWDNHDQ\ULVNVJHW
everyone out of your home and call the Fire Brigade.
,I\RXKDYHDQHOHFWULFDO¿UHLQWKHNLWFKHQ
3XOOWKHSOXJRXWRUVZLWFKRႇWKHSRZHUDWWKHIXVHER[WKLVPD\
EHHQRXJKWRVWRSWKH¿UHLPPHGLDWHO\
6PRWKHUWKH¿UHZLWKD¿UHEODQNHWRUXVHDGU\SRZGHURUFDUERQ
dioxide extinguisher
5HPHPEHUQHYHUXVHZDWHURQDQHOHFWULFDORUFRRNLQJRLO¿UH
Other Safety Advice
Servicing should be carried out only by authorised personnel.
Do not operate the appliance without the glass panel correctly
¿WWHG
There is a risk of electric shock, so always make sure you have
WXUQHGRႇDQGXQSOXJJHG\RXUDSSOLDQFH$OZD\VDOORZWKHSURGXFW
to cool down before you change the bulb.
Do not modify the outer panels of this appliance in any way.

SAFETY
This appliance must be earthed.
The appliance must never be disconnected from the mains supply
GXULQJXVHDVWKLVZLOOVHULRXVO\DIIHFWWKHVDIHW\DQGSHUIRUPDQFH
particularly in relation to surface temperatures becoming hot and
JDVRSHUDWHGSDUWVQRWZRUNLQJHIILFLHQWO\7KHFRROLQJIDQLIILWWHG
LVGHVLJQHGWRUXQRQDIWHUWKHFRQWURONQREKDVEHHQVZLWFKHGRII
GAS WARNING! - If you smell gas: Do not try to light any
appliance, Do not touch any electrical switch. Contact your local
gas supplier immediately.
,IWKHVXSSO\FRUGLVGDPDJHGLWPXVWEHUHSODFHGE\WKH
PDQXIDFWXUHULWVVHUYLFHDJHQWRUVLPLODUO\TXDOLILHGSHUVRQVLQ
RUGHUWRDYRLGDKD]DUG
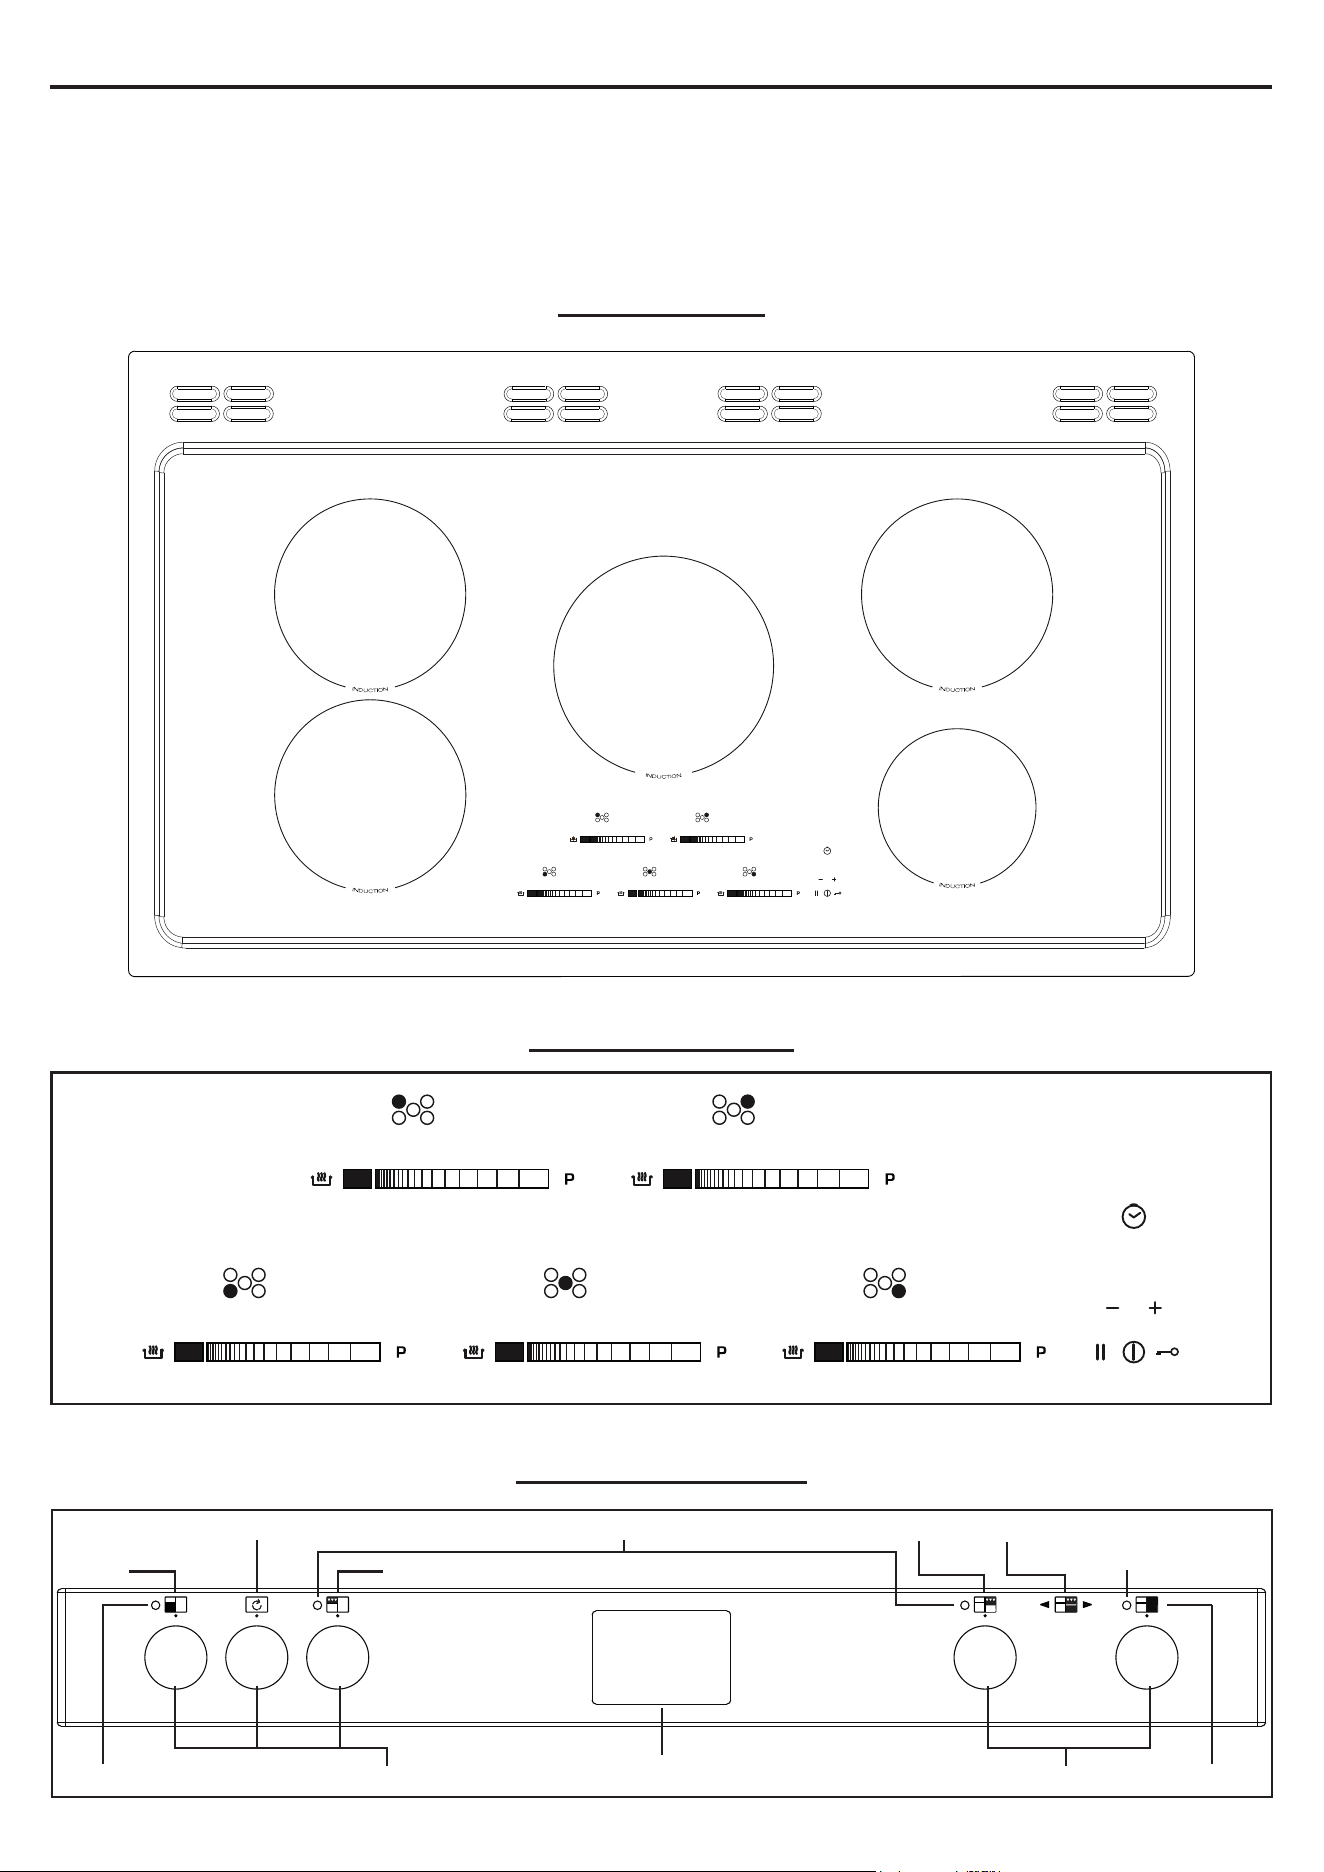
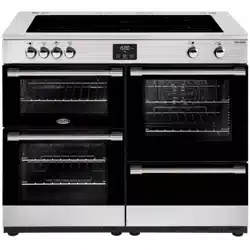
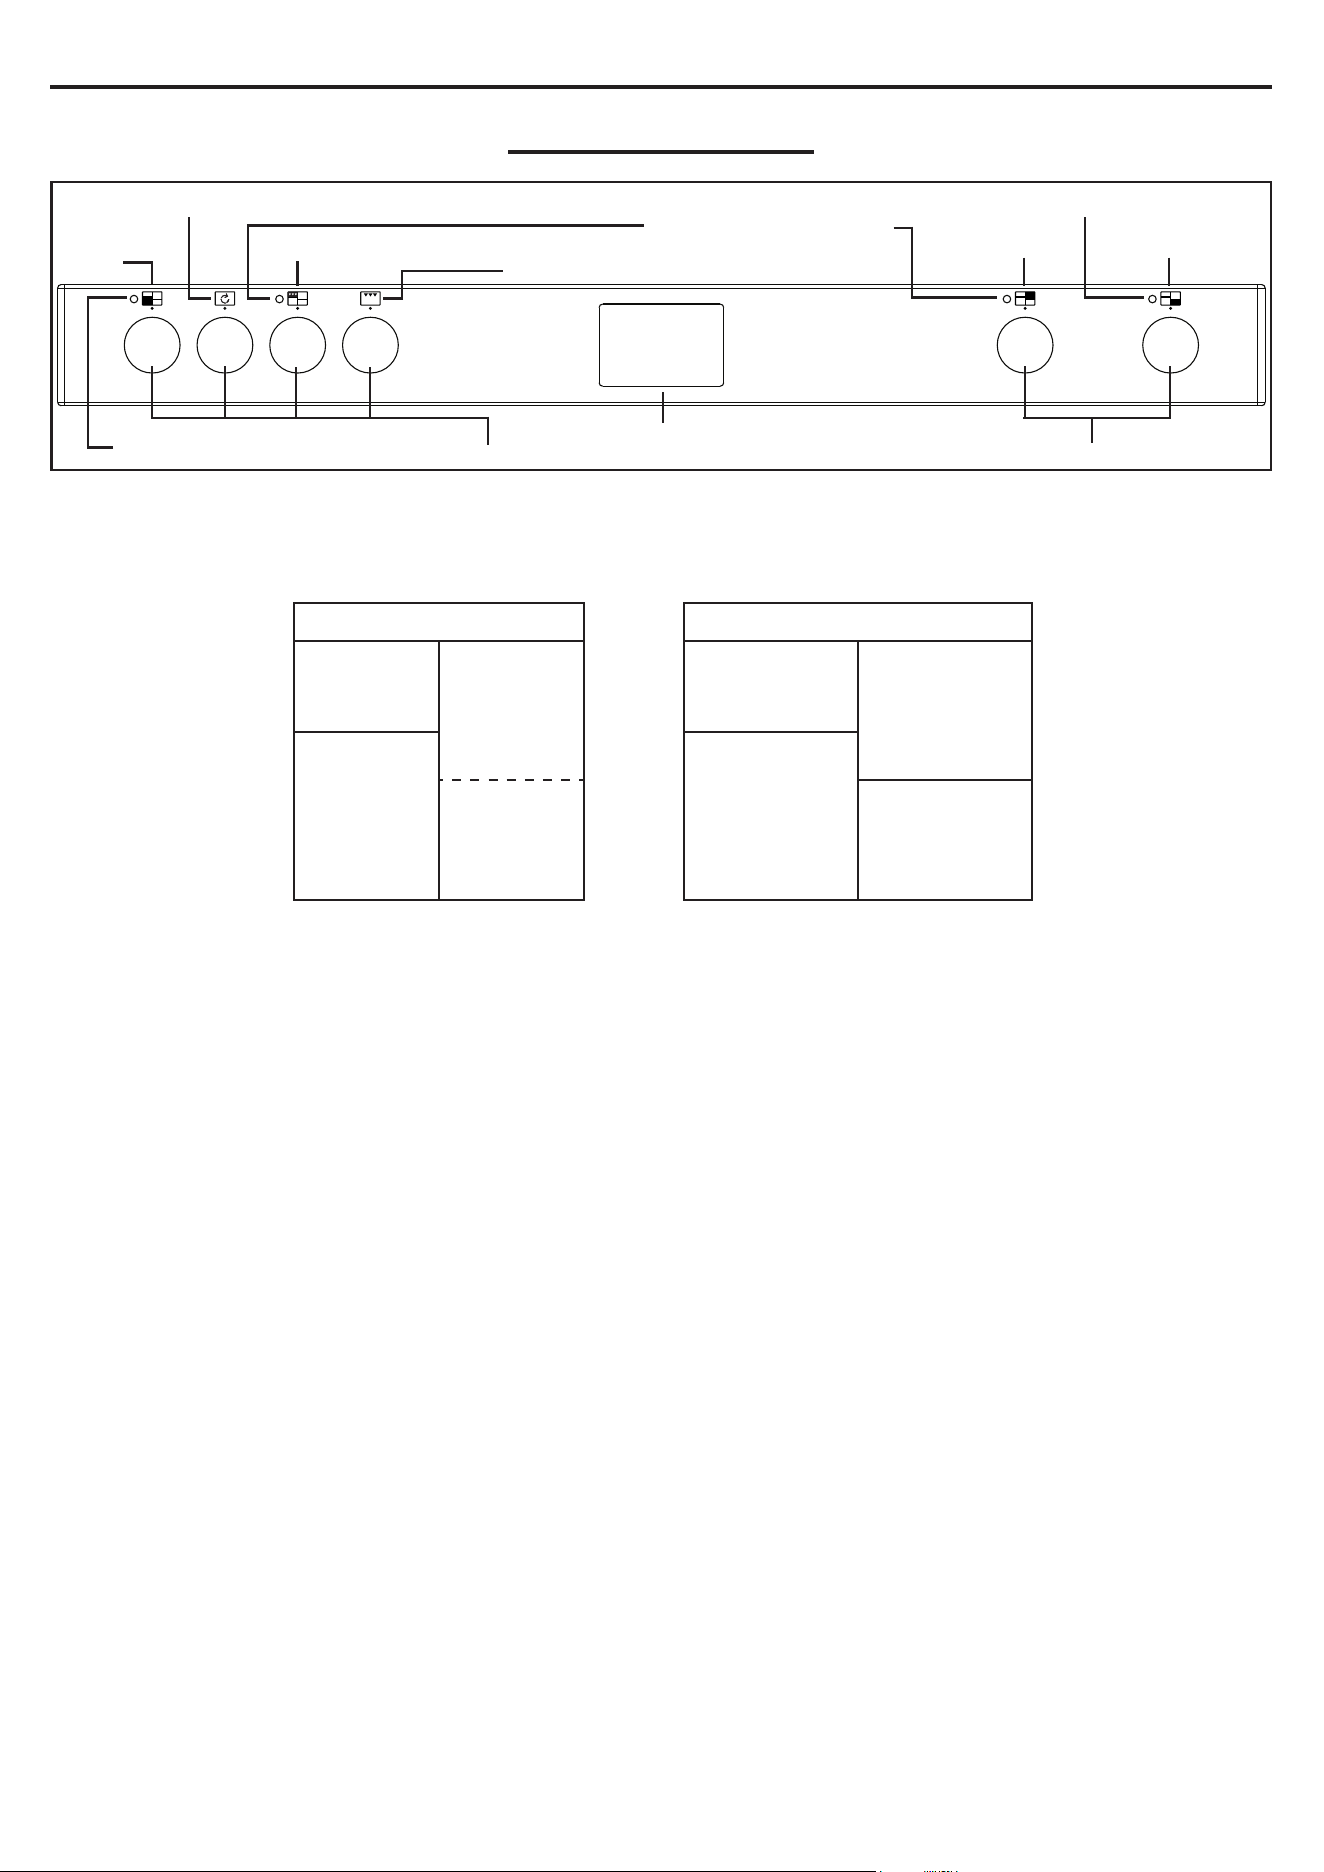
USING YOUR APPLIANCE
Getting to know your product
Note: <RXUDSSOLDQFHOD\RXWPD\GLႇHUGHSHQGLQJRQWKHPRGHO
Hob 90/110cm
Hob control panel
Control Panel 90cm
Oven controls
Oven controls
Oven
Top Oven/Grill
Split Cavity
Oven Top Oven/Grill
Oven Selector Control
Clock/Programmer
Thermostat indicator
Thermostat indicator
Thermostat indicator
USING YOUR APPLIANCE
Control Panel 110cm
Fascia Fascia
90cm 110cm
Top Oven
Multifunction
Oven
Fanned
Oven with
Splitter
Top Oven
Multifunction
Oven
Fanned
Oven
Slow
Cook
Oven
Oven Selector Control
Grill
Clock/Programmer
Oven Oven
Oven controlsOven controls
Thermostat indicator
Thermostat indicator
Thermostat indicator
Top Oven/Grill

USING YOUR APPLIANCE
Appliance functions
Note: Your oven may not have all of the functions shown here. We recommend for best cooking results,
please preheat your oven for 15 minutes and 3-5 minutes for grilling.
2QO\VORZFRRNXVLQJWKHGHGLFDWHGIXQFWLRQ:KHQXVLQJWKHPXOWLIXQFWLRQRYHQ¿UVWO\VHOHFWWKH
fanned oven feature.
Intense Baking Defrost
Base Heat with Fan Conventional Oven
S
Slow Cook Fanned Oven
Fanned Grill Low Grill
Oven Selector Control Single Grill
Conventional Grill Dual Grill
Top Heat Base Heat
Lights Only Pizza Function
Bread Proving Keep Warm
Oven Selector Control Electric oven
OFF
OFF
S
120
140
160
180
200
220
240
260

USING YOUR APPLIANCE
Ovens and Grill
When using the top oven or main oven, the white thermostat indicator light will come on until the
selected temperature is reached.
When the Top oven/grill or grill is switched on, the cooling fans come on to keep the fascia and control
knobs cool during cooking/grilling. The cooling fans may operate when the main ovens are in use,
depending on the temperature setting. The fans may continue to operate for a period after the oven/grill
KDVEHHQVZLWFKHGRႇ'XULQJXVHWKHIDQPD\F\FOHRQDQGRႇWKLVLVQRUPDO
Important: Never put items directly on top the base of the oven, or cover the oven base with foil, as
this may cause the element to overheat. Always position items on the shelf.
The left hand main oven will not operate if the programmer is set to Auto, see clock/programmer
section.
Top Oven - Grill
THE DOOR MUST BE OPEN WHEN THE GRILL IS USED.
Main Oven - Grill
THE DOOR MUST BE CLOSED WHEN THE GRILL IS USED FOR FANNED AND CONVENTIONAL
GRILLING.
Tall Oven - Grill (90cm only)
THE DOOR MUST BE OPEN WHEN THE GRILL IS USED.
USING YOUR APPLIANCE
Grill pan and trivet
The grill trivet (inside the grill pan) can be inverted to give a high or low position, or it may be removed.
The speed of grilling can be controlled by selecting a higher or lower shelf position, or adjusting the grill
setting.
Inverted

USING THE HOB
6.220
USING THE HOB
USING THE HOTPLATE
Commercial simmering aids should
not be used as they create excessive
temperatures that can damage the
surface and may cause a hazard.
Do not place aluminium foil or plastic
utensils on the ceramic glass, as they
may melt and damage the surface.
Do not use the ceramic glass hotplate
surface for storage.
When cooking with fat or oil, never
leave unattended.
Turn pan handles to a safe position,
so they are out of reach of children,
not overhanging the appliance, and
cannot be caught accidentally.
Position pans over the centre of the
hotplate elements.
Do not use the hob as a chopping
board or a storage area, as this
increases the likelihood of it be-
ing damaged - e.g.; plastic utensils
placed on a warm hob may melt onto
it, and damage the ceramic glass
surface.
Be careful when cooking foods in
salted water, or foods containing
large amounts of sugar, syrup or jam
- if they are spilled onto hot areas of
the hob they may damage it.
/LIWSDQVRQWRDQGRWKHVXUIDFH
rather than sliding them across the
surface, to avoid marks and
scratches.
If you use a wet paper towel to
remove spills from a warm heating
area of the hob, be careful to avoid
steam burns.
Do not use abrasive powder cleaners,
metal wire wool pads, impregnated
plastic pads, detergents, bleaches,
bath stain removers, or chemical
oven cleaners; all these types of
products will damage the ceramic
glass.
The functions of the hob comply with
the applicable standards on
electromagnetic interference
Your induction cooking hob thus
complies fully with the statutory
requirements (Directive 2004/108/EC).
It is designed to not interfere with the
functioning of other electrical
equipment as long as these also
comply with the same regulations.
Your induction hob generates magnetic
¿HOGVLQLWVLPPHGLDWHYLFLQLW\
So that there is no interference
between your cooking hob and a
pacemaker, the pacemaker must be
designed in compliance with the
appropriate regulations.
In this respect we can only guarantee
the compliance of our own product.
You can ask the manufacturer or your
doctor about the compliance or any
incompatibilities of your pacemaker.
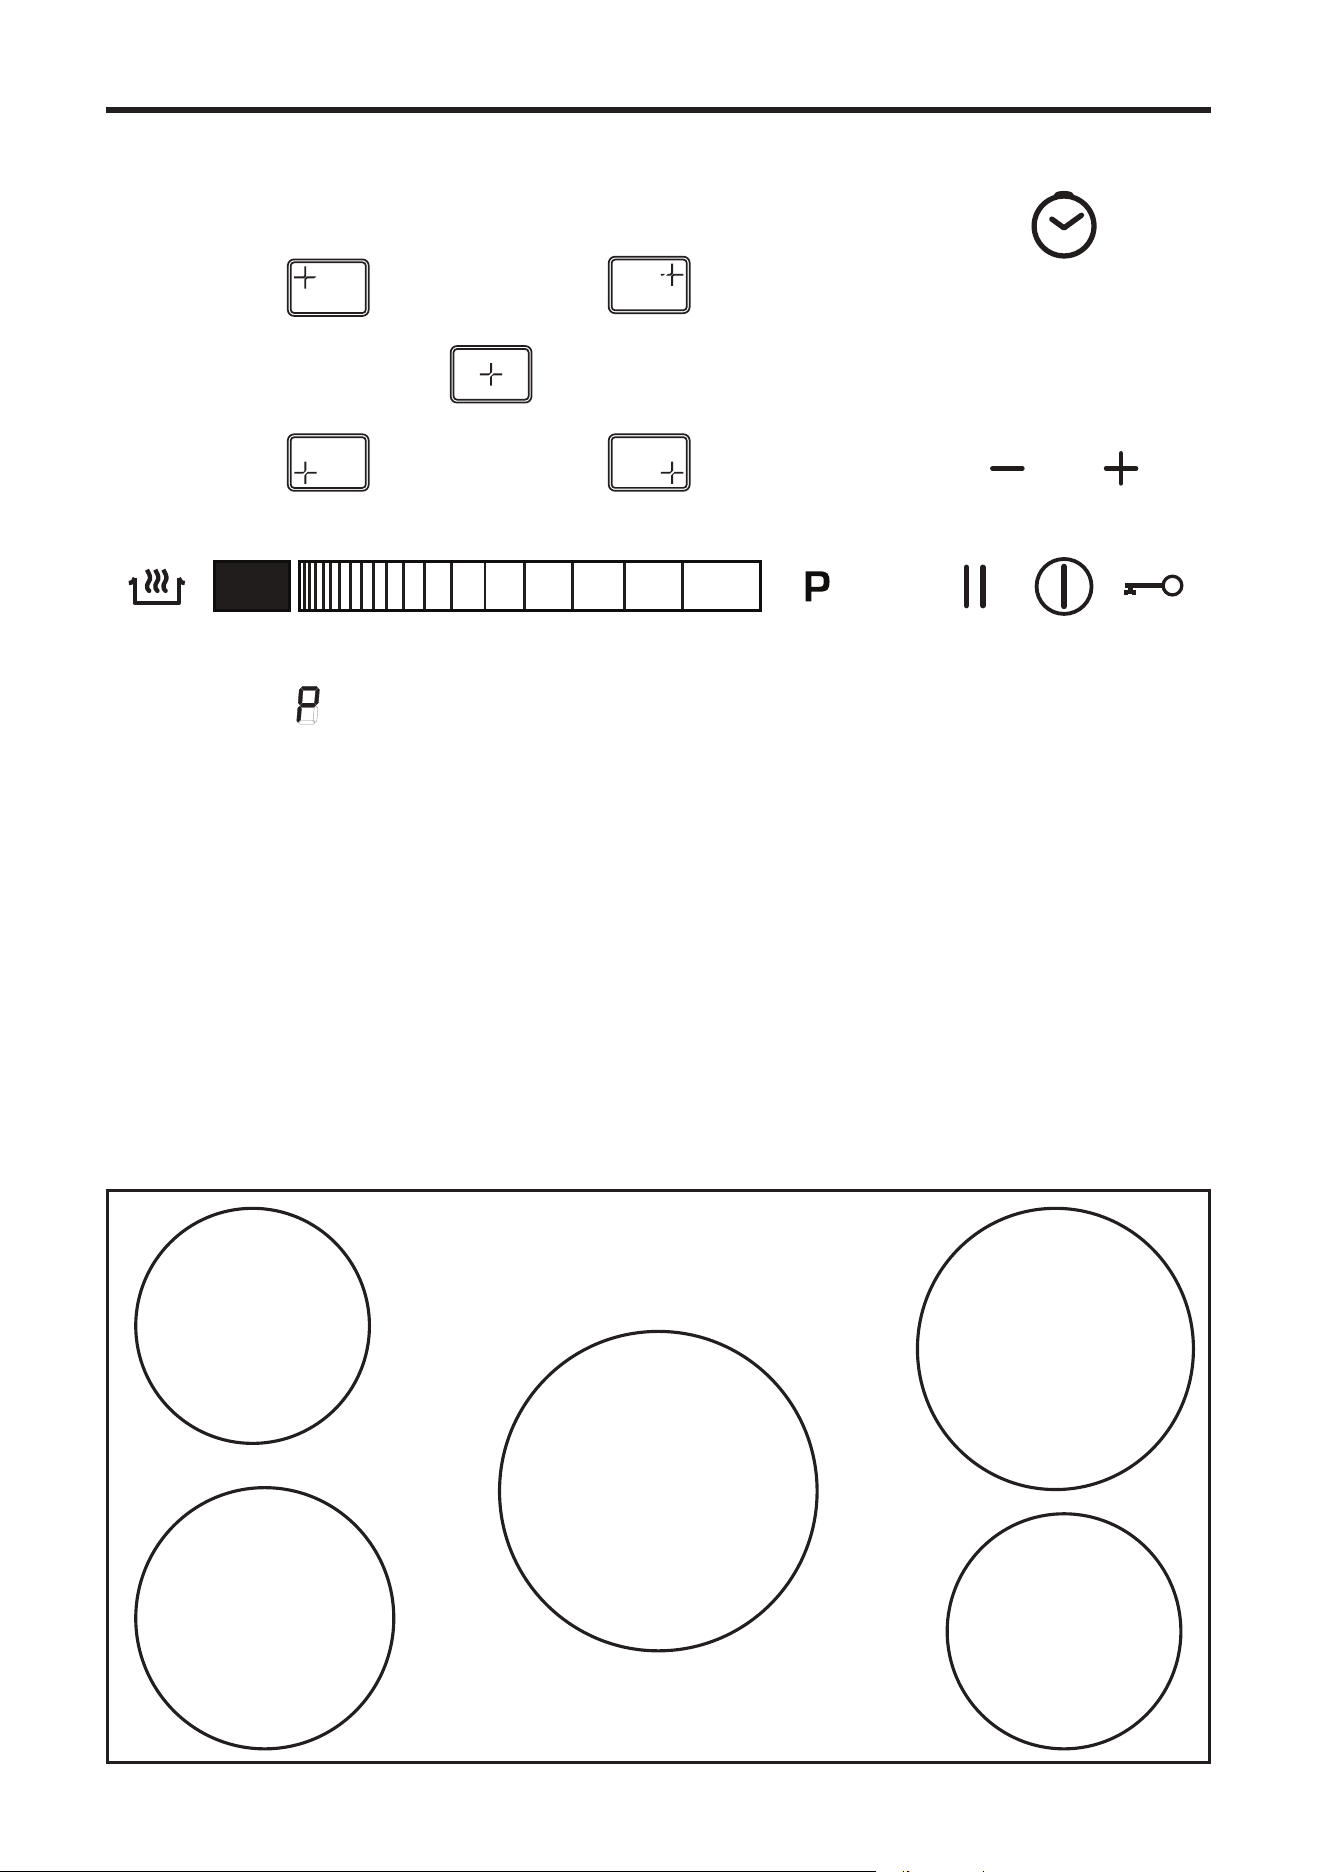
Once you have powered on the
induction hob, you have 10
seconds to set the power or use
the timer, before the induction
KRELVDXWRPDWLFDOO\VZLWFKHGR
USING THE HOB
6.220
USING THE HOB
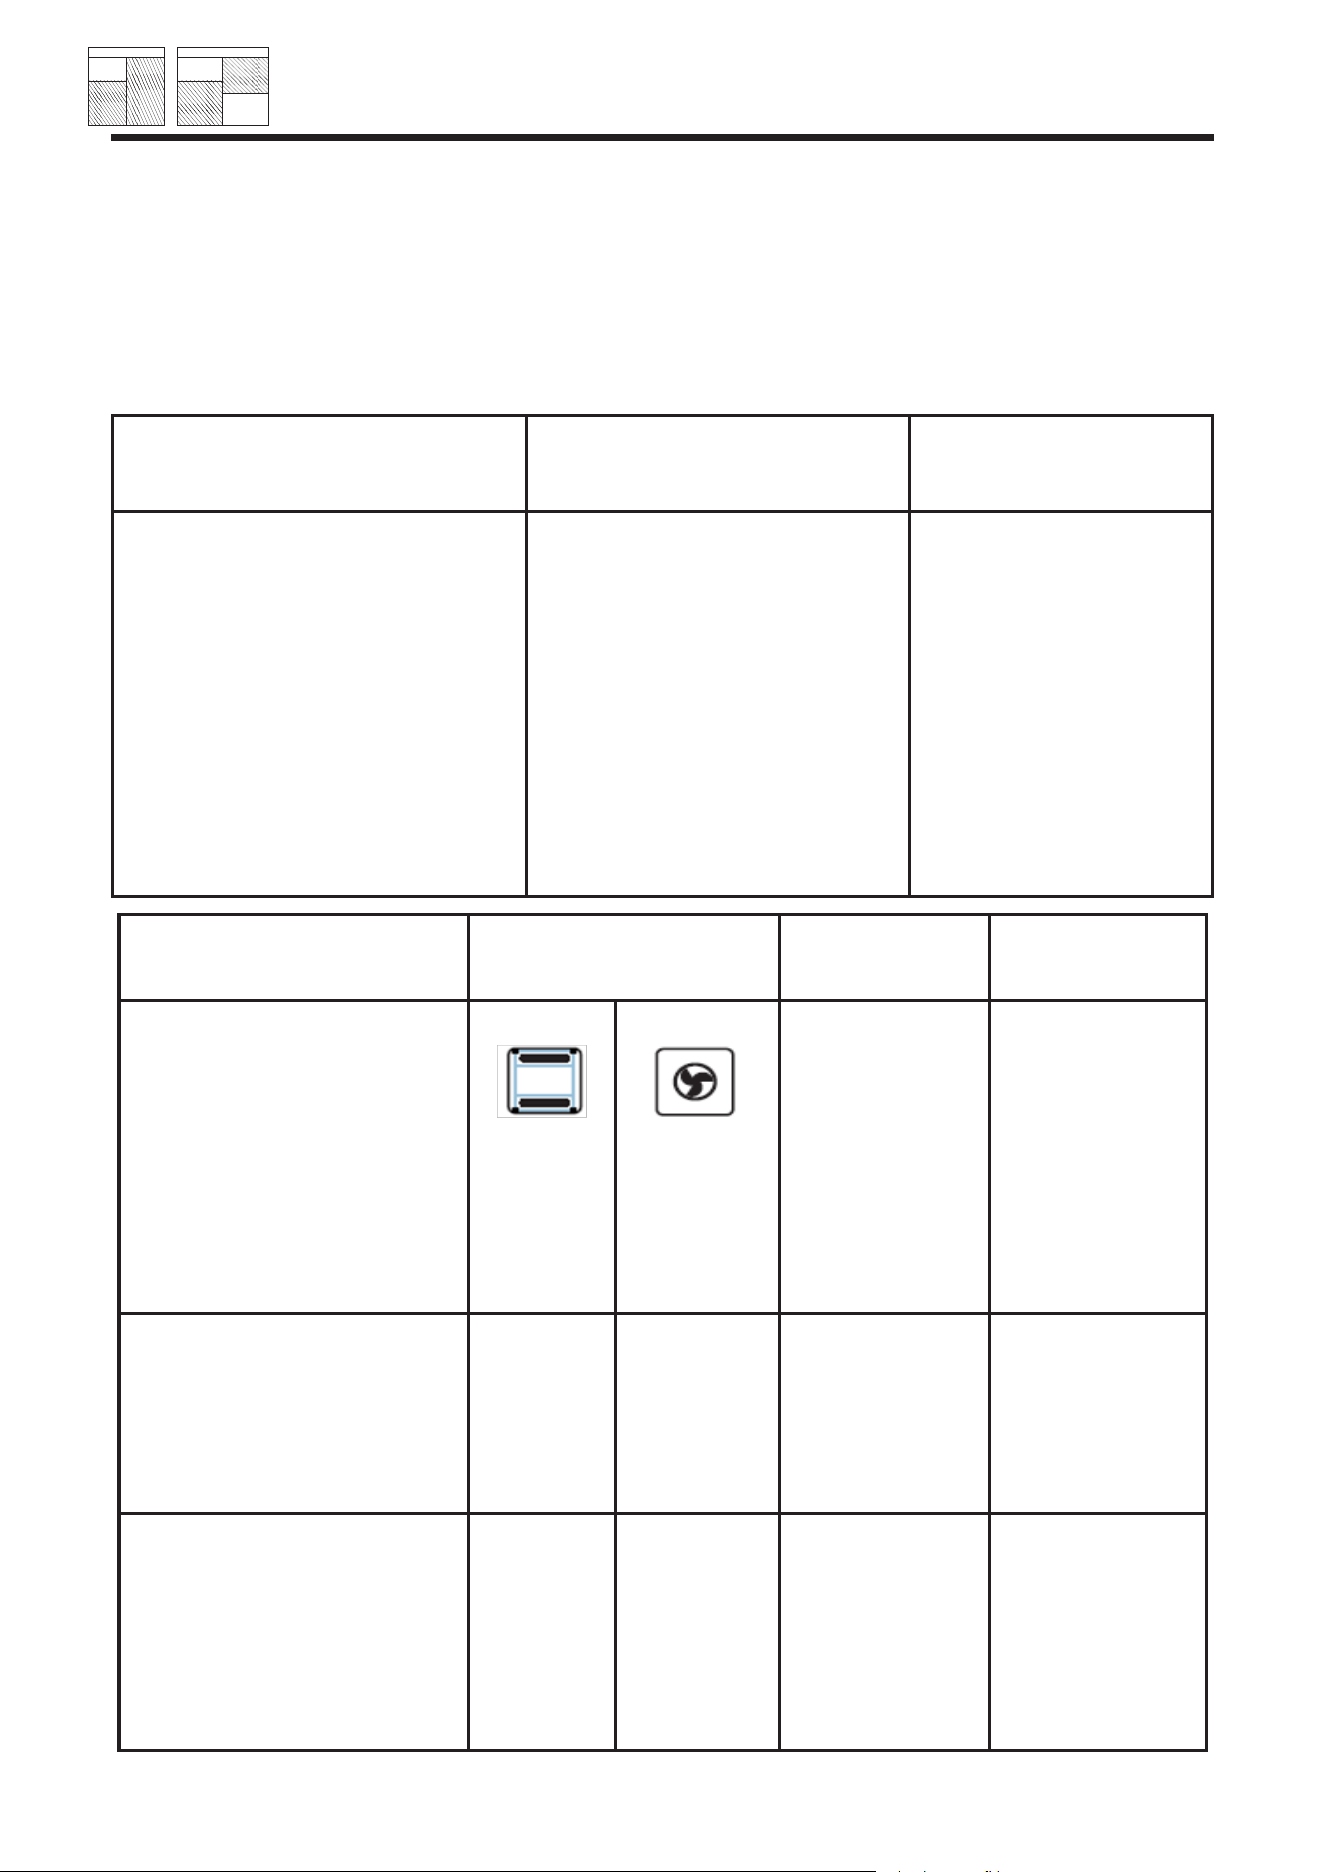
Feature Symbol Description
Eco power
,QGXFWLRQ3RZHULVWKHPRVWHQHUJ\HFLHQWPHDQVRI
cooking food, provides fast heat up and boiling times.
Slide Control
6OLGH\RXU¿QJHUDORQJWKHJUDSKLFRUVLPSO\WRXFKWKH
graphic at the power level you require.
Digital display Secret till “lit” hob display.
No. of power
levels
13 Precise and repeatable control settings.
Special Functions
Three preset temperature controls set at 42
o
C, 70
o
C, and
94
o
C. Ideal for Melting chocolate, Warming and Rapid
Simmer respectively.
Central Power
2Q2
3RZHU2Q2IRUWKH,QGXFWLRQKRE
Power Boost
Temporarily boost the power to a cook zone by a
massive 60%.
Pause/un-pause This button pauses cooking with one touch. (cuts power)
Minute Minder
To a maximum time of 9 hours 99 minutes, you can time
anything.
Auto Time
6ZLWFK¶V2DOO
zones
Yes
$OO¿YH]RQHVFDQEHVLPXOWDQHRXVO\WLPHGWRWXUQR
automatically.
Key Lock
To prevent accidentally changing settings, press the key
graphic to lock the controls.
Pan Detection
Lets you know if the correct pans are being used and
KHOSVWRVDYHHQHUJ\:KHQDSDQLVOLIWHGRWKH]RQH
the power is automatically cut.
Overheat Pan
Detection
Yes
Helps prevent cookware from overheating providing an
additional level of safety not available on other types of
hobs.
Child lock Yes Prevents unintentional operation of the hob.
Residual Heat
Indictions
Warns you against hot surfaces but also indicates that
the residual heat which can be used as a temporary
warm zone.
Holiday Shutdown Yes
1RRSHUDWLRQLVUHTXLUHGWKHKREZLOOWXUQLWVVHOIRLI
left.

USING THE HOB
6.220
USING THE HOB
About the induction hob
The induction hob provides the most
HQHUJ\HFLHQWKREWHFKQRORJ\DYDLODEOH
The induction system provides superior
heat up and cool down times for pans -
you get fast, precise, repeatable power
control.
As induction only heats up the pan, there
is no lost heat from the cooking process,
which in turn, limits the heat generated in
the kitchen.
Auto Power Tuning
Induction hobs have a unique power
tuning system that automatically tunes
the power to the size of the pan base this
ensures energy isn’t wasted.
Touch Controls
The touch controls for your induction have
EHHQGHVLJQHGWRSURYLGH\RXZLWK¿QJHU
touch control of your hob, providing
accurate and repeatable power settings
for cooking and an easy clean surface that
can be easily wiped over.
Each cook zone displays it’s individual
power setting.
Using the Touch Controls
To select a cook zone or the timer, simply
WRXFKWKHJUDSKLFVOLGHUXVLQJWKHÀDW
RI\RXU¿QJHUQRWWKHWLS7KHFRQWUROV
respond to touch, so you don’t need to
apply any pressure.
Once you have powered on the induc-
tion hob, you have 10 seconds to set the
power or use the timer.
If the red displays disappear, simply press
the power button again.
Always ensure the control area is clean,
dry and free from of any objects (e.g.
utensils, tea towels and cloths). Spillages
DQGZDWHUPD\PDNHWKHFRQWUROVGLFXOW
to operate.
Basic Hob Function
7XUQLQJRQWKHKRE
8VHWKHRQREXWWRQ
$FWLYDWLQJDFRRN]RQH
Select the slider and operate by sliding
\RXU¿QJHUDFURVVWKHJUDSKLFRU
touching the graphic at the desired power
level (0-9).
Modifying the power setting whilst
cooking
7XUQLQJRLQGLYLGXDOFRRNLQJ]RQHV
1. Decrease the power setting until the
display shows 0. If the cook zone
surface is hot to touch, H will replace
0 in the display.
Small Pan
Large Pan
USING THE HOB
6.220
USING THE HOB
Induction controls
Power Boost
The power boost is a function that can
be used to temporally boost the normal
maximum power for a cook zone by
borrowing the available power from a
“paired zone”.
All the cook zones have this function.
The Power Boost is activated by sliding or
touching the P.
Note The Power Boost function will only
operate for a limited time and is also
under thermal control. This means the
power boost will deactivate
automatically if the product is hot, to
protect the internal electronic components
of the hob and to prevent the cookware
from overheating.
PP
PP
PP
PP
120mm
Smallest recommended pan diameter
USING THE HOB
6.220
USING THE HOB
Special Function Key
Touch once for Function 1 94
o
C -
Ideal for a Rapid Simmering.
Touch twice for Function 2
70
o
C - Ideal for keeping warm
Touch three times for Function 3
42
o
C - Ideal for melting or sauces
Pan detection
When a zone has been activated but no
pan has been placed on the cook zone,
the zone will recognise that there is no
pan in position. It also means the hob
only uses power when a suitable pan is
placed on the zone. This reduces the
energy used during the cooking process,
LHZKHQ\RXWDNH\RXUSDQRWKH]RQH
the hob automatically reduces the power,
and only switches back on when you
replace the pan.
Note If the
symbol does not
disappear when a pan is placed on the
zone it indicates that the pan is not
suitable for induction cooking.
SPECIAL HOB FUNCTIONS
2Q2VZLWFK
7KHFHQWUDORQRVZLWFKHQDEOHVDOORI
WKHFRRNLQJ]RQHVWREHVZLWFKHGRQR
simultaneously at a touch of a button, so
ZKHQ\RXKDYH¿QLVKHGFRRNLQJRUDUH
called away from the kitchen for any
reason you can be safe in the knowledge
that everything is under control and safe.
To Operate
1. 6HOHFWWKHRQRNH\7KHNH\QHHGV
to be pressed for at least 1 second to
activate, this is to ensure that the
hob cannot be activated
unintentionally.
Note:
All other keys only need to be pressed for
0.3 seconds to be activated/deactivated.
Note:
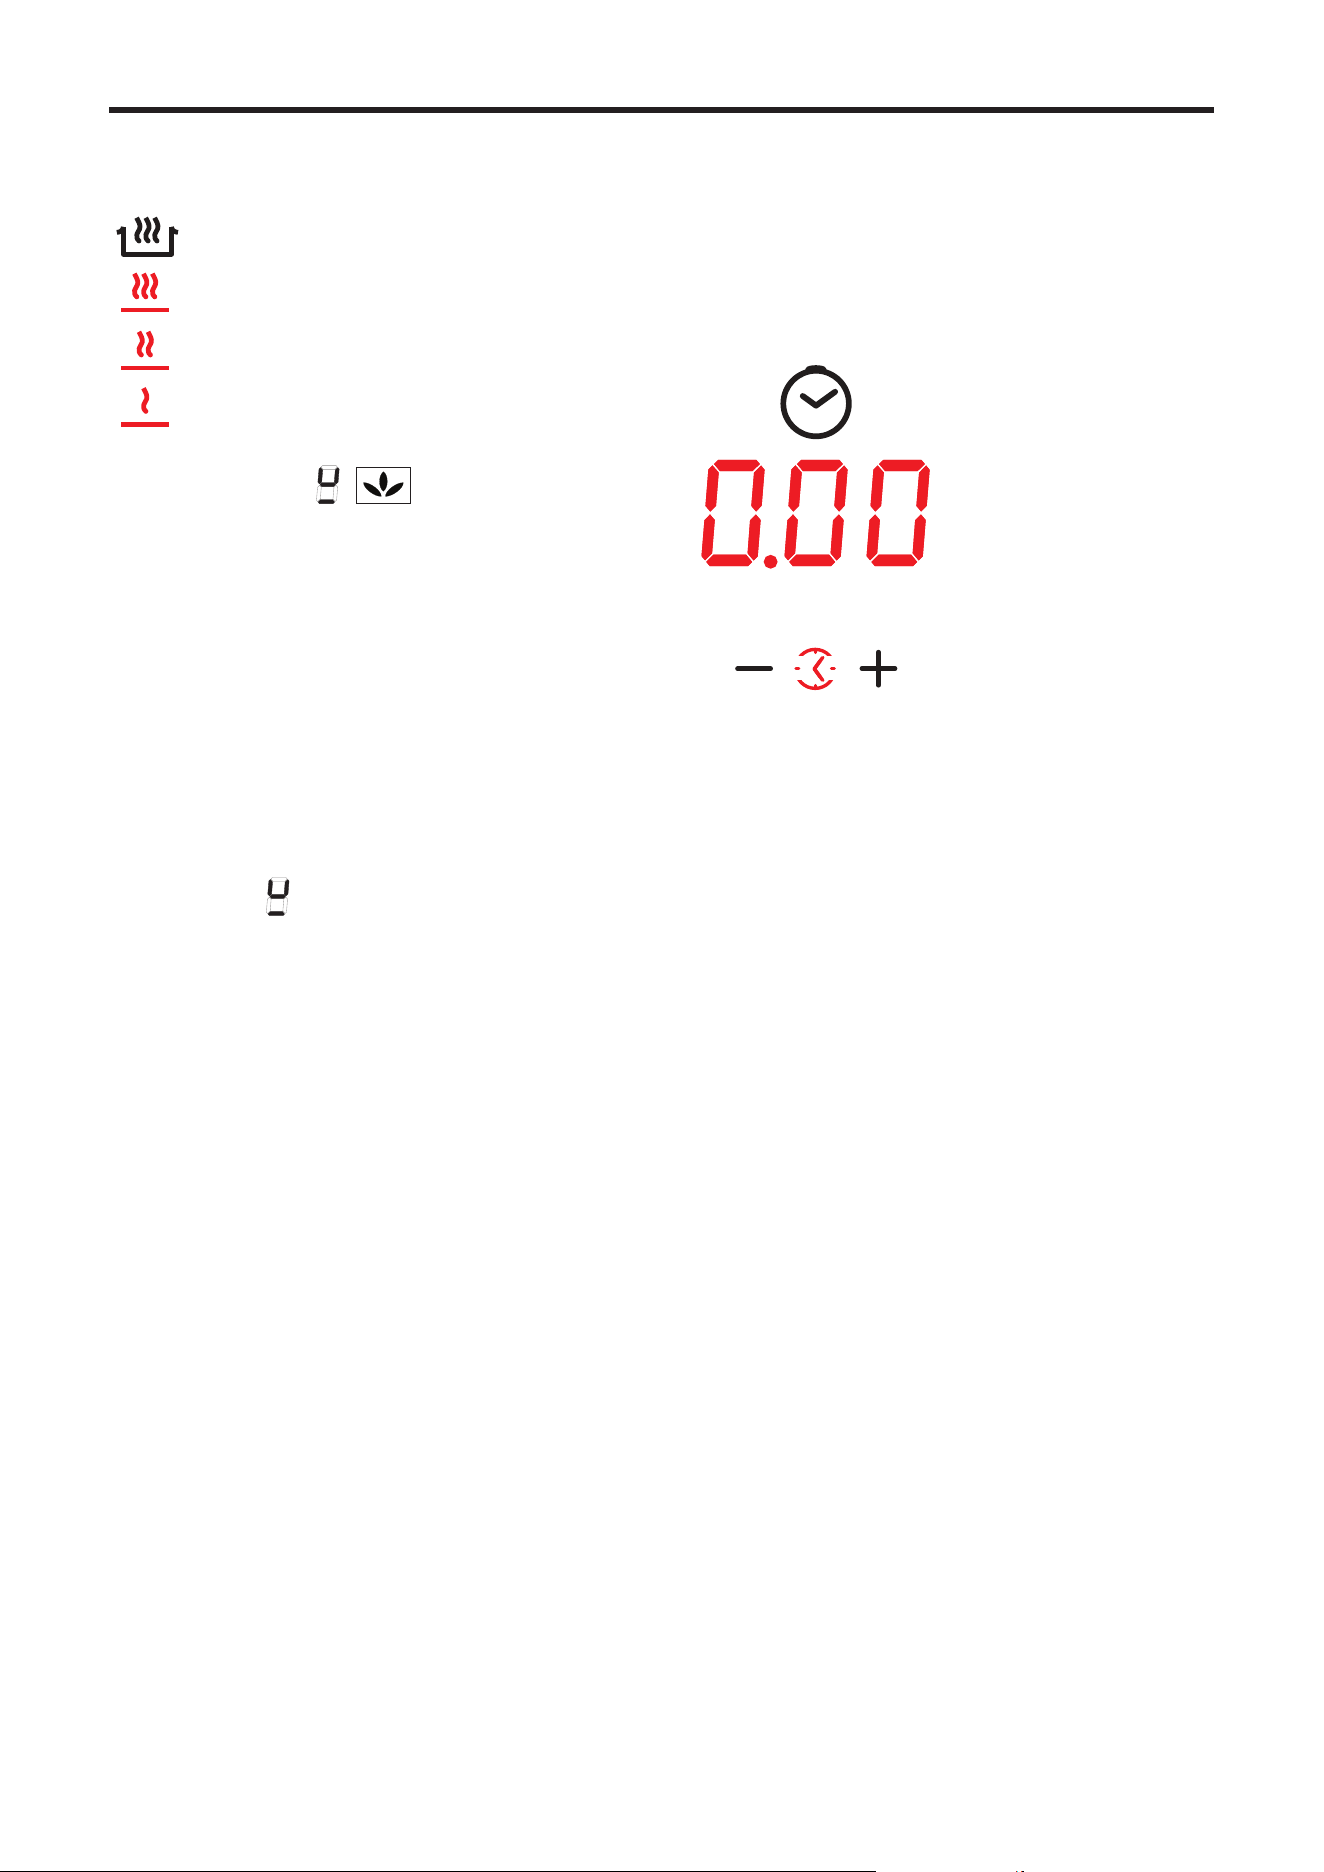
“H” will appear on any cook zone display
that is still hot to touch.
Using the Timer
min
The timer has up to
7 timers. 6 timers to
be assigned to the
cooking zones and
one independent
timer called egg-
timer.
The displays show
the remaining time
until the alarm is
activated.
All timers work as count down timers. The
operation range is between 1 min to 2h
PLQ)RUWLPHVOHVVWKDQPLQVWKH
display is exact to the second.
Before activating a timer the control has
to be switched on. Switching the
FRQWURORGHDFWLYDWHVFRRNLQJ]RQH
related timers. The egg timer stays active
DIWHUVZLWFKLQJWKHFRQWUROR
A symbol next to the zone will be lit when
a timer is set to that zone
Activating Cooking Zone Timer
To activate the timer, press both the plus
(+) and minus (-) keys together.
A timer can be activated for each active
cooking zone. After selecting the timer the
cooking zone related luminous symbol is
fully lit and the timer display shows 0.00.
For the following 10 sec it is now pos-
sible to assign a timer value to the active
cooking zone. After 10 sec without input,
the timer function is deactivated and the
GLVSOD\LVVZLWFKHGRDJDLQ8VLQJWKH
timer selection key again (as long as no
value was set) the next active cooking
zone can be selected.

USING THE HOB
6.220
USING THE HOB
Setting a timer value
By pressing the timer keys, a timer
value can be set. If the timer-plus-
NH\LVSUHVVHG¿UVWWKHGLVSOD\VWDUWV
with 1 min and can be increased in 1
min steps. If the timer-minus-key is
SUHVVHG¿UVWWKHWLPHUVWDUWVZLWK
min and can be decreased in 1 min
steps.
Pressing the key permanently speeds
up the timer adjustment. The speed
will also increase while the key is
held. (the time between two time
steps reduces).
If a timer has expired the timer alarm
is activated and the assigned cooking
]RQHLVLPPHGLDWHO\VZLWFKHGR
The cooking zone display shows 0 or
H.
If no user input stops the alarm
signal it will be on for maximum 2
PLQXWHV
The alarm can be deactivated
E\VZLWFKLQJRWKHFRQWURO
using the main switch or by
pressing the two timer keys or
it will be deactivated automatically after 2
minutes.
6ZLWFKLQJRDWLPHURUFKDQJLQJWKH
time setting
7KHWLPHUYDOXHFDQEHPRGL¿HGDWDQ\
time by selecting the timer and then by
pressing the (+ or -) timer key.
To stop an active timer the value can be
set to 0. Pressing plus and minus
simultaneously for 2 seconds also resets
the timer value to 0.00.
Minute Minder
The minute minder buzzes when the time
VHWKDVH[SLUHG,WGRHVQRWVZLWFKRDQ\
zone.
To operate:
1. 7XUQRQWKHKREXVLQJWKHRQRNH\
2. Select the timer by pressing the +
and - keys together (do not activate
any cook zone).
3. Set the right hand digit up to 9 min-
utes (Single Minutes Units) and wait a
couple of seconds.
4. The display will now indicate for you
to set the left hand digit, up to 90
minutes (10 Minute Units).
The timer is now set and begins
counting down. (No zone indicator
light should be set).
6. You can now use the hob as normal.
:KHQWKHWLPHLVXS
1. The corresponding indicator in the
WLPHUGLVSOD\ZLOOÀDVKWKHWLPHUZLOO
beep.
2. Touch any control to stop the
beeping.
Warning! - Never leave the hob
unattended when in use, even when you
KDYHVHWWKHWLPHUWRWXUQRWKHFRRN
zone.
Additional timer information
To modify or cancel a timer setting follow
VWHSVWRDERYH
To set the timer for additional zones follow
VWHSVWRDERYH
If multiple zones have been set for timed
operation, the timer display will always
display the time for the cook zone with
the shortest time remaining.
7RFKHFNWKHWLPHUVHWWLQJIRUDGLHUHQW
cook zone, press the plus and minus keys
together until the clock symbol
illuminates next to the chosen cook zone.
7KHUHPDLQLQJWLPHZLOOEULHÀ\DSSHDULQ
the timer display.
min
USING THE HOB
6.220
USING THE HOB
Pause key
Warning!
Don’t leave pans on the hob when you’re
QRWDURXQGWDNHWKHPRWKHKHDWLI\RX
have to leave the kitchen (even if you
think it will only be for a moment, while
you answer the door or phone) or you can
use the Pause Key.
The Pause key is ideal for unexpected
interruptions when cooking. With this
button you can pause all cooking settings
(Cuts power) with one touch.
To Operate
1. Press the pause key.
Note:- All cook zones functions will pause
(no power) and will be displayed for each
cook zone.
2. To restart, press the pause button
and then within 10 sec use the
cooking zone slider left to the timer
(slide from low to higher levels).
Note:- All cook zones will automatically
resume to the previous settings.
Cookware for the induction hobs
Cookware for the induction cooking zones must be made of metal and have magnetic
properties. The base must also be the correct diameter.
Suitable Cookware for Induction Hobs Unsuitable Cookware
Enamelled steel pots with a thick base
Pots made of copper, stainless steel,
aluminium, oven-proof glass, wood,
ceramic and terra-cotta.
Cast iron pots with an enamelled base
Pots made of multi layer stainless steel,
rustproof ferrite steel or aluminium with
a special base
Pans marked for use with induction
How to establish the suitability of a pan
Check your pans with a magnet. If it sticks and it’s the correct diameter, it’s suitable for
use with induction. Also with pans that bear the symbol for suitability for cooking with
induction.
Note - when using certain pans, you may get various noises from the pans. This is due
WRWKHGHVLJQRIWKHSDQVDQGGRHVQRWHHFWWKHSHUIRUPDQFHRUVDIHW\RIWKHKRE
Pans should not be allowed to come into contact with coloured trims during use as this
may cause discolouration of the surface
USING THE HOB
6.220
USING THE HOB
Child Lock
This feature is to help prevent accidental
switching on of the hob, especially by
young children.
To activate:
Press the key lock button and pause
button together, and then release them.
Complete activation by pressing the key
lock button again.
To deactivate:
Press the key lock button and pause
button together, and then release them.
Complete activation by pressing the pause
button again.
Residual Heat indicators
,IZKHQWKHFRRN]RQHLVVZLWFKHGRWKH
glass surface is above 60°C , H will be
displayed in the cook zone display until
the glass surface drops below
DSSUR[LPDWHO\&
This feature not only warns you against
hot surfaces but also indicates that there
is residual heat which can be used as
temporary warm zone.
Note - The cook zone itself does not heat
up, but the ceramic glass does get hot
because of the hot pan conducting heat
back onto the hob glass.
Overheat Pan Protection
The hob is equipped with additional safety
systems that help to prevent cookware
from overheating, providing an additional
level of safety not available on conven-
tional hobs (such as gas and ceramic
hobs).
Approximate
Glass
Surface
Temperature
(
o
C)
Intelligent hob
safety system
200
Reduces Power Boost
setting to Power Level 9
Reduces power to 60%
of power level setting
270
6ZLWFKHVFRRN]RQHR
300
Switches whole
DSSOLDQFHR
Note - The safety temperature control
of the pans is only possible with quality
ÀDWERWWRPHGSDQVVXLWDEOHIRULQGXFWLRQ
cooking. Poor quality pans can create
air gaps between the glass and the pan,
ZKLFKDHFWVWKHDFFXUDF\RIWKH
temperature control.
Auto Stand by (Holiday Shut Down)
7KHKREZLOODXWRPDWLFDOO\VZLWFKLWVHOIR
if left unattended.
Cooking guide
For best cooking results, follow the
examples in the guide below, bearing in
mind that settings 8 and 9 are maximum
positions and should only be used for
deep frying and bringing up to the boil
quickly.
USING THE HOB
6.220
USING THE HOB
Preparation
Very fast
frying
Fast Medium Slow Simmering,
re-heating
Keeping
warm
9 8 7 6 4 3 2 1
Soup
Thin soup
Thick soup
9
9
Fish
Court-Bouillon
Deep fried
9
9
Sauces
7KLFNÀRXUEDVHG
Buttery, containing eggs
9
9
Vegetables
Spinach
Pulses
Boiled potatoes
Carrots
Saute potatoes
Frozen vegetables
9
9
9
9
9
9
9
9
9
Meat
Thin cuts of meat
Fried steak
9
9
Other types of cooking
Deep frying: frozen chips
Deep frying: fresh chips
Pressure cooking
Stewed fruit
Pancakes
Custard
To melt chocolate
Jam
Milk
Fried eggs
Pasta
Re-heating baby food
Rice pudding
Keeping food warm
Stews
9
9
9
9
9
9
9
9
9
9
9
9
9
9
9
9
9

USING THE HOB
6.220
USING THE HOB
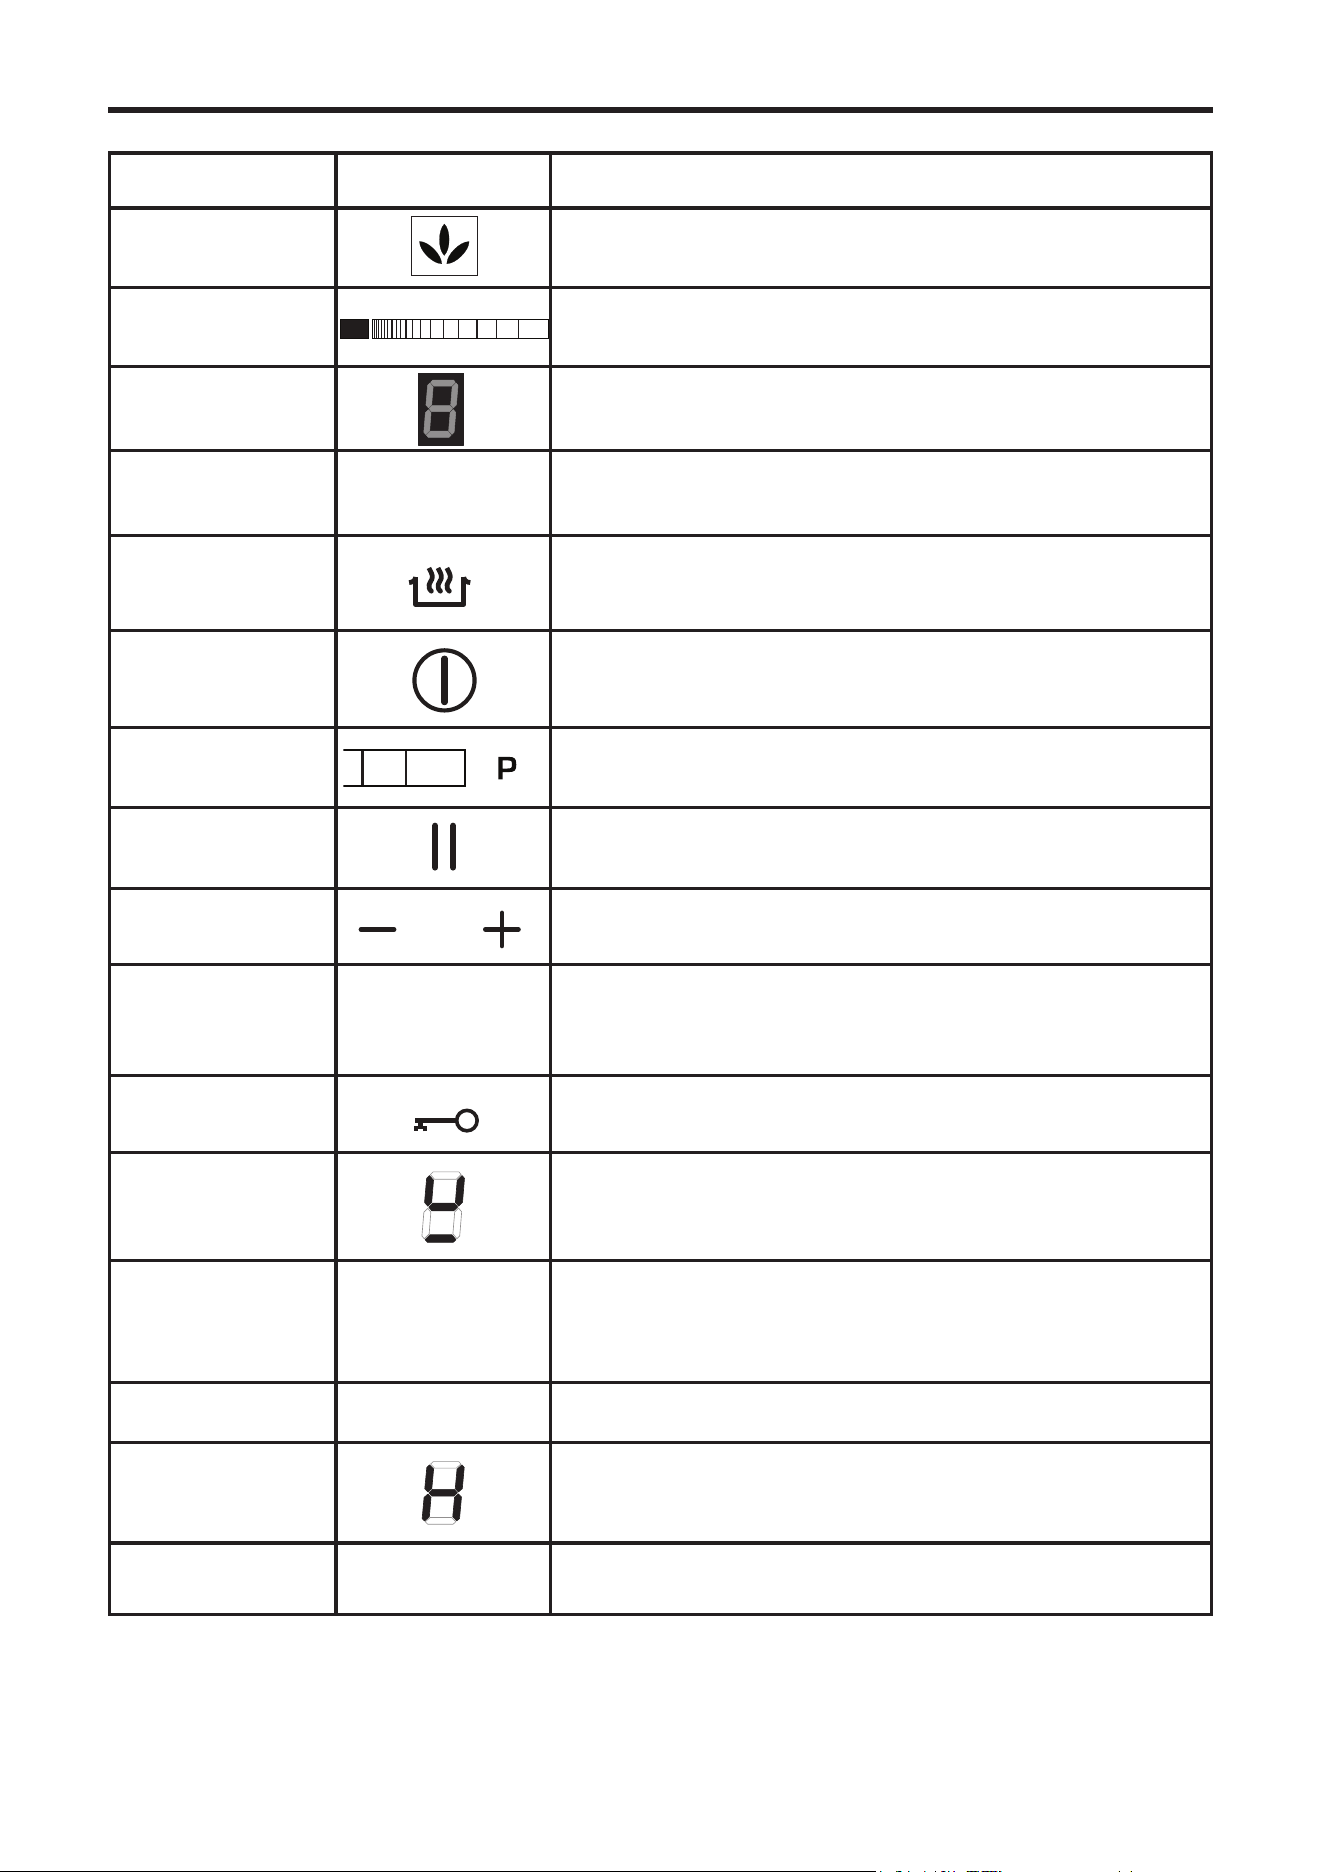
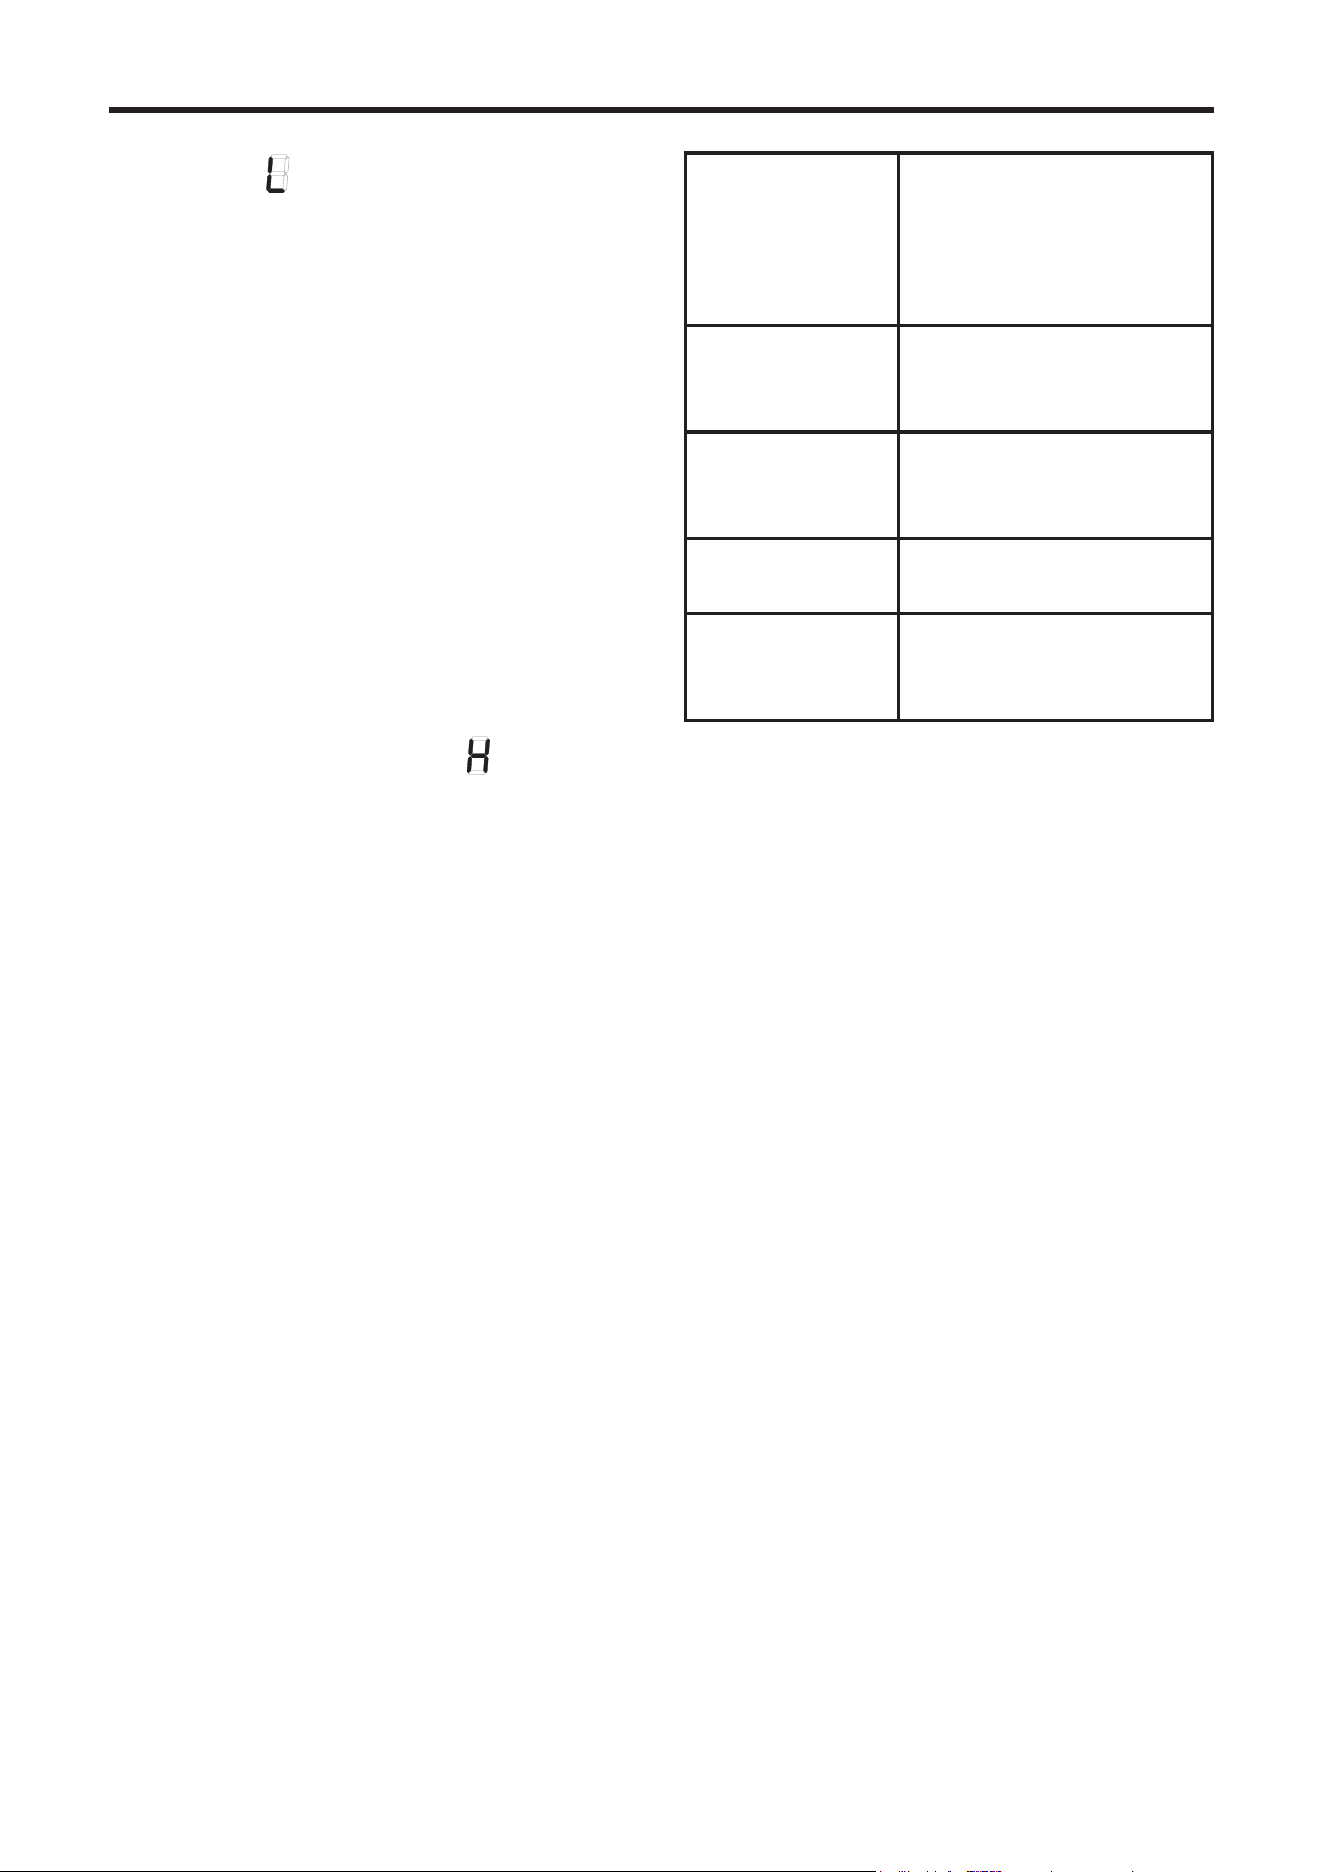
Troubleshooting with the Induction Hob
Code Problem Possible Cause Solution
Hob is not
working
in display
Child lock is activated
Deactivate child
lock
Power boost not
working
The appliance is hot,
power boost is
deactivated when the
appliance is hot to
protect the electronics
and prevents the pans
from overheating
Allow the
appliance to cool
ER21
Control unit cuts
RDIWHUSURJUDP
setting
Electronics overheating
Allow the
appliance to cool
ER400
Check mains
cable connection
and terminals
at the terminal
block are wired
correctly
E2
Overheating of
induction coil
Pan overheating
Remove pans and
allow to cool
E8
Fan blocked or
faulty
Fan inlets are blocked
or faulty fans
Check fan inlet
at the rear of the
appliance
E6
Error on power
board
No power to power
board
Please call
Customer Care
ER03 and
continuous
tone or
Water or pans on
the glass above
the user controls
Water or cookware on
the glass over the touch
control sensors
Clean any water
on surface above
user controls/
display

USING THE GRILL - ELECTRIC
Warning: Accessible parts may
become hot when the grill is in
use. Children should be kept away
%()25(<2867$57*5,//,1*
Before you use the grill, make sure you
have placed the grill shelf in the posi-
tion you need as once the grill is on you
may injure yourself if you try to move the
shelf.
Do not close the door while the grill
is in use.
Turn the grill control knob to the heat
setting you require.
On Richmond and Gourmet models
only, turn the selector control knob to
the grilling position, then select the
heat setting you require.
7RVZLWFKRUHWXUQWKHFRQWURONQRE
WRWKHµR¶SRVLWLRQ
The cooling fan will come on during
use, and may continue to run for
some time afterwards.
To adjust your results, you can turn
the grid over, or remove it altogether.
If your grill is a dual grill:
The dual grill uses all of the top ele-
ment and is ideal for grilling large
quantities of food.
The single grill uses part of the ele-
ment only, and is better suited to grill
smaller amounts of food.
The grill pan
This appliance comes with a grill pan and
a grid.
Shelf & Grid adjustments
Speed of grilling can be adjusted by
changing the shelf position or the turning
the grill pan grid
High: For thin foods and toasting.
Low: For thicker meat pieces.
Aluminium Foil
Never cover the grill pan or grill trivet
with foil, or allow fat to build up in the
JULOOSDQDVWKLVFUHDWHVD¿UHKD]DUG
Types of grill
Fixed rate grill: has a full ‘on’
VHWWLQJDQGµR
Variable rate grill:
has adjustable heat settings
ORZWRKLJKRUKLJK
depending on the model.
Single grill: has one grill element. The
grill pan trivet MUST be inverted when
using the single grill function.
Dual grill: has two grill elements which
can be used together, or as a single
grill.
For best results:
3UHKHDWWKHVLQJOHJULOOIRU
minutes and the dual grill for3
minutes.
i
i
i
USING THE GRILL - ELECTRIC
Food Type
Time Approx
(mins)
Bacon
Sausages
Chops
/DPE
3RUN
Toast
URXQGV
URXQGV
1 - 2 (per side)
1 - 2 (per side)
Bread products
%XQV
7HDFDNHV
1 - 2 (per side)
1 - 2 (per side)
Cheese on toast
URXQGV
URXQGV
Fish
¿OOHWV
Chicken
¿OOHWV 20 - 30
Beef Steaks
UDUH
PHGLXP
ZHOOGRQH
Gammon Steaks
7 - 10
As with any cooking guide, all
times are approximate and can
be adjusted to suit personal
taste.
i

USING THE TOP OVEN
When you are cooking keep children
away from the vicinity of the oven.
Caution: The top element gets
extremely hot when in use, so
take extra care to avoid touch-
ing it.
The top oven is a conventional oven.
Note: The top oven is not controlled by
the programmer.
To turn on the top oven
Turn the temperature control knob until
the required temperature is selected.
The white thermostat indicator will come
on until the selected temperature is
UHDFKHGDQGWKHQJRR,WZLOOWXUQRQ
DQGRSHULRGLFDOO\DVWKHWKHUPRVWDW
operates to maintain the selected tem-
perature.
7RVZLWFKRUHWXUQWKHWRSRYHQFRQWURO
NQREWRWKHRSRVLWLRQ
Important: Never put items directly on
the base of the oven, or cover the oven
base with foil, as this may cause the ele-
ment to overheat. Always position items
on the shelf.
The cooling fan
When the top oven is switched on, you
will hear the cooling fan come on - this
keeps the fascia and control knobs of the
appliance cool during cooking. The fan
may continue to operate for a period after
WKHRYHQFRQWUROKDVEHHQVZLWFKHGR
Preheating
The oven must be preheated when cook-
ing frozen or chilled foods, and we rec-
ommend preheating for yeast mixtures,
EDWWHUVVRXpVDQGZKLVNHGVSRQJHV
Preheat the oven until the indicator light
VZLWFKHVRIRUWKH¿UVWWLPHWKLVZLOO
WDNHXSWRPLQXWHVGHSHQGLQJRQWKH
temperature selected.
If you are not preheating the oven, the
cooking times in the following guide may
need to be extended, as they are based
on a preheated oven.
Shelf positions
When cooking frozen or chilled food, use
the highest possible shelf position, while
allowing some clearance between the
food and the top element.
The oven shelf must be positioned with
the up-stand at the rear of the oven and
facing up. Position baking trays and roast-
ing tins on the middle of the shelves, and
leave one clear shelf position between
shelves, to allow for circulation of heat.
When using the top oven
As part of the cooking process, hot air is
expelled through a vent at the top of the
oven(s). When opening the oven door,
care should be taken to avoid any possible
contact with potentially hot air, since this
may cause discomfort to people with sen-
sitive skin. We recommend that you hold
the underneath of the oven door handle.
USING THE TOP OVEN
TOP OVEN BAKING GUIDE
Cooking times
These times are based on cooking in a
preheated oven.
These cooking times are approximate,
due to the size and type of cooking dish
and personal preferences.
Shelf positions
As a general guide, when cooking frozen
or chilled food, use the highest pos-
sible shelf position, while allowing some
clearance between the food and the top
element. Follow the instructions given on
packaging.
Item Temperature
(°C)
Shelf
Position
Approximate cooking time
Small cakes
Victoria sandwich
(2 x 180mm / 7”)
Swiss roll
Semi rich fruit cake
(180mm x 7”)
Scones
Meringues
180
160
200
140
90 - 100
1
1
1
1
1
1
PLQV
PLQV
8 - 12 mins
2¼ - 2¾ hours
PLQV
2 - 3 hours
Shortcrust pastry
3XÀDN\SDVWU\
Choux pasrty
200 - 210
200 - 210
200 - 210
1
1
1
Depends on size & type of cook-
LQJGLVKDOVRWKH¿OOLQJ
Biscuits
Sponge pudding
Milk pudding
160 - 200
140
2
1
1
10 - 20 mins
PLQV
2 - 2½ hours
Cooking temperatures
The temperature settings and time given
in the Baking Guides are based on dishes
made with block margarine. If soft tub
margarine is used, it may be necessary
to reduce the temperature setting. If a
UHFLSHJLYHVDGLHUHQWWHPSHUDWXUHVHW-
ting to that shown in the guide, the recipe
instruction should be followed.
Because the top oven is more compact,
it may be necessary to reduce cooking
WHPSHUDWXUHVVSHFL¿HGLQUHFLSHVE\XSWR
20°C.
Use the baking guide as a reference for
determining which temperatures to use.

USING THE MAIN OVEN - ELECTRIC
Accessible parts may be
KRWZKHQWKHRYHQLVXVHG
Young children should be
NHSWDZD\
To switch on the oven
Turn the oven control knob(s) to the
required setting.
7KHZKLWHWKHUPRVWDWQHRQLI¿WWHGZLOO
come on until the selected temperature
LVUHDFKHGDQGWKHQJRRLWZLOOWXUQ
RQDQGRSHULRGLFDOO\DVWKHWKHUPRVWDW
operates to maintain the selected
temperature.
7RVZLWFKRUHWXUQWKHFRQWURONQREWR
WKHRSRVLWLRQ
When using the oven
As part of the cooking process, hot air
is expelled through a vent in the oven.
When opening the oven door, care should
be taken to avoid any possible contact
with potentially hot air, since this may
cause discomfort to people with sensitive
skin. We recommend that you hold the
underneath of the oven door handle.
PREHEATING
Fanned oven
When cooking sensitive items such as
VRXHDQG<RUNVKLUHSXGGLQJVRU ZKHQ
cooking bread, we recommend that the
oven is preheated until the neon switches
RIRUWKH¿UVWWLPH)RUDQ\RWKHUW\SHV
of cooking, a preheat may not be re-
quired.
Conventional oven
Preheating is always required
Manual Operation (Left hand oven
only)
The programmer must be set to manual
operation before the main oven can be
used. If A (Auto) is on the programmer
display, return the oven to manual by
by pressing the plus and minus buttons
simultaneously or the Menu button where
applicable. Any programme which has
been set is cancelled.
The cooling fan
The cooling fan may operate when the
main oven is on and may continue to
operate for a period after the oven has
EHHQVZLWFKHGR
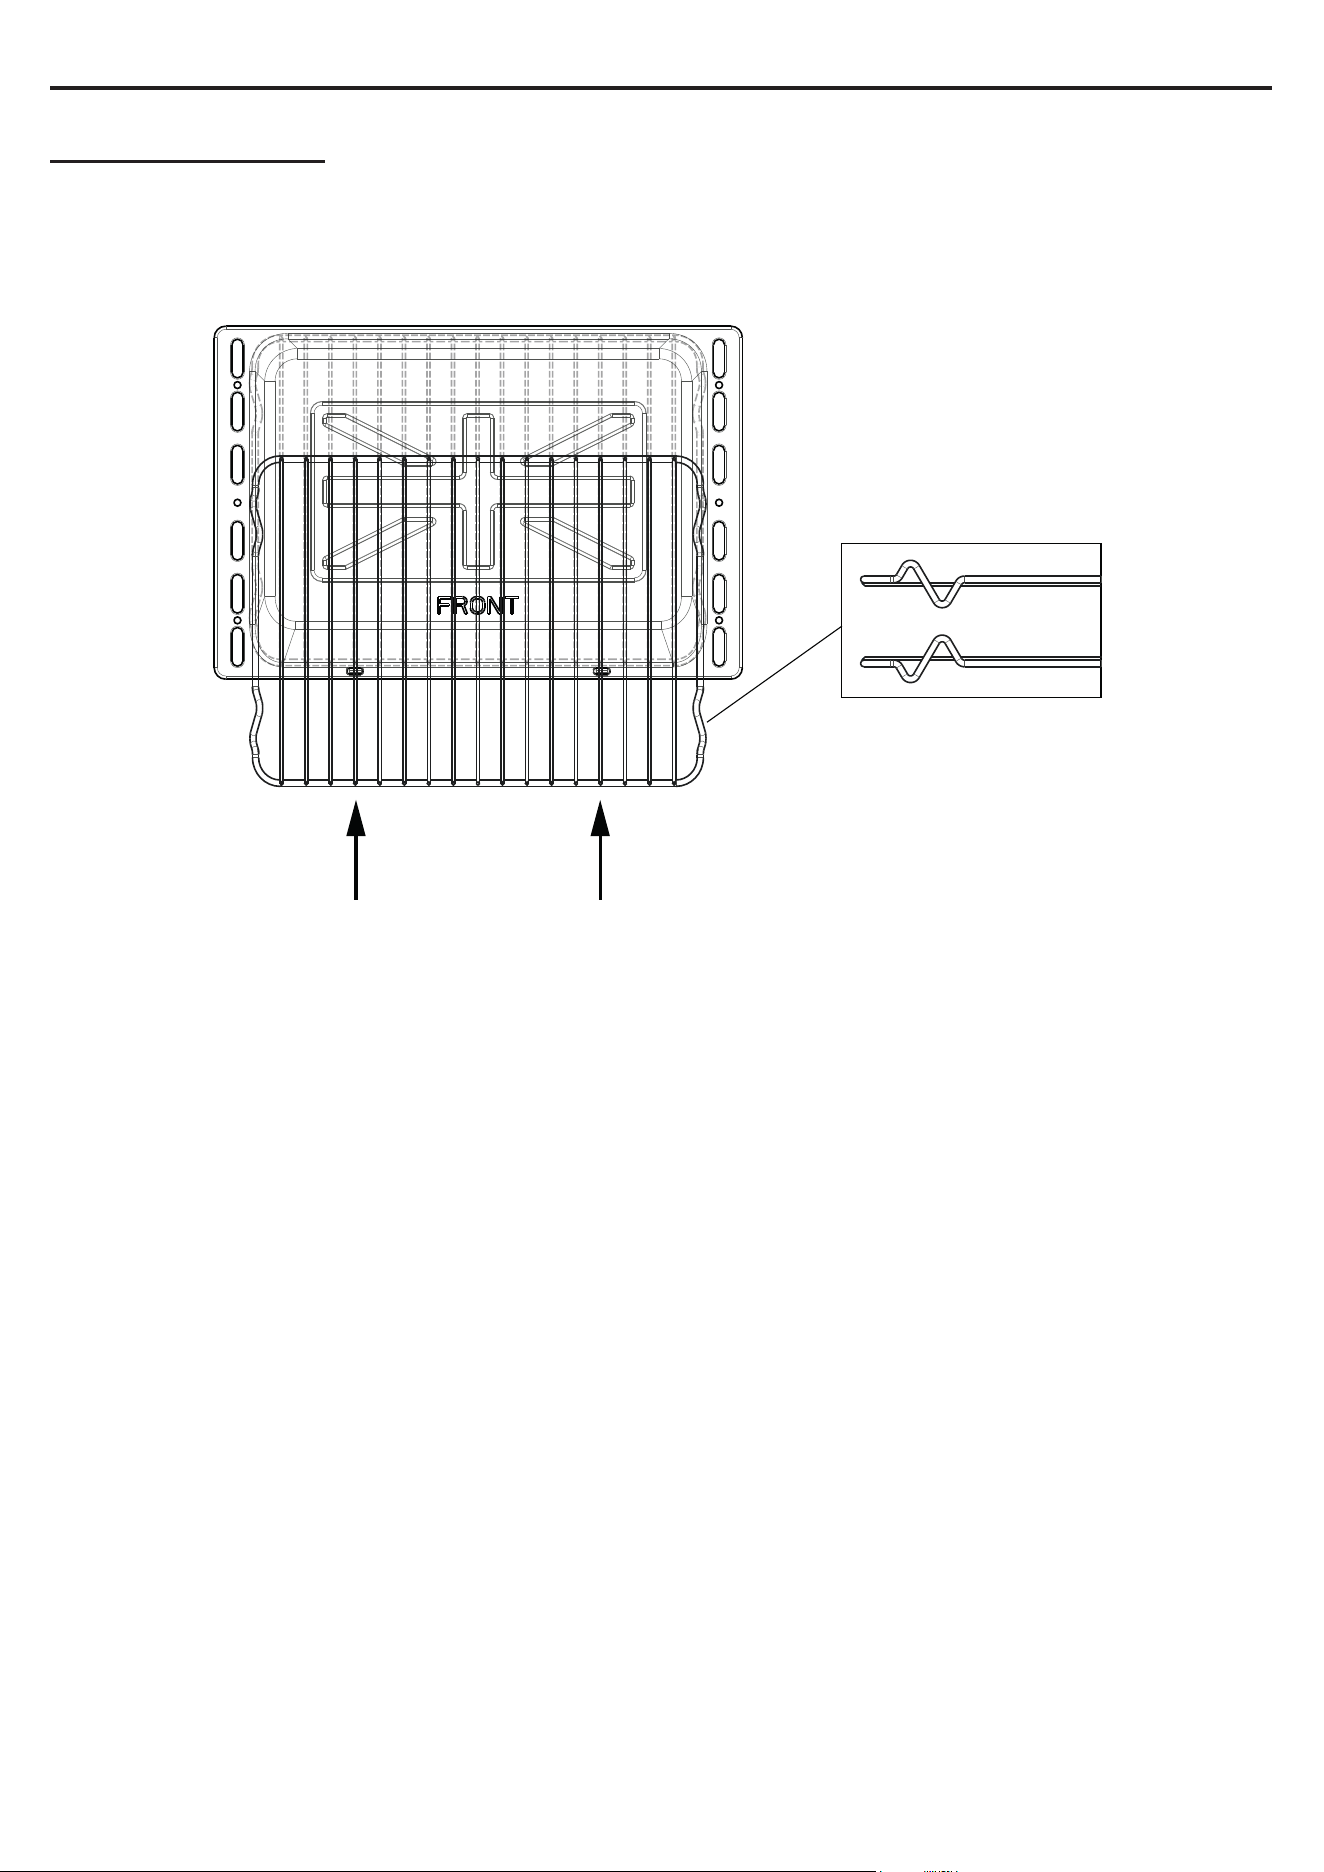
OVEN FURNITURE
Oven shelves
The oven shelf must be positioned with
the upstand at the rear of the oven and
facing upwards.
Position baking trays and roasting tins on
the middle of the shelves.
Baking tray and roasting tins
For best cooked results and even brown-
ing, the recommended size baking trays
and roasting tins that should be used are
as follows;
%DNLQJWUD\PP[PP
This size of baking tray will hold up to 12
small cakes.
Roasting tin 370mm x 320mm
We recommend that you use good quality
cookware. Poor quality trays and tins may
warp when heated, leading to uneven
baking results.

USING THE MAIN OVEN - ELECTRIC
Slow cooking ( Setting or 100°C)
Make sure that frozen foods are
thoroughly thawed before cooking.
Do not slow cook joints of meat
or poultry weighing more than
2¼kg/4½lb.
Preheat the oven to 170°C and cook
for 30 minutes, then adjust the oven
control to or 100°C (slow cook
setting) for the remainder of the
cooking time.
Slow cooking times will be about 3
times as long as conventional cooking
times.
Do not open the oven door
unnecessarily during slow cooking,
as this will result in heat loss at low
temperatures.
$OZD\VXVHGLVKHVZLWKWLJKWO\¿WWLQJ
OLGV7RUHFWLI\EDGO\¿WWLQJOLGVSODFH
foil over the dish underneath the lid.
Aluminium foil
Use foil only to cover food or cooking
dishes, using foil to cover the shelves or
RYHQEDVHFUHDWHVD¿UHKD]DUG
Cooking with a fanned oven
$VWKLVLVDKLJKHFLHQF\RYHQ
you may notice the emission of
steam from the oven when the door
LVRSHQHG3OHDVHWDNHFDUHZKHQ
RSHQLQJWKHGRRU
If you are used to cooking with a
FRQYHQWLRQDORYHQ\RXZLOO¿QGDQXPEHU
RIGLHUHQFHVWRFRRNLQJZLWKDIDQRYHQ
ZKLFKZLOOUHTXLUHDGLHUHQWDSSURDFK
There are no zones of heat in a fan oven
as the convection fan at the back of
the oven ensures an even temperature
throughout the oven.
This makes it ideal for batch baking - eg;
when planning a party as all the items will
be cooked within the same length of time.
Foods are cooked at a lower temperature
than a conventional oven, so
conventional recipe temperature may
have to be reduced. Please refer to the
conversion chart.
Preheating is generally not necessary as a
fan oven warms up quickly.
7KHUHLVQRÀDYRXUWUDQVIHUHQFHLQDIDQ
oven, which means you can cook strong
VPHOOLQJIRRGVVXFKDV¿VKDWWKHVDPH
time as mild foods - eg; milk puddings.
When batch baking foods that will rise
during cooking - eg; bread - always
ensure that enough space has been left
between the shelves to allow for the rise.
Notes:
When 2 or more shelves are being used, it
may be necessary to increase the cooking
time slightly.
Because the 2 oven shelves are wider
than in many ovens, it is possible to cook
2 items per shelf - eg; 2 victoria
sandwiches or 2 casseroles.
When roasting meats, you will notice that
fat splashing is reduced, which is due in
part to the lower oven temperatures, and
will help keep cleaning of the oven to a
minimum.
Because a fan oven has an even
temperature throughout the oven, there is
no need to follow the shelf positions given
in the baking guide.

USING THE MAIN OVEN - ELECTRIC
There is no need to interchange dishes
RQWRGLHUHQWVKHOYHVSDUWZD\WKURXJK
cooking, as with a conventional oven.
To help the air circulate freely
Position the shelves evenly within the
oven and maintain a clearance from the
oven roof and base.
If more than one cooking dish or
baking tray is to be used on a shelf, leave
DJDSRIDWOHDVWPPEHWZHHQWKH
items themselves and the oven interior.
Keep Warm
(Setting or 70°C)
This setting temperature is set to allow
the user to keep food warm without over
cooking. This setting can also thaw frozen
foods, or warm plates.
Do not use this as a cooking function.
Defrosting and cooling in the
main oven
To defrost frozen foods, turn the main
oven control to the Bread Proving
position, place the food in the centre of
the oven and close the door.
To cool foods after cooking prior to
refrigerating or freezing, turn the main
oven control to the defrost position and
open the door.
Defrosting times
6PDOORUWKLQSLHFHVRIIUR]HQ¿VKRUPHDW
HJ¿VK¿OHWVSUDZQVPLQFHZLOOWDNH
approximately 1 - 2 hours.
Placing the food in a single layer will
reduce the thawing time.
A medium sized casserole or stew will
take approximately 3 - 4 hours.
A 1½kg/3lb oven ready chicken will take
DSSUR[LPDWHO\KRXUVUHPRYHWKHJLEOHWV
as soon as possible.
Be safe
'RQRWGHIURVWVWXHGSRXOWU\XVLQJWKLV
method.
Do not defrost larger joints of meat and
poultry over 2kg/4lb using this method.
Never place uncooked food for defrosting
next to cooked food which is to be cooled,
as this can lead to cross contamination.
'HIURVWLQJPHDWSRXOWU\DQG¿VKFDQEH
accelerated using this method but make
sure they are completely thawed before
cooking thoroughly. Place meat and poul-
try on a trivet in a meat tin.
MAIN OVEN BAKING GUIDE
Cooking times & temperatures
The temperature settings and times given
in the baking guide are based on dishes
made with block margarine. If soft tub
margarine is used it may be necessary to
reduce the temperature setting.
Allow enough space between shelves for
food that will rise during cooking.
Do not place items on the oven base as
this will prevent air circulating freely.
USING THE MAIN OVEN - ELECTRIC
Note: This is a fanned oven, therefore
some adjustment will have to be
made to conventional cooking
temperatures. The table below shows
conventional cooking temperatures,
fanned oven temperatures and gas marks.
For optimum results,
conventional temperatures need to be
converted to fanned oven temperatures.
For example, an item which would
normally cook at a conventional
temperature of 180 °C, will now cook at
the fanned oven temperature of 160°C.
Conventional temperature
(°C)
Fanned Oven
(°C)
Gas Mark
100
110
130
140
160
180-190
200
220
230
100
110
120
130
140
160
170
180
190
200
1/4
1/4
1/2
1
2
3
6
7
8
9
Food Type Temperature
settings (°C)
Time
$SSUR[
Shelf
Position
Cakes
Small cakes
Victoria sandwich
Semi rich fruit cake
Christmas cake
Conv
190
180
Fanned
160
160
20 - 30
HRS - 3HRS
HRS - 3HRS
2 - 4
3
2
2
Puddings
Bread and butter pud-
ding
Fruit crumble
170
200
KU
40 - 1hr
3
3
Miscellaneous
Yorkshire pudding:
large
small
Shortcrust pastry
220
220
200
200
200
180
40 - 48
Depends on
¿OOLQJ
USING THE MAIN OVEN - ELECTRIC
Traditional fruit cakes
It should be remembered that ovens can
vary over time, therefore cooking times
can vary, making it
to be precise
when baking fruit cakes.
It is necessary therefore, to test the cake
before removal from the oven. Use a
warmed skewer inserted into the centre of
the cake. If the skewer comes out clean,
then the cake is cooked.
• Follow the temperatures suggested
in the recipe and then adjust
accordingly to the conversion table.
• Do not attempt to make Christmas
cakes larger than the oven can cope
with, you should allow at least 25mm
(1”) space between the oven walls
and the tin.
• Always follow the temperatures
recommended in the recipe.
• To protect a very rich fruit cake
during cooking, tie 2 layers of brown
paper around the tin.
• We recommend that the cake tin is
not stood on layers of brown paper,
as this can hinder
circulation
of air.
• Do not use soft tub margarine for
rich fruit cakes, unless
in
the recipe.
• Always use the correct size and
shape of tin for the recipe quantities.
Roast turkey
Roasting turkey involves cooking two
types of meat - the delicate light
breast meat, which must not be allowed
to dry out, and the darker leg meat,
which takes longer to cook.
The turkey must be roasted long enough
for the legs to cook, so frequent
basting is necessary. The breast meat can
be covered once browned.
• Always make sure that the turkey is
completely thawed and that the
giblets are removed before cooking.
• Turkey should be roasted at 160°C
- 180°C (fanned) or 180°C - 200°C
(conventional) for 20 minutes per
450g (1 lb), plus 20 minutes, unless
packaging advises otherwise.
• The turkey can be open roasted,
breast side down, for half of the cook
time, and then turned over for the
remainder of the cooking time.
• If the turkey is
add 5 minutes
per 450g (1 lb) to the cooking time.
• If roasting turkey covered with foil,
add 5 minutes per 450g (1 lb) to the
cooking time.
To test if the turkey is cooked, push a
skewer into the thickest part of the
thigh. If the juices run clear, the turkey
is cooked. If the juices are still pink, the
turkey will need longer cooking.
USING THE MAIN OVEN - ELECTRIC
Roasting guide
The times given in the roasting guide
are only approximate, because the size
and age of the bird will
cooking
times as will the shape of a joint and the
proportion of the bone.
Frozen meat should be thoroughly thawed
before cooking. For large joints it is
advisable to thaw over night.
Frozen poultry should be thoroughly
thawed before cooking. The time required
depends on the size of the bird - eg; a
large turkey may take up to 48 hours to
thaw.
Use of a trivet with a roasting tin will
reduce fat splashing and will help to keep
the oven interior clean. Alternatively, to
help reduce fat splashing, potatoes or
other vegetables can be roasted around
the meat/poultry.
Notes:
• When cooking
meat or poultry
calculate the cooking time from the
total weight of the meat plus the
• For joints cooked in foil or covered
roasters, and for lidded casseroles,
add 5 minutes per 450g (1lb) to the
calculated cooking time.
• Smaller joints weighing less than
1.25kg (2½lb) may require 5 minutes
per 450g (1lb) extra cooking time.
• Position the oven shelf so that the
meat or poultry is in the centre of the
oven.
• It is recommended that the appliance
is cleaned after open roasting.
Cook in main oven at:
160°C - 180°C (fanned)
180°C - 200°C (conventional)
Approximate Cooking Time
(preheated oven)
Beef
Rare
Medium
Well done
20 minutes per 450g (1lb), plus 20 minutes
25 minutes per 450g (1lb), plus 25 minutes
30 minutes per 450g (1lb), plus 30 minutes
Lamb
Medium
Well Done
25 minutes per 450g (1lb), plus 25 minutes
30 minutes per 450g (1lb), plus 30 minutes
Pork
35 minutes per 450g (1lb), plus 35 minutes
Poultry
20 minutes per 450g (1lb), plus 20 minutes

USING THE OVEN/GRILL - MULTI-FUNCTION
MULTIFUNCTION OVEN
The multifunction oven can be controlled
by the programmer (see The
Programmer/Clock for details).
The programmer, must be set to manual
before it can be used, or programmed.
Switching on the multifunction oven
• Use the function control knob to
select the function you wish to use -
see the functions table for details.
Note: You can change function during
cooking if you wish, as long as the
oven is in manual mode.
• Turn the temperature control knob to
the temperature you wish to use.
• The thermostat indicator will come on
to show that the oven is heating, and
once the temperature is achieved, it
will go out.
• Turn the function control knob and
the temperature control knob back to
the
position.
• The cooling fan may come on during
use, and may continue to run for
some time afterwards.
i
Important: Never place food, or
dishes on the base of the main oven,
the element is here and it will cause
over heating.
USING THE OVEN/GRILL - MULTI-FUNCTION
Oven & Grill Functions
The chart below details all of the functions which are available. Your oven may not
have all of the functions shown here.
Main Oven
Function
Recommended Uses
Oven & Grill Functions
Main Oven Function Recommended Uses
Base Heat Only Used to finish off the bases of food following cooking using the conventional
or fanned modes. The base heat can be used to provide additional
browning for pizzas, pies and quiche. Use this function towards the end of
cooking.
Top Heat Only The heat is ideal from browning off the tops of food as it is not as fierce as
the grill following conventional or fanned cooking. Provides additional
browning for dishes like Lasagna or Cauliflower cheese. Use this function
towards the end of
cooking.
Conventional Oven This function is ideal for traditional roasting. The meat is placed in the
middle of the oven, roast potatoes towards the top.
Intensive Bake Suitable for food with a high moisture content, such as quiche, bread and
cheesecake. It also eliminates the need for baking pastry blind.
Fanned Grill The fan allows the heat to circulate around the food. Ideal for thinner foods
such as bacon, fish and gammon steaks. Foods do not require turning. Use
with the oven door closed.
Fanned Oven The even temperature in the oven makes this function suitable for batch
baking, or batch cooking foods.
Defrost To defrost foods, such as cream cakes/gateaux, use with the oven door
closed. For cooling dishes prior to refrigeration, leave the door open.
Dual Grill This function cooks food from the top and is ideal for a range of food from
toast to steaks. As the whole grill is working, you can cook larger quantities
of food.
Single Grill For smaller quantities of food, but is still ideal for
anything from toast to steaks.
Base Heat with Fan Used to cook open pies (such as mince pies) the base element ensures that
the base is cooked while the fan allows the air to circulate around the filling
- without being too intensive.
Lights only Use when the oven is switched off and cold to aid cleaning the oven cavity.
The chart below details all of the functions which are available. Your oven may
not have all of the functions shown here.
27
Base Heat Only
8VHGWR¿QLVKRWKHEDVHVRIIRRGIROORZLQJFRRNLQJXVLQJWKH
conventional or fanned modes. The base heat can be used to
provide additional browning for pizzas, pies and quiche. Use this
function towards the end of cooking.
Oven & Grill Functions
Main Oven Function Recommended Uses
Base Heat Only Used to finish off the bases of food following cooking using the conventional
or fanned modes. The base heat can be used to provide additional
browning for pizzas, pies and quiche. Use this function towards the end of
cooking.
Top Heat Only The heat is ideal from browning off the tops of food as it is not as fierce as
the grill following conventional or fanned cooking. Provides additional
browning for dishes like Lasagna or Cauliflower cheese. Use this function
towards the end of
cooking.
Conventional Oven This function is ideal for traditional roasting. The meat is placed in the
middle of the oven, roast potatoes towards the top.
Intensive Bake Suitable for food with a high moisture content, such as quiche, bread and
cheesecake. It also eliminates the need for baking pastry blind.
Fanned Grill The fan allows the heat to circulate around the food. Ideal for thinner foods
such as bacon, fish and gammon steaks. Foods do not require turning. Use
with the oven door closed.
Fanned Oven The even temperature in the oven makes this function suitable for batch
baking, or batch cooking foods.
Defrost To defrost foods, such as cream cakes/gateaux, use with the oven door
closed. For cooling dishes prior to refrigeration, leave the door open.
Dual Grill This function cooks food from the top and is ideal for a range of food from
toast to steaks. As the whole grill is working, you can cook larger quantities
of food.
Single Grill For smaller quantities of food, but is still ideal for
anything from toast to steaks.
Base Heat with Fan Used to cook open pies (such as mince pies) the base element ensures that
the base is cooked while the fan allows the air to circulate around the filling
- without being too intensive.
Lights only Use when the oven is switched off and cold to aid cleaning the oven cavity.
The chart below details all of the functions which are available. Your oven may
not have all of the functions shown here.
27
Top Heat Only
7KHKHDWLVLGHDOIRUEURZQLQJRWKHWRSVRIIRRGDVLWLVQRWDV
¿HUFHDVWKHJULOOIROORZLQJFRQYHQWLRQDORUIDQQHGFRRNLQJ3UR-
YLGHVDGGLWLRQDOEURZQLQJIRUGLVKHVOLNH/DVDJQDRU&DXOLÀRZHU
cheese. Use this function towards the end of cooking.
Oven & Grill Functions
Main Oven Function Recommended Uses
Base Heat Only Used to finish off the bases of food following cooking using the conventional
or fanned modes. The base heat can be used to provide additional
browning for pizzas, pies and quiche. Use this function towards the end of
cooking.
Top Heat Only The heat is ideal from browning off the tops of food as it is not as fierce as
the grill following conventional or fanned cooking. Provides additional
browning for dishes like Lasagna or Cauliflower cheese. Use this function
towards the end of
cooking.
Conventional Oven This function is ideal for traditional roasting. The meat is placed in the
middle of the oven, roast potatoes towards the top.
Intensive Bake Suitable for food with a high moisture content, such as quiche, bread and
cheesecake. It also eliminates the need for baking pastry blind.
Fanned Grill The fan allows the heat to circulate around the food. Ideal for thinner foods
such as bacon, fish and gammon steaks. Foods do not require turning. Use
with the oven door closed.
Fanned Oven The even temperature in the oven makes this function suitable for batch
baking, or batch cooking foods.
Defrost To defrost foods, such as cream cakes/gateaux, use with the oven door
closed. For cooling dishes prior to refrigeration, leave the door open.
Dual Grill This function cooks food from the top and is ideal for a range of food from
toast to steaks. As the whole grill is working, you can cook larger quantities
of food.
Single Grill For smaller quantities of food, but is still ideal for
anything from toast to steaks.
Base Heat with Fan Used to cook open pies (such as mince pies) the base element ensures that
the base is cooked while the fan allows the air to circulate around the filling
- without being too intensive.
Lights only Use when the oven is switched off and cold to aid cleaning the oven cavity.
The chart below details all of the functions which are available. Your oven may
not have all of the functions shown here.
27
Conventional
Oven
This function is ideal for traditional roasting. The meat is placed
in the middle of the oven, roast potatoes towards the top.
Oven & Grill Functions
Main Oven Function Recommended Uses
Base Heat Only Used to finish off the bases of food following cooking using the conventional
or fanned modes. The base heat can be used to provide additional
browning for pizzas, pies and quiche. Use this function towards the end of
cooking.
Top Heat Only The heat is ideal from browning off the tops of food as it is not as fierce as
the grill following conventional or fanned cooking. Provides additional
browning for dishes like Lasagna or Cauliflower cheese. Use this function
towards the end of
cooking.
Conventional Oven This function is ideal for traditional roasting. The meat is placed in the
middle of the oven, roast potatoes towards the top.
Intensive Bake Suitable for food with a high moisture content, such as quiche, bread and
cheesecake. It also eliminates the need for baking pastry blind.
Fanned Grill The fan allows the heat to circulate around the food. Ideal for thinner foods
such as bacon, fish and gammon steaks. Foods do not require turning. Use
with the oven door closed.
Fanned Oven The even temperature in the oven makes this function suitable for batch
baking, or batch cooking foods.
Defrost To defrost foods, such as cream cakes/gateaux, use with the oven door
closed. For cooling dishes prior to refrigeration, leave the door open.
Dual Grill This function cooks food from the top and is ideal for a range of food from
toast to steaks. As the whole grill is working, you can cook larger quantities
of food.
Single Grill For smaller quantities of food, but is still ideal for
anything from toast to steaks.
Base Heat with Fan Used to cook open pies (such as mince pies) the base element ensures that
the base is cooked while the fan allows the air to circulate around the filling
- without being too intensive.
Lights only Use when the oven is switched off and cold to aid cleaning the oven cavity.
The chart below details all of the functions which are available. Your oven may
not have all of the functions shown here.
27
Intensive Bake
Suitable for food with a high moisture content, such as quiche,
bread and cheesecake. It also eliminates the need for baking
pastry blind.
Oven & Grill Functions
Main Oven Function Recommended Uses
Base Heat Only Used to finish off the bases of food following cooking using the conventional
or fanned modes. The base heat can be used to provide additional
browning for pizzas, pies and quiche. Use this function towards the end of
cooking.
Top Heat Only The heat is ideal from browning off the tops of food as it is not as fierce as
the grill following conventional or fanned cooking. Provides additional
browning for dishes like Lasagna or Cauliflower cheese. Use this function
towards the end of
cooking.
Conventional Oven This function is ideal for traditional roasting. The meat is placed in the
middle of the oven, roast potatoes towards the top.
Intensive Bake Suitable for food with a high moisture content, such as quiche, bread and
cheesecake. It also eliminates the need for baking pastry blind.
Fanned Grill The fan allows the heat to circulate around the food. Ideal for thinner foods
such as bacon, fish and gammon steaks. Foods do not require turning. Use
with the oven door closed.
Fanned Oven The even temperature in the oven makes this function suitable for batch
baking, or batch cooking foods.
Defrost To defrost foods, such as cream cakes/gateaux, use with the oven door
closed. For cooling dishes prior to refrigeration, leave the door open.
Dual Grill This function cooks food from the top and is ideal for a range of food from
toast to steaks. As the whole grill is working, you can cook larger quantities
of food.
Single Grill For smaller quantities of food, but is still ideal for
anything from toast to steaks.
Base Heat with Fan Used to cook open pies (such as mince pies) the base element ensures that
the base is cooked while the fan allows the air to circulate around the filling
- without being too intensive.
Lights only Use when the oven is switched off and cold to aid cleaning the oven cavity.
The chart below details all of the functions which are available. Your oven may
not have all of the functions shown here.
27
Fanned Grill
The fan allows the heat to circulate around the food. Ideal for
WKLQQHUIRRGVVXFKDVEDFRQ¿VKDQGJDPPRQVWHDNV)RRGVGR
not require turning. Use with the oven door closed.
Oven & Grill Functions
Main Oven Function Recommended Uses
Base Heat Only Used to finish off the bases of food following cooking using the conventional
or fanned modes. The base heat can be used to provide additional
browning for pizzas, pies and quiche. Use this function towards the end of
cooking.
Top Heat Only The heat is ideal from browning off the tops of food as it is not as fierce as
the grill following conventional or fanned cooking. Provides additional
browning for dishes like Lasagna or Cauliflower cheese. Use this function
towards the end of
cooking.
Conventional Oven This function is ideal for traditional roasting. The meat is placed in the
middle of the oven, roast potatoes towards the top.
Intensive Bake Suitable for food with a high moisture content, such as quiche, bread and
cheesecake. It also eliminates the need for baking pastry blind.
Fanned Grill The fan allows the heat to circulate around the food. Ideal for thinner foods
such as bacon, fish and gammon steaks. Foods do not require turning. Use
with the oven door closed.
Fanned Oven The even temperature in the oven makes this function suitable for batch
baking, or batch cooking foods.
Defrost To defrost foods, such as cream cakes/gateaux, use with the oven door
closed. For cooling dishes prior to refrigeration, leave the door open.
Dual Grill This function cooks food from the top and is ideal for a range of food from
toast to steaks. As the whole grill is working, you can cook larger quantities
of food.
Single Grill For smaller quantities of food, but is still ideal for
anything from toast to steaks.
Base Heat with Fan Used to cook open pies (such as mince pies) the base element ensures that
the base is cooked while the fan allows the air to circulate around the filling
- without being too intensive.
Lights only Use when the oven is switched off and cold to aid cleaning the oven cavity.
The chart below details all of the functions which are available. Your oven may
not have all of the functions shown here.
27
Fanned Oven
The even temperature in the oven makes this function suitable
for batch baking, or batch cooking foods.
Oven & Grill Functions
Main Oven Function Recommended Uses
Base Heat Only Used to finish off the bases of food following cooking using the conventional
or fanned modes. The base heat can be used to provide additional
browning for pizzas, pies and quiche. Use this function towards the end of
cooking.
Top Heat Only The heat is ideal from browning off the tops of food as it is not as fierce as
the grill following conventional or fanned cooking. Provides additional
browning for dishes like Lasagna or Cauliflower cheese. Use this function
towards the end of
cooking.
Conventional Oven This function is ideal for traditional roasting. The meat is placed in the
middle of the oven, roast potatoes towards the top.
Intensive Bake Suitable for food with a high moisture content, such as quiche, bread and
cheesecake. It also eliminates the need for baking pastry blind.
Fanned Grill The fan allows the heat to circulate around the food. Ideal for thinner foods
such as bacon, fish and gammon steaks. Foods do not require turning. Use
with the oven door closed.
Fanned Oven The even temperature in the oven makes this function suitable for batch
baking, or batch cooking foods.
Defrost To defrost foods, such as cream cakes/gateaux, use with the oven door
closed. For cooling dishes prior to refrigeration, leave the door open.
Dual Grill This function cooks food from the top and is ideal for a range of food from
toast to steaks. As the whole grill is working, you can cook larger quantities
of food.
Single Grill For smaller quantities of food, but is still ideal for
anything from toast to steaks.
Base Heat with Fan Used to cook open pies (such as mince pies) the base element ensures that
the base is cooked while the fan allows the air to circulate around the filling
- without being too intensive.
Lights only Use when the oven is switched off and cold to aid cleaning the oven cavity.
The chart below details all of the functions which are available. Your oven may
not have all of the functions shown here.
27
Defrost
To defrost foods, such as cream cakes/gateaux, use with the
oven door closed. For cooling dishes prior to refrigeration, leave
the door open.
Oven & Grill Functions
Main Oven Function Recommended Uses
Base Heat Only Used to finish off the bases of food following cooking using the conventional
or fanned modes. The base heat can be used to provide additional
browning for pizzas, pies and quiche. Use this function towards the end of
cooking.
Top Heat Only The heat is ideal from browning off the tops of food as it is not as fierce as
the grill following conventional or fanned cooking. Provides additional
browning for dishes like Lasagna or Cauliflower cheese. Use this function
towards the end of
cooking.
Conventional Oven This function is ideal for traditional roasting. The meat is placed in the
middle of the oven, roast potatoes towards the top.
Intensive Bake Suitable for food with a high moisture content, such as quiche, bread and
cheesecake. It also eliminates the need for baking pastry blind.
Fanned Grill The fan allows the heat to circulate around the food. Ideal for thinner foods
such as bacon, fish and gammon steaks. Foods do not require turning. Use
with the oven door closed.
Fanned Oven The even temperature in the oven makes this function suitable for batch
baking, or batch cooking foods.
Defrost To defrost foods, such as cream cakes/gateaux, use with the oven door
closed. For cooling dishes prior to refrigeration, leave the door open.
Dual Grill This function cooks food from the top and is ideal for a range of food from
toast to steaks. As the whole grill is working, you can cook larger quantities
of food.
Single Grill For smaller quantities of food, but is still ideal for
anything from toast to steaks.
Base Heat with Fan Used to cook open pies (such as mince pies) the base element ensures that
the base is cooked while the fan allows the air to circulate around the filling
- without being too intensive.
Lights only Use when the oven is switched off and cold to aid cleaning the oven cavity.
The chart below details all of the functions which are available. Your oven may
not have all of the functions shown here.
27
Dual Grill
This function cooks food from the top and is ideal for a range of
food from toast to steaks. As the whole grill is working, you can
cook larger quantities of food.
Oven & Grill Functions
Main Oven Function Recommended Uses
Base Heat Only Used to finish off the bases of food following cooking using the conventional
or fanned modes. The base heat can be used to provide additional
browning for pizzas, pies and quiche. Use this function towards the end of
cooking.
Top Heat Only The heat is ideal from browning off the tops of food as it is not as fierce as
the grill following conventional or fanned cooking. Provides additional
browning for dishes like Lasagna or Cauliflower cheese. Use this function
towards the end of
cooking.
Conventional Oven This function is ideal for traditional roasting. The meat is placed in the
middle of the oven, roast potatoes towards the top.
Intensive Bake Suitable for food with a high moisture content, such as quiche, bread and
cheesecake. It also eliminates the need for baking pastry blind.
Fanned Grill The fan allows the heat to circulate around the food. Ideal for thinner foods
such as bacon, fish and gammon steaks. Foods do not require turning. Use
with the oven door closed.
Fanned Oven The even temperature in the oven makes this function suitable for batch
baking, or batch cooking foods.
Defrost To defrost foods, such as cream cakes/gateaux, use with the oven door
closed. For cooling dishes prior to refrigeration, leave the door open.
Dual Grill This function cooks food from the top and is ideal for a range of food from
toast to steaks. As the whole grill is working, you can cook larger quantities
of food.
Single Grill For smaller quantities of food, but is still ideal for
anything from toast to steaks.
Base Heat with Fan Used to cook open pies (such as mince pies) the base element ensures that
the base is cooked while the fan allows the air to circulate around the filling
- without being too intensive.
Lights only Use when the oven is switched off and cold to aid cleaning the oven cavity.
The chart below details all of the functions which are available. Your oven may
not have all of the functions shown here.
27
Single Grill
For smaller quantities of food, but is still ideal for anything from
toast to steaks.
Oven & Grill Functions
Main Oven Function Recommended Uses
Base Heat Only Used to finish off the bases of food following cooking using the conventional
or fanned modes. The base heat can be used to provide additional
browning for pizzas, pies and quiche. Use this function towards the end of
cooking.
Top Heat Only The heat is ideal from browning off the tops of food as it is not as fierce as
the grill following conventional or fanned cooking. Provides additional
browning for dishes like Lasagna or Cauliflower cheese. Use this function
towards the end of
cooking.
Conventional Oven This function is ideal for traditional roasting. The meat is placed in the
middle of the oven, roast potatoes towards the top.
Intensive Bake Suitable for food with a high moisture content, such as quiche, bread and
cheesecake. It also eliminates the need for baking pastry blind.
Fanned Grill The fan allows the heat to circulate around the food. Ideal for thinner foods
such as bacon, fish and gammon steaks. Foods do not require turning. Use
with the oven door closed.
Fanned Oven The even temperature in the oven makes this function suitable for batch
baking, or batch cooking foods.
Defrost To defrost foods, such as cream cakes/gateaux, use with the oven door
closed. For cooling dishes prior to refrigeration, leave the door open.
Dual Grill This function cooks food from the top and is ideal for a range of food from
toast to steaks. As the whole grill is working, you can cook larger quantities
of food.
Single Grill For smaller quantities of food, but is still ideal for
anything from toast to steaks.
Base Heat with Fan Used to cook open pies (such as mince pies) the base element ensures that
the base is cooked while the fan allows the air to circulate around the filling
- without being too intensive.
Lights only Use when the oven is switched off and cold to aid cleaning the oven cavity.
The chart below details all of the functions which are available. Your oven may
not have all of the functions shown here.
27
Base Heat with
Fan
Used to cook open pies (such as mince pies) the base element
ensures that the base is cooked while the fan allows the air to
FLUFXODWHDURXQGWKH¿OOLQJZLWKRXWEHLQJWRRLQWHQVLYH
Bread Proving
To select a temperature, turn the temperature knob as well as
WKHIXQFWLRQVHOHFWRUNQRE7KH¿UVWFOLFNRIWKHWHPSHUDWXUH
knob is about 40
o
C.
Pizza
This function is ideal for cooking pizza. The fanned oven oper-
ates with the addition of the base element to cook pizza perfectly
USING THE OVEN/GRILL - MULTI-FUNCTION
%HIRUH\RXVWDUWJULOOLQJ
Before you use the grill, make sure you
have placed the grill shelf in the
position you need as once the grill is on
you may injure yourself if you try to move
the shelf.
FANNED / CONVENTIONAL GRILL
The grill function must be used with
the door closed.
Turn the selector control knob to the
grill setting you require (conventional
or fanned).
Turn the temperature selector to the
heat setting you require in a similar
way to selecting the oven tempera-
ture.
7RVZLWFKRUHWXUQWKHFRQWURONQREVWR
WKHµR¶SRVLWLRQ
The cooling fan may come on during use,
and may continue to run for some time
afterwards.
To adjust your results, you can turn the
grid over, or remove it altogether.
The grill neon
When grilling with the door closed, the
QHRQZLOOF\FOHRQDQGRDVWKHWHPSHUD-
ture is maintained inside the cavity.
i
Warning: Accessible parts may
become hot when the grill is in use.
Children should be kept away.
i
Types of grill
Single grill: has one grill element. The
grill pan trivet MUST be inverted when
using single grill in the main oven.
i
For best results:
3UHKHDWWKHVLQJOHJULOOIRU
minutes.
USING THE OVEN/GRILL - MULTI-FUNCTION
Fanned oven guide
Some adjustment will have to be
made to conventional cooking tem-
peratures.
The table below shows conven-
tional cooking temperatures, fanned
temperatures and gas marks. For op-
timum results using the fanned oven
setting, conventional temperatures
need to be converted to the fanned
oven temperatures.
For example and item which would
cook at 180°C will now cook at the
fanned oven temperature of 160°C.
7KLVLVDKLJKHFLHQF\RYHQ\RX
may notice an emission of steam
when the door is opened.
When cooking chilled or frozen foods,
use the recommended cooking times
and temperature on the packaging.
Always make sure the food is piping
hot throughout before serving.
There are no zones of heat, and no
ÀDYRXUWUDQVIHUZKHQXVLQJDIDQQHG
oven - allowing you to cook a greater
variety of foods together.
If you are cooking on more than
one shelf, you may need to slightly
increase the cooking time.
Always make sure that there is
enough space between dishes, to
allow food to rise, and to air to
circulate.
Conventional temp (°C)
µ$¶(FLHQF\IDQQHG
oven (°C)
Gas Mark
100
110
130
140
160
180 - 190
200
220
230
100
110
120
130
140
160
170
180
190
200
1/4
1/4
1/2
1
2
3
6
7
8
9
USING THE OVEN/GRILL - MULTI-FUNCTION
COOKING GUIDE
Pre-heating
To get the best results from your oven,
ZHUHFRPPHQGSUHKHDWLQJIRUDURXQG
WRPLQXWHVEHIRUHSODFLQJ\RXUGLVKHV
in. This is especially important for items
which are chilled, frozen, batter based,
yeast based or whisked sponges.
If you are using a fanned function, you
should still preheat but for a shorter time.
The items in the cooking guide below are
based on a pre-heated oven, but can be
adjusted to take into account personal
taste.
Oven and bake-ware
Always use high quality trays and tins
for cooking. Poor quality tins and trays
can warp in the oven producing uneven
results.
Never use dishes which are cracked, dam-
aged or not oven proof as heating may
lead to shattering inside the oven.
OVEN FURNITURE
Oven shelves
The oven shelf must be positioned with
the upstand at the rear of the oven and
facing upwards.
Position baking trays and roasting tins on
the middle of the shelves, and leave one
clear shelf position between shelves, to
allow for circulation of heat.
Baking tray and roasting tins
For best cooked results and even brown-
ing, the recommended size baking trays
and roasting tins that should be used are
as follows;
%DNLQJWUD\PP[PP
This size of baking tray will hold up to 12
small cakes.
Roasting tin 370mm x 320mm
We recommend that you use good quality
cookware. Poor quality trays and tins may
warp when heated, leading to uneven
baking results.
Food Type 7HPS6HWWLQJ& 7LPH$SSUR[
Shelf
Position
Cakes
Small cakes
Victoria sandwich
Semi rich fruit cake
Christmas cake
Conv
Pre-heating
To get the best results from your oven, we recommend
pre-heating for around 5 to 15 minutes before placing
your dishes in. This is especially important for items
which are chilled, frozen, batter based, yeast based or
whisked sponges.
If you are using a fanned function, you should still pre-
heat but for a shorter time.
The items in the cooking guide below are based on a
pre-heated oven, but can be adjusted to take into account
personal taste.
Oven and bakeware
Always use high quality trays and tins for cooking. Poor
quality tins and trays can warp in the oven producing
uneven results.
Never use dishes which are cracked, damaged or not
oven proof as heating may lead to shattering inside the
oven.
Food Type Temp.
Setting ˙C
Time
Approx.
Shelf
Position
Cakes
Small cakes
Victoria sandwich
Semi rich fruit cake
Christmas cake
Conv
190
180
150
150
Fanned
175
160
125
125
Intensive
-
-
-
-
15 - 25
20 - 30
2
1/2
- 3hrs
2
1/2
- 3hrs
7 & 13
7
5
3
Puddings
Bread & butter
pudding
Fruit crumble
170
200
150
175
-
-
45 - 1hr
40 - 1hr
9
9
Miscellaneous
Yorkshire pudding:
large
small
Shortcrust pastry
220
220
200
200
200
180
200
200
180
40 - 45
15 - 20
depends on
filling
11
12
top - middle
e
31
190
180
Fanned
Pre-heating
To get the best results from your oven, we recommend
pre-heating for around 5 to 15 minutes before placing
your dishes in. This is especially important for items
which are chilled, frozen, batter based, yeast based or
whisked sponges.
If you are using a fanned function, you should still pre-
heat but for a shorter time.
The items in the cooking guide below are based on a
pre-heated oven, but can be adjusted to take into account
personal taste.
Oven and bakeware
Always use high quality trays and tins for cooking. Poor
quality tins and trays can warp in the oven producing
uneven results.
Never use dishes which are cracked, damaged or not
oven proof as heating may lead to shattering inside the
oven.
Food Type Temp.
Setting ˙C
Time
Approx.
Shelf
Position
Cakes
Small cakes
Victoria sandwich
Semi rich fruit cake
Christmas cake
Conv
190
180
150
150
Fanned
175
160
125
125
Intensive
-
-
-
-
15 - 25
20 - 30
2
1/2
- 3hrs
2
1/2
- 3hrs
7 & 13
7
5
3
Puddings
Bread & butter
pudding
Fruit crumble
170
200
150
175
-
-
45 - 1hr
40 - 1hr
9
9
Miscellaneous
Yorkshire pudding:
large
small
Shortcrust pastry
220
220
200
200
200
180
200
200
180
40 - 45
15 - 20
depends on
filling
11
12
top - middle
e
31
160
Intensive
Pre-heating
To get the best results from your oven, we recommend
pre-heating for around 5 to 15 minutes before placing
your dishes in. This is especially important for items
which are chilled, frozen, batter based, yeast based or
whisked sponges.
If you are using a fanned function, you should still pre-
heat but for a shorter time.
The items in the cooking guide below are based on a
pre-heated oven, but can be adjusted to take into account
personal taste.
Oven and bakeware
Always use high quality trays and tins for cooking. Poor
quality tins and trays can warp in the oven producing
uneven results.
Never use dishes which are cracked, damaged or not
oven proof as heating may lead to shattering inside the
oven.
Food Type Temp.
Setting ˙C
Time
Approx.
Shelf
Position
Cakes
Small cakes
Victoria sandwich
Semi rich fruit cake
Christmas cake
Conv
190
180
150
150
Fanned
175
160
125
125
Intensive
-
-
-
-
15 - 25
20 - 30
2
1/2
- 3hrs
2
1/2
- 3hrs
7 & 13
7
5
3
Puddings
Bread & butter
pudding
Fruit crumble
170
200
150
175
-
-
45 - 1hr
40 - 1hr
9
9
Miscellaneous
Yorkshire pudding:
large
small
Shortcrust pastry
220
220
200
200
200
180
200
200
180
40 - 45
15 - 20
depends on
filling
11
12
top - middle
e
31
-
-
-
-
20 - 30
2½ - 3hrs
2½ - 3hrs
2 & 4
3
2
2
Puddings
Bread & butter
pudding
Fruit crumble
170
200
-
-
KU
40 - 1hr
3
3
Miscellaneous
Yorkshire pudding:
large
small
Shortcrust pastry
220
220
200
200
200
180
200
200
180
GHSHQGVRQ¿OOLQJ

Cupboard / Hood / Side Clearances
Nominal width of the hob
Wall Cabinet
400mm
90mm
90mm
400mm
min
600mm
Benchtop Benchtop
View from front
Benchtop Benchtop
70mm
• If your appliance has a side opening door, we recommend a side clearance of 70mm to allow the
oven door to fully open, if placed up to a wall or cabinetry.
• The cooker must have a side clearance above hob level of 90mm up to a height of 400mm.
DIMENSIONS AND CLEARANCES - OPTION 2
View from above, with the
appliance located in a corner
*If above installation method is used then
rangecooker must protrude in front of
cabinetry so rangecooker doors do not
infringe onto cabinetry. Refer Fig.2
Rangecooker Width 896/1096mm
Benchtop Width 900/1100mm (Minimum)
Wall Cabinet
Maximum
Cabinetry
Depth
570mm
Benchtop
Depth
600mm
No shelf or overhang of combustible material should
be closer than 600mm above the hob.
For the required clearance between rangehood and the
hob refer to the rangehood user manual.
Front of rangecooker doors need to protrude
past cabintery doors by at least 30mm
* Min 2mm clearance required
between cabinets and
rangecooker
* Min 2mm clearance required
between cabinets and
rangecooker
FIG.2
FIG.1
USING THE OVEN/GRILL - MULTI-FUNCTION
Roasting Guide
Roasting times depend on the weight,
shape and texture of the meat and
personal preference. In order to
calculate the roasting time, weigh
the meat or poultry, including the
VWXQJDQGIROORZWKHWLPHVJLYHQ
below.
Frozen meat must be thoroughly
thawed before cooking. For large
joints, it is advisable to thaw over-
night.
Frozen poultry must be thoroughly
thawed before cooking. The time
required depends on the size of the
bird - eg: a large turkey may take up
to 48 hours to thaw.
:KHQFRRNLQJVWXHGPHDWRUSRXO-
try, calculate the cooking time from
the total weight of the meat plus the
VWXQJ
Cooking joints in foil, covered roast-
ers, lidded casseroles, or roasting
bags will help to reduce meat shrink-
age, give a more moist result and
may reduce fat splashing. However,
a slightly longer cooking times will
EHUHTXLUHGDGGPLQXWHVSHU
JOEWRWKHFDOFXODWHGFRRNLQJ
time. When using roasting bags do
not exceed the temperatures recom-
mended by the manufacturer, and do
not allow the roasting bag to touch
the sides or top of the oven.
Use of a trivet with the roasting tin
will reduce fat splashing during open
roasting, and will help to keep the
oven interior clean.
Meat joints (including chicken) should
be roasted at 180 - 200°C Conven-
tional/ 160 - 180°C Fanned for 20 - 30
PLQVSHUJOESOXVPLQXWHVRQ
shelf position 2.

Cupboard / Hood / Side Clearances
Nominal width of the hob
Wall Cabinet
400mm
90mm
90mm
400mm
min
600mm
Benchtop Benchtop
View from front
Benchtop Benchtop
70mm
• If your appliance has a side opening door, we recommend a side clearance of 70mm to allow the
oven door to fully open, if placed up to a wall or cabinetry.
• The cooker must have a side clearance above hob level of 90mm up to a height of 400mm.
DIMENSIONS AND CLEARANCES - OPTION 2
View from above, with the
appliance located in a corner
*If above installation method is used then
rangecooker must protrude in front of
cabinetry so rangecooker doors do not
infringe onto cabinetry. Refer Fig.2
Rangecooker Width 896/1096mm
Benchtop Width 900/1100mm (Minimum)
Wall Cabinet
Maximum
Cabinetry
Depth
570mm
Benchtop
Depth
600mm
No shelf or overhang of combustible material should
be closer than 600mm above the hob.
For the required clearance between rangehood and the
hob refer to the rangehood user manual.
Front of rangecooker doors need to protrude
past cabintery doors by at least 30mm
* Min 2mm clearance required
between cabinets and
rangecooker
* Min 2mm clearance required
between cabinets and
rangecooker
FIG.2
FIG.1
USING THE OVEN/GRILL - MULTI-FUNCTION
Roasting Guide
Roast turkey
Roasting turkey perfectly involves
FRRNLQJWZRGLHUHQWW\SHVRIPHDW
the delicate light breast meat, which
must not be allowed to dry out, and
the darker leg meat, which takes
longer to cook.
The turkey must be roasted long
enough for the legs to cook, so
frequent basting is necessary. The
breast meat can be covered once
browned.
Turkey should be roasted at 180°C -
190°C Conventional / 160°C - 180°C
Fanned for 20 mins per 1lb, plus 20
minutes.
The turkey can be open roasted,
breast side down, for half of the cook
time, and then turned over for the
remainder of the cooking time.
,IWKHWXUNH\LVVWXHGDGGPLQXWHV
per 1lb to the cooking time.
If roasting turkey covered with foil,
DGGPLQXWHVSHUOEWRWKHFRRNLQJ
time.
To test if the turkey is cooked, push
D¿QHVNHZHULQWRWKHWKLFNHVWSDUW
of the thigh. If the juices run clear,
the turkey is cooked. If the juices are
still pink, the turkey will need longer
cooking. Always make sure that the
turkey is cooked properly before serv-
ing.
Turkey Roasting times.
Most Turkeys are measured by the
kilogram. Timing should be calculated
in either of these ways:
40 minutes per 1kg plus 10 minutes
per 1/4 kg.
or
20 minutes per 1lb, plus 20 minutes.
The maximum size Turkey for this ap-
pliance is: 20lbs approximately 9kgs.
Please do not attempt to roast a
Turkey larger than this, as the results
cannot be guaranteed.
USING THE OVEN/GRILL - MULTI-FUNCTION
General Baking Guide
Trouble-shooting - fruit cakes
PROBLEM POSSIBLE CAUSE
Fruit sinking to the bottom
Low oven temperature which may cause the cake
to take longer to set, allowing the fruit to sink. Or,
too much liquid, or raising agent. The fruit may
not have been properly washed and dried.
Cake sinking / dipping in the
centre
Too much raising agent in the mixture. Too hot, or
too cool an oven. Or, not enough liquid or insuf-
¿FLHQWFUHDPLQJ
Surface cracks
Too small a tin, or too much mixture in the tin.
Too much raising agent in the mix, plus not
HQRXJKOLTXLGRULQVXFLHQWFUHDPLQJ7KHRYHQ
may be too hot.
Hard outer crust with a damp
patch inside
Oven too hot, therefore the cake baked too
TXLFNO\7RRPXFKVXJDURULQVXFLHQWOLTXLG
Burnt outside
Oven temperature too high. Oven too small for
WKHVL]HRIFDNH,QVXFLHQWSURWHFWLRQDURXQGWKH
tin. Cake baked on too high a shelf.
Texture with pronounced holes. Too much raising agent. Flour unevenly mixed.
Texture too close and cake insuf-
¿FLHQWO\ULVHQ
Not enough raising agent. Not enough liquid. Too
FRRODQRYHQ,QVXFLHQWFUHDPLQJ
Cake crumbles when cut
Not enough liquid. Baked for too long. Not enough
sugar. Too much baking agent.
Too dry
2YHUEDNLQJ,QVXFLHQWHJJRUOLTXLG7RRPXFK
raising agent.
Trouble-shooting - sponge cakes
Domed top
,QVXFLHQWFUHDPLQJRIPL[WXUH&DNHEDNHGRQ
too high a shelf position, or at too high a tem-
perature. Paper liners can cause the outer edge
not to rise and the centre to peak.
Hollowed / sunken top
Too much raising agent. Oven temperature too
low, or incorrect shelf position. Cake removed
from oven before it’s cooked. Use of soft tub
margarine.
Very pale, but cooked
Oven temperature too low. Baked too low in the
oven
2YHUÀRZLQJWLQ Tin too small for the amount of mixture

USING THE OVEN/GRILL - MULTI-FUNCTION
Cooling and Defrosting Function
To cool foods quickly straight after
cooking, but before refrigerating or
freezing, turn the oven control to the
defrost position, and open the door.
To defrost frozen foods, turn the oven
control to the defrost position, place
the food in the centre of the oven
and close the door.
Defrosting times
6PDOORUWKLQSLHFHVRIIUR]HQ¿VKRU
PHDWHJ¿VK¿OOHWVSUDZQVDQG
mince will take approximately 1 - 2
hours. Placing the food in a single
layer will reduce the thawing time.
A medium sized casserole or stew will
take around 3 - 4 hours.
A 1½kg / 3lb oven ready chicken
ZLOOWDNHDURXQGKRXUVUHPRYHWKH
giblets as soon as possible.
Always check foods are thoroughly
defrosted before cooking.
Be safe
'RQRWGHIURVWVWXHGSRXOWU\XVLQJ
this method.
Do not defrost larger joints of meat
and poultry over 2kg / 4lb using this
method.
Never place uncooked food for de-
frosting next to cooked food which is
to be cooled, as this can lead to cross
contamination.
'HIURVWLQJPHDWSRXOWU\DQG¿VK
speeded up using this method,
but make sure they are completely
thawed before cooking thoroughly.
Place meat and poultry on a trivet in
a meat tin, to catch the juices from
the defrosting process.

USING THE OVEN - SLOW COOK (100/110CM ONLY)
Introduction
One of your oven compartments is an
electric oven which provides a gentle heat
suitable for slow cooking or
keeping food warm. The oven is
operated by a button or knob (button on
Sterling and knob on Richmond) at the
right hand of the fascia, and a white neon
will illuminate to show that the oven is
switched on. Please check which side the
slow cook oven is on, by looking at the
VSHFL¿FDWLRQDWWKHIURQWRIWKLVKDQGERRN
The slow cook element is positioned
in the base of the lower compartment-
always make sure that the prepared
cooking pot is placed centrally on the
base of this compartment.
Do not use either compartment to store
food or canned items.
Cooking times
The cooking time varies according to the
type of food being cooked, and
experience will show how long foods
should be cooked for, according to
personal taste and preference.
In general foods should be cooked for at
OHDVWKRXUVDQGPD\EHOHIWXSWR
hours without spoiling if covered. As a
guide, foods cooked using the slow cook
oven will take about three times longer
than they would in a conventional oven.
Cookware
Any oven proof cookware maybe used for
slow cooking, provided they have a close
¿WWHGOLG
7RUHFWLI\DEDGO\¿WWLQJOLGDSLHFHRI
cooking foil may be placed over the
dish,under the lid.
For convenience and to save washing
up, the most useful cookware for slow
FRRNLQJDUHWKHÀDPHSURRIW\SHZKLFK
can be used over direct heat and for oven
FRRNLQJDQGDUHVXFLHQWO\DWWUDFWLYHWR
use as serving dishes.
Keeping food warm
Turn the oven on, and allow to pre-heat
for 20 minutes before placing the food in
the oven. If food is to be kept moist then
it is important to cover the dish or plate to
prevent food from drying out. This can be
done using aluminium foil if the dish does
not have a lid.
'RQRWXVHFOLQJ¿OPWRFRYHUIRRGDVLW
cannot with stand the heat produced in
the oven.
Some foods are best left un covered if you
wish to keep the food dry and crisp.
Do not add gravy to plated meals until
serving.
Carved meat should be placed on one
plate and covered, adding just one
table-spoon of gravy to keep it moist.
When keeping plated meals warm it is
recommended that the food is placed on
hot rather than cold plates.
Slow Cooking
Slow cooking has always been the best
way to prepare a nutritious hot meal
with the minimum of preparation and
maximum time away from the kitchen.
7KHEHQH¿WVRIVORZFRRNLQJKDYHEHHQ
recognized by cooks for centuries, and are
still appreciated by cooks today.

USING THE OVEN - SLOW COOK (100/110CM ONLY)
The advantages of slow cooking are
as follows:
Food can be left to cook unattended
for several hours and will keep hot for
several hours if left covered, without
spoiling for a further 2-3 hours, so
foods can be left to cook while you
are out for the day, or over night.
Inexpensive cuts of meat become
deliciously tender when slow cooked.
Slow cooking will also produce moist,
tender“roasts”with minimal meat
shrink-age and reduced oven soiling.
Dishes such as soups, vegetables,
puddings savory dishes and preserves
are also suitable for slow cooking.
There is no topping up of
VWHDPHUVVWHDP¿OOHGNLWFKHQVRU
constant checking to do.
Using the slow cook oven
Turn the oven on and preheat for 20
minutes. Always place the prepared
cooking pot centrally on the base of the
oven. Follow the guide lines for the best
results.
The maximum capacity of oven proof
GLVKHVVKRXOGEHQRPRUHWKDQ
OLWUHVSLQWV
3OHDVHQRWH7KHPRUH\RX¿OOWKH
dish/pot the longer it will take to
cook.
Cooking times will vary depending on
the size and shape of the meat, or
poultry.
Always bring soups,casseroles and
liquids to the boil before placing in a
preheated oven. To give more colour
to meat or poultry, fry the meat to
brown and add to stock which is hot.
All meat and poultry recipes need a
PLQLPXPRIKRXUVWRFRRN
Make sure all frozen ingredients are
well thawed out.
Always ensure that frozen poultry has
thoroughly defrosted in a refrigerator
and all ice crystals have melted.
Cut root vegetables into smaller
pieces as they take longer than meat
to cook.
If possible they should be sauteed for
2-3 minutes before slow cooking.
Ensure that root vegetables are
always at the bottom of the pan
immersed in the cooking liquid.
A meat thermometer should be used
when cooking pork joints and poultry.
The internal temperature of the food
VKRXOGUHDFKÚ&
6WXHGPHDWRUVWXHGSRXOWU\
should not be slow cooked. Cook any
VWXQJVHSDUDWHO\
Cover casseroles with a lid, or foil to
prevent loss of moisture.
Adjust seasonings and thickenings at
the end of cooking time.
Dried red kidney beans must be
boiled for a minimum of 10 minutes
following soaking before inclusion in
any dish.
Opening the door during cooking,
leads to heat loss, and will lead to
increased cooking times.

With the Stoves PROFLEX™ splitter you can convert the tall oven into two separate fan ovens which
can be controlled independently to maximise your cooking options.
Left hand control Right hand control
120
140
160
S
200
220
180
240
S
120
140
160
180
200
220
240
260
To activate the Tall Oven (without splitter)
Right Hand Control
S
120
140
160
180
200
220
240
260
To use the tall oven without the splitter, turn the right hand control knob to the desired function or
temperature.
USING THE SPLITTER - 90CM DELUXE ONLY

To activate the splitter function
Upper Oven (with splitter)
Left Hand Control
120
140
160
S
200
220
180
240
7RXVHWKHXSSHURYHQVHSDUDWHO\¿UVWO\LQVHUWWKHVSOLWWHUWKHQWXUQWKHOHIWKDQGFRQWURONQREWRVHOHFW
the function or temperature. This will activate the top half of the oven.
Note: We do not recommend using the top oven only for cooking frozen foods and foods with high
moisture as this can result in excess condensation. When cooking foods with a high moisture content,
use either the full or both ovens.
Please do not use the splitter as a shelf and only position into the dedicated guides in the tall cavity.
Lower Oven (with splitter)
Left Hand Control Right Hand Control
S
120
140
160
180
200
220
240
260
120
140
160
S
200
220
180
240
With the upper oven activated, by turning the right hand control knob to a function or temperature, the
lower oven can operate. The lower oven cannot be used separately.
Warning: Please allow the splitter to cool before removing.
USING THE SPLITTER - 90CM DELUXE ONLY
Using the upper and lower ovens
:KHQXVLQJWKHXSSHUDQGORZHURYHQVDWGLႇHUHQWWHPSHUDWXUHVXVHWKHXSSHURYHQDWWKHKLJKHU
temperature and the lower oven at the lower temperature. The table below shows the minimum
temperature that can be achieved in the lower oven when the upper oven is in use. For example with
the upper oven at 200°C, the minumum temperature that can be used in the lower oven is 120°C.
Upper Oven temperature
(°C)
Lower Oven Minimum
temperature (°C)
100 (Slow Cook)
S
70 (Keep Warm)
120 80
140 90
160
100 (Slow Cook)
S
180 110
200 120
220 130
Grilling
THE DOOR MUST BE OPEN WHEN THE GRILL IS USED FOR CONVENTIONAL GRILLING.
To operate the grill, turn the left hand control to the grill function symbol.
Grill pan and trivet
The grill trivet (inside the grill pan) can be inverted to give a high or low position, or it may be removed.
The speed of grilling can be controlled by selecting a higher or lower shelf position, or adjusting the grill
setting.
Inverted
USING THE SPLITTER - 90CM DELUXE ONLY

How to position the Splitter
USING THE SPLITTER - 90CM DELUXE ONLY
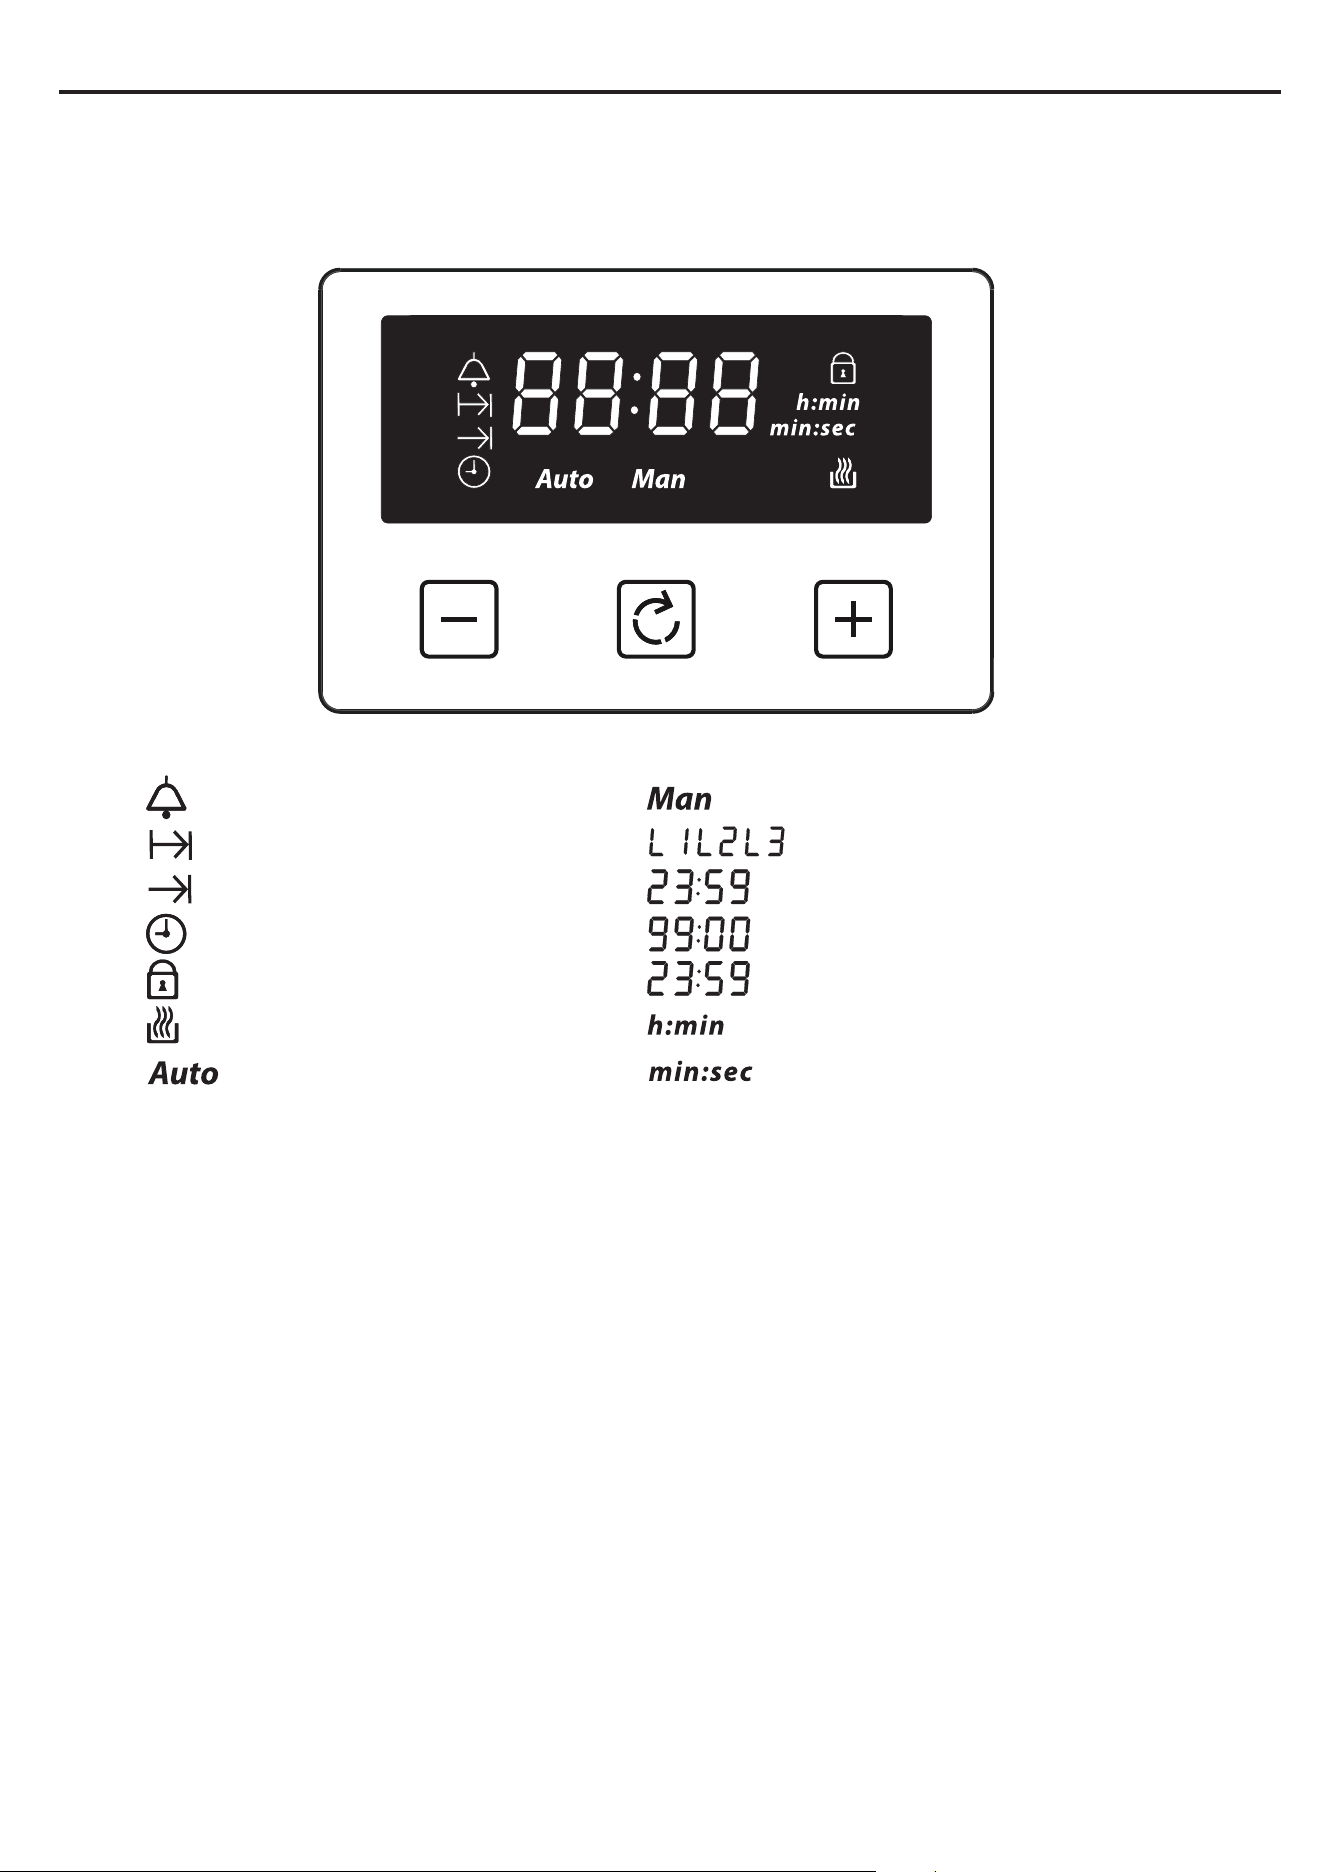
Please be aware that only the multifunction oven is controlled by the programmer.
Note: Your clock / programmer may not have all these functions
Minute minder
MenuMinus Plus
Cooking time / Duration
End of cooking time
Time of day
Keylock
Auto cooking
Automatic mode
Manual mode
Volume level
7-segment display
Max. adjustable minute minder
Max. adjustable cooking time
Display hours:minutes
Display minutes:seconds
, ,
Using the touch controls
Menu - Scroll through to select a function
Plus - Increase time or volume
Minus - Decrease time or volume
When a function is selected and the time or volume is set, the chosen function will automatically start
seven seconds after setting.
Manual Mode
If the programmer is not in semi-automatic or full-automatic mode you can use oven functions manually.
The manual icon is also on the display.
CLOCK/PROGRAMMER

Setting the time of day
By pressing menu, scroll through the functions until you reach ‘time of day’.
1
Press the function button until the ‘time of day’
symbol appears
2
Press the plus or minus buttons to set a time
Setting the minute minder
The maximum cooking time that can be set is 99 minutes.
1
Press the function button until the ‘minute
minder’ symbol appears
2
Press the plus or minus buttons to set a time
Once set, the minute minder will start to countdown in steps of seconds. The display will show the
minute minder symbol and the remaining time. The countdown will continue in the background, if other
functions are being set.
When the set time for the minute minder has completed, an alarm is heard and the minute minder
V\PEROZLOOÀDVKRQWKHGLVSOD\3UHVVDQ\EXWWRQWRVWRSWKHDODUPDQGWKHWLPHRIGD\LVGLVSOD\HG
CLOCK/PROGRAMMER
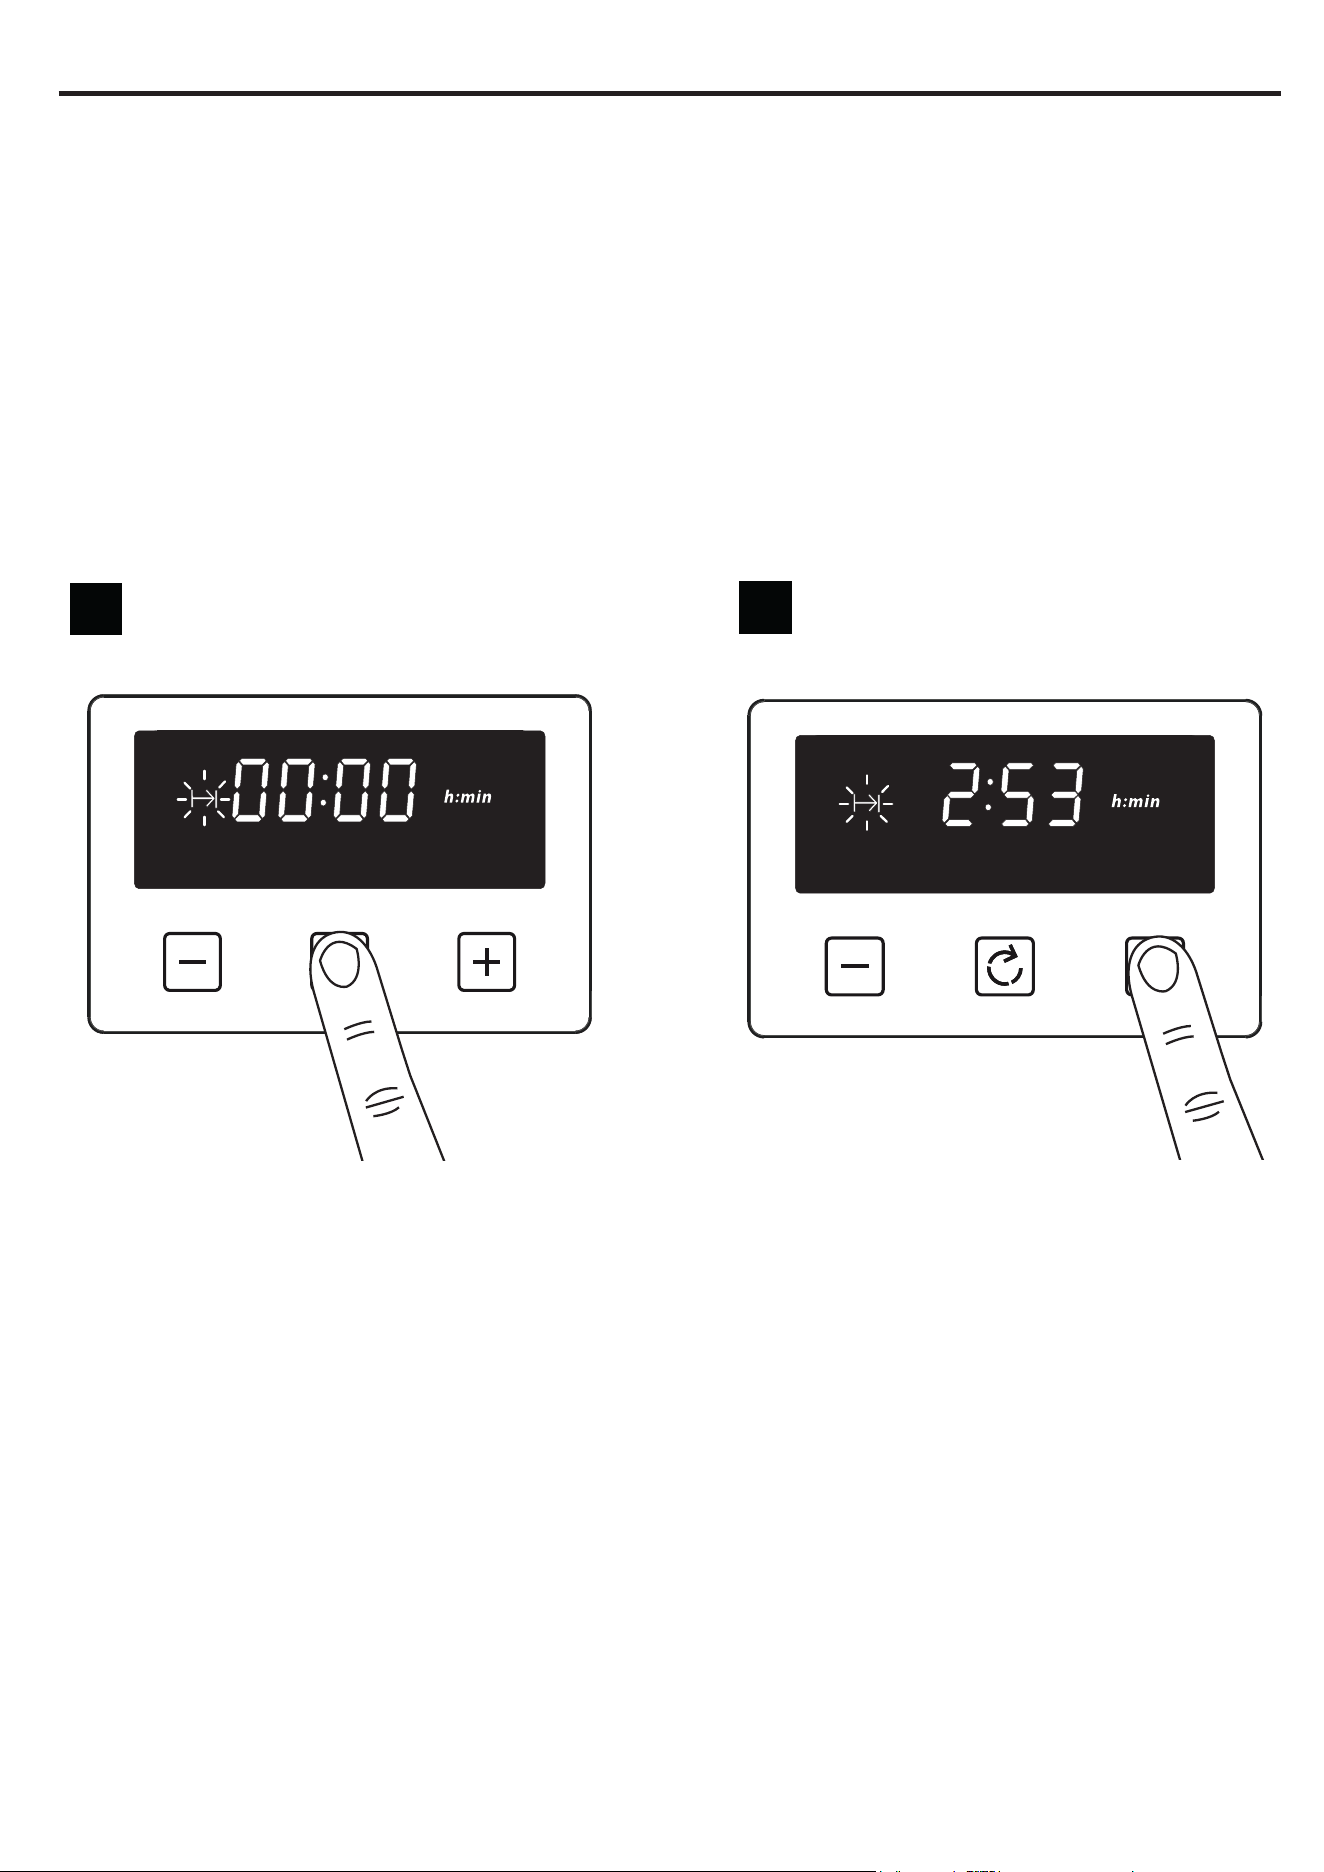
To modify or cancel the minute minder
Return to the minute minder function and use either the plus or minus buttons to adjust the time. By
setting the time to ‘0.00’, this will cancel the countdown.
Setting the cooking time (the duration of time the oven will operate for) Semi
Automatic cooking
Note: Only the bottom left hand oven on 1000cm and 1100cm appliances can use the Semi Automatic
cooking function.
The maximum cooking time that can be set is 23 hours and 59 minutes.
1
Press the function button until the ‘cooking
time’ symbol appears
2
Press the plus or minus buttons to set a time
Once set, the automatic mode, auto cooking symbol and the time of day is displayed.
:KHQFRRNLQJLVFRPSOHWHGDQDODUPLVKHDUGDQGWKHPDQXDOPRGHV\PEROÀDVKHVRQWKHGLVSOD\
Press the Menu button to stop the alarm and then the ‘time of day’ will then be displayed. Pressing the
Menu button again will return to manual mode.
To modify or cancel the cooking time
Return to the ‘cooking time’ function and use either the plus or minus buttons to set the time. By setting
the time to ‘0.00’, this will cancel the countdown.
CLOCK/PROGRAMMER
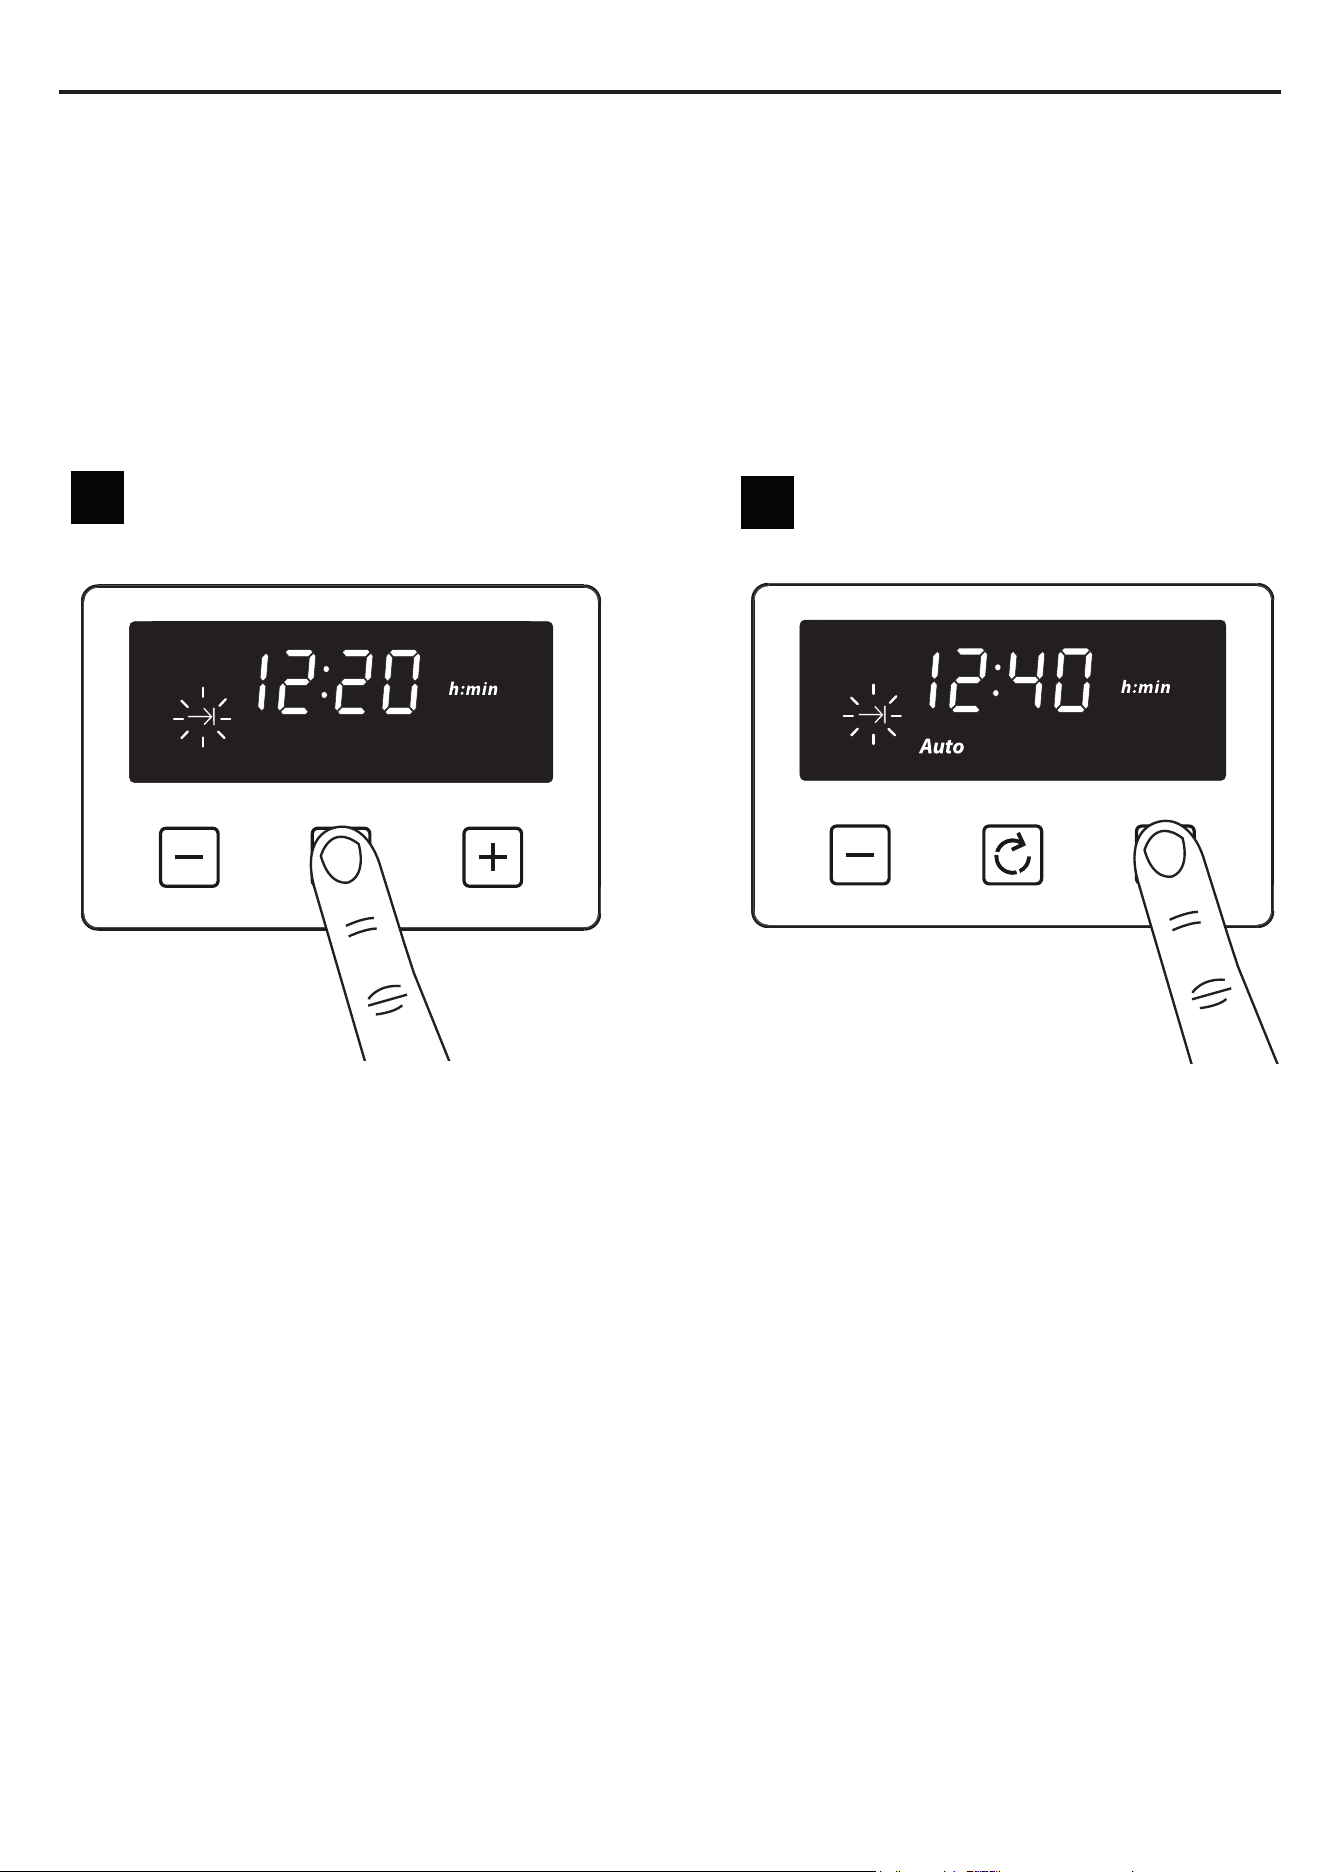
6HWWLQJWKHHQGRIFRRNLQJWLPHWRVHWDWLPHIRUWKHRYHQWRWXUQRႇ)XOO\
Automatic
Enter cooking duration as described in ‘Setting the cooking time’ section.
The display shows the current ‘time of day’ plus the ‘end of cooking time’ symbol. The latest ‘end of
cooking time’ is limited to the current ‘time of day’ plus the maximum time that can be set (23 hours and
59 minutes).
1
Press the function button until the ‘end of
cooking time’ symbol appears
2
Press the plus or minus buttons to set a time
The auto cooking symbol disappears from the display once the time, the required cooking settings and
temperature have been set. The appliance will not be switched on until the set cooking start time, that is
WKHGLႇHUHQFHEHWZHHQWKHFRRNLQJHQGWLPHDQGWKHFRRNLQJGXUDWLRQ
:KHQFRRNLQJLVFRPSOHWHGDQDODUPLVKHDUGDQGPDQXDOPRGHV\PEROÀDVKHVRQWKHGLVSOD\3UHVV
the menu button to stop the alarm. Pressing the Menu button again will return to manual mode.
To modify or cancel the end of cooking time
Return to the ‘end of cooking time’ function and use either the plus or minus buttons to set the time. The
‘end of cooking time’ can be deleted by counting back using the minus button until it equals the current
time of day.
CLOCK/PROGRAMMER
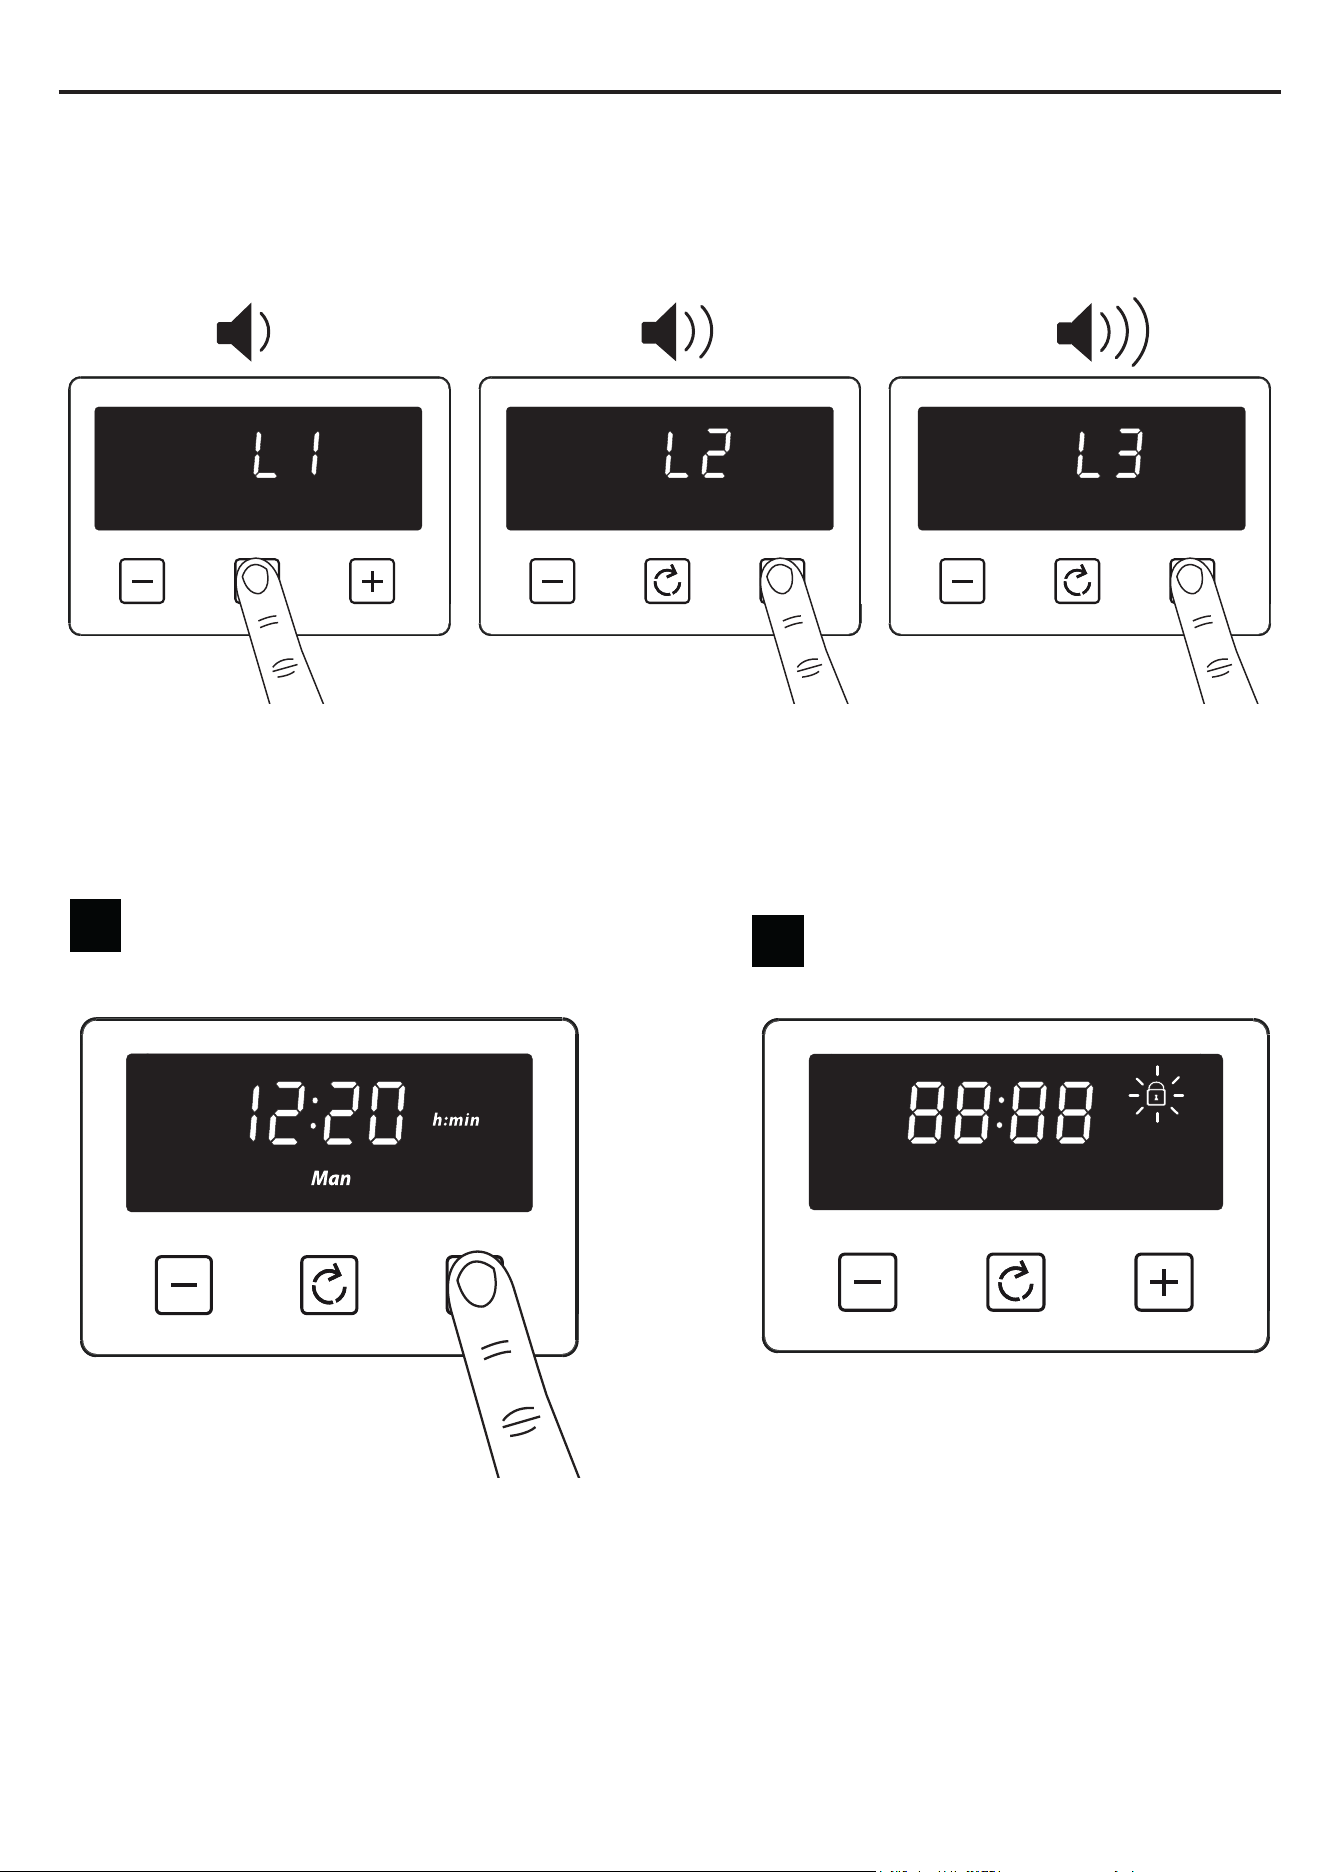
Setting the volume
3UHVVWKHPHQXEXWWRQXQWLO³/;´; RUÀDVKHVRQWKHGLVSOD\8VHWKHSOXVRUPLQXVEXWWRQVWR
select a tone.
Note: Default tone is L3
Activating / deactivating Key lock
1
Press and hold the plus button for 3-5
seconds
2
Once the Key lock is active, the buttons will be inactive. A two beep signal will be heard if the buttons
are pressed.
To deactivate the Key lock
Press and hold the plus button for 3-5 seconds. The Key lock symbol will disappear and the appliance
can continue to be used.
Note: In case of main power loss for a short time (about 1.5 minutes), timer maintains its status. Key
lock status and buzzer tone are memorized independent of the power loss duration.
CLOCK/PROGRAMMER
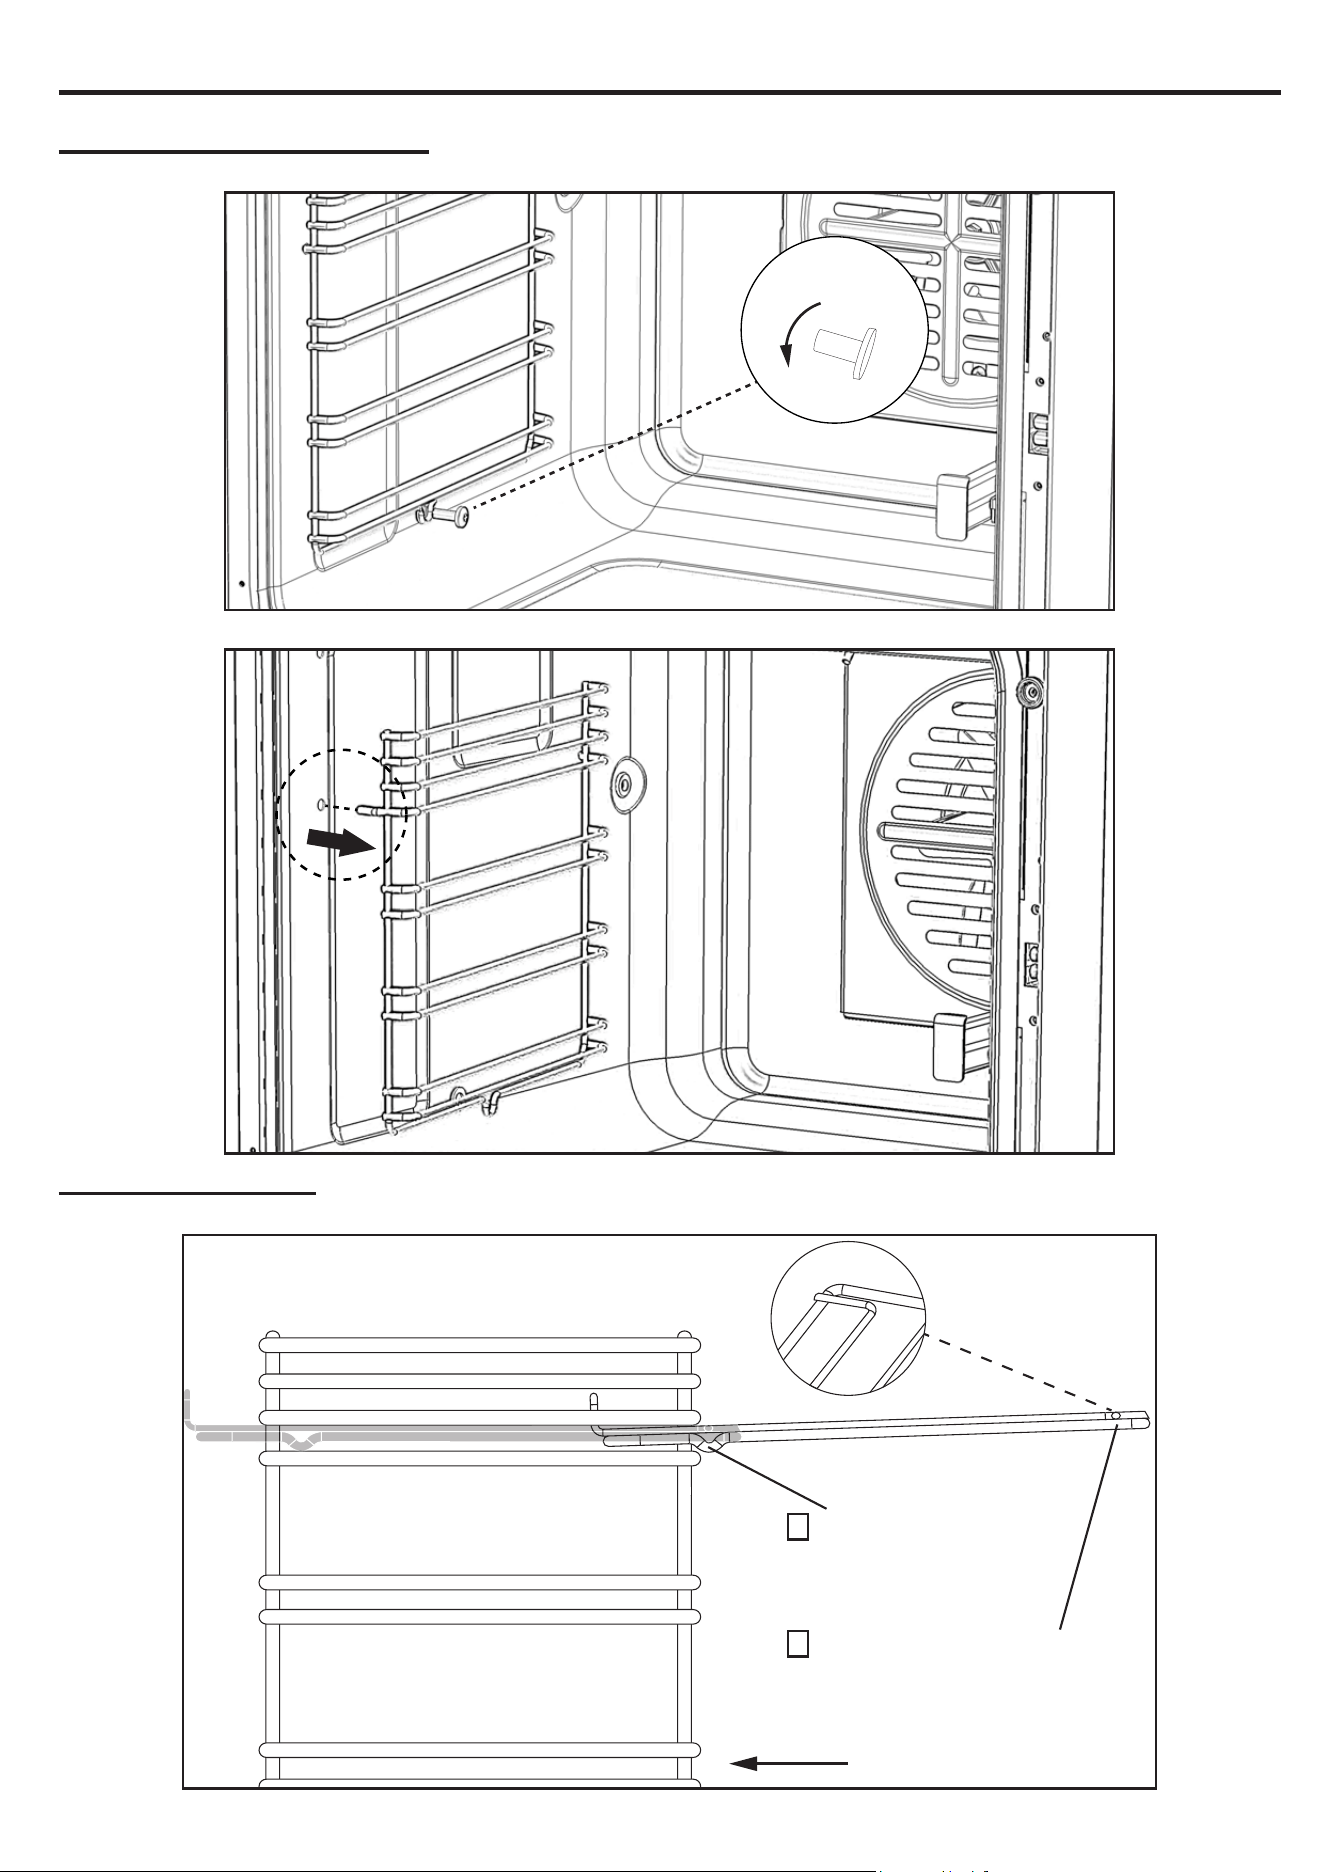
USING YOUR APPLIANCE
Removing Shelf Runners
To Open
Standard shelves
Front of appliance
2
Ensure the shelf is fully pushed
back towards the back of the
oven, until the shelf stopper is
reached.
Slightly raise the shelf and
insert in the chosen shelf
position
1

USING YOUR APPLIANCE
<RXUSURGXFWZLOOEHVXSSOLHGZLWKHLWKHURQHRIWKH¿WWHG7HOHVFRSLFJXLGHVDVVKRZQ3OHDVHUHIHUWR
the instructions below.
Option 1: Removing Telescopic guides
1
2
3
Option 1
Squared
Option 1
Rounded
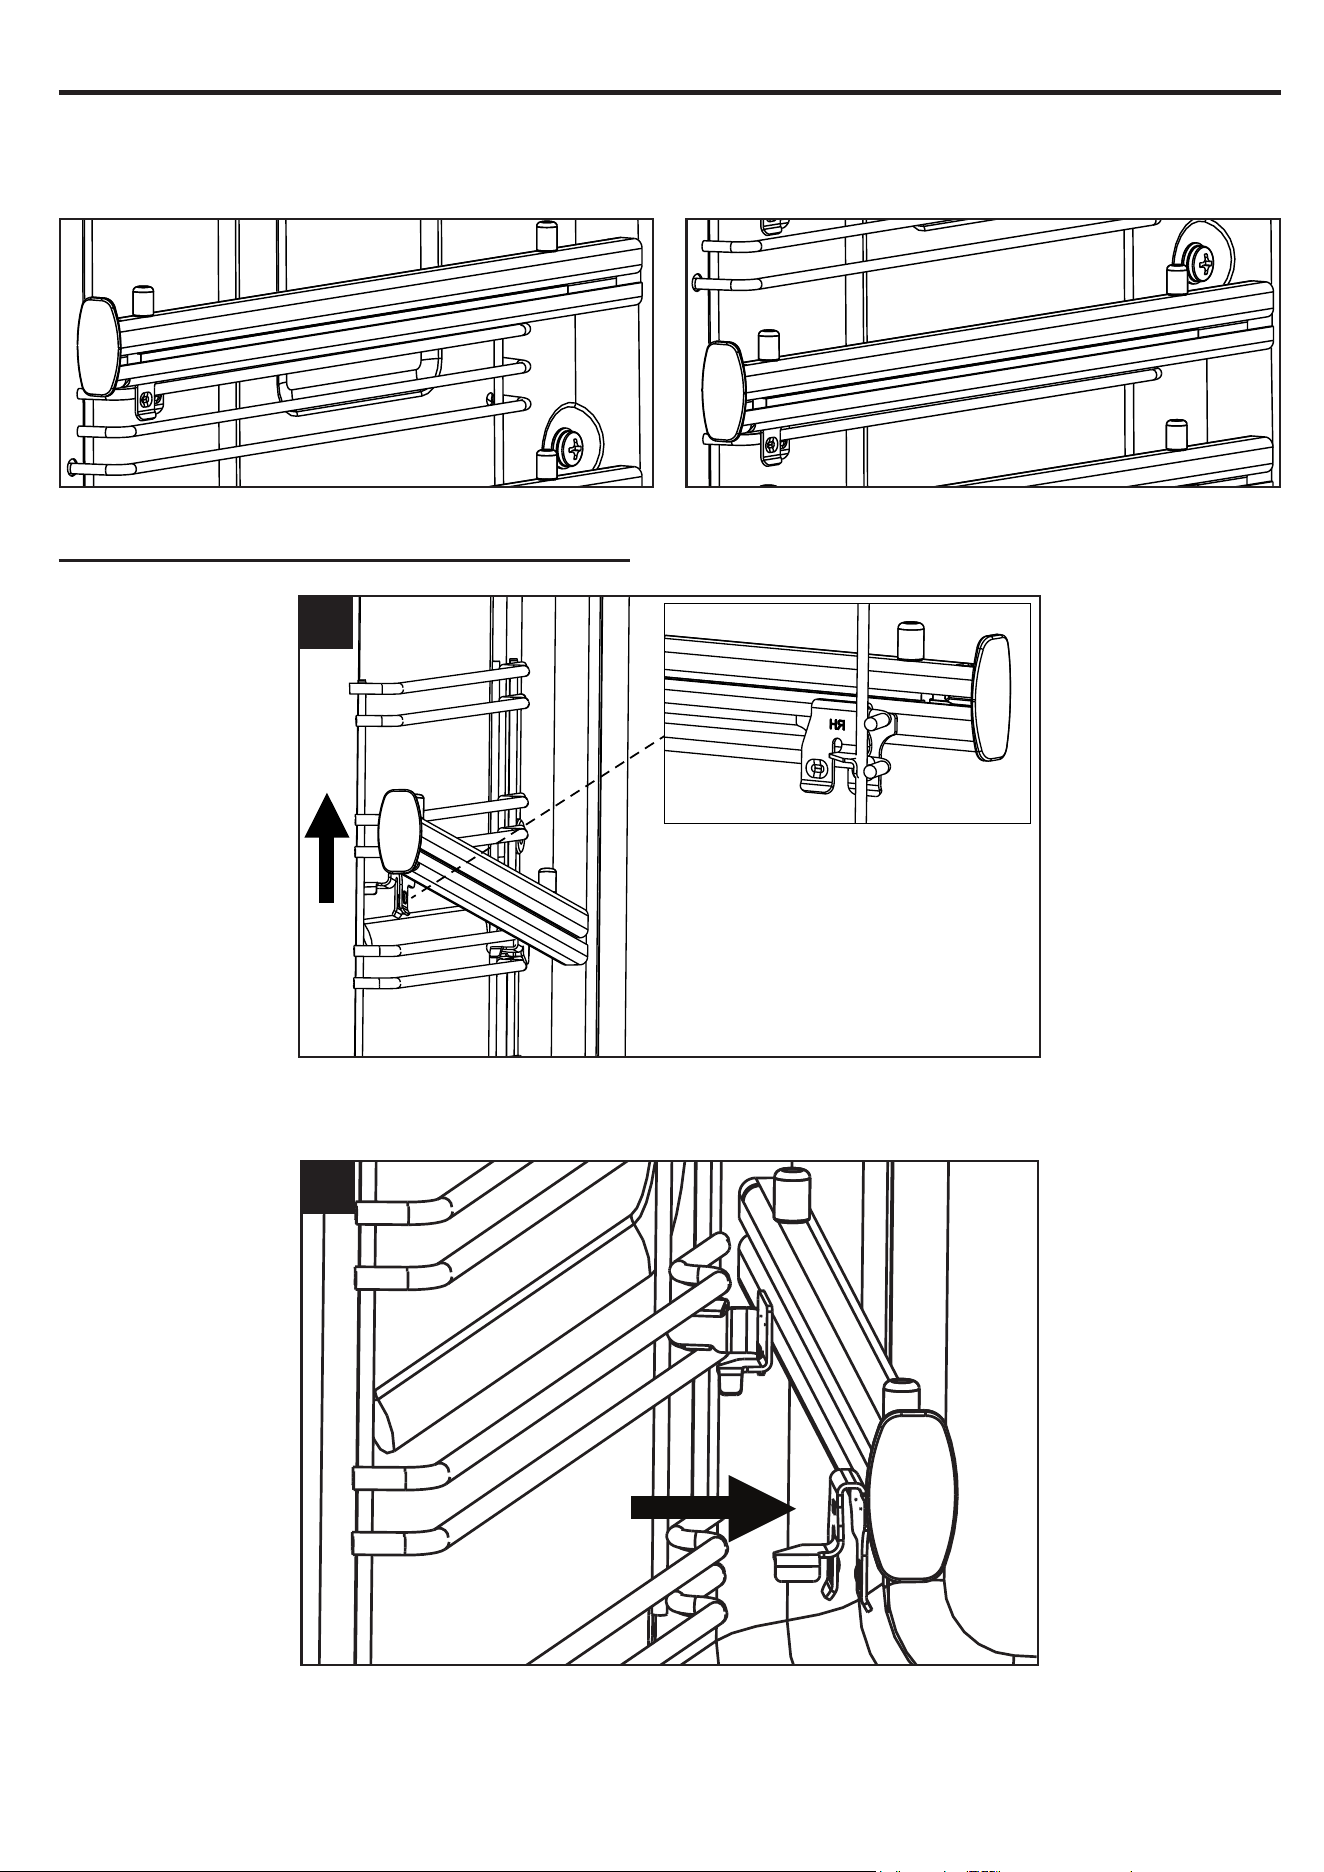
USING YOUR APPLIANCE
Note: The Telescopic guides can only be attached to the top part of the top, middle and bottom sections
of the shelves as shown below.
Option 2: Removing Telescopic guides
Front Clip
3XVKWKHIURQWRIWKHJXLGHXSZDUGV¿UPO\HQVXULQJWKHIURQWFOLSLVUHOHDVHGIURPWKHVKHOIUXQQHU
Pull the guide away from the shelf runner.
1
2
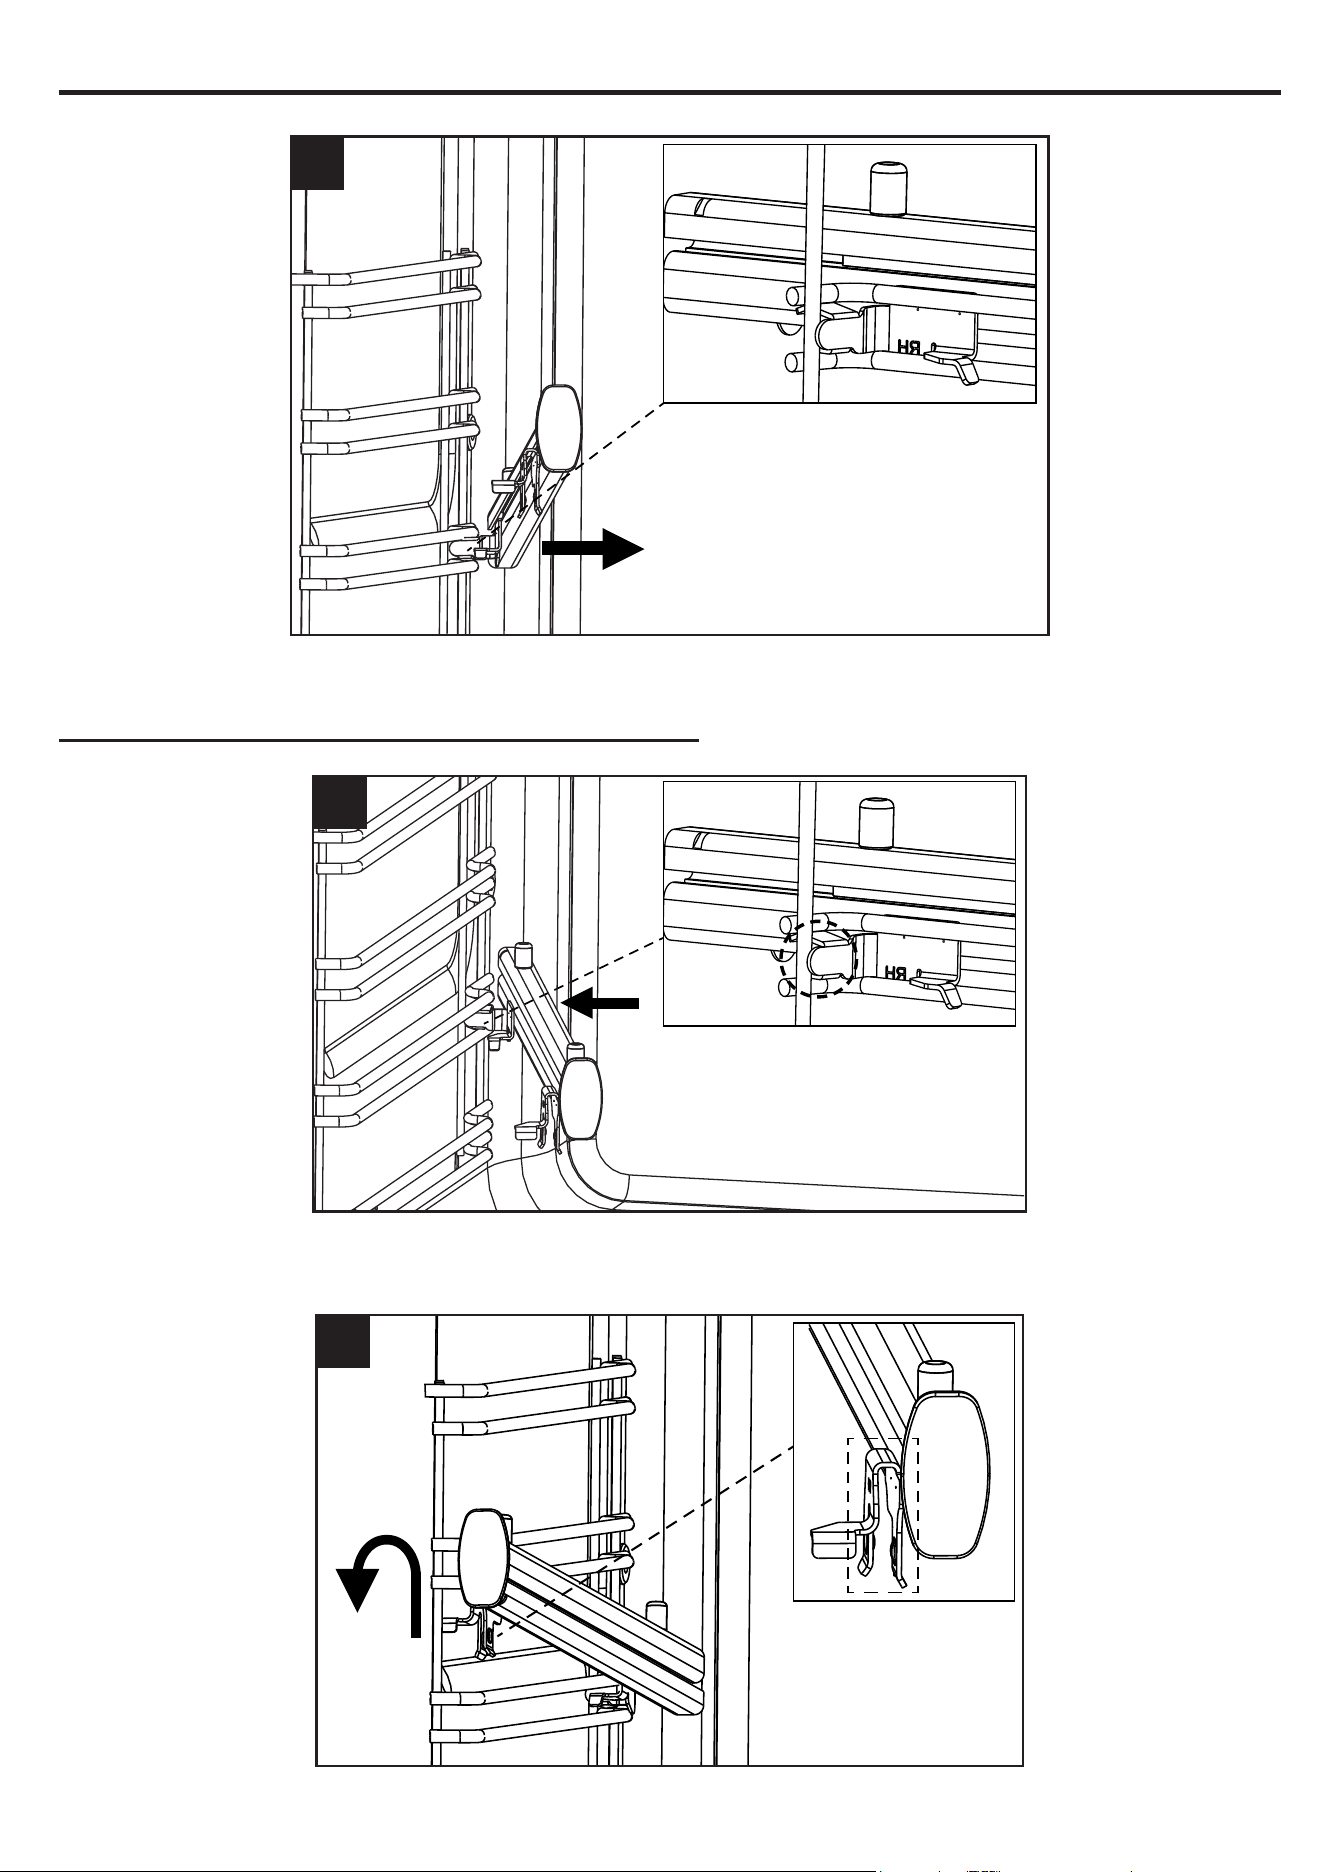
USING YOUR APPLIANCE
Back clip
Pull the back clip away from in between the shelf runner.
Option 2: To reinstall the Telescopic guides
Back clip
Secure the back clip in between the shelf runner. Ensure the guide is fully pushed back towards the
back of shelf runner.
Front clip
/RFDWHWKHIURQWFOLSRQWRWKHVKHOIUXQQHUDQG¿UPO\SXVKWKHIURQWRIWKHJXLGHGRZQXQWLOWKHIURQWFOLS
is secured into place.
3
1
2
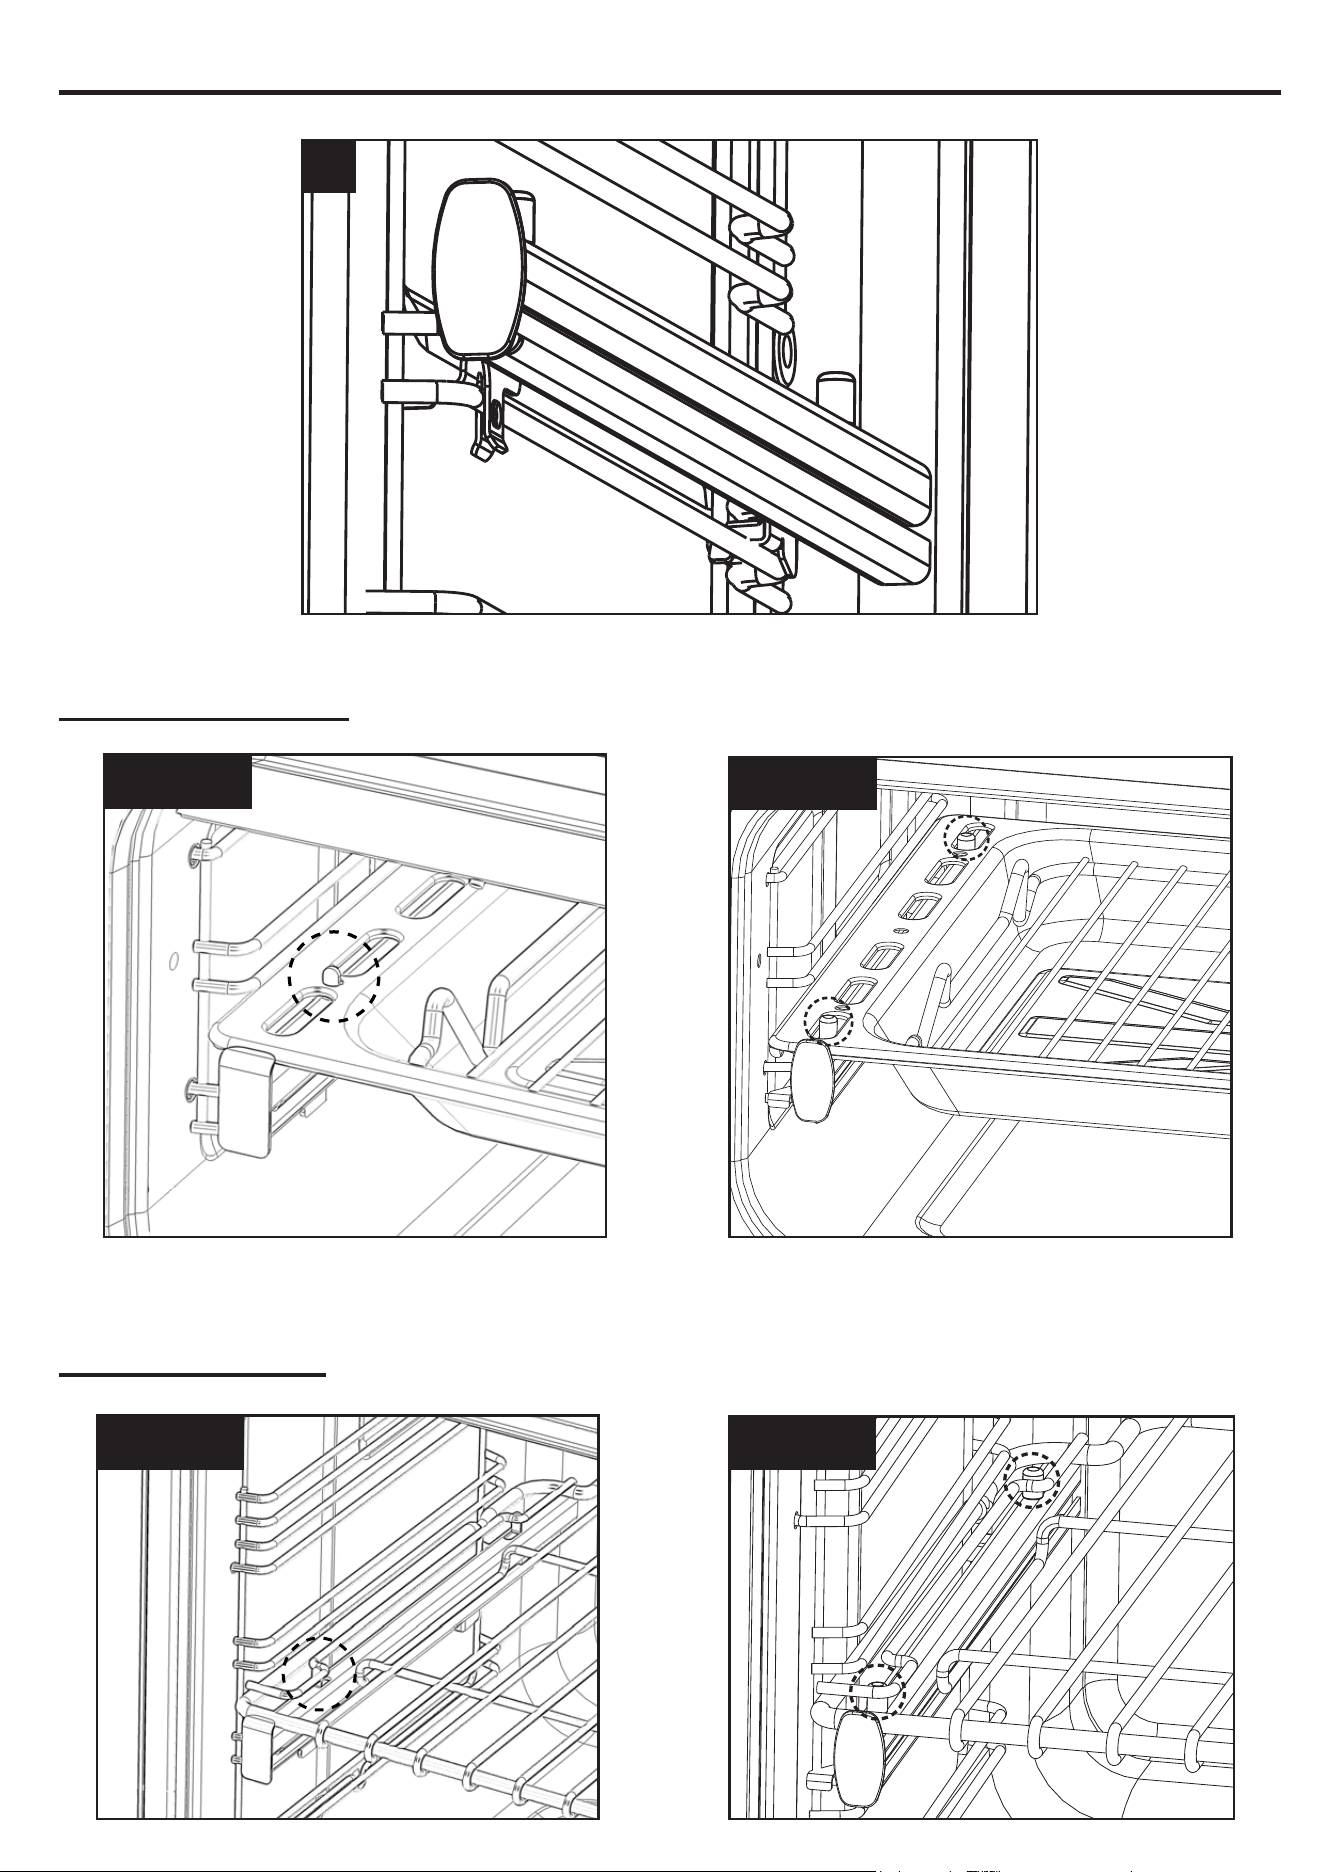
USING YOUR APPLIANCE
7KH7HOHVFRSLFJXLGHVKRXOGQRZEH¿WWHGFRUUHFWO\DQGVHFXUHWRWKHVKHOIUXQQHU
Full width oven pan
Note: Please ensure the wires / oven pan locate around the small tabs on the telescopic runner.
Telescopic sliders
Option 1
Option 1
Option 2
Option 2
3
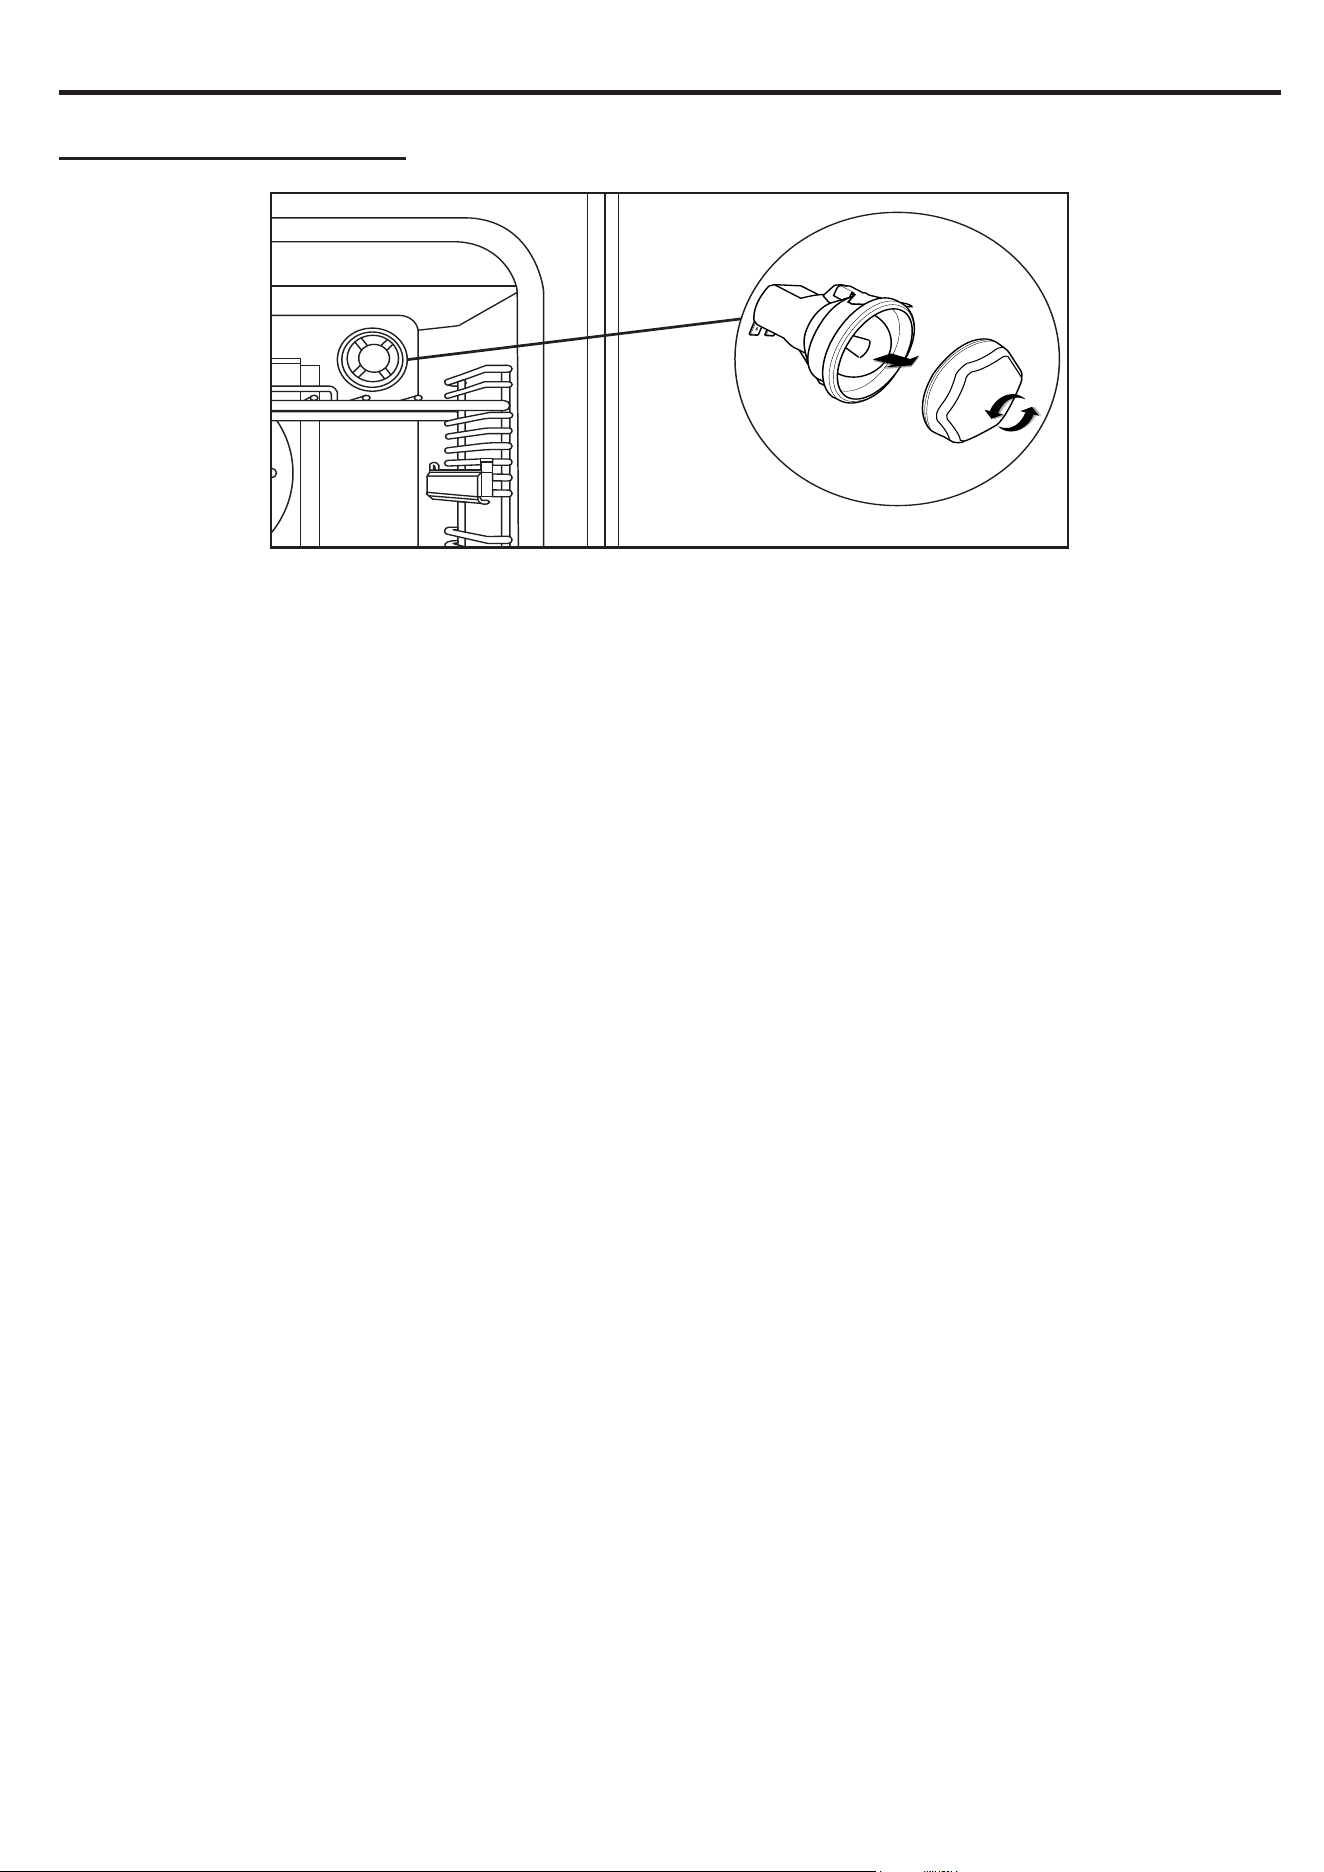
USING YOUR APPLIANCE
Changing the light bulb
Not all appliances have the same number and type of bulbs. Before you replace your bulb, check to see
what type you have. Please remember that bulbs are not covered by your warranty.
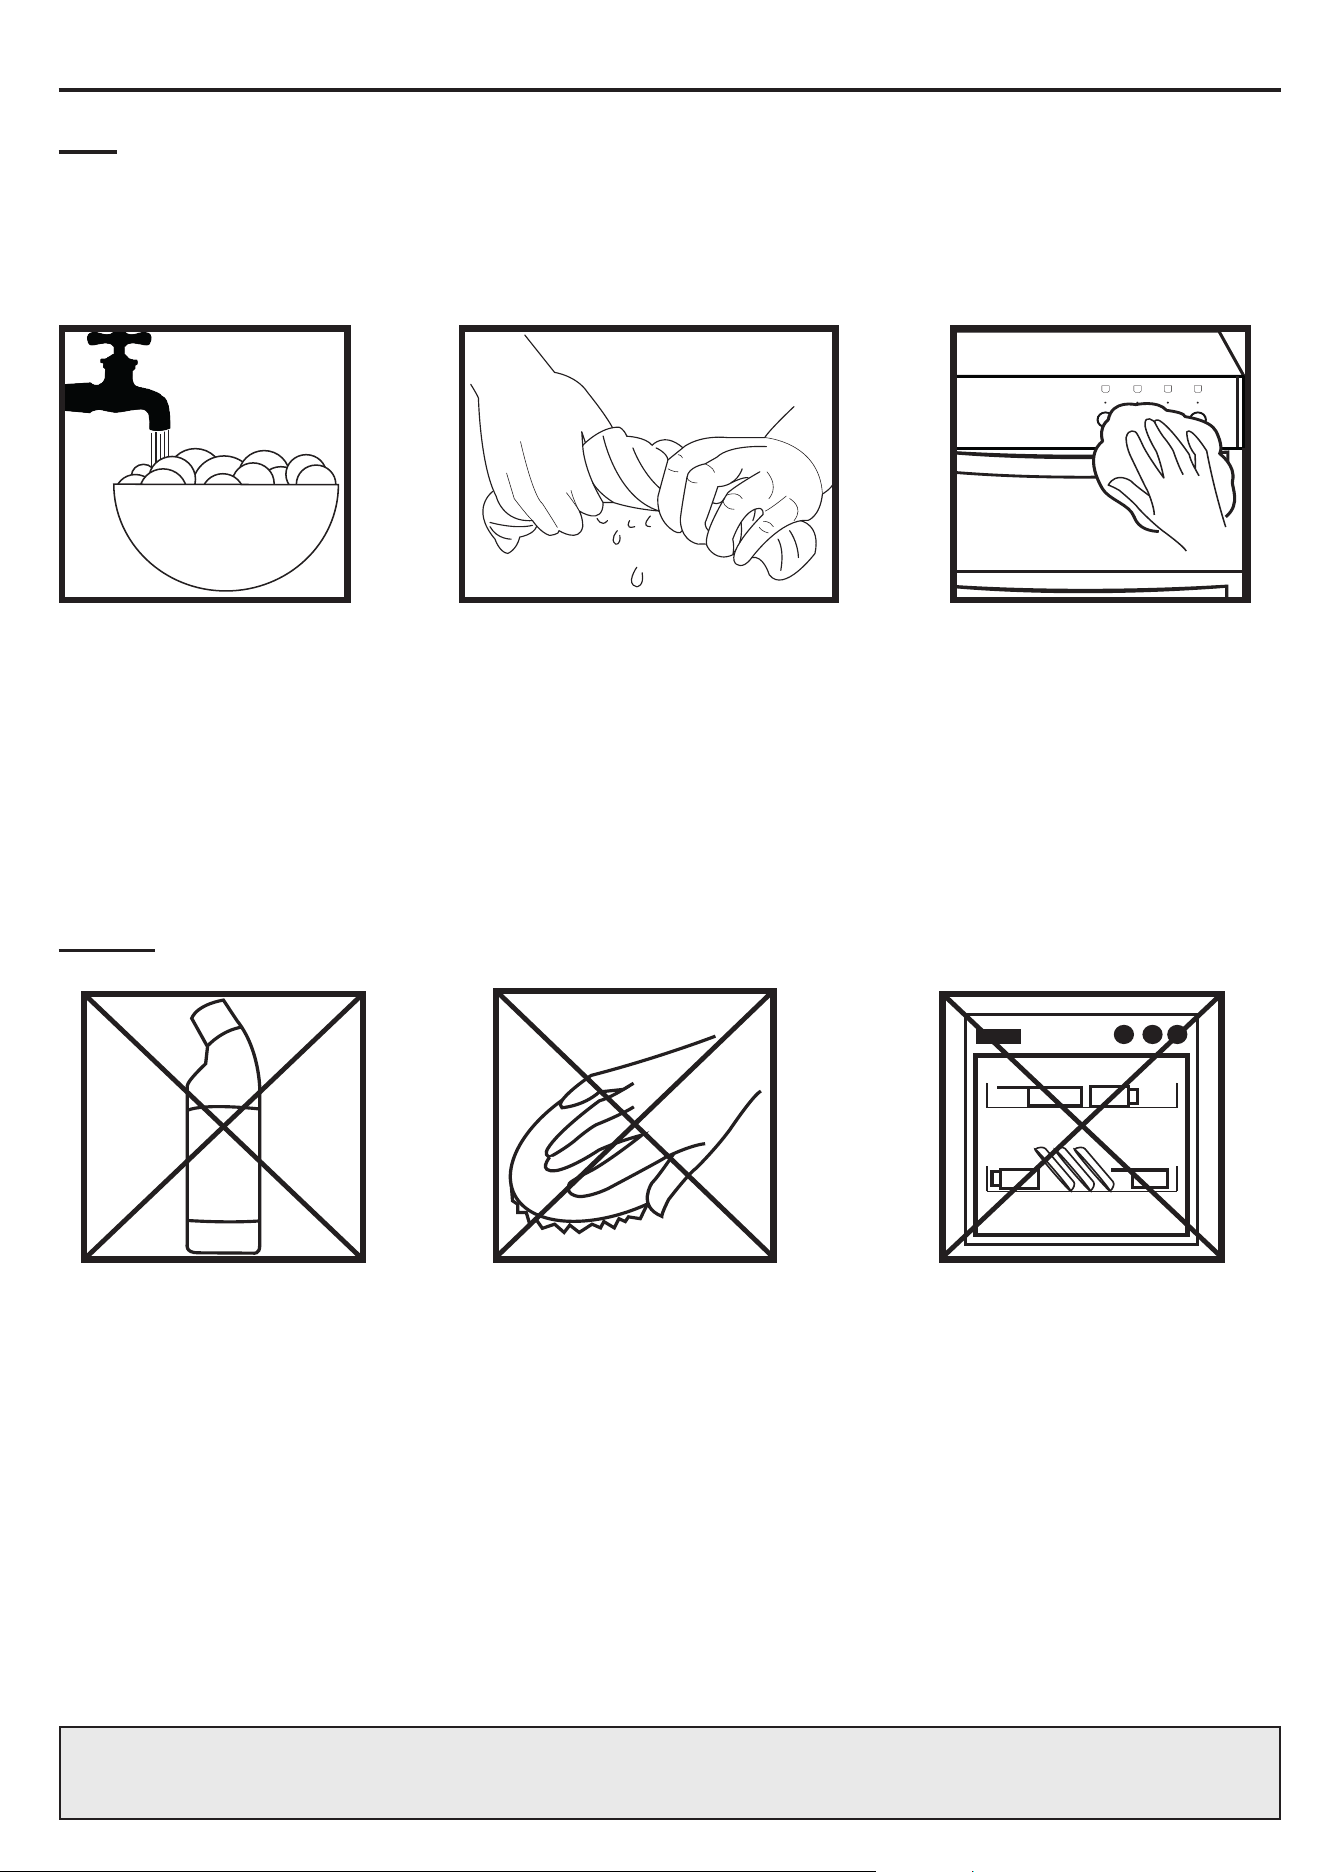
CLEANING YOUR APPLIANCE
Dos
Note:$OZD\VVZLWFKRႇ\RXUDSSOLDQFHDQGDOORZLWWRFRROGRZQEHIRUH\RXFOHDQDQ\SDUWRILW
Note: Please take extra care when cleaning over the symbols on the control panel, as this can lead to
them fading.
H
Tips: Some foods can mark or damage the metal or paint work e.g.; Vinegar, fruit juices and salt.
Always clean food spillages as soon as possible.
Note::KHQFOHDQLQJWKHJULOOWDNHFDUHRIWKH¿[LQJEUDFNHWVDQG¿[LQJV
Don’ts
IT IS IMPORTANT TO CLEAN YOUR APPLIANCE REGULARLY AS A BUILD UP OF FAT CAN
AFFECT ITS PERFORMANCE OR DAMAGE IT AND MAY INVALIDATE YOUR GUARANTEE.
IN ADDITION TO THE ABOVE, DO NOT USE METAL SCRAPERS TO CLEAN THE OVEN DOOR
GLASS.
Undiluted bleaches
Chloride products
Warm, soapy water Wipe with damp cloth
Dry with a soft cloth
Clean, wrung out cloth
Wire Wool
Abrasive cleaners
Nylon pads
Steam cleaners
Do not place in the
dishwasher:
Cast iron griddle
Pan supports
Burner caps & skirts
:HRႇHUDJUHDWUDQJHRIFOHDQLQJSURGXFWVDQGDFFHVVRULHVIRU\RXUDSSOLDQFH
To shop, please visit our website located at the front of this User Guide.

INSTALLATION INSTRUCTIONS
FAILURE TO INSTALL APPLIANCES CORRECTLY IS DANGEROUS AND COULD
LEAD TO PROSECUTION.
7KLVDSSOLDQFHVKDOORQO\EHLQVWDOOHGRQO\E\DXWKRULVHGSHUVRQVDQGLQDFFRUGDQFHZLWK
WKHPDQXIDFWXUHUVLQVWDOODWLRQLQVWUXFWLRQVORFDOUHJXODWLRQVPXQLFLSDOEXLOGLQJFRGHV
HOHFWULFDOZLULQJUHJXODWLRQVDQGDQ\RWKHUVWDWXWRU\UHJXODWLRQV
Our policy is one of constant development and improvement, therefore we cannot guar-
DQWHHWKHVWULFWDFFXUDF\RIDOORIRXULOOXVWUDWLRQVDQGVSHFLILFDWLRQV&KDQJHVPD\KDYH
been made subsequent to publishing.
Please keep to the following points most carefully;
Although every care has been taken to ensure this appliance has no sharp edges, we
recommend that you wear protective gloves when installing and moving this appliance.
This will prevent injury.
Ensure that you route all mains cables well clear of any adjacent heat source.
The space for air circulation, located underneath and at the back of the hob improves its
UHOLDELOLW\E\HQVXULQJWKDWLWZLOOFRROGRZQHIILFLHQWO\
Installations should be carried out in line with the National Regulations applicable for this
product type.
INSTALLATION INSTRUCTIONS
Before you start please read the instructions.
3ODQQLQJ\RXULQVWDOODWLRQZLOOVDYH\RXWLPHDQGHႇRUW
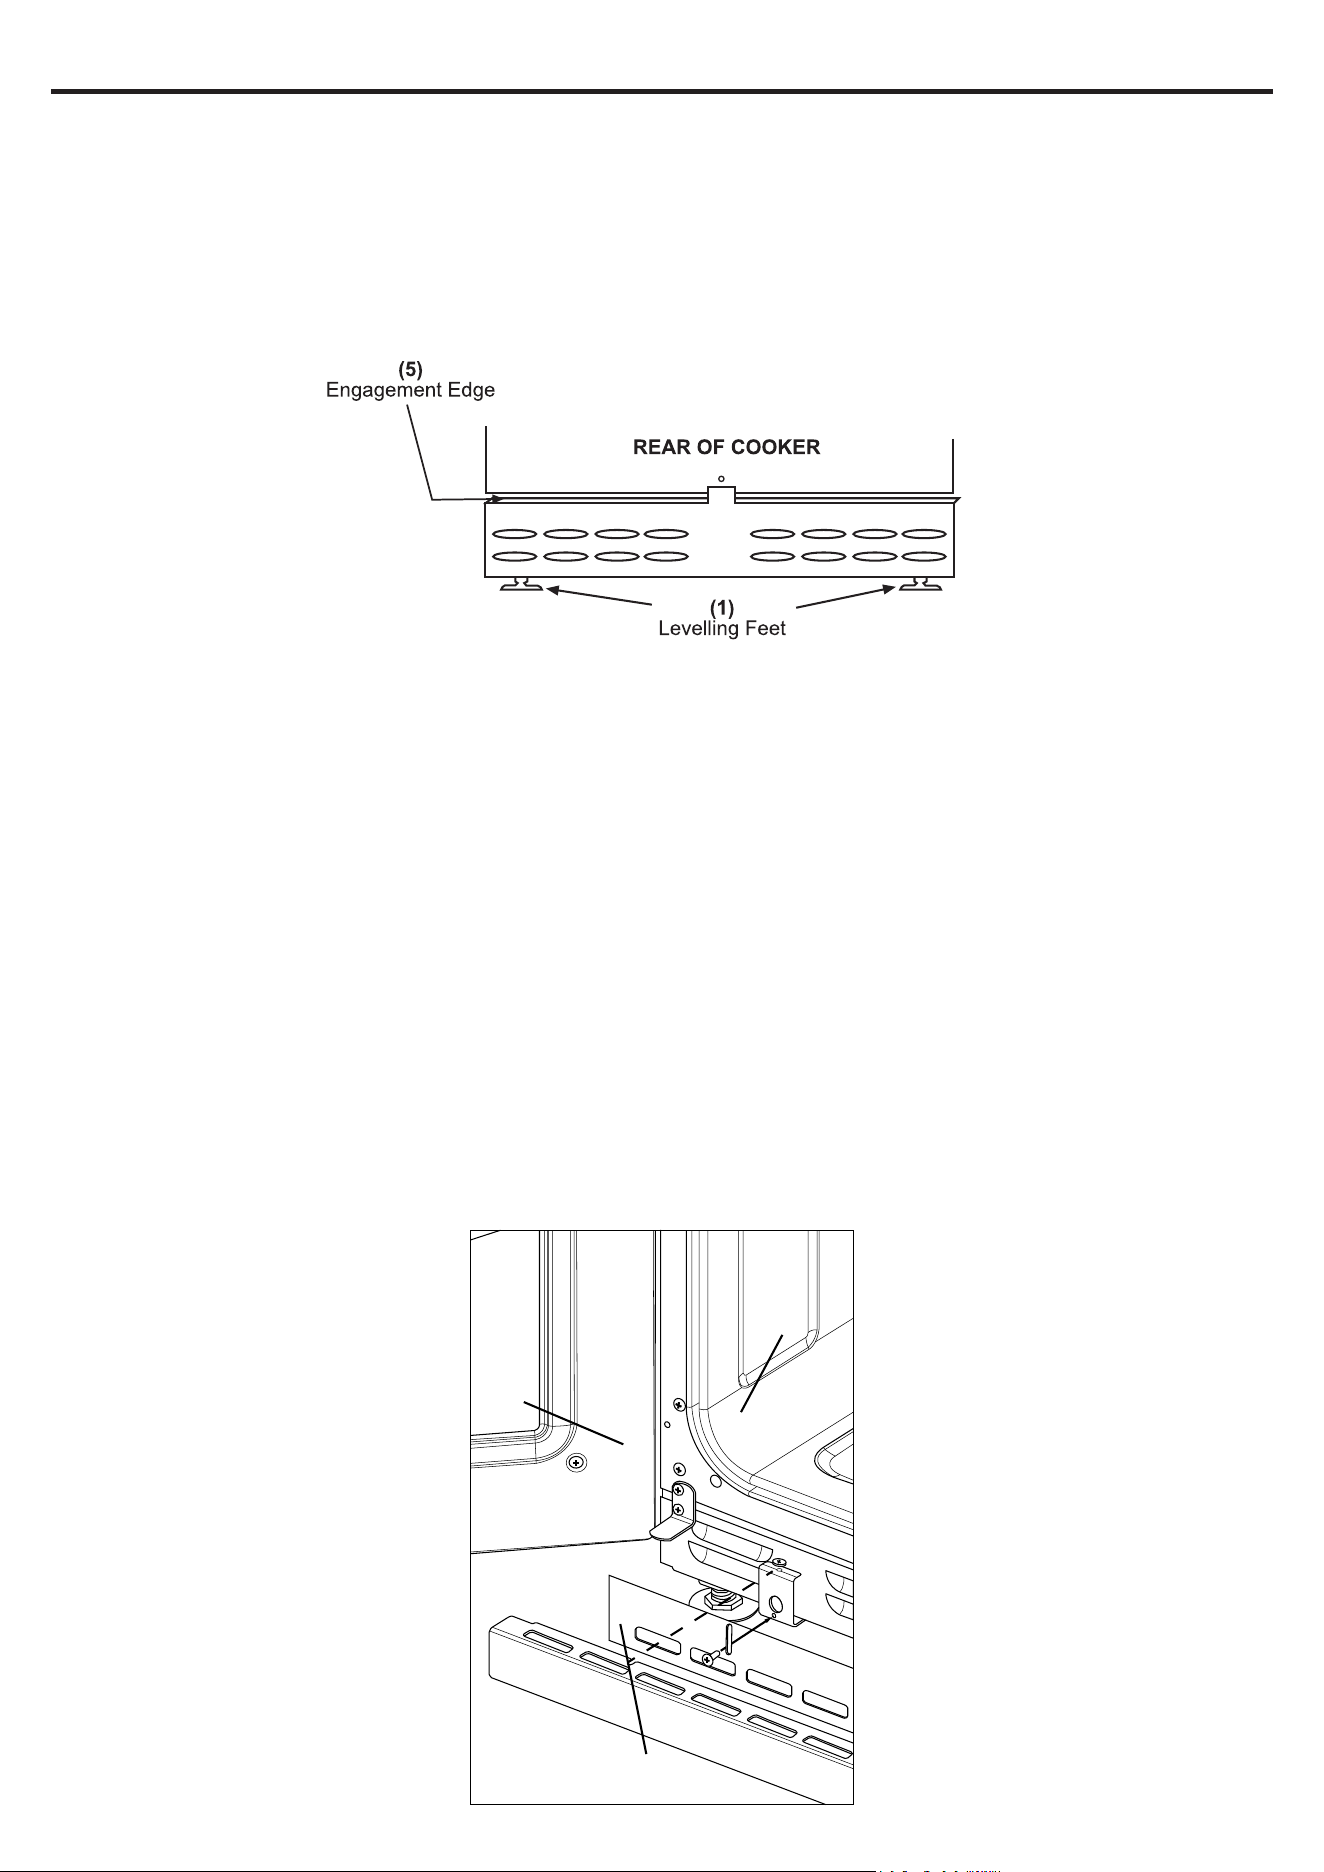
Levelling Your Cooker
Place a spirit level on a baking sheet onto an oven shelf.
7KHFRRNHULV¿WWHGZLWKOHYHOLQJIHHW/HYHO\RXUFRRNHUWR\RXUGHVLUHGKHLJKWXVLQJWKHOHYHOLQJIHHW
at the front and rear of the cooker.
5HDUZKHHOVLI¿WWHG
Adjustment of the wheel height can be made with a screw driver, through the hexagonal hole in the
front plinth
Fitting the plinth
Make sure the appliance is raised to a height of 915mm or above before beginning. If the appliance
LVEHORZPP\RXFDQRQO\¿WWKHSOLQWKFRYHUODEHOOHG;<RXFDQDGMXVWWKHKHLJKWXVLQJWKH
feet (1) of the appliance. If your appliance has a storage drawer at the bottom, you access the re-
quired holes through the base of the drawer after lifting the mat.
Open the appliance doors, and loosen screw A located on bracket (2). Do not remove this screw
entirely
Insert screw B, through slot (3) and screw into the small hole at the bottom of bracket (2). Make sure
WKDWWKHSOLQWKFRYHULVÀXVKWRWKHDSSOLDQFHEXWQRWRYHUWLJKWHQHG
Oven cavity
Door
X
Y
A
B
(1)
(2)
(3)
Plinth Cover
BEFORE INSTALLATION
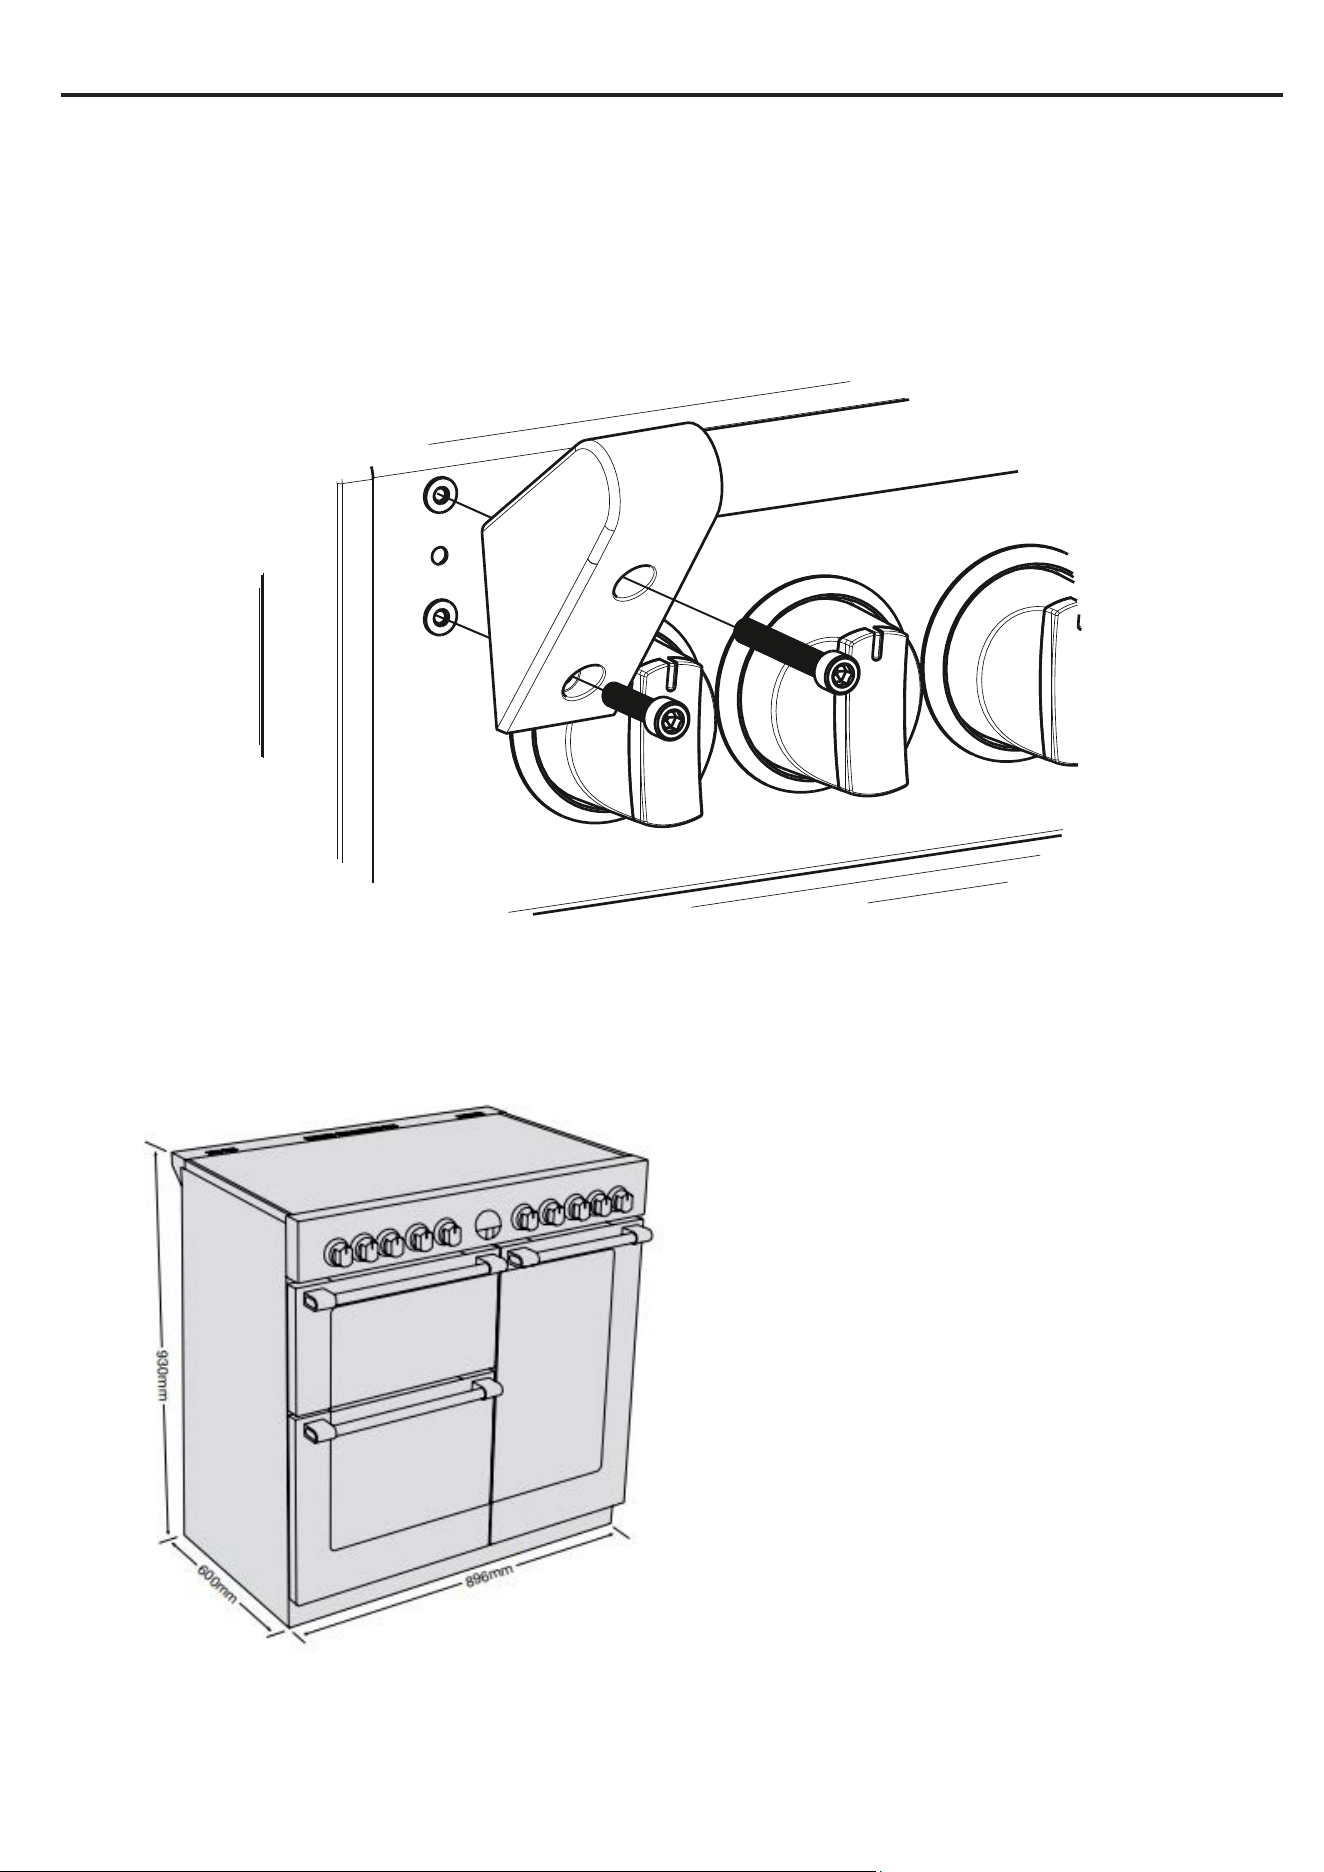
Fitting the towel rail (if applicable)
On the towel rail there are two holes, top (A) and bottom (B), these holes have corresponding holes
on the fascia at each end.
The 2x longer screws are designed for the top hole (A) where as the remaining screw just goes
through the bottom hole (B). Both screws are M6 screws. Using the Allen key provided, tighten the
VFUHZVPDNLQJVXUHWKDWWKHWRZHOUDLOLVÀXVKWRWKHIDVFLDEXWQRWRYHUWLJKWHQHG
A
B
Vinyl wrapped surfaces (if applicable)
BEFORE INSTALLATION
If this appliance is installed near vinyl
wrappedsurfaces, we strongly
recommend using an installation kit
available from the vinyl-wrap supplier.
Belling cannot accept any responsibility for
damage caused due to installation into
cabinets with lowtemperature tolerances.
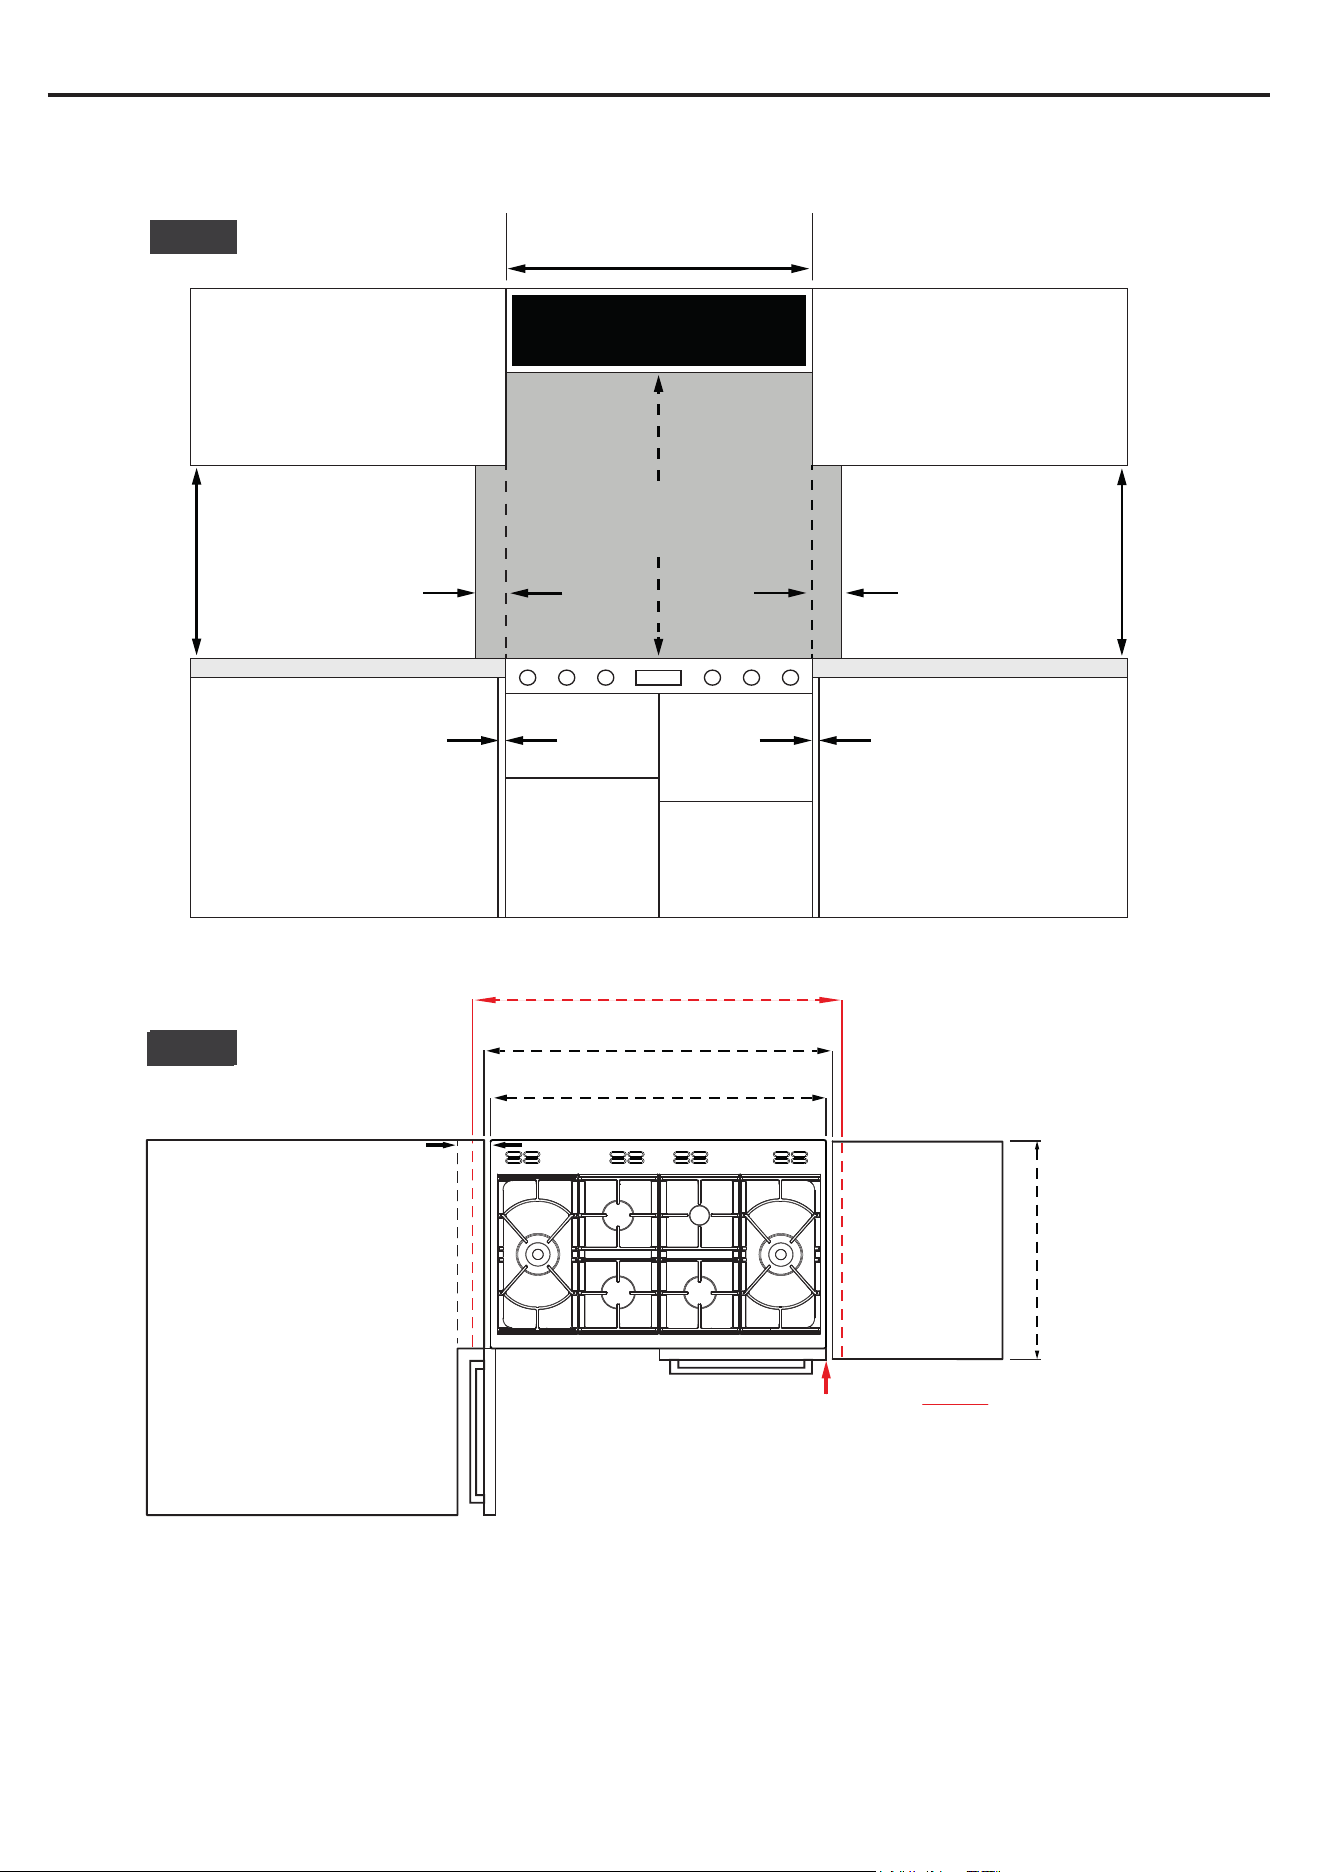
Cupboard / Hood Clearances
Nominal width of the hob
Wall Cabinet
400mm
No shelf or overhang of combustible material should
be closer than 600mm above the hob.
For the required clearance between rangehood and the
hob refer to the rangehood user manual.
90mm
90mm
*Min 10mm clearance
required between
cabinets and rangecooker
*Min 10mm clearance
required between
cabinets and rangecooker
400mm
min
600mm
Benchtop Benchtop
View from front
70mm
• If your appliance has a side opening door, we recommend a side clearance of 70mm to allow the
oven door to fully open, if placed up to a wall or cabinetry.
• The cooker must have a side clearance above hob level of 90mm up to a height of 400mm.
DIMENSIONS AND CLEARANCES - OPTION 1
View from above, with the
appliance located in a corner
*Min 10mm clearance required in order
to avoid rangecooker doors infringing
onto cabinetry.
Rangecooker Width 896/1096mm
Gap required between Benchtop
900/1100mm (Minimum)
Wall Cabinet
Gap required between Cabinetry
916/1116mm (Minimum)
Benchtop Benchtop
Benchtop and
Cabinetery
Depth
600mm
FIG.2
FIG.1
Front of ranegcooer door should align
with front of cabinetery
FIG.2
Install rangehoods in accordance with manufacturers instructions, no closer than 600mm above
the cooking surface for Rangehoods and 750mm for Exhaust Fans.
Cupboard / Hood Clearances
Nominal width of the hob
Wall Cabinet
400mm
No shelf or overhang of combustible material should
be closer than 600mm above the hob.
For the required clearance between rangehood and the
hob refer to the rangehood user manual.
90mm
90mm
*Min 10mm clearance
required between
cabinets and rangecooker
*Min 10mm clearance
required between
cabinets and rangecooker
400mm
min
600mm
Benchtop Benchtop
View from front
70mm
• If your appliance has a side opening door, we recommend a side clearance of 70mm to allow the
oven door to fully open, if placed up to a wall or cabinetry.
• The cooker must have a side clearance above hob level of 90mm up to a height of 400mm.
DIMENSIONS AND CLEARANCES - OPTION 1
View from above, with the
appliance located in a corner
*Min 10mm clearance required in order
to avoid rangecooker doors infringing
onto cabinetry.
Rangecooker Width 896/1096mm
Gap required between Benchtop
900/1100mm (Minimum)
Wall Cabinet
Gap required between Cabinetry
916/1116mm (Minimum)
Benchtop Benchtop
Benchtop and
Cabinetery
Depth
600mm
FIG.2
FIG.1
Front of ranegcooer door should align
with front of cabinetery
FIG.2
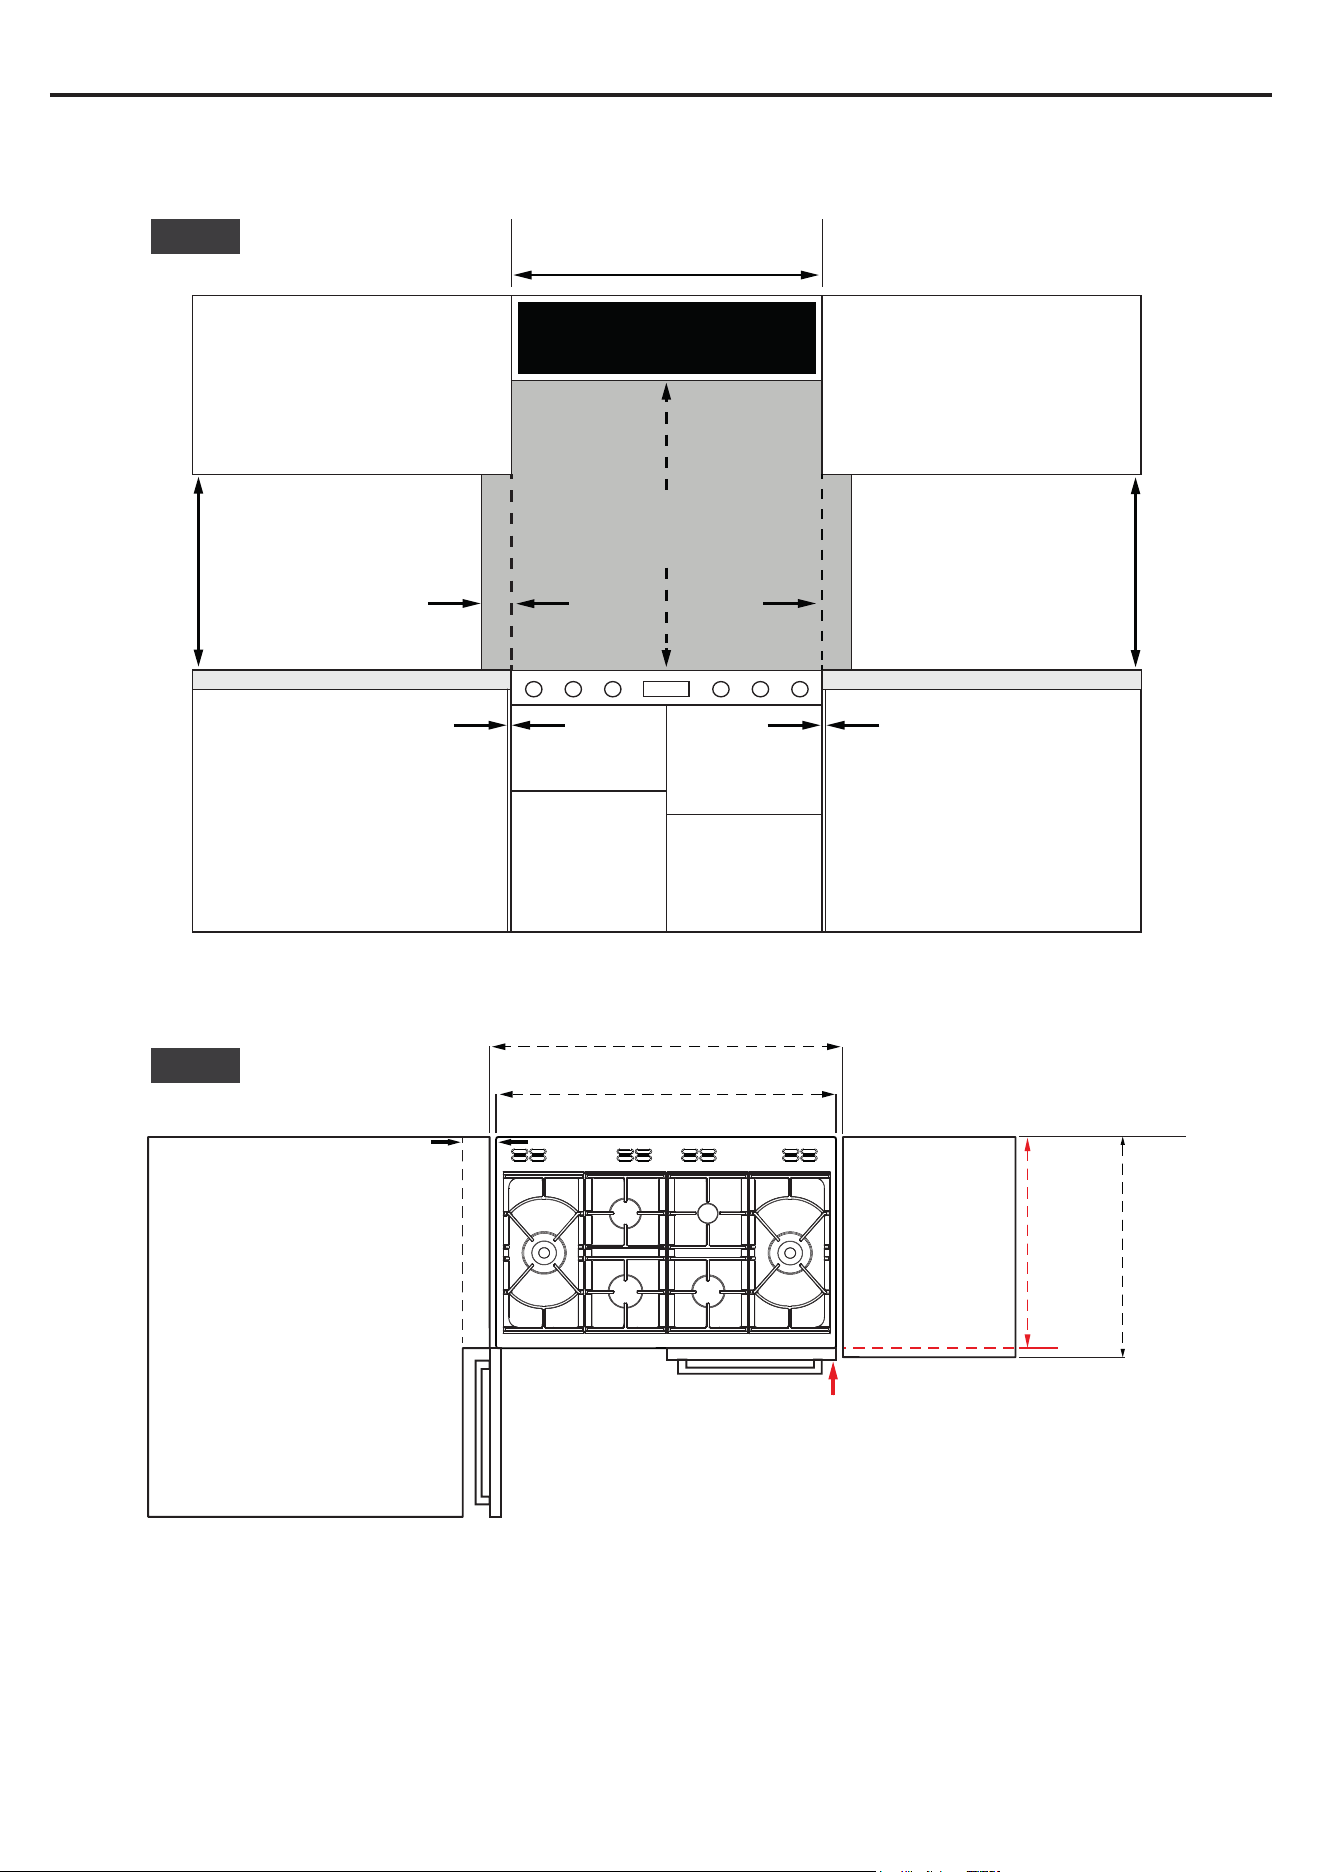
Cupboard / Hood / Side Clearances
Nominal width of the hob
Wall Cabinet
400mm
90mm
90mm
400mm
min
600mm
Benchtop Benchtop
View from front
Benchtop Benchtop
70mm
• If your appliance has a side opening door, we recommend a side clearance of 70mm to allow the
oven door to fully open, if placed up to a wall or cabinetry.
• The cooker must have a side clearance above hob level of 90mm up to a height of 400mm.
DIMENSIONS AND CLEARANCES - OPTION 2
View from above, with the
appliance located in a corner
*If above installation method is used then
rangecooker must protrude in front of
cabinetry so rangecooker doors do not
infringe onto cabinetry. Refer Fig.2
Rangecooker Width 896/1096mm
Benchtop Width 900/1100mm (Minimum)
Wall Cabinet
Maximum
Cabinetry
Depth
570mm
Benchtop
Depth
600mm
No shelf or overhang of combustible material should
be closer than 600mm above the hob.
For the required clearance between rangehood and the
hob refer to the rangehood user manual.
Front of rangecooker doors need to protrude
past cabintery doors by at least 30mm
* Min 2mm clearance required
between cabinets and
rangecooker
* Min 2mm clearance required
between cabinets and
rangecooker
FIG.2
FIG.1
Install rangehoods in accordance with manufacturers instructions, no closer than 600mm above
the cooking surface for Rangehoods and 750mm for Exhaust Fans.
Cupboard / Hood / Side Clearances
Nominal width of the hob
Wall Cabinet
400mm
90mm
90mm
400mm
min
600mm
Benchtop Benchtop
View from front
Benchtop Benchtop
70mm
• If your appliance has a side opening door, we recommend a side clearance of 70mm to allow the
oven door to fully open, if placed up to a wall or cabinetry.
• The cooker must have a side clearance above hob level of 90mm up to a height of 400mm.
DIMENSIONS AND CLEARANCES - OPTION 2
View from above, with the
appliance located in a corner
*If above installation method is used then
rangecooker must protrude in front of
cabinetry so rangecooker doors do not
infringe onto cabinetry. Refer Fig.2
Rangecooker Width 896/1096mm
Benchtop Width 900/1100mm (Minimum)
Wall Cabinet
Maximum
Cabinetry
Depth
570mm
Benchtop
Depth
600mm
No shelf or overhang of combustible material should
be closer than 600mm above the hob.
For the required clearance between rangehood and the
hob refer to the rangehood user manual.
Front of rangecooker doors need to protrude
past cabintery doors by at least 30mm
* Min 2mm clearance required
between cabinets and
rangecooker
* Min 2mm clearance required
between cabinets and
rangecooker
FIG.2
FIG.1
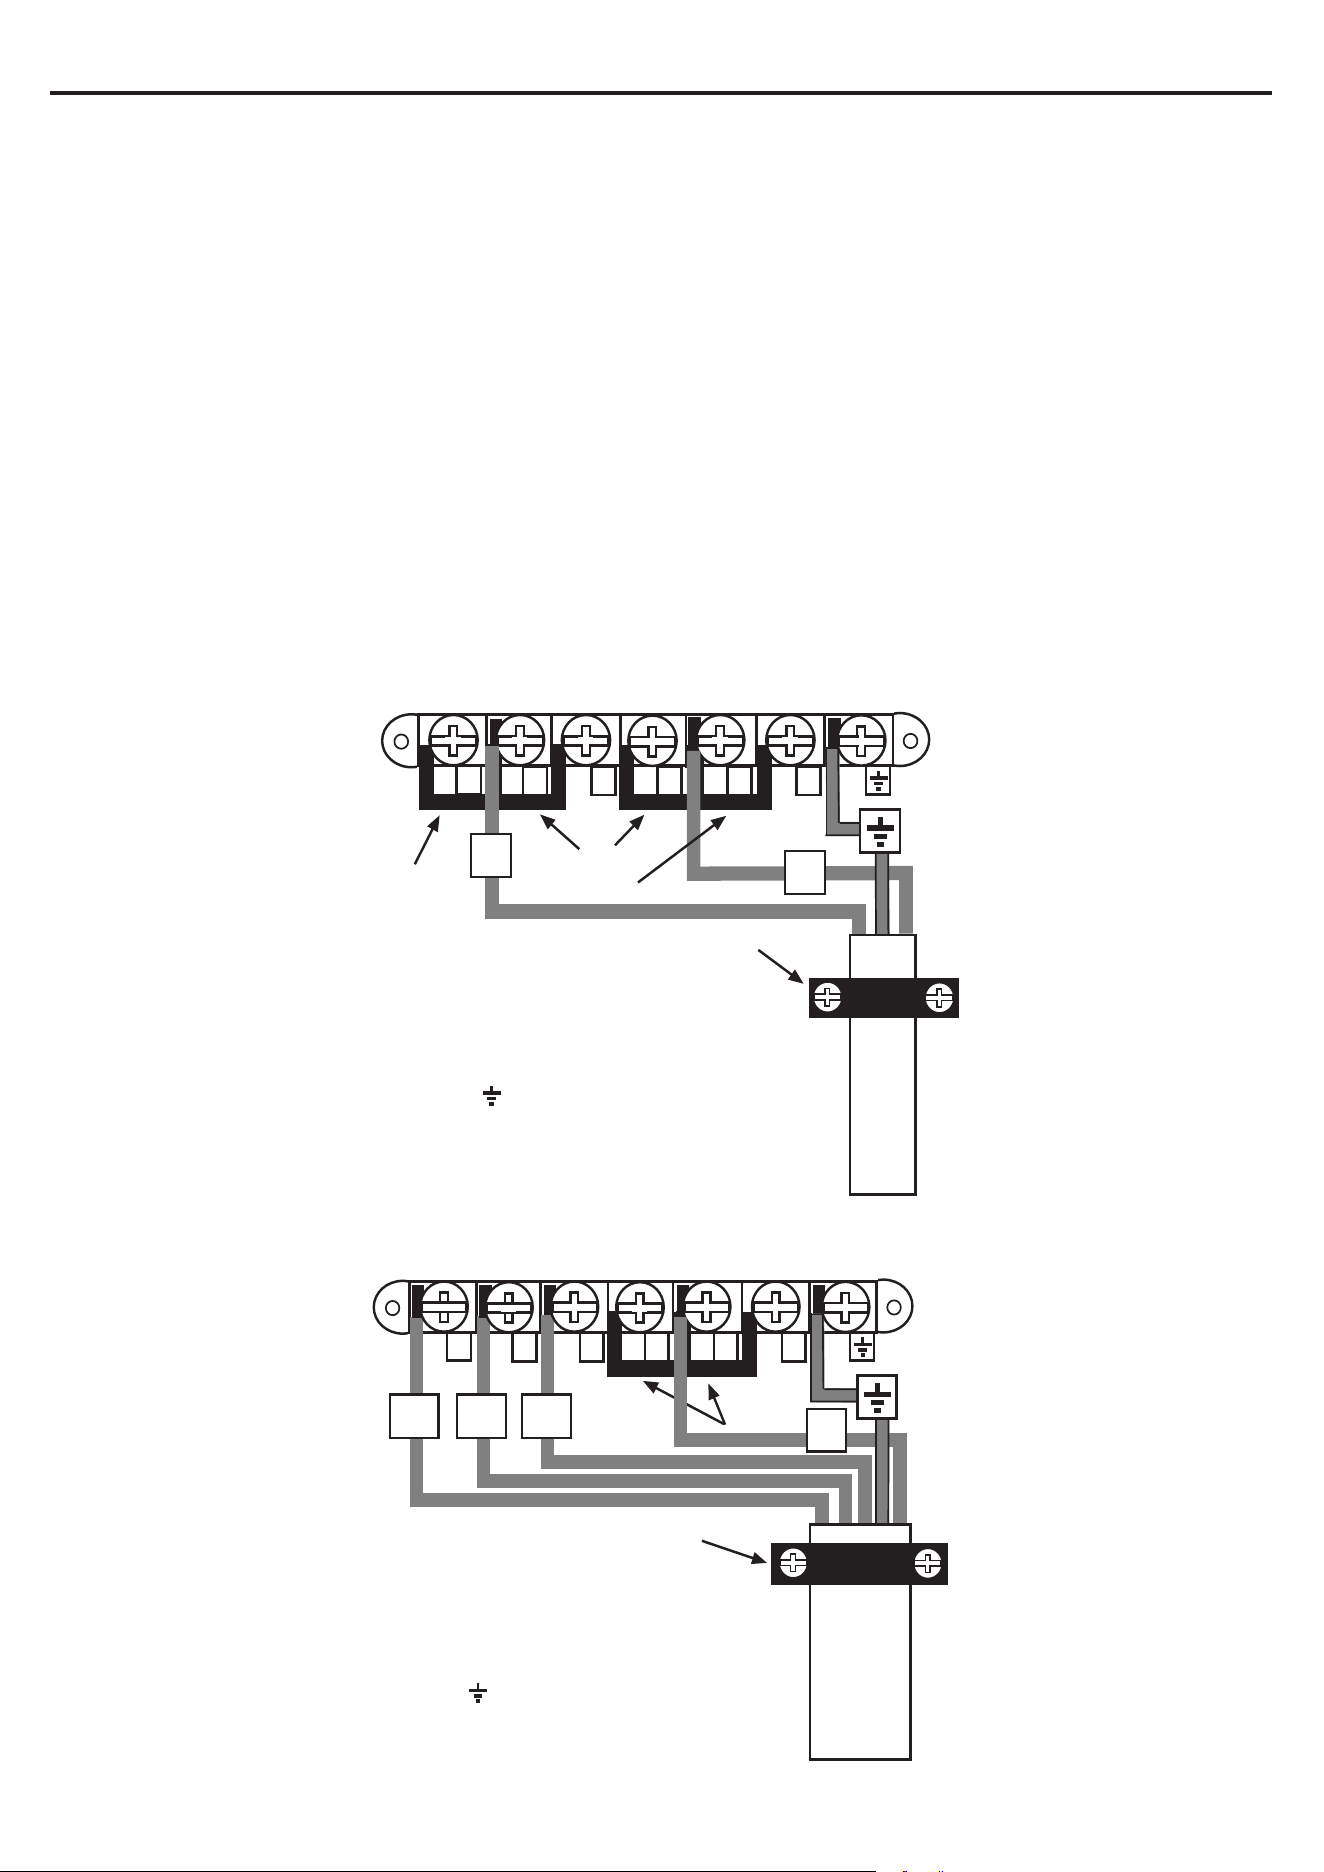
CONNECT TO THE ELECTRICITY SUPPLY - TERMINAL BLOCK
WARNING: This appliance must be earthed.
7KLVDSSOLDQFHPXVWEH¿WWHGWRDVZLWFKSURYLGLQJDOOSROHGLVFRQQHFWLRQZLWKDPLQLPXPFRQWDFW
separation of 3mm.
Access to the mains terminal is gained by removing the terminal block cover at the rear of the
appliance.
&RQQHFWLRQVKRXOGEHPDGHZLWKDVXLWDEOHÀH[LEOHFDEOHZLWKDPLQLPXPWHPSHUDWXUHUDWLQJRI
70°C.
First strip the wires then push the cable through the cable clamp.
Connect the cable to the terminal block and tighten the cable clamp screws - see diagram.
5H¿WWKHWHUPLQDOER[FRYHU
6XႈFLHQWFDEOHVKRXOGEHXVHGWRDOORZWKHFRRNHUWREHSXOOHGRXWEXWPXVWKDQJFOHDURIWKHÀRRU
so it does not become twisted or trapped when the cooker is pushed back.
The terminal block screws and clamps can be damaged by excessive tightening and untightening. DO
NOT USE POWER TOOLS!
Single Phase Connection (240V ~ 50Hz)
4
5
2
3
6
1
N
L
Shorting
Links
Shorting
Link
Connect cable to terminal block:
L to terminal 2.
N to terminal 5.
Earth to terminal.
Ensure shorting links are fitted between
terminals 1-2, 2-3, 4-5 and 5-6.
Ensure all screws are fully tightened.
Cable
Clamp
Three Phase Connection (240/415V 3N ~ 50Hz)
4
5
2
3
6
1
N
Shorting
Links
Connect cable to terminal block:
Remove shorting links 1-2 and 2-3
L1, L2 and L3 to terminals 1, 2 and 3.
N to terminal 5.
Earth to terminal.
Ensure shorting links are fitted between
terminals 4-5 and 5-6.
Ensure all screws are fully tightened.
Cable
Clamp
L1
L2
L3
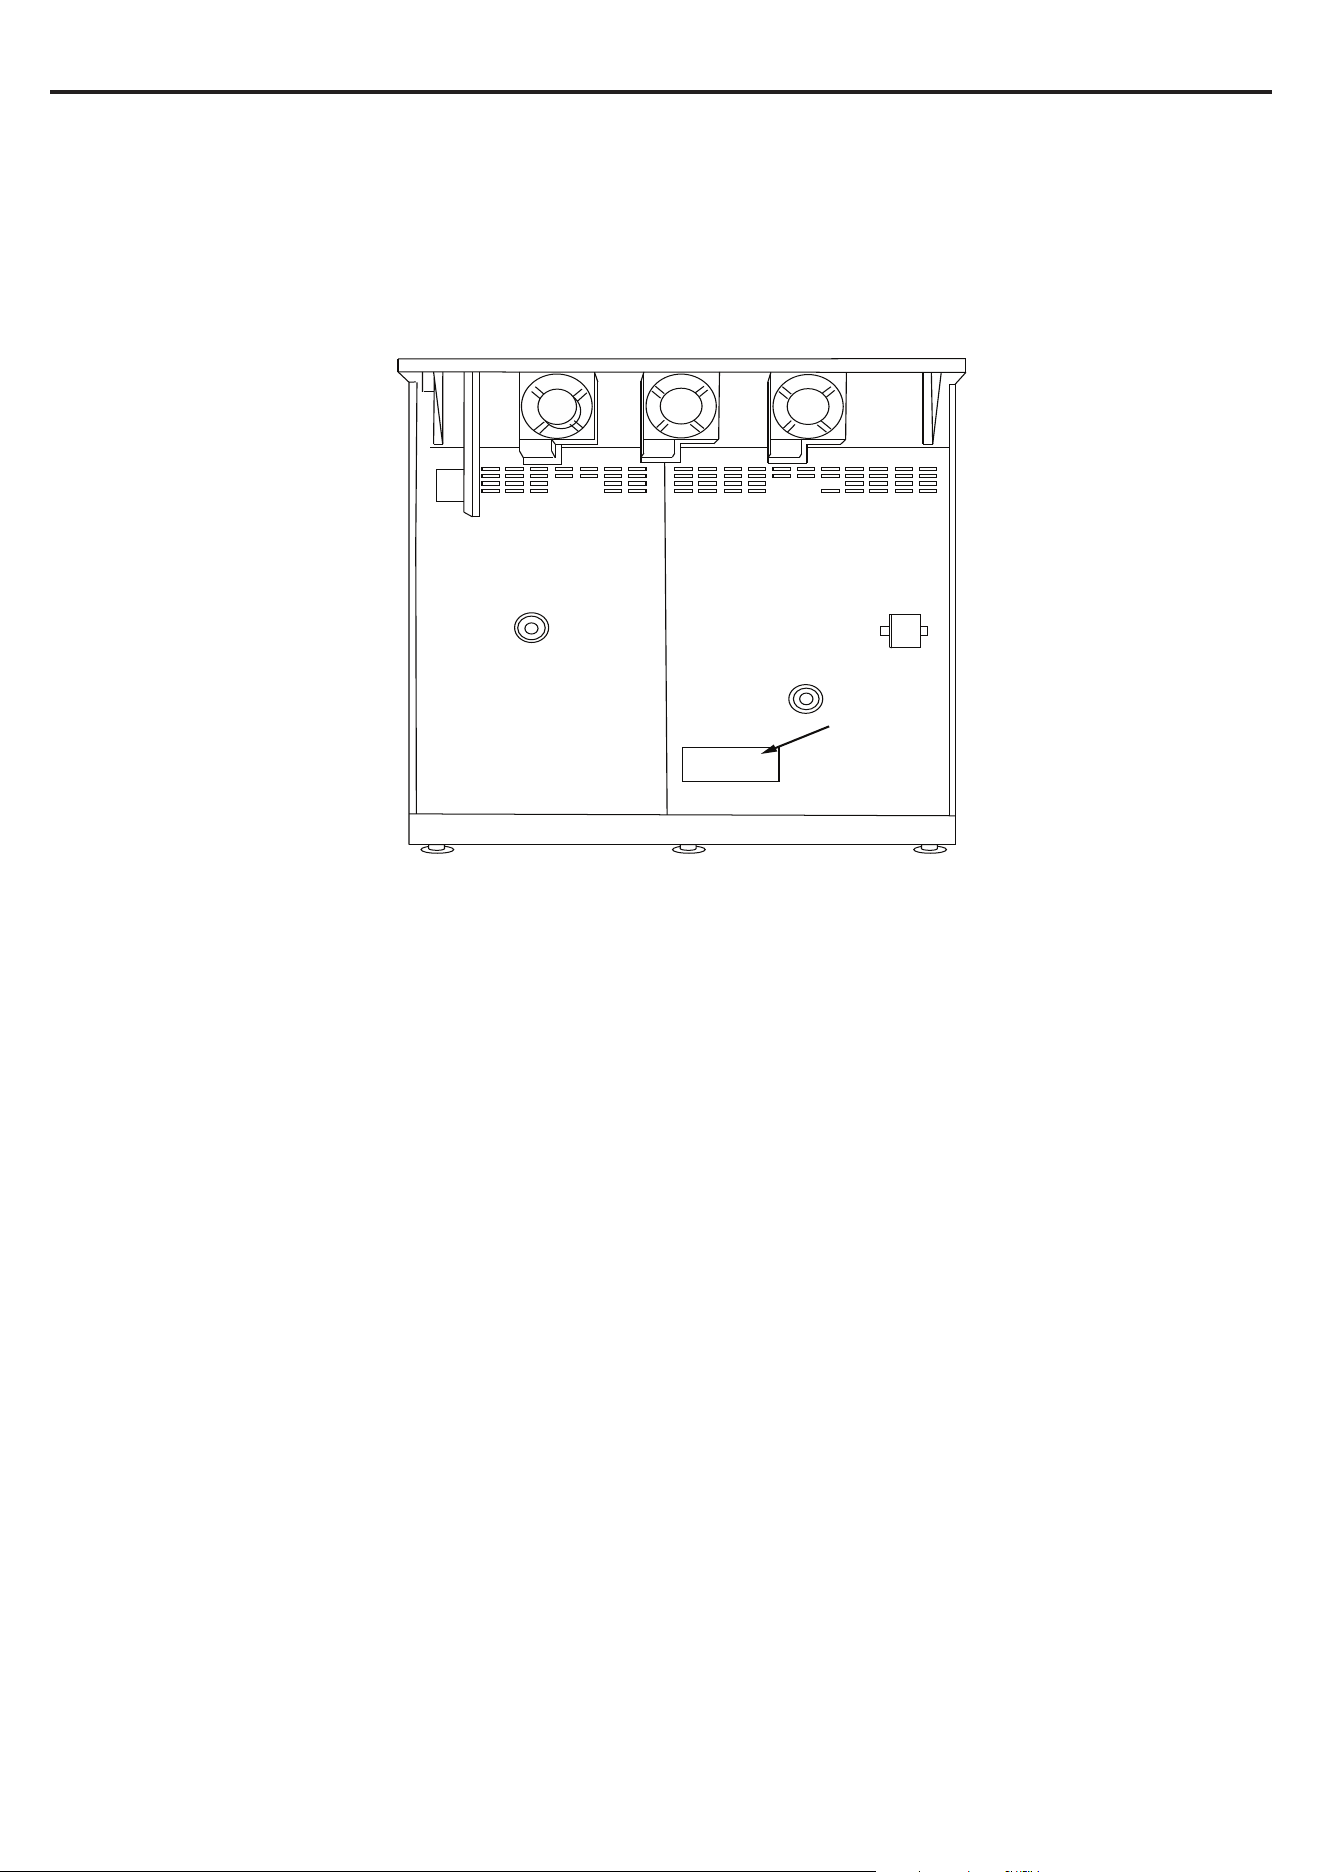
Electric connection location (see illustration below)
The electric connection can be found on the rear of the appliance.
Electrical cable
entry point
CONNECT TO THE ELECTRICITY SUPPLY

Check the operation of electrical components
Clock Programmer/Minute Minder
Check functions as described in the User Guide.
Oven light & Convection fan
Open the main oven door. Turn the main oven control knob to the defrost setting. Check the oven light
and convection fan both come on. Turn control knob back to ‘OFF’ position.
Cooling Fan
Open the grill door. Turn the grill control knob to the full power setting . Check that the cooling fan
RSHUDWHV7XUQFRQWURONQREEDFNWRµ2))¶SRVLWLRQDQGFKHFNFRROLQJIDQVZLWFKHVRႇLPPHGLDWHO\
/LG6DIHW\V\VWHPLI¿WWHG
,JQLWHDOOKRWSODWHEXUQHUVLQFOXGLQJZRN$WWHPSWWRFORVHWKHOLGDQGPDNHVXUHDOOÀDPHVDUH
extinguished by the safety system.
,I\RXDUHVDWLV¿HGWKDWWKHFRRNHULVRSHUDWLQJFRUUHFWO\WXUQLWRႇDQGVKRZWKHFXVWRPHUKRZWRXVHLW
0DNHVXUH\RXDVNWKHFXVWRPHUWRRSHUDWHWKHFORFNLI¿WWHGDQGFRQWUROV
([SODLQWRWKHXVHUWKDWWKHOLGVDIHW\V\VWHPPXVWQRWEHXVHGDVDPHDQVRIWXUQLQJRႇWKHKRWSODWH
burners. Control knobs must always be turned to the ‘OFF’ position after use.
Note: If the cooker does not perform correctly, inform the customer of the problem and put a warning
notice on the cooker. If the problem is dangerous, then disconnect the cooker. If there is a fault, then
the customer should be advised to contact the manufacturer’s local service organisation or the retailer
.
Before leaving the installation hand over the User Guide to the customer
COMMISSIONING
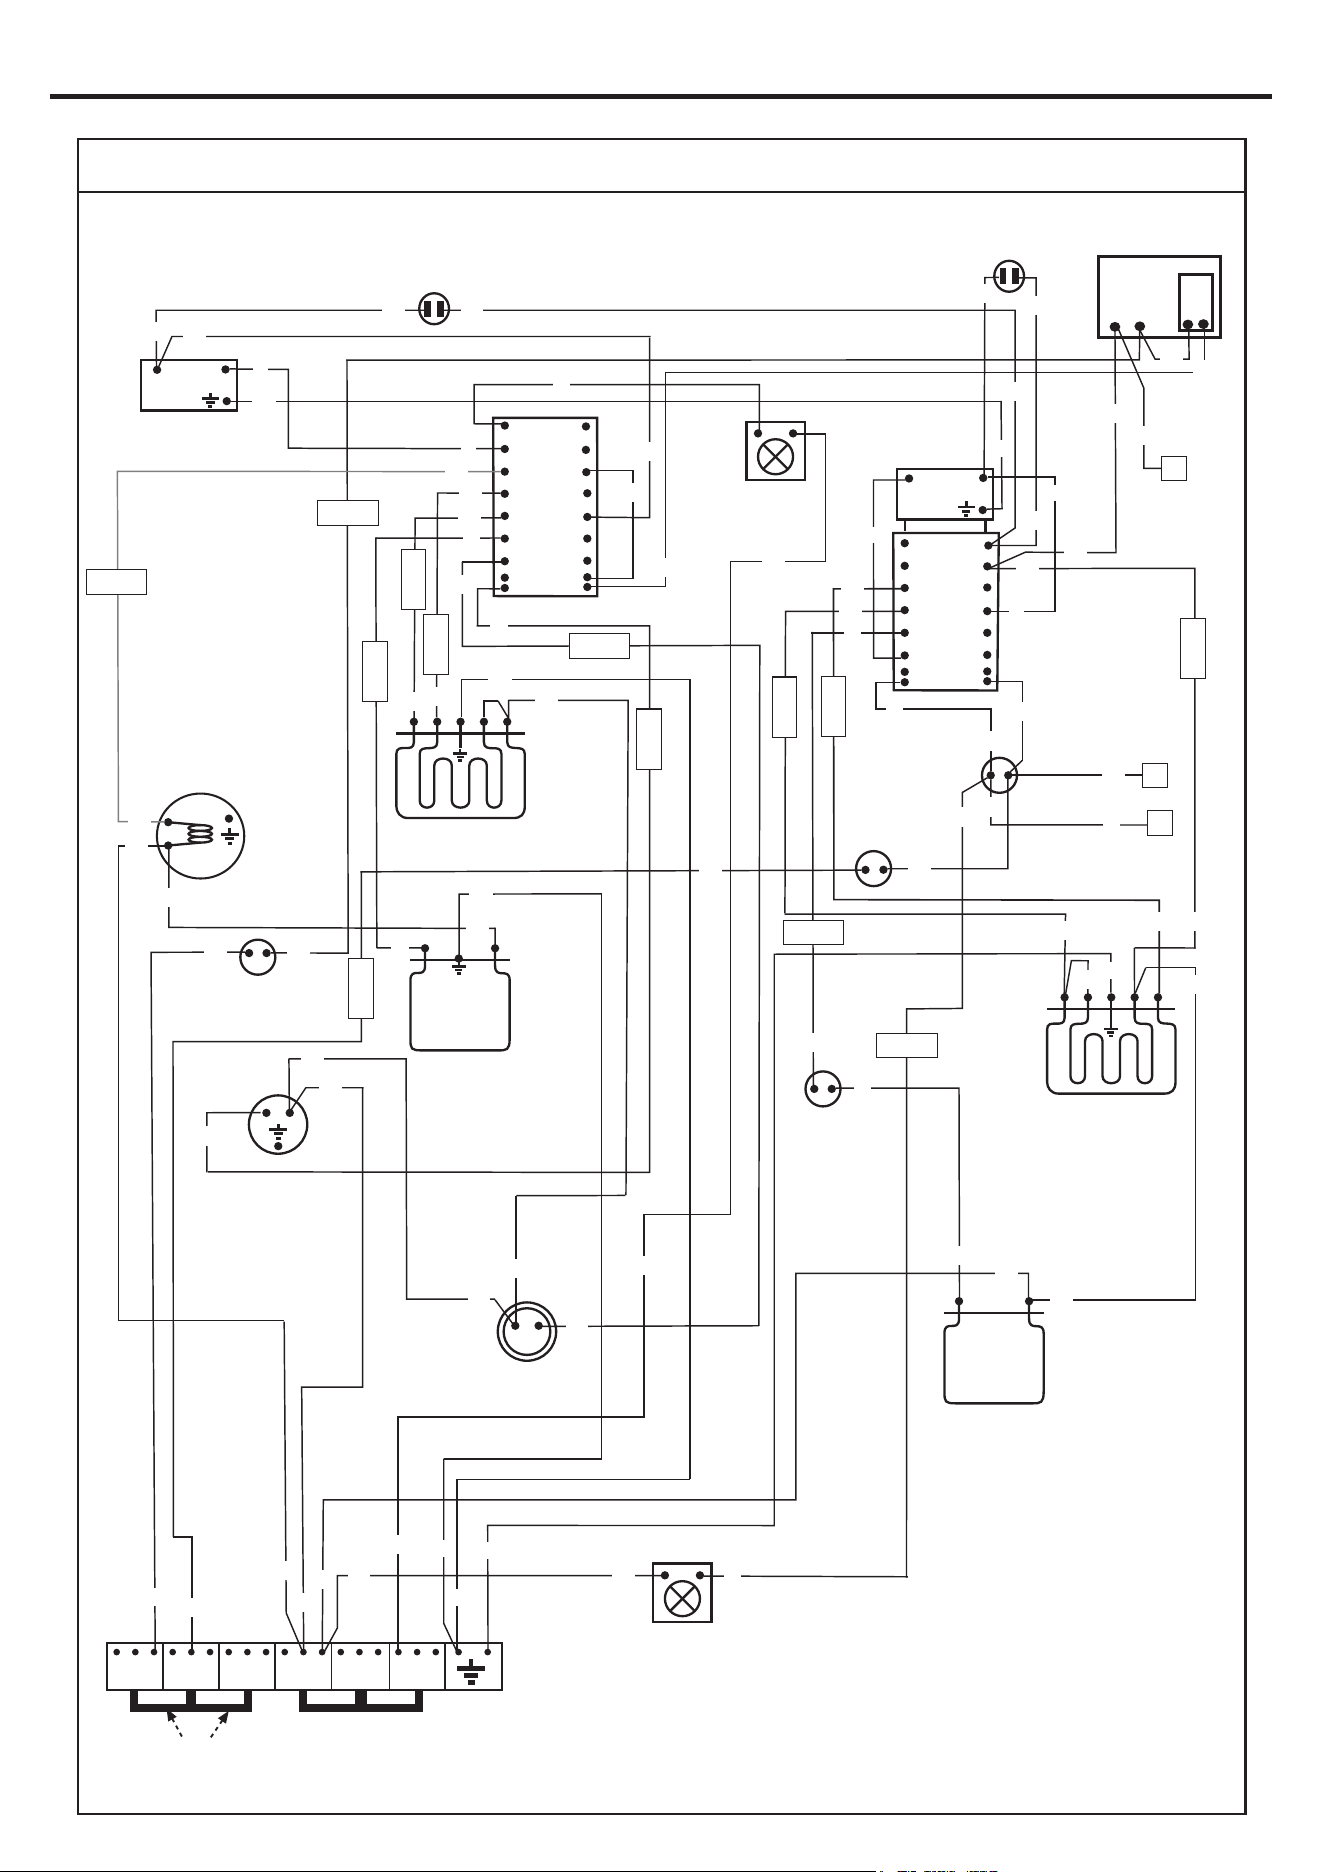
USING YOUR APPLIANCE
1
2
3
4
5
6
P1
P2
P3
P4
P5
P6
7
TOP OVEN
SWITCH
1
2
THERMOSTAT
Wiring colour code: Bk-Black, Bn-Brown, Bu-Blue, Gn-Green, Or-Orange, R-Red, W-White, Y-Yellow, V-Violet, Gy -Grey
LH FRONT
THERMAL
SWITCH
LH
COOLING
FAN
LH TOP REAR
THERMAL
CUTOUT
LEFT
HAND
OVEN LAMP
Bu
Bu
Gn
LH REAR MAIN
THERMAL CUTOUT
Bk
LH STAT.
NEON
Bk
PROGRAMMER
N
L
LH TOP
THERMAL
CUTOUT
LH OVEN
FAN
ELEMENT
LH OVEN
STIR FAN
P7
TOP STAT.
NEON
Bk
TOP OVEN
GRILL ELEMENT
TOP OVEN
BASE
ELEMENT
Bk
Bk
Or
Bk
V
1
2
3
4
5
6
P1
P2
P3
P4
P5
P6
7
MULTIFUNCTION
SELECTOR
SWITCH
P7
1
2
MAIN T-STAT
8
P8
Y
Or
W
V
MAIN OVEN
BASE
ELEMENT
Gn
Gn
Bk
Bk
Bk
MAIN OVEN
GRILL ELEMENT
Bk
Or
Bk
Bk
A
B
C
Y
Y
Y
Y
Y
Or
Or
Or
Or
Or
Or
Y
Or
Bk
Bk
W
W
R
R
R
R
R
R
Gn
Gn
Gn
Gn
Gn
Bk
Bk
Bk
Bk
Bk
Bn
Bn
Y
Gy
Gy
V
V
Bk
Bk
Connector
MO-Pin 1
Connector
MO-Pin 2
Connector
MO-Pin 3
Connector
MO-Pin 4
Connector
MO-Pin 5
Connector
MO-Pin 6
Connector
MO-Pin 7
Connector
TO-Pin 1
Connector
TO-Pin 2
Connector
TO-Pin 3
Connector
TO-Pin 4
Connector
TO-Pin 5
Connector
TO-Pin 6
Bk
W
V
Bn
Or
Bn
WIRING DIAGRAM- LH OVEN PAGE 1/3
Bk
Remove These Two Links for Multi-Phase Installations !
Or
W
W
R
Bk
Bk
Bn
Bk
W
INLET
TERMINAL
BLOCK
L1
L2 L3 4(N)
5(N)
6(N)
083753500
13.09.2018
BELLING RICHMOND/COOKCENTRE 900Ei- AU
CENTRE
COOLING
FAN
Y
Bu
Bu
Bu
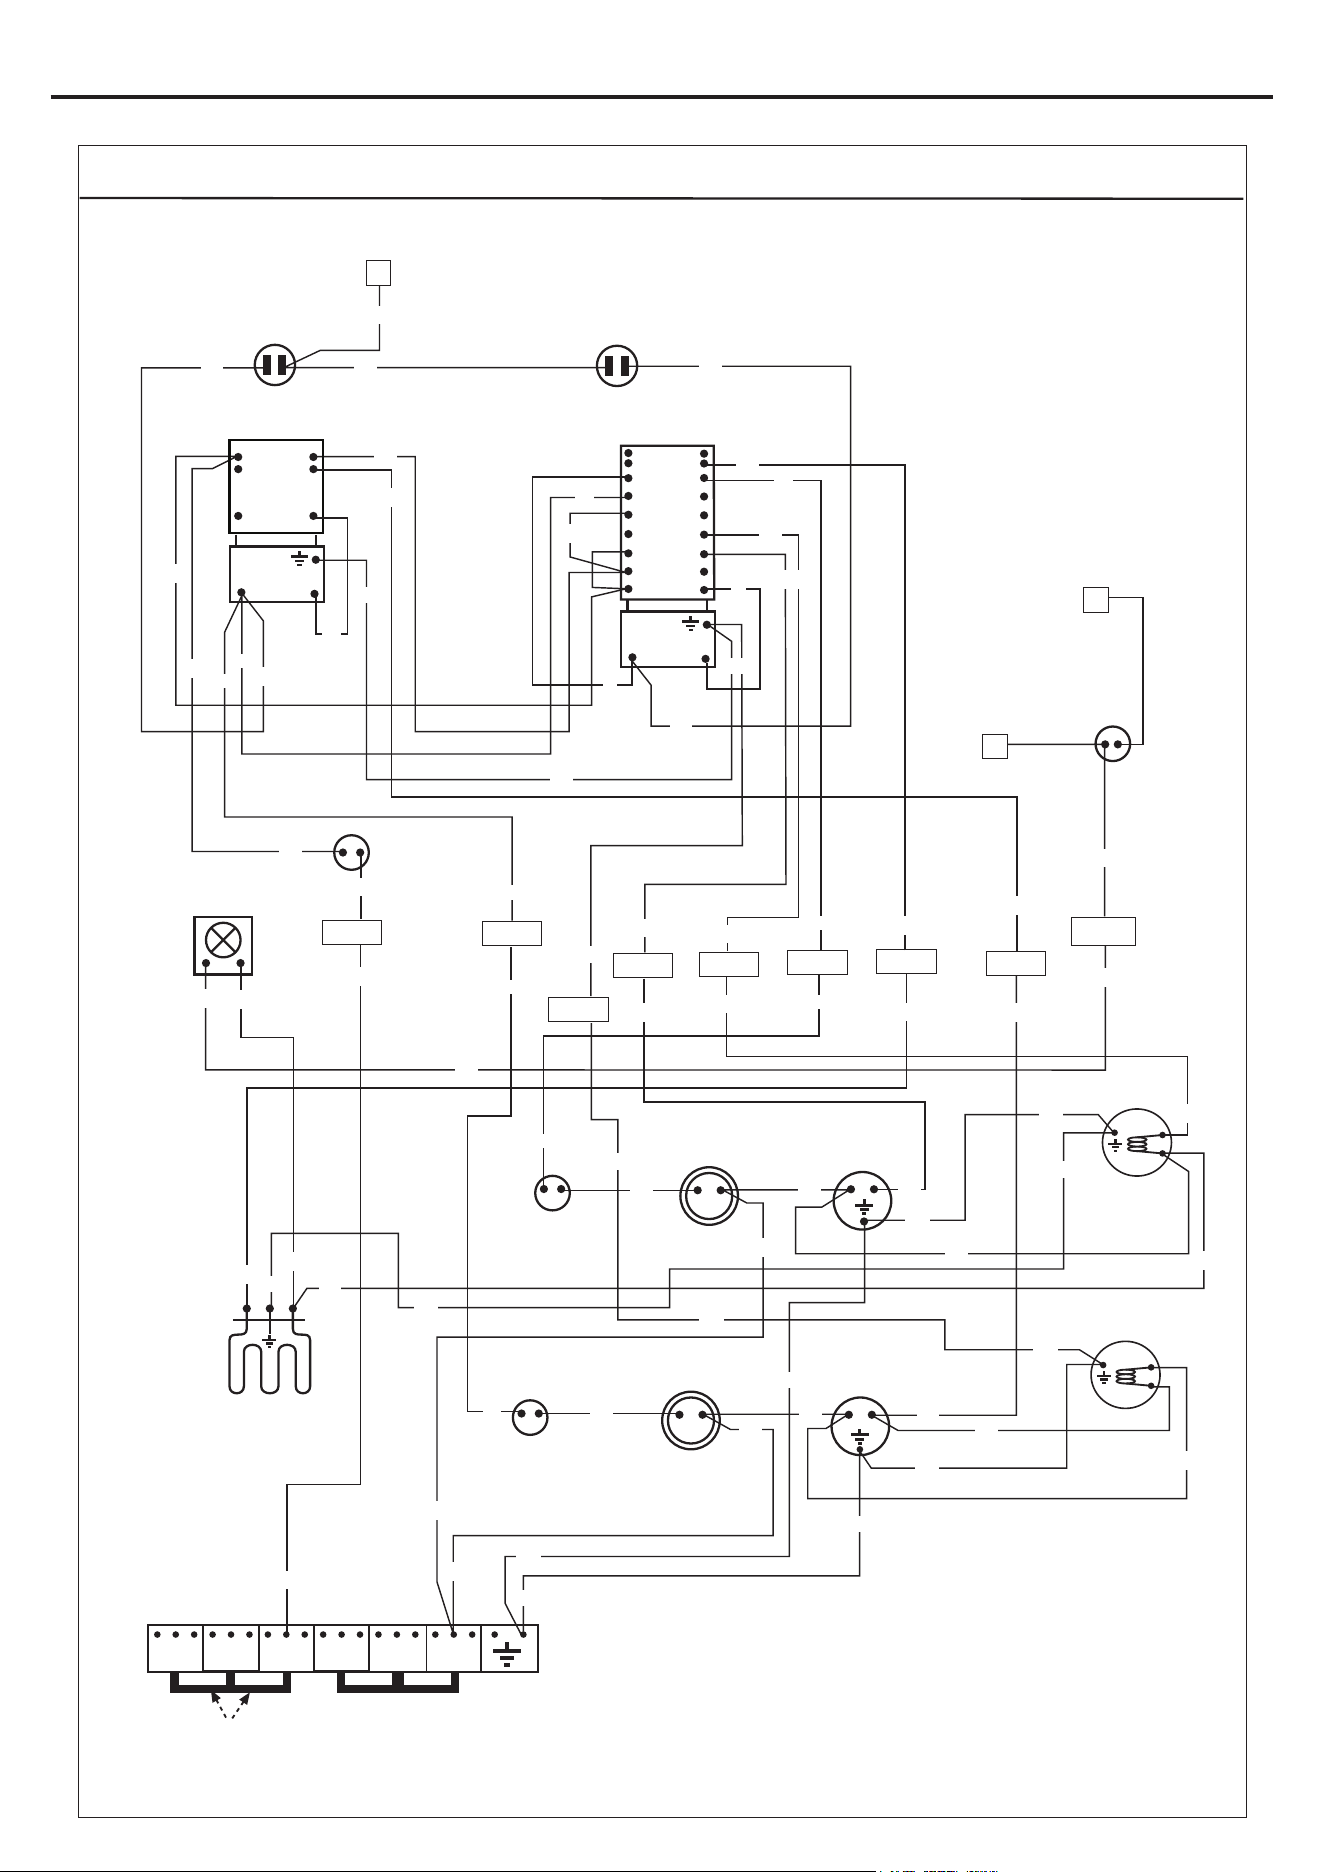
USING YOUR APPLIANCE
Wiring colour code: Bk-Black, Bn-Brown, Bu-Blue, Gn-Green, Or-Orange, R-Red, W-White, Y-Yellow, V-Violet
BELLING RICHMOND/COOKCENTRE 900Ei- AU WIRING DIAGRAM- RH OVEN PAGE 2/3
Connector
RH-Pin 3
Connector
RH-Pin 6
RH FRONT
THERMAL
SWITCH
Y
Connector
RH-Pin 7
RH
COOLING FAN
Bu
Y
RH BOTTOM OVEN
FAN ELEMENT
RH TOP
OVEN
STIR FAN
RH REAR
TOP OVEN
THERMAL
CUTOUT
RH TOP OVEN
FAN ELEMENT
Connector
RH-Pin 4
Connector
RH-Pin 1
LH SPLITTER SWITCH
1
2
3
4
5
6
7
8
P8
P7
P6
P5
P4
P3
P2
P1
1
2
THERMOSTAT
FAN STALL
TOP THERMAL
CUTOUT
W
RH SPLITTER
SWITCH
P1
P2
2
1
1
2
THERMOSTAT
V
Connector
RH-Pin 9
Connector
RH-Pin 8
Connector
RH-Pin 2
W
Connector
RH-Pin 5
Gn
Gn
Gn
Gn
Bn
Bn
Bn
Bn
Bn
W
W
W
Or
Or
Or
Or
Or
Y
Y
Y
Y
RH BOTTOM
OVEN
STIR FAN
RH TOP
OVEN
LIGHT
RH BOTTOM
OVEN LIGHT
RH REAR BOTTOM
OVEN THERMAL
CUTOUT
W
W
W
W
YY
Y
Y
Bk
Bk
Bk
Bk
Bk
RH SPLITTER
GRILL ELEMENT
Bu
Bk
Bk
Bk
Bn
Bn
Bn
Bk
Or
Or
Y
Y
Y
Bn
Bn
Gn
Gn
Gn
Gn
Gn
Gn
Gn
Gn
Gn
Gn
Gn
Gn
Gn
Or
Or
Bk
B
C
TOP SPLITTER
OVEN NEON
BOTTOM
SPLITTER
OVEN NEON
Bk
Bk
Bk
A
Bk
Bk
W
W
Bk
Remove These Two Links for Multi-Phase Installations !
INLET
TERMINAL
BLOCK
L1
L2 L3 4(N)
5(N)
6(N)
083753500
13.09.2018
V
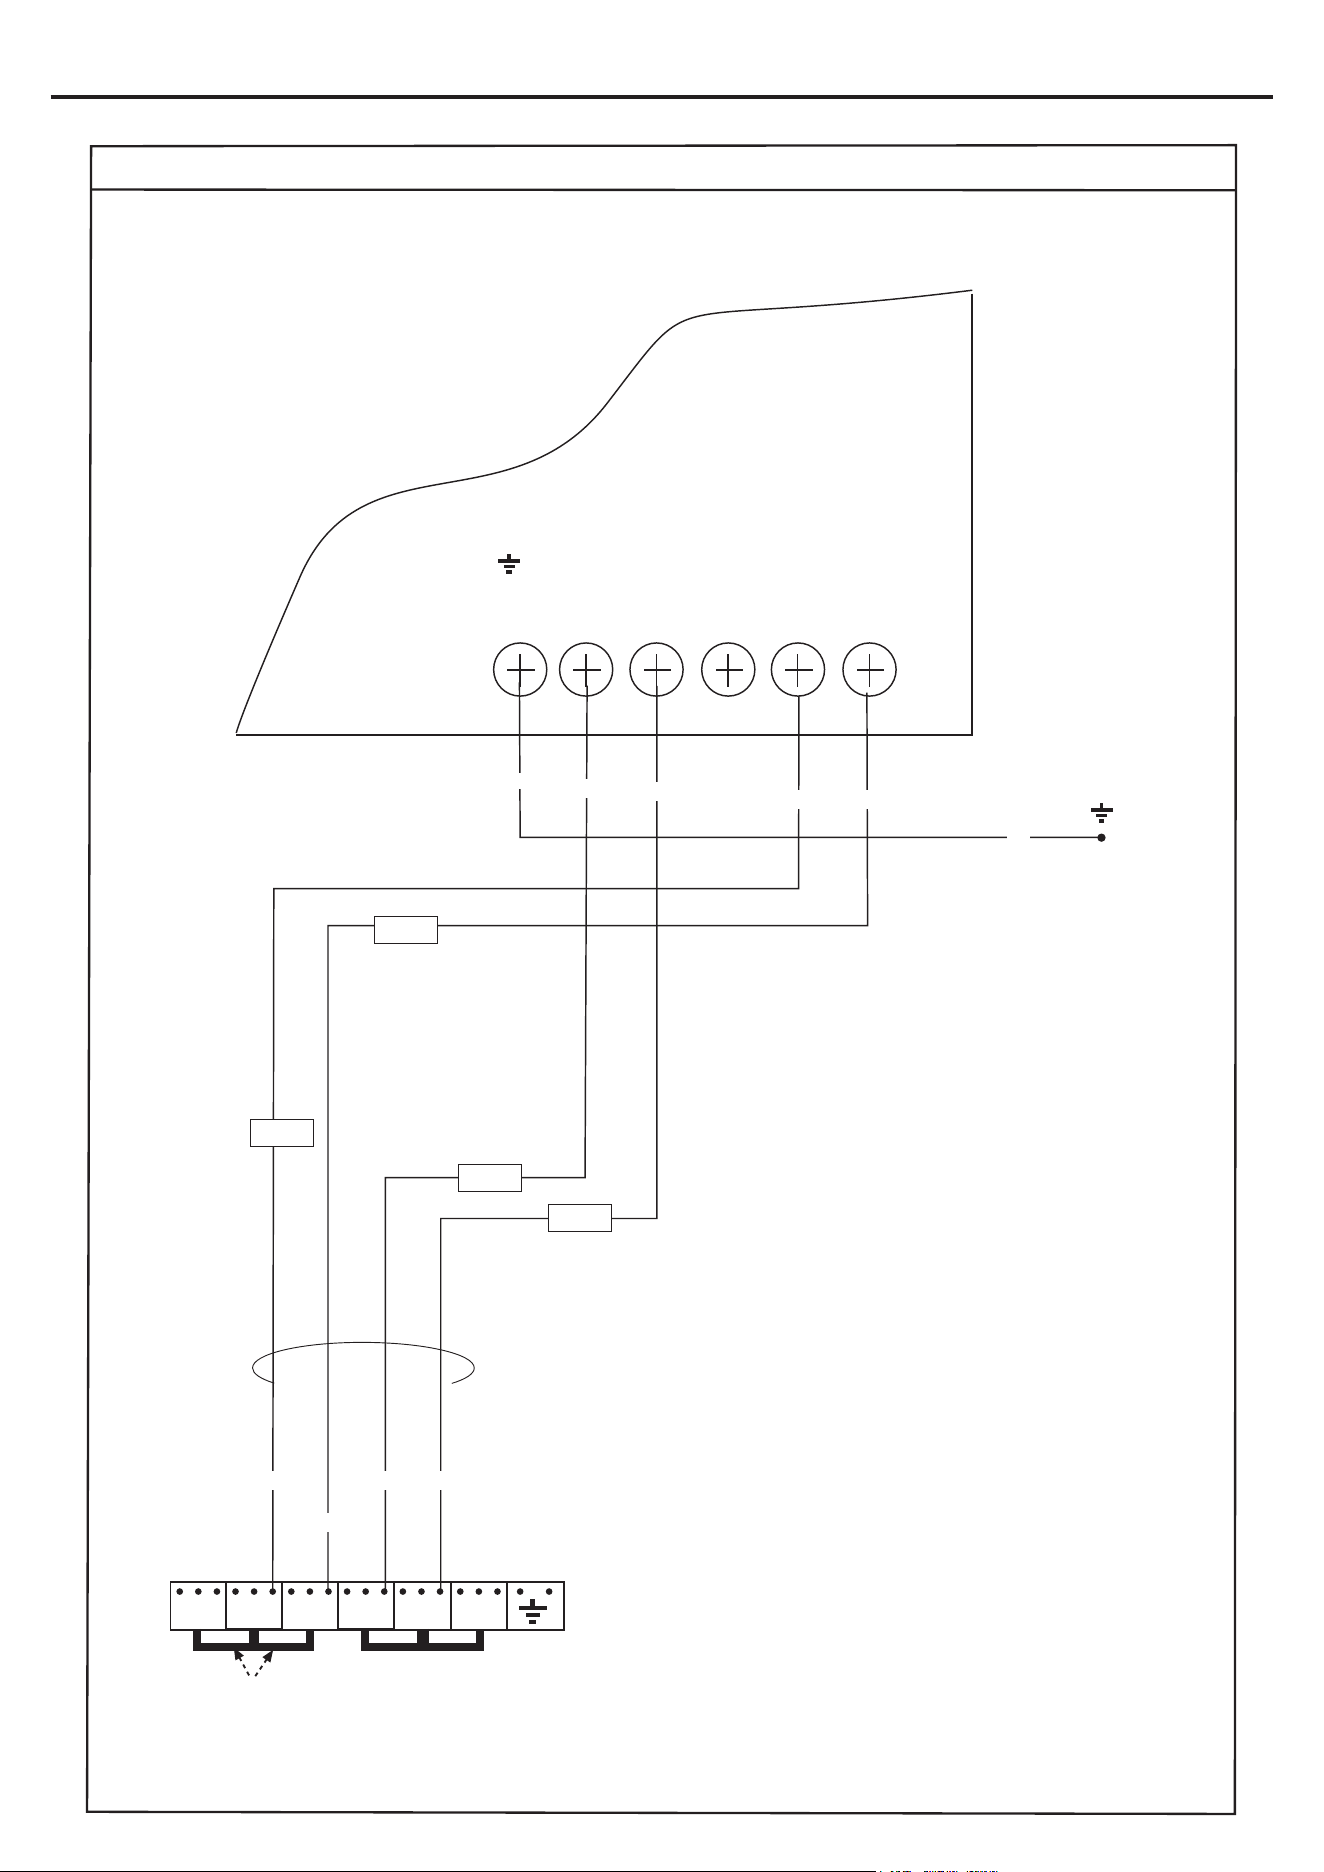
USING YOUR APPLIANCE
Wiring colour code: Bk-Black, Bn-Brown, Bu-Blue, Gn-Green, Or-Orange, R-Red, W-White, Y-Yellow, V-Violet
1 2345
L L LNN
Bu
Bu
Connector
No.1
Connector
No.5
Connector
No.2
Connector
No.6
Earth point left
hand side in top
comparment
R
R
R
R
Bu
Bu
Gn
Gn
WIRING DIAGRAM- INDUCTION UNIT PAGE 3/3
Remove These Two Links for Multi-Phase Installations !
INLET
TERMINAL
BLOCK
L1
L2 L3 4(N)
5(N)
6(N)
083753500
13.09.2018
BELLING RICHMOND/COOKCENTRE 900Ei- AU
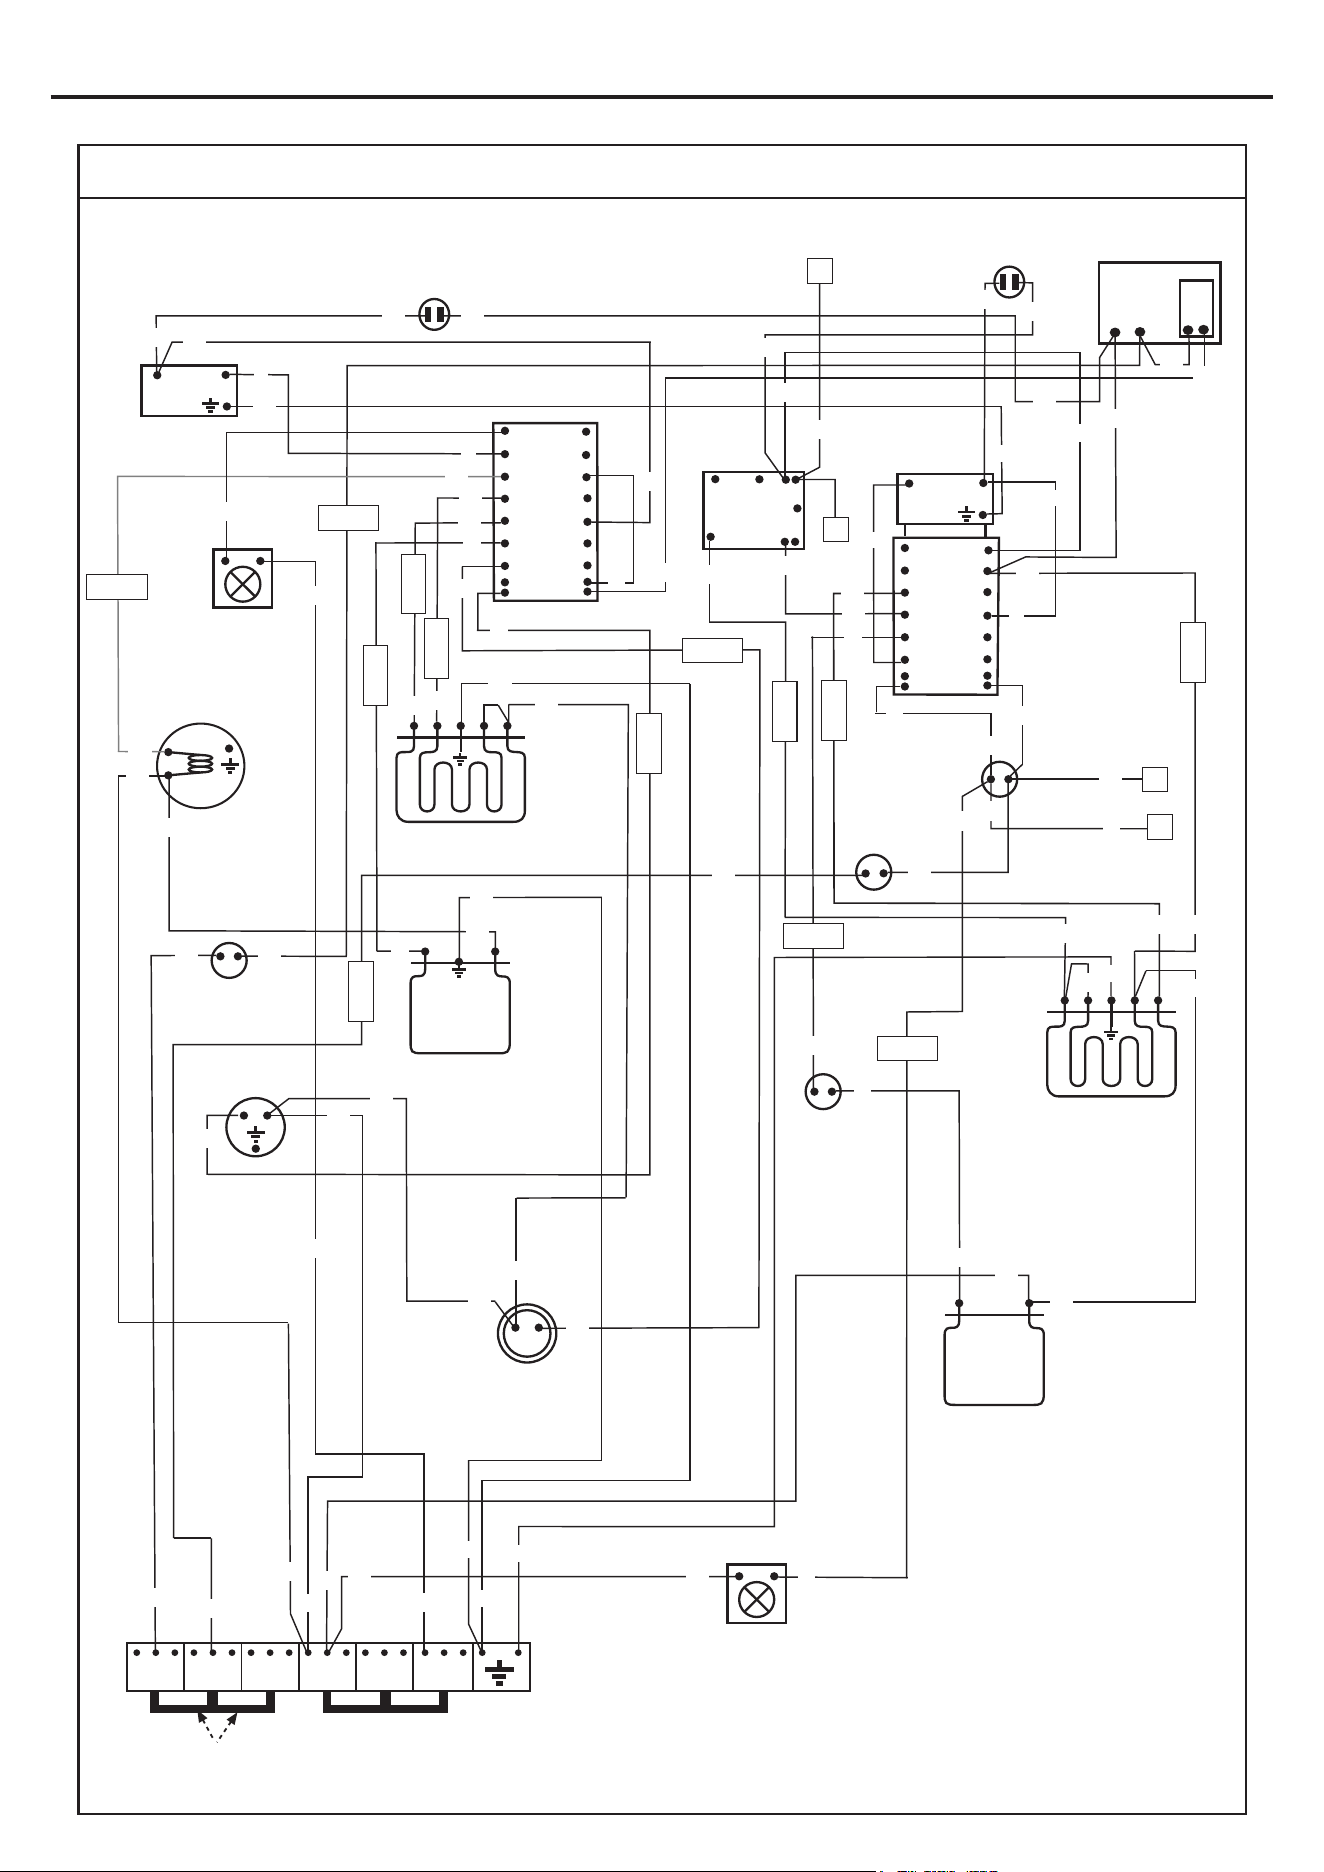
USING YOUR APPLIANCE
1
2
3
4
5
6
P1
P2
P3
P4
P5
P6
7
TOP OVEN
SWITCH
1
2
THERMOSTAT
Wiring colour code: Bk-Black, Bn-Brown, Bu-Blue, Gn-Green, Or-Orange, R-Red, W-White, Y-Yellow, V-Violet, Gy -Grey
LH FRONT
THERMAL
SWITCH
LH
COOLING
FAN
LH TOP REAR
THERMAL
CUTOUT
LEFT
HAND
OVEN LAMP
Bu
Bu
Gn
LH REAR MAIN
THERMAL CUTOUT
Bk
LH STAT.
NEON
Bk
PROGRAMMER
N
L
LH TOP
THERMAL
CUTOUT
LH OVEN
FAN
ELEMENT
LH OVEN
STIR FAN
P7
TOP STAT.
NEON
Bk
TOP OVEN
GRILL ELEMENT
TOP OVEN
BASE
ELEMENT
Bk
Bk
Or
Bk
V
1
2
3
4
5
6
P1
P2
P3
P4
P5
P6
7
MULTIFUNCTION
SELECTOR
SWITCH
P7
1
2
MAIN T-STAT
8
P8
W
Y
Or
P1
2
P2
S2
S1
4
GRILL REG
(EGO)
W
V
MAIN OVEN
BASE
ELEMENT
Gn
Gn
Bk
Bk
Bk
MAIN OVEN
GRILL ELEMENT
Bk
Or
Bk
Bk
A
B
C
Y
Y
Y
Y
Y
Or
Or
Or
Or
Or
Or
Y
Or
Bk
Bk
W
W
R
R
R
R
R
R
Gn
Gn
Gn
Gn
Gn
Bk
Bk
Bk
Bk
Bn
Bn
Bn
Y
Gy
Gy
Bn
V
V
Bk
Bk
Connector
MO-Pin 1
Connector
MO-Pin 2
Connector
MO-Pin 3
Connector
MO-Pin 4
Connector
MO-Pin 5
Connector
MO-Pin 6
Connector
MO-Pin 7
Connector
TO-Pin 1
Connector
TO-Pin 2
Connector
TO-Pin 3
Connector
TO-Pin 4
Connector
TO-Pin 5
Connector
TO-Pin 6
Bk
W
V
Bn
Bn
Or
Bn
WIRING DIAGRAM- LH OVEN PAGE 1/3
Bk
Or
W
W
R
Bk
Bk
D
Bk
Bk
INLET
TERMINAL
BLOCK
L1
L2 L3 4(N)
5(N)
Remove These Two Links for Multi-Phase Installations !
6(N)
083753000
30.08.2018
BELLING RICHMOND/COOKCENTRE 1100Ei- AU
CENTRE
COOLING
FAN
Y
Bu
Bu
Bu
Bk
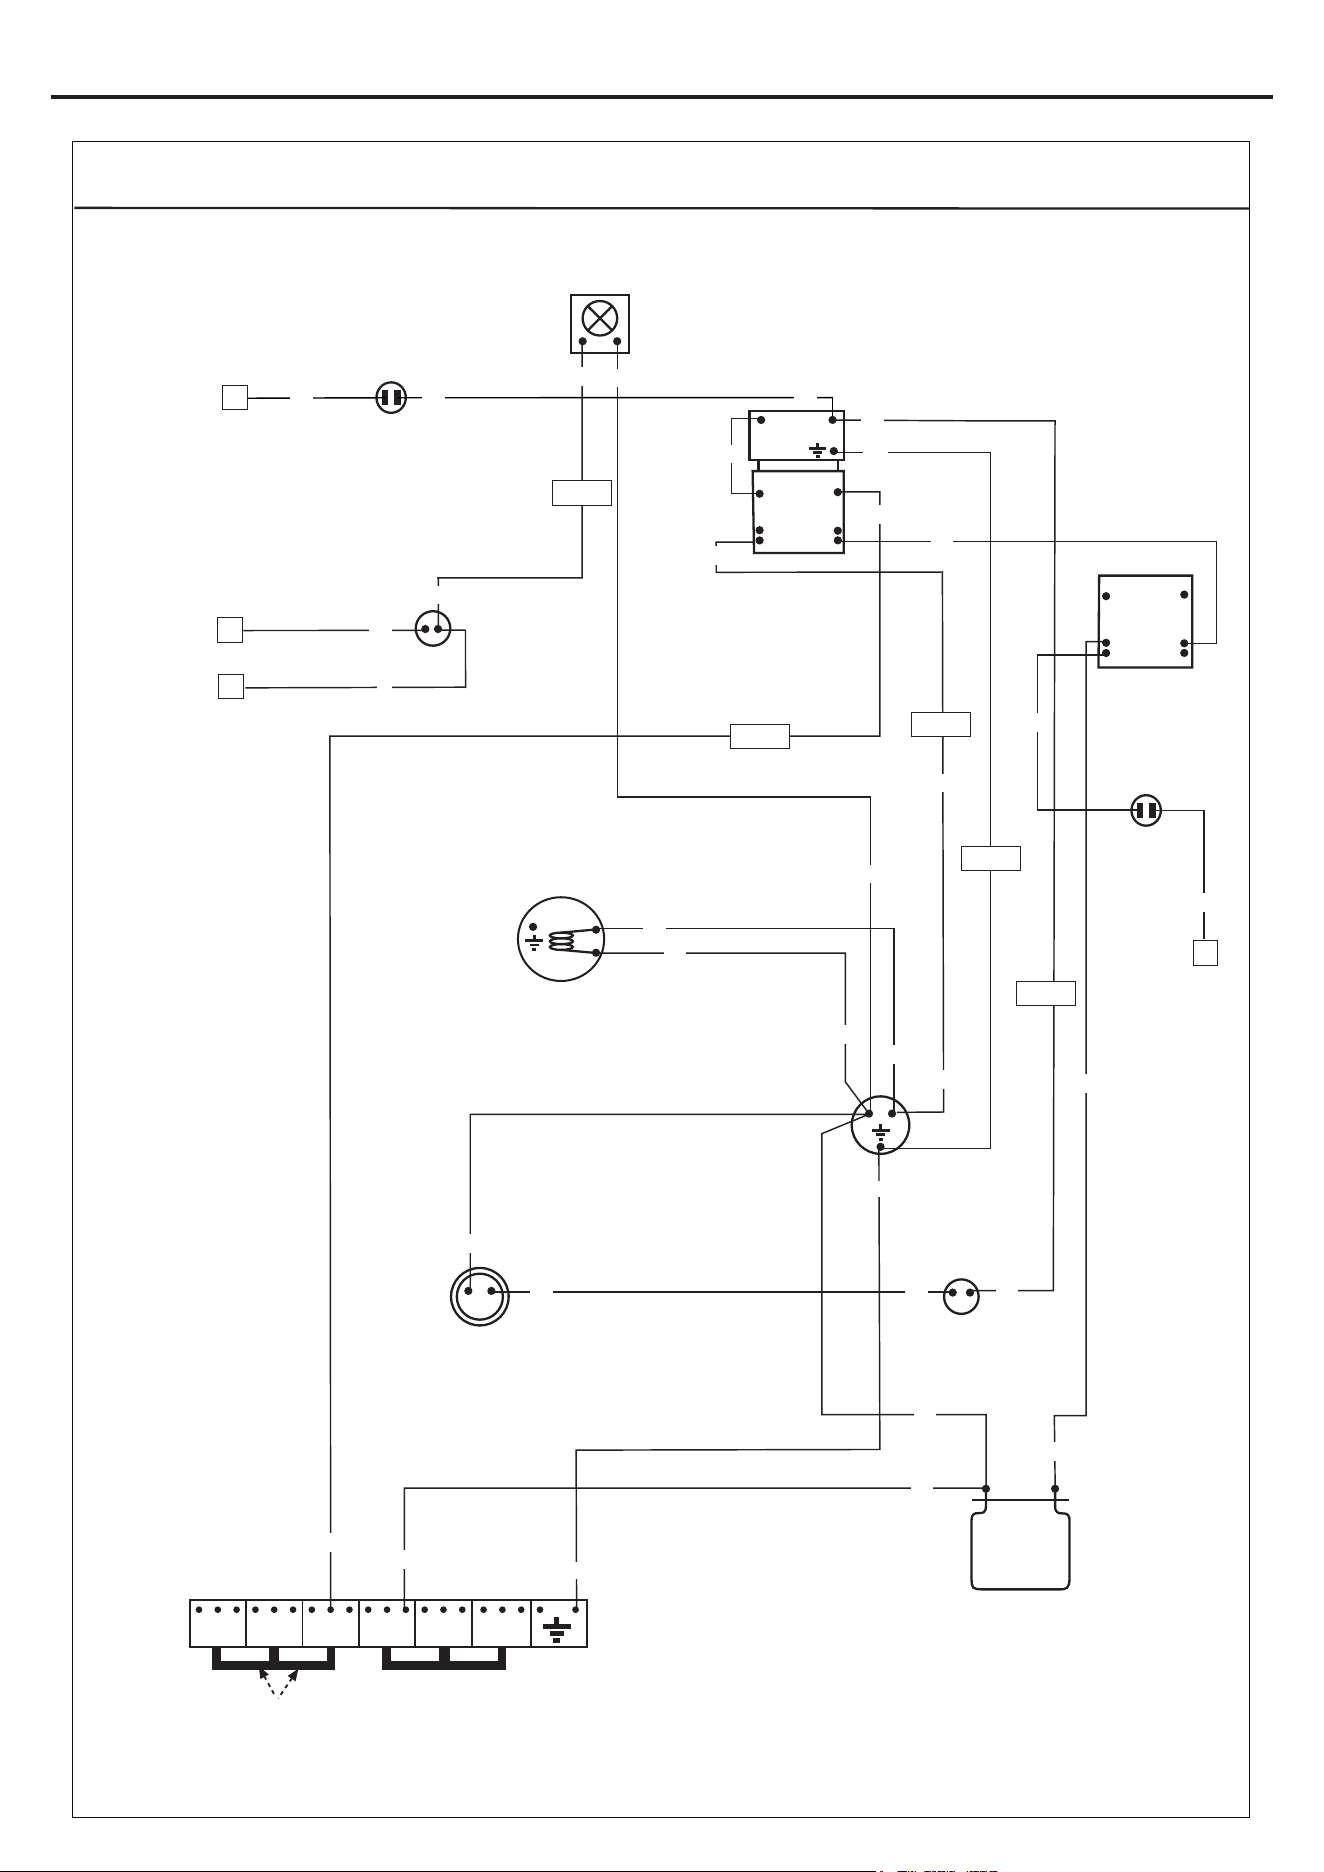
USING YOUR APPLIANCE
RH OVEN FAN
ELEMENT
RH REAR
THERMAL
CUTOUT
RH OVEN
STIR FAN
RIGHT HAND
OVEN
LAMP
Bk
Bn
W
W
Or
Bk
Gn
Bn
Gn
Gn
W
RH STAT.
NEON
RH
COOLING FAN
RH FRONT
THERMAL
SWITCH
Bu
Wiring colour code: Bk-Black, Bn-Brown, Bu-Blue, Gn-Green, Or-Orange, R-Red, W-White, Y-Yellow, V-Violet
1
2
THERMOSTAT
RH OVEN
SWITCH
1
2
P1
P2
Y
Bk
Y
Y
Bk
Bu
Or
A
B
C
Y
Bn
Bk
Bk
Connector
RH-Pin 2
Connector
RH-Pin 3
Connector
RH-Pin 1
Connector
RH-Pin 5
Y
Y
Bu
Bu
Bu
Bu
SLOW
COOK
ELEMENT
Bk
Bn
SLOW
COOK
NEON
R
R
D
WIRING DIAGRAM- RH OVEN PAGE 2/3
SLOW COOK
SWITCH
1
2
P1
P2
Connector
RH-Pin 4
Bk
Bk
INLET
TERMINAL
BLOCK
L1
L2 L3 4(N)
5(N)
Remove These Two Links for Multi-Phase Installations !
6(N)
BELLING RICHMOND/COOKCENTRE 1100Ei- AU
083753000
30.08.2018
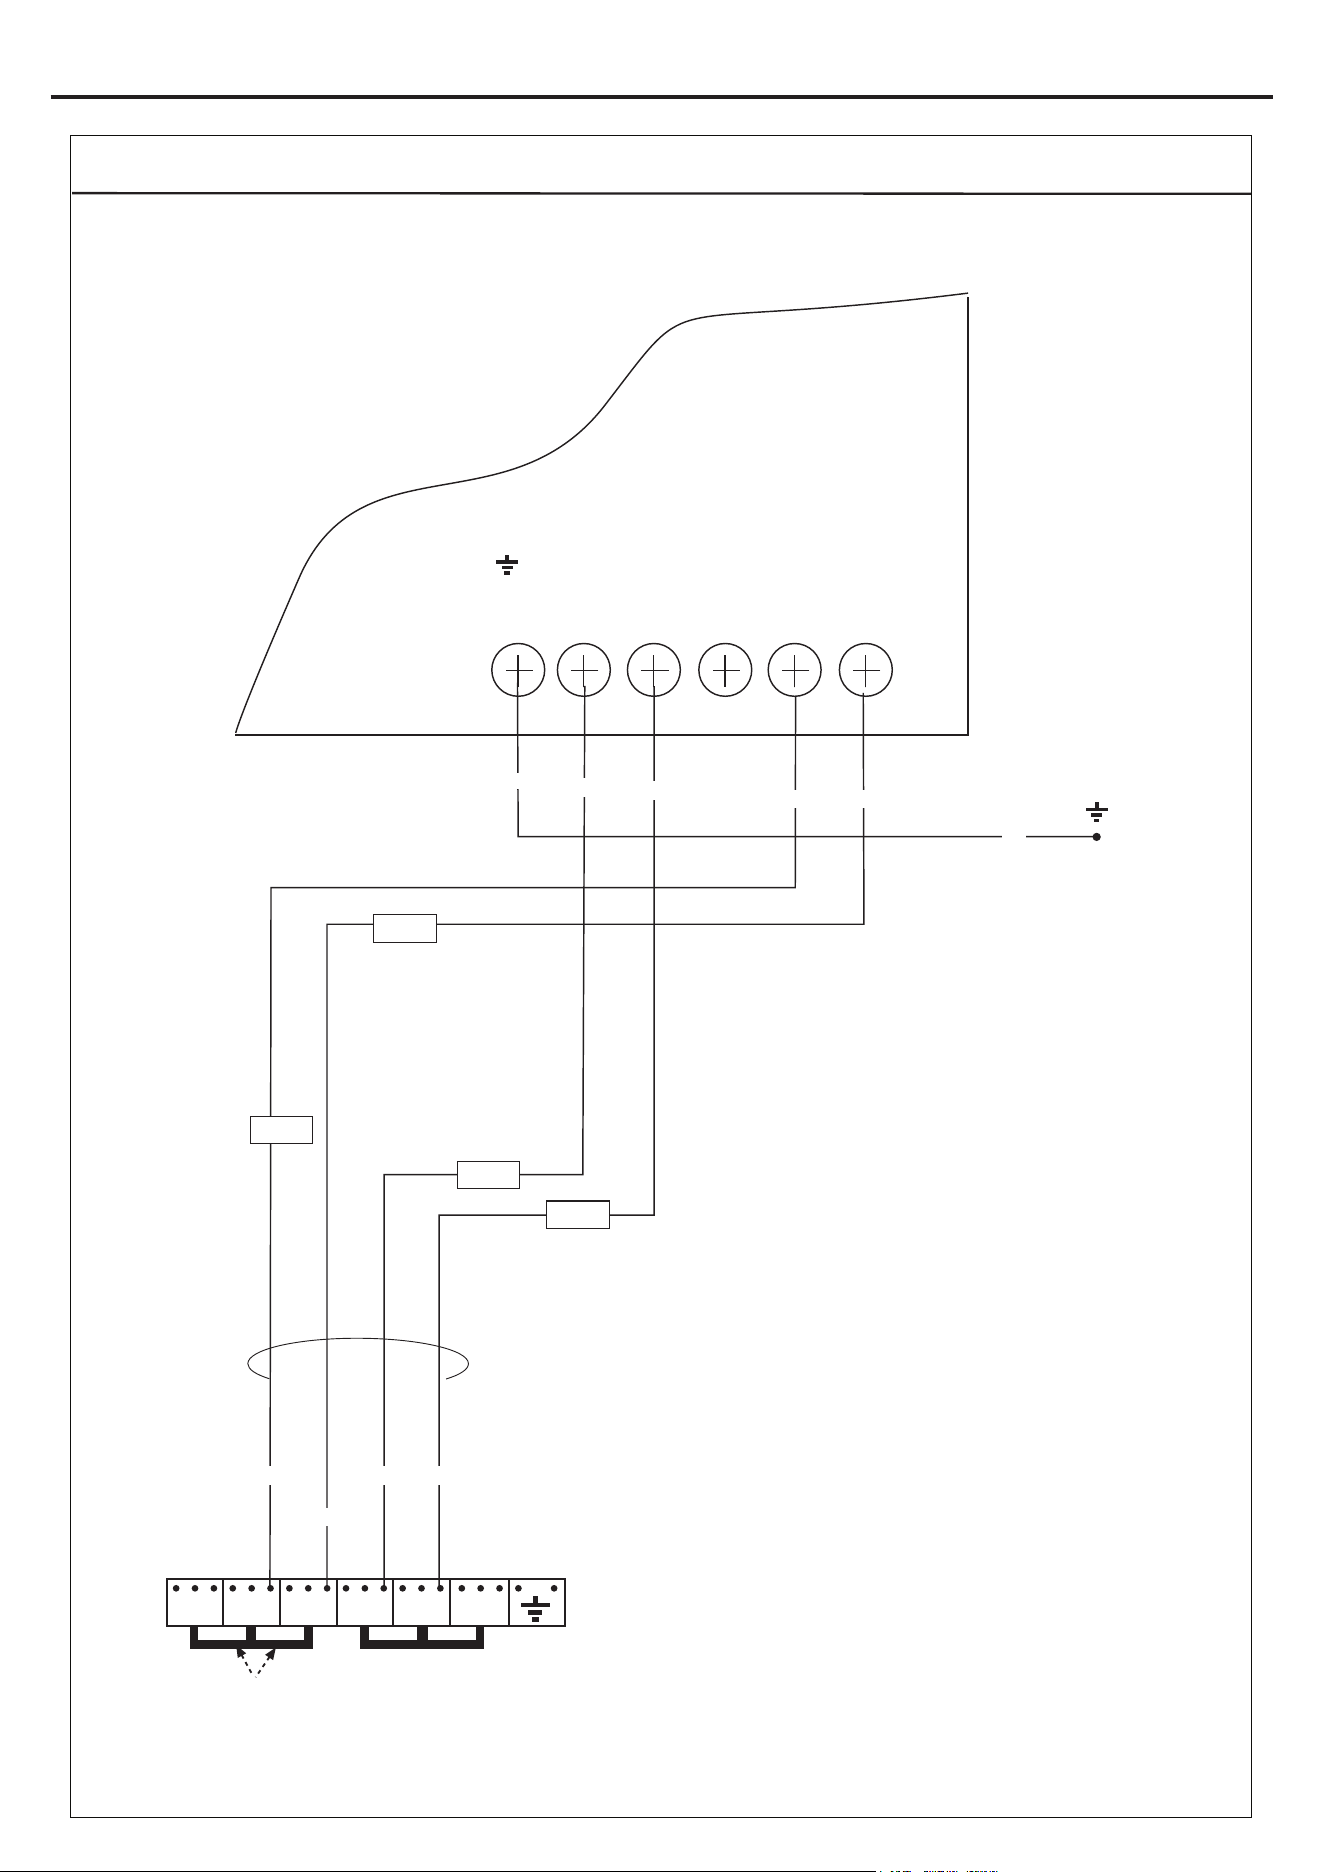
USING YOUR APPLIANCE
Wiring colour code: Bk-Black, Bn-Brown, Bu-Blue, Gn-Green, Or-Orange, R-Red, W-White, Y-Yellow, V-Violet
1 2345
L L LNN
Bu
Bu
Connector
No.1
Connector
No.5
Connector
No.2
Connector
No.6
Earth point left
hand side in top
comparment
R
R
R
R
Bu
Bu
Gn
Gn
WIRING DIAGRAM- INDUCTION UNIT PAGE 3/3
INLET
TERMINAL
BLOCK
L1
L2 L3 4(N)
5(N)
Remove These Two Links for Multi-Phase Installations !
6(N)
BELLING RICHMOND/COOKCENTRE 1100Ei- AU
083753000
30.08.2018
TECHNICAL DATA
Electric Range
Electrical supply / load
Electrical
supply
Hotplate Zone Appliance Size (cm) / Load kW
90 110
240v Induction
Left hand front 1.60 boost to 3.00
Left hand rear 1.60 boost to 3.00
Right hand front 1.10 boost to 2.20
Right hand rear 1.40 boost to 3.00
Middle 2.70 boost to 3.70
Maximum load 7.40kW
Hob top
Ovens
Electrical supply / load
Electrical
supply
Oven Appliance Size (cm) / Load kW
90 110
240v
Multifunction 3.1 3.1
Fanned 2.0 2.0
Fanned (90cm tall oven) 2.5 N/A
Fanned (90cm deluxe oven) 1.7 / 3.0 N/A
Dual variable grill 1.7 / 2.7 1.7 / 2.7
Conventional top 1.4 1.4
Slow Cook N/A 0.17
Electrical supply / load
Appliance Size (cm) Electrical supply Max. load (kW)
90
240V
16.38
110 15.53
Appliance
Oven Lamps / Fans
Lamps (90cm deluxe
Right Hand Oven)
25W each
Lamps 40W each
Appliance class Class 1 - freestanding cooker
Electrical supply 240V/415 3N ~ 50Hz

MANUFACTURER GUARANTEE
This warranty is provided in Australia by Glen Dimplex Australia Pty Limited ABN 69 118 275 460
(Phone number 1300 556 816) and in New Zealand by Glen Dimplex New Zealand Limited NZBN
9429000069823 (Phone number 09 274 8265) in respect of the Belling product.
1. Belling Express Warranty
Subject to the exclusions below, we warrant that the product will not have any electrical or
mechanical breakdowns within:
a) In the case of Belling products used for personal, domestic or household purposes, a period
of 5 years from the date the product is purchased as a brand-new product from a retailer
located in Australia / New Zealand.
b) In the case of Belling products used for purposes other than personal, domestic or
household purposes (including business or commercial use), a period of 90 days from the
date the product is purchased as a brand-new product from a retailer located in Australia /
New Zealand. Belling products are designed and intended for domestic use only; and
c) All warranty repairs must be carried out by Glen Dimplex or their nominated service agent
Note: warranty periods detailed above may vary in line with agreements with select retail and
builder partners and may differ between Australia and New Zealand.
The benefits conferred by this express warranty are in addition to the Consumer Guarantees
referred to in section 3 and any other statutory rights you may have under the Australian / New
Zealand Consumer Law and/or other applicable laws.
2. Warranty exclusions
This express warranty does not apply where:
a) The product has been installed, used or operated otherwise than in accordance with the
product manual or other similar documentation provided to you with the product;
b) The product requires repairs due to damage resulting from accident, misuse, incorrect
installation, insect or vermin infestation, improper liquid spillage, cleaning or maintenance,
unauthorised modification, use on an incorrect voltage, power surges and dips, voltage
supply problems, tampering or unauthorised repairs by any persons, use of defective or
incompatible accessories or exposure to abnormally corrosive conditions, events
independent of human control which occurred after the goods left the control of Glen
Dimplex;

c) The repair relates to the replacement of consumable parts such as fuses and bulbs or any
other parts of the product which require routine replacement;
d) You are unable to provide us with reasonable proof of purchase for the product;
e) the breakdown occurs after the expiry of the express warranty period set out in section 1 or
f) the product was not purchased in Australia / New Zealand as a brand-new product.
3. Consumer guarantees
Our goods come with guarantees that cannot be excluded under the Australian / New Zealand
Consumer Law. You are entitled to a replacement or refund for a major failure and for compensation
for any other reasonably foreseeable loss or damage. You are also entitled to have the goods
repaired or replaced if the goods fail to be of acceptable quality and the failure does not amount to a
major failure.
4. How to make a claim
You may make a claim under this warranty through our website, contacting our customer care line
or via email. Contact details for Glen Dimplex Australia and New Zealand can be found at the end of
this document
To make a valid claim under this warranty, you must:
a) Lodge the claim with us as soon as possible and no later than 14 days after you first become
aware of the breakdown;
b) Provide us with the product serial number;
c) Provide us with reasonable proof of purchase for the product. This can take the form of a
store receipt, new home handover form or other payment receipt documentation; and
d) If required by us, provide us (or any person nominated by us) with access to the premises at
which the product is located at times nominated by us (so that we can inspect the product).
MANUFACTURER GUARANTEE

5. Warranty claims
If you make a valid claim under this warranty and none of the exclusions set out in section 2 apply,
we will, at our election, either repair the product or replace the product with a product of identical
specification (or where the product is superseded or no longer in stock, with a product of as close a
specification as possible).
Goods presented for repair may be replaced by refurbished goods of the same type rather than
being repaired. Refurbished parts may be used to repair the goods.
Products are designed and supplied for normal domestic use. We will not be liable to you under this
warranty for business loss or damage of any kind whatsoever.
Glen Dimplex Australia Pty Ltd Glen Dimplex New Zealand Ltd
www.glendimplex.com.au www.glendimplex.co.nz
Australia New Zealand
Ph: 1300 556 816 Ph: 09 274 8265
customer.care.ha@glendimplex.com.au nztechserv@glendimplex.co.nz
MANUFACTURER GUARANTEE
READ THE INSTRUCTION BOOKLET BEFORE INSTALLING AND USING THE APPLIANCE.
The manufacturer will not be responsible for any damage to property or to persons caused by
incorrect installation or improper use of the appliance.
The manufacturer is not responsible for any inaccuracies, due to printing or transcription errors,
contained in this manual. In addition, the appearance of the figures reported is also purely
indicative.
The manufacturer reserves the right to make changes to its products when considered necessary
and useful, without affecting the essential safety and operating characteristics.
Glen Dimplex constantly seeks ways to improve the specifications and designs of their products.
Whilst every effort is made to produce up to date literature, this document should not be regarded
as an infallible guide. Actual product only should be used to derive cut out sizes.
All appliances must be installed by a qualified person/s with adherence to the relevant electrical,
plumbing and building codes, with compliance being issued as required by state or national
legislation.
Additionally, all upright cookers must have the anti-tilt device installed correctly in adherence to the
relevant standards by a licenced installer.
For maximum effectiveness and efficiency all rangehoods should be installed with the use of
ductwork, by a licenced installer with adherence to the relevant state and national building codes
and regulations.
All Glen Dimplex appliances are for Domestic use only, and must be installed by a licence installer
into Domestic Applications only, without exception and to the required Authorities guidelines. Any
installation outside of this will VOID warranty. Alfresco areas are not a Domestic application.
Distributed by:
Glen Dimplex Australia Pty Ltd Glen Dimplex New Zealand Ltd
For full terms and conditions, or to register your product warranty, please visit our website:
www.glendimplex.com.au www.glendimplex.co.nz
For service advice, please contact the Customer Care Centre by phone or email below.
Australia New Zealand
Ph: 1300 556 816 Ph: 09 274 8265
VERSION 1 REVISION 20211212