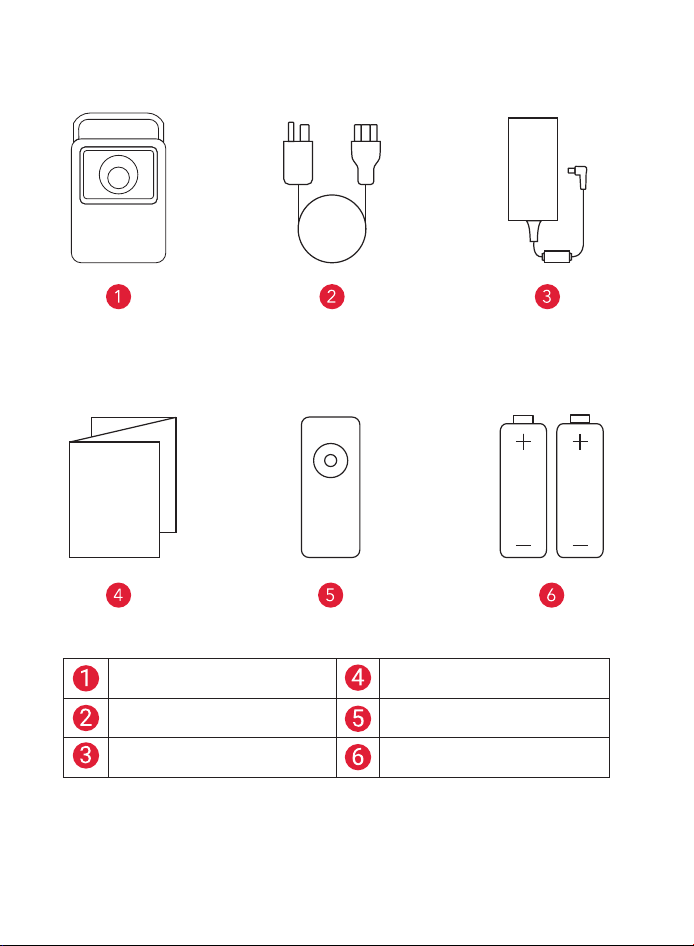
What's included
NEBULA X1 Quick Start Guide
Adapter Remote Controller
AC Cable AAA Battery × 2
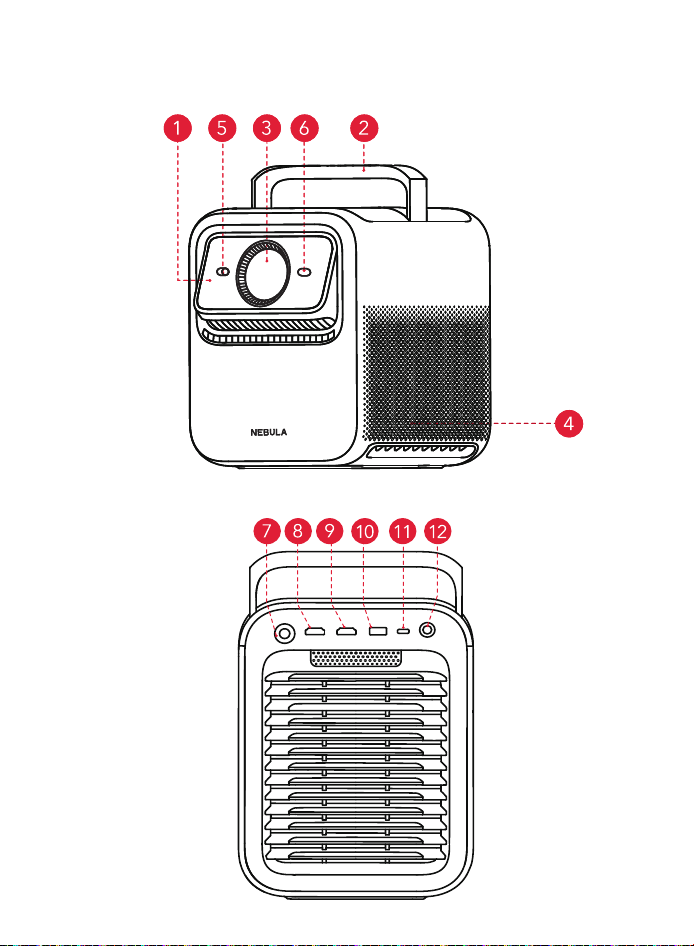
At a Glance
1. Front View
2. Rear View
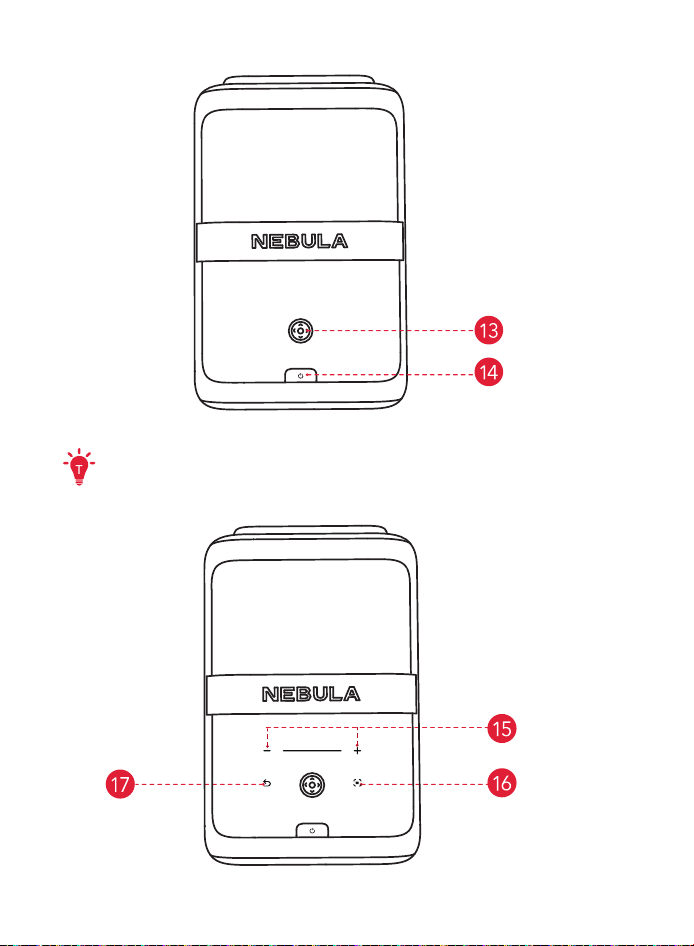
3. Top View
The touch-sensitive panel will light up when the projector is on.
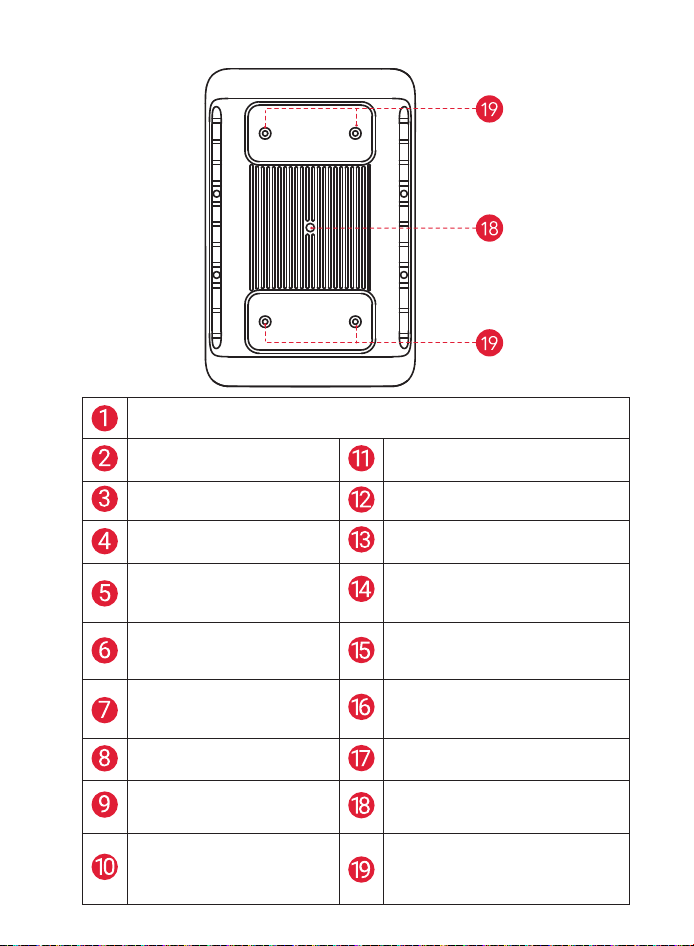
4. Bottom View
Electronic Fully-Automated Micro Gimbal
• Automatically adjusts the image position.
Retractable Handle
• For easy portability.
USB-C
• For connecting compatible devices.
Lens
• Projects high-quality images.
Audio/Optical
• For external audio systems.
Speaker
• Delivers clear audio.
Navigation & Selection
• Button for menu navigation.
Illuminance and Image Sensors
• Detects ambient light and
adjusts brightness.
Power Button
• Turns the projector on/off or enters
standby mode.
ToF (Time of Flight) Sensor
• Measures distance for
precise image adjustments.
Volume Control
• Adjusts the audio level.
DC-IN
• For connecting the power
adapter.
Auto Image Adjustment
• Automatically adjusts the image.
HDMI 1
• For connecting external devices.
Return Button
• Returns to the previous menu.
HDMI 2 (eARC)
• Supports audio return for
sound systems.
1/4" Tripod Mount
• For mounting the projector on a
tripod.
USB-A
• For media playback from USB
drives.
4 M4 Mounts (Recommended Minimum
Bolt Length: 6 mm)
• It is recommended to use all 4 M4
mounting holes for ceiling installation.
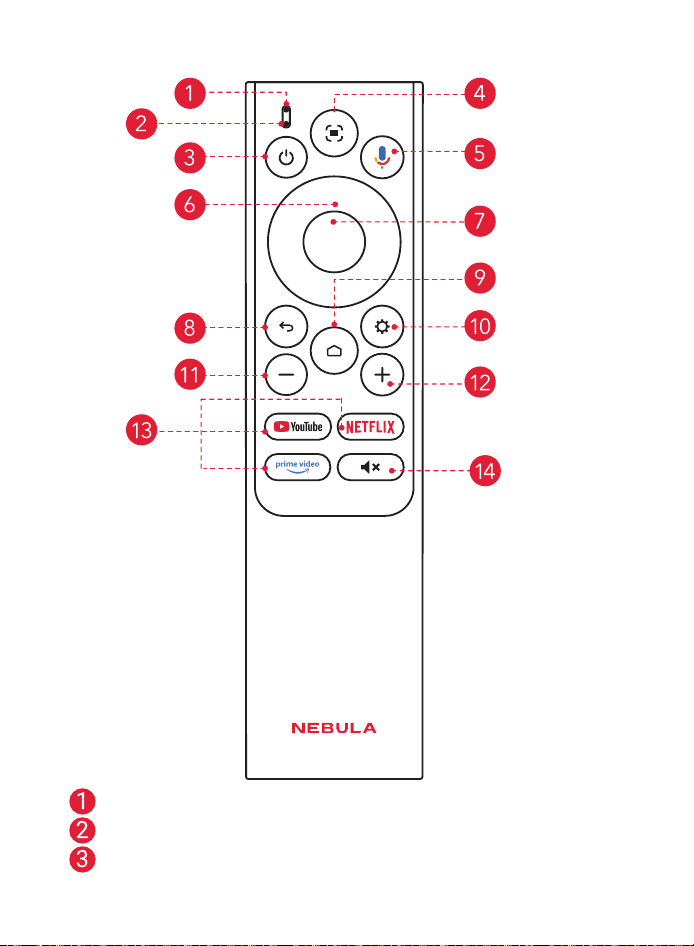
5. Remote Control
Status Indicator
Microphone
Power
• Short press to enter standby mode; long press to power o / restart /
Sleep/ switch to Bluetooth speaker mode.
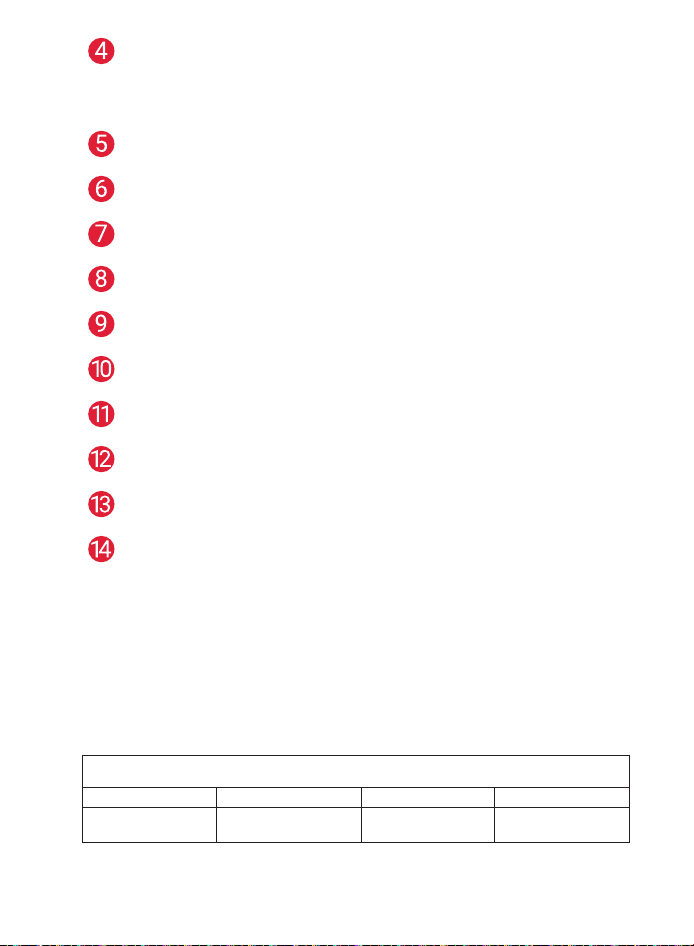
Auto Image Adjustment
• Press to enable auto image adjustment.
• Long press to direct to Nebula Dashboard (a shortcut inteace for
enabling Manual Focus, Move & Zoom, Spatial Adaptation, Screen Fit, All
Projector Settings.)
Google Assistant
• Press and hold to talk to Google Assistant.
Navigation
• Control the cursor on the screen.
Confirm
• Press to select, pause, or resume.
Return
• Return to previous page.
Home
• Press to go to the home page, long press to open settings.
Settings
• Press to go to settings.
Volume Down
• Press to reduce volume.
Volume Up
• Press to increase volume.
Streaming Apps
• Press to open YouTube, Nelix, or Prime Video.
Mute
• Press to mute / unmute the sound.
Getting Started
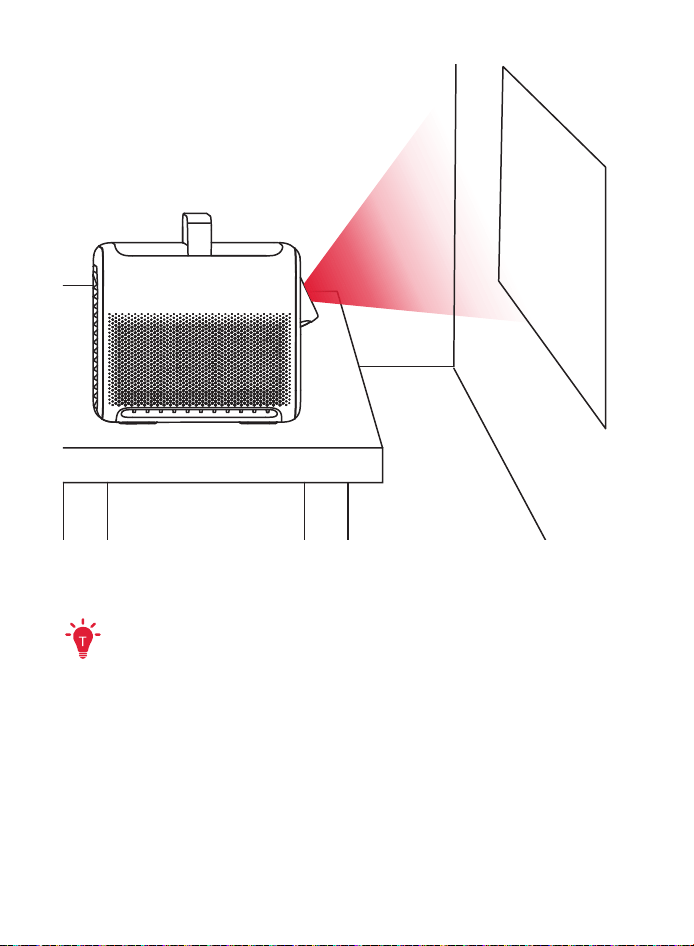
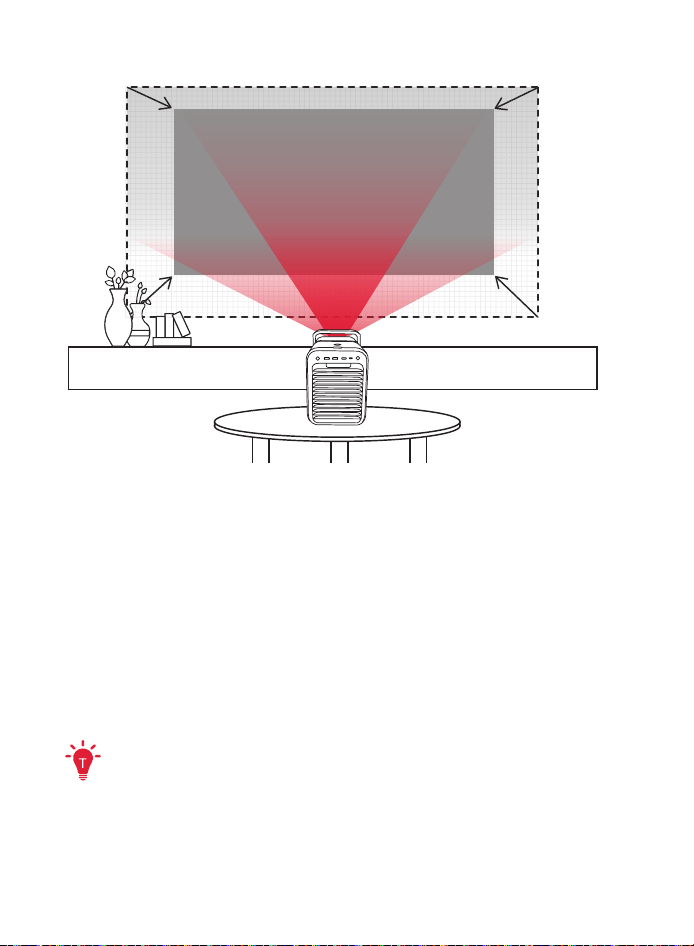
1. Placement
Place this device on a stable, flat surface, and point it squarely toward the
projection suace. For best results, the projection suace should be white.
This projector features an optical zoom lens that allows you to adjust the throw
ratio of your projector from 0.9:1 to 1.5:1.
Recommended Distance
between Device and Projection Suace
60" 120" 150" 300"
1.2 - 2.0 m
(3.9 - 6.6 )
2.4 - 4.0 m
(7.9 - 13.1 )
3.0 - 5.0 m
(9.8 - 16.4 )
6.0 - 10 m
(19.7 - 32.8 )
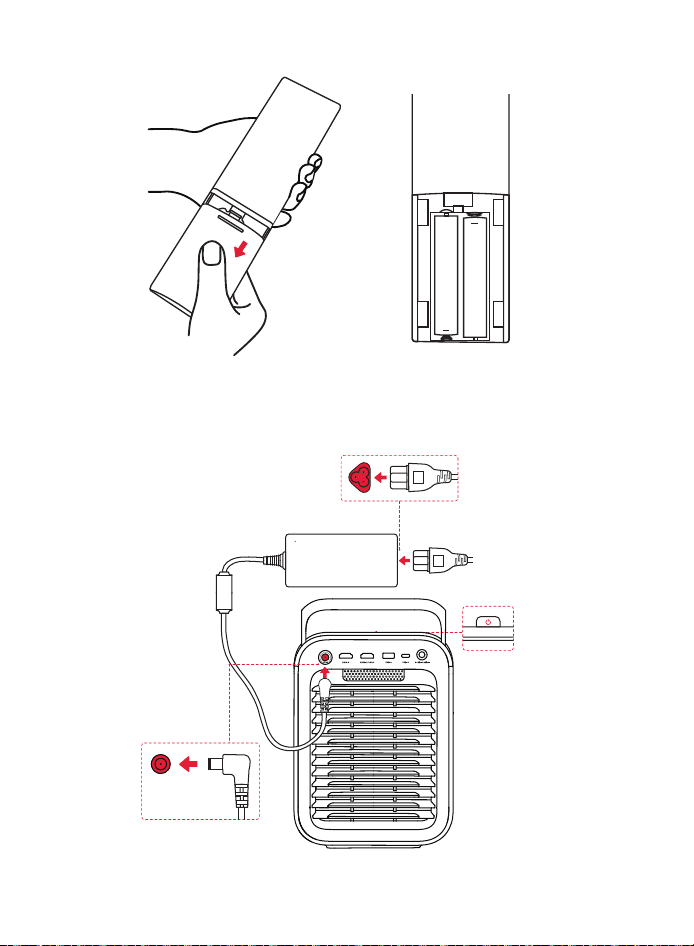
2. Prepare Remote Control
+
+
AAA
AAA
①
Slide down to open the battery compartment.
②
Insert two AAA batteries, matching the polarity (+ / -) as indicated.
3. Connect to Power
Plug the cord into the adapter. Then connect the projector to the power supply.
When successfully connected to the power supply, the power button on the
projector will turn red.
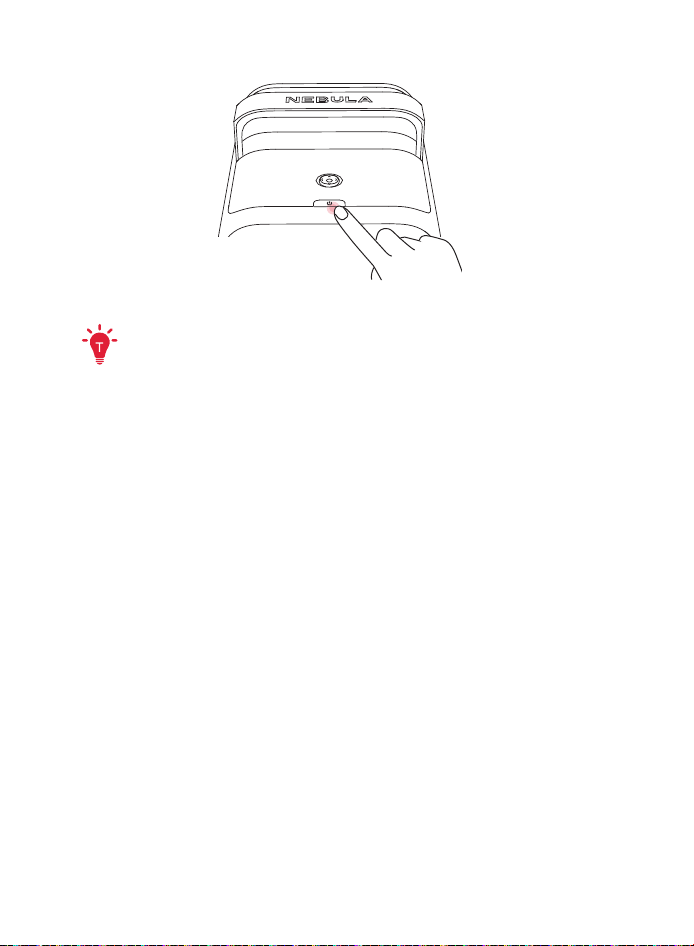
4. Power On / O
• Power On: Press the power button once.
When the projector is powered on, the power button will turn steady white.
• Power O:
①
Press and hold the power button for 3 seconds (wait for the on-screen prompt).
②
Confirm power o with the navigation button or wait 15 seconds for automatic
power o.
• Standby Mode: Short press the power button to enter standby mode.
5. Auto Focus and Auto Keystone Correction
①
When the projector is powered on, Spatial Adaptation will be automatically
triggered. If a screen is detected, the image will be fitted to the screen
automatically; if no screen is detected, the projector will automatically adjust
and project the image onto the most suitable area, and then peorm auto
image correction. (Note: As long as you do not move the projector, image
correction will not be triggered again on subsequent startups.)
②
While the projector is on, pressing the [Auto image adjustment] button on the
remote control will trigger Auto Focus and Auto Keystone Correction.
③
When the projector is moved while powered on, Auto Focus and Auto Keystone
Correction will be automatically triggered.
You can also customize the above-mentioned automation behaviors by going to
All Settings > Projector > Automation.
6. Network Settings
Use the following methods to connect the projector to a wireless network.
①
Go to All Settings > Network & Internet, and then turn on Wi-Fi.
②
Open NEBULA Connect app, then navigate to My Device > Tools > Wi-Fi.
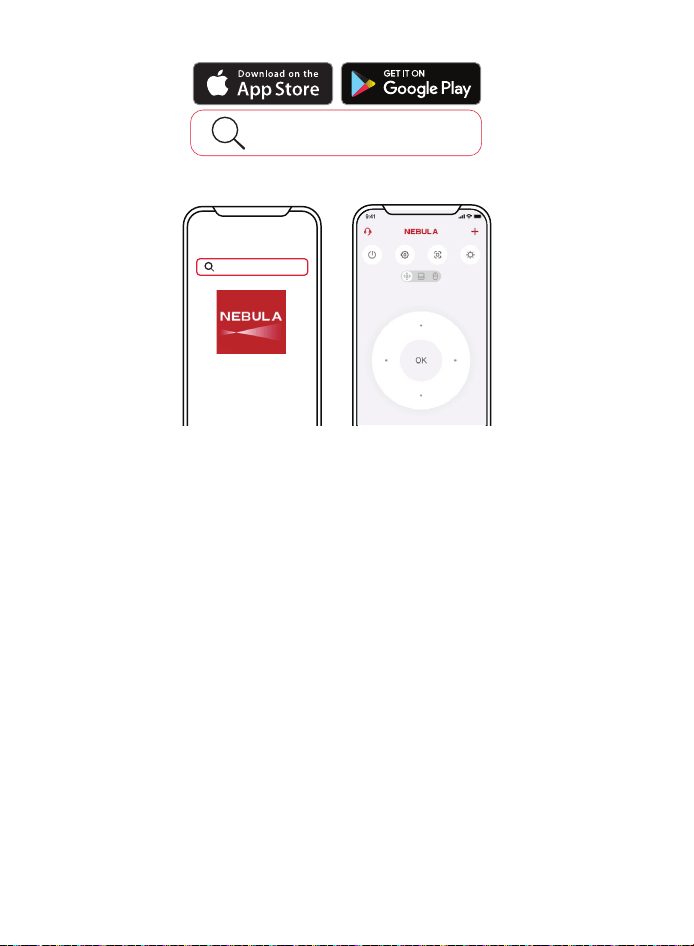
7. Control the Projector with the NEBULA Connect App
Nebula Connect
Download theNEBULA Connectapp to
control the projector using a smartphone.
Nebula Connect
Easily control your projector via the NEBULA Connect app on your smartphone.
Using Your NEBULA X1
1. Select an App
Once connected to a wireless network, you can access online services, enjoy
movies, music and pictures, and browse online. You can download more apps
from Google Play.
①
Press home page icon to access the home page.
②
Select [Apps]
>
[Search for apps and games].
2. Voice Assistant
Press the Google Assistant button on the remote, you can speak to the Google
Assistant and request your commands.
3. Wireless Casting
You can wirelessly cast movies, games, music, and the entire screen from your
iOS, macOS, Android, or Windows device to NEBULA X1.

3. 1 Cast In-App Content
You can cast content from apps that support Chromecast, such as YouTube and
Prime Video.
①
Connect your device and projector to the same wireless network.
②
Open the streaming app on your device.
③
Play a video clip and tap the cast icon on the video screen.
④
Select NEBULA X1 to connect. The projector will mirror the video screen on your
device.
•
To cast in-app content, make sure you are using the same streaming
service account on both the mobile phone and the projector.
•
Certain content cannot be cast on NEBULA X1 due to copyright restrictions.
You can stream the content via the same app installed on your projector.
3. 2 Cast Device Screen
You can cast the entire screen from your device to the projector. Before that,
please ensure NEBULA X1 and your device are connected to the same wireless
network.
For iOS devices:
①
Install the Nebula Cast app on your projector.
②
Open Nebula Cast app and follow the on-screen instructions to complete the
process.
③
Access the Control Center of your iOS device and click the Screen Mirror icon.
④
Click on "NEBULA X1" in the device list.
For Android devices:
①
Enter Google Home APP and select "NEBULA X1".
②
Tap [Cast my screen] icon on the page.
4. Bluetooth Speaker Mode
The projector can also be used as
a Bluetooth speaker.
①
Go to All Settings > Display & Sound > Sound > Turn on Bluetooth Speaker Mode
to switch your NEBULA projector from Projector mode to Bluetooth Speaker mode.
Alternatively, you can go to Dashboard > Sound > Turn on the Bluetooth Speaker
Mode.
②
Enable Bluetooth on your smartphone and select NEBULA X1.
5. Pairing Remote and Bluetooth Accessories
You can connect external Bluetooth accessories to your projector, including
speakers, headphones, and keyboards.
①
To pair your remote control, go to All Settings > Remotes & Accessories > Pair
More Oicial Accessories > Nebula Remote; to pair other Bluetooth accessories,
go to All Settings > Remotes & Accessories > Pair Accessory.
②
Put your remote or Bluetooth accessory into pairing mode.
③
Select the device that you want to connect to.
6. Use the Electronic Micro Gimbal
The built-in micro gimbal adjusts the projected image position automatically
during Spatial Adaptation.
For precise vertical image adjustments, you can adjust manually under All Settings
> Projector > Move & Zoom.
•
Please do not manually push or adjust the micro gimbal, and keep your
fingers away from the micro gimbal during operation.
•
The micro gimbal supports upward tilt up to 25 degrees, allowing you to
achieve the optimal projection angle.
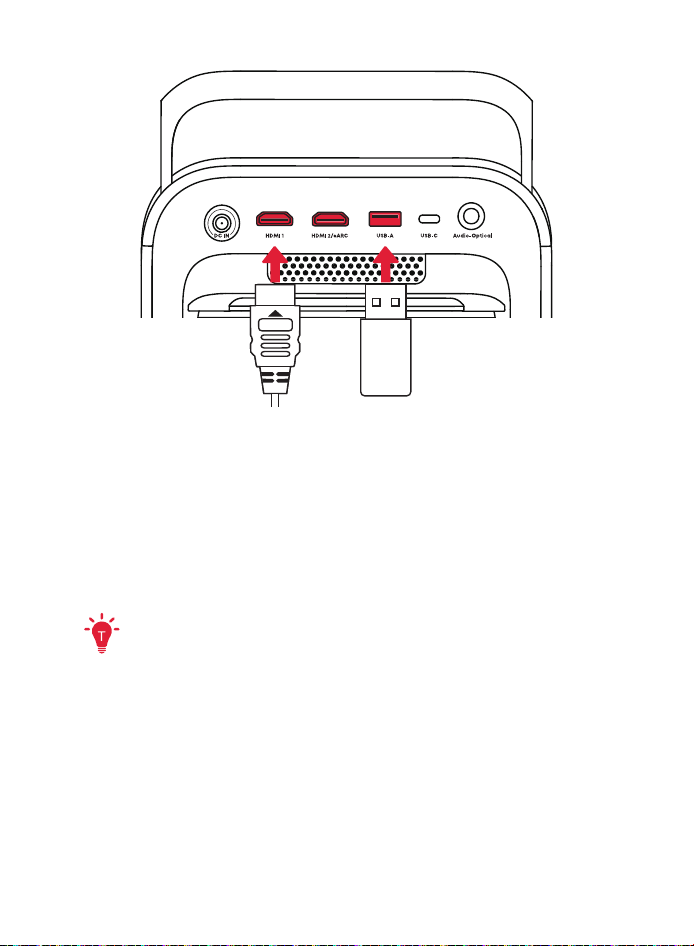
7. Play Video from HDMI / USB Devices
This projector supports connections with various HDMI playback devices such as
TV sticks, TV boxes, DVD players, set-top boxes (STB), game consoles, and more.
With this projector, you can also enjoy music, video, and pictures on a USB
storage device (not included).
To access and play files from a USB flash drive, you need to first install a file
manager app. We recommend downloading "Nebula File Manager". Without a file
manager, the projector cannot read any files on your USB drive.
For better video playback experience, we recommend installing one of the
following video players: VLC, MX Player, or Kodi. We recommend formatting your
USB drive as FAT32 or NTFS. If your USB drive uses exFAT format, only MX Player can
be used to play video files.
①
Direct Connection with HDMI Devices and Speakers/Soundbars
• When connecting the projector directly to an HDMI playback device (e.g.,
game consoles, streaming devices), the video signal is displayed on the
projector, while the audio can be output to an external speaker or soundbar
via the HDMI 2 (eARC) port. To enable this, you may need to configure your
sound system settings to eARC mode.
②
AVR (Audio/Video Receiver) Setup
• For setups involving an AVR, connect your HDMI playback device (e.g., game
console, Apple TV) directly to the AVR. The AVR will process the audio and send it
to the connected speakers, while the video signal is passed through the AVR to
the projector. This setup ensures optimal audio and video synchronization.
③
Dual HDMI Port Switching
• The projector features dual HDMI ports, allowing you to connect two HDMI
devices simultaneously. You can easily switch between HDMI 1 and HDMI 2
(eARC) channels by going to All Settings > Channels & Inputs > Inputs.
8. Spatial Adaptation and Spatial Recall
Spatial Adaptation
The projector will automatically adjust the image based on the actual
environment.
If a projection screen is detected, the image is automatically adjusted to fit the
screen. If no screen is found, the projector will automatically identify the optimal
projection area and correct the image accordingly.
You can customize this setup by going to All Settings > Projector > Spatial
Adaptation.
Spatial Recall
After you have adjusted image size, position, wall color, or other settings, you
can save these settings as a space profile. When you move the projector to a
dierent location and later return it to the original spot, simply go to All Settings >
Projector > Spatial Recall to select the saved space profile to instantly restore all
your preferred settings.
①
For best results with Spatial Recall, ensure the projector is placed close to
its original position.
②
When using the Spatial Adaptation and Spatial Recall features, ensure
that the projector is positioned no more than 4 meters from the
projection suace.
9. Move & Zoom
If you want to manually adjust the projection size and position, you can navigate
to All Settings > Projector > Move & Zoom, then follow these steps:
①
Press the Volume Down or Volume Up buttons to zoom in or out until the
projected image reaches your desired size.
②
Use the navigation buttons to move the projected image to your preferred
position.
③
If the image is not perfectly rectangular after the adjustment, press the
Confirm button to activate Auto Keystone Correction. For more precise
keystone adjustment, you can also press the Auto Image Adjustment button on
the remote control to switch to manual keystone correction.
10. 3D Mode
NEBULA X1 supports projecting 3D videos in three formats: Side-by-Side, Top-and-
Bottom, and Frame Packing.
To access this feature, play a 3D video and then navigate to All Settings > Display
& Sound > Picture > 3D Mode. Select the desired format, and wear DLP Link 3D
glasses (not included) to fully experience the 3D eect.
• 3D Mode can only be enabled aer a 3D video starts playing.
• To enjoy the Frame Packing format, please use an external Blu-ray 3D player
(ensure the 3D option is enabled in the player settings), play a genuine Blu-
ray 3D disc in 3D mode, and then select the Frame Packing format in the
projector's 3D settings.
Settings
You can experience more advanced features going through the Settings menu.
All items shown in this section are for illustration purposes only, and they may
be subject to change due to software updates. Please refer to the actual
display for the most accurate information.
1. Projector
On the home page, select [All Settings]
>
[Projector] and press confirm.
[Spatial
Adaptation]
Automatically detects screens or walls ann adapts the
image for optimal correction.
[Spatial
Recall]
Supports saving multiple space profiles, enabling one-
click restoration as needed.
[Focus]
• [Start Auto Focus]: Automatically peorms Auto Focus for
clear images.
• [Peorm Manual Focus]: Manually adjusts the focus for
clear images.
[Keystone
Correction]
• [Start Auto Keystone Correction]: Automatically corrects
the image into a 16:9 rectangle.
• [Auto Obstacle Avoidance]: When enabled, the system
avoids obstacles during auto keystone correction.
• [Peorm Manual Keystone Correction]: Manually
peorm keystone correction to turn the image into a 16:9
rectangle.
• [Keystone Correction Settings]: Access more options
related to keystone correction.
[Screen Fit]
• [Start Auto Screen Fit]: Automatically detects the screen
and aligns the image to its borders.
• [Peorm Manual Screen Fit]: Manually adjust the image
to match the screen's borders.
[Move & Zoom] Move and resize the projected image as desired.
[Wall Color
Adaptation]
Adapts to the color of the projection suace to deliver
more accurate colors when watching movies.
[Eye Guard]
When someone enters the projection area within 3 meters,
the brightness will automatically reduce to prevent eye
damage from intense light.
[More Projector
Settings]
• [Trigger by Remote]: Short pressing the auto image
adjustment button will trigger the selected action.
• [Trigger at Startup]: Aer startup, if the projector's
placement diers from its previous position, the selected
tasks will be peormed automatically.
• [Trigger Aer Movement]: The selected tasks will be
peormed automatically if the projector is moved while
powered on.
[Advanced Settings]
[Projection Mode]: Select a way of placing the projector.
• [Auto]: Automatically detects whether the projector is
inverted. Automatically switch between these options.
• [Front]: The device is located in front of the projection
suace.
• [Front Ceiling]: The device is hanging from the ceiling in
an upside-down position. The image is rotated by 180
degrees.
• [Rear]: The device is located behind the projection
suace.
• [Rear Ceiling]: The device is hanging from the ceiling in
an upside-down position behind the projection suace.
The image is rotated by 180 degrees and horizontally
mirrored.
[Do Not Disturb]: Disable unwanted pop-up notifications.
• [Projection Issue Alerts]: Receive alerts when issues are
detected.
• [Fine Tuning Popup]: Receive a popup aer Seamless
Auto Keystone Correction.
• [Nebula Smart Popup]: Receive prompts when the
projector status changes.
[Startup and Shutdown]
• [Auto Pitch at Startup and Shutdown]: Automatically
adjust the projector's pitch angle during startup and
shutdown.

[Overheating Protection]: Detects close-range obstacles
and automatically reduces brightness to prevent
overheating.
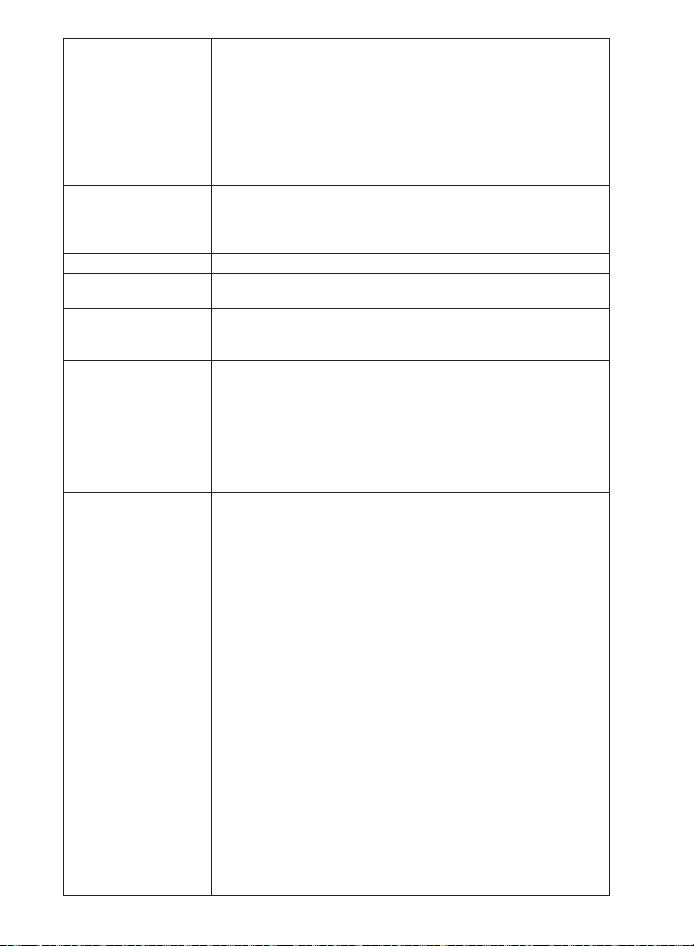
[Display & Sound]
[Picture]
[Brightness]: Adjust the brightness of the projector display.
[Picture Mode]: The projector is preset with several
predefined picture modes so that you can choose one to
suit your environment and input source.
• [Standard]: Keeps natural looking colors with a balance
of warm and cool tones.
• [Nebula Master]: Enjoy immersive, true-to-life, and vibrant
visuals.
• [Movie]: Provides the best colors for watching movies.
• [Game]: Increases the brightness and response time level
for playing video games.
• [Conference]: Increases the brightness but aects the
color reproduction.
• [Custom]: Customize image parameters to match your
preferences.
• [Contrast]: Adjusts the dierence between light and
dark areas of the image.
• [Saturation]: Changes the intensity of the colors in the
picture.
• [Sharpness]: Enhances the clarity and definition of
image details.
• [Color Temperature]: Adjusts the warmth or coolness of
colors.
• [Wall Color]: Optimizes the image based on the color of
your projection suace.
• [Gamma]: Adjusts the midtone brightness to improve
image details.
• [Restore Default Settings]: Resets all settings to their
factory defaults.
[Expert Settings]: Customize expert settings to enhance
image quality.
• [Dynamic Contrast]: Adjust the contrast dynamically to
improve image quality.
• [MEMC]: Improves motion smoothness.
• [Color Space]: Select appropriate color space.
• [DNR]: Reduces noise for a clearer image.
• [MPEG NR]: Minimizes compression artifacts.
• [DI Film Mode]: Provides smoother transitions in movie
scenes.
• [Color Tuner]: Fine-tunes color peormance.
• [11 Point White Balance Correction]: Fine-tuning improves
color accuracy.
[Sound]
[Movie]: Creates a surround-sound listening experience
for watching movies.
[Music]: Enhances the treble for listening to music.
[Outdoors]: Increases volume for playing audio / video
outdoors.
[Custom]: Manually set audio settings such as balance,
bass, and treble.
[Turn on the Bluetooth Speaker Mode]: Enable using the
projector as a Bluetooth speaker.
[Bluetooth Speaker Delay]: To synchronize the sound with
the image, adjust the sound delay by 10 milliseconds for
each operation.
[Expert Settings]: Customize advanced settings to
enhance audio quality.
• eARC: Supports the connection of external devices such
as sound systems for audio return capabilities.
[Audio Output]
[Auto]: Automatically select the best audio output mode.
[Bypass]: Pass the digital audio signal through without
processing it, allowing the connected device to decode
the audio.
[PCM]: Output audio in PCM format.
[Dolby Digital Plus]: Output audio in the Dolby Digital Plus
format.
[Dolby Digital]: Output audio in the Dolby Digital format.
[Digital Output Delay]: Adjust the delay of the digital
audio output to synchronize the sound with the video.
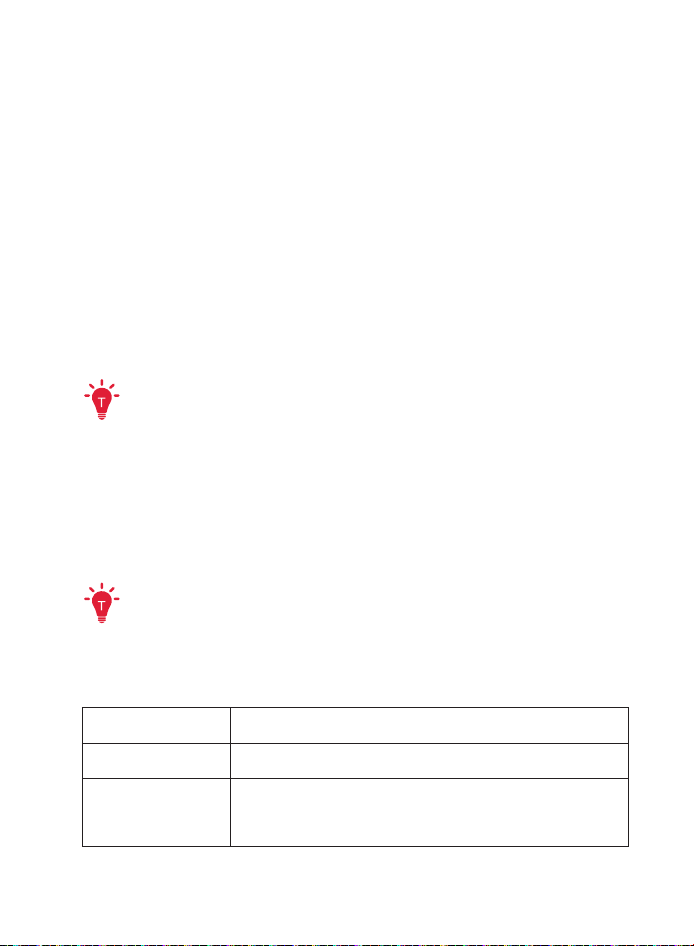
2. System
On the home page, select [All Settings]
>
[Projector] and press confirm.
[Ambient Mode] Set your preferences to display photos, weather, and time on
your Google TV.
[Power & Energy] Change the auto-sleep settings, choose the power on
behavior, turn o the current display, or set auto power-o
time when no signal is available.
[About] Check the product information, update the system, reset the
device, or rename the device.
[Date & Time] Enable or disable automatic date and time. Manually set date
and time, select time zone, or set time format.
[Language] Select an on-screen display language.
[Keyboard] Check and manage keyboards.
[Storage] Check the device storage and free up storage.
[Cast] Settings for casting content from Android phones, tablets,
and other devices to the projector.
[System Sounds] Turn on/o system sound notifications.
[Restart] Restart the system.

3. Others
On the home page, select [All Settings] to find more setting options.
[Acessibility] Enhance usability for users with visual, hearing, or mobility
impairments by adjusting audiovisual eects and
interaction methods.
[Accounts & Profiles] Sign in to make the most of Google TV.
[Privacy] Customize your privacy preferences.
[Remotes &
Accessories]
Search for accessories (such as Bluetooth speakers,
remote control, etc.) for pairing.
Bluetooth Visibility: When disabled, the projector will not be
discovered by other Bluetooth devices.
[Help & Feedback] Leave your feedback on the projector or share any other
ideas.
System Update
To fully enhance your experience with this product with the latest features, you
are recommended to update the system from time to time.
To update the system, go to [All Settings]
>
[System]
>
[About]
>
[System update].
Troubleshooting
①
Cannot Charge
• Use the included adapter and charging cable to charge the projector.
②
Cannot Connect to a Wi-Fi Network
• Place your projector within 16 / 5 m of the router and reconnect.
• Set your router to 2.4 GHz or 5 GHz and retry.
• Restart your projector and router and retry.
• Try a dierent Wi-Fi network or your phone's hotspot.
③
Blurry Image
• Ensure that the Camera/TOF on the front panel is not blocked or dirty.
• Slightly move the projector or press the auto focus icon on the remote to start
auto focus.
• To manually adjust the focus, go to [All Settings] > [Projector] > [Focus] > [Peorm
Manual Focus], and use le and right on the remote to make the adjustments.
• Adjust the projection angle and direction as well as the height of the projector if
necessary.
• For auto-focus to function properly, the distance between the projector and the
screen should be between 1.5 to 4 meters.
④
Auto Keystone Correction Failed
• Ensure that the Camera/TOF on the front panel is not blocked or dirty.
• The best automatic keystone correction distance is 1.0-4.0m, horizontal ±30°@3m/
±10°@4m.
⑤
Auto Screen Fit Failed
• Ensure the screen is rectangular with black borders.
• Check if the screen color contrasts sharply with the borders; avoid using screens
that are close to black in color.

• Ensure the distance between the screen and the projector is within 4 m.
• Ensure the screen border width is 5mm.
• Ensure the projected image covers the entire screen.
• Ensure the screen size is at least 10% larger than the projection area.
• Ensure the central grid is within the screen and not obstructed.
• If auto screen fit failed, you can peorm manual keystone correction via [All
Settings] > [Projector] > [Keystone Correction] > [Peorm Manual Keystone
Correction].
⑥
Eye Guard Failed
• Ensure that the Camera/TOF on the front panel is not blocked or dirty.
• Eye Guard feature works best at a distance of 10 cm to 4 m.
• Go to [All Settings] > [Projector] >[Eye Guard] and check if the feature has been
enabled.
⑦
Wall Color Adaptation Failed
• Ensure that the Camera/TOF on the front panel is not blocked or dirty.
• Ensure the image is projected onto a light-colored wall (color temperature
between 3500K and 15000K, color coordinates within 0.45).
⑧
No HDMI Signal
• Use a dierent HDMI cable.
• Connect your projector with another HDMI playback device.
• Connect the HDMI playback device to your TV via HDMI cable to check if the
device or cable malfunctions.
• Adjust the HDMI playback device's output resolution / frequency to be the same
as the projector's.
⑨
No Sound Output from External Speakers
• Check if the projector is set to mute mode.
• Check if the projector's "HDMI2/eARC" port or Bluetooth is connected to an
external audio device.
⑩
How to Control Nelix with Mouse Mode
• Install Nebula Connect on your phone and connect with NEBULA X1. Select Mouse
mode. Use one finger to move and click, or two fingers to scroll.
⑪
How to Play Videos without Wi-Fi
• Download videos to a USB drive in FAT32 format. For the following steps, see Play
Video from HDMI / USB Devices.
Specification
Specifications are subject to change without notice.
Input DC-IN 22V*10.9A
Power Consumption 240W
Standby Power Consumption
<
0.5W
Brightness 3,500 ANSI Lumens
Resolution 3840 × 2160
Light Source Triple Laser
Color Gamut 110% Rec. 2020
Native Contrast Ratio 5,000:1
Aspect Ratio 16:9
Throw Ratio 0.9:1 to 1.5:1
Speaker Output Power 15W ×2+5W ×2
Noise 26dB@1m
Wi-Fi WiFi5
Bluetooth Version 5.1
USB Format FAT, FAT32, NTFS
Operating Temperature 0-35
℃
Trademarks
HDMI, and HDMI logo and High-Definition Multimedia Inteace are trademarks
or registered trademarks of HDMI licensing LLC in the United States and other
countries.
Dolby, Dolby Audio, Dolby Vision, and the double-D symbol are trademarks of
Dolby Laboratories Licensing Corporation. Manufactured under license from
Dolby Laboratories. Confidential unpublished works Copyright © 1992-2024 Dolby
Laboratories. All rights reserved.
The Bluetooth® word mark and logos are registered trademarks owned by the
Bluetooth SIG, Inc. and any use of such marks by Anker Innovations Limited is
under license. Other trademarks and trade names are those of their respective
owners.
Default Open Ports: Wi-Fi (2.4 GHz / 5 GHz)
Port Description:
1. Upon initial power-on or aer a reset, if no Wi-Fi information has been
configured, the device will begin scanning for available SSIDs.
2. In normal operating mode, the device will automatically connect to the
previously saved router SSID and password.
3. To change the Wi-Fi configuration, you can go to Settings > WiFi, or follow the
instructions in the manual to reset and reconfigure the network connection.