18100/97533
EN
Original Instructions
Version 1
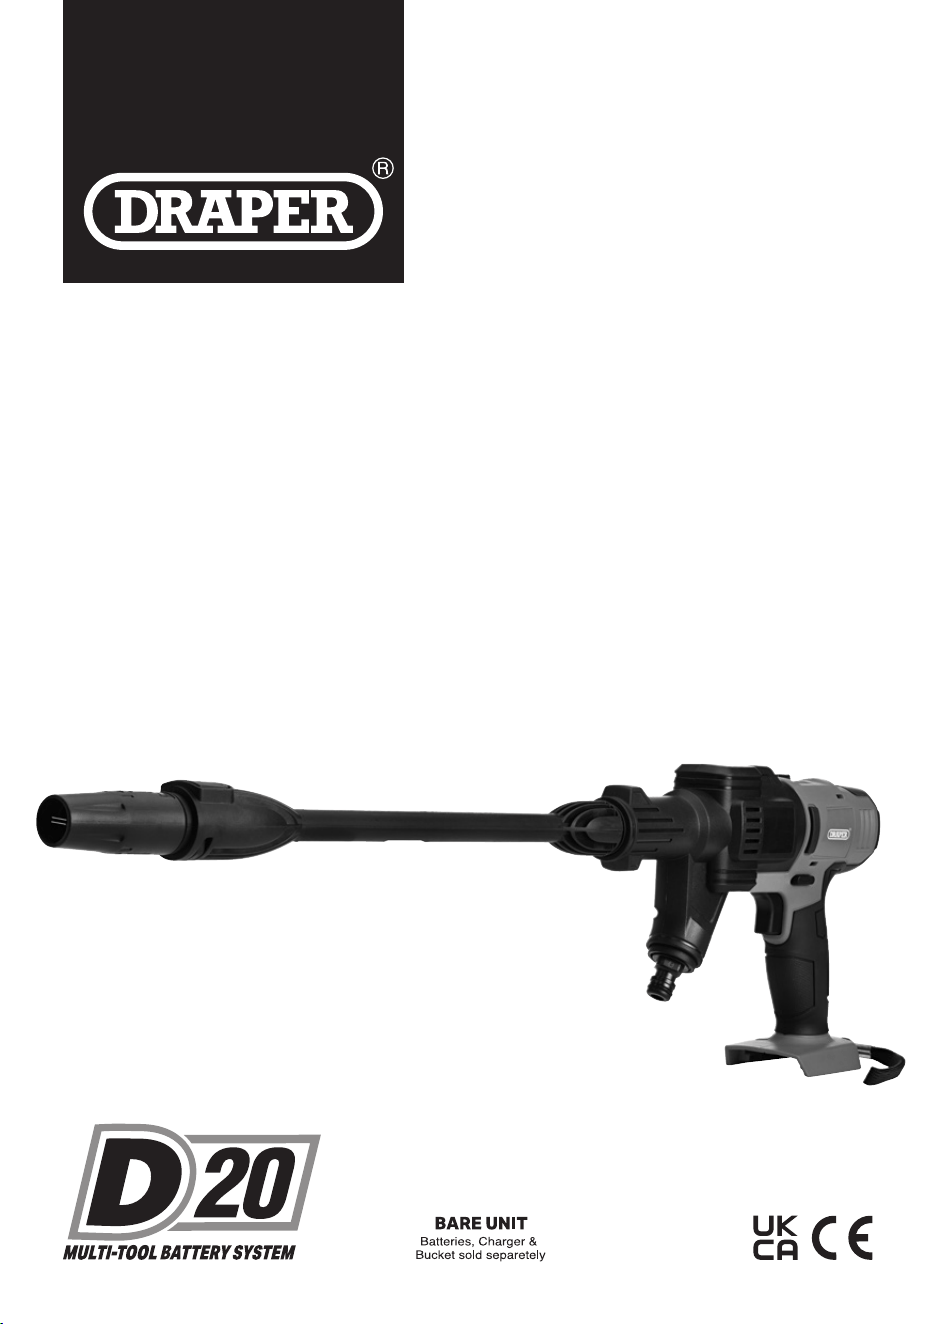
2 0V
PRESSURE
WASHER
2. Contents
EN
1.1 Product Reference
User Manual for: 20V Pressure Washer
Stock No: 97533 (EU 91912), 18100
Part No: D20PW16BARKIT, D20PW16BAR
1.2 Revisions
Version 1: March 2024
First release
1.3 Understanding the Safety Content of
This Manual
WARNING!
– Situations or actions that may result
in personal injury or death.
CAUTION! – Situations or actions that may result
in damage to the product or surroundings.
Important: – Information or instructions of particular
importance.
1. Preface
– 2 –
EN
1. Preface 2
1.1 Product Reference 2
1.2 Revisions 2
1.3 Understanding the Safety Content of This
Manual 2
2. Contents 2
3. Product Introduction 3
3.1 Intended Use 3
3.2 Specication 3
4. Health and Safety Information 4-6
4.1 General Health & Safety Information 4
4.2 Specic Safety Instructions for Pressure
Washer Use 4
4.3 Safety Instructions for Mains Powered
Chargers & Battery Packs 4
4.4 Battery packs 5
4.5 Connection to the power supply (charger) 5
4.6 Residual Risk 5
4.7 Explanation of symbols 6
5. Identication and Unpacking 7-8
5.1 Product Overview 7
5.2 Packaging 8
6. Battery Pack Charging 8-9
6.1 To charge the battery pack 8
6.2 Battery Pack Protection Features 8
6.3 Battery Pack Charge Status 9
7. Preparing the Pressure Washer 9-10
7.1 Pressure Washer Assembly 10
8. Operating Instructions 11-12
8.1 Battery Fitting 11
8.2 Removing the air from the hose 11
8.3 Selecting the nozzle pattern 11
8.4 Detergent bottle 12
8.5 Safety catch button 12
9. Maintenance and Troubleshooting 13-14
9.1 Hose Filter Cleaning 13
9.2 Gun Connector Filter Cleaning/ Replacement 13
9.3 General maintenance 14
9.4 Storage 14
9.5 Troubleshooting 14
10. Spares, Returns and Disposal 15
10.1 Battery Pack Disposal Information 15
11. Warranty 15
These are the original product instructions. Please
read the instructions carefully and note the Health
and Safety warnings and cautions. Retain for future
reference.
Please visit drapertools.com/manuals for the latest
version of this manual and the associated parts list,
if applicable.

– 3 –
3. Product Introduction
Stock No. 18100/97533
Part No. D20PW16BAR/D20PW16BARKIT
Rated voltage: 20V
Working pressure: 0 – 16 Bar (230 PSI)
Max ow rate: 120L/hour
Type of protection: IPX5
Sound pressure level: <70dB
Sound power level: <80dB
Vibration level: <2.5m/S
2
Net weight (appliance only): 1.5kg
Battery Pack (18100 sold separately)
Stock No. 55887
Part No. D20B2.OAH
Type: Li-Ion
Rated voltage: 20V/2.0Ah
Battery Charger (18100 sold separately)
Stock No. 55913
Part No. D20BCF
Rated voltage: 230V
Rated frequency: 50Hz
Rated DC output voltage: 20V
Rated DC output current: 4A
Protective device rated current: 8A
Construction: Class II
EN
3.2 Specication
3.1 Intended Use
This product is designed as a portable pressure washer to
clean vehicles, machinery and outside property.
This product is intended for domestic and infrequent
light-duty trade use. Any other application beyond the
conditions established for use will be considered misuse.
Draper Tools accepts no responsibility for improper use of
this product.
– 4 –
4. Health and Safety Information
Important: Read all the Health and Safety instructions
before attempting to operate, maintain or repair this
product and retain for future reference. Failure to follow
these instructions may result in injury or damage to the
user, the product or the item being cleaned.
4.1 General Health & Safety Information
• Keep the work area clean and well lit.
• NOTE: This appliance is not intended for use by
persons (including children) with reduced physical,
sensory or mental capabilities or lack of experience
and knowledge, unless they have been given
supervision or instruction concerning the use of the
appliance by a person responsible for their safety.
Children should be supervised to ensure that they do
not play with the appliance.
• Local regulations may restrict the age of the operator.
• Keep children and bystanders away while operating
this washer.
• Use appropriate personal protective equipment.
ALWAYS wear eye protection.
• Store the pressure washer out of the reach of children.
• The appliance should only be serviced by a qualied
repair person using identical replacement parts.
4.2 Specic Safety Instructions for
Pressure Washer Use
WARNING! This appliance is for outdoor
use only.
WARNING! Disconnect the battery before
changing accessories, servicing or performing
any maintenance.
WARNING! Keep all connections tight and in
good working order.
• To prevent unintentional starting always activate the
safety catch (2) after use and when storing the tool.
• Never use the appliance if important parts of the
appliance are damaged, e.g. safety devices, high
pressure hose, gun, etc.
• This appliance has been designed for use with a
neutral shampoo based on biodegradable anionic
surface-active detergents. The use of other detergents
or chemicals may damage the appliance.
• Never use the appliance with people in the vicinity
unless they are wearing protective clothing.
• Do not direct the nozzle toward mechanical parts
containing lubricant grease, as the grease will
dissolve and spread over the surrounding ground.
• Vehicle tyres/tyre valves may only be cleaned from a
minimum distance of 30cm, otherwise the vehicle
tyre/tyre valve could be damaged by the high-
pressure jet. The rst indication of this is a
discolouration of the tyre. Damaged vehicle tyres/
tyre valves can be dangerous.
• High pressure jets may be dangerous if improperly
used. Jets must never be pointed at people, animals,
live electrical equipment or the appliance itself.
• The accessories and high-pressure couplings are
important for the appliance’s safety. Use only
accessories and couplings recommended (it is
extremely important to protect these components
against damage by avoiding their improper use and
protecting them against bending, knocks and
scratches.
WARNING! The pressure washer must only be
used with clean water. Salt water, non-ltered
water or corrosive chemicals must not be used as
they will damage the cleaner.
• Release residual pressure before disconnecting hose.
4.3 Safety Instructions for Mains Powered
Chargers & Battery Packs
• The charger is for indoor use only. DO NOT expose
to rain.
• Only use the correct recommended Draper charger
and corresponding battery pack with this product.
Visit the Draper website for more information on the
range of chargers and batteries available for use with
this product.
• Do not charge any other batteries with the Draper
chargers. Any other application is considered misuse.
• Before charging the product refer to the instructions
supplied with the charger and battery for correct
operation and suitability for use with this product.
• Prior to plugging the charger in to the supply, check that
the plug, cord and charger casing are in good condition.
If any are damaged, have the defective part(s) replaced
immediately by a suitably qualied person.
• Only use a correctly rated mains outlet to provide
power, do not plug into site generators, attach to
engine generators or D.C. sources. Do not use a mains
socket outlet that is not switched.
EN

– 5 –
4. Health and Safety Information
• Do not attempt to charge battery packs that are too
hot (over 30°C) or too cold (under 5°C), if these
conditions apply set the battery pack aside to
“normalise” before proceeding with the charging
operation.
• Set up the charger and cord in a safe place where it
will not be knocked, tripped over, stepped on, etc. and
where it is well ventilated. Make sure the ventilation
slots in the charger case are not obstructed.
• Inspect the battery pack for damage before plugging
into the charger, ensuring the correct orientation.
• Switch the charger on and check that the correct
indicators illuminate, allow the battery pack to charge
(see the specic instructions for your charger). Once
charging is complete, switch the charger o,
disconnect from power supply, remove the battery
pack and store.
4.4 Battery packs
• Before charging, read the instructions.
• Do not expose to rain.
• Only use Draper D20 battery packs with this product.
• Do not charge any other batteries with Draper
chargers. Any other application is considered misuse.
• The charger must be disconnected from the power
supply before removing the battery.
• The battery must be removed from the appliance
before it is recycled.
• The battery is to be disposed of in-line with local
authority procedures.
• Do not crush, open or burn the battery. Exposure to
potentially harmful materials may occur.
• In case of re use CO2 or dry chemical extinguisher.
• Do not expose to high temperatures >50°C. The
battery may degrade at high temperatures.
• Charge battery in conditions between 5°C to 30°C
with the designated charger for the battery.
• Do not use battery if it has been stored at 5°C or less.
Allow it to “normalise” at room temperature before
usage/charging.
Warning! – Leaking battery packs
• The electrolyte in battery packs is corrosive. Avoid
contact with the skin – If contact is made, ush the
area with clean water, pat dry and seek medical
attention at the earliest opportunity.
• Inform medical personnel that the contaminant is a
“high alkaline, corrosive liquid”.
• If electrolyte comes into contact with the eyes, ush
with of water only. Seek immediate medical attention,
relaying the information above.
4.5 Connection to the power supply
(charger)
Caution: Risk of electric shock. Do not open.
• This appliance is supplied with an approved plug and
cord for your safety. Never use a damaged or
incomplete plug.
• If the power supply cord is damaged, it must be replaced
by Draper Tools, an authorised service agent or similarly
qualied personnel in order to avoid a hazard.
• This appliance is Class II† and is designed for
connection to a power supply matching that detailed
on the rating label and compatible with the plug tted.
• If an extension lead is required, use an approved and
compatible lead rated for this appliance. Follow all the
instructions supplied with the extension lead. Ensure
that the extension lead is fully unwound.
• Keep extension leads away from moving hazardous
parts to avoid damages to the cord which can lead to
contact with live parts. Position cord safely to avoid
tripping over.
• †Double insulated : This product requires no
earth connection as supplementary insulation is
applied to the basic insulation to protect against
electric shock in the event of failure of the basic
insulation.
4.6 Residual Risk
• The safety instructions in this manual cannot account
for all possible conditions and situations that may
occur. Exercise common sense and caution when
using this product and protect against any additional
conceivable risks.
EN

4. Health and Safety Information
Read the instruction manual
Wear face mask and safety glasses
Keep out of the reach of children
Warning!
European conformity
UK Conformity Assessed
130°
Fuse protective device
Polarity indication
Direct current
Class II construction
(Double insulated)
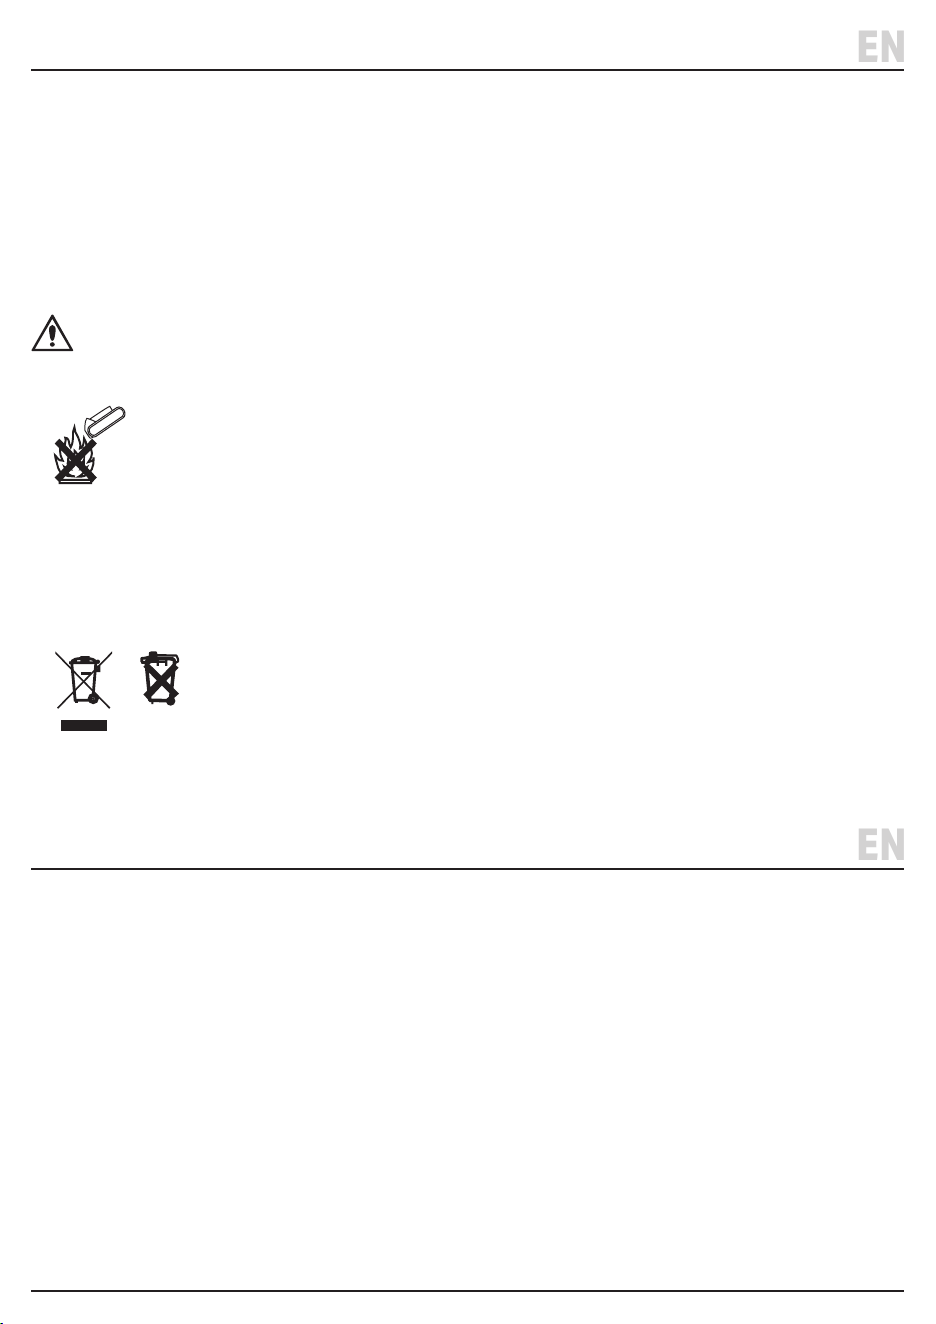
WEEE –
Waste Electrical & Electronic Equipment
Do not dispose of Waste Electrical & Electronic Equipment
in with domestic rubbish
– 6 –
EN
4.7 Explanation of symbols Battery Pack/Charger
Do not incinerate or throw onto re
For indoor use only;
do not expose to rain
Lithium-ion product
Li-ion
– 7 –
5. Identication and Unpacking
EN
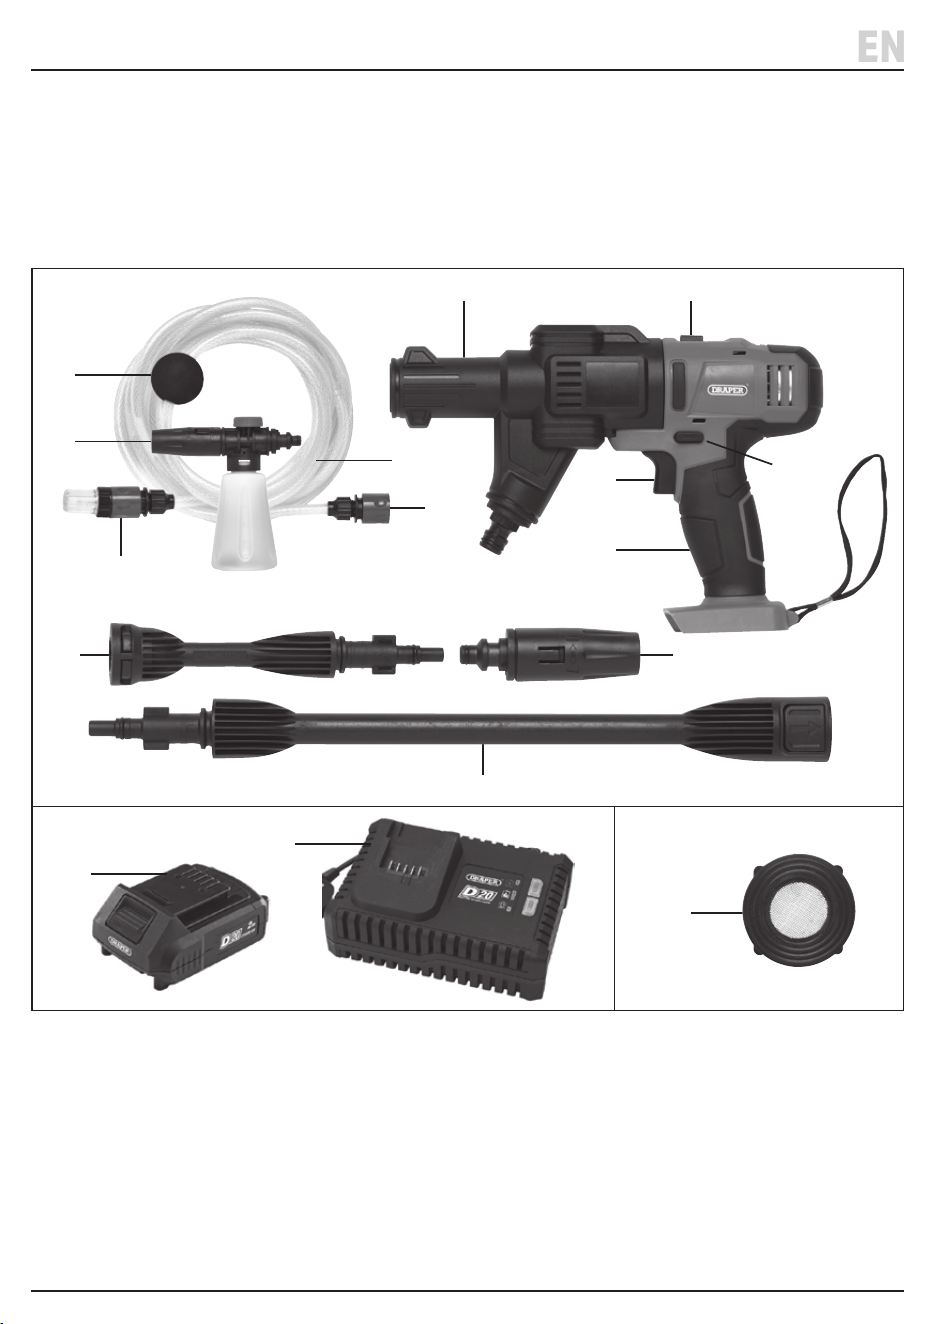
(1) Lock and release switch
(2) Safety catch button
(3) ON/OFF trigger
(4) Soft grip
(5) Power nozzle
(6) Float
(7) Detergent bottle
(8) Hose connector
5.1 Product Overview
Carefully remove the product from the packaging and
examine it for any signs of damage that may have
occurred during shipment.
Before assembling the product, lay the contents out and
check them against the parts shown below. If any part is
damaged or missing, do not attempt to use the product.
Please contact the Draper Helpline; contact details can
be found at the back of this manual.
(2)
(11)
(1)(5)
(10)
(9) 6M suction hose
(10) Hose lter
(11) Long lance
(12) Short lance
(13) Variable spray pattern nozzle
(14) 2.oAh Li-ion battery (sold separately for 18100)
(15) D20 fast battery charger (sold separately for 18100)
(16) 1 X Spare lter for gun connector
(18100 - sold separately)
(3)
(4)
(7)
(12) (13)
(9)
(8)
(6)
(14)
(15)
(16)
5. Identication and Unpacking
Please visit drapertools.com for our full range of accessories and consumables.
EN
– 8 –
5.2 Packaging
Keep the product packaging for the duration of the
warranty period in case the product needs to be returned
for repair.
WARNING! Keep packaging materials out of
reach of children. Dispose of packaging
correctly and responsibly and in accordance
with local regulations.
6. Battery Pack Charging
Important! Only use Draper designated battery packs
and chargers with this product. Use of any other
third-party battery packs/chargers is considered misuse
and will invalidate the warranty. Once connected to the
mains supply, recharging of the battery can be left
generally unsupervised.
Warning! Check the condition of the charger and
battery prior to each charge. Do not use if there is
any sign of damage. The battery pack must be
charged before initial use.
EN
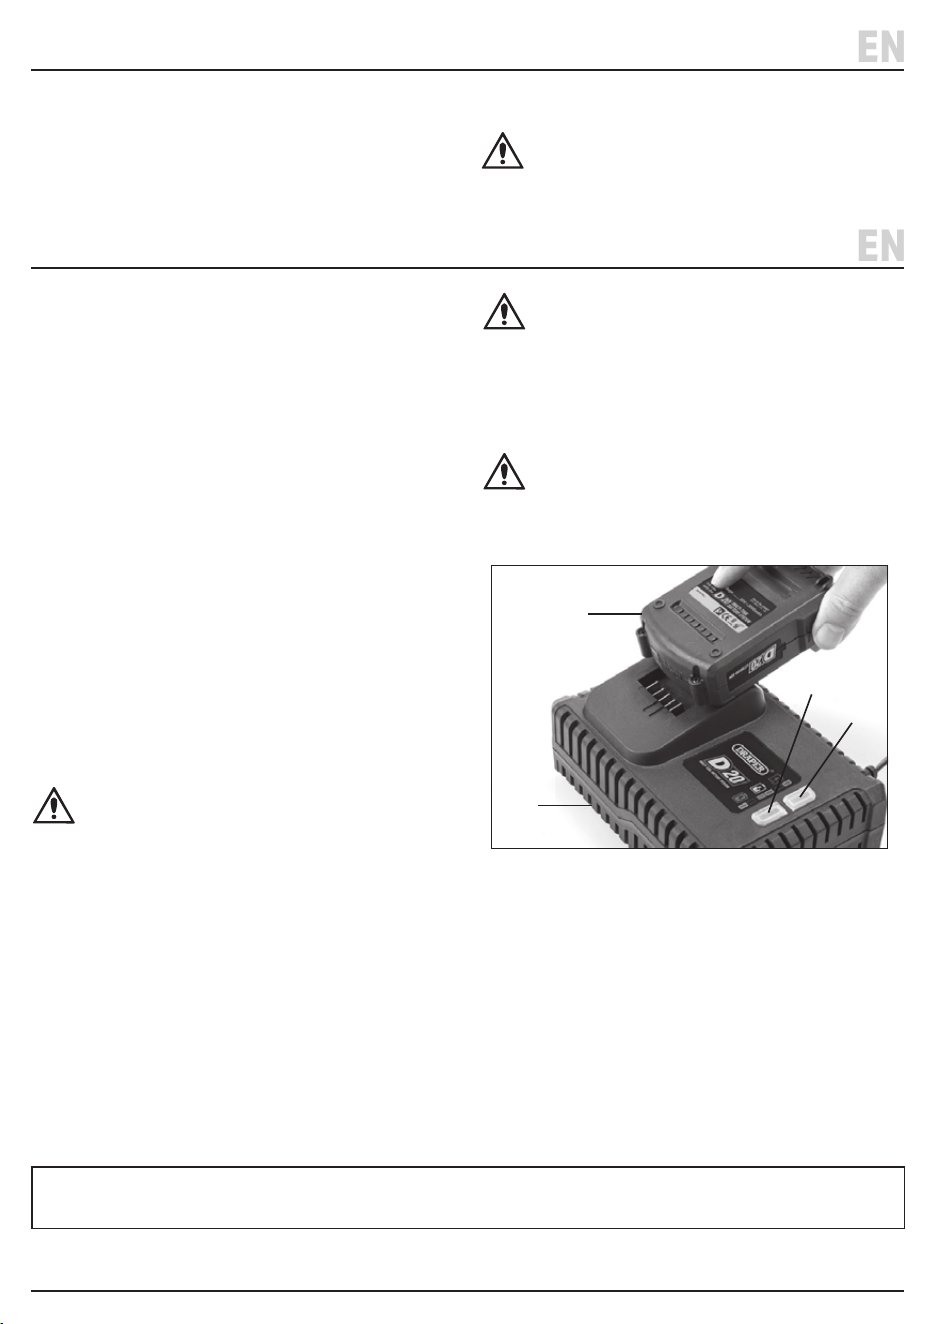
6.1 To charge the battery pack: - Fig. 1.
1. Plug the battery charger (15) unit into a suitable
mains power supply socket. The red LED (15.1) will
illuminate to show the charger has power.
2. Slide the battery (14) into the charger (the battery is
designed to t into the charger only one way).
• Whilst the battery is charging, the red LED on the
charger will remain on and the green LED (15.2)
will ash.
• When the battery is fully charged the green LED stops
ashing and changes to solid green. The red LED will
turn o.
Caution: Only use the plug to disconnect from the
power supply, never use the cord.
Caution: If the battery charger has been in
continuous use it will be hot. Once charging is
completed, leave the charger to cool. Only
charge cooled batteries.
6.2 Battery Pack Protection Features
• Overcharging protection: When the battery pack is
fully charged, the charger will automatically shuts o,
protecting the internal components.
• Over-discharging protection: Stops the battery pack
from discharging beyond the recommended lowest
safety voltage.
• Overheating protection: An internal thermistor
cut-o sensor shuts o the battery pack should it
become too hot during operation. Allow to cool for
30 minutes before using.
• Current protection: If the battery is overloaded or
the maximum current draw exceeded, the battery will
shut o to protect internal components. The battery
pack will resume operation once the current draw is
at a safe level.
• Short circuit protection: The battery pack will stop
operating immediately if it short circuits.
Fig. 1
(15)
(15.2)
(15.1)
(14)
– 9 –
6. Battery Pack Charging
EN
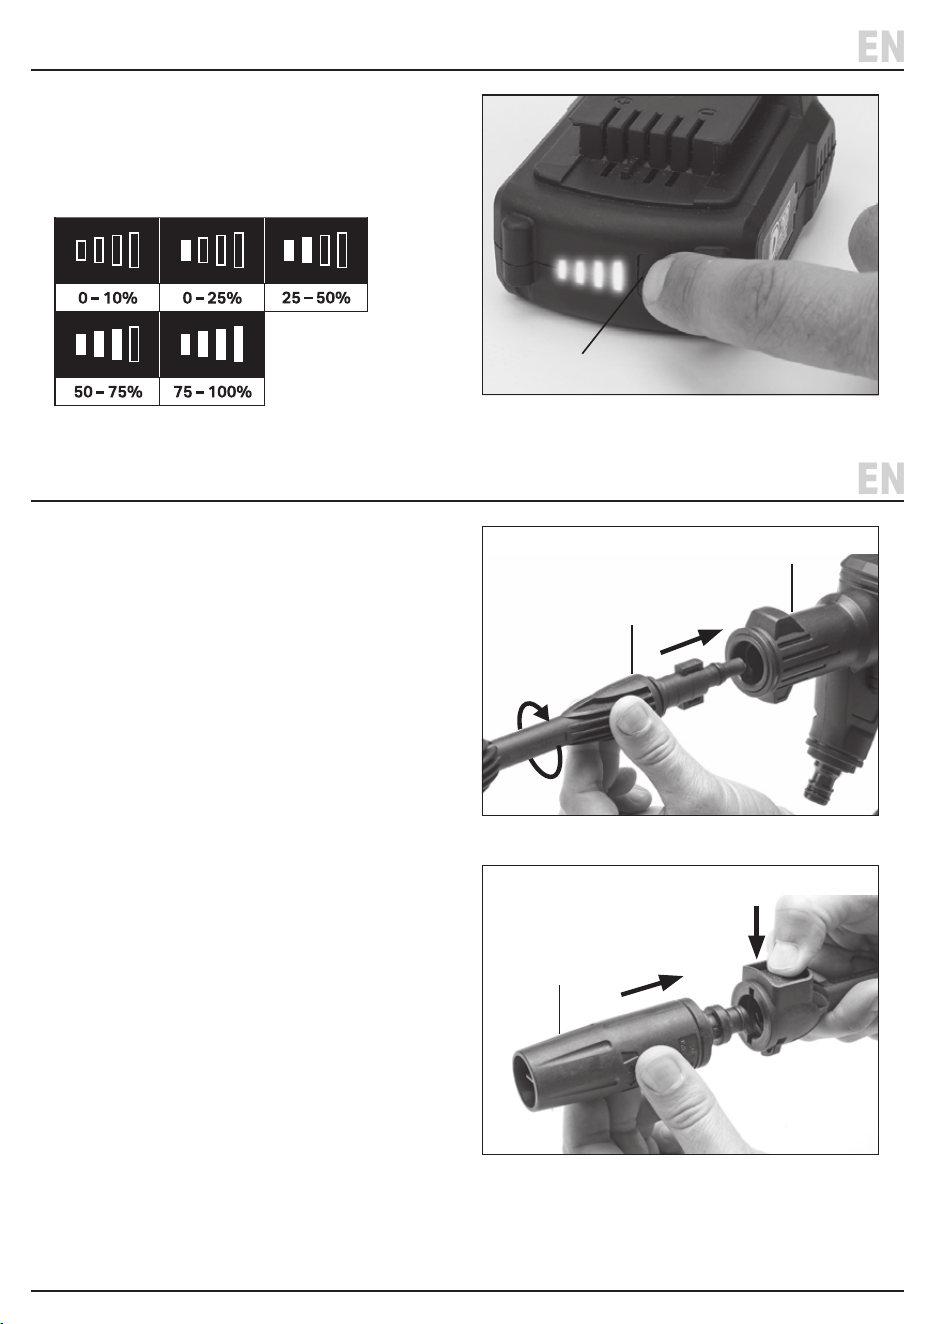
6.3 Battery Pack Charge Status - Fig. 2.
• To check the battery charge status press the
charge level indicator button (14.2).
Fig. 2
7. Preparing the Pressure Washer
EN
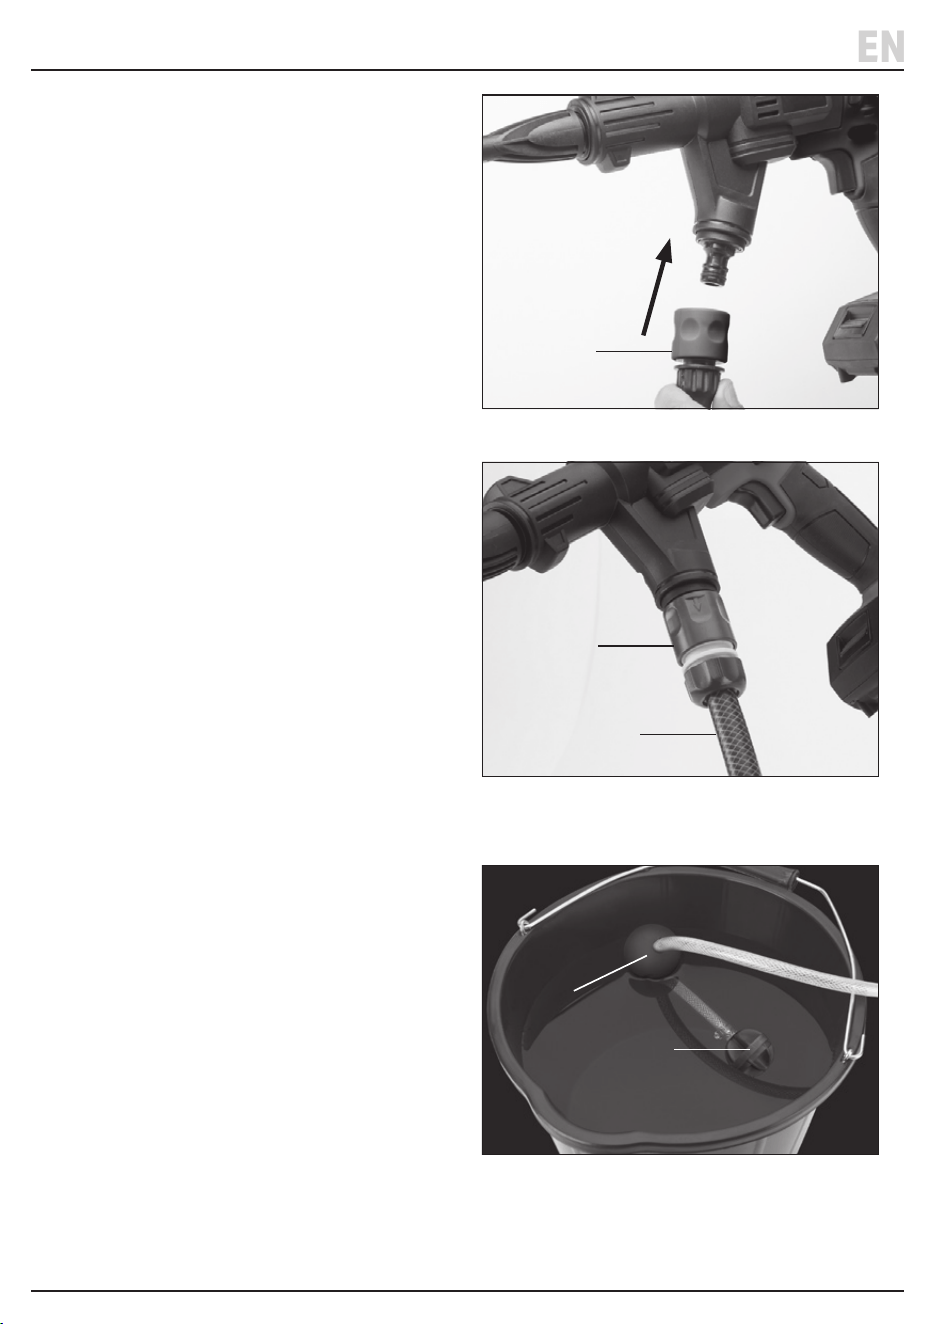
7.1 Pressure Washer Assembly - Fig. 3.
1. Attach either the long (11) or short (12) lance to the
power nozzle (5) – ensuring that the 2 notches on the
lance are aligned with the grooves inside the power
nozzle.
2. Attach the variable spray nozzle (13) to the end of the
lance – Fig. 4.
Fig. 3
Fig. 4
(14.2)
(5)
(11) / (12)
(13)
2
1
2
1
– 10 –
7. Preparing the Pressure Washer
EN
3. Connect the hose (8) to the power nozzle (5) .
Check the connection is secure by gently pulling
the hose. - Fig. 5 & 6.
4. Place the lter (10) end of the hose into a bucket or
other clean water source. - Fig. 7.
• Note: This appliance is not suitable for connecting to
a tap.
Fig. 7
Fig. 5
Fig. 6
(9)
(10)
(6)
(8)
(8)
– 11 –
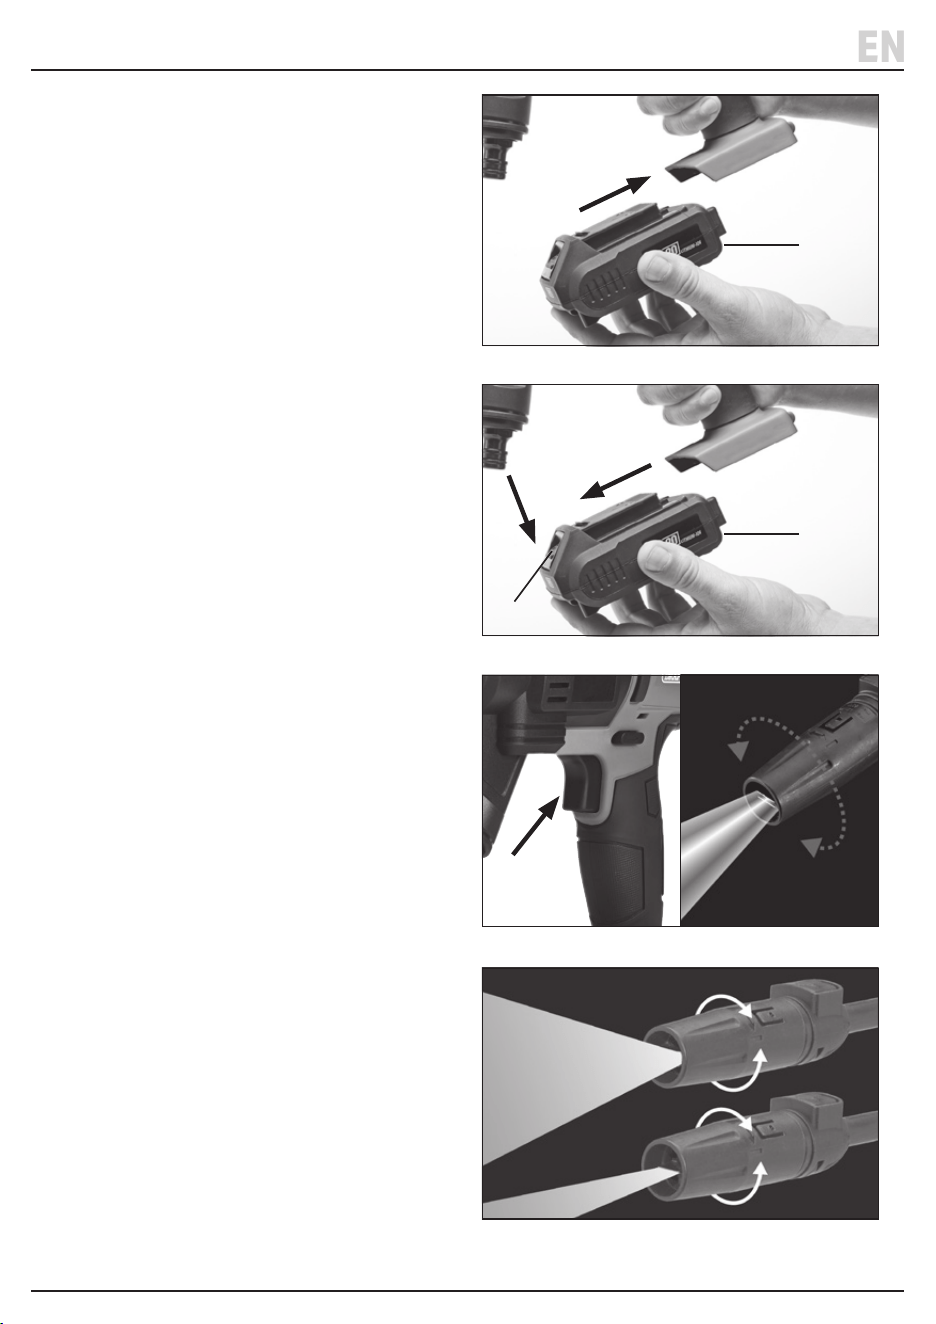
8.1 Battery Fitting - Fig. 8A.
• Slide the battery pack (14) onto the base of the
handle.
To release the battery pack: - Fig. 8B.
• Press the battery release button (14.1) and gently
slide the battery pack o.
8.2 Removing the air from the hose - Fig. 9.
1. Before using the pressure washer remove the air
from the hose. Position the power nozzle below
waist height (<5ft/1.5m) and attach the long
lance and variable spray nozzle.
2. Turn the nozzle to high pressure and hold the
trigger (3) on until water sprays out of the end of
the hose. Depending on the water source this
could take up to 30 seconds.
8.3 Selecting the Nozzle Pattern - Fig. 10.
• Select a suitable nozzle pattern by turning the nozzle
(13).
• DO NOT change the nozzle pattern when the pressure
washer is switched on.
8. Operating Instructions
Important: Before operating this product, read and
understand all the safety instructions listed in this
manual. Ensure that the product is fully assembled and
correctly prepared for use.
EN
Fig. 8B
Fig. 8A
Fig. 9
Fig. 10
(14)
(14)
(14.1)
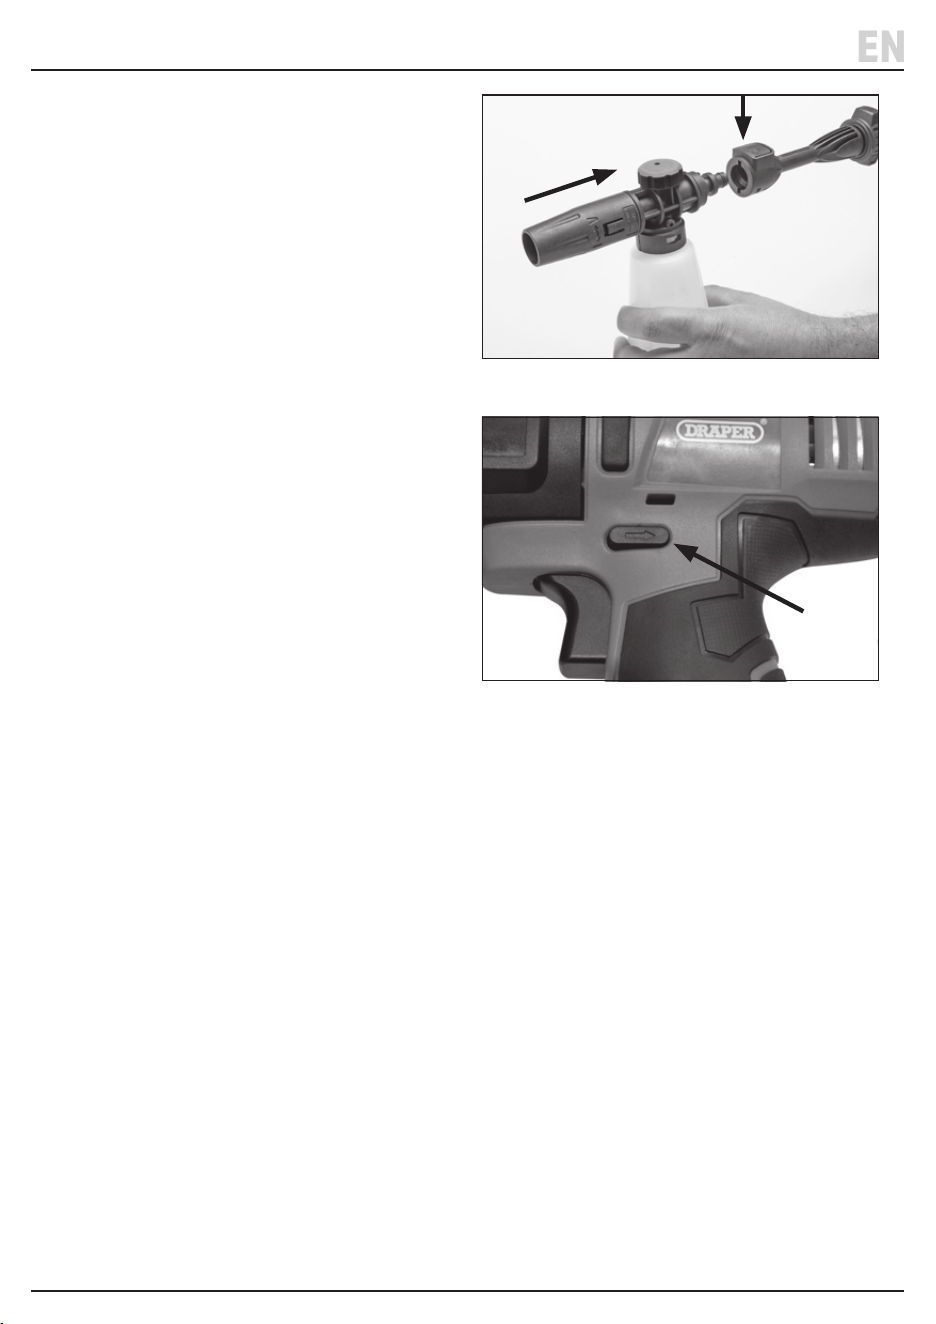
8.4 Detergent bottle - Fig. 11.
• Use the detergent bottle (7) for deeper cleaning.
• Use with either the long or short lance.
8.5 Safety Catch Button - Fig. 12.
• The pressure washer gun is tted with a safety catch
to prevent accidentally operation. It will NOT lock the
trigger during operation.
• When the pressure washer is not being operated,
press the safety button (2) to lock the trigger in the
‘OFF’ position. To release, press the button again.
8. Operating Instructions
EN
– 12 –
Fig. 11
Fig. 12
(2)
2
1

– 13 –
(10.1) (10.3) (10.2)
9.1 Hose Filter Cleaning - Fig.13 - Fig.14.
• Clean the lter regularly to prevent clogging and poor
water ow.
• Remove the lter (10) from the hose and unscrew the
clear section (10.2) from the connector (10.1).
• Pull out the strainer (10.3) and rinse the parts with
clean water.
• Reassemble and t back to the end of the hose – the
black ‘O’ ring should be positioned at the open end.
9.2 Gun Connector Filter Cleaning/
Replacement - Fig. 15.
• To replace the lter (16) unscrew the power nozzle
connector and remove the old lter and clean. If the
lter is damaged and requires replacement a spare
one is supplied in pack.
9. Maintenance and Troubleshooting
Important: Remove the battery pack from the tool before
carrying out any adjustment, servicing or maintenance.
Inspect the product for damaged or worn parts before
each use.
Do not operate it if you nd damaged or worn parts.
EN
Fig. 14
Fig. 13
Fig. 15
(16)
(10)
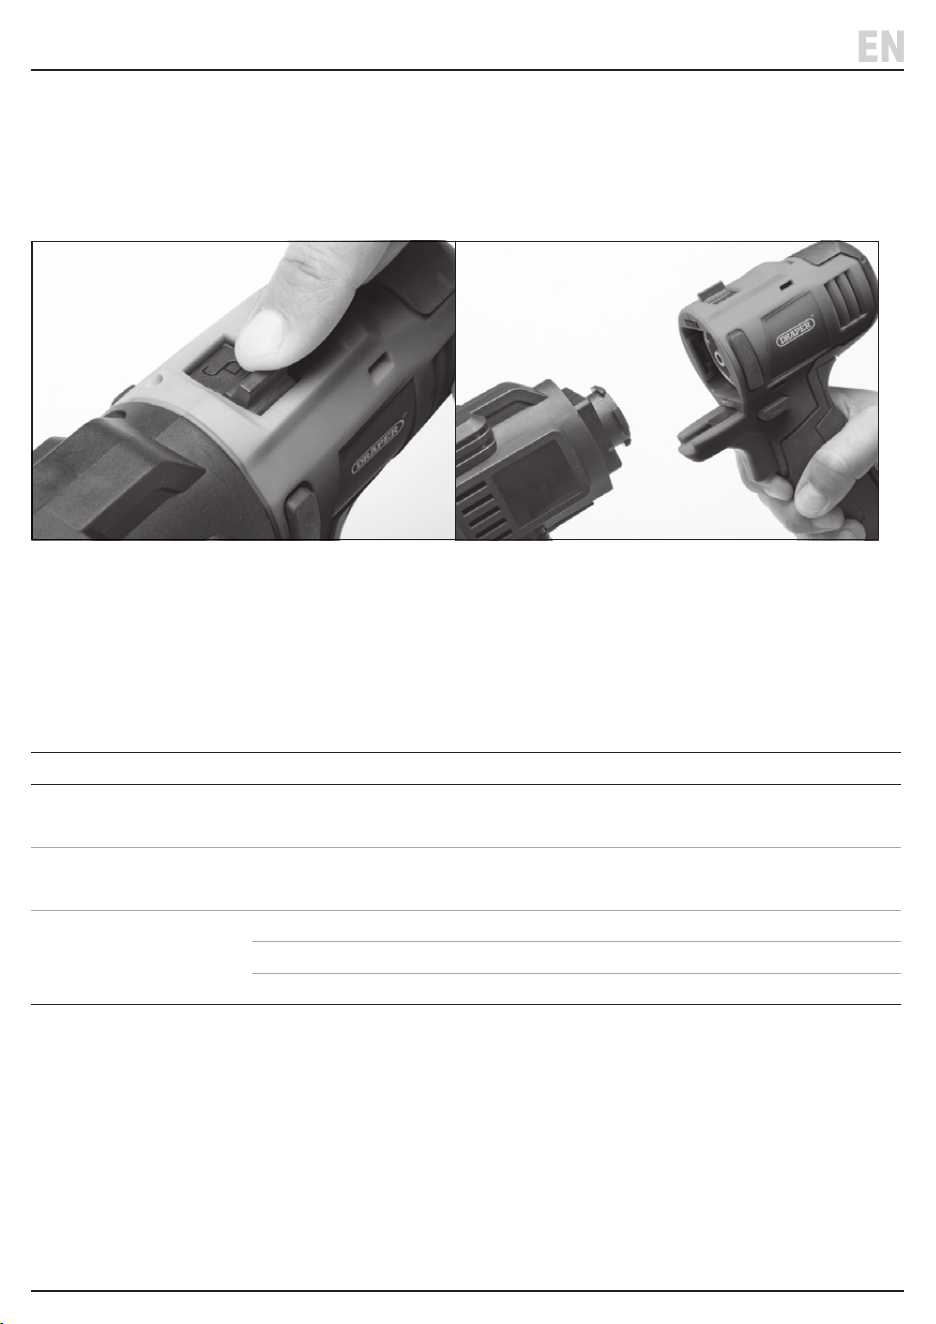
9.3 General Maintenance - Fig.16. - Fig.17.
• Clean the moulded plastic housing of the machine
using a soft brush and clean cloth. Do not use
water, solvents or abrasives.
• Push the lock and release lever (1) to the unlock
position to separate the handle from the power
nozzle for maintenance and cleaning.
9. Maintenance and Troubleshooting
EN
Fig. 17Fig. 16
9.4 Storage
• Before storage, completely drain all the water from
the lances and hose.
• Store in a secure, frost free and dry place out of the
reach of children.
9.5 Troubleshooting
Problem Possible cause Remedy
Washer does not operate or
runs slowly.
Battery pack not charged.
Battery pack faulty or damaged.
Recharge battery.
Replace battery pack.
Low water output. Filters clogged.
Clean lters – refer to section 9.1 and 9.2.
Always use clean water
No water spray from nozzles.
Air in hose. Empty the air from the hose – refer to section 8.2.
Hose connector is leaking. Check hose connected to gun correctly.
Hose not submerged in water. Submerge water lter connector in water completely.
– 14 –
– 15 –
10. Spares, Returns and Disposal
EN
For spare parts, servicing, and repair and replacement
options, please contact the Draper Tools Product
Helpline for details of your nearest authorised agent.
At the end of its working life, dispose of the product
responsibly and in line with local regulations. Recycle
where possible.
10.1 Battery Pack Disposal Information
Warning!
• DO NOT burn or mutilate batteries; this may release
toxic or corrosive substances.
• Do not short circuit cells, may cause burns.
• ALWAYS remove the battery from the tool before
recycling and dispose of it in accordance with local
regulations.
• Do not dispose of batteries or cells in a charged
condition.
* Waste Electrical & Electrical Equipment
11. Warranty
Draper Tools products are guaranteed for 24 months -
For more information visit drapertools.com/warranty.
EN
Li-ion

© Published by Draper Tools Limited© Published by Draper Tools Limited
Delta International
Delta International BV
Oude Graaf 8
6002 NL
Weert
Netherlands
Contact Details
Draper Tools
Draper Tools Limited
Hursley Road
Chandler’s Ford
Eastleigh
Hampshire
SO53 1YF
UK
Website: drapertools.com
Email: [email protected]
Product Helpline: +44 (0) 23 8049 4344
Telephone Sales Desk: +44 (0) 23 8049 4333
General Enquiries: +44 (0) 23 8026 6355
General Fax: +44 (0) 23 8026 0784
Please contact the Draper Tools Product Helpline for repair and servicing enquiries.