

Original Instructions
Originalbetriebsanleitung
Instructions Originales
Instrucciones Originales
Notice Originale
Oryginalna Instrukcja
Originele Instructies
Instrucțiuni Iniţiale
H320-P
H320-E
015-0001
015-0013
015-0015
015-0017
015-0002
015-0003
015-0004
015-0008
015-0009
015-0010
015-0012
015-0016

www.evolutionpowertools.com
2
Model Specications
Evolution Power Tools reserves the right to
make improvements and modications to the
design and technical specication of this
product without prior notication.
This manual was originally written in English.
Motor EU/UK 220-240V~50Hz 300W, US 120V~60Hz 1.25A
Motor Speed (min
-1
) EU/UK 2860 (no load), US 3450 (no load)
Compaction Force (kN) 5
Recommended Maximum 30
Operator Usage Time (mins)
Sound Power Level (LwA) 88.5 dB(A) K= 2.09 dB(A)
Sound Pressure Level (LpA) 83.3 dB(A) K= 3 dB(A)
Vibration (m/sec
2
) 18.496 K = 1.5
Net weight kg (lb) 25.4 (56)
Handle Height (during operations) mm (inches) 920 (36)
Machine Reach (during operations) mm (inches) 1290 (51)
Footprint Width mm (inches) 320 (12-1/2)
Cable Length Metres (Feet) 10 (33)
Insulation Class I
IP44
H320-P
H320-E
Engine Type Single cylinder 4 stroke OHV
Engine Power 1.7 kW 3600 min
-1
Spark Plug Replacement LD E6TC (available from Evolution)
NGK BP6HS
CHAMPION L87YCC
AC DELCO 42FS
Spark Plug Gap 0.028 – 0.031 inches
0.7 – 0.8 mm
Air Filter Replacement Evolution H1S58
Valve Clearances (cold) Inlet 0.15 mm 0.006 inches
Exhaust 0.20 mm 0.008 inches
Compaction Force (kN) 10
Vibration (m/sec
2
) 20.211 K = 1.5
Sound Power Level (LwA) 97.9 dB(A) K= 2.42 dB(A)
Sound Pressure Level (LpA) 90.5 dB K= 3 dB(A)
Operator Usage Time (mins) 20
Recommended Maximum
Oil Type SAE 10W-30/40
Oil Capacity (litres) 0.25
( oz) 8.45
Fuel Type E5 & E10 Unleaded Petrol/Gasoline
Fuel Capacity (litres) 1.2
( oz) 40.57
Net weight kg (lb) 32.45 (71.5)
Handle Height (during operations - 1020 (40)
extension handle tted) mm (inches)
Machine Reach (during operations – 1290 (51)
extension handle tted) mm (inches)
Footprint Width mm (inches) 320 (12-1/2)

www.evolutionpowertools.com
3
IMPORTANT
Please read these operating and safety
instructions carefully and completely.
For your own safety, if you are uncertain about
any aspect of using this equipment please access
the relevant Technical Helpline, the number of
which can be found on the Evolution Power Tools
website. We operate several Helplines throughout
our worldwide organization, but Technical help is
also available from your supplier.
WEB www.evolutionpowertools.com/register
Congratulations on your purchase of an
Evolution Power Tools Machine. Please
complete your product registration ‘online’
as explained in the A5 online guarantee
registration leaet included with this machine.
You can also scan the QR code found on the A5
leaet with a Smart Phone. This will enable you
to validate your machine’s guarantee period
via Evolutions website by entering your details
and thus ensure prompt service if ever needed.
We sincerely thank you for selecting a product
from Evolution Power Tools.
EVOLUTION LIMITED GUARANTEE.
EVOLUTION POWER TOOLS RESERVES THE
RIGHT TO MAKE IMPROVEMENTS AND
MODIFICATIONS TO THE PRODUCT DESIGN
WITHOUT PRIOR NOTICE.
PLEASE REFER TO THE GUARANTEE
REGISTRATION LEAFLET AND/OR THE
PACKAGING FOR DETAILS OF THE TERMS
AND CONDITIONS OF THE GUARANTEE.
Evolution Power Tools will, within the guarantee
period, and from the original date of purchase,
repair or replace any goods found to be defective
in materials or workmanship. This guarantee is
void if the tool being returned has been used
beyond the recommendations in the Instruction
Manual or if the machine has been damaged
by accident, neglect, or improper service. This
guarantee does not apply to machines and / or
components which have been altered, changed, or
modied in any way, or subjected to use beyond
recommended capacities and specications.
Electrical components are subject to respective
manufacturers’ warranties. All goods returned
defective shall be returned prepaid freight to
Evolution Power Tools. Evolution Power Tools
reserves the right to optionally repair or replace
it with the same or equivalent item. There is no
warranty – written or verbal – for consumable
accessories such as (following list not exhaustive)
blades, cutters, drills, chisels or paddles etc. In
no event shall Evolution Power Tools be liable
for loss or damage resulting directly or indirectly
from the use of our merchandise or from any other
cause. Evolution Power Tools is not liable for any
costs incurred on such goods or consequential
damages. No ocer, employee or agent of
Evolution Power Tools is authorized to make oral
representations of tness or to waive any of the
foregoing terms of sale and none shall be binding
on Evolution Power Tools.
Questions relating to this limited guarantee
should be directed to the company’s head
oce, or call the appropriate Helpline number.
POWER TOOL GENERAL SAFETY
INSTRUCTIONS
(These General Power Tool Safety Instructions
are as specied in BS EN 500-1:2006+A1 & EN
50 0 -4:2011
WARNING: Read all safety
warnings and instructions.
Failure to follow the warnings and instructions
may result in electric shock, re and/ or serious
injury.
Save all warnings and instructions for future
reference.
The term “power tool” in the warnings refers
to your mains-operated (corded) power tool or
battery-operated (cordless) power tool.

www.evolutionpowertools.com
4
1) General Power Tool Safety Warnings [Work
area safety]
a) Keep work area clean and well lit. Cluttered
or dark areas invite accidents.
b) Do not operate power tools in explosive
atmospheres, such as in the presence of
ammable liquids, gasses or dust. Power tools
create sparks which may ignite the dust or fumes.
c) Keep children and bystanders away while
operating power tool. Distractions can cause
you to lose control.
2) General Power Tool Safety Warnings
[Electrical Safety]
a) Power tool plugs must match the outlet. Never
modify the plug in any way. Do not use any
adapter plugs with earthed (grounded) power
tools. Unmodied plugs and matching outlets will
reduce the risk of electric shock.
b) Avoid body contact with earthed or
grounded surfaces, such as pipes, radiators,
ranges and refrigerators. There is an increased
risk of electric shock if your body is earthed or
grounded.
c) Do not expose power tools to rain or wet
conditions. Water entering a power tool will
increase the risk of electric shock.
d) Do not abuse the cord. Never use the cord
for carrying, pulling or unplugging the power
tool. Keep cord away from heat, oil, sharp edges
or moving parts. Damaged or entangled cords
increase the risk of electric shock.
e) When operating a power tool outdoors, use
an extension cord suitable for outdoor use. Use
of a cord suitable for outdoor use reduces the risk
of electric shock.
f) If operating a power tool in a damp location
is unavoidable, use a residual current device
(RCD) protected supply. Use of an RCD reduces
the risk of electric shock.
3) General Power Tool Safety Warnings
[Personal Safety].
a) Stay alert, watch what you are doing and
use common sense when operating a power
tool. Do not use a power tool while you are
tired or under the inuence of drugs, alcohol
or medication. A moment of inattention while
operating power tools may result in serious
personal injury.
b) Use personal protective equipment. Always
wear eye protection. Protective equipment
such as dust masks, non-skid safety shoes, hard
hat or hearing protection used for appropriate
conditions will reduce personal injuries.
c) Prevent unintentional starting. Ensure the
switch is in the o-position before connecting
to power source and or battery pack, picking
up or carrying the tool. Carrying power tools
with your nger on the switch or energising
the power tools that have the switch on invites
accidents.
d) Remove any adjusting key or wrench before
turning the power tool on. A wrench or key left
attached to a rotating part of a power tool may
result in personal injury .
e) Do not overreach. Keep proper footing and
balance at all times. This enables better control of
the power tool in unexpected situations.
f) Dress properly. Do not wear loose clothing
or jewellery. Keep your hair, clothing and
gloves away from moving parts. Loose clothes,
jewellery or long hair can be caught in moving
parts.
g) If devices are provided for the connection
of dust extraction and collection facilities,
ensure that these are connected and properly
used. Use of dust collection can reduce dust-
related hazards.
h) Do not let familiarity gained from frequent
use of tools allow you to become complacent
and ignore tool safety principles. A careless
action can cause severe injury within a fraction of
a second.
4) General Power Tool Safety Warnings [Power
tool use and care].
a) Do not force the power tool. Use the correct
power tool for your application. The correct
power tool will do the job better and safer at a
rate for which it was designed.
b) Do not use the power tool if the switch does
not turn it on or o. Any power tool that cannot
be controlled with the switch is dangerous and
must be repaired.
c) Disconnect the power tool from the power
source and/or battery pack from the power
tool before making any adjustments, changing

www.evolutionpowertools.com
5
accessories, or storing power tools. Such
preventative safety measures reduce the risk of
starting the power tool accidentally.
d) Store idle power tools out of the reach of
children and do not allow persons unfamiliar
with the power tool or these Instructions
to operate the power tool. Power tools are
dangerous in the hands of untrained users.
e) Maintain power tools. Check for
misalignment or binding of moving parts,
breakage of moving parts and any other
condition that may aect the power tools
operation. If damaged, have the power tool
repaired before use. Many accidents are caused
by poorly maintained power tools.
f) Keep cutting tools sharp and clean. Properly
maintained cutting tools with sharp cutting edges are
less likely to bind and are easier to control.
g) Use the power tool, accessories and tool
bits etc. in accordance with these instructions,
taking into account the working conditions
and the work to be performed. Use of the power
tool for operations dierent from those intended
could result in a hazardous situation.
h) Keep handles and grasping surfaces dry,
clean and free from oil and grease. Slippery
handles and grasping surfaces do not allow
for safe handling and control of the tool in
unexpected situations.
5) General Power Tool Safety Warnings
[Service]
a) Have your power tool serviced by a qualied
repair person using only identical replacement
parts. This will ensure that the safety of the power
tool is maintained.
SAFETY INSTRUCTIONS FOR H320-P
a. Petrol or diesel powered engines must never
be used in unventilated closed spaces. The
exhaust fumes produced are highly toxic and
can cause ‘Carbon Monoxide Poisoning’ which
will cause drowsiness and ultimately death. It is
only permissible to run a petrol engine indoors if the
building can be very well ventilated and the exhaust
fumes can be captured and ducted to the outside
through an exhaust extraction/scavenger system.
b. The engine should not be run at speeds
that exceed the maximum speed on the rating
plate. Operating an engine at excessive speeds
increases the likelihood of component failure and
consequent accidents.
c. Do not tamper with components that
regulate the engines speed. You may alter the
factory set running parameters.
d. Use only the type of fuel listed in this
Instruction Manual. Using fuel with an octane
rating less than that specied can lead to
excessive engine wear and premature engine
failure.
e. Keep the area around the engine clear, clean
and tidy. Never allow any combustible material
(timber, plastic, cardboard, canvas etc) near a
running engine.
f. Do not use in or near to potentially explosive
atmospheres. Dust laden atmospheres as can
be found in some industrial buildings (Flour Mills,
Timber Mills) have an explosive potential.
g. Regularly check the fuel system for leaks.
Hoses and unions should be checked for
deterioration or chang. Check the fuel tank for
damage or for a poorly tting or worn fuel cap.
Any defects must be rectied before the engine
is used.
h. Always stop the engine and allow it to cool
down before refuelling. Try to avoid any fuel
spillage (often caused by ‘overlling’ the tank)
and clean up any spilt fuel immediately. The
application of dry sand is an eective way of
neutralising fuel spills. Do not allow sand to come
into contact with any part of the engine.
i. When transporting the engine in a vehicle
ensure that the fuel tap is turned o. To
minimise the risk of fuel spillage the engine
should be secured by ropes etc to the load area
of the vehicle so that it cannot move during
transportation. The engine should be secured in
as level an attitude as possible.
j. For long term storage we recommend that
the fuel system of the engine is drained. See
Fig.20 for instructions. During long term storage
additives in modern fuels can precipitate from the
fuel and block jets and valves in the fuel system.
k. Store the machine in a secure and well
ventilated area. Unauthorised personnel should
not have access to this machine.
SAFETY INSTRUCTIONS FOR FUEL FILLING
a. Select level bare ground, remote from any
www.evolutionpowertools.com
6
buildings as a refuelling station. Ensure that
there is no combustible material in the immediate
vicinity.
b. Smoking, using a naked ame or producing
sparks is strictly forbidden whilst refuelling.
Petrol is highly ammable and its vapours are
combustible.
c. Ensure that the fuel tap is turned ‘o’. This will
ensure that fresh fuel does not ‘ood’ the engines
carburettor.
d. The engine must be turned ‘o’ and allowed
to cool before refuelling is attempted.
Inadvertent fuel spillage onto a hot engine can
result in the risk of re.
e. Any fuel spills must be dealt with
immediately. If petrol contaminates any clothing
the operator must change clothes. Do not rely on
the fuel evaporating from the clothes. Wash or
launder the clothing when the fuel has evaporated
from the material.
f. The use of a funnel during refuelling is
recommended. Use of a funnel will minimise the
risk of fuel spillage.
g. Fill the tank with the correct grade of
unleaded fuel to a level approximately half
way up the fuel lter. Pour the fuel into the tank
carefully and do not try to ll the tank completely.
Pour the petrol slowly to avoid air traps during lling
that could cause fuel spillage.
h. Check the fuel tank cap, and replace as soon
as refuelling is completed. The cap has a bayonet
type connection. Check that it is correctly installed
and seated before slowly turning on the fuel tap.
i. Check for any fuel leaks throughout the fuel
system. Do not attempt to start the engine if a fuel
leak is suspected. Any detected leak must be repaired
by a suitably qualied technician.
j. Observe all national and/or local regulations
about the storage and use of petroleum
products. All local bye laws should be observed.
HEALTH ADVICE
WARNING: When using this machine,
dust particles will be produced. In some
instances, depending on the materials you are
working with, this dust can be particularly harmful.
You are advised to consider the risks associated
with the materials you are working with and to
reduce the risk of exposure. As some materials
can produce dust that may be hazardous to your
health, we recommend the use of an approved
face mask with replaceable lters when using this
machine.
You should always:
• Work in a well-ventilated area.
• Work with approved safety equipment, such as
dust masks that are specially designed to lter
microscopic particles.
WARNING: the operation of any power
tool can result in foreign objects being
thrown towards your eyes, which could result in
severe eye damage. Before beginning power tool
operation, always wear safety goggles or safety
glasses with side shield or a full face shield where
needed.
WARNING: If any parts are missing,
do not operate your machine until the
missing parts are replaced. Failure to follow this
rule could result in serious personal injury.
ADDITIONAL SAFETY RULES FOR
H320 COMPACTOR
a. Cordon o the work area. Members of the public
and unauthorised personnel should be kept at a safe
distance from compacting operations.
b. Be completely sure that you know how to
switch the machine ‘o’. If you get into diculty
during compacting operations it is important that
you can perform an emergency shutdown of the
machine.
c. Never leave the H320 running and
unattended. The machine vibrates as soon as it is
started, and will also begin to move forwards. The
machine must be shutdown if it is left unattended.
d. Always switch the engine ‘o’ before moving
the machine around the site. When moving or
transporting the machine the engine must be
switched ‘o’ and preferable cold, with the fuel tap
in the ‘o’ position.
e. As the H320 engine becomes hot during use
ensure that you do not touch the engine or
allow any combustible material or clothing to
contact the engine during use. Only touch or
service a cold engine.
f. Never remove, alter or tamper with any of

www.evolutionpowertools.com
7
the machines guards. The guards are specially
designed and tted to provide you with the greatest
possible protection during operations. If a guard is
missing or damaged do not use the machine until
the guard is repaired or replaced by a competent
technician.
g. Be especially careful to maintain control
when working on a sloping surface. Work up
and down a sloping surface not across it.
h. Where there are a number of dierent layers
to be compacted on top of each other, compact
each layer separately. This will ensure the
integrity of each layer.
i. Work the H320 over the work surface in an
organised pattern until the desired compaction
is achieved. This ensures the safest working
practice is maintained.
j. Always carry out the pre-use safety checks
before starting operations. Follow the guidance
in later sections of this Manual.
PPE (Personal Protective Equipment)
Note: If using this equipment on a construction site
it is important that the operator conforms to any
site rules/regulations that may apply. Consult the
site foreman or other responsible person for details.
a. Wear suitable clothing. This could include a
Boiler Suit or Padded Coverall and Hi Vis jacket etc.
b. Wear suitable footwear. Safety shoes with
steel toecaps and anti-slip soles are recommended.
c. Wear suitable Safety Glasses. A Full Face
Safety Shield or Safety Goggles with side shields
which provide protection from thrown debris is
recommended.
d. Protect you hearing. Wear suitable ear
protectors.
e. Wear suitable gloves. High grip gloves are
recommended.
f. Wear respiratory protection. A dust mask
with replaceable lters which provide protection
against ne toxic dust, bres and vapours is
recommended.
g. Wear a Safety Helmet. The use of a Safety
Hat may be compulsory on construction sites to
protect the operator from potential overhead
dangers.
VEHICULAR TRANSPORTATION
WARNING: This machine requires at
least a two man lift.
Prepare the vehicle in advance so that it is ready
to receive the machine. Take great care to
ensure that the machine is not dropped during
loading/unloading.
• Although compact, this machine is heavy. To
reduce the risk of injury, get competent help
whenever you have to lift this machine.
• To reduce the risk of back injury, hold the
machine close to your body when lifting. Bend
your knees so you can lift with your legs, not
your back. Lift by using convenient areas of the
main external frame.
• Lift the machine into the vehicle and secure in as
level an attitude as possible with ropes, tie down
straps etc so that the machine cannot move
during transportation.
Note: H320-P: It is best and safest practice when
transporting this machine in a vehicle that there
should be no fuel present in the machines fuel
tank.
INTENDED USE OF THIS POWER TOOL
WARNING: This product is a powered
Compaction Plate and has been designed
to be used with special Evolution accessories.
Only use accessories designed for use with this
machine and/or those recommended specically by
Evolution Power Tools Ltd.
This machine can be used to compact surfaces such
as crusher run, small aggregates, soil, sand and sub
base materials etc. When tted with the Paving Pad,
the H320 can be used to compact and settle most
types of block paving.
www.evolutionpowertools.com
8
Reasons for Compaction
Disturbed soil, new inll, subbase or blacktop will
have air pockets and small voids within, which,
if not compacted can lead to possible problems
developing.
• As trac crosses the surface of an
uncompacted area, the loads imposed press
downwards on the material underneath. This
can lead to subsidence of the top surface as
material migrates downwards to ll the voids.
• A static load (house, garage etc) built upon
uncompacted ground could suer subsidence
as material beneath it moves.
• Water seeping into material that contains
voids and air pockets can collect in these
spaces and will expand during freezing
conditions and contract again during warm/
dry spells. Expansion and contraction is a
major contributory factor causing damage
to building foundations, and can lead to a
structure needing underpinning.
Compaction increases the density of the material
and hence its ability to withstand static and
dynamic loads. Eliminating air pockets and
small voids reduces the chances of water ingress
collection and subsequent subsidence due to
material expansion and contraction.
PROHIBITED USE OF THIS POWER TOOL
WARNING: This product is a powered
Compaction Plate and must only be used as
such. It must not be modied in any way, or used
to power any other equipment or drive any other
accessories other than those mentioned in this
Instruction Manual.
WARNING: This machine is not intended
for use by persons (including children) with
reduced physical, sensory or mental capabilities, or
lack of experience and knowledge, unless they have
been given supervision or instruction concerning
the safe use of the machine by a person responsible
for their safety.
Children should be supervised to ensure that they
do not have access to, and are not allowed to play
with, this machine.
ELECTRICAL SAFETY – H320-E
THE MAINS PLUG
This product is tted with the correct moulded plug
for the designated sales market. The plug meets the
requirements of international standards, and must
be connected to a supply voltage that is equal to
that stated on the rating label. If the plug or mains
supply lead are damaged they must be replaced
with a complete assembly that is identical to the
original. Adhere to the requirements for mains
electricity supply connection that applies in your
Country. If in doubt consult a qualied electrician.
BS plug can only be used in the UK. The plug should
be plugged into the socket indoor to full the
required IP protection degree. The plug should be
incorporated with a power cord longer than 10m.
OUTDOOR USE – H320-E
WARNING: For your protection if this tool
is to be used outdoors it should not be exposed
to rain, or used in very damp locations. For added
protection use a residual current device (R.C.D.) that
will interrupt the supply if the leakage current to earth
exceeds 30mA for 30ms. Always check the operation
of the residual current device (R.C.D.) before using the
machine.
If an extension cable is required it must be a
suitable type for use outdoors and so labelled.
The manufacturers instructions should be
followed when using an extension cable.

www.evolutionpowertools.com
9
VIBRATION
WARNING: When using this machine the
operator can be exposed to highlevels of
vibration transmitted to the hand and arm.
It is possible that the operator could develop
“Vibration white nger disease” (Raynaud
syndrome). This condition can reduce the
sensitivity of the hand to temperature as well
as producing general numbness. Prolonged or
regular users of compacting machines should
monitor the condition of their hands and ngers
closely. If any of the symptoms become evident,
seek immediate medical advice.
• The measurement and assessment of human
exposure to hand-transmitted vibration in the
workplace is given in:
BS EN ISO 5349-1:2001 and
BS EN ISO 5349-2:2002
• Many factors can inuence the actual vibration
level during operation e.g. the work surfaces
condition and orientation and the type and
condition of the machine being used. Before
each use, such factors should be assessed, and
where possible appropriate working practices
adopted. Managing these factors can help
reduce the eects of vibration:
Handling
• Handle the machine with care, allowing the
machine to do the work.
• Avoid using excessive physical eort on
any of the machines controls.
• Consider your security and stability, and the
orientation of the machine during use.
Work Surface
• Consider the work surface material;
its condition, density, strength,
rigidity and orientation.
SYMBOLS AND LABELS
WARNING: Do not operate machine
if warning and/or instruction labels are
missing or damaged. Contact Evolution
Power Tools for replacement labels.
Note: All or some of the following symbols may
appear in the manual or on the product.
Volts
V
Amperes
A
Speed
min
-1
(RPM)
Alternating current
~
Sound power level
Read the Manual
Wear Ear Protection
Wear Eye Protection
Wear Dust Protection
Warning
CAUTION: Hot exhaust. Do
not touch
HOT! Do not touch
Hot surface
CE Certication
UKCA Certication
Intertek Certication
Serious Health Hazard
Hazardous To The Environment
Waste electrical and
electronic equipment
Engine oil 10/30W
Choke open
Choke closed
CAUTION: This is a
4 stroke engine.
Fill with petrol only.
Do not ll with
diesel oil.
Allow motor to cool before
opening the fuel cap. The
vapour is extremely ammable
and may ignite on contact
with a hot surface or ames.
UNLEADED
PETROL ONLY!*
HIGHLY FLAMMABLE.
*E5 & E10
HOT!

www.evolutionpowertools.com
10
1. VIBRATION PLATE
2. FUEL TANK
3. ENGINE ‘ON/OFF’ IGNITION SWITCH
4. THROTTLE LEVER
5. CHOKE CONTROL
6. RECOIL STARTER
7. FUEL TAP
8. ENGINE OIL FILLER/DIPSTICK
9. AIR FILTER
10. SPARK PLUG
11. EXHAUST
12. ENGINE OIL DRAIN PLUG
13. FAST RUN ADJUSTMENT SCREW
14. BELT GUARD
15. ANTI-VIBRATION HAND GRIP
16. TOOL STORAGE
(1)
(14)
(2)
(7)
(5)
(9)
(4)
(13)
(6)
(3)
(8)
(12)
(15)
(16)
(11)
(10)
MACHINE OVERVIEW H320-P

www.evolutionpowertools.com
11
MACHINE OVERVIEW H320-E
1. VIBRATION PLATE
2. CROSSBAR/CABLE STORE
3. SAFETY START ‘ON/OFF’ SWITCH
4. ANTI-VIBRATION HAND GRIP
5. UPPER SECTION - HANDLE
6. MIDDLE SECTION - HANDLE
7. CABLE ROUTING CLIPS
(1)
(2)
(3)
(4)
(5)
(6)
(7)

www.evolutionpowertools.com
12
GETTING STARTED
UNPACKING
Caution: This packaging contains sharp objects.
Take care when unpacking. This machine could
require two persons to lift, assemble and move
this machine. Remove the machine, together with
the accessories supplied from the packaging.
Check carefully to ensure that the machine
is in good condition and account for all the
accessories listed in this manual. Also make sure
that all the accessories are complete. If any parts
are found to be missing, the machine and its
accessories should be returned together in their
original packaging to the retailer. Do not throw
the packaging away; keep it safe throughout the
guarantee period. Dispose of the packaging in
an environmentally responsible manner. Recycle
if possible. Do not let children play with empty
plastic bags due to the risk of suocation.
ITEMS SUPPLIED -
H320-P COMPACTOR
DESCRIPTION QUANTITY
Instruction manual 1
Middle handle extension 1
Upper handle extension 1
Middle handle attachment
M10 x 20 screws
4
Upper handle attachment
M10 x 15 screws
4
Upper handle washers 4
Alan key 8mm 1
Spark plug box spanner &
Tommy bar
1
Engine oil (400 ml bottle) 1
ITEMS SUPPLIED -
H320-E COMPACTOR
DESCRIPTION QUANTITY
Instruction manual 1
Handle attachment screws
(long) M10 x 40
2
Handle attachment screws
(short) M10 x 15
2
Handle washers 4
Middle handle 1
Upper handle 1
Alan key 8mm 1
Handle cross bar/cable store 1
Additional Accessories
In addition to the standard items supplied with
this machine the following accessories are also
available from the Evolution online shop
at www.evolutionpowertools.com or from your
local retailer.
DESCRIPTION PART No
H320 Paving Pad Paving Pad
015-0007

www.evolutionpowertools.com
13
Fig. 2
Fig. 1
ASSEMBLY
Your Evolution H320 needs some minor assembly before
use. If you have the petrol engined machine, complete
all assembly before lling the engine with 0.4L of the
recommended service oil.
1. Attaching the Extension Handle – H320-P
Note: The handle extension has an anti-vibration
hand grip which helps the operator to manage the
vibration transmitted by the machine to the hand/arm
of the operator. The Extension Handle should be tted
for operational purposes, but can be folded, during
transportation or storage. Removing the bottom four
screws and loosening the top four screws allows the
handle extension to be folded for ease of transportation.
• Carefully slide the middle handle section over the
two lower handle brackets and align the four holes
in the middle handle with the four vertical thredded
holes in the lower brackets.
•
Insert the four M10 x 20 screws through the middle
handle and the upper handle brackets.(Fig. 2)
• Tighten all four screws securely using the alan key.
2. Assembling/attaching the Handle – H320-E
Note: The H320-E Handle consists of four (4) main parts:
• Lower handle (factory attached to the machine).
• Middle section.
• Upper section with ‘On/O’ safety switch.
• Cross-bar/cable store.
The two long screws are used to attach the cross-bar/cable
store and the middle section of the handle to the pivoting
lower handles.
• Carefully position the cross-bar cable store into its
service position.
Note: The cable pins should face rearwards.
• Carefully slide the Middle Section over the lower
handles and align the holes.
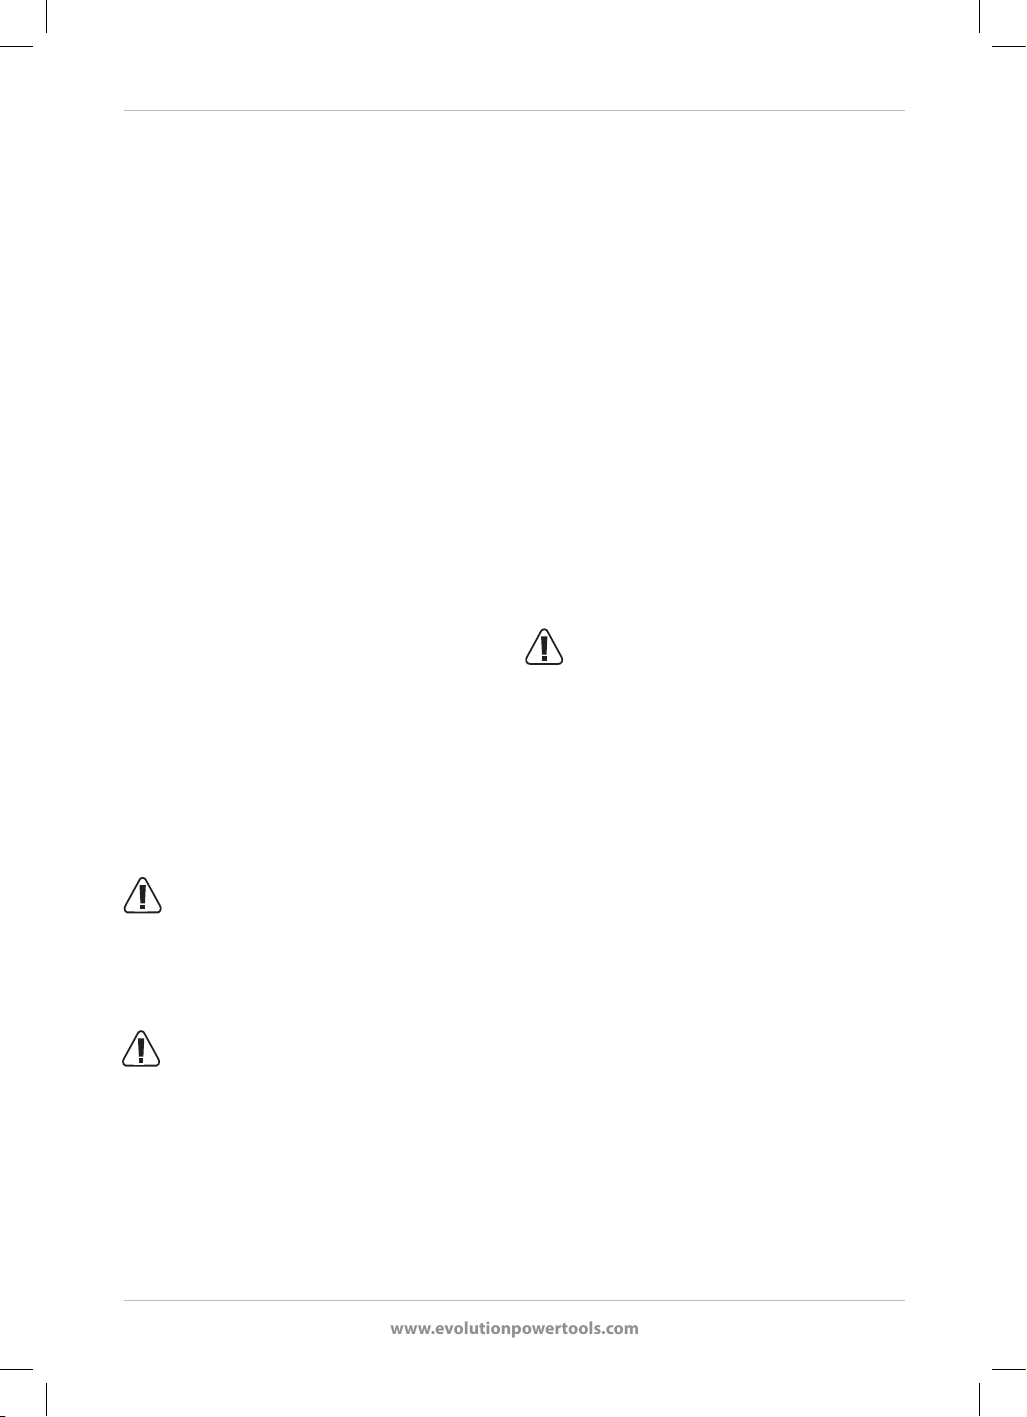
• A washer must be used bewteen the screw & the
handles. (Fig. 1)
• Insert the long screws through the holes in the middle
handle, through the holes in the lower handles and
screw them into the captive nuts in the cross-bar/cable
store. (Fig. 3)
• Tighten these screws securely using the alan key.
Fig. 3
www.evolutionpowertools.com
14
The two short screws are used to attach the Upper Section
of the handle to the Middle Section.
• Carefully slide the Upper Section of the handle over the
Middle Section and align the holes.
• Insert the screws through the Upper Section handle
and screw them into the captive nuts within the Middle
Section.
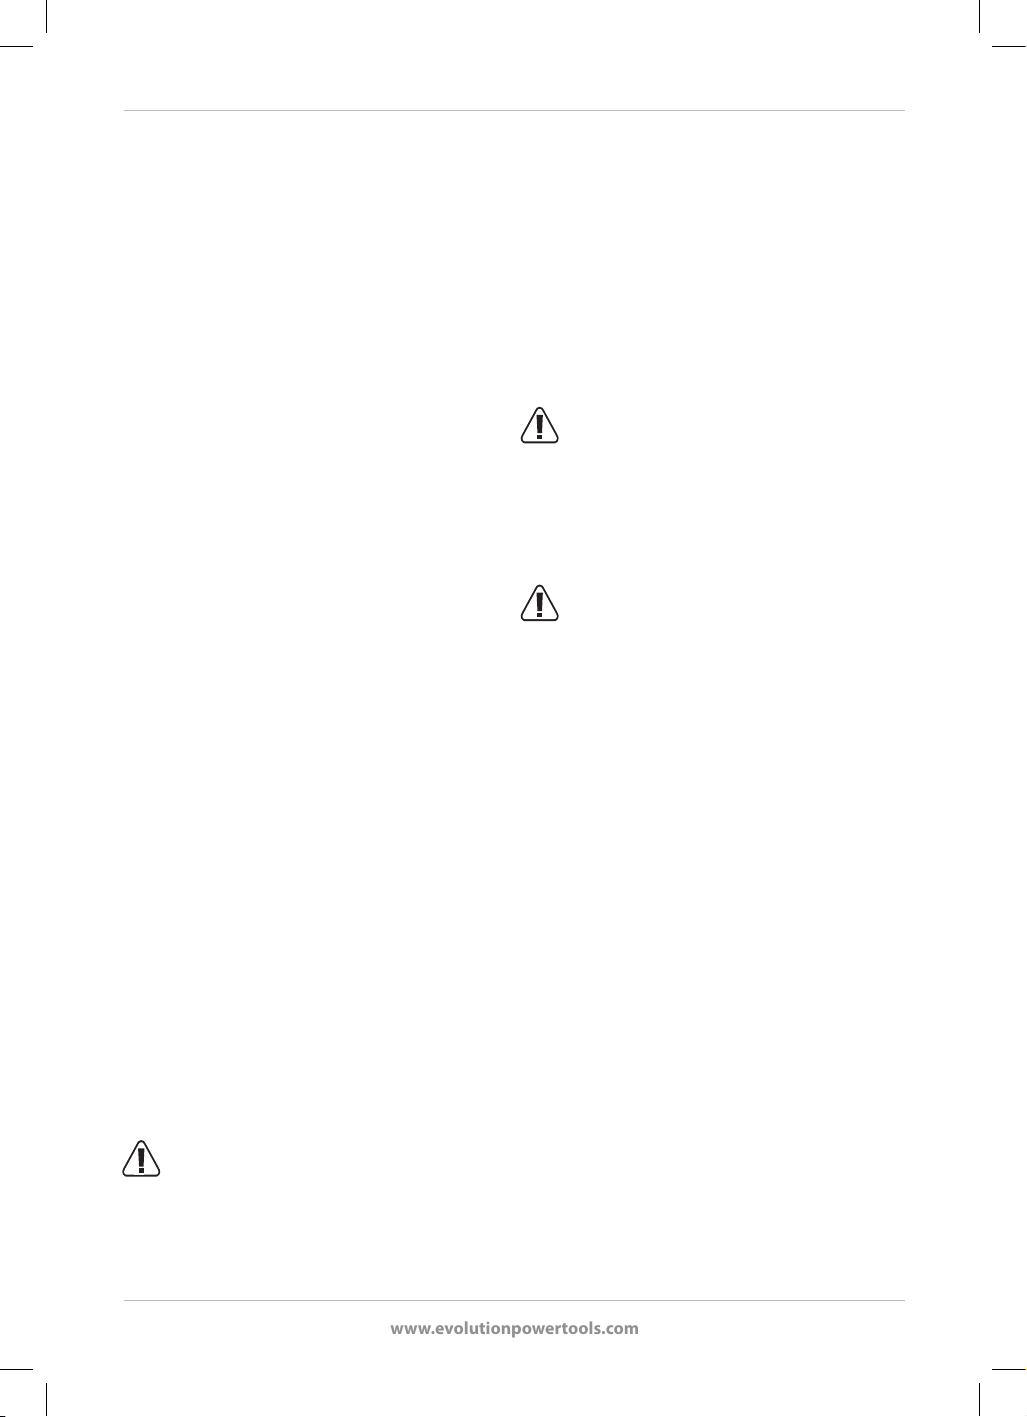
The H320-E is supplied with 3 cable clips to safely route
the power cable up the handle frame. These must be
tted. Failure to do so will void your warranty. Locate them
on the same side as the power trigger and space them as
shown in (Fig.4a & 4b)
WARNING: Take care to ensure that the power
cable from the Safety Switch down to the motor is ‘free’ and
not ‘trapped’ during the assembly process.
Initial lling and checking the oil level –
H320-P
WARNING: This machine does not come lled
with oil. No attempt to start the engine must be made
until the crankcase is lled to the correct level with the
correct grade of oil.
Note: Oil (provided) should be poured into the
machine through the Oil Filler/Level Cap. Oil capacity is
approximately 0.4 litre of 10W 30 automotive oil (available
at all good motor factors and most petrol stations). For
some non-temperate climatic areas an alternative grade of
oil may be preferable – consult your supplier.
The Oil Filler Cap unscrews from the machines engine
casing and incorporates an oil level dip stick. (Fig. 5) Take
care not to spill any oil.
Fig. 5
Fig. 4a
Fig. 4b

www.evolutionpowertools.com
15
Note: It is important that when checking the oil level the
machine is on a stable, horizontal and level surface with
the engine stopped and cold.
Two index marks are provided on the dipstick.
The oil level should be maintained at or near the
upper index mark.
• Remove the Oil Filler/Level Cap and wipe the dipstick
with a clean dry cloth.
• Pour in the required amount of oil. (approx 0.4L)
• Allow the oil to settle for 10+ seconds.
• View the oil level through the oil ller orice. The oil
level should be very near the top of the threads with oil
just about to spill out from the crankcase (the machine
must be on a level horizontal surface).
• Insert the dipstick and screw the cap fully ‘home’.
Unscrew the ller cap and withdraw the dipstick.
Visually check the
oil level on the dipstick.
• Adjust as necessary.
• When the level is correct tighten the Oil Filler/Level Cap
securely into the engine casing.
Note: Change the oil according to the Maintenance
Summary Chart (Refer also to MAINTENANCE – Engine oil
replacement)
Pre – operating checks
Note: Before each operation the machine should be
inspected to ensure that all safety features etc, are working
correctly.
• Check that all safety guards are in position and
undamaged.
• H320-E – Check the integrity of the power cable and
plug. If the power cable or plug is damaged in any
way the cable and/or the plug must be replaced by
a competent technician with identical replacement
parts.
• H320-P - Check all fuel hoses, unions and ller caps etc
for signs of uid leakage. Any leak detected must be
repaired before operations commence.
• Check the engine oil level and adjust as necessary.
• Check the fuel level and top up as necessary.
• Thoroughly inspect the rest of the machine for any
form of damage particularly to covers, guards, rubber
components etc.
Fig. 6
Fig. 7

www.evolutionpowertools.com
16
Starting the H320-P
• Fill the fuel tank with petrol. The fuel tank ller lter has
a red plastic insert to mark the max fuel level. Do not
allow fuel to raise above this mark.
• Turn the fuel tap lever to the ‘On’ position. (Fig. 6)
• Set the choke lever to the ‘Choke On’ position. (Fig. 7)
• Press the engine ignition rocker switch to the ‘ON’ (I)
position. (Fig. 8)
• Set the throttle lever to maximum. (Fig.9)
• Steady the H320 by holding the operating handle at a
convenient point.
• Use your other hand to grip the recoil starter cord
handle. (Fig. 10)
• Pull the recoil starter cord slowly until resistance is felt
indicating that the starter is engaged.
• When resistance is felt pull the cord sharply.
• Continue this procedure until the engine starts.
• The engine unit may rev (hunt) for a short period until
the engine is up to temperature.
• Usually the choke can be returned to the ‘o’ (run)
position almost immediately when the engine res
up, but this will depend upon ambient temperatures,
operating conditions etc. and operator discretion will
be required.
• Under some circumstances choke may be needed even
when the engine is warm from a previous operating
cycle. If you experience diculty in starting a warm
engine:
• Set the choke to the ‘on’ position (right).
• Pull the recoil starter once.
• Return the choke to the ‘o’ (run) position (left).
• Pull the recoil starter until the engine res.
• Note: The H320-P will begin to vibrate and travel as
soon as the engine is started. The operator should
ensure due diligence when starting this machine.
Stopping your H320-P Engine
• Press the engine ignition rocker switch to the ‘OFF’ (0)
position.
• Close the fuel tap.
Fig. 8
Fig. 9
Fig. 10

www.evolutionpowertools.com
17
Machine Travel – H320-P
Note: Adjusting the speed of the engine alters the frequency
of vibration and also the speed at which the machine travels
forwards.
Note: The Fast Run Screw limits the maximum travel of the
throttle lever and thus controls maximum engine speed
only.
If you need to alter the maximum engine speed to increase or
decrease the speed of ‘travel’ of the machine:
• Turn the Fast Run Screw (Fig. 11) a little at a time (half a turn
max) clockwise to decrease the engine speed, or counter
clockwise to increase the speed of the engine.
• Ensure that the throttle lever is set to maximum.
• Start the machine and check the ‘travel’ of the machine at
the new Fast Run Screw setting.
• If necessary stop the machine and adjust further
the Fast Run Screw until the desired ‘travel’ speed is
achieved.
Starting and Stopping the H320-E
The H320-E is tted with a Safety Start ‘On/O’ switch. The
safety interlock prevents the switch lever from being operated
until the safety lock button is depressed.
• Press the safety lock button (a) and pull the switch (b)
lever to start the machine. (Fig. 12)
• Release the switch lever to switch o the machine.
Note: Upon release of the switch lever the motor will stop
and the safety lock button will automatically revert to ‘safe
mode’.
WARNING: The operator should always be
aware of the routing of the power cable to ensure that it
does not become a ‘trip’ or any other form of hazard, or
could be ‘run over’ by the machine.
Fig. 11
Fig. 12
(a)
(b)

www.evolutionpowertools.com
18
GENERAL OPERATING ADVICE
• Ensure that bystanders are kept at a safe distance from
compacting operations. If necessary cordon o the
work area and post WARNING notices.
• Plan your work, and the path you intend the machine to
travel, before you start compacting operations.
• Survey the working area before you begin and remove
or otherwise neutralise any obstructions/obstacles that
could pose a danger.
• Ensure you have all the correct PPE and know how to
use it.
• The compactor will travel forwards under its own power.
Gentle inputs from the operator on the machines handle
are all that is necessary to ‘steer’ the machine. The
operator should hold the anti-vibration handle grip with
both hands, and the hands should be positioned as far
apart as possible.
• Several passes over the work area may be required to
compact the material to the desired density.
• If the work area is sloped, work up and down the
sloping surface, not across
MAINTENANCE
H320-P
Regular maintenance is essential to keep your machine
and its accessories in serviceable condition. We
recommend that only competent operators who have
experience in servicing and maintaining petrol engines
attempt these procedures. If in doubt have the machine
serviced at an Evolution approved Service Centre.
1. Engine oil replacement
Engine oil should be replaced after the initial
‘running in’ period and at the intervals specied
in the Service Schedule.
Note: Engine oil is easier to replace when the engine has
been run up to temperature and the oil is warm.
• Ensure that the engine is positioned on a hard level
surface.
• Remove the oil ller cap. (Fig. 13)
• Place a suitable oil collection pan under the engine.
• Remove the oil drain plug so that the oil can drain
completely from the engine. (Fig. 14)
WARNING: Be careful. Contact with used
Fig. 13
Fig. 14

www.evolutionpowertools.com
19
Fig. 15
engine oil can be harmful. The oil could be very hot (burn
risk) and some operators may experience irritation if the oil
contaminates exposed skin. The operator should consider
wearing mechanics protective gloves if available. Any skin
contaminated with oil should be washed with soap and
copious amounts of clean water as soon as possible.
• Check the oil drain plug and its gasket.
• Check the oil ller cap and its ‘O’ ring gasket.
• Replace any non-serviceable parts.
• Re-install the oil drain plug and tighten rmly.
• Rell the engine with the correct grade of engine oil to
the correct level.
• Ret the oil ller cap.
• Check for leaks and spillages, and deal with as
necessary.
Note: Used engine oil should be disposed of in an
environmentally safe way. Check with your Local Authority
for the nearest used oil re-cycling facility.
2. Spark Plug - Checking and replacement
After approximately 50 hours of operation the spark plug
should be removed for checking, cleaning and resetting.
To remove and reinstall the spark plug:
• Ensure that the engine is switched ‘OFF’ and the fuel
tap is in the ‘OFF’ position.
WARNING: The engine should be cold before
commencing the spark plug removal procedure.
• Pull the HT lead from the spark plug.
• Using a spark plug socket (supplied) remove the spark
plug. (Fig. 15)
A serviceable spark plug in good condition should
exhibit light tan deposits on the plug nose. Remove these
deposits with a sti brass wire brush.
• Check the electrode gap of the plug using a set of
feeler gauges.
• Adjust if necessary. The gap is given in ‘Specication
H320-P’.
• Re-install the spark plug. Be careful that it engages the
threads in the cylinder head correctly.

www.evolutionpowertools.com
20
• Hand- tighten spark the plug using the supplied spark
plug socket.
• Slide the supplied tommy bar through the hole in the
end of the spark plug socket.
• Position the tommy bar so that equal amounts protrude
through either side of the spark plug socket.
• Finally make the gas tight seal by turning the spark plug
socket between ¼ to ½ of a turn. This nal fractional turn
will crush the spark plug washer and make a gas tight seal.
Do not overtighten the spark plug.
• Reattach the HT lead to top of the spark plug.
3. Air Filter
WARNING: Never run the engine without the air
lter element tted.
After approximately 50 hours of use the condition of the
air lter should be checked.
Note: The air lter may require more frequent attention if
the operating environment is especially dusty.
To remove:
• Ensure that the engine is switched ‘OFF’ and the fuel
tap is in the ‘OFF’ position. The engine should be cold.
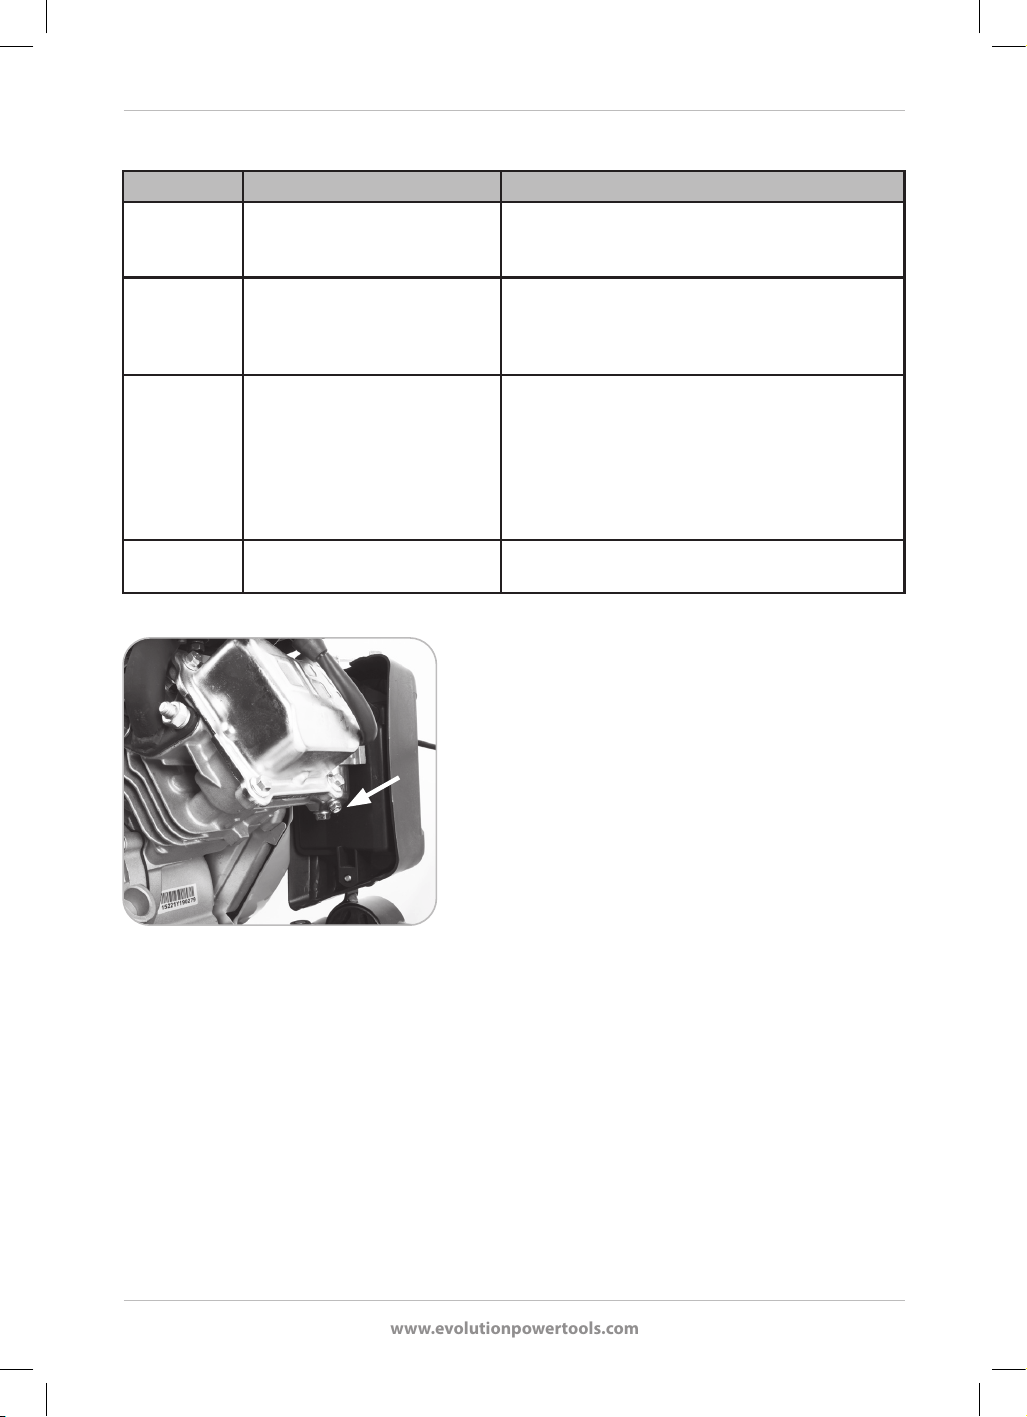
• Unscrew the wing nuts from the Air Filter housing
cover and remove it. (Fig. 16)
• Carefully store these parts for later re-installation.
• Remove the Air Filter Element from the housing for
inspection. (Fig. 17) If the paper element of the air lter
shows signs of severe discolouration and clogging by
dirt, dust etc it should be replaced.
To ret:
• Install the element into the Air Filter Housing.
A new element can t either way round.
• Replace the Air Filter housing cover.
• Replace the wing nuts and ensure that the cover
is correctly seated and the wing nuts are securely
tightened.
Fig. 16
Fig. 17

www.evolutionpowertools.com
21
4. Fuel Tank Filler Filter
Occasionally visually check the condition of the fuel tank ller
lter (when refuelling is ideal). If there is any sign of deposit
build up, remove the lter from the tank and clean.
• Clean the lter with environmentally friendly water
based degreasing agent and if necessary blow the ne
mesh through with clean, dry compressed air.
• Allow to dry thoroughly before retting.
• When retting, ensure that the 2 cut outs on the top
edge of the lter line up with the cut outs in the fuel
tank ller neck.
5. Checking the Drive Belt Tension
WARNING: Only attempt this procedure with
the machine cold and the engine switched ‘o’ and
the spark plug cap removed.
Drive belt tension should be checked after the rst 4 hours
of use and then as specied in the Routine Maintenance
Schedule.
To check the Drive Belt Tension:
• Remove the Belt Guard by removing the three (3) socket
headed screws (Fig. 18) using a hex key and spanner (not
supplied) and store safely for future use.
Note: These three (3) socket headed screws are position
specic. Note the position of each of the screws and its
related accessories as it is removed from the machine so
that it can be replaced in its original position.
• Deection by light nger pressure at the mid-point of
the belt should be approximately 5/6 mm (1/4 inch).
Note: The engine unit of the H320 is positioned over four
(4) slots on the Engine Mounting Plate. Four (4) engine
mounting bolts are positioned through these four slots
and are screwed from underneath up into the base of the
engine crankcase block. This arrangement enables the
engine to be repositioned on the plate.
• Loosen the four (4) hexagonal headed bolts using a
suitable spanner (not supplied).
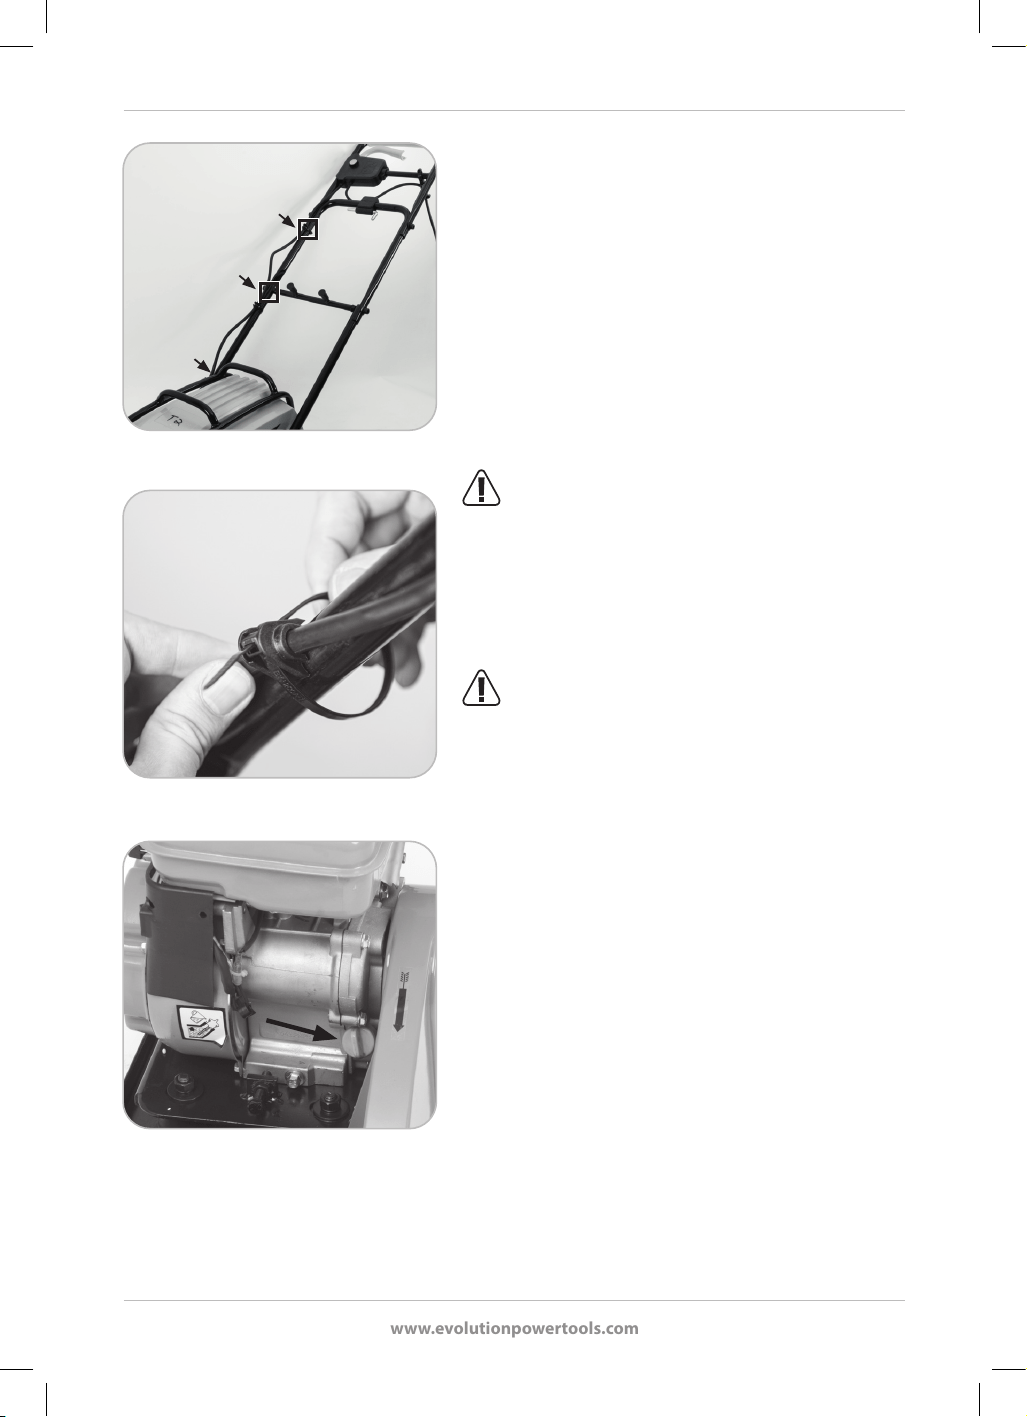
• Slide the engine backwards or forwards to alter the
tension of the Drive Belt. An adjustment screw (Fig.
19) is provided at the front of the engine to aid precise
positioning of the engine.
• When correct tension has been achieved,
securely tighten the engine mounting bolts.
Fig. 18
Fig. 19

www.evolutionpowertools.com
22
WARNING: Do not adjust the adjustment/tentioning bolt without loosening the four mounting
bolts, as this could cause damage to the engine casing.
Note: Care must be taken to ensure that the engine remains ‘square’ and ‘inline’ on the mounting plate. If the
engine were to be in a slightly ‘twisted’ conguration on the mounting plate, the drive belt and pulleys would
be put under ‘distress’ and wear quickly ensue.
• Replace the drive Belt Guard and securely tighten the three (3) socket headed screws in their original
positions.
6. Recoil Starting System
The ventilation slots should be kept clean and free from any obstructions.
Remove any foreign matter from the ventilation slots.
H320-P
ROUTINE MAINTENANCE
SCHEDULE
After rst 4
hours
Every
20 hours or
monthly
Every
50 hours or
3 monthly
Every
100 hours or
6 monthly
Engine Oil Level Check
● ●
Engine Oil Change
●
(1
st
change only)
●
Air Filter Check
●
Air Filter Replace
●
Spark Plug Check
●
Drive Belt Tension
● ●
Fuel Filter Check/Clean
●
MAINTENANCE H320-E
Note: Any maintenance must be carried out with the machine switched o and disconnected from the
power supply.
Check that all safety features and guards are operating correctly on a regular basis. Only use this
machine if all guards/safety features are fully operational.
All motor bearings in this machine are lubricated for life. No further lubrication is required.
Use a clean, slightly damp cloth to clean the plastic parts of the machine. Do not use solvents or similar
products which could damage the plastic parts.
WARNING: Do not attempt to clean by inserting pointed objects through openings in the
machines casings etc. The machines air vents should be cleaned using compressed dry air.

www.evolutionpowertools.com
23
TROUBLESHOOTING H320-P
PROBLEM CAUSE POSSIBLE REMEDY
Engine will
not start.
No Fuel.
Engine switched ‘O’.
Fouled spark plug.
Engine cold.
Engine ‘ooded’ with petrol.
Air Filter clogged or
contaminated with oil.
Major Fault.
Open Fuel Tap
Fill Fuel Tank.
Switch Engine ‘On’.
Remove, clean, reset and replace plug.
Ensure choke setting is correct.
Leave for ve (5) mins.
Open choke and fully open the throttle
and try again.
Remove spark plug, clean and replace.
Try again until engine res.
Replace Air Filter.
Contact Agent or Evolution Power Tools
for further advice.
Machine
does not
vibrate.
Belt Tension Incorrect.
Air Filter Blocked.
Eccentric Unit Damaged.
Engine speed too slow.
Adjust the belt tension.
Renew the Air Filter.
Replace eccentric unit.
Increase engine speed slightly.
TROUBLE SHOOTING H320-E
PROBLEM CAUSE POSSIBLE REMEDY
Machine will
not start.
Supply not switched ‘On’
Fuse in Plug ‘blown’.
Safety Start Button not
depressed preventing
‘On/O’ actuation.
Damaged or
broken power cord.
Switch on supply at the socket.
Replace fuse and check supply.
Depress Safety Start Button
and then pull Start Lever.
Have the damaged cord replaced by an identical
type tted by a competent technician.
www.evolutionpowertools.com
24
GENERAL TROUBLESHOOTING GUIDE
PROBLEM CAUSE POSSIBLE REMEDY
Paving
blocks
damaged.
Plate in direct contact with the
pavings.
Fit a ‘Paving Pad’.
Bituminous
surface
aking
(laminating).
Over compactation. Remove and relay.
Low travel
speed.
Layer thickness too deep
(plate sinking).
Engine speed too low.
Moisture content of the
material too high or too low.
Remove some of the material so that the layer
thickness is reduced.
Increase engine speed slightly.
Remove the material and adjust the
moisture content.
H320-P not
Travelling.
Engine speed too low. Increase engine speed slightly.
Fig. 20
LONG TERM STORAGE H320-P
If your Evolution machine is not going to be used for a
period of 4 months or more (e.g. over the winter period)
the operator should consider preparing it for long term
storage. This will keep the engine in optimum condition for
re-commissioning when required.
• Drain all the fuel from the fuel tank and carburettor
into a suitable approved container.
• A drain tap can be found underneath the carburettor
oat bowl. Loosen this tap to allow the fuel to drain
from the machine. (Fig. 20)
• Tighten the drain tap when all the fuel has been
removed.
• Remove the spark plug.
• Pour approximately one tablespoon of clean engine oil
into the spark plug hole.
• Ensure that the engine ignition switch is in the ‘OFF’
position.
• Gently pull the recoil starter a few times.
• Replace the spark plug.
• Gently pull the recoil starter until resistance is felt (this
will mean that the piston is on its compression stroke
with both valves closed). Stop pulling the recoil starter.
• Store the engine in a secure, dry and well ventilated
location, under a cover to prevent dust, debris etc from
settling on the machine.

www.evolutionpowertools.com
25
RETURNING THE H320-P
In the event that you need to return your H320-P machine
to Evolution, you must follow the below steps to make it
safe for couriers.
1. Completely drain the machine of fuel from the fuel tank
and carburetor. (Fig. 20)
2. Completely drain the engine oil. (Fig. 14)
3. Disassemble the handle by removing the screws. Take
care to keep all removed parts. (Fig. 2)
4. Securely package the machine in a box, preferably in its
original packaging.
Note: The machine will be returned without fuel and oil.
Ensure you ll with fuel and oil before starting the engine.
Use of Optional Evolution Accessories
(available as a customer purchase option)
ENVIRONMENTAL PROTECTION
Waste electrical products should not be disposed of with
household waste. Please recycle where facilities exist.
Check with your Local Authority or retailer for recycling
advice.

www.evolutionpowertools.com
26
EC DECLARATION OF CONFORMITY
In accordance with EN ISO 17050-1:2004
The manufacturer of the product covered by this Declaration is:
UK: Evolution Power Tools Ltd. Venture One, Longacre Close, Holbrook Industrial Estate, Sheeld, S20 3FR.
FR: Evolution Power Tools SAS. 61 Avenue Lafontaine, 33560, Carbon-Blanc, Bordeaux, France.
The manufacturer hereby declares that the machine as detailed in this declaration fulls all the relevant
provisions of the Machinery Directive and other appropriate directives as detailed below.
The manufacture further declares that the machine as detailed in this declaration, where applicable, fulls
the relevant provisions of the Essential Health and Safety requirements.
The Directives covered by this Declaration are as detailed below:
And is in conformity with the applicable requirements of the following documents
EN 500-1:2006+A1• EN 500-4:2011• EN ISO 3744: 1995 • EN ISO 14982:2009
Product Details
Description: H320-P
Evolution Model No: 015-0001, 015-0013
Factory Model No: XZ-10C/JF152
Brand Name: EVOLUTION
The technical documentation required to demonstrate that the product meets the requirements of directive has been
compiled and is available for inspection by the relevant enforcement authorities, and veries that our technical le contains the
documents listed above and that they are the correct standards for the product as detailed above.
Name and address of technical documentation holder.
Signed: Print: Barry Bloomer - CEO
Date: 23/08/2022
UK: Evolution Power Tools Ltd. Venture One, Longacre Close, Holbrook Industrial Estate, Sheeld, S20 3FR.
FR: Evolution Power Tools SAS. 61 Avenue Lafontaine, 33560, Carbon-Blanc, Bordeaux, France.
®
H320-P
1907/2006 The Registration, Evaluation, Authorization and Restriction of Chemicals & REACH EC No. 1907/2006
annex XVII
2006/42/EC. Machinery Directive.
2014/30/EU. Electromagnetic Compatibility Directive.
2011/65/EU. & (EU)2015/863. The Restriction of the Use of certain Hazardous Substances in Electrical Equipment (RoHS) Directive.
2000/14/EU & 2005/88/EC Noise Directive

www.evolutionpowertools.com
27
EC DECLARATION OF CONFORMITY
In accordance with EN ISO 17050-1:2004
The manufacturer of the product covered by this Declaration is:
UK: Evolution Power Tools Ltd. Venture One, Longacre Close, Holbrook Industrial Estate, Sheeld, S20 3FR.
FR: Evolution Power Tools SAS. 61 Avenue Lafontaine, 33560, Carbon-Blanc, Bordeaux, France.
The manufacturer hereby declares that the machine as detailed in this declaration fulls all the relevant
provisions of the Machinery Directive and other appropriate directives as detailed below.
The manufacture further declares that the machine as detailed in this declaration, where applicable, fulls
the relevant provisions of the Essential Health and Safety requirements.
The Directives covered by this Declaration are as detailed below:
UK legislation_Supply of Machinery (Safety) Regulations 2008
UK legislation _The Restriction of the Use of Certain Hazardous Substances in Electrical and Electronic Equipment
Regulations 2012
UK legislation_Electromagnetic Compatibility Regulations 2016;
UK Noise Regulations_SI 2001 1701 & SI 2005 3525
And is in conformity with the applicable requirements of the following documents
BS EN 500-1:2006+A1 • BS EN 500-4:2011 • BS EN ISO 3744: 1995 • BS EN ISO 14982:2009
Product Details
Description: H320-P
Evolution Model No: 015-0001, 015-0013
Factory Model No: XZ-10C/JF152
Brand Name: EVOLUTION
The technical documentation required to demonstrate that the product meets the requirements of directive has been
compiled and is available for inspection by the relevant enforcement authorities, and veries that our technical le contains the
documents listed above and that they are the correct standards for the product as detailed above.
Name and address of technical documentation holder.
Signed: Print: Barry Bloomer - CEO
Date: 23/08/2022
UK: Evolution Power Tools Ltd. Venture One, Longacre Close, Holbrook Industrial Estate, Sheeld, S20 3FR.
FR: Evolution Power Tools SAS. 61 Avenue Lafontaine, 33560, Carbon-Blanc, Bordeaux, France.
®
H320-P

www.evolutionpowertools.com
28
EC DECLARATION OF CONFORMITY
In accordance with EN ISO 17050-1:2004
The manufacturer of the product covered by this Declaration is:
UK: Evolution Power Tools Ltd. Venture One, Longacre Close, Holbrook Industrial Estate, Sheeld, S20 3FR.
FR: Evolution Power Tools SAS. 61 Avenue Lafontaine, 33560, Carbon-Blanc, Bordeaux, France.
The manufacturer hereby declares that the machine as detailed in this declaration fulls all the relevant
provisions of the Machinery Directive and other appropriate directives as detailed below.
The manufacture further declares that the machine as detailed in this declaration, where applicable, fulls
the relevant provisions of the Essential Health and Safety requirements.
The Directives covered by this Declaration are as detailed below:
And is in conformity with the applicable requirements of the following documents
EN 500-1:2006+A1 • EN 500-4:2011 • EN 60204-1:2018 • EN IEC 55014-1:2021
EN IEC 55014-2:2021 • EN IEC 61000-3-2:2019/A1:2021 • EN 61000-3-3:2013/A2:2021
EN ISO 3744:1995
Product Details
Description: H320-E
Evolution Model No: 015-0002, 015-0004, 015-0008, 015-0010
Factory Model No: XZ-5A
Brand Name: EVOLUTION
Voltage: 220-240V ~ 50Hz
Input: 300W
The technical documentation required to demonstrate that the product meets the requirements of directive has been
compiled and is available for inspection by the relevant enforcement authorities, and veries that our technical le contains the
documents listed above and that they are the correct standards for the product as detailed above.
Name and address of technical documentation holder.
Signed: Print: Barry Bloomer - CEO
Date: 23/08/2022
UK: Evolution Power Tools Ltd. Venture One, Longacre Close, Holbrook Industrial Estate, Sheeld, S20 3FR.
FR: Evolution Power Tools SAS. 61 Avenue Lafontaine, 33560, Carbon-Blanc, Bordeaux, France.
®
H320-E
1907/2006 The Registration, Evaluation, Authorization and Restriction of Chemicals & REACH EC No. 1907/2006
annex XVII
2006/42/EC. Machinery Directive.
2014/30/EU. Electromagnetic Compatibility Directive.
2011/65/EU. & (EU)2015/863. The Restriction of the Use of certain Hazardous Substances in Electrical Equipment (RoHS) Directive.
2002/96/EC as amended by 2003/108/EC The Waste Electrical and Electronic Equipment (WEEE) Directive.
2000/14/EU & 2005/88/EC Noise Directive

www.evolutionpowertools.com
29
EC DECLARATION OF CONFORMITY
In accordance with EN ISO 17050-1:2004
The manufacturer of the product covered by this Declaration is:
UK: Evolution Power Tools Ltd. Venture One, Longacre Close, Holbrook Industrial Estate, Sheeld, S20 3FR.
FR: Evolution Power Tools SAS. 61 Avenue Lafontaine, 33560, Carbon-Blanc, Bordeaux, France.
The manufacturer hereby declares that the machine as detailed in this declaration fulls all the relevant
provisions of the Machinery Directive and other appropriate directives as detailed below.
The manufacture further declares that the machine as detailed in this declaration, where applicable, fulls
the relevant provisions of the Essential Health and Safety requirements.
The Directives covered by this Declaration are as detailed below:
UK legislation_Supply of Machinery (Safety) Regulations 2008
UK legislation_Electromagnetic Compatibility Regulations 2016
UK legislation _The Restriction of the Use of Certain Hazardous Substances in Electrical and Electronic Equipment
Regulations 2012
UK regulation _ The Waste Electrical and Electronic Equipment Regulations 2013
UK Noise Regulations_SI 2001 1701 & SI 2005 3525
And is in conformity with the applicable requirements of the following documents
BS EN 500-1:2006+A1 • BS EN 500-4:2011 • BS EN 60204-1:2018 • BS EN IEC 55014-1:2021
BS EN IEC 55014-2:2021 • BS EN IEC 61000-3-2:2019/A1:2021 • BS EN 61000-3-3:2013/A2:2021
Product Details
Description: H320-E
Evolution Model No: 015-0002,015-0004, 015-0008, 015-0010
Factory Model No: XZ-5A
Brand Name: EVOLUTION
Voltage: 220-240V ~ 50Hz
Input: 300W
The technical documentation required to demonstrate that the product meets the requirements of directive has been
compiled and is available for inspection by the relevant enforcement authorities, and veries that our technical le contains the
documents listed above and that they are the correct standards for the product as detailed above.
Name and address of technical documentation holder.
Signed: Print: Barry Bloomer - CEO
Date: 23/08/2022
UK: Evolution Power Tools Ltd. Venture One, Longacre Close, Holbrook Industrial Estate, Sheeld, S20 3FR.
FR: Evolution Power Tools SAS. 61 Avenue Lafontaine, 33560, Carbon-Blanc, Bordeaux, France.
®
H320-E

www.evolutionpowertools.com
30
Modellspezikationen
Evolution Power Tools behält sich das Recht vor,
Verbesserungen und Änderungen am
Design und den technischen Spezikationen dieses
Produkts ohne vorherige Benachrichtigung
vorzunehmen.
Dieses Handbuch wurde ursprünglich in englischer
Sprache erstellt.
Motor EU/UK 220-240V~50Hz 300W, US 120V~60Hz 1,25A
Motordrehzahl (min
-1
) EU/UK 2860 (Leerlauf), US 3450 (Leerlauf)
Verdichtungskraft (kN) 5
Empfohlenes Maximum 30
Betreiberbenutzungszeit (Min)
Schallleistungspegel (LwA) 88,5 dB(A) K= 2,09 dB(A)
Schallleistungspegel (LpA) 83,3 dB(A) K= 3 dB(A)
Vibration (m/s
2
) 18,496 K = 1,5
Gewicht kg (Pfd) 25,4 (56)
Grihöhe (während des Betriebs) mm (Zoll) 920 (36)
Grihöhe (während des Betriebs) mm (Zoll) 1290 (51)
Standäche Breite mm (Zoll) 320 (12-1/2)
Kabellänge Meter (Fuß) 10 (33)
Isolationsklasse I
IP44
H320-P
H320-E
Motorentyp Einzylinder-Viertakter OHV
Motorleistung 1,7kW 3.600min
-1
Zündkerzen-Ersatz LD E6TC (erhältlich von Evolution)
NGK BP6HS
CHAMPION L87YCC
AC DELCO 42FS
Zündkerzenabstand 0,028 – 0,031 Zoll
0,7 – 0,8 mm
Luftlter-Ersatz Evolution H1S58
Ventilspiel (kalt) Einlass 0,15 mm 0,006 Zoll
Auspu 0,20 mm 0,008 Zoll
Verdichtungskraft (kN) 10
Vibration (m/s
2
) 20,211 K = 1,5
Schallleistungspegel (LwA) 97,9 dB(A) K= 2,42 dB(A)
Schallleistungspegel (LpA) 90,5 dB K= 3 dB(A)
Betreiberbenutzungszeit (Min) 20
Empfohlenes Maximum
Öltyp SAE 10W-30/40
Ölkapazität (Liter) 0,25
( oz) 8,45
Kraftstotyp E5 & E10 Bleifreies Benzin
Kraftstokapazität (Liter) 1,2
( oz) 40,57
Gewicht kg (Pfd) 32,45 (71,5)
Grihöhe (während des Betriebs - 1020 (40)
Verlängerungsgri montiert) mm (Zoll)
Maschinenreichweite (während des Betriebs - 1290 (51)
Verlängerungsgri montiert) mm (Zoll)
Standäche Breite mm (Zoll) 320 (12-1/2)

www.evolutionpowertools.com
31
WICHTIG
Lesen Sie diese Betriebs- und
Sicherheitsanweisungen bitte sorgfältig und
vollständig durch.
Sollten Sie sich hinsichtlich der Anwendung dieses
Elektrowerkzeugs unsicher fühlen, kontaktieren
Sie zu Ihrer eigenen Sicherheit unsere technische
Helpline, deren Nummer auf der Website von
Evolution Power Tools zu nden ist. Wir betreiben
mehrere Helplines in unserer weltweiten
Organisation, technische Hilfe erhalten Sie aber
auch von Ihrem Lieferanten.
WEB www.evolutionpowertools.com/register
Wir gratulieren Ihnen zum Kauf einer Maschine
von Evolution Power Tools. Bitte folgen Sie
den Anweisungen des beiliegenden A5-
Merkblattes zur Online-Garantieregistrierung
und registrieren Sie Ihr Produkt „online“.
Sie können ebenfalls den auf dem A5-
Merkblatt enthaltenen QR-Code mithilfe eines
Smartphones scannen. Hierdurch aktivieren
Sie die Garantiefrist Ihrer Maschine über die
Evolution-Website. Geben Sie zu diesem Zweck
einfach Ihre Kontaktdaten ein und sichern Sie
sich einen schnellen Kundenservice, immer
wenn Sie ihn benötigen. Wir danken Ihnen, dass
Sie sich für ein Produkt von Evolution Power
Tools entschieden haben.
BEGRENZTE GARANTIE VON EVOLUTION.
EVOLUTION POWER TOOLS BEHÄLT SICH DAS
RECHT VOR, OHNE VORHERIGE MITTEILUNG
KONSTRUKTIVE VERBESSERUNGEN UND
ÄNDERUNGEN AM PRODUKT VORZUNEHMEN.
DIE GARANTIEBEDINGUNGEN FINDEN
SIE AUF DEM MERKBLATT ZUR
GARANTIEREGISTRIERUNG UND/ODER DER
VERPACKUNG.
Evolution Power Tools repariert oder ersetzt
innerhalb der Garantiefrist und ab ursprünglichem
Kaufdatum alle Waren, bei denen Mängel
im Material oder in der Ausführungsqualität
auftreten. Diese Garantie ist nichtig, wenn
die zurückgegebene Maschine entgegen der
Empfehlungen des Bedienungshandbuchs
verwendet wurde oder sie durch Unfall,
Fahrlässigkeit oder unsachgemäße Wartung
beschädigt worden ist. Diese Garantie gilt nicht
für Maschinen und/oder Komponenten, die in
irgendeiner Form geändert oder modiziert oder
außerhalb der empfohlenen Kapazitäten und
Spezikationen eingesetzt worden sind. Elektrische
Komponenten werden durch die Garantien der
jeweiligen Hersteller abgedeckt. Alle retournierten
defekten Waren sind frachtfrei an Evolution Power
Tools zu senden. Evolution Power Tools behält sich
das Recht vor, optional eine Reparatur oder eine
Ersatzlieferung mit gleichen oder gleichwertigen
Posten vorzunehmen. Es besteht keine
Garantie – weder schriftlich noch mündlich – für
Verschleißteile wie (jedoch nicht beschränkt auf)
Klingen, Schneider, Bohrer, Meißel oder Schaufeln
usw. Evolution Power Tools haftet in keinem Fall
für Verlust oder Schäden, die direkt oder indirekt
auf den Gebrauch von Ware von Evolution Power
Tools oder auf jegliche anderweitige Ursachen
zurückzuführen sind. Evolution Power Tools haftet
weder für jegliche Kosten, die für solche Waren
entstehen, noch für Folgeschäden. Angestellte
oder Vertreter von Evolution Power Tools sind
nicht bevollmächtigt, mündliche Erklärungen
zur Eignung abzugeben oder auf irgendeine
der vorstehenden Geschäftsbedingungen zu
verzichten; derartige Erklärungen haben keinerlei
bindende Wirkung für Evolution Power Tools.
Fragen zu dieser begrenzten Garantie sind an
die Firmenzentrale zu richten oder über einen
Anruf über die jeweilige Helpline-Nummer zu
klären.
ALLGEMEINE SICHERHEITSANWEISUNGEN FÜR
ELEKTROWERKZEUGE
(Diese Allgemeinen Sicherheitsanweisungen für
Maschinenwerkzeuge entsprechen BSEN500-
1:2006+A1 & EN500-4:2011
WARNUNG: Lesen Sie sorgfältig alle
Warnhinweise und Anweisungen.
Die Nichtbeachtung der Warnhinweise und
Anweisungen kann zu Stromschlag, Brand und/
oder schweren Verletzungen führen.
Bewahren Sie alle Warnungen und
Anweisungen zum späteren Nachschlagen auf.

www.evolutionpowertools.com
32
Der Begri „Elektrowerkzeug“ in den
Warnhinweisen bezieht sich auf Ihr
netzbetriebenes (verkabeltes) Elektrowerkzeug
oder Ihr akkubetriebenes (kabelloses)
Elektrowerkzeug.
1) Allgemeine Sicherheitswarnungen zum
Elektrowerkzeug [Sicherheit am Arbeitsplatz]
a) Sorgen Sie für einen sauberen und gut
beleuchteten Arbeitsbereich. Unordnung oder
dunkle Arbeitsbereiche können zu Unfällen führen.
b) Betreiben Sie Elektrowerkzeuge nicht in
explosionsgefährdeten Bereichen, z.B. in
Gegenwart von brennbaren Flüssigkeiten,
Gasen oder Stäuben. Elektrowerkzeuge erzeugen
Funken, die Staub oder Gase entzünden können.
c) Halten Sie Kinder und umstehende Personen
während des Betriebs des Elektrowerkzeugs
fern. Ablenkungen können dazu führen, dass Sie
die Kontrolle über das Gerät verlieren.
2) Allgemeine Sicherheitswarnungen zum
Elektrowerkzeug [Elektrische Sicherheit]
a) Der Stecker des Elektrowerkzeugs muss zur
Steckdose passen. Verändern Sie den Stecker
niemals auf irgendeine Weise. Verwenden
Sie keine Adapterstecker für geerdete
Elektrowerkzeuge. Unveränderte Stecker und
passende Steckdosen verringern das Risiko eines
Stromschlags.
b) Vermeiden Sie Körperkontakt mit geerdeten
Oberächen wie Rohren, Heizkörpern,
Herden und Kühlschränken. Das Risiko eines
Stromschlags steigt, wenn Ihr Körper geerdet ist.
c) Setzen Sie Elektrowerkzeuge keinem Regen
oder Nässe aus. Das Eindringen von Wasser
in ein Elektrowerkzeug erhöht das Risiko eines
Stromschlags.
d) Zweckentfremden Sie das Kabel nicht.
Verwenden Sie das Kabel niemals zum Tragen,
trennen Sie das Gerät nicht durch Ziehen am
Kabel vom Netz. Halten Sie das Kabel von Hitze,
Öl, scharfen Kanten oder beweglichen Teilen
fern. Beschädigte oder verwickelte Kabel erhöhen
das Risiko eines Stromschlags.
e) Wenn Sie ein Elektrowerkzeug im
Freien betreiben, verwenden Sie ein
Verlängerungskabel, das für den Außenbereich
geeignet ist. Die Verwendung eines für den
Außenbereich geeigneten Kabels verringert das
Risiko eines Stromschlags.
f) Ist die Verwendung des Elektrowerkzeugs in
feuchter Umgebung unumgänglich, verwenden
Sie eine Fehlerstrom-Schutzeinrichtung (R.C.D.).
Die Verwendung eines Fehlerstromschutzschalters
verringert das Risiko eines Stromschlags.
3) Allgemeine Sicherheitswarnungen zum
Elektrowerkzeug [Persönliche Sicherheit].
a) Seien Sie beim Betrieb des Geräts immer
aufmerksam und verantwortungsbewusst.
Verwenden Sie Elektrowerkzeuge nicht, wenn
Sie müde sind oder unter dem Einuss von
Drogen, Alkohol oder Medikamenten stehen.
Ein kurzer Moment der Unachtsamkeit beim
Betrieb von Elektrowerkzeugen kann zu schweren
Verletzungen führen.
b) Verwenden Sie persönliche
Schutzausrüstung. Tragen Sie immer einen
Augenschutz. Das Tragen von Schutzausrüstung
wie Staubmaske, rutschfesten Sicherheitsschuhen,
Schutzhelm oder Gehörschutz verringert das Risiko
von Verletzungen.
c) Verhindern Sie die unbeabsichtigte
Inbetriebnahme. Vergewissern Sie sich, dass
der Schalter ausgeschaltet ist, bevor Sie es
an der Stromquelle und/oder an der Batterie
anschließen, anheben oder transportieren. Das
Tragen von Elektrowerkzeugen mit dem Finger am
Schalter oder die Aktivierung der Stromversorgung
einer Maschine, deren Schalter in der Stellung „ON“
(An) steht, kann zu Unfällen führen.
d) Entfernen Sie Einstellschlüssel
oder Schraubenschlüssel, bevor Sie
das Elektrowerkzeug einschalten.
Schraubenschlüssel oder andere Schlüssel, die in
sich bewegenden Teilen des Elektrowerkzeugs
stecken, können körperliche Verletzungen
verursachen .
e) Nicht übergreifen. Achten Sie stets auf guten
Stand bzw. gute Balance. Dadurch können Sie
das Gerät in unerwarteten Situationen besser unter
Kontrolle halten.
f) Tragen Sie angemessene Kleidung. Tragen
Sie keine weite Kleidung oder Schmuck. Halten
Sie Ihre Haare, Kleidung und Handschuhe
von beweglichen Teilen fern. Weite Kleidung,
Schmuck oder langes Haar können sich in
bewegenden Teilen verfangen.

www.evolutionpowertools.com
33
g) Falls Vorrichtungen zum Absaugen
und Sammeln von Staub vorhanden sind,
schließen Sie diese an und verwenden Sie
sie ordnungsgemäß. Die Verwendung eines
Staubabscheiders vermindert durch Staub
verursachte Gefahren.
h) Eine im Laufe der Zeit gewonnene
Vertrautheit mit dem Werkzeuggebrauch sollte
nicht zu Sorglosigkeit und dem Ignorieren
von Sicherheitshinweisen führen. Eine
Unachtsamkeit kann zu schweren Verletzungen in
kürzester Zeit führen.
4) Allgemeine Sicherheitshinweise
zum Elektrowerkzeug [Gebrauch und
Instandhaltung].
a) Wenden Sie keine Gewalt auf das
Elektrowerkzeug an. Verwenden Sie das
richtige Elektrowerkzeug für Ihre Zwecke. Das
richtige Elektrowerkzeug erledigt die Arbeit besser
und sicherer mit der Geschwindigkeit, für die es
entwickelt wurde.
b) Verwenden Sie das Elektrowerkzeug nicht,
wenn der Schalter nicht ein- und ausschaltet.
Jedes Elektrowerkzeug, dessen An-/Ausschalter
nicht funktioniert, stellt eine Gefahr dar und muss
repariert werden.
c) Trennen Sie das Elektrowerkzeug von
der Stromquelle und/oder den Akku vom
Elektrowerkzeug, bevor Sie Einstellungen
vornehmen, Zubehörteile wechseln
oder Elektrowerkzeuge lagern. Derartige
vorbeugende Maßnahmen verringern das Risiko,
dass das Elektrowerkzeug unbeabsichtigt startet.
d) Bewahren Sie unbenutzte Geräte außerhalb
der Reichweite von Kindern auf und lassen Sie
Personen, die mit dem Gerät nicht vertraut sind
oder diese Anweisungen nicht gelesen haben,
das Gerät nicht benutzen. Elektrowerkzeuge sind
für ungeübte Bediener gefährlich.
e) Warten Sie Elektrowerkzeuge. Stellen
Sie sicher, dass sich alle beweglichen Teile
in der richtigen Position benden, keine
Teile gebrochen sind und keine sonstigen
Fehler vorliegen, um den reibungslosen
Betrieb des Geräts sicherzustellen. Wenn
das Elektrowerkzeug beschädigt ist, lassen
Sie es vor dem Gebrauch reparieren. Viele
Unfälle werden durch schlecht gewartete
Elektrowerkzeuge verursacht.
f) Halten Sie die Schneidwerkzeuge scharf und
sauber. Sorgfältig gepegte Schneidwerkzeuge
mit scharfen Schneidkanten verklemmen sich
seltener und sind leichter zu führen.
g) Verwenden Sie das Elektrowerkzeug,
Zubehör und Werkzeugteile usw.
in Übereinstimmung mit diesen
Anweisungen unter Berücksichtigung der
Arbeitsbedingungen und der auszuführenden
Arbeit. Die unzweckmäßige Verwendung des
Elektrowerkzeugs kann zu Gefahr führen.
h) Halten Sie Handgrie und Greiächen
trocken, sauber und frei von Öl und Fett.
Rutschige Grie und Greiächen verhindern die
sichere Handhabung und Kontrolle des Werkzeugs
in unerwarteten Situationen.
5) Allgemeine Sicherheitswarnungen zum
Elektrowerkzeug [Wartung]
a) Lassen Sie Ihr Elektrowerkzeug von
qualiziertem Fachpersonal und nur
mit identischen Ersatzteilen reparieren.
Dadurch wird die fortwährende Sicherheit des
Elektrowerkzeugs gewährleistet.
SICHERHEITSHINWEISE FÜR H320-P
a. Benzin- oder Dieselmotoren dürfen
niemals in unbelüfteten geschlossenen
Räumen verwendet werden. Die erzeugten
Abgase sind hochgiftig und können zu einer
„Kohlenmonoxidvergiftung“ führen, die zu
Schläfrigkeit und letztendlich zum Tod führt.
Der Betrieb eines Benzinmotors im Innenbereich
ist nur zulässig, wenn das Gebäude sehr gut
belüftet werden kann und die Abgase aufgefangen
und durch ein Absaugsystem nach außen
abgeführt werden können.
b. Der Motor darf nicht mit einer Drehzahl
betrieben werden, die die auf dem Typenschild
angegebene Höchstgeschwindigkeit
überschreitet. Der Betrieb eines Motors bei zu
hohen Drehzahlen erhöht die Wahrscheinlichkeit
eines Komponentenversagens und daraus
resultierender Unfälle.
Nehmen Sie keine Eingrie an den
Komponenten vor,
die die die Drehzahl des Motors regeln.
Sie dürfen die werkseitig eingestellten
Betriebsparameter ändern.

www.evolutionpowertools.com
34
d. Verwenden Sie nur den in dieser
Bedienungsanleitung aufgeführten Kraftsto.
Die Verwendung von Kraftsto mit einer geringeren
Oktanzahl als angegeben kann zu übermäßigem
Motorverschleiß und zu vorzeitigem Motorausfall
führen.
e. Halten Sie den Bereich um den Motor frei,
sauber und aufgeräumt. Lassen Sie niemals
brennbares Material (Holz, Kunststo, Karton,
Leinwand usw.) in der Nähe eines laufenden Motors.
f. Nicht in oder in der Nähe
explosionsgefährdeter Bereiche verwenden.
Staubige Umgebungen, wie sie in einigen
Industriebauten (Getreidemühlen, Sägemühlen) zu
nden sind, besitzen ein explosives Potenzial.
g. Überprüfen Sie das Kraftstosystem
regelmäßig auf Lecks. Schläuche und Anschlüsse
sollten auf Verschleiß oder Abrieb überprüft
werden. Prüfen Sie den Kraftstotank auf
Beschädigungen oder einen schlecht sitzenden
oder verschlissenen Tankdeckel. Eventuelle Mängel
müssen behoben werden, bevor der Motor
verwendet wird.
h. Stoppen Sie immer den Motor und lassen Sie
ihn abkühlen, ehe Sie nachfüllen. Vermeiden
Sie das Verschütten von Kraftsto (häug durch
„Überfüllen“ des Tanks), und beseitigen Sie
verschütteten Kraftsto sofort. Trockener Sand
ist ein wirksames Mittel zur Neutralisierung
von verschüttetem Kraftsto. Lassen Sie keinen
Sand mit irgendeinem Teil des Motors in Kontakt
kommen.
i. Achten Sie beim Transport des Motors in
einem Fahrzeug darauf, dass der Kraftstohahn
abgeschaltet ist. Um die Gefahr des Auslaufens
von Kraftsto zu minimieren, sollte der Motor mit
Seilen usw. im Laderaum des Fahrzeugs befestigt
werden, damit er sich während des Transports nicht
bewegen kann. Der Motor sollte in einer möglichst
waagerechten Stellung gesichert werden.
j. Zur Langzeitlagerung empfehlen wir, dass
das Kraftstosystem des Motors entleert wird.
Für Anweisungen, siehe Abb.20. Während
der Langzeitlagerung können in modernen
Kraftstoen enthaltene Zusatzstoe aus dem
Kraftsto entweichen und Düsen und Ventile im
Kraftstosystem blockieren.
k. Lagern Sie die Maschine an einem sicheren
und gut belüfteten Ort. Unbefugte Mitarbeiter
sollten keinen Zugri auf dieses Gerät haben.
SICHERHEITSANWEISUNGEN FÜR DAS BEFÜLLEN
MIT KRAFTSTOFF
a. Wählen Sie ebenen Boden, fern von
Gebäuden, als Ort der Befüllung. Stellen Sie
sicher, dass sich kein brennbares Material in
unmittelbarer Nähe bendet.
b. Beim Befüllen ist das Rauchen, die
Verwendung einer oenen Flamme oder das
Erzeugen von Funken strengstens verboten.
Benzin ist leicht entammbar und seine Dämpfe
sind brennbar.
c. Stellen Sie sicher, dass der Benzinhahn
ausgeschaltet („o“) ist. Dadurch wird
sichergestellt, dass der Kraftstovergaser des
Motors nicht mit frischem Kraftsto überutet wird.
d. Der Motor muss ausgeschaltet sein und
abkühlen, bevor das Befüllen durchgeführt
wird. Versehentliches Auslaufen von Kraftsto auf
einen heißen Motor kann zu Brandgefahr führen.
e. Verschüttetes Benzin muss umgehend
entfernt werden. Hat Benzin Kleidung
verunreinigt, so muss der Bediener die Kleidung
wechseln. Verlassen Sie sich nicht darauf, dass der
Kraftsto aus der Kleidung verdunstet. Waschen
oder reinigen Sie die Kleidung, wenn der Kraftsto
aus dem Material verdunstet ist.
f. Die Verwendung eines Trichters beim Befüllen
wird empfohlen. Die Verwendung eines Trichters
minimiert das Risiko des Verschüttens von
Kraftsto.
g. Füllen Sie den Tank mit der richtigen Menge
bleifreien Kraftstos bis etwa zur Hälfte des
Kraftstolters. Füllen Sie den Kraftsto vorsichtig
in den Tank und versuchen Sie nicht, den Tank
vollständig zu füllen. Gießen Sie das Benzin
langsam ein, um Lufteinschlüsse während des
Füllens zu vermeiden, die zum Verschütten von
Kraftsto führen könnten.
h. Den Tankdeckel prüfen und ersetzen, sobald
das Befüllen abgeschlossen ist. Der Deckel hat
eine Bajonettverbindung. Vergewissern Sie sich,
dass er richtig installiert und montiert ist, bevor Sie
den Kraftstohahn langsam drehen.
i. Überprüfen Sie das Kraftstosystem auf
Kraftstoecks. Starten Sie den Motor nicht,
wenn Sie ein Kraftstoeck vermuten. Festgestellte
Leckagen müssen von einem entsprechend
qualizierten Techniker repariert werden.
j. Beachten Sie alle nationalen und/oder lokalen
Vorschriften zur Lagerung und Verwendung von

www.evolutionpowertools.com
35
Erdölerzeugnissen. Alle örtlichen Gesetze sind zu
beachten.
GESUNDHEITSHINWEISE
WARNUNG: Bei Arbeiten mit dieser
Maschine können Staubpartikel entstehen.
Abhängig von den Materialien, mit denen Sie
arbeiten, kann dieser Staub in einigen Fällen
besonders schädlich sein. Es wird empfohlen,
die mit den Materialien, mit denen Sie arbeiten,
verbundenen Risiken zu berücksichtigen
und das Expositionsrisiko zu verringern. Da
einige Materialien gesundheitsschädlichen
Staub erzeugen können, empfehlen wir die
Verwendung einer zugelassenen Gesichtsmaske
mit austauschbaren Filtern, wenn Sie dieses Gerät
verwenden.
Sie sollten stets:
• in gut gelüfteten Bereichen arbeiten.
• geprüfte Schutzausrüstung tragen, z.B.
Staubmasken für die Filterung mikroskopisch
kleiner Partikel.
WARNUNG: Bei der Arbeit mit
Elektrowerkzeugen können Objekte in Richtung
Ihrer Augen geschleudert werden. Dies kann zu
schweren Verletzungen der Augen führen. Tragen
Sie vor Inbetriebnahme des Elektrowerkzeugs
immer eine Sicherheitsbrille oder eine Schutzbrille
mit seitlichem Schutz oder wenn notwendig einen
vollächigen Gesichtsschutz.
WARNUNG: Sollten Teile fehlen,
verwenden Sie die Maschine nicht,
bis die fehlenden Teile ersetzt wurden. Die
Nichtbeachtung dieser Regel kann zu schweren
Verletzungen führen.
ZUSÄTZLICHE SICHERHEITSREGELN FÜR
DEN H320-VERDICHTER
a. Den Arbeitsbereich abriegeln. Anwesende und
nicht autorisiertes Personal sollten sich in sicherem
Abstand von Verdichtungsvorgängen benden.
b. Stellen Sie sicher, dass Sie wissen, wie Sie das
Gerät ausschalten („o“). Wenn während des
Verdichtungsvorgangs Probleme auftreten, ist es
wichtig, dass Sie eine Notabschaltung der Maschine
durchführen können.
c. Lassen Sie den H320 niemals unbeaufsichtigt
laufen. Die Maschine vibriert, sobald sie gestartet
wird, und beginnt sich vorwärts zu bewegen. Die
Maschine muss heruntergefahren werden, wenn sie
unbeaufsichtigt bleibt.
d. Schalten Sie den Motor immer aus, bevor Sie
die Maschine auf dem Gelände bewegen. Wenn
Sie die Maschine bewegen oder transportieren,
muss der Motor ausgeschaltet und vorzugsweise
kalt sein, wobei sich der Kraftstohahn in der
Position „Aus“/„O “ bendet.
e. Wenn der H320-Motor während des Betriebs
heiß wird, stellen Sie sicher, dass Sie den Motor
nicht berühren und dass brennbare Materialien
oder Kleidung während des Betriebs keinen
Kontakt mit dem Motor haben. Berühren oder
warten Sie nur einen kalten Motor.
f. Niemals die Schutzvorrichtungen der
Maschine entfernen, verändern oder
manipulieren. Die Schutzvorrichtungen sind
speziell entwickelt und ausgestattet, um Ihnen den
größtmöglichen Schutz während des Betriebs zu
bieten. Wenn ein Schutz fehlt oder beschädigt ist,
verwenden Sie die Maschine erst, wenn der Schutz
von einem kompetenten Techniker repariert oder
ersetzt wurde.
g. Seien Sie besonders vorsichtig, wenn Sie auf
einer geneigten Fläche arbeiten. Arbeiten Sie auf
einer geneigten Fläche auf und ab, nicht quer.
h. Falls mehrere Schichten übereinander
verdichtet werden sollen, verdichten Sie jede
Schicht separat. Dadurch wird die Integrität jeder
Schicht sichergestellt.
i. Führen Sie den H320 in einem organisierten
Muster über die Arbeitsäche, bis die
gewünschte Verdichtung erreicht ist. Dies
gewährleistet, dass die größtmögliche Sicherheit
während der Arbeit gegeben ist.
j. Führen Sie die Sicherheitsprüfungen vor
Gebrauch immer durch, bevor Sie den Betrieb
beginnen. Befolgen Sie die Anweisungen in
späteren Abschnitten dieses Handbuchs.
PSA (persönliche Schutzausrüstung)
Hinweis: Wird dieses Gerät auf einer Baustelle
verwendet, muss der Verwender alle geltenden
Baustellenrichtlinien/-verordnungen einhalten.
Wenden Sie sich bei Fragen an den örtlichen

www.evolutionpowertools.com
36
Bauleiter oder andere verantwortliche Mitarbeiter.
a. Tragen Sie geeignete Kleidung. Hierbei kann
es sich um einen Arbeitsoverall, einen gepolsterten
Overall, um Signalkleidung und Ähnliches handeln.
b. Tragen Sie geeignetes Schuhwerk. Es
werden Sicherheitsschuhe mit Stahlkappen und
rutschfesten Sohlen empfohlen.
c. Tragen Sie einen geeigneten Augenschutz.
Es wird ein voller Gesichtsschutzschild oder eine
Schutzbrille mit Seitenschutz empfohlen, der bzw.
die Schutz vor umheriegenden Teilen bietet.
d. Schützen Sie Ihr Gehör. Tragen Sie einen
geeigneten Gehörschutz.
e. Tragen Sie geeignete Handschuhe. Es wird
griges Handschuhmaterial empfohlen.
f. Tragen Sie einen Atemschutz. Es wird
eine Staubmaske mit austauschbaren Filtern
empfohlen, die vor feinem, giftigem Staub, Fasern
und Dämpfen schützt.
g. Tragen Sie einen Schutzhelm. Möglicherweise
ist das Tragen eines Schutzhelms auf Baustellen
Picht, um den Verwender vor den Gefahren
herabfallender oder über Kopf positionierter
Gegenstände zu schützen.
FAHRZEUGTRANSPORT
WARNUNG: Zum Heben dieser
Maschine sind mindestens zwei Männer
erforderlich.
Bereiten Sie das Fahrzeug im Voraus so vor, dass es
für das Beladen mit der Maschine bereit ist. Achten
Sie darauf, dass die Maschine beim Be- und
Entladen nicht herunterfällt.
• Obwohl kompakt, ist diese Maschine schwer.
Um das Verletzungsrisiko zu reduzieren,
sollten Sie sich beim Anheben dieser Maschine
fachkundige Hilfe holen.
• Um das Risiko von Rückenverletzungen zu
reduzieren, halten Sie die Maschine beim
Anheben nahe an Ihren Körper. Beugen Sie die
Knie, damit Sie die Maschine mit den Beinen
heben können und nicht mit dem Rücken.
Greifen Sie zum Heben geeignete Bereiche des
äußeren Hauptrahmens.
• Heben Sie die Maschine in das Fahrzeug und
sichern Sie sie so mit Seilen, Zurrgurten usw.,
dass sich die Maschine während des Transports
nicht bewegen kann.
Hinweis: H320-P: Beim Transport dieser Maschine
in einem Fahrzeug ist es am besten und sichersten,
dass sich im Kraftstotank der Maschine kein
Kraftsto bendet.
BESTIMMUNGSGEMÄSSER GEBRAUCH DES
ELEKTROWERKZEUGS
WARNUNG: Dieses Produkt ist eine
elektrisch betriebene Verdichtungsplatte
und wurde für den Einsatz mit speziellen
Zubehörteilen von Evolution entwickelt.
Verwenden Sie ausschließlich für den Gebrauch
mit dieser Maschine entwickeltes und/oder
ausdrücklich von Evolution Power Tools Ltd
empfohlenes Zubehör.
Diese Maschine kann zum Verdichten von
Oberächen wie Brecherlauf, kleinen Aggregaten,
Erde, Sand und Untergrundmaterialien usw.
verwendet werden. Wenn der H320 mit dem
Paving Pad ausgestattet ist, kann er zum
Verdichten und Absetzen der meisten Pasterarten
verwendet werden.
Gründe für das Verdichten
Lockerer Boden, neue Füllmaterialien, Unterboden
oder Asphalt enthalten Lufteinschlüsse und kleine
Hohlräume, die, wenn sie nicht verdichtet werden,
zu möglichen Problemen führen können.
• Wenn die Oberäche einer nicht verdichteten
Fläche durch Verkehr belastet wird, drücken die
aufgebrachten Lasten das darunter liegende
Material nach unten. Dies kann zum Absinken
der Oberäche führen, da das Material nach
unten wandert, um die Hohlräume zu füllen.
• Eine statische Last (Haus, Garage usw.), die
auf nicht verdichtetem Boden errichtet
wurde, kann nachgeben, da sich das darunter
bendliche Material bewegt.
• Wasser, das in Material mit Hohlräumen
und Lufteinschlüssen eindringt, kann sich in
diesen Räumen ansammeln und sich unter
Frostbedingungen ausdehnen und bei Warm-/
Trockenperioden wieder zusammenziehen.
Expansion und Kontraktion sind wesentliche
Faktoren für Schäden an Gebäudefundamenten
www.evolutionpowertools.com
37
und können dazu führen, dass eine Struktur
gestützt werden muss.
Durch die Verdichtung wird die Dichte des
Materials erhöht und kann damit statischen und
dynamischen Belastungen standhalten. Durch
das Beseitigen von Lufteinschlüssen und kleinen
Hohlräumen wird die Gefahr der Ansammlung
von Wasser und des nachfolgenden Absinkens
aufgrund von Materialausdehnung und
-kontraktion verringert.
UNZULÄSSIGER GEBRAUCH DIESES
ELEKTROWERKZEUGS
WARNUNG: Dieses Produkt ist eine
elektrische Verdichtungsplatte und darf nur
bestimmungsgemäß verwendet werden. Es dürfen
keinerlei Modikationen vorgenommen werden.
Weiterhin darf die Maschine nicht mit anderer
Ausrüstung oder anderem Zubehör als dem in
dieser Betriebsanleitung erwähnten in Betrieb
genommen werden.
WARNUNG: Diese Maschine ist
nicht bestimmt zur Nutzung durch Personen
(einschließlich Kindern) mit eingeschränkten
körperlichen, sensorischen bzw. geistigen
Fähigkeiten, mangelnder Erfahrung bzw.
fehlendem Wissen, sofern diese nicht durch eine
für ihre Sicherheit verantwortliche Person eine
Beaufsichtigung bzw. Anweisung für die sichere
Nutzung der Maschine erfahren haben.
Kinder müssen beaufsichtigt werden, um
sicherzustellen, dass sie keinen Zugang zu der
Maschine haben und nicht mit ihr spielen.
ELEKTRISCHE SICHERHEIT - H320-E
DER NETZSTECKER
Dieses Produkt ist mit dem entsprechenden
Netzstecker für den vorgesehenen Absatzmarkt
ausgestattet. Der Stecker erfüllt die Anforderungen
internationaler Normen und muss an eine
Versorgungsspannung angeschlossen werden, die
der auf dem Typenschild angegebenen entspricht.
Wenn der Stecker oder das Netzkabel beschädigt
sind, müssen sie mit einer kompletten Baugruppe
ersetzt werden, die mit dem Original identisch
ist. Beachten Sie die in Ihrem Land geltenden
Anforderungen für den Netzanschluss. Im
Zweifelsfall wenden Sie sich an einen qualizierten
Elektriker.
Ein BS-Stecker kann nur in GB verwendet werden.
Der Stecker sollte innerhalb eines Gebäudes in die
Steckdose gesteckt werden, um die erforderliche
IP-Schutzart zu gewährleisten. Der Stecker sollte
mit einem Netzkabel mit einer Länge von mehr als
10m verbunden werden.
AUSSENGEBRAUCH – H320-E
WARNUNG: Zu Ihrer eigenen Sicherheit
sollte diese Maschine bei Verwendung im
Freien keinem Regen ausgesetzt und nicht in
einer feuchten Umgebung eingesetzt werden.
Verwenden Sie für zusätzlichen Schutz eine
Fehlerstrom-Schutzeinrichtung (R.C.D.), die
bei Leckstrom von über 30mA über einen
Zeitraum von 30ms die Stromzufuhr unterbricht.
Überprüfen Sie immer die Funktion der
Fehlerstrom-Schutzeinrichtung, bevor Sie die
Maschine verwenden.
Wenn ein Verlängerungskabel erforderlich ist,
muss es für die Verwendung im Freien geeignet
und entsprechend gekennzeichnet sein.
Bei Verwendung eines Verlängerungskabels sind
die Anweisungen des Herstellers zu beachten.
VIBRATION
WARNUNG: Beim Betrieb dieser Maschine
ist der Bediener u.U. starken Vibrationen an
Hand und Arm ausgesetzt. Möglicherweise
tritt dadurch beim Bediener die
„Weißngerkrankheit“ (Raynaud-Syndrom)
auf. Dies kann die Temperaturempndlichkeit
der Hand beeinträchtigen und ein allgemeines
Taubheitsgefühl erzeugen. Personen,
die längere Zeit oder regelmäßig mit
Verdichtungsmaschinen arbeiten, sollten den
Zustand ihrer Hände und Finger aufmerksam
beobachten. Falls die vorgenannten Symptome
auftreten, sollte unverzüglich ärztlicher Rat
eingeholt werden.
• Die Messung und Bewertung der
Auswirkungen von Schwingungen auf das
Hand-Arm-System am Arbeitsplatz wird in

www.evolutionpowertools.com
38
folgenden Normen beschrieben:
BS EN ISO 5349-1:2001 und
BS EN ISO 5349-2:2002
• Die Stärke der Vibration während des Betriebs
wird von einer Vielzahl von Faktoren beeinusst
wie z.B. Beschaenheit und Ausrichtung der
Arbeitsoberäche und Typ und Zustand der
verwendeten Maschine. Derartige Faktoren
sollten vor jeder Verwendung bewertet werden,
um geeignete Arbeitspraktiken festzulegen,
falls möglich. Folgende Einstellungen können
Vibrationen vermindern:
Gebrauch
• Bedienen Sie die Maschine mit Sorgfalt,
lassen Sie sie die Arbeit für Sie verrichten.
• Wenden Sie nicht unnötig viel Kraft auf die
Bedienelemente der Maschine an.
• Berücksichtigen Sie Ihre eigene Sicherheit
und Stabilität sowie die Ausrichtung der
Maschine während des Betriebs.
Arbeitsoberäche
• Berücksichtigen Sie das Material Ihrer
Arbeitsoberäche;
deren Zustand, Dicke, Robustheit,
Härte und Ausrichtung.
SYMBOLE UND LABEL
WARNUNG: Verwenden Sie die
Maschine nicht, wenn Warnhinweise und/
oder Hinweisschilder fehlen oder beschädigt sind.
Für Ersatz wenden Sie sich an Evolution Power
Tools.
Hinweis: Manche oder alle der folgenden Symbole
können in der Originalbetriebsanleitung oder auf
dem Produkt abgebildet sein.

www.evolutionpowertools.com
39
Volt
V
Ampere
A
Drehzahl
min
-1
(U/min)
Wechselstrom
~
Schallleistungspegel
Handbuch lesen
Gehörschutz tragen
Augenschutz tragen
Staubschutz tragen
Warnung
VORSICHT: Heißer Auspu.
Nicht berühren
HEISS! Nicht berühren
Heiße Oberäche
CE-Zertizierung
UKCA-Zertizierung
Intertek-Zertizierung
Schwere Gefahr für die
Gesundheit
Schwere Gefahr für die Umwelt
Entsorgung als Elektro-
und Elektronikschrott
Motoröl 10/30W
Drossel auf
Drossel zu
VORSICHT: Dies ist ein
Viertaktmotor.
Nur mit Benzin befüllen.
Nicht mit
Dieselöl befüllen.
Lassen Sie den Motor
abkühlen, bevor Sie den
Tankdeckel önen. Der Dampf
ist extrem leicht entammbar
und kann sich bei Kontakt mit
einer heißen Oberäche oder
Flammen entzünden.
HOT!
NUR BLEIFREIES
BENZIN!*
HOCHENTZÜNDLICH.
*E5 & E10
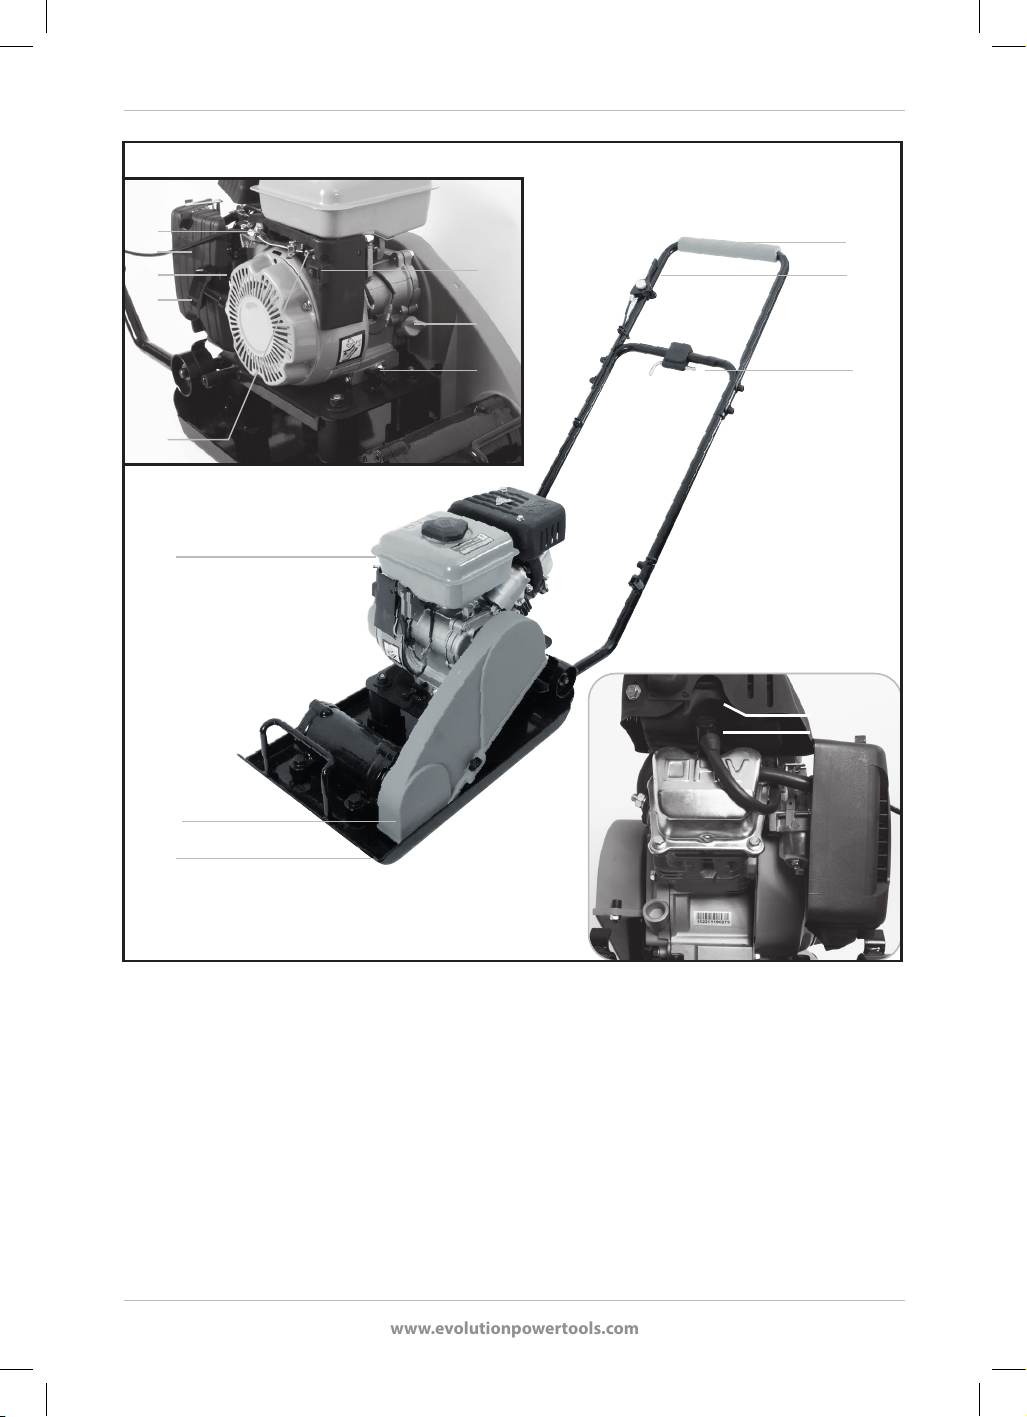
www.evolutionpowertools.com
40
1. VIBRATIONSPLATTE
2. TREIBSTOFFTANK
3. MOTOREN AN-/AUS-AUSLÖSESCHALTER
4. GASHEBEL
5. CHOKEHEBEL
6. RÜCKSTOSS-STARTER
7. BENZINHAHN
8. MOTORÖLFÜLLER/MESSSTAB
9. LUFTFILTER
10. ZÜNDKERZE
11. AUSPUFF
12. MOTORÖLABLAUFSCHRAUBE
13. SCHNELLE EINSTELLUNGSSCHRAUBE
14. RIEMENSCHUTZ
15. ANTI-VIBRATIONS-HANDGRIFF
16. WERKZEUGABLAGE
(1)
(14)
(2)
(7)
(5)
(9)
(4)
(13)
(6)
(3)
(8)
(12)
(15)
(16)
(11)
(10)
MASCHINENÜBERSICHT H320-P

www.evolutionpowertools.com
41
MASCHINENÜBERSICHT H320-E
1. VIBRATIONSPLATTE
2. GRIFFKREUZ/KABELLAGER
3. SICHERHEITSSTART AN-/AUS-SCHALTER
4. ANTI-VIBRATIONS-HANDGRIFF
5. OBERER ABSCHNITT - GRIFF
6. MITTLERER ABSCHNITT - GRIFF
7. CLIPS FÜR DIE KABELFÜHRUNG
(1)
(2)
(3)
(4)
(5)
(6)
(7)

www.evolutionpowertools.com
42
ERSTE SCHRITTE
AUSPACKEN
Vorsicht: Diese Verpackung enthält scharfe
Gegenstände. Lassen Sie beim Auspacken
Vorsicht walten. Es können zwei Personen
erforderlich sein, um diese Maschine anzuheben,
zusammenzubauen und zu bewegen. Entnehmen
Sie die Maschine sowie das im Lieferumfang
enthaltene Zubehör der Verpackung. Überprüfen
Sie sorgfältig, ob die Maschine in gutem
Zustand ist, und berücksichtigen Sie dabei
das gesamte in dieser Anleitung aufgeführte
Zubehör. Stellen Sie ebenfalls sicher, dass alle
Zubehörteile vollständig sind. Fehlen Teile, geben
Sie die Maschine zusammen mit dem Zubehör
in Originalverpackung beim Einzelhändler ab.
Entsorgen Sie die Verpackung nicht; bewahren Sie
sie während der Garantiefrist sicher auf. Entsorgen
Sie die Verpackung umweltfreundlich. Recyceln
Sie sie nach Möglichkeit. Lassen Sie niemals
Kinder mit leeren Plastiktüten spielen, es besteht
Erstickungsgefahr.
IM LIEFERUMFANG ENTHALTENE TEILE -
H320-P VERDICHTER
BESCHREIBUNG MEN-
GE
Betriebsanleitung 1
Verlängerung für den mittleren Gri 1
Verlängerung für den oberen Gri 1
Befestigung für den mittleren Gri
Schrauben M10x20
4
Befestigung für den oberen Gri
Schrauben M10x15
4
Unterlegscheiben für den oberen Gri 4
Sechskantschlüssel 8 mm 1
Zündkerzensteckschlüssel &
Knebelstange
1
Motoröl (400 ml Flasche) 1
IM LIEFERUMFANG ENTHALTENE TEILE -
H320-E VERDICHTER
BESCHREIBUNG MENGE
Betriebsanleitung 1
Schrauben zur Befestigung des
Gris (lang) M10 x 40
2
Schrauben zur Befestigung des
Gris (kurz) M10 x 15
2
Unterlegscheiben für den Gri 4
Mittlerer Gri 1
Oberer Gri 1
Sechskantschlüssel 8 mm 1
Grikreuz/Kabellager 1
Zusätzliches Zubehör
Neben den im Lieferumfang dieser Maschine
enthaltenen Standardartikeln sind zudem die
folgenden Zubehörteile über den Evolution-
Online-Shop unter www.evolutionpowertools.com
oder bei Ihrem örtlichen Händler erhältlich.
BESCHREIBUNG TEILE-Nr
H320 Paving Pad Pasterplatte
015-0007
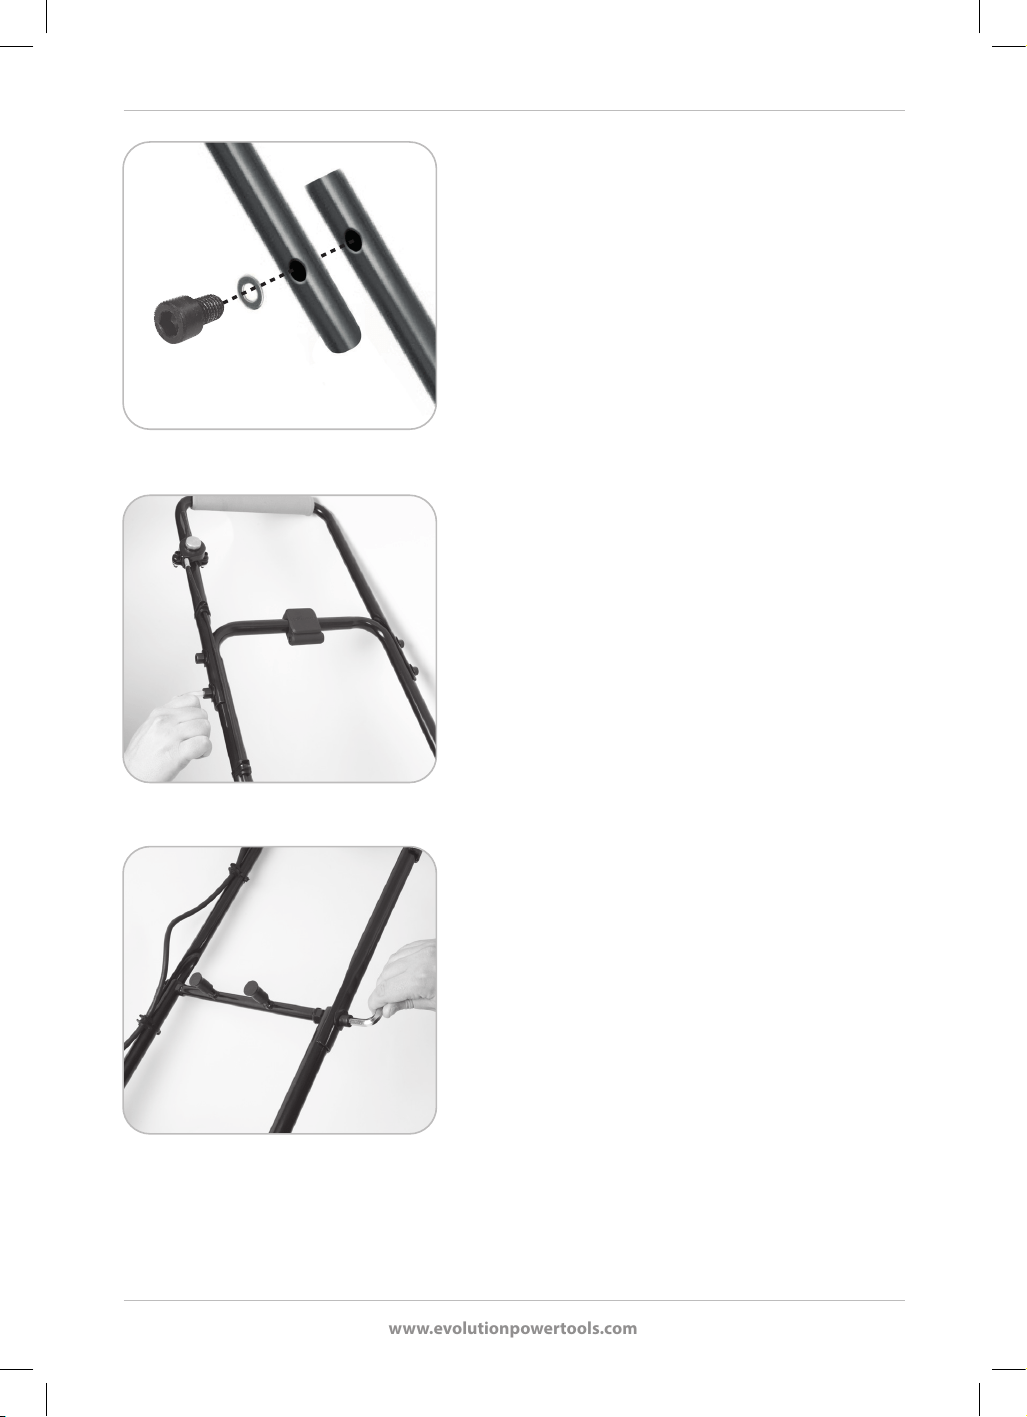
www.evolutionpowertools.com
43
Abb. 2
Abb. 1
MONTAGE
Ihr Evolution H320 muss vor dem Gebrauch mit wenigen
Handgrien zusammengebaut werden. Wenn Sie sich für
das Modell mit Benzinmotor entschieden haben, schließen
Sie die gesamte Montage ab, bevor Sie den Motor mit 0,4l
des empfohlenen Serviceöls befüllen.
1. Anbringen des Verlängerungsgris – H320-P
Hinweis: Die Griverlängerung verfügt über einen
Anti-Vibrationshandgri, der dem Bediener hilft, die
von der Maschine an die Hand/den Arm des Bedieners
übertragenen Vibrationen zu kontrollieren. Der
Verlängerungsgri sollte während des Betriebs angebracht
sein, er kann jedoch während des Transports oder der
Lagerung zusammengeklappt werden. Durch Entfernen der
beiden unteren Schrauben und Lösen der oberen beiden
Schrauben kann die Griverlängerung zum leichteren
Transport zusammengeklappt werden.
• Schieben Sie das mittlere Griteil vorsichtig über
die beiden unteren Grihalterungen und richten Sie
die vier Löcher im mittleren Gri mit den vier vertikalen
Dreieckslöchern in den unteren Halterungen aus.
•
Stecken Sie die vier Schrauben M10 x 20 durch den
mittleren Gri und die oberen Grihalterungen.(Abb.2)
• Ziehen Sie alle vier Schrauben mit dem
Innensechskantschlüssel fest an.
2. Gri montieren/befestigen – H320-E
Hinweis: Der H320-E-Gri besteht aus vier (4) Hauptteilen:
• Unterer Gri (werkseitig an der Maschine befestigt).
• Mittlerer Abschnitt.
• Oberer Abschnitt mit Sicherheitsschalter „An-/Aus“
(„On“/“O“).
• Grikreuz/Kabellager.
Mit den zwei langen Schrauben werden das Grikreuz/
Kabellager und der mittlere Abschnitt des Gris an den
schwenkbaren unteren Grien befestigt.
• Bringen Sie das Grikreuz/Kabellager vorsichtig in seine
Serviceposition.
Hinweis: Die Kabelbolzen sollten nach hinten zeigen.
• Schieben Sie den mittleren Abschnitt vorsichtig über
die unteren Grie und richten Sie die Löcher aus.
• Zwischen der Schraube und den Grien muss eine
Unterlegscheibe eingelegt werden. (Abb.1)
• Führen Sie die langen Schrauben durch die Löcher im
mittleren Gri, durch die Löcher in den unteren Grien,
und schrauben Sie sie in die Kägmuttern im Grikreuz/
Kabellager. (Abb.3)
• Ziehen Sie diese Schrauben mit dem
Abb. 3

www.evolutionpowertools.com
44
Innensechskantschlüssel fest an.
Mit den zwei kurzen Schrauben wird der obere Abschnitt
des Gris am mittleren Abschnitt befestigt.
• Schieben Sie den oberen Abschnitt des Gris vorsichtig
über den mittleren Abschnitt und richten Sie die Löcher
aus.
• Führen Sie die Schrauben durch den Gri des oberen
Abschnitts und schrauben Sie sie in die Kägmuttern im
mittleren Abschnitt.
Der H320-E wird mit 3 Kabelclips geliefert, um das
Stromkabel sicher am Rahmen des Gris hinauf zu führen.
Diese müssen montiert werden. Falls Sie das nicht tun,
erlischt die Garantie. Bringen Sie sie an derselben Seite an,
an der sich auch der Anschalter bendet, und lassen Sie
einen Abstand wie in Abb. 4a & 4b angegeben.
WARNUNG: Achten Sie darauf, dass das
Stromkabel vom Sicherheitsschalter zum Motor
während des Montagevorgangs „frei“ und nicht
„eingeklemmt“ ist.
Erstbefüllung und Kontrolle des Ölstands –
H320-P
WARNUNG: Diese Maschine wird nicht mit
Öl gefüllt geliefert. Es darf kein Versuch
unternommen werden, den Motor zu starten, bis das
Kurbelgehäuse mit dem korrekten Öl auf den richtigen
Stand gefüllt ist.
Hinweis: Öl (im Lieferumfang enthalten) sollte durch
den Ölfüller/Füllstanddeckel in die Maschine eingefüllt
werden. Die Ölkapazität beträgt ca. 0,4 Liter von 10W 30
Autoöl (erhältlich bei allen guten Motorservicestellen und
den meisten Tankstellen). In einigen nicht gemäßigten
Klimazonen ist eine alternative Ölsorte vorzuziehen -
wenden Sie sich an Ihren Lieferanten.
Der Öleinfülldeckel kann vom Motorgehäuse der Maschine
abgeschraubt werden und enthält einen Ölstandsmessstab.
(Abb. 5) Achten Sie darauf, kein Öl zu verschütten.
Hinweis: Bei der Kontrolle des Ölstands ist es wichtig, dass
sich die Maschine auf einer stabilen, waagerechten und
ebenen Fläche bendet, während der Motor stillsteht und
kalt ist.
Abb. 5
Abb. 4a
Abb. 4b

www.evolutionpowertools.com
45
Auf dem Messstab benden sich zwei Indexmarken.
Der Ölstand sollte auf oder in der Nähe der
oberen Indexmarke gehalten werden.
• Entfernen Sie den Öleinfülldeckel und wischen Sie den
Messstab mit einem sauberen, trockenen Tuch ab.
• Füllen Sie die erforderliche Ölmenge ein. (ca. 0,4 l)
• Lassen Sie das Öl mindestens 10 Sekunden stehen.
• Den Ölstand durch die Öleinfüllönung betrachten.
Der Ölstand sollte sich sehr nahe an der Spitze
des Gewindes benden, wobei gerade Öl aus dem
Kurbelgehäuse austritt (die Maschine muss sich auf
einer waagerechten horizontalen Oberäche benden).
• Setzen Sie den Ölmessstab ein und schrauben Sie die
Kappe vollständig auf. Schrauben Sie den Einfülldeckel
ab und ziehen Sie den Ölmessstab heraus. Visuelle
Prüfung des
Ölstands am Ölmessstab.
• Korrigieren Sie den Ölstand gegebenenfalls.
• Wenn der Füllstand korrekt ist, ziehen Sie den
Öleinfülldeckel fest in das Motorgehäuse.
Hinweis: Wechseln Sie das Öl gemäß der
Wartungsübersichtstabelle (Siehe auch WARTUNG -
Motoröl ersetzen)
Überprüfungen vor dem Betrieb
Hinweis: Vor jedem Betrieb sollte die Maschine überprüft
werden, um sicherzustellen, dass alle Sicherheitsfunktionen
usw. ordnungsgemäß funktionieren.
• Stellen Sie sicher, dass alle Schutzvorrichtungen in
Position und unbeschädigt sind.
• H320-E – Überprüfen Sie die Unversehrtheit des
Netzkabels und des Steckers. Wenn das Netzkabel oder
der Stecker beschädigt ist, müssen das Kabel und/
oder der Stecker von einem qualizierten Techniker mit
identischen Ersatzteilen ausgetauscht werden.
• H320-P – Überprüfen Sie alle Kraftstoschläuche,
Anschlüsse und Einfülldeckel usw. auf Anzeichen von
Flüssigkeitslecks. Festgestellte Leckagen müssen vor
dem Betrieb behoben werden.
• Überprüfen Sie den Motorölstand und stellen Sie ihn
gegebenenfalls ein.
• Kraftstostand prüfen und bei Bedarf nachfüllen.
• Untersuchen Sie den Rest der Maschine gründlich
auf Beschädigungen, insbesondere an Abdeckungen,
Schutzvorrichtungen, Gummikomponenten usw.
Starten des H320-P
Abb. 6
Abb. 7

www.evolutionpowertools.com
46
• Füllen Sie den Kraftstotank mit Benzin. Der Einfülllter
hat einen roten Plastikeinsatz, um den maximalen
Kraftstostand zu markieren. Lassen Sie Kraftsto nicht
über diese Markierung hinaus aufsteigen.
• Drehen Sie den Kraftstohahn in die Position „On“.
(Abb.6)
• Stellen Sie den Choke-Hebel auf die Position „Choke On“.
(Abb.7)
• Drücken Sie den Wippschalter für die Motorzündung
auf die Position „ON“ (I). (Abb.8)
• Stellen Sie den Gashebel auf Maximum. (Abb. 9)
• Halten Sie den H320 fest, indem Sie den Bediengri an
einem geeigneten Punkt halten.
• Fassen Sie mit der anderen Hand den Gri des
Seilzugstarters. (Abb.10)
• Ziehen Sie den Seilzugstarter langsam, bis ein
Widerstand spürbar ist, der anzeigt, dass der Starter
eingerastet ist.
• Wenn ein Widerstand spürbar ist, ziehen Sie das Seil
kräftig an.
• Fahren Sie mit diesem Vorgang fort, bis der Motor
startet.
• Das Aggregat kann kurzzeitig drehen (jagen), bis der
Motor auf Temperatur ist.
• Normalerweise kann der Choke fast sofort nach dem
Anlassen des Motors in die Position „Aus“ (Betrieb)
gebracht werden. Dies hängt jedoch von den
Umgebungstemperaturen, Betriebsbedingungen
usw. ab, und der Betreiber muss dies nach eigenem
Ermessen tun.
• Unter bestimmten Umständen kann ein Choke
erforderlich sein, auch wenn der Motor von einem
vorherigen Betriebszyklus warm ist. Wenn Sie
Schwierigkeiten haben, einen warmen Motor zu starten:
• Stellen Sie den Choke auf die Position „Ein“ (rechts).
• Ziehen Sie den Rücklaufstarter einmal.
• Bringen Sie den Choke wieder in die Position „Aus“
(links).
• Ziehen Sie den Rücklaufstarter, bis der Motor zündet.
• Hinweis: Der H320-P beginnt zu vibrieren und zu
fahren, sobald der Motor gestartet wird. Der Bediener
sollte beim Starten dieser Maschine die gebotene
Sorgfalt walten lassen.
Anhalten des H320-P-Motors
• Drücken Sie den Wippschalter für die Motorzündung in
die Position „OFF“ (0).
Abb. 8
Abb. 9
Abb. 10

www.evolutionpowertools.com
47
• Kraftstohahn schließen.
Fahrt der Maschine - H320-P
Hinweis: Durch das Einstellen der Motordrehzahl werden
die Vibrationsfrequenz und auch die Geschwindigkeit, mit
der sich die Maschine vorwärts bewegt, geändert.
Hinweis: Die Schnelllaufschraube begrenzt den maximalen
Hub des Gashebels und steuert damit nur die maximale
Motordrehzahl.
Wenn Sie die maximale Motordrehzahl ändern müssen, um
die Fahrgeschwindigkeit der Maschine zu erhöhen oder zu
verringern:
• Drehen Sie die Schnelllaufschraube (Abb. 11) nach und
nach (max. eine halbe Umdrehung) im Uhrzeigersinn,
um die Motordrehzahl zu verringern, oder gegen den
Uhrzeigersinn, um die Motordrehzahl zu erhöhen.
• Stellen Sie sicher, dass der Gashebel auf maximal
eingestellt ist.
• Starten Sie die Maschine und überprüfen Sie den
„Weg“ der Maschine bei der neuen Einstellung der
Schnelllaufschraube.
• Stoppen Sie ggf. die Maschine und stellen Sie die
Schnelllaufschraube weiter ein, bis die gewünschte
Fahrgeschwindigkeit erreicht ist.
Starten und Stoppen des H320-E
Der H320-E ist mit einem An-/Aus-Schalter („On“/
„O“) für den Sicherheitsstart ausgestattet. Die
Sicherheitsverriegelung verhindert, dass der Schalthebel
betätigt wird, bis die Sicherheitsverriegelungstaste
gedrückt wird.
• Drücken Sie die Sicherheitsverriegelungstaste (a) und
ziehen Sie den Hebel (b), um die Maschine zu starten.
(Abb.12)
• Lassen Sie den Hebel los, um die Maschine
abzuschalten.
Hinweis: Beim Loslassen des Schalthebels stoppt der Motor
und der Sicherheitssperrknopf wechselt automatisch in den
„sicheren Modus“.
WARNUNG: Der Bediener sollte sich immer
über die Position des Netzkabels im Klaren sein,
um sicherzustellen, dass es während der Bewegung der
Maschine oder in einer anderen Form nicht zur Gefahr wird
Abb. 11
Abb. 12
(a)
(b)

www.evolutionpowertools.com
48
oder von der Maschine „überfahren“ wird.
ALLGEMEINE HINWEISE ZUM BETRIEB
• Stellen Sie sicher, dass sich die Personen in
der Umgebung in einem sicheren Abstand zu
Verdichtungsvorgängen benden. Falls notwendig,
den Arbeitsbereich absperren und WARNhinweise
anbringen.
• Planen Sie Ihre Arbeit und den gewünschten Weg der
Maschine, bevor Sie mit dem Verdichten beginnen.
• Besichtigen Sie den Arbeitsbereich, bevor Sie beginnen,
und entfernen Sie Hindernisse, die eine Gefahr
darstellen könnten.
• Stellen Sie sicher, dass Sie über die richtige PSA
verfügen und wissen, wie Sie diese verwenden.
• Der Verdichter fährt mit eigener Kraft vorwärts. Ein
leichter Kraftaufwand des Bedieners am Gri der
Maschine genügt, um die Maschine zu „lenken“. Der
Bediener sollte den Anti-Vibrationsgri mit beiden
Händen halten, und die Hände sollten so weit wie
möglich voneinander entfernt sein.
• Es können mehrere Durchgänge über dem
Arbeitsbereich erforderlich sein, um das Material auf die
gewünschte Dichte zu verdichten.
• Wenn der Arbeitsbereich geneigt ist, bearbeiten Sie die
geneigte Fläche auf- und abwärts, nicht quer
INSTANDHALTUNG
H320-P
Regelmäßige Wartung ist unerlässlich, um die Maschine
und deren Zubehör in einem funktionsfähigen Zustand
zu halten. Wir empfehlen, dass nur kompetente Bediener,
die Erfahrung in der Wartung und Instandhaltung von
Benzinmotoren haben, diese Vorgänge durchführen. Lassen
Sie die Maschine im Zweifelsfall von einem von Evolution
autorisierten Service-Center warten.
1. Motorölwechsel
Motoröl sollte nach der ersten Einfahrphase
und in den im Service-Zeitplan angegebenen
Zeitabständen
ausgewechselt werden.
Hinweis: Motoröl ist leichter zu ersetzen, wenn der Motor
auf Temperatur gebracht wurde und das Öl warm ist.
• Stellen Sie sicher, dass der Motor auf einer harten
Abb. 13
Abb. 14
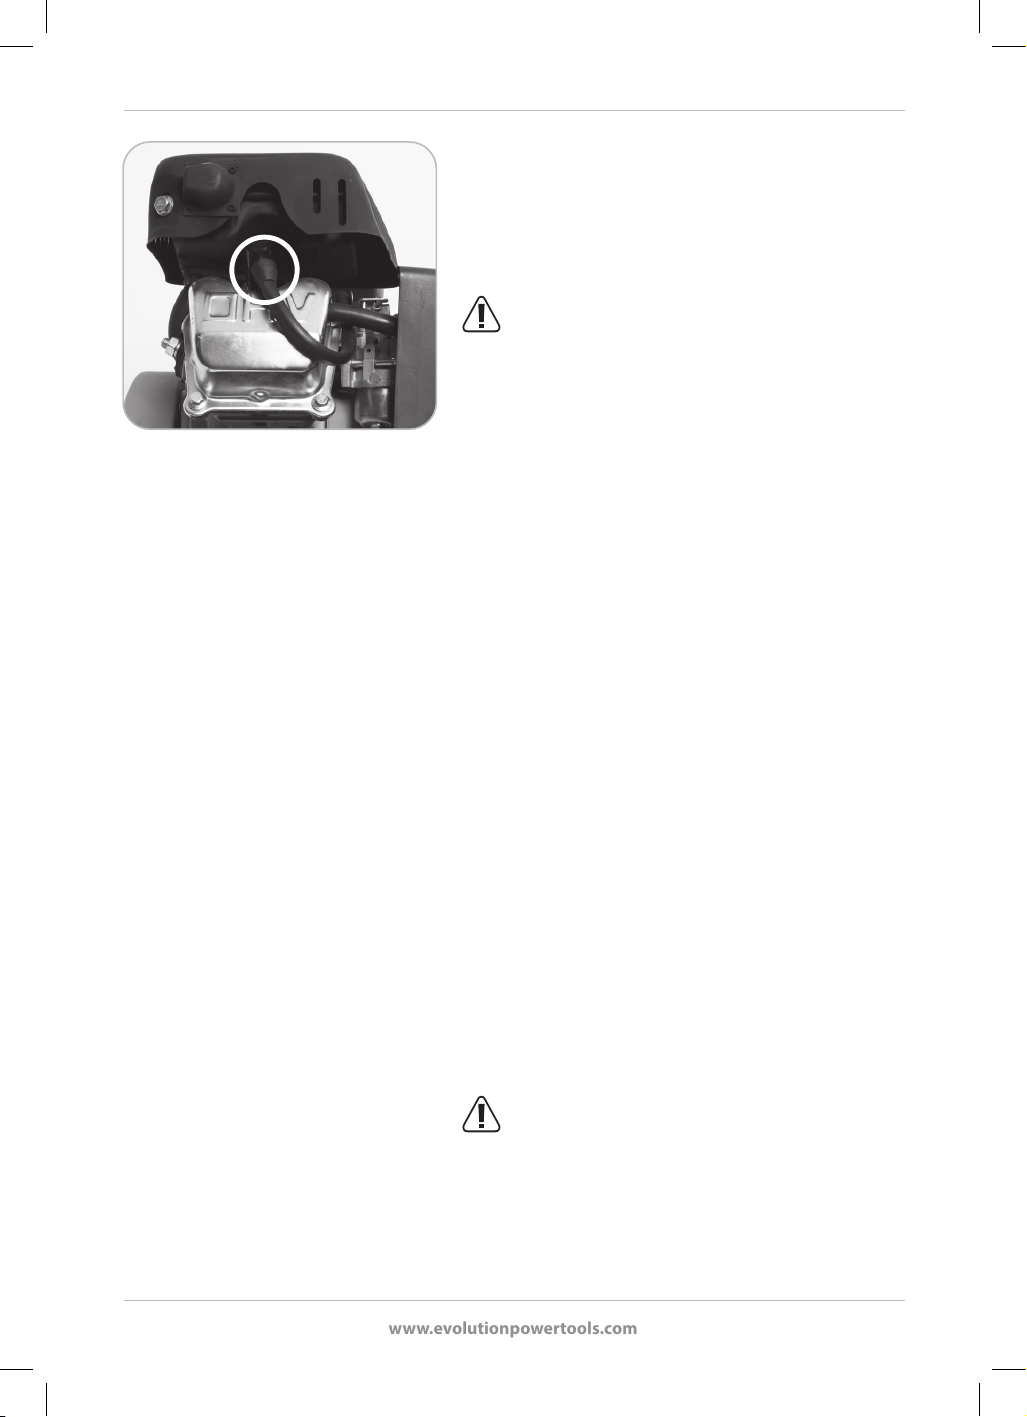
www.evolutionpowertools.com
49
Abb. 15
ebenen Fläche steht.
• Entfernen Sie den Öleinfülldeckel. (Abb.13)
• Stellen Sie eine geeignete Ölsammelwanne unter den
Motor.
• Entfernen Sie den Ölablassstopfen, damit das Öl
vollständig aus dem Motor ablaufen kann. (Abb.14)
WARNUNG: Seien Sie vorsichtig. Der Kontakt
mit gebrauchtem Motoröl kann schädlich sein. Das Öl
kann sehr heiß sein (Verbrennungsrisiko), und bei einigen
Bedienern kann es zu einer Reizung kommen, wenn das
Öl die Haut verschmutzt. Der Betreiber sollte Mechanik-
Schutzhandschuhe tragen, falls vorhanden. Mit Öl
verschmutzte Haut sollte so schnell wie möglich mit Seife
und reichlich sauberem Wasser gewaschen werden.
• Überprüfen Sie den Ölablassstopfen und seine
Dichtung.
• Prüfen Sie den Öleinfülldeckel und die Dichtung des
O-Rings.
• Tauschen Sie nicht reparierbare Teile aus.
• Setzen Sie den Ölablassstopfen wieder ein und ziehen
Sie ihn fest an.
• Füllen Sie den Motor mit dem richtigen Motoröl auf den
richtigen Stand auf.
• Setzen Sie den Öleinfülldeckel wieder ein.
• Überprüfen Sie, ob undichte Stellen vorhanden sind,
und reparieren Sie diese gegebenenfalls.
Hinweis: Altes Motoröl sollte umweltgerecht entsorgt
werden. Erkundigen Sie sich bei Ihrer Gemeindeverwaltung
nach der nächsten Altöl-Recyclinganlage.
2. Zündkerze - Überprüfung und Austausch
Nach ungefähr 50 Betriebsstunden sollte die Zündkerze zur
Überprüfung, Reinigung und Anpassung entfernt werden.
Entfernen und erneutes Installieren der Zündkerze:
• Stellen Sie sicher, dass der Motor ausgeschaltet ist und
der Kraftstohahn in der Position „AUS“ ist.
WARNUNG: Der Motor sollte kalt sein, bevor
mit dem Entfernen der Zündkerze begonnen wird.
• Ziehen Sie das HT-Kabel von der Zündkerze ab.
• Entfernen Sie die Zündkerze mit einem
Zündkerzensteckschlüssel (im Lieferumfang enthalten).
(Abb.15)
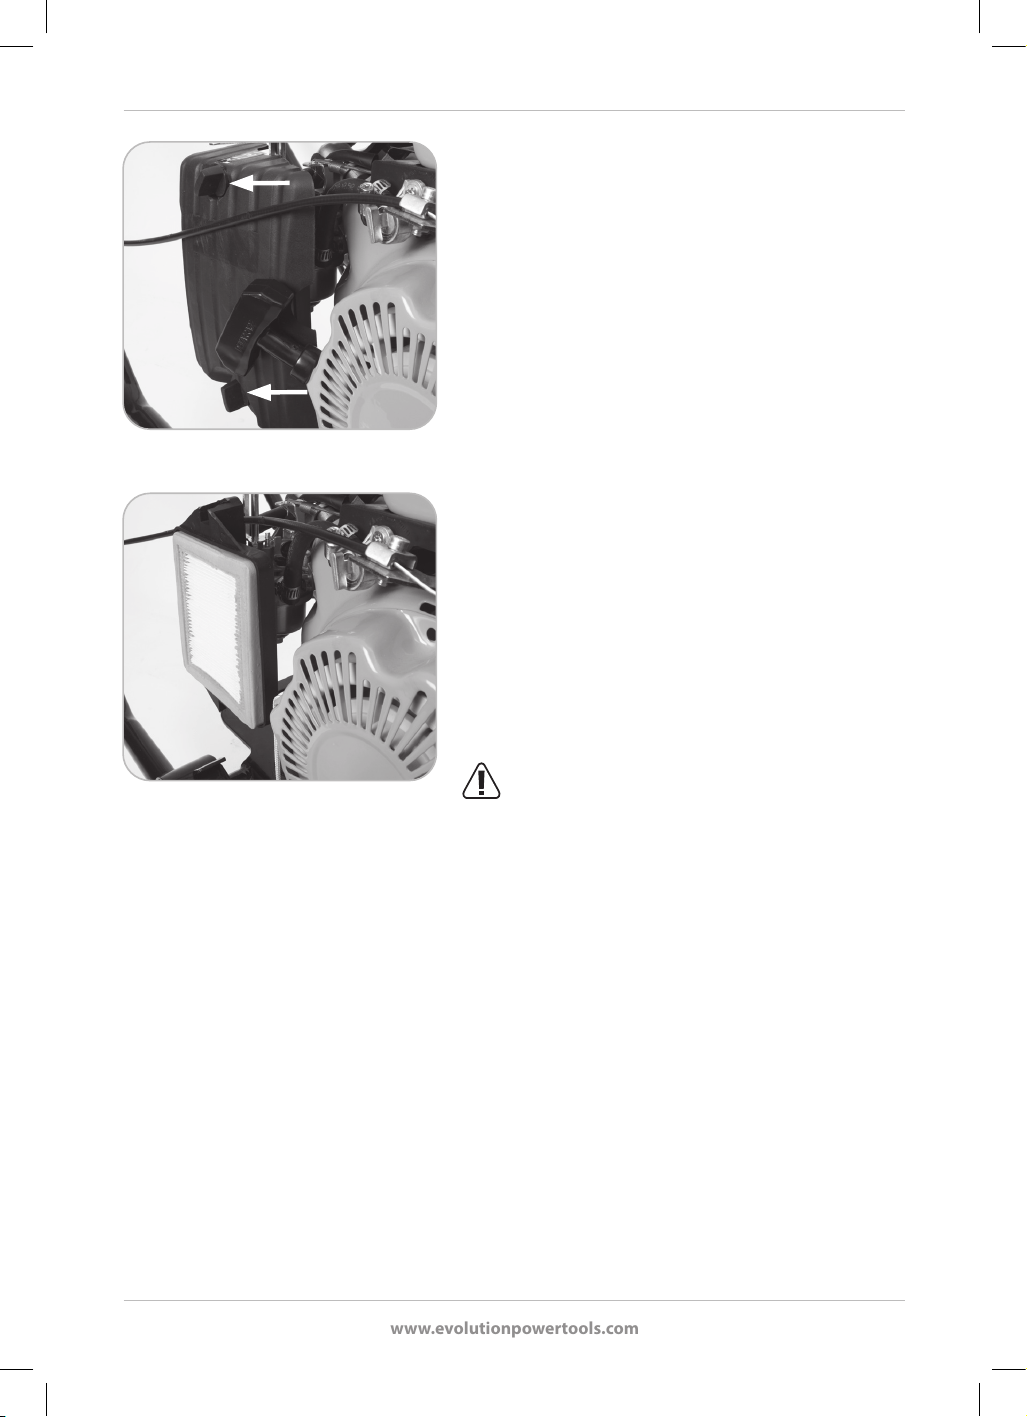
www.evolutionpowertools.com
50
Eine wartungsfähige Zündkerze in gutem Zustand sollte
leichte braune Ablagerungen auf der Kerzenspitze
aufweisen. Entfernen Sie diese Ablagerungen mit einer
steifen Messingdrahtbürste.
• Prüfen Sie den Elektrodenspalt der Kerze mit einer Reihe
von Fühlerlehren.
• Bei Bedarf anpassen. Der Spalt ist in der „Spezikation
H320-P“ angegeben.
• Die Zündkerze wieder einbauen. Achten Sie darauf, dass
das Gewinde richtig in den Zylinderkopf eingreift.
• Die Zündkerze mit dem mitgelieferten
Zündkerzensteckschlüssel per Hand fest anziehen.
• Schieben Sie die mitgelieferte Knebelstange durch die
Önung am Ende des Zündkerzensteckschlüssels.
• Positionieren Sie die Knebelstange so, dass zu beiden
Seiten des Zündkerzensteckschlüssels gleich langeTeile
herausragen.
• Stellen Sie einen gasdichten Abschluss her, indem Sie
den Zündkerzensteckschlüssel um ¼ bis ½ Umdrehung
drehen. Diese letzte fraktionierte Drehung wird die
Zündkerzenscheibe zerdrücken und eine gasdichte
Dichtung bilden. Die Zündkerze nicht zu fest anziehen.
• Bringen Sie das HT-Kabel wieder oben an der Zündkerze
an.
3. Luftlter
WARNUNG: Lassen Sie den Motor niemals ohne
Luftlterelement laufen.
Nach ungefähr 50 Betriebsstunden sollte der Zustand des
Luftlters überprüft werden.
Hinweis: Der Luftlter muss möglicherweise häuger
gewartet werden, wenn die Betriebsumgebung besonders
staubig ist.
Zum Entfernen:
• Stellen Sie sicher, dass der Motor ausgeschaltet ist und
der Kraftstohahn in der Position „AUS“ ist. Der Motor
sollte kalt sein.
• Lösen Sie die Flügelmuttern vom
Luftltergehäusedeckel und entfernen Sie ihn. (Abb.16)
• Bewahren Sie diese Teile sorgfältig für die spätere
Wiederanbringung auf.
• Entfernen Sie das Luftlterelement zur Inspektion aus
dem Gehäuse. (Abb. 17) Wenn das Papierelement des
Luftlters starke Verfärbungen aufweist und durch
Schmutz, Staub usw. verstopft ist, sollte es ersetzt
werden.
Abb. 16
Abb. 17

www.evolutionpowertools.com
51
Erneuter Einbau:
• Installieren Sie das Element im Luftltergehäuse.
Ein neues Element kann in beide Richtungen passen.
• Bringen Sie die Abdeckung des Luftltergehäuses
wieder an.
• Setzen Sie die Flügelmuttern wieder ein und stellen
Sie sicher, dass der Deckel richtig sitzt und die
Flügelmuttern fest angezogen sind.
4. Kraftstotank-Einfülllter
Überprüfen Sie gelegentlich den Zustand des
Kraftstotank-Einfülllters (idealerweise während des
Nachfüllens). Bei Anzeichen von Ablagerungen den Filter
aus dem Tank nehmen und reinigen.
• Reinigen Sie den Filter mit einem umweltfreundlichen
Entfettungsmittel auf Wasserbasis und blasen Sie das
feine Netz gegebenenfalls mit sauberer, trockener
Druckluft durch.
• Lassen Sie ihn vor dem Einbau gründlich trocknen.
• Achten Sie beim Wiedereinbau darauf, dass die 2
Aussparungen an der Oberkante des Filters mit den
Aussparungen im Tankstutzen übereinstimmen.
5. Antriebsriemenspannung prüfen
WARNUNG: Nehmen Sie diesen Vorgang
nur bei kalter Maschine, ausgeschaltetem Motor und
abgenommener Zündkerzenkappe vor.
Die Spannung des Antriebsriemens sollte nach den ersten
4 Betriebsstunden und dann gemäß den Angaben im
Wartungsplan überprüft werden.
So überprüfen Sie die Antriebsriemenspannung:
• Entfernen Sie den Riemenschutz, indem Sie die drei
(3) Innensechskantschrauben (Abb. 18) mit einem
Inbusschlüssel und einem Schraubenschlüssel (nicht im
Lieferumfang enthalten) entfernen und für eine spätere
Verwendung sicher aufbewahren.
Hinweis: Diese drei (3) Zylinderschrauben sind
positionsspezisch. Notieren Sie sich die Position der
einzelnen Schrauben und des zugehörigen Zubehörs,
wenn Sie sie aus der Maschine nehmen, damit diese an
ihrer ursprünglichen Position wieder angebracht werden
können.
• Die Durchbiegung durch leichten Fingerdruck am
Mittelpunkt des Riemens sollte ungefähr 5/6 mm (1/4
Zoll) betragen.
Hinweis: Die Motoreinheit des H320 ist über vier (4)
Abb.18
Abb. 19

www.evolutionpowertools.com
52
WARNUNG: Justieren Sie die Einstell-/Befestigungsschraube nicht, ohne die vier
Befestigungsschrauben zu lösen, da dies zu Schäden am Motorgehäuse führen kann.
Hinweis: Es muss darauf geachtet werden, dass der Motor auf der Montageplatte „quadratisch“ und
„inline“ bleibt. Wenn sich der Motor auf der Montageplatte in einer etwas „verdrehten“ Konguration
benden würde, würden der Antriebsriemen und die Riemenscheiben unter „Stress“ geraten, und es
kommt schnell zu Verschleiß.
• Setzen Sie den Antriebsriemenschutz wieder ein und ziehen Sie die drei (3) Zylinderschrauben fest an
ihren ursprünglichen Positionen an.
6. Seilzugstarter-System
Die Lüftungsschlitze sollten sauber und frei von Hindernissen gehalten werden.
Fremdkörper aus den Lüftungsschlitzen entfernen.
Schlitze auf der Motormontageplatte positioniert.
Vier (4) Motorbefestigungsschrauben sind durch
diese vier Schlitze positioniert und werden von
unten in die Basis des Kurbelgehäuseblocks
geschraubt. Diese Anordnung ermöglicht es, den
Motor auf der Platte neu zu positionieren.
• Lösen Sie die vier (4) Sechskantschrauben
mit einem geeigneten Schlüssel (nicht im
Lieferumfang enthalten).
• Schieben Sie den Motor vor oder zurück, um
die Spannung des Antriebsriemens zu ändern.
Eine Einstellschraube (Abb. 19) bendet sich
an der Vorderseite des Motors, um die genaue
Positionierung des Motors zu unterstützen.
• Wenn die richtige Spannung erreicht wurde,
die Befestigungsschrauben des Motors fest
anziehen.

www.evolutionpowertools.com
53
H320-P
ROUTINEWARTUNG
ZEITPLAN
Nach den ers-
ten 4 Stunden
Alle
20 Stunden
oder monatlich
Alle
50 Stunden
oder
alle 3 Monate
Alle
100 Stunden
oder
alle 6 Monate
Motorölstand prüfen
● ●
Motorölwechsel
●
(nur 1. Wechsel)
●
Luftlter prüfen
●
Luftlter ersetzen
●
Zündkerzen prüfen
●
Antriebsriemenspannung
● ●
Kraftstolter prüfen/
reinigen
●
INSTANDHALTUNG H320-E
Hinweis: Jegliche Instandhaltungsarbeiten dürfen nur an ausgeschalteter und vom Stromnetz getrennter
Maschine ausgeführt werden.
Stellen Sie regelmäßig sicher, dass alle Sicherheitsvorkehrungen und Schutzvorrichtungen
ordnungsgemäß funktionieren. Verwenden Sie die Maschine nur, wenn alle Sicherheits-/
Schutzvorkehrungen ordnungsgemäß funktionieren.
Alle Motorenlager dieser Maschine sind auf Lebensdauer geschmiert. Zusätzliches Schmieren ist nicht
notwendig.
Verwenden Sie ein sauberes, angefeuchtetes Tuch, um die Plastikteile der Maschine zu reinigen.
Verwenden Sie keine Lösungsmittel o.ä., die die Plastikteile beschädigen könnten.
WARNUNG: Versuchen Sie nicht, durch Einführen spitzer Objekte durch Önungen im
Gehäuse usw. der Maschine diese zu reinigen. Die Lüftungsschlitze der Maschine dürfen nur mit
Druckluft gereinigt werden.

www.evolutionpowertools.com
54
FEHLERSUCHE H320-P
PROBLEM URSACHE MÖGLICHE ABHILFE
Motor
startet nicht.
Kein Treibsto.
Motor abgeschaltet (‘O’).
Verschmutzte Zündkerze.
Motor kalt.
Motor mit Benzin ‘geutet’.
Luftlter verstopft oder mit Öl
verschmutzt.
Schwerwiegender Fehler.
Kraftstohahn önen
Kraftstotank füllen.
Schalten Sie den Motor ein.
Stecker entfernen, reinigen, zurücksetzen und
ersetzen.
Stellen Sie sicher, dass die Choke-Einstellung
korrekt ist.
Fünf (5) Minuten warten.
Önen Sie den Choke und den Gashebel
vollständig
und versuchen Sie es erneut.
Zündkerze ausbauen, reinigen und austauschen.
Versuchen Sie es erneut, bis der Motor zündet.
Luftlter ersetzen.
Für weitere Informationen,
wenden Sie sich an Ihren Anbieter oder
Evolution Power Tools.
Maschine
vibriert
nicht.
Riemenspannung falsch.
Luftlter verstopft.
Exzentereinheit beschädigt.
Motordrehzahl zu niedrig.
Stellen Sie die Riemenspannung ein.
Ersetzen Sie den Luftlter.
Exzentereinheit austauschen.
Drehzahl etwas erhöhen.

www.evolutionpowertools.com
55
FEHLERSUCHE H320-E
PROBLEM URSACHE MÖGLICHE ABHILFE
Maschine
startet nicht.
Zufuhr nicht eingeschaltet
(„On“)
Sicherung im Stecker
"durchgebrannt".
Sicherheitstaste nicht
gedrückt, um
An-/Aus-Betätigung zu
verhindern.
Beschädigtes oder
kaputtes Netzkabel.
Versorgungsspannung an der Steckdose
einschalten.
Sicherung austauschen und Versorgung prüfen.
Drücken Sie die Sicherheitsstarttaste
und ziehen Sie dann den Starthebel.
Lassen Sie das beschädigte Kabel durch einen
identischen Typ ersetzen, der von einem
kompetenten Techniker montiert wurde.
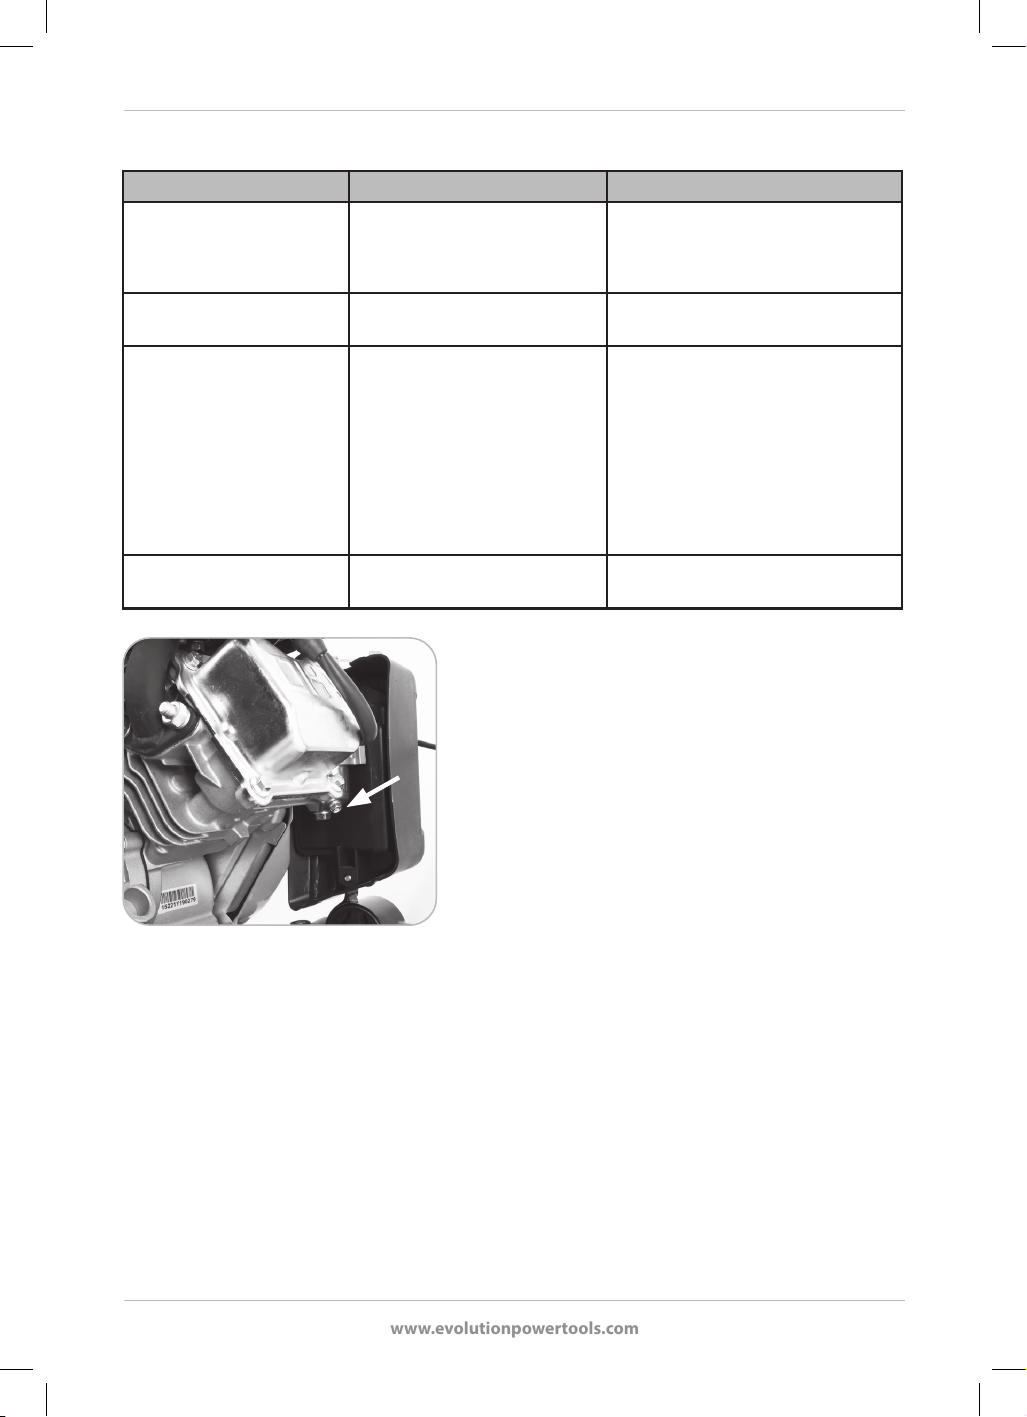
www.evolutionpowertools.com
56
ALLGEMEINE FEHLERSUCHE
PROBLEM URSACHE MÖGLICHE ABHILFE
Pastersteine beschädigt. Platte in direktem Kontakt mit
Paster.
Einen „Paving Pad“ anbringen.
Abblättern von Bitumen
(Laminieren).
Überverdichtung. Entfernen und weiterleiten.
Niedrige
Fahrgeschwindigkeit.
Schichtdicke zu tief (Sinken
der Platte).
Motordrehzahl zu niedrig.
Feuchtigkeitsgehalt des
Materials zu hoch oder zu
niedrig.
Entfernen Sie etwas Material, so
dass die Schichtdicke reduziert
wird.
Drehzahl etwas erhöhen.
Entfernen Sie das Material und
passen Sie den
Feuchtigkeitsgehalt an.
Keine Fortbewegung des
H320-P.
Motordrehzahl zu niedrig. Drehzahl etwas erhöhen.
Abb. 20
LAGERUNG H320-P
Wenn Ihr Evolution-Gerät für einen Zeitraum von 4 oder
mehr Monaten (z.B. über den Winter) nicht verwendet
wird, sollte der Bediener die Vorbereitung für eine
Langzeitlagerung in Betracht ziehen. Dadurch bleibt der
Motor in einem optimalen Zustand und kann bei Bedarf
erneut in Betrieb genommen werden.
• Lassen Sie den gesamten Kraftsto aus dem
Kraftstotank und dem Vergaser in einen geeigneten
zugelassenen Behälter ab.
• Unter der Vergaserschwimmerschale bendet sich ein
Ablasshahn. Lösen Sie diesen Hahn, damit der Kraftsto
aus der Maschine abießen kann. (Abb.20)
• Ziehen Sie den Ablasshahn an, wenn der gesamte
Kraftsto entfernt wurde.
• Entfernen Sie die Zündkerze.
• Füllen Sie ungefähr einen Esslöel sauberes Motoröl in
das Zündkerzenloch.
Stellen Sie sicher, dass der Auslöseschalter der Maschine
sich in der Stellung „OFF“ (Aus) bendet.
• Ziehen Sie den Rückstoßstarter einige Male vorsichtig.
• Ersetzen Sie die Zündkerze.
• Ziehen Sie den Rücklaufstarter vorsichtig, bis ein
Widerstand spürbar ist (dies bedeutet, dass sich der
Kolben bei geschlossenen Ventilen im Kompressionshub
bendet). Ziehen Sie den Seilzugstarter nicht weiter.

www.evolutionpowertools.com
57
• Lagern Sie den Motor an einem sicheren, trockenen und
gut belüfteten Ort unter einer Abdeckung, damit sich
kein Staub, Schmutz usw. auf der Maschine absetzen
kann.
RÜCKGABE DES H320-P
Falls Sie Ihr Gerät H320-P an Evolution zurückgeben
müssen, müssen Sie die unten stehenden Schritte zur
Sicherheit des Zustelldienstes befolgen.
1. Lassen Sie den Kraftsto vollständig aus Kraftstotank
und Vergaser des Geräts ab. (Abb.20)
2. Lassen Sie das Motoröl vollständig ab. (Abb.14)
3. Demontieren Sie den Gri, indem Sie die Schrauben
entfernen. Achten Sie darauf, dass Sie alle entfernten Teile
aufbewahren. (Abb.2)
4. Verpacken Sie das Gerät sicher in einer Kiste,
vorzugsweise in seiner Originalverpackung.
Hinweis: Das Gerät wird ohne Kraftsto und Öl
zurückgegeben. Achten Sie darauf, dass Sie vor dem
Anlassen des Motors Kraftsto und Öl einfüllen.
Verwendung der optionalen Evolution-Zubehörteile
(als Kundenoption erhältlich)
UMWELTSCHUTZ
Elektroschrott nicht mit dem Haushaltsmüll entsorgen.
Nach Möglichkeit recyceln. Für Informationen hinsichtlich
Recycling wenden Sie sich bitte an Ihre Behörde vor Ort
oder Ihren Händler.

www.evolutionpowertools.com
58
EG-KONFORMITÄTSERKLÄRUNG
In Übereinstimmung mit EN ISO 17050-1:2004
Der Hersteller des von dieser Konformitätserklärung gedeckten Produktes ist:
UK: Evolution Power Tools, Venture One, Longacre Close, Holbrook Industrial Estate, Sheeld, S20 3FR.
FR: Evolution Power Tools SAS. 61 Avenue Lafontaine, 33560, Carbon-Blanc, Bordeaux, Frankreich.
Hiermit erklärt der Hersteller, dass die Maschine wie in dieser Erklärung dargestellt allen relevanten
Auagen der Maschinenrichtlinie und anderer betreender weiter unten ausgeführten Richtlinien
entspricht.
Hiermit erklärt der Hersteller ferner, dass die in dieser Erklärung angegebene Maschine, wo zutreend, die
relevanten Bestimmungen des grundlegenden Arbeitsschutzes erfüllt.
Die in dieser Erklärung berücksichtigten Richtlinien lauten wie folgt:
Und erfüllt die zutreenden Vorgaben der folgenden Dokumente
EN 500-1:2006+A1• EN 500-4:2011• EN ISO 3744: 1995 • EN ISO 14982:2009
Produktdetails
Beschreibung: H320-P
Evolution Modellnummer: 015-0001, 015-0013
Werks-Modellnummer: XZ-10C/JF152
Markenname: EVOLUTION
Die technischen Unterlagen, die notwendig sind, um zu belegen, dass dieses Produkt den Anforderungen der Richtlinie
entspricht, wurden von der zuständigen Vollzugsbehörde eingefordert und können dort zur Inspektion eingesehen
werden. Diese Unterlagen belegen, dass unser technisches Verzeichnis die oben aufgeführten Dokumente enthält und
dass diese den korrekten Normen für dieses Produkt, wie oben aufgeführt, entsprechen.
Name und Adresse der für das technische Verzeichnis verantwortlichen Person.
Unterschrieben: Gedruckt: Barry Bloomer - CEO
Datum: 23.08.22
UK: Evolution Power Tools, Venture One, Longacre Close, Holbrook Industrial Estate, Sheeld, S20 3FR.
FR: Evolution Power Tools SAS. 61 Avenue Lafontaine, 33560, Carbon-Blanc, Bordeaux, Frankreich.
®
H320-P
1907/2006 Die Registrierung, Bewertung, Zulassung und Beschränkung chemischer Stoffe & REACH EG Nr.
1907/2006 Anhang XVII
2006/42/EC. Maschinenrichtlinie.
2014/30/EU. EMC-Richtlinie.
2011/65/EU. & (EU)2015/863. Einschränkung der Verwendung bestimmter Gefahrstoffe in elektrischer Ausrüstung (RoHS-Richtlinie).
2000/14/EU & 2005/88/EC Lärmschutzrichtlinie

www.evolutionpowertools.com
59
EG-KONFORMITÄTSERKLÄRUNG
In Übereinstimmung mit EN ISO 17050-1:2004
Der Hersteller des von dieser Konformitätserklärung gedeckten Produktes ist:
UK: Evolution Power Tools, Venture One, Longacre Close, Holbrook Industrial Estate, Sheeld, S20 3FR.
FR: Evolution Power Tools SAS. 61 Avenue Lafontaine, 33560, Carbon-Blanc, Bordeaux, Frankreich.
Hiermit erklärt der Hersteller, dass die Maschine wie in dieser Erklärung dargestellt allen relevanten Auagen der
Maschinenrichtlinie und anderer betreender weiter unten ausgeführten Richtlinien entspricht.
Hiermit erklärt der Hersteller ferner, dass die in dieser Erklärung angegebene Maschine, wo zutreend, die relevanten
Bestimmungen des grundlegenden Arbeitsschutzes erfüllt.
Die in dieser Erklärung berücksichtigten Richtlinien lauten wie folgt:
Und erfüllt die zutreenden Vorgaben der folgenden Dokumente
EN 500-1:2006+A1 • EN 500-4:2011 • EN 60204-1:2018 • EN IEC 55014-1:2021 • EN ISO 3744:1995
EN IEC 55014-2:2021 • EN IEC 61000-3-2:2019/A1:2021 • EN 61000-3-3:2013/A2:2021
Produktdetails
Beschreibung: H320-E
Evolution Modellnummer: 015-0002, 015-0004, 015-0008, 015-0010
Werks-Modellnummer: XZ-5A
Markenname: EVOLUTION
Spannung: 220-240V ~ 50Hz
Energiezufuhr: 300W
Die technischen Unterlagen, die notwendig sind, um zu belegen, dass dieses Produkt den Anforderungen der Richtlinie
entspricht, wurden von der zuständigen Vollzugsbehörde eingefordert und können dort zur Inspektion eingesehen
werden. Diese Unterlagen belegen, dass unser technisches Verzeichnis die oben aufgeführten Dokumente enthält und
dass diese den korrekten Normen für dieses Produkt, wie oben aufgeführt, entsprechen.
Name und Adresse der für das technische Verzeichnis verantwortlichen Person.
Unterschrieben: Gedruckt: Barry Bloomer - CEO
Datum: 23.08.22
UK: Evolution Power Tools, Venture One, Longacre Close, Holbrook Industrial Estate, Sheeld, S20 3FR.
FR: Evolution Power Tools SAS. 61 Avenue Lafontaine, 33560, Carbon-Blanc, Bordeaux, Frankreich.
®
H320-E
1907/2006 Die Registrierung, Bewertung, Zulassung und Beschränkung chemischer Stoffe & REACH EG Nr.
1907/2006 Anhang XVII
2006/42/EC. Maschinenrichtlinie.
2014/30/EU. EMC-Richtlinie.
2011/65/EU. & (EU)2015/863. Einschränkung der Verwendung bestimmter Gefahrstoffe in elektrischer Ausrüstung (RoHS-Richtlinie).
2002/96/EG geändert durch die Richtlinie Nr. 2003/108/EG über Elektro- und Elektronik-Altgeräte (WEEE).
2000/14/EU & 2005/88/EC Lärmschutzrichtlinie
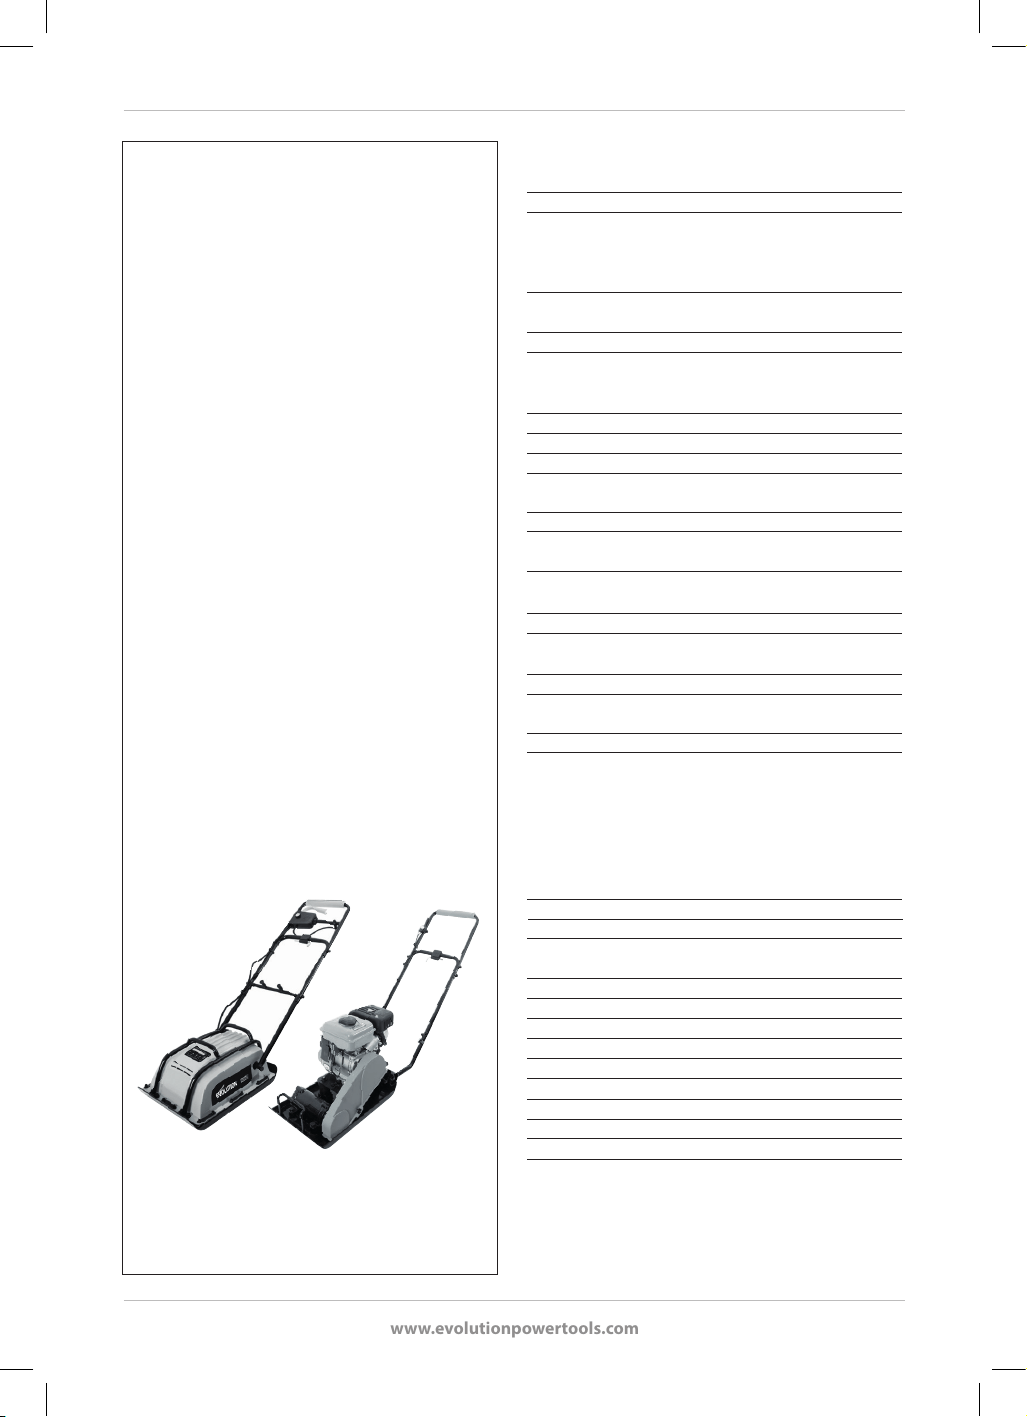
www.evolutionpowertools.com
60
Spécications du modèle
Evolution Power Tools se réserve le droit
d’apporter des modications et des améliorations
à la conception et aux spécications techniques de ce
produit sans notication préalable.
La version originale de ce manuel a été rédigée en
anglais.
Moteur UE/RU 220-240V~50Hz 300W, US 120V~60Hz 1,25A
Vitesse du moteur (min
-1
) UE/RU 2860 (à vide), US 3450 (à vide)
Force de compactage (kN) 5
Durée d'utilisation maximale par l’opérateur recommandée (mins)
30
Niveau d'intensité acoustique (LwA) 88,5dB(A) K= 2,09dB(A)
Niveau de pression acoustique (LpA) 83,3dB(A) K= 3dB(A)
Vibrations (m/sec
2
) 18,496 K= 1,5
Poids net kg (lb) 25,4 (56)
Hauteur de la poignée (pendant l’opération) mm (pouces) 920
(36)
Portée de la machine (pendant l’opération) mm (pouces) 1290
(51)
Largeur de l'empreinte mm (pouces) 320 (12-1/2)
Longueur du câble mètres (pieds) 10 (33)
Classe d’isolation I
IP44
H320-P
H320-E
Type de moteur Monocylindre 4temps OHV
Puissance du moteur 1,7kW 3600min
-1
Remplacement de la bougie LD E6TC (disponible chez
Evolution)
NGK BP6HS
CHAMPION L87YCC
AC DELCO 42FS
Écart entre les bougies 0,7 – 0,8mm
0,028 – 0,031 pouces
Remplacement du ltre à air Evolution H1S58
Jeux des soupapes (à froid) Entrée 0,15 mm 0,006 pouces
Sortie 0,20mm 0,008pouce
Force de compactage (kN) 10
Vibrations (m/sec
2
) 20,211 K = 1,5
Niveau d'intensité acoustique (LwA) 97,9dB(A) K= 2,42dB(A)
Niveau de pression acoustique (LpA) 90,5dB K= 3dB(A)
Durée d'utilisation par l’opérateur (mins) 20
Maximum recommandé
Type d’huile SAE 10W-30/40
Capacité de stockage d'huile (litres) 0,25
( oz) 8,45
Type de carburant E5 et E10 Essence sans plomb/Gasoil
Capacité de stockage de carburant (litres) 1,2
( oz) 40,57
Poids net kg (lb) 32,45 (71,5)
Hauteur de la poignée (pendant l’opération - extension de poignée
montée) mm (pouces) 1020
(40)
Portée de la machine (pendant l’opération – extension de poignée
montée) mm (pouces) 1290
(51)
Largeur de l'empreinte mm (pouces) 320 (12-1/2)

www.evolutionpowertools.com
61
IMPORTANT
Veuillez lire attentivement ces consignes
d'utilisation et de sécurité dans leur intégralité.
Pour votre propre sécurité, si vous avez des
doutes concernant un aspect de l'utilisation de ce
matériel, veuillez contacter l'assistance technique
appropriée dont le numéro se trouve sur le site
Internet d'Evolution Power Tools. Nous assurons
diérentes lignes d'assistance téléphoniques au
sein de notre société à l'échelle mondiale, mais une
assistance technique est également disponible
auprès de votre fournisseur.
SITE INTERNET www.evolutionpowertools.com/
register
Félicitations pour votre achat d’une machine
Evolution Power Tools. Veuillez enregistrer
votre produit «en ligne» comme expliqué
dans la brochure A5 d’enregistrement en ligne
de la garantie fournie avec la machine. Vous
pouvez également scanner le code QR situé
sur la brochure A5 à l'aide d'un smartphone.
Cela vous permettra de valider la période
de garantie de la machine via le site Internet
d’Evolution en saisissant vos coordonnées,
ce qui vous garantira un service rapide si
nécessaire. Nous vous remercions sincèrement
d’avoir choisi un produit de la gamme
d’Evolution Power Tools.
GARANTIE LIMITÉE D'EVOLUTION. EVOLUTION
POWER TOOLS SE RÉSERVE LE DROIT DE
MODIFIER ET D'AMÉLIORER LE PRODUIT, SANS
AVIS PRÉALABLE.
VEUILLEZ VOUS REPORTER À LA BROCHURE
D'ENREGISTREMENT DE LA GARANTIE
ET/OU L'EMBALLAGE POUR PRENDRE
CONNAISSANCE DES DÉTAILS DES MODALITÉS
ET DES CONDITIONS DE LA GARANTIE.
Durant la période de la garantie à compter de
la date d'achat d'origine, Evolution Power Tools
réparera ou remplacera toute marchandise
présentant un défaut de matériau ou de
fabrication. Cette garantie ne s'applique pas si
la machine renvoyée a été utilisée de manière
non conforme au mode d'emploi ou si elle a
été endommagée par accident, par négligence
ou en raison d'un entretien inadéquat. Cette
garantie ne s’applique pas aux machines et/
ou composants qui ont été altérés, changés ou
modiés de quelque manière que ce soit, ou
sujets à une utilisation contraire aux capacités et
spécications recommandées. Les composants
électriques sont soumis à la garantie de leurs
fabricants respectifs. Toute marchandise retournée
pour cause de défaut doit être envoyée en port
prépayé à Evolution Power Tools. Evolution Power
Tools se réserve le droit de réparer l’outil ou de le
remplacer par un produit identique ou équivalent.
Les accessoires consommables tels que (la liste
suivante n'est pas exhaustive) lames, fraises,
perceuses, ciseaux, palettes, etc. ne font l’objet
d’aucune garantie, écrite ou verbale. Evolution
Power Tools ne pourrait en aucun cas être tenu
responsable de la perte ou des dégâts résultant
directement ou indirectement de l'utilisation
de notre marchandise ou de toute autre
cause. Evolution Power Tools ne peut être tenu
responsable de tous frais engagés sur de tels biens
ou de tous dommages indirects. Aucun dirigeant,
employé ou mandataire de Evolution Power Tools
n’est autorisé à présenter des déclarations de
conformité verbales ou à renoncer à n’importe
laquelle des conditions de vente qui précèdent et
aucune de ces actions n’engage Evolution Power
Tools.
Les questions relatives à cette garantie limitée
doivent être adressées au siège de l’entreprise.
Vous pouvez également appeler la ligne
d’assistance concernée.
CONSIGNES GÉNÉRALES DE SÉCURITÉ POUR LES
OUTILS ÉLECTRIQUES
(Ces consignes générales de sécurité pour les outils
électriques sont telles que spéciées dans BS EN
500-1:2006+A1 et EN 500-4:2011
AVERTISSEMENT: Lisez tous les
avertissements et les consignes de
sécurité.
Le non-respect des avertissements et des
instructions peut causer des électrocutions, des
incendies et/ou des blessures graves.
Conservez tous les avertissements de sécurité

www.evolutionpowertools.com
62
et toutes les instructions pour vous y reporter
par la suite.
Dans les avertissements, le terme « outil électrique
» fait référence aux outils électriques fonctionnant
sur secteur (avec l) ou sur batterie (sans l).
1) Avertissements généraux de sécurité des
outils électriques [sécurité de l’aire de travail]
a) L’espace de travail doit être propre et
susamment éclairé. Les espaces sombres et
encombrés sont propices aux accidents.
b) Ne mettez pas en marche votre outil
électrique dans un environnement explosif, ou
en présence de liquide inammable, de gaz ou
de poussière. Les outils électriques produisent des
étincelles qui peuvent faire enammer la poussière
ou les vapeurs.
c) Tenez les enfants et les autres personnes
présentes éloignés lorsque vous utilisez un
outil électrique. Les distractions peuvent causer
une perte de contrôle.
2) Avertissements généraux relatifs aux outils
électriques [sécurité électrique]
a) Les ches des outils électriques doivent
correspondre à la prise secteur utilisée. Ne
modiez jamais la che, de quelque façon
que ce soit. N’utilisez jamais d’adaptateurs
de che avec des outils reliés à la terre. Les
ches et prises non modiées réduisent le risque
d’électrocution.
b) Évitez tout contact du corps avec des
surfaces reliées à la terre, telles que des tuyaux,
radiateurs, cuisinières et réfrigérateurs. Le
risque d’électrocution est accru si votre corps est
relié à la terre.
c) N’exposez les outils électriques ni à la pluie ni
à l’humidité. La pénétration d’eau dans ces outils
accroît le risque d’électrocution.
d) Ne malmenez pas le câble d’alimentation.
N’utilisez jamais le câble d’alimentation
pour transporter l’outil électrique et ne le
débranchez jamais en tirant sur le câble.
Tenez le câble à l’écart de la chaleur, de
l’huile, d'objets tranchants et des pièces en
mouvement. Un câble endommagé ou emmêlé
accroît le risque d'électrocution.
e) Pour les travaux à l’extérieur, utilisez un câble
spécialement conçu à cet eet. L’utilisation d’un
câble conçu pour l’usage extérieur réduit le risque
d’électrocution.
f) Si l'utilisation de l’outil électrique dans des
endroits humides est inévitable, utilisez une
prise protégée par un dispositif de courant
diérentiel résiduel (DCR). L’utilisation d’un
dispositif de courant diérentiel résiduel (DCR)
réduit le risque d’électrocution.
3) Avertissements généraux relatifs aux outils
électriques [sécurité électrique].
a) Restez attentif, prêtez attention au travail
que vous êtes en train d’eectuer et faites
preuve de bon sens lors de l’utilisation de tout
outil électrique. N’utilisez pas d’outil électrique
si vous êtes fatigué(e) ou sous l’inuence de
l’alcool, de drogues ou de médicaments. Un
moment d’inattention pendant l’utilisation d’un
outil électrique peut entraîner des blessures
graves.
b) Utilisez un équipement de protection
individuelle. Portez toujours un dispositif de
protection oculaire. L’équipement de sécurité, tel
qu’un masque ltrant, des chaussures de sécurité,
un casque ou une protection auditive, utilisé dans
des conditions appropriées réduira le risque de
blessures.
c) Veillez à éviter les démarrages impromptus.
Assurez-vous que l’interrupteur est en position
d’arrêt avant de brancher l’outil sur une prise
secteur et/ou un bloc-batterie, de ramasser ou
de transporter l’outil. Porter un outil électrique
avec le doigt sur son interrupteur ou brancher un
outil électrique dont l’interrupteur est en position
de marche peut causer un accident.
d) Retirez les clés de réglage ou les clés à écrous
avant de mettre l’outil électrique en marche.
Un outil ou une clé laissé sur une pièce rotative
d’un outil électrique pourrait causer de graves
dommages corporels.
e) Ne travaillez pas à bout de bras. Gardez
toujours un bon appui et un bon équilibre. Ceci
permettra de mieux contrôler l’outil électrique en
cas de situation imprévue.
f) Portez une tenue appropriée. Ne portez
ni vêtements amples, ni bijoux. Gardez vos
cheveux, vêtements et gants à l’écart des pièces
en mouvement. Les vêtements amples, les bijoux
et les cheveux longs peuvent se prendre dans les

www.evolutionpowertools.com
63
pièces en mouvement.
g) Si des dispositifs sont prévus pour le
raccordement d'installations d'extraction et
de collecte des poussières, assurez-vous qu'ils
sont raccordés et utilisés correctement. L’usage
de ces dispositifs de collecte des poussières peut
réduire les dangers présentés par la poussière.
h)Ne vous montrez pas trop sûr de vous et
n’ignorez pas les précautions de sécurité d’un
outil à cause de la familiarité acquise avec son
utilisation fréquente. Toute action imprudente
risque d’entraîner de graves blessures en une
fraction de seconde.
4) Avertissements généraux relatifs à la sécurité
des outils électriques [utilisation et entretien
des outils électriques].
a) Ne forcez pas sur l’outil électrique. Utilisez
l’outil électrique approprié pour le travail. Un
outil électrique approprié exécutera mieux le
travail et de façon moins dangereuse s’il est utilisé
dans les limites prévues de son utilisation.
b) N’utilisez pas l’outil électrique si
l’interrupteur ne permet pas de le mettre en
marche ou de l’arrêter. Tout outil électrique qui
ne peut pas être contrôlé par son interrupteur est
dangereux et doit être réparé.
c) Débranchez l’outil de sa source électrique
et/ ou de son bloc-batteries avant d’eectuer
des réglages, de changer les accessoires ou de
ranger l’outil. Ces mesures de sécurité préventives
réduisent les risques de démarrage accidentel de
l’outil électrique.
d) Lorsque vous avez ni de vous en servir,
rangez les outils électriques hors de portée
des enfants et empêchez les personnes qui
ne connaissent pas l’outil électrique ou les
présentes instructions de l’utiliser. Les outils
électriques sont dangereux lorsqu’ils sont utilisés
par des personnes non initiées.
e) Entretenez les outils électriques. Vériez
qu’aucune pièce mobile n’est mal alignée
ou bloquée, qu’aucune pièce n’est brisée et
assurez-vous qu’aucun autre problème ne
risque d’aecter le bon fonctionnement de
l’outil électrique. En cas de dommages, faites
réparer l’outil électrique avant de l’utiliser de
nouveau. Beaucoup d’accidents sont causés par
des outils électriques mal entretenus.
f) Gardez les outils de coupe bien aûtés
et propres. Des outils de coupe correctement
entretenus et dont les tranchants sont bien aûtés
risquent moins de se bloquer et sont plus faciles à
contrôler.
g) Utilisez l’outil électrique, les accessoires et
les embouts, etc., conformément au présent
mode d'emploi pour les utilisations pour
lesquelles ils sont conçus, en tenant compte
des conditions et du type de travail à exécuter.
L’usage d’un outil électrique pour des utilisations
pour lesquelles il n’est pas conçu peut être
dangereux.
h) Faites en sorte que les poignées et les
surfaces de prise soient toujours sèches,
propres et dénuées d’huile ou de graisse. Des
poignées ou des surfaces de prises glissantes ne
permettent pas la manipulation et le contrôle
de l'outil en toute sécurité lors de situations
imprévues.
5) Avertissements généraux de sécurité des
outils électriques [Entretien]
a) L’entretien de l'outil électrique doit être
coné à un technicien qualié, utilisant
exclusivement des pièces identiques à celles
d’origine. Ceci assurera le maintien de la sécurité
de l’outil électrique.
CONSIGNES DE SÉCURITÉ POUR H320-P
a. Les moteurs à essence ou diesel ne doivent
jamais être utilisés dans des espaces fermés
non ventilés. Les gaz d’échappement produits
sont hautement toxiques et peuvent provoquer
un «empoisonnement au monoxyde de
carbone» qui entraînera de la somnolence
et nalement la mort. Il n'est permis de faire
fonctionner un moteur à essence à l'intérieur que si
le bâtiment peut être très bien ventilé et si les gaz
d'échappement peuvent être captés et canalisés
vers l'extérieur par un système d'extraction/de
récupération des gaz d'échappement.
b. Le moteur ne doit pas tourner à des vitesses
supérieures à la vitesse maximale indiquée
sur la plaque signalétique. Faire fonctionner
un moteur à des vitesses excessives augmente
la probabilité de défaillance des composants et
d'accidents en découlant.
c. Ne modiez pas les composants qui
régulent la vitesse des moteurs. Vous pouvez

www.evolutionpowertools.com
64
modier les paramètres de fonctionnement réglés
en usine.
d. Utilisez uniquement le type de carburant
indiqué dans ce mode d’emploi. L'utilisation de
carburant avec un indice d'octane inférieur à celui
spécié peut entraîner une usure excessive du
moteur et une panne prématurée de celui-ci.
e. Gardez la zone autour du moteur dégagée,
propre et bien rangée. Ne laissez jamais aucun
matériau combustible (bois, plastique, carton, toile,
etc.) près d'un moteur en marche.
f. N’utilisez pas l’outil dans ou à proximité
d'atmosphères potentiellement explosives. Les
atmosphères poussiéreuses que l'on retrouve dans
certains bâtiments industriels (moulins à farine,
scieries) ont un potentiel explosif.
g. Vériez régulièrement le système de
carburant pour détecter toute fuite. Les tuyaux
et les raccords doivent être vériés an de repérer
toute détérioration ou tout frottement. Vériez que
le réservoir de carburant n'est pas endommagé
ou si le bouchon de carburant est mal ajusté ou
usé. Tout défaut doit être corrigé avant d'utiliser le
moteur.
h. Arrêtez toujours le moteur et laissez-le
refroidir avant de faire le plein. Essayez d'éviter
tout déversement de carburant (souvent causé
par un «remplissage excessif» du réservoir) et
nettoyez immédiatement tout carburant renversé.
L'application de sable sec est un moyen ecace
de neutraliser les déversements de carburant. Ne
laissez pas le sable entrer en contact avec aucune
partie du moteur.
i. Lors du transport du moteur dans un véhicule,
assurez-vous que le robinet de carburant est
fermé. Pour réduire le risque de déversement de
carburant, le moteur doit être xé par des cordes,
etc. à la zone de chargement du véhicule an
qu'il ne puisse pas bouger pendant le transport.
Le moteur doit être xé dans une attitude aussi
horizontale que possible.
j. Pour un stockage à long terme, nous
recommandons de vidanger le système
d'alimentation en carburant du moteur. Voir
l’Ill. 20 pour les instructions. Pendant le stockage
à long terme, les additifs dans les carburants
modernes peuvent précipiter du carburant et
bloquer les jets et les vannes du système de
carburant.
k. Stockez la machine dans un endroit sûr et bien
ventilé. Le personnel non autorisé ne doit pas avoir
accès à cette machine.
CONSIGNES DE SÉCURITÉ POUR LE
REMPLISSAGE DE CARBURANT
a. Sélectionnez un sol nu à niveau, éloigné de
tout bâtiment comme station de ravitaillement.
Assurez-vous qu'il n'y a aucun matériau
combustible à proximité immédiate.
b. Fumer, utiliser une amme nue ou produire
des étincelles est strictement interdit lors
du ravitaillement. L'essence est hautement
inammable et ses vapeurs sont combustibles.
c. Assurez-vous que le robinet de carburant est
fermé. Cette précaution garantira que le carburant
neuf «n'inondera» pas le carburateur du moteur.
d. Veillez à arrêter le moteur et à le laisser
refroidir avant de faire le plein. Un déversement
accidentel de carburant sur un moteur chaud peut
entraîner un risque d'incendie.
e. Tout déversement de carburant doit être
traité immédiatement. Si l'essence contamine des
vêtements, l'opérateur doit en changer. Ne comptez
pas sur l’évaporation du carburant renversé sur
des vêtements. Attendez que le carburant se soit
évaporé du tissu avant de laver ou de faire laver les
vêtements.
f. L'utilisation d'un entonnoir est recommandée
lorsque vous faites le plein. L'utilisation d'un
entonnoir minimisera le risque de déversement de
carburant.
g. Remplissez le réservoir de carburant sans
plomb de l’indice approprié jusqu'à un niveau
approximativement à mi-hauteur du ltre à
carburant. Versez le carburant dans le réservoir
avec précaution, sans essayer de le remplir
complètement. Versez l'essence lentement pour
éviter la formation de pièges à air susceptibles de
provoquer un déversement de carburant pendant
le remplissage.
h. Vériez le bouchon du réservoir de carburant
et remettez-le en place dès que le plein est
terminé. Le bouchon possède un dispositif de
raccordement de type baïonnette. Vériez qu'il
est correctement installé et xé avant d'ouvrir
lentement le robinet de carburant.
i. Vériez l’absence de toute fuite de carburant
dans le système d'alimentation en carburant.
N'essayez pas de démarrer le moteur si vous
soupçonnez la présence d’une fuite de carburant.
Toute fuite détectée doit être réparée par un

www.evolutionpowertools.com
65
technicien possédant les qualications appropriées.
j. Respectez toutes les réglementations
nationales et/ou locales concernant le stockage
et l'utilisation de produits pétroliers. Toutes les
lois locales doivent être respectées.
CONSEILS DE SANTÉ
AVERTISSEMENT: Lors de l'utilisation
de cette machine, des particules de
poussière peuvent être générées. Dans certains
cas, en fonction des matériaux avec lesquels
vous travaillez, cette poussière peut se révéler
particulièrement nocive. Il est conseillé de
considérer les risques associés aux matériaux avec
lesquels vous travaillez et de réduire les risques
d'exposition. Certains matériaux pouvant générer
des poussières potentiellement dangereuses pour
votre santé, nous vous conseillons d'utiliser un
masque agréé avec des ltres interchangeables lors
de l'utilisation de cette machine.
Vous devriez toujours :
• Travailler dans un endroit bien aéré.
• Travaillez en portant un équipement de
protection agréé tel qu’un masque anti-
poussière spécialement conçu pour ltrer les
particules microscopiques.
AVERTISSEMENT: l’utilisation d’un outil
électrique peut entraîner la projection
d’objets étrangers, qui peuvent être à l'origine de
lésions oculaires graves. Avant de commencer à
utiliser un outil électrique, portez toujours des
lunettes de protection munies d'écrans latéraux,
des lunettes de sécurité ou un masque facial
intégral si nécessaire.
AVERTISSEMENT: S'il manque des
pièces, n'utilisez pas la machine jusqu'à ce
que les pièces manquantes soient remplacées. Le
non-respect de cette règle pourrait provoquer des
blessures graves.
CONSIGNES DE SÉCURITÉ SUPPLÉMENTAIRES
POUR LE
COMPACTEUR H320
a. Délimitez la zone de travail. Le public et le
personnel non autorisé doivent être maintenus à
une distance sûre des opérations de compactage.
b. Assurez-vous que vous savez comment
éteindre la machine. Si vous rencontrez des
dicultés pendant les opérations de compactage,
il est important que vous puissiez eectuer un arrêt
d'urgence de la machine.
c. Ne laissez jamais le H320 en marche et sans
surveillance. La machine vibre dès qu'elle est mise
en marche et commence également à avancer. La
machine doit être arrêtée si elle est laissée sans
surveillance.
d. Arrêtez toujours le moteur avant de déplacer
la machine sur le chantier. Lors du déplacement
ou du transport de la machine, le moteur doit être
arrêté, de préférence à froid, et le robinet d'essence
doit être fermé en position «ARRÊT».
e. Comme le moteur du H320 devient chaud
pendant l'utilisation, veillez à ne pas le toucher
et à ne pas laisser de matériau ou de vêtement
combustible entrer en contact avec lui pendant
l'utilisation. Ne touchez ou n'entretenez le moteur
que lorsqu'il est froid.
f. N'enlevez, ne modiez et ne manipulez jamais
les protections de la machine. Les protections
sont spécialement conçues et adaptées pour
vous orir la meilleure protection possible
pendant les opérations. En cas d'absence ou
d'endommagement d'une protection, n'utilisez pas
la machine jusqu'à ce que la protection soit réparée
ou remplacée par un technicien compétent.
g. Faites particulièrement attention à garder le
contrôle lorsque vous travaillez sur une surface
en pente. Travaillez de haut en bas sur une surface
en pente et non en travers.
h. Lorsque plusieurs couches diérentes
doivent être compactées les unes sur les autres,
compactez chaque couche séparément. Cela
permettra de garantir l'intégrité de chaque couche.
i. Déplacez le H320 sur la surface de travail
de manière organisée jusqu'au niveau de
compactage souhaité. Cela permet de garantir
une pratique de travail des plus sûres.
j. Eectuez toujours les contrôles de sécurité
avant utilisation avant de commencer les
opérations. Suivez les conseils donnés dans les
rubriques ultérieures de ce mode d'emploi.
ÉPI(équipement de protection individuelle)
Remarque: Si vous utilisez cet équipement sur
un chantier de construction, l’opérateur doit
impérativement se conformer aux éventuels règles/

www.evolutionpowertools.com
66
règlements en vigueur sur le chantier. Contactez
le chef de chantier ou tout autre responsable pour
plus d’informations.
a. Portez des vêtements adaptés. Par exemple,
un bleu de travail ou une combinaison rembourrée
et une veste à haute visibilité, etc.
b. Portez des chaussures adaptées. Il est
conseillé de porter des chaussures de sécurité
équipées d’embouts en acier et de semelles
antidérapantes.
c. Portez des lunettes de sécurité adaptées. Il
est conseillé d’utiliser un écran facial de sécurité
complet ou des lunettes de sécurité avec écrans
latéraux qui vous protègent des projections de
débris.
d. Protégez votre audition. Portez des
protections auditives adaptées.
e. Portez des gants adaptés. Il est conseillé de
porter des gants hautement adhérents.
f. Portez une protection respiratoire. Il est
conseillé de porter un masque à poussière avec
des ltres remplaçables an d’être protégé des
poussières, des bres et des vapeurs nes et
toxiques.
g. Portez un casque de sécurité. Il est possible
que le port d'un casque de sécurité soit obligatoire
sur les chantiers de construction an de protéger
l’opérateur des dangers au-dessus de lui.
TRANSPORT DANS UN VÉHICULE
AVERTISSEMENT: Il faut au moins deux
personnes pour soulever cette machine.
Préparez le véhicule à l'avance an qu'il soit
prêt à recevoir la machine. Veillez à ce que la
machine ne tombe pas pendant le chargement/
déchargement.
• Bien que compacte, cette machine est lourde.
Pour réduire le risque de blessures, demandez
à une personne compétente de vous aider
à chaque fois que vous devez porter cette
machine.
• An de réduire le risque de blessures au dos,
tenez la machine près de votre corps lorsque
vous la soulevez. Pliez les genoux de manière à
la soulever avec les jambes et non avec le dos.
Soulevez-la en utilisant des zones adaptées du
cadre extérieur principal.
• Mettez la machine dans le véhicule en la
soulevant et sécurisez-la en position aussi plane
que possible avec des cordes, des courroies
d’arrimage, etc., de façon à ce qu'elle ne puisse
pas bouger pendant le transport.
Remarque: H320-P: Lors du transport de cette
machine dans un véhicule, il est préférable et plus
sûr qu'il n'y ait pas de carburant dans le réservoir
de la machine.
USAGE PRÉVU DE CET OUTIL ÉLECTRIQUE
AVERTISSEMENT: Ce produit est une
plaque de compactage motorisée et a
été conçu pour être utilisé avec les accessoires
spéciaux Evolution. Utilisez uniquement des
accessoires conçus pour l'utilisation avec cette
machine et/ou ceux spéciquement recommandés
par Evolution Power Tools Ltd.
Cette machine peut être utilisée pour compacter
des surfaces telles que les matériaux concassés, les
petits agrégats, la terre, le sable et les couches de
fondation, etc. Lorsqu'elle est équipée du patin de
pavage, la H320 peut être utilisée pour compacter
et stabiliser la plupart des types de pavés.
Motifs de compactage
Les sols perturbés, les nouveaux remblais, les
couches de fondation ou les enrobés contiennent
des poches d'air et de petits vides qui, s'ils ne sont
pas compactés, peuvent entraîner des problèmes.
• Lorsque les véhicules circulent à la surface
d'une zone non compactée, les charges
imposées exercent une pression vers le bas sur
le matériau sous-jacent. Cela peut entraîner
un aaissement de la surface supérieure, car
le matériau migre vers le bas pour remplir les
vides.
• Une charge statique (maison, garage, etc.)
construite sur un sol non compacté peut subir
un aaissement lorsque le matériau sous-jacent
se déplace.
• L'eau qui s'inltre dans un matériau contenant
des vides et des poches d'air peut s'accumuler
dans ces espaces et se dilater pendant les
épisodes de gel et se contracter à nouveau
pendant les périodes de chaleur et de
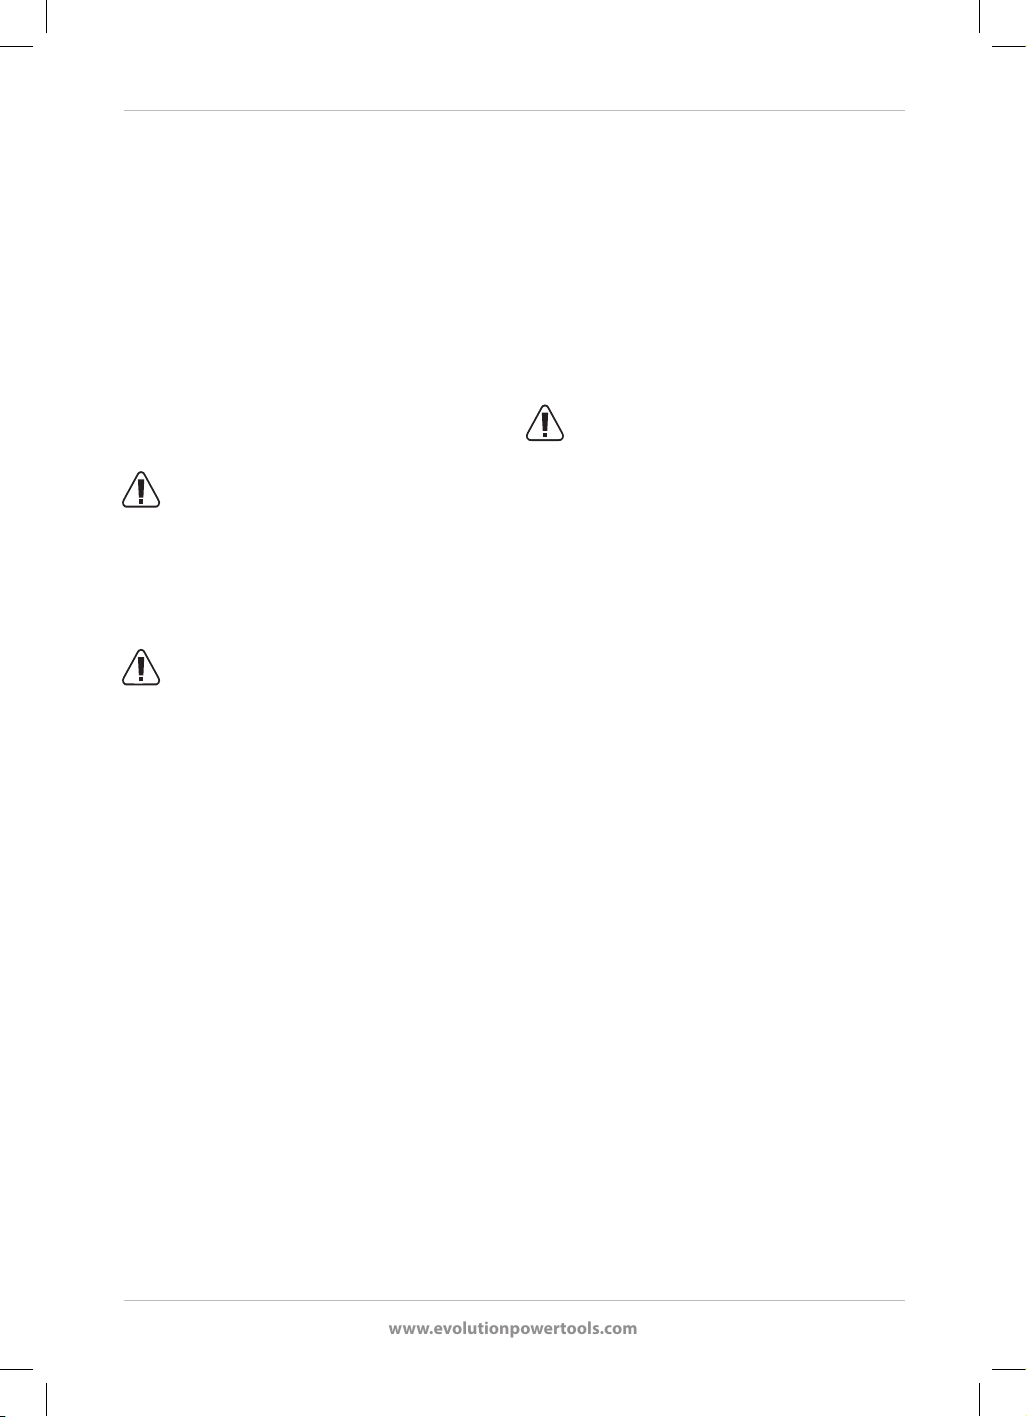
www.evolutionpowertools.com
67
sécheresse. La dilatation et la contraction
sont des facteurs importants qui contribuent
à endommager les fondations des bâtiments
et qui peuvent conduire à la nécessité d'une
reprise en sous-œuvre de la structure.
Le compactage augmente la densité du matériau
et donc sa capacité à résister aux charges statiques
et dynamiques. L'élimination des poches d'air et
des petits vides réduit les risques d'inltration
d'eau et d'aaissement ultérieur dû à la dilatation
et à la contraction des matériaux.
USAGE PROSCRIT DE CET OUTIL ÉLECTRIQUE
AVERTISSEMENT: Ce produit est
une plaque de compactage motorisée et
doit uniquement être utilisé en tant que tel. Il
ne doit en aucun cas être modié ou utilisé pour
alimenter tout autre appareil ou entraîner tout
accessoire autre que ceux mentionnés dans le
présent mode d'emploi.
AVERTISSEMENT: Cette machine
n'est pas conçue pour être utilisée par
des personnes (y compris les enfants) dont les
capacités physiques, sensorielles ou mentales
sont réduites, ou dénuées d'expérience ou de
connaissances, sauf si elles ont pu bénécier d’une
surveillance ou d’instructions par une personne
responsable de leur sécurité et capable d'utiliser la
machine en toute sécurité.
Les enfants doivent être surveillés pour garantir
qu'ils n'aient pas accès à cette machine et qu'ils ne
soient pas autorisés à jouer avec.
SÉCURITÉ ÉLECTRIQUE – H320-E
LA PRISE SECTEUR
Ce produit est équipé d’une che moulée
correspondant au marché de vente désigné.
La che répond aux exigences des normes
internationales et doit être connectée à une
tension d'alimentation égale à celle indiquée
sur l'étiquette signalétique. Si la che ou le
câble de raccordement sont endommagés de
quelque manière que ce soit, ils doivent être
remplacés dans leur intégralité à l’identique par
rapport à l’original. Respectez les conditions de
raccordement au réseau électrique en vigueur
dans votre pays. En cas de doute, consultez un
électricien qualié.
La che BS ne peut être utilisée qu’au Royaume-
Uni. La che doit être branchée dans la prise
d'alimentation à l'intérieur pour satisfaire au
degré de protection IP requis. La prise doit être
incorporée à un cordon d’alimentation de plus de
10m de long.
UTILISATION EN EXTÉRIEUR - H320-E
AVERTISSEMENT: Si vous utilisez cet
outil en extérieur, ne l’exposez pas à la pluie
et ne l’utilisez pas dans des lieux très humides
pour assurer votre protection. Pour une protection
supplémentaire, utilisez un dispositif de courant
diérentiel résiduel (DCR) qui interrompra
l'alimentation si le courant de fuite vers la terre
excède 30 mA pour 30 ms. Vériez toujours le bon
fonctionnement du dispositif diérentiel résiduel
(DCR) avant d’utiliser la machine.
Si vous devez utiliser une rallonge, celle-ci doit
convenir à l’utilisation en extérieur et cette
mention doit gurer sur l’étiquette.
Les instructions du fabricant doivent être
respectées lors de l’utilisation d’une rallonge.
VIBRATION
AVERTISSEMENT: Lors de l’utilisation de cette
machine, l’utilisateur peut être exposé à de
hauts niveaux de vibrations transmises à sa
main et à son bras. L’opérateur est susceptible
de développer le syndrome de Raynaud. Ce
syndrome peut diminuer la sensibilité de
la main à la température et provoquer un
engourdissement général. Les personnes
utilisant des compacteurs de manière régulière
ou prolongée doivent surveiller attentivement
l’état de leurs mains et de leurs doigts. En cas
d'apparition de l'un des symptômes, consultez
immédiatement un médecin.
• La mesure et l'évaluation de l’exposition de
l’être humain aux vibrations transmises par les
mains en milieu professionnel sont précisées
dans les normes suivantes :
BS EN ISO 5349-1:2001 et

www.evolutionpowertools.com
68
BS EN ISO 5349-2:2002
• Plusieurs facteurs peuvent inuencer le niveau
de vibration eectif lors de l’utilisation, comme
l'état et l'orientation des surfaces de travail et
le type et l’état de la machine utilisée. Avant
chaque utilisation, vous devez évaluer ces
facteurs et, si possible, adopter des pratiques
professionnelles appropriées. La gestion de ces
facteurs peut contribuer à réduire les eets des
vibrations :
Manipulation
• Manipulez la machine avec soin
en lui laissant faire le travail.
• Évitez les eorts physiques excessifs sur
toutes les commandes de la machine.
• Prenez en considération votre sécurité et
votre stabilité ainsi que l'orientation de la
machine durant son utilisation.
Surface de travail
• Prenez en compte la matière de la surface
de travail,
son état, sa densité, sa résistance,
sa rigidité et son orientation.
SYMBOLES ET ÉTIQUETTES
AVERTISSEMENT: N’utilisez pas la machine si les
étiquettes d’avertissement et/ou d’instructions
sont manquantes ou endommagées. Contactez
Evolution Power Tools pour le remplacement des
étiquettes.
Remarque: Tous les symboles suivants ou certains
d'entre eux peuvent apparaître dans le mode
d'emploi ou sur le produit.
Volts
V
Ampères
A
Vitesse
min
-1
(TPM)
Courant alternatif
~
Niveau d’intensité
acoustique
Lisez le mode d'emploi
Portez des protections
auditives
Portez un dispositif de
protection oculaire
Portez un dispositif de
protection contre la
poussière
Avertissement
ATTENTION :
Échappement chaud. Ne
pas toucher
CHAUD! Ne pas toucher
HOT!
Surface chaude
Certication CE
Certication UKCA
Certication Intertek
Risque grave pour la santé
Dangereux pour
l'environnement
Déchets électriques et
équipement électronique
Huile moteur 10/30W
Starter ouvert
Starter fermé
ATTENTION : Cette machine
est équipée d'un moteur à
4 temps.
Faites uniquement le plein
avec de l'essence.
Ne faites pas le plein avec du
gazole.
SANS PLOMB
ESSENCE UNIQUEMENT!*
HAUTEMENT INFLAMMABLE.
* E5 et E10
Laissez refroidir le moteur
avant d'ouvrir le bouchon
du réservoir. La vapeur est
extrêmement inammable et
peut s'enammer au contact
d'une surface chaude ou de
ammes.

www.evolutionpowertools.com
69

www.evolutionpowertools.com
70
1. PLAQUE VIBRANTE
2. RÉSERVOIR DE CARBURANT
3. INTERRUPTEUR D'ALLUMAGE «MARCHE/ARRÊT»
DU MOTEUR
4. LEVIER D’ACCÉLÉRATION
5. CONTRÔLE DU STARTER
6. DÉMARREUR MANUEL
7. ROBINET DE CARBURANT
8. REMPLISSAGE D'HUILE MOTEUR/JAUGE
9. FILTRE À AIR
10. BOUGIE D'ALLUMAGE
11. ÉCHAPPEMENT
12. BOUCHON DE VIDANGE D'HUILE MOTEUR
13. VIS DE RÉGLAGE DE FONCTIONNEMENT ACCÉ-
LÉRÉ
14. PROTÈGE-COURROIE
15. POIGNÉE ANTI-VIBRATION
16. RANGE-OUTILS
(1)
(14)
(2)
(7)
(5)
(9)
(4)
(13)
(6)
(3)
(8)
(12)
(15)
(16)
(11)
(10)
PRÉSENTATION DE LA MACHINE H320-P

www.evolutionpowertools.com
71
PRÉSENTATION DE LA MACHINE H320-E
1. PLAQUE VIBRANTE
2. BARRE TRANSVERSALE/ RANGE-CÂBLE
3. INTERRUPTEUR DE DÉMARRAGE DE SÉCURITÉ
«MARCHE / ARRÊT»
4. POIGNÉE ANTI-VIBRATION
5. SECTION SUPÉRIEURE - POIGNÉE
6. SECTION CENTRALE - POIGNÉE
7. CLIPS D’ACHEMINEMENT DE CÂBLES
(1)
(2)
(3)
(4)
(5)
(6)
(7)

www.evolutionpowertools.com
72
PRISE EN MAIN
DÉBALLAGE
Mise en garde : Cet emballage contient des
objets tranchants. Faites attention lors du
déballage. Soulever, monter et déplacer cette
machine peut nécessiter la présence de deux
personnes. Retirez la machine et les accessoires
fournis de l'emballage. Vériez soigneusement
que la machine est en bon état et que vous
disposez de tous les accessoires énumérés dans
le présent mode d'emploi. Assurez-vous que
tous les accessoires sont complets. S’il manque
une ou plusieurs pièces, renvoyez la machine et
ses accessoires dans leur emballage d’origine au
revendeur. Ne jetez pas l’emballage. Conservez-le
en bon état tout au long de la période de garantie.
Jetez l’emballage d’une manière respectueuse de
l’environnement. Si possible, recyclez-le. Ne laissez
pas les enfants jouer avec des sacs plastiques
vides, en raison du risque de suocation.
ÉLÉMENTS FOURNIS -
COMPACTEUR H320-P
DESCRIPTION QUANTITÉ
Mode d’emploi 1
Extension de la poignée centrale 1
Extension de la poignée
supérieure
1
Fixation de la poignée centrale
Vis M10 x 20
4
Fixation de la poignée
supérieure
Vis M10 x 15
4
Rondelles de la poignée
supérieure
4
Clé Allen 8mm 1
Clé à douille pour bougie
d’allumage et barre en T
1
Huile moteur (bouteille de 400
ml)
1
ÉLÉMENTS FOURNIS -
COMPACTEUR H320-E
DESCRIPTION QUANTITÉ
Mode d’emploi 1
Vis de xation de la poignée
(longue) M10 x 40
2
Vis de xation de la poignée
(courte) M10 x 15
2
Rondelles de poignée 4
Poignée centrale 1
Poignée supérieure 1
Clé Allen 8mm 1
Barre transversale/range-câble
de la poignée
1
Accessoires complémentaires
En plus des articles standard fournis avec cette
machine, les accessoires suivants sont également
disponibles dans le magasin en ligne d’Evolution
sur www.evolutionpowertools.com ou chez votre
fournisseur local.
DESCRIPTION PIÈCE n°
Patin pour pavage H320 Patin pour
pavage
015-0007

www.evolutionpowertools.com
73
Ill.2
Ill.1
MONTAGE
Votre machine Evolution H320 nécessite quelques étapes
de montage avant d'être utilisé. Si vous disposez d'une
machine à moteur à essence, terminez tout le montage
avant de remplir le moteur avec 0,4litre de l'huile de
service recommandée.
1. Fixation de la poignée d'extension - H320-P
Remarque: La rallonge de poignée est dotée d'une
poignée anti-vibration qui aide l'opérateur à gérer les
vibrations transmises par la machine à la main/au bras de
l'opérateur. La poignée d'extension doit être montée pour
les besoins de l'utilisation, mais peut être repliée pour le
transport ou le stockage. Il est possible de plier l'extension
de la poignée pour faciliter le transport en retirant les
quatre vis inférieures et en desserrant les quatre vis
supérieures.
• Faites glisser avec précaution la partie centrale de la
poignée sur les deux supports inférieurs de la poignée et
alignez les quatre trous de la poignée centrale avec les
quatre trous verticaux en forme de triangle des supports
inférieurs.
•
Insérez les quatre vis M10 x 20 dans la poignée centrale
et les supports de la poignée supérieure.(Ill. 2)
• Serrez fermement les quatre vis à l'aide de la clé Allen.
2. Montage/xation de la poignée – H320-E
Remarque: La poignée du H320-E est constituée de quatre
(4) pièces principales:
• Poignée inférieure (xée en usine à la machine).
• Section centrale.
• Section supérieure avec interrupteur de sécurité
«marche/arrêt».
• Barre transversale/range-câble.
Les deux vis longues servent à xer la barre transversale/
le range-câble et la section centrale de la poignée aux
poignées inférieures pivotantes.
• Placez soigneusement la barre transversale/le range-
câble dans sa position de marche.
Remarque: Les ches du câble doivent être orientées vers
l'arrière.
• Faites glisser soigneusement la section centrale sur les
poignées inférieures et alignez les trous.
• Une rondelle doit être utilisée entre la vis et les
poignées. (Ill. 1)
• Insérez les vis longues dans les trous de la poignée
centrale, dans les trous des poignées inférieures
et vissez-les dans les écrous captifs de la barre
transversale/du range-câble. (Ill. 3)
Ill.3
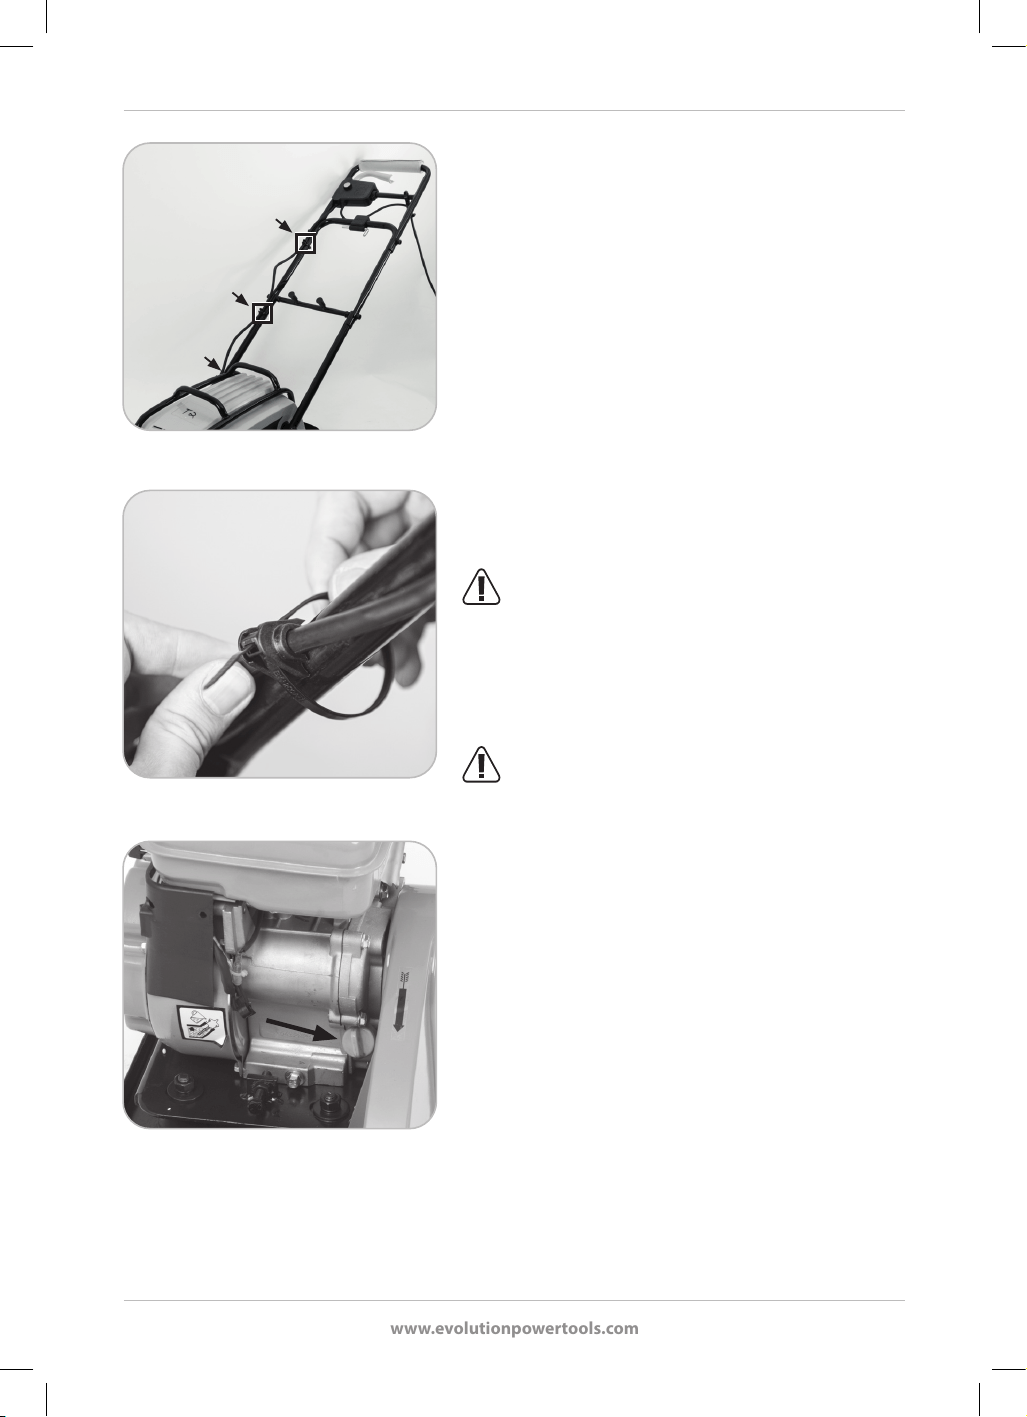
www.evolutionpowertools.com
74
• Serrez fermement ces vis à l'aide de la clé Allen.
Les deux vis courtes servent à xer la section supérieure de
la poignée à la section centrale.
• Faites glisser soigneusement la section supérieure de la
poignée sur la section centrale et alignez les trous.
• Insérez les vis dans la poignée de la section supérieure
et vissez-les dans les écrous captifs de la section
centrale.
Le modèle H320-E est équipé de 3 pinces pour câbles
permettant d'acheminer le câble d’alimentation jusqu’au
cadre de la poignée en toute sécurité. Ils doivent être
xés. Tout manquement à cette xation annulera votre
garantie. Positionnez-les du même côté que la gâchette
d’alimentation et espacez-les comme indiqué aux (Ill. 4a
et 4b)
AVERTISSEMENT: Veillez à ce que le câble
d'alimentation allant de l'interrupteur de sécurité au
moteur soit libre et ne soit pas coincé pendant le processus
de montage.
Remplissage initial et vérication du niveau d’huile –
H320-P
AVERTISSEMENT: Il n’y a pas d’huile dans
la machine quand vous l’achetez. Aucune tentative
de démarrage du moteur ne doit être faite tant que le
carter de vilebrequin n'est pas rempli au niveau correct
avec l'huile de la bonne qualité.
Remarque: L’huile (fournie) doit être versée dans la
machine par le bouchon de remplissage/niveau d'huile. La
capacité d'huile est d'environ 0,4 L d'huile automobile 10W
30 (disponible dans tous les bons magasins automobiles et
dans la plupart des stations-service). Pour certaines zones
climatiques non tempérées, une autre qualité d'huile peut
être préférable, consultez votre fournisseur.
Le bouchon de remplissage d'huile se dévisse du carter du
moteur de la machine et comprend une jauge de niveau
d'huile. (Ill. 5) Faites attention de ne pas renverser d’huile.
Remarque: Quand vous vériez le niveau d’huile, il est
important que la machine soit sur une surface plane,
horizontale et stable, avec le moteur arrêté et froid.
Il y a deux repères sur la jauge d’huile.
Le niveau d’huile doit être maintenu au niveau ou à
Ill.5
Ill. 4a
Ill. 4b
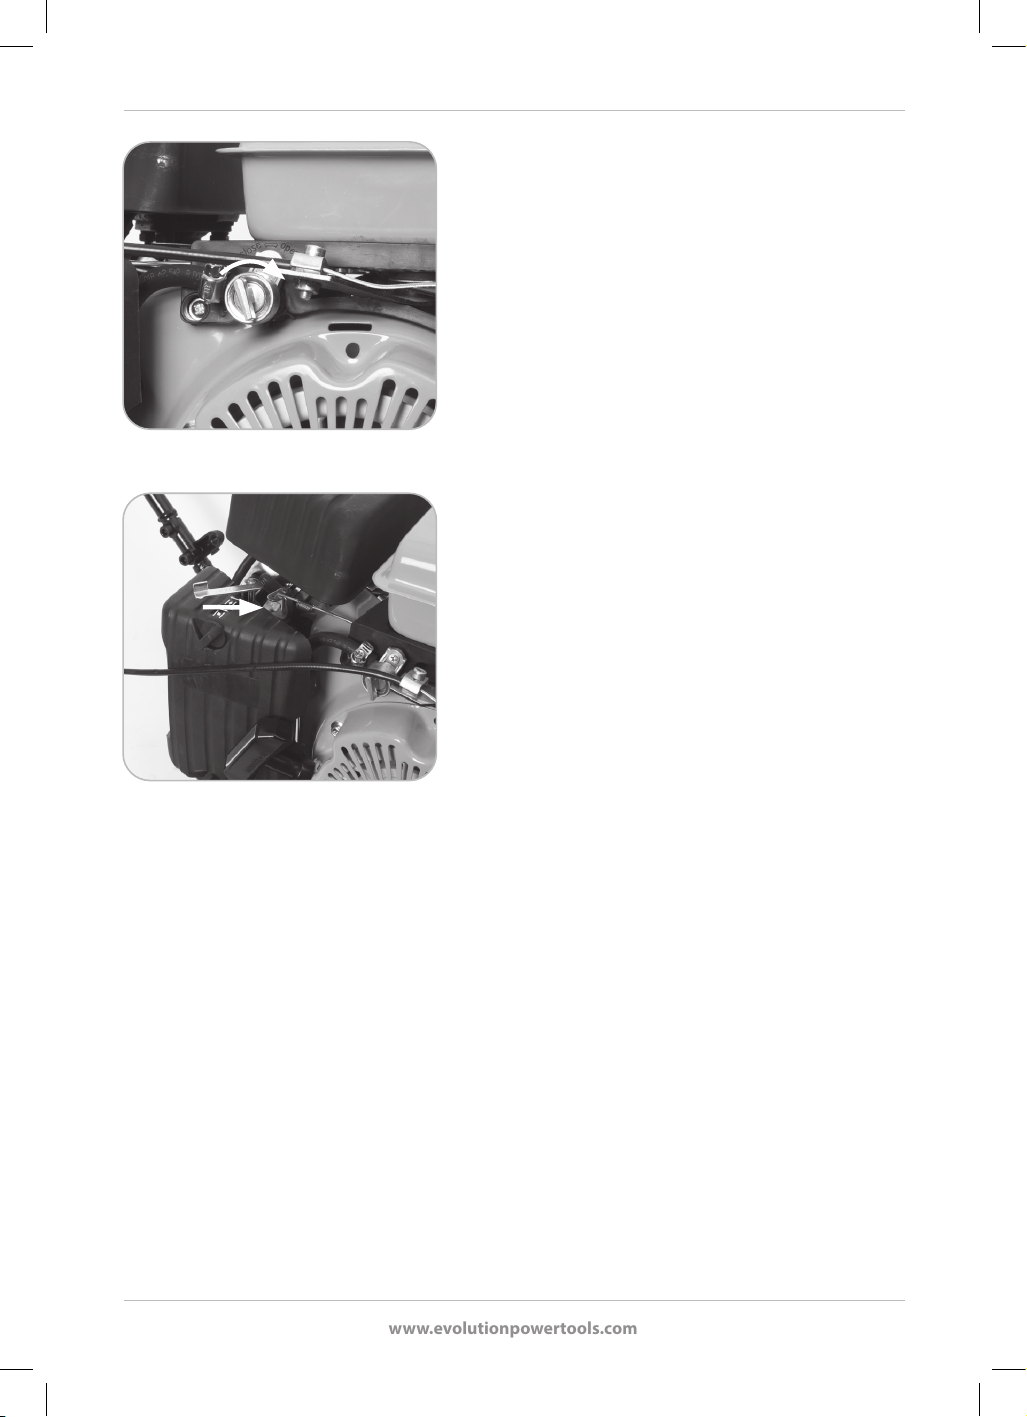
www.evolutionpowertools.com
75
proximité du repère le plus haut.
• Enlevez le bouchon du niveau d’huile/de remplissage et
essuyez la jauge avec un tissu sec et propre.
• Versez la quantité requise d’huile. (environ 0,4L)
• Laissez l’huile reposer une dizaine de secondes.
• Regardez le niveau d’huile à travers l’orice de
remplissage de l’huile. Le niveau d’huile doit être au
plus près du haut des letages avec l’huile à la limite de
déborder du carter (la machine doit être sur une surface
horizontale plane).
• Insérez la jauge et vissez le bouchon à fond. Dévissez
le bouchon du remplissage et retirez la jauge. Vériez
visuellement le niveau d’huile sur la jauge.
• Ajustez-le si nécessaire.
• Lorsque le niveau est correct, vissez fermement le
bouchon du remplissage/niveau d’huile dans le
tambour-machine.
Remarque: Changez l’huile en suivant les instructions
dans le tableau d’entretien (référez-vous aussi à ENTRETIEN
– Remplacement de l’huile de moteur)
Vérications avant utilisation
Remarque: Avant chaque utilisation, la machine doit être
inspectée pour s'assurer que tous les dispositifs de sécurité,
etc. fonctionnent correctement.
• Vériez que toutes les protections de sécurité sont en
place et non endommagées.
• H320-E - Vériez l'intégrité du câble d'alimentation et
de la che. Si le câble d'alimentation ou la che sont
endommagés de quelque manière que ce soit, le câble
et/ou la che doivent être remplacés par un technicien
compétent avec des pièces de rechange identiques.
• H320-P - Vériez tous les tuyaux de carburant,
les raccords et les bouchons de remplissage, etc.
pour détecter les signes de fuite de liquide. Toute
fuite détectée doit être réparée avant le début des
opérations.
• Vériez le niveau d'huile moteur et ajustez-le si
nécessaire.
• Vériez le niveau de carburant et faites l'appoint si
nécessaire.
• Inspectez minutieusement le reste de la machine pour
détecter toute forme de dommage, en particulier
les couvercles, les protections, les composants en
caoutchouc, etc.
Ill.6
Ill.7

www.evolutionpowertools.com
76
Démarrage du modèle H320-P
• Remplissez le réservoir de carburant avec de l'essence.
Le ltre du goulot de remplissage du réservoir de
carburant est muni d’un insert en plastique indiquant
le niveau maximal de carburant. Ne versez pas de
carburant au-dessus de ce marquage.
• Mettez le levier du robinet du carburant en position
«Marche» en le tournant. (Ill. 6)
• Réglez le levier du starter sur la position «Starter». (Ill.
7)
• Mettez le bouton d'allumage du moteur en position
«Marche» (I). (Ill. 8)
• Réglez le levier d’accélération au maximum. (Ill. 9)
• Stabilisez le modèle H320 en tenant la poignée de
conduite à un endroit pratique.
• Utilisez l’autre main pour attraper la manette du starter
manuel. (Ill. 10)
• Tirez la manette du starter manuel lentement jusqu’à ce
que vous sentiez une résistance, ce qui indique que le
starter est engagé.
• Quand vous sentez la résistance, tirez la manette d’un
coup sec.
• Répétez l’opération jusqu’à ce que le moteur démarre.
• L'unité moteur peut tourner (chasser) pendant
une courte période jusqu'à ce que le moteur soit à
température.
• Habituellement, le starter peut être ramené à la position
«arrêt» (fonctionnement) presque immédiatement
lorsque le moteur démarre, mais cela dépendra
des températures ambiantes, des conditions de
fonctionnement, etc. et cela devra se faire à la discrétion
des opérateurs .
• Dans certaines circonstances, le starter peut être
nécessaire même lorsque le moteur est chaud après un
cycle de fonctionnement précédent. Si vous éprouvez
des dicultés à démarrer un moteur chaud :
• Réglez le starter sur la position «marche» (droite).
• Tirez unefois le démarreur manuel.
• Remettez le starter en position «arrêt»
(fonctionnement) (à gauche).
• Tirez sur le démarreur manuel jusqu'à ce que le
moteur s'allume.
• Remarque: Le modèle H320-P commencera à vibrer et
à se déplacer dès le démarrage du moteur. L'opérateur
doit faire preuve de vigilance lors du démarrage de
cette machine.
Ill.8
Ill.9
Ill.10

www.evolutionpowertools.com
77
Arrêt du moteur H320-P
• Mettez le bouton d'allumage du moteur en position
«ARRÊT» (0).
• Fermez le robinet de carburant.
Déplacement de la machine - H320-P
Remarque: Le réglage du régime du moteur modie la
fréquence des vibrations ainsi que la vitesse à laquelle la
machine avance.
Remarque: La vis de fonctionnement accéléré limite la
course maximale du levier d'accélération et contrôle donc
uniquement la vitesse maximale du moteur.
Si vous devez modier le régime maximal du moteur pour
augmenter ou diminuer la vitesse de déplacement de la
machine :
• Tournez la vis de fonctionnement accéléré (Ill. 11)
petit à petit (un demi-tour maximum) dans le sens
des aiguilles d'une montre pour diminuer la vitesse
du moteur, ou dans le sens inverse pour augmenter la
vitesse du moteur.
• Vériez que le levier d'accélération est réglé au
maximum.
• Démarrez la machine et vériez le déplacement
de la machine avec le nouveau réglage de la vis de
fonctionnement accéléré.
• Si nécessaire, arrêtez la machine et réglez à nouveau
la vis de fonctionnement accéléré jusqu'à atteindre la
vitesse de déplacement souhaitée.
Démarrage et arrêt du modèle H320-E
Le modèle H320-E est équipé d'un interrupteur de
démarrage de sécurité «marche/arrêt». Le verrouillage de
sécurité empêche d'actionner le levier de l'interrupteur tant
que le bouton de verrouillage de sécurité n'est pas enfoncé.
• Appuyez sur le bouton de verrouillage de sécurité (a)
et tirez le levier de l'interrupteur (b) pour démarrer la
machine. (Ill. 12)
• Relâchez le levier de l'interrupteur pour éteindre la
machine.
Remarque: Lorsque vous relâchez le levier de
l'interrupteur, le moteur s'arrête et le bouton de
verrouillage de sécurité revient automatiquement en mode
sécurisé.
Ill.11
Ill.12
(a)
(b)

www.evolutionpowertools.com
78
AVERTISSEMENT: L'opérateur doit toujours être
attentif au parcours du câble d'alimentation an de
s'assurer qu'il ne constitue pas un risque de chute ou toute
autre forme de danger, ou qu'il ne soit pas écrasé par la
machine.
CONSEILS GÉNÉRAUX D'UTILISATION
• Veillez à ce que les passants soient maintenus à une
distance sûre des opérations de compactage. Si
nécessaire, délimitez la zone de travail et achez des
avis d’AVERTISSEMENT.
• Avant de commencer les opérations de compactage,
planiez votre travail et le chemin que vous comptez
emprunter avec la machine.
• Examinez la zone de travail avant de commencer et
enlevez ou neutralisez tout élément ou obstacle qui
pourrait constituer un danger.
• Vériez que vous disposez de tous les EPI appropriés et
que vous savez comment les utiliser.
• Le compacteur se déplace vers l'avant par sa propre
force. Il sut à l'opérateur d'appuyer doucement sur la
poignée de la machine pour la diriger. L'opérateur doit
tenir la poignée anti-vibration à deux mains, et elles
doivent être placées aussi loin que possible l'une de
l'autre.
• Plusieurs passages sur la zone de travail peuvent être
nécessaires pour compacter le matériau à la densité
souhaitée.
• Si la zone de travail est en pente, travaillez de haut en
bas de la surface en pente, et non en travers
ENTRETIEN
H320-P
Un entretien régulier est essentiel pour maintenir votre
machine et ses accessoires en état de marche. Nous
recommandons que seuls les opérateurs compétents qui
ont de l’expérience dans l’entretien et la maintenance des
moteurs à essence tentent ces procédures. Si vous avez des
doutes, faites faire les entretiens de votre machine dans un
centre d’entretien agréé par Evolution.
1. Remplacement de l’huile de moteur
L'huile moteur doit être remplacée après la période initiale
de rodage et aux intervalles spéciés dans le programme
d'entretien.
Remarque: L’huile de moteur est plus facile à changer
Ill.13
Ill.14

www.evolutionpowertools.com
79
Ill.15
quand le moteur est monté en température et que l’huile
est chaude.
• Assurez-vous que le moteur est placé sur une surface
dure et plane.
• Enlevez le bouchon du réservoir d’huile. (Ill. 13)
• Placez un récipient adapté pour récupérer l’huile sous le
moteur.
• Enlevez le bouchon de vidange de façon à ce que l’huile
puisse être complètement vidangée du moteur. (Ill. 14)
AVERTISSEMENT: Faites attention. Le
contact avec de l’huile de moteur usagée peut être
dangereux. L’huile peut être très chaude (risque de brûlure)
et certains opérateurs peuvent être victime d’irritation
si l’huile contamine la peau exposée. L'opérateur doit
envisager de porter des gants de protection mécanique si
possible. Lavez au savon et à l'eau claire toute partie de la
peau contaminée par l'huile dès que possible.
• Vériez le bouchon de vidange et son joint d’étanchéité.
• Vériez le bouchon de remplissage de l’huile et son joint
torique.
• Remplacez toute pièce qui ne serait pas en état de
marche.
• Réinstallez le bouchon de vidange et serrez-le
fermement.
• Re-remplissez le moteur avec l’huile de moteur de type
correct jusqu’au niveau correct.
• Fixez de nouveau le bouchon de remplissage de l’huile.
• Vériez qu’il n’y a pas de fuite ou de débordement, et
remédiez-y au besoin.
Remarque: L’huile de moteur usagée doit être éliminée de
manière respectueuse de l’environnement. Contactez votre
municipalité an qu’elle vous indique les infrastructures de
recyclage d’huile usagée les plus proches.
2. Bougie – Vérication et remplacement
Après environ 50 heures d’utilisation, la bougie doit être
enlevée an de la vérier, de la nettoyer et de la remettre
en place.
Pour enlever et installer à nouveau la bougie:
• Assurez-vous que le moteur est arrêté (sur «ARRÊT») et
que le robinet du carburant est en position «ARRÊT».
AVERTISSEMENT: Le moteur doit être froid
avant de commencer la procédure d’extraction de la

www.evolutionpowertools.com
80
bougie.
• Tirez l’allumage haute tension de la bougie.
• À l'aide d'une douille de bougie (fournie), retirez la
bougie d'allumage. (Ill. 15)
Une bougie en bon état doit montrer de légers dépôts
bruns sur le culot. Enlevez ces dépôts avec une brosse
métallique laiton.
• Vériez l’écartement entre les pointes d’électrode de la
bougie à l’aide d’une jauge d’épaisseur.
• Ajustez si nécessaire. L'écartement est indiqué dans la
rubrique «Spécication du H320-P».
• Réinstallez la bougie d’allumage. Veillez à ce qu’elle
s'engage correctement dans les lets de la culasse.
• Serrez la bougie à la main avec la douille de bougie
fournie.
• Faites glisser la barre en T fournie à travers le trou de
l'extrémité de la douille de la bougie.
• Positionnez la barre en T de manière à ce qu'une
longueur égale dépasse de chaque côté de la douille de
la bougie.
• Enn, réalisez le joint étanche au gaz en tournant la
douille de la bougie d'allumage entre ¼ et ½ tour. Ce
dernier tour fractionné écrase la rondelle de la bougie
et crée un joint étanche aux gaz. Ne serrez pas trop la
bougie d'allumage.
• Ré-attachez l’allumage haute tension en haut de la
bougie.
3. Filtre à air
AVERTISSEMENT: Ne faites jamais fonctionner
le moteur sans le ltre à air.
Après environ 50heures d'utilisation, il est nécessaire de
vérier l'état du ltre à air.
Remarque: Si l’environnement est particulièrement
poussiéreux, il faudra prêter une attention plus fréquente
au ltre.
Pour le retirer:
• Assurez-vous que le moteur est arrêté (sur «ARRÊT») et
que le robinet du carburant est en position «ARRÊT». Le
moteur doit être froid.
• Dévissez les écrous papillon du couvercle du boîtier du
ltre à air et retirez-le. (Ill. 16)
• Rangez soigneusement ces pièces pour les ré-installer
plus tard.
Ill.16
Ill.17

www.evolutionpowertools.com
81
• Retirez l'élément du ltre à air du boîtier pour
l'inspecter. (Ill. 17) Si l'élément en papier du ltre à
air présente des signes de décoloration importante et
d'obstruction due à la saleté, à la poussière, etc. il doit
être remplacé.
Pour le remettre en place:
• Installez l'élément dans le boîtier du ltre à air.
Un nouvel élément peut s'adapter dans les deux sens.
• Remettez le couvercle du boîtier du ltre à air en place.
• Replacez les écrous papillon et vériez que le couvercle
est bien en place et que les écrous papillon sont bien
serrés.
4. Filtre de remplissage de réservoir de carburant
De temps en temps, inspectez visuellement l’état
du ltre de remplissage du réservoir (idéalement
lors du remplissage du carburant). S’il y a des signes
d’accumulation de dépôts, retirez le ltre du réservoir et
nettoyez-le.
• Nettoyez le ltre avec un agent dégraissant respectueux
de l’environnement à base d’eau, et si nécessaire, utilisez
de l’air compressé sec et propre pour souer sur la ne
grille.
• Laissez-le sécher complètement avant de le remonter.
Lors du remontage, assurez-vous que les 2 découpes sur
le bord supérieur du ltre s'alignent avec les découpes
du goulot de remplissage du réservoir de carburant.
5. Contrôle de la tension de la courroie de transmission
AVERTISSEMENT: N'eectuez cette procédure
que lorsque la machine est froide, le moteur éteint et
le capuchon de la bougie retiré.
La tension de la courroie d'entraînement doit être vériée
après les 4 premières heures d'utilisation, puis comme
indiqué dans le programme d'entretien courant.
Contrôle de la tension de la courroie de transmission:
• Retirez le protège-courroie en enlevant les trois (3) vis
à tête creuse (Ill. 18) à l'aide d'une clé hexagonale et
d'une clé à molette (non fournies) et rangez-le en lieu
sûr pour une utilisation ultérieure.
Remarque: Ces trois (3) vis à tête creuse ont une position
bien spécique. Notez la position de chacune des vis et
de ses accessoires connexes au fur et à mesure qu'ils sont
retirés de la machine, an de pouvoir les replacer dans leur
position d'origine.
• La déformation par une légère pression du doigt au
Ill. 18
Ill.19

www.evolutionpowertools.com
82
milieu de la courroie doit être d'environ 5/6mm (1/4de
pouce).
Remarque: L'unité moteur du modèle H320 est
positionnée sur quatre(4) fentes de la plaque de montage
du moteur. Quatre(4) boulons de montage du moteur
sont positionnés à travers ces quatre fentes et sont vissés
par le dessous jusqu'à la base du bloc du carter du moteur.
Cette disposition permet de repositionner le moteur sur la
plaque.
• Desserrez les quatre (4) boulons à tête hexagonale à
l'aide d'une clé appropriée (non fournie).
• Faites glisser le moteur vers l'arrière ou l'avant pour
modier la tension de la courroie d'entraînement. Une
vis de réglage (Ill. 19) est prévue à l'avant du moteur
pour faciliter le positionnement précis du moteur.
• Une fois la bonne tension trouvée, serrez fermement les
boulons de montage du moteur.

www.evolutionpowertools.com
83
AVERTISSEMENT: Ne réglez pas le boulon de réglage/de tension sans desserrer les quatre
boulons de montage, car cela pourrait endommager le carter du moteur.
Remarque: Veillez à ce que le moteur reste à l’équerre et aligné sur la plaque de montage. Si la plaque
de montage du moteur devait se trouver dans une conguration légèrement tordue, la courroie
d'entraînement et les poulies seraient sollicitées et s'useraient rapidement.
• Replacez la protection de la courroie d'entraînement et serrez fermement les trois(3) vis à tête creuse
dans leur position d'origine.
6. Système de démarrage manuel
Les ouvertures de la ventilation doivent être gardées propres et exemptes de toute obstruction.
Enlevez toute matière étrangère des ouvertures de la ventilation.
H320-P
ENTRETIEN COURANT
PROGRAMME
Après les 4pre-
mières heures
Toutes les
20heures ou
chaque mois
Toutes les
50heures ou
chaque 3mois
Toutes les
100heures ou
chaque 6mois
Contrôle du niveau d'huile
moteur
● ●
Changement d'huile moteur
●
(1
er
changement
uniquement)
●
Contrôle du ltre à air
●
Remplacement du ltre
à air
●
Contrôle de la bougie
d'allumage
●
Tension de la courroie d'en-
traînement
● ●
Contrôle/Nettoyage du
ltre à carburant
●
ENTRETIEN H320-E
Remarque: Tout entretien doit être eectué avec la machine éteinte et débranchée de la source
d'alimentation.
Vériez régulièrement que tous les éléments de sécurité et les carters fonctionnent correctement. Utilisez
cette machine uniquement si tous les carters et dispositifs de sécurité sont opérationnels.
Tous les paliers du moteur de cet appareil sont lubriés à vie. Aucune autre lubrication n’est requise.
Nettoyez les pièces en plastique de l'appareil à l’aide d'un chion propre légèrement humide. N’utilisez
pas de solvants ou de produits similaires qui pourraient endommager les parties en plastique.
AVERTISSEMENT: Ne tentez pas de nettoyer la machine en insérant des objets pointus
dans les ouvertures dans son carter, etc. Les évents de la machine doivent être régulièrement
nettoyés à l’aide d’air sec comprimé.

www.evolutionpowertools.com
84
DÉPANNAGE H320-P
PROBLÈME CAUSE SOLUTION AU PROBLÈME
Le moteur
ne démarre
pas.
Absence de carburant.
Moteur éteint (sur «ARRÊT»).
Bougie d'allumage encrassée.
Moteur froid.
Moteur «inondé» d'essence.
Filtre à air bouché ou
contaminé par de l'huile.
Défaillance majeure.
Ouvrez le robinet de carburant
Remplissez le réservoir de carburant.
Allumez le moteur (sur «ON»).
Retirez, nettoyez, réglez et remplacez le
bouchon.
Vériez que le réglage du starter est correct.
Attendez cinq(5) minutes.
Ouvrez le starter et ouvrez complètement
l'accélérateur et réessayez.
Retirez la bougie d'allumage, nettoyez-la et
replacez-la.
Réessayez jusqu'à ce que le moteur s'allume.
Remplacez le ltre à air.
Contactez votre distributeur ou Evolution Power
Tools pour plus de conseils.
La machine
ne vibre pas.
La tension de la courroie est
incorrecte.
Filtre à air bloqué.
Unité excentrique
endommagée.
Régime moteur trop lent.
Réglez la tension de la courroie.
Remplacez le ltre à air.
Remplacez l'unité excentrique.
Augmentez légèrement le régime moteur.

www.evolutionpowertools.com
85
DÉPANNAGE H320-E
PROBLÈME CAUSE SOLUTION AU PROBLÈME
La machine
ne démarre
pas.
L'alimentation n'est pas
allumé
Le fusible de la prise a sauté.
Le bouton de démarrage de
sécurité n'est pas enfoncé, ce
qui empêche l'activation de la
fonction «marche/arrêt».
Câble d'alimentation
endommagé ou cassé.
Branchez l'alimentation sur la prise.
Remplacez le fusible et vériez l'alimentation.
Appuyez sur le bouton de démarrage de sécurité
puis tirez le levier de démarrage.
Faites remplacer le cordon endommagé par
un câble identique monté par un technicien
compétent.
GUIDE DE DÉPANNAGE GÉNÉRAL
PROBLÈME CAUSE SOLUTION AU PROBLÈME
Blocs de pavés
endommagés.
Plaque en contact direct avec
les pavés.
Utilisez un «patin pour pavage».
Écaillage de
la surface
bitumineuse
(laminage).
Sur-compactage. Retirez et relayez.
Faible vitesse de
déplacement.
Épaisseur de la couche trop
importante (enfoncement de
la plaque).
Régime moteur trop faible.
Teneur en humidité du
matériau trop élevée ou trop
faible.
Retirez une partie du matériau de manière à
réduire l'épaisseur de la couche.
Augmentez légèrement le régime moteur.
Retirez le matériau et ajustez le taux
d'humidité.
La machine
H320-P n’avance
pas.
Régime moteur trop faible. Augmentez légèrement le régime moteur.

www.evolutionpowertools.com
86
Ill.20
STOCKAGE DE LONGUE DURÉE H320-P
Si vous ne comptez pas utiliser votre machine Evolution
pour une période de 4 mois ou plus (ex. pendant la période
hivernale), vous devez considérer la préparation pour le
remisage à long terme. Cela permettra de garder le moteur
en condition optimale jusqu’à la remise en service, quand
désiré.
• Vidangez tout le carburant du réservoir et du
carburateur dans un récipient adapté et agréé.
• Le robinet de vidange se trouve sous la cuve à otteur
du carburateur. Desserrez ce robinet pour permettre au
carburant de s'écouler de la machine. (Ill. 20)
• Serrez le robinet de vidange lorsque tout le carburant a
été vidé.
• Enlevez la bougie.
• Versez environ une cuillère à soupe d’huile de moteur
propre dans l’orice de la bougie.
• Assurez-vous que l’interrupteur d’allumage du moteur
est en position «ARRÊT».
• Tirez doucement sur le démarreur manuel plusieurs fois.
• Remplacez la bougie.
• Tirez doucement sur le démarreur manuel jusqu’à ce
que vous sentiez la résistance (cela signie que le piston
est sur la course de compression avec les deux soupapes
fermées). Arrêtez alors de tirer sur le démarreur manuel.
• Entreposez le moteur dans un endroit sûr, sec et
bien ventilé, sous une protection pour éviter que de
la poussière, des débris, etc. ne se déposent sur la
machine.
RETOUR DE LA MACHINE H320-P
Si vous devez retourner la machine H320-P à Evolution,
veuillez suivre les étapes ci-dessous pour garantir la
sécurité du coursier.
1. Vidangez complètement le carburant de la machine
depuis le réservoir de carburant et le carburateur. (Ill. 20)
2. Vidangez complètement l’huile du moteur. (Ill. 14)
3. Démontez la poignée en retirant les vis. Prenez soin de
conserver toutes les pièces retirées. (Ill. 2)
4. Emballez soigneusement la machine dans une boîte, de
préférence dans son emballage d’origine.
Remarque: La machine sera retournée sans carburant, ni
huile. Pensez bien à l'approvisionner en carburant et en
huile avant de démarrer le moteur.

www.evolutionpowertools.com
87
Utilisation des accessoires Evolution en option
(disponible comme option d'achat pour le client)
PROTECTION DE L’ENVIRONNEMENT
Les produits électriques ne doivent pas être jetés avec
les ordures ménagères. Veuillez les recycler lorsque les
infrastructures le permettent. Contactez votre municipalité
ou votre revendeur pour obtenir des conseils sur le
recyclage.

www.evolutionpowertools.com
88
DÉCLARATION CE DE CONFORMITÉ
Conformément à la norme EN ISO 17050-1:2004
Le fabricant du produit couvert par cette déclaration est :
RU: Evolution Power Tools Ltd. Venture One, Longacre Close, Holbrook Industrial Estate, Sheeld, S20 3FR.
FR: Evolution Power Tools SAS. 61 Avenue Lafontaine, 33560, Carbon-Blanc, Bordeaux, France.
Le fabricant déclare par les présentes que la machine, comme décrit dans la présente déclaration, satisfait
à l'ensemble des dispositions pertinentes de la directive machines et aux autres directives appropriées
comme listées ci-après.
Le fabricant déclare en outre que la machine, comme décrite dans la présente déclaration, satisfait aux
dispositions pertinentes des exigences essentielles de santé et de sécurité.
Les directives couvertes par cette déclaration sont comme listées ci-après :
1907/2006 Réglementation REACH sur l’enregistrement, l’évaluation, l’autorisation et les restrictions s’appliquant
aux substances chimiques (CEn°1907/2006 annexe XVII)
2006/42/EC. Directive sur les Machines. .
2014/30/EU. Directive sur la Compatibilité Électromagnétique.
2011/65/EU. & (EU)2015/863. La limitation de l’utilisation de certaines substances dangereuses dans le matériel électrique (RoHS).
2000/14/EU & 2005/88/EC Directive sur le bruit
Et est conforme aux exigences applicables des documents suivants
EN 500-1:2006+A1• EN 500-4:2011• EN ISO 3744: 1995 • EN ISO 14982:2009
Détails du produit
Description: H320-P
Modèle Evolution n°: 015-0001, 015-0013
Modèle d’usine n°: XZ-10C/JF152
Nom du fabricant : EVOLUTION
La documentation technique requise pour prouver que le produit est conforme aux exigences des directives a été
compilée et est disponible à toute inspection par les autorités concernées chargées de faire appliquer la législation, et
elle montre que notre dossier technique contient les documents listés ci-dessus et que le produit présenté ci-dessus
respecte les normes standards qui y sont mentionnées.
Nom et adresse du détenteur de la documentation technique.
Signature: Nom : Barry Bloomer - PDG
Date : 23/08/2022
RU: Evolution Power Tools Ltd. Venture One, Longacre Close, Holbrook Industrial Estate, Sheeld, S20 3FR.
FR: Evolution Power Tools SAS. 61 Avenue Lafontaine, 33560, Carbon-Blanc, Bordeaux, France.
®
H320-P

www.evolutionpowertools.com
89
DÉCLARATION CE DE CONFORMITÉ
Conformément à la norme EN ISO 17050-1:2004
Le fabricant du produit couvert par cette déclaration est :
RU: Evolution Power Tools Ltd. Venture One, Longacre Close, Holbrook Industrial Estate, Sheeld, S20 3FR.
FR: Evolution Power Tools SAS. 61 Avenue Lafontaine, 33560, Carbon-Blanc, Bordeaux, France.
Le fabricant déclare par les présentes que la machine, comme décrit dans la présente déclaration, satisfait à l'ensemble
des dispositions pertinentes de la directive machines et aux autres directives appropriées comme listées ci-après.
Le fabricant déclare en outre que la machine, comme décrite dans la présente déclaration, satisfait aux dispositions
pertinentes des exigences essentielles de santé et de sécurité.
Les directives couvertes par cette déclaration sont comme listées ci-après :
1907/2006 Réglementation REACH sur l’enregistrement, l’évaluation, l’autorisation et les restrictions s’appliquant
aux substances chimiques (CEn°1907/2006 annexe XVII)
2006/42/EC. Directive sur les Machines. .
2014/30/EU. Directive sur la Compatibilité Électromagnétique.
2011/65/EU. & (EU)2015/863. La limitation de l’utilisation de certaines substances dangereuses dans le matériel électrique (RoHS).
2002/96/EC telle qu’amendée par la directive 2003/108/CE déchets des équipements électriques et électroniques
(DEEE).
2000/14/EU & 2005/88/EC Directive sur le bruit
Et est conforme aux exigences applicables des documents suivants
EN 500-1:2006+A1 • EN 500-4:2011 • EN 60204-1:2018 • EN IEC 55014-1:2021 • EN ISO 3744:1995
EN IEC 55014-2:2021 • EN IEC 61000-3-2:2019/A1:2021 • EN 61000-3-3:2013/A2:2021
Détails du produit
Description: H320-E
Modèle Evolution n°: 015-0002,015-0004, 015-0008, 015-0010
Modèle d’usine n°: XZ-5A
Nom du fabricant : EVOLUTION
Tension : 220-240V ~ 50Hz
Entrée : 300W
La documentation technique requise pour prouver que le produit est conforme aux exigences des directives a été
compilée et est disponible à toute inspection par les autorités concernées chargées de faire appliquer la législation, et
elle montre que notre dossier technique contient les documents listés ci-dessus et que le produit présenté ci-dessus
respecte les normes standards qui y sont mentionnées.
Nom et adresse du détenteur de la documentation technique.
Signature:
Nom : Barry Bloomer - PDG
Date : 23/08/2022
RU: Evolution Power Tools Ltd. Venture One, Longacre Close, Holbrook Industrial Estate, Sheeld, S20 3FR.
FR: Evolution Power Tools SAS. 61 Avenue Lafontaine, 33560, Carbon-Blanc, Bordeaux, France.
®
H320-E

www.evolutionpowertools.com
90
Especicaciones del modelo
Evolution Power Tools se reserva el derecho a
realizar mejoras y modicaciones en el
diseño y las características técnicas de este
producto sin previo aviso.
Este manual se escribió originalmente en inglés.
Motor EU/UK 220-240V~50Hz 300W, US 120V~60Hz 1,25A
Velocidad del motor (min
-1
) EU/UK 2860 (sin carga), US 3450 (sin
carga)
Fuerza de compactación (kN) 5
Máximo recomendado 30
Tiempo de uso por parte del usuario (min)
Nivel de potencia acústica (LwA) 88,5 dB(A) K= 2,09 dB(A)
Nivel de presión acústica (LpA) 83,3 dB(A) K= 3 dB(A)
Vibración (m/seg
2
) 18,496 K = 1,5
Peso neto kg (lb) 25,4 (56)
Altura del mango (durante el funcionamiento) mm (pulgadas) 920
(36)
Alcance de la máquina (durante el funcionamiento) mm (pulgadas)
1290 (51)
Anchura de huella mm (pulgadas) 320 (12-1/2)
Longitud del cable en metros (pies) 10 (33)
Clase de aislamiento I
IP44
H320-P
H320-E
Tipo de motor Un cilindro 4 tiempos, válvula en cabeza
Potencia del motor 1,7 kW 3600min
-1
Sustitución de bujía LD E6TC (disponible de Evolution)
NGK BP6HS
CHAMPION L87YCC
AC DELCO 42FS
Separación de bujía 0,028 – 0,031 pulgadas
0,7 – 0,8 mm
Sustitución del ltro de aire Evolution H1S58
Juego de válvulas (frío) Entrada 0,15 mm 0,006 pulgadas
Evacuación 0,20 mm 0,008 pulgadas
Fuerza de compactación (kN) 10
Vibración (m/seg
2
) 20,211 K = 1,5
Nivel de potencia acústica (LwA) 97,9 dB(A) K= 2,42 dB(A)
Nivel de presión acústica (LpA) 90,5dB K= 3dB(A)
Tiempo de uso por parte del usuario (min) 20
Máximo recomendado
Tipo de aceite SAE 10W-30/40
Capacidad de aceite (litros) 0,25
( oz) 8,45
Tipo de combustible E5 y E10 Gasolina sin plomo estándar
Capacidad de combustible (litros) 1,2
( oz) 40,57
Peso neto kg (lb) 32,45 (71,5)
Altura del mango (durante el funcionamiento - 1020 (40)
mango de extensión equipado) mm (pulgadas)
Alcance de la máquina (durante el funcionamiento – 1290 (51)
mango de extensión equipado) mm (pulgadas)
Anchura de huella mm (pulgadas) 320 (12-1/2)

www.evolutionpowertools.com
91
IMPORTANTE
Lea estas instrucciones de manejo y seguridad
detenidamente y en su totalidad.
Por su propia seguridad, si no está seguro de
algún aspecto sobre el uso de este equipo,
póngase en contacto con el servicio de asistencia
técnica. Encontrará el número de teléfono en la
página web de Evolution Power Tools. Nuestra
organización dispone de varios teléfonos de
soporte en todo el mundo, aunque su proveedor
también puede ofrecerle asistencia técnica.
PÁGINA WEB www.evolutionpowertools.com/
register
Enhorabuena por adquirir una máquina de
Evolution Power Tools. Por favor, complete el
registro de su producto en línea tal y como
se indica en el folleto de registro de garantía
en línea A5 adjunto a esta máquina. También
puede escanear el código QR impreso en este
con un smartphone. De esta manera, validará
el periodo de garantía de su máquina a través
de la página web de Evolution al introducir sus
datos y, así, dispondrá de un servicio rápido si
fuera necesario. Le agradecemos sinceramente
que haya escogido un producto de Evolution
Power Tools.
GARANTÍA LIMITADA DE EVOLUTION.
EVOLUTION POWER TOOLS SE RESERVA
EL DERECHO A HACER MEJORAS Y
MODIFICACIONES EN EL DISEÑO DEL
PRODUCTO SIN PREVIO AVISO.
POR FAVOR, CONSULTE EL FOLLETO DE
REGISTRO DE GARANTÍA Y/O EL EMBALAJE
PARA OBTENER MÁS DETALLES ACERCA
DE LOS TÉRMINOS Y CONDICIONES DE LA
GARANTÍA.
Evolution Power Tools reparará o cambiará, dentro
del periodo de garantía y desde la fecha original
de compra, cualquier producto que sea defectuoso
en materiales o fabricación. Esta garantía será nula
si la herramienta devuelta se ha usado sin seguir
las recomendaciones del manual de instrucciones
o si la máquina se daña por accidente, descuido
o uso inapropiado. Esta garantía no es aplicable a
máquinas o componentes alterados, cambiados o
modicados de alguna manera, o sometidos a un
uso que excede las capacidades y especicaciones
recomendadas. Los componentes eléctricos
están sujetos a las garantías de sus respectivos
fabricantes. Todos los objetos defectuosos se
devolverán con ete prepagado a Evolution Power
Tools. Evolution Power Tools se reserva el derecho
de reparar el producto o substituirlo por uno igual
o equivalente. No existe garantía, escrita o verbal,
para accesorios consumibles como (la siguiente
lista no es exhaustiva) hojas, cortadores, taladros,
cinceles o paletas, etc. Evolution Power Tools no se
hace responsable en ningún caso de la pérdida o el
daño causado directa o indirectamente por el uso
de nuestros productos o por cualquier otra causa.
Evolution Power Tools no se hace responsable de
ningún coste o daño indirecto derivado de estos
productos. Ningún ejecutivo, empleado o agente
de Evolution Power Tools está autorizado a realizar
declaraciones orales de idoneidad o a renunciar a
cualquiera de los términos de venta anteriores, ni
estas tendrán carácter vinculante para Evolution
Power Tools.
Las cuestiones relativas a esta garantía
limitada deberán dirigirse a la ocina central
de la empresa o consultarse en el número de
asistencia correspondiente.
INSTRUCCIONES GENERALES DE SEGURIDAD
PARA HERRAMIENTAS ELÉCTRICAS
(Estas instrucciones generales de seguridad para
herramientas eléctricas son las que se especican
en las normas BS EN 500-1:2006+A1 y EN 500-
4:2011)
ADVERTENCIA: lea todas las
advertencias e instrucciones de
seguridad.
El incumplimiento de las advertencias e
instrucciones puede provocar una descarga
eléctrica, incendios y/o lesiones graves.
Conserve todas las advertencias e instrucciones
para poder consultarlas en el futuro.
El término «herramienta eléctrica» de las
advertencias se reere a la herramienta alimentada
por la red eléctrica (con cable) o con baterías

www.evolutionpowertools.com
92
(inalámbrica).
1) Advertencias generales de seguridad de la
herramienta eléctrica [Seguridad en el área de
trabajo]
a) Mantenga la zona de trabajo limpia y bien
iluminada. Las zonas desordenadas u oscuras
pueden provocar accidentes.
b) No utilice las herramientas eléctricas en
atmósferas explosivas, como en presencia
de líquidos inamables, gases o polvo. Las
herramientas eléctricas producen chispas que
pueden incendiar el polvo o los gases.
c) Mantenga a los niños y a otras personas
alejados cuando utilice una herramienta
eléctrica. Las distracciones pueden hacerle perder
el control.
2) Advertencias generales de seguridad de la
herramienta eléctrica [Seguridad eléctrica]
a) Los enchufes de la herramienta eléctrica
deben adaptarse a las tomas de corriente.
No modique el enchufe de ningún modo.
No utilice adaptadores de enchufe con
herramientas eléctricas que tienen conexión
a tierra. Si las tomas de corriente coinciden y los
enchufes no se modican, se reduce el riesgo de
que se produzca una descarga eléctrica.
b) Evite el contacto corporal con supercies
conectadas a tierra tales como tuberías,
radiadores, cocinas eléctricas y refrigeradores.
El riesgo de descarga eléctrica aumenta si su
cuerpo está conectado a tierra.
c) No exponga las herramientas eléctricas a
la lluvia o a la humedad. Si entra agua en una
herramienta eléctrica, aumenta el riesgo de
descarga eléctrica.
d) No utilice el cable de forma incorrecta. Nunca
utilice el cable para transportar, arrastrar
o desenchufar la herramienta eléctrica.
Mantenga el cable lejos del calor, del aceite,
de esquinas cortantes o de piezas móviles. Los
cables dañados o enredados aumentan el riesgo
de descarga eléctrica.
e) Cuando trabaje con una herramienta
eléctrica en exteriores, utilice un alargador
adecuado para uso en exteriores. El uso de un
cable adecuado para exteriores reduce el riesgo de
que se produzca una descarga eléctrica.
f) Si es inevitable tener que usar una
herramienta eléctrica en un lugar húmedo, es
necesario utilizar una toma protegida por un
dispositivo de corriente residual (RCD). El uso de
un RCD reduce el riesgo de descarga eléctrica.
3) Advertencias generales de seguridad de la
herramienta eléctrica [Seguridad personal].
a) Manténgase alerta, tenga cuidado con lo
que hace y aplique el sentido común al utilizar
una herramienta eléctrica. No utilice una
herramienta eléctrica cuando esté cansado
o se encuentre bajo la inuencia de alguna
droga, alcohol o medicación. Un momento de
distracción mientras utiliza herramientas eléctricas
puede ocasionar lesiones personales graves.
b) Utilice equipo de protección individual.
Utilice siempre protección ocular. El uso de
equipo de protección, como mascarillas para el
polvo, calzado antideslizante, casco o protección
auditiva para condiciones adecuadas, reducirá las
lesiones personales.
c) Evite el encendido accidental. Compruebe
que el interruptor está en la posición «OFF»
(Apagado) antes de conectar la herramienta a
la fuente de alimentación o a las baterías, o de
coger o transportar la herramienta. Transportar
herramientas eléctricas con el dedo sobre el
interruptor o enchufar herramientas eléctricas
con el interruptor encendido puede propiciar
accidentes.
d) Retire cualquier llave de ajuste o inglesa
antes de encender la herramienta eléctrica.
Una llave, como una llave inglesa, colocada en una
pieza giratoria de la herramienta eléctrica puede
ocasionar lesiones personales .
e) Manténgase siempre dentro de sus límites.
Mantenga una postura y equilibrio adecuados
en todo momento. Esto permitirá un mejor
control de la herramienta eléctrica ante situaciones
inesperadas.
f) Vístase de forma adecuada. No lleve ropa
holgada ni joyas. Mantenga el pelo, la ropa y los
guantes alejados de las piezas móviles. La ropa
suelta, las joyas o el cabello largo pueden quedar
atrapados en las piezas móviles.
g) Si se proporcionan dispositivos para la
conexión de medios de extracción y recogida
de polvo, asegúrese de que estén conectados y
de que se utilizan correctamente. El uso de estos

www.evolutionpowertools.com
93
dispositivos puede reducir los riesgos derivados
del polvo.
h) El hecho de que esté familiarizado con las
herramientas gracias al uso frecuente no puede
hacer que se vuelva complaciente e ignore los
principios de seguridad de la herramienta. Una
acción negligente puede provocar lesiones graves
en una milésima de segundo.
4) Advertencias generales de seguridad de
la herramienta eléctrica [Uso y cuidado de la
herramienta eléctrica].
a) No fuerce la herramienta eléctrica. Utilice
la herramienta eléctrica correcta para su
aplicación. La herramienta correcta realizará el
trabajo de una forma más precisa y segura al ritmo
para el que ha sido diseñada.
b) No utilice la herramienta eléctrica si el
interruptor no la enciende ni la apaga. Cualquier
herramienta eléctrica que no se pueda controlar
con el interruptor es peligrosa y se debe reparar.
c) Desconecte la herramienta eléctrica de
la fuente de alimentación o batería antes
de realizar algún tipo de ajuste, cambiar
accesorios o almacenarla. Este tipo de medidas
de seguridad preventivas reducen el riesgo de que
la herramienta arranque por accidente.
d) Guarde las herramientas eléctricas fuera del
alcance de los niños y no permita que personas
que no estén familiarizadas con ellas o con
estas instrucciones las usen. Las herramientas
eléctricas son peligrosas en manos de personas sin
preparación.
e) Lleve a cabo un mantenimiento regular de las
herramientas eléctricas. Verique la alineación
y jación de las piezas móviles, la posible rotura
de estas y cualquier otra condición que pueda
afectar al funcionamiento de las herramientas
eléctricas. Si está dañada, repare la herramienta
eléctrica antes de usarla. Muchos accidentes se
producen debido a un mantenimiento deciente
de las herramientas eléctricas.
f)Mantenga las herramientas de corte limpias
y aladas. Las herramientas de corte con un buen
mantenimiento y bordes de corte alados son
menos propensas a trabarse y son más fáciles de
controlar.
g) Utilice la herramienta eléctrica, accesorios y
brocas, etc., de acuerdo con estas instrucciones
y teniendo en cuenta las condiciones de
funcionamiento y el trabajo que se va a realizar.
El uso de la herramienta eléctrica para operaciones
diferentes a las previstas podría provocar una
situación peligrosa.
h)Mantenga los mangos y las supercies de
agarre secos, limpios y libres de aceite y grasa.
Los mangos y supercies de agarre resbaladizos
no permiten un manejo y control seguros de la
herramienta en situaciones inesperadas.
5) Advertencias generales de seguridad de la
herramienta eléctrica [Servicio]
a) Lleve la herramienta eléctrica a reparar a
un experto cualicado que utilice solo piezas
de repuesto idénticas. Esto garantizará que la
seguridad de la herramienta eléctrica se preserve.
INSTRUCCIONES DE SEGURIDAD PARA H320-P
a. Los motores de gasolina o diésel nunca se
deben usar en espacios cerrados no ventilados.
Los gases de escape producidos son muy
tóxicos y pueden provocar «intoxicación por
monóxido de carbono», que causa somnolencia
y, en última instancia, la muerte. Solo se permite
hacer funcionar un motor de gasolina en interiores
si el edicio se puede ventilar muy bien y los
gases de escape se pueden captar y transportar
al exterior a través de un sistema de extracción/
recolección especíco.
b. El motor no debe funcionar a velocidades
que superen la velocidad máxima en la placa de
características. El funcionamiento de un motor
a velocidades excesivas aumenta la probabilidad
de fallo de los componentes y de accidentes
asociados.
c. No altere los componentes que
regulan la velocidad del motor. Puede modicar
los parámetros de funcionamiento congurados
de fábrica.
d. Use solamente el tipo de combustible
indicado en este Manual de instrucciones. El uso
de combustible con un índice de octano inferior al
especicado puede provocar un desgaste excesivo
del motor y un fallo prematuro del mismo.
e. Mantenga el área alrededor del motor
despejada, limpia y ordenada. Nunca permita
que haya material combustible (madera, plástico,
cartón, tela, etc.) cerca de un motor en marcha.
f. No se debe usar en o cerca de atmósferas

www.evolutionpowertools.com
94
potencialmente explosivas. En las atmósferas
cargadas de polvo que se pueden encontrar en
algunos edicios industriales (molinos de harina,
aserraderos), se podrían producir explosiones.
g. Compruebe con regularidad el sistema de
combustible en busca de fugas. Las mangueras
y uniones se deben comprobar en busca de signos
de deterioro o roce. Compruebe el depósito de
combustible en busca de daños o de un tapón de
combustible desgastado o mal ajustado. Se debe
corregir cualquier defecto antes de usar el motor.
h. Detenga siempre el motor y permita que se
enfríe antes de repostar el combustible. Intente
evitar los vertidos de combustible (a menudo
provocados por un «llenado excesivo» del depósito)
y limpie el combustible vertido de inmediato. La
aplicación de arena seca es una manera efectiva de
neutralizar los vertidos de combustible. No permita
que la arena entre en contacto con ninguna pieza
del motor.
i. Al transportar el motor en un vehículo,
asegúrese de que el grifo de combustible está
apagado. Para minimizar el riesgo de vertido de
combustible, el motor se debe asegurar mediante
cuerdas, etc. a la zona de carga del vehículo para
que no se pueda mover durante el transporte. Se
debe asegurar el motor lo más horizontal posible.
j. Para el almacenamiento a largo plazo,
recomendamos drenar el sistema de
combustible del motor. Véase la Fig.20 para las
instrucciones. Durante el almacenamiento a largo
plazo, los aditivos de los combustibles modernos
pueden precipitarse y bloquear las boquillas y
válvulas del sistema de combustible.
k. Almacene la máquina en una zona segura y
bien ventilada. El personal no autorizado no debe
tener acceso a esta máquina.
INSTRUCCIONES DE SEGURIDAD PARA EL
LLENADO DE COMBUSTIBLE
a. Seleccione un suelo desnudo nivelado,
alejado de otros edicios, como una estación
de repostaje. Asegúrese de que no hay material
combustible en las inmediaciones.
b. Está estrictamente prohibido fumar, usar
una llama desnuda o producir chispas durante
el repostaje. La gasolina es muy inamable y sus
vapores son combustibles.
c. Asegúrese de que el grifo de combustible está
cerrado. Esto asegurará que el combustible fresco
no «inunde» el carburador del motor.
d. Se debe apagar el motor y permitir que se
enfríe antes de proceder al repostaje. Un vertido
de combustible involuntario sobre un motor
caliente puede provocar riesgo de incendio.
e. Se debe solucionar cualquier vertido de
combustible de inmediato. Si la gasolina
mancha cualquier prenda de ropa, el operario
debe cambiarse. No confíe en que el combustible
se evapore de la ropa. Lave la ropa cuando el
combustible se haya evaporado del material.
f. Se recomienda el uso de un embudo durante
el repostaje. El uso de un embudo minimizará el
riesgo de vertido de combustible.
g. Llene el depósito con el grado correcto de
combustible sin plomo hasta un nivel que
esté aproximadamente a la mitad del ltro de
combustible. Vierta el combustible en el depósito
con cuidado y no intente llenar el depósito por
completo. Vierta la gasolina despacio para evitar
que quede aire atrapado durante el llenado que
pueda provocar vertidos de combustible.
h. Compruebe el tapón del depósito de
combustible y vuelva a ponerlo en cuanto se
haya completado el repostaje. El tapón tiene
una conexión de tipo bayoneta. Compruebe que
está correctamente instalado y asentado antes de
encender lentamente el grifo del combustible.
i. Compruebe si hay fugas de combustible en
todo el sistema de combustible. No intente
arrancar el motor si se sospecha que hay una fuga
de combustible. Cualquier fuga detectada debe
ser reparada por un técnico con la cualicación
adecuada.
j. Respete todas las normativas nacionales y
locales acerca del almacenamiento y el uso de
productos derivados del petróleo. Se deben
respetar todos los estatutos locales.
CONSEJOS PARA LA SALUD
ADVERTENCIA: al utilizar esta máquina,
se producirán partículas de polvo. A veces,
según los materiales con los que trabaje, este
polvo puede ser especialmente perjudicial. Se
recomienda que considere el riesgo asociado a
los materiales con los que trabaja y que reduzca
el riesgo de exposición. Algunos materiales
pueden producir polvo dañino para su salud.
Recomendamos el uso de mascarillas con ltros
reemplazables homologadas cuando utilice esta

www.evolutionpowertools.com
95
máquina.
Siempre debe:
• trabajar en una zona bien ventilada.
• trabajar con un equipo de seguridad
homologado, como mascarillas para el polvo
diseñadas especícamente para ltrar partículas
microscópicas.
ADVERTENCIA: el manejo de cualquier
herramienta eléctrica puede provocar que se
lancen objetos externos contra los ojos que pueden
ocasionar daños graves en los mismos. Antes
de empezar a utilizar una herramienta eléctrica,
póngase siempre gafas de seguridad completas
o con protección lateral, o una pantalla que cubra
toda la cara cuando sea necesario.
ADVERTENCIA: si faltan piezas,
no utilice la máquina hasta que estas se
reemplacen. No seguir esta indicación puede
causar graves lesiones personales.
NORMAS DE SEGURIDAD ADICIONALES PARA LA
COMPACTADORA H320
a. Acordone el área de trabajo. Los miembros
del público y el personal no autorizado se deben
mantener a una distancia segura de las operaciones
de compactación.
b. Debe estar completamente seguro de que
sabe cómo apagar la máquina. Si experimenta
dicultades durante las operaciones de
compactado, es importante que pueda realizar un
apagado de emergencia de la máquina.
c. Nunca deje la H320 en funcionamiento y
sin supervisión. La máquina vibra en cuanto
se arranca y también empezará a moverse hacia
delante. Se debe apagar la máquina si se deja
desatendida.
d. Apague siempre el motor antes de mover la
máquina de sitio. Cuando se mueva o transporte
la máquina, el motor debe estar apagado y
preferiblemente frío, con el grifo de combustible en
la posición «OFF» (Apagado).
e. Como el motor de la H320 se calienta durante
el uso, asegúrese de no tocarlo ni permita que
un material combustible o la ropa entre en
contacto con el motor durante el uso. Solo se
puede tocar o realizar el servicio de un motor frío.
f. Nunca retire, altere ni modique ninguna de
las protecciones de la máquina. Las protecciones
se han diseñado y equipado especialmente para
proporcionarle la mayor protección posible durante
el funcionamiento. Si falta una protección o se ha
dañado, no use la máquina hasta que un técnico
competente la haya reparado o sustituido.
g. Tenga especial cuidado de mantener el
control al trabajar en una supercie inclinada.
Trabaje hacia arriba y hacia abajo en una supercie
inclinada, y no cruzándola.
h. Cuando haya una serie de capas diferentes
que se van a compactar unas encima de
otras, compacte cada capa por separado. Esto
asegurará la integridad de cada capa.
i. Mueva la H320 por la supercie de trabajo
siguiendo un patrón organizado hasta que se
logre la compactación deseada. Esto asegura que
se mantiene la práctica de trabajo más segura.
j. Efectúe siempre las comprobaciones de
seguridad previas al uso antes de iniciar los
trabajos. Siga la guía en las secciones posteriores
de este manual.
EPI (Equipo de Protección Individual)
Nota: si este equipo se utiliza en una obra, es
importante que el operario cumpla cualquier
normativa o norma de la obra pertinente. Consulte
al capataz u a otra persona responsable para
disponer de más información.
a. Lleve ropa adecuada. Esto podría incluir
un mono o mono acolchado y una chaqueta
reectante, etc.
b. Lleve calzado adecuado. Se recomienda
calzado de seguridad con punteras de acero y
suelas antideslizantes.
c. Lleve gafas de protección adecuadas. Se
recomiendan gafas con protección lateral o una
máscara que cubra toda la cara que protejan ante
los residuos que salen disparados.
d. Proteja sus oídos. Lleve protección adecuada
para los oídos.
e. Lleve guantes adecuados. Se recomiendan
guantes de agarre.
f. Lleve protección respiratoria. Se recomienda
una máscara antipolvo con ltros reemplazables
que proteja contra el polvo no tóxico, bras y
vapores.
g. Lleve un casco de seguridad. El uso de un casco
de seguridad puede ser obligatorio en obras para
proteger al operario de peligros potenciales por
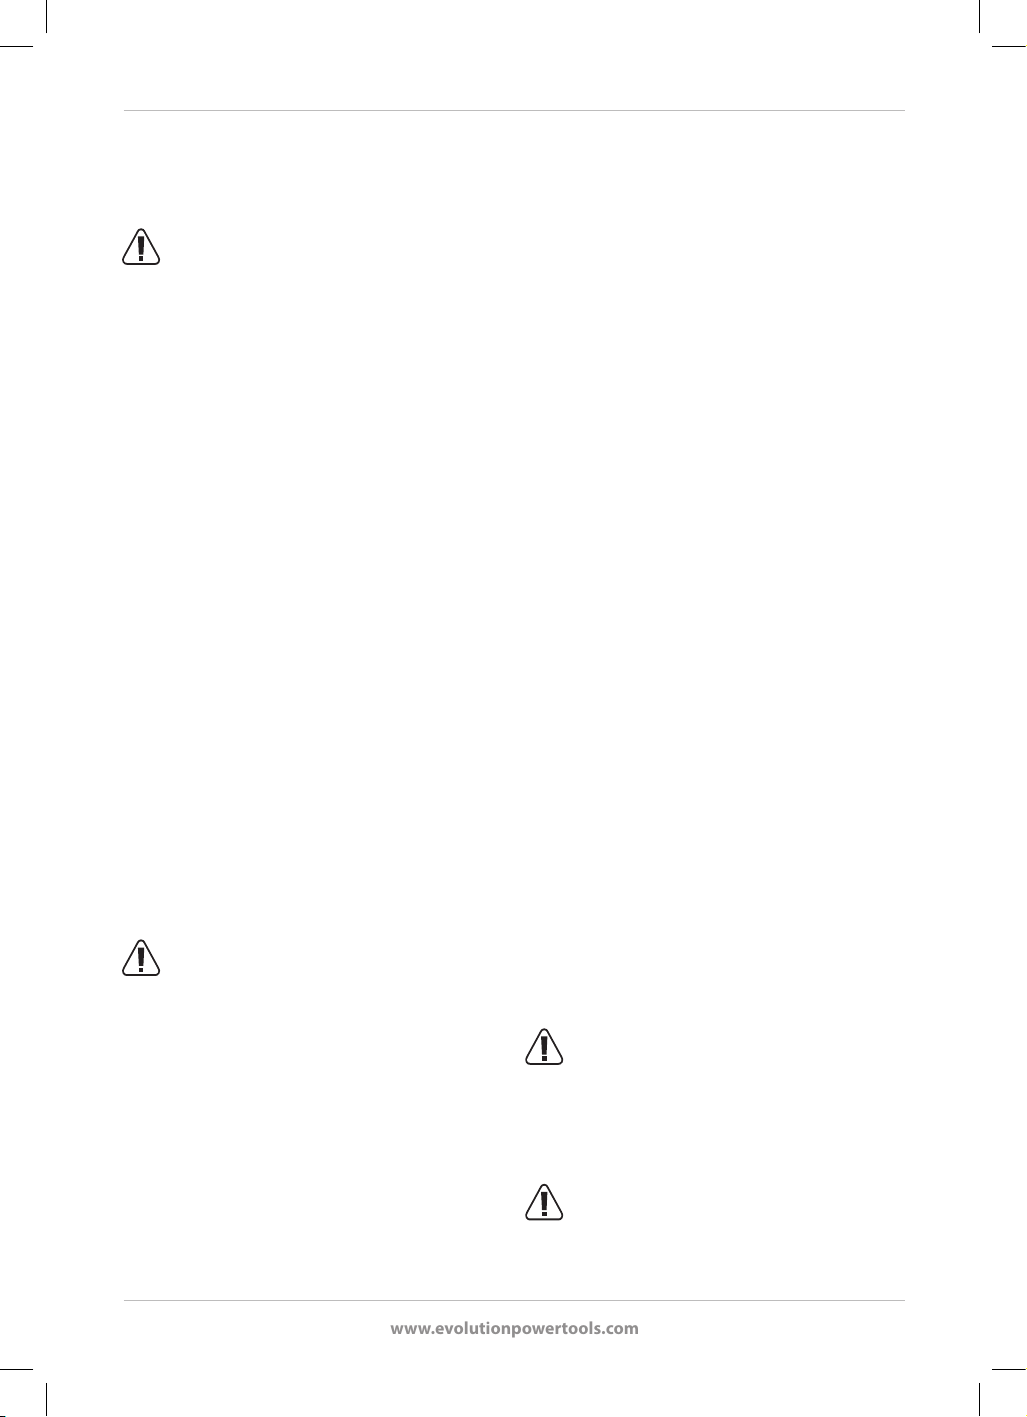
www.evolutionpowertools.com
96
encima.
TRANSPORTE EN VEHÍCULOS
ADVERTENCIA: son necesarios al menos
dos hombres para levantar la máquina.
Prepare el vehículo con antelación para que
esté listo para recibir la máquina. Tenga mucho
cuidado de asegurar que no se cae la máquina
durante la carga/descarga.
• A pesar de ser compacta, esta máquina es
pesada. Para reducir el riesgo de lesiones,
solicite ayuda profesional cada vez que tenga
que levantar esta máquina.
• Para reducir el riesgo de lesiones en la espalda,
sujete la máquina cerca del cuerpo cuando la
levante. Doble las rodillas para poder levantarla
con las piernas, no la espalda. Levántela
usando las áreas apropiadas del marco externo
principal.
• Suba la máquina al vehículo y asegúrela en
una posición lo más nivelada posible con
cuerdas, correas de sujeción, etc., de modo
que la máquina no se pueda mover durante el
transporte.
Nota: H320-P: lo mejor y lo más seguro es que no
haya combustible en el depósito de combustible
de la máquina cuando se transporte en un
vehículo.
USO PREVISTO DE ESTA HERRAMIENTA
ELÉCTRICA
ADVERTENCIA: este producto es una
placa de compactación motorizada y se ha
diseñado para su uso con accesorios especiales de
Evolution. Use solo accesorios diseñados para el
uso en esta máquina y/o aquellos recomendados
especícamente por Evolution Power Tools Ltd.
Esta máquina se puede usar para compactar
supercies, tales como un producto bruto de
molienda, agregados pequeños, suelo, arena y
materiales de subbase, etc. Cuando se equipa con
la almohadilla de pavimentado, la H320 se puede
usar para compactar y asentar la mayoría de tipos
de pavimento de bloques.
Motivos para la compactación
El suelo alterado, el relleno nuevo, la subbase o el
asfalto tendrán bolsas de aire y pequeños huecos
en su interior que, si no se compactan, pueden
provocar el desarrollo de posibles problemas.
• A medida que el tráco cruza la supercie
de una zona no compactada, las cargas
impuestas presionan hacia abajo sobre el
material subyacente. Esto puede provocar el
hundimiento de la supercie superior, ya que
el material migra hacia abajo para rellenar los
huecos.
• Una carga estática (casa, garaje, etc.) construida
sobre suelo no compactado podría sufrir un
hundimiento cuando el material subyacente se
mueva.
• El agua que se ltra en el material que contiene
estos huecos y bolsas de aire se puede
almacenar en estos espacios, se expandirá en
condiciones de congelación y se contraerá
de nuevo durante los periodos secos/cálidos.
La expansión y la contracción es uno de
los principales factores que contribuyen,
provocando daños en los cimientos de los
edicios y puede hacer que la estructura
requiera un recalce.
La compactación aumenta la densidad del
material y, por tanto, su capacidad de resistir
cargas estáticas y dinámicas. La eliminación de las
bolsas de aire y los pequeños espacios reduce las
probabilidades de recogida del agua entrante y el
subsiguiente hundimiento debido a la expansión y
contracción del material.
USO PROHIBIDO DE ESTA HERRAMIENTA
ELÉCTRICA
ADVERTENCIA: este producto es una
placa de compactación motorizada y solo
debe usarse como tal. No debe modicarse
de ninguna manera, ni usarse para alimentar
ningún otro equipo, ni accionar accesorios no
especicados en este manual de instrucciones.
ADVERTENCIA: esta máquina no está
diseñada para ser utilizada por personas
(niños incluidos) con discapacidad psíquica,
sensorial o mental, o con falta de experiencia

www.evolutionpowertools.com
97
y conocimiento, a no ser que hayan sido
supervisadas o instruidas en el uso seguro de
la máquina por una persona responsable de su
seguridad.
Debe supervisarse a los niños para asegurarse de
que no tienen acceso a la máquina ni pueden jugar
con ella.
SEGURIDAD ELÉCTRICA: H320-E
EL CONECTOR PRINCIPAL
Este producto está equipado con el conector
correcto moldeado para el mercado de venta
designado. El conector cumple los requisitos de
las normas internacionales y se debe conectar a
una tensión de alimentación igual a la indicada
en la etiqueta de características. Si el enchufe o
cable de la red de suministro se dañan, se deben
reemplazar por un conjunto completo que sea
idéntico al original. Cumpla los requisitos para
la conexión del suministro de red eléctrica que
corresponda a su país. En caso de duda, consulte a
un electricista cualicado.
Solo se puede usar el enchufe BS en el Reino
Unido. El enchufe se debe conectar a la toma
interior para cumplir el grado de protección IP
requerido. El enchufe debe ir acompañado de un
cable de alimentación con una longitud superior
a 10m.
USO EN EXTERIORES: H320-E
ADVERTENCIA: para su protección, si
va a usar esta herramienta en exteriores no
debe exponerla a la lluvia o usarla en lugares muy
húmedos. Para garantizar una mayor protección,
utilice un dispositivo de corriente residual (RCD)
que interrumpa el suministro si la corriente de
fuga a tierra es superior a 30mA durante 30ms.
Compruebe siempre el funcionamiento del
dispositivo de corriente residual (RCD) antes de
utilizar la máquina.
Si se necesita un alargador, debe ser de un
tipo adecuado para uso en exteriores y estar
etiquetado para tal n.
Se deben seguir las instrucciones de los fabricantes
al utilizar un alargador.
VIBRACIÓN
ADVERTENCIA: al utilizar esta máquina, el
operario puede estar expuesto a altos niveles
de vibración transmitidos a la mano y al brazo.
Es posible que el operador pueda desarrollar
la «enfermedad de los dedos blancos por
vibración» (síndrome de Raynaud). Esta
enfermedad puede reducir la sensibilidad de
la mano a la temperatura, así como producir
entumecimiento general. Los usuarios que
utilicen estas máquinas de compactación de
manera prolongada o regular deben vigilar de
cerca el estado de sus manos y dedos. Si aparece
alguno de los síntomas, busque atención médica
inmediata.
• La medición y la evaluación de la exposición
humana a las vibraciones transmitidas a la
mano en el lugar de trabajo se indican en:
BS EN ISO 5349-1:2001 y
BS EN ISO 5349-2:2002
• Muchos factores pueden inuir en el nivel de
vibración real durante el funcionamiento, p. ej.,
el estado y la orientación de las supercies de
trabajo, y el tipo y el estado de la máquina que
se está utilizando. Antes de cada uso, se deben
evaluar dichos factores y adoptar prácticas de
trabajo adecuadas siempre que sea posible.
Controlar estos factores puede ayudar a reducir
los efectos de la vibración:
Manipulación
• Manipule la máquina con cuidado,
permitiendo que esta haga el trabajo.
• Evite un esfuerzo físico excesivo en
cualquiera de los controles de las máquinas.
• Tenga en cuenta su seguridad y estabilidad,
así como la orientación de la máquina
durante su uso.
Supercie de trabajo
• Tenga en cuenta el material de la supercie
de trabajo,
su estado, densidad, resistencia,
rigidez y orientación.

www.evolutionpowertools.com
98
SÍMBOLOS Y ETIQUETAS
ADVERTENCIA: no utilice esta máquina
si faltan etiquetas de instrucciones o advertencia,
o si están dañadas. Póngase en contacto con
Evolution Power Tools para sustituir las etiquetas.
Nota: todos o algunos de los siguientes símbolos
pueden aparecer en el manual o en el producto.
Voltios
V
Amperios
A
Velocidad
min
-1
(RPM)
Corriente alterna
~
Nivel de potencia acústica
Lea el manual
Utilice protección auditiva
Utilice protección ocular
Utilice protección contra el polvo
Advertencia
PRECAUCIÓN: evacuación
caliente. No tocar
¡CALIENTE! No tocar
Supercie caliente
Certicado CE
Certicado UKCA
Certicado Intertek
Peligro para la salud serio
Peligroso para el medioambiente
Residuos de equipos eléctricos y
electrónicos
Aceite del motor 10/30W
Estárter abierto
Estárter cerrado
PRECAUCIÓN: se trata de
un motor de 4 tiempos.
Llenar solamente con gasolina.
No llenar con diésel.
Deje que el motor se enfríe antes de
abrir el tapón de combustible. El vapor
es extremadamente inamable y podría
encenderse al entrar en contacto con
una supercie caliente o llamas.
SIN PLOMO
¡SOLO GASOLINA!*
MUY INFLAMABLE.
*E5 y
E10
HOT!

www.evolutionpowertools.com
99

www.evolutionpowertools.com
100
1. PLACA DE VIBRACIÓN
2. DEPÓSITO DE COMBUSTIBLE
3. INTERRUPTOR DE IGNICIÓN «ON/OFF» (ENCENDIDO/
APAGADO) DEL MOTOR
4. PALANCA DEL REGULADOR
5. CONTROL DEL ESTÁRTER
6. ARRANQUE DE CUERDA
7. GRIFO DE COMBUSTIBLE
8. SONDA DE NIVEL/LLENADO DEL ACEITE DEL MOTOR
9. FILTRO DE AIRE
10. BUJÍA
11. EVACUACIÓN
12. TAPÓN DE DRENAJE DEL ACEITE DEL MOTOR
13. TORNILLO DE AJUSTE DE MARCHA RÁPIDA
14. PROTECCIÓN DE LA CORREA
15. ASA ANTIVIBRACIÓN
16. ALMACENAMIENTO DE HERRAMIENTAS
(1)
(14)
(2)
(7)
(5)
(9)
(4)
(13)
(6)
(3)
(8)
(12)
(15)
(16)
(11)
(10)
DESCRIPCIÓN GENERAL DE LA MÁQUINA H320-P

www.evolutionpowertools.com
101
DESCRIPCIÓN GENERAL DE LA MÁQUINA H320-E
1. PLACA DE VIBRACIÓN
2. BARRA TRANSVERSAL/ALMACÉN DE CABLE
3. INTERRUPTOR «ON/OFF» (ENCENDIDO/APAGADO) DE
INICIO DE SEGURIDAD
4. ASA ANTIVIBRACIÓN
5. MANGO, SECCIÓN SUPERIOR
6. MANGO, SECCIÓN MEDIA
7. ABRAZADERAS PARA TENDER LOS CABLES
(1)
(2)
(3)
(4)
(5)
(6)
(7)

www.evolutionpowertools.com
102
PRIMEROS PASOS
DESEMBALAJE
Precaución: esta caja contiene objetos alados.
Ábrala con cuidado. Podrían hacer falta dos
personas para elevar, montar y mover esta
máquina. Retire la máquina del embalaje junto
con los accesorios incluidos. Compruebe que la
máquina está en buenas condiciones y que se
incluyen todos los accesorios especicados en
este manual. Asegúrese también de que todos
los accesorios están completos. Si falta alguna
pieza, la máquina o accesorios, devuélvalo todo
a su distribuidor en su embalaje original. No tire
el embalaje y consérvelo durante todo el período
de garantía. Deseche el embalaje respetando
la normativa de medioambiente. Si es posible,
recíclelo. No deje que los niños jueguen con las
bolsas de plástico vacías, ya que existe riesgo de
asxia.
ELEMENTOS SUMINISTRADOS:
COMPACTADORA H320-P
DESCRIPCIÓN CANTIDAD
Manual de instrucciones 1
Extensión del mango central 1
Extensión del mango superior 1
Conexión del mango central
Tornillos M10 x 20
4
Conexión del mango superior
Tornillos M10 x 15
4
Arandelas del mango superior 4
Llave Allen de 8mm 1
Llave de vaso para bujías y
barra de fuerza
1
Aceite para motor (frasco de
400ml)
1
ELEMENTOS SUMINISTRADOS:
COMPACTADORA H320-E
DESCRIPCIÓN CANTIDAD
Manual de instrucciones 1
Tornillos de conexión del mango
(largos) M10 x 40
2
Tornillos de conexión del mango
(cortos) M10 x 15
2
Arandelas del mango 4
Mango central 1
Mango superior 1
Llave Allen de 8mm 1
Barra transversal del mango/
almacén de cable
1
Accesorios adicionales
Además de los elementos estándar suministrados
con esta máquina, también ponemos a su
disposición los siguientes accesorios que
encontrará en la tienda en línea de Evolution
en www.evolutionpowertools.com o en su
distribuidor local.
DESCRIPCIÓN N.º DE PIEZA
Almohadilla de
pavimentación H320
Almohadilla de
pavimentación
015-0007

www.evolutionpowertools.com
103
Fig. 2
Fig. 1
ENSAMBLAJE
La Evolution H320 necesita algo de montaje antes de su
uso. Si tiene la máquina con motor de gasolina, complete
todo el montaje antes de rellenar el motor con 0,4l del
aceite de servicio recomendado.
1. Fijación del mango de extensión: H320-P
Nota: la extensión del mango tiene un asa antivibración
que ayuda al operario a lidiar con la vibración que la
máquina transmite a su mano/brazo. El mango de
extensión se debe jar para nes operativos, pero se puede
doblar durante el transporte o el almacenamiento. Si se
retiran los cuatro tornillos inferiores y se aojan los cuatro
tornillos superiores, se puede plegar la extensión del
mango para mayor comodidad durante el transporte.
• Deslice con cuidado la sección del mango central
sobre los dos soportes del mango inferior y alinee los
cuatro agujeros del mango central con los cuatro agujeros
verticales roscados de los soportes inferiores.
•
Inserte los cuatro tornillos M10 x 20 a través del mango
central y los soportes del mango superior.(Fig.2)
• Apriete bien los cuatro tornillos con la llave Allen.
2. Montaje/jación del mango: H320-E
Nota: el mango de la H320-E consta de cuatro (4) partes
principales:
• Mango inferior (jado a la máquina de fábrica).
• Sección media.
• Sección superior con interruptor de seguridad «ON/
OFF» (Encendido/Apagado).
• Barra transversal/almacén de cable.
Los dos tornillos largos se usan para jar la barra
transversal/el almacén de cable y la sección media del
mango a los mangos inferiores giratorios.
• Coloque con cuidado la barra transversal/el almacén de
cable en su posición de uso.
Nota: las clavijas del cable deben mirar hacia atrás.
• Deslice con cuidado la sección media sobre los mangos
inferiores y alinee los oricios.
• Se debe usar una arandela entre el tornillo y los mangos.
(Fig. 1)
• Introduzca los tornillos largos a través de los oricios en
el mango central, a través de los oricios en los mangos
inferiores, y atorníllelos a las tuercas prisioneras en la
barra transversal/almacén de cable. (Fig. 3)
• Apriete bien estos tornillos con la llave Allen.
Fig. 3
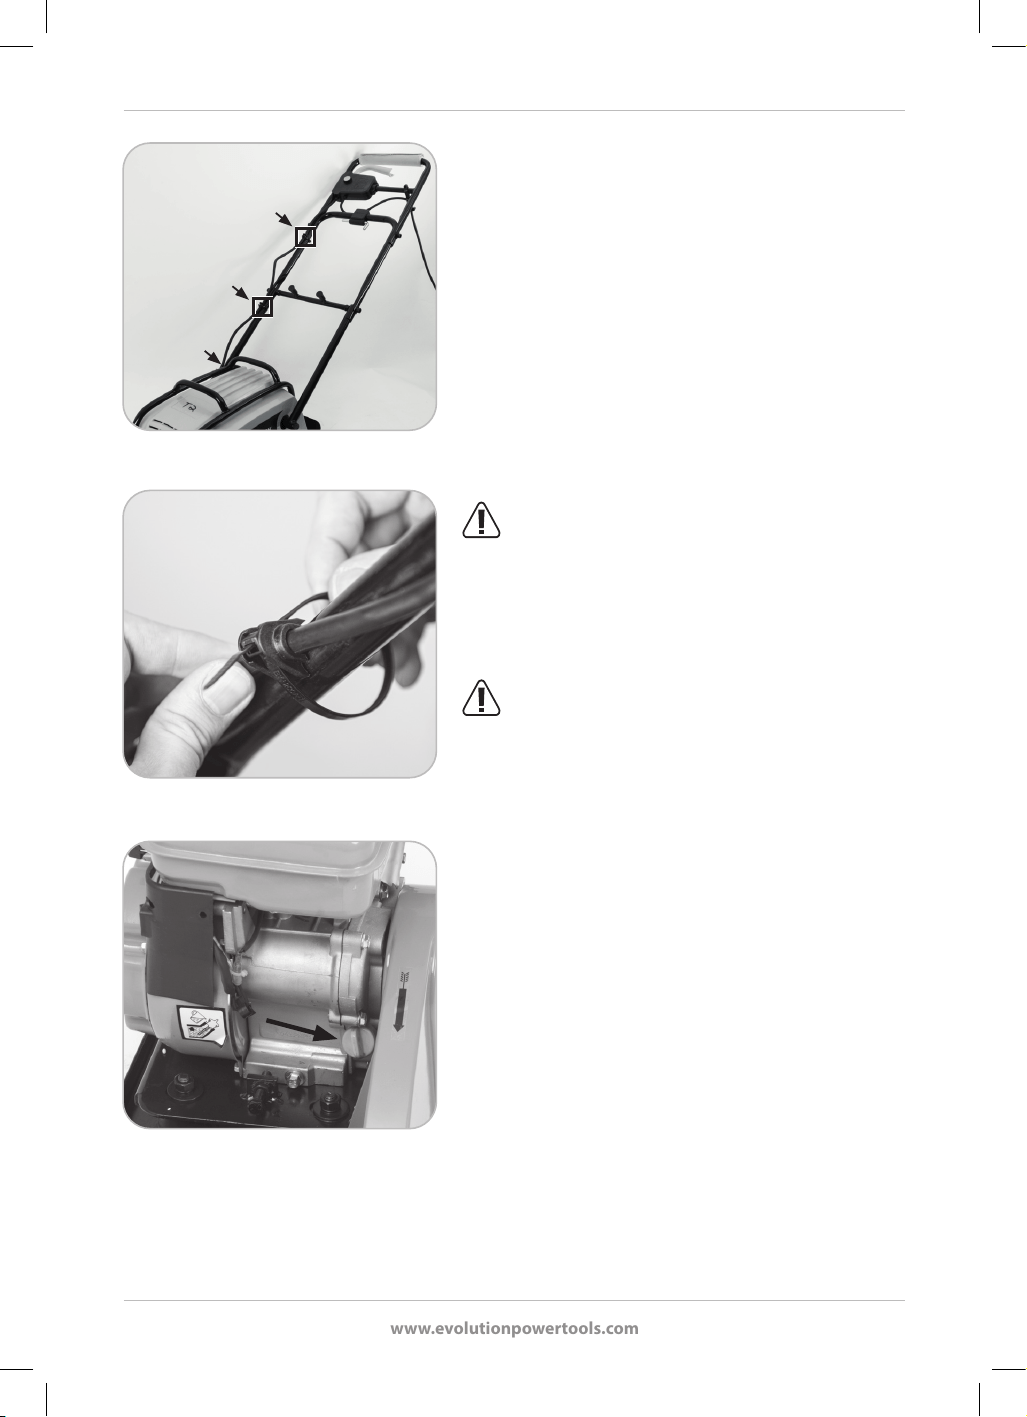
www.evolutionpowertools.com
104
Los dos tornillos cortos se usan para jar la sección superior
del mango a la sección media.
• Deslice con cuidado la sección superior del mango
sobre la sección media y alinee los oricios.
• Introduzca los tornillos a través del mango de la sección
superior y atorníllelos en las tuercas prisioneras dentro
de la sección media.
El H320-E se suministra con tres (3)abrazaderas de cables
para tender de forma segura el cable eléctrico hasta el
marco del mango. Estas deben instalarse. De no hacerlo,
se anulará la garantía. Colóquelas en el mismo lado que
el gatillo de alimentación y sepárelas como se indica en
(Fig.4a y 4b)
ADVERTENCIA: asegúrese de que el cable de
alimentación que baja desde el interruptor de
seguridad hasta el motor está «libre» y no se queda
«atrapado» durante el proceso de montaje.
Llenado inicial y comprobación del nivel de aceite:
H320-P
ADVERTENCIA: esta máquina no se entrega con
aceite. No se debe intentar arrancar el motor hasta
que se haya llenado el cárter hasta el nivel correcto con
aceite de grado adecuado.
Nota: el aceite (suministrado) se debe verter en la máquina
a través del tapón de nivel/llenado de aceite. La capacidad
de aceite es de aproximadamente 0,4litros de aceite
automovilístico 10W 30 (disponible en todas las buenas
fábricas de motores y en la mayoría de gasolineras).
Para algunas zonas climáticas no templadas puede ser
preferible usar un grado de aceite alternativo. Consulte a su
proveedor.
El tapón de llenado de aceite se desenrosca de la carcasa
del motor de la máquina e incorpora una sonda del nivel
de aceite. (Fig. 5) Tenga cuidado de no derramar nada de
aceite.
Nota: es importante que al comprobar el nivel de aceite
la máquina esté en una supercie estable, horizontal y
nivelada con el motor parado y frío.
Se proporcionan dos marcas de referencia en la varilla de
medición.
El nivel de aceite se debe mantener en o cerca de la
marca de referencia superior.
Fig. 5
Fig. 4a
Fig. 4b

www.evolutionpowertools.com
105
• Retire el tapón de nivel/llenado de aceite y limpie la
sonda de nivel con un trapo seco y limpio.
• Vierta la cantidad de aceite requerida. (aprox. 0,4l).
• Permita que el aceite se asiente durante más de 10
segundos.
• Observe el nivel de aceite a través del oricio de llenado
de aceite. El nivel de aceite debe estar muy cerca de
la parte superior de las roscas, con el aceite a punto
de rebosar del cárter (la máquina debe estar en una
supercie horizontal nivelada).
• Introduzca la sonda de nivel y enrosque completamente
el tapón a la posición inicial. Desenrosque el tapón
de llenado y retire la sonda de nivel. Compruebe
visualmente
el nivel de aceite en la sonda de nivel.
• Realice los ajustes necesarios.
• Si el nivel es correcto, apriete el tapón de nivel/llenado
de aceite de forma segura en la carcasa del motor.
Nota: cambie el aceite de acuerdo con la Tabla resumen
de mantenimiento (consulte también MANTENIMIENTO:
cambio del aceite del motor).
Comprobaciones previas al funcionamiento
Nota: se debe inspeccionar la máquina antes de cada
operación para asegurar que todas las características de
seguridad, etc. funcionan correctamente.
• Compruebe que todas las guardas de protección están
en posición y que no presentan daños.
• H320-E: compruebe la integridad del conector y el
cable de alimentación. Si el conector o el cable de
alimentación están dañados de alguna forma, un
técnico competente debe sustituir el cable y/o el
conector con piezas de repuesto idénticas.
• H320-P: compruebe todas las mangueras de
combustible, uniones y tapones de llenado, etc., en
busca de signos de fuga de uidos. Cualquier fuga
detectada se debe reparar antes de comenzar los
trabajos.
• Compruebe el nivel de aceite del motor y ajústelo según
sea necesario.
• Compruebe el nivel de aceite y rellénelo según sea
necesario.
• Inspeccione detenidamente el resto de la máquina en
busca de cualquier forma de daño, en particular, en
las cubiertas, guardas de protección, componentes de
goma, etc.
Fig. 6
Fig. 7

www.evolutionpowertools.com
106
Arranque de la H320-P
• Llene el depósito de combustible con gasolina. El ltro
de llenado del depósito de combustible tiene un inserto
de plástico para marcar el nivel máximo de combustible.
No hay que dejar que el combustible suba por encima
de esta marca.
• Gire la palanca del grifo de combustible a la posición
«ON» (Encendido). (Fig. 6)
• Ponga la palanca del estárter en la posición «Choke ON»
(Estárter encendido). (Fig. 7)
• Pulse el interruptor basculante de la ignición del motor
en la posición «ON» (Encendido) (I). (Fig. 8)
• Ponga la palanca del regulador en el máximo. (Fig. 9)
• Estabilice la H320 sujetando el mango de
funcionamiento en un punto adecuado.
• Use la otra mano para agarrar el asa del arranque de
cuerda. (Fig. 10)
• Tire del arranque de cuerda lentamente hasta que note
resistencia, lo cual indica que el motor está engranado.
• Cuando note resistencia, tire de la cuerda rápidamente.
• Continúe con este procedimiento hasta que el motor
arranque.
• La unidad de motor puede revolucionarse (traquetear)
durante un breve período hasta que alcance la
temperatura.
• Normalmente, el estárter puede volver a la posición (de
funcionamiento) «OFF» (Apagado) casi inmediatamente
después de que arranque el motor, pero esto dependerá
de las temperaturas ambiente, las condiciones
operativas, etc. y será a discreción del operario.
• En algunas circunstancias se puede necesitar el estárter
incluso cuando el motor ya está caliente por un ciclo
operativo anterior. Si tiene dicultades para arrancar un
motor caliente:
• Ponga el estárter en la posición «On» (Encendido,
derecha).
• Tire del arranque de cuerda una vez.
• Ponga el estárter de nuevo en la posición de
funcionamiento «OFF» (Apagado, izquierda).
• Tire del arranque de cuerda hasta que el motor
arranque.
• Nota: la H320-P empezará a vibrar y desplazarse en
cuanto arranque el motor. El operario debe asegurar la
diligencia necesaria al arrancar esta máquina.
Parada del motor de la H320-P
Fig. 8
Fig. 9
Fig. 10

www.evolutionpowertools.com
107
• Pulse el interruptor basculante de la ignición del motor
en la posición «OFF» (Apagado) (0).
• Cierre el grifo de combustible.
Desplazamiento de la máquina: H320-P
Nota: el ajuste de la velocidad del motor modica la
frecuencia de vibración y también la velocidad a la que la
máquina se desplaza hacia delante.
Nota: el tornillo de marcha rápida limita el desplazamiento
máximo de la palanca del regulador y así controla solo la
velocidad máxima del motor.
Si necesita modicar la velocidad máxima del motor para
aumentar o disminuir la velocidad de «desplazamiento» de
la máquina:
• Gire el tornillo de marcha rápida (Fig. 11) un poco cada
vez (media vuelta como máx.) hacia la derecha para
disminuir la velocidad del motor, o hacia la izquierda
para aumentar la velocidad del motor.
• Asegúrese de que la palanca del regulador está ajustada
en el máximo.
• Arranque la máquina y compruebe el «desplazamiento»
de la máquina con el nuevo ajuste del tornillo de
marcha rápida.
• En caso necesario, detenga la máquina y siga ajustando
el tornillo de marcha rápida hasta que se logre la
velocidad de «desplazamiento» deseada.
Arranque y parada de la H320-E
La H320-E está equipada con un interruptor «ON/OFF»
(Encendido/Apagado) de arranque de seguridad. El
bloqueo de seguridad evita que la palanca del interruptor
se accione hasta que se haya pulsado el botón de bloqueo
de seguridad.
• Pulse el botón de bloqueo de seguridad (a) y tire de la
palanca del interruptor (b) para arrancar la máquina.
(Fig. 12)
• Suelte la palanca del interruptor para apagar la
máquina.
Nota: al soltar la palanca del interruptor, el motor se
detendrá y el botón de bloqueo de seguridad volverá
automáticamente al «modo seguro».
ADVERTENCIA: el operario siempre debe ser
consciente del tendido del cable de alimentación
Fig. 11
Fig. 12
(a)
(b)

www.evolutionpowertools.com
108
para asegurarse de que no representa peligro de «tropiezo»
ni de ningún otro tipo, y que la máquina no pueda pasar
por encima.
CONSEJOS GENERALES DE USO
• Asegúrese de que cualquier persona presente
mantenga una distancia de seguridad respecto a los
trabajos de compactación. En caso necesario, acordone
la zona y coloque avisos de ADVERTENCIA.
• Planique su trabajo y la ruta por la que tiene previsto
que se desplace la máquina antes de empezar con los
trabajos de compactación.
• Estudie el área de trabajo antes de empezar y retire
o neutralice de otra forma cualquier obstrucción/
obstáculo que pudiera suponer un peligro.
• Asegúrese de tener todo el EPI correcto y que sabe
cómo usarlo.
• La compactadora se desplazará hacia delante ella
sola. Para «dirigir» la máquina, solo es necesario que
el operario haga indicaciones suaves en el mango
de la máquina. El operario debe sujetar el mango
antivibración con ambas manos y estas se deben
colocar lo más separadas posibles.
• Puede ser necesario hacer varias pasadas sobre el área
de trabajo para compactar el material hasta la densidad
deseada.
• Si la zona de trabajo está inclinada, desplácese hacia
arriba y hacia abajo de la supercie inclinada, no
cruzándola.
MANTENIMIENTO
H320-P
El mantenimiento regular es esencial para mantener
la máquina y sus accesorios en una condición de uso
óptima. Recomendamos que solamente efectúen estos
procedimientos los operarios competentes que tengan
experiencia en la reparación y el mantenimiento de
motores de gasolina. En caso de duda, llévelo a un centro
de servicio técnico aprobado por Evolution.
1. Cambio del aceite del motor
El aceite del motor se debe cambiar después del periodo de
funcionamiento inicial
y en los intervalos especicados
en el Calendario de servicio técnico.
Nota: es más fácil cambiar el aceite del motor cuando el
Fig. 13
Fig. 14

www.evolutionpowertools.com
109
Fig. 15
motor ha funcionado hasta alcanzar la temperatura y el
aceite está caliente.
• Asegúrese de que el motor está situado sobre una
supercie dura y nivelada.
• Retire el tapón de llenado de aceite. (Fig. 13)
• Coloque un colector de aceite adecuado bajo el motor.
• Retire el tapón de drenaje del aceite para que se pueda
drenar completamente el aceite del motor. (Fig. 14)
ADVERTENCIA: tenga cuidado. El contacto
con aceite de motor usado puede ser perjudicial. El
aceite podría estar muy caliente (riesgo de quemadura)
y algunos operarios podrían experimentar irritación si el
aceite contamina piel expuesta. El operario debería tener
en cuenta llevar guantes protectores de mecánico, si
dispone de ellos. Se debe lavar lo antes posible con jabón
y abundante agua limpia la piel que se haya contaminado
con aceite.
• Compruebe el tapón de drenaje de aceite y su junta.
• Compruebe el tapón de llenado de aceite y su junta
tórica.
• Sustituya cualquier pieza que no esté en un estado
operativo óptimo.
• Vuelva a instalar el tapón de drenaje de aceite y
apriételo rmemente.
• Vuelva a llenar el motor con el grado correcto de aceite
de motor hasta el nivel adecuado.
• Vuelva a poner el tapón de llenado de aceite.
• Busque fugas o vertidos y soluciónelos según sea
necesario.
Nota: el aceite de motor usado se debe desechar de forma
segura para el medioambiente. Consulte a la autoridad
local acerca de las instalaciones más cercanas para el
reciclaje de aceite usado.
2. Bujía - Comprobación y sustitución
Cuando transcurran aproximadamente 50 horas
de funcionamiento, se debe retirar la bujía para su
comprobación, limpieza y reajuste.
Para retirar y reinstalar la bujía:
• Asegúrese de que el motor está apagado y de que
el grifo de combustible está en la posición «OFF»
(Apagado).

www.evolutionpowertools.com
110
ADVERTENCIA: el motor debe estar frío antes de
comenzar el procedimiento de retirada de la bujía.
• Tire del cable de alta tensión de la bujía.
• Retire la bujía usando una toma de bujía (suministrado).
(Fig. 15)
Una bujía en buen estado debería presentar depósitos de
color tostado claro en la cabeza. Elimínelos con un cepillo
metálico de latón rígido.
• Compruebe la separación de los electrodos de la bujía
con una galga de espesores.
• Ajústela en caso necesario. El hueco se indica en
«Especicaciones de la H320-P».
• Reinstale la bujía. Asegúrese de que engrana las roscas
en la cabeza del cilindro correctamente.
• Apriete a mano la bujía usando la toma de bujía
suministrada.
• Deslice la barra de fuerza suministrada a través del
oricio en el extremo de la toma de la bujía.
• Coloque la barra de fuerza de modo que sobresalga una
cantidad igual a través de los dos lados de la toma de
bujía.
• Finalmente, haga la junta estanca al gas girando la toma
de la bujía entre ¼ y ½ vuelta. Esta última fracción de
giro apretará la arandela de la bujía y hará que la junta
sea estanca al gas. No apriete en exceso la bujía.
• Una de nuevo el cable de alta tensión a la parte superior
de la bujía.
3. Filtro de aire
ADVERTENCIA: nunca haga funcionar la bujía sin
el elemento de ltro de aire instalado.
Se debe comprobar el estado del ltro de aire después de
aproximadamente 50 horas de uso.
Nota: el ltro de aire puede precisar una atención más
frecuente si el entorno operativo es especialmente
polvoriento.
Para quitarlo:
• Asegúrese de que el motor está apagado y de que
el grifo de combustible está en la posición «OFF»
(Apagado). El motor debería estar frío.
• Desenrosque las tuercas de mariposa de la cubierta de
la carcasa del ltro de aire y retírela. (Fig. 16)
• Almacene estas piezas con cuidado para su posterior
reinstalación.
Fig. 16
Fig. 17

www.evolutionpowertools.com
111
• Retire de la carcasa el elemento del ltro de aire para
su inspección. (Fig. 17) Si el elemento de papel del
ltro de aire muestra signos de decoloración fuerte y
obstrucción por suciedad, polvo, etc., se debe sustituir.
Para reequipar:
• Instale el elemento en la carcasa del ltro de aire.
Se puede instalar un nuevo elemento por cualquier
lado.
• Sustituya la cubierta de la carcasa del ltro de aire.
• Sustituya las tuercas de mariposa y asegúrese de que
la cubierta está asentada correctamente y de que las
tuercas de mariposa están apretadas de forma segura.
4. Filtro de llenado del depósito de combustible
Compruebe visualmente de vez en cuando el estado del
ltro de llenado del depósito de combustible (idealmente,
al repostar). Si hay signos de acumulación de depósitos,
retire el ltro del depósito y límpielo.
• Limpie el ltro con un agente desengrasante con base
acuosa respetuoso con el medioambiente y, en caso
necesario, sople la malla na con aire comprimido seco
y limpio.
• Deje que se seque completamente antes de volver a
instalarlo.
• Al volver a instalarlo, asegúrese de que los dos recortes
en el borde superior del ltro se alinean con los recortes
en el cuello del ltro del depósito de combustible.
5. Comprobación de la tensión de la correa de
transmisión
ADVERTENCIA: realice este procedimiento
solamente con la máquina fría, el motor apagado y el
tapón de la bujía retirado.
Se debe comprobar la tensión de la correa de transmisión
tras las primeras cuatro horas de uso y después según se
especica en el Calendario de mantenimiento rutinario.
Para comprobar la tensión de la correa de transmisión:
• Retire la guarda de protección de la correa retirando
los tres (3) tornillos de cabeza hueca (Fig. 18) usando
una llave hexagonal y una llave (no suministrada) y
almacénela de forma segura para su uso futuro.
Nota: estos tres (3) tornillos de cabeza hueca tienen una
posición especíca. Anote la posición de cada uno de
los tornillos y sus accesorios relacionados al retirarlos de
la máquina para que se puedan volver a colocar en su
posición original.
Fig. 18
Fig. 19

www.evolutionpowertools.com
112
ADVERTENCIA: no ajuste el perno de ajuste/tensión sin aojar los cuatro pernos de montaje,
ya que esto podría dañar la carcasa del motor.
Nota: hay que tener cuidado para asegurar que el motor permanece «encuadrado» y «alineado» sobre
la placa de montaje. Si el motor estuviera en una conguración ligeramente «torcida» sobre la placa de
montaje, la correa de transmisión y las poleas se someterían a «esfuerzo» y se produciría un desgaste
rápido.
• La desviación al presionar ligeramente con el dedo
en el punto central de la correa debería ser de
aproximadamente 5/6 mm (1/4 pulgadas).
Nota: la unidad del motor de la H320 se coloca sobre
cuatro (4) ranuras en la placa de montaje del motor. Se
colocan cuatro (4) pernos de montaje del motor a través
de estas cuatro ranuras y se atornillan desde abajo en
la base del bloque del cárter del motor. Esta disposición
permite cambiar de posición el motor sobre la placa.
• Aoje los cuatro (4) pernos de cabeza hexagonal
usando una llave adecuada (no suministrada).
• Deslice el motor hacia delante o hacia atrás para
modicar la tensión de la correa de transmisión. Se
proporciona un tornillo de ajuste (Fig. 19) en la parte
delantera del motor para ayudar a colocar de forma
precisa el motor.
• Cuando se haya logrado la tensión correcta,
apriete de forma segura los pernos de montaje del
motor.

www.evolutionpowertools.com
113
• Sustituya la protección de la correa de transmisión y apriete de forma segura los tres (3) tornillos de
cabeza hueca en sus posiciones originales.
6. Sistema de arranque de cuerda
Las ranuras de ventilación se deben mantener limpias y libres de cualquier obstrucción.
Retire cualquier cuerpo extraño de las ranuras de ventilación.
H320-P
CALENDARIO DE
MANTENIMIENTO RUTI-
NARIO
Después de las
cuatro primeras
horas
Cada
20 horas o
mensualmente
Cada
50 horas o
3 meses
Cada
100 horas o
6 meses
Comprobación del nivel de
aceite del motor
● ●
Cambio del aceite del motor
●
(solo primer
cambio)
●
Comprobación del ltro
de aire
●
Sustitución del ltro de aire
●
Comprobación de la bujía
●
Tensión de la correa de
transmisión
● ●
Comprobación/limpieza del
ltro de combustible
●
MANTENIMIENTO DE LA H320-E
Nota: cualquier actividad de mantenimiento se debe llevar a cabo con la máquina apagada y
desconectada de la red de suministro de energía.
Compruebe que todas las características de seguridad y las protecciones están funcionando
correctamente de forma regular. Solo utilice esta máquina si las protecciones o características de
seguridad funcionan debidamente.
Todos los cojinetes del motor de esta máquina están lubricados de por vida. No es necesario volver a
lubricarlos.
Utilice un paño limpio y ligeramente húmedo para limpiar las partes de plástico de la máquina. No utilice
disolventes ni productos similares que podrían dañarlas.
ADVERTENCIA: no intente limpiar introduciendo objetos puntiagudos a través de las
aberturas de las cubiertas de las máquinas, etc. Los conductos de ventilación se deben limpiar con
aire comprimido seco.

www.evolutionpowertools.com
114
RESOLUCIÓN DE PROBLEMAS DE LA H320-P
PROBLEMA CAUSA POSIBLE SOLUCIÓN
El motor no
arranca.
No hay combustible.
Interruptor del motor en
«OFF» (Apagado).
Bujía sucia.
Motor frío.
Motor «inundado» con
gasolina.
Filtro de aire obstruido o
contaminado con aceite.
Fallo grave.
Abra el grifo de combustible
Llene el depósito de combustible.
Ponga el interruptor del motor en «On»
(Encendido).
Retire, limpie, reajuste y sustituya la bujía.
Asegúrese de que el ajuste del estárter es
correcto.
Déjelo cinco (5) minutos.
Abra el estárter y abra completamente el
regulador
e inténtelo de nuevo.
Retire, limpie y sustituya la bujía.
Inténtelo de nuevo hasta que el motor arranque.
Sustituya el ltro de aire.
Póngase en contacto con un agente o con
Evolution Power Tools
para obtener más consejos.
La máquina
no vibra.
Tensión de la correa
incorrecta.
Filtro de aire bloqueado.
Unidad excéntrica dañada.
Velocidad del motor
demasiado lenta.
Ajuste la tensión de la correa.
Renueve el ltro de aire.
Sustituya la unidad excéntrica.
Aumente ligeramente la velocidad del motor.

www.evolutionpowertools.com
115
RESOLUCIÓN DE PROBLEMAS DE LA H320-E
PROBLEMA CAUSA POSIBLE SOLUCIÓN
La máquina
no arranca.
No se ha conectado la
alimentación.
Fusible de la bujía «fundido».
No se ha pulsado el botón de
inicio de seguridad,
lo que evita la actuación
de «ON/OFF» (Encendido/
Apagado).
Cable de alimentación
roto o dañado.
Encienda la alimentación en la toma.
Sustituya el fusible y compruebe la
alimentación.
Pulse el botón de inicio de seguridad
y, después, tire de la palanca de inicio.
Solicite a un técnico competente la sustitución
del cable dañado por otro de un tipo idéntico.
GUÍA GENERAL DE RESOLUCIÓN DE PROBLEMAS
PROBLEMA CAUSA POSIBLE SOLUCIÓN
Bloques del
pavimento
dañados.
Placa en contacto directo con
el pavimento.
Instale una «Almohadilla de pavimentación».
Descamación
de la supercie
bituminosa
(laminado).
Compactación excesiva. Retire y vuelva a extender.
Baja velocidad
de desplaz-
amiento.
Grosor de la capa demasiado
profundo (hundimiento de la
placa).
Velocidad del motor
demasiado baja.
Contenido de humedad del
material demasiado elevado o
demasiado bajo.
Retire parte del material para reducir el grosor
de la capa.
Aumente ligeramente la velocidad del motor.
Retire el material y ajuste el contenido de
humedad.
La H320-P no
se desplaza.
Velocidad del motor
demasiado baja.
Aumente ligeramente la velocidad del motor.
ALMACENAMIENTO A LARGO PLAZO DE LA H320-P

www.evolutionpowertools.com
116
Fig. 20
Si no se va a usar su máquina de Evolution durante un
periodo de cuatro meses o más (p. ej., durante el periodo
invernal), el operario debería considerar el prepararla para
el almacenamiento a largo plazo. Esto mantendrá el motor
en una condición óptima para su nueva puesta en servicio
cuando se requiera.
• Drene todo el combustible del depósito de combustible
y el carburador en un recipiente aprobado.
• Se puede encontrar un grifo de drenaje debajo del
cuenco otante del carburador. Aoje este grifo para
permitir el drenaje del combustible de la máquina. (Fig.
20)
• Apriete el grifo de drenaje cuando se haya sacado todo
el combustible.
• Retire la bujía.
• Vierta aproximadamente una cuchada de aceite de
motor limpio dentro del oricio de la bujía.
• Asegúrese de que el interruptor de ignición del motor
está en la posición «OFF» (Apagado).
• Tire suavemente del arranque de cuerda unas cuantas
veces.
• Sustituya la bujía.
• Tire con cuidado del arranque de cuerda hasta que
note resistencia (esto signicará que el pistón está en
su carrera de compresión con ambas válvulas cerradas).
Deje de tirar del arranque de cuerda.
• Almacene el motor en un lugar seguro, seco y bien
ventilado, debajo de una cubierta para evitar que se
pose polvo, residuos, etc. sobre la máquina.
DEVOLUCIÓN DE LA H320-P
En el caso de que tenga que devolver la máquina H320-P
a Evolution, debe seguir los estos pasos para que el envío
sea seguro.
1. Drene completamente el combustible de su depósito y
del carburador de la máquina. (Fig. 20)
2. Drene completamente el aceite del motor. (Fig. 14)
3. Desmonte el mango quitando los tornillos. Encárguese
de guardar todas las piezas retiradas. (Fig. 2)
4. Embale la máquina de forma segura en una caja,
preferiblemente en su embalaje original.
Nota: la máquina se devolverá sin combustible ni aceite.
Antes de arrancar el motor, asegúrese de llenarlo con
combustible y aceite.
Uso de accesorios opcionales de Evolution

www.evolutionpowertools.com
117
(disponibles como opción de compra para el cliente)
PROTECCIÓN MEDIOAMBIENTAL
Los productos eléctricos no se deben tirar a la basura
doméstica. Recicle en los puntos destinados a ello. Consulte
a la autoridad local o el vendedor para obtener más
información sobre el reciclaje.

www.evolutionpowertools.com
118
DECLARACIÓN DE CONFORMIDAD CE
De conformidad con EN ISO 17050-1:2004
El fabricante del producto incluido en esta Declaración es el siguiente:
Reino Unido: Evolution Power Tools Ltd., Venture One, Longacre Close, Holbrook Industrial Estate, Sheeld, S20 3FR (Reino Unido).
FR: Evolution Power Tools SAS. 61 Avenue Lafontaine, 33560, Carbon-Blanc, Burdeos (Francia).
El fabricante declara que la máquina, tal y como se detalla en la presente declaración, cumple todas las disposiciones pertinentes de la
Directiva relativa a las máquinas y otras directivas apropiadas, tal y como se especica a continuación.
Asimismo, el fabricante declara que la máquina, tal y como se indica detalladamente en la presente declaración, en los casos en los que sea
aplicable, cumple con las disposiciones pertinentes sobre los requisitos esenciales de seguridad y salud.
Las Directivas incluidas en esta declaración se detallan a continuación:
1907/2006 Reglamento (CE) n.º 1907/2006, anexo XVII, relativo al registro, la evaluación, la autorización y la
restricción de las sustancias y preparados químicos (REACH)
2006/42/EC. Directiva relativa a las máquinas.
2014/30/EU. Directiva de compatibilidad electromagnética.
2011/65/EU. & (EU)2015/863. Directiva sobre restricciones a la utilización de determinadas sustancias peligrosas en aparatos
eléctricos y electrónicos (RoHS)
2000/14/EU & 2005/88/EC Directiva de ruido
Y está en conformidad con los requisitos aplicables de los siguientes documentos
EN 500-1:2006+A1• EN 500-4:2011• EN ISO 3744: 1995 • EN ISO 14982:2009
Detalles del producto
Descripción: H320-P
N.º de modelo Evolution: 015-0001, 015-0013
N.º de modelo de fábrica: XZ-10C/JF152
Marca comercial: EVOLUTION
La documentación técnica necesaria para demostrar que el producto cumple con los requisitos de la directiva se ha
elaborado y está disponible para su inspección por parte de las autoridades competentes pertinentes. Garantiza que
nuestro archivo técnico contiene los documentos enumerados anteriormente y que estas son las normas correctas para
el producto, tal y como se ha detallado antes.
Nombre y dirección del titular de la documentación técnica.
Firmado: Impresión: Barry Bloomer - Director ejecutivo
Fecha: 23/08/2022
Reino Unido: Evolution Power Tools Ltd., Venture One, Longacre Close, Holbrook Industrial Estate, Sheeld, S20 3FR
(Reino Unido).
FR: Evolution Power Tools SAS. 61 Avenue Lafontaine, 33560, Carbon-Blanc, Burdeos (Francia).
®
H320-P

www.evolutionpowertools.com
119
DECLARACIÓN DE CONFORMIDAD CE
De conformidad con EN ISO 17050-1:2004
El fabricante del producto incluido en esta Declaración es el siguiente:
Reino Unido: Evolution Power Tools Ltd., Venture One, Longacre Close, Holbrook Industrial Estate, Sheeld, S20 3FR
(Reino Unido).
FR: Evolution Power Tools SAS. 61 Avenue Lafontaine, 33560, Carbon-Blanc, Burdeos (Francia).
El fabricante declara que la máquina, tal y como se detalla en la presente declaración, cumple todas las disposiciones pertinentes de la
Directiva relativa a las máquinas y otras directivas apropiadas, tal y como se especica a continuación.
Asimismo, el fabricante declara que la máquina, tal y como se indica detalladamente en la presente declaración, en los casos en los que sea
aplicable, cumple con las disposiciones pertinentes sobre los requisitos esenciales
de seguridad y salud.
Las Directivas incluidas en esta declaración se detallan a continuación:
1907/2006 Reglamento (CE) n.º 1907/2006, anexo XVII, relativo al registro, la evaluación, la autorización y la
restricción de las sustancias y preparados químicos (REACH)
2006/42/EC. Directiva relativa a las máquinas.
2014/30/EU. Directiva de compatibilidad electromagnética.
2011/65/EU. & (EU)2015/863. Directiva sobre restricciones a la utilización de determinadas sustancias peligrosas en aparatos
eléctricos y electrónicos (RoHS)
2002/96/EC Directiva sobre residuos de aparatos eléctricos y electrónicos (RAEE).
2000/14/EU & 2005/88/EC Directiva de ruido
Y está en conformidad con los requisitos aplicables de los siguientes documentos
EN 500-1:2006+A1 • EN 500-4:2011 • EN 60204-1:2018 • EN IEC 55014-1:2021 • EN ISO 3744:1995
EN IEC 55014-2:2021 • EN IEC 61000-3-2:2019/A1:2021 • EN 61000-3-3:2013/A2:2021
Detalles del producto
Descripción: H320-E
N.º de modelo Evolution: 015-0002, 015-0004, 015-0008, 015-0010
N.º de modelo de fábrica: XZ-5A
Marca comercial: EVOLUTION
Voltaje: 220-240V ~ 50Hz
Entrada: 300 W
La documentación técnica necesaria para demostrar que el producto cumple con los requisitos de la directiva se ha
elaborado y está disponible para su inspección por parte de las autoridades competentes pertinentes. Garantiza que
nuestro archivo técnico contiene los documentos enumerados anteriormente y que estas son las normas correctas para
el producto, tal y como se ha detallado antes.
Nombre y dirección del titular de la documentación técnica.
Firmado: Impresión: Barry Bloomer - Director ejecutivo
Fecha: 23/08/2022
Reino Unido: Evolution Power Tools Ltd., Venture One, Longacre Close, Holbrook Industrial Estate, Sheeld, S20 3FR
(Reino Unido).
FR: Evolution Power Tools SAS. 61 Avenue Lafontaine, 33560, Carbon-Blanc, Burdeos (Francia).
®
H320-E
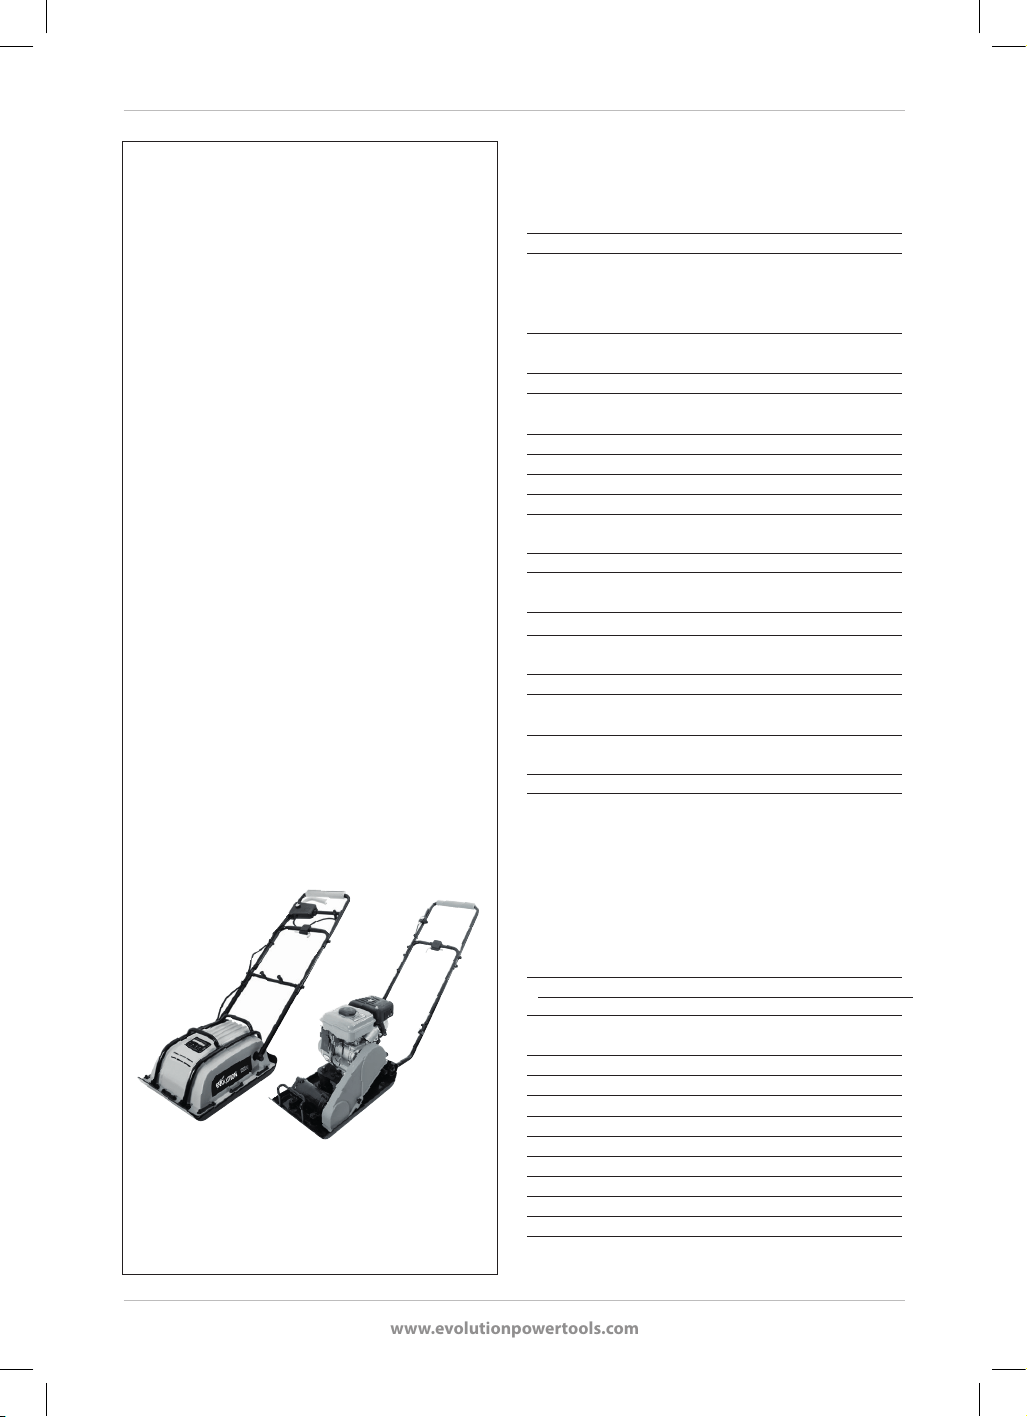
www.evolutionpowertools.com
120
Speciche modello
Evolution Power Tools si riserva il diritto
di apportare migliorie e modiche
al design e alle speciche tecniche del presente
prodotto senza preavviso.
Il presente manuale è stato scritto originariamente in
inglese.
Motore EU/UK 220-240 V~50 Hz 300 W, US 120 V~60 Hz 1,25 A
Velocità motore (min
-1
) 2.860 (a vuoto), US 3.450 (a vuoto)
Forza di compattazione (kN) 5
Tempo massimo raccomandato
utilizzo per l'operatore 30
(minuti)
Livello potenza acustica (LwA) 88,5 dB(A) K= 2,09 dB(A)
Livello pressione acustica (LpA) 83,3 dB(A) K= 3 dB(A)
Vibrazioni (m/sec
2
) 18,496 K = 1,5
Peso netto kg (lb) 25,4 (56)
Altezza impugnatura (in uso) mm (pollici) 920 (36)
Raggio utensile (in uso) mm (pollici) 1.290 (51)
Larghezza impronta mm (pollici) 320 12-1/2)
Lunghezza cavo metri (piedi) 10 (33)
Classe di isolamento I
IP44
H320-P
H320-E
Tipo di motore Monocilindrico 4 tempi a valvole in testa
Potenza del motore 1,7 kW 3.600 min
-1
Ricambio candela d'accensione LD E6TC (disponibile da Evolution)
NGK BP6HS
CHAMPION L87YCC
AC DELCO 42FS
Distanza elettrodi candela d'accensione 0,028 – 0,031 pollici
0,7 – 0,8 mm
Sostituzione ltro dell'aria Evolution H1S58
Giochi valvola (a freddo) Ingresso 0,15 mm 0,006 pollici
Scarico 0,20 mm 0,008 pollici
Forza di compattazione (kN) 10
Vibrazioni (m/sec
2
) 20,211 K = 1,5
Livello potenza acustica (LwA) 97,9 dB(A) K= 2,42 dB(A)
Livello pressione acustica (LpA) 90,5 dB K= 3 dB(A)
Tempo di utilizzo per l'operatore 20 (minuti)
Tempo massimo raccomandato
Tipo di olio SAE 10W-30/40
Capacità olio (litri) 0,25
( oz) 8,45
Tipo carburante Benzina senza piombo E5 ed E10
Piena capacità (litri) 1,2
( oz) 40,57
Peso netto kg (lb) 32,45 (71,5)
Altezza impugnatura (in uso - 1020 (40)
impugnatura di estensione inserita) mm (pollici)
Raggio utensile (in uso - 1290 (51)
impugnatura di estensione inserita) mm (pollici)
Larghezza impronta mm (pollici) 320 (12-1/2)

www.evolutionpowertools.com
121
IMPORTANTE
Si prega di leggere attentamente tutte le istruzioni
d’uso e di sicurezza.
Per la propria sicurezza, se sussistono dubbi circa
un qualsiasi aspetto riguardante l’utilizzo di questa
attrezzatura, si prega di contattare l'assistenza
tecnica telefonica al numero indicato sul sito web
di Evolution Power Tools. La nostra organizzazione
internazionale gestisce diverse linee telefoniche
di assistenza. In alternativa, anche il fornitore del
prodotto può orire assistenza tecnica.
WEB www.evolutionpowertools.com/register
Congratulazioni per l'acquisto di un prodotto
Evolution Power Tools. Si prega di completare
la registrazione del prodotto “online” come
spiegato nel documento A5 sulla registrazione
della garanzia allegato al presente
apparecchio. È possibile inoltre scansionare
il codice QR presente nel documento A5
con uno smartphone. In tal modo sarà
possibile convalidare il periodo di garanzia
dell’apparecchio tramite il sito web di Evolution
introducendo i propri dati e assicurandosi
un'assistenza immediata qualora necessario.
La ringraziamo sinceramente per aver scelto un
prodotto Evolution Power Tools.
GARANZIA LIMITATA EVOLUTION. EVOLUTION
POWER TOOLS SI RISERVA IL DIRITTO DI
APPORTARE MIGLIORIE E MODIFICHE AL
DESIGN DEI PRODOTTI SENZA PREAVVISO.
SI PREGA DI CONSULTARE IL DOCUMENTO PER
LA REGISTRAZIONE DELLA GARANZIA E/O LA
CONFEZIONE PER ULTERIORI DETTAGLI SUI
TERMINI E CONDIZIONI DELLA GARANZIA.
Evolution Power Tools, entro il periodo di garanzia
considerato a partire dalla data dell'acquisto,
riparerà e sostituirà i prodotti rivelatisi difettosi a
causa dei materiali o della manifattura. La garanzia
non è valida se lo strumento restituito non è stato
usato nel rispetto delle raccomandazioni del
manuale di istruzioni o se l’apparecchio è stato
danneggiato accidentalmente, per negligenza
o uso inadeguato. La garanzia non si applica ad
apparecchi e/o componenti che abbiano subito
alterazioni o modiche di qualsiasi genere, o che
non siano stati usati rispettando le speciche
e le capacità raccomandate. I componenti
elettrici sono soggetti alle garanzie dei rispettivi
produttori. Eventuali prodotti restituiti in stato
difettoso saranno spediti in porto franco a
Evolution Power Tools. Evolution Power Tools si
riserva il diritto di riparare il prodotto difettoso o
in alternativa di sostituirlo con lo stesso prodotto
o un prodotto equivalente. Non esiste garanzia,
scritta o orale, per accessori soggetti a usura,
come (a titolo esemplicativo ma non esaustivo)
lame, taglierine, trivelle, scalpelli o palette,
ecc. In nessun caso Evolution Power Tools sarà
responsabile di perdite o danni risultanti in modo
diretto o indiretto dall’uso dei nostri prodotti o
da qualsiasi altra causa. Evolution Power Tools
non è responsabile per eventuali costi sostenuti
in relazione a tali prodotti o per eventuali danni
conseguenti. Nessun funzionario, dipendente
o agente di Evolution Power Tools è autorizzato
a prestare oralmente dichiarazioni di idoneità,
o a rinunciare a qualsiasi condizione di vendita
esposta di seguito, e nessuna di tali dichiarazioni
sarà vincolante per Evolution Power Tools.
Eventuali questioni relative alla presente
garanzia limitata dovranno essere inoltrate
alla sede centrale dell’azienda, o contattando
l’apposito numero di assistenza.
ISTRUZIONI GENERALI SULLA SICUREZZA DEGLI
UTENSILI ELETTRICI
(Le presenti istruzioni generali di sicurezza degli
utensili elettrici sono redatte in accordo alle
normative BS EN 500-1:2006+A1 ed EN 500-4:2011
ATTENZIONE: Leggere per intero le
istruzioni e le avvertenze di sicurezza.
Il mancato rispetto delle avvertenze e delle
istruzioni può comportare scosse elettriche, rischio
di incendio e/o gravi lesioni.
Conservare tutte le avvertenze e le istruzioni
per future consultazioni.
La dicitura "elettroutensile" nelle avvertenze si
riferisce al presente elettroutensile alimentato via
rete elettrica (con cavo) o a batteria (senza cavo).

www.evolutionpowertools.com
122
1) Avvertenze generali sulla sicurezza degli
utensili elettrici [Sicurezza dell'area di lavoro]
a) Mantenere l'area di lavoro pulita e
ben illuminata. Aree disordinate o non
adeguatamente illuminate potrebbero dar luogo
a infortuni.
b) Non azionare l'utensile elettrico in
un'atmosfera potenzialmente esplosiva,
come in presenza di liquidi, gas o polveri
inammabili. Gli utensili elettrici generano
scintille che possono innescare polveri o vapori.
c) Tenere lontani i bambini e altre persone
durante l'uso dell'elettroutensile. In caso
di distrazione si potrebbe perdere il controllo
dell'apparecchio.
2) Avvertenze generali sulla sicurezza degli
utensili elettrici [Sicurezza elettrica]
a) Le spine di alimentazione degli elettroutensili
devono essere idonee all'inserimento nella
presa. La spina non deve essere assolutamente
modicata. Non utilizzare connettori adattatori
con elettroutensili collegati a terra. Spine
elettriche non modicate e prese adeguate
riducono il rischio di folgorazione.
b) Evitare il contatto diretto con superci
collegate a terra, come tubi, termosifoni, stufe
e frigoriferi. Quando il corpo è a diretto contatto
con la terra sussiste un maggiore pericolo di scosse
elettriche.
c) Non esporre gli elettroutensili alla pioggia
o all'umidità. La penetrazione di acqua in un
apparecchio elettrico aumenta il rischio di scosse
elettriche.
d) Non sollecitare eccessivamente il cavo di
alimentazione. Non utilizzare mai il cavo per
trasportare, tirare o scollegare l'elettroutensile.
Tenere il cavo al riparo da calore, olio, spigoli
vivi o parti in movimento. I cavi danneggiati
o aggrovigliati aumentano il rischio di scosse
elettriche.
e) Quando si utilizza un elettroutensile in
ambiente esterno, utilizzare esclusivamente
una prolunga omologata per l'uso all'aperto.
L'utilizzo di un cavo omologato per l'utilizzo
all'aperto riduce il rischio di scosse elettriche.
f) Qualora sia indispensabile utilizzare l'utensile
elettrico in ambiente umido, impiegare un
alimentatore protetto dotato di interruttore
dierenziale (RCD). L'utilizzo di un RCD riduce il
rischio di folgorazione.
3) Avvertenze generali sulla sicurezza degli
utensili elettrici [Sicurezza personale].
a) Agire sempre con attenzione, osservare le
proprie azioni e procedere in modo ragionevole
quando si adopera un elettroutensile. Non
utilizzare l'elettroutensile quando si è stanchi
o sotto l'eetto di droghe, alcol o farmaci.
Un solo momento di disattenzione nell'uso
dell'elettroutensile può dare luogo a gravi lesioni.
b) Utilizzare i dispositivi di protezione
personale. Indossare sempre gli occhiali di
sicurezza. L'uso di dispositivi di protezione
individuale come mascherina antipolvere, scarpe
antinfortunistiche anti-scivolo, casco protettivo
o protezioni acustiche a seconda dell'impiego
dell'elettroutensile riduce il rischio di lesioni
personali.
c) Evitare l'accensione involontaria. Accertarsi
che l'elettroutensile sia spento prima di
collegarlo all'alimentazione e/o alla batteria,
sollevarlo o trasportarlo. Non trasportare un
utensile elettrico con le dita sull'interruttore o dare
corrente quando tale comando è sulla posizione di
accensione.
d) Rimuovere eventuali chiavi o brugole di
regolazione prima di avviare l'utensile elettrico.
Una chiave o una brugola rimasta attaccata a una
parte rotante di un utensile elettrico può causare
lesioni personali .
e) Evitare posture innaturali. Provvedere a
una posizione sicura e mantenere sempre
l'equilibrio. Ciò garantisce un controllo migliore
dell'elettroutensile in caso di situazioni impreviste.
f) Indossare un abbigliamento idoneo. Non
indossare abiti ampi o gioielli. Tenere lontani
i capelli, gli abiti e i guanti dalle parti in
movimento. Gli abiti ampi, i gioielli o i capelli
lunghi possono impigliarsi nelle parti mobili.
g) Se è possibile montare aspirapolvere
e dispositivi di raccolta, accertarsi che
siano collegati e che vengano utilizzati
correttamente. L'uso di un aspirapolvere può
ridurre i pericoli associati alla polvere.
h) Non permettere che la familiarità d'uso degli
utensili dovuta al frequente utilizzo comporti
leggerezza e noncuranza riguardo ai principi
di sicurezza. Un'azione incauta può produrre

www.evolutionpowertools.com
123
conseguenze gravi nel giro di pochi secondi.
4) Avvertenze generali sulla sicurezza degli
utensili elettrici [Utilizzo e cura degli utensili
elettrici].
a) Non forzare l'utensile elettrico. Utilizzare
l'elettroutensile idoneo al proprio lavoro. Con
l'elettroutensile adatto si lavora meglio e con
maggiore sicurezza nell'intervallo di prestazione
indicata.
b) Non utilizzare l'utensile elettrico se
l'interruttore non si accende o non si spegne.
Qualunque utensile elettrico che non possa essere
controllato tramite l'interruttore è pericoloso e
deve essere riparato.
c) Scollegare l'utensile elettrico dalla fonte
di alimentazione e/o dal pacco batterie
prima di eseguire qualunque riparazione,
cambio di accessori o di riporlo. Questa misura
precauzionale impedisce il rischio di avvio
involontario dell'elettroutensile.
d) Riporre gli utensili elettrici inattivi e
tenerli lontani dalla portata dei bambini.
Non consentire a persone che non abbiano
familiarità con il loro funzionamento o con
le presenti istruzioni di metterli in funzione.
Gli elettroutensili sono pericolosi se utilizzati da
persone inesperte.
e) Manutenzione degli elettroutensili.
Controllare che le parti mobili dell'apparecchio
funzionino perfettamente, che non si
inceppino e che non vi siano elementi rotti o
danneggiati al punto da compromettere la
funzione dell'elettroutensile. Nel caso risulti
danneggiato, far riparare l'elettroutensile
prima dell'utilizzo. Molti infortuni derivano da
una cattiva manutenzione degli elettroutensili.
f) Mantenere gli utensili da taglio ben alati
e puliti. Gli strumenti da taglio su cui è stata
eettuata un'adeguata manutenzione presentano
una probabilità inferiore di incepparsi e sono più
facili da controllare.
g) Utilizzare elettroutensili, accessori, utensili,
ecc. in conformità con le presenti istruzioni,
tenendo in considerazione le condizioni di
lavorazione e l'attività da eseguire. L'utilizzo
di un utensile elettrico per un compito dierente
da quello per il quale è stato concepito può
comportare rischi.
i) Tenere le impugnature e le superci di
presa asciutte, pulite e libere da olio e grassi.
Impugnature e superci di presa scivolose non
consentono la gestione in sicurezza e il controllo
dell'utensile in situazioni impreviste.
5) Avvertenze generali sulla sicurezza degli
utensili elettrici [Assistenza]
a) Accertarsi di far riparare il proprio utensile
elettrico solo da personale qualicato che
impieghi ricambi originali e identici. Ciò
consentirà di preservare la sicurezza dell'utensile
elettrico.
ISTRUZIONI DI SICUREZZA PER H320-P
a. I motori diesel o a benzina non devono mai
essere utilizzati in spazi chiusi non ventilati.
I gas di scarico prodotti sono altamente
tossici e possono causare un avvelenamento
da monossido di carbonio responsabile di
sonnolenza e inne morte. L'utilizzo in ambiente
chiuso di un motore a benzina è consentito solo
nel caso di strutture che possano essere ventilate
in maniera molto ecace e nelle quali i gas di
scarico possano essere catturati e incanalati verso
l'esterno tramite sistemi di aspirazione/ripulitura
d'aria.
b Il motore non deve essere portato a velocità
che superino i limiti massimi segnalati sulla
targhetta descrittiva delle speciche. Far
funzionare un motore a velocità eccessiva aumenta
la possibilità di rottura dei suoi componenti e
quindi di incidenti conseguenti.
c. Non alterare utilizzando componenti che
regolano la velocità dei motori. È possibile
intervenire sui parametri di operatività impostati
in fabbrica.
d. Utilizzare esclusivamente il tipo di
carburante indicato nel manuale di istruzioni.
Utilizzare un carburante dal numero di ottano
inferiore a quello specicato può comportare
eccessiva usura del motore e la sua prematura
avaria.
e. Mantenere l'area circostante al motore
sgombra, ordinata e pulita. Non lasciare mai
nelle vicinanze di un motore in funzione materiale
combustibile (legno, plastica, cartone, tela ecc.).
f. Non utilizzare in o nelle vicinanze di
atmosfere potenzialmente esplosive. Le
atmosfere contenenti polveri, riscontrabili in

www.evolutionpowertools.com
124
complessi industriali (impianti di macinazione,
segherie), rappresentano un potenziale esplosivo.
g. Vericare su base regolare l'impianto di
carburazione per eventuali perdite. Attacchi
e innesti devono essere esaminati per vericare
l'esistenza di deterioramento o attriti. Vericare il
serbatoio carburante per rilevare eventuali danni,
segni di usura o scarsa ecacia del tappo di
chiusura. Qualunque difetto dovrà essere corretto
prima di utilizzare il motore.
h. Spegnere sempre il motore e consentirgli di
rareddarsi prima di eettuare un rifornimento
di carburante. Cercare di evitare qualunque
fuoriuscita di carburante (spesso dovuta a
eccessivo riempimento del serbatoio) e pulire
immediatamente il carburante versato. L'utilizzo di
sabbia asciutta è un metodo ecace per rendere
innocuo il carburante accidentalmente versato. Non
consentire però alla sabbia di entrare in contatto
con alcuna parte del motore.
i. Durante il trasporto dell'utensile a motore in
un veicolo, assicurarsi che il rubinetto sia chiuso.
Per ridurre il rischio di fuoriuscita di carburante,
il motore dovrebbe essere ssato, ad esempio da
cavi adatti, nell'area di carico del veicolo, in modo
tale da non potersi muovere durante il trasporto. Il
motore deve sempre essere ssato in questo modo
quando possibile.
j. Per l'immagazzinamento a lungo termine si
raccomanda che l'intero sistema di carburazione
del motore sia svuotato. Vedere la Fig.20 per
istruzioni. Durante tali periodi di inattività, gli
additivi chimici presenti nei moderni carburanti
possono precipitare e bloccare augelli e valvole del
sistema di carburazione.
k. Conservare l'utensile in un'area sicura e ben
ventilata. Il personale non autorizzato non deve
avere accesso all'utensile.
ISTRUZIONI DI SICUREZZA PER IL
RIFORNIMENTO DI CARBURANTE
a. Scegliere un punto di appoggio sgombro, in
piano e distante da qualsiasi struttura, come
postazione di rifornimento. Accertarsi che non
vi sia materiale combustibile nelle immediate
vicinanze.
b. È severamente proibito fumare, usare amme
vive o produrre scintille durante le operazioni di
rifornimento. La benzina è altamente inammabile
e i suoi vapori combustibili.
c. Assicurarsi che il rubinetto del serbatoio sia
chiuso. Ciò garantirà che il carburante immesso
non fuoriesca sul carburatore del motore.
d. Il motore deve essere spento e lasciato
rareddare prima di eettuare un tentativo di
rifornimento. Fuoriuscite accidentali di carburante
sul motore bollente costituiscono un rischio di
incendio.
e. Si deve intervenire immediatamente per
rimediare a qualunque fuoriuscita di carburante.
Qualora la benzina contamini gli indumenti,
l'operatore deve cambiarli. Non adarsi alla
convinzione che il carburante evapori rapidamente
dagli indumenti. Lavare gli indumenti una volta
evaporato il carburante.
f. È consigliato l'utilizzo di un imbuto durante la
procedura di rifornimento. Utilizzare un imbuto
per ridurre il rischio di fuoriuscita.
g. Riempire il serbatoio con la corretta quantità
di benzina senza piombo portandolo a un livello
approssimativamente corrispondente a metà
del ltro carburante. Versare con attenzione il
carburante nel serbatoio e non cercare di riempirlo
del tutto. Versare il carburante lentamente
per evitare che bolle d'aria presenti durante
l'operazione causino fuoriuscite di liquido.
h. Controllare il tappo del serbatoio e inserirlo
non appena completata l'operazione di
rifornimento. Il tappo è dotato di incastro
a baionetta. Vericare che sia correttamente
inserito e in posizione prima di girare il rubinetto
lentamente in posizione aperta.
i. Vericare l'assenza di qualunque perdita di
carburante dal sistema di carburazione. Non
cercare di azionare il motore in caso di sospetta
perdita di carburante. Qualunque perdita di
carburante deve essere riparata da un tecnico
qualicato.
j. Rispettare tutte le normative nazionali e/o
locali riguardo l'uso e la conservazione di
prodotti contenenti benzina. Tutti i regolamenti
locali devono essere rispettati.
INDICAZIONI SANITARIE
ATTENZIONE: Durante l'utilizzo
dell'utensile, si produrranno particelle di polvere.
In alcune circostanze, a seconda del materiale sul
quale si sta lavorando, tali polveri possono risultare

www.evolutionpowertools.com
125
particolarmente dannose. Si consiglia di tenere in
considerazione i pericoli associati ai materiali sui
quali si opera e di ridurre il rischio di esposizione.
Data la potenziale pericolosità delle polveri
prodotte da alcuni materiali, si raccomanda di
usare una mascherina certicata per naso e bocca
dotata di ltri sostituibili durante l'utilizzo di questo
apparecchio.
È sempre necessario:
• Lavorare in un'area ben ventilata.
• Lavorare con materiale di sicurezza approvato,
come maschere antipolvere specicamente
progettate per ltrare particelle microscopiche.
ATTENZIONE: il funzionamento
di qualunque utensile elettrico può comportare
l'eventualità che un oggetto estraneo sia scagliato
verso gli occhi, causando lesioni oculari gravi. Prima
di iniziare a utilizzare un utensile elettrico, indossare
sempre occhiali di protezione o occhiali di sicurezza
con protezioni laterali o una maschera facciale
completa quando necessario.
ATTENZIONE: In caso vi siano delle
parti mancanti, non mettere in funzione il
proprio apparecchio n quando esse non siano
state sostituite. Il mancato rispetto della presente
regola può comportare gravi lesioni.
REGOLE DI SICUREZZA SUPPLEMENTARI
PER IL COMPATTATORE H320
a. Recintare l'area di lavoro. Passanti e personale
non autorizzato devono essere tenuti a distanza di
sicurezza dalle operazioni di compattamento.
b. Accertarsi del tutto di essere capaci di
spegnere l'utensile. Qualora si verichino
imprevisti o dicoltà durante le operazioni di
compattamento, è importante essere in grado
di eseguire uno spegnimento di emergenza
dell'apparecchio.
c. Non lasciare mai l'H320 in funzione e senza
custodia. L'utensile produrrà vibrazioni non
appena avviato, e inizierà anche a muoversi in
avanti. L'utensile deve essere spento se lasciato
privo di custodia.
d. Spegnere sempre (o) l'utensile prima
di spostarlo sul posto di lavoro. Durante lo
spostamento o il trasporto dell'utensile, il motore
deve essere spento e preferibilmente freddo, con il
rubinetto del carburante in posizione chiusa (o).
e. Dato che il motore dello H320 si scalderà
durante l'uso, assicurarsi di non toccarlo e non
consentire a materiali combustibili o indumenti
di entrarvi in contatto. Toccare o riparare il motore
esclusivamente quando è freddo.
f. Non rimuovere, modicare o manomettere
in alcun caso le protezioni dell'utensile. Le
protezioni sono appositamente progettate e
installate per fornire il grado massimo di tutela
dell'operatore durante il funzionamento. Qualora
una protezione sia mancante o danneggiata, non
utilizzare l'utensile n quando essa non sia stata
riparata o sostituita da un tecnico qualicato.
g. Prestare particolarmente attenzione quando
si lavora su una supercie scoscesa. Lavorare
andando verso l'alto o verso il basso della supercie
scoscesa e mai trasversalmente.
h. Nel caso in cui ci siano diversi strati da
dover compattare l'uno sull'altro, eettuare
la compattazione di uno strato alla volta. Ciò
preserverà l'integrità di ogni strato.
i. Passare l'H320 sulla supercie di lavoro
secondo uno schema organizzato no a che non
sia raggiunto il tipo di compattazione richiesta.
Ciò assicura che siano rispettate le pratiche
lavorative più sicure.
j. Eseguire sempre i controlli preventivi di
sicurezza prima di intraprendere l'utilizzo.
Seguire le indicazioni nelle sezioni successive del
manuale.
DPI (Dispositivi di Protezione Individuale)
Avvertenza: Qualora si utilizzi l'apparecchio in
cantiere, è importante che l'operatore si adegui
a tutte le regole/normative in vigore sul posto.
Consultare il caposquadra o il responsabile per
dettagli.
a. Indossare vestiario adeguato. Ciò potrebbe
includere una tuta integrale, una copertura
imbottita e una giacca ad alta visibilità, ecc.
b. Indossare calzature adeguate. Si
raccomandano scarpe antinfortunistiche con punta
rinforzata in acciaio e suola antisdrucciolo.
c. Indossare occhiali di sicurezza adeguati. Si
raccomanda una protezione facciale integrale o
occhiali di sicurezza con protezioni laterali che
orano riparo da detriti scagliati in aria.

www.evolutionpowertools.com
126
d. Proteggere l'udito. Indossare protezioni
acustiche adeguate.
e. Indossare guanti adeguati. Si raccomandano
guanti a elevata presa.
f. Indossare protezioni per le vie respiratorie.
Si raccomanda l'utilizzo di una maschera con ltri
sostituibili che fornisca protezione dalle polveri,
bre e vapori tossici.
g. Indossare un casco di sicurezza. L'uso di un
casco di sicurezza può essere obbligatorio sui
cantieri per difendere l'operatore da potenziali
pericoli sospesi.
TRASPORTO SU RUOTE
ATTENZIONE: Il presente utensile
richiede almeno due persone per essere
sollevato.
Preparare preventivamente il veicolo per il
trasporto in maniera tale che sia pronto ad
accogliere l'utensile. Prestare grande attenzione
a garantire che l'utensile non cada durante le
operazioni di carico/scarico.
• Sebbene compatto, il presente utensile è
pesante. Per ridurre il rischio di infortuni,
richiedere un aiuto adeguato ogni volta sia
necessario sollevare l'apparecchio.
• Per ridurre il rischio di infortuni alla schiena,
tenere l'utensile vicino al proprio corpo quando
lo si solleva. Piegare le ginocchia in maniera
da sollevare il peso con le proprie gambe, non
con la schiena. Sollevare l'utensile aerrandolo
dalle parti più comode della struttura principale
esterna.
• Sollevare l'utensile sul veicolo e ancorarlo in
piano con cavi adeguati, ssaggi a chiusura ecc.
in maniera tale che esso non si possa muovere
durante il trasporto.
Avvertenza: H320-P: L'assenza di carburante nel
serbatoio dell'utensile durante il suo trasporto
rappresenta la soluzione migliore e più sicura.
DESTINAZIONE D'USO DELL'ELETTROUTENSILE
ATTENZIONE: Il presente prodotto
è un compattatore a piastra ed è stato
progettato per essere usato in abbinamento
a specici accessori Evolution. Utilizzare
esclusivamente accessori progettati per l'utilizzo
sul presente apparecchio e/o quelli espressamente
raccomandati da Evolution Power Tools Ltd.
L'utensile può essere utilizzato per compattare
misto granulare, piccoli aggregati, terriccio, sabbia,
materiale di scavo ecc. Se equipaggiato con una
piastra da pavimentazione, il compattatore H320
può esser usato per compattare e stabilizzare la
maggior parte dei tipi di pavimenti.
Utilità della compattazione
Terreni accidentati, pannellature, massetti o
asfaltature presenteranno piccole sacche d'aria
e vuoti al loro interno che, qualora non siano
compattati, possono portare a possibili problemi in
corso d'opera.
• Quando un carico esercita pressione su un'area
non compattata, il suo peso comprime il
materiale sottostante. Questo può portare a
cedimenti della supercie, dato che il materiale
si sposta verso il basso per colmare i vuoti.
• Un carico statico (una casa, un garage ecc)
costruito su un terreno non compattato può
subire cedimenti verso il basso dato che il
materiale sottostante si assesta.
• L'acqua che permea attraverso materiali
che contengono sacche d'aria o vuoti si
può accumulare in tali spazi ed espandersi
in seguito, ghiacciandosi per il freddo e
contraendosi nuovamente in momenti di
caldo/secco. Espansione e contrazione sono
i fattori maggiormente responsabili del
danneggiamento delle fondamenta degli
edici, e possono portare questi ultimi ad avere
necessità di sostegni strutturali.
La compattazione accresce la densità del materiale
e pertanto la sua capacità di resistenza a carichi
statici e dinamici. Eliminando sacche d'aria e piccoli
vuoti si riduce le possibilità di concentrazione di
acqua inltrata e di seguenti cedimenti dovuti
all'espansione/contrazione del materiale.
USO NON CONSENTITO DELL'ELETTROUTENSILE
ATTENZIONE: Il presente prodotto è
un compattatore a piastra e deve essere
utilizzato esclusivamente come tale. Esso non

www.evolutionpowertools.com
127
deve in alcun modo essere modicato, o utilizzato
per alimentare qualunque altro apparecchio o
manovrare un qualunque accessorio dierente
da quelli identicati nel presente manuale di
istruzioni.
ATTENZIONE: Il presente utensile non
è progettato per essere impiegato da
persone (bambini inclusi) con capacità siche,
sensoriali o mentali ridotte, o da utenti privi di
esperienza e conoscenza, a meno che essi non
siano supervisionati o istruiti circa il suo utilizzo
in sicurezza da un responsabile competente in tal
senso.
Si consiglia di controllare che i bambini non
abbiano accesso al presente utensile e che non
abbiano la possibilità di giocarci.
SICUREZZA ELETTRICA – H320-E
LA SPINA DI ALIMENTAZIONE
Il presente prodotto è dotato del corretto
modello di spina elettrica per il relativo mercato
di vendita. La spina soddisfa i requisiti degli
standard internazionali e deve essere collegata
a un voltaggio elettrico corrispondente a quello
indicato sull'etichetta descrittiva. Qualora spina
o cavo di alimentazione siano danneggiati,
essi devono essere sostituiti da un ricambio
unico e completo dei due componenti, identico
all'originale. Rispettare i requisiti relativi
all'erogazione dell'alimentazione elettrica adeguati
al Paese in cui si risiede. In caso di dubbio,
consultare un elettricista qualicato.
Le spine di tipo BS possono essere utilizzate
esclusivamente nel Regno Unito. La spina deve
essere inserita in una presa di corrente al coperto
per ottemperare al necessario grado di protezione
IP. La spina deve essere integrata in un cavo di
alimentazione di lunghezza maggiore ai 10 m.
USO ALL'APERTO – H320-E
ATTENZIONE: Per la propria sicurezza,
qualora il presente apparecchio
sia utilizzato all'aperto, esso non deve essere
esposto alla pioggia o impiegato in ambienti
umidi. Per una protezione supplementare,
utilizzare un interruttore dierenziale (R.C.D.) che
interrompa l'alimentazione qualora la dispersione
di corrente a terra superi i 30 mA per 30 ms.
Vericare sempre il funzionamento dell'interruttore
dierenziale (R.C.D.) prima di utilizzare l'utensile.
Qualora sia necessario un cavo di prolunga, esso
deve essere di tipo idoneo all'utilizzo esterno e
contrassegnato di conseguenza.
Quando si utilizza un cavo di prolunga, devono
essere rispettate le istruzioni del produttore.
VIBRAZIONI
ATTENZIONE: Durante l'utilizzo del presente
utensile, l'operatore può essere esposto a un
alto livello di vibrazioni trasmesse al braccio
e alla mano. L'operatore potrebbe sviluppare
la sindrome del dito bianco da vibrazione
(sindrome di Raynaud). Tale patologia può
ridurre la sensibilità della mano alla temperatura
e provocare un intorpidimento generale. Coloro
che utilizzano su base regolare e in maniera
prolungata nel tempo un compattatore devono
monitorare attentamente la condizione delle
proprie mani e dita. Qualora si manifestassero
con evidenza uno o più sintomi, consultare
immediatamente un medico.
• La misurazione e la valutazione dell'esposizione
alle vibrazioni trasmesse all'arto sul posto di
lavoro è contemplata nelle normative:
BS EN ISO 5349-1:2001 e
BS EN ISO 5349-2:2002
• Numerosi fattori possono inuenzare il livello
reale delle vibrazioni durante il funzionamento,
come ad esempio la condizione e
l'orientamento della supercie di lavoro e il tipo
e lo stato dell'apparecchio in uso. Tali fattori
devono essere valutati prima di ogni utilizzo,
e, laddove possibile, devono essere messe in
atto le idonee pratiche lavorative. La buona
gestione dei seguenti fattori può concorrere a
ridurre gli eetti delle vibrazioni:
Gestione
• Maneggiare l'utensile con cura,
consentendogli di eettuare il proprio
lavoro.
• Evitare di usare eccessiva forza sica sui
controlli dell'utensile.

www.evolutionpowertools.com
128
• Considerare la propria sicurezza ed
equilibrio, e l'orientamento dell'utensile
durante l'uso.
Supercie di lavoro
• Esaminare il materiale della supercie di
lavoro;
la sua condizione, densità, resistenza,
rigidità e orientamento.
SIMBOLI E ETICHETTE
ATTENZIONE: Non mettere in funzione
il presente apparecchio qualora le etichette
di sicurezza e/o istruzioni risultino mancanti o
danneggiate. Contattare Evolution Power Tools per
le etichette sostitutive.
Avvertenza: Tutti o alcuni dei seguenti simboli
possono essere presenti nel manuale o sul
prodotto.
Volt
V
Ampere
A
Velocità
min
-1
(RPM)
Corrente alternata
~
Livello potenza acustica
Leggere il manuale
Indossare protezioni
acustiche
Indossare protezioni per
gli occhi
Indossare protezioni
antipolvere
Attenzione
ATTENZIONE: Scarico
rovente. Non toccare
ROVENTE! Non toccare
HOT!
Supercie rovente
Certicazione CE
Certicazione UKCA
Marchio Intertek
Rischio grave per l'incolumità
Rischio di danni ambientali
Smaltimento di
apparecchiature elettriche
ed elettroniche
Olio motore 10/30W
Starter aperto
Starter chiuso
ATTENZIONE: Questo è un
motore a 4 tempi.
Rifornire esclusivamente a
benzina.
Non rifornire con
carburante diesel.
ESCLUSIVAMENTE
BENZINA SENZA PIOMBO!*
ALTAMENTE INFIAMMABILE.
*E5 ed E10
Consentire al motore di
rareddarsi prima di aprire il
tappo del carburante. Il vapore
è estremamente inammabile
e può prendere fuoco a
contatto con una supercie
bollente o amme.

www.evolutionpowertools.com
129

www.evolutionpowertools.com
130
1. PIASTRA VIBRANTE
2. SERBATOIO
3. INTERRUTTORE AVVIAMENTO MOTORE ON/OFF
4. LEVA ACCELERATORE
5. CONTROLLO STARTER
6. AVVIAMENTO A STRAPPO
7. RUBINETTO SERBATOIO
8. STANGHETTA/RIEMPIMENTO OLIO MOTORE
9. FILTRO DELL'ARIA
10. CANDELA D'ACCENSIONE
11. SCARICO
12. TAPPO DI SCARICO OLIO MOTORE
13. VITE DI REGOLAZIONE RAPIDA
14. PROTEZIONE CINGHIA
15. PRESA ANTI VIBRAZIONI
16. CONSERVAZIONE DEGLI STRUMENTI IN DOTAZIONE
(1)
(14)
(2)
(7)
(5)
(9)
(4)
(13)
(6)
(3)
(8)
(12)
(15)
(16)
(11)
(10)
PANORAMICA DELL'UTENSILE H320-P

www.evolutionpowertools.com
131
PANORAMICA DELL'UTENSILE H320-E
1. PIASTRA VIBRANTE
2. TRAVERSA/AVVOLGI CAVO
3. INTERRUTTORE DI SICUREZZA ON/OFF
4. PRESA ANTI VIBRAZIONI
5. SEZIONE SUPERIORE - IMPUGNATURA
6. SEZIONE MEDIANA - IMPUGNATURA
7. FERMI PASSACAVO
(1)
(2)
(3)
(4)
(5)
(6)
(7)

www.evolutionpowertools.com
132
GUIDA INTRODUTTIVA
DISIMBALLAGGIO
Attenzione: Il pacco contiene oggetti taglienti.
Prestare attenzione durante l'apertura. Per
sollevare, montare e spostare il presente
apparecchio possono essere necessarie due
persone. Rimuovere l'apparecchio insieme
agli accessori inclusi nell'imballo. Controllare
attentamente che l'apparecchio sia in buone
condizioni e vericare che siano presenti tutti gli
accessori elencati nel presente manuale. Accertarsi
inoltre che tutti gli accessori siano completi
in ogni loro parte. Qualora si riscontrino parti
mancanti, l'apparecchio e i suoi accessori devono
essere restituiti al rivenditore insieme all'imballo
originale. Non gettare via l'imballo. Conservarlo
intatto per la durata del periodo di garanzia.
Smaltire il materiale d'imballaggio in maniera
eco-responsabile. Riciclare laddove possibile. Non
consentire ai bambini di giocare con le buste di
plastica vuote a causa del rischio di soocamento.
COMPONENTI IN DOTAZIONE -
COMPATTATORE H320-P
DESCRIZIONE QUANTITÀ
Manuale di istruzioni 1
Prolunga impugnatura mediana 1
Prolunga impugnatura
superiore
1
Attacco impugnatura mediana
20 x viti M10
4
Attacco impugnatura
superiore
15 x viti M10
4
Rondelle impugnatura superiore 4
Chiave a brugola 8 mm 1
Chiave a tubo per candela
d'accensione e traversino
1
Olio motore (bottiglia 400 ml) 1
COMPONENTI IN DOTAZIONE -
COMPATTATORE H320-E
DESCRIZIONE QUANTITÀ
Manuale di istruzioni 1
40 x viti M10 per attacco
impugnatura (lunghe)
2
15 x viti M10 per attacco
impugnatura (corte)
2
Rondelle per impugnatura 4
Impugnatura mediana 1
Impugnatura superiore 1
Chiave a brugola 8 mm 1
Impugnatura trasversale/avvolgi
cavo
1
Accessori supplementari
In aggiunta ai componenti standard forniti
unitamente all'apparecchio, sono disponibili sul
negozio online di Evolution anche i seguenti
accessori,
all'indirizzo www.evolutionpowertools.com o
tramite il proprio rivenditore locale.
DESCRIZIONE PARTE N
Piastra da pavimentazione
H320
Piastra da
pavimentazione
015-0007

www.evolutionpowertools.com
133
Fig. 2
Fig. 1
MONTAGGIO
Il tuo Evolution H320 richiede un montaggio minimo prima
dell'uso. Qualora si disponga della versione a benzina,
concludere tutte le operazioni di montaggio prima di
versare nel motore 0,4 l dell'olio motore raccomandato.
1. Collegare l'estensione dell'impugnatura - H320-P
Avvertenza: L'estensione dell'impugnatura dispone di una
presa antivibrazioni che aiuta l'operatore nella gestione
delle vibrazioni trasmesse dall'utensile alla mano/braccio
dell'operatore. L'estensione dell'impugnatura dovrebbe
essere inserita per scopi operativi, ma può essere ripiegata,
durante il trasporto o l'immagazzinamento. Rimuovendo le
quattro viti ad alette sul fondo e allentando le due presenti
sulla sommità, si consente all'estensione di ripiegarsi in
avanti per facilitare il trasporto.
• Far scorrere con cautela la sezione dell'impugnatura
mediana sulle due stae inferiori e allineare i quattro fori
sull'impugnatura mediana con i quattro fori lettati situati
sulle stae inferiori.
•
Inserire quattro delle 20 viti M10 attraverso l'impugnatura
mediana e le stae dell'impugnatura superiore.(Fig. 2)
• Serrare fermamente tutte e quattro le viti utilizzando la
chiave a brugola.
2. Montare/collegare l'impugnatura - H320-E
Avvertenza: L'impugnatura dell'H320-E è composta da
quattro (4) parti principali:
• Impugnatura inferiore (montata in fabbrica
sull'utensile).
• Sezione mediana.
• Sezione superiore con interruttore di sicurezza On/O.
• Traversa/avvolgi cavo.
Le due viti lunghe sono impiegate per attaccare la traversa/
avvolgi cavo e la sezione mediana dell'impugnatura alla
parte inferiore girevole.
• Posizionare con attenzione la traversa avvolgi cavo nella
sua posizione operativa.
Avvertenza: I poli del cavo devono essere rivolti
all'indietro.
• Prestando attenzione, far scivolare la sezione mediana
sopra l'impugnatura inferiore e allineare i fori.
• Tra la vite e le impugnature deve essere utilizzata una
rondella. (Fig. 1)
• Inserire le viti lunghe nei fori della sezione mediana,
attraverso quelli nell'impugnatura inferiore, e serrarle
nei dadi di innesto nella traversa/avvolgi cavo. (Fig. 3)
• Serrare fermamente tali viti utilizzando la chiave a
brugola.
Fig. 3

www.evolutionpowertools.com
134
Le due viti corte servono per attaccare la sezione superiore
dell'impugnatura a quella mediana.
• Prestando attenzione, far scivolare la sezione superiore
al di sopra di quella mediana e allineare i fori.
• Inserire le viti attraverso la sezione superiore e serrarle
nei dadi di innesto presenti sulla sezione mediana.
L'H320-E ha in dotazione 3 fermi per cavo in modo da
disporre in maniera sicura il cavo di alimentazione sul
telaio dell'impugnatura. È necessario installarli. Il mancato
rispetto di tale istruzione annullerà la garanzia. Posizionarli
sul medesimo lato del pulsante di alimentazione e
distanziarli come mostrato nelle (Fig.4a e 4b)
ATTENZIONE: Prestare attenzione che il cavo
di alimentazione dall'interruttore di sicurezza no al
motore rimanga libero e non impigliato durante il processo
di montaggio.
Rifornimento iniziale e controllo del livello dell'olio –
H320-P
ATTENZIONE: Il presente utensile non è fornito
provvisto di olio motore. Non compiere tentativi di
accensione motore nché il carter non sia riempito no al
corretto livello dall'adeguato tipo di olio.
Avvertenza: L'olio (in dotazione) deve essere versato
nell'utensile attraverso il tappo di riempimento/
rabbocco dell'olio. La capacità dell'olio è di circa 0,4
litri di olio automobilistico 10W 30 (disponibile presso
tutti gli autoricambi e la maggior parte delle stazioni di
rifornimento). Per alcune zone geograche dai climi rigidi
potrebbe essere preferibile una gradazione diversa di olio -
Consultare il proprio fornitore.
Il tappo di riempimento/rabbocco dell'olio si svita dal corpo
motore ed è dotato di stanghetta per la misurazione del
livello dell'olio. (Fig. 5) Fare attenzione a non versare olio.
Avvertenza: Quando si verica il livello dell'olio, è
importante che l'utensile poggi su una supercie in piano,
orizzontale e dritta con il motore fermo e freddo.
Sulla stanghetta di misurazione sono presenti due
indicatori.
Il livello dell'olio deve essere mantenuto presso o nelle
vicinanze del
segno superiore di indicazione.
Fig. 5
Fig. 4a
Fig. 4b

www.evolutionpowertools.com
135
• Rimuovere il tappo di riempimento/rabbocco dell'olio e
asciugare la stanghetta con un panno asciutto e pulito.
• Versare la necessaria quantità d'olio.
(approssimativamente 0,4 l)
• Consentire all'olio di stabilizzarsi per 10+ secondi.
• Vericare il livello dell'olio attraverso l'orizio di
riempimento. Il livello dell'olio dovrebbe essere
prossimo alla parte superiore della lettatura interna, e
l'olio dovrebbe quasi fuoriuscire dal carter (per questo
l'utensile deve poggiare su una supercie orizzontale).
• Inserire la stanghetta e avvitare del tutto il tappo in
sede. Svitare il tappo e slare la stanghetta. Controllare a
vista il
livello dell'olio sulla stanghetta.
• Aggiungere quanto necessario.
• Quando il livello è corretto, avvitare saldamente il tappo
di riempimento/rabbocco dell'olio sul corpo motore.
Avvertenza: Sostituire l'olio secondo il prospetto di
manutenzione riepilogativo (Fare riferimento anche a
MANUTENZIONE - Sostituzione olio motore)
Veriche pre-attivazione
Avvertenza: Prima di ogni utilizzo l'utensile dovrebbe
essere ispezionato per essere certi che tutte le funzioni di
sicurezza siano correttamente operative.
• Controllare che tutte le protezioni siano in sede e che
non presentino danni.
• H320-E – Vericare l'integrità del cavo e della spina di
alimentazione. Qualora il cavo di alimentazione o la
spina siano in alcun modo danneggiati, essi devono
essere sostituiti con ricambi originali identici da un
tecnico qualicato.
• H320-P - Vericare tutti gli attacchi della carburazione,
giunti e tappi di riempimento ecc. per rilevare eventuali
perdite di uidi. Qualunque perdita rilevata deve essere
riparata prima di intraprendere l'attività.
• Vericare il livello dell'olio motore e regolarlo se
necessario.
• Vericare il livello del carburante e regolarlo se
necessario.
• Ispezionare approfonditamente il resto dell'utensile per
rilevare eventuali danni, in particolare a rivestimenti,
protezioni, componenti in gomma ecc.
Avvio dell'H320-P
• Riempire il serbatoio con la benzina. Il ltro di
riempimento del serbatoio dispone di un inserto
Fig. 6
Fig. 7
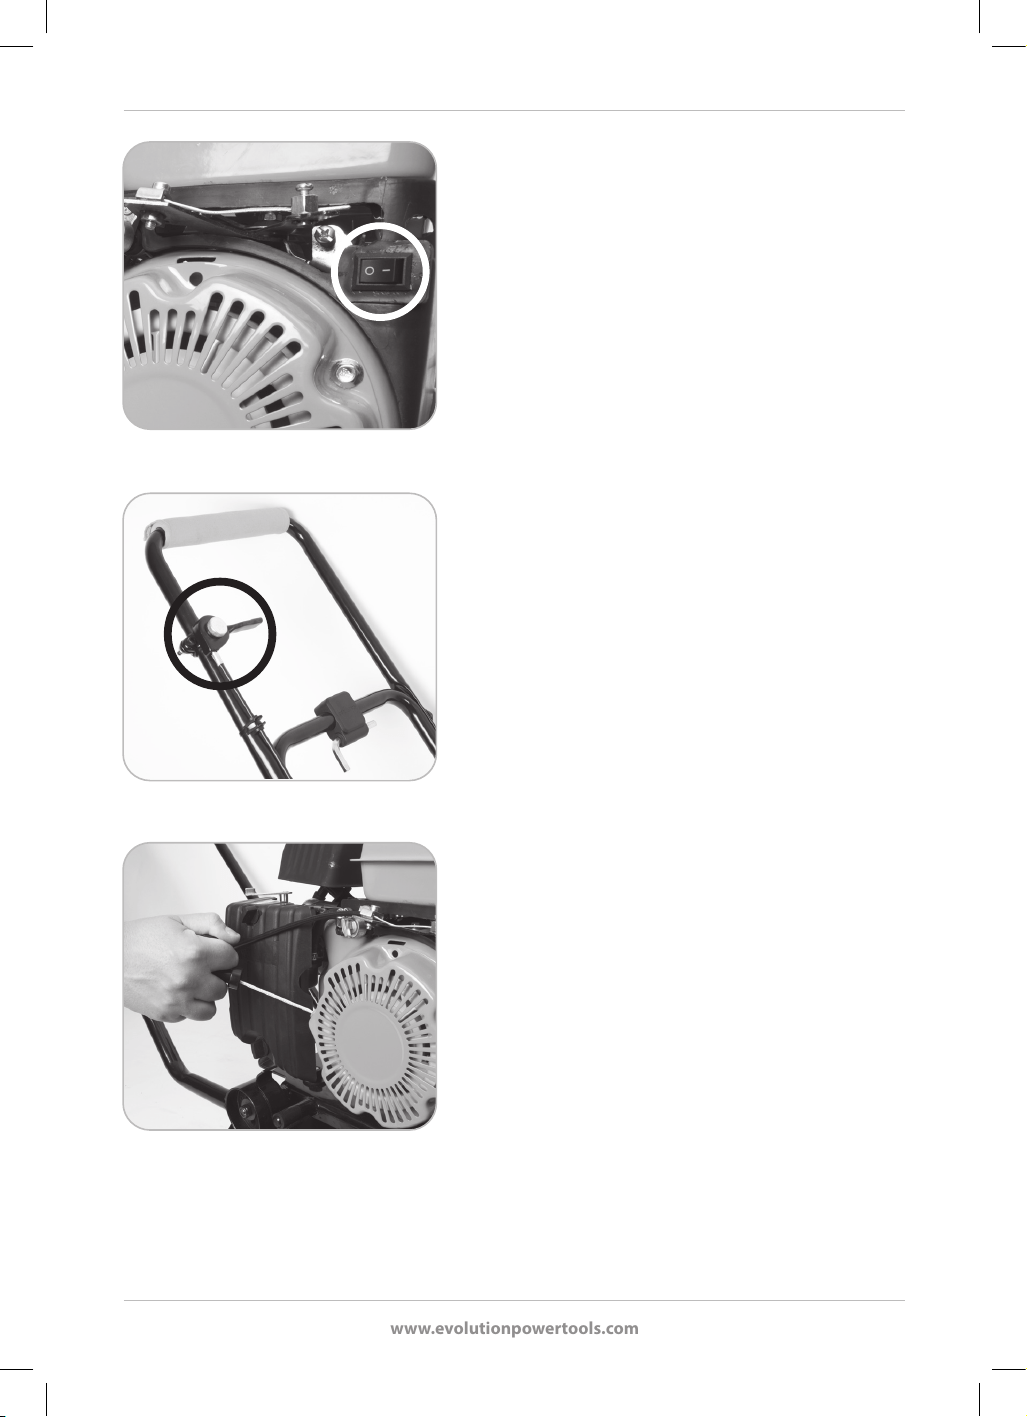
www.evolutionpowertools.com
136
in plastica rossa che segnala il livello massimo di
carburante. Non oltrepassare tale indicazione con il
quantitativo di carburante.
• Posizionare la leva del rubinetto carburante in posizione
On. (Fig. 6)
• Spostare la levetta dello starter sulla posizione di avvio
"Choke On". (Fig. 7)
• Premere il commutatore di avviamento motore
portandolo in posizione ON (I). (Fig. 8)
• Portare al massimo la leva dell'acceleratore. (Fig.9)
• Controllare l'H320 aerrando l'impugnatura di manovra
in un punto comodo.
• Con l'altra mano, aerrare la maniglietta del cavo
dell'avviamento a strappo. (Fig. 10)
• Tirare lentamente il cavo dell'avviamento a strappo
no a che non si avverte una resistenza che indichi
l'ingaggio del meccanismo di avviamento.
• Quando si avverte tale resistenza, tirare il cavo con
decisione.
• Ripetere tale procedura no a che non si avvia il motore.
• L'unità motore può girare (hunt) per un breve periodo
di tempo no a quando il motore ha raggiunto la
temperatura.
• Di norma lo starter può essere riposizionato sulla
posizione "o"’ subito dopo l'accensione del motore,
ma ciò dipende anche dalla temperatura ambientale,
dalle condizioni di lavoro ecc. e l'operatore dovrà quindi
valutare a propria discrezione.
• In alcune circostanze, lo starter può essere necessario
anche quando il motore è ancora caldo per un
precedente ciclo di funzionamento. Qualora si
riscontrino dicoltà nell'avviare un motore già caldo:
• Spostare la levetta dello starter sulla posizione "on"
(destra).
• Tirare l'avviamento a strappo una volta.
• Riportare la levetta dello starter sulla posizione "o"
(sinistra).
• Tirare l'avviamento a strappo nché il motore non
parta.
• Avvertenza: L'H320-P comincerà a vibrare e a muoversi
appena il motore è avviato. L'operatore dovrà garantire
la dovuta responsabilità ad utensile avviato.
Arresto del motore H320-P
• Premere il commutatore di avviamento motore
portandolo in posizione OFF (0).
• Chiudere il rubinetto carburante.
Fig. 8
Fig. 9
Fig. 10

www.evolutionpowertools.com
137
Corsa dell'utensile – H320-P
Avvertenza: Regolare la velocità del motore altera la
frequenza delle vibrazioni e anche la velocità di moto in
avanti dell'utensile.
Avvertenza: La vite rapida limita lo spostamento
massimo della leva dell'acceleratore e quindi controlla
esclusivamente la massima velocità del motore.
Qualora sia necessario modicare la velocità massima
del motore per aumentare o diminuire la velocità di
spostamento del compattatore:
• Girare la vite rapida (Fig. 11) un po' alla volta (massimo
di mezzo giro) in senso orario per diminuire la velocità
del motore, o in senso antiorario per aumentarne la
velocità.
• Accertarsi che la leva dell'acceleratore sia impostata al
massimo.
• Avviare l'utensile e vericarne la capacità di
spostamento con la nuova impostazione della vite
rapida.
• Qualora necessario, fermare l'utensile e regolare
ulteriormente la vite rapida per raggiungere la velocità
di spostamento desiderata.
Avvio e arresto dell'H320-E
L'H320-E è equipaggiato con un interruttore di avviamento
di sicurezza On/O. Il dispositivo di blocco sicuro evita che
la leva dell'interruttore possa essere azionata ntanto che il
pulsante di blocco è inserito.
• Premere il pulsante di blocco sicuro (a) e tirare la leva
dell'interruttore (b) per avviare l'utensile. (Fig. 12)
• Rilasciare la leva dell'interruttore per spegnere l'utensile.
Avvertenza: Appena rilasciata la leva dell'interruttore, il
motore si fermerà e il pulsante di blocco sicuro ritornerà
automaticamente nella modalità sicura.
ATTENZIONE: L'operatore deve sempre
essere consapevole del percorso del cavo di
alimentazione per accertarsi che non costituisca rischio
di inciampo o di altro pericolo, o che non sia "calpestato"
dall'utensile stesso.
INDICAZIONI GENERICHE DI UTILIZZO
• Assicurarsi che i presenti siano tenuti a distanza di
Fig. 11
Fig. 12
(a)
(b)

www.evolutionpowertools.com
138
sicurezza dalle operazioni di compattamento. Qualora
necessario, recintare l'area di lavoro e aggere avvisi di
ATTENZIONE.
• Pianicare il lavoro e il percorso che si intende far
compiere all'utensile prima di iniziare le procedure di
compattamento.
• Ispezionare l'area da trattare prima di iniziare,
rimuovendo o neutralizzando in altra maniera
qualunque ostacolo/ostruzione che possa costituire
pericolo.
• Accertarsi di avere a disposizione tutti gli adeguati DPI e
di sapere come utilizzarli.
• Il compattatore si muoverà in avanti in maniera
autonoma. Sono sucienti delicati indirizzamenti da
parte dell'operatore sull'impugnatura dell'utensile per
manovrarlo. L'operatore deve aerrare con entrambe le
mani l'impugnatura antivibrazioni. Le mani dovrebbero
essere poste alla massima distanza possibile una
dall'altra.
• Possono rendersi necessari diversi passaggi sull'area
di lavoro per compattare il materiale no alla densità
desiderata.
• Se l'area di lavoro è scoscesa, operare andando
verso l'alto o verso il basso della supercie e non
trasversalmente
MANUTENZIONE
H320-P
Una manutenzione su base regolare è essenziale per
mantenere l'utensile e i suoi accessori in condizioni di
funzionamento. Si raccomanda che soltanto operatori
competenti, con esperienza nella manutenzione e
riparazione di motori a benzina, si cimentino nelle seguenti
procedure. Nel caso di dubbi, adarsi a un centro di
assistenza autorizzato Evolution.
1. Sostituzione dell'olio motore
L'olio del motore dovrebbe essere sostituito dopo l'iniziale
periodo di rodaggio e agli intervalli specicati
nel prospetto di assistenza.
Avvertenza: L'olio del motore è più facile da cambiare
quando il motore è stato portato a temperatura e l'olio è
caldo.
• Accertarsi che il motore sia posizionato su una
supercie rigida orizzontale.
• Rimuovere il tappo di riempimento/rabbocco olio. (Fig.
Fig. 13
Fig. 14

www.evolutionpowertools.com
139
Fig. 15
13)
• Posizionare un'adeguata vaschetta di raccolta dell'olio
sotto il motore.
• Rimuovere il tappo di scarico dell'olio in maniera tale
che l'olio possa spurgare completamente dal motore.
(Fig. 14)
ATTENZIONE: Prestare attenzione. Il
contatto con l'olio esausto del motore può essere
pericoloso. L'olio potrebbe essere molto caldo (rischio
di ustione) e alcuni operatori potrebbero avere una
reazione allergica nel caso l'olio contamini la pelle
esposta. L'operatore dovrebbe prendere in considerazione
l'eventualità di indossare guanti protettivi da meccanico, se
disponibili. La pelle contaminata dall'olio deve essere lavata
il prima possibile con sapone e con abbondante acqua
fresca.
• Controllare il tappo di scarico dell'olio e la sua
guarnizione.
• Controllare il tappo di riempimento dell'olio e la sua
guarnizione ad anello.
• Sostituire ogni componente non riparabile.
• Reinserire il tappo di scarico dell'olio e stringere
saldamente.
• Rifornire il motore con il tipo corretto e la quantità
adeguata di olio.
• Reinserire il tappo di riempimento olio.
• Vericare eventuali perdite e fuoriuscite, e intervenire
come necessario.
Avvertenza: L'olio esausto del motore deve essere smaltito
in maniera ecologicamente sicura. Identicare tramite la
propria autorità locale competente l'impianto di riciclo più
vicino.
2. Candela d'accensione - Controllo e sostituzione
Dopo circa 50 ore di funzionamento, la candela dovrebbe
essere rimossa per il controllo, la pulizia e la ricollocazione.
Per rimuovere e reinstallare la candela d'accensione:
• Accertarsi che il motore sia spento (OFF) e che anche il
rubinetto carburante sia in posizione OFF.
ATTENZIONE: Prima di intraprendere l'operazione
di rimozione della candela, il motore deve essere
freddo.
• Slare i cavetti d'accensione dalla candela.

www.evolutionpowertools.com
140
• Usando una chiave per candele (in dotazione),
rimuovere la candela. (Fig. 15)
Una candela riparabile in buone condizioni dovrebbe
mostrare un deposito marrone chiaro sulla punta.
Rimuovere tale accumulo con una spazzola rigida dalle
setole ottonate.
• Vericare la spaziatura tra gli elettrodi tramite un set di
spessimetri.
• Regolare come necessario. La spaziatura è indicata in
"Speciche H320-P".
• Reinstallare la candela d'accensione. Fare attenzione che
essa si innesti correttamente nella lettatura della testa
cilindrica.
• Stringere a mano la candela usando la chiave per
candele in dotazione.
• Far scorrere il traversino in dotazione nel foro
sull'estremità della chiave per candele.
• Posizionare il traversino in maniera tale che sporga
in egual lunghezza su entrambi i lati della chiave per
candele.
• Inne, renderla a tenuta di gas girando la chiave per
candele per ¼ - ½ giro. Questa frazione nale di giro
frantumerà la rondella, rendendo la guarnizione a
tenuta di gas. Non serrare eccessivamente la candela.
• Ricollegare i cavetti di accensione sopra la candela.
3. Filtro dell'aria
ATTENZIONE: In nessuna circostanza tenere in
funzione il motore senza ltro dell'aria inserito.
Dopo circa 50 ore di utilizzo, le condizioni del ltro dell'aria
devono essere vericate.
Avvertenza: Il ltro dell'aria può richiedere veriche
di maggior frequenza qualora si lavori in ambienti
particolarmente polverosi.
Per rimuoverlo:
• Accertarsi che il motore sia spento (OFF) e che anche
il rubinetto carburante sia in posizione OFF. Il motore
deve essere freddo.
• Svitare il dado a farfalla dalla copertura
dell'alloggiamento del ltro dell'aria e rimuoverlo. (Fig.
16)
• Conservare attentamente questi componenti per la
successiva reinstallazione.
• Rimuovere il ltro dell'aria dall'alloggiamento per
esaminarlo. (Fig. 17) Se la parte in carta del ltro
Fig. 16
Fig. 17
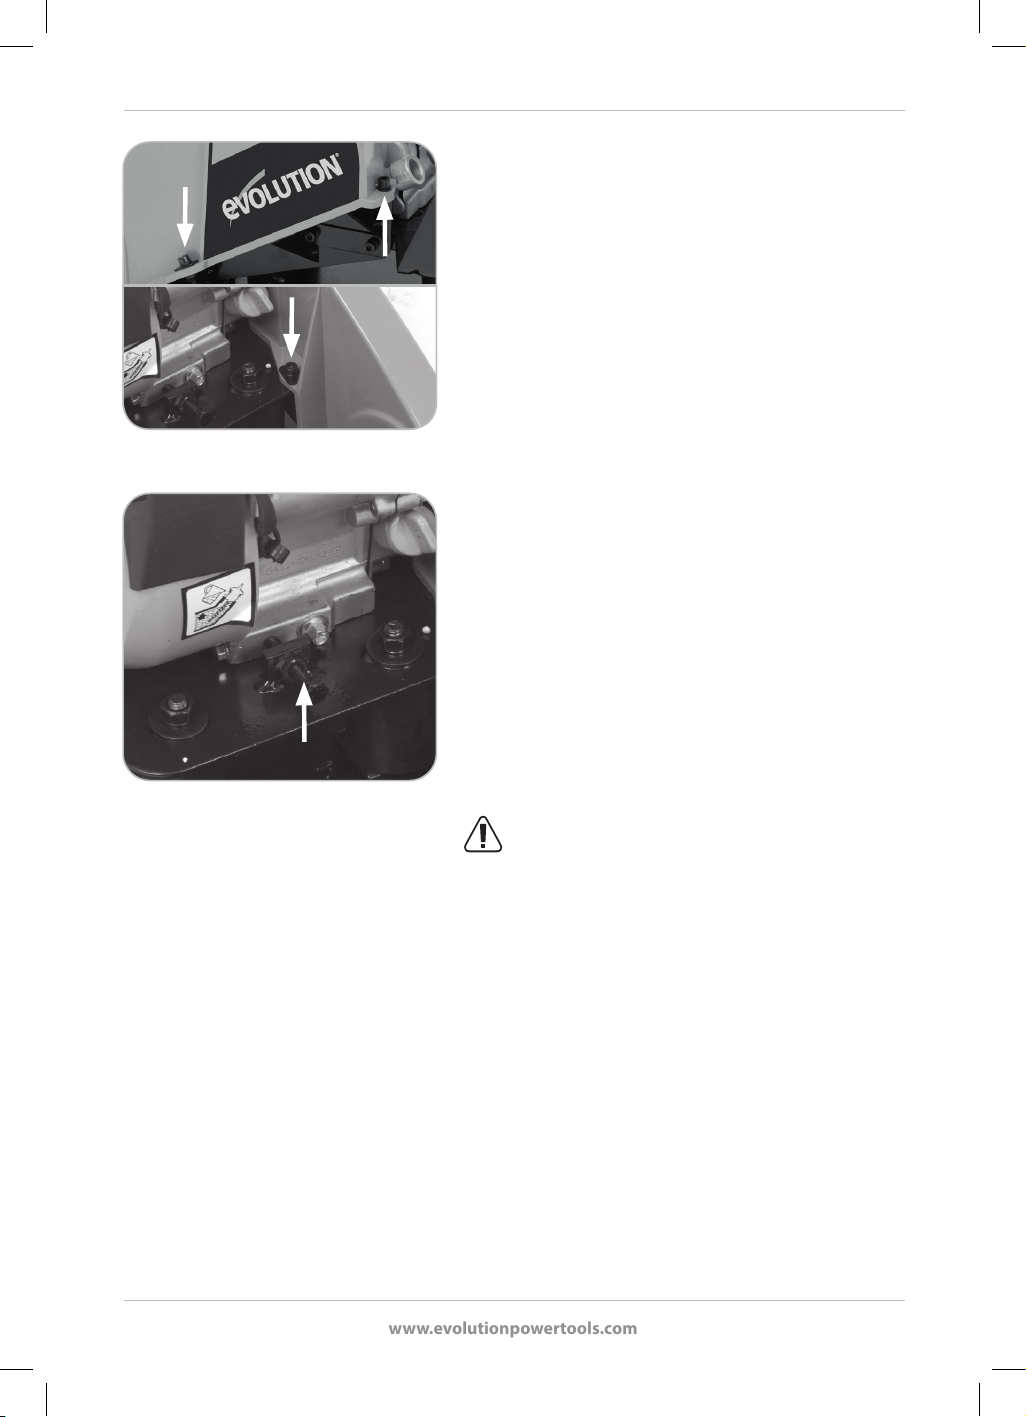
www.evolutionpowertools.com
141
dell'aria presenta segni di decolorazione e intasamento
da sporcizia, polvere ecc., esso deve essere sostituito.
Per il reinserimento:
• Installare l'elemento nell'alloggiamento del ltro
dell'aria.
Il nuovo elemento può essere inserito per qualunque
verso.
• Riposizionare la copertura dell'alloggiamento del ltro
dell'aria.
• Riposizionare il dado a farfalla e assicurarsi che
la copertura sia correttamente in sede e il dado
saldamente serrato.
4. Filtro del bocchettone di rifornimento serbatoio
Vericare occasionalmente a vista le condizioni del ltro
del bocchettone di rifornimento del serbatoio (idealmente
durante il rifornimento). Qualora siano presenti segni di
accumuli di sporcizia, rimuovere il ltro dal serbatoio per
pulirlo.
• Pulire il ltro con un detergente sgrassante ecologico a
base di acqua e, se necessario, irrorare la retina sottile
che lo compone con un getto di aria compressa secca.
• Consentirgli di asciugarsi del tutto prima di ricollocarlo.
• Durante il suo riposizionamento, assicurarsi che le 2
aperture sul bordo superiore del ltro si allineino con
quelle sul bocchettone di rifornimento del serbatoio.
5. Vericare la tensione della cinghia di trasmissione
ATTENZIONE: Intraprendere la
presente procedura esclusivamente a utensile
freddo e a motore spento e con il tappo della candela
d'accensione rimosso.
La tensione della cinghia di trasmissione deve essere
controllata dopo le prime 4 ore di utilizzo, e di seguito
come specicato nel prospetto riepilogativo di
manutenzione.
Per vericare la tensione della cinghia di trasmissione:
• Rimuovere la protezione della cinghia svitando le tre (3)
viti a brugola (Fig. 18) tramite una chiave esagonale e
a tubo (non in dotazione) e conservarle al sicuro per il
successivo utilizzo.
Avvertenza: Tali tre (3) viti a brugola hanno posizioni
speciche. Annotare la posizione di ciascuna delle viti e dei
suoi relativi accessori mentre si rimuovono dall'utensile,
così da poter essere poi rimesse nelle medesime posizioni.
Fig. 18
Fig. 19

www.evolutionpowertools.com
142
• Lo spostamento risultante a metà della lunghezza della
cinghia, esercitando una leggera pressione con un dito,
dovrebbe essere di approssimativamente 5/6 mm (1/4
di pollice).
Avvertenza: L'unità motore dell'H320 è collocata su
quattro (4) aperture presenti sulla piastra di montaggio
motore. Attraverso tali aperture passano i quattro (4)
bulloni di montaggio motore che vengono serrati da sotto
nel blocco carter alla base del motore. Tale congurazione
consente al motore di essere ricollocato sulla piastra.
• Allentare i quattro (4) bulloni a testa esagonale con una
chiave adeguata (non in dotazione).
• Far scorrere il motore in avanti e indietro per modicare
la tensione della cinghia di trasmissione. Sulla parte
anteriore del motore è presente una vite di regolazione
(Fig. 19) che favorisce il preciso posizionamento dello
stesso.
• Quando si raggiunge la corretta tensione,
serrare saldamente i bulloni di montaggio del motore.

www.evolutionpowertools.com
143
ATTENZIONE: Non agire sulla vite di regolazione/tensionamento senza aver prima allentato i
quattro bulloni. Ciò potrebbe arrecare danno al corpo motore.
Avvertenza: Prestare attenzione che il motore rimanga parallelo e in linea con la piastra di montaggio.
Nel caso in cui il motore fosse leggermente storto sulla piastra, la cinghia di trasmissione e la sua puleggia
lavoreranno con più fatica con una conseguente rapida usura dei pezzi in questione.
• Sostituire la protezione della cinghia di trasmissione e stringere saldamente le tre (3) viti a brugola
nelle loro originarie posizioni.
6. Sistema di avviamento a strappo
Le prese di areazione devono essere tenute sgombre e prive di qualunque ostruzione.
Rimuovere da esse eventuali corpi estranei.
H320-P
PROSPETTO RIEPILOGATIVO
DI MANUTENZIONE
Dopo le prime
4 ore
Ogni
20 ore o men-
silmente
Ogni
50 ore o
trimestral-
mente
Ogni
100 ore o
semestral-
mente
Controllo livello olio motore
● ●
Sostituzione olio motore
●
(soIo 1º cambio)
●
Controllo ltro dell'aria
●
Sostituzione ltro dell'aria
●
Controllo candela
●
Tensione cinghia
● ●
Controllo/Pulitura ltro
carburante
●
MANUTENZIONE DELL'H320-E
Avvertenza: Tutte le attività di manutenzione devono essere condotte a utensile spento e disconnesso
dalla fonte di alimentazione.
Vericare regolarmente che tutte le funzioni e le protezioni di sicurezza operino in modo corretto.
Utilizzare il presente utensile soltanto se tutte le protezioni/funzioni di sicurezza sono del tutto operative.
Tutti i cuscinetti a sfera del presente utensile sono lubricati a vita. Non è richiesta ulteriore lubricazione.
Utilizzare un panno pulito e leggermente umido per pulire le parti in plastica dell'apparecchio. Non
utilizzare solventi o simili prodotti che potrebbero danneggiare le parti in plastica dell'utensile.

www.evolutionpowertools.com
144
ATTENZIONE: Non tentare di pulire inserendo oggetti appuntiti nelle aperture della struttura
dell'apparecchio ecc. Le prese di areazione devono essere pulite tramite getti di aria
compressa.
RISOLUZIONE DEI PROBLEMI H320-P
PROBLEMA CAUSA POSSIBILE RIMEDIO
Il motore
non si avvia.
Assenza di carburante.
Motore spento (O).
Candela sporca.
Motore freddo.
Motore allagato di carburante.
Filtro dell'aria ostruito o
sporco d'olio.
Avaria principale.
Aprire il rubinetto carburante
Riempire il serbatoio.
Avviare il motore (On).
Rimuovere, ripristinare e sostituire la candela.
Assicurarsi che la posizione dello starter sia
corretta.
Lasciarlo aperto per cinque (5) minuti.
Tirare lo starter e accelerare al massimo
e provare di nuovo.
Rimuovere la candela, pulirla e reinstallarla.
Provare nuovamente no all'avvio del motore.
Sostituire il ltro dell'aria.
Contattare il proprio agente o Evolution Power
Tools
per ulteriori dettagli.
L'utensile
non vibra.
Tensione della cinghia errata.
Filtro dell'aria ostruito.
Unità eccentrica danneggiata.
Il motore gira troppo
lentamente.
Regolare la cinghia.
Ripristinare il ltro dell'aria.
Sostituire l'unità eccentrica.
Aumentare leggermente la velocità del motore.

www.evolutionpowertools.com
145
RISOLUZIONE DEI PROBLEMI H320-E
PROBLEMA CAUSA POSSIBILE RIMEDIO
L'utensile
non si avvia.
L'alimentazione non è accesa
(On)
Fusibile bruciato nella
candela.
Il pulsante di avvio di
sicurezza non premuto
impedisce
la selezione delle posizioni
On/O.
Cavo di alimentazione
danneggiato o rotto.
Accendere l'alimentazione sulla presa.
Rimpiazzare il fusibile e vericare
l'alimentazione.
Premere il pulsante di avvio sicuro
e quindi tirare la leva di avvio.
Far sostituire il cavo di alimentazione con
un modello identico installato da un tecnico
qualicato.
GUIDA ALLA RISOLUZIONE DEI PROBLEMI GENERALI
PROBLEMA CAUSA POSSIBILE RIMEDIO
Pavimentazione
danneggiata.
Piastra a diretto contatto
con la pavimentazione.
Inserire una piastra da pavimentazione.
La supercie del
conglomerato
bituminoso
si scheggia
(esfoliazione).
Compattamento eccessivo. Rimuovere e passare nuovamente.
Velocità di
movimento bassa.
Spessore dello strato
eccessivo (aondamento
della piastra).
Il motore gira troppo
lentamente.
Grado di umidità del
materiale eccessivo o
insuciente.
Rimuovere parte del materiale per ridurre
lo spessore dello strato.
Aumentare leggermente la velocità del
motore.
Rimuovere il materiale e stabilizzare il
grado di umidità.
H320-P non
funzionante.
Il motore gira troppo
lentamente.
Aumentare leggermente la velocità del
motore.

www.evolutionpowertools.com
146
Fig. 20
IMMAGAZZINAMENTO A LUNGO TERMINE H320-P
Se si prevede per il presente utensile Evolution un periodo
di inutilizzo di 4 mesi o superiore (ad esempio in inverno),
l'operatore dovrà prepararlo per un immagazzinamento a
lungo termine. Ciò conserverà il motore nelle condizioni
ideali per il suo riavvio al momento necessario.
• Svuotare il serbatoio e il carburatore, versando il loro
contenuto in recipienti adeguati e omologati.
• Un rubinetto di scarico può essere trovato sotto la
vaschetta del carburatore. Allentare tale rubinetto per
consentire lo spurgo del carburante dall'utensile. (Fig.
20)
• Stringere il rubinetto di scarico quando si è spurgato
tutto il carburante.
• Rimuovere la candela d'accensione.
• Versare all'incirca un cucchiaio da cucina di olio motore
pulito nel foro della candela.
• Accertarsi che il pulsante di avviamento sia in posizione
spenta (OFF).
• Tirare delicatamente per un paio di volte l'avvio a
strappo.
• Reinserire la candela d'accensione.
• Tirare delicatamente l'avvio a strappo no ad avvertire
resistenza (ciò signica che il pistone è entrato nella sua
fase di compressione con entrambe le valvole chiuse).
Smettere di tirare l'avvio a strappo.
• Conservare il motore in posto sicuro, asciutto e ben
ventilato, sotto una copertura per prevenire l'accumulo
di polvere e sporcizia sull'utensile.
RESO DELL'H320-P
Nel caso in cui si renda necessario restituire a Evolution la
propria macchina H320-P, è obbligatorio seguire i passaggi
qui di seguito per rendere tale operazione sicura per i
corrieri.
1. Drenare totalmente il carburante dal serbatoio e dal
carburatore della macchina. (Fig. 20)
2. Spurgare totalmente l'olio del motore. (Fig. 14)
3. Smontare l'impugnatura rimuovendo le viti. Fare
attenzione a conservare tutti i componenti rimossi. (Fig.
2)
4. Imballare la macchina in una scatola in maniera sicura,
preferibilmente nel proprio imballo originale.
Avvertenza: La macchina sarà restituita senza carburante
o olio. Assicurarsi di riempire con carburante e olio prima di

www.evolutionpowertools.com
147
avviare il motore.
Utilizzo degli accessori opzionali Evolution
(disponibili come opzioni di acquisto per il cliente)
TUTELA AMBIENTALE
I riuti di materiale elettrico non devono essere smaltiti
insieme a quelli domestici. Si prega di riciclare laddove
siano presenti adeguate infrastrutture. Vericare con il
proprio ente responsabile locale o con il rivenditore le
indicazioni per il riciclo.

www.evolutionpowertools.com
148
DICHIARAZIONE DI CONFORMITÀ CE
Ai sensi della normativa EN ISO 17050-1:2004
Il produttore del prodotto oggetto della presente dichiarazione:
UK: Evolution Power Tools Ltd. Venture One, Longacre Close, Holbrook Industrial Estate, Sheeld, S20 3FR.
FR: Evolution Power Tools SAS. 61 Avenue Lafontaine, 33560, Carbon-Blanc, Bordeaux, Francia.
Il produttore dichiara di seguito che l'utensile, come illustrato nella presente dichiarazione, soddisfa le disposizioni pertinenti della Direttiva
Macchine e delle altre direttive idonee come di seguito descritto.
Il produttore dichiara inoltre che l'utensile, così come illustrato nella presente dichiarazione, laddove applicabile, soddisfa le disposizioni
pertinenti della normativa relativa ai requisiti essenziali di sicurezza e tutela della salute (EHSRs).
Le direttive oggetto della presente dichiarazione sono quelle di seguito riportate:
1907/2006 Registrazione, valutazione, autorizzazione e restrizione di sostanze chimiche e regolamento REACH CE
N. 1907/2006 allegato XVII
2006/42/EC. Direttiva Macchine.
2014/30/EU. Direttiva Compatibilità Elettromagnetica.
2011/65/EU. & (EU)2015/863. La Direttiva circa la restrizione all’uso di sostanze pericolose nelle apparecchiature elettriche ed
elettroniche (RoHS)
2000/14/EU & 2005/88/EC La Direttiva sul rumore
Ed è conforme ai requisiti applicabili dei seguenti documenti
EN 500-1:2006+A1• EN 500-4:2011• EN ISO 3744: 1995 • EN ISO 14982:2009
Dettagli prodotto
Descrizione: H320-P
Evolution modello N: 015-0001, 015-0013
Modello di fabbrica N: XZ-10C/JF152
Marca: EVOLUTION
La documentazione tecnica a suragio della compatibilità del prodotto con i requisiti della direttiva è stata redatta
e messa a disposizione per la consultazione da parte delle autorità preposte pertinenti. Essa dimostra che le nostre
schede tecniche contengono i documenti sopra elencati e che soddisfano i criteri corretti per il prodotto così come in
precedenza illustrato.
Nome e indirizzo del titolare della documentazione tecnica.
Firmato: Stampa: Barry Bloomer - CEO
Data: 23/08/2022
UK: Evolution Power Tools Ltd. Venture One, Longacre Close, Holbrook Industrial Estate, Sheeld, S20 3FR.
FR: Evolution Power Tools SAS. 61 Avenue Lafontaine, 33560, Carbon-Blanc, Bordeaux, Francia.
®
H320-P

www.evolutionpowertools.com
149
DICHIARAZIONE DI CONFORMITÀ CE
Ai sensi della normativa EN ISO 17050-1:2004
Il produttore del prodotto oggetto della presente dichiarazione:
UK: Evolution Power Tools Ltd. Venture One, Longacre Close, Holbrook Industrial Estate, Sheeld, S20 3FR.
FR: Evolution Power Tools SAS. 61 Avenue Lafontaine, 33560, Carbon-Blanc, Bordeaux, Francia.
Il produttore dichiara di seguito che l'utensile, come illustrato nella presente dichiarazione, soddisfa le disposizioni
pertinenti della Direttiva Macchine e delle altre direttive idonee come di seguito descritto.
Il produttore dichiara inoltre che l'utensile, così come illustrato nella presente dichiarazione, laddove applicabile, soddisfa
le disposizioni pertinenti della normativa relativa ai requisiti essenziali di sicurezza e tutela della salute (EHSRs).
Le direttive oggetto della presente dichiarazione sono quelle di seguito riportate:
1907/2006 Registrazione, valutazione, autorizzazione e restrizione di sostanze chimiche e regolamento REACH CE N.
1907/2006 allegato XVII
2006/42/EC. Direttiva Macchine.
2014/30/EU. Direttiva Compatibilità Elettromagnetica.
2011/65/EU. &
(EU)2015/863.
La Direttiva circa la restrizione all’uso di sostanze pericolose nelle apparecchiature elettriche ed
elettroniche (RoHS)
2002/96/EC come emendato da 2003/108/CE Direttiva sui Riuti da Apparecchiature Elettriche ed Elettroniche (RAEE).
2000/14/EU & 2005/88/EC La Direttiva sul rumore
Ed è conforme ai requisiti applicabili dei seguenti documenti
EN 500-1:2006+A1 • EN 500-4:2011 • EN 60204-1:2018 • EN IEC 55014-1:2021 • EN ISO 3744:1995
EN IEC 55014-2:2021 • EN IEC 61000-3-2:2019/A1:2021 • EN 61000-3-3:2013/A2:2021
Dettagli prodotto
Descrizione: H320-E
Evolution modello N: 015-0002, 015-0004, 015-0008, 015-0010
Modello di fabbrica N: XZ-5A
Marca: EVOLUTION
Tensione: 220-240 V ~ 50 Hz
Ingresso: 300 W
La documentazione tecnica a suragio della compatibilità del prodotto con i requisiti della direttiva è stata redatta
e messa a disposizione per la consultazione da parte delle autorità preposte pertinenti. Essa dimostra che le nostre
schede tecniche contengono i documenti sopra elencati e che soddisfano i criteri corretti per il prodotto così come in
precedenza illustrato.
Nome e indirizzo del titolare della documentazione tecnica.
Firmato: Stampa: Barry Bloomer - CEO
Data: 23/08/2022
UK: Evolution Power Tools Ltd. Venture One, Longacre Close, Holbrook Industrial Estate, Sheeld, S20 3FR.
FR: Evolution Power Tools SAS. 61 Avenue Lafontaine, 33560, Carbon-Blanc, Bordeaux, Francia.
®
H320-E

www.evolutionpowertools.com
150
Specykacje modelu
Evolution Power Tools zastrzega sobie prawo
do wprowadzania ulepszeń imodykacji
do konstrukcji ispecykacji technicznej
tego produktu bez wcześniejszego powiadomienia.
Oryginał tej instrukcji został napisany wjęzyku
angielskim.
Silnik UE/UK 220–240V ~ 50Hz 300W, US 120V ~ 60Hz 1,25A
Prędkość obrotowa silnika (min
-1
) UE/UK 2 860 (bez obciążenia), US 3
450 (bez obciążenia)
Siła zagęszczania (kN) 5
Zalecana wartość maksymalna 30
czasu użytkowania przez operatora (min)
Poziom mocy akustycznej (LwA) 88,5 dB(A) K= 2,09 dB(A)
Poziom ciśnienia akustycznego (LpA) 83,3 dB(A) K= 3 dB(A)
Wibracje (m/sek
2
) 18,496 K = 1,5
Waga netto kg (lb) 25,4 (56)
Wysokość uchwytu (podczas pracy) mm (cale) 920 (36)
Wysokość uchwytu (podczas pracy) mm (cale) 1 290 (51)
Szerokość podstawy mm (cale) 320 (12-1/2)
Długość kabla metry (stopy) 10 (33)
Klasa izolacji I
IP44
H320-P
H320-E
Typ silnika Jednocylindrowy, 4-suwowy OHV
Moc silnika 1,7 kW 3 600 min
-1
Zamienna świeca zapłonowa LD E6TC (dostępna wofercie
Evolution)
NGK BP6HS
CHAMPION L87YCC
AC DELCO 42FS
Przerwa iskrowa 0,028–0,031 cala
0,7–0,8 mm
Wymienny ltr powietrza Evolution H1S58
Odstępy między zaworami (zimne) Wlot 0,15mm 0,006cala
Wydech 0,20mm 0,008cala
Siła zagęszczania (kN) 10
Wibracje (m/sek
2
) 20,211 K = 1,5
Poziom mocy akustycznej (LwA) 97,9 dB(A) K= 2,42 dB(A)
Poziom ciśnienia akustycznego (LpA) 90,5 dB K= 3 dB(A)
Czas użytkowania przez operatora (min) 20
Zalecana wartość maksymalna
Typ oleju SAE 10W-30/40
Pojemność zbiornika oleju (litry) 0,25
(uncje) 8,45
Typ paliwa Benzyna bezołowiowa/Benzyna E5 iE10
Pojemność zbiornika paliwa (litry) 1,2
(uncje) 40,57
Waga netto kg (lb) 32,45 (71,5)
Wysokość uchwytu (podczas pracy – 1020 (40)
zamontowany uchwyt przedłużający) mm (cale)
Zasięg maszyny (podczas pracy – 1290 (51)
zamontowany uchwyt przedłużający) mm (cale)
Szerokość podstawy mm (cale) 320 (12-1/2)

www.evolutionpowertools.com
151
WAŻNE
Należy uważnie iwcałości zapoznać się ztreścią
niniejszej instrukcji obsługi oraz bezpieczeństwa.
Ze względów bezpieczeństwa, wprzypadku
wątpliwości co do jakiegokolwiek aspektu
dotyczącego korzystania ztego urządzenia należy
skontaktować się zodpowiednią infolinią obsługi
technicznej, której numer podany jest na stronie
internetowej rmy Evolution Power Tools. Nasza
ogólnoświatowa organizacja oferuje dostęp
do kilku infolinii obsługi technicznej. Pomoc
techniczna dostępna jest również udystrybutorów.
STRONA INTERNETOWA www.
evolutionpowertools.com/register
Gratulujemy zakupu narzędzia marki Evolution
Power Tools. Zapraszamy do rejestracji
produktu w internecie zgodnie z ulotką w
formacie A5 dotyczącą rejestracji online
dołączoną do urządzenia. Można również
zeskanować kod QR zamieszczony na ulotce w
formacie A5 za pomocą smartfona. Umożliwi
to potwierdzenie okresu gwarancyjnego
urządzenia za pośrednictwem strony
internetowej Evolution poprzez podanie
danych osobowych, co wrazie potrzeby
zapewni szybki dostęp do usług serwisowych.
Serdecznie dziękujemy za wybranie produktu
marki Evolution Power Tools.
OGRANICZONA GWARANCJA
EVOLUTION. FIRMA EVOLUTION POWER
TOOLS ZASTRZEGA SOBIE PRAWO DO
WPROWADZANIA ULEPSZEŃ ORAZ
ZMIAN WKONSTRUKCJI PRODUKTU BEZ
UPRZEDNIEGO POWIADOMIENIA.
PROSZĘ ZAPOZNAĆ SIĘ ZULOTKĄ
REJESTRACYJNĄ I/LUB OPAKOWANIEM
WCELU UZYSKANIA INFORMACJI
OZASADACH IWARUNKACH GWARANCJI.
W okresie gwarancyjnym oraz począwszy od
pierwotnej daty zakupu rma Evolution Power
Tools zobowiązuje się do naprawy lub wymiany
towarów uznanych za wadliwe pod względem
materiałów lub wykonania. Niniejsza gwarancja
traci ważność, jeżeli zwrócone narzędzie nie było
używane zgodnie z zaleceniami znajdującymi
się w instrukcji użytkowania lub jeśli urządzenie
zostało zniszczone przez przypadek, zaniedbanie,
bądź nieodpowiednie serwisowanie. Niniejsza
gwarancja nie obowiązuje w przypadku urządzeń
lub części, które zostały zmodykowane w
jakikolwiek sposób, bądź były używane niezgodnie
z określonymi możliwościami i specykacjami.
Części elektryczne podlegają gwarancjom
odpowiednich producentów. Wszystkie
uszkodzone produkty należy zwracać opłaconą
przez klienta przesyłką do rmy Evolution Power
Tools. Firma Evolution Power Tools zastrzega sobie
prawo do opcjonalnej naprawy lub wymiany
produktu na taki sam lub porównywalny produkt.
Materiały eksploatacyjne takie jak (poniższa lista
nie jest wyczerpująca) noże, frezy, wiertła, dłuta,
łopatki itp. nie są objęte żadną gwarancją. W
żadnym wypadku rma Evolution Power Tools
nie będzie ponosić odpowiedzialności za straty
lub szkody wynikające z bezpośredniego lub
pośredniego korzystania z naszego towaru lub
z jakiejkolwiek innej przyczyny. Firma Evolution
Power Tools nie ponosi odpowiedzialności za
poniesione koszty lub szkody pośrednie. Żaden
członek kadry kierowniczej, pracownik ani
przedstawiciel rmy Evolution Power Tools nie
jest uprawniony do ustnego przedstawiania
swojego stanowiska na temat stanu urządzenia
ani uchylania żadnego zustalonych warunków
sprzedaży. Sytuacje takie nie będą wiążące dla
rmy Evolution Power Tools.
Pytania dotyczące niniejszej ograniczonej
gwarancji należy kierować do siedziby zarządu
rmy lub pod odpowiednim numerem infolinii.
OGÓLNE INSTRUKCJE BEZPIECZEŃSTWA
ELEKTRONARZĘDZI
(Niniejsze ogólne instrukcje bezpieczeństwa
korzystania zelektronarzędzi są zgodne zBS EN
500-1:2006+A1 iEN 500-4:2011).
OSTRZEŻENIE: Należy zapoznać się
ztreścią wszelkich ostrzeżeń oraz
instrukcji.
Nieprzestrzeganie ostrzeżeń i instrukcji może
doprowadzić do porażenia prądem, pożaru i/lub
poważnych obrażeń.

www.evolutionpowertools.com
152
Należy zachować wszystkie ostrzeżenia i
instrukcje na przyszłość.
Termin „elektronarzędzie” odnosi się do urządzenia
zasilanego sieciowo (przewodowego) lub
urządzenia zasilanego za pomocą akumulatora
(bezprzewodowego).
1. Ogólne ostrzeżenia w zakresie
bezpieczeństwa elektronarzędzi
[Bezpieczeństwo obszaru roboczego]
a) Należy zadbać o czystość i prawidłowe
oświetlenie obszaru pracy. Nieporządek lub brak
wystarczającego oświetlenia mogą spowodować
wypadek.
b) Nie należy używać elektronarzędzi
wprzestrzeniach, wktórych istnieje zagrożenie
wybuchem, np. wobecności łatwopalnych
cieczy, gazów lub pyłów. Elektronarzędzia
wytwarzają iskry, które mogą spowodować zapłon
pyłu lub oparów.
c) Nie wolno dopuszczać dzieci ani
osób postronnych do obszaru pracy
elektronarzędzia. Rozproszenie uwagi może
spowodować utratę kontroli.
2. Ogólne ostrzeżenia w zakresie
bezpieczeństwa elektronarzędzi
[Bezpieczeństwo elektryczne]
a) Wtyczka elektronarzędzia musi być
dopasowana do gniazda zasilania. Nie wolno
w żaden sposób modykować wtyczki. W
przypadku elektronarzędzi z uziemieniem
nie należy stosować przejściówek. Oryginalne
wtyczki dopasowane do gniazd zmniejszają ryzyko
porażenia prądem.
b) Należy unikać dotykania uziemionych
powierzchni, takich jak rury, grzejniki, piece i
lodówki. Uziemienie ciała powoduje zwiększenie
ryzyka porażenia prądem.
c) Nie należy wystawiać elektronarzędzi na
działanie deszczu lub wilgoci. Przedostanie się
wody do wnętrza urządzenia zwiększa ryzyko
porażenia prądem.
d) Nie należy nadwyrężać przewodu. Nie
wolno używać przewodu do przenoszenia,
przeciągania lub odłączania elektronarzędzia.
Przewód należy trzymać z dala od źródeł ciepła,
oleju, ostrych krawędzi lub ruchomych części
urządzenia. Uszkodzone lub poplątane przewody
zwiększają ryzyko porażenia prądem.
e) W przypadku korzystania z urządzenia na
wolnym powietrzu należy używać przedłużacza
przystosowanego do użytku na zewnątrz.
Korzystanie z przedłużacza przystosowanego do
użytku na zewnątrz zmniejsza ryzyko porażenia
prądem.
f) W przypadku konieczności korzystania z
elektronarzędzia w bardzo wilgotnym miejscu
należy używać gniazda zasilania wyposażonego
w wyłącznik różnicowo-prądowy (RCD).
Korzystanie z wyłącznika różnicowo-prądowego
zmniejsza ryzyko porażenia prądem.
3) Ogólne ostrzeżenia w zakresie
bezpieczeństwa elektronarzędzi
[Bezpieczeństwo osobiste].
a) Podczas korzystania z elektronarzędzia
użytkownik powinien być czujny, uważny i
zachowywać zdrowy rozsądek. Nie należy
używać elektronarzędzi w stanie zmęczenia
bądź pod wpływem narkotyków, alkoholu
lub leków. Chwila nieuwagi podczas obsługi
urządzenia może doprowadzić do poważnych
obrażeń ciała.
b) Należy korzystać ze środków ochrony
indywidualnej. Należy zawsze stosować środki
ochrony oczu. Wyposażenie ochronne, takie jak
maska przeciwpyłowa, antypoślizgowe obuwie
robocze, kask ochronny lub nauszniki ochronne
używane w odpowiednich warunkach zmniejszają
ryzyko odniesienia obrażeń.
c) Należy zapobiegać przypadkowemu
włączeniu urządzenia. Przed podłączeniem
do źródła zasilania i/lub akumulatora oraz
przed podnoszeniem lub przenoszeniem
narzędzia należy upewnić się, że przełącznik
zasilania znajduje się w pozycji wyłączonej.
Przenoszenie urządzenia z palcem umieszczonym
na przełączniku zasilania lub podłączanie
elektronarzędzi przy włączonym przełączniku
zasilania stwarza ryzyko wypadku.
d) Przed włączeniem elektronarzędzia należy
usunąć z niego wszelkie klucze regulacyjne.
Klucz pozostawiony wobracającej się części
elektronarzędzia może spowodować obrażenia
ciała.
e) Nie należy się wychylać. Należy zawsze
zachowywać odpowiednią pozycję i równowagę

www.evolutionpowertools.com
153
ciała. Umożliwia to lepszą kontrolę nad
elektronarzędziem w nieoczekiwanych sytuacjach.
f) Należy nosić odpowiednią odzież. Do pracy z
elektronarzędziem nie należy zakładać luźnej
odzieży ani biżuterii. Włosy, odzież i rękawice
należy trzymać z dala od ruchomych części
urządzenia. Luźne ubranie, biżuteria lub długie
włosy mogą zostać wciągnięte przez ruchome
części urządzenia.
g) Jeśli do zestawu dołączone są urządzenia
do podłączenia mechanizmów odsysania i
zbierania pyłu, należy się upewnić, że są one
prawidłowo przyłączone i eksploatowane.
Korzystanie z urządzenia odsysającego pył może
zmniejszyć zagrożenie związane z obecnością
kurzu.
h) Nie należy pozwolić, aby obeznanie
związane z częstym korzystaniem z urządzenia
doprowadziło do beztroski i ignorowania
zasad bezpieczeństwa. Nieprzemyślane działanie
może spowodować poważne obrażenia w ułamku
sekundy.
4. Ogólne ostrzeżenia w zakresie
bezpieczeństwa elektronarzędzi [Eksploatacja i
pielęgnacja elektronarzędzi].
a) Nie przeciążać urządzenia. Należy
używać narzędzi odpowiednich dla danego
zastosowania. Prawidłowe narzędzie wykona
zadanie lepiej i bezpieczniej w podanym zakresie
sprawności.
b) Nie należy korzystać z urządzenia, jeśli
przełącznik ON/OFF go nie uruchamia lub
nie wyłącza. Elektronarzędzia, które nie mogą
być kontrolowane za pomocą przełącznika, są
niebezpieczne i muszą zostać oddane do naprawy.
c) Przed dokonaniem regulacji, wymiany
akcesoriów lub przechowywaniem
elektronarzędzia należy odłączyć wtyczkę
od źródła zasilania lub akumulator od
urządzenia. Prewencyjne środki bezpieczeństwa
zmniejszają ryzyko przypadkowego uruchomienia
elektronarzędzia.
d) Nieużywane elektronarzędzia należy
przechowywać w miejscu niedostępnym
dla dzieci i nie dopuszczać do nich osób nie
znających elektronarzędzi lub ich instrukcji
obsługi. W rękach niedoświadczonych
użytkowników elektronarzędzia stanowią
zagrożenie.
e) Należy przeprowadzać konserwacje
elektronarzędzi. Należy sprawdzać urządzenie
pod kątem nieprawidłowego ustawienia
lub zablokowania elementów ruchomych,
pęknięć elementów ruchomych lub innych
usterek, które mogą wpłynąć na prawidłowe
funkcjonowanie urządzenia. W przypadku
usterki urządzenie musi zostać naprawione
przed ponownym użyciem. Niewłaściwa
konserwacja elektronarzędzi jest przyczyną wielu
wypadków.
f) Należy utrzymywać narzędzia tnące w
czystości i pamiętać o ich ostrzeniu. Prawidłowo
pielęgnowane narzędzia tnące z ostrymi
krawędziami tnącymi rzadziej się zacinają i łatwiej
nimi sterować.
g) Elektronarzędzi, akcesoriów, końcówek
itp. należy używać zgodnie z niniejszymi
instrukcjami, mając na uwadze warunki
pracy i wykonywane zadania. Używanie
narzędzi do wykonywania prac niezgodnych
z ich przeznaczeniem może doprowadzić do
niebezpiecznych sytuacji.
h) Uchwyty i powierzchnie chwytne muszą
być suche, czyste i niezanieczyszczone olejem
ani smarem. Śliskie uchwyty i powierzchnie
uniemożliwiają bezpieczną obsługę i kontrolę
urządzenia w nieprzewidzianych sytuacjach.
5) Ogólne ostrzeżenia dotyczące
bezpieczeństwa elektronarzędzi
[Serwisowanie]
a) Urządzenie powinno być serwisowane przez
wykwalikowaną osobę i wyłącznie przy użyciu
identycznych części zamiennych. Zagwarantuje
to utrzymanie bezpieczeństwa elektronarzędzia.
INSTRUKCJE BEZPIECZEŃSTWA DOTYCZĄCE
MODELU H320-P
a. Silników zasilanych benzyną lub olejem
napędowym nie wolno nigdy używać
wniewentylowanych pomieszczeniach
zamkniętych. Wytwarzane spaliny są wysoce
toksyczne imogą doprowadzić do zatrucia
tlenkiem węgla, które powoduje senność
iostatecznie śmierć. Eksploatacja silnika
spalinowego wpomieszczeniach zamkniętych
jest dopuszczalna tylko wtedy, gdy budynek
jest bardzo dobrze wentylowany, aspaliny są

www.evolutionpowertools.com
154
wychwytywane iusuwane na zewnątrz przez
system odprowadzający.
b. Silnik nie powinien pracować zprędkością
przekraczającą maksymalną prędkość na
tabliczce znamionowej. Praca silnika znadmierną
prędkością zwiększa prawdopodobieństwo awarii
podzespołów i- wkonsekwencji - wypadków.
c. Nie należy manipulować elementami
regulującymi prędkość obrotową silnika. Może
to zmienić fabrycznie ustawione parametry.
d. Używać wyłącznie typu paliwa wskazanego
wtej instrukcji obsługi. Stosowanie paliwa
oliczbie oktanowej mniejszej niż podana może
prowadzić do nadmiernego zużycia silnika ijego
przedwczesnej awarii.
e. Obszar otaczający silnik należy utrzymywać
wczystości iporządku. Nigdy wolno dopuścić
do tego, by materiały łatwopalne (drewno,
plastik, karton, płótno itp.) znalazły się wpobliżu
pracującego silnika.
f. Urządzenia nie należy używać
wprzestrzeniach, wktórych istnieje zagrożenie
wybuchem, ani wich pobliżu. Niektóre budynki
przemysłowe (młyny, tartaki) pełne są pyłu, który
może wybuchnąć.
g. Należy regularnie sprawdzać układ paliwowy
pod kątem wycieków. Węże izłącza powinny być
sprawdzane pod kątem zużycia lub przetarcia.
Należy sprawdzać, czy zbiornik paliwa nie jest
uszkodzony oraz czy korek nie jest źle dopasowany
lub zużyty. Przed użyciem silnika należy usunąć
wszelkie usterki.
h. Przed każdym tankowaniem należy wyłączyć
silnik ipozwolić mu ostygnąć. Unikać rozlania
paliwa (często spowodowanego przepełnieniem
zbiornika) inatychmiast sprzątać rozlane paliwo.
Zastosowanie suchego piasku skutecznie
neutralizuje rozlane paliwo. Nie dopuścić do
kontaktu piasku zjakąkolwiek częścią silnika.
i. Podczas transportu silnika wpojeździe
upewnić się, że kurek paliwa jest zakręcony.
Aby zminimalizować ryzyko rozlania paliwa, silnik
powinien być przymocowany za pomocą lin itp.
do powierzchni ładunkowej pojazdu tak, aby
nie mógł się przemieszczać podczas transportu.
Silnik powinien być zamocowany na możliwie jak
najrówniejszej powierzchni.
j. Wprzypadku długiego okresu
przechowywania zalecane jest opróżnienie
układu paliwowego silnika. Instrukcje
znajdują się na Rys. 20. Podczas długiego okresu
przechowywania dodatki zawarte wobecnie
stosowanych paliwach mogą się wytrącać
iblokować dysze izawory wukładzie paliwowym.
k. Przechowywać urządzenie wbezpiecznym
idobrze wentylowanym miejscu.
Nieupoważniony personel nie powinien mieć
dostępu do tego urządzenia.
INSTRUKCJE BEZPIECZEŃSTWA DOTYCZĄCE
UZUPEŁNIANIA PALIWA
a. Paliwo uzupełniać na równym, nieosłoniętym
terenie oddalonym od wszelkich zabudowań.
Upewnić się, że wbezpośrednim otoczeniu nie ma
materiałów łatwopalnych.
b. Palenie tytoniu, używanie otwartego ognia
lub wytwarzanie iskier jest surowo zabronione
podczas uzupełniania paliwa. Benzyna jest
wysoce łatwopalna, a jej opary mogą wybuchnąć.
c. Upewnić się, że kurek paliwa jest ustawiony w
pozycji „o”. Dzięki temu świeżo dolane paliwo nie
zaleje gaźnika silnika.
d. Przed przystąpieniem do tankowania
wyłączyć silnik ipozostawić go do ostygnięcia.
Nieumyślne rozlanie paliwa na gorący silnik może
spowodować pożar.
e. Rozlane paliwo należy natychmiast sprzątnąć.
Jeśli benzyna zanieczyści odzież, operator musi
zmienić ubranie. Nie polegać na tym, że paliwo
odparuje zubrania. Wyprać odzież po odparowaniu
paliwa zmateriału.
f. Podczas tankowania zaleca się stosowanie
lejka. Użycie lejka zminimalizuje ryzyko rozlania
paliwa.
g. Napełnić zbiornik paliwem bezołowiowym
odpowiedniej klasy do poziomu mniej więcej
wpołowie wysokości ltra paliwa. Wlewać paliwo
do zbiornika ostrożnie inie próbować napełniać
zbiornika do pełna. Wlać benzynę powoli, aby
uniknąć wytwarzania się bąbelków powietrza
podczas napełniania, które mogłyby spowodować
rozlanie się paliwa.
h. Sprawdzić korek zbiornika paliwa izałożyć
go zaraz po zakończeniu tankowania. Nasadka
ma złącze typu bagnetowego. Sprawdzić, czy
jest prawidłowo zamontowana iosadzona przed
powolnym przekręceniem kurka paliwowego.
i. Sprawdzić, czy wcałym układzie paliwowym
nie ma wycieków paliwa. Nie próbować
uruchamiać silnika, jeśli podejrzewa się wyciek
paliwa. Każdy wykryty wyciek musi zostać usunięty

www.evolutionpowertools.com
155
przez odpowiednio wykwalikowanego technika.
j. Przestrzegać wszystkich krajowych ilokalnych
przepisów dotyczących przechowywania
istosowania produktów petrochemicznych.
Przestrzegać wszystkich lokalnych przepisów
porządkowych.
ZALECENIA ZDROWOTNE
OSTRZEŻENIE: Podczas korzystania
zurządzenia wytworzą się cząsteczki
pyłu. W niektórych przypadkach, w zależności
od wykorzystywanych materiałów, pył może
być szczególnie szkodliwy. Zaleca się ocenę
ryzyka związanego z obróbką danego materiału
i ograniczenie narażenia na szkodliwe czynniki.
Niektóre materiały mogą produkować pyły
szkodliwe dla zdrowia. Zalecamy stosowanie
zatwierdzonych masek przeciwpyłowych
zwymiennymi ltrami podczas korzystania
zurządzenia.
Należy zawsze:
• Pracować w dobrze wentylowanym miejscu.
• Korzystać z zatwierdzonych środków
bezpieczeństwa, takich jak maski
przeciwpyłowe, zaprojektowane specjalnie, po
to aby ltrować mikroskopijne cząsteczki.
OSTRZEŻENIE: Podczas korzystania
z dowolnego elektronarzędzia ciała
obce mogą zostać wyrzucone wkierunku oczu
operatora, co może skutkować poważnym urazem
narządu wzroku. Przed przystąpieniem do pracy
zelektronarzędziem należy założyć okulary lub
gogle ochronne zosłoną boczną. Wmiarę potrzeby
należy zastosować całkowitą osłonę twarzy.
OSTRZEŻENIE: Wprzypadku braku
jakichkolwiek części urządzenia nie należy
go uruchamiać aż do momentu uzupełnienia
brakujących komponentów. Nieprzestrzeganie tego
zalecenia może spowodować poważne obrażenia
ciała.
DODATKOWE ZASADY BEZPIECZEŃSTWA
DOT. ZAGĘSZCZARKI H320
a. Odgrodzić miejsce pracy. Osoby postronne
inieupoważniony personel powinni znajdować
się wbezpiecznej odległości od obsługiwanej
zagęszczarki.
b. Upewnić się, że wiesz jak wyłączyć maszynę.
Wprzypadku wystąpienia trudności podczas
zagęszczania ważna jest umiejętność awaryjnego
wyłączenia maszyny.
c. Nigdy nie pozostawiać uruchomionej
zagęszczarki H320 bez nadzoru. Po uruchomieniu
maszyna zaczyna wibrować iporuszać się do
przodu. Maszyna pozostawiona bez nadzoru musi
zostać wyłączona.
d. Zawsze wyłączać silnik przed zmianą
lokalizacji maszyny. Podczas przenoszenia lub
transportu maszyny silnik musi być wyłączony
inajlepiej zimny, akurek paliwa musi znajdować się
wpozycji „o ”.
e. Ponieważ silnik maszyny H320 nagrzewa się
podczas eksploatacji, wtrakcie użytkowania
nie wolno go dotykać ani nie dopuszczać
do kontaktu silnika zżadnym łatwopalnym
materiałem ani odzieżą. Dotykać lub serwisować
tylko zimny silnik.
f. Nigdy nie usuwać, nie zmieniać ani nie
manipulować osłonami maszyny. Osłony są
specjalnie zaprojektowane idopasowane tak,
aby zapewniać operatorowi jak największą
ochronę. Jeśli brakuje osłony lub jest ona
uszkodzona, nie używaj maszyny, dopóki osłona
nie zostanie naprawiona lub wymieniona przez
doświadczonego technika.
g. Zachować szczególną ostrożność, aby
utrzymać kontrolę podczas pracy na
powierzchni pochyłej. Na powierzchni pochyłej
należy pracować w kierunku wgórę iwdół , anie
wpoprzek.
h. Jeśli praca wymaga zagęszczenia kilku
różnych warstw (jedna na drugiej), należy
zagęszczać każdą warstwę oddzielnie. Zapewni
to integralność każdej warstwy.
i. Pracować zagęszczarką H320 na powierzchni
roboczej wzorganizowany sposób, aż do
uzyskania pożądanego zagęszczenia. Pozwoli to
zachować bezpieczeństwo podczas pracy.
j. Przed rozpoczęciem pracy należy
zawsze przeprowadzić wstępne kontrole
bezpieczeństwa. Postępować zgodnie ze
wskazówkami zawartymi wdalszych częściach tej
instrukcji.
Środki ochrony indywidualnej
www.evolutionpowertools.com
156
Uwaga: Jeśli urządzenie jest stosowane na placu
budowy, ważne jest, aby operator przestrzegał
wszelkich obowiązujących tam zasad/przepisów.
W celu uzyskania szczegółowych informacji należy
zwrócić się do kierownika budowy lub innej
odpowiedzialnej osoby.
a. Zakładać odpowiednią odzież. Może to być
ubranie robocze lub wywatowany kombinezon i
kamizelka odblaskowa itp.
b. Zakładać odpowiednie obuwie. Zaleca się
stosowanie obuwia ze stalowymi noskami i
podeszwami antypoślizgowymi.
c. Zakładać odpowiednie okulary ochronne.
Zaleca się stosowanie pełnej osłony twarzy
lub gogli ochronnych zbocznymi osłonami,
które zapewniają ochronę przed wyrzucanymi
odłamkami.
d. Chronić narząd słuchu. Zakładać odpowiednie
środki ochrony uszu.
e. Zakładać odpowiednie rękawice. Zaleca się
stosowanie rękawic o wysokiej przyczepności.
f. Zakładać środki ochrony dróg oddechowych.
Zaleca się stosowanie maski przeciwpyłowej z
wymiennymi ltrami, które chronią przed drobnym
toksycznym pyłem, włóknami i oparami.
g. Zakładać kask ochronny. Na niektórych
placach budowy obowiązkowe może być założenie
kasku, aby chronić operatora przed potencjalnym
ryzykiem urazu na skutek niebezpieczeństw
znajdujących się ponad poziomem głowy.
TRANSPORT SAMOCHODOWY
OSTRZEŻENIE: Do podnoszenia tej
maszyny potrzebne są co najmniej dwie
osoby.
Przygotować wcześniej pojazd, aby był gotowy
na załadowanie maszyny. Zachować szczególną
ostrożność, aby nie upuścić maszyny podczas
załadunku/rozładunku.
• Mimo kompaktowych rozmiarów maszyna
jest ciężka. Aby zmniejszyć ryzyko obrażeń
podczas podnoszenia maszyny należy
skorzystać zpomocy osoby kompetentnej.
• Aby obniżyć poziom ryzyka urazów pleców,
podczas podnoszenia należy trzymać
urządzenie blisko ciała. Należy ugiąć kolana
i podnosić ciężar za pomocą pracy nóg, nie
pleców. Podnieść łapiąc za dogodne obszary
głównej ramy zewnętrznej.
• Przenieść maszynę do pojazdu izabezpieczyć
na jak najbardziej wyrównanej pozycji za
pomocą lin, pasów mocujących itp. tak, aby
uniemożliwić przemieszczanie się maszyny
podczas transportu.
Uwaga: H320-P: Najlepszą inajbezpieczniejszą
praktyką podczas transportu tego urządzenia
wpojeździe jest usunięcie paliwa ze zbiornika
maszyny.
PRZEWIDZIANE ZASTOSOWANIE
ELEKTRONARZĘDZIA
OSTRZEŻENIE: Ten produkt to napędzana
płyta zagęszczająca. Został zaprojektowany
do stosowania ze specjalnymi akcesoriami
rmy Evolution. Używać wyłącznie akcesoriów
zaprojektowanych do stosowania ztym
urządzeniem lub zalecanych przez Evolution
Power Tools Ltd.
Maszyna ta może być używana do zagęszczania
powierzchni takich jak żużel, małe kruszywa, gleba,
piasek, materiały podbudowy itp. Po wyposażeniu
wpłytę do chodników maszyna H320 może być
używana do zagęszczania iosadzania większości
rodzajów kostki brukowej.
Przyczyny zagęszczania
Wnaruszonej glebie, nowym wypełnieniu,
podkładzie lub asfalcie znajdują się kieszenie
powietrzne imałe puste przestrzenie, które - jeśli
nie zostaną zagęszczone - mogą prowadzić do
rozwoju ewentualnych problemów.
• Ruch drogowy na niezagęszczonym terenie
wywiera obciążenie, które naciska na
znajdujący się pod spodem materiał. Może to
prowadzić do osiadania górnej powierzchni,
ponieważ materiał migruje wdół, aby wypełnić
puste przestrzenie.
• Obciążenie statyczne (dom, garaż itp.)
zbudowane na niezagęszczonym gruncie może
ulec osiadaniu wwyniku przemieszczania się
znajdującego się pod spodem materiału.
• Woda wsiąkająca wmateriał zawierający puste
przestrzenie ikieszenie powietrzne może się
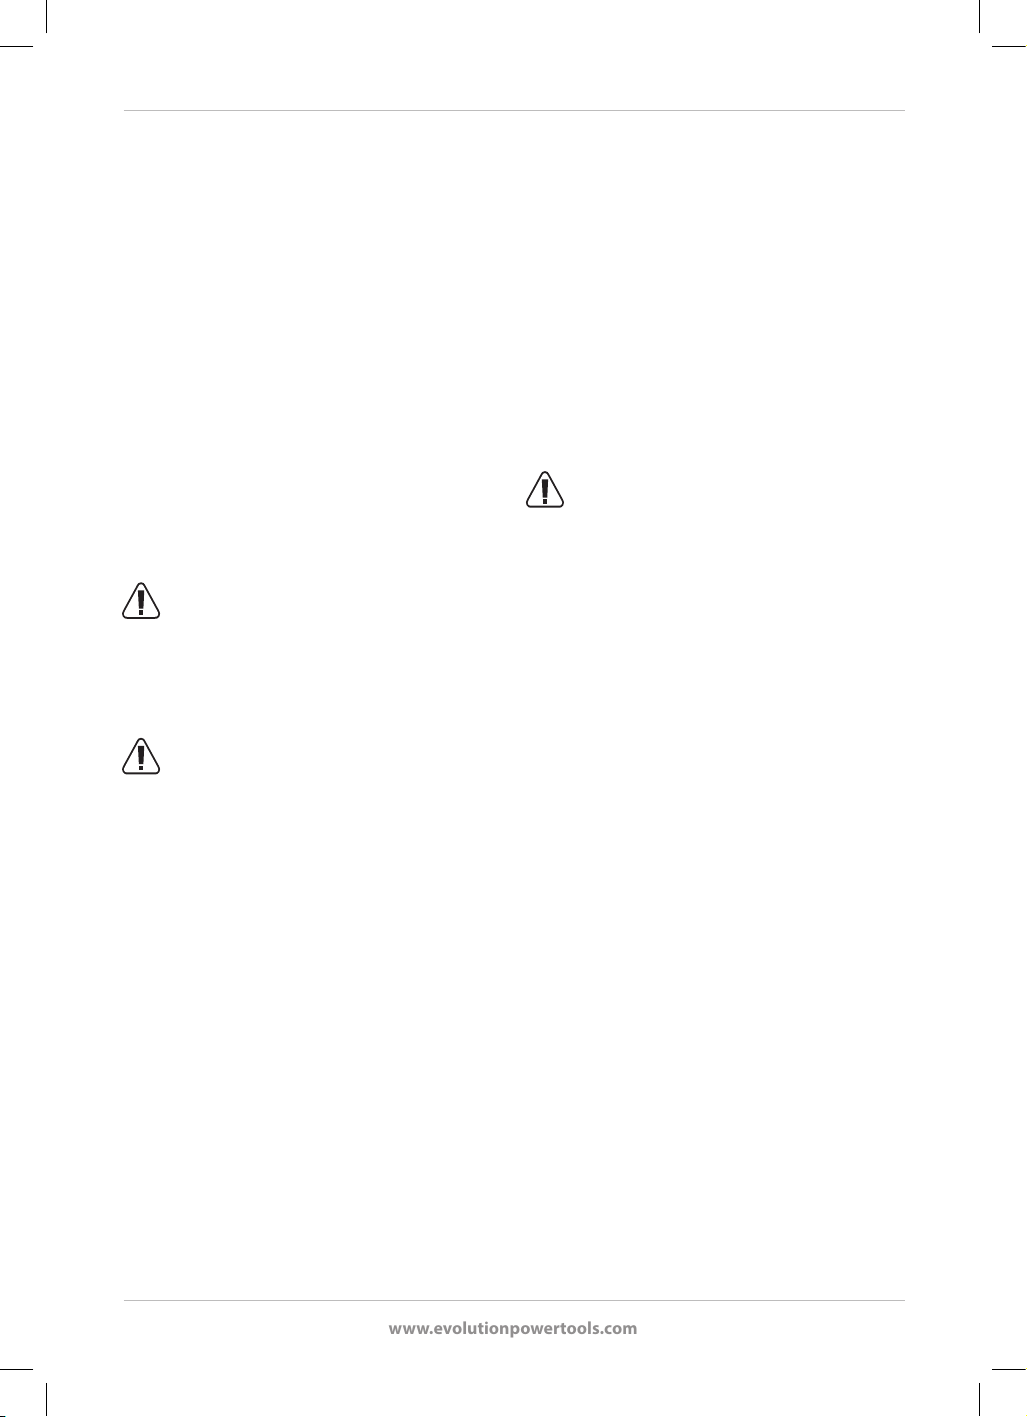
www.evolutionpowertools.com
157
wnich gromadzić, przez co materiał będzie
się rozszerzać podczas mrozów, anastępnie
kurczyć podczas ciepłych/suchych okresów.
Rozszerzanie ikurczenie jest głównym
czynnikiem powodującym uszkodzenia
fundamentów budynku imoże prowadzić
do konieczności wykonania podkładu pod
konstrukcję.
Zagęszczanie zwiększa gęstość materiału, atym
samym jego zdolność do wytrzymywania obciążeń
statycznych idynamicznych. Wyeliminowanie
kieszeni powietrznych imałych pustych
przestrzeni zmniejsza szanse na gromadzenie się
wody ipóźniejsze osiadanie wwyniku rozszerzania
ikurczenia się materiału.
ZABRONIONE ZASTOSOWANIE
ELEKTRONARZĘDZIA
OSTRZEŻENIE: Ta zasilana płyta
zagęszczająca może być używana wyłącznie
zgodnie zprzeznaczeniem. Nie wolno wprowadzać
w urządzeniu żadnych modykacji ani stosować go
do zasilania jakichkolwiek urządzeń lub akcesoriów
innych niż określone w niniejszej instrukcji.
OSTRZEŻENIE: Urządzenie
nie jest przeznaczone do obsługi przez
dzieci iosoby oograniczonej sprawności zycznej,
sensorycznej lub umysłowej, lub nieposiadające
odpowiedniego doświadczenia iwiedzy,
chyba że będą one nadzorowane lub zostaną
poinstruowane na temat bezpiecznego korzystania
zurządzenia przez osobę odpowiedzialną za ich
bezpieczeństwo.
Dzieci wymagają stałego nadzoru, aby nie miały
żadnego dostępu do sprzętu. Nie wolno pozwalać
im na zabawę urządzeniem.
BEZPIECZEŃSTWO ELEKTRYCZNE – H320-E
WTYCZKA SIECIOWA
Produkt jest wyposażony wodpowiednio
prolowaną wtyczkę dostosowaną do danego
rynku. Wtyczka spełnia wymagania norm
międzynarodowych imusi być podłączona do
źródła zasilania onapięciu równym podanemu
na etykiecie znamionowej. Wprzypadku
uszkodzenia wtyczki lub przewodu zasilającego
należy je wymienić na kompletny zestaw
identyczny zoryginalnym. Należy przestrzegać
wymagań dotyczących podłączania do sieci
elektrycznej obowiązujących wdanym kraju.
Wrazie wątpliwości należy skonsultować się
zwykwalikowanym elektrykiem.
Wtyczka BS może być stosowana tylko
wZjednoczonym Królestwie. Wtyczka powinna
być podłączona do gniazda wewnątrz budynku,
aby spełnić wymagany stopień ochrony IP. Wtyczka
powinna być połączona zprzewodem zasilającym
dłuższym niż 10m.
EKSPLOATACJA NA ZEWNĄTRZ – H320-E
OSTRZEŻENIE: Jeśli urządzenie
będzie eksploatowane na zewnątrz, ze
względów bezpieczeństwa nie należy używać
go wmiejscach zawilgoconych ani narażać na
działanie deszczu. W celu zapewnienia dodatkowej
ochrony należy zastosować wyłącznik różnicowo-
prądowy (RCD), który przerwie dopływ zasilania,
jeśli prąd różnicowy przekroczy 30mA przez
okres 30ms. Należy zawsze sprawdzić działanie
wyłącznika różnicowo-prądowego (RCD) przed
przystąpieniem do korzystania z urządzenia.
W przypadku konieczności zastosowania
przedłużacza należy upewnić się, że nadaje się
on do użytku na zewnątrz i jest odpowiednio
oznaczony.
Podczas korzystania z przedłużacza należy
przestrzegać instrukcji producenta.
WIBRACJE
OSTRZEŻENIE: Podczas użytkowania tego
urządzenia operator może być narażony na
wysoki poziom wibracji przenoszonych na dłonie
iręce. U operatora może dojść do „choroby
wibracyjnej białych palców” (objaw Raynauda).
Stan ten może zmniejszyć wrażliwość ręki na
temperaturę, jak również powodować jej ogólne
drętwienie. Wprzypadku długotrwałego lub
regularnego korzystania zzagęszczarek należy
dokładnie monitorować stan dłoni ipalców. W
przypadku wystąpienia jakichkolwiek objawów
należy zasięgnąć porady lekarza.
• Pomiar i ocena narażenia człowieka na drgania

www.evolutionpowertools.com
158
przenoszone na dłonie w miejscu pracy są
podane w:
BS EN ISO 5349-1:2001 i
BS EN ISO 5349-2:2002
• Wiele czynników może wpłynąć na
poziom wibracji podczas pracy, np. stan
i położenie powierzchni roboczej oraz
typ i stan używanego urządzenia. Należy
ocenić te czynniki przed każdym użyciem i
dostosować do nich odpowiednie metody
pracy. Ograniczenie wpływu tych czynników
może przyczynić się do zmniejszenia skutków
wibracji:
Obsługa
• Należy obsługiwać maszynę, zachowując
ostrożność i pozwalając urządzeniu
wykonywać zadanie.
• Należy unikać używania nadmiernej siły
zycznej w stosunku do jakichkolwiek
elementów układu sterowania
urządzeniem.
• Należy zwrócić uwagę na własne
bezpieczeństwo i stabilną pozycję, a
także na położenie urządzenia podczas
użytkowania.
Powierzchnia robocza
• Należy zwrócić uwagę na materiał, z
którego wykonana jest powierzchnia
robocza: jego stan, gęstość, wytrzymałość,
sztywność i położenie.
SYMBOLE IETYKIETY
OSTRZEŻENIE: Nie należy korzystać zurządzenia,
jeśli oznaczenia ostrzegawcze lub informacyjne
są uszkodzone lub zostały usunięte. Należy
skontaktować się z Evolution Power Tools w celu
uzyskania nowych etykiet.
Uwaga: Wszystkie lub niektóre z następujących
symboli mogą znajdować się w instrukcji lub na
produkcie.
Wolty
V
Ampery
A
Prędkość
min
-1
(obr/min)
Prąd zmienny
~
Poziom mocy akustycznej
Przeczytać instrukcję
obsługi
Stosować środki ochrony
słuchu
Stosować środki ochrony
oczu
Stosować ochronę przed
pyłem
Ostrzeżenie
UWAGA: Gorące opary.
Nie dotykać
GORĄCE! Nie dotykać
HOT!
Gorąca powierzchnia
Certykat CE
Certykat UKCA
Certykat Intertek
Poważne zagrożenie dla
zdrowia
Niebezpieczne dla środowiska
Zużyty sprzęt elektryczny
ielektroniczny
Olej silnikowy 10/30W
Dławik otwarty
Dławik zamknięty
UWAGA: To jest
silnik czterosuwowy.
Napełniać wyłącznie benzyną.
Nie napełniać
olejem napędowym.
BEZOŁOWIOWA
WYŁĄCZNIE BENZYNA!*
WYSOKA ŁATWOPALNOŚĆ.
* E5 i E10

www.evolutionpowertools.com
159
Przed zdjęciem korka
zbiornika paliwa odczekać,
aż silnik ostygnie. Opary są
skrajnie łatwopalne imogą
zapalić się wkontakcie
zgorącą powierzchnią lub
płomieniami.

www.evolutionpowertools.com
160
1. PŁYTA WIBRACYJNA
2. ZBIORNIK PALIWA
3. PRZEŁĄCZNIK ON/OFF SILNIKA
4. DŹWIGNIA PRZEPUSTNICY
5. REGULATOR DŁAWIKA
6. ROZRUSZNIK ODRZUTOWY
7. KUREK PALIWA
8. WLEW/WSKAŹNIK POZIOMU OLEJU SILNIKO-
WEGO
9. FILTR POWIETRZA
10. WTYCZKA ŚWIECY ISKROWEJ
11. WYDECH
12. KOREK SPUSTOWY OLEJU SILNIKOWEGO
13. ŚRUBA REGULACYJNA SZYBKIEGO BIEGU
14. OSŁONA PASA
15. UCHWYT ANTYWIBRACYJNY
16. MIEJSCE NA NARZĘDZIA
(1)
(14)
(2)
(7)
(5)
(9)
(4)
(13)
(6)
(3)
(8)
(12)
(15)
(16)
(11)
(10)
SCHEMAT URZĄDZENIA H320-P

www.evolutionpowertools.com
161
SCHEMAT URZĄDZENIA H320-E
1. PŁYTA WIBRACYJNA
2. POPRZECZKA / SCHOWEK NA KABEL
3. PRZEŁĄCZNIK BEZPIECZEŃSTWA ON/OFF
4. UCHWYT ANTYWIBRACYJNY
5. UCHWYT GÓRNY
6. UCHWYT ŚRODKOWY
7. KLIPSY DO PROWADZENIA PRZEWODÓW
(1)
(2)
(3)
(4)
(5)
(6)
(7)

www.evolutionpowertools.com
162
PRZYGOTOWANIE DO PRACY
ROZPAKOWYWANIE
Uwaga: Opakowanie zawiera ostre przedmioty.
Należy zachować ostrożność podczas
rozpakowywania. Podniesienie, złożenie i
przeniesienie tego urządzenia może wymagać
pracy dwóch osób. Urządzenie wraz z załączonymi
akcesoriami należy wyjąć z opakowania. Należy
dokładnie sprawdzić, czy urządzenie jest w
dobrym stanie i potwierdzić obecność wszystkich
akcesoriów wymienionych w instrukcji obsługi.
Należy również upewnić się, czy w żadnym
z akcesoriów nie brakuje komponentów. W
przypadku braku jakiegokolwiek komponentu
należy zwrócić urządzenie do dystrybutora w
oryginalnym opakowaniu wraz ze wszystkimi
akcesoriami. Nie wyrzucać opakowania.
Opakowanie należy zachować na czas trwania
okresu gwarancyjnego. Opakowanie należy
zutylizować wsposób przyjazny dla środowiska.
Jeśli to możliwe, należy poddać je recyklingowi.
Nie należy pozwalać dzieciom na zabawę
torebkami foliowymi ze względu na ryzyko
uduszenia.
ELEMENTY WZESTAWIE –
ZAGĘSZCZARKA H320-P
OPIS LICZBA
SZTUK
Instrukcja obsługi 1
Przedłużenie uchwytu środkowego 1
Przedłużenie uchwytu górnego 1
Mocowanie uchwytu środkowego
Śruby M10 x 20
4
Mocowanie uchwytu górnego
Śruby M10 x 15
4
Podkładki uchwytu górnego 4
Klucz imbusowy 8mm 1
Klucz do świec zapłonowych
ipokrętło
1
Olej silnikowy (butelka 400 ml) 1
ELEMENTY WZESTAWIE –
ZAGĘSZCZARKA H320-E
OPIS LICZBA
SZTUK
Instrukcja obsługi 1
Śruby mocujące uchwyt (długie)
M10 x 40
2
Śruby mocujące uchwyt
(krótkie) M10 x 15
2
Podkładki uchwytu 4
Uchwyt środkowy 1
Uchwyt górny 1
Klucz imbusowy 8mm 1
Poprzeczka uchwytu / schowek
na kabel
1
Dodatkowe akcesoria
Poza podstawowymi elementami załączonymi do
tego urządzenia następujące akcesoria są również
dostępne wsklepie internetowym Evolution
pod adresem www.evolutionpowertools.com
iulokalnego dystrybutora.
OPIS Nr części
Podkładka do brukowania
H320
Podkładka do
brukowania
015-0007

www.evolutionpowertools.com
163
Rys. 2
Rys. 1
MONTAŻ
Urządzenie Evolution H320 wymaga niewielkiego
montażu przed użyciem. Wprzypadku maszyny zsilnikiem
benzynowym zakończyć cały montaż przed napełnieniem
silnika 0,4l zalecanego oleju serwisowego.
1. Montaż uchwytu przedłużającego – H320-P
Uwaga: Przedłużenie uchwytu ma antywibracyjną rączkę,
która ogranicza wibracje przenoszonymi przez maszynę
na dłoń/rękę operatora. Uchwyt przedłużający powinien
służyć do obsługi maszyny, ale może zostać złożony
na czas transportu lub przechowywania. Odkręcenie
czterech dolnych śrub ipoluzowanie czterech górnych
umożliwia złożenie przedłużenia uchwytu wcelu ułatwienia
transportu.
• Ostrożnie nasunąć środkową część uchwytu na dwa
dolne wsporniki iwyrównać cztery otwory wśrodkowym
uchwycie zczterema pionowymi gwintowanymi otworami
wdolnych wspornikach.
•
Przełożyć cztery śruby M10 x 20 przez uchwyt środkowy
igórne uchwyty.(Rys. 2)
• Dokręcić mocno wszystkie cztery śruby za pomocą
klucza imbusowego.
2. Montaż/zakładanie uchwytu – H320-E
Uwaga: Uchwyt H320-E składa się zczterech (4) głównych
części. Są to:
• dolny uchwyt (fabrycznie przymocowany do maszyny),
• część środkowa,
• część górna zwyłącznikiem bezpieczeństwa „On/O”,
• poprzeczka uchwytu / schowek na kabel.
Dwie długie śruby służą do zamocowania poprzeczki
/ schowka na kabel oraz środkowej części uchwytu do
obrotowych uchwytów dolnych.
• Ostrożnie ustawić poprzeczkę / schowek na kabel
wpozycji serwisowej.
Uwaga: Styki kabla powinny być skierowane do tyłu.
• Ostrożnie nasunąć część środkową na dolne uchwyty
iwyrównać otwory.
• Podkładkę należy umieścić pomiędzy śrubą,
auchwytami. (Rys. 1)
• Przełożyć długie śruby przez otwory wśrodkowym
uchwycie oraz otwory wdolnych uchwytach,
anastępnie wkręcić je wnakrętki zabezpieczające
wpoprzeczce / schowku na kabel. (Rys. 3)
• Dokręcić mocno wszystkie śruby za pomocą klucza
imbusowego.
Rys. 3

www.evolutionpowertools.com
164
Dwie krótkie śruby służą do mocowania górnej części
uchwytu do części środkowej.
• Ostrożnie nasunąć górną część uchwytu na część
środkową iwyrównać otwory.
• Włożyć śruby przez uchwyt części górnej iwkręcić je
wnakrętki zabezpieczające wczęści środkowej.
Model H320-E jest dostarczany z3klipsami do kabli,
aby bezpiecznie poprowadzić kabel zasilający wgórę
ramy uchwytu. Muszą one zostać zamontowane.
Niezastosowanie się do tego wymogu spowoduje utratę
gwarancji. Umieścić je po tej samej stronie co wyzwalacz
sieciowy irozmieścić zgodnie zrysunkami (Rys. 4a i4b)
OSTRZEŻENIE: Zwrócić uwagę, aby kabel zasilający
poprowadzony od wyłącznika bezpieczeństwa wdół
do silnika był luźny iniczym nieprzycięty podczas montażu.
Pierwsze napełnienie isprawdzenie poziomu oleju –
H320-P
OSTRZEŻENIE: Dostarczona maszyna nie jest
napełniona olejem. Nie wolno podejmować prób
uruchomienia silnika, dopóki skrzynia korbowa nie zostanie
napełniona do właściwego poziomu olejem odpowiedniej
klasy.
Uwaga: Olej (wzestawie) wlać do maszyny przez otwór
wlewu/poziomu oleju. Wlać 0,4 litra oleju samochodowego
10W 30 (dostępnego we wszystkich dobrych sklepach
motoryzacyjnych ina większości stacji benzynowych).
Wniektórych obszarach oklimacie innym niż umiarkowany
preferowana może być inna klasa oleju. Skonsultować się
zdostawcą.
Korek wlewu oleju odkręca się od obudowy silnika maszyny
izawiera wskaźnik poziomu oleju. (Rys. 5) Należy uważać,
aby nie rozlać oleju.
Rys. 5
Rys. 4a
Rys. 4b

www.evolutionpowertools.com
165
Uwaga: Ważne jest, aby podczas sprawdzania poziomu
oleju maszyna znajdowała się na stabilnej, poziomej
irównej powierzchni, asilnik był wyłączony izimny.
Na wskaźniku poziomu oleju znajdują się dwa znaczniki.
Olej powinien być utrzymywany na poziomie lub blisko
poziomu
górnego znacznika.
• Zdjąć korek wlewu/poziomu oleju iwytrzeć wskaźnik
czystą, suchą szmatką.
• Wlać wymaganą ilość oleju (około 0,4l).
• Pozwolić olejowi osiąść przez ponad 10 sekund.
• Sprawdzić poziom oleju przez otwór wlewu oleju.
Poziom oleju powinien znajdować się bardzo blisko
górnej części gwintu, aolej powinien niemalże wylewać
się ze skrzyni korbowej (maszyna musi stać na równej,
poziomej powierzchni).
• Włożyć wskaźnik poziomu oleju iprzykręcić korek
do końca. Odkręcić korek wlewu paliwa iwyciągnąć
wskaźnik. Sprawdzić wzrokowo
poziom oleju na miarce.
• Wrazie potrzeby dolać olej.
• Gdy poziom jest prawidłowy, dokręcić mocno korek
wlewu/poziomu oleju wobudowie silnika.
Uwaga: Wymienić olej zgodnie ztabelą podsumowującą
konserwację (patrz również KONSERWACJA – Wymiana
oleju silnikowego)
Czynności kontrolne przed rozpoczęciem obsługi
Uwaga: Przed każdym uruchomieniem sprawdzić, czy
wszystkie zabezpieczenia itp. działają prawidłowo.
• Sprawdzić, czy wszystkie osłony bezpieczeństwa
znajdują się na swoim miejscu inie są uszkodzone.
• H320-E – Sprawdzić integralność kabla zasilającego
iwtyczki. Jeśli kabel zasilający lub wtyczka są
wjakikolwiek sposób uszkodzone, muszą zostać
wymienione przez kompetentnego technika na
identyczne części zamienne.
• H320-P – Sprawdzić wszystkie węże paliwowe, złącza
ikorki wlewu paliwa itp. pod kątem oznak wycieku
płynu. Każdy wykryty wyciek musi zostać usunięty przed
rozpoczęciem eksploatacji.
• Sprawdzić poziom oleju silnikowego iwrazie potrzeby
dolać olej.
• Sprawdzić poziom paliwa iwrazie potrzeby uzupełnić.
• Dokładnie sprawdzić pozostałe części maszyny
pod kątem wszelkich form uszkodzeń dotyczących
Rys. 6
Rys. 7

www.evolutionpowertools.com
166
szczególnie osłon, elementów gumowych itp.
Uruchomienie urządzenia H320-P
• Napełnić zbiornik paliwa benzyną. Filtr wlewu zbiornika
paliwa ma czerwoną plastikową wkładkę wskazującą
maksymalny poziom paliwa. Paliwo nie może
przekraczać tego poziomu.
• Obrócić dźwignię kurka paliwa do pozycji „On”. (Rys. 6)
• Ustawić dźwignię dławika wpozycji „Choke On”. (Rys. 7)
• Wcisnąć przełącznik kołyskowy zapłonu silnika do
pozycji „ON” (I). (Rys. 8)
• Ustawić dźwignię przepustnicy na maksimum. (Rys. 9)
• Unieruchomić H320, trzymając uchwyt operacyjny
wdogodnym miejscu.
• Drugą ręką chwycić za uchwyt linki rozrusznika
odrzutowego. (Rys. 10)
• Pociągnąć powoli za linkę rozrusznika, aż do wyczucia
oporu wskazującego, że rozrusznik jest włączony.
• Po wyczuciu oporu pociągnąć mocno za sznurek.
• Powtarzać tę procedurę aż do uruchomienia silnika.
• Jednostka silnika może obracać się (rozbiegać) przez
krótki moment, aż silnik osiągnie odpowiednią
temperaturę.
• Zazwyczaj dławik można przywrócić do pozycji „o”
(run) prawie natychmiast po uruchomieniu silnika, ale
będzie to zależało od temperatury otoczenia, warunków
pracy itp. Wymaga to oceny operatora.
• Wniektórych okolicznościach dławik może być
potrzebny nawet wtedy, gdy silnik jest ciepły po
poprzednim cyklu pracy. Wprzypadku trudności
zuruchomieniem ciepłego silnika:
• Ustawić dławik wpozycji „on” (prawa).
• Pociągnąć raz za rozrusznik odrzutowy.
• Przywrócić dławik do pozycji „o” (run, lewa).
• Ciągnąć za rozrusznik odrzutowy aż do
uruchomienia silnika.
• Uwaga: H320-P zacznie wibrować iruszy zaraz po
uruchomieniu silnika. Użytkownik powinien zachować
należytą staranność przy uruchamianiu tej maszyny.
Zatrzymywanie silnika urządzenia H320-P
• Wcisnąć przełącznik kołyskowy zapłonu silnika do
pozycji „OFF” (0).
• Zakręcić kurek paliwa.
Ruch urządzenia H320-P
Rys. 8
Rys. 9
Rys. 10
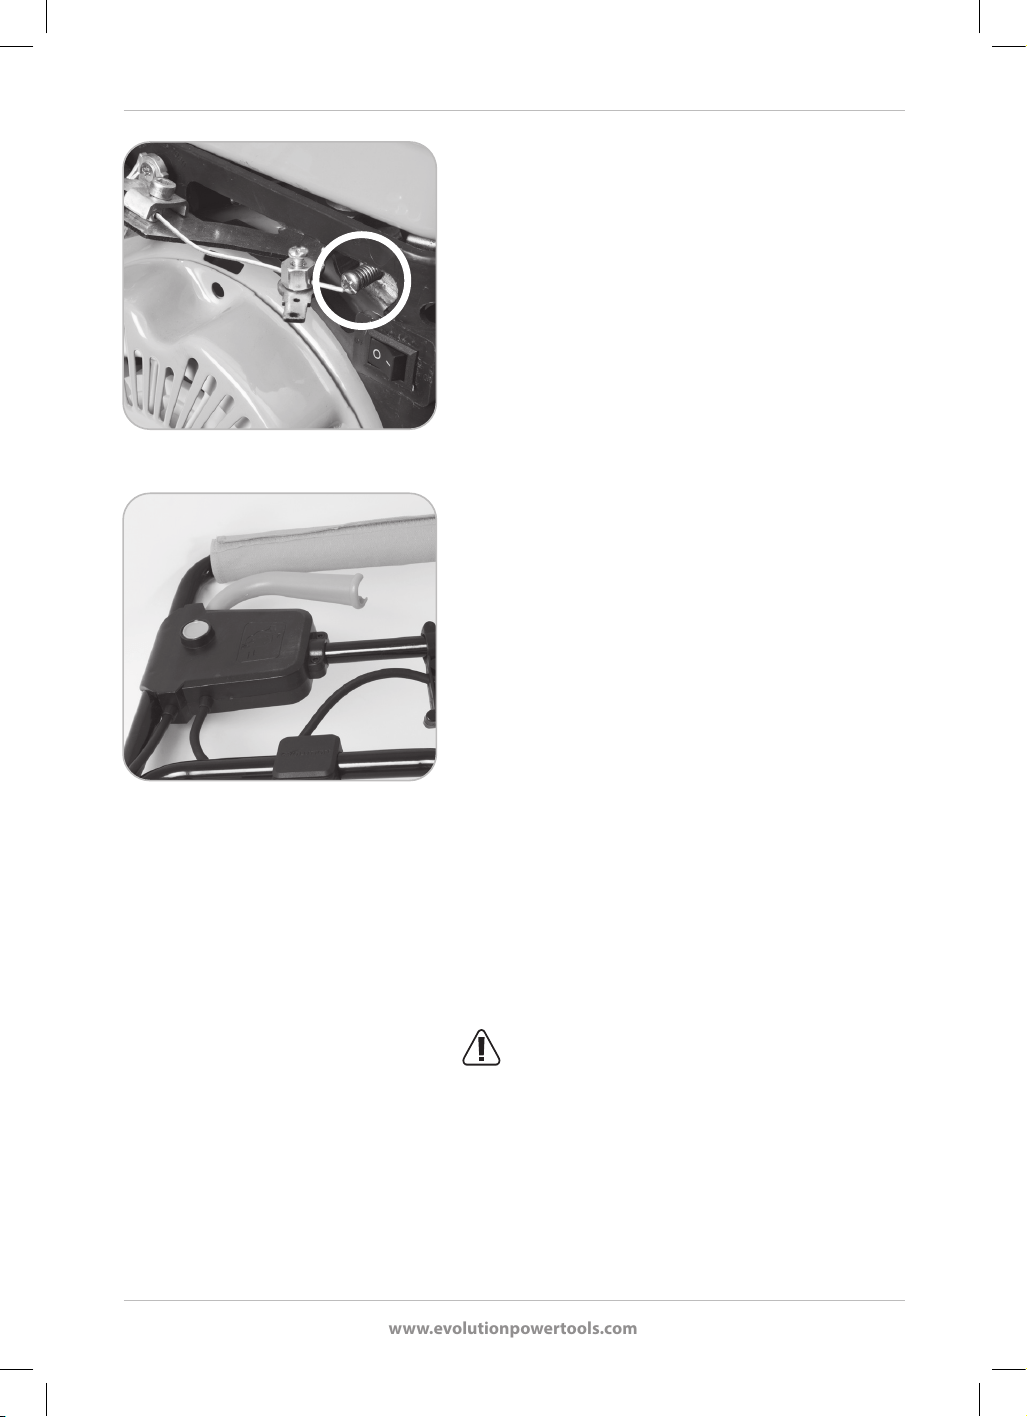
www.evolutionpowertools.com
167
Uwaga: Regulacja prędkości obrotowej silnika zmienia
częstotliwość wibracji, atakże prędkość, zjaką maszyna
porusza się do przodu.
Uwaga: Śruba szybkiego biegu ogranicza maksymalny
skok dźwigni przepustnicy iwten sposób steruje tylko
maksymalną prędkością obrotową silnika.
Aby zmienić maksymalną prędkość obrotową silnika, czyli
zwiększyć lub zmniejszyć prędkość ruchu maszyny:
• Przekręcić śrubę szybkiego biegu (Rys. 11) po trochu
(maks. pół obrotu) zgodnie zruchem wskazówek
zegara, aby zmniejszyć prędkość obrotową silnika,
lub przeciwnie do ruchu wskazówek zegara, aby ją
zwiększyć.
• Upewnić się, że dźwignia przepustnicy jest ustawiona
na maksimum.
• Uruchomić maszynę isprawdzić, jak się porusza przy
nowym ustawieniu śruby szybkiego biegu.
• Wrazie potrzeby zatrzymać maszynę idalej regulować
śrubę szybkiego biegu, aż do uzyskania pożądanej
prędkości ruchu.
Uruchamianie izatrzymywanie urządzenia H320-E
Urządzenie H320-E jest wyposażone wprzełącznik
bezpieczeństwa „On/O”. Blokada bezpieczeństwa
uniemożliwia uruchomienie dźwigni wyłącznika, dopóki nie
zostanie wciśnięty przycisk blokady bezpieczeństwa.
• Nacisnąć przycisk blokady bezpieczeństwa (a)
ipociągnąć dźwignię przełącznika (b), aby uruchomić
maszynę. (Rys. 12)
• Zwolnić dźwignię przełącznika, aby wyłączyć maszynę.
Uwaga: Po zwolnieniu dźwigni przełącznika silnik zatrzyma
się, aprzycisk blokady bezpieczeństwa automatycznie
powróci do trybu bezpiecznego.
OSTRZEŻENIE: Operator powinien zawsze
zwracać uwagę na przebieg kabla zasilającego,
aby nie stwarzał on ryzyka potknięcia ani innego rodzaju
zagrożenia, ani nie mógł zostać przejechany przez maszynę.
OGÓLNE ZALECENIA DOT. OBSŁUGI
• Dopilnować, aby osoby postronne znajdowały się
wbezpiecznej odległości od pracującej zagęszczarki.
W razie potrzeby odgrodzić miejsce pracy irozstawić
tabliczki znapisem UWAGA.
Rys. 11
Rys. 12
(a)
(b)
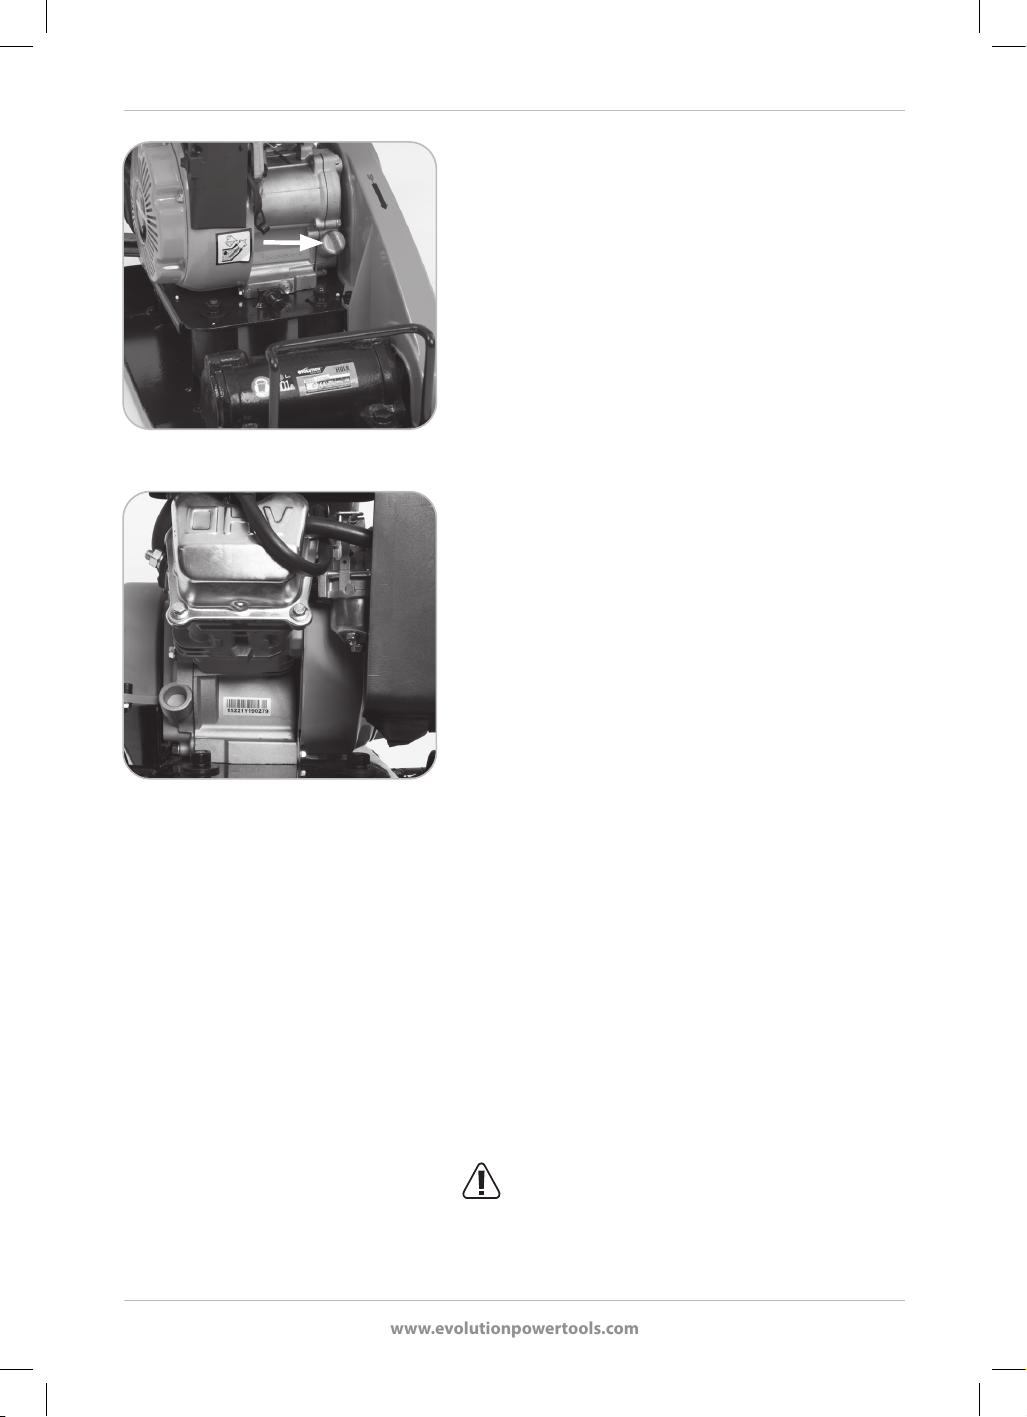
www.evolutionpowertools.com
168
• Przed rozpoczęciem zagęszczania zaplanować swoją
pracę idrogę, którą ma przebyć maszyna.
• Przed rozpoczęciem pracy sprawdzić obszar roboczy
iusunąć lub winny sposób zneutralizować wszelkie
przeszkody, które mogą stanowić zagrożenie.
• Wyposażyć się we wszystkie właściwe środki ochrony
indywidualnej iwiedzieć, jak ich używać.
• Zagęszczarka będzie samoistnie poruszać się do
przodu. Operator może delikatnie kierować maszyną za
pomocą uchwytu. Operator powinien trzymać uchwyt
antywibracyjny obiema rękami, aręce powinny być
ustawione jak najdalej od siebie.
• Do zagęszczenia materiału do pożądanej gęstości może
być wymagane kilka przejazdów przez obszar roboczy.
• Jeśli obszar roboczy jest pochyły, pracować wgórę
iwdół pochyłej powierzchni, anie wpoprzek.
KONSERWACJA
H320-P
Regularna konserwacja jest niezbędna, aby utrzymać
maszynę ijej akcesoria wstanie nadającym się do
użytku. Zalecamy, aby serwisowanie ikonserwację
silnika spalinowego przeprowadzali jedynie operatorzy
kompetentni wtym zakresie. Wrazie wątpliwości zlecić
serwisowanie urządzenia wautoryzowanym centrum
serwisowym Evolution.
1. Wymiana oleju silnikowego
Olej silnikowy wymienić po pierwszym okresie
„docierania” iwodstępach czasu określonych
wharmonogramie przeglądów.
Uwaga: Olej silnikowy łatwiej jest wymienić, gdy silnik
został rozgrzany iolej jest ciepły.
• Upewnić się, że silnik jest ustawiony na twardej, równej
powierzchni.
• Zdjąć korek wlewu oleju. (Rys. 13)
• Umieścić pod silnikiem odpowiednią miskę do zbierania
oleju.
• Wykręcić korek spustowy oleju, aby olej mógł całkowicie
spłynąć zsilnika. (Rys. 14)
OSTRZEŻENIE: Uwaga. Kontakt ze zużytym
olejem silnikowym może być szkodliwy. Olej może
być bardzo gorący (ryzyko poparzenia), auniektórych
operatorów może wystąpić podrażnienie, jeśli olej zabrudzi
odsłoniętą skórę. Operator powinien rozważyć założenie
Rys. 13
Rys. 14

www.evolutionpowertools.com
169
Rys. 15
rękawic ochronnych dla mechaników, jeśli są dostępne.
Skórę zabrudzoną olejem jak najszybciej umyć mydłem
orazdużą ilością czystej wody.
• Sprawdzić korek spustowy oleju ijego uszczelkę.
• Sprawdzić korek wlewu oleju ijego uszczelkę typu
O-ring.
• Wymienić wszystkie części nie nadające się do naprawy.
• Ponownie założyć korek spustowy oleju imocno
dokręcić.
• Napełnić silnik olejem silnikowym odpowiedniej klasy
do właściwego poziomu.
• Założyć korek wlewu oleju.
• Sprawdzić, czy nie ma wycieków ani rozlanych płynów,
iw razie potrzeby je usunąć.
Uwaga: Zużyty olej silnikowy powinien być utylizowany
wsposób bezpieczny dla środowiska. Sprawdzić, gdzie
znajduje się najbliższy zakład recyklingu zużytego oleju.
2. Świeca zapłonowa – kontrola iwymiana
Po około 50godzinach pracy wyjąć świecę zapłonową
wcelu jej sprawdzenia, wyczyszczenia iponownego
zamontowania.
Aby wyjąć iponownie zamontować świecę zapłonową:
• Upewnić się, że silnik jest wyłączony, akurek paliwa
znajduje się wpozycji „OFF”.
OSTRZEŻENIE: Przed rozpoczęciem procedury
wykręcania świecy zapłonowej silnik powinien ostygnąć.
• Wyciągnąć przewód HT ze świecy zapłonowej.
• Za pomocą nasadki do świec zapłonowych (wzestawie)
wykręcić świecę zapłonową. (Rys. 15)
Sprawna świeca zapłonowa wdobrym stanie powinna mieć
lekko opalony osad na nosku. Usunąć ten osad za pomocą
sztywnej mosiężnej szczotki drucianej.
• Sprawdzić szczelinę elektrodową wtyczki za pomocą
zestawu czujników.
• Wrazie potrzeby przeprowadzić regulację. Wymiar
szczeliny jest podany wspecykacji urządzenia H320-P.
• Ponownie zamontować świecę zapłonową. Dopilnować,
aby świeca zapłonowa prawidłowo weszła wgwint
wgłowicy cylindra.

www.evolutionpowertools.com
170
• Ręcznie dokręcić świecę zapłonową za pomocą gniazda
świecy zapłonowej (wzestawie).
• Wsunąć pokrętło (wzestawie) przez otwór wkońcówce
gniazda świecy zapłonowej.
• Ustawić pokrętło tak, aby w równym stopniu wystawało
zobu stron gniazda świecy zapłonowej.
• Na koniec wykonaj uszczelnienie gazowe, obracając
gniazdo świecy zapłonowej od ¼ do ½ obrotu. Ten
ostatni ułamek obrotu przygniecie podkładkę świecy
zapłonowej iuszczelni ją gazowo. Nie dokręcać
nadmiernie świecy zapłonowej.
• Podłączyć ponownie przewód HT do górnej części
świecy zapłonowej.
3. Filtr powietrza
OSTRZEŻENIE: Nigdy nie uruchamiać silnika bez
założonego elementu ltrującego powietrze.
Po około 50godzinach użytkowania sprawdzić stan ltra
powietrza.
Uwaga: Filtr powietrza może wymagać częstszej uwagi,
jeśli środowisko pracy jest szczególnie zapylone.
Aby wyjąć:
• Upewnić się, że silnik jest wyłączony, akurek paliwa
znajduje się wpozycji „OFF”. Silnik powinien być zimny.
• Odkręcić nakrętki motylkowe na pokrywie obudowy
ltra powietrza izdjąć ją. (Rys. 16)
• Części te starannie przechowywać wcelu późniejszego
ponownego zamontowania.
• Wyjmij element ltrujący powietrze zobudowy wcelu
sprawdzenia. (Rys. 17) Jeśli element papierowy ltra
powietrza wykazuje oznaki silnego odbarwienia
izatkania przez brud, kurz itp. należy go wymienić.
Aby ponownie zamontować:
• Zamontować element wobudowie ltra powietrza.
Nowy element będzie pasować wobie strony.
• Założyć pokrywę obudowy ltra powietrza.
• Założyć ponownie nakrętki motylkowe iupewnić
się, że pokrywa jest prawidłowo osadzona, anakrętki
motylkowe są dokładnie dokręcone.
4. Filtr wlewu zbiornika paliwa
Od czasu do czasu wizualnie sprawdzić stan ltra
wlewu zbiornika paliwa (najlepiej podczas tankowania).
Wprzypadku jakichkolwiek oznak nagromadzenia się
osadów wyjąć ltr ze zbiornika iwyczyścić.
Rys. 16
Rys. 17

www.evolutionpowertools.com
171
• Wyczyścić ltr przyjaznym dla środowiska środkiem
odtłuszczającym na bazie wody iwrazie potrzeby
przedmuchać drobną siatkę czystym, suchym
sprężonym powietrzem.
• Przed ponownym zamontowaniem pozostawić do
całkowitego wyschnięcia.
• Podczas ponownego montażu upewnić się, że
2wycięcia na górnej krawędzi ltra pokrywają się
zwycięciami wszyjce wlewu zbiornika paliwa.
5. Sprawdzanie naprężenia pasa napędowego
OSTRZEŻENIE: Procedurę tę wykonywać tylko,
gdy maszyna jest zimna, silnik wyłączony, aosłona
świecy zapłonowej zdjęta.
Naprężenie pasa napędowego sprawdzić po pierwszych
4godzinach pracy, anastępnie zgodnie zharmonogramem
rutynowych przeglądów.
Aby sprawdzić naprężenie pasa napędowego:
• Zdjąć osłonę pasa, odkręcając trzy (3) śruby złbem
gniazdowym (Rys. 18) za pomocą klucza imbusowego
iklucza płaskiego (brak wzestawie), iodłożyć je
wbezpieczne miejsce.
Uwaga: Te trzy (3) śruby złbem gniazdowym mają
konkretne umiejscowienie. Zapamiętać położenie każdej ze
śrub izwiązanych znią akcesoriów wtrakcie wyjmowania
zmaszyny, aby można je było założyć zpowrotem
wodpowiednich miejscach.
• Ugięcie pod wpływem lekkiego nacisku palca
wśrodkowym punkcie pasa powinno wynosić około
5/6mm (1/4 cala).
Uwaga: Jednostka silnikowa urządzenia H320 jest
umieszczona nad czterema (4) szczelinami na płycie
montażowej silnika. Przez te cztery szczeliny przechodzą
cztery (4) śruby mocujące silnik, wkręcone od spodu
wpodstawę bloku skrzyni korbowej silnika. Taki układ
umożliwia zmianę położenia silnika na płycie.
• Poluzować cztery (4) śruby złbem sześciokątnym za
pomocą odpowiedniego klucza (brak wzestawie).
• Przesunąć silnik do tyłu lub do przodu, aby zmienić
naprężenie pasa napędowego. Zprzodu silnika znajduje
się śruba regulacyjna (Rys. 19) ułatwiająca precyzyjne
ustawienie silnika.
• Po uzyskaniu prawidłowego naprężenia
mocno dokręcić śruby mocujące silnik.
Fig. 18
Rys. 19

www.evolutionpowertools.com
172
OSTRZEŻENIE: Nie regulować śruby regulacyjnej/trzymającej bez poluzowania czterech śrub
mocujących, ponieważ może to spowodować uszkodzenie obudowy silnika.
Uwaga: Silnik powinien pozostać prostopadły iustawiony wrównej linii na płycie montażowej. Jeśli
silnik znalazłby się wlekko skręconej pozycji na płycie montażowej, pas napędowy ikoła pasowe byłyby
narażone na niebezpieczeństwo i szybko uległyby zużyciu.
• Założyć osłonę pasa napędowego idokładnie dokręcić trzy (3) śruby złbem gniazdowym wich
pierwotnych położeniach.
6. System rozruchowy
Szczeliny wentylacyjne powinny być czyste iniezablokowane.
Usunąć wszelkie elementy obce ze szczelin wentylacyjnych.

www.evolutionpowertools.com
173
H320-P
RUTYNOWE PRZEGLĄDY:
HARMONOGRAM
Po pierwszych
4godzinach
Co 20 godzin
lub co miesiąc
Co 50godzin
lub 3razy
wmiesiącu
Co 100godzin
lub 6razy
wmiesiącu
Kontrola poziomu oleju
silnikowego
● ●
Wymiana oleju silnikowego
●
(tylko pierwsza
wymiana)
●
Kontrola ltra powietrza
●
Wymiana ltra powietrza
●
Kontrola świecy zapłonowej
●
Naprężenie pasa napędo-
wego
● ●
Kontrola/czyszczenie ltra
paliwa
●
KONSERWACJA H320-E
Uwaga: Przed przystąpieniem do czynności konserwacyjnych należy upewnić się, że urządzenie jest
wyłączone iodłączone od źródła zasilania.
Należy regularnie sprawdzać, czy wszystkie elementy zabezpieczające oraz osłony działają poprawnie.
Urządzenia można używać tylko wtedy, gdy wszystkie elementy zabezpieczające i osłony są w pełni
funkcjonalne.
Wszystkie łożyska silnika w tym urządzeniu posiadają dożywotni zapas smaru. Dodatkowe smarowanie
nie jest wymagane.
Plastikowe części urządzenia należy czyścić czystą, lekko zwilżoną szmatką. Nie używać rozpuszczalników
ani podobnych produktów, które mogłyby uszkodzić plastikowe części.
OSTRZEŻENIE: Nie wolno podejmować prób czyszczenia narzędzia poprzez wkładanie
spiczastych przedmiotów wotwory wobudowie urządzenia, itp. Otwory wentylacyjne maszyny
czyścić za pomocą sprężonego powietrza.

www.evolutionpowertools.com
174
ROZWIĄZYWANIE PROBLEMÓW ZURZĄDENIEM H320-P
PROBLEM PRZYCZYNA MOŻLIWE ROZWIĄZANIE
Silnik nie
chce się
uruchomić.
Brak paliwa.
Wyłączony silnik.
Zepsuta świeca zapłonowa.
Zimny silnik.
Silnik zalany benzyną.
Filtr powietrza zatkany lub
zanieczyszczony olejem.
Poważna usterka.
Odkręcić kurek paliwa.
Napełnić zbiornik paliwa.
Włączyć silnik.
Wyjąć, wyczyścić, zresetować iponownie
zamontować wtyczkę.
Upewnić się, że dławik jest prawidłowo
ustawiony.
Pozostawić na pięć (5) minut.
Otworzyć dławik, całkowicie otworzyć
przepustnicę
ispróbować ponownie.
Wyjąć świecę zapłonową, wyczyścić iponownie
zamontować.
Próbować, aż silnik zapali.
Wymienić ltr powietrza.
Wcelu uzyskania dalszych porad należy
skontaktować się zprzedstawicielem lub rmą
Evolution Power Tools
.
Maszyna nie
wibruje.
Nieprawidłowe naprężenie
pasa.
Zablokowany ltr powietrza.
Uszkodzony zespół
mimośrodowy.
Zbyt mała prędkość obrotowa
silnika.
Wyregulować naprężenie pasa.
Wymienić ltr powietrza.
Wymienić zespół mimośrodowy.
Zwiększyć nieznacznie obroty silnika.

www.evolutionpowertools.com
175
ROZWIĄZYWANIE PROBLEMÓW ZURZĄDENIEM H320-E
PROBLEM PRZYCZYNA MOŻLIWE ROZWIĄZANIE
Maszyna
nie chce się
uruchomić.
Zasilanie nie jest włączone.
Przepalony bezpiecznik we
wtyczce.
Niewciśnięty przycisk
bezpiecznego uruchomienia
uniemożliwiający
włączenie/wyłączenie.
Uszkodzony lub
zepsuty przewód zasilający.
Włączyć zasilanie wgniazdku.
Wymienić bezpiecznik isprawdzić zasilanie.
Wcisnąć przycisk bezpiecznego uruchomienia,
a następnie pociągnąć dźwignię uruchamiającą.
Zlecić kompetentnemu technikowi wymianę
uszkodzonego przewodu na identyczny typ.
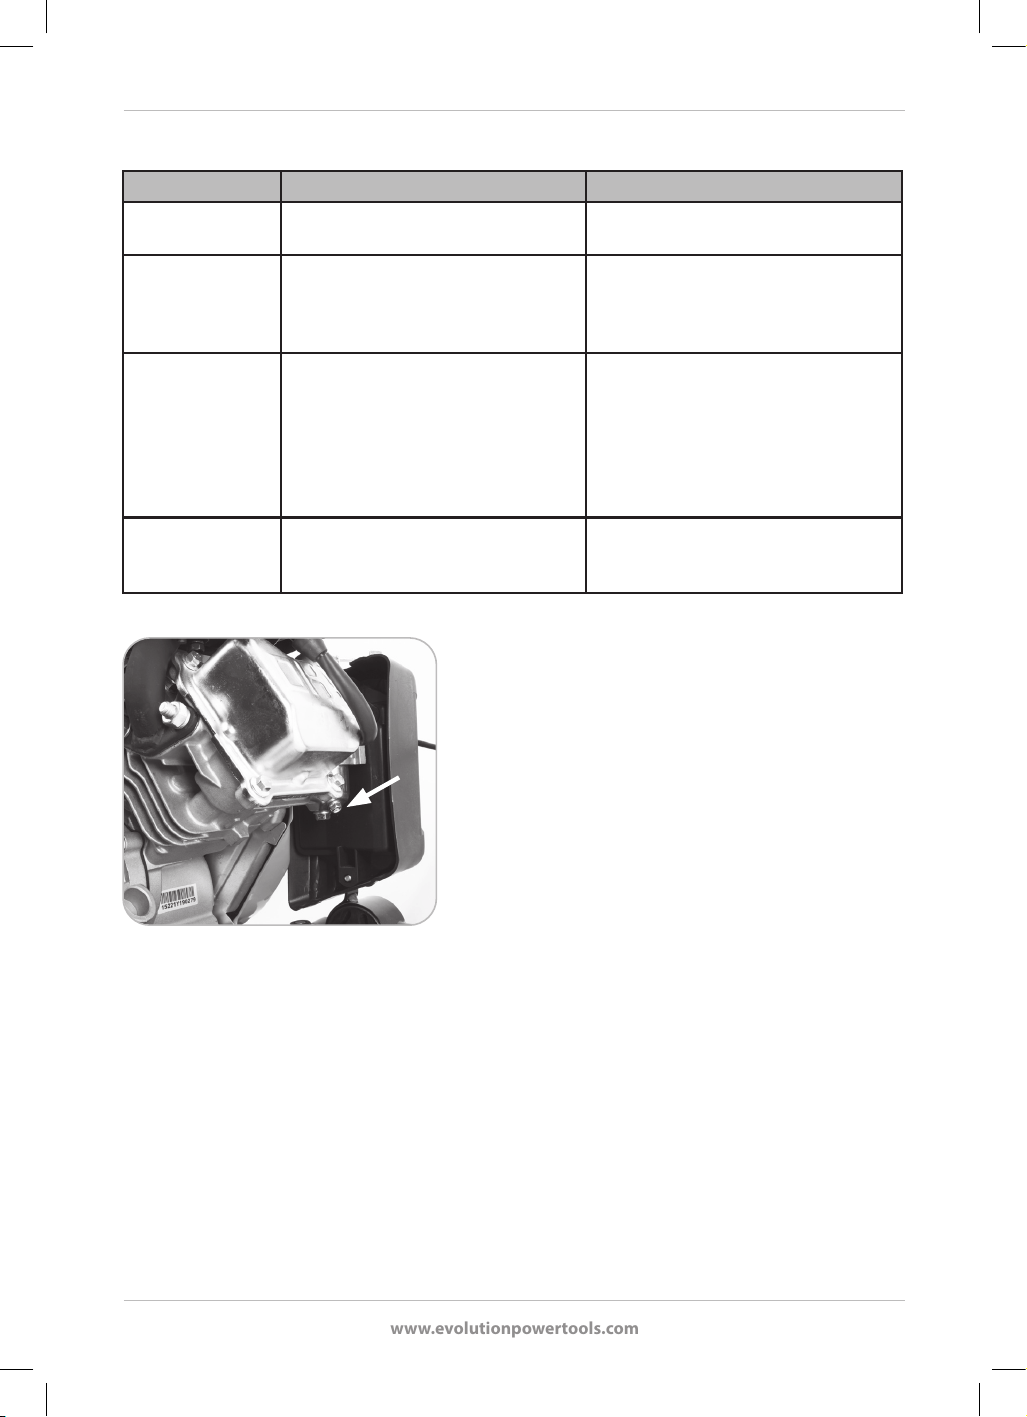
www.evolutionpowertools.com
176
OGÓLNA INSTRUKCJA ROZWIĄZYWANIA PROBLEMÓW
PROBLEM PRZYCZYNA MOŻLIWE ROZWIĄZANIE
Uszkodzona
kostka brukowa.
Płyta wbezpośrednim kontakcie
zkostką brukową.
Zamontować podkładkę do kostki
brukowej.
Łuszczenie się
(laminowanie)
nawierzchni
bitumicznej.
Nadmierne zagęszczenie. Zdjąć iułożyć ponownie.
Niska prędkość
ruchu.
Zbyt gruba warstwa (płyta się
zapada).
Zbyt niskie obroty silnika.
Za wysoka lub za niska wilgotność
materiału.
Usunąć część materiału, aby
zmniejszyć grubość warstwy.
Zwiększyć nieznacznie obroty silnika.
Usunąć materiał iskorygować
wilgotność.
Urządzenie
H320-P nie
porusza się.
Zbyt niskie obroty silnika. Zwiększyć nieznacznie obroty silnika.
Rys. 20
PRZECHOWYWANIE URZĄDZENIA H320-P PRZEZ
DŁUŻSZY OKRES CZASU
Jeżeli urządzenie Evolution nie będzie używane przez okres
4miesięcy lub dłużej (np. wokresie zimowym), operator
powinien rozważyć przygotowanie maszyny do okresu
długiego przechowywania. Pozwoli to utrzymać silnik w
optymalnym stanie do ponownego uruchomienia wrazie
potrzeby.
• Spuść całe paliwo ze zbiornika paliwa igaźnika do
odpowiedniego zatwierdzonego pojemnika.
• Kurek spustowy można znaleźć pod miską pływakową
gaźnika. Poluzować ten kurek, aby umożliwić spływanie
paliwa zmaszyny. (Rys. 20)
• Dokręcić kurek spustowy, gdy całe paliwo zostanie
usunięte.
• Wykręcić świecę zapłonową.
• Wlać około jedną łyżkę stołową czystego oleju
silnikowego do otworu świecy zapłonowej.
• Upewnić się, że wyłącznik zapłonu silnika znajduje się
wpozycji „OFF”.
• Delikatnie pociągnąć kilka razy za rozrusznik odrzutowy.
• Wkręcić świecę zapłonową.
• Delikatnie pociągnąć za rozrusznik odrzutowy aż do
wyczucia oporu (będzie to oznaczało, że tłok jest na
suwie sprężania przy zamkniętych obu zaworach).
Puścić rozrusznik odrzutowy.
• Silnik przechowywać wbezpiecznym, suchym idobrze

www.evolutionpowertools.com
177
wentylowanym miejscu pod osłoną, aby zapobiec
osiadaniu na maszynie kurzu, gruzu itp.
ZWROT URZĄDZENIA H320-P
Wprzypadku konieczności zwrotu maszyny H320-P do
rmy Evolution wykonać poniższe czynności, aby zapewnić
bezpieczeństwo rmie kurierskiej.
1. Całkowicie opróżnić maszynę zpaliwa ze zbiornika
igaźnika. (Rys. 20)
2. Całkowicie spuścić olej silnikowy. (Rys. 14)
3. Rozmontować uchwyt poprzez odkręcenie śrub. Zebrać
wszystkie zdemontowane części. (Rys. 2)
4. Bezpiecznie zapakować maszynę wkarton, najlepiej
woryginalne opakowanie.
Uwaga: Maszyna zostanie zwrócona bez paliwa ioleju.
Przed uruchomieniem silnika upewnić się, że urządzenie
jest napełnione paliwem iolejem.
Korzystanie z opcjonalnych akcesoriów Evolution
(dostępnych do kupienia przez klienta)
OCHRONA ŚRODOWISKA
Odpady produktów elektrycznych nie powinny być
utylizowane razem zodpadami gospodarstwa domowego.
Jeżeli to możliwe, poddać utylizacji. Wskazówki dotyczące
recyclingu można uzyskać od władz lokalnych lub
dystrybutora.

www.evolutionpowertools.com
178
DEKLARACJA ZGODNOŚCI WE
Zgodność z EN ISO 17050-1:2004
Producent artykułu objętego niniejszą deklaracją:
UK: Evolution Power Tools Ltd. Venture One, Longacre Close, Holbrook Industrial Estate, Sheeld, S20 3FR.
FR: Evolution Power Tools SAS. 61 Avenue Lafontaine, 33560, Carbon-Blanc, Bordeaux, Francja.
Producent deklaruje niniejszym, że urządzenie, jak opisano w niniejszej deklaracji, spełnia wszystkie
odpowiednie przepisy dyrektywy maszynowej i innych odpowiednich dyrektyw wymienionych poniżej.
Producent oświadcza, że urządzenie, jak opisano w niniejszym oświadczeniu, w stosownych przypadkach
spełnia odpowiednie przepisy w zakresie ochrony zdrowia i bezpieczeństwa.
Dyrektywy objęte niniejszą deklaracją zostały wyszczególnione poniżej:
1907/2006 Rejestracja, ocena, udzielanie zezwoleń i stosowane ograniczenia w zakresie chemikaliów –
rozporządzenie REACH WE nr 1907/2006, załącznik XVII
2006/42/EC. Dyrektywa Maszynowa.
2014/30/EU. Dyrektywa kompatybilności elektromagnetycznej.
2011/65/EU. &
(EU)2015/863.
Dyrektywa w sprawie ograniczenia stosowania niektórych niebezpiecznych substancji w sprzęcie
elektrycznym i elektronicznym (dyrektywa RoHS).
2000/14/EU & 2005/88/EC Dyrektywa ws. emisji hałasu
I jest zgodne z obowiązującymi wymaganiami określonymi w następujących dokumentach
EN 500-1:2006+A1• EN 500-4:2011• EN ISO 3744: 1995 • EN ISO 14982:2009
Dane produktu
Opis: H320-P
Nr modelu Evolution: 015-0001, 015-0013
Numer fabryczny modelu: XZ-10C/JF152
Nazwa marki: EVOLUTION
Dokumentacja techniczna wykazująca, że produkt spełnia wymagania dyrektywy, została opracowana ijest dostępna
do wglądu dla właściwych organów egzekwowania prawa oraz potwierdza, że nasza dokumentacja techniczna zawiera
dokumenty wymienione powyżej oraz że są to właściwe normy dla produktu zgodnie zpowyższymi informacjami.
Imię, nazwisko iadres posiadacza dokumentów technicznych.
Podpis: Drukiem: Barry Bloomer – dyrektor generalny
Data: 23-08-2022 r.
UK: Evolution Power Tools Ltd. Venture One, Longacre Close, Holbrook Industrial Estate, Sheeld, S20 3FR.
FR: Evolution Power Tools SAS. 61 Avenue Lafontaine, 33560, Carbon-Blanc, Bordeaux, Francja.
®
H320-P

www.evolutionpowertools.com
179
DEKLARACJA ZGODNOŚCI WE
Zgodność z EN ISO 17050-1:2004
Producent artykułu objętego niniejszą deklaracją:
UK: Evolution Power Tools Ltd. Venture One, Longacre Close, Holbrook Industrial Estate, Sheeld, S20 3FR.
FR: Evolution Power Tools SAS. 61 Avenue Lafontaine, 33560, Carbon-Blanc, Bordeaux, Francja.
Producent deklaruje niniejszym, że urządzenie, jak opisano w niniejszej deklaracji, spełnia wszystkie
odpowiednie przepisy dyrektywy maszynowej i innych odpowiednich dyrektyw wymienionych poniżej.
Producent oświadcza, że urządzenie, jak opisano w niniejszym oświadczeniu, w stosownych przypadkach
spełnia odpowiednie przepisy w zakresie ochrony zdrowia i bezpieczeństwa.
Dyrektywy objęte niniejszą deklaracją zostały wyszczególnione poniżej:
1907/2006 Rejestracja, ocena, udzielanie zezwoleń i stosowane ograniczenia w zakresie chemikaliów –
rozporządzenie REACH WE nr 1907/2006, załącznik XVII
2006/42/EC. Dyrektywa Maszynowa.
2014/30/EU. Dyrektywa kompatybilności elektromagnetycznej.
2011/65/EU. &
(EU)2015/863.
Dyrektywa w sprawie ograniczenia stosowania niektórych niebezpiecznych substancji w sprzęcie
elektrycznym i elektronicznym (dyrektywa RoHS).
2002/96/EC zmieniona przez dyrektywę 2003/108/WE wsprawie zużytego sprzętu elektrycznego ielektronicznego
(WEEE).
2000/14/EU & 2005/88/EC Dyrektywa ws. emisji hałasu
I jest zgodne z obowiązującymi wymaganiami określonymi w następujących dokumentach
EN 500-1:2006+A1 • EN 500-4:2011 • EN 60204-1:2018 • EN IEC 55014-1:2021 • EN ISO 3744:1995
EN IEC 55014-2:2021 • EN IEC 61000-3-2:2019/A1:2021 • EN 61000-3-3:2013/A2:2021
Dane produktu
Opis: H320-E
Nr modelu Evolution: 015-0002, 015-0004, 015-0008, 015-0010
Numer fabryczny modelu: XZ-5A
Nazwa marki: EVOLUTION
Napięcie: 220–240V ~ 50Hz
Moc wejściowa: 300W
Dokumentacja techniczna wykazująca, że produkt spełnia wymagania dyrektywy, została opracowana ijest dostępna
do wglądu dla właściwych organów egzekwowania prawa oraz potwierdza, że nasza dokumentacja techniczna zawiera
dokumenty wymienione powyżej oraz że są to właściwe normy dla produktu zgodnie zpowyższymi informacjami.
Imię, nazwisko iadres posiadacza dokumentów technicznych.
Podpis: Drukiem: Barry Bloomer – dyrektor generalny
Data: 23-08-2022 r.
UK: Evolution Power Tools Ltd. Venture One, Longacre Close, Holbrook Industrial Estate, Sheeld, S20 3FR.
FR: Evolution Power Tools SAS. 61 Avenue Lafontaine, 33560, Carbon-Blanc, Bordeaux, Francja.
®
H320-E
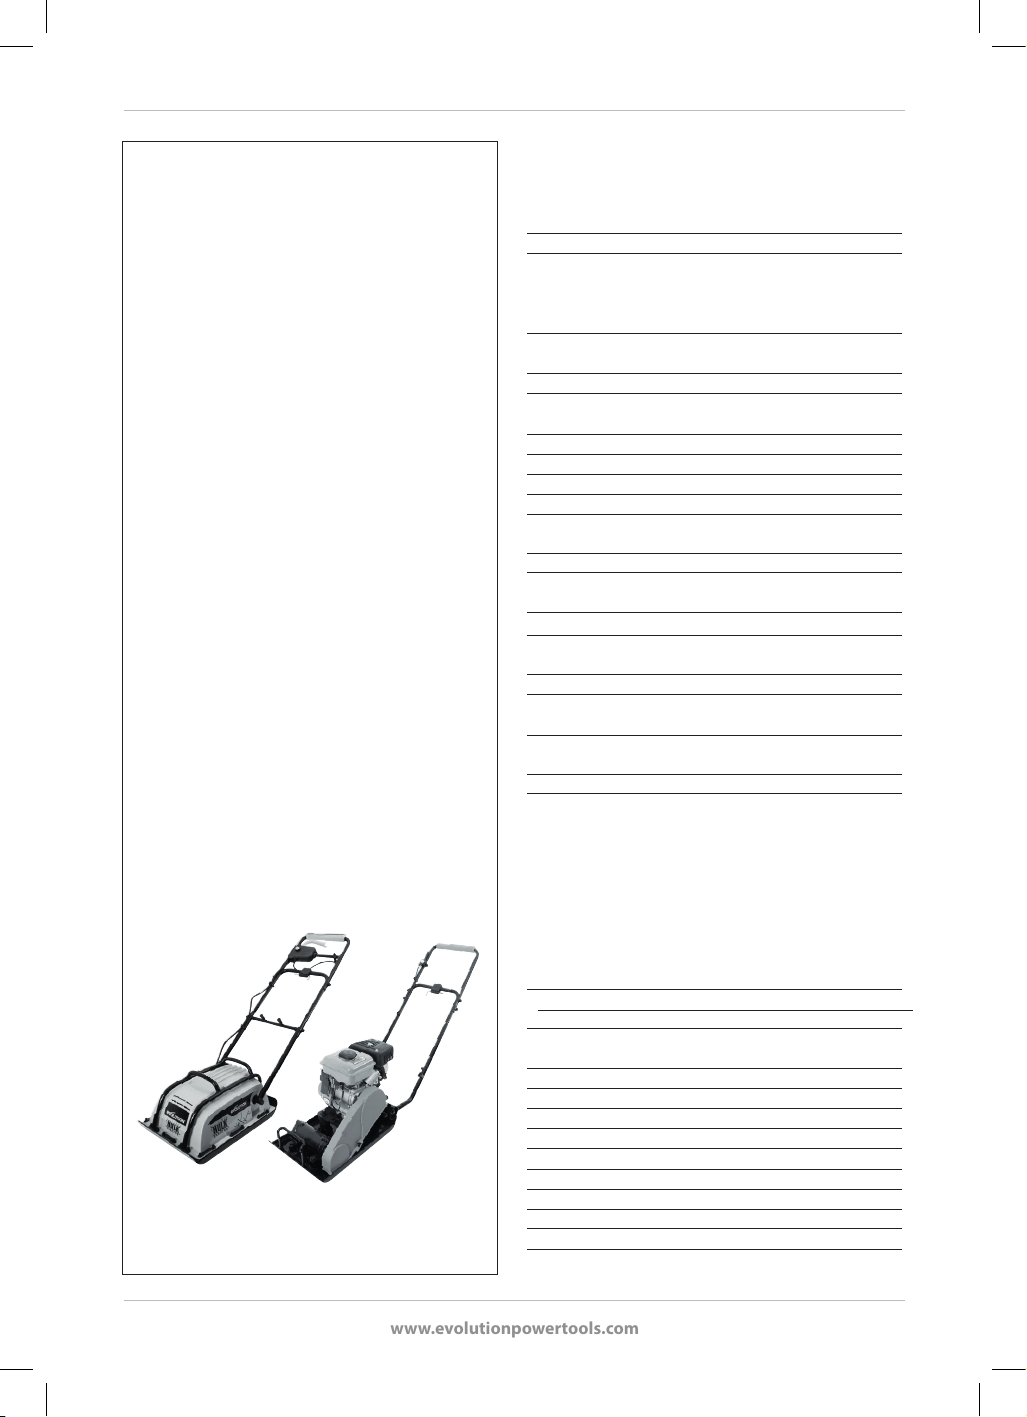
www.evolutionpowertools.com
180
Modelspecicaties
Evolution Power Tools behoudt zich het recht voor om
verbeteringen en wijzigingen aan te brengen aan
ontwerp en technische specicaties van dit
product zonder voorafgaande kennisgeving.
Deze handleiding is oorspronkelijk in het Engels
geschreven.
Motor EU/UK 220-240V~50Hz 300W, US 120V~60Hz 1,25A
Motorsnelheid (min
-1
) EU/UK 2860 (onbelast), US 3450 (onbelast)
Verdichtingskracht (kN) 5
Aanbevolen maximum 30
Gebruikstijd operator (minuten)
Geluidsvermogensniveau (LwA) 88,5 dB(A) K=2,09 dB(A)
Geluidsdrukniveau (LpA) 83,3 dB(A) K= 3 dB(A)
Trilling (m/sec
2
) 18,496 K = 1,5
Nettogewicht kg (lb) 25,4 (56)
Hoogte handgreep (tijdens gebruik) mm (inch) 920 (36)
Machinebereik (tijdens bewerkingen) mm (inch) 1290 (51)
Breedte voetafdruk mm (inch) 320 (12-1/2)
Kabellengte meters (voet) 10 (33)
Isolatieklasse I
IP44
H320-P
H320-E
Motortype eencilinder 4-takt OHV
Motorvermogen 1,7 kW 3600 min
-1
Bougievervanging LD E6TC (verkrijgbaar bij Evolution)
NGK BP6HS
CHAMPION L87YCC
AC DELCO 42FS
Tussenruimte bougie 0,028 – 0,031 inch
0,7 – 0,8 mm
Luchtlter-vervanging Evolution H1S58
Klepspelingen (koud) Inlaat 0,15 mm 0,006 inch
Uitlaat 0,20 mm 0,008 inch
Verdichtingskracht (kN) 10
Trilling (m/sec
2
) 20,211 K = 1,5
Geluidsvermogensniveau (LwA) 97,9 dB(A) K=2,42 dB(A)
Geluidsdrukniveau (LpA) 90,5 dB K= 3 dB(A)
Gebruikstijd operator (min) 20
Aanbevolen maximum
Olietype SAE 10W-30/40
Oliecapaciteit (liter) 0,25
( oz) 8,45
Brandstoftype E5 & E10 Loodvrije benzine
Brandstofcapaciteit (liter) 1,2
( oz) 40,57
Nettogewicht kg (lb) 32,45 (71,5)
Hoogte handgreep (tijdens operaties - 1020 (40)
verlengde handgreep gemonteerd) mm (inch)
Machinebereik (tijdens operaties – 1290 (51)
verlengde handgreep gemonteerd) mm (inch)
Breedte voetafdruk mm (inch) 320 (12-1/2)

www.evolutionpowertools.com
181
BELANGRIJK
Lees deze gebruiksaanwijzing en
veiligheidsvoorschriften zorgvuldig en in zijn
geheel door.
Bent u onzeker over hoe u bepaalde functies van
dit gereedschap moet gebruiken, dan is het voor
uw eigen veiligheid aanbevolen de relevante
technische hulplijn te raadplegen. U vindt het
nummer hiervan op de website van Evolution
Power Tools. We hebben meerdere hulplijnen
binnen onze wereldwijde organisatie. U kunt
voor technische hulp echter ook uw leverancier
raadplegen.
WEB www.evolutionpowertools.com/register
Gefeliciteerd met de aankoop van een
Evolution Power Tools machine. Registreer uw
product online, zoals uitgelegd in de A5-folder
voor online garantieregistratie die bij de
machine is gevoegd. U kunt de QR-code op de
A5-folder ook scannen met een smartphone.
Dit stelt u in staat om de garantieperiode van
uw machine te valideren op de Evolution-
website door uw gegevens in te voeren. Dit ten
behoeve van snelle service, mocht u deze ooit
nodig hebben. Wij danken u hartelijk dat u voor
een product van Evolution Power Tools hebt
gekozen.
EVOLUTION BEPERKTE GARANTIE.
EVOLUTION POWER TOOLS BEHOUDT ZICH
HET RECHT VOOR OM VERBETERINGEN EN
AANPASSINGEN AAN HET PRODUCT DOOR
TE VOEREN ZONDER VOORAFGAANDE
KENNISGEVING.
DE DETAILS VAN DE ALGEMENE
VOORWAARDEN VAN DE GARANTIE KUNT
U RAADPLEGEN IN DE FOLDER VOOR
GARANTIEREGISTRATIE EN/OF OP DE
VERPAKKING.
Binnen de garantieperiode, vanaf de
oorspronkelijke aankoopdatum, zal Evolution
Power Tools alle goederen repareren of vervangen
of die defect zijn als gevolg van materiaalfouten of
gebrekkig vakmanschap.
Deze garantie vervalt wanneer het teruggezonden
gereedschap gebruikt is zonder de aanbevelingen
in de gebruiksaanwijzing in acht te nemen, of
als de machine beschadigd is door een ongeluk,
nalatigheid of verkeerd onderhoud. Deze
garantie is niet van toepassing op machines en/
of onderdelen die gewijzigd, veranderd of op
enigerlei wijze aangepast zijn, of die gebruikt
zijn in strijd met de aanbevolen vermogens
en specicaties. Elektrische componenten
zijn onderworpen aan de garanties van de
respectieve fabrikanten. Alle geretourneerde
defecte goederen dienen franco naar Evolution
Power Tools worden gezonden. Evolution Power
Tools behoudt zich het recht voor producten
optioneel te repareren dan wel te vervangen door
eenzelfde of een gelijkwaardig product. Er bestaat
geen garantie, schriftelijk noch mondeling, voor
verbruiksaccessoires zoals (volgende lijst is niet
volledig) zaagbladen, messen, boren, beitels en
schoepen enz. In geen geval zal Evolution Power
Tools aansprakelijk zijn voor verlies of schade die
het directe of indirecte gevolg zijn van het gebruik
van onze producten of van enige andere oorzaak.
Evolution Power Tools is niet aansprakelijk
voor eventuele gemaakte kosten voor zulke
goederen of voor eventuele gevolgschade.
Geen verantwoordelijke, medewerker of
vertegenwoordiger van Evolution Power Tools is
bevoegd om mondeling uitspraken te doen over
de geschiktheid van voorgaande voorwaarden
dan wel om hiervan afstand te doen. Dergelijke
mondelinge uitspraken hebben voor Evolution
Power Tools dan ook geen bindend karakter.
Vragen met betrekking tot deze beperkte
garantie dienen aan het hoofdkantoor van
het bedrijf te worden gericht. U kunt ook de
betreende hulplijn bellen.
ALGEMENE VEILIGHEIDSINSTRUCTIES VOOR
ELEKTRISCH GEREEDSCHAP
(Deze algemene veiligheidsinstructies voor
elektrisch gereedschap zijn gespeciceerd in BS EN
500-1:2006+A1 & EN 500-4:2011
WAARSCHUWING: Lees alle
veiligheidswaarschuwingen en-
instructies.

www.evolutionpowertools.com
182
Het niet opvolgen van waarschuwingen en
instructies kan leiden tot een elektrische schok,
brand en/of persoonlijk letsel.
Bewaar alle waarschuwingen en instructies
voor toekomstige raadpleging.
De term 'elektrisch gereedschap' in de
waarschuwingen verwijst naar door stroom
(met netsnoer) of door een batterij/accu gevoed
(snoerloos) elektrisch gereedschap.
1) Algemene veiligheidswaarschuwingen
voor elektrisch gereedschap [Veiligheid op de
werkplek]
a) Houd de werkplek schoon en goed verlicht.
Rommelige of donkere ruimtes vragen om
ongelukken.
b) Gebruik elektrisch gereedschap niet in
een explosieve omgeving, zoals in de buurt
van ontvlambare vloeistoen, gassen of stof.
Elektrische gereedschappen maken vonken en
kunnen het stof of de dampen doen ontvlammen.
c) Houd kinderen en omstanders op een veilige
afstand tijdens het bedienen van elektrisch
gereedschap. Aeiding kan tot controleverlies
leiden.
2) Algemene veiligheidswaarschuwingen voor
elektrisch gereedschap [Elektrische veiligheid]
a) Stekkers van elektrisch gereedschap
moeten overeenstemmen met het stopcontact
. Pas de stekker nooit aan. Gebruik geen
adapterstekkers bij geaarde elektrische
gereedschappen. Ongewijzigde stekkers en
overeenkomende stopcontacten verminderen het
risico op een elektrische schok.
b) Vermijd lichamelijk contact met geaarde
oppervlakken zoals buizen, radiatoren,
fornuizen en koelkasten. Er bestaat een
verhoogd risico op elektrische schokken als uw
lichaam geaard is.
c) Stel elektrisch gereedschap niet bloot aan
regen of een natte omgeving. Water in een
elektrisch gereedschap verhoogt het risico op
elektrische schokken.
d) Misbruik het snoer niet. Gebruik het snoer
nooit om elektrisch gereedschap te dragen, te
trekken of om de stekker uit het stopcontact te
halen. Houd het snoer uit de buurt van hitte,
olie, scherpe randen of bewegende delen.
Beschadigde of in de war geraakte snoeren
vergroten het risico op elektrische schokken.
e) Bij gebruik buitenshuis van elektrisch
gereedschap dient u een verlengsnoer te
gebruiken dat hiervoor geschikt is. Een
snoer dat geschikt is voor gebruik buitenshuis
vermindert het risico op elektrische schokken.
f) Indien het onvermijdbaar voor u is om
elektrisch gereedschap in een vochtige
omgeving te gebruiken, kunt u het best
een voeding met aardlekschakelaar (RDC)
gebruiken. Het gebruik van een aardlekschakelaar
vermindert het risico op elektrische schokken.
3) Algemene veiligheidswaarschuwingen
voor elektrisch gereedschap [Persoonlijke
veiligheid].
a) Blijf alert, let op bij wat u doet en gebruik
uw gezonde verstand bij het bedienen
van elektrisch gereedschap. Gebruik geen
elektrisch gereedschap als u moe bent of onder
invloed van drugs, alcohol of medicijnen. Een
moment van onoplettendheid tijdens het werken
met elektrische gereedschappen kan leiden tot
ernstig lichamelijk letsel.
b) Gebruik persoonlijke
beschermingsmiddelen. Draag altijd
oogbescherming. Veiligheidsuitrusting zoals
stofmasker, slipvrije veiligheidsschoenen, helm
of gehoorbescherming zullen persoonlijk letsel
verminderen, indien deze worden gebruikt onder
de juiste omstandigheden.
c) Voorkom onbedoeld starten. Zorg ervoor
dat de schakelaar in de uit-positie staat
voordat u de stroombron en/of accu aansluit,
het gereedschap oppakt of draagt. Het dragen
van elektrisch gereedschap met uw vinger op de
schakelaar of de stekker in het stopcontact steken
met de schakelaar aan, is een uitnodiging voor
ongelukken.
d) Verwijder stelsleutels of moersleutels
voordat u het elektrische gereedschap
inschakelt. Een sleutel doe op een bewegend
onderdeel van elektrisch gereedschap is blijven
zitten, kan tot lichamelijk letsel leiden .
e) Reik niet te ver. Zorg dat u te allen tijde
stevig staat en uw evenwicht behoudt. Dat
zorgt voor een betere controle over het elektrische

www.evolutionpowertools.com
183
gereedschap in onverwachte situaties.
f) Draag gepaste kleding. Draag geen
loszittende kleding of sieraden. Houd uw haar,
kleding en handschoenen uit de buurt van
bewegende delen. Loszittende kleding, sieraden
en lang haar kunnen verstrikt raken in bewegende
delen.
g) Als er voorzieningen zijn voor het aansluiten
van stofafzuiging en -opvanging, zorg er dan
voor dat deze zijn aangesloten en correct
worden gebruikt. Het gebruik van stofopvanging
en stofverzameling kan stofgerelateerde gevaren
verminderen.
h) Word niet overmoedig door gewenning
bij frequent gebruik van gereedschappen
en laat u niet verleiden tot negeren van de
veiligheidsvoorschriften. Een onachtzame actie
kan in een fractie van een seconde ernstig letsel
veroorzaken.
4) Algemene veiligheidswaarschuwingen voor
elektrisch gereedschap [Gebruik en onderhoud
van elektrisch gereedschap].
a) Forceer het elektrisch gereedschap niet.
Gebruik het juiste elektrische gereedschap voor
uw toepassing. Het juiste elektrische gereedschap
en gebruik op de snelheid waarvoor het is
ontworpen, zal zorgen voor betere en veiligere
uitvoering van het werk.
b) Gebruik het elektrisch gereedschap niet als
de schakelaar het niet in- of uitschakelt. Elk
elektrisch gereedschap dat niet met de schakelaar
bediend kan worden, is gevaarlijk en moet
gerepareerd worden.
c) Koppel het elektrische gereedschap los van
de stroombron en / of accu van het elektrische
gereedschap voordat u aanpassingen
aanbrengt, accessoires verwisselt of
elektrisch gereedschap opbergt. Dergelijke
veiligheidsmaatregelen verminderen de kans dat
het elektrische gereedschap onbedoeld opstart.
d) Bewaar elektrische gereedschappen als ze
niet in gebruik zijn buiten bereik van kinderen
en sta niet toe dat personen die niet bekend
zijn met het elektrische gereedschap of
deze instructies het elektrische gereedschap
bedienen. Elektrische gereedschappen zijn
gevaarlijk in handen van onervaren gebruikers.
e) Zorg voor goed onderhoud van uw
elektrische gereedschappen. Controleer
op foutieve uitlijning of het vastlopen
van bewegende onderdelen, defecten
van bewegende onderdelen of andere
omstandigheden die de werking van
de elektrische gereedschappen kunnen
beïnvloeden. Bij schade moet het elektrische
gereedschap vóór gebruik gerepareerd worden.
Veel ongelukken worden veroorzaakt door slecht
onderhouden elektrische gereedschappen.
f) Houd snijgereedschappen scherp en
schoon. Goed onderhouden snijwerktuigen met
scherpe snijkanten lopen minder snel vast en zijn
gemakkelijker onder controle te houden.
g) Gebruik het elektrische gereedschap,
de accessoires en inzetgereedschappen
etc. in overeenstemming met deze
instructies, rekening houdend met de
werkomstandigheden en het werk dat moet
worden uitgevoerd. Het elektrische gereedschap
gebruiken voor handelingen anders dan waarvoor
het bedoeld is, kan leiden tot gevaarlijke situaties.
h) Houd de handgrepen en grijpoppervlakken
droog, schoon en vrij van olie en vet. Glibberige
handgrepen en grijpoppervlakken maken veilig
gebruik van en controle over het gereedschap in
onverwachte situaties onmogelijk.
5) Algemene veiligheidswaarschuwingen voor
elektrisch gereedschap [Service]
a) Geef het elektrische gereedschap in
onderhoud bij een gekwaliceerd reparateur en
zorg dat alleen originele onderdelen gebruikt
worden. Dit zorgt voor behoud van de veiligheid
van het elektrische gereedschap.
VEILIGHEIDSINSTRUCTIES VOOR H320-P
a. Benzine- of dieselmotoren mogen nooit
in ongeventileerde gesloten ruimten
worden gebruikt. De geproduceerde
uitlaatgassen zijn zeer giftig en kunnen
koolmonoxidevergiftiging veroorzaken,
wat sufheid en uiteindelijk de dood tot
gevolg heeft. Binnenshuis laten draaien van
een benzinemotor is alleen toegestaan als het
gebouw zeer goed kan worden geventileerd en
de uitlaatgassen opgevangen en naar buiten
geleid kunnen worden via een uitlaatgasafzuiging/
opvangsysteem.
b. De motor mag niet draaien met snelheden

www.evolutionpowertools.com
184
die het maximale toerental op het typeplaatje
overschrijden. Het laten draaien van een motor
met te hoge snelheden vergroot de kans op defecte
onderdelen en daaruit voortvloeiende ongevallen.
c. Knoei niet met onderdelen die
het toerental van de motoren regelen. U kunt
de in de fabriek ingestelde bedrijfsparameters
wijzigen.
d. Gebruik alleen het type brandstof dat in
deze gebruiksaanwijzing wordt vermeld. Het
gebruik van brandstof met een lager octaangehalte
dan gespeciceerd kan leiden tot overmatige
motorslijtage en vroegtijdige motorstoring.
e. Houd het gebied rond de motor vrij, schoon
en netjes. Laat nooit brandbaar materiaal (hout,
plastic, karton, canvas enz.) in de buurt van een
draaiende motor slingeren.
f. Niet gebruiken in of in de buurt van
potentieel explosieve atmosferen. Met stof
beladen atmosferen zoals die in sommige
industriële gebouwen (meelfabrieken, hout- en
timmerfabrieken) te vinden zijn, hebben een
explosief potentieel.
g. Controleer het brandstofsysteem
regelmatig op lekkage. Slangen en koppelingen
moeten worden gecontroleerd op slijtage en
schuurplekken. Controleer de brandstoftank op
beschadigingen en op een slecht passende of
versleten tankdop. Eventuele gebreken moeten
worden verholpen voordat de motor gebruikt
wordt.
h. Zet de motor altijd af en laat deze afkoelen
voordat u gaat tanken. Probeer morsen van
brandstof te voorkomen (vaak veroorzaakt door
het 'overvullen' van de tank) en ruim gemorste
brandstof onmiddellijk op. Het aanbrengen van
droog zand is een eectieve manier om gemorste
brandstof te neutraliseren. Laat geen zand in
contact komen met enig onderdeel van de motor.
i. Zorg ervoor dat de brandstofkraan
dichtgedraaid is wanneer u de motor in een
voertuig vervoert. Om het risico op morsen van
brandstof tot een minimum te beperken, moet
de motor met touwen enz. aan de laadruimte van
het voertuig worden vastgemaakt, zodat de motor
tijdens het transport niet kan bewegen. De motor
moet zo recht mogelijk worden vastgezet.
j. Voor langdurige opslag raden wij aan om het
brandstofsysteem van de motor af te tappen.
Zie afb. 20 voor instructies. Bij langdurige opslag
kunnen additieven in moderne brandstoen uit de
brandstof neerslaan en sproeiers en kleppen in het
brandstofsysteem blokkeren.
k. Bewaar de machine in een veilige en goed
geventileerde ruimte. Onbevoegd personeel mag
geen toegang hebben tot deze machine.
VEILIGHEIDSINSTRUCTIES VOOR HET VULLEN
MET BRANDSTOF
a. Kies een vlak en leeg terrein, ver van alle
gebouwen, als plek om brandstof aan te vullen.
Zorg ervoor dat er zich geen brandbaar materiaal in
de directe omgeving bevindt.
b. Roken, het gebruik van open vuur of het
produceren van vonken is ten strengste
verboden tijdens het tanken. Benzine is licht
ontvlambaar en de dampen ervan zijn brandbaar.
c. Zorg ervoor dat de brandstofkraan op 'uit'
staat. Dit zorgt ervoor dat verse brandstof de
carburateur van de motor niet laat 'overstromen'.
d. De motor moet 'uit' staan en afgekoeld
zijn voordat u brandstof bij gaat vullen. Het
onbedoeld morsen van brandstof op een hete
motor kan brand veroorzaken.
e. Gemorste brandstof moet onmiddellijk
worden verholpen. Als kleding door benzine
verontreinigd is, moet de operator zich omkleden.
Vertrouw er niet op dat de brandstof uit de kleding
verdampt. Was de kleding als de brandstof uit het
materiaal is verdampt.
f. Gebruik van een trechter tijdens het vullen
met brandstof wordt aanbevolen. Het gebruik
van een trechter minimaliseert het risico op morsen
van brandstof.
g. Vul de tank met loodvrije brandstof van de
juiste kwaliteit tot ongeveer halverwege het
brandstolter. Giet de brandstof voorzichtig in
de tank en probeer niet de tank helemaal te vullen.
Giet de benzine langzaam bij, ter voorkoming van
luchtinsluitingen die morsen van brandstof zouden
kunnen veroorzaken.
h. Controleer de tankdop en zet deze terug
zodra het tanken is voltooid. De dop heeft
een bajonetsluiting. Controleer of deze correct
is geïnstalleerd en op zijn plaats zit voordat u
langzaam de brandstofkraan opendraait.
i. Controleer het gehele brandstofsysteem op
eventuele brandstoekkage. Doe geen poging
om de motor te starten als een brandstoek wordt
vermoed. Elk gedetecteerd lek moet worden
gerepareerd door een voldoende gekwaliceerde

www.evolutionpowertools.com
185
technicus.
j. Neem alle nationale en/of lokale voorschriften
met betrekking tot de opslag en het gebruik van
aardolieproducten in acht. Alle lokale wetten
moeten worden nageleefd.
GEZONDHEIDSADVIES
WAARSCHUWING: Bij gebruik van deze
machine worden stofdeeltjes geproduceerd.
Afhankelijk van de materialen waarmee u werkt,
kan dit stof zeer schadelijk zijn. We raden u aan
de risico's verbonden aan de materialen waarmee
u werkt goed in te schatten en het risico van
blootstelling te beperken. Sommige materialen
kunnen stof produceren dat gevaarlijk kan zijn
voor uw gezondheid. We raden u daarom aan bij
het gebruik van deze machine een goedgekeurd
gezichtsmasker met verwisselbare lters te dragen.
Werk steeds:
• In een goed-geventileerde ruimte.
• Met goedgekeurde veiligheidsuitrustingen,
zoals stofmaskers die speciaal ontworpen zijn
om microscopische deeltjes te lteren.
WAARSCHUWING: bij werken met elektrisch
gereedschap kunnen voorwerpen richting
uw ogen worden geprojecteerd, wat kan leiden
tot ernstige oogschade. Voordat u begint met
werken met het elektrisch gereedschap altijd een
veiligheidsbril opzetten of een veiligheidsbril met
zijbescherming of een volledig gelaatsscherm
indien nodig.
WAARSCHUWING: Als er onderdelen
ontbreken, gebruik dan uw apparaat niet,
totdat de ontbrekende onderdelen zijn vervangen.
Het niet opvolgen van deze regel kan leiden tot
ernstig lichamelijk letsel.
AANVULLENDE VEILIGHEIDSVOORSCHRIFTEN
VOOR
H320 COMPACTOR
a. Zet het werkgebied af. Publiek moet op veilige
afstand van de verdichtingswerkzaamheden
gehouden worden, evenals onbevoegd personeel.
b. Zorg dat u absoluut zeker weet hoe u de
machine uit moet zetten. Als u tijdens het
verdichten in de problemen komt, is het belangrijk
dat u een noodstop van de machine kunt uitvoeren.
c. Laat de H320 nooit draaiend en onbeheerd
achter. De machine trilt zodra deze wordt gestart
en zal ook vooruit gaan rijden. De machine moet
worden uitgeschakeld als deze onbeheerd wordt
achtergelaten.
d. Zet de motor altijd uit, voordat u de machine
over het terrein verplaatst. Bij het verplaatsen
of transporteren van de machine moet de
motor uit zijn en bij voorkeur koud zijn, met de
brandstofkraan in de Uit-stand.
e. Aangezien de motor van de H320 tijdens
gebruik heet wordt, moet u ervoor zorgen
dat u de motor niet aanraakt en dat er geen
brandbaar materiaal of kleding in contact komt
met de motor tijdens het gebruik. Alleen een
koude motor aanraken of onderhouden.
f. Nooit de machineafschermingen verwijderen,
wijzigen of manipuleren. De afschermingen
zijn speciaal ontworpen en gemonteerd om u de
grootst mogelijke bescherming te bieden tijdens
werkzaamheden. Als een afscherming ontbreekt of
beschadigd is, de machine niet gebruiken totdat de
afscherming is gerepareerd of vervangen door een
bevoegde technicus.
g. Let vooral goed op om de controle te
behouden bij het werken op een hellend
oppervlak. Werk naar boven en naar beneden op
een hellend oppervlak, niet dwars eroverheen.
h. Als er een aantal verschillende lagen op
elkaar moeten worden verdicht, verdicht dan
elke laag afzonderlijk. Dit waarborgt de integriteit
van elke laag.
i. Werk met de H320 in een georganiseerd
patroon over het werkoppervlak totdat de
gewenste verdichting is bereikt. Zo werkt u
volgens de veiligste werkpraktijk.
j. Voer altijd de veiligheidscontroles vóór
gebruik uit voordat u met de werkzaamheden
begint. Volg de richtlijnen in latere secties van deze
handleiding.
PBM (Persoonlijke beschermingsmiddelen)
Opmerking: Als deze apparatuur op een
bouwplaats wordt gebruikt, is het belangrijk dat
de operator zich houdt aan de bouwplaatsregels/
voorschriften die van toepassing zijn. Raadpleeg de
voorman of een andere verantwoordelijke persoon
van de bouwplaats voor details.

www.evolutionpowertools.com
186
a. Draag geschikte kleding. Dit kan bijvoorbeeld
een ketelpak of een gewatteerde overall en een
zichtbaarheidshesje zijn.
b. Draag geschikt schoeisel. Veiligheidsschoenen
met stalen neus en antislipzolen worden
aanbevolen.
c. Draag een geschikte veiligheidsbril. Een
veiligheidsscherm voor het hele gezicht of een
veiligheidsbril met zijschermen die bescherming
bieden tegen weggeslingerde voorwerpen of
rommel wordt aanbevolen.
d. Bescherm uw gehoor. Draag geschikte
oorbeschermers.
e. Draag geschikte handschoenen.
Handschoenen met goede grip worden
aanbevolen.
f. Draag adembescherming. Een stofmasker
met vervangbare lters die bescherming bieden
tegen jn giftig stof, vezels en dampen wordt
aanbevolen.
g. Draag een veiligheidshelm. Het gebruik
van een veiligheidshelm kan verplicht zijn op
bouwplaatsen om de operator te beschermen
tegen mogelijke gevaren boven het hoofd.
VERVOER MET EEN VOERTUIG
WAARSCHUWING: Deze machine
heeft minimaal een tweepersoonslift nodig.
Bereid het voertuig van tevoren voor zodat het
klaar is voor de machine. Let goed op dat de
machine niet valt tijdens het laden/lossen.
• Deze machine is compact, maar wel zwaar.
Om het risico op letsel te verminderen, moet u
zorgen voor deskundige hulp wanneer u deze
machine moet optillen.
• Om het risico op rugletsel te verlagen, moet
u de machine dicht bij uw lichaam houden bij
het optillen. Buig uw knieën, zodat u vanuit
uw benen kan tillen, niet vanuit uw rug. Til op
met behulp van handige delen van het externe
hoofdframe.
• Til de machine in het voertuig en zet hem zo
recht mogelijk vast met touwen, spanbanden
enz. zodat de machine tijdens het transport
niet kan bewegen.
Opmerking: H320-P: De beste en veiligste manier
om deze machine in een voertuig te vervoeren
is ervoor zorgen dat er geen brandstof in de
brandstoftank van de machine aanwezig is.
BEOOGD GEBRUIK VAN DIT ELEKTRISCH
GEREEDSCHAP
WAARSCHUWING: Dit product is een
aangedreven Verdichtingsplaat en is
ontworpen om te worden gebruikt met speciale
Evolution-accessoires. Gebruik alleen accessoires
die ontworpen zijn voor gebruik met deze
machine en/of speciek aanbevolen worden door
Evolution Power Tools Ltd.
Deze machine kan worden gebruikt voor
het verdichten van oppervlakken zoals
brekerpuin, kleine toeslagstoen, aarde, zand en
funderingsmateriaal enz. Indien uitgerust met het
Bestratingskussen kan de H320 worden gebruikt
om de meeste soorten stenen bestrating te
verdichten en te stabiliseren.
Redenen voor verdichting
Verstoorde grond, nieuwe vulling, onderlaag of
wegdek hebben luchtzakken en kleine holtes
binnenin die, indien niet verdicht, tot problemen
kunnen leiden.
• Als het verkeer het oppervlak van een
niet-verdicht gebied kruist, drukken de
uitgeoefende belastingen in neerwaartse
richting op het onderliggende materiaal.
Dit kan leiden tot verzakking van het
bovenoppervlak als materiaal zich naar
beneden verplaatst om de holtes te vullen.
• Een statische belasting (huis, garage enz.)
die op onverdichte grond is gebouwd, kan
verzakken als materiaal eronder beweegt.
• Water dat in materiaal sijpelt dat holtes en
luchtbellen bevat, kan zich in deze ruimtes
verzamelen en zal uitzetten bij vorst en weer
krimpen tijdens warme/droge periodes.
Uitzetting en krimp is een belangrijke oorzaak
van schade aan de fundering van gebouwen
en kan ertoe leiden dat een constructie moet
worden ondersteund.
Verdichting verhoogt de dichtheid van het
materiaal en daarmee het vermogen om statische
en dynamische belastingen te weerstaan. Het

www.evolutionpowertools.com
187
elimineren van luchtzakken en kleine holtes
verkleint de kans op binnendringen van water
en daaropvolgende verzakking als gevolg van
uitzetting en krimp van het materiaal.
VERBODEN GEBRUIK VAN DIT ELEKTRISCHE
GEREEDSCHAP
WAARSCHUWING: Dit product is een
aangedreven Verdichtingsplaat en mag
alleen als zodanig worden gebruikt. Het mag
op geen enkele manier worden aangepast of
worden gebruikt voor het aandrijven van andere
apparatuur of gebruikt worden met andere
accessoires dan die genoemd worden in deze
gebruiksaanwijzing.
WAARSCHUWING: Deze machine
is niet bedoeld voor gebruik door personen
(inclusief kinderen) met verminderde fysieke,
zintuiglijke of mentale vermogens, of gebrek aan
ervaring en kennis, tenzij ze onder toezicht staan
of instructies hebben gekregen over het veilige
gebruik van de machine door een persoon die
verantwoordelijk is voor hun veiligheid.
Kinderen moeten onder toezicht staan zodat ze
geen toegang hebben tot deze machine. Kinderen
mogen niet spelen met de machine.
ELEKTRISCHE VEILIGHEID – H320-E
DE NETSTEKKER
Dit product is voorzien van de juiste gegoten
stekker voor de aangewezen afzetmarkt. De
stekker voldoet aan de eisen van internationale
normen en moet worden aangesloten op een
voedingsspanning die gelijk is aan de spanning die
op het typeplaatje staat vermeld. Als de stekker of
het netsnoer beschadigd zijn, moeten ze worden
vervangen door een compleet geheel item dat
identiek is aan het origineel. Houd u aan de
vereisten voor aansluiting op het elektriciteitsnet
die in uw land van toepassing zijn. Raadpleeg bij
twijfel een gekwaliceerde elektricien.
BS-stekker kan alleen in het VK worden gebruikt.
De stekker moet in een stopcontact binnenshuis
worden gestoken om aan de vereiste IP-
beschermingsgraad te voldoen. De stekker moet
zijn voorzien van een netsnoer dat langer is dan
10 meter.
BUITENGEBRUIK – H320-E
WAARSCHUWING: Voor uw
bescherming mag dit gereedschap indien
het buitenshuis wordt gebruikt, niet worden
blootgesteld aan regen of worden gebruikt in
een zeer vochtige omgeving. Gebruik voor extra
bescherming een aardlekschakelaar (R.C.D.)
die de stroomtoevoer onderbreekt als de
lekstroom groter is dan 30 mA gedurende 30
milliseconden. Controleer altijd de werking van de
aardlekschakelaar voordat u de machine gebruikt.
Indien een verlengsnoer nodig is moet het een
geschikt type zijn voor gebruik buitenshuis en van
een label zijn voorzien dat dit aangeeft.
De instructies van de fabrikant moeten worden
opgevolgd bij het gebruik van een verlengsnoer.

www.evolutionpowertools.com
188
TRILLING
WAARSCHUWING: Bij gebruik van deze machine
kan de operator worden blootgesteld aan
intense trillingen die worden overgedragen op
hand en arm. Het is mogelijk dat de gebruiker
'trillende witte vinger-ziekte' (Raynaud-
syndroom) kan ontwikkelen. Deze aandoening
kan de temperatuurgevoeligheid van de hand
verminderen en algemene gevoelloosheid
veroorzaken. Bij langdurig of regelmatig
gebruik van deze verdichtingsmachine moeten
gebruikers de conditie van hun handen en
vingers goed in de gaten houden. Indien een
symptoom optreedt, onmiddellijk een arts
raadplegen.
• De meting en beoordeling van de blootstelling
van de mens aan trillingen die aan de hand
worden doorgegeven is aangeduid in:
BS EN ISO 5349-1:2001 en
BS EN ISO 5349-2:2002
• Vele factoren kunnen het niveau van de
trillingen tijdens de werking beïnvloeden;
bv. de toestand en opstelling van het
werkoppervlak en het type en de toestand van
de gebruikte machine. Deze factoren moeten
voor elk gebruik geëvalueerd worden, en waar
mogelijk moet een aangepaste werkwijze
worden toegepast. Goed omgaan met deze
factoren zal de eecten van trillingen helpen
verminderen:
Hantering
• Behandel de machine met zorg en laat de
machine het werk doen.
• Vermijd het uitoefenen van overdadige
fysieke kracht op de besturingselementen.
van de machine.
• Let op uw veiligheid en stabiliteit, en op de
oriëntatie/plaatsing van de machine tijdens
het gebruik.
Werkoppervlak
• Let op het materiaal van het werkoppervlak;
de toestand ervan, dichtheid, sterkte,
rigiditeit en oriëntatie/plaatsing.
SYMBOLEN EN ETIKETTEN
WAARSCHUWING: Gebruik deze machine niet
als er enig waarschuwings- en/of instructie-etiket
ontbreekt of beschadigd is. Neem contact op met
Evolution Power Tools voor vervangende etiketten.
Opmerking: Alle of sommige van de volgende
symbolen kunnen in de handleiding of op het
product getoond worden.
Volt
V
Ampère
A
Snelheid
min
-1
(RPM)
Wisselstroom
~
Geluidsvermogensniveau
Lees de handleiding
Draag gehoorbescherming
Draag oogbescherming
Draag stofbescherming
Waarschuwing
LET OP: Hete uitlaat. Niet
aanraken
HEET! Niet aanraken
HOT!
Heet oppervlak
CE-certicatie
UKCA-certicatie
Intertek-certicatie
Ernstig gezondheidsgevaar
Gevaarlijk voor de omgeving
Afval van elektrische en
elektronische apparatuur
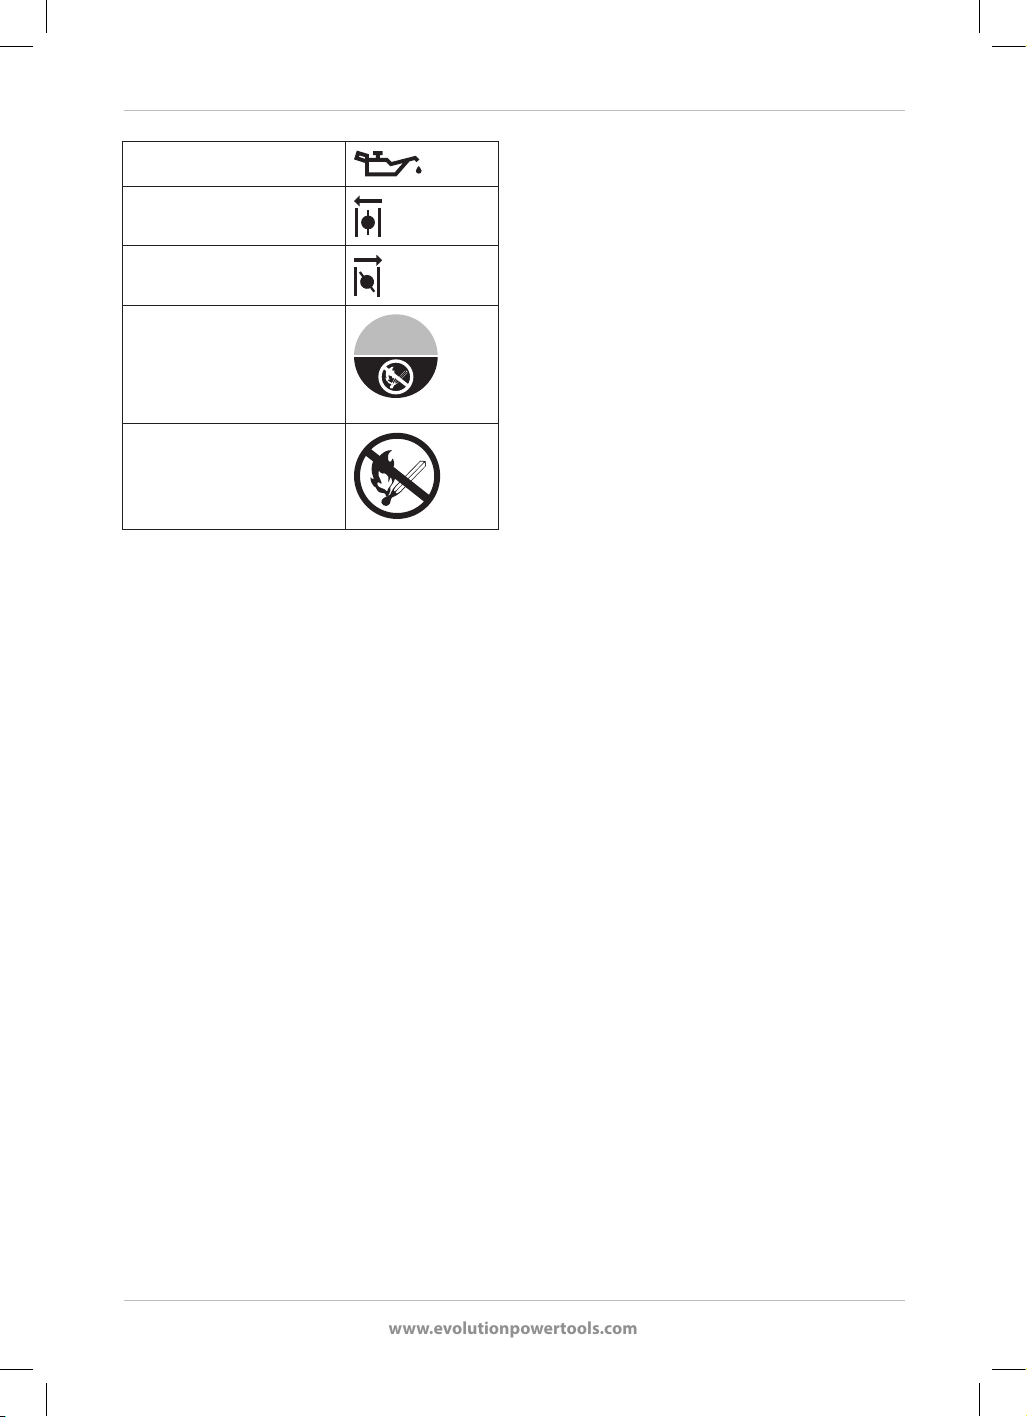
www.evolutionpowertools.com
189
Motorolie 10/30W
Choke open
Choke gesloten
LET OP: Dit is een
4-taktmotor.
Alleen met benzine vullen.
Niet vullen met
dieselolie.
ONGELOOD
ALLEEN BENZINE!*
LICHT ONTVLAMBAAR.
*E5 & E10
Laat de motor afkoelen voordat u de
tankdop opent. De damp is uiterst
ontvlambaar en kan ontbranden bij
contact met een heet oppervlak of
vlammen.

www.evolutionpowertools.com
190
1. TRILPLAAT
2. BRANDSTOFTANK
3. AAN/UIT-SCHAKELAAR MOTOR
4. GASHENDEL
5. CHOKE-CONTROLE
6. TERUGLOOPSTARTER
7. BRANDSTOFKRAAN
8. VULLER/PEILSTOK MOTOROLIE
9. LUCHTFILTER
10. BOUGIE
11. UITLAAT
12. AFVOERPLUG MOTOROLIE
13. SNELLE AFSTELSCHROEF
14. RIEMBESCHERMER
15. ANTI-TRILLINGSHANDGREEP
16. OPBERGEN GEREEDSCHAP
(1)
(14)
(2)
(7)
(5)
(9)
(4)
(13)
(6)
(3)
(8)
(12)
(15)
(16)
(11)
(10)
MACHINE-OVERZICHT H320-P

www.evolutionpowertools.com
191
MACHINE-OVERZICHT H320-E
1. TRILPLAAT
2. DWARSBALK/KABELWARTEL
3. VEILIGHEIDSSTART AAN/UIT-SCHAKELAAR
4. ANTI-TRILLINGSHANDGREEP
5. HANDGREEP BOVENSTE GEDEELTE
6. HANDGREEP MIDDELSTE GEDEELTE
7. KABELLEIDINGCLIPS
(1)
(2)
(3)
(4)
(5)
(6)
(7)

www.evolutionpowertools.com
192
AAN DE SLAG
UITPAKKEN
Let op: Deze verpakking bevat scherpe
voorwerpen. Wees voorzichtig bij het uitpakken.
Er kunnen twee personen nodig zijn om
deze machine op te tillen, te monteren en te
verplaatsen. Verwijder de machine, samen met
de meegeleverde accessoires, uit de verpakking.
Controleer zorgvuldig of de machine zich in
goede conditie bevindt en controleer of alle
accessoires die in deze handleiding worden
genoemd aanwezig zijn. Controleer ook dat alle
accessoires compleet zijn. Indien er onderdelen
ontbreken, moet de machine met de accessoires
samen in hun originele verpakking geretourneerd
worden aan de leverancier. Gooi de verpakking
niet weg. Bewaar de verpakking zorgvuldig tijdens
de garantieperiode. Gooi de verpakking op een
milieuverantwoorde manier weg. Recycle indien
mogelijk. Laat kinderen niet met lege plastic zakjes
spelen, in verband met verstikkingsgevaar.
ITEMS GELEVERD -
H320-P COMPACTOR
BESCHRIJVING AANTAL
Gebruiksaanwijzing 1
Middelste handgreepverlenging 1
Bovenste handgreepverlenging 1
Middelste
handgreepbevestiging
M10 x 20 schroeven
4
Bovenste handgreepbevestiging
M10 x 15 schroeven
4
Sluitringen bovenste handgreep 4
Imbus 8 mm 1
Bougiedopsleutel & wringijzer 1
Motorolie (es van 400 ml) 1
ITEMS GELEVERD -
H320-E COMPACTOR
BESCHRIJVING AANTAL
Gebruiksaanwijzing 1
Bevestigingsschroeven
handgreep (lang) M10 x 40
2
Bevestigingsschroeven
handgreep (kort) M10 x 15
2
Sluitringen handgreep 4
Middelste handgreep 1
Bovenste handgreep 1
Imbus 8 mm 1
Handgreep dwarsbalk/
kabelwartel
1
Extra accessoires
Naast de standaardonderdelen die bij deze
machine worden geleverd, zijn de volgende
accessoires ook verkrijgbaar via de webshop van
Evolution
www.evolutionpowertools.com of bij uw lokale
verkoper.
BESCHRIJVING Onderdeelnr.
H320
Bestratingskussen
Bestratingskussen
015-0007

www.evolutionpowertools.com
193
Afb. 2
Afb. 1
MONTAGE
Uw Evolution H320 heeft wat kleine montage nodig vóór
gebruik. Als u een machine met benzinemotor heeft,
voltooi dan alle montage voordat u de motor vult met 0,4
liter van de aanbevolen onderhoudsolie.
1. Bevestiging van de Handgreepverlenging – H320-P
Opmerking: De handgreepverlenging heeft een anti-
trillingshandgreep die de operator helpt om de trillingen te
hanteren die door de machine worden doorgegeven aan de
hand/arm van de operator. De Handgreepverlenging moet
worden gemonteerd voor operationele doeleinden, maar
kan tijdens transport of opslag worden opgevouwen. Door
de onderste vier schroeven te verwijderen en de bovenste
vier schroeven los te draaien, kan de handgreepverlenging
worden opgevouwen voor gemakkelijk transport.
• Schuif het middelste handgreepgedeelte voorzichtig
over de twee onderste handgreepbeugels en lijn de vier
gaten in de middelste handgreep uit met de vier verticale
schroefdraadgaten in de onderste beugels.
•
Steek de vier M10 x 20 schroeven door de middelste
handgreep en de bovenste handgreepbeugels.(Afb. 2)
• Draai alle vier de schroeven stevig vast met de
imbussleutel.
2. De handgreep monteren/bevestigen – H320-E
Opmerking: De handgreep van de H320-E bestaat uit vier
(4) hoofdonderdelen:
• Onderste handgreep (in de fabriek aan de machine
bevestigd).
• Middelste gedeelte.
• Bovenste gedeelte met 'Aan/Uit'-veiligheidsschakelaar.
• Dwarsbalk/kabelwartel.
De twee lange schroeven worden gebruikt om de
dwarsbalk/kabelwartel en het middelste gedeelte van
de handgreep aan de draaibare onderste handgrepen te
bevestigen.
• Plaats de kabelwartel van de dwarsbalk voorzichtig in
de servicepositie.
Opmerking: De kabelpennen moeten naar achteren
wijzen.
• Schuif het middelste gedeelte voorzichtig over de
onderste handgrepen en lijn de gaten uit.
• Tussen de schroef en de handgrepen moet een sluitring
worden gebruikt. (Afb. 1)
• Steek de lange schroeven door de gaten in de middelste
handgreep, door de gaten in de onderste handgrepen
en schroef ze in de geborgde moeren in de dwarsbalk/
kabelwartel. (Afb. 3)
Afb. 3

www.evolutionpowertools.com
194
• Draai deze schroeven stevig vast met de imbussleutel.
De twee korte schroeven worden gebruikt om het bovenste
gedeelte van de handgreep aan het middelste gedeelte
te bevestigen.
• Schuif het bovenste gedeelte van de handgreep
voorzichtig over het middelste gedeelte en lijn de gaten
uit.
• Steek de schroeven door het bovenste gedeelte van de
handgreep en schroef ze in de geborgde moeren in het
middelste gedeelte.
De H320-E wordt geleverd met 3 kabelclips om de
voedingskabel veilig langs het handgreepframe te leiden.
Deze moeten gemonteerd worden. Als u dit niet doet,
vervalt uw garantie. Plaats ze aan dezelfde kant als de
stroomtrigger en plaats ze zoals weergegeven in (Afb. 4a
& 4b)
WAARSCHUWING: Zorg ervoor dat de
voedingskabel van de veiligheidsschakelaar naar de
motor 'vrij' is en niet 'geklemd' tijdens het montageproces.
Eerste vulling en controle van het oliepeil – H320-P
WAARSCHUWING: Deze machine is bij levering
niet gevuld met olie. Er mag geen poging worden
gedaan om de motor te starten voordat het carter is gevuld
tot het juiste peil met de juiste kwaliteit olie.
Opmerking: Olie (meegeleverd) moet in de machine
worden gegoten via de olievuller/peildop. Oliecapaciteit
is ongeveer 0,4 liter 10W 30 auto-olie (verkrijgbaar bij
alle goede motorretailers en de meeste benzinestations).
Voor sommige niet-gematigde klimatologische gebieden
kan een alternatieve oliesoort de voorkeur verdienen –
raadpleeg uw leverancier.
De olievuldop wordt losgeschroefd van de motorbehuizing
van de machine en bevat een oliepeilstok. (Afb. 5) Let goed
op dat u geen olie morst.
Afb. 5
Afb. 4a
Afb. 4b

www.evolutionpowertools.com
195
Opmerking: Het is belangrijk dat de machine bij het
controleren van het oliepeil op een stabiele, horizontale
en vlakke ondergrond staat met uitgeschakelde en koude
motor.
Op de peilstok zijn twee indexmarkeringen aangebracht.
Het oliepeil moet op of nabij de
bovenste indexmarkering zijn.
• Verwijder de olievuldop/peildop en veeg de peilstok af
met een schone, droge doek.
• Giet de benodigde hoeveelheid olie erin. (ongeveer 0,4
l)
• Laat de olie 10+ seconden bezinken.
• Bekijk het oliepeil via de olievulopening. Het oliepeil
moet heel dicht bij de bovenkant van de schroefdraad
staan, met olie die op het punt staat uit het carter
te stromen (de machine moet op een horizontaal
oppervlak staan).
• Steek de peilstok erin en draai de dop helemaal 'home'.
Draai de vuldop los en trek de peilstok eruit. Controleer
visueel het
oliepeil op de peilstok.
• Pas zo nodig aan.
• Als het peil correct is, draait u de olievuldop/peildop
stevig vast in de motorbehuizing.
Opmerking: Ververs de olie volgens de
Onderhoudsoverzichtstabel (zie ook ONDERHOUD -
Motorolie vervangen)
Pre-operationele controles
Opmerking: Vóór elke handeling moet de machine
worden geïnspecteerd om er zeker van te zijn dat alle
veiligheidsvoorzieningen enz. correct werken.
• Controleer dat alle veiligheidsvoorzieningen op hun
plaats zitten en onbeschadigd zijn.
• H320-E – Controleer de integriteit van de voedingskabel
en stekker. Als de voedingskabel of stekker op enigerlei
wijze beschadigd is, moet de kabel en/of de stekker
worden vervangen door een competente technicus met
identieke vervangende onderdelen.
• H320-P - Controleer alle brandstofslangen, koppelingen
en vuldoppen enz. op tekenen van vloeistoekkage. Elk
gedetecteerd lek moet worden gerepareerd voordat de
werkzaamheden beginnen.
• Controleer het motoroliepeil en vul zo nodig bij.
• Controleer het brandstofpeil en vul zo nodig bij.
• Inspecteer de rest van de machine grondig op
Afb. 6
Afb. 7

www.evolutionpowertools.com
196
enige vorm van schade, met name aan afdekkingen,
afschermingen, rubberen onderdelen enz.
Het starten van de H320-P
• Vul de brandstoftank met benzine. Het vullter van de
brandstoftank heeft een rood plastic inzetstuk om het
maximale brandstofpeil aan te geven. Laat de brandstof
niet boven deze markering komen.
• Draai de hendel van de brandstofkraan in stand 'Aan'.
(Afb. 6)
• Zet de chokehendel in stand 'Choke aan'. (Afb. 7)
• Druk de tuimelschakelaar voor het contact van de
motor in stand 'AAN' (I). (Afb. 8)
• Zet de gashendel op maximum. (Afb. 9)
• Houd de H320 stabiel door de bedieningshendel op een
handig punt vast te houden.
• Gebruik uw andere hand om de handgreep van het koord
van de terugloopstarter vast te pakken. (Afb. 10)
• Trek langzaam aan het koord van de terugloopstarter
totdat u weerstand voelt, wat aangeeft dat de starter is
ingeschakeld.
• Trek krachtig aan het koord als u weerstand voelt.
• Ga door met deze procedure totdat de motor start.
• De motorunit mag voor een korte periode toeren
draaien (jagen) totdat de motor op temperatuur is.
• Gewoonlijk kan de choke vrijwel onmiddellijk worden
teruggezet in de 'uit'-stand wanneer de motor start,
maar dit is afhankelijk van de omgevingstemperaturen,
bedrijfsomstandigheden enz. en discretie van de
bestuurder is vereist.
• Onder bepaalde omstandigheden kan choke nodig
zijn, zelfs als de motor nog warm is na een eerdere
bedrijfscyclus. Als u problemen ondervindt bij het
starten van een warme motor:
• Zet de choke in de 'aan'-stand (rechts).
• Trek één keer aan de terugloopstarter.
• Zet de choke terug in de ‘uit’ stand (links).
• Trek aan de terugloopstarter totdat de motor
aanslaat.
• Opmerking: De H320-P begint te trillen en te
rijden zodra de motor gestart is. De operator moet
zorgvuldigheid in acht nemen bij het starten van deze
machine.
Uw H320-P-motor stoppen
• Druk de tuimelschakelaar voor het contact van de motor
Afb. 8
Afb. 9
Afb. 10

www.evolutionpowertools.com
197
in de stand 'UIT' (0).
• Sluit de brandstofkraan.
Rijsnelheid – H320-P
Opmerking: Door het toerental van de motor aan te
passen, verandert de trillingsfrequentie en ook de snelheid
waarmee de machine vooruit rijdt.
Opmerking: De Fast Run Screw begrenst de maximale
slag van de gashendel en regelt dus alleen het maximale
motortoerental.
Als u het maximale motortoerental moet wijzigen om de
rijsnelheid van de machine te verhogen of te verlagen:
• Draai de Fast Run-schroef (Afb. 11) beetje bij beetje
(maximaal een halve slag) met de klok mee om het
motortoerental te verlagen, of tegen de klok in om het
motortoerental te verhogen.
• Zorg dat de gashendel op maximum staat.
• Start de machine en controleer het rijden van de
machine bij de nieuwe Fast Run Screw-instelling.
• Stop indien nodig de machine en stel de Fast Run Screw
verder af totdat de gewenste rijsnelheid is bereikt.
De H320-E starten en stoppen
De H320-E is uitgerust met een Veiligheidsstart Aan/
Uit-schakelaar. De veiligheidsvergrendeling voorkomt
dat de schakelhendel wordt bediend, totdat de
veiligheidsvergrendelingsknop wordt ingedrukt.
• Druk op de veiligheidsvergrendelingsknop (a) en trek
aan de schakelaar (b) om de machine te starten. (Afb.
12)
• Laat de schakelhendel los om de machine uit te
schakelen.
Opmerking: Bij het loslaten van de schakelhendel stopt
de motor en keert de veiligheidsvergrendelingsknop
automatisch terug naar de veilige modus.
WAARSCHUWING: De operator moet er zich
altijd bewust van zijn waar de stroomkabel loopt,
om erover struikelen, met de machine overrijden en
andere vormen van gevaar te voorkomen.ALGEMEEN
BEDIENINGSADVIES
• Zorg ervoor dat omstanders op een veilige afstand
van verdichtingswerkzaamheden worden gehouden.
Zet indien nodig het werkgebied af en plaats
Afb. 11
Afb. 12
(a)
(b)

www.evolutionpowertools.com
198
WAARSCHUWINGS aanduidingen.
• Plan uw werk en de route die u met de machine wilt
aeggen, voordat u begint met verdichten.
• Onderzoek het werkgebied voordat u begint en
verwijder of neutraliseer eventuele obstakels die een
gevaar kunnen vormen.
• Zorg dat u over de juiste PBM beschikt en weet hoe u
deze moet gebruiken.
• De compactor rijdt op eigen kracht vooruit. Het enige
dat nodig is om de machine te sturen, is zachte input
van de operator op de handgreep van de machine. De
operator moet de anti-trillingshandgreep met beide
handen vasthouden en de handen moeten zo ver
mogelijk uit elkaar worden geplaatst.
• Er kunnen meerdere bewegingen over het werkgebied
nodig zijn om het materiaal tot de gewenste dichtheid
te verdichten.
• Als het werkgebied hellend is, werk dan naar boven en
naar beneden op he hellende oppervlak, niet dwars
erop
ONDERHOUD
H320-P
Regelmatig onderhoud is essentieel om uw machine en de
accessoires in een bruikbare staat te houden. We raden aan
om deze procedures over te laten aan bekwame operators
die ervaring hebben met service en onderhoud van
benzinemotoren. Laat bij twijfel de machine nakijken bij
een door Evolution erkend servicecentrum.
1. Motorolie vervangen
Motorolie moet worden vervangen na de eerste
inloopperiode en met de aangegeven intervallen
in het serviceschema.
Opmerking: Motorolie is gemakkelijker te vervangen als
de motor op temperatuur is gelopen en de olie warm is.
• Zorg dat de motor op een harde, rechte en vlakke
ondergrond staat.
• Verwijder de olievuldop. (Afb. 13)
• Plaats een geschikte olieopvangbak onder de motor.
• Verwijder de olieaftapplug zodat de olie volledig uit de
motor kan lopen. (Afb. 14)
WAARSCHUWING: Wees voorzichtig. Contact
met gebruikte motorolie kan schadelijk zijn.
De olie kan erg heet zijn (risico op brandwonden) en
Afb. 13
Afb. 14

www.evolutionpowertools.com
199
Afb. 15
sommige gebruikers kunnen irritatie ervaren als de
olie de blootgestelde huid verontreinigt. De operator
moet overwegen om mechanische beschermende
handschoenen te dragen, indien beschikbaar. Elke huid die
met olie is verontreinigd, moet zo snel mogelijk met zeep
en ruime hoeveelheden schoon water worden gewassen.
• Controleer de olieaftapplug en de pakking.
• Controleer de olievuldop en de O-ringpakking.
• Vervang alle niet-onderhoudbare onderdelen.
• Plaats de olieaftapplug terug en draai hem stevig vast.
• Vul de motor bij met de juiste kwaliteit motorolie tot het
juiste peil.
• Breng de olievuldop weer aan.
• Controleer op lekken en morsen en handel dit zo nodig
af.
Opmerking: Gebruikte motorolie moet op een
milieuvriendelijke manier worden afgevoerd. Informeer
bij uw lokale overheid voor de dichtstbijzijnde
recyclingfaciliteit voor gebruikte olie.
2. Bougie - Controleren en vervangen
Na ongeveer 50 bedrijfsuren moet de bougie worden
verwijderd voor controle, reiniging en reset.
Om de bougie te verwijderen en terug te plaatsen:
• Zorg dat de motor op UIT staat en dat de
brandstofkraan in de UIT-stand staat.
WAARSCHUWING: De motor moet koud zijn
voordat u begint met het verwijderen van de bougie.
• Trek de HT-kabel uit de bougie.
• Verwijder de bougie met behulp van een bougiedop
(meegeleverd). (Afb. 15)
Een bruikbare bougie in goede staat moet lichtbruine
afzettingen op de bougieneus vertonen. Verwijder deze
afzettingen met een stijve koperen draadborstel.
• Controleer de elektrodenafstand van de stekker met
een set voelermaatjes.
• Pas indien nodig aan. De tussenruimte wordt gegeven
in ‘Specicatie H320-P’.
• Plaats de bougie terug. Zorg ervoor dat deze goed in de
schroefdraad in de cilinderkop grijpt.
• Draai de bougie handvast met de meegeleverde
bougiedop.

www.evolutionpowertools.com
200
• Schuif het meegeleverde wringijzer door het gat in het
uiteinde van de bougiedop.
• Plaats het wringijzer zodanig dat gelijke hoeveelheden
aan weerszijden van de bougie-aansluiting uitsteken.
• Maak tot slot de gasdichte afdichting door de
bougiedop ¼ tot ½ slag te draaien. Deze laatste fractie
van de draai zal de bougiering pletten en een gasdichte
afdichting maken. Draai de bougie niet te vast.
• Bevestig de HT-kabel weer aan de bovenkant van de
bougie.
3. Luchtlter
WAARSCHUWING: Laat de motor nooit draaien
zonder dat het luchtlterelement is gemonteerd.
Na ongeveer 50 uur gebruik moet de staat van de luchtlter
worden gecontroleerd.
Opmerking: De luchtlter kan vaker aandacht nodig
hebben als de werkomgeving bijzonder stog is.
Verwijderen:
• Zorg dat de motor op UIT staat en dat de
brandstofkraan in de UIT-stand staat. De motor moet
koud zijn.
• Draai de vleugelmoeren van het luchtlterhuisdeksel los
en verwijder het. (Afb. 16)
• Bewaar deze onderdelen zorgvuldig voor latere
herinstallatie.
• Verwijder het luchtlterelement uit de behuizing
voor inspectie. (Afb. 17) Als het papieren element
van de luchtlter tekenen van ernstige verkleuring
en verstopping door vuil, stof enz. vertoont, moet het
worden vervangen.
Om opnieuw te monteren:
• Installeer het element in de luchtlterbehuizing.
Een nieuw element kan in beide richtingen passen.
• Plaats het deksel van de luchtlterbehuizing terug.
• Vervang de vleugelmoeren en zorg dat het deksel goed
op zijn plaats zit en dat de vleugelmoeren stevig zijn
vastgedraaid.
4. Brandstoftankvullter
Controleer af en toe visueel de staat van de
brandstoftankvullter (idealiter bij iedere keer tanken). Als
er tekenen van afzettingen zijn, verwijder dan het lter uit
de tank en reinig het.
• Reinig het lter met een milieuvriendelijk
Afb. 16
Afb. 17

www.evolutionpowertools.com
201
ontvettingsmiddel op waterbasis en blaas de jnmazige
mazen eventueel door met schone, droge perslucht.
• Grondig laten drogen alvorens terug te plaatsen.
• Zorg er bij het terugplaatsen voor dat de 2 uitsparingen
aan de bovenrand van de lter op één lijn liggen met de
uitsparingen in de vulopening van de brandstoftank.
5. De spanning van de aandrijfriem controleren
WAARSCHUWING: Voer deze procedure
uitsluitend uit als de machine koud is en de motor
uitgeschakeld is en de bougiedop verwijderd is.
De spanning van de aandrijfriem moet na de eerste
4 uur gebruik worden gecontroleerd en daarna zoals
gespeciceerd in het routineonderhoudsschema.
Om de spanning van de aandrijfriem te controleren:
• Verwijder de riembeschermer door de drie (3)
inbusbouten (Afb. 18)te verwijderen met een
inbussleutel en steeksleutel (niet meegeleverd). Bewaar
deze veilig voor toekomstig gebruik.
Opmerking: Deze drie (3) inbusbouten zijn
positiespeciek. Let op de positie van elk van de schroeven
en de bijbehorende accessoires wanneer deze uit de
machine worden verwijderd, zodat ze in de oorspronkelijke
positie kunnen worden teruggeplaatst.
• Doorbuiging door lichte vingerdruk in het midden van
de riem moet ongeveer 5 tot 6 mm (1/4 inch) zijn.
Opmerking: De motoreenheid van de H320
is gepositioneerd op vier (4) sleuven op de
motormontageplaat. Vier (4) motorbevestigingsbouten
worden door deze vier sleuven geplaatst en worden van
onderaf in de basis van het motorcarterblok geschroefd.
Door deze opstelling kan de motor opnieuw op de plaat
worden geplaatst.
• Draai de vier (4) zeskantbouten los met een geschikte
sleutel (niet meegeleverd).
• Schuif de motor naar achteren of naar voren om
de spanning van de aandrijfriem te wijzigen. Een
stelschroef (Afb. 19) aan de voorzijde van de motor
dient om te helpen bij de exacte positionering van de
motor.
• Als de juiste spanning is bereikt,
draai dan de bevestigingsbouten van de motor stevig
vast.
Afb. 18
Afb. 19

www.evolutionpowertools.com
202
PROBLEEMOPLOSSING H320-P
PROBLEEM OORZAAK MOGELIJKE OPLOSSING
Motor start
niet.
Geen brandstof.
Motor staat Uit.
Vervuilde bougie.
Motor koud.
Motor 'overstroomd' met
benzine.
Luchtlter verstopt of
vervuild met olie.
Ernstige storing.
Brandstofkraan openen
Brandstoftank vullen.
Zet Motor Aan.
Verwijder, reinig, reset en vervang de bougie.
Zorg dat de choke-instelling correct is.
Wacht vijf (5) minuten.
Open de choke en open volledig de gashendel
en probeer opnieuw.
Verwijder, reinig en vervang de bougie.
Probeer opnieuw totdat de motor aanslaat.
Luchtlter vervangen.
Neem contact op met de vertegenwoordiger of
met Evolution Power Tools
voor verder advies.
Machine trilt
niet.
Riemspanning onjuist.
Luchtlter geblokkeerd.
Excentrische eenheid
beschadigd.
Motortoerental te laag.
Stel de riemspanning af.
Vernieuw het luchtlter.
Excentrische eenheid vervangen.
Verhoog het motortoerental iets.

www.evolutionpowertools.com
203
WAARSCHUWING: Stel de stel-/spanbout niet af zonder de vier bevestigingsbouten
los te draaien, omdat dit schade aan de motorbehuizing kan veroorzaken.
Opmerking: Er moet op worden gelet dat de motor recht en 'inline' op de montageplaat blijft. Als de
motor in een enigszins 'gedraaide' conguratie op de montageplaat zou staan, zouden de aandrijfriem en
poelies onder 'last' komen te staan en zou snel slijtage optreden.
• Plaats de aandrijfriembescherming terug en draai de drie (3) inbusbouten stevig vast op hun
oorspronkelijke posities.
6. Terugloop-startsysteem
De ventilatiesleuven moeten schoon en vrij van obstakels worden gehouden.
Verwijder eventueel vreemd materiaal uit de ventilatiesleuven.
H320-P
ROUTINE-
ONDERHOUDSSCHEMA
Na de eerste
4 uur
Iedere
20 uur of maan-
delijks
Iedere
50 uur of
3-maandelijks
Iedere
100 uur of
6-maandelijks
Motoroliepeil controleren
● ●
Motorolie verversen
●
(alleen 1e
ver-
versing)
●
Luchtltercontrole
●
Luchtltervervanging
●
Bougiecontrole
●
Aandrijfriemspanning
● ●
Brandstoltercontrole/
reiniging
●
ONDERHOUD H320-E
Opmerking: Ieder onderhoud moet worden uitgevoerd met de machine uitgeschakeld en losgekoppeld
van de stroomvoorziening.
Controleer regelmatig of alle veiligheidsfuncties en beschermingen goed werken. Gebruik deze machine
alleen indien alle beschermingen/veiligheidsfuncties volledig werken.
Alle motorlagers in deze machine zijn levenslang gesmeerd. Er is geen verdere smering vereist.
Gebruik een schone, lichtvochtige doek voor het schoonmaken van de plastic onderdelen van de
machine. Gebruik geen oplosmiddelen of dergelijke producten die de kunststof onderdelen kunnen
beschadigen.
WAARSCHUWING: Probeer niet schoon te maken door puntige voorwerpen in openingen in
de behuizing van de machine enz. te perslucht worden gereinigd.

www.evolutionpowertools.com
204
GIDS VOOR ALGEMENE PROBLEEMOPLOSSING
PROBLEEM OORZAAK MOGELIJKE OPLOSSING
Bestratingsstenen
beschadigd.
Plaat in direct contact met de
bestrating.
Breng een bestratingskussen aan.
Afschilfering
van bitumineus
oppervlak
(lamineren).
Oververdichting. Verwijder en plaats terug.
Lage rijsnelheid. Laagdikte te diep
(plaatverzakking).
Motortoerental te laag.
Vochtgehalte van het
materiaal te hoog of te laag.
Verwijder een deel van het materiaal zodat
de laagdikte wordt verminderd.
Verhoog het motortoerental iets.
Verwijder het materiaal en pas het
vochtgehalte aan.
H320-P rijdt niet. Motortoerental te laag. Verhoog het motortoerental iets.
PROBLEEMOPLOSSING H320-E
PROBLEEM OORZAAK MOGELIJKE OPLOSSING
Machine
start niet.
Toevoer niet Aan
Zekering in stekker
doorgebrand.
Veiligheidsstartknop niet
ingedrukt , waardoor de
Aan/Uit-bediening niet
gebruikt kan worden.
Beschadigd of
kapot netsnoer.
Schakel de voeding in bij het stopcontact.
Vervang de zekering en controleer de voeding.
Druk op de veiligheidsstartknop
en trek dan aan de starthendel.
Laat een bevoegde technicus het beschadigde
snoer vervangen door een identiek type snoer.

www.evolutionpowertools.com
205

www.evolutionpowertools.com
206
Afb. 20
LANGDURIGE OPSLAG H320-P
Als uw Evolution-machine gedurende een periode van 4
maanden of langer niet zal worden gebruikt (bijvoorbeeld
tijdens de winterperiode), moet de operator overwegen de
machine voor te bereiden voor langdurige opslag. Hierdoor
blijft de motor in optimale staat voor herinbedrijfstelling
indien nodig.
• Tap alle brandstof uit de brandstoftank en carburateur
af in een geschikte goedgekeurde bak.
• Onder de vlotterkamer van de carburateur bevindt zich
een aftapkraan. Draai deze kraan open om de brandstof
uit de machine te laten lopen. (Afb. 20)
• Draai de aftapkraan dicht als alle brandstof is
verwijderd.
• Verwijder de bougie.
• Giet ongeveer een eetlepel schone motorolie in het
bougiegat.
• Zorg dat de contactschakelaar van de motor in de UIT-
stand staat.
• Trek voorzichtig een paar keer aan de terugloopstarter.
• Vervang de bougie.
• Trek voorzichtig aan de terugloopstarter totdat u
weerstand voelt (dit betekent dat de zuiger in zijn
compressieslag staat met beide kleppen gesloten). Stop
met trekken aan de terugloopstarter.
• Sla de motor op een veilige, droge en goed
geventileerde plaats op, onder een afdekking om
te voorkomen dat stof, vuil enz. op de machine
terechtkomt.
RETOURNEREN VAN DE H320-P
In het geval dat u uw H320-P-machine aan Evolution moet
retourneren, moet u de onderstaande stappen volgen om
transport veilig te maken voor vervoerders.
1. Tap de brandstof van de machine volledig af uit de
brandstoftank en de carburateur. (Afb. 20)
2. Tap de motorolie volledig af. (Afb. 14)
3. Demonteer de handgreep door de schroeven te
verwijderen. Zorg ervoor dat u alle verwijderde
onderdelen bewaart. (Afb. 2)
4. Verpak de machine veilig in een doos, bij voorkeur in de
originele verpakking.

www.evolutionpowertools.com
207
Opmerking: De machine wordt weer geretourneerd
zonder brandstof en olie. Zorg ervoor dat u brandstof en
olie bijvult voordat u de motor start.
Gebruik van optionele Evolution-accessoires
(beschikbaar als aankoopoptie voor klanten)
BESCHERMING VAN HET MILIEU
Elektrische afvalproducten mogen niet met huishoudelijk
afval worden afgevoerd. Gelieve te recyclen waar
faciliteiten beschikbaar zijn. Informeer bij uw lokale
autoriteiten of leverancier voor recyclingadvies.

www.evolutionpowertools.com
208
EC-VERKLARING VAN OVEREENSTEMMING
In overeenstemming met EN ISO 17050-1:2004
De fabrikant van het product waarop deze verklaring betrekking heeft, is:
VK: Evolution Power Tools Ltd. Venture One, Longacre Close, Holbrook Industrial Estate, Sheeld, S20 3FR.
FR: Evolution Power Tools SAS. 61 Avenue Lafontaine, 33560, Carbon-Blanc, Bordeaux, France.
De fabrikant verklaart hierbij dat de machine zoals beschreven in deze verklaring voldoet aan alle relevante bepalingen
van de machinerichtlijn en andere toepasselijke richtlijnen, zoals hieronder beschreven.
De fabrikant verklaart verder ook dat de machine, zoals beschreven in deze verklaring, indien van toepassing, aan de
relevante bepalingen over de essentiële vereisten voor gezondheid en veiligheid voldoet.
De richtlijnen waarop deze verklaring betrekking heeft, worden hieronder nader beschreven:
1907/2006 Rejestracja, ocena, udzielanie zezwoleń i stosowane ograniczenia w zakresie chemikaliów –
rozporządzenie REACH WE nr 1907/2006, załącznik XVII
2006/42/EC. Machinerichtlijn
2014/30/EU. Elektromagnetische compatibiliteit.
2011/65/EU. & (EU)2015/863. De beperking van het gebruik van bepaalde gevaarlijk stoffen in elektrische apparatuur (RoHS)
richtlijn.
2000/14/EU & 2005/88/EC Richtlijn omgevingslawaai.
En is conform de van toepassing zijnde vereisten van de volgende documenten
EN 500-1:2006+A1• EN 500-4:2011• EN ISO 3744: 1995 • EN ISO 14982:2009
Productgegevens
Omschrijving: H320-P
Evolution modelnr: 015-0001, 015-0013
Fabrieksmodelnr.: XZ-10C/JF152
Merknaam: EVOLUTION
De technische documentatie die vereist is om aan te tonen dat het product aan de vereisten van de richtlijnen voldoet is
verzameld en beschikbaar voor onderzoek door relevante handhavingsinstanties, en verieert dat ons technische dossier
de documenten hierboven bevat en dat ze de correcte standaarden zijn voor het hierboven beschreven product.
Naam en adres van de houder van de technische documentatie.
Ondertekend: In letters: Barry Bloomer - CEO
Datum: 23/08/22
VK: Evolution Power Tools Ltd. Venture One, Longacre Close, Holbrook Industrial Estate, Sheeld, S20 3FR.
FR: Evolution Power Tools SAS. 61 Avenue Lafontaine, 33560, Carbon-Blanc, Bordeaux, France.
®
H320-P

www.evolutionpowertools.com
209
EC-VERKLARING VAN OVEREENSTEMMING
In overeenstemming met EN ISO 17050-1:2004
De fabrikant van het product waarop deze verklaring betrekking heeft, is:
VK: Evolution Power Tools Ltd. Venture One, Longacre Close, Holbrook Industrial Estate, Sheeld, S20 3FR.
FR: Evolution Power Tools SAS. 61 Avenue Lafontaine, 33560, Carbon-Blanc, Bordeaux, France.
De fabrikant verklaart hierbij dat de machine zoals beschreven in deze verklaring voldoet aan alle relevante bepalingen
van de machinerichtlijn en andere toepasselijke richtlijnen, zoals hieronder beschreven.
De fabrikant verklaart verder ook dat de machine, zoals beschreven in deze verklaring, indien van toepassing, aan de
relevante bepalingen over de essentiële vereisten voor gezondheid en veiligheid voldoet.
De richtlijnen waarop deze verklaring betrekking heeft, worden hieronder nader beschreven:
1907/2006 Rejestracja, ocena, udzielanie zezwoleń i stosowane ograniczenia w zakresie chemikaliów –
rozporządzenie REACH WE nr 1907/2006, załącznik XVII
2006/42/EC. Machinerichtlijn
2014/30/EU. Elektromagnetische compatibiliteit.
2011/65/EU. & (EU)2015/863. De beperking van het gebruik van bepaalde gevaarlijk stoffen in elektrische apparatuur (RoHS)
richtlijn.
2002/96/EC De richtlijn Afgedankte elektrische en elektronische apparatuur (AEEA).
2000/14/EU & 2005/88/EC Richtlijn omgevingslawaai.
En is conform de van toepassing zijnde vereisten van de volgende documenten
EN 500-1:2006+A1 • EN 500-4:2011 • EN 60204-1:2018 • EN IEC 55014-1:2021 • EN ISO 3744:1995
EN IEC 55014-2:2021 • EN IEC 61000-3-2:2019/A1:2021 • EN 61000-3-3:2013/A2:2021
Productgegevens
Omschrijving: H320-E
Evolution modelnr: 015-0002, 015-0004, 015-0008, 015-0010
Fabrieksmodelnr.: XZ-5A
Merknaam: EVOLUTION
Spanning: 220-240V ~ 50Hz
Input: 300W
De technische documentatie die vereist is om aan te tonen dat het product aan de vereisten van de richtlijnen voldoet is
verzameld en beschikbaar voor onderzoek door relevante handhavingsinstanties, en verieert dat ons technische dossier
de documenten hierboven bevat en dat ze de correcte standaarden zijn voor het hierboven beschreven product.
Naam en adres van de houder van de technische documentatie.
Ondertekend: In letters: Barry Bloomer - CEO
Datum: 23/08/22
VK: Evolution Power Tools Ltd. Venture One, Longacre Close, Holbrook Industrial Estate, Sheeld, S20 3FR.
FR: Evolution Power Tools SAS. 61 Avenue Lafontaine, 33560, Carbon-Blanc, Bordeaux, France.
®
H320-E
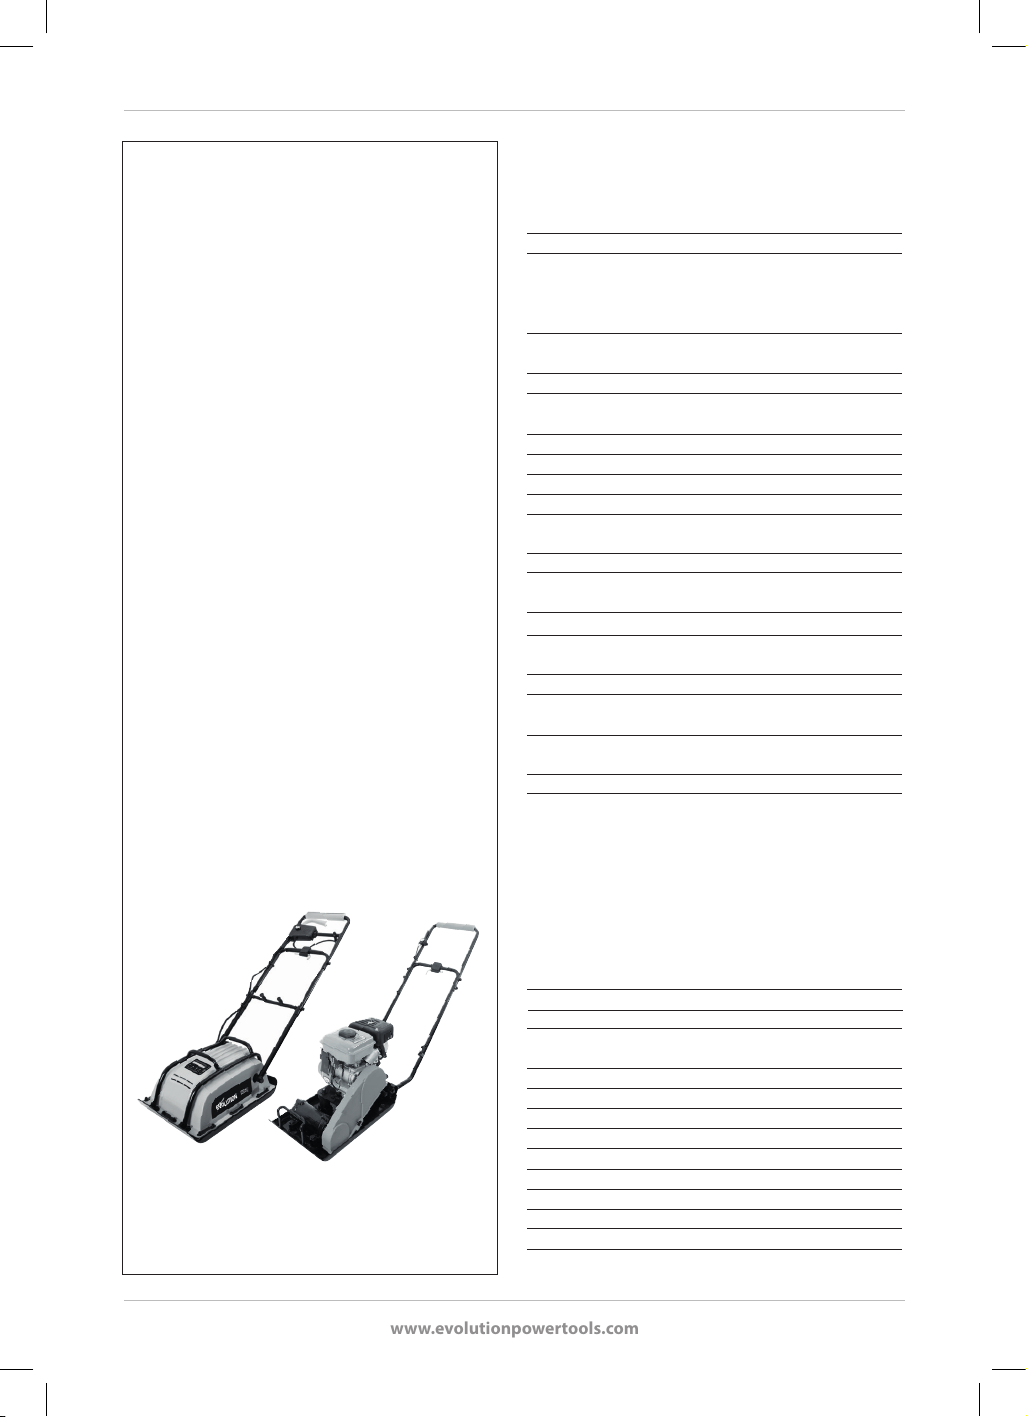
www.evolutionpowertools.com
210
Specicații model
Evolution Power Tools își rezervă dreptul de a
aduce îmbunătățiri și modicări
designului și specicațiilor tehnice ale acestui
produs fără înștiințare prealabilă.
Acest manual a fost redactat inițial în limba engleză.
Motor EU/UK 220-240 V~50 Hz 300 W, SUA 120 V~60 Hz 1,25 A
Viteză motor (min
-1
) EU/UK 2860 (la mers în gol), SUA 3450 (la mers
în gol)
Putere de compactare (kN) 5
Maximum recomandat 30
Timp util pentru operator (minute)
Nivel putere acustică (LwA) 88,5 dB(A) K=2,09 dB(A)
Nivel presiune acustică (LpA) 83,3 dB(A) K=3 dB(A)
Vibrație (m/sec
2
) 18,496 K = 1,5
Greutate netă kg (livre) 25,4 (56)
Înălțimea mânerului (pe durata operațiilor) mm (inci) 920 (36)
Distanța acoperită de unealtă (pe durata operațiilor) mm (inci) 1290
(51)
Diametru talpă mm (inci) 320 (12-1/2)
Lungimea cablului metri (picioare) 10 (33)
Clasă izolație I
IP44
H320-P
H320-E
Tip motor OHV 4 timpi monocilindric
Capacitate motor 1.7 kW 3600 min
-1
Bujie de schimb LD E6TC (disponibilă la Evolution)
NGK BP6HS
CHAMPION L87YCC
AC DELCO 42FS
Distanță disruptivă a bujiei 0.028 – 0.031 inci (0,071 - 0,078 cm)
0,7 – 0,8 mm
Filtru de aer de schimb Evolution H1S58
Jocuri ale supapei (rece) Ajutaj de intrare 0,15 mm 0,006 inci
Eșapament 0,20 mm 0,008 inci
Putere de compactare (kN) 10
Vibrație (m/sec
2
) 20,211 K = 1,5
Nivel putere acustică (LwA) 97,9 dB(A) K=2,42 dB(A)
Nivel presiune acustică (LpA) 90,5 dB K=3 dB(A)
Timp util pentru operator (minute) 20
Maximum recomandat
Tip ulei SAE 10W-30/40
Capacitate ulei (litri) 0,25
(uncii lichide) 8,45
Tip combustibil E5 și E10 Benzină fără plumb
Capacitate combustibil (litri) 1,2
(uncii lichide) 40,57
Greutate netă kg (livre) 32,45 (71,5)
Înălțimea mânerului (pe durata operațiilor - 1020 (40)
cu mâner de extensie montat) mm (inci)
Distanța acoperită de unealtă (pe durata operațiilor– 1290 (51)
cu mâner de extensie montat) mm (inci)
Diametru talpă mm (inci) 320 (12-1/2)

www.evolutionpowertools.com
211
IMPORTANT
Vă rugăm să citiți cu atenție și integral aceste
instrucțiuni privind utilizarea și siguranța.
Pentru siguranța dumneavoastră, dacă aveți
nelămuriri cu privire la orice aspect al folosirii
acestui echipament, vă rugăm să contactați
Centrul corespunzător de asistență tehnică, al
cărui număr de telefon poate găsit pe site-ul
web Evolution Power Tools. În cadrul organizației
noastre, la nivel global, avem deschise mai multe
centre de asistență telefonică, dar serviciul de
asistență tehnică este oferit și de furnizorul
dumneavoastră.
SITE WEB www.evolutionpowertools.com/register
Felicitări pentru achiziția unui aparat Evolution
Power Tools. Vă rugăm să efectuați înregistrarea
on-line a produsului, conform instrucțiunilor
din broșura A5 de înregistrare a garanției
produsului, oferită împreună cu acest aparat.
De asemenea, puteți scana codul QR de pe
broșura A5 cu ajutorul unui smartphone. Astfel,
introducându-vă datele, perioada de garanție
a aparatului dumneavoastră va validată prin
intermediul site-ului web Evolution și veți
benecia de service prompt, în caz de nevoie.
Vă mulțumim sincer pentru că ați ales un
produs al companiei Evolution Power Tools.
GARANȚIA LIMITATĂ EVOLUTION. EVOLUTION
POWER TOOLS ÎȘI REZERVĂ DREPTUL DE
A ADUCE ÎMBUNĂTĂȚIRI ȘI MODIFICĂRI
CONSTRUCŢIEI PRODUSULUI, FĂRĂ
ÎNȘTIINȚARE PREALABILĂ.
VĂ RUGĂM SĂ CONSULTAȚI BROȘURA
DE ÎNREGISTRARE A GARANȚIEI ȘI/SAU
AMBALAJUL PENTRU DETALII CU PRIVIRE LA
TERMENII ȘI CONDIȚIILE GARANȚIEI.
În perioada de garanție și începând cu data inițială
a achiziției, Evolution Power Tools va repara
sau înlocui orice produs căruia îi vor găsite
defecțiuni materiale sau de fabricație. Această
garanție devine nulă dacă unealta returnată a
fost folosită nerespectând recomandările din
manualul de instrucțiuni sau dacă unealta a fost
deteriorată accidental, prin neglijență sau service
necorespunzător. Această garanție nu se aplică
aparatelor și/sau componentelor care au fost
modicate în orice fel sau care au fost folosite în
afara capacităților și specicațiilor recomandate.
Componentele electrice sunt supuse garanției
ecărui producător în parte. Toate produsele
defecte vor returnate către Evolution Power Tools
cu taxa de expediere plătită în avans. Evolution
Power Tools își rezervă dreptul de a repara sau
înlocui opțional produsul cu un articol identic
sau echivalent. Nu se oferă garanție - scrisă sau
verbală - pentru accesoriile consumabile, cum ar
(lista următoare nu este exhaustivă) discurile,
frezele, burghiele, dălțile sau paletele etc. În niciun
caz Evolution Power Tools nu va răspunzătoare
de pierderi sau deteriorări rezultate direct sau
indirect din utilizarea produselor noastre sau din
orice altă cauză. Evolution Power Tools nu este
răspunzătoare pentru niciun cost asociat acestor
produse sau pentru daune secundare. Niciun
funcționar, angajat sau agent al Evolution Power
Tools nu este autorizat să facă expuneri verbale
de conformitate sau să renunțe la oricare dintre
termenii de vânzare anteriori și niciunul dintre
aceștia nu va obliga în vreun fel Evolution Power
Tools.
Nelămuririle legate de această garanție limitată
trebuie adresate biroului central al companiei
sau telefonic, la linia de relații cu clienții.
INSTRUCȚIUNI GENERALE DE SIGURANȚĂ
PENTRU UNELTELE ELECTRICE
(Aceste instrucțiuni generale privind siguranța
utilizării uneltelor electrice sunt conform
specicațiilor din BS EN 500-1:2006+A1 și EN 500-
4:2011
AVERTISMENT: Citiți toate avertismentele
și instrucțiunile pentru siguranță.
Nerespectarea avertismentelor și a instrucțiunilor
poate conduce la șocuri electrice, incendii și/sau
vătămări grave.
Păstrați avertismentele și instrucțiunile de
folosire pentru referințe ulterioare.
Termenul „unealtă electrică” din avertismente
se referă la unealta dumneavoastră electrică
cu alimentare la rețea (cu cablu) sau la unealta
electrică cu acumulator (fără cablu).

www.evolutionpowertools.com
212
1) Avertismente generale de siguranță pentru
uneltele electrice [Siguranța zonei de lucru]
a) Păstrați zona de lucru curată și bine
iluminată. O zonă de lucru aglomerată și
întunecoasă predispune la accidente.
b) Nu operați unelte electrice în atmosfere
explozive, cum ar în prezența lichidelor
inamabile, a gazelor sau a pulberii. Uneltele
electrice creează scântei care pot aprinde pulberile
sau vaporii.
c) Țineți copiii și privitorii la distanță atunci
când operați o unealtă electrică. Orice vă
distrage atenția vă poate face să pierdeți controlul.
2) Avertismente generale de siguranță pentru
uneltele electrice [Siguranța la curentul electric]
a) Ștecărele uneltelor electrice trebuie să se
potrivească cu priza. Nu modicați niciodată
ștecărul în niciun fel. Nu folosiți ștecăre
adaptoare la uneltele electrice cu împământare.
Ștecărele nemodicate și prizele pe măsură reduc
riscul de electrocutare.
b) Evitați contactul zic cu suprafețele
împământate, cum ar țevile, caloriferele,
plitele și frigiderele. Există un risc sporit
de electrocutare în cazul în care corpul
dumneavoastră face circuit cu solul.
c) Nu expuneți uneltele electrice la ploaie sau
la condiții de umezeală. Pătrunderea apei într-o
unealtă electrică crește riscul de electrocutare.
d) Nu forțați cablul. Nu folosiți niciodată cablul
pentru a transporta, a trage sau scoate din
priză unealta electrică. Țineți cablul departe de
căldură, ulei, muchii ascuțite sau piese mobile.
Cablurile deteriorate sau încâlcite cresc riscul de
electrocutare.
e) Atunci când operați o unealtă electrică la
exterior, folosiți un cablu prelungitor potrivit
pentru utilizare la exterior. Folosirea unui cablu
potrivit pentru utilizare în aer liber reduce riscul de
electrocutare.
f) În cazul în care operarea unei unelte electrice
într-un loc umed este inevitabilă, folosiți o
sursă de alimentare protejată cu un dispozitiv
de curent rezidual (DCR). Utilizarea unui DCR
reduce riscul de electrocutare.
3) Avertismente generale de siguranță pentru
uneltele electrice [Siguranța personală].
a) Fiți vigilenți, atenți la ce faceți și dați dovadă
de simț practic atunci când operați o unealtă
electrică. Nu folosiți unealta electrică când
sunteți obosiți sau sub inuența drogurilor,
alcoolului sau medicamentelor. O singură clipă
de neatenție când operați unelte electrice poate
avea ca rezultat vătămări personale grave.
b) Folosiți echipament personal de protecție.
Purtați întotdeauna protecție pentru ochi.
Echipamentul de protecție precum măștile anti-
praf, încălțămintea de siguranță anti-alunecare,
casca sau protecția pentru urechi, folosite în situații
adecvate, reduc vătămările corporale.
c) Preveniți pornirea accidentală. Asigurați-
vă că butonul de pornire este în poziția oprit
înainte de a conecta unealta la sursa de curent
și/sau la acumulator, înainte de a o ridica sau
transporta. Transportarea uneltelor electrice cu
degetul pe comutator sau alimentarea cu curent
a uneltelor electrice care au comutatorul pornit
predispune la accidente.
d) Îndepărtați cheia de reglare înainte de a
porni unealta electrică. O cheie rămasă xată la
o piesă rotativă a uneltei electrice poate duce la
vătămări corporale .
e) Nu vă întindeți. Mențineți-vă tot timpul
echilibrul și o poziție stabilă. Astfel veți controla
mai bine unealta electrică în situații imprevizibile.
f) Îmbrăcați-vă corespunzător. Nu purtați haine
largi sau bijuterii. Țineți-vă părul, hainele sau
mănușile la distanță de piesele mobile. Hainele
largi, bijuteriile sau părul lung se pot prinde în
piesele mobile.
g) Dacă sunt furnizate dispozitive pentru
conectarea pieselor de extracție și colectare a
prafului, asigurați-vă că acestea sunt conectate
și folosite în mod adecvat. Utilizarea colectorului
de praf poate reduce riscurile asociate prafului.
h) Nu lăsați ca obișnuința cu alte unelte folosite
frecvent să vă facă să neglijați sau să ignorați
principiile de siguranță ale uneltei. O acțiune
neglijentă poate provoca vătămări grave într-o
fracțiune de secundă.
4) Avertismente generale de siguranță pentru
uneltele electrice [Utilizarea și întreținerea
uneltei electrice].
a) Nu forțați unealta electrică. Folosiți unealta
electrică adecvată nevoilor dumneavoastră.
Unealta electrică adecvată va face treaba mai

www.evolutionpowertools.com
213
bine și mai sigur într-un ritm pentru care a fost
proiectată.
b) Nu folosiți unealta electrică în cazul în care
nu se poate opri și porni de la comutator. Orice
unealtă electrică ce nu poate controlată de la
comutator este periculoasă și trebuie reparată.
c) Deconectați unealta electrică de la sursa de
curent și/sau acumulator înainte de a efectua
orice reglaje, înainte de a schimba accesorii sau
înainte de a o depozita. Aceste măsuri preventive
de siguranță reduc riscul de pornire accidentală a
uneltei electrice.
d) Nu depozitați uneltele electrice la
îndemâna copiilor și nu permiteți persoanelor
nefamiliarizate cu unealta electrică sau cu
aceste instrucțiuni să opereze unealta electrică.
Uneltele electrice sunt periculoase dacă sunt
folosite de persoane neinstruite corespunzător.
e) Întrețineți uneltele electrice. Asigurați-vă
că nu există nealinieri sau blocaje ale pieselor
mobile, suri ale pieselor mobile sau orice alt
defect care ar putea afecta funcționarea uneltei
electrice. Dacă este defectă, solicitați repararea
uneltei electrice înainte de utilizare. Multe
accidente sunt provocate de întreținerea decitară
a uneltelor electrice.
f) Păstrați instrumentele de tăiat ascuțite și
curate. Uneltele electrice întreținute adecvat cu
muchiile ascuțite bine nu agață și sunt mai ușor de
controlat.
g) Folosiți unealta electrică, accesoriile, piesele
detașabile ale acesteia etc. în conformitate cu
aceste instrucțiuni, ținând cont de condițiile
de lucru și de lucrul ce urmează a efectuat.
Utilizarea uneltei electrice pentru alte operații
decât cele prevăzute poate conduce la situații
periculoase.
h) Păstrați mânerele și suprafețele de prindere
uscate, curate și fără urme de ulei și grăsime.
Mânerele și suprafețele de prindere alunecoase nu
permit manevrarea și controlul sigur al uneltei în
situații imprevizibile.
5) Avertismente generale de siguranță pentru
uneltele electrice [Service]
a) Solicitați depanarea uneltei dumneavoastră
electrice de către un depanator calicat,
folosind numai piese de schimb identice. Acest
lucru va garanta menținerea gradului de siguranță
a uneltei electrice.
INSTRUCȚIUNI DE SIGURANȚĂ PENTRU H320-P
a. Motoarele pe bază de benzină sau motorină
nu trebuie folosite niciodată în spații închise,
neaerisite. Gazele de eșapament rezultate sunt
foarte toxice și pot duce la asxierea cu oxid
de carbon. Aceasta provoacă somnolență și, în
cele din urmă, deces. Utilizarea unui motor pe
benzină în interior este permisă numai în cazul în
care clădirea poate aerisită foarte bine, iar gazele
de eșapament pot captate și transportate afară
cu ajutorul unui sistem de extragere.
b. Motorul nu trebuie utilizat la viteze care
depășesc parametrii evidențiați pe plăcuța
indicatoare a caracteristicilor tehnice. Operarea
unui motor la viteze excesive crește probabilitatea
de avarie a pieselor și a accidentelor rezultate.
c. Nu modicați componentele care
controlează viteza motorului. S-ar putea să
modicați parametrii de funcționare stabiliți inițial.
d. Folosiți numai tipul de combustibil
menționat în acest manual de instrucțiuni.
Folosirea unui combustibil cu o cifră octanică mai
scăzută decât este recomandat poate cauza uzarea
excesivă a motorului și avarierea prematură a
acestuia.
e. Păstrați zona din jurul motorului liberă,
curată și ordonată. Nu lăsați niciodată materiale
inamabile (lemn, plastic, carton, țesături etc.) în
preajma unui motor în funcțiune.
f. Nu utilizați unealta în atmosfere cu potențial
exploziv sau în preajma acestora. Atmosferele cu
mult praf, cum ar cele întâlnite în anumite clădiri
industriale (precum morile de făină sau fabricile de
lemn) ar putea explozive.
g. Vericați în mod regulat sistemul de
alimentare cu combustibil pentru a preveni
scurgerile. Furtunurile și punctele de contact
trebuie vericate pentru a constata dacă sunt
deteriorate sau uzate. Vericați rezervorul pentru
combustibil pentru a constata dacă este defect sau
dacă are un capac pentru combustibil nepotrivit
sau uzat. Orice defect trebuie remediat înainte de a
folosi motorul.
h. Înainte de alimentare, opriți întotdeauna
motorul și lăsați-l să se răcească. Încercați
să evitați orice fel de scurgeri de combustibil
(provocate adesea de umplerea excesivă a
rezervorului) și curățați imediat toate scurgerile de
combustibil. O metodă ecientă de a neutraliza
scurgerile de combustibil este aplicarea de nisip

www.evolutionpowertools.com
214
uscat. Nu permiteți nisipului să intre în contact cu
niciuna din părțile motorului.
i. Asigurați-vă că robinetul pentru combustibil
este închis atunci când transportați motorul într-
un automobil. Pentru a reduce riscul de scurgeri
de combustibil, motorul ar trebui să e xat cu
ajutorul unor funii, etc. în zona pentru încărcătură
a vehiculului, astfel încât să nu se miște în timpul
transportului. Acesta ar trebui să e xat într-o
poziție pe cât posibil de echilibrată.
j. În cazul depozitării de lungă durată,
recomandăm să goliți complet sistemul de
alimentare cu combustibil al motorului. A se
vedea Fig. 20 pentru instrucțiuni. Pe durata
depozitării de lungă durată, aditivii din carburanții
moderni se pot evapora din combustibil și pot
bloca ajutajele și valvele sistemului de alimentare.
k. Păstrați unealta într-o zonă bine aerisită și
sigură. Persoanele neautorizate nu ar trebui să aibă
acces la această unealtă.
INSTRUCȚIUNI DE SIGURANȚĂ PENTRU
ALIMENTAREA CU COMBUSTIBIL
a. Alegeți o zonă cu o suprafață plană și goală,
aată la distanță de orice clădire. Asigurați-vă că
nu există niciun material inamabil în apropiere.
b. E strict interzis fumatul în timpul alimentării,
folosirea focului deschis sau producerea
scânteilor. Benzina este foarte inamabilă, iar
vaporii acesteia pot exploda.
c. Asigurați-vă că robinetul de combustibil este
„închis”. Acest lucru va împiedica „inundarea”
carburatorului motorului cu combustibil nou.
d. Motorul trebuie oprit și lăsat să se răcească
înainte de a încerca să alimentați unealta.
Vărsarea din neatenție a combustibilului pe un
motor cald poate crea risc de incendiu.
e. Orice scurgere de carburant trebuie
rezolvată imediat. În cazul în care combustibilul
contaminează îmbrăcămintea operatorului, acesta
trebuie să se schimbe. Nu vă bazați pe faptul că
acesta se va evapora de pe haine. Spălați sau
curățați hainele după ce combustibilul se evaporă
din material.
f. Este recomandată utilizarea unei pâlnii în
timpul alimentării. Acest lucru va diminua riscul
scurgerilor de combustibil.
g. Umpleți rezervorul cu categoria potrivită
de combustibil fără plumb până la nivelul
recomandat, aproximativ până la jumătatea
ltrului de carburant. Turnați cu grijă
combustibilul în rezervor, fără a încerca să îl umpleți
în totalitate. Turnați încet pentru a evita golurile de
aer. Acestea ar putea cauza scurgeri de combustibil.
h. Vericați capacul rezervorului și puneți-l la loc
de îndată ce terminați alimentarea. Acesta este
un conector de tip baionetă. Vericați dacă este
instalat și așezat corect înainte de a da încet drumul
robinetului pentru combustibil.
i. Vericați să nu existe nicio scurgere la sistemul
de alimentare. Nu încercați să porniți motorul
dacă bănuiți că există o scurgere. Toate scurgerile
identicate trebuie reparate de către un tehnician
cu calicările potrivite.
j. Respectați toate normele naționale și/sau
locale cu privire la depozitarea și utilizarea
produselor pe bază de petrol. Toate regulile
locale trebuie respectate.
RECOMANDĂRI PRIVIND SĂNĂTATEA
AVERTISMENT: Când utilizați această
unealtă, se produc particule de praf. În unele
situații, în funcție de materialele cu care lucrați,
acest praf poate deosebit de dăunător. Este
recomandat să aveți în vedere riscurile asociate
materialelor cu care lucrați și să reduceți riscul de
expunere. Întrucât unele materiale pot produce
praf care poate periculos pentru sănătatea
dumneavoastră, vă recomandăm să folosiți măști
pentru față aprobate, cu ltre înlocuibile, atunci
când folosiți această unealtă.
Trebuie întotdeauna:
• Să lucrați într-o zonă bine ventilată.
• Să lucrați cu echipament de siguranță aprobat,
cum ar măștile de praf, care sunt proiectate
special să ltreze particule microscopice.
AVERTISMENT: operarea uneltelor
electrice poate face ca obiecte străine să e
aruncate spre ochii dumneavoastră, ceea ce poate
provoca leziuni grave. Înainte de a începe să folosiți
unealta electrică, purtați întotdeauna ochelari de
protecție cu scut lateral sau scut complet pentru
față, atunci când e nevoie.
AVERTISMENT: În cazul în care lipsește o
piesă, nu operați unealta până când piesa

www.evolutionpowertools.com
215
lipsă nu este înlocuită. Nerespectarea acestei reguli
poate avea ca rezultat vătămări grave.
REGULI SUPLIMENTARE DE SIGURANȚĂ PENTRU
PLACA COMPACTOARE H320
a. Îngrădiți zona de lucru. Membrii publicului
și persoanele neautorizate ar trebui ținute la o
distanță sigură de operațiile de compactare.
b. Asigurați-vă că știți cum să puneți unealta în
poziția „oprit”. Este important să puteți efectua
o oprire de urgență a uneltei în cazul în care
întâmpinați dicultăți în timpul operațiilor de
compactare.
c. Nu lăsați niciodată unealta nesupravegheată
dacă este în funcțiune. Aceasta vibrează de îndată
ce este pornită și începe să avanseze. Dacă este
lăsată nesupravegheată, unealta trebuie să e
oprită.
d. Opriți întotdeauna motorul înainte de a
transporta unealta prin zona de lucru. Când
mutați sau transportați unealta, aceasta trebuie
să e oprită și, preferabil, rece. Robinetul pentru
combustibil trebuie să e în poziția „oprit”.
e. Motorul H320 se încinge în timpul utilizării.
Asigurați-vă că nu îl atingeți și nu permiteți
niciunui material inamabil sau articol de
îmbrăcăminte să intre în contact cu el în această
perioadă. Atingeți și depanați motorul numai când
este rece.
f. Nu îndepărtați, modicați sau manipulați
niciodată elementele de protecție ale uneltei.
Acestea sunt proiectate și instalate special pentru
a vă oferi cel mai mare nivel de protecție pe
parcursul operațiilor. În cazul în care un mecanism
de protecție lipsește sau este defect, nu utilizați
unealta până când acesta nu este reparat sau
înlocuit de către un tehnician competent.
g. Aveți grijă să mențineți controlul când lucrați
pe o suprafață înclinată. Lucrați în direcție
longitudinală și nu de-a curmezișul suprafeței
înclinate.
h. Atunci când trebuie să compactați mai multe
straturi diferite unul peste altul, compactați
ecare strat separat. Această metodă va asigura
integritatea ecărui strat.
i. Parcurgeți suprafața de lucru cu H320 într-
un mod organizat până obțineți nivelul de
compactare dorit. Astfel, respectați cel mai sigur
mod de lucru.
j. Efectuați întotdeauna vericările de
siguranță înainte de a începe operațiile. Urmați
instrucțiunile din secțiunile ulterioare ale acestui
manual.
EPP (Echipament de protecție personală)
Notă: În cazul în care acest echipament este folosit
într-o zonă de construcție, operatorul trebuie să
respecte toate normele/regulile stabilite pentru
zona respectivă. Consultați-vă cu șeful de șantier
sau altă persoană responsabilă pentru a cere detalii.
a. Purtați îmbrăcăminte adecvată. Aceasta ar
putea include salopete, haine de lucru căptușite,
veste reectorizante etc.
b. Purtați încălțăminte adecvată. Se recomnadă
încălțămintea de protecție cu vârf de oțel și talpă
anti-derapantă.
c. Purtați ochelari de protecție adecvați. Se
recomandă un scut pentru toată fața sau ochelari
de protecție cu scut lateral, care protejează
împotriva resturilor proiectate.
d. Protejați-vă auzul. Purtați protecție adecvată
pentru urechi.
b. Purtați mănuși adecvate. Se recomandă
mănușile cu prindere solidă.
c. Purtați protecție pentru sistemul respirator.
Se recomandă o mască anti-praf cu ltre care pot
înlocuite și care protejează împotriva prafului n
toxic, brelor și vaporilor.
g. Purtați o cască de protecție. Utilizarea unei
căști de protecție ar putea obligatorie în unele
zone de construcții, pentru a proteja operatorul
împotriva pericolelor prezentate de munca la
înălțime.
TRANSPORTUL CU AUTOMOBILUL
AVERTISMENT: Această unealtă trebuie
ridicată de cel puțin doi oameni.
Pregătiți vehiculul înainte, astfel încât să e pregătit
pentru a încărca unealta. Aveți mare grijă să nu
scăpați unealta în timpul încărcării/descărcării.
• Deși compactă, această unealtă este grea.
Pentru a reduce riscul de vătămare, cereți ajutor
specializat oricând trebuie să ridicați această
unealtă.
• Pentru a reduce riscul de a vă vătăma spatele,
țineți unealta aproape de corp atunci când
www.evolutionpowertools.com
216
o ridicați. Îndoiți genunchii pentru a solicita
picioarele, nu spatele. Ridicați apucând părțile
potrivite ale cadrului extern.
• Ridicați și introduceți unealta în vehicul și
xați-o cât de echilibrat posibil cu ajutorul
funiilor, benzilor de xare etc., astfel încât să nu
se miște pe durata transportului.
Notă: H320-P: Se recomandă ca rezervorul uneltei
să e gol atunci când este transportată într-un
vehicul.
ÎNTREBUINȚAREA PREVĂZUTĂ PENTRU
ACEASTĂ UNEALTĂ ELECTRICĂ
AVERTISMENT: Acest produs este o placă
de compactare cu alimentare electrică,
proiectată pentru a utilizată cu accesorii speciale
Evolution. Folosiți numai accesorii proiectate
pentru utilizarea cu această unealtă și/sau cu cele
recomandate special de Evolution Power Tools
Ltd.
Această unealtă poate folosită pentru
compactarea suprafețelor precum pietriș, agregate
mici, pământ, nisip și materiale pentru fundații etc.
Atașată la talpa pentru pavaj, H320 poate folosită
pentru a compacta și a xa majoritatea tipurilor de
pavaj de tip bloc.
Motive pentru compactare
Pământul deranjat, umplerea nouă, stratul de
fundație sau asfaltul conțin compartimente cu aer
și cavități mici care pot provoca anumite probleme
dacă nu sunt compactate.
• Pe măsură ce tracul trece peste suprafața unei
zone necompactate, greutatea impusă apasă
pe materialul de dedesubt. Acest lucru poate
duce la prăbușirea stratului de suprafață, pe
măsură ce materialul migrează în jos pentru a
umple golurile.
• Sarcinile statice (case, garaje etc.) construite
pe o suprafață necompactată s-ar putea
scufunda pe măsură ce materialul de sub ele se
deplasează.
• În aceste spații goale se poate acumula apă,
care se dilată la îngheț și se contractă din nou
în condiții calde/uscate. Aceste fenomene
contribuie semnicativ la deteriorarea
fundațiilor construcțiilor și pot duce la nevoia
de subzidire a unei structuri.
Compactarea crește densitatea materialului și, prin
urmare, capacitatea acestuia de a suporta sarcini
statice și dinamice. Eliminarea cavităților cu aer și
a micilor goluri reduce probabilitatea de apariție a
admisiilor de apă și a prăbușirii ulterioare datorate
extinderii și contracției materialului.
ÎNTREBUINȚĂRI INTERZISE PENTRU ACEASTĂ
UNEALTĂ ELECTRICĂ
AVERTISMENT: Acest produs este o placă
de compactare cu alimentare electrică
și trebuie folosit strict în acest sens. Nu trebuie
modicat în niciun fel și nu trebuie folosit nici
pentru a alimenta orice alt echipament sau
a acționa orice alte accesorii în afara celor
menționate în prezentul manual de instrucțiuni.
AVERTISMENT: Această unealtă nu este
destinată pentru a folosită de persoane cu
capabilități zice, senzoriale sau mentale reduse
(inclusiv copii) sau cărora le lipsesc experiența
și cunoștințele necesare, decât dacă au fost
supravegheate sau instruite cu privire la utilizarea
în siguranță a produsului de către o persoană
răspunzătoare pentru siguranța lor.
Copiii trebuie supravegheați pentru a nu avea
acces la această unealtă și nu au voie să se joace
cu aceasta.
SIGURANȚA LA CURENT ELECTRIC - H320-E
ȘTECHERUL
Acest produs este prevăzut cu ștecher turnat,
potrivit pentru piața de destinație. Acesta respectă
cerințele standardelor internaționale și trebuie
conectat la o sursă cu un voltaj egal celui expus
pe eticheta de clasicare. În cazul în care ștecherul
sau cablul de alimentare sunt defecte, ele trebuie
înlocuite cu un ansamblu complet, identic cu
cel original. Respectați cerințele care vizează
conexiunile pentru alimentarea electrică din țara
dumneavoastră. Dacă aveți dubii, cereți sfatul unui
electrician calicat.
Ștecherul de tip BS poate utilizat numai în
Regatul Unit. Pentru a respecta gradul de protecție
IP (protecție de admisie), ștecherul trebuie introdus
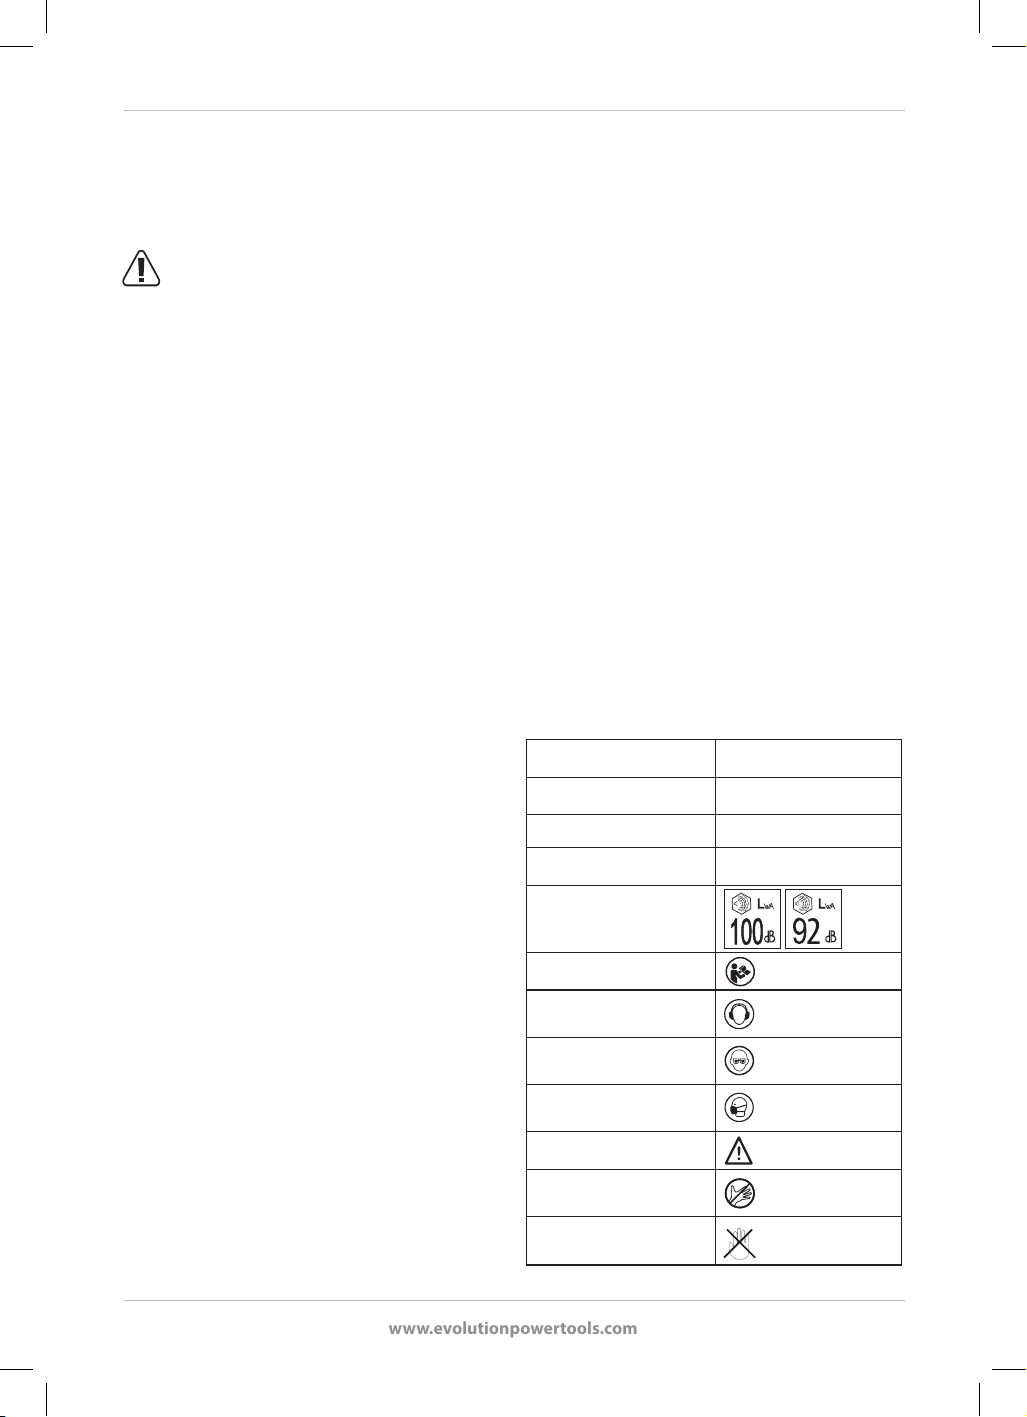
www.evolutionpowertools.com
217
într-o priză în interior. Acesta trebuie asamblat cu
un cablu de alimentare mai lung de 10 m.
UTILIZARE ÎN AER LIBER - H320-E
AVERTISMENT: Pentru protecția
dumneavoastră, în cazul în care această
unealtă este folosită în aer liber, nu trebuie să
e expusă la condiții de ploaie și nici folosită în
locuri foarte umede. Pentru mai multă protecție,
folosiți un dispozitiv de curent rezidual (D.C.R.) care
întrerupe alimentarea cu electricitate atunci când
scurgerea de curent în pământ depășește 30 mA
timp de 30 ms. Vericați întotdeauna funcționarea
dispozitivului de curent rezidual (D.C.R.) înainte de
utilizarea aparatului.
Dacă este necesar un cablu prelungitor, acesta
trebuie să e de tipul potrivit pentru utilizare în aer
liber și să e etichetat corespunzător.
Trebuie respectate instrucțiunile fabricantului
atunci când folosiți un cablu prelungitor.
VIBRAȚIE
AVERTISMENT: La folosirea acestei unelte,
operatorul poate expus la niveluri ridicate de
vibrație transmisă la nivelul mâinii și al brațului.
Este posibil ca operatorul să dezvolte „afecțiunea
degetelor albe” (sindromul Raynaud). Această
afecțiune poate să reducă sensibilitatea mâinii
la temperatură, precum și să ducă la o stare
generală de amorțire. Persoanele care utilizează
unelte de compactare în mod regulat sau
pentru perioade mai lungi de timp ar trebui să
monitorizeze atent starea mâinilor și a degetelor
lor. În cazul în care apar simptome clare, solicitați
imediat sfatul medicului.
• Măsurarea și evaluarea gradului de expunere a
omului la vibrațiile transmise la nivelul mâinii la
locul de muncă sunt detaliate în:
BS EN ISO 5349-1:2001 și
BS EN ISO 5349-2:2002
• Mulți factori pot inuența nivelul efectiv al
vibrațiilor în timpul operării, de exemplu, starea
și orientarea suprafeței de lucru, precum și
tipul și starea uneltei folosite. Înaintea ecărei
întrebuințări, aceste aspecte trebuie vericate
și, după caz, trebuie aplicate practicile de
muncă corespunzătoare. Gestionarea acestor
factori poate ajuta la reducerea efectelor
vibrațiilor:
Manevrarea
• Manevrați unealta cu grijă, lăsând-o să
acționeze.
• Evitați să aplicați forță zică în exces asupra
oricăror comenzi ale uneltei.
• Țineți cont de siguranța și stabilitatea
dumneavoastră, precum și de orientarea
uneltei în timpul utilizării.
Suprafața de lucru
• Țineți cont de materialul suprafeței de lucru;
de starea, densitatea, rezistența,
rigiditatea și orientarea acestuia.
SIMBOLURI ȘI ETICHETE
AVERTISMENT: Nu utilizați unealta
dacă etichetele de avertizare și/sau instruire lipsesc
sau sunt deteriorate. Contactați Evolution Power
Tools pentru înlocuirea etichetelor.
Notă: Toate sau unele dintre următoarele
simboluri pot să apară în manual sau pe produs.
Volți
V
Amperi
A
Viteză
min
-1
(RPM)
Curent alternativ
~
Nivel putere acustică
Citiți manualul
Purtați protecție pentru
urechi
Purtați protecție pentru
ochi
Purtați protecție împotriva
prafului
Avertisment
ATENȚIE: Eșapament
erbinte. Nu atingeți
FIERBINTE! Nu atingeți
HOT!
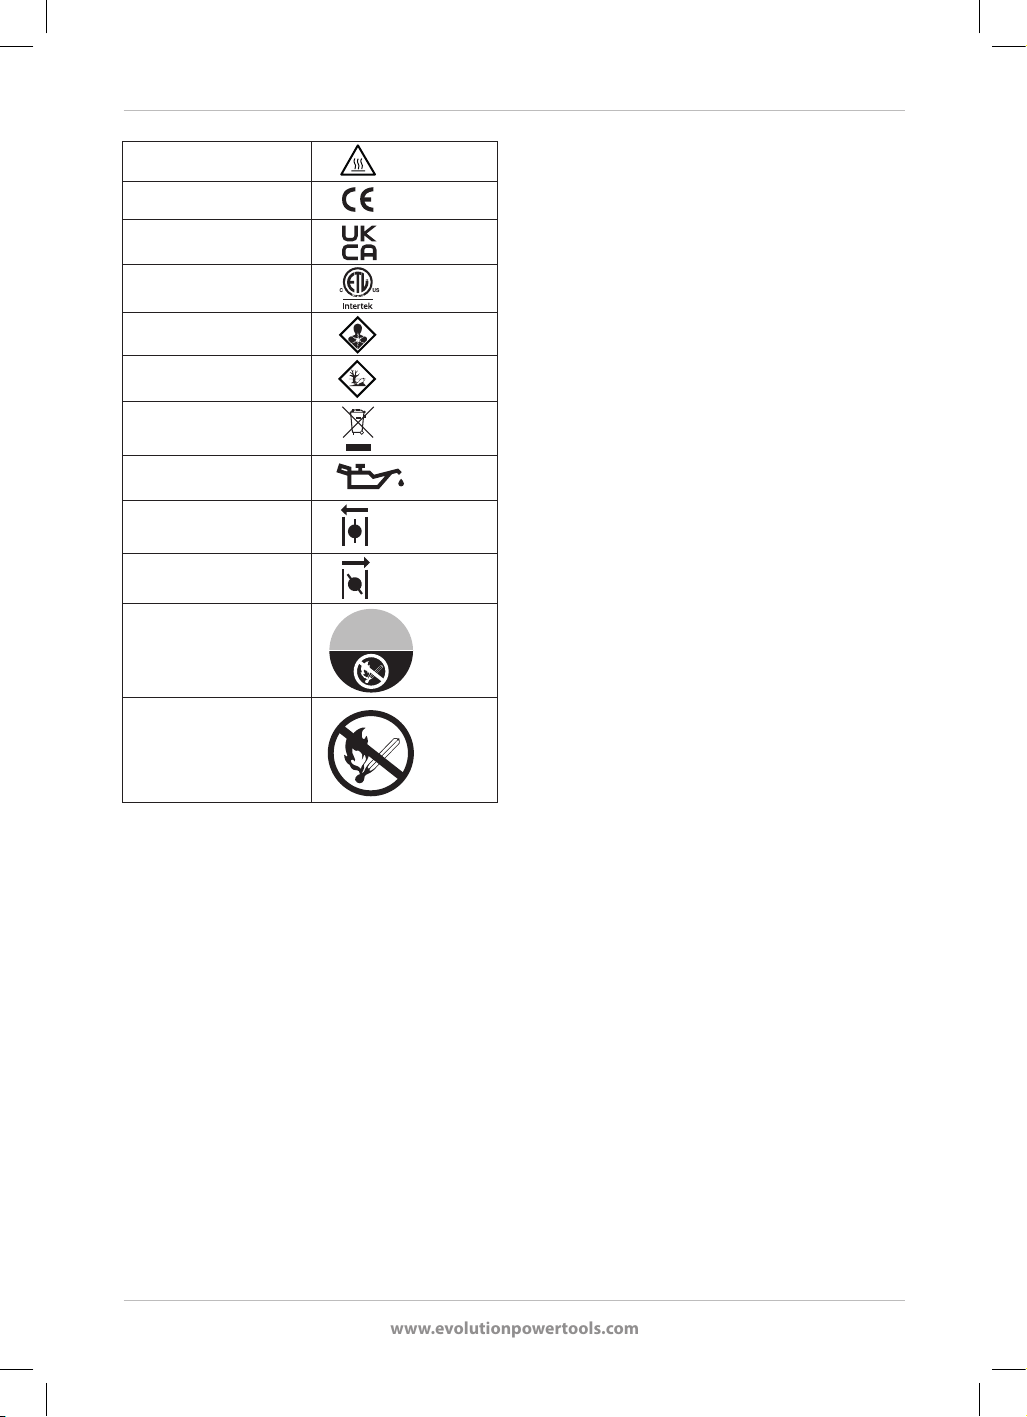
www.evolutionpowertools.com
218
Suprafață erbinte
Certicare CE
Certicare UKCA
Certicare Intertek
Pericol serios pentru sănătate
Periculos pentru mediul
înconjurător
Deșeuri de echipamente
electrice și electronice
Ulei motor 10/30W
Ajutaj deschis
Ajutaj închis
ATENȚIE: Acesta este
un motor cu 4 timpi.
Alimentați numai cu benzină.
Nu alimentați cu
motorină diesel.
Lăsați motorul să se răcească
înainte de a deschide capacul
pentru combustibil. Vaporii
sunt extrem de inamabili și
pot lua foc la contactul cu o
suprafață erbinte sau ăcări.
DOAR BENZINĂ
FĂRĂ PLUMB!*
FOARTE INFLAMABIL.
*E5 și E10

www.evolutionpowertools.com
219
1. TALPĂ VIBRATOARE
2. REZERVOR COMBUSTIBIL
3. BUTON DE CONTACT MOTOR „PORNIT/OPRIT ”
4. MANETĂ CLAPETĂ ACCELERAȚIE
5. CONTROL AJUTAJ
6. DEMAROR RECUL
7. ROBINET COMBUSTIBIL
8. INDICATOR/ȘTUȚ PENTRU UMPLEREA MOTORU-
LUI CU ULEI
9. FILTRU AER
10. BUJIE
11. EȘAPAMENT
12. BUȘON DE GOLIRE PENTRU ULEIUL DIN MOTOR
13. ȘURUB DE REGLARE PENTRU FUNCȚIONARE
ACCELERATĂ
14. PROTECȚIE CUREA
15. MÂNER ANTI-VIBRAȚIE
16. LOC DEPOZITARE UNEALTĂ
(1)
(14)
(2)
(7)
(5)
(9)
(4)
(13)
(6)
(3)
(8)
(12)
(15)
(16)
(11)
(10)
PREZENTAREA UNELTEI H320-P
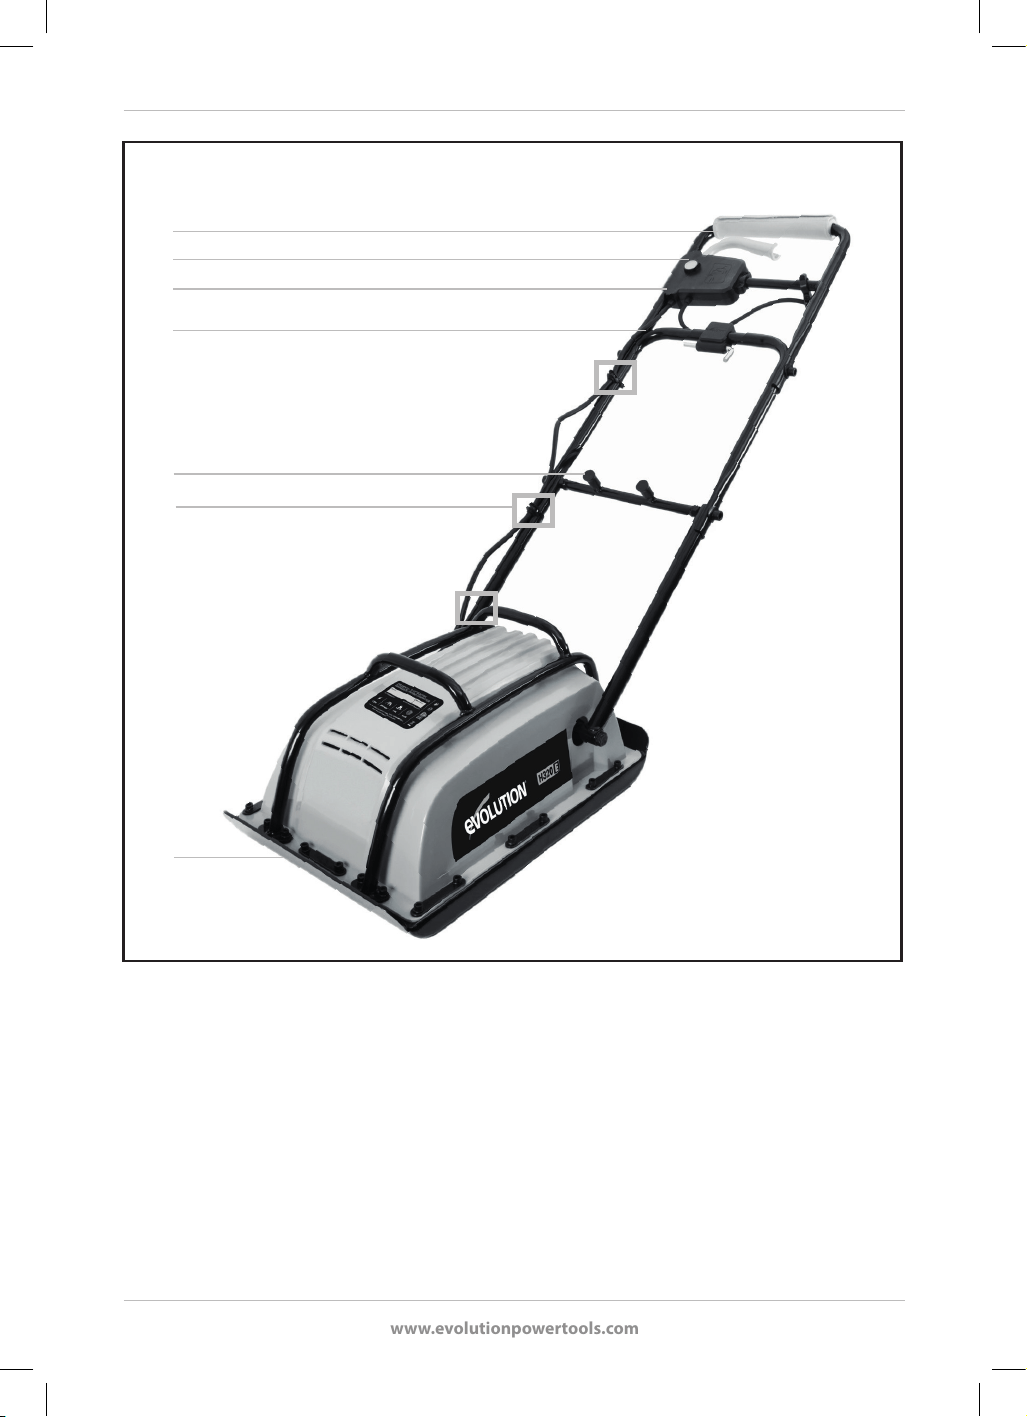
www.evolutionpowertools.com
220
PREZENTAREA UNELTEI H320-E
1. TALPĂ VIBRATOARE
2. CAVITATE PENTRU DEPOZITARE CABLU/TRAVER-
SĂ
3. COMUTATOR „PORNIT/OPRIT” PENTRU PORNIRE
ÎN SIGURANȚĂ
4. MÂNER ANTI-VIBRAȚIE
5. PARTEA SUPERIOARĂ - MÂNER
6. PARTEA MIJLOCIE - MÂNER
7. CLEME DIRIJARE CABLU
(1)
(2)
(3)
(4)
(5)
(6)
(7)

www.evolutionpowertools.com
221
PRIMII PAȘI
DESPACHETAREA
Atenție: Ambalajul conține obiecte ascuțite.
Aveți grijă când despachetați. Poate nevoie de
două persoane pentru a ridica, a asambla și a
muta această unealtă. Scoateți din cutie unealta,
împreună cu accesoriile furnizate. Vericați cu
atenție ca aparatul să e într-o stare bună și faceți
inventarul tuturor accesoriilor enumerate în
acest manual. De asemenea, asigurați-vă că toate
accesoriile sunt complete. Dacă descoperiți că
lipsesc piese, aparatul și accesoriile sale trebuie
returnate împreună în ambalajul original către
vânzător. Nu aruncați ambalajul; păstrați-l la loc
sigur pe toată perioada de garanție. Eliminați
ambalajul într-un mod ecologic. Reciclați, dacă
este posibil. Nu lăsați copiii să se joace cu pungile
de plastic goale. Există risc de sufocare.
ARTICOLE FURNIZATE -
PLACĂ COMPACTOARE H320-P
DESCRIERE CANTITATE
Manual de instrucțiuni 1
Extensie pentru mânerul mijlociu 1
Extensie pentru mânerul superior 1
Accesoriu pentru mânerul mijlociu
Șuruburi M10 x 20
4
Accesoriu pentru mânerul
superior
Șuruburi M10 x 15
4
Șaibe pentru mânerul superior 4
Cheie imbus 8 mm 1
Cheie inelară bujie și bară de
manipulare
1
Ulei motor (sticlă de 400 ml) 1
ARTICOLE FURNIZATE -
PLACĂ COMPACTOARE H320-E
DESCRIERE CANTITATE
Manual de instrucțiuni 1
Șuruburi accesoriu mâner
(lungi) M10 x 40
2
Șuruburi accesoriu mâner
(scurte) M10 x 15
2
Șaibe mâner 4
Mâner mijlociu 1
Mâner superior 1
Cheie imbus 8 mm 1
Cavitate pentru depozitare
cablu/mâner traversă
1
Accesorii suplimentare
Pe lângă articolele standard furnizate cu această
unealtă, următoarele accesorii sunt, de asemenea,
disponibile în magazinul online Evolution
pe www.evolutionpowertools.com sau la
comerciantul dumneavoastră local.
DESCRIERE Nr. PIESĂ
Talpă pentru pavaj H320 Talpă pentru pavaj
015-0007

www.evolutionpowertools.com
222
Fig. 2
Fig. 1
ASAMBLARE
Unealta dumneavoastră Evolution H320 trebuie asamblată
înainte de a folosită. Dacă dețineți unealta cu alimentare
pe benzină, nalizați procesul de asamblare înainte de a
alimenta motorul cu 0,4 L din uleiul recomandat pentru
service.
1. Atașarea mânerului de extensie - H320-P
Notă: Extensia pentru mâner are un mâner anti-vibrație
care ajută operatorul să controleze vibrația transmisă
de unealtă către mâna/brațul acestuia. Aceasta ar trebui
montată în scopuri operaționale, dar poate pliată în
timpul transportului sau al depozitării. Scoaterea celor
patru șuruburi de la bază și slăbirea celor patru șuruburi din
partea superioară permite ca extensia de mâner să e pliată
pentru a facilita transportul.
• Împingeți cu grijă partea din mijloc a mânerului pe
deasupra celor două suporturi de mâner inferioare și aliniați
cele patru găuri din partea de mijloc a mânerului cu cele
patru găuri letate verical din suporturile
inferioare.
•
Introduceți cele patru șuruburi M10 x 20 prin
suporturile mânerului mijlociu și superior.(Fig. 2)
• Strângeți bine toate cele patru șuruburi folosind cheia
imbus.
2. Asamblarea/atașarea mânerului - H320-E
Notă: Mânerul H320-E este format din patru (4) părți
principale:
• Mânerul inferior (atașat la unealtă din fabricație).
• Partea de mijloc.
• Partea superioară cu comutator de siguranță „Pornit/
Oprit”.
• Cavitate pentru depozitare cablu/traversă.
Cele două șuruburi lungi se folosesc pentru a atașa
cavitatea pentru depozitarea cablului/traversei și a părții de
mijloc a mânerului de mânerele inferioare pivotante.
• Așezați cu grijă cavitatea pentru depozitarea cablului/
traversei în poziția de funcționare.
Notă: Clemele pentru cablu ar trebui să e orientate înspre
spate.
• Împingeți cu grijă partea de mijloc pe deasupra
mânerelor inferioare și aliniați găurile.
• Introduceți o șaibă între șurub și mânere. (Fig. 1)
• Introduceți șuruburile lungi prin găurile din mânerul
mijlociu, apoi prin găurile din mânerele inferioare și
înletați-le în piulițele din cavitatea pentru depozitarea
cablului/traversei. (Fig. 3)
• Strângeți bine aceste șuruburi folosind cheia imbus.
Fig. 3
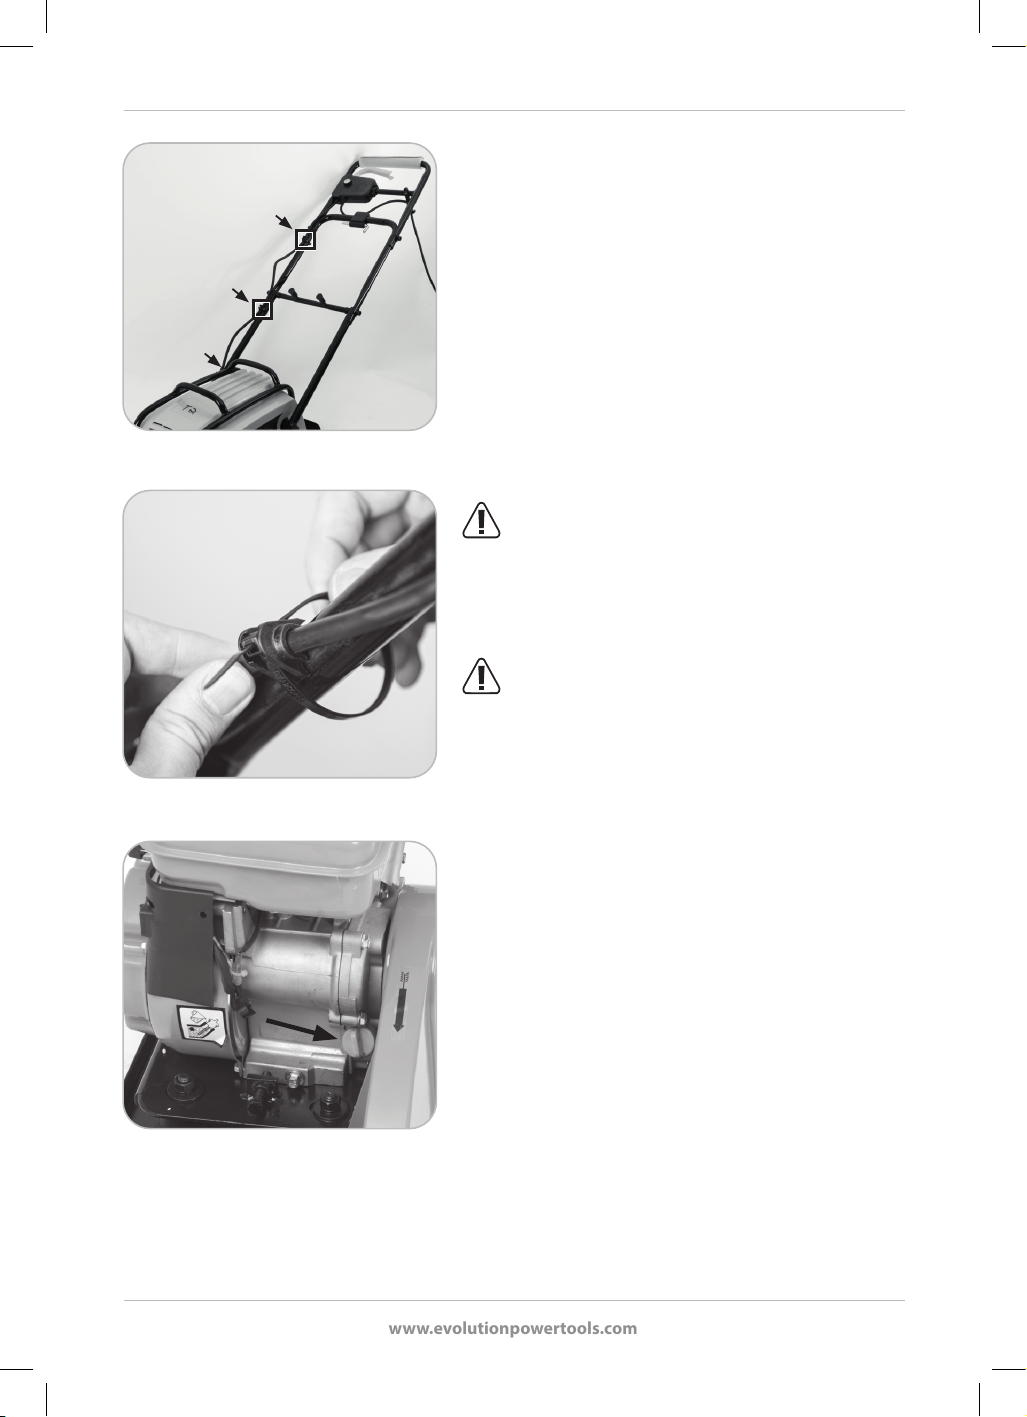
www.evolutionpowertools.com
223
Cele două șuruburi scurte se folosesc pentru a atașa partea
superioară a mânerului de partea de mijloc.
• Împingeți cu grijă partea superioară a mânerului pe
deasupra părții de mijloc și aliniați găurile.
• Introduceți șuruburile prin mânerul părții superioare și
înșurubați-le în piulițele din partea de mijloc.
Unealta H320 este dotată cu 3 cleme pentru cablu
pentru a ghida în siguranță cablul de alimentarea în
sus, după cadrul mânerului. Acestea trebuie montate.
Nerespectarea acestei reguli va avea ca rezultat anularea
garanției dumneavoastră. Poziționați-le pe aceeași parte cu
comutatorul de pornire și aranjați-le conform imaginilor din
(Fig. 4a și 4b)
AVERTISMENT: În timpul procesului de asamblare,
aveți grijă să mențineți cablul de alimentare de la
comutatorul de siguranță până la motor „liber”, nu „prins”.
Alimentarea inițială și vericarea nivelului de ulei -
H320-P
AVERTISMENT: Această unealtă nu vă este oferită
alimentată cu ulei. Nu încercați să porniți motorul
înainte de a umple carterul cu uleiul potrivit până la nivelul
indicat.
Notă: Uleiul (furnizat) ar trebui turnat în unealtă prin
ștuțul pentru umplerea cu ulei. Capacitatea pentru ulei
este aproximativ 0,4 litri de ulei pentru motoare cu ardere
internă 10W 30 (disponibil la toți agenții de motoare de
calitate și la majoritatea benzinăriilor). În anumite zone
climatice non-temperate, s-ar putea să e recomandată
o altă categorie de ulei - discutați cu furnizorul
dumneavoastră.
Capacul ștuțului pentru umplerea cu ulei se deșurubează
de la acoperirea motorulului și este prevăzut cu un
indicator de nivel al uleiului. (Fig. 5) Aveți grijă să nu vărsați
ulei.
Fig. 5
Fig. 4a
Fig. 4b

www.evolutionpowertools.com
224
Notă: Când măsurați nivelul uleiului, este important ca
unealta să se ae pe o suprafață stabilă, orizontală și plană
iar motorul să e oprit și rece.
Indicatorul de ulei este marcat cu două semne de indice.
Uleiul ar trebui să se ae întotdeauna la semnul superior
sau aproape de acesta.
• Scoateți capacul ștuțului pentru umplerea cu ulei și
ștergeți indicatorul de ulei cu o cârpă curată și uscată.
• Turnați cantitatea necesară de ulei. (aprox. 0,4 L)
• Lăsați uleiul să se așeze timp de +10 secunde.
• Măsurați cu ochiul nivelul uleiului prin oriciul ștuțului
pentru umplere. Acesta ar trebui să se ae foarte
aproape de capătul superior al leturilor, uleiul ind
foarte aproape de a se vărsa din carter (unealta trebuie
să e pe o suprafață orizontală plană).
• Introduceți indicatorul de ulei și înșurubați complet
capacul. Deșurubați capacul ștuțului și scoateți
indicatorul de ulei. Vericați vizual
nivelul uleiului de pe indicator.
• Reglați după nevoie.
• Când nivelul este potrivit, strângeți bine capacul ștuțului
de umplere cu ulei.
Notă: Schimbați uleiul conform gracului de prezentare a
întreținerii (a se vedea și ÎNTREȚINERE - Schimbarea uleiului
de motor)
Vericări înainte de operare
Notă: Înainte de ecare operare, unealta ar trebui
vericată pentru a vă asigura că toate funcțiile de siguranță
funcționează corect.
• Asigurați-vă că toate scuturile de siguranță sunt pe
poziție și fără defecte.
• H320-E – Vericați integritatea cablului de alimentare și
a ștecherului. Dacă acestea prezintă orice fel de defect,
cablul și/sau ștecherul trebuie înlocuit cu o piesă de
schimb identică de către un tehnician competent.
• H320-P - Vericați toate furtunurile pentru combustibil,
punctele de contact, capacele ștuțurilor etc. pentru
a detecta semne de scurgeri de lichid. Orice scurgere
identicată trebuie reparată înainte de a începe
operarea uneltei.
• Vericați nivelul uleiului și reglați după nevoie.
• Vericați nivelul combustibilului și adăugați după
nevoie.
• Vericați atent restul uneltei pentru a detecta orice
defect, mai ales la capace, apărătoare, componente de
Fig. 6
Fig. 7

www.evolutionpowertools.com
225
cauciuc etc.
Pornirea uneltei H320-P
• Umpleți rezervorul cu benzină. Filtrul ștuțului de
umplere al rezervorului are o bucșă roșie de plastic
pentru a marca nivelul maxim de combustibil. Nu lăsați
combustibilul să depășească acest marcaj.
• Mutați maneta robinetului de combustibil în poziția
„Pornit”. (Fig. 6)
• Puneți maneta de ajutaj în poziția „Ajutaj pornit”. (Fig. 7)
• Apăsați comutatorul pentru contact motor în poziția
„PORNIT” (I). (Fig. 8)
• Rotiți maneta clapetei de accelerație la maxim. (Fig.9)
• Fixați unealta H320, ținând mânerul de operare într-un
punct convenabil.
• Folosiți-vă cealaltă mână pentru a apuca mânerul
pentru cablul demarorului de recul. (Fig. 10)
• Trageți încet de cablul demarorului de recul până simțiți
o rezistență, care indică faptul că demaratorul este prins.
• Când simțiți rezistență, trageți tare de cablu.
• Repetați această acțiune până la pornirea motorului.
• Unitatea motorului poate să se tureze (o mică variație)
pentru o scurtă perioadă de timp, până ce motorul
ajunge la temperatura necesară.
• De obicei, ajutajul poate pus din nou în poziția
„oprit” (funcționare) aproape imediat după ce motorul
pornește, însă acest lucru depinde de temperatura
ambientală, condițiile de operare etc. Acest lucru
rămâne la discreția operatorului.
• În anumite condiții, ajutajul poate necesar chiar și
atunci când motorul este cald ca urmare a unui ciclu de
operare anterior. În cazul în care întâmpinați dicultăți la
pornirea unui motor cald:
• Puneți ajutajul în poziția „pornit” (dreapta).
• Trageți o dată de demarorul de recul.
• Puneți ajutajul din nou în poziția „oprit” (funcționare)
(stânga).
• Trageți de demarorul de recul până ce motorul
pornește.
• Notă: Unealta H320-P începe să vibreze și să avanseze
de îndată ce motorul pornește. Operatorul trebuie să
aibă grijă când pornește această unealtă.
Oprirea motorului H320-P
• Apăsați comutatorul pentru contact motor în poziția
„OPRIT” (0).
Fig. 8
Fig. 9
Fig. 10

www.evolutionpowertools.com
226
• Închideți capacul pentru combustibil.
Deplasarea uneltei - H320-P
Notă: Modicarea vitezei motorului schimbă frecvența
vibrației, precum și viteza cu care unealta avansează.
Notă: Șurubul pentru funcționare accelerată limitează
deplasarea maximă a manetei clapetei de accelerație,
controlând astfel doar viteza maximă a motorului.
Dacă doriți să modicați viteza maximă a motorului pentru
a crește sau a scădea viteza „deplasării” uneltei:
• Rotiți șurubul pentru funcționare accelerată (Fig. 11)
câte puțin (maxim jumătate de rotație) în sensul acelor
de ceasornic pentru a descrește viteza motorului, sau
în sens invers acelor de ceasornic pentru a crește viteza
motorului.
• Asigurați-vă că maneta clapetei de accelerație este la
maxim.
• Porniți unealta și evaluați „deplasarea” acesteia în noua
poziție a șurubului pentru funcționare accelerată.
• Dacă este necesar, opriți unealta și continuați să ajustați
șurubul pentru funcționare accelerată până obțineți
viteza de „deplasare” dorită.
Pornirea și oprirea uneltei H320-E
Unealta H320-E este dotată cu un comutator de siguranță
„Pornit/Oprit”. Dispozitivul de interblocare de siguranță nu
permite operarea manetei comutatoare până când butonul
de blocare de siguranță nu este eliberat.
• Pentru a porni unealta, apăsați butonul de blocare de
siguranță (a) și trageți de maneta (b) comutatoare.
(Fig. 12)
• Eliberați maneta comutatoare pentru a opri unealta.
Notă: După eliberarea manetei comutatoare, motorul se
oprește iar butonul de blocare de siguranță revine automat
la „starea de siguranță”.
AVERTISMENT: Operatorul trebuie să aibă grijă
întotdeauna la poziția cablului de alimentare, astfel
încât acesta să nu prezinte un pericol de împiedicare sau
orice alt tip de pericol, și să nu se ae pe traiectoria uneltei,
riscând să e „călcat” de aceasta.
Fig. 11
Fig. 12
(a)
(b)
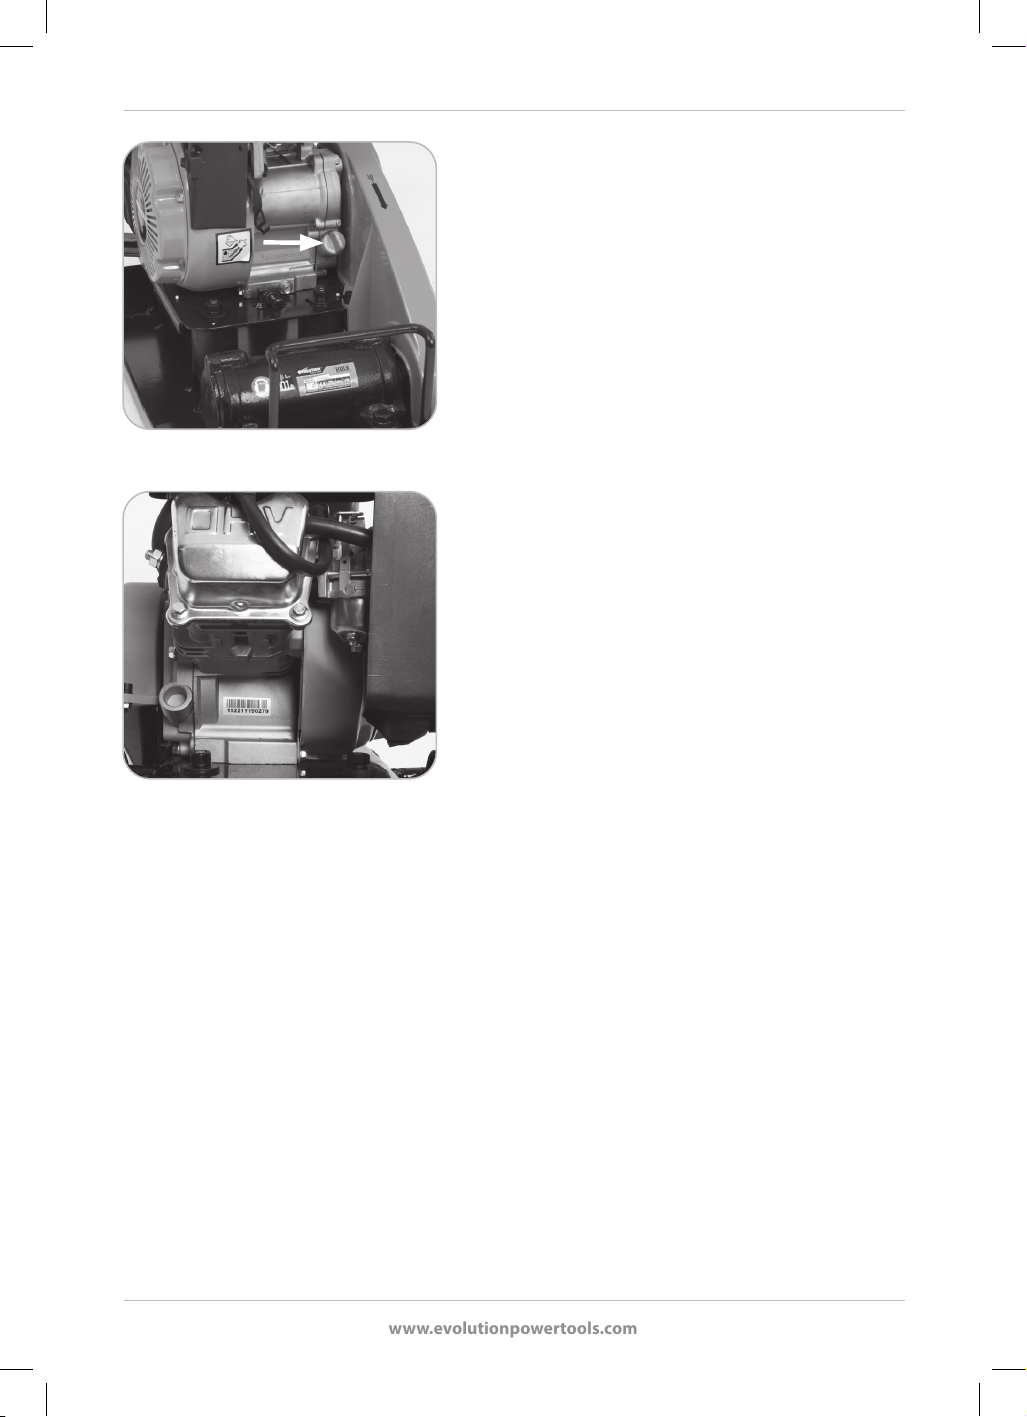
www.evolutionpowertools.com
227
RECOMANDĂRI GENERALE DE OPERARE
• Asigurați-vă că persoanele din apropiere se aă la o
distanță sigură față de lucrările de compactare. Dacă
e necesar, îngrădiți zona de lucru și expuneți așe de
AVERTISMENT.
• Înainte de a începe operațiile de compactare, planicați-
vă munca și ruta pe care intenționați să direcționați
unealta.
• Inspectați zona de lucru și îndepărtați sau neutralizați
orice obstrucții/obstacole care ar putea prezenta un
pericol.
• Asigurați-vă că aveți tot EPPnecesar și știți cum să îl
folosiți.
• Compactorul se va deplasa înainte de unul singur.
Pentru a-l „conduce”, operatorul trebuie numai să
ghideze ușor mânerul. Operatolul trebuie să țină
mânerul anti-vibrații cu ambele mâini, acestea ind
poziționate cât departe posibil una de cealaltă.
• S-ar putea să e nevoie de mai multe parcurgeri peste
zona de lucru pentru a compacta materialul până la
densitatea dorită.
• În cazul în care zona de lucru este înclinată, parcurgeți
suprafața de sus în jos, nu de-a curmezișul acesteia.
ÎNTREȚINEREA
H320-P
Întreținerea regulată este esențială pentru a menține
unealta și accesoriile acesteia într-o stare reparabilă.
Recomandăm ca aceste proceduri să e efectuate numai de
către operatori competenți, care au experiență în repararea
și întreținerea motoarelor cu combustibil. Dacă nu sunteți
siguri, apelați la un centru de service aprobat de Evolution.
1. Înlocuirea uleiului de motor
Uleiul de motor trebuie schimbat după perioada
inițială de „rodaj” și la intervalele specicate
în Programul de service.
Notă: Uleiul de motor se schimbă mai ușor când motorul a
fost adus la temperatura de funcționare și uleiul e cald.
• Asigurați-vă că motorul este poziționat pe o suprafață
dură și plană.
• Scoateți capacul ștuțului de umplere cu ulei. (Fig. 13)
• Poziționați o tavă potrivită pentru colectarea uleiului
sub motor.
• Scoateți bușonul de golire a uleiului astfel încât acesta
Fig. 13
Fig. 14

www.evolutionpowertools.com
228
Fig. 15
să se poată scurge complet din motor. (Fig. 14)
AVERTISMENT: Aveți grijă. Contactul cu uleiul
de motor uzat poate dăunător. Acesta poate
foarte erbinte (risc de opărire), iar unii operatori pot suferi
iritații în cazul în care uleiul contaminează pielea expusă.
Operatorul este sfătuit să poarte mănuși de protecție
pentru mecanici dacă sunt disponibile. Pielea contaminată
cu ulei trebuie spălată cu săpun și o cantitate copioasă de
apă curată cât de repede posibil.
• Vericați bușonul de golire a uleiului și garnitura
acestuia.
• Vericați capacul ștuțului de umplere cu ulei și garnitura
inelară în formă de „O” a acestuia.
• Înlocuiți toate componentele care nu pot reparate.
• Puneți la loc bușonul de golire a uleiului și strângeți-l
bine.
• Umpleți din nou motorul cu uleiul potrivit până la
nivelul indicat.
• Puneți la loc capacul ștuțului de umplere cu ulei.
• Vericați dacă există scurgeri și ocupați-vă de ele în caz
de nevoie.
Notă: Uleiul de motor folosit trebuie eliminat printr-o
metodă care nu dăunează mediului înconjurător. Contactați
autoritatea locală din zona dumneavoastră pentru a aa
unde se aă cea mai apropiată stație de reciclare a uleiului
folosit.
2. Bujie - Vericare și înlocuire
Bujia trebuie scoasă pentru a vericată, curățată și
resetată după aproximativ 50 de ore de operare.
Pentru a scoate și a reinstala bujia:
• Asigurați-vă că motorul este „OPRIT”, iar robinetul pentru
combustibil este în poziția „OPRIT”.
AVERTISMENT: Motorul trebuie să e rece înainte
de a porni procesul de scoatere a bujiei.
• Trageți cablul HT din bujie.
• Scoateți bujia cu ajutorul cheii pentru bujie (furnizată).
(Fig. 15)
O bujie reparabilă într-o stare bună ar trebui să aibă mici
depuneri maronii pe vârf. Îndepărtați aceste depuneri cu
ajutorul unei perii dure de sârmă de alamă.
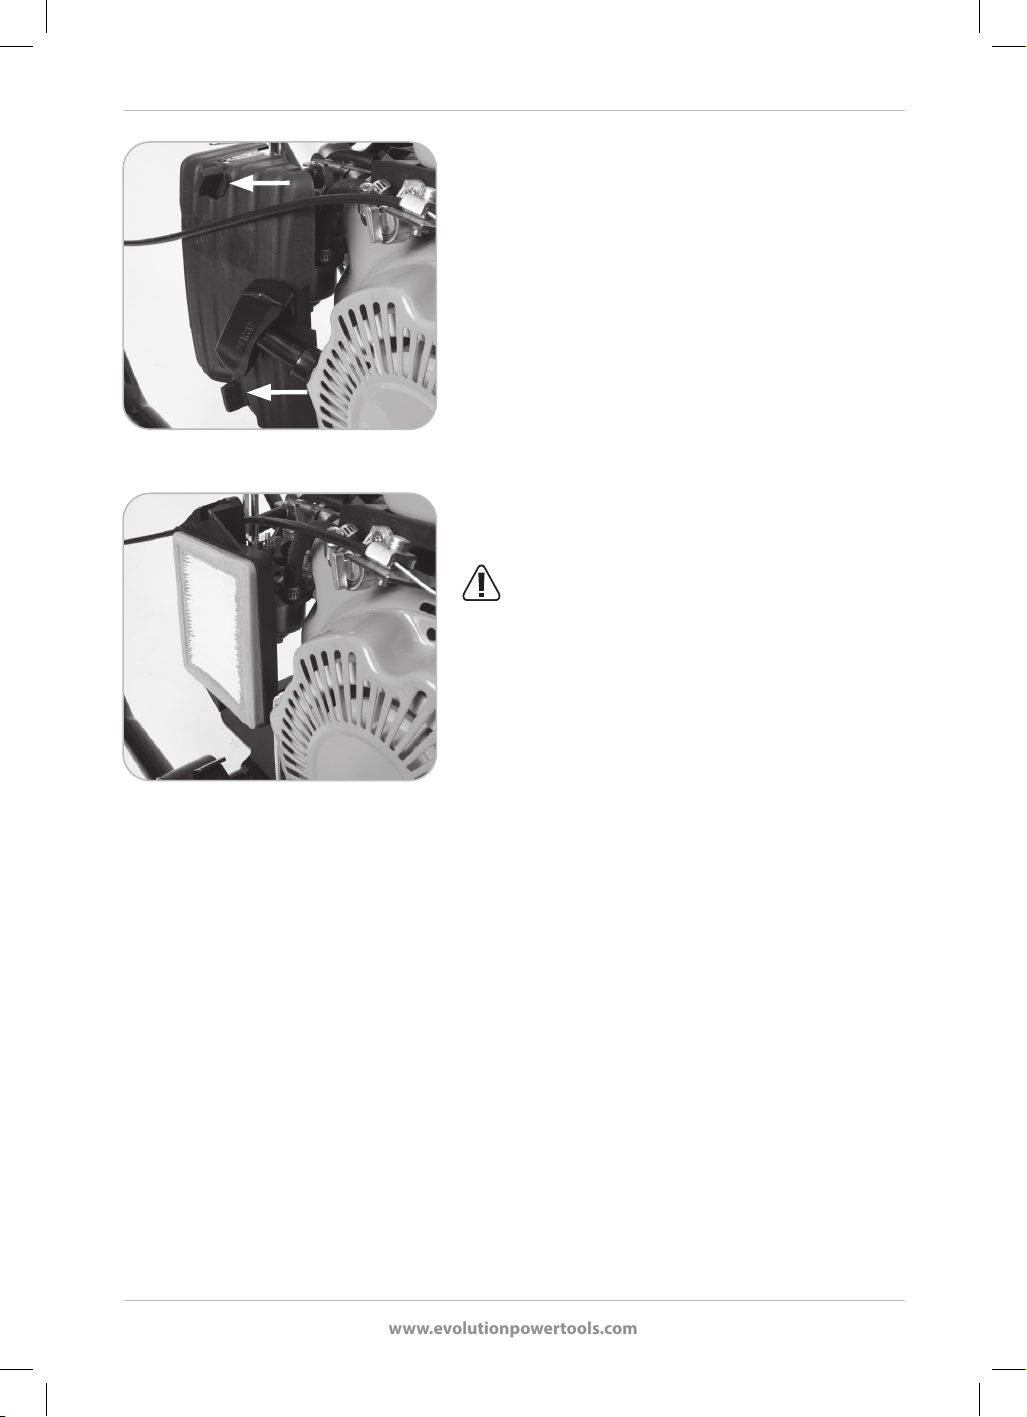
www.evolutionpowertools.com
229
• Vericați distanța dintre electrozii bujiei folosind o leră.
• Reglați după nevoie. Distanța este oferită în
„Specicațiile H320-P”.
• Reinstalați bujia. Aveți grijă să o conectați corect la rele
din vârful cilindrului.
• Strângeți cu mâna bujia folosind cheia pentru bujie
furnizată.
• Introduceți bara de manipulare prin oricul din capătul
cheii pentru bujie.
• Poziționați bara astfel încât cheia pentru bujie să se ae
la mijlocul acesteia.
• La nal, realizați închiderea etanșă la gaze prin rotirea
cheii pentru bujie între ¼ - ½ de rotație. Această ultimă
rotație fracțională va sfărâma șaiba bujiei și va produce
o închidere etanșă la gaze. Nu strângeți bujia prea tare.
• Atașați din nou cablul HT la partea superioară a bujiei.
3. Filtru aer
AVERTISMENT: Nu lăsați niciodată motorul să
funcționeze fără ltrul de aer instalat.
Vericați starea acestuia după aproximativ 50 de ore de
utilizare.
Notă: S-ar putea să e nevoie să vericați ltrul de aer mai
des dacă utilizați unealta într-un mediu cu mult praf.
Pentru a-l scoate:
• Asigurați-vă că motorul este „OPRIT”, iar robinetul pentru
combustibil este în poziția „OPRIT”. Motorul trebuie să
e rece.
• Deșurubați piulițele-uture de la capacul carcasei
ltrului de aer și scoateți-l. (Fig. 16)
• Depozitați cu grijă aceste componente pentru a le
reatașa ulterior.
• Scoateți ltrul de aer din carcasă pentru a-l verica. (Fig.
17) În cazul în care partea de hârtie a ltrului de aer este
foarte decolorată sau înfundată cu mizerie, praf etc.,
aceasta trebuie înlocuită.
Pentru a-l reinstala:
• Așezați piesa înapoi în carcasa pentru ltru de aer.
O piesă nouă poate instalată pe oricare din părți.
• Puneți la loc capacul carcasei pentru ltrul de aer.
• Puneți la loc piulițele-uture și asigurați-vă că ați
așezat corect capacul, iar piulițele-uture sunt strânse
corespunzător.
Fig. 16
Fig. 17

www.evolutionpowertools.com
230
4. Filtru pentru ștuțul de umplere a rezervorului
Vericați din când în când vizual starea ltrului pentru
ștuțul de umplere a rezervorului (cel mai indicat atunci
când realimentați cu combustibil). Dacă observați depuneri
de mizerie, scoateți ltrul din rezervor și curățați-l.
• Curățați ltrul folosind un agent de curățare degresant
pe bază de apă, care nu dăunează mediului înconjurător,
iar dacă este necesar, suați meșa nă cu aer coprimat
uscat și curat.
• Lăsați-l să se usuce complet înainte de a-l pune la loc.
• Înainte de a-l pune la loc, asigurați-vă că cele 2 oricii de
pe marginea superioară a ltrului sunt aliniate cu cele
de pe marginea ștuțului de umplere a rezervorului.
5. Vericarea tensiunii curelei de transmisie
AVERTISMENT: Efectuați această procedură numai
când motorul este oprit, unealta rece, iar capacul
bujiei scos.
Tensiunea curelei de transmisie trebuie vericată după
primele 4 ore de utilizare, apoi conform Orarului de
întreținere de rutină.
Pentru a verica tensiunea curelei de transmisie:
• Îndepărtați protecția curelei prin scoaterea celor trei
(3) șuruburi în formă de cap de cheie (Fig. 18) folosind
o cheie imbus și o cheie de buloane (nefurnizate) și
depozitați-o în siguranță pentru utilizarea ulterioară.
Notă: Aceste trei (3) șuruburi în formă de cap de cheie sunt
specice poziției. Rețineți poziția ecăruia și accesoriile
relevante pe măsură ce le desfaceți de la unealtă pentru a le
putea pune înapoi în poziția inițială.
• Îndoirea prin apăsarea ușoară cu degetul la mijlocul
curelei ar trebui să e de aproximativ 5/6 mm (1/4 inci).
Notă: Unitatea motorului H320 este poziționată peste patru
(4) fante pe talpa de montare a motorului. Prin acestea trec
patru (4) bolți de montare a motorului, care sunt înșurubați
de dedesubt în blocul carter al motorului. Acest aranjament
permite motorului să e repoziționat pe talpă.
• Slăbiți cele patru (4) bolțuri cu capete hexagonale
folosind o cheie de buloane potrivită (nefurnizată).
• Glisați motorul în față sau în spate pentru a modica
tensiunea curelei de transmisie. În fața motorului se
găsește un șurub de reglare (Fig. 19) pentru a servi la
poziționarea precisă a acestuia.
• Odată ce ați obținut tensiunea corectă,
strângeți bine bolții de montare a motorului.
Fig. 18
Fig. 19

www.evolutionpowertools.com
231
AVERTISMENT: Nu reglați bolțul de reglare/tensionare fără a slăbi cele patru bolțuri de montare,
deoarece puteți deteriora carcasa motorului.
Notă: Aveți grijă să mențineți motorul „drept” și „aliniat” pe talpa de montare. Dacă acesta este puțin „rotit”,
cureaua și roțile de transmisie sunt puse sub „stres” și se avariază rapid.
• Puneți protecția curelei de transmisie la loc și strângeți bine cele trei (3) șuruburi în formă de cap de
cheie în pozițiile inițiale.
6. Sistemul demaror de recul
Canalele de ventilație trebuie păstrate curate și fără orice fel de blocaje.
Îndepărtați toate corpurile străine prezente în ele.
H320-P
CALENDARUL
ÎNTREȚINERII DE RUTINĂ
După primele
4 ore
O dată la
20 de ore sau
lunar
O dată la
50 de ore sau
o dată la 3 luni
O dată la
100 de ore sau
o dată la 6 luni
Vericarea nivelului uleiului
de motor
● ●
Schimbarea uleiului de
motor
●
(numai prima
schimbare)
●
Vericarea ltrului de aer
●
Înlocuirea ltrului de aer
●
Vericarea bujiei
●
Tensiunea curelei de trans-
misie
● ●
Curățarea/Vericarea ltru-
lui de combustibil
●
ÎNTREȚINERE H320-E
Notă: Orice operațiune de întreținere trebuie întreprinsă cu unealta oprită și deconectată de la sursa de
alimentare.
Vericați regulat dacă toate funcțiile de siguranță și scuturile funcționează corect. Folosiți această unealtă
doar dacă toate scuturile/funcțiile de siguranță sunt complet operaționale.
Toți rulmenții din această unealtă sunt lubriați pe viață. Nu este necesară lubrierea lor.
Folosiți o cârpă curată și puțin umezită pentru a curăța piesele plastice ale uneltei. Nu folosiți solvenți sau
produse similare, care pot deteriora piesele de plastic.
AVERTISMENT: Nu încercați să curățați introducând obiecte ascuțite în deschizăturile
carcasei uneltei etc. Oriciile de aerisire ale uneltei trebuie curățate folosind aer comprimat uscat.

www.evolutionpowertools.com
232
DEPANARE H320-P
PROBLEMĂ CAUZĂ SOLUȚIA POSIBILĂ
Motorul nu
pornește.
Lipsă combustibil.
Motorul este oprit.
Bujie defectă.
Motor rece.
Motor „inundat” cu benzină.
Filtru de aer înfundat sau
contaminat cu ulei.
Defect major.
Deschideți robinetul pentru combustibil.
Umpleți rezervorul de combustibil.
Porniți motorul.
Scoateți, curățați, resetați și puneți bujia la loc.
Asigurați-vă că ajutajul este setat corect.
Așteptați cinci (5) minute.
Deschideți ajutajul și deschideți complet clapeta
de accelerație,
după care încercați din nou.
Scoateți bujia, curățați-o și puneți-o la loc.
Încercați dn nou până când motorul pornește.
Înlocuiți ltrul de aer.
Pentru sfaturi suplimentare,
contactați agentul sau Evolution Power Tools.
Unealta nu
vibrează.
Tensiune curea incorectă.
Filtru de aer blocat.
Unitate excentrică deteriorată.
Viteza motorului prea joasă.
Reglați tensiunea curelei.
Înlocuiți ltrul de aer.
Repoziționați unitatea excentrică.
Creșteți ușor viteza motorului.
DEPANARE H320-E
PROBLEMĂ CAUZĂ SOLUȚIA POSIBILĂ
Unealta nu
pornește.
Alimentarea nu este „pornită”
Siguranța ștecherului arsă.
Butonul de pornire în
siguranță nu este eliberat,
ceea ce nu permite
acționarea comenzii „Pornit/
Oprit”.
Cablu de alimentare
deteriorat sau defect.
Porniți alimentarea cu electricitate de la priză.
Înlocuiți siguranța și vericați sursa de
alimentare.
Eliberați butonul de pornire în siguranță,
apoi trageți de maneta de pornire.
Înlocuiți cablul defect cu unul identic, cu ajutorul
unui tehnician competent.
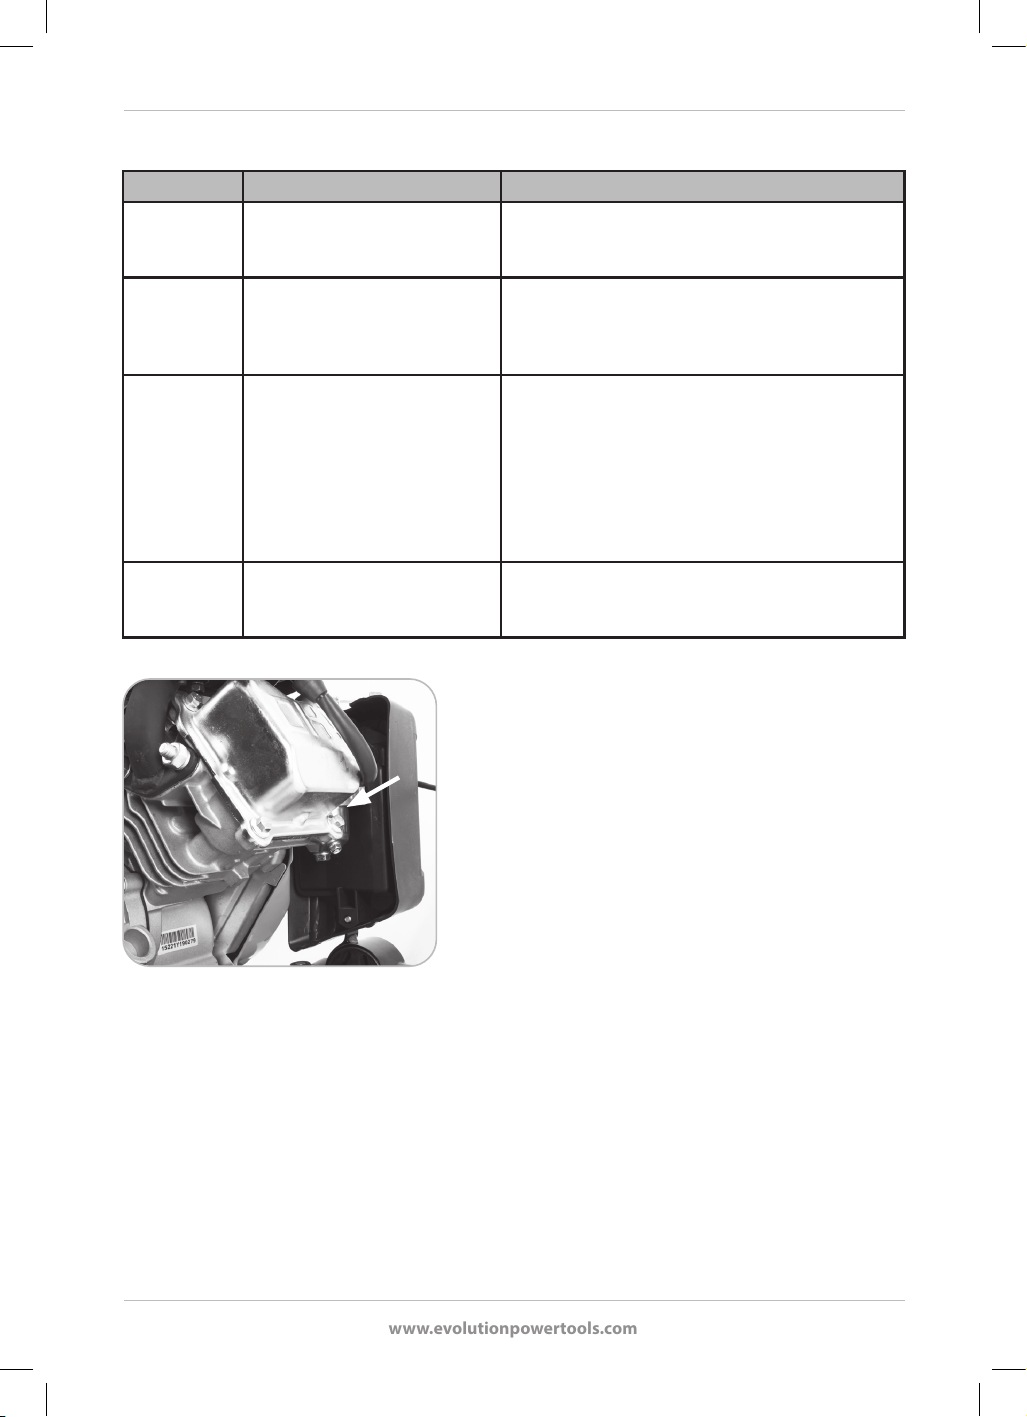
www.evolutionpowertools.com
233
GHID GENERAL PENTRU DEPANARE
PROBLEMĂ CAUZĂ SOLUȚIA POSIBILĂ
Blocuri
de pavaj
deteriorate.
Talpa în contact direct cu
pavajul.
Instalați o „talpă pentru pavaj”.
Suprafața
bituminoasă
se exfoliază
(laminează).
Supra-compactare. Îndepărtați și acoperiți din nou.
Viteză de
deplasare
scăzută.
Adâncimea stratului prea
mare (talpa se scufundă).
Viteza motorului prea joasă.
Conținutul de apă al
materialului prea ridicat sau
prea scăzut.
Îndepărtați o parte a materialului, astfel încât să
reduceți grosimea stratului.
Creșteți ușor viteza motorului.
Îndepărtați materialul și reglați
conținutul de apă.
H320-P
nu se
deplasează.
Viteza motorului prea joasă. Creșteți ușor viteza motorului.
Fig. 20
DEPOZITARE PE TERMEN LUNG H320-P
În cazul în care nu plănuiți să utilizați unealta
dumneavoastră Evolution pentru o perioadă de 4 luni sau
mai mult (de ex. peste iarnă), ar trebui să o pregătiți pentru
depozitarea pe termen lung. Acest lucru va păstra motorul
în starea ideală pentru repunere în funcțiune atunci când
aveți nevoie.
• Scurgeți tot combustibilul din rezervor și carburator
într-un recipient potrivit și aprobat.
• Robinetul de scurgere se aă sub plutitorul
carburatorului. Deschideți-l pentru a permite
combustibilului să se scurgă din unealtă. (Fig. 20)
• După ce tot combustibilul s-a scurs, închideți-l la loc.
• Scoateți bujia.
• Turnați aproximativ o lingură de ulei de motor curat în
oriciul bujiei.
• Asigurați-vă că butonul de contact al motorului este în
poziția „OPRIT”.
• Trageți ușor de demarorul de recul de câteva ori.
• Puneți bujia la loc.
• Trageți ușor de demarorul de recul până simțiți o forță
rezistentă (acest lucru înseamnă că pistonul se aă la
timpul de compresie, iar ambele valve sunt închise). Nu
mai trageți de demarorul de recul.
• Depozitați motorul într-o locație sigură, uscată și aerisită

www.evolutionpowertools.com
234
bine, sub o prelată, pentru a preveni depunerea prafului,
resturilor etc. pe unealtă.
RETURNAREA UNELTEI H320-P
În cazul în care sunteți nevoiți să returnați unealta
dumneavoastră H320-P la Evolution, sunteți obligați să
urmați pașii următori pentru a asigura protecția curierilor.
1. Goliți complet combustibilul din rezervorul și din
carburatorul uneltei. (Fig. 20)
2. Goliți complet uleiul de motor. (Fig. 14)
3. Scoateți șuruburile și dezasamblați mânerul. Aveți grijă să
păstrați toate componentele scoase. (Fig. 2)
4. Împachetați bine unealta într-o cutie, de preferat în
ambalajul original.
Notă: Unealta trebuie returnată fără combustibil și ulei.
Asigurați-vă că o alimentați cu carburant și ulei înainte de a
porni motorul.
Utilizarea accesoriilor opționale Evolution
(disponibile sub formă de opțiune de achiziționare pentru
client)
PROTEJAREA MEDIULUI ÎNCONJURĂTOR
Deșeurile din produse electrice nu trebuie aruncate
împreună cu deșeurile menajere. Vă rugăm să reciclați la
locurile special amenajate. Adresați-vă autorității locale sau
vânzătorului pentru îndrumări cu privire la reciclare.

www.evolutionpowertools.com
235

www.evolutionpowertools.com
236
DECLARAȚIE DE CONFORMITATE CE
În conformitate cu EN ISO 17050-1:2004
Fabricantul produsului acoperit de prezenta Declarație este:
MAREA BRITANIE: Evolution Power Tools Ltd. Venture One, Longacre Close, Holbrook Industrial Estate, Sheeld, S20
3FR.
FRANȚA: Evolution Power Tools SAS. 61 Avenue Lafontaine, 33560, Carbon-Blanc, Bordeaux, Franța.
Prin prezenta, fabricantul declară că aparatul, așa cum este descris în această declarație, respectă toate
prevederile relevante ale Directivei privind echipamentele tehnice și alte directive specice, după cum se
detaliază mai jos.
Fabricantul mai declară că aparatul, așa cum este descris în această declarație, acolo unde este cazul,
respectă prevederile relevante ale Cerințelor esențiale de sănătate și siguranță.
Directivele acoperite de această Declarație sunt cele detaliate mai jos:
1907/2006 Directiva REACH
2006/42/CE. Directiva privind echipamentele tehnice.
2014/30/UE. Directiva privind compatibilitatea electromagnetică.
2011/65/UE & (UE)2015/863. Directiva privind restricțiile de utilizare a anumitor substanțe periculoase cu echipamentele electrice.
2000/14/UE & 2005/88/CE Directiva privind emisiile sonore
Și este în conformitate cu cerințele aplicabile ale următoarelor documente
EN 500-1:2006+A1• EN 500-4:2011• EN ISO 3744: 1995 • EN ISO 14982:2009
Detalii produs
Descriere: H320-P
Nr. model Evolution: 015-0001, 015-0013
Model fabricație nr.: XZ-10C/JF152
Nume marcă: EVOLUTION
Documentația tehnică necesară pentru a demonstra că produsul respectă cerințele directivei a fost completată și este
disponibilă pentru a inspectată de autoritățile relevante și demonstrează că dosarul nostru tehnic conține documentele
enumerate mai sus și că acestea reprezintă standardele corecte pentru produs, așa cum este descris mai sus.
Numele și adresa deținătorului documentației tehnice.
Semnătura: Numele cu litere de tipar: Barry Bloomer - Director
Executiv
Data: 23.08.2022
MAREA BRITANIE: Evolution Power Tools Ltd. Venture One, Longacre Close, Holbrook Industrial Estate, Sheeld, S20 3FR.
FRANȚA: Evolution Power Tools SAS. 61 Avenue Lafontaine, 33560, Carbon-Blanc, Bordeaux, Franța.
®
H320-P

www.evolutionpowertools.com
237
DECLARAȚIE DE CONFORMITATE CE
În conformitate cu EN ISO 17050-1:2004
Fabricantul produsului acoperit de prezenta Declarație este:
MAREA BRITANIE: Evolution Power Tools Ltd. Venture One, Longacre Close, Holbrook Industrial Estate, Sheeld, S20
3FR.
FRANȚA: Evolution Power Tools SAS. 61 Avenue Lafontaine, 33560, Carbon-Blanc, Bordeaux, Franța.
Prin prezenta, fabricantul declară că aparatul, așa cum este descris în această declarație, respectă toate prevederile
relevante ale Directivei privind echipamentele tehnice și alte directive specice, după cum se detaliază mai jos.
Fabricantul mai declară că aparatul, așa cum este descris în această declarație, acolo unde este cazul, respectă prevederile
relevante ale Cerințelor esențiale de sănătate și siguranță.
Directivele acoperite de această Declarație sunt cele detaliate mai jos:
1907/2006 Directiva REACH
2006/42/EC. Directiva privind echipamentele tehnice.
2014/30/EU. Directiva privind compatibilitatea electromagnetică.
2011/65/EU. & (EU)2015/863. Directiva privind restricțiile de utilizare a anumitor substanțe periculoase cu echipamentele electrice.
2012/19/EU. Directiva privind deșeurile de echipamente electrice și electronice (DEEE).
2000/14/EU & 2005/88/EC Directiva privind emisiile sonore
Și este în conformitate cu cerințele aplicabile ale următoarelor documente
EN 500-1:2006+A1 • EN 500-4:2011 • EN 60204-1:2018 • EN IEC 55014-1:2021 • EN ISO 3744:1995
EN IEC 55014-2:2021 • EN IEC 61000-3-2:2019/A1:2021 • EN 61000-3-3:2013/A2:2021
Detalii produs
Descriere: H320-E
Nr. model Evolution: 015-0002, 015-0004, 015-0008, 015-0010
Model fabricație nr.: XZ-5A
Nume marcă: EVOLUTION
Voltaj: 220-240 V ~ 50 Hz
Putere consumată: 300W
Documentația tehnică necesară pentru a demonstra că produsul respectă cerințele directivei a fost completată și este
disponibilă pentru a inspectată de autoritățile relevante și demonstrează că dosarul nostru tehnic conține documentele
enumerate mai sus și că acestea reprezintă standardele corecte pentru produs, așa cum este descris mai sus.
Numele și adresa deținătorului documentației tehnice.
Semnătura: Numele cu litere de tipar: Barry Bloomer - Director Executiv
Data: 23.08.2022
MAREA BRITANIE: Evolution Power Tools Ltd. Venture One, Longacre Close, Holbrook Industrial Estate, Sheeld, S20 3FR.
FRANȚA: Evolution Power Tools SAS. 61 Avenue Lafontaine, 33560, Carbon-Blanc, Bordeaux, Franța.
®
H320-E

238
www.evolutionpowertools.com
Notes

239
www.evolutionpowertools.com
Notes

V3
EPT QR CODE
FR
Evolution Power Tools SAS
61 Avenue Lafontaine
33560, Carbon-Blanc
Bordeaux
T: +33 (0)5 57 30 61 89
UK
Evolution Power Tools Ltd
Venture One, Longacre Close
Holbrook Industrial Estate
Sheffield, S20 3FR
T: +44 (0)114 251 1022
AUS
Total Tools (Importing) Pty Ltd
20 Thackray Road
Port Melbourne
Vic 3207
T: 03 9261 1900