PN: 80032407 • 12/01/2023
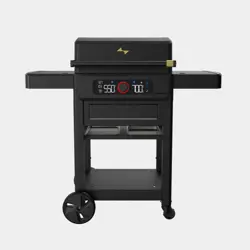
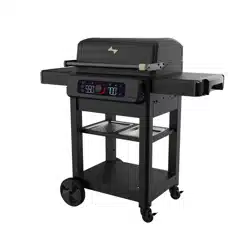
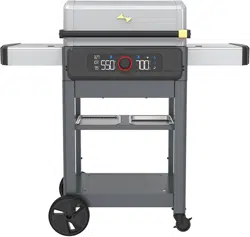
MODEL NUMBER
24653014
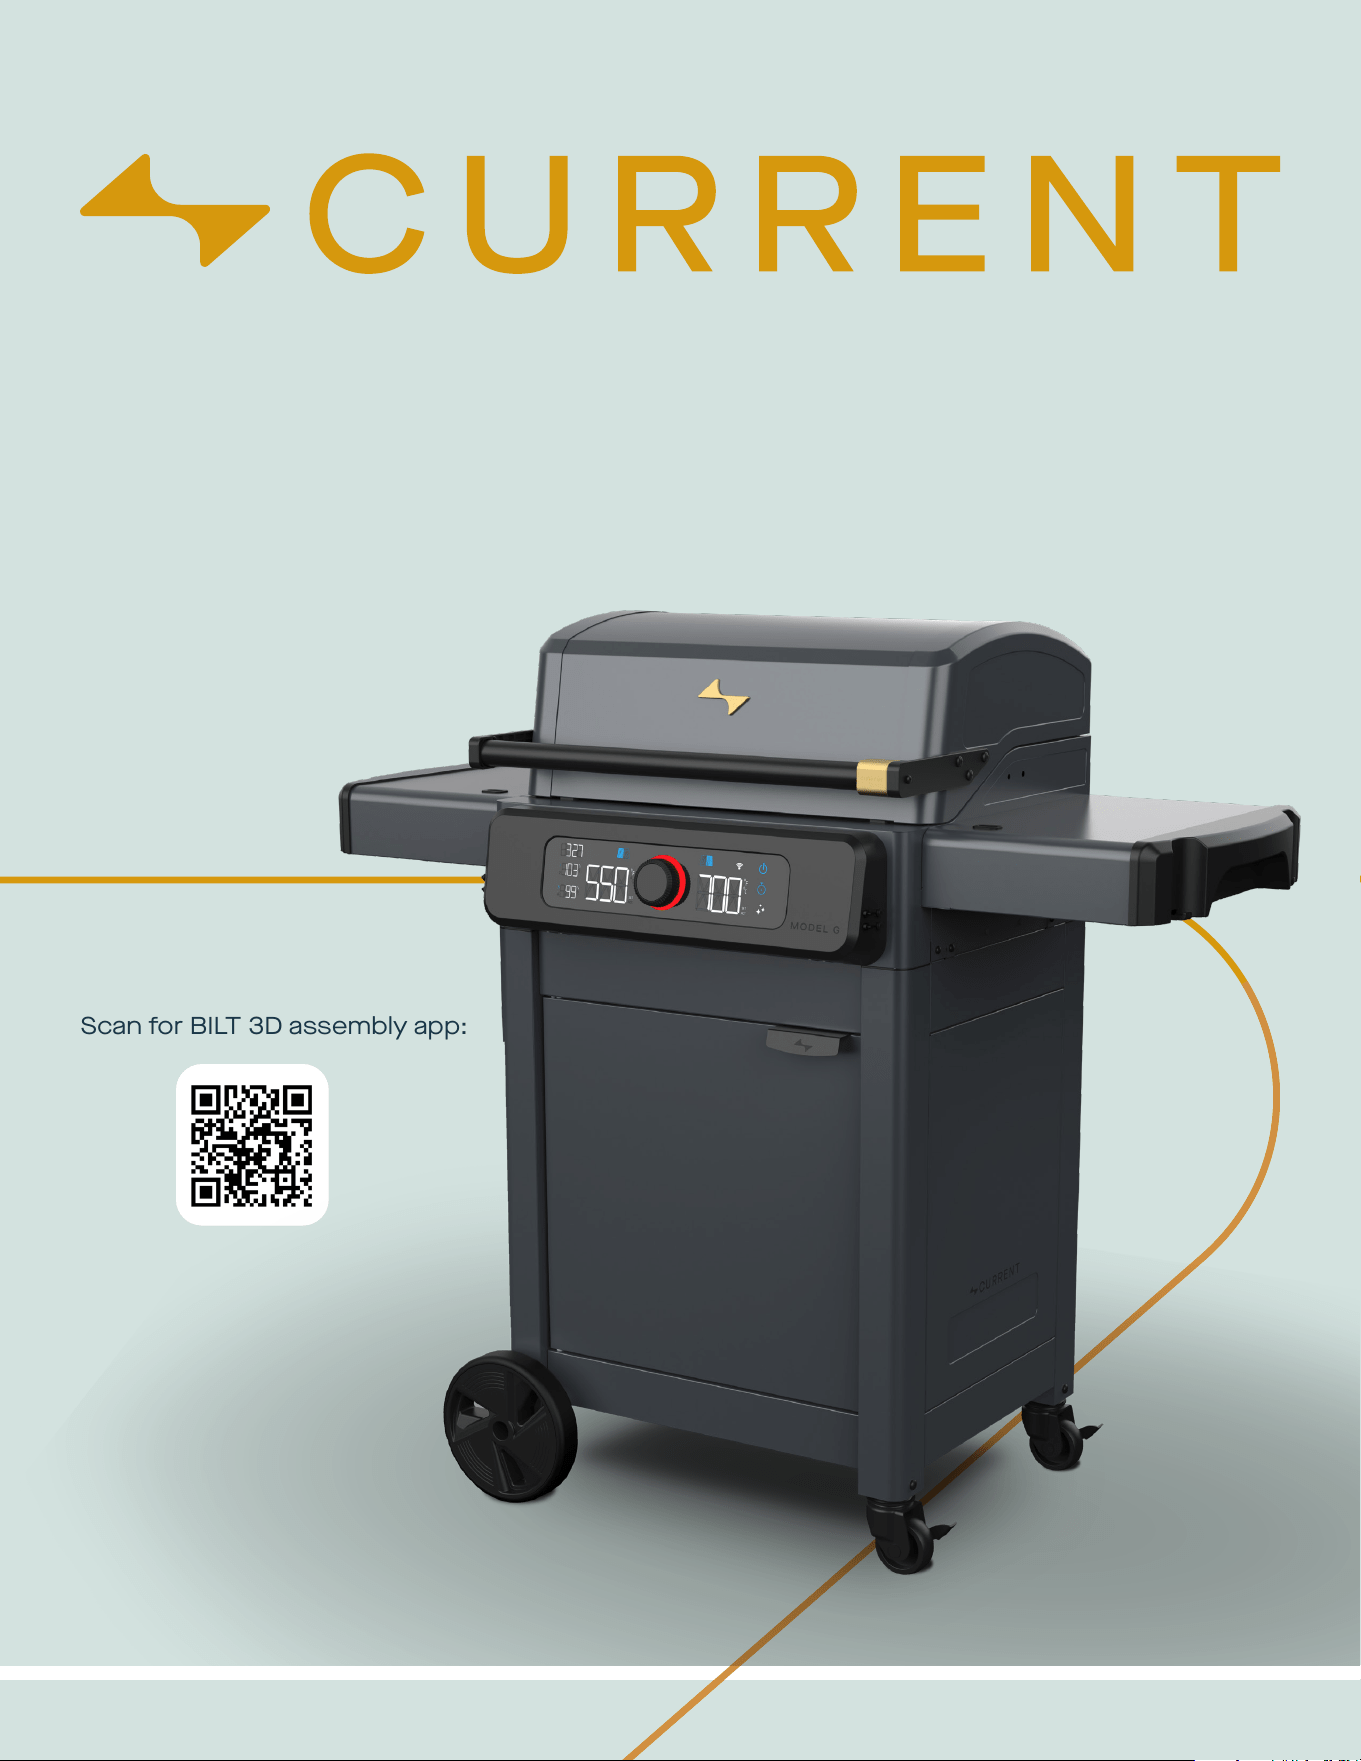
Scan for BILT 3D assembly app:
CURRENTBACKYARD.COM2
WARNING
Failure to follow all manufacturer’s instructions could
result in serious personal injury and/or property damage.
• Read and follow all the information and safeguards in this
product guide before attempting to assemble or operate this
grill.
• Keep appliance area clear and free from combustible
materials, gasoline and other ammable vapors and liquids.
Do not use or store gasoline, kerosene or other ammable
liquids within 20 feet of this grill when in use.
CAUTION
For outdoor household use only, do not expose to rain.
Do not use indoors or for commercial cooking.
• It is the responsibility of the assembler/owner to assemble, install
and maintain grill.
• Fuel, such as charcoal briquettes, is not to be used with appliance.
The grill is not designed for charcoal. The re will create an unsafe
condition and damage the grill.
• The use of accessory attachments not recommended by the
appliance manufacturer may cause injuries.
IMPORTANT SAFEGUARDS
When using electrical appliances, basic safety precautions should
always be followed including the following:
READ ALL INSTRUCTIONS
For Safe Use of Your appliance and to Avoid Serious Injury:
DANGER
To protect against electrical shock, do not immerse cord, plugs,
controller or heating element in water or any other liquid.
• To prevent grill from being splashed or falling into water, do not use
grill within 10 feet of a pool, pond or other body of water.
• Keep grill dry and out of rain at all times. Keep electric plugs off
ground and dry. Store grill in weather protected area or under grill
cover when not in use.
• Use only on properly grounded outlet. Never remove grounding
plug or use with an adapter to two prongs.
• Do not let cord touch hot surfaces. Do not let cord hang over edge
of tabletop or other items where it can be pulled by children or
tripped over.
• Do not operate any appliance with a damaged cord or plug or after
the appliance malfunctions or has been damaged in any manner.
• Use only with GFI (Ground Fault Interrupter) protected circuit.
• Your Current Electric Grill requires a full 20-amp exterior electric
power outlet to operate properly. Running it on a lower current
outlet/circuit breaker may cause the circuit to trip.
WE RECOMMEND USING A 20-AMP GFCI. IF OUTLET IS NOT 15-
AMP OR HIGHER, PLEASE REPLACE OUTLET.
Since 1971 the National Electric Code (NEC) has required Ground Fault
Interrupter devices on all outdoor circuits.
• If your residence was built before 1971, check with a qualied
electrician to determine if a Ground Fault Interrupter protector exists.
• Do not use this appliance if the circuit does not have GFI protection.
• Do not plug this appliance into an indoor circuit.
To prevent power loss:
• Unplug any other electrical devices, like patio lights, powered by the
exterior outlet/circuit breaker before plugging in your grill.
If power is lost during use:
• Identify and unplug any other electrical devices that lost power at the
same time and reset the breaker.
• If your circuit breaker continues to trip during use, consult a
qualied electrician.
• Try using a different electrical outlet, if available. Check your owner’s
manual for recommended use of extension cords.
Extension Cord Use and Safety
For best grill performance use of extension cord is not recommended.
If you must use an extension cord, for your safety, care shall be
exercised in the use of extension cord:
Use only outdoor type with 3 prong grounding plug, rated for 15
amperes or more, approved by UL, marked with a W and a tag
stating “Suitable for Use with Outdoor Appliance”.
The cord should be arranged so that it will not drape over the
countertop or tabletop where it can be pulled on by children or
tripped over unintentionally.
The connection to an extension cord should be kept dry and off
the ground.
Use the shortest length extension cord required. Do not connect
2 or more extension cords together. A 12 or 14 gauge extension
cord of 50 ft. or less is acceptable.
SAFETY SYMBOLS
The symbols and boxes shown below explain what each
heading means. Read and follow all of the messages
found throughout the manual.
INSTALLER/ASSEMBLER:
Leave this manual with consumer.
CONSUMER:
Keep this manual for future reference.
This instruction manual contains important
information necessary for the safe use of the
appliance.
Follow all warnings and instructions when using the
appliance.
WARNING
WARNING: Indicates a potentially hazardous situation which,
if not avoided, could result in death or serious injury.
CAUTION
CAUTION: Indicates a potentially hazardous situation or unsafe
practice which, if not avoided, may result in minor or moderate
injury.
DANGER
DANGER: Indicates an imminently hazardous situation which,
if not avoided, will result in death or serious injury.
CURRENTBACKYARD.COM3
USE AND CARE
APARTMENT DWELLERS
• Check with management to learn the requirements and re codes
for using an electric grill in your apartment complex. Use only as
allowed.
SAVE THESE INSTRUCTIONS
CAUTION
• Do not use sharp or pointed tools to clean grill.
• Do not use abrasive oven cleaners, steel wool or metal brushes
to clean porcelain grates or grill body. They will damage the nish.
DANGER
To avoid the possibility of burns be sure grill is cool before cleaning
electric controller and heating element.
CLEANING
• Allow grill to cool before moving, cleaning or storing.
• Do not clean this product with a water spray or the like.
CAUTION
Replace damaged part(s) only with Current Backyard replacement
parts. Do not attempt to repair damaged parts.
Caution: The user is cautioned that changes or modications not
expressly approved by the party responsible for compliance could
void the user’s authority to operate the equipment.
This device complies with Part 15 of the FCC Rules. Operation is
subject to the following two conditions: (1) this device may not cause
harmful interference, and (2) this device must accept any interference
received, including interference that may cause undesired operation.
NOTE: This equipment has been tested and found to comply with the
limits for a Class B digital device, pursuant to Part 15 of the FCC Rules.
These limits are designed to provide reasonable protection against
harmful interference in a residential installation. This equipment
generates, uses and can radiate radio frequency energy and, if not
installed and used in accordance with the instructions, may cause
harmful interference to radio communications. However, there is no
guarantee that interference will not occur in a particular installation.
If this equipment does cause harmful interference to radio or television
reception, which can be determined by turning the equipment off and
on, the user is encouraged to try to correct the interference by one or
more of the following measures:
• Reorient or relocate the receiving antenna.
• Increase the separation between the equipment and receiver.
• Connect the equipment into an outlet on a circuit different from that to
which the receiver is connected.
• Consult the dealer or an experienced radio/TV technician for help.
FCC Radiation Exposure Statement
This equipment complies with FCC radiation exposure limits set forth for an
uncontrolled environment. This equipment should be installed and operated
with a minimum distance of 20cm between the radiator and your body.
This transmitter must not be co-located or operating in conjunction with any
other antenna or transmitter.
• Do not use appliance for other than intended use.
• Extreme caution must be used when moving an appliance
containing hot oil or other hot liquids.
• To disconnect, turn controller “off”, then remove plug from wall
outlet. Unplug from outlet when not in use and before moving or
cleaning. Allow to cool before putting on or taking off parts.
WARNING
• Do not use 16 or 18 gauge extension cords. Damage to household
wiring and/or re could result.
• Use care when operating your grill.
• Close supervision is necessary when any appliance is used by or
near children. Keep children away from grill both when hot and cold.
• Keep pets away from the appliance at all times.
• This appliance is not intended for and should never be used as a
heater.
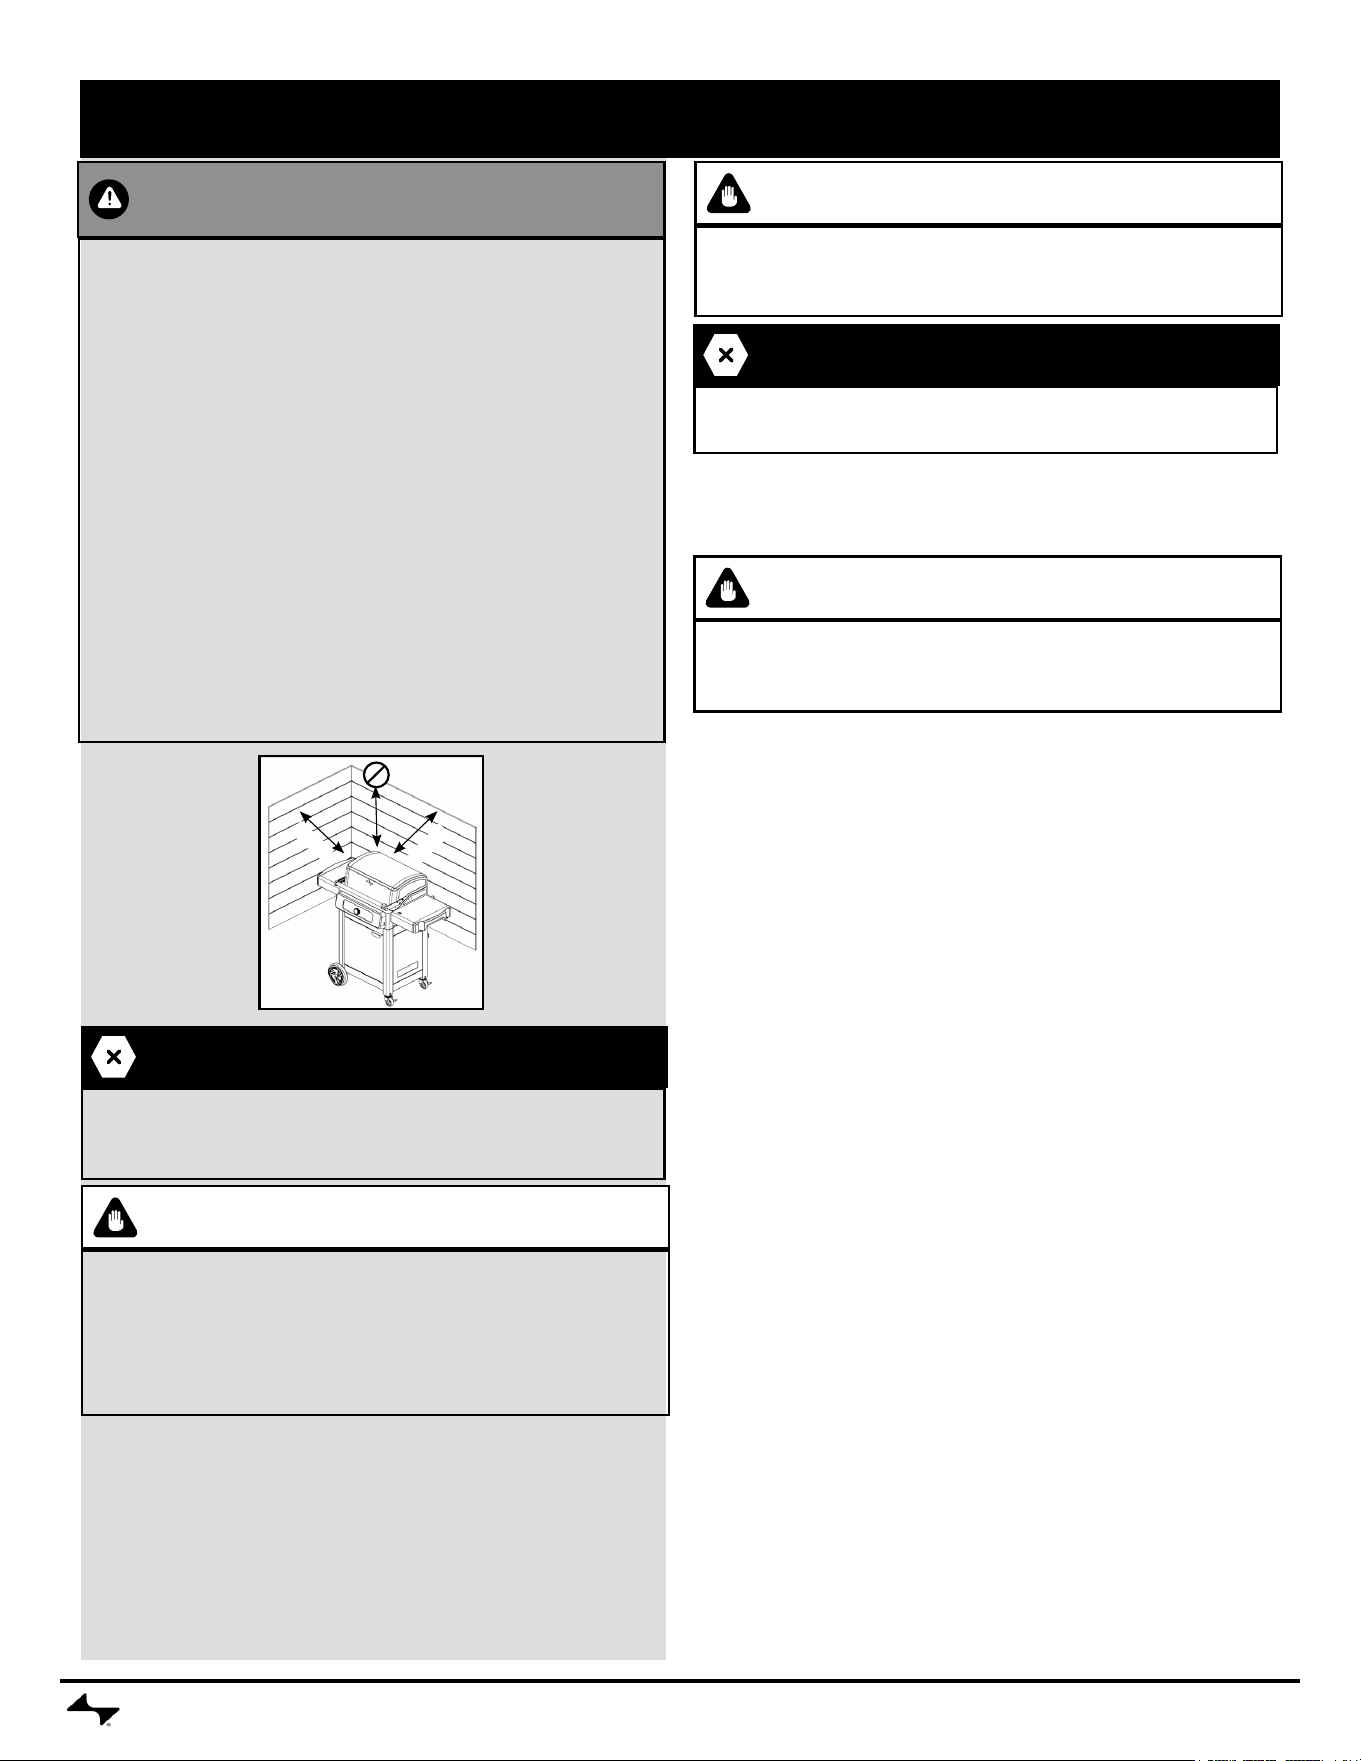
• Use appliance only in well-ventilated space. Keep grill 24” (2 feet)
away from walls and rails.
• Do not move the appliance when in use.
• The use of alcohol, prescription or non-prescription drugs may
impair the consumer’s ability to properly assemble or safely operate
the appliance.
• When cooking, the appliance must be on a level, stable surface in
an area clear of combustible material.
• Do not touch hot surfaces. This appliance will be hot during and
after use. Use insulated oven mitts or gloves and long-handled
barbecue utensils for protection from hot surfaces or splatter from
cooking liquids. Use handles and knobs provided for operation.
DANGER
In case of re turn controller to OFF position, unplug grill from outlet
and allow re to burn out. Do not use water to put out a re in this or
another electrical appliance.
CAUTION
• Do not leave appliance unattended when ON or while burning off
food residue. If appliance has not been regularly cleaned, a grease
re can occur that may damage the product.
• Putting out grease res by closing the lid is not possible. This
appliance is well ventilated for safety reasons.
2 feet
2 feet
CURRENTBACKYARD.COM4
Before rst use of grill:
• Remove all packaging and sale labels from the grill. Do not use
sharp tools to remove stickers.
• Wash cooking grate with warm soapy water, rinse and dry
thoroughly.
Before each use of grill:
• Use grill only on a rm and level surface to prevent tipping over.
• To prevent household circuit breakers from tripping, keep electric
controller dry and do not use other electrical products on the same
circuit.
• Check grease tray to make sure it is empty and is mounted under
the drain hole.
• The grease tray must be inserted into appliance and emptied
after each use.
• For stick-free cooking, apply a thorough coating of vegetable oil or
vegetable oil based spray to the cooking grate.
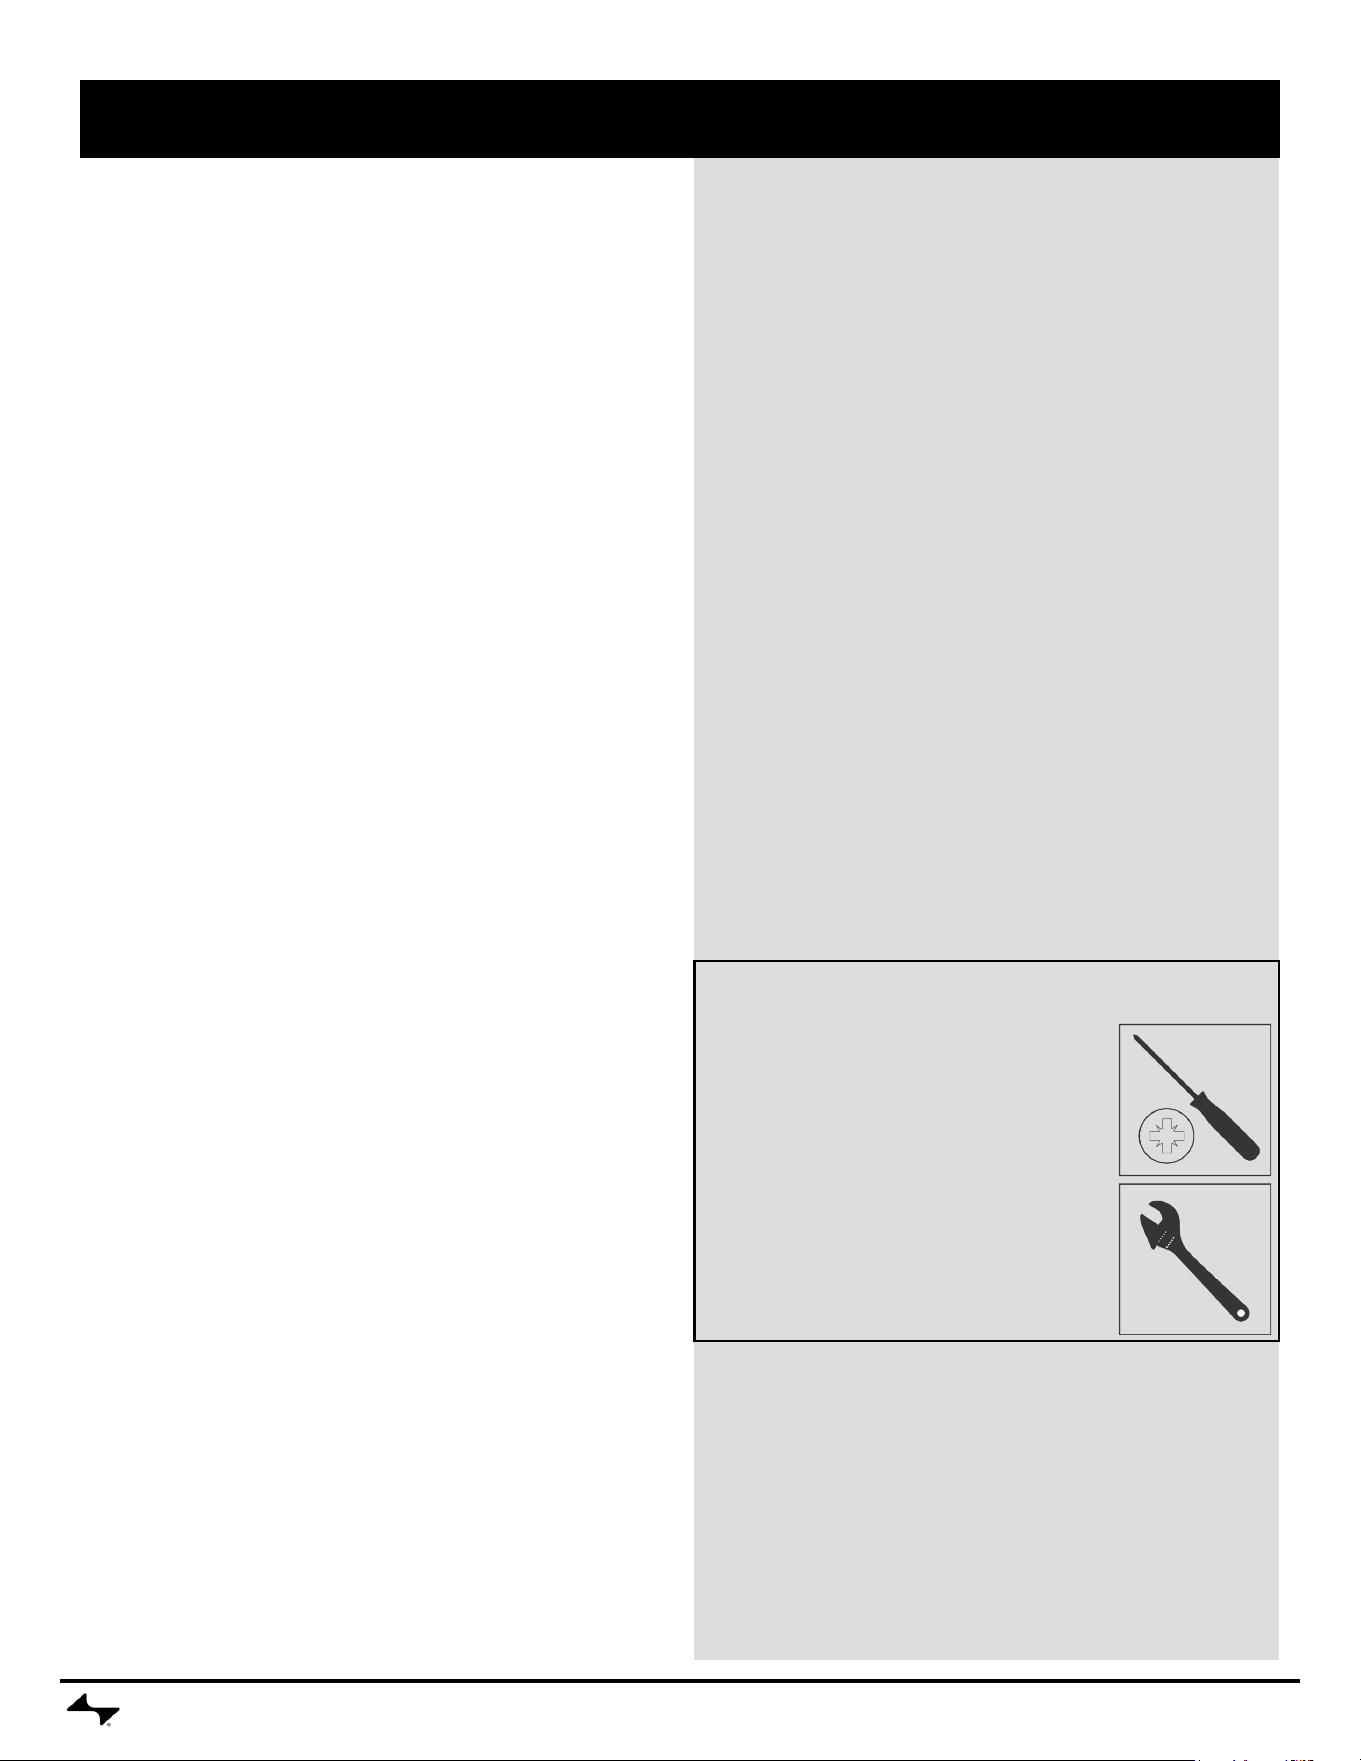
Turn grill on:
• Plug power supply cord into a properly grounded, GFI protected
outlet. If extension cord must be used refer to “Extension Cord Use
and Safety” on page 2.
• Press power button to turn on controller. Light ring will turn blue
indicating controller is ready for use.
• Rotating control knob will adjust temperature 5°F up or down. Press
knob to conrm desired temperature.
• Light ring will pulse red until SET temperature is reached, then will
glow solid red. Temperature display will alternate between SET and
ACTUAL temperature until SET temperature is reached.
• To adjust temperate, turn clockwise to raise the temperature or
counterclockwise to lower the temperature. Press the control knob
to SET the DESIRED temperature.
• For further instruction on controller use, see “Quick Start” on page 5.
• To convert to °C, press Timer and Smart Clean buttons together.
Changing between °F and °C can only be done while unit is “ON”.
Grilling:
• For best results, cook with the lid closed to hold in heat and provide
complete cooking.
• Temperature display on the controller indicates the cooking
temperature inside the grill.
• Controller setting for various foods are dependent upon outdoor
conditions and personal cooking preferences.
• If you have an appliance problem see the “Troubleshooting Section”.
Turn grill off:
• To turn controller/grill off, press and hold the power button for 3
seconds until the display turns off.
• Unplug cord from outlet.
Cleaning electrical controller:
• Clean controller face by wiping with a soft, dry cloth.
Controlling grease res:
• To aid in controlling grease res use the following precautions:
• Keep grill free from grease; chance of re is greatly increased by
grease buildup.
• Trim excess fat off meat and use less fatty cuts of meat to reduce
chance of grease res.
• If are-up occurs during cooking reduce controller setting and close
lid.
• If are-up continues turn off the controller and unplug the power
cord.
• Clean the heating element tray assembly under the heating element
at least once a season, more often with heavy use.
Cleaning your grill:
• Excess build up of burned grease and food particles will reduce the
grill’s cooking performance. To obtain optimum performance:
• Clean the heating element tray plate assembly and frame at
least once a season, more often with heavy use.
• Using a mild detergent or hot soapy water, moderately scrub
surface of the heating element tray assembly with a plastic
or brass bristle brush.
• Clean cooking grates regularly with warm soapy water or a
baking soda and water solution. Use non-abrasive scouring
powder for stubborn stains.
• Your Current cooking grates are made from anodized aluminum,
and will take on seasoning over time. They should get darker and
eventually turn black. This is intended, and can help improve the
performance of the product.
SAFETY TIPS
• If a bristle brush is used to clean any of the grill cooking surfaces,
ensure no loose bristles remain on cooking surfaces prior to grilling.
It is not recommended to clean cooking surfaces while grill is hot.
Do not clean the cooking grate with a scraper, sharp tool or putty
knife.
• It is not recommended to clean the cooking grates in a dishwasher.
Storing your grill:
• Clean cooking grate.
• Store grill in weather protected area or under grill cover when not
in use.
• Always unplug your grill prior to storage.
USE AND CARE
Adjustable Wrench (or 7/16” combo wrench)
(Not included)
Tools Required for Assembly
Phillips Screwdriver
(Included)
QUICK START
CURRENTBACKYARD.COM
5
POWER ON / OFF
Press the power button to turn the grill on. Press and hold the power button for three seconds to turn the
grill off.
SYNCHRONIZE
ZONES
To synchronize the zones again, rotate the control knob to desired temperature and press the knob to
confirm.
SET
TEMPERATURE
Both temperature zones are initially synchronized. Move the control knob clockwise to set a higher
temperature. Press the knob and wait until the light ring stops pulsating, indicating target temperature is
reached.. The display alternates between the current and the desired temperature, "Set" and "Act'' flash.
Turning counterclockwise decreases the temperature
SEPARATE
ZONES
To set the zones individually, press the grill symbol above the temperature display on the selected side. This
allows the temperature to be set for the selected zone.
QUICK START
CURRENTBACKYARD.COM
6
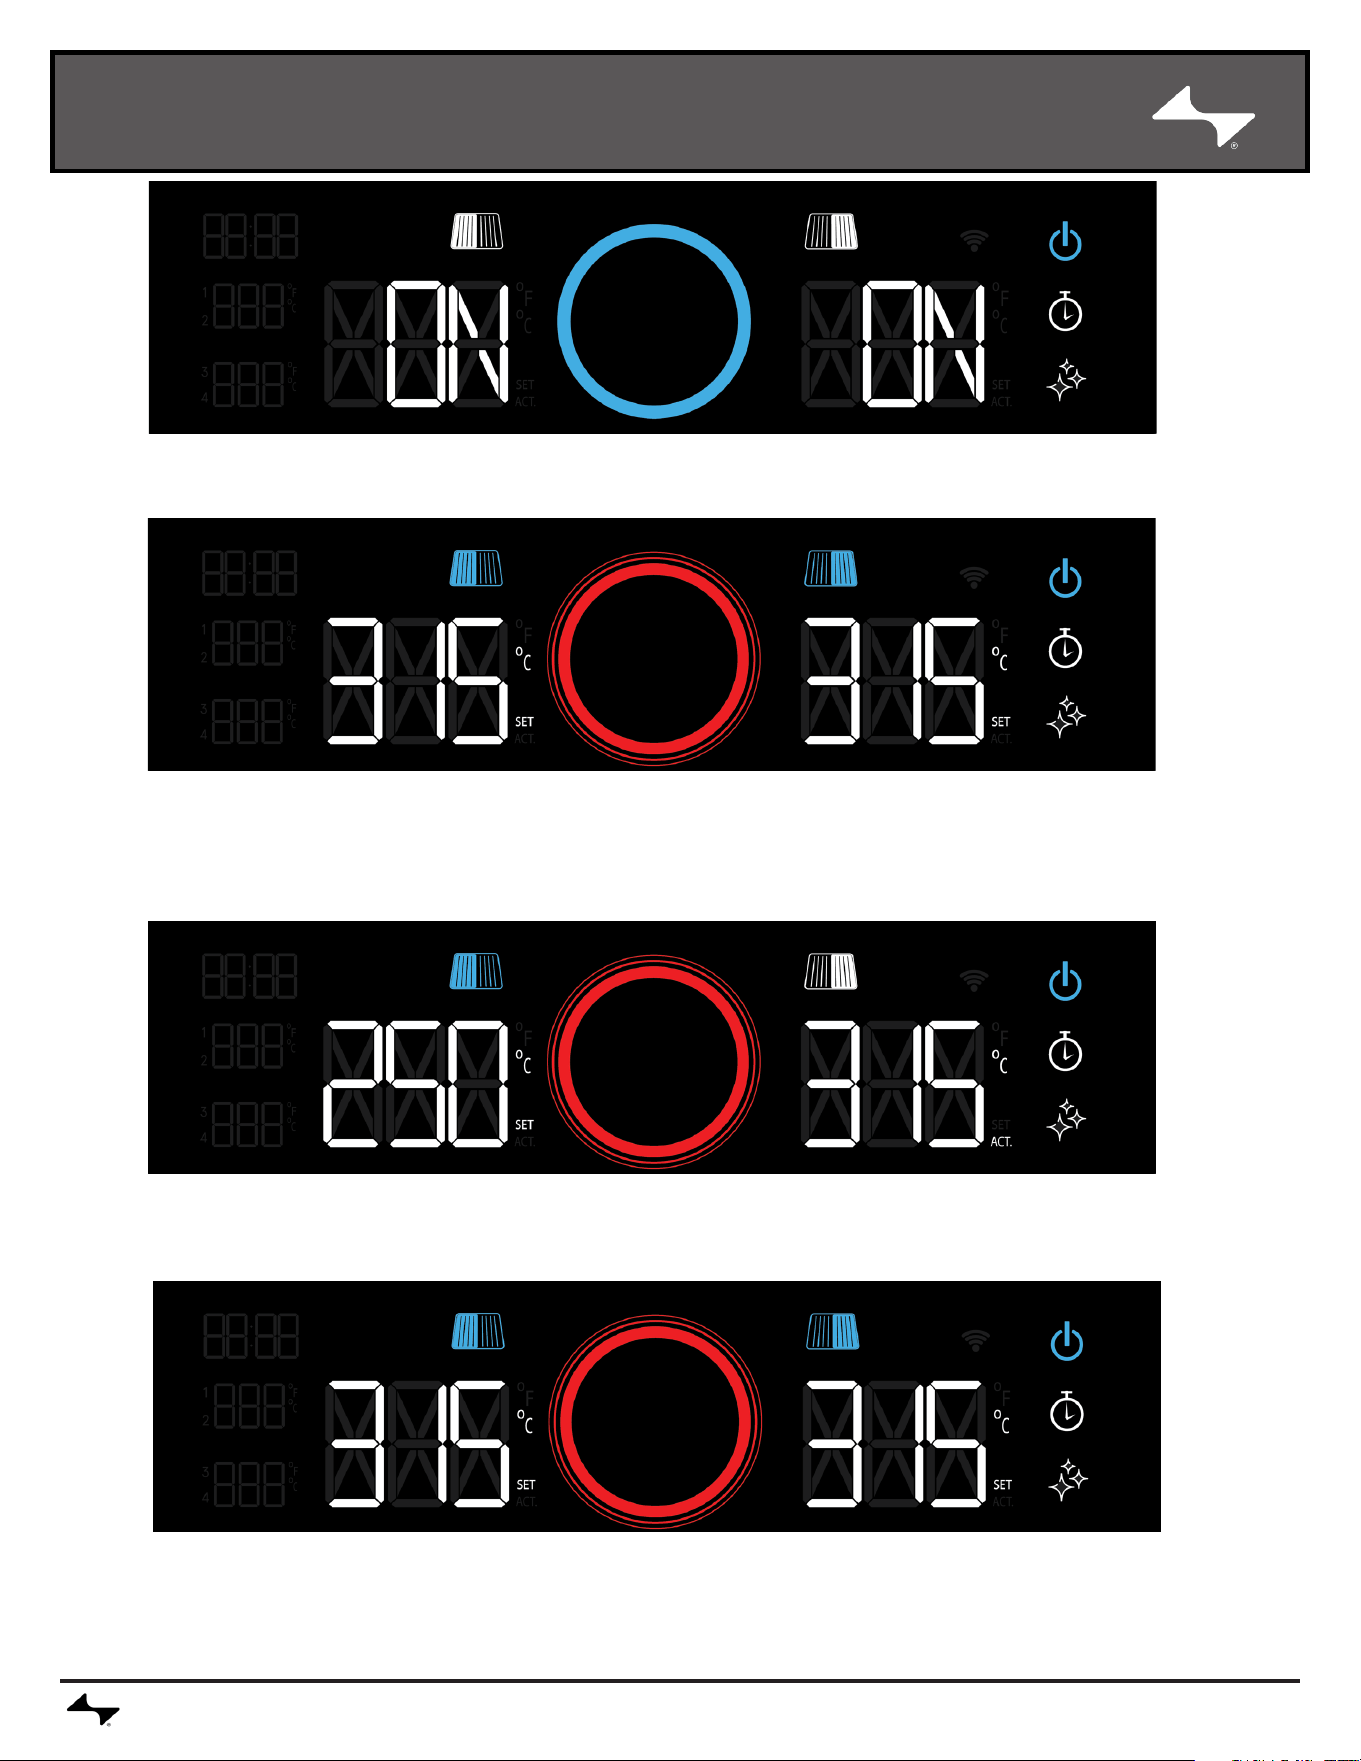
TURNING ZONES
ON AND OFF
A long press on a grill symbol switches the respective zone off completely. To switch to on again, press the
symbol until it lights up again.
TlMER &
FOOD
TEMPERATURE
Pressing the stopwatch symbol activates the timer. The display flashes 00:00. Use the rotary knob
to set the time in 30-second increments and confirm by pressing.
The LEDs for the food temperature sensors are also located on the left. They show the
temperatures as soon as they are connected to the grill.
SMART CLEAN
With the lid closed, press the Smart Clean symbol for two seconds until the light ring lights up. The grill
switches off automatically as soon as the program is completed. To interrupt the process, press the
Smart Clean symbol for two seconds and the grill returns to the last setting.
ERRORS
All error codes are explained in the interactive assembly instructions, if you have any questions, our
customer service will be happy to help: currentbackyard.com
CURRENTBACKYARD.COM
7
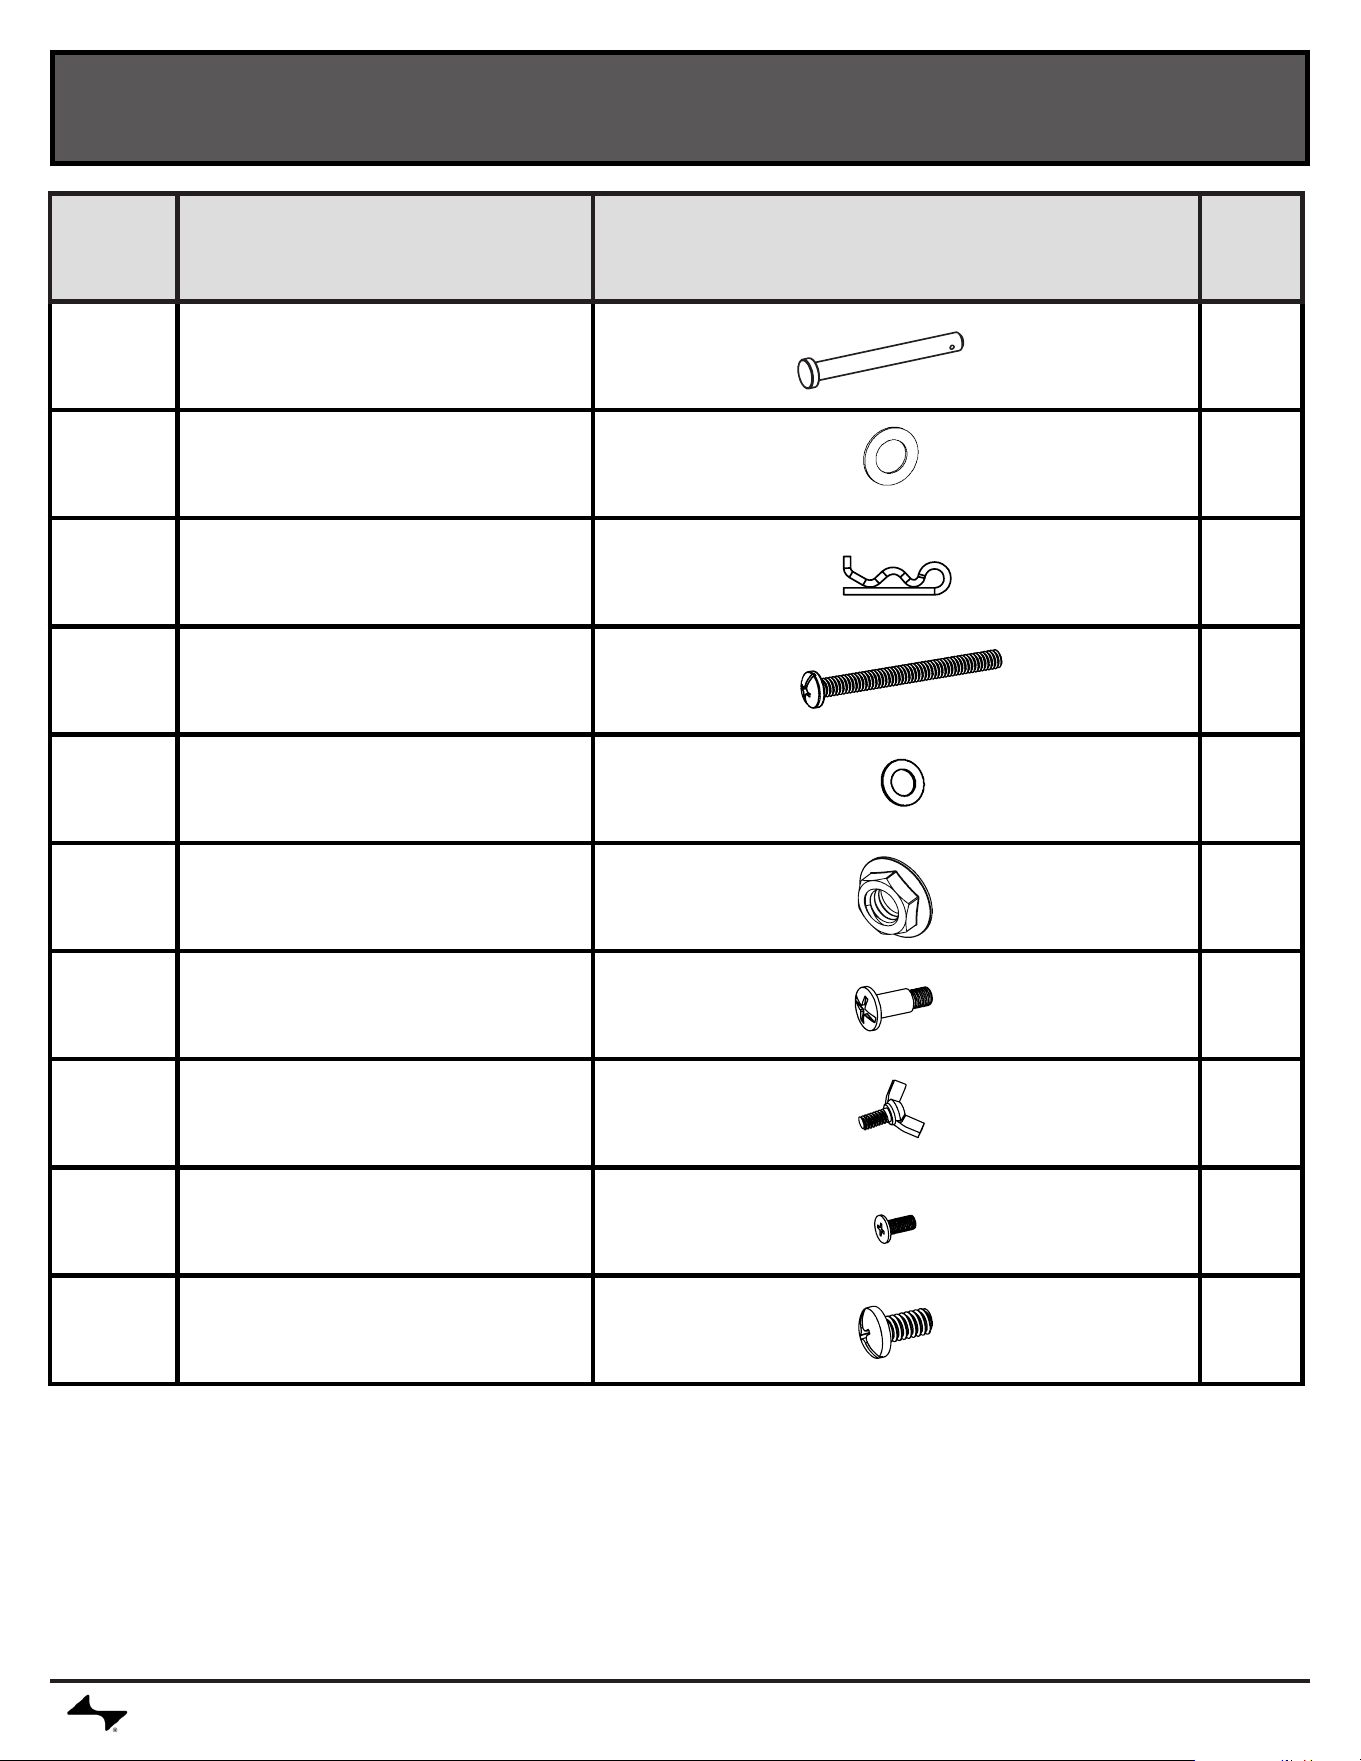
HARDWARE
*
*
* NOT REQUIRED FOR CART MODELS
KEY DESCRIPTION IMAGE QTY
A Axle, 10mm x 9.3mm 2
B
Aluminum Washer 20mm x
11mm
2
C Hitch Pin 2
D
Screw, Machine,1/4"-20 x 2
3/4"
2
E
Aluminum Washer 14mm x
7.4mm
2
F 1/4-20 Flange Nut 2
G Shoulder Screw 4
H Wing Screw, #10-24 x 1/2" 1
J
Screw, Machine, Flat Head
#10-24 x 1/2"
2
K
Screw, Machine,Combo
Pan Head #1/4-20 x 1/2"
4
REPLACEMENT PARTS LIST
CURRENTBACKYARD.COM8
Key Qty Description
1 1 TOP LID
2 1 HANDLE F/ LID
3 2 TOP LID RUBBER BUMPER
4 1 LOGO PLATE F/ LID
5 2 TOP LID HINGE
6 1 FIREBOX FRAME
7 1 ELEMENT TRAY BOTTOM
8 8 ELEMENT TRAY SUPPORT PIN
9 1 POWER BOX MODULE
10 2 ELEMENT TRAY
11 4 GREASE TENT
12 2 HEATING ELEMENT
13 1
TEMPERATURE SENSOR
(WHITE)
14 1 TEMPERATURE SENSOR (RED)
15 2 BRACKET, F/ WARMING RACK
16 1 CONTROL PANEL HOUSING
17 1 CONTROL MODULE
18 1 CONTROL MODULE PANEL
19 1
PROBE JACK, SET OF 2
(WHITE)
20 1
PROBE JACK, SET OF 2
(RED)
21 1 CONTROL KNOB
22 2 GREASE TRAY BRACKET
23 1 GREASE PAN
24 1 WARMING RACK
25 4 COOKING GRATE
26 1
SHELF GROMMET (SET OF 2)
27 1 LEFT SIDE SHELF
28 1 RIGHT SIDE SHELF
29 2 END CAP, F/ SIDE SHELF
30 1 LEFT FRONT LEG (#1)
31 1 LEFT REAR LEG (#2)
32 1 RIGHT FRONT LEG (#3)
33 1 RIGHT REAR LEG (#4)
Key Qty Description
34 2 LEG CAP, FRONT
35 2 LEG CAP, REAR
36 2 SIDE CART BRACE
37 2 WHEEL
38 1 WHEEL AXLE (SET OF 2)
39 1 MIDDLE CART SHELF
40* 2 SIDE CART PANEL
41* 1 REAR CART PANEL
42* 2 FRONT/ REAR BRACE
43* 1 DOOR, NO HANDLE
44* 1 HANDLE F/ DOOR
45 1 CORD WRAP
46 1 BOTTOM SHELF
47 2 CASTER, LOCKING
48 1
OUTSIDE MEAT PROBE
HOLDER
49 2 MEAT PROBE
50 1
POWER CORD REPLACE-
MENT
51* 1 MAGNET ASSEMBLY
52* 1 FIXED PIN, F/ DOOR
53* 1 SPRING PIN, F/ DOOR
54 1 TRAY, PERFORATED
55 1 TRAY, SOLID
56* 6 PANEL CLIP
57 1 GROMMET, SMOKE SHOT
58 1 GROMMET, POWER CORD
NOT Shown
… 1 PRODUCT GUIDE
… 1 HARDWARE PACK
… 1
CART/SHELF HARDWARE
REPLACEMENT
*
NOT INCLUDED IN CART MODELS
REPLACEMENT PARTS DIAGRAM
CURRENTBACKYARD.COM9
50
24
7
22
23
58
25
57
58
6
15
12
14
13
16
17
2
9
1
3
4
21
18
19
49
48
36
45
52*
11
26
28
29
27
46
39
54
55
37
47
32
33
31
30
38
53*
51*
44*
56*
40*
41*
34
35
42*
10
20
43*
*
NOT INCLUDED IN CART MODELS
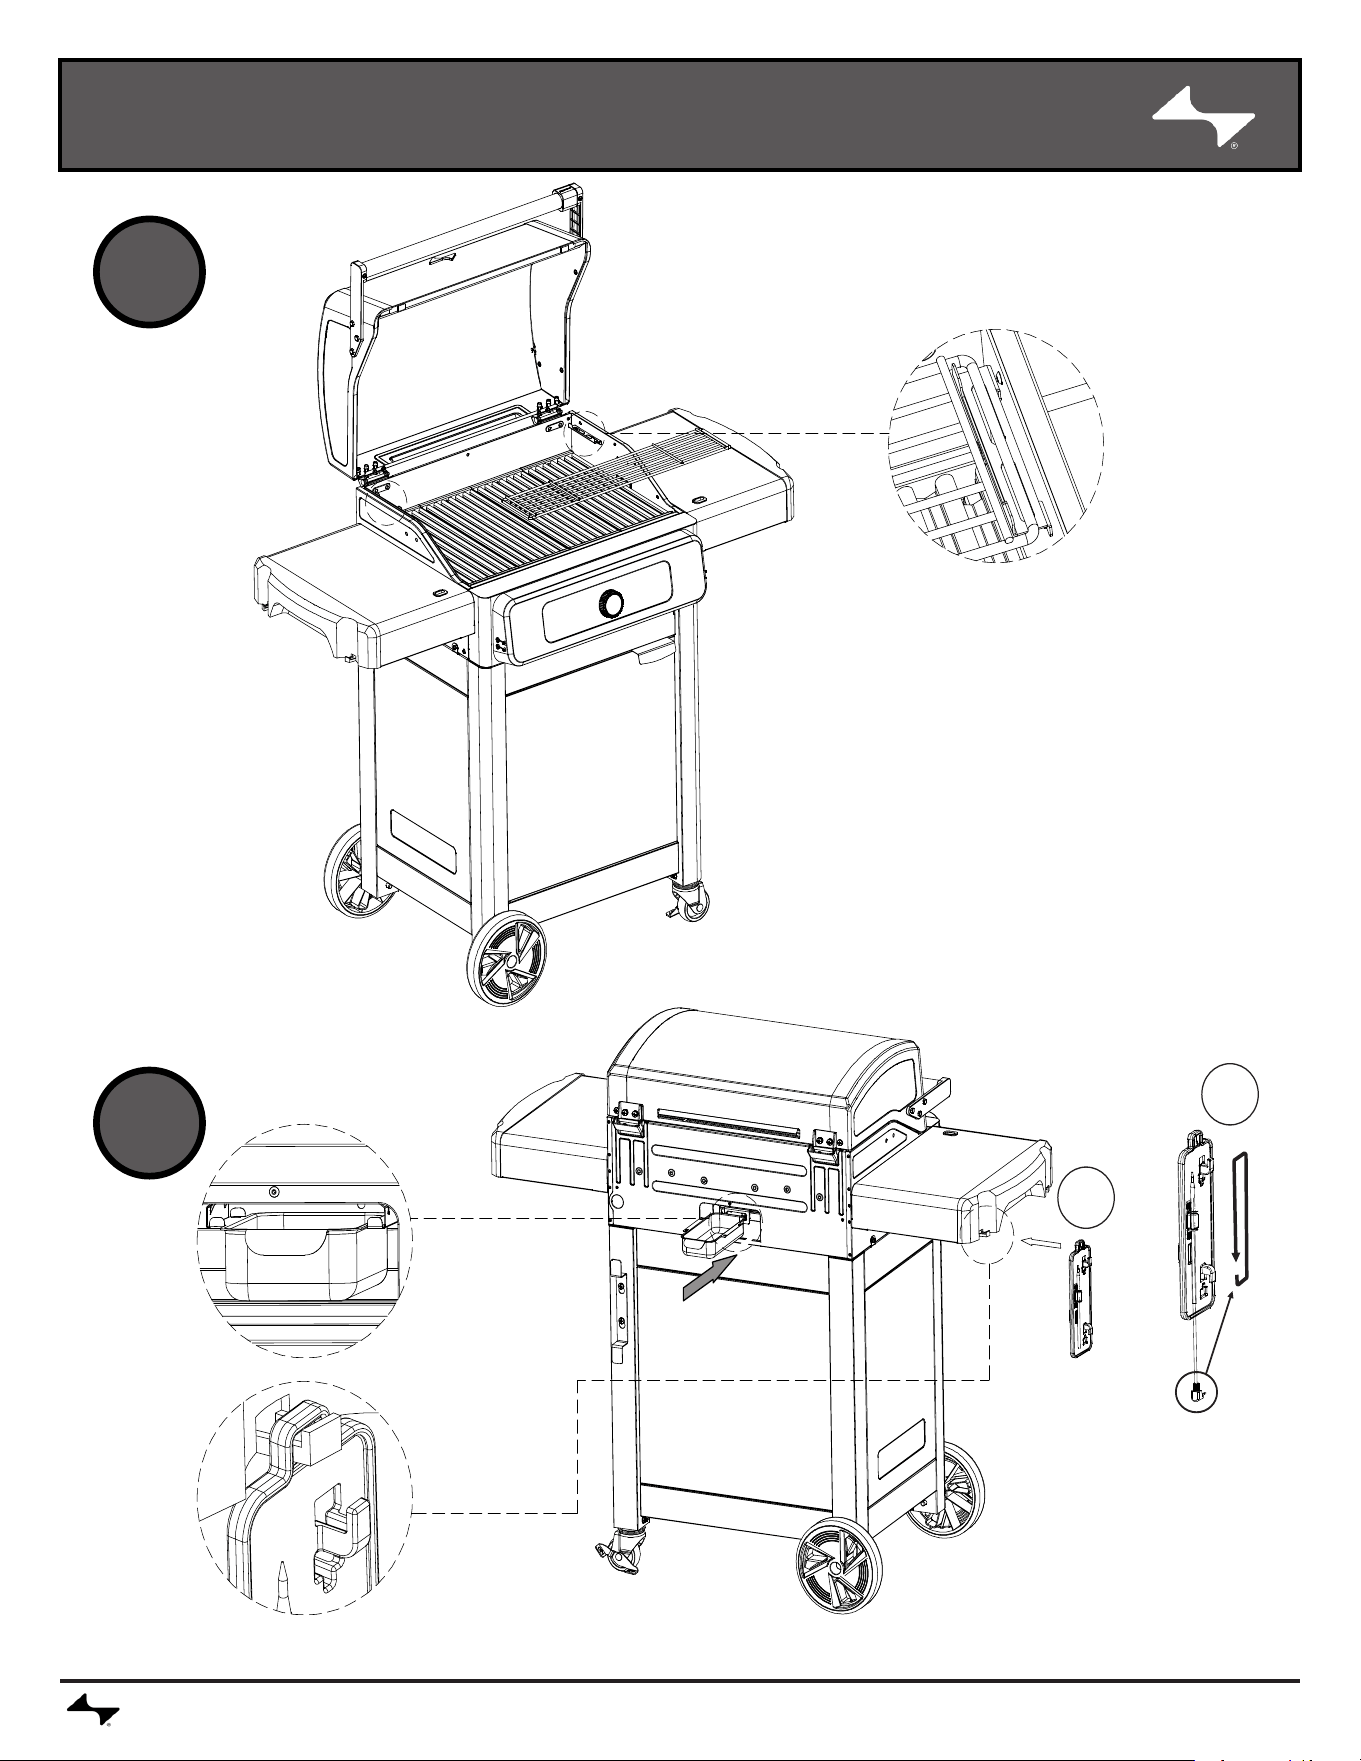
ASSEMBLY
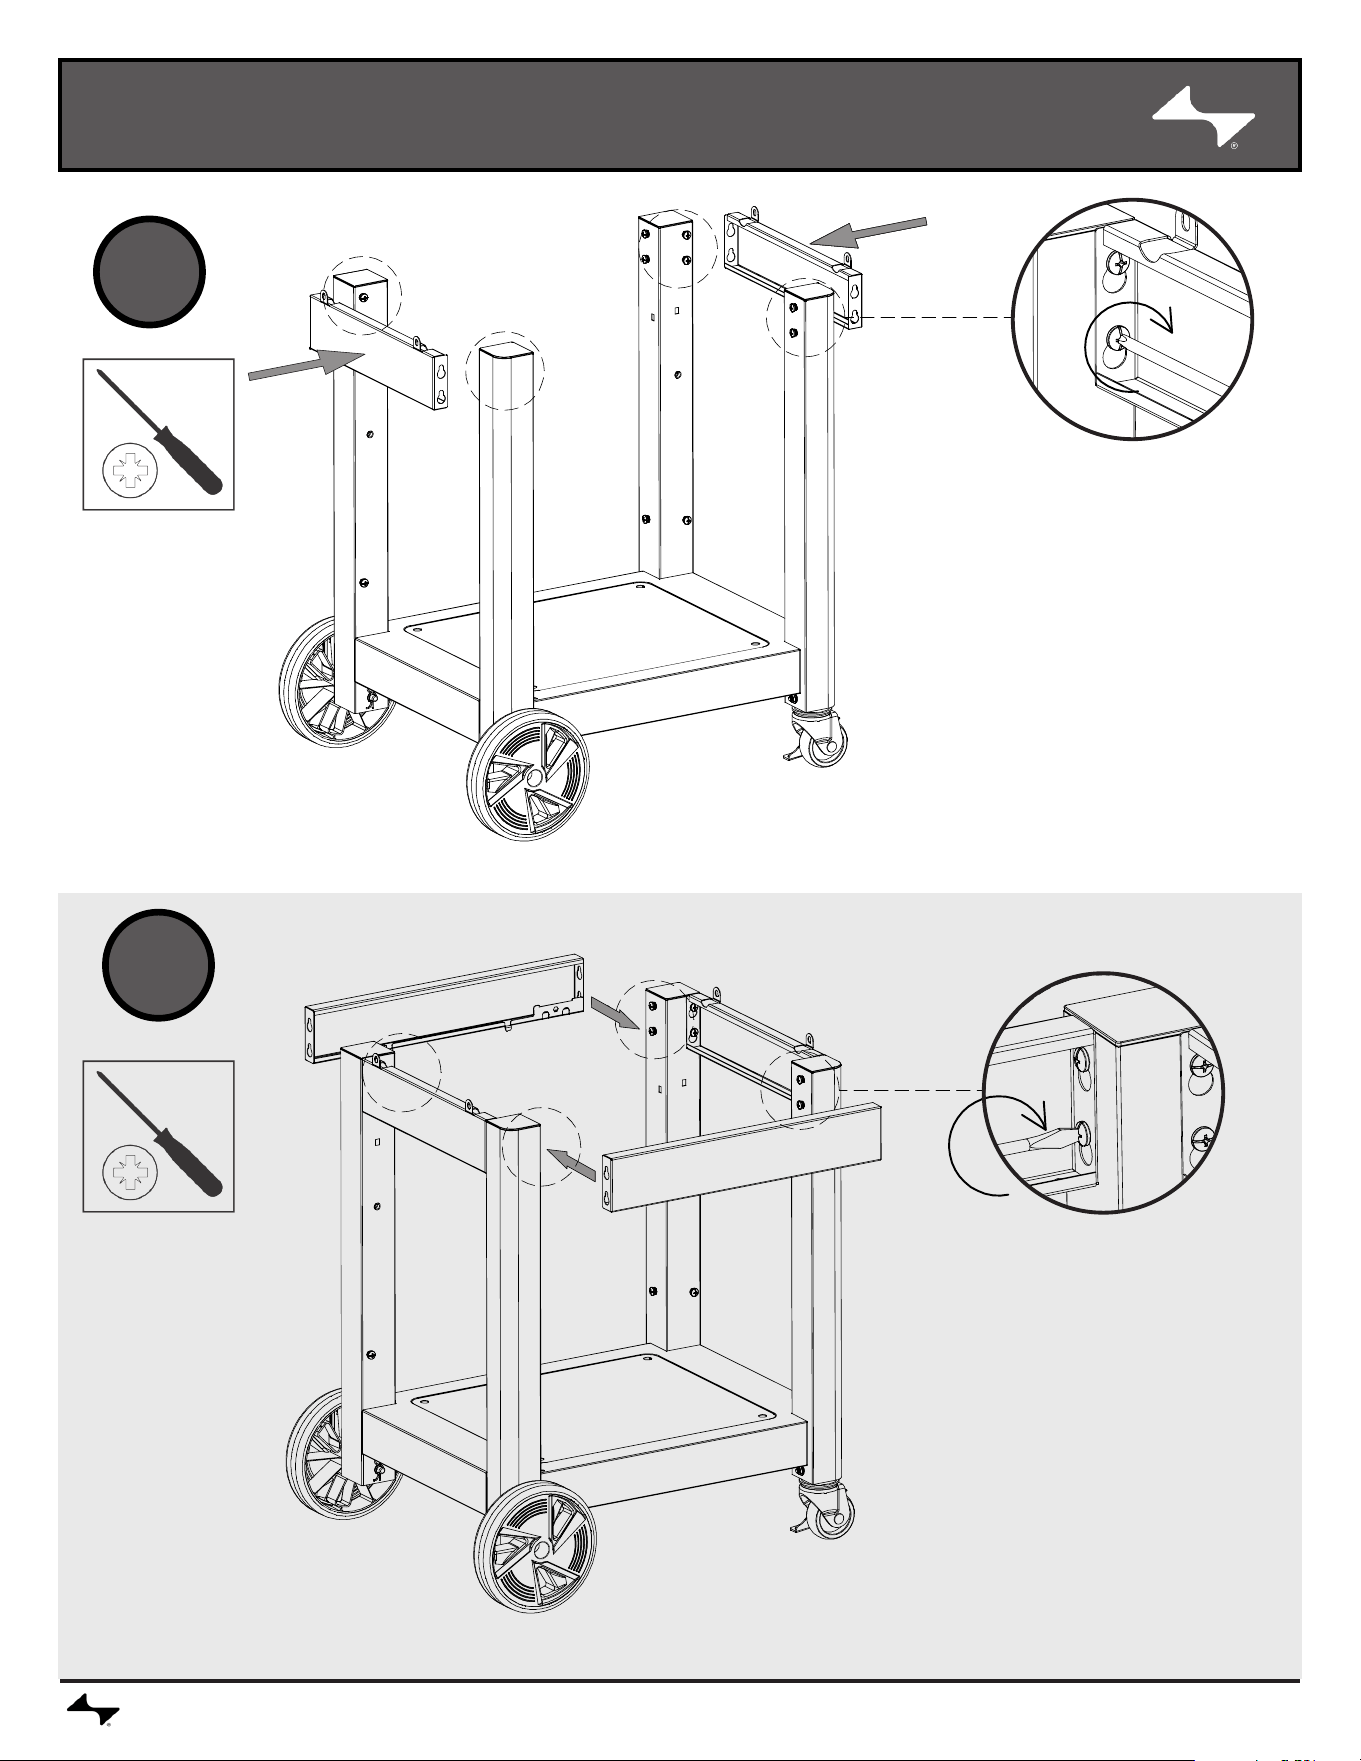
CURRENTBACKYARD.COM10
2
1
NOTE: SCREWDRIVER INCLUDED IN TOP CENTER PARTS BOX
ASSEMBLY
CURRENTBACKYARD.COM11
3
4
A
D
E
F
C
B
ASSEMBLY
CURRENTBACKYARD.COM12
5
6
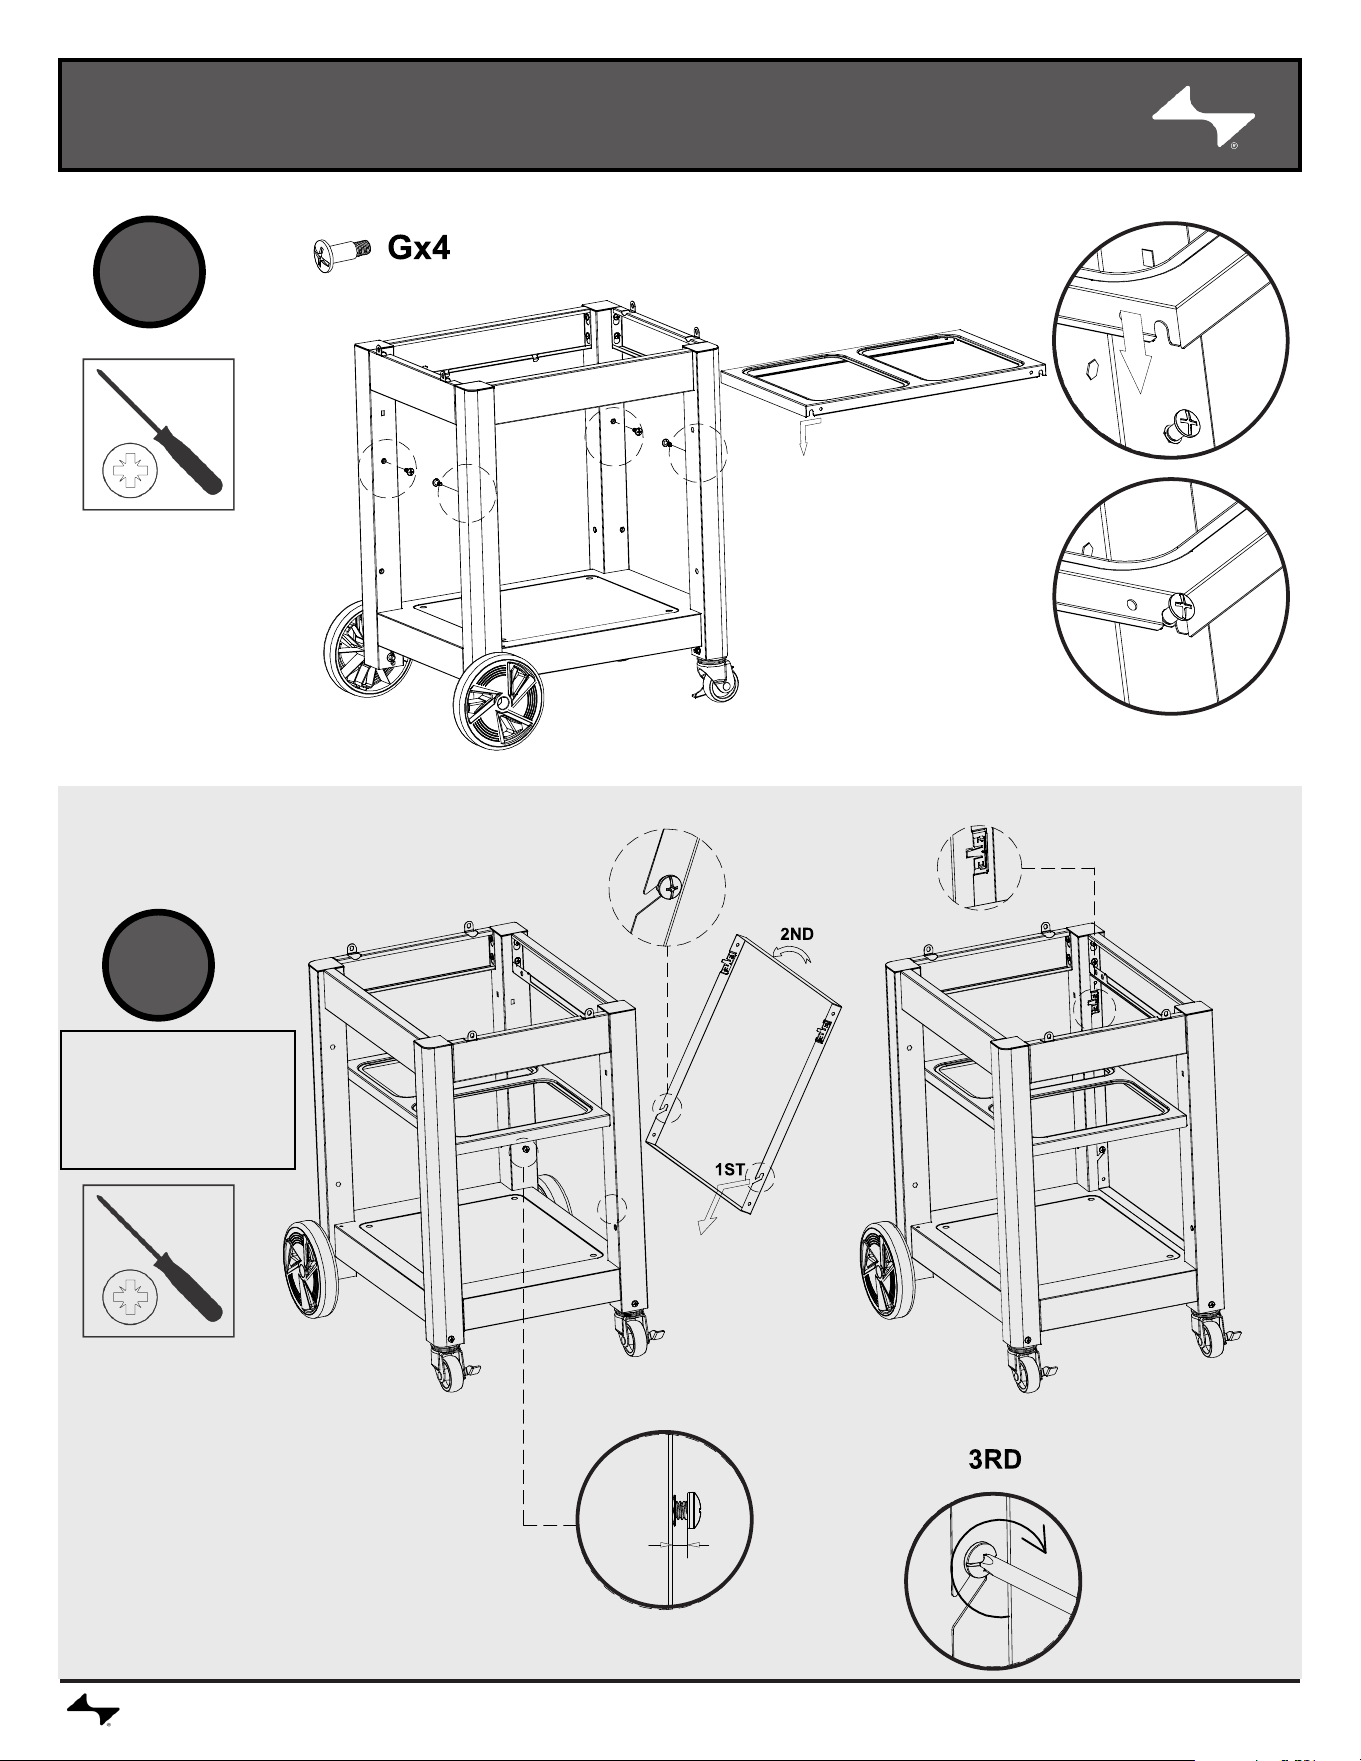
ASSEMBLY
CURRENTBACKYARD.COM13
7
8
NOTE: This
step is for
Cabinet
models only
ASSEMBLY
CURRENTBACKYARD.COM14
9
10
NOTE: This
step is for
Cabinet
models only
NOTE: This
step is for
Cabinet
models only
ASSEMBLY
CURRENTBACKYARD.COM15
11
12
NOTE: This
step is for
Cabinet
models only
NOTE: This
step is for
Cabinet
models only
ASSEMBLY
CURRENTBACKYARD.COM16
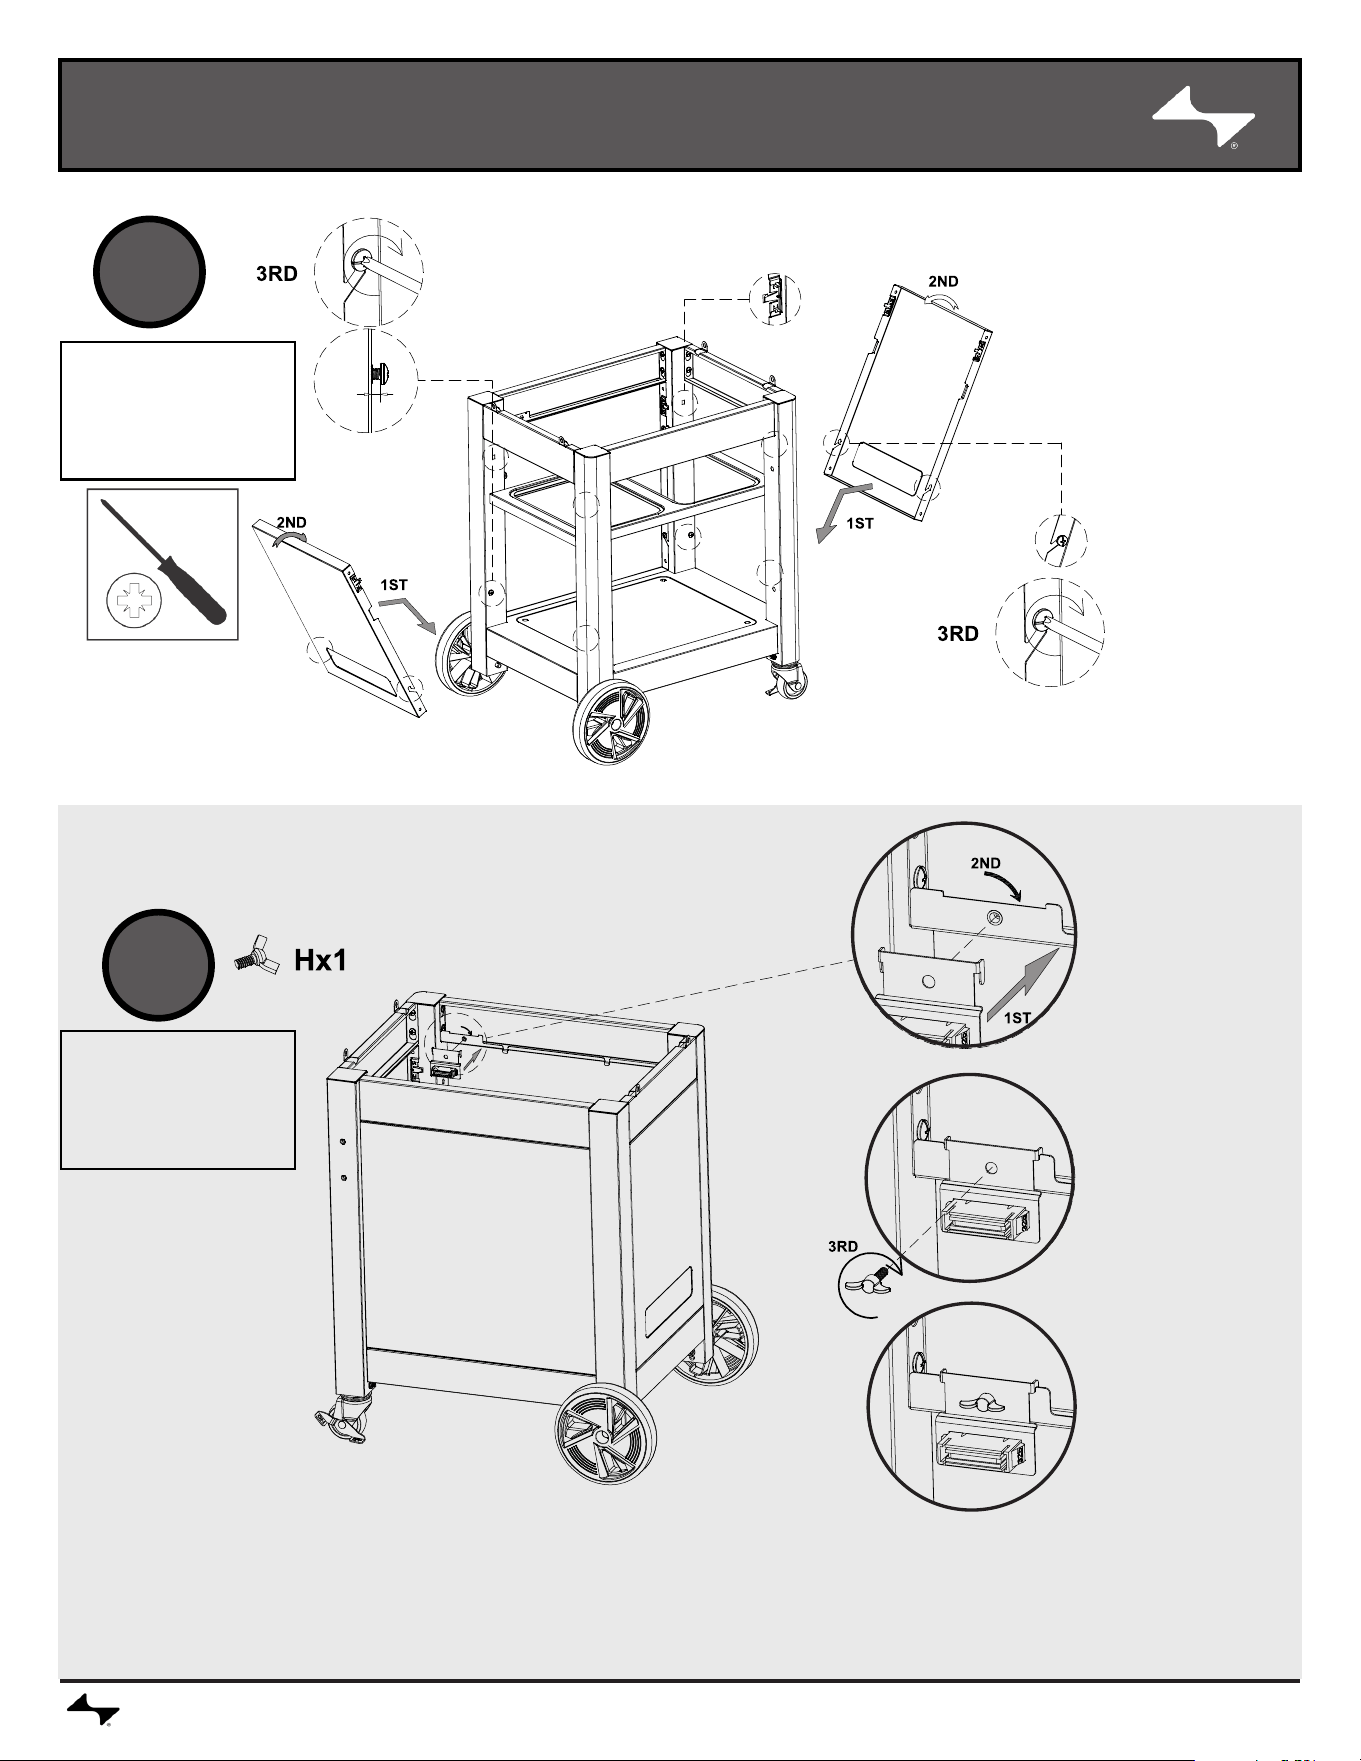
713
14
ASSEMBLY
CURRENTBACKYARD.COM17
15
16
- OR -
ASSEMBLY
CURRENTBACKYARD.COM18
17
18
ASSEMBLY
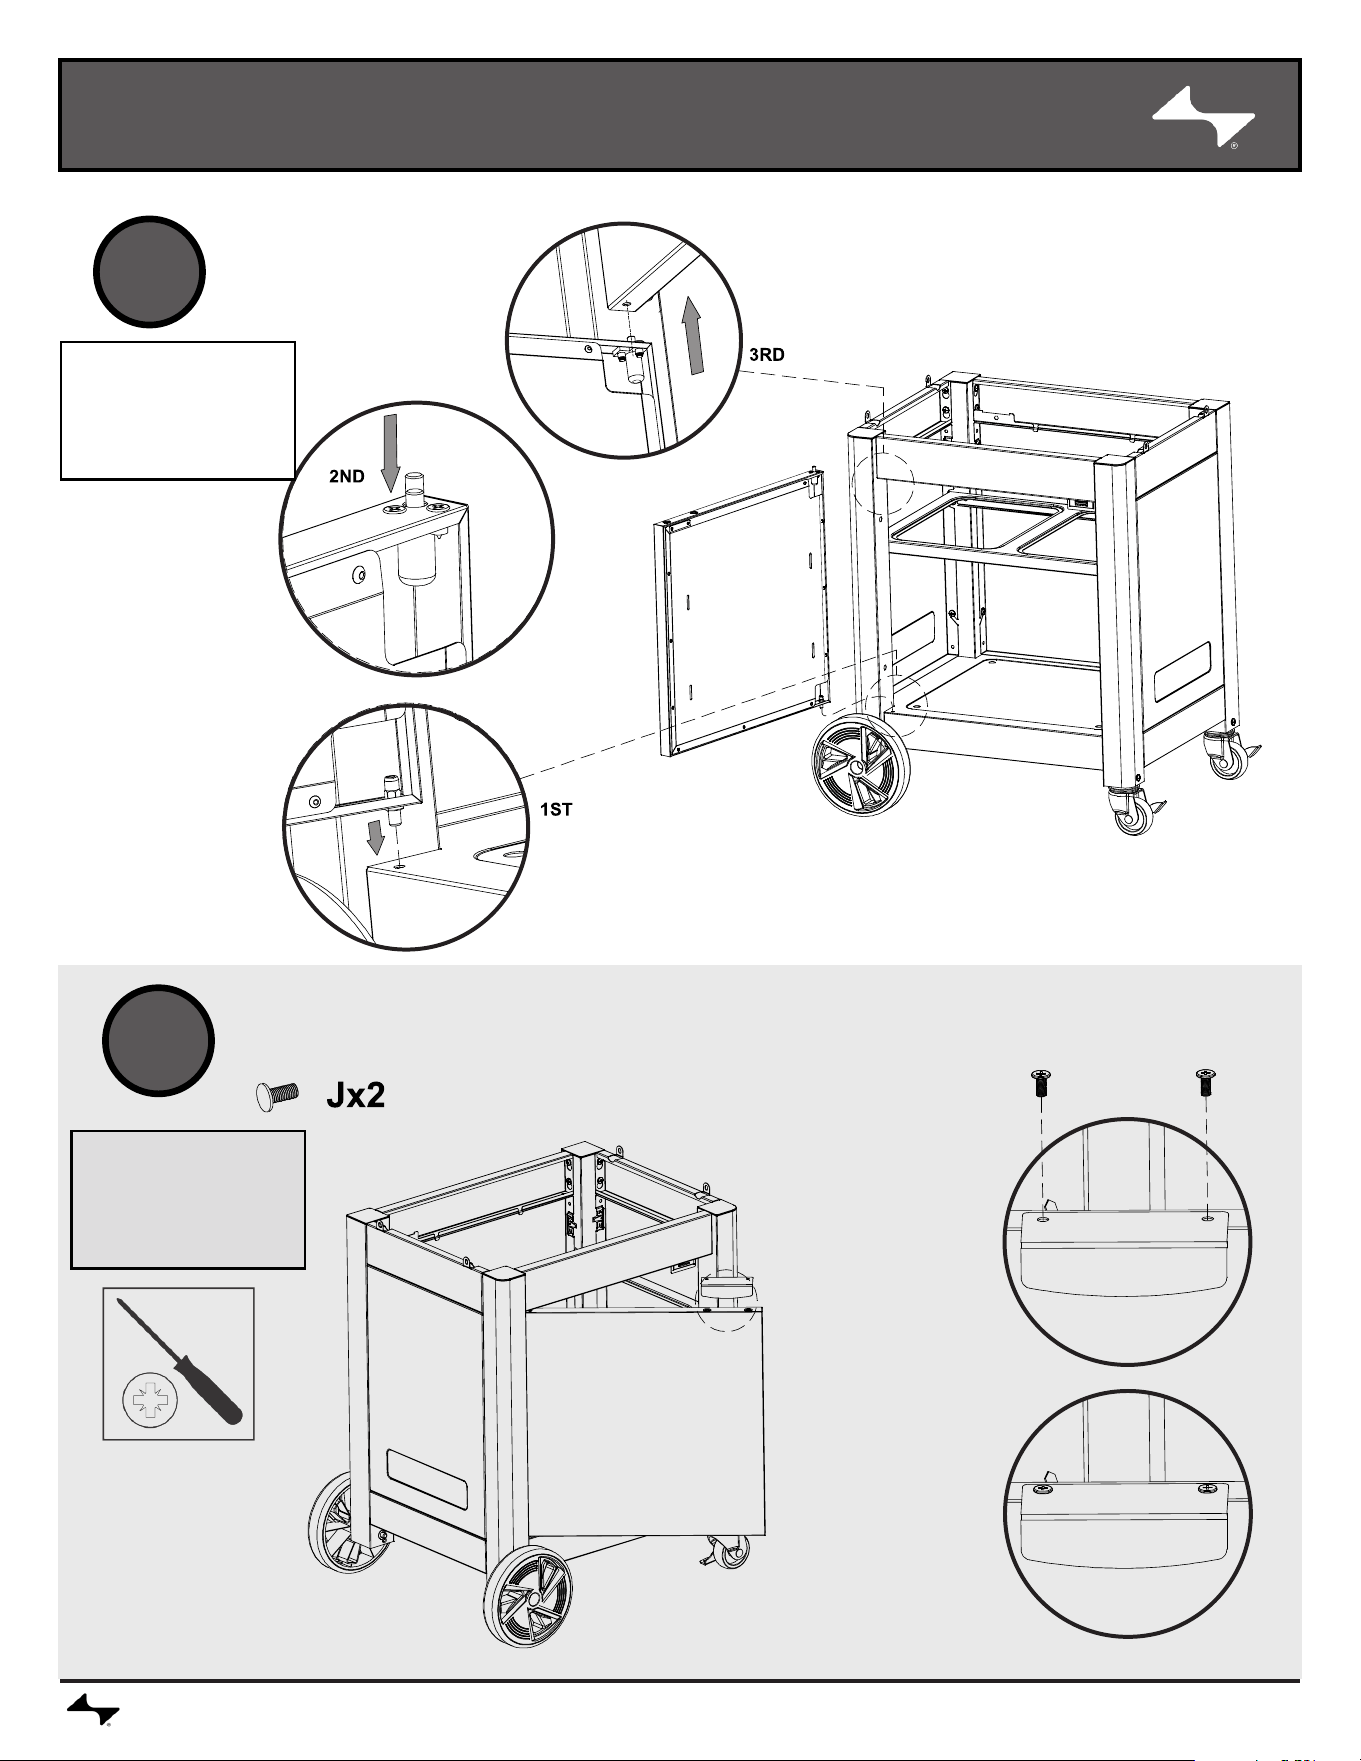
CURRENTBACKYARD.COM19
19
20
OPTIONAL SHELF STORAGE POSITION.
ASSEMBLY
CURRENTBACKYARD.COM20
st
1
nd
2
21
22
TROUBLESHOOTING
CURRENTBACKYARD.COM21
Problem Possible Cause
Prevention/Solution
Grill does not get to
temperature
Setpoint changed
• Check if the setpoint has been lowered.
Lid Left Open or opened
frequently
• Leaving the grill lid open will prolong the heat-up process. When possible,
keep lid closed while cooking.
Temperature Sensor
Defect
• If the temperature does not rise, check wire connections:
• Turn off and unplug grill.
• Remove control panel and ensure all wires are firmly connected -
Reassemble the control panel and assess the temperature probe with
the same method.
• If temperature still does not rise, your temperature sensor may need to be
replaced
• Please call customer service for assistance.
Food probe temperature does
not show up in display or
shows unreasonable value
Not fully seated/plugged in
• Push probe plug all the way into probe jack.
Food probe damaged
• Plug probe into another probe jack and observe reading. If no display
or an unreasonable value is shown, replace food probe. If temperature
display is now active and at a reasonable value, try original jack once
more. If display is still bad, the probe jack may need to be replaced.
• Please call customer service for assistance.
Contamination in the food
probe jack
• Inspect the food probe jacks that do not report a temperature with a
ashlight to nd any debris. If there is debris, ensure the grill is unpowered
and then remove debris carefully.Check that the food probe connector is
clean and dry. Insert the food probe into an adjacent jack to inspect for a
reading. If there is no temperature displayed in the controller for any of the
jacks, then the food probe is damaged.
Food probe is not properly
inserted in food
• Tip of probe should be inserted into thickest part of the food being
measured. Food probe should not be in direct contact with any bone since
direct contact will prevent an accurate reading. Food probe should not be
in contact with grill surface.
Product won't connect to
Bluetooth
Product is too far away
from phone
• Complete pairing process with device within 1,5m (5 ft) of phone.
Phone Bluetooth turned off
or on Airplane Mode
• In your mobile device settings, make sure Bluetooth is turned on and
airplane mode is disabled.
1. For Android devices, make sure that location services are turned on and
that the application is permitted to use location services. This will enable
Bluetooth to be used in the application.
2. For iPhone devices, check that Bluetooth is enabled for the application
in the operating system settings.
Product is already paired
to another phone
• Use the original mobile device paired to the product or reset the grill's
connections. If resetting the grill connection, rst remove the product from
the mobile device Bluetooth settings. Alternatively, turn off bluetooth on the
previous mobile device while performing the pairing process.
• To reset grill connection, press and hold the control knob for 10 seconds.
A beep will sound indicating reset is complete. Now go through the paring
process for Bluetooth on the device.
Product is already paired
to the same phone
• Turn the product off and close the application. Turn product back on and
re-open the application. If product is still not connected by Bluetooth,
remove the product from the mobile phone operating system Bluetooth
device settings. On the grill, press and hold the control knob until it beeps
to clear the grill's Bluetooth settings and restart the pairing process.
TROUBLESHOOTING
CURRENTBACKYARD.COM22
Problem Possible Cause
Prevention/Solution
Product won't connect to WiFi
Incorrect router password
• Check password and try wi connection process again.
No internet
• Verify internet access on other devices.If other devices have internet:
- Unplug grill for 30 seconds and plug back in. Check for connection. -
Unplug router for 30 seconds and plug back in. Check for connection.
Perform WiFi setup in the application again - if the WiFi network does not
appear in the scan list, the product may be too far from the router.
Router is too far away from
grill
• Perform WiFi setup in the application again - if the WiFi network does not
appear in the scan list, the product may be too far from the router. With
a mobile device in the area where the grill is located, check that there is
internet access.
Obstacles between router
and grill
• Position grill such that the number of walls and objects between the grill
and the router is minimized.
No 2.4GHz wi
• Grill only supports 2.4G WiFi networks. An alternate router is required.
Controller Failure
• No power to the control
console.
• Grill starts ok but control
screen goes blank, grill stops
working.
The unit is not plugged in.
• Check to be sure if cord is properly plugged into outlet. Plug into outlet and
reassess.
The power circuit fuse has
tripped.
• Check if GFCI outlet or breaker has been tripped and reset circuit.
• A power cord malfunction
or failure.
• Controller (PCB)
malfunction.
• Unplug the grill from power. Remove the Control Panel and ensure
all wires are not damaged and are firmly connected, particularly the
power cord. If wires are damaged, replace appropriate components and
reassess. If wires are not damaged and connections are conrmed, please
contact customer service for further assistance.
GFCI Issues
• No power to the control
console.
• Grill starts ok but control
screen goes blank, grill stops
working.
• GFCI reset button pops out on
outlet.
• Faulty GFCI outlet.
• Moisture inside outlet.
• Outlet not on a dedicated
circuit.
• Amp draw on outlet rated
lower than 15 amps.
• Circuit breaker issues."
• Unplug everything from the outlet.
• Press the reset button on the outlet and ensure the test button returns to
normal position.
• Plug in and turn on grill for around 10 minutes, watch for GFCI tripping.
• If GFCI did trip during the 10-minute period verify the amp draw of the
GFCI (We recommend using a 20-amp GFCI). If Outlet is not 15-amp or
higher, replace the Outlet.
• If a 20-amp GFCI is being used and tripping still occurs, an electrician may
be required.
• If GFCI did not trip during the 10-minute period, and if you are using a
second appliance on the same outlet, re-plug in and turn on the original
second appliance.
• If GFCI trips with the second appliance on, there may be an issue with the
second appliance.
• Plug a different appliance into the same outlet and turn the appliance on.
• If tripping occurs with the different appliance an electrician may be
required.Unplug everything from the outlet.
CURRENTBACKYARD.COM23
This warranty only applies to units purchased from an authorized retailer. Manufacturer warrants to the original consumer-purchaser only that this
product shall be free from defects in workmanship and materials after correct assembly and under normal and reasonable home use for the periods
indicated below beginning on the date of purchase*. The manufacturer reserves the right to require that defective parts be returned, postage and or
freight pre-paid by the consumer for review and examination.
*Note: A dated sales receipt WILL be required for warranty service.
The original consumer-purchaser will be responsible for all shipping charges for parts replaced under the terms of this limited warranty.
This limited warranty is applicable in the United States and Canada only, is only available to the original owner of the product and is not transferable.
Manufacturer requires proof of your date of purchase. Therefore, you should retain your sales slip or invoice. Registering your product is not a
substitute for proof of purchase and the manufacturer is not responsible for or required to retain proof of purchase records. This limited warranty applies
to the functionality of the product ONLY and does not cover cosmetic issues such as scratches, dents, corrosions or discoloring by heat, abrasive and
chemical cleaners or any tools used in the assembly or installation of the appliance, surface rust, or the discoloration of stainless steel surfaces. Paint is
not warranted and will require touch up. RUST is not considered a manufacturing or materials defect.
This limited warranty will not reimburse you for the cost of any inconvenience, food, personal injury or property damage.
ITEMS MANUFACTURER WILL NOT PAY FOR:
1. Shipping cost, standard or expedited, for warranty and replacement parts.
2. Service calls to your home.
3. Repairs when your product is used for other than normal, single-family household or residential use.
4. Damage, failures, or operating difculties resulting from accident, alteration, careless handling, misuse, abuse, re, ood, acts of God, improper
installation or maintenance, installation not in accordance with electrical or plumbing codes, or use of products not approved by the manufacturer.
5. Any food loss due to product failures or operating difculties.
6. Replacement parts or repair labor costs for units operated outside the United States or Canada.
7. Pickup and delivery of your product.
8. Repairs to parts or systems resulting from unauthorized modications made to the product.
9. The removal and/or reinstallation of your product.
DISCLAIMER OF IMPLIED WARRANTIES and LIMITATION OF REMEDIES
Repair or replacement of defective parts is your exclusive remedy under the terms of this limited warranty. In the event of parts availability issues, the
manufacturer reserves the right to substitute like or similar parts that are equally functional. Manufacturer will not be responsible for any consequential or
incidental damages arising from the breach of either this limited warranty or any applicable implied warranty, or for failure or damage resulting from acts
of God, improper care and maintenance, grease re, accident, alteration,replacement of parts by anyone other than Manufacturer, misuse, transportation,
commercial use, abuse, hostile environments (inclement weather, acts of nature, animal tampering), improper installation or installation not in accordance
with local codes or printed manufacturer instructions.
THIS LIMITED WARRANTY IS THE SOLE EXPRESS WARRANTY GIVEN BY THE MANUFACTURER. NO PRODUCT PERFORMANCE SPECIFI-
CATION OR DESCRIPTION WHEREVER APPEARING IS WARRANTED BY MANUFACTURER EXCEPT TO THE EXTENT SET FORTH IN THIS
LIMITED WARRANTY. ANY IMPLIED WARRANTY PROTECTION ARISING UNDER THE LAWS OF ANY STATE, INCLUDING IMPLIED WARRANTY
OF MERCHANTABILITY OR FITNESS FOR A PARTICULAR PURPOSE OR USE, IS HEREBY LIMITED IN DURATION TO THE DURATION OF THIS
LIMITED WARRANTY.
Neither dealers nor the retail establishment selling this product has any authority to make any additional warranties or to promise remedies in addition to
or inconsistent with those stated above. Manufacturer’s maximum liability, in any event, shall not exceed the purchase price of the product paid by the
original consumer. NOTE: Some states do not allow an exclusion or limitation of incidental or consequential damages, so some of the above limitations or
exclusions may not apply to you. This limited warranty gives you specic legal rights as set forth herein. You may also have other rights which vary from
state to state. In the state of California only, if renishing or replacement of the product is not commercially practicable, the retailer selling this product or
the Manufacturer will refund the purchase price paid for the product, less the amount directly attributable to use by the original consumer-purchaser prior
to discovery of the nonconformity. In addition, in the state of California only, you may take the product to the retail establishment selling this product in
order to obtain perforMance under this limited warranty. If you wish to obtain performance of any obligation under this limited warranty, you should write to:
Consumer Relations
P. O. Box 1240
Columbus, GA 31902-1240
Consumer returns will not be accepted unless a valid Return Authorization is rst acquired. Authorized returns are clearly marked on the outside of the
package with an RA number and the package is shipped freight/postage pre-paid. Consumer returns that do not meet these standards will be refused.
LIMITED WARRANTY
SCOPE OF COVERAGE PERIOD OF COVERAGE with Registration PERIOD OF COVERAGE WITHOUT Registration TYPE OF FAILURE COVERAGE
Grill Lid and Grates 10 years from date of purchase* 5 years from date of purchase* PERFORATION, MANUFACTURING,
AND MATERIAL DEFECTS ONLY
Electronics 2 years from date of purchase* 1 years from date of purchase*
All Other Parts 5 years from date of purchase* 3 years from date of purchase*
CURRENTBACKYARD.COM24
PRODUCT REGISTRATION / REGISTRACIÓN DEL PRODUCTO /
ENREGISTREMENT DU PRODUIT
Two convenient ways to register your product:
Deux manières pratiques d’enregistrer votre produit:
Dos maneras convenientes de registrar su producto:
Online
En ligne
En línea
By Mail | Par la poste | Por correo
@ CURRENTBACKYARD.COM
1
2
Please ll out this card and attached a copy of your sales receipt. Return it within 10 days of purchase for warranty
service. Proof of purchase will be required. The warranty is not transferable.
Veuillez remplir cette carte et joindre une copie de votre reçu de vente. Renvoyez-le dans les 10 jours de l’achat
pour le service de garantie. Une preuve d’achat sera nécessaire. La garantie n’est pas transférable.
Por favor llene esta tarjeta y adjunte una copia de su recibo de compra. Devuelva en el plazo de 10 días de la
compra para el servicio de la garantía. Se requerirá prueba de compra. La garantía no es transferible.
*1. First Name | Prénom | Nombre Initial | Initiale | Inicial Last Name | Nom de famille | Apellido
Address | Adresse | Dirección Apt. No | No d’appt | No de appart
City | Ville | Ciudad State | Etat | Estado Zip Code | Code post | Código post
*2. E-mail Address | Adresse e-mail | Dirección de correo electrónico
*3. Phone Number | Numéro de téléphone | Número de Teléfono
*5. Attach copy of your sales receipt here.
Joignez une copie de votre reçu de vente ici.
Adjunte una copia de su recibo de venta aquí.
*4. Model Number | Numéro de modèle | Número de modelo
Serial Number | Numéro de série | Número de serie
6. Date of Purchase | Date d’achat | Fecha de compra
7. Store Name | Nom du magasin | Nombre de la tienda
8. Purchase Price | Prix d’achat | Precio de compra
Mail to: | Envoyer à: | Correo a:
CURRENT Warranty Registration
P.O. Box 1240
Columbus, Ga 31902-1240
We respect your privacy | Nous respectons votre vie privée | Respetamos su privacidad If you
prefer not to receive special offers and promotions from Current Backyard, please check here:
Si vous préférez recevoir des offres et promotions spéciales de Current Backyard, veuillez
vérier ici:
Si estás buscando un lugar para alojarse en Current Backyard, compruebe aquí.
Thank you for completing this questionnaire | Merci d’avoir rempli ce questionnaire. | Gracias por completar este cuestionario
*Required | Obligatoire | Necesario **Please Print | Veuillez imprimer | Por favor imprima

CURRENTBACKYARD.COM25

CURRENTBACKYARD.COM26

CURRENTBACKYARD.COM27

©2023 Current, LLC. Columbus, GA, 31904. Printed in China.
The product associated with this guide was manufactured in China.
©2023 Current, LLC. Columbus, GA, 31904