User guide
Please make sure to read this User Guide prior to using your unit.
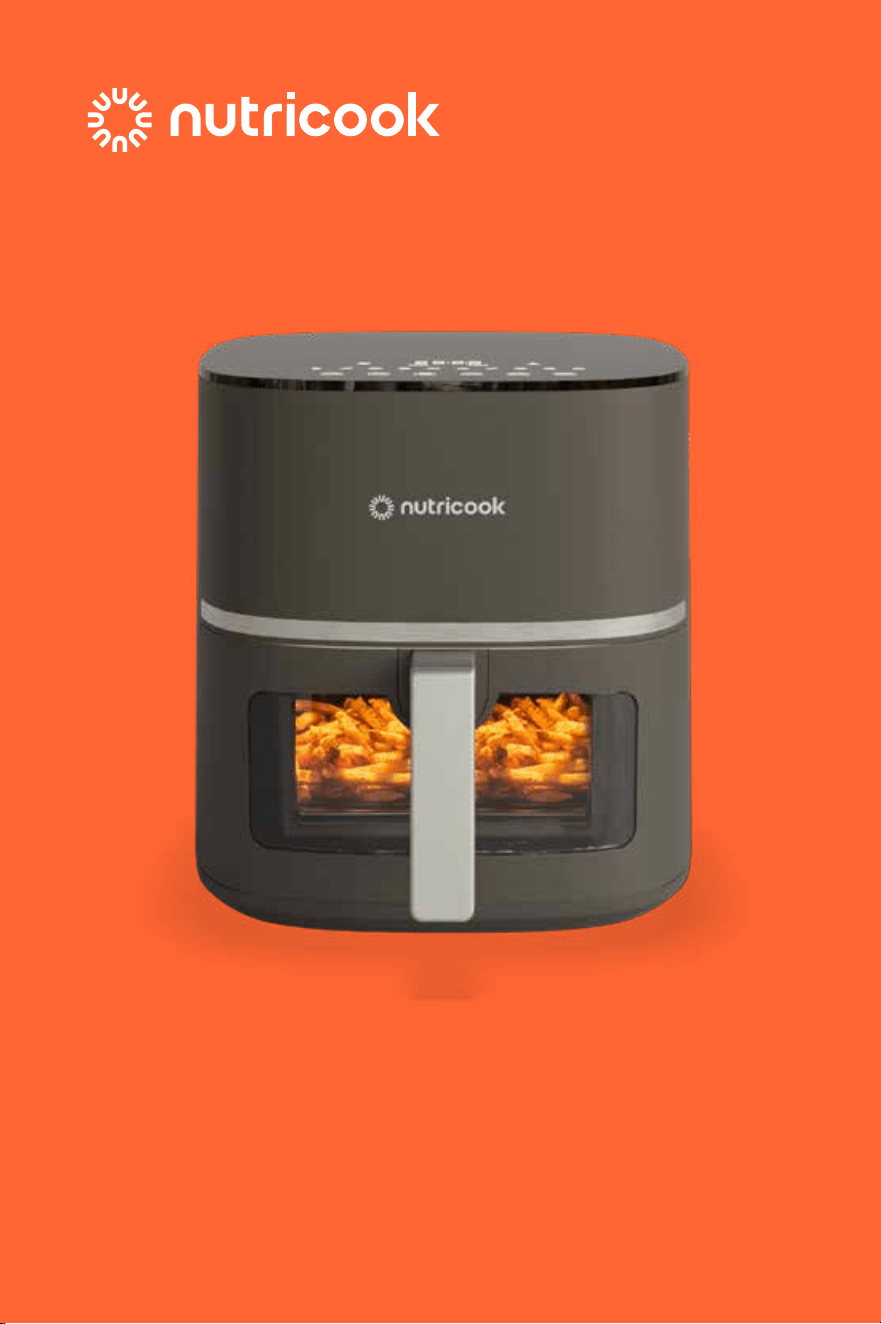
AIR FRYER ESSENTIALS VISION

ContentsHello!
Welcome to Nutricook
Easy cooking, delicious food, better nutrition:
It’s what you get when you’re part of our Nutricook community.
We’re so glad you’ve joined us!
Now let’s get started.
Join us and
#ElevateYourLife
@nutricookworld
Explore more of our products
and accessories on our website.
www.nutricookworld.com
To get help:
Our customer service team is always ready
to answer questions or solve issues.
Email: [email protected]
04 Before you begin
05 Important safeguards & cautionary information
09 What's included
10 Air fryer parts overview
11 Control panel details
12 Internal light
12 Initial test run
13 Preheating
13 Cooking
14 Cooking programs
15 Shaking food
16 Helpful tips
17 Care & maintenance
18 Troubleshooting
19 Warranty
32

Before you begin
1. Remove and safely discard all packaging materials and any
temporary labels from inside and outside of the Air Fryer. Ensure
that there is no packaging underneath and around the Air Fryer
basket and cooking tray.
2. Verify that all parts are accounted for.
3. Place the Air Fryer on a stable, level, clean, heat-resistant, dry
surface and away from external heat sources. Ensure there is
enough space behind and above the Air Fryer against the surface.
Leave enough room to remove the Air Fryer basket safely.
4. Read all Important safeguards and cautionary information in this
User guide. Failure to do so may result in property damage and/or
personal injury.
5. Follow Care & maintenance instructions in this User guide to
clean the air fryer before cooking. Wash both the Air Fryer
basket and cooking tray with a warm, soapy water. Rinse and dry
thoroughly before using.
6. Wipe the inside and outside of the Air Fryer with a slightly moist
cloth and dry with a towel.
7. Place the cooking tray into the basket. Ensure the rubber
stoppers are installed. Lock air Fryer basket to the body.
Rubber Stoppers:
• The cooking tray has 4 rubber stoppers that keep the cooking tray
fitted to the bottom of the air fryer basket and prevent the tray
from directly touching the basket and avoid damaging the non-
stick coating.
• It is recommended to remove the rubber stoppers during
cleaning only. To remove, pull out one side at a time starting from
the bottom. To put it back, position the rubber into the holes and
push in one side at a time. The rubber stoppers must be installed
before using the air fryer.
*WARNING: Read this User guide carefully and completely, and retain for future
reference. Failure to adhere to safety instructions may result in serious injury.
Important safeguards &
cautionary information
WARNING! This appliance generates heat and escaping steam during
use. To avoid the risk of serious injury, carefully read all instructions before
operating this appliance.
When using any electrical appliance, basic safety precautions should always be
observed, including the following critical information.
GENERAL SAFETY
• DO NOT touch hot surfaces.
Use handles or knobs. Use oven
mitts or potholders.
• CAUTION! Extreme caution
must be used when moving unit
containing hot oil or other hot
liquids.
• To protect against electrical
shock, DO NOT immerse cord,
plugs, or the unit in water or
other liquid.
• Close supervision is necessary
when any unit is used by or near
children.
• This appliance is NOT a toy, and
children should NOT play with it.
• Children should be supervised
to ensure that they DO NOT
play with the appliance.
• This appliance is NOT intended
for use by persons (including
children) with reduced physical,
sensory or mental capabilities,
or lack of experience and
knowledge, unless they have
been given supervision or
instruction concerning use
of the appliance by a person
responsible for their safety.
• Unplug from outlet when not
in use, during assembly, during
disassembly, and before
cleaning. Allow to cool before
putting or taking off parts and
before cleaning.
• DO NOT use appliance other
than its intended use. For
household countertop use only.
DO NOT USE outdoors.
• This appliance is not intended
to be operated by means of
an external timer or separate
remote-control system.
• DO NOT tamper with any of the
safety mechanisms.
• DO NOT place on or near a hot
gas, electric burner and or in
a heated oven. Heat from an
external source will damage the
appliance.
• DO NOT use the air fryer near
flammable materials such
as curtains, tablecloths, etc.
ALWAYS place and use the
unit on a flat, stable and heat-
resistant surface away from
heat sources or liquids.
• NEVER put baking or
parchment paper into the air
fryer without food on top. Air
circulation can cause paper to
lift and touch heating element.
• ALWAYS use heat-safe
containers. Be extremely
cautious if using containers that
aren’t metal or glass.
54

• NEVER put the appliance
against the wall or other
appliances when cooking.
There should be at least 5
inches of free space for the
back side, left/right sides and
the upper side of the appliance.
• DO NOT place anything on
top of your air fryer. DO NOT
store anything inside your air
fryer other than the included
accessories when not in use.
• To turn the unit off, press
CANCEL then remove plug
from the wall outlet.
• CAUTION! HOT
SURFACE: This appliance
generates heat and escaping
steam during use. Proper
precautions must be taken to
prevent the risk of burns, fires
or other injury to persons or
damage to property.
• CAUTION! This appliance
is hot during operation and
retains heat for some time
after turning OFF. ALWAYS
wear proper hand protection
when handling hot materials
and allow metal parts to cool
before cleaning. DO NOT
place anything on top of the
appliance while it is operating
or while it is hot.
• Avoid making contact with
moving parts.
• DO NOT place any combustible
materials on the cooking
chamber such as paper,
cardboard, plastic, styrofoam
or wood.
• Proper maintenance is
recommended after each use.
Refer to care and maintenance
section of this user guide. Allow
unit to cool before cleaning.
• DO NOT place oversized foods
or metal utensils into the air
fryer as they may cause fire
and/or personal injury.
• DO NOT overfill the air fryer
basket with food. Excessive
amount of food may touch the
heating element and can cause a
fire hazard.
• An air fryer works with hot air only.
NEVER fill the basket with oil or
fat. This could result in fire and/or
personal injury.
• To avoid risk of fire, property
damage and personal injury, DO
NOT spray cooking oil into the
cooking chamber.
• WARNING! DO NOT touch
any accessories during or
immediately after cooking.
Allow unit to cool.
• CAUTION! During air frying,
hot air is released from the
air outlet opening. Keep your
hands and face distance from
the air outlet opening. Also,
be careful of hot steam and air
when you remove the Air Fryer
Basket from the appliance.
• CAUTION! DO NOT block the
air vents.
• NEVER use the air fryer without
the basket in place. Air Fryer
will not operate unless air fryer
basket is fully closed.
• To avoid personal injury,
ALWAYS use proper hand
protection and exercise caution
when adding or removing food
from the air fryer basket.
• CAUTION! After hot air
frying, the cooking tray and the
air fryer basket and the cooked
foods are hot. Extreme caution
must be used when handling
the air fryer basket.
• NEVER place unprotected
hands inside the appliance
until it has cooled to room
temperature.
• DO NOT touch hot surfaces
with unprotected hands.
• CAUTION! Extreme caution
must be observed when
disposing hot oil or liquids from
the air fryer basket.
• WARNING! DO NOT turn
the air fryer basket over after
cooking as the hot cooking tray
may fall out and create a safety
hazard.
• When cooking naturally high
fat foods, DO NOT turn the air
fryer basket over after cooking
as the cooking tray may fall
out including the excess fats
collected on the basket which
can cause a safety hazard. Use
a tong to transfer food from the
basket.
• DO NOT clean with metal
scouring pads. Metal fragments
can break off the pad and touch
electrical parts, creating a risk
of electric shock.
• DO NOT rinse the appliance
under tap.
• If the appliance starts emitting
black smoke, immediately turn
off and unplug your air fryer.
White smoke is normal which
can be caused by heating fat
or food splashing. Black smoke
indicates food is burning or
there is a circuit problem.
Wait for smoke to stop before
opening the air fryer basket.
Contact customer service for
any assistance.
• If this appliance begins to
malfunction during use,
immediately pull the air fryer
basket out of the body. Then
remove plug from wall outlet.
DO NOT use or attempt to
repair the malfunctioning
appliance.
• DO NOT leave this appliance
unattended during use.
• Keep the cord out of reach of
children and infants to avoid
the risk of electric shock and
choking.
• WARNING! After air frying,
make sure to place the air fryer
basket on a stable, level, clean,
heat-resistant and dry surface
when transferring food from
the basket.
• NEVER move a hot Air Fryer or
an Air Fryer containing hot food.
Allow to cool before moving.
• WARNING! This Air Fryer
should NOT be used to boil
water.
• WARNING! This Air Fryer
should NEVER be used to deep
fry foods.
• All users of this appliance
must read and understand
this instruction manual before
operating or cleaning this
appliance. Failure to follow any
of the important safeguards
and instructions for safe use
is a misuse of your appliance
that can void your warranty and
create the risk of serious injury.
76
ELECTRICAL SAFETY
CAUTION: To avoid risk of electric shock, NEVER immerse the cord, plug, or
air fryer base in water or other liquids.
• DO NOT use this product
in locations with different
electrical specifications or plug
types. Do not operate with any
type of plug adapter or voltage
converter device, as these may
cause electrical shorting, fire,
electric shock, personal injury
or product damage.
• DO NOT modify the plug in any
way, as doing so will void the
warranty.
• DO NOT pull, twist or mistreat
the power cord.
• The use of attachments or parts
not recommended and sold
by Nutricook may cause fire,
electric shock, personal injury,
or product damage and will void
the warranty.
• If the supply cord is damaged, it
must be replaced by its service
agent or similarly qualified
persons in order to avoid a
hazard.
• ALWAYS POWER OFF and
UNPLUG the appliance when
it is not in use or BEFORE
cleaning.
• DO NOT allow the cord to hang
over the edge of the table or
counter. DO NOT pull, twist, or
damage the power cord. DO
NOT allow cord to touch hot
surfaces, including the stove.
• DO NOT let cord hang over
edge of table or counter, or
touch hot surfaces. The cord
can get tangled or cause
the appliance to fall. Bring it
to a qualified technician for
examination, repair or electrical
and mechanical adjustment.
• DO NOT operate this appliance
with a damaged cord or plug or
if the appliance malfunctions, or
is dropped or damaged in any
manner.
• Use of adapters and converters
is considered an unauthorized
modification of the product
and as such voids the warranty.
Use of this product in locations
with different electrical
specifications may result in
damage to the product.
• DO NOT use an extension
cord. A short power-supply
cord is used for this appliance
to reduce the risk of children
grabbing the cord and prevent
it from draping over the counter
or tabletop where it could
be accidentally pulled off or
tripped over.
PLASTICIZER WARNING
CAUTION: To prevent Plasticizers
from migrating from the finish of the
countertop or tabletop or other furniture,
place NON-PLASTIC coasters or place
mats between the appliance and the
finish of the countertop or tabletop.
Failure to do so may cause the finish to
darken; permanent blemishes may occur
or stains can appear.
Save these instructions!
FOR HOUSEHOLD USE ONLY
MODEL CAPACITY POWER VOLTAGE WEIGHT DIMENSION
AIR FRYER
ESSENTIALS VISION
AFE152V-G
5.2 L 1500 W
220-240 V
50/60 Hz
4.6 kg 37.2 x 27.6 x 29.5 cm
Product Specification:
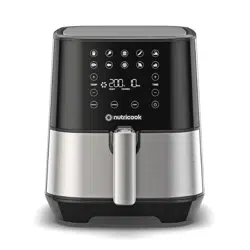
What's included
• 1500W AIR FRYER BASE
• AIR FRYER BASKET
• COOKING TRAY
• USER GUIDE
98
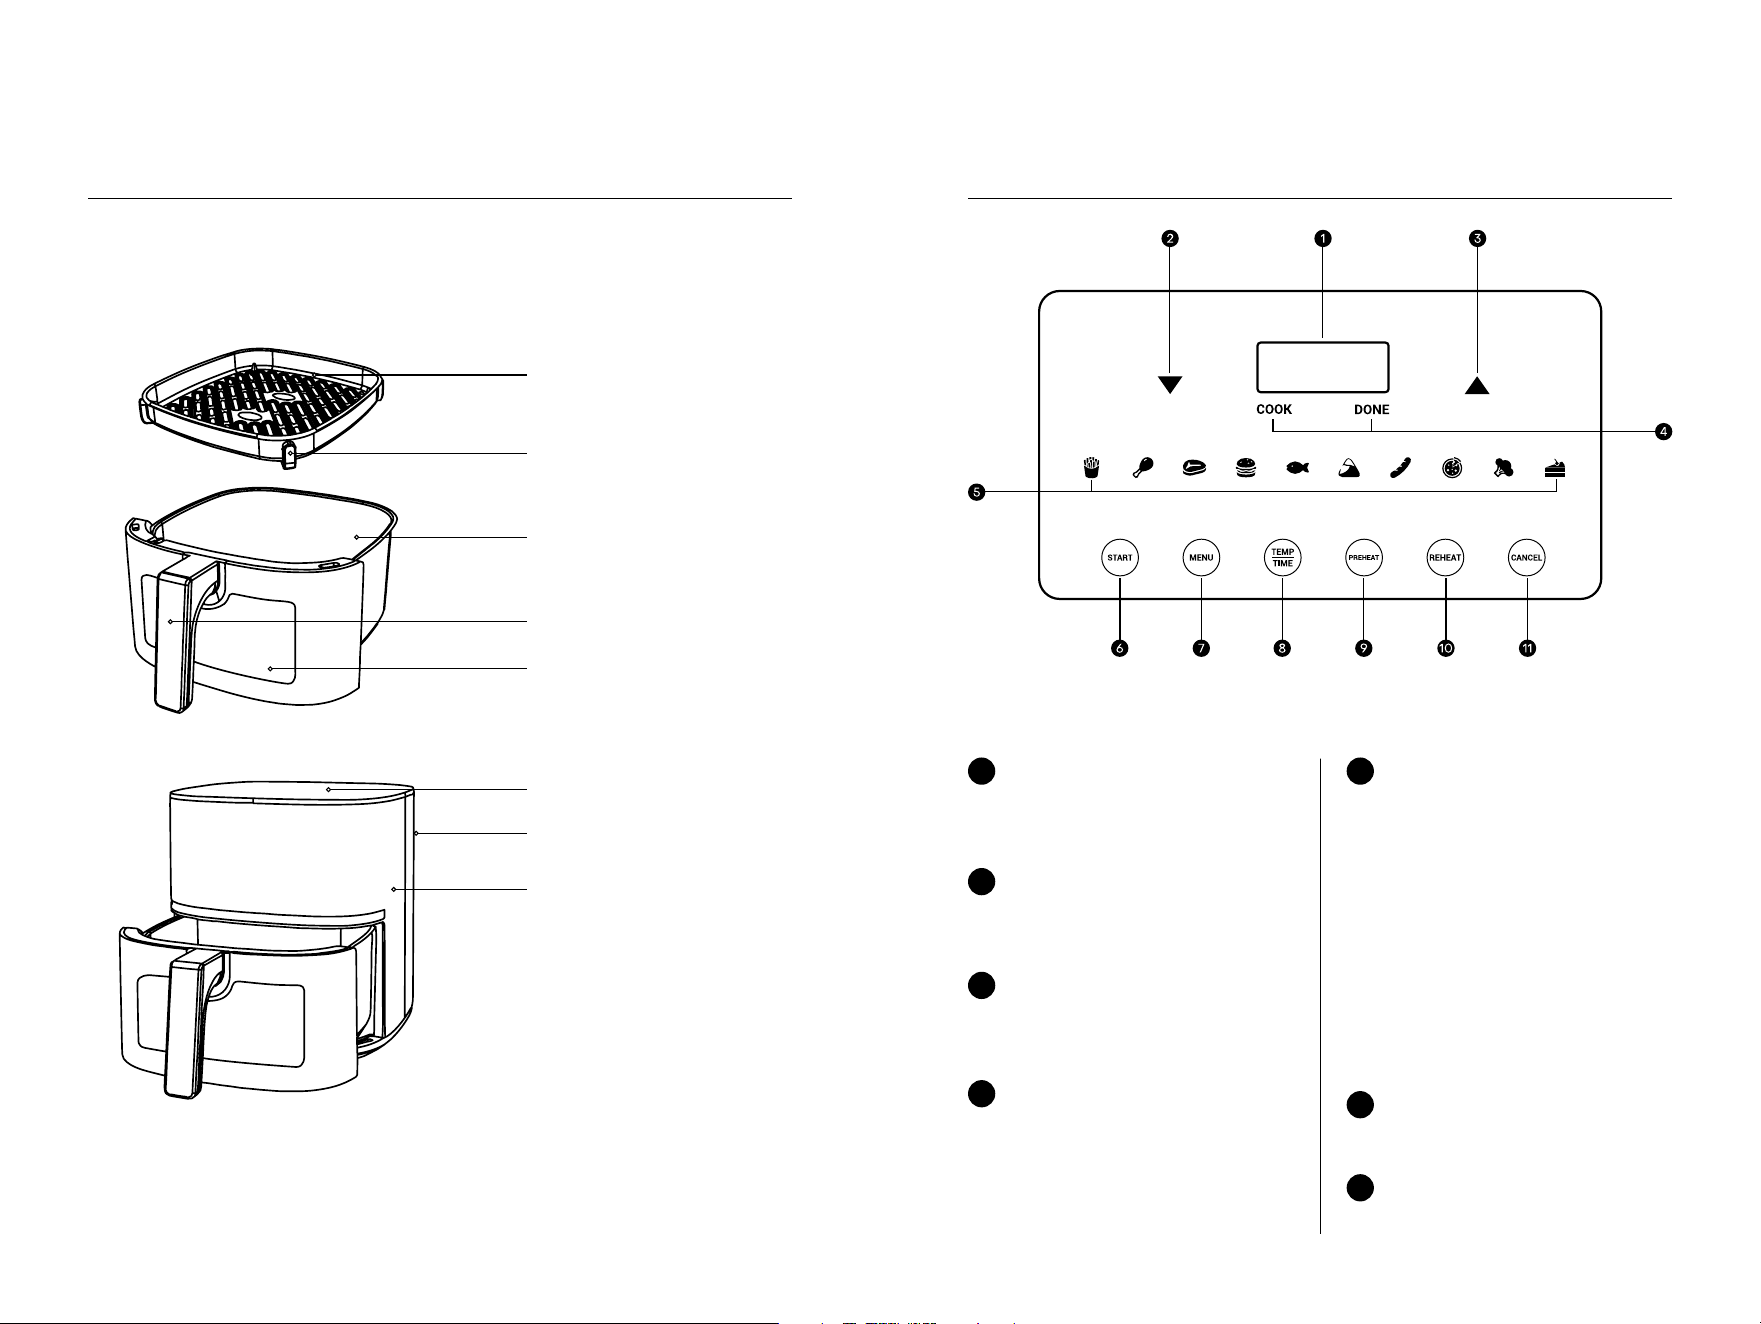
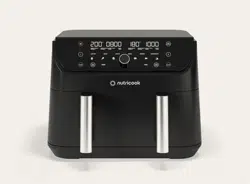
Air fryer parts overview
*NOTE: Images are for visual representations only. Always refer to actual product.
Air vent (located at the back of air fyer)
Digital control panel
Air fryer body
Digital screen
Displays cooking temperature
and cooking time.
1
Arrow up button
Arrow down button
Use to increase cooking time and
temperature.
Use to decrease cooking time
and temperature.
3
START button
MENU button
Use to start cooking.
Use to cycle through the cooking
programs.
6
7
2
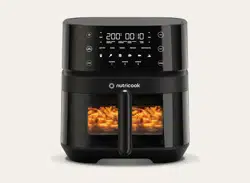
Control panel details
Cooking Status Indicator
COOK – illuminates during
cooking.
DONE – illuminates once
cooking is complete.
4
Preset cooking programs
Preset cooking programs have
automatic temperature and time
settings (see Preset Programs
Table for the default time and
temperature). Select any of the
following cooking program by
pressing the MENU button.
Fries Steak
Chicken Fish
Burger Pizza
Sausage Broccoli
Samosa Cake
5
Non-stick cooking tray
Air fryer basket
Air fryer basket handle
Glass window
Rubber stoppers
1110

TEMP/TIME button
8
PREHEAT button
REHEAT button
CANCEL button
Use to preheat the Air Fryer
before cooking to save time and
improves the texture of the food.
Use for reheating leftovers (such
as pizza) producing a crispy
result.
Use to cancel a program at any
time (during program selection or
during cooking cycle). Pressing
this button will return the unit to
standby mode.
9
10
11
Press to select between cooking
temperature and time before
making adjustments.
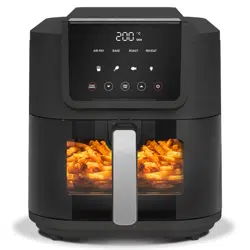
Initial test run
This step is optional but recommended to get yourself familiarized with the Air
Fryer Essentials and ensure it is working properly. It will also help eliminate any
residue or traces of odor in the Air Fryer that may remain after shipping.
NOTE: This process must be done with no food in the Air Fryer basket.
Internal light automatically switches on as soon as cooking starts until
complete.
1. Place air fryer on a stable, level,
clean, heat-resistant, and dry
surface, close to an electrical
outlet.
2. Ensure the cooking tray is
inserted into the air fryer basket
without any food.
3. Plug in unit to a power outlet.
4. Press MENU button. By default,
the FRIES icon blinks.
5. Press TEMP/TIME and set
temperature to 200 °C.
6. Press TEMP/TIME and set time
to 5 minutes.
7. Press START to begin initial
test run.
8. After time is complete, End
appears on the display.
9. Allow unit to cool.
You’re all set. Happy cooking!
CAUTION!
• DO NOT touch hot surface and accessories during or immediately
after cooking. The air fryer basket and cooking tray become extremely
hot during the cooking process. Avoid physical contact with hot parts.
ALWAYS wear proper hand protection when handling hot materials to
avoid burns and serious physical injury. Allow accessories to completely
cool before cleaning
• DO NOT overfill the air fryer basket with food. Overfilling will result to
uneven cooking. It is recommended to fry smaller batches of food as this
will allow proper air circulation for even cooking and browning.
• ALWAYS be careful of hot steam when opening the air fryer basket during
and after cooking.
• DO NOT place oversized foods or metal utensils into the air fryer.
• DO NOT block the air vents.
• DO NOT leave this appliance unattended during use.
• ALWAYS use oven mitts or heat-resistant gloves, as well as silicone-
tipped tongs to flip, shake or when taking out your food. Be extremely
careful as the unit and the cooked foods are very hot.
Preheating the Air Fryer before placing food is recommended unless the unit is
already hot from a previous cooking cycle. Preheating saves cooking time and
improves the texture of cooked foods.
1. Place Air Fryer on a stable, level, clean, heat-resistant and dry surface,
close to an electrical outlet.
2. Ensure the air fryer basket is locked into the unit.
3. Plug in unit to a power outlet.
4. Press PREHEAT.
5. Optionally, adjust PREHEAT temperature and time. Press TEMP/TIME
button and use the set of arrows to adjust temperature or time.
6. Press START to begin Preheating.
7. Once Preheating is complete, screen displays dash lines.
Cooking
Preheating
Internal light
1312
These programs are designed with pre-programmed time and
temperature for certain foods to take the guess work out of cooking.
Cooking programs
1. Preheat air fryer. Follow the
steps in Preheating.
2. Once preheating is complete,
add food into the basket.
3. Select program by pressing the
MENU button. Press repeatedly
until the desired cooking
program is selected.
4. Adjust temperature by pressing
the TEMP/TIME button then
use the set of arrows.
5. Adjust cooking time by pressing
the TEMP/TIME button then
use the set of arrows.
Note:
Temperature and time adjustments
can be done during program
selection or at any point during the
cooking cycle.
6. Press START to begin.
7. When the cooking time is
complete, screen displays End.
8. Pull the air fryer basket from the unit
and place on a clean, flat surface.
WARNING! Be careful of hot
steam.
9. Transfer the food from the Air Fryer
basket and serve.
10. Allow the Air Fryer basket and
cooking tray to completely cool
before cleaning.
During the cooking process, shake the basket or flip your food for even cooking
and browning. It is recommended to shake the basket or flip your food once or
more, if desired.
CAUTION:
• Always be careful of hot steam when pulling the air fryer basket from the
unit.
Shaking food
1. Hold the air fryer basket just
above a heat resistant surface
and shake it or flip food
carefully.
Note: When cooking naturally
high fat foods, flip the food
using a silicone-tipped tong.
DO NOT shake the basket
to avoid risk of hot liquids
splashing.
2. Depending on the food, the
basket might be too heavy to
shake. In this case, ensure to
place the Air Fryer basket on
a stable and heat-resistant
surface then shake it or flip
food carefully. If basket won’t
shake because of the weight,
use a silicone-tipped tong
instead.
WARNING!
• For safety purposes, it
is recommended to use
silicone-tipped tongs to
flip food that contains oil or
any hot liquids. Any excess
oil and liquids can splash
from the basket when
shaking.
• Always drain any excess oil
or hot liquids from the air
fryer basket. Excess oil may
produce extra smoke when
heated for longer period.
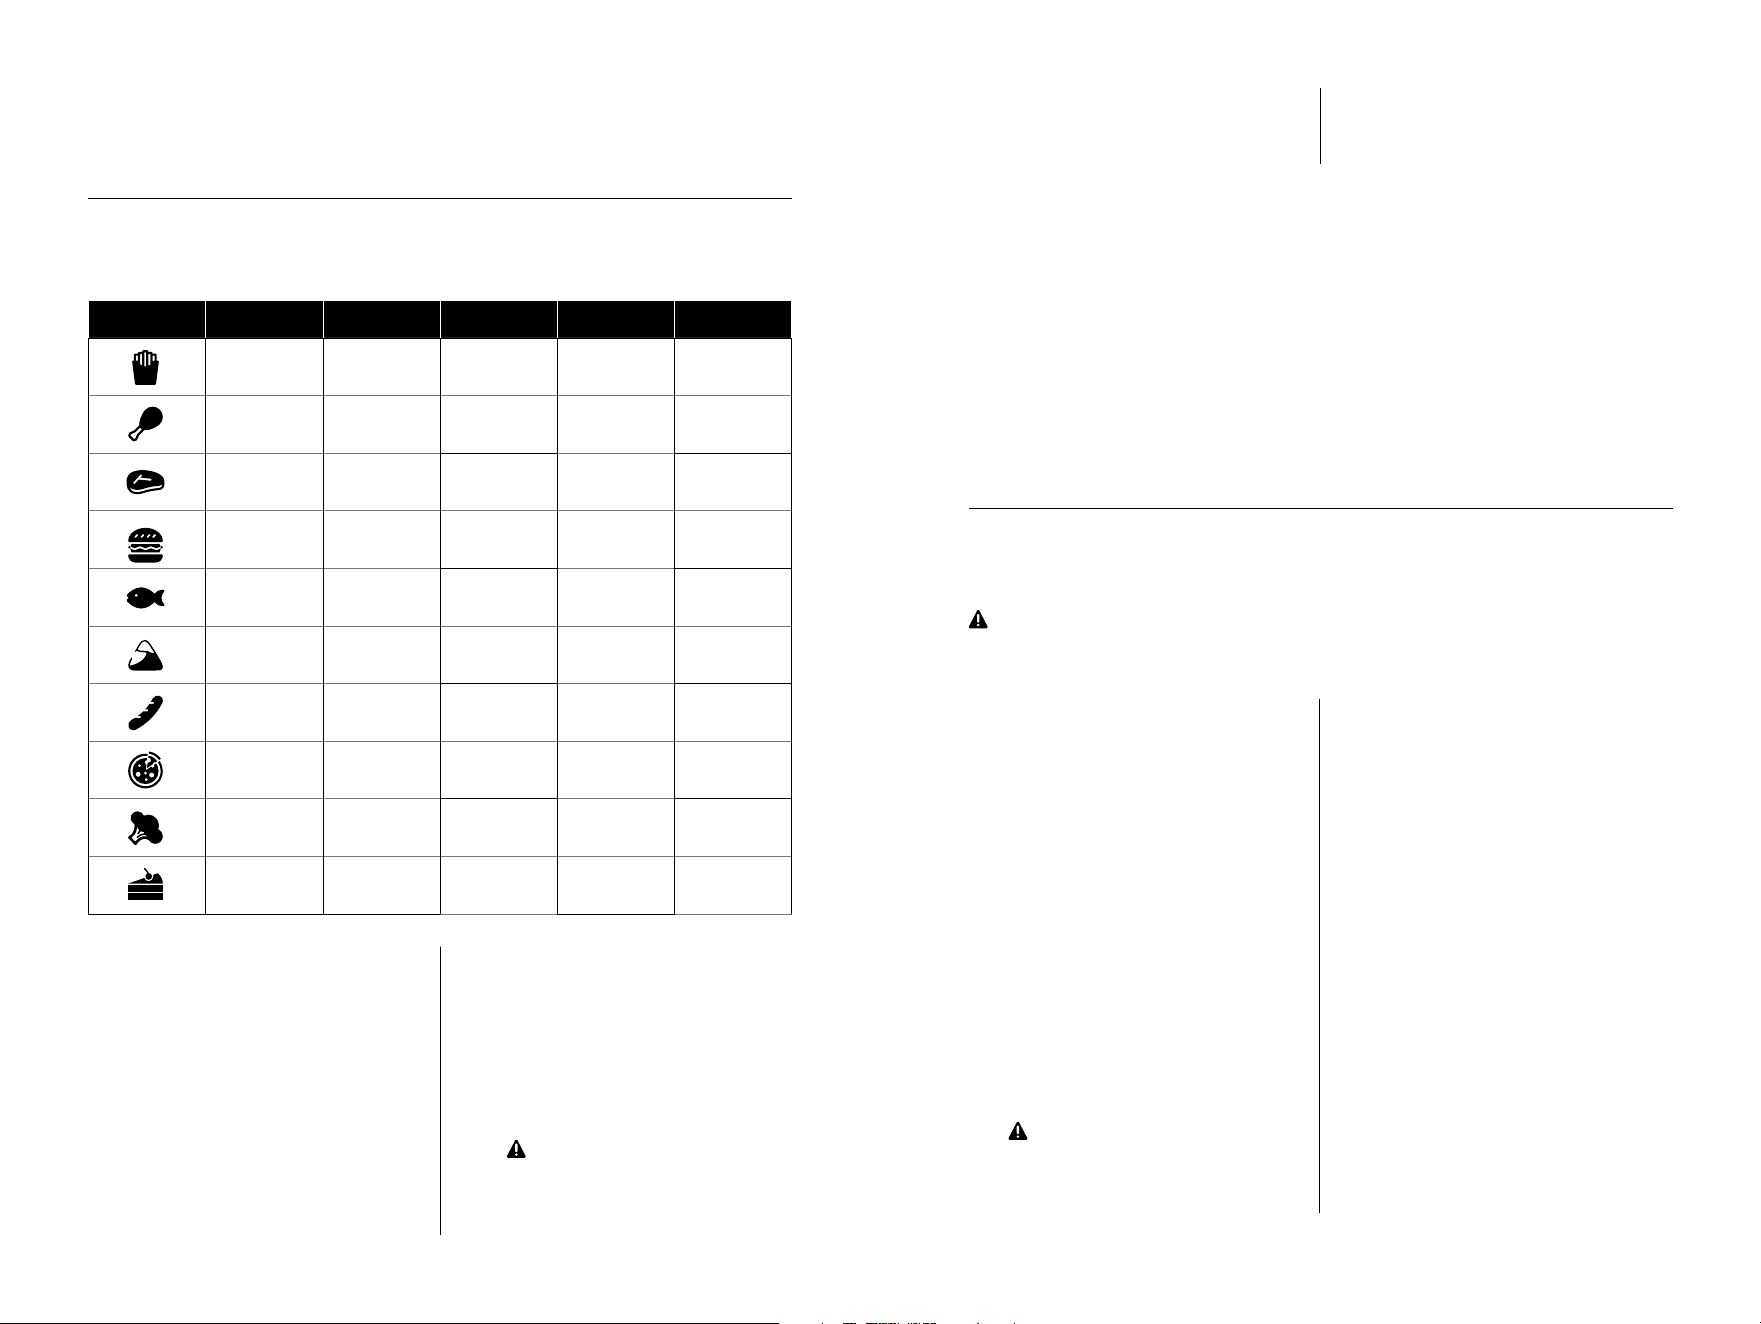
Preset icon Description Default Time Time Range
Default
Temperature °C
Temperature
Range
Fries 18 min 1 min - 1 hour 200°C 40°C - 200°C
Chicken 25 min 1 min - 1 hour 190°C 40°C - 200°C
Steak 16 min 1 min - 1 hour 200°C 40°C - 200°C
Burger 20 min 1 min - 1 hour 200°C 40°C - 200°C
Fish 8 min 1 min - 1 hour 200°C 40°C - 200°C
Samosa 18 min 1 min - 1 hour 200°C 40°C - 200°C
Sausage 14 min 1 min - 1 hour 180°C 40°C - 200°C
Pizza 12 min 1 min - 1 hour 160°C 40°C - 200°C
Broccoli 8 min 1 min - 1 hour 150°C 40°C - 200°C
Cake 30 min 1 min - 1 hour 150°C 40°C - 200°C
1514

Helpful tips
1. Always pat food dry before cooking to encourage browning and avoid
excess smoke.
2. DO NOT overfill the air fryer basket with food. Overfilling will result to
uneven cooking. It is recommended to fry smaller batches of food as this
will allow proper air circulation for even cooking and browning.
3. Spray oil works best. Oil is distributed evenly, and less oil is needed. Use
oils with high-smoke point like canola, avocado, grapeseed or vegetable
oil to help reduce smoke while cooking. Oils with low smoke point like olive
oil produce more smoke.
4. It is recommended to spray or add a small amount of oil to your food if
adding seasoning or breading to ensure that these light ingredients stick
to the food. The air fryer rapidly circulates air and pushes it to your food
during the cooking process which can take out light ingredients if they are
not properly adhered to the food.
5. When cooking naturally high fat foods, it is recommended to empty oil and
fats collected on the basket between batches to avoid excess smoke.
6. It is recommended to shake the basket or flip your food once or more,
as desired to check for doneness. This will also allow even cooking and
browning. Always observe safety precautions when shaking the basket or
flipping foods.
WARNING: DO NOT immerse air
fryer in water.
WARNING: To avoid electric shock or damage to your air fryer, ALWAYS
unplug the power cord from the power supply outlet before cleaning.
Make sure that all parts and accessories of your air fryer have cooled
down completely.
CAUTION:
• DO NOT immerse the power cord or your air fryer in water or any
other liquids.
• DO NOT use abrasive cleaners, steel wool, or scouring pads.
• DO NOT clean with metal scouring pads. Metal fragments can break
off the pad and touch electrical parts, creating a risk of electric
shock.
• Dry all parts and accessories thoroughly after cleaning, before using,
or before storing your air fryer.
• Make sure that all parts and surfaces are completely dry before
connecting your air fryer to a power outlet. Wet parts can cause
electric shock.
• ALWAYS clean your air fryer thoroughly every after use.
• DO NOT store anything on top of the air fryer.
• DO NOT store anything inside your air fryer other than the cooking
tray.
Care & maintenance
Parts and
Accessories
Cleaning method and tips
Air Fryer Base and
Plug Cord
• Wipe the outer part of the air fryer with soft and barely damp cloth. Dry with
a towel thoroughly.
• DO NOT submerge in water or any other liquids.
• Clean the inner part of the air fryer with soft and barely damp cloth including
the heating coil to remove baked-on grease and food debris/residue. Wipe it
dry with a soft cloth.
WARNING! ALWAYS ensure that the inner and outer surface including the
heating coil is dry before storing or using the air fryer.
Air Fryer Basket
• Wash the air fryer basket with warm, soapy water and non-abrasive sponge.
Ensure that baked-on grease and food debris/residue are removed. Rinse
well and dry thoroughly.
NOTE: The air fryer basket is dishwasher-safe.
NOTE: The air fryer basket has a non-stick coating. To avoid any damage on the
non-stick coating, NEVER use metal utensils and abrasive cleaning materials.
Cooking tray and
rubber stoppers
• Remove the 4 rubber stoppers and wash with warm, soapy water and
non-abrasive sponge. Ensure that all grease and food debris are removed.
Rinse well and dry thoroughly. Install the rubber stoppers before putting the
cooking tray back in the air fryer basket.
• Wash the cooking tray with warm, soapy water and non-abrasive sponge.
Ensure that all grease and food debris are removed. Rinse well and dry
thoroughly.
NOTE: The cooking tray has a non-stick coating. To avoid any damage on the non-
stick coating, NEVER use metal utensils and abrasive cleaning materials.
1716
NOTE: If you encounter any issue which is not listed above, contact Customer
Service at 800-NUTRI (68874) or email support@nutricookworld.com
for assistance.
Issue Possible Cause Solution
Air Fryer will not
turn on
Unit is not plugged in.
Plug in unit to an electrical outlet. DO NOT use
the unit in locations with different electrical
specifications or plug types.
Food is
undercooked
Air fryer basket is overloaded.
DO NOT overfill the air fryer basket with food.
Overfilling will result to uneven cooking. It is
recommended to fry smaller batches of food
as this will allow proper air circulation for even
cooking and browning.
It is recommended to shake the basket or flip
your food once or more, as desired to check
for doneness. This will also allow even cooking
and browning.
White smoke is
coming out from
the unit
Excess oil and naturally high fat
foods may produce white smoke
while cooking.
This is normal. It is recommended to empty
oils or fats accumulated in the cooking pot
between batches of cooking to avoid excess
smoke.
The air fryer basket and cooking
tray have not been cleaned from
previous use.
Follow care and maintenance instruction to
clean accessories and remove dried food
debris or grease after every use.
Using oil with low smoke point
such as olive oil may excess
smoke.
Use oil with high smoke point such as
avocado, canola or grapeseed oil.
Black smoke is
coming out from
the unit
Food is burning.
Immediately turn off the unit and unplug. Wait
for smoke to stop before opening the air fryer
basket. Clean all accessories thoroughly.
There is a circuit problem.
Immediately turn off the unit and unplug.
Wait for smoke to stop before opening the air
fryer basket. Contact customer service for
assistance.
WARNING: DO NOT attempt to use the
unit.
Display shows
error code
E1
Temperature sensor open
circuit.
WARNING:
Stop using the unit when these error codes
appear.
Disconnect from power supply and contact
Customer Service immediately.
Display shows
error code
E2
Temperature sensor turnoff.
Troubleshooting
LIMITED WARRANTY
FOR NUTRICOOK
Nutricook’s limited warranty
obligations are confined to the
terms set forth below:
Nutricook warrants this product
against defects in materials and
workmanship for a period of two
years from the date of original retail
purchase. This limited warranty is
valid only in the country in which the
product is purchased and comes
with the product at no extra charge,
however shipping and processing
fees will be incurred for returns,
replacements and or refunds.
OBTAINING WARRANTY SERVICE
For limited warranty service, simply
visit www.nutricookworld.com for
Customer Service details of your
respective territory or contact our
customer service department at
support@nutricookworld.com
and we will be glad to help you.
When you contact our customer
service department you will be
asked for your name, address,
telephone number and to provide
proof of the original purchase
(receipt) containing a description
of the product(s), purchase date,
and the appropriate Nutricook
bar code(s). Before you send your
product for limited warranty service
please make sure to keep a copy
of all relevant documents for your
files (receipt, etc.). It is always
recommended to purchase product
insurance and tracking services
when sending your product for
service. Remember, shipping and
processing fees will be incurred and
are not covered by the two-year
limited warranty.
EXCLUSIONS AND LIMITATIONS
This Nutricook Two-Year Limited
Warranty applies only to Nutricook
products distributed by or for
Nutricook that can be identified
by the “Nutricook” trademark,
trade name, logo and bar code.
Nutricook’s Two-Year Limited
Warranty does not apply to any
other products that may appear
to be authentic, but were not
distributed/sold by Nutricook.
Normal wear and tear is not covered
by this limited warranty.
This limited warranty applies to
consumer use only, and is void when
the product is used in a commercial
or institutional setting.
This limited warranty extends
only to the original consumer
purchaser and is not transferable. In
addition, proof of purchase must be
demonstrated.
Repair or replacement of the
product (or, if repair or replacement
is not feasible, a refund of the
purchase price) is the exclusive
remedy of the consumer under this
limited warranty. Nutricook shall
not be liable for any incidental or
consequential damages for breach
of this limited warranty or any
implied warranty on this product.
This limited warranty does not apply:
(a) to damage caused by accident,
abuse, misuse, or misapplication;
(b) to damage caused by
improper maintenance (including
unauthorized parts service); (c) to
a product or a part that has been
modified in any way; (d) if any
Nutricook bar code or trademark
has been removed or defaced; and
or (e) if the product has been used
with an adapter/converter.
Warranty
1918

THIS LIMITED WARRANTY AND
THE REMEDIES SET FORTH ABOVE
ARE EXCLUSIVE AND IN LIEU
OF ALL OTHER WARRANTIES,
REMEDIES AND CONDITIONS,
WHETHER ORAL OR WRITTEN,
EXPRESS OR IMPLIED. NUTRICOOK
SPECIFICALLY DISCLAIMS ANY
AND ALL IMPLIED WARRANTIES,
INCLUDING, WITHOUT
LIMITATION, WARRANTIES OF
MERCHANTABILITY AND FITNESS
FOR A PARTICULAR PURPOSE. IF
NUTRICOOK CANNOT LAWFULLY
DISCLAIM IMPLIED WARRANTIES
UNDER THIS LIMITED WARRANTY,
ALL SUCH WARRANTIES,
INCLUDING WARRANTIES OF
MERCHANTABILITY AND FITNESS
FOR A PARTICULAR PURPOSE
ARE LIMITED IN DURATION TO
THE DURATION OF THIS LIMITED
WARRANTY. No Nutricook reseller,
agent, or employee is authorized
to make any modification to this
warranty.
NUTRICOOK IS NOT RESPONSIBLE
FOR DIRECT, SPECIAL, INCIDENTAL
OR CONSEQUENTIAL DAMAGES
RESULTING FROM ANY BREACH OF
WARRANTY OR CONDITION, OR
UNDER ANY OTHER LEGAL THEORY,
INCLUDING BUT NOT LIMITED
TO LOST PROFITS, DOWNTIME,
GOODWILL, DAMAGE TO OR
REPLACEMENT OF EQUIPMENT
AND PROPERTY. NUTRICOOK
SPECIFICALLY DOES NOT
REPRESENT THAT IT WILL BE ABLE
TO REPAIR ANY PRODUCT UNDER
THIS LIMITED WARRANTY.
Notes
2120

AIR FRYER ESSENTIALS VISION
Model No. AFE152V
nutricook
®
| www.nutricookworld.com | All rights reserved.
Illustrations may differ from the actual product. We are constantly striving to improve our
products, therefore the specifications contained herein are subject to change without
notice.
Nutricook is a registered trademark of Caliber Brands FZE.
AFE152V_Series_UG_V1.202307