www.klarstein.com
AEROVITAL
CUBE CHEF
Heißluftfritteuse
Hot Air Fryer
Freidora de aire caliente
Friteuse à air chaud
Friggitrice ad aria calda
10034217 10037975

3
DE
Sicherheitshinweise4
Geräteübersicht6
Bedienfeld7
Installation7
Verwendung des Zubehörs8
Bedienung12
Programme13
Funktionen einstellen14
Reinigung und Pege17
Spezielle Entsorgungshinweise für Verbraucher in Deutschland18
Hinweise zur Entsorgung20
Hersteller & Importeur (UK)20
Sehr geehrter Kunde,
wir gratulieren Ihnen zum Erwerb Ihres Gerätes. Lesen Sie
die folgenden Hinweise sorgfältig durch und befolgen Sie
diese, um möglichen Schäden vorzubeugen. Für Schäden,
die durch Missachtung der Hinweise und unsachgemäßen
Gebrauch entstehen, übernehmen wir keine Haftung. Scannen
Sie den folgenden QR-Code, um Zugriff auf die aktuellste
Bedienungsanleitung und weitere Informationen rund um das
Produkt zu erhalten.
INHALTSVERZEICHNIS
English 21
Français 37
Español 53
Italiano 69
TECHNISCHE DATEN
Artikelnummer 10034217, 10037975
Stromversorgung 220-240 V ~ 50/60 Hz
Leistung (Watt) 1700 W
Kapazität (Liter) 14 l

4
DE
ZUBEHÖR
Hinweis: Das folgende Zubehör wird nicht mitgeliefert, ist aber für diesen Artikel
unter den folgenden Artikelnummern erhältlich:
Artikelnummer
10034407 10034408 10034409
Zubehör Korb Steakgitter Spießrost
Artikelnummer
10034410 10034411
Zubehör Drehkorb Spieß-Set
Artikelnummer
10037976 10037977 10037978
Zubehör Zange und Spieße Gitterkorb
Abtropfblech und
Gitterrost
SICHERHEITSHINWEISE
• Bewahren Sie diese Bedienungsanleitung für den zukünftigen Gebrauch auf.
• Kinder ab 8 Jahren, psychisch, sensorisch und körperlich eingeschränkte Menschen
dürfen das Gerät nur benutzen, wenn sie vorher von einer für sie verantwortlichen
Aufsichtsperson ausführlich mit den Funktionen und den Sicherheitsvorkehrungen
vertraut gemacht wurden und die damit verbundenen Risiken verstehen.
• Überprüfen Sie vor dem ersten Gebrauch, ob die Spannung Ihrer Steckdose mit der
angegebenen Spannung übereinstimmt.
• Tauchen Sie das Netzkabel, den Netzstecker oder das Gerät nicht in Wasser oder
andere Flüssigkeiten, um Stromschläge zu vermeiden.
• Halten Sie Kinder und Haustiere während des Betriebs vom Gerät fern.
• Schalten Sie das Gerät nach der Benutzung aus und ziehen Sie den Netzstecker
aus der Steckdose.
• Das Gerät sollte an einem separaten Stromkreislauf von anderen Geräten getrennt
betrieben werden. Wenn der Stromkreislauf durch andere Geräte überlastet ist,
funktioniert dieses Gerät möglicherweise nicht richtig.
• Lassen Sie äußerste Vorsicht walten, wenn Sie einen Behälter bewegen, der heiße
Lebensmittel enthält.
• Lassen Sie das Netzkabel nicht über die Kante von Tischen und Arbeitsächen
herunterhängen und achten Sie darauf, dass das Netzkabel nicht mit heißen
Geräteoberächen in Berührung kommt.
• Stellen Sie das Gerät immer sicher in die Mitte des Tischs oder der Arbeitsäche.
• Berühren Sie keine heißen Geräteoberächen. Verwenden Sie zum Bewegen oder
Anheben die Griffe.

5
DE
• Die Verwendung von Zubehör, das nicht ausdrücklich vom Hersteller empfohlen
wird, kann zu Verletzungen führen.
• Stellen Sie das Gerät nicht auf hitzeempndlichen Glasoberächen,
Holzoberächen oder Tischdecken. Legen Sie vor dem Gebrauch bei diesen
Oberächen unbedingt eine hitzeunempndlichen Platte mit Wärmeschutz unter
das Gerät.
• Verwenden Sie das Gerät nicht, wenn das Netzkabel beschädigt ist, das Gerät
Fehlfunktionen aufweist oder auf sonstige Art und Weise beschädigt wurde.
• Schalten Sie das Gerät aus und ziehen Sie den Netzstecker aus der Steckdose,
bevor sie das Gerät reinigen oder warten und wenn Sie es nicht mehr verwenden.
Lassen Sie das Gerät zuerst abkühlen, bevor Sie Geräteteile entnehmen oder
hinzufügen.
• Stellen Sie das Gerät nicht in die unmittelbare Nähe von heißen Gas- oder
Elektroöfen oder in einen aufgeheizten Backofen.
• Sollte der Netzstecker nicht richtig passen, wenden Sie sich in jedem Fall an einen
qualizierten Elektriker, um das Stromschlagrisiko zu minimieren. Versuchen Sie
niemals, den Netzstecker auf irgendeine Weise zu manipulieren.
• Reinigen Sie das Gerät nicht mit metallischen Scheuerschwämmen. Kleine
Metallteile könnten abbrechen und elektrische Bestandteile des Geräts
kurzschließen, was zu einem Stromschlag führen und das Gerät beschädigen
könnte.
• Bereiten Sie Lebensmittel zur Minimierung des Stromschlagrisikos ausschließlich in
dem im Lieferumfang enthaltenen, beschichteten, nicht haftenden Behälter zu. Das
Gerät ist nur für den häuslichen Gebrauch im Innenbereich ausgelegt.
• Verwenden Sie das Gerät ausschließlich für den vorgesehenen
Verwendungszweck.
VORSICHT
Verbrennungsgefahr! Beim Heißluft-Frittieren wird heißer Dampf durch
die Luftauslässe abgegeben. Halten Sie Ihre Hände und Ihr Gesicht in
einem sicheren Abstand vom Dampf und von den Luftauslässen. Achten
Sie auch auf heißen Dampf und Luft, wenn Sie Geräteteile aus dem
Gerät nehmen.

DE
6
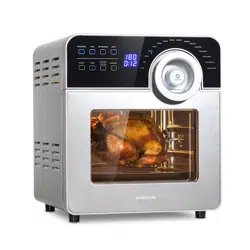
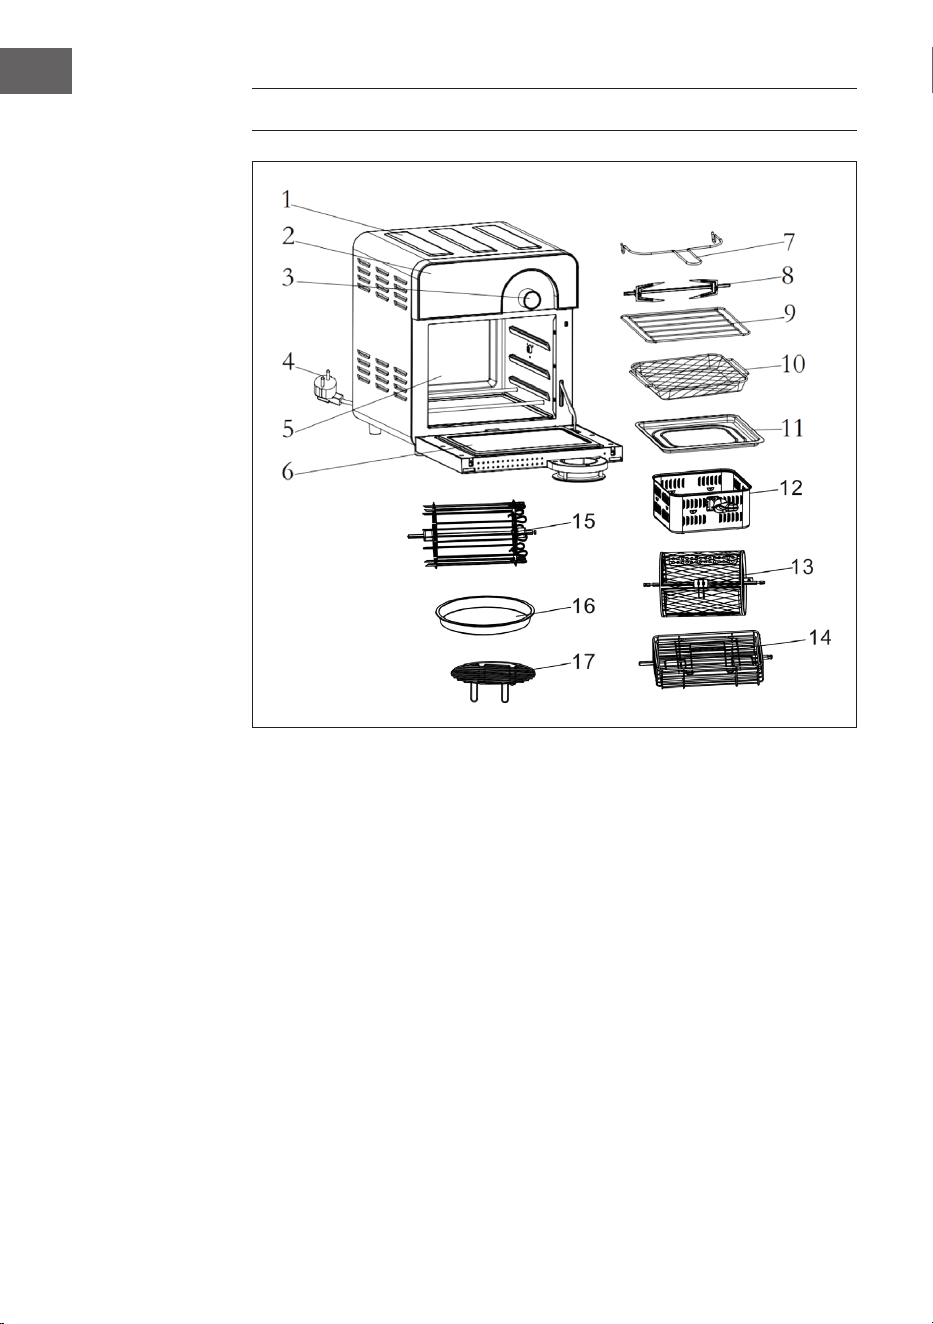
GERÄTEÜBERSICHT
1
Gehäuse
7
Korbzange
13
Drehkorb (optional)
2
Bedienfeld
8
Hähnchenspieß
14
Steakgitter (optional)
3
Drehregler mit
EIN/AUS-Taste
9
Gitterrost
15
Spießrost (optional)
4
Netzkabel
10
Gitterkorb
16
Frittierkorb (optional)
5
Innenraum
11
Abtropfblech
17
Hoher Gittereinsatz
(optional)
6
Tür
12
Korb (optional)
7
DE
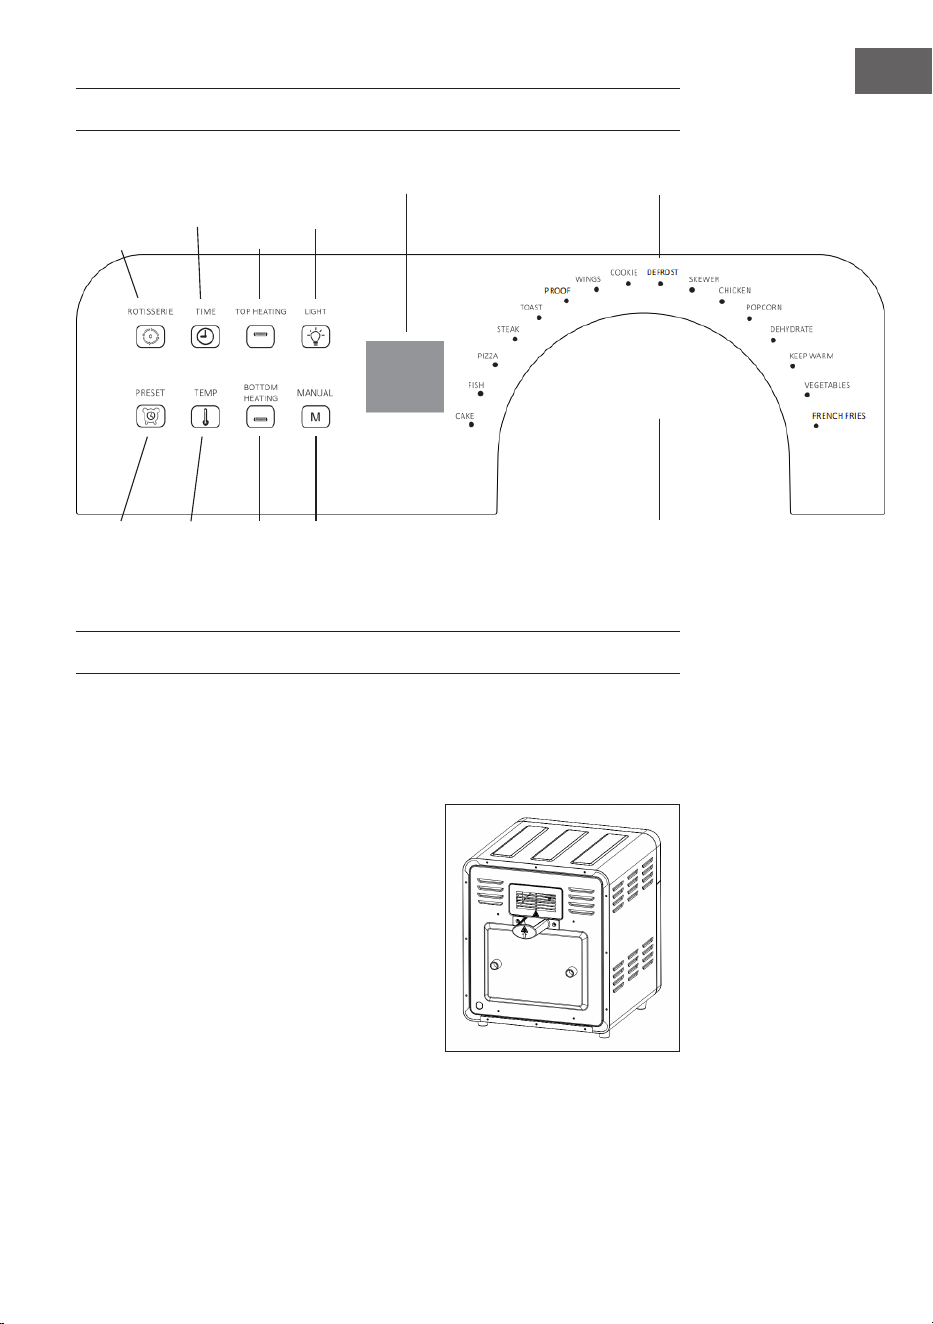
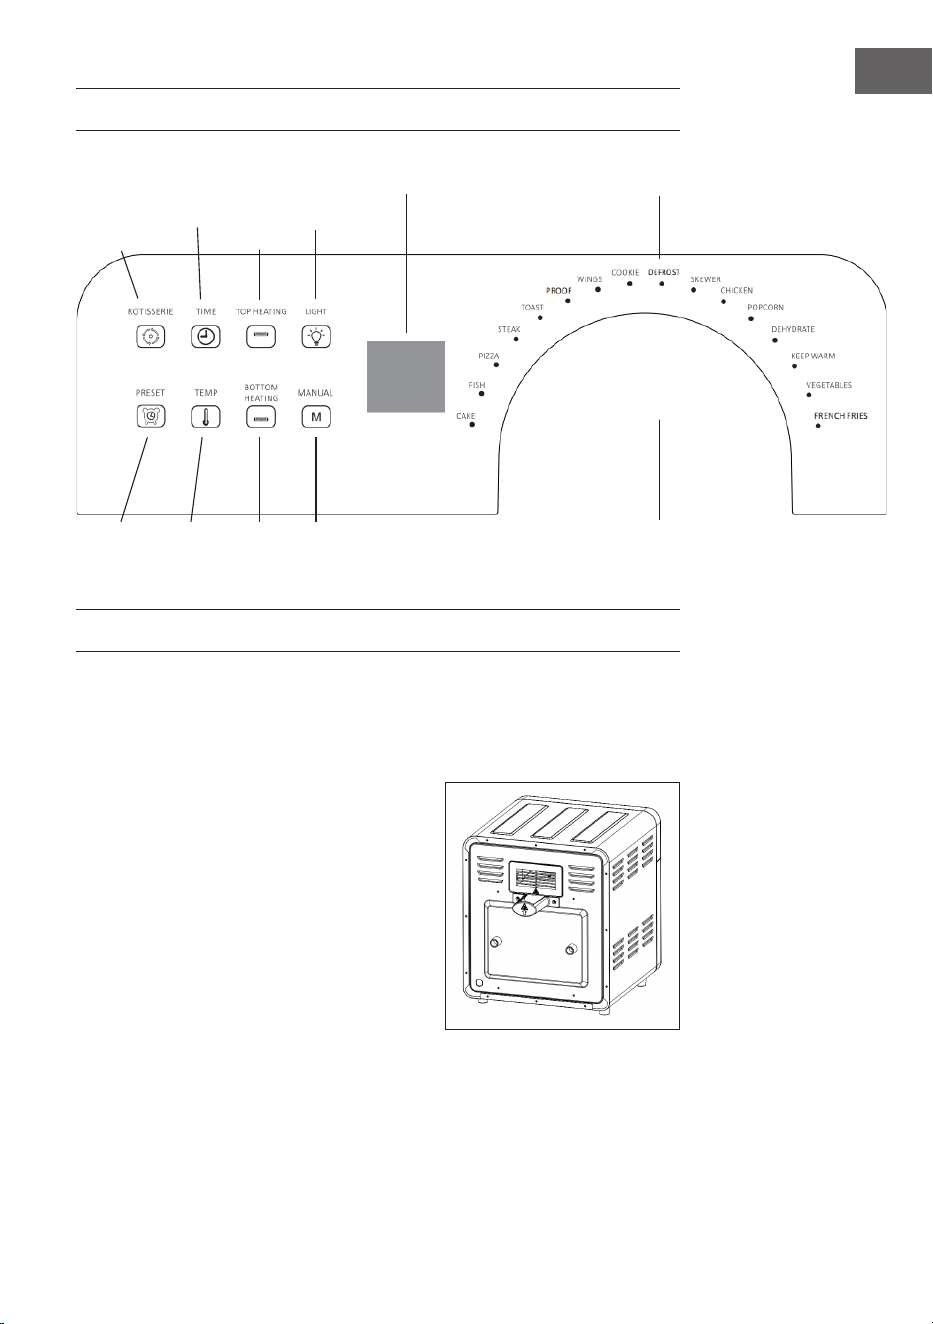
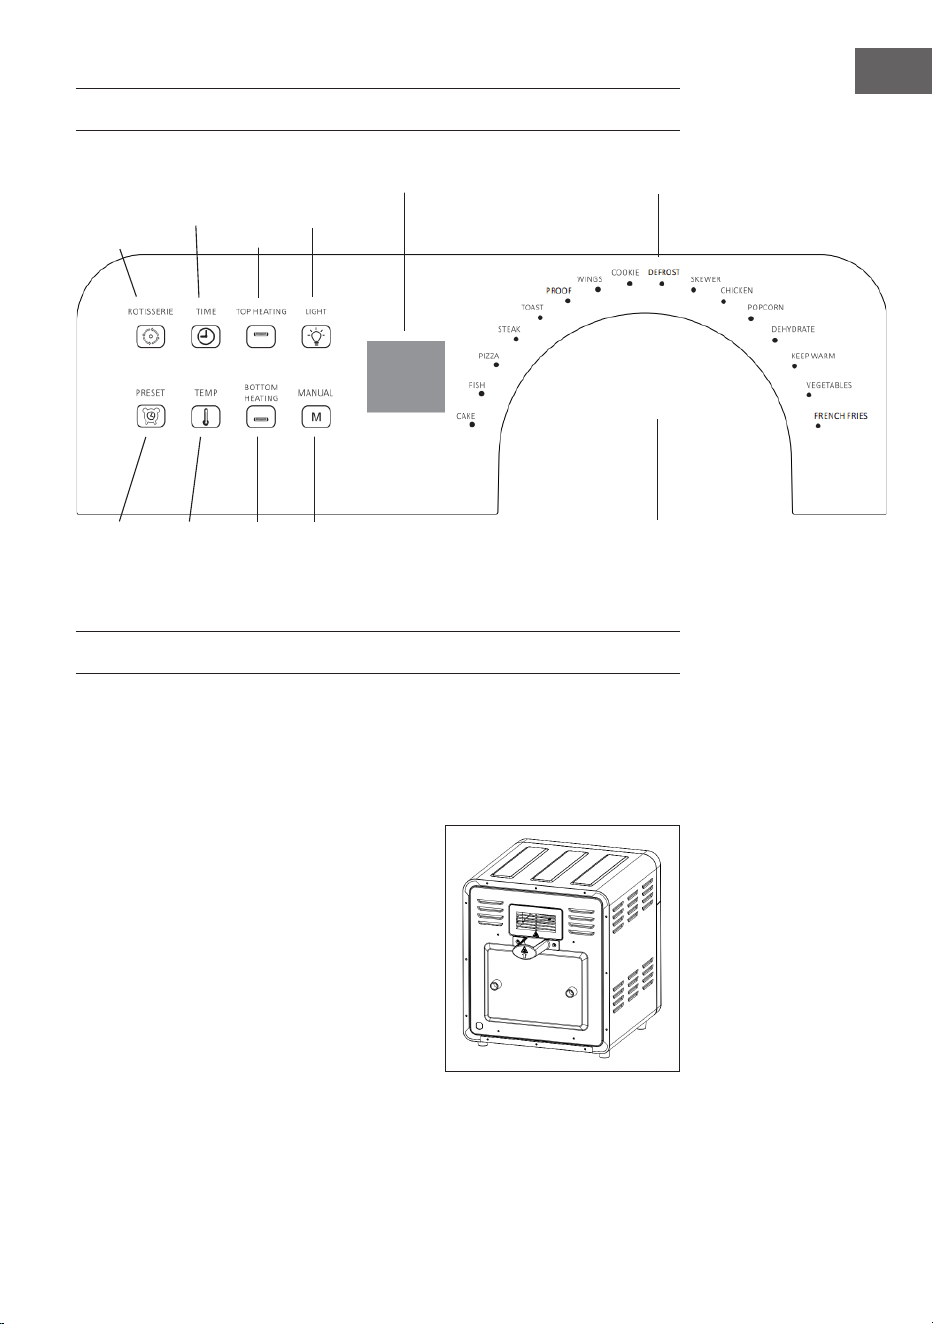
BEDIENFELD
INSTALLATION
Vor der ersten Verwendung
1. Entfernen Sie alle Verpackungsmaterialien, Aufkleber und Etiketten.
2. Reinigen Sie das gesamte Zubehör mit heißen Wasser, Spülmittel und einem nicht
scheuerndem Schwamm.
3. Reiben Sie das Geräteinnere und
Geräteäußere mit einem Tuch ab.
4. Bei der ersten Inbetriebnahme des Geräts
kann ein leichter Geruch und Rauch
auftreten. Dies ist normal und verschwindet
nach kurzer Zeit.
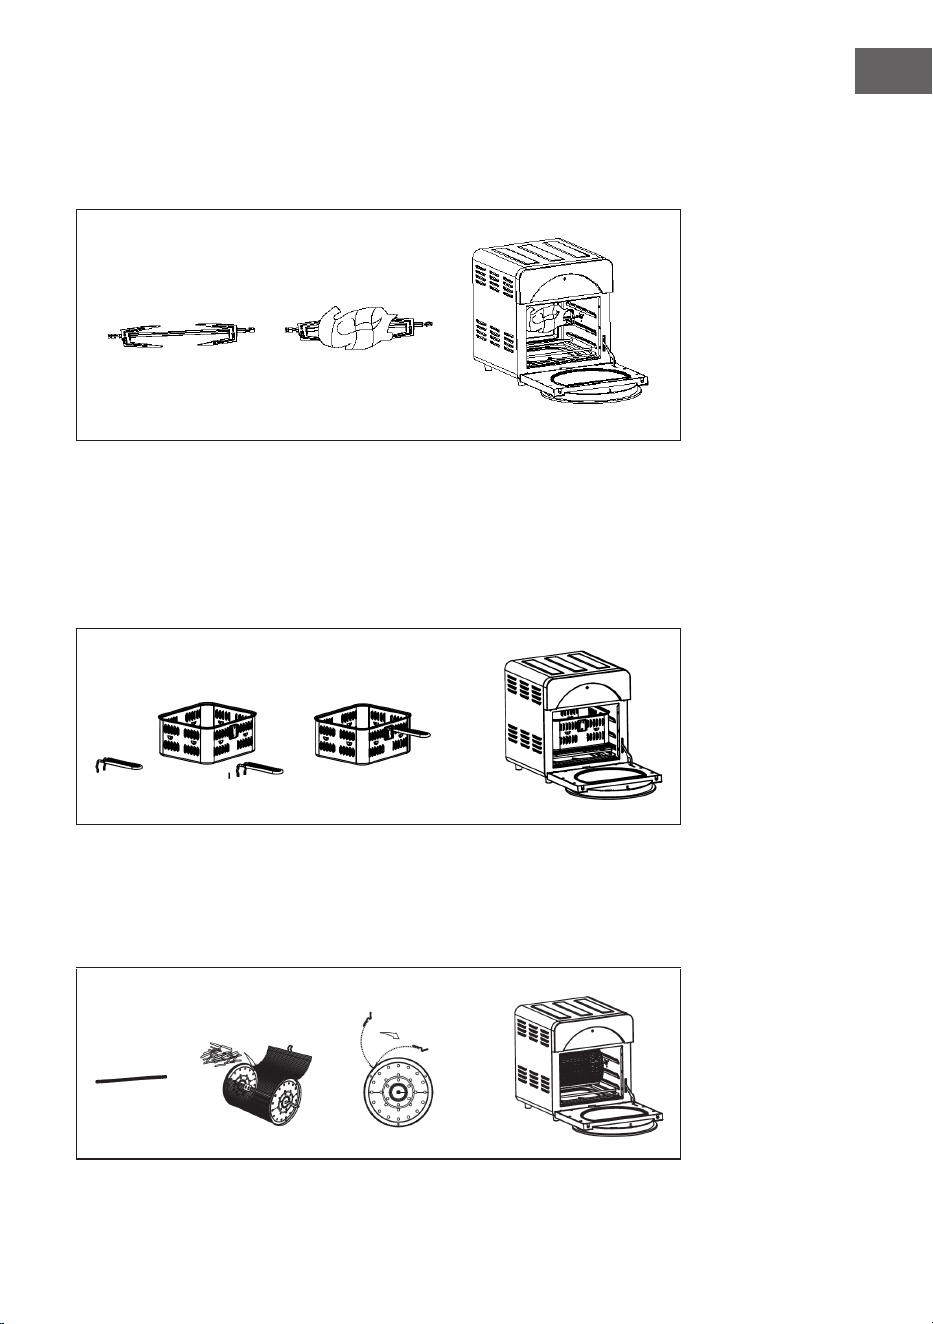
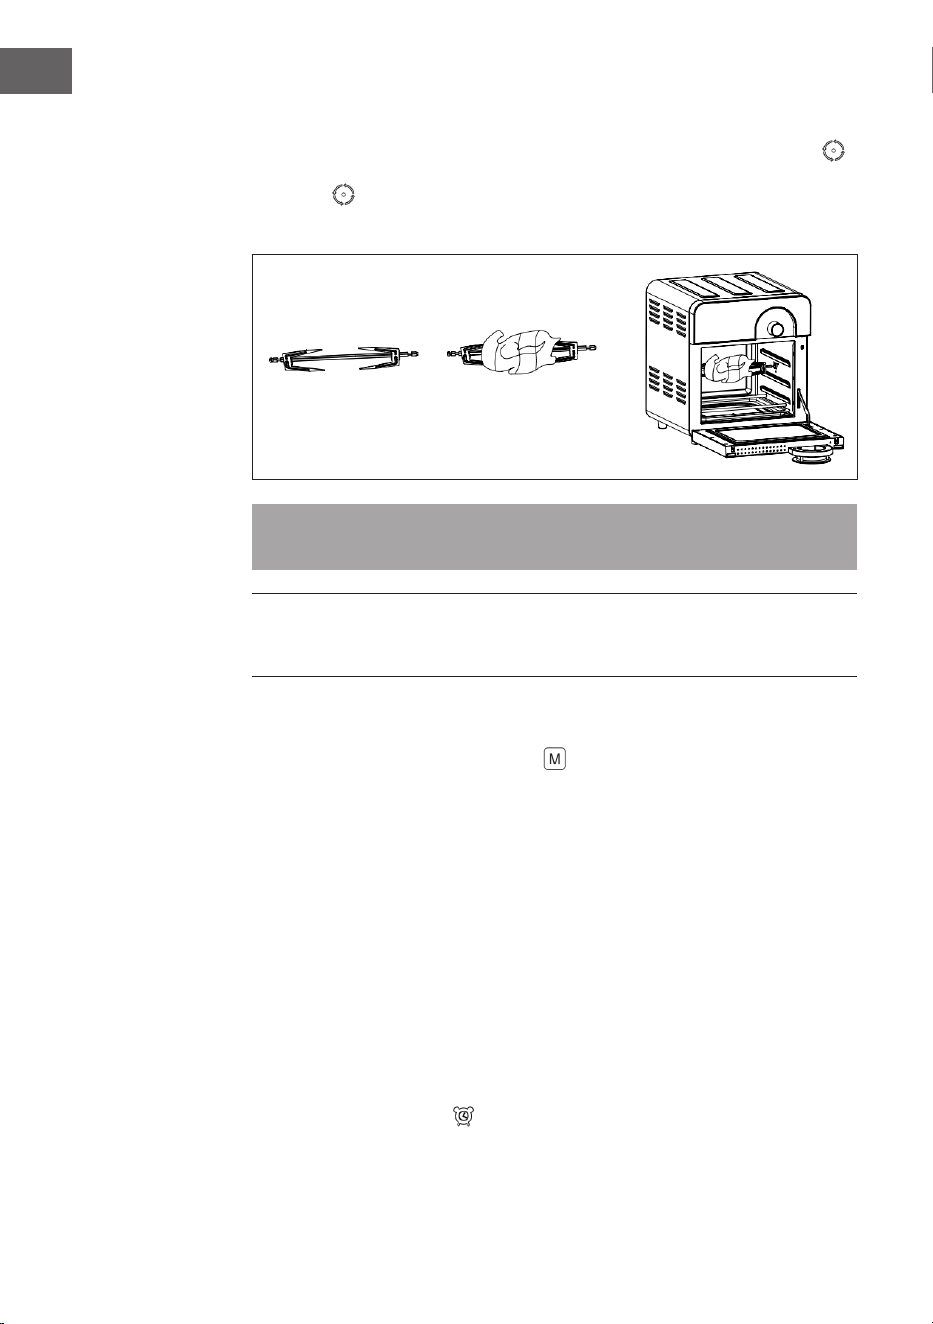
5. Montieren Sie die Luftauslasstrennwand
manuell und tragen Sie vor der
Inbetriebnahme des Gerätes reißfesten
Kleber auf die beiden Schraubenköpfe auf
(siehe Abbildung rechts).
Aufstellort
• Stellen Sie das Gerät auf eine ebene Fläche.
• Achten Sie darauf, dass ein Mindestabstand von 10 cm zu leicht entzündlichen
Materialien wie Vorhängen, Wandverkleidungen etc. eingehalten wird.
Tasten Display Programmwahl
Rotisserie
(Drehen)
Zeit Ober-
hitze
Licht
Zeit-
vorwahl
(Preset)
Tempe-
ratur
Unter-
hitze
Manuell
Drehregler
mit EIN/AUS-Taste
(ON/OFF)
8
DE
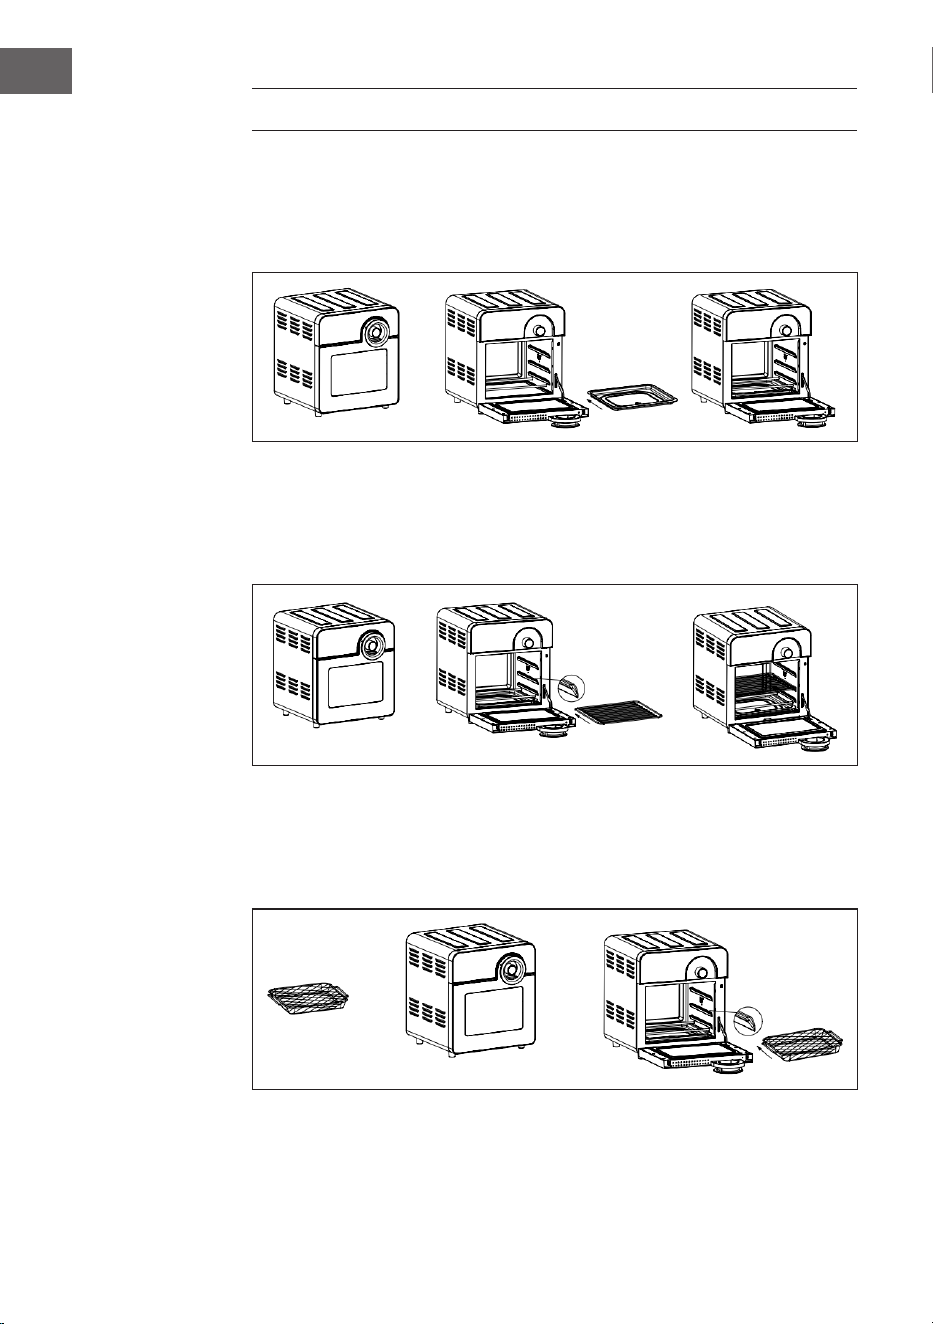
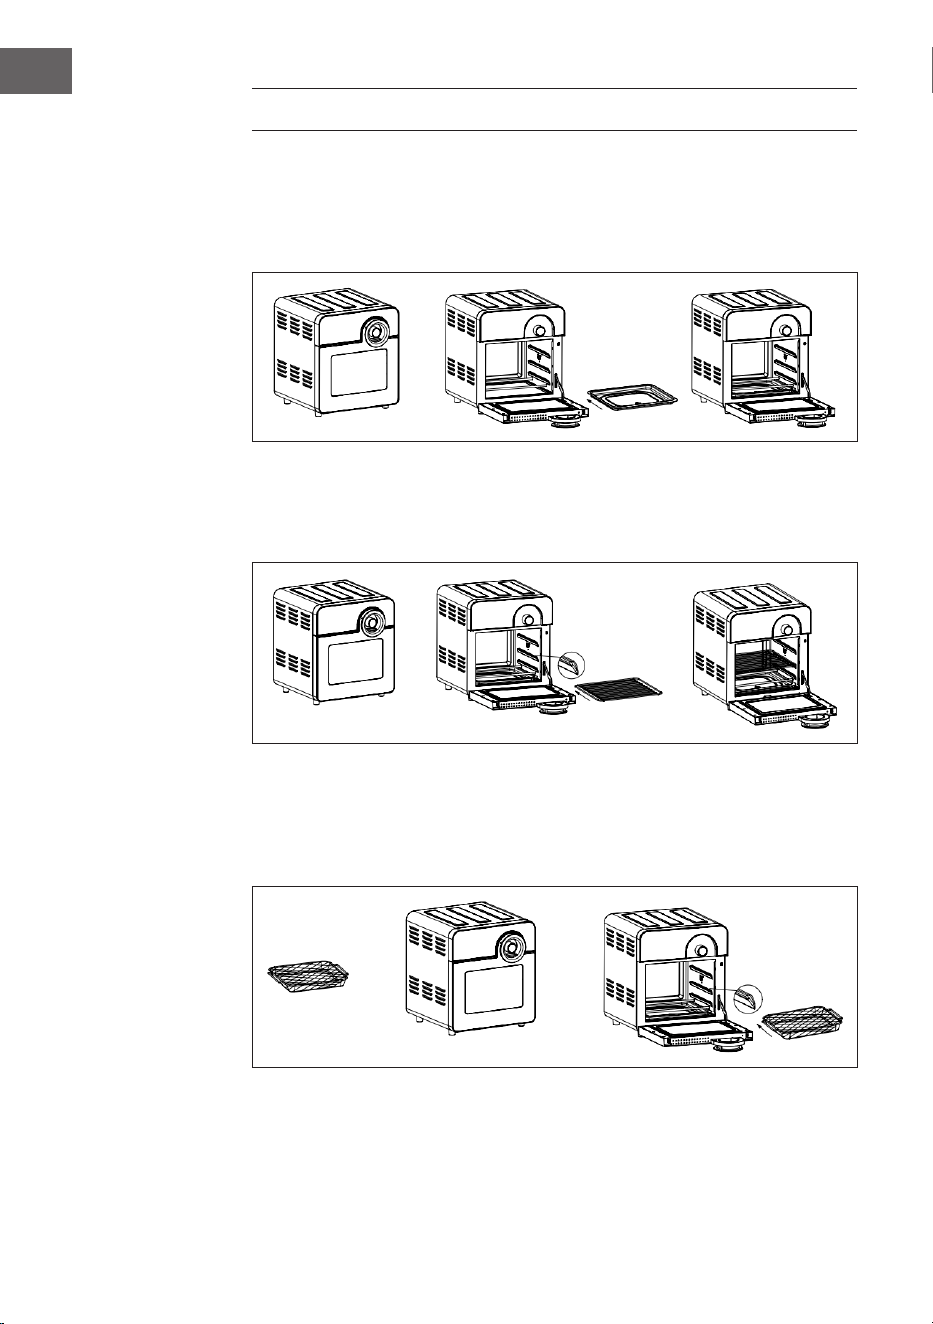
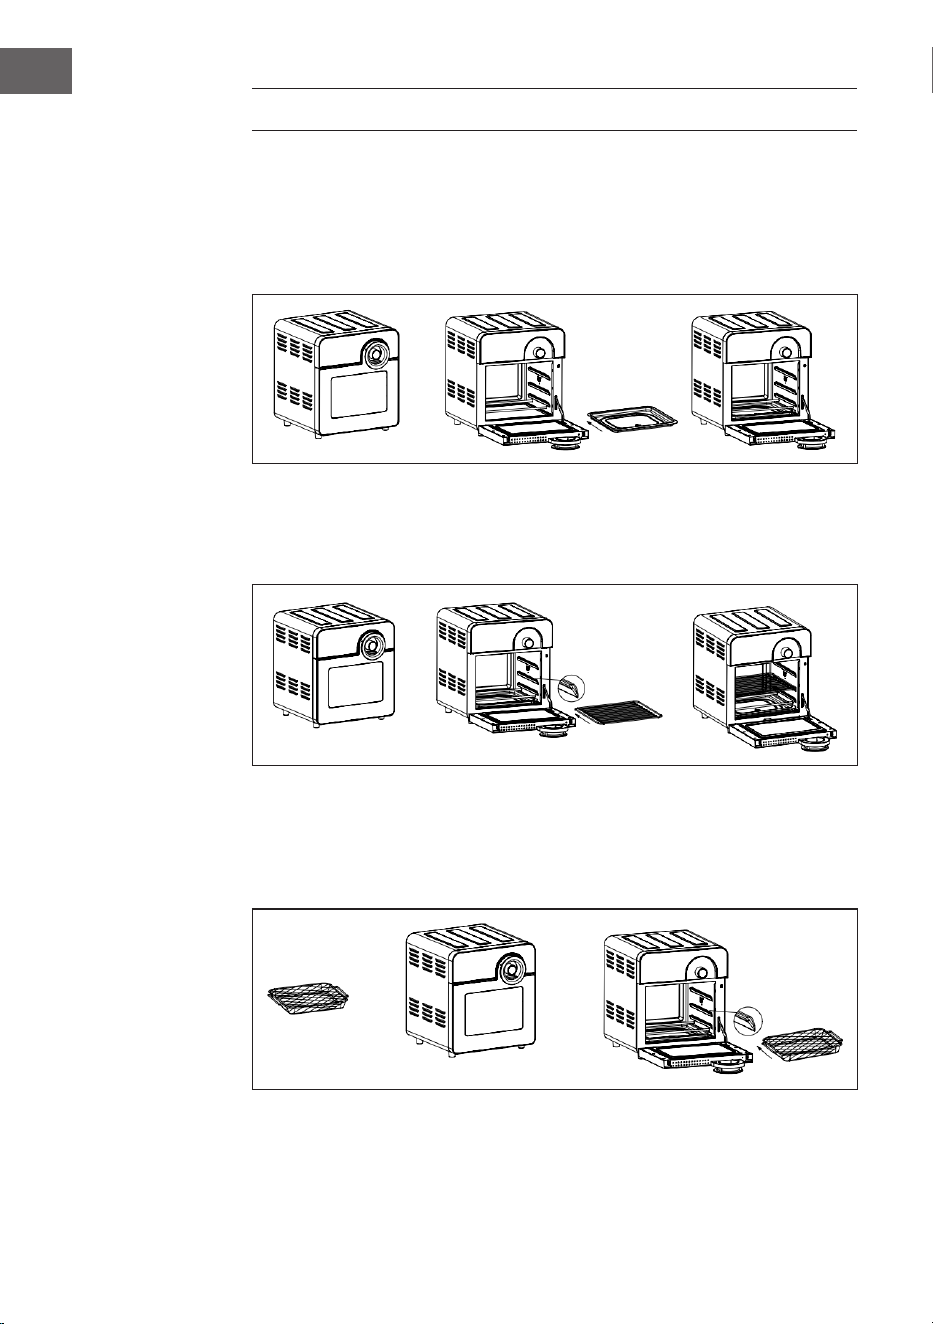
VERWENDUNG DES ZUBEHÖRS
Abtropfblech
• Öffnen Sie die Tür des Geräts.
• Schieben Sie das Abtropfblech in das Gerät (siehe nachfolgende Abbildung).
Gitter
• Schieben Sie das Gitter in das Gerät hinein (siehe Abbildung unten).
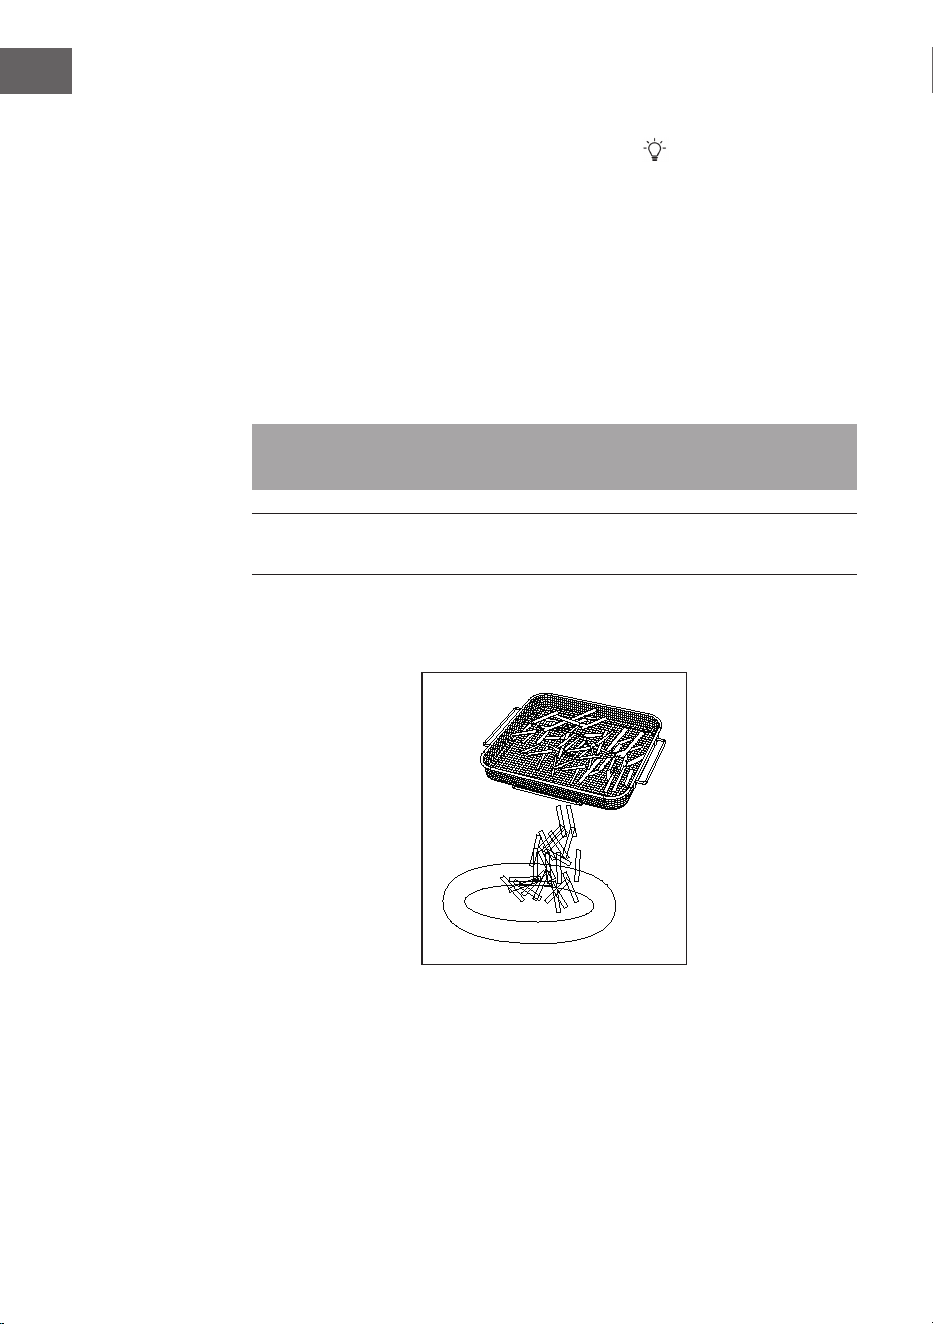
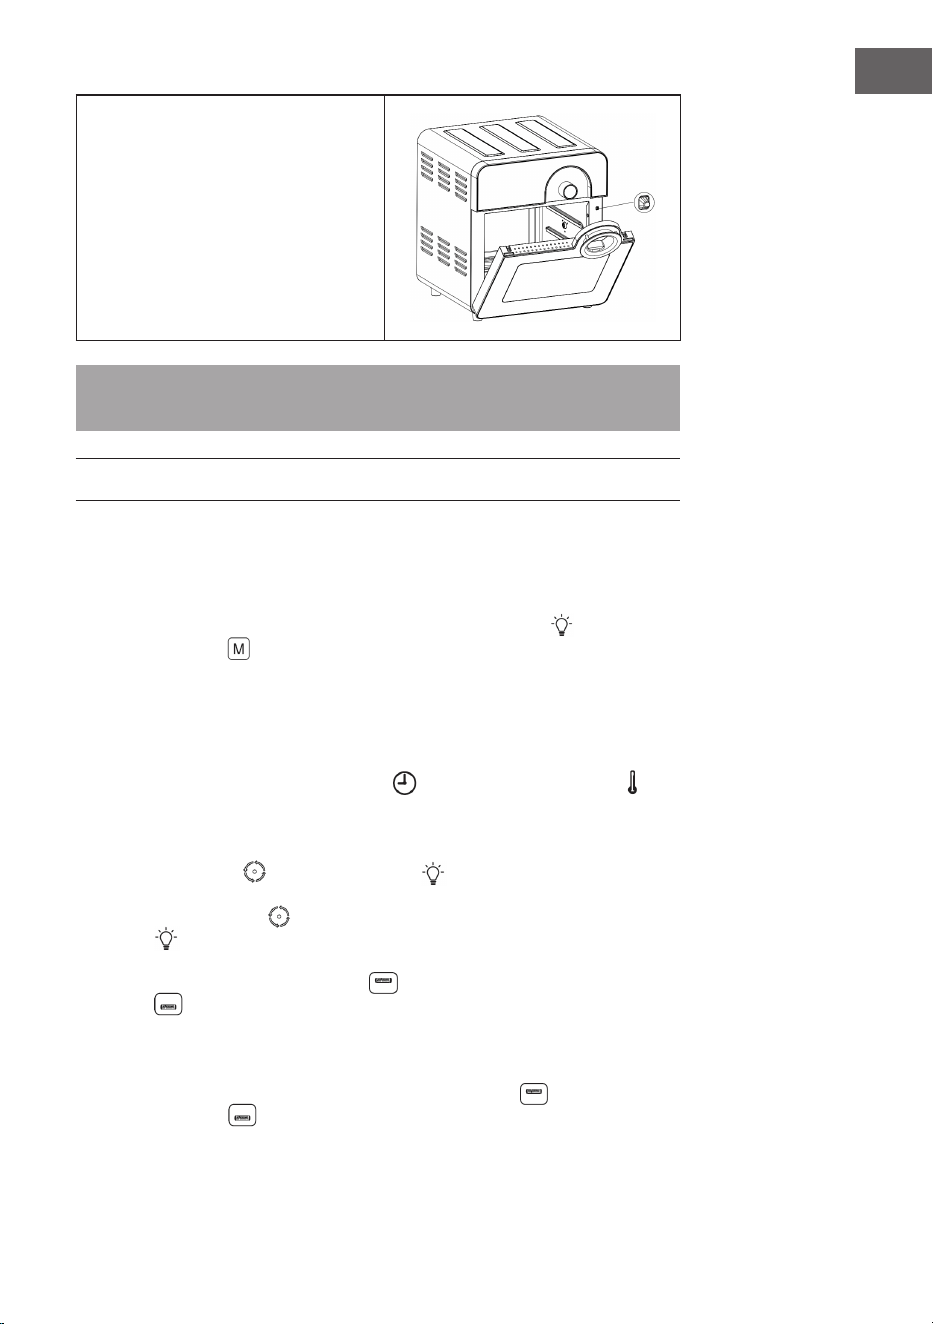
Gitterkorb
• Legen Sie die Lebensmittel, die Sie zubereiten möchten, in den Gitterkorb.
Platzieren Sie diesem im Inneren des Geräts und schließen Sie die Tür (siehe
Abbildung unten).
9
DE
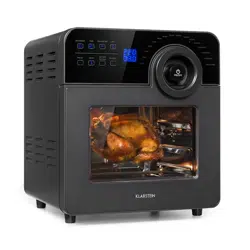
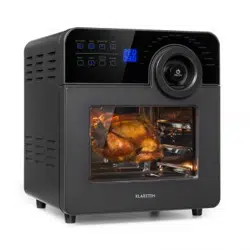
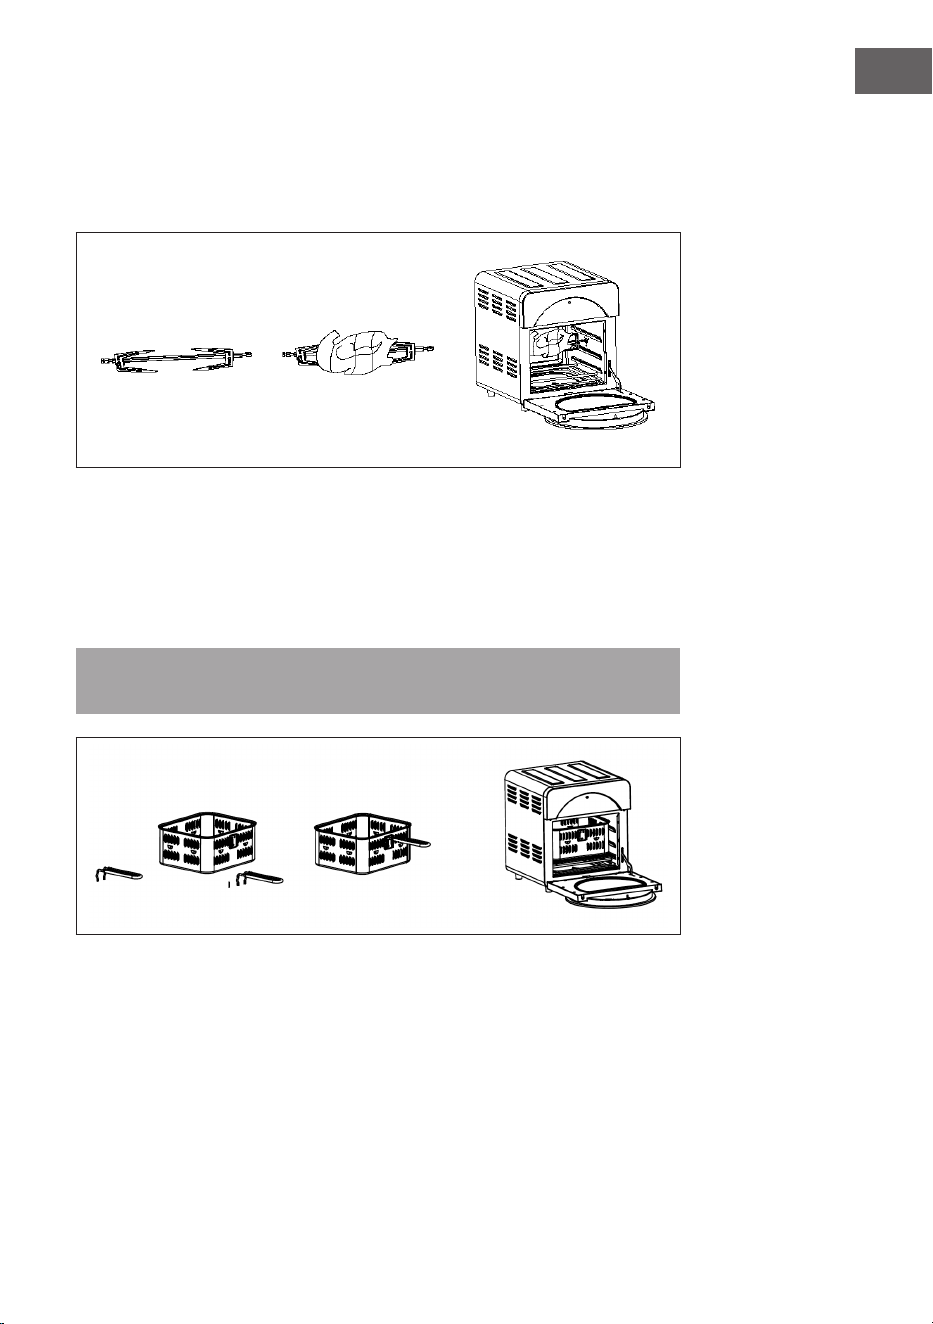
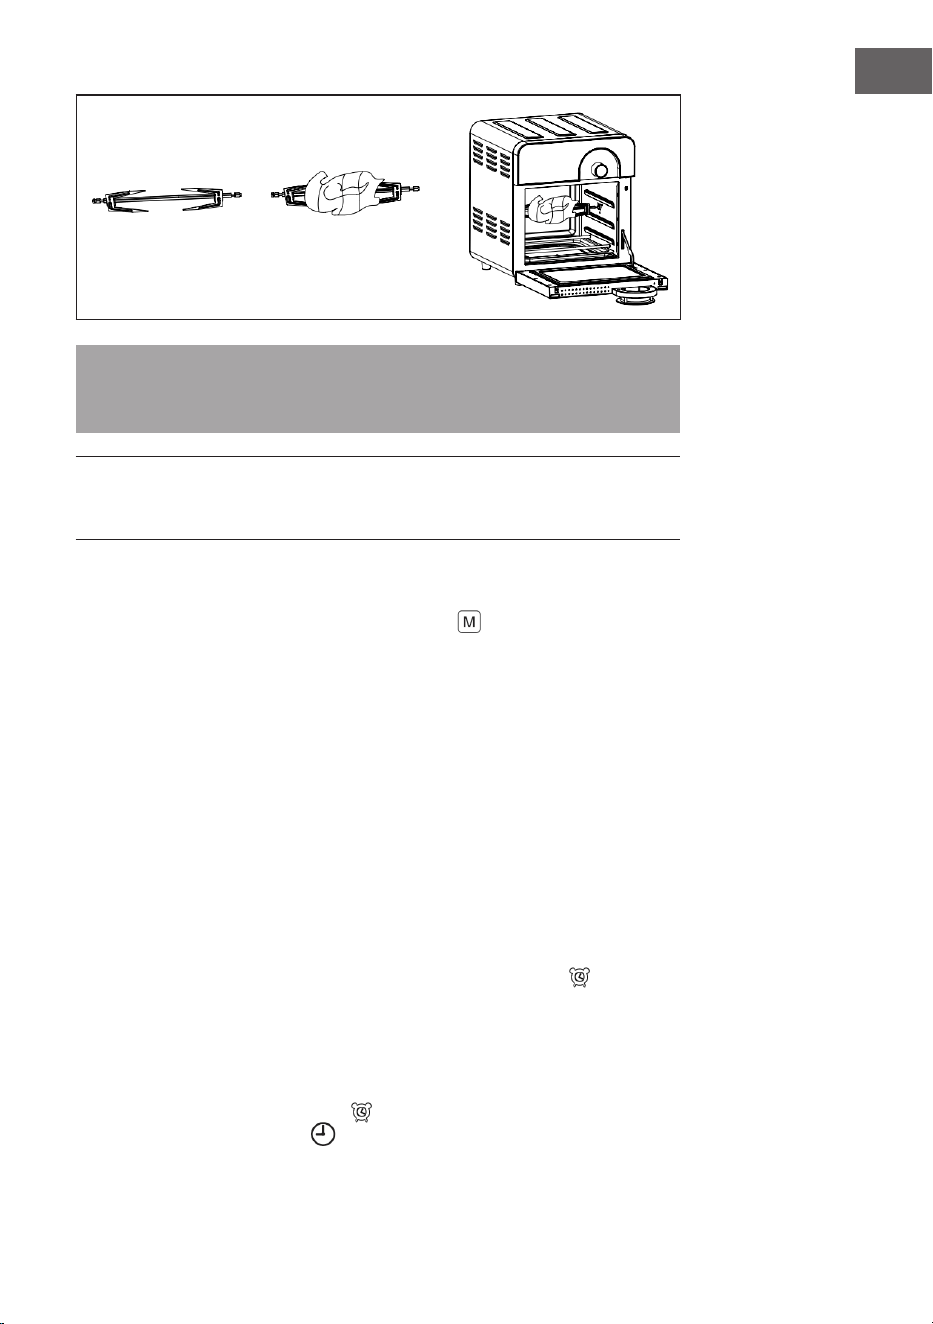
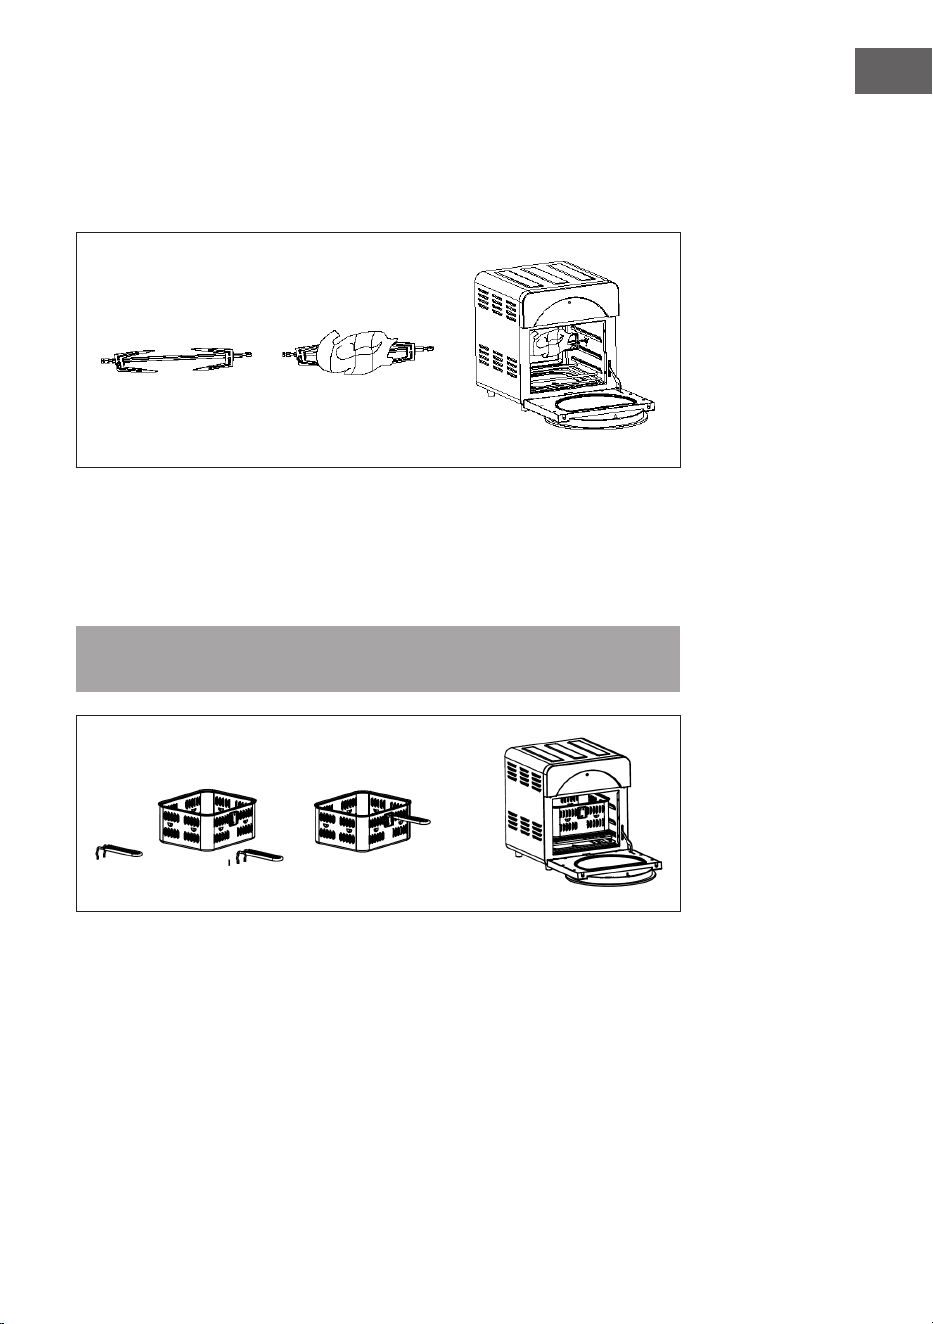
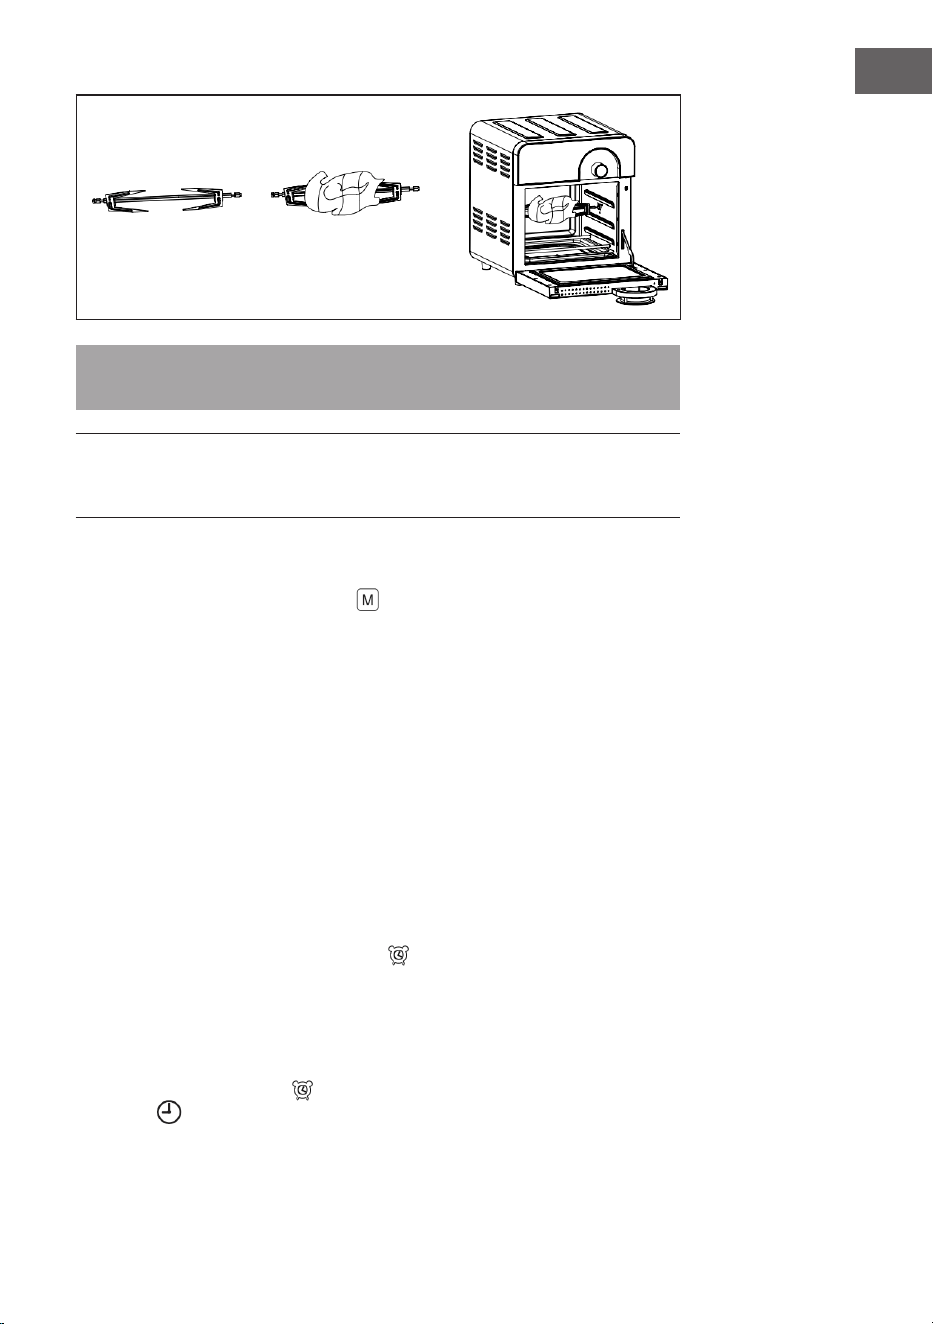
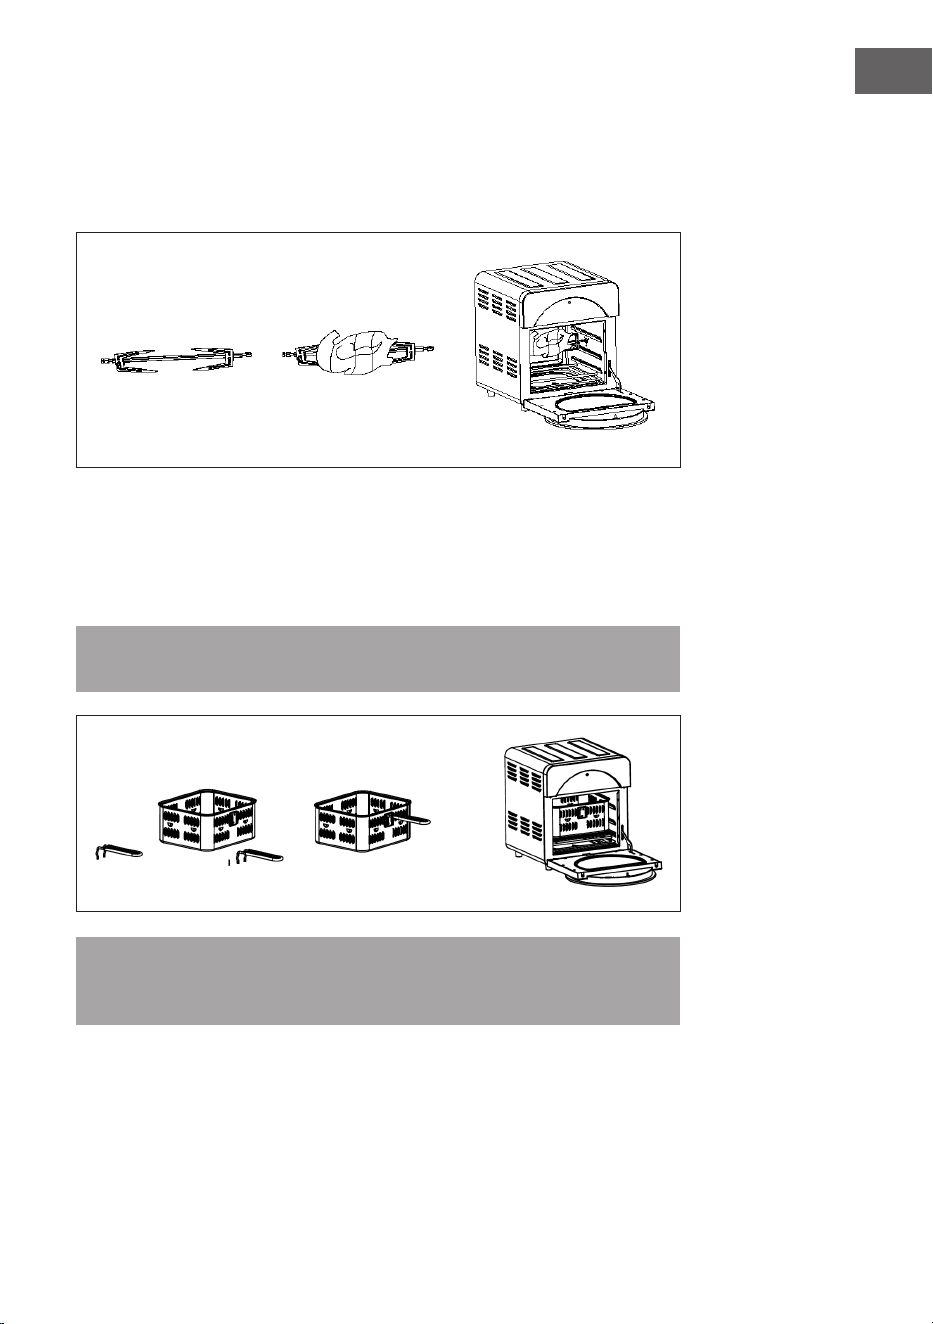
Drehgabel
• Die 360-Grad-Drehung ermöglicht ein gleichmäßiges Garen. Der Drehmodus ist
werkseitig voreingestellt. In der Abbildung unten wird die richtige Methode zum
Garen eines ganzen Hähnchens mit Spindel und Rotisseriegabeln dargestellt.
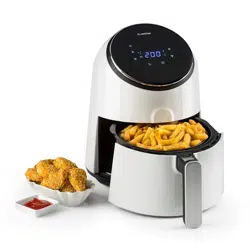
Korb mit Griff (optional)
• Befestigen Sie den Griff, indem Sie ihn in dem dafür vorgesehenen Schlitz am Korb
einrasten. Legen Sie anschließend die zuzubereitenden Lebensmittel in den Korb
und platzieren Sie diesen im Geräteinneren. Entfernen Sie anschließend den Griff
und schließen Sie die Tür.
Hinweis: Schieben Sie zunächst das Gitter auf der untersten Einschub-Ebene in das
Gerät hinein, damit der Korb darauf abgestellt werden kann (siehe Abbildung unten).
• Stellen Sie nach der Zubereitung sicher, dass der Griff richtig am Korb befestigt ist,
bevor Sie diesen am Griff aus dem Gerät entnehmen. Stellen Sie den Korb auf einer
hitzebeständigen und ebenen Oberäche ab.

10
DE
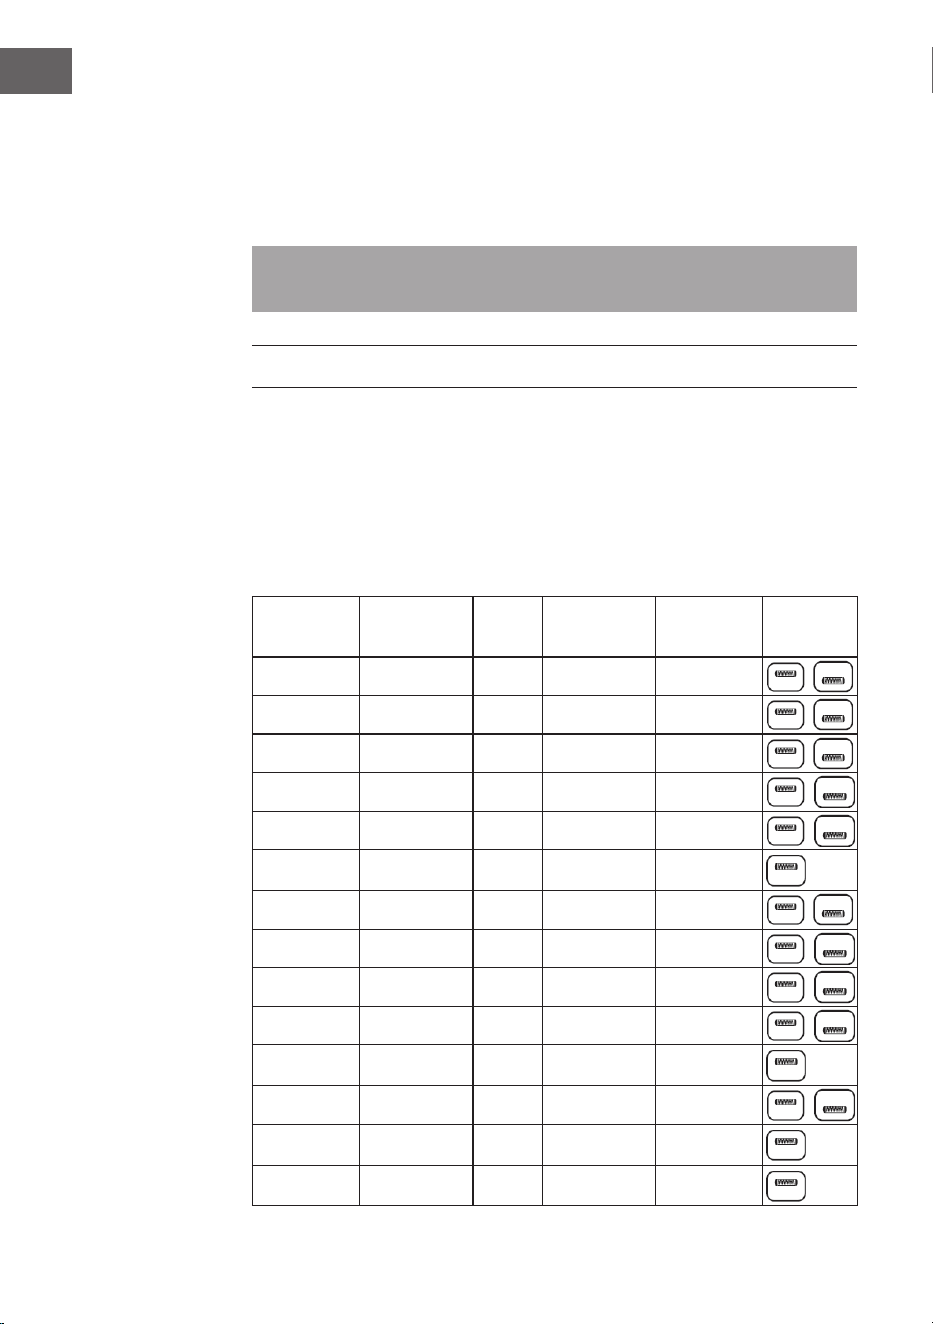
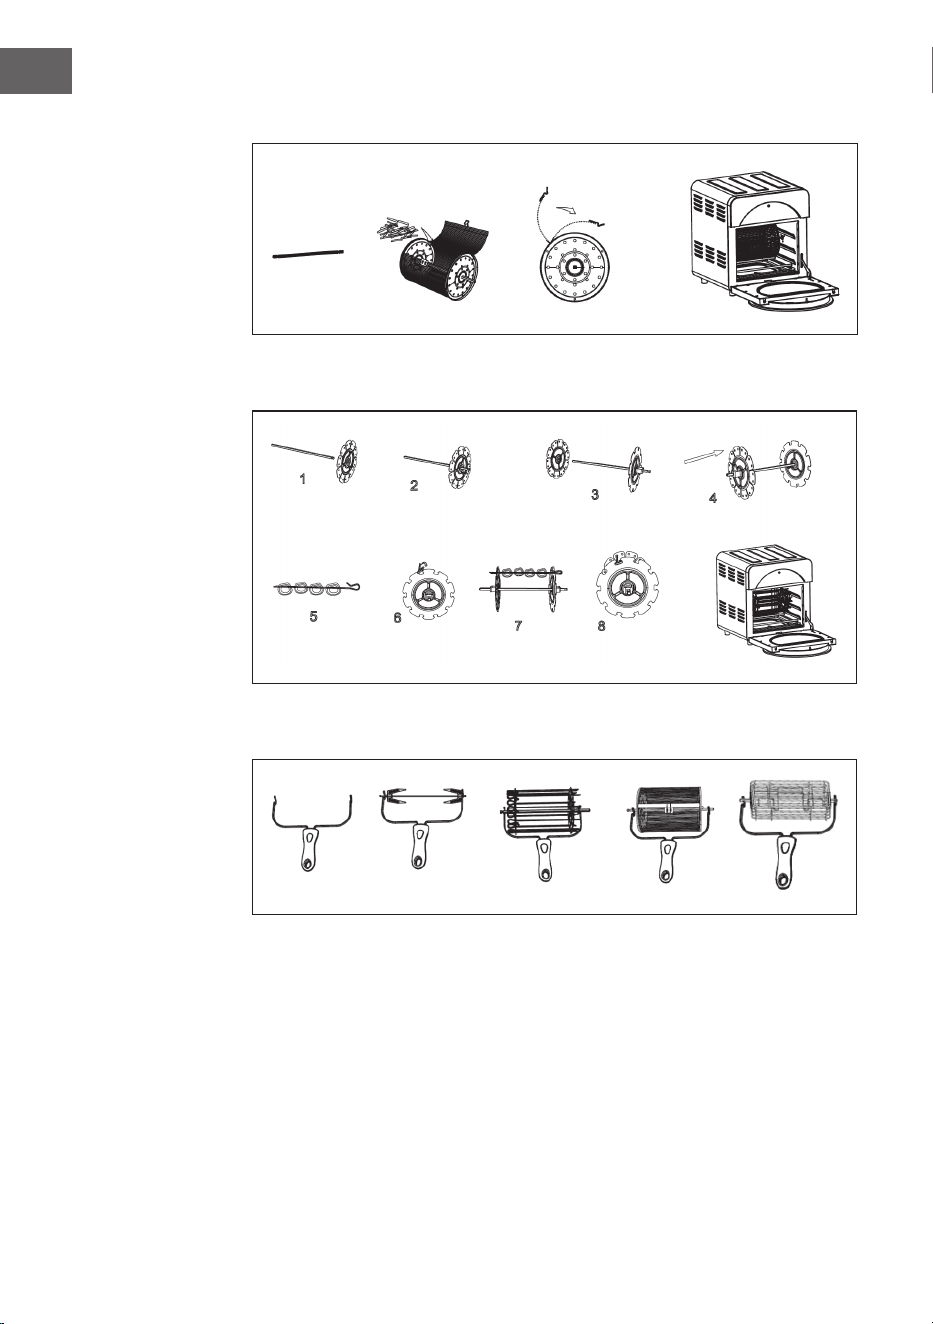
Drehkorb (optional)
Spieß-Set (optional)
Drehkorb-Griff

11
DE
Hoher Gittereinsatz (optional)
• Der hohe Gittereinsatz kann auf dem Abtropfblech platziert werden, so dass
Pfannen oder andere Kochutensilien ausreichend Abstand zu den Heizstäben am
Boden des Geräts aufweisen.
Hinweise zum bestimmungsgemäßen Gebrauch des Zubehörs
• Verwenden Sie für verschiedene Zubereitungsarten immer geeignetes Kochzubehör.
• Verwenden Sie nach der Zubereitung zur Entnahme des Zubehörs Handschuhe.
• Platzieren Sie das Abtropfblech immer auf der untersten Einschub-Schiene.
• Achten Sie darauf, dass zwischen den Lebensmitteln und den Heizstäben ein
Mindestabstand von 40 mm bestehen muss, da sich Lebensmittel beim Erhitzen
noch ausdehnen können.
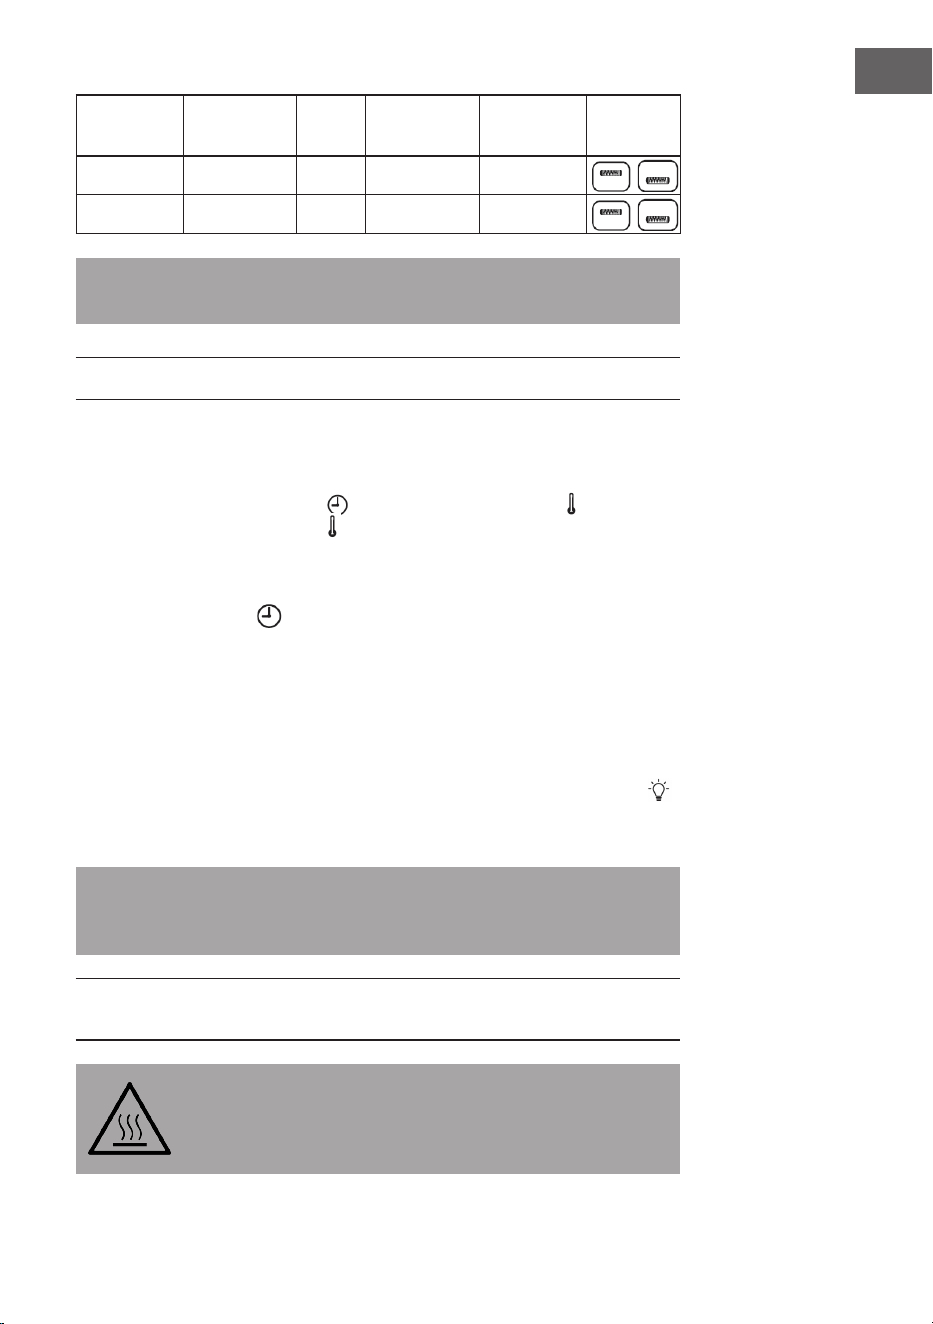
Wie in der Abbildung rechts
dargestellt, verfügt das Gerät über
einen Schutzschalter.
Hinweis: Das Gerät funktioniert nur mit geschlossener Tür richtig. Wenn der
Schutzschalter nicht berührt wird, zeigt der Bildschirm „--“ an.

12
DE
BEDIENUNG
1. Wenn Sie den Netzstecker des Geräts in die Steckdose stecken, ertönt ein
Signalton und der digitale Bildschirm und alle Betriebsleuchten blinken kurz auf und
gehen dann wieder aus.
2. Drücken Sie die EIN/AUS-Taste, die Displayanzeige leuchtet und das Gerät wird
in den Standby-Modus versetzt.
3. Im Standby-Modus sind mit Ausnahme der EIN/AUS-Taste, der LICHT-Taste
und der MANUELL-Taste alle anderen Tasten gesperrt.
4. Wenn im Standby-Modus 60 Sekunden keine Taste gedrückt wird, schaltet sich das
Gerät automatisch aus.
5. Drehen Sie im Standby-Modus den Drehregler für die Programmauswahl, wählen
Sie ein Programm aus und drücken Sie die EIN/AUS-Taste, um das Programm zu
starten.
6. Wenn Sie während des Betriebs oder der Programmauswahl die Zeit oder die
Temperatur des Programms anpassen wollen, drücken Sie die ZEIT-Taste oder
die TEMPERATUR-Taste . Die entsprechende Zahl blinkt im Display auf. Drehen
Sie, solange diese blinkt, am Regler, um die Temperatur und die Uhrzeit wie
gewünscht einzustellen.
7. Sowohl während der Programmauswahl als auch während des Betriebs können
Sie die ROTIEREN-Taste und die LICHT-Taste drücken, um die jeweilige
Funktion einzuschalten. Wenn die Funktion eingeschaltet ist, leuchtet das
entsprechende Tastensymbol. Drücken Sie die ROTIEREN-Taste erneut, um die
Rotisserie-Funktion auszuschalten. Drücken Sie die LICHT-Taste erneut, um das
Licht im Gerät auszuschalten. Wenn in einem beliebigen Modus über 60 Sekunden
lang keine Taste gedrückt wird, geht das Licht ebenfalls automatisch aus.
8. Durch Drücken der OBERHITZE-Taste und UNTERHITZE-Taste können
Sie das obere und das untere Heizelement unabhängig voneinander ein- und
ausschalten. Wenn das jeweilige Heizelement eingeschaltet ist, leuchtet das
entsprechende Tastensymbol. Sind beide Heizelemente ausgeschaltet und Sie
drücken die EIN/AUS-Taste, ertönen mehrere schnelle Signaltöne und das Gerät
wird nicht gestartet. Während ein Programm läuft, sind die OBERHITZE-Taste
und die UNTERHITZE-Taste gesperrt.
9. Wenn Sie während des Betriebs die EIN/AUS-Taste drücken, wird das laufende
Programm abgebrochen, das Display blinkt und das Gerät wird in den Standby-
Modus versetzt. Der Lüfter läuft noch eine Minute weiter, um Hitze abzuführen,
und das Gerät schaltet sich anschließend automatisch aus. (Sollten Sie in dieser
Nachlaufzeit die Tür öffnen, geht der Lüfter zwar automatisch aus, startet aber
wieder, wenn Sie die Tür schließen.) Drücken Sie erneut die EIN/AUS-Taste, um
das Gerät sofort auszuschalten.
Hinweis: Es wird empfohlen, zu warten, bis der Lüfter sich automatisch abschaltet,
damit der Innenraum des Geräts ausreichend abgekühlt ist, bevor Sie die Tür öffnen.
13
DE
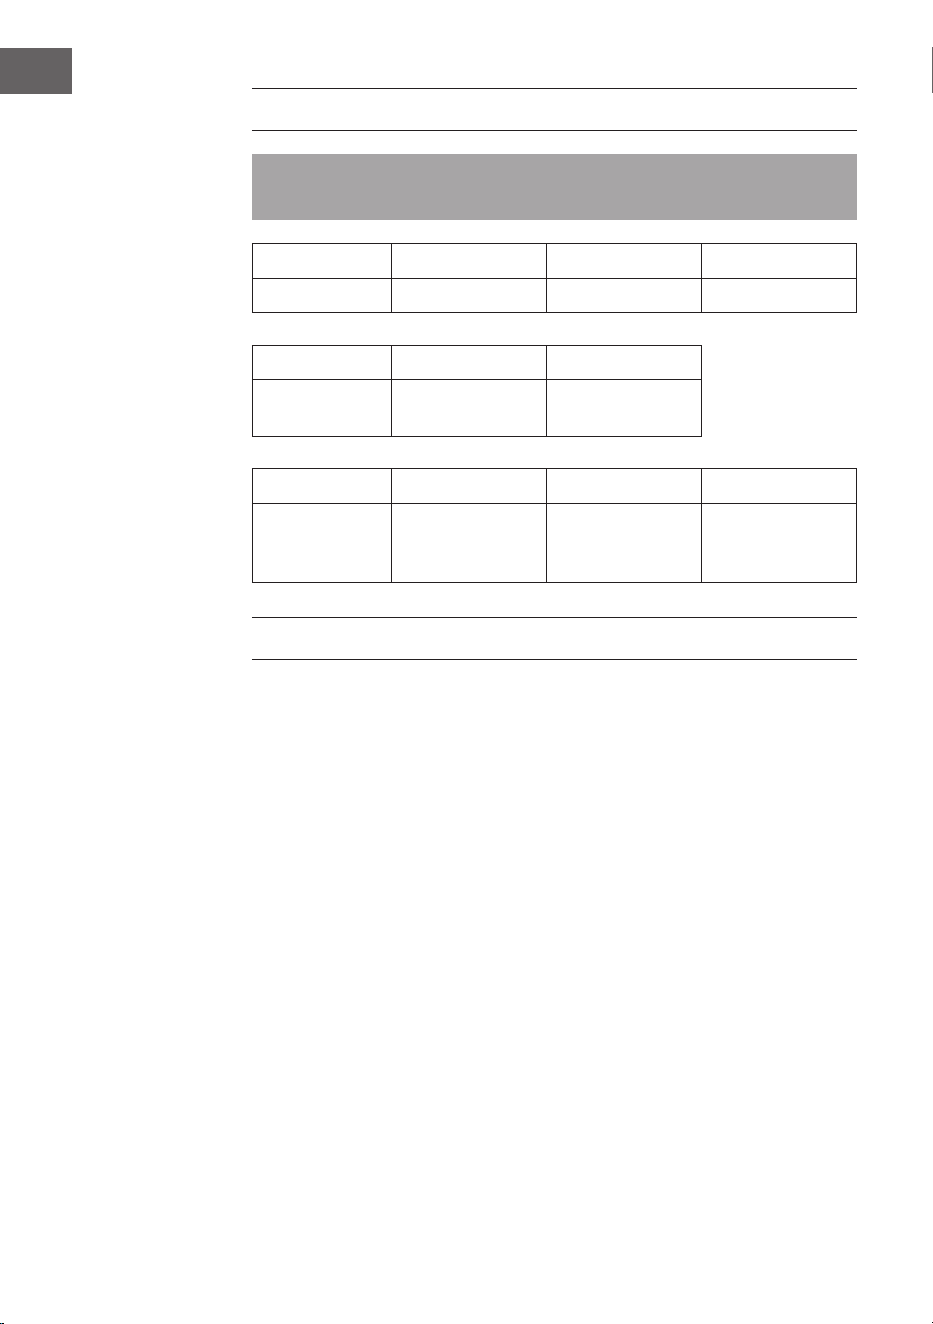
PROGRAMME
• Das Gerät verfügt über eine Vielzahl an Kombinationen von Zubereitungszeit und
Zubereitungstemperatur, um unterschiedlichen Kochbedürfnissen zu entsprechen.
• Wenn Sie im Standby-Modus am Regler drehen, um das gewünschte Programm
auszuwählen, leuchtet die entsprechende Leuchtanzeige auf. Drücken Sie nun zum
Starten des Geräts die EIN/AUS-Taste.
• In der nachfolgenden Tabelle nden Sie unsere Menü-Kombinationen. Sie können
die Garzeit und die Temperatur jeweils Ihren Bedürfnissen entsprechend anpassen.
Programm Gericht /
Funktion
Programm-
Temperatur
Programm-
Zeit
Temperatur-
Auswahl
Zeit-
Auswahl
Heiz-
modus
Cake
Kuchen 180°C 30 min 50 – 220°C 1min – 1h
Fish
Fisch 180°C 15 min 50 – 220°C 1min – 1h
Pizza
Pizza 180°C 10 min 50 – 220°C 1min – 1h
Steak
Steak 180°C 12 min 50 – 220°C 1min – 1h
Toast
Toast 220°C 6 min 50 – 220°C 1min – 1h
Proof
Aufgehen (Teig) 40°C 90 min 40°C 1 – 90 min
Wings
Flügel 200°C 15 min 50 – 220°C 1min – 1h
Cookie
Kekse 180°C 12 min 50 – 220°C 1min – 1h
Defrost
Auftauen 80°C 10 min 50 – 220°C 1min – 1h
Skewer
Spieß 200°C 15 min 50 – 220°C 1min – 1h
Chicken
Hähnchen 220°C 30 mins 50 – 220°C 1min – 1h
Popcorn
Popcorn 220°C 8 min 50 – 220°C 1min – 1h
Dehydrate
Entfeuchten 70°C 8 hour 50 – 70°C 10 min – 8h
Keep Warm
Warmhalten 80°C 30 min 50 – 220°C 1min – 1h
Vegetables
Gemüse 180°C 12 min 50 – 220°C 1min – 1h
French Fries
Pommes 220°C 20 min 50 – 220°C 1min – 1h
Hinweis: Je größer das Hähnchen oder die Menge an Lebensmitteln, desto länger
die Zubereitungszeit. Passen Sie die Zubereitungstemperatur und die Zubereitungszeit
Ihren individuellen Bedürfnissen an.
14
DE
FUNKTIONEN EINSTELLEN
Garzeit und Temperatur einstellen
1. Wenn Sie nach der Auswahl des Programms die Zubereitungszeit und die
Zubereitungstemperatur anpassen möchten, drücken Sie die ZEIT-Taste und die
TEMPERATUR-Taste .
2. Drücken Sie zur Anpassung der Zubereitungstemperatur die TEMPERATUR-Taste
. Die entsprechende Zahl beginnt in der Displayanzeige zu blinken. Drehen Sie
am Regler, um die Temperatur in 10°C-Schritten zu erhöhen oder zu senken. Es
kann eine Temperatur zwischen 50°C und 220°C eingestellt werden.
3. Drücken Sie zur Anpassung der Zubereitungszeit die ZEIT-Taste . Die
entsprechende Zahl beginnt in der Displayanzeige zu blinken. Drehen Sie am
Regler, um die Zeit in Schritten von 1 Minute zu erhöhen oder zu senken. Wenn der
einstellbare Bereich groß ist, lässt sich die Zeit in 10-Minuten-Schritten einstellen.
Pause-Funktion
• Wird die Tür während des Betriebs geöffnet, stoppt das Gerät automatisch. Wenn
die Tür geöffnet ist, sind alle Tasten außer der EIN/AUS-Taste, der LICHT-Taste
und der ROTISSERIE-Taste gesperrt. Schließen Sie die Tür wieder, setzt das
Gerät den Betrieb im zuvor eingestellten Modus fort.
Hinweis: Wenn die Tür während des Betriebs geöffnet wurde und nicht innerhalb
von 10 Minuten geschlossen wird, schaltet sich das Gerät automatisch aus und in der
Displayanzeige erscheint „---“. Das Gerät bleibt anschließend ausgeschaltet (auch
wenn Sie die Tür jetzt schließen).
TIPP: Wenden Sie die Lebensmittel während der Zubereitung in regelmäßigen oder
unregelmäßigen Abständen, um sicherzustellen, dass Ihre Speisen gleichmäßig
durchgegart werden.
VORSICHT
Verbrennungsgefahr! Während des Betriebs werden das Gerät und die
Zubehörteile sehr heiß. Fassen Sie diese nicht mit bloßen Händen an. Es
wird empfohlen, Ofenhandschuhe zu tragen.
Drehfunktion (Rotisserie)
• Diese Funktion ermöglicht ein gleichmäßiges Erhitzen der Speisen. Drücken Sie auf
die ROTISSERIE-Taste . Das entsprechende Tastensymbol leuchtet im Bedienfeld
auf. Drücken Sie die ROTISSERIE-Taste erneut, um die Funktion auszuschalten.
• Verwenden Sie den Hähnchenspieß, wie in der nachfolgenden Abbildung
dargestellt.
15
DE
Hinweis: Das Gesamtgewicht des Hähnchens sollte für die Verwendung des
Drehspießes 1,2 kg nicht überschreiten. Bereiten Sie Hähnchen, die ein höheres
Gewicht aufweisen, im Frittierkorb zu.
TIPP: Fixieren Sie die Hähnchenschenkel und -ügel mit einem Faden. Stechen Sie vor
der Zubereitung kleine Löcher in die Hähnchenschenkel, da das Fleisch an dieser Stelle
sehr dick ist und schwer von der Hitze durchdrungen werden kann.
Manuelle Einstellungsfunktion
• Wenn Sie im Standby-Modus die MANUELL-Taste drücken, leuchtet das
entsprechende Tastensymbol auf dem Bedienfeld auf. Die voreingestellte
Temperatur beträgt 120 °C und die voreingestellte Zeit ist 20 Minuten.
• Drücken Sie zum Starten die EIN/AUS-Taste.
• Wenn Sie während des Betriebs erneut die EIN/AUS-Taste drücken, stoppt das
Gerät den Betrieb und die Leuchtanzeige geht aus. Der Lüfter läuft noch eine
Minute weiter, bevor das Gerät in den Standby-Modus versetzt wird.
• Wenn Sie diese Funktion auswählen, sind die 16 Anzeigeleuchten der
Programmauswahl aus und Sie können lediglich die Garzeit und die Temperatur
anpassen. Die maximal einstellbare Zeit beträgt in diesem Modus eine Stunde und
es kann eine Temperatur zwischen 50 °C – 220 °C ausgewählt werden.
Zeitvorwahl-Funktion (Preset)
• Drücken Sie die EIN/AUS-Taste, die Displayanzeige leuchtet auf.
• Drehen Sie am Drehregler, um das gewünschte Programm in der Programmwahl
auszuwählen. Drücken Sie anschließend die ZEITVORWAHL-Taste , um die
Zeitvorwahl-Einstellungen vorzunehmen. In der Displayanzeige wird nun die
voreingestellte Zeit bis zum Start angezeigt. Die Zahl blinkt und kann durch Drehen
des Reglers in 10-Minuten-Schritten angepasst werden. Die maximal einstellbare
Zeit beträgt 9Stunden und 50Minuten, die kürzeste Zeit beträgt 10 Minuten.
• Solange das Programm noch nicht gestartet wurde, kann die Zeitvorwahl durch
Drücken der ZEITVORWAHL-Taste abgebrochen werden. (ACHTUNG: Wenn
Sie stattdessen die ZEIT-Taste drücken, wird die Zeit des gewählten Programms
und nicht die Einstellung der Zeitvorwahl-Funktion im Display angezeigt!).
16
DE
• Drücken Sie, nachdem Sie die gewünschte Zeit bis zum Start ausgewählt haben,
die EIN/AUS-Taste, um die Einstellung der Zeitvorwahl abzuschließen. Mit
Ausnahme der EIN/AUS-Taste und der LICHT-Taste sind alle anderen Tasten
nun gesperrt. Die Zeitvorwahl kann jetzt nur noch durch erneutes Drücken der
EIN/AUS-Taste abgebrochen werden. Das Programm startet nach Ablauf der
eingestellten Vorlaufzeit.
Zubereitungsende
1. Das Gerät piept am Ende der Zubereitungszeit drei Mal auf und hört auf zu heizen.
Der Lüfter läuft eine Minute lang weiter, bis die Temperatur im Innenraum zu sinken
beginnt.
2. Öffnen Sie die Tür und nehmen Sie den Korb mit den zubereiteten Speisen heraus.
Stellen Sie den Korb auf eine hitzebeständige und ebene Fläche.
Hinweis: Wenn Sie den Korb aus dem Gerät nehmen, berühren Sie den Korb nicht
mit den bloßen Händen. Verwenden Sie Ofenhandschuhe.
TIPP: Sollten die Lebensmittel noch nicht fertig gegart sein, legen Sie diese in den Korb
zurück und lassen Sie sie ein paar Minuten länger im Gerät garen.
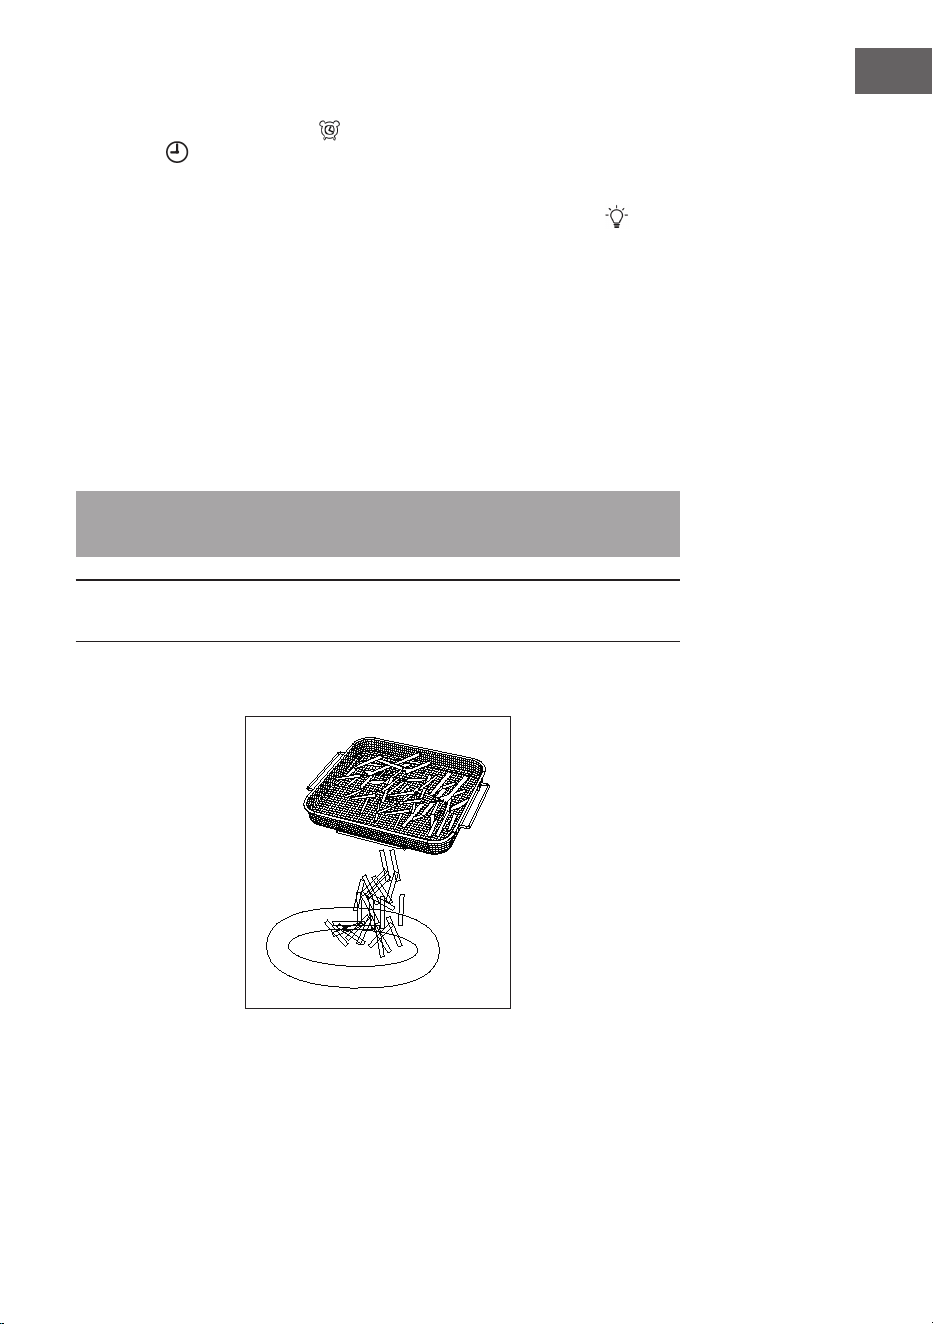
3. Geben Sie das fertig zubereitete Essen auf einen Teller oder anderes Geschirr
(siehe nachfolgende Abbildung).
4. Schalten Sie das Gerät nach dem Gebrauch aus und ziehen Sie den Netzstecker
aus der Steckdose.

17
DE
REINIGUNG UND PFLEGE
WARNUNG
Stromschlaggefahr! Tauchen Sie das Netzkabel, den Stecker und das
Gehäuse des Gerätes nicht in Wasser oder andere Flüssigkeiten. Es
kann zu Schäden am Gerät, Feuer oder Verletzungen.
Hinweis: Schalten Sie das Gerät vor der Reinigung aus und ziehen Sie den
Netzstecker aus der Steckdose.
• Entfernen Sie das Zubehör.
• Reinigen Sie das Gerät nach jedem Gebrauch. Reinigen Sie das Zubehör und
die Innenseite des Gerätes nicht mit spitzen oder scharfen Küchenutensilien oder
Scheuermittel, da diese die Beschichtung beschädigen.
• Wischen Sie die Außenseite des Gerätes mit einem weichen, feuchten Tuch ab.
• Reinigen Sie das Zubehör mit heißem Wasser, etwas Geschirrspülmittel und einem
nicht scheuernden Schwamm. Lassen Sie das Zubehör trocknen, bevor Sie es
wieder in das Gerät einsetzen.
• Entfernen Sie hartnäckige Fettrückstände mit einer Entfettungsüssigkeit.
• Reinigen Sie das Innere des Gerätes mit einem nicht scheuernden Schwamm.
• Reinigen Sie das Heizelement mit einer Reinigungsbürste, um
Lebensmittelrückstände zu entfernen.
• Wenn Sie das Gerät länger nicht benutzen, reinigen Sie es, bevor Sie es verstauen.
• Lagern Sie das Gerät und die Zubehörteile in einer trockenen, sauberen und vor
Korrosion geschützten Umgebung.

18
DE
SPEZIELLE ENTSORGUNGSHINWEISE FÜR
VERBRAUCHER IN DEUTSCHLAND
Entsorgen Sie Ihre Altgeräte fachgerecht. Dadurch wird gewährleistet, dass die
Altgeräte umweltgerecht verwertet und negative Auswirkungen auf die Umwelt und
menschliche Gesundheit vermieden werden. Bei der Entsorgung sind folgende Regeln
zu beachten:
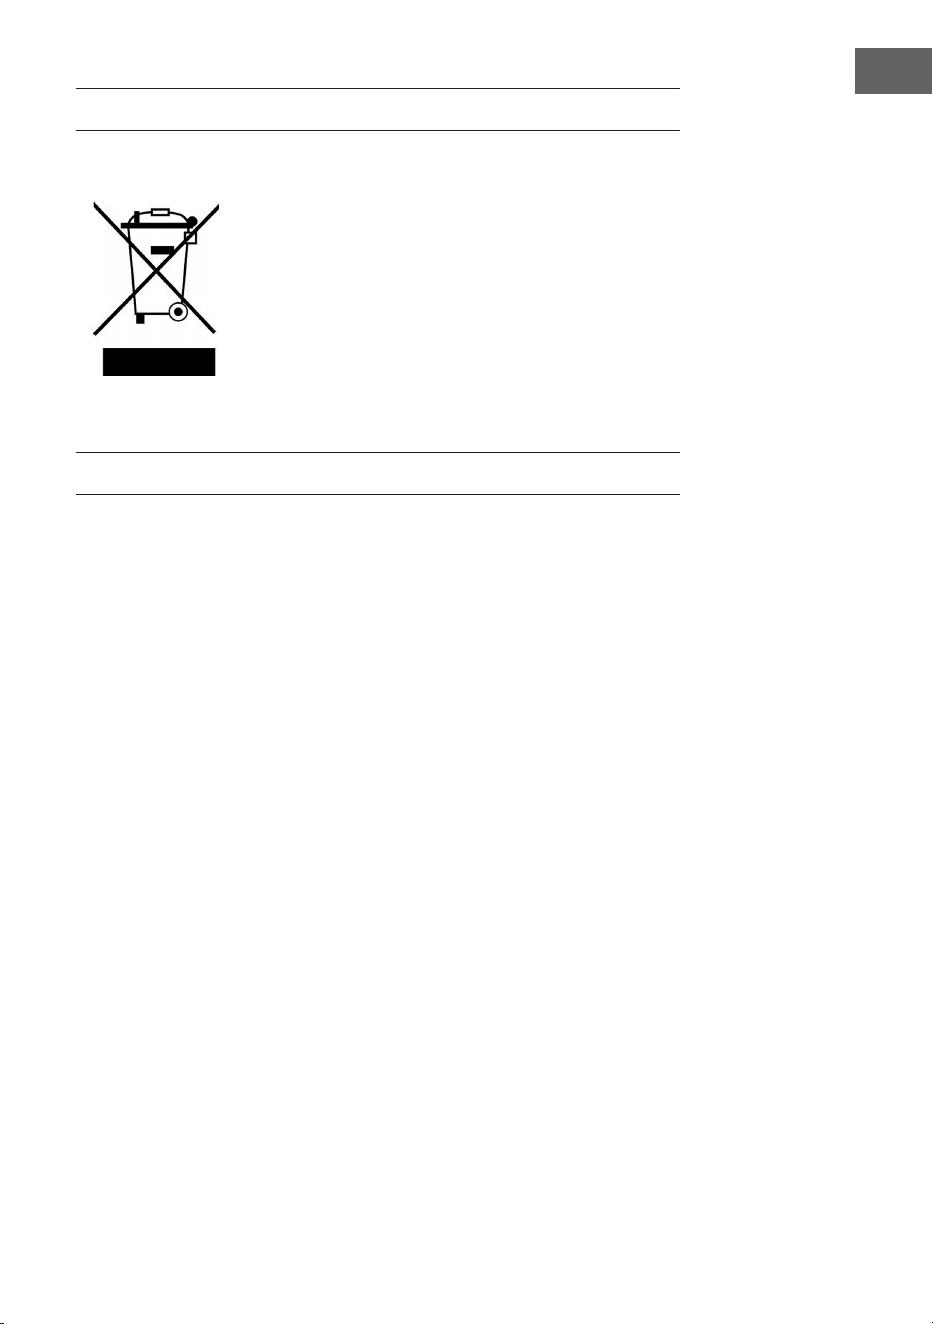
• Jeder Verbraucher ist gesetzlich verpichtet, Elektro- und Elektro-
nikaltgeräte (Altgeräte) sowie Batterien und Akkus getrennt vom
Hausmüll zu entsorgen. Sie erkennen die entsprechenden Altgeräte
durch folgendes Symbol der durchgestrichene Mülltonne (WEEE
Symbol).
• Sie haben Altbatterien und Altakkumulatoren, die nicht vom Altgerät umschlossen
sind, sowie Lampen, die zerstörungsfrei aus dem Altgerät entnommen werden
können, vor der Abgabe an einer Entsorgungsstelle vom Altgerät zerstörungsfrei zu
trennen.
• Bestimmte Lampen und Leuchtmittel fallen ebenso unter das Elektro- und
Elektronikgesetz und sind dementsprechend wie Altgeräte zu behandeln.
Ausgenommen sind Glühbirnen und Halogenlampen. Entsorgen Sie Glühbirnen
und Halogenlampen bitte über den Hausmüll, sofern Sie nicht das WEEE Symbol
tragen.
• Jeder Verbraucher ist für das Löschen von personenbezogenen Daten auf dem
Elektro- bzw. Elektronikgerät selbst verantwortlich.
Rücknahmepicht der Vertreiber
Vertreiber mit einer Verkaufsäche für Elektro- und Elektronikgeräte von mindestens 400
Quadratmetern sowie Vertreiber von Lebensmitteln mit einer Gesamtverkaufäche von
mindestens 800 Quadratmetern, die mehrmals im Kalenderjahr oder dauerhaft Elektro-
und Elektronikgeräte anbieten und auf dem Markt bereitstellen, sind verpichtet,
1 bei der Abgabe eines neuen Elektro- oder Elektronikgerätes an einen Endnutzer ein
Altgerät des Endnutzers der gleichen Geräteart, das im Wesentlichen die gleichen
Funktionen wie das neue Gerät erfüllt, am Ort der Abgabe oder in unmittelbarer
Nähe hierzu unentgeltlich zurückzunehmen und
2 auf Verlangen des Endnutzers Altgeräte, die in keiner äußeren Abmessung größer
als 25 Zentimeter sind, im Einzelhandelsgeschäft oder in unmittelbarer Nähe hierzu
unentgeltlich zurückzunehmen; die Rücknahme darf nicht an den Kauf eines Elektro-
oder Elektronikgerätes geknüpft werden und ist auf drei Altgeräte pro Geräteart
beschränkt.

19
DE
• Bei einem Vertrieb unter Verwendung von Fernkommunikationsmitteln ist die
unentgeltliche Abholung am Ort der Abgabe auf Elektro- und Elektronikgeräte der
Kategorien 1, 2 und 4 gemäß § 2 Abs. 1 ElektroG, nämlich „Wärmeüberträger“,
„Bildschirmgeräte“ (Oberäche von mehr als 100 cm²) oder „Großgeräte“
(letztere mit mindestens einer äußeren Abmessung über 50Zentimeter)
beschränkt. Für andere Elektro- und Elektronikgeräte (Kategorien 3, 5, 6) ist eine
Rückgabemöglichkeit in zumutbarer Entfernung zum jeweiligen Endnutzer zu
gewährleisten.
• Altgeräte dürfen kostenlos auf dem lokalen Wertstoffhof oder in folgenden
Sammelstellen in Ihrer Nähe abgegeben werden: www.take-e-back.de
• Für Elektro- und Elektronikgeräte der Kategorien 1, 2 und 4 an bieten wir auch die
Möglichkeit einer unentgeltlichen Abholung am Ort der Abgabe. Beim Kauf eines
Neugeräts haben sie die Möglichkeit eine Altgerätabholung über die Webseite
auszuwählen.
• Batterien können überall dort kostenfrei zurückgegeben werden, wo sie verkauft
werden (z. B. Super-, Bau-, Drogeriemarkt). Auch Wertstoff- und Recyclinghöfe
nehmen Batterien zurück. Sie können Batterien auch per Post an uns zurücksenden.
Altbatterien in haushaltsüblichen Mengen können Sie direkt bei uns von Montag bis
Freitag zwischen 08:00 und 16:00 Uhr unter der folgenden Adresse unentgeltlich
zurückgeben:
Chal-Tec Fulllment GmbH
Norddeutschlandstr. 3
47475 Kamp-Lintfort
• Wichtig zu beachten ist, dass Lithiumbatterien aus Sicherheitsgründen vor der
Rückgabe gegen Kurzschluss gesichert werden müssen (z. B. durch Abkleben der
Pole).
• Finden sich unter der durchgestrichenen Mülltonne auf der Batterie zusätzlich die
Zeichen Cd, Hg oder Pb ist das ein Hinweis darauf, dass die Batterie gefährliche
Schadstoffe enthält. (»Cd« steht für Cadmium, »Pb« für Blei und »Hg« für
Quecksilber).
Hinweis zur Abfallvermeidung
Indem Sie die Lebensdauer Ihrer Altgeräte verlängern, tragen Sie dazu bei, Ressourcen
efzient zu nutzen und zusätzlichen Müll zu vermeiden. Die Lebensdauer Ihrer Altgeräte
können Sie verlängern indem Sie defekte Altgeräte reparieren lassen. Wenn sich
Ihr Altgerät in gutem Zustand bendet, könnten Sie es spenden, verschenken oder
verkaufen.

20
DE
HINWEISE ZUR ENTSORGUNG
Wenn es in Ihrem Land eine gesetzliche Regelung zur
Entsorgung von elektrischen und elektronischen Geräten
gibt, weist dieses Symbol auf dem Produkt oder auf der
Verpackung darauf hin, dass dieses Produkt nicht im
Hausmüll entsorgt werden darf. Stattdessen muss es zu
einer Sammelstelle für das Recycling von elektrischen
und elektronischen Geräten gebracht werden. Durch
regelkonforme Entsorgung schützen Sie die Umwelt und die
Gesundheit Ihrer Mitmenschen vor negativen Konsequenzen.
Informationen zum Recycling und zur Entsorgung dieses
Produkts, erhalten Sie von Ihrer örtlichen Verwaltung oder
Ihrem Hausmüllentsorgungsdienst.
HERSTELLER & IMPORTEUR (UK)
Hersteller:
Chal-Tec GmbH, Wallstraße 16, 10179 Berlin, Deutschland.
Importeur für Großbritannien:
Berlin Brands Group UK Limited
PO Box 42
272 Kensington High Street
London, W8 6ND
United Kingdom
21
EN
Dear Customer,
Congratulations on purchasing this device. Please read the
following instructions carefully and follow them to prevent
possible damages. We assume no liability for damage caused
by disregard of the instructions and improper use. Scan the QR
code to get access to the latest user manual and more product
information.
CONTENTS
TECHNICAL DATA
Item number 10034217, 10037975
Power supply 220-240 V ~ 50/60 Hz
Power consumption (watt) 1700 W
Capacity (litre) 14 l
Safety Instructions22
Product Overview24
Control Panel25
Installation25
Usage of the Accessories26
Operation29
Programs30
Function Settings31
Cleaning and Maintenance34
Disposal Considerations35
Manufacturer & Importer (UK)35
22
EN
ACCESSORIES
Note: The following accessories are not supplied, but are available for this item
under the following item numbers:
Item number
10034407 10034408 10034409
Accessory Basket Steak rack Skewer rack
Item number
10034410 10034411
Accessory Rolling cage Fry set
Item number
10037976 10037977 10037978
Accessory Tongs and skewers Mesh tray
Drip tray and
grid rack
SAFETY INSTRUCTIONS
• Keep this manual for future reference.
• This device may be only used by children 8 years old or older and persons with
limited physical, sensory and mental capabilities and / or lack of experience
and knowledge, provided that they have been instructed in use of the device by a
responsible person who understands the associated risks.
• Before using for the rst time, check that the voltage of your power outlet matches
the specied voltage.
• To avoid electric shock, do not immerse the power cord or the device itself in water
or other liquids.
• Keep children and pets away from the device during operation.
• After use, switch off the appliance and disconnect the mains plug from the socket.
• The unit should be operated separately from other units on a separate circuit. If the
circuit is overloaded by other devices, this device may not work properly.
• Take extreme care when moving a container containing hot food.
• Do not let the power cord hang over the edge of tables or work surfaces, and be
careful not to allow the power cord to come into contact with the hot surfaces of the
equipment.
• Always place the unit securely in the center of the table or worktop.
• Do not touch hot device surfaces. Use the handles to move or lift.
• Use of accessories not expressly recommended by the manufacturer may result in
injury.

23
EN
• Do not place the device on heat-sensitive glass surfaces, wooden surfaces or
tablecloths. Before use, always place a heat-insensitive plate with thermal insulation
under these surfaces.
• Never use the device if the power cord is damaged, if the device malfunctions or
has been damaged in any other way.
• Before cleaning or when not in use, switch off the device and disconnect the power
plug from the socket. Allow the device to cool down before removing or adding
any parts.
• Do not place the device in the immediate vicinity of hot gas or electric ovens or in a
heated oven.
• If the power plug does not t properly, always contact a qualied electrician to
minimize the potential for electrical shock. Never try to manipulate the power plug
in any way.
• Do not clean the device with metallic scouring pads. Small metal parts could break
off and short out the electrical components of the device, which could result in
electric shock or damage the device.
• To minimize the risk of electric shock, only prepare food in the supplied, coated,
non-stick container.
• This device is designed for indoor use only.
• Use the device only for its intended purpose.
CAUTION
Risk of burns! During hot air frying, hot steam is released through the air
outlets. Keep your hands and face at a safe distance from the steam
and from the air outlets. Also be careful of hot steam and air when you
remove appliance parts from the appliance.
24
EN
PRODUCT OVERVIEW
1
Housing
7
Cage tong
13
Rolling cage (optional)
2
Control panel
8
Chicken fork
14
Steak rack (optional)
3
Control knob with
ON/OFF button
9
Wire rack
15
Skewer rack (optional)
4
Power cord
10
Mesh basket
16
Frying pan (optional)
5
Inner chamber
11
Drip tray
17
High rack (optional)
6
Door
12
Basket (optional)

25
EN
CONTROL PANEL
INSTALLATION
Before rst Use
1. Remove all packaging materials, stickers and labels.
2. Clean the basket and all other accessories with hot water, dishwashing liquid, and
a non-abrasive sponge.
3. Wipe the inside and outside of the
appliance with a cloth.
4. A slight odour and smoke may occur
when the unit is rst used. These are
caused by production residues. This is
normal and disappears after a short
time.
5. Install the air outlet partition wall board
manually, and apply anti-tear glue on
the two screw heads before using the
appliance (see gure on the right).
Installation site
• Place the appliance on a horizontal surface.
• Keep at least 10 cm away from the back and sides of the appliance and keep it
away from curtains, wall coverings, and other combustible materials.
Buttons Digital
display
screen
Program selection
Rotisserie Time Top
heating
Light
Preset Temper-
ature
Bottom
heating
Manual
Control knob
with ON/OFF button
26
EN
USAGE OF THE ACCESSORIES
Drip tray
• Open the front door.
• Put the drip tray into the according to the directions shown in the gure below:
Wire rack
• Insert the wire rack into the unit according to the directions shown in the gure
below:
Mesh basket
• Put the food into the mesh basket, put it into the inner chamber, and close the door
(see gure below):
27
EN
Rotisserie fork
• By 360 degree rotation, more evenly. The scroll cooking mode is the default. Below
gures show the right way to cook a whole chicken with spindle and rotisserie forks:
Basket with handle (optional)
• Assemble the handle by clipping it into the corresponding slot of the basket. Then
place food into the basket, and take the basket into the inner chamber, remove the
handle, then close the door. Remember to slide the wire rack into the lowest slot and
then the place basket onto the wire rack. As shown in below gures:
• After cooking, make sure that the handle and the basket are tightly connected, grab
the handle, remove the basket from the cavity, and put it in a safe horizontal plane.
Rolling cage (optional)

28
EN
Skewer set (optional)
Rotisserie handle
High rack (optional)
• The high rack can be placed onto the drip tray, so that pans or cookware can be
separated from bottom heating tubes.
Notes for proper usage of the accessories
• Choose proper accessories for different cooking.
• Use personal GLOVES to take out the drip tray or wire rack after cooking nished.
• Always keep the drip tray stay in the lowest layer for gathering oil from fried food.
• Do not keep the food close to the heat pipe, keep the distance of 40 mm at a
minimum, because the food may get bigger after heating, depending on the actual
situation.
29
EN
There is a safety switch as shown in
the picture on the right:
Note: Only when the door is closed the appliance can work properly. If the switch is
not touched, the screen will display “--”.
OPERATION
1. When the power plug is plugged into the wall outlet, a beep sounds and the digital
screen and all indicator lights ash briey and turn off again.
2. Press the ON/OFF button, the digital screen is lit and the appliance goes into
standby mode.
3. In standby mode, except the ON/OFF button, the LIGHT button and the
MANUAL button , all other buttons are locked.
4. If no button is pressed for 60 seconds in standby mode, the appliance switches off
automatically.
5. In standby mode, turn the knob to program selection, select a program, and press
the ON/OFF button to start the program.
6. If you want to adjust the time or temperature of the program during operation or
program selection, press the TIME button or the TEMPERATURE button . The
corresponding number will ash on the display. While it is ashing, turn the knob to
set the temperature and time as desired.
7. During program selection as well as during operation, you can press the
ROTISSERIE button and the LIGHT button to turn on the respective
function. When the function is active, the corresponding indicator will light. Press
the ROTISSERIE button again to turn off the rotisserie function. Press the LIGHT
button again to turn off the light. In any mode, if the light is on and no button is
pressed for 60 seconds, it will automatically turn off.
8. By pressing the TOP HEATING button and the BOTTOM HEATING
button , you can switch the upper and lower heating elements on and off
independently of each other. When the respective heating element is on, the
corresponding button symbol will light. If both heating elements are off and you
press the ON/OFF button, several fast beeps will sound and the appliance will not
start. While a program is running, the TOP HEATING button and the BOTTOM
HEATING button are locked.
30
EN
9. If you press the ON/OFF button during operation, the running program is
cancelled, the display ashes and the appliance enters standby mode. The fan
will continue to run for one minute to dissipate heat, and the appliance will then
turn off automatically. (If you open the door during this delay time, the fan will
automatically turn off, but will restart when you close the door.) Press the ON/OFF
button again to switch off the appliance immediately.
Note: It is recommended that you wait until the fan stops automatically to allow the
inside of the appliance to cool sufciently before opening the door.
PROGRAMS
• The appliance has a variety of combinations of cooking time and cooking
temperature to meet different cooking needs.
• In standby mode, when you turn the control knob to select the desired program, the
corresponding indicator light will illuminate. Press the ON/OFF button to start the
appliance.
• In the following table you will nd our menu combinations. You can change the
cooking time and temperature according to your actual needs.
Menu Default
temperature
Default
time
Temperature
selection
Time
Selection
Heating
mode
Cake
180°C 30 min 50 – 220°C 1min – 1h
Fish
180°C 15 min 50 – 220°C 1min – 1h
Pizza
180°C 10 min 50 – 220°C 1min – 1h
Steak
180°C 12 min 50 – 220°C 1min – 1h
Toast
220°C 6 min 50 – 220°C 1min – 1h
Proof
40°C 90 min 40°C 1– 90 min
Wings
200°C 15 min 50 – 220°C 1min – 1h
Cookie
180°C 12 min 50 – 220°C 1min – 1h
Defrost
80°C 10 min 50 – 220°C 1min – 1h
Skewer
200°C 15 min 50 – 220°C 1min – 1h
Chicken
220°C 30 mins 50 – 220°C 1min – 1h
Popcorn
220°C 8 min 50 – 220°C 1min – 1h
Dehydrate
70°C 8 hour 50 – 70°C 10 min – 8h
Keep Warm
80°C 30 min 50 – 220°C 1min – 1h
31
EN
Menu Default
temperature
Default
time
Temperature
selection
Time
Selection
Heating
mode
Vegetables
180°C 12 min 50 – 220°C 1min – 1h
French Fries
220°C 20 min 50 – 220°C 1min – 1h
Note: The larger the chicken or the amount of food, the longer the preparation time.
Adjust the preparation temperature and time to your individual needs.
FUNCTION SETTINGS
Cooking time and temperature settings
1. If you want to adjust the cooking time and cooking temperature after selecting the
program, press the TIME button and the TEMPERATURE button .
2. Press the TEMPERATURE button to adjust the cooking temperature. The
corresponding number in the display starts ashing. Turn the control knob to
increase or decrease the temperature in 10°C steps. A temperature between
50°C and 220°C can be set.
3. Press the TIME button to adjust the cooking time. The corresponding number
starts ashing on the display. Turn the control knob to increase or decrease the time
in 1 minute steps. If the adjustable range is large, the time can be set in 10-minute
steps.
Pause function
• If the door is opened during operation, the appliance stops automatically. When
the door is open, all buttons except the ON/OFF button and the LIGHT button
are locked. If you close the door again, the appliance will continue to operate in
the previously set mode.
Note: If the door has been opened during operation and is not closed within
10minutes, the appliance will automatically turn off and the display shows “---”. The
appliance then remains turned off (even if you close the door now).
TIP: During preparation, turn the food at regular or irregular intervals to ensure that your
food is cooked evenly.
CAUTION
Risk of burns! During cooking, the appliance and all accessories are
very hot. Do not touch them with bare hands. It is recommended to use
oven gloves.
32
EN
Rotating function
• This function allows the food to be heated evenly. Press the ROTISSERIE button .
The corresponding button icon lights up on the control panel. Press the ROTISSERIE
button again to deactivate the function.
• Use the roast chicken fork as shown in the gure below:
Note: The total weight of the chicken should not exceed 1.2 kg when using the roast
chicken fork. Prepare chickens with a higher weight in the fry basket.
TIP: Fix the chicken legs and wings with a thread. Make small holes in the chicken legs
before preparation, as the meat is very thick in this area and it is difcult for the heat to
penetrate.
Manual setting function
• When you press the MANUAL button in standby mode, the corresponding
button icon on the control panel lights up. The default temperature is 120°C and
the default time is 20 minutes.
• Press the ON/OFF button to start.
• If you press the ON/OFF button again during operation, the appliance will stop
and the indicator light will turn off. The fan will continue to run for one minute before
it goes into standby mode.
• When you select this function, the 16 program selection indicator lights are off and
you can only adjust the cooking time and temperature. The maximum time that can
be set in this mode is one hour and a temperature between 50 °C – 220 °C can
be selected.
Start delay function (Preset)
• Press the ON/OFF button, the display will light.
• Turn the control knob to select the desired program in the program selection and
press the PRESET button to make the settings for the start delay. The display
will now show the preset time to start. The number ashes and can be adjusted by
turning the control knob in 10 minute steps. The maximum time that can be set is
9hours and 50 minutes, the shortest time is 10minutes.
33
EN
• As long as the program has not been started yet, the start delay can be cancelled
by pressing the PRESET button . (ATTENTION: If you press the TIME button
instead , the display will show the time of the selected program and not the
setting of the start delay function!)
• After selecting the desired time to start, press the ON/OFF button to complete the
start delay settings. Except of the ON/OFF button and the LIGHT button all
other buttons are now blocked. The start delay function can now only be cancelled
by pressing the ON/OFF button again. The program starts after the set lead time
has elapsed.
Cooking nish
1. The appliance beeps three times at the end of the preparation time and stops
heating. The fan continues to run for one minute until the temperature inside begins
to drop.
2. Open the door and remove the basket of prepared food. Place the basket on a at,
heat-resistant surface.
Note: When removing the basket from the appliance, do not touch the basket with
your bare hands. Use oven gloves.
TIP: If the food has not yet been fully cooked, put it back in the basket and let it cook for
a few minutes longer in the appliance.
3. Place the prepared food on a plate or other dish (see gure below).
4. After use, switch off the appliance and unplug the power plug from the socket.

34
EN
CLEANING AND MAINTENANCE
WARNING
Risk of electric shock! Do not immerse the power cord, plug or housing
in water or other liquids. This may result in damage to the product, re
or injury.
Note: Before cleaning, turn off the power and unplug the appliance from the wall
outlet.
• Remove all accessories.
• Clean the appliance after each use. Do not clean the accessories and the inside of
the appliance with pointed or sharp kitchen utensils or abrasive cleaners, as these
will damage the coating.
• Wipe the outside of the appliance with a soft, damp cloth.
• Clean the accessories with hot water, a little dishwashing detergent and a non-
abrasive sponge. Let the accessories dry before reinserting them into the unit.
• Remove stubborn grease residues with a degreasing liquid.
• Clean the inside of the appliance with a non-abrasive sponge.
• Clean the heating elements with a cleaning brush to remove food residue.
• If you will not be using the appliance for a long time, clean it before storing it.
• Store the appliance and its accessories in a dry, clean and non-corrosive
environment.
35
EN
DISPOSAL CONSIDERATIONS
If there is a legal regulation for the disposal of electrical
and electronic devices in your country, this symbol on the
product or on the packaging indicates that this product must
not be disposed of with household waste. Instead, it must be
taken to a collection point for the recycling of electrical and
electronic equipment. By disposing of it in accordance with
the rules, you are protecting the environment and the health of
your fellow human beings from negative consequences. For
information about the recycling and disposal of this product,
please contact your local authority or your household waste
disposal service.
MANUFACTURER & IMPORTER (UK)
Manufacturer:
Chal-Tec GmbH, Wallstrasse 16, 10179 Berlin, Germany.
Importer for Great Britain:
Berlin Brands Group UK Limited
PO Box 42
272 Kensington High Street
London, W8 6ND
United Kingdom

36

37
FR
FICHE TECHNIQUE
Numéro d'article 10034217, 10037975
Alimentation 220-240 V ~ 50/60 Hz
Puissance (watts) 1700 W
Capacité (litres) 14 l
Consignes de sécurité38
Aperçu de l‘appareil40
Panneau de commande41
Installation41
Utilisation des accessoires42
Utilisation46
Programmes47
Réglage des fonctions48
Nettoyage et entretien51
Informations sur le recyclage52
Fabricant et importateur (UK)52
Chère cliente, cher client,
Toutes nos félicitations pour l’acquisition de ce nouvel appareil.
Veuillez lire attentivement et respecter les instructions de ce mode
d’emploi an d’éviter d’éventuels dommages. Nous ne saurions
être tenus pour responsables des dommages dus au non-respect
des consignes et à la mauvaise utilisation de l’appareil. Scannez
le QR-Code pour obtenir la dernière version du mode d‘emploi
et à d‘autres informations concernant le produit.
SOMMAIRE
38
FR
ACCESSOIRES
Remarque : Les accessoires suivants ne sont pas inclus, mais sont disponibles pour
cet article sous les références suivantes:
Numéro d'article
10034407 10034408 10034409
Accessoires Panier Grille à steak Grille à brochettes
Numéro d'article
10034410 10034411
Accessoires Panier rotatif
Ensemble de
brochettes
Numéro d'article
10037976 10037977 10037978
Accessoires Pinces et brochettes Panier métallique
Plaque
d‘égouttement et
grille de cuisson
CONSIGNES DE SÉCURITÉ
• Conservez ce mode d‘emploi pour vous y référer ultérieurement.
• Les enfants âgés de 8 ans ou plus, les personnes ayant une décience mentale,
sensorielle ou physique ne sont autorisés à utiliser l‘appareil que s‘ils ont été
parfaitement familiarisés avec les fonctions et les précautions de sécurité par une
personne responsable de leur sécurité et s‘ils ont bien compris les risques encourus.
• Avant la première utilisation, vériez que la tension de votre prise secteur
correspond à la tension de l‘appareil.
• N‘immergez pas le cordon d‘alimentation, la che d‘alimentation ou l‘appareil
dans l‘eau ou tout autre liquide an d‘éviter tout choc électrique.
• Gardez les enfants et les animaux domestiques à l‘écart de l‘appareil pendant le
fonctionnement.
• Éteignez l‘appareil après utilisation et débranchez le cordon d‘alimentation de la
prise.
• L‘appareil doit être utilisé sur une prise et un circuit séparés des autres appareils. Si
le circuit est surchargé par d‘autres appareils, celui-ci pourrait ne pas fonctionner
correctement.
• Faites très attention lorsque vous déplacez un récipient contenant des aliments
chauds.
• Ne laissez pas le cordon d‘alimentation pendre du bord des tables et plans de
travail et ne laissez jamais le cordon d‘alimentation entrer en contact avec les
surfaces chaudes de l‘appareil.

39
FR
• Placez toujours l‘appareil en toute sécurité au centre de la table ou du plan de
travail.
• Ne touchez pas les surfaces chaudes de l‘appareil. Utilisez les poignées pour le
déplacer ou le soulever.
• L‘utilisation d‘accessoires non expressément recommandés par le fabricant peut
entraîner des blessures.
• Ne placez pas l‘appareil sur une surface en verre ou en bois ou des nappes
sensibles à la chaleur. Assurez-vous de placer une plaque résistante à la chaleur
comme protection contre la chaleur sous l‘appareil avant de l‘utiliser sur ces
surfaces.
• N‘utilisez pas l‘appareil si le cordon d‘alimentation est endommagé, s‘il ne
fonctionne pas correctement ou s‘il a été endommagé d‘une autre manière.
• Éteignez l‘appareil et débranchez le cordon d‘alimentation avant de le nettoyer ou
de le réparer, ou lorsque vous cessez de l‘utiliser. Laissez l’appareil refroidir avant
de retirer ou d’ajouter des pièces.
• Ne placez pas l‘appareil à proximité immédiate de fours à gaz chauds ou
électriques, ni dans un four chauffé.
• Si la che d‘alimentation n‘est pas correctement branchée, contactez un électricien
qualié an de réduire le risque de choc électrique. N‘essayez jamais de bricoler
la che d‘alimentation de quelque manière que ce soit.
• Ne nettoyez pas l‘appareil avec des tampons à récurer métalliques. De petites
pièces métalliques pourraient se détacher et provoquer un court-circuit des
composants électriques de l‘appareil, ce qui pourrait provoquer un choc électrique
et endommager l‘appareil.
• An de minimiser les risques d‘électrocution, préparez les aliments uniquement dans
le récipient antiadhésif fourni.
• Utilisez l‘appareil uniquement aux ns prévues.
ATTENTION
La friture à l‘air chaud produit une vapeur chaude au niveau des sorties
d‘air. Tenez vos mains et votre visage à une distance de sécurité des
bouches d’air et de vapeur. Faites également attention à la vapeur et à
l‘air chaud lorsque vous retire des pièces de l‘appareil.

40
FR
APERÇU DE L‘APPAREIL
1
Boîtier
7
Pince à panier
13
Panier rotatif (en
option)
2
Panneau de
commande
8
Broche à poulet
14
Grille à steak (en
option)
3
Bouton avec fonction
marche/arrêt
9
Grille de cuisson
15
Grille à brochettes
(en option)
4
Câble secteur
10
Panier métallique
16
Panier à friture (en
option)
5
Espace intérieur
11
Plaque
d‘égouttement
17
Insert de grille haute
(en option)
6
Porte
12
Panier (en option)
41
FR
PANNEAU DE COMMANDE
INSTALLATION
Avant la première utilisation
1. Retirez tous les matériaux d‘emballage, les autocollants et les étiquettes.
2. Nettoyez tous les accessoires avec de l’eau chaude, du savon et une éponge non
abrasive.
3. Essuyez l‘intérieur de l‘appareil et l‘extérieur
de l‘appareil avec un chiffon.
4. Lors de la première utilisation, l‘appareil
peut dégager un peu de fumée et une
légère odeur. Ceci est normal et disparaît
rapidement.
5. Installez manuellement la cloison de
ventilation et appliquez un adhésif résistant
à la déchirure sur les deux têtes de vis
avant de faire fonctionner l‘appareil (voir
l‘illustration à droite).
Emplacement
• Placez l‘appareil sur une surface plane.
• Veillez à respecter une distance minimale de 10 cm avec les matériaux
inammables tels que les rideaux, les revêtements muraux, etc.
Touches Ecran Sélection du programme
Rôtissoire
(tourner)
Durée Chaleur
voûte
Eclairage
Temporisation
(Preset)
Temp. Chaleur
de sole
Manuel
Bouton
avec commande (ON/OFF)
42
FR
UTILISATION DES ACCESSOIRES
Plaque d‘égouttement
• Ouvrez la porte de l‘appareil.
• Faites glisser la plaque d‘égouttement dans l’appareil (voir la gure suivante).
Grille
• Glissez la grille à l‘intérieur de l‘appareil (voir la gure ci-dessous).
Panier grillagé
• Placez les aliments que vous souhaitez préparer dans le panier grillagé. Placez
celui-ci à l‘intérieur de l‘appareil et fermez la porte (voir la gure ci-dessous).
43
FR
Fourche de rôtissoire
• La rotation à 360 degrés permet une cuisson uniforme. Le mode de rotation est
réglé en usine. L‘illustration ci-dessous montre la méthode correcte pour cuire un
poulet entier avec une fourche et une rôtissoire.
Panier avec poignée (option)
• Fixez la poignée en l’enfonçant dans la fente prévue sur le panier. Placez ensuite
les aliments à préparer dans le panier et placez celui-ci à l‘intérieur de l‘appareil.
Puis retirez la poignée et fermez la porte.
Remarque : Poussez d’abord la grille au niveau le plus bas dans l’appareil an que
le panier puisse y être placé (voir gure ci-dessous).
• En n de cuisson, assurez-vous que la poignée est correctement xée au panier
avant de l‘utiliser pour retirer celui-ci de l‘appareil. Placez le panier sur une surface
plane et résistante à la chaleur.
44
FR
Panier rotatif (option)
Kit brochettes (option)
Poignée du panier rotatif

45
FR
Accessoire grille surélevée (option)
• La grille surélevée peut se placer sur la plaque d‘égouttage de manière à ce que
les casseroles ou autres ustensiles de cuisson soient sufsamment espacés des
barres de chauffage au bas de l‘appareil.
Remarques sur l‘utilisation prévue des accessoires
• Utilisez toujours des accessoires de cuisson adaptés aux différents types de
préparation.
• Utilisez des gants après la cuisson pour retirer les accessoires.
• Placez toujours la plaque d‘égouttement sur la glissière la plus basse.
• Assurez-vous qu‘il y a une distance minimale de 40 mm entre les aliments et les
éléments chauffants, car les aliments peuvent se dilater en chauffant.
Comme le montre la gure à
droite, l‘appareil est équipé d‘un
disjoncteur.
Remarque : L‘appareil ne fonctionne correctement que lorsque la porte est fermée.
Si vous ne touchez par le disjoncteur, l‘écran afche „-“.
46
FR
UTILISATION
1. Lorsque vous branchez le cordon d‘alimentation dans la prise, un bip retentit,
l‘écran numérique et tous les voyants clignotent brièvement, puis s‘éteignent à
nouveau.
2. Appuyez sur la touche ON / OFF, l‘écran s‘allume et l‘appareil passe en mode
veille.
3. En mode veille, toutes les autres touches, à l‘exception des touches ON / OFF,
LIGHT et MANUAL sont verrouillées.
4. Si vous n‘appuyez sur aucune touche pendant 60 secondes en mode veille,
l‘appareil s‘éteint automatiquement.
5. En mode veille, tournez le bouton de sélection, sélectionnez un programme et
appuyez sur la touche ON / OFF pour démarrer le programme.
6. Si vous souhaitez régler la durée ou la température du programme pendant le
fonctionnement ou modier la sélection du programme, appuyez sur la touche
ou TEMPERATUR . Le nombre correspondant clignote à l‘écran. Pendant qu‘il
clignote, tournez le bouton pour régler la température et la durée comme vous le
souhaitez.
7. Pendant la sélection du programme et pendant le fonctionnement, vous pouvez
appuyer sur les touches et LIGHT pour activer la fonction correspondante.
Lorsque la fonction est activée, le symbole de la touche correspondante s’allume.
Appuyez à nouveau sur la touche pour désactiver la fonction de tournebroche.
Appuyez à nouveau sur la touche pour éteindre la lumière de l‘appareil. Si
vous n‘appuyez sur aucune touche pendant plus de 60 secondes dans n‘importe
quel mode, la lumière s‘éteint également automatiquement.
8. Appuyez sur les touches CHALEUR DE VOÛTE et CHALEUR DE SOLE
pour activer et désactiver indépendamment les éléments chauffants supérieur
et inférieur. Lorsque l‘élément chauffant correspondant est allumé, le symbole
correspondant s‘allume. Si les deux éléments chauffants sont éteints et que vous
appuyez sur la touche ON / OFF, plusieurs bips rapides retentissent et l‘appareil
ne démarre pas. Lorsqu‘un programme est en cours d‘exécution, les touches
CHALEUR DE VOÛT et CHALEUR DE SOLE sont verrouillées .
9. Si vous appuyez sur la touche ON / OFF pendant le fonctionnement, le
programme en cours sera interrompu, l‘afchage clignote et l‘appareil passe
en mode veille. Le ventilateur continue de fonctionner pendant une minute pour
dissiper la chaleur, puis l‘appareil s‘éteint automatiquement. (Si vous ouvrez la
porte pendant ce délai, le ventilateur s‘éteint automatiquement, mais redémarre
si vous refermez la porte.) Appuyez à nouveau sur la touche ON / OFF pour
éteindre immédiatement l‘appareil.
Remarque : Il est recommandé d‘attendre que le ventilateur s‘éteigne
automatiquement pour permettre à l‘intérieur de l‘appareil de refroidir sufsamment
avant d‘ouvrir la porte.

47
FR
PROGRAMMES
• L‘appareil offre de nombreuses combinaisons de temps et de températures de
cuisson pour répondre aux différents besoins.
• Tournez le bouton en mode veille pour sélectionner le programme souhaité et
allumer le voyant correspondant. Appuyez maintenant sur la touche ON / OFF
pour démarrer l’appareil.
• Le tableau ci-dessous présente nos combinaisons de menus. Vous pouvez ajuster le
temps de cuisson et la température en fonction de vos besoins.
Programme Plat / fonction Température
programme
Durée
programme
Sélection
température
Choix durée Mode
chauffage
Cake
Gâteau 180°C 30 min 50 – 220°C 1min – 1h
Fish
Poisson 180°C 15 min 50 – 220°C 1min – 1h
Pizza
Pizza 180°C 10 min 50 – 220°C 1min – 1h
Steak
Steak 180°C 12 min 50 – 220°C 1min – 1h
Toast
Toast 220°C 6 min 50 – 220°C 1min – 1h
Proof
Levée (de pâte) 40°C 90 min 40°C 1 – 90 min
Wings
Ailes 200°C 15 min 50 – 220°C 1min – 1h
Cookie
Biscuits 180°C 12 min 50 – 220°C 1min – 1h
Defrost
Décongélation 80°C 10 min 50 – 220°C 1min – 1h
Skewer
Brochette 200°C 15 min 50 – 220°C 1min – 1h
Chicken
Poulet 220°C 30 mins 50 – 220°C 1min – 1h
Popcorn
Popcorn 220°C 8 min 50 – 220°C 1min – 1h
Dehydrate
Déshydrater 70°C 8 hour 50 – 70°C 10 min – 8h
Keep Warm
Maintien au
chaud
80°C 30 min 50 – 220°C 1min – 1h
Vegetables
Légumes 180°C 12 min 50 – 220°C 1min – 1h
French Fries
Frites 220°C 20 min 50 – 220°C 1min – 1h
Remarque : Plus le poulet ou la quantité de nourriture est volumineuse, plus la
cuisson est longue. Adaptez la température et le temps de préparation à vos besoins
individuels.
48
FR
RÉGLAGE DES FONCTIONS
Réglage de la durée et de la température de cuisson
1. Si, après avoir sélectionné le programme, vous souhaitez régler le temps et la
température de cuisson, appuyez sur les touches TIME et TEMPERATUR .
2. Appuyez sur la touche TEMPERATUR-Taste pour régler la température de cuisson Le
nombre correspondant clignote à l‘écran. Tournez le bouton pour augmenter ou
diminuer la température par 10 °C. Vous pouvez régler une température entre 50
°C et 220 °C.
3. Appuyez sur la touche pour régler la durée de cuisson. Le nombre
correspondant clignote à l‘écran. Tournez le bouton pour augmenter ou diminuer la
durée par 1 minute. Si la plage de réglage est large, vous pouvez régler la durée
par 10 minutes.
Fonction pause
• Si vous ouvrez la porte en cours de fonctionnement, l‘appareil s‘arrête
automatiquement. Lorsque la porte est ouverte, toutes les touches sauf les touches
ON / OFF, LIGHT et ROTISSERIE sont verrouillées. Lorsque vous refermez la
porte, l‘appareil reprend le fonctionnement dans le mode précédemment déni.
Remarque : Si la porte est ouverte pendant le fonctionnement et n‘est pas refermée
dans les 10 minutes, l‘appareil s‘éteint automatiquement et l‘écran afche „---“.
L‘appareil reste alors éteint (même si vous refermez maintenant la porte).
CONSEIL : Retournez les aliments à intervalles réguliers ou irréguliers pendant la
cuisson pour leur assurer une cuisson uniforme.
ATTENTION
Risque de brûlure ! Pendant le fonctionnement, l‘appareil et les
accessoires deviennent très chauds. Ne les touchez pas à mains nues.
Ilest recommandé de porter des gants de cuisine.
Fonction rotation (Rôtissoire)
• Cette fonction permet une cuisson uniforme des aliments. Appuyez sur la touche
. Le symbole correspondant s’allume sur le panneau de commande. Appuyez à
nouveau sur la touche ROTISSERIE pour désactiver la fonction .
• Utilisez la broche à poulet comme indiqué dans l‘illustration suivante.
49
FR
Remarque : Le poids total du poulet ne doit pas dépasser 1,2 kg pour l‘utilisation de
la rôtissoire. Préparez les poulets plus lourds dans le panier à friture.
CONSEIL : Fixez les cuisses et les ailes de poulet avec un l. Faites de petits trous dans
les cuisses de poulet avant de les cuire car la viande est très épaisse à cet endroit et
peut être difcile à pénétrer par la chaleur.
Fonction de réglage manuel
• Lorsque vous appuyez sur la touche en mode veille, l’icône de la touche
correspondante s’allume sur le panneau de commande. La température par défaut
est de 120 °C et la durée préréglée de 20 minutes.
• Appuyez sur la touche ON / OFF pour commencer.
• Si vous appuyez à nouveau sur la touche ON / OFF pendant le fonctionnement,
l‘appareil s‘arrête et le témoin s‘éteint. Le ventilateur continue de fonctionner
pendant une minute avant de mettre l‘appareil en mode veille.
• Lorsque vous sélectionnez cette fonction, les 16 voyants de sélection de programme
sont éteints et vous ne pouvez régler que le temps de cuisson et la température.
La durée maximum réglable dans ce mode est d‘une heure et une température est
réglable entre 50 °C et 220 °C.
Fonction préréglage de la durée (Preset)
• Appuyez sur le bouton ON / OFF pour allumer l’écran.
• Tournez le bouton rotatif pour sélectionner le programme souhaité dans la
sélection. Appuyez ensuite sur la touche , pour dénir les paramètres de délai.
L‘écran afche maintenant le délai préréglée pour commencer. Le nombre clignote
et peut être modié en tournant le bouton par incréments de 10 minutes. La durée
maximale réglable est de 9 heures et 50 minutes, la plus courte durée est de
10minutes.
• Tant que le programme n‘a pas encore été démarré, le délai peut être annulé
en appuyant sur la touche (ATTENTION : si vous appuyez à la place sur la
touche c‘est l’heure du programme sélectionné qui s‘afche à l’écran, et non le
délai!).

50
FR
• Après avoir sélectionné l‘heure de démarrage souhaitée, appuyez sur la touche
ON / OFF pour terminer le réglage du délai. À l‘exception des touches ON / OFF
et LIGHT, toutes les autres touches sont maintenant verrouillées. La temporisation ne
peut maintenant être annulée qu’en appuyant de nouveau sur la touche ON / OFF.
Le programme commence à la n du temps préréglé.
Fin de préparation
1. L‘appareil émet trois bips à la n du temps de cuisson et cesse de chauffer.
Le ventilateur continue de fonctionner pendant une minute jusqu‘à ce que la
température à l‘intérieur commence à baisser.
2. Ouvrez la porte et sortez le panier avec les plats préparés. Posez le panier sur une
surface plane et résistante à la chaleur.
Remarque : Lorsque vous retirez le panier de l‘appareil, ne le touchez pas à mains
nues. Utilisez des gants de cuisine.
CONSEIL : Si les aliments ne sont pas bien cuits, remettez-les dans le panier et faites-les
cuire encore quelques minutes.
3. Placez le plat préparé dans une assiette ou d‘autres ustensiles (voir la gure ci-
dessous).
4. Éteignez l‘appareil après utilisation et débranchez le cordon d‘alimentation de la
prise.

51
FR
NETTOYAGE ET ENTRETIEN
MISE EN GARDE
Risque d‘électrocution ! N‘immergez pas le cordon d‘alimentation, la
che et le boîtier de l‘appareil dans de l‘eau ou tout autre liquide. Cela
pourrait endommager l‘appareil, provoquer un incendie ou des
blessures.
Remarque : Eteignez l‘appareil avant de le nettoyer et débranchez le cordon
d‘alimentation de la prise.
• Retirez les accessoires.
• Nettoyez l‘appareil après chaque utilisation. Ne nettoyez pas les accessoires et
l‘intérieur de l‘appareil avec des ustensiles de cuisine pointus ou tranchants ou des
produits abrasifs, car ils risqueraient d‘endommager le revêtement.
• Essuyez l‘extérieur de l‘appareil avec un chiffon doux et humide.
• Nettoyez les accessoires à l’eau chaude, avec du liquide vaisselle et une éponge
non abrasive. Faites sécher les accessoires avant de le remettre dans l’appareil.
• Éliminez les résidus de graisse tenaces avec un dégraissant liquide.
• Nettoyez l‘intérieur de l‘appareil avec une éponge non abrasive.
• Nettoyez l‘élément chauffant avec une brosse de nettoyage pour éliminer les
résidus d‘aliments.
• Si vous n‘utilisez pas l‘appareil pendant une longue période, nettoyez-le avant de
le ranger.
• Rangez l‘appareil et ses accessoires dans un endroit sec, propre et à l‘abri de la
corrosion.

52
FR
INFORMATIONS SUR LE RECYCLAGE
S‘il existe une réglementation pour l‘élimination ou le
recyclage des appareils électriques et électroniques dans
votre pays, ce symbole sur le produit ou sur l‘emballage
indique que cet appareil ne doit pas être jeté avec les
ordures ménagères. Vous devez le déposer dans un point
de collecte pour le recyclage des équipements électriques
et électroniques. La mise au rebut conforme aux règles
protège l‘environnement et la santé de vos semblables des
conséquences négatives. Pour plus d‘informations sur le
recyclage et l‘élimination de ce produit, veuillez contacter
votre autorité locale ou votre service de recyclage des
déchets ménagers.
FABRICANT ET IMPORTATEUR (UK)
Fabricant :
Chal-Tec GmbH, Wallstraße 16, 10179 Berlin, Allemagne.
Importateur pour la Grande Bretagne :
Berlin Brands Group UK Limited
PO Box 42
272 Kensington High Street
London, W8 6ND
United Kingdom

53
ES
DATOS TÉCNICOS
Número de artículo 10034217, 10037975
Suministro eléctrico 220-240 V ~ 50/60 Hz
Potencia (vatios) 1700 W
Capacidad (litros) 14 l
Indicaciones de seguridad54
Vista general del aparato56
Panel de control57
Instalación57
Uso de los accesorios58
Utilización62
Programas63
Congurar funciones64
Limpieza y cuidado67
Indicaciones sobre la retirada del aparato68
Fabricante e importador (Reino Unido)68
Estimado cliente:
Le felicitamos por la adquisición de este producto. Lea
atentamente las siguientes instrucciones y sígalas para evitar
posibles daños. No asumimos ninguna responsabilidad por los
daños causados por el incumplimiento de las instrucciones y el
uso inadecuado. Escanee el siguiente código QR para obtener
acceso a la última guía del usuario y más información sobre el
producto.
ÍNDICE

54
ES
ACCESORIOS
Nota: Los siguientes accesorios no están incluidos, pero están disponible por
separado para este artículo con el siguiente número de producto:
Número de artículo
10034407 10034408 10034409
Accesorio Cesta Rejilla para letes Espetón
Número de artículo
10034410 10034411
Accesorio Cesta giratoria Set de espetón
Número de artículo
10037976 10037977 10037978
Accesorio Pinzas y espetones Cesta de rejilla
Bandeja de goteo
y rejilla
INDICACIONES DE SEGURIDAD
• Conserve el manual de instrucciones para usos posteriores.
• Los niños mayores de 8 años y las personas con discapacidades físicas, sensoriales
o psíquicas solamente podrán utilizar el aparato si han sido previamente instruidas
sobre su uso y conocen las indicaciones de seguridad y los riesgos que entraña su
uso.
• Antes de utilizar el aparato, asegúrese de que la tensión de la toma de corriente
coincida con la indicada en la placa técnica del aparato.
• No sumerja el aparato, el cable de alimentación ni el enchufe en agua ni en
ningún otro líquido para evitar descargas eléctricas.
• Mantenga a los niños y mascotas alejados del aparato.
• Apague el aparato y desconecte el enchufe de la toma de corriente tras su uso.
• El aparato debe conectarse a un circuito eléctrico independiente de otros
dispositivos. Si se sobrecarga el circuito eléctrico de otros dispositivos, es posible
que este aparato no funcione correctamente.
• Extreme las precauciones cuando mueva un recipiente que contenga alimentos
calientes.
• Asegúrese de que el cable de alimentación no quede colgando de los cantos de
mesas y supercies ni que entre en contacto con las supercies calientes.
• Coloque el aparato en medio de la supercie de trabajo o de la mesa.
• No toque las supercies calientes del aparato. Utilice las asas para mover o
levantar el aparato.
• La utilización de accesorios que no hayan sido recomendados expresamente por
el fabricante puede provocar lesiones.

55
ES
• No coloque el aparato sobre supercies que no sean resistentes al calor,
supercies de madera, de cristal o manteles. Sobre dichas supercies, coloque
siempre un soporte resistente al calor con protección bajo el aparato antes de
utilizarlo.
• No utilice el aparato en ningún caso si el cable de alimentación está dañado, si
el aparato presenta problemas en el funcionamiento o si se ha visto dañado de
cualquier modo.
• Antes de limpiar el aparato o si no lo utiliza, apáguelo y desconecte el enchufe de
la toma de corriente. Deje que el aparato se enfríe por completo antes de montarlo
o desmontarlo.
• No coloque el aparato cerca de hornos eléctricos o de gas o dentro de un horno
caliente.
• Contacte con un electricista cualicado en caso de que el enchufe no encaje
para minimizar un riesgo potencial de descarga eléctrica. En ningún caso intente
manipular el enchufe.
• No limpie el aparato con lanas de acero. Las pequeñas piezas metálicas pueden
romperse y cortocircuitar componentes eléctricos del aparato, lo que provocaría
una descarga eléctrica y una posible avería del aparato.
• Prepare los alimentos para minimizar el riesgo de descarga eléctrica
exclusivamente en los recipientes incluidos en el envío con recubrimiento
antiadherente. El aparato solamente es apto para un uso doméstico y en interiores.
• Utilice el aparato solamente para el n indicado en este manual.
ATENCIÓN
Existe riesgo de quemaduras. Durante el proceso de fritura con aire
caliente, se liberará vapor caliente a través de las salidas de aire.
Mantenga las manos y el rostro a una distancia segura del vapor y de
las salidas de aire. Tenga cuidado con el vapor y el aire caliente
cuando extraiga accesorios del aparato.

56
ES
VISTA GENERAL DEL APARATO
1
Carcasa
7
Mango para la
cesta
13
Cesta giratoria
(opcional)
2
Panel de control
8
Espetón para pollo
14
Rejilla para letes
(opcional)
3
Regulador con
botón ON/OFF
9
Rejilla
15
Espetón de rejilla
(opcional)
4
Cable de
alimentación
10
Cesta de rejilla
16
Cesta para freír
(opcional)
5
Interior
11
Bandeja de goteo
17
Accesorio de rejilla
elevado (opcional)
6
Puerta
12
Cesta (opcional)
57
ES
PANEL DE CONTROL
INSTALACIÓN
Antes del primer uso
1. Retire todo el material de embalaje, pegatinas y etiquetas.
2. Limpie todos los accesorios con agua caliente, lavavajillas y una esponja no
abrasiva.
3. Limpie el interior y el exterior del aparato
con un paño.
4. En la primera puesta en marcha del
aparato puede aparecer un ligero olor y
humo. Se trata de un fenómeno normal
y desaparecerá en un periodo breve de
tiempo.
5. Monte la pared separadora de la salida
de aire manualmente y, antes de poner en
marcha el aparato, aplique pegamento
resistente en las dos cabezas de los tornillos
(véase ilustración de la derecha).
Lugar de instalación
• Coloque el aparato en una supercie plana.
• Asegúrese de que se guarde una distancia mínima de 10 cm con respecto a
materiales fácilmente inamables, como cortinas, revestimientos de paredes, etc.
Botones Pantalla Selección de programa
Asado
(girar)
Tiempo Calor
arriba
Luz
Preselección
de tiempo
(Preset)
Tempe-
ratura
Calor
abajo
Manual
Regulador
con botón (ON/OFF)
58
ES
USO DE LOS ACCESORIOS
Bandeja antigoteo
• Abra la puerta del aparato.
• Deslice la bandeja antigoteo en el interior del aparato (véase la siguiente
ilustración).
Rejilla
• Introduzca la rejilla dentro del aparato (véase ilustración inferior).
Cesta de rejilla
• Introduzca los alimentos que desea preparar dentro de la cesta de rejilla.
Colóquela en el interior del aparato y cierre la puerta (véase ilustración inferior).
59
ES
Espetón
• La rotación de 360 grados le permite lograr una cocción uniforme. El modo
giratorio está precongurado de fábrica. En la ilustración siguiente se representa el
método correcto para preparar un pollo entero con espetón y brochetas de asado.
Cesta con asa (opcional)
• Fije el asa encajando la ranura prevista para ello en la cesta. A continuación,
coloque los alimentos que debe preparar en la cesta y esta, en el interior del
aparato. A continuación, coloque el mango y cierre la puerta.
Nota: Primero coloque la rejilla en el último nivel del aparato para poder colocar la
cesta encima (véase la ilustración inferior).
Tras la preparación, asegúrese de que el mango esté bien jado a la cesta antes de
cogerla por el mango para extraerla del aparato. Coloque la cesta en una supercie
plana y resistente al calor.

60
ES
Cesta giratoria (opcional)
Juego de espetón (opcional)
Mango de la cesta giratoria
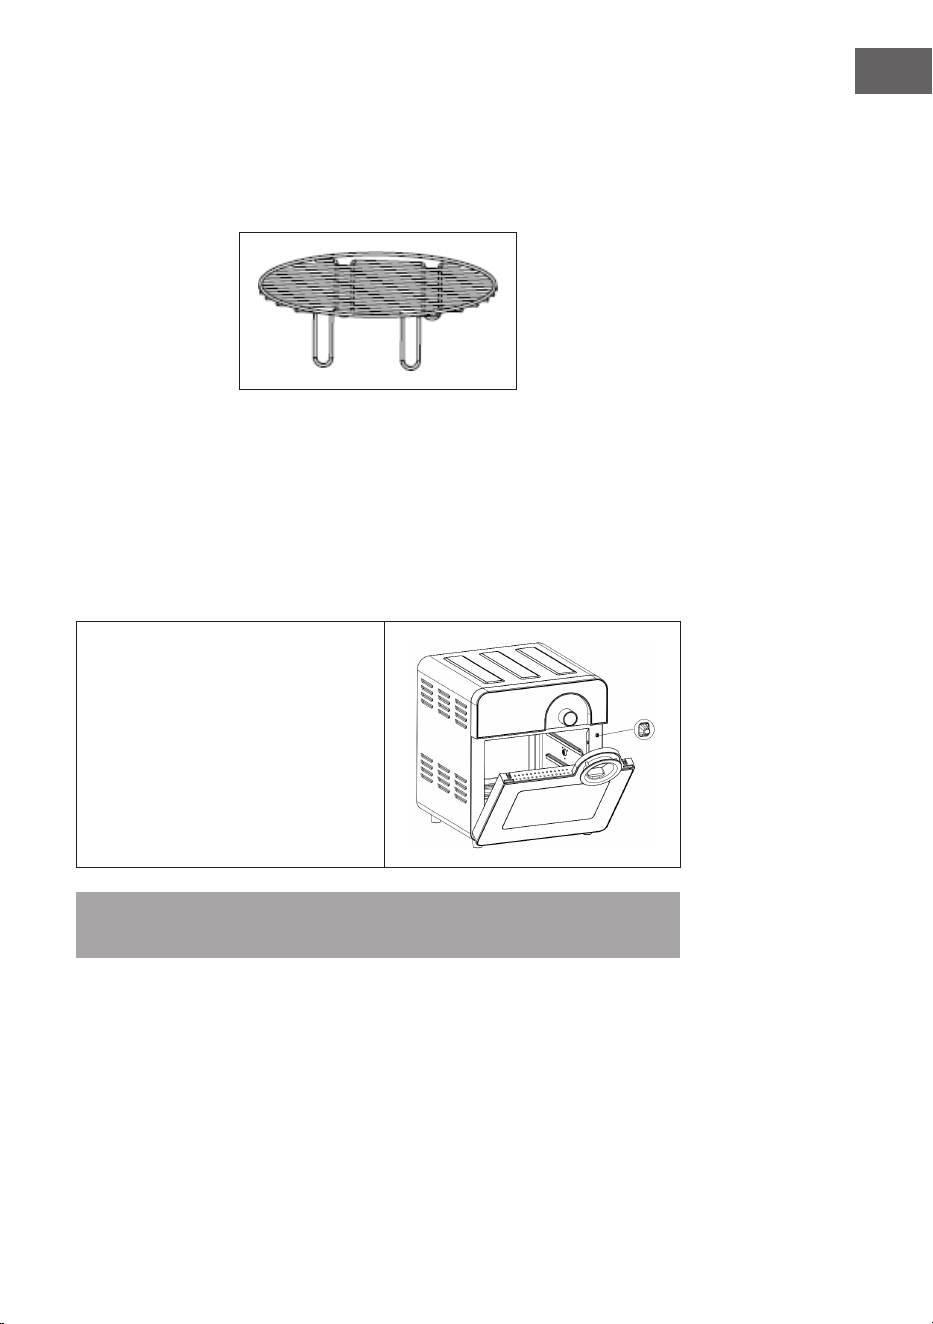
61
ES
Accesorio de rejilla elevado (opcional)
• El accesorio de rejilla elevado se puede colocar sobre la bandeja antigoteo de
modo que las sartenes u otros utensilios de cocina tengan una distancia suciente
con las resistencias de la base del aparato.
Indicaciones para un uso correcto de los accesorios
• Utilice siempre un accesorio de cocina adecuado para distintos tipos de
preparación.
• Tras la preparación, utilice guantes para retirar el accesorio.
• Coloque la bandeja antigoteo siempre en el riel de entrada más bajo.
• Asegúrese de que entre los alimentos y la resistencia exista una distancia mínima
de 40 mm para que los alimentos puedan expandirse cuando se calienten.
Como se representa en la
ilustración, el aparato dispone de
un disyuntor.
Nota: El aparato funciona solamente con la puerta cerrada correctamente. Si el
disyuntor no se toca, la pantalla muestra „--“.
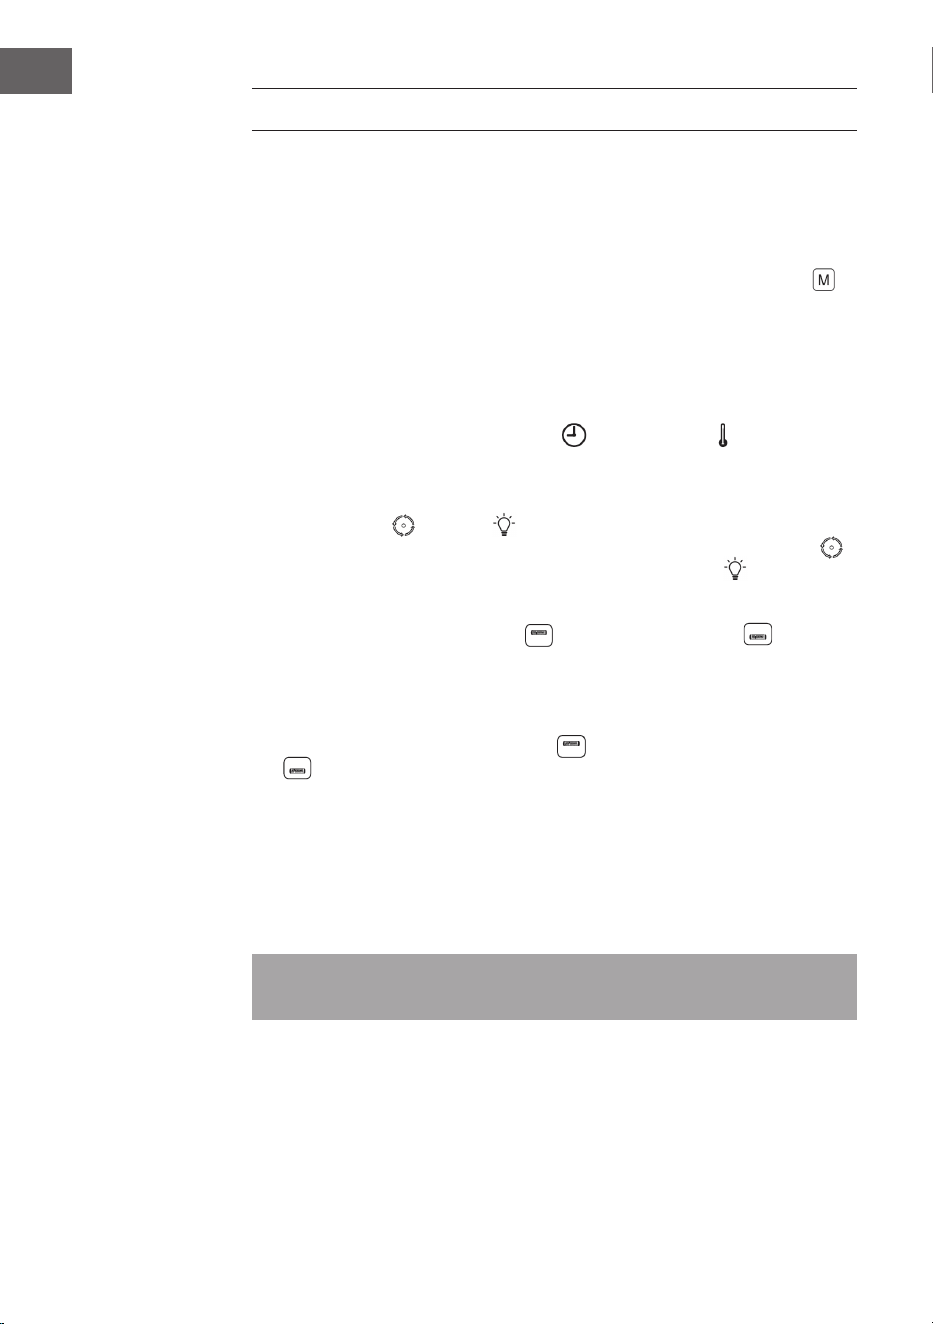
62
ES
UTILIZACIÓN
1. Cuando conecte el enchufe a la toma de corriente, suena una señal y la pantalla
digital y todos los indicadores de funcionamiento parpadean brevemente y luego
se apagan.
2. Pulse el botón ON/OFF, el indicador luminoso se ilumina y el aparato cambia al
modo standby.
3. En modo standby, excepto el botón ON/OFF, el botón de la LUZ y el botón
todos los botones se encuentran bloqueados.
4. Si no se presiona ningún botón en 60 segundos, el aparato se apaga
automáticamente.
5. Gire el regulador giratorio en modo standby para seleccionar los programas, elija
un programa y pulse el botón ON/OFF para iniciar un programa.
6. Si durante el funcionamiento o la selección del programa desea ajustar el tiempo
o la temperatura de este, pulse el botón o TEMPERATURA . El dígito
correspondiente parpadea en pantalla. Mientras siga parpadeando, gire el
regulador para ajustar como desee la temperatura y la hora.
7. Tanto durante la selección del programa como durante el funcionamiento, puede
pulsar el botón y el botón para activar la respectiva función. Si la función
está activada, se ilumina el símbolo correspondiente. Pulse de nuevo el botón
para desactivar la función del espetón. Pulse de nuevo el botón para apagar
la luz del aparato. Si en cualquier modo no pulsa ningún botón en 60 segundos, la
luz se apaga automáticamente.
8. Pulsando el botón CALOR ARRIBA y el botón CALOR ABAJO puede
activar y desactivar de manera independiente la resistencia superior e inferior.
Cuando cada una de las resistencias esté encendida, se ilumina el símbolo
correspondiente. Si ambas resistencias están apagadas y pulsa el botón ON/OFF,
suenan varias señales acústicas y el aparato no se inicia. Mientras funciona un
programa, los botones CALOR ARRIBA y CALOR ABAJO están bloqueados
.
9. Si pulsa el botón ON/OFF durante el funcionamiento, se interrumpe el programa
actual, la pantalla parpadea y el aparato se cambia al modo standby. El
ventilador continúa funcionando otro minuto para disipar el calor y el aparato
se apaga automáticamente a continuación. (Si en ese periodo de tiempo abre la
puerta, el ventilador se apagará automáticamente, pero se reiniciará en cuanto
cierre la puerta). Pulse otra vez el botón ON/OFF para apagar enseguida el
aparato.
Nota: Se recomienda esperar a que el aparato se haya apagado automáticamente
para que el interior del aparato se enfríe lo suciente antes de abrir la puerta.
63
ES
PROGRAMAS
• El aparato dispone de una variedad de combinaciones de tiempos y temperatura
de preparación para corresponder con distintas necesidades de cocción.
• Si selecciona con el regulador el modo standby para seleccionar el programa
deseado, el indicador luminoso se enciende. Pulse el botón ON/OFF para iniciar
el aparato.
• En la siguiente tabla encontrará nuestras combinaciones de menú. Puede
ajustar como corresponda el tiempo de cocción y la temperatura acorde a sus
necesidades.
Programa Plato /Función Temperatura
programa
Tiempo
programa
Selección
temperatura
Selección
tiempo
Modo
calor
Cake
Bizcocho 180°C 30 min 50 – 220°C 1min – 1h
Fish
Pescado 180°C 15 min 50 – 220°C 1min – 1h
Pizza
Pizza 180°C 10 min 50 – 220°C 1min – 1h
Steak
Filete 180°C 12 min 50 – 220°C 1min – 1h
Toast
Tostada 220°C 6 min 50 – 220°C 1min – 1h
Proof
Subir (masa) 40°C 90 min 40°C 1 – 90 min
Wings
Ave 200°C 15 min 50 – 220°C 1min – 1h
Cookie
Galletas 180°C 12 min 50 – 220°C 1min – 1h
Defrost
Descongelar 80°C 10 min 50 – 220°C 1min – 1h
Skewer
Espetón 200°C 15 min 50 – 220°C 1min – 1h
Chicken
Pollo 220°C 30 mins 50 – 220°C 1min – 1h
Popcorn
Palomitas 220°C 8 min 50 – 220°C 1min – 1h
Dehydrate
Deshidratar 70°C 8 hour 50 – 70°C 10 min – 8h
Keep Warm
Mantenimiento
de calor
80°C 30 min 50 – 220°C 1min – 1h
Vegetables
Verduras 180°C 12 min 50 – 220°C 1min – 1h
French Fries
Patatas fritas 220°C 20 min 50 – 220°C 1min – 1h
Nota: Cuanto más grande sea el pollo o la cantidad de alimentos, más prolongado
será el tiempo de preparación. Ajuste la temperatura de preparación y el tiempo de
preparación acorde a sus necesidades.
64
ES
CONFIGURAR FUNCIONES
Regular tiempo de cocción y temperatura
1. Si después de la selección del programa desea ajustar el tiempo y la temperatura
de preparación, pulse el botón y el botón .
2. Pulse el botón para ajustar la temperatura de preparación. El dígito
correspondiente empieza a parpadear en pantalla. Gire el regulador para
aumentar o reducir la temperatura en intervalos de 10 °C. Puede seleccionar una
temperatura de entre 50 °C y 220 °C.
3. Pulse el botón para ajustar el tiempo de preparación. El dígito correspondiente
empieza a parpadear en pantalla. Gire el regulador para aumentar o reducir el
tiempo en intervalos de 1 minuto. Si el área regulable es grande, el tiempo podrá
ajustarse en intervalos de 10 minutos.
Función pausa
• Si se abre la puerta durante el funcionamiento, se detiene el aparato
automáticamente. Cuando la puerta está abierta, todos los botones estarán
bloqueados excepto ON/OFF, LUZ y ASAR . Vuelva a cerrar la puerta y el
aparato se pondrá de nuevo en funcionamiento en el modo anterior.
Nota: Si se ha abierto la puerta durante el funcionamiento y no se cierra en 10
minutos, el aparato se apaga automáticamente y en el indicador de la pantalla
aparece „---“. El aparato continuará apagado (aunque cierre ahora la puerta).
CONSEJO: Voltee los alimentos durante la preparación en intervalos regulares o
irregulares para garantizar que sus platos se cocinen correctamente.
ATENCIÓN
Existe riesgo de quemaduras. Durante el funcionamiento, el aparato y
los accesorios alcanzan temperaturas muy elevadas. No los toque con
las manos desnudas. Se recomienda utilizar guantes.
Función giratoria (espetón)
• Esta función permite un calentamiento homogéneo de los platos. Pulse el botón
. El símbolo del botón correspondiente se ilumina en el panel de control. Pulse de
nuevo el botón ASAR para desactivar la función .
• Utilice el espetón de pollo como se representa en la siguiente imagen.
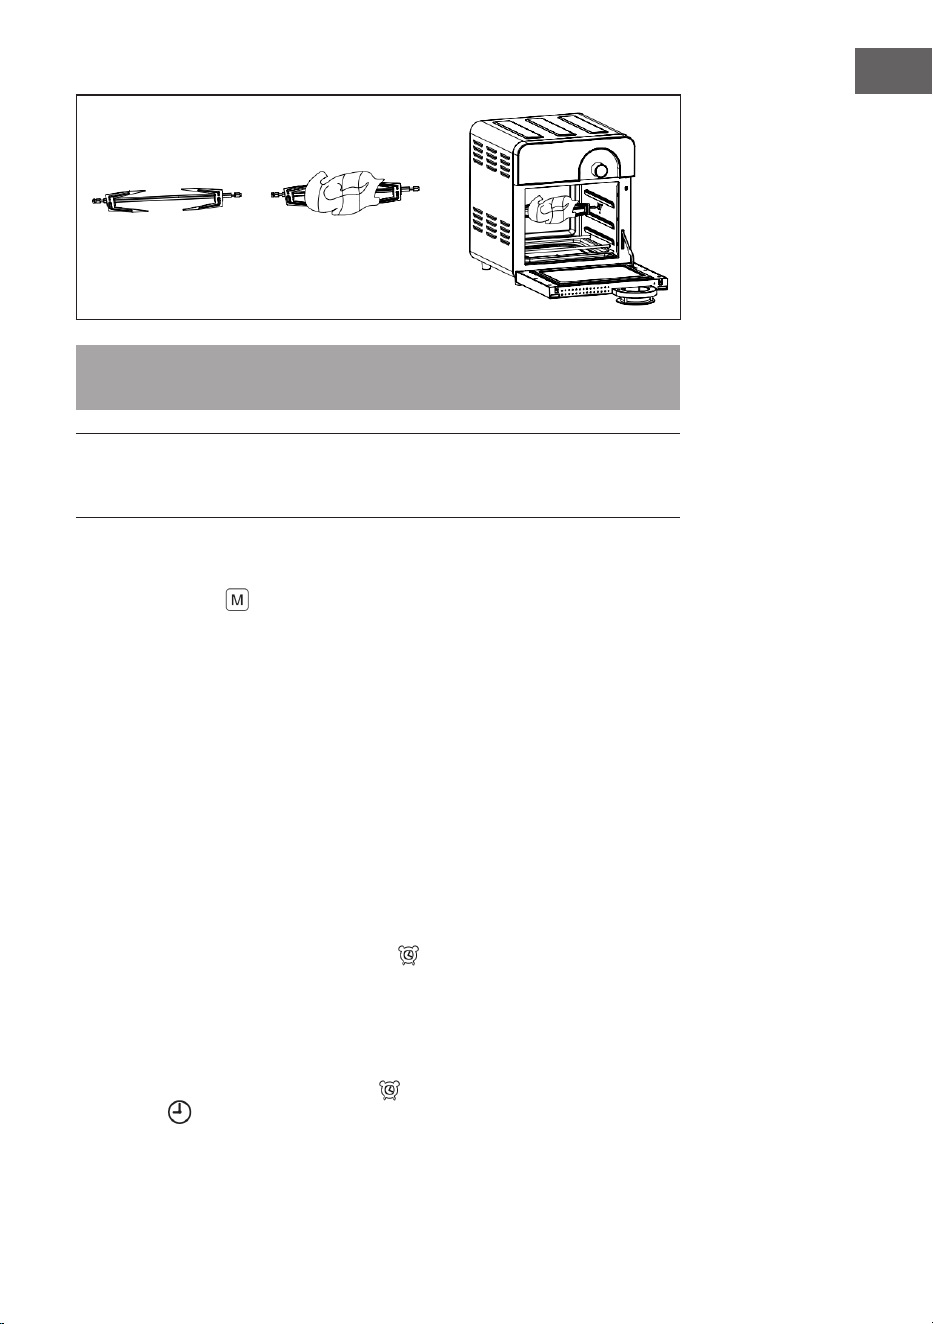
65
ES
Nota: El peso total del pollo no debe superar 1,2 kg para utilizar el espetón.
Prepare pollos que tengan un peso elevado en la cesta para freír.
CONSEJO: Fije los muslos y las alas del pollo con un hilo. Antes de preparar, haga
pequeños oricios en el muslo del pollo, pues la carne en esta zona es muy gruesa y es
difícil que el calor traspase.
Función de ajuste manual
• Si pulsa el botón en modo standby, el símbolo correspondiente se ilumina
en el panel de control. La temperatura predeterminada es de 120 °C y el tiempo
predeterminado es de 20 minutos.
• Pulse el botón ON/OFF para iniciar.
• Si pulsa el botón ON/OFF durante el funcionamiento, el aparato detiene
el funcionamiento y el indicador luminoso se apaga. El ventilador continúa
funcionando otro minuto antes de que el aparato cambie al modo standby.
• Si selecciona esta función, se apagan los 16 indicadores luminosos de la selección
de programa y solamente podrá ajustar el tiempo de cocción y la temperatura. El
tiempo máximo regulable en este modo es de 1 hora y se puede seleccionar una
temperatura entre 50 °C y 220 °C.
Función de preselección de tiempo (Preset)
• Pulse el botón ON/OFF, el indicador luminoso se ilumina.
• Gire el regulador para seleccionar el programa deseado en la selección de
programas. Pulse a continuación el botón , para realizar los ajustes de
preselección de tiempo. En el indicador del display solamente se muestra el tiempo
predeterminado hasta el inicio. El dígito parpadea y girando el regulador se puede
ajustar en intervalos de 10 minutos. El tiempo máximo programable es de 9 horas y
50 minutos, el tiempo más breve es de 10 minutos.
• Mientras no se haya iniciado todavía el programa, la preselección de tiempo
puede interrumpirse pulsando el botón (ATENCIÓN: Si en su lugar pulsa
el botón aparece el tiempo del programa seleccionado y no el ajuste de la
función de preselección de tiempo en pantalla).
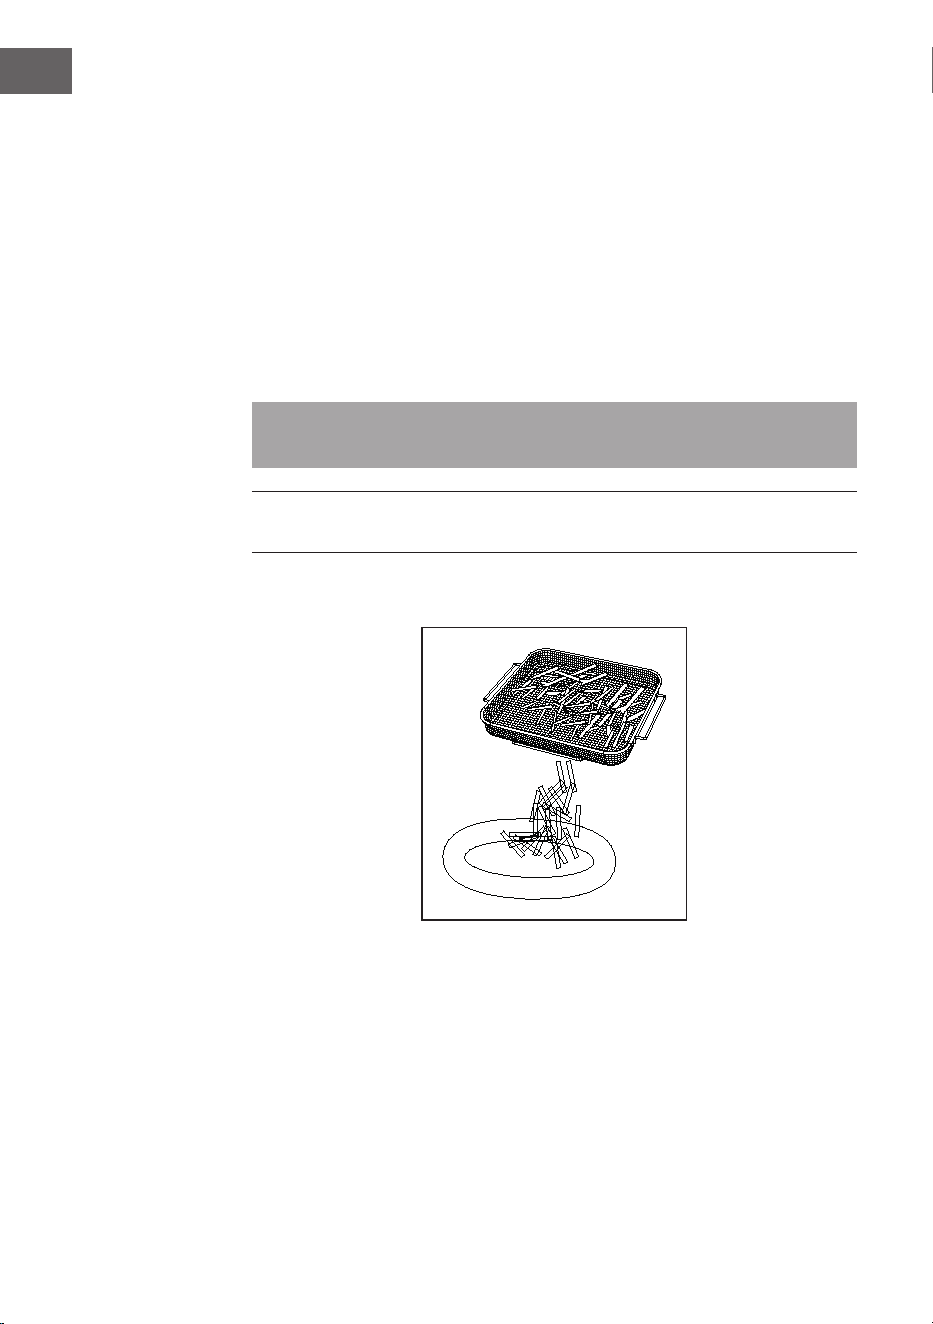
66
ES
• Pulse el botón ON/OFF después de haber seleccionado el tiempo deseado al
inicio para nalizar la conguración de preselección de tiempo. Excepto el botón
ON/OFF y el botón de la LUZ todos los botones se encuentran bloqueados. La
preselección de tiempo solo puede interrumpirse pulsando de nuevo el botón ON/
OFF. El programa se inicia tras nalizar el tiempo de preselección congurada.
Fin de la preparación
1. El aparato pita al nal del tiempo de preparación tres veces y deja de calentar. El
ventilador continúa funcionando un minuto hasta que la temperatura del interior
descienda.
2. Abra la puerta y extraiga la cesta con los platos preparados. Coloque la cesta en
una supercie plana y resistente al calor.
Nota: Cuando retire la cesta del aparato, no toque la cesta con las manos
desnudas. Utilice guantes de horno.
CONSEJO: Si los alimentos todavía no están listos, introdúzcalos de nuevo en la cesta
y deje que se cocinen durante un par de minutos más.
3. Coloque la comida lista en un plato u otro tipo de vajilla (véase ilustración).
4. Apague el aparato y desconecte el enchufe de la toma de corriente después de su
uso.

67
ES
LIMPIEZA Y CUIDADO
ADVERTENCIA
Riesgo de descarga eléctrica. No sumerja el aparato, el cable de
alimentación ni el enchufe en agua ni en ningún otro líquido. Puede
provocar daños en el aparato, fuego o lesiones.
Nota: Apague el aparato y desconecte el enchufe de la toma de corriente antes de
limpiarlo.
• Retire los accesorios.
• Limpie el aparato después de cada uso. No limpie los accesorios y el interior del
aparato con utensilios de cocina puntiagudos o alados ni productos abrasivos,
pues estos tienen un recubrimiento.
• Limpie el exterior del aparato con un paño suave y húmedo.
• Limpie todos los accesorios con agua caliente, un poco de lavavajillas y una
esponja no abrasiva. Seque completamente los accesorios antes de colocarlos de
nuevo en el aparato.
• Elimine los restos de grasa incrustados con un líquido desengrasante.
• Limpie el interior del aparato con una esponja no abrasiva.
• Limpie la resistencia con un cepillo de limpieza para eliminar los restos de
alimentos.
• Si no utiliza el aparato durante un periodo prolongado de tiempo, límpielo antes
de guardarlo.
• Almacene el aparato y los accesorios en un entorno seco, limpio y protegido de la
corrosión.
68
ES
INDICACIONES SOBRE LA RETIRADA DEL
APARATO
Si en su país existe una disposición legal relativa a la
eliminación de aparatos eléctricos y electrónicos, este
símbolo estampado en el producto o en el embalaje
advierte que no debe eliminarse como residuo doméstico.
En lugar de ello, debe depositarse en un punto de recogida
de reciclaje de aparatos eléctricos y electrónicos. Una
gestión adecuada de estos residuos previene consecuencias
potencialmente negativas para el medio ambiente y la salud
de las personas. Puede consultar más información sobre el
reciclaje y la eliminación de este producto contactando con
su administración local o con su servicio de recogida de
residuos.
FABRICANTE E IMPORTADOR (REINO UNIDO)
Fabricante:
Chal-Tec GmbH, Wallstraße 16, 10179 Berlín, Alemania.
Importador para Gran Bretaña:
Berlin Brands Group UK Limited
PO Box 42
272 Kensington High Street
London, W8 6ND
United Kingdom

69
IT
DATI TECNICI
Numero articolo 10034217, 10037975
Alimentazione 220-240 V ~ 50/60 Hz
Potenza (Watt) 1700 W
Capacità (litri) 14 l
Avvertenze di sicurezza70
Descrizione del dispositivo72
Pannello di controllo73
Installazione73
Utilizzo degli accessori74
Utilizzo78
Programmi79
Impostare le funzioni80
Pulizia e manutenzione83
Avviso di smaltimento84
Produttore e importatore (UK) 84
Gentile Cliente,
La ringraziamo per aver acquistato il dispositivo. La preghiamo
di leggere attentamente le seguenti istruzioni per l’uso e di
seguirle per evitare possibili danni tecnici. Non ci assumiamo
alcuna responsabilità per danni scaturiti da una mancata
osservazione delle avvertenze di sicurezza e da un uso
improprio del dispositivo. Scansionare il codice QR seguente,
per accedere al manuale d’uso più attuale e per ricevere
informazioni sul prodotto.
INDICE

70
IT
ACCESSORI
Nota: i seguenti accessori non sono inclusi in consegna ma possono essere acquistati
ai seguenti numeri articolo:
Numero articolo
10034407 10034408 10034409
Accessori Cestello
Gabbia per
bistecche
Rack spiedo
Numero articolo
10034410 10034411
Accessori Cestello rotante Set spiedo
Numero articolo
10037976 10037977 10037978
Accessori Pinza e spiedi Cestello a griglia
Teglia di
gocciolamento e
griglia
AVVERTENZE DI SICUREZZA
• Conservare il presente manuale per future consultazioni.
• Bambini a partire da 8 anni e persone con limitate capacità siche e psichiche
possono utilizzare il dispositivo solo se sono stati istruiti in modo esaustivo da una
persona responsabile del loro controllo sulle funzioni e sulle procedure di sicurezza
e hanno compreso i rischi connessi.
• Prima del primo utilizzo, controllare che la tensione della presa elettrica utilizzata
corrisponda alla tensione indicata.
• Non immergere il cavo di alimentazione o il dispositivo in acqua o altri liquidi, in
modo da evitare folgorazioni.
• Tenere bambini e animali domestici lontano dal dispositivo mentre è in funzione.
• Dopo l’utilizzo, spegnere il dispositivo e staccare la spina.
• Il dispositivo deve essere utilizzato su un circuito elettrico separato da altri
dispositivi. Se il circuito elettrico è sovraccaricato da altri dispositivi, questo
dispositivo potrebbe non funzionare correttamente.
• Prestare la massima attenzione quando si spostano contenitori pieni di alimenti
bollenti.
• Non lasciare che il cavo penzoli dal bordo del tavolo o della supercie di lavoro e
assicurarsi che non entri in contatto con superci bollenti.
• Posizionare sempre il dispositivo al centro del tavolo o della supercie di lavoro.
• Non toccare in alcun caso le superci bollenti del dispositivo. Utilizzare le
impugnature per spostare o sollevare il dispositivo.

71
IT
• L’utilizzo di accessori non espressamente consigliati dal produttore può causare
lesioni.
• Non posizionare e utilizzare il dispositivo su superci in vetro e legno o su tovaglie
sensibili al calore. In presenza di tali superci, mettere sotto al dispositivo un
pannello termoresistente con protezione dal calore.
• Non utilizzare assolutamente il dispositivo se il cavo di alimentazione è
danneggiato, se il dispositivo presenta malfunzionamenti o se è stato danneggiato
in qualche modo.
• Prima della pulizia e in caso di non utilizzo, spegnere il dispositivo e staccare la
spina. Prima di togliere o montare componenti, attendere che il dispositivo si sia
completamente raffreddato.
• Non posizionare il dispositivo nelle immediate vicinanze di fornelli elettrici o a gas
caldi o in un forno riscaldato.
• Se non è possibile collegare correttamente la spina, rivolgersi a un elettricista per
minimizzare il rischio di folgorazioni. Non cercare in alcun caso di manipolare la
spina.
• Non pulire il dispositivo con spugne metalliche abrasive. Piccole parti metalliche
potrebbero staccarsi e cortocircuitare componenti elettrici del dispositivo, con la
possibilità di conseguenti folgorazioni e danni al dispositivo.
• Per minimizzare il rischio di folgorazioni, preparare gli alimenti esclusivamente
nel contenitore con rivestimento antiaderente incluso in consegna. Il dispositivo è
adatto solo all’utilizzo casalingo in ambienti chiusi.
• Utilizzare il dispositivo solo per gli scopi previsti.
ATTENZIONE
Pericolo di ustione! Durante il procedimento di frittura con aria calda,
viene emesso vapore bollente dai punti di scarico dell’aria. Tenere
visoe mani a distanza di sicurezza da questi punti di uscita dell’aria.
Fare attenzione a vapori e aria bollente anche quando si tolgono
componenti dal dispositivo.

72
IT
DESCRIZIONE DEL DISPOSITIVO
1
Alloggiamento
7
Impugnatura per il
cestello
13
Cestello rotante
(opzionale)
2
Pannello di controllo
8
Spiedo per pollo
14
Gabbia per bistecche
(opzionale)
3
Manopola con
tasto ON/OFF
9
Griglia
15
Rack spiedo
(opzionale)
4
Cavo di
alimentazione
10
Cestello a griglia
16
Cestello di frittura
(opzionale)
5
Vano interno
11
Teglia di
gocciolamento
17
Inserto a griglia alto
(opzionale)
6
Sportello
12
Cestello (opzionale)
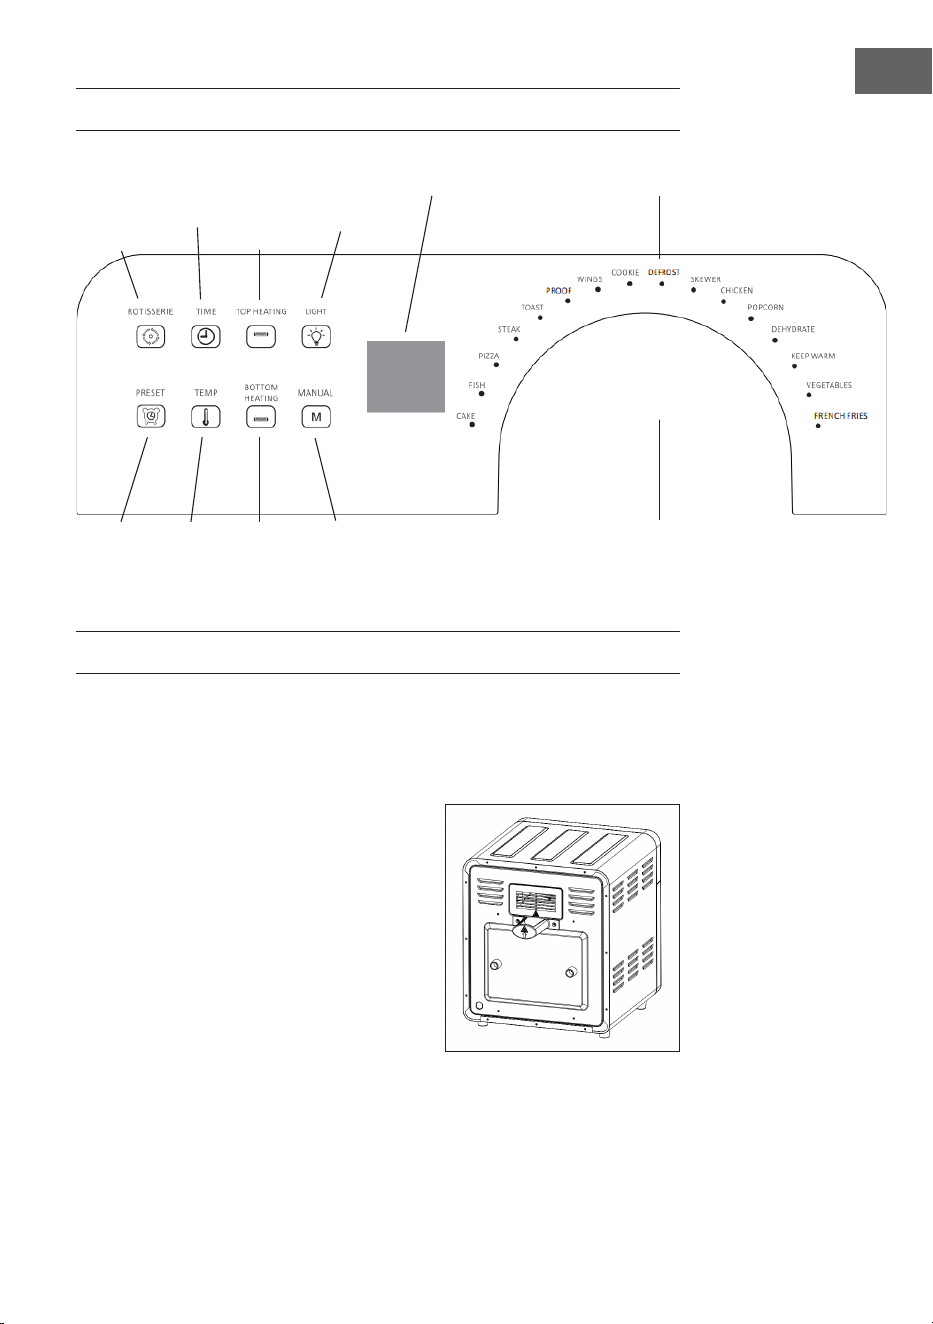
73
IT
PANNELLO DI CONTROLLO
INSTALLAZIONE
Prima del primo utilizzo
1. Rimuovere i materiali di imballaggio, gli adesivi e le etichette.
2. Pulire tutti gli accessori con acqua calda, detersivo per piatti e una spugna non
abrasiva.
3. Sfregare l’interno e l’esterno del dispositivo
con un panno.
4. Quando si mette in funzione il dispositivo
per la prima volta possono comparire fumo
e un leggero odore. Questo è normale e
scompaiono dopo breve tempo.
5. Montare manualmente la parete divisoria
dell’uscita dell’aria e applicare colla
antistrappo sulla testa delle viti prima
della messa in funzione del dispositivo
(v.immagine).
Luogo di posizionamento
• Posizionare il dispositivo su una supercie piana.
• Assicurarsi di mantenere una distanza di almeno 10 cm da materiali facilmente
inammabili, come tende, rivestimenti in tessuto, ecc.
Tasti Display Selezione programma
Rotisserie
(girarrosto)
Tempo Cottura
superiore
Luce
Preselezione
tempo
(Preset)
Tempe-
ratura
Cottura
inferiore
Manuale
Manopola
con tasto (ON/OFF)

74
IT
UTILIZZO DEGLI ACCESSORI
Contenitore di gocciolamento
• Aprire lo sportello del dispositivo.
• Far scorrere il contenitore di gocciolamento nel dispositivo (vedere l’illustrazione
sottostante)
Griglia
• Inserire la griglia nel dispositivo (v. immagine sotto).
Cestello con griglia
• Mettere gli alimenti da preparare nel cestello, posizionarlo all’interno del
dispositivo e chiudere lo sportello (v. immagine sotto).

75
IT
Forca rotante
• La rotazione a 360° permette una cottura omogenea. La modalità rotante è
impostata in fabbrica. Nell’immagine sotto viene mostrato il modo corretto per
cuocere un pollo intero con il girarrosto.
Cestello con impugnatura (opzionale)
• Fissare l’impugnatura, incastrandola nell’apposita fessura sul cestello. Mettere poi
gli alimenti da preparare nel cestello e metterlo all’interno del dispositivo. Staccare
l’impugnatura e chiudere lo sportello..
Nota: posizionare la griglia prima sulla guida più in basso, in modo da poterci
poggiare sopra il cestello (v. immagine sotto).
Dopo la preparazione, assicurarsi che l’impugnatura sia ben agganciata al cestello,
prima di toglierlo dal dispositivo. Poggiare il cestello su una supercie piana e
termoresistente.

76
IT
Cestello rotante (opzionale)
Set spiedo (opzionale)
Impugnatura cesto rotante

77
IT
Inserto a griglia sollevato (opzionale)
• L’inserto a griglia sollevato può essere posizionato sopra al contenitore di
gocciolamento, in modo che padelle o altri utensili da cucina siano a una distanza
sufciente dalle resistenze sul fondo del dispositivo.
Avvertenze per il corretto utilizzo degli accessori
• Utilizzare sempre accessori adatti ai diversi tipi di preparazione.
• Utilizzare sempre dei guanti termoresistenti per rimuovere gli accessori dopo la
preparazione.
• Posizionare sempre il contenitore di gocciolamento sulla guida più in basso.
• Assicurarsi che ci siano almeno 40 mm di distanza tra gli alimenti e le resistenze,
dato che gli alimenti possono espandersi quando si riscaldano.
Come mostrato nell’immagine a
destra, il dispositivo è dotato di un
interruttore di sicurezza.
Nota: il dispositivo funziona correttamente solo con lo sportello chiuso. Se non si
tocca l’interruttore di sicurezza, lo schermo mostra “- -“.

78
IT
UTILIZZO
1. Quando si inserisce la spina del dispositivo nella presa elettrica, viene emesso
un segnale acustico e lo schermo digitale e tutte le spie di funzionamento
lampeggiano brevemente.
2. Premere ON/OFF, il display si illumina e il display passa in standby.
3. In standby, tutti i tasti sono bloccati tranne ON/OFF, LUCE e MANUALE .
4. Se non si preme alcun tasto per 60 secondi in modalità standby, il dispositivo si
spegne automaticamente.
5. Premere la manopola per selezionare il programma in modalità standby, scegliere
un programma e premere ON/OFF per avviarlo.
6. Se si desidera regolare tempo o temperatura durante il funzionamento o la
selezione del programma, premere TEMPO o TEMPERATURA . La cifra
corrispondente lampeggia sul display. Ruotare la manopola no a impostare tempo
o temperatura desiderati.
7. Durante la selezione del programma e il funzionamento è possibile premere
GIRARROSTO e il tasto per attivare le rispettive funzioni. Quando
la funzione è accesa, si illumina il simbolo corrispondente. Premere di nuovo
GIRARROSTO per arrestare la funzione. Premere di nuovo LUCE per spegnere
la luce nel dispositivo . Se non si premono tasti per 60 secondi in una modalità
a scelta, anche la luce si spegne automaticamente.
8. Premendo e il tasto è possibile accendere e spegnere individualmente la
resistenza in alto e quella in basso. Quando una resistenza è accesa, si illumina il
simbolo corrispondente. Se entrambe le resistenze sono spente e si preme ON/
OFF, vengono emessi diversi segnali acustici in rapida successione e il dispositivo
non viene avviato. Mentre è in funzione un programma, le funzioni e sono
bloccate.
9. Se si preme ON/OFF durante il funzionamento, il programma in corso viene
interrotto, il display lampeggia e il dispositivo passa in standby. La ventola
resta in funzione per un minuto, per dissipare il calore e il dispositivo si spegne
automaticamente. (Se si apre lo sportello durante il tempo di ventilazione postuma,
la ventola si spegne automaticamente, ma si riaccende appena si richiude lo
sportello). Premere di nuovo ON/OFF per spegnere subito il dispositivo.
Nota: si consiglia di aspettare che la ventola si spegna da sola, in modo che il vano
interno del dispositivo sia sufcientemente raffreddato quando si apre lo sportello.

79
IT
PROGRAMMI
• Il dispositivo è dotato di numerose combinazioni di tempi e temperatura di
preparazione, in modo da soddisfare diverse necessità.
• Se si gira la manopola in standby per selezionare un programma, si illumina
l’indicazione corrispondente. Premere ON/OFF per avviare il dispositivo.
• Nella tabella seguente si trovano le nostre combinazioni per menu. Tempo e
temperatura possono essere regolati in base alle singole necessità..
Programma Pietanza /
funzione
Temperatura
programma
Tempo
programma
Selezione
temperatura
Selezione
tempo
Modalità
calore
Cake
Torta 180°C 30 min 50 – 220°C 1min – 1h
Fish
Pesce 180°C 15 min 50 – 220°C 1min – 1h
Pizza
Pizza 180°C 10 min 50 – 220°C 1min – 1h
Steak
Bistecca 180°C 12 min 50 – 220°C 1min – 1h
Toast
Toast 220°C 6 min 50 – 220°C 1min – 1h
Proof
Lievitare
(impasto)
40°C 90 min 40°C 1 – 90 min
Wings
Alette 200°C 15 min 50 – 220°C 1min – 1h
Cookie
Biscotti 180°C 12 min 50 – 220°C 1min – 1h
Defrost
Scongelare 80°C 10 min 50 – 220°C 1min – 1h
Skewer
Spiedo 200°C 15 min 50 – 220°C 1min – 1h
Chicken
Pollo 220°C 30 mins 50 – 220°C 1min – 1h
Popcorn
Popcorn 220°C 8 min 50 – 220°C 1min – 1h
Dehydrate
Disidratare 70°C 8 hour 50 – 70°C 10 min – 8h
Keep warm
Mantenere
calde
80°C 30 min 50 – 220°C 1min – 1h
Vegetables
verdure 180°C 12 min 50 – 220°C 1min – 1h
French fries
Patatine fritte 220°C 20 min 50 – 220°C 1min – 1h
Nota: più grande è il pollo o la quantità di alimenti, più lungo sarà il tempo
necessario. Regolare tempo e temperatura della preparazione in base alle singole
necessità.
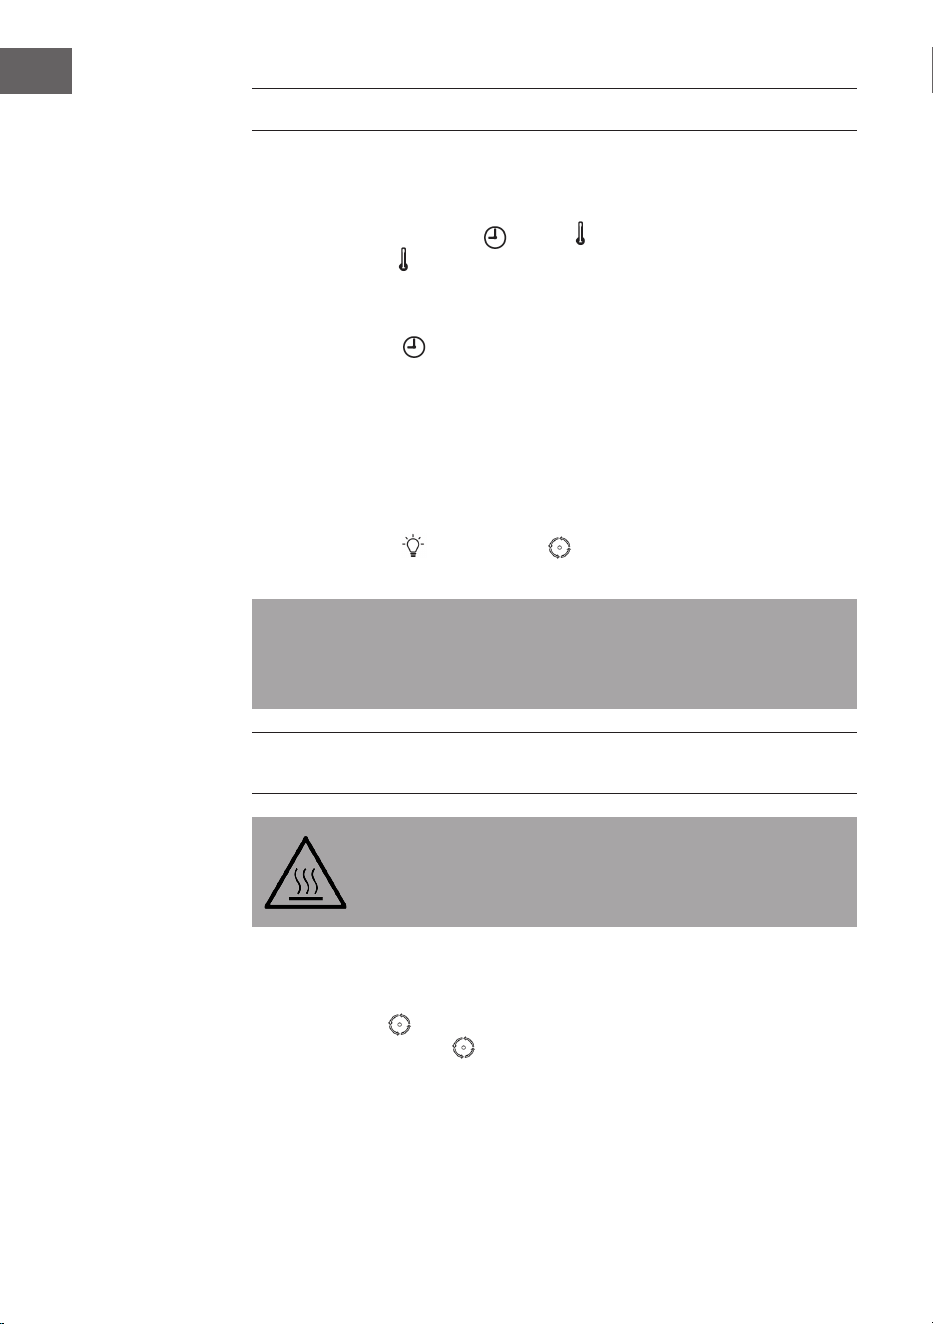
80
IT
IMPOSTARE LE FUNZIONI
Impostare tempo e temperatura di cottura
1. Se si desiderano impostare tempo e temperatura dopo la selezione del
programma, premere il tasto e il tasto .
2. Premere il tasto per regolare la temperatura per la preparazione. La relativa
cifra inizia a lampeggiare sul display. Girare la manopola per aumentare o
diminuire la temperatura in intervalli di 10 °C. La temperatura può essere impostata
tra 50 e 220 °C.
3. Premere TEMPO per regolare la durata della preparazione. La relativa cifra
inizia a lampeggiare sul display. Girare la manopola per aumentare o diminuire la
durata in intervalli di 1 minuto. La durata può essere impostata in intervalli 10 minuti
per programmi con lunghi lassi di tempo.
Funzione pausa
• Se si apre lo sportello durante il funzionamento, il dispositivo si arresta
automaticamente. Quando lo sportello è aperto, tutti i tasti sono bloccati, tranne
ON/OFF, LUCE e GIRARROSTO . Chiudere lo sportello e il dispositivo
riprende il funzionamento con la modalità impostata in precedenza.
Nota: se lo sportello viene aperto durante il funzionamento e non viene richiuso
entro 10 minuti, il dispositivo si spegne automaticamente e lo schermo mostra “- -”.
Chiudere lo sportello e il dispositivo riprende il funzionamento con la modalità
impostata in precedenza.
NOTA: girare gli alimenti a intervalli regolari o irregolari durante la preparazione, in
modo da garantire una cottura omogenea.
ATTENZIONE
Pericolo di ustione! Il dispositivo è gli accessori diventano estremamente
bollenti durante il funzionamento. Non toccarli a mani nude. Si
consiglia di utilizzare guanti da forno.
Girarrosto (Rotisserie)
• Questa funzione permette un riscaldamento omogeneo delle pietanze. Premere
GIRARROSTO . Il relativo simbolo si illumina sul pannello di controllo. Premere
di nuovo GIRARROSTO per disattivare la funzione.
• Utilizzare lo spiedo come mostrato nell’immagine seguente.

81
IT
Nota: il peso totale del pollo non deve superare 1,2 kg per poter utilizzare lo
spiedo. Preparare il pollo nel cestello per friggere se è più pesante.
NOTA: bloccare cosce e ali con un lo da cucina. Fare di piccoli fori nella coscia prima
della cottura, dato che la carne in questa zona è molto spessa e difcile da penetrare
per il calore.
Impostazione manuale
• Se si preme MANUALE in standby, si illumina il relativo simbolo sul pannello di
controllo. La temperatura predenita è di 120 °C e il tempo è di 20 minuti.
• Premere ON/OFF per avviare il dispositivo.
• Se si preme ON/OFF durante il funzionamento, il dispositivo si arresta e
l’indicazione luminosa si spegne. La ventola continua a funzionare per un minuto,
prima che il dispositivo passi in standby.
• Se si seleziona questa funzione, le 16 indicazioni luminose della selezione del
programma sono spente ed è possibile regolare solo tempo e temperatura. Il tempo
massimo è di 1 ora e la temperatura può essere impostata tra 50 e 220 °C.
Selezione anticipata del tempo (Preset)
• Premere ON/OFF e il display si illumina.
• Girare la manopola per selezionare il programma desiderato. Premere SELEZIONE
ANTICIPATA DEL TEMPO , per realizzare l’impostazione. Lo schermo mostra
il tempo preimpostato no all’avvio. La cifra lampeggia e può essere regolata in
intervalli di 10 minuti girando la manopola. Il tempo massimo è di 9 ore e 50 minuti
e quello minimo è di 10 minuti.
• Fino a quando non viene avviato il programma, la elezione anticipata del
tempo può essere interrotta premendo SELEZIONE ANTICIPATA DEL TEMPO
(ATTENZIONE: se invece si preme TEMPO viene mostrato tempo del
programma selezionato e non la regolazione della selezione del tempo anticipata.)
• Dopo aver impostato il tempo desiderato no all’avvio, premere ON/OFF per
concludere la selezione anticipata del tempo. Esclusi ON/OFF e LUCE tutti gli
altri tasti sono bloccati. La selezione anticipata del tempo può ora essere interrotta
solo premendo ON/OFF. Il programma si avvia quando scade il tempo impostato.
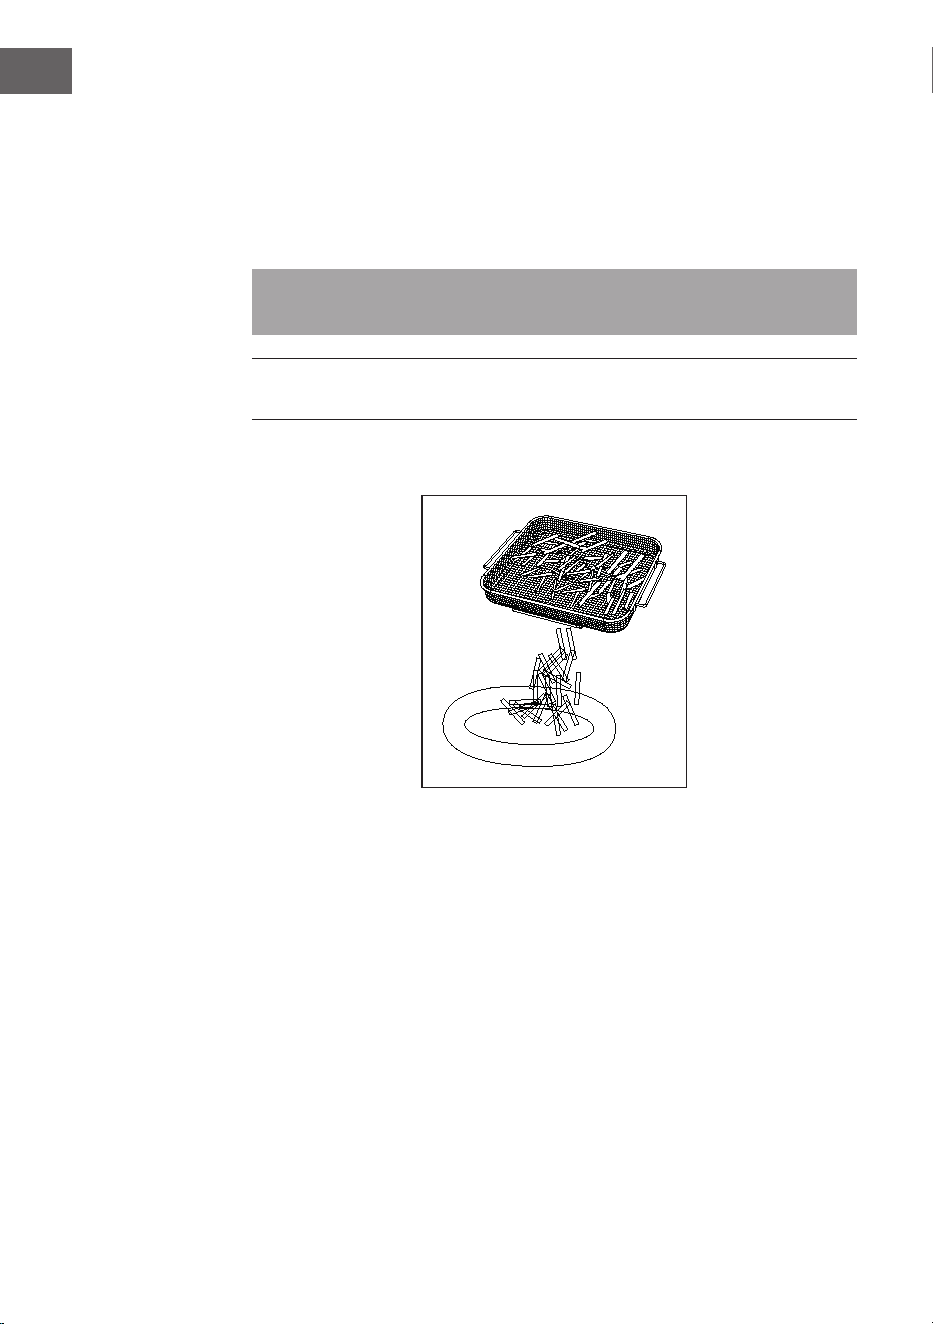
82
IT
Fine della preparazione
1. Terminata la preparazione, il dispositivo emette tre segnali acustici e smette di
riscaldare. La ventola continua a funzionare per un minuto, no a quando la
temperatura interna inizia ad abbassarsi.
2. Aprire lo sportello e togliere il cestello con le pietanze pronte. Poggiare il cestello
su una supercie piana e termoresistente.
Nota: quando si toglie il cestino dal dispositivo, non toccare il cestino a mani nude.
Indossare guanti da forno.
NOTA: se gli alimenti non sono completamente cotti, rimetterli nel cestello e farli
cuocere per un paio di minuti in più.
3. Impiattare gli alimenti pronti.
4. Spegnere il dispositivo e staccare la spina dopo l’uso.

83
IT
PULIZIA E MANUTENZIONE
AVVERTENZA
Pericolo di folgorazione! Non immergere cavo di alimentazione,
spinae alloggiamento in acqua o altri liquidi. Possono risultare danni,
incendi o lesioni.
Nota: prima della pulizia, spegnere il dispositivo e staccare la spina.
• Rimuovere gli accessori.
• Pulire il dispositivo dopo ogni utilizzo. Non pulire accessori e interno del dispositivo
con oggetti aflati o appuntiti e prodotti abrasivi, dato che potrebbero rovinare il
rivestimento.
• Pulire l’esterno del dispositivo con un panno morbido inumidito.
• Pulire gli accessori con acqua bollente, un po’ di detersivo per piatti e una spugna
non abrasiva. Far asciugare gli accessori prima di rimetterli nel dispositivo.
• Pulire l’interno del dispositivo con una spugna non abrasiva.
• Pulire la resistenza con una spazzola, in modo da eliminare resti di alimenti.
• Se non si utilizza il dispositivo per lunghi periodi, pulirlo prima di metterlo via.
• Conservare dispositivo e accessori in un ambiente asciutto, pulito e protetto dalla
corrosione.

84
IT
AVVISO DI SMALTIMENTO
Se nel proprio paese si applicano le regolamentazioni
inerenti lo smaltimento di dispositivi elettrici ed elettronici,
questo simbolo sul prodotto o sulla confezione segnala che
questi prodotti non possono essere smaltiti con i riuti normali
e devono essere portati a un punto di raccolta di dispositivi
elettrici ed elettronici. Grazie al corretto smaltimento dei
vecchi dispositivi si tutela il pianeta e la salute delle persone
da possibili conseguenze negative. Informazioni riguardanti il
riciclo e lo smaltimento di questi prodotti si ottengono presso
l’amministrazione locale oppure il servizio di gestione dei
riuti domestici.
PRODUTTORE E IMPORTATORE (UK)
Produttore:
Chal-Tec GmbH, Wallstraße 16, 10179 Berlino, Germania.
Importatore per la Gran Bretagna:
Berlin Brands Group UK Limited
PO Box 42
272 Kensington High Street
London, W8 6ND
United Kingdom