
www.auna-multimedia.com
Birmingham
Hi-Fi Stereo System mit Internetradio & Plattenspieler
Hi-Fi Stereo System with Internet Radio & Turntable
Chaîne Hifi stéréo avec radio Internet et platine vinyle
Sistema estéreo Hi-Fi con radio por Internet y tocadiscos
Sistema stereo Hi-Fi con radio Internet e giradischi
10034090


3
DE
Sehr geehrter Kunde,
wir gratulieren Ihnen zum Erwerb Ihres Gerätes.
Lesen Sie die folgenden Hinweise sorgfältig durch
und befolgen Sie diese, um möglichen Schäden
vorzubeugen. Für Schäden, die durch Missachtung der
Hinweise und unsachgemäßen Gebrauch entstehen,
übernehmen wir keine Haftung. Scannen Sie den
folgenden QR-Code, um Zugri auf die aktuellste
Bedienungsanleitung und weitere Informationen rund
um das Produkt zu erhalten:
INHALTSVERZEICHNIS
Sicherheitshinweise 4
Geräteübersicht 5
Installation 8
Inbetriebnahme und Bedienung 10
Radio-Modus 10
CD-Modus 12
Wiedergabe von MP3-Dateien von USB-Geräten 15
Zusatzfunktionen 17
Plattenspieler 18
BT Verbindungsherstellung und Wiedergabe 19
Aux-In 19
Spotify Connect 20
Technische Daten 20
Spezielle Entsorgungshinweise für Verbraucher in Deutschland 21
Hinweise zur Entsorgung 23
Konformitätserklärung 23
English 25
Español 45
Français 65
Italiano 85

4
DE
SICHERHEITSHINWEISE
Hinweis: Da es durch die CD-Bewegung und den sensiblen Schaltkreis
zu Interferenzen mit in der Nähe bendlichen Geräten kommen kann,
schalten Sie das Gerät aus, wenn Sie andere elektrische Geräte in der
Nähe verwenden möchten.
• Alle Sicherheits- und Bedienungshinweise müssen eingehalten werden.
• Das Gerät darf nicht in der Nähe von Wasser verwendet werden oder
mit Feuchtigkeit in Berührung kommen.
• Stellen Sie sicher, dass keine Flüssigkeit über dem Gerät oder den
Geräteönungen verschüttet wird.
• Bewegen Sie das Gerät vorsichtig, um Stromschläge zu vermeiden.
• Blockieren Sie keinesfalls die Belüftungsönungen des Geräts.
• Stellen Sie das Gerät keinesfalls in der Nähe von Wärmequellen
(wie beispielsweise Heizungen) auf und setzen Sie es keiner direkten
Sonneneinstrahlung aus.
• Stecken Sie den Netzstecker des Geräts, gemäß der
Bedienungsanleitung, in die Steckdose.
• Dieses Gerät verfügt über einen Überhitzungsschutz
(Sicherheitsvorrichtung). Sollte dieser ersetzt werden müssen, wenden
Sie sich an den Hersteller, den Kundendienst oder an eine in ähnlicher
Weise qualizierte Person.
• befolgen Sie zur Reinigung des Geräts die Hinweise im Abschnitt
„Reinigung und Pege“.
• Ziehen Sie den Netzstecker aus der Steckdose, wenn Sie das Gerät
über einen längeren Zeitraum nicht verwenden.
• Das Gerät muss von einer hierfür qualizierten Person repariert
werden, wenn:
- der Netzstecker oder das Netzkabel beschädigt sind,
- Fremdkörper oder Flüssigkeit in die Geräteönungen gelangt sind,
- das Gerät Regen ausgesetzt wurde,
- das Gerät ohne äußerliche Veränderungen nicht richtig funktioniert,
- das Gerät heruntergefallen und der Subwoofer kaputt ist.
• Versuchen Sie keinesfalls, das Gerät selbst zu reparieren, da der
Garantieanspruch dadurch erlöschen würde.
• Der Netzstecker des Geräts dient als Trennschalter und sollte deshalb
leicht zugänglich und jederzeit erreichbar sein.
• Zur Vermeidung von Unfällen muss das Gerät sicher am Boden oder an
der Wand, gemäß der Installationshinweise, xiert werden.
• Bei dem Gerät handelt es sich um ein Laserprodukt der Klasse I.
5
DE
VORSICHT
Durch Nichtbeachten der in der Bedienungsanleitung
beschriebenen Bedienungshinweise kann es zur Freisetzung
von gefährlicher Strahlung kommen. Dieses Gerät sollte
ausschließlich von hierfür qualiziertem Personal angepasst
und repariert werden.
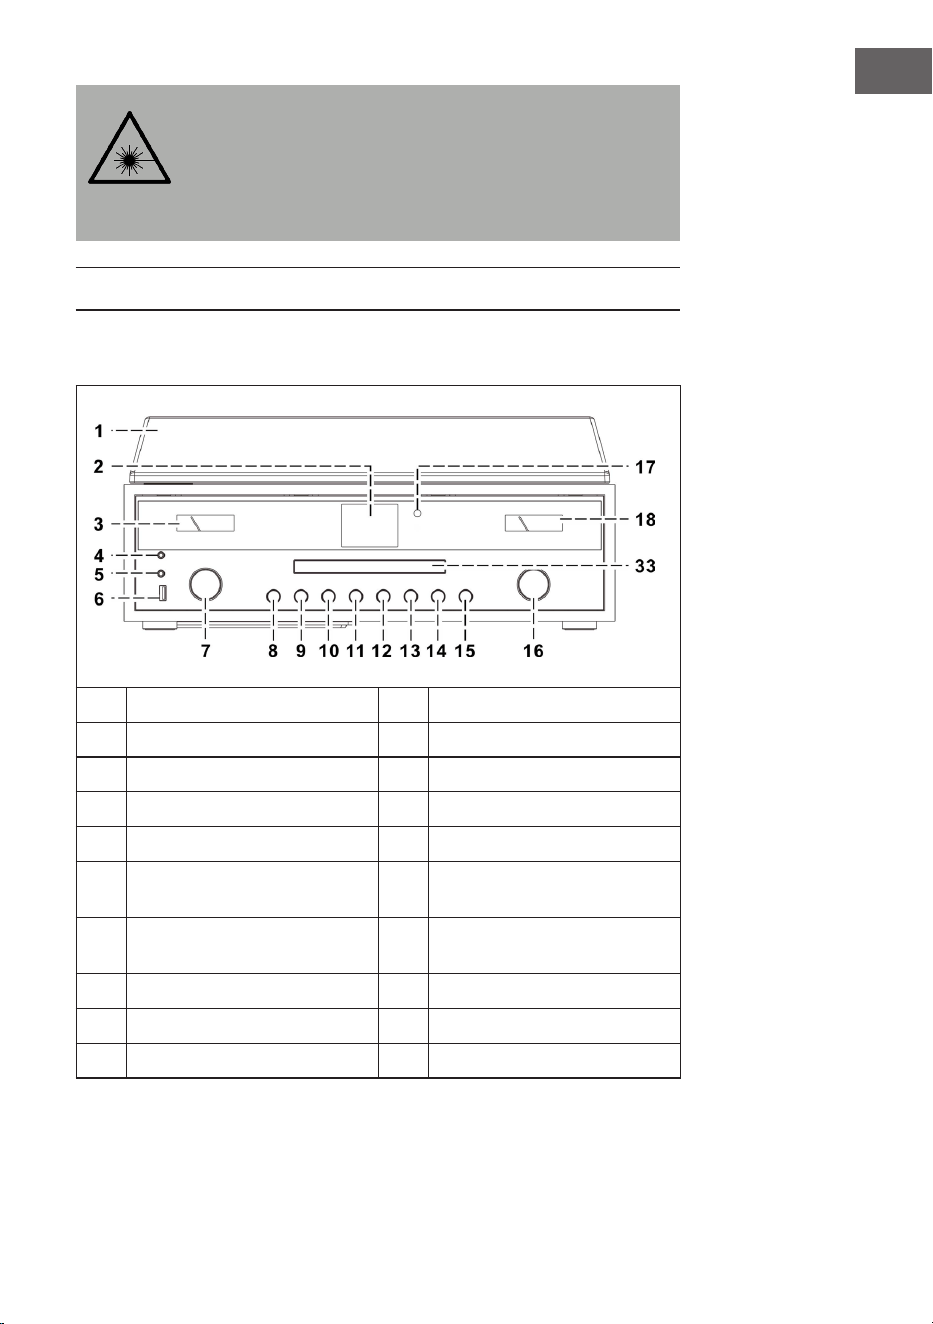
GERÄTEÜBERSICHT
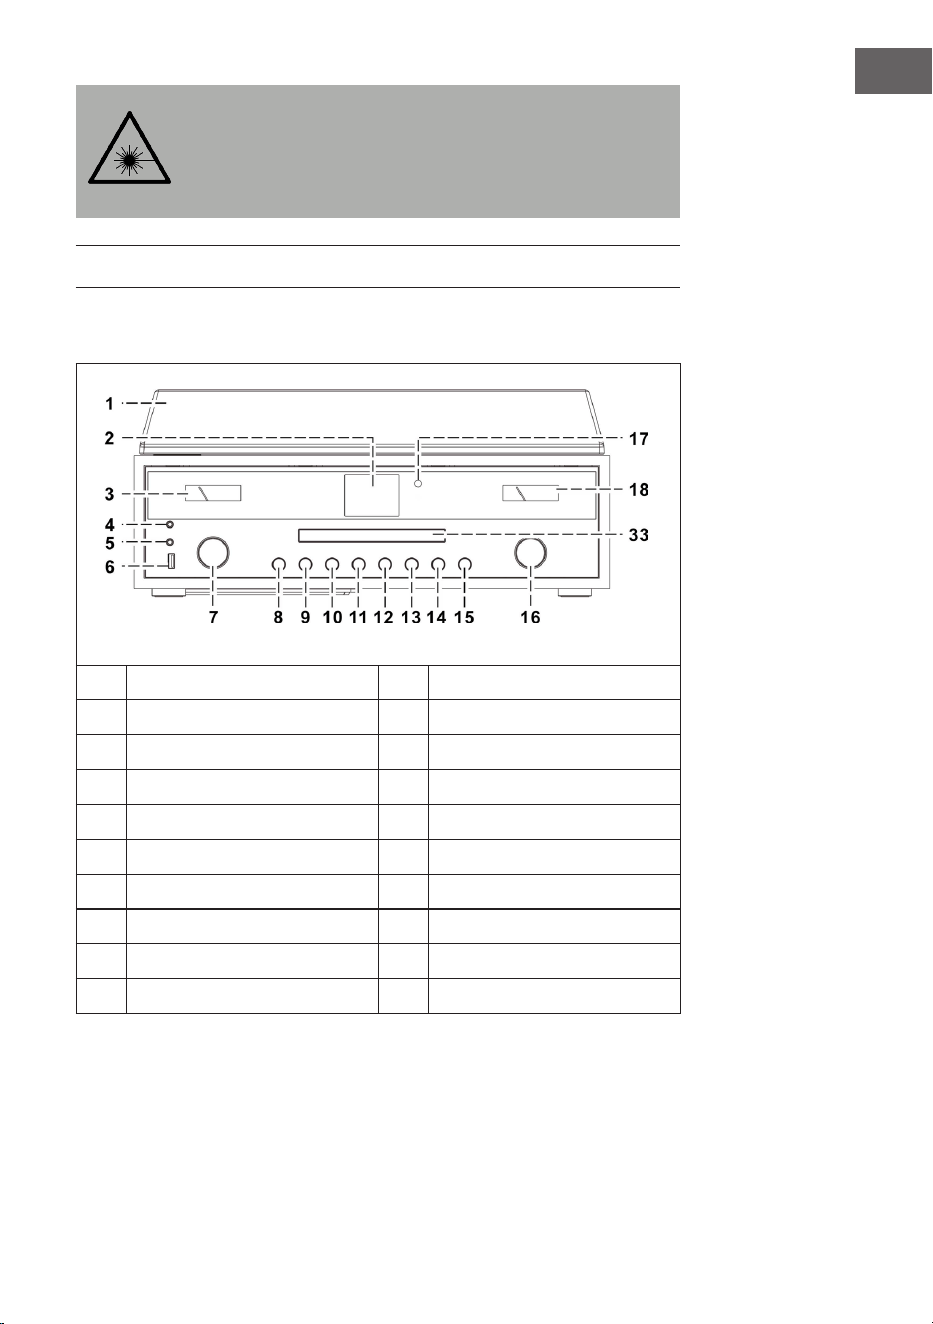
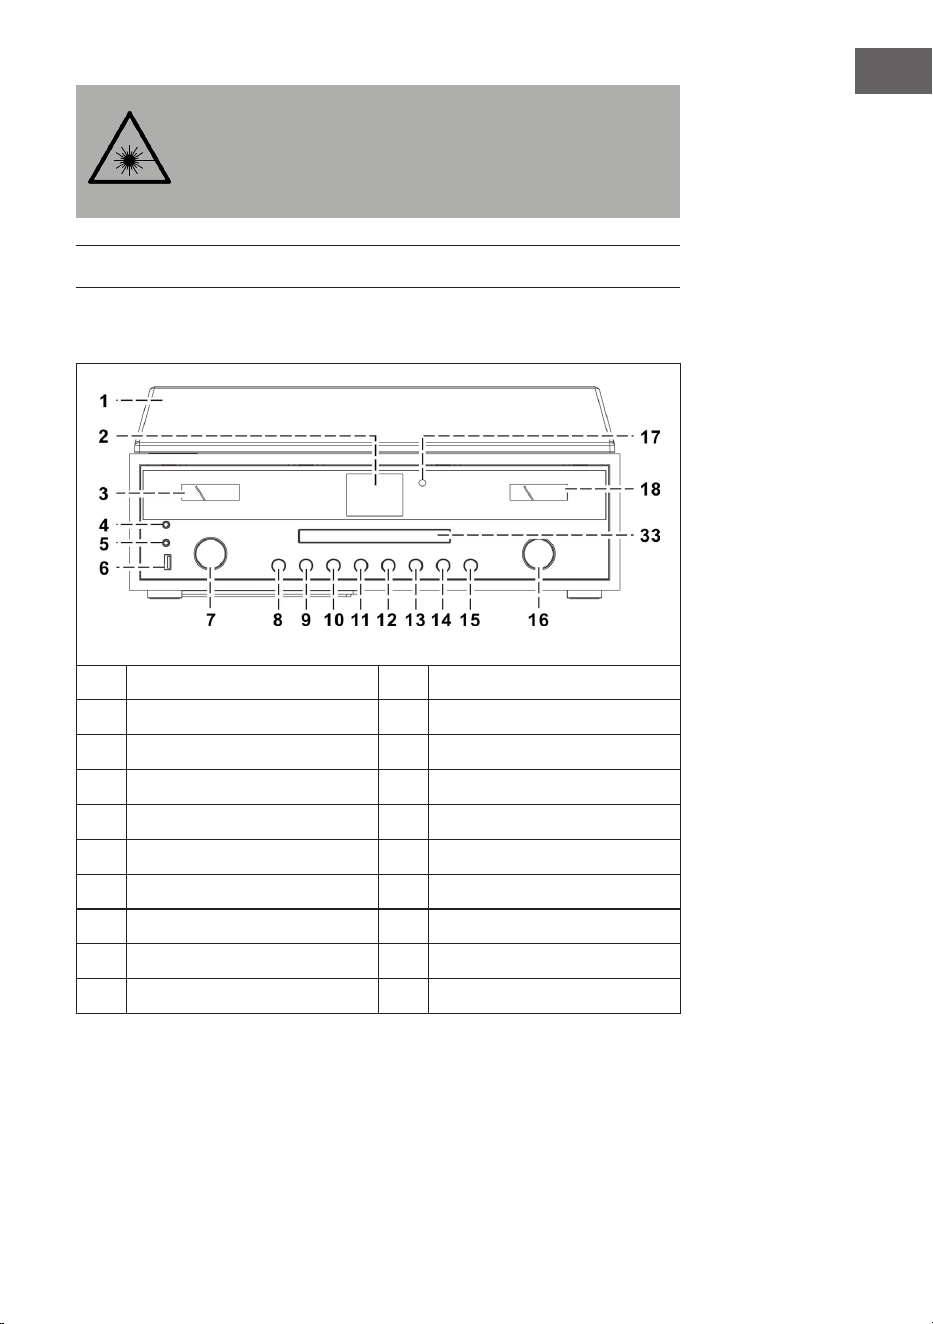
Gerät (Vorderansicht)
1
Staubabdeckung
11
P-Taste
2
Bildschirm
12
Titel nach vorne überspringen
3
Aussteuerungsmesser
13
Wiedergabe/Pause/Stopp
4
Kopfhöreranschluss
14
Titel nach hinten überspringen
5
AUX-IN-Anschluss
15
MODE (Modus)
6
USB-Anschluss
16
VOLUME -/+ (Lautstärke)/
Ein-/Ausschalttaste
7
Pfeiltasten (hoch/runter) / OK/
Suche
17
Fernbedienungssensor
8
CD-Fach önen/schließen
18
Aussteuerungsmesser
9
Zurück
33
Tür der CD-Fachs
10
MENU/INFO
6
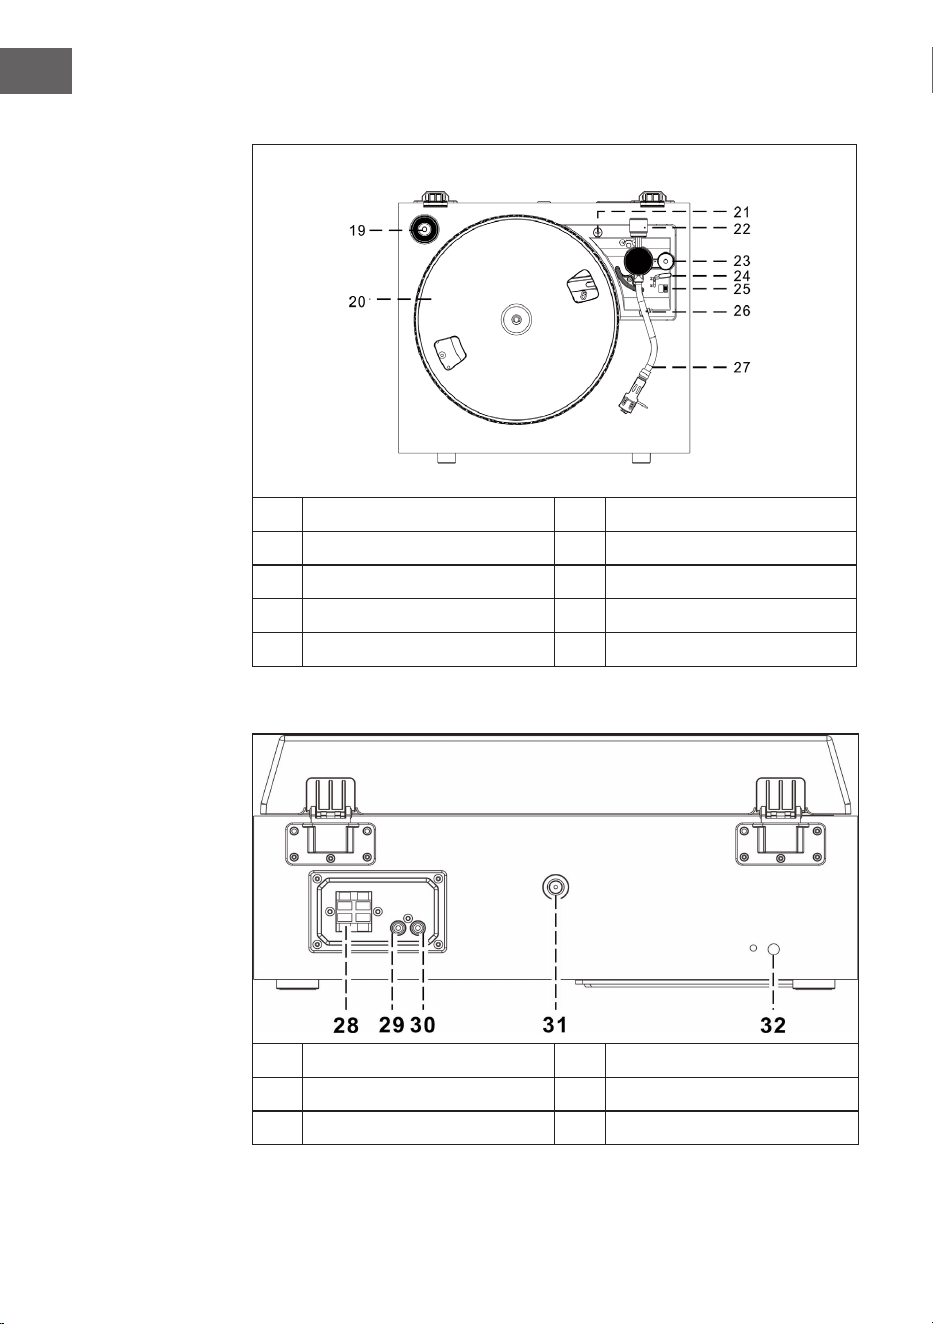
DE
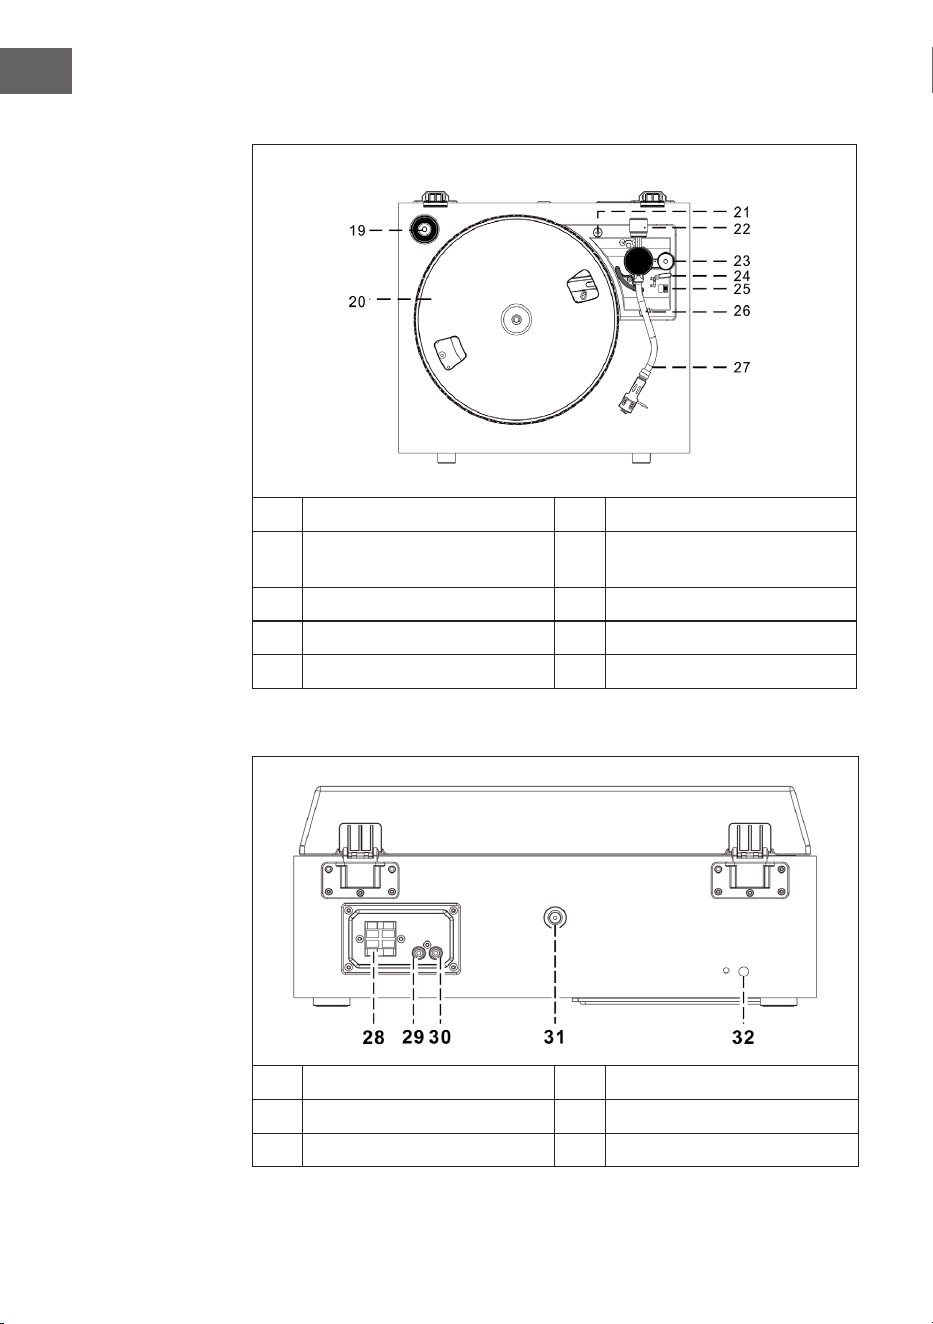
Plattenspieler
19
45 RPM Adapter
24
Lifthebel
20
Drehteller
25
Geschwindigkeit (33 & 45 RPM)
21
Transportsicherung
26
Tonarmsicherung
22
Gegengewicht
27
Tonarm mit Nadel
23
Höhenregler
Rückansicht
28
Lautsprecheranschluss
31
Antennenanschluss
29
Rechter Line-Out Anschluss
32
Netzkabel
30
Linker Line-Out Anschluss

7
DE
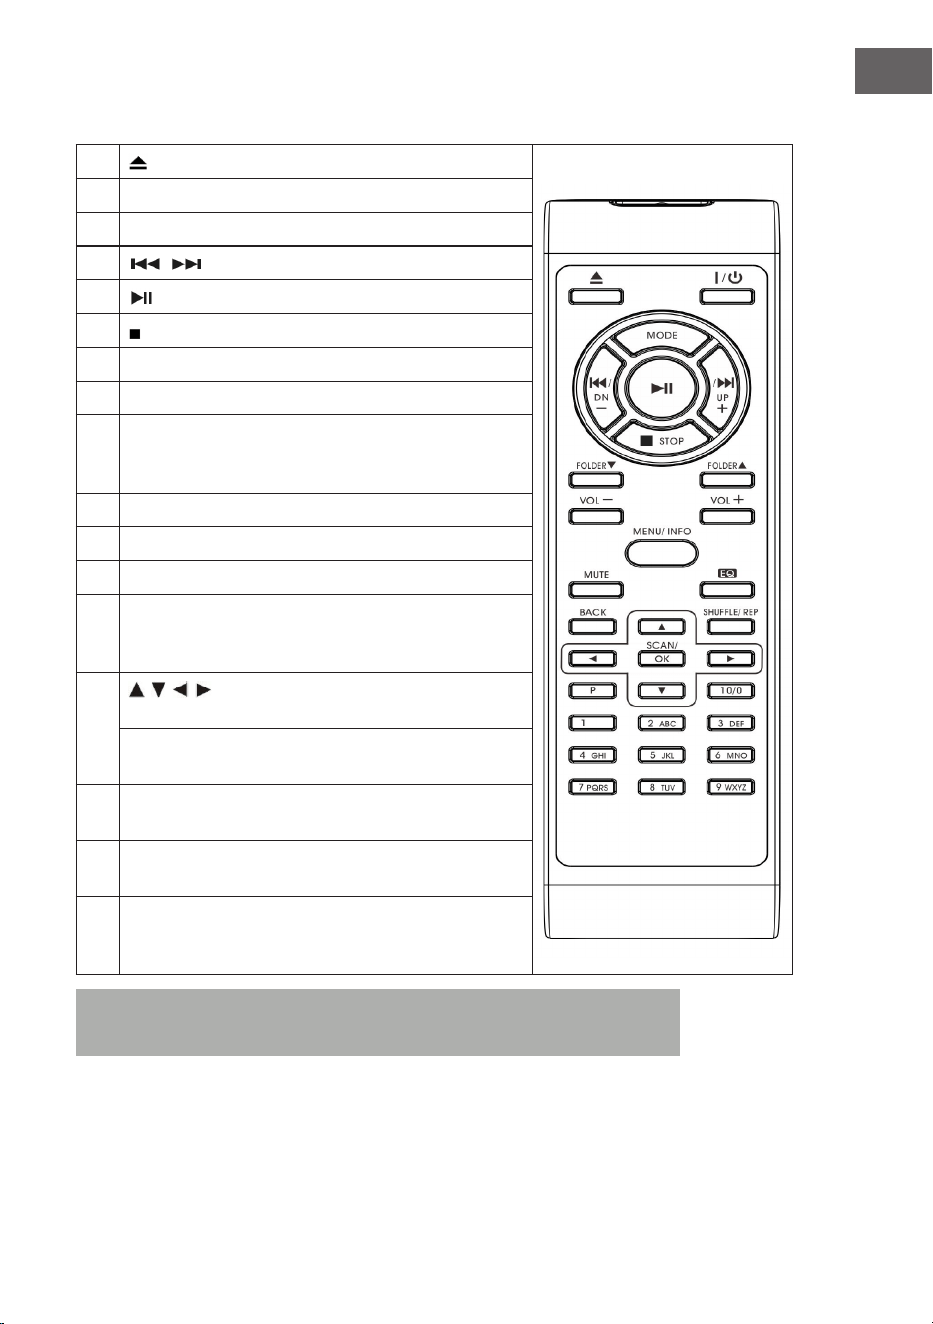
Fernbedienung
1
(CD-Fach önen/schließen)
2 On/Standby (Einschalten/Standbymodus)
3 MODE (Modusauswahl)
4
/ (vorheriger/ nächster Titel)
5
(Wiedergabe/ Pause)
6 (Stopp)
7 Folder/Pre (vorheriger/hoch/runter Ordner)
8 Volume -/+ (Lautstärke anpassen)
9 MENU/INFO (Internetradio: Informationsauswahl; CD-/
USB-Modus: Aktivierung ID3-Funktion; Alle anderen
Modi: Menü)
10 Mute (Ton zeitweise stummschalten)
11 Preset EQ (Auswahl verschiedener EQ-Modi)
12 BACK (zurück zur vorherigen Ansicht)
13 SHUFFLE/REP (CD-Modus: Wiederholungsfunktion
aktivieren; USB-Modus: Wiederholungsfunktion
aktivieren; Taste gedrückt halten: Zufallswiedergabe)
14
/ / / Pfeiltasten (Menümodus: Auswahl oben/
unten/links/rechts;
FM-/DAB-Modus: oben/unten; Internetradio: Auswahl
des Speicherplatzes)
15 SCAN/OK (Im Menümodus: Auswahl bestätigen; FM-/
DAB-Suche: Sendersuche)
16 P (Internetradio/DAB/FM/CD: drücken, um gespeicherte
Sender aufzurufen; gedrückt halten, um Sender zu
speichern)
17 Nummerntasten 10/ 0-9 (Internetradio/DAB/FM:
Eingabe der Speicherplatznummer; CD-Modus: Auswahl
der Titelnummer
Hinweis: Wenn über einen Zeitraum von 15 Minuten keine Musik
abgespielt wird, wechselt das Gerät, zum Schutz der Umwelt,
automatisch in den Standby-Modus.

8
DE
INSTALLATION
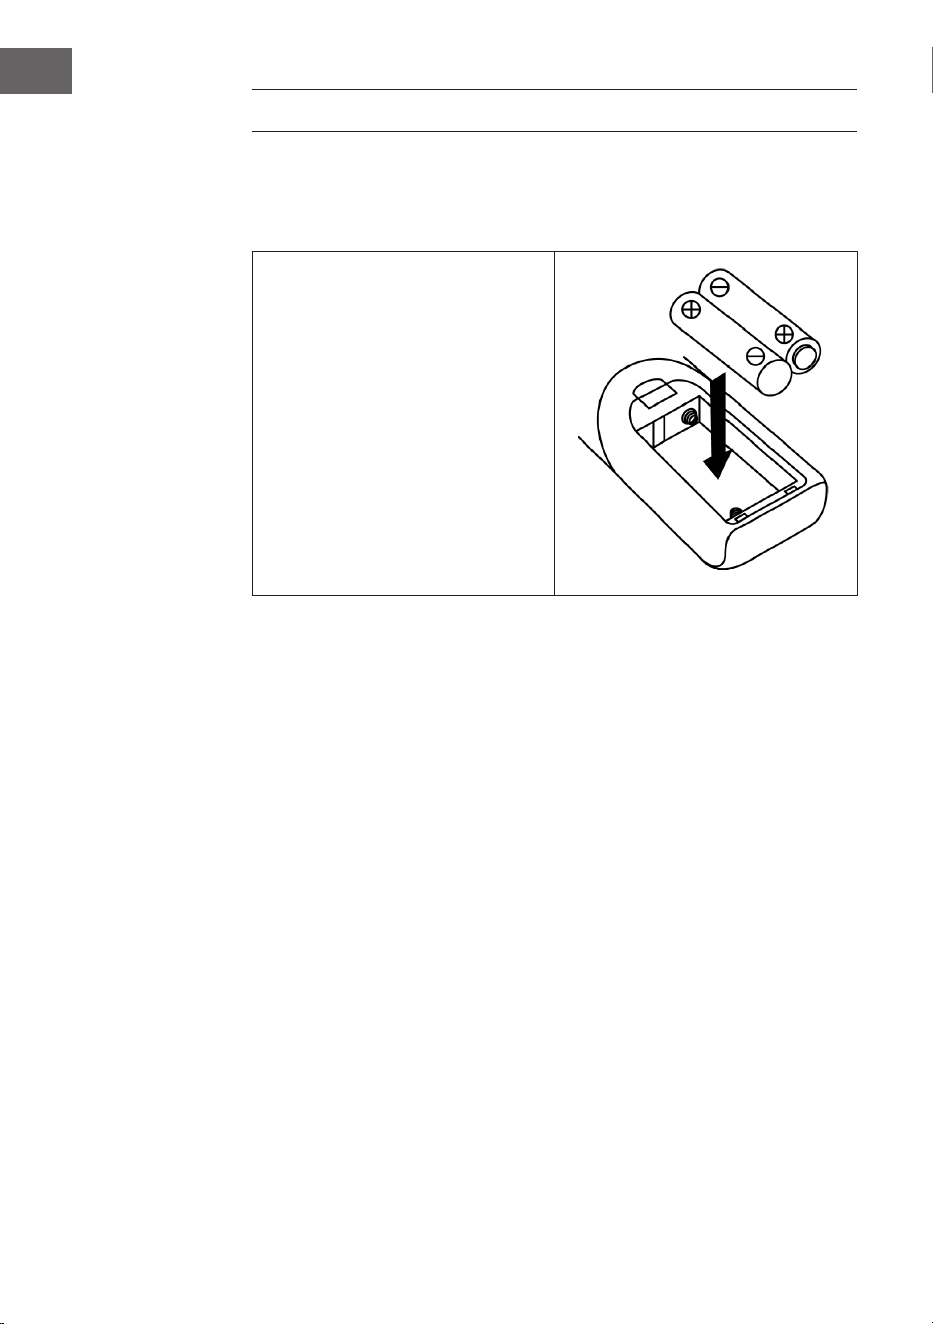
Einlegen der Batterien
Das Batteriefach bendet sich auf der Rückseite der Fernbedienung.
• Entfernen Sie die Abdeckung
des Batteriefachs, indem Sie
dieses an der Markierung
eindrücken und anschließend
abnehmen.
• Legen Sie zwei Batterien
des Typs AAA (nicht im
Lieferumfang enthalten) in das
Batteriefach ein und achten Sie
auf die richtige Polarität.
• Setzen Sie die Abdeckung des
Batteriefachs wieder ein.
Vorsichtsmaßnahmen im Umgang mit Batterien
• Batterien müssen von einem Erwachsenen ausgetauscht werden.
• Vermischen Sie keine alten und neuen Batterien.
• Vermischen Sie keine Batterien unterschiedlichen Typs.
• Die Versorgungsklemmen dürfen nicht kurzgeschlossen werden.
• Nicht dafür ausgelegt Batterien dürfen keinesfalls aufgeladen werden.
• Entnehmen Sie leere Batterien.
• Verwenden Sie ausschließlich Batterien des passenden Typs.

9
DE
Installationshinweise
• Entpacken Sie alle Gerätebestandteile und entfernen Sie sämtliches
Verpackungsmaterial.
• Stecken Sie den Netzstecker des Geräts erst dann in die Steckdose,
wenn Sie sich vergewissert haben, dass die auf dem Typenschild des
Geräts angegebene Spannung mit der Stromspannung übereinstimmt
und alle Anschlüsse gemacht wurden.
• Blockieren Sie keinesfalls die Belüftungsönungen und stellen Sie
sicher, dass um das Gerät herum mehrere Zentimeter Abstand frei sind,
um eine ausreichende Belüftung desselben zu gewährleisten.
• Stecken Sie den Netzstecker (32) in die Steckdose.
• Wenn Sie das Gerät zum ersten Mal einstecken, wird auf dem
Bildschirm „auna“ angezeigt.
• Ungefähr 30 Sekunden später startet das Gerät, wenn es zum ersten
Mal verwendet wird, automatisch den Einrichtungsassistenten und
der Bildschirm zeigt „Start now“ an und hat als Antwort „YES“ (ja)
voreingestellt. Drücken Sie zum Starten des Einrichtungsassistenten die
Taste OK (7).
• Das Gerät önet anschließend den automatischen Updatemodus.
Wählen Sie mit den Tasten / eine Updatequelle aus und bestätigen
Sie Ihre Auswahl mit der Taste OK (7). Die Zeitzonenauswahl önet sich
anschließend.
• Wählen Sie mit den Tasten / die gewünschte Zeitzone aus und
bestätigen Sie Ihre Auswahl durch Drücken der Taste OK (7). Die
Einstellung für Sommer- und Winterzeit önet sich.
• Wählen Sie mit den Tasten / Sommerzeit aus und drücken Sie zum
Bestätigen die Taste OK (7). Die Netzwerkeinstellungen önen sich nun
und „YES“ ist werkseitig eingestellt. Drücken Sie zum Bestätigen die
Taste OK (7). Das Gerät önet nun die Regionseinstellung. Werkseitig
ist „Europa“ eingestellt.
• Drücken Sie zum Bestätigen der Region die Taste OK (7). Das Gerät
sucht dann nach Ihrem Router und zeigt die gefundenen Netzwerke auf
dem LC-Bildschirm (2) an.
• Wählen Sie den gewünschten Router mit den Tasten / aus und
bestätigen Sie Ihre Auswahl durch Drücken der Taste OK (7).
• Wählen Sie durch Drücken der Tasten / „WPS“ aus und bestätigen
Sie Ihre Auswahl durch Drücken der Taste OK (7).
• Geben Sie das Passwort durch Drücken der Tasten / .
• Wählen Sie, sobald Sie das Passwort eingegeben haben, „OK“ aus und
drücken Sie zum Bestätigen die Taste OK (7). Das Gerät verbindet sich
nun mit dem Internet und sobald die Verbindung erfolgreich hergestellt
wurde, zeigt der Bildschirm „Setup wizard completed“ an. Drücken Sie
zum Fortfahren erneut die Taste OK.
10
DE
INBETRIEBNAHME UND BEDIENUNG
1. Das Gerät wechselt, nachdem Sie die oben aufgezeigten Einstellungen
vorgenommen haben, in den Internetradiomodus. Drücken Sie die
Tasten / und wählen Sie „Station list“ (Senderliste) aus. Bestätigen
Sie Ihre Auswahl durch Drücken der Taste OK.
2. Drücken Sie die Tasten / , um „Stations“ (Sender) auszuwählen und
bestätigen Sie Ihre Auswahl durch drücken der Taste OK.
3. Drücken Sie zur Auswahl des gewünschten Suchmodus, wie
beispielsweise der Suche nach Standort, die Tasten / und drücken
Sie zum Bestätigen Ihrer Auswahl die Taste OK.
4. Beispielsweise bei der Standortsuche werden verschiedene Sender
aus der direkten Umgebung auf dem Bildschirm aufgelistet. Der
gewünschte Sender kann durch drücken der Tasten / , ausgewählt
werden. Bestätigen Sie Ihre Auswahl durch drücken der Taste OK.
5. Die gefundenen Radiosender werden auf dem Bildschirm aufgelistet.
Der gewünschte Sender kann durch drücken der Tasten / ,
ausgewählt werden. Bestätigen Sie Ihre Auswahl durch drücken der
Taste OK.
6. Stellen Sie die gewünschte Lautstärke mit den Lautstärketasten (16) ein.
RADIO-MODUS
Senderspeicherung (IR-Modus)
Hinweis: Es können bis zu 10 Radiosender gespeichert werden.
1. Stellen Sie den gewünschten Internetradiosender ein.
2. Halten Sie die Taste P (11) gedrückt. Wählen Sie den gewünschten
Sender durch drücken der Tasten / aus und bestätigen Sie Ihre
Auswahl mit der Taste OK (7).
3. Wiederholen Sie die Schritte 1 und 2 für alle weiteren Sender.
4. Wenn Sie die gespeicherten Sender aufrufen möchten, drücken Sie die
Taste P und wählen Sie den gewünschten Sender mit den Tasten /
aus. Bestätigen Sie Ihre Auswahl durch Drücken der Taste OK.
Manuelle Sendersuche (FM-Modus)
1. Drücken Sie zur Auswahl des FM-Modus die Taste MODE (15).
2. Drücken Sie zum Bestätigen die Taste OK.
3. Stellen Sie mit den Tasten / den gewünschten Sender ein.
4. Passen Sie die Lautstärke mit den Lautstärketasten (16) an.

11
DE
Automatische Sendersuche
1. Drücken Sie zur Auswahl des FM-Modus die Taste MODE (15).
2. Drücken Sie zur Auswahl der Suchrichtung die Tasten / und drücken
Sie zum Bestätigen die Taste OK. Die automatische Sendersuche wird
dann gestartet.
3. Wiederholen Sie Schritt 2 so lange, bis der gewünschte Sender erreicht
wurde.
4. Passen Sie die Lautstärke mit den Lautstärketasten (16) an.
Radio Datensystem (RDS)
Diese Einstellung wird von dem jeweiligen Sender zur Verfügung gestellt.
Auf dem LC-Bildschirm werden dann die zur Verfügung gestellten
Informationen angezeigt. Durch mehrfaches drücken der Taste MENU/INFO,
werden nacheinander die folgenden Informationen angezeigt: Radiotext >
Programmart > Frequenz > Datum/Uhrzeit
FM Stereo Empfang
Drücken Sie die Taste MENU /INFO (10), um in das FM-Menü zu gelangen.
Durch Drücken der Tasten / , kann die Audioeinstellung, durch
Bestätigen mit der Taste OK, ausgewählt werden. Der Bildschirm zeigt dann
„Listen in Mono only“ (nur in Mono hören) an. Wenn Sie mit den Tasten
/ „NO“ auswählen und mit der Taste OK bestätigen, spielt das Gerät
den Sender in Stereo ab und das Stereosymbol wird auf dem Bildschirm
angezeigt.
DAB Radio
1. Drücken Sie zur Auswahl des DAB-Modus die Taste MODE (15).
2. Drücken Sie zum Bestätigen die Taste OK.
3. Das Gerät startet innerhalb von 2 Sekunden im Bereich 11b – 12d
automatisch einen Sendersuchlauf. Stellen Sie mit den Tasten / den
gewünschten Sender ein und bestätigen Sie Ihre Auswahl mit der Taste
OK.
4. Durch mehrfaches drücken der Taste MENU/INFO, werden
nacheinander die folgenden DAB-Informationen angezeigt:
Gruppenname > Programmart > Frequenz > Signalstärke >
Übertragungsrate > Datum/Uhrzeit
5. Passen Sie die Lautstärke mit den Lautstärketasten (16) an.

12
DE
Senderspeicherung (DAB-Modus)
Hinweis: Es können bis zu 20 DAB-Sender gespeichert werden.
1. Stellen Sie den DAB-Modus ein.
2. Stellen Sie den gewünschten Radiosender entweder automatisch oder
manuell ein.
3. Halten Sie die Taste P (11) gedrückt. Wählen Sie den gewünschten
Speicherplatz durch drücken der Tasten / aus.
4. Bestätigen Sie Ihre Auswahl mit der Taste OK (7).
5. Wiederholen Sie die Schritte 1 und 3 für alle weiteren Sender.
6. Wenn Sie die gespeicherten Sender aufrufen möchten, drücken Sie die
Taste P und wählen Sie den gewünschten Sender mit den Tasten /
aus. Bestätigen Sie Ihre Auswahl durch Drücken der Taste OK.
Hinweis: Nach 15 Sekunden ohne Eingabe kehrt das Gerät automatisch
in den normalen Radiomodus zurück. Ein gespeicherter Sender
kann durch das Speichern eines anderen Senders auf dem gleichen
Speicherplatz überschrieben werden.
Radioempfang
Das Gerät verfügt über eine abnehmbare Antenne. Stellen Sie sicher,
dass die Antenne an den Antennenanschluss angeschlossen wurde und
vollständig ausgefahren ist, um einen guten Empfang zu gewährleisten.
CD-MODUS
1. Drücken Sie zur Auswahl des CD-Modus die Taste MODE (15).
2. Drücken Sie zum Bestätigen die Taste OK.
3. Drücken Sie auf die Taste (8) zum Önen des CD-Fachs.
4. Legen Sie eine CD, mit der beschrifteten Seite nach oben, in das CD-
Fach ein und schließen Sie das CD-Fach.
5. Eine Suche wird gestartet und der LC-Bildschirm (2) zeigt die
Gesamtanzahl der auf der CD bendlichen Titel sowie die gesamte
Wiedergabedauer an. Die CD-Wiedergabe wird automatisch gestartet.
6. Passen Sie die Lautstärke mit den Lautstärketasten (16) an.

13
DE
Wiedergabe/Pause
Drücken Sie einmal auf die Taste (13), um die Wiedergabe zu pausieren.
Wenn Sie die Taste erneut drücken, wird die Wiedergabe fortgesetzt.
Wiedergabe stoppen
Wenn die Taste während der Wiedergabe oder Pause gedrückt wird,
stoppt das Gerät die gesamte Wiedergabe.
Titel überspringen
1. Wenn während der Wiedergabe oder Pause die Taste (14) gedrückt
wird, wird der aktuelle Titel übersprungen. Das Gerät bendet sich beim
nächsten Titel im gleichen Modus (Wiedergabe oder Pause).
2. Wenn während der Wiedergabe oder Pause die Taste (14) gedrückt
wird, wird der aktuelle Titel übersprungen. Das Gerät bendet sich beim
vorherigen Titel im gleichen Modus (Wiedergabe oder Pause).
MP3-CDs
1. Nach der Suche wird die Gesamtanzahl der Titel und die
Albuminformationen auf dem LC-Bildschirm angezeigt. Das Gerät
startet die Wiedergabe automatisch.
2. Drücken Sie zur Auswahl des gewünschten Titels die Tasten / .
ID3-Funktion
Wenn Sie mehrfach die Taste MENU/INFO drücken, zeigt der LC-Bildschirm
„F01 T001 00:01“ an. Während der Wiedergabe der MP3-Datei wird der
Name des Albums/ Künstlers/ Titels angezeigt.
• Sollte kein Name vorhanden sein, oder der Name in einer nicht
unterstützen Sprache sein, bleibt der LC-Bildschirm beim Drücken der
Taste MENU/INFO leer.
• Wenn das Eingabeformat der CD nicht vom System unterstützt wird,
können /Album/Künstler/Titel nicht erkannt werden.
• Das System unterstützt bei der ID3-Funktion nur englische und
arabische Ziern.
MP3-Format – Anforderungen
• Bitrate: 32 kbps ~ 320 kbps; Samplingrate: 32 kHz, 44,1 kHz und 48 kHz
dekodierbar
• Die Wiedergabeleistung von MP3-CDs hängt von der Aufnahmequalität
und der Aufnahmemethode ab. Des Weiteren ist die Ladezeit bei MP3-
CDs, auf Grund des anderen Formats, länger als bei normalen CDs.
14
DE
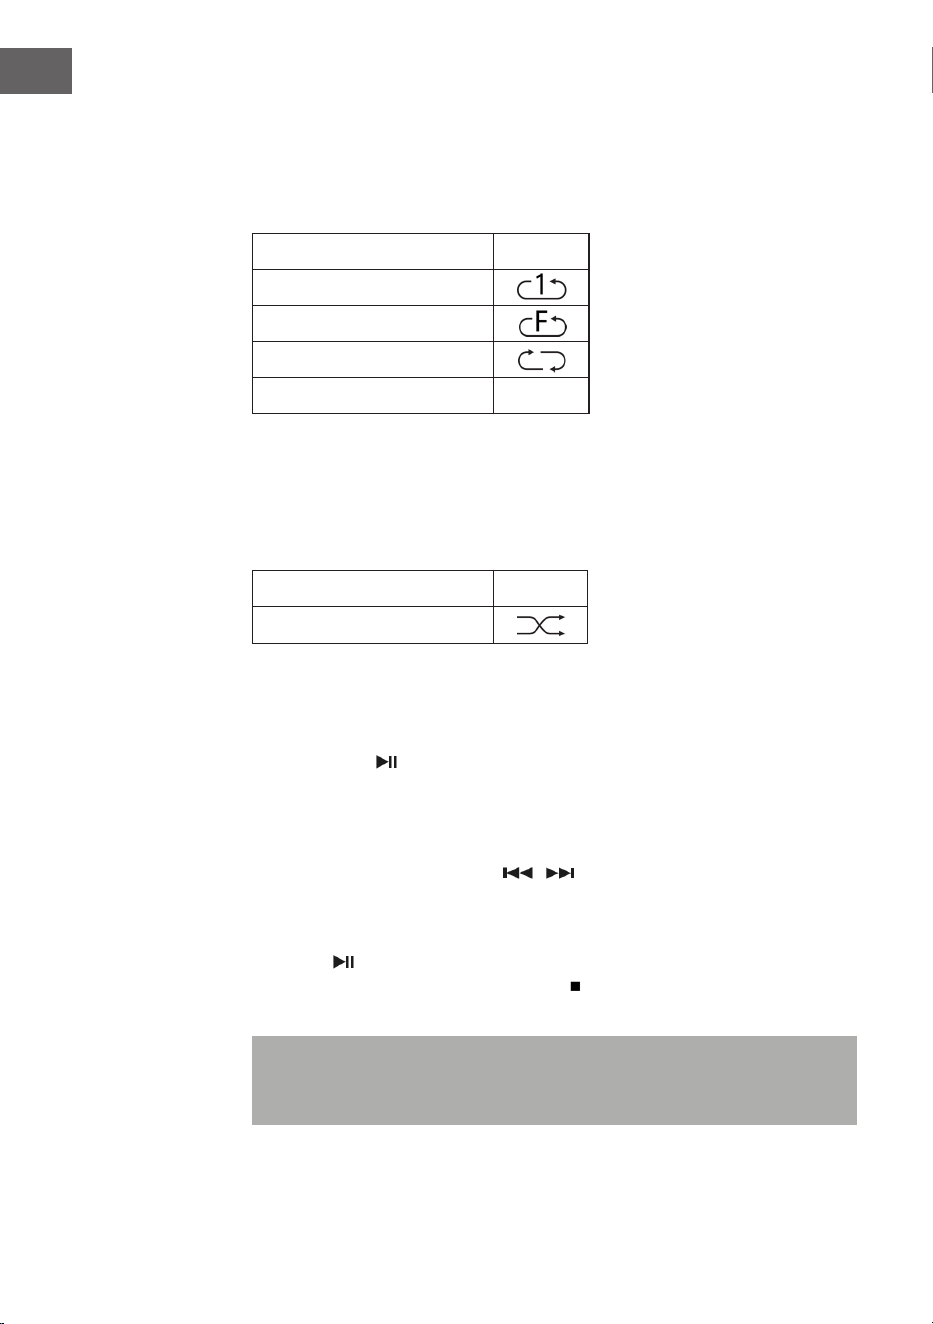
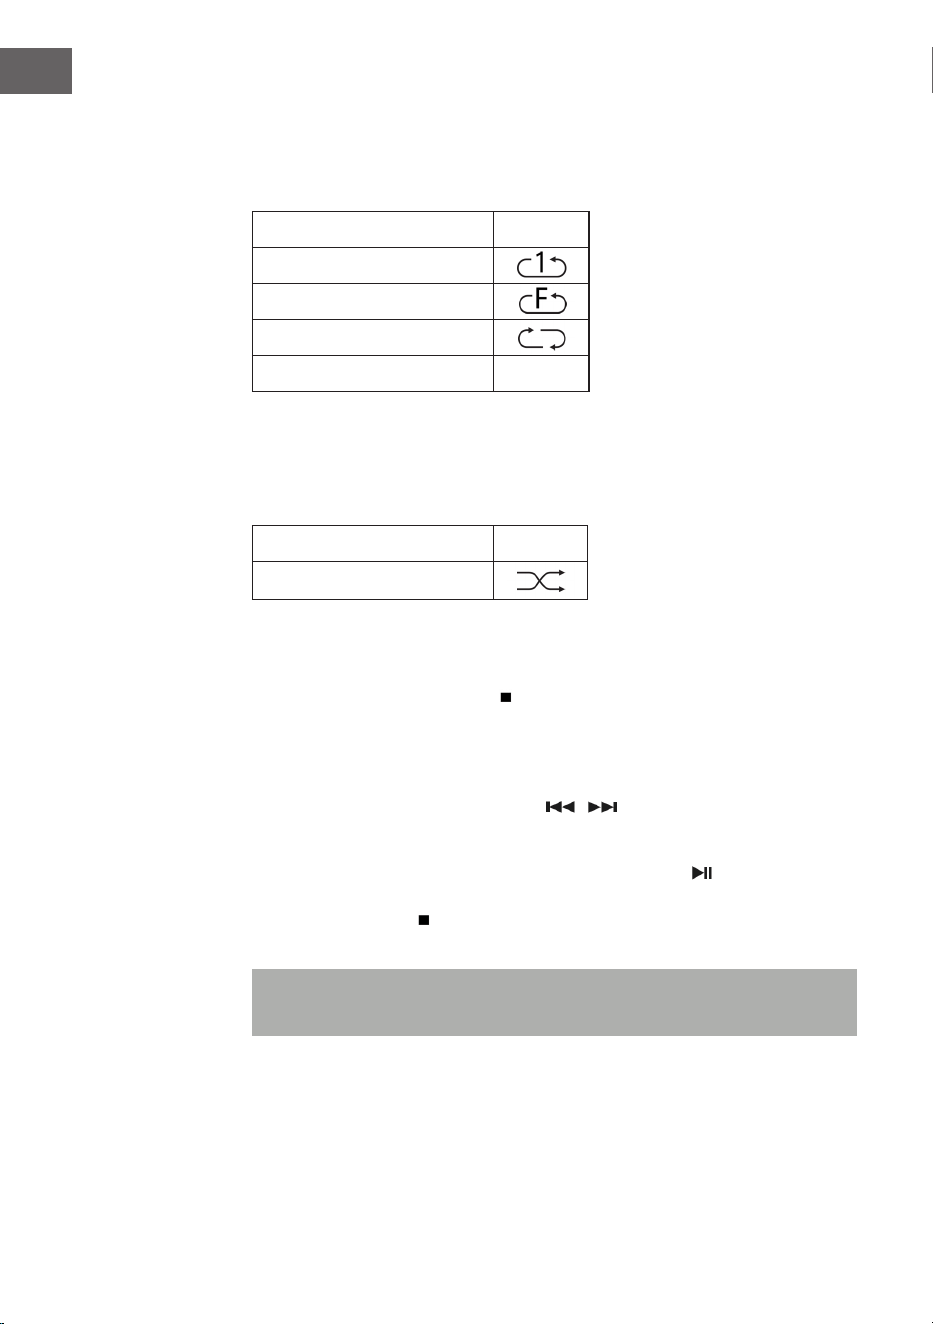
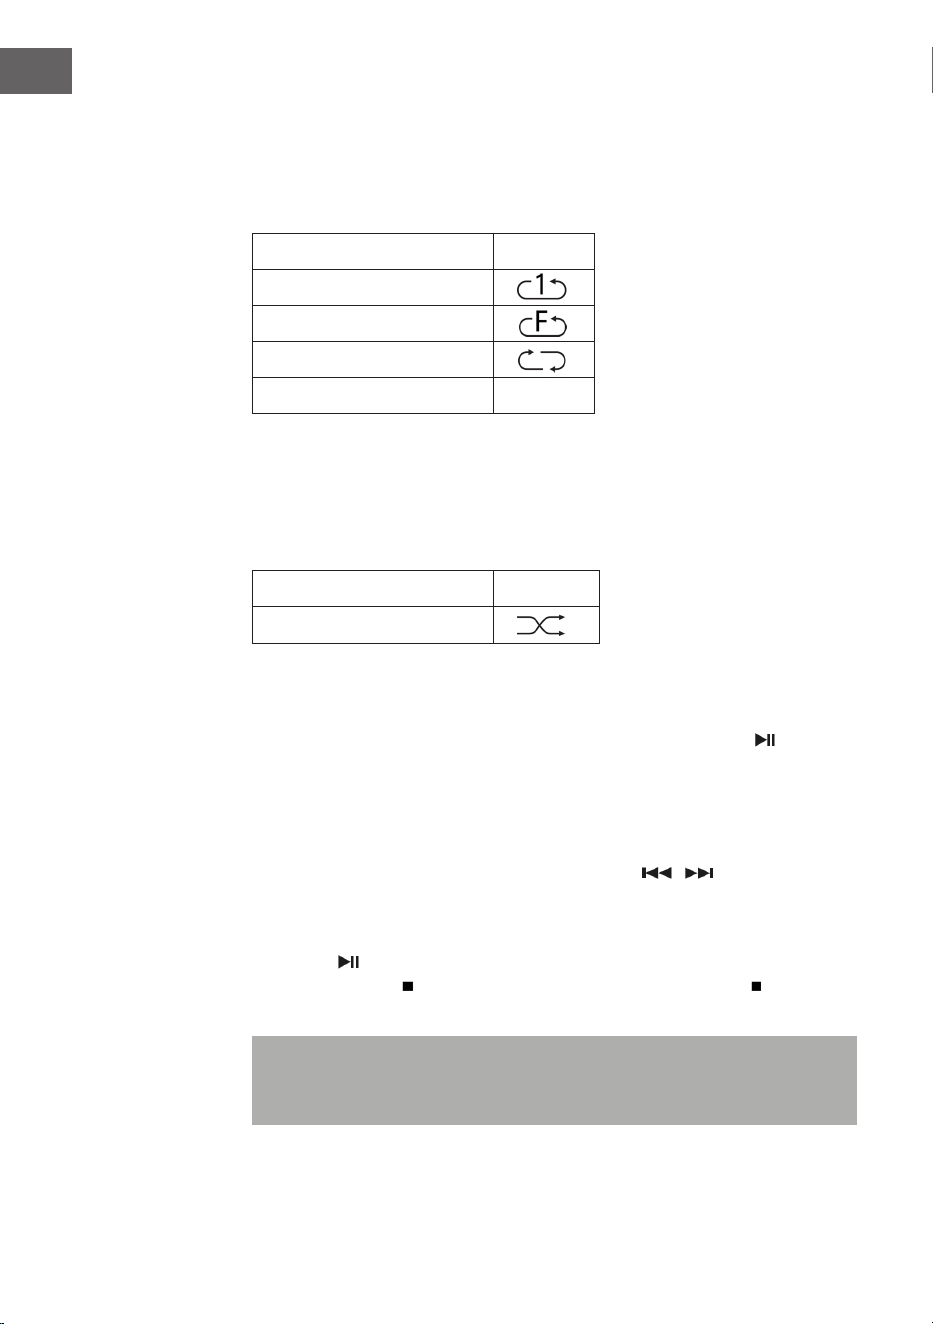
Titel wiederholen (für CDs)
Sie können den gewünschten Titel, Ordner (nur MP3) oder die gesamte
CD mit dieser Funktion wiederholen: (1) Wiederholen 1 > (2) Alle Titel
wiederholen > (3) wiederholen deaktiviert.
Wiedergabemodus Anzeige
Einen Titel wiederholen
Ordner wiederholen
Alle Titel wiederholen
Wiederholen deaktiviert -----
Zufallswiedergabe
Mit dieser Funktion werden alle Titel in zufälliger Reihenfolge
wiedergegeben. Drücken Sie während des Wiederholungsmodus die Taste
REP/SHUFFLE, um die Zufallswiedergabe zu aktivieren.
Wiedergabemodus Anzeige
Random (Zufall)
CD Titelspeicherung
Bis zu 20 CD-Titel können in beliebiger Reihenfolge in einer Liste
gespeichert werden. Stellen Sie vor der Verwendung dieser Funktion sicher,
dass die Taste (13) gedrückt wurde.
1. Stellen Sie den CD-Modus ein und stoppen Sie die CD-Wiedergabe.
2. Halten Sie die Taste P (11) gedrückt und auf dem LC-Bildschirm wird
„program“ angezeigt.
3. Wählen Sie mit den Tasten / den gewünschten Titel aus.
4. Drücken Sie zum Speichern die Taste OK.
5. Wiederholen Sie die Schritte 3 und 4, um weitere Titel zu speichern.
6. Drücken Sie, sobald alle gewünschten Titel gespeichert wurden, die
Taste , um die gespeicherten CD-Titel wiederzugeben.
7. Drücken Sie zum Stoppen die Taste und drücken Sie die Taste erneut,
um alle gespeicherten Titel zu löschen.
Hinweis: Wenn innerhalb von 30 Sekunden, nachdem die Taste P
gedrückt wurde, keine Taste gedrückt wird, wird der Speichermodus
automatisch abgebrochen.

15
DE
WIEDERGABE VON MP3-DATEIEN VON USB-
GERÄTEN
Das Gerät kann auf USB-Geräten gespeicherte MP3-Dateien dekodieren.
1. Versetzen Sie das Gerät zunächst in den Standby-Modus oder einen
beliebigen Modus (außer dem USB-Modus).
2. Stecken Sie den USB-Stick richtig herum in den USB-Anschluss und
stellen Sie sicher, dass dieser richtig darin steckt.
3. Drücken Sie mehrfach die Taste MODE, um den „My Player Modus“
auszuwählen.
4. Drücken Sie zum Bestätigen die Taste OK (7).
5. Wählen Sie mit den Tasten / die gewünschte Datei aus und drücken
Sie zum Starten der Wiedergabe die Taste OK.
6. Stellen Sie mit den Lautstärketasten (16) die gewünschte Lautstärke ein.
Wiedergabe/Pause
Drücken Sie einmal auf die Taste (13), um die Wiedergabe zu pausieren.
Wenn Sie die Taste erneut drücken, wird die Wiedergabe fortgesetzt.
Wiedergabe stoppen
Wenn die Taste während der Wiedergabe oder Pause gedrückt wird,
stoppt das Gerät die gesamte Wiedergabe.
Titel überspringen
• Wenn während der Wiedergabe oder Pause die Taste (14) gedrückt
wird, wird nächste Titel abgespielt.
• Wenn während der Wiedergabe oder Pause die Taste (14) gedrückt
wird, wird der aktuelle Titel erneut wiedergegeben. Drücken Sie die
Taste erneut, um den vorherigen Titel abzuspielen.

16
DE
ID3-Funktion
Wenn Sie mehrfach die Taste MENU/INFO drücken, zeigt der LC-Bildschirm
die MP3-Informationen wie Album/ Künstler/Titel etc. an.
• Sollte kein Name vorhanden sein, oder der Name in einer nicht
unterstützen Sprache sein, bleibt der LC-Bildschirm beim Drücken der
Taste MENU/INFO leer.
• Wenn das Eingabeformat der CD nicht vom System unterstützt wird,
können /Album/Künstler/Titel nicht erkannt werden.
• Das System unterstützt bei der ID3-Funktion nur englische und
arabische Ziern.
MP3-Format – Anforderungen
• Bitrate: 32 kbps ~ 320 kbps; Samplingrate: 32 kHz, 44,1 kHz und 48 kHz
dekodierbar
• Die Wiedergabeleistung von MP3-CDs hängt von der Aufnahmequalität
und der Aufnahmemethode ab.
Wiederholen/ Zufallswiedergabe
Drücken Sie die Taste MENU (10), um in das Menü zu gelangen und
wählen Sie mit den Tasten / die Zufallswiedergabe oder den
Wiederholungsmodus aus. Bestätigen Sie Ihre Auswahl durch drücken der
Taste OK.
• Das Gerät kann MP3-Dateien nur im USB-Modus lesen. Es können keine
Musikdateien mit anderem Format dekodiert werden.
• Wenn Sie einen MP3-Player an den USB-Anschluss des Geräts
anschließen, kann es sein, dass das Gerät die darauf bendlichen
Dateien, weil der MP3-Player nicht kompatibel ist, nicht wiedergeben
kann. Es handelt sich dabei nicht um einen Fehler des Geräts.
• Der USB-Anschluss darf nicht in Verbindung mit einem USB-
Verlängerungskabel verbunden werden und darf nicht direkt an einen
Computer angeschlossen werden

17
DE
ZUSATZFUNKTIONEN
Automatisches Ausschalten
1. Drücken und halten Sie die Taste MENU gedrückt und wählen Sie mit
den Tasten / das Hauptmenü aus. Bestätigen Sie Ihre Auswahl durch
Drücken der Taste OK.
2. Wählen Sie mit den Tasten / „Sleep mode“ aus und drücken Sie zum
Bestätigen die Taste OK.
3. Wählen Sie die gewünschte Zeit bis zum automatischen Ausschalten aus
15-30-45-60 mit den Tasten / aus und bestätigen Sie Ihre Auswahl
mit der Taste OK. Der LC-Bildschirm zeigt anschließend die ausgewählte
Zeit bis zum automatischen Ausschalten auf dem Bildschirm an. Das
Gerät wechselt, wenn die Zeit abgelaufen ist, in den Standby-Modus.
EQ-Funktion
1. Drücken Sie die Taste MENU, um in das Hauptmenü zu gelangen und
wählen Sie mit den Tasten / „Equalizer“ aus. Drücken Sie zum
Bestätigen die Taste OK.
2. Wählen Sie mit den Tasten „Flat, Jazz, Rock, Movie, Classic, Pop, News,
My EQ oder MY EQ SETUP“ aus und bestätigen Sie Ihre Auswahl mit der
Taste OK.
Spracheinstellung
1. Drücken Sie die Taste MENU und wählen Sie mit den Tasten „Language“
aus. Bestätigen Sie Ihre Auswahl mit der Taste OK.
2. Stellen Sie mit den Tasten / die gewünschte Sprache ein und
bestätigen Sie Ihre Auswahl mit der Taste OK.
Werkseinstellung
1. Drücken Sie die Taste MENU und wählen Sie mit den Tasten „Factory
reset“ aus. Bestätigen Sie Ihre Auswahl mit der Taste OK.
2. Wählen Sie mit den Tasten / zum Neustart des Gerät und zum
Löschen aller darauf bendlichen Informationen „YES“ und bestätigen
Sie Ihre Auswahl mit der Taste OK. Gehen Sie nun genauso wie beim
ersten Einschalten des Geräts vor.
18
DE
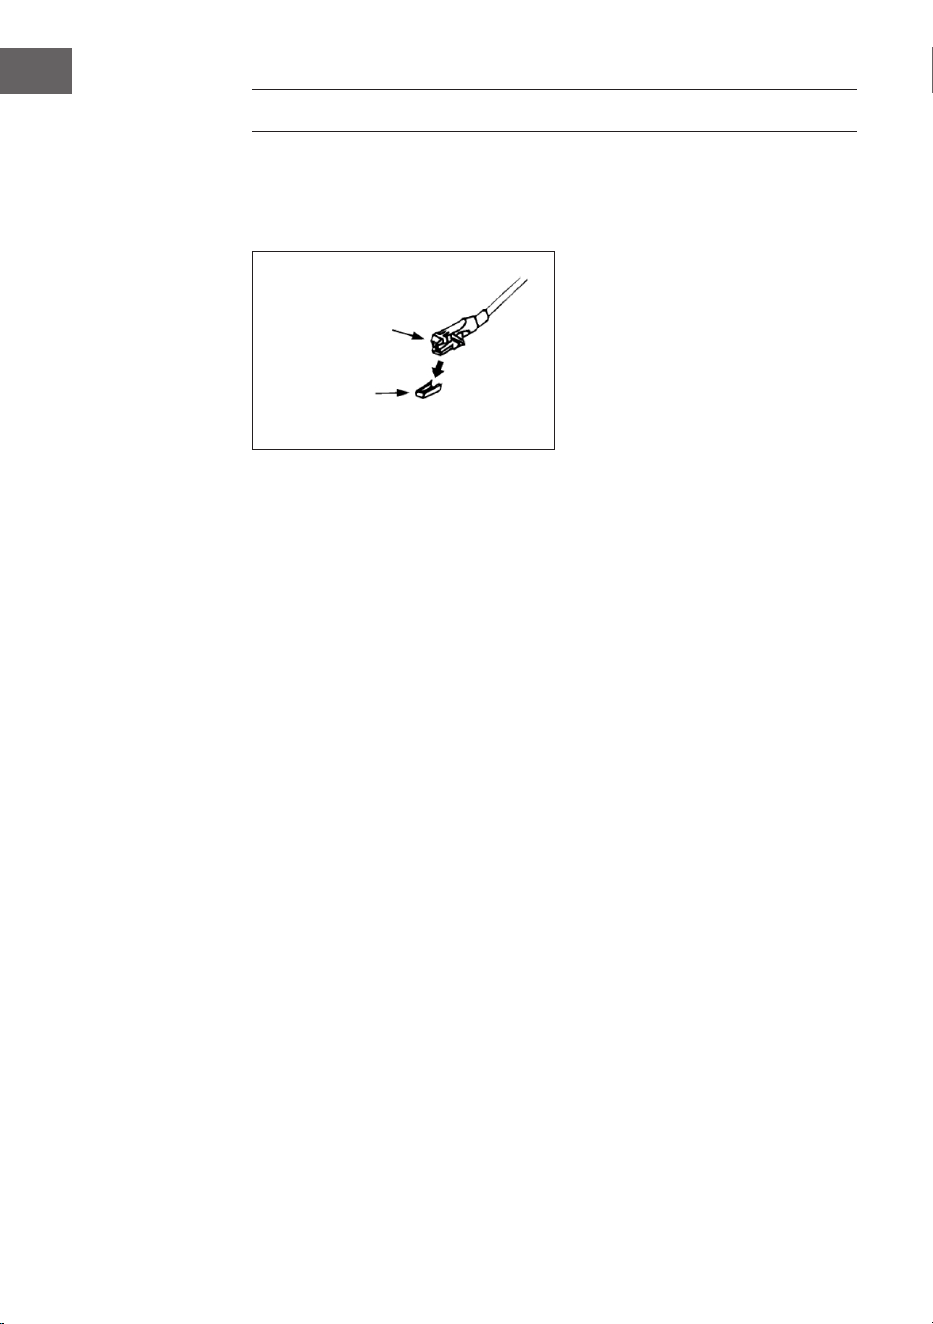
PLATTENSPIELER
Entfernen Sie den Nadelschutz. Stellen Sie sicher, dass der Tonarm vor
der Verwendung des Plattenspielers von der Halterung genommen und
anschließend wieder gesichert wird.
1. Drücken Sie zur Auswahl des Plattenspieler-Modus (Phono) mehrfach
die Taste MODE.
2. Drücken Sie zum Bestätigen die Taste OK.
3. Bringen Sie die Geschwindigkeitsauswahl (25) in die richtige Position,
abhängig von der jeweiligen Schallplatte.
4. Legen Sie die Schallplatte auf den Drehteller (verwenden Sie falls
notwendig den Adapter).
5. Bringen Sie den Tonarmhebel (27) nach oben.
6. Heben Sie den Tonarm langsam von der Halterung herunter und
bewegen Sie diesen vorsichtig in Richtung der Schallplatte. Der
Drehteller beginnt sich langsam zu drehen. Positionieren Sie den
Tonarm oberhalb der gewünschten Stelle der Schallplatte.
7. Ziehen Sie den Tonarmhebel nach unten. Der Tonarm wird langsam auf
die Schallplatte abgesenkt und die Wiedergabe beginnt.
8. Am Ende der Schallplatte bewegt sich der Tonarm automatisch wieder
in die Ruheposition.
9. Heben Sie den Tonarm zum manuellen Stoppen der Schallplatte von
dieser herunter.
Pause
Heben Sie den Tonarm an, um die Wiedergabe zeitweise zu unterbrechen.
Kartusche
Schutz

19
DE
Wichtige Hinweise
• Das automatische Rücknahmesystem wurde mechanisch entworfen
und der Rücksetzpunkt kann durch den Transport beeinusst werden.
Deshalb kann es vorkommen, dass der Tonarm beim ersten Aufsetzen
auf die Schallplatte automatisch auf die Halterung zurückkehrt. Dies ist
keine Fehlfunktion.
• Die Länge der Schallplatte kann variieren. Wenn Sie feststellen, dass
der Tonarm nach der Wiedergabe der Schallplatte nicht automatisch
zurückkehren kann, stellen Sie den Tonarm bitte manuell wieder
in die Ruheposition zurück oder stellen Sie den automatischen
Rückgabepunkt ein.
BT VERBINDUNGSHERSTELLUNG UND
WIEDERGABE
1. Drücken Sie zur Auswahl des BT-Modus die Taste MODE (15).
2. Drücken Sie zum Bestätigen die Taste OK.
3. Das Display (2) zeigt [No media] und das BT-Symbol.
4. Halten Sie die Taste MENU/INFO (10) gedrückt, und drücken Sie auf die
Pfeiltasten (hoch/runter) (7), um [Setup BT] auszuwählen. Drücken Sie
zum Bestätigen die Taste OK.
5. Im Display (2) blinkt nun das BT-Symbol und das Display zeigt [BT
Discoverable], was bedeutet, dass sich das Gerät im Suchmodus
bendet.
6. Aktivieren Sie BT auf Ihrem externen Smartphone oder Tablet und
wähle Sie das Gerät mit dem Namen [Birmingham] aus, um sich mit der
Stereoanlage zu verbinden.
7. Sobald die Verbindung zwischen beiden Geräten steht, leuchtet das BT-
Symbol durchgehend auf dem Display (2).
8. Starten Sie Musik auf Ihrem externen Gerät und hören Sie sie über die
Stereoanlage.
AUX-IN
Schließen Sie ein anderes Audiogerät, beispielsweise einen tragbaren
CD-Player, MP3-Player, Kassettenspieler, iPod etc. mithilfe eines 3,5 mm
Anschlusskabels (nicht im Lieferumfang enthalten) an den Aux-In-Anschluss
an der Seite des Geräts an. Wählen Sie mit der Taste MODE den Aux-In-
Modus aus und drücken Sie zum Starten der Wiedergabe die Taste OK.
20
DE
SPOTIFY CONNECT
Dein neues Gerät hat Spotify Connect
Verwende dein Smartphone, Tablet oder deinen Computer als
Fernbedienung für Spotify. Auf spotify.com/connect erfährst du
mehr.
Lizenzen
Die Spotify Software unterliegt den Nutzungsrechten von Drittanbietern,
die auf folgender Seite eingesehen werden können:
https://www.spotify.com/connect/third-party-licenses
Alle aufgeführten Marken sind Warenzeichen der jeweiligen Unternehmen.
Fehler und Auslassungen ausgenommen und technischen Änderungen
unterliegend. Unsere allgemeinen Geschäftsbedingungen nden
Anwendung.
TECHNISCHE DATEN
Artikelnummer 10034090
Stromversorgung 220-240 V ~ 50/60 Hz
Max. Leistung 50 W (2 x 12,5 W RMS)
Radio IR/DAB+/FM-RDS
FM-Frequenz 87,5-108 MHz
DAB-Frequenz DAB+ Band III 174-240 MHz
WLAN-Frequenz 2,4 GHz
WLAN-Sendeleistung (max.) +13 dBm
BT-Frequenz 2,402-2,480 GHz
BT-Sendeleistung (max.) 4 dBm

21
DE
SPEZIELLE ENTSORGUNGSHINWEISE FÜR
VERBRAUCHER IN DEUTSCHLAND
Entsorgen Sie Ihre Altgeräte fachgerecht. Dadurch wird gewährleistet,
dass die Altgeräte umweltgerecht verwertet und negative Auswirkungen
auf die Umwelt und menschliche Gesundheit vermieden werden. Bei der
Entsorgung sind folgende Regeln zu beachten:
• Jeder Verbraucher ist gesetzlich verpichtet, Elektro- und
Elektronikaltgeräte (Altgeräte) sowie Batterien und Akkus
getrennt vom Hausmüll zu entsorgen. Sie erkennen die
entsprechenden Altgeräte durch folgendes Symbol der
durchgestrichene Mülltonne (WEEE-Symbol).
• Sie haben Altbatterien und Altakkumulatoren, die nicht vom Altgerät
umschlossen sind, sowie Lampen, die zerstörungsfrei aus dem
Altgerät entnommen werden können, vor der Abgabe an einer
Entsorgungsstelle vom Altgerät zerstörungsfrei zu trennen.
• Bestimmte Lampen und Leuchtmittel fallen ebenso unter das Elektro-
und Elektronikgesetz und sind dementsprechend wie Altgeräte zu
behandeln. Ausgenommen sind Glühbirnen und Halogenlampen.
Entsorgen Sie Glühbirnen und Halogenlampen bitte über den Hausmüll,
sofern sie nicht das WEEE-Symbol tragen.
• Jeder Verbraucher ist für das Löschen von personenbezogenen Daten
auf dem Elektro- bzw. Elektronikgerät selbst verantwortlich.
Rücknahmepicht der Vertreiber
Vertreiber mit einer Verkaufsäche für Elektro- und Elektronikgeräte von
mindestens 400 Quadratmetern sowie Vertreiber von Lebensmitteln mit
einer Gesamtverkaufsäche von mindestens 800 Quadratmetern, die
mehrmals im Kalenderjahr oder dauerhaft Elektro- und Elektronikgeräte
anbieten und auf dem Markt bereitstellen, sind verpichtet,
1 bei der Abgabe eines neuen Elektro- oder Elektronikgerätes an einen
Endnutzer ein Altgerät des Endnutzers der gleichen Geräteart, das
im Wesentlichen die gleichen Funktionen wie das neue Gerät erfüllt,
am Ort der Abgabe oder in unmittelbarer Nähe hierzu unentgeltlich
zurückzunehmen und
2 auf Verlangen des Endnutzers Altgeräte, die in keiner äußeren
Abmessung größer als 25 Zentimeter sind, im Einzelhandelsgeschäft
oder in unmittelbarer Nähe hierzu unentgeltlich zurückzunehmen; die
Rücknahme darf nicht an den Kauf eines Elektro- oder Elektronikgerätes
geknüpft werden und ist auf drei Altgeräte pro Geräteart beschränkt.

22
DE
• Bei einem Vertrieb unter Verwendung von Fernkommunikationsmitteln
ist die unentgeltliche Abholung am Ort der Abgabe auf Elektro- und
Elektronikgeräte der Kategorien 1, 2 und 4 gemäß § 2 Abs. 1 ElektroG,
nämlich „Wärmeüberträger“, „Bildschirmgeräte“ (Oberäche von mehr
als 100 cm²) oder „Großgeräte“ (letztere mit mindestens einer äußeren
Abmessung über 50 Zentimeter) beschränkt. Für andere Elektro- und
Elektronikgeräte (Kategorien 3, 5, 6) ist eine Rückgabemöglichkeit in
zumutbarer Entfernung zum jeweiligen Endnutzer zu gewährleisten.
• Altgeräte dürfen kostenlos auf dem lokalen Wertstohof oder in
folgenden Sammelstellen in Ihrer Nähe abgegeben werden: www.take-
e-back.de
• Für Elektro- und Elektronikgeräte der Kategorien 1, 2 und 4 bieten
wir auch die Möglichkeit einer unentgeltlichen Abholung am Ort der
Abgabe. Beim Kauf eines Neugeräts haben Sie die Möglichkeit, eine
Altgerätabholung über die Webseite auszuwählen.
• Batterien können überall dort kostenfrei zurückgegeben werden, wo sie
verkauft werden (z. B. Super-, Bau-, Drogeriemarkt). Auch Wertsto- und
Recyclinghöfe nehmen Batterien zurück. Sie können Batterien auch per
Post an uns zurücksenden. Altbatterien in haushaltsüblichen Mengen
können Sie direkt bei uns von Montag bis Freitag zwischen 08:00 und
16:00 Uhr unter der folgenden Adresse unentgeltlich zurückgeben:
Chal-Tec Fulllment GmbH
Norddeutschlandstr. 3
47475 Kamp-Lintfort
• Wichtig zu beachten ist, dass Lithiumbatterien aus Sicherheitsgründen
vor der Rückgabe gegen Kurzschluss gesichert werden müssen (z. B.
durch Abkleben der Pole).
• Finden sich unter der durchgestrichenen Mülltonne auf der Batterie
zusätzlich die Zeichen Cd, Hg oder Pb ist das ein Hinweis darauf, dass
die Batterie gefährliche Schadstoe enthält. (»Cd« steht für Cadmium,
»Pb« für Blei und »Hg« für Quecksilber).
Hinweis zur Abfallvermeidung
Indem Sie die Lebensdauer Ihrer Altgeräte verlängern, tragen Sie dazu
bei, Ressourcen eizient zu nutzen und zusätzlichen Müll zu vermeiden.
Die Lebensdauer Ihrer Altgeräte können Sie verlängern, indem Sie defekte
Altgeräte reparieren lassen. Wenn sich Ihr Altgerät in gutem Zustand
bendet, könnten Sie es spenden, verschenken oder verkaufen.

23
DE
HINWEISE ZUR ENTSORGUNG
Wenn es in Ihrem Land eine gesetzliche Regelung
zur Entsorgung von elektrischen und elektronischen
Geräten gibt, weist dieses Symbol auf dem Produkt
oder auf der Verpackung darauf hin, dass dieses
Produkt nicht im Hausmüll entsorgt werden darf.
Stattdessen muss es zu einer Sammelstelle für
das Recycling von elektrischen und elektronischen
Geräten gebracht werden. Durch regelkonforme
Entsorgung schützen Sie die Umwelt und die
Gesundheit Ihrer Mitmenschen vor negativen
Konsequenzen. Informationen zum Recycling
und zur Entsorgung dieses Produkts, erhalten
Sie von Ihrer örtlichen Verwaltung oder Ihrem
Hausmüllentsorgungsdienst.
Dieses Produkt enthält Batterien. Wenn es in Ihrem
Land eine gesetzliche Regelung zur Entsorgung
von Batterien gibt, dürfen die Batterien nicht im
Hausmüll entsorgt werden. Informieren Sie sich
über die örtlichen Bestimmungen zur Entsorgung
von Batterien. Durch regelkonforme Entsorgung
schützen Sie die Umwelt und die Gesundheit Ihrer
Mitmenschen vor negativen Konsequenzen.
KONFORMITÄTSERKLÄRUNG
Hersteller:
Chal-Tec GmbH, Wallstraße 16, 10179 Berlin,
Deutschland.
Importeur für Großbritannien:
Berlin Brands Group UK Limited
PO Box 42
272 Kensington High Street
London, W8 6ND
United Kingdom
Hiermit erklärt Chal-Tec GmbH, dass der
Funkanlagentyp Birmingham der Richtlinie
2014/53/EU entspricht. Der vollständige Text der
EU-Konformitätserklärung ist unter der folgenden
Internetadresse verfügbar: use.berlin/10034090


25
EN
Dear Customer,
Congratulations on purchasing this device. Please read
the following instructions carefully and follow them to
prevent possible damages. We assume no liability for
damage caused by disregard of the instructions and
improper use. Scan the QR code to get access to the
latest user manual and more product information.
CONTENTS
Safety Instructions 26
Product Overview 27
Installation 30
Commissioning and Operation 32
Radio Mode 32
CD Mode 34
Play MP3 les from USB Devices 37
Additional Functions 39
Phono Mode (Turntable) 40
BT Connection and Playback 41
Aux In 41
Spotify Connect 42
Technical Data 42
Disposal Considerations 43
Declaration of Conformity 43

26
EN
SAFETY INSTRUCTIONS
Note: Because CD movement and sensitive circuitry can cause
interference with nearby equipment, turn o the equipment if you intend
to use other electrical equipment in the vicinity.
• All safety and operating instructions must be followed.
• Do not use the unit near water or moisture.
• Make sure that no liquid is spilled over the device or the openings in the
device.
• Move the unit carefully to avoid electric shock.
• Do not block the ventilation openings of the unit.
• Do not place the unit near any heat sources (such as heaters) or expose
it to direct sunlight.
• Plug the appliance into a wall outlet according to the operating
instructions.
• This equipment is equipped with an overheat protection (safety device).
If it needs to be replaced, contact the manufacturer, customer service or
a similarly qualied person.
• To clean the unit, follow the instructions in the „Cleaning and Care“
section.
• Unplug the appliance from the wall outlet when not in use for an
extended period of time.
• The unit must be repaired by a qualied person if:
- the power plug or cord is damaged,
- foreign objects or liquid have entered the openings of the device,
- the device has been exposed to rain,
- the device does not function properly without external changes,
- the unit is dropped and the subwoofer is broken.
• Do not attempt to repair the unit yourself as this will void the warranty.
• The power plug is used as a disconnect switch and should be easily
accessible at all times.
• To prevent accidents, the unit must be securely fastened to the oor or
wall in accordance with the installation instructions.
• The device is a Class I laser product.
27
EN
CAUTION
Non-compliance with the operating instructions described in
this manual may result in the release of hazardous radiation.
This device should only be adjusted and repaired by qualied
personnel.
PRODUCT OVERVIEW
Device (front view)
1
Dustcover
11
P button
2
LCD display
12
Skip down button
3
VU meter
13
Play/Pause / STOP button
4
Headphone Socket
14
Skip up button
5
AUX-IN Socket
15
MODE button
6
USB Socket
16
VOLUME -/+ /POWER knob
7
Up/Down/OK/SCAN knob
17
Remote Sensor
8
OPEN/CLOSE button
18
VU meter
9
BACK button
33
CD door
10
MENU/INFO button

28
EN
Turntable
19
Single 45 RPM Adaptor
24
Cue Lever
20
Turntable Platter
25
Speed Selector (33&45 rpm)
21
Transit Screw
26
Tone Arm Lock
22
Counter Weight
27
Tone Arm with Stylus
23
Pitch Control
Back view
28
Speaker Terminal
31
Antenna Socket
29
Right Line Out Socket
32
AC Power Cord
30
Left Line Out Socket
29
EN
Fernbedienung
1
(Open/Close CD tray)
2 On/Standby
3 MODE
4
/ (previous/next title)
5
(Play/Pause)
6 (Stop)
7 Folder/Pre (Previous/up/down Folder)
8 Volume -/+ (adjust volume)
9 MENU/INFO (Internet radio: information selection; CD/
USB mode: ID3 function activation; All other modes:
menu)
10 Mute (mute sound temporarily)
11 Preset EQ (selection of dierent EQ modes)
12 BACK (back to previous view)
13 SHUFFLE/REP (CD mode: activate repeat function; USB
mode: activate repeat function; keep button pressed:
Random Playback)
14
/ / / Arrow keys (Menu mode: Selection up/
down/left/right;
FM/DAB mode: up/down; Internet radio: selection of
memory)
15 SCAN/OK (In menu mode: conrm selection; FM/DAB
search: station search)
16 P (Internet radio/DAB/FM/CD: press to access stored
stations; press and hold to store stations)
17 Number buttons 10/ 0-9 (Internet radio/DAB/FM: Enter
the memory location number; CD mode: Select the track
number; CD mode: Select the track number)
Note: If no music is played for 15 minutes, the unit automatically
switches to standby mode to protect the environment.
30
EN
INSTALLATION
Inserting the batteries
The battery compartment is located on the back of the remote control.
• Remove the cover of the
battery compartment by
pressing it in at the mark and
then removing it.
• Insert two AAA batteries (not
supplied) into the battery
compartment and make sure
the polarity is correct.
• Replace the battery cover.
Precautions when handling batteries
• Batteries must be replaced by an adult.
• Do not mix old and new batteries.
• Do not mix batteries of dierent types.
• Do not short-circuit the supply terminals.
• Do not charge batteries designed for this purpose.
• Remove empty batteries.
• Only use batteries of the appropriate type.

31
EN
installation instructions
• Unpack all parts of the unit and remove all packing material.
• Do not plug the appliance into a wall outlet until you are sure that the
voltage on the appliance‘s nameplate matches the voltage and that all
connections have been made.
• Do not block the air vents or allow several centimeters of space around
the product to allow adequate ventilation.
• Plug the power plug (32) into the wall outlet.
• When you plug in the unit for the rst time, „auna“ will be displayed on
the screen.
• Approximately 30 seconds later, when the device is used for the rst
time, it automatically starts the Setup Wizard and the screen displays
„Start now“ with „YES“ (yes) as the default response. Press OK (7) to
start the Setup Wizard.
• The device then opens the automatic update mode. Select an update
source with the / buttons and conrm your selection with the OK
button (7). The time zone selection then opens.
• Select the desired time zone with the / buttons and conrm your
selection by pressing the OK button (7). The setting for summer and
winter time opens.
• Use the / buttons to select summer time and press the OK button
(7) to conrm. The network settings now open and „YES“ is factory
set. Press the OK key (7) to conrm. The device now opens the region
setting. The factory setting is „Europe“.
• Press the OK key (7) to conrm the region. The device then searches for
your router and displays the networks found on the LC screen (2).
• Select the desired router with the / buttons and conrm your
selection by pressing the OK button (7).
• Select „WPS“ by pressing the / buttons and conrm your selection
by pressing the OK button (7).
• Enter the password by pressing the / buttons.
• Once you have entered the password, select „OK“ and press the OK
button (7) to conrm. The device will now connect to the Internet and
once the connection is successful, the Setup wizard completed screen
will appear. Press OK again to continue.
32
EN
COMMISSIONING AND OPERATION
1. After you have made the settings shown above, the unit switches to
Internet radio mode. Press the / buttons and select „Station list“.
Conrm your selection by pressing the OK button.
2. Press the / buttons to select „Stations“ and conrm your selection
by pressing the OK button.
3. Press the / buttons to select the desired search mode, such as
search by location, and press the OK button to conrm your selection.
4. For example, when searching for a location, various stations in the
immediate vicinity are listed on the screen. The desired station can
be selected by pressing the / , buttons. Conrm your selection by
pressing the OK button.
5. The radio stations found will be listed on the screen. The desired station
can be selected by pressing the / , buttons. Conrm your selection by
pressing the OK button.
6. Use the volume buttons (16) to adjust the desired volume.
RADIO MODE
Preset station (IR mode)
Note: Up to 10 radio stations can be stored.
1. Set the desired Internet radio station.
2. Press and hold the P button (11). Select the desired station by pressing
the / buttons and conrm your selection with the OK button (7).
3. Repeat steps 1 and 2 for all other stations.
4. If you want to access the stored stations, press the P button and select
the desired station with the / buttons. Conrm your selection by
pressing the OK button.
Manual station search (FM mode)
1. Press the MODE button (15) to select the FM mode.
2. Press the OK button to conrm.
3. Use the / buttons to select the desired channel.
4. Adjust the volume with the volume buttons (16).

33
EN
Automatic station search
1. Press the MODE button (15) to select the FM mode.
2. Press the / buttons to select the search direction and press the OK
button to conrm. The automatic station search will start.
3. Repeat step 2 until the desired station is reached.
4. Adjust the volume using the volume buttons (16).
Radio Data System (RDS)
This setting is provided by the respective transmitter. The information
provided will then be displayed on the LCD screen. By pressing the MENU/
INFO button several times, the following information is displayed one after
the other: Radiotext > Programme type > Frequency > Date/Time
FM Stereo Reception
Press the MENU/INFO button (10) to enter the FM menu. Press the /
buttons to select the audio setting and press the OK button to conrm. The
screen will then display „Listen in Mono only“. If you select „NO“ with the
/ buttons and press the OK button, the unit will play the station in stereo
and the stereo icon will appear on the screen.
DAB Radio
1. Press the MODE button (15) to select the DAB mode.
2. Press the OK button to conrm.
3. The unit will automatically start a station scan in the range 11b - 12d
within 2 seconds. Set the desired station with the / buttons and
conrm your selection with the OK button.
4. Press the MENU/INFO button several times to display the following
DAB information one after the other: Group name > Program type >
Frequency > Signal strength > Transmission rate > Date/time
5. Adjust the volume with the volume keys (16).

34
EN
Preset station (DAB mode)
Note: Up to 20 DAB stations can be stored.
1. Set the DAB mode. 1.
2. Set the desired radio station either automatically or manually.
3. Press and hold the P button (11). Select the desired memory location by
pressing the / buttons.
4. Conrm your selection with the OK button (7).
5. Repeat steps 1 and 3 for all other channels.
6. Press the P button to display the preset stations and select the desired
station using the / buttons. Conrm your selection by pressing the
OK button.
Note: After 15 seconds of no input, the unit automatically returns to
normal radio mode. A stored station can be overwritten by storing
another station in the same location.
Radio reception
The device has a removable antenna. Make sure that the antenna is
connected to the antenna connector and fully extended to ensure good
reception.
CD MODE
1. Press the MODE button (15) to select the CD mode.
2. Press the OK button to conrm.
3. Press the button (8) to open the CD compartment.
4. Insert a CD with the label side facing up into the CD tray and close the
CD tray.
5. A search will start and the LCD screen (2) will display the total number
of tracks on the CD and the total playback time. CD playback will start
automatically.
6. Adjust the volume with the volume buttons (16).

35
EN
Play/Pause
Press the button (13) once to pause playback. Press the button again to
resume playback.
To stop playback
If the button is pressed during playback or pause, the unit stops all
playback.
Skip track
1. If the button (14) is pressed during playback or pause, the current
title will be skipped. The unit will be in the same mode (Play or Pause)
for the next track.
2. If the button (14) is pressed during playback or pause, the current
track will be skipped. The unit is in the same mode (Play or Pause) with
the previous track.
MP3 CDs
1. After searching, the total number of tracks and album information will
be displayed on the LCD screen. The unit starts playback automatically.
2. Press the / buttons to select the desired track.
ID3 Function
If you press the MENU/INFO button repeatedly, the LCD will display „F01
T001 00:01“. During playback of the MP3 le, the name of the album/artist/
title will be displayed.
• If there is no name or the name is in a language that is not supported,
the LCD screen remains blank when the MENU/INFO button is pressed.
• If the input format of the CD is not supported by the system, /Album/
Artist/Track cannot be recognized.
• The system only supports English and Arabic numerals in the ID3
function.
MP3 format requirements
• Bitrate: 32 kbps ~ 320 kbps; sampling rate: 32 kHz, 44.1 kHz and 48 kHz
decodable
• The playback performance of MP3 CDs depends on the recording
quality and recording method. Furthermore, due to the dierent format,
the loading time for MP3 CDs is longer than for normal CDs.
36
EN
Repeat track (for CDs)
You can repeat the desired track, folder (MP3 only) or the entire CD with this
function: (1) Repeat 1 > (2) Repeat all tracks > (3) Repeat disabled.
Playback mode Display
Repeat a title
Repeat folder
Repeat all tracks
Repeat disabled -----
Random playback
This function plays back all tracks in random order. During repeat mode,
press the REP/SHUFFLE button to activate random playback.
Playback mode Display
Random
CD track storage
Up to 20 CD tracks can be stored in any order in a list. Before using this
function, make sure the button (13) is pressed.
1. Set the CD mode and stop CD playback.
2. Press and hold the P button (11) and „program“ will be displayed on the
LCD.
3. Select the desired track with the / buttons.
4. Press the OK button to save.
5. Repeat steps 3 and 4 to save more songs.
6. Once all desired tracks have been saved, press the button to play
the saved CD tracks.
7. Press the button to stop and press the button again to delete all
stored tracks.
Note: If no button is pressed within 30 seconds of pressing the P button,
the save mode will be cancelled automatically.

37
EN
PLAY MP3 FILES FROM USB DEVICES
The unit can decode MP3 les stored on USB devices.
1. First, set the unit to standby mode or any mode (except USB mode).
2. Insert the USB stick correctly into the USB port and make sure that it is
inserted correctly.
3. Press the MODE button repeatedly to select „My Player Mode.
4. Press the OK button (7) to conrm.
5. Select the desired le with the / buttons and press the OK button to
start playback.
6. Use the Volume buttons (16) to adjust the desired volume.
Play/Pause
Press the button (13) once to pause playback. Press the button again to
resume playback.
To stop playback
If the button is pressed during playback or pause, the unit stops all
playback.
Skip track
• If the button (14) is pressed during playback or pause, the next
track will be played.
• If the button (14) is pressed during playback or pause, the current
track will be played again. Press the button again to play the previous
track.

38
EN
ID3 function
If you press the MENU/INFO button repeatedly, the LCD screen will display
MP3 information such as album/artist/title, etc. The LCD screen will also
display MP3 information.
• If there is no name or the name is in a language that is not supported,
pressing the MENU/INFO button will leave the LCD blank.
• If the input format of the CD is not supported by the system, /Album/
Artist/Track cannot be recognized.
• The system only supports English and Arabic numerals in the ID3
function.
MP3 format requirements
• Bitrate: 32 kbps ~ 320 kbps; sampling rate: 32 kHz, 44.1 kHz and 48 kHz
decodable
• The playback performance of MP3 CDs depends on the recording
quality and recording method.
Repeat/Random Playback
Press the MENU button (10) to enter the menu and use the / buttons to
select Random Play or Repeat Mode. Conrm your selection by pressing the
OK button.
• The unit can read MP3 les only in USB mode. It is not possible to
decode music les with a dierent format.
• If you connect an MP3 player to the USB port of the unit, the unit may
not be able to play back the les on it because the MP3 player is not
compatible. This is not a fault of the device.
• The USB port must not be connected in conjunction with a USB
extension cable and must not be connected directly to a computer.

39
EN
ADDITIONAL FUNCTIONS
Automatic switch-o
1. Press and hold the MENU button and select the main menu with the
/ buttons. Conrm your selection by pressing the OK button.
2. Select „Sleep mode“ with the / buttons and press the OK button to
conrm.
3. Select the desired time until automatic switch-o from 15-30-45-60 with
the / buttons and conrm your selection with the OK button. The
LCD screen will then display the selected time until automatic power
o. When the time has elapsed, the unit switches to standby mode.
EQ function
1. Press the MENU button to enter the main menu and use the /
buttons to select „Equalizer“. Press the OK button to conrm.
2. Select „Flat, Jazz, Rock, Movie, Classic, Pop, News, My EQ or MY EQ
SETUP“ with the buttons and conrm your selection with the OK button.
Language setting
1. Press the MENU button and select „Language“ with the buttons.
Conrm your selection by pressing the OK button.
2. Select the desired language with the / buttons and conrm your
selection with the OK button.
Factory setting
1. Press the MENU button and select „Factory reset“ with the buttons.
Press the OK button to conrm your selection.
2. Select „YES“ with the / buttons to restart the unit and delete all the
information on it and conrm your selection with the OK button. Now
proceed in the same way as when switching on the device for the rst
time.

40
EN
PHONO MODE (TURNTABLE)
Remove the needle guard. Make sure that the tonearm is removed from the
holder before using the turntable and then secured again.
1. Press the MODE button repeatedly to select the phono mode.
2. Press the OK button to conrm.
3. Move the speed selection (25) to the correct position, depending on the
record.
4. Place the record on the turntable (use the adapter if necessary).
5. Move the tonearm lever (27) upwards.
6. Slowly lift the tonearm o the holder and carefully move it towards the
record. The turntable will begin to rotate slowly. Position the tonearm
above the desired position on the record.
7. Pull the tonearm lever down. The tonearm is slowly lowered onto the
record and playback begins.
8. At the end of the record, the tonearm will automatically return to the
rest position.
9. Lift the tonearm o the record to stop it manually.
Pause
Raise the tonearm to pause playback temporarily.
cartridge
guard

41
EN
Important notes
• The automatic return system is mechanically designed and the reset
point can be inuenced by the transport. Therefore, the tonearm may
automatically return to the holder the rst time it is placed on the
record. This is not a malfunction.
• The length of the record can vary. If you notice that the tonearm cannot
return automatically after the record has been played, please return the
tonearm to the rest position manually or set the automatic return point.
BT CONNECTION AND PLAYBACK
1 To select the BT mode, press the MODE key (15).
2 Press the OK button to conrm.
3 The display (2) shows [No media] and the BT icon.
4 Hold down the MENU/INFO key (10) and press the up/down arrow keys
(7) to select [Setup BT]. Press the OK key to conrm.
5 The BT symbol blinks on the display (2) and the display shows [BT
Discoverable], indicating that the machine is in search mode.
6 Enable BT on your external smartphone or tablet, and select the device
named [Birmingham] to connect to the audio system.
7 Once the connection between the two devices is established, the BT
icon lights continuously on the display (2).
8 Start music on your external device and listen to it through the audio
system.
AUX IN
Connect another audio device, such as a portable CD player, MP3 player,
cassette player, iPod, etc., to the aux-in port on the side of the device using
a 3.5 mm connection cable (not supplied). Press the MODE button to select
Aux In mode and press the OK button to start playback.

42
EN
SPOTIFY CONNECT
Your new device has Spotify Connect built in
Use your phone, tablet or computer as a remote control for Spotify.
Go to spotify.com/connect to learn how.
Licenses
The Spotify Software is subject to third party licenses found here:
https://www.spotify.com/connect/third-party-licenses
All listed brands are trademarks of their companies. Errors and omissions
excepted, and subject to technical change. Our general terms of delivery
and payment are applied.
TECHNICAL DATA
Item number 10034090
Power supply 220-240 V ~ 50/60 Hz
Max. power 50 W (2 x 12.5 W RMS)
Radio IR/DAB+/FM-RDS
FM frequency 87.5-108 MHz
DAB frequency DAB+ Band III 174-240 MHz
WiFi frequency 2.4 GHz
WiFi radio-frequency power
(max.)
+13 dBm
BT frequency 2.402-2.480 GHz
BT radio-frequency power
(max.)
4 dBm

43
EN
DISPOSAL CONSIDERATIONS
If there is a legal regulation for the disposal of
electrical and electronic devices in your country,
this symbol on the product or on the packaging
indicates that this product must not be disposed of
with household waste. Instead, it must be taken to
a collection point for the recycling of electrical and
electronic equipment. By disposing of it in accordance
with the rules, you are protecting the environment and
the health of your fellow human beings from negative
consequences. For information about the recycling
and disposal of this product, please contact your local
authority or your household waste disposal service.
This product contains batteries. If there is a legal
regulation for the disposal of batteries in your country, the
batteries must not be disposed of with household waste.
Find out about local regulations for disposing of batteries.
By disposing of them in accordance with the rules, you are
protecting the environment and the health of your fellow
human beings from negative consequences.
DECLARATION OF CONFORMITY
Manufacturer:
Chal-Tec GmbH, Wallstrasse 16, 10179 Berlin,
Germany.
Importer for Great Britain:
Berlin Brands Group UK Limited
PO Box 42
272 Kensington High Street
London, W8 6ND
United Kingdom
Hereby, Chal-Tec GmbH declares that the radio
equipment type Birmingham is in compliance with
Directive 2014/53/EU. The full text of the EU declaration
of conformity is available at the following internet
address: use.berlin/10034090
For Great Britain: Hereby, Chal-Tec GmbH declares that
the radio equipment type Birmingham is in compliance
with the relevant statutory requirements. The full text of
the declaration of conformity is available at the following
internet address: use.berlin/10034090


45
ES
Estimado cliente:
Le felicitamos por la adquisición de este producto.
Lea atentamente el siguiente manual y siga
cuidadosamente las instrucciones de uso con el n de
evitar posibles daños. La empresa no se responsabiliza
de los daños ocasionados por un uso indebido del
producto o por haber desatendido las indicaciones de
seguridad. Escanee el código QR para obtener acceso
al manual de usuario más reciente y otra información
sobre el producto:
ÍNDICE
Indicaciones de seguridad 46
Descripción del producto 47
Instalación 50
Puesta en marcha y funcionamiento 52
Mode radio 52
Modo CD 54
Reproduce archivos MP3 desde dispositivos USB 57
Otras funciones 59
Tocadiscos 60
Conexión y reproducción via BT 61
Aux-In 61
Conexión a Spotify 62
Datos técnicos 62
Indicaciones sobre la retirada del aparato 63
Declaración de conformidad 63

46
ES
INDICACIONES DE SEGURIDAD
Nota: Debido a que el movimiento del CD y los circuitos sensibles
pueden causar interferencia con el equipo cercano, apague el equipo si
tiene la intención de utilizar otro equipo eléctrico en las proximidades.
• Deben observarse todas las instrucciones de seguridad y
funcionamiento.
• El aparato no debe usarse cerca de lugares con agua o muy húmedos.
• Asegúrese de que no se vierta líquido sobre el aparato o por las
ranuras.
• Mueva la unidad con cuidado para evitar descargas eléctricas.
• No bloquee la ventilación del aparato.
• No coloque el aparato cerca de fuentes de calefacción (como por
ejemplo estufas) y no lo ponga bajo la luz directa del sol.
• Enchufe el aparato en una toma de corriente de acuerdo con las
instrucciones de funcionamiento.
• Este equipo tiene un sistema de protección contra el
sobrecalentamiento (sistema de seguridad). Si tuviera que ser
reemplazado, diríjase al fabricante, a atención al cliente o a una persona
cualicada.
• Para la limpieza del aparato sigue las instrucciones que aparecen en el
apartado “Limpieza y mantenimiento”
• Desenchufe el aparato si no va a utilizarlo durante un largo periodo de
tiempo.
• El aparato debe ser reparado por una persona cualicada, en los
siguientes casos:
- si el enchufe o el cable están dañados.
- si han entrado objetos o líquidos en las ranuras
- si se ha mojado con la lluvia.
- si no funciona adecuadamente sin hacer cambios externos.
- si se ha caído y se ha estropeado el subwoofer
• No intente reparar el aparato usted mismo, ya que perderá la validez de
la garantía.
• El enchufe sirve también como interruptor, por eso debe estar accesible
siempre.
• Para evitar accidentes el aparato debe estar anclado al suelo o a la
pared como se explica en las instrucciones de instalación.
• El aparato es un producto de láser Clase I
47
ES
ATENCIÓN
El incumplimiento de las instrucciones de funcionamiento
descritas en este manual puede provocar la emisión de
radiaciones peligrosas. Este dispositivo sólo debe ser
ajustado y reparado por personal cualicado.
DESCRIPCIÓN DEL PRODUCTO
Aparato (Vista frontal)
1
Tapa
11
Botón P
2
Pantalla LCD
12
Botón skip down
3
Indicador de volumen
13
Botón Play/Pause / STOP
4
Entrada auriculares
14
Botón Skip up
5
Entrada AUX-IN
15
Botón MODE
6
Entrada USB
16
Rueda VOLUMEN -/+ /POWER
7
Selector arriba/abajo/OK/SCAN
17
Sensor remoto
8
Botón Abrir/cerrar
18
Indicador de volumen
9
Botón atrás
33
Bandeja de CD
10
Botón MENU/INFO
48
ES
Tocadiscos
19
Adaptador de Single 45 RPM
24
Palanca ajuste altura
20
Plato giradiscos
25
Selector de velocidad (33&45
rpm)
21
Perno de tránsito
26
Seguro del brazo
22
Contrapeso
27
Brazo con aguja
23
Control de pitch
Vista posterior
28
Terminal de altavoces
31
Salida antena
29
Salida linea derecha
32
Cable de corriente
30
Salida linea izquierda

49
ES
Mando a distancia
1
(Abrir/cerrar bandeja del CD)
2 On/Standby (encendido/en espera)
3 MODE (selección de modo)
4
/ (Título anterior/posterior)
5
(Lecture/ Pause)
6 (Stop)
7 Carpeta (carpeta anterior/abajo/arriba)
8 Volumen -/+ (ajuste de volume)
9 MENU/INFO (Radio en internet: selección de
información; modo CD/ USB: activación de la función
ID3; Menú general: menú)
10 Mute (silenciar temporalmente)
11 Conguración EQ (selección de diferentes tipos de
ecualización)
12 BACK (vuelta a la vista anterior)
13 SHUFFLE/REP (Modo CD: activar la función repetición;
modo USB: activar la función repetición; manteniendo el
botón pulsado: modo aleatorio)
14
/ / / Teclas de echa (modo menú: selección
arriba/abajo/izquierda/derecha)
Modo FM/DAB: arriba/abajo; Radio en internet:
selección de la memoria)
15 SCAN/OK (En el menú modo: conrmar selección;
Búsqueda FM/DAB: búsqueda de emisora)
16 P (Radio en internet/DAB/FM/CD: pulsar para acceder
a las emisoras guardadas; presionar y mantener para
guardar emisoras)
17 Botones numéricos10/ 0-9 (Radio en internet/DAB/
FM: introduce el número correspondiente a la emisora
guardada; Modo CD: selección del la pista)
Nota: Si no se reproduce música durante 15 minutos, el aparato cambia
automáticamente a Mode Standby para proteger el medioambiente.

50
ES
INSTALACIÓN
Introducir las pilas
El compartimento de las pilas está en la parte de atrás del mando a
distancia.
• Retire la tapa del
compartimento de las pilas
presionando en la marca y
retirándolo.
• Inserte dos pilas AAA (no
incluidas) en el compartimento
y asegúrese de que las polos
están bine colocados.
• Coloque la tapa de nuevo.
Precauciones necesarias con las baterías
• Las pilas deben ser sustituidas por un adulto.
• No mezcle pilas nuevas y viejas.
• No mezcle pilas de diferentes tipos.
• Los terminales de alimentación no deben estar en cortocircuito
• No recargue pilas que no están diseñadas para ello.
• Retire las pilas que estén gastadas.
• Utilice solo el tipo de pilas adecuado.

51
ES
Instrucciones de instalación
• Desembale todos los componentes de la unidad y retire todo el
material de embalaje.
• No conecte la unidad a la toma de corriente hasta que haya realizado
todas las conexiones y vericado que el voltaje en la placa de
identicación coincide con el voltaje en su área.
• Nunca bloquee las aberturas de ventilación y asegúrese de que haya
varios centímetros de espacio libre alrededor de la unidad para
asegurar una ventilación adecuada.
• Enchufe el enchufe de alimentación (32) en la toma de corriente.
• Al conectar el aparato por primera vez, en el display aparece „auna“.
• Unos 30 segundos después, durante el primer uso, el dispositivo inicia
automáticamente el asistente de instalación, la pantalla muestra „Start
now“ y selecciona por defecto la respuesta „YES“. Pulse el botón OK (7)
para iniciar el asistente de conguración.
• El dispositivo abre entonces el modo de actualización automática.
• Utilice los botones / para seleccionar una fuente de actualización
y conrme su selección con el botón OK (7). A continuación, se abre la
selección de zona horaria.
• Utilice los botones / para seleccionar el horario de verano y pulse
el botón OK (7) para conrmar. Los ajustes de red se abrirán con la
respuesta „SI“ preseleccionada. Pulse el botón OK (7) para conrmar.
La unidad abre entonces el ajuste de región. El ajuste por defecto es
„Europa“.
• Pulse el botón OK (7) para conrmar la región. A continuación, el
dispositivo busca el enrutador y muestra las redes que se encuentran
en la pantalla LCD (2).
• Seleccione el router deseado con las teclas / y conrme la selección
pulsando la tecla OK (7).
• Pulse los botones / para seleccionar „WPS“ y conrme la selección
pulsando el botón OK (7).
• Introduzca la contraseña pulsando las teclas /.
• Una vez introducida la contraseña, seleccione „OK“ y pulse el botón
OK (7) para conrmar. El dispositivo se conectará a Internet y, una
vez establecida la conexión, aparecerá en la pantalla „Setup wizard
completed“ (Asistente de conguración completado). Presione el botón
OK de nuevo para continuar.
52
ES
PUESTA EN MARCHA Y FUNCIONAMIENTO
• Después de haber realizado los ajustes indicados anteriormente, el
aparato cambia al modo de radio por Internet. Pulse los botones / y
seleccione „Lista de emisoras“. Conrme su selección pulsando el botón
OK.
• Pulse los botones / para seleccionar „Estaciones“ y conrme la
selección pulsando el botón OK.
• Pulse los botones / para seleccionar el modo de búsqueda deseado,
como buscar por ubicación, y pulse el botón OK para conrmar su
selección.
• Por ejemplo, cuando se busca una ubicación, en la pantalla aparecen
varias estaciones en las inmediaciones. La emisora deseada se puede
seleccionar pulsando los botones / . Conrme su selección pulsando
el botón OK.
• Las emisoras de radio encontradas aparecerán en la pantalla. La
emisora deseada se puede seleccionar pulsando los botones / .
Conrme su selección pulsando el botón OK.
Utilice los botones de volumen (16) para ajustar el volumen deseado.
MODE RADIO
Guardar emisoras (Modo IR)
Nota: Se pueden guardar hasta 10 emisoras.
1. Seleccione la emisora deseada.
2. Mantenga presionada la tecla P (11). Elija la emisora deseada con las
teclas / y conrme la selección con la tecla OK.
3. Repita los pasos 1 y 2 para todas las emisoras.
4. Cuando quiera escuchar una emisora guardada, apriete la tecla P y elija
la emisora deseada con las teclas / . Conrme la selección con la
tecla OK.
Búsqueda manual de emisoras (Modo FM)
1. Para seleccionar el modo FM pulse la tecla MODE (15).
2. Conrme la selección con la tecla OK
3. Use las teclas / para sintonizar la emisora deseada.
4. Use los botones de volumen (16) para ajustarlo al nivel deseado.

53
ES
Búsqueda automática de emisoras
1. Pulse la tecla MODE (15) para seleccionar el modo FM.
2. Pulse las teclas / para seleccionar la dirección de búsqueda
y conrme la selección con la tecla OK. Comenzará la búsqueda
automática.
3. Repita el paso número 2 hasta encontrar la emisora deseada.
4. Use los botones de volumen (16) para ajustarlo al nivel deseado.
Sistema de Radio por datos (RDS)
Esta función la pone a disposición la propia emisora. En la pantalla
aparecerán las informaciones disponibles. Pulsando varias veces la tecla
MENU/INFO aparecerá la siguiente información: Radiotexto>Tipo de
programa>Frecuencia>Fecha/hora.
Recepción FM Estéreo
Pulse la tecla MENU /INFO (10), para acceder al menú FM. Con las teclas
/ , seleccione la emisora. Conrme la selección con la tecla OK. En la
pantalla se muestra el mensaje “Listen in Mono only” (escuchar en modo
mono). Si selecciona con las teclas / “NO”y conrma con la tecla OK, el
aparato reproducirá en estéreo y aparecerá en la pantalla el símoblo
Radio DAB
1. Pulse la tecla MODE (15) para seleccionar el modo Radio DAB.
2. Conrme la selección con la tecla OK.
3. El aparato mostrará automáticamente las emisoras buscadas en el
rango de 11b – 12d. Con las teclas / seleccione la emisora. Conrme
la selección con la tecla OK.
4. Pulsando varias veces la tecla MENU/INFO aparecerá la
siguiente información DAB: Nombre del grupo>Tipo de
programa>Frecuencia>Señal> cuota de transmisión > Fecha/hora.
5. Use los botones de volumen (16) para ajustarlo al nivel deseado.

54
ES
Ajuste de emisora (Modo DAB)
Nota: Se pueden guardar hasta 20 emisoras DAB.
1. Seleccione modo DAB. 1.
2. Seleccione la emisora deseada de manera automática o manual.
3. Presione y mantenga el botón P (11). Seleccione de la memoria con las
teclas / .
4. Conrme la selección con la tecla OK.
5. Repita los pasos 1 y 3 con el resto de canales.
6. Pulse el botón P y con las teclas / seleccione la emisora deseada.
Conrme la selección con la tecla OK.
Nota: Después de 15 segundos sin tocar ninguna tecla el aparato vuelve
automáticamente al modo radio. Una emisora se puede sustituir por otra
guardándola en su número.
Recepción de radio
El aparato tiene una antena desmontable. Asegúrese de que la antena está
conectada y extendida para que tenga una buena recepción de la señal.
MODO CD
1. Pulse la tecla MODE (15) para seleccionar el modo CD.
2. Conrme la selección con la tecla OK.
3. Pulse el botón 8 para abrir la bandeja del CD.
4. Introduzca un CD con la carátula mirando para arriba y cierre la
bandeja.
5. En la pantalla (2) aparecerá el número total de pistas del CD y el tiempo
total de reproducción. El CD comienza a reproducir automáticamente.
6. Use los botones de volumen (16) para ajustarlo al nivel deseado.

55
ES
Reproducción/Pausa
Pulse una vez la tecla (13), para pausar la reproducción. Si pulsa de
nuevo la tecla, la reproducción comieneza de nuevo.
Detener la reproducción
Al pulsar la tecla durante la reproducción, o cuando esta está pausada, se
detiene la reproducción.
Saltar una pista
1. Al pulsar la tecla (14) durante la reproducción, o cuando esta está
pausada, se salta a la pista siguiente. El reproductor se mantiene en la
función anterior, pausa o reproducción
2. Al pulsar la tecla (14) durante la reproducción, o cuando esta está
pausada, se salta a la pista siguiente. El reproductor se mantiene en la
función anterior, pausa o reproducción.
MP3-CD
1. Se mostrará el número total de pistas y la información del álbum en la
pantalla. La reproducción comenzará de manera automática.
2. Pulse las teclas / para seleccionar la pista deseada.
Función ID3
Si pulsa la tecla MENU/INFO repetidamente, aparece en la pantalla “F01
T001 00:01“. Durante la reproducción se mostrará el nombre del álbum/
artista/título.
• Si no hay ningún nombre o el nombre está en un idioma no compatible,
cuando pulse la tecla MENU/INFO la pantalla permanecerá vacía.
• Si el formato del CD no es compatible con el sistema, este no
reconocerá el Álbum/artista/título.
• El sistema en la función ID3 es compatible con números anglosajones y
árabes.
Formato MP3 Especicaciones
• Velocidad bit: 32 kbps ~ 320 kbps; Frecuencia de muestreo: 32 kHz, 44,1
kHz y 48 kHz.
• La reproducción desde un CD en formato MP3 depende de la calidad
y del método de grabación. El tiempo de carga del MP3, es por su
formato, más largo que con un CD normal.
56
ES
Repetir pista (para CDs)
Con esta función puede repetir la pista, la carpeta (sólo MP3) o el CD
completo que desee: (1) Repetir 1 > (2) Repetir todas las pistas > (3) Repetir
desactivado.
Modo de reproducción Pantalla
Repetir un título
Repetir carpeta
Repite todas las pistas
Repetición desactivada -----
Reproducción aleatoria
Esta función reproduce todas las pistas en orden aleatorio. Durante el modo
de repetición, pulse el botón REP/SHUFFLE para activar la reproducción
aleatoria.
Modo de reproducción Pantalla
Random (aleatorio)
Almacenamiento de pistas de CD
Se pueden almacenar hasta 20 pistas de CD en cualquier orden de una
lista. Antes de utilizar esta función, asegúrese de que el botón (13) esté
presionado.
1. Ajuste el modo CD y detenga la reproducción del CD.
2. Mantenga pulsado el botón P (11) , y aparecerá „program“ en la pantalla
LCD.
3. Seleccione la pista deseada con los botones / .
4. Presione el botón OK para guardar.
5. Repita los pasos 3 y 4 para guardar más canciones.
6. Una vez que se hayan guardado todas las pistas deseadas, pulse el
botón , para reproducir las pistas del CD guardadas.
7. Pulse el botón para detenerse y vuelva a pulsar el botón para
eliminar todas las pistas almacenadas.
Nota: Si no se pulsa ningún botón dentro de los 30 segundos
siguientes a la pulsación del botón P, el modo de guardar se cancela
automáticamente.

57
ES
REPRODUCE ARCHIVOS MP3 DESDE
DISPOSITIVOS USB
La unidad puede decodicar archivos MP3 almacenados en dispositivos
USB.
1 Primero, je la unidad en el modo de espera o en cualquier otro modo
(excepto el modo USB).
2 Inserte la memoria USB correctamente en el puerto USB y asegúrese de
que está insertada correctamente.
3 Pulse el botón MODE repetidamente para seleccionar „Mi modo de
reproducción“.
4 Pulse el botón OK (7) para conrmar.
5 Seleccione el archivo deseado con los botones / y pulse el botón
OK para iniciar la reproducción.
6 Utilice los botones de volumen (16) para ajustar el volumen deseado.
Reproducir/Pausar
Pulse el botón (13), una vez para pausar la reproducción. Pulse el botón
de nuevo para reanudar la reproducción.
Detener la reproducción
Si se pulsa el botón durante la reproducción o pausa, la unidad detiene la
reproducción.
Saltar título
• Si se pulsa el botón (14) durante la reproducción o pausa, se
reproducirá la siguiente pista.
• Si se pulsa el botón (14) durante la reproducción o pausa, la pista
actual se reproducirá de nuevo. Pulse el botón de nuevo para reproducir
la pista anterior.

58
ES
Función ID3
Si pulsa el botón MENU/INFO repetidamente, la pantalla LCD mostrará
información de MP3 como álbum/artista/título, etc. La pantalla LCD
también mostrará información de MP3.
• Si no hay ningún nombre, o el nombre está en un idioma que no es
compatible, la pantalla LCD permanece en blanco cuando se pulsa el
botón MENÚ/INFO.
• Si el formato de entrada del CD no es soportado por el sistema, /
Album/Artist/Title no puede ser reconocido.
• El sistema sólo soporta números ingleses y árabes en la función ID3.
Formato MP3 - Requisitos
• Velocidad de bits: 32 kbps ~ 320 kbps; Velocidad de muestreo: 32 kHz,
44,1 kHz y 48 kHz decodicable
• El rendimiento de reproducción de los CD de MP3 depende de la
calidad y del método de grabación.
Repetición/reproducción aleatoria
Pulse el botón MENU (10) para acceder al menú y elegir la reproducción
aleatoria con los botones / o el modo de repetición. Conrme su
elección pulsando Aceptar.
• El dispositivo sólo puede reproducir archivos MP3 en el modo USB. No
puede decodicar archivos de audio en un formato diferente.
• Si conecta un reproductor de MP3 al puerto USB del dispositivo, es
posible que éste no pueda reproducir los archivos que contiene si el
reproductor de MP3 no es compatible. No es un defecto del dispositivo.
• El puerto USB no debe estar conectado a un cable de extensión USB ni
directamente a un ordenador.

59
ES
OTRAS FUNCIONES
Apagado automático
1. Pulse y mantenga presionado el botón MENU, seleccione con las teclas
/ . Conrme su selección con la tecla OK.
2. Seleccione “Sleep mode” (modo dormir) con las teclas / Conrme
su selección con la tecla OK.
3. Seleccione el tiempo deseado hasta el apagado automático en rangos
de 15-30-45-60 con las teclas / y conrme su selección con la
tecla OK. En la pantalla aparecerá el tiempo restante hasta el apagado
automático. Cuando termina el tiempo seleccionado el aparato cambia
a modo en espera.
Función EQ (ecualizador)
1. Pulse el botón MENU, seleccione con las teclas / y seleccione
“Equalizer” (ecualizador). Conrme su selección con la tecla OK.
2. Seleccione “Flat, Jazz, Rock, Movie, Classic, Pop, News, My EQ or MY EQ
SETUP“ con las teclas y conrme su selección con la tecla OK.
Ajuste del idioma
1. Pulse el botón MENU, seleccione con las teclas / y seleccione
“Language” (idioma). Conrme su selección con la tecla OK.
2. Seleccione el idioma deseado con las teclas / y conrme su
selección con la tecla OK.
Ajustes de fabrica
1. Pulse el botón MENU, seleccione con las teclas / y seleccione
“Factory reset” (vuelta a los valores de fábrica). Conrme su selección
con la tecla OK.
2. Seleccione “YES” (sí) con las teclas / para reiniciar el aparato y
borrar toda la información y conrme su selección con la tecla OK. A
continuación, repita los pasos de la primera puesta en marcha.

60
ES
TOCADISCOS
Retire el protector de la aguja. Asegúrese de que el brazo se ha soltado del
seguro y vuelva a colocar en su lugar antes de usar el plato.
1. Pulse la tecla MODE varias veces para seleccionar el modo Phono
(tocadiscos)
2. Conrme su selección con la tecla OK.
3. Seleccione la velocidad adecuada (25) dependiendo del disco.
4. Coloque el disco en el plato (si es necesario use el adaptador).
5. Levante el brazo (27) hacia arriba.
6. Sepárelo de su soporte de seguridad y llévelo con cuidado hacia el
disco. El plato comenzará a girar lentamente. Coloque el braco en el
lugar deseado del disco.
7. Baje el brazo. Cuando la aguja toque el disco comenzará la
reproducción.
8. Al llegar al nal del disco el brazo vuelve automáticamente a la posición
inicial.
9. Levante el brazo para detener la reproducción manualmente.
Pausa
Levante el brazo de reproducción para detener momentáneamente la
reproducción.
Cartucho
Protección

61
ES
Notas importantes
• El punto de retorno del sistema está diseñado mecánicamente y se ha
podido ver modicado por el transporte. Por eso es posible que vuelva
automáticamente al inicio la primera vez que se usa. No es un error.
• La duración del disco puede varia. Si el brazo no vuelve
automáticamente al inicio después de terminar el disco, devuelva el
brazo a su posición inicial o congure el punto de retorno.
CONEXIÓN Y REPRODUCCIÓN VIA BT
1 Presione el botón MODE (15) para seleccionar el modo BT.
2 Presione el botón OK para conrmar.
3 La pantalla (2) muestra [Sin medios] y el símbolo de BT.
4 Mantenga pulsado el botón MENU/INFO (10) y presione los botones
de echa arriba/abajo (7) para seleccionar [Congurar BT]. Presione el
botón OK para conrmar.
5 El símbolo de BT parpadeará en la pantalla (2) y la pantalla mostrará
[BT Discoverable], indicando que el dispositivo está en modo de
búsqueda.
6 Habilite el BT en su smartphone o tableta externa y seleccione el
dispositivo llamado [Birmingham] para conectarlo a su sistema estéreo.
7 Una vez establecida la conexión, el icono de BT se iluminará
continuamente en la pantalla (2).
8 Inicie la música en su dispositivo externo y escúchela a través del
sistema estéreo.
AUX-IN
Conecte otro aparato reproductor, por ejemplo un reproductor de CD
portátil, un reproductor MP3, un radiocasete, iPod, etc, con un cable de
conector de 3,5 mm (no incluido) en la entrada de AUX-IN que está en el
lateral del aparato. Elija con la tecla MODE el modo AUX-IN y pulse OK para
conrmar la selección.
62
ES
CONEXIÓN A SPOTIFY
Este reproductor tiene una conexión a Spotif
Use su teléfono móvil, tableta u ordenador como un mando a distancia para
Spotify. Consulte en spotify.com/connect
Licencias
El software Spotify está sujeto a los derechos de uso de terceros, que se
encuentran en la siguiente página:
https://www.spotify.com/connect/third-party-licenses
Todas las marcas comerciales mencionadas son marcas comerciales
de sus respectivas compañías. Errores y omisiones excluidos y sujetos
a modicaciones técnicas. Se aplican nuestros términos y condiciones
generales.
DATOS TÉCNICOS
Número del artículo 10034090
Corriente 220-240 V ~ 50/60 Hz
Potencia máxima 50 W (2 x 12,5 W RMS)
Radio IR/DAB+/FM-RDS
FM frecuencia 87,5-108 MHz
DAB frecuencia DAB+ Banda III 174-240 MHz
WiFi frecuencia 2,4 GHz
WiFi potencia de
radiofrecuencia (max.)
+13 dBm
BT frecuencia 2,402-2,480 GHz
BT potencia de
radiofrecuencia (max.)
4 dBm

63
ES
RETIRADA DEL APARATO
Si en su país existe una disposición legal relativa a
la eliminación de aparatos eléctricos y electrónicos,
este símbolo estampado en el producto o en
el embalaje advierte que no debe eliminarse
como residuo doméstico. En lugar de ello, debe
depositarse en un punto de recogida de reciclaje
de aparatos eléctricos y electrónicos. Una gestión
adecuada de estos residuos previene consecuencias
potencialmente negativas para el medio ambiente
y la salud de las personas. Puede consultar más
información sobre el reciclaje y la eliminación de este
producto contactando con su administración local o
con su servicio de recogida de residuos.
Este producto contiene baterías. Si en su país existe
una disposición legal relativa a la eliminación de
baterías, estas no deben eliminarse como residuo
doméstico. Infórmese sobre la normativa vigente
relacionada con la eliminación de baterías. Una
gestión adecuada de estos residuos previene
consecuencias potencialmente negativas para el
medio ambiente y la salud de las personas.
DECLARACIÓN DE CONFORMIDAD
Fabricante:
Chal-Tec GmbH, Wallstraße 16, 10179 Berlín, Alemania.
Importador para Gran Bretaña:
Berlin Brands Group UK Limited
PO Box 42
272 Kensington High Street
London, W8 6ND
United Kingdom
Por la presente, Chal-Tec GmbH declara que el tipo
de equipo radioeléctrico Birmingham es conforme
con la Directiva 2014/53/UE. El texto completo de la
declaración UE de conformidad está disponible en la
dirección Internet siguiente: use.berlin/10034090


65
FR
Chère cliente, cher client,
Toutes nos félicitations pour l’acquisition de ce nouvel
appareil. Veuillez lire attentivement et respecter
les instructions de ce mode d’emploi an d’éviter
d’éventuels dommages. Nous ne saurions être tenus
pour responsables des dommages dus au non-respect
des consignes et à la mauvaise utilisation de l’appareil.
Scannez le QR-Code pour obtenir la dernière version
du mode d‘emploi ainsi que d‘autres informations
concernant le produit :
SOMMAIRE
Consignes de sécurité 66
Aperçu de l‘appareil 67
Installation 70
Mise en marche et utilisation 72
Mode radio 72
Mode CD 74
Lecture de chiers MP3 sur un appareil USB 77
Autres fonctions 79
Platine vinyle 80
Établissement d‘une connexion BT et lecture 81
Aux-In 81
Spotify Connect 82
Fiche technique 82
Informations sur le recyclage 83
Déclaration de conformité 83

66
FR
CONSIGNES DE SÉCURITÉ
Remarque : Etant donné que le mouvement du CD et les circuits
sensibles peuvent interférer avec les appareils se trouvant à proximité,
éteignez l‘appareil si vous envisagez d‘utiliser d‘autres appareils
électriques à proximité.
• Toutes les instructions de sécurité et d‘utilisation doivent être
respectées.
• L‘appareil ne doit pas être utilisé près de l‘eau ni entrer en contact avec
l‘humidité.
• Assurez-vous qu‘aucun liquide ne se soit répandu sur l‘appareil ou dans
ses ouvertures.
• Déplacez doucement l‘appareil pour éviter les chocs électriques.
• Ne bloquez jamais pas les ouvertures de ventilation de l‘appareil.
• Ne placez jamais l‘appareil à proximité de sources de chaleur (telles que
des radiateurs) et ne l‘exposez pas aux rayons directs du soleil.
• Branchez la che d‘alimentation de l‘appareil dans la prise secteur
conformément au mode d‘emploi.
• Cet appareil possède une protection contre la surchaue (Dispositif de
sécurité). Si elle doit être remplacée, contactez le fabricant, le service
clientèle ou une personne de qualication similaire. Pour nettoyer
l‘appareil, suivez les instructions fournies au chapitre „Nettoyage et
entretien“.
• Débranchez le cordon d‘alimentation de la prise si vous n‘utilisez pas
l‘appareil pendant une longue période.
• L’appareil doit être réparé par une personne qualiée si :
- La che ou le câble secteur sont endommagés,
- Des corps étrangers ou des liquides ont pénétré dans l‘appareil,
- L‘appareil a été exposé à la pluie,
- l‘appareil ne fonctionne pas correctement sans modications
externes,
- l‘appareil est tombé et le subwoofer est en panne.
• N‘essayez jamais de réparer l‘appareil vous-même, cela annulerait la
garantie.
• La che secteur de l’appareil sert de disjoncteur et doit donc être
facilement accessible à tout moment.
• Pour éviter les accidents, l‘appareil doit être solidement xé au sol ou
au mur conformément aux instructions d‘installation.
• L‘appareil est un produit laser de classe I.
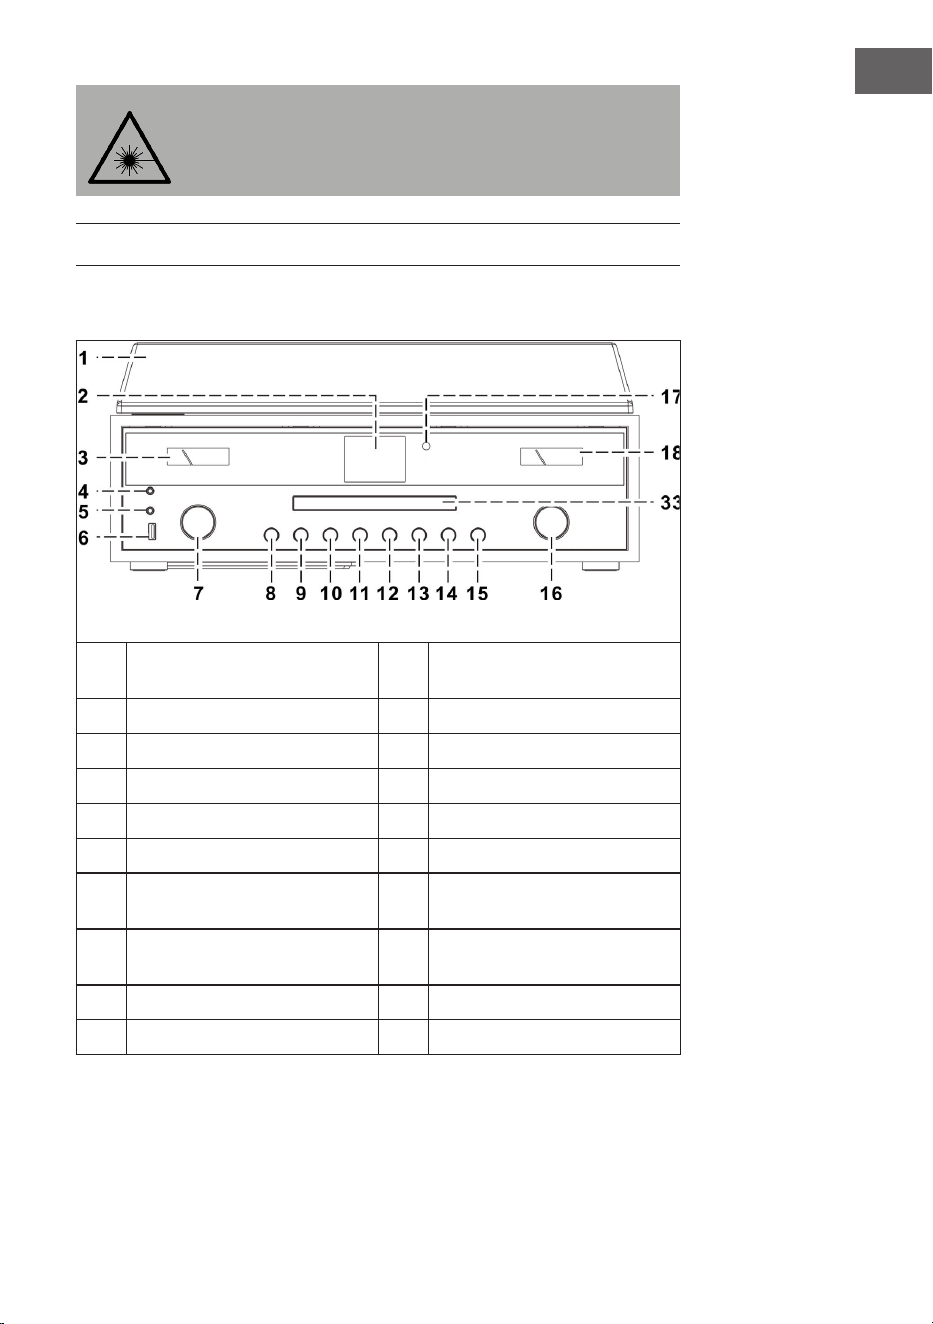
67
FR
ATTENTION
Le non-respect du mode d’emploi décrit dans ce manuel
peut entraîner des rayonnements dangereux. Cet appareil ne
doit être réglé et réparé que par du personnel qualié.
APERÇU DE L‘APPAREIL
Appareil (vue de face)
1
Couvercle de protection contre la
poussière
11
Touche P
2
Ecran
12
Saut de titre en avant
3
Vumètre
13
Lecture /Pause/Stop
4
Prise casque
14
Saut de titre en arrière
5
Prise AUX-IN
15
MODE (Modus)
6
Port USB
16
VOLUME -/+ / marche /arrêt
7
Touches échées (haut/bas) /
OK/ recherche
17
Capteur de la télécommande
8
Ouvrir/fermer le compartiment
CD
18
Vumètre
9
Retour
33
Porte du compartiment CD
10
MENU/INFO
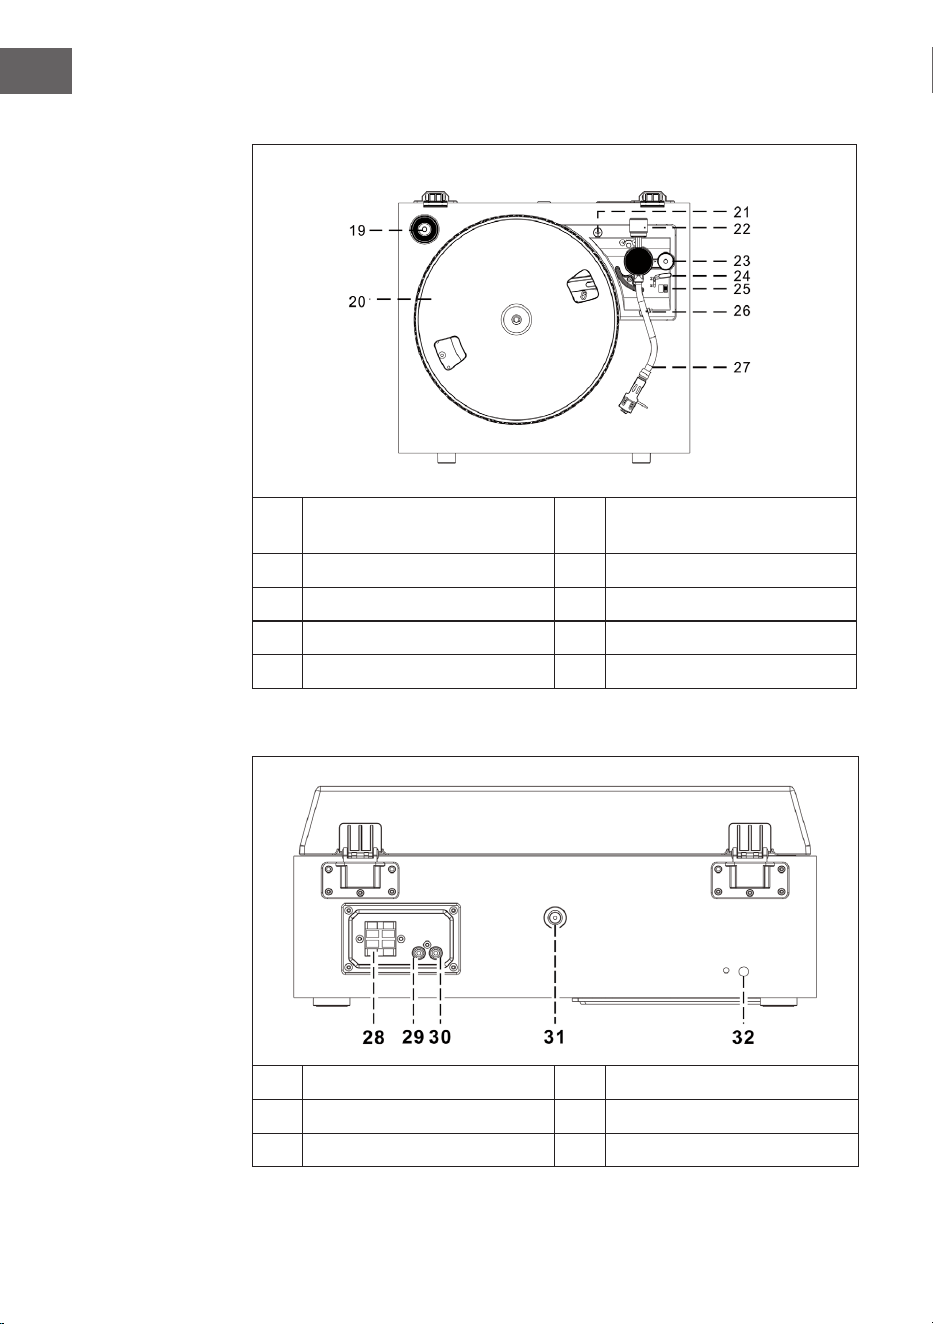
68
FR
Platine vinyle
19
Adaptateur 45 T
24
Levier de commande du bras de
lecture
20
Platine
25
Vitesse (33 & 45 T)
21
Sécurité pour le transport
26
Verrouillage du bras de lecture
22
Contrepoids
27
Bras de lecture avec aiguille
23
Réglage en hauteur
Vue de dos
28
Prise d'enceinte
31
Prise d'antenne
29
Prise Line-Out droite
32
Câble secteur
30
Prise Line-Out gauche
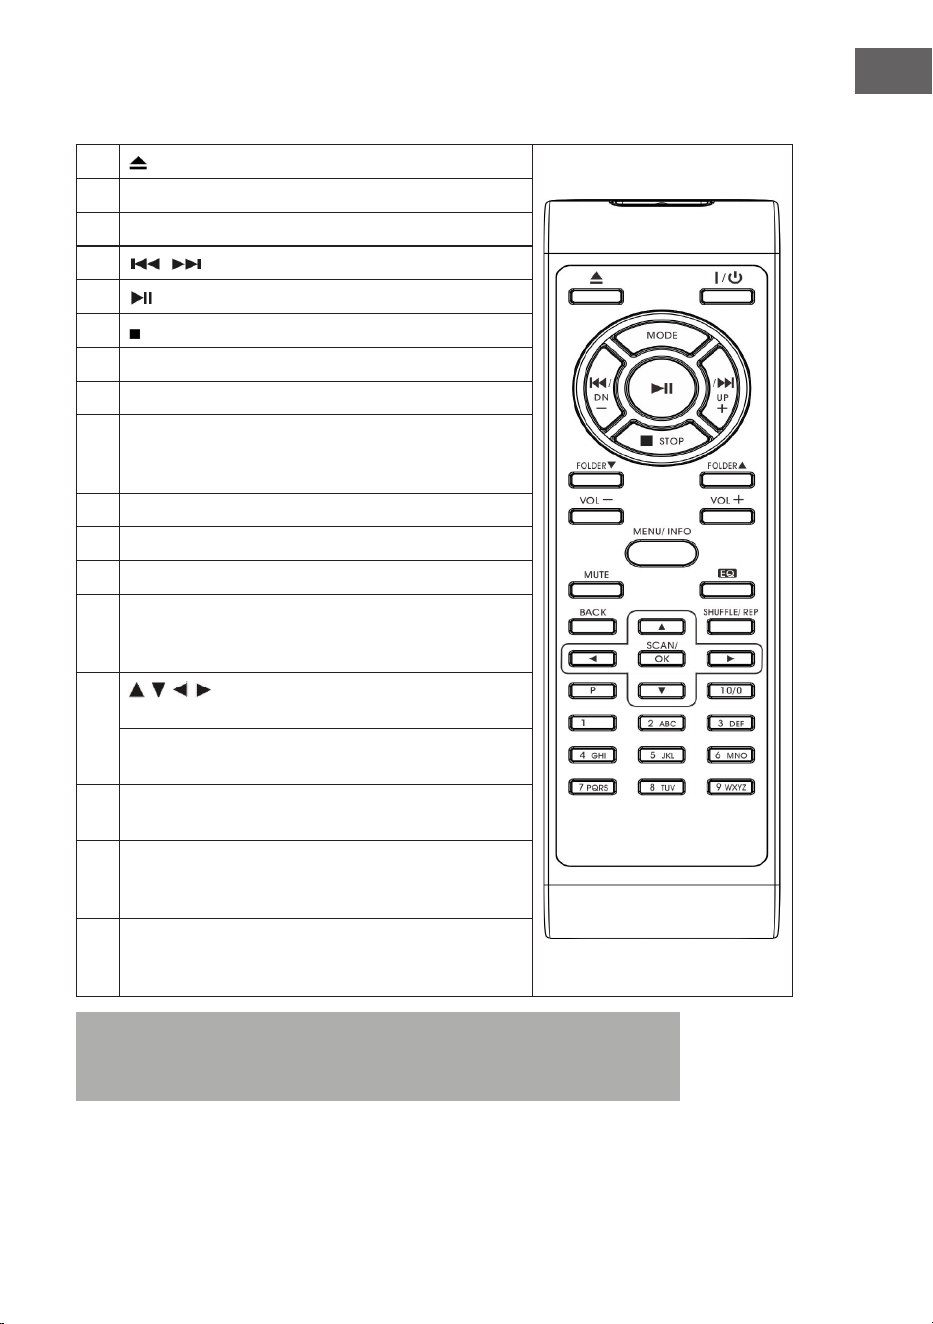
69
FR
Télécommande
1
(ouvrir/fermer le compartiment CD)
2 On/Standby (marche/veille)
3 MODE (sélection du mode)
4
/ (titre précédent/ suivant)
5
(Lecture/ Pause)
6 (Stop)
7 Dossier/Pre (dossier précédent/haut/bas)
8 Volume -/+ (réglage du volume)
9 MENU/INFO (radio Internet : sélection d'une information
; Mode CD/ USB : activation de la fonction ID3 ; dans
tous les autres modes : Menu)
10 Mute (pour couper le son temporairement)
11 Preset EQ (choix de diérents modes d'égaliseur)
12 BACK (retour à l'écran précédent)
13 SHUFFLE/REP (en mode CD : activer la fonction
répétition ; en mode USB : activer la fonction répétition ;
touche maintenue : lecture aléatoire)
14
/ / / Touches échées (mode menu : sélection
haut/ bas/gauche/droite)
Modes FM/DAB : haut /bas ; radio Internet : choix des
emplacements mémoire)
15 SCAN/OK (en mode menu : conrmer la sélection ; en
recherche FM/ DAB : recherche de station)
16 P (radio Internet /DAB/FM/CD : appuyez pour rappeler
des stations mémorisées ; maintenez pour mémoriser
une station)
17 Touches numériques 10/ 0-9 (radio Internet/DAB/FM:
saisie des numéros d'emplacements mémoire ; mode
CD : sélection des numéros de titres
Remarque : Si aucune musique n‘est lue pendant 15 minutes,
l‘appareil bascule automatiquement en mode veille pour protéger
l‘environnement.

70
FR
INSTALLATION
Installation des piles
Le compartiment à piles se trouve au dos de la télécommande.
• Retirez le couvercle du
compartiment à piles en
appuyant sur le repère, puis
retirez-le.
• Insérez deux piles AAA (non
fournies) dans le compartiment
à piles et veillez à respecter la
polarité.
• Remettez le couvercle du
compartiment à piles.
Précautions nécessaires avec les piles
• Les piles doivent être remplacées par un adulte.
• Ne mélangez pas des piles neuves et usagées.
• Ne mélangez pas des piles de types diérents.
• Les bornes ne doivent pas être court-circuitées.
• Les batteries alcalines ne doivent jamais être chargées.
• Retirez les piles vides.
• Utilisez uniquement des piles du type approprié.

71
FR
Consignes d‘installation
• Déballez tous les composants de l‘appareil et retirez tout le matériel
d‘emballage.
• Ne branchez pas la che de l‘appareil dans la prise tant que vous n‘avez
pas eectué tous les branchements et vérié que la tension sur la
plaque signalétique correspond à la tension de votre secteur.
• Ne bloquez jamais les ouvertures de ventilation et assurez-vous qu‘il
y a un espace libre de plusieurs centimètres autour de l‘appareil pour
assurer une ventilation adéquate.
• Branchez la che d‘alimentation (32) dans la prise.
• Lorsque vous branchez l‘appareil pour la première fois, „auna“ s‘aiche
à ‚écran“.
• Environ 30 secondes plus tard, lors de la première utilisation, l‘appareil
lance automatiquement l’assistant d’installation, l’écran aiche „Start
now“ et sélectionne par défaut la réponse „OUI“. Appuyez sur la touche
OK (7) pour lancer l’assistant de conguration.
• L‘appareil ouvre alors le mode de mise à jour automatique.
• Utilisez les touches / pour sélectionner une source de mise à jour et
conrmez votre sélection avec la touche OK (7). La sélection du fuseau
horaire s‘ouvre alors.
• Utilisez les touches / pour sélectionner l‘heure d‘été puis appuyez
sur la touche OK (7) pour conrmer. Les paramètres réseau vont
maintenant s‘ouvrir avec la réponse „OUI“ pré sélectionnée. Appuyez
sur la touche OK (7) pour conrmer. L‘appareil ouvre ensuite le réglage
de la région. Le réglage par défaut est „Europe“.
• Appuyez sur la touche OK (7) pour conrmer la région. L‘appareil
recherche ensuite votre routeur et aiche les réseaux trouvés sur l‘écran
LCD (2).
• Sélectionnez le routeur souhaité avec les touches / et conrmez
votre sélection en appuyant sur la touche OK (7).
• Appuyez sur les touches / pour sélectionner „WPS“ et conrmez
votre sélection en appuyant sur la touche OK (7).
• Entrez le mot de passe en appuyant sur les touches / .
• Une fois le mot de passe entré, sélectionnez „OK“ et appuyez sur la
touche OK (7) pour conrmer. L‘appareil va maintenant se connecter à
Internet et une fois la connexion établie, l‘écran aiche „Setup wizard
completed“. Appuyez à nouveau sur la touche OK pour continuer.
72
FR
MISE EN MARCHE ET UTILISATION
1. L‘appareil passe en mode radio Internet après avoir eectué les
réglages ci-dessus. Appuyez sur les touches / et sélectionnez „Liste
des stations“. Conrmez votre choix en appuyant sur la touche OK.
2. Appuyez sur les touches / , pour sélectionner „Stations“ et conrmez
votre sélection en appuyant sur la touche OK.
3. Pour sélectionner le mode de recherche souhaité, tel que la recherche
d‘emplacement, appuyez sur les touches / puis sur OK pour
conrmer votre sélection.
4. Par exemple, dans la recherche de position, diérentes stations de
l‘environnement direct sont répertoriées à l‘écran. Vous pouvez choisir
la station désirée en appuyant sur les touches / , Conrmez votre
choix en appuyant sur OK.
5. Les stations de radio trouvées sont listées à l‘écran. Vous pouvez choisir
la station désirée en appuyant sur les touches / . Conrmez votre
choix en appuyant sur OK.
6. Réglez le volume souhaité avec les touches de volume (16).
MODE RADIO
Mémorisation de station (en mode IR)
Remarque : vous pouvez mémoriser jusqu‘à 10 stations de radio.
1. Réglez la station de radio Internet souhaitée.
2. Maintenez la touche P (11). Sélectionnez la station souhaitée en
appuyant sur les touches / et conrmez votre choix en appuyant sur
OK (7).
3. Répétez les étapes 1 et 2 pour toutes les autres stations.
4. Si vous souhaitez rappeler les stations préréglées, appuyez sur la
touche P et sélectionnez la station souhaitée à l’aide des touches / .
Conrmez votre choix en appuyant sur OK.
Recherche manuelle de stations (mode FM)
1. Appuyez sur la touche MODE (15) pour sélectionner le mode FM.
2. Appuyez sur OK pour conrmer.
3. Utilisez les touches / pour régler la station souhaitée.
4. Réglez le volume avec les touches de volume (16).

73
FR
Recherche automatique de stations
1. Appuyez sur la touche MODE (15) pour sélectionner le mode FM.
2. Appuyez sur les touches / pour sélectionner le sens de la recherche
et appuyez sur OK pour conrmer. La recherche automatique de stations
est alors lancée.
3. Répétez l‘étape 2 jusqu‘à ce que la station souhaitée soit atteinte (16).
Radio Data System (RDS)
Ce réglage est mis à disposition par les stations. Les informations
fournies seront ensuite aichées sur l‘écran LCD. En appuyant plusieurs
fois sur la touche MENU / INFO, les informations suivantes sont aichées
successivement : Texte radio > Type de programme > Fréquence > Date/
Heure.
Réception en FM stéréo
Appuyez sur la touche MENU / INFO (10) pour accéder au menu FM.
En appuyant sur les touches / , et en conrmant avec OK, vous pouvez
choisir le réglage audio. L‘écran aiche „Listen in Mono only“. Lorsque vous
sélectionnez „NON“ avec les touches / et conrmez avec la touche OK,
l‘appareil lit la station en stéréo et l‘icône stéréo s‘aiche à l‘écran.
Radio DAB
1. Sélectionnez le mode DAB en appuyant sur la touche MODE (15).
2. Conrmez en appuyant sur OK.
3. L‘appareil lance automatiquement une recherche de stations dans les 2
secondes entre 11b et 12d. Utilisez les touches / pour sélectionner la
station souhaitée et conrmez votre sélection en appuyant sur OK.
4. En appuyant plusieurs fois sur la touche MENU / INFO, vous aichez
les informations DAB suivantes les unes après les autres : Nom du
groupe > Type de programme > Fréquence > Force du signal > Taux de
transmission > Date / heure
5. Ajustez le volume avec les touches de volume (16) an.

74
FR
Mémorisation de stations (en mode DAB)
Remarque : vous pouvez mémoriser jusqu‘à 20 stations DAB.
1. Passez en mode DAB.
2. Réglez la station souhaitée automatiquement ou manuellement.
3. Maintenez la touche P (11). Choisissez l‘emplacement mémoire en
appuyant sur les touches / .
4. Conrmez votre choix en appuyant sur OK (7).
5. Répétez les étapes 1 et 3 pour toutes les autres stations.
6. Lorsque vous souhaitez rappeler des stations mémorisées, appuyez
sur la touche P et choisissez votre station avec les touches / puis
conrmez en appuyant sur OK.
Remarque : Au bout de 15 secondes sans entrée, l‘appareil retourne
automatiquement en mode radio normal. Une station stockée peut
être écrasée en stockant une autre station sur le même emplacement
mémoire.
Réception radio
L‘appareil dispose d‘une antenne amovible. Vériez que l‘antenne est
branchée au connecteur d‘antenne et complètement déployée pour une
bonne réception.
MODE CD
1. Pour sélectionner le mode CD, appuyez sur la touche MODE (15).
2. Appuyez sur OK pour conrmer.
3. Appuyez sur la touche (8) pour ouvrir le compartiment à CD.
4. Insérez un CD avec l‘étiquette vers le haut dans le compartiment à CD
et refermez-le.
5. La recherche se lance et l‘écran LC (2) indique le nombre total de pistes
sur le CD et la durée totale de lecture. La lecture du CD commence
automatiquement.
6. Ajustez le volume avec les touches de volume (16).

75
FR
Lecture / Pause
Appuyez une fois sur la touche (13), pour mettre la lecture en pause. En
appuyant à nouveau sur la touche, la lecture reprend.
Pour arrêter la lecture
Lorsque vous appuyez sur la touche pendant la lecture ou en pause,
l‘appareil arrête complètement la lecture.
Saut de titre
1. Lorsque vous appuyez sur la touche (14) pendant la lecture ou en
pause, l‘appareil saute le titre en cours de lecture. L‘appareil se trouve
dans le même mode avec le titre suivant (en lecture ou en pause).
2. Lorsque vous appuyez sur la touche (14) pendant la lecture ou en
pause, l‘appareil saute le titre en cours de lecture. L‘appareil se trouve
dans le même mode avec le titre suivant (en lecture ou en pause).
MP3-CDs
1. Après la recherche, le nombre total de pistes et les informations sur
l‘album s‘aichent sur l‘écran LCD. L‘appareil commence la lecture
automatiquement.
2. Pour sélectionner le titre souhaité, appuyez sur les touches / .
Fonction ID3
Si vous appuyez plusieurs fois sur la touche MENU/INFO, l‘écran LCD aiche
„F01 T001 00:01“. Pendant la lecture d‘un chier MP3 l‘écran aiche le nom
de l‘album/ de l‘artiste/ le titre du morceau.
• Si aucun nom n‘est disponible ou si le nom est dans une langue non
prise en charge, l‘écran LCD reste vide lorsque vous appuyez sur la
touche MENU / INFO.
• Si le système ne prend pas en charge le format d‘entrée du CD, les
informations Album / Artiste / Titre ne peuvent pas être reconnues.
• Le système ne prend en charge que les chires anglais et arabes pour la
fonction ID3.
Conditions requises - format MP3
• Débit binaire : 32 kbps ~ 320 kbps ; Taux d‘échantillonnage : 32 kHz,
44,1 kHz et 48 kHz décodables
• Les performances de lecture des CD MP3 dépendent de la qualité et de
la méthode d’enregistrement. De plus, en raison du format diérent,
le temps de chargement des CD MP3 est plus long qu‘avec les CD
normaux.
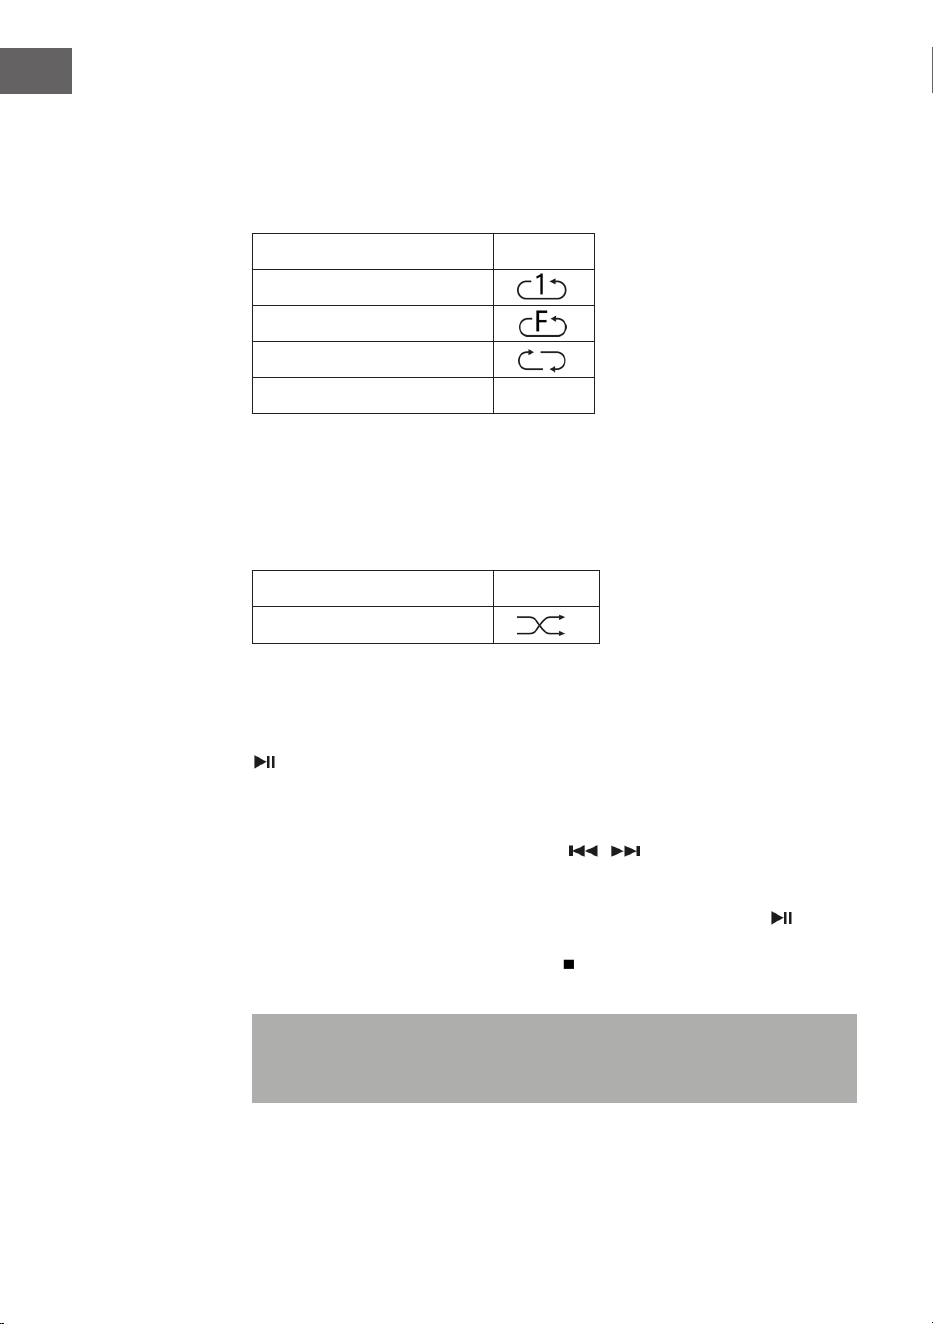
76
FR
Répétition d‘un titre (pour les CD)
Vous pouvez répéter une piste, un dossier (MP3 uniquement) ou un CD
entier en utilisant cette fonction : (1) Répéter 1> (2) Répéter toutes les
pistes> (3) Répétition désactivée.
Mode de lecture Aichage
Répéter un titre
Répéter un dossier
Répéter tous les titres
Répétition désactivée -----
Lecture aléatoire
Cette fonction lit tous les titres dans un ordre aléatoire. En mode de
répétition, appuyez sur la touche REP / SHUFFLE pour activer la lecture
aléatoire.
Mode de lecture Aichage
Random (aléatoire)
CD Titelspeicherung
Vous pouvez mémoriser jusqu‘à 20 titres de CD ans une liste et les lire dans
l‘ordre de votre choix. Avant d‘utiliser cette fonction, vériez que la touche
(13) est appuyée.
1. Passez en mode CD et arrêtez la lecture du CD.
2. Maintenez la touche P (11) , l‘écran LCD aiche „program“.
3. Choisissez un titre avec les touches / .
4. Mémorisez-le en appuyant sur OK.
5. Répétez les étapes 3 et 4 pour mémoriser d‘autres titres.
6. Une fois que vous avez mémorisé tous les titres, appuyez sur , pour
lancer la liste des titres de CD mémorisée.
7. Pour arrêter, appuyez sur la touche et appuyez de nouveau sur cette
touche pour eacer tous les titres mémorisés.
Remarque : Si vous n‘appuyez sur aucune touche dans les 30
secondes qui suivent l‘appui sur la touche P, le mode mémoire est
automatiquement annulé.

77
FR
LECTURE DE FICHIERS MP3 SUR UN APPAREIL
USB
L‘appareil peut décoder les chiers MP3 stockés sur des périphériques USB.
1. Mettez d‘abord l‘appareil en mode veille ou dans n‘importe quel mode
(sauf le mode USB).
2. Insérez la clé USB dans le port USB dans le bon sens et assurez-vous
qu’elle est insérée correctement.
3. Appuyez plusieurs fois sur la touche MODE pour sélectionner „My
player mode“.
4. Appuyez sur OK (7) pour conrmer.
5. Utilisez les touches / pour sélectionner le chier souhaité et appuyez
sur OK pour lancer la lecture.
6. Utilisez les touches de volume (16) pour régler le volume souhaité.
Lecture /Pause
Appuyez une fois sur la touche (13), pour mettre la lecture en pause.
Appuyez à nouveau sur la touche pour reprendre la lecture.
Pour arrêter la lecture
Lorsque vous appuyez sur la touche pendant la lecture ou en pause,
l‘appareil arrête complètement la lecture.
Saut de titre
• En mode lecture ou pause, si vous appuyez sur la touche (14)
l‘appareil lit le titre suivant.
• En mode lecture ou pause, si vous appuyez sur la touche (14)
l‘appareil lit à nouveau le titre en cours. Appuyez à nouveau sur la
touche pour lire le titre précédent.

78
FR
Fonction ID3
Si vous appuyez plusieurs fois sur la touche MENU/INFO, l‘écran LCD aiche
les informations MP3 telles que le nom de l‘album/ de l‘artiste /le titre du
morceau etc.
• Si aucun nom n‘est disponible ou si le nom est dans une langue non
prise en charge, l‘écran LCD reste vide lorsque vous appuyez sur la
touche MENU / INFO.
• Si le système ne prend pas en charge le format d‘entrée du CD, les
informations Album / Artiste / Titre ne peuvent pas être reconnues.
• Le système ne prend en charge que les chires anglais et arabes pour la
fonction ID3.
Conditions requises – format MP3
• Débit binaire : 32 kbps ~ 320 kbps ; Taux d‘échantillonnage : 32 kHz,
44,1 kHz et 48 kHz décodables
• Les performances de lecture des CD MP3 dépendent de la qualité et de
la méthode d’enregistrement.
Répétition / lecture aléatoire
Appuyez sur la touche MENU (10) pour accéder au menu et choisissez la
lecture aléatoire avec les touches / ou bien le mode de répétition.
Conrmez vote choix en appuyant sur OK.
• L‘appareil ne peut lire les chiers MP3 qu‘en mode USB. Vous ne pouvez
pas décoder des chiers audio d‘un format diérent.
• Si vous connectez un lecteur MP3 au port USB de l‘appareil, il est
possible que l‘appareil ne puisse pas lire les chiers qu‘il contient si le
lecteur MP3 n‘est pas compatible. Ce n‘est pas un défaut de l‘appareil.
• Le port USB ne doit pas être connecté à une rallonge USB ni
directement à un ordinateur.

79
FR
AUTRES FONCTIONS
Arrêt automatique
1. Maintenez la touche MENU puis utilisez les touches / pour
sélectionner le menu principal. Conrmez votre choix en appuyant sur
OK.
2. Utilisez les touches / pour sélectionner „Mode veille“ et appuyez sur
OK pour conrmer.
3. Sélectionnez la durée souhaitée avant d‘éteindre automatiquement en
choisissant 15-30-45-60 avec les touches / et conrmez votre choix
en appuyant sur OK. L‘écran LCD aiche ensuite le temps sélectionné
jusqu‘à l‘extinction automatique de l‘écran. L‘appareil passe en mode
veille lorsque le temps est écoulé.
Fonction EQ
1. Appuyez sur la touche MENU pour accéder au menu principal et utilisez
les touches / pour sélectionner „Égaliseur“. Appuyez sur OK pour
conrmer.
2. Utilisez les touches / pour choisir „Flat, Jazz, Rock, Film, Classique,
Pop, Nouvelles, Mon EQ ou MY EQ SETUP“ et conrmez votre sélection
en appuyant sur OK.
Choix de la langue
1. Appuyez sur la touche MENU et choisissez „Language“ avec les touches
/ . Conrmez en appuyant sur la touche OK.
2. Réglez votre langue avec les touches / et conrez votre choix en
appuyant sur la touche OK.
Paramètres d‘usine
1. Appuyez sur la touche MENU et choisissez „Factory reset“ avec les
touches / . Conrmez en appuyant sur la touche OK.
2. Choisissez YES avec les touches / de redémarrer l‘appareil et
d‘eacer toutes les données qui s‘y trouvent et conrmez votre choix en
appuyant sur OK. Procédez maintenant de la même manière que lors de
la première mise en marche de l‘appareil.
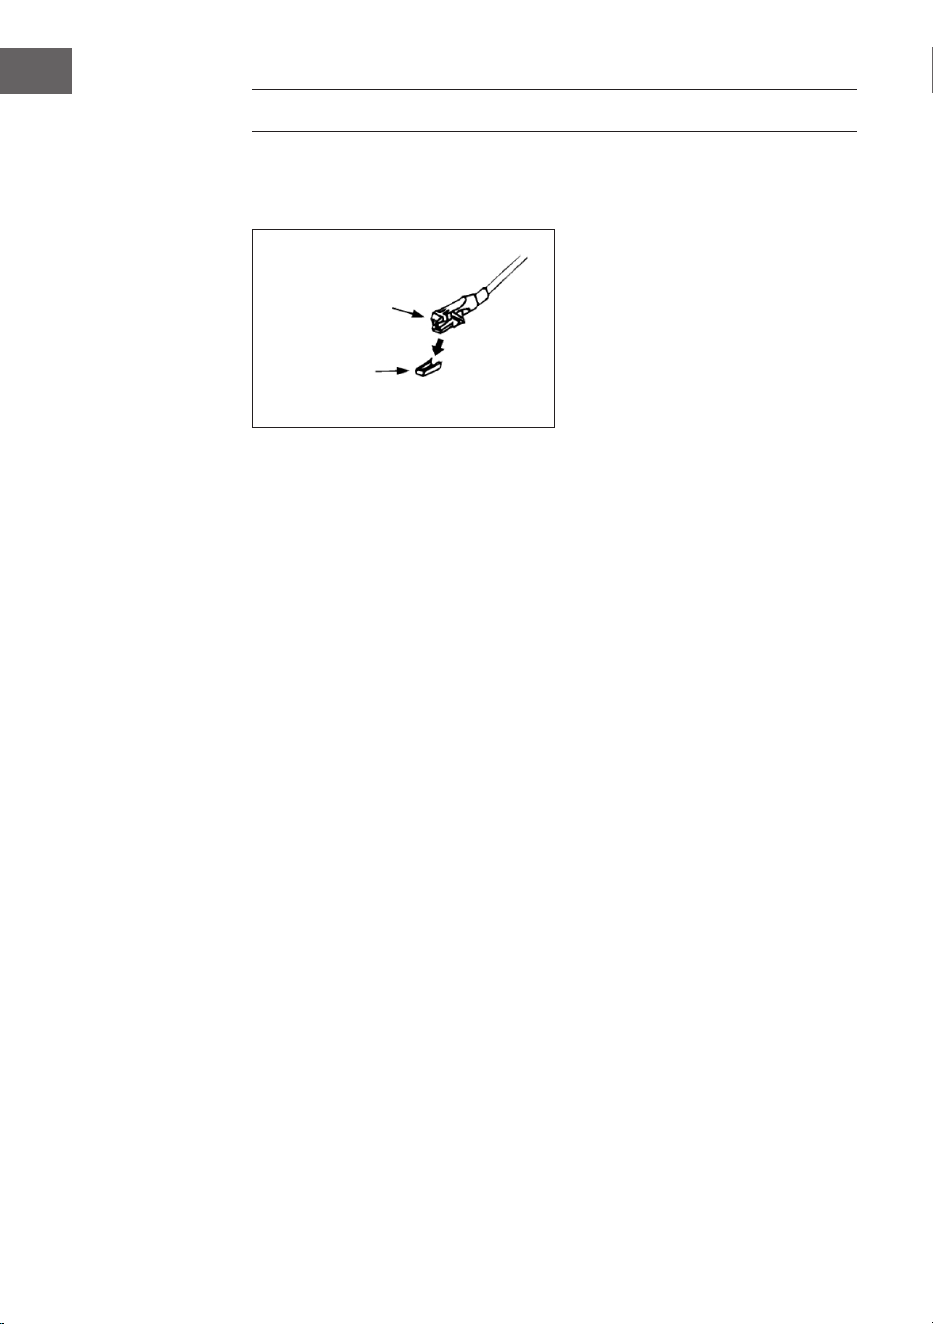
80
FR
PLATINE VINYLE
Retirez la protection de l‘aiguille. Vériez que le bras de lecture est retiré de
son support, puis bloquez-le à nouveau avant d’utiliser la platine.
1. Appuyez plusieurs fois sur la touche MODE pour sélectionner le mode
platine vinyle.
2. Appuyez sur OK pour conrmer.
3. Placez le sélecteur de vitesse (25) dans la bonne position, en fonction
du disque.
4. Placez le disque sur la platine (utilisez l’adaptateur si nécessaire).
5. Soulevez le levier du bras de lecture (27).
6. Sortez lentement le bras de lecture de son support et déplacez-le
doucement vers le disque. La platine commence à tourner lentement.
Placez le bras de lecture au-dessus de la position souhaitée du disque.
7. Descendez le bras de lecture. Le bras de lecture s‘abaisse lentement sur
le disque et la lecture commence.
8. À la n du disque, le bras de lecture revient automatiquement à sa
position de repos.
9. Soulevez le bras de lecture pour arrêter manuellement le disque.
Pause
Soulevez le bras de lecture pour interrompre momentanément la lecture.
Cartouche
Protection

81
FR
Importantes remarques
• Le système de retour automatique a été conçu mécaniquement et
le point de réinitialisation peut se décaler pendant le transport. Par
conséquent, il se peut que le bras de lecture revienne automatiquement
au support lorsqu’il est placé pour la première fois sur le disque. Il ne
s‘agit pas d‘un dysfonctionnement de l‘appareil.
• La longueur des disques peut varier. Si vous constatez que le bras de
lecture ne peut pas revenir automatiquement après la lecture du disque,
remettez manuellement le bras de lecture à sa position d‘origine ou
dénissez le point de retour automatique.
ÉTABLISSEMENT D‘UNE CONNEXION BT ET
LECTURE
1 Appuyez sur le bouton MODE (15) pour sélectionner le mode BT.
2 Appuyez sur le bouton OK pour conrmer.
3 L‘écran (2) aiche [Pas de média] et le symbole BT.
4 Maintenez la touche MENU/INFO (10) enfoncée et appuyez sur les
touches échées haut/bas (7) pour sélectionner [Congurer BT].
Appuyez sur le bouton OK pour conrmer.
5 L‘icône BT clignote sur l‘écran (2) et l‘écran aiche [BT Discoverable],
indiquant que l‘appareil est en mode recherche.
6 Activez BT sur votre smartphone ou tablette externe et sélectionnez
l‘appareil nommé [Birmingham] pour le connecter à votre chaîne stéréo.
7 Une fois la connexion établie, l‘icône BT s‘allume en permanence sur
l‘écran (2).
8 Lancez la musique sur votre appareil externe et écoutez-la sur la chaîne
stéréo.
AUX-IN
Branchez un autre périphérique audio, tel qu‘un lecteur CD portable, un
lecteur MP3, un lecteur de cassette, un iPod, etc. au connecteur d’entrée
Aux-in sur le côté de l’appareil à l’aide d’un câble de raccordement de 3,5
mm (non fourni). Appuyez sur la touche MODE pour sélectionner le mode
Aux-In et appuyez sur OK pour lancer la lecture.
82
FR
SPOTIFY CONNECT
Votre nouvel appareil a Spotify Connect
Utilisez votre smartphone, tablette ou ordinateur comme télécommande
pour Spotify. Pour en savoir plus, allez sur spotify.com/connect.
Licences
Le logiciel Spotify est soumis aux droits d’utilisation de tiers, consultables à
la page suivante :
https://www.spotify.com/connect/third-party-licenses
Toutes les marques citées sont des marques de leurs sociétés respectives.
Erreurs et omissions exclues et sous réserve de modications techniques.
Nos conditions générales s‘appliquent.
FICHE TECHNIQUE
Numéro d'article 10034090
Alimentation 220-240 V ~ 50/60 Hz
Puissance max. 50 W (2 x 12,5 W RMS)
Radio IR/DAB+/FM-RDS
FM fréquence 87,5-108 MHz
DAB fréquence DAB+ Bande III 174-240 MHz
WiFi fréquence 2,4 GHz
WiFi puissance de
radiofréquence (max.)
+13 dBm
BT fréquence 2,402-2,480 GHz
BT puissance de
radiofréquence (max.)
4 dBm

83
FR
CONSEILS POUR LE RECYCLAGE
S‘il existe une réglementation pour l‘élimination ou le
recyclage des appareils électriques et électroniques
dans votre pays, ce symbole sur le produit ou sur
l‘emballage indique que cet appareil ne doit pas
être jeté avec les ordures ménagères. Vous devez le
déposer dans un point de collecte pour le recyclage
des équipements électriques et électroniques.
La mise au rebut conforme aux règles protège
l‘environnement et la santé de vos semblables des
conséquences négatives. Pour plus d‘informations
sur le recyclage et l‘élimination de ce produit, veuillez
contacter votre autorité locale ou votre service de
recyclage des déchets ménagers.
Ce produit contient des piles. S‘il existe une
réglementation pour l‘élimination ou le recyclage
des piles dans votre pays, vous ne devez pas les
jeter avec les ordures ménagères. Renseignez-vous
sur les dispositions locales relatives à la collecte
des piles usagées. La mise au rebut conforme aux
règles protège l‘environnement et la santé de vos
semblables des conséquences négatives.
DÉCLARATION DE CONFORMITÉ
Fabricant :
Chal-Tec GmbH, Wallstraße 16, 10179 Berlin,
Allemagne.
Importateur pour la Grande Bretagne :
Berlin Brands Group UK Limited
PO Box 42
272 Kensington High Street
London, W8 6ND
United Kingdom
Le soussigné, Chal-Tec GmbH, déclare que
l’équipement radioélectrique du type Birmingham est
conforme à la directive 2014/53/UE. Le texte complet
de la déclaration UE de conformité est disponible à
l’adresse internet suivante : use.berlin/10034090


85
IT
Gentile Cliente,
La ringraziamo per aver acquistato il dispositivo.
La preghiamo di leggere attentamente le seguenti
istruzioni per l’uso e di seguirle per evitare possibili
danni tecnici. Non ci assumiamo alcuna responsabilità
per danni scaturiti da una mancata osservazione delle
avvertenze di sicurezza e da un uso improprio del
dispositivo. Scansionare il codice QR seguente, per
accedere al manuale d’uso più attuale e per ricevere
informazioni sul prodotto.
INDICE
Avvertenze di sicurezza 86
Descrizione del dispositivo 87
Installazione 90
Messa in funzione e utilizzo 92
Modalità radio 92
Modalità CD 94
Riproduzione di le MP3 da dispositivi USB 97
Funzioni aggiuntive 99
Giradischi 100
Stabilire la riproduzione bt e riproduzione 101
Aux-In 101
Spotify Connect 102
Dati tecnici 102
Avviso di smaltimento 103
Dichiarazione di conformità 103

86
IT
AVVERTENZE DI SICUREZZA
Nota: dato che il movimento del CD e il circuito integrato sensibile
possono causare interferenze con altri dispositivi elettrici nelle
vicinanze, spegnere il dispositivo volete utilizzare altri dispositivi elettrici
nelle vicinanze.
• Tutte le avvertenze di sicurezza e utilizzo devono essere rispettate.
• Il dispositivo non deve essere utilizzato nelle vicinanze d’acqua o
entrare in contatto con umidità.
• Assicurarsi di non versare liquidi sul dispositivo o sulle sue aperture.
• Spostare il dispositivo facendo attenzione, in modo da evitare
folgorazioni.
• Non bloccare assolutamente le aperture di ventilazione del dispositivo.
• Non posizionare il dispositivo vicino a fonti di calore (come ad es. stufe)
e non esporlo alla luce del sole diretta.
• Collegare la spina alla presa elettrica nel rispetto delle indicazioni
contenute nel manuale.
• Il dispositivo è dotato di una protezione da surriscaldamento
(dispositivo di sicurezza). Se è necessario sostituirla, rivolgersi al
produttore, al servizio di assistenza ai clienti o a una persona con
qualica equivalente.
• Seguire le indicazioni del paragrafo “Pulizia e manutenzione” per pulire
il dispositivo.
• Staccare la spina dalla presa elettrica se non si utilizza il dispositivo per
tempi prolungati.
• Il dispositivo deve essere riparato da una persona qualicata se:
- Il cavo di alimentazione o la spina sono danneggiati.
- Sono niti corpi estranei o liquidi nelle aperture del dispositivo.
- Il dispositivo è stato esposto a pioggia.
- Il dispositivo non funziona correttamente senza modiche esterne.
- Il dispositivo è caduto e il subwoofer è guasto.
• Non cercare in nessun caso di riparare il dispositivo autonomamente,
altrimenti la garanzia perde validità.
• La spina del dispositivo funge da sezionatore e deve essere facilmente
accessibile e raggiungibile in ogni momento.
• Per evitare incidenti, il dispositivo deve essere ssato in modo sicuro al
pavimento o alla parete, nel rispetto delle avvertenze di installazione.
• Il dispositivo è un prodotto laser di classe I.
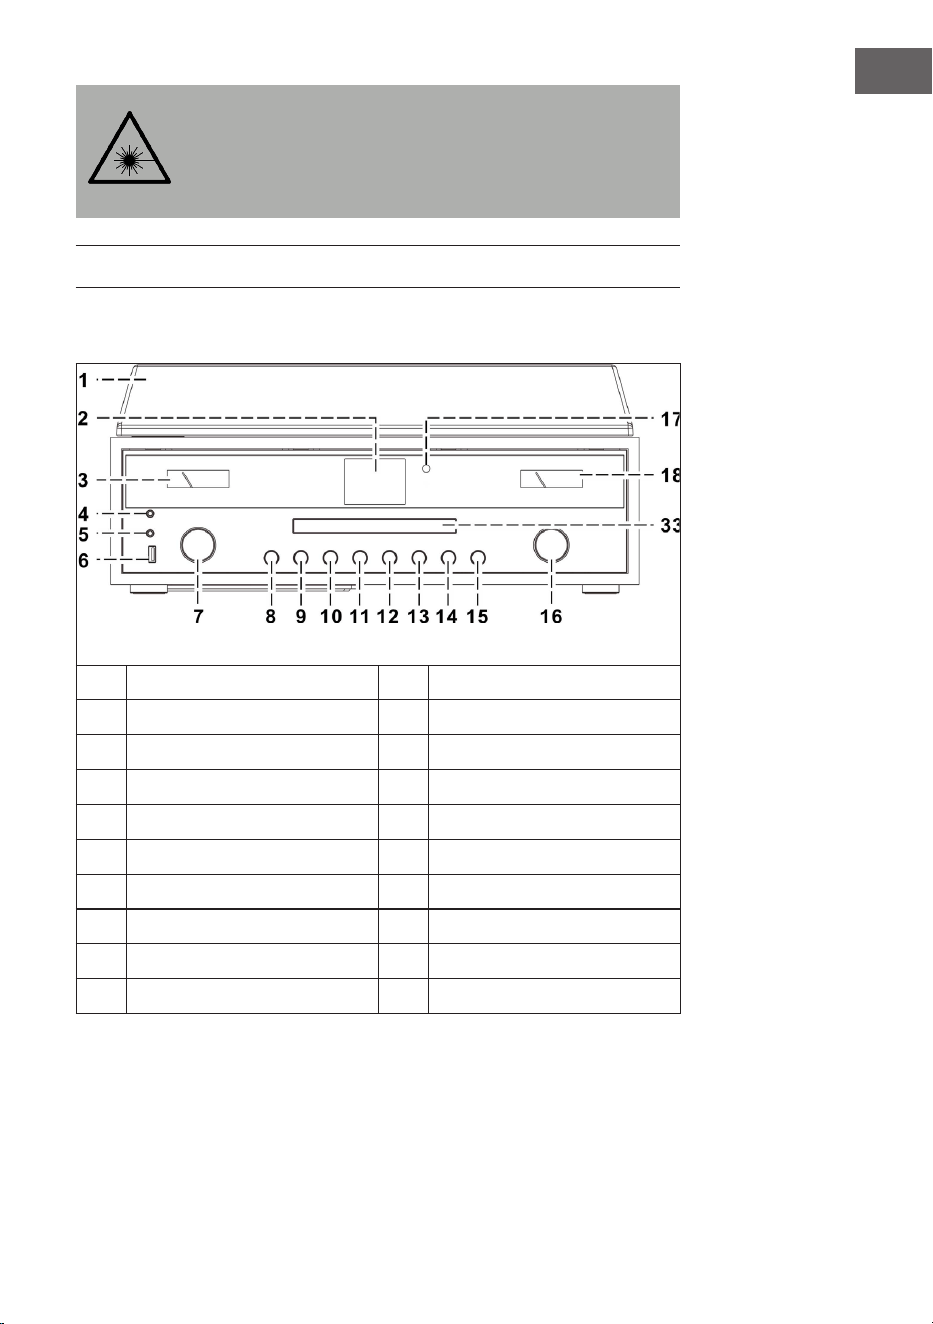
87
IT
ATTENZIONE
Il mancato rispetto delle avvertenze di utilizzo contenute nel
manuale può causare lo sprigionamento di radiazioni
pericolose. Il dispositivo deve essere regolato e riparato solo
da personale qualicato.
DESCRIZIONE DEL DISPOSITIVO
Dispositivo (vista frontale)
1
Copertura antipolvere
11
Tasto P
2
Schermo
12
Passare al titolo successivo
3
VU meter
13
Play/Pausa/Stop
4
Connessione cuie
14
Passare al titolo precedente
5
Connessione AUX-IN
15
MODE (modalità)
6
Connessione USB
16
VOLUME +/-/ON/OFF
7
Tasti freccia (su/giù)/OK/Cerca
17
Sensore telecomando
8
Aprire/chiudere vano CD
18
VU meter
9
Indietro
33
Sportello del vano CD
10
MENU/INFO
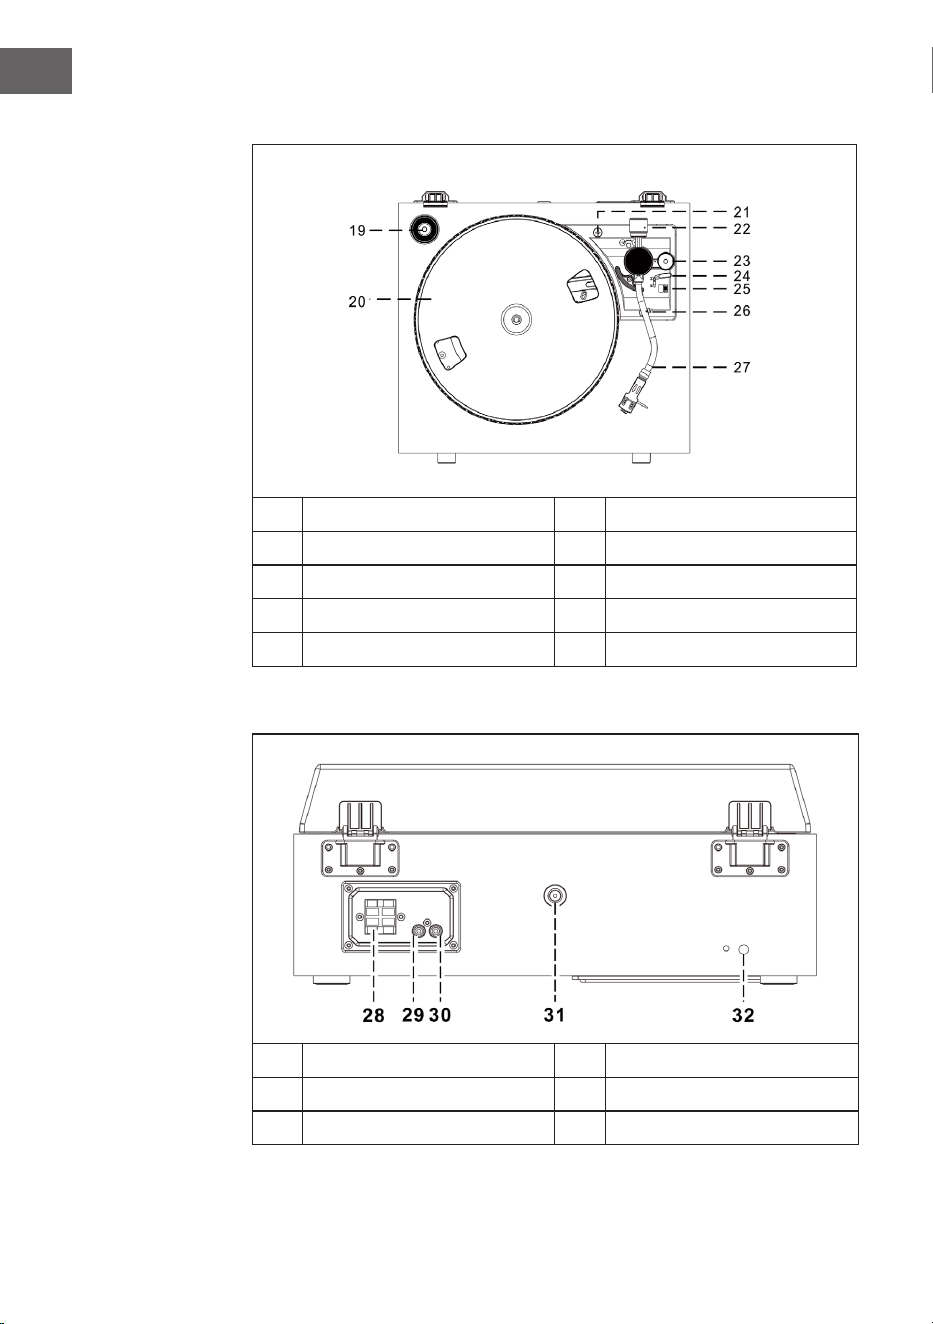
88
IT
Giradischi
19
Adattatore 45 giri
24
Leva di sollevamento
20
Piatto rotante
25
Velocità (33 e 45 giri)
21
Sicura per il trasporto
26
Sicura braccio del pick-up
22
Contrappeso
27
Braccio del pick-up con puntina
23
Regolazione alti
Vista posteriore
28
Connessione altoparlanti
31
Connessione antenna
29
Connessione Line-Out destra
32
Cavo di alimentazione
30
Connessione Line-Out destra

89
IT
Telecomando
1
(aprire/chiudere il vano CD)
2 On/Standby (accendere/modalità standby)
3 MODE (selezione modalità)
4
/ (titolo precedente/successivo)
5
(Play/Pausa)
6 (Stop)
7 Folder/Pre (cartella precedente/in alto/in basso)
8 Volume +/- (regolazione volume)
9 MENU/INFO (selezione informazioni web radio:
modalità CD/USB: attivazione funzione ID3; tutte le altre
modalità: menu)
10 Mute (disattivare l’audio temporaneamente)
11 Preset EQ (selezione di diverse modalità EQ)
12 BACK (tornare alla schermata precedente)
13 SHUFFLE/REP (modalità CD: attivazione della funzione
di ripetizione; modalità USB: attivazione della funzione
di ripetizione; tenendo premuto il tasto: riproduzione
casuale)
14
/ / / Tasti freccia (modalità menu: selezione in
alto/in basso/a sinistra/a destra)
Modalità FM/DAB: in alto/in basso; web radio: selezione
della posizione di salvataggio)
15 SCAN/OK (in modalità menu: conferma della selezione;
ricerca FM/DAB: ricerca emittenti
16 P (web radio/DAB/FM/CD: premere per accedere alle
emittenti salvate; tenere premuto per salvare emittenti)
17 Tasti numerici 10/0-9 (web radio/DAB/FM: inserimento
del numero della posizione di salvataggio; modalità CD:
selezione del numero del titolo
Nota: se non si riproduce musica per un lasso di tempo di 15 minuti,
il dispositivo passa automaticamente in standby per la salvaguardia
dell’ambiente.

90
IT
INSTALLAZIONE
Inserire le batterie
Il vano delle batterie si trova sul retro del telecomando.
• Togliere la copertura del vano
delle batterie, premendo sul
segno e staccandola.
• Inserire due batterie tipo AAA
(non incluse in consegna) nel
vano e fare attenzione alla
corretta polarità.
• Riposizionare la copertura.
Misure di sicurezza per la gestione delle batterie
• Le batterie devono essere sostituite da un adulto.
• Non mischiare batterie vecchie e nuove.
• Non mischiare batterie di tipi diversi.
• I morsetti di alimentazione non devono essere cortocircuitati.
• Non ricarica batterie che non sono progettate per questo ne.
• Togliere le batterie scariche.
• Utilizzare solo batterie del tipo adatto.

91
IT
Avvertenze sull’installazione
• Disimballare tutti i componenti del dispositivo e rimuovere tutti i
materiali d’imballaggio.
• Collegare la spina alla preda elettrica solo dopo essersi assicurati che
la tensione indicata sulla targhetta del dispositivo corrisponda con la
tensione di rete e dopo aver realizzato tutti i collegamenti.
• Non bloccare assolutamente le aperture di ventilazione e assicurarsi di
lasciare diversi centimetri di spazio intorno al dispositivo, in modo da
garantire una ventilazione suiciente.
• Inserire la spina (32) nella presa elettrica.
• Quando si accende il dispositivo per la prima volta, sullo schermo
compare “auna”.
• Dopo circa 30 secondi si attiva il dispositivo. Se è il primo utilizzo, passa
automaticamente all’assistente di congurazione, lo schermo mostra
“Start now” e la risposta predenita è “YES” (sì). Premere OK (7) per
avviare l’assistente di congurazione.
• Il dispositivo apre automaticamente la modalità di aggiornamento.
Utilizzare i tasti / per selezionare una fonte per l’aggiornamento e
confermare con OK (7). Si apre la selezione del fuso orario.
• Selezionare il fuso orario desiderato con / e confermare con OK
(7). SI apre l’impostazione per ora legale e solare. Si aprono ora le
impostazioni di rete e la risposta predenita è “YES”. Premere OK (7) per
confermare. Il dispositivo apre ora le impostazioni dell’area geograca.
L’impostazione predenita è “Europa”.
• Premere OK (7) per confermare l’area geograca. Il dispositivo cerca il
vostro router e mostra sullo schermo LC (2) le reti trovate.
• Selezionare il router con / e confermare con OK (7).
• Selezionare “WPS” con / e confermare con OK (7).
• Inserire la password con / .
• • Una volta inserita la password, selezionare “OK” e confermare con
OK (7). Il dispositivo si connette a Internet e, quando è stata stabilita la
connessione, lo schermo mostra “Setup wizard completed). Premere di
nuovo OK per continuare.
92
IT
MESSA IN FUNZIONE E UTILIZZO
1 Una volta eseguite le impostazioni indicate, il dispositivo passa in
modalità web radio. Premere / e selezionare “Station list” (elenco
emittenti). Confermare con OK.
2 Premere / per selezionare “Stations” (emittenti) e confermare con
OK.
3 Premere / per selezionare la modalità di ricerca desiderata, come ad
es. ricerca in base alla località e confermare con OK.
4 Ad esempio, nella ricerca basata sulla località vengono elencate
diverse emittenti della vostra area. Selezionare l’emittente con / e
confermare con OK.
5 Le emittenti trovate vengono elencate sullo schermo. Selezionare
l’emittente con / / e confermare con OK.
6 Impostare il volume con gli appositi tasti (16).
MODALITÀ RADIO
Salvataggio emittenti (modalità IR)
Nota: possono essere salvate no a 10 emittenti.
1. Impostare l’emittente desiderata.
2. Tenere premuto il tasto P (11). Selezionare l’emittente con / e
confermare con OK (7).
3. Ripetere i passaggi 1 e 2 per tutte le altre emittenti.
4. Se si desidera aprire un’emittente salvata, premere il tasto P,
selezionare l’emittente con / e confermare con OK.
Ricerca manuale delle emittenti (modalità FM)
1. Premere MODE (15) per selezionare la modalità FM.
2. Confermare con OK.
3. Impostare l’emittente desiderata con / .
4. Impostare il volume con gli appositi tasti (16).

93
IT
Ricerca emittenti automatica
1. Premere MODE (15) per selezionare la modalità FM.
2. Premere / per selezionare la direzione di ricerca e confermare con
OK. Inizia la ricerca automatica.
3. Ripetere il passaggio 2 no a raggiungere l’emittente desiderata.
4. Impostare il volume con gli appositi tasti (16).
Sistema di dati della radio (RDS)
Questa impostazione viene messa a disposizione dalle rispettive
emittenti. Sullo schermo LC vengono mostrate informazioni messe a
disposizione dalle emittenti. Premendo più volte MENU/INFO vengono
mostrate in sequenza le seguenti informazioni: Radiotext>Tipo di
programma>Frequenza>Data/Ora.
Ricezione FM stereo
Premere MENU/INFO (10) per raggiungere il menu FM. Premendo / , è possibile
seleziona le impostazioni audio. Confermare con OK. Lo schermo mostra
“Listen in Mono only) (ascoltare solo in mono). Se si seleziona “NO” con
/ e si conferma con OK, il dispositivo riproduce l’emittente in stereo e il simbolo
corrispondente compare sullo schermo.
Radio DAB
1. Premere MODE (15) per selezionare la modalità DAB.
2. Premere OK per confermare.
3. Il dispositivo inizia la ricerca automatica nel settore 11b-12d entro 2
secondi. Impostare l’emittente desiderata con / e confermare con
OK.
4. Premendo più volte MENU/INFO vengono mostrate in sequenza
le seguenti informazioni DAB: Nome del gruppo>Tipo di
programma>Frequenza>Intensità del segnale>Velocità di
trasferimento>Data/Ora.
5. Regolare il volume con gli appositi tasti (16).

94
IT
Salvataggio di emittenti (modalità DAB)
Nota: possono essere salvate no a 20 emittenti DAB.
1. Impostare la modalità DAB.
2. Impostare l’emittente desiderata in modo automatico o manuale.
3. Tenere premuto il tasto P (11). Selezionare la posizione di salvataggio
con / .
4. Confermare con OK (7).
5. Ripetere i passaggi 1 e 3 per tutte le altre emittenti.
6. Se si desidera aprire un’emittente salvata, premere il tasto P,
selezionare l’emittente con / e confermare con OK.
Nota: dopo 15 minuti senza alcuna immissione, il dispositivo torna in
modalità radio normale. Un’emittente può essere sovrascritta, salvando
nella stessa posizione un’altra emittente.
Ricezione radio
Il dispositivo è dotato di un’antenna rimovibile. Assicurarsi che antenna sia
completamente collegata all’apposita connessione per garantire una buona
ricezione.
MODALITÀ CD
1. Premere MODE (15) per selezionare la modalità CD.
2. Confermare con OK.
3. Premere il tasto (8) per aprire il vano CD.
4. Inserire un CD con il lato stampato verso l’alto e chiudere il vano.
5. Inizia la ricerca e lo schermo LC (2) mostra il numero totale di titoli
sul CD e la durata totale di riproduzione. La riproduzione del CD inizia
automaticamente.
6. Regolare il volume con gli appositi tasti (16).

95
IT
Play/Pausa
Pulse una vez la tecla (13), per mettere in pausa la riproduzione.
Premerlo di nuovo per riprendere la riproduzione.
Arrestare la riproduzione
Premere durante la riproduzione o in modalità Pausa per arrestare
completamente la riproduzione.
Saltare un titolo
1. Se si preme (14) durante la riproduzione o in modalità Pausa, si
salta il titolo attuale. Il dispositivo si trova nella stessa modalità (Play o
Pausa), ma al titolo successivo.
2. Se si preme (14) durante la riproduzione o in modalità Pausa, si
salta il titolo attuale. Il dispositivo si trova nella stessa modalità (Play o
Pausa), ma al titolo precedente.
MP3-CD
1. Dopo la ricerca viene mostrato il numero totale di titoli e le informazioni
sull’album vengono mostrate sullo schermo LC. Il dispositivo inizia
automaticamente la riproduzione.
2. Premere / per selezionare il titolo desiderato.
Funzione ID3
Premendo più volte MENU/INFO, lo schermo LC mostra “F01 T001 00:01”.
Durante la riproduzione di le MP3 vengono mostrati il nome dell’album/
l’artista/il titolo.
• Se non è disponibile alcun nome o se il nome è in una lingua non
supportata, lo schermo LC resta vuoto quando si preme MENU/INFO.
• Se il formato del CD non è supportato dall’impianto, non è possibile
riconoscere album/artista/titolo.
• L’impianto supporta solo cifre inglesi e arabe per la funzione ID3.
Formato MP3 – prerequisiti
• Bitrate: 32 kbps ~ 320 kbps; Samplingrate: 32 kHz, 44,1 kHz e 48 kHz
decodicabile
• La capacità di riproduzione di CD MP3 dipende dalla qualità e dal
metodo di registrazione. Inoltre, il tempo di carica del CD MP3 può
essere più lungo rispetto a normali CD, a causa del diverso formato.
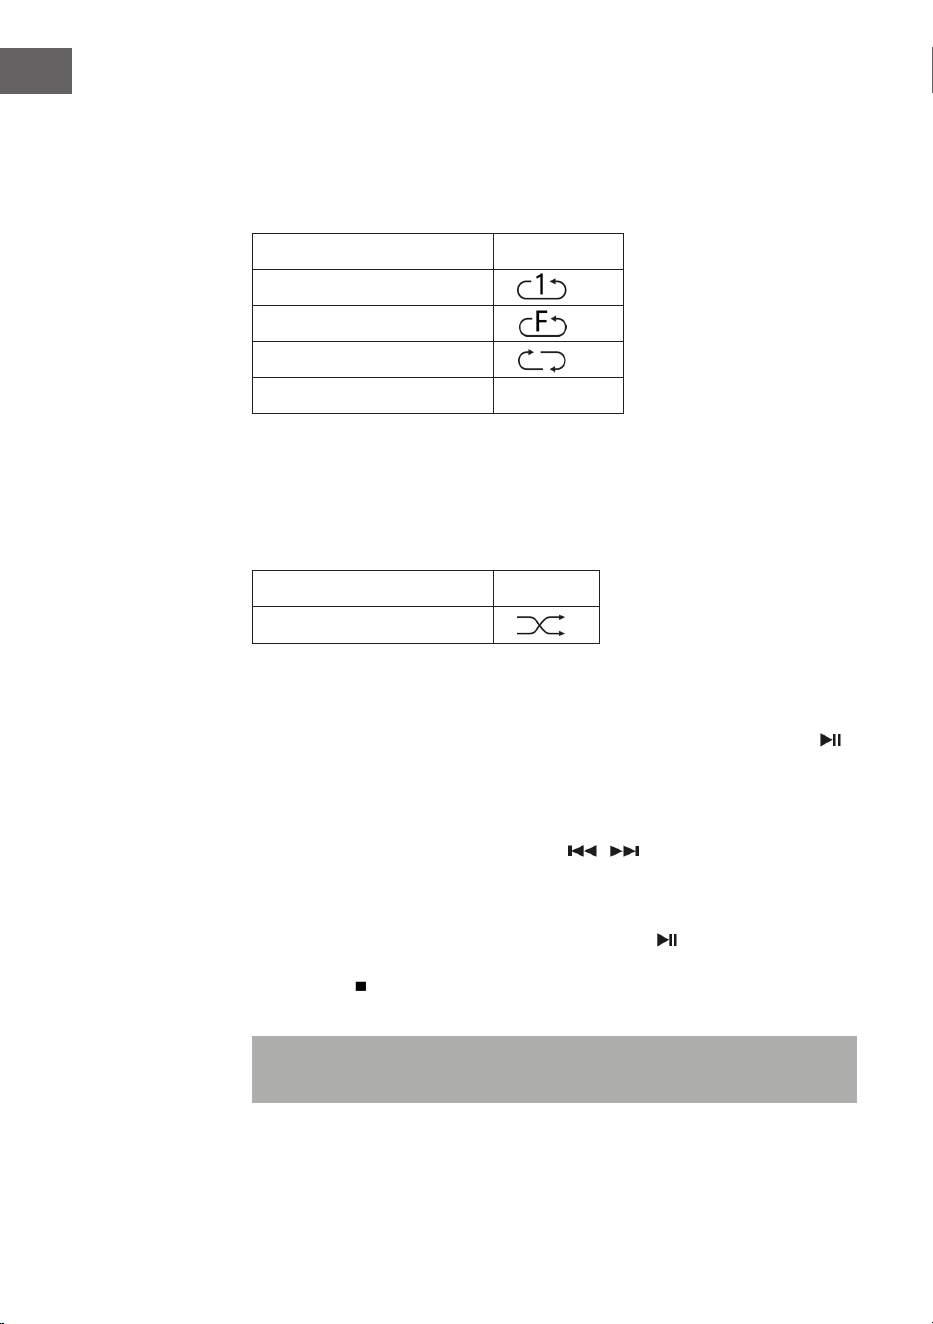
96
IT
Ripetizione di titoli (per CD)
Con questa funzione, è possibile ripetere il titolo, la cartella (solo MP3) o
il CD che si desidera: (1) Ripetere 1>(2) Ripetere tutti i titoli>(3) Ripetizione
disattivata.
Modalità di riproduzione Spia
Ripetere un titolo
Ripetere una cartella
Ripetere tutti i titoli
Ripetizione disattivata -----
Riproduzione casuale
Con questa funzione, tutti i titoli vengono riprodotti in ordine casuale.
Premere REP/SHUFFLE in modalità di ripetizione per attivare la
riproduzione casuale.
Modalità di riproduzione Spia
Random (casuale)
Salvataggio brani CD
Possono essere salvati in un elenco no a 20 titoli CD in una sequenza a
piacere. Prima di utilizzare questa funzione, assicurarsi di aver premuto
(13).
1. Impostare la modalità CD e arrestare la riproduzione CD.
2. Tenere premuto P (11) e sullo schermo LC compare “program”.
3. Selezionare il titolo desiderato con / .
4. Presione el botón OK para guardar.
5. Premere OK per salvare.
5. Ripetere i passaggi 3 e 4 per salvare altri titoli.
6. Quando sono stati salvati tutti i titoli, premere , per riprodurre i titoli
CD salvati.
7. Premere per arrestare la riproduzione e premerlo di nuovo per
cancellare tutti i titoli salvati.
Nota: se non vengono premuti tasti entro 30 secondi dopo aver premuto
P, la modalità di salvataggio viene interrotta automaticamente.

97
IT
RIPRODUZIONE DI FILE MP3 DA DISPOSITIVI
USB
Il dispositivo è in grado di decodicare le MP3 salvati su dispositivi USB.
1 Mettere il dispositivo in standby o in una modalità a piacere (esclusa la
modalità USB).
2 Inserire la chiavetta USB nell’apposito ingresso e assicurarsi che sia
collegata correttamente.
3 Premere più volte MODE per selezionare “My Player Mode”.
4 Confermare con OK (7).
5 Selezionare il le desiderato con / e avviare la riproduzione con
OK.
6 Impostare il volume con gli appositi tasti (16).
Play/Pausa
Premere una volta il tasto (13), per mettere in pausa la riproduzione.
Premerlo di nuovo per riprendere la riproduzione.
Arrestare la riproduzione
Premere durante la riproduzione o in modalità Pausa per arrestare
completamente la riproduzione.
Saltare un titolo
• Se si preme (14) durante la riproduzione o in modalità Pausa, viene
riprodotto il titolo successivo.
• Se si preme (14) durante la riproduzione o in modalità Pausa, viene
riprodotto il titolo precedente.

98
IT
Funzione ID3
Premendo più volte MENU/INFO, lo schermo LC mostra informazioni MP3
come album/artista/titolo, ecc.
• Se non è disponibile alcun nome o se il nome è in una lingua non
supportata, lo schermo LC resta vuoto quando si preme MENU/INFO.
• Se il formato del CD non è supportato dall’impianto, non è possibile
riconoscere album/artista/titolo.
• L’impianto supporta solo cifre inglesi e arabe per la funzione ID3.
Formato MP3 – prerequisiti
• Bitrate: 32 kbps ~ 320 kbps; Samplingrate: 32 kHz, 44,1 kHz e 48 kHz
decodicabile
• La capacità di riproduzione di CD MP3 dipende dalla qualità e dal
metodo di registrazione.
Ripetizione/Riproduzione casuale
Premere MENU (10) per accedere al menu e utilizzare / per selezionare
riproduzione casuale o ripetizione. Confermare con OK.
• Il dispositivo può leggere le MP3 solo in modalità USB. Non possono
essere decodicati le musicali in altri formati.
• Se si collega un lettore MP3 alla connessione USB del dispositivo, può
capitare che i le non possano essere riprodotti, se il lettore MP3 non è
compatibile. Non si tratta di un malfunzionamento del dispositivo.
• La connessione USB non deve essere collegata a un cavo USB di
prolunga e non deve essere collegata direttamente a un computer.

99
IT
FUNZIONI AGGIUNTIVE
Spegnimento automatico
1. Tenere premuto MENU e selezionare il menu principale con /
Confermare con OK.
2. Selezionare “Sleep Mode” con / e confermare con OK.
3. Selezionare il tempo desiderato no allo spegnimento automatico
tra 15-30-45-60 minuti con / e confermare con OK. Lo schermo
LC mostra il tempo impostato no allo spegnimento automatico. Il
dispositivo passa in standby quando il tempo è scaduto.
Función EQ (ecualizador)
1. Premere MENU per raggiungere il menu principale e selezionare
“Equalizer” con / Confermare con OK.
2. Selezionare “Flat, Jazz, Rock, Movie, Classic, Pop, News, My EQ o MY EQ
SETUP” con i tasti / e confermare con OK.
Impostare la lingua
1. Premere MENU e selezionare “Language” con i tasti / . Confermare
con OK.
2. Impostare la lingua desiderata con / e confermare con OK.
Impostazioni di fabbrica
1. Premere MENU e selezionare “Factory reset” con i tasti / .
Confermare con OK.
2. Selezionare “YES” con / per riavviare il dispositivo e cancellare tutte
le informazioni che si trovano al suo interno. Confermare con OK. Ora
procedere come alla prima accensione del dispositivo.

100
IT
GIRADISCHI
Rimuovere la protezione della puntina. Assicurarsi di togliere il braccio
del pick-up prima di utilizzare il giradischi e di ssarlo nuovamente dopo
l’ascolto.
1. Premere più volte MODE per selezionare la modalità giradischi (Phono).
2. Confermare con OK.
3. Impostare correttamente la velocità (25), in base al tipo di disco.
4. Poggiare il disco sul piatto (utilizzare l’adattatore, se necessario).
5. Portare verso l’alto la leva di sollevamento (27).
6. Sollevare lentamente il braccio del pick-up dal supporto e muoverlo
con cura verso il disco. Il piato inizia a girare lentamente. Posizionare il
braccio del pick-up sopra al punto del disco desiderato.
7. Abbassare la leva di sollevamento del braccio del pick-up. Il braccio si
abbassa lentamente sul disco e inizia la riproduzione.
8. Alla ne del disco, il braccio del pick-up torna automaticamente nella
posizione di riposo.
9. Per fermare manualmente il disco, sollevare il braccio del pick-up dal
disco.
Pausa
Sollevare il braccio del pick-up per interrompere la riproduzione
temporaneamente.
Cartuccia
Protezione

101
IT
Avvertenze importanti
• Il sistema di ritorno automatico è stato progettato meccanicamente
e il punto di ritorno può essere inuenzato dal trasporto. Può dunque
capitare che il braccio del pick-up torni automaticamente sul supporto
quando lo si poggia per la prima volta sul disco. Questo non indica un
malfunzionamento.
• La lunghezza del disco può variare. Se si nota che il braccio del pick-up
non torna automaticamente indietro quando termina la riproduzione
del disco, rimettere il braccio del pick-up in posizione di riposo
manualmente o impostare il punto di ritorno automatico.
STABILIRE LA RIPRODUZIONE BT E
RIPRODUZIONE
1 Premere il tasto MODE (15) per selezionare il modo BT.
2 Premere il tasto OK per confermare.
3 Il display (2) mostra [No media] e il simbolo BT.
4 Tenere premuto il tasto MENU/INFO (10) e premere i tasti freccia su/giù
(7) per selezionare [Setup BT]. Premere il tasto OK per confermare.
5 L’icona BT lampeggerà sul display (2) e il display mostrerà [BT
Discoverable], indicando che il dispositivo è in modalità di ricerca.
6 Abilita BT sul tuo smartphone o tablet esterno e seleziona il dispositivo
denominato [Birmingham] per connetterti al tuo impianto stereo.
7 Una volta stabilita la connessione, l’icona BT si illumina continuamente
sul display (2).
8 Avviare la musica sul dispositivo esterno e ascoltarla attraverso il
sistema audio.
AUX-IN
Collegare un altro dispositivo audio, ad es. un lettore CD portatile, un
lettore MP3, un mangiacassette, un iPod alla connessione AUX-IN sul lato
del dispositivo, utilizzando un cavo di connessione da 3,5 mm (non incluso
in consegna). Selezionare la modalità AUX-IN con MODE e confermare con
OK.

102
IT
SPOTIFY CONNECT
Il vostro nuovo dispositivo è dotato di Spotify Connect
Utilizzate il vostro smartphone, tablet o PC come telecomando per Spotify.
Scoprite di più alla pagina spotify.com/connect.
Licenze
Il software Spotify è sottoposto a diritti utente di parti terze, consultabili
alla pagina web seguente:
https://www.spotify.com/connect/third-party-licenses
Tutti i marchi indicati sono marchi registrati delle relative aziende. Esclusi
errori e omissioni e con la possibilità di modiche tecniche. Si applicano le
nostre condizioni contrattuali generali.
DATI TECNICI
Numero articolo 10034090
Alimentazione 220-240 V ~ 50/60 Hz
Potenza massima 50 W (2 x 12,5 W RMS)
Radio IR/DAB+/FM-RDS
FM frequenza 87.5-108 MHz
DAB frequenza DAB+ Banda III 174-240 MHz
WiFi frequenza 2.4 GHz
WiFi potenza a
radiofrequenza (max.)
+13 dBm
BT frequenza 2.402-2.480 GHz
BT potenza a radiofrequenza
(max.)
4 dBm

103
IT
SMALTIMENTO
Se nel proprio paese si applicano le
regolamentazioni inerenti lo smaltimento di
dispositivi elettrici ed elettronici, questo simbolo
sul prodotto o sulla confezione segnala che questi
prodotti non possono essere smaltiti con i riuti
normali e devono essere portati a un punto di
raccolta di dispositivi elettrici ed elettronici. Grazie
al corretto smaltimento dei vecchi dispositivi si
tutela il pianeta e la salute delle persone da possibili
conseguenze negative. Informazioni riguardanti
il riciclo e lo smaltimento di questi prodotti si
ottengono presso l’amministrazione locale oppure il
servizio di gestione dei riuti domestici.
Il prodotto contiene batterie. Se nel proprio
paese si applicano le regolamentazioni inerenti
lo smaltimento di batterie, non possono essere
smaltite con i normali riuti domestici. Preghiamo
di informarvi sulle regolamentazioni vigenti sullo
smaltimento delle batterie. Grazie al corretto
smaltimento dei vecchi dispositivi si tutela l’ambiente
e la salute delle persone da conseguenze negative.
DICHIARAZIONE DI CONFORMITÀ
Produttore:
Chal-Tec GmbH, Wallstraße 16, 10179 Berlino,
Germania.
Importatore per la Gran Bretagna:
Berlin Brands Group UK Limited
PO Box 42
272 Kensington High Street
London, W8 6ND
United Kingdom
Il fabbricante, Chal-Tec GmbH, dichiara che il tipo
di apparecchiatura radio Birmingham è conforme
alla direttiva 2014/53/UE. Il testo completo della
dichiarazione di conformità UE è disponibile al
seguente indirizzo Internet: use.berlin/10034090