
16" ELECTRIC CHAIN SAW CS1216
SCIE À CHAÎNE ÉLECTRIQUE DE 406 MM (16 PO)
Read all safety rules and instructions carefully before operating this tool.
Distributed By Cleva North America 601 Regent Park Court Greenville, SC 29607 (866)-384-8432
Lisez attentivement toutes les règles de sécurité ainsi que les instructions avant de faire fonctionner cet outil.
Distribué par Cleva North America 601 Regent Park Court Greenville, SC 29607 (866)-384-8432
MNL_CS1216_V1
EN p. 2
FR p. 46
Operators Manual / Manual D'utilisation

ELECTRICAL
2
CONTENTS 2
SPECIFICATIONS
2
IMPORTANT SAFETY INSTRUCTIONS
3-5
8-9
GENERAL SAFETY RULES 6-7
SYMBOLS
10-11
KNOW YOUR CHAINSAW 12-13
ASSEMBLY 14
OPERATION 15-27
MAINTENANCE 28-40
TROUBLESHOOTING 41
WARRANTY 42
EXPLODED VIEW / PARTS LIST 43-44
NOTES 45
TABLE OF CONTENTS
SPECIFICATIONS
16’ AC CHAIN SAW CS1216
Rated Voltage: 120 V 60Hz
Capacity: 12A
Chain Speed(No-load): 12m/s
Chain Bar Length: 16 Inch
Chain Pitch: 3/8 Inch
Oil Tank: 120ml
Toolless Chain Tensioning(Sds): Yes
Automatic Chain Oiler: Yes
Steel Bucking Spikes: Yes
Lock-off Button For On/Off Switch: Yes
Maximum Cutting Diameter 16inch
Oregon Bar 516480 and 112364
Oregon Chain 91PX057
3
IMPORTANT SAFETY INSTRUCTIONS
WARNING
Do not attempt to operate this tool until you have read all of the instructions, safety information, etc.
contained in this manual thoroughly and understand them completely. Failure to comply may result
Donotstartcuttinguntil youhave a clearworkarea,securefooting,and a plannedretreat
pathfromthefallingtree.Clutteredareasinviteaccidents.
Keepallchildren,bystanders,visitors,andanimalsoutoftheworkareawhilestartingor
cutting with the chainsaw.
liquids, gases, or dust. Power tools create sparks that may ignite the dust or fumes.
WARNING
Use outdoor extension cords marked SW-A, SOW-A, STW-A, STOW-A, SJW-A, SJTW-A, or
SJTOW-A. These cords are rated for outdoor use, and reduce the risk of electric shock.
PolarizedPlugs.Toreducetheriskofelectricshock,thistoolhas a polarizedplug(oneblade
toinstalltheproperoutlet.Donotchangethepluginanyway.
Makesure yourextensioncordisingoodcondition.Whenusinganextensioncord,besure
to use one heavy enough to carry the current your product will draw. A wire gauge size
(A.W.G.) of at least 14 is recommended for an extension cord 50' (15 m) or less in length. A
cordexceeding100'(30m)isnotrecommended.Ifindoubt,usethenextheaviergauge.The
smaller the gauge number, the heavier the cord. An undersized cord will cause a drop in line
voltage,resultinginlossofpowerandoverheating.
Inspectextensioncordsperiodically,andifdamaged,haverepairedby a licensedelectrician.
Constantlystayawareofcordlocation.Followingthisrulewillreducetheriskofelectricshock
cut-resistantmaterialoronesthatcontaincut-resistantinserts.Wearnon-slipsafetyfootwear.
Wearnon-slipheavydutyglovestoimprove yourgripandtoprotect yourhands.Donotwear
bedrawnintothemotororcatchthechainorunderbrush.Securehairsoitisaboveshoulder
level.
Heavyprotectiveclothingmayincreaseoperatorfatigue,whichcouldleadtoheatstroke.
During weather that is hot and humid, heavy work should be scheduled for early morning or
lateafternoonhours,whentemperaturesarecooler.
WeareyeprotectionthatismarkedtocomplywithANSIZ87.1aswellashearingandhead
protectionwhenoperatingthisequipment.Hearingprotectionshouldbeworn.
Alwaysbeawareofwhat youaredoingwhenusingthechainsaw.Usecommonsense.Do
medication.

4
IMPORTANT SAFETY INSTRUCTIONS
Donotexposethechainsawtorain.
Donotusethechainsawindamporwetlocations.
Stay alert and pay attention to what you are doing.
Keep all parts of your body away from the saw chain when the unit is running.
Alwayscarrythechainsawbythefronthandlewiththebatteryremovedandtheguidebarand
saw chain positioned to the rear.
Never let anyone use your chainsaw who has not received adequate instructions in its proper
use. This applies to rentals as well as privately owned
saws.
Before youstarttheunit,makesurethesawchainisnotcontactinganyobject.
Stop the chain saw before setting it down.
Maintaintheunitwithcare.Keepthecuttingedgesharpandcleanforbestperformanceand
toreducetheriskofinjury.Followinstructionsforlubricatingandchangingaccessories.
Keephandlesdry,clean,andfreeofoilandgrease.
thechainsawhandles.Seriousinjurytotheoperator,helpers,bystanders,oranycombination
of these persons may result from one-handed operation. A chainsaw is intended for two-
handed use.
Avoidbodycontactwithgroundedsurfacessuchasmetalpipesandwirefences.Thereisan
increased risk of electric shock if your body is grounded.
Do not operate a chainsaw that is damaged, improperly adjusted, or not completely and
securely assembled. Chain should slow to a stop when the trigger switch is released. If the
chaincontinuestoturnafterthetriggerswitchhasbeenreleased,havetheunitservicedby
your nearest LawnMaster service dealer.
Check for damaged parts, misalignment or binding of moving parts, broken parts and
mountings, and any other condition that may affect the operation of the tool.
All chainsaw service, other than the items listed in the operation and maintenance sections,
should be performed by your nearest LawnMaster service dealer.
Always maintain a proper stance.
D
onotusechainsawifswitchdoesnotturnitonandoff.Havedefectiveswitchreplacedby
authorized service centre.
Do not adapt your chainsaw to a bow guide or use it to power any attachments or devices not
listed for the saw.
Disconnectchainsawfrompowersupplywhennotinuse,beforeservicing,andwhenmaking
adjustments and changing attachments, such as saw chain and guard.
Do not cut vines and/or small underbrush.
Do not operate a chainsaw in a tree, on a ladder, or on scaffoldin
g.Doingsoisextremely
dangerous.
NOTE:Thesizeoftheworkareadependsonthejobbeingperformedaswellasthesizeofthetreeor
workpieceinvolved.Forexample,fellingatreerequiresalargerworkareathanmakingbuckingcuts.

5
IMPORTANT SAFETY INSTRUCTIONS
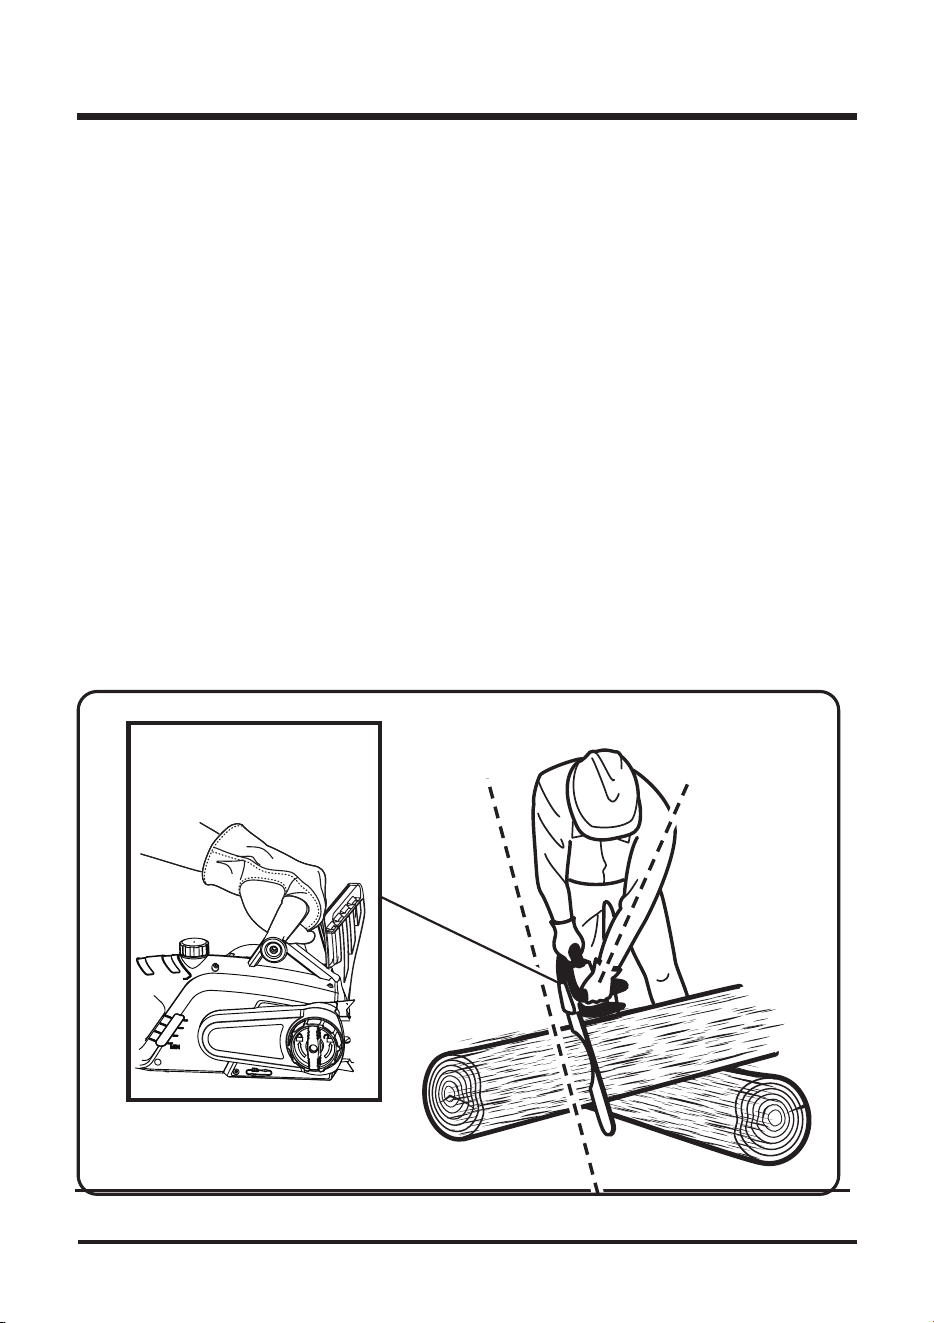
Use extreme caution when cutting small brush and saplings, because small material may
catchthesawchainandbewhippedtoward youorpull youoffbalance.
Whencutting a limbthatisundertension,bealertforspringback,sothat youwillnotbe
Donotforcethechainsaw.Thejobcanbeperformedbetterifthesawisusedattheratethat
itwasdesignedtoworkat.
Alwaysusetherightproductfor yourapplication.Thechainsawshouldbeusedforcutting
wood only. Never use the chainsaw to cut plastic, masonry or non-wooden building materials.
Do not use the chainsaw for purposes other than what it is intended for.
Storechainsawwhennotinuse.Chainsawshouldbestoredin a dryandhighorlockedarea,
out of the reach of childr
en.
Save these instructions. Refer to them frequently, and use them to instruct others who may
use this tool. If you loan someone this tool, also loan them these instructions.
WARNING
Some dust created by power sanding, sawing, grinding, drilling, and other construction activities
contains chemicals known to cause cancer, birth defects or other reproductive harm. Some
examples of these chemicals are:
lead from lead-based paints
crystallinesilicafrombricksandcementandothermasonryproducts,and
arsenicandchromiumfromchemicallytreatedlumber.
Your risk of exposure to these chemicals varies depending on how often you do this type of
work. To reduce your exposure to these chemicals, work in a well-ventilated area, and work with
particles.
SAVE THESE INSTRUCTIONS
6
GENERAL SAFETY RULES
WARNING
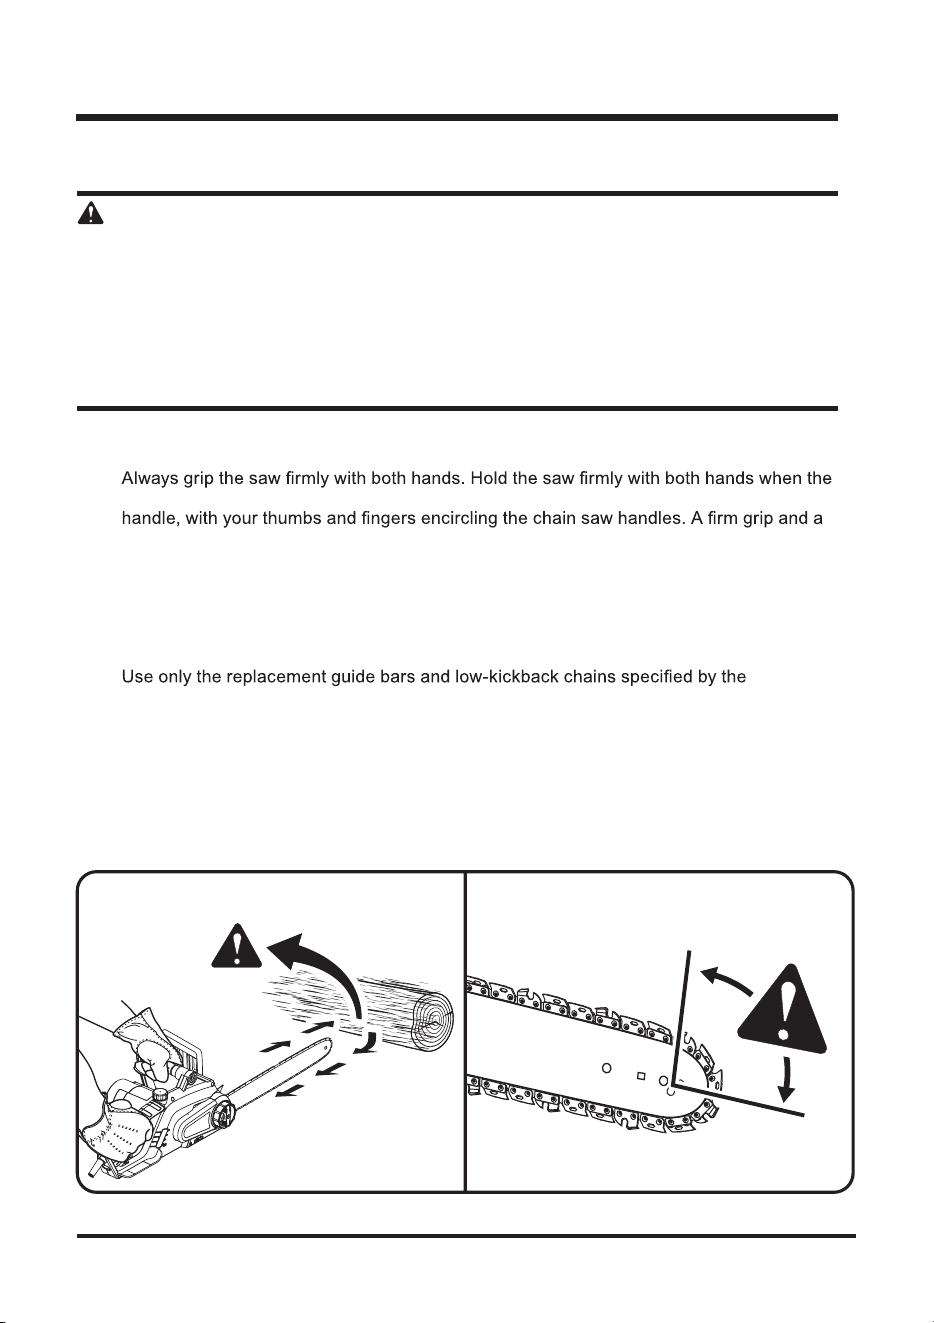
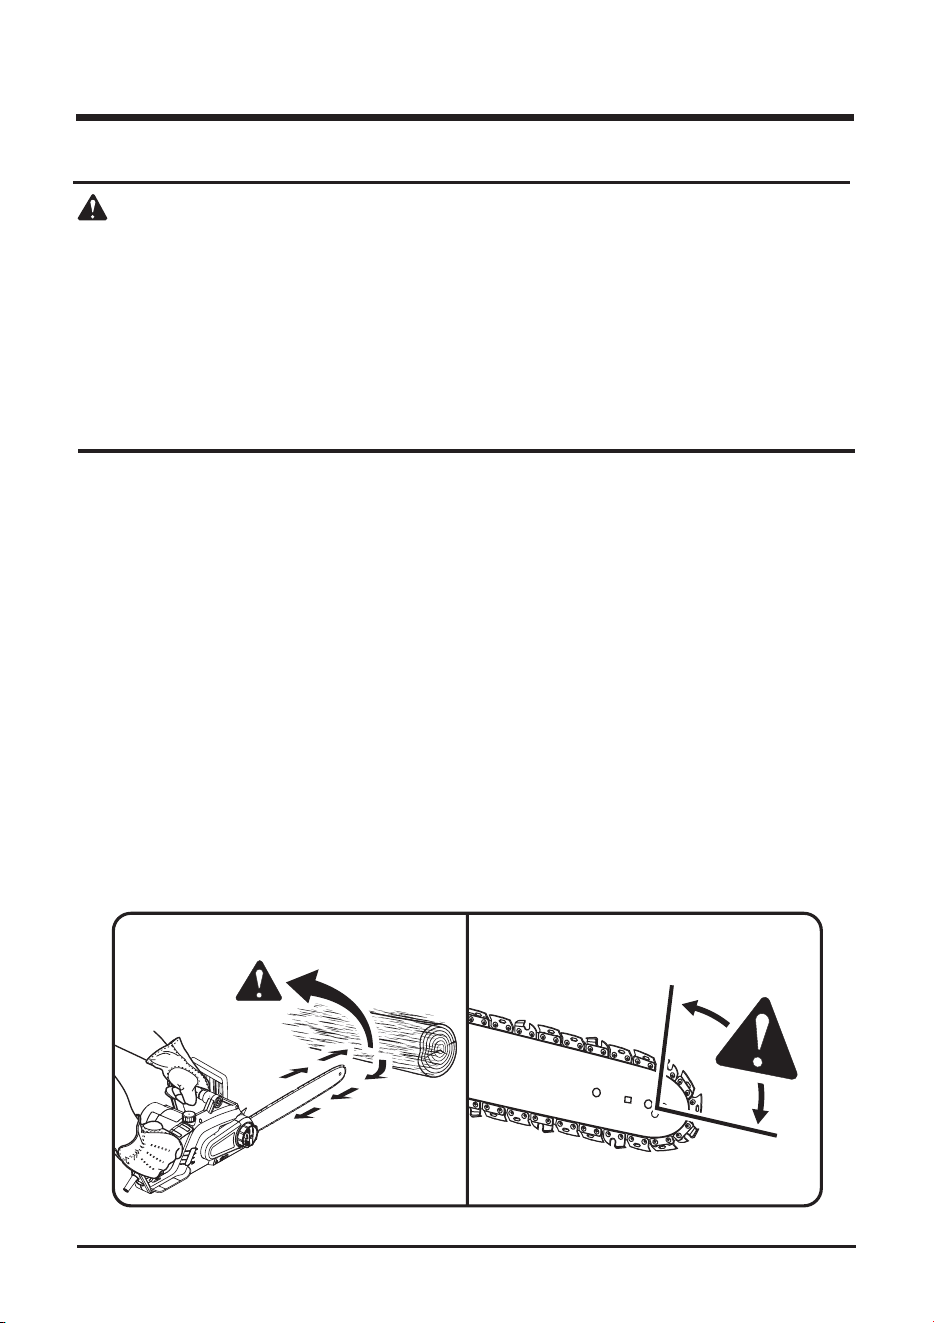
Kickback may occur when the moving chain contacts an object at the upper portion of the tip of the
guide bar, or when the wood closes in and pinches the saw chain in the cut. Contact at the upper
portion of the tip of the guide bar can cause the chain to dig into the object and stop the chain for
an instant. The result is a lightning fast reverse reaction that kicks the guide bar up and back toward
the operator. If the saw chain is pinched along the top of the guide bar, the guide bar can be driven
rapidly back toward the operator. Either of these reactions can cause loss of saw control, which
can result in serious injury. Do not rely exclusively on the safety devic
es built into the saw. As a
chainsaw user, you should take several steps to keep your cutting jobs free from accident or injury.
THE FOLLOWING PRECAUTIONS SHOULD BE FOLLOWED TO MINIMIZE KICKBACK:
1.
unitisrunning.Place yourrighthandontherearhandleand yourlefthandonthefront
stiffleftarmwillhelp youmaintaincontrolofthesawifkickbackoccurs.
2.Makesurethattheareainwhich youarecuttingisfreeofobstructions.Donotletthe
noseoftheguidebarcontact a log,branch,fence,oranyotherobstructionthatcouldbe
hitwhile youareoperatingthesaw.
3. Always cut with the unit running. Fully squeeze the trigger switch and maintain cutting
speed.
4.
manufacturer for the saw.
With a basic understanding of kickback, you can reduce or eliminate the element of surprise.
Sudden surprise contributes to accidents.
Keepproperfootingandbalanceatalltimes.
Do not cut above shoulder height or overreach when cutting.
Follow the sharpening and maintenance instructions for the saw chain.
Fig. 2Fig. 1
ROTATIONAL
KICKBACK
KICKBACK
DANGER ZONE
KICKBACK (See Fig. 1 - 2.)

7
GENERAL SAFETY RULES
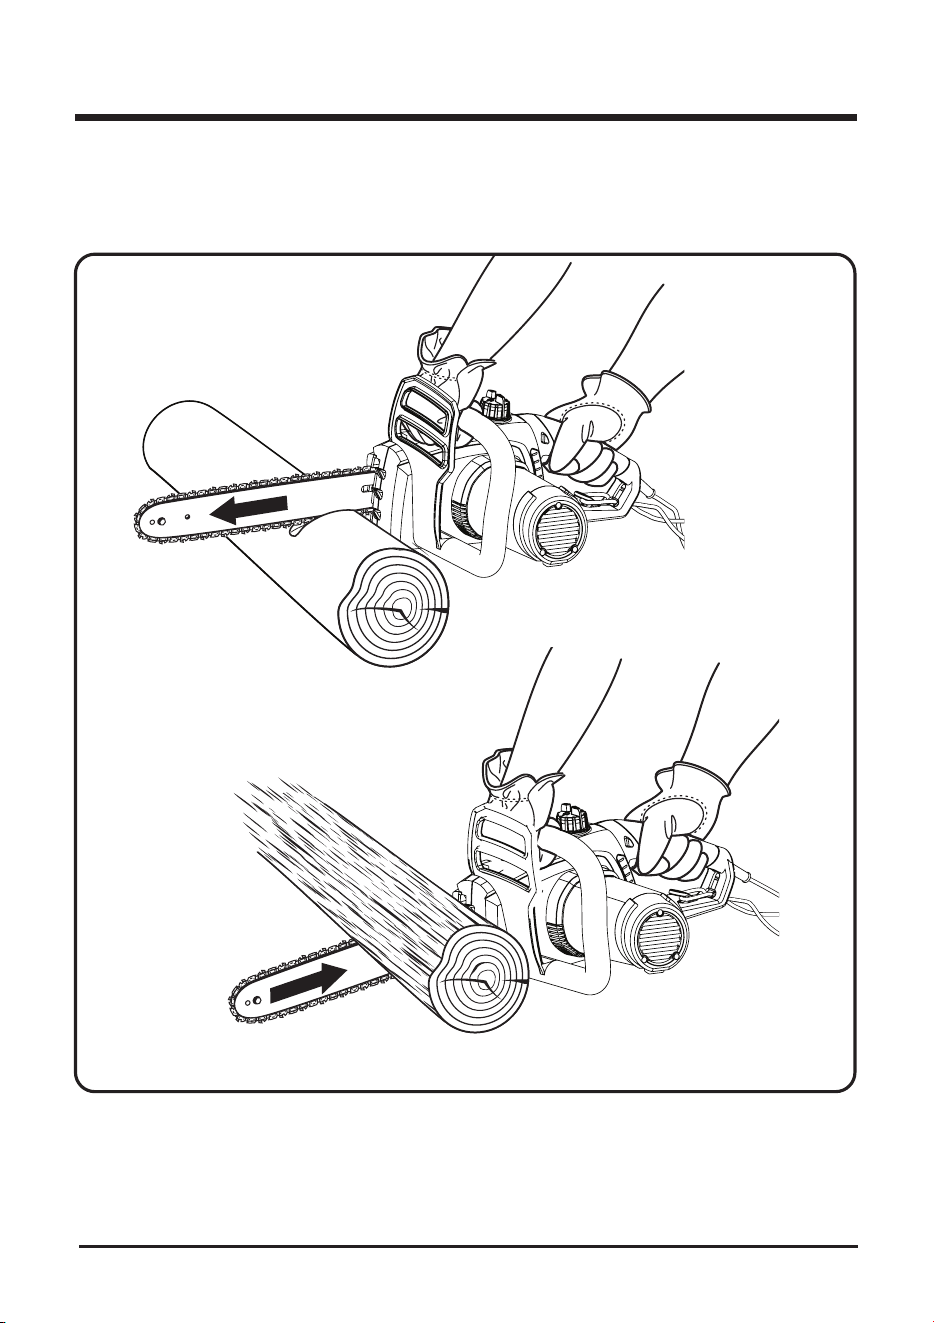
3XVKDQG3XOO²7KLVUHDFWLRQIRUFHLVDOZD\VRSSRVLWHWRWKHGLUHFWLRQWKHFKDLQLVPRYLQJZKHUH
contact is made with the wood. Thus, the operator must be ready to control the PULL when cutting
on the bottom edge of the bar, and the PUSH when cutting along the top edge. (See Fig. 3)
Fig. 3
PULL
PUSH

8
Some of the following symbols may be used on this product. Please study them and learn their
meaning. Proper interpretation of these symbols will allow you to operate the product better and safer.
SYMBOLS
SYMBOL NAME DESIGNATION/EXPLANATION
V Volts Voltage
A Amperes Current
Hz Hertz Frequency (cycles per second)
W Watts Power
min Minutes Time
Alternating Current Type of current
Direct Current Type or a characteristic of current
No Load Speed Rational speed, at no load
Class II Construction Double-insulated construction
/min Per Minute Revolutions, strokes, surface speed, orbits etc.,
per minute
Wet Conditions Alert Do not expose to rain or use in damp locations
Read The Operator’s Manual To reduce the risk of injury user must read and
understand operator’s manual before using this
product.
Eye and Head Protection Wear eye and head protection when operating
this equipment.
Safety Alert Precautions that involve your safety.
Operate With Two Hands Hold and operate the saw properly with both hands
Kickback DANGER! Beware of kickback.
Bar Nose Contact Avoid bar nose contact.
Wear Gloves Wear non-slip, heavy-duty protective gloves when
handling the chainsaw.
Wear Safety Footwear Wear non-slip safety footwear when using this
equipment.
Keep Bystanders Away Keep all bystanders at least 50 ft. away.
9
SYMBOLS
The following signal words and meanings are intended to explain the levels of risk associated
with this product.
SERVICE
service technician. For service we suggest you return the product to your nearest AUTHORIZED
SERVICE CENTER for repair. When servicing, use only identical replacement parts.
WARNING
To avoid serious personal injury, do not attempt to use this product until you have read this Owner's
Manual thoroughly and understand it completely. If you do not understand the warnings and
instructions in this Owner's Manual, do not use this product. Call the Toll-free Helpline (1-866-384-
843 ) for assistance. The operation of any power tool can result in foreign objects being thrown
into your eyes, which can result in severe eye damage. Before operating a power tool, always wear
safety goggles, safety glasses with side shields, or a full face shield when needed. We recommend
a Wide Vision Safety Mask for use over eyeglasses or standard safety glasses with side shields.
Always use eye protection that is marked to comply with ANSI Z87.1.
WARNING
The operation of any power tool can result in foreign objects being thrown into your eyes,
which can result in severe eye damage. Before beginning power tool operation, always
wear safety goggles or safety glasses with side shields and, when needed, a full face
shield. We recommend Wide Vision Safety Mask for use over eyeglasses or standard
safety glasses with side shields. Always use eye protection which is marked to comply
with ANSI Z87.1.
SYMBOL SIGNAL MEANING
DANGER
Indicates an imminently hazardous situation, which, if not
avoided, will result in death or serious injury.
WARNING
Indicates a potentially hazardous situation, which, if not avoided,
could result in death or serious injury.
CAUTION
Indicates a potentially hazardous situation, which, if not avoided,
may result in minor or moderate injury.
CAUTION
(Without Safety Alert Symbol) Indicates a situation that may
result in property damage.
SAVE THESE INSTRUCTIONS
ELECTRICAL
10
WARNING
TO AVOID ELECTRICAL HAZARDS, FIRE HAZARDS, OR DAMAGE TO THE TOOL, USE
PROPER CIRCUIT PROTECTION. THIS CHAINSAW IS WIRED AT THE FACTORYFOR 120 V
OPERATION. CONNECT TO A 120 V, 15 A CIRCUIT, AND USE A 15 A TIME-DELAYED FUSE OR
CIRCUIT BREAKER. TO AVOID SHOCK OR FIRE WHEN THE POWER CORD IS WORN, CUT,
OR DAMAGED IN ANY WAY, REPLACE IT IMMEDIATELY.
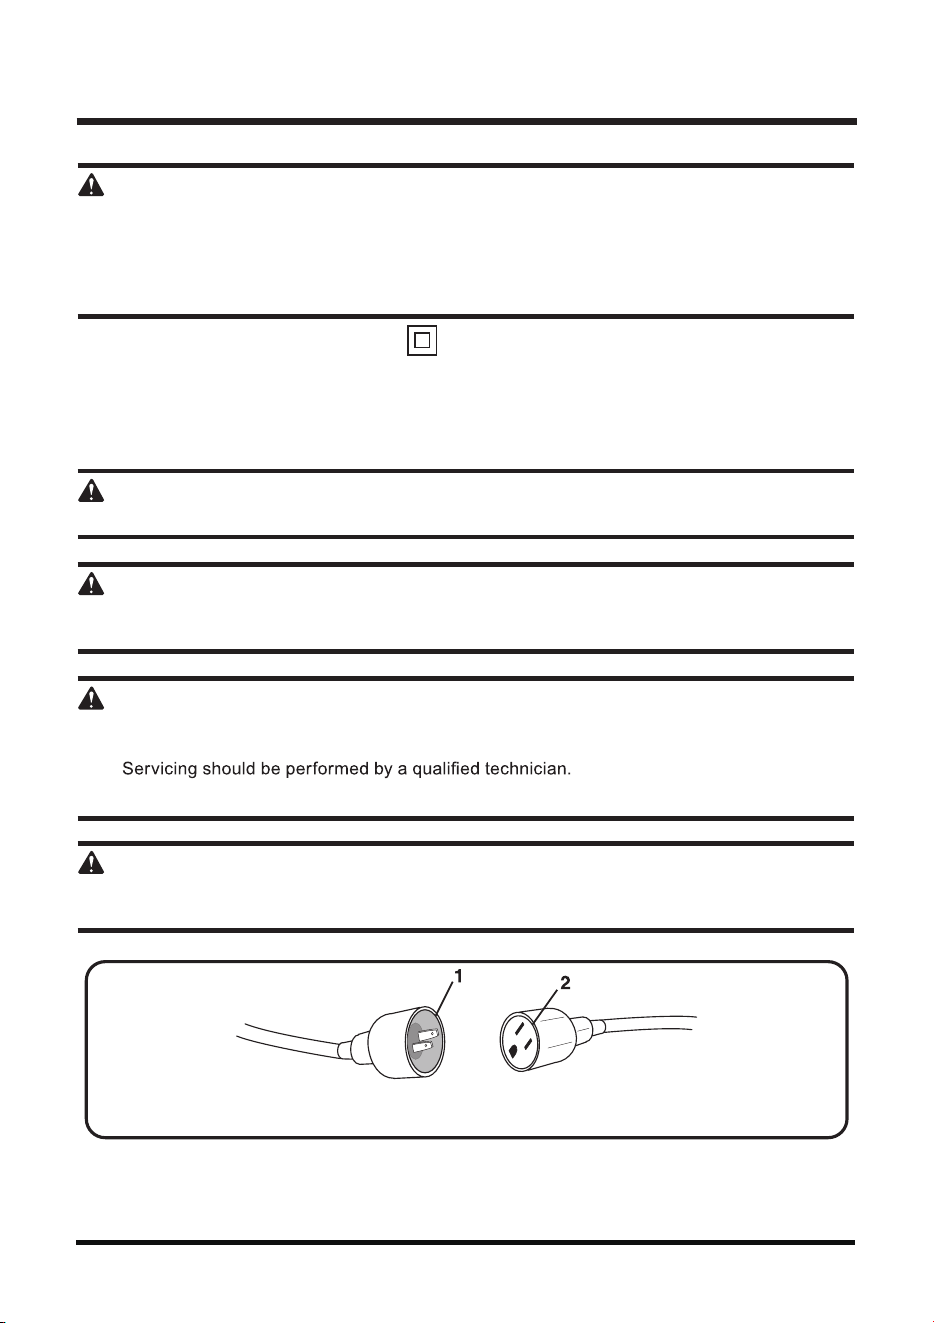
DOUBLE INSULATED (See Fig. 4)
This chainsaw has a plug that looks like the one shown in Fig. 4. The chainsaw is double
insulated to provide a double thickness of insulation between you and the tool’s electrical system.
All exposed metal parts are isolated from the internal metal motor components with protective
insulation.
WARNING
TO AVOID INJURY, USE ONLY IDENTICAL CHAINSAW REPLACEMENT PARTS
WARNING
DOUBLE INSULATION DOES NOT TAKE THE PLACE OF NORMAL SAFETY PRECAUTIONS
WHEN OPERATING THIS TOOL.
WARNING
TO AVOID ELECTRIC SHOCK:
1.Useonlyidenticalreplacementpartswhenservicing a tool with double insulation.
2.Donotuseinwetordampareasorexposetorain.
CAUTION
IN ALL CASES, MAKE CERTAIN THE RECEPTACLE IN QUESTION IS PROPERLY GROUNDED.
IF YOU ARE NOT SURE, HAVE A CERTIFIED ELECTRICIAN CHECK THE RECEPTACLE.
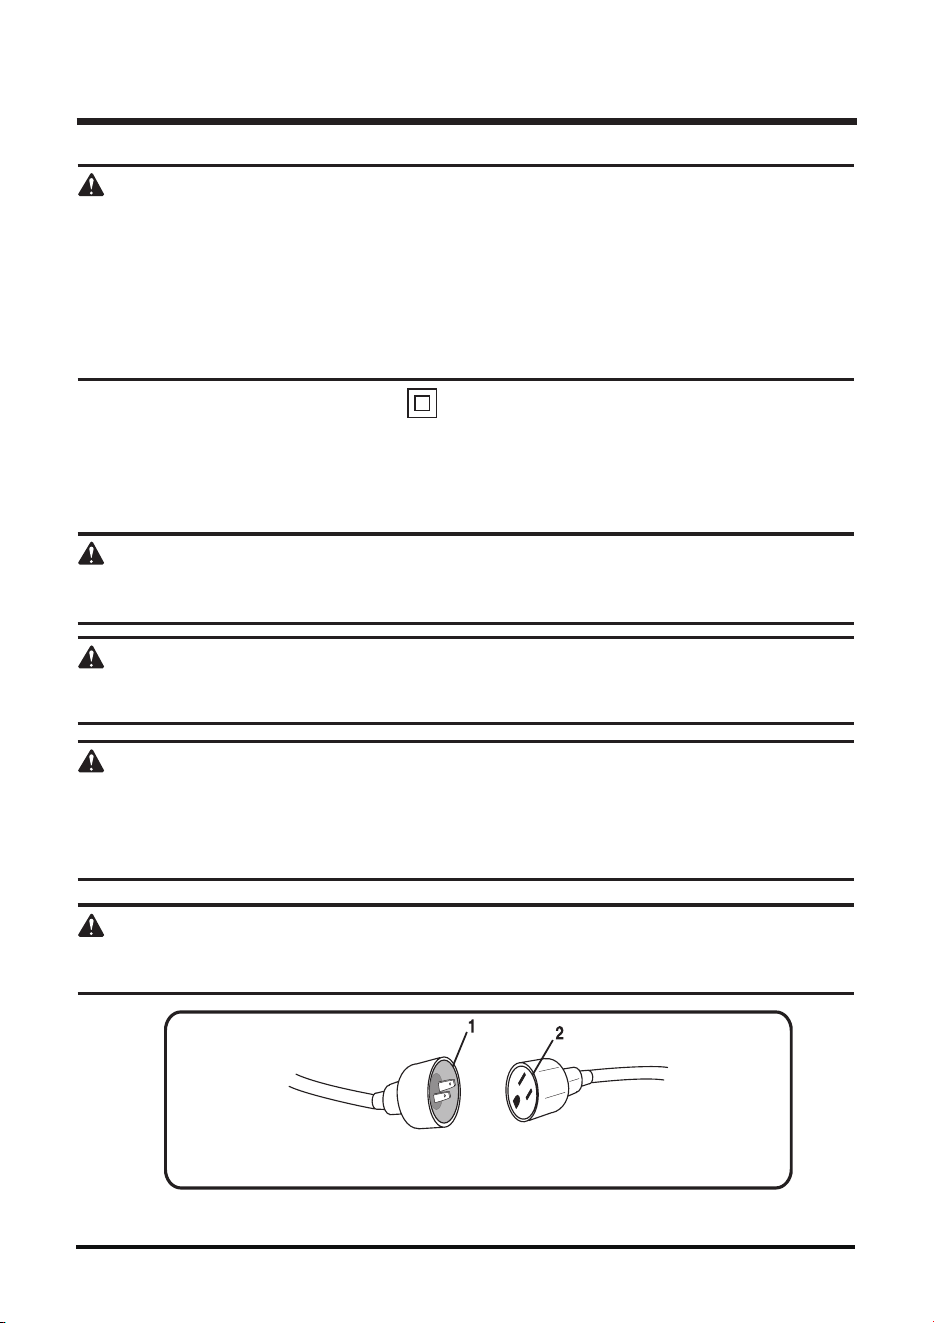
1) 2-prong plug
2) Properly grounded extension cord
Fig. 4

11
Be sure your extension cord is properly wired and in good condition. Always replace a damaged
cords away from sharp objects, excessive heat and damp or wet areas.
Use a separate electrical circuit for your tools. This circuit must not be less than 12-gauge cord
and should be protected with a 15-amp time delayed fuse. Before connecting the motor to the
power line, make sure the switch is in the OFF position and the electric current is rated the same
as the current stamped on the motor nameplate. Running at a lower voltage will damage the
motor.
WARNING
THIS TOOL MUST BE GROUNDED WHILE IN USE TO PROTECT THE OPERATOR FROM
ELECTRICAL SHOCK.
ELECTRICAL
WARNING
THIS LAWN TOOL IS FOR OUTDOOR USE ONLY. DO NOT EXPOSE TO RAIN OR USE IN
DAMP LOCATIONS.
GUIDELINES FOR USING EXTENSION CORDS
USE THE PROPER EXTENSION CORD. Make sure your extension cord is in good condition.
When using an extension cord, be sure to use one of heavy enough gauge to carry the current
your product will draw. An undersized cord will cause overheating. The table below shows the
correct size to use depending on cord length and nameplate ampere rating. If in doubt, use the
next heavier gauge.The smaller the gauge number, the heavier the cord.
MINIMUM GAUGE FOR EXTENSION CORDS (AWG)
(WHEN USING 120 V ONLY)
Amp Rating Total Length of Cord in Feet (meters)
More Than Not More Than 25' (7.6 m) 50' (15 m) 100' (30.4 m) 150' (45.7 m)
0 6 18 16 16 14
61018161412
10 12 16 16 14 12
12 16 14 12 Not Recommended
SAVE THESE INSTRUCTIONS

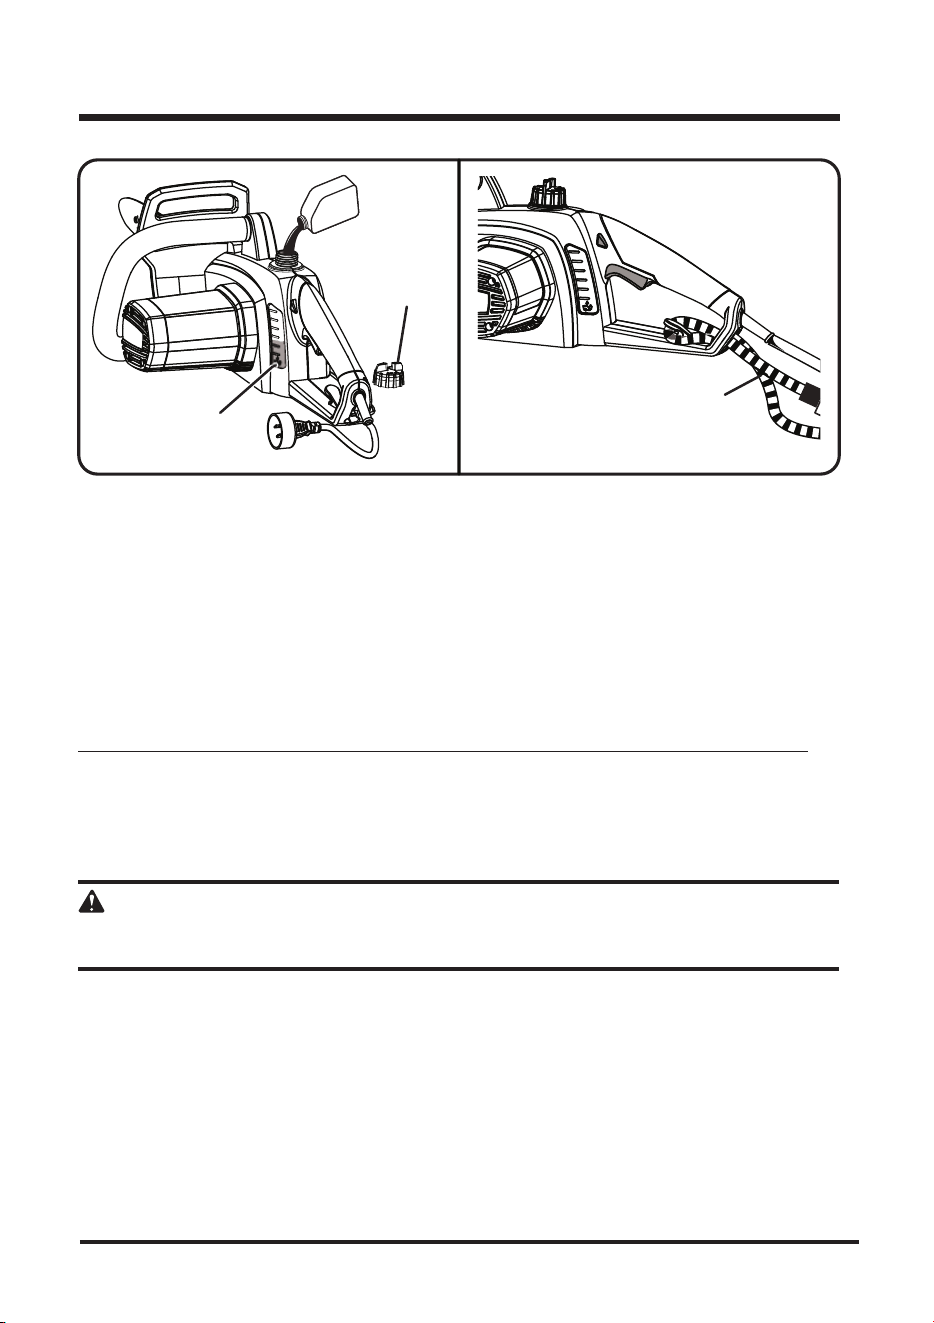
12
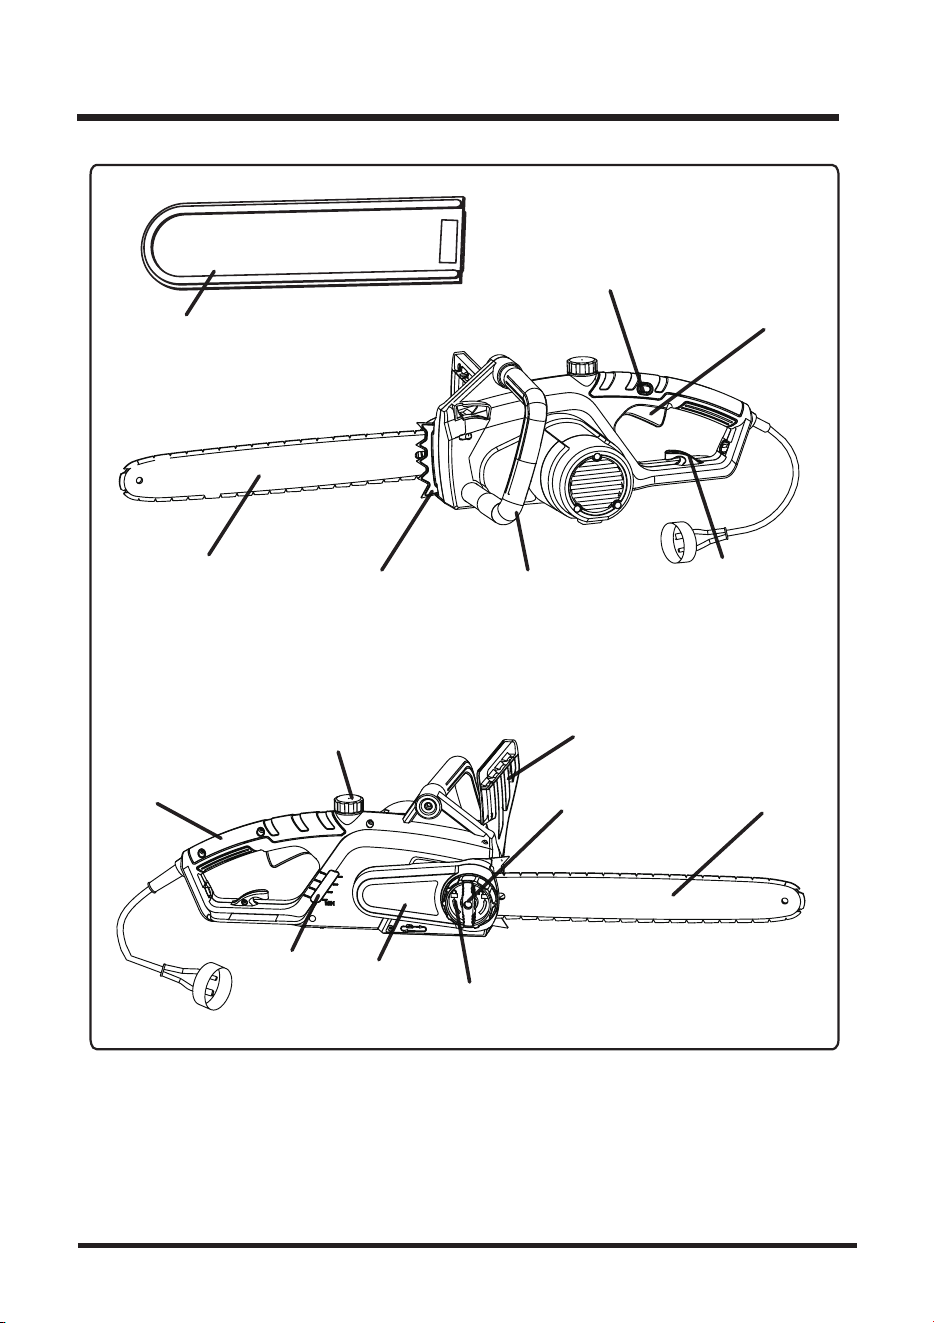
KNOW YOUR CHAINSAW
LOW KICKBACK
METAL BUCKING
SPIKES
SAW CHAIN
TRIGGER
SWITCH
SWITCH
LOCK
CORD
RETAINER
FRONT
HANDLE
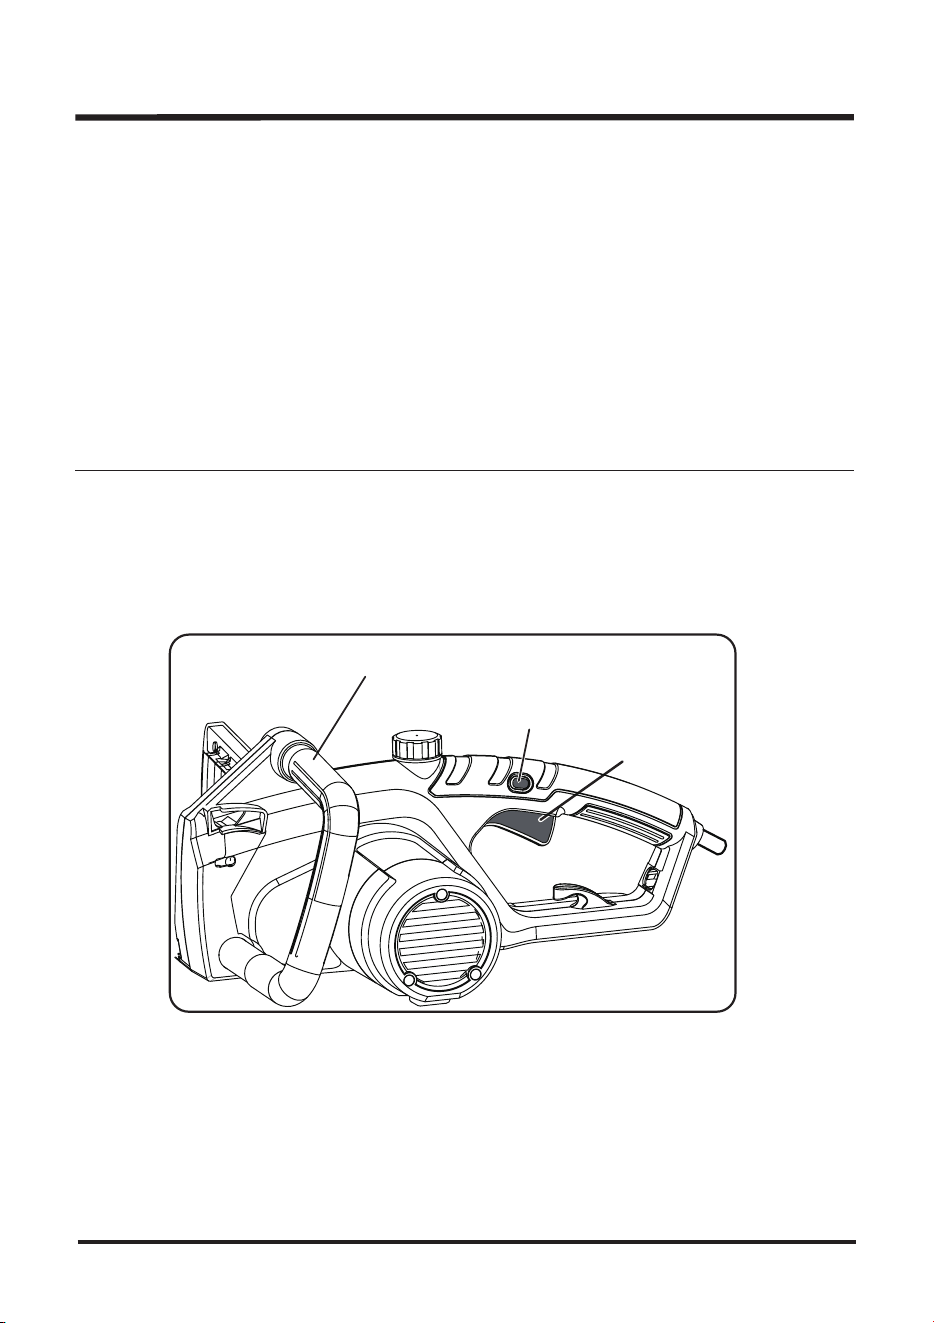
Fig. 5
CLEAR REUSABLE
SCABBARD
REAR
HANDLE
OIL RESERVOIR
CAP
CHAIN
COVER
QUICK VIEW
OIL INDICATOR
CHAIN COVER
LOCK KNOB
GUIDE
BAR
FRONT HAND
GUARD
CHAIN TENSIONING
KNOB

13
The safe use of this product requires an understanding of the information on the tool and in this
Owner's Manual, as well as a knowledge of the project you are attempting.
Before using this product, familiarize yourself with all operating features and safety rules.
CHAIN TENSIONING KNOB
This feature allows user to adjust the tension of the chain.
GUIDE BAR
The factory-equipped guide bar has a small radius tip that offers a somewhat lower kickback
potential.
LOW-KICKBACK SAW CHAIN
The low-kickback saw chain helps minimize the force of a kickback reaction by preventing the cutters
from digging in too deeply at the kickback zone.
QUICK-VIEW OIL INDICATOR
Semi-transparent oil reservoir that allows user to see when to add oil.
SWITCH LOCK
A control feature designed to prevent the motor from being started accidentally..
TRIGGER SWITCH
Squeeze the trigger switch to operate the unit after switch lock has been pushed in.
Release the trigger switch to stop the unit.
KNOW YOUR CHAINSAW

14
ASSEMBLY
UNPACKING
This product has been shipped completely assembled.
Carefully remove the product and any accessories from the box. Make sure that all items listed
in the packing list are included.
Inspect the product carefully to make sure no breakage or damage occurred during shipping.
Do not discard the packing material until you have carefully inspected and satisfactorily operated
the product.
If any parts are damaged or missing, please call 1-866-384-8432 for assistance.
PACKING LIST
Chainsaw
Clear Resuable Scabbard
Owner's Manual
WARNING
If any parts are damaged or missing, do not operate this product until the parts are replaced.
Failure to heed this warning could result in serious personal injury.
WARNING
Do not connect to power supply until assembly is complete. Failure to comply could result in
accidental starting and possible serious personal injury.
WARNING
Do not attempt to modify this product or create accessories not recommended for use with this
leading to possible serious personal injury.
15
OPERATION
WARNING
Do not allow familiarity with this product to make you careless. Remember that a careless fraction
WARNING
Always wear safety goggles or safety glasses with side shields when operating power tools. Failure
to do so could result in objects being thrown into your eyes, resulting in possible serious injury.
WARNING
Do not use any attachments or accessories not recommended by the manufacturer of this product.
The use of attachments or accessories not recommended can result in serious personal injury.
APPLICATIONS
You can use this product for the purposes listed below:
Basic limbing, felling, and woodcutting
Removing buttress roots
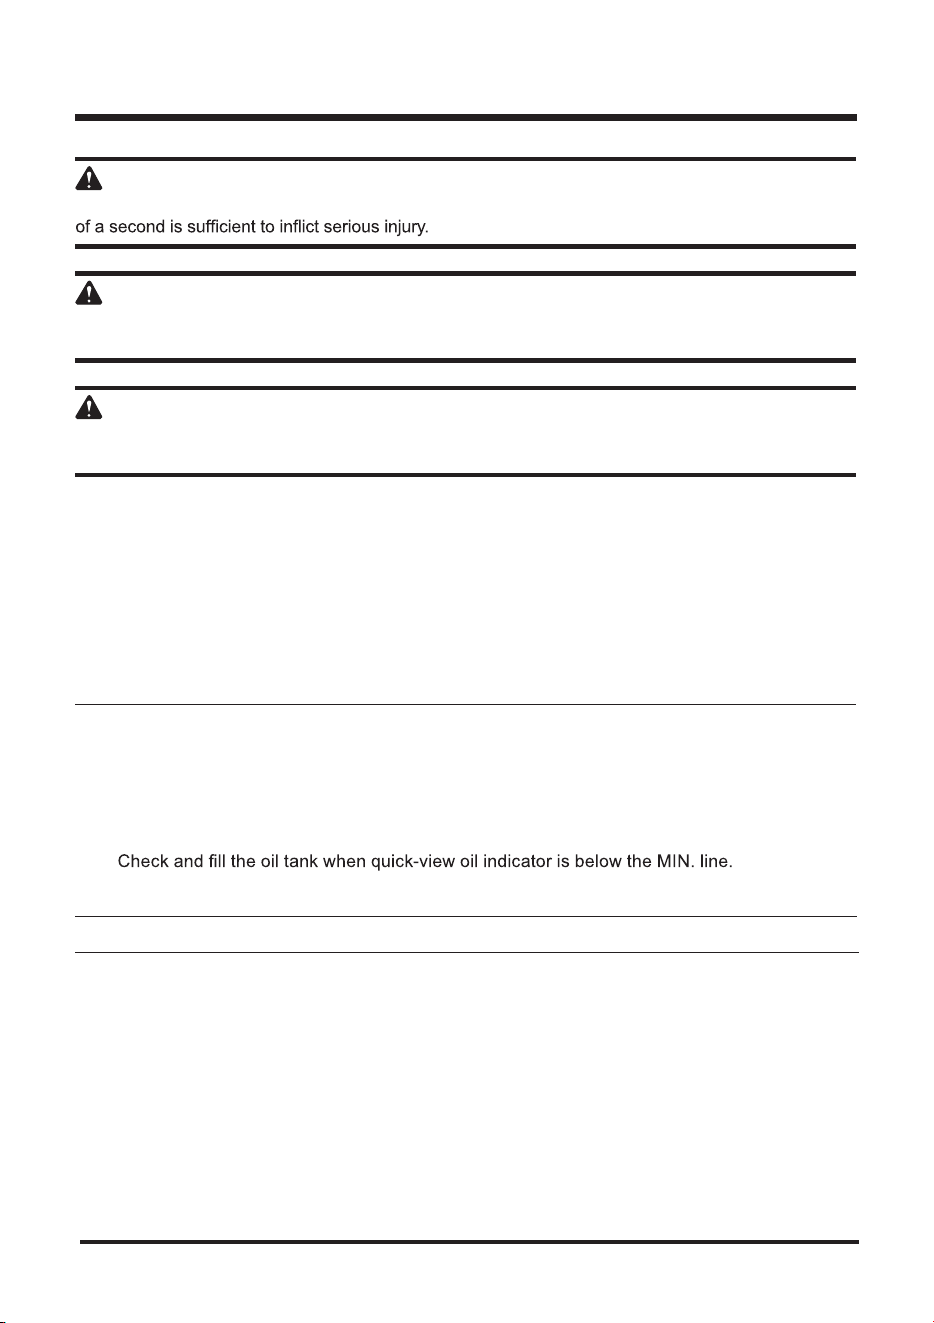
ADDING BAR AND CHAIN LUBRICANT (See Fig. 6)
Use standard chainsaw bar and chain Lubricant. It is designed for chains and chain oilers, and is
formulated to perform over a wide temperature range with no dilution required.
NOTE:Thechainsawcomesfromthefactorywithnobarandchainoiladded.Level should
also be checked after every 20 minutes of use, and refilled as needed.
Remove oil cap.
Carefully pour the bar and chain oil into the tank.
Wipe off excess oil.
Repeat as needed.
NOTE:Donotusedirty,usedorotherwisecontaminatedoils.Damagemayoccurtothebarorchain.
NOTE:Itisnormalforoiltoseepfromthesawwhennotinuse.Topreventseepage,emptytheoil
tankaftereachuse,thenrunforoneminute.Whenstoringtheunitforalongperiodoftime(three
monthsorlonger),besurethechainislightlylubricated.Thiswillpreventrustonthechainandbar
sprocket.
16
OPERATION
CONNECTING TO POWER SUPPLY (See Fig. 7)
This chainsaw is designed with a cord retainer that prevents the extension cord from being pulled
loose while using.
Form a loop with the end of the extension cord.
Insertloopportionofextensioncordthroughtheopeninginthesideoftherearhandle,
andplaceovercordhitch.
Slowly pull loop against cord retainer until the slack is removed.
Plug chainsaw into extension cord.
NOTE:Failuretoremoveallexcesscordslackfromextensioncordretainercouldresultinplugloosening
from receptacle.
STARTING AND STOPPING THE CHAINSAW (See Fig. 8)
WARNING
Keep body to the left of the chain line. Never straddle the saw or chain, or lean over past the
chain line.
CHAIN
LU B R I CANT
Fig. 6 Fig. 7
OIL
RESERVOIR
CAP
QUICK VIEW
OIL INDICATOR
EXTENSION
CORD
17
OPERATION
Fig. 8
STARTING THE CHAIN SAW:
Make sure chain tension is at desired setting. Refer to Adjusting the Chain Tension in the
Maintenance section of this manual.
Makesurethechaincoverlockknobistighttothechaincover.
Makesurenoobjectsorobstructionsareinimmediatevicinitywhichcouldcomeintocontact
with the bar and chain.
Press and hold the switch lock. This makes the trigger switch operational.
Pressandholdthetriggerswitch,releasetheswitchlock,andcontinu
etosqueezethe
trigger switch for continued operation.
STOPPING THE CHAINSAW:
NOTE:Itisnormalforthechaintocoasttoastoponcethetriggerswitchisreleased.
Release the trigger switch to stop the chainsaw.
Uponreleaseofthetriggerswitch,theswitchlockwillbeautomaticallyresettothelock
position.
SWITCH
TRIGGER
SWITCH
LOCK
HANDLE

OPERATION
18
PREPARING FOR CUTTING
PROPER GRIP ON HANDLES
(See Fig. 9)
See General Safety Rules for appropriate safety equipment.
Wearnon-slipglovesformaximumgripandprotection.
yourrighthandontherearhandlesothat yourbodyistotheleftofthechainline.
encirclethehandle,withthethumbwrappedunderthehandlebar.Thisgripisleastlikely
to be broken by a kickback or other sudden reaction of the saw. Any grip in which the
ofthesawcancauselossofcontrol.
WARNING
Never use a left-handed (cross-handed) grip or any stance that would place your body or arm
across the chain line.
WARNING
DO NOT operate the trigger switch with your left hand and hold the
front handle with your right hand. Never allow any part of your body
to be in the chain line while operating a saw.
Fig. 9
PROPER HAND
GRIP POSITION
CHAIN
LINE
OPERATION
19
PROPER CUTTING STANCE
(See Fig. 10)
Balance your weight with both feet on solid ground.
Keepleftarmwithelbowlockedin a “straightarm”positiontowithstandanykickbackforce.
Keep yourbodytotheleftofthechainline.
Keep your thumb on underside of handlebar.
BASIC OPERATING/CUTTING PROCEDURES
Practice cutting a few small logs using the following technique to get the “feel” of using the saw
before you begin a major sawing operation.
Taketheproperstanceinfrontofthewoodwiththesawidling.
Presstheswitchlockandsqueezethetriggerswitch,thenreleaseswitchlockandletthe
chain accelerate to full spe
ed before entering the cut.
Begin cutting with the saw against the log.
Keep the unit running the entire time you are cutting, maintain a steady speed.
Allowthechaintocutfor you;exertonlylightdownwardpressure.
Forcingthecutcouldresultindamagetothebar,chain,ormotor.
Release the trigger switch as soon as the cut is completed, allowing the chain to stop. If you run
the saw without a cutting load, unnecessary wear can occur to the chain, bar, and unit.
Donotputpressureonthesawattheendofthecut.
Fig. 10
THUMB ON
UNDERSIDE OF
HANDLE BAR
CHAIN
LINE
STRAIGHT
ARM
OPERATION
20
WORK AREA PRECAUTIONS
(See Fig. 11)
Cutonlywoodormaterialsmadefromwood;nosheetmetal,noplastics,nomasonry,nonon-
wooden building materials.
Neverallowchildrentooperatethesaw.Allownopersontousethischainsawwhohasnot
read this Owner's Manual or received adequate instructions for the safe and proper use of this
chainsaw.
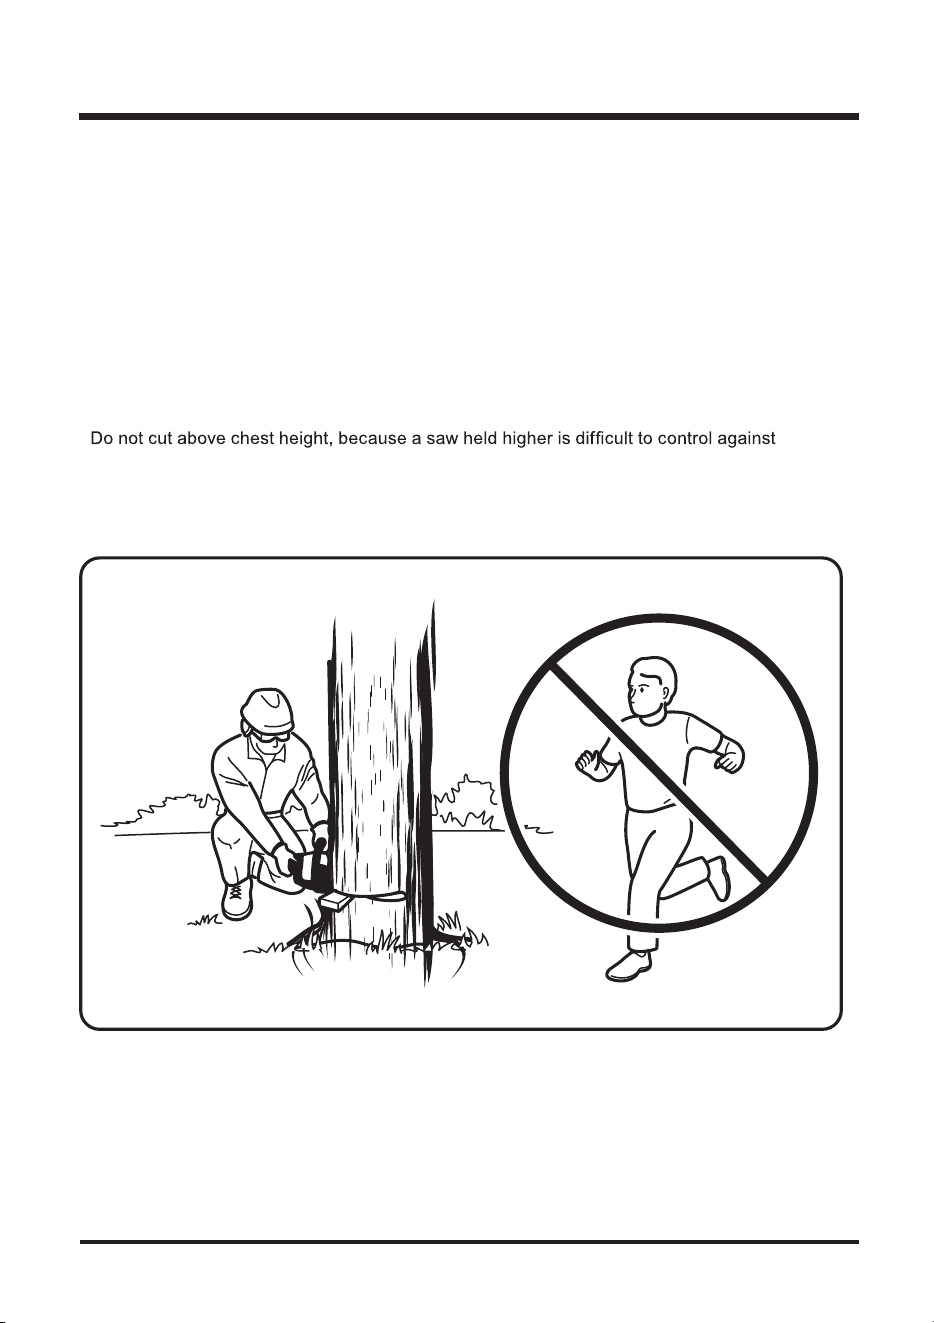
Keep everyone – helpers, bystanders, children, and animals – a SAFE DISTANCE from the
cuttingarea.Duringfellingoperat
ions,thesafedistanceshouldbe a leasttwicetheheightof
thelargesttreesinthefellingarea.Duringbucking operations, keep a minimum distance of
15'(4.6m)betweenworkers.
Always cut with both feet on solid ground to prevent being pulled off balance.
kickback forces.
Do not fell trees near electrical wires or buildings. Leave this operation for professionals.
Cutonlywhenvisibilityandlightareadequatefor youtoseeclearly.
Fig. 11
FELLING TREES
HAZARDOUS CONDITIONS (See Fig. 12)
When felling a tree, it is important that you heed the following warnings to prevent possble
serious injury
OPERATION
21
6DZZLWKJXLGHEDUDWDIODWDQJOH
1HYHUZRUNZLWKDORRVHZLGHO\VWUHWFKHGRUWKHKHDYLO\ZRUQRXWFKDLQ
(QVXUHFKDLQLVVKDUSHQHGFRUUHFWO\
1HYHUVDZDERYHVKRXOGHUKHLJKW
1HYHUZRUNZLWKWKHWLSRIWKHJXLGHEDU
$OZD\VKROGWKHSURGXFWILUPO\ZLWKERWKKDQGV
$OZD\VXVHDORZNLFNEDFNFKDLQ
$SSO\WKHVWHHOEXFNLQJVSLNHVIRUOHYHUDJH
(QVXUHFRUUHFWFKDLQWHQVLRQ
'RRQO\FXWZLWKWKHPRWRUDWKLJKVSHHGV
'RQRWOHWWKHQRVHRIWKHJXLGHEDUFRQWDFWDORJEUDQFKRUDQ\RWKHUREVWUXFWLRQZKLFKFRXOG
be hit while you are operating the product.
)ROORZPDQXIDFWXUHU¶VVKDUSHQLQJDQGPDLQWHQDQFHLQVWUXFWLRQVIRUWKHDZFKDLQ
2QO\XVHUHSODFHPHQWJXLGHEDUVDQGVDZFKDLQVVSHFLILHGE\WKHPDQXIDFWXUHURUHTXLYDOHQW
replacements.
When bucking and felling operations are being performed by two or more persons at the same time,
the felling operations should be separated from the bucking operation by a distance of at least twice
the height of the tree being felled.
Trees should not be felled in a manner that would endanger any
person, strike any utility line or cause any pro perty damage. If the tree does make contact with any
utility line, the company should be notified immediately.
The product operator should keep on the uphill side of the terrain as the tree is likely to roll or slide
downhill after it is felled.
TO AVOID KICKBACK
OPERATION
22
Donotcutdowntreeshavinganextremelean,orlargetreeswithrottenlimbs,loosebark
or hollow trunks. Have these trees pushed or dragged down with heavy equipment, then
cut them up.
Donotcuttreesnearelectricalwiresorbuildings
Check the tree for damaged or dead branches that could fall and hit you during felling
Periodicallyglanceatthetopofthetreeduringthebackcuttoassurethetreeisgoingto
fall in the desired direction
Ifthetreestartstofallintheworngdi
rection, or if the saw gets caught or hung up during
thefall,leavethesawandsave yourself!
WARNING
Do not fell trees during periods of high wind or heavy precipitation. Wait until the hazardous
weather has ended.
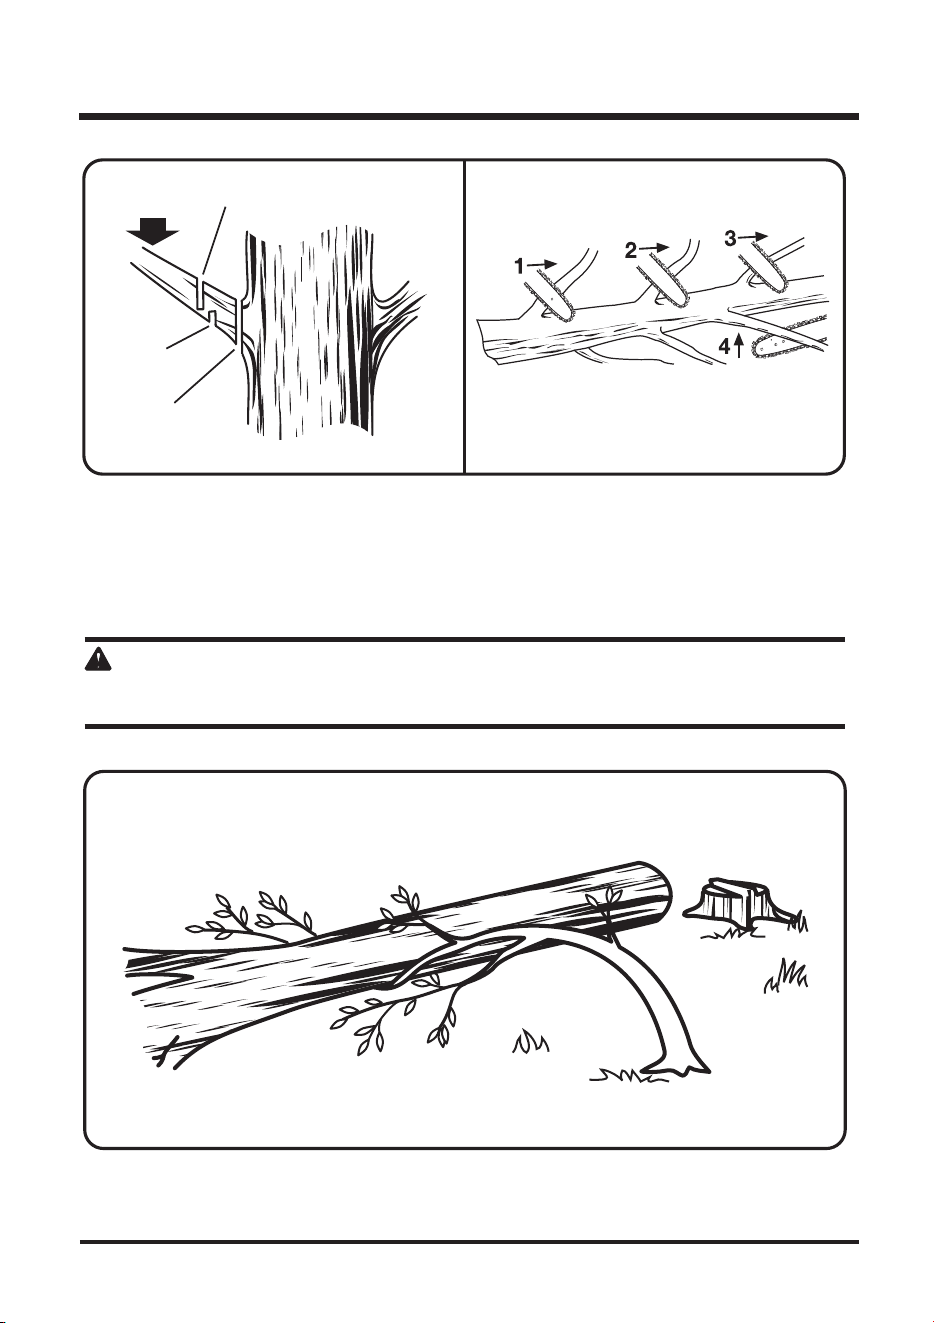
PROPER PROCEDURE FOR TREE FELLING (See Fig. 13)
Felling a treH²When bucking and felling operations are being perfrmed by two or more
personsatthesametime,thefellingoperationsshouldbeseparatedfromthebucking
operationby a distanceofatleasttwicetheheightofthetreebeingfelled.Treesshouldnot
be felled in a manner that would endanger any person, strike any utility line, or cause any
propertydamage.Ifthetreedoesmakecontactwithanyutilityline,theutilitycompanyhould
Operatorshouldkeepontheuphillsideofterrainasthetreeislikelytorollorslideafteritis
felled.
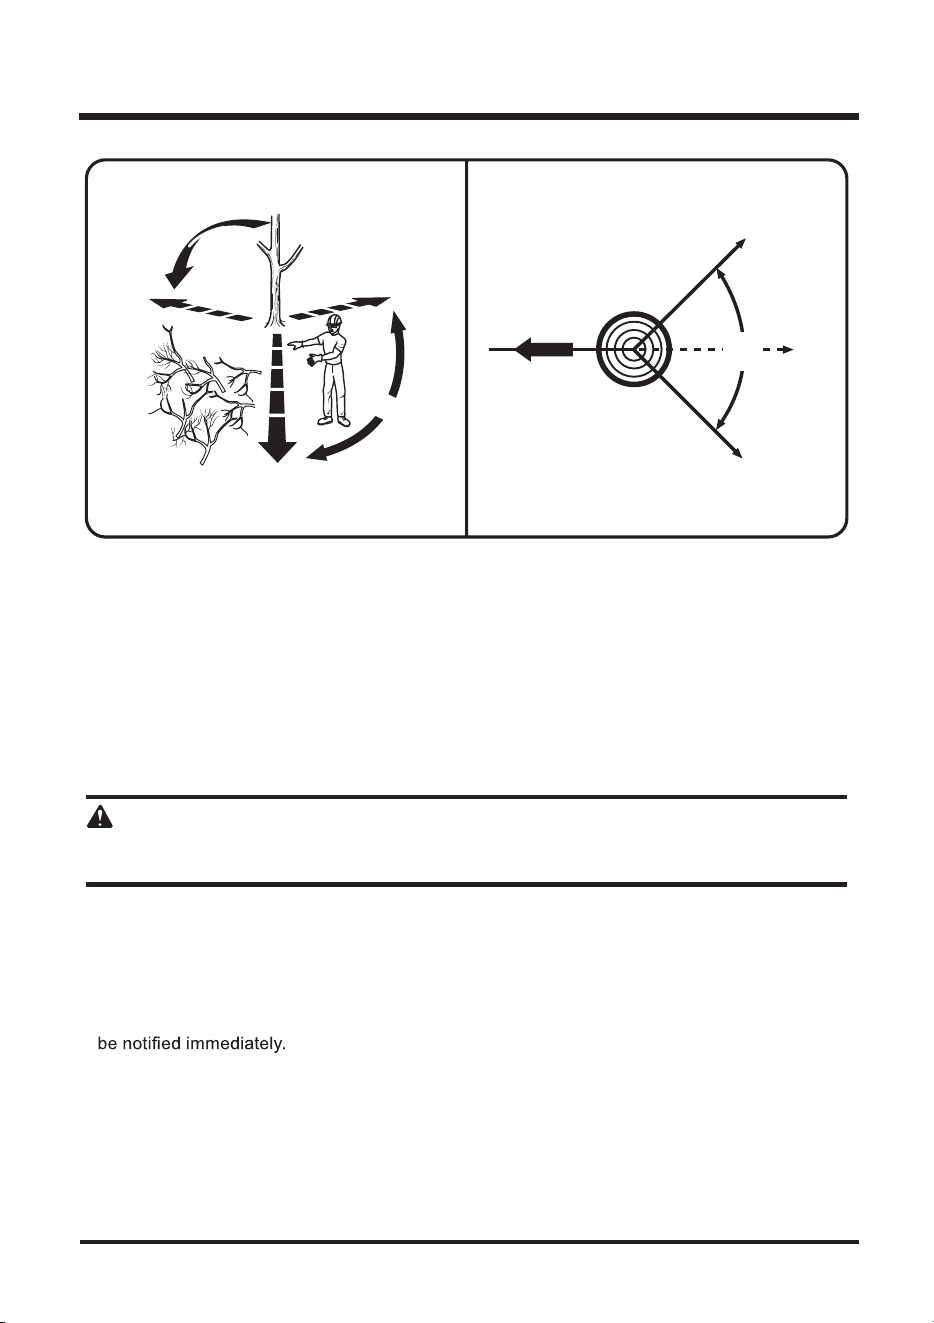
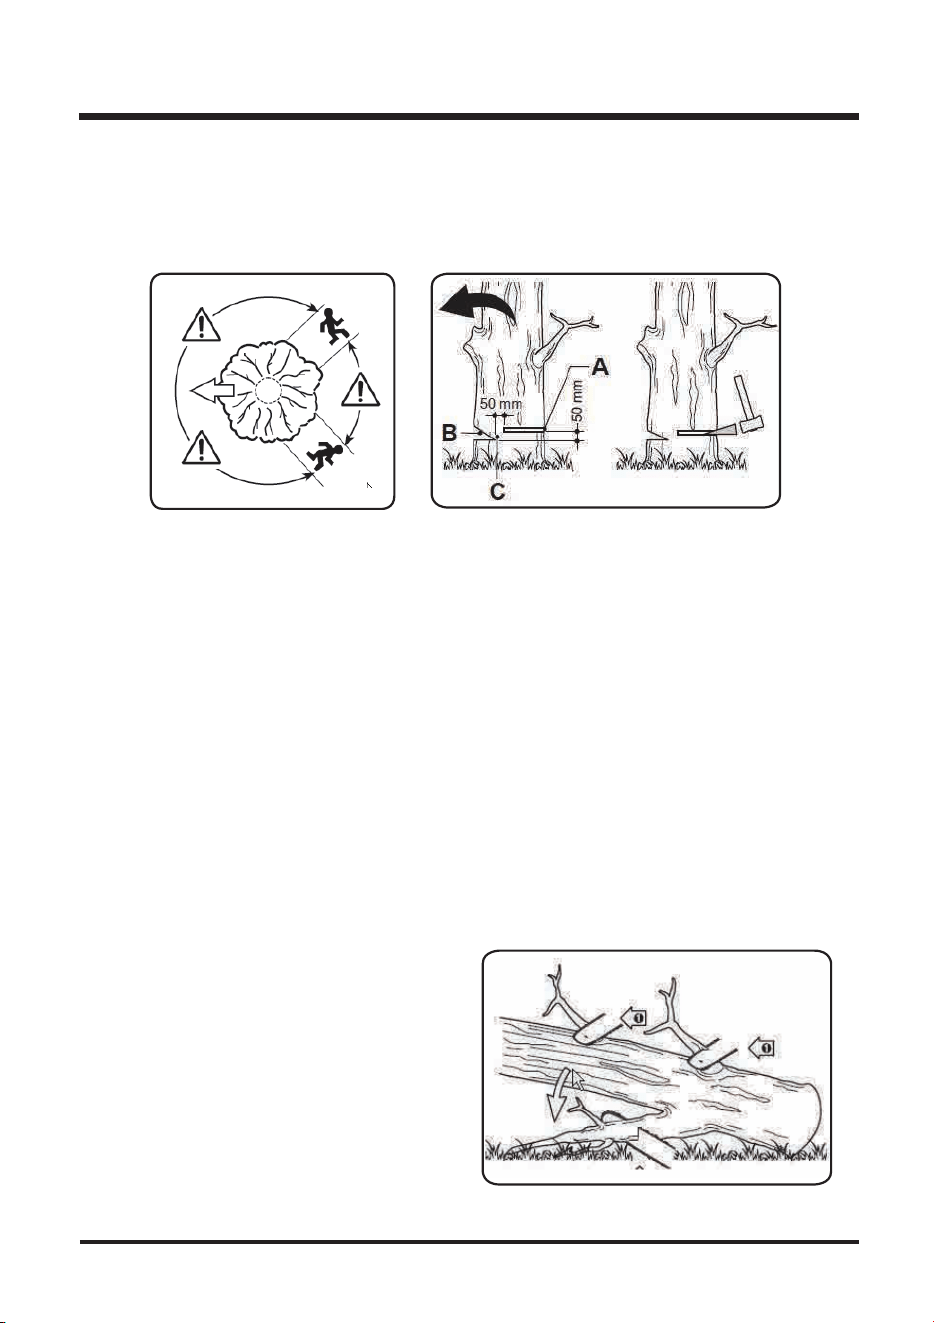
Pick your escape route (or routes in case the intended route is blocked). Clear the immediate
area around the tree and make sure there are no obstructions in your planned path of retreat.
Clear the path of safe retreat approximately 135° from the planned line of fall.
Fig. 12
PATH OF
SAFE RETREAT
PATH
OF SAFE
RETREAT
135° FROM
PLANNED LINE
OF FALL
PLANNED
LINE OF
FALL
90°
90°
45°
45°
135°
135°
PLANNED LINE
OF FALL
23
OPERATION
An escape path should be planned and cleared as necessary before cuts are started.
The escape path should extend back and diagonally to the rear of the expected line of fall (Fig. 26).
Before felling is started, consider the natural lean of the tree, the location of larger branches and the
wind direction to judge which way the tree will fall.
FELLING BACK CUT
Make the felling back cut (A) at least 50 mm higher than the horizontal notching cut (Fig. 13). Keep
the felling back cut parallel to the horizontal notching cut. Make the felling back cut so enough wood
is left to act as a hinge. The hinge wood keeps the tree from twisting and falling in the wrong direction.
Do not cut through the hinge.
As the felling gets close to the hinge, the tree should begin to fall. If there is any chance that the tree
may not fall in desired direction or it may rock back and bind the saw chain, stop cutting before the
felling back cut is complete and use wedges of wood, plastic or aluminium to open the cut and drop
the tree along the desired line of fall.
When the tree begins to fall remove the product from the cut, stop the motor, put the product down,
then use the retreat path planned. Be alert for overhead limbs falling and watch your footing.
Limbing is removing the branches from a fallen
tree. When limbing leave larger lower limbs to
support the log off the ground. Remove the small
limbs in one cut .
Branches under tension should be cut from the
bottom up to avoid binding the product.
NOTCHING UNDERCUT
Make the notch (B) 1/3 the diameter of the tree, perpendicular to the direction of falls (Fig. 13).
Make the lower horizontal notching cut first. This will help to avoid pinching either the saw chain or
the guide bar when the second notch is being made.
Fig.13
OPERATION
24
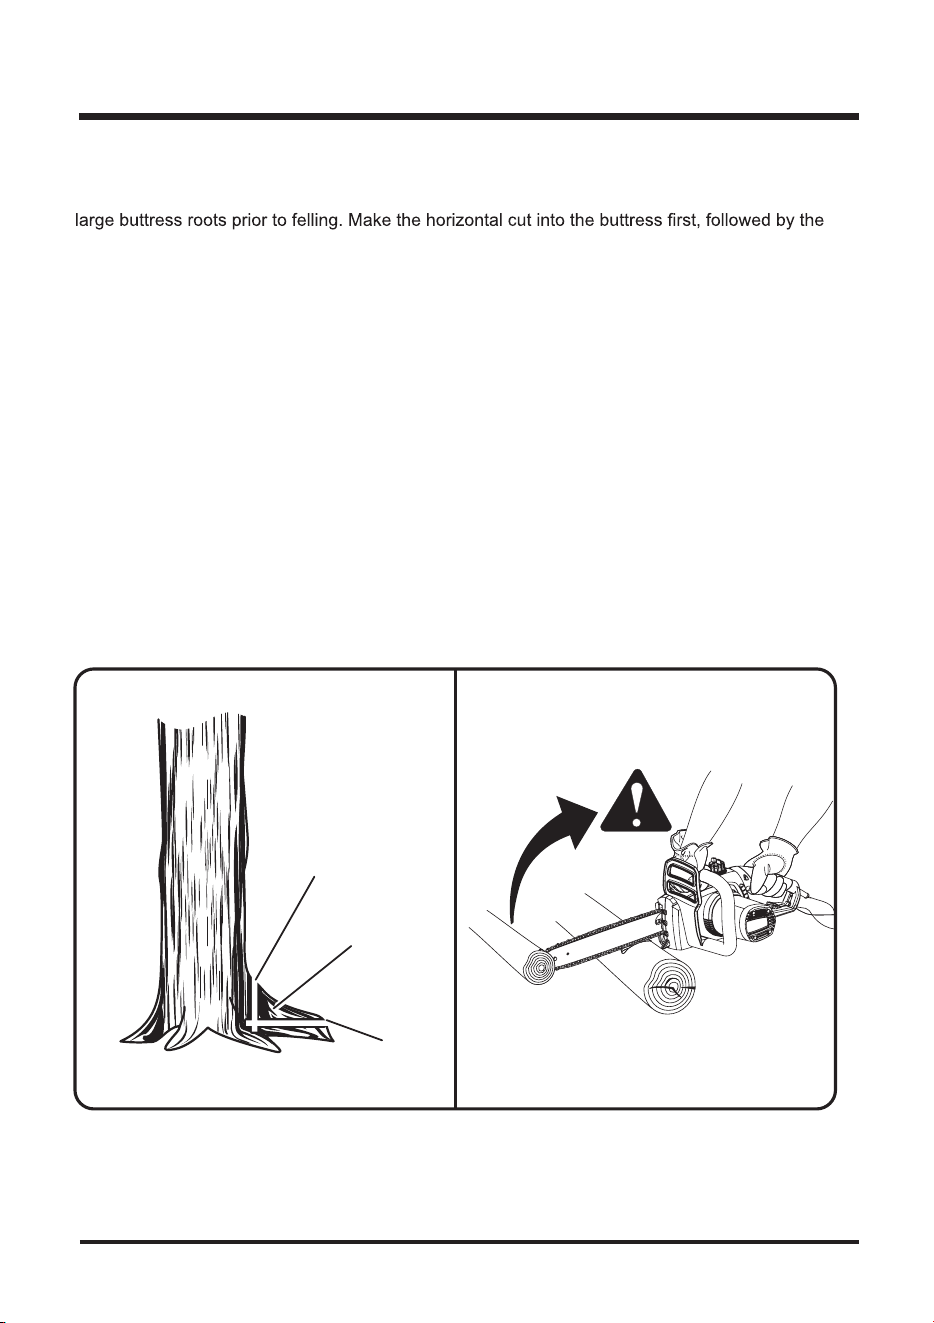
REMOVING BUTTRESS ROOTS
(See Fig. 14)
A buttress root is a large root extending from the trunk of the tree above the ground. Remove
vertical cut. Remove the resulting loose section from the work area. Follow the correct tree felling
procedure as stated in Proper Procedure For Tree Felling after you have removed the large
buttress roots.
BUCKING
(See Fig. 15)
Bucking is the term used for cutting a fallen tree to the desired log length.
Alwaysmakesure yourfootingissecureand yourweightisdistributedevenlyonboth
feet.
Cutonlyonelogat a time.
Support small logs on a saw horse or another log while bucking.
Keep a clearcuttingarea.Makesurenoobjectscancontacttheguidebarnoseandchain
during cutting, because this can cause kickback.
When bucking on a slope, always stand on the uphill side of the log. To maintain complete
controlofthechainsawwhencuttingthroughthelog,r
elease the cutting pressure near
theendofthecutwithoutrelaxing yourgriponthechainsawhandles.Donotletthechain
contacttheground.Aftercompletingthecut,waitforthesawchaintostopbefore you
move the chainsaw. Always stop the motor before moving from tree to tree.
Fig. 14 Fig. 15
VERTICAL
CUT
LOOSE
SECTION
HORIZONTAL
CUT
KICKBACK
OPERATION
25
BUCKINGWITHAWEDGE
(See Fig. 16)
If the wood diameter is large enough for you to insert a soft bucking wedge without touching the
chain, you should use the wedge to hold the cut open to prevent pinching.
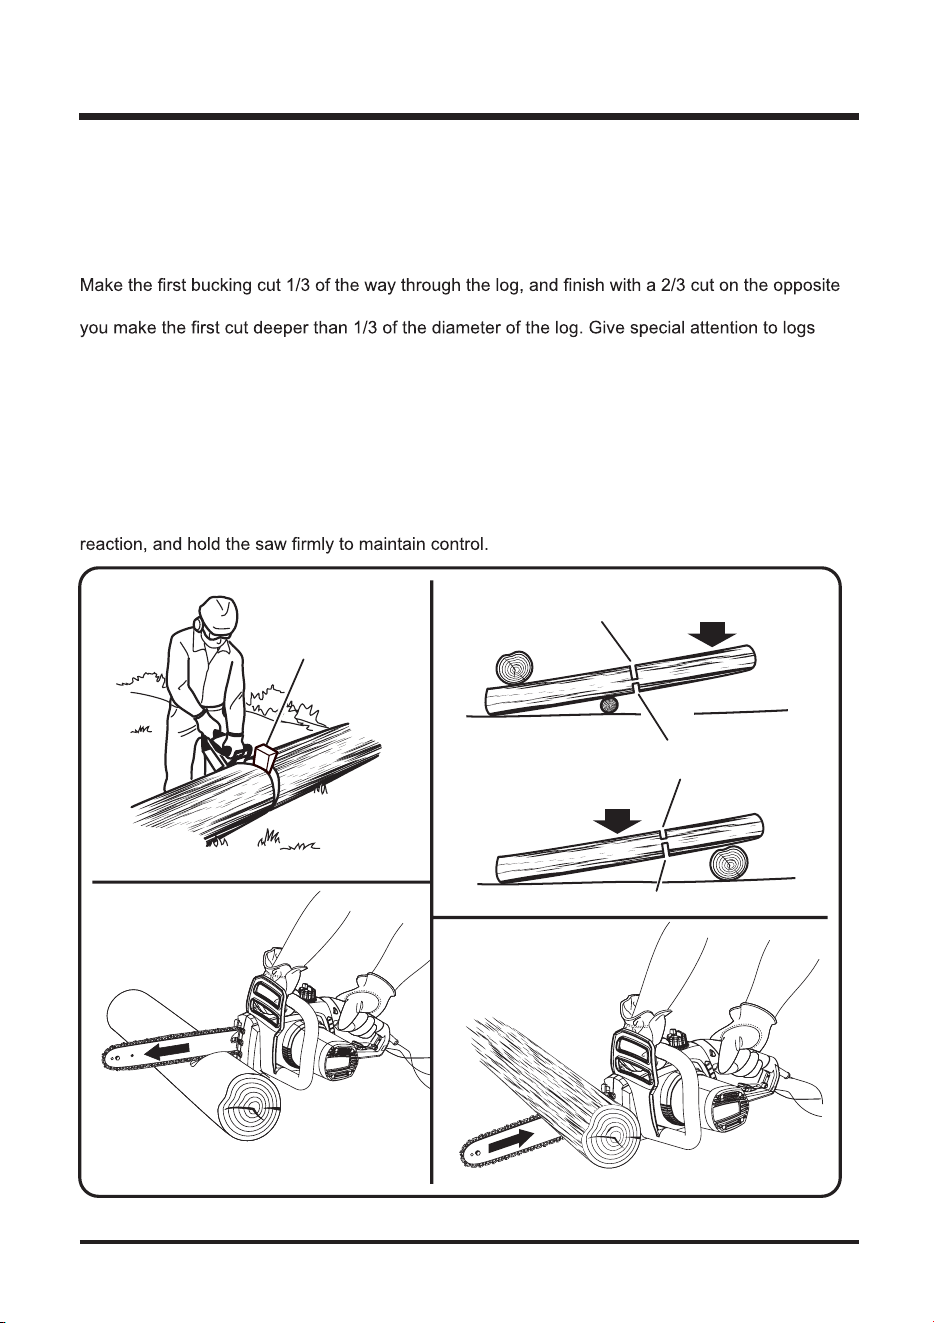
BUCKINGLOGSUNDERSTRESS
(See Fig. 17)
side. As you cut the log, it will tend to bend. The saw can become pinched or hung in the log if
under stress to prevent the bar and chain from pinching.
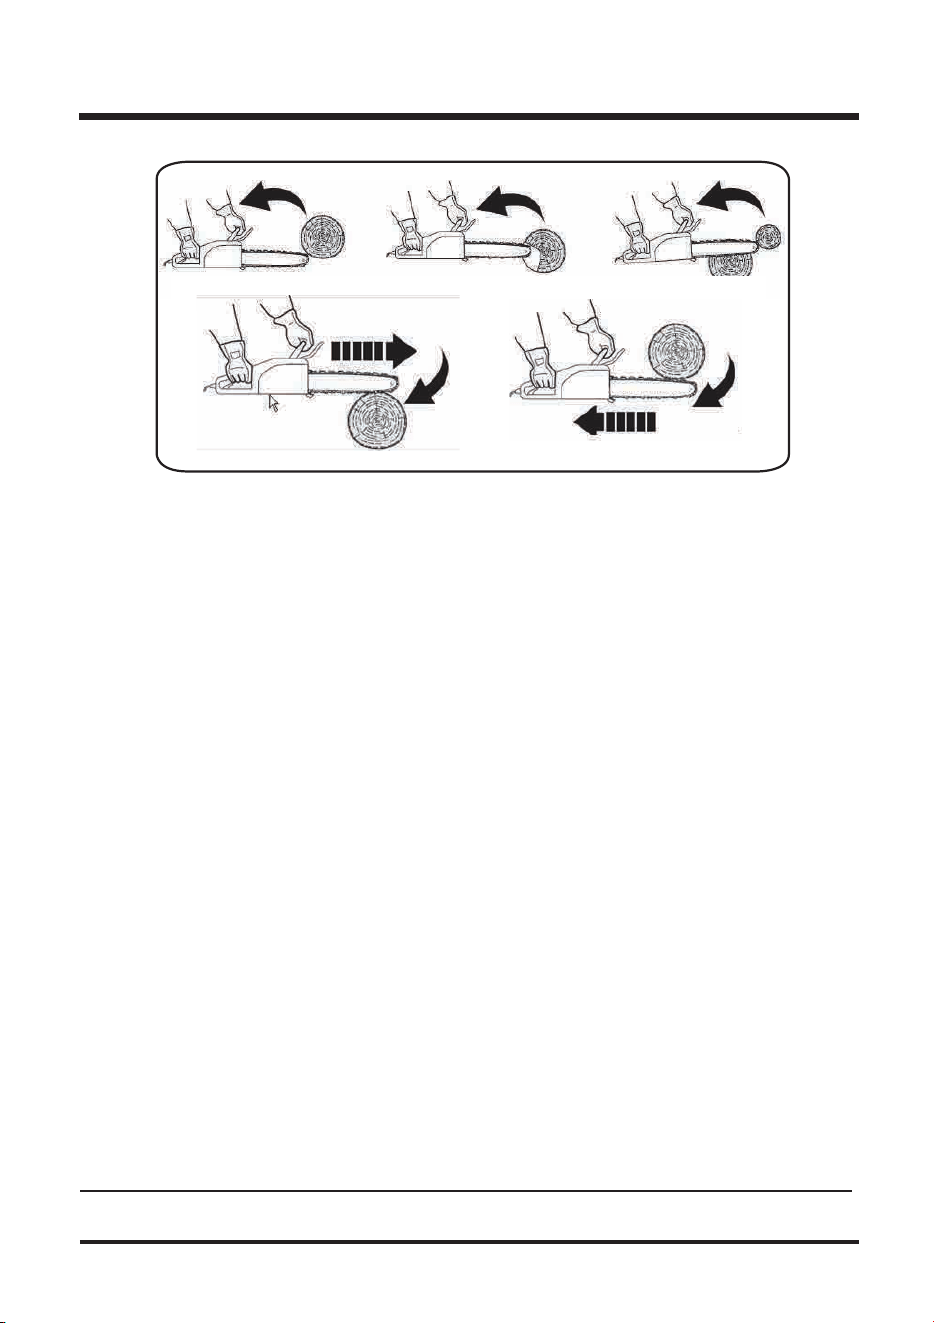
OVERBUCKING
(See Fig. 18)
Begin on the top side of the log with the bottom of the saw against the log; exert light pressure
downward. Note that the saw will tend to pull away from you.
UNDERBUCKING (See Fig. 19)
Begin on the under side of the log with the top of the saw against the log; exert light pressure
upward. During underbucking, the saw will tend to push back at you. Be prepared for this
Fig. 16 Fig. 17
Fig. 18 Fig. 19
WEDGE
LOAD
1ST CUT 1/3 DIA
OVERBUCKING
1ST CUT 1/3 DIA
FINISHING CUT
UNDERBUCKING
FINISHING CUT
LOAD
LOG SUPPORTED AT ONE END
LOG SUPPORTED AT BOTH ENDS
OPERATION
26
LIMBING
(See Fig. 20)
Limbing is removing branches from a fallen tree.
footingissecureand yourweightisdistributedevenlyonbothfeet.
Leavethelargersupportlimbsunderthetreetokeepthetreeoffthegroundwhilecutting.
Limbs should be cut one at a time. Remove the cut limbs from the work area often to help
keeptheworkareacleanandsafe.
Branches under tension should be cut from the bottom up to avoid binding the chainsaw.
Keepthetreebetween youandthechainsawwhilelimbing.Cutfromthesideofthetree
opposite the branch you are cutting.
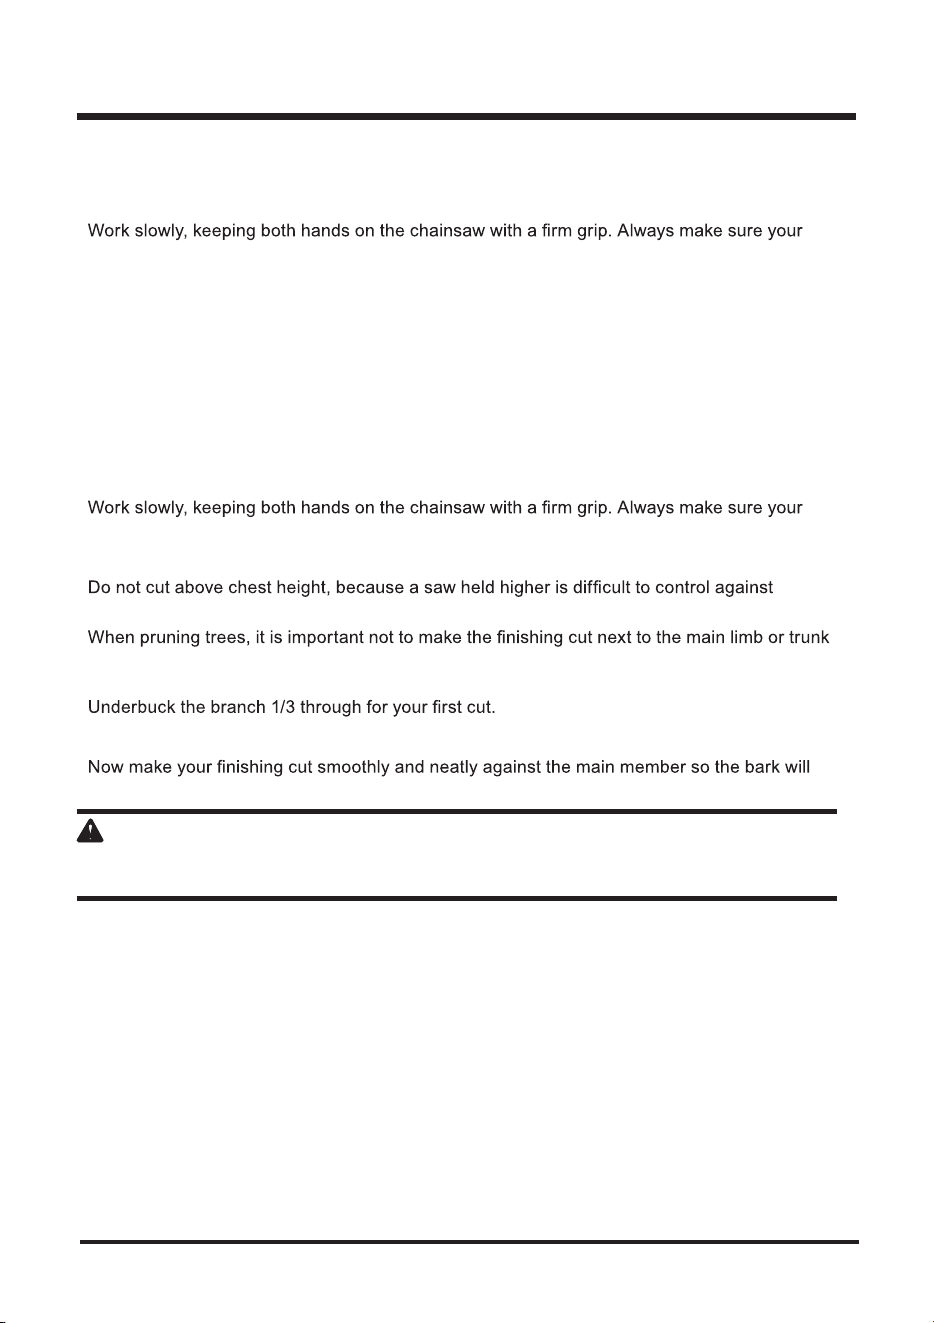
PRUNING (See Fig. 21)
Pruning is trimming limbs from a live tree.
footingissecureand yourweightisdistributedevenlyonbothfeet.
Do not cut from a ladder. This is extremely dangerous. Leave this operation for professionals.
kickback.
until you have cut off the limb further out to reduce the weight. This prevents stripping the bark
fromthemainmember.
Yoursecondcutshouldoverbucktodropthebranchoff.
grow back to seal the wound.
WARNING
Never cut through to the notch when making a back cut. The hinge controls the fall of the tree. This
is the section of wood between the notch and backcut.
OPERATION
27
CUTTING SPRINGPOLES (See Fig. 22)
A springpole is any log, branch, rooted stump, or sapling that is bent under tension by other
wood, so that it springs back if the wood holding it is cut or removed. On a fallen tree, a rooted
stump has a high potential of springing back to the upright position during the bucking cut to
separate the log from the stump. WDWFKRXWIRUVSULQJSROHV²WKH\DUHGDQJHURXV
WARNING
Springpoles are dangerous, and could strike the operator, causing the operator to lose control of
the chainsaw. This could result in severe or fatal injury to the operator.
Fig. 22
SPRINGPOLE
Fig. 20 Fig. 21
LOAD
FINISHING CUT
SECOND CUT
CUT LIMBS ONE AT A TIME AND LEAVE
SUPPORT LIMBS UNDER TREE UNTIL
LOG IS CUT
FIRST CUT
1/3 DIA
MAINTENANCE
28
WARNING
When servicing, use only identical LawnMaster replacement parts OR suggested replacement parts
by LawnMaster. Use of any other parts may create a hazard or cause product damage.
WARNING
Always wear safety goggles or safety glasses with side shields during power tool operation or when
blowing dust. If operation is dusty, also wear a dust mask.
GENERAL MAINTENANCE
Avoid using solvents when cleaning plastic parts. Most plastics are susceptible to damage from
various types of commercial solvents. Use a clean cloth to remove dirt, dust, lubricant, grease, etc.
WARNING
contact with plastic parts at any time. Chemicals can damage, weaken or destroy plastic, which
may result in serious personal injury.
LUBRICATION
for the life of the unit under normal operating conditions. Therefore, no further lubrication is
required.
29
MAINTENANCE
Switch the product off, remove the battery pack and let it cool down
Check, clean and store the product as described below
Keep the product clean. Remove debris from it after each use and before storage.
Regular and proper cleaning will help ensure safe use and prolong the life of the product.
Inspect the product before each use for worn and damaged parts.
Do not operate it if you find broken and worn parts.
Clean the product with a slightly damp cloth and mild soap. Use a brush for areas that are hard to reach.
In particular clean the air vents (4) after every use with a cloth and brush.
Remove stubborn dirt with high pressure air (max. 3 bar).
Check for any damage and wear. Repair damages in accordance with this instruction manual or
take it to an authorised service centre before using the product again.
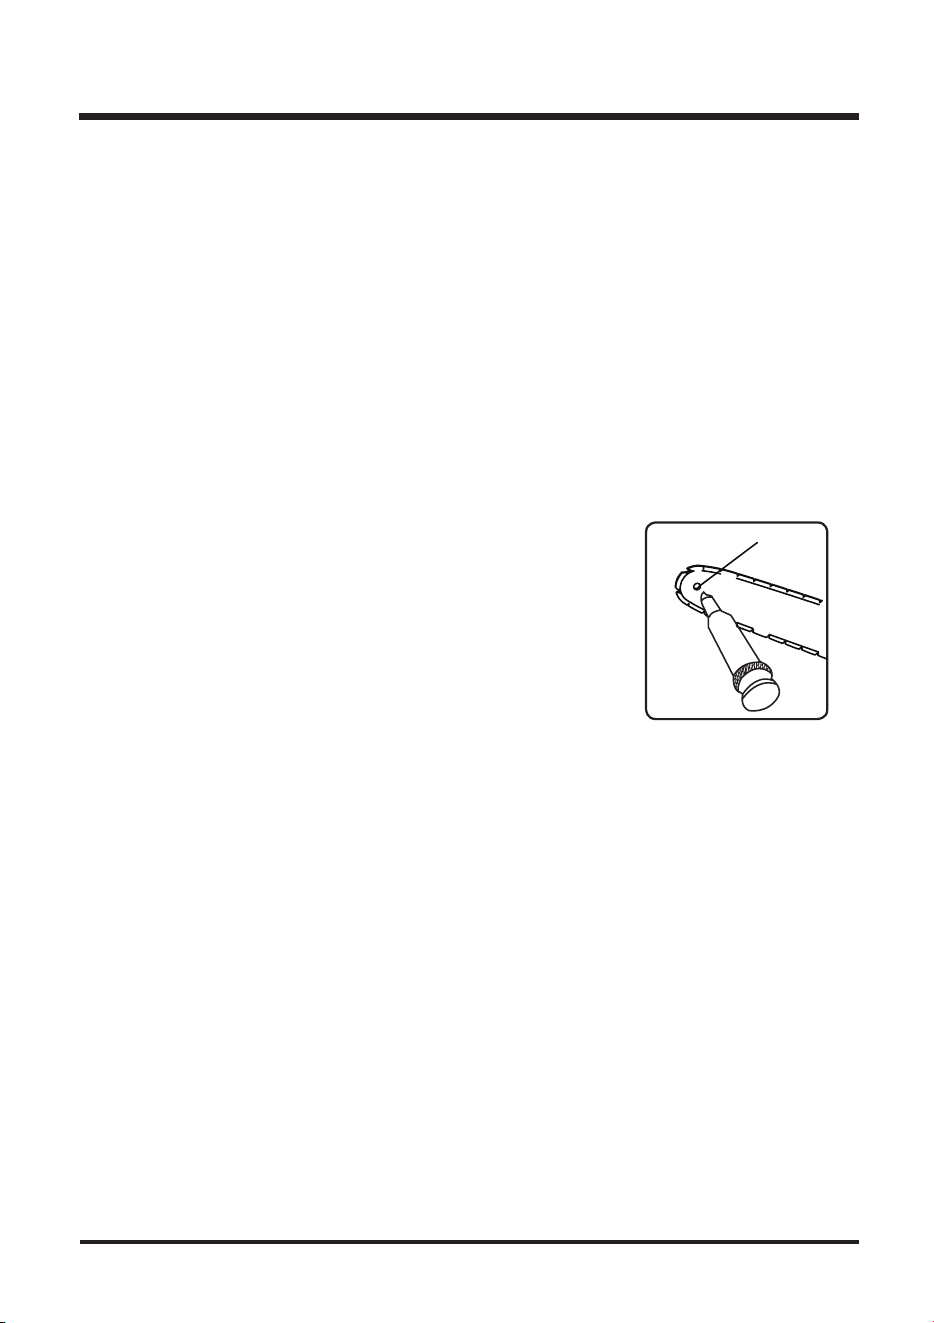
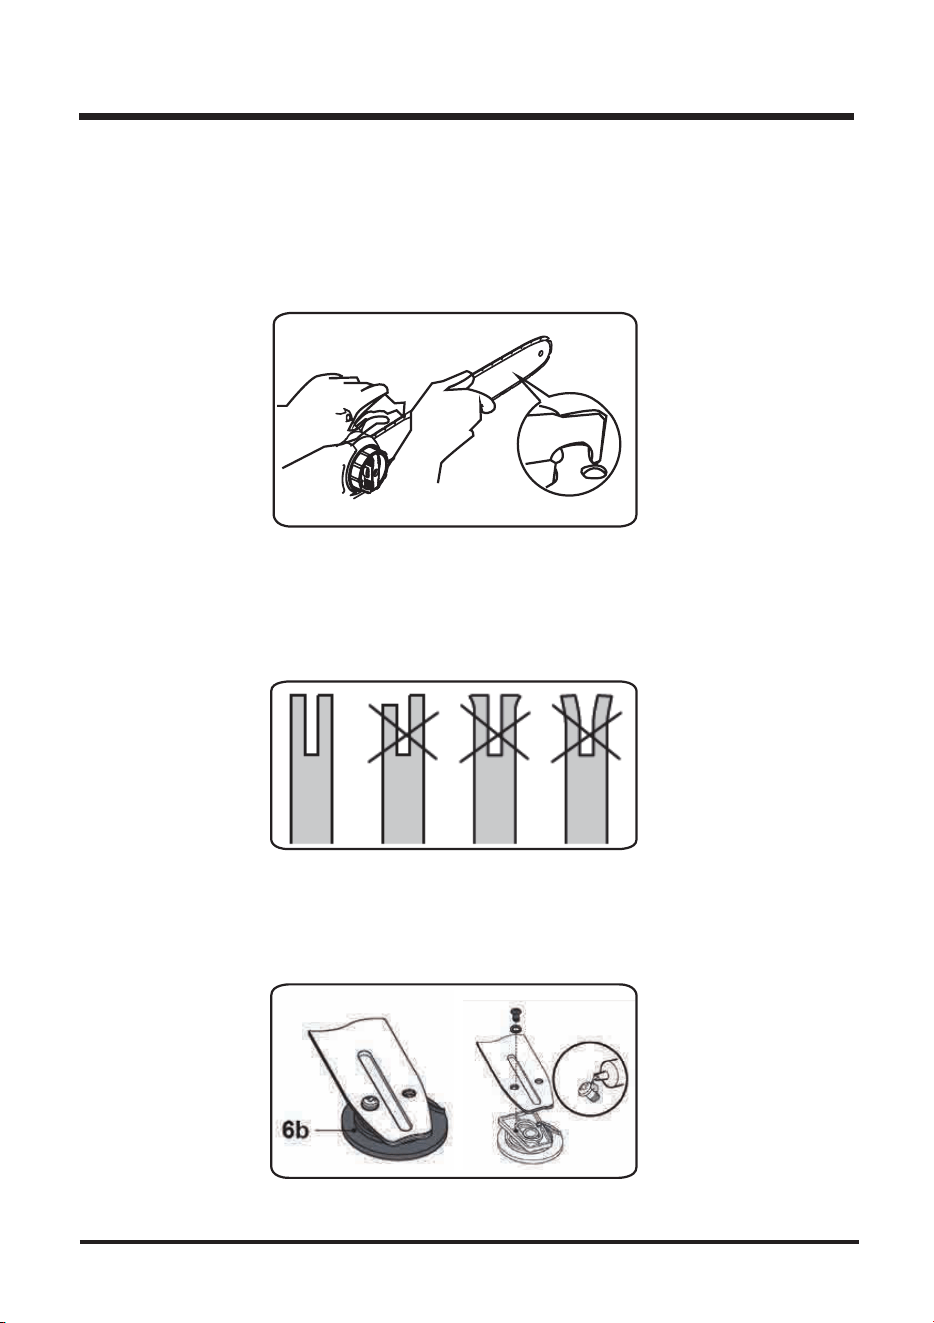
Clean the sprocket nose (7). Using a disposable lube gun, insert
the needle nose into the lubrication hole (C) and inject grease until
it appears at the outside edge of the sprocket (Fig. 23).
Rotate the saw chain (5) by hand. Repeat the lubrication procedure
until the entire sprocket has been greased.
GENERAL CLEANING
SPROCKET NOSE
Most guide bar problems can be prevented merely by keeping the product well maintained.
Incorrect filing and non-standard cutter and depth gauge settings are the causes of most guide
bar problems, primarily resulting in uneven bar wear. As the bar wears unevenly, the rails widen,
which may cause the chain to clatter and make it difficult to complete straight cuts. If the guide bar
is insufficiently lubricated and the product is operated with a saw chain which is too tight, this will
contribute to rapid bar wear. To help minimise bar wear, maintenance of the guide bar as well as
the saw chain is recommended.
Disassemble the guide bar and saw chain in >>reversed order from assembly.
Check the oiling port (16) for clogging and clean >>if necessary to ensure proper lubrication of the
guide bar and saw chain during operation. Use a soft wire small enough to insert into the oil
discharge hole
GUIDE BAR AND SAW CHAIN MAINTENANCE
C
Fig.23
30
MAINTENANCE
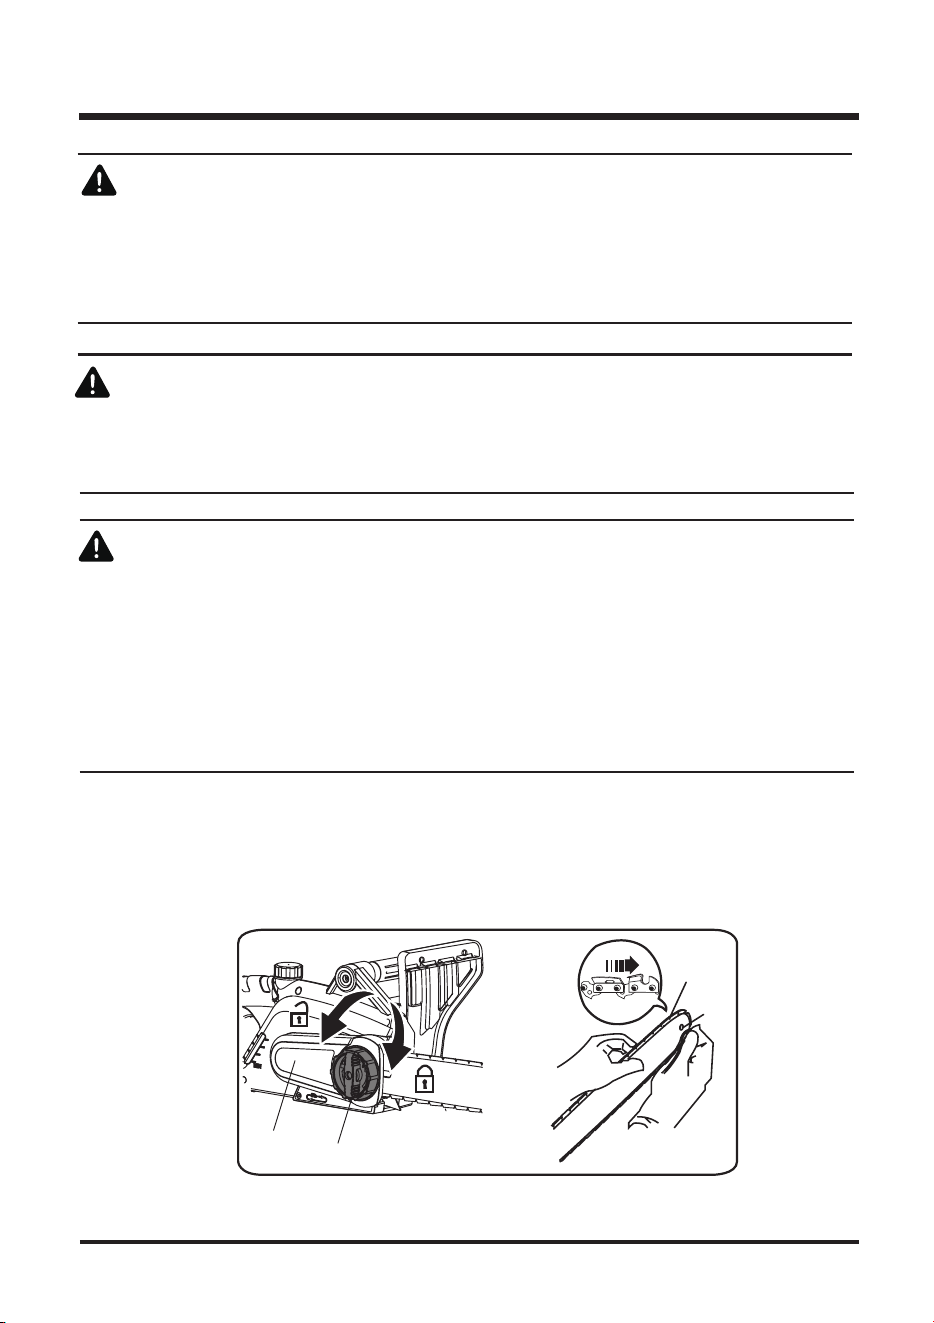
REPLACING THE GUIDE BAR AND CHAIN
(See Fig. 24 - 32.)
DANGER
Never start the motor before installing the guide bar, chain, chain cover, and chain cover lock knob.
serious injury.
WARNING
To avoid serious personal injury, read and understand all the safety instructions in this section.
WARNING
Before performing any maintenance, make sure the tool is unplugged from the power supply.
Failure to heed this warning could result in serious personal injury.
CAUTION
Always wear gloves when handling the bar and chain. These components are sharp and may
contain burrs.
WARNING
Never touch or adjust the chain while the motor is running. The saw chain is very sharp. Always
wear protective gloves when performing maintenance involving the chain to avoid possible serious
lacerations.
Bar and
Chain Combinations sectionlaterinthismanual.
31
MAINTENANCE
Keep all parts of the body away from the saw chain when the chain saw is
operating. Before you start the chain saw, make sure the saw chain is not
contacting anything. A moment of inattention while operating chain saws may cause
entanglement of your clothing or body with the saw chain.
Always hold the chain saw with your right hand on the rear handle and your
left hand on the front handle. Holding the chain saw with a reversed hand configuration
increases the risk of personal injury and should never be done.
WARNING
Always use a saw chain designed as “low-kickback” or a saw chain which meets the low-kickback
requirements! A standard saw chain (a chain which does not have the kickback reducing guard links)
should only be used by an experienced professional operator!
Nevertheless, a low-kickback saw chain does not completely eliminated kickback! A low-kickback
or “safety” chain should never be regarded as complete protection against injury!
Therefore always use a low-kickback saw chain in conjunction with other kickback protection
devices such as the front hand guard!
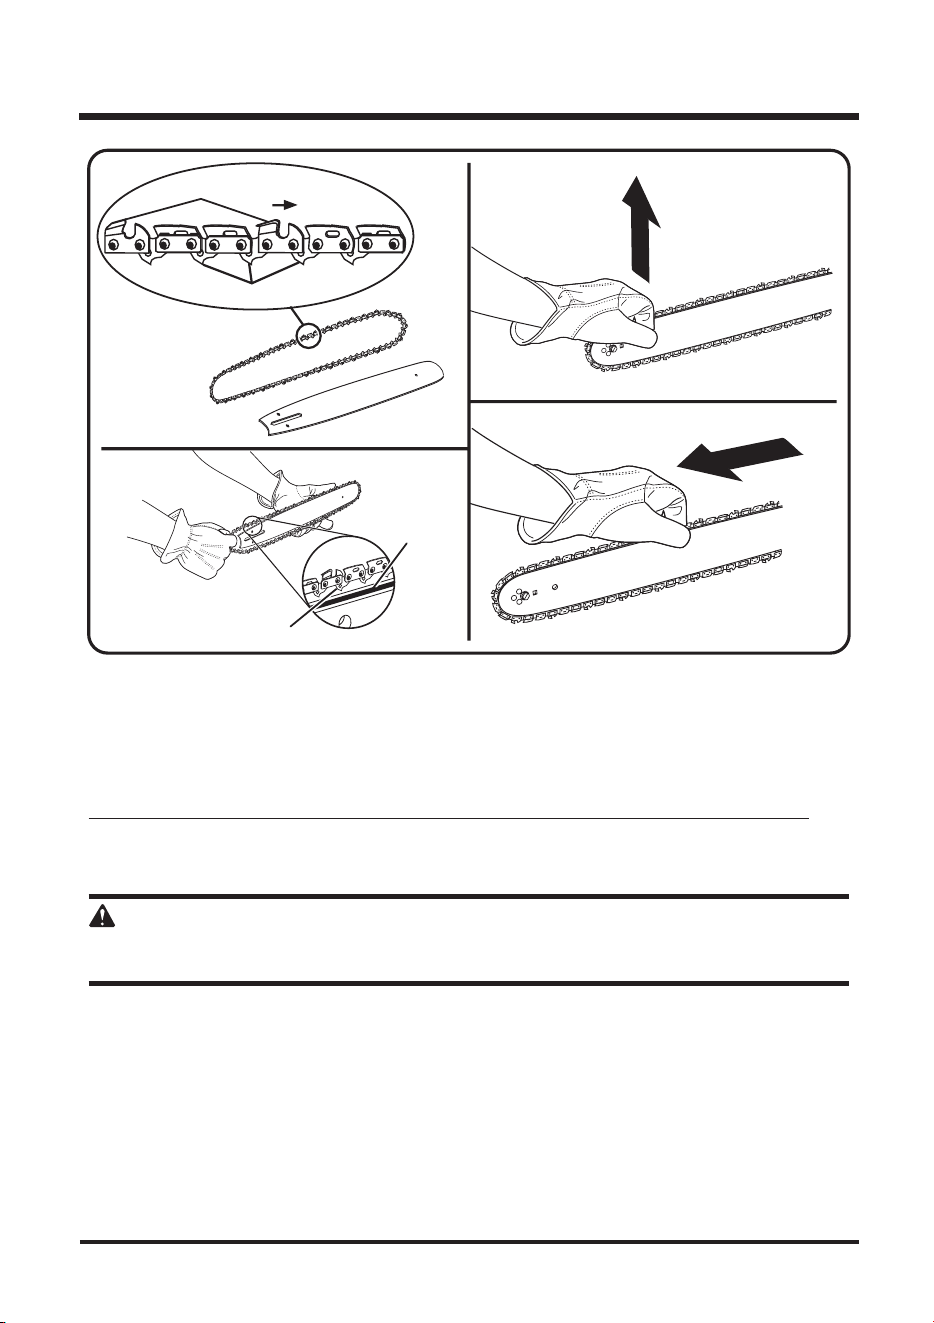
Use only the guide bar (6) and saw chain (5) according to the technical data of the product.
Place the product on a suitable flat surface.
Loosen the locking wheel (9) and remove the side cover (10) (Fig. 24).
Spread the saw chain (5) out with the cutting edges of the chain pointing in the rotational direction
WARNING
WARNING
10
9 Fig.24 Fig.25
6
5
32
MAINTENANCE
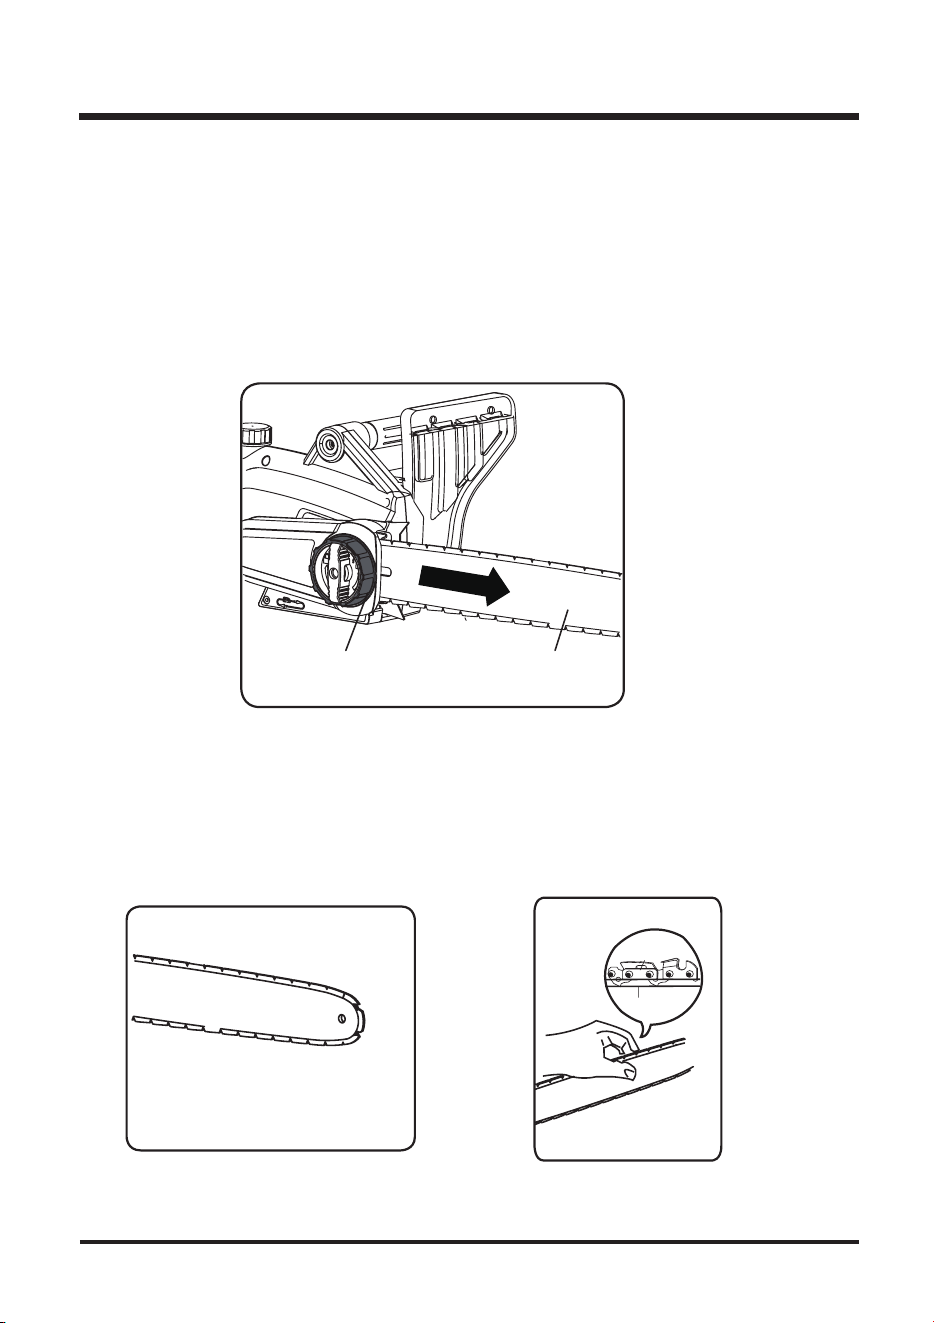
SAW CHAIN TENSIONING
Always check the saw chain tension before use and regularly during use approx. every five cuts.
Upon initial operation, new chains can lengthen considerably. This is normal during the break-in
period and the interval between future adjustments will lengthen quickly.
SET THE PRODUCT ON A SUITABLE FLAT SURFACE.
Turn the tension wheel (8) until the chain “tie straps” are just touching the bottom edge of the
guide bar (6) (Fig. 26).
TENSION TEST
Check the chain tension using one hand to lift the saw chain (5) against the weight of the product.
The correct chain tension is achieved when the saw chain can be lifted by approximately 2-4mm
from the guide bar (6) in the centre (Figs. 27-28).
Adjust the tension if you find that the chain saw is too loose or tight
2-4mm
8
6
Fig. 26
Fig. 27
Fig. 28
33
MAINTENANCE
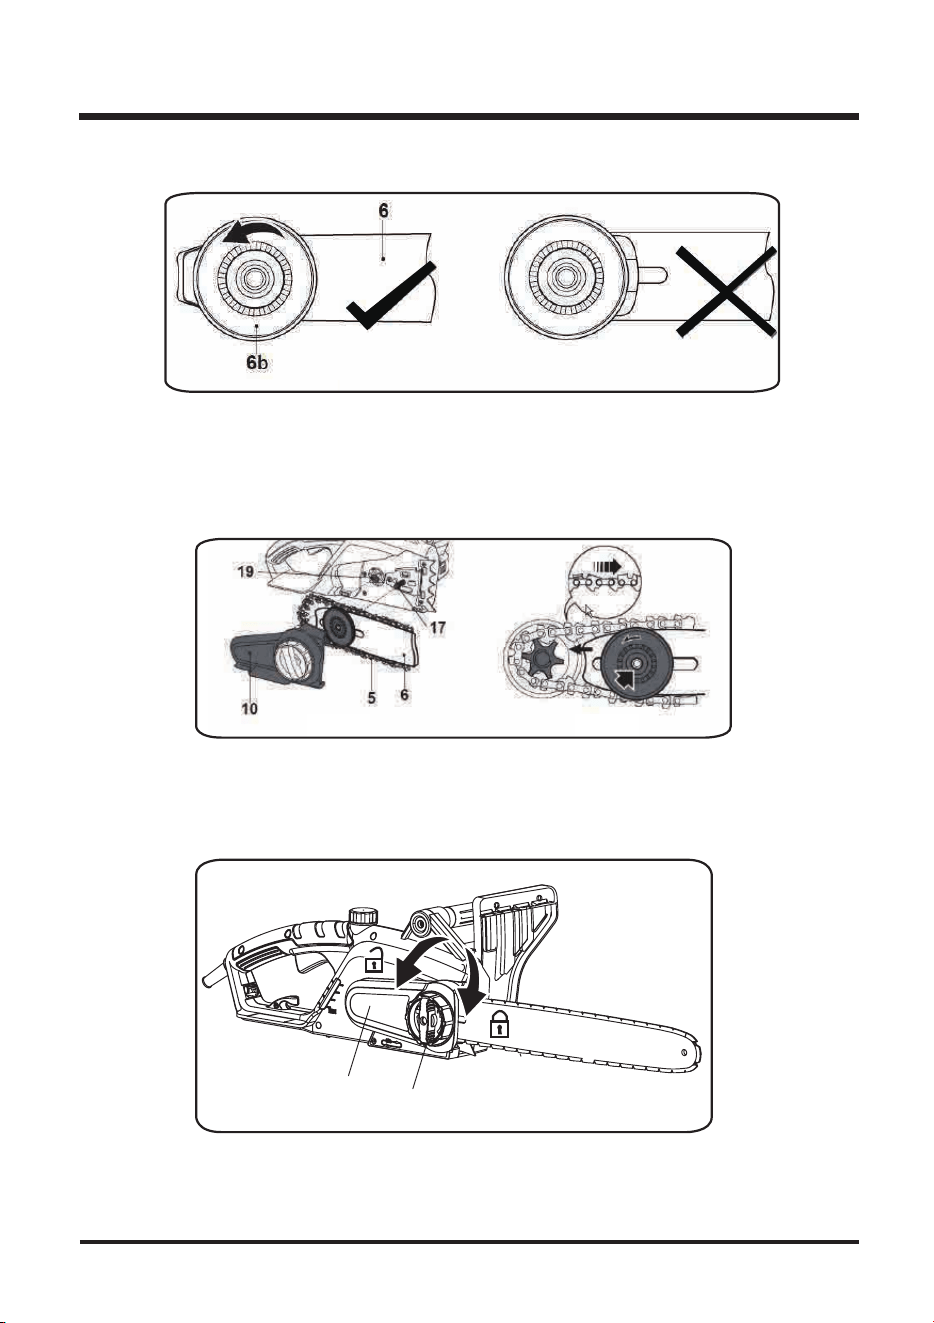
Ensure the tension disc (6b) is adjusted to outer right position, turn anticlockwise if required (Figs. 29-30).
Align the guide bar (6) and saw chain (5) assembly with the drive sprocket (19) and support bolt (17).
Lay the saw chain around the drive sprocket and then lower the guide bar to install it to the support
bolt (Figs. 31-32).
Replace the side cover (10) and slightly tighten the locking wheel (9) (Fig. 33).
Do not tighten the locking
wheel completely; saw chain tensioning is required first.
10
9
Fig. 29 Fig. 30
Fig. 31 Fig. 32
Fig. 33
34
MAINTENANCE
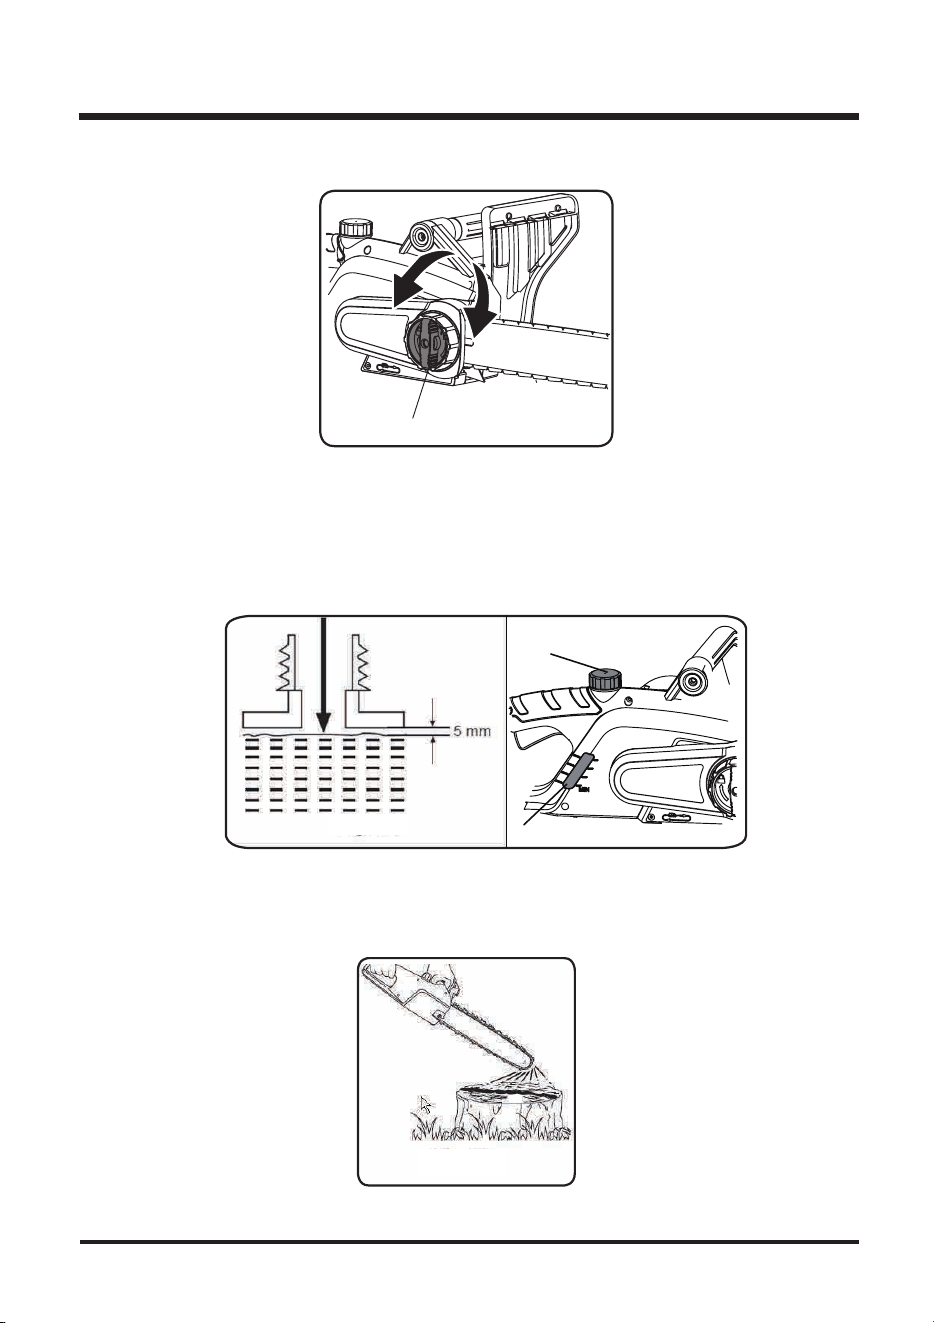
Releasethetipoftheguidebar,andturnthechaintensioningknob1/2turnclockwise.
Holdthetipoftheguidebarupandtightenthechaincoverlockknob.
The chain is correctly tensioned when there is no sag on the underside of the guide bar, and
when the chain is snug, but can be turned by hand without binding.
NOTE:Ifchainistootight,itwillnotrotate.Loosenthechaincoverlockknobslightly,andturnthechain
tensioningknob1/4turncounter-clockwise.Liftthetipoftheguidebarup,andretightenthechaincoverlock
knob. Ensure that the chain will rotate without binding.
WARNING
Never touch or adjust the chain while the motor is running. The saw chain is very sharp. Always
wear protective gloves when performing maintenance involving the chain.
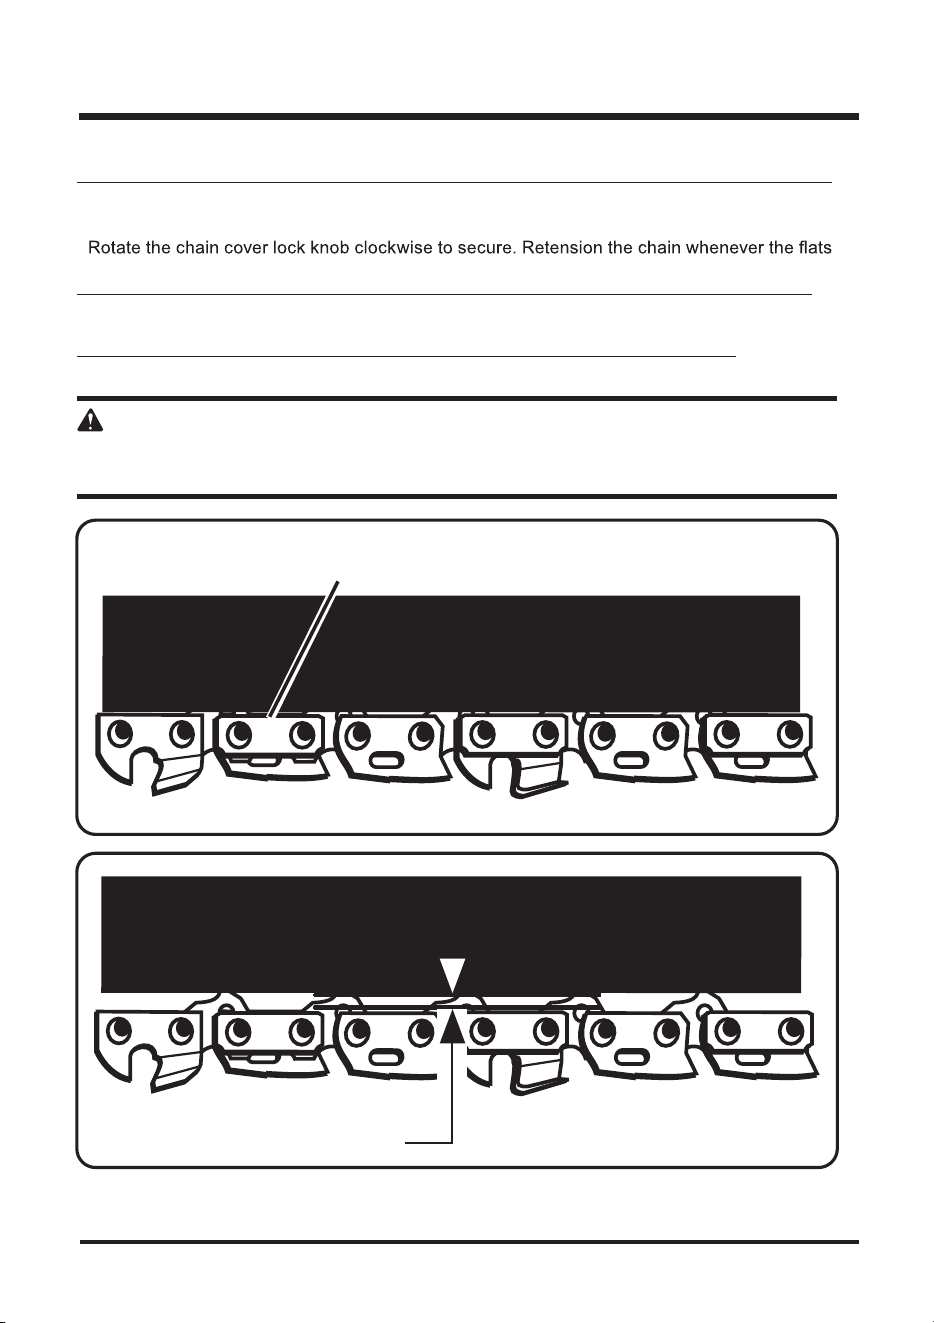
CHAIN DRIVE LINKS
BAR
GROOVE
CUTTERS
CHAIN DRIVE LINKS
CHAIN ROTATION
Fig. 37
Fig. 36
Fig. 35
Fig. 34
35
MAINTENANCE
Turnthechaintensioningknobclockwisetotensionthechain.
NOTE: A coldchainiscorrectlytensionedwhenthereisnoslackontheundersideoftheguidebar,thechain
is snug, and it can be turned by hand without binding.
onthedrivelinkshangoutofthebargroove.
NOTE: During normal saw operation, the temperature of the chain increases. The drive links of a correctly
tensionedwarmchainwillhangapproximately1/16"(1.3mm)outofthebargroove.
NOTE: New chains tend to stretch. Check the chain tension frequently and tension as required.
CAUTION
A chain tensioned while warm may be too tight upon cooling.
Check the “cold tension” before next use.
Fig. 38
Fig. 39
§ .050 in.
FLATS ON DRIVE LINKS
36
MAINTENANCE
Do not overfill. Leave approximately 5 mm of space to the lower edge to allow the lubricant to
expand (Fig. 41).
Check the oil level at the window of the oil tank (11) prior to switching on and regularly during
operation. Refill oil when the oil level is lower than the “MIN” marking (Fig. 42).
Wipe up spilled lubricant with a soft cloth and refit the tank cap (11a).
ake sure the guide bar (6) and the saw chain (5) are in place when you check the oil delivery.
Switch on the product (see section “on/off switch” below); keep pressing the on/off switch (13) and
check if the chain oil is delivered as shown in the figure (Fig. 43)
Turn the locking wheel (9) to tighten the side >>cover (10) completely (Fig. 40).
Fig. 40
9
11a
11
Fig. 41
Fig. 42
Fig. 43
37
MAINTENANCE
CARE AND MAINTENANCE
Check the drive sprocket (19). If it is worn or damaged due to strain, have it replaced by an
authorised service agent.
Clear residue from the rails on the guide bar (6) using a screwdriver, putty knife, wire brush or other
similar tool. This will keep the oil passages open to provide proper lubrication to the bar (6) and
chain (5) .
Check the guide bar ‘rail’ for wear: Hold a ruler (straight edge) against the side of the guide bar
and ‘cutter side plates’. If there is a gap between the ruler and guide bar the guide bar ‘rail’ is normal.
If there is no gap (ruler flush against the side of the guide bar) the guide bar ‘rail’ is worn and needs
to be replaced with a new one of the same type .
Turn the guide bar 180° to allow even wear, thereby extending the life span of the guide bar (6).
Loosen the screw and remove the tension disc (6b) from the guide bar.
Ensure the rubber washer on the screw is free of wear. Turn the guide bar and fix the tension disc
with the screw. Apply a drop of suitable glue to the screw to ensure its safe positioning when reassembly.
MAINTENANCE
38
CAUTION
Make sure the chainsaw is disconnected from the power supply before you work on the saw.
CHAIN MAINTENANCE (See Fig. 44)
Use only a low-kickback chain on this saw. This fast-cutting chain provides kickback reduction when
properly maintained. For smooth and fast cutting, maintain the chain properly.The chain requires
sharpening when the wood chips are small and powdery, the chain must be forced through the
wood during cutting, or the chain cuts to one side. During maintenance of the chain, consider the
following:
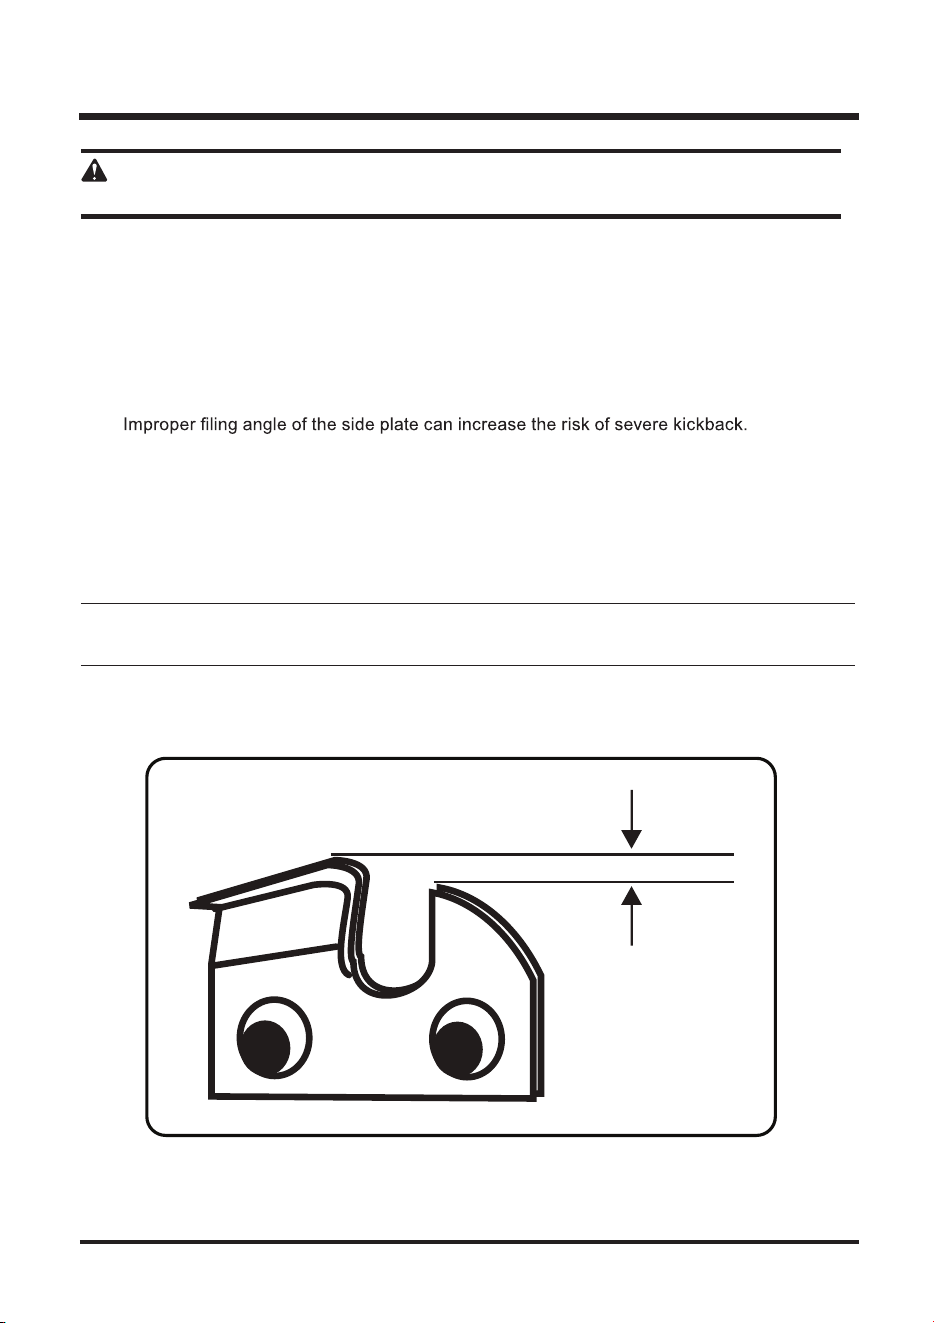
Raker (depth gauge) clearance.
Toolowincreasesthepotentialforkickback.
Not low enough decreases cutting ability.
Ifthecutterteethhithardobjectssuchasnailsandstones,orareabradedbymudor
sand on the wood, have an authorized service centre sharpen the chain.
NOTE:Inspectthedrivesprocketforwearordamagewhenreplacingthechain.Ifsignsofwearordamage
are present in the areas indicated, have the drive sprocket replaced by an a
uthorized service centre.
NOTE:Ifyoudonotfullyunderstandthecorrectprocedureforsharpeningthechainafterreadingthe
instructions that follow, have the saw chain sharpened by an authorized service centre or replace with a
recommended low-kickback chain.
Fig. 44
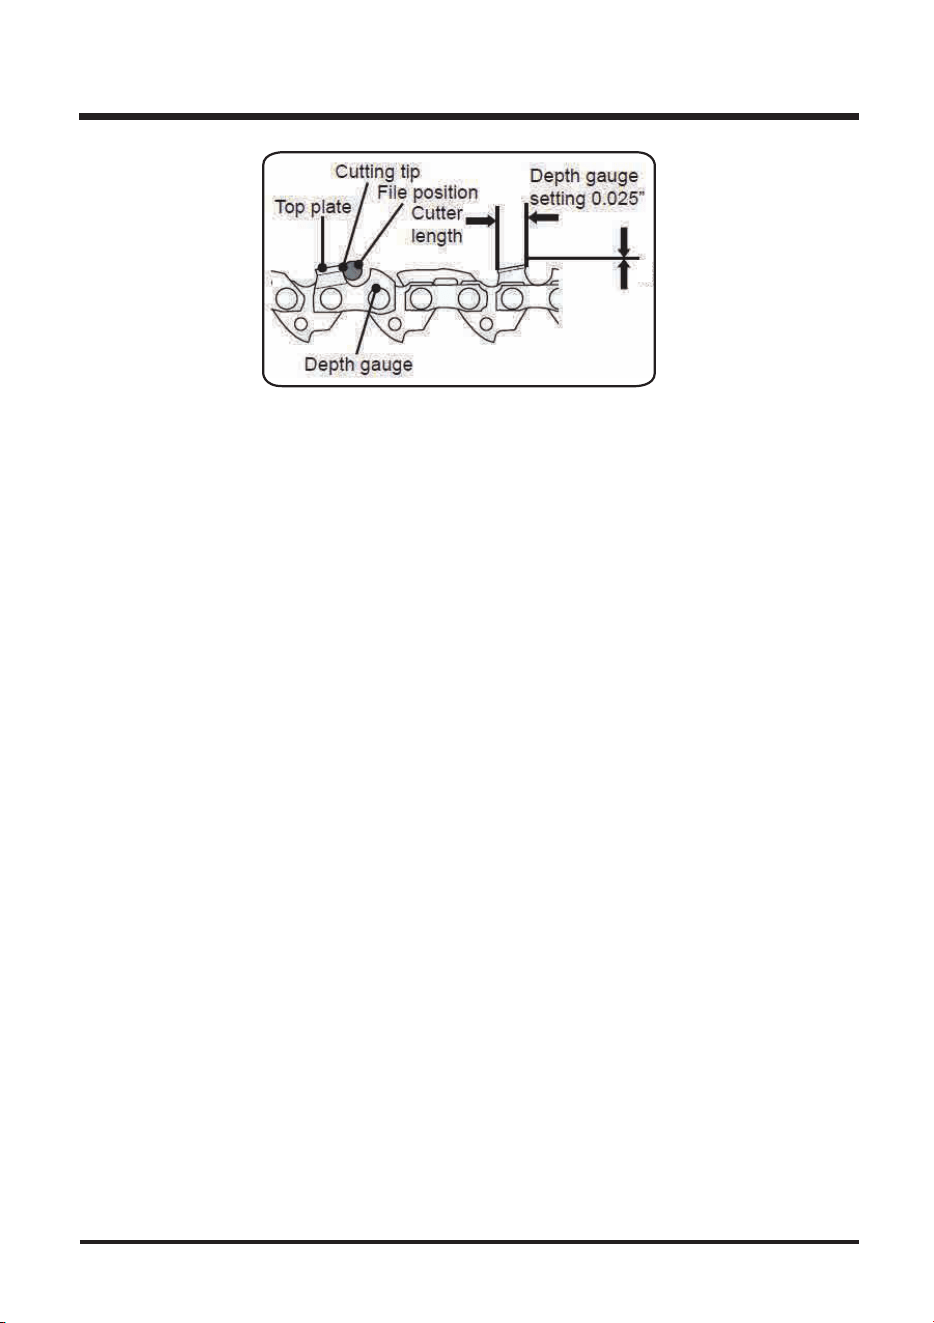
RAKER (DEPTH GAUGE) CLEARANCE
.025 in.
MAINTENANCE
39
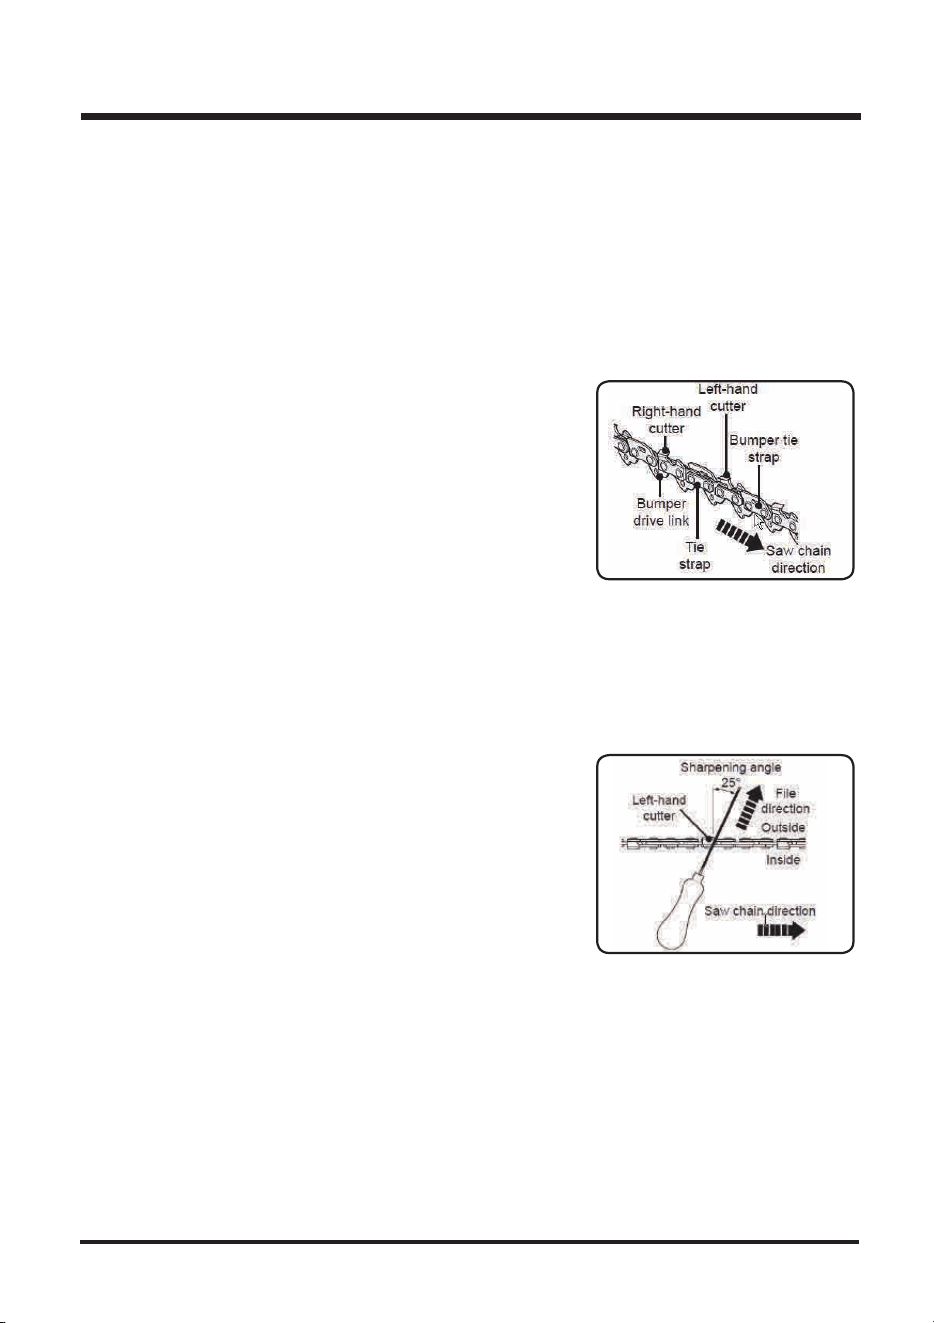
SAW CHAIN SHARPENING
Have your chain (5) sharpened professionally at an authorised service centre, or sharpen the chain
yourself by using a proper sharpening kit. Also observe the sharpening instructions supplied with
the sharpening kit.
The height difference between the tooth and the ridge is the cutting depth.
When sharpening the saw chain (5) you have to consider the
following points
)LOHDQJOH
&XWWLQJDQJOH
)LOHSRVLWLRQ
'LDPHWHURIURXQGILOH
)LOH
To sharpen the chain proceed as follows:
8VHSURWHFWLYHJORYHV
(QVXUHWKHFKDLQLVFRUUHFWO\WHQVLRQHG
(QJDJHWKHFKDLQEUDNHWRORFNWKHFKDLQRQWKHEDU
Use a round file, whose diameter is 1.1 times the cutting tooth depth.
Make sure 20% of the file diameter is above the cutter’s top plate.
A file guide is available from most reputable tool merchants and
is the easiest way to hold the file at the correct position.
File at an angle perpendicular to the bar, and at an angle of 25°
to the direction of travel
File each tooth from the inside towards outside only.
File one side of the chain first than turn the saw around and repeat the process.
Sharpen each tooth equally by using the same number of strokes.
Keep all cutter lengths equal. Check the safety depth gauge height every 5 sharpenings.
If the depth gauges are also trimmed it is essential that the original profile is restored.
Use a depth gauge measuring >>instrument to check the height of the depth gauge.
Depth gauge measuring jigs are available from most reputable tool merchants
Check the saw chain for possible wear and damages. Replace it with a new one if required.
Experienced user can sharpen a dull saw chain (see section “Saw chain sharpening” below).
Refit the saw chain (5) and the guide bar (6) as described under “Assembly”.
MAINTENANCE
40
This product does not contain any parts that can be repaired by the consumer.
Contact a qualified specialist to have it checked and repaired. lean the product as described above.
Store the product and its accessories in a dry, frost-free place.
Always store the product in a place that is inaccessible to children. The ideal storage temperature
is between 10 and 30°C.
We recommend using the original package for storage or covering the product with a suitable
cloth or enclosure to protect it against dust.
TRANSPORTATION
Switch the product off and remove the battery pack before transporting it anywhere.
Attach the blade cover to the saw blade. Attach other transportation guards, if applicable.
Always carry the product by its gripping handles (1, 2).
Protect the product from any heavy impact or strong vibrations which may occur during
transportation
in vehicles.
Secure the product to prevent it from slipping or falling over.
STORAGE

41
Retension chain, Refer to
Adjusting Chain Tension
earlier in this manual.
Refer to Replacing Bar and
Chain earlier in this manual.
Inspect guide bar and chain
for damage.
Sharpen chain.
Reverse direction of chain.
TROUBLESHOOTING
PROBLEM
Bar and chain running
hot and smoking.
Motor runs, but chain
is not rotating.
Motor runs,chain rotates
but does not cut.
CAUSE
Check chain tension for
over-tight condition.
Chain-oil tank empty.
Chain tension too tight.
Check guide bar and
chain assembly.
Check guide bar and
chain for damage.
Dull chain.
Chain on backwards.
REMEDY
Plug in the power cord.

WARRANTY
42
We take pride in producing a high quality, durable product. This Lawnmaster® product carries a
limited two (2) year warranty against defects in workmanship and materials from date of purchase
under normal household use. If product is to be used for commercial, industrial or rental use, a 30
day limited warranty will apply. Batteries carry a one-year warranty against defects in workmanship
and materials. Batteries must be charged in accordance with the operator's manual directions and
regulations in order to be valid. Warranty does not apply to defects due to direct or indirect abuse,
negligence, misuse, accidents, repairs or alterations and lack of maintenance. Please keep your
receipt/packing list as proof of purchase. This warranty gives you specific legal rights, and you
may have other rights, which vary from state to state. For product service call Customer Service at
(866) 384-8432.
Items not covered by warranty :
1. Any part that has become inoperative due to misuse, commercial use, abuse, neglect, accident,
improper maintenance, or alteration;
2. The unit, if it has not been operated and/or maintained in accordance with the owner's manual;
3. Normal wear, except as noted below;
4. Routine maintenance items such as lubricants, blade sharpening;
5. Normal deterioration of the exterior finish due to use or exposure.
Transportation Charges : Transportation charges for the movement of any power equipment unit or
attachment are the responsibility of the purchaser. It is the purchaser’s responsibility to pay
transportation charges for any part submitted for replacement under this warranty unless such
return is requested in writing by LawnMaster.
SAVE YOUR RECEIPTS. THIS WARRANTY IS VOID WITHOUT THEM.
43
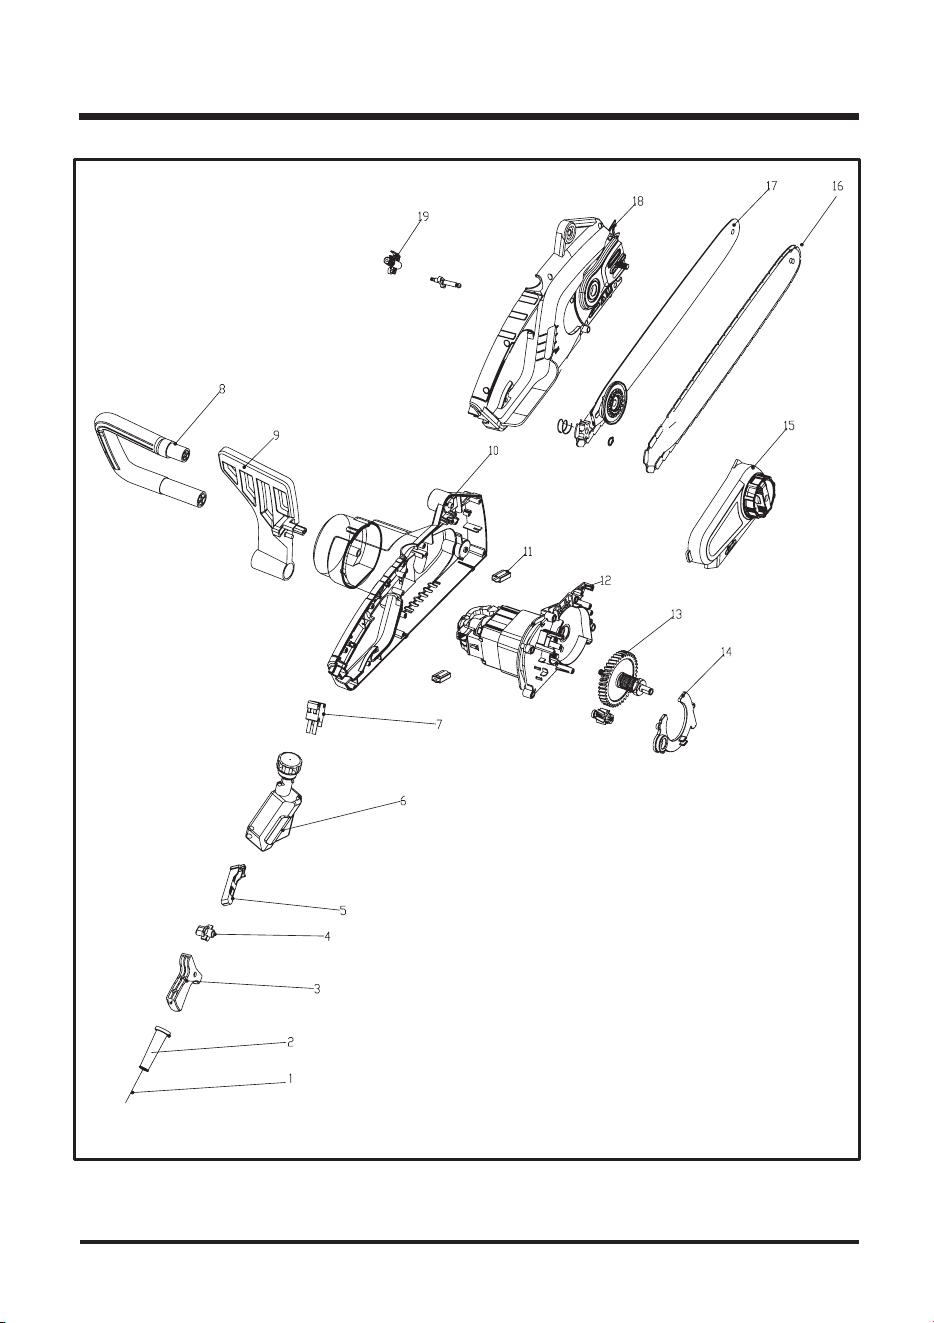
EXPLODED VIEW / PARTS LIST

EXPLODED VIEW / PARTS LIST
44
Key Number
1
2
3
4
5
6
7
8
9
10
11
12
13
14
15
16
17
18
19
171-7J13002
196-7J11601
293-7J13001
293-7J13002
235-7J13001
324-7J13001
139-7J13001
297-7J13001
216-7J13001
303-7J13001
324-7J13002
324-7J13003
324-7J13004
313-7J11203
324-7J13005
372-1610
324-7J13006
303-7J13002
324-7J13006
Drawing Number
CS1216 Manual Parts List
Description Quantity
Power Cord
Shield Sleeve
Switch Button
Button Assy
Push Button
Oil Resevoir
Swith Assembly
Top Handle
Front Handle Guard
Left Motor Housing
Electrical Carbon Component
Motor Assembly
Gear Assembly
Dust Proof Cover
Tensioner Housing
Chain
Bar
Right Motor Housing
Oil Pump Assembly
1
1
1
1
1
1
1
1
1
1
1
1
1
1
1
1
1
1
1

45
NOTES

ÉQUIPEMENT ÉLECTRIQUE
CONTENU
46
46DONNÉES TECHNIQUES
CONSIGNES DE SÉCURITÉ IMPORTANTES
47-49
52-53
RÈGLES GÉNÉRALES DE SÉCURITÉ 50-51
SYMBOLES
54-55
FAMILIARISEZ-VOUS AVEC VOTRE SCIE À CHAÎNE 56-57
MONTAGE 58
UTILISATION 59-71
ENTRETIEN 72-84
DÉPANNAGE 85
GARANTIE 86
VUE ÉCLATÉE/LISTE DES PIÈCES 87-88
REMARQUES 89
TABLE DES MATIÈRES
DONNÉES TECHNIQUES
SCIE À CHAÎNE ÉLECTRIQUE DE 406 MM (16 PO) CS1216
Tension Nominale : 120 V 60Hz
Capacité : 12 A
Vitesse De La Chaîne (À Vide): 12m/s
Longueur Du Guide-chaîne: 406 mm (16 po)
Pas De Chaîne: 9,52 mm (3/8 po)
Réservoir D'huile: 120ml
Mise En Tension De La Chaîne Sans Outils (Sds): Oui
Lubrificateur Automatique De Chaîne: Oui
Griffes De Butée En Acier: Oui
Bouton De Verrouillage Pour L'interrupteur Marche/arrêt: Oui
46
Diamètre De Coupe Maximal 406 mm (16 Po)
Guide Oregon 516480 et 112364
Chaîne Oregon 91PX057

47
CONSIGNES DE SÉCURITÉ IMPORTANTES
AVERTISSEMENT
N'essayez pas d'utiliser cette machine avant d'avoir lu et entièrement compris toutes les consignes,
informations de sécurité etc. contenues dans ce manuel. Dans le cas contraire, vous risquez de
provoquer un accident, avec à la clé un incendie, une électrocution ou des blessures graves.
$YDQWGHFRPPHQFHUjFRXSHUGXERLVDWWHQGH]GDYRLUXQHVSDFHGHWUDYDLOGpJDJpXQERQ
équilibre et un chemin de retraite pour le moment où l'arbre tombera. Travailler au milieu du
désordre augmente le risque d'accident.
4XDQGYRXVFRPPHQFH]jWUDYDLOOHURXTXHYRXVFRXSH]GXERLVDYHFODVFLHjFKDvQHDVVXUH]
vous qu'il n'y a ni enfants, ni spectateurs, ni visiteurs, ni animaux dans votre espace de travail.
1¶XWLOLVH]SDVODVFLHjFKDvQHGDQVGHVDWPRVSKqUHVH[SORVLYHVFRPPHHQSUpVHQFHGHOLTXLGHV
de gaz ou de poussières inflammables. Les outils électriques créent des étincelles qui peuvent
enflammer la poussière ou les vapeurs.
AVERTISSEMENT
8WLOLVH]OHVFRUGRQVSURORQJDWHXUVG¶H[WpULHXUSRUWDQWOHVODEHOV6:$62:$67:$672:$
6-:$6-7:$RX6-72:$&HVFRUGRQVVRQWFRQoXVSRXUXQHXWLOLVDWLRQHQH[WpULHXUHW
réduisent les risques d'électrocution.
)LFKHVSRODULVpHV$ILQGHUpGXLUHOHVULVTXHVG¶pOHFWURFXWLRQFHWRXWLOGLVSRVHG¶XQHILFKHSRODULVpH
O¶XQHGHVODPHVHVWSOXVODUJHTXHO¶DXWUH,OQ¶\DTX¶XQHIDoRQG¶LQVpUHUODILFKHGDQVXQHSULVH
SRODULVpH6LODILFKHQHV¶LQVqUHSDVHQWLqUHPHQWGDQVODSULVHLQYHUVH]ODILFKH
6LHOOHQHVLQVqUHWRXMRXUVSDVFRUUHFWHPHQWFRQWDFWH]XQpOHFWULFLHQTXDOLILpDILQTX¶LOLQVWDOOHXQH
prise adaptée. Ne modifiez en aucun cas la fiche.
9HLOOH]jFHTXHYRWUHFRUGRQSURORQJDWHXUVRLWHQERQpWDW/RUVTXHYRXVXWLOLVH]XQFRUGRQ
prolongateur, veillez à ce que celui-ci soit suffisamment épais pour transporter le courant nécessaire
DXSURGXLW8QFDOLEUHGHILO$:*GDXPLQLPXPHVWUHFRPPDQGpSRXUXQFRUGRQSURORQJDWHXU
de 15 m (50 pieds) maximum. Nous vous déconseillons d'utiliser un cordon de plus de 30 m (100
pieds). En cas de doute, utilisez le calibre immédiatement supérieur.
Plus le numéro du calibre est petit, plus le cordon est épais. Un cordon de calibre insuffisant
provoquera une chute de tension engendrant une perte de puissance et une surchauffe.
([DPLQH]UpJXOLqUHPHQWOHVFRUGRQVHWVLOVVRQWHQGRPPDJpVIDLWHVOHVUpSDUHUSDUXQpOHFWULFLHQ
agréé. À tout moment, vous devez savoir où se trouve votre cordon. Le respect de cette consigne
réduira les risques d'électrocution ou d'incendie.
3RUWH]GHVYrWHPHQWVELHQDMXVWpV3RUWH]WRXMRXUVXQSDQWDORQORQJHWVROLGHXQHVDORSHWWHGHV
jeans ou des jambières en tissu anti-coupure ou contenant des entre-deux dans une matière anti-
coupure. Portez des chaussures de sécurité antidérapantes. Pour avoir une meilleure prise et
vous protéger les mains, portez de gros gants de travail antidérapants.
Évitez de porter des bijoux, des shorts, des sandales, voire d'être pieds nus. Évitez de porter des
vêtements lâches: ils pourraient s'accrocher dans le moteur, la chaîne ou les broussailles.
$WWDFKH]YRXVOHVFKHYHX[GHIDoRQTXLOVQHWRPEHQWSDVHQGHVVRXVGHVpSDXOHV

CONSIGNES DE SÉCURITÉ IMPORTANTES
48
3RUWHUXQHWHQXHGHSURWHFWLRQORXUGHSHXWDXJPHQWHUODIDWLJXHHWHQWUDvQHUXQFRXSGHFKDOHXU
/RUVTXHOHWHPSVHVWFKDXGHWKXPLGHWUDYDLOOH]HQGpEXWGHPDWLQpHRXHQILQGDSUqVPLGL
quand les températures sont plus clémentes.
4XDQGYRXVPDQLH]FHWWHPDFKLQHXWLOLVH]XQHSURWHFWLRQRFXODLUHUpSRQGDQWjODQRUPH$16,
Z87.1, ainsi que des protections auditives et un casque. Des protections auditives sont indispensables.
4XDQGYRXVXWLOLVH]ODVFLHjFKDvQHVDFKH]WRXMRXUVFHTXHYRXVIDLWHV)DLWHVSUHXYHGHERQ
VHQV1¶XWLOLVH]MDPDLVO¶DSSDUHLOORUVTXHYRXVrWHVIDWLJXpPDODGHRXVRXVOHIIHWGHO¶DOFRROGH
drogues ou de médicaments.
1H[SRVH]SDVODVFLHjFKDvQHjODSOXLH
1¶XWLOLVH]SDVO¶DSSDUHLOGDQVXQHQGURLWKXPLGHRXPRXLOOp
6R\H]DWWHQWLIjFHTXHYRXVIDLWHV
0DLQWHQH]WRXWPHPEUHGXFRUSVjO¶pFDUWORUVTXHODVFLHjFKDvQHHVWHQIRQFWLRQQHPHQW
7HQH]WRXMRXUVODVFLHjFKDvQHSDUODSRLJQpHGHGHYDQWEDWWHULHUHWLUpHHWOHJXLGHHWODFKDvQH
en position arrière.
1HODLVVH]MDPDLVHPSOR\HUODVFLHjFKDvQHSDUTXHOTXXQTXLQDLWSDVpWpIRUPpjVRQXWLOLVDWLRQ
qu'il s'agisse d'une scie privée ou de location.
$YDQWG¶DOOXPHUODPDFKLQHDVVXUH]YRXVTXHODFKDvQHQHVWHQFRQWDFWDYHFDXFXQREMHW
$UUrWH]ODVFLHjFKDvQHDYDQWGHODGpSRVHU
3RXUpYLWHUXQGpPDUUDJHDFFLGHQWHOQHWHQH]MDPDLVODPDFKLQHHQD\DQWOHGRLJWVXUOHERXWRQ
de mise en marche.
(QWUHWHQH]O¶DSSDUHLODYHFVRLQ3RXUREWHQLUOHVPHLOOHXUVUpVXOWDWVHWUpGXLUHOHULVTXHGHEOHVVXUHV
veillez à ce que le tranchant soir toujours affûté. Suivez les instructions concernant la lubrification
et le remplacement des accessoires.
0DLQWHQH]OHVSRLJQpHVVqFKHVSURSUHVHWH[HPSWHVGKXLOHHWGHJUDLVVH
1XWLOLVH]SDVODVFLHjFKDvQHjXQHVHXOHPDLQ3RXUDYRLUXQHERQQHSULVHYHLOOH]jELHQVHUUHU
les pouces et les autres doigts autour des poignées. Si vous utilisez l'appareil à une seule main,
vous risquer de causer des blessures graves non seulement à vous-même mais aussi aux autres
WUDYDLOOHXUVHWDX[SHUVRQQHVTXLVHWURXYHQWjSUR[LPLWp8QHVFLHjFKDvQHHVWFRQoXHSRXUrWUH
utilisée à deux mains.
eYLWH]WRXWFRQWDFWFRUSRUHODYHFGHVVXUIDFHVPLVHVjODWHUUHWHOOHVTXHOHVWX\DX[HWOHVFO{WXUHV
métalliques. Le risque d'électrocution est accru si votre corps est en contact avec la terre.
1XWLOLVH]SDVXQHVFLHjFKDvQHHQGRPPDJpHRXGRQWOHVSLqFHVVRLHQWPDODMXVWpHVLQFRPSOqWHV
RXPDODVVHPEOpHV4XDQGYRXVOkFKH]O¶LQWHUUXSWHXUjJkFKHWWHODFKDvQHGRLWUDOHQWLUSXLVVDUUrWHU
6LODFKDvQHFRQWLQXHjWRXUQHUXQHIRLVTXHYRXVDYH]OkFKpO¶LQWHUUXSWHXUjJkFKHWWHIDLWHVUpYLVHU
l'appareil par votre concessionnaire LawnMaster.
9pULILH]TXHWRXWHVOHVSLqFHVVRQWHQERQpWDWTXHOHVSLqFHVPRELOHVVRQWDOLJQpHVFRUUHFWHPHQW
HWQHVRQWSDVEORTXpHVTX¶HOOHVQHSUpVHQWHQWQLGpIRUPDWLRQQLUXSWXUHQLDXWUHGRPPDJH
SRXYDQWDIIHFWHUOHIRQFWLRQQHPHQWGHO¶RXWLO
7RXWHQWUHWLHQRXUpSDUDWLRQQHILJXUDQWSDVGDQVOHVVHFWLRQVXWLOLVDWLRQHWHQWUHWLHQGHFHPDQXHO
devra être assuré par votre concessionnaire LawnMaster.

CONSIGNES DE SÉCURITÉ IMPORTANTES
REMARQUE: La taille de l'espace de travail requis est fonction de la tâche à accomplir et de la
taille de l'arbre ou de l'objet sur lequel vous travaillez. Par exemple, abattre un arbre demande
un espace de travail plus grand que le débiter.
49
9HLOOH]WRXMRXUVjYRWUHSRVLWLRQ
1¶XWLOLVH]SDVO¶RXWLOVLOLQWHUUXSWHXUQHOHPHWSDVHQPDUFKHRXQHO¶pWHLQWSDV)DLWHVUHPSODFHU
l'interrupteur défectueux par un centre d'entretien agréé.
1XWLOLVH]SDVYRWUHVFLHjFKDvQHDYHFXQJXLGHFKDvQHDUTXpHWQHOHPSOR\H]SDVSRXUIDLUH
fonctionner des pièces ou des fixations qui ne sont pas prévues pour elle.
'pEUDQFKH]ODVFLHjFKDvQHGDQVOHVFLUFRQVWDQFHVVXLYDQWHVTXDQGYRXVQHOXWLOLVH]SDVDYDQW
de lui faire passer un entretien, quand vous faites des réglages et quand vous changez des pièces
telles que la chaîne et le garde-chaîne.
1HOXWLOLVH]SDVSRXUFRXSHUGHODYLJQHQLGHVEURXVVDLOOHV
1XWLOLVH]SDVXQHFKDvQHjVFLHHQpWDQWGDQVXQDUEUHVXUXQHpFKHOOHRXVXUXQpFKDIDXGDJH
c'est extrêmement dangereux.
6R\H]H[WUrPHPHQWFLUFRQVSHFWTXDQGYRXVFRXSH]GHVDUEULVVHDX[HWGXERLVDJHOHVSHWLWV
végétaux peuvent se prendre dans la chaîne et vous gicler au visage ou vous faire perdre l'équilibre.
6LYRXVFRXSH]XQHEUDQFKHVRXPLVHjXQHWHQVLRQIDLWHVDWWHQWLRQDXUHERQG
1HIRUFH]SDVODVFLHjFKDvQH9RXVREWLHQGUH]XQPHLOOHXUWUDYDLOVLYRXVIDLWHVWRXUQHUODVFLHj
ODYLWHVVHSRXUODTXHOOHHOOHDpWpFRQoXH
9HLOOH]WRXMRXUVjFHTXHOHSURGXLWHWVRQXWLOLVDWLRQVRLHQWHQDGpTXDWLRQ1HPSOR\H]ODVFLHj
FKDvQHTXHSRXUFRXSHUGXERLV1HOHPSOR\H]MDPDLVSRXUFRXSHUGXSODVWLTXHGHODPDoRQQHULH
ou des matériaux de construction qui ne soient pas en bois ou à base de bois.
1HPSOR\H]ODVFLHjFKDvQHTXHSRXUFHSRXUTXRLHOOHDpWpFRQoXH
5DQJH]ODVFLHjFKDvQHORUVTXHYRXVQHO¶XWLOLVH]SDV*DUGH]ODGDQVXQHQGURLWVHFIHUPpRX
en hauteur, hors de portée des enfants.
&RQVHUYH]FHVFRQVLJQHV&RQVXOWH]OHVIUpTXHPPHQWHWXWLOLVH]OHVSRXUH[SOLTXHUOHIRQFWLRQQHPHQW
GHFHWRXWLODX[DXWUHVSHUVRQQHVVXVFHSWLEOHVGHO¶XWLOLVHU6LYRXVSUrWH]FHWRXWLOSUrWH]
également ce manuel.
AVERTISSEMENT
&HUWDLQHVSRXVVLqUHVJpQpUpHVSDUSRQoDJHpOHFWULTXHVFLDJHEUR\DJHSHUoDJHHWGDXWUHVDFWLYLWpV
liées à la construction contiennent des produits chimiques connus pour provoquer des cancers, des
malformations congénitales ou autres dommages au fœtus. Parmi ces produits de synthèse figurent:
OHSORPESURYHQDQWGHGLYHUVHVSHLQWXUHVjEDVHGHSORPE
ODVLOLFHFULVWDOOLQHSURYHQDQWGHVEULTXHVHWGXFLPHQWDLQVLTXHGDXWUHVSURGXLWVGHPDoRQQHULHHW
ODUVHQLFHWFKURPHSURYHQDQWGXERLVWUDLWpDYHFGHVSURGXLWVGHV\QWKqVH
Les risques d'exposition à ces produits de synthèse dépendent de la fréquence à laquelle vous
effectuez ce type de travail. Afin de réduire votre exposition à ces produits, travaillez dans un endroit
bien aéré, avec un équipement de sécurité agréé, comme les masques à poussière spécialement
FRQoXVSRXUILOWUHUOHVSDUWLFXOHVPLFURVFRSLTXHV
CONSERVEZ CES CONSIGNES
50
RÈGLES GÉNÉRALES DE SÉCURITÉ
AVERTISSEMENT
Un rebond peut se produire si la pointe du guide-chaîne touche un objet ou que le bois se resserre et
coince la scie à chaîne dans l'entaille Le contact de la partie supérieure de l'extrémité du guide peut
faire plonger la chaîne dans le bois et la bloquer pendant un instant. Il en résulte une réaction fulgurante,
projetant le guide vers le haut et l'arrière, en direction de l'utilisateur. Si la chaîne se coince sur le haut
du guide, celui-ci peut être projeté violemment en arrière, en direction de l'utilisateur. L'une comme
ODXWUHFHVUpDFWLRQVSHXYHQWYRXVIDLUHSHUGUHOHFRQWU{OHGHORXWLOHWHQWUDvQHUGHVEOHVVXUHVJUDYHV
Ne vous fiez pas exclusivement aux dispositifs de sécurité incorporés à votre scie à chaîne.
Un utilisateur responsable doit multiplier les précautions pour éviter les accidents et blessures lors de
l'emploi d'une scie à chaîne.
PRÉCAUTIONS À PRENDRE POUR MINIMISER LE REBOND:
1. Prenez toujours la scie à chaîne fermement à deux mains et tenez-la de cette même manière
pendant qu'elle fonctionne. Tenez la poignée avant avec la main gauche et la poignée arrière
avec la main droite, en serrant bien les pouces et les autres doigts autour des poignées.
Si vous avez une bonne prise et le
bras gauche bien tendu, vous pourrez mieux maîtriser la chaîne à scie en cas de rebond.
2. Assurez-vous que la zone de travail est bien dégagée. Évitez que l'extrémité du guide entre en
contact avec une bille, une branche, une palissade ou tout autre obstacle susceptible d'être heurté
pendant le travail.
3. Veillez à ce que la machine tourne toujours pendant que vous coupez le bois. Serrez la gâchette
à fond et maintenez la vitesse de coupe.
4. Utilisez exclusivement les guides et chaînes à faible rebond spécifiés pour cet outil.
6LYRXVFRPSUHQH]OHSULQFLSHGXUHERQGYRXVSRXUUH]UpGXLUHRXpOLPLQHUODGLPHQVLRQGHVXUSULVH
L'élément de surprise contribue à causer des accidents.
0DLQWHQH]FRQVWDPPHQWYRWUHpTXLOLEUHHWXQHDVVLVHIHUPH
1HVFLH]SDVjERXWGHEUDVQLSOXVKDXWTXHODKDXWHXUGHVpSDXOHV
5HVSHFWH]OHVFRQVLJQHVGHQWUHWLHQHWGDLJXLVDJHGRQQpVSRXUODVFLHjFKDvQH
Fig. 2Fig. 1
REBOND PAR
ROTATION
ZONE DE REBOND:
DANGER
REBOND (voir fig. 1 et 2)
51
RÈGLES GÉNÉRALES DE SÉCURITÉ
3RXVVpHHWWUDFWLRQ&HWWHIRUFHGHUpDFWLRQHVWWRXMRXUVjOLQYHUVHGXVHQVGHURWDWLRQGHOD
FKDvQHjOHQGURLWGXFRQWDFWDYHFOHERLV/XWLOLVDWHXUGRLWGRQFrWUHSUrWjFRQWU{OHUOD75$&7,21
lorsqu'il scie avec le bas du guide, et la POUSSÉE lorsqu'il scie avec le dessus (voir fig. 3)
Fig. 3
TRACTION
POUSSÉE

52
Vous trouverez peut-être certains des symboles suivants sur ce produit. Veuillez les étudier et apprendre
OHXUVLJQLILFDWLRQ8QHLQWHUSUpWDWLRQFRUUHFWHGHFHVV\PEROHVYRXVSHUPHWWUDG¶XWLOLVHUOHSURGXLWG¶XQH
IDoRQSOXVSHUIRUPDQWHHWSOXVVUH
SYMBOLES
NOM DÉSIGNATION/EXPLICATION
V Volts Tension
A Ampères Courant
Hz Hertz Fréquences (cycles par seconde)
: :DWWV Alimentation
min Minutes Durée
Courant Alternatif Type De Courant
Courant Continu Type Ou Caractéristique Du Courant
Vitesse À Vide Vitesse Rationnelle, À Vide
Fabrication De Classe Ii Fabrication À Double Isolation
/min
Par Minute Révolutions, Amplitudes De Pulsation, Vitesse
De Surface, Orbites, Etc. Par Minute
Alerte De Conditions Humides
N'exposez Pas L'outil À La Pluie, Ne L'utilisez Pas
Dans Des Endroits Humides.
/LVH]/H0DQXHO'¶XWLOLVDWLRQ
3RXU5pGXLUH/HV5LVTXHV'H%OHVVXUHV/¶XWLOLVDWHXU
Doit Lire Et Assimiler Le Contenu Du Manuel
'¶XWLOLVDWLRQ$YDQW'H6H6HUYLU'H&HW$SSDUHLO
Protection Des Yeux Et De
La Tête
Portez Des Lunettes De Protection Et Un Casque
Lorsque Vous Utilisez Cet Appareil.
Alerte De Sécurité Précautions Pour Assurer Votre Sécurité
Utilisez Vos Deux Mains Tenez La Machine Et Utilisez-la À Deux Mains
Rebond '$1*(5$WWHQWLRQ$X5HERQG
Extrémité Du Guide Évitez Tout Contact Avec L'extrémité Du Guide.
Gants De Protection
Quand Vous Utilisez La Scie À Chaîne, Protégez-
vous Les Mains Avec De Gros Gants De Travail
Antidérapants.
Portez Des Chaussures
De Sécurité
Quand Vous Utilisez Cette Machine, Portez Des
Chaussures De Sécurité Antidérapantes.
Maintenez Les Personnes
3UpVHQWHV¬/¶pFDUW
Maintenez Toutes Les Personnes Présentes À
8QH'LVWDQFH'¶DX0RLQV03LHGV
SYMBOLE
53
SYMBOLES
Les termes de mise en garde suivants et leur signification visent à expliquer le degré de risque associé
à cet appareil.
ENTRETIEN
L'entretien requiert une prudence extrême et une bonne connaissance de l'outil. Il doit donc
exclusivement être réalisé par un personnel d'entretien qualifié. Dans le cas où un entretien serait
nécessaire, nous vous recommandons de renvoyer l'outil dans le CENTRE D'ENTRETIEN AGRÉÉ le plus
proche de votre domicile. Pour l'entretien et les réparations, utilisez exclusivement des pièces de
rechange identiques à celles d'origine.
AVERTISSEMENT
Pour éviter toute blessure grave, n'essayez pas d'utiliser ce produit avant d'avoir lu attentivement
ce manuel d'utilisation et de l'avoir entièrement assimilé. Si vous ne comprenez pas les avertissements
et les instructions de ce manuel d'utilisation, n'utilisez pas ce produit. Si vous avez besoin d'aide,
appelez la ligne d'assistance téléphonique sans frais (1-866-384-843). L'utilisation d'un outil électrique
peut provoquer des projections d'objets étrangers dans les yeux, avec des risques de lésions oculaires
graves. Avant de commencer à utiliser un outil électrique, portez toujours des lunettes de sécurité,
des lunettes de sécurité à écrans latéraux ou, le cas échéant, un écran facial complet.
1RXVUHFRPPDQGRQVGHSRUWHUOHPDVTXHGHSURWHFWLRQ:LGH9LVLRQSDUGHVVXVGHVOXQHWWHVGH
vue ou des lunettes de sécurité classiques à écrans latéraux. Utilisez toujours une protection oculaire
répondant à la norme ANSI Z87.1.
AVERTISSEMENT
L'utilisation d'un outil électrique peut provoquer des projections d'objets étrangers dans les
yeux, avec des risques de lésions oculaires graves. Avant de commencer à utiliser un outil
électrique, portez toujours des lunettes de sécurité, des lunettes de sécurité à écrans latéraux
SYMBOLE MISE EN GARDE SIGNIFICATION
DANGER
,QGLTXH8QH6LWXDWLRQ'H'DQJHU,PPpGLDW4XL6L(OOH1¶HVW
Pas Évitée, Provoquera Des Blessures Graves, Voire La Mort.
AVERTISSEMENT
,QGLTXH8QH6LWXDWLRQ'H'DQJHU3RWHQWLHO4XL6L(OOH1¶HVW
Pas Évitée, Peut Provoquer Des Blessures Graves, Voire La Mort.
ATTENTION
,QGLTXH8QH6LWXDWLRQ'H'DQJHU3RWHQWLHO4XL6L(OOH1¶HVW
Pas Évitée, Pourrait Provoquer Des Blessures Mineures Ou
Modérées.
ATTENTION
6DQV6\PEROH'¶DOHUWH'H6pFXULWp,QGLTXH8QH6LWXDWLRQ
Pouvant Provoquer Des Dégâts Matériels.
CONSERVEZ CES CONSIGNES
ou, le cas échéant, un écran facial complet. Nous recommandons de porter le masque de protection
:LGH9LVLRQSDUGHVVXVGHVOXQHWWHVGHYXHRXGHVOXQHWWHVGHVpFXULWpFODVVLTXHVjpFUDQVODWpUDX[
Utilisez toujours une protection oculaire répondant à la norme ANSI Z87.1.
ÉQUIPEMENT ÉLECTRIQUE
54
AVERTISSEMENT
POUR ÉVITER TOUT RISQUE D'ÉLECTROCUTION, D'INCENDIE OU D'ENDOMMAGEMENT
DE L'OUTIL, VEUILLEZ UTILISER UNE PROTECTION DE CIRCUIT ADÉQUATE. LE CÂBLAGE
D'USINE DE CETTE SCIE À CHAÎNE EST PRÉVU POUR UNE UTILISATION À 120 V.
BRANCHEZ L'APPAREIL SUR UN CIRCUIT À 120 V 15 A ET METTEZ UN FUSIBLE TEMPORISÉ
DE 15 A OU UN DISJONCTEUR. POUR ÉVITER TOUT RISQUE D'ÉLECTROCUTION OU
D'INCENDIE, SI LE CORDON D'ALIMENTATION EST USÉ, COUPÉ OU ENDOMMAGÉ,
REMPLACEZ-LE IMMÉDIATEMENT.
DOUBLE ISOLATION (voir figure 4)
Cette scie à chaîne est équipée d'une fiche qui ressemble à celle représentée sur la figure 4. Elle
comporte une double isolation afin de fournir une double épaisseur d'isolation entre vous et le
système électrique de l'outil. Tous les éléments métalliques exposés sont isolés des composants
métalliques internes du moteur par une isolation de protection.
AVERTISSEMENT
POUR ÉVITER LES RISQUES DE BLESSURES, UTILISEZ EXCLUSIVEMENT DES PIÈCES DE
RECHANGE IDENTIQUES À CELLES D'ORIGINE.
AVERTISSEMENT
LA DOUBLE ISOLATION NE REMPLACE PAS LES MESURES DE SÉCURITÉ NORMALES LORS
DU FONCTIONNEMENT DE L'OUTIL.
AVERTISSEMENT
POUR ÉVITER TOUTE ÉLECTROCUTION:
1. Lors de l'entretien d'un outil à double isolation, utilisez exclusivement des pièces de
remplacement identiques à celles d'origine. L'entretien doit être effectué par un technicien qualifié.
2. Ne pas utiliser dans des endroits humides et ne pas exposer à la pluie.
CAUTION
DANS TOUS LES CAS, ASSUREZ-VOUS QUE LA PRISE EST CORRECTEMENT MISE À LA TERRE.
EN CAS DE DOUTE, FAITES VÉRIFIER LA PRISE PAR UN ÉLECTRICIEN AGRÉÉ.
1) Fiche À 2 Broches
2) Cordon Prolongateur Correctement Mis À La Terre
Fig. 4

55
Veillez à ce que votre cordon prolongateur soit correctement câblé et en bon état. Un cordon
prolongateur endommagé doit toujours être remplacé ou réparé par une personne qualifiée avant
de pouvoir être réutilisé. Maintenez les cordons prolongateurs à bonne distance des objets coupants,
G¶XQHVRXUFHGHFKDOHXUH[FHVVLYHRXGHVHQGURLWVKXPLGHVRXPRXLOOpV
Utilisez un circuit électrique séparé pour vos outils. Ce circuit ne doit pas être inférieur à un cordon
de calibre 12 et doit être protégé à l'aide d'un fusible temporisé de 15 ampères. Avant de connecter
le moteur à la ligne électrique, assurez-vous que l'interrupteur est en position OFF (arrêt) et que le
courant électrique est identique à celui indiqué sur la plaque signalétique du moteur.
Un fonctionnement à une tension inférieure endommagerait le moteur.
AVERTISSEMENT
POUR PROTÉGER L'UTILISATEUR DE TOUT RISQUE D'ÉLECTROCUTION, CET OUTIL DOIT
ÊTRE MIS À LA TERRE LORSQU'IL EST UTILISÉ.
ÉQUIPEMENT ÉLECTRIQUE
AVERTISSEMENT
CET OUTIL EST CONÇU POUR ÊTRE EXCLUSIVEMENT UTILISÉ À L'EXTÉRIEUR. NE PAS
EXPOSER À LA PLUIE NI UTILISER DANS DES ENDROITS HUMIDES.
DIRECTIVES RELATIVES À L’UTILISATION DE CORDONS PROLONGATEURS
UTILISEZ UN CORDON PROLONGATEUR ADÉQUAT. Veillez à ce qu'il soit en bon état. Lorsque
vous utilisez un cordon prolongateur, veillez à ce que son calibre soit suffisant pour transporter le
courant nécessaire au produit. Un cordon de taille insuffisante provoquera une surchauffe.
Le tableau ci-dessous montre la taille correcte à utiliser en fonction de la longueur du cordon et de
la valeur nominale indiquée sur la plaque signalétique. En cas de doute, utilisez le calibre
immédiatement supérieur. Plus le numéro du calibre est petit, plus le cordon est épais.
CALIBRE MINIMAL POUR CORDONS PROLONGATEURS (AWG)
(TENSION DE 120 V UNIQUEMENT)
Intensité Nominale Longueur Totale Du Cordon En Mètres (Pieds)
Plus De Pas Plus De 7,6 m (25 P) 15 m (50 P) 30,4 m (100 P) 45,7 m (150 P)
0 6 18 16 16 14
61018161412
10 12 16 16 14 12
12 16 14 12 Déconseillé
CONSERVEZ CES CONSIGNES
56
FAMILIARISEZ-VOUS AVEC VOTRE SCIE À CHAÎNE
FAIBLE REBOND
SAW CHAIN
Metal Pointes
Tron?onnage
Gachette
Commutateur De
Verrouillage
Retenue Du
Cordon
Poignée
Avant
Fig. 5
GAINE RÉUTILISABLE
Poignée
Arrière
Reservoir
D'huile Pac
Carter De
Cha?ne
Quick View
Oil Indicator
Chain ??Cache-serrure
Bouton
GUIDE
BAR
Protège-main
Avant
Tension De Cha?ne
Bouton

57
Pour utiliser ce produit en toute sécurité, assimilez bien les informations inscrites sur l'outil et
contenues dans le présent manuel. Préparez également soigneusement votre projet de travail.
$YDQWG¶XWLOLVHUFHWDSSDUHLOIDPLOLDULVH]YRXVDYHFWRXWHVOHVFDUDFWpULVWLTXHVGHIRQFWLRQQHPHQW
ainsi que les règles de sécurité.
BOUTON DE TENSION DE LA CHAÎNE
Dispositif permettant de régler la tension de la chaîne.
GUIDE-CHAÎNE
Le guide-chaîne d'origine possède une extrémité à faible rayon, qui permet de réduire un peu le
risque de rebond.
CHAÎNE À FAIBLE REBOND
La chaîne à rebond réduit contribue à réduire la puissance du rebond en empêchant les gouges
(lames) de s'enfoncer trop profondément dans la zone de rebond.
INDICATEUR INSTANTANÉ DE NIVEAU D'HUILE
Réservoir semi-transparent, permettant à l'utilisateur de voir quand il faut ajouter de l'huile.
VERROUILLAGE DE L'INTERRUPTEUR
Dispositif de sécurité permettant d'éviter un démarrage accidentel du moteur.
INTERRUPTEUR À GÂCHETTE
Après avoir enfoncé le verrou de l'interrupteur, pressez la gâchette pour faire démarrer la machine.
Pour l'arrêter, relâchez la gâchette.
FAMILIARISEZ-VOUS AVEC VOTRE SCIE À CHAÎNE

58
MONTAGE
DÉBALLAGE
Ce produit a été expédié entièrement monté.
)DLWHVELHQDWWHQWLRQTXDQGYRXVVRUWH]OHSURGXLWHWVHVDFFHVVRLUHVGHODERvWH9pULILH]TXHWRXV
les accessoires répertoriés sont présents.
&RQWU{OH]VRLJQHXVHPHQWOHSURGXLWSRXUYpULILHUTXDXFXQEULVRXGRPPDJHQHVHVWSURGXLWGXUDQW
le transport.
1HMHWH]SDVOHPDWpULHOG¶HPEDOODJHDYDQWG¶DYRLUVRLJQHXVHPHQWH[DPLQpOHSURGXLWHWG¶DYRLU
FRQVWDWpTXLOIRQFWLRQQHGHIDoRQVDWLVIDLVDQWH
6LGHVSLqFHVPDQTXHQWRXVRQWHQGRPPDJpHVYHXLOOH]FRQWDFWHUOHVHUYLFHjODFOLHQWqOHDX
1-866-384-8432 pour obtenir de l'aide.
LISTE D'EMBALLAGE
6FLHjFKDvQH
*DLQHUpXWLOLVDEOH
0DQXHOGXWLOLVDWLRQ
AVERTISSEMENT
Si des pièces sont manquantes ou endommagées, ne faites pas fonctionner ce produit avant de
les avoir remplacées.
Le non-respect de cet avertissement peut entraîner des blessures graves.
AVERTISSEMENT
1HSDVUHOLHUjXQHVRXUFHG¶DOLPHQWDWLRQDYDQWTXHOHPRQWDJHVRLWWHUPLQp/HQRQUHVSHFWGH
cette consigne peut provoquer un démarrage accidentel et entraîner des blessures graves.
AVERTISSEMENT
1¶HVVD\H]SDVGHPRGLILHUFHSURGXLWRXGHFUpHUGHVDFFHVVRLUHVQRQH[SUHVVpPHQWUHFRPPDQGpV
pour celui-ci. De telles altérations ou modifications constituent un cas d'utilisation impropre et peuvent
provoquer des situations dangereuses, susceptibles d'entraîner des blessures graves.

59
UTILISATION
AVERTISSEMENT
5HVWH]SUXGHQWPrPHORUVTXHYRXVSHQVHUH]ELHQFRQQDvWUHFHSURGXLW6RXYHQH]YRXVTX¶XQH
IUDFWLRQGHVHFRQGHG¶LQDWWHQWLRQSHXWVXIILUHSRXUSURYRTXHUGHVEOHVVXUHVJUDYHV
AVERTISSEMENT
Quand vous utilisez des outils électriques, portez toujours des lunettes de sécurité ou des lunettes de
sécurité à écrans latéraux. Le non-respect de cette consigne peut provoquer des projections d'objets
dans les yeux, avec des risques de lésions graves.
AVERTISSEMENT
1¶XWLOLVH]SDVGHIL[DWLRQVRXG¶DFFHVVRLUHVQRQH[SUHVVpPHQWUHFRPPDQGpVSDUOHIDEULFDQWGHFHSURGXLW
/XWLOLVDWLRQGHIL[DWLRQVRXG¶DFFHVVRLUHVQRQUHFRPPDQGpVSHXWHQWUDvQHUGHVEOHVVXUHVJUDYHV
APPLICATIONS
Ce produit est destiné aux tâches suivantes:
eEUDQFKDJHJURVVLHUDEDWWDJHHWGpELWDJH
eOLPLQDWLRQGHJURVVHVUDFLQHV
AJOUTER DU LUBRIFIANT POUR LE GUIDE ET LA CHAÎNE (voir fig. 6)
8WLOLVH]XQOXEULILDQWVWDQGDUGSRXUJXLGHHWFKDvQHGHVFLHjFKDvQH&HVSURGXLWVVRQWFRQoXVSRXU
les chaînes et les lubrificateurs de chaînes et leur formule leur permet d'agir dans un large éventail
de températures sans qu'il y ait besoin de les diluer.
REMARQUE: La scie à chaîne est fabriquée sans ajout d'huile pour la chaîne ou le guide.
Vérifiez donc le niveau toutes les 20 minutes et ajoutez de l'huile si nécessaire.
5HWLUH]OHERXFKRQGXUpVHUYRLU
5HPSOLVVH]OHUpVHUYRLUGKXLOHSRXUODFKDvQHHWOHJXLGH
(VVX\H]OKXLOHH[FpGHQWDLUH
4XDQGOLQGLFDWHXULQVWDQWDQpGHQLYHDXHQGHVVRXVGXPLQLPXP0,1UHPSOLVVH]OHUpVHUYRLU
5pSpWH]OHSURFHVVXVVLQpFHVVDLUH
REMARQUE: Évitez d'employer des huiles sales, usées ou autrement contaminées: cela risque
d'endommager la chaîne ou le guide.
REMARQUE: Si vous voyez que la scie à chaîne perd de l'huile quand elle n'est pas utilisée,
c'est normal. Si vous voulez éviter ces pertes, videz le réservoir après chaque utilisation et
faites tourner la machine pendant une minute. Si vous comptez ne pas utiliser la machine
pendant trois mois ou plus, veillez à lubrifier légèrement la chaîne: vous éviterez ainsi la
formation de rouille sur la chaîne et les pignons du guide.
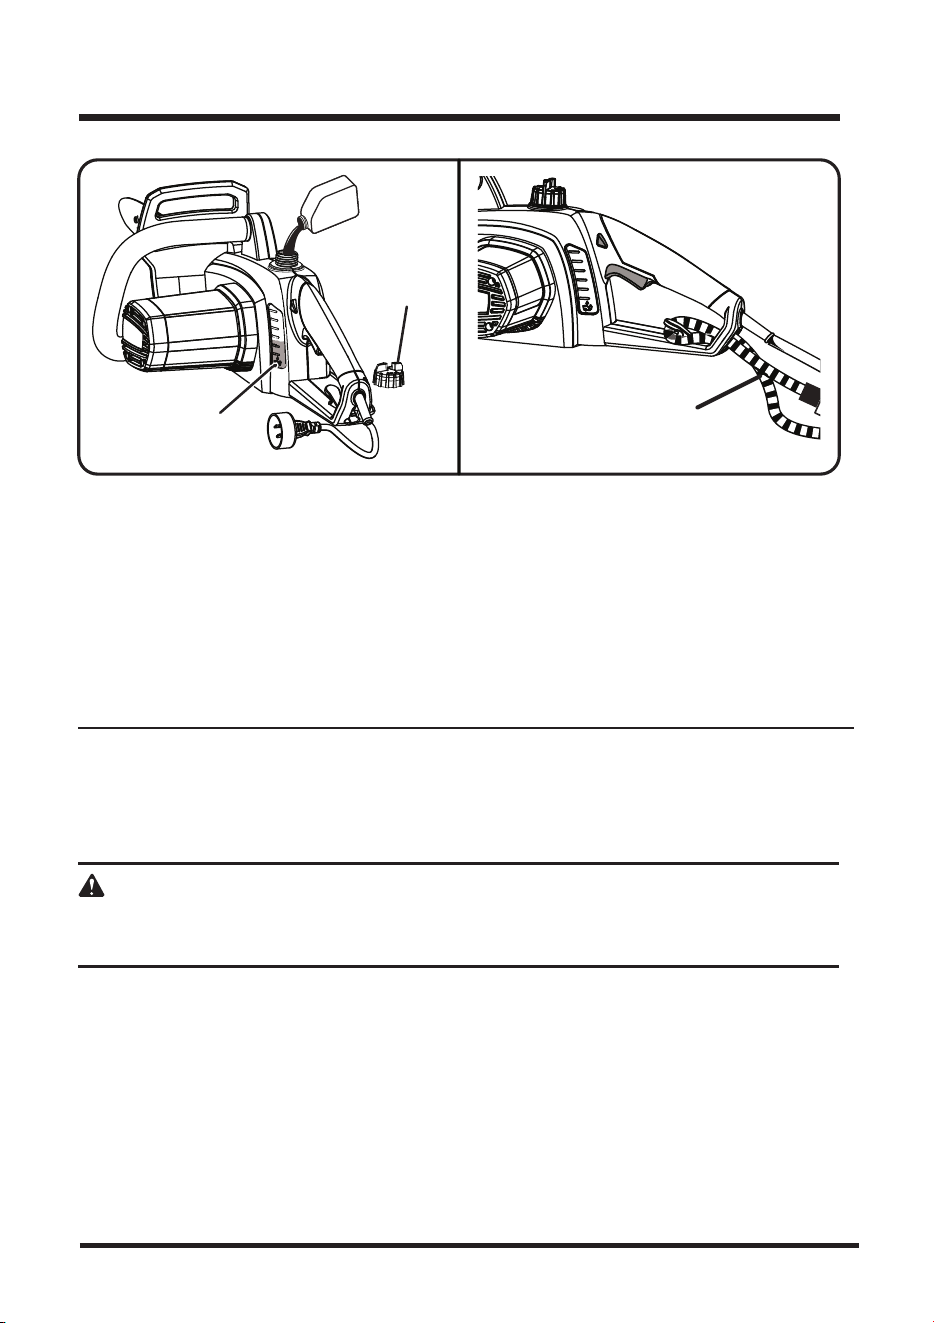
60
UTILISATION
RACCORDEMENT À LA SOURCE D'ALIMENTATION (voir fig. 7)
&HWWHVFLHjFKDvQHHVWFRQoXHDYHFXQVHUUHFkEOHTXLHPSrFKHOHFRUGRQSURORQJDWHXUGHVH
détacher pendant l'utilisation.
)RUPH]XQHERXFOHDYHFOH[WUpPLWpGHODUDOORQJH
,QVpUH]ODSDUWLHGHODERXFOHGXFRUGRQSURORQJDWHXUjWUDYHUVORXYHUWXUHGDQVOHF{WpGHOD
poignée arrière et placez-la sur la fixation du cordon.
7LUH]GRXFHPHQWODERXFOHFRQWUHOHVHUUHFkEOHMXVTXjFHTXLOQ\DLWSOXVDXFXQPRX
5DFFRUGH]ODVFLHDXFRUGRQSURORQJDWHXU
REMARQUE: Si vous n'éliminez pas totalement l'excédent de mou du serre-câble du cordon prolongateur,
la fiche risque de se détacher de la prise.
DÉMARRAGE/ARRÊT DE LA SCIE À CHAÎNE (voir la fig. 8)
AVERTISSEMENT
Veillez à toujours vous trouver à la gauche de l'axe de la chaîne. Ne chevauchez jamais la scie ou
la chaîne et ne vous penchez jamais au-delà de l'axe de la chaîne.
CHAIN
LU B R I CANT
Fig. 6 Fig. 7
INDICATEUR
INSTANTANÉ
DE NIVEAU
D'HUILE
BOUCHON DU
RÉSERVOIR
D'HUILE
CORDON
PROLONGATEUR

61
UTILISATION
Fig. 8
DÉMARRAGE DE LA SCIE À CHAÎNE:
9pULILH]TXHODFKDvQHHVWWHQGXHjODWHQVLRQDGpTXDWH5HSRUWH]YRXVjODVHFWLRQGHFH
manuel consacrée au réglage de la tension de la chaîne.
9pULILH]TXHOHERXWRQGHYHUURXLOODJHGXFDUWHUGHFKDvQHHVWELHQVHUUp
9pULILH]TXLOQHWUDvQHjSUR[LPLWpDXFXQREMHWVXVFHSWLEOHGHQWUHUHQFRQWDFWDYHFODFKDvQH
ou le guide.
(QIRQFH]OHYHUURXGHOLQWHUUXSWHXUHWPDLQWHQH]/LQWHUUXSWHXUjJkFKHWWHHVWPDLQWHQDQWXWLOLVDEOH
(QIRQFH]OLQWHUUXSWHXUjJkFKHWWHHWPDLQWHQH]SXLVOkFKH]OHYHUURXGHOLQWHUUXSWHXUHWPDLQWHQH]
l'interrupteur à gâchette enfoncé pour éviter que la scie ne s'éteigne.
ARRÊT DE LA SCIE À CHAÎNE:
REMARQUE: Une fois que vous aurez lâché l'interrupteur à gâchette, la chaîne ralentira jusqu'à
l'arrêt complet. C'est normal.
3RXUDUUrWHUODVFLHjFKDvQHOkFKH]OLQWHUUXSWHXUjJkFKHWWH
8QHIRLVTXHFHVHUDIDLWOHYHUURXGHOLQWHUUXSWHXUVHUHPHWWUDDXWRPDWLTXHPHQWHQSRVLWLRQYHUURXLOOpH
INTERRUPTEUR À
GÂCHETTE
VERROUILLAGE
DE L'INTERRUPTEUR
POIGNÉE
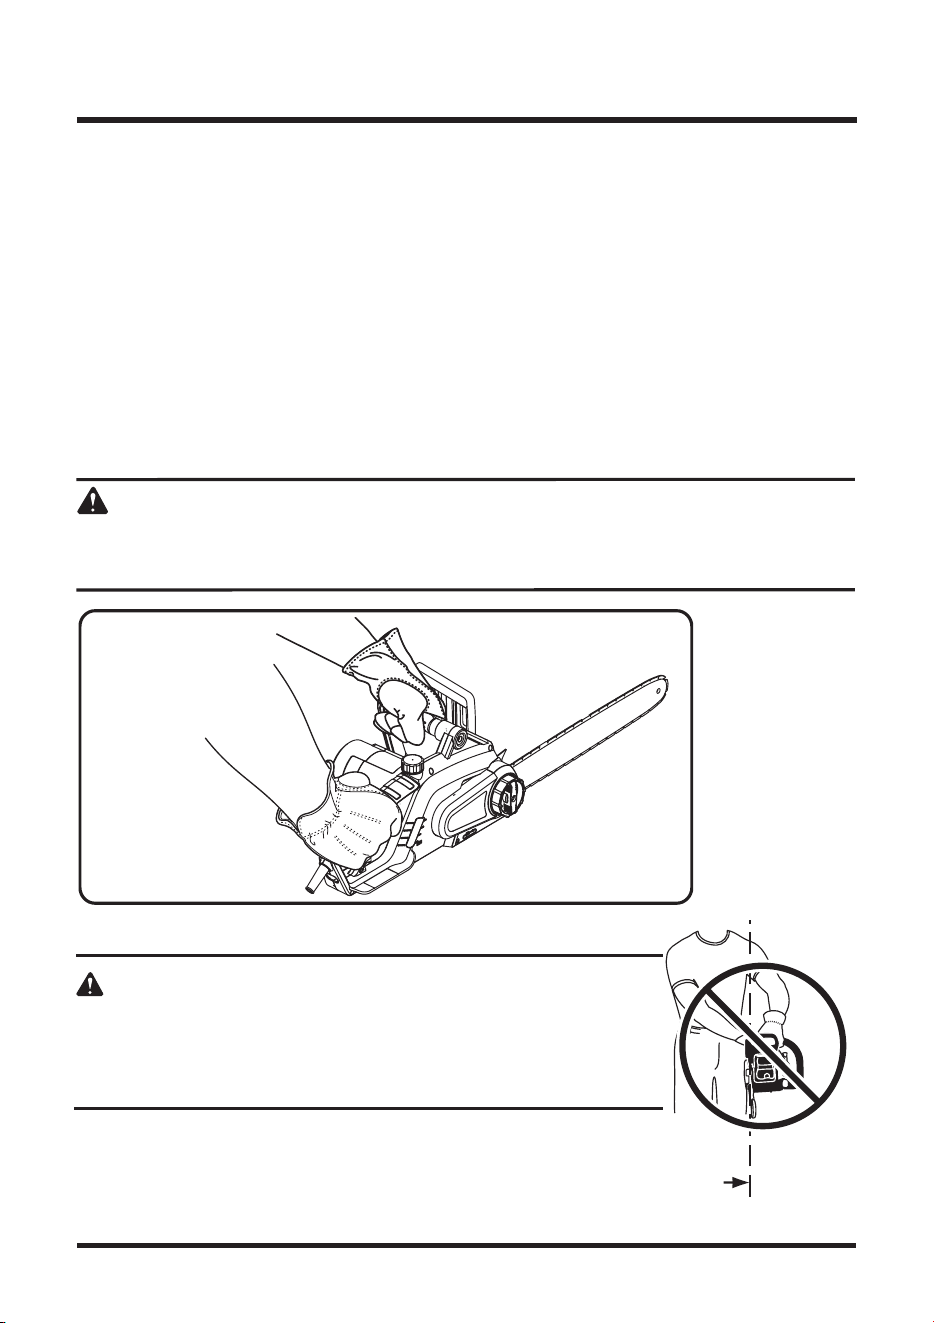
UTILISATION
62
COMMENT SE PRÉPARER À SCIER
COMMENT TENIR CORRECTEMENT LES POIGNÉES (voir fig. 9)
Pour l'équipement de sécurité souhaitable, voir les Règles générales de sécurité.
3RXUDYRLUODPHLOOHXUHSULVHHWODPHLOOHXUHSURWHFWLRQSRVVLEOHVSRUWH]GHVJDQWVDQWLGpUDSDQWV
3UHQH]WRXMRXUVODVFLHjFKDvQHIHUPHPHQWjGHX[PDLQV7HQH]WRXMRXUVODSRLJQpHDYDQWDYHF
ODPDLQJDXFKHHWODSRLJQpHDUULqUHDYHFODPDLQGURLWHGHIDoRQjDYRLUOHFRUSVjJDXFKHGH
l'axe de la chaîne.
9HLOOH]jWRXMRXUVDYRLUODVFLHELHQHQPDLQTXDQGOHPRWHXUWRXUQH9HLOOH]jDYRLUOHVGRLJWVELHQ
serrés autour de la poignée, avec le pouce recroquevillé sous la barre. Cette position des mains
sera la plus stable en cas de rebond ou de saute de la scie à chaîne. Toute position où le pouce
HWOHVDXWUHVGRLJWVVRQWVXUOHPrPHF{WpGHODSRLJQpHHVWGDQJHUHXVHSDUFHTXHODVFLHjFKDvQH
risque de vous échapper et cas de saute ou de rebond, même léger.
AVERTISSEMENT
Ne tenez jamais la scie à chaîne de la main gauche (mains inversées) et bannissez toute position
qui vous oblige à avoir le bras ou le corps en travers de l'axe de la chaîne.
AVERTISSEMENT
N'actionnez PAS l'interrupteur avec la main gauche en tenant la poignée
avant avec la main droite. Ne laissez jamais une partie du corps
quelconque se trouver dans l'axe de chaîne pendant que la scie à chaîne
fonctionne.
Fig. 9
PRISE CORRECTE
AXE DE
LA CHAÎNE
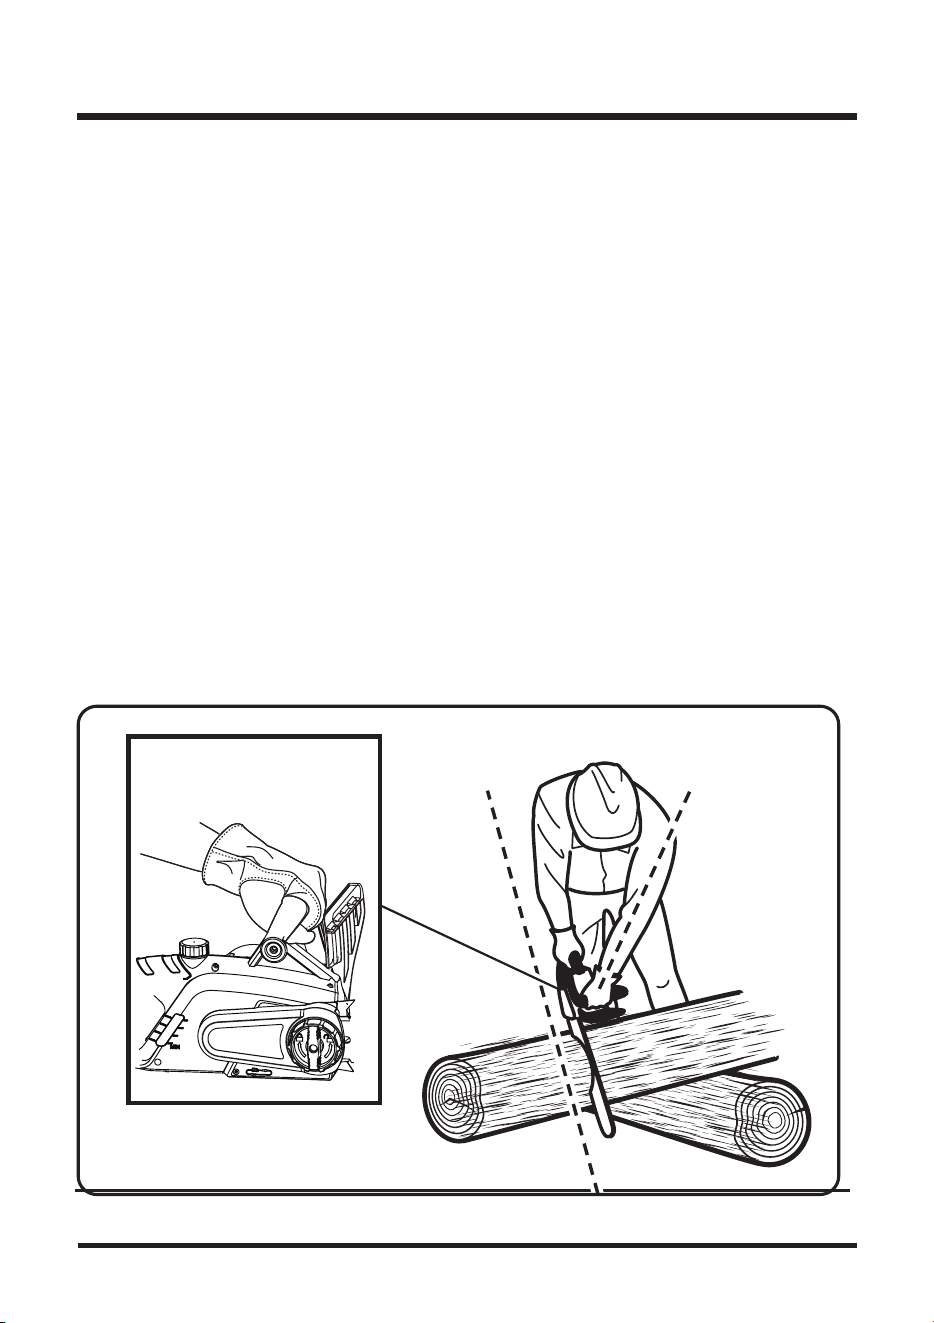
UTILISATION
63
BONNE POSITION POUR SCIER (voir fig. 10)
MÉTHODE D'UTILISATION/DE COUPE ÉLÉMENTAIRE
Exercez-vous en coupant quelques petites branches avec la technique décrite ci-après, pour vous
familiariser avec la scie à chaîne avant d'entreprendre un travail plus important.
7HQLH]YRXVELHQFDPSpHWHQpTXLOLEUHVXUOHVGHX[SLHGVVXUXQVROIHUPH
*DUGH]OHEUDVJDXFKHELHQWHQGXFRXGHEORTXpDILQGHSRXYRLUIDLUHIDFHjXQpYHQWXHOUHERQG
9HLOOH]jYRXVWURXYHUjODJDXFKHGHOD[HGHODFKDvQH
*DUGH]OHSRXFHUHFURTXHYLOOpVRXVODEDUUH
0HWWH]YRXVHQSRVLWLRQFRUUHFWHIDFHjODSLqFHjFRXSHUVFLHDUUrWpH
(QIRQFH]OHYHUURXGHOLQWHUUXSWHXUHWVHUUH]OLQWHUUXSWHXUjJkFKHWWHSXLVOkFKH]OHYHUURXHW
laissez la chaîne parvenir à pleine vitesse avant de commencer la coupe.
&RPPHQFH]ODFRXSHDYHFODVFLHDSSX\pHFRQWUHODELOOH
0DLQWHQH]XQUpJLPHPRWHXUXQLIRUPHSHQGDQWWRXWHODGXUpHGHODFRXSH
/DLVVH]ODFKDvQHHIIHFWXHUOHWUDYDLOQHODSRXVVH]YHUVOHEDVTXHOpJqUHPHQW6LYRXVSRXVVH]
GHIDoRQH[FHVVLYHYRXVULVTXH]GHQGRPPDJHUODFKDvQHOHJXLGHRXOHPRWHXU
5HOkFKH]OLQWHUUXSWHXUjJkFKHWWHGqVTXHODFRXSHDpWpHIIHFWXpHHWDWWHQGH]TXHODFKDvQH
s'immobilise. Faire fonctionner l'appareil sans charge de coupe peut causer une usure excessive
de la chaîne, du guide et du moteur.
1DSSX\H]SDVVXUODVFLHHQILQGHFRXSH
Fig. 10
POUCE EN-DESSOUS
DE LA BARRE
AXE DE LA
CHAÎNE
BRAS TENDU

UTILISATION
64
PRÉCAUTIONS DE CHANTIER (voir fig. 11)
1HFRXSH]SDVGHSODVWLTXHGHPDoRQQHULHQLGHPDWpULDX[GHFRQVWUXFWLRQTXLQHVRLHQWSDV
en bois ou à base de bois.
1HODLVVH]MDPDLVGHVHQIDQWVXWLOLVHUFHWRXWLO1HODLVVH]MDPDLVHPSOR\HUODVFLHjFKDvQHSDU
quelqu'un qui n'ait pas lu le manuel d'utilisation ou qui n'ait pas été formé à son utilisation.
0DLQWHQH]WRXWOHPRQGHDXWUHVWUDYDLOOHXUVVSHFWDWHXUVHQIDQWVDQLPDX[j%211(',67$1&(
de votre zone de coupe. Pour l'abattage, la distance de sécurité doit être d'au moins deux fois
la taille de l'arbre le plus grand se trouvant dans la zone de coupe. Pour le débitage, maintenez
une distance d'au moins 4,6 m (15 P) entre les travailleurs.
7UDYDLOOH]WRXMRXUVDYHFOHVGHX[SLHGVVXUXQVROIHUPHSRXUpYLWHUGHSHUGUHOpTXLOLEUH
1HFRXSH]ULHQDXGHVVXVGXQLYHDXGHODSRLWULQHSDUFHTXXQHVFLHWHQXHHQKDXWHXUHVW
difficile à maîtriser en cas de rebond.
1DEDWWH]SDVGDUEUHVjSUR[LPLWpGHOLJQHVpOHFWULTXHVRXGHEkWLPHQWV/DLVVH]FHWUDYDLOj
des professionnels.
1HFRXSH]TXHORUVTXHODYLVLELOLWpHWODOXPLqUHSHUPHWWHQWGHELHQYRLU
Fig. 11
ABATTAGE D'ARBRES
CONDITIONS DANGEREUSES (See Fig. 12)
Quand vous abattez un arbre, gardez à l'esprit les avertissements suivants, pour éviter des
blessures potentiellement graves.
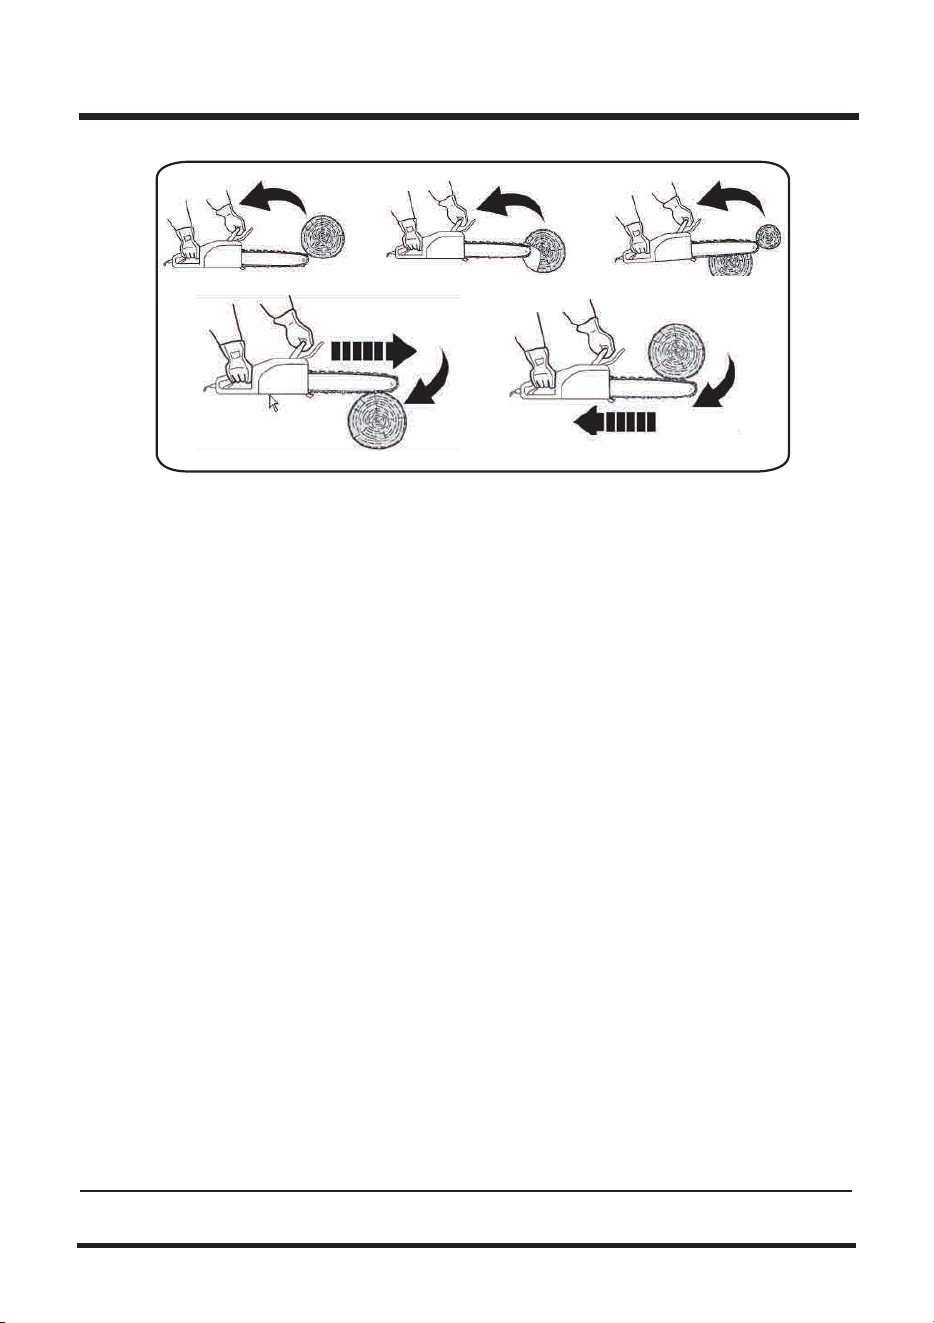
UTILISATION
65
Quand deux personnes ou plus font de l'abattage et du débitage ensemble, veillez à laisser entre
l'abattage et le débitage une distance d'au moins deux fois la taille de l'arbre à abattre.
Quand vous abattez des arbres, veillez à ne mettre en danger ni personnes, ni lignes électriques
ou conduites d'aucune sorte, ni biens ou possessions de quiconque. Si l'arbre heurte malgré tout
une ligne électrique ou une conduite, avertissez immédiatement la société concernée.
Sur un terrain pentu, veillez à vous trouver en amont l'arbre, étant donné que celui-ci, une fois abattu,
aura tendance à rouler ou glisser vers le bas.
6FLH]DYHFOHJXLGHFKDvQHjDQJOHSODW
1HWUDYDLOOH]MDPDLVDYHFXQHFKDvQHOkFKHGpWHQGXHRXWUqVXVpH
$VVXUH]YRXVTXHODFKDvQHHVWFRUUHFWHPHQWDIIWpH
1HWUDYDLOOH]MDPDLVDXGHVVXVGHODKDXWHXUGHVpSDXOHV
1HWUDYDLOOH]MDPDLVDYHFODSRLQWHGXJXLGHFKDvQH
7HQH]WRXMRXUVODVFLHjFKDvQHIHUPHPHQWjGHX[PDLQV
8WLOLVH]WRXMRXUVXQHFKDvQHjIDLEOHUHERQG
8WLOLVH]OHVJULIIHVGHEXWpHHQDFLHUSRXUDYRLUXQHIIHWGHOHYLHU
9pULILH]ODWHQVLRQGHODFKDvQH
1HFRXSH]TXDYHFOHPRWHXUjKDXWHYLWHVVH
eYLWH]TXHOH[WUpPLWpGXJXLGHHQWUHHQFRQWDFWDYHFXQHELOOHXQHEUDQFKHRXWRXWDXWUHREVWDFOH
susceptible d'être heurté pendant le travail.
5HVSHFWH]OHVFRQVLJQHVGHQWUHWLHQHWGDLJXLVDJHGRQQpVSDUOHIDEULFDQWGHODVFLHjFKDvQH
(QFDVGHUHPSODFHPHQWXWLOLVH]H[FOXVLYHPHQWOHVJXLGHVHWFKDvQHVVSpFLILpVSDUOHIDEULFDQW
ou des produits équivalents.
POUR ÉVITER LES REBONDS
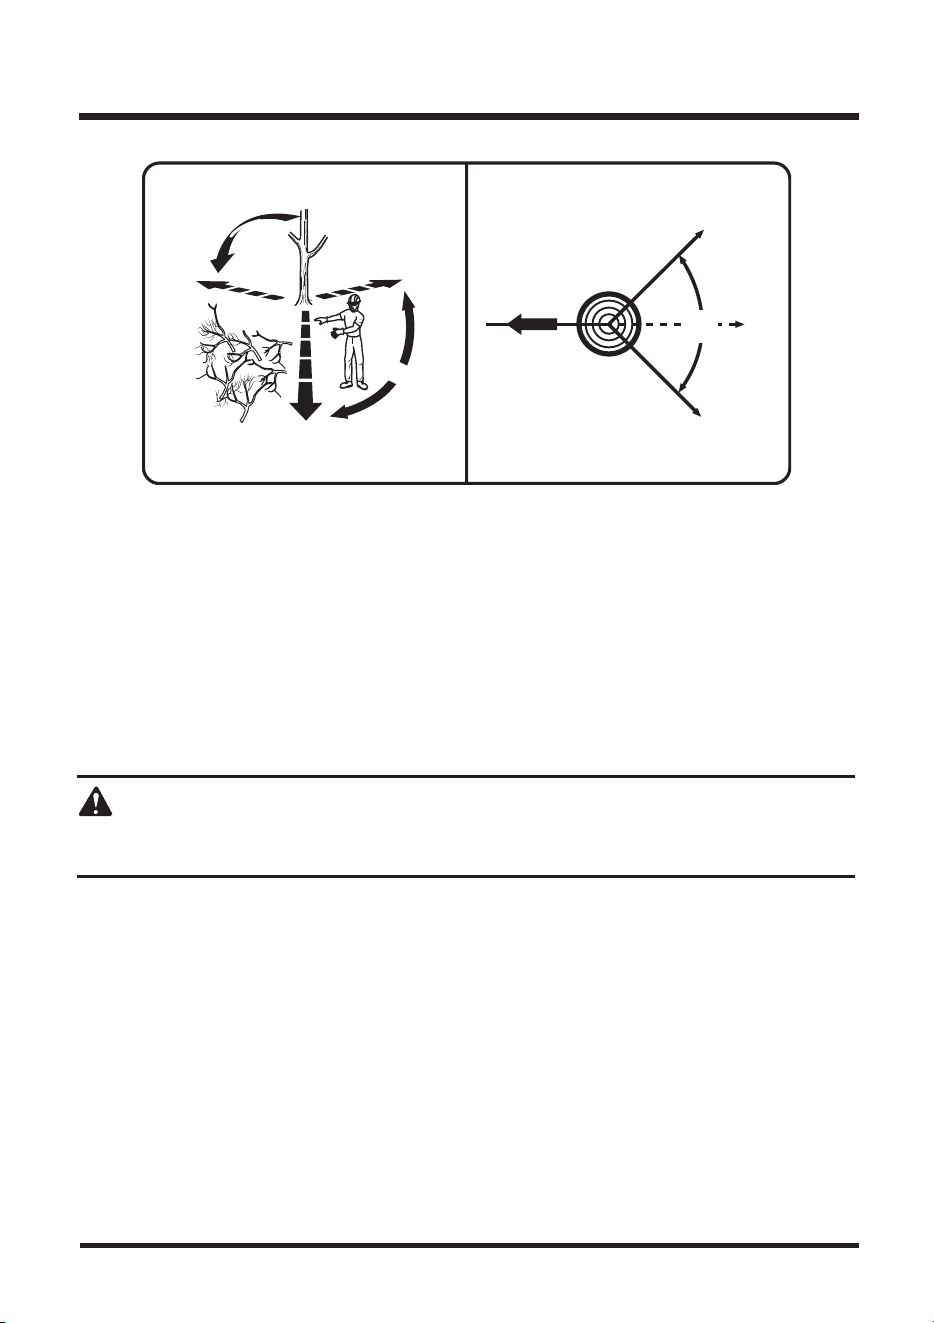
UTILISATION
66
1HSDVFRXSHUGDUEUHVH[WUrPHPHQWLQFOLQpVQLGHJURVDUEUHVGRQWOHVEUDQFKHVVRLHQW
pourries, l'écorce décollée ou le tronc creux. Ces arbres doivent être poussés ou tirés à terre
par un engin de chantier lourd avant d'être débités.
1DEDWWH]SDVGDUEUHVjSUR[LPLWpGHOLJQHVpOHFWULTXHVRXGHEkWLPHQWV
5HJDUGH]VLODUEUHFRPSRUWHGHVEUDQFKHVPRUWHVRXHQGRPPDJpHVULVTXDQWGHWRPEHUHW
de heurter l'utilisateur pendant l'abattage.
3HQGDQWOHWUDLWGDEDWWDJHREVHUYH]GHWHPSVjDXWUHODFLPHGHODUEUHSRXUYRXVDVVXUHU
qu'il tombera dans la direction souhaitée.
6LODUEUHFRPPHQFHjWRPEHUGDQVXQHPDXYDLVHGLUHFWLRQRXTXHODVFLHjFKDvQHVHSLQFH
RXVHEORTXHSHQGDQWODFKXWHDEDQGRQQH]ODHWVDXYH]YRXV
AVERTISSEMENT
N'effectuez pas d'abattage par grand vent ou en cas de fortes précipitations. Attendez que le
danger ait disparu.
PROCÉDURE CORRECTE POUR L'ABATTAGE
(voir fig. 13)
$EDWWDJHGDUEUHV4XDQGGHX[SHUVRQQHVRXSOXVIRQWGHODEDWWDJHHWGXGpELWDJHHQVHPEOH
veillez à laisser entre l'abattage et le débitage une distance d'au moins deux fois la taille de l'arbre
à abattre. Quand vous abattez des arbres, veillez à ne mettre en danger ni personnes, ni lignes
électriques ou conduites d'aucune sorte, ni biens ou possessions de quiconque. Si un arbre heurte
malgré tout une ligne électrique ou une conduite, avertissez immédiatement la société concernée.
6XUXQWHUUDLQSHQWXYHLOOH]jYRXVWURXYHUHQDPRQWODUEUHpWDQWGRQQpTXHFHOXLFLXQHIRLV
abattu, aura tendance à rouler ou glisser vers le bas.
)L[H]YRXVXQFKHPLQGHUHWUDLWHRXSOXVLHXUVDXFDVROHFKHPLQSUpYXVHUDLWEORTXp
Déblayez les environs immédiats et assurez-vous qu'aucun obstacle ne se trouve sur le chemin de
retraite que vous avez prévu. Déblayez le chemin de retraite sur environ 135° autour de l'axe de
chute prévu.
Fig. 12
CHEMIN DE
RETRAITE
CHEMIN
DE
RETRAITE
135° PAR RAPPORT
À L'AXE DE CHUTE
PRÉVU
AXE DE CHUTE
PRÉVU
90°
90°
45°
45°
135°
135°
AXE DE CHUTE PRÉVU
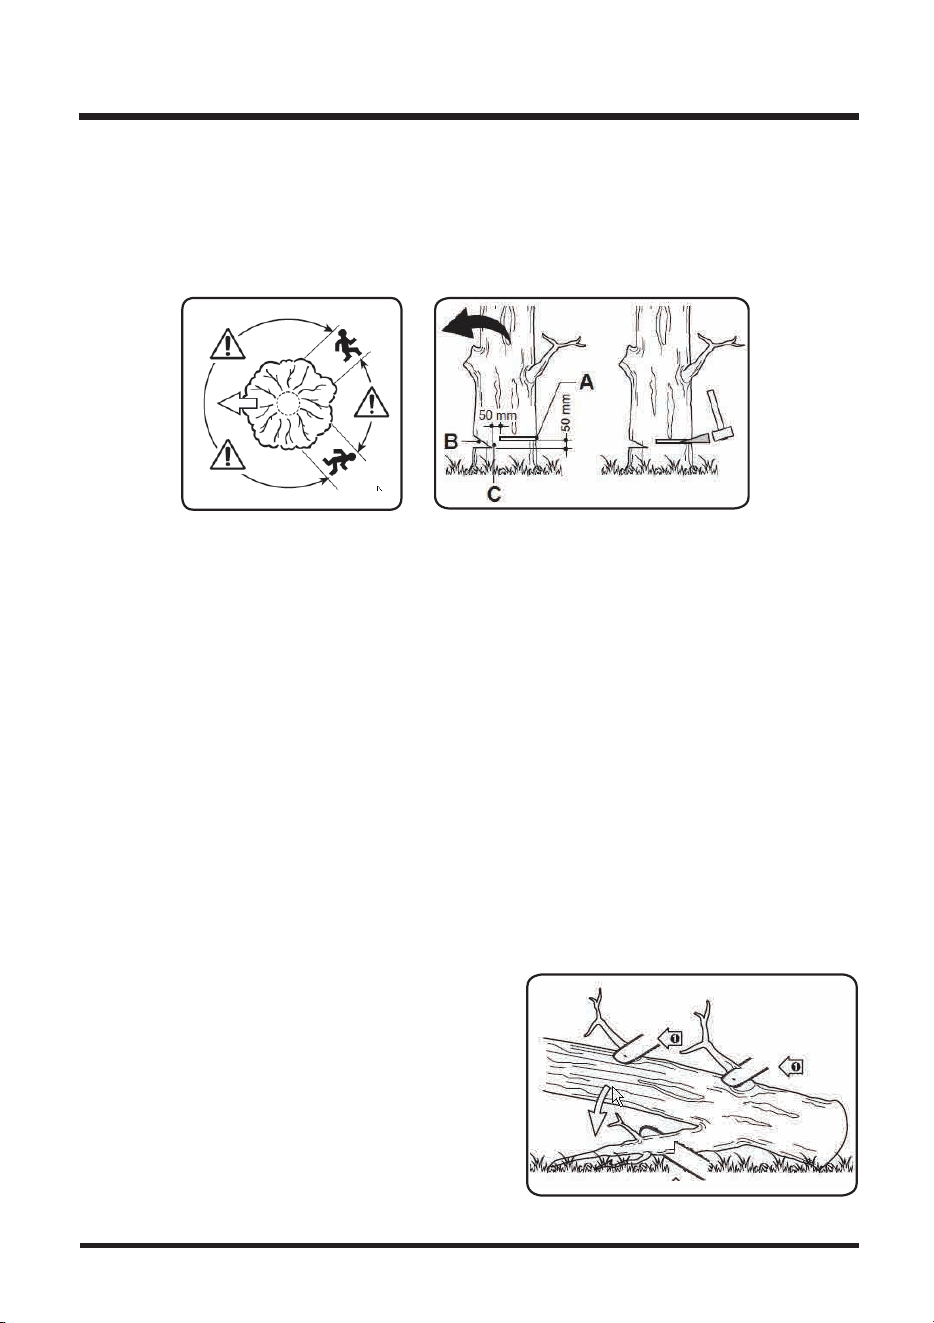
67
UTILISATION
,OHVWQpFHVVDLUHGHSUpYRLUXQFKHPLQGHUHWUDLWHVUHWOLEUHGHWRXWREVWDFOHDYDQWG¶HQWUHSUHQGUH
ODFRXSHGHO¶DUEUH/HFKHPLQGHUHWUDLWHGRLWrWUHVLWXpjO¶DUULqUHHWHQGLDJRQDOHSDUUDSSRUWjOD[H
de chute prévu (fig. 26). Avant de commencer l'abattage, tenez compte de l'inclinaison de l'arbre,
de la position des grosses branches et de la direction du vent. Tous ces facteurs influenceront la
direction dans laquelle l'arbre tombera.
ENTAILLE ARRIÈRE
Pratiquez une entaille arrière (A) au moins 50 mm (2 po) au-dessus de l'entaille horizontale du sifflet
(fig. 13). Veillez à ce que l'entaille arrière soit parallèle à l'entaille horizontale du sifflet. Pratiquez
OHQWDLOOHDUULqUHGHWHOOHIDoRQTXLOUHVWHDVVH]GHERLVSRXUREWHQLUXQH©FKDUQLqUHªFHVWOHERLVGH
la charnière qui empêche l'arbre de basculer et de tomber dans une mauvaise direction.
Ne coupez jamais la charnière.
/RUVTXHOHWUDLWG¶DEDWWDJHVHUDSSURFKHGHODFKDUQLqUHODFKXWHGHODUEUHHVWFHQVpHFRPPHQFHU
S'il y a un risque que l'arbre ne tombe pas dans l'axe souhaité ou qu'il retombe en arrière et bloque
la scie à chaîne, arrêtez le trait d'abattage avant qu'il soit assez profond pour causer la chute de
ODUEUHHWLQVpUH]GHVFRLQVHQERLVHQSODVWLTXHRXHQDOXPLQLXPGDQVOHQWDLOOHGHIDoRQjORXYULU
et à guider la chute de l'arbre.
Dès que l'arbre commence à tomber, retirez la scie à chaîne, arrêtez le moteur, posez la scie à terre
et échappez-vous par le chemin de retraite prévu.
Méfiez-vous des chutes de branches et regardez
où vous mettez les pieds.
L'opération consistant à retirer les branches d'un arbre
abattu s'appelle l'ébranchage. Pour maintenir l'arbre à
distance du sol pendant l'ébranchage, ne coupez pas
les grosses branches qui le soutiennent. Coupez les
petites branches d'un seul coup
Les branches sous tension doivent être sciées de bas
en haut pour éviter de coincer la scie à chaîne.
SIFFLET
Pour faire un sifflet, pratiquez une entaille (B), d'environ le tiers du diamètre du tronc, perpendiculairement
jOD[HGHFKXWHILJ&RPPHQFH]WRXMRXUVSDUOHQWDLOOHKRUL]RQWDOHLQIpULHXUHGHIDoRQj
empêcher le pincement de la scie à chaîne ou du guide quand vous ferez la deuxième entaille.
Fig.13
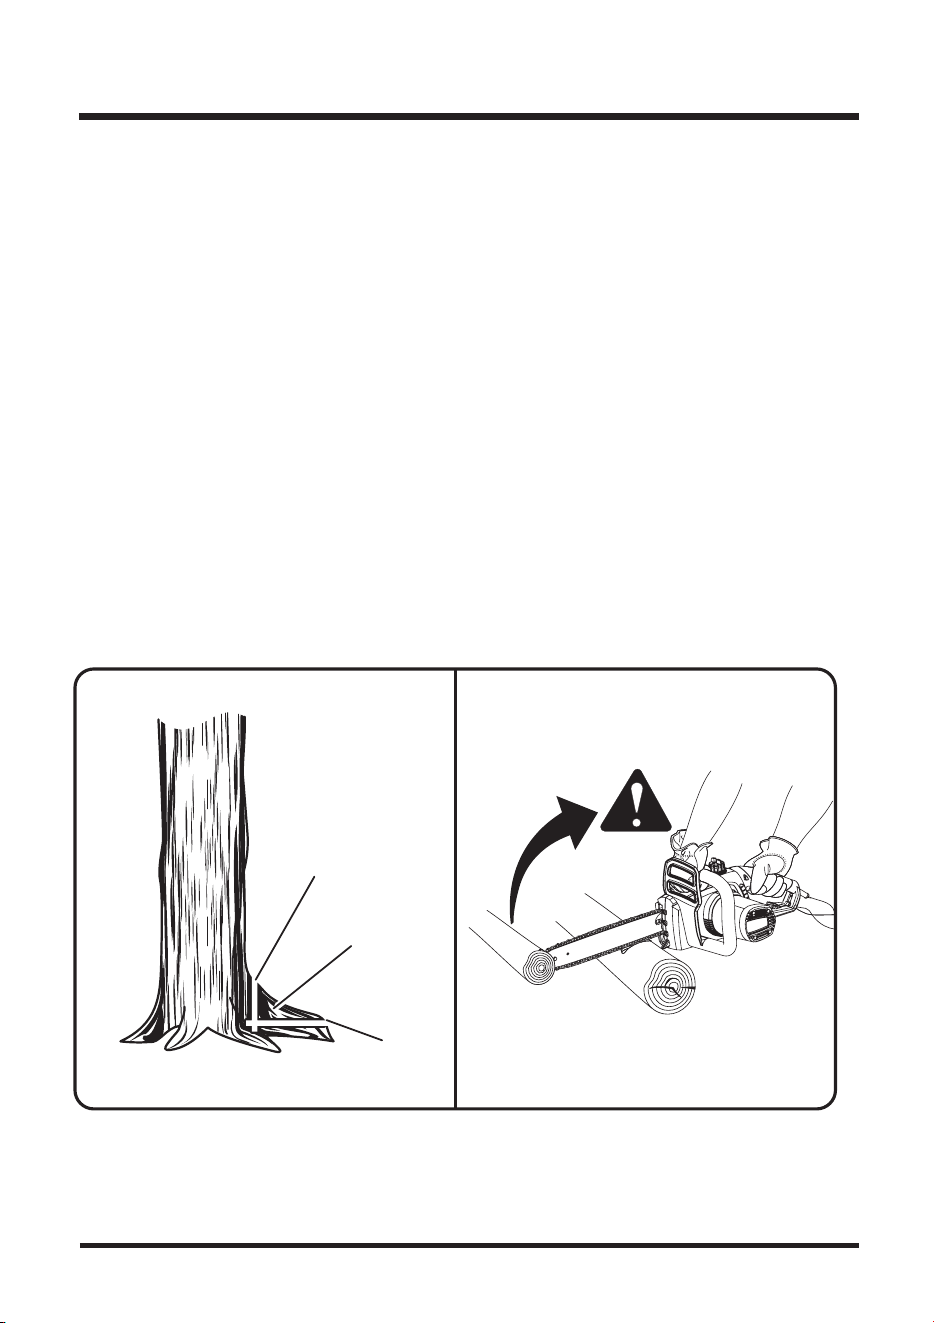
UTILISATION
68
COMMENT RETIRER LES RACINES D'APPUI
(voir fig. 14)
Une racine d'appui est une grosse racine partant du tronc et faisant saillie au-dessus du sol.
Retirez les racines d'appui avant d'abattre l'arbre. Commencez par faire une entaille horizontale dans
la racine, puis faites-en une verticale. Retirez la partie ainsi découpée et jetez-la au loin. Une fois
que vous aurez retiré les plus grosses racines d'appui, suivez la procédure correcte pour l'abattage.
TRONÇONNAGE (See Fig. 15)
2QDSSHOOHWURQoRQQDJHRXGpELWDJHOHIDLWGHFRXSHUXQDUEUHDEDWWXHQELOOHVGHODWDLOOHGpVLUpH
9HLOOH]jWRXMRXUVYRXVWHQLUELHQFDPSpHWHQpTXLOLEUHOHSRLGVpJDOHPHQWUpSDUWLVXUOHV
deux pieds.
1HFRXSH]TXXQHELOOHjODIRLV
6RXWHQH]OHVSHWLWHVELOOHVDYHFXQFKHYDOHWRXXQHDXWUHELOOH
*DUGHUOHVSDFHGHWUDYDLOSURSUHHWGpEOD\p$VVXUH]YRXVTXHULHQQHULVTXHGHQWUHUHQ
contact avec l'extrémité du guide et la chaîne car cela pourrait causer un rebond.
3RXUOHWURQoRQQDJHVXUXQWHUUDLQSHQWXSODFH]YRXVWRXMRXUVHQDPRQW3RXUJDUGHUXQ
FRQWU{OHWRWDOGHODVFLHjFKDvQHUpGXLVH]ODSUHVVLRQHQILQGHFRXSHVDQVUHOkFKHUODSULVH
des deux mains sur les poignées. Ne laissez pas la chaîne toucher le sol. Une fois la coupe
terminée, attendez l'immobilisation complète de la chaîne avant de déplacer la scie.
Arrêtez toujours le moteur avant de passer d'un arbre à un autre.
Fig. 14 Fig. 15
ENTAILLE
VERTICALE
PARTIE
DÉTACHÉE
ENTAILLE
HORIZONTALE
REBOND
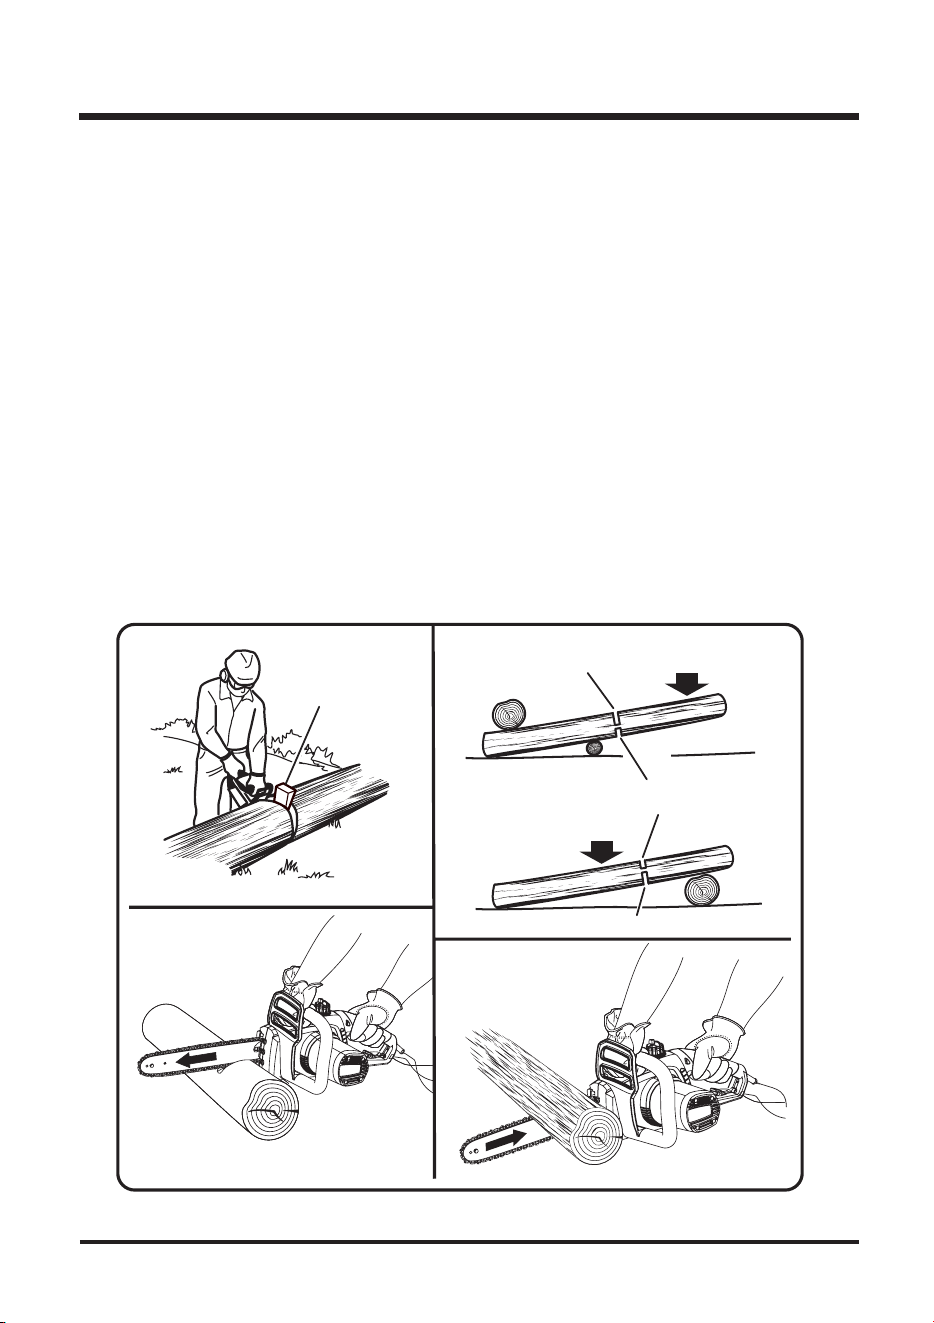
UTILISATION
69
TRONÇONNAGE AVEC UN COIN (voir fig. 16)
(voir fig. 17)
(voir fig. 18)
(voir fig. 19)
Si le diamètre du tronc vous permet d'enfoncer un coin sans toucher la chaîne, utilisez-en un pour
maintenir l'entaille ouverte et éviter de pincer la scie à chaîne.
TRONÇONNAGE DE BILLES SOUS CONTRAINTE
&RPPHQFH]SDUFRXSHUVXUGHOpSDLVVHXUGHODELOOHHWWHUPLQH]OHVSDUODXWUHF{Wp
À mesure qu'elle est coupée, la bille a tendance à fléchir. Si la première coupe dépasse le tiers du
diamètre de la bille, la lame risque d'être pincée ou bloquée dans l'entaille. Prêtez une attention
particulière aux billes sous contrainte pour éviter que le guide et la chaîne ne soient pincés.
COUPE PAR LE DESSUS
Commencez sur le dessus de la bille, le bas de la scie à chaîne appuyé contre le bois, et exercez
une légère pression vers le bas. Notez que la scie à chaîne aura tendance à tirer vers l'avant.
COUPE PAR LE DESSOUS
Commencez sur le dessous de la bille, le haut de la scie à chaîne appuyé contre le bois, et exercez
une légère pression vers le haut. Notez que la scie à chaîne aura tendance à revenir vers vous.
3UpSDUH]YRXVjFHWWHUpDFWLRQHWWHQH]IHUPHPHQWODVFLHSRXUHQJDUGHUOHFRQWU{OH
Fig. 16 Fig. 17
Fig. 18 Fig. 19
COIN
CHARGE
1e COUPE: 1/3 DIAM.
COUPE PAR
LE DESSUS
1e COUPE: 1/3 DIAM.
COUPE DE FINITION
COUPE PAR
LE DESSOUS
COUPE DE FINITION
CHARGE
BILLE SOUTENUE À UNE EXTRÉMITÉ
BILLE SOUTENUE AUX DEUX EXTRÉMITÉS

UTILISATION
70
ÉBRANCHAGE (voir fig. 20)
L'opération consistant à retirer les branches d'un arbre abattu s'appelle l'ébranchage.
7UDYDLOOH]OHQWHPHQWHQWHQDQWjWRXWPRPHQWODVFLHjFKDvQHjGHX[PDLQV9HLOOH]jWRXMRXUV
vous tenir bien campé et en équilibre, le poids également réparti sur les deux pieds.
3RXUPDLQWHQLUODUEUHjGLVWDQFHGXVROSHQGDQWOpEUDQFKDJHQHFRXSH]SDVOHVJURVVHVEUDQFKHV
qui le soutiennent.
&RXSH]OHVEUDQFKHVXQHSDUXQH3RXUODVpFXULWpHWODQHWWHWpGHYRWUHHVSDFHGHWUDYDLO
évacuez les branches coupées.
/HVEUDQFKHVVRXVWHQVLRQGRLYHQWrWUHVFLpHVGHEDVHQKDXWSRXUpYLWHUGHFRLQFHUODVFLHjFKDvQH
3HQGDQWOpEUDQFKDJHJDUGH]OHWURQFGHODUEUHHQWUHOHFRUSVHWODVFLHFHVWjGLUHWHQH]YRXV
GXF{WpGXWURQFRSSRVpjODEUDQFKHjFRXSHU
(voir fig. 21)ÉLAGAG
L'élagage consiste à couper les branches d'un arbre sur pied.
7UDYDLOOH]OHQWHPHQWHQWHQDQWjWRXWPRPHQWODVFLHjFKDvQHjGHX[PDLQV9HLOOH]jWRXMRXUV
vous tenir bien campé et en équilibre, le poids également réparti sur les deux pieds.
1HWUDYDLOOH]SDVGHSXLVXQHpFKHOOHFHVWWUqVGDQJHUHX[/DLVVH]FHWUDYDLOjGHVSURIHVVLRQQHOV
1HFRXSH]ULHQDXGHVVXVGXQLYHDXGHODSRLWULQHSDUFHTXXQHVFLHWHQXHHQKDXWHXUHVWGLIILFLOH
à maîtriser en cas de rebond.
/RUVGHOpODJDJHLOHVWLPSRUWDQWGHQHSDVFRXSHUDXUDVGXQHEUDQFKHPDvWUHVVHRXGXWURQF
avant d'avoir coupé la branche à distance pour en réduire le poids. Vous éviterez ainsi d'endommager
l'écorce du membre principal.
/DSUHPLqUHHQWDLOOHGRLWrWUHHIIHFWXpHSDUOHGHVVRXVMXVTXDXWLHUVGXGLDPqWUHGHODEUDQFKH
/DGHX[LqPHHQWDLOOHGRLWrWUHHIIHFWXpHSDUOHGHVVXVSRXUIDLUHWRPEHUODEUDQFKH
8QHIRLVFHODIDLWYRXVSRXYH]HIIHFWXHUODFRXSHILQDOHGHIDoRQQHWWHDXUDVGXPHPEUHSULQFLSDO
GHIDoRQjSHUPHWWUHjOpFRUFHGHUHSRXVVHUSRXUVFHOOHUODSODLH
AVERTISSEMENT
Quand vous faites une entaille arrière, ne coupez jamais par le sifflet: la charnière (la partie du tronc
HQWUHOHVLIIOHWHWOHQWDLOOHDUULqUHHVWODSDUWLHTXLFRQWU{OHODFKXWHGHODUEUH
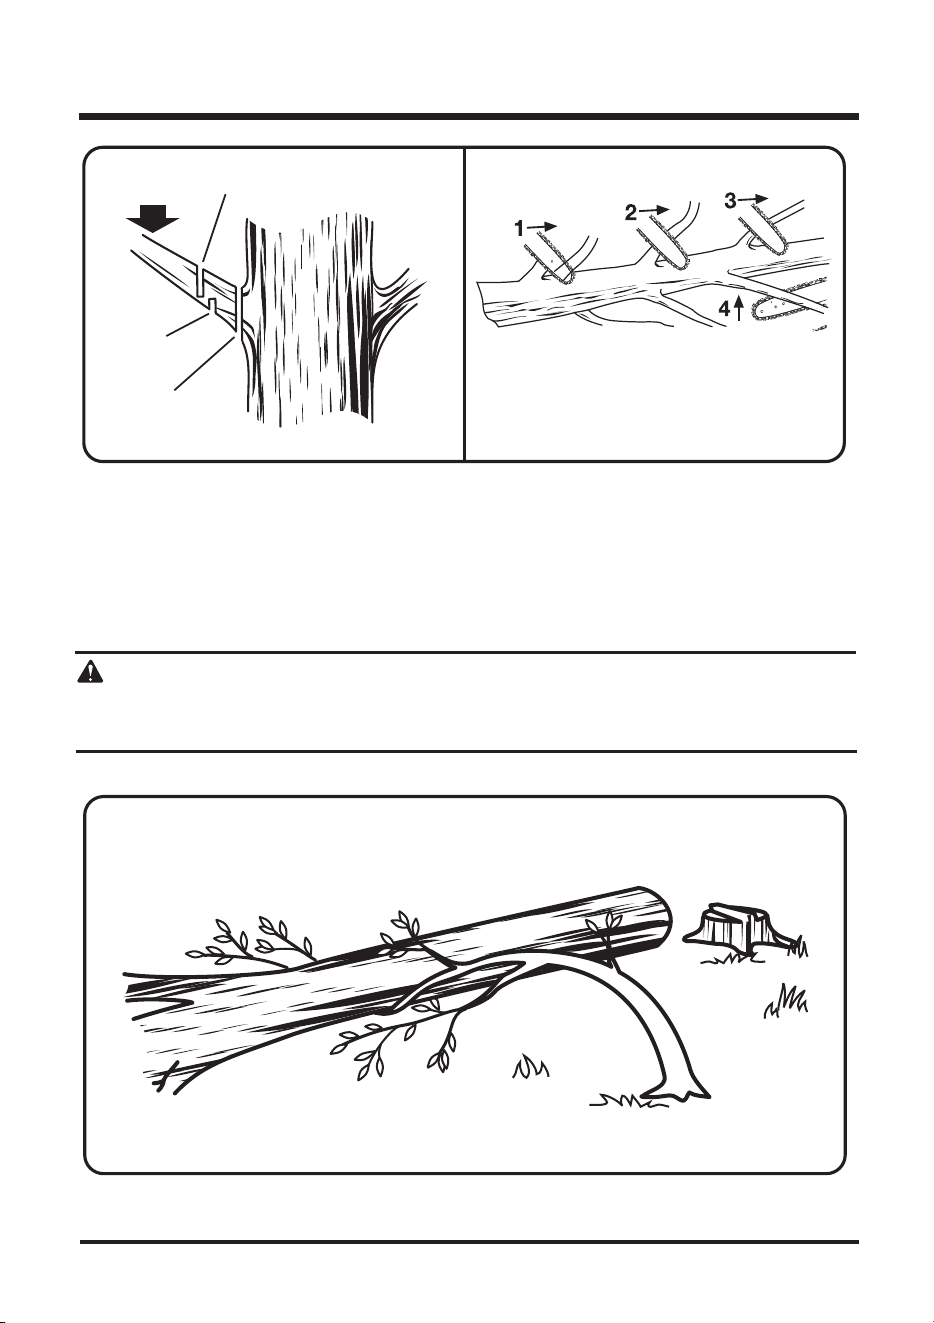
UTILISATION
71
FOUETS (voir fig. 22)
Un fouet est une bille, une branche, une souche déracinée ou un arbrisseau fléchi et mis sous tension
par une autre pièce de bois, et qui se détendra une fois que cette pièce aura été coupée ou enlevée.
La souche déracinée d'un arbre abattu a de fortes chances de se remettre à la verticale lorsque vous
aurez terminé la coupe destinée à séparer le tronc de la souche. Méfiez-vous des fouets:
- ils sont dangereux.
AVERTISSEMENT
/HVIRXHWVVRQWGDQJHUHX[LOVSHXYHQWKHXUWHUORSpUDWHXUHWOXLIDLUHSHUGUHOHFRQWU{OHGHODVFLHj
chaîne, entraînant des blessures graves, voire mortelles.
Fig. 22
FOUET
Fig. 20 Fig. 21
CHARGE
COUPE DE
FINITION
DEUXIÈME COUPE
COUPEZ LES BRANCHES UNE PAR
UNE ET LAISSEZ LES GROSSES
BRANCHES QUI SOUTIENNENT
L'ARBRE JUSQU´À CE QUE VOUS
AYEZ FINI LE TRONÇONNAGE.
1e COUPE:
1/3 DIAM.

ENTRETIEN
72
AVERTISSEMENT
Pour les entretiens, utilisez exclusivement des pièces identiques à celles d'origine OU des pièces de
UHFKDQJHFRQVHLOOpHVSDU/DZQ0DVWHU/¶XWLOLVDWLRQG¶DXWUHVW\SHVGHSLqFHVSHXWHQJHQGUHUGHV
risques ou endommager le produit.
AVERTISSEMENT
Portez toujours des lunettes de protection ou des lunettes de sécurité à écrans latéraux de protection
quand vous utilisez un outil électrique ou que vous évacuez de la poussière. Si vous travaillez dans
une zone poussiéreuse, portez également un masque anti poussière.
ENTRETIEN GÉNÉRAL
eYLWH]O¶XWLOLVDWLRQGHVROYDQWVORUVGXQHWWR\DJHGHVSLqFHVHQSODVWLTXH/DSOXSDUWGHVPDWLqUHV
plastiques sont vulnérables aux divers solvants qu'on trouve dans le commerce. Utilisez des chiffons
SURSUHVSRXUUHWLUHUODVDOHWpODSRXVVLqUHO¶KXLOHODJUDLVVHHWF
Ne laissez jamais de liquides tels que des fluides de freins, de l'essence, des produits à base de pétrole
ou des huiles pénétrantes entrer en contact avec les pièces en plastique. Les produits de synthèse
peuvent endommager, éroder ou détruire le plastique, ce qui peut entraîner des blessures graves.
Tous les roulements de cet outil sont enduits d'un lubrifiant de haute qualité, en quantité suffisante
pour la durée de vie entière de l'outil dans des conditions d'utilisation normales. Par conséquent,
aucune lubrification ultérieure des roulements ne sera nécessaire.
AVERTISSEMENT
LUBRIFICATION

73
MAINTENANCE
Nettoyez la machine avec un chiffon légèrement mouillé et du savon doux. Utilisez une brosse pour
les zones difficiles d'accès.Après chaque utilisation, nettoyez en particulier les orifices d'aération
(4) à l'aide d'un chiffon et d'une brosse.
Retirez la saleté tenace avec de l'air à haute pression (max. 3 bar).
Vérifiez que l'appareil ne présente aucun signe de dommage ou d'usure. Réparez les dommages
conformément au présent manuel d'instructions ou apportez l'appareil à un centre d'entretien agréé
avant de le réutiliser.
1HWWR\H]OHSLJQRQGHUHQYRL$ODLGHG¶XQSLVWROHWGHJUDLVVDJH
LQVpUH]O¶LQMHFWHXUjDLJXLOOHGDQVORULILFHGHOXEULILFDWLRQ&HWLQMHFWH]
ODJUDLVVHMXVTXjFHTX¶HOOHVRLWYLVLEOHVXUOHERUGH[WpULHXUGXSLJQRQ
(fig. 23). Faites tourner la chaine (5) à la main et répétez la procédure
GHOXEULILFDWLRQMXVTX¶jFHTXHO¶HQVHPEOHGXSLJQRQDLWpWpOXEULILp
NETTOYAGE GÉNÉRAL
PIGNON DE RENVOI
La majorité des problèmes relatifs au guide-chaîne peuvent être évité par le simple entretien
DGpTXDWGHODPDFKLQH/HUHPSOLVVDJHLQDGpTXDWO¶LUUpJXODULWpGHODODPHHWOHVUpJODJHVGX
OLPLWHXUGHSURIRQGHXUVRQWjO¶RULJLQHGHODPDMRULWpGHVSUREOqPHVUHODWLIVDXJXLGHFKDvQH
HQWUDvQDQWSULQFLSDOHPHQWXQHXVXUHQRQXQLIRUPHGXJXLGH¬PHVXUHTXHOHJXLGHV¶XVHGH
PDQLqUHLUUpJXOLqUHOHVUDLOVV¶pODUJLVVHQWSRXYDQWFDXVHUXQFOLTXHWLVGHODFKDvQHHWGHVGLIILFXOWpV
à effectuer des entailles droites. Si le guide-chaîne est insuffisamment lubrifié et que vous utilisiez
la machine avec une chaîne trop serrée, l'usure du guide sera plus rapide. Pour réduire l'usure du
guide, veillez à bien entretenir ce dernier ainsi que la chaîne.
Démontez le guide et la chaîne dans >>l'ordre inverse de l'ordre de montage.
Vérifier si l'orifice de sortie d'huile (16) n'est pas bouché et, >>si nécessaire, nettoyez-le.
Vous assurerez ainsi une bonne lubrification de la chaîne et du guide quand la machine est en
fonctionnement.
Pour déboucher l'orifice de sortie d'huile, utilisez un fil de fer fin et souple.
ENTRETIEN DE LA CHAÎNE ET DU GUIDE
C
Fig.23
Éteignez la machine, retirez les batteries et laissez-les refroidir. Examinez la machine, nettoyez-la
HWUDQJH]ODjO¶DEULGHODSRXVVLqUHHQUHVSHFWDQWOHVFRQVLJQHVFLGHVVRXV5HWLUH]OHVGpFKHWV
de la machine après chaque utilisation et avant de la ranger.
Un bon nettoyage régulier permet de garantir une utilisation en toute sécurité et de prolonger la
durée de vie de la machine.
Avant chaque utilisation, vérifiez qu'aucune pièce du produit n'est usée ou endommagée.
Ne l'utilisez pas si vous constatez la présence de pièces cassées ou usées.

74
MAINTENANCE
REMPLACEMENT DU GUIDE ET DE LA CHAÎNE (voir fig.. 24 - 32.)
DANGER
Ne lancez jamais le moteur avant d'avoir installé la chaîne, le guide-chaîne, le carter de chaîne et le
bouton de verrouillage du carter de chaîne. Si ces pièces ne sont pas toutes en place, l'embrayage
peut être éjecté ou éclater, avec un risque de blessures graves pour l'utilisateur.
AVERTISSEMENT
Pour éviter toute blessure grave, assurez-vous d'avoir lu et assimilé les consignes de sécurité
contenues dans cette section.
AVERTISSEMENT
$YDQWG¶HQWUHSUHQGUHGHVWUDYDX[G¶HQWUHWLHQDVVXUH]YRXVTXHODPDFKLQHHVWGpEUDQFKpHGHOD
VRXUFHG¶DOLPHQWDWLRQ
Le non-respect de cet avertissement peut entraîner des blessures graves.
ATTENTION
Portez toujours des gants quand vous manipulez la chaîne et le guide: ces éléments sont tranchants
et peuvent présenter des bavures.
AVERTISSEMENT
Ne touchez ou ne réglez jamais la chaîne lorsque le moteur tourne: elle est très tranchante.
Pour éviter des coupures profondes, portez toujours des gants lorsque vous l'entretenez.
REMARQUE: Quand vous remplacez la chaîne et le guide, prenez toujours les pièces spécifiées dans
la section de ce manuel consacrée aux combinaisons de chaînes et de guides.
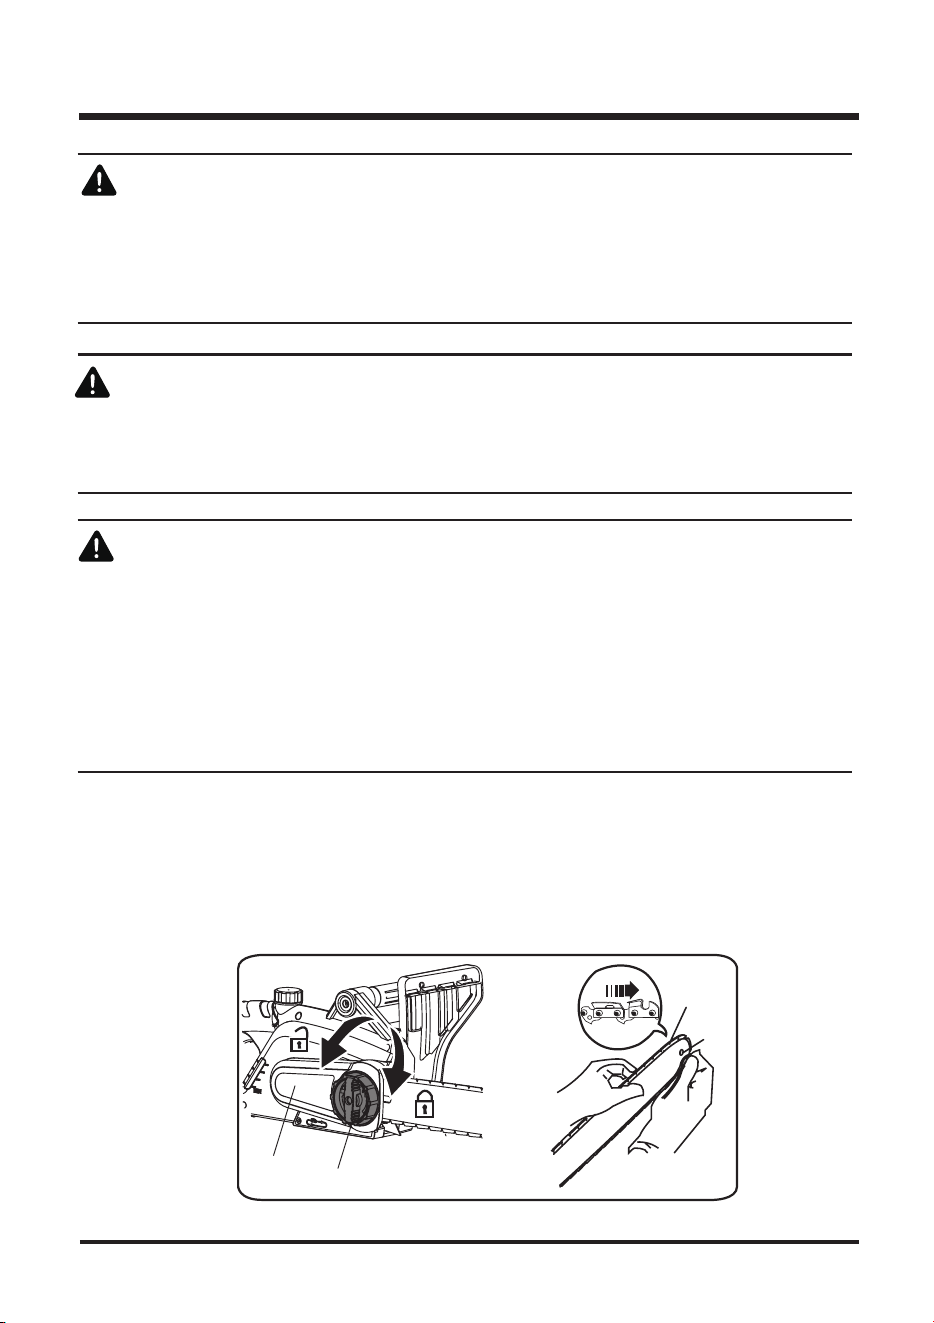
75
MAINTENANCE
Maintenez tout membre du corps à l’écart de la chaîne lorsque la scie à chaîne
est en cours de fonctionnement. Avant d’allumer la scie à chaîne, assurez-vous
qu’elle ne touche rien. 3HQGDQWO¶XWLOLVDWLRQGHODVFLHjFKDvQHXQPRPHQWG¶LQDWWHQWLRQVXIILW
pour que des vêtements ou des parties du corps soient entraînés par la chaîne.
Tenez toujours la scie à chaîne avec la main droite sur la poignée arrière et la
main gauche sur la poignée avant. Toute inversion des mains augmenterait le risque de
blessures.
AVERTISSEMENT
Utilisez toujours une chaîne à faible rebond répondant aux normes en la matière. L'utilisation d'une
FKDvQHVWDQGDUGFKDvQHTXLQHGLVSRVHSDVGHPDLOORQVUpGXLVDQWO¶HIIHWGHUHERQGGRLWrWUHUpVHUYpH
jXQRSpUDWHXUSURIHVVLRQQHO1pDQPRLQVXQHFKDvQHjIDLEOHUHERQGQ¶pOLPLQHSDVFRPSOqWHPHQW
OHUHERQG8QHFKDvQHjIDLEOHUHERQGRX©FKDvQHGHVpFXULWpªQHGRLWMDPDLVrWUHFRQVLGpUpH
comme une protection totale contre les blessures.
Combinez donc toujours une chaîne à faible rebond avec d'autres mesures de protection contre
les rebonds, tels que le protège-main avant.
Quand vous utilisez le guide-chaîne (6) et la chaîne (5), veillez toujours à respecter les caractéristiques
techniques du produit.
Placez la machine sur une surface plane.
Desserrez la roue de serrage (9) et retirez le cache latéral (10) (fig. 24).
Étirez la chaîne (5) avec les lames orientées dans le sens de rotation et emboîtez la chaîne dans
AVERTISSEMENT
AVERTISSEMENT
10
9 Fig.24 Fig.25
6
5
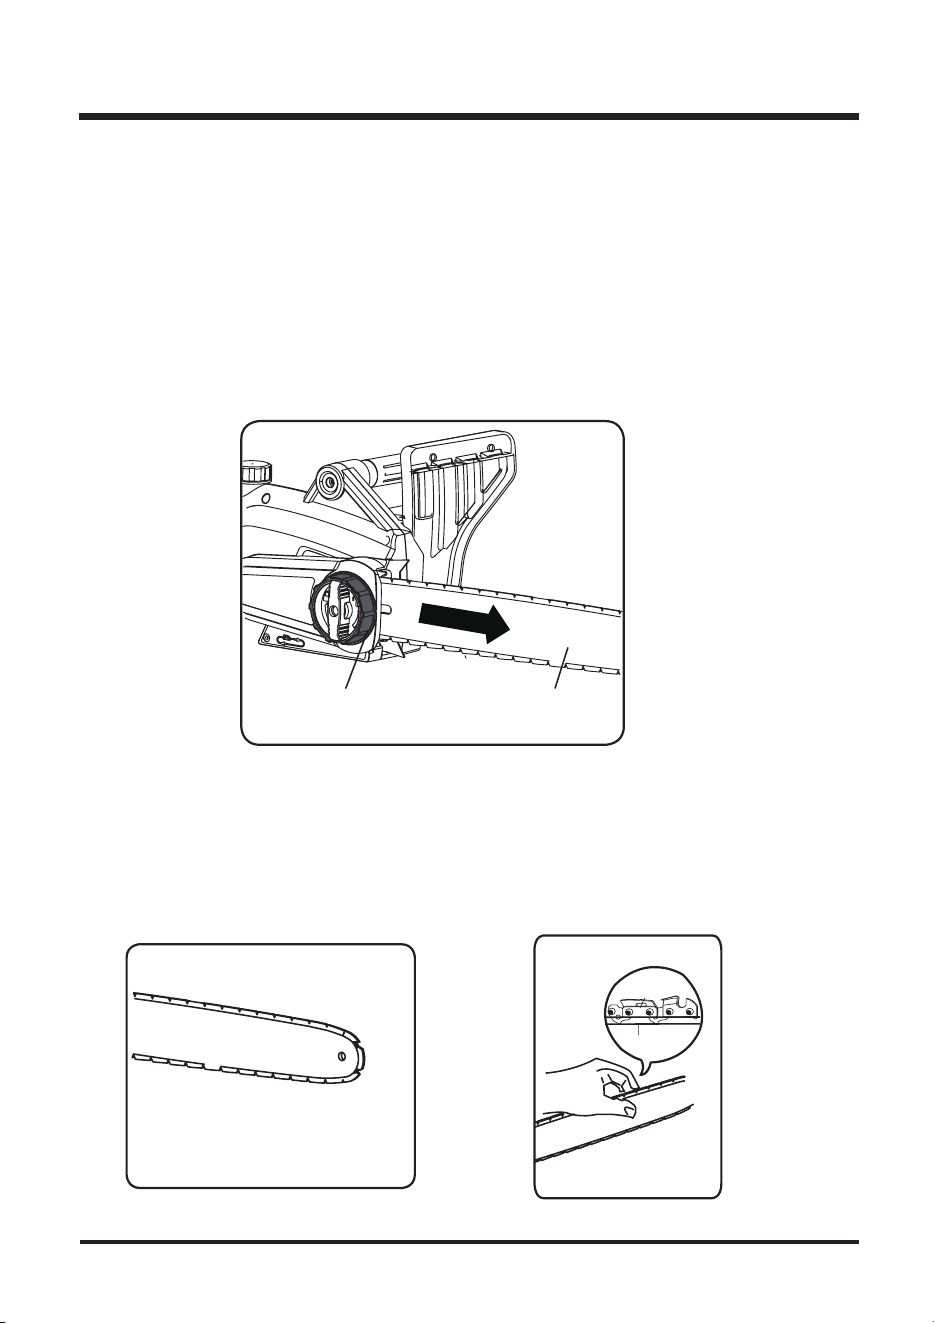
76
MAINTENANCE
TENSION DE LA CHAÎNE
Vérifiez toujours la tension de la chaîne avant de commencer à utiliser la scie, puis régulièrement
en cours d'utilisation (après environ 5 coupes).
Il faut prendre en considération que les chaînes neuves peuvent s'élargir considérablement au
GpEXW&HSKpQRPqQHHVWQRUPDOGXUDQWODSpULRGHGHURGDJHHWO¶LQWHUYDOOHHQWUHOHVUpJODJHV
V¶DOORQJHUDHQVXLWHUDSLGHPHQW
PLACEZ LA MACHINE SUR UNE SURFACE PLATE.
7RXUQH]ODURXHGHUpJODJHGHODWHQVLRQMXVTXjFHTXHOHV©DWWDFKHVªGHODFKDvQHWRXFKHQW
le dessous du guide (6) (fig. 26).
ÉPREUVE DE TENSION
Pour vérifier la tension de la chaîne, essayez de soulever la chaîne (5) à une main. La chaîne est
à la bonne tension si vous parvenez à la soulever de 2 à 4 mm au-dessus du guide (6) dans la
partie centrale (fig. 27 et 28).
Ajustez la tension si nécessaire.
2-4mm
8
6
Fig. 26
Fig. 27
Fig. 28
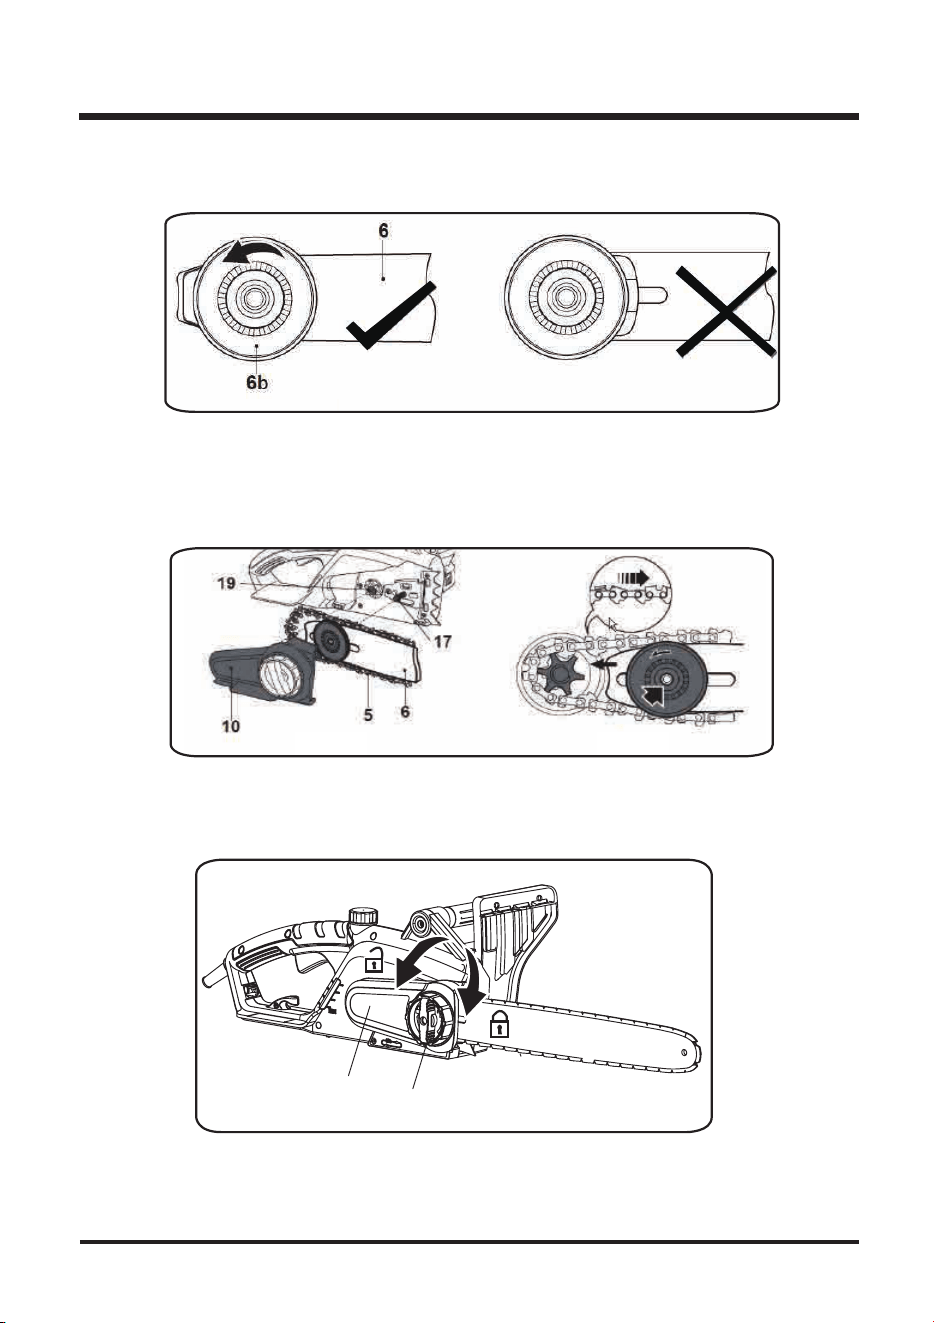
77
MAINTENANCE
Vérifiez que le disque de tension (6b) est en position droite extérieur et, si nécessaire, tournez-le dans
le sens inverse des aiguilles d'une montre (fig. 29 et 30).
Alignez le guide-chaîne (6) et la chaîne (5) avec le pignon d'entraînement (19) et le boulon de soutien (17).
Attachez la chaîne autour du pignon d'entraînement, puis descendez le guide pour l'attacher sur le
boulon de soutien (fig. 31 et 32).
Remettez le cache latéral (10) et serrez légèrement la roue de serrage (9) (fig. 33)
mais pas à fond: il faut d'abord tendre la chaîne.
10
9
Fig. 29 Fig. 30
Fig. 31 Fig. 32
Fig. 33
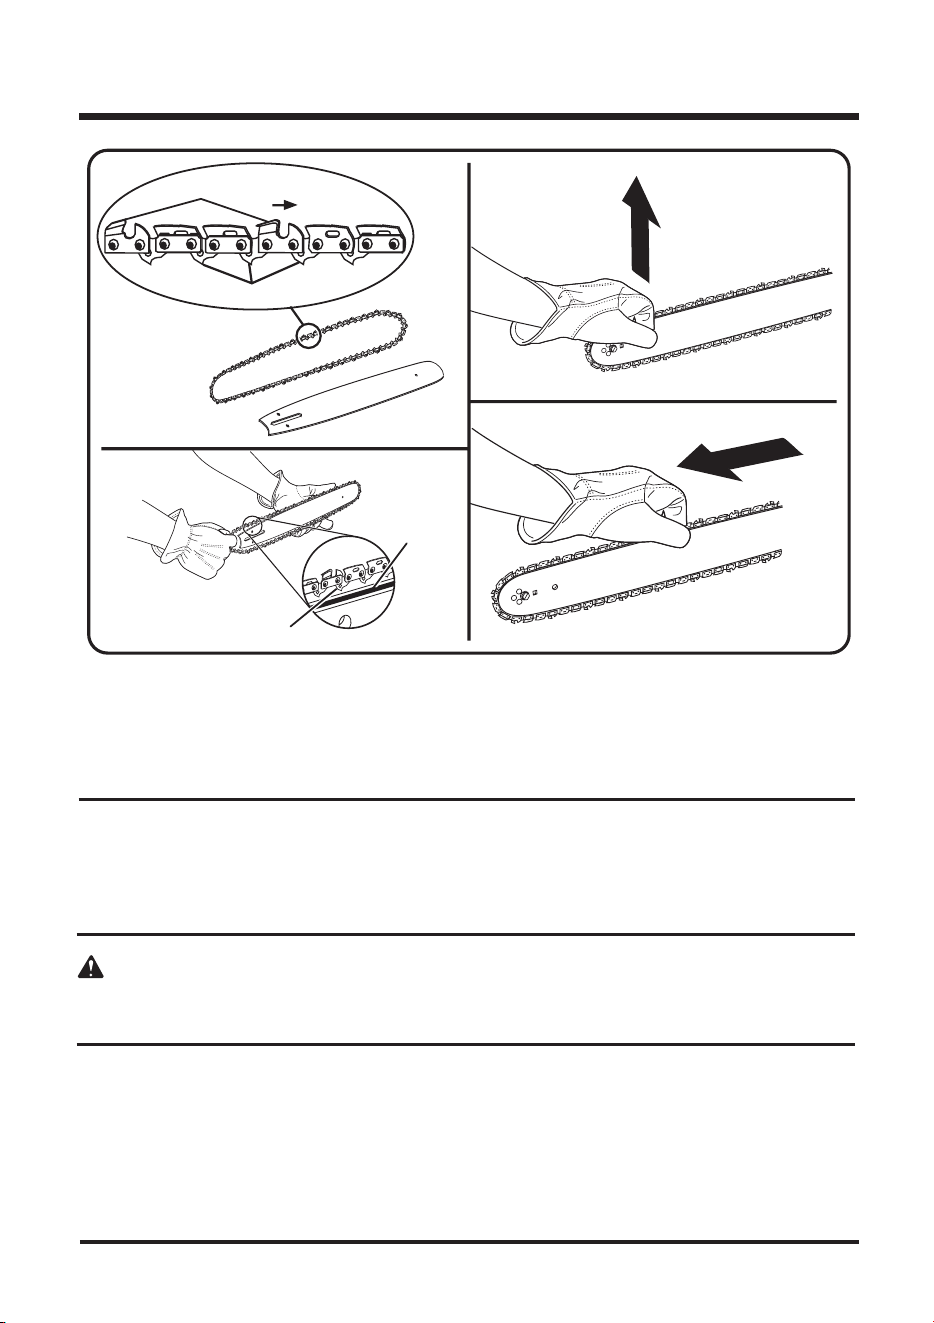
78
MAINTENANCE
/kFKH]OH[WUpPLWpGXJXLGHHWIDLWHVIDLUHWRXUDXERXWRQGHWHQVLRQGHODFKDvQH
7HQH]OH[WUpPLWpGXJXLGHHQODLUHWVHUUH]OHERXWRQGHYHUURXLOODJHGXFDUWHUGHFKDvQH
La tension est bonne s'il n'y a pas de mou sur le dessous du guide et si la chaîne est bien serrée
mais qu'elle ne se bloque pas quand on la fait tourner à la main.
REMARQUE: Si la chaîne est trop serrée, elle ne pourra pas tourner. Desserrez un peu le bouton de verrouillage
du carter de chaîne et tournez le bouton de tension de la chaîne d'1/4 de tour dans le sens inverse des aiguilles
d'une montre. Levez l'extrémité du guide en l'air et resserrez le bouton de verrouillage du carter de chaîne.
Vérifiez que la chaîne tourne sans se bloquer.
AVERTISSEMENT
Ne touchez ou ne réglez jamais la chaîne lorsque le moteur tourne: elle est très tranchante. Portez
toujours des gants lorsque vous entretenez la chaîne.
MAILLONS-GUIDES
MAILLONS-
GUIDES
LAMES
RAINURE DU GUIDE
ROTATION DE
LA CHAÎNE
Fig. 37
Fig. 36
Fig. 35
Fig. 34
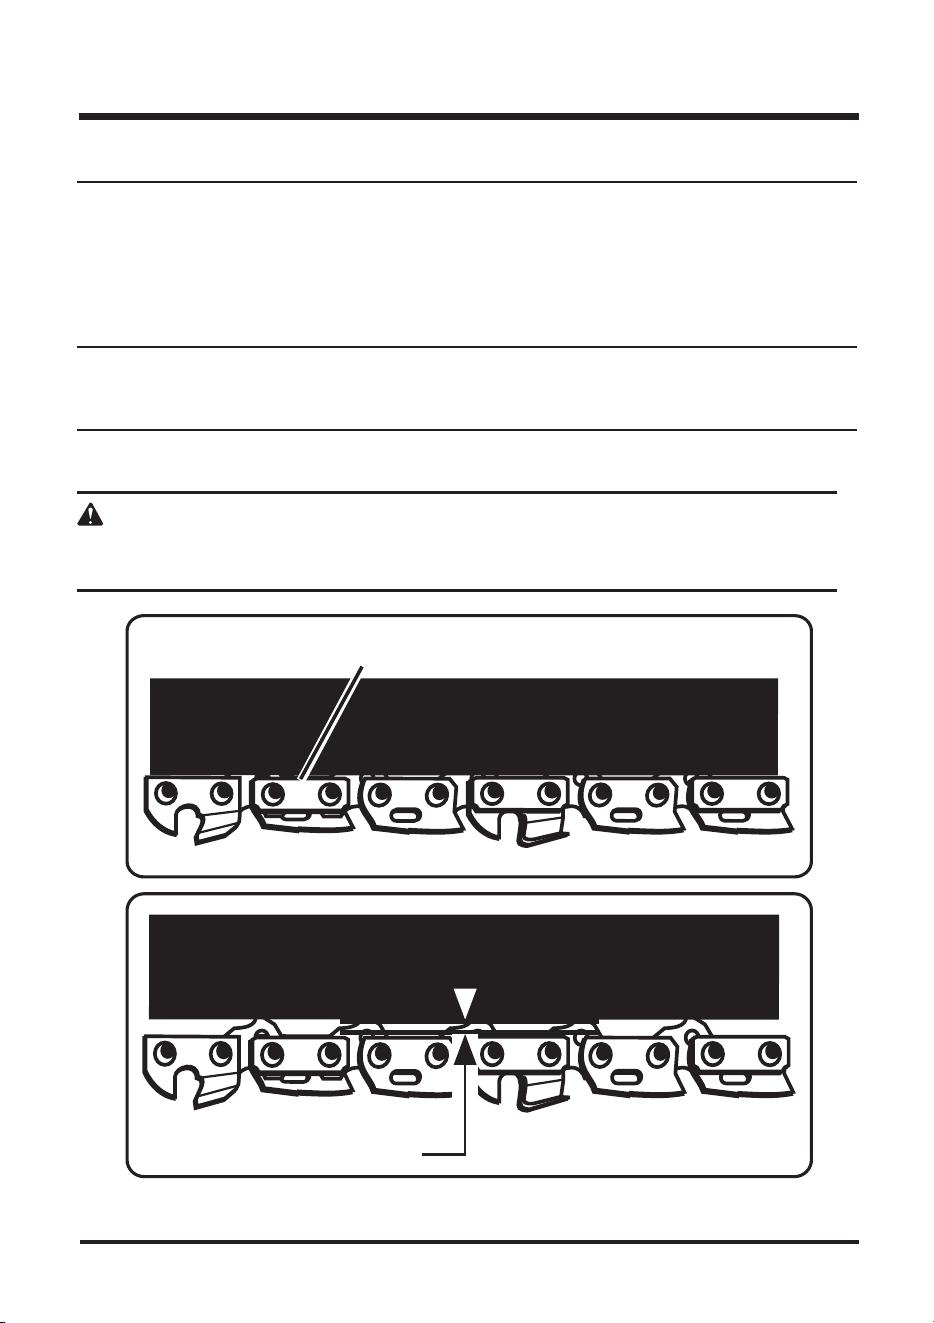
79
MAINTENANCE
3RXUWHQGUHODFKDvQHWRXUQH]OHERXWRQGHWHQVLRQGDQVOHVHQVGHVDLJXLOOHVGXQHPRQWUH
3RXUVHUUHUWRXUQH]OHERXWRQGHYHUURXLOODJHGXFDUWHUGHFKDvQHGDQVOHVHQVGHVDLJXLOOHVGXQH
montre. Retendez la chaîne dès que les plats des maillons-guides (dits aussi maillons d'entraînement)
dépassent de la rainure du guide.
REMARQUE: La tension d'une chaîne à froid tension est bonne s'il n'y a pas de mou sur le dessous du guide
et si la chaîne est bien serrée mais sans se bloquer quand on la fait tourner à la main.
REMARQUE: Il est normal que la température de la chaîne augmente en cours d'utilisation. Les maillons-guides
(ou maillons d'entraînement) d'une chaîne bien tendue et chaude doivent ressortir de la rainure du guide d'à
peu près 1,3 mm (1/16 po).
REMARQUE: Les chaînes neuves ont tendance à se distendre. Vérifiez souvent la tension de la chaîne et
retendez-la si nécessaire.
ATTENTION
Une chaîne tendue à chaud pourra s'avérer trop serrée une fois qu'elle aura refroidi.
Avant de la réutiliser, vérifiez sa tension à froid.
Fig. 38
Fig. 39
§PPSR
PLATS DES MAILLONS-GUIDES

80
MAINTENANCE
1HUHPSOLVVH]SDVWURS/DLVVH]jSHXSUqVPPGXF{WpLQIpULHXUSRXUSHUPHWWUHDXOXEULILDQWGH
se dilater (fig. 41).
Avant de lancer la machine, vérifiez visuellement le niveau d'huile du réservoir (11) et revérifiez
encore régulièrement pendant que vous travaillez. Remplissez quand le niveau est en-dessous de
la graduation MIN (fig. 13).
Si du lubrifiant a coulé, essuyez-le avec un chiffon, puis refermez le bouchon du réservoir (11a).
Quand vous vérifiez l'huile, assurez-vous que le guide (6) et la chaîne (5) sont bien en place.
Allumez la machine (voir la section ad hoc plus bas). Maintenez l'interrupteur (13) enfoncé et
regardez si l'huile de chaîne se répand bien, comme le montre l'illustration (fig. 43).
Tournez la roue de serrage (9) pour serrer à fond le >>cache latéral (10) (fig. 40).
Fig. 40
9
11a
11
Fig. 41
Fig. 42
Fig. 43
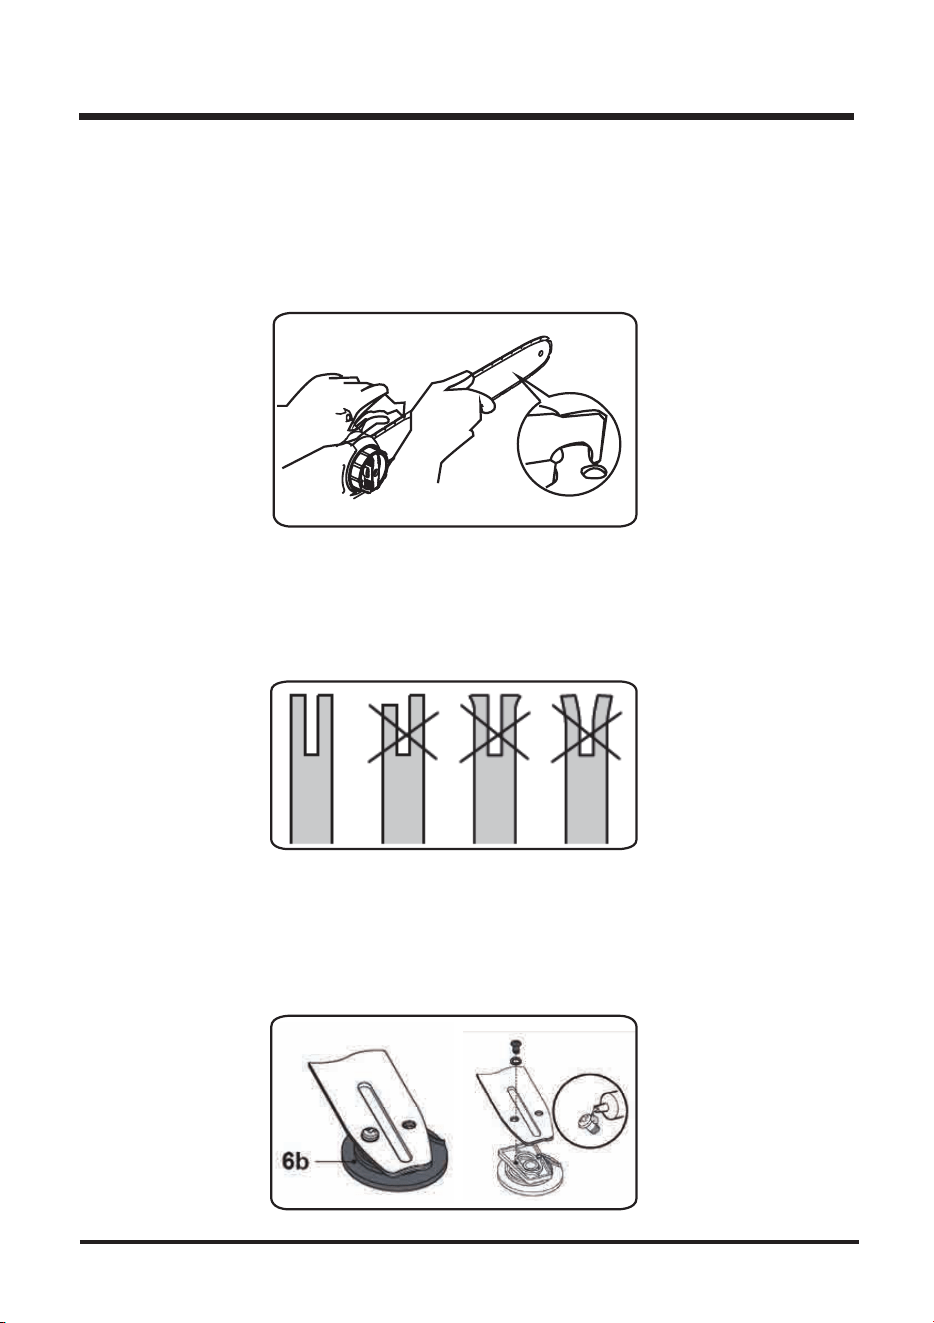
81
MAINTENANCE
SOIN ET ENTRETIEN
9pULILH]OHSLJQRQGHQWUDvQHPHQW6¶LOHVWHQGRPPDJpRXXVpHQUDLVRQGXQHVROOLFLWDWLRQLQWHQVH
il doit être remplacé par un service de réparation agréé.
Prenez un tournevis, un couteau de vitrier, une brosse métallique ou un objet similaire, et nettoyez
OHVUpVLGXVVXUOHVUDLOVGXJXLGHFKDvQH&HODPDLQWLHQGUDRXYHUWOHVSDVVDJHVG¶KXLOHDILQTXH
le guide (6) et la chaîne (5) soient correctement lubrifiés .
Vérifiez si le rail du guide-chaîne est usé. Tenez une règle contre le flanc du guide-chaîne et les
©IODVTXHVODWpUDX[GHVODPHVªVLO\DXQHVSDFHHQWUHODUqJOHHWOHJXLGHFKDvQHOHUDLOGXJXLGH
est bon. S'il n'y a pas d'espace (si la règle est à plat contre le flanc du guide-chaîne), le rail est usé
et doit être remplacé. Prenez-en un du même type .
Retournez le guide-chaîne à 180° pour obtenir une usure égale: cela allongera la durée de vie du guide (6).
Défaites la vis et détachez le disque de tension (6b) du guide-chaîne .
Vérifiez si la rondelle en caoutchouc de la vis est usée. Tournez le guide-chaîne et vissez le disque
de tension. Pour assurer que la vis reste bien en place quand vous assemblerez le tout, mettez une
goutte d'une bonne colle.
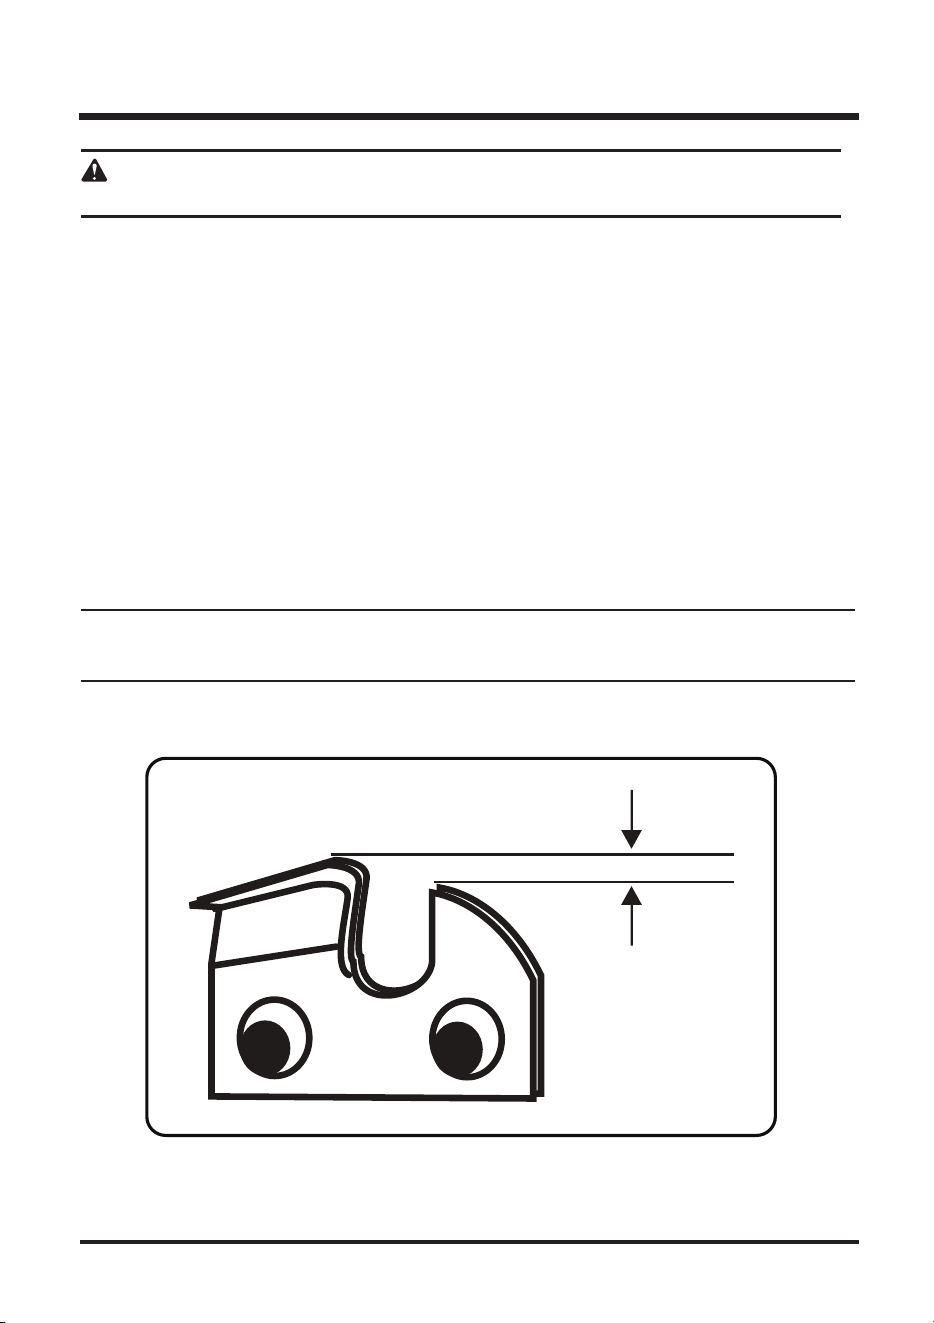
MAINTENANCE
82
ATTENTION
Avant de commencer à travailler sur la scie à chaîne, vérifier qu'elle est bien débranchée.
ENTRETIEN DE LA CHAÎNE (voir fig. 44)
Utilisez cette scie à chaîne uniquement avec une chaîne à faible rebond. Quand elle est bien entretenue,
cette chaîne rapide permet de réduire les rebonds. Pour couper bien et rapidement, cette chaîne a
besoin d'un bon entretien. Elle a besoin d'un affûtage quand les copeaux sont petits et poudreux,
quand il faut pousser pour que la chaîne s'enfonce dans le bois pendant la coupe ou quand elle coupe
GXQF{Wp4XDQGYRXVHQWUHWHQH]ODFKDvQHJDUGH]ELHQFHFLjOHVSULW
VLODQJOHGHOLPDJHGHVIODVTXHVODWpUDX[QHVWSDVFRUUHFWOHULVTXHGHUHERQGYLROHQWDXJPHQWHUD
d'autant.
OpFDUWGXOLPLWHXUGHSURIRQGHXUOLPLWHXUGpSDLVVHXUGHVFRSHDX[
VLWURSEDVOHULVTXHGHUHERQGVHUDSOXVLPSRUWDQW
VLSDVDVVH]EDVODVFLHFRXSHUDPRLQVELHQ
6LOHVGHQWVGHODPHVKHXUWHQWGHVREMHWVGXUVFRPPHGHVFORXVRXGHVSLHUUHVRXTXHOOHVVRLHQW
érodées par du sable présent sur le bois, faites affûter la chaîne par un centre d'entretien agréé.
REMARQUE: quand vous remplacez la chaîne, regardez si le pignon d'entraînement est usé ou endommagé.
S'il est usé ou endommagé aux endroits indiqués, faites-le remplacer par un centre d'entretien agréé.
REMARQUE: si, après avoir lu les consignes ci-dessous, vous ne comprenez pas parfaitement la procédure
à suivre, faites affûter la chaîne par un centre d'entretien agréé ou remplacez-la par une chaîne à faible rebond.
Fig. 44
ÉCART DU LIMITEUR DE PROFONDEUR
PPSR
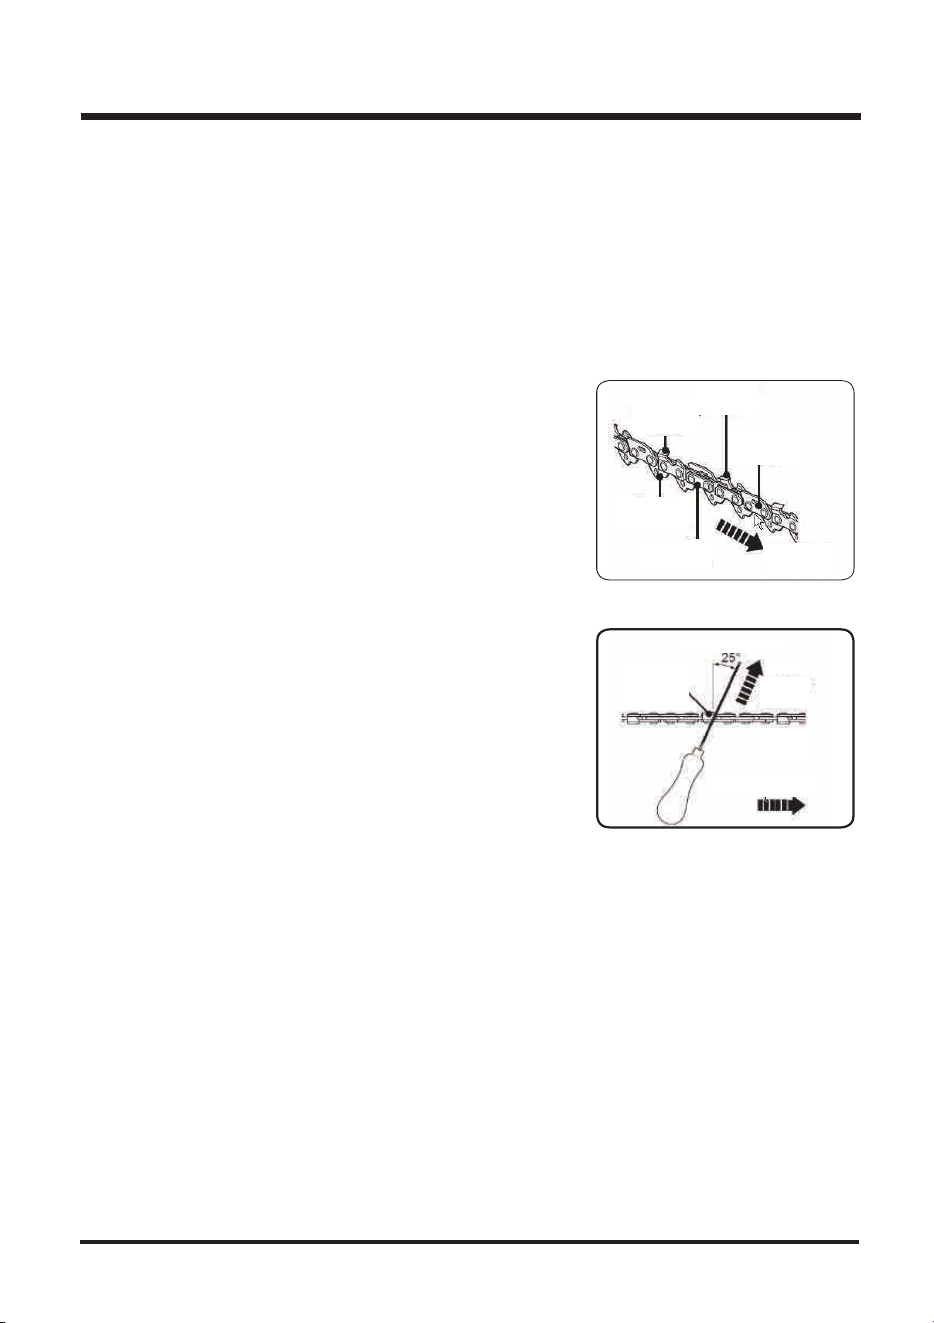
MAINTENANCE
83
AFFÛTAGE DE LA CHAÎNE
Faites affûter votre chaîne (5) par les professionnels d'un centre d'entretien agréé ou affûtez-la
vous-même en utilisant une bonne trousse d'affûtage. Suivez les instructions qui accompagnent la
WURXVVHG¶DIIWDJH
La différence de hauteur entre la dent et la strie représente la
profondeur de coupe.
Quand vous affûtez la chaîne (5), gardez à l'esprit les points
suivants:
/DQJOH'H/D/LPH
/¶DQJOH'H&RXSH
/D3RVLWLRQ'H/D/LPH
/H'LDPqWUH'H/D/LPH5RQGH
/D/LPH
Pour affûter la chaîne, procédez comme suit:
0HWWH]GHVJDQWVGHSURWHFWLRQ
9pULILH]TXHODFKDvQHVRLWWHQGXHFRUUHFWHPHQW
0HWWH]OHIUHLQGHFKDvQHSRXUIL[HUODFKDvQHDXJXLGH
Utilisez une lime ronde dont le diamètre soit d'1,1 fois la
profondeur de la dent.
Vérifiez que le 20% du diamètre de la lime dépasse du flasque
supérieur de la lame.
/DSOXSDUWGHVERQVFRPPHUoDQWVRQWXQJXLGHSRXUOLPHFHVWODIDoRQODSOXVVLPSOHGHWHQLUOD
lime en position correcte.
Limez perpendiculairement au guide et à 25° par rapport à la direction de défilement.
Pour chaque dent, limez exclusivement de l'intérieur vers l'extérieur.
/LPH]XQF{WpGHODFKDvQHSXLVWRXUQH]ODVFLHjFKDvQHHWUHFRPPHQFH]GHODXWUHF{Wp
Pour obtenir un résultat égal, donnez le même nombre de coups sur chaque dent.
Veillez à ce que la longueur de toutes les lames reste égale. Pour la sécurité, vérifiez la hauteur du
limiteur de profondeur tous les 5 affûtages.
Si vous limez aussi les limiteurs de profondeur, restaurez impérativement leur profil d'origine.
Pour vérifier la hauteur des limiteurs de profondeur, utilisez un instrument ad hoc.
2QHQWURXYHFKH]ODSOXSDUWGHVERQVFRPPHUoDQWV
Regardez si la chaîne est usée ou endommagée. Si nécessaire, remplacez-la par une nouvelle.
8QXWLOLVDWHXUH[SpULPHQWpSHXWDIIWHUXQHFKDvQHpPRXVVpHYRLUODVHFWLRQ©$IIWDJHGHODFKDvQHª
ci-dessous).
5HPRQWH]ODFKDvQHHWOHJXLGHVHORQOHVFRQVLJQHVGRQQpHVGDQVODVHFWLRQ©0RQWDJHª
Lame de droite
Lame de gauche
Attache
d'amortisseur
Maillon-guide
d'amortisseur
Attache
Angle d'affûtage
Sens du feu
Extérieur
Intérieur
Sens de la chaîne
Lame de gauche
Sens de la
chaîne
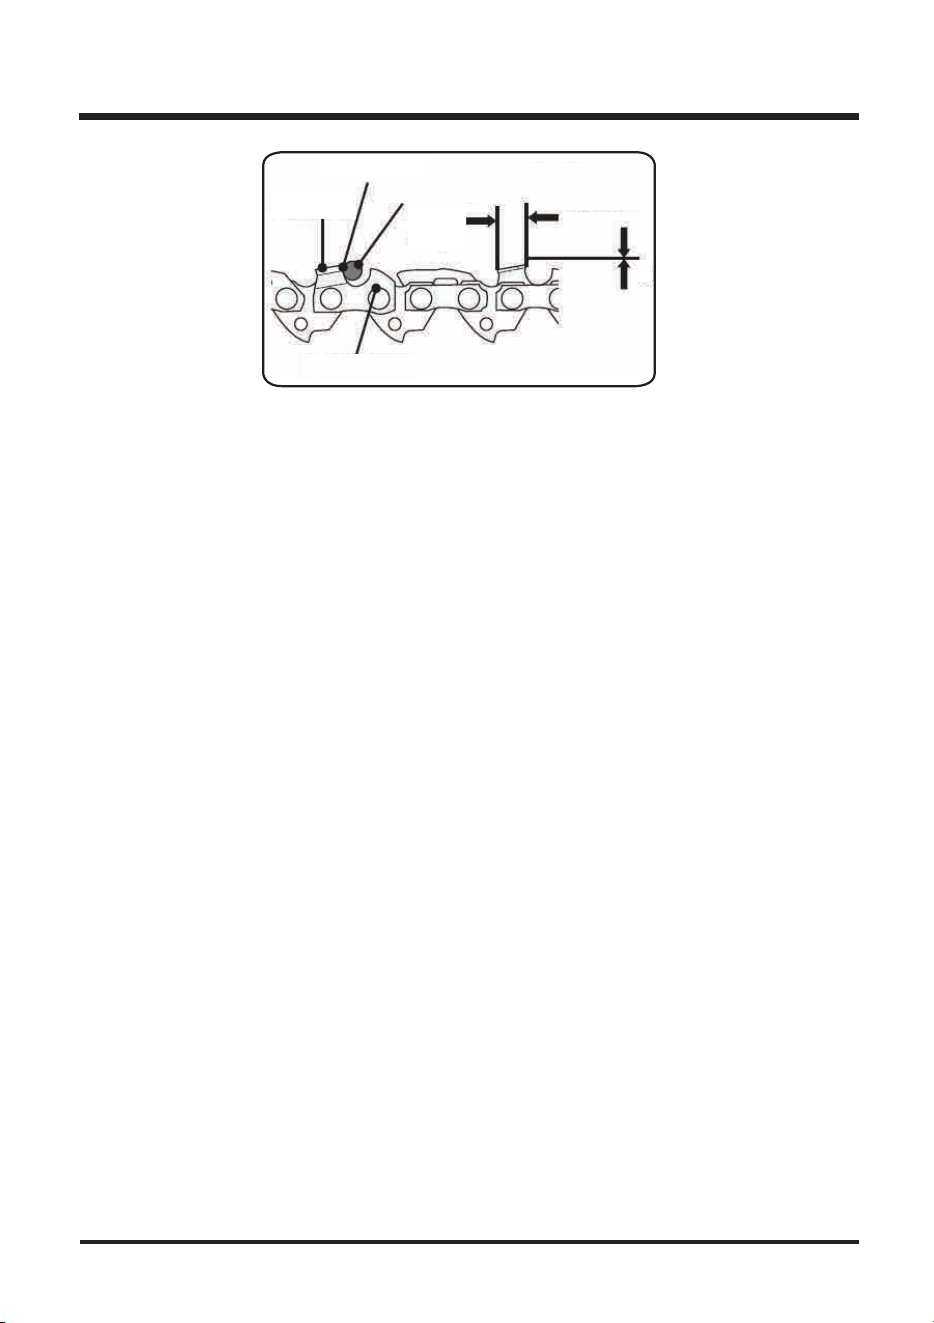
MAINTENANCE
84
Flasque
supérieur
Pointe coupante
Longueur
de la lame
Réglage du
Limiteur de profondeur
Position du feu
limiteur de
profondeur 0,025”
Aucune des pièces de ce produit ne peut être réparée par le consommateur.
Comme stipulé ci-dessus, faites-le examiner et réparer par un spécialiste.
Rangez le produit et ses accessoires dans un endroit sec et à l'abri du gel.
Gardez-le toujours hors de portée des enfants. La température idéale de rangement est de 10 à 30°C.
Nous vous recommandons d'utiliser l'emballage d'origine pour l'entreposage de l'appareil, ou de
le couvrir avec un chiffon adéquat ou de le mettre un sac, afin de le protéger de la poussière.
TRANSPORT
Mettez l'appareil hors tension et retirez le bloc batterie avant de le transporter.
Mettez le couvre-lame et fixez les autres protections de transport, le cas échéant.
Portez toujours l'appareil par ses poignées (1 et 2).
1¶H[SRVH]SDVO¶DSSDUHLOjGHVFKRFVYLROHQWVRXjGHIRUWHVYLEUDWLRQVTXLSHXYHQWVHSURGXLUH
lors du transport dans des véhicules.
Fixez-bien l'appareil afin qu'il ne glisse pas ou ne tombe pas.
RANGEMENT

85
Vérifiez la tension de la
chaîne (reportez-vous à la
section de ce manuel
consacrée au réglage de
la tension de la chaîne)
Reportez-vous à la section
GHFHPDQXHO©5HPSODFHPHQW
GXJXLGHHWGHODFKDvQHª
Vérifiez si la chaîne et le
guide-chaîne ne sont pas
endommagés
Affûtez la chaîne
Inversez le sens de la chaîne
DÉPANNAGE
PROBLÈME
La chaîne et le guide
deviennent chauds et f
ument
Le moteur tourne mais
pas la chaîne
Le moteur tourne, la
chaîne aussi mais elle
ne coupe pas
CAUSE
Vérifiez si la chaîne n'est
pas trop tendue
Le réservoir d'huile de la
chaîne est vide
La chaîne est trop tendue
Vérifiez la chaîne et le
guide-chaîne
Vérifiez la chaîne et le
guide-chaîne
Chaîne émoussée
La chaîne tourne en arrière
REMÈDE
%UDQFKH]OHFRUGRQG¶DOLPHQWDWLRQ

GARANTIE
86
Nous sommes fiers de fabriquer un produit durable de haute qualité. Ce produit LawnMaster
®
comporte une garantie limitée de deux (2) ans contre tout défaut de fabrication et défaillance
matérielle à compter de sa date d'achat, sous réserve de conditions normales d'usage résidentiel.
Si le produit est destiné à un usage commercial, industriel ou à des fins de location, une garantie
limitée de 30 jours s'applique. Les batteries possèdent une garantie limitée d'un an contre tout
défaut de fabrication et défaillance matérielle. Pour être valides, les batteries doivent être chargées
FRQIRUPpPHQWDX[GLUHFWLYHVHWUqJOHPHQWDWLRQVGXPDQXHOG¶XWLOLVDWLRQ/DJDUDQWLHQHFRXYUHSDV
les dommages résultant d'une utilisation abusive directe ou indirecte, de la négligence, d'une
utilisation incorrecte, d'accidents, de réparations ou de modifications et du manque d'entretien.
9HXLOOH]FRQVHUYHUYRWUHUHoXOLVWHGHPEDOODJHFRPPHSUHXYHGDFKDW&HWWHJDUDQWLHYRXVDFFRUGH
des droits légaux spécifiques, mais vous pouvez avoir d'autres droits qui varient selon les États.
Si vous avez des questions au sujet de ce produit, appelez le service clientèle au (866) 384-8432.
Articles non couverts par la garantie:
1. toute pièce devenue inopérante suite à un usage impropre, une utilisation commerciale, une
XWLOLVDWLRQDEXVLYHXQHQpJOLJHQFHXQDFFLGHQWXQHQWUHWLHQLQFRUUHFWRXXQHPRGLILFDWLRQ
ODSSDUHLOVLOQDSDVpWpXWLOLVpHWRXHQWUHWHQXFRQIRUPpPHQWDXPDQXHOG¶XWLOLVDWLRQ
OXVXUHQRUPDOHH[FHSWLRQIDLWHGHVFDVFLGHVVRXV
DUWLFOHVGHQWUHWLHQGHURXWLQHFRPPHOHVOXEULILDQWVODIIWDJHGHVODPHV
5. détérioration normale du revêtement extérieur du fait de l'utilisation ou de l'exposition aux
intempéries.
Frais de transport: Les frais de transport pour l'acheminement de toute unité d'équipement motorisé
ou d'accessoires sont à la charge de l'acheteur. Il incombe à l'acheteur de payer les frais de transport
de toute pièce soumise à des fins de remplacement dans le cadre de cette garantie, sauf si ce retour
est demandé par écrit par LawnMaster.
CONSERVEZ VOS REÇUS D’ACHAT. CETTE GARANTIE EST NULLE SANS LESDITS
REÇUS D’ACHAT.

87
VUE ÉCLATÉE/LISTE DES PIÈCES

VUE ÉCLATÉE/LISTE DES PIÈCES
88
Key Number
1
2
3
4
5
6
7
8
9
10
11
12
13
14
15
16
17
18
19
171-7J13002
196-7J11601
293-7J13001
293-7J13002
235-7J13001
324-7J13001
139-7J13001
297-7J13001
216-7J13001
303-7J13001
324-7J13002
324-7J13003
324-7J13004
313-7J11203
324-7J13005
372-1610
324-7J13006
303-7J13002
324-7J13006
Le Cordon D'alimentation
Bouclier Manches
Mettez Bouton
Ens. Bouton
Bouton Poussoir
Huile Resevoir
Assemblée Swith
Top Manche
Garde De La Poignée Avant
Carter Moteur Gauche
Composant Carbone Électrique
Ensemble Moteur
Assemblage D'engrenages
Couvercle Étanche À La Poussière
Logement Tendeur
Chain
Bar
Droit Carter Moteur
Ensemble De Pompe À Huile
Drawing Number
CS1216 Manual LISTE DES PIÈCES
'HVFULSWLRQ Quantity
1
1
1
1
1
1
1
1
1
1
1
1
1
1
1
1
1
1
1

89
REMARQUES