GAF249
DIGITAL AIR FRYER
USER MANUAL | RECIPES | COOKING CHART

2
Model: GAF249
© 2022 Gourmia
1.0
www.gourmia.com
The Steelstone Group
Brooklyn, NY
All rights reserved. No portion of this manual may be reproduced by any means
whatsoever without written permission from The Steelstone Group, except for the
inclusion of quotations in a media review.
Although every precaution has been taken in the preparation of this manual, The
Steelstone Group assumes no responsibility for errors or omissions. Nor is any
liability assumed for damages resulting from the use of the information contained
herein. Although every eort has been made to ensure that the information
contained in this manual is complete and accurate, The Steelstone Group is not
engaged in rendering professional advice or services to the individual consumer;
further, The Steelstone Group shall not be held responsible for any loss or damage
allegedly arising from any information or suggestions in this manual.
IMPORTANT!
READ THIS USER MANUAL CAREFULLY
AND RETAIN FOR FUTURE REFERENCE.
FOR CUSTOMER SERVICE
QUESTIONS OR COMMENTS
VISIT WWW.GOURMIA.COM
EMAIL [email protected]
OR CALL 888.552.0033
MON-THU 9:00AM TO 6:00PM ET
AND FRI 9:00AM TO 3:00PM ET
LANGUAGES SUPPORTED: ENGLISH, SPANISH, FRENCH

3
Congratulations on the purchase of your
Digital Air Fryer from Gourmia!
Here at Gourmia, our one and only goal is to make sure nutritious and delicious meals
are always a practical possibility no matter how fast-paced your life is. Whether you’re
in need of a hearty breakfast, a mid-day snack, or a satisfying supper, our dependable,
easy-to-use appliances are designed to work for you while you work your way through
your busy day.
This manual provides an overview and instructions on all the air fryer’s functions and
features, along with directions for assembling, operating, cleaning, and maintaining
your appliance. Please read all safety instructions before getting started. Keep this
manual handy for future use and review.
Our team is available to help with any and every question you might have about your
new air fryer. We’re excited for you and want you to get the most out of your purchase—
so whether you need assistance with setup or guidance on which features to enable
for which foods, we’re happy to walk you through it, step by step.
Happy and easy cooking!
We’d love to hear about the mouthwatering meals you’re creating with your new air
fryer! Share your thoughts, recipes, and photos with us.
@gourmia
4

5
Important Safeguards
Know Your Air Fryer
∙ Display and Control Panel
∙ Preheat
∙ Turn Reminder
∙ Display, °F / °C, & Sound
∙ Presets Chart
Before First Use
Using Your Air Fryer
Cooking Tips
Cleaning & Maintenance
Troubleshooting
Warranty & Service
Recipes
Cooking Chart
6
8
9
9
9
10
11
12
13
16
17
18
19
20
40
TABLE OF CONTENTS
TABLE OF CONTENTS

6
FOR CUSTOMER SERVICE VISIT WWW.GOURMIA.COM OR CALL 888.552.0033
6
Read all instructions before using the electric appliance. The following
basic precautions should always be followed:
1. This appliance is not intended for
use by children or persons with
reduced physical, sensory or mental
capabilities, or lack of experience
and knowledge, unless they are
supervised by a responsible adult.
2. Close supervision is necessary when
any appliance is used near children.
Children should be supervised to
ensure that they do not play with
the appliance. Cleaning and user
maintenance should not be done by
children unless they are supervised by
a responsible adult.
3. Check if the voltage indicated on the
appliance corresponds to the local
main voltage before you connect the
appliance.
4. Do not use the appliance if the plug,
the main cord or the appliance itself is
damaged. Always make sure that the
plug is inserted properly into a wall
outlet.
5. Do not operate any appliance with
a damaged cord or plug, after the
appliance malfunctions, or if the
appliance has been damaged in any
manner. Return the appliance to the
nearest authorized service facility for
examination, repair, or adjustment.
6. Do not let the cord hang over the
edge of the table or counter, nor let it
touch hot surfaces.
7. To protect against electric shock, do
not immerse cord, plugs, or appliance
in water or other liquid.
8. Do not plug in the appliance or
operate the control panel with wet
hands.
9. Never connect this appliance to an
external timer switch or separate
remote-control system, in order
to avoid a hazardous situation. To
disconnect, turn o the appliance,
then remove the plug from wall outlet.
10. Do not place the appliance on or
near combustible materials such as a
tablecloth or curtain. The accessible
surfaces may become hot during use.
Do not place on or near a hot gas or
electric burner, or in a heated oven.
11. Do not place the appliance against
a wall or against other appliances.
Leave at least 4 inches of free space
on the back and sides, and 4 inches
of free space above the appliance.
Do not place anything on top of the
appliance.
12. If using parchment paper or other
liner, do not leave it in the basket
alone without the weight of food to
hold it in place. An unsecured liner can
be blown into the air fryer’s heating
element, creating a fire hazard.
13. Do not use the appliance for any other
purpose than described in this manual.
The use of accessory attachments
not recommended by the appliance
manufacturer may cause injuries.
14. Do not leave the appliance
unattended when plugged in.
15. Extreme caution must be used when
moving an appliance containing hot oil
or other hot liquids.
16. Do not touch hot surfaces; use the
handle. During air frying, hot steam
is released through the air outlet
openings. Keep your hands and face
IMPORTANT SAFEGUARDS
IMPORTANT SAFEGUARDS

7
7
Power:
AC120V~ 60Hz 1200W
CORD AND PLUG SAFETY
• A short power-supply cord is provided to reduce the risk of becoming entangled in
or tripping over a longer cord.
• Extension cords may be used if care is exercised in their use.
• If an extension cord is used:
a. The marked electrical rating of the extension cord should be at least equal to
the electrical rating of the appliance; and
b. The longer cord should be arranged so that it will not drape over the countertop
or tabletop where it can be pulled on by children or tripped over.
ELECTRICAL POLARIZED PLUG
This unit has a polarized plug (one blade is wider
than the other). To reduce the risk of electric shock,
the plug is intended to be used by inserting it into
the electrical outlet only one way. If the plug does
not fit securely into the outlet, reverse the plug and
re-insert. If it still does not fit, contact a qualified
electrician for assistance. Do not modify the plug in
any way.
at a safe distance from the steam and
from the air outlet openings. Also be
careful of hot steam and air when
you remove the basket from the
appliance.
17. After using the appliance, avoid
contact with the hot metal inside.
Unplug from outlet when not in
use and before cleaning. Allow the
appliance to cool before cleaning.
18. Immediately unplug the appliance
if you see dark smoke coming from
the appliance. Wait for the smoke
emission to stop before you remove
the basket from the appliance.
19. Do not use outdoors.
20. For household use only.
IMPORTANT SAFEGUARDS
SAVE THESE INSTRUCTIONS
8
FOR CUSTOMER SERVICE VISIT WWW.GOURMIA.COM OR CALL 888.552.0033
8
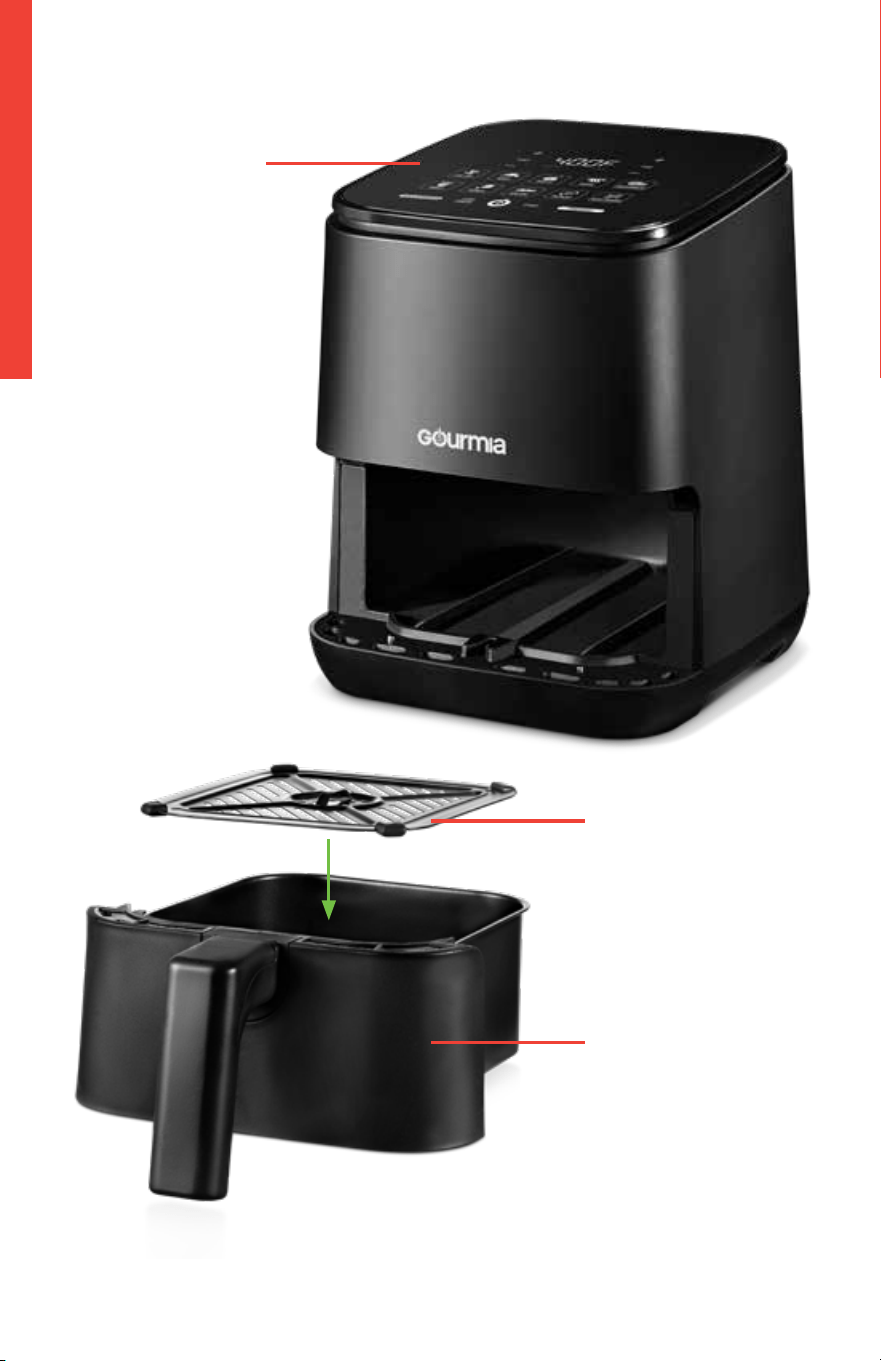
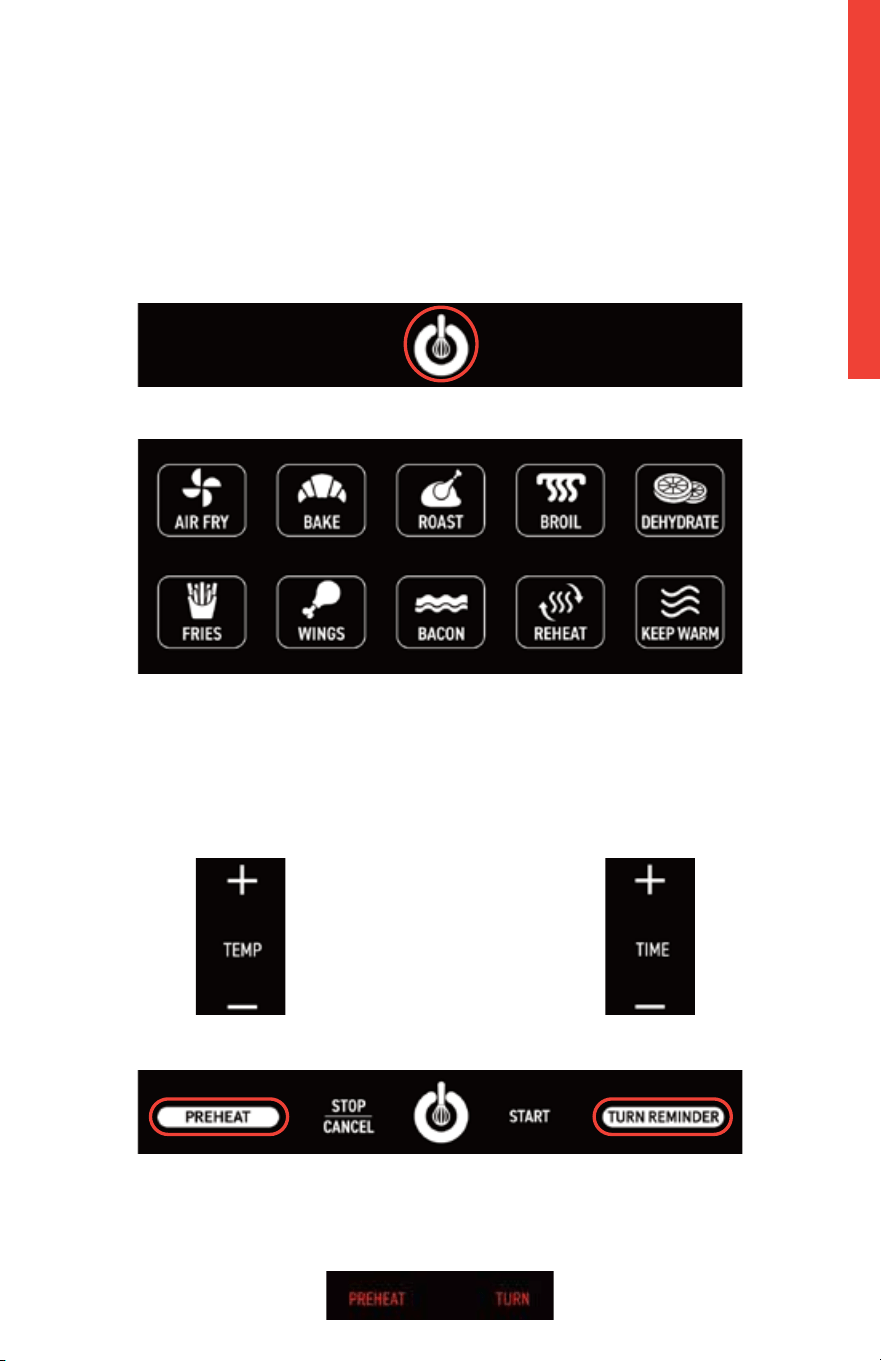
KNOW YOUR AIR FRYER
Basket
Place the crisper tray into the basket.
Display /
Control Panel
Crisper Tray
NOTE: The silicone bumpers on the crisper tray should be left on during use.
They are food grade and BPA-free. The bumpers can be removed for cleaning.
KNOW YOUR AIR FRYER
9
9
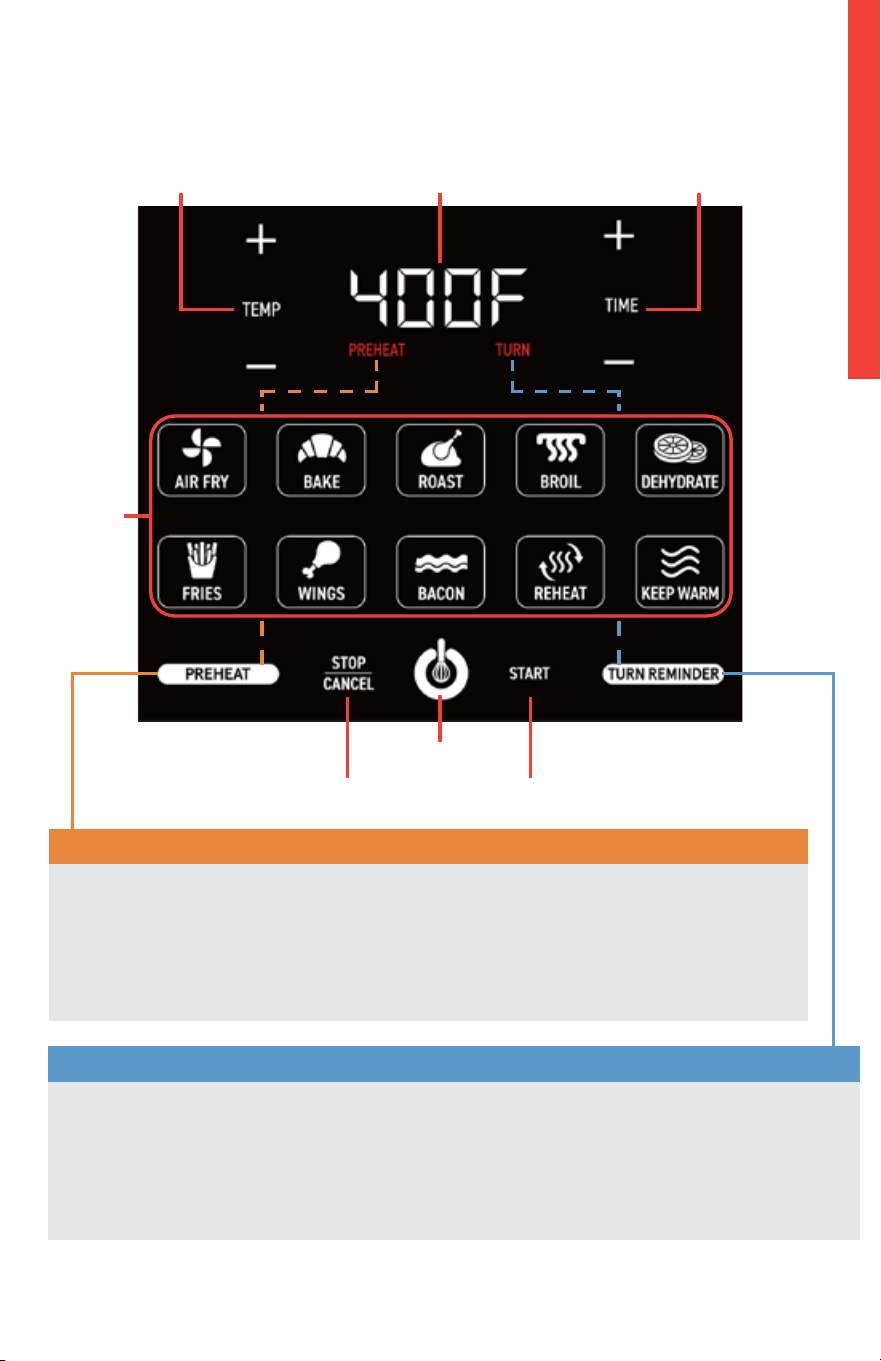
KNOW YOUR AIR FRYER
When enabled, air fryer will preheat and prompt you when to add food.
Tap PREHEAT to enable or disable preheating before tapping START.
When preheating is enabled, PREHEAT will appear in red on the display.
DISPLAY AND CONTROL PANEL
Power Icon
PREHEAT
When enabled, air fryer will prompt you to turn food halfway through cook time.
Tap TURN REMINDER to enable or disable turn reminder before tapping START.
When turn reminder is enabled, TURN will appear in red on the display.
TURN REMINDER
See the chart on page 11 for presets that have preheat and turn reminder on by
default, and those that have the option to toggle the settings on and o.
StartStop / Cancel
Crisper Tray
Temperature
Controls
Time
Controls
KNOW YOUR AIR FRYER
Temperature / Time
Presets

10
10
FOR CUSTOMER SERVICE VISIT WWW.GOURMIA.COM OR CALL 888.552.0033
Below are display indicators and notifications for guided cooking prompts.
DISPLAY, °F / °C, & SOUND
PrE xeat
The air fryer is preheating.
Add Food
The air fryer is preheated.
turn Food
Reminder to turn or toss food.
End
The cook time has elapsed.
Preheat is enabled.
Turn Reminder is enabled.
TOGGLE °F / °C
To toggle between displaying temperature in Fahrenheit and Celsius, press
and hold the KEEP WARM preset.
MUTE AIR FRYER
To silence the air fryer’s beeping sound, press and hold STOP / CANCEL.
Press and hold STOP / CANCEL again to turn the sound on.
NOTE: The air fryer will still beep for guided cooking prompts.
DISPLAY, °F / °C, & SOUND
11
11
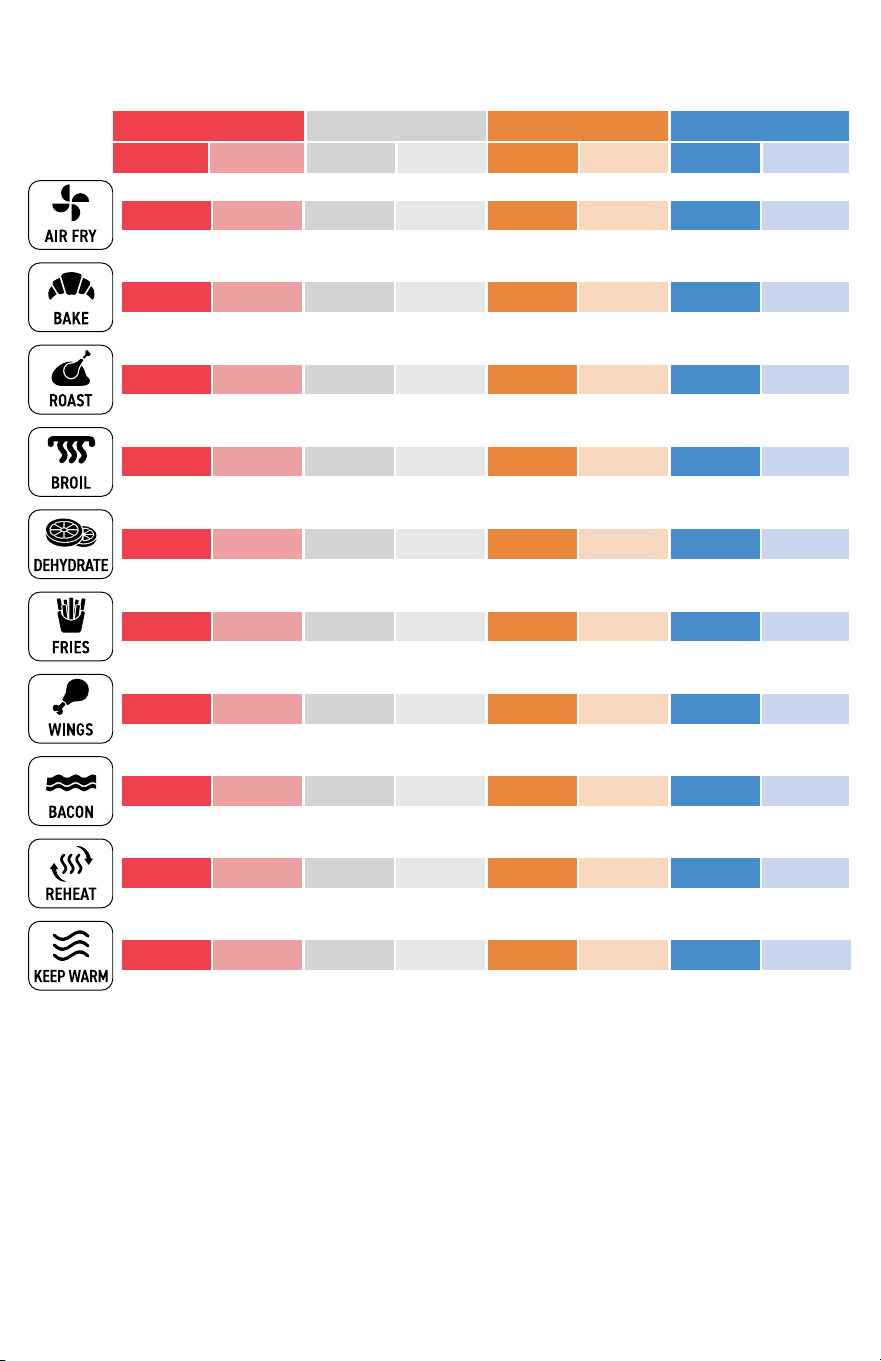
PRESETS CHART
TEMPERATURE
DEFAULT RANGE
TIME
DEFAULT RANGE
PREHEAT
DEFAULT TOGGLE
TURN REMINDER
DEFAULT TOGGLE
NOTE: A check mark indicates preheat and turn reminder can be enabled or
disabled by tapping PREHEAT / TURN REMINDER before tapping START.
400F 170-400F 20 min 1-60 min on
P
o
P
375F 170-400F 6 min 1-60 min o
P
o
P
400F 170-400F 25 min 1-60 min on
P
on
P
400F 170-400F 20 min 1-60 min on
P
o
P
400F 170-400F 15 min 1-60 min on
P
on
P
400F 170-400F 20 min 1-60 min on
P
on
P
400F 170-400F 20 min 1-60 min on
P
o
P
400F 170-400F 25 min 1 min-2 h on
P
on
P
325F 170-400F 25 min 1 min-2 h on
P
o
P
400F 170-400F 20 min 1-60 min on
P
o
P
135F 90-170F 8 h
30 m-24 h
o n/a o
P
400F 400F 12 min 1-60 min on
P
on
P
300F 170-400F 15 min 1-60 min o
P
o
P
400F 170-400F 20 min 1-60 min on
P
o
P
200F
150-200F
30 min 1 min-8 h o
n/a
o n/a

12
12
1. Remove all packaging, stickers, and labels from the air fryer, including the
tape securing the basket to the unit.
2. To pull out the basket for cleaning, secure the unit with one hand and pull
the basket handle straight back with the other hand.
3. Thoroughly clean the basket and crisper tray with hot water, dishwashing
liquid, and a non-abrasive sponge.
4. Wipe the inside chambers and outside of the air fryer with a moist cloth.
NOTE: During the first few uses, there might be a hot plastic smell. This is
perfectly normal in new air fryers as the material is heated for the first time. The
smell will go away after the first few uses.
BEFORE FIRST USE
WARNING:
Do not put anything on top of the air fryer.
Do not place the air fryer against a wall or against other appliances. It is important
to leave at least 4 inches of free space above and around all sides of the air fryer
to allow for proper ventilation.
Do not fill the basket with oil, frying fat, or any other liquid; this appliance works
by circulating hot air.
To avoid the risk of fire:
• NEVER place the air fryer on a gas or electric stovetop, even if the
stovetop is o.
• If using parchment paper or other liner, always be sure there is food in the
basket so the liner is safely secured in place.
Not Recommended
Cooking Spray
Recommended
Oil Mister / Spray Bottle
NOTE: When spraying food for a crispier finish, we recommend using regular
cooking oil instead of cooking spray, as the latter may damage the accessories.
BEFORE FIRST USE
13
13
USING YOUR AIR FRYER
1. Place the air fryer on a stable, level, and heat-resistant surface.
2. Place the crisper tray into the basket and slide it into the air fryer.
3. Plug the air fryer into an outlet.
4. Tap the power icon to turn the air fryer on.
5. Tap the desired preset.
8. Tap PREHEAT / TURN REMINDER to enable or disable these settings.
Preheat and turn reminder are on by default for recommended presets.
PREHEAT / TURN appear in red on the display when enabled.
USING YOUR AIR FRYER
6. Tap the temperature controls’s
+ and - icons to increase or
decrease the temperature.
The display will show the preset temperature and time.
7. Tap the time controls’s + and -
icons to increase or decrease
the time.

14
FOR CUSTOMER SERVICE VISIT WWW.GOURMIA.COM OR CALL 888.552.0033
14
9. IF PREHEAT IS ENABLED
a. Tap START.
The display will show
PrE xeat (Preheat) and the air fryer will begin
preheating. Once preheated, the air fryer will beep and the display will show
Add Food (Add Food).
WARNING: The basket will be hot. Do not touch hot surfaces!
b. Remove the basket carefully, place food inside, and return it to
the air fryer to automatically begin cooking.
NOTE: If the basket is not removed, the cook time will begin.
9. IF PREHEAT IS DISABLED
a. Remove the basket, place food inside, and return it to the air fryer.
b. Tap START.
IF TURN REMINDER IS ENABLED
a. Halfway through the cook time, the air fryer will beep and the display
will show
turn Food (Turn Food).
b. Remove the basket carefully and place it on a heat-resistant surface.
c. Turn or toss the food using non-metal tongs.
d. Return the basket to the air fryer to automatically resume cooking.
NOTE: If the basket is not removed, cooking will continue.
USING YOUR AIR FRYER
USING YOUR AIR FRYER

15
15
When your selected cook time has elapsed, the air fryer will beep and the
display will show End (End).
10. Remove the basket carefully and place it on a heat-resistant surface.
11. Remove food from the basket using non-metal tongs.
STOP / CANCEL COOKING
Tap STOP / CANCEL to stop cooking. Tap START to resume cooking.
Removing the basket from the air fryer during cooking will stop cooking. Returning
the basket to the air fryer will automatically resume cooking.
Tap STOP / CANCEL twice to cancel cooking.
CAUTION:
Always use caution when removing the basket during / after cooking; hot steam
may escape!
WARNING: The basket and food will be hot. Do not touch hot surfaces!
Do not use sharp or metal utensils as they can scratch the nonstick surface.
Do not turn the basket upside down, as any excess oil that has collected on the
bottom of the basket will leak onto the food.
USING YOUR AIR FRYER
TURN OFF AIR FRYER
Press and hold the power icon to turn o the air fryer. Unplug the air fryer from the
outlet when not in use.
USING YOUR AIR FRYER

16
FOR CUSTOMER SERVICE VISIT WWW.GOURMIA.COM OR CALL 888.552.0033
16
COOKING TIPS
• For an extensive list of foods and their ideal amounts, temperature and time
settings, along with preparation notes, see the Air Fry Cooking Chart and
Dehydrate Chart on pages 40-43.
• Check food for desired doneness a few minutes before cook time elapses
and cook a little longer if necessary.
• Always ensure raw proteins reach food-safe temperature.
• Air fryers perform similarly to ovens; follow the “oven” instructions on item
packaging or recipe.
• Snacks that can be prepared in an oven can also be prepared in the air fryer.
• Smaller ingredients usually require a slightly shorter cook time than larger
ingredients.
• Preheating the air fryer before adding food will generally deliver the best
results (see PREHEAT on page 9).
• When cooking multiple batches in a row, only preheat before the first batch.
• Turning or tossing food halfway through cook time will deliver evenly
browned and crispy results (see TURN REMINDER on page 9).
• Toss fresh potatoes with 1 tablespoon of oil for a crispy exterior. Air fry the
ingredients within a few minutes after adding the oil.
• Do not cook foods that will produce a large amount of grease in the air fryer.
• Place a baking pan or an oven-safe dish or pan in the basket to cook fragile
or filled ingredients.
COOKING TIPS

17
17
CLEANING & MAINTENANCE
STORAGE
• Unplug the appliance and let it cool down.
• Make sure all parts are clean and dry.
• Store the appliance in a clean and dry place.
ENVIRONMENT
Do not throw away the appliance with the normal household waste
at the end of its life; instead, hand it in at an ocial collection point for
recycling. By doing this, you help to preserve the environment.
GUARANTEE AND SERVICE
If you need service or information or if you have a problem, please visit www.
Gourmia.com or contact your distributor.
WARNING:
NEVER immerse cord, plug, or air fryer in water or any other liquid.
Do not use metal kitchen utensils or abrasive cleaning material to clean the
basket or crisper tray, as this may damage the nonstick coating.
• Clean the air fryer after every use.
• Unplug the air fryer from the outlet before cleaning.
• Let the air fryer cool down completely before cleaning. Remove the basket
from the air fryer to cool it down quicker.
• Clean the basket and crisper tray in the dishwasher’s top rack only or with
hot water, dish soap, and a non-abrasive sponge.
• If residue is stuck to the bottom of the basket, fill it with hot water and dish
soap and let it soak.
• Wipe the outside of the air fryer with a moist cloth.
• Clean the inside of the air fryer with hot water, dish soap and a cleaning
brush to remove any food residue.
• Ensure the air fryer is completely dry before using.
CLEANING & MAINTENANCE

18
18
PROBLEM
The air fryer does not
work.
POSSIBLE CAUSE
The air fryer is not
plugged in.
The timer has not been
set.
The basket is not put into
the air fryer properly.
The basket is overfilled.
The ingredients did
not cook.
There are too many
ingredients in the basket.
The set temperature is
too low.
The cook time is too
short.
SOLUTION
Plug the main plug into a grounded
wall socket.
Tap + and - icons to set the required
cook time to turn on the air fryer.
Slide the basket into the air fryer
properly.
Do not fill the basket beyond max
line.
Put smaller batches of ingredients
in the basket. Smaller batches are
fried more evenly.
Tap + and - icons to set the required
temperature setting.
Tap + and - icons to set the required
cook time.
Certain types of ingredients
need to be shaken halfway
through the cook time.
Ingredients that lie on top of or
across each other (e.g. fries) need
to be shaken halfway through the
cook time (see TURN REMINDER
on page 9).
The ingredients are
fried unevenly.
You used a type of snack
meant to be cooked in a
traditional deep fryer.
Use oven snacks or lightly brush
some oil onto the snacks for a
crispier result.
Fried snacks are not
crispy.
You are preparing greasy
ingredients.
When you fry greasy ingredients in the
air fryer, a large amount of oil will leak
into the basket. The oil produces white
smoke and the basket may heat up
more than usual. This does not aect
the air fryer or the end result.
White smoke comes
out of the air fryer.
The basket still contains
grease residue from
previous use.
White smoke is caused by grease
heating up in the basket. Make
sure you clean the basket properly
after each use.
Quality potatoes will give
an even cook.
Use fresh potatoes and make sure
they stay firm during frying.
Fresh fries are fried
unevenly.
Potatoes are too starchy. Rinse the potato sticks properly
and dry to remove starch from the
outside of the sticks.
The crispiness of the fries
depends on the amount
of oil and water in the
fries.
Make sure you dry the potato sticks
properly before you add the oil.
Cut the potato sticks smaller for a
crispier result. Add slightly more oil
for a crispier result.
Fresh fries are not
crispy.
The basket does not
fit inside the air fryer.
TROUBLESHOOTING

19
19
WARRANTY & SERVICE
This Limited Warranty is for one full year from the date of
purchase and requires proof of purchase from an authorized
seller. It is applicable to the original purchaser only and is
not transferable to a third party user. Repair or replacement
of defective parts is solely at Gourmia’s discretion. In the
event that repair isn’t possible, Gourmia will replace the
product/part. If product repair/replacement won’t suce,
Gourmia has the option of refunding the cash value of the
product or component returned.
Product defects not covered under the Warranty provisions
include normal wear and damage incurred from use or
accidental negligence, misuse of instruction specifications
or repair by unauthorized parties. Gourmia is not liable for
any incidental or consequential damages incurred by such
circumstances.
Only valid within the United States.
Register your product at www.Gourmia.com/warranty
FOR CUSTOMER SERVICE
QUESTIONS OR COMMENTS
VISIT WWW.GOURMIA.COM
EMAIL [email protected]
OR CALL 888.552.0033
MON-THU 9:00AM TO 6:00PM ET
AND FRI 9:00AM TO 3:00PM ET
LANGUAGES SUPPORTED: ENGLISH, SPANISH
WARRENTY & SERVICE

20

21
½ cup all-purpose flour
2 teaspoons BBQ seasoning
½ cup buttermilk, or whole milk
1 egg
1 cup panko breadcrumbs
1 large yellow sweet onion, sliced ½-inch thick and
separated into rings
Ranch dressing for serving (optional)
AIR FRY at 400°
1. In a shallow pan, combine flour with BBQ seasoning
2. In a separate pan, beat egg together with buttermilk
3. Put panko in another separate pan
4. Working in batches, dip onion rings into seasoned flour, then egg
mixture and lastly into panko
5. Place as many onion rings as will fit in a single layer into air
fryer basket
6. Cook in batches if necessary
7. Cook onion rings for 8-10 minutes until golden brown
Serve with ranch dressing if desired
BBQ Onion Rings
Serves 4 / COOK TIME 8-10 minutes

22

23
10 jalapeños, cut in half lengthwise seeds removed
6 oz. cream cheese, softened
¼ cup shredded cheddar cheese
2 slices bacon, air fried and crumbled
1 green onion, chopped
½ teaspoon garlic powder
½ teaspoon hot sauce
¼ teaspoon smoked paprika (optional)
AIR FRY at 400°
1. Combine all ingredients except jalapeños in a bowl and mix well
2. Stuff each of the jalapeño halves with some of the cheese
mixture
3. Place stuffed jalapeños in air fryer basket in a single layer,
cooking in batches if necessary
4. Cook 5-8 minutes or until cheese is melted and jalapeños are
slightly browned
Bacon Cheddar
Jalapeño Poppers
Serves 4 / COOK TIME 5-8 minutes

24

25
2 small to medium size russet potatoes
2 teaspoons vegetable oil
Salt and pepper
½ cup crème fraiche or sour cream
4 slices smoked salmon
Fresh dill for garnish
AIR FRY at 400°
1. Coat the potatoes with the oil and season with salt and pepper
2. Place potatoes in air fryer basket and cook 35-45 minutes or
until potatoes are cooked through
3. Let potatoes cool for 5 minutes
4. Make a small slice along the top of each potato and squeeze to
open slightly
5. Top each potato with some of the crème fraiche,
2 slices of smoked salmon and some fresh dill
Brunch Baked
Potatoes
Serves 2 / COOK TIME 35-45 minutes

26

27
2 cups cooked rotisserie chicken, shredded
½ cup red enchilada sauce
12 corn or small flour tortillas
¾ cup crumbled queso fresco or mozzarella cheese
½ cup Mexican crema or sour cream
1 avocado sliced
ROAST at 375°
1. Mix together chicken and enchilada sauce
2. Lay tortillas out in a single layer on a cutting board
3. Divide chicken mixture equally between tortillas
4. Repeat with cheese
5. Cook tortillas four at a time until heated through and
tortillas are crispy, approximately 8 minutes
6. Repeat with remaining tortilla
7. Top each tostada with some of the crema and a few slices of
avocado
Chicken Tostadas
Serves 4 / COOK TIME 5-8 minutes
28

29
8 ounces imitation crab sticks carefully torn into long
strips and dried well
1 tablespoon vegetable oil
1 tablespoon old bay seasoning
AIR FRY at 375°
1. Put crab strips in a large bowl
2. Pour oil over crab and gently mix
3. Sprinkle seasoning over crab and toss to coat evenly
4. Spread crab out in a single layer in basket cooking in two batch-
es if necessary
5. Cook 8-12 minutes or until crab strips are crisp
Cool completely before serving
Crab Chips
Serves 8 / COOK TIME 8-12 minutes

30

31
8 ounces cream cheese or chive cream cheese, softened
1 green onion, finely chopped (omit if using chive cream
cheese)
6 ounces crab meat or imitation crab sticks (if using
sticks chop into ¼-inch pieces)
1 package wonton wrappers
Vegetable oil
AIR FRY at 400°
1. Mix together cream cheese, green onion and crab meat
2. Dampen the outer edges of each wrapper with a little water
3. Place about 2 teaspoons of filling in the center of each wrapper
4. Fold in half into a triangle and gently press edges together to
seal
5. Brush both sides of each triangle with oil and place in single
layer in air fryer basket
6. Cook 8-10 minutes until golden brown and crispy
Repeat as necessary until all crab Rangoon are cooked
Crab Rangoon
Makes approximately 36 Rangoon, 12 servings
COOK TIME 8- 10 minutes

32

33
1 pound ground pork or beef
4 ounces water chestnuts, finely minced
3 tablespoons panko breadcrumbs
1 tablespoon soy sauce
1 teaspoon sesame oil
1 teaspoon ginger, grated or finely minced
1 teaspoon garlic, grated or finely minced
1 large scallion, minced
1 egg, lightly beaten
½ teaspoon black pepper
AIR FRY at 400°
1. Mix all ingredients together
2. Form into 1 ½-inch balls
3. Cook 10-12 minutes or until cooked through, cooking in batches
if necessary
Serve over noodles or rice
Inside Out Dumplings
Serves 4 / COOK TIME 10-12 minutes

34

35
2cupsall-purpose flour
4teaspoonsbaking powder
¼ cupsugar
¼ teaspoonkosher salt
6tablespoonscold unsalted butter, cut into pieces
½ teaspoon whole caraway seeds
¼ cup raisins
⅔ cupbuttermilk or whole milk
1 large egg
BAKE at 375°
1. In a food processor pulse flour, baking powder, salt, and sugar
a few times until just combined
2. Add the butter and pulse 7-10 times until the butter is
completely distributed, the mixture should have a sandy
texture to it
3. Transfer to a large mixing bowl
4. In a small bowl, whisk together the milk and egg,
save 2 tablespoons to brush on scones just before baking
5. Pour the remaining milk and egg mixture into the mixing bowl
with the dry ingredients
6. Add caraway seeds and raisins to bowl
7. Stir with a spatula until a rough dough forms
8. Transfer to a lightly floured surface and knead briefly until the
dough comes together into ball (do not over work the dough or the
scones will be tough)
9. Roll dough out to approximately 1-inch thick
10. Using a 2½-inch round cookie or biscuit cutter, cut out circles
re-rolling and cutting as necessary to use all of the dough
11. Brush tops of scones with the reserved egg wash
12. Place the scones into the air fryer basket leaving ½-inch space
between each, cooking in batches if necessary
13. Bake scones for 10-15 minutes or until tops are golden brown
Irish Soda Bread
Scones
Makes 8-10 scones / COOK TIME 10-15 minutes

36

37
2 slices hearty white bread
2 slices cheddar cheese
2 tablespoons kimchi, drained and chopped
2 slices bacon, air fried and crumbled
1 small green onion, chopped
Softened butter
AIR FRY at 375°
1. Place one slice of cheese on 1 slice of bread
2. Top with kimchi, bacon and green onion
3. Top with remaining cheese slice and bread
4. Butter both sides of bread
5. Place sandwich in air fryer basket and cook for 5 minutes
turning halfway through cooking or until golden brown and melty
Kimchi and Bacon
Grilled Cheese
Serves 1 / COOK TIME 5 minutes

38

39
1 head garlic
2 teaspoons olive or vegetable oil
AIR FRY at 375°
1. Slice the very top of the head of garlic off and drizzle with oil
2. Wrap in foil
3. Place in air fryer basket
4. Cook 25-30 minutes or until garlic is very soft and golden brown
5. Unwrap and let sit until cool enough to handle
6. To extract roasted garlic cloves, squeeze from the bottom of the
clove up
Use in sauces, dressings, marinades, with vegetables or for garlic
bread
Roasted Garlic
Makes 1 head of garlic / COOK TIME 25-30 minutes
40
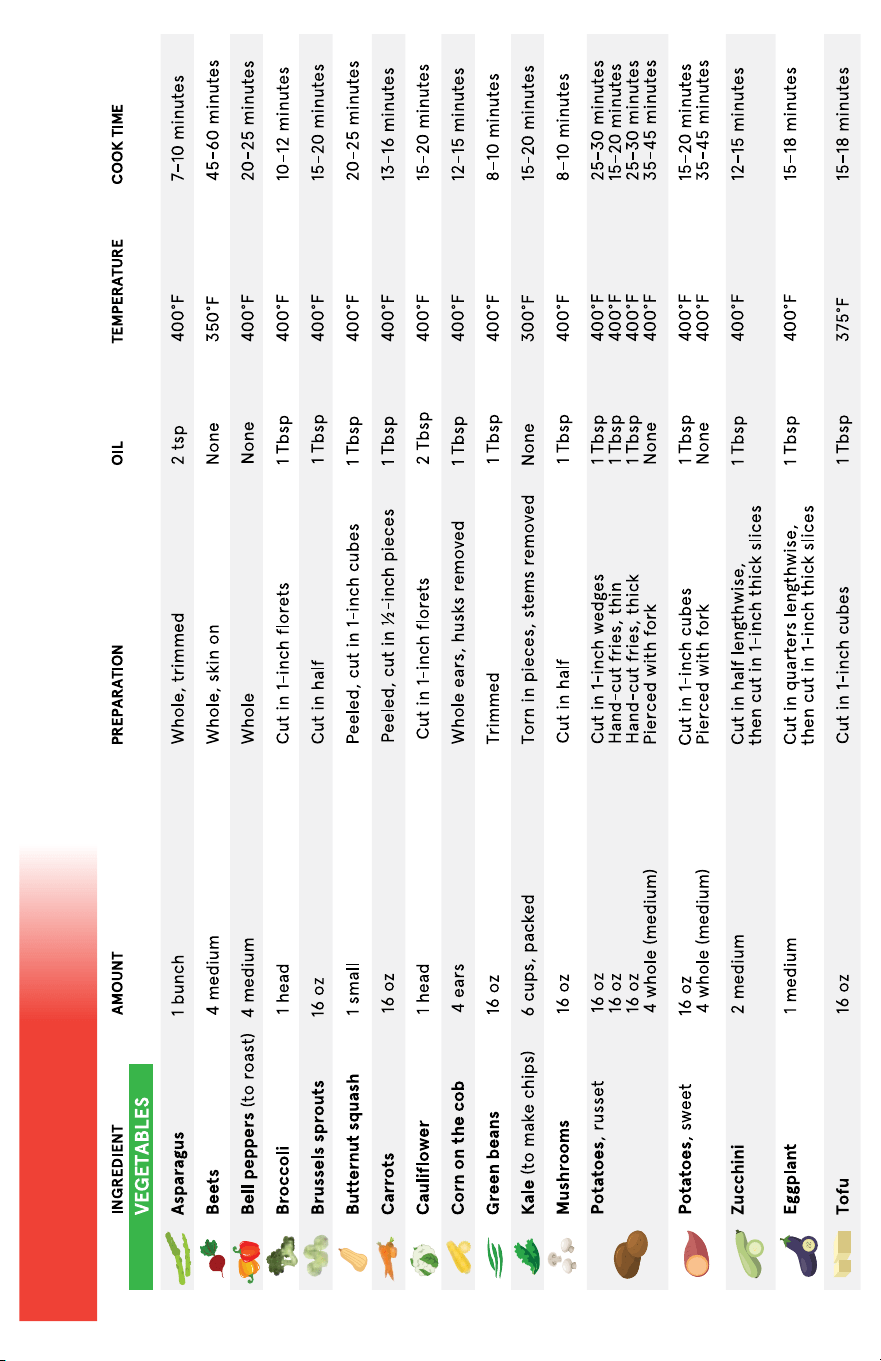
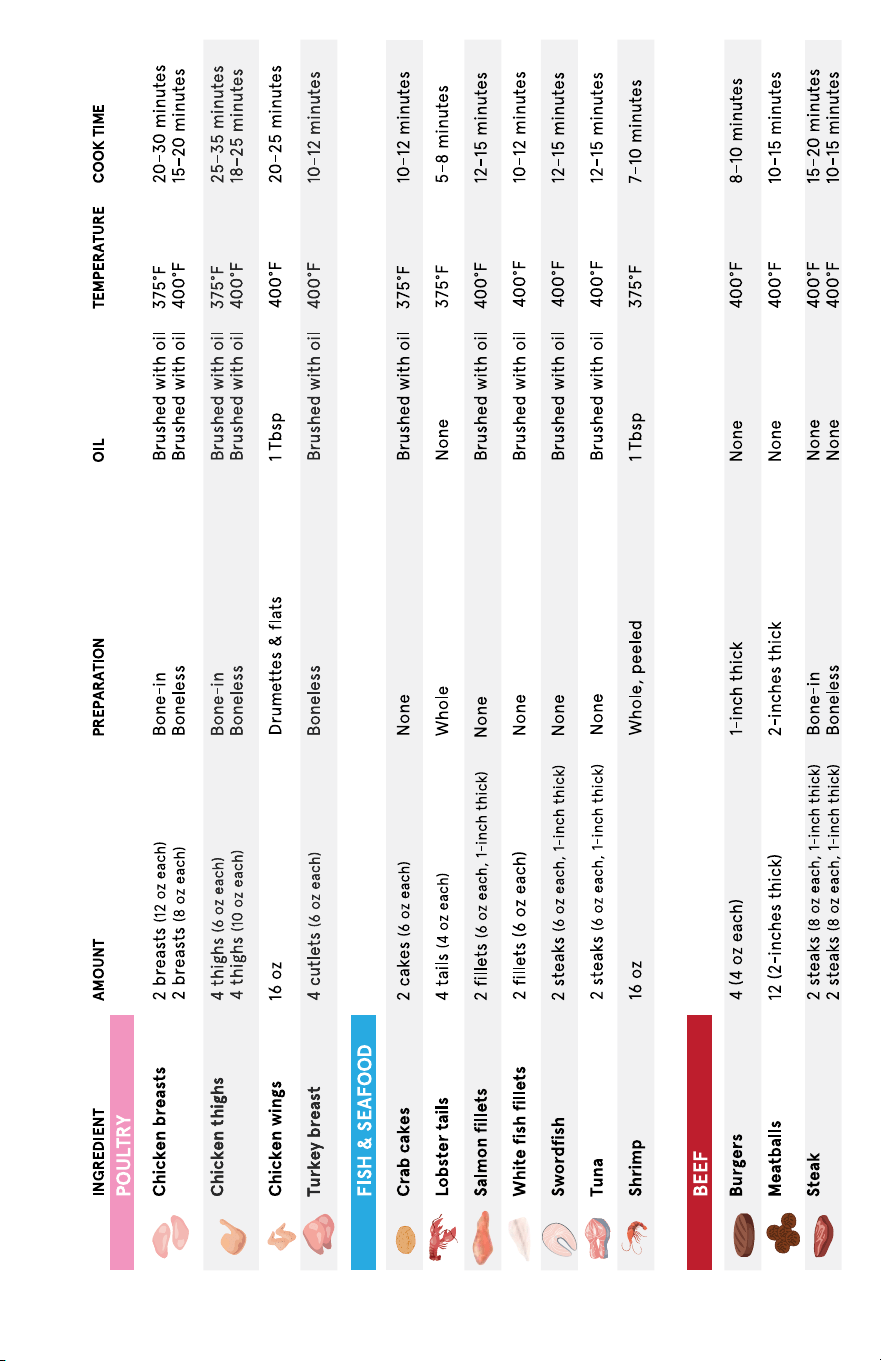
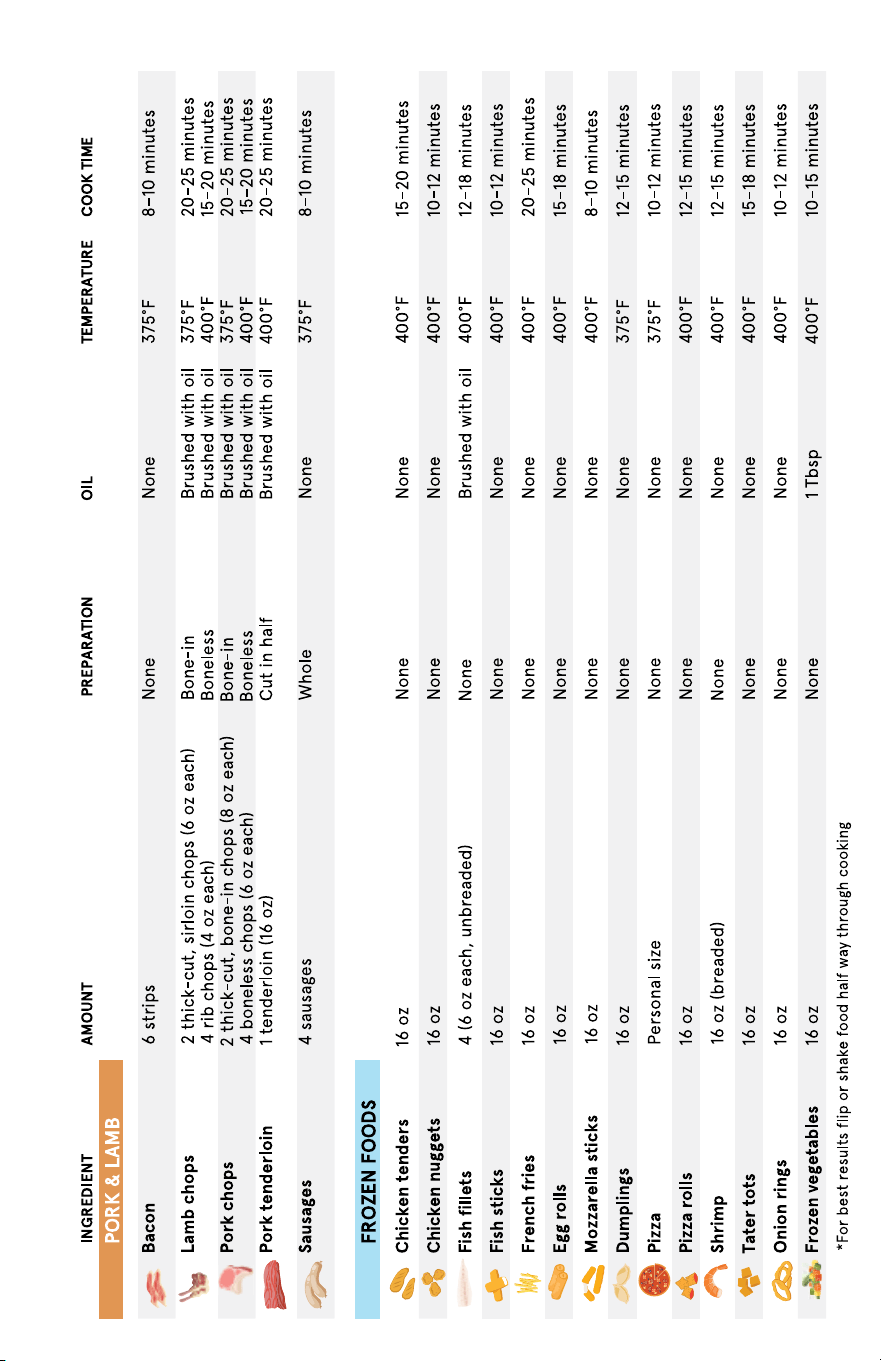
AIR FRY COOKING CHART
41
Cook time will vary depending on the amount of food, thickness, and brand.
Check food for desired doneness a few minutes before cook time elapses and cook a little longer if necessary. Ensure raw proteins reach food-safe temperature.
42
Cook time will vary depending on the amount of food, thickness, and brand.
Check food for desired doneness a few minutes before cook time elapses and cook a little longer if necessary. Ensure raw proteins reach food-safe temperature.
43
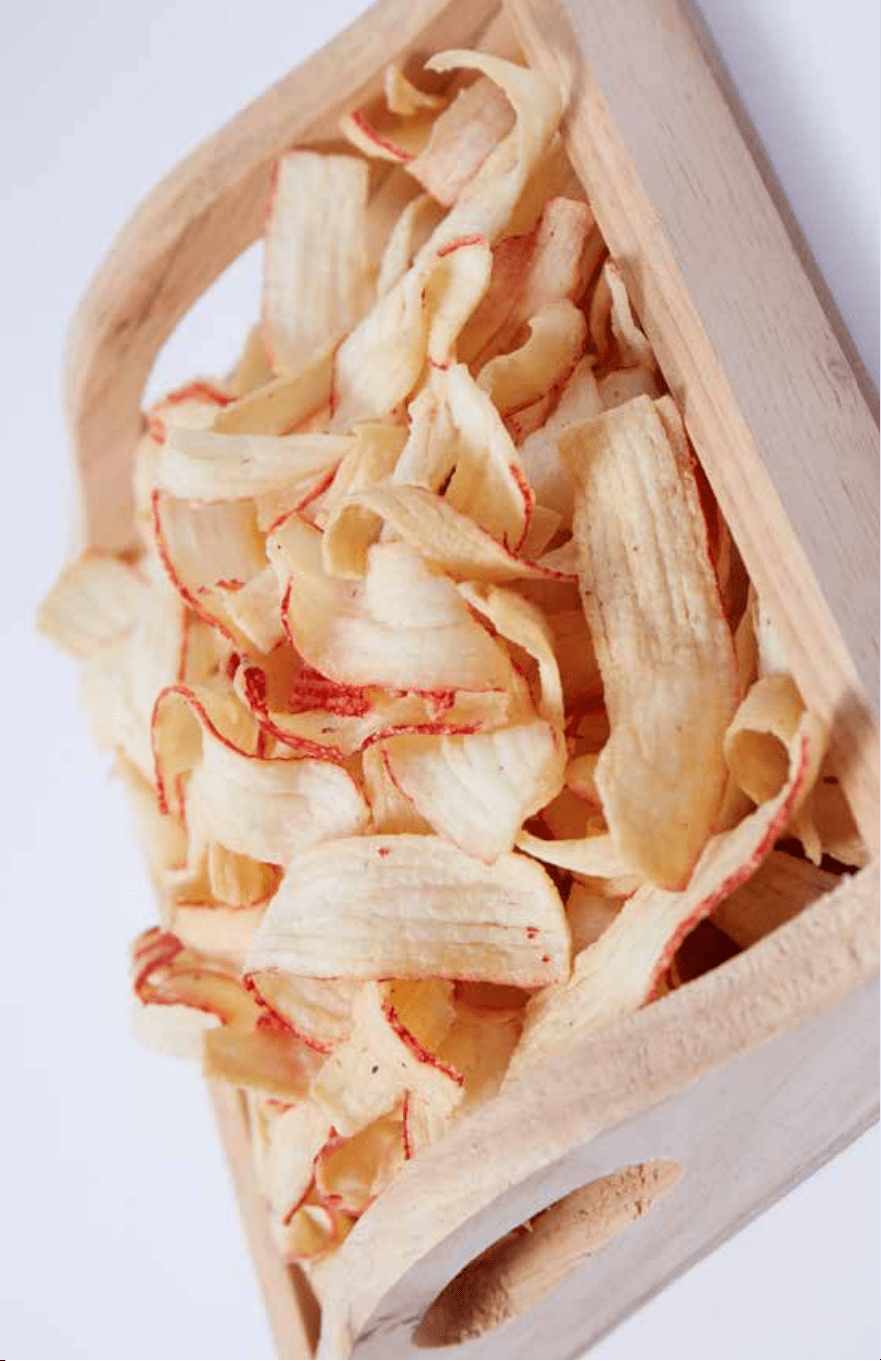
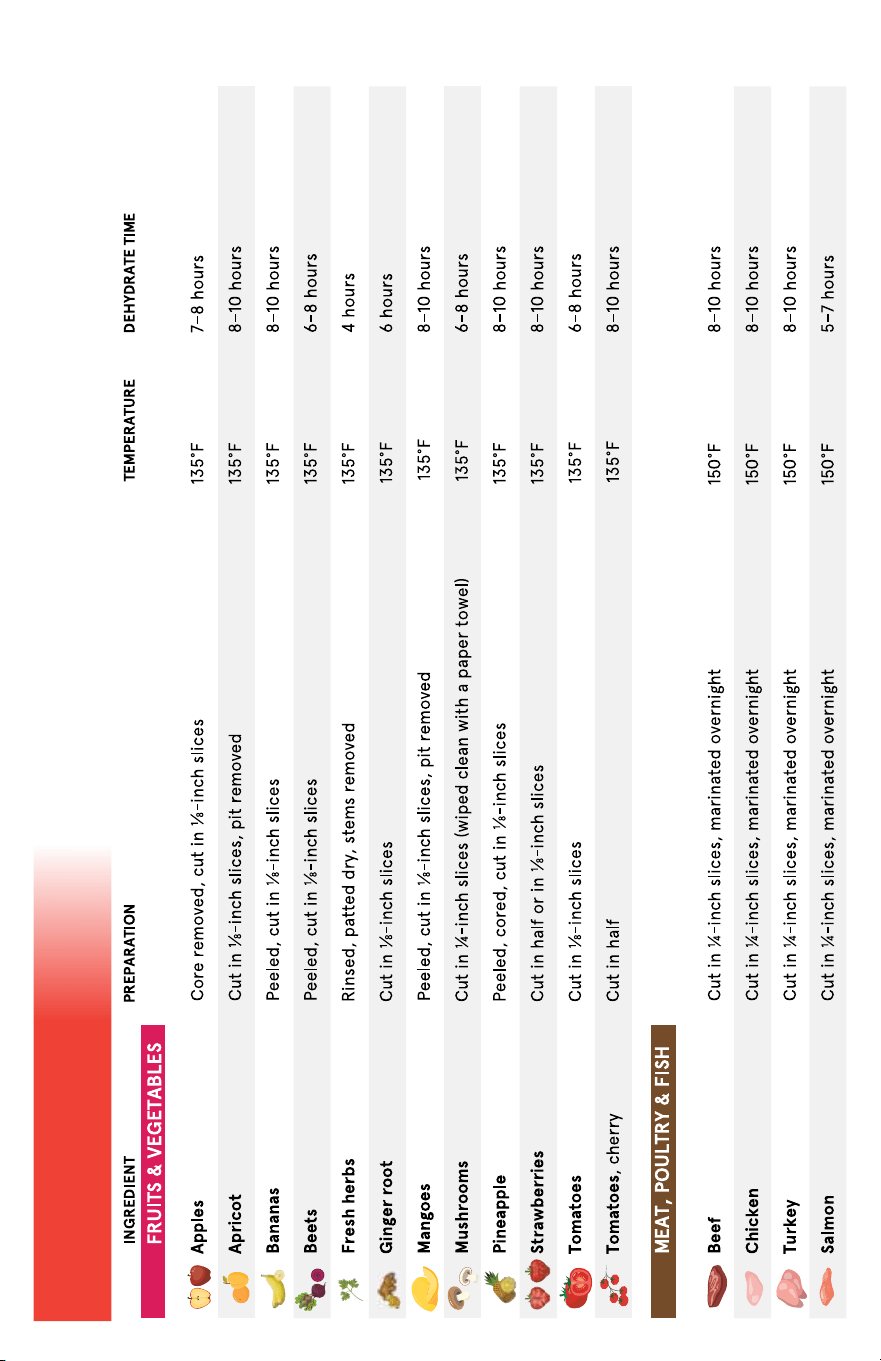
DEHYDRATE CHART

We’d love to hear from you!
888.552.0033
info@gourmia.com
Get cooking with Gourmia
