Each Serene Background LED kit includes:
Item Quantity
1
1
1
1
2
2
1
Description
12V DC Power Supply, UL® Listed
Serene Background LED Controller
Serene LED Background Light
Serene Aquarium Background Film
LED Light Clips w/Suction Cups
Stand Brackets w/3M Tape & Screws
Remote Control
1
or
A
C
B
E
F
Note:
components, please contact us
directly at www.current-usa.com.
DO NOT RETURN TO RETAILER
SERENE BACKGROUND LIGHT KIT
BOX CONTENTS
NOTE: IF YOU ARE MISSING ANY
ITEMS FROM YOUR KIT, PLEASE
CONTACT US DIRECTLY AT
www.current-usa.com/support
DO NOT RETURN TO RETAILER
IMPORTANT: READ INSTRUCTIONS BEFORE INSTALLING, NOTE ALL SAFETY WARNINGS
For additional installation instructions, tips and videos, please visit
www.current-usa.com/serene-led-guide
Please carefully remove all items from this kit, remove any plastic protective film or material
and dispose of properly. PLEASE recycle this box and other materials as local laws allow.
D
G
PRODUCT SPECIFICATIONS
MODEL AQUARIUMS #LEDs WATTS DIMENSIONS FILM SIZE
FITS
BACKGROUND LIGHT
3151 24” to 36” 18 8 23” x 1” dia. 37” x 18”
3152 36” to 48” 22 12 29” x 1” dia. 49” x 18”
3153 48” to 60” 30 16 45” x 1” dia. 61” x 24”
3154 72” 40 18 56” x 1” dia. 73” x 24”
Attachment Tape For Controller
H
current-usa.com
SERENE
Background LED
M
50
current
BRITE
+
A
B
C
D
E
F
G
H
What’s Included
SERENE LED KIT
Installation Instructions
2
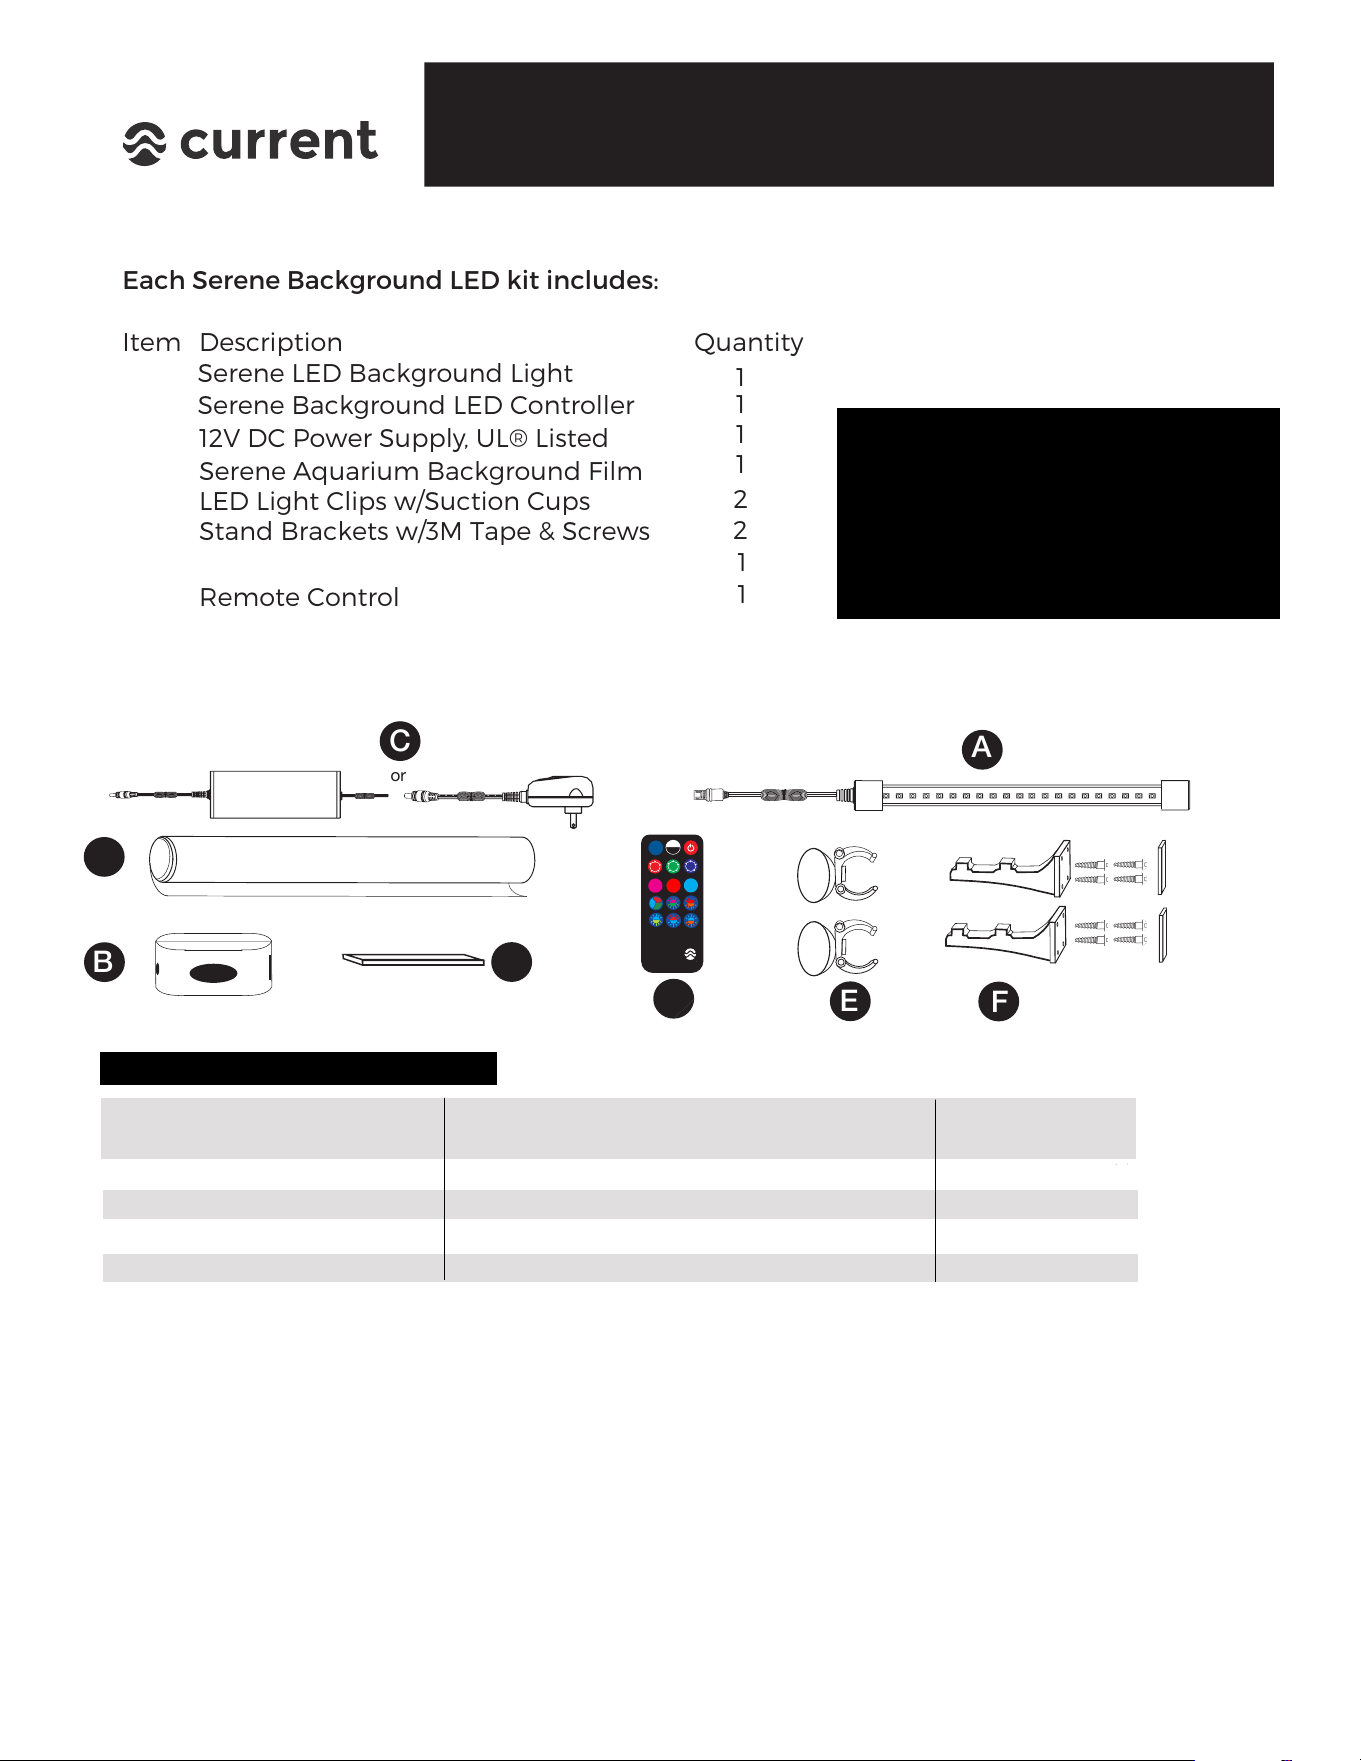
STEP 1 - Serene Background Installation
1. Measure glass aquarium back & lightly mark
cutting lines on the back side of lm material.
3. Remove any aquarium components (such as a
hang-on lter) and clean aquarium back using
freshwater (do not use soap or spray cleaner.)
4. Thorougly wet back of glass with clean
freshwater using a sponge or sprayer.
5. Remove corner of
lm backing and stick to
top corner of aquarium. Peel clear
lm
backing and apply background to wet glass.
6. Use your hand to position
lm and
remove any large air bubbles.
7. Squeeze out water and air bubbles with a
smooth tool (such as a at ruler or credit card.)
Check for tiny air bubbles from both sides of
the glass. If there are tiny bubbles, do more
squeegeeing.
(TIP: Using more water on glass back while installing
the glass
lm will make positioning easier.)
2. CAREFULLY cut background lm to size using
scissors or a razor blade knife.
8. Place ruler or card at aquarium glass edge and
carefully trim background material using a razor
blade. Wipe any excess water with a lint free
cloth, then re-install any aquarium accessories.
NOTE: If simply taping aquarium background lm to glass back, follow steps 1-3 then use clear tape to
attach background to aquarium. Trim if needed. If using static cling method, please follow ALL steps below.
SERENE LED KIT
Installation Instructions
3
STEP 2 - Serene Background LED Light Installation
Two installation methods for the Serene Background LED light are included with each
Serene LED Kit:
1. Swivel clips with stand mounts - this is the ideal method of mounting and will provide
the strongest lighting effect for background lighting, however does require space (6”+)
for installation. This is also the preferred method if installing on a rimless/frameless
aquarium.
2. Swivel clips with suction cups - this is the easiest method of installation, however does
require a surface for suction cup mounting (either aquarium plastic frame or glass top.)
Note: The Serene Background LED light is IP68/Submersible and waterproof, so installing under glass
canopies or inside aquarium on back wall is acceptable.
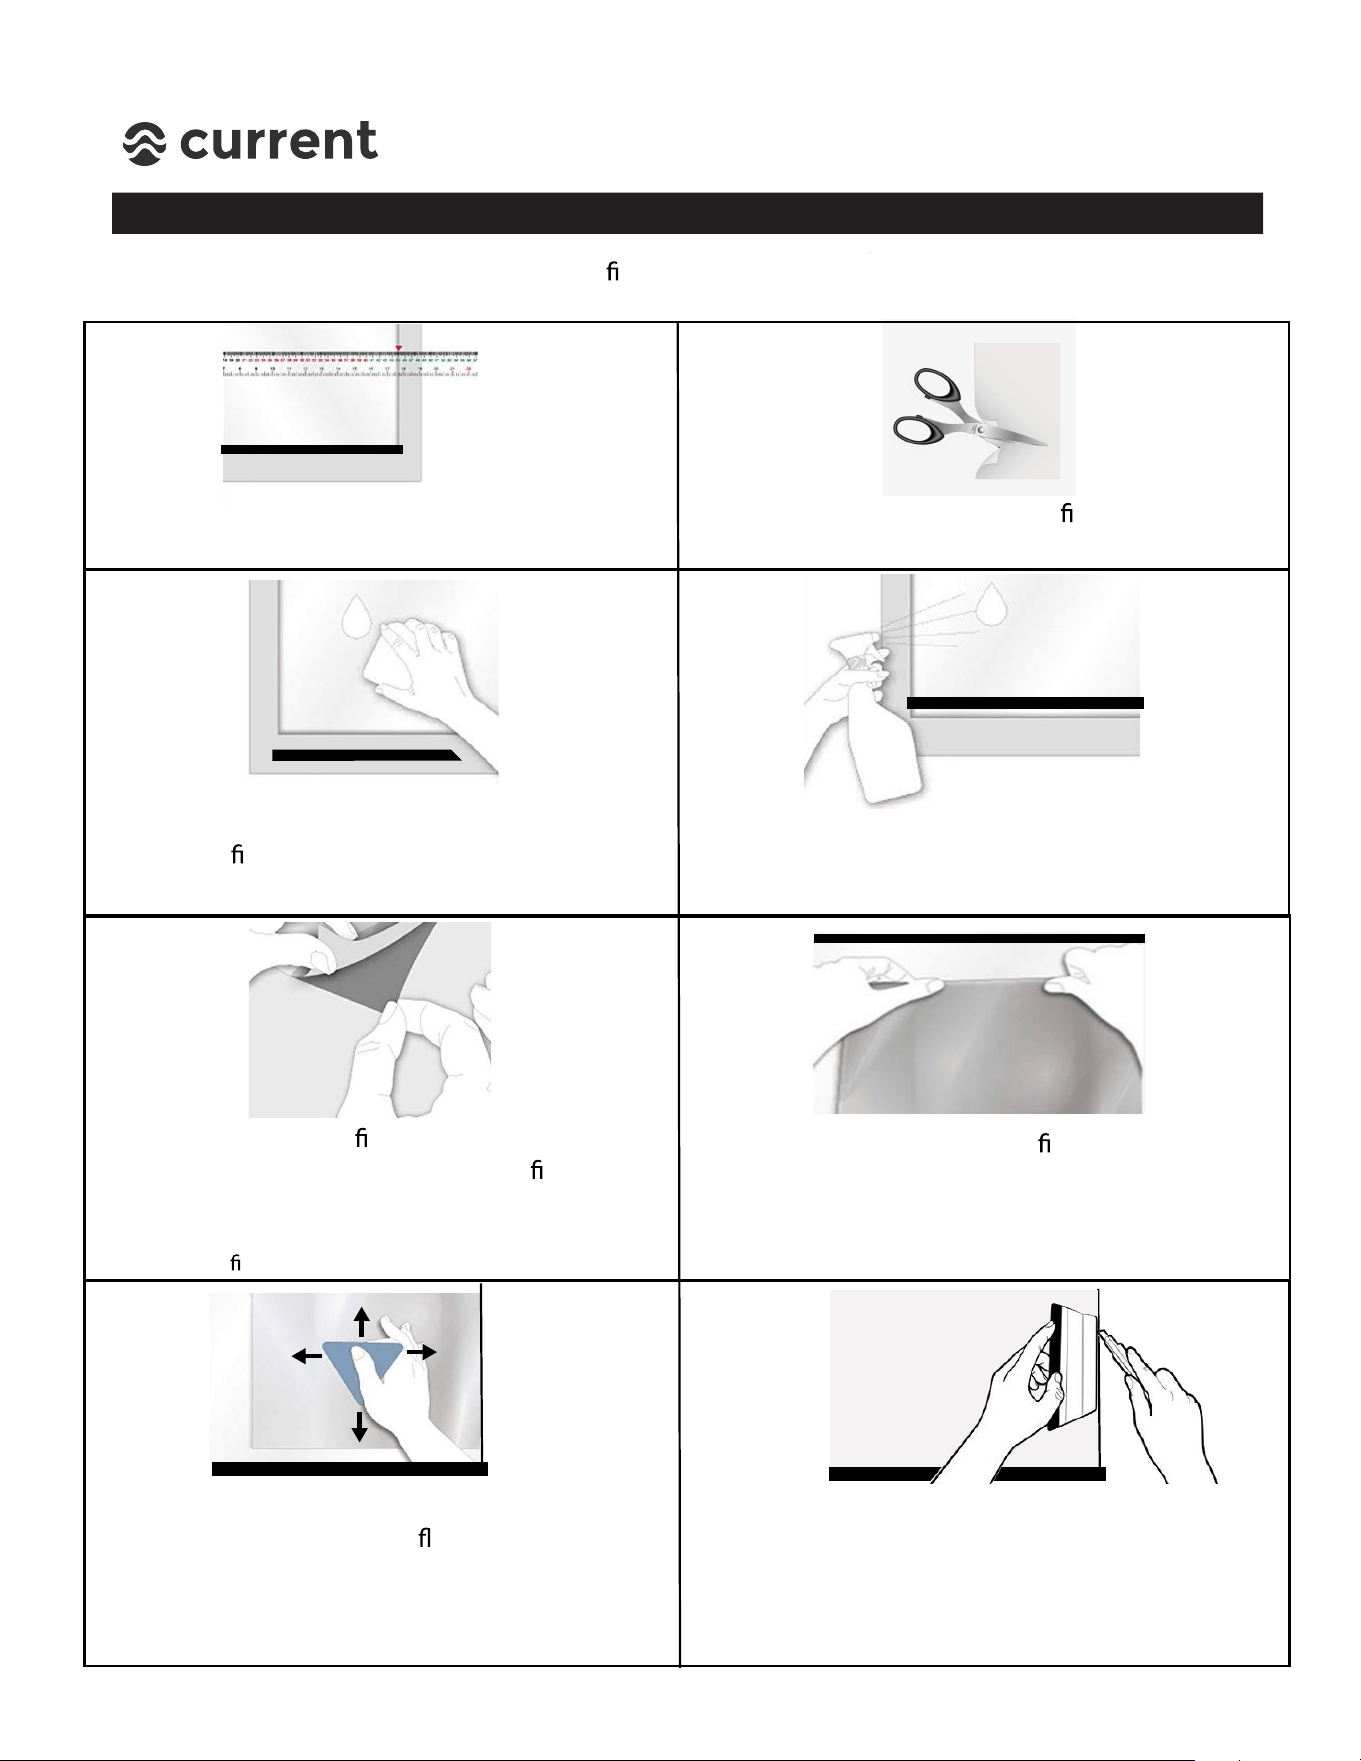
Installation Method #1 - Swivel Clips with Stand Mounts
1. Remove light swivel clips from
suction cups by turning 90 degrees
and removing.
2. Place clips onto outer tab on stand mounts
and turn 90 degrees to attach.
3. Mark installation location of stand
mounts (ideally, 1/2”-1” below bottom
of aquarium and 1”-6” from ends.
4. Attach stand mounts to back of stand
using 4 small wood screws. (NOTE: 3M
adhesive tape is also included for installation,
Skip to Step 6 below.)
5. Insert Background LED light into
swivel clips and swivel LEDs to
illuminate background film.
6. If using 3M adhesive tape, insert Background
LED light into swivel clips and position LEDs
to illuminate background light. Attach 3M
adhesive tape to stand mounts and position
into place by pressing firmly towards stand.
Aquarium
1/2”-1” below
bottom
24” Kit = ~16”
36” Kit = ~24”
48” Kit = ~34”
72” Kit = ~48”
Stand
Bottom
3M Tape
SERENE LED KIT
Installation Instructions
4
STEP 2 - Serene Background LED Light Installation
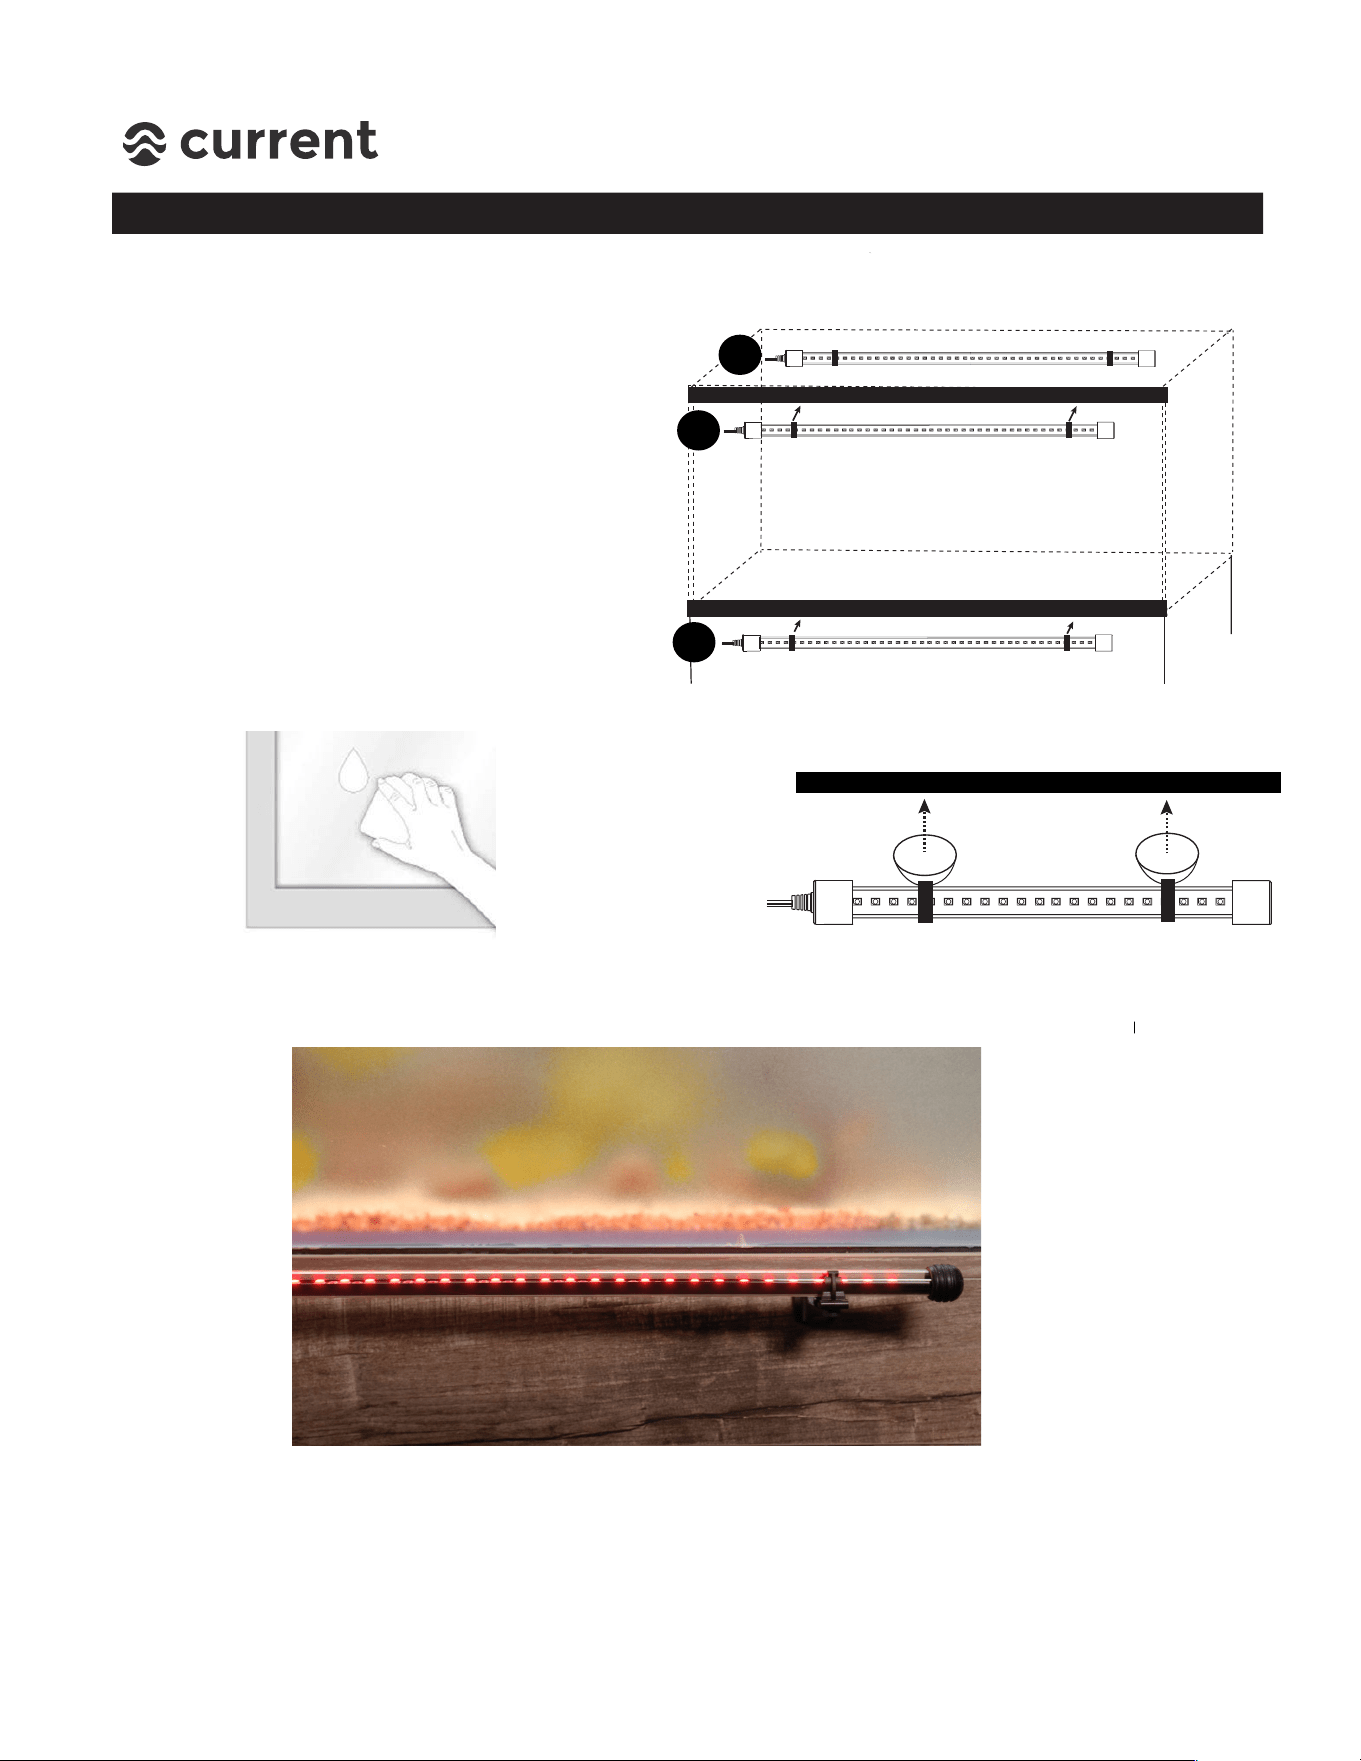
Installation Method #2 - Swivel Clips with Suction Cups
1. Locate Background LED light
mounting location and clean
of any dirt, algae or debris.
2. Slightely moisten inside of suction
cups and firmly press LED light into
desired location.
3. Swivel LED light to illuminate backround film.
Note: To get the strongest background lighting effect, it’s best to place light a few inches
away from background vs. lighting close. This provides distance for the LED light to spread
evenly over the background film and cover a wider surface area.
r
The included suction cups are a simple
way to install the background LED light,
especially for framed aquariums or
aquariums with glass tops. The best
mounting locations include:
A. Inside or outside Glass Top
B. Top aquarium frame
C. Bottom aquarium frame
A
B
C