INSTRUTION MANUAL
BEDIENUNGSANLEITUNG
MANUEL D'INSTRUCTIONS
MANUAL DE INSTRUCCIONES
MANUALE DI ISTRUZ IONI
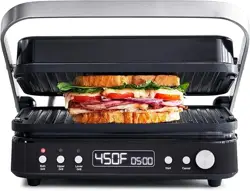
CONTACT GRILL
Model:LS-GC02C-H
AC 220- -240V~ 50 60Hz 2000W
PLEASE READ INSTRUCTIONS CAREF ULLY BEFORE ASSEMBLY
RETAIN THIS MANUAL FOR FUTURE REFERENCE

EN CONTENTS
IMPORTANT SAFETY INFORMATION........................................................................................................01
TECHNICAL DATA......................................................................................................................................02
PRODUCT OVERVIEW................................................................................................................................ 02
BEFORE FIRST USE..................................................................................................................................03
OPERATION .............................................................................................................................................03
CLEANING AND CARE ................................................................................................................................05
ERROR CODE ...........................................................................................................................................06
WARRANTY ................................................................................................................................................06
DE INHALT
WICHTIGE SICHERHEITSINFORMATIONEN............................................................................................... 07
TECHNISCHE DATEN ..................................................................................................................................08
PRODUKTÜBERSICHT .................................................................................................................................09
VOR DER ERSTEN BENUTZUNG ................................................................................................................09
BETRIEB .......................................................................................................................................................10
REINIGUNG UND PFLEGE ...........................................................................................................................13
FEHLERCODE ...............................................................................................................................................13
GARANTIE .....................................................................................................................................................13
FR TABLE DES MATIÈRES
CONSIGNES DE SÉCURITÉ IMPORTANTES ..............................................................................................14
CARACTERISTIQUES TECHNIQUES ........................................................................................................15
AVANT LA PREMIÈRE UTILISATION ...........................................................................................................16
FUNCTIONNEMENT .....................................................................................................................................17
NETTOYAGE ET ENTRETIEN ....................................................................................................................19
CODE D'ERREUR ......................................................................................................................................19
GARANTIE .................................................................................................................................................20
ES CONTENIDO
INSTRUCCIONES DE SEGURIDAD .........................................................................................................20
CARACTERÍSTICAS TÉCNICAS .............................................................................................................21
IDENTIFICACIÓN DE LAS PARTES ..........................................................................................................22
ANTES DEL PRIMER USO...................................................................................................................... 23
FUNCIONAMIENTO .................................................................................................................................23
LIMPIEZA Y MANTENIMIENTO ......................................................................................................................26
CÓDIGO DE ERROR .................................................................................................................................26
GARANTÍA ......................................................................................................................................................26
IT CONTENUTO
MPORTANTI MISURE DI SICUREZZA ..........................................................................................................27
SPECIFICHE TECNICHE ..............................................................................................................................28
PANORAMICA DEL PRODOTTO ..................................................................................................................28
PRIMA DEL PRIMO UTILIZZO ......................................................................................................................29
FUNZIONAMENTO ........................................................................................................................................30
PULIZA E MANUTENZIONE .........................................................................................................................32
CODICE DI ERRORE ....................................................................................................................................32
GARANZIA ...................................................................................................................................................33

1
IMPORTANT SAFETY INFORMATION
When using your appliance, basic safety precautions should always be followed, including the following.
1.Ensure that the voltage indicated on the rating plate matches your domestic power supply.
2.If the power cable is damaged, in order to avoid danger, it must be replaced by the manufacturer or its
maintenance department or similar professionals.
3.To protect against electric shock, do not immerse the cord, plug or machine in water or any other liquids.
4.Do not touch the hot surface of the grill during or after operation.
5.Use a silicone food tong to take out the food.
6.When the grill machine is not in use, the plug should be pulled out of the socket to avoid electric shock,
leakage and fire caused by aging insulation.
7.The matching grill accessories should be used correctly to avoid fire or injury.
8.The grill should be placed in a dry environment and should not be used outdoors.
9.While the grill is in use, maintain a distance of 20 cm from it at all times.
10.Place the grill on a stable surface when you use it. Do not approach flammable items.
11.When the grill is in operation, be careful when moving the food tray or other accessories to avoid being
scalded by hot oil or high-temperature liquids.
12.Do not place any items on the grill. Do not cover it, or block the heat dissipation position.
13.Grill can consume food only, do not put large
a fire.
14.This appliance can be used by persons with reduced physical, sensory or mental capabilities or lack of
experience and knowledge if they have been given supervision or in
struction concerning its safe use and
und
erstand the hazards involved.This appliance may not be used by children.Keep the appliance and its
cord out of reach of children. Ensure children are kept supervised while it is operating and do not play with
the appliance.
15.Children may not clean the grill or carry out any user maintenance on it.
16.This appliance is intended for household and similar use, such as:
- staff kitchen areas in shops, offices and other
- working environ
ments;
- farmhouses;
- b
y clients in hotels,motels and other residential-type environments;
- bed-and-breakfast-type environments.
pieces of food or metal items on the grill as they may cause

2
TECHNICAL DATA
Model
LS-GC02C-H
Power supply
220- -240V~ 50 60Hz
Power Consumption
2000W
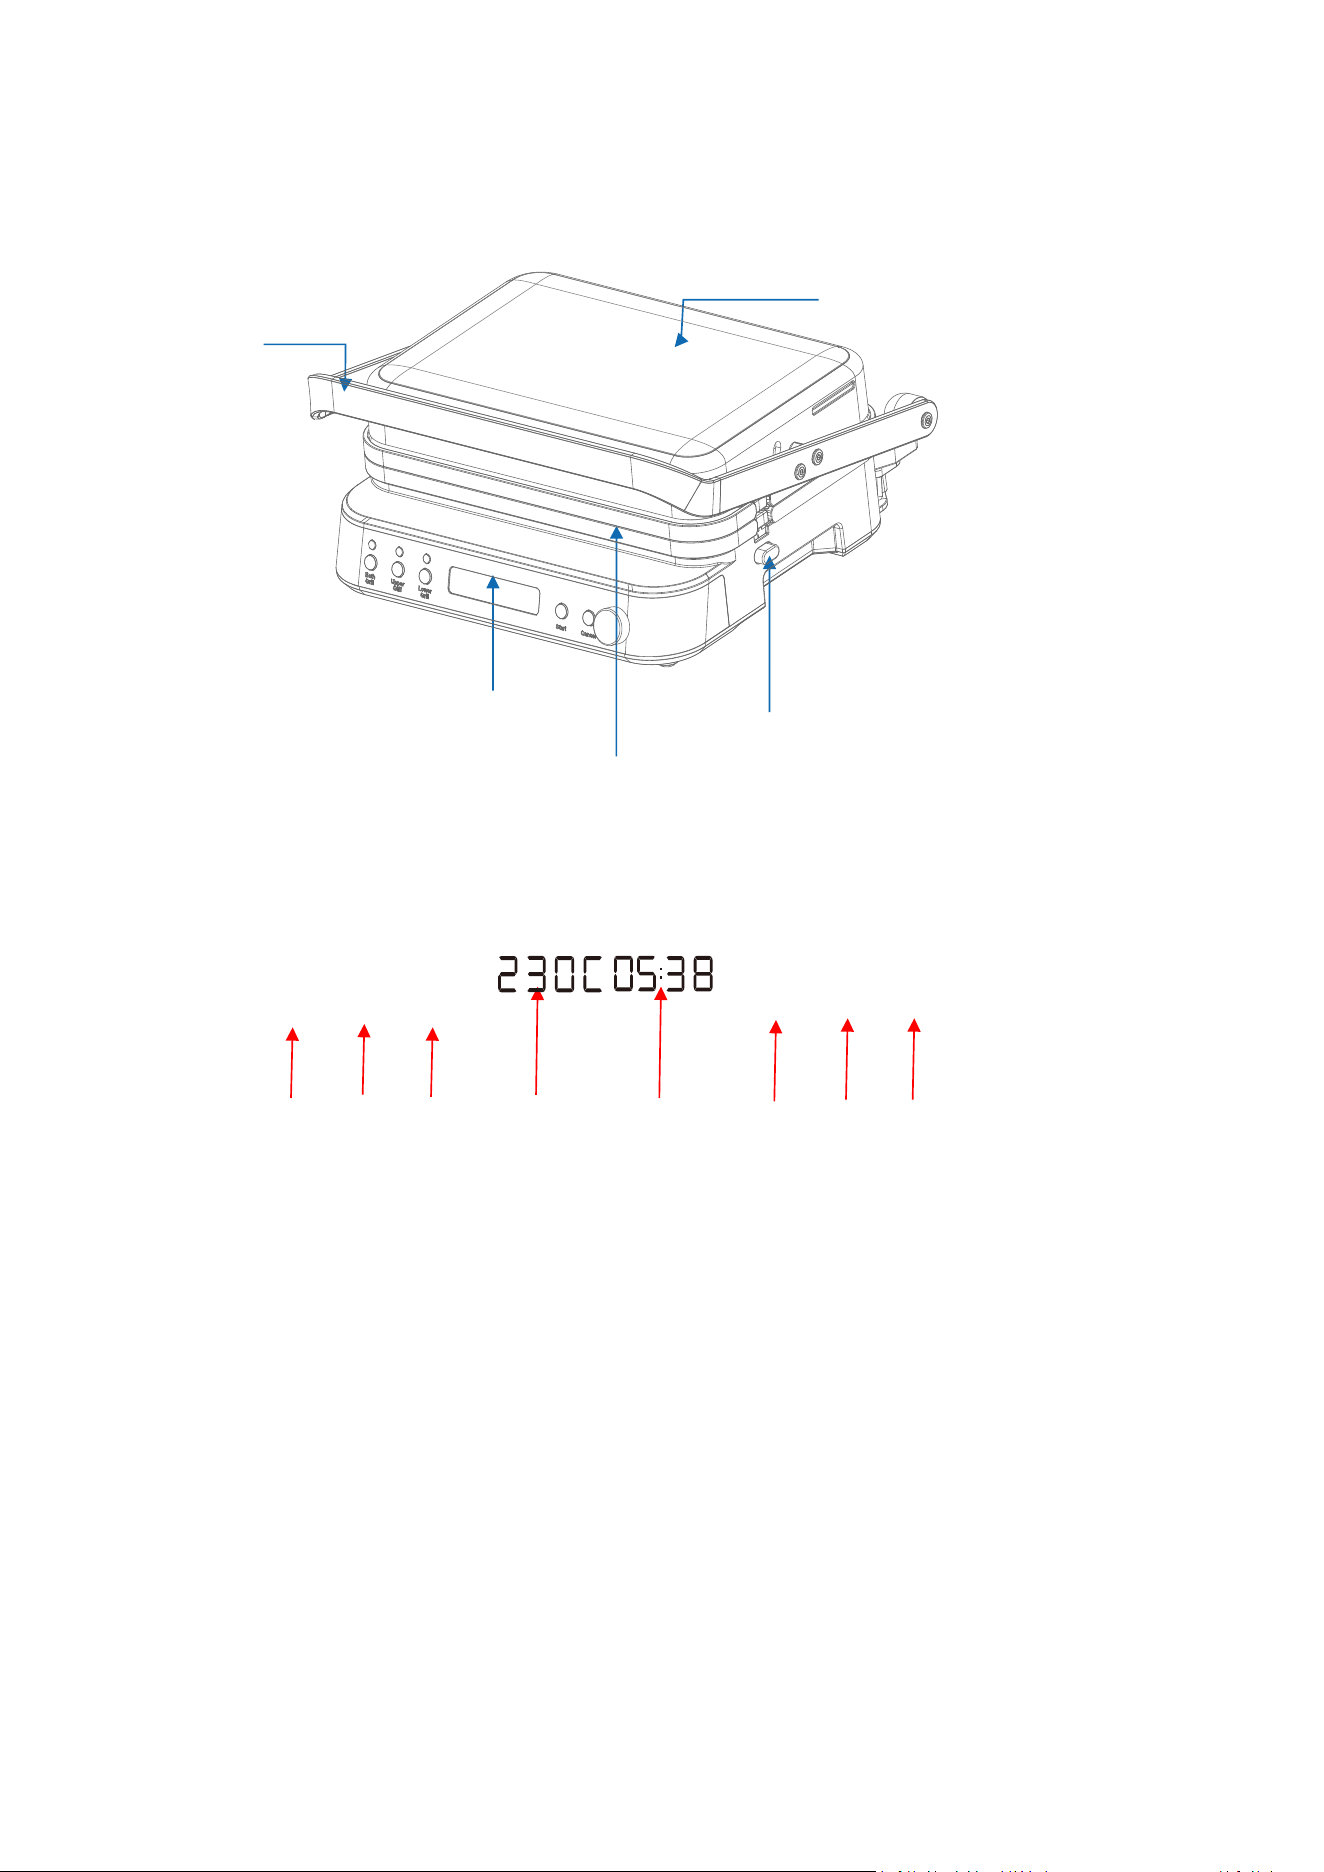
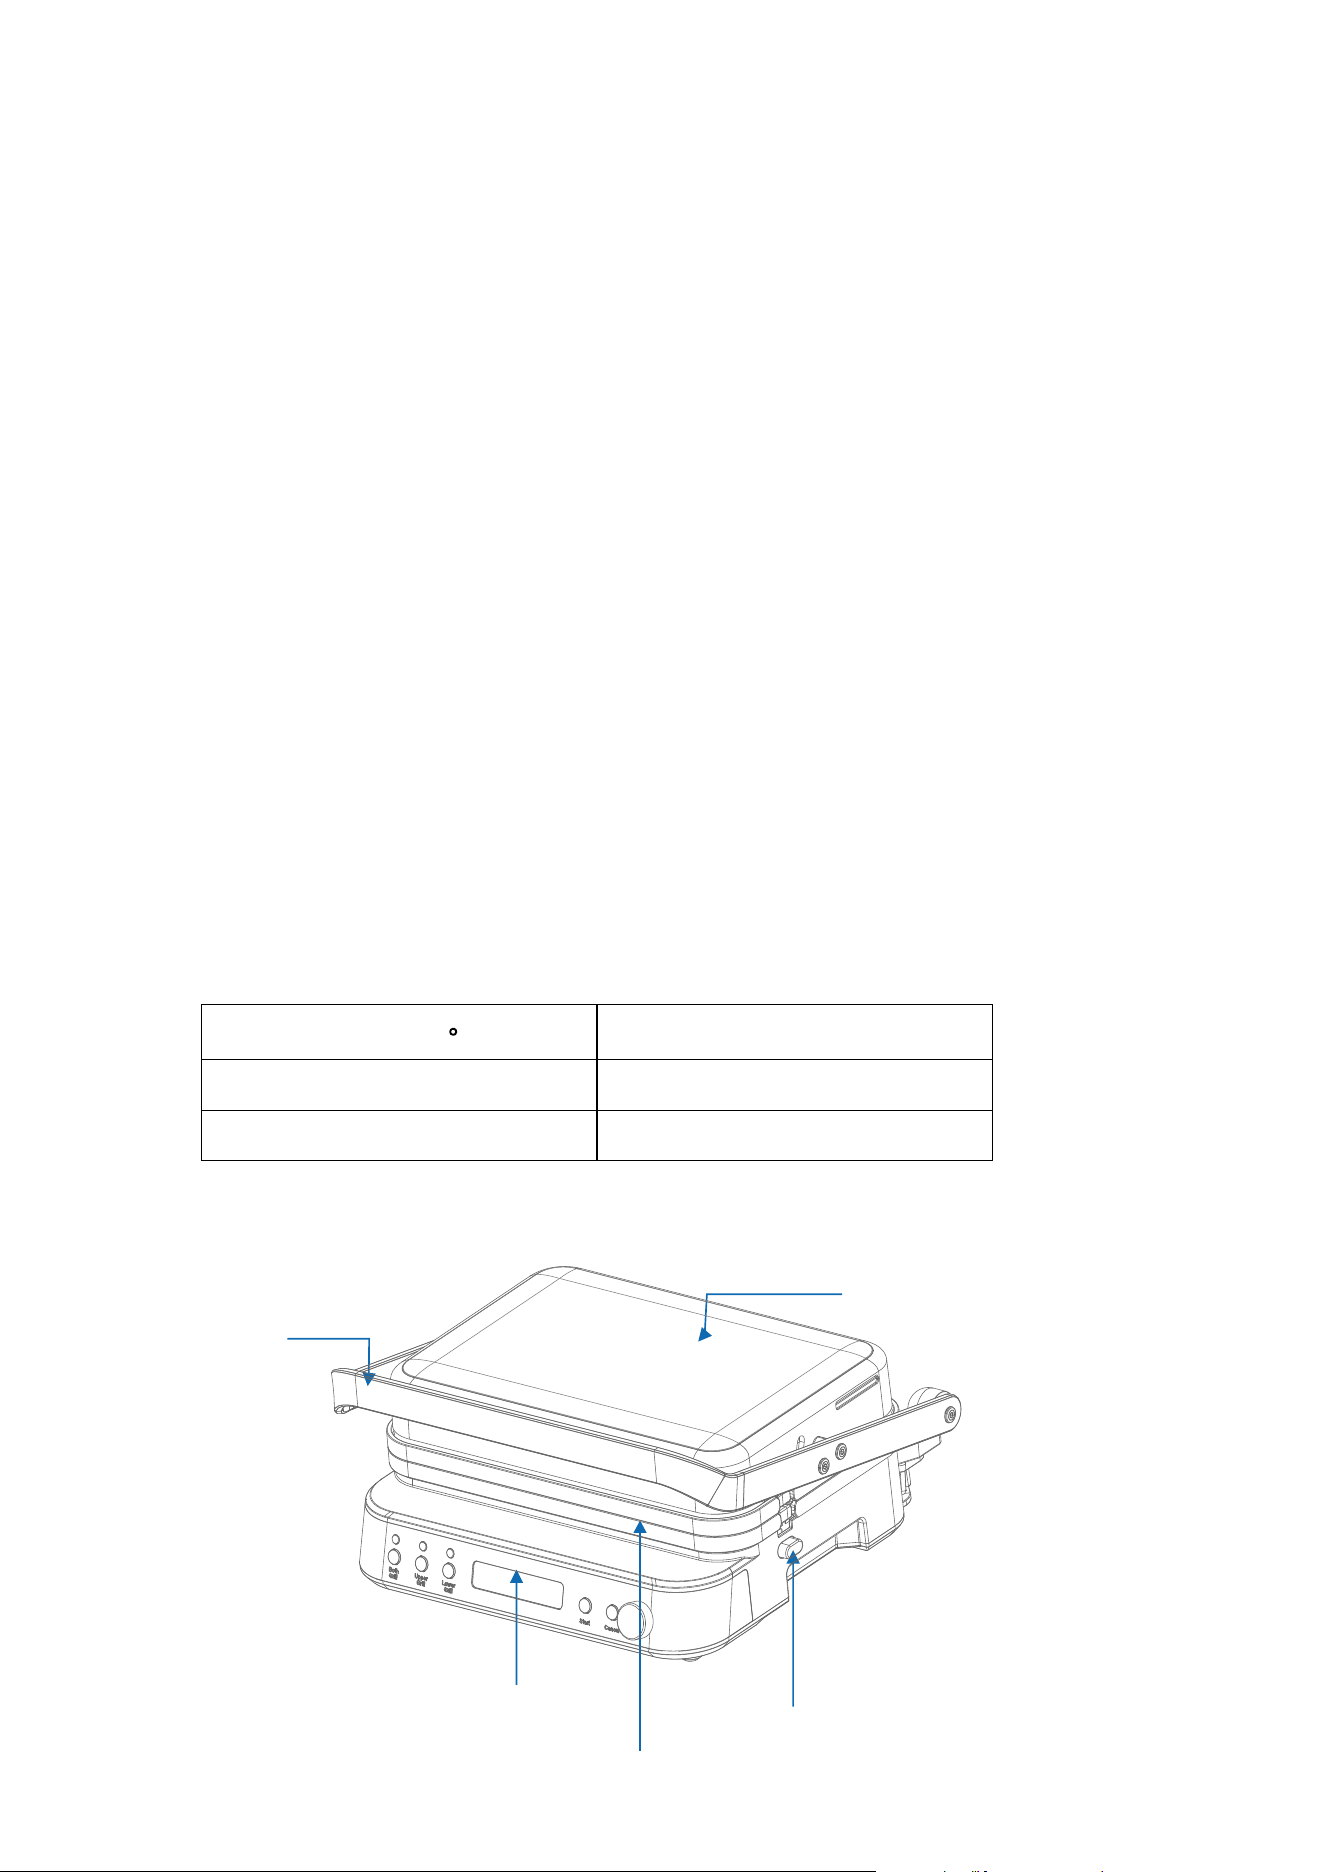
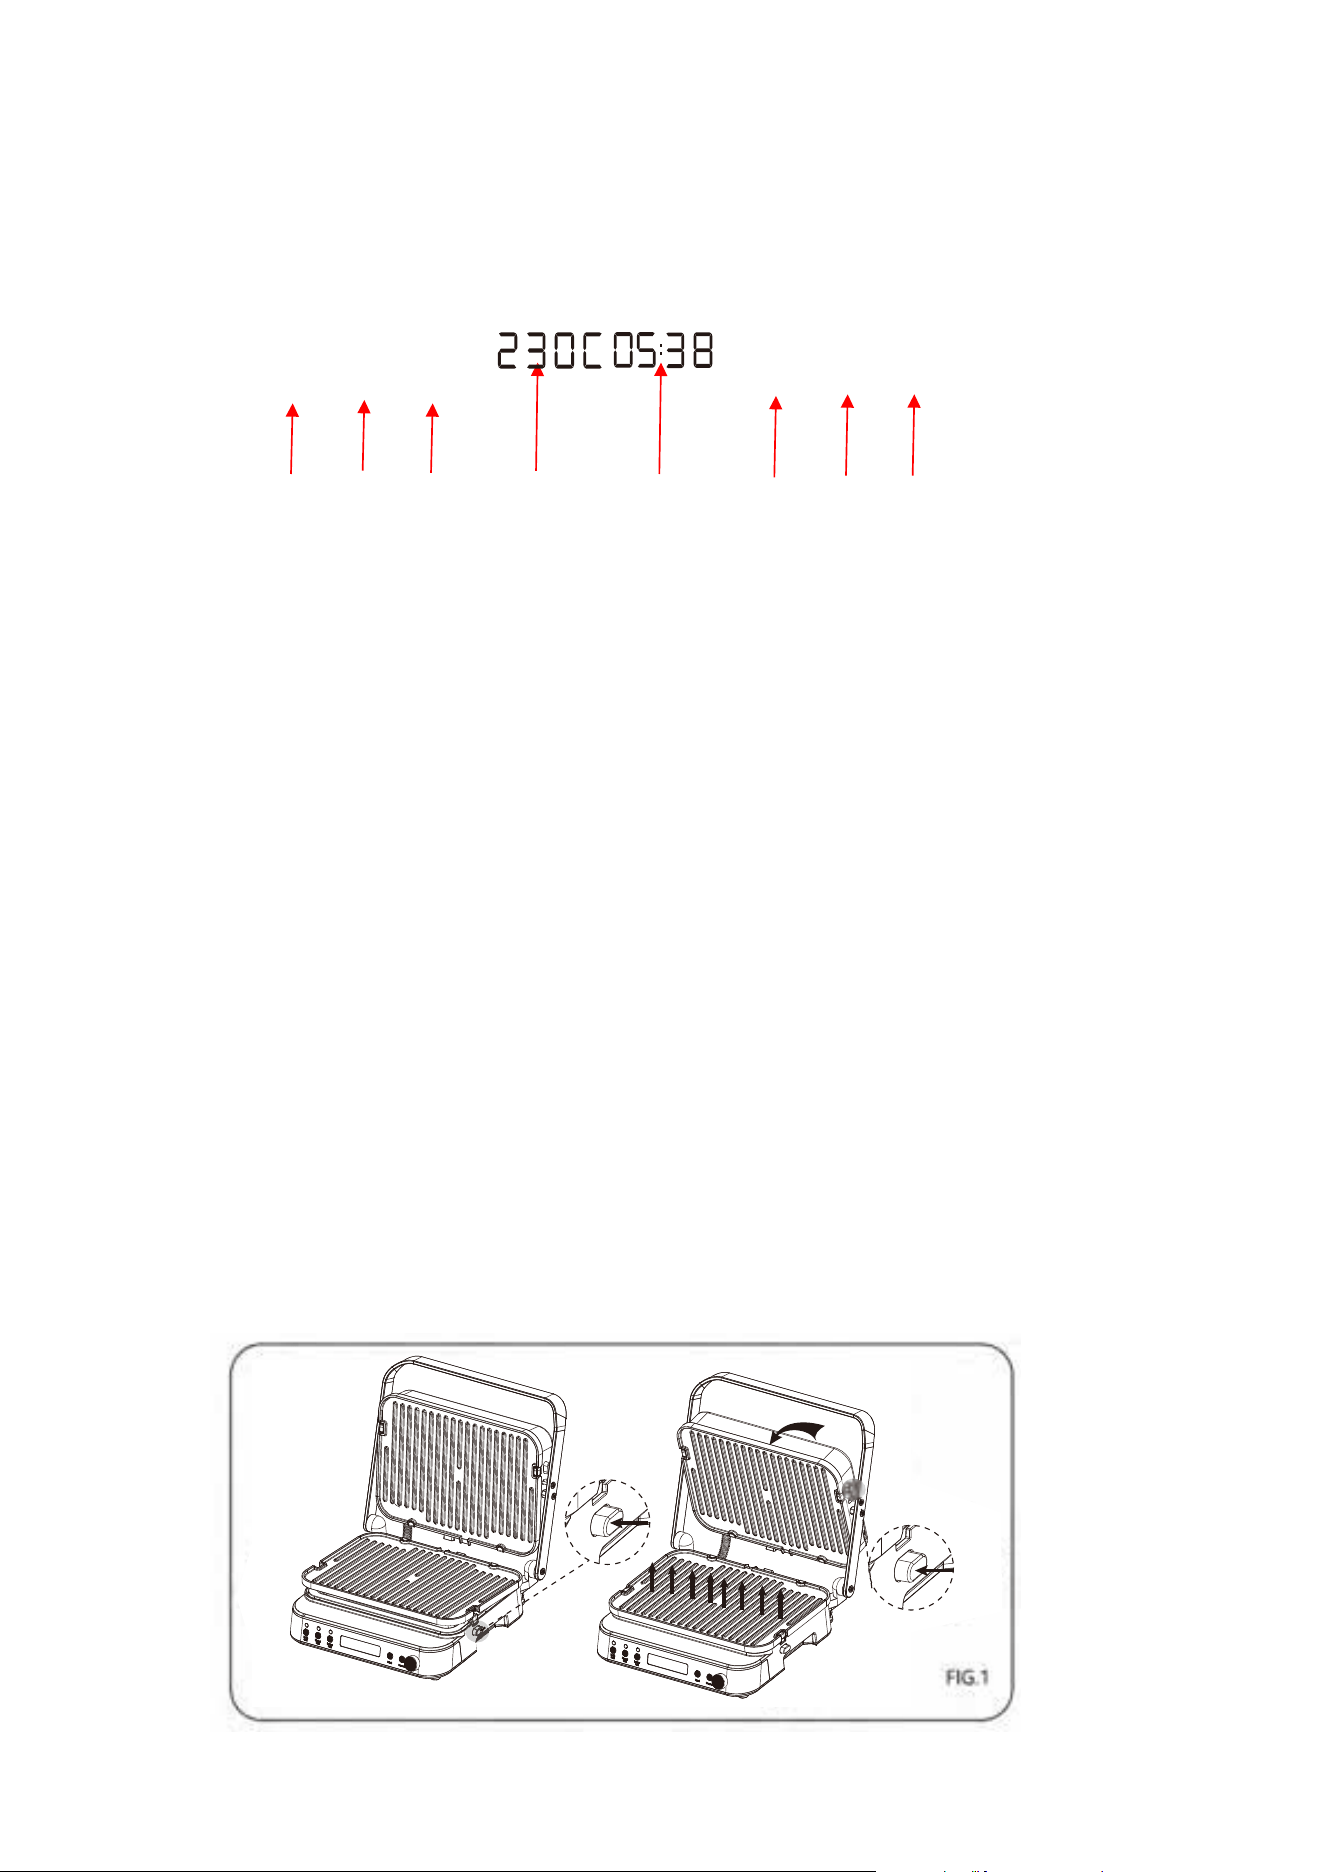
PRODUCT OVERVIEW
Control panel
1. Both grill plate heating together 2. Only upper plate heating
3. Only lower plate heating. 4. Temperature display
5. Time display 6. Start cooking
8. Rotating knob to select time and temperature
7. Cancel cooking
1
2
6
7
8
Top cover
Grill plate
Hot plate unlocking button
Control panel
Handle
3
4
5
3
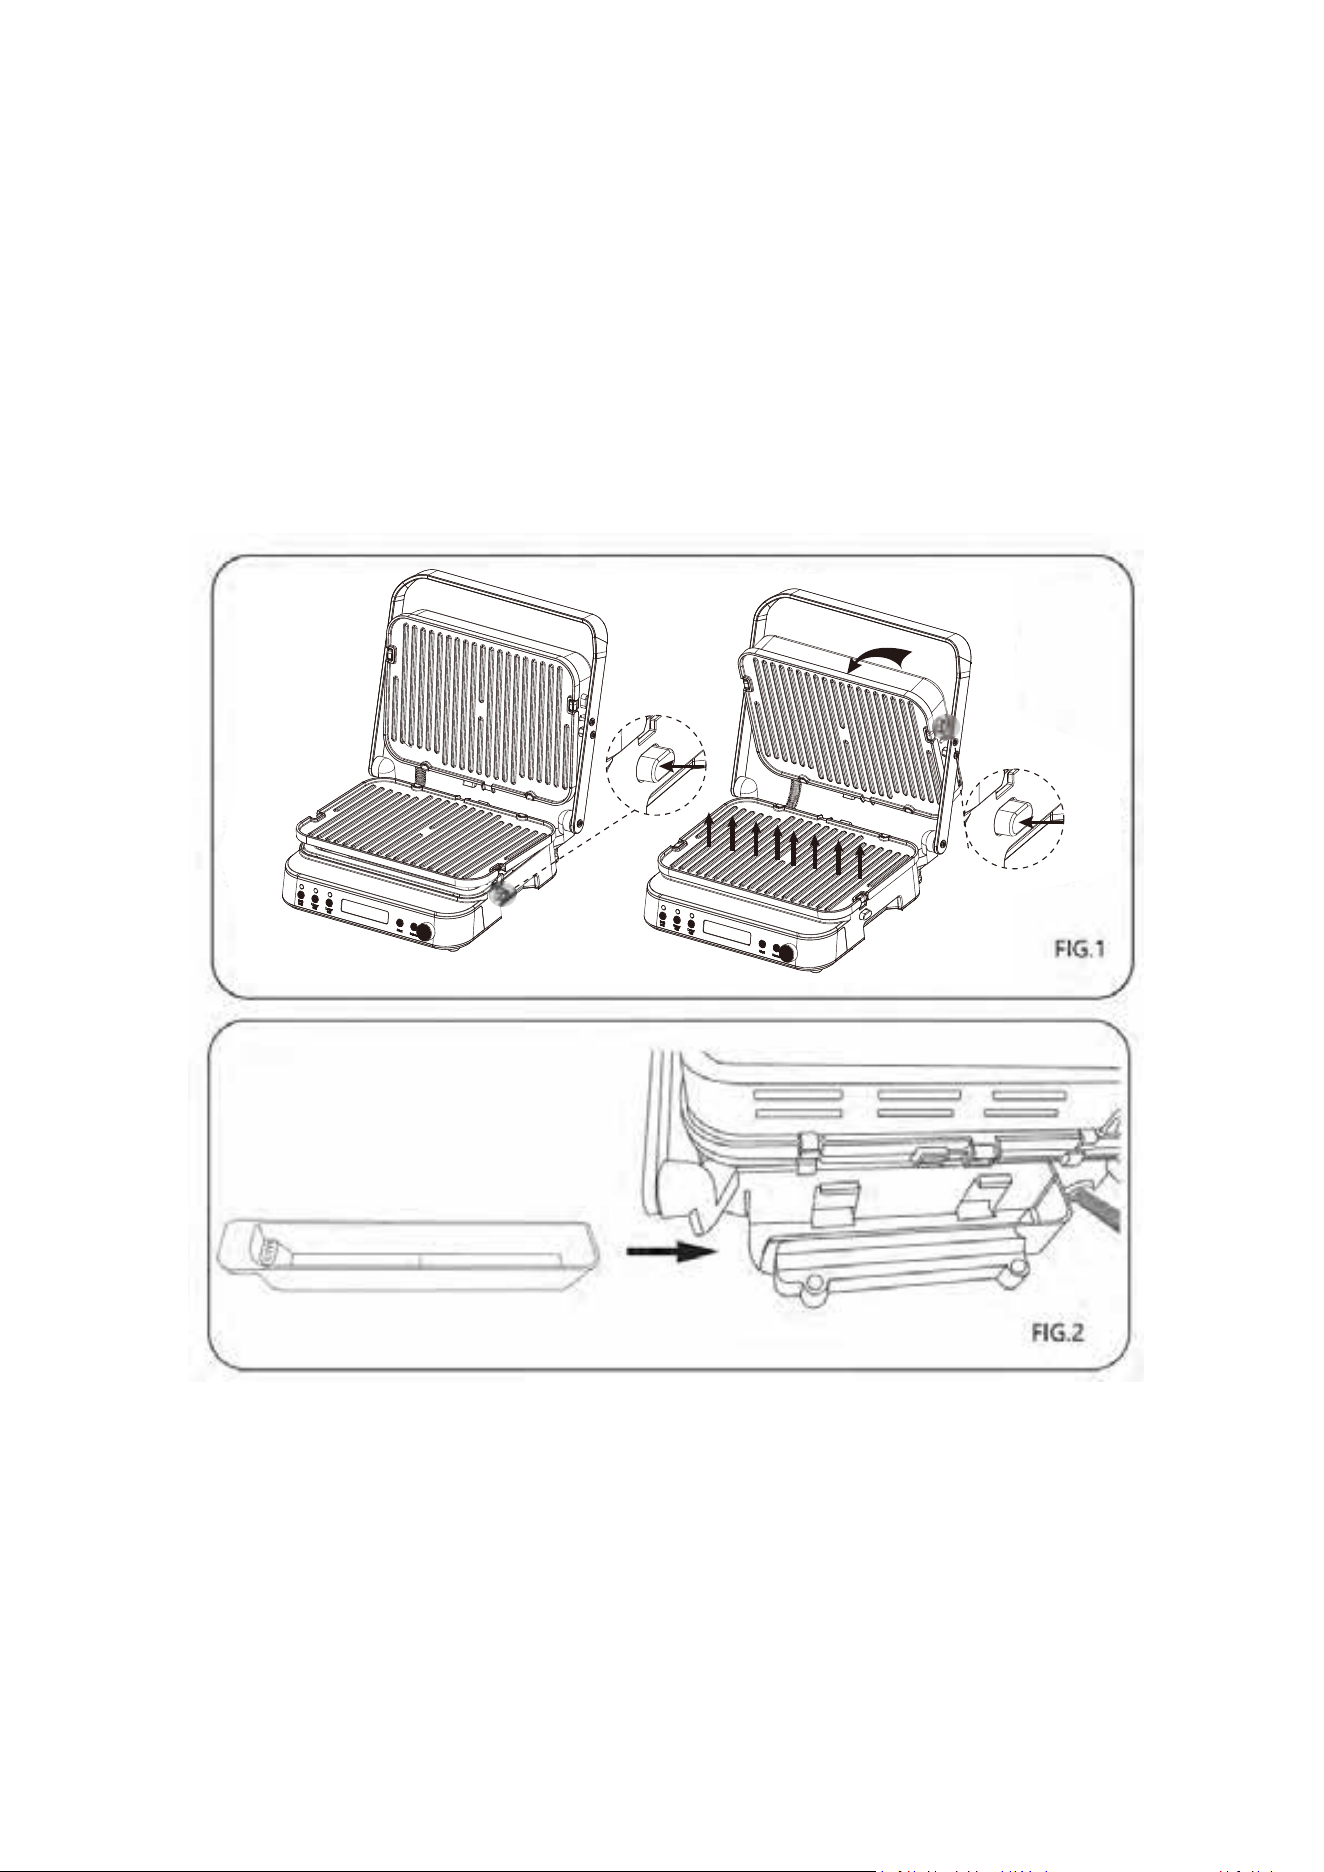
BEFORE FIRST USE
1.Take the appliance out of the package and remove all the packaging material.Check the
appliance to ensure all necessary parts are present.
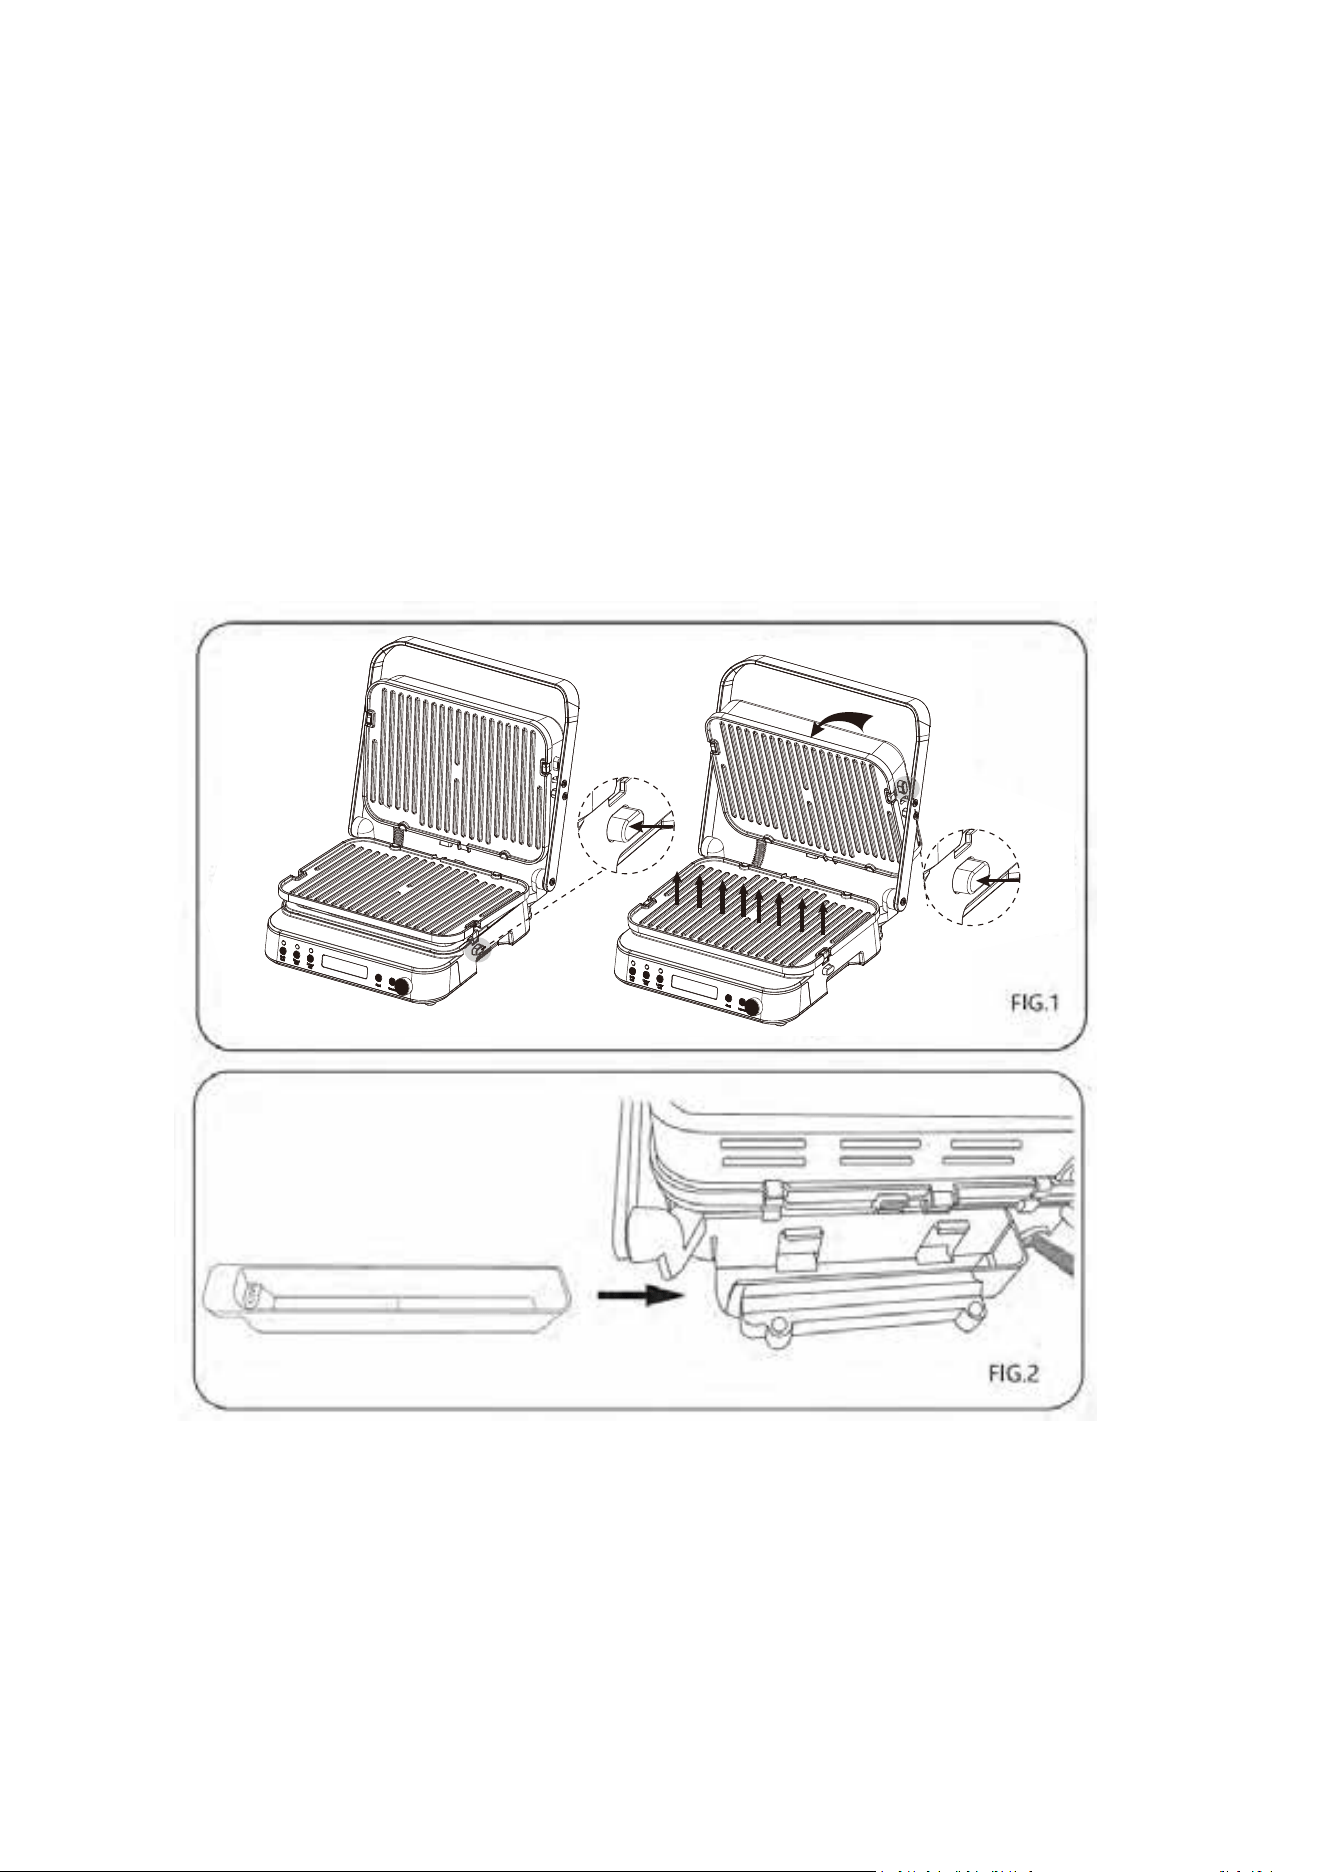
2.Remove the grill plate by pressing the "Unlock" button and taking it out.(FIG.1)
3.Before using it for the first time, clean the grill plate ( or the waffle plate, if included) with warm
water and a mild cleaning agent, then thoroughly dry the parts.
4.Select the desired cooking surface and insert the grill plate ( or the waffle plate, if included) ,
making sure it is properly in place.
5.Ensure that the drip tray is inserted correctly at the back of appliance.(FIG.2)
OPERATION
1. Plug in the appliance and you will hear a beep sound. All the indication lights turn on and off,
and the display shows "OFF”.
2.Select the required cooking function - Both Grill\Upper Grill\Lower Grill- by pressing the
corresponding button.

4
3.Turn the knob to adjust temperature; After setting temperature, press the knob and time flash,
turn the knob to adjust the time.
4.Press the "Start" button to start preheating. When the unit starts preheating,the display
shows”PRE" and the setting temperature. When the preheating process is complete, the unit
beeps 5 times, the temperature and time flash on display to remind preheating finished;
5.For better results, add a little cooking oil or a small quantity of the ingredients to the plate.Put
the food on the grill plate and press the"Start"button. The unit starts counting down .(If you do
not press the"Start" button within 30 minutes, the unit will go into standby mode "OFF”).
6.When the countdown is over, the unit beeps five time,the display shows “donE”.
7. Press button “Cancel” to goes into standby mode “OFF” .
8.Use the handle to lift the lid. Remove the food with a heat-resistant plastic spatula.
Never use sharp mental tongs or a knife as these can cause damage to the non-stick coating of the
grill plates.
Suggestions for using the waffle plate (if included)
1.Suggested temperature and time: 150℃, 5 minutes
2.Suggested capacity for each chamber(totally 4 chambers): 80ml/chamber
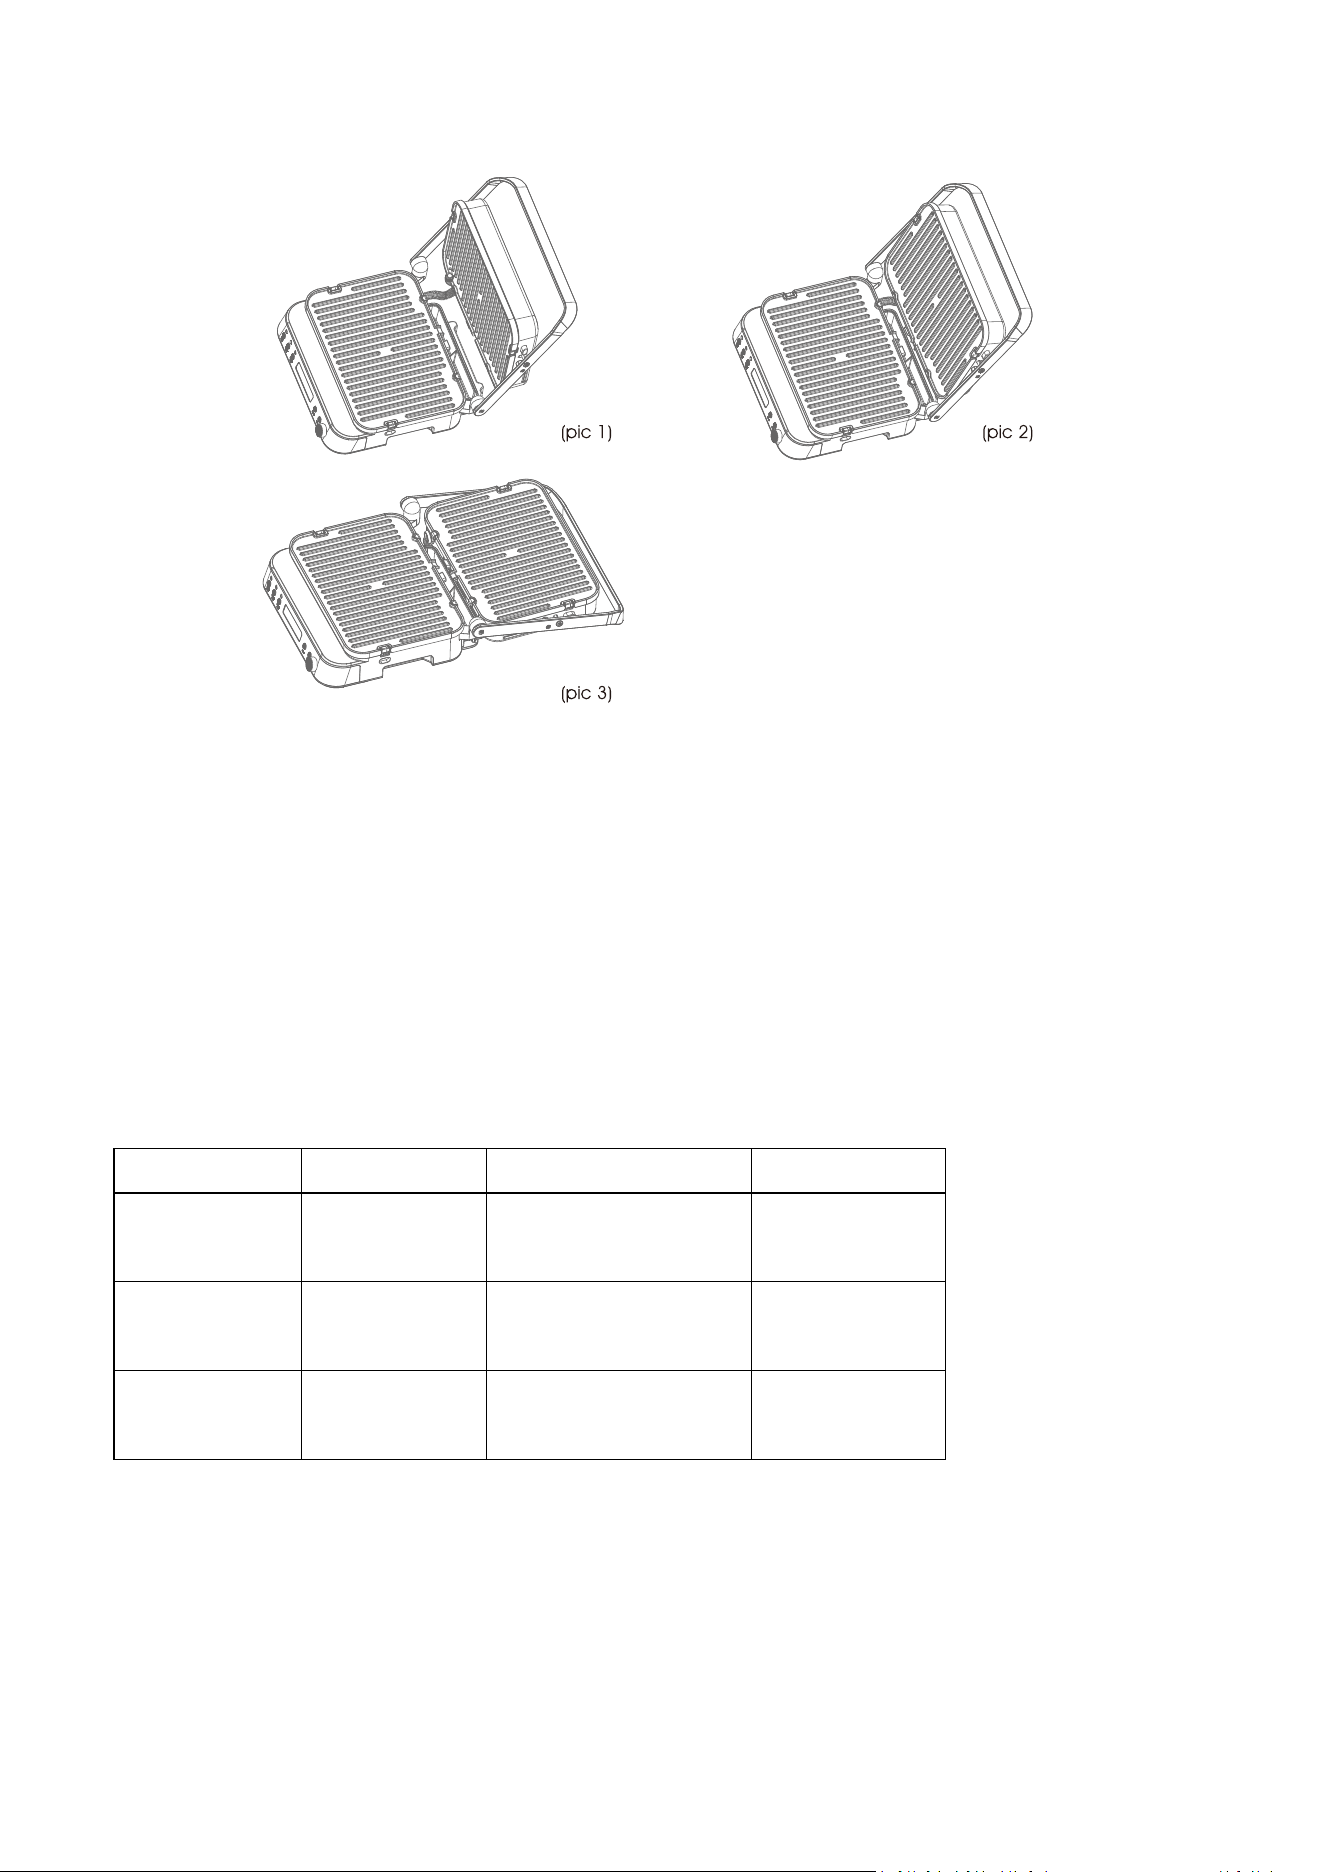
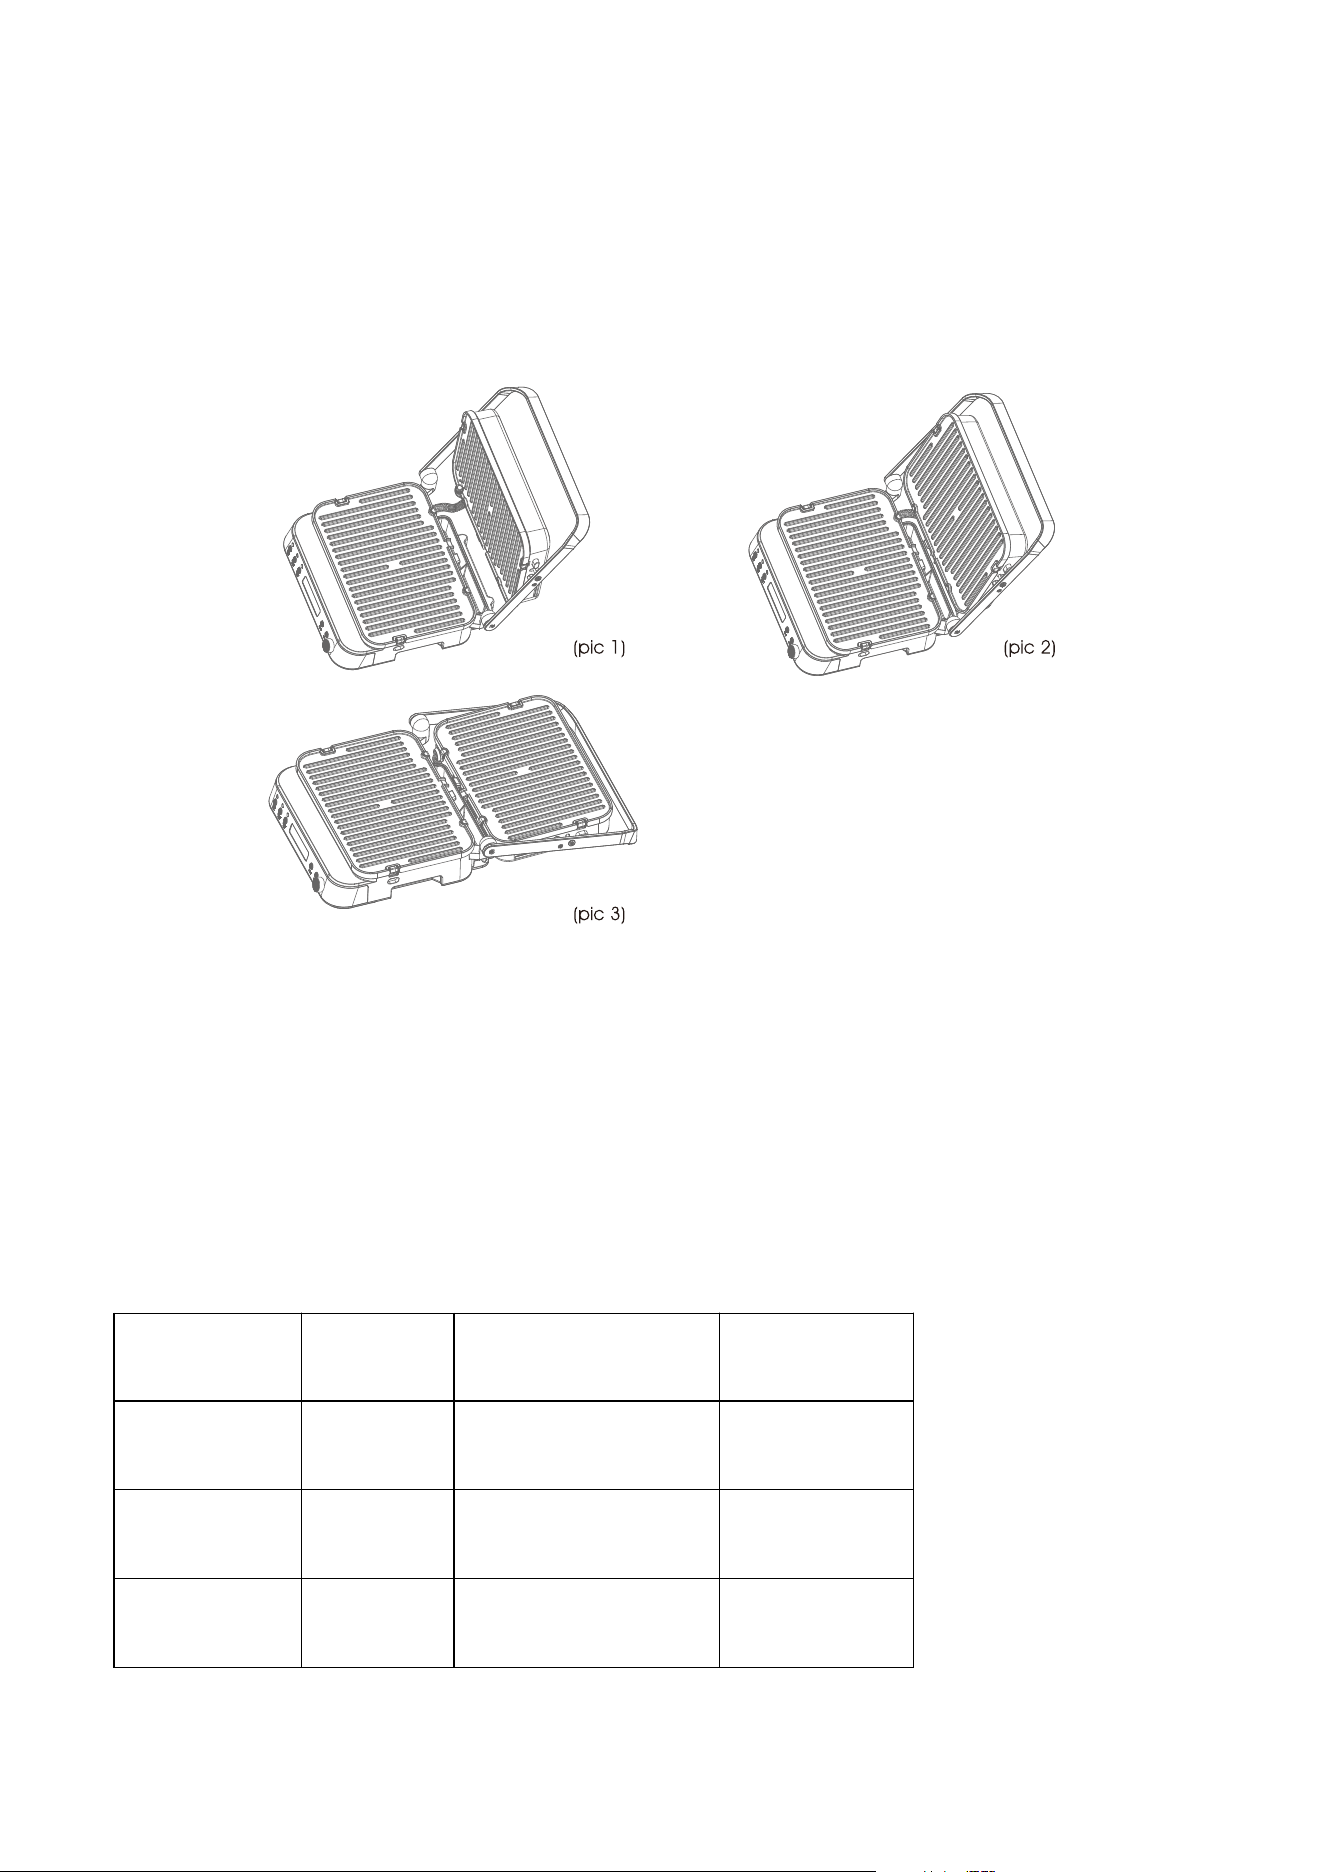
How to use flat grill mode:
1.When preheating finishes, use the handle to move the top cover to open position(like pic1),
wearing the oven mitt, press the top cover to level with the handle(like pic2), then press the
handle &top cover to flat position(like pic3);
Pls take care when open the top cover to flat position, as it’s hot after preheating.

5
Remark:
1. During cooking, you can press the "Cancel" button to exit the current mode and select the desired
function.
2. During cooking, you can turn the knob to adjust time/temperature, the unit will start cooking
at the new time/temperature within 3 seconds.
3. The unit could memory last setting temperature and time; When turn on the unit and select
desired function, setting temperature and time of last use will appear on display.
Time and temperature range:
Function Default
display
Temperature range Time range
Both grill
230℃ 05:00 80-230℃(5℃/step)
30S-60MIN(30s/
step)
Upper grill
200℃ 10:00 80-220℃(5℃/step)
30S-60MIN(30s/
step)
Lower grill
200℃ 10:00 80-220℃(5℃/ step)
30S-60MIN(30s/
step)
Helpful tips:
1. For satisfactory result, add a little cooking oil or cooking spray to the plates.
2. To reduce the preheating time, close the grill plates during preheating.
3. Only using the handle to open or close the top cover.
CLEANING AND CARE
Disconnect the plug from the socket when the appliance is not in use, as well as before cleaning
the unit and/or individual parts.
1.Allow the appliance to cool down completely .Caution: The grill is still very hot. It takes a while
to cool down.
2.Press the “Unlock" button to remove the plate from the grill.
3.After removing the grill plate, you can clean it in warm soapy water or in the dishwasher.
4.Wear gloves to remove the drip tray at the back of the appliance. Empty the drip tray into a
heat-resistant pan, rinse it in warm, soapy water and dry it thoroughly later.
Note: Before removing the drip tray, make sure that the temperature of the oil or oil residue is
less than 40℃, otherwise it can burn.
6
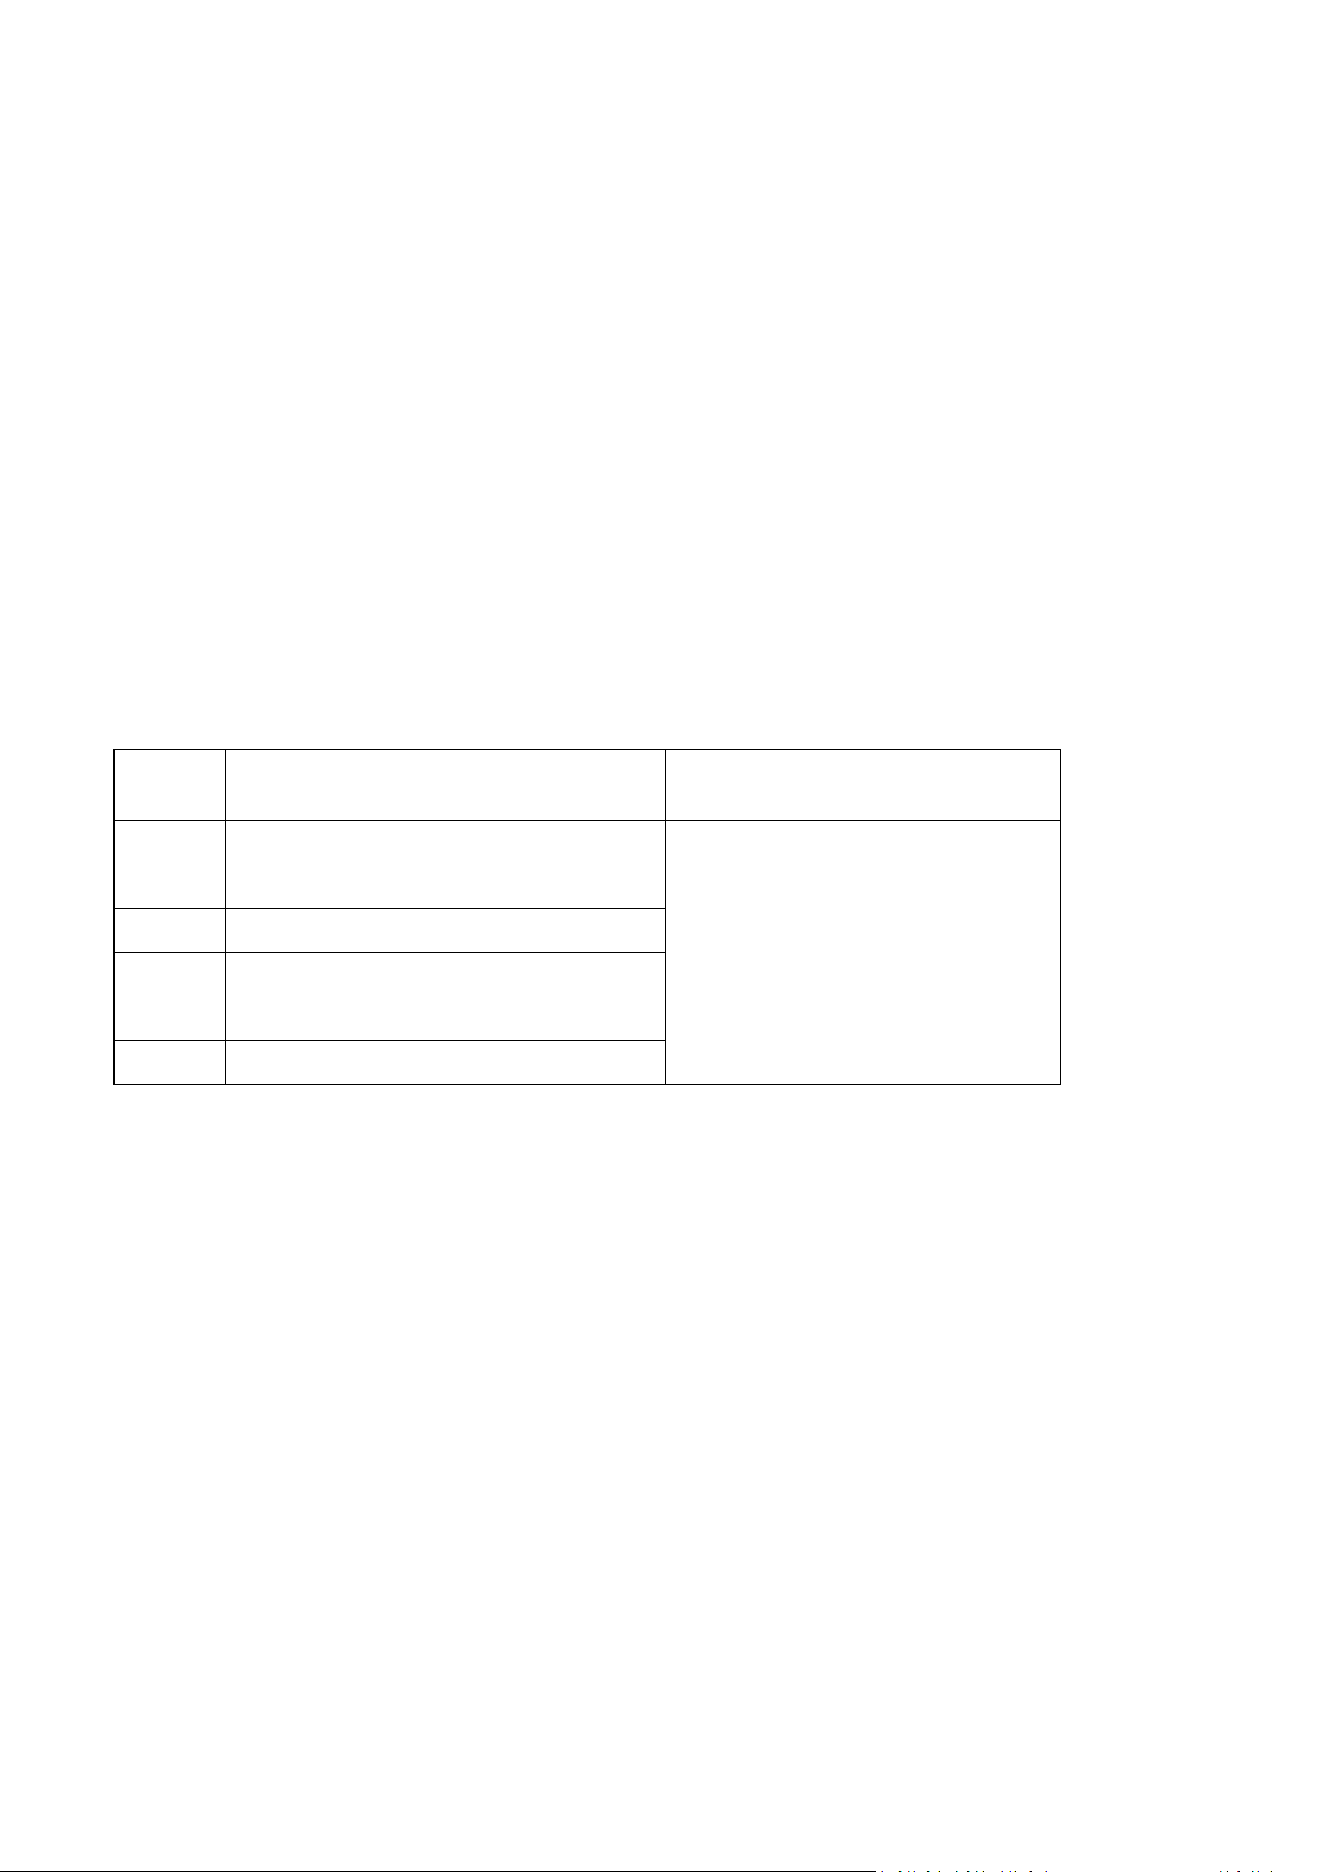
ERROR CODE
Code
Description
Solution
E1
Open circuit of upper thermostat
Pls. contact after-sales service
E2
Short circuit of upper thermostat
E3
Open circuit of lower thermostat
E4
Short circuit of lower thermostat
The device meets the requirements of Regulation 2014/30/EU as well as the
applicable standards EN55014-1:2017,EN 55014-2:2015,EN IEC
61000-3-2:2019,EN61000-3-3:2013+A1
Manufacturer:
Foshan Linshine Technology Co.,Ltd
Add.:No.5-2-4, Fuan Jiyue Industrial Park, Fuyu Village, Leliu Town, Shunde District, Foshan City,
Guangdong, P.R. China
LUCID-Reg.-Nr.DE5033664182143
This marking indicates that this product should not be disposed with other household wastes
throughout the EU. To prevent possible harm to the environment or human health from
uncontrolled waste disposal, recycle it responsibly to promote the sustainable reuse of
material resources. To return your used device, please use the return and collection systems
or contact the retailer where the product was purchased. They can take this product for
environmental safe recycling.
WARRANTY
Dear Customer,
Thank you for choosing AMZCHEF product. We sincerely hope that you are satisfied with it.
The manufacturer's warranty covers the product for a period of 24 months from the date of
purchase against manufacturing faults. All warranties are automatically kept track of in our system,
so there is no need to register your product.
For an extra 1 year's free warranty, please register at our official website www.iamzchef.com or fill
Name: APEX CE SPECIALISTS LIMITED
Add.:UNIT 3D NORTH POINT HOUSE,NORTH POINT
BUSINESS PARK,NEW MALLOW ROAD,CORK,T23 AT2P,IRELAND
logistic01@iamzchef.com
7
within 24 hours. We suggest to provide a warranty card, a photo or a video if there’s broken spare
part or not working machine sothat we can be much more clear about your problems and offer
you the best solution.
Kindly send back the warranty card to us after filling in the information. Thanks for your effort!
WICHTIGE SICHERHEITSINFORMATIONEN
1. Stellen Sie sicher, dass die auf dem Typenschild angegebene Spannung mit
lhrerHausstromversorgung übereinstimmt.
2.Wenn das Netzkabel beschädigt ist, muss eszur Vermeidung von Gefahren durch denHersteller
oder dessen Wartungsabteilungoder ähnliche Fachleute ersetzt werden.
3.Zum Schutz vor elektrischem Schlag dürfen Sie das Kabel, den Stecker oder das Gerät nicht in
Wasser oder andere Flüssigkeiten tauchen.
4.Berühren Sie nicht die heiBe Oberfläche desGrills während oder nach dem Betrieb.
5.Verwenden Sie eine Lebensmittelzange aus Silikon, um die Lebensmitt elherauszunehmen.
6.Wenn der Grill nicht in Gebrauch ist, sollte derStecker aus der Steckdose gezogen werden,um
Stromschlag, Leckagen und Brände durchalternde lsolierung zu vermeiden.
7.Das passende Grillzubeör sollte korrektverwendet werden, um Feuer oderVerletzungen zu
vermeiden.
8
8.Der Grill sollte in einer trockenen Umgebungaufgestellt werden und nicht im Freienverwendet
werden.
9.Halten Sie während des Betriebs des Grills stets einen Abstand von 20 cm zu diesem ein.
10.Stellen Sie den Grill auf eine stabile Fläche,wenn Sie ihn benutzen. Nähern Sie sich
nichtbrennbaren Gegenständen.
11.Wenn der Grill in Betrieb ist, seien Sie vorsichtig, wenn Sie die Lebensmittelschaleoder anderes
Zubehör bewegen, um Verbrühungen durch heiBes ol oder Hochtemperatur Flüssigkeiten zu
vermeiden.
12.Stellen Sie keine Gegenstände auf den Grill. Decken Sie ihn nicht ab und blockieren Sienicht die
Wärm
eabgabe Position.
13.Der Grill kann nur für Lebensmittel verwendet werden. Legen sie keine groben Lebensmittel
Stücke oder Metallgegenstände auf den Grill, da diese einen Brand verursachen können.
14.Dieses Gerät kann von Personen mit verringerten physischen, sensorischen oder mentalen
Fähigkeiten oder Mangel an Erfahrung und Wiss
en benutzt werden, wenn sie beaufsichtigt oder
bezüglich des sicheren Gebrauchs des Gerätes unterwiesen wurden und die daraus resultierenden
Gefahren verstehen. Dieses Gerät darf nicht von Kindern benutzt werden. Halten Sie das Gerät
und sein Kabel außerhalb der Reichweite von Kindern. Stellen Sie sicher, dass Kinder während des
Betriebs beaufsichtigt werden und nicht mit dem Gerät spielen.
15.Kinder duirfen den Grill nicht reinigen oder eine Benutzerwartung daran durchführen.
16.Dieses Gerat ist fur den Hausgebrauch und ähnliche Zwecke bestimmt, wie z. B.:
- Personalkichenbereiche in Geschäften, Büros und anderen Arbeitsumgebungen;
- Bauernhäuser;
- von Kunden in Hotels, Motels und anderen wohnungsähnlichen Umgebungen;
- Bed-and-breakfast artige Umgebungen.
TECHNISCHE DATEN
Modell
LS-GC02C-H
Spannungsversorgung
220-240V 50-60Hz
Leistungsaufnahme
2000W
9
PRODUKTÜBERSICHT
BEDIENFELD
1.Beide Grillplatten heizen zusammen
2.Oberer Grill: Nur obere Grillplatte heizt
3. Unterer Grill :nur untere Grillplatte heizt
4.Temperaturanzeige
5. Zeitanzeige
6. Start (das Kochen starten)
7.Cancel (das Kochen abbrechen)
8.Drehknopf zur Auswahl von Zeit und Temperatur
VOR DER ERSTEN BENUTZUNG
1.Nehmen Sie das Gerät aus der Verpackung und entfernen Sie das gesamte Verpackungsmaterial.
Überprüfen Sie das Gerät, um sicherzustellen, dass alle erforderlichen Teile vorhanden sind.
1
2
6
7
8
Oberes Gehäuse
Grillplatte
Entriegelungstaste der Grillplatte
Bedienfeld
Handgriff
3
4
5
10
2.Entfernen Sie die Grillplatte, indem Sie die Taste . “Entriegeln”dricken und sie
herausnehmen.(FIG.1)
3. Reinigen Sie die Grillplatte (oder die Waffelplatte, falls vorhanden) mit warmem Wasser und
einem milden Reinigungsmittel, bevor Sie sie zum ersten Mal verwenden, und trocknen Sie die
Teile anschließend gründlich ab.
4.Wählen Sie die gewünschte Kochfläche aus und setzen Sie die Grillplatte (oder die Waffelplatte,
falls vorhanden) ein. Achten Sie dabei darauf, dass sie richtig sitzt.
5.Achten Sie darauf, dass die Tropfschale an der Rückseite des Gerats richtig
eingesetztist.(FIG.2)
BETR IEB
1.Stecken Sie das Gerät ein, und Sie hören einen Signalton. Alle Anzeigeleuchten
schalten sich ein und aus, und im Display wird "OFF” angezeigt.
2.Wählen Sie die gewünschte Kochfunktion - Beide Grill \ Oberer Grill \ Unterer Grill - durch
Drücken der entsprechenden Taste.

11
3.Drehen Sie den Knopf, um die Temperatur einzustellen. Drücken Sie nach dem Einstellen der
Temperatur den Knopf und den Zeitblitz. Drehen Sie den Knopf, um die Zeit einzustellen.
4.Drücken Sie die Taste "Start", um das Vorheizen zu starten. Wenn das Gerät mit dem Vorheizen
beginnt, wird im Display "PRE" angezeigt und die eingestellte Temperatur an.Wenn der
Vorheizvorgang abgeschlossen ist, piept das Gerät 5 mal, Die Anzeige von Temperatur und Zeit
blinkt, um daran zu erinnern, dass das Vorheizen beendet ist.
5. Für bessere Ergebnisse geben Sie ein wenig Speiseöl oder eine kleine Menge der Zutaten auf die
platte. Legen Sie die Lebensmittel auf die Grillplatte und drücken Sie die Taste "Start". Das Gerät
beginnt herunterzählen.(Wenn Sie die . Start" -Taste nicht innerhalb von 30 Minuten drücken, geht
das Gerät in den Standby-Modus “OFF").
6.Wenn der Countdown abgelaufen ist, piept das Gerät fünfmal und auf dem Display wird
„donE“ angezeigt.
7. Drücken Sie die Taste „Abbrechen“, und das Display zeigt „OFF“ an.
8. Verwenden Sie den Griff, um den Deckel anzuheben. Nehmen Sie das Grillgut mit
einem hitzebeständigen Kunststoffspatel heraus. Verwenden Sie niemals eine
scharfe Metallzange oder ein Messer, da diese die Antihaftbeschichtung der
Grillplatten beschadigen können.
Vorschläge zur Verwendung der Waffelplatte (falls enthalten)
1. Empfohlene Temperatur und Zeit: 150 ℃ / 340 ℉, 5 Minuten
2. Empfohlene Kapazität für jede Kammer (insgesamt 4 Kammern): 80 ml / Kammer
So verwenden Sie d en Flachgrillmodus:
1.Wenn das Vorheizen beendet ist, bewegen Sie die obere Abdeckung mit dem Griff in die
geöffnete Position (wie in Bild 1), tragen Sie den Ofenhandschuh, drücken Sie die obere
Abdeckung auf Höhe des Griffs (wie in Bild 2) und drücken Sie dann den Griff und die obere
Abdeckung in die flache Position (wie Bild 3);
Bitte seien Sie vorsichtig, wenn Sie die obere Abdeckung in eine flache Position öffnen, da es nach
dem Vorheizen heiß ist.
12
Hinweis
1.Wahrend des Garens konnen Sie die Taste ,,Abbrechen" drucken, um denaktuellen Modus zu
verlassen und die gewunschte Funktion zu wahlen.
2.Während des Kochens können Sie den Knopf drehen, um Zeit / Temperatur einzustellen. Das
Gerat startet den Garvorgang mit der neuenzeit/Temperatur innerhalb von 3 Sekunden.
3. Das Gerät kann die zuletzt eingestellte Temperatur und Zeit speichern. Wenn Sie das Gerät
einschalten und die gewünschte Funktion auswählen, werden die eingestellte Temperatur und der
Zeitpunkt der letzten Verwendung angezeigt.
Zeit- und Temperaturbereich:
Funktion
Standardanzeige
Temperaturbereich
Zeitsbereich
Beide grillen
230°C 05:00 80-230°C
(5°C/Schritt)
30S-60MIN(30s/
Schritt)
Oberer Grill
200°C 10:00 80-220°C
(5°C/Schritt)
30S-60MIN(30s/
Schritt)
Grill absenken
200°C10:00 80-220°C
(5°C/Schritt)
30S-60MIN(30s/
Schritt)
Hilfreiche Tipps:
1.Für ein zufriedenstellendes Ergebnis etwas Speiseöl oder Kochspray auf die Teller geben.
2.Um die Vorheizzeit zu verkürzen, schließen Sie die Grillplatten während des Vorheizens.
3.Verwenden Sie den Griff nur zum Öffnen oder Schließen der oberen Abdeckung.
13
REINIGUNG UND PFLEGE
Ziehen Sie den Stecker aus der Steckdose, wenn das Gerät nicht benutzt wird, sowie vor der
Reinigung des Gerätes und/oder einzelner Teile.
1.Lassen Sie das Gerät vollständig abkühlen. Vorsicht! Der Grill ist noch sehr heiß. Es dauert eine
Weile, bis er abgekühlt ist.
2.Drücken Sie die Taste ,,Entriegeln”, um die Platte vom Grill zu entfernen.
3.Nach dem Entfernen der Grillplatte können Sie diese in warmem Seifenlauge oder in der
Spülmaschine reinigen.
4. Tragen Sie Handschuhe, um die Tropfschale auf der Rückseite des Geräts zu entfernen.
Entleeren Sie die Tropfschale in eine hitzebeständige Schale, spülen Sie sie in warmem
Seifenwasser aus und trocknen Sie sie später gründlich.
Hinweis: Vergewissern Sie sich vor dem Entfernen der Auffangschale, dass die Temperatur des Öls
oder der Ölrreste weniger als 40 ° C beträgt, da es sonst au verbrennungen kommen kann.
FEHLERCODE
Code
Beschreibung
Lösung
E1
Unterbrechung des oberen
Thermostats
Bitte wenden Sie sich an den
Kundendienst
E2
Kurzschluss des oberen Thermostats
E3
Unterbrechung des unteren
Thermostats
E4
Kurzschluss des unteren Thermostats
GARANTIE
Sehr geehrter Kunde,
Vielen Dank, dass Sie sich für das Produkt AMZCHEF entschieden haben. Wir hoffen aufrichtig, dass
Sie damit zufrieden sind.
Die Herstellergarantie deckt das Produkt für einen Zeitraum von 24 Monaten ab Kaufdatum gegen
Herstellungsfehler ab. Alle Garantien werden in unserem System automatisch nachverfolgt, sodass Sie
Ihr Produkt nicht registrieren müssen.
Für eine zusätzliche kostenlose Garantie von 1 Jahr registrieren Sie sich bitte auf unserer offiziellen
Website www.iamzchef.com oder füllen Sie die folgende Garantiekarte aus, machen Sie ein Foto und
senden Sie sie an info@iamzchef.com.
Agent / Distributor ist herzlich eingeladen, uns zu kontaktieren. E-Mail: info@iamzchef.com.
Hilfe oder Fragen während des Gebrauchs, Schnellkontakt: info@iamzchef.com, wir werden Sie
innerhalb von 24 Stunden bedienen. Wir empfehlen, eine Garantiekarte, ein Foto oder ein Video zur
Verfügung zu stellen, wenn ein Ersatzteil defekt ist oder die Maschine nicht funktioniert, damit wir Ihre

14
Probleme klarer erkennen und Ihnen die beste Lösung anbieten können.
Bitte senden Sie uns die Garantiekarte nach dem Ausfüllen der Informationen zurück. Danke für Ihre
Bemühungen!
CONSIGNES DE SÉCURITÉ IMPORTANTES
Lors de l'utilisation de votre appareil, des précautions de sécurité de base doivent toujours être
suivies, y compris les suivantes.
1.Assurez-vous que la tension indiquée sur la plaque signalétique correspond à votre alimentation
électrique domestique.
2.Si le câble d'alimentation est endommagé, afin d'éviter tout danger, il doit être remplacé par le
fabricant, son service de maintenance ou un professionnel similaire.
3.Pour vous protéger contre tout risque d’ électrocution,ne plongez pas le câble , la prise ou I'
appareil dans Peau ou tout autre liquide.
4.Ne touchez pas la surface chaude du aril pendant ou après le fonctionnement.
5.Utilisez une pince alimentaire en silicone pour retirer les aliments.
6.Lorsque le gril n'est pas utilisé, il doit être débranché pour éviter les chocs électriques, les fuites
et les incendies causés par le vieillissement de I'isolation.
7.Les accessoires correspondants doivent être utilisés correctement pour éviter les incendies ou
les blessures.
8.Le gril doit être placé dans un environnement sec et ne doit pas être utilisé en extérieur.
9.Pendant que le gril est en cours d'utilisation, maintenez-vous a tout moment a une distance d'
au moins 20 cm.
15
10.PIacez le qril sur une surface stable lorsque vous I'utinsez. Ne I'approchez pas d'objets
inflammables.
11.Lorsque le gril est en marche, faites attention lorsque vous déplacez le plateau a aliments ou
d'a
utres accessoires pour éviter d'être brûlé par de I'huile chaude ou des liquides a haute
temperature.
12.Ne placez aucun objet sur le gril. Ne le couvrez pas et ne bloquez pas la sortie de dissipation
thermique.
13.Le gril ne peut traiter que de la nourriture. Ne placez pas de gros morceaux de nourriture ou
d'objets en métal sur le gril car ils pourraient provoquer un incendie.
14.Cet appareil peut être utilisé par des personnes ayant des capacités physiques, sensorielles ou
mentales réduites ou manquant d'expérience et de connaissances si elles sont sous surveillance ou
ont reçu des instructions concernant son utilisation en toute sécurité et comprennent les risques
encourus. Cet appareil ne doit pas être utilisé par des enfants. Maintenez I'appareil et son cable
hors de portee des enfants. Assurez-vous que les enfants sont surveilles pendant son
fonctionnement et qu' ils ne jouent pas avec I'appareil.
15.Les enfants ne doivent pas nettoyer le gril ni effectuer de maintenance sur celui-ci.
16.Cet appareil est destiné a être utilisé a des fins domestiques ou similairesz telles que:
-Les cuisines du personnel dans les magasins, bureaux et autres environnements de travail;
-Par des clients d' hôtels, motels et autres environnements de types résidentiels.
CARACTERISTIQUES TECHNIQUES
SCHÉMA DE L' AP P A REIL
Modèle n
°
LS-GC02C-H
Alimentation
220-240V 50-60Hz
Puissance
2000W
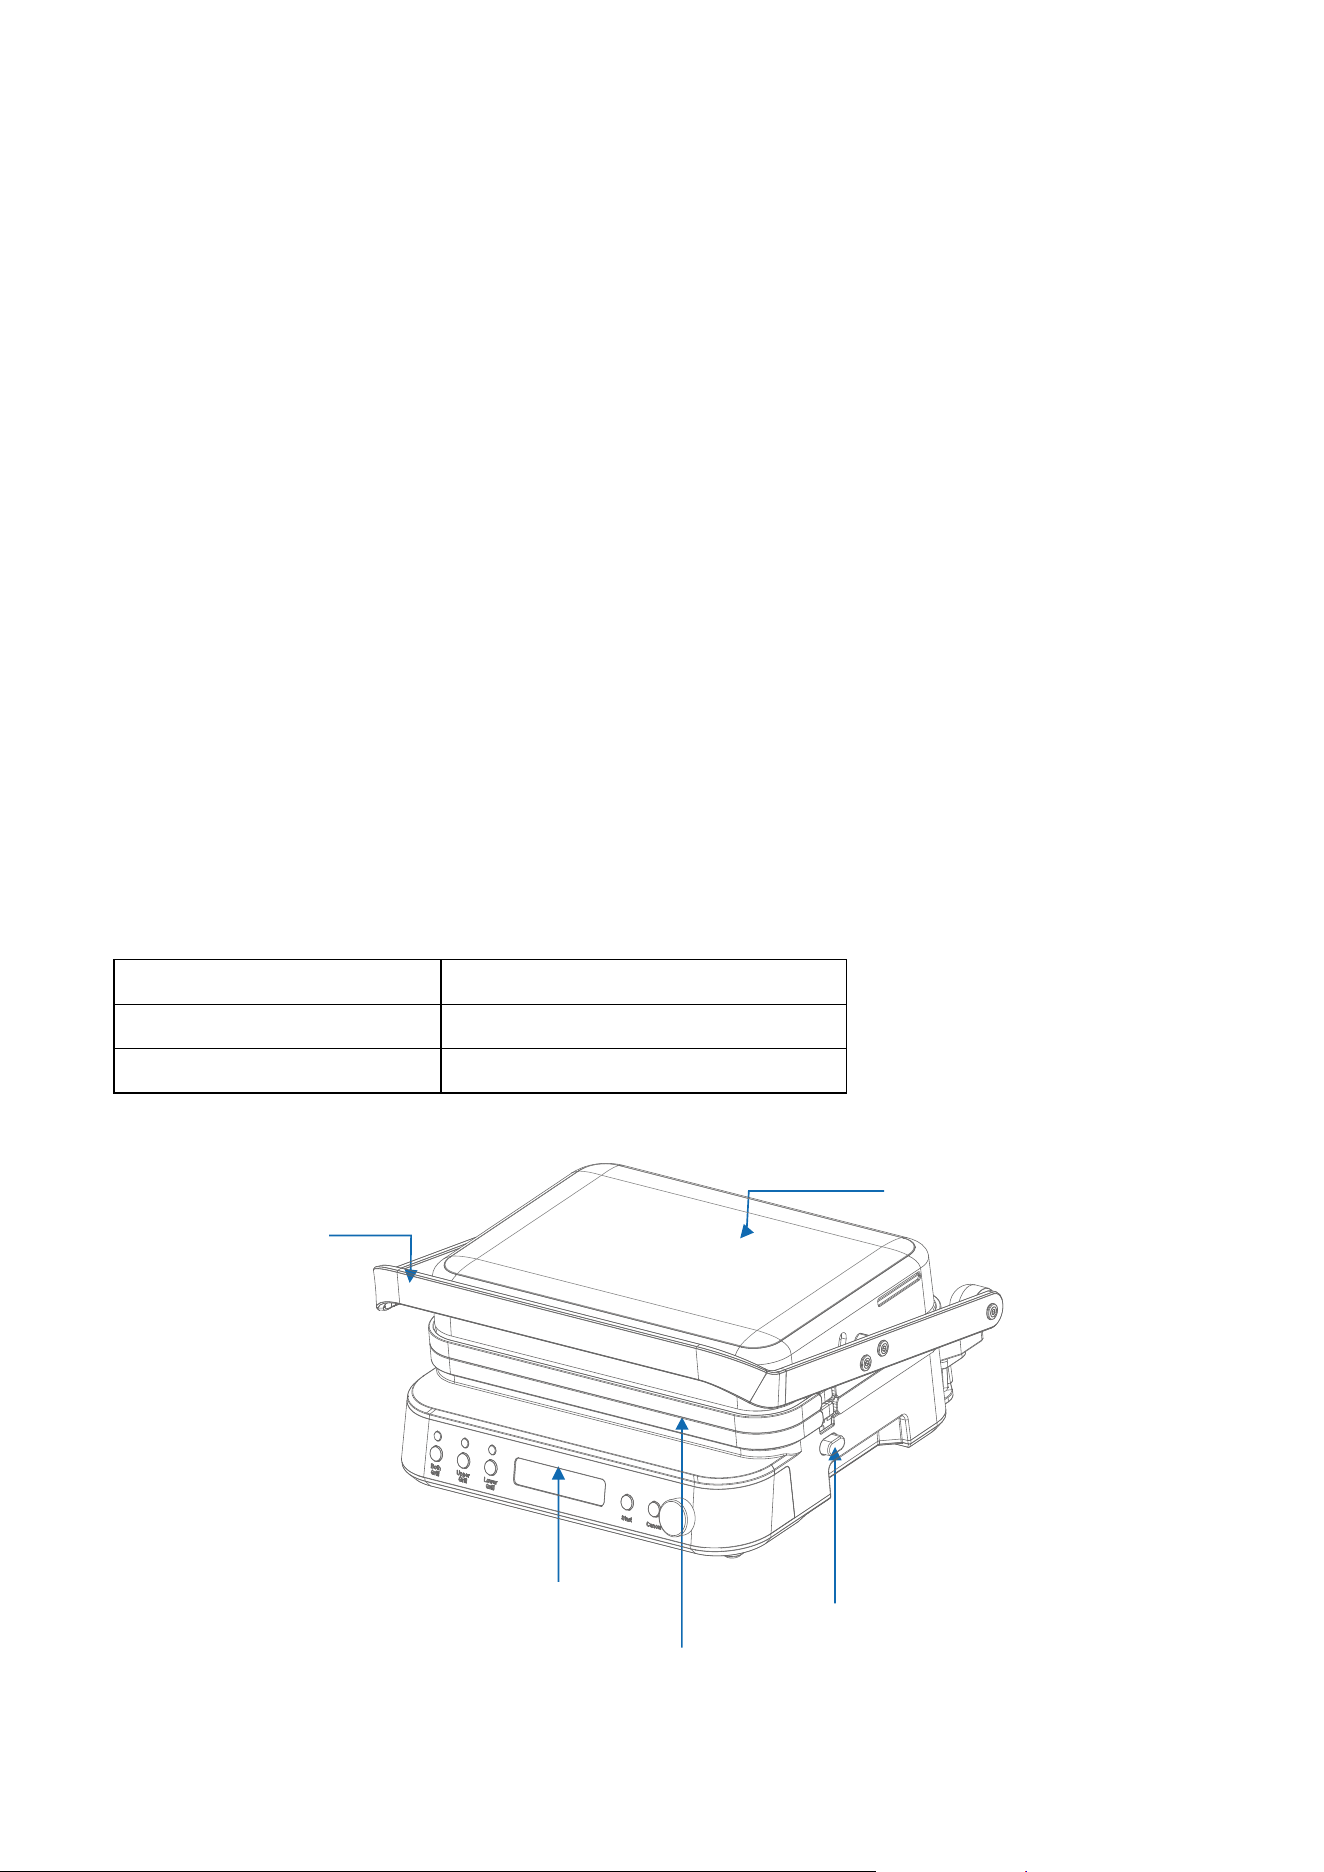
Boîtier supérieur
Plaque de gril
Bouton de déverrouillage de la plaque
Panneau de commande
Poignée
16
Panneau de commande
1.Les deux plaques de gril chauffent ensemble
2. Gril supérieure(uniquement pour chauffer la plaque supérieure)
3.Gril inferieur (uniquement pour chauffer la plaque mferieure)
4. Affichage de la temperature
5.Affichage du temps
6.Demarrer (demarrer à cuisiner)
7.Annuler (annuler demarrer à cuisiner)
8. Bouton rotatif pour sélectionner l'heure et la température
AVANT LA PREMIÈRE UTILISATION
1.Sortez I'appareil de son emballage et retirez tout le matériel d'emballage. Vérifiez I'appareil pour
vous assurer que toutes les pièces nécessaires sont présentes.
2.Retirez la plaque de cuisson en appuyant sur le bouton «Unlock» et en la retirant.(FIG.1)
3.Avant de L'utiliser pour la premiere fois, nettoyer la plaque gril (ou l'assiette à gaufres, si incluse)
avec de I'eau tiede et un produit de nettoyage doux puis sechez soigneusement les pieces.
4.Selectionnez la surface de cuisson desiree et inserez la plaque de cuisson(ou l'assiette à gaufres,
si incluse) en vous assurant qu'elle est bien en place.
5.Assurez-vous que le bac collecteur est correctement insere a I'arriere de I'ap pareil,(FIG.2)
1 2
6
7
8
3
4
5

17
FUNCTIONNEMENT
1.Branchez I'appareil et vous entendrez un bip. Tous les voyants lumineux s'allument et
s'eteignent et I'ecran affiche «OFF».
2.Selectionnez la fonction de cuisson souhaitee: Les deux gril \ gril supérieur \ gril inférieur en
appuyant sur le bouton correspondant.\
3.Tournez le bouton pour régler la température; Après avoir réglé la température, appuyez sur le
bouton et l'heure clignote, tournez le bouton pour régler l'heure.
4.Appuyez sur le bouton «Demarrer » pour demarrer le prechauffage.Lors
que I'appareil
commence le prechauffage, I'ecran affiche «PRE» et la température de réglage.Lorsque le
processus de prechauffage est termine, I'appareil emet 5 bips,la température et l'heure clignotent
sur l'affichage pour rappeler que le préchauffage est terminé.
5.Pour de meilleurs résultats, ajoutez un peu d'huile de cuisson ou une petite quantité
d’ingredients sur la plaque. Placez les aliments sur la plaque de cuisson et appuyez sur le bouton
«Demarrer ». L'ap
pareil commence le compte a rebours. (Si vous n'appuyez pas sur le bouton
«Demarrer »dans les 30 minutes, l'appareil passera en mode veille «OFF»).
6.Lorsque le compte a rebours est termine, l'appareil emet cinq bips sonores, l'écran affiche
«donE».
7.Appuyez sur le bouton «Annuler»et l'ecran affiche «OFF».
8.Utilisez la poignee pour soulever le couvercle. Retirez les aliments avec une spatule en plastique
resistante a la chaleur. N'utilisez jamais de pinces en métal tranchantes ou de couteau car ceux-ci
peuvent endommager le revêtement antiadhésif des plaques.
Suggestions d'utilisation de l'assiette à gaufres (si incluse)
1. température et temps suggérés: 150 ℃, 5 minutes
2. capacité suggérée pour chaque chambre (au total 4 chambres): 80 ml / chambre
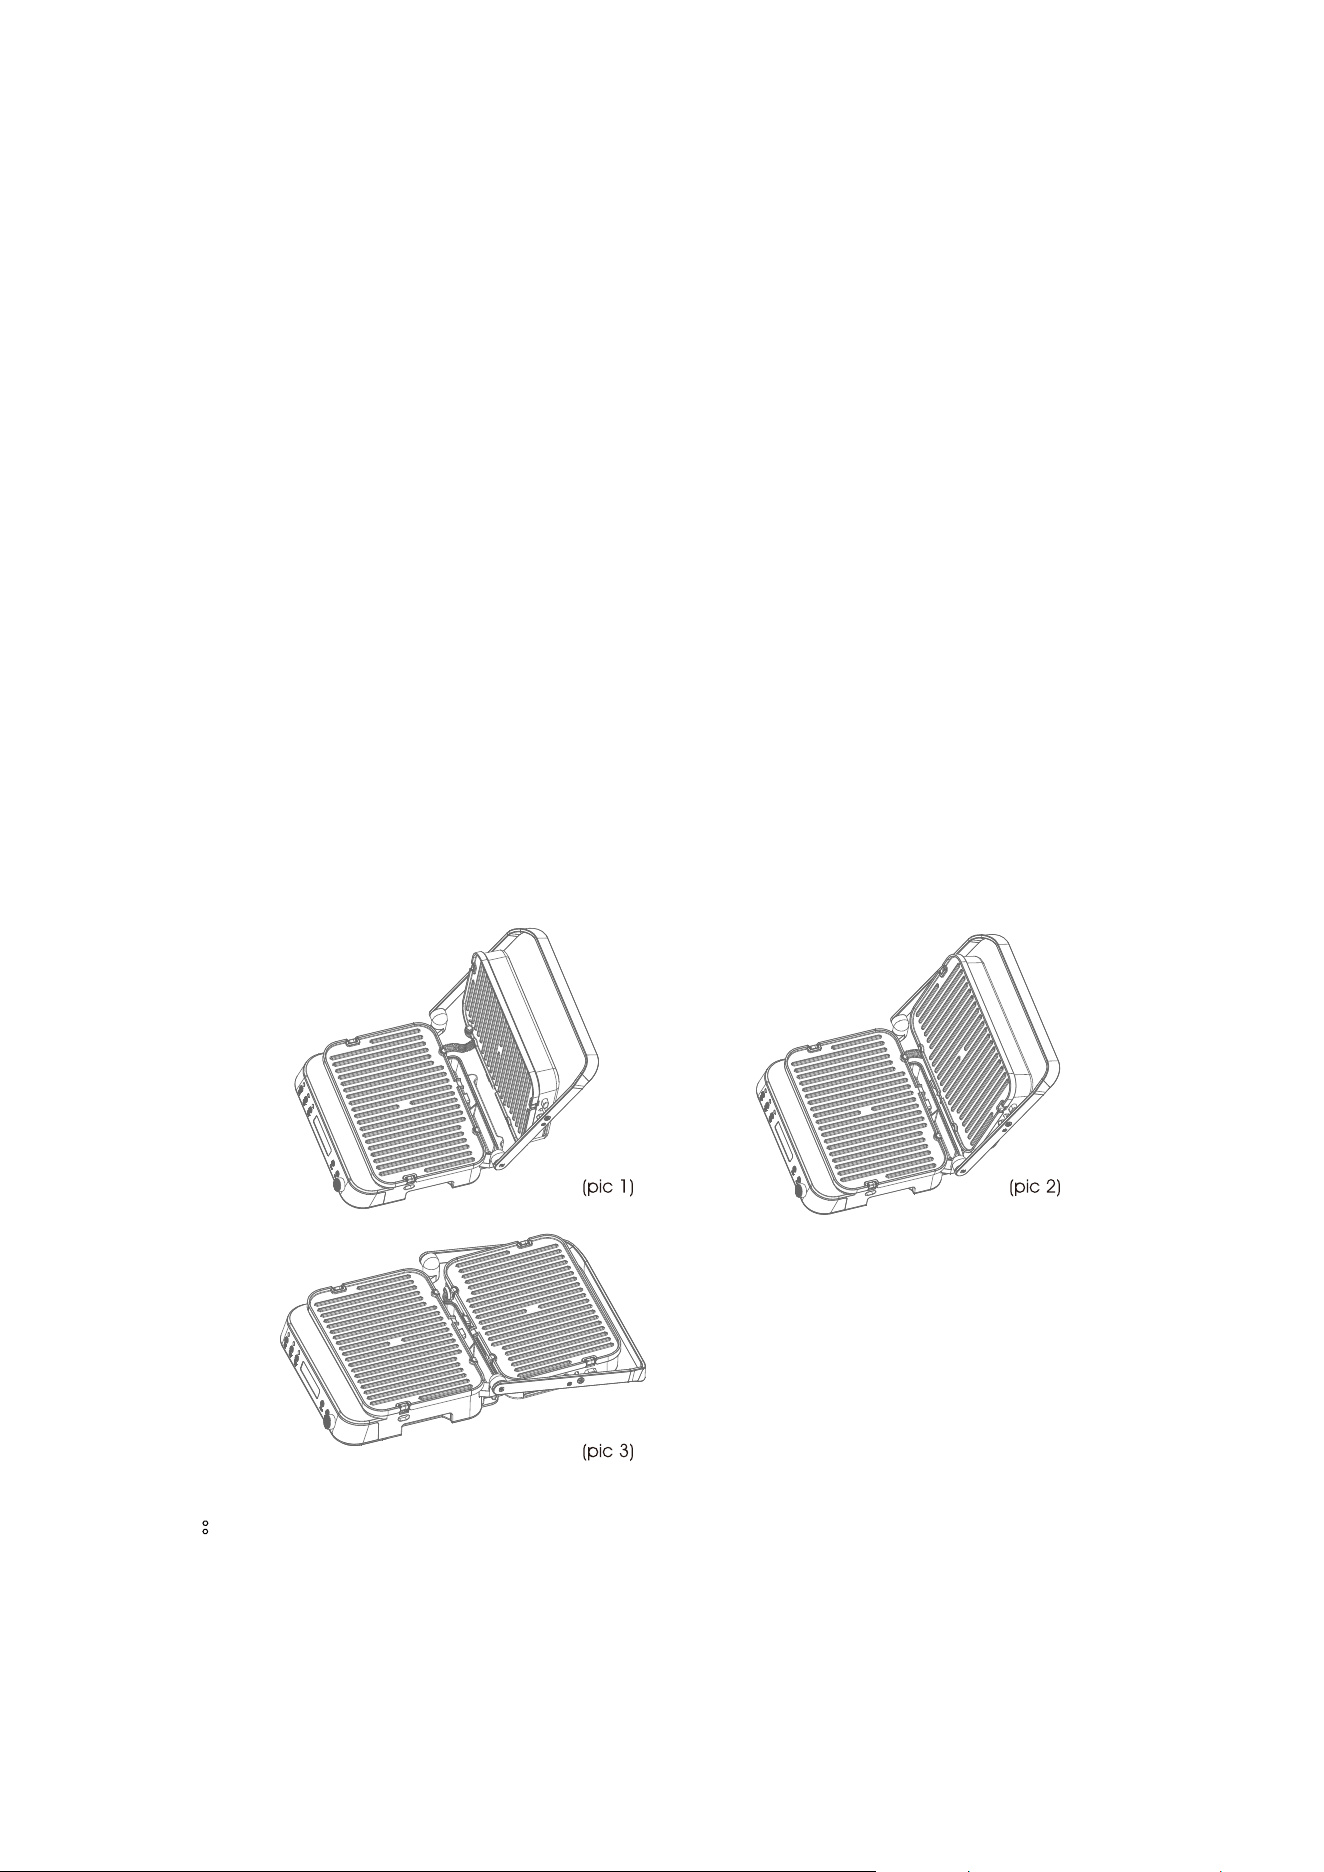
Comment utiliser le mode gril plat:
1.Lorsque le préchauffage se termine, utilisez la poignée pour déplacer le couvercle supérieur en
position ouverte (comme sur la photo 1), en portant le gant de four, appuyez sur le couvercle
18
supérieur pour mettre au niveau de la poignée (comme sur la photo 2), puis appuyez sur la
poignée et le couvercle supérieur en position plate (comme pic3);
Veuillez faire attention lorsque vous ouvrez le couvercle supérieur en position plate, car il est
chaud après le préchauffage.
Remarques:
1.Pendant la cuisson, vous pouvez appuyer sur le bouton «Annuler» pour quitter le mode actuel et
selectionner la fonction souhaitee.
2.Pendant la cuisson, vous pouvez tourner le bouton pour régler le temps / la température,
L'appareil commencera a cuire a la nouvelle duree / temperature dans les 3 secondes.
3. L'unité peut mémoriser la dernière température et l'heure de réglage; Lors de la mise sous
tension de l'appareil et de la sélection de la fonction souhaitée, le réglage de la température et de
l'heure de la dernière utilisation apparaîtra à l'écran.
Plage de temps e t de température
Fonctions Affichage
par defaut
Plage de temperature Plage de temps
Les deux grill
230°C 05:00 80-230°C
(par etapes de 5°C)
30S-60MIN (par
etapes de 30s)
Grille supérieure
200°C 10:00 80-220°C
(par etapes de 5°C)
30S-60MIN (par
etapes de 30s)
Grille inférieure
200°C10:00 80-220°C
(par etapes de 5°C)
30S-60MIN (par
etapes de 30s)
19
Conseils utiles:
1.Pour un résultat satisfaisant, ajoutez un peu d'huile de cuisson ou un aérosol de cuisson dans les
assiettes.
2.Pour réduire le temps de préchauffage, fermez les plaques du gril pendant le préchauffage.
Utilisez uniquement la poignée pour ouvrir ou fermer le capot supérieur.
NETTOYAGE ET ENTRETIEN
Debranchez l'appareil lorsqu' il n'est pas utilise et avant de le
nettoyer lui ou ses pieces detachees.
1. Laissez l'appareil refroidir completement. Attention: le gril
est encore tres chaud un certain moment. II faut un certain
temps pour qu' il refroidisse.
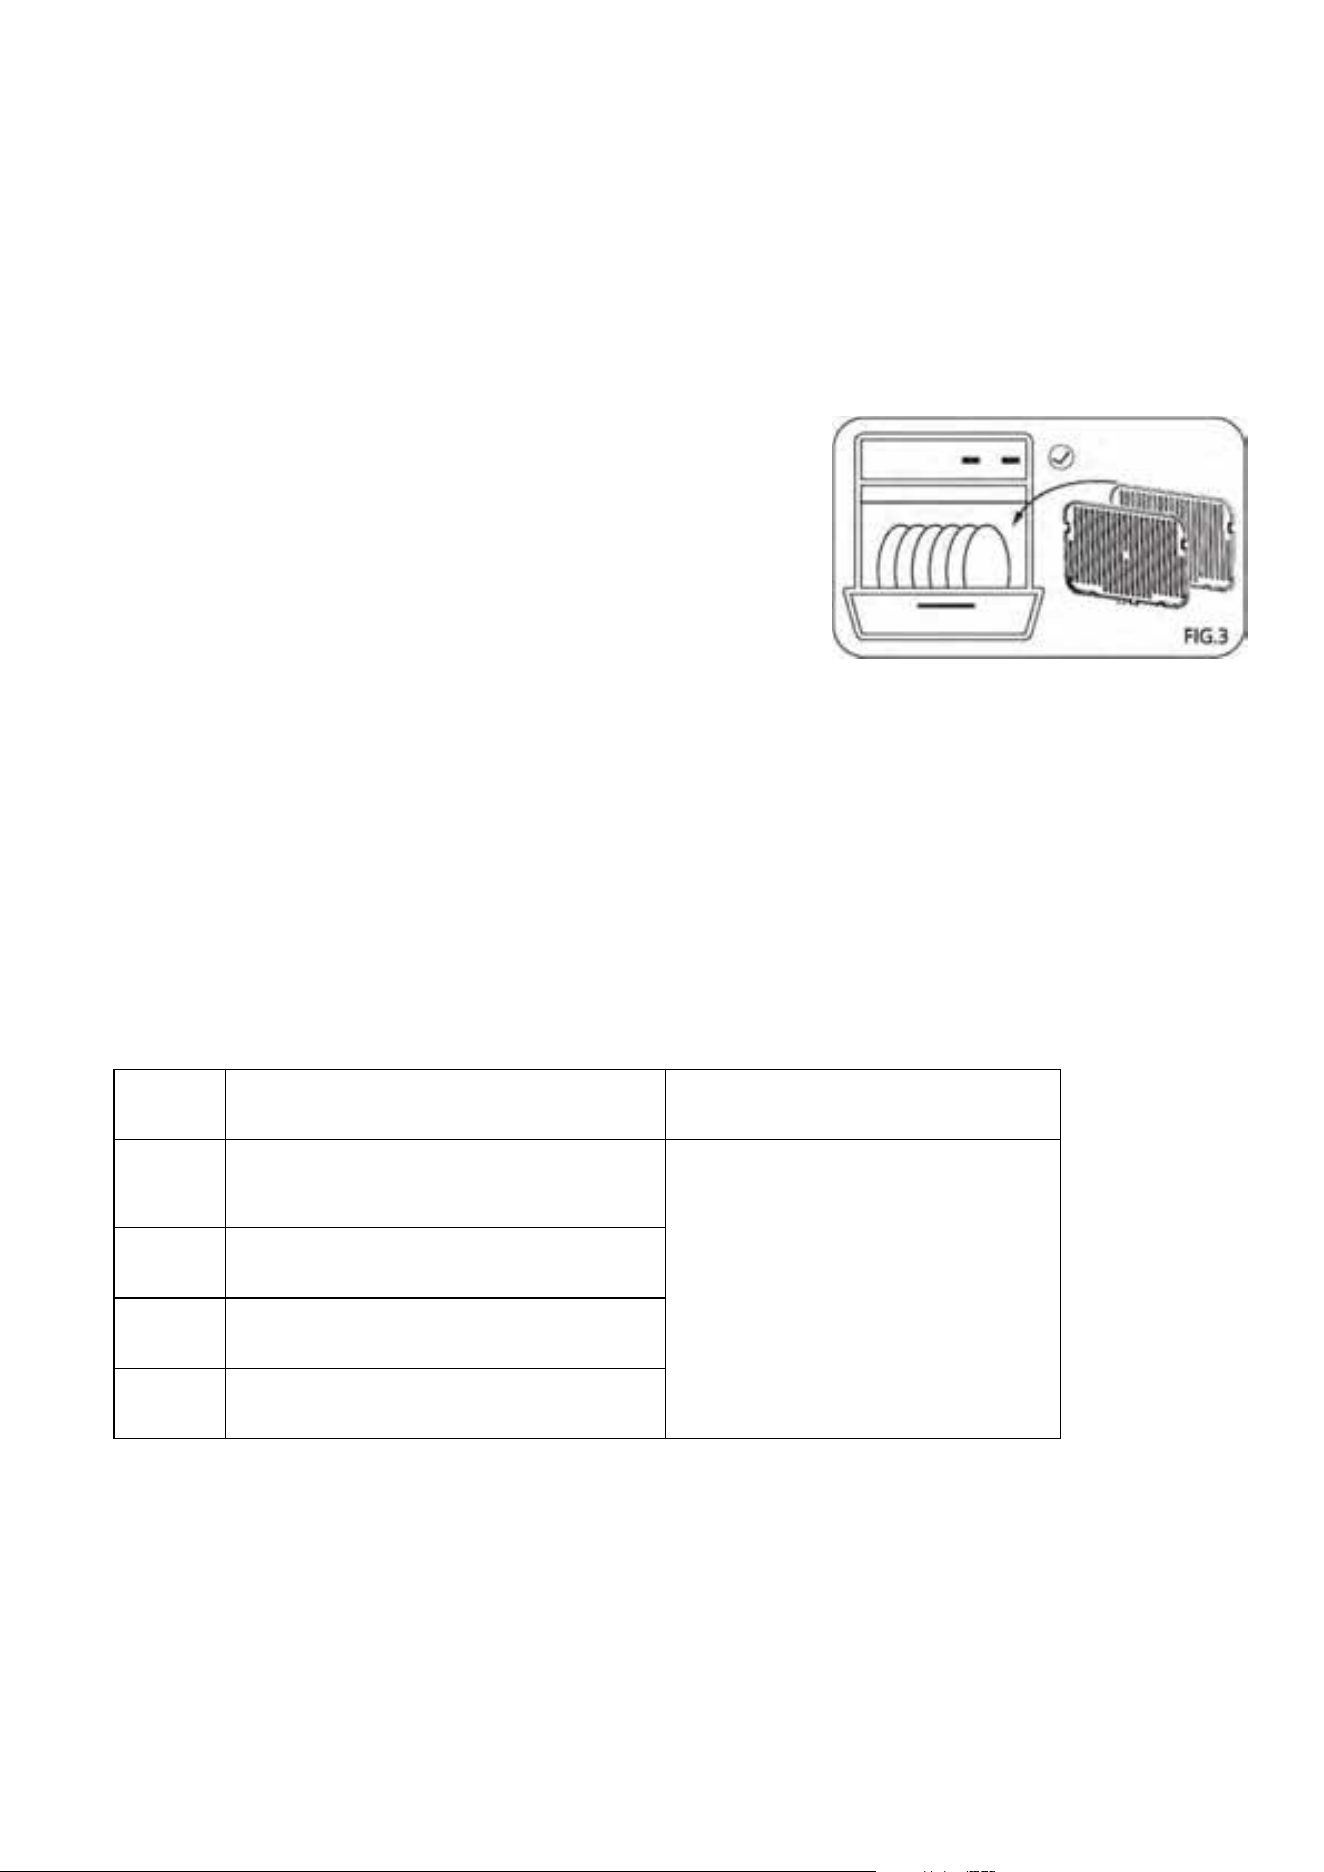
2. Appuyez sur le bouton «Unlock» pour
retirer la plaque du gril.
3.Apres avoir retire la plaque, vous pouvez la nettoyer a I'eau chaude savonneuse ou au
lave-vaisselle.(FIG.3)
4.Portez des gants pour retirer le bac collecteur a I'arriere de l'appareil. Videz le bac dans un
recipient resistant a la chaleur puis rincez-le a I'eau tiede savonneuse et sechez-le plus tard
soigneusement.
Remarque: Avant de retirer le bac, assurez-vous que la temperature de I'huile ou des residus
d'huile est inferieure a 40 °C. Dans le cas contraire, vous pourriez vous bruler.
CODE D'ERREUR
Code
Description
Solution
E1
Circuit ouvert du thermostat
supérieur
Veuillez contacter le service
après-vente
E2
Court-circuit du thermostat supérieur
E3
Circuit ouvert du thermostat inférieur
E4
Court-circuit du thermostat inférieur
GARANTIE
Cher client,
Merci d'avoir choisi le produit AMZCHEF. Nous espérons sincèrement que vous en êtes satisfait.
La garantie du fabricant couvre le produit pendant une période de 24 mois à compter de la date d'achat
20
contre les défauts de fabrication. Toutes les garanties sont automatiquement conservées dans notre
système, il n'est donc pas nécessaire d'enregistrer votre produit.
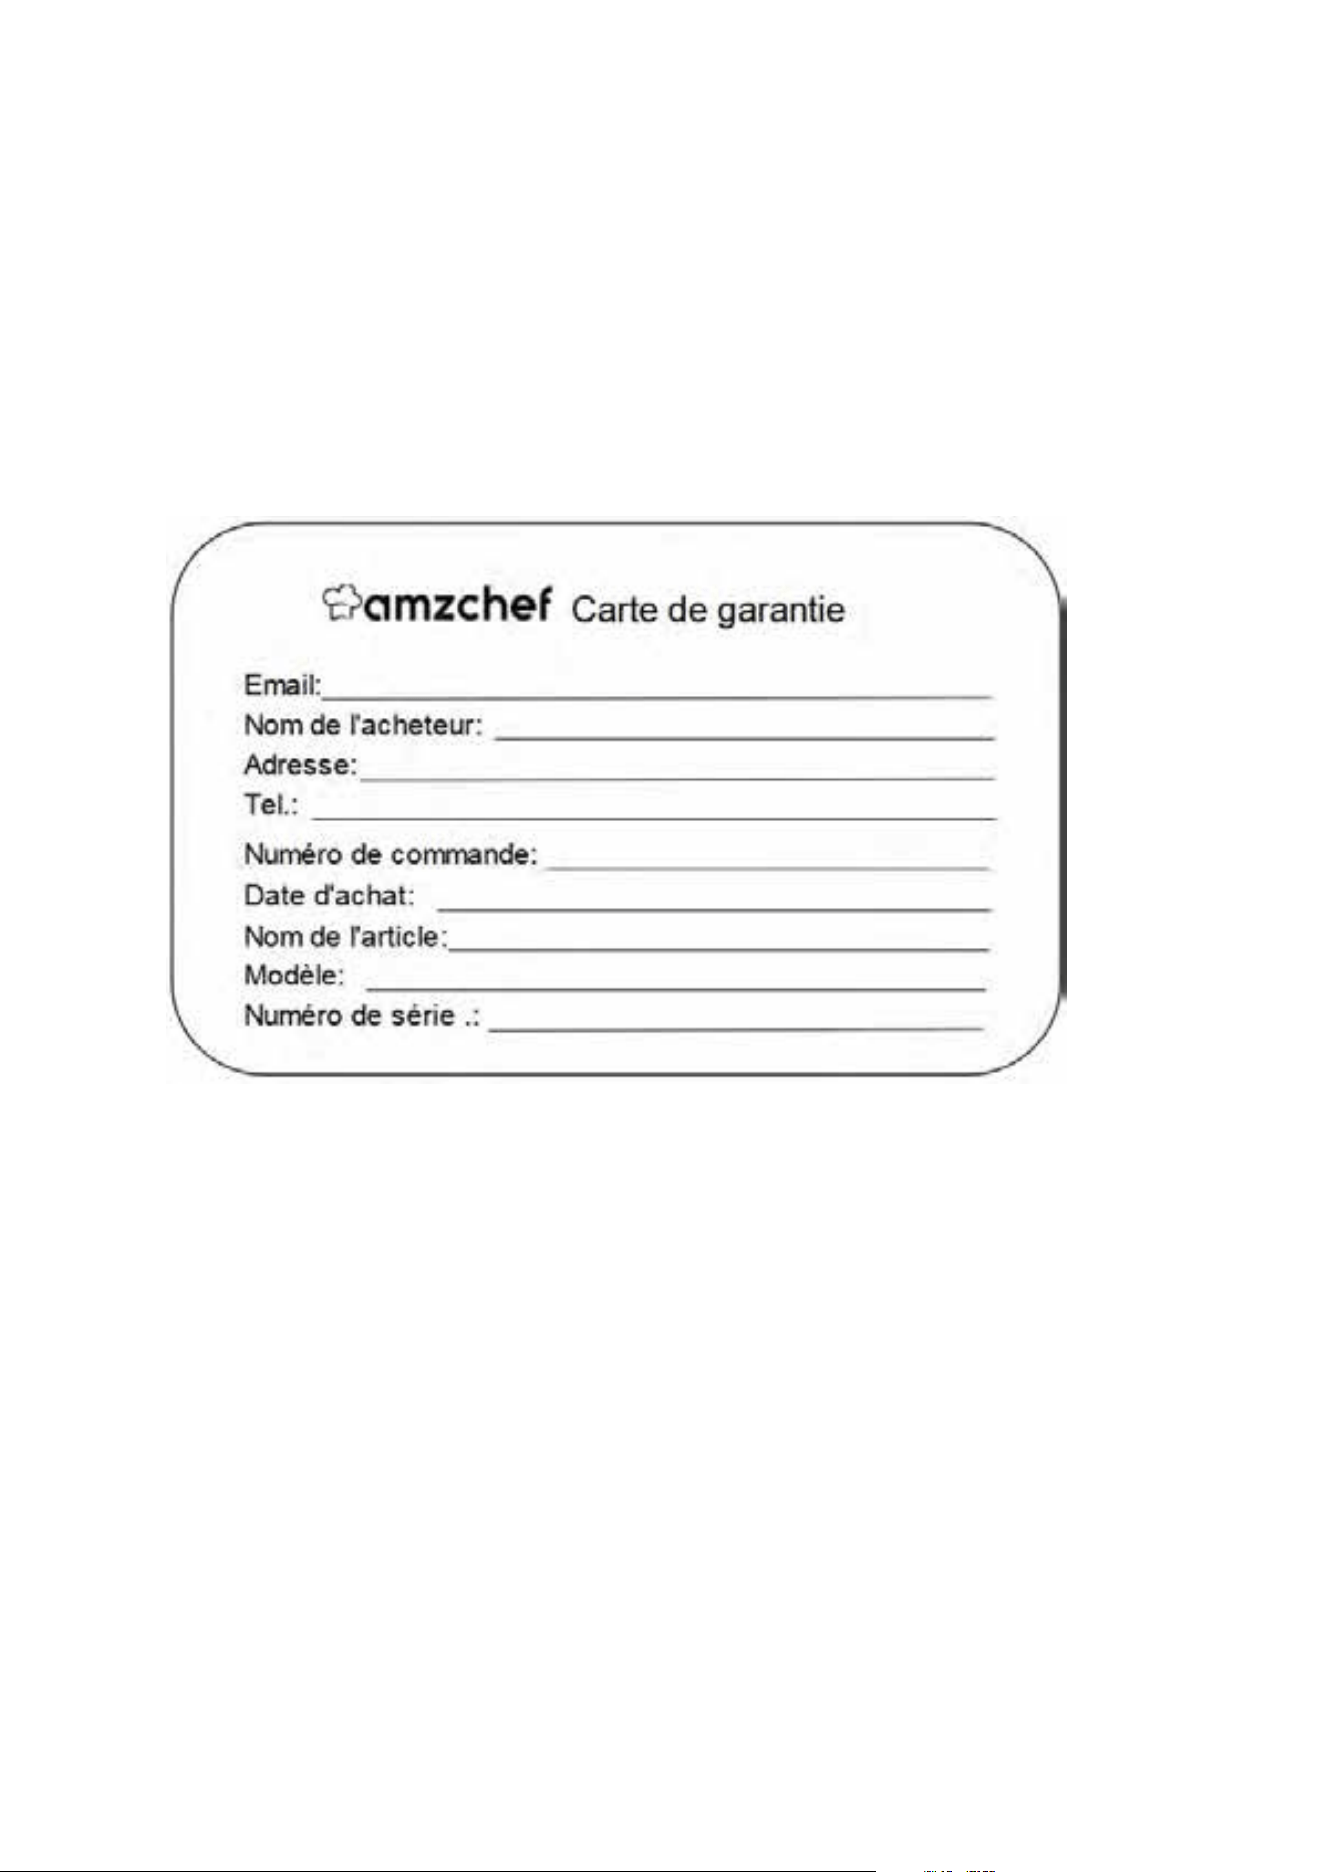
Pour une garantie gratuite supplémentaire d'un an, veuillez vous inscrire sur notre site officiel
www.iamzchef.com ou remplir la carte de garantie suivante, prendre une photo et l'envoyer à
info@iamzchef.com.
L'agent / distributeur est invité à nous contacter. Courriel : info@iamzchef.com.
Toute aide ou question pendant l'utilisation, Contact rapide: info@iamzchef.com, nous vous répondrons
dans les 24 heures. Nous vous suggérons de fournir une carte de garantie, une photo ou une vidéo s'il y
a une pièce de rechange cassée ou une machine qui ne fonctionne pas afin que nous puissions être
beaucoup plus clairs sur vos problèmes et vous offrir la meilleure solution.
Veuillez nous renvoyer la carte de garantie après avoir rempli les informations. Merci pour votre effort!
INSTRUCCIONES DE SEGURIDAD
1.Asegurese de que la tensión corresponda con la tensión indicada en la etiqueta del aparato.
2.Si el cable electrico esta dañado o no funciona correctamente, envieselo al fabricante, al servicio
de reparaciones, o a un electricista profesional.
3.Para evitar una descarga eléctrica, no sumerja el cable, el enchufe o el aparato en agua u otros
Ifquidos.
4.No toque las superficies calientes del aparato durante el funcionamiento ni después de utilizarlo.
5.Utilice pinzas de parrilla de silicona para sacar los alimentos.
6.Cuando no vaya a utilizer el aparato y antes de lavarlo, asegurese de que este desenchufado de
la toma de corriente para evitar descargas eléctricas, fugas o incendios producidos por la
degradación del aislante.
7.Utilice e los accesorios de la parrilla compatibles siguiendo las indicaciones para evitar incendios
o lesiones.
21
8.EI aparato debe colocarse en un entorno seco y no debe utilizarse al aire libre.
9.Cuando la parrilla esté en uso, mantengase a una distancia de 20 cm del aparato en todo
momento.
10.Coloque la parrilla sobre una superficie estable cuando la utilice. Mantenga el aparato aleyado
de objetos inflamables.
11 .Cuando utilice el aparato, extreme la precaución al mover la bandeja u otros accesorios para
evitar quemarse con el aceite caliente o con liquidos a altas temperaturas.
12.No coloque ningún objeto sobre la parrilla. No cubra el aparato ni Io bloquee de manera que se
impida la disipacion termica.
13.La pa
rrilla debe utilizarse unicamente con alimentos. No coloque trozos grandes de comida ni
objetos metalicos sobre la parrilla, ya que podna producirse un incendio.
14.Este aparato no debe ser utilizado por personas con capacidades físicas, sensoriales o mentales
reducidas, o que carezcan de experiencia o conocimiento sobre el manejo de estos dispositivos, a
menos que esten bajo supervision de una persona responsable. Los n
inos no deben utilizar este
aparato. Mantenga el aparato y el cable de alimentacion fuera del alcance de los ninos. Vigile que
los ninos no jueguen con el aparato mientras este en funcionamiento.
15.Los niños no deben llevar a cabo tareas de limpieza o mantenimiento en el aparato.
16.Este aparato esta diseñado para uso doméstico unicamente
CARACTERÍSTICAS TÉCNICAS
Modelo n°
LS-GC02C-H
Alimentación
220-240V 50-60Hz
Consumo eléctrico
2000W
IDENTIFICACIÓN DE LAS PARTES
Carcasa superior
Parrilla
grill
Botón de desbloqueo de la parrilla grill
Panel de control
Asa

22
PANEL DE CONTROL
1.Ambas placas de parrilla se calientan juntas
2.Placa parrilla inferior (solo calienta la placa inferior)
3.Placa parrilla siperior(solo calienta la placa superior)
4.Visualizacion de la temperatura
5.Visualizacion del tiempo
6.Iniciar el trabajo
7.Cancelar el trabajo
8. Perilla giratoria para seleccionar tiempo y temperatura
ANTES DEL PRIMER USO
1.Saque el a para to del paquete y retire todo el material de embalaje. Verifique que el aparato
contenga todas las piezas y accesorios.
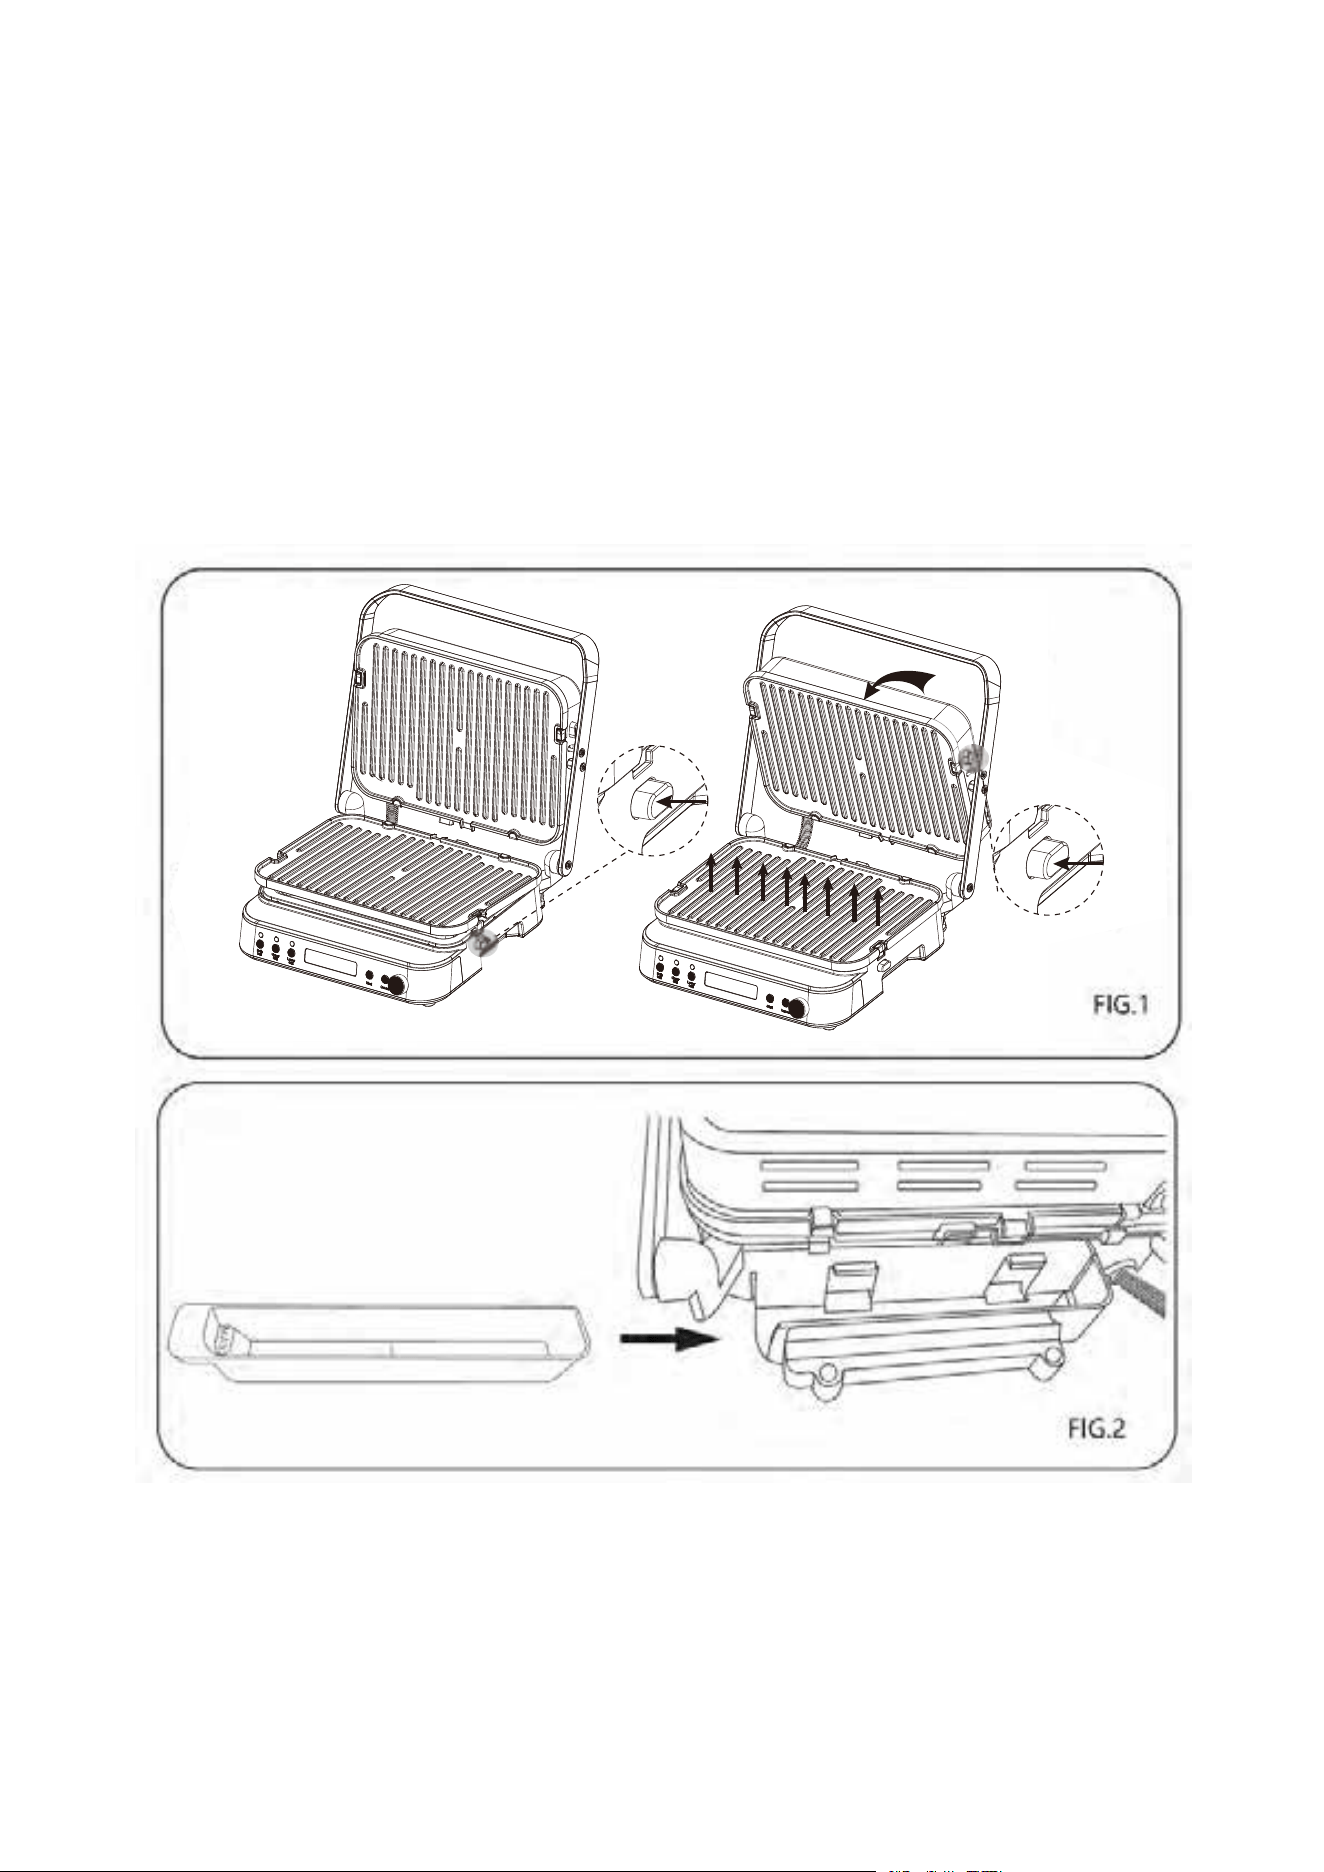
2.Retire la placa grill presionando el boton "desbloquear".(FIG.1)
3.Antes de utilizar el aparato por primera vez ,lave la placa grill (o el plato de gofres, si está
incluido)con agua caliente y un detergente suave, y seque minuciosamente todas las piezas.
4.Coloque el aparato sobre una superficie adaptada e inserte la placa grill (o el plato de gofres, si
está incluido), asegurandose de que este adecuadamente instalada.
5.Introduzca correctamente la bandeja de aceite en el aparato.(FIG.2)
1
2
6
7
8
3
4
5

23
FUNCIONAMIENTO
1.Enchufe el aparato a la corriente eléctrica. Oirá un "bip". Todos los indicadores luminosos se
encenderan y se apagaran y en la pantalla se visualizara "OFF".
2.Seleccione la funcion deseada - Both Grill\Upper Grill\Lower Grill- presionando el boton
correspondiente
3. Gire la perilla para ajustar la temperatura; Después de configurar la temperatura, presione la
perilla y el tiempo parpadeará, gire la perilla para ajustar la hora.
4.Pulse el botón"Start" para empezar a precalentar el aparato. Cuando el aparato comience a
precalentarse, en la pantalla se visualizara "PRE" y la temperatura de ajuste.Cuando el
calentamiento se haya completado, emitira 5 "bips" ,la temperatura y el tiempo parpadean en la
pantalla para recordar que el precalentamiento ha terminado;
5.Para mejores resultados,agregue un poco de aceite de cocina o una pequeña cantidad de los
ingredientes al plato. Coloque los alimentos sobre la parrilia y pulse el boton "Start". Comenzara
una cuenta atras. (Si no pulsa el botón"Start"en los siguientes 30 minutos, la unidad entrará en
modo "OFF").
24
6.Cuando haya terminado la cuenta atrás, la unidad emite cinco "bips" y en la pantalla se
visualizara "donE".
7.Al pulsar el botón"Cancel" en la pantalla se visualizara "OFF".
8.Use el asa para levan tar la tapa. Retire los alimentos con una espátula o unas pinzas de parrilla
de plástico resistente al calor. Nunca utilice pinzas de metal, tenedores o cuchillos, ya que podrian
dañar la capa antiadherente de la placa grill.
Sugerencias para usar el plato de gofres (si se incluye)
1.Temperatura y tiempo sugeridos: 150 ℃, 5 minutos
2.Capacidad sugerida para cada cámara (en total 4 cámaras): 80 ml / cámara
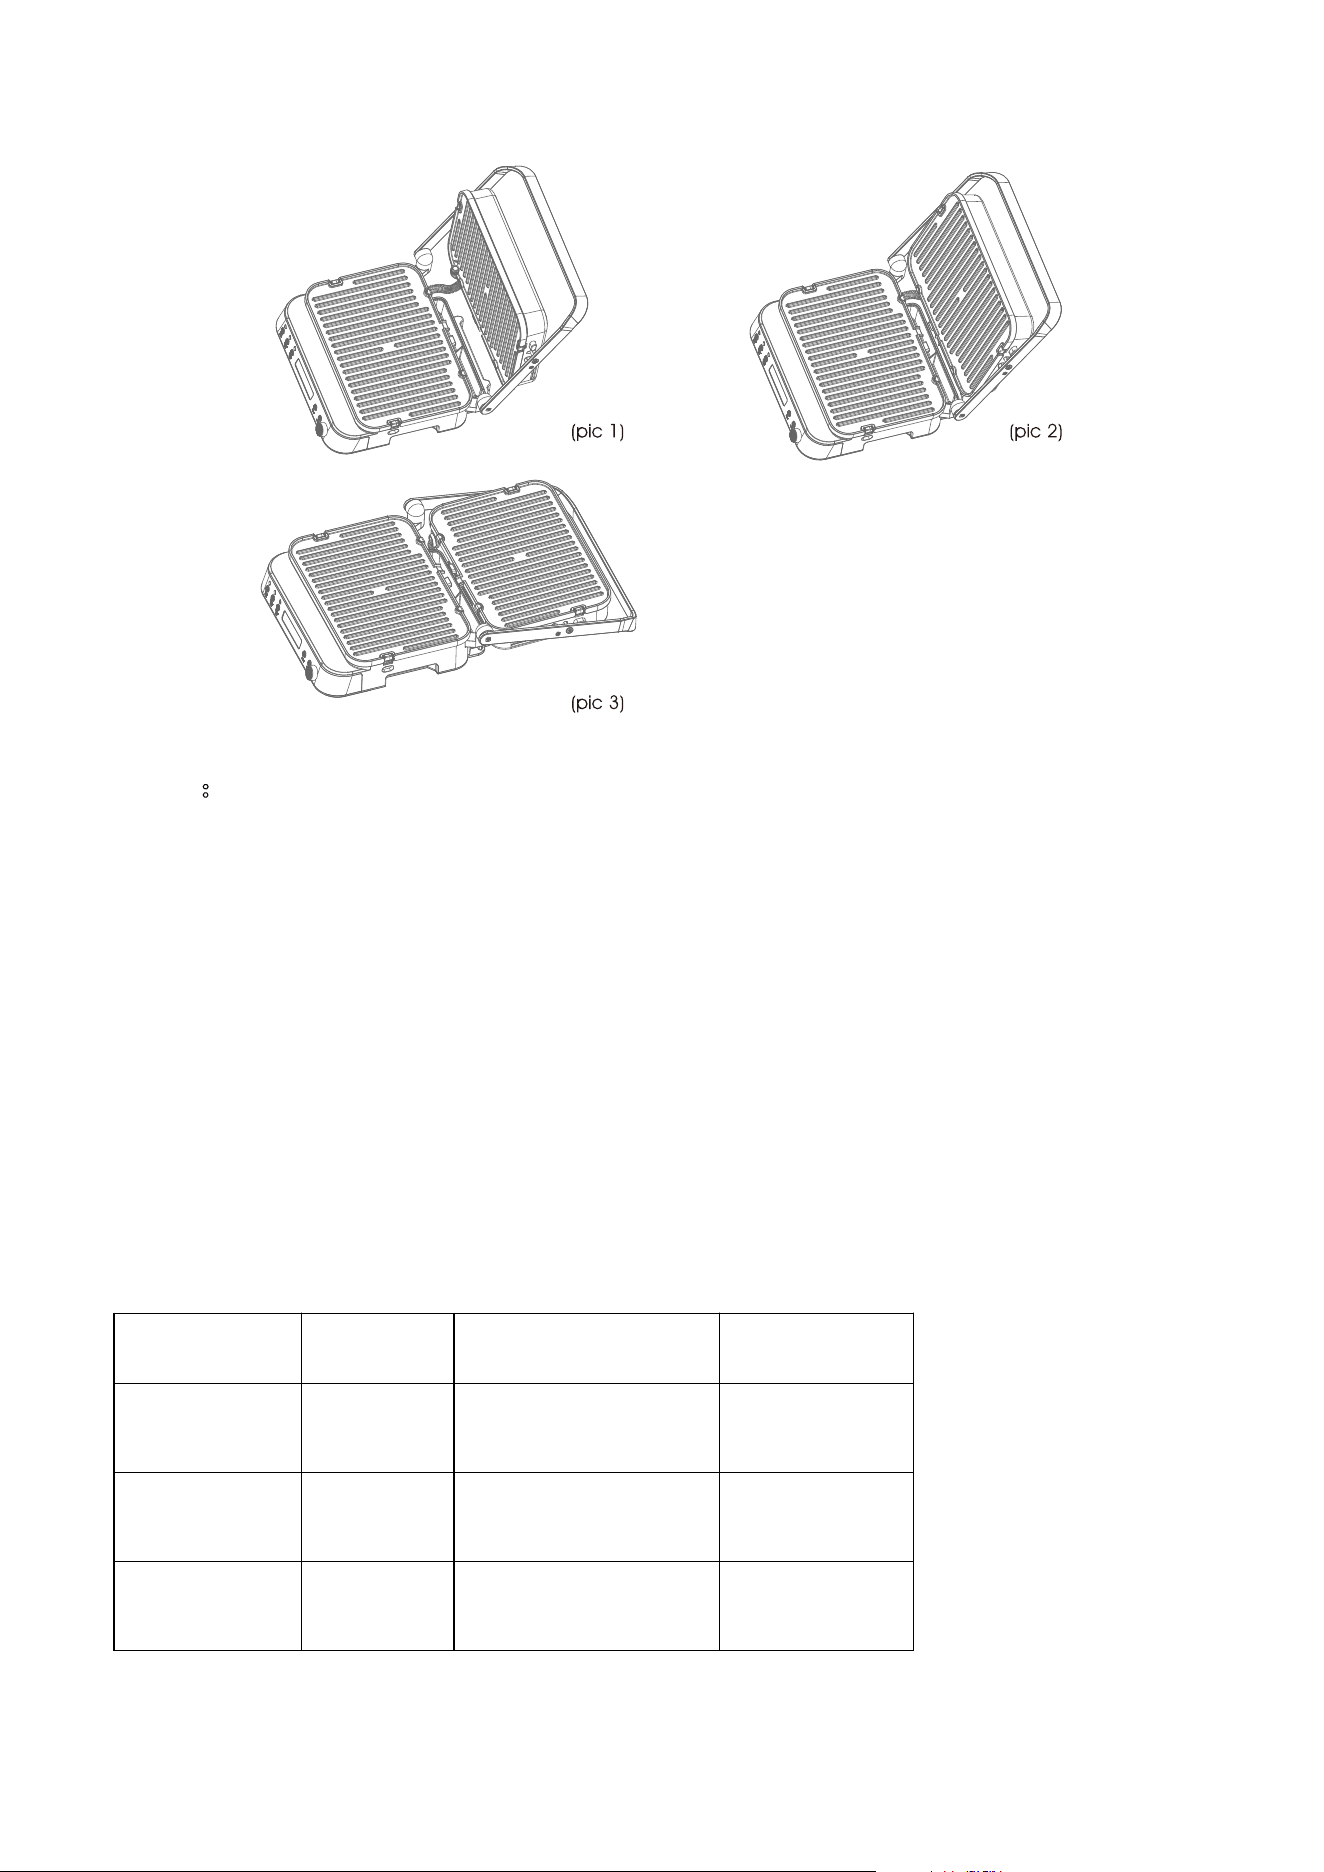
Cómo utilizar el modo de parrilla plana:
1.Cuando termine el precalentamiento, use el mango para mover la cubierta superior a la posición
abierta (como en la imagen 1), usando el guante de cocina, presione la cubierta superior para
nivelar con el mango (como en la imagen 2), luego presione el mango y la cubierta superior a la
posición plana (como pic3);
Tenga cuidado al abrir la cubierta superior a una posición plana, ya que hace calor después del
precalentamiento.
Nota:
Durante el cocinado, puede pulsar el boton "Cancel" para salir del modo actual y seleccionar la
funcióndeseada.

25
Durante el cocinado, puede girar la perilla para ajustar el tiempo y temperatura. La unidad
comenzará a cocinar con el tiempo y la temperatura seleccionados en 3 segundos.
3. La unidad puede memorizar la última configuración de temperatura y hora; Cuando encienda la
unidad y seleccione la función deseada, la temperatura de ajuste y la hora del último uso
aparecerán en la pantalla.
Rango de tiempo y temperatura:
Función
Ajustes por
Defecto
Rango de temperatura
Rango de tiempo
Ambos grill
230℃ 05:00
80-230℃
(5℃/step)
30S-60MIN(30s/
step)
Parrilla superior
200℃ 10:00
80-220℃
(5℃/step)
30S-60MIN(30s/
step)
Parrilla inferior
200℃ 10:00
80-220℃
(5℃/step)
30S-60MIN(30s/
step)
Consejos útiles:
1.Para un resultado satisfactorio, agregue un poco de aceite de cocina o aceite en aerosol a las
placas.
2. Para reducir el tiempo de precalentamiento, cierre las placas de la parrilla durante el
precalentamiento.
3. Utilice únicamente el asa para abrir o cerrar la cubierta superior.
LIMPIEZA Y MANTENIMIENTO
Desenchufe el a para to de la toma de corriente cuando no
vaya a utilizarlo y antes de lavar la unidad o alguna pieza.
1.Deje que el aparato se enfrie completamente. Atención:
Después del uso la parrilla esta muy caliente. Tarda un
tiempo en enfriarse, no la toque.
2.Pulse el botón"Desbloqueo" para retirar la placa del aparato.
3.Cuando haya retirado la placa, puede lavarla con agua
caliente con jabon.(FIG.3)
4.Utilice guantes para retirar la bandeja de aceite situada en la parte trasera de la unidad. Vacie la
bandeja de aceite en un recipiente resistente al calory lavela con agua caliente con jabon. Sequela
minuciosamente.
Nota: Antes de retirar la bandeja de aceite, asegurese de que la temperatura del aceite o de los
residues no supere los 40°C, de Io contrario podna quemarse.
26
CÓDIGO DE ERROR
Código
Descripción
Solución
E1
Circuito abierto del termostato
superior
Póngase en contacto con el
servicio posventa
E2
Cortocircuito del termostato superior
E3
Circuito abierto del termostato
inferior
E4
Cortocircuito del termostato inferior
GARANTÍA
Apreciado Cliente,
Gracias por elegir productos AMZCHEF. Esperamos sinceramente que pueda estar satisfecho con el
producto.
La garantía del fabricante incluye 24 meses para el producto a partir de la fecha de compra contra todos
los defectos de fabricación. Todas las garantías se guardarán automáticamente en nuestro sistema, por
lo que no hace falta registrar su producto.
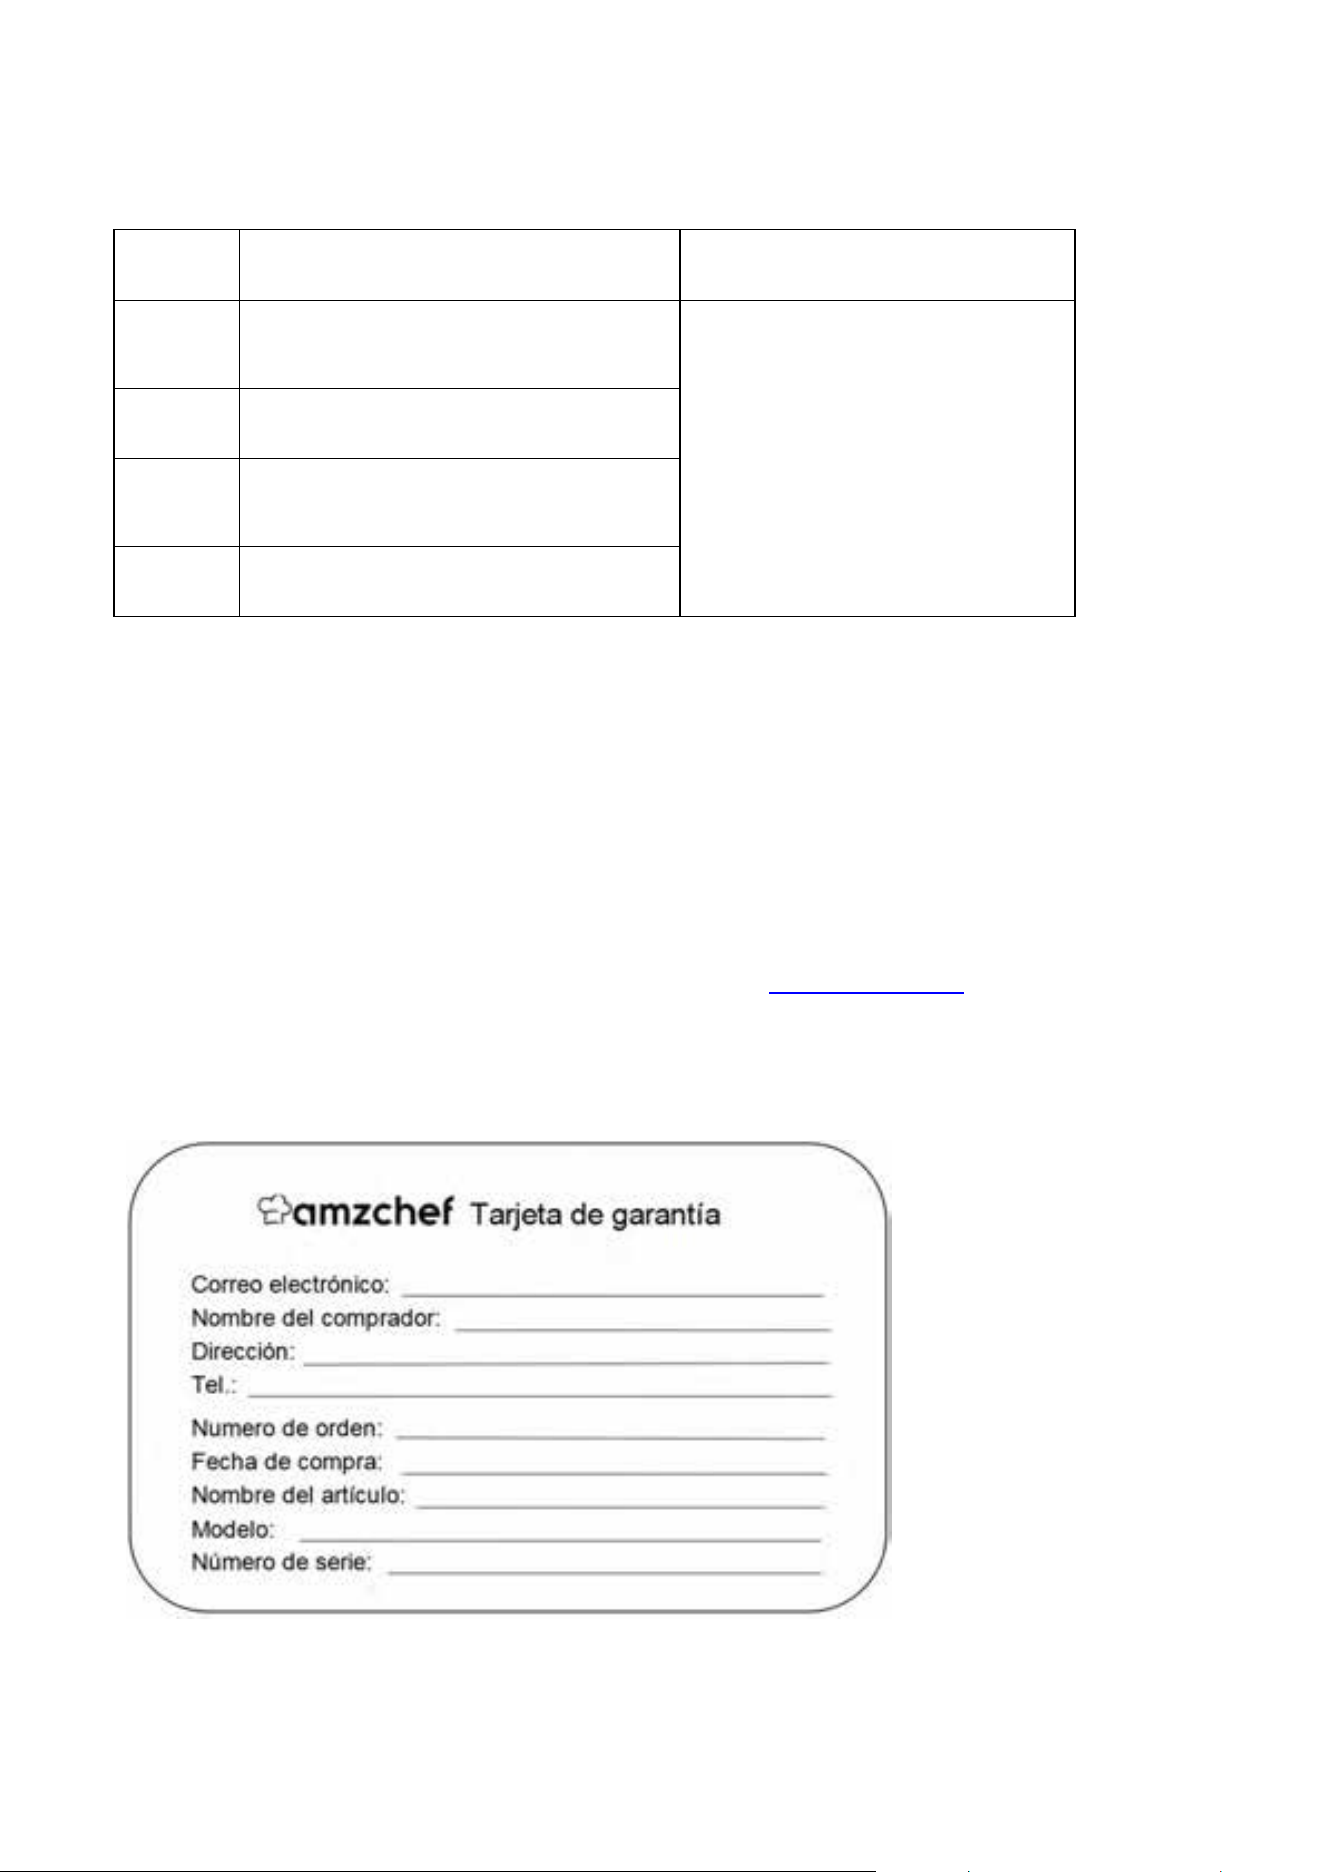
Si quiere obtener un año adicional de garantía, registre en nuestro sitio web oficial www.iamzchef.com o
complete la siguiente Tarjeta de Garantía, tome foto y envíe a
info@iamzchef.com
.
Para cualquier ayuda o problema durante el uso, póngase en contacto rápido a info@iamzchef.com, le
atenderemos en 24 horas. Se le sugiere proporcionar una tarjeta de garantía, una foto o un video si hay
alguna pieza dañada o el aparato no funciona, así podemos conocer más claro sobre sus problemas y
ofrecerle la mejor solución.
Tenga la gentileza de enviarnos la tarjeta de garantía después de completar la información. ¡Gracias por
su soporte!

27
IMPORTANTI MISURE DI SICUREZZA
1.Assicurarsi che la tensione indicata sulla targhetta dei dati corrisponda alia rete elettrica
domestica.
2.Se il cavo di alimentazione è danneggiato, per evitare pericoli, deve essere sostituito dal
produttore o dal suo reparto di manutenzione o da professionisti qualificati.
3.Per proteggersi da scosse elettriche, non immergere il cavo, la spina o la macchina in acqua o
altri liquidi.
4.Non toccare la superficie calda del grill durante o dopo il funzionamento.
5.Utilizzare una pinza in silicone per alimenti per maneggiare ed estrarre il cibo.
6.Quando la griglia non è in uso, la spina deve essere estratta dalla presa per evitare scosse
elettriche, perdite e incendi causati dall'invecchiamento della guarnizione.
7.Gli accessori della griglia devono essere utilizzati correttamente per evitare incendi o lesioni.
8.La gr
iglia deve essere collocata in un ambiente asciutto e non deve essere utilizzata all'aperto.
9.Mentre la griglia e in uso, mantenere sempre una distanza di 20 cm da essa.
10.Posizionare la griglia su una superficie stabile quando la si utilizza. Non posizionarla vicino a
oggetti infiammabili.
11.Quando la griglia è in funzione, fare attenzione quando si sposta il vassoio del cibo o altri
accessori per evitare di essere scottati da olio caldo o liquidi ad alta temperatura.
12.Non posizionare alcun oggetto sulla griglia. Non coprirlo o bloccare le prese d' aria.
13.La gr
iglia può essere utilizzata solo per cuocere cibo di piccole o medie dimensioni, non mettere
grandi pezzi di cibo o oggetti di metallo sul grill poiché potrebbero causa re un incendio.
14.Questo apparecchio può essere utilizzato da persone con ridotte capacità fisiche, sensoriali,
mentali o prive di esperienza e conoscenza solo se sono state supervisionate o istruite riguardo al
suo uso sicuro e ne comprendono i pericoli. Questo apparecchio non può essere utilizzato dai
bambini. Tenere I'apparecchio e il cavo fuori dalla portata dei bambini. Assicurarsi che i bambini
siano sorvegliati mentre la griglia e in funzione e che non giochino con I'apparecchio.
15.I bambini non possono pulire la griglia o eseguire operazioni di manutenzione.
16.Questo apparecchio è destinato ad uso domestico e simili, come:
-aree cucina per il personale in negozi, uffici e altri ambienti di lavoro;
-agriturismi;
-da clienti in hotel, motel e altri ambienti di tipo residenziale;
-ambienti di tipo bed & breakfast
SPECIFICHE TECNICHE
N. Modello
LS-GC02C-H
Alimentazione
220-240V 50-60Hz
Consumo
2000W

28
PANORAMICA D EL PRODOTTO
Pannello di controllo
1.Entrambe le piastre grill si riscaldano insieme
2.Griglia inferiore (riscalda sola la griglia in feriore)
3.Griglia superiore(riscalda sola la griglia superiore)
4.Temperatura
5.Tempo di cottura
6.Awia cottura
7.Annulla cottura
8.Manopola rotante per selezionare ora e temperatura
1 2
6
7
8
Alloggiamento superiore
Griglia doppia
Leva di sblocco
Pannello di controllo
Maniglia
3
4
5
29
PRIMA DEL PRIMO UTILIZZO
1.Estrarre I'apparecchio dalla confezione e r i muovere tutto il materiale di imball aggio. Controllare
I'ap parecchiatura per assicurarsi che t utte le part i necessarie siano presenti e non risultino danneggiate.
2.Estrarre la griglia tirandola mentre si preme la leva di sblocco.(FIG.I)
3.Pri ma di usare questo prodotto per la prima volta, pulire la piastra(o la pi astra per waffle, se inclusa)
con acqua calda e un detergente delicato, quindi a
sciugare accuratamente.
4.Selezionare la superficie di cottura desiderata e inserire la griglia(o la piastra per waffle, se inclusa),
assicurandosi che sia correttamente in posizione.
5.Verificare che la vaschetta raccogli olio sia inserita correttament e sul retro dell'apparecchio.(FIG.2)

30
FUNZIONAMENTO
1.Collegare prima di tutto V apparecchio alla corrente; si sentira un segnale acusti co. Tutte le spie si
accenderanno e si spegneranno e il display mostrera "OFF".
2.Seleziona re una funzione di cottura-Both Grill\Upper Grill\Lower Grill-premendo il pu l sante
corrispondente.
3.Ruotare la m a nopola pe r regolare la temperatura; Dopo aver impostato la temperatura,
premere la manopola e l'ora lampeggia, ruotare la man opola per rego l a r e l'ora.
4.Premere il pulsante "Awia" per a wiare il preriscaldamento. Quando l'unita inizia a preriscaldarsi,
il display mostra "PRE" e l a temperatura impostata. Quando i l processo di preriscaldamento e
complete, Punita emette 5 se gnali acustici,la temperatura e l'ora lampeggiano sul display per
ricordare che il preriscaldamento è terminato;
5.Per ot tenere risultati migliori, aggiungere un po’ d i olio da cucina o una piccola quantita di
ingredienti sulla griglia. Mettere il cibo sulla griglia e premere il p ulsan te "Awia". L'unita inizia il
con to alia ro vescia. (Se non si preme il pulsante "Awia" entro 30 minuti,l'unità si spe gnerà).
6.Al termine del conto alia rovescia, Pu nit a emette cinque segnali acustici ,II display mostra "donE"
(terminato) .
7.Premere il pulsante "Annulla", il display mostra "OFF".
8.Utilizzare la maniglia per sollevare il coperchio. Rimuovere il ci bo con una spatola di plastica
resistente al calore. Non usare mai pinze in metallo o strumenti affilati poiche potrebbero
danneggiare il rivestimento antiaderente delle griglie.
Suggerimenti per l'utilizzo della piastra per waffle (se in clusa)
1.Temperatura e tempo sugger i ti: 150 ℃ / 340 ℉, 5 minuti
2.Capacità suggerita per ogni camera (totalmente 4 camere): 8 0 ml / camera
Come utilizzare la modalità grill piatto:
Una volta terminato il preriscaldamento, utilizzare la maniglia per spostare il coperchio superiore in
posizione di apertura (come in foto1), indossare il guanto da forno, premere il coperchio superiore al
livello della maniglia (come in foto2), quindi premere la maniglia e il coperchio superiore in posizione
piatta (come la foto 3);
Si prega di fare att
enzione quando si apre il
coperchio superiore in posizione piatta, po ic hé è caldo dopo
il preriscaldamento.
31
Note:
•
Durante la cottura, è possibile premere il pulsante "Annulla" per uscire dalla modalita corrente e
selezionare nuovamente una funzione.
• Durante la cottura è possibile ruotare la manopola per regolare tempo / temperatura, L'unita
aggiornera la cottura secondo le nuove impostazioni entro 3 secondi.
•
L'unità potrebbe memorizzare l'ultima temperatura e ora di impostazione; Quando si accende
l'unità e si seleziona la funzione desiderata, sul display verranno visualizzati l'impostazione della
temperatura e l'ora dell'ultimo utilizzo.
Tempo e temperatura:
Funzione
Parametri
predefiniti Variazione temperatura
Variazione
tempo di cottura
Entrambi grill
230°C 05:00 80-230°C
(5°C/ step)
30S-60MIN(30s/
step)
Grigio superiore
200°C 10:00 80-220°C
(5°C/step)
30S-60MIN(30s/
step)
Griglia inferiore
200°C 10:00 80-220°C
(5°C/ step)
30S-60MIN(30s/
step)
32
Consigli utili:
1.Per un risultato soddisfacente, aggiungere un po 'di olio da cucina o spray da cucina sui piatti.
2.Per ridurre il tempo di preriscaldamento, chiudere le piastre del grill durante il preriscaldamento.
3. Utilizzare solo la maniglia per aprire o chiudere il coperchio superiore.
PULIZA E MANUTENZIONE
Scollegare sempre la spina dalla presa quando I'apparecchio non
e in uso e prima di pulire l'unita e/o singole parti.
1 .Lasciar raffreddare completamente rapparecchio. Attenzione:
la griglia potrebbe rimanere molto calda anche se il resto delle
superfici si sono raffreddate.
Premere la leva di sblocco per rimuovere la griglia.
Una volta rimossa, e possibile pulire la griglia con acqua calda e sapone o in lavastoviglie,(FIG.3)
4.lndossare guanti per rimuovere la vaschetta raccogli olio sul retro delTapparecchio. Svuotarla in
una padella resistente al calore, sciacquarla con acqua tiepida e sapone e asciugarla
accuratamente.
Nota: Prima di rimuovere la vaschetta raccogli olio, assicurarsi che la temperatura dell'olio o dei
residui di olio sia inferiore a 40
°
C, altrimenti si possono subire lesioni da bruciatura.
CODICE DI ERRORE
Codice
Descrizione
Soluzione
E1
Circuito aperto del termostato
superiore
Si prega di contattare il servizio
post-vendita
E2
Cortocircuito del termostato
superiore
E3
Circuito aperto del termostato
inferiore
E4
Cortocircuito del termostato inferiore

33
GARANZIA
Caro cliente,
Grazie per aver scelto il prodotto AMZCHEF. Ci auguriamo sinceramente che tu ne sia soddisfatto.
La garanzia del produttore copre il prodotto per un periodo di 24 mesi dalla data di acquisto contro
i difetti di fabbricazione. Tutte le garanzie vengono registrate automaticamente nel nostro sistema,
quindi non è necessario registrare il prodotto.
Per un ulteriore anno di garanzia gratuita, registrati sul nostro sito web ufficiale www.iamzchef.com
o compila la seguente scheda di garanzia, scatta una foto e inviala a info@iamzchef.com.
L'agente / distributore è invitato a contattarci. E-mail
:
info@iamzchef.com.
Qualsiasi aiuto o domanda durante l'uso, contatto rapido: info@iamzchef.com, ti forniremo
assistenza entro 24 ore. Suggeriamo di fornire una scheda di garanzia, una foto o un video se c'è un
pezzo di ricambio rotto o la macchina non funziona in modo da poter essere molto più chiari sui
tuoi problemi e offrirti la soluzione migliore.
Si prega di rispedirci la scheda di garanzia dopo aver inserito le informazioni. Grazie per i tuoi sforzi!