

Technical Support and E-Warranty Certificate
www.vevor.com/support
TRUCK CRANES USER MANUAL
Model:HXCZDJ-04
We continue to be committed to provide you tools with competitive price.
"Save Half", "Half Price" or any other similar expressions used by us only represents an
estimate of savings you might benefit from buying certain tools with us compared to the major
top brands and does not necessarily mean to cover all categories of tools offered by us. You
are kindly reminded to verify carefully when you are placing an order with us if you are
actually saving half in comparison with the top major brands.

- 1 -
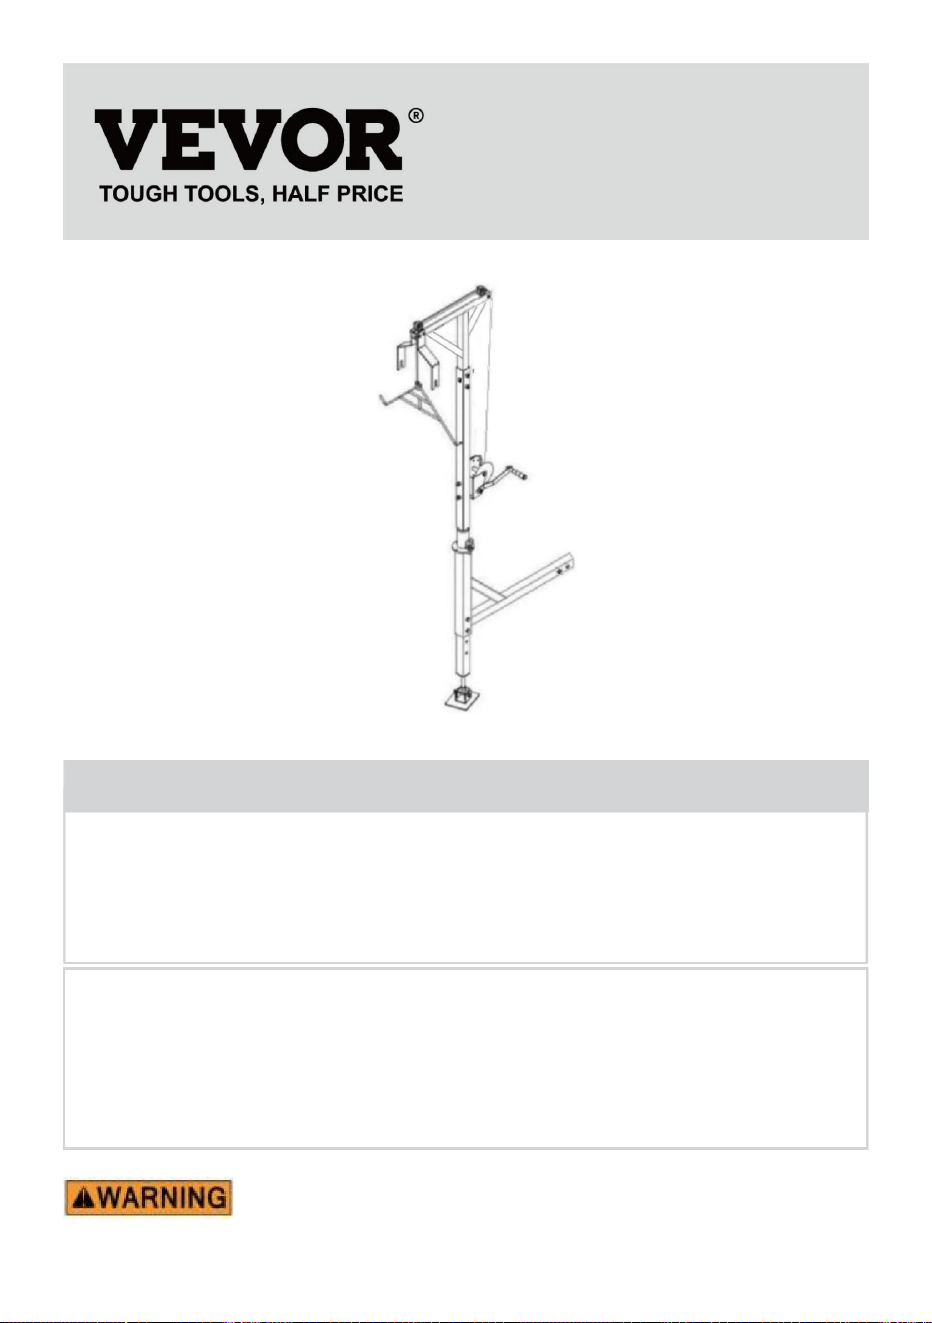
Model:HXCZDJ-04
Photo for reference
Have product questions? Need technical support? Please feel free to
contact us:
Technical Support and E-Warranty Certificate
www.vevor.com/support
NEED HELP? CONTACT US!
This is the original instruction, please read all manual instructions
carefully before operating. VEVOR reserves a clear interpretation of our
user manual. The appearance of the product shall be subject to the
product you received. Please forgive us that we won't inform you again if
there are any technology or software updates on our product.
TRUCK CRANES

- 2 -
1. Read carefully and understand all ASSEMBLY AND
OPERATION INSTRUCTIONS before operating.
2. Failure to follow the safety rules and other basic safety precautions
may result in serious personal injury.
GENERALSAFETY RULES
1.
Never overload.
2.
This winch is designed for lifting, not for pulling!
3. Never put your hand or anything else near the gear, rim and
rolling cable.Always wear gloves when using the winch
4. Never try to repair or disassemble the winch when there is
a problem.Ask a machinist or specialist for help.
5. Do not use the product when you are tired, or under the influence
of alcohol, prescription medicines or drugs.
6. The safety precautions and instructions given in this manual are
unable to cover in detail all the conditions and situations that may arise.
7.The operator and/or user must use common sense and caution
when operating the product especially for any matters that are not referred
to the above.
8.The use of any accessories , other than those recommended by
the manufacturer or stated in the instructions manual
,
may result in
injury or may cause damages.
Operation:
1. Keep the work area clean and free.Cluttered areas invite
accidents. 2. Observe the work area environment conditions.
- Do not expose the product to rain.
- Do not use in damp or wet Locations.
- Ensure that work area environment is kept well-lit (sunlight or
artificial lighting).
2. Dress properly

- 3 -
- Do not wear loose clothing or jewelry that could be caught in moving
parts.
- Rubber gloves and non-skid footwear are recommended as well as a cap
to contain long hair.
4. Do not use the product for purposes other than those for which it is
intended.The product will do a better and safer job at its rated load if it is
used for the purposes it was designed for.
5.The load is maximum when the lifting rod of the product is adjusted to the
lowest;The load of the product decreases as the height of the lifting rod
increases.
6. Keep a safe distance and keep children away
- Keep yourself and others at a safe distance from the work area,the
product and the steel cable when pulling under load.
- Keep bystanders (esp. children) and animals away from the work area.
- Keep the product away from children or from their environment.
Never allow children to operate the product.Children should be supervised
to ensure that they do not play with the product.
7.Do not damage the steel cable
- Never move the product by dragging it by the cable.
- Keep the cable away from heat and sharp edges.
- Do not step or roll over the product or steel cable.
- During operation, do not step over the product or the steel cable.
8.Safety at work
- Use appropriate protective equipment according to the working
environment.
-Never pull loads greater than the maximal capacity of the product.
SAVE THESE INSTRUCTIONS
- 4 -
MODEL AND PARAMETERS
Model
HXCZDJ-04
Hoist Capacity
Max. 600lbs
Hoisting Height
210~250cm
Hand Winch
Max. 1000lbs
Rotation Angle
360 degree
Material
Powder-coated Steel
Color
Black
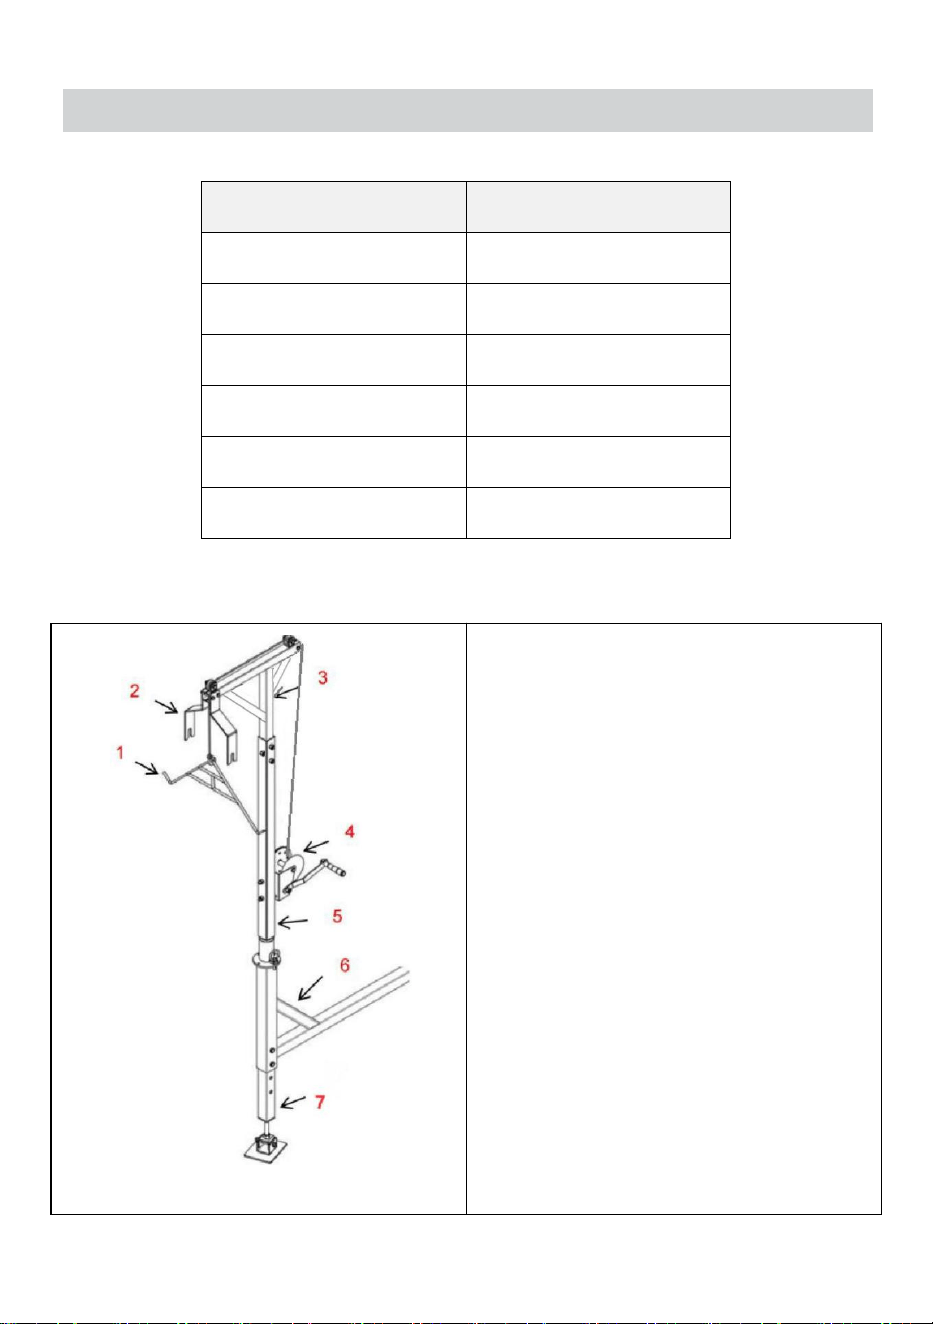
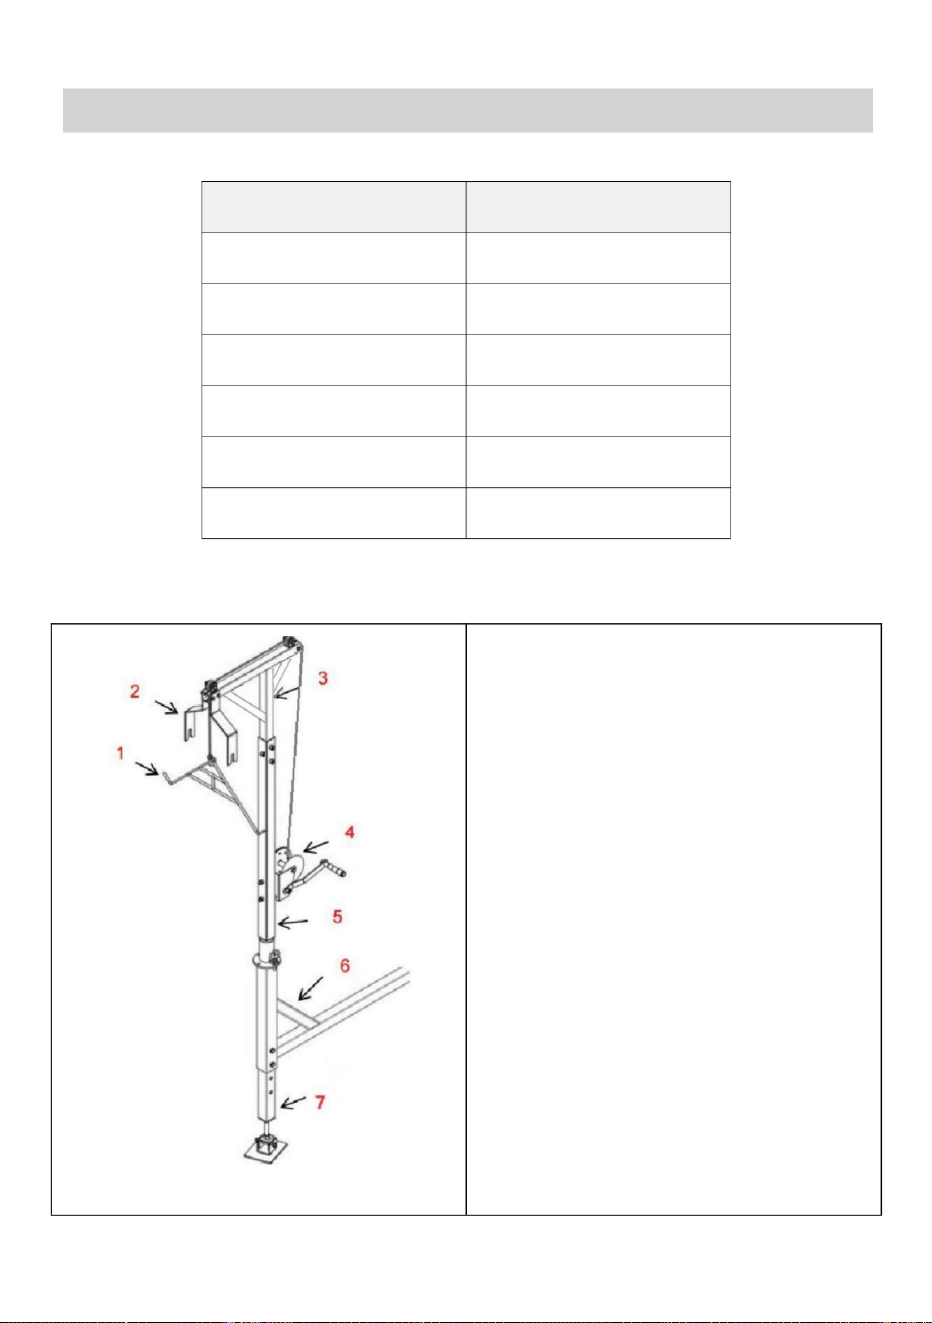
HXCZDJ-04
1.Prey Hook
2.Stop Fork
3.Lifting Rod
4.Hand winch
5.Upright Rod
6.Trailer Bar
7.Supporting Leg
- 5 -
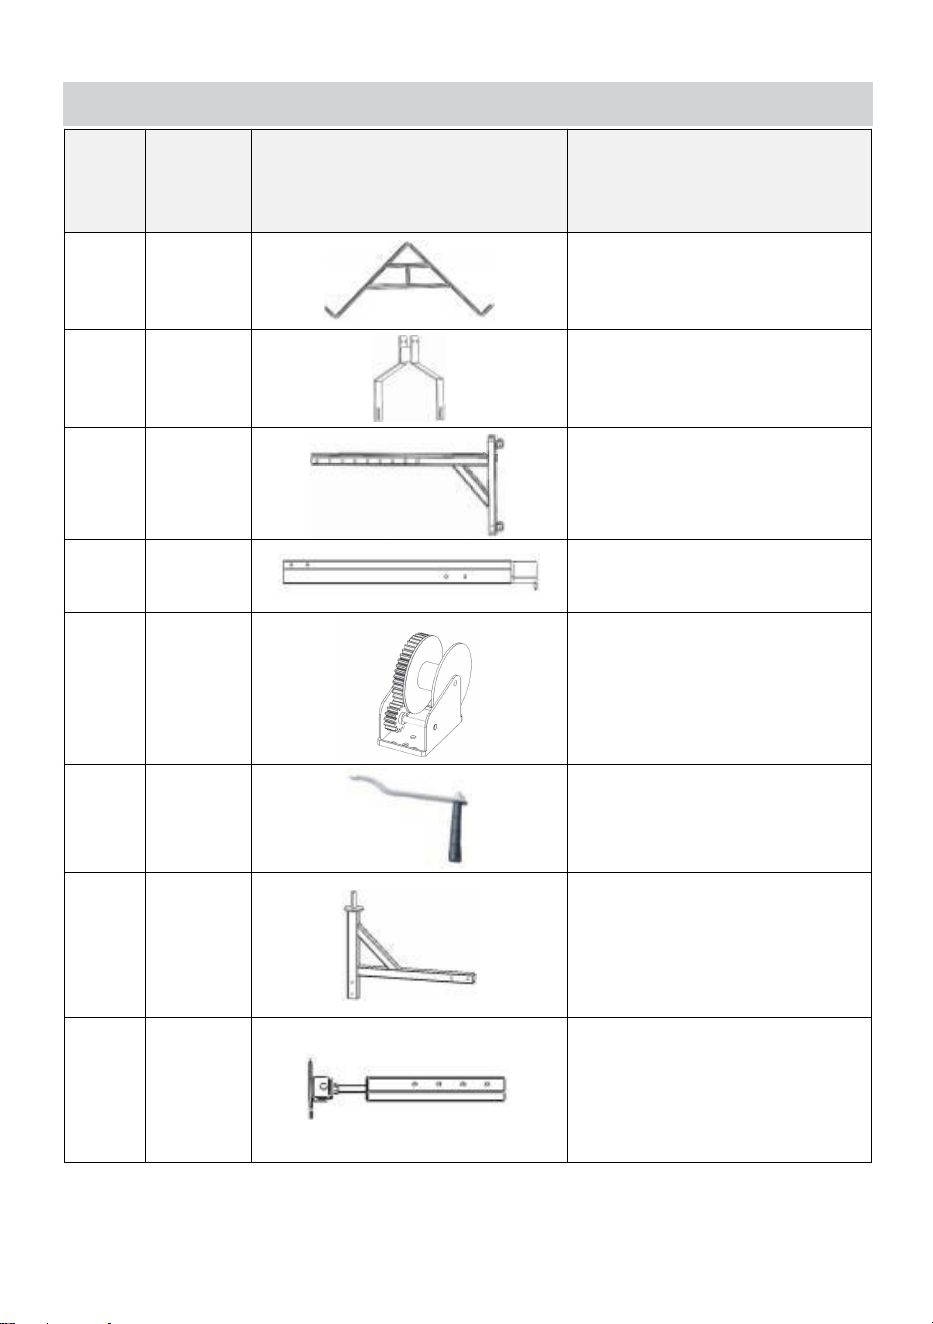
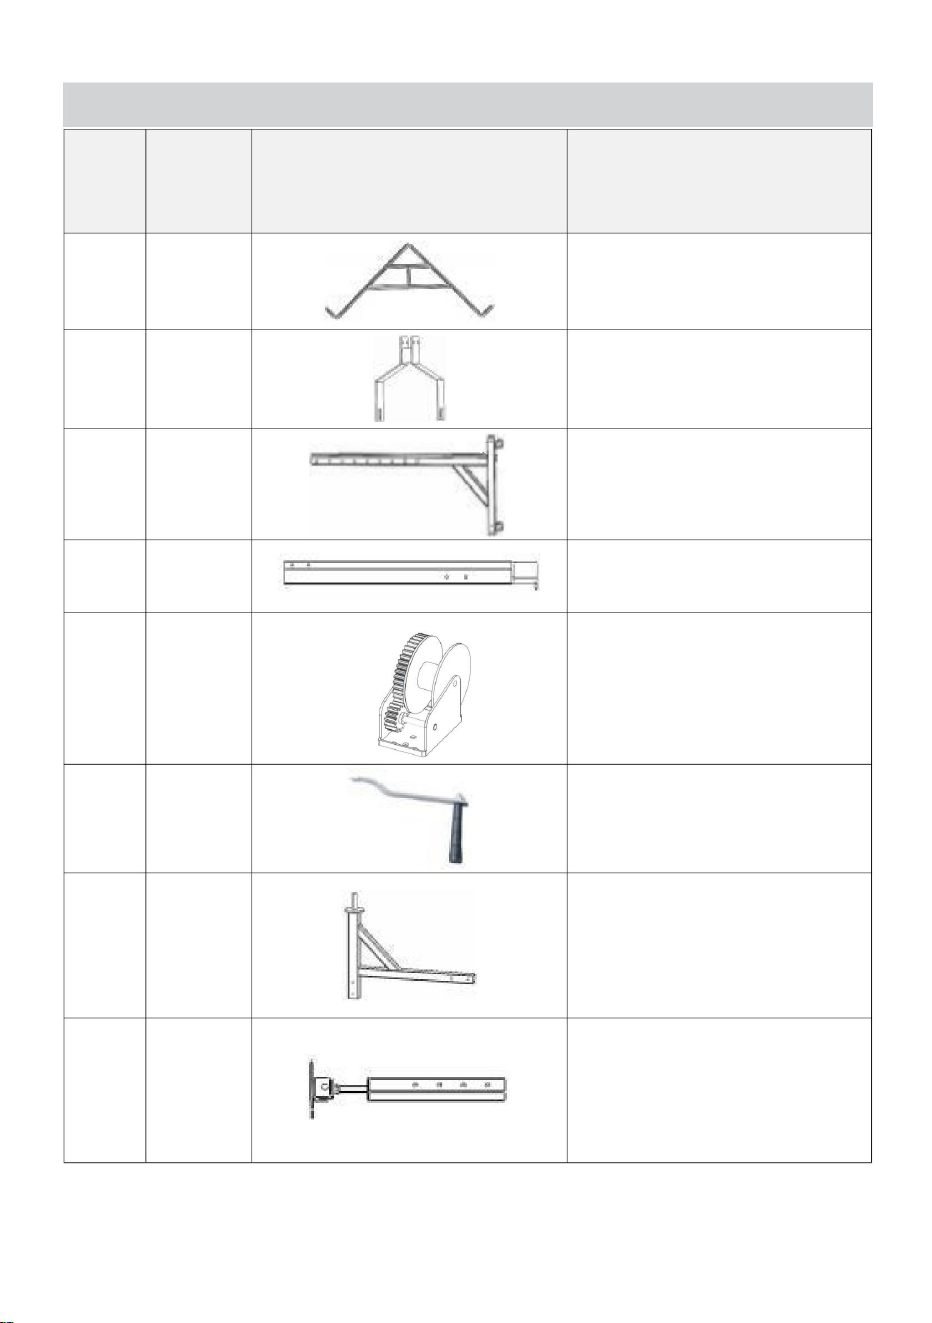
COMPONENTS
NO.
Name
Picture
Qty of
HXCZDJ-04
1
A
1
2
B
1
3
C
1
4
D
1
5
E
1
6
F
1
7
G
1
8
H
1
- 6 -
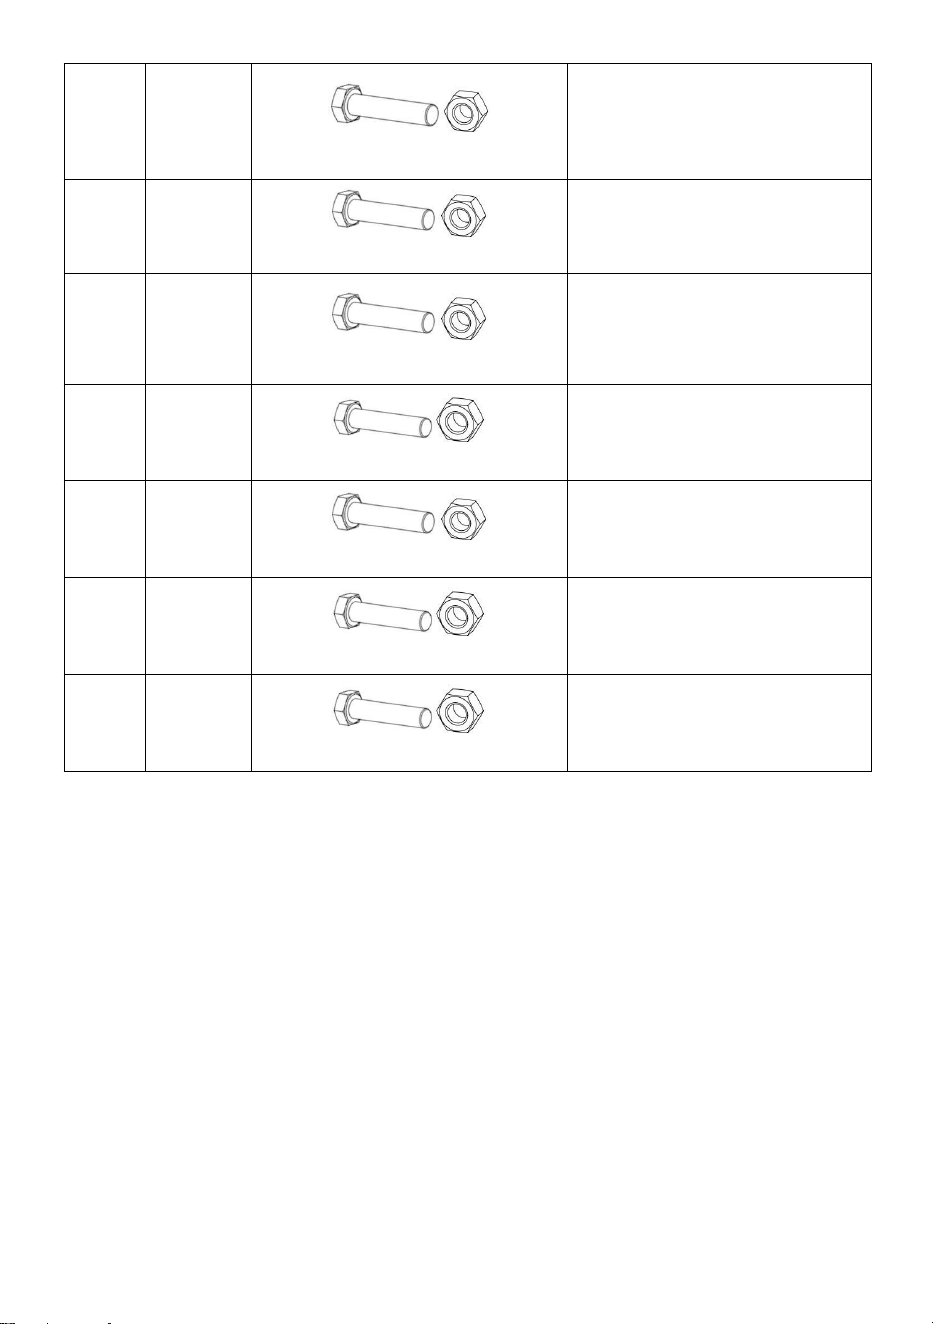
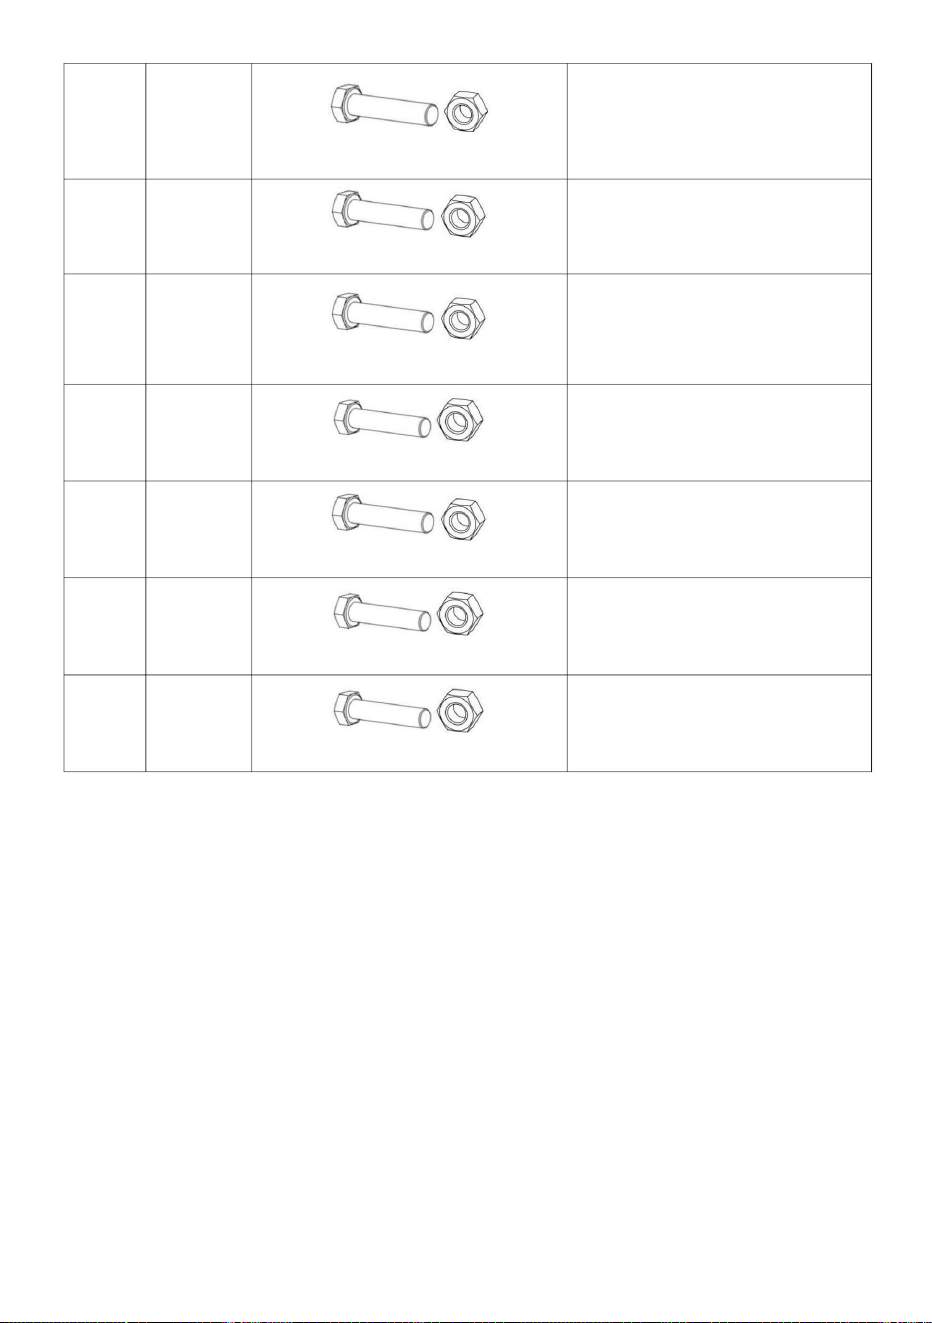
9
I
M12*50
2
10
J
M10*55
2
11
K
M10*40
5
12
L
M12*60
2
13
M
M10*60
2
14
N
M12*70
3
15
O
M12*25
2
- 7 -
ASSEMBLY
Installation Preparation:
1. Two or more people to move and assemble the product.
2. Please prepare a carpet or mat to protect your floor you need to
spread out all the accessories.
3. Please prepare gloves to avoid being scratched by sharp parts that
may occur during installation.
4. Please open all the boxes to check that the accessories are
complete and in good condition.
5. If you need to use power tools to install this product, please set the
speed to low speed in advance.
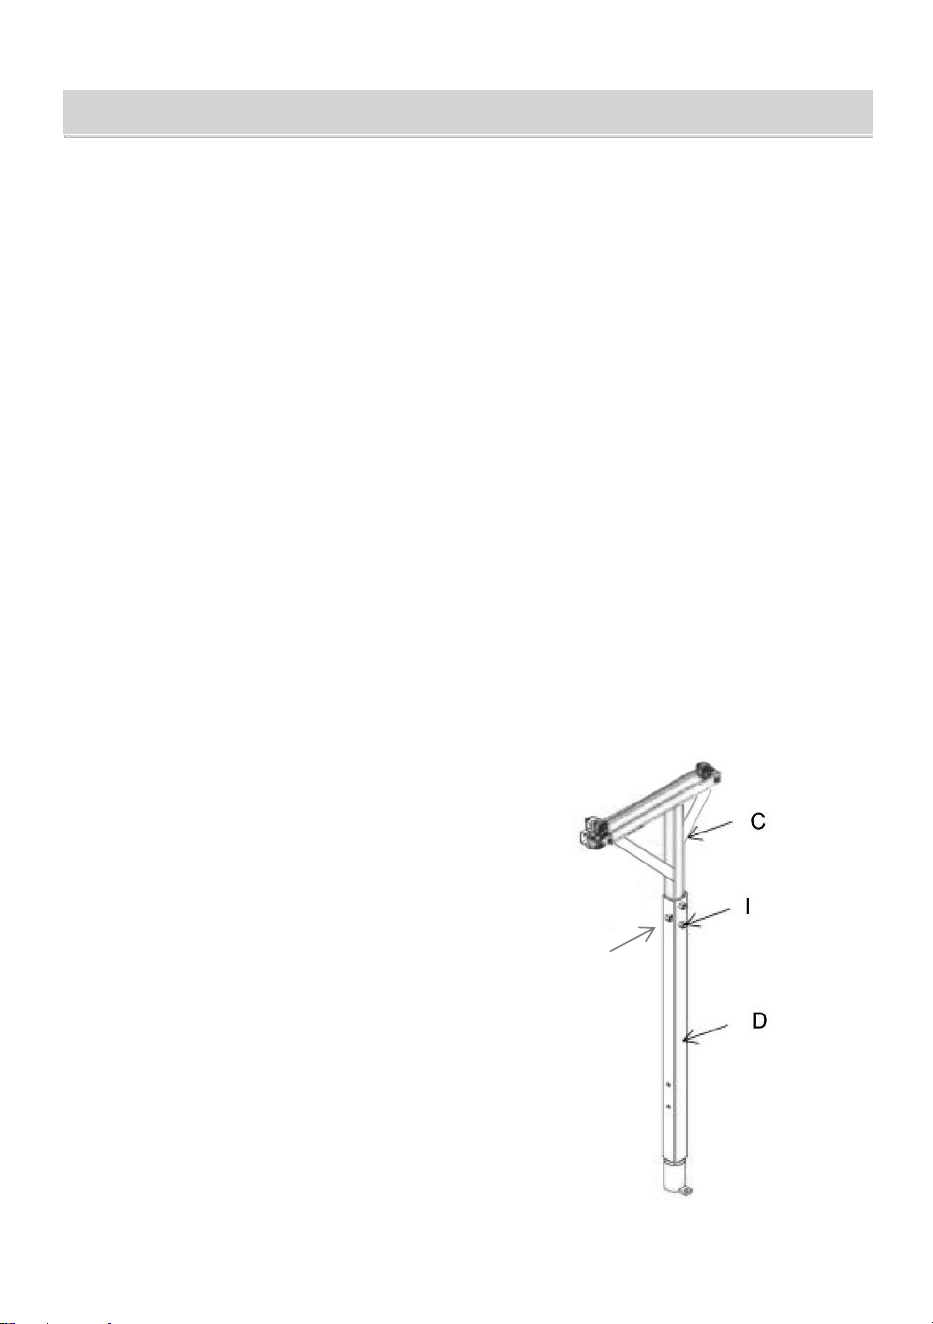
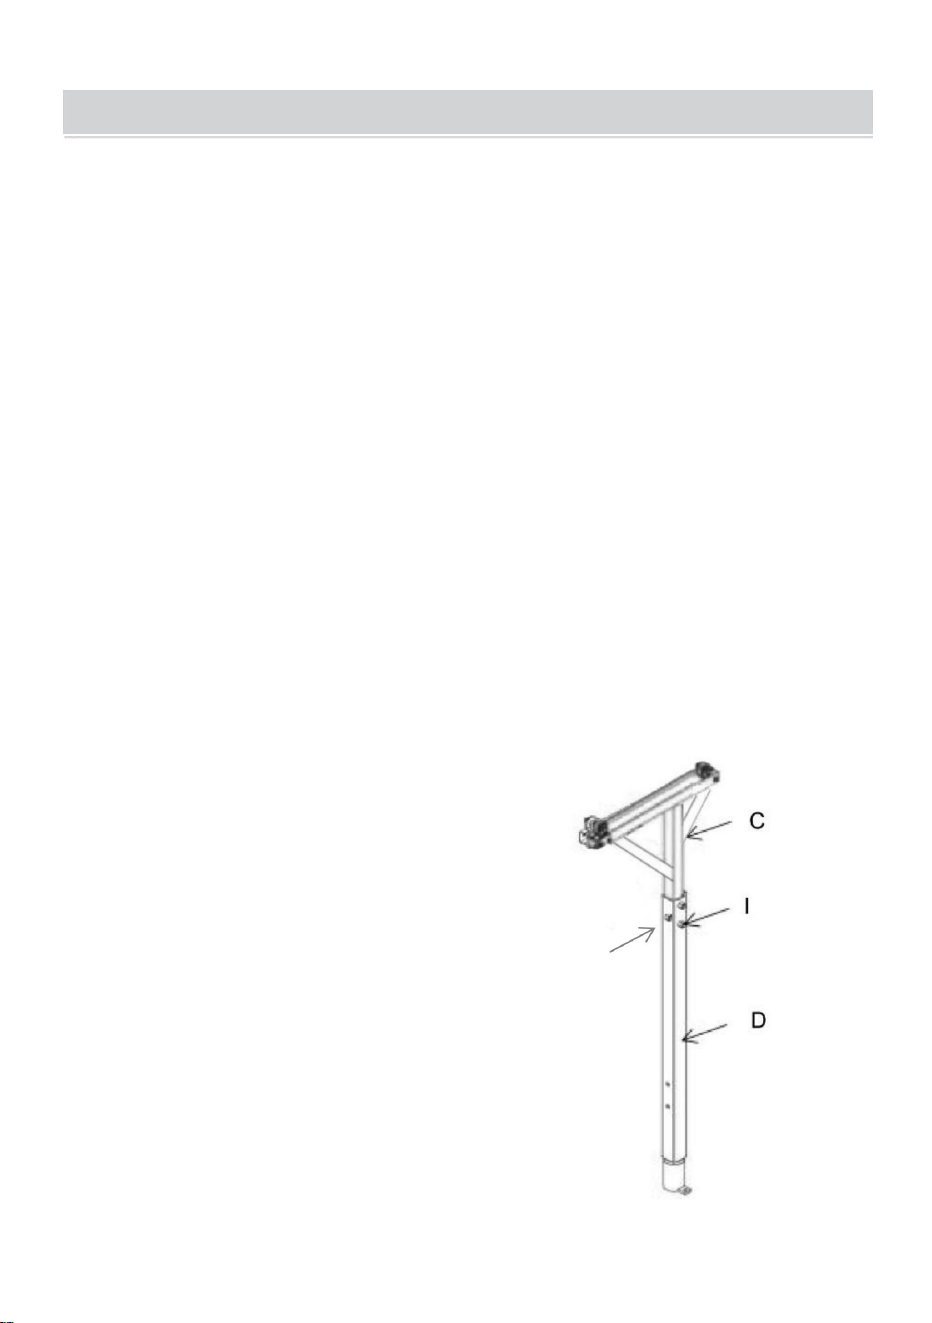
Step1
:
Insert C into D, align holes, and
lock with I. Note:The hole position can be
adjusted according to the required
height.
NOTE: You can insert O tighten from the side
to increase the stability of the crane.
O
- 8 -
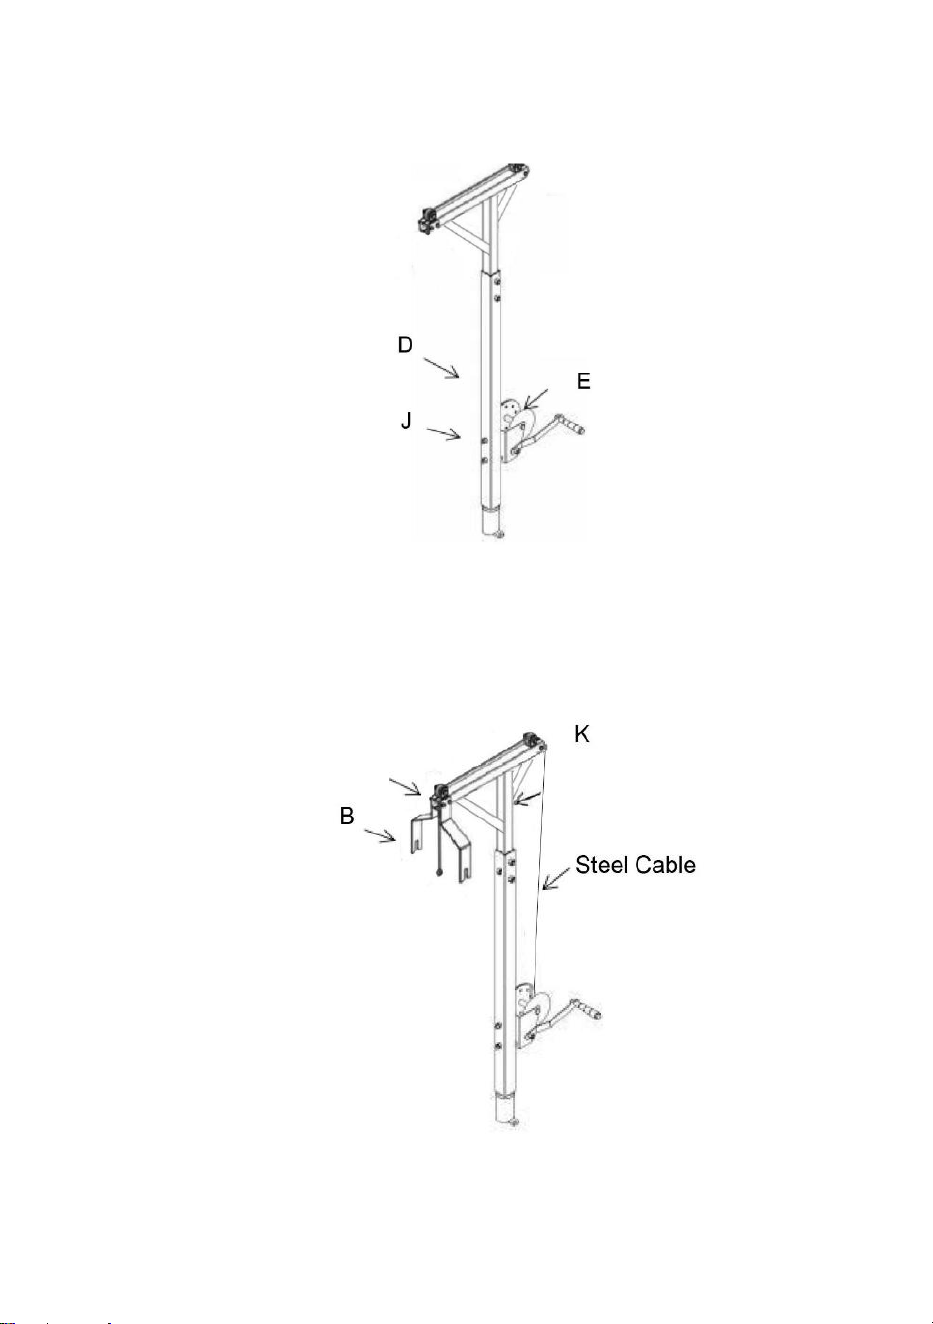
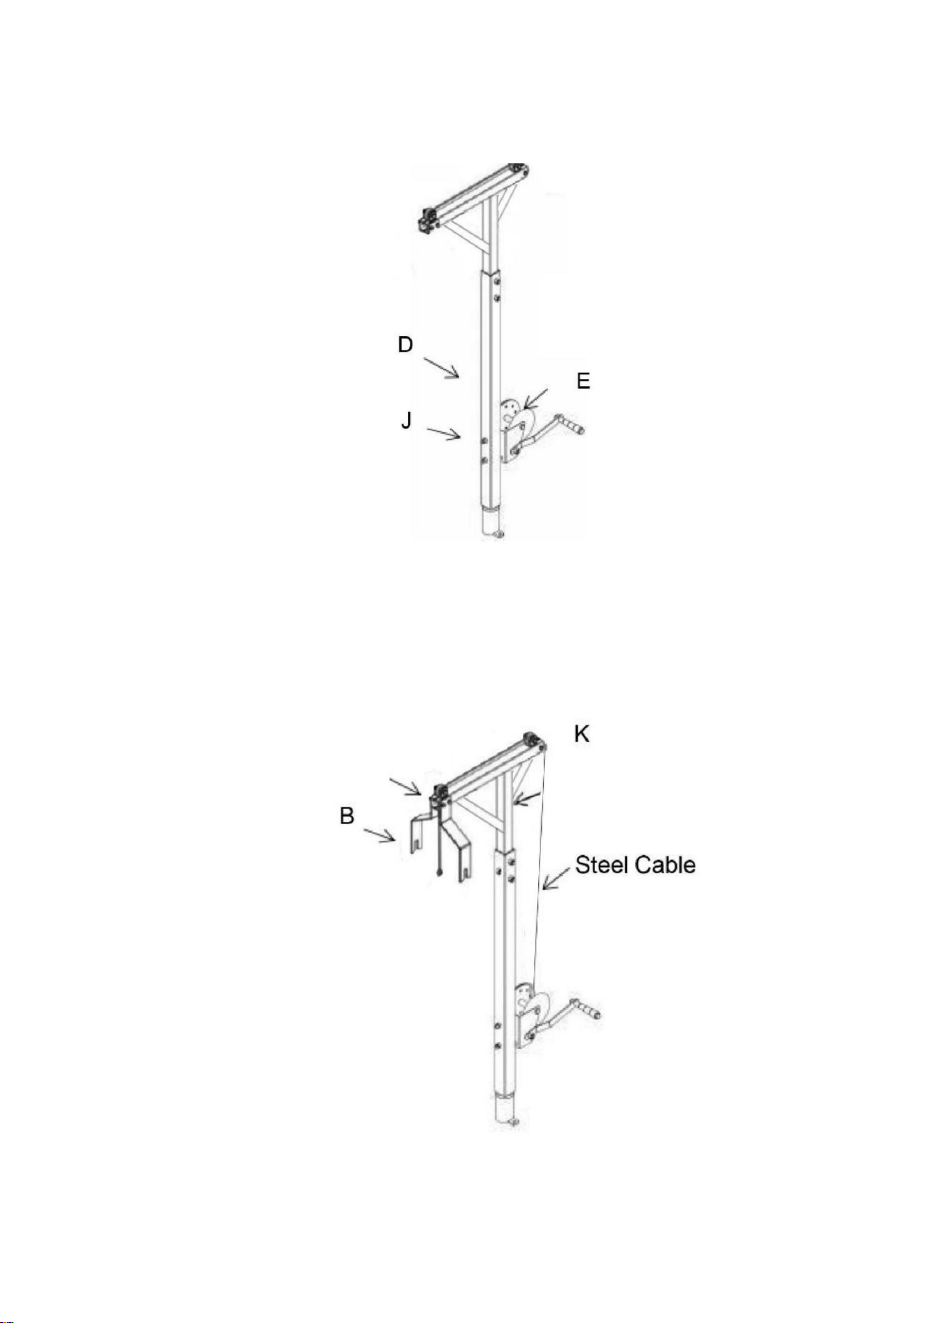
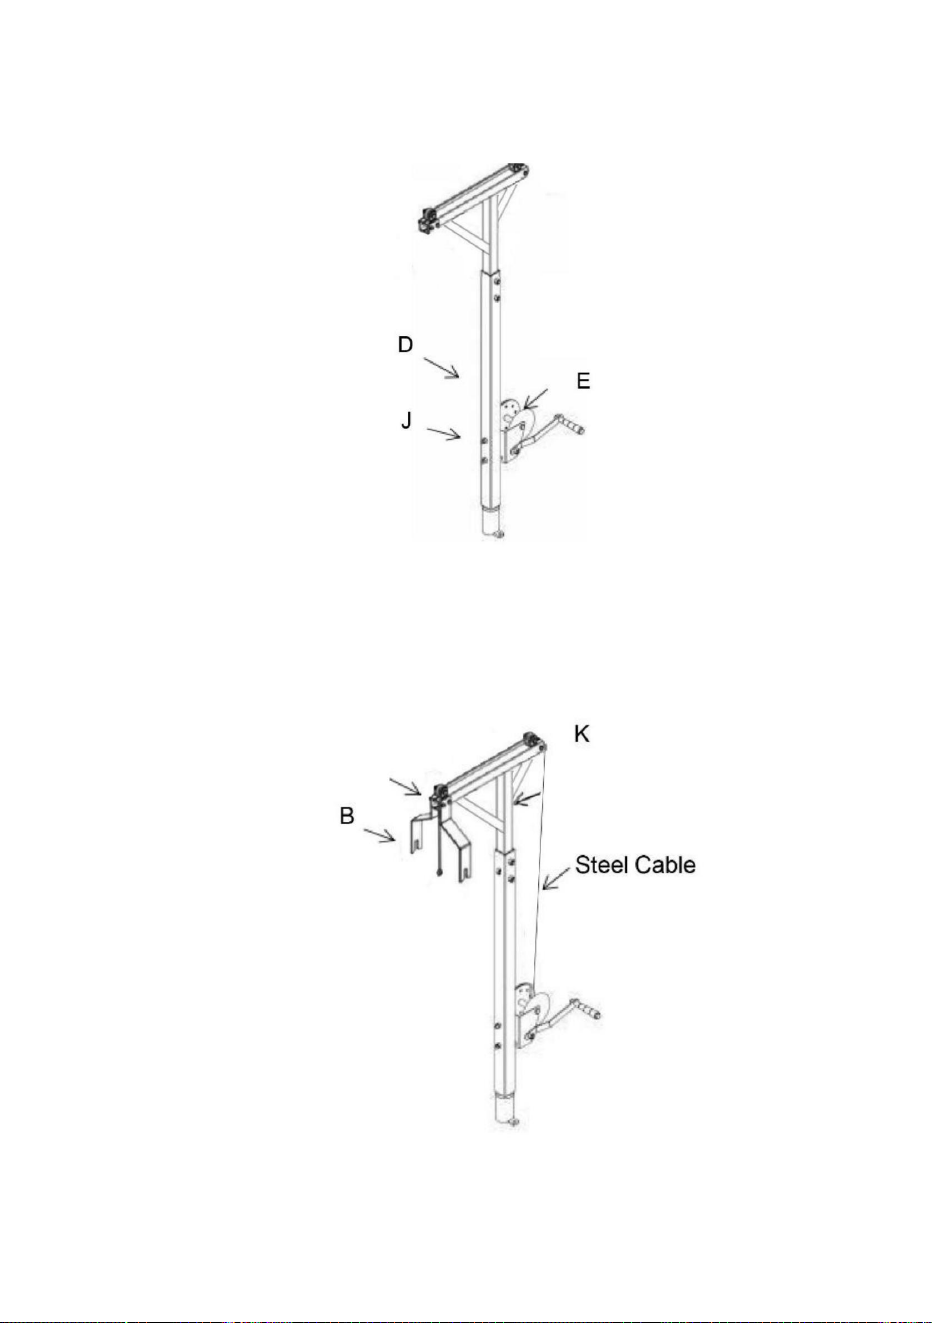
Step2
:
Install manual winch(E),Align 2 mounting holes and lock with (J).
Step3:Install stop fork(B). First put the steel cable into the pulley groove
and then lock it with (K) and (M).
M
- 9 -
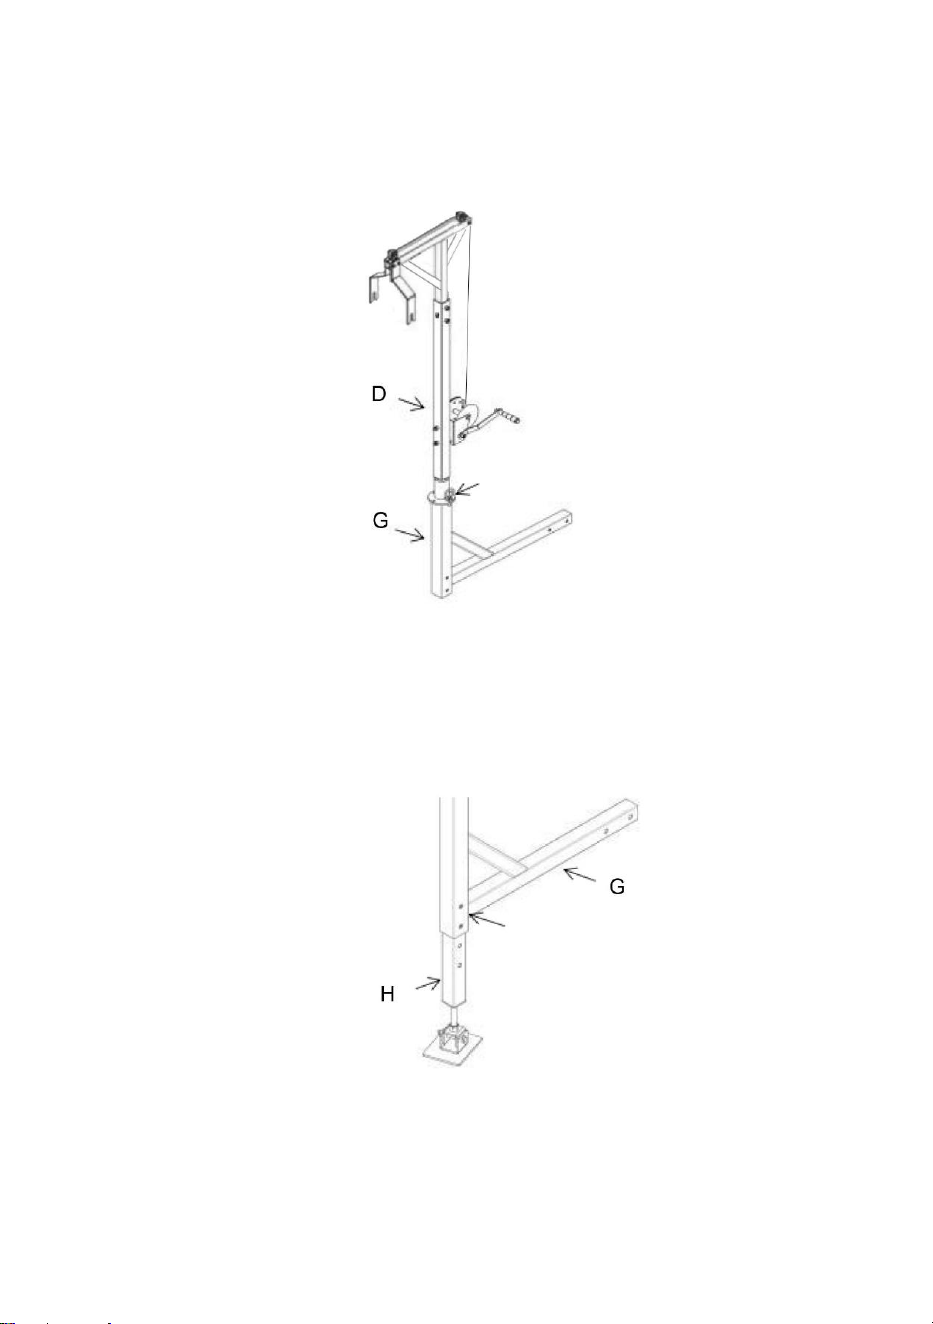
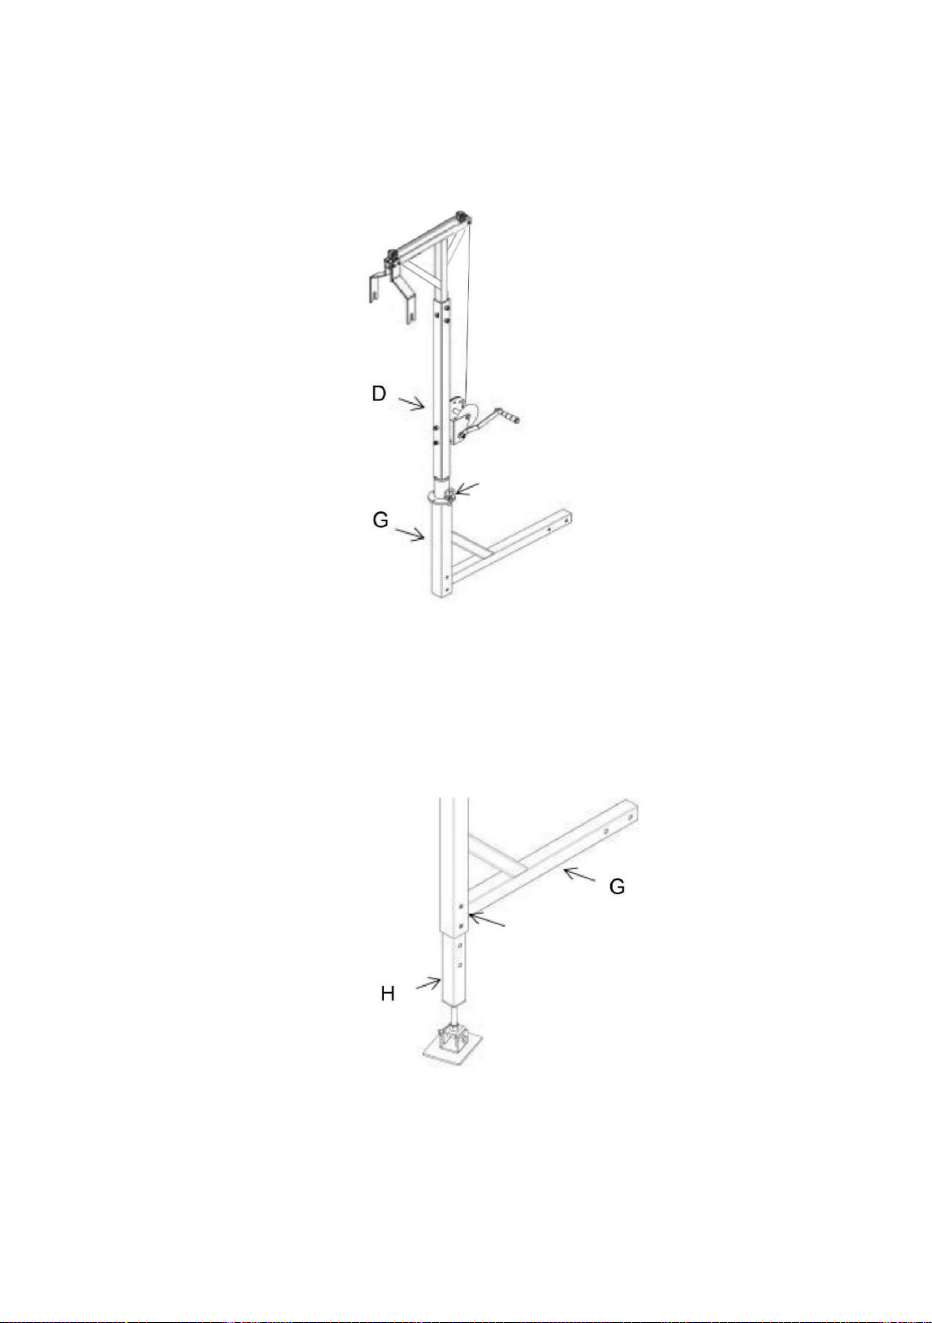
Step4
:
Install the trailer bar.Insert G into D, Align 2 mounting holes and
lock with (K).
Then connect it to the car and you can use it.
Step5
:
Insert H into G, align holes, and lock with L.(Note:The hole
position can be adjusted according to the required height.)
Connect to the car as in Step 4.
L
K
- 10 -
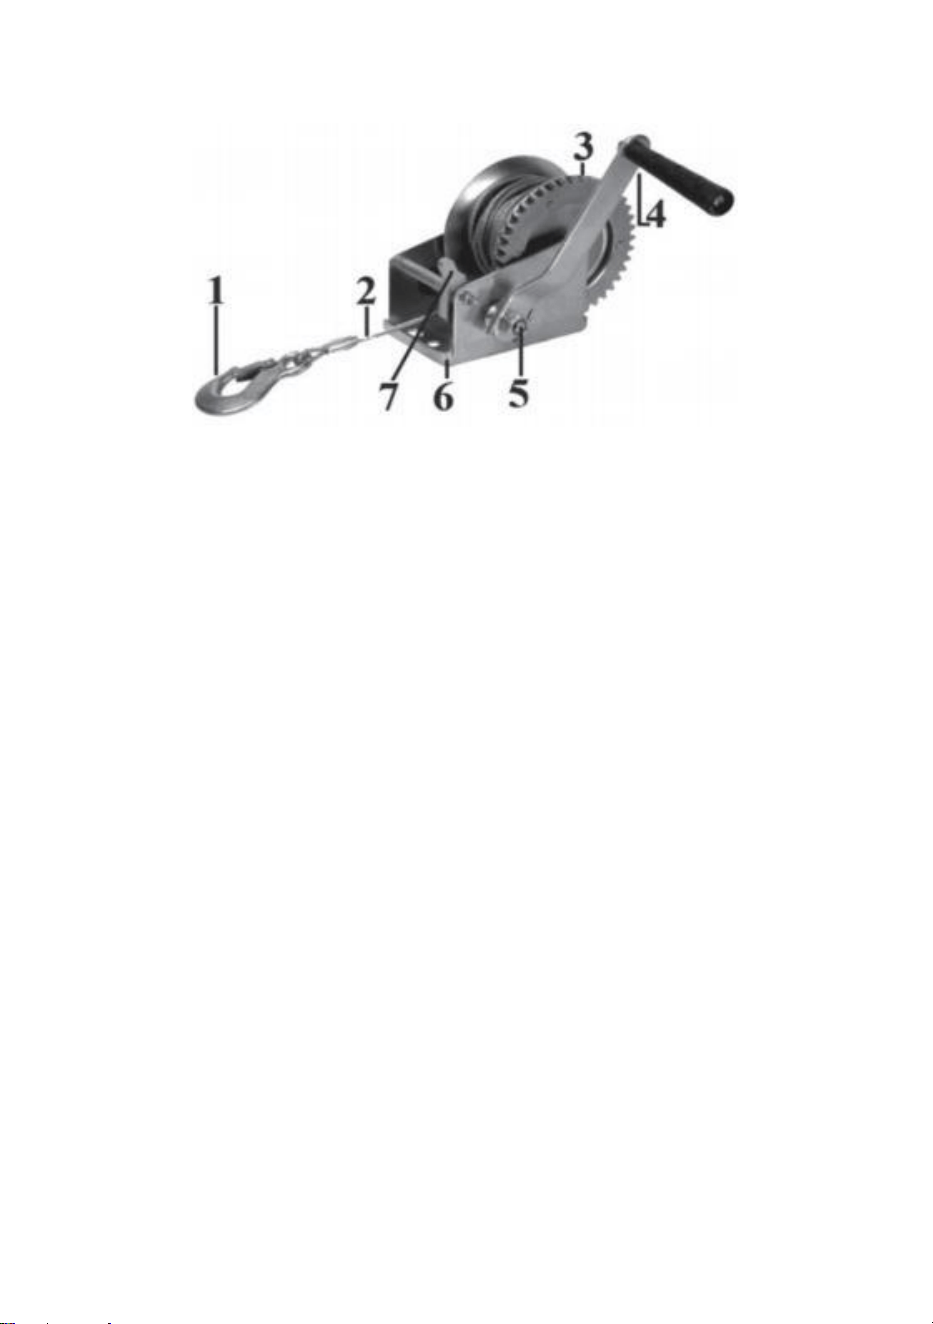
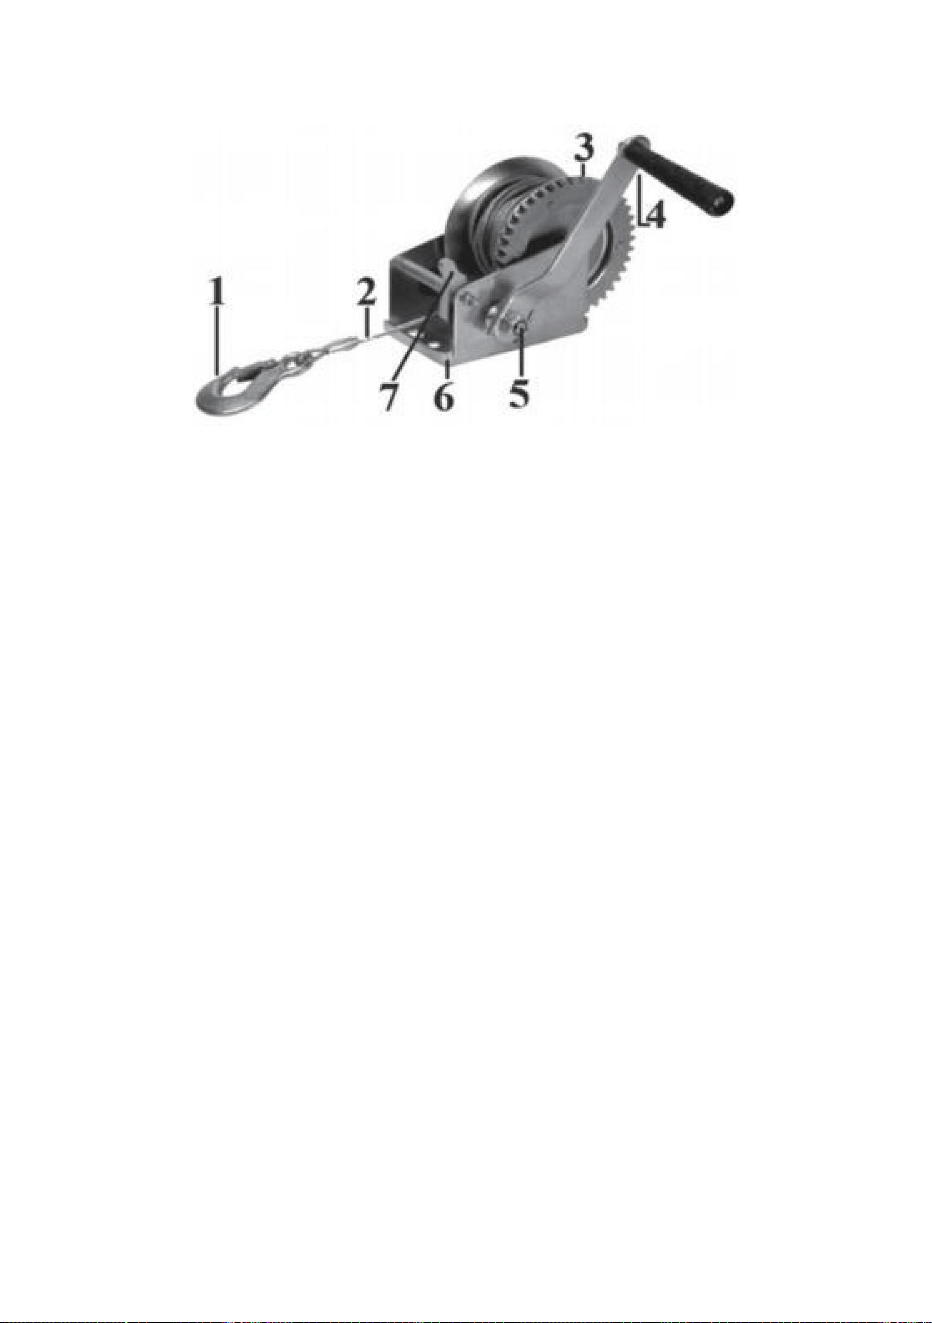
Hand Winch Operation:
1. Hook 2. Steel Cable 3. Rim 4. Crank 5. Axis Bolt 6. Base
7. Ratchet Switch
Install 4 on 5 and lock securely,
The forward and reverse steering is
controlled by 7, Turn the handle 4 to rewind or release the steel cable.
The ratchet switch should always be fully engaged.
1.Lubricate the steel cable and hook regularly with slight grease.
2.Grease the gears and bearings every 6 months.Use any good
quality waterproof grease.
2. Inspect periodically all parts
,
steel cable
,
and accessories and
replace them if damaged or used.
3.Have damaged parts replaced by an authorized service center.
4.Check the nuts periodically and tighten them if they are loose.
5.Regularly check the steel cable for signs of tear and wear. Replace
any damaged cable at an authorized service center.
6.Keep the product properly maintained and clean for better and
safer performance.
7.Inspect all moving parts and mounting bolts and nuts before use.
Tighten if necessary.
8.Product must be stored in a dry location. Always lock up a product
and keep out it of reach of children.


Modèle:HXCZDJ04.
Nouscontinuonsànousengageràvousfournirdesoutilsàdesprixcompétitifs.
«Économisezlamoitié»,«Moitiéprix»outouteautreexpressionsimilaireutiliséeparnousnereprésente
qu'uneestimationdeséconomiesquevouspourriezréaliserenachetantcertainsoutilscheznousparrapport
auxgrandesmarquesetnecouvrepasnécessairementtouteslescatégoriesd'outilsquenousproposons.
Nousvousrappelonsdebienvouloirvérifiersoigneusementlorsquevouspassezunecommandechez
noussivouséconomisezréellementlamoitiéparrapportauxgrandesmarques.
MANUELD'UTILISATIONDESGRUESPOURCAMIONS
Assistancetechniqueetcertificatdegarantie
électroniquewww.vevor.com/support
Machine Translated by Google

Vousavezdesquestionssurnosproduits?Vousavezbesoind'uneassistancetechnique?N'hésitezpas
ànouscontacter:
Ils'agitdelanoticed'utilisationd'origine.Veuillezlireattentivementtouteslesinstructionsdumanuel
avantdel'utiliser.VEVORseréserveledroitd'interpréterclairementnotremanueld'utilisation.L'apparence
duproduitdépendduproduitquevousavezreçu.Veuilleznousexcuser,nousnevousinformerons
plussidesmisesàjourtechnologiquesoulogiciellessontdisponiblessurnotreproduit.
Assistancetechniqueetcertificatdegarantie
électroniquewww.vevor.com/support
Photopourréférence
Modèle:HXCZDJ04.
GRUESPOURCAMIONS
BESOIND'AIDE?CONTACTEZNOUS!
1
Machine Translated by Google

RÈGLESGÉNÉRALESDESÉCURITÉ
Opération:
lorsdel'utilisationduproduit,enparticulierpourtoutequestionquin'estpasmentionnée
3.Neplacezjamaisvotremainoutoutautreobjetàproximitédel'engrenage,delajanteet
Nepasexposerleproduitàlapluie.
Assurezvousquel'environnementdelazonedetravailestbienéclairé(lumièredusoleilou
8.L'utilisationdetoutaccessoireautrequeceuxrecommandéspar
1.Lisezattentivementetcompreneztouteslesinstructionsd'ASSEMBLAGEET
4.N'essayezjamaisderépareroudedémonterletreuillorsqu'ilya
peutentraînerdesblessurescorporellesgraves.
desblessuresoudesdommages.
d'alcool,demédicamentssurordonnanceoudedrogues.
éclairageartificiel).
1.Nejamaissurcharger.
incapabledecouvrirendétailtouteslesconditionsetsituationsquipeuventsurvenir.
1.Gardezlazonedetravailpropreetlibre.Leszonesencombréesinvitent
2.Cetreuilestconçupoursoulever,paspourtirer!
7.L'opérateuret/oul'utilisateurdoiventfairepreuvedebonsensetdeprudence.
accidents.2.Respecterlesconditionsenvironnementalesdelazonedetravail.
unproblème.Demandezdel'aideàunmachinisteouàunspécialiste.
lefabricantouindiquédanslemanueld'instructions,peutentraîner
Nepasutiliserdansdesendroitshumidesoumouillés.
câbleroulant.Porteztoujoursdesgantslorsquevousutilisezletreuil
àcequiprécède.
INSTRUCTIONSD'UTILISATIONavantl'utilisation.
2.Nonrespectdesrèglesdesécuritéetautresprécautionsdesécuritédebase
5.N'utilisezpasleproduitlorsquevousêtesfatiguéousousl'influencededrogues.
2.Habillezvouscorrectement
6.Lesprécautionsetinstructionsdesécuritédonnéesdanscemanuelsont
2
Machine Translated by Google

3
parties.
Gardezlecâbleàl’écartdelachaleuretdesbordstranchants.
Maintenezvousetlesautresàunedistancedesécuritédelazonedetravail,
Desgantsencaoutchoucetdeschaussuresantidérapantessontrecommandésainsiqu'unecasquette
Nepasmarcherniroulersurleproduitoulecâbleenacier.
Pendantlefonctionnement,nepasmarchersurleproduitousurlecâbleenacier.
pourcontenirlescheveuxlongs.
4.N'utilisezpasleproduitàd'autresfinsquecellespourlesquellesilestdestiné.
produitetlecâbleenacierlorsdelatractionsouscharge.
Tenirlespersonnesprésentes(enparticulierlesenfants)etlesanimauxéloignésdelazonedetravail.
prévu.Leproduitferauntravailmeilleuretplussûràsachargenominales'ilest
Tenirleproduithorsdeportéedesenfantsoudeleurenvironnement.
8.Sécuritéautravail
Utiliserunéquipementdeprotectionappropriéenfonctiondesconditionsdetravail
utiliséauxfinspourlesquellesilaétéconçu.
Nelaissezjamaislesenfantsutiliserleproduit.Lesenfantsdoiventêtresurveillés.
environnement.
pours'assurerqu'ilsnejouentpasavecleproduit.
5.Lachargeestmaximalelorsquelatigedelevageduproduitestrégléesurla
Nejamaistirerdeschargessupérieuresàlacapacitémaximaleduproduit.
CONSERVEZCESINSTRUCTIONS
leplusbas;Lachargeduproduitdiminueàmesurequelahauteurdelatigedelevage
Neportezpasdevêtementsamplesnidebijouxquipourraientseprendredanslesmouvements
augmente.
7.Nepasendommagerlecâbleenacier
Nejamaisdéplacerleproduitenletirantparlecâble.
6.Gardezunedistancedesécuritéetéloignezlesenfants
Machine Translated by Google

4.Treuilmanuel
5.Tigeverticale
6.Barrederemorque
2.Arrêtdelafourche
3.Tigedelevage
1.Hameçondeproie
HXCZDJ04
7.Jambed'appui
4
Anglederotation
Couleur
Treuilmanuel
210à250cm
Hauteurdelevage
Matériel
Capacitédelevage
Modèle HXCZDJ04
Max.1000lb
360degrés
Max.600lb
Acieravecrevêtementenpoudre
Noir
PARAMÈTRESMODELAND
Machine Translated by Google
3
6
C
Image
F
1
1
QuantitédeHXCZDJ04
1
1
4
UN
D
7
G
1
1
1
5
2
8
H
B 1
ET 1
Non.Nom
COMPOSANTS
5
Machine Translated by Google

M12*25
M10*40
2
N
M12*50
10
3
J
2
M12*70
2
M12*60
LE
13
M10*55
2
11 K
M
2
M10*60
5
12
je
9
14
L
15
6
Machine Translated by Google
Réglezlavitesseàbassevitesseàl'avance.
Étape1:InsérezCdansD,alignezlestrouset
1.Deuxpersonnesoupluspourdéplaceretassemblerleproduit.
2.Veuillezprépareruntapisouunpaillassonpourprotégervotresoldontvousavezbesoin
étalertouslesaccessoires.
verrouilleravecI.Remarque:lapositiondutroupeutêtre
ajustéenfonctiondesbesoins
3.Veuillezpréparerdesgantspouréviterd'êtrerayépardespiècestranchantesqui
hauteur.
peutseproduirelorsdel'installation.
REMARQUE:vouspouvezinsérerleOenleserrantparlecôté
pouraugmenterlastabilitédelagrue.
4.Veuillezouvrirtouteslesboîtespourvérifierquelesaccessoiressont
completetenbonétat.
5.Sivousdevezutiliserdesoutilsélectriquespourinstallerceproduit,veuillezréglerle
Préparationdel'installation:
LE
ASSEMBLÉE
7
Machine Translated by Google
M
Étape2:installezletreuilmanuel(E),alignezles2trousdemontageetverrouillezavec(J).
Étape3:Installezlafourched'arrêt(B).Placezd'abordlecâbleenacierdanslarainuredela
poulie,puisbloquezleavec(K)et(M).
8
Machine Translated by Google

L
K
Connectezleensuiteàlavoitureetvouspourrezl'utiliser.
Étape5:insérezHdansG,alignezlestrousetverrouillezavecL.(Remarque:lapositiondutrou
peutêtreajustéeenfonctiondelahauteurrequise.)
Étape4:Installezlabarrederemorque.InsérezGdansD,alignezles2trousdemontageetverrouillez
avec(K).
Connectezvousàlavoiturecommeàl’étape4.
9
Machine Translated by Google

10
1.Crochet2.Câbleenacier3.Jante4.Manivelle5.Boulond'axe6.Base
8.Leproduitdoitêtrestockédansunendroitsec.Conserveztoujoursleproduitsousclé.
3.Faitesremplacerlespiècesendommagéesparuncentredeserviceagréé.
7.Interrupteuràcliquet
etgarderhorsdeportéedesenfants.
Installez4sur5etverrouillezsolidement,ladirectionavantetarrièreest
contrôlépar7,Tournezlapoignée4pourenrouleroulibérerlecâbleenacier.
4.Vérifiezrégulièrementlesécrousetserrezless'ilssontdesserrés.
5.Vérifiezrégulièrementquelecâbleenacierneprésenteaucunsignededéchirureoud'usure.Remplacezle
L'interrupteuràcliquetdoittoujoursêtrecomplètementengagé.
toutcâbleendommagédansuncentredeserviceagréé.
1.Lubrifiezrégulièrementlecâbleenacieretlecrochetavecunelégèregraisse.
6.Gardezleproduitcorrectemententretenuetproprepourunmeilleuret
desperformancesplussûres.
2.Graissezlesengrenagesetlesroulementstousles6mois.Utilisezn'importequelbon
graisseimperméabledequalité.
Fonctionnementdutreuilmanuel:
2.Inspectezpériodiquementtouteslespièces,lecâbleenacieretlesaccessoireset
7.Inspecteztouteslespiècesmobilesetlesboulonsetécrousdemontageavantutilisation.
Resserrezsinécessaire.
remplacezless'ilssontendommagésouusés.
Machine Translated by Google


Modell: HXCZDJ-04
„Sparen Sie die Hälfte“, „Halber Preis“ oder andere ähnliche Ausdrücke, die wir verwenden, stellen nur eine
Schätzung der Ersparnis dar, die Sie beim Kauf bestimmter Werkzeuge bei uns im Vergleich zu den großen
Topmarken erzielen können, und decken nicht unbedingt alle von uns angebotenen Werkzeugkategorien ab. Wir
möchten Sie freundlich daran erinnern, bei Ihrer Bestellung bei uns sorgfältig zu prüfen, ob Sie im Vergleich
zu den großen Topmarken tatsächlich die Hälfte sparen.
Wir sind weiterhin bestrebt, Ihnen Werkzeuge zu wettbewerbsfähigen Preisen anzubieten.
BENUTZERHANDBUCH FÜR LKW-KRANE
Technischer Support und E-Garantie-Zertifikat
www.vevor.com/support
Machine Translated by Google

Dies ist die Originalanleitung. Bitte lesen Sie alle Anweisungen sorgfältig durch, bevor Sie
das Gerät in Betrieb nehmen. VEVOR behält sich eine klare Auslegung unserer Bedienungsanleitung
vor. Das Erscheinungsbild des Produkts richtet sich nach dem Produkt, das Sie erhalten
haben. Bitte verzeihen Sie uns, dass wir Sie nicht erneut informieren, wenn es Technologie- oder
Software-Updates für unser Produkt gibt.
Sie haben Fragen zu unseren Produkten? Sie benötigen technischen Support? Dann kontaktieren
Sie uns gerne:
Technischer Support und E-Garantie-Zertifikat
www.vevor.com/support
Foto als Referenz
Brauchen Sie Hilfe? Kontaktieren Sie uns!
LKW-KRANE
Modell: HXCZDJ-04
- 1 -
Machine Translated by Google

ALLGEMEINESICHERHEITSREGELN
4. Versuchen Sie niemals, die Winde zu reparieren oder zu zerlegen, wenn
5. Verwenden Sie das Produkt nicht, wenn Sie müde sind oder unter dem Einfluss
2. Nichtbeachtung der Sicherheitsregeln und anderer grundlegender Sicherheitsvorkehrungen
ÿ
2. Kleide dich angemessen
Betrieb:
6. Die in diesem Handbuch enthaltenen Sicherheitshinweise und Anweisungen sind
2. Diese Winde ist zum Heben und nicht zum Ziehen bestimmt!
7.Der Bediener und/oder Benutzer muss gesunden Menschenverstand walten lassen und vorsichtig sein
Unfälle. 2. Beachten Sie die Umgebungsbedingungen am Arbeitsplatz.
BEDIENUNGSANLEITUNG vor der Inbetriebnahme.
ein Problem. Bitten Sie einen Maschinisten oder Spezialisten um Hilfe.
vom Hersteller oder in der Bedienungsanleitung angegeben, kann zu
Rollenkabel. Tragen Sie beim Gebrauch der Winde immer Handschuhe
zu dem oben genannten.
- Nicht an feuchten oder nassen Orten verwenden.
Verletzungen oder Schäden verursachen.
kann zu schweren Verletzungen führen.
von Alkohol, verschreibungspflichtigen Medikamenten oder Drogen.
künstliche Beleuchtung).
1. Überladen Sie niemals.
Es ist nicht möglich, alle Bedingungen und Situationen, die auftreten können, im Detail abzudecken.
1. Halten Sie den Arbeitsbereich sauber und frei.Unordentliche Bereiche laden ein
beim Betrieb des Produkts, insbesondere bei Angelegenheiten, die nicht in
3. Bringen Sie Ihre Hand oder andere Gegenstände niemals in die Nähe des Zahnrads, der Felge und
- Setzen Sie das Produkt nicht dem Regen aus.
8.Die Verwendung von anderem Zubehör als dem von
- Sorgen Sie für eine gute Beleuchtung des Arbeitsbereichs (Sonnenlicht oder
1. Lesen Sie sorgfältig und verstehen Sie alle MONTAGE- UND
- 2 -
Machine Translated by Google

- 3 -
5.Die Last ist maximal, wenn die Hubstange des Produkts auf die eingestellt ist
um sicherzustellen, dass sie nicht mit dem Produkt spielen.
8.Sicherheit am Arbeitsplatz
- Ziehen Sie niemals Lasten, die größer sind als die maximale Kapazität des Produkts.
für den Zweck verwendet werden, für den es entwickelt wurde.
Erlauben Sie Kindern niemals, das Produkt zu bedienen. Kinder sollten beaufsichtigt werden
Umfeld.
- Bewegen Sie das Produkt niemals, indem Sie es am Kabel ziehen.
Teile.
am niedrigsten;Die Last des Produkts verringert sich mit der Höhe der Hubstange
6. Halten Sie einen Sicherheitsabstand und halten Sie Kinder fern
7. Beschädigen Sie das Stahlkabel nicht
- Tragen Sie keine weite Kleidung oder Schmuck, der sich in bewegten
erhöht.
- Halten Sie das Kabel von Hitze und scharfen Kanten fern.
um lange Haare unter Kontrolle zu halten.
Produkt und Stahlseil beim Ziehen unter Last.
- Während des Betriebs nicht auf das Produkt oder das Stahlseil steigen.
BEWAHREN SIE DIESE ANWEISUNGEN AUF
- Gummihandschuhe und rutschfestes Schuhwerk sowie eine Mütze werden empfohlen
- Halten Sie selbst und andere Personen einen sicheren Abstand zum Arbeitsbereich,
- Nicht auf das Produkt oder das Stahlseil treten oder darüber rollen.
Das Produkt wird bei seiner Nennlast eine bessere und sicherere Arbeit leisten, wenn es
- Bewahren Sie das Produkt außerhalb der Reichweite von Kindern und deren Umfeld auf.
- Verwenden Sie geeignete Schutzausrüstung entsprechend der Arbeitsumgebung.
4. Verwenden Sie das Produkt nicht für andere Zwecke als die, für die es bestimmt ist.
- Halten Sie Unbeteiligte (insbesondere Kinder) und Tiere vom Arbeitsbereich fern.
Machine Translated by Google

6.Trailer-Leiste
4.Handwinde
3.Hebestange
1. Beutehaken
5. Aufrechte Stange
2.Stoppgabel
HXCZDJ-04
7.Stützbein
- 4 -
Drehwinkel
Material
Farbe
Max. 1000 Pfund
Hubhöhe
Handwinde
Hubkapazität
Modell
Max. 600 Pfund
360 Grad
Pulverbeschichteter Stahl
HXCZDJ-04
210~250 cm
Schwarz
MODELAND-PARAMETER
Machine Translated by Google

2
5
7
8
1
1
1
1
1
Nr. Name
B
3
UND
1
6
H
Menge von HXCZDJ-04
1
1
Bild
C
F
A
D
G
1
4
KOMPONENTEN
- 5 -
Machine Translated by Google

M10*55
13
2
M12*60
DER
2
M12*25
M10*60
11
M
2
K
M12*50
N
2
M10*40
J
2
M12*70
10
3
5
M
ICH
9
12
14
15
- 6 -
Machine Translated by Google

4. Bitte öffnen Sie alle Kartons, um zu überprüfen, ob das Zubehör
um die Stabilität des Kranes zu erhöhen.
Während der Installation können Fehler auftreten.
HINWEIS: Sie können O von der Seite einführen oder festziehen
Vorbereitung der Installation:
vollständig und in gutem Zustand.
Geschwindigkeit vorab auf niedrige Geschwindigkeit.
5. Wenn Sie Elektrowerkzeuge zur Installation dieses Produkts verwenden müssen, stellen Sie bitte die
2. Bitte bereiten Sie einen Teppich oder eine Matte vor, um Ihren Boden zu schützen.
Mit I verriegeln. Hinweis: Die Lochposition kann
1. Zwei oder mehr Personen zum Transport und Zusammenbau des Produkts.
Schritt 1: C in D einsetzen, Löcher ausrichten und
3. Bitte bereiten Sie Handschuhe vor, um Kratzer durch scharfe Teile zu vermeiden, die
Höhe.
breitet alle Accessoires aus.
angepasst an die erforderlichen
DER
MONTAGE
- 7 -
Machine Translated by Google

M
Schritt 3: Installieren Sie die Stoppgabel (B). Legen Sie zuerst das Stahlkabel in die Riemenscheibennut
und verriegeln Sie es dann mit (K) und (M).
Schritt 2: Manuelle Winde (E) installieren, zwei Montagelöcher ausrichten und mit (J) verriegeln.
- 8 -
Machine Translated by Google

M
K
Schritt 5: H in G einsetzen, Löcher ausrichten und mit L verriegeln. (Hinweis: Die Lochposition kann entsprechend der
erforderlichen Höhe angepasst werden.)
Stellen Sie wie in Schritt 4 eine Verbindung zum Auto her.
Schließen Sie es dann an das Auto an und schon können Sie es verwenden.
Schritt 4: Installieren Sie die Anhängerstange. Setzen Sie G in D ein, richten Sie die beiden Montagelöcher aus und verriegeln Sie
sie mit (K).
- 9 -
Machine Translated by Google

- 10 -
2. Schmieren Sie die Zahnräder und Lager alle 6 Monate. Verwenden Sie ein gutes
sicherere Leistung.
1.Stahlseil und Haken regelmäßig mit etwas Fett schmieren.
6.Halten Sie das Produkt ordnungsgemäß gewartet und sauber für eine bessere und
Bei Bedarf festziehen.
1. Haken 2. Stahlkabel 3. Felge 4. Kurbel 5. Achsbolzen 6. Basis
ersetzen Sie sie, wenn sie beschädigt oder abgenutzt sind.
hochwertiges wasserfestes Fett.
7. Überprüfen Sie vor der Verwendung alle beweglichen Teile und Befestigungsschrauben und -muttern.
Bedienung der Handwinde:
2. Überprüfen Sie regelmäßig alle Teile, Stahlkabel und Zubehör und
8. Das Produkt muss an einem trockenen Ort gelagert werden. Schließen Sie das Produkt immer ab
4 auf 5 montieren und sicher verriegeln. Die Vorwärts- und Rückwärtslenkung ist
4. Überprüfen Sie die Muttern regelmäßig und ziehen Sie sie fest, wenn sie locker sind.
7. Ratschenschalter
3. Lassen Sie beschädigte Teile von einem autorisierten Servicecenter austauschen.
und bewahren Sie es außerhalb der Reichweite von Kindern auf.
Der Ratschenschalter sollte immer vollständig eingerastet sein.
Lassen Sie beschädigte Kabel von einem autorisierten Servicecenter reparieren.
Gesteuert durch 7. Drehen Sie den Griff 4, um das Stahlkabel aufzurollen oder freizugeben.
5.Überprüfen Sie das Stahlkabel regelmäßig auf Anzeichen von Verschleiß. Ersetzen Sie
Machine Translated by Google


Modello:HXCZDJ-04
Continuiamo a impegnarci per fornirvi strumenti a prezzi competitivi.
"Risparmia la metà", "Metà prezzo" o qualsiasi altra espressione simile da noi utilizzata rappresenta
solo una stima del risparmio che potresti ottenere acquistando determinati utensili con noi rispetto ai
principali marchi principali e non significa necessariamente coprire tutte le categorie di utensili da noi
offerti. Ti ricordiamo gentilmente di verificare attentamente quando effettui un ordine con noi se
stai effettivamente risparmiando la metà rispetto ai principali marchi principali.
MANUALE D'USO DELLE GRU PER AUTOCARRI
Supporto tecnico e certificato di garanzia
elettronica www.vevor.com/support
Machine Translated by Google
Hai domande sui prodotti? Hai bisogno di supporto tecnico? Non esitare a contattarci:
Questa è l'istruzione originale, si prega di leggere attentamente tutte le istruzioni del
manuale prima di utilizzare. VEVOR si riserva una chiara interpretazione del nostro manuale
utente. L'aspetto del prodotto sarà soggetto al prodotto ricevuto. Vi preghiamo di
perdonarci se non vi informeremo di nuovo se ci sono aggiornamenti tecnologici o software sul
nostro prodotto.
- 1 -
Foto di riferimento
Modello:HXCZDJ-04
AUTOGRU
HAI BISOGNO DI AIUTO? CONTATTACI!
Supporto tecnico e certificato di garanzia
elettronica www.vevor.com/support
Machine Translated by Google

REGOLE GENERALI DI SICUREZZA
6. Le precauzioni di sicurezza e le istruzioni fornite nel presente manuale sono
Operazione:
2. Mancato rispetto delle norme di sicurezza e di altre precauzioni di sicurezza di base
5. Non utilizzare il prodotto quando si è stanchi o sotto l'effetto di
,
2. Vestiti in modo appropriato
ISTRUZIONI PER L'USO prima di utilizzare l'apparecchio.
cavo di rotolamento. Indossare sempre i guanti quando si utilizza il verricello
a quanto sopra.
- Non utilizzare in luoghi umidi o bagnati.
un problema. Chiedi aiuto a un macchinista o a uno specialista.
il produttore o indicato nel manuale di istruzioni, può causare
2. Questo argano è progettato per sollevare, non per tirare!
7. L'operatore e/o l'utente devono usare buon senso e cautela
incidenti. 2. Osservare le condizioni ambientali dell'area di lavoro.
1. Non sovraccaricare mai.
1. Mantenere l'area di lavoro pulita e libera. Le aree disordinate invitano
incapace di coprire in dettaglio tutte le condizioni e le situazioni che potrebbero presentarsi.
può causare gravi lesioni personali.
di alcol, farmaci da prescrizione o droghe.
illuminazione artificiale).
lesioni o possono causare danni.
8. L'uso di accessori diversi da quelli consigliati da
- Assicurarsi che l'ambiente dell'area di lavoro sia ben illuminato (luce solare o
1. Leggere attentamente e comprendere tutte le ISTRUZIONI PER L'ASSEMBLAGGIO E
3. Non mettere mai le mani o qualsiasi altra cosa vicino all'ingranaggio, al cerchione e
durante l'utilizzo del prodotto, in particolare per tutte le questioni non menzionate
- Non esporre il prodotto alla pioggia.
4. Non tentare mai di riparare o smontare il verricello quando c'è
- 2 -
Machine Translated by Google

- 3 -
- Utilizzare dispositivi di protezione adeguati in base alle condizioni di lavoro
utilizzato per gli scopi per cui è stato progettato.
Non permettere mai ai bambini di utilizzare il prodotto. I bambini devono essere sorvegliati
ambiente.
5.Il carico è massimo quando l'asta di sollevamento del prodotto è regolata alla
per assicurarsi che non giochino con il prodotto.
-Non tirare mai carichi superiori alla capacità massima del prodotto.
più basso;Il carico del prodotto diminuisce all'aumentare dell'altezza dell'asta di sollevamento
7. Non danneggiare il cavo d'acciaio
SALVA QUESTE ISTRUZIONI
- Non indossare abiti larghi o gioielli che potrebbero impigliarsi durante il movimento
aumenta.
- Non spostare mai il prodotto trascinandolo dal cavo.
6. Mantenere una distanza di sicurezza e tenere lontani i bambini
parti.
- Tenere il cavo lontano da fonti di calore e da spigoli vivi.
- Si consigliano guanti di gomma e calzature antiscivolo, nonché un berretto
- Mantenere se stessi e gli altri a una distanza di sicurezza dall'area di lavoro,
- Non calpestare o rotolare sul prodotto o sul cavo d'acciaio.
per contenere i capelli lunghi.
prodotto e il cavo d'acciaio durante la trazione sotto carico.
- Durante il funzionamento, non calpestare il prodotto o il cavo d'acciaio.
4. Non utilizzare il prodotto per scopi diversi da quelli per cui è stato concepito.
- Tenere le persone presenti (in particolare i bambini) e gli animali lontano dall'area di lavoro.
8.Sicurezza sul lavoro
previsto. Il prodotto svolgerà un lavoro migliore e più sicuro al suo carico nominale se è
- Tenere il prodotto lontano dalla portata dei bambini e dal loro ambiente.
Machine Translated by Google
4. Argano a mano
5. Asta verticale
6. Barra del rimorchio
7.Gamba di supporto
2. Forcella di arresto
3. Asta di sollevamento
1. Gancio da preda
HXCZDJ-04
Angolo di rotazione
Materiale
Colore
HXCZDJ-04
Altezza di sollevamento
Argano a mano
Capacità di sollevamento
Modello
Massimo 600 libbre
210~250cm
Massimo 1000 libbre
Acciaio verniciato a polvere
Nero
360 gradi
MODELLO E PARAMETRI
- 4 -
Machine Translated by Google

G
1
1
1
2
5
8
B
E
H
1
1
1
NO. Nome
3
6
Immagine
C
F
Quantità di HXCZDJ-04
1
1
1
4
7
UN
D
COMPONENTI
- 5 -
Machine Translated by Google

M12*70
2
M12*60
IL
M10*55
13
11
M
2
E
2
M12*25
M10*60
2
M10*40
M12*50
N
10
3
J
2
5
12
IO
9
14
L
15
- 6 -
Machine Translated by Google

potrebbero verificarsi durante l'installazione.
NOTA: è possibile inserire O stringere lateralmente
4. Si prega di aprire tutte le scatole per verificare che gli accessori siano
per aumentare la stabilità della gru.
completo e in buone condizioni.
5. Se è necessario utilizzare utensili elettrici per installare questo prodotto, impostare
Preparazione all'installazione:
ridurre in anticipo la velocità.
1. Due o più persone per spostare e montare il prodotto.
Passaggio 1: inserire C in D, allineare i fori e
2. Si prega di preparare un tappeto o uno zerbino per proteggere il pavimento di cui si ha bisogno
bloccare con I. Nota: la posizione del foro può essere
distribuisci tutti gli accessori.
regolato secondo le necessità
3. Si prega di preparare i guanti per evitare di essere graffiati da parti taglienti che
altezza.
IL
ASSEMBLAGGIO
- 7 -
Machine Translated by Google

M
Fase 3: Installare la forcella di arresto (B). Per prima cosa, inserire il cavo d'acciaio nella scanalatura
della puleggia, quindi bloccarlo con (K) e (M).
Fase 2: installare il verricello manuale (E), allineare i 2 fori di montaggio e bloccare con (J).
- 8 -
Machine Translated by Google
L
E
Quindi collegalo all'auto e potrai utilizzarlo.
Fase 5: Inserire H in G, allineare i fori e bloccare con L. (Nota: la posizione del foro può
essere regolata in base all'altezza richiesta.)
Fase 4: Installare la barra del rimorchio. Inserire G in D, allineare 2 fori di montaggio e
bloccare con (K).
Collegarsi all'auto come nel passaggio 4.
- 9 -
Machine Translated by Google

- 10 -
1. Lubrificare regolarmente il cavo d'acciaio e il gancio con un leggero strato di grasso.
6. Mantenere il prodotto correttamente mantenuto e pulito per un uso migliore e
2. Ingrassare gli ingranaggi e i cuscinetti ogni 6 mesi. Utilizzare qualsiasi prodotto di buona qualità
prestazioni più sicure.
grasso impermeabile di qualità.
7. Prima dell'uso, ispezionare tutte le parti mobili, i bulloni e i dadi di montaggio.
Funzionamento dell'argano manuale:
2. Ispezionare periodicamente tutte le parti, il cavo d'acciaio e gli accessori e
Stringere se necessario.
sostituirli se danneggiati o usati.
1. Gancio 2. Cavo d'acciaio 3. Cerchione 4. Manovella 5. Bullone dell'asse 6. Base
8. Il prodotto deve essere conservato in un luogo asciutto. Chiudere sempre a chiave il prodotto
7. Interruttore a cricchetto
3. Far sostituire le parti danneggiate da un centro di assistenza autorizzato.
e tenere fuori dalla portata dei bambini.
Installare 4 su 5 e bloccare saldamente, lo sterzo avanti e indietro è
4. Controllare periodicamente i dadi e serrarli se sono allentati.
comandato da 7, Girare la manovella 4 per riavvolgere o rilasciare il cavo d'acciaio.
5. Controllare regolarmente il cavo d'acciaio per individuare eventuali segni di usura e rottura. Sostituirlo
L'interruttore a cricchetto deve essere sempre completamente inserito.
eventuali cavi danneggiati presso un centro di assistenza autorizzato.
Machine Translated by Google


Modelo:HXCZDJ04
"Ahorrelamitad","mitaddeprecio"ocualquierotraexpresiónsimilarqueutilicemossolorepresenta
unaestimacióndelahorroquepodríaobteneralcomprarciertasherramientasconnosotrosencomparación
conlasprincipalesmarcasynonecesariamentesignificaquecubratodaslascategoríasdeherramientas
queofrecemos.Lerecordamosque,alrealizarunpedidoconnosotros,verifiquecuidadosamentesi
realmenteestáahorrandolamitadencomparaciónconlasprincipalesmarcas.
Seguimoscomprometidosabrindarleherramientasaprecioscompetitivos.
MANUALDEUSUARIODEGRÚASSOBRECAMIONES
Soportetécnicoycertificadodegarantíaelectrónica
www.vevor.com/support
Machine Translated by Google

¿Tienepreguntassobreelproducto?¿Necesitaasistenciatécnica?Nodudeenponerseencontacto
connosotros:
Estassonlasinstruccionesoriginales,leaatentamentetodaslasinstruccionesdelmanual
antesdeutilizarelproducto.VEVORsereservaunainterpretaciónclaradenuestromanualde
usuario.Laaparienciadelproductoestarásujetaalproductoquerecibió.Perdónenosporno
informarlenuevamentesihayactualizacionesdetecnologíaosoftwareennuestroproducto.
Soportetécnicoycertificadodegarantía
electrónicawww.vevor.com/support
Fotodereferencia
Modelo:HXCZDJ04
GRÚASSOBRECAMIONES
¿NECESITASAYUDA?¡CONTÁCTANOS!
1
Machine Translated by Google

REGLASGENERALESDESEGURIDAD
unproblema.Pidaayudaaunmaquinistaoespecialista.
elfabricanteoindicadoenelmanualdeinstrucciones,puederesultaren
iluminaciónartificial).
lesionesopuedecausardaños.
Puedeprovocarlesionespersonalesgraves.
dealcohol,medicamentosrecetadosodrogas.
1.Nuncasobrecargue.
nosepuedencubrirendetalletodaslascondicionesysituacionesquepuedansurgir.
1.Mantengaeláreadetrabajolimpiaylibre.Lasáreasdesordenadasinvitan
aloperarelproducto,especialmenteparacualquierasuntoquenoestémencionado
3.Nuncacoloquelamanoninadacercadelengranaje,lallantay
Noexpongaelproductoalalluvia.
1.LeaatentamenteycomprendatodaslasINSTRUCCIONESDEMONTAJEY
4.Nuncaintenterepararodesmontarelcabrestantecuandohaya
8.Elusodecualquieraccesoriodistintoalosrecomendadospor
Asegúresedequeelentornodeláreadetrabajosemantengabieniluminado(luzsolaro
5.Noutiliceelproductosiestácansadoobajolainfluenciadealcoholodrogas.
2.Noseguirlasnormasdeseguridadyotrasprecaucionesbásicasdeseguridad.
2.Vísteteapropiadamente
Operación:
6.Lasprecaucioneseinstruccionesdeseguridadproporcionadasenestemanualson
2.¡Estecabrestanteestádiseñadoparalevantar,noparatirar!
7.Eloperadory/ousuariodebeutilizarelsentidocomúnylaprecaución.
Accidentes.2.Observarlascondicionesambientalesdeláreadetrabajo.
Noutilizarenlugareshúmedosomojados.
Cableenrollable.Utilicesiempreguantesalutilizarelcabrestante.
Aloanterior.
INSTRUCCIONESDEOPERACIÓNantesdeoperar.
2
Machine Translated by Google

3
5.Lacargaesmáximacuandolabarradeelevacióndelproductoestáajustadaala
paragarantizarquenojueguenconelproducto.
8.Seguridadeneltrabajo
Nuncatirecargassuperioresalacapacidadmáximadelproducto.
utilizadoparalosfinesparalosquefuediseñado.
Nuncapermitaquelosniñosoperenelproducto.Losniñosdebenestarsupervisados.
ambiente.
Nuncamuevaelproductoarrastrándoloporelcable.
6.Mantengaunadistanciaseguraymantengaalosniñosalejados.
regiones.
másbajo;Lacargadelproductodisminuyeamedidaqueaumentalaalturadelabarradeelevación.
7.Nodañeelcabledeacero.
Nouseropasueltanijoyasquepuedanengancharseenelmovimiento.
aumenta.
Mantengaelcablealejadodelcalorydebordesafilados.
Paracontenerelcabellolargo.
productoyelcabledeaceroaltirarbajocarga.
Duranteelfuncionamiento,nopiseelproductonielcabledeacero.
GUARDEESTASINSTRUCCIONES
Serecomiendanguantesdegomaycalzadoantideslizante,asícomogorra.
Manténgaseustedylosdemásaunadistanciaseguradeláreadetrabajo,
Nopiseniruedesobreelproductonielcabledeacero.
previsto.Elproductofuncionarámejorydemaneramásseguraconsucarganominalsise
Mantenerelproductofueradelalcancedelosniñosodesuentorno.
Utilizarequipodeprotecciónadecuadosegúnlascondicionesdetrabajo.
4.Noutiliceelproductoparafinesdistintosdeaquellosparalosquefuediseñado.
Mantengaalostranseúntes(especialmentealosniños)yalosanimalesalejadosdeláreadetrabajo.
Machine Translated by Google

4.Cabrestantemanual
5.Varillavertical
6.Barraderemolque
2.Detenerlahorquilla
3.Barradeelevación
1.Ganchodepresa
HXCZDJ04
7.Piernadeapoyo
4
Material
Color
Ánguloderotación
Máximo1000libras
Alturadeelevación
Cabrestantemanual
Capacidaddeelevación
Modelo
Máximo600libras
360grados
Acerorecubiertodepolvo
HXCZDJ04
210~250cm
Negro
MODELOYPARÁMETROS
Machine Translated by Google

2
5
7
8
1
1
1
1
1
NO.Nombre
B
3
Y
1
6
yo
CantidaddeHXCZDJ04
1
1
Imagen
do
F
A
D
GRAMO
1
4
COMPONENTES
5
Machine Translated by Google
M10*55
13
2
M12*60
EL
2
M12*25
M10*60
11
METRO
2
K
M12*50
norte
2
M10*40
Yo
2
M12*70
10
3
5
yo
I
9
14
12
15
6
Machine Translated by Google

4.Abratodaslascajasparacomprobarquelosaccesoriosestén
paraaumentarlaestabilidaddelagrúa.
Puedeocurrirdurantelainstalación.
NOTA:PuedesinsertarelOapretardesdeellateral
Preparacióndelainstalación:
Completoyenbuenestado.
acelerarabajavelocidadconantelación.
5.Sinecesitautilizarherramientaseléctricasparainstalaresteproducto,configureel
2.Prepareunaalfombraotapeteparaprotegerelpisoquenecesita.
BloquearconI.Nota:Laposicióndelorificiopuedeser
1.Dosomáspersonasparamoverymontarelproducto.
Paso1:InserteCenD,alineelosorificiosy
3.Prepareguantesparaevitarrayarseconpartesafiladasque
altura.
Distribuyetodoslosaccesorios.
ajustadosegúnlorequerido
EL
ASAMBLEA
7
Machine Translated by Google

METRO
Paso3:Instalelahorquilladetope(B).Primerocoloqueelcabledeaceroenlaranuradela
poleayluegobloquéelocon(K)y(M).
Paso2:Instaleelcabrestantemanual(E),alineelos2orificiosdemontajeybloquéelocon(J).
8
Machine Translated by Google

K
yo
Paso5:InserteHenG,alineelosorificiosybloquéelosconL.(Nota:Laposicióndelorificio
sepuedeajustarsegúnlaalturarequerida).
Conéctesealautomóvilcomoenelpaso4.
Luegoconéctaloalautoypodrásusarlo.
Paso4:Instalelabarradelremolque.InserteGenD,alineelos2orificiosdemontajey
bloquéeloscon(K).
9
Machine Translated by Google
10
2.Engraselosengranajesycojinetescada6meses.Utilicecualquierlubricanteenbuenestado.
rendimientomásseguro.
1.Lubriqueperiódicamenteelcabledeaceroyelganchoconunaligeragrasa.
6.Mantengaelproductodebidamentemantenidoylimpioparaunmejory
Apretarsiesnecesario.
1.Gancho2.Cabledeacero3.Llanta4.Manivela5.Pernodeleje6.Base
Grasaimpermeabledecalidad.
Reemplácelossiestándañadosousados.
7.Inspeccionetodaslaspiezasmóvilesylospernosytuercasdemontajeantesdeusar.
Operacióndelcabrestantemanual:
2.Inspeccioneperiódicamentetodaslaspiezas,cablesdeaceroyaccesorios.
8.Elproductodebealmacenarseenunlugarseco.Guardesiempreelproductobajollave.
Instale4en5ybloquéelodeformasegura.Ladirecciónhaciaadelanteyhaciaatráses
4.Reviseperiódicamentelastuercasyapriételassiestánflojas.
7.Interruptordetrinquete
3.Hagaqueuncentrodeservicioautorizadoreemplacelaspiezasdañadas.
ymantenerfueradelalcancedelosniños.
Elinterruptordetrinquetedebeestarsiemprecompletamenteactivado.
Cualquiercabledañadoenuncentrodeservicioautorizado.
controladopor7,girelamanija4pararebobinaroliberarelcabledeacero.
5.Reviseperiódicamenteelcabledeaceroparadetectarsignosdedesgasteyrotura.Reemplace
Machine Translated by Google


Model:HXCZDJ-04
Nadal staramy się oferować Państwu narzędzia w konkurencyjnych cenach.
„Oszczędź połowę”, „Połowa ceny” lub inne podobne wyrażenia używane przez nas stanowią
jedynie szacunkowe oszczędności, jakie możesz uzyskać, kupując u nas określone narzędzia w
porównaniu z głównymi markami i niekoniecznie oznaczają one objęcie wszystkich kategorii narzędzi
oferowanych przez nas. Uprzejmie przypominamy, aby dokładnie sprawdzić, czy składając u nas
zamówienie faktycznie oszczędzasz połowę w porównaniu z głównymi markami.
INSTRUKCJA OBSŁUGI DŹWIGU SAMOCHODOWEGO
Wsparcie techniczne i certyfikat gwarancji
elektronicznej www.vevor.com/support
Machine Translated by Google

To jest oryginalna instrukcja, przed użyciem należy uważnie przeczytać wszystkie
instrukcje. VEVOR zastrzega sobie jasną interpretację naszej instrukcji obsługi. Wygląd
produktu będzie zależał od produktu, który otrzymałeś. Prosimy o wybaczenie, że nie
poinformujemy Cię ponownie, jeśli w naszym produkcie pojawią się jakiekolwiek aktualizacje
technologiczne lub oprogramowania.
Masz pytania dotyczące produktu? Potrzebujesz wsparcia technicznego? Skontaktuj się z
nami:
Wsparcie techniczne i certyfikat gwarancji
elektronicznej www.vevor.com/support
Zdjęcie w celach informacyjnych
Model:HXCZDJ-04
DŹWIGI SAMOCHODOWE
POTRZEBUJESZ POMOCY? SKONTAKTUJ SIĘ Z NAMI!
- 1 -
Machine Translated by Google

OGÓLNEZASADYBEZPIECZEŃSTWA
- Nie stosować w miejscach wilgotnych lub mokrych.
lina toczna. Zawsze zakładaj rękawice podczas korzystania z wyciągarki
do powyższego.
może spowodować poważne obrażenia ciała.
alkoholu, leków na receptę lub narkotyków.
INSTRUKCJA OBSŁUGI przed rozpoczęciem użytkowania.
problem. Poproś o pomoc mechanika lub specjalistę.
producenta lub podane w instrukcji obsługi, może spowodować
2. Ta wyciągarka jest przeznaczona do podnoszenia, a nie ciągnięcia!
7. Operator i/lub użytkownik musi zachować zdrowy rozsądek i ostrożność
wypadków. 2. Obserwuj warunki panujące w miejscu pracy.
6. Środki ostrożności i instrukcje podane w niniejszej instrukcji są
Działanie:
5. Nie stosuj produktu, gdy jesteś zmęczony lub pod wpływem środków odurzających.
,
2. Nieprzestrzeganie zasad bezpieczeństwa i innych podstawowych środków ostrożności
2. Ubierz się odpowiednio
1. Przeczytaj uważnie i zrozum wszystkie instrukcje dotyczące montażu i montażu.
4. Nigdy nie próbuj naprawiać ani demontować wyciągarki, gdy jest
8. Stosowanie akcesoriów innych niż zalecane przez
- Zadbaj o to, aby w miejscu pracy było dobrze oświetlone (światłem słonecznym lub
podczas obsługi produktu, zwłaszcza w kwestiach, które nie zostały omówione
3. Nigdy nie wkładaj ręki ani niczego innego w pobliże przekładni, obręczy i
- Nie wystawiać produktu na działanie deszczu.
1. Nigdy nie przeciążaj.
nie jest możliwe szczegółowe omówienie wszystkich warunków i sytuacji, które mogą się pojawić.
1. Utrzymuj miejsce pracy w czystości i porządku. Zagracone miejsca zapraszają
(sztuczne oświetlenie).
spowodować obrażenia lub szkody.
- 2 -
Machine Translated by Google

- 3 -
- Utrzymuj siebie i innych w bezpiecznej odległości od miejsca pracy.
- Nigdy nie przesuwaj produktu, ciągnąc go za kabel.
- Nie wolno stawać na produkcie lub linie stalowej ani przejeżdżać po nich.
strony.
6. Zachowaj bezpieczną odległość i nie pozwalaj dzieciom zbliżać się do Ciebie
najniższy;Obciążenie produktu zmniejsza się w miarę wzrostu wysokości drążka podnoszącego
7. Nie uszkadzaj stalowej liny
- Nie należy nosić luźnej odzieży ani biżuterii, które mogłyby zostać wciągnięte w ruchome przedmioty.
5. Obciążenie jest maksymalne, gdy pręt podnoszący produkt jest wyregulowany do
wzrasta.
aby mieć pewność, że nie będą bawić się produktem.
- Trzymaj kabel z dala od źródeł ciepła i ostrych krawędzi.
-Nigdy nie ciągnij ciężarów większych niż maksymalny udźwig produktu.
używany zgodnie z przeznaczeniem.
Nigdy nie pozwalaj dzieciom obsługiwać produktu. Dzieci powinny znajdować się pod nadzorem.
środowisko.
ZAPISZ TE INSTRUKCJE
zamierzone. Produkt będzie lepiej i bezpieczniej wykonywał swoją pracę przy obciążeniu znamionowym, jeśli
- Przechowywać produkt w miejscu niedostępnym dla dzieci i ich otoczenia.
- Stosować odpowiedni sprzęt ochronny zgodnie z warunkami pracy.
4. Nie używaj produktu do celów innych niż te, do których jest przeznaczony.
- Nie dopuszczać osób postronnych (zwłaszcza dzieci) i zwierząt do miejsca pracy.
8. Bezpieczeństwo w pracy
zawierać długie włosy.
produktu i stalowej liny podczas ciągnięcia pod obciążeniem.
- Podczas pracy nie należy stawać na produkcie ani na linie stalowej.
- Zalecane są rękawice gumowe i obuwie antypoślizgowe, a także czapka
Machine Translated by Google

6. Belka przyczepy
4. Wciągarka ręczna
3. Pręt podnoszący
7.Noga podporowa
2. Zatrzymaj widelec
5. Pręt pionowy
1. Hak na zdobycz
HXCZDJ-04
- 4 -
Kąt obrotu
Tworzywo
Kolor
HXCZDJ-04
Nośność podnośnika
Wciągarka ręczna
Wysokość podnoszenia
Model
Maks. 600 funtów
210~250cm
Maks. 1000 funtów
Stal malowana proszkowo
360 stopni
Czarny
PARAMETRY MODELANDU
Machine Translated by Google

I
H
1
Ilość HXCZDJ-04
1
1
C
Zdjęcie
A
D
F
G
1
4
5
2
7
8
1
1
1
1
NIE. Imię
3
6
B 1
SKŁADNIKI
- 5 -
Machine Translated by Google

M
N
M12*50
M10*40
2
J
2
M12*70
10
3
13
M10*55
2
M12*60
TO
2
M10*60
M12*25
2
11 K
I
L
5
9
12
14
15
- 6 -
Machine Translated by Google

2. Przygotuj dywan lub matę, aby chronić podłogę, którą potrzebujesz
zamknij za pomocą I. Uwaga: Pozycja otworu może być
Krok 1: Włóż C do D, wyrównaj otwory i
1. Dwie lub więcej osób do przenoszenia i montażu produktu.
3. Przygotuj rękawice, aby uniknąć zadrapań ostrymi częściami, które mogą uszkodzić skórę.
wysokość.
rozłóż wszystkie akcesoria.
dostosowane zgodnie z wymaganiami
aby zwiększyć stabilność dźwigu.
4. Otwórz wszystkie pudełka, aby sprawdzić, czy akcesoria są
Podczas instalacji mogą wystąpić następujące błędy.
UWAGA: Można włożyć O dokręcając z boku
Przygotowanie do instalacji:
z wyprzedzeniem zmniejszyć prędkość do niskiej.
kompletne i w dobrym stanie.
5. Jeśli do zainstalowania tego produktu konieczne jest użycie elektronarzędzi, należy ustawić
TO
MONTAŻ
- 7 -
Machine Translated by Google

M
Krok 2: Zamontuj ręczną wyciągarkę (E), wyrównaj 2 otwory montażowe i zablokuj za pomocą (J).
Krok 3: Zainstaluj widełki oporowe (B). Najpierw umieść stalową linkę w rowku rolki, a następnie
zablokuj ją za pomocą (K) i (M).
- 8 -
Machine Translated by Google

K
L
Krok 5: Włóż H do G, wyrównaj otwory i zablokuj L. (Uwaga: położenie otworu można
dostosować do wymaganej wysokości.)
Połącz się z samochodem tak jak w kroku 4.
Następnie podłącz go do samochodu i gotowe.
Krok 4: Zamontuj drążek przyczepy. Włóż G do D, wyrównaj 2 otwory montażowe i zablokuj za
pomocą (K).
- 9 -
Machine Translated by Google

- 10 -
2. Okresowo sprawdzaj wszystkie części, linę stalową i akcesoria.
7. Przed użyciem należy sprawdzić wszystkie ruchome części oraz śruby i nakrętki montażowe.
Zainstaluj 4 na 5 i zablokuj bezpiecznie. Kierowanie do przodu i do tyłu jest
4. Sprawdzaj nakrętki okresowo i dokręć je, jeśli są luźne.
3. Uszkodzone części należy wymienić w autoryzowanym serwisie.
7. Przełącznik zapadkowy
Przełącznik zapadkowy powinien być zawsze w pełni włączony.
wszelkie uszkodzenia kabli należy oddać do autoryzowanego serwisu.
i przechowywać w miejscu niedostępnym dla dzieci.
sterowane za pomocą 7. Obróć uchwyt 4, aby zwinąć lub zwolnić linę stalową.
5. Regularnie sprawdzaj stalową linę pod kątem oznak rozdarcia i zużycia. Wymień
bezpieczniejsza praca.
2. Smaruj koła zębate i łożyska co 6 miesięcy. Używaj dobrego smaru.
1. Regularnie smaruj linę stalową i hak niewielką ilością smaru.
6. Utrzymuj produkt w odpowiedniej konserwacji i czystości, aby zapewnić lepszą i
W razie konieczności dokręcić.
1. Hak 2. Linka stalowa 3. Obręcz 4. Korba 5. Śruba osi 6. Podstawa
Wymień je, jeśli są uszkodzone lub zużyte.
8. Produkt musi być przechowywany w suchym miejscu. Zawsze zamykaj produkt
wysokiej jakości smar wodoodporny.
Obsługa wyciągarki ręcznej:
Machine Translated by Google


Model: HXCZDJ-04
"Save Half", "Half Price" of andere soortgelijke uitdrukkingen die wij gebruiken, geven alleen een schatting van de
besparingen die u kunt behalen door bepaalde gereedschappen bij ons te kopen in vergelijking met de grote topmerken
en betekent niet noodzakelijkerwijs dat alle categorieën gereedschappen die wij aanbieden, worden gedekt. Wij
herinneren u eraan om zorgvuldig te controleren of u daadwerkelijk de helft bespaart in vergelijking met de grote
topmerken wanneer u een bestelling bij ons plaatst.
Wij streven er voortdurend naar om u gereedschappen tegen concurrerende prijzen te leveren.
HANDLEIDING VOOR VRACHTWAGENKRANEN
Technische ondersteuning en e-garantiecertificaat
www.vevor.com/support
Machine Translated by Google

Dit is de originele instructie, lees alle handleidingen zorgvuldig door voordat u het product
gebruikt. VEVOR behoudt zich een duidelijke interpretatie van onze gebruikershandleiding voor.
Het uiterlijk van het product is afhankelijk van het product dat u hebt ontvangen. Vergeef ons
dat we u niet opnieuw zullen informeren als er technologie- of software-updates voor ons product zijn.
Heeft u vragen over het product? Heeft u technische ondersteuning nodig? Neem dan gerust
contact met ons op:
Technische ondersteuning en e-
garantiecertificaat www.vevor.com/support
Foto ter referentie
HULP NODIG? NEEM CONTACT MET ONS OP!
VRACHTWAGENKRANEN
Model: HXCZDJ-04
- 1 -
Machine Translated by Google

ALGEMENE VEILIGHEIDSREGELS
1. Overbelast nooit.
niet in staat om in detail alle omstandigheden en situaties te beschrijven die zich kunnen voordoen.
1. Houd de werkruimte schoon en vrij. Rommelige ruimtes nodigen uit tot
kunstlicht).
letsel of schade veroorzaken.
kan leiden tot ernstig persoonlijk letsel.
van alcohol, voorgeschreven medicijnen of drugs.
1. Lees alle MONTAGE- EN GEBRUIKSAANWIJZINGEN zorgvuldig door en begrijp ze.
4. Probeer nooit de lier te repareren of te demonteren als er
- Zorg ervoor dat de werkomgeving goed verlicht is (zonlicht of
8. Het gebruik van andere accessoires dan die welke door de fabrikant zijn aanbevolen.
bij het bedienen van het product, met name voor zaken die niet in de bijgevoegde instructies zijn vermeld.
3. Plaats nooit uw hand of iets anders in de buurt van de versnelling, de velg en
- Stel het product niet bloot aan regen.
6. De veiligheidsmaatregelen en instructies die in deze handleiding worden gegeven, zijn
Werking:
5. Gebruik het product niet als u moe bent of onder invloed bent
2. Het niet naleven van de veiligheidsregels en andere elementaire veiligheidsmaatregelen
ÿ
2. Kleed je goed
- Niet gebruiken op vochtige of natte locaties.
rolkabel. Draag altijd handschoenen bij het gebruik van de lier
naar het bovenstaande.
GEBRUIKSAANWIJZING voordat u het apparaat gaat gebruiken.
een probleem. Vraag een machinist of specialist om hulp.
de fabrikant of vermeld in de gebruiksaanwijzing, kan resulteren in
2. Deze lier is ontworpen om te hijsen, niet om te trekken!
7. De bediener en/of gebruiker moet gezond verstand en voorzichtigheid gebruiken
ongevallen. 2. Houd rekening met de omstandigheden op de werkplek.
- 2 -
Machine Translated by Google

- 3 -
bedoeld. Het product zal beter en veiliger werken bij de nominale belasting als het
- Houd het product buiten bereik van kinderen en hun omgeving.
BEWAAR DEZE INSTRUCTIES
- Gebruik passende beschermingsmiddelen volgens de werkvoorschriften
4. Gebruik het product niet voor andere doeleinden dan waarvoor het bedoeld is.
- Houd omstanders (vooral kinderen) en dieren uit de buurt van het werkgebied.
8. Veiligheid op het werk
- Stap tijdens het gebruik niet over het product of de staalkabel.
om lang haar te bevatten.
product en de staalkabel bij het trekken onder belasting.
- Houd uzelf en anderen op een veilige afstand van het werkgebied, de
- Rubberen handschoenen en antislipschoenen worden aanbevolen, evenals een pet
- Stap of rol niet over het product of de staalkabel.
- Verplaats het product nooit door het aan de kabel te verslepen.
onderdelen.
6. Houd een veilige afstand en houd kinderen uit de buurt
- Houd de kabel uit de buurt van hitte en scherpe randen.
laagste;De belasting van het product neemt af naarmate de hoogte van de hefstang toeneemt
- Draag geen losse kleding of sieraden die in bewegende delen kunnen blijven haken.
neemt toe.
om ervoor te zorgen dat ze niet met het product spelen.
5. De belasting is maximaal wanneer de hefstang van het product is afgesteld op de
7. Beschadig de stalen kabel niet
-Trek nooit lasten die groter zijn dan de maximale capaciteit van het product.
gebruikt voor de doeleinden waarvoor het ontworpen is.
Laat kinderen nooit het product bedienen. Kinderen moeten onder toezicht staan.
omgeving.
Machine Translated by Google

6. Aanhangwagenstang
4.Handlier
3. Hefstang
7. Ondersteunende poot
2.Stop vork
5. Staande staaf
1.Prooihaak
HXCZDJ-04
- 4 -
Rotatiehoek
Materiaal
Kleur
HXCZDJ-04
Hijshoogte
Handlier
Hijscapaciteit
Model
Maximaal 600 pond
210~250cm
360 graden
Poedergecoat staal
Zwart
Maximaal 1000 pond
MODELANDPARAMETERS
Machine Translated by Google

A
D
1
G
1
4
7
1
Hoeveelheid HXCZDJ-04
1
C
Afbeelding
F
1
NEE. Naam
3
6
B 1
EN
5
2
8
H
1
1
1
COMPONENTEN
- 5 -
Machine Translated by Google

J
2
M12*70
10
3
N
M12*50
M10*40
2
2
M10*60
M12*25
2
11 Ik
M
13
M10*55
2
M12*60
DE
I
Ik
5
9
12
14
15
- 6 -
Machine Translated by Google

3. Zorg dat u handschoenen bij de hand hebt om te voorkomen dat u wordt bekrast door scherpe onderdelen.
hoogte.
spreid alle accessoires uit.
aangepast volgens de vereiste
2. Zorg dat u een tapijt of mat bij de hand hebt om uw vloer te beschermen.
vergrendel met I. Let op: De positie van het gat kan worden
Stap 1: Plaats C in D, lijn de gaten uit en
1. Twee of meer personen om het product te verplaatsen en te monteren.
Installatievoorbereiding:
van tevoren op lage snelheid zetten.
compleet en in goede staat.
5. Als u elektrisch gereedschap nodig hebt om dit product te installeren, stel dan de
om de stabiliteit van de kraan te vergroten.
4. Open alle dozen om te controleren of de accessoires aanwezig zijn.
kunnen tijdens de installatie optreden.
LET OP: U kunt de O vanaf de zijkant inbrengen en vastdraaien
MONTAGE
DE
- 7 -
Machine Translated by Google

M
Stap 2: Installeer de handmatige lier (E), lijn de 2 montagegaten uit en vergrendel ze met (J).
Stap 3: Installeer de stopvork (B). Plaats eerst de stalen kabel in de groef van de katrol en
vergrendel deze vervolgens met (K) en (M).
- 8 -
Machine Translated by Google

Ik
Ik
Stap 5: Plaats H in G, lijn de gaten uit en vergrendel ze met L. (Opmerking: de positie van de gaten kan
worden aangepast aan de gewenste hoogte.)
Sluit het apparaat aan op de auto zoals in stap 4.
Sluit het vervolgens aan op de auto en u kunt het gebruiken.
Stap 4: Installeer de aanhangerbeugel. Plaats G in D, lijn de 2 montagegaten uit en vergrendel ze met (K).
- 9 -
Machine Translated by Google

- 10 -
De ratelschakelaar moet altijd volledig ingeschakeld zijn.
Lever beschadigde kabels in bij een erkend servicecentrum.
bediend door 7, Draai aan de hendel 4 om de staalkabel op te winden of los te maken.
5. Controleer de stalen kabel regelmatig op tekenen van scheuren en slijtage. Vervang
Installeer 4 op 5 en vergrendel ze stevig. De voor- en achterwaartse besturing is
4. Controleer de moeren regelmatig en draai ze vast als ze los zitten.
3. Laat beschadigde onderdelen vervangen door een erkend servicecentrum.
7. Ratelschakelaar
en buiten bereik van kinderen houden.
Indien nodig aandraaien.
Vervang ze als ze beschadigd of gebruikt zijn.
1. Haak 2. Stalen kabel 3. Velg 4. Krukas 5. Asbout 6. Basis
8.Product moet op een droge locatie worden bewaard. Sluit een product altijd af
waterbestendig vet van hoge kwaliteit.
Bediening van de handlier:
2. Controleer periodiek alle onderdelen, stalen kabels en accessoires en
veiligere uitvoering.
2.Smeer de tandwielen en lagers elke 6 maanden. Gebruik een goede
7. Controleer alle bewegende delen en bevestigingsbouten en -moeren vóór gebruik.
1. Smeer de staalkabel en de haak regelmatig in met een beetje vet.
6. Zorg ervoor dat het product goed onderhouden en schoon is voor een betere en
Machine Translated by Google


Modell: HXCZDJ-04
"Spara hälften", "halva priset" eller andra liknande uttryck som används av oss representerar
bara en uppskattning av besparingar du kan dra nytta av att köpa vissa verktyg hos oss jämfört med
de stora toppmärkena och betyder inte nödvändigtvis att täcka alla kategorier av verktyg som erbjuds
av oss. Du påminns vänligen om att noggrant kontrollera när du gör en beställning hos oss om
du faktiskt sparar hälften i jämförelse med de främsta stora varumärkena.
Vi fortsätter att vara engagerade i att ge dig verktyg till konkurrenskraftiga priser.
LASTBIRKRANAR ANVÄNDARHANDBOK
Teknisk support och e-garanticertifikat
www.vevor.com/support
Machine Translated by Google

Har du produktfrågor? Behöver du teknisk support? Kontakta oss gärna:
Detta är den ursprungliga instruktionen, läs alla instruktioner noggrant innan du
använder den. VEVOR reserverar sig för en tydlig tolkning av vår användarmanual. Utseendet
på produkten är beroende av den produkt du fått. Ursäkta oss att vi inte kommer att
informera dig igen om det finns någon teknik eller mjukvaruuppdateringar på vår produkt.
Teknisk support och e-garanticertifikat
www.vevor.com/support
Foto för referens
Modell: HXCZDJ-04
LASTBIRKRANAR
BEHÖVER HJÄLP? KONTAKTA OSS!
- 1 -
Machine Translated by Google

- 2 -
4. Försök aldrig reparera eller demontera vinschen när det finns
5. Använd inte produkten när du är trött eller påverkad
2. Underlåtenhet att följa säkerhetsreglerna och andra grundläggande säkerhetsåtgärder
ÿ
2. Klä dig ordentligt
Drift:
6. Säkerhetsföreskrifterna och instruktionerna i denna handbok är
2. Denna vinsch är designad för att lyfta, inte för att dra!
7. Operatören och/eller användaren måste använda sunt förnuft och vara försiktig
olyckor. 2. Observera arbetsområdets miljöförhållanden.
DRIFTINSTRUKTIONER före användning.
ett problem. Fråga en maskinist eller specialist om hjälp.
tillverkaren eller anges i bruksanvisningen ÿ kan leda till
rullkabel. Bär alltid handskar när du använder vinschen
till ovanstående.
- Använd inte på fuktiga eller våta platser.
skada eller kan orsaka skador.
kan leda till allvarliga personskador.
av alkohol, receptbelagda läkemedel eller droger.
artificiell belysning).
1. Överbelasta aldrig.
inte i detalj täcka alla förhållanden och situationer som kan uppstå.
1. Håll arbetsområdet rent och fritt. Röriga områden inbjuder
när du använder produkten, särskilt för alla ärenden som inte hänvisas till
3. Placera aldrig din hand eller något annat nära växeln, fälgen och
- Utsätt inte produkten för regn.
8.Användning av andra tillbehör än de som rekommenderas av
- Se till att arbetsmiljön hålls väl upplyst (solljus eller
1. Läs noga och förstå alla MONTERING OCH
ALLMÄNNA SÄKERHETSREGLER
Machine Translated by Google

5. Belastningen är maximal när produktens lyftstång är justerad till
för att säkerställa att de inte leker med produkten.
8. Säkerhet på jobbet
- Dra aldrig laster som är större än produktens maximala kapacitet.
används för de syften som den är avsedd för.
Låt aldrig barn använda produkten. Barn bör övervakas
miljö.
- Flytta aldrig produkten genom att dra den i kabeln.
delar.
6. Håll ett säkert avstånd och håll barn borta
lägst; Produktens belastning minskar med höjden på lyftstången
7. Skada inte stålvajern
- Bär inte löst sittande kläder eller smycken som kan fastna i rörelse
ökar.
- Håll kabeln borta från värme och vassa kanter.
att innehålla långt hår.
produkten och stålvajern vid dragning under belastning.
- Trampa inte över produkten eller stålkabeln under drift.
SPARA DESSA INSTRUKTIONER
– Gummihandskar och halkfria skor rekommenderas samt keps
- Håll dig själv och andra på säkert avstånd från arbetsområdet
- Trampa eller rulla inte över produkten eller stålkabeln.
avsedd. Produkten kommer att göra ett bättre och säkrare jobb vid sin nominella belastning om den är det
- Håll produkten borta från barn eller deras miljö.
- Använd lämplig skyddsutrustning enligt arbetssättet
4. Använd inte produkten för andra ändamål än de den är för
- Håll åskådare (särskilt barn) och djur borta från arbetsområdet.
- 3 -
Machine Translated by Google

Material
Färg
Rotationsvinkel
Max. 1000 pund
Lyfthöjd
Hand vinsch
Lyftkapacitet
Modell
Max. 600 pund
360 grader
Pulverlackerat stål
HXCZDJ-04
210-250 cm
Svart
- 4 -
4.Handvinsch
5. Upprätt stång
6. Trailer Bar
2. Stoppa gaffel
3. Lyftstång
1. Byteskrok
HXCZDJ-04
7. Stödben
MODELLANDSPARAMETRAR
Machine Translated by Google

2
5
7
8
1
1
1
1
1
INGA. Namn
B
3
OCH
1
6
H
Antal HXCZDJ-04
1
1
Bild
C
F
A
D
G
1
4
KOMPONENTER
- 5 -
Machine Translated by Google

M10*55
13
2
M12*60
DE
2
M12*25
M10*60
11
M
2
K
M12*50
N
2
M10*40
J
2
M12*70
10
3
5
L
jag
9
14
12
15
- 6 -
Machine Translated by Google

4. Öppna alla rutorna för att kontrollera att tillbehören är det
för att öka kranens stabilitet.
kan uppstå under installationen.
OBS: Du kan sätta in O dra åt från sidan
Installationsförberedelser:
komplett och i gott skick.
hastighet till låg hastighet i förväg.
5. Om du behöver använda elverktyg för att installera den här produkten, ställ in
2. Förbered en matta eller matta för att skydda ditt golv du behöver
lås med I. Obs: Hålpositionen kan vara
1. Två eller flera personer ska flytta och montera produkten.
Steg 1: Sätt in C i D, rikta in hålen och
3. Förbered handskar för att undvika att bli repad av vassa delar som
höjd.
sprid ut alla tillbehör.
justeras efter behov
DE
MONTERING
- 7 -
Machine Translated by Google
M
Steg 2: Installera manuell vinsch (E), Rikta in 2 monteringshål och lås med (J).
Steg 3: Montera stoppgaffeln (B). Lägg först stålvajern i remskivans spår och
lås den sedan med (K) och (M).
- 8 -
Machine Translated by Google

L
K
Anslut den sedan till bilen så kan du använda den.
Anslut till bilen som i steg 4.
Steg 5: Sätt in H i G, rikta in hålen och lås med L. (Obs: Hålets position
kan justeras efter önskad höjd.)
Steg 4: Installera släpbygeln. Sätt in G i D, rikta in 2 monteringshål och lås
med (K).
- 9 -
Machine Translated by Google

2. Smörj kugghjulen och lagren var sjätte månad. Använd valfritt material
säkrare prestanda.
1. Smörj stålvajern och haka regelbundet med lite fett.
6. Håll produkten ordentligt underhållen och ren för bättre och
Dra åt vid behov.
1. Krok 2. Stålkabel 3. Fälg 4. Vev 5. Axelbult 6. Bas
byt ut dem om de är skadade eller används.
vattentätt kvalitetsfett.
7. Inspektera alla rörliga delar och monteringsbultar och muttrar före användning.
Handvinschdrift:
2. Inspektera regelbundet alla delar, stålkabel, och tillbehör och
8. Produkten måste förvaras på en torr plats. Lås alltid en produkt
Installera 4 på 5 och lås säkert, Fram- och bakåtstyrningen är
4.Kontrollera muttrarna med jämna mellanrum och dra åt dem om de sitter lösa.
7. Spärrbrytare
3. Låt ett auktoriserat servicecenter byta ut skadade delar.
och förvara den utom räckhåll för barn.
Spärrbrytaren ska alltid vara helt inkopplad.
skadad kabel hos ett auktoriserat servicecenter.
styrs av 7, Vrid handtaget 4 för att spola tillbaka eller släppa stålvajern.
5. Kontrollera regelbundet stålkabeln för tecken på slitage och slitage. Ersätta
- 10 -
Machine Translated by Google


