1
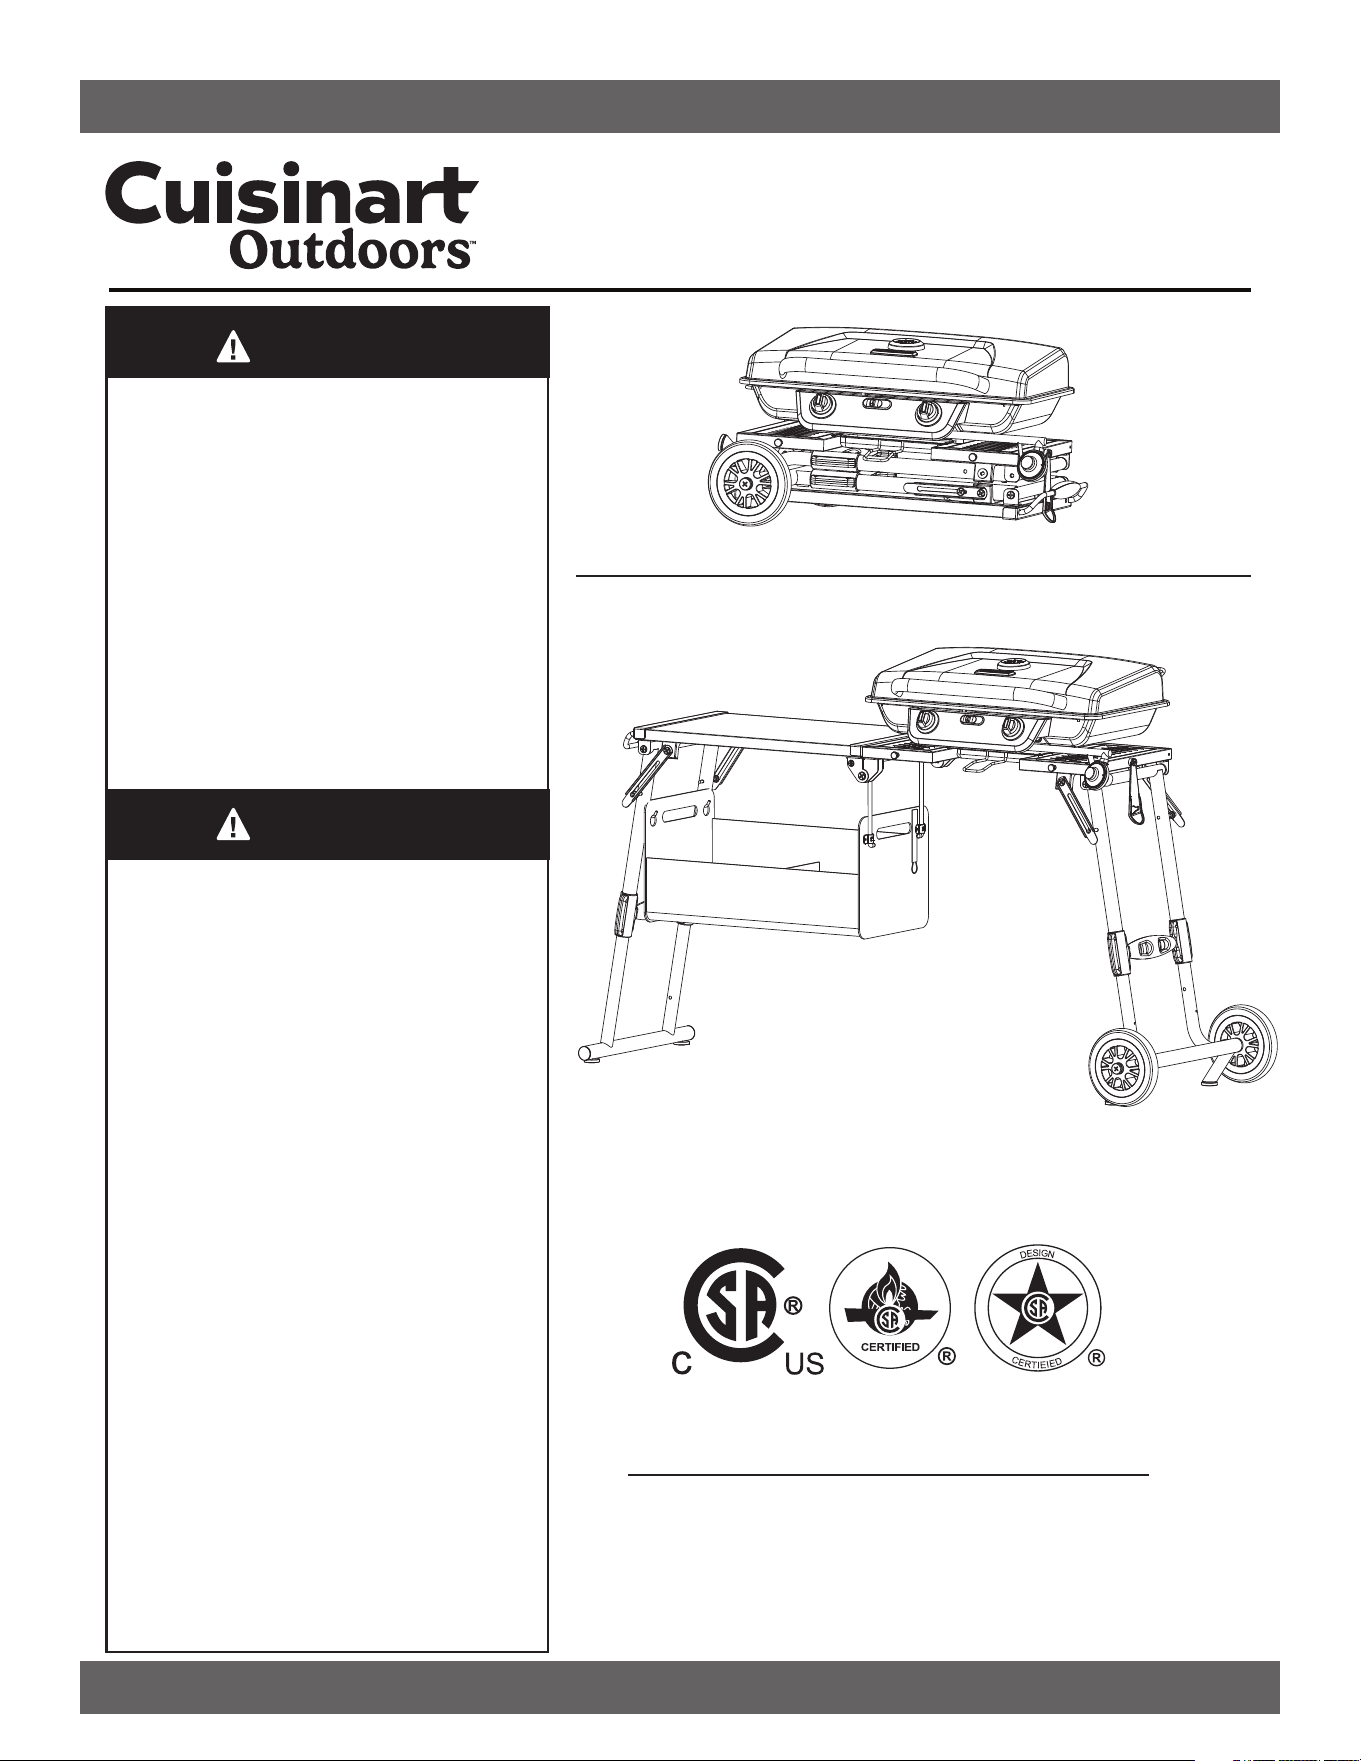
Prep ‘n Go Folding Gas Grill
DO NOT RETURN PRODUCT TO THE STORE
Before visiting your local retailer, please email
[email protected] or call our customer service
department at 1-866-994-6390 to chat with a representative.
To best serve you, our representatvies are available to answer
calls Monday to Friday 9 AM to 5 PM EST.
Customer Service Hotline
1-866-994-6390
• For Outdoor Use Only (outside
any enclosure)..
• This instruction manual
contains important information
necessary for proper assembly
and safe use of this appliance.
• Read and follow all warnings
and instructions before
assembling and using the
appliance.
• Follow all warnings and
instructions when using the
appliance.
• Keep this manual for future
reference.
• If you smell gas:
1. Shut off gas supply to the
appliance.
2. Extinguish any open ames.
3. Open the lid.
4. If the odor continues, keep
away from the appliance and
immediately call your re
department.
Failure to follow these
instructions could result in re
or explosion which could cause
property damage, personal
injury, or death.
• Never operate this appliance
unattended.
• Do not store or use gasoline
or other ammable liquids or
vapors in the vicinity of this or
any other appliance.
• An LP cylinder not connected
for use shall not be stored in
the vicinity of this or any other
appliance.
• Check for leaks every time
prior to lighting the Grill, even
if purchased fully assembled.
Gas leaks may cause a re
or explosion. Please read the
instructions on page 20 .
WARNING
DANGER
CSA/ANSI Z21.89:(23) • CSA 1.18:(23)
MODEL NO: CGG-288

2
Table of Contents
Table of Contents 2
Safety Information 3
What’s In The Box 5
Assembly Instructions 6
Setup Instructions 8
Operating Instructions 20
Care and Maintenance 22
Trouble Shooting 23
Match Light Instructions 23
Exploded View 24
Parts List 25
Warranty 26
3
Please read the following instructions carefully before attempting to assemble, operate or install the product. Failure to follow
these instructions may result in serious bodily injury and/or property damage. If you have questions regarding the product
please call customer service at 866-994-6390, 9 a.m.-5 p.m., EST, Monday-Friday or email [email protected].
LP- gas supply cylinder to be used must be constructed and marked in accordance with the specications
for LP-gas cylinders of the U.S Department of Transportation (DOT) or the National Standard of Canada,
CAN-B339, Cylinders, Spheres and Tubes for the Transportation of Dangerous Goods.
1. The installation must conform with local codes or, in the absence of local codes, with the National Fuel Gas Codes, with
the National Fuel Gas Code, ANSI Z223.1/NFPA 54, Storage and Handling of Liqueed Petroleum Gases, ANSI/NFPA
58.
2. Grill is for outdoor use only. Grill should be operated in a well-ventilated space. Never operate in an enclosed space,
garage or building. Your grill is not intended to be installed in or on recreational vehicles and/or boats.
3. Do not move the appliance when in use. Allow the appliance to cool to below 115F(45C) before moving or storing.
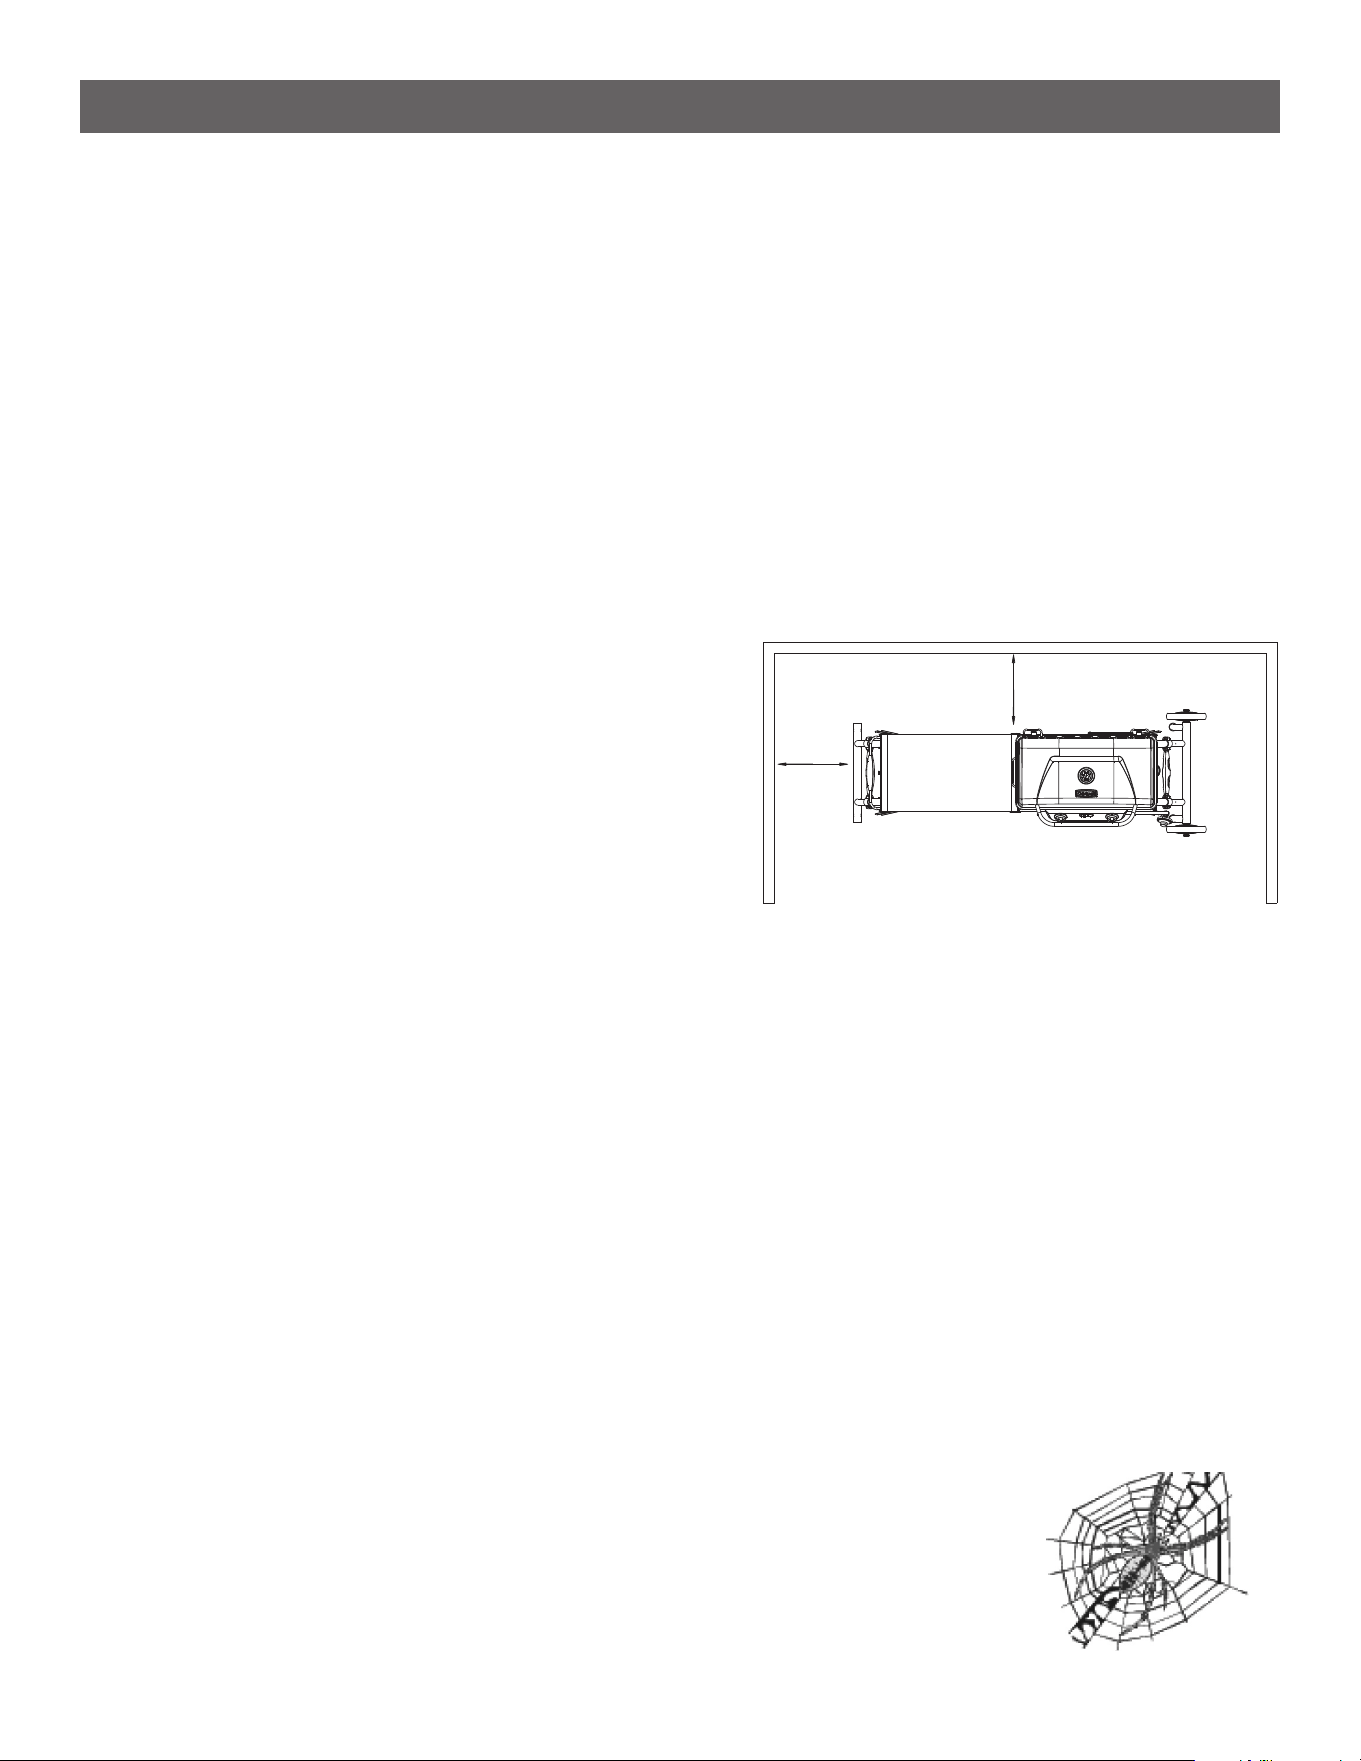
4. Do not install or use grill within 36” of combustible materials from back and sides of grill. Grill shall not be located under
overhead surfaces (closed carport, garage, porch, patio) that can catch re.
5. Never attempt to attach this grill to the self-contained LP gas
system of a camper trailer or motor home.
6. It is the responsibility of the assembler/owner to assemble, install
and maintain gas grill. Do not let children and pets operate or play
near your grill. Failure to follow these instructions could result in
serious personal injury and/or property damage.
7. Carefully follow instructions in this manual for proper assembly
and leak testing of your grill. Do not use grill until leak checked.
If leak is detected at any time, it must be stopped and corrected
before using grill further.
8. Appliance area should be kept clear and free from combustible
materials, gasoline, bottled gas in any from and other ammable vapors and liquids. Do not obstruct ow of combustion
and ventilation air.
9. Never try to light grill with lid closed! Buildup of gases is very dangerous and could cause an explosion.
10. Keep any electrical cord or fuel supply hose away from any heated surfaces.
11. Propane is a ammable gas and improper handling may result in explosion and/or re and serious accident or injury.
12. This appliance will be hot during and after use. Use insulated oven mitts or gloves for protection from hot surfaces or
splatter from cooking liquids.
13. Do not leave your grill unattended while in operation.
14. Do not use while under the inuence of drugs or alcohol.
15. Do not store any spare LP (propane) cylinder, full or empty, under or near your grill.
16. Appliance is not intended for commercial use or rental.
17. The cylinder must be disconnected when the appliance is not in use.
18. This appliance is not intended for and should never be used as a heater.
19. The specic size and capacity of the cylinder to be used is 16.4 oz.
20. The LP gas supply cylinder to be used shall be constructed and marked in accordance with the specications for LP gas
cylinders, U.S. DOT, or CSA B339.
NATURAL HAZARD • SPIDERS
FACT: Sometimes spiders and other small insects climb into the burner tube. The spiders spin webs,
build nests and lay eggs. The webs or nests can be very small, but they are very strong and can
block the ow of gas. Clean burner prior to use after storing, at the beginning of griddling season or
after a period of one month not being used.
SAFETY INFORMATION
SAVE THESE INSTRUCTIONS
FOR OUTDOOR HOUSEHOLD USE ONLY
36"(914mm)
36"(914mm)

4
SAFETY INFORMATION
The Fuel System
Gas grills are used safely by millions of people when following simple safety precautions.
The items in the fuel system are designed for operation with this grill. They must not be replaced with any other
brand. (See parts list for replacement items.)
GAS BURNER: The gas burner is constructed of stainless steel and should not require maintenance other than
inspection for insects/nests inside the air intake slots.
PROPANE FUEL: Warning - propane is a ammable gas. Improper handling may result in an explosion and/or
re and serious accident or injury. Your grill is designed to operate with propane gas only and is equipped with the
proper orice for Propane gas.
Caution: Do not connect this grill with any gas supply other than propane. propane gas is heavier than air
and settles in lower areas. Make certain adequate ventilation is available when using your grill. The propane gas cyl-
inder may be stored outside in a well-ventilated area out of the reach of children when the grill is not in use. If the
appliance is not in use, the gas must be turned off at the supply cylinder.
The propane gas cylinder shall be used only outdoors in a well-ventilated space and not in a building, garage, or
any other enclosed area. Grill may be stored indoor if the propane gas cylinder is removed and stored outdoor.
The LP gas cylinder (not included) is threaded for connection directly to the gas regulator supplied with this appli-
ance. Care should be taken when threading the cylinder to the regulator to engage threads correctly to achieve
the proper and intended connection. When disconnecting or connecting the propane gas cylinder, be careful
that the regulator does not strike the grill, the ground, or any other surfaces. Replace the protective cap over the
threaded cylinder connection when removed from grill. If any difculty occurs when connecting or disconnecting
the cylinder to the regulator assembly, contact your local gas supplier for assistance.
When re-connecting the propane gas cylinder to the regulator, be sure to hand-tighten until snug. This connection
should be inspected for damage and leak tested after each re-connection.
5
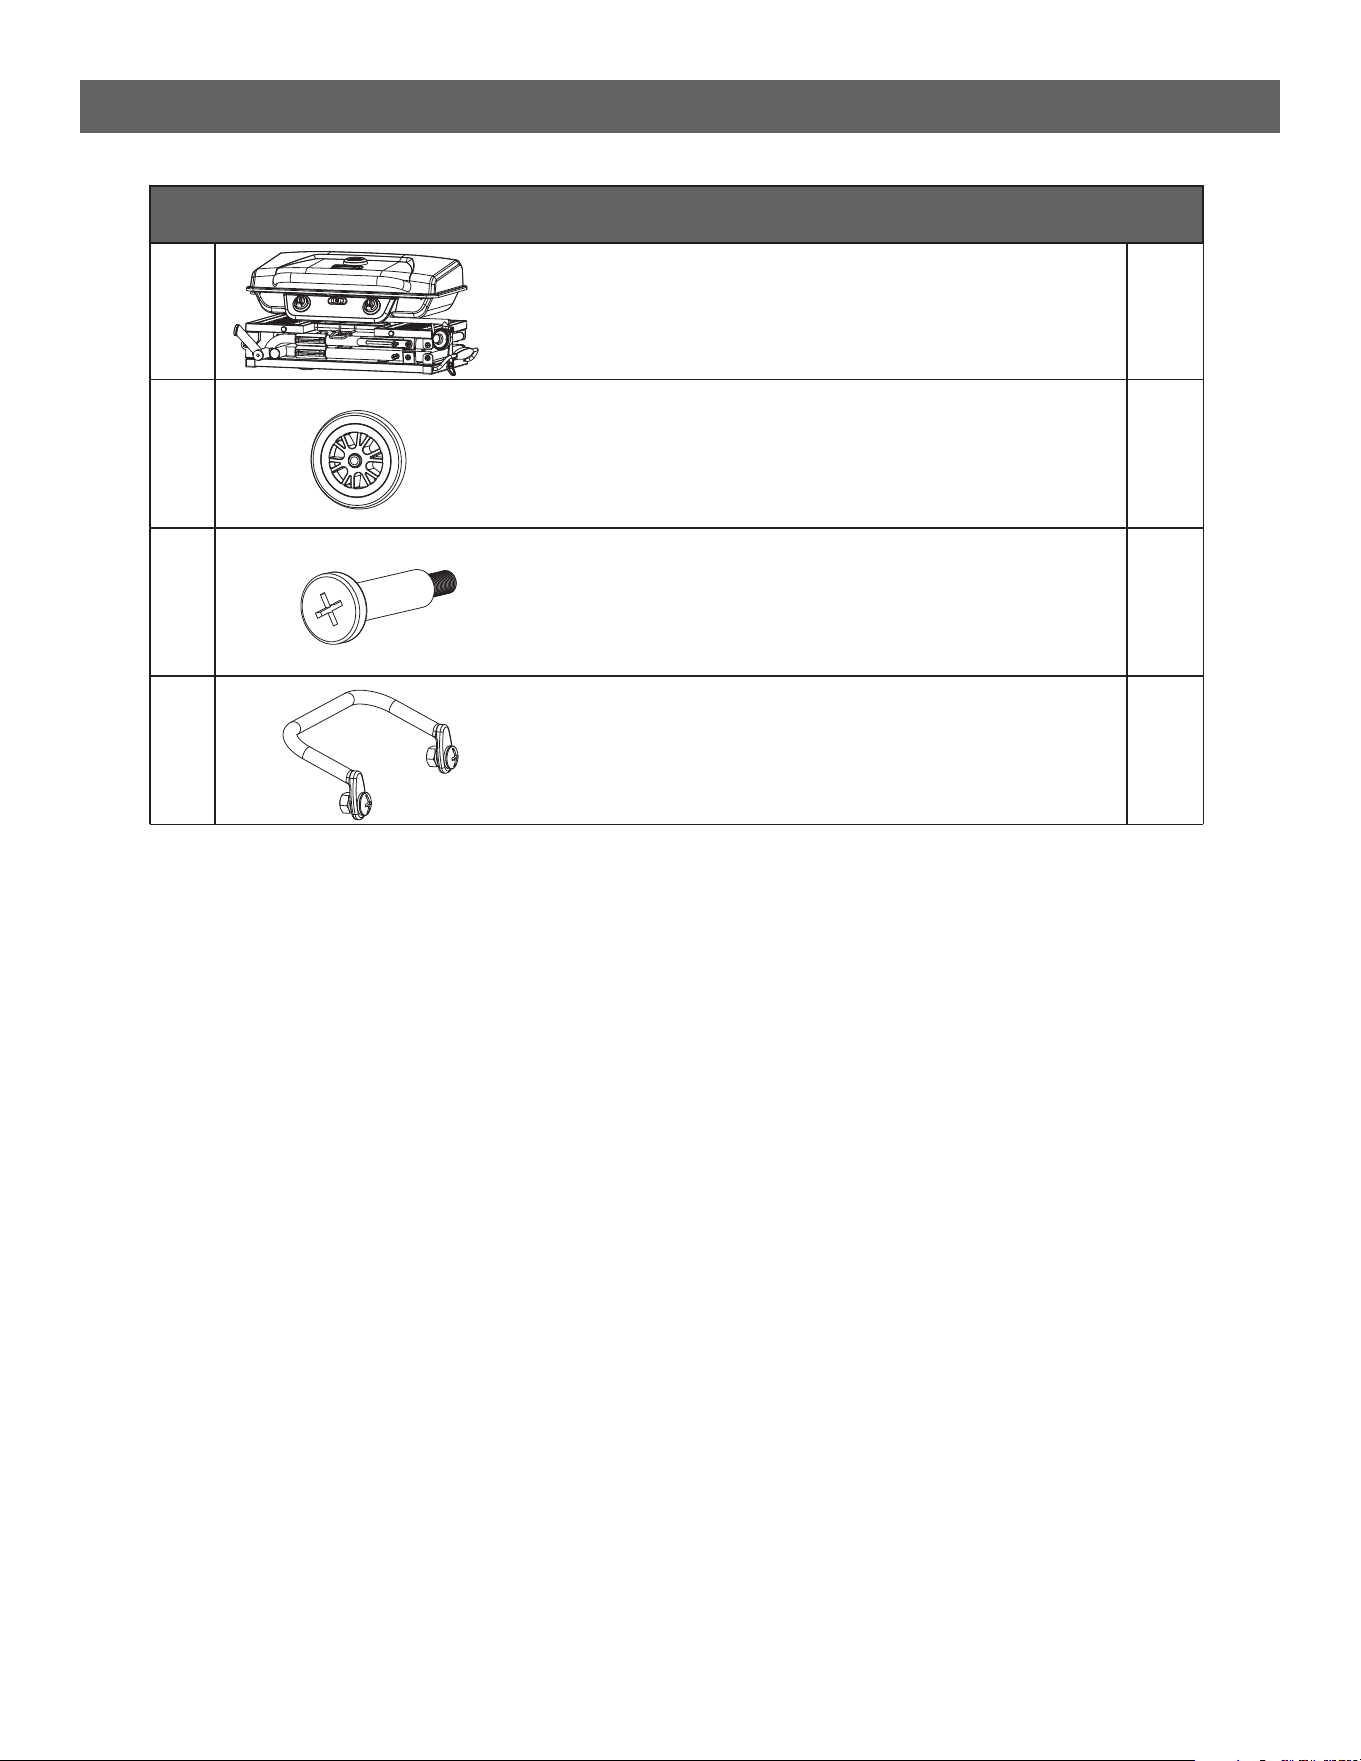
WHAT’S IN THE BOX
1
Wheel
Wheel Axel
Roll Bar
Prep ‘n Go Grill Assembly
with Storage Tote
1pc
2pc
2pc
2pc
2
3
4
PART DESCRIPTION QTY
6
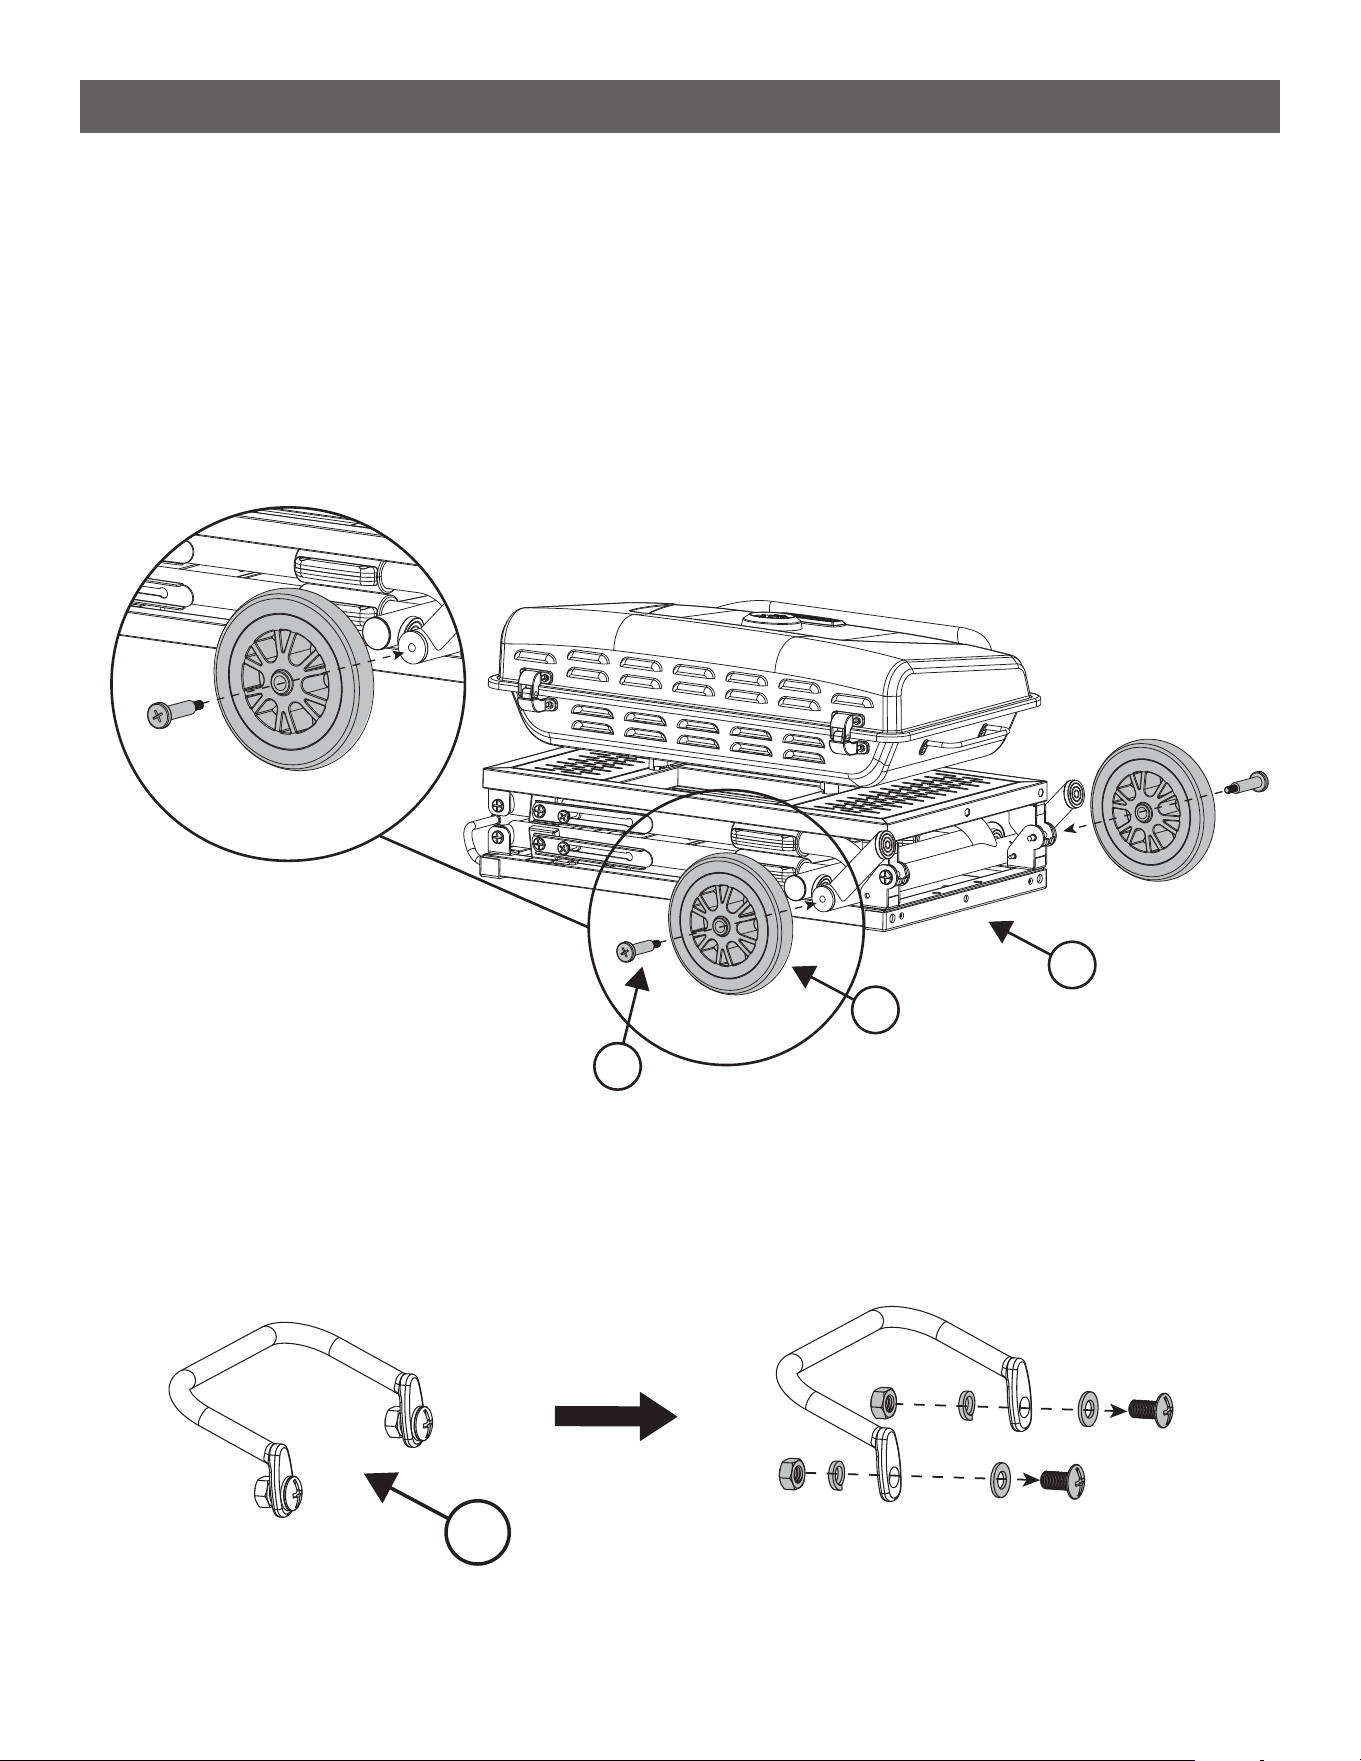
ASSEMBLY INSTRUCTIONS
Before beginning assembly, installation or operation of product, make sure all parts are present. Compare parts
with package contents list. If any part is missing or damaged, do not attempt to assemble, install or operate the
product. Contact customer service for replacement parts.
STEP 2
--------------------------------------------------------------------------------------
• Taking note of the order, disassemble the screws and washers from the Roll Bars (4).
STEP 1
--------------------------------------------------------------------------------------
• Attach the two Wheels (2) to the Prep ‘n Go Grill (1) using two Wheel Axles (3).
Estimated asembly time:
10 minutes
Tools you will need:
• Phillips Head Screwdriver
4
2
1
3
7
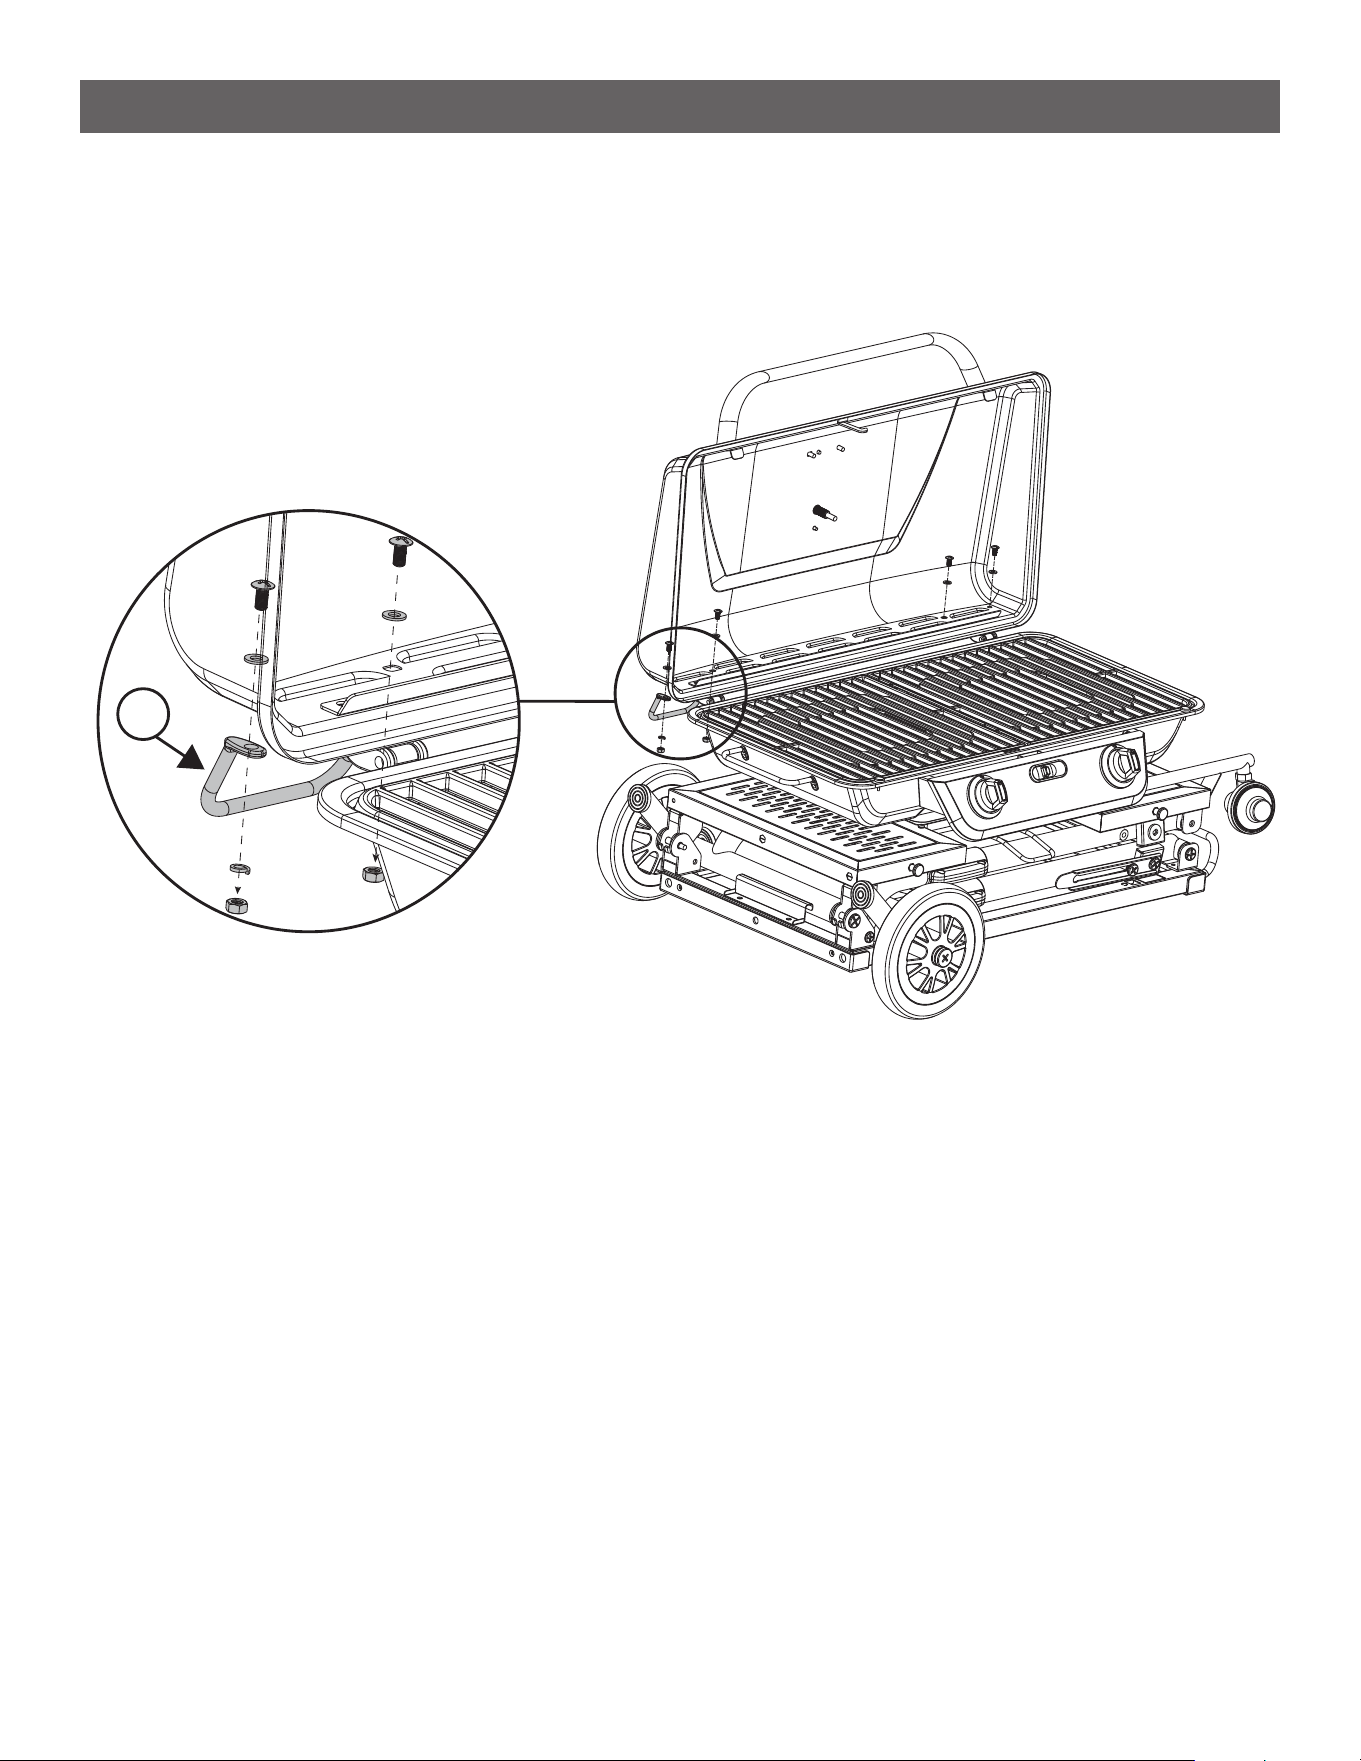
ASSEMBLY INSTRUCTIONS
STEP 3
--------------------------------------------------------------------------------------
• Unlock the grill lid and assemble the two Roll Bars (4) to the back of the lid, maintaining the washer order
from Step 2.
• The Roll Bars should angle upwards, ensuring they are higher up on the lid.
4
8
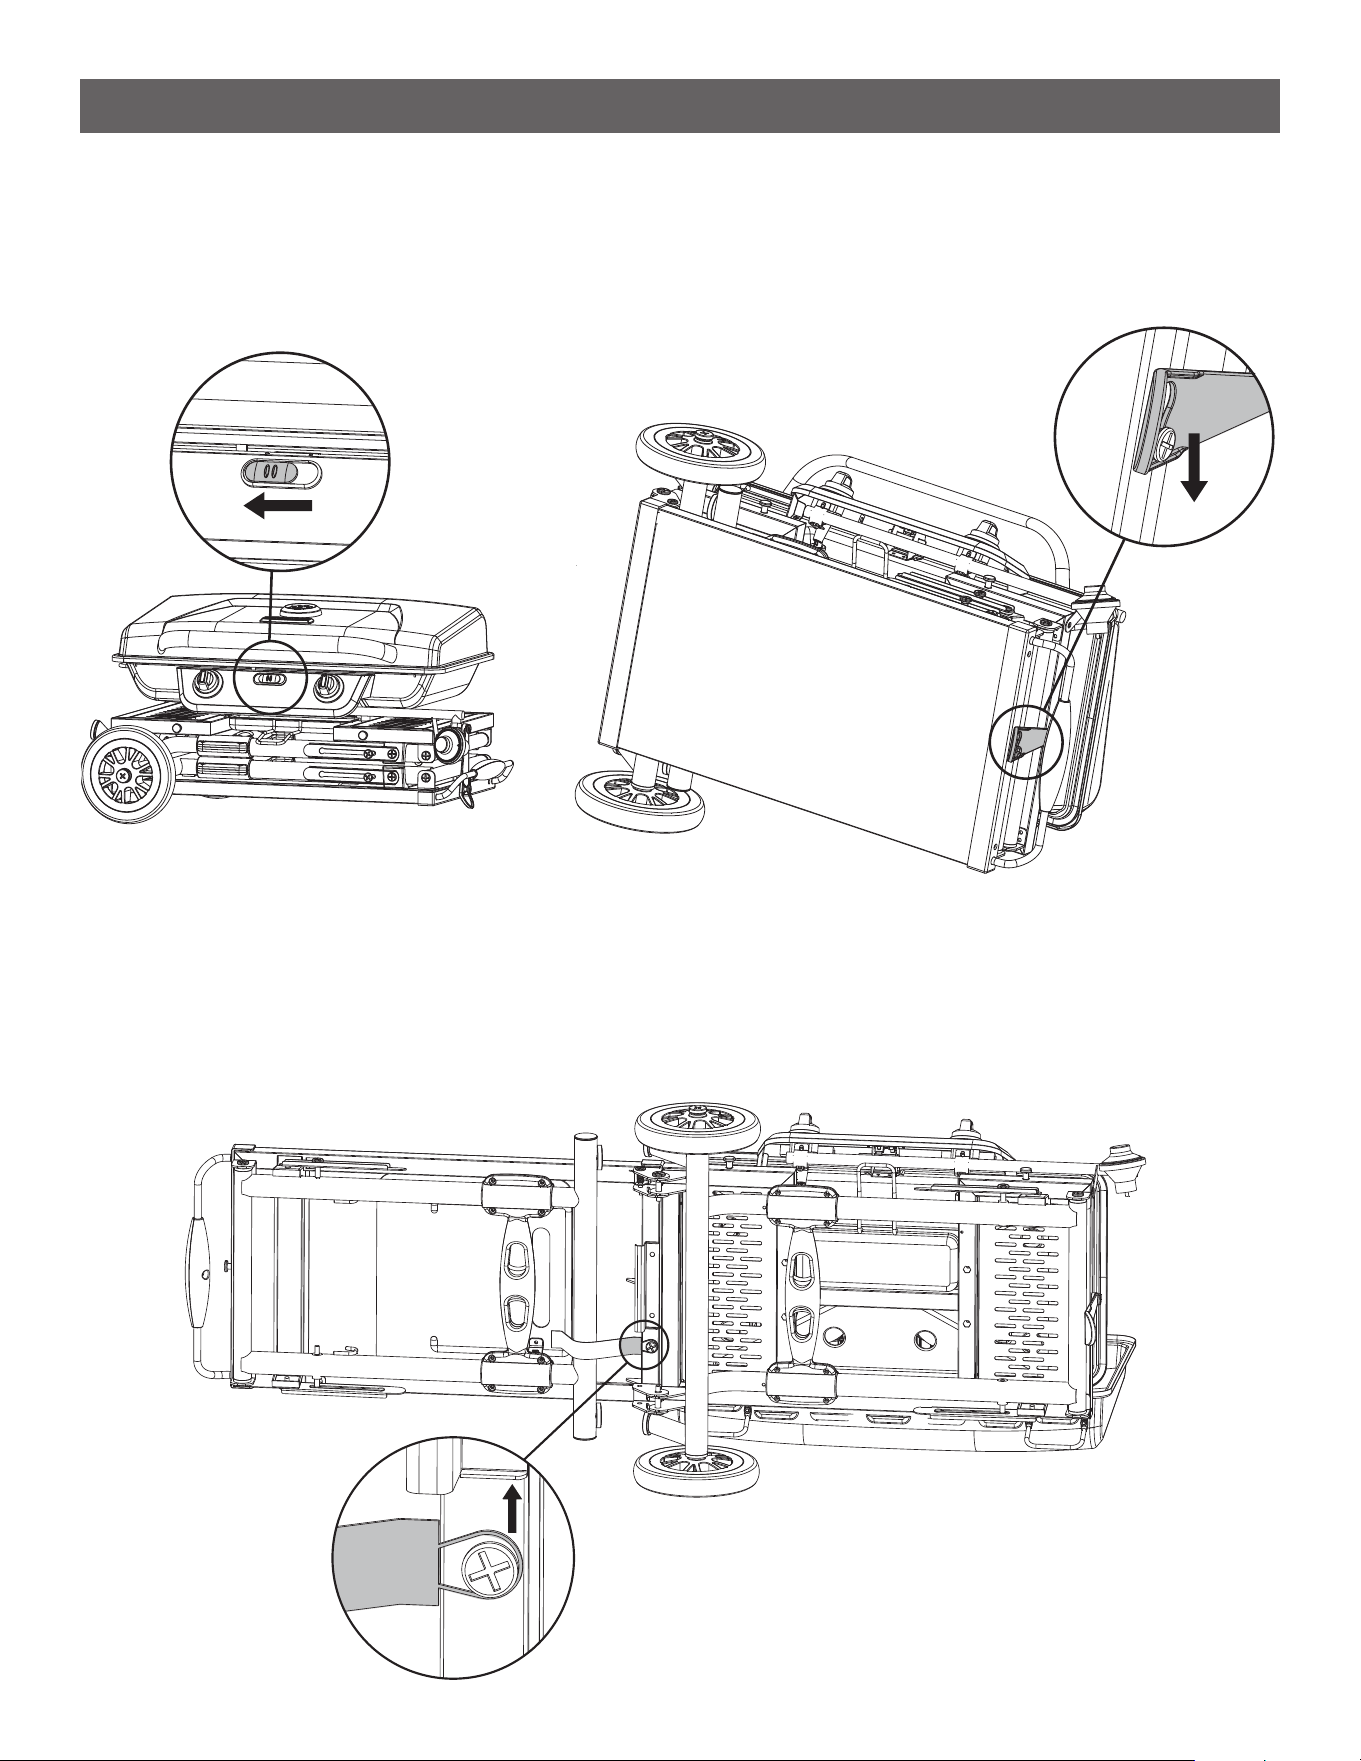
SETUP INSTRUCTIONS: UNFOLDING
STEP 1
--------------------------------------------------------------------------------------
• Ensure the lid is locked by pushing the lid lock to the left.
• Lift the front side of the grill so that it is standing on the rear wheel and the roll bars behind the lid.
• Press the red latch down on the right side to unlock the unit and rotate the latch out of the way.
STEP 2
--------------------------------------------------------------------------------------
• Swing the table out from under the grill until it locks in place.
• Unhook the strap holding the left legs in place.
9
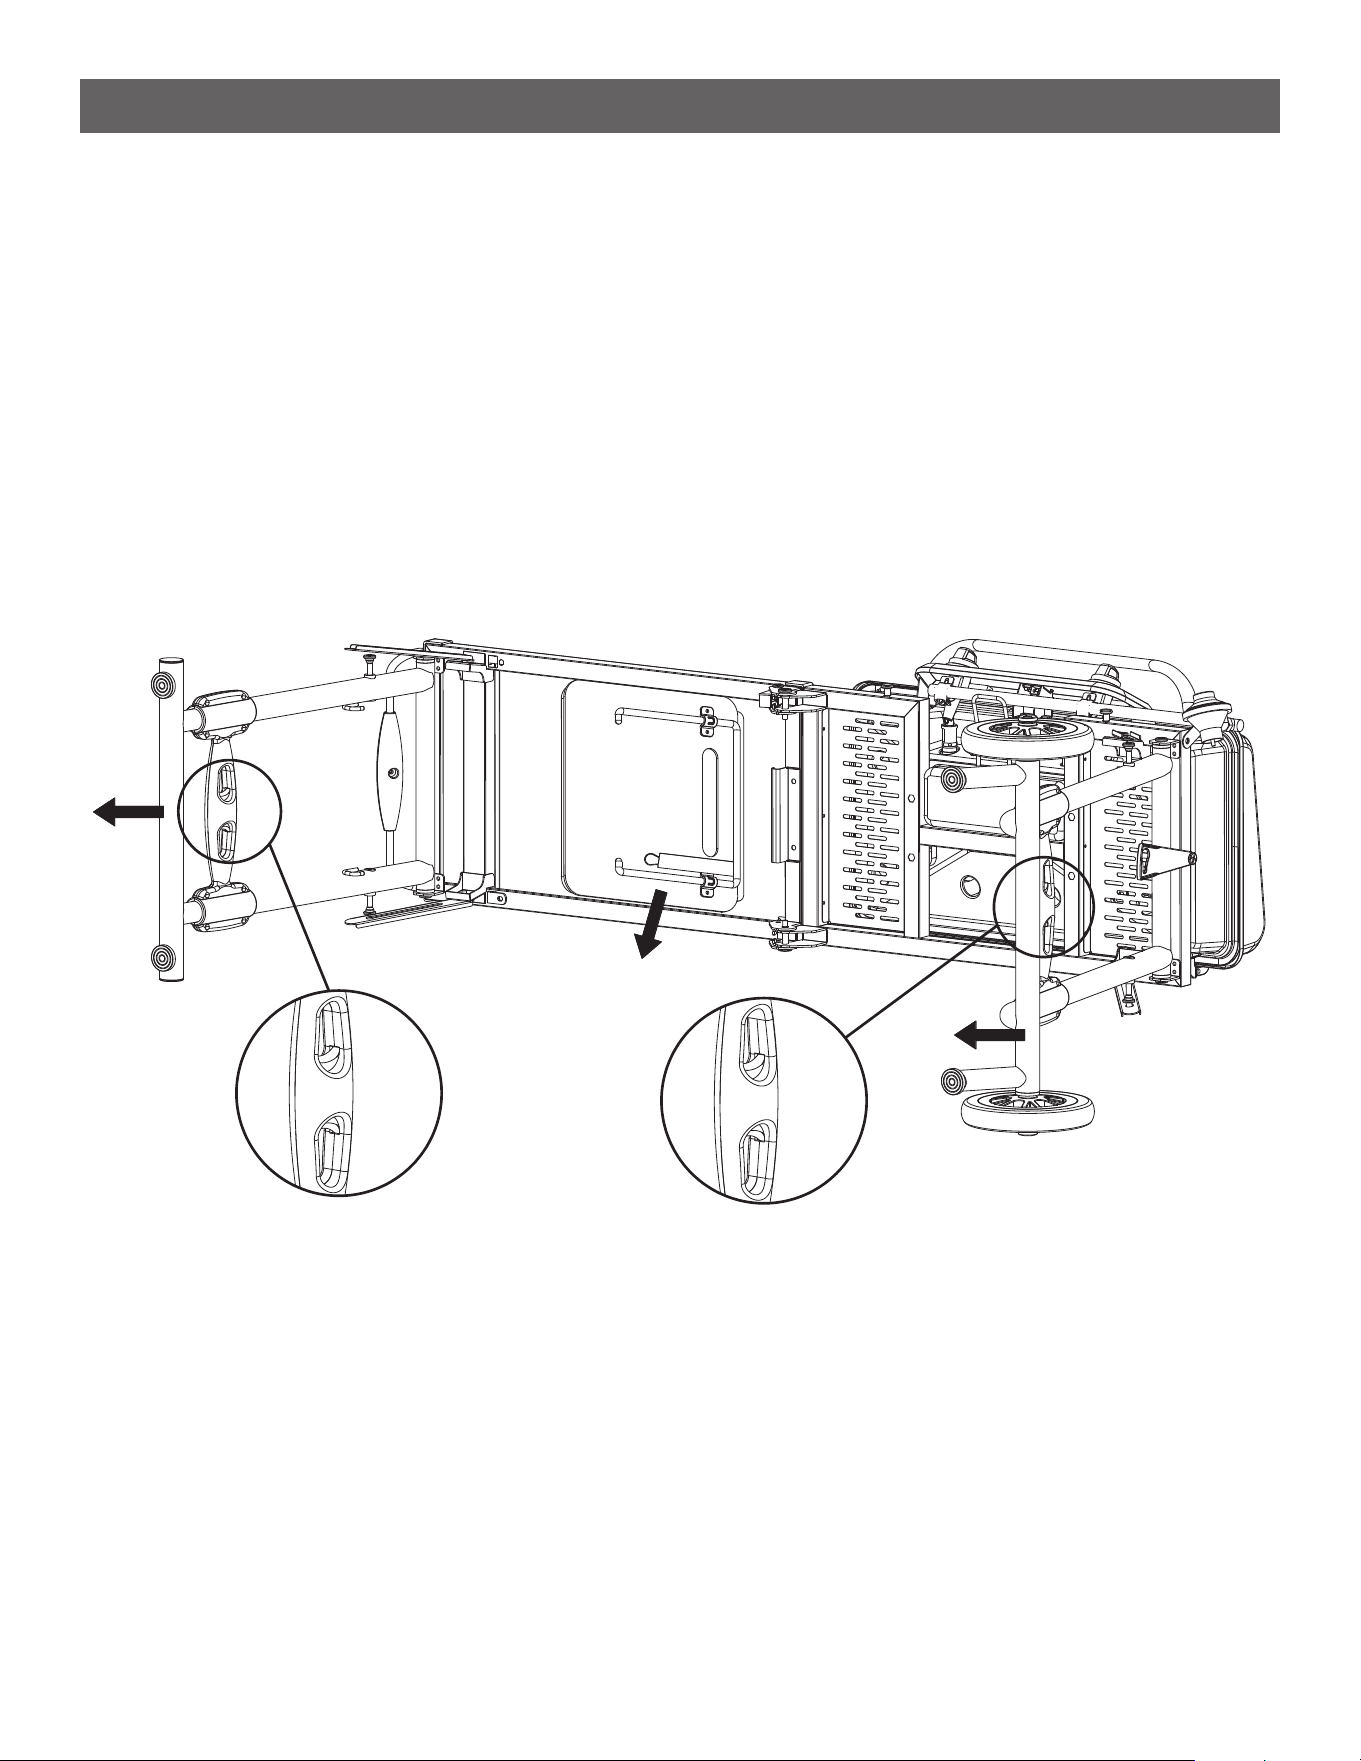
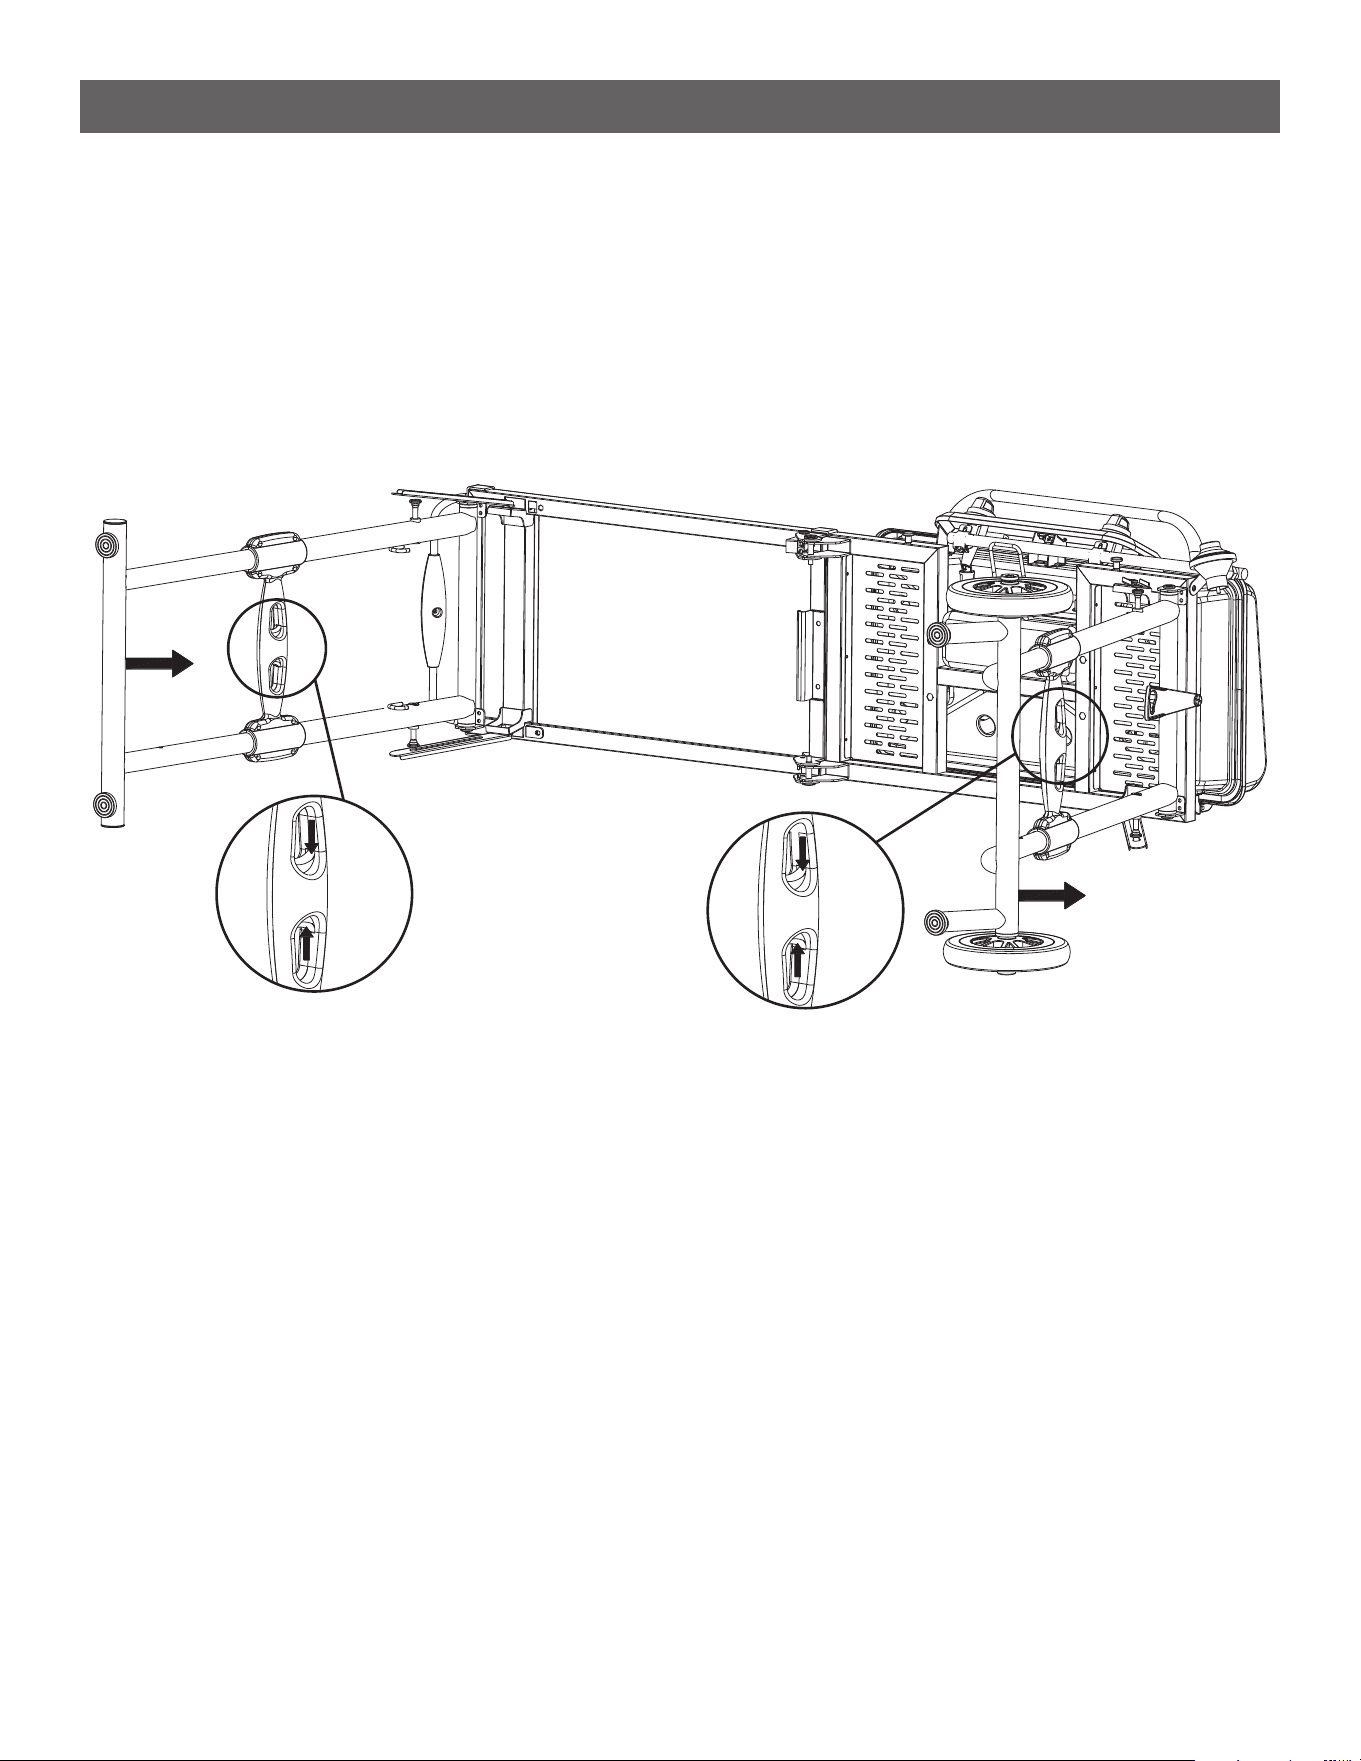
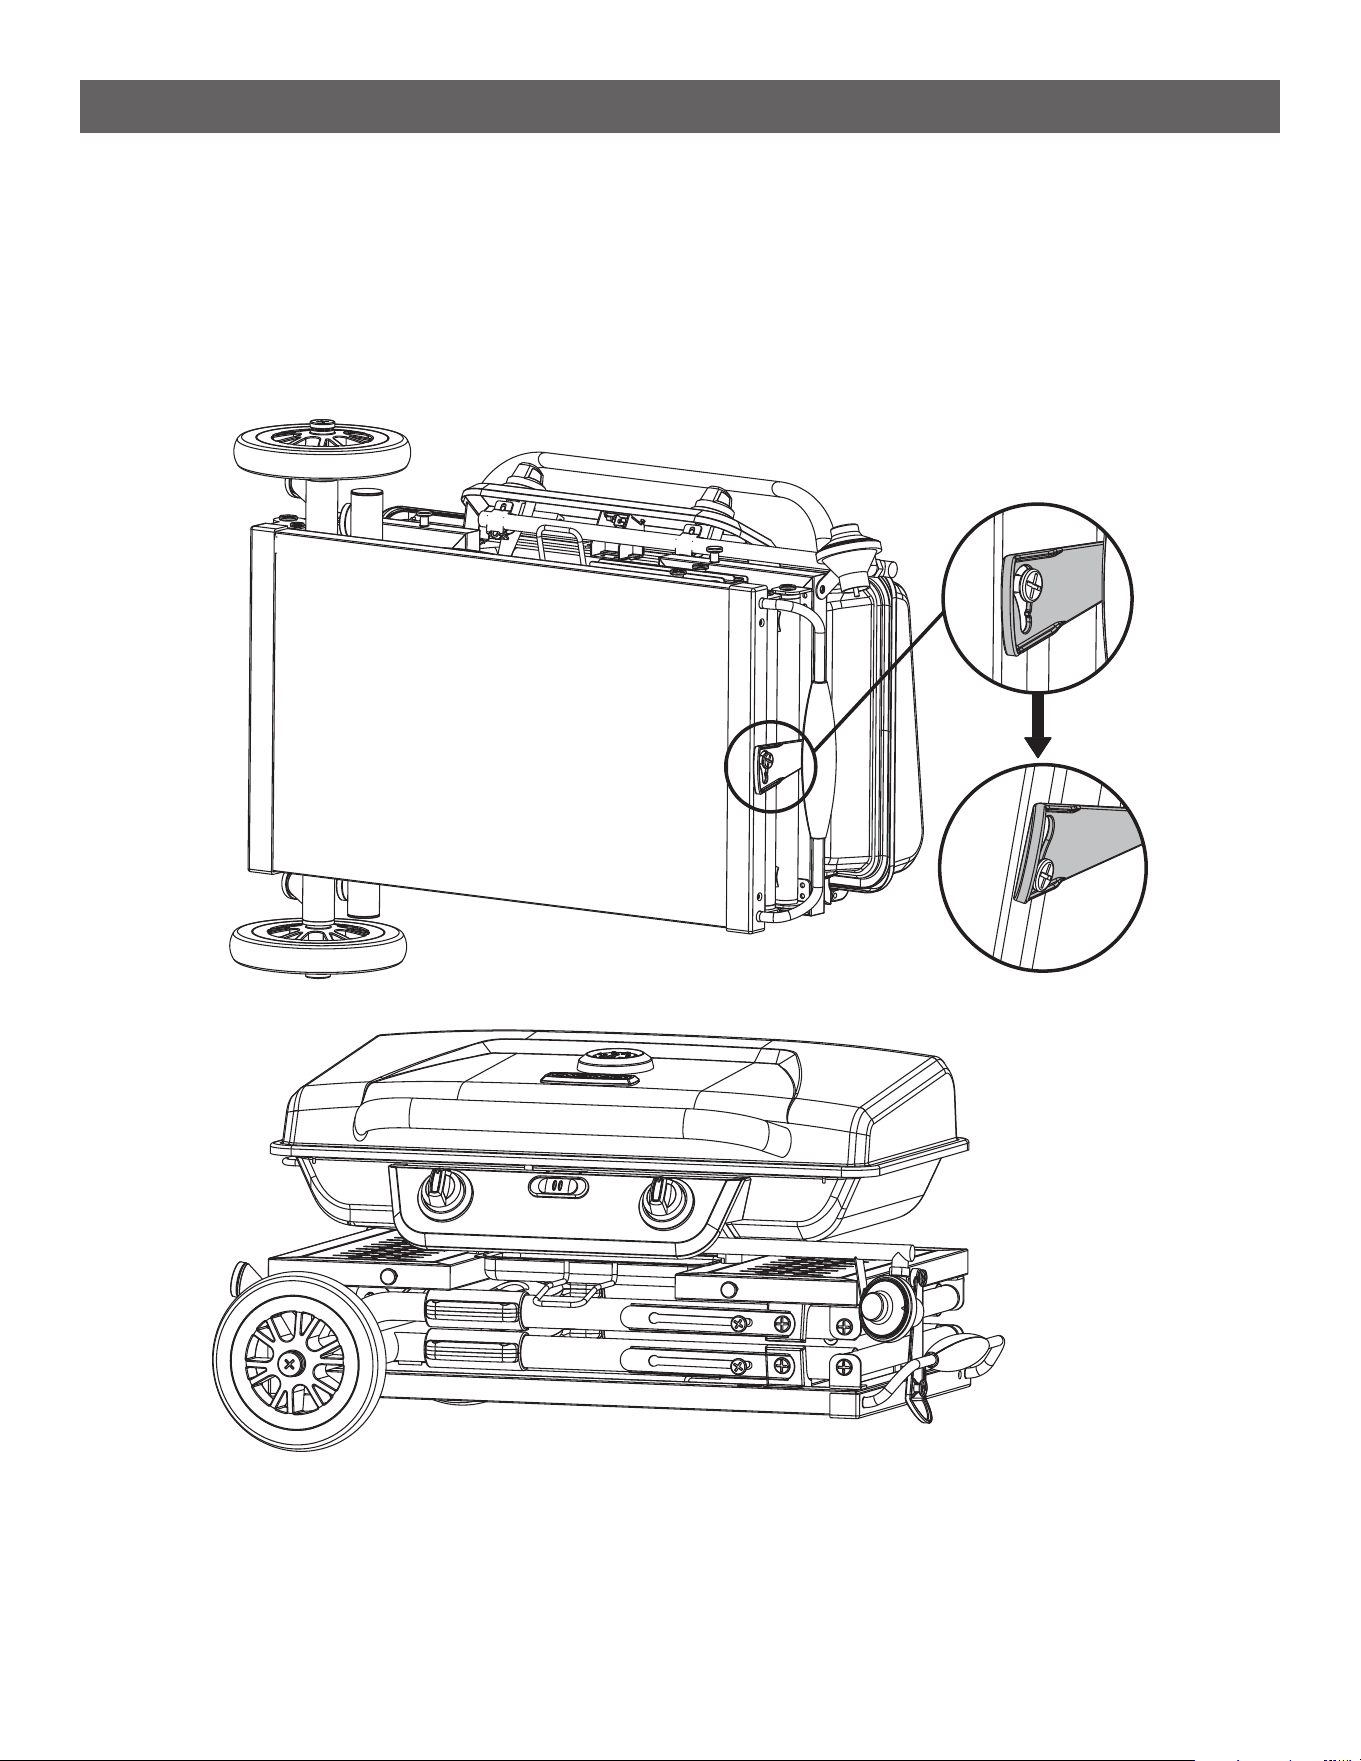
SETUP INSTRUCTIONS: UNFOLDING
STEP 3
--------------------------------------------------------------------------------------
• First, swing the legs with wheels out from under the grill until they lock in place. The legs will open past 90
degrees; this is normal and helps with stability.
• Next, swing the legs out from under the table until they lock in place
• The storage tote will now be accessible, set it aside for now.
• Extend both legs by holding the lock triggers together and pulling the legs out on each side until they lock
in place.
10
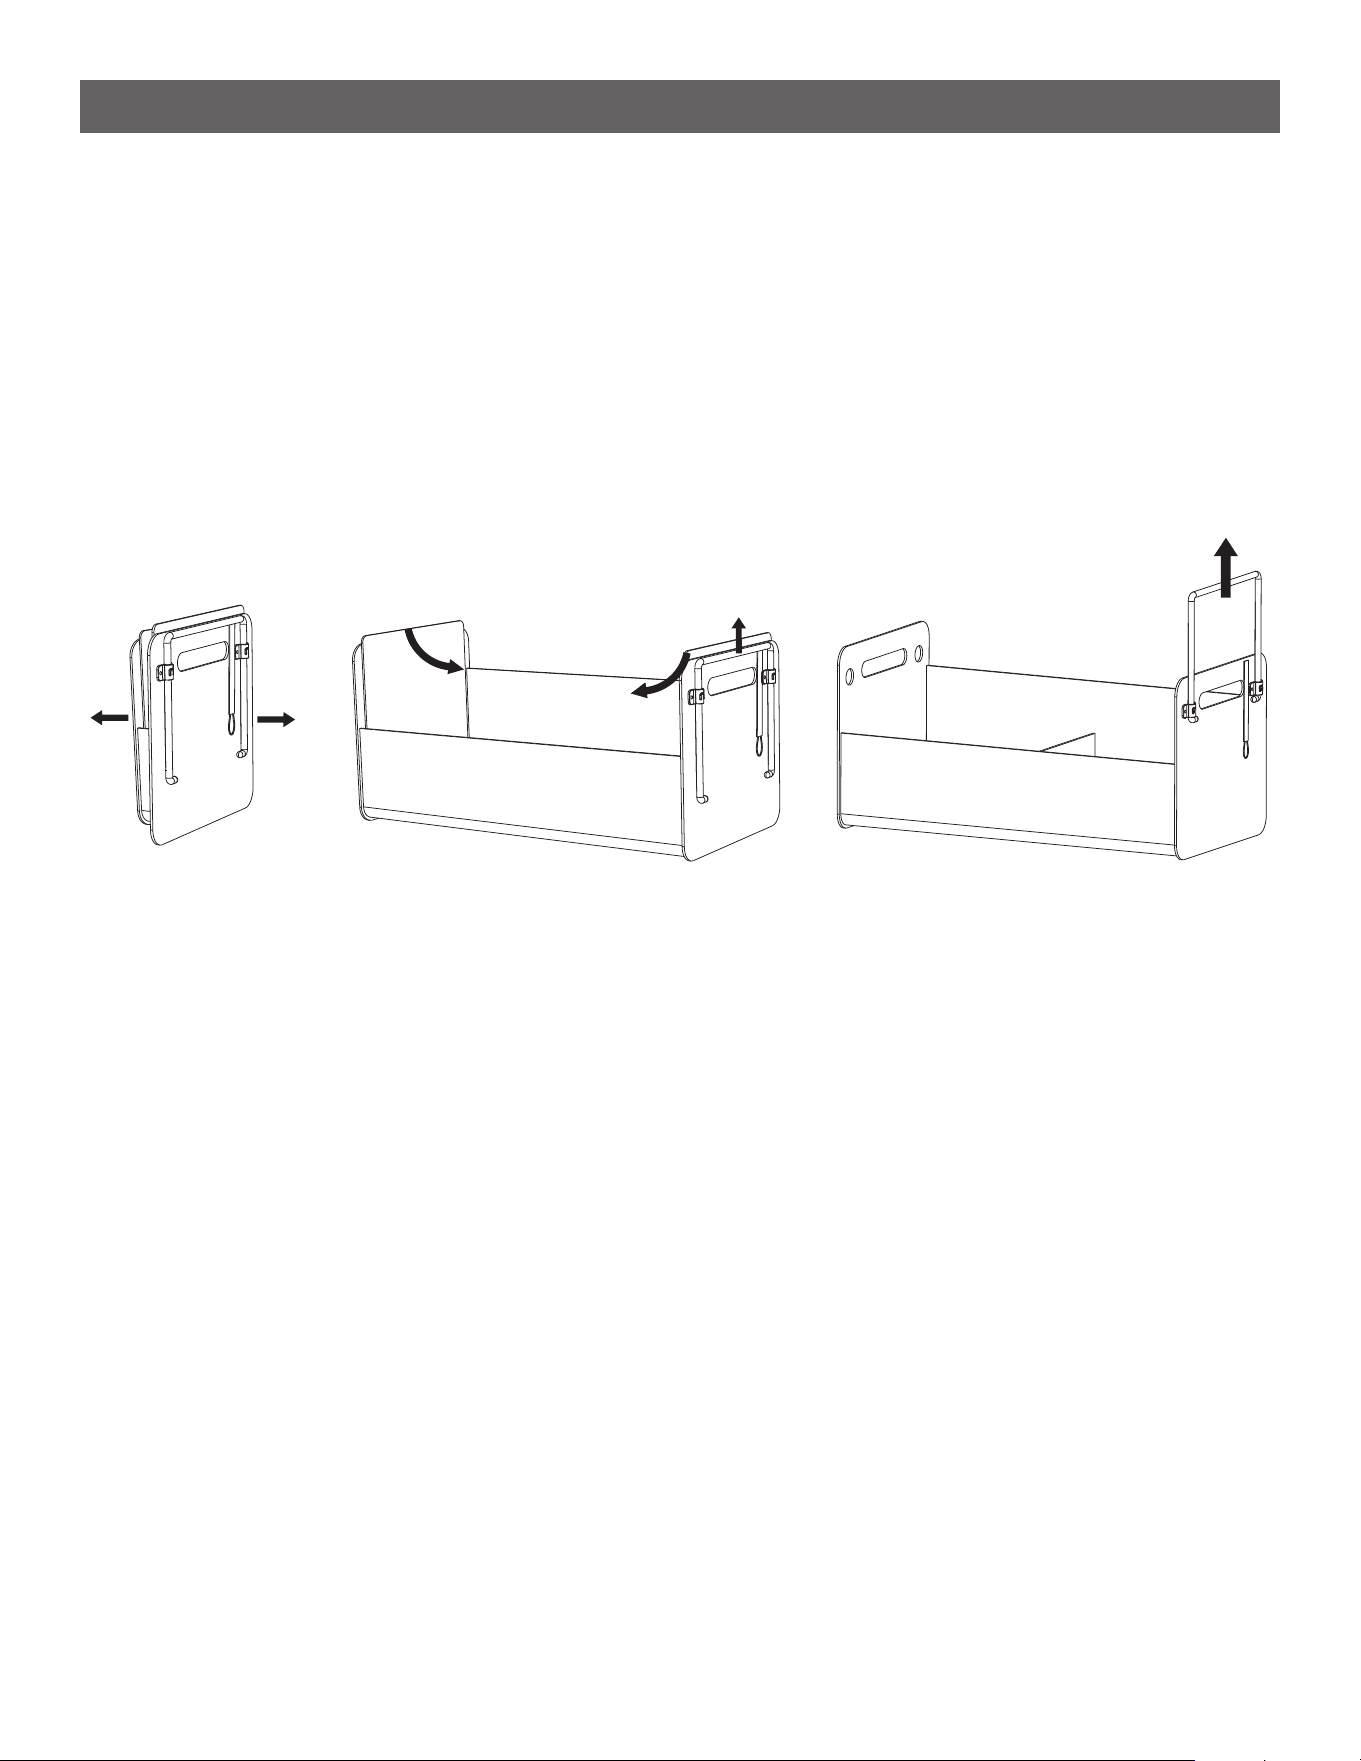
SETUP INSTRUCTIONS: UNFOLDING
STEP 4
--------------------------------------------------------------------------------------
• Take the storage tote and pull it open by the two handles.
• Place the two hard panels at at the bottom of the tote to provide sturdy support.
• Pull the plastic hanging frame up from the right side until it clicks in place.
11
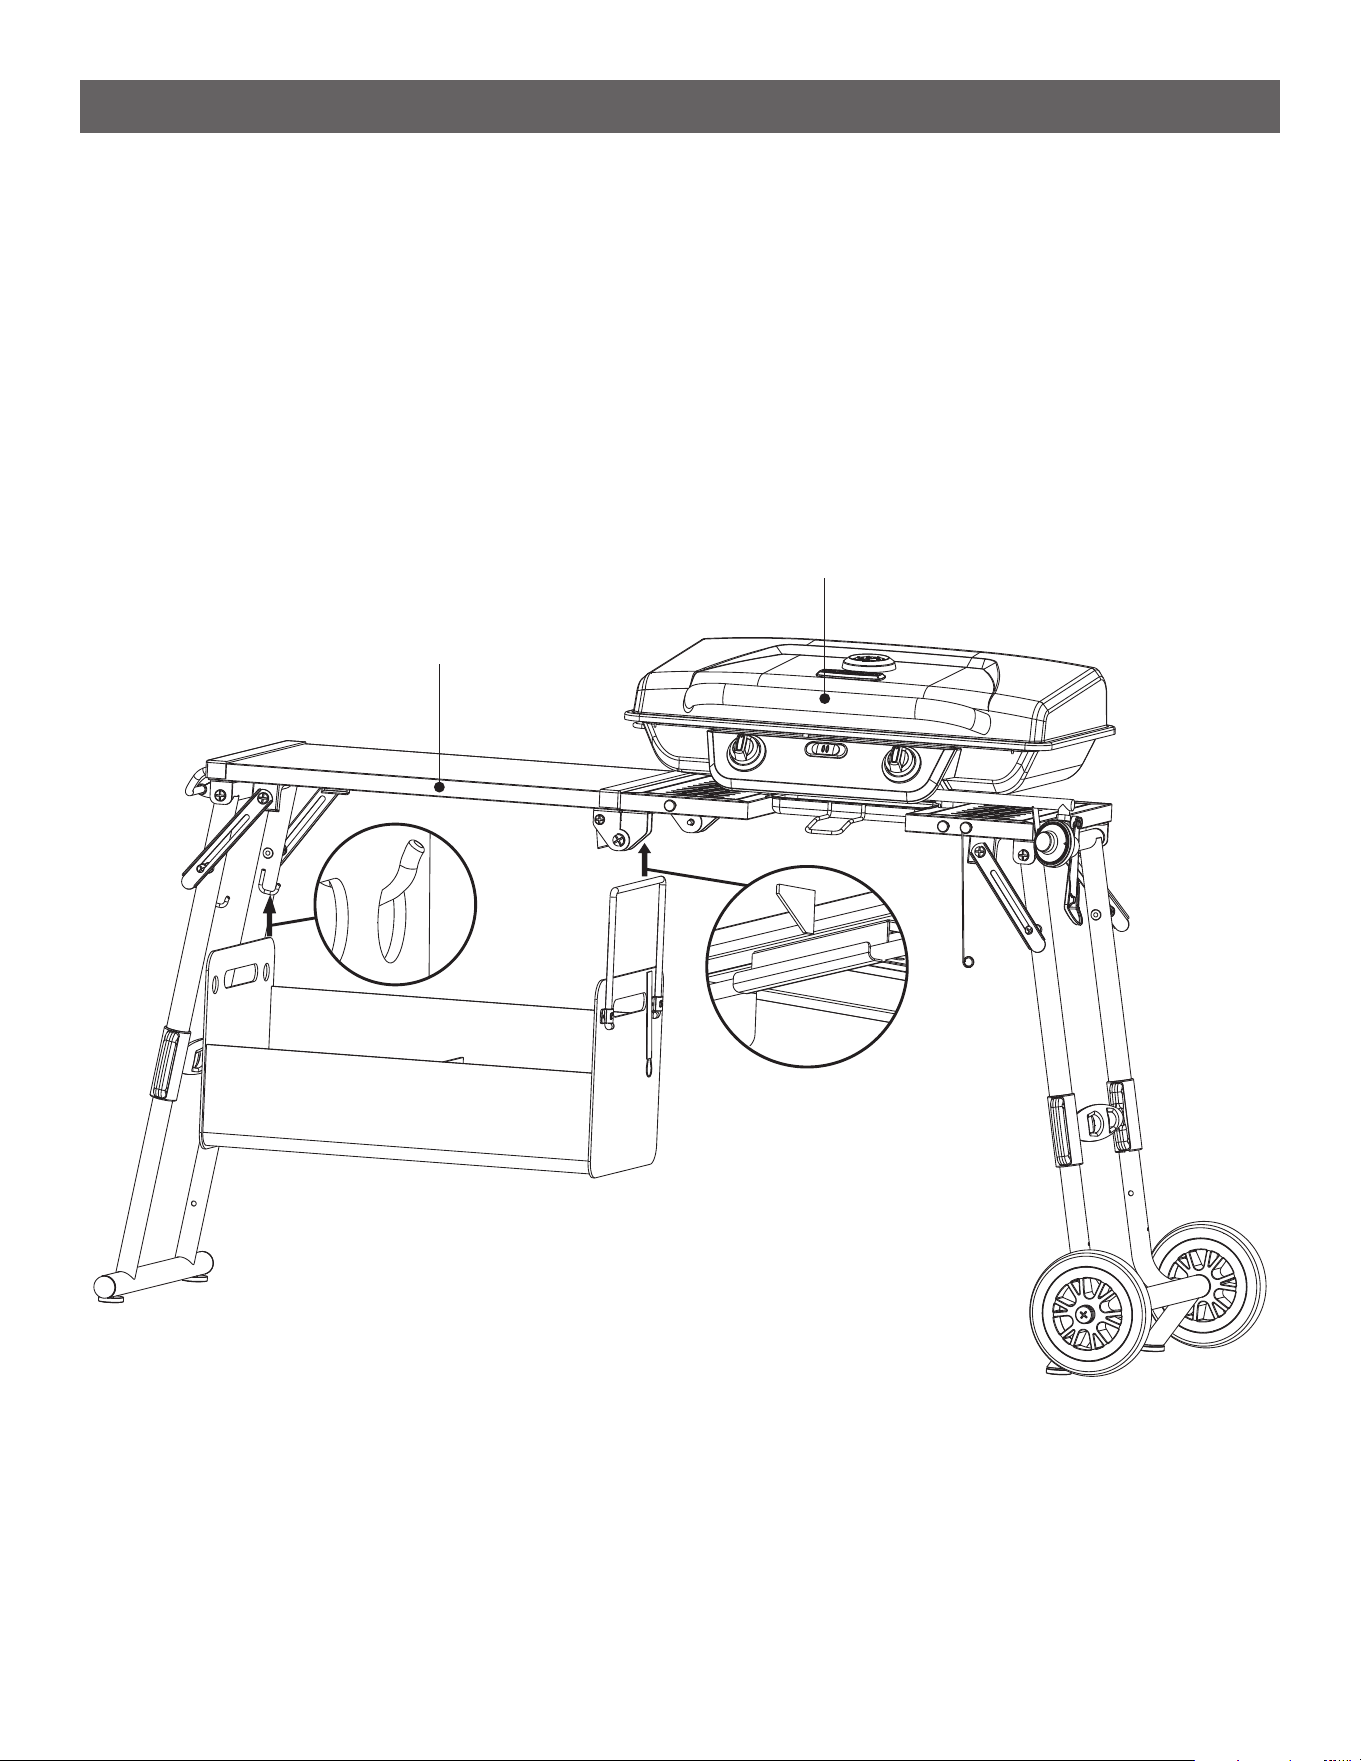
SETUP INSTRUCTIONS: UNFOLDING
STEP 5
--------------------------------------------------------------------------------------
• Lift the grill onto its legs by grabbing the grill lid handle and underneath the front edge of the table. Gently
pull the legs apart to ensure the grill is stable.
• Hook the fabric tote under the table. There are two wire hooks on the left legs that hook into the steel rings
on the left side of the tote. See Detail [I]. On the right side of the table there is a long steel hook for the
plastic hanging frame. See Detail [II].
Grab here to lift
Grab here to lift
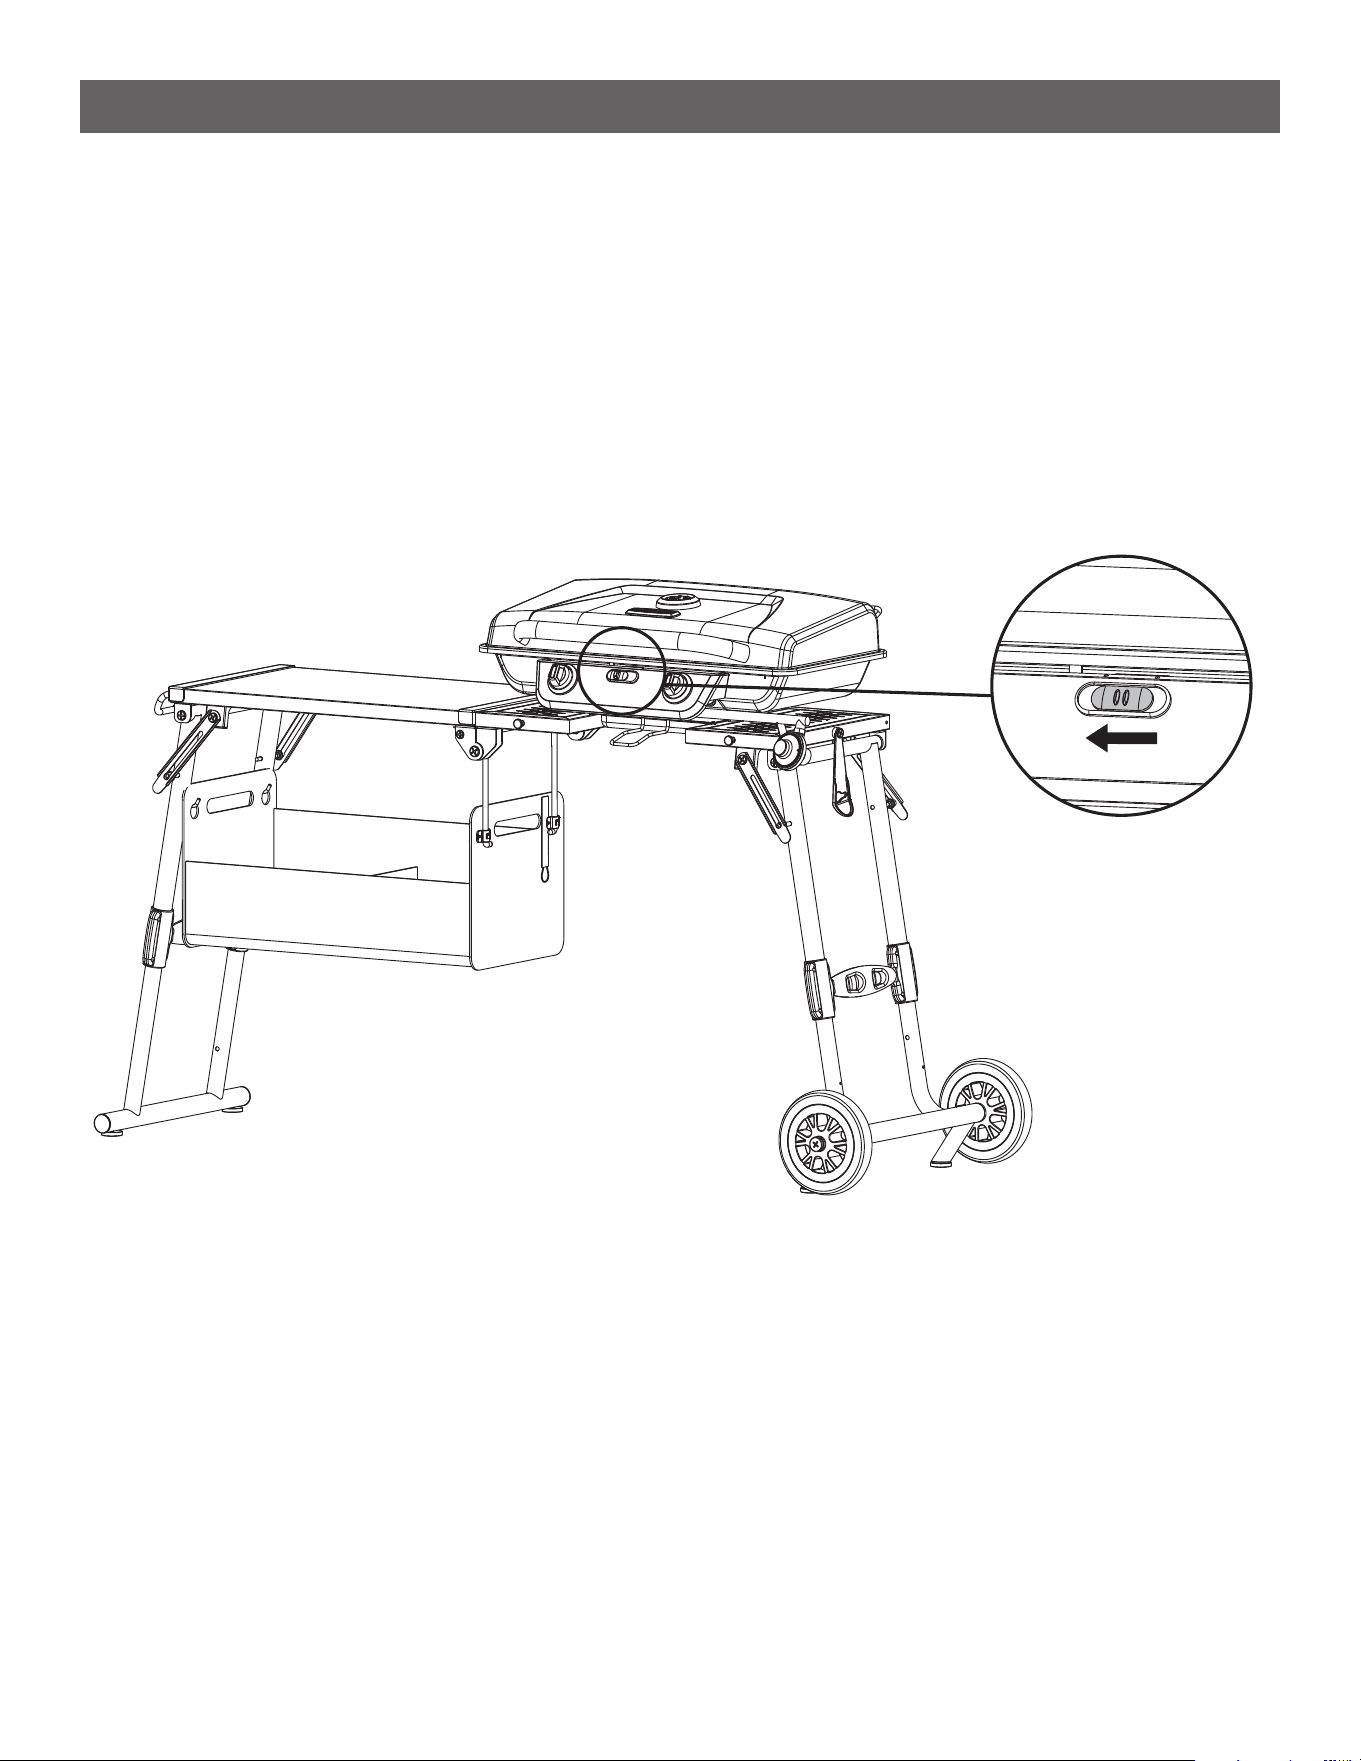
12
SETUP INSTRUCTIONS: FOLDING
STEP 1
--------------------------------------------------------------------------------------
• Ensure the grill has cooled completely, the grill grates are in place and the lid is fully closed and locked.
• Remove the propane tank and empty the grease cup.
13
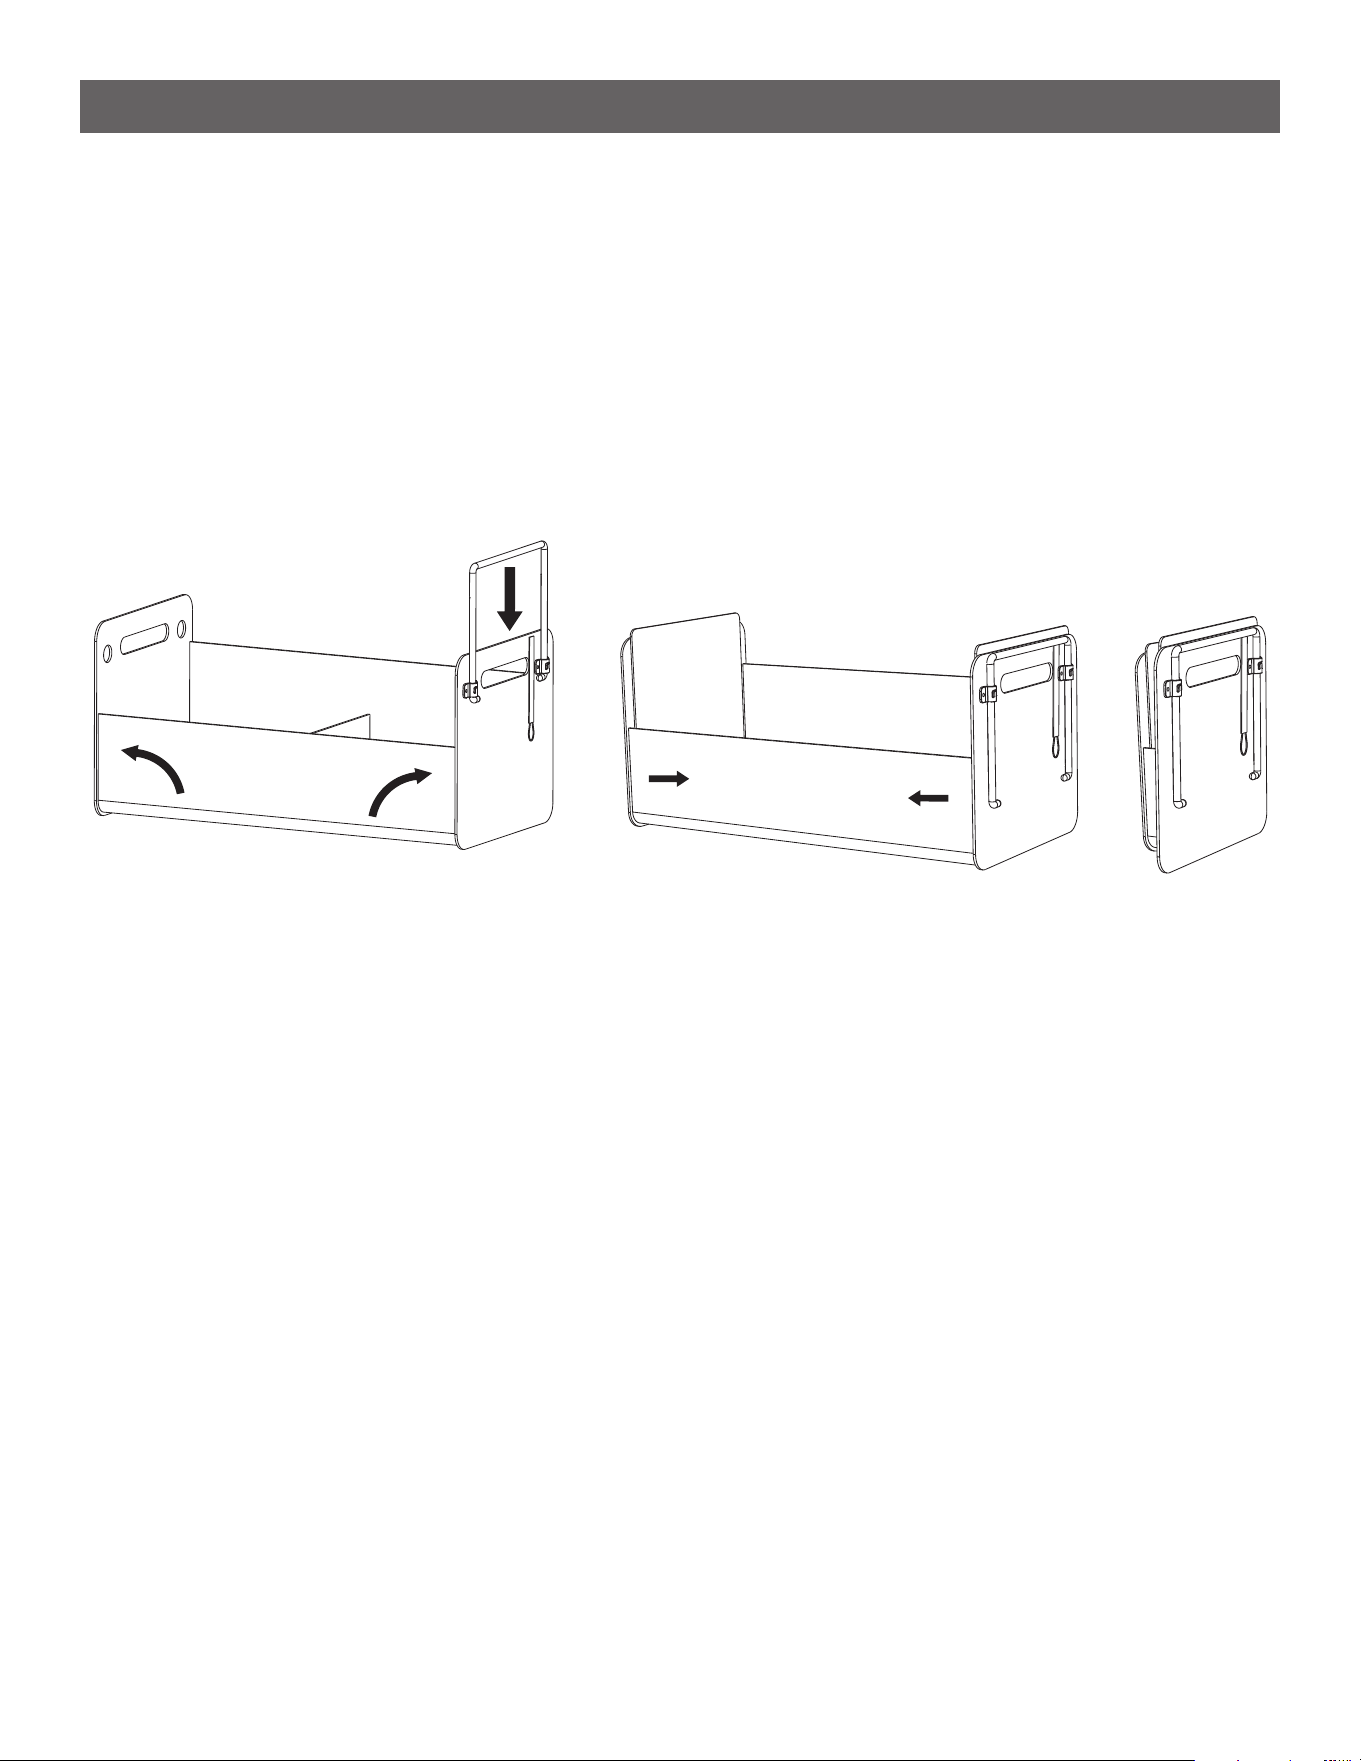
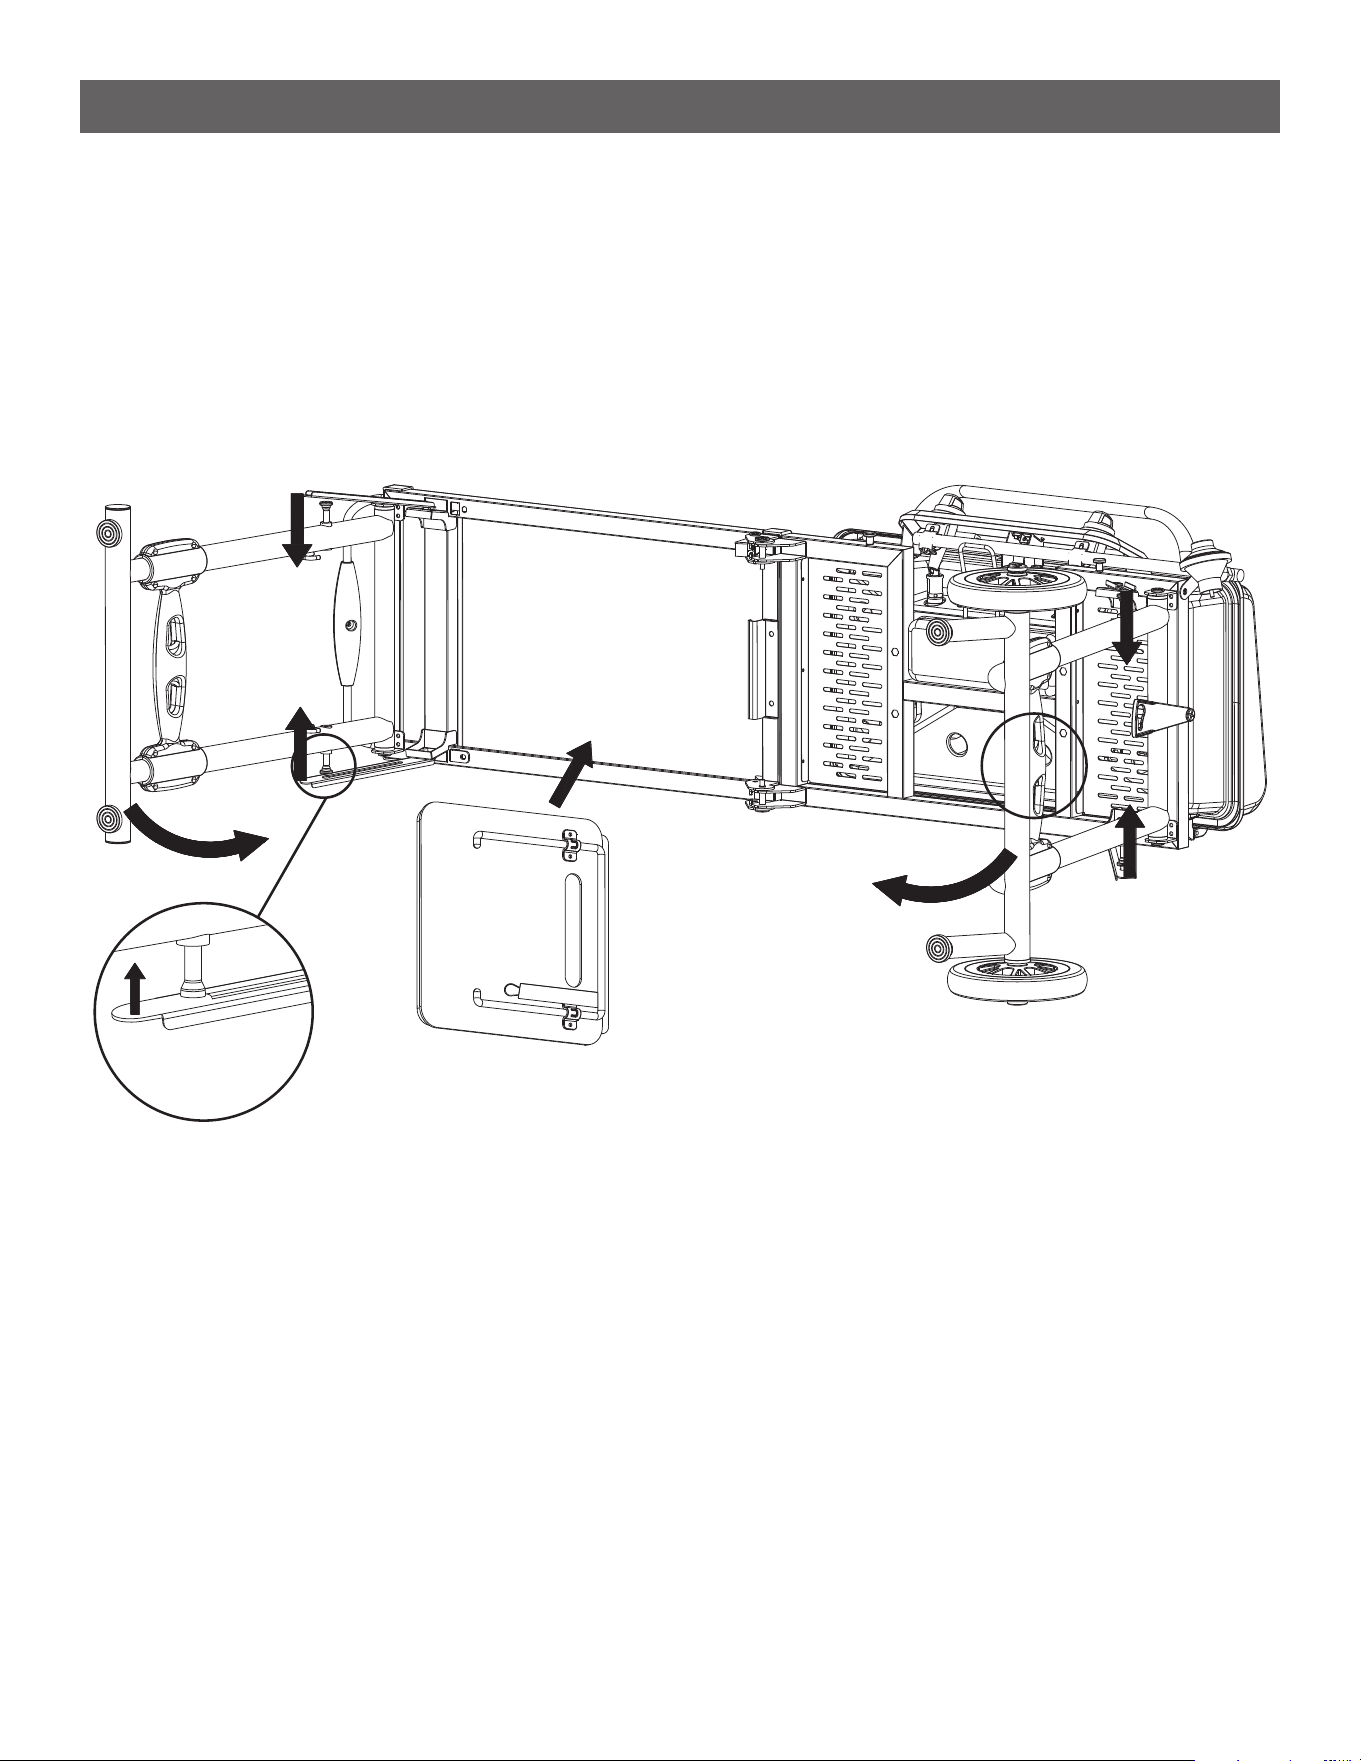
SETUP INSTRUCTIONS: FOLDING
STEP 2
--------------------------------------------------------------------------------------
• Remove the storage tote and push the plastic hanging frame down.
• Pull up the two hard panels.
• Press the two sides of the tote together ensuring all the panels and fabric folds neatly.
14
SETUP INSTRUCTIONS: FOLDING
STEP 3
--------------------------------------------------------------------------------------
• Gently lay the grill onto the Roll Bars by holding the grill lid handle and underneath the front edge of the
table.
• Retract both legs by holding the lock triggers together and pushing the legs in on each side.
15
SETUP INSTRUCTIONS: FOLDING
STEP 4
--------------------------------------------------------------------------------------
• Hold down the ends of both the front and back corner braces of the left leg, then fold the leg in. The
storage tote can be tucked between the table and the now-folded leg.
• Repeat the process to fold in the legs on the grill side.
16
SETUP INSTRUCTIONS: FOLDING
STEP 5
--------------------------------------------------------------------------------------
• Ensure the storage tote is placed correctly. The plastic hanging frame should be facing out with the strap
close to the right side.
• Pull the strap out from under the leg, wrap it over the leg itself, and hook it to the fastener under the table.
The left leg and the carry tote will be secured together when done correctly.
17
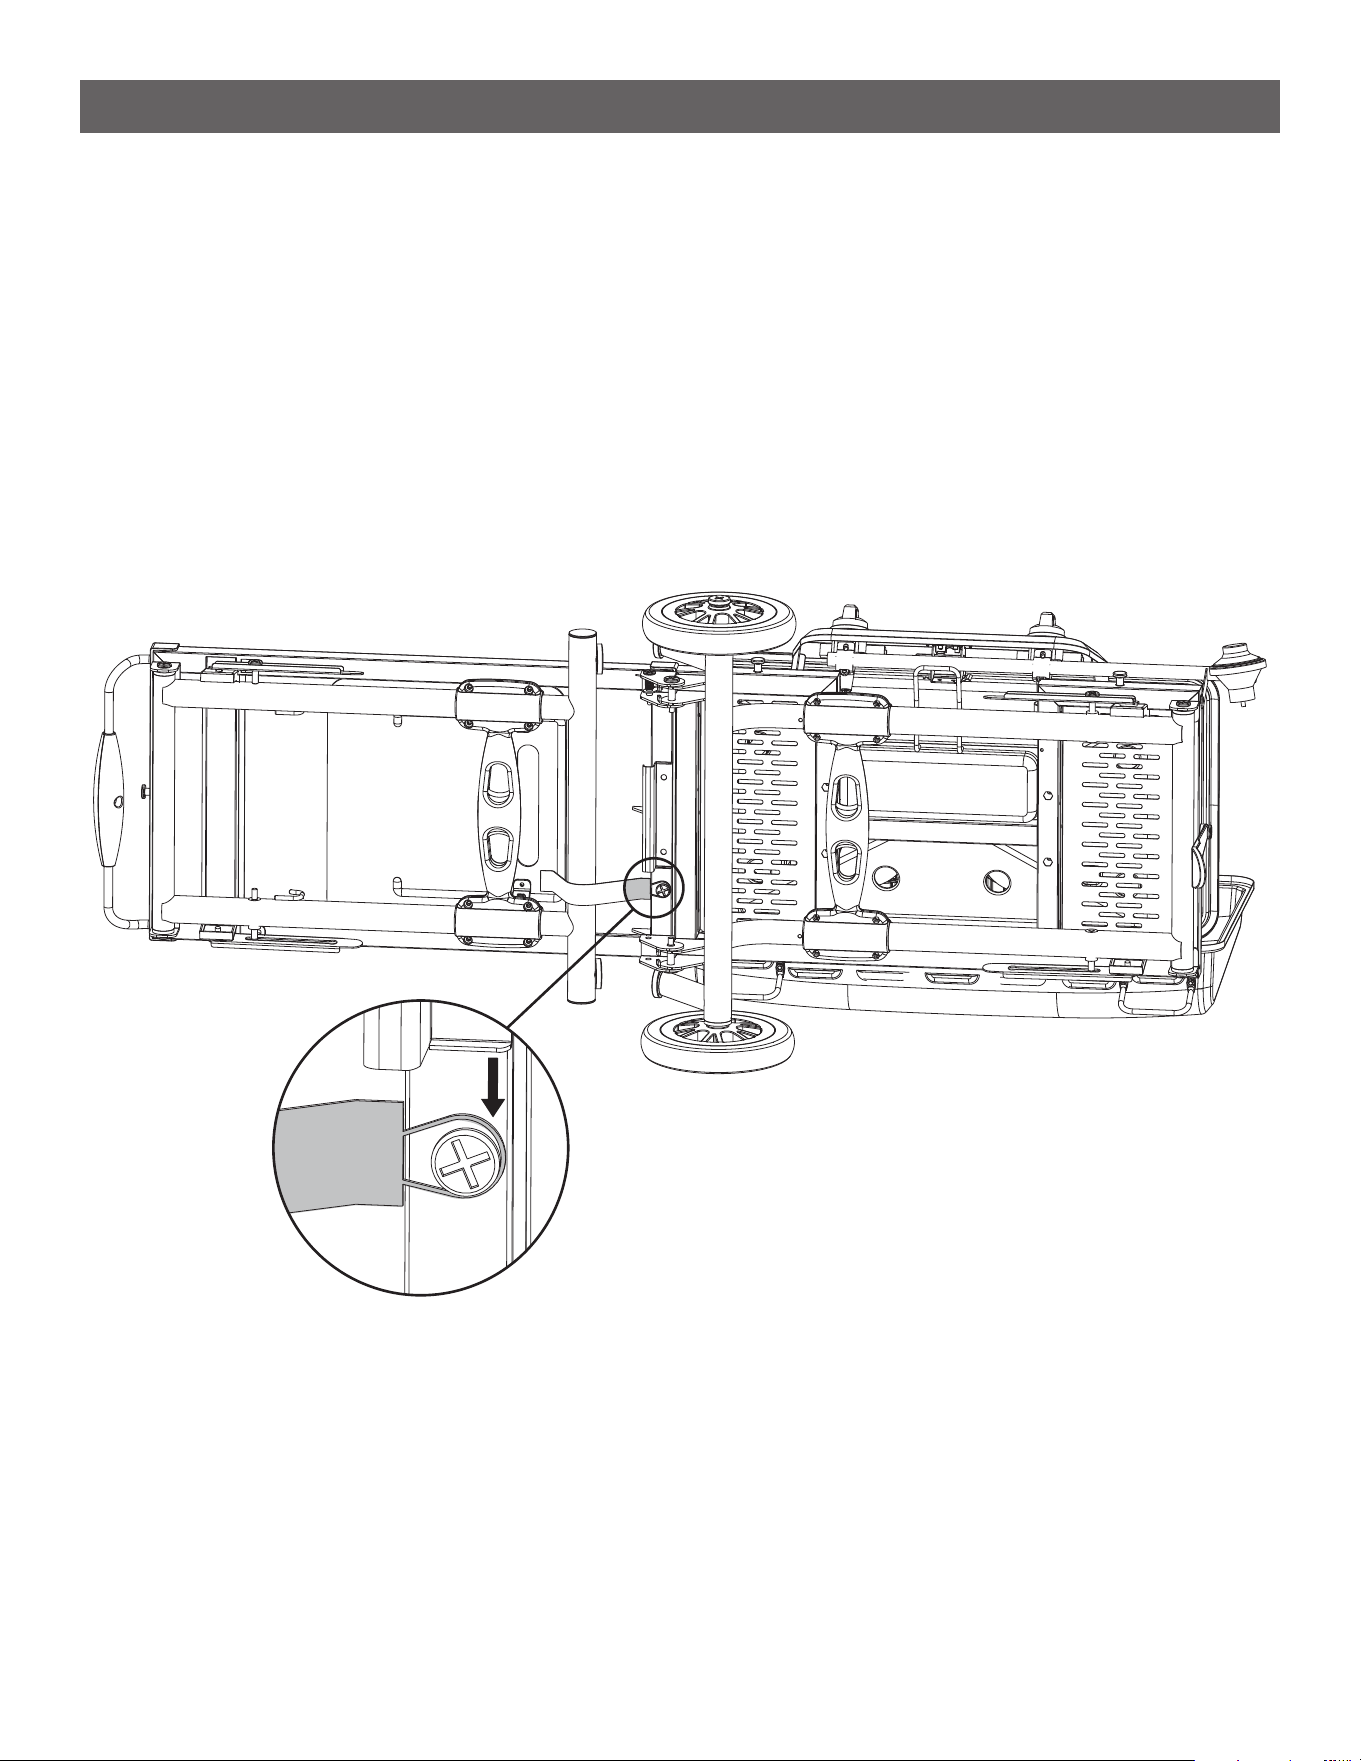
SETUP INSTRUCTIONS: FOLDING
STEP 6
--------------------------------------------------------------------------------------
• Release the lock on the center hinge by holding it back slightly.
• Fold the table side under the grill.
18
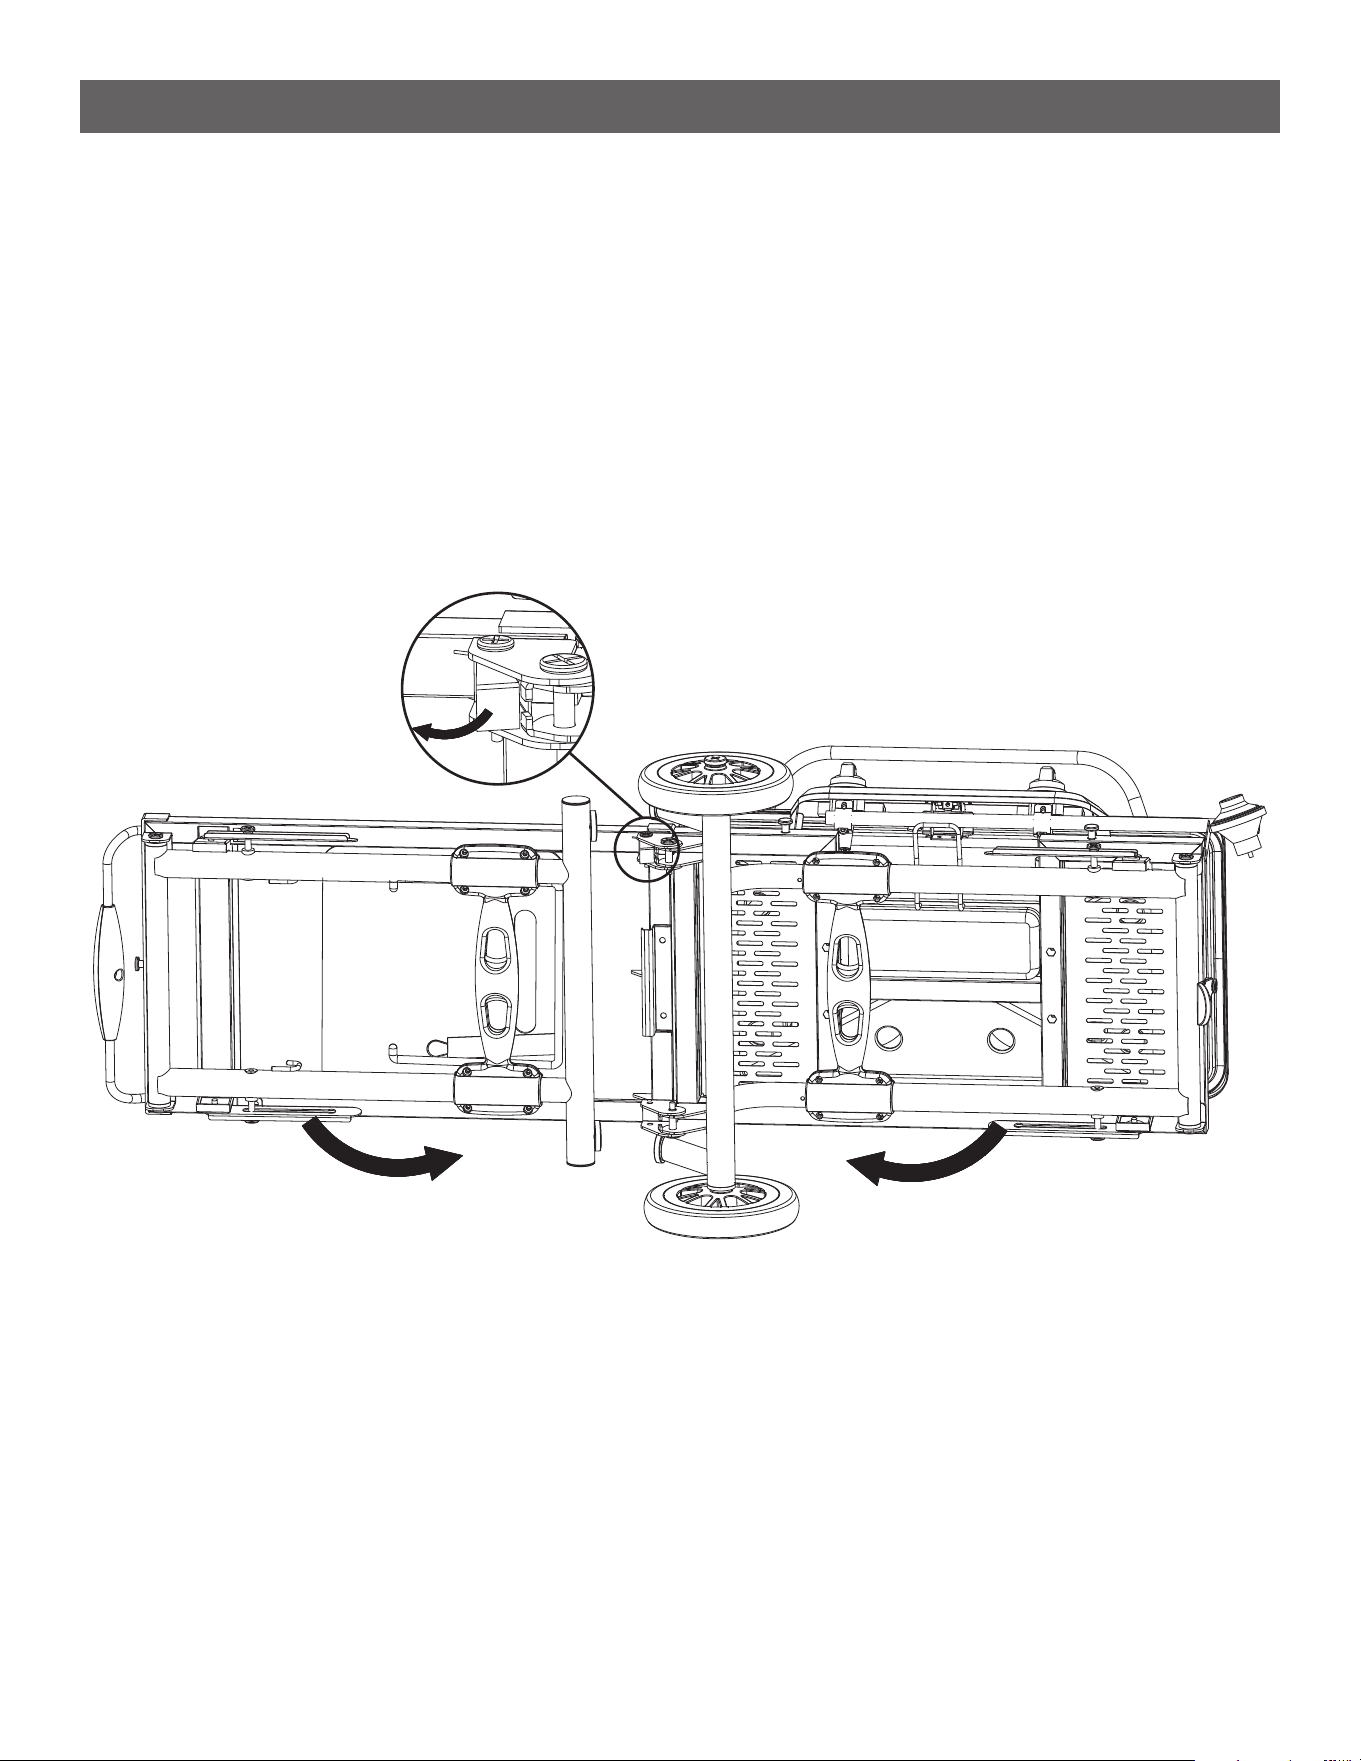
SETUP INSTRUCTIONS: FOLDING
STEP 7
--------------------------------------------------------------------------------------
• Release the lock on the center hinge by holding it back slightly.
• Fold the table side under the grill.
19
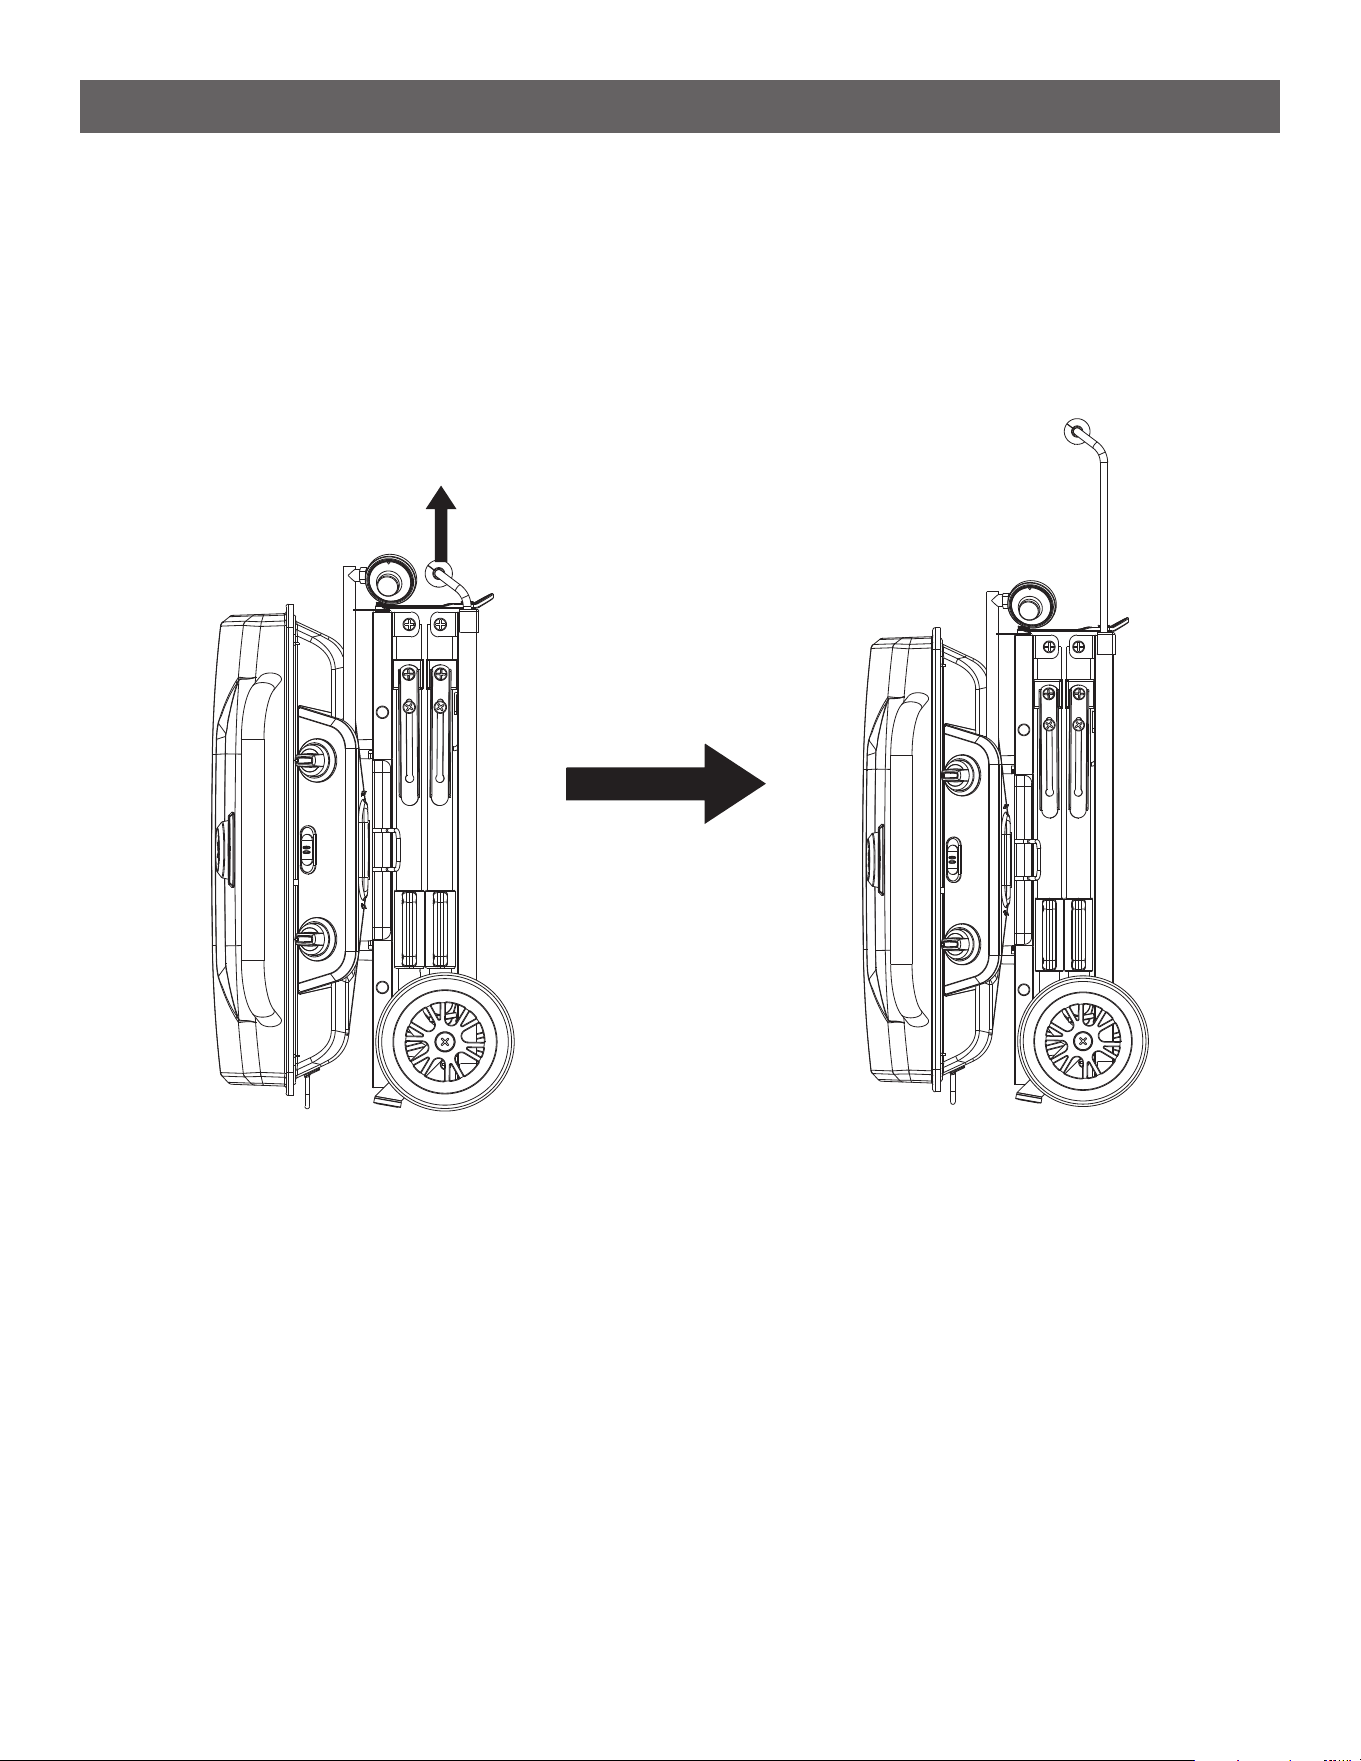
SETUP INSTRUCTIONS: FOLDING
STEP 8
--------------------------------------------------------------------------------------
• Stand the folded grill up on its wheels and pull the handle out to easily wheel it anywhere.
20
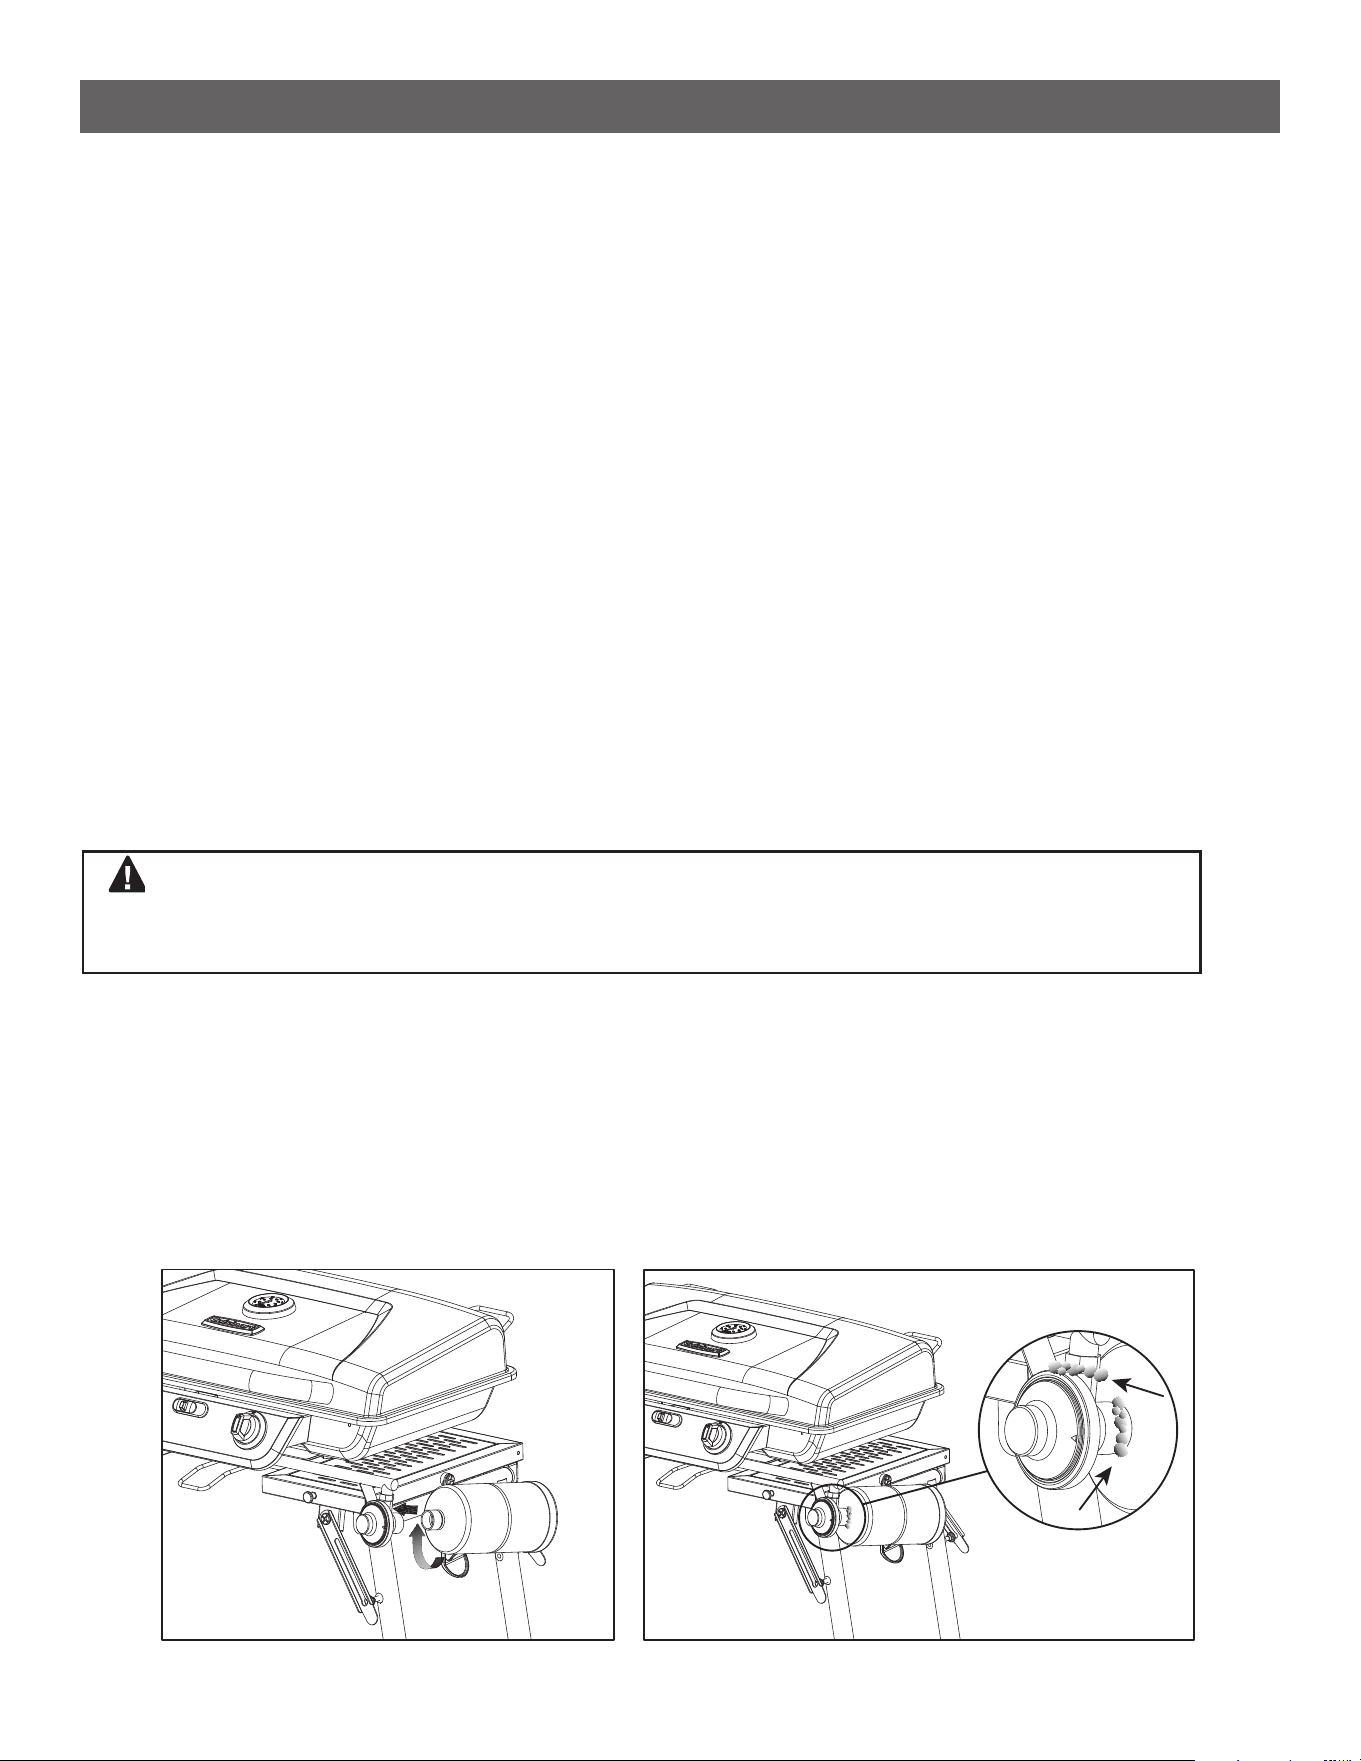
OPERATING OUTDOOR GRILL (INSTRUCTIONS)
CONNECTING THE LIQUID PROPANE (LP) CYLINDER
--------------------------------------------------------------------------------------
• Conrm the cylinder valve matches the mating style of the regulator. This product is equipped with a CGA
no. 600 LP cylinder connection.
• Make sure the burner valve is in the “OFF” position. If not, push the knob in and turn it clockwise until the
words “OFF” is displayed on the top of the knob.
• Inspect the regulator assembly to ensure there is no debris or damage.
• Thread the LP cylinder onto the regulator by hand until tight. Do not use tools because they can damage
the components resulting in a dangerous gas leak. See Detail [I].
• Before lighting the product conduct a leak test.
DISCONNECTING THE LIQUID PROPANE (LP) CYLINDER
--------------------------------------------------------------------------------------
• Press in and then turn the burner knobs clockwise to “OFF”, then wait until all surfaces are cool.
• Detach the LP cylinder from the regulator by turning the LP cylinder counterclockwise until it comes off.
• Place dust cap on cylinder valve outlet whenever the cylinder is not in use. Only install the type of dust cap
on the cylinder valve outlet that is provided with the cylinder valve. Other types of caps or plugs may result
in leakage of propane.
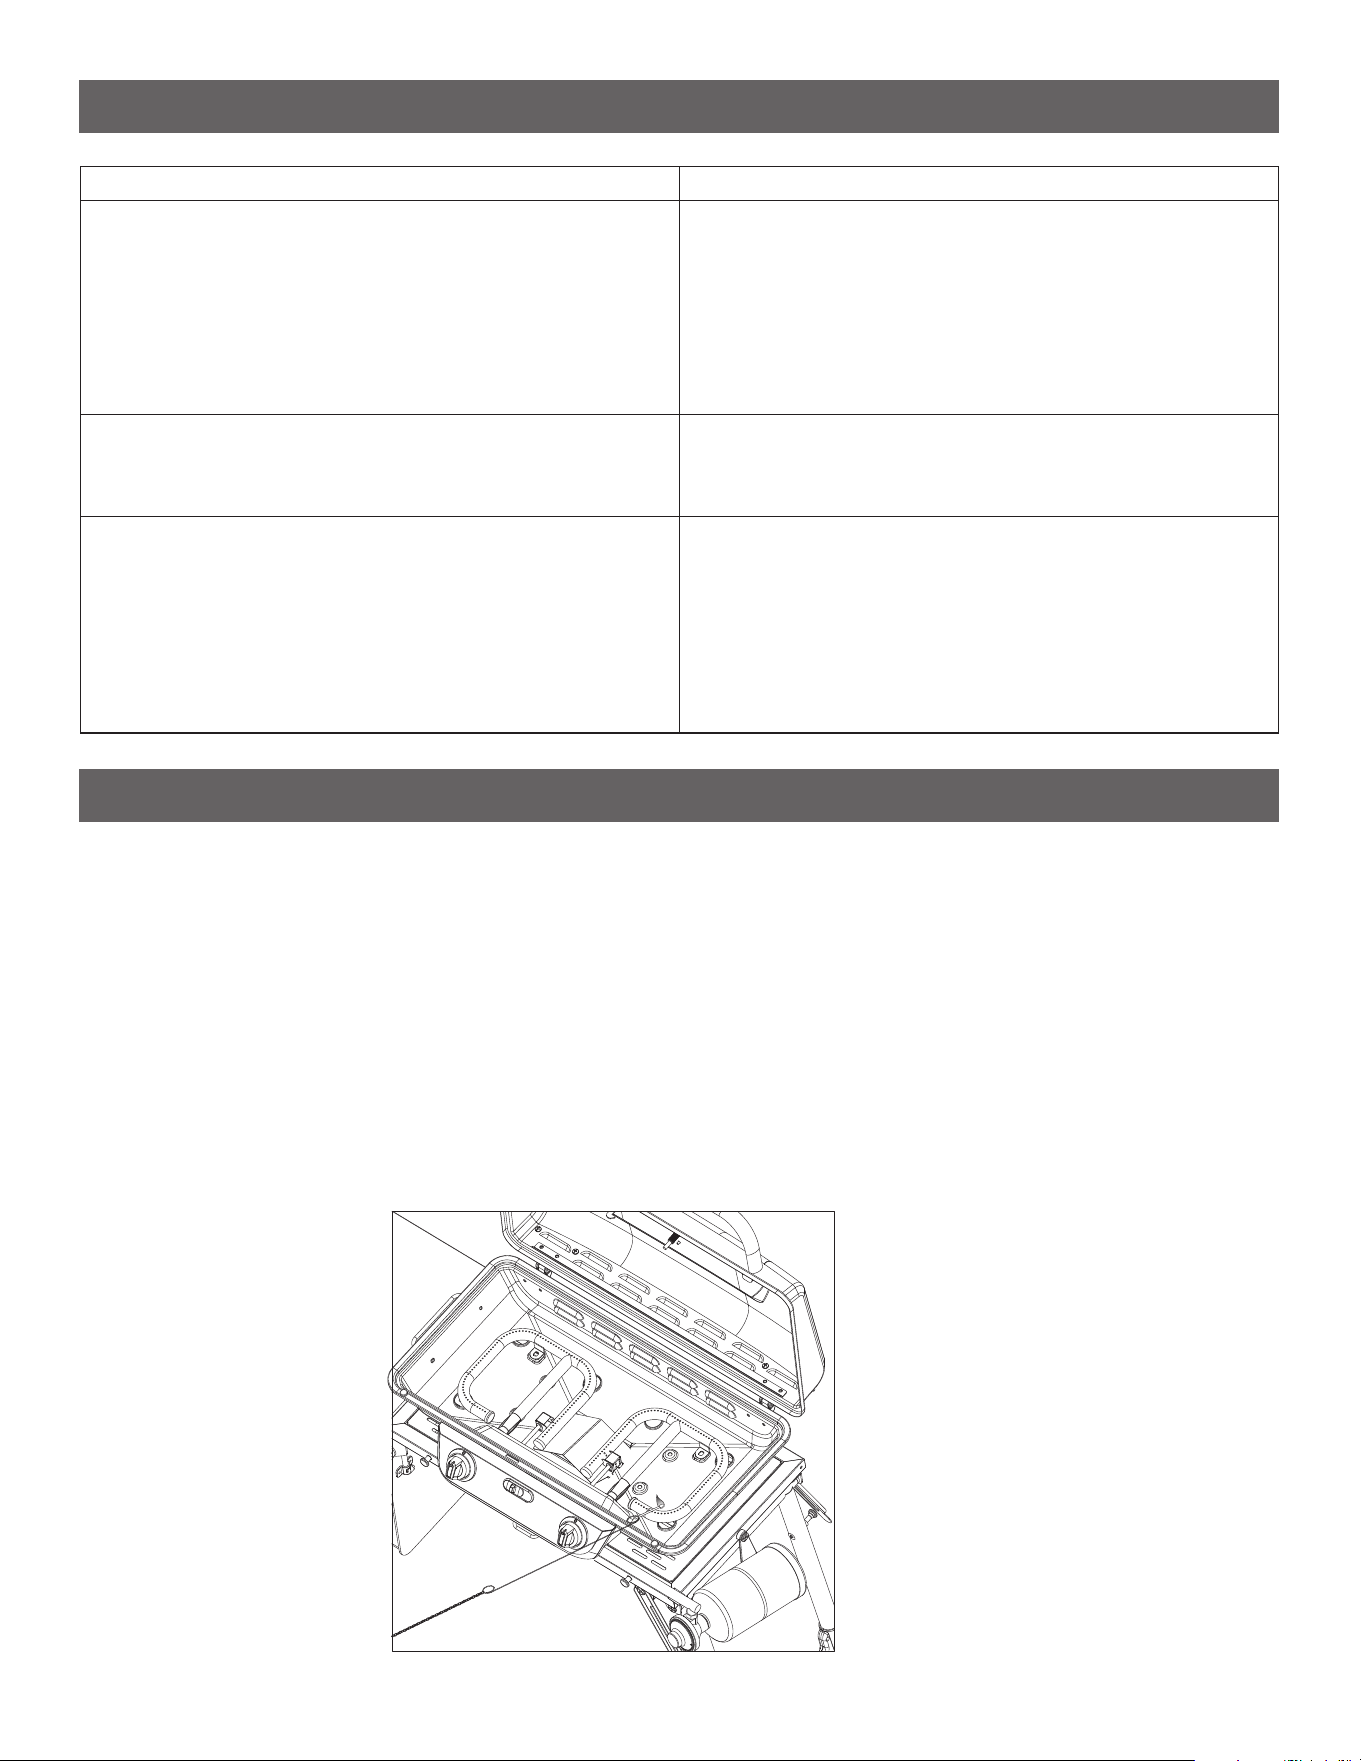
LEAK TEST PROCEDURE
--------------------------------------------------------------------------------------
• Connect a LP cylinder that is not empty.
• Create a solution of 80% water and 20% liquid soap in a spray bottle.
• Apply the soap solution to the connection points of the regulator and look for active bubbling which indicates a
gas leak. Locations to check are circled in Detail [II].
• If a leak is detected hand tighten the LP tank connection to see if it stops.
• If the leak continues disconnect the LP cylinder and contact our customer care team for further assistance at
866-994-6390 or email [email protected].
Check all gas supply ttings for leaks regularly. Do not use the product until all connections have been
checked and do not leak. Do not smoke while leak testing. Never leak test with an open ame.
WARNING:
Detail [ I ] Detail [ II ]
21
OUTDOOR USE ONLY / NEVER LEAVE UNATTENDED
--------------------------------------------------------------------------------------
1. Check that the burner knob is in the “OFF” position. Thread the propane cylinder to the regulator and screw it
in tightly by hand.
2. Open the lid. Push the control knob in and slowly turn it counterclockwise until you hear a click and HIGH is
displayed.
3. If ignition does not occur 2 seconds after the click, turn the burner knob off and try again. If after several
attempts it still fails to ignite the burner, call our customer service team at 866-994-6390 for assistance.
4. Burner will start in the HIGH position, adjust to desired power level by turning the knob counterclockwise.
5. Let the unit pre-heat for at least 10-15 minutes before beginning to cook.
WARNING: DO NOT stand with any body parts over active burner.
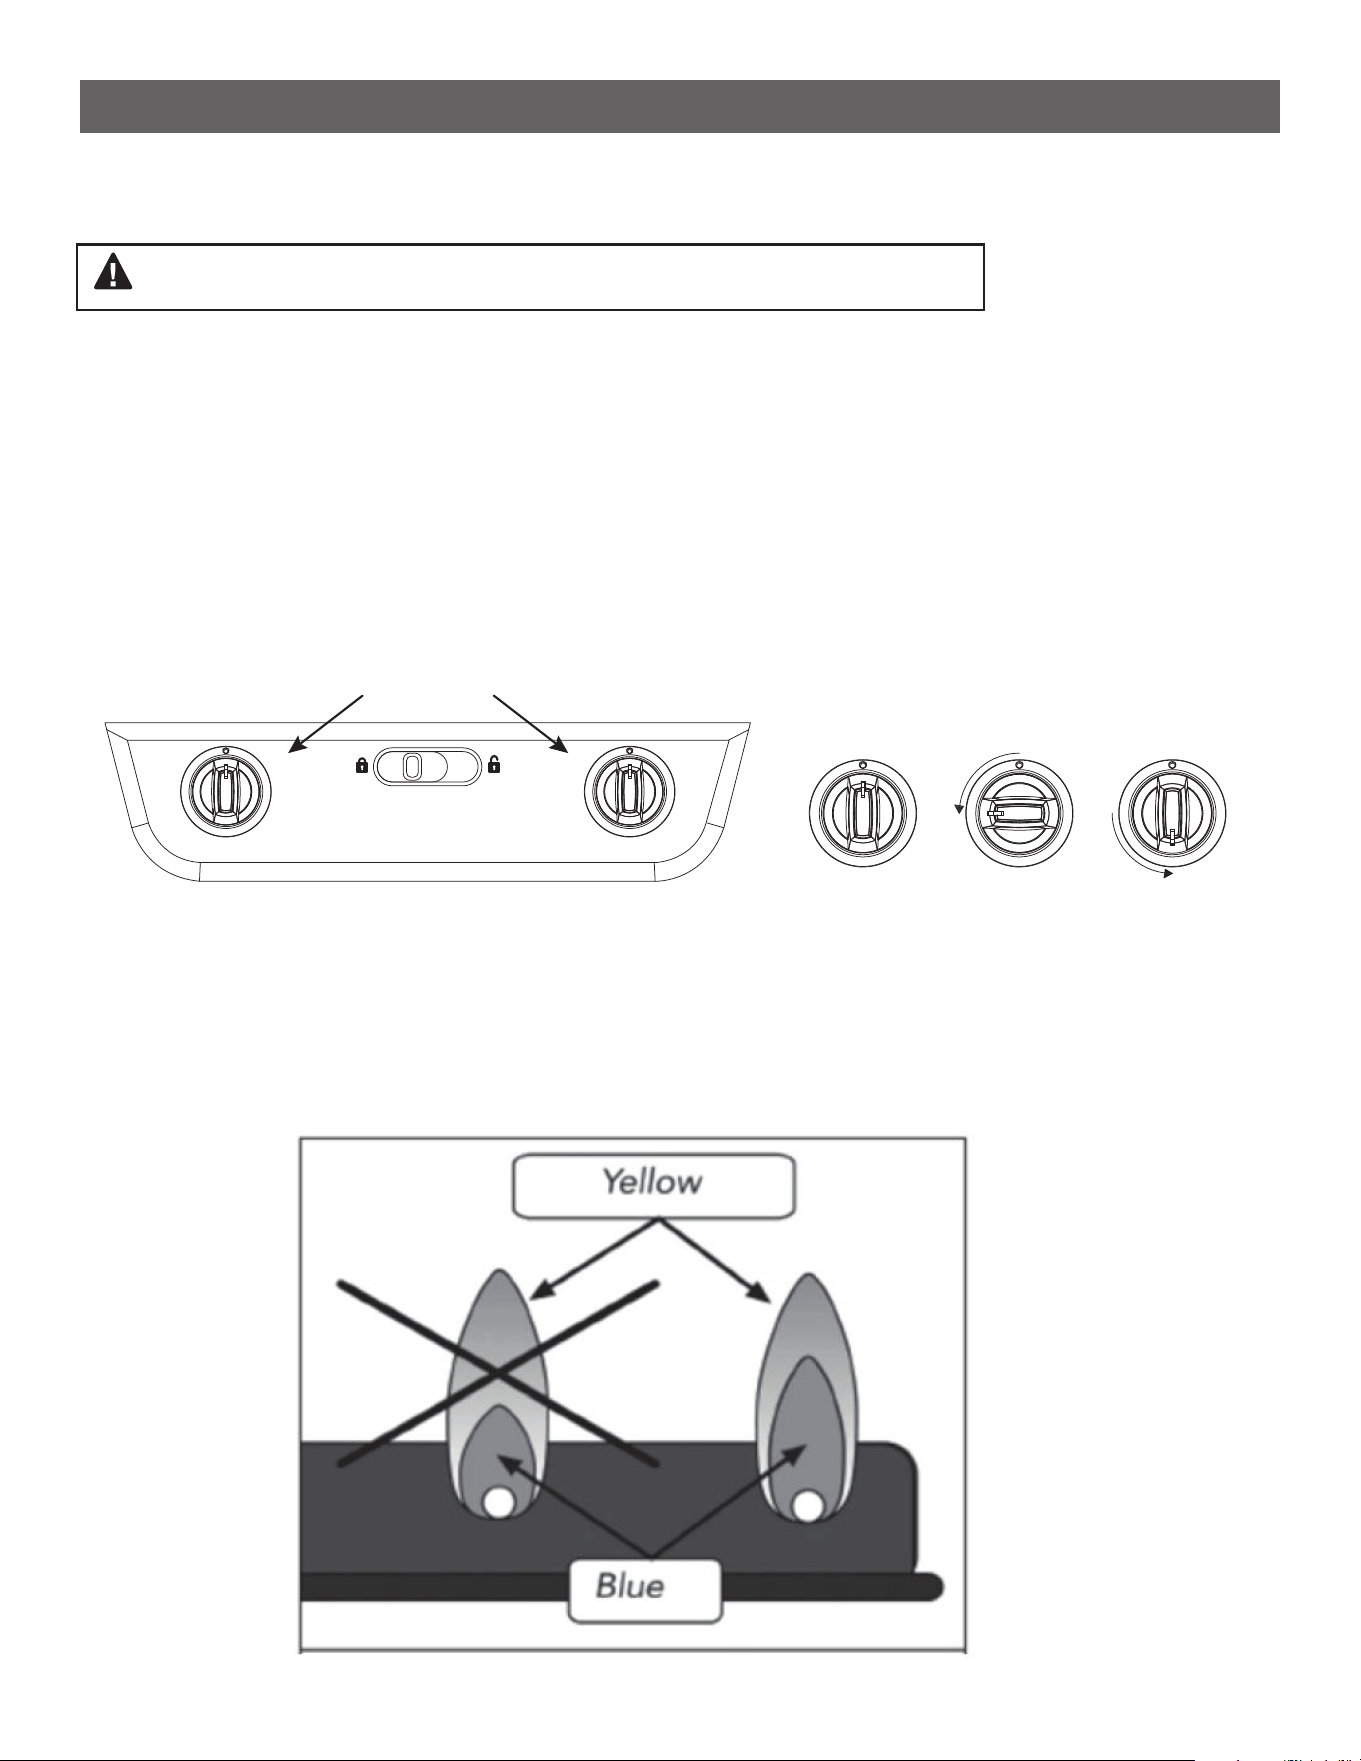
OFF HIGH LOW
Control Knob
OPERATING OUTDOOR GRILL (INSTRUCTIONS)
FLAME CHARACTERISTICS
--------------------------------------------------------------------------------------
Check for good burner ame characteristics. The entire burner tube should be lit, and the ame should be touch-
ing the burner with a stable blue color. Some intermittent yellow tips on the ames are OK. Indicators of a problem
could be if the burners are not fully lit, there is persistent yellow, excessive noise, or ames lifting away from the
burner.
22
CLEANING AND CARE
--------------------------------------------------------------------------------------
• Empty and clean the grease pan regularly and be careful not to allow it to overow. Accumulated grease is a
re hazard. Always empty the grease tray and clean the grill before folding and storing.
• Wash with mild detergent or a non-abrasive cleaner and warm water.
• All surfaces can be cleaned with a non-abrasive sponge or rag and mild detergent with warm water to soften
any buildup. For best results wipe grill dry completely with an absorbent towel after to remove all moisture from
surfaces.
• Be careful not to damage painted surfaces, as it will expose the steel underneath to the environment which
can result in rust. In the event some paint was scratched off a surface it is recommended to clean off any rust
and cover it with matching paint.
• To help avoid corrosion like rust or weathering of painted surfaces, it is recommended to store this grill indoors
or away from the elements when not in use.
CARE AND MAINTENANCE
Note: DO NOT leave the grill outside during inclement weather unless it is covered. Rain water can
collect inside of the grill, the grill body or the grease cups if left uncovered.
!
MAINTENANCE
----------------------------------------------------------------------------------------------------------
• There is very little care and maintenance needed for this product which is designed and made of materials that
will last for many years with normal use.
• Following these instructions will improve the longevity and quality of cooking. Keeping appliance area clear and
free from combustible materials, gasoline, and other ammable vapors and liquids.
• Not obstructing the ow of combustion and ventilation air.
• Keeping the ventilation opening(s) of the cylinder free and clear from debris.
• It is recommended to disassemble the burner and clean both inside and outside at least twice a year and
especially after long storage. Thoroughly dry the inside and outside of the burner before reassembly. A clogged
burner can lead to a re beneath the appliance.
• Install the burner by inserting the venturi side into the hole in the front of the burner box. Gently move the
burner around in the hole until you nd the center and can insert it all the way. You will know it is right when
the burner points straight out of the hole and the tab at the back of the burner box lines up with the burners
corresponding hole. Reinstall the screw to lock the burner in place.
• When the grill is not in use, turn the control knob to the “OFF” position, then detach LP cylinder.
• Keep area adjacent to the burner box clear of debris and free of anything ammable or combustible.
• The manufacturer has properly located the burner with respect to the orice to allow the appliance to burn
effectively. Please do not attempt to adjust the burner. It is preset to the factory specications.
23
MATCH LIGHT INSTRUCTIONS
If for any reason you want to use a match to start this product please follow these instructions:
• Remove the lid, Grill top, or any other obstructions from the top of the burner.
• Verify the propane tank is installed and when turning control knob, gas ows through the burner.
• Locate the match holder which is installed on the right side of the Grill body.
• Slip a match into the ring clip at the end of the match holder.
• Strike the match.
• Turn the burner knob to the HIGH position then move the lit match towards the burner ports through the gap
in the ame tamer. Burner will light.
• Once burner is lit, turn the burner knob to the LOW position and place Grill top and lid back on.
TROUBLE SHOOTING
Problems What To Do
Grill will not light. • Check to see if the propane cylinder is empty.
• Check burner ports for any blockage. You may need to disas-
semble the burner to fully clear any blockages.
• Check the gas nozzle on the burner for an obstruction. If nozzle is
blocked, clean with a needle or thin wire. NEVER USE A WOODEN
TOOTHPICK.
Burner ame is orange on high power or heat is lower than ex-
pected.
• Check for spiders and insects.
• Call customer service at 866-994-6390 or email
Low heat with the control knob on the “HIGH” setting. • Make sure the Grill area is clear of dust.
• Make sure the burner and orice are clean.
• Check for spiders and insects.
• Is there adequate gas supply available?
• Is the Grill being preheated for 15 minutes?
24
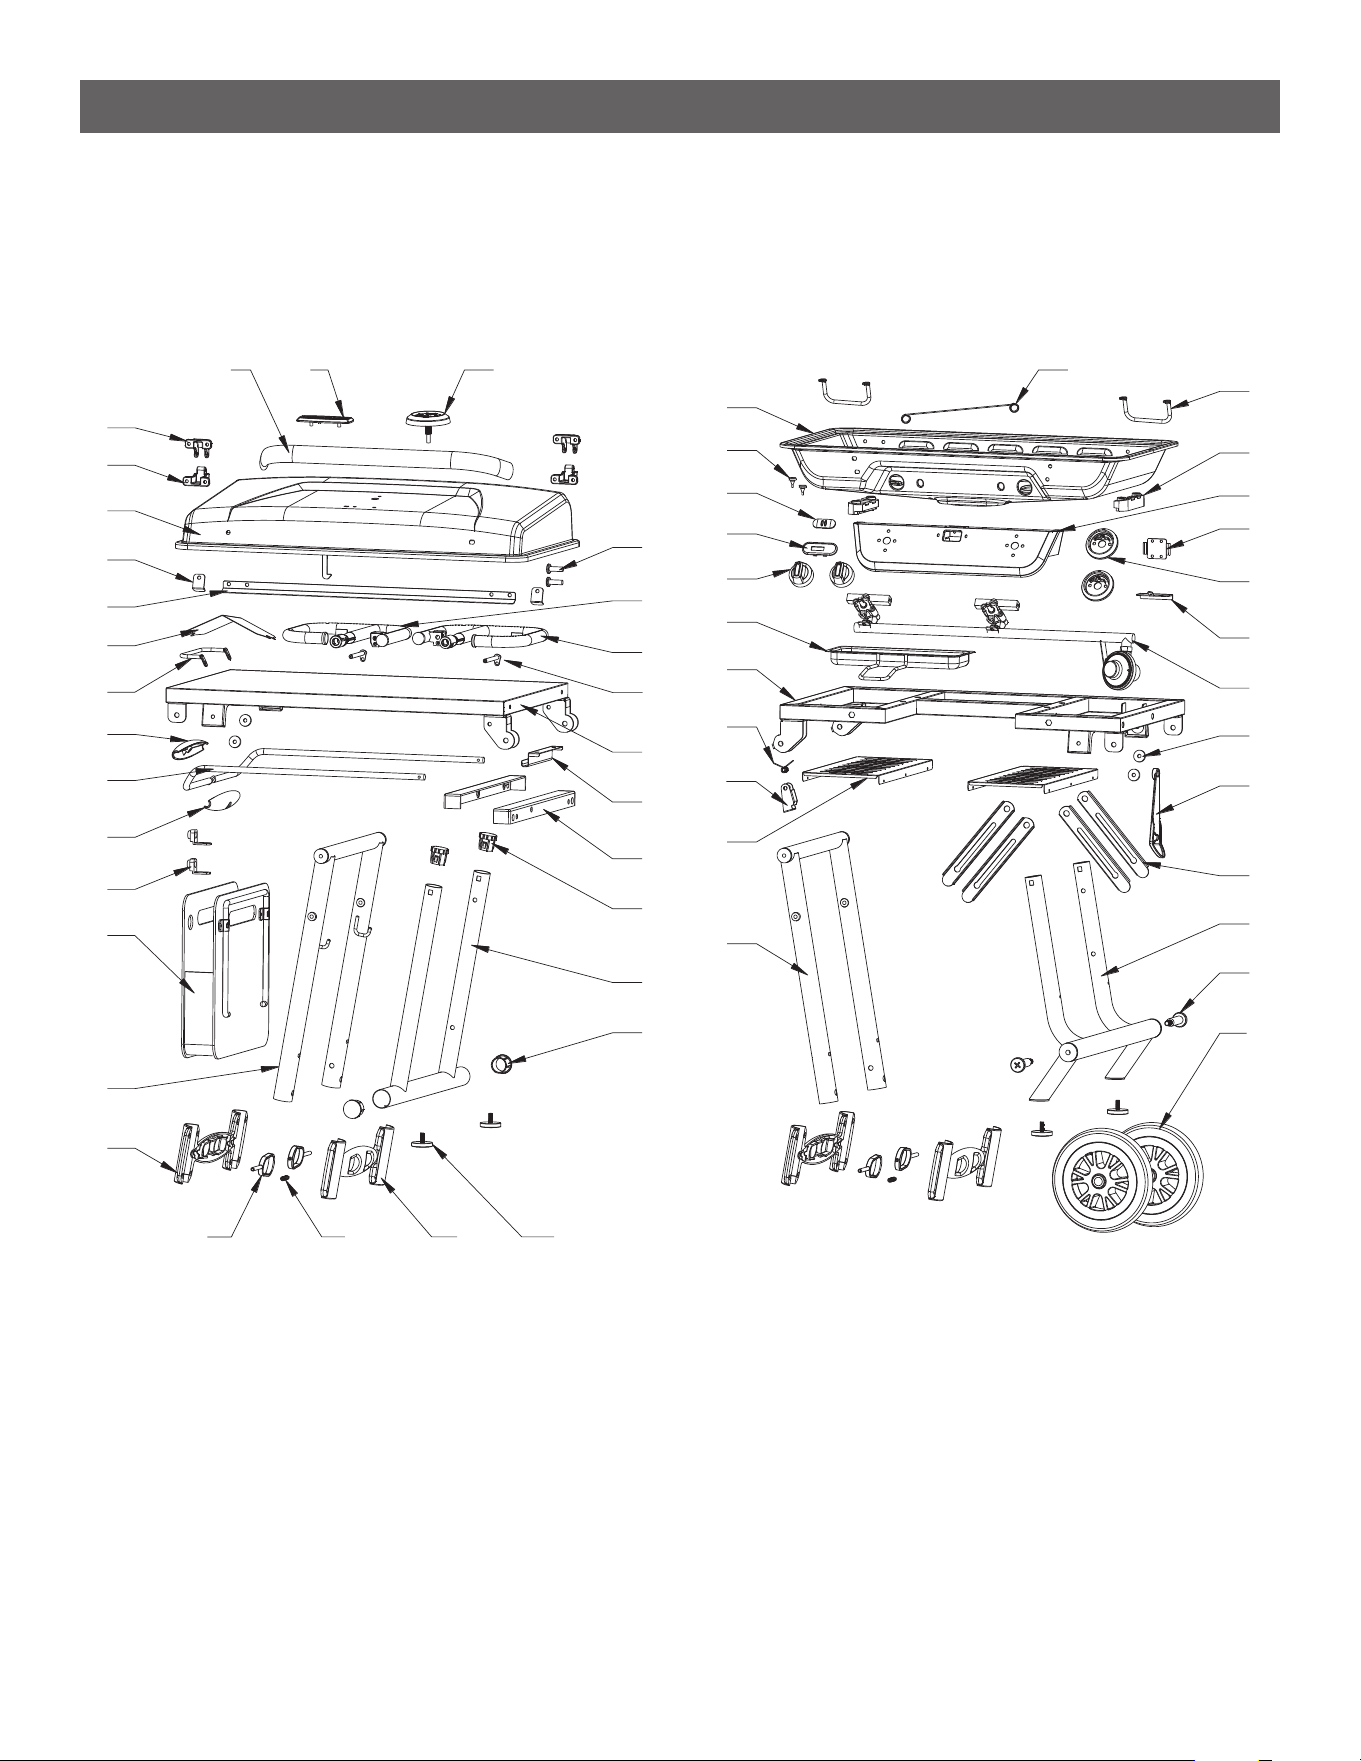
EXPLODED VIEW & PARTS LIST
1 2 3
4
6
5
7
8
9
10
11
12
13
14
15
16
17
18
19 20 21
22
23
24
25
26
27
28
29
30
31
32
33
34
35
36
37
38
39
40
41
42
43
44
45
46
47
48
49
50
51
52
53
54
56
55
For replacement parts, call our customer service department 866-994-6390, 9 a.m.-5 p.m., EST, Monday-Friday
or email [email protected] NOTE: Not all parts are replaceable.
25
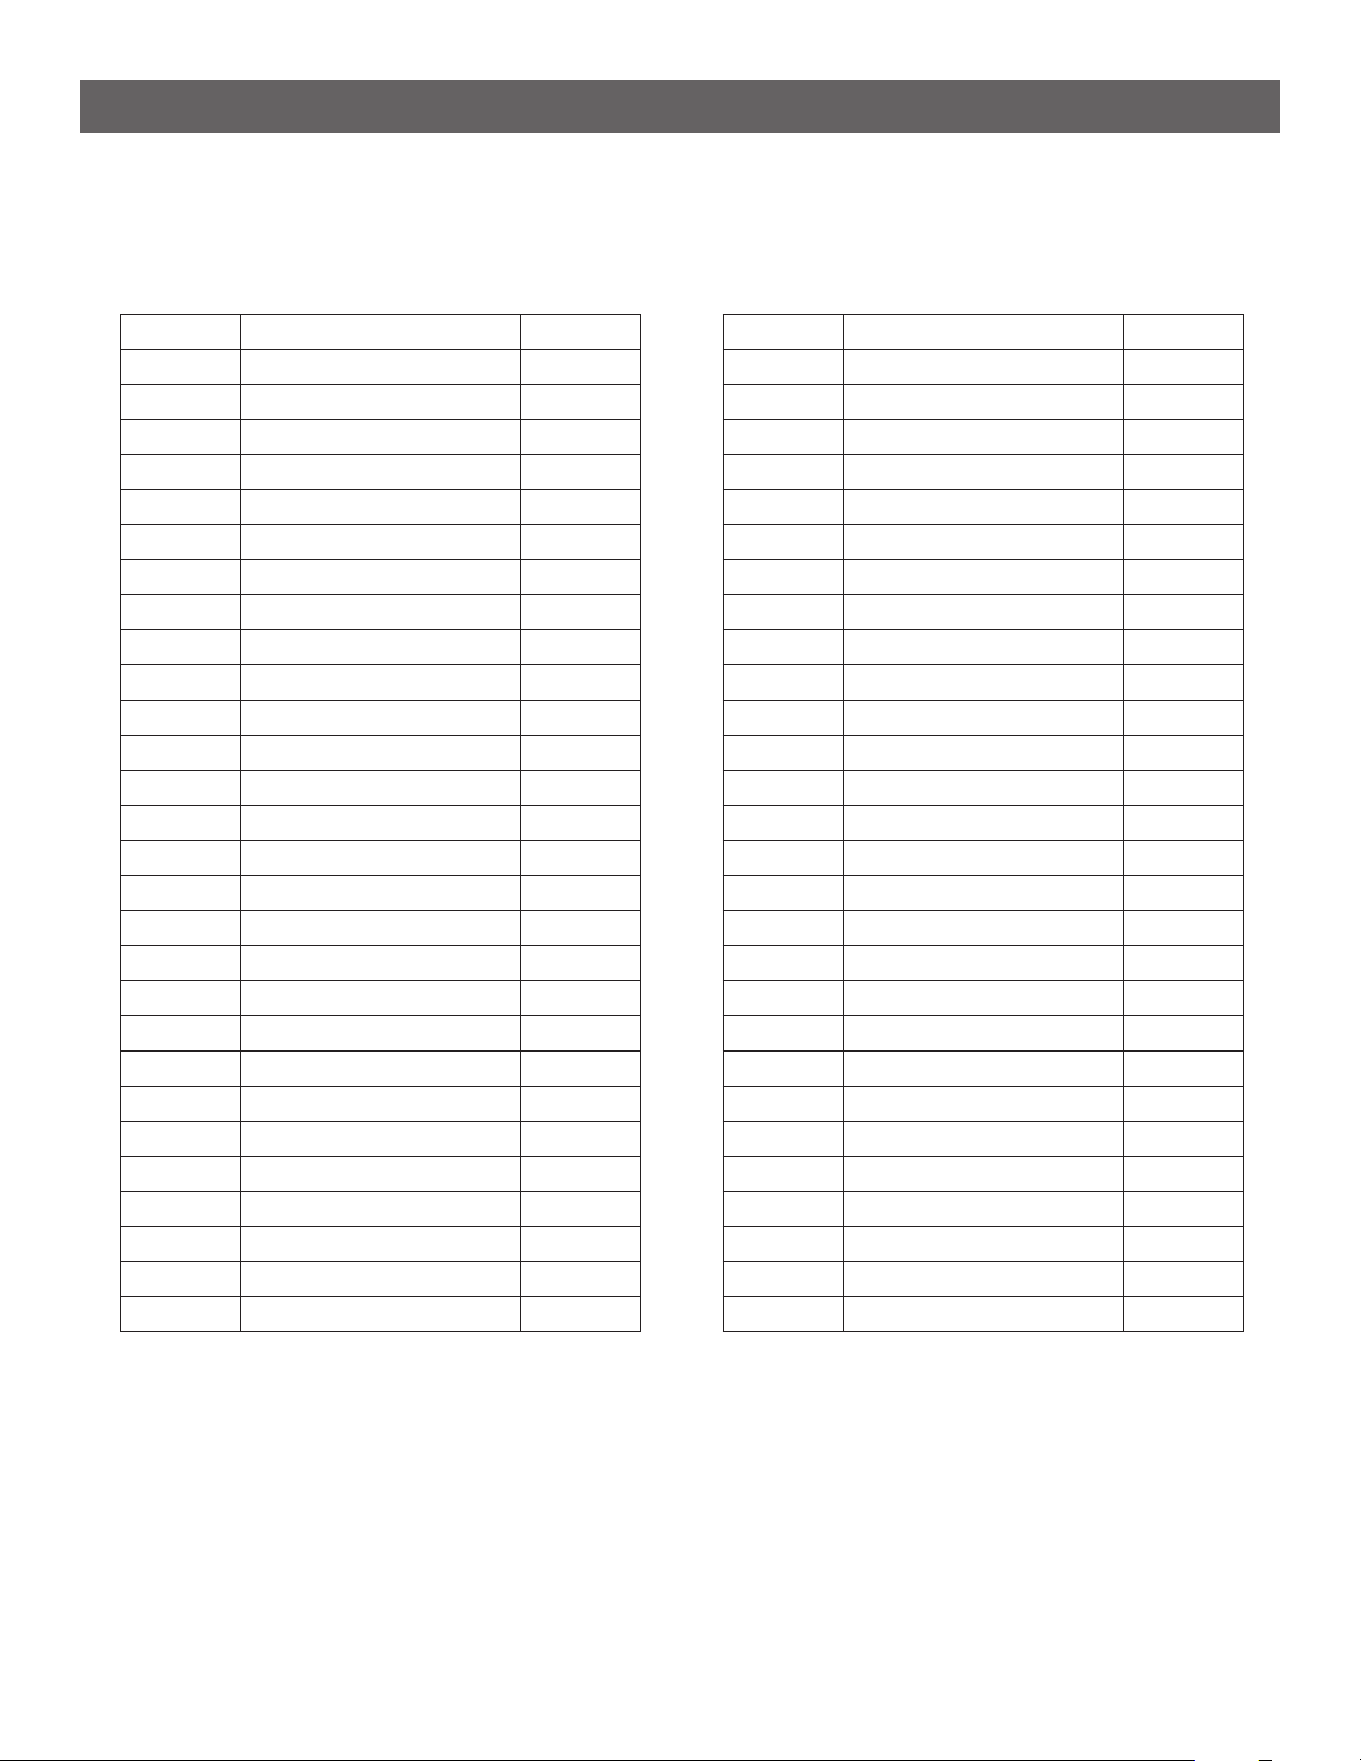
EXPLODED VIEW & PARTS LIST
For replacement parts, call our customer service department 866-994-6390, 9 a.m.-5 p.m., EST, Monday-Friday
or email [email protected] NOTE: Not all parts are replaceable.
Part Description Quantity
1 Grill Lid Handle 1
2 Logo Badge 1
3 Thermometer 1
4 Upper Lid Hinge 2
5 Lower Lid Hinge 2
6 Lid 1
7 Grate Stopper, Front 2
8 Great Stopper, Back 1
9 Heat Shield 1
10 Folded Support Leg 1
11 Suitcase Handle A 1
12 Suitcase Rod 1
13 Suitcase Handle B 1
14 Suitcase Handle Guide 2
15 Storage Tote 1
16 Upper Left Leg 1
17 Leg Frame A 2
18 Leg Pin 4
19 Leg Pin Spring 2
20 Leg Frame B 2
21 Adjustable Leveling Feet 4
22 Leg Caps 2
23 Lower Left Leg 1
24 Leg Inner Stops 4
25 Table Trim 2
26 Storage Tote Hook 1
27 Side Table 1
28 Ignitor 2
Part Description Quantity
29 Right Burner 1
30 Left Burner 1
31 Lid Hinge Pin 2
32 Grill Body 1
33 Lid Bumper 2
34 Lid Lock 1
35 Lid Lock Bezel 1
36 Knob 2
37 Grease Cup 1
38 Grill Frame 1
39 Table Lock Spring 1
40 Table Lock 1
41 Grill Frame Cover 2
42 Upper Right Leg 1
43 Wheel 2
44 Wheel Axel 2
45 Lower Right Leg 1
46 Leg Corner Brace 4
47 Frame Latch 1
48 Leg Washer 4
49 Gas Manifold 1
50 Lid Lock Slider 1
51 Knob Bezel 2
52 Lid Lock Spring Plate 1
53 Control Panel 1
54 Grill Mount 2
55 Roll Bar 2
56 Match Lighter 1

26
LIMITED WARRANTY
Subject to the exclusions and limitations contained herein, Conair LLC dba Cuisinart (“Cuisinart”) warrants that
the Cuisinart® Prep ‘n Go Folding Gas Grill will be free from material defects in materials and workmanship under
normal home use conditions for a period of three (3) years beginning on the date the Product was purchased in
its original, sealed packaging, unless otherwise specied in this Limited Warranty. This Limited Warranty is only for
U.S. consumers (dened herein as purchasers at retail for personal, family, or household use) who originally pur-
chase the Product from Cuisinart or an authorized Cuisinart® reseller (if you are unsure whether a retailer or other
point of sale is an authorized or unauthorized Cuisinart reseller, contact Cuisinart).
This Limited Warranty does NOT cover:
• Normal wear and tear;
• Any Product purchased by commercial purchasers or for commercial or non-household uses;
• Accessories, parts, or software added to the Product after the system is shipped from Cuisinart;
• Any costs associated with the replacement or repair of the Product, including labor, installation, or other costs
incurred by you without prior Cuisinart approval;
• Damage to the Product, defective conditions, or nonconformities due to: (1) external causes, including ship-
ping, accidents, abnormal conditions (such as mechanical or environmental); (2) usage not in accordance with
Product instructions; (3) misuse, neglect, unauthorized alteration, unauthorized repair; and (4) acts of god or
other events beyond Cuisinart’s control;
• Though necessary repairs and maintenance might be performed by any company, damage caused by you or
any nonauthorized third party, may void, this Limited Warranty;
• Damage caused by accessories or replacement parts not specically authorized by Cuisinart, may void, this
Limited Warranty; and
• Any Product where the original Product identication markings (trademark or serial number) have been re-
moved, altered, or obliterated from the Product.
It is recommended that you visit the website, https://cuisinart.registria.com, for a fast, efcient way to complete
your product registration. However, product registration does not eliminate the need for the consumer to maintain
the original proof of purchase in order to obtain the warranty benets. In the event that you do not have proof of
purchase date, the purchase date for purposes of this Limited Warranty will be the date of manufacture.

27
CALIFORNIA RESIDENTS ONLY
The three (3) year Limited Warranty period begins on the date the Product was delivered, which may be different
than the date the Product was purchased. California residents also have the option of obtaining the benets of this
Limited Warranty by bringing the Product to (A) the store where it was purchased or (B) another retail store that
sells Cuisinart products of the same type. The retail store shall then, according to its preference, either repair the
Product, refer the consumer to an independent repair facility, replace the Product with another identical or reason-
ably equivalent product, or refund the purchase price less the amount directly attributable to the consumer’s prior
usage of the Product. California residents may also, according to their preference, return nonconforming products
directly to Cuisinart for repair or, if necessary, replacement with another identical or reasonably equivalent product
by calling our Consumer Service Center toll-free at 1-800-726-0190. Cuisinart will be responsible for the cost of
such repair, replacement, and/or shipping and handling for such nonconforming products under warranty.
THIS LIMITED WARRANTY GIVES YOU SPECIFIC LEGAL RIGHTS, AND YOU MAY ALSO HAVE OTHER RIGHTS
THAT VARY FROM STATE TO STATE OR BY JURISDICTION. IN THE EVENT THIS LIMITED WARRANTY IS
BREACHED, YOU MAY HAVE CLAIMS FOR REPLACEMENT, DAMAGES, OR OTHER PENALTIES
LIMITATIONS OF LIABILITY/ADDITIONAL LIMITATIONS AND EXCLUSIONS
ALL EXPRESS AND IMPLIED WARRANTIES ARE LIMITED IN DURATION TO THE LIMITED WARRANTY PERIOD.
NO WARRANTIES APPLY AFTER THAT PERIOD. SOME STATES DO NOT ALLOW LIMITATIONS ON HOW LONG
AN IMPLIED WARRANTY LASTS, SO THIS LIMITATION MAY NOT APPLY TO YOU. CUISINART’S RESPONSI-
BILITY UNDER THIS OR ANY OTHER WARRANTY, IMPLIED OR EXPRESS, IS LIMITED TO REPAIR, REPLACE-
MENT, OR REFUND, AS SET FORTH ABOVE. THESE REMEDIES ARE THE SOLE AND EXCLUSIVE REMEDIES
FOR ANY BREACH OF WARRANTY. TO THE MAXIMUM EXTENT PERMITTED BY LAW, CUISINART IS NOT RE-
SPONSIBLE FOR ANY DIRECT, INDIRECT, SPECIAL, INCIDENTAL, OR CONSEQUENTIAL DAMAGES RESULT-
ING FROM ANY BREACH OF WARRANTY OR UNDER ANY OTHER LEGAL THEORY (INCLUDING, BUT NOT
LIMITED TO, LOST PROFITS, DOWNTIME, GOODWILL, DAMAGE TO OR REPLACEMENT OF EQUIPMENT AND
PROPERTY, AND ANY COSTS OF RECOVERING, REPROGRAMMING, OR REPRODUCING ANY PROGRAM OR
DATA STORED IN OR USED WITH A SYSTEM CONTAINING THE PRODUCT), EVEN IF CUISINART HAS BEEN
ADVISED OF THE POSSIBILITY OF SUCH DAMAGES. SOME STATES DO NOT ALLOW THE EXCLUSION OR
LIMITATION OF INCIDENTAL OR CONSEQUENTIAL DAMAGES, SO THE ABOVE LIMITATIONS OR EXCLUSIONS
MAY NOT APPLY TO YOU. ALL EXPRESS AND IMPLIED WARRANTIES ARE LIMITED IN DURATION TO THE
LIMITED WARRANTY PERIOD. NO WARRANTIES APPLY AFTER THAT PERIOD. SOME STATES (OR JURISDIC-
TIONS) DO NOT ALLOW LIMITATIONS ON HOW LONG AN IMPLIED WARRANTY LASTS, SO THIS LIMITATION
MAY NOT APPLY TO YOU.
This Limited Warranty is issued by:
Conair LLC
1 Cummings Point Road
Stamford, CT 06902
1-800-726-0190

28
Questions, problems, missing parts? Before returning to your retailer,
call our customer service department at 866-994-6390, 9 a.m.-5 p.m.,
EST, Monday-Friday or email [email protected]
Visit our website: www.cuisinart.com
2412
Model# CGG-288
Cuisinart Outdoors a division of Conair LLC
Newton, MA 02466
Master Contract: