
User's Guide
for Dryers
DRY735C_SVG
Original InstructionsOriginal Instructions
Keep These Instructions for Future Reference.Keep These Instructions for Future Reference.
CAUTION: Read the instructions before using theCAUTION: Read the instructions before using the
machine.machine.
(If this machine changes ownership, this manual
must accompany machine.)
www.speedqueen.comwww.speedqueen.com
Part No. D518540ENR3
February 2025

WARNING
WARNING
FOR YOUR SAFETY, the information in this manual
must be followed to minimize the risk of fire or
explosion or to prevent property damage, personal
injury or death.
W033
WARNING
• Do not store or use gasoline or other flammable
vapors and liquids in the vicinity of this or any
other appliance.
• WHAT TO DO IF YOU SMELL GAS:
• Do not try to light any appliance.
• Do not touch any electrical switch; do not
use any phone in your building.
• Clear the room, building or area of all occu-
pants.
• Immediately call your gas supplier from a
neighbor’s phone. Follow the gas supplier’s
instructions.
• If you cannot reach your gas supplier, call
the fire department.
• Installation and service must be performed by a
qualified installer, service agency or the gas
supplier.
W052
EPA EST. NO.:101050-WI-1
User's Guide
© Copyright, Alliance Laundry Systems LLC -
DO NOT COPY or TRANSMIT
3 Part No. D518540ENR3
Register Your Product
Welcome to the Speed Queen family.
Thank you for your support of our truly commercial quality
products. Please take a moment to register your product.
Benefits of registering your product:
• Provides verification of ownership
• Receive product notifications
• Simplifies warranty service, if needed
• Grants access to leave a product review
• Opt-in for latest offers and promotions
It's quick and easy to register.
Simply go to:
https://speedqueen.com/support/register-your-products/
Or scan:
Register Your Product
© Copyright, Alliance Laundry Systems LLC -
DO NOT COPY or TRANSMIT
4 Part No. D518540ENR3
Safety Information
Explanation of Safety Instruction
Messages
Precautionary statements (“DANGER,” “WARNING,” and
“CAUTION”), followed by specific instructions, are found in
this manual and on machine decals. These precautions are
intended for the personal safety of the operator, user, ser-
vicer, and those maintaining the machine.
DANGER
Indicates an imminently hazardous situation that, if
not avoided, will cause severe personal injury or
death.
WARNING
Indicates a hazardous situation that, if not avoided,
could cause severe personal injury or death.
CAUTION
Indicates a hazardous situation that, if not avoided,
may cause minor or moderate personal injury or
property damage.
Additional precautionary statements (“IMPORTANT” and
“NOTE”) are followed by specific instructions.
IMPORTANT:IMPORTANT: The word “IMPORTANT” is used to inform theThe word “IMPORTANT” is used to inform the
reader of specific procedures where minor machine dam-reader of specific procedures where minor machine dam-
age will occur if the procedure is not followed.age will occur if the procedure is not followed.
NOTE:NOTE: The word “NOTE” is used to communicate installa-The word “NOTE” is used to communicate installa-
tion, operation, maintenance or servicing information that istion, operation, maintenance or servicing information that is
important but not hazard related.important but not hazard related.
Important Safety Instructions
Save These Instructions
WARNING
To reduce the risk of fire, electric shock, serious
injury or death to persons when using your dryer,
follow these basic precautions:
W130
• Read all instructions before using the dryer.
• Refer to the GROUNDING INSTRUCTIONS in the INSTALLA-
TION manual for the proper grounding of the dryer.
• Do not dry articles that have been previously cleaned in,
soaked in, washed in, or spotted with gasoline, dry-clean-
ing solvents, other flammable or explosive substances as
they give off vapors that could ignite or explode. Highly
flammable substances commonly used in domestic envi-
ronments including acetone, denatured alcohol, petrol/
gasoline, kerosene, spot removers (some brands), turpen-
tine, waxes and wax removers. This appliance shall not be
used to dry off solvents or dry-cleaning fluids.
• Do not allow children to play on or in the unit. This appli-
ance is not intended for use by young children or infirm
persons without supervision. Young children should be su-
pervised to ensure that they do not play with the appli-
ance.
• Before the dryer is removed from service or discarded, re-
move the door to the drying compartment.
• Do not reach into the dryer if the cylinder is revolving.
• Do not install or store the dryer where it will be exposed to
water and/or weather.
• Do not tamper with the controls.
• Do not repair or replace any part of the dryer, or attempt
any servicing unless specifically recommended in the
user-maintenance instructions or in published user-repair
instructions that you understand and have the skills to
carry out.
• Do not use fabric softeners or products to eliminate static
unless recommended by the manufacturer of the fabric
softener product.
• To reduce the risk of fire, DO NOT DRY plastics or articles
containing foam rubber (also known as latex foam) or sim-
ilarly textured rubberlike materials. Foam rubber materials
can, when heated, produce fire by spontaneous combus-
tion.
• Always clean the filter after every load. A layer of lint in the
filter reduces drying efficiency and prolongs drying time.
Safety Information
© Copyright, Alliance Laundry Systems LLC -
DO NOT COPY or TRANSMIT
5 Part No. D518540ENR3

• Keep area around the exhaust opening and adjacent sur-
rounding area free from the accumulation of lint, dust and
dirt.
• The interior of the dryer and the exhaust duct should be
cleaned periodically by qualified service personnel.
• This gas appliance contains or produces a chemical or
chemicals which can cause death or serious illness and
which are known to the State of California to cause can-
cer, birth defects, or other reproductive harm. To reduce
the risk from substances int he fuel or from fuel combus-
tion, make sure this appliance is installed, operated, and
maintained according to the manufacturer's instructions.
• Dryer will not operate with the loading door open. DO NOT
bypass the door safety switch by permitting the dryer to
operate with the door open. The dryer will stop tumbling
when the door is opened. Do not use the dryer if it does
not stop tumbling when the door is opened. Do not use
the dryer if it does not stop tumbling when the door is
opened or starts tumbling without pressing or turning the
START mechanism. Remove the dryer from use and call
the service person.
• Do not put articles soiled with vegetable or cooking oil in
the dryer, as these oils may not be removed during wash-
ing. Due to the remaining oil, the fabric may catch on fire
by itself.
• To reduce the risk of fire, DO NOT put clothes which have
traces of any flammable substances such as machine oil,
flammable chemicals, thinner, etc. or anything containing
wax or chemicals such as in mops and cleaning cloths, or
anything dry-cleaned at home with dry-cleaning solvent in
the dryer.
• Use the dryer only for its intended purpose, drying clothes.
• Always disconnect the electrical power to the dryer before
attempting service. Disconnect the power cord by grasp-
ing the plug, not the cord.
• If supply cord is damaged, it must be replaced by a spe-
cial cord or assembly available from the manufacturer or
its service agent.
• Install this dryer according to the INSTALLATION INSTRUC-
TIONS. All connections for electrical power, earthing and
gas supply must comply with local codes and be made by
licensed personnel when required. Do not do it yourself
unless you know how!
• Remove laundry immediately after the dryer stops.
• Always read and follow manufacturer's instructions on
packages of laundry and cleaning aids. Heed all warnings
or precautions. To reduce the risk of poisoning or chemi-
cal burns, keep them out of reach of children at all times
(preferably in a locked cabinet).
• Do not tumble fiberglass curtains and draperies unless
the label says it can be done. If they are dried, wipe out
the cylinder with a damp cloth to remove particles of fiber-
glass.
• ALWAYS follow the fabric care instructions supplied by the
garment manufacturer.
• Never operate the dryer with any guards and/or panels re-
moved.
• DO NOT operate the dryer with missing or broken parts.
• DO NOT bypass any safety devices.
• Failure to install, maintain, and/or operate this machine
according to the manufacturer's instructions may result in
conditions which can produce bodily injury and/or proper-
ty damage.
NOTE:NOTE: The WARNING and IMPORTANT SAFETY INSTRUC-The WARNING and IMPORTANT SAFETY INSTRUC-
TIONS appearing in this manual are not meant to cover allTIONS appearing in this manual are not meant to cover all
possible conditions and situations that may occur. Commonpossible conditions and situations that may occur. Common
sense, caution and care must be exercised when installing,sense, caution and care must be exercised when installing,
maintaining, or operating the dryer.maintaining, or operating the dryer.
Always contact your dealer, distributor, service agent or the
manufacturer about any problems or conditions you do not
understand.
Safety Information
© Copyright, Alliance Laundry Systems LLC -
DO NOT COPY or TRANSMIT
6 Part No. D518540ENR3

Table of ContentsTable of Contents
Before DryingBefore Drying.............................................................................................................................................................................................................. 88
Energy Saving Tips....................................................................................................... 8
Helps and Hints ...........................................................................................................8
Sort ............................................................................................................................... 8
Load.............................................................................................................................. 8
Operating Your DryerOperating Your Dryer ................................................................................................................................................................................1010
Available Drying Settings...........................................................................................10
Cycle Selection...........................................................................................................10
Automatic Perm Press/Knits Cycle .......................................................................10
Automatic Regular/Delicate Cycle ........................................................................10
Time Dry Cycle ........................................................................................................10
Sanitize ................................................................................................................10
Fabric Selector...........................................................................................................11
To Dry ClothesTo Dry Clothes ......................................................................................................................................................................................................1212
Optional Drying RackOptional Drying Rack ................................................................................................................................................................................1313
MaintenanceMaintenance ..........................................................................................................................................................................................................1414
Lubrication .................................................................................................................14
Care of Your Dryer .....................................................................................................14
Exhaust System ......................................................................................................14
Lint Filter ....................................................................................................................14
TroubleshootingTroubleshooting ................................................................................................................................................................................................1515
Normal Operating Sounds.........................................................................................16
Warranty Repairs .......................................................................................................17
Contact Information...................................................................................................17
© Copyright 2025, Alliance Laundry Systems LLC
All rights reserved. No part of the contents of this book may be reproduced or transmitted in any form or by any means without the expressed written consent of
the publisher.
© Copyright, Alliance Laundry Systems LLC -
DO NOT COPY or TRANSMIT
7 Part No. D518540ENR3
Before Drying
Energy Saving Tips
• Make sure the lint filter is always clean.
• Do not overload the dryer.
• Do not overdry items.
• Remove items to be ironed while still damp.
• Large loads of similar fabrics dry the most efficiently. How-
ever, dry permanent press in smaller loads to prevent
wrinkling.
• Use the correct cycle for the type of fabric being dried.
• Locate your dryer so the exhaust duct is as short and
straight as possible.
• Do not open the door during the drying cycle.
• Plan to do your laundry on low humidity days; your clothes
will dry faster.
• Dry multiple loads of clothes one right after another so
dryer interior does not have to be reheated for each load.
Helps and Hints
WARNING
To reduce the risk of fire, explosion, serious injury
or death, clothes which have traces of any
flammable substances such as cooking oil,
machine oil, flammable chemicals, thinner, etc.
must not be put into the dryer.
W131
• The directions for installation and proper exhausting are
given in the Installation Instructions which are included
with the dryer.
• Static electricity may cause garments of synthetic fibers
(as in lingerie) to cling together, especially if they are over-
dried. The use of a liquid fabric softener in the rinse water
of the washer, or a fabric softener sheet in the dryer, will
soften clothes and reduce static electricity.
• Do not wash or dry clothes that shed lint in the same load
with permanent press or knit garments.
• Remove permanent press loads immediately after dryer
stops.
• Follow the care labels on FLAME RETARDANT, SCOTCH-
GUARD™, etc., garments for proper washing and drying.
• If loads should be damp for ironing, use the Damp Dry-
ness setting, in an Automatic cycle.
Sort
If you have correctly sorted the items for washing, they
should be properly sorted for drying too.
1. Sort by color.
2. Separate lint shedding fabrics and lint receiving fabrics.
Towels, flannels, chenille, cottons, rugs, etc., shed lint.
Corduroys, knits (including socks), permanent press, and
synthetics attract lint.
3. Separate no heat, low heat and high heat items.
In any kind of drying, lightweight fabrics will dry faster than
heavyweight fabrics. If mixed loads are dried together (such
as sheets and towels), remove the lighter weight fabrics
when they are dry to prevent overdrying and wrinkling. The
best method is to dry clothes which require the same time,
temperature or dryness level in the same load.
Load
WARNING
Do not wash or dry items soiled with vegetable or
cooking oils. Some oils may remain after washing
and may cause the fabric to catch on fire by itself.
W527
• Do not overload your dryer. Bulk, not weight, determines
the load size. If the dryer is overloaded, it could cause dis-
coloration or permanent heat damage to the load.
• There should be space in the dryer for the clothes to tum-
ble freely and help to reduce wrinkles.
• Large and small pieces together make up loads which will
tumble well. Permanent press loads should be smaller to
provide room for tumbling. Proper tumbling allows for few-
er wrinkles.
• A load can be too small. Just a few small pieces will not
tumble properly. They will take longer to dry and they may
be wrinkled. For small loads, add a couple of large towels
or non lint shedding items to aid in tumbling.
• The following illustrations show the ideal load sizes for
fabrics. The average load will fill the cylinder one third to
half full when wet.
Before Drying
© Copyright, Alliance Laundry Systems LLC -
DO NOT COPY or TRANSMIT
8 Part No. D518540ENR3

Cylinder with wet linens and cottonsCylinder with wet linens and cottons
D665I_SVG
Cylinder with wet permanent press itemsCylinder with wet permanent press items
D666I_SVG
Before Drying
© Copyright, Alliance Laundry Systems LLC -
DO NOT COPY or TRANSMIT
9 Part No. D518540ENR3
Operating Your Dryer
DRY2868N_SVG
START
Figure 1
WARNING
To reduce the risk of fire, electric shock, serious
injury or death to persons, read the Safety
Information section before operating the dryer.
W520
Available Drying Settings
Dryness selections are based on the size of the load, the
type of fabric, and the desired moisture level of the fabric.
MAX DRY and MORE DRY will dry very small loads and some
heavy items, such as blue jeans, but will overdry lightweight
items, such as sheets and shirts. Overdrying can cause
wrinkling, shrinking, excessive lint conditions, and will use
more energy than necessary.
LESS DRY, which uses the least energy, will dry large loads
and lightweight items, such as sheets and shirts, but might
leave other items, such as denim and heavy bath towels,
more damp.
To increase energy savings and to make sure loads are
dried without overdrying, set your loads on LESS DRY. If
items are damp at the end of a cycle, the timer knob needs
to be set closer to the MORE DRY setting the next time
these loads are dried. If items are overdry at the end of a cy-
cle, the timer knob should be set closer to COOL DOWN
when these loads are dried again. Remember the settings
that work best to get ideal drying results.
The COOL DOWN period at the end of each cycle provides
items a chance to tumble with no heat and cool down to
room temperature. This prevents wrinkles from setting if
items cannot be cared for immediately.
NOTE:NOTE: The timer knob will not advance as quickly in the AU-The timer knob will not advance as quickly in the AU-
TOMATIC cycles as it does in the TIME DRY cycle. The time itTOMATIC cycles as it does in the TIME DRY cycle. The time it
takes for the timer knob to advance depends on the typetakes for the timer knob to advance depends on the type
and size of the load being dried.and size of the load being dried.
The ENERGY SAVER settings, marked with an asterisk(*),
show which settings will use the least energy and will leave
items damp for easier ironing.
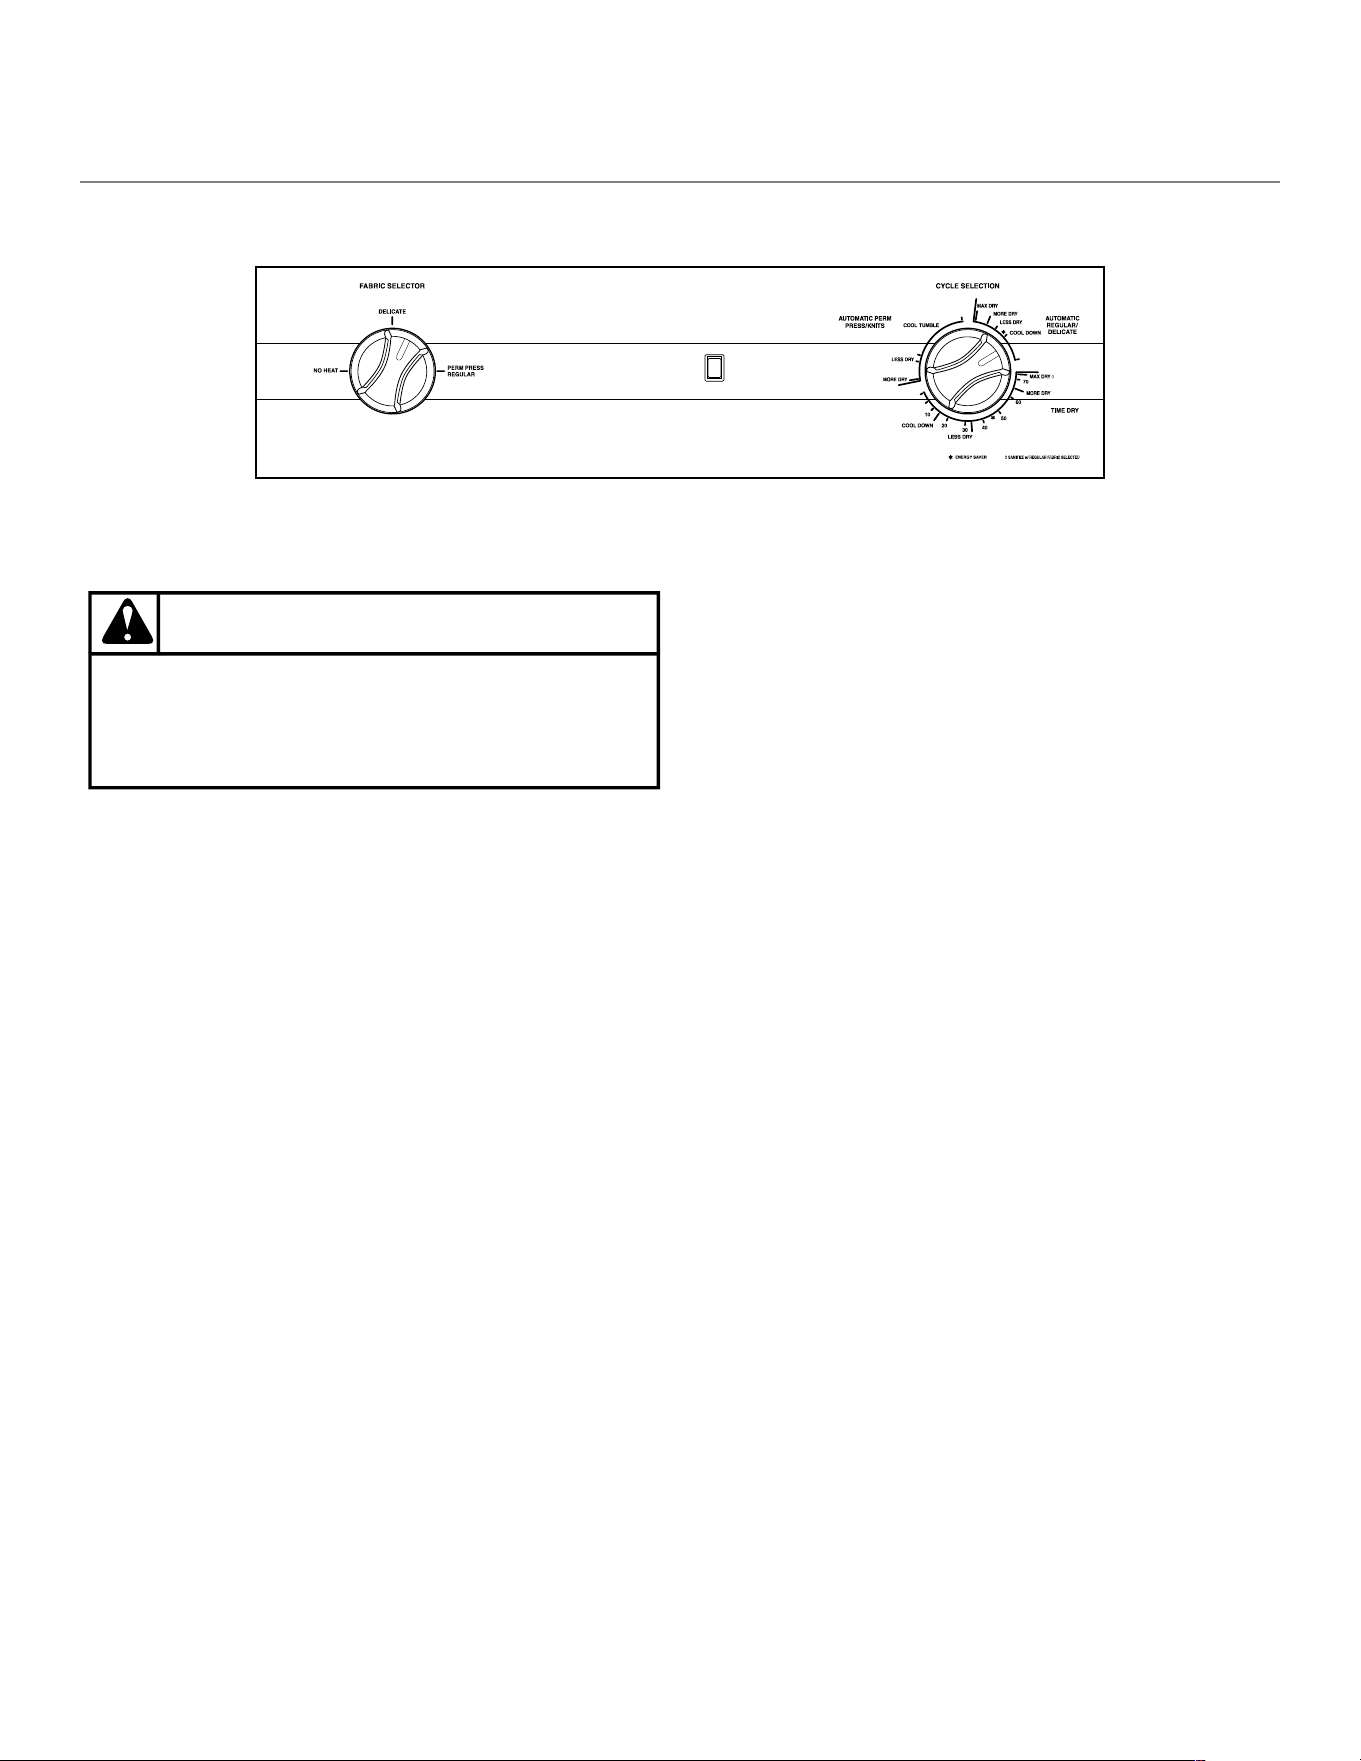
Cycle Selection
The following cycle descriptions will help determine which
cycle to choose depending on the type of laundry being
dried.
NOTE:NOTE: Use Time Dry Cycles for No Heat tumble. Using Auto-Use Time Dry Cycles for No Heat tumble. Using Auto-
matic cycles with No Heat will result in very short cyclematic cycles with No Heat will result in very short cycle
times. Automatic cycles are designed to dry loads usingtimes. Automatic cycles are designed to dry loads using
heat to the dryness level selected.heat to the dryness level selected.
Automatic Perm Press/Knits Cycle
Use for permanent press items and synthetics. The type of
heat is determined by selecting the proper Fabric Selector
option. There are three settings in the AUTOMATIC PERM
PRESS/KNITS cycle: MORE DRY, LESS DRY and COOL
DOWN.
Automatic Regular/Delicate Cycle
Use for sturdy items like play or work clothes and also for
delicate items. The type of heat is determined by choosing
the proper Fabric Selector option. There are three settings
in the AUTOMATIC REGULAR/DELICATE cycle - MAX DRY,
MORE DRY, and LESS DRY.
Time Dry Cycle
This cycle will operate dryer for up to 75 minutes. Cottons
and heavyweight items dry best between 50 and 75 min-
utes, and lightweight items dry best between 20 and 40
minutes.
Sanitize
This is a 75 minute, high heat cycle that sanitizes your laun-
dry by killing 99.9% of common household bacteria*.
Operating Your Dryer
© Copyright, Alliance Laundry Systems LLC -
DO NOT COPY or TRANSMIT
10 Part No. D518540ENR3

Set the Cycle Selection to Time Dry, Max Dry, the Fabric Se-
lector to Perm Press/ Regular, and allow the dryer to com-
plete the cycle uninterrupted.
NOTE:NOTE: The Sanitize setting uses high heat. Check the fabricThe Sanitize setting uses high heat. Check the fabric
label for proper care instructions.label for proper care instructions.
*Bacteria tested by an independent lab were Staphylococ-
cus aureus, Pseudomonas aeruginosa, Klebsiella pneumo-
niae. Individual results may vary.
Fabric Selector
The type of heat is determined by selecting the proper Fab-
ric Selector option.
Use NO HEAT on items that shrink easily or to "fluff" items.
Use DELICATE to dry delicate items.
Use PERM PRESS/REGULAR for permanent press items and
synthetics or for sturdy items like play or work clothes.
Operating Your Dryer
© Copyright, Alliance Laundry Systems LLC -
DO NOT COPY or TRANSMIT
11 Part No. D518540ENR3
To Dry Clothes
This appliance shall not be used to dry off solvents or dry
cleaning fluids. Fabric softeners, or similar products, should
be used as specified by the fabric softener instructions.
IMPORTANT:IMPORTANT: Refer to the INSTALLATION INSTRUCTIONS be-Refer to the INSTALLATION INSTRUCTIONS be-
fore using dryer.fore using dryer.
IMPORTANT:IMPORTANT: Before using dryer for the first time, use an all-Before using dryer for the first time, use an all-
purpose cleaner or a detergent and water solution and apurpose cleaner or a detergent and water solution and a
damp cloth to remove shipping dust from inside of dryerdamp cloth to remove shipping dust from inside of dryer
drum.drum.
NOTE:NOTE: This appliance is designed for repeated normal opera-This appliance is designed for repeated normal opera-
tion according to operating instructions.tion according to operating instructions.
1. Sort items into separate loads.
NOTE:NOTE: Remove all objects from pockets such as lighters andRemove all objects from pockets such as lighters and
matches.matches.
IMPORTANT:IMPORTANT: Oil affected items can ignite spontaneously, es-Oil affected items can ignite spontaneously, es-
pecially when exposed to heat sources such as in a tumblepecially when exposed to heat sources such as in a tumble
dryer. The items become warm, causing an oxidation reac-dryer. The items become warm, causing an oxidation reac-
tion in the oil. Oxidation creates heat. If the heat cannot es-tion in the oil. Oxidation creates heat. If the heat cannot es-
cape, the items can become hot enough to catch fire. Piling,cape, the items can become hot enough to catch fire. Piling,
stacking or storing oil affected items can prevent heat fromstacking or storing oil affected items can prevent heat from
escaping and so create a fire hazard.escaping and so create a fire hazard.
NOTE:NOTE: Remove all sharp objects from laundry to avoid tearsRemove all sharp objects from laundry to avoid tears
and rips to items during normal machine operation.and rips to items during normal machine operation.
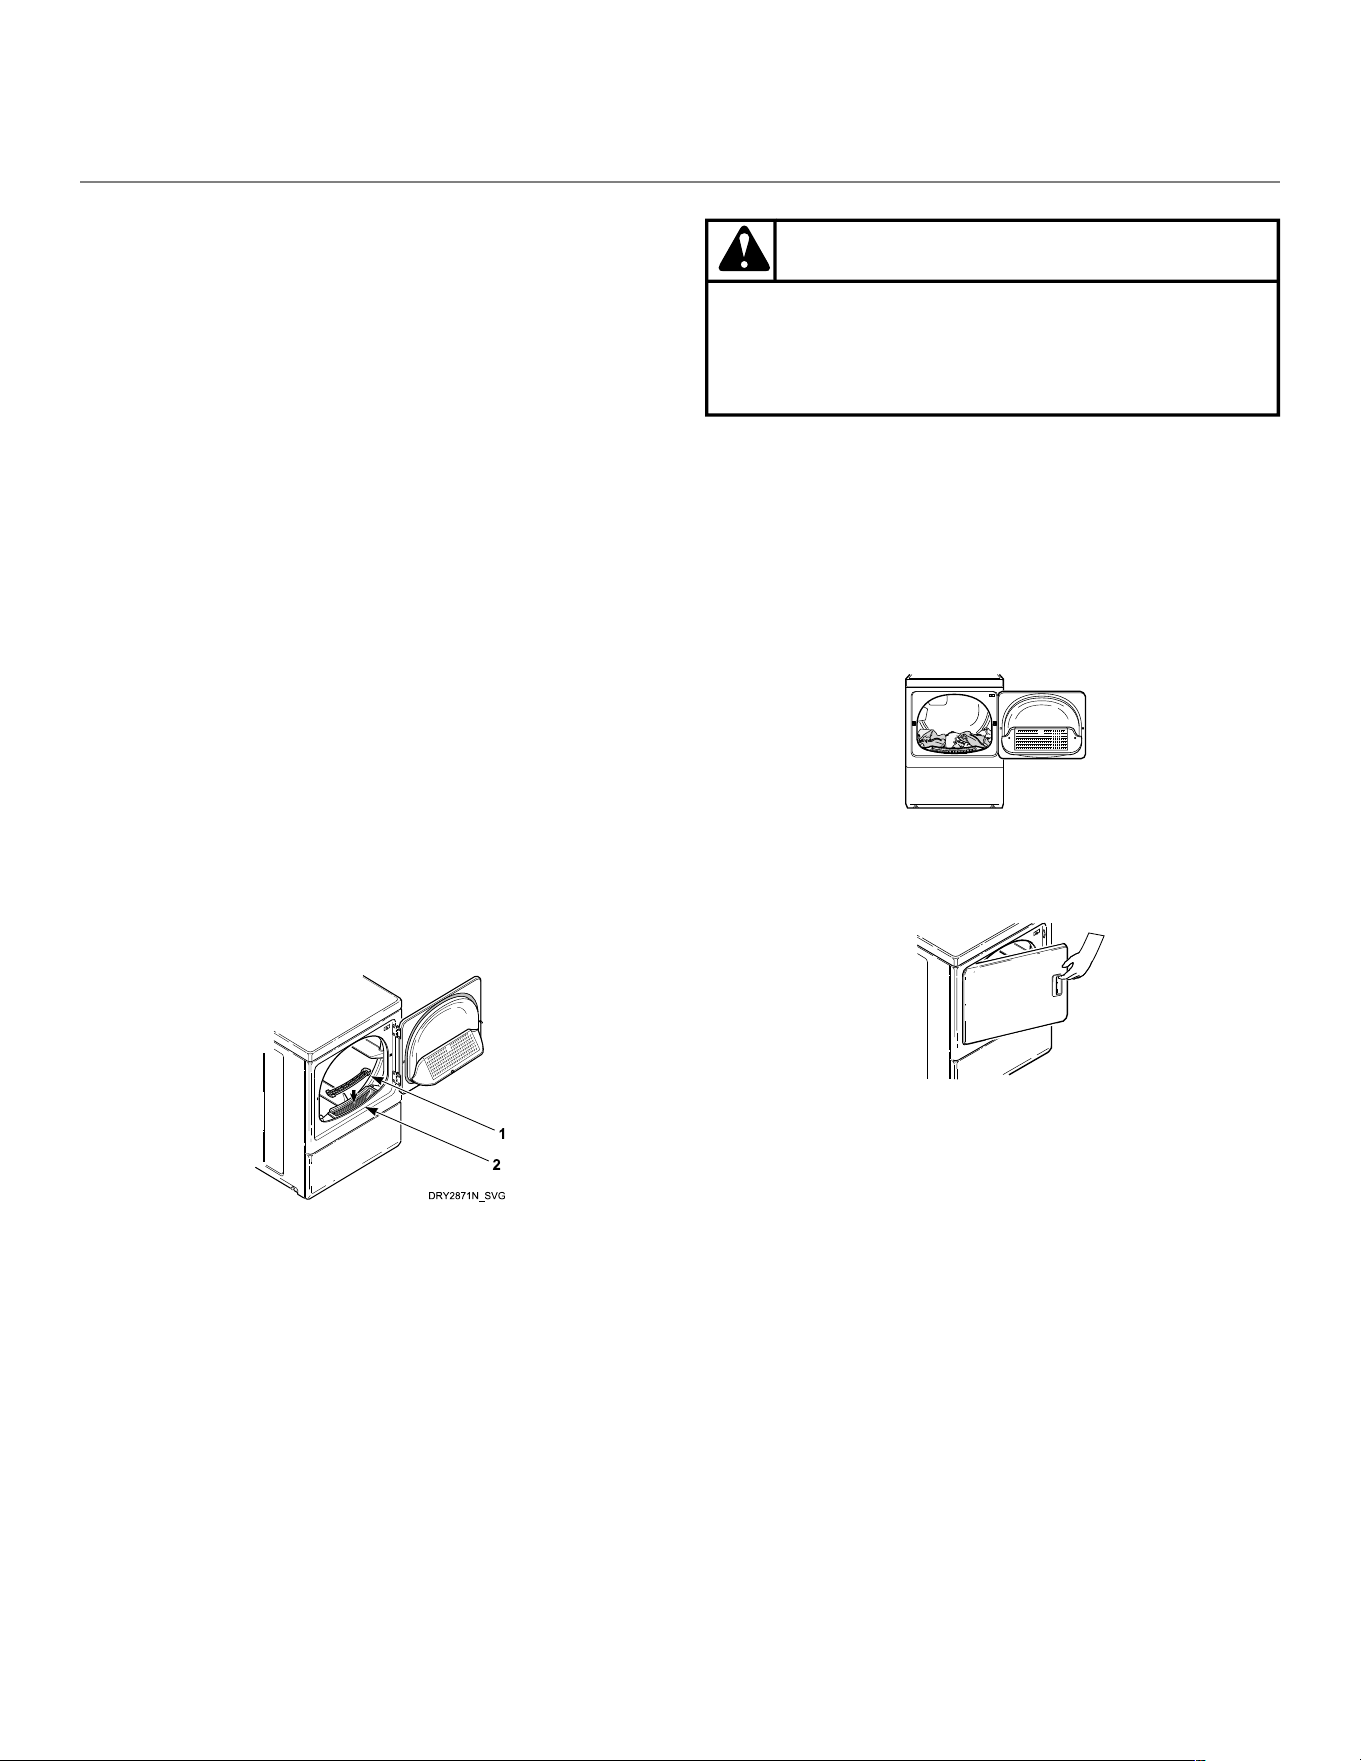
2. Clean lint filter (if using lint filter guard, remove first).
1. Lint Filter Guard (optional)
2. Lint Filter
Figure 2
WARNING
To reduce the risk of fire and risk of lint collecting
in exhaust duct, do not operate dryer without lint fil-
ter in place.
W771
NOTE:NOTE: The Lint Filter Guard is an optional accessory to helpThe Lint Filter Guard is an optional accessory to help
prevent items from falling in the lint filter.prevent items from falling in the lint filter.
3. Load dryer half full with laundry ( 8.2 kg [18 pounds]
maximum dry clothes load). Add fabric softener sheet, if
desired.
NOTE:NOTE: To avoid damage to dryer, do not use more than oneTo avoid damage to dryer, do not use more than one
fabric softener sheet per load.fabric softener sheet per load.
D666I_SVG
4. Close loading door. Dryer will not operate with the door
open.
D668IE0A
5. Select Fabric Selector based on load type. Follow gar-
ment manufacturer's care labels for recommended tem-
perature settings.
6. Select the desired Cycle setting under Cycle Selection us-
ing the timer knob. These settings control the drying
time.
The ENERGY SAVER settings, marked with an asterisk (*),
show which dryer settings will use the least energy and will
leave items damp for easier ironing.
7. Push start button.
NOTE:NOTE: To stop dryer at any time, open the door or turn timerTo stop dryer at any time, open the door or turn timer
knob to an off position. To restart dryer, close door, resetknob to an off position. To restart dryer, close door, reset
timer if necessary, and push start button.timer if necessary, and push start button.
To Dry Clothes
© Copyright, Alliance Laundry Systems LLC -
DO NOT COPY or TRANSMIT
12 Part No. D518540ENR3

Optional Drying Rack
A drying rack, Part No. D512082, is available at extra cost
through your Factory Authorized Service Center.
The drying rack can be used in time dry cycles only for no-
tumble drying of articles such as tennis shoes, sweaters,
stuffed toys or other delicate items.
DRY2332N_SVGDRY2332N_SVG
Optional Drying Rack
© Copyright, Alliance Laundry Systems LLC -
DO NOT COPY or TRANSMIT
13 Part No. D518540ENR3
Maintenance
Lubrication
All moving parts are sealed in a permanent supply of lubri-
cant or are equipped with oilless bearings. Additional lubri-
cation will not be necessary.
Care of Your Dryer
WARNING
To reduce the risk of an electric shock, serious
injury or death, disconnect the electrical service to
the dryer before cleaning the interior.
W132
Dryer Interior
Wipe the surfaces using a soft cloth and household cleaner
or a non-abrasive paste of powdered laundry detergent and
hot water, followed by a short heat cycle with a load of rags.
To remove crayon or ball point ink off the dryer drum, put
the heat on high and use old rags in the dryer to absorb the
crayon or ink. If unsuccessful, contact the appliance dealer.
DO NOT use any chemicals in the dryer.
IMPORTANT:IMPORTANT: The use of chlorine bleach for removing any dis-The use of chlorine bleach for removing any dis-
colorations should be avoided because bleach could dam-colorations should be avoided because bleach could dam-
age the finish.age the finish.
Cabinet
Wipe the dryer cabinet as needed. If detergent, bleach or
other washing products have been spilled on the dryer, wipe
immediately. Some products will cause permanent damage
if spilled on the cabinet.
Control Panel
Use only a damp or sudsy cloth for cleaning the control pan-
el. Some spray pretreat products may harm the finish on the
control panel. DO NOT use products that contain alcohol on
the control panel.
Exhaust System
WARNING
To reduce the risk of electric shock, disconnect the
electrical service to the dryer before cleaning.
W043
WARNING
Any disassembly requiring the use of tools must be
performed by a suitably qualified service person.
W299
The exhaust duct should be inspected after one year of use
and cleaned if necessary by a qualified service person to re-
move any lint build-up. Inspect and clean exhaust duct
every one to two years as required thereafter.
Every two years a qualified service person should remove all
front panels and vacuum the inside of the dryer
NOTE:NOTE: This recommended maintenance is not covered underThis recommended maintenance is not covered under
the terms of the warranty.the terms of the warranty.
The weather hood should be checked frequently to make
sure the dampers move freely, dampers are not pushed in
and that nothing has been set against them.
Keep dryer area clear and free from combustible materials,
gasoline and other flammable vapors and liquids.
Do not obstruct the flow of combustion and ventilation air.
NOTE:NOTE: Verify proper operation after servicing.Verify proper operation after servicing.
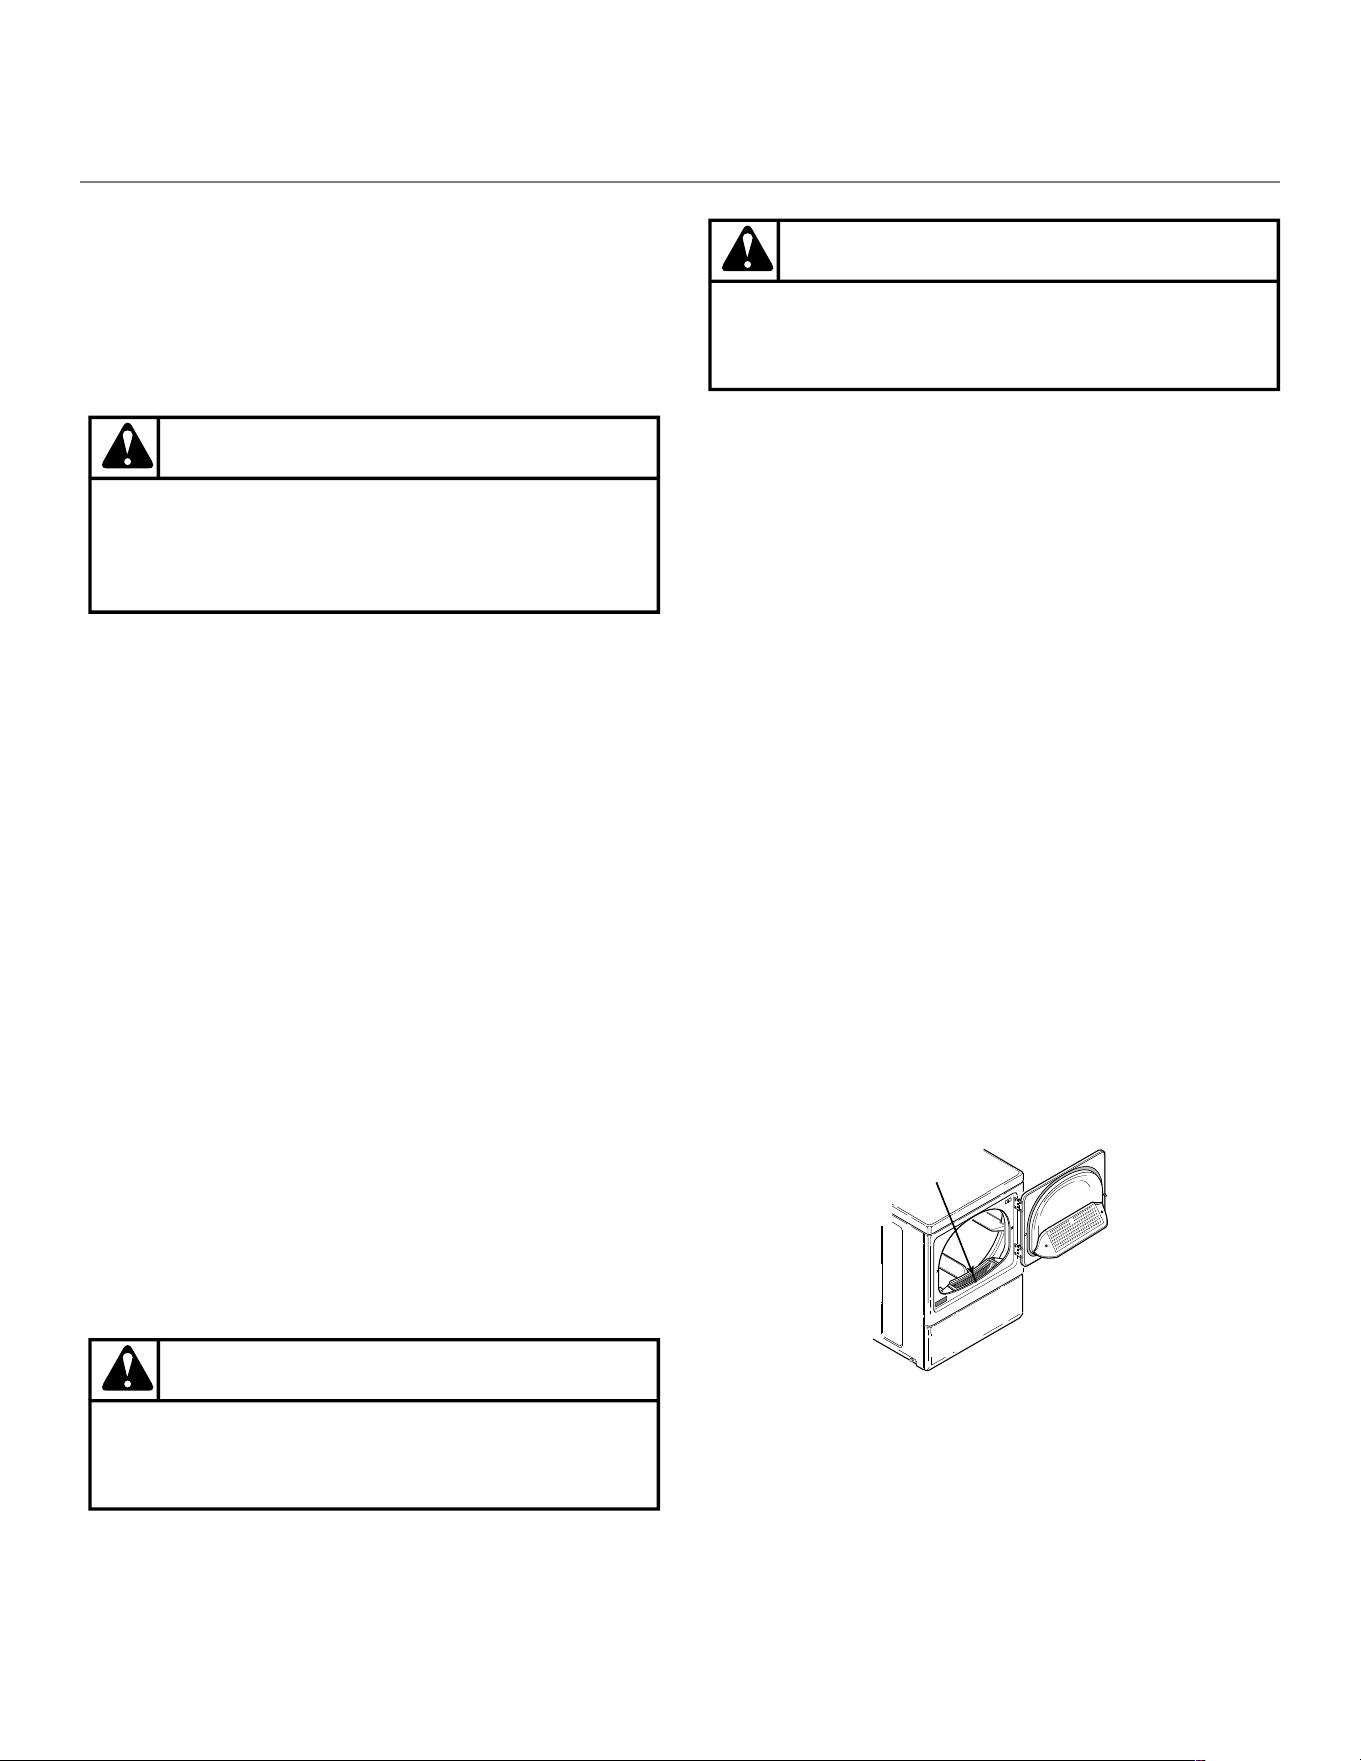
Lint Filter
The lint filter is located at the front of the dryer in the lower
part of the door opening.
CLEAN THE LINT FILTER BEFORE DRYING EACH LOAD. (If us-
ing optional lint filter guard, remove first).
Annually remove lint filter and screw to vacuum the duct un-
der it.
DRY2782N_SVG
1
1. Lint Filter
Figure 3
Maintenance
© Copyright, Alliance Laundry Systems LLC -
DO NOT COPY or TRANSMIT
14 Part No. D518540ENR3

Troubleshooting
Try these troubleshooting tips before making a service call.
They may save you time and money.
Dryer SymptomDryer Symptom Possible Cause/SolutionPossible Cause/Solution
Dryer won’t start
• Make sure the power cord is plugged all the way into the electrical
outlet.
• Make sure loading door is closed.
• Push start button to start dryer.
• Make sure the laundry room fuse(s) isn’t blown or loose, or circuit
breakers aren’t open.
• The dryer itself does not have an electrical fuse. An electric dryer
has an electrical circuit with two fuses.
• Check if motor overload protector has cycled. Wait 10 minutes and
try again.
Dryer won’t heat
• Electric dryers only – Some homes may have two fuses or circuit
breakers for an electric dryer; both fuses or circuit breakers should
be checked. Make sure the laundry room fuse(s) isn’t blown or
loose, or that the circuit breakers aren’t open.
• Gas dryer only – Make sure equipment and main gas line valve is
turned on.
• Check exhaust duct to outside to see if it is kinked, blocked or
needs cleaning.
• Check weather hood to make sure flapper moves freely, has not
been pushed in or has not been blocked.
Dryer doesn’t dry clothes satisfactorily
• Check exhaust duct to outside to see if it is kinked, blocked or
needs cleaning.
• Check weather hood to make sure flapper moves freely, has not
been pushed in or has not been blocked.
• Auto-Sensing cycle – Adjust Dryness selection.
• Time Dry cycle - Allow more or less time.
• Clean the lint filter.
• Make sure the load isn’t too small. Small loads may not tumble
properly or dry evenly.
• The Auto-Sensing cycles are not suggested to be used for small
loads such as two small towels. For those loads, use the Time
Dry cycle.
• Check load being dried. Heavy items dried with lightweight items
will not dry as quickly as the rest of the load.
• Refer to Sort section for proper sorting information.
Dryer is noisy
• Check dryer for foreign objects (nails, coins, bobby pins, metal,
plastic toys, etc.). Remove items from dryer.
• Make sure dryer is level. Uneven leveling can cause vibration.
continues...
Troubleshooting
© Copyright, Alliance Laundry Systems LLC -
DO NOT COPY or TRANSMIT
15 Part No. D518540ENR3
Dryer SymptomDryer Symptom Possible Cause/SolutionPossible Cause/Solution
Clothes are too wrinkled
• Check heat setting. Overdrying can cause wrinkling.
• Check load size. Large loads may not tumble properly and may
cause wrinkling.
Clothes have odor
• Check room for odors before drying clothes. Any odor (fried foods,
paint, varnish, cleaners, burning wood, etc.) will transfer to clothing
as the dryer draws air from the room.
• Ventilate room before drying clothes.
Cycle advances too slowly
• When in an Auto-Sensing cycle, the time it takes depends on the
type and size of the load being dried. When clothing has more
moisture, the cycle takes longer than when the clothes are more
dry.
Water Leaks
• Check that inlet hose is properly installed on the faucet and the
dryer's steam valve.
• Check the condition of the inlet hose. Replace inlet hose every five
years.
• Check laundry room plumbing.
• Check house water pressure. In cases of extremely low water pres-
sure, leaking may occur.
continues...
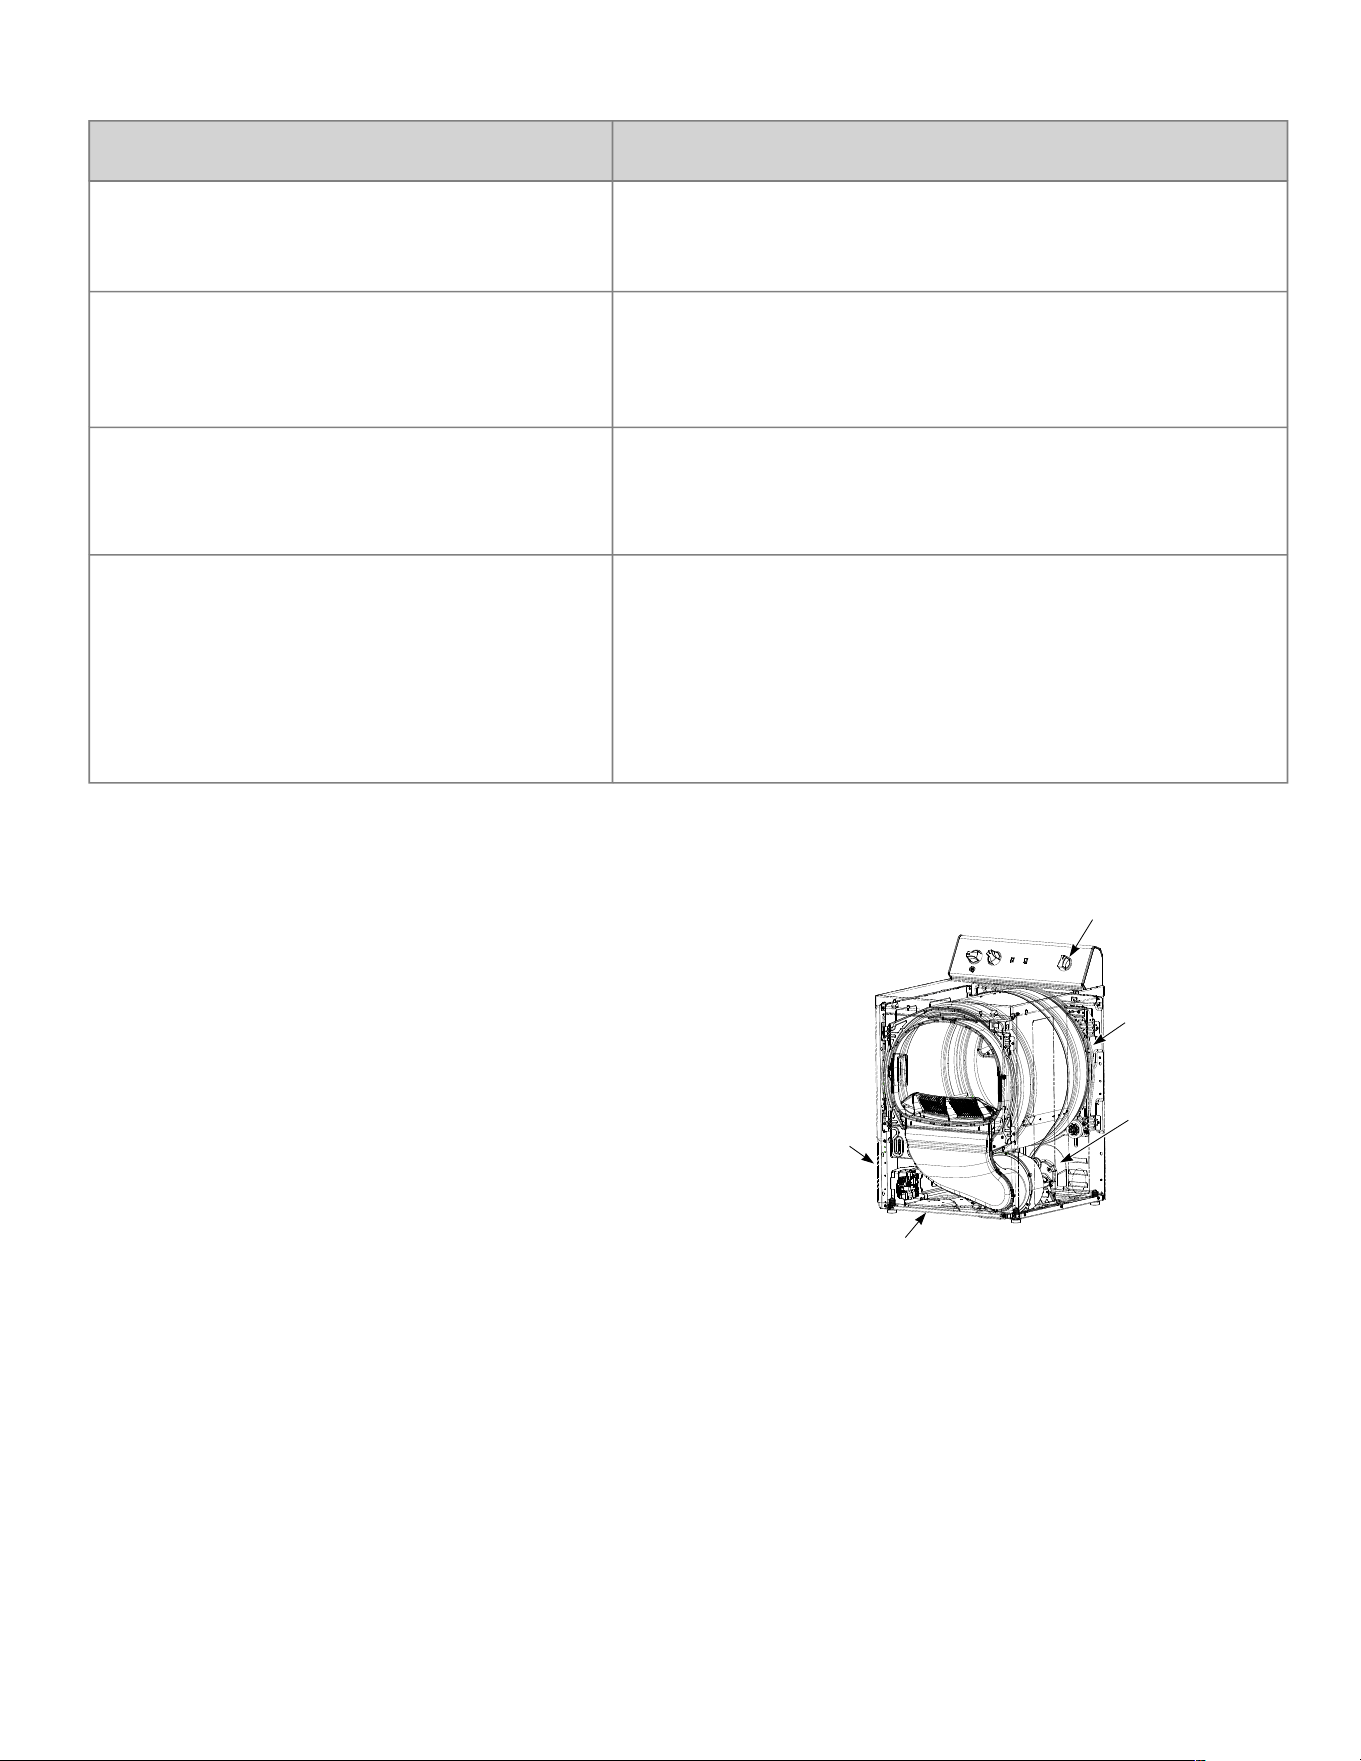
Normal Operating Sounds
The following normal operating sounds may be heard while
the machine is running a cycle.
DRY2919N
5
4
3
2
1
1. Ticking of Timer
2. Rhythmic Thumping (Caused by Cylinder Seam Con-
tacting Drum Roller)
3. Thumping Noise from Belt
4. Rush of Air (Gas Models)
5. Clicks from Relays on Output Board
Figure 4
Troubleshooting
© Copyright, Alliance Laundry Systems LLC -
DO NOT COPY or TRANSMIT
16 Part No. D518540ENR3
Warranty Repairs
If your appliance needs repair, you can locate an authorized
service provider directly from our Support page at
www.speedqueen.com.
Before scheduling service, please consult Limited Warranty
for full terms. As a reminder, the following items are not
covered by the limited warranty and, if a service technician
is called, you will be responsible for payment of the service
call.
• Plugged or restricted venting
• Kinked venting
• Cleaning lint from within the dryer
• Home electrical issues
• Home gas issues
• Foreign objects found inside the dryer
• Instruction on how to use machine
• Issues related to improper installation
As detailed in the Limited Warranty, if the unit is operated in
a multiple-user setting or commercial application, the unit's
limited warranty is three (3) years parts only. Labor cover-
age is not included in this warranty.
Contact Information
If you have any questions or need assistance with your ap-
pliance, please visit us online at www.speedqueen.com.
From our website you can:
• Register your appliance
• Find manuals and other product literature
• Locate authorized service providers near you
• Locate replacement parts
If additional support is needed, contact us using one of the
following methods:
PhonePhone: (920) 748-3121 or (800) 552-5475
Contact Us FormContact Us Form: www.speedqueen.com/contact/
MailMail: Speed Queen
Shepard Street
P.O. Box 990
Ripon, WI 54971-0990
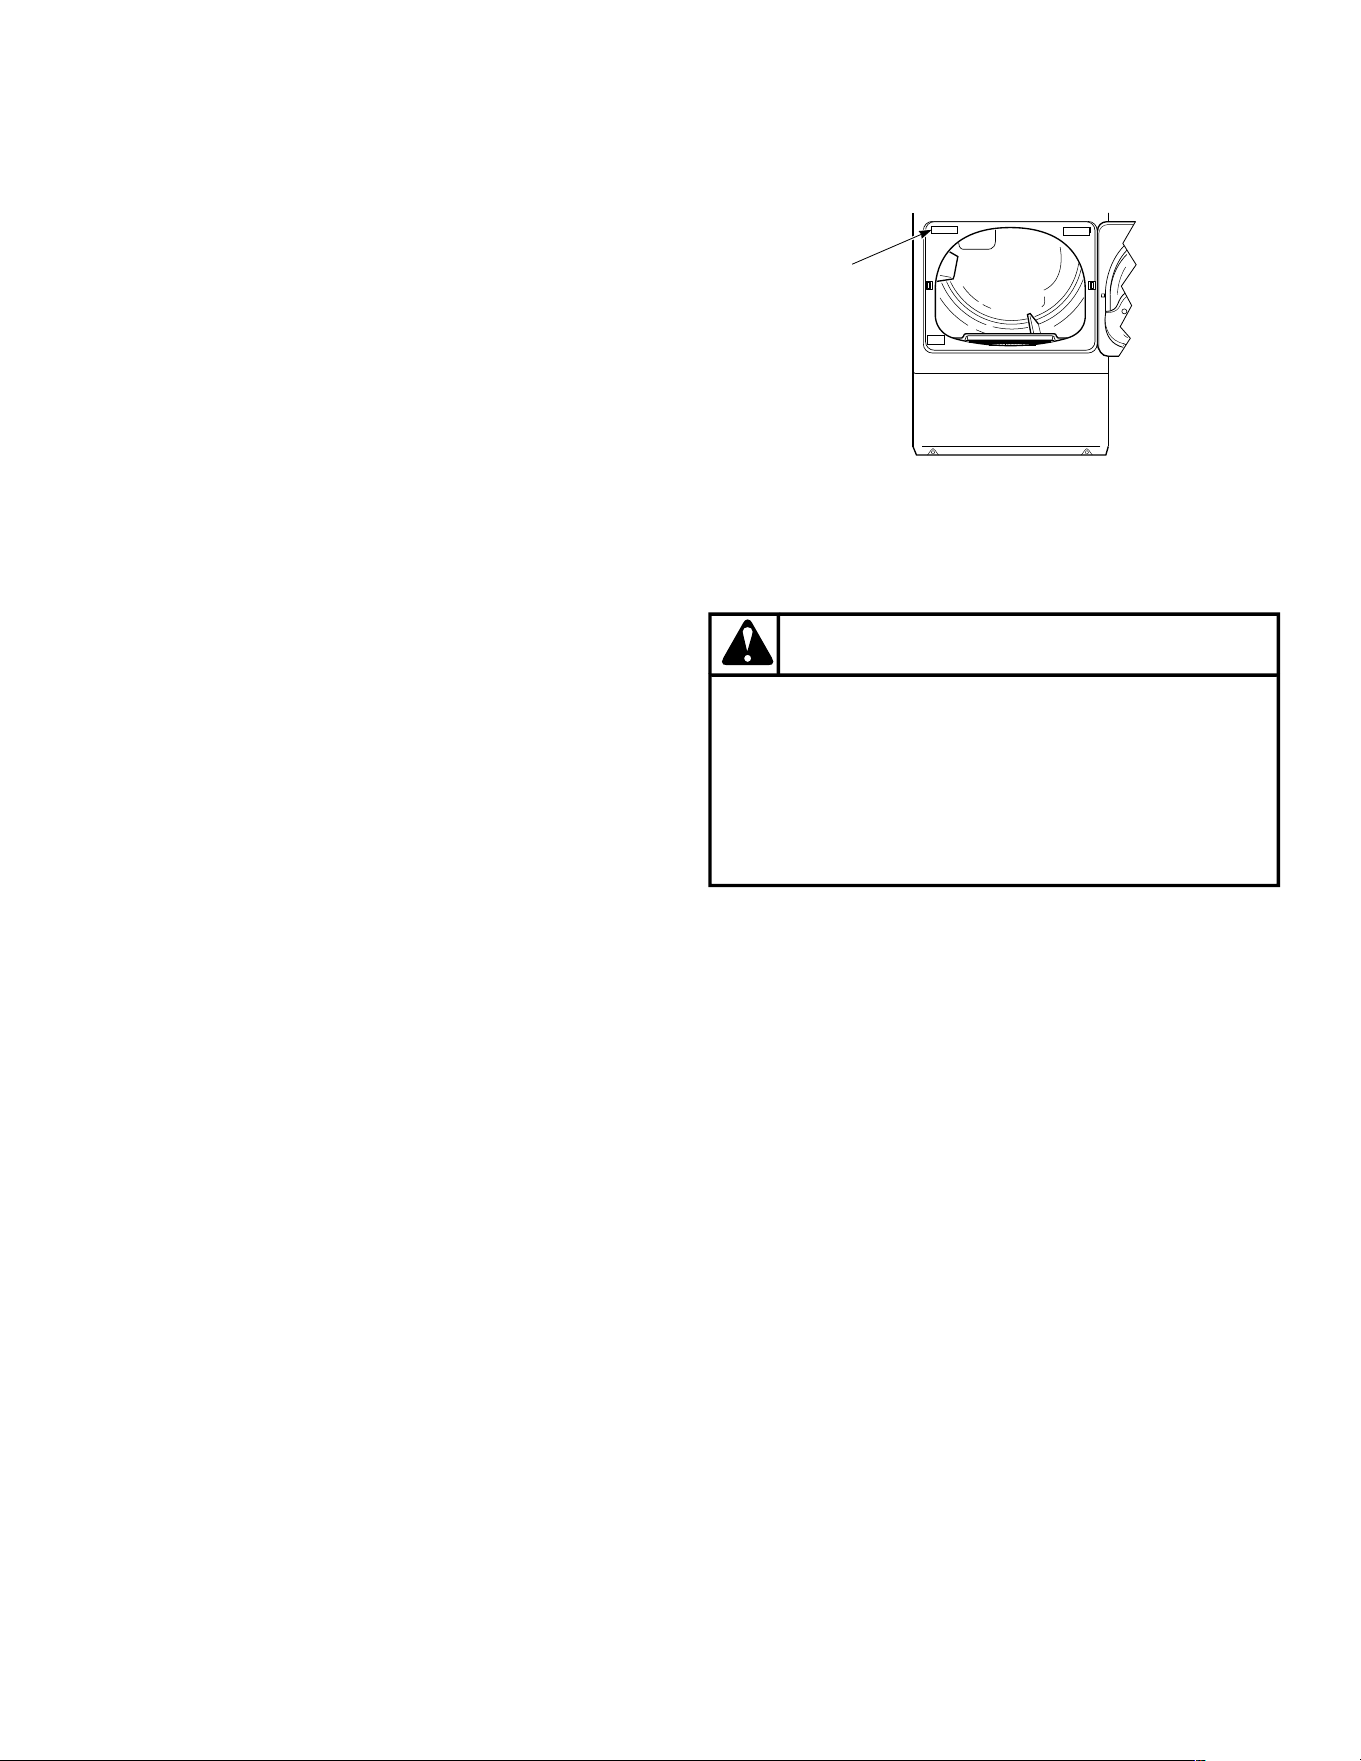
When contacting us, please provide the following informa-
tion:
• Date Purchased
• Model Number
• Serial Number
The Model and Serial Numbers are located on the serial
plate. The serial plate will be in the location shown.
DRY2527N_SVG
1
1. Serial Plate
WARNING
To reduce the risk of serious injury or death, DO
NOT repair or replace any part of the unit or attempt
any servicing unless specifically recommended in
the user-maintenance instructions or in published
user-repair instructions that you understand and
have the skills to carry out.
W329
Troubleshooting
© Copyright, Alliance Laundry Systems LLC -
DO NOT COPY or TRANSMIT
17 Part No. D518540ENR3
