

LG
Electronics
P/No.:
3828FY3057L

Washing
Machine
OWNER'S
MANUAL
Please
read
this
manual
carefully
before
operating
your
set.
Retain
it
for
future
reference.
Record
model
number
and
serial
number
of
the
set.
See
the
label
attached
on
the
back
cover
and
quote
this
information
to
your
dealer
when
you
require
service.
This
washing
machine
is
designed
and
manufactured
for
household
use
only.
MODELS
:
WP-830Q/WP-840Q
WP-970Q(S)/WP-1250Q(S)

CONTENTS
SAFETY
MEASURE.............................................
3~4
PARTS
IDENTIFICATION.....................................
4~5
INSTALLATION.....................................................
6~7
PREPARATIONS
BEFORE
WASHING.....................8
HOW
TO
WASH........................................................9
HOW
TO
RINSE................................................10~11
HOW
TO
SPIN.........................................................11
AFTER
FINISHING..................................................12
REFERENCE...........................................................12
CARE
AND
MAINTENANCE.............................13~14
TROUBLESHOOTING
GUIDE................................14
SPECIFICATIONS...................................................15
2

SAFETY
MEASURE
3
Manufacturer
is
not
responsible
for
accidents
caused
by
the
user
as
a
result
of
not
following
the
user's
guide.
Switch
Area
Avoid
watering
on
the
switch
area
It
may
cause
electric
shock
or
fire.
Volatile
Material
Do
not
use
volatile
material
such
as
Benzene,
Gasoline,
bug
killer.
Do
not
leave
strong
alkaline
substance
such
as
bleach
inside
the
tub.
Damage
on
plastic
surface
and
rubber
parts
may
occur.
Power
Cord
If
the
power
supply
cord
is
damaged,
it
must
only
be
replaced
by
the
manufacture
or
its
service
agent
or
a
similarly
qualified
person
in
order
to
avoid
a
hazard.
Hard
objects
Remove
pins,
buckles
and
removable
hard
objects
in
the
wash
load
to
avoid
damaging
the
tub
before
your
washing
CAUTION
Do
not
plug
in
the
power
supply
cord
when
your
hand
wet.
In
Operation
Do
not
insert
the
hand
in
the
spin
dryer
basket
while
the
machine
is
in
operation.
(Do
not
let
children
climb
on
the
machine
or
climb
into
the tub
Injury
may
occur.)
Electric
Outlet
Avoid
connecting
several
electric
devices
to
single
outlet.
It
may
cause
fire.
Heat
Avoid
electric
heater,
candle
light,
cigarette
light,
bug
smoker,
etc.
near
the
machine.
It
may
ignite
or
deform
plastic
part.
Spin
Motor
After
continuous
using
spinning
program
3
times,
please
stop
spinning
more
than
1
hour.
Otherwise
the
spin
motor
could
be
damaged
of
fired.
Installation
Area
Avoid
area
exposed
to
snow,
rain,
or
where
humidity
is
high.
It
may
cause
electric
shock.

4
1.
Water
Supply
Inlet
Connect
here
with
the
inlet
hose
from
the
water
faucet
to
feed
water
to
the
tub.
2.
Wash
Timer
Select
the
desired
time
for
washing
or
rinsing.
3.
Wash
Program
Set
the selector
to
"Gentle",
"Normal",
"Strong"
according
to
kind
and
quantity
of
the
laundry.
4.
Drain
Selector
Select
"Wash
Rinse"
for
washing
and
rinsing,
and
"Drain"
to
drain
the
water
out
of
the
tub.
5.
Spin
Timer
Select
the
desired
time
for
spinning.
The
maximum
limit
is
5
min.
Don't
rotate
the
knob
more
than
prescribed
limit.
6.
Water
Supply
Selector
Select
"WASH"
to
supply
water
for
washing
and
rinsing
and
"SPIN"
for
spin
shower
rinse.
It
is
electrically
operated
to
facilitate
you
to
know
the
completion
of
washing
cycle.
Buzzer(Option
:
Inside)
WASH
Spin
Timer
Drain
Selector
Wash
Program
Water
Supply
Selector
Wash
Timer
Off
Wash
Rinse
Drain
2
3
4
5
6
1
0
3
5
1
4
2
Off
0
9
15
3
12
6
Normal
Gentle
Strong
PUNCH
Hot
water
Avoid
using
hot
water
over
50°C.
It
may
deform
plastic
parts
or
cause
malfunction.
Installation
Install
the
washing
machine
on
a
horizontal
support.
Otherwise,
it
may
cause
vibration
and
noise.
CAUTION
WASH
GENTLE
NORMAL
STRONG
WASH-RINSE
D
RAIN
0
1
5
2
4
3
0
3
15
6
129
SPIN
TIMER
DRAIN
SELECTOR
WASH
PROGRAM
WATER
SELECTOR
WASH
TIMER
OFF
OFF
2
3
4
5
6
1
PUNCH
PARTS
IDENTIFICATION
WP-830Q/WP-840Q
WP-970Q(S)/WP-1250Q(S)

PARTS
IDENTIFICATION
WASHING
WP-970Q(S)
WP-830Q/WP-840Q/WP-1250Q(S)
COVER
WATER
SUPPLY
SELECTOR
LEVER
OVER FLOW
FILTER
ROTATION
FILTER-C
TUB
PULSATOR
SAFETY
COVER-2
SPIN
DRYER
BASKET
EARTH
WIRE
(For
models
with
two
prong
plug)
(Vertical
movement
of
smaller
plate
can
be
operated
only
when
sufficient
amount
of
laundry
is
deposited.)
(Please
refer
to
page
9
"How
To
Wash"
when
you
fill
water
into
the
wash
tub)
POWER
CORD
SPIN
DRYER
COVER
SAFETY
COVER-2
SAFETY
COVER-1
SPIN
DRYER
BASKET
EARTH
WIRE
(For
models
with
two
prong
plug)
POWER
CORD
SPIN
DRYER
COVER
Remark
:
for
WP-1250Q
use
panel
control
same
as
WP-970Q
WASHING
COVER
WATER
SUPPLY
SELECTOR
LEVER
OVER FLOW
FILTER
ROTATION
FILTER-C
TUB
PULSATOR
(Vertical
movement
of
smaller
plate
can
be
operated
only
when
sufficient
amount
of
laundry
is
deposited.)
SAFETY
COVER-1
(Please
refer
to
page
9
"How
To
Wash"
when
you
fill
water
into
the
wash
tub)
Safety
Cover
Drain
Hose
Asm
Wheel
Asm
Adjustable
Leg
×4
×2
Wheel
Shaft
×
4
OPTION
OPTION
Accessories
5

INSTALLATION
6
Set
on
flat
and
firm
floor.
Incorrect
installation
may
cause
severe
noise
and
break
down.
Maintain
more
than
10cm
between
the
side
of
drain
hose
and
the
wall.
A
carpet
must
not
obstruct
the
ventilation
openings.
Leveling
the
machine
(Option)
Lift
the
front
of
the
washing
machine
and
twist
the
Adjustable
Leg
until
the
washing
machine
is
placed
evenly.
If
the
Adjustable
Leg
is
too
short,
use
the
Level
Adjusting
Plates
as
shown.
Installation
area
Connecting
the
drain
hose
Connect
the
drain
hose
to
the
outlet
of
the
plunger
valve
located
at
the
back
side
of
the
washing
machine.
Push
the
clamp
toward
the
body
of
the
washing
machine
as
shown
in
the
figure.
Notes
:
Be
sure
to
re-route
the
hose
so
that
it
is
not
kinked
or
has
sharp
bends
which
will
prevent
proper
drainage.
The
level
of
the
drain
should
be
slightly
lower
than
the
lowest
part
of
the
washing
machine
in
order
to
ensure
proper
and
complete
drainage.

7
due
to
leaking
current
and
electric
shock.
It
is
attached
at
the
back
of
the
washer.
Connect
it
to
the
metal
water
pipe.
If
the
water
pipe
is
made
of
plastic,
it
does
not
have
the
earth
effect.
Never
connect
the earth
wire
to
the
gas
pipe,
lightning
arrester.
telephone
connecter,
etc.
WARNING-THE
APPLIANCE
WITH
TWO-PRONGED
PLUG
MUST
BE
GROUNDED.
Other
earthing
method
Insert
the
power
plug
into
the
outlet.
Before
connecting
the
power
plug,
check
if
the
voltage
setting
of
the
washer
matches
the
outlet
voltage.
If
AC
outlet
with
ground
terminal
is
used,
grounding
is
not
needed.
If
not,
never
forget
earthing
(earthing
method
above).
The
appliance
must
be
positioned
so
that
the
plug
is
accessible.
This
washer
is
assembled
for
220V,
but
can
be
changed
from
220V
to
110V(or
127V).
Check
your
electrical
source
and
follow
the
diagram
below
to
convert
voltage.
After
connect
the
earth
wire
to
the
earth
copper
plate,
bury
it
at
least
75cm
deep
under
the
wet
ground.
Connect
the
earth
wire
to
the
earthing
only
outlet.
When
installing
it
in
an
area
where
earthing
is
not
possible,
purchase
a
short-circuit
breaker
(15mA
at
operation,
7.5mA
at
idle)
and
connect
it
to
the
outlet.
Gas
pipe
Earth
wire
Ground
terminal
Earth
copper
plate
Earth
wire
75cm
Short-circuit
breaker
Earth
wire
Connecting
the
earth
wire
Connecting
the
power
plug
Voltage
Change
(only
for
dual
voltage)
Install
the
earth
wire
to
prevent
short-circuit

PREPARATIONS
BEFORE
WASHING
8
Inlet
hose
Connect
the
water
supply
hose
to
the
water
supply
inlet.
Set
the
water
supply
selector
lever
to
"WASH"
for
washing
and
rinsing,
to
"SPIN"
for
interim
spin
rinse.
Note:
The
water
selector
lever
should
not
be
placed
near
the
center
(as
shown
in
Fig
otherwise
water
will
flow
into
the
wash
and
spin
tub
simultaneously.)
(Fig
)
$
123
Check
the
washing
instruction
labels
on
the
clothing
to
be
washing
Remove
any
objects
from
the
pockets
of
the
clothing.
Object
left
in
the
pockets
may
damage
the
clothing
or
washing
machine
(especially
cause
clogging
of
the
drain
hose).
Separated
washing
is
required
for
oiled
or
dyed
laundry.
Preparation
Before
washing
Note)
For
better
wash
of
lots
of
laundry,
Putting
more
heavily-soiled
laundry
first
is
recommended.
Connect
the
power
cord
to
the
electrical
outlet.
Drain
hose
Lay
down
the
drain
hose.
Keep
the
drain
hose
flipped
down
while
washing
is
in
process.
9
Refer
to
TABLE
2
in
REFERENCE
on
page
12
Refer
to
TABLE
2
in
REFERENCE
on
page
12
for
information
on
how
to
select
the
appropriate
washing
time.
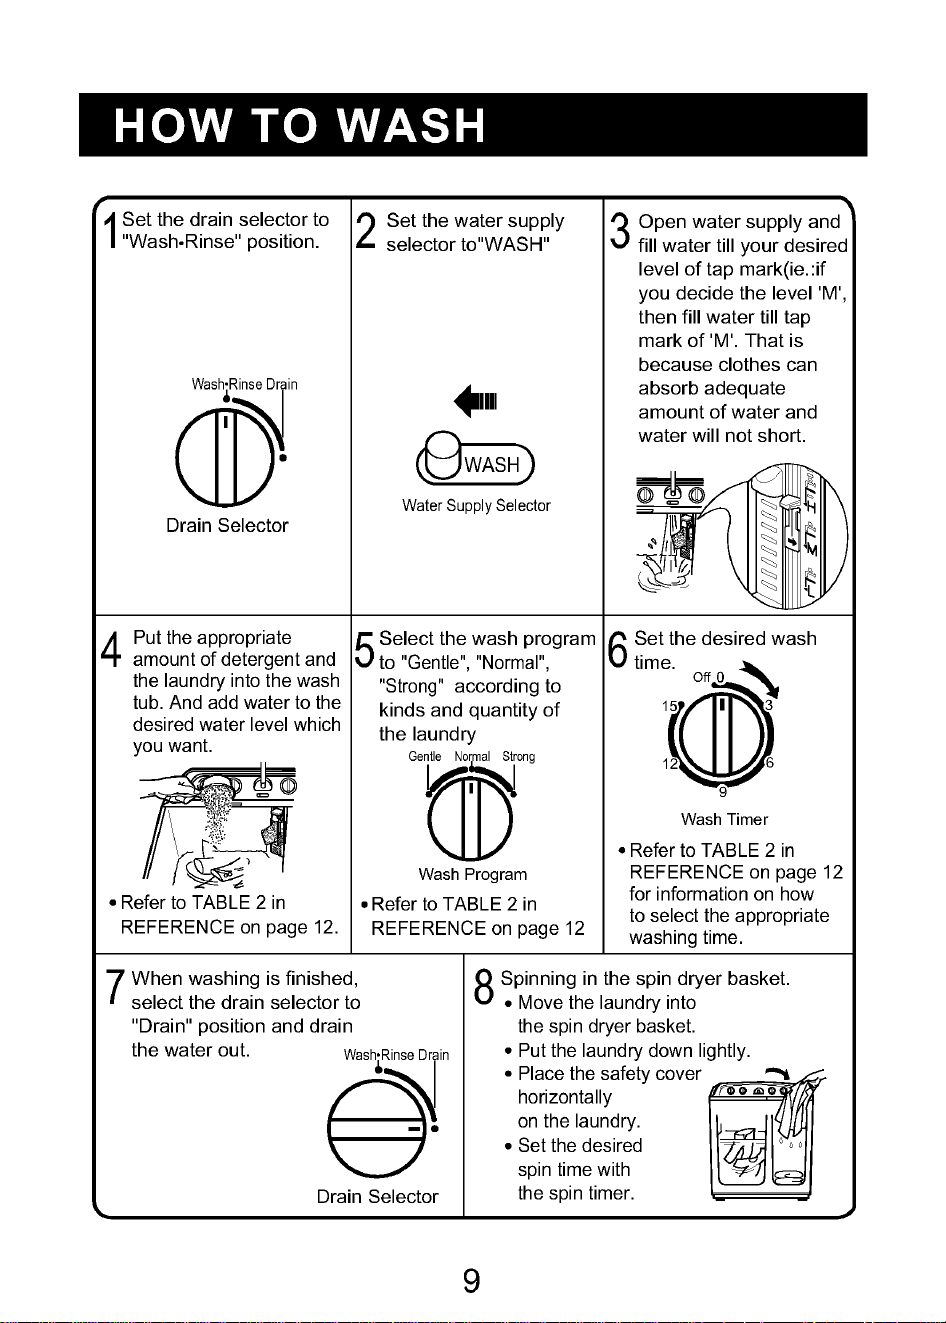
1Set
the
drain
selector
to
"Wash
Rinse"
position.
2
Set
the
water
supply
selector
to"WASH"
3
Put
the
appropriate
amount
of
detergent
and
the
laundry
into
the
wash
tub.
And
add
water
to
the
desired
water
level
which
you
want.
5
4
Select
the
wash
program
to
"Gentle",
"Normal",
"Strong"
according
to
kinds
and
quantity
of
the
laundry
6
Set
the
desired
wash
time.
7
When
washing
is
finished,
select
the
drain
selector
to
"Drain"
position
and
drain
the
water
out.
8
Spinning
in
the
spin
dryer
basket.
Move
the
laundry
into
the
spin
dryer
basket.
Put
the
laundry
down
lightly.
Place
the
safety
cover
horizontally
on
the
laundry.
Set
the
desired
spin
time
with
the
spin
timer.
Refer
to
TABLE
2
in
REFERENCE
on
page
12.
WASH
Water
Supply
Selector
Wash
Program
Normal
Gentle
Strong
Wash
Timer
Off
0
9
15
3
12
6
Open
water
supply
and
fill
water
till
your
desired
level
of
tap
mark(ie.:if
you
decide
the
level
'M',
then
fill
water
till
tap
mark
of
'M'.
That
is
because
clothes
can
absorb
adequate
amount
of
water
and
water
will
not
short.
Drain
Selector
Wash
Rinse
Drain
Drain
Selector
Wash
Rinse
Drain

HOW
TO
RINSE
10
1
2
34
5
6
Water
Supply
Selector
SPIN
1
Set
the
drain
selector
to
4
Put
the
laundry
into
the
wash
tub
and
repeat
1
to
3
course.
"Wash
Rinse"
position
and
feed
appropriate
water
to
the
tub.
2
Set
the
rinse
time
with
the
wash
timer
3
Put
the
laundry
into
the
spin
dryer
basket
and
set
the
spin
time
with
the
spin
timer.
Water
Supply
Selector
WASH
Wash
Timer
Off
0
9
15
3
12
6
Spin
T
imer
Off
0
3
5
1
4
2
Interim
spin
rinse
prior
to
regular
rinsing
will
remove
sudsy
water
from
the
laundry
and
improve
rinsing
efficiency.
This
course
allows
you
to
save
water
as
this
course
is
to
rinse
after
feeding
appropriate
water
to
the
tub.
After
washing.
Put
the
laundry
into
the
spin
dryer
basket.
Place
the
safety
cover
horizontally
on
the
laundry.
Set
the
desired
spin
time
with
the
spin
timer
After
spinning.
Put
the
laundry
into
the
wash
tub
and
rinse.
Set
the
water
supply
selector
to
"SPIN"
Allow
the
water
to
flow
appropriately.
Turn
off
the
water
supply,
close
the
safety
cover-2
and
spin
dryer
cover
Interim
spin
rinse
Economical
water
supply
rinse
Drain
Selector
Wash
Rinse
Drain

11
Water
Supply
Selector
WASH
123
Wash
Timer
Off
0
9
15
3
12
6
This
over
flowing
rinse
is
helpful
to
improve
rinsing
efficiency
and
remove
the
lint.
Set
the
drain
selector
to
"Wash
Rinse"
position.
Put
the
laundry
into
the
wash
tub
and
open
the
water
faucet.
Set
the
rinse
time
with
the
wash
timer
and
feed
water
continuously.
HOW
TO
SPIN
Spin
time
guide
Safety
cover
1.
Put
the
laundry
evenly
into
the
spin
dryer
basket.
2.
Put
the
laundry
down
lightly.
3.
Place
the
safety
cover
horizontally
on
the
top
of
the
laundry.
4.
Close
the
spin
dryer
cover.
5.
Set
the
spin
timer
according
to
the
following
table.
If
the
spin
dryer
basket
is
off-balance
and
vibrates
excessively,
stop
the
spinning,
rearrange
the
clothes
evenly,
and
then
resume
spinning.
If
spinning
fail
to
stop
within
15
seconds
after
the
spin
dryer
cover
is
opened,
the
brake
is
out
of order.
Immediately
stop
using
the
machine
and
request
repair
service.
Type
of
clothing
Spin
time
Thin
fabrics
(synthetic
fabrics,
mixed
fabrics)
1
minute
Sweaters
(synthetic
fabrics)
1~3
minutes
Cotton
underwear
3~5
minutes
Sheets,
towels
5
minutes
Continuous
water
supply
rinse
3
4
Drain
Selector
Wash
Rinse
Drain
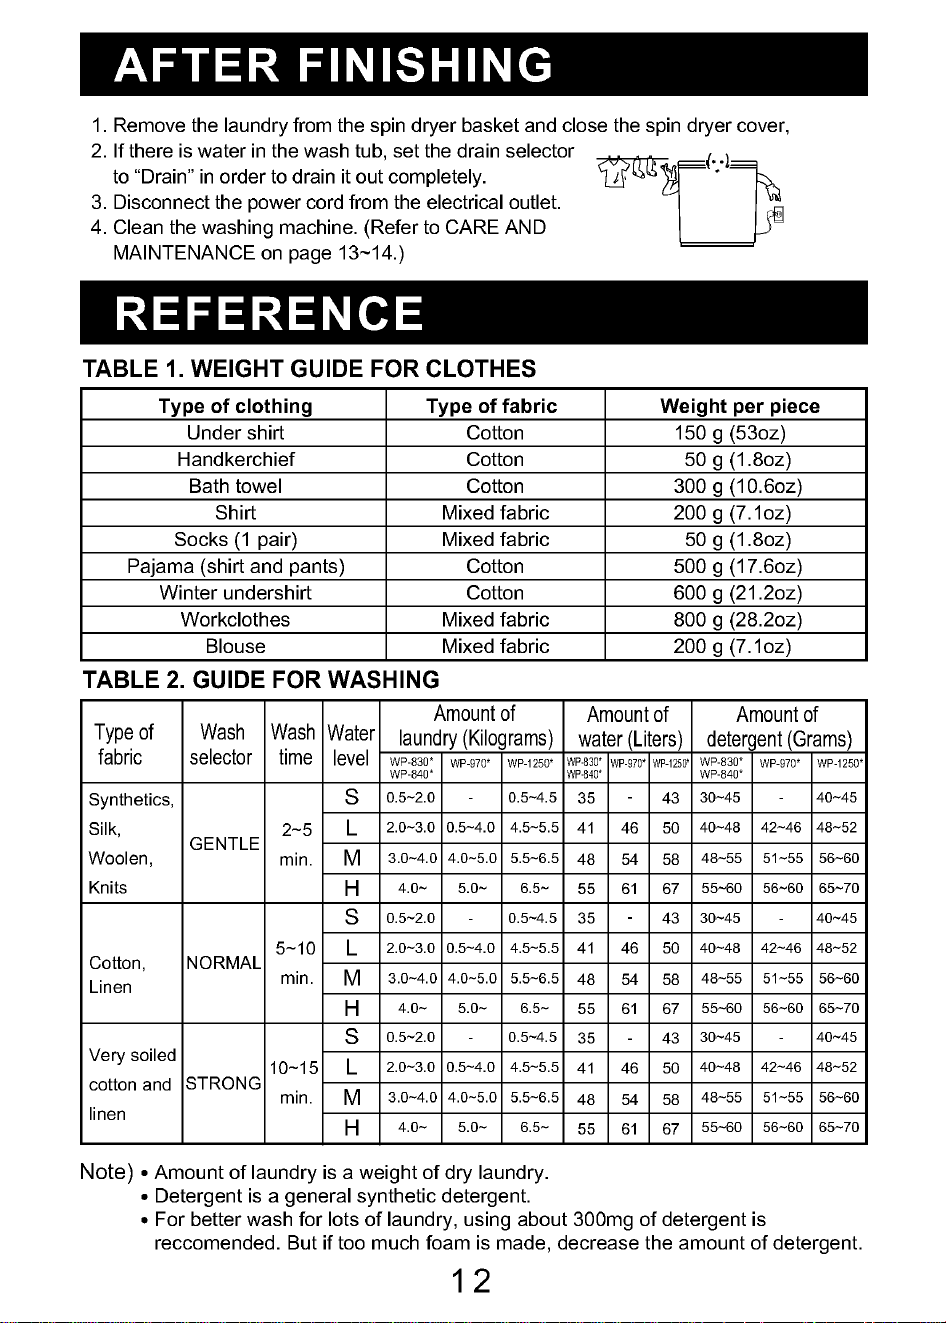
TABLE
1.
WEIGHT
GUIDE
FOR
CLOTHES
TABLE
2.
GUIDE
FOR
WASHING
Note)
Amount
of
laundry
is
a
weight
of
dry
laundry.
Detergent
is
a
general
synthetic
detergent.
For
better
wash
for
lots
of
laundry,
using
about
300mg
of
detergent
is
reccomended.
But
if
too
much
foam
is
made,
decrease
the
amount
of
detergent.
Type
of
clothing
Type
of
fabric
Weight
per
piece
Under
shirt
Cotton
150
g
(53oz)
Handkerchief
Cotton
50
g
(1.8oz)
Bath
towel
Cotton
300
g
(10.6oz)
Shirt
Mixed
fabric
200
g
(7.1oz)
Socks
(1
pair)
Mixed
fabric
50
g
(1.8oz)
Pajama
(shirt
and
pants)
Cotton
500
g
(17.6oz)
Winter
undershirt
Cotton
600
g
(21.2oz)
Workclothes
Mixed
fabric
800
g
(28.2oz)
Blouse
Mixed
fabric
200
g
(7.1oz)
Type
of
fabric
Wash Wash
time
Amount
of
Water
Amount
of
Amount
of
selector
laundry
(Kilograms)
level
water
(Liters)
detergent
(Grams)
Synthetics,
Silk,
Woolen,
Knits
GENTLE
2~5
min.
NORMAL
5~10
min.
STRONG
10~15
min.
L
S
M
H
35
41
48
55
0.5~2.0
WP-830*
WP-970*
WP-1250*
WP-840*
WP-830*
WP-970*
WP-1250*
WP-840*
WP-830*
WP-970*
WP-1250*
WP-840*
2.0~3.0
3.0~4.0
4.0~
Cotton,
Linen
Very
soiled
cotton
and
linen
L
S
M
H
L
S
M
H
-
-
-
46
54
61
43
50
58
67
35
41
48
55
46
54
61
43
50
58
67
35
41
48
55
46
54
61
43
50
58
67
-
0.5~4.0
4.0~5.0
5.0~
0.5~4.5
4.5~5.5
5.5~6.5
6.5~
30~45
40~48
48~55
55~60
-
42~46
51~55
56~60
40~45
48~52
56~60
65~70
0.5~2.0
2.0~3.0
3.0~4.0
4.0~
-
0.5~4.0
4.0~5.0
5.0~
0.5~4.5
4.5~5.5
5.5~6.5
6.5~
30~45
40~48
48~55
55~60
-
42~46
51~55
56~60
40~45
48~52
56~60
65~70
0.5~2.0
2.0~3.0
3.0~4.0
4.0~
-
0.5~4.0
4.0~5.0
5.0~
0.5~4.5
4.5~5.5
5.5~6.5
6.5~
30~45
40~48
48~55
55~60
-
42~46
51~55
56~60
40~45
48~52
56~60
65~70
12
1.
Remove
the
laundry
from
the
spin
dryer
basket
and
close
the
spin
dryer
cover,
2.
If
there
is
water
in
the
wash
tub,
set
the
drain
selector
to
"Drain"
in
order
to
drain
it
out
completely.
3.
Disconnect
the
power
cord
from
the
electrical
outlet.
4.
Clean
the
washing
machine.
(Refer
to
CARE
AND
MAINTENANCE
on
page
13~14.)

CARE
AND
MAINTENANCE
Be
sure
to
disconnect
the
power
cord
from
the
electric
outlet
before
starting
care
and
maintenance.
If
the
washing
machine
itself
becomes
dirty.
The
washing
machine
can
be
cleaned
with
a
mild
liquid
detergent.
Never
use
abrasive
cleanser
or
chemicals
such
as
benzene
or
thinner
to
clean
the
washing
machine,
because
these
materials
will
damage
both
the
painted
surfaces
and
the
plastic
parts.
If
a
button
or
some
other
object
gets
caught
in
the
pulsator.
1.
Take
out
the
pulsator
cap
with
"-"
type
driver.
2.
Use
a
screwdriver
to
loosen
the
screw
in
the
center
1.
Take
out
the
rotation
filter-C
by
pulling
in
the
direction
shown.
2.
Turn
the
net
over
and
rinse
in
water.
3.
After
cleaning,
replace
the
rotation
filter-C.
WP-970Q(S)
WP-830Q/WP-840Q/WP-1250Q(S)
of
the
pulsator,
and
lift
the
pulsator
straight
up
in
order
to
remove
the
button
or
other
object.
3.
Replace
the
pulsator
and
tighten
the
screw.
4.
Replace
the
pulsator
cap.
Washing
machine
Pulsator
Rotation
filter-C
13

CARE
AND
MAINTENANCE
TROUBLESHOOTING
GUIDE
14
If
clothing
becomes
trapped
between
the
spin
dryer
basket
and
the
spin
tub.
1.
Take
hold
of
the
front
of
the
safety
cover-1
and
pull
the
tub
by
the
other
hand.
2.
Pull
the
safety
cover-1
upward
and
then
remove
the
article
of
clothing.
3.
Close
the
safety
cover-1,
pressing
down
on
it
so
that
it
fits
securely
into
the
spin
tub.
Type
of
clothing
Checking
point
Motor
does
not
operate
Is
the
power
cord
firmly
plugged
in?
Is
the
timer
turned
to
a
suitable
point
except
"OFF"?
Spin
dryer
basket
does
Is
there
any
clothing
dropped
between
the
basket
not
operate.
and
tub?
Is
the
spin
dryer
cover
closed?
Is
the
laundry
gathered
to
one
side
of
the
spin
dryer
basket?
No
draining
Is
there
any
lint
stuck
in
the
plunger
valve?
Is
the
end
of
the
drain
hose
guide
located
at
an
exceed
height?
Spin
dryer
basket
Before
Requesting
Service
Safety
cover-1
Tub
1.
Pull
the
overflow
filter
forward
from
the
wash
tub
in
the
direction
of
the
arrow.
2.
Use
a
brush
or
your
hand
to
remove
all
of
the
lints
whichs has
adhered
to
the
overflow
filter.
3.
Insert
the
over
flow
filter
back
into
the
wash
tub.
1
2
3
Overflow
filter
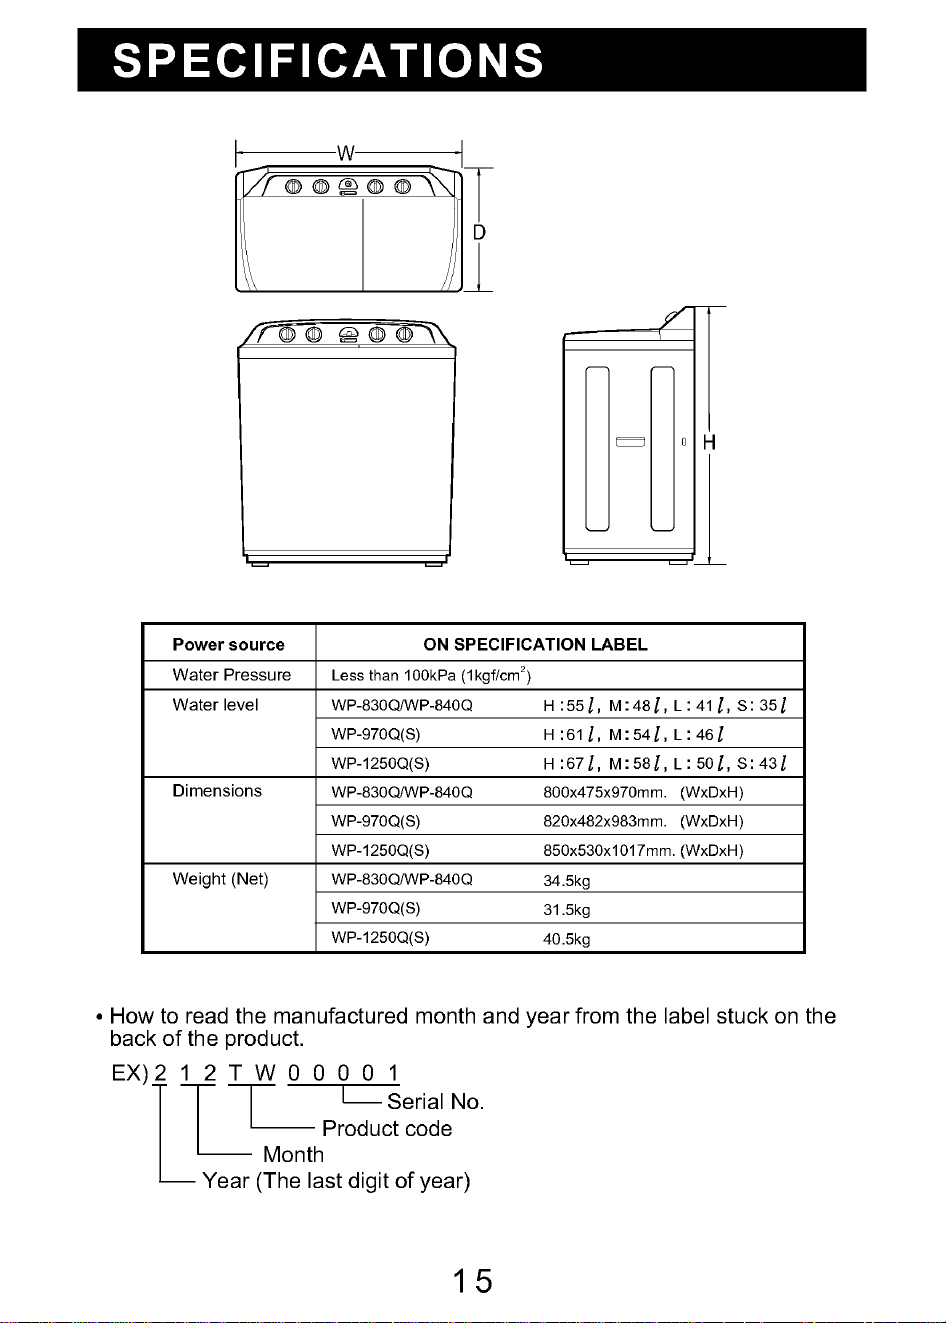
15
H
D
W
Power
source
ON
SPECIFICATION
LABEL
Water
level
WP-830Q/WP-840Q
Water
Pressure
Less
than
100kPa
(1kgf/cm2)
Dimensions
WP-830Q/WP-840Q
800x475x970mm.
(WxDxH)
820x482x983mm.
(WxDxH)
850x530x1017mm.
(WxDxH)
Weight
(Net)
34.5kg
31.5kg
40.5kg
WP-970Q(S)
WP-1250Q(S)
WP-970Q(S)
WP-1250Q(S)
WP-830Q/WP-840Q
WP-970Q(S)
WP-1250Q(S)
How
to
read
the
manufactured
month
and
year
from
the
label
stuck
on
the
back
of
the
product.
EX)212TW00001SerialNo.
Product
code
Month
Year
(The
last
digit
of
year)
S
L
M
H55
48
41
35
L
M
H61
54 46
S
L
M
H67
58
50
43
