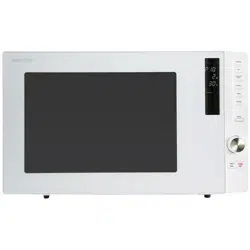

R-27C-B
Important
ENGLISH
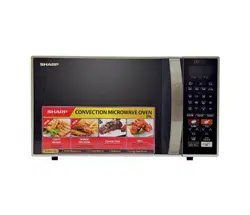
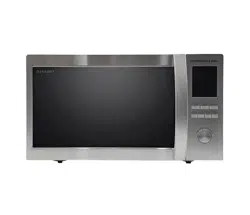
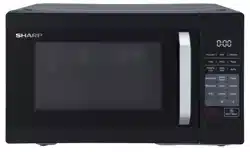
MICROWAVE OVEN WITH GRILL AND CONVECTION
OPERATION MANUAL
This operation manual contains important information which you should read carefully before using
your microwave oven.
IMPORTANT: There may be a serious risk to health if this operation manual is not followed or if the oven is modied
so that it operates with the door open.
SPECIFICATIONS
CONTENTS
CONTENTS ................................................................................................................................................................................................................................................................2
SPECIFICATIONS .....................................................................................................................................................................................................................................................2
OVEN AND ACCESSORIES ....................................................................................................................................................................................................................................3
CONTROL PANEL .....................................................................................................................................................................................................................................................4
IMPORTANT SAFETY INSTRUCTIONS ...........................................................................................................................................................................................................5-6t
INSTALLATION ..........................................................................................................................................................................................................................................................7
OPERATION INSTRUCTION .................................................................................................................................................................................................................................8
SETTING THE CLOCK ..............................................................................................................................................................................................................................................8
SETTING THE KITCHEN TIMER ............................................................................................................................................................................................................................8
DAILY DISH .............................................................................................................................................................................................................................................................11
AUTO MENU ..........................................................................................................................................................................................................................................................12
AIRFRY ......................................................................................................................................................................................................................................................................13
SUITABLE OVENWARE ..........................................................................................................................................................................................................................................14
CARE AND CLEANING .........................................................................................................................................................................................................................................15
TROUBLESHOOTING .....................................................................................................................................................................................................................................15-16
MICROWAVE COOKING .......................................................................................................................................................................................................................................8
GRILL COOKING ......................................................................................................................................................................................................................................................8
CONVECTION COOKING ......................................................................................................................................................................................................................................8
COMBI.COOKING ....................................................................................................................................................................................................................................................9
DEFROST BY WEIGHT ..............................................................................................................................................................................................................................................9
DEFROST BY TIME ...................................................................................................................................................................................................................................................9
MULTI-STAGE COOKING ......................................................................................................................................................................................................................................9
SPEEDY COOKING .................................................................................................................................................................................................................................................... 9
LOCK-OUT FUNCTION FOR CHILDREN ............................................................................................................................................................................................................10
DEODORIZER ........................................................................................................................................................................................................................................................ 10
STEAM CLEAN .......................................................................................................................................................................................................................................................10
HEALTHY DISH ......................................................................................................................................................................................................................................................10
Operation manual
:eman ledoM
AC Line Voltage : 230V~, 50Hz single phase
: 10Arekaerb tiucric/esuf enil noitubirtsiD
: 1450WevaworciM :deriuqer rewoP CA
: 900WevaworciM :rewop tuptuO
: 1000W)derarfnI( llirG poT
Convection : 2100W
Mode (Energy Save Mode) : less than 1.0W
zHM0542 :ycneuqerF evaworciM
Outside Dimensions (W) x (H) x (D) mm : 495 x 290 x 435
Cavity Dimensions (W) x (H) x (D) mm : 330 x 251 x 322
: 27 litres***yticapaC nevO
: ø 288 mm)ssalg( elbatnruT
Weight : approx. 15.8kg
AS PART OF A POLICY OF CONTINUOUS IMPROVEMENT, WE RESERVE THE RIGHT TO ALTER DESIGN AND SPECIFICATIONS WITHOUT NOTICE.
GB-2
R-27C-B
ENGLISH
SEIROSSECCA DNA NEVO
Never touch the grill when it is hot.
NOTE: When you order accessories, please mention two items: pa
rt
name and model name to your dealer or SHARP authorised service
agent.
NOTES:
• The waveguide cover is fragile. Care should be taken when cleaning inside the oven to ensure that it is not damaged.
• After cooking fatty foods without a cover, always clean the cavity and especially the grill heating element thoroughly, these must be dry
and free from grease. Built-up grease may overheat and begin to smoke or cat
e.
• Always operate the oven with the turntable and turntable support
ed correctly. This promotes thorough, even cooking. A badly ed
turntable may rattle, may not rotate properly and could cause damage to the oven.
• All food and containers of food are always placed on the turntable for cooking.
• The turntable rotates clockwise or anti-clockwise. The rotary direction may change each time you start the oven. This does not a
ect
cooking performance.
WARNING:
The door, outer cabinet, oven cavity, accessories and dishes will become very hot during operation. To prevent burns,
always use thick oven gloves.
GB-3
(1)
(2)
A
B
C
D
E
F
A) Control panel
B) Turntable ring assembly
C) Glass tray
D) Observation window
E) Door assembly
F) Safety interlock system
Higher Wire Rack(Cannot be used
in microwave function)
Lower Wire Rack(Cannot be
used in microwave function)
Turntable Installation
Hub (underside)
Glass tray
Turntable ring assembly
Turntable
shaft
a. Never place the glass tray upside down. The glass tray
should never be restricted.
b. Both glass tray and turntable ring assembly must always
be used during cooking.
c. All food and containers of food are always placed on the
glass tray for cooking.
d. If glass tray or turntable ring assembly cracks or breaks,
contact your nearest authorized service center.
Names of Oven Parts and Accessories
Remove the oven and all materials from the carton and oven cavity.
CONTROL PANEL
Menu options:
1. Popcorn button
2. Cake button
3. Healthy Dish button
4. Deodorizer button
5. Microwave button
6. Grill button
7. button
8. Stop/Cancel button
9. Fishbutton
10. Chicken button
11. Pizza button
12. Pasta button
13. Daily Dish button
14. Airfry button
15. Steam Clean button
16. Clock button
17. Timer button
18. Defrost button
19. Combi. button
20. Conv. button
21. button
22. button
23. Start/+30sec. button
10
11
9
13
15
17
19
21
12
14
16
18
20
22
23
1
2
3
4
5
6
7
8
GB-4

IMPORTANT SAFETY INSTRUCTIONS
To reduce the risk of re, electric shock, injury to
persons or exposure to excessive microwave oven
energy when using your appliance, follow basic
precautions, including the following:
1. Read and follow the specic:"PRECAUTIONS TO
AVOID POSSIBLE EXPOSURE TO EXCESSIVE
MICROWAVE ENERGY".
2. This appliance is not intended for use by persons
(including children) with reduced physical,
sensory or mental capabilities, or lack of
experience and knowledge, unless they have
been given supervision or instruction concerning
use of the appliance by a person responsible for
their safety.
3. Children should be supervised to ensure that
they do not play with the appliance.
4. If the supply cord is damaged, it must be replaced
by the manufacturer, its service agent or similarly
qualied persons in order to avoid a hazard.
5. WARNING: Ensure that the appliance is switched
o before replacing the lamp to avoid the
possibility of electric shock.
6. WARNING: It is hazardous for anyone other than
a competent person to carry out any service or
repair operation that involves the removal of a
cover which gives protection against exposure to
microwave energy.
7. WARNING: Liquids and other foods must not be
heated in sealed containers since they are liable
to explode.
8. When heating food in plastic or paper containers,
keep an eye on the oven due to the possibility of
ignition.
9. Only use utensils that are suitable for use in
microwave ovens.
10. If smoke is emitted, switch o or unplug the
appliance and keep the door closed in order to
stie any ames.
11. Microwave heating of beverages can result in
delayed eruptive boiling, therefore care must be
taken when handling the container.
12. The contents of feeding bottles and baby food
jars shall be stirred or shaken and the tempera-
ture checked before consumption, in order to
avoid burns.
13. Eggs in their shell and whole hard-boiled eggs
should not be heated in microwave ovens since
they may explode, even after microwave heating
has ended.
14. The oven should be cleaned regularly and any
food deposits removed.
15. Failure to maintain the oven in a clean condition
could lead to deterioration of the surface that
could adversely aect the life of the appliance
and possibly result in a hazardous situation.
16. The appliance must not be installed behind a
decorative door in order to avoid overheating.
(This is not applicable for appliances with
decorative door.)
17. Only use the temperature probe recommended
for this oven. (for ovens provided with a facility to
use a temperature-sensing probe.)
18. The microwave oven shall not be placed in a
cabinet unless it has been tested in a cabinet.
19. The microwave oven must be operated with the
decorative door open. (for ovens with a
decorative door.)
20. This appliance is intended to be used in
household and similar applications such as:
- sta kitchen areas in shops, oces and other
working environments;
- by clients in hotels, motels and other residential
type environments;
- farm houses;
- bed and breakfast type environments.
21. The microwave oven is intended for heating food
and beverages. Drying of food or clothing and
heating of warming pads, slippers, sponges,
damp cloth and similar may lead to risk of injury,
ignition or re.
22. Metallic containers for food and beverages are
not allowed during microwave cooking.
23. The appliance shall not be cleaned with a steam
cleaner.
24. The appliance is intended to be used freestand-
ing.
25. The rear surface of appliances shall be placed
against a wall.
26. The appliances are not intended to be operated
by means of an external timer or separate
remote-control system.
27. The temperature of accessible surfaces may be
high when the appliance is operating.
28. WARNING: When the appliance is operated in
the combination mode, children should only use
the oven under adult supervision due to the
temperatures generated.
READ CAREFULLY AND KEEP FOR FUTURE
REFERENCE
ENGLISH
WARNING
GB-5

IMPORTANT SAFETY INSTRUCTIONS
PRECAUTIONS TO AVOID POSSIBLE EXPOSURE
TO EXCESSIVE MICROWAVE ENERGY
(a) Do not attempt to operate this oven with the door
open since this can result in harmful exposure to
microwave energy. It is important not to break or
tamper with the safety interlocks.
(b) Do not place any object between the oven front
face and the door or allow soil or cleaner residue
to accumulate on sealing surfaces.
(c) WARNING: If the door or door seals are damaged,
the oven must not be operated until it has been
repaired by a competent person.
ADDENDUM
If the apparatus is not maintained in a good state of
cleanliness, its surface could be degraded and aect
the lifespan of the apparatus and lead to a dangerous
situation.
TO REDUCE THE RISK OF INJURY TO PERSONS
GROUNDING INSTALLATION
DANGER
Electric Shock Hazard
Touching some of the internal components can cause
serious personal injury or death. Do not disassemble
this appliance.
WARNING
Electric Shock Hazard
Improper use of the grounding can result in electric
shock.
Do not plug into an outlet until appliance is properly
installed and grounded.
This appliance must be grounded. In the event of an
electrical short circuit, grounding reduces the risk of
electric shock by providing an escape wire for the
electric current.
This appliance is equipped with a cord having a
grounding wire with a grounding plug. The plug
must be plugged into an outlet that is properly
installed and grounded.
Consult a qualied electrician or serviceman if the
grounding nstructions are not completely
understood or if doubt exists as to whether the
appliance is properly grounded.
If it is necessary to use an extension cord, use only a
3-wire extension cord.
1. A short power-supply cord is provided to reduce
the risks resulting from becoming entangled in or
tripping over a longer cord.
2. If a long cord set or extension cord is used:
1) The marked electrical rating of the cord set or
extension cord should be at least as great as the
electrical rating of the appliance.
2) The extension cord must be a grounding-type
3-wire cord.
3) The long cord should be arranged so that it will
not drape over the counter top or tabletop where it
can be pulled on by children or tripped over
unintentionally.
CLEANING
Be sure to unplug the appliance from the power
supply.
1. Clean the cavity of the oven after using with a
slightly damp cloth.
2. Clean the accessories in the usual way in soapy
water.
3. The door frame and seal and neighbouring parts
must be cleaned carefully with a damp cloth when
they are dirty.
4. Do not use harsh abrasive cleaners or sharp metal
scrapers to clean the oven door glass since they
can scratch the surface, which may result in
shattering of the glass.
5. Cleaning Tip---For easier cleaning of the cavity
walls that the food cooked can touch: Place half a
lemon in a bowl, add 300ml (1/2 pint) water and
heat on 100% microwave power for 10 minutes.
Wipe the oven clean using a soft, dry cloth.
UTENSILS
CAUTION
Personal Injury Hazard
It is hazardous for anyone other than a competent
person to carry out any service or repair operation
that involves the removal of a cover which gives
protection against exposure to microwave energy.
See the instructions on "Materials you can use in
microwave oven or to be avoided in microwave
oven." There may be certain non-metallic utensils
that are not safe to use fo microwaving. If in doubt,
you can test the utensil in question following the
procedure below.
Utensil Test:
1. Fill a microwave-safe container with 1 cup of cold
water (250ml) along with the utensil in question.
2. Cook on maximum power for 1 minute.
3. Carefully feel the utensil. If the empty utensil is
warm, do not use it for microwave cooking.
4. Do not exceed 1 minute cooking time.
GB-6
INSTALLATION
5. Securely connect the plug of the oven to a
standard earthed (grounded) household electrical
outlet.
WARNING: Do not place the oven where heat,
moisture or high humidity are generated, (for
example, near or above a conventional oven) or near
combustible materials (for example, curtains).
Do not block or obstruct air vent openings.
Do not place objects on top of the oven.
ELECTRICAL CONNECTION
• Do not allow water to come into contact with the
power supply cord or plug.
• Insert the plug properly into the socket.
• Do not connect other appliances to the same
socket using an adaptor plug.
• If the power supply cord is damaged, it must be
replaced by a Sharp approved service facility or a
ed person to avoid a hazard.
• When removing the plug from the socket always
grip the plug, never the cord as this may damage
the power supply cord and the connections inside
the plug.
1. Remove all packing materials from the inside of
the oven cavity and remove any protective lm
found on the microwave oven cabinet surface.
Check the oven carefully for any signs of damage.
2. Place the oven on a secure, level surface, strong
enough to take the oven weight, plus the heaviest
item likely to be cooked in the oven. Do not place
the oven in a cabinet.
3. Select a level surface that provides enough open
space for the intake and/or outlet vents. The rear
surfac
e of appliance shall be placed against a wall.
• A minimum space of 20cm is required between
the oven and any adjacent walls.
• Leave a minimum space of 30cm above the
oven.
•
Do not remove the feet from the bottom of the
oven.
• Blocking the intake and/or outlet openings can
damage the oven.
• Place the oven as far away from radios and TV as
possible. Operation of the microwave oven may
cause interference to your radio or TV reception.
4. The oven door may become hot during
cooking. Place or mount the oven so that the
bottom of the oven is 85cm or more above
the oor. Keep children away from the door to
prevent them burning themselves.
20 cm
30 cm
20 cm
min
85 cm
0 cm
GB-7
ENGLISH

OPERATION INSTRUCTION
When the microwave oven is plugged into an outlet, the screen will display "0:00 ", and the buzzer will ring once to enter the standby mode.
SETTING THE CLOCK
1) In standby mode, press “ Clock ” once, and then the screen displays " 00:00 ".
The hour gures will ash.
2) Press " +/- " to adjust the hour gures. The input time should be within 0-23.
3) Press " Clock " to conrm, and the minute gures will ash.
4) Press " +/- " to adjust the minute gures. The input time should be within 0-59.
5) Press " Clock " to nish clock setting.
Note: 1) The clock will not work if it is not set when powered.
2) After step 4, if you do not press " Clock " within 5 minutes, the oven will go back to the previous status automatically.
SETTING THE KITCHEN TIMER
1) In standby mode, press " Timer " once, and the screen displays "0:00".
2) Press " +/- " to adjust the timer. The maximum value is 95:00.
3) Press " Timer " to conrm setting.
Note: During kitchen timer, any other programs cannot work.
MICROWAVE COOKING
1) In standby mode, press “ Microwave ”, and “P100” will display.
2) Press " +/-" or press“ Microwave ” repeatedly to set the power level.
“P100, P90, P80, P70, P60, P50, P40, P30, P20, P10” are available.
3) Press " Start/+30sec. " to conrm. Default cooking time 15:00 will display.
4) Press " +/- " to set the cooking time.The maximum value is 95:00.
5) Press " Start/+30sec. " to start cooking.
GRILL COOKING
1) Press " Grill " once, and " G " will display.
2) Press " Start/+30sec. " to conrm, default cooking time 15:00 will display.
3) Press " +/-" to set the cooking time.The maximum value is 95:00.
4) Press " Start/+30sec. " to start cooking.
Note: 1) If half the grill time passes, the oven sounds to remind you to turn the food over.
2) In the cooking process, when you increase or reduce the time, half time prompt is no aected.
CONVECTION COOKING
1) Press " Conv. " once. and "150°C " will display.
2) Press " Conv. " repeatedly or press " +/- " to choose temperature from 150°C to 240°C.
10 options are available, including 150, 160, 170, 180, 190, 200, 210, 220, 230, 240 (°C).
3) Press " Start/+30sec. " to conrm the temperature.
4) If you press " Start/+30sec. " again, the oven will start preheating. When the preheating temperature is reached, the buzzer will sound
twice. You can open the oven door and place food in it.
5) Press " +/- " to set the cooking time.The maximum value is 95:00.
6) Press " Start/+30sec. " to start working.
GB-8

Instructions Display MicrowaveCombination Instructions
1 •
2 •
3
4
C-1
C-2
C-3
C-4 •
Grill
•
•
•
Convection
•
•
•
COMBI.COOKING
1) Press " Combi. " once, the screen will display "C-1", and press "Combi." repeatedly or press " +/- " to choose the mode you want, and "C-1",
"C-2" "C-3", or "C-4" will display.
2) Press " Start/+30sec. " to conrm the mode.
3) Press " +/- " to set the cooking time.The maximum value is 95:00.
4) Press " Start/+30sec. " to start cooking.
DEFROST BY WEIGHT
1) In standby mode, press " Defrost " once, and th e screen displays "dEF1".
2) Press " Start/+30sec. " to conrm,100g displays.
3) Press " +/-" to set the defrost weight within 100~2000g.
4) Press " Start/+30sec. " to start defrosting.
Note: The buzzer will sound to remind of turning over the food during defrosting.
DEFROST BY TIME
1) In standby mode, press " Defrost " twice, and the screen displays "dEF2".
2) Press " Start/+30sec. " to conrm, and then screen displays "15:00 " .
3) Press " +/-" to set the defrost time.The maximum value is 95:00.
4) Press " Start/+30sec. " to start defrosting.
Note: The buzzer will sound to remind of turning over the food during defrosting.
MULTI-STAGE COOKING
Two stages can be maximumly set. If one stage is defrosting, it should be put in the rst stage automatically. The buzzer will ring once after
each stage and the next stage will begin. Kitchen Timer, Auto menu , Speedy cooking or Preheating cannot be set as one of the multi-stage.
Example: If you want to defrost the food for 10 minutes, then grill them for 10 minutes and 30 seconds. You can follow these steps.
1) Press " Defrost " twice, and the screen will display "dEF2".
2) Press " Start/+30sec. " to conrm,15:00 displays.
3) Press " +/-" to adjust the defrost time until 10:00 displays.
4) Press " Grill " once, "G" displays, press " Start/+30sec. " to conrm.
5) Press " +/- " to adjust the grill time until 10:30 displays.
6) Press " Start/+30sec. " to start cooking.
SPEEDY COOKING
In standby state, press " Start/+30sec. " to start cooking with 100% power for
30 seconds directly.
GB-9
ENGLISH
LOCK-OUT FUNCTION FOR CHILDREN
You can use this function to prevent children from accidentally turning the oven on.
Lock: In standby state, press " Clock " for 3 seconds. The buzzer will sound to enter the children-lock state, and the lock icon will light.
Lock quitting: In locked state, press " Clock " for 3 seconds.The buzzer will sound denoting that the lock is released, and the lock icon will
disappear.
DEODORIZER
1) In standby state, press " Deodorizer ", and the screen displays "dE" .
2) Press " Start/+30sec. " to start working.
STEAM CLEAN
1) In standby state, press " Steam Clean ", and the screen displays "SC".
2) Press " Start/+30sec. " to start working.
HEALTHY DISH
1) In standby mode, press " Healthy Dish " once, and "Hd01" will display.
2) Press " Healthy Dish " repeatedly or press " +/- " to choose the menu from "Hd01" to "Hd05".
3) Press " Start/+30sec. " to conrm the submenu.The default weight of the menu will display.
4) Press " +/-" to set the weight.
5) Press " Start/+30sec. " to start cooking.
Healthy Dish Chart
Healthy Dish Chart
Hd01
Quinoa
100g
200g
200g
300g
100g
200g
200g
300g
2 servings
4 servings
100g
200g
200g
300g
100g
200g
200g
300g
2
4
Hd02
Couscous
Hd03
Macaroni
Hd04
Brown Rice
Hd05
Oatmeal
P100/P50
P100/P50
P80
P100/P50
P100/P50
WEIGHT DISPLAY POWER
GB-10
DAILY DISH
1) In standby mode, press " Daily Dish " once, and "dd01" will display.
2) Press " Daily Dish " repeatedly or press " +/- " to choose the menu from "dd01" to "dd12".
3) Press " Start/+30sec. " to conrm the submenu. The default weight of the menu will display.
4) Press " +/- " to set the weight.
5) Press " Start/+30sec. " to start cooking.
Note: Skip the step 4 in menu dd10~dd12.
Daily Dish Chart
MENU
dd01
Frozen Peas
dd02
Frozen mix Vegetable
dd03
Frozen Broccoli
dd04
Fresh Spinach
dd05
Frozen green beans
dd06
Potatoes without skin
dd07
Potatoes with skin
dd08
Frozen lasagna
dd09
Grill chicken breasts
dd10
lamb rack
dd11
Roast beef
dd12
Grill garlic bread
P100
P100
P100
P100
P100
P100
P100
C-1
Grill60%+
Conv.240℃
C-4
C-4
C-4
200g
400g
200g
400g
200g
400g
200g
400g
200g
400g
400g
800g
2
4
300g
600g
200g
400g
900g
900g
200g
200g
400g
200g
400g
200g
400g
200g
400g
200g
400g
400g
800g
2
4
300g
600g
200g
400g
900g
900g
200g
WEIGHT DISPLAY POWER
GB-11
ENGLISH
AUTO MENU
For example set the sh for 350g;
1) In standby mode, press " Fish " once, and "150g" will display.
2) Press " Fish " repeatedly or press " +/- " until 350g displays.
3) Press " Start/+30sec. " to start cooking.
Note: In auto menu, no need to input cooking time and powel level, appropriate value has be provided for your convenience.
Menu Chart
Note: The buzzer will sound to remind of turning over the food during chicken menu.
MENU
Popcorn
P100
Fish
P80
Chicken
C-4
Cake
preheat conv.160/
conv.160
Pizza
C-4
Pasta
P80
50g
100g
150g
250g
350g
450g
650g
500g
750g
1000g
1200g
475g
100g
200g
300g
50g(with cold water 450g)
100g(with cold water 800g)
150g(with cold water 1200g)
50g
100g
150g
250g
350g
450g
650g
500g
750g
1000g
1200g
475g
100g
200g
300g
50
100
150
WEIGHT DISPLAY POWER
GB-12
AIRFRY
For air fry cooking you will need to select & conrm the type of food, please refer to the chart below.
1) In standby mode, press " Airfry " repeatedly or press " +/- " to choose the menu, and "AF01~AF10" will display in order.
2) Press " Start/+30sec. " to start cooking.
Notes: (1) The buzzer will sound to remind of turning over the food during cooking.
(2) Use the accessory pan and rack. Put the food into the pan and place the pan on the rack.
DISPLAY
AF01
AF02
AF03
AF04
AF05
AF06
AF07
AF08
AF09
AF10
MENU
Frozen French Fries
Frozen Potato Wedges
Frozen Chicken nuggets
Frozen Fried Squid
Frozen Onion Ring
Frozen Breaded Prawns
Frozen Fried Ch icken Cutlet
Grilled Fresh Fish Fillets
Frozen Bualo Chicken win gs
Frozen Fried Chicken W ings
300g
450g
350g
250g
250g
250g
400g
300g
420g
500g(~70g/pc)
WEIGHT
GB-13
ENGLISH
SUITABLE OVENWARE
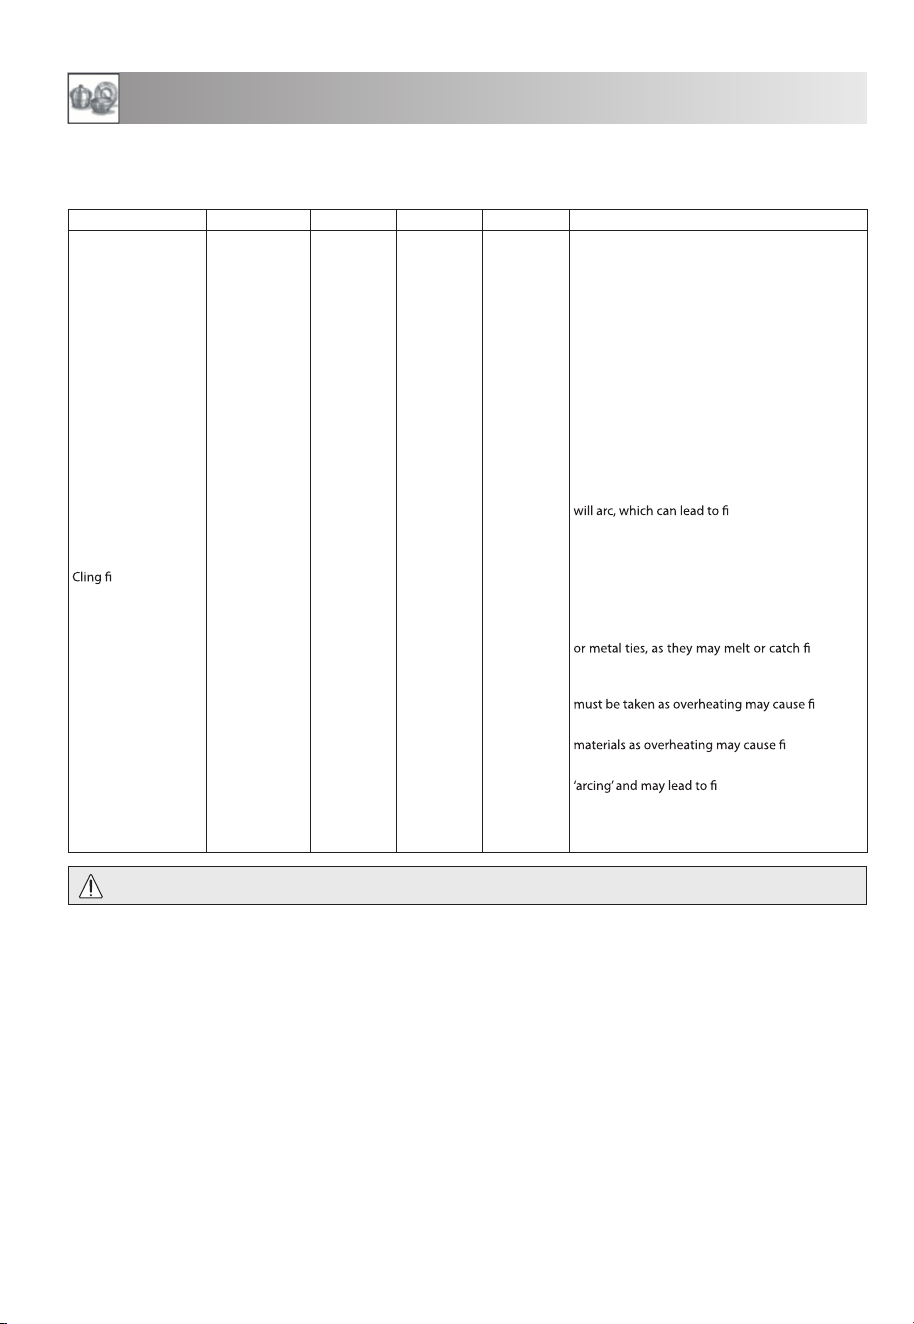
To cook/defrost food in a microwave oven, the microwave energy must be able to pass through the container to penetrate the food.
Therefore it is important to choose suitable cookware.
Round/oval dishes are preferable to square/oblong ones, as the food in the corners tends to overcook. A variety of cookware can be used
as listed below.
Cookware Microwave Safe Grill Convection Mix Cook Comments
Aluminium foil
Foil containers
✔
/
✘
✔ ✔
✔
/
✘
Small pieces of aluminium foil can be used to
shield food from overheating. Keep foil at least
2cm from the oven walls, as arcing may occur.
Foil containers are not recommended unless
specied by the manufacturer, e.g. Microfoil ®,
follow instructions carefully.
Browning dishes
✔ ✘✘✘
Always follow the manufacturers instructions. Do
not exceed heating times given. Be very careful as
these dishes become very hot.
China and ceramics
✔
/
✘
✘✔✔
Mix Conv.
only
Porcelain, pottery, glazed earthenware and bone
china are usually suitable, except for those with
metallic decoration.
Glassware e.g. Pyrex ®
✔ ✔✔✔
Care should be taken if using ne glassware as it
can break or crack if heated suddenly.
Metal
✘ ✔✔✘
It is not recommended to use metal cookware as it
re.
Plastic/Polystyrene e.g
fast food containers
✔ ✘ ✔
✔
/
✘
Care must be taken as some containers warp, melt
or discolour at high temperatures.
lm
✔ ✘✘✘
It should not touch the food and must be pierced
to let the steam escape.
Freezer/Roasting bags
✔ ✘
✔
/
✘
✘
Must be pierced to let steam escape. Ensure bags
are suitable for microwave use. Do not use plastic
re due to
the metal ‘arcing’.
Paper - plates, cups
and kitchen paper
✔ ✘✘✘
Only use for warming or to absorb moisture. Care
re.
Straw and wooden
containers
✔ ✘✘✘
Always supervise the oven when using these
re.
Recycled paper and
newspaper
✘ ✘✘✘
May contain extracts of metal which will cause
re.
Rack
✔ ✔✔✔
The metal racks supplied have been specially
designed for all cooking modes and will not
damage the oven.
WARNING:
When heating food in plastic or paper containers, monitor the oven due to the possibility of ignition.
GB-14
GNINAELC DNA ERAC
CAUTION: DO NOT USE COMMERCIAL OVEN CLEANERS, STEAM
CLEANERS, ABRASIVE, HARSH CLEANERS, ANY THAT CONTAIN
SODIUM HYDROXIDE OR SCOURING PADS ON ANY PART OF
YOUR MICROWAVE OVEN.
Before cleaning, make sure the oven cavity, door, oven cabinet
and accessories are completely cool.
CLEAN THE OVEN AT REGULAR INTERVALS AND REMOVE ANY
FOOD DEPOSITS – Keep the oven clean, or the oven could lead
ect the
life of the appliance and possibly result in a hazardous situation.
Oven exterior
The outside of your oven can be cleaned easily with mild soap and
with a moist cloth, and dry
the exterior with a soft towel.
Oven controls
Open the door before cleaning to de-activate the oven controls.
Care should be taken when cleaning the oven control. Using a cloth
dampened with water only, gently wipe the panel until it becomes
clean. Avoid using excessive amounts of water. Do not use any sort
of chemical or abrasive cleaner.
Oven Interior
1. For cleaning, wipe away any splatters or spills with a soft damp
cloth or sponge after each use while the oven is still warm. For
heavier spills, use a mild soap and wipe several times with a
damp cloth until all residues are removed. Built-up splashes may
re, and cause arcing. Do
not remove the waveguide cover.
2. Make sure that the mild soap or water does not penetrate the
small vents in the walls which may cause damage to the oven.
3. Do not use spray type cleaners on the oven interior.
4. Heat up your oven regularly by using the convection and grill.
Remaining food or fat splashed can cause smoke or bad smell.
5. Food will release steam during cooking and cause condensation
inside the oven and door. It is important to wipe the oven dry. A
build up of condensation will eventually lead to rust forming on
the oven interior.
SPECIAL NOTE for WAVEGUIDE COVER: Keep the waveguide cover
clean at all times. The waveguide cover is constructed from a fragile
material and should be cleaned with care (follow the cleaning in-
structions above).
Excessive soaking may cause disintegration of the waveguide cover.
The waveguide cover is a consumable part and without regular
cleaning, will need to be replaced.
Accessories
The accessories like turntable, turntable support, rack and crisp plate
should be washed in a mild washing up liquid solution
and dried.
They are dishwasher safe.
SPECIAL NOTE for TURNTABLE SUPPORT:
After cooking, always clean the turntable support, especially around
the rollers. These must be free from food splashes and grease. Built-
up splashes or grease may overheat and cause arcing, begin to
re.
Door
To remove all traces of dirt, regularly clean both sides of the door,
the door seals and adjacent parts with a soft, damp cloth. Do not use
harsh abrasive cleaners or sharp metal scrapers to clean the glass
oven door since they can scratch the surface, which may result in
shattering of the glass.
NOTE: A steam cleaner should not be used.
Cleaning tip - For easier cleaning of your oven:
Place half a lemon in a bowl, add 300ml (1/2 pint) water and heat on 100% for 10 -12 minutes.
Wipe the oven clean using a soft, dry cloth.
Convection modes, the cooling fan will switch on to cool the oven
cavity. When the cooling fan works, the display may show “NOW
COOLING”. To clear it, press the STOP/CLEAR key and the display
will return to “. 0”. During these modes, the cooling fan will carry on
working after you have pressed the STOP/CLEAR key. You may feel
hot air blowing out of the air-vent openings.
WARNING: Never adjust, repair or modify the oven yourself. It
is hazardous for anyone other than a SHARP trained engineer
to carry out servicing or repairs.
This is important as it may involve the removal of covers that
provide protection against microwave energy.
• The door seal stops microwave leakage during oven operation,
but does not form an airtight seal. It is normal to see drops of
water, light or feel warm air around the oven door. Food with a
high moisture content will release steam and cause condensation
inside the door which may drip from the oven.
•
cations: Do not attempt to operate the oven
if it is not working properly.
• Outer Cabinet & Lamp Access: Never remove the outer cabinet.
This is very dangerous due to high voltage parts inside which
must never be touched, as this could be fatal.
Your oven is not tted with a lamp access cover. If the lamp
fails, do not attempt to replace the lamp yourself, call a SHARP
approved service facility.
IMPORTANT:
If you cook food for more than the standard time (see chart below)
using the same cooking mode, the oven's safety mechanisms
automatically activate. The microwave power level will be reduced
.
If you think the oven is not working properly there are some simple
checks you can carry out yourself before calling an engineer. This
will help prevent unnecessary service calls if the fault is something
simple.
Follow this simple check below:
Place half a cup of water on the turntable and close the door.
Programme the oven to cook for 1 minute using 100% microwave
power.
1. Does the oven lamp come on when it is cooking?
2. Does the turntable rotate?
3. Does the cooling fan work? (Check by placing your hand above
the air vent openings.)
4. After 1 minute does the audible signal sound?
5. Is the water in the cup hot?
Take the cup of water out of the oven and close the door.
Programme the oven to cook for 3 minutes using the top grill.
6. After 3 minutes, does the grill heating element become red?
Programme the oven to cook for 3 minutes using the convection
on 240°C.
7. After 3 minut
es, is the oven cavity hot?
If you answer “NO” to any question rst check that the oven is
plugged in properly and the fuse has not blown. If there is no
fault with either, check against the troubleshooting chart on the
following page.
NOTES:
• Safety powerdowns:
If you cook food for more than the standard time (see chart
opposite) using the same cooking mode, the oven’s safety
mechanisms automatically activate. The microwave power level
.
• After manual or automatic cooking using the Grill, Combi or
GNITOOHSELBUORT
GB-15
ENGLISH
Cooking Mode Standard time
Microwave P100 30 minutes
Grill/ Convection/ Combi
cooking mode
Intermittent operation,
temperature and time controlled
TROUBLESHOOTING
TROUBLESHOOTING CHART
REWSNAYREUQ
Draught circulates around the
door.
When the oven is working, air circulates within the cavity.
The door does not form an airtight seal so air may escape from the door.
Condensation forms in the oven,
and may drip from the door.
The oven cavity will normally be colder than the food being cooked, and so steam produced when
cooking will condense on the colder surface. The amount of steam produced depends on the water
content of the food being cooked. Some foods, such as potatoes have a high moisture content.
Condensation trapped in the door glass should clear after a few hours.
Flashing or arcing from within the
cavity when cooking.
Arcing will occur when a metallic object comes into close proximity to the oven cavity during cooking.
This may possibly roughen the surface of the cavity, but would not otherwise damage the oven.
Arcing potatoes. Ensure all "eyes" are removed from the potatoes and that they have been pierced, place directly onto
an dish or similar.
The display is lit but the control
panel will not work when pressed.
Check the door is closed properly.
Oven cooks too slowly. Ensure correct power level has been selected.
Oven makes a noise. The microwave energy pulses ON and OFF during cooking/defrosting.
Outer cabinet is hot. The cabinet may become warm to the touch - keep children away.
GB-16


Printed in China
PN.:261800317970