Setup Instructions
Product No. 2000270 / 2000271 / 2000272
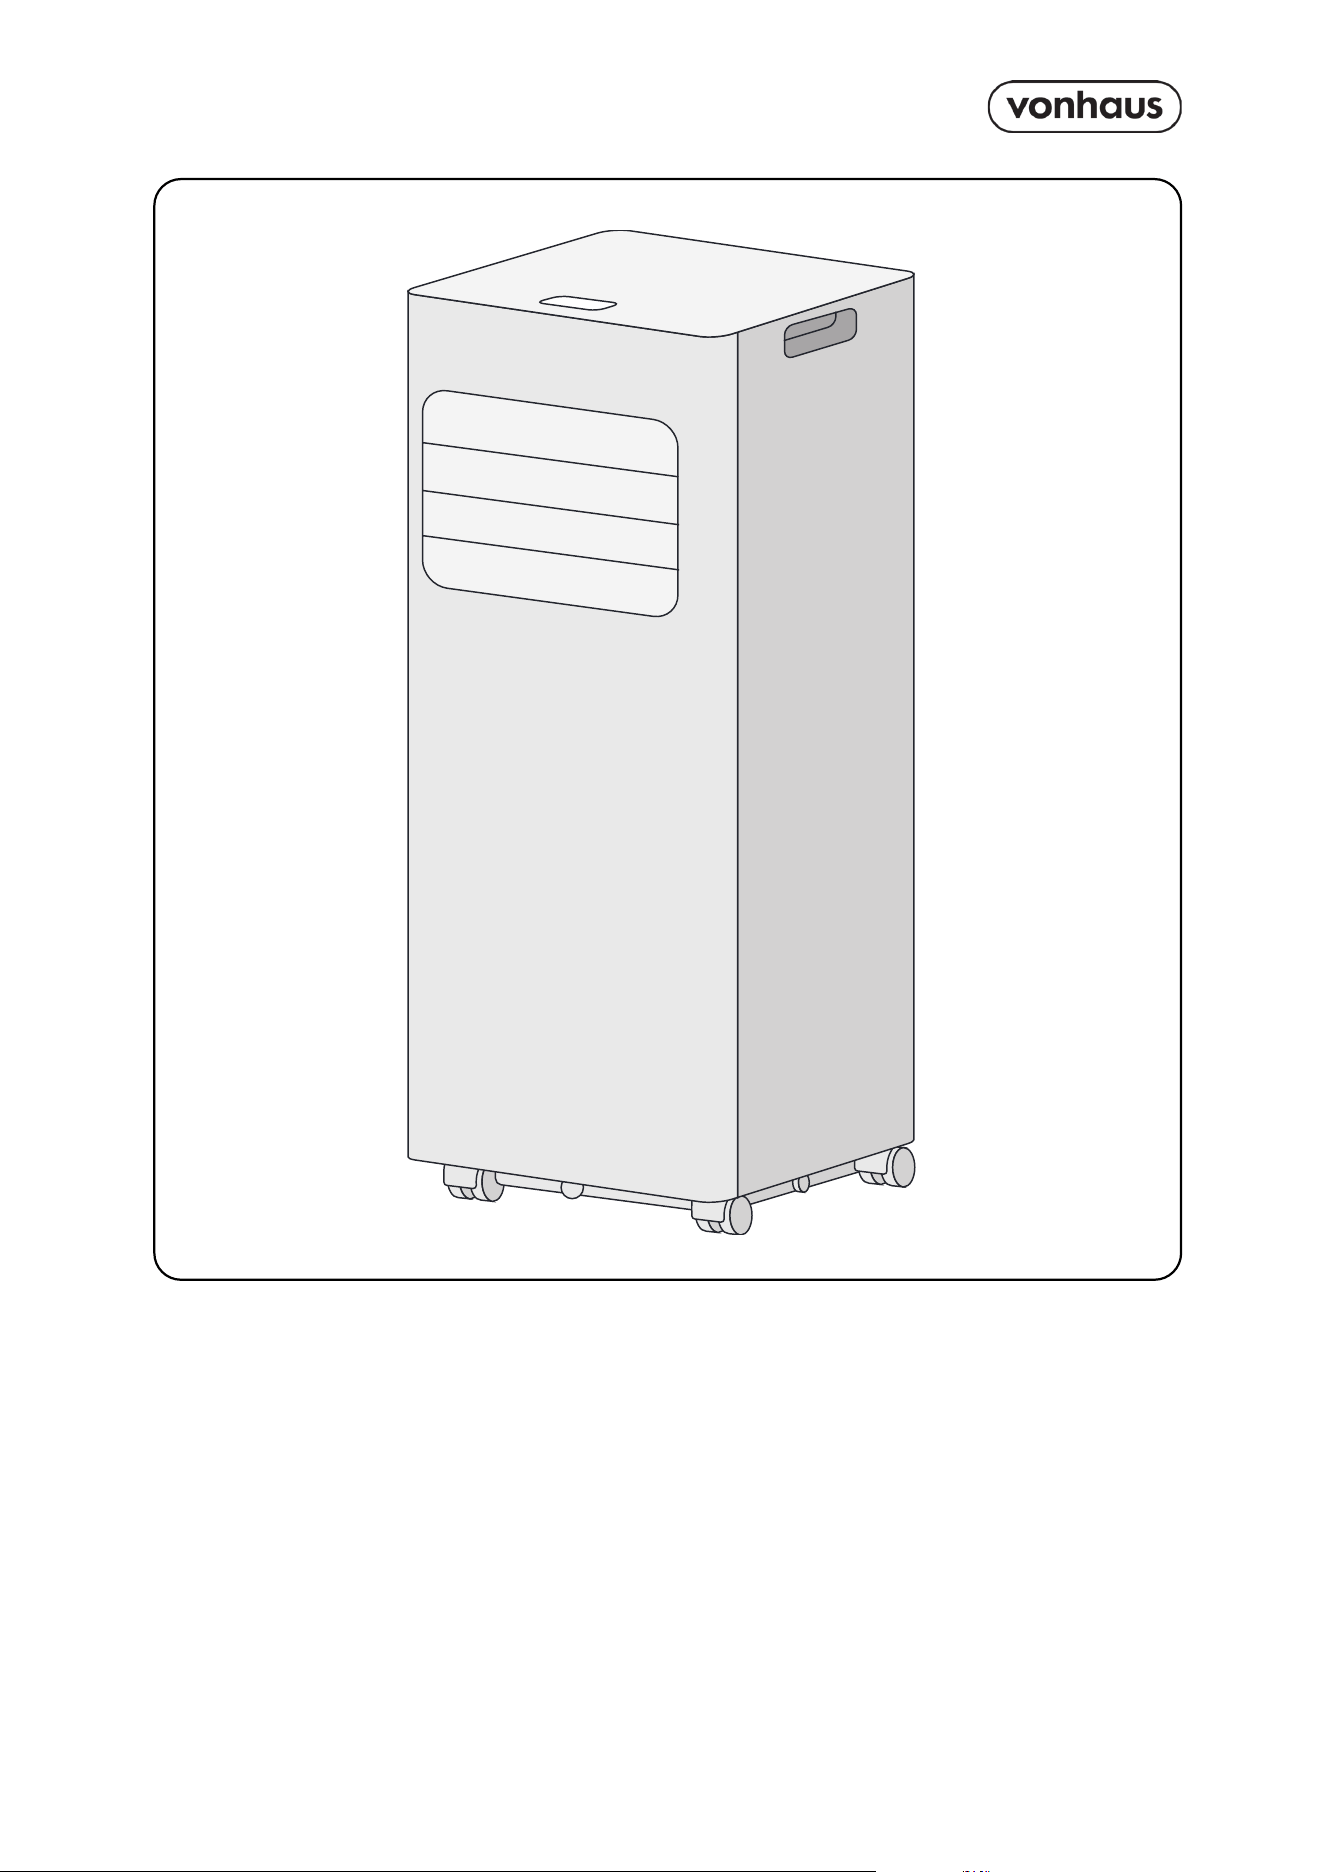
AIR
CONDITIONER
2
Need further help?
suppor[email protected]
See our full range at
www.vonhaus.com
Besoin d’aide supplémentaire ?
suppor[email protected]
Découvrez notre gamme complète sur
www.vonhaus.com
Benötigen Sie weitere Hilfe?
suppor[email protected]
Entdecken Sie unser gesamtes
Sortiment auf
www.vonhaus.com
Necesita más ayuda?
suppor[email protected]
Descubra toda nuestra gama en
www.vonhaus.com
Hai bisogno di ulteriore assistenza?
suppor[email protected]
Scopri tutta la nostra gamma su
www.vonhaus.com
Important
• The unit must remain upright for at least 24 hours before first use to ensure proper
functioning.
• The product should always be kept upright during operation and storage.
Let’s get started!
Visit our product hub for
useful tips and tricks on
getting the most out of
your new product.
SCAN ME
3
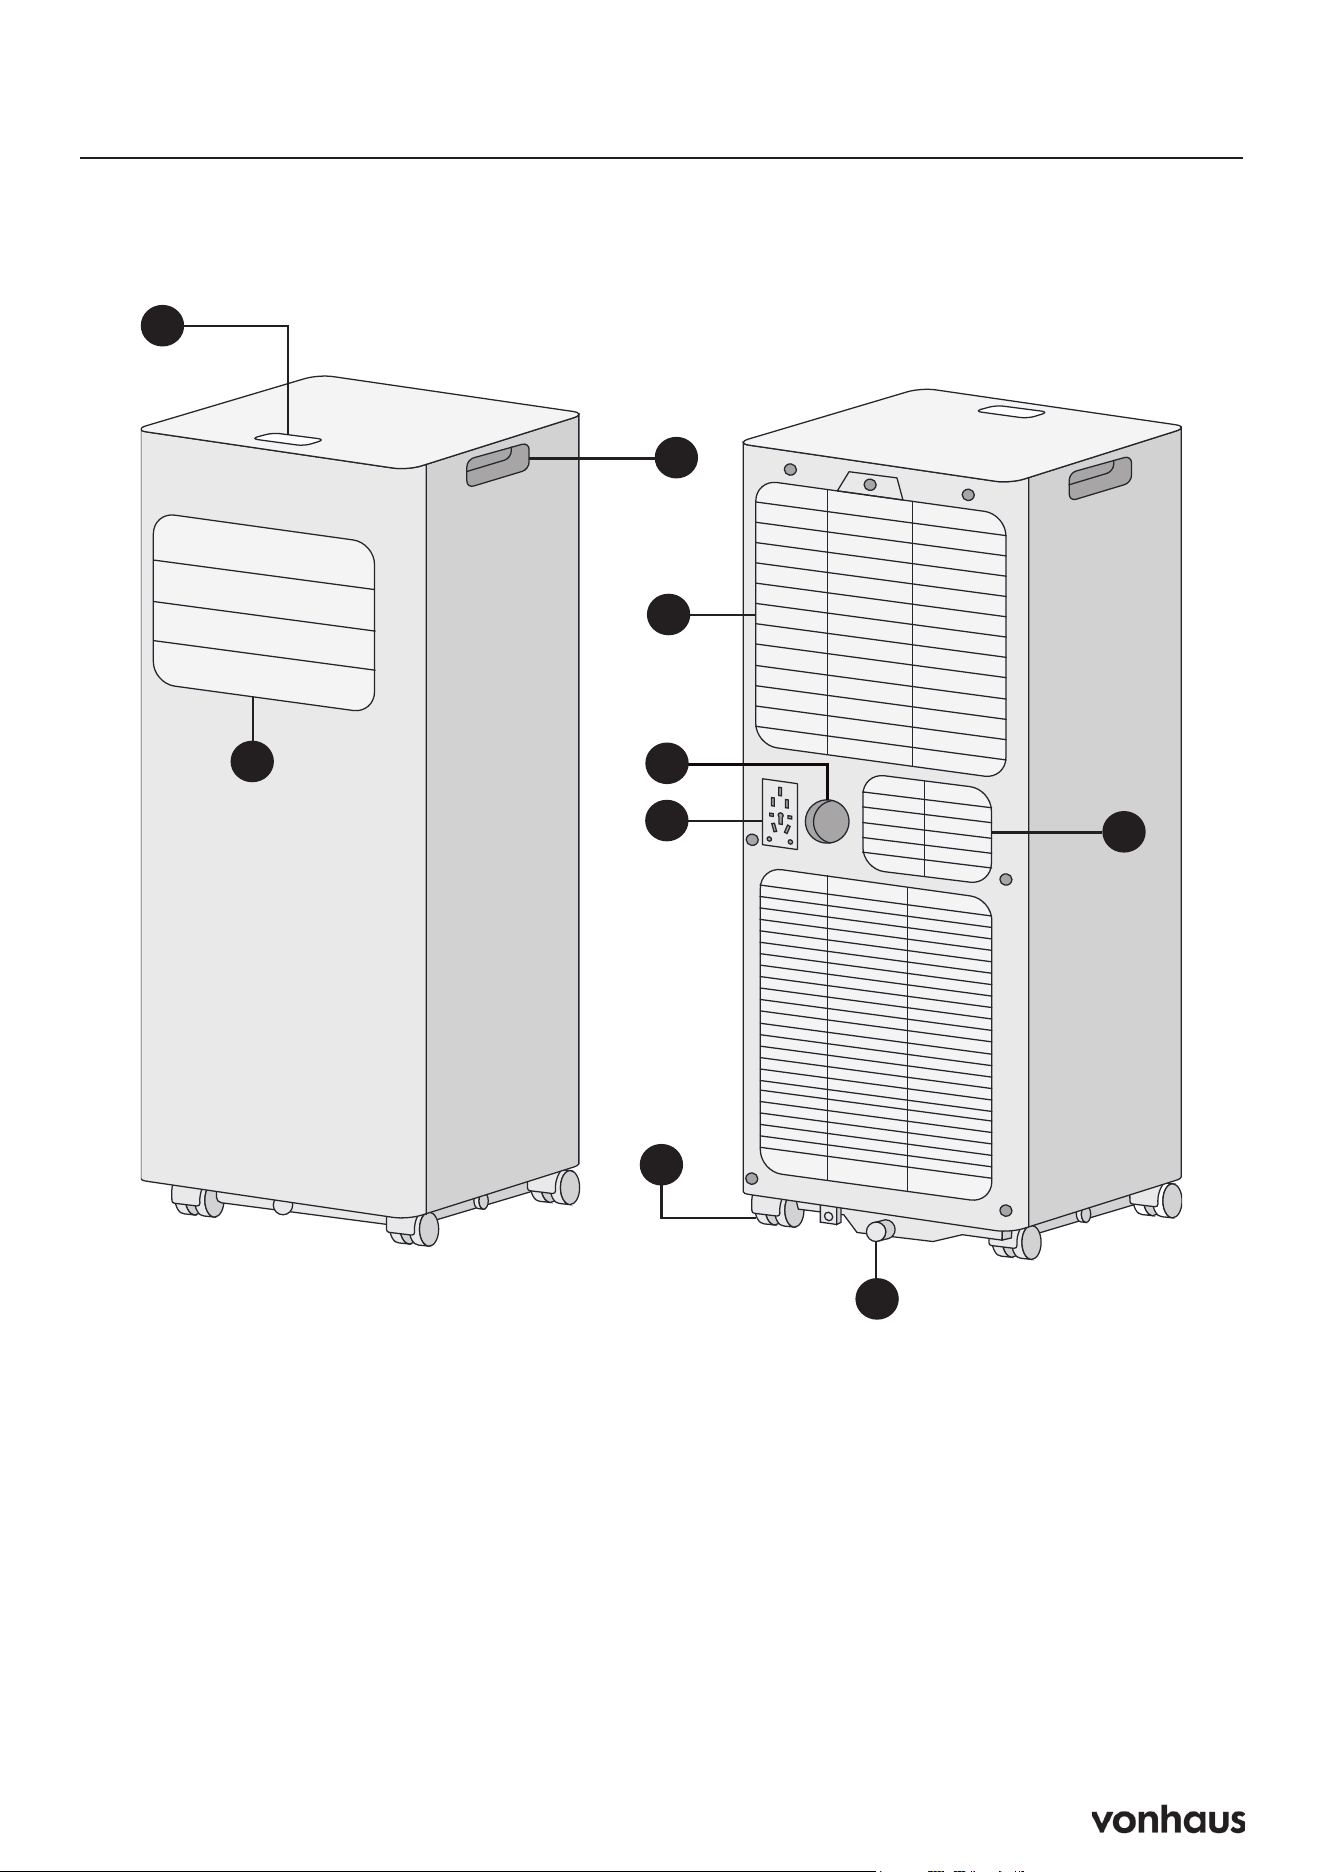
Product Diagram
3
6
7
4
2
1
5
1. Control Panel
2. Air Outlet
3. Handle
4. Air Inlet with Air Filter
5. Wheels
6. Drainage Hole
7. Air Exhaust
8. Continuous Drain Hole
9. Plug Storage
8
9

4
Components
A. Exhaust Hose
B. Hose Connector
C. Window Kit Adapter
D. Drainage Pipe
E. Remote Control
F. Sliding Window Kit
G. Universal Window Kit
A B C
D E
F
G
F
G
5
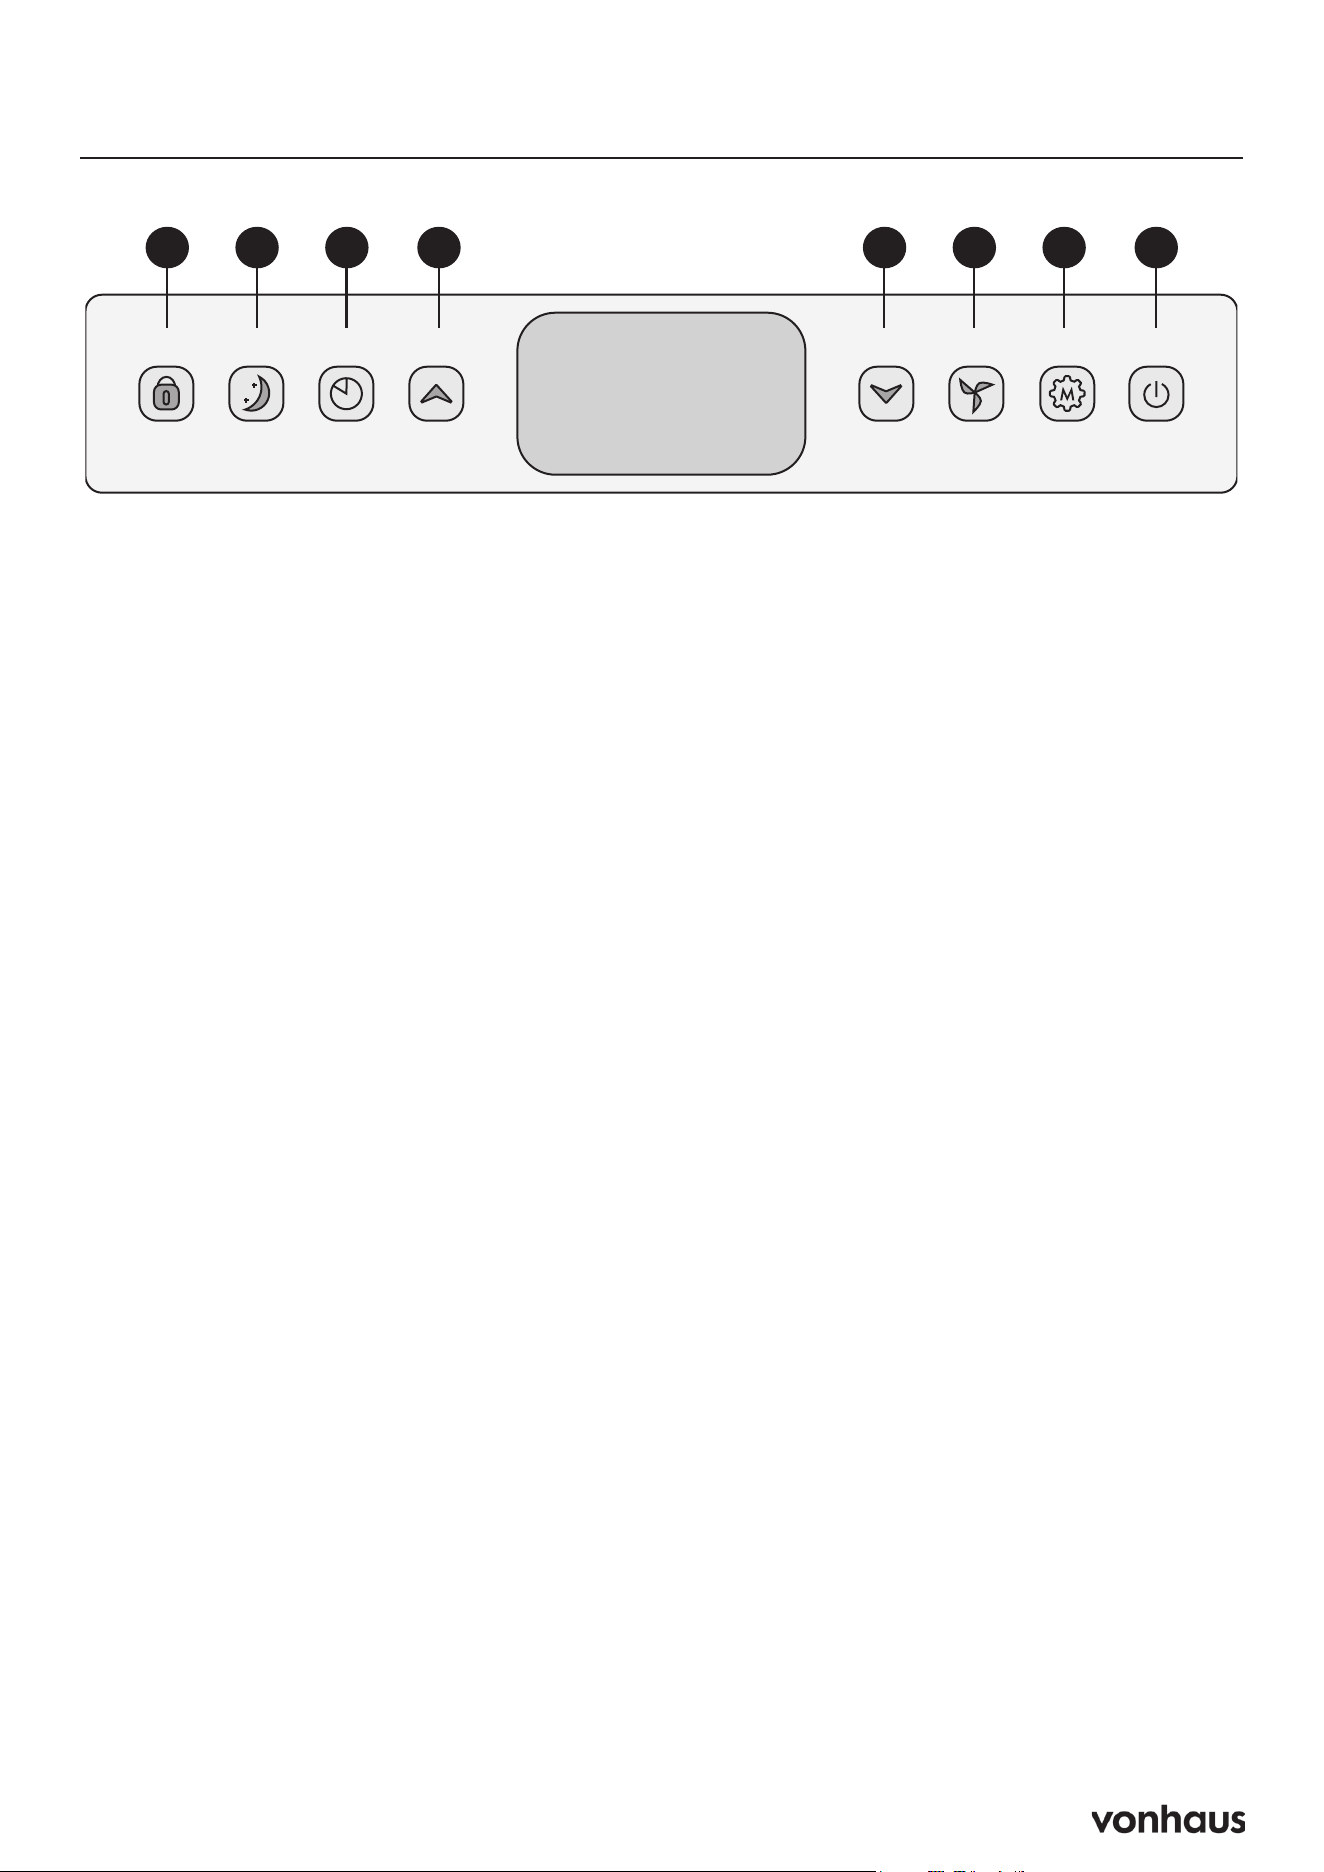
Control Panel
A B C D E F G H
A. Lock
Press and hold to activate or deactivate the
child lock function.
B. Sleep
Press to turn sleep mode on or off.
C. Timer (24 Hours)
Press to set a timer for operation duration (1-24
hours)
D. Up
Press to increase the desired temperature
(16C-32C) or timer setting.
E. Down
Press to decrease the desired temperature or
timer setting.
F. Speed
Press to switch the fan speed between HIGH
and LOW settings.
G. Mode
Press to switch between fan, cooling, and
dehumidifier (dry) operation modes.
H. Power
Press to turn the machine on or off.

6
Use & Operation
Start-up and Shutdown
• Press POWER to turn the unit on.
• Press MODE button to select the desired
operation mode.
• Press POWER again to turn off the unit.
Operation Modes
The unit has four operation modes: Fan, Cool,
Dehumidifier, and Sleep.
Cooling Your Room
• Press MODE button repeatedly until the
COOL indicator lights up.
• Press Up/Down button to adjust the
temperature shown on the screen. The
temperature can be set between 16C and
32C.
• Press SPEED button repeatedly until the
desired fan speed indicator lights up.
• To adjust horizontal air flow direction, adjust
the inner louver manually.
Note: The air conditioner stops when the
room temperature falls below the selected
temperature.
Ventilating Your Room
• Press MODE button repeatedly until the
FAN indicator lights up.
• Press SPEED button repeatedly to select the
desired fan speed.
Note: In ventilation mode, the air is circulated
but not cooled.
Dehumidifying / Drying Your Room
• Press MODE button on the control panel or
remote control until the DRY indicator lights
up.
• Connect the hose to the drain outlet at the
back of the unit.
Note: In this mode, the fan speed automatically
sets to low and cannot be changed.
Sleep Mode
Sleep mode can only be activated in cooling
mode.
When in cooling mode:
• After 1 hour, the preset temperature
increases by 1C
• After another hour, the preset temperature
increases by another 1C
7
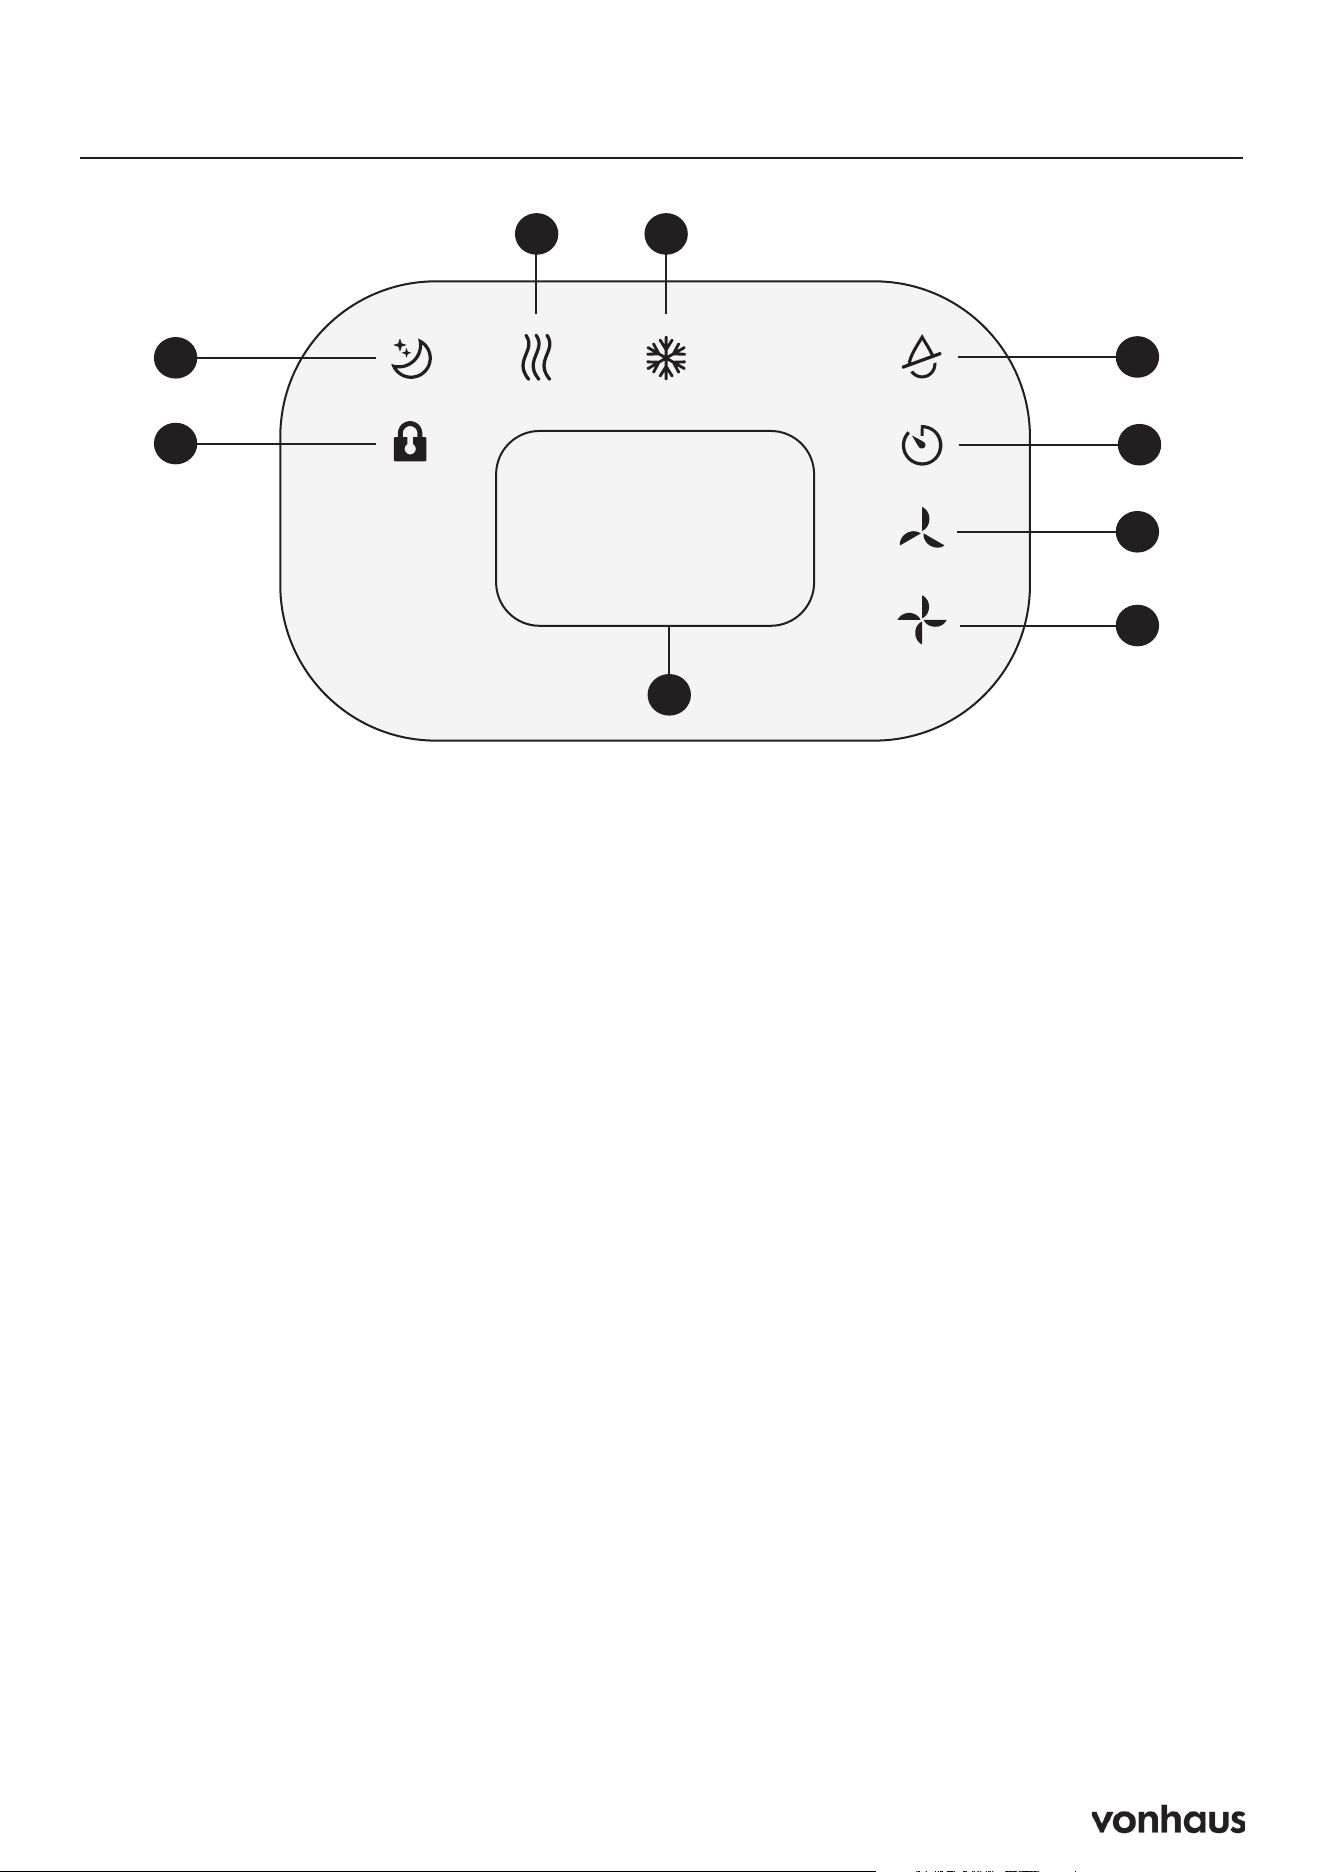
Display Screen
A. Fan
B. Cooling
C. Dehumidifier / Dry
D. Timer
E. Low Fan
F. High Fan
G. Display Window
H. Lock
I. Sleep
H
I
C
E
F
D
BA
G
8
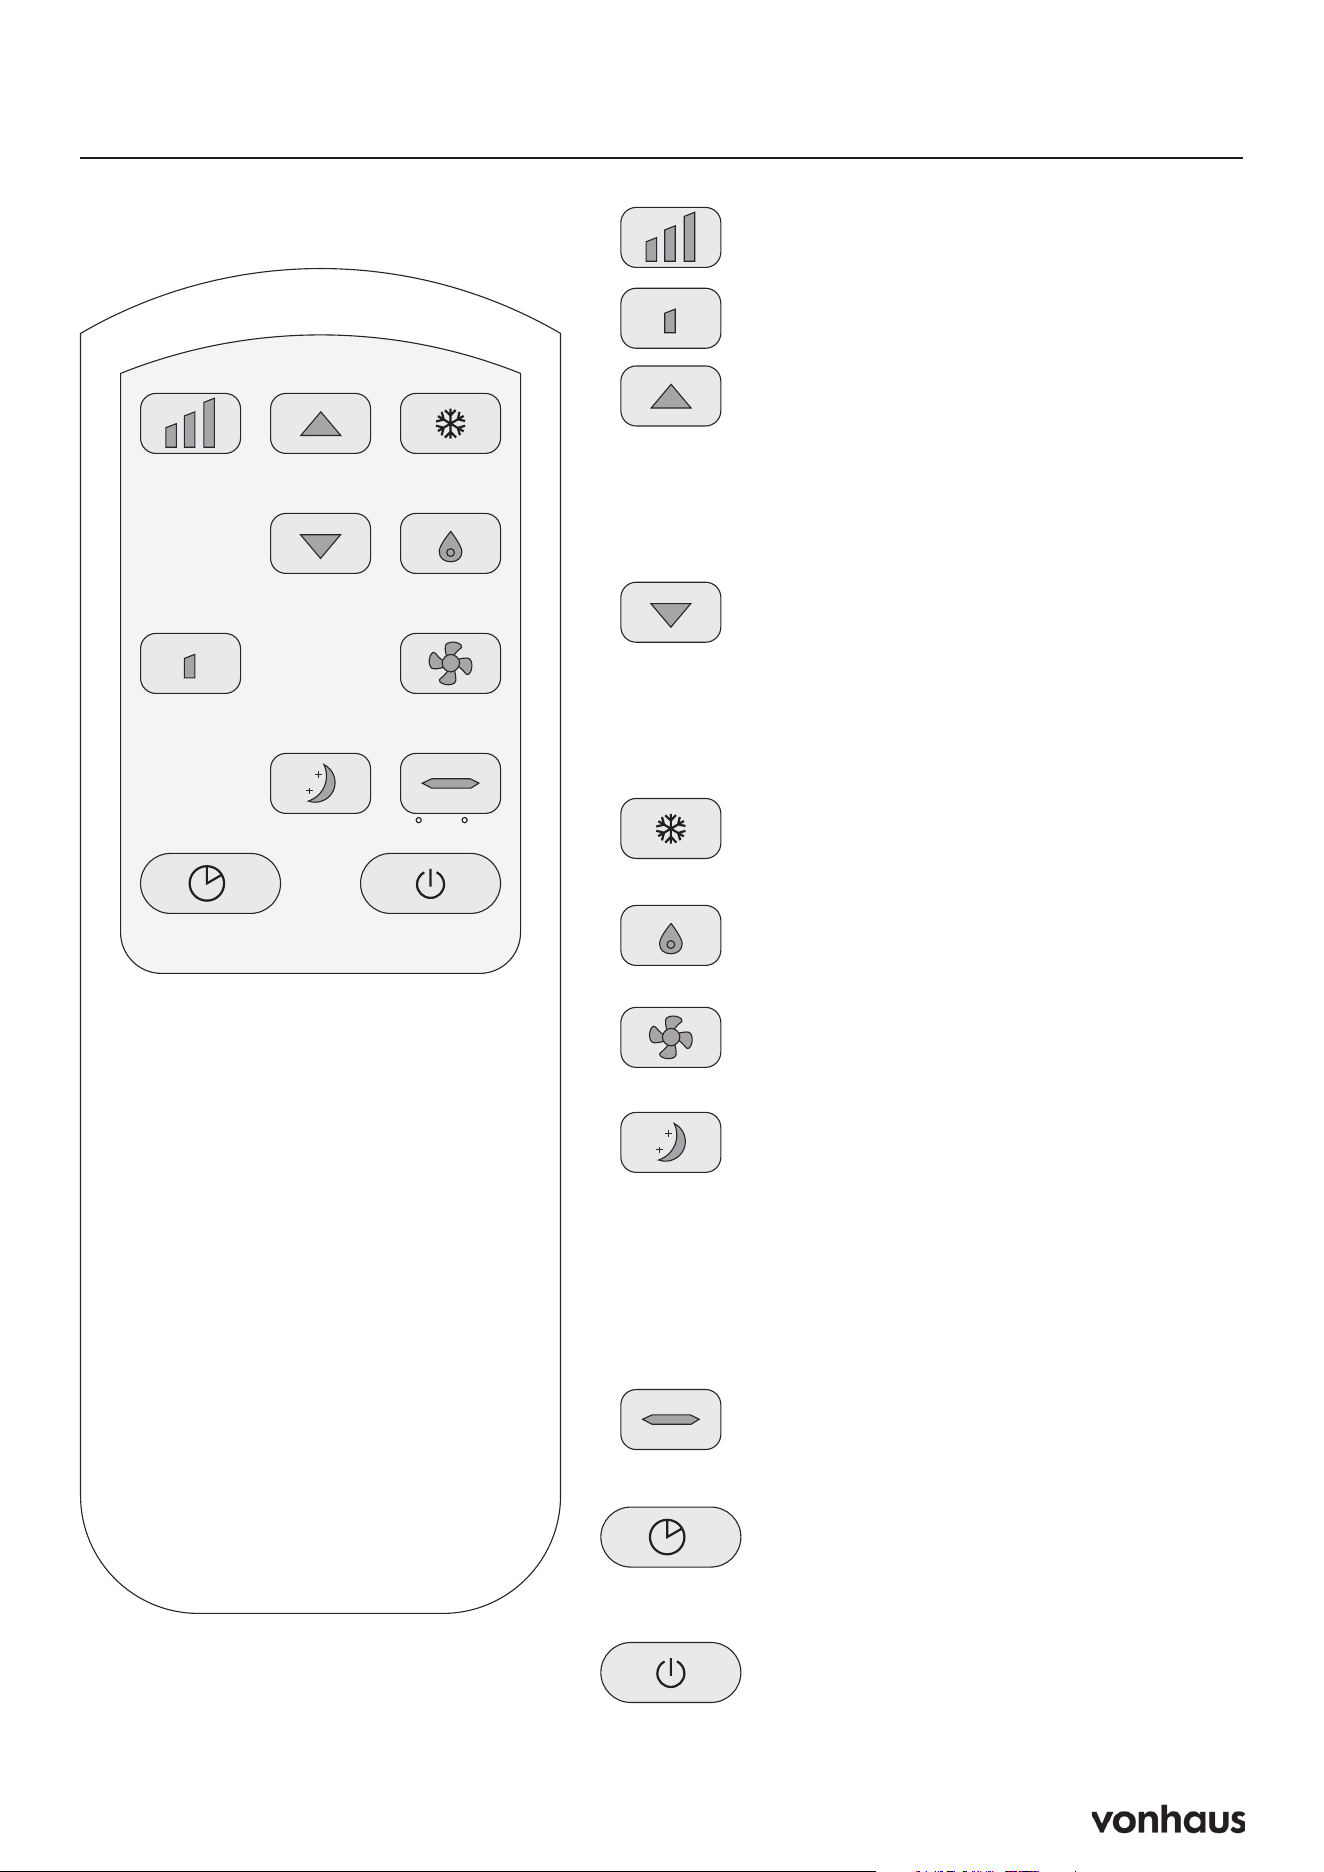
Remote Control
High Up Cool
Dry
Fan
C / FSleep
PowerTimer
Low
Down
High Fan Speed (High):
• Activates high-speed fan mode.
Low Fan Speed (Low):
• Activates low-speed fan mode.
Temperature UP / Timer UP (Up
Arrow):
• Increases the temperature setting
(16–32°C).
• Increases the timer setting (1–24
hours).
Temperature DOWN / Timer
DOWN (Down Arrow):
• Decreases the temperature setting
(16–32°C).
• Decreases the timer setting (1–24
hours).
Cooling Mode (Cool):
• Activates cooling mode for
temperature control.
Dry/Dehumidify Mode (Dry):
• Activates the dehumidification
function.
Fan Mode (Fan):
• Activates fan-only mode without
cooling or dehumidifying.
Sleep Mode (Sleep):
• Can only be used in cooling mode.
• Automatically increases the preset
temperature by 1°C/2°F after 1
hour and another 1°C/2°F after
the second hour.
• Dims control panel indicators
during operation.
Celsius/Fahrenheit Switch (C/F):
• Toggles between Celsius and
Fahrenheit temperature display.
Timer Setting / On-Off (Timer):
• Sets a timer for operation duration
(1–24 hours).
• Turns the timer function on or off.
Power On/Off (Power):
• Turns the unit on or off.
9
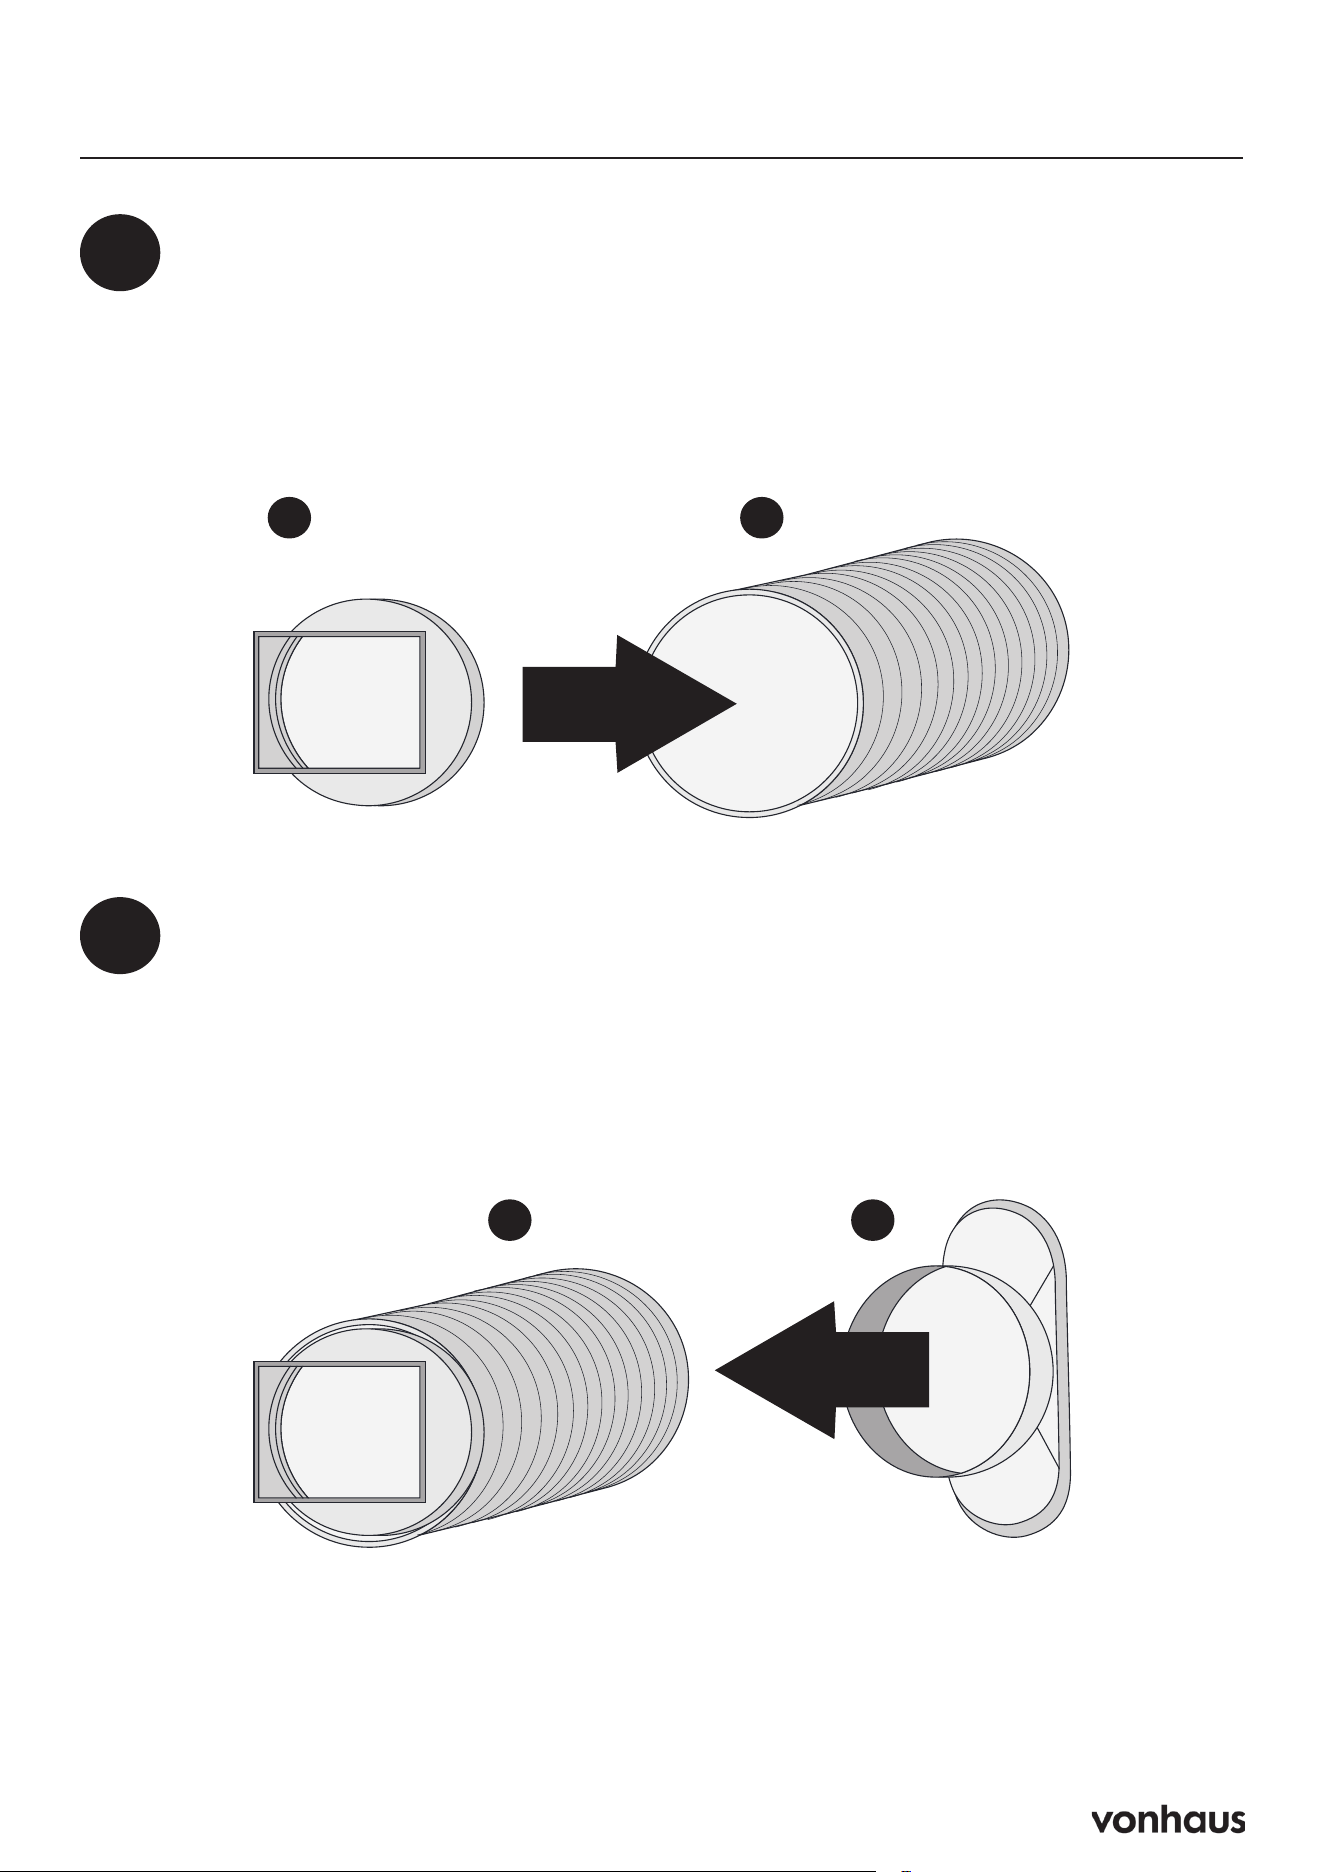
Assembly
Prepare the Hose (Already Pre-Assembled)
• Attach the hose connector to one end of the exhaust hose. It should come out of
the box already attached.
1
B A
Add Window Adapter
• Line up the other end of the exhaust hose to the adapter and slowly turn the
adapter clockwise to allow the thread of the hose to become attached to the
adapter.
• Keep turning until the exhaust hose is securely connected to the adapter. This
can be tricky the first time as its designed to be tight.
2
CA
10
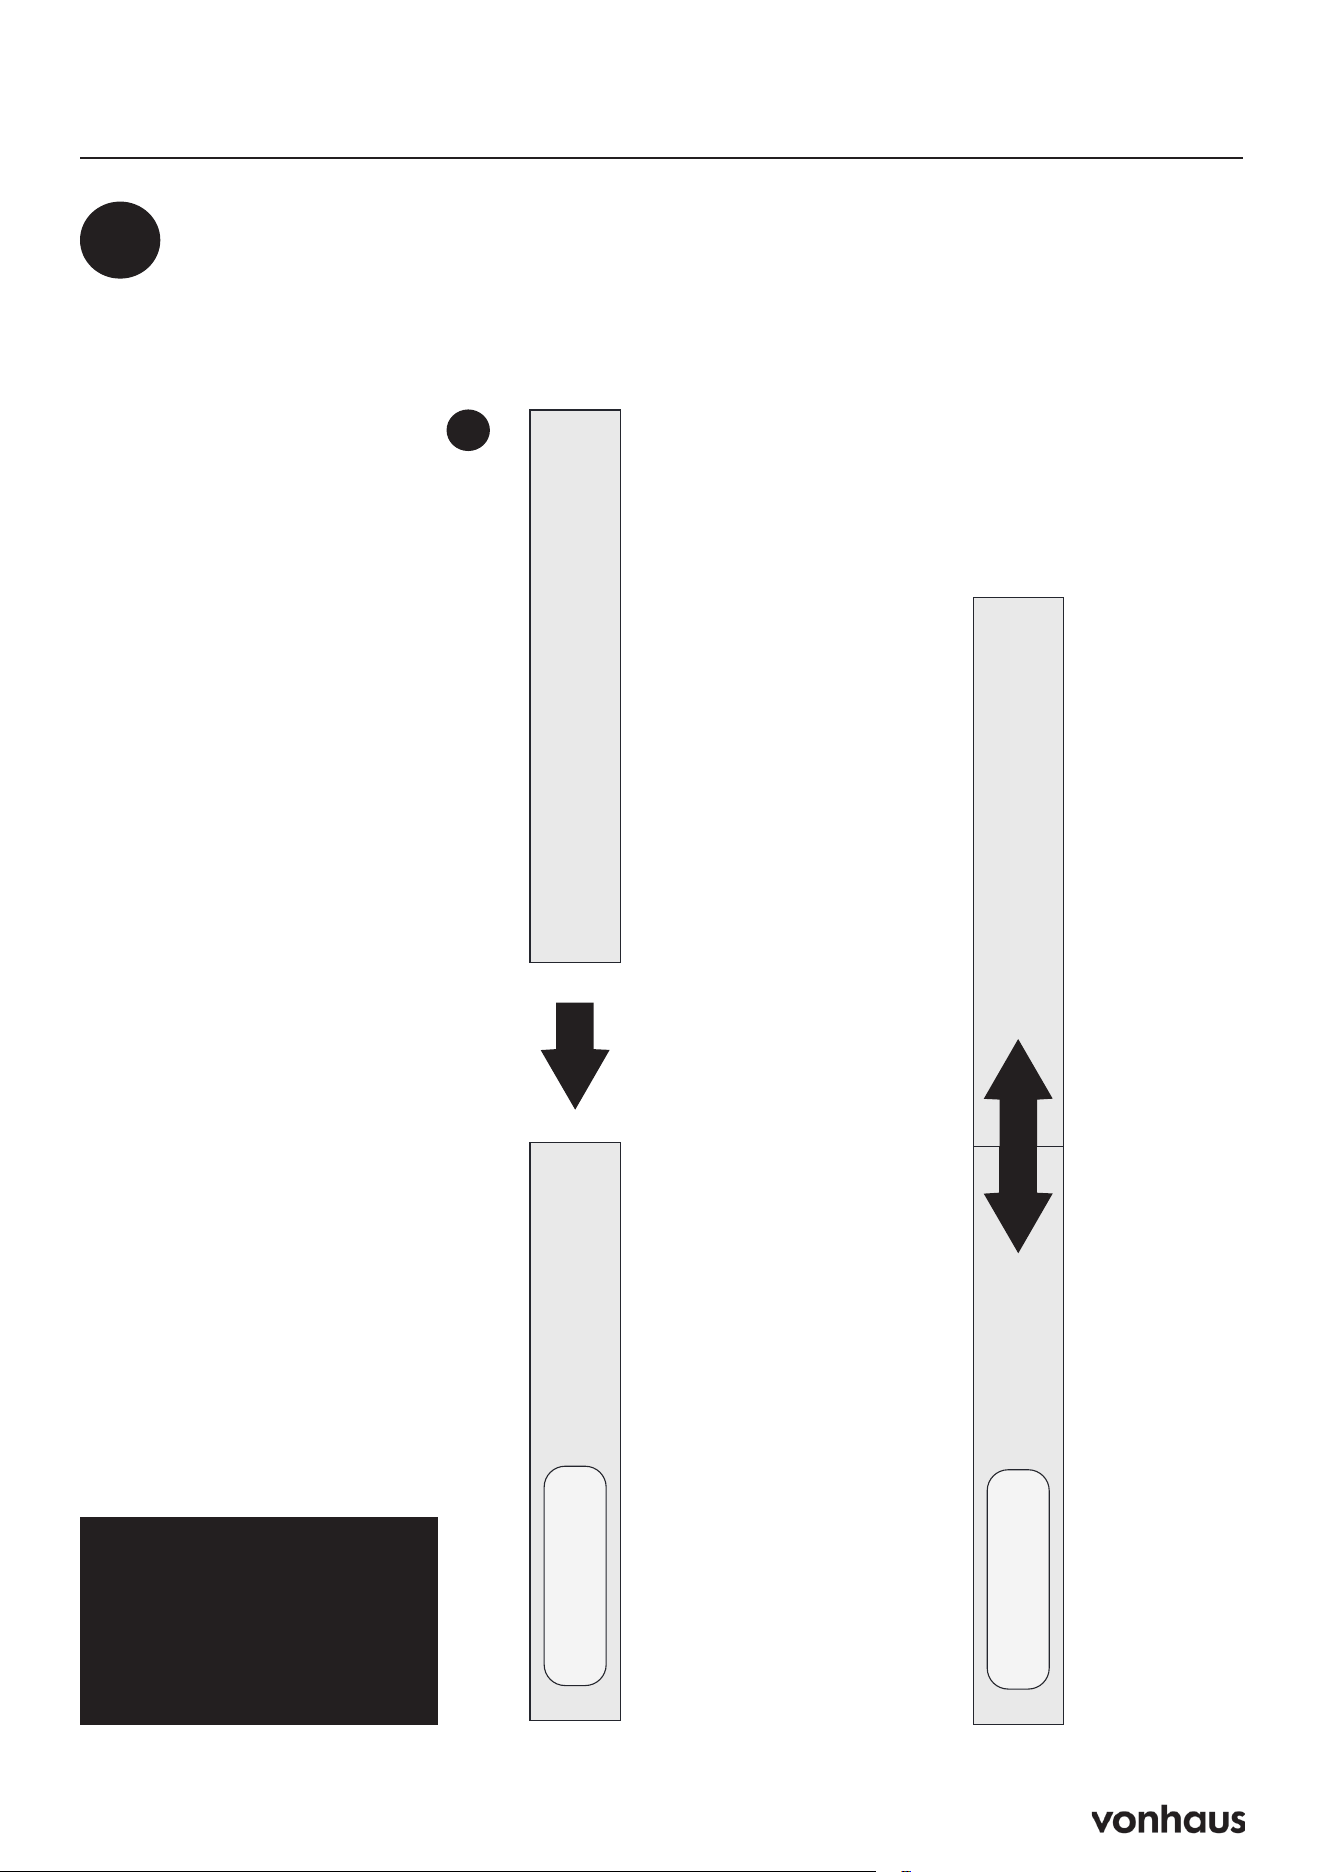
Assembly
3
Set Up Sliding Window Kit
• Extend the window kit to match your window length
• Insert the exhaust hose into the window kit
Hinged Window?
See page 15 for setup
instructions.
F
11
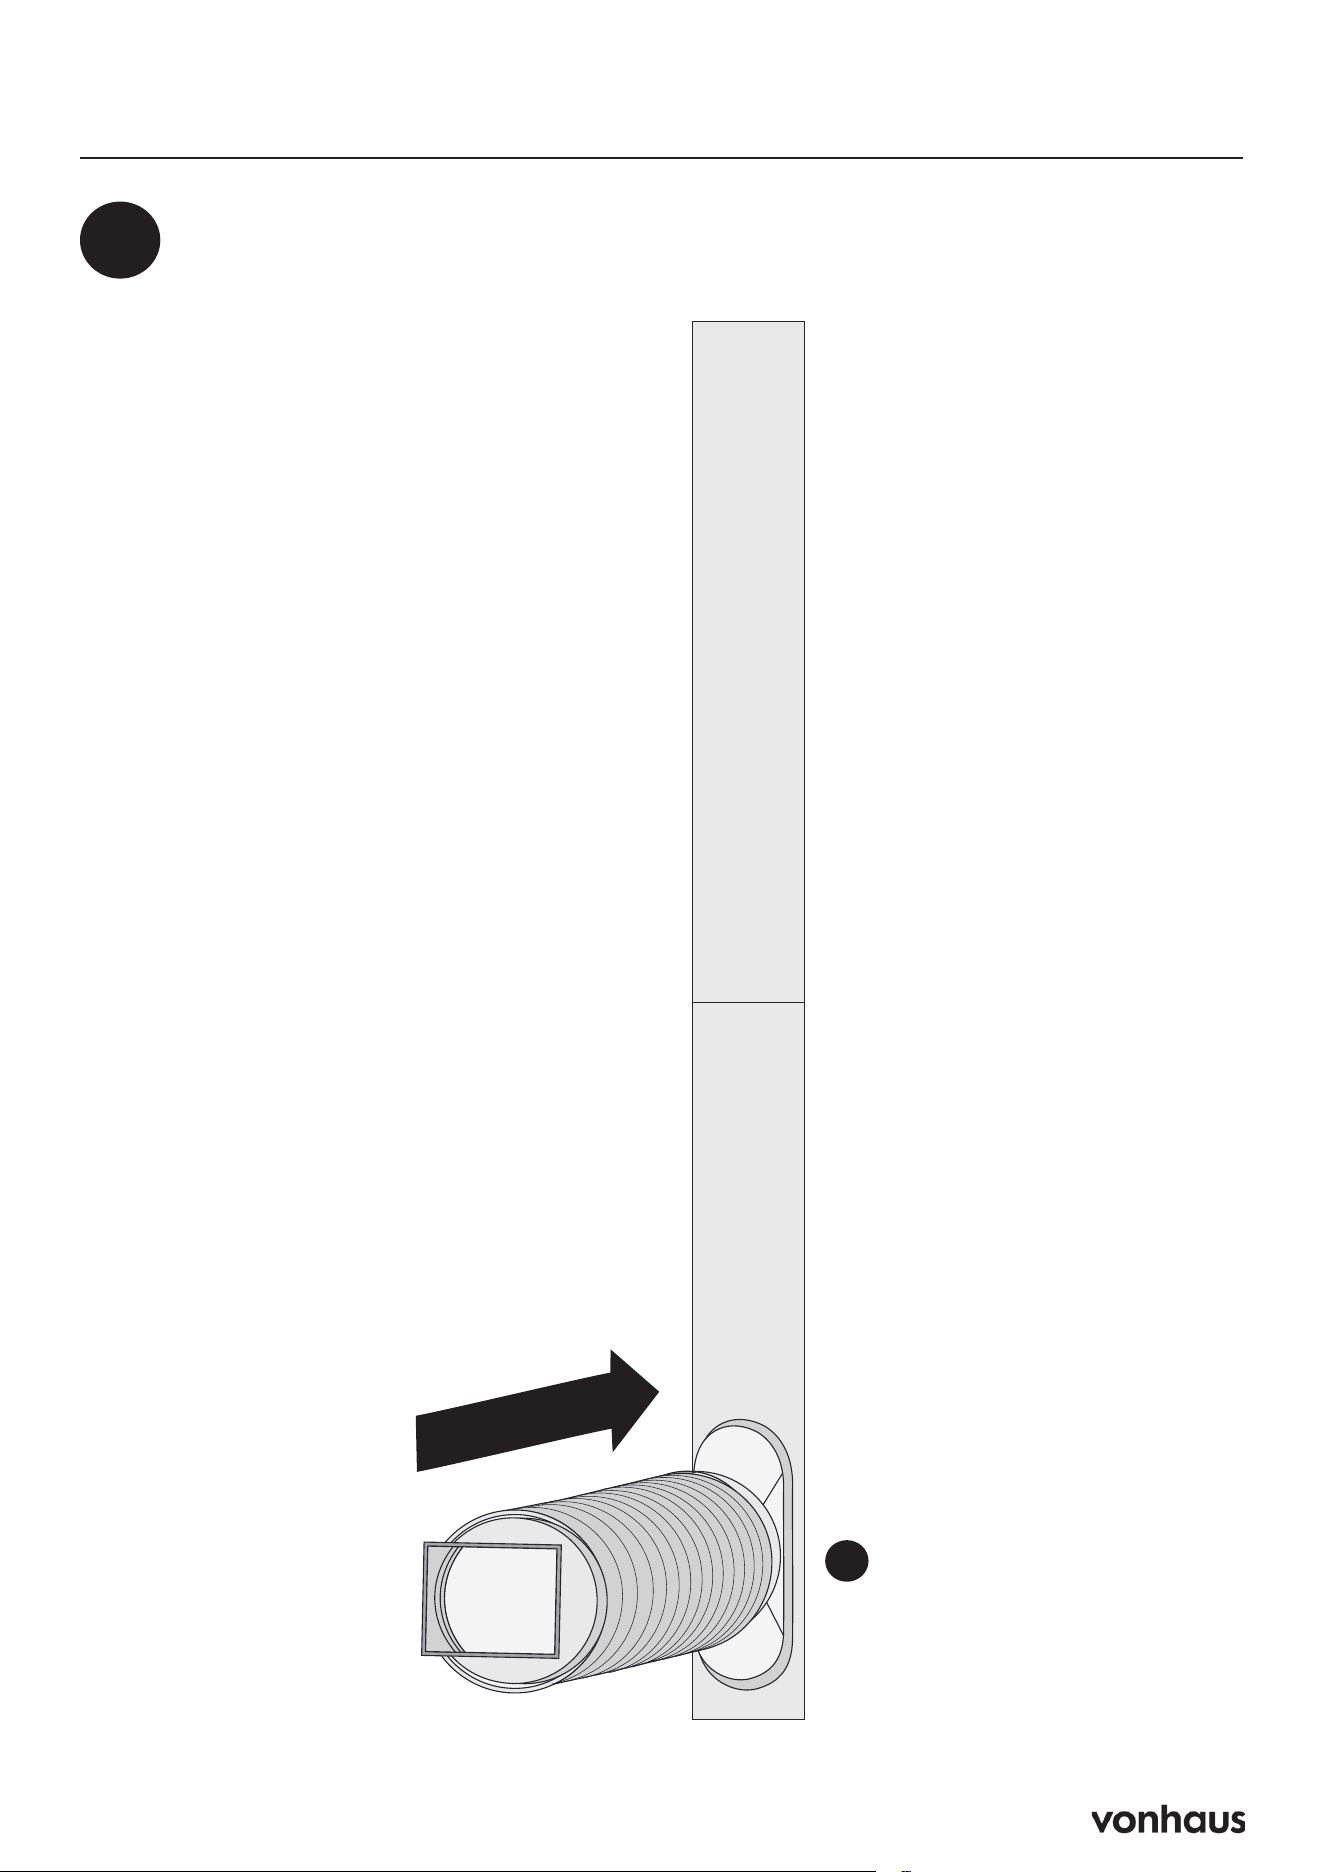
Assembly
Insert the Exhaust Hose into the Window Kit
4
C
12
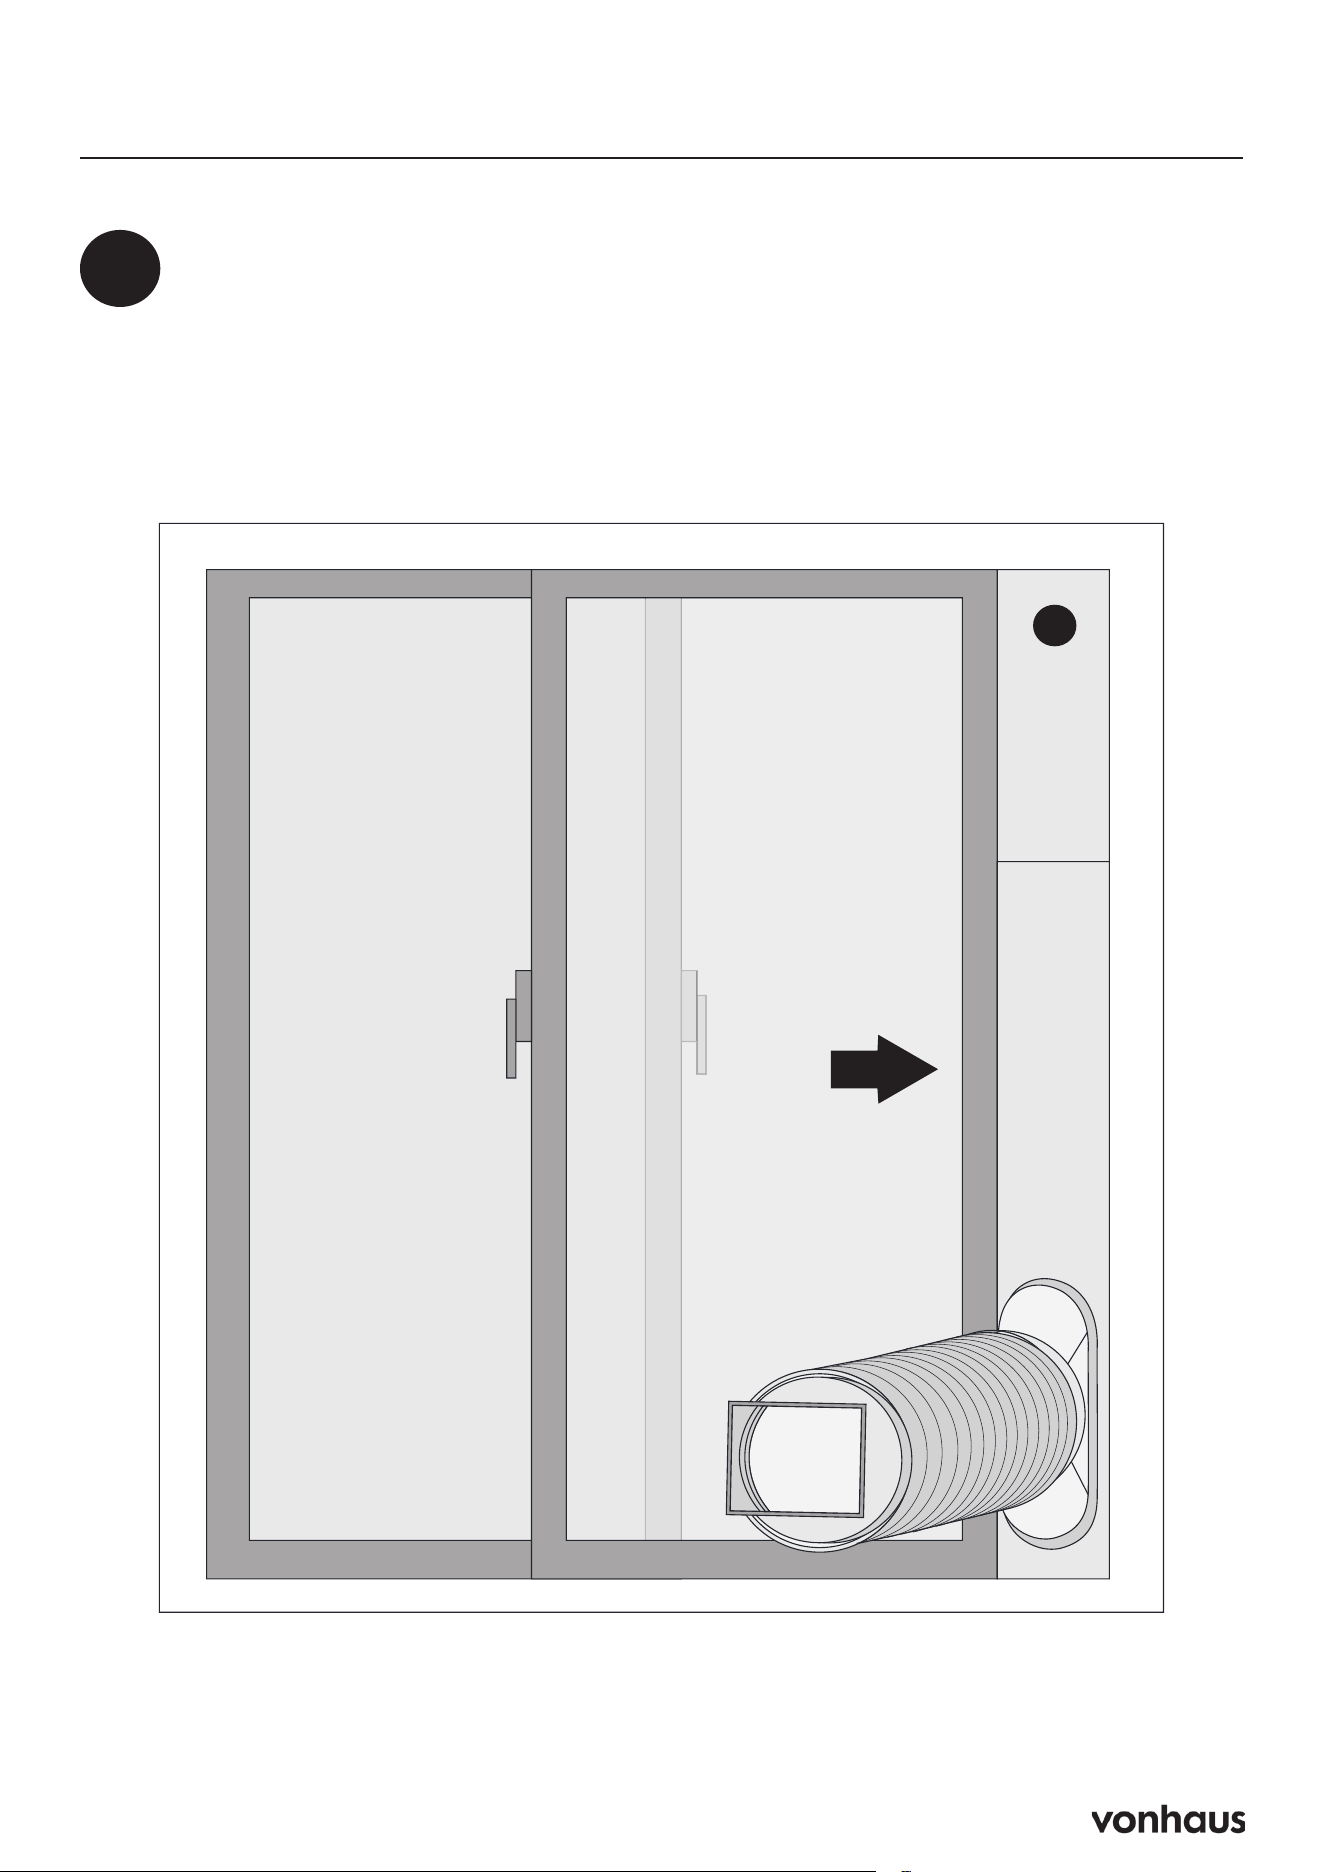
Assembly
5
Secure the Window
• Close window against the kit
• Use duct tape if needed for a firm hold
• Seal any gaps for maximum efficiency
F
13
Assembly
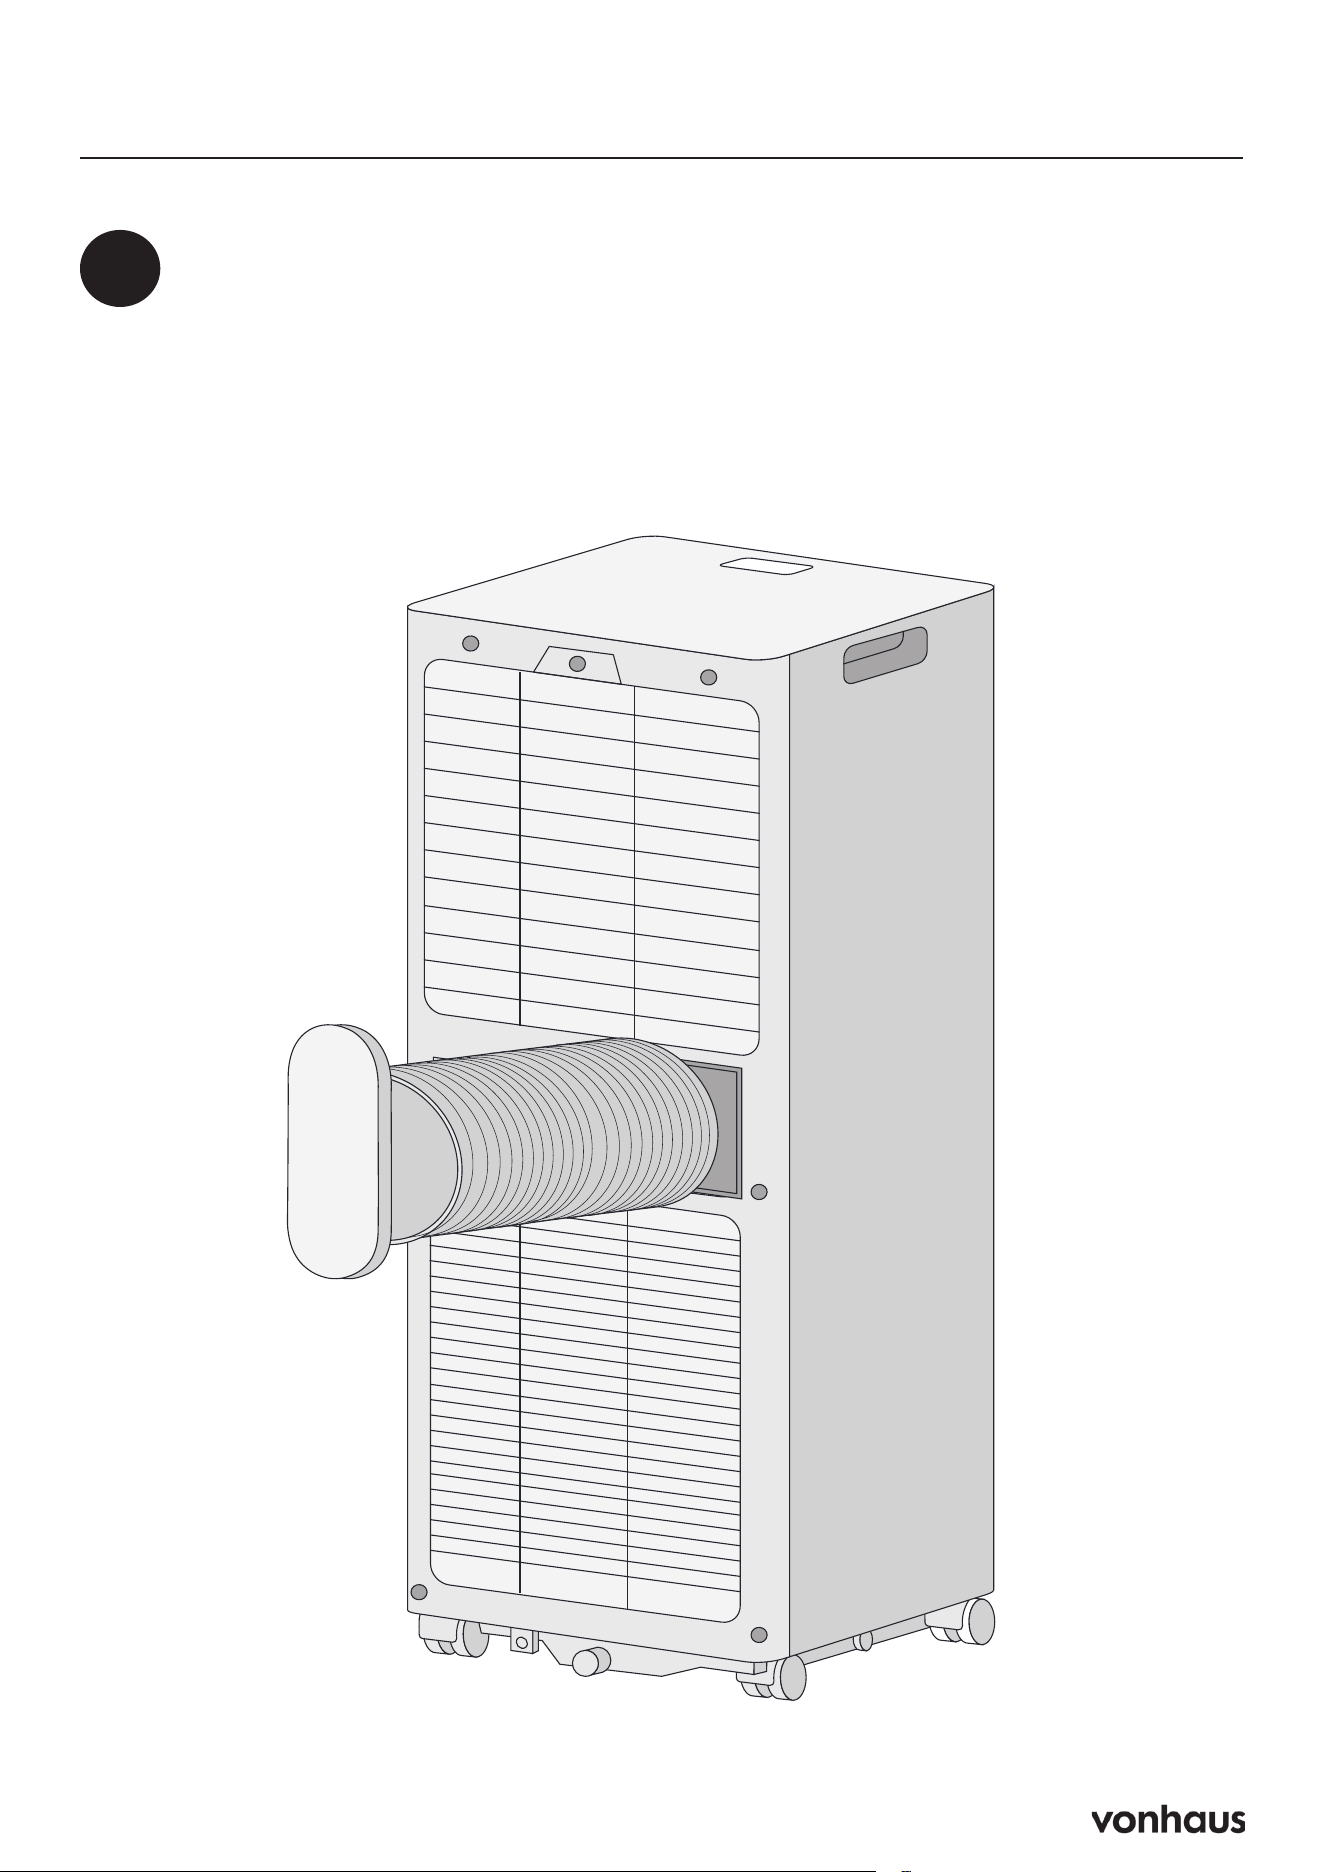
6
Connect to AC Unit
• Slide the hose connector in to the brackets on the exhaust outlet.
• The exhaust hose should lock in to place with a click.
14
Assembly
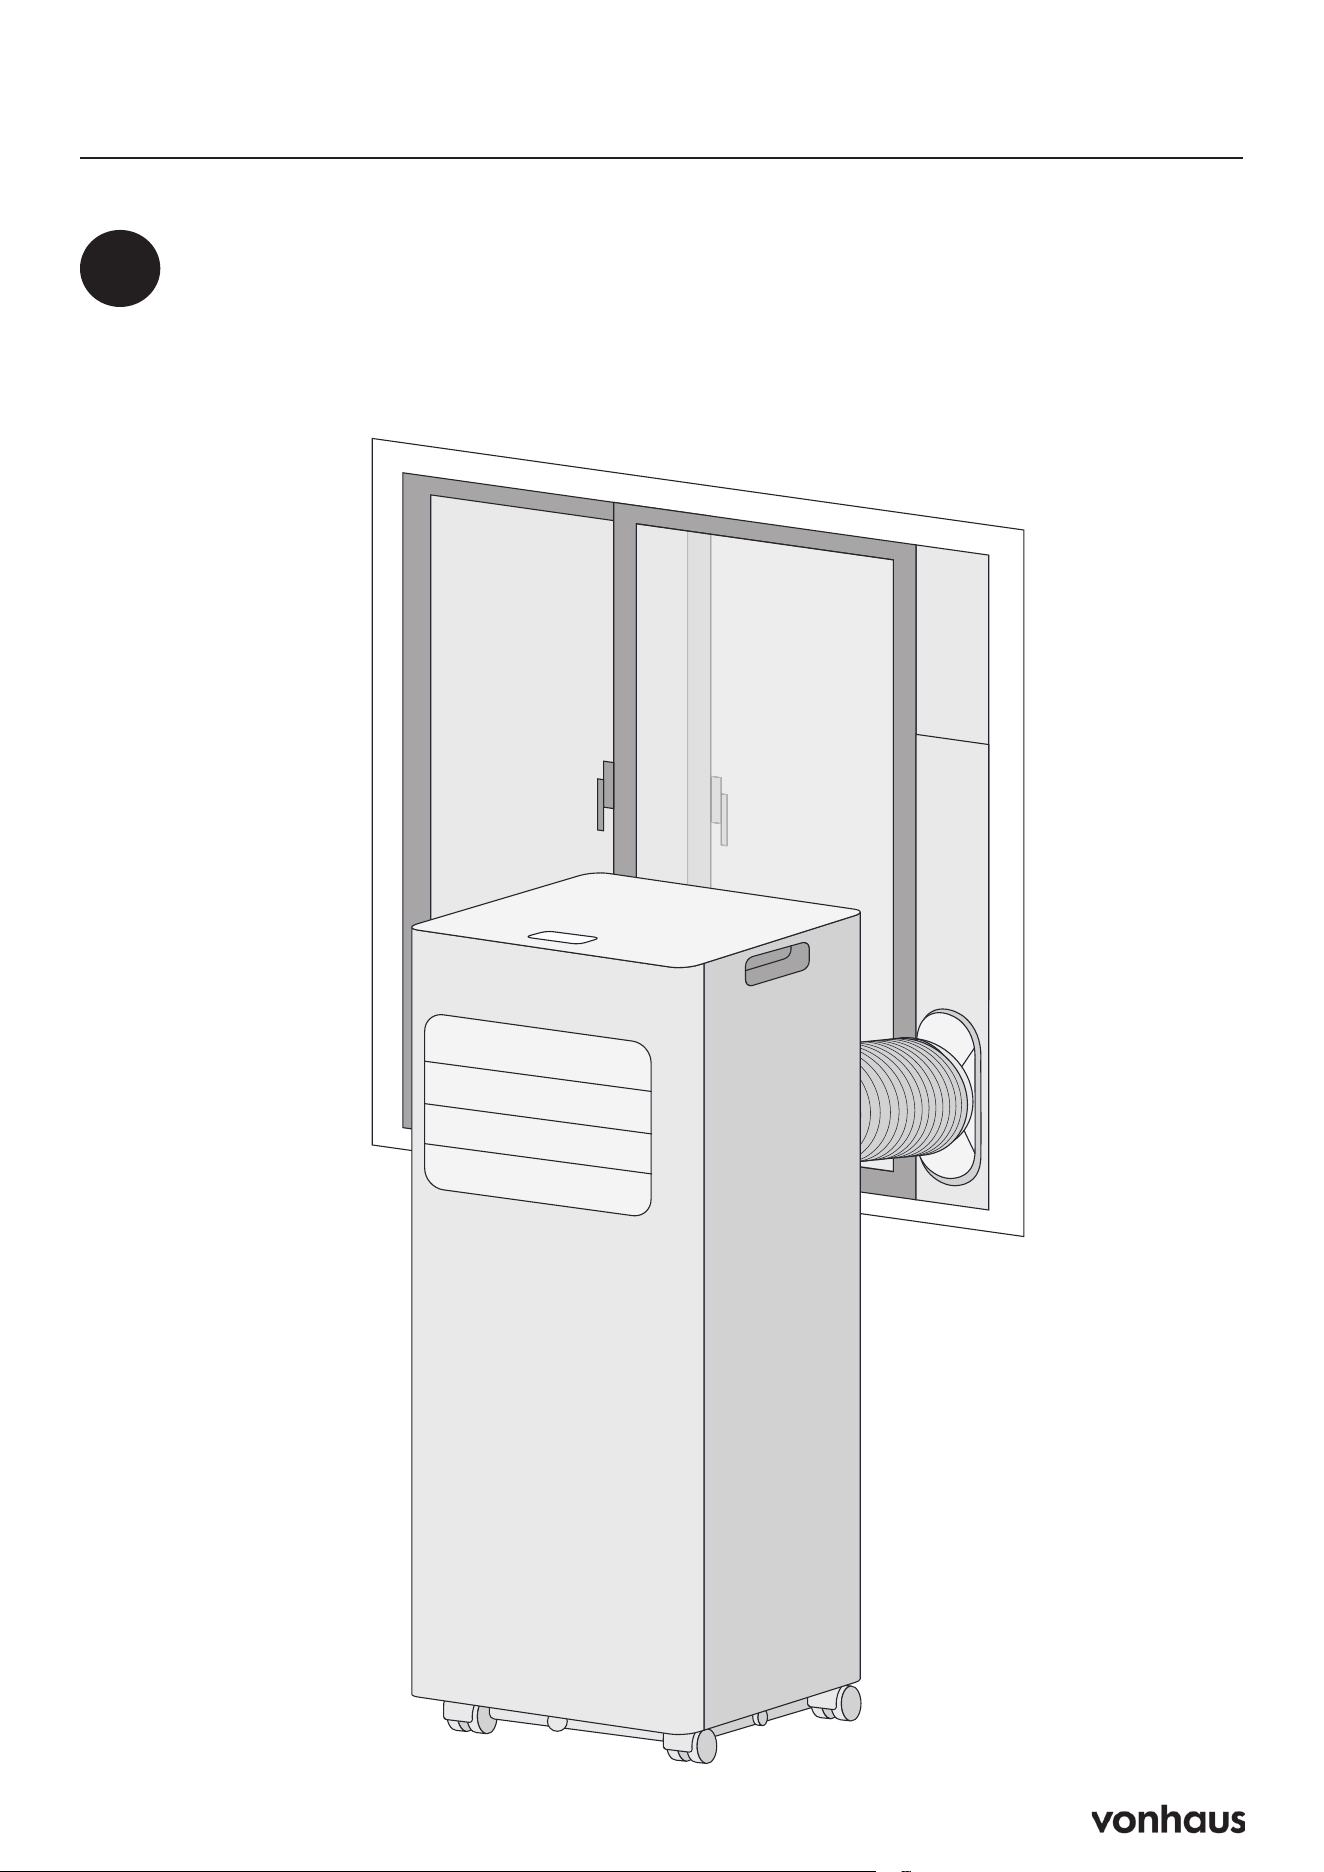
7
Position the Unit
• Keep hose as straight as possible (avoid bends)
• Place AC near an electrical outlet
15
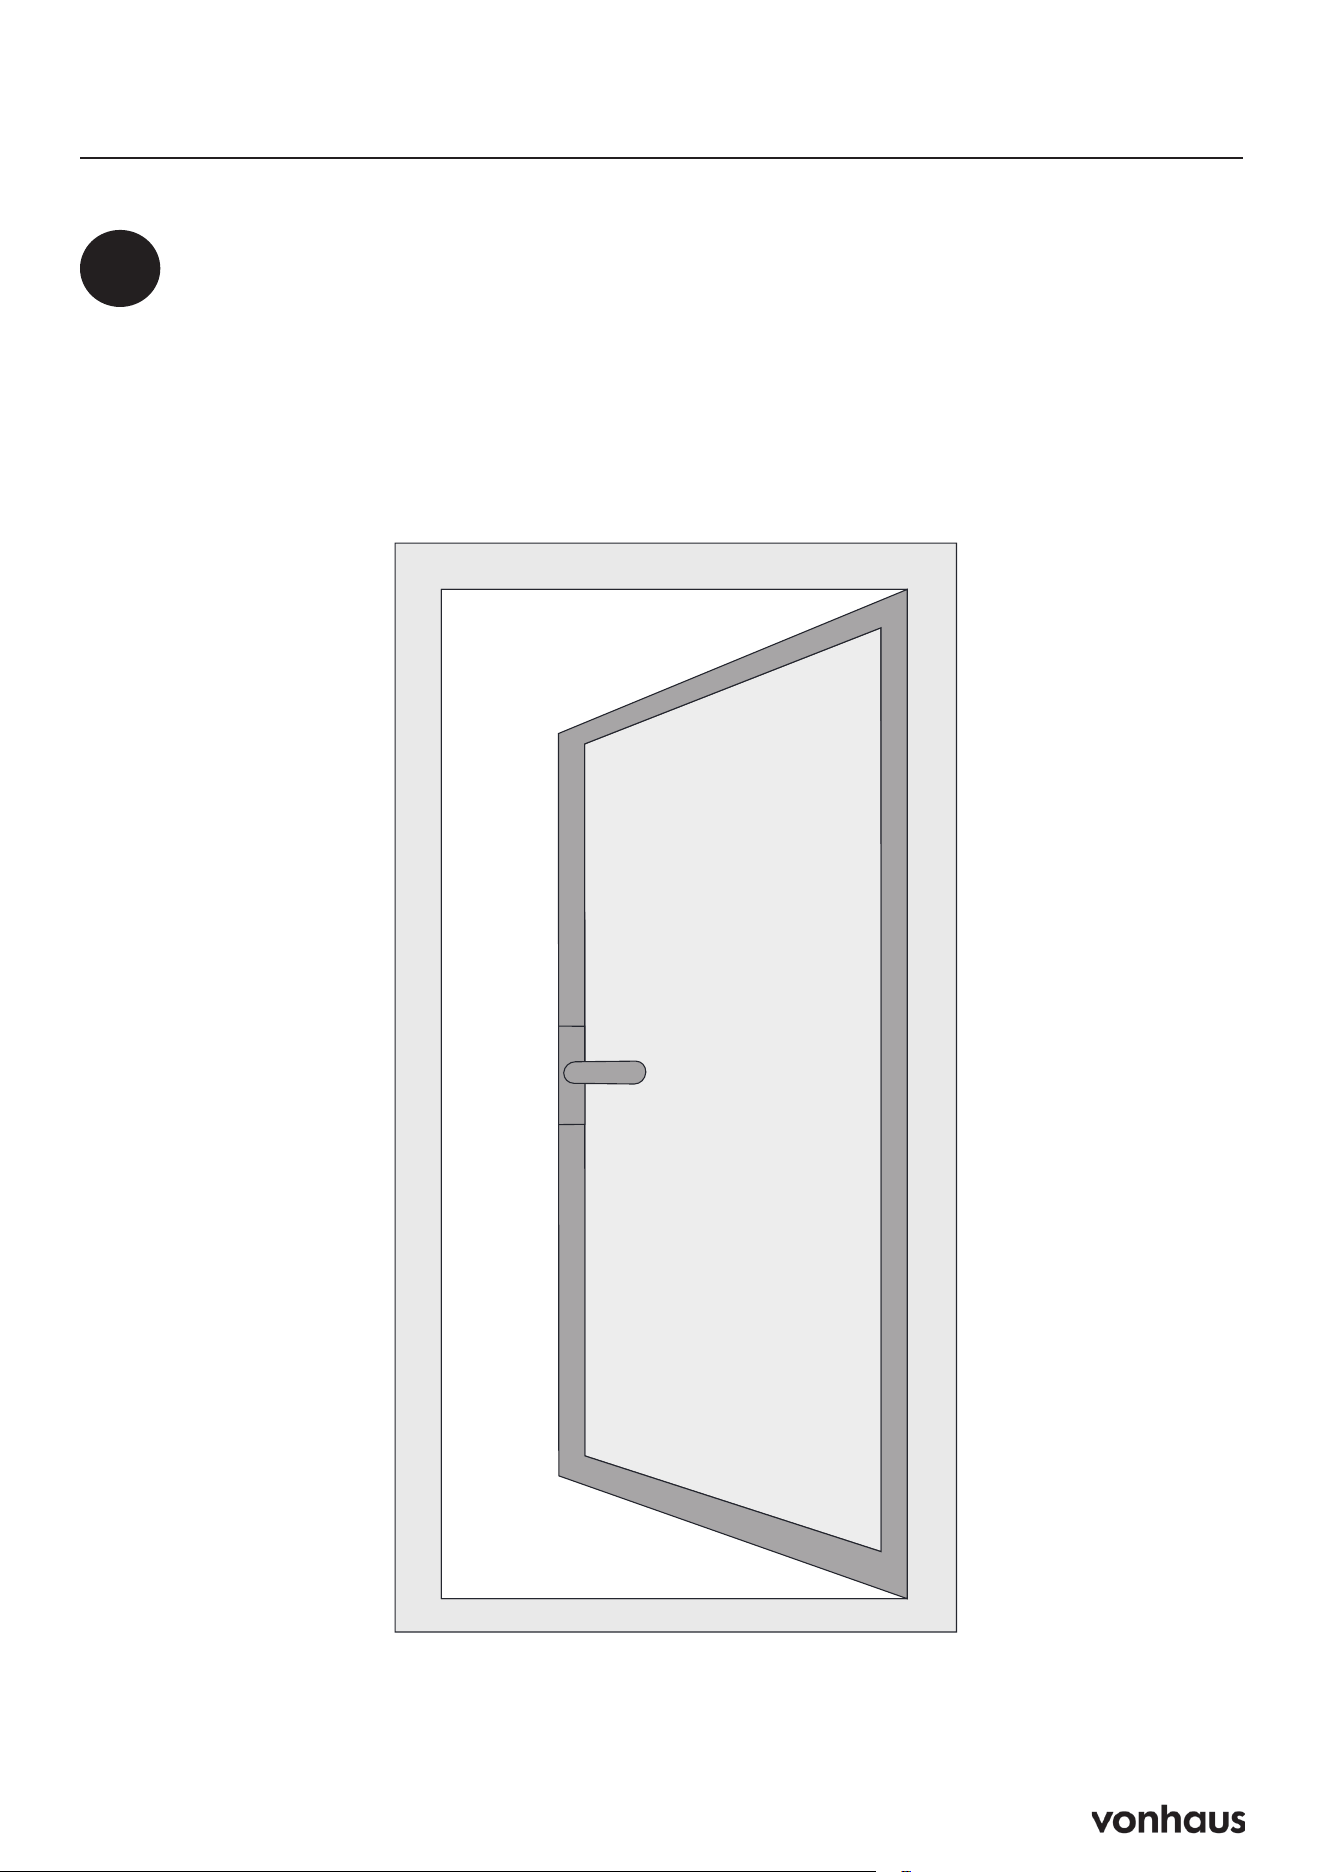
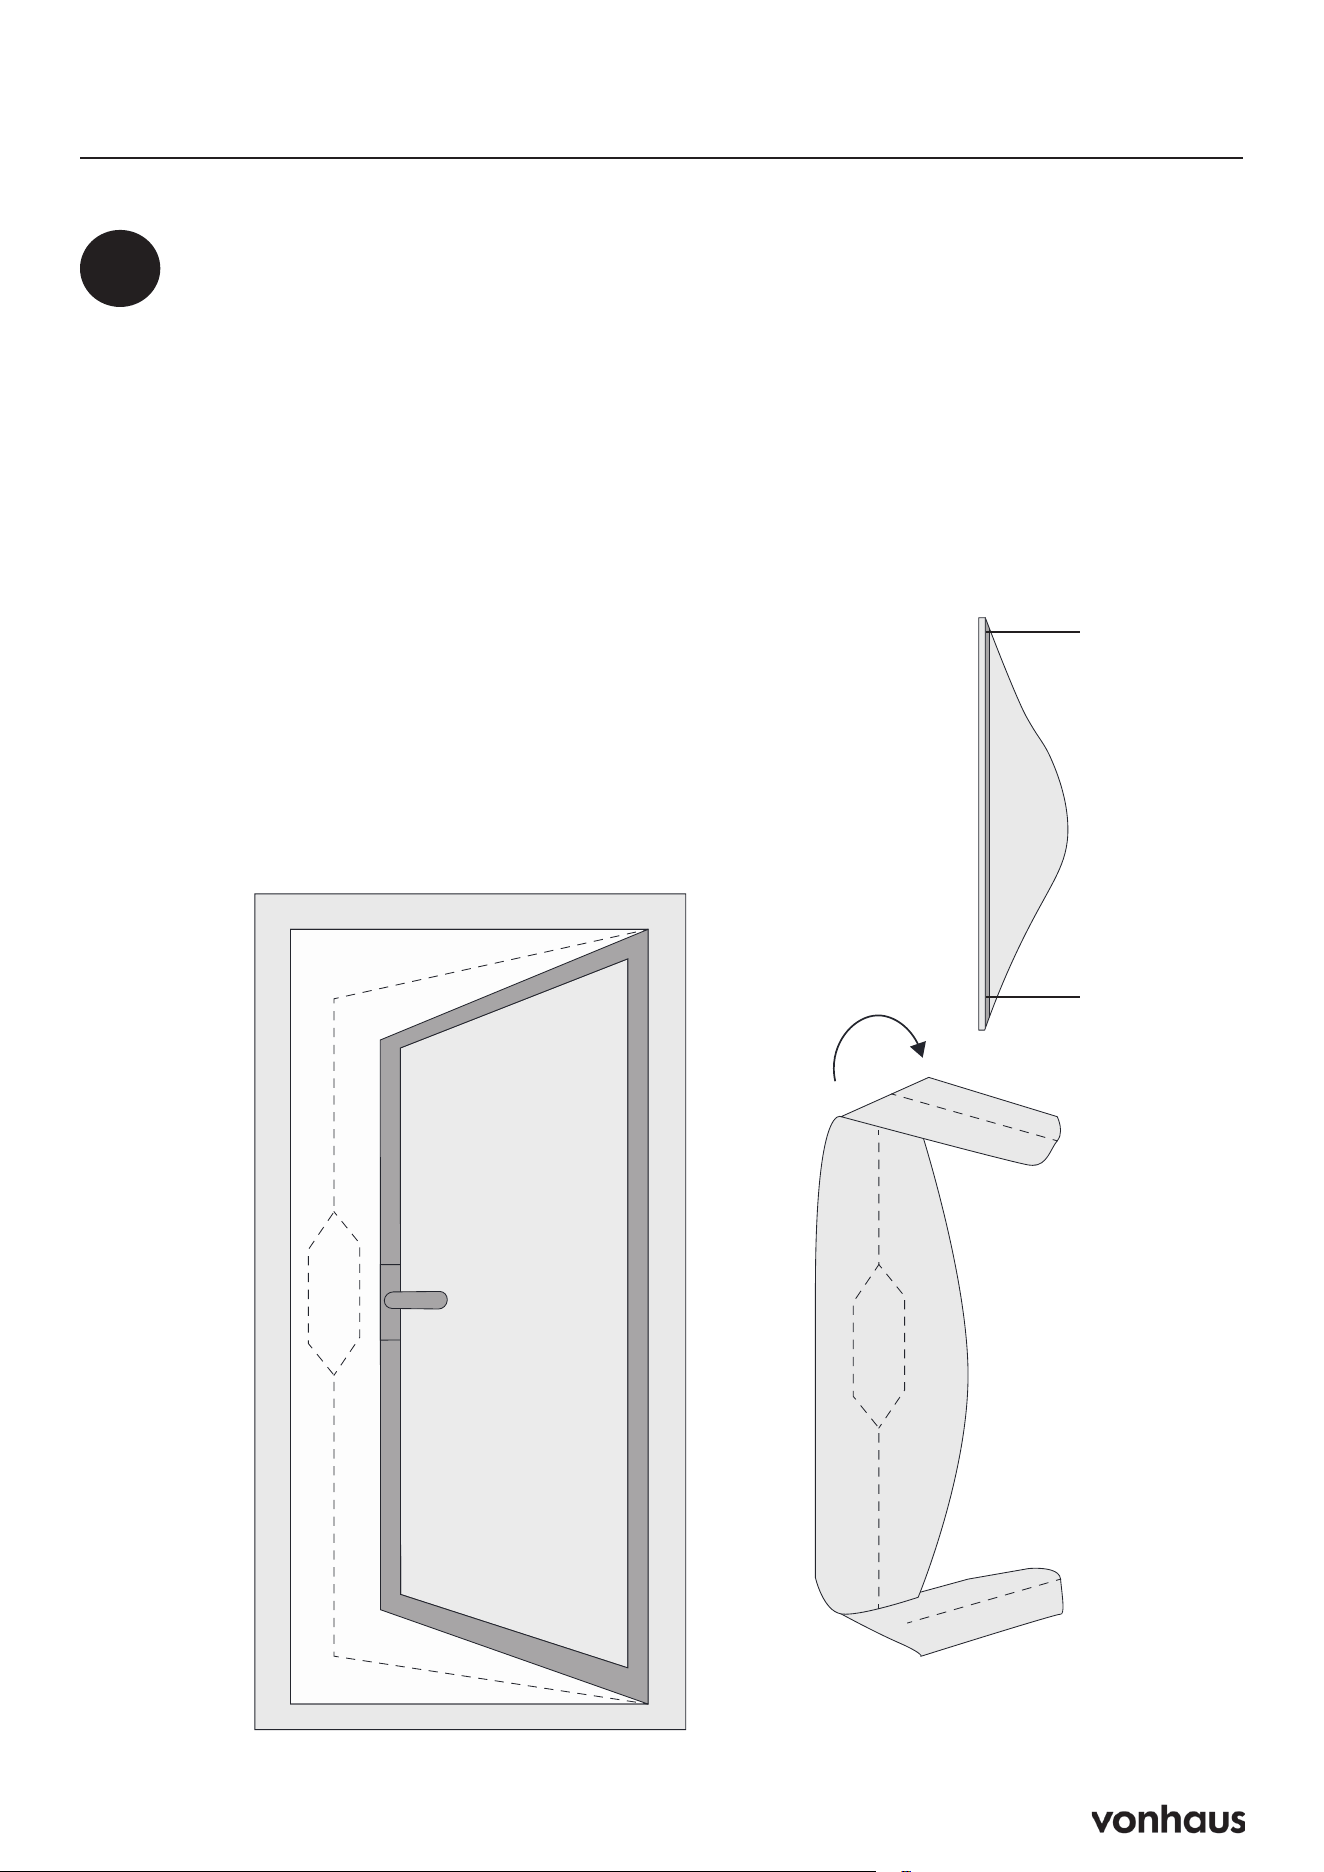
Hinged Window Sealing Fabric Installation
1
Prepare the Window
• Open the window.
• Clean the frame and casement surfaces to remove dust and dirt.
16
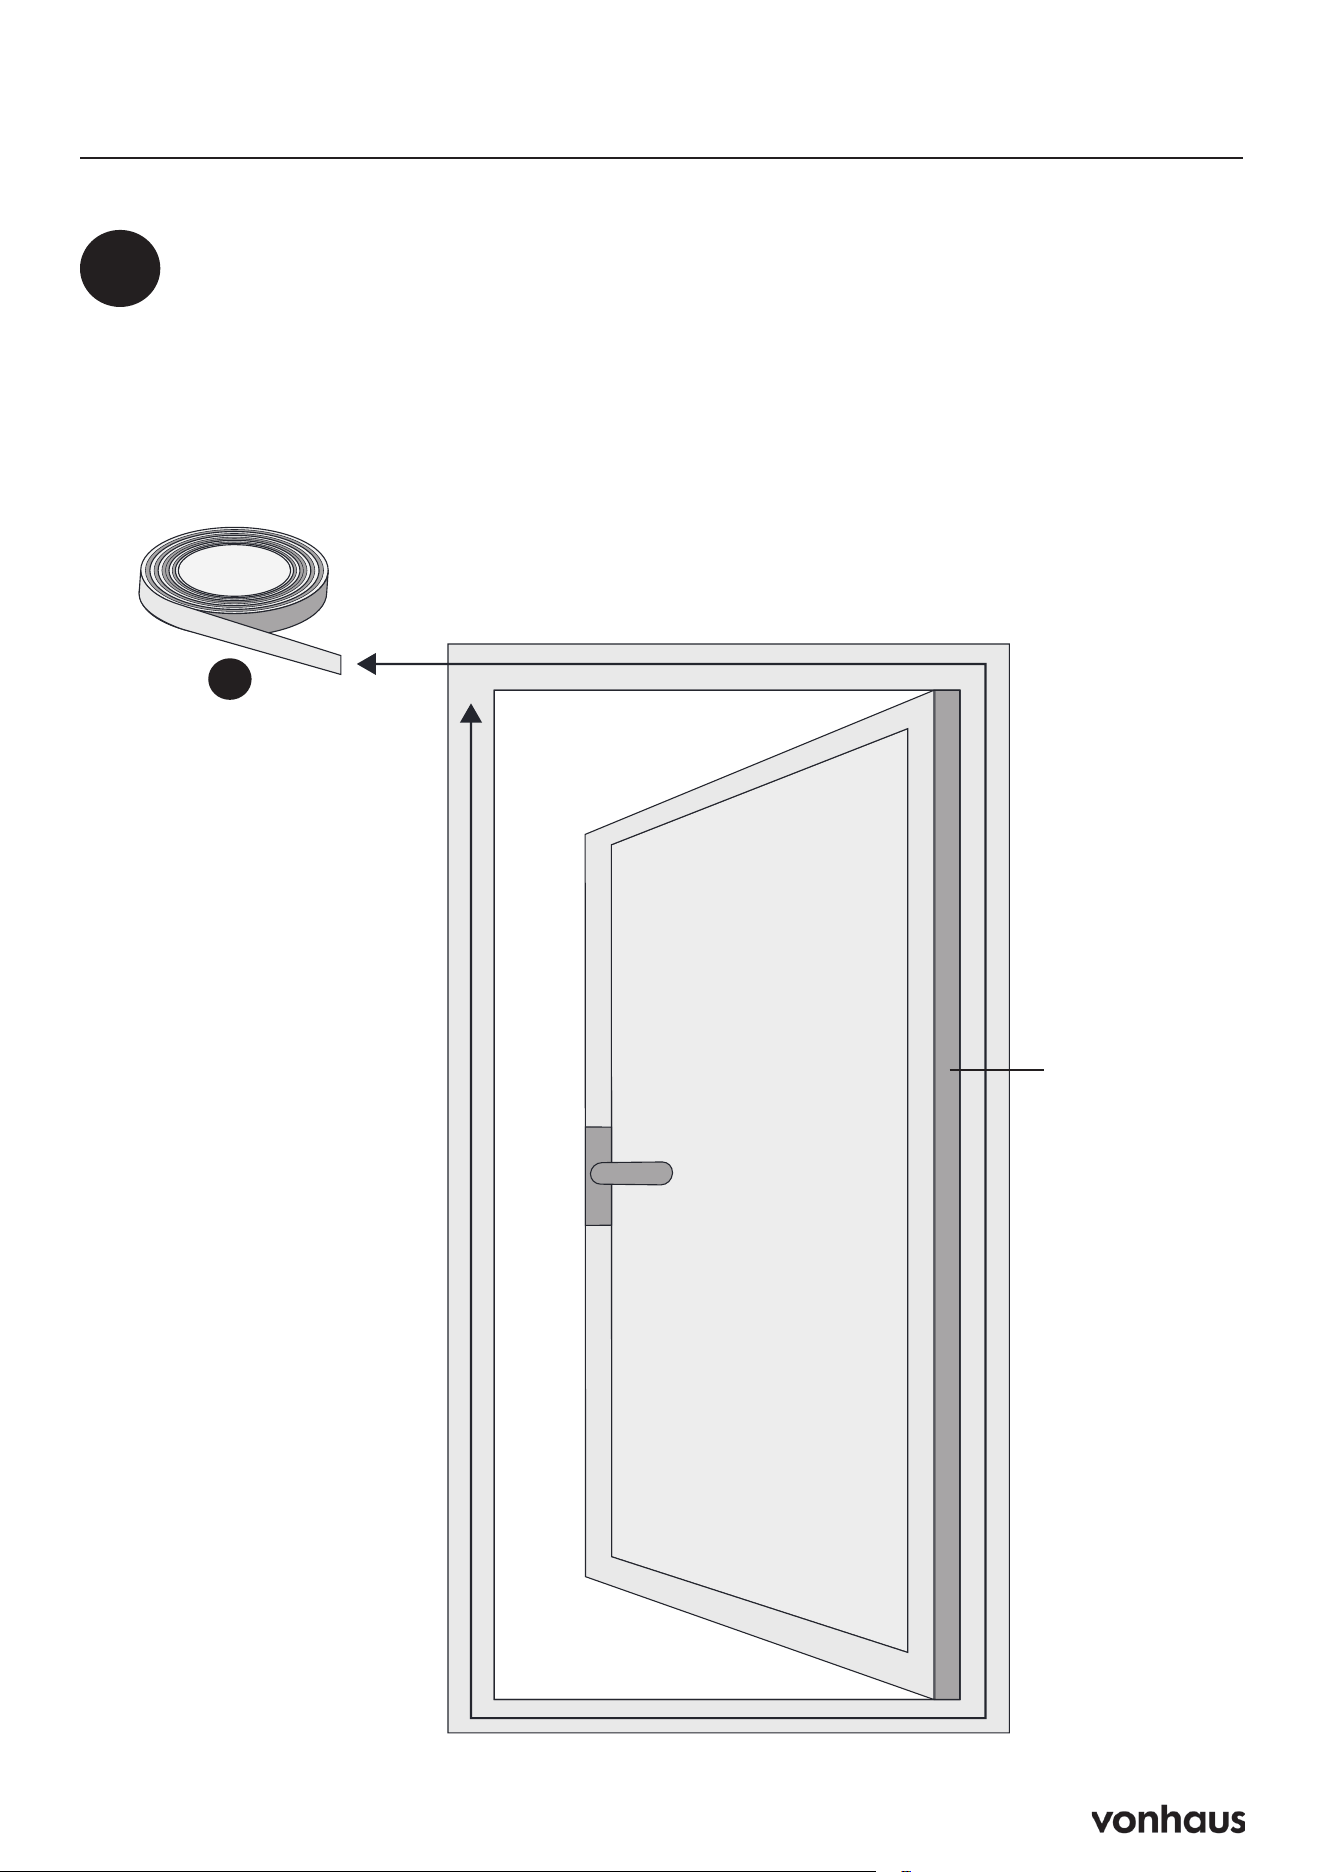
Hinged Window Sealing Fabric Installation
2
Attach Velcro Tape
• Stick Velcro tape around the entire window frame.
• Avoid sticking it to the window seal to ensure the window can close fully.
• Stick Velcro tape around the entire window casement (inside or outside).
• Double-check that the window can still close properly.
Casement
G
17
Hinged Window Sealing Fabric Installation
3
Attach Side A of the Fabric
• Attach Side A of the sealing fabric to the Velcro on the
window frame. Start in the centre and work outward.
Test the Window
• Open and close the window to ensure the sealing fabric isn’t
caught anywhere.
Attach Side B of the Fabric
• Attach Side B of the sealing fabric to the Velcro on the
window casement. Again, start in the centre and work
outward.
Side A
Side B
18
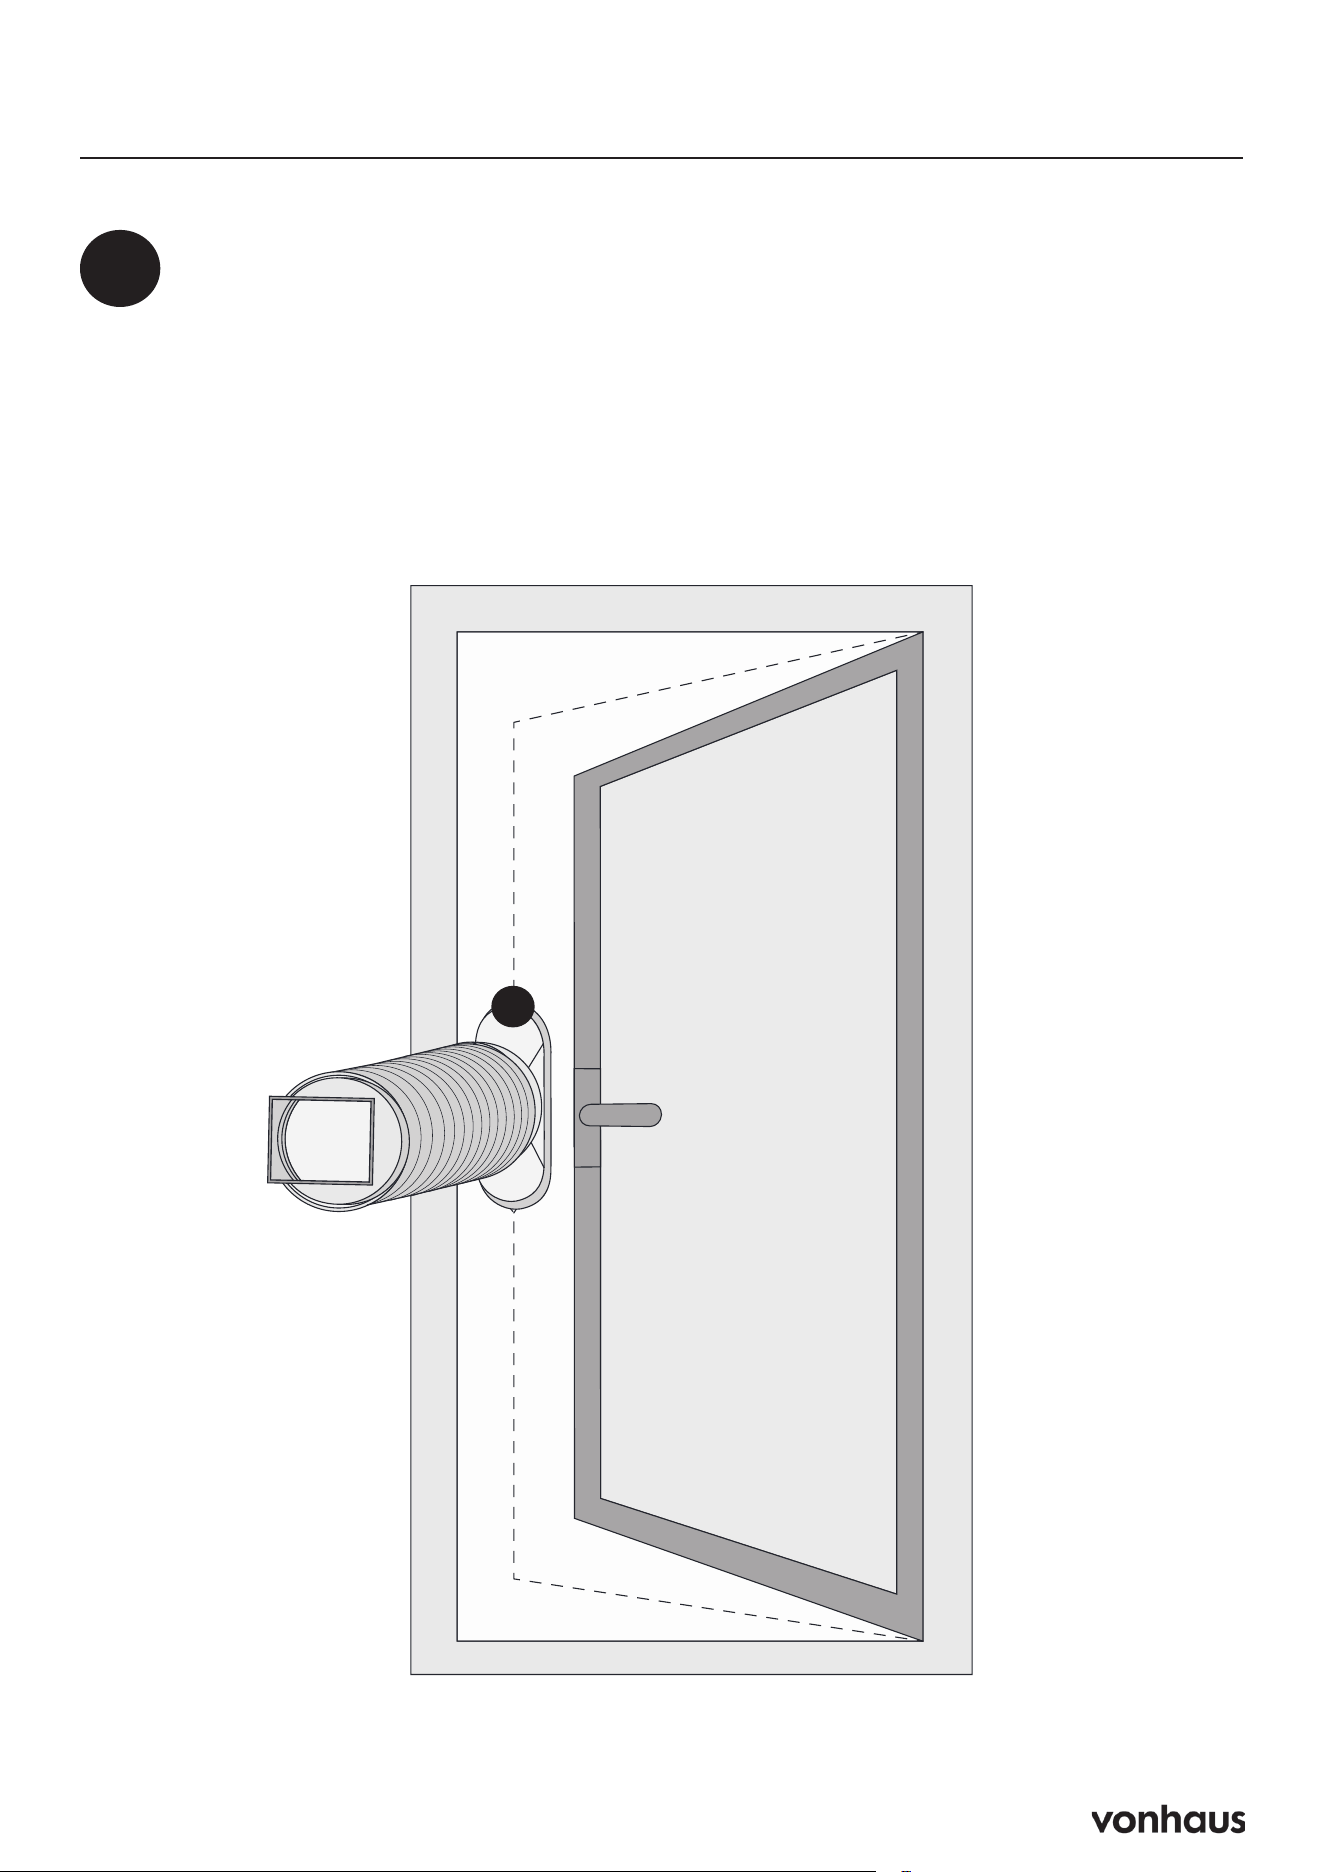
Hinged Window Sealing Fabric Installation
4
Insert the Exhaust Hose
• Insert the Exhaust Hose:
• Open the window slightly.
• Insert the heat exhaust hose short connector into the sealing
fabric. Secure it by zipping around its lip.
C
19
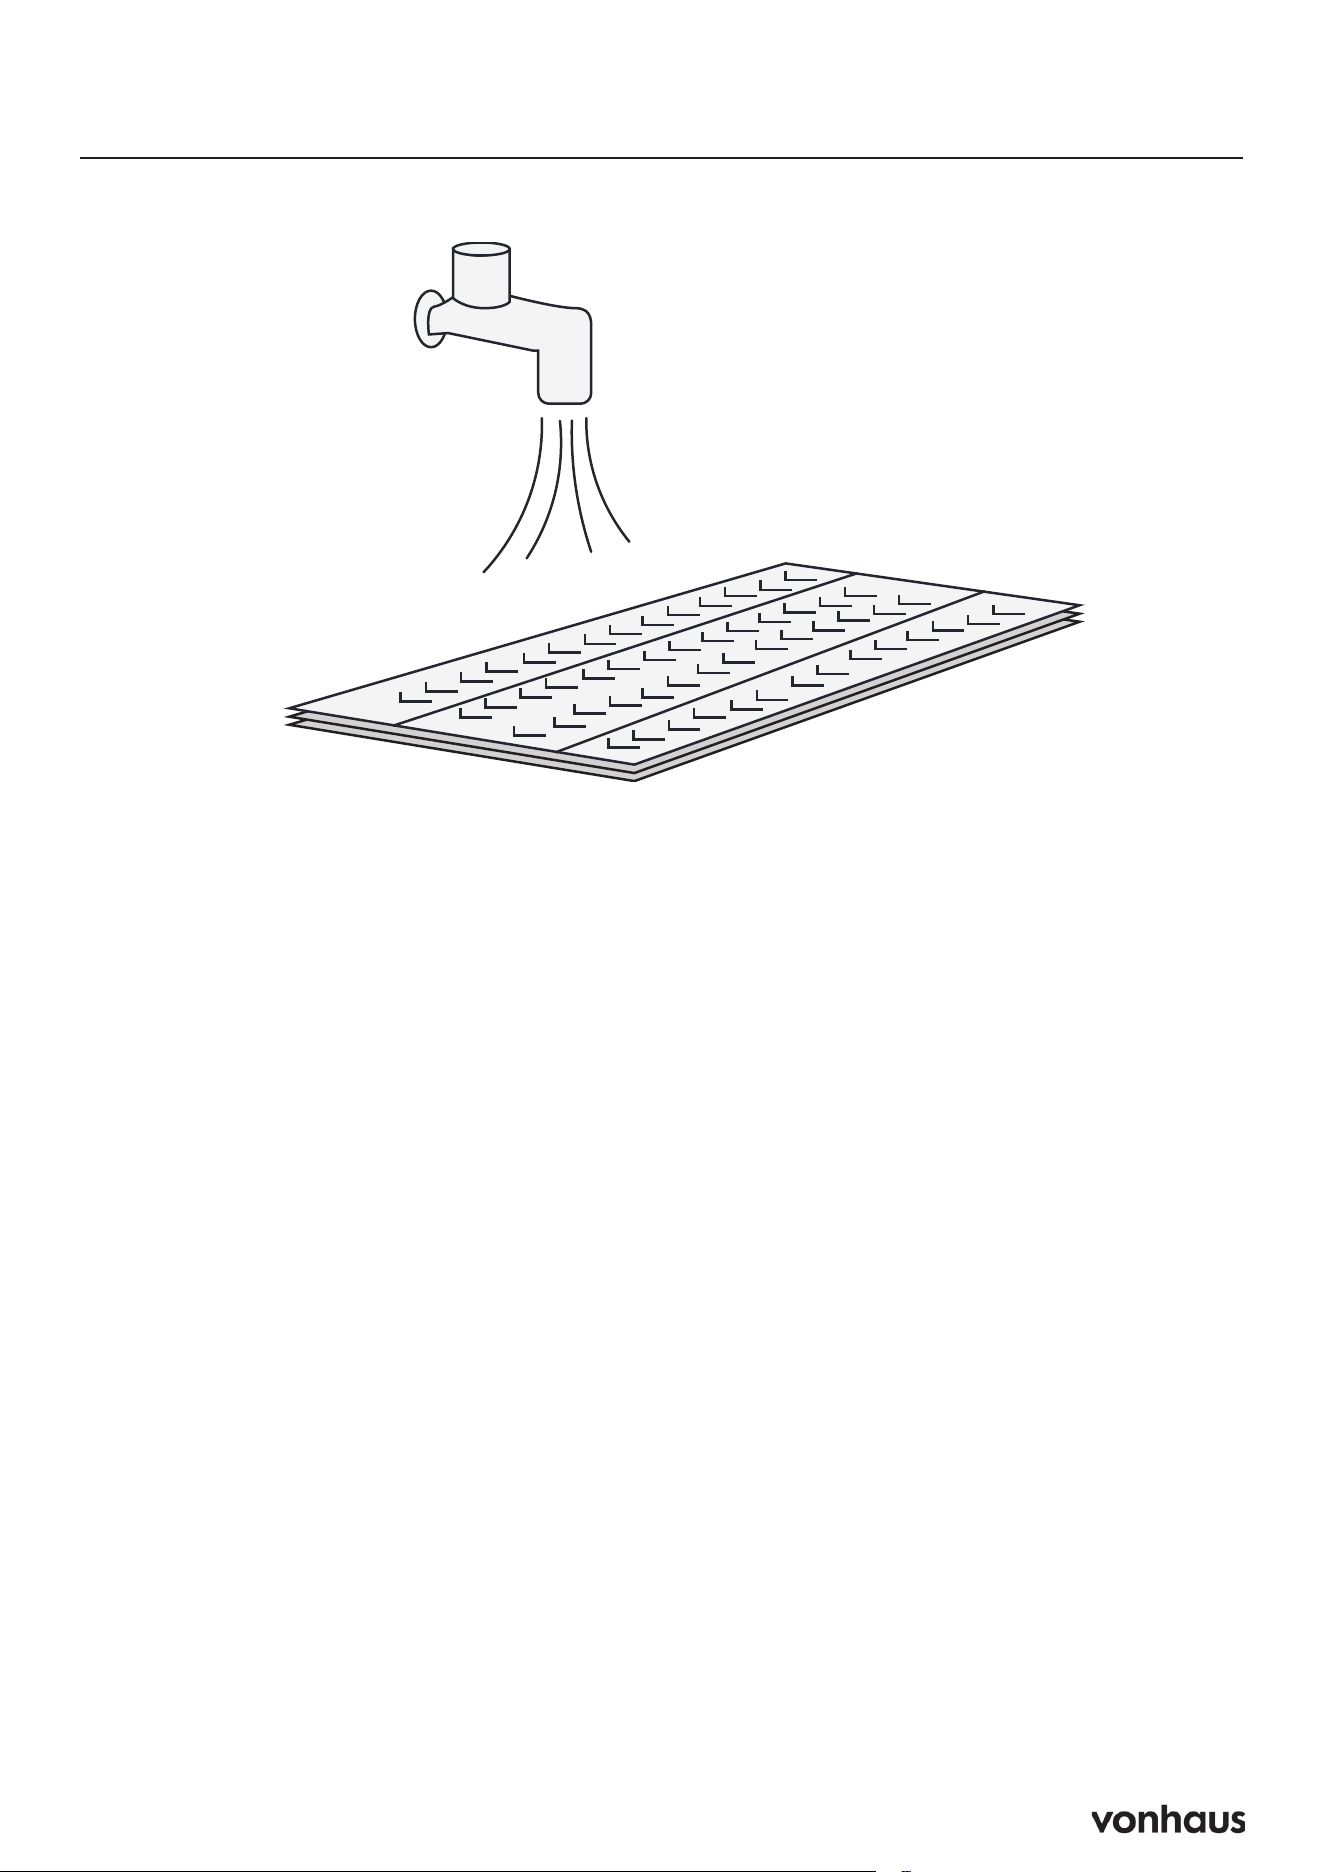
Cleaning the Air Filter
Why Clean?
Clean every 2 weeks
• Dust restricts airflow
• Reduced airflow decreases efficiency
• Blocked filters can damage unit
• Never run unit without filter
Steps
1. Turn off and unplug unit
2. Remove filter
3. Vacuum dust from filter
4. Rinse under running water (opposite to air-
flow direction)
5. Air dry completely
6. Reinstall
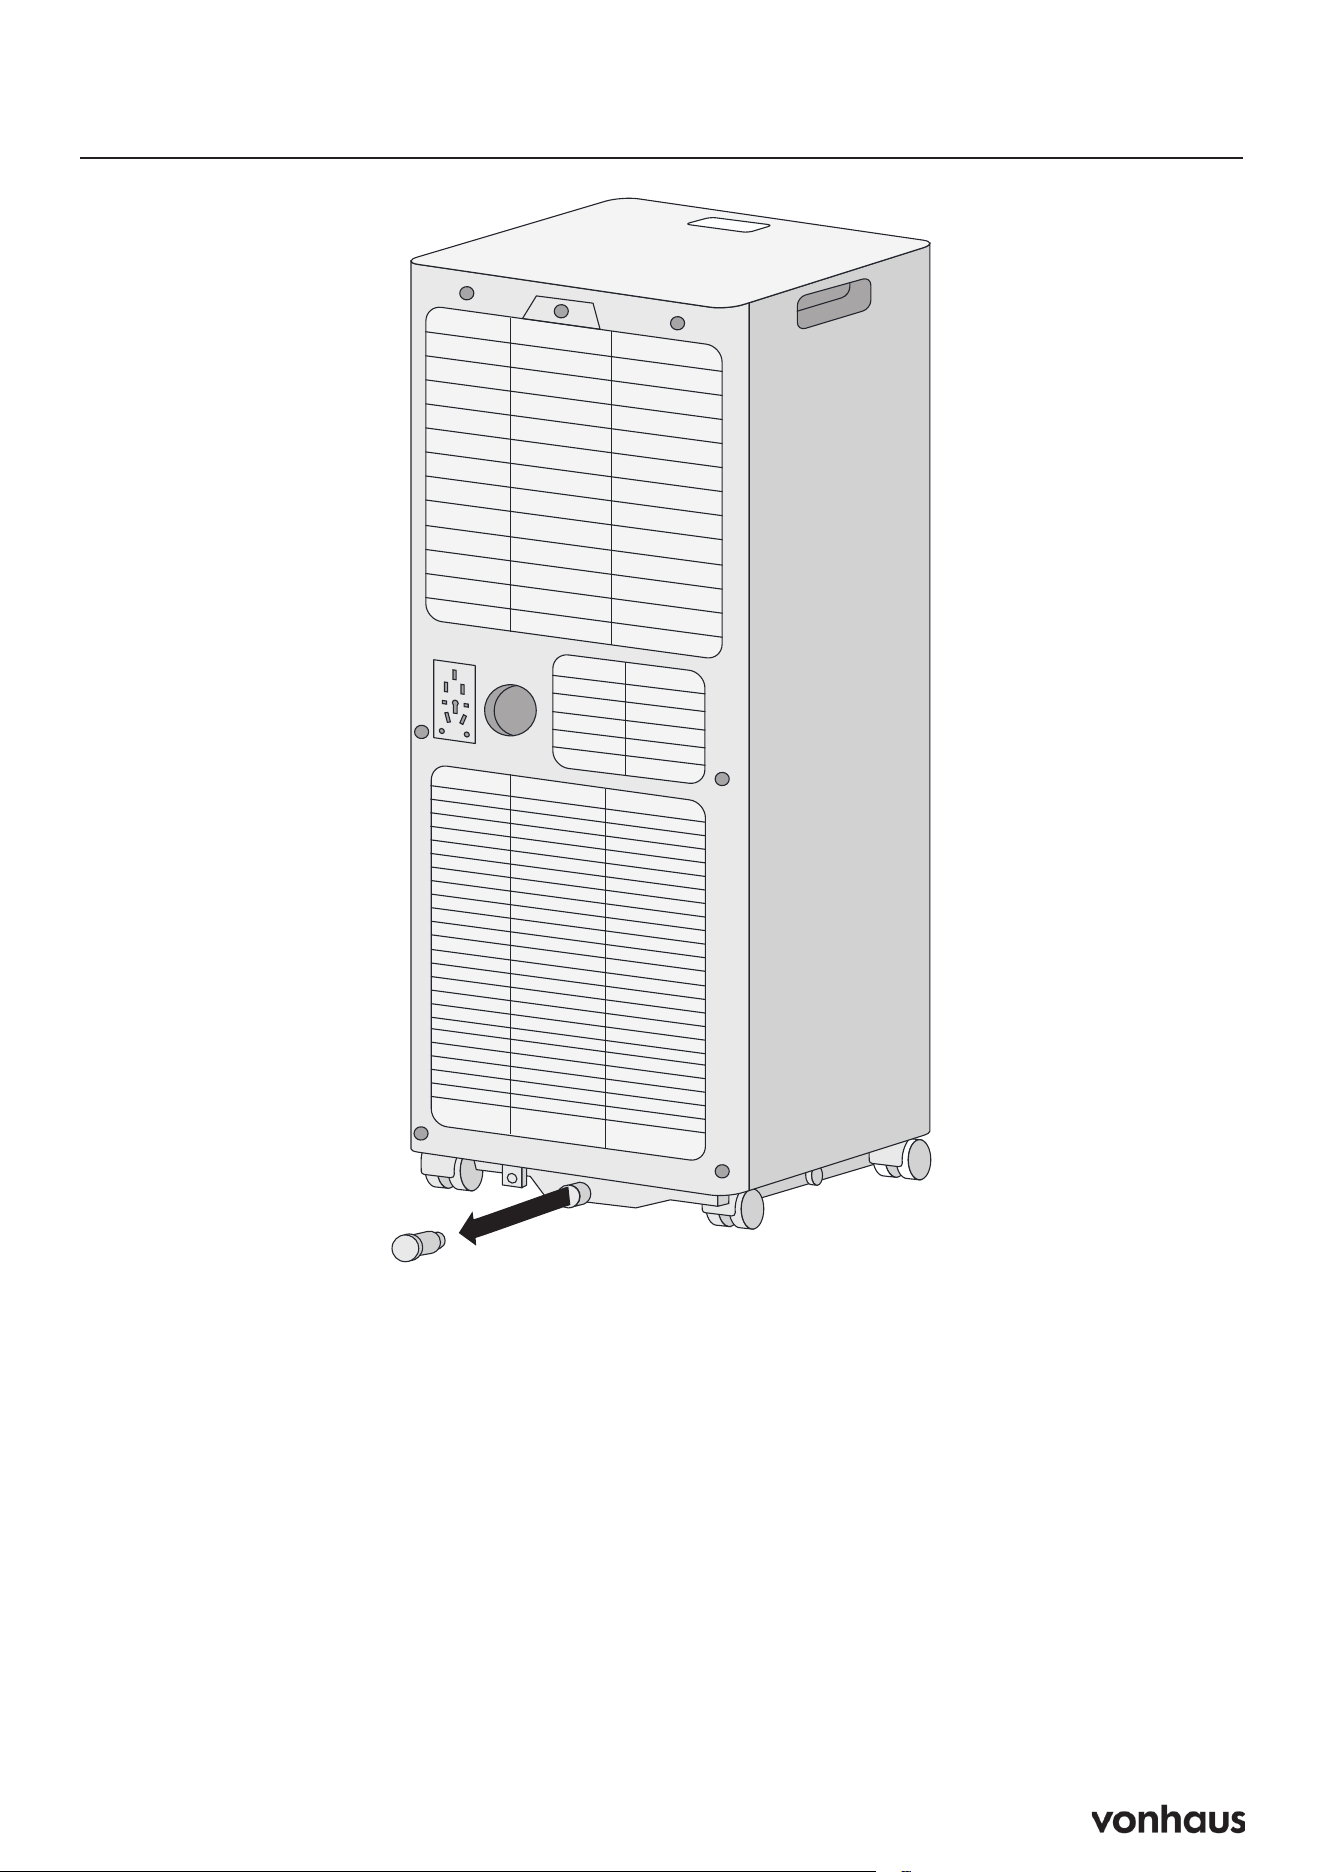
20
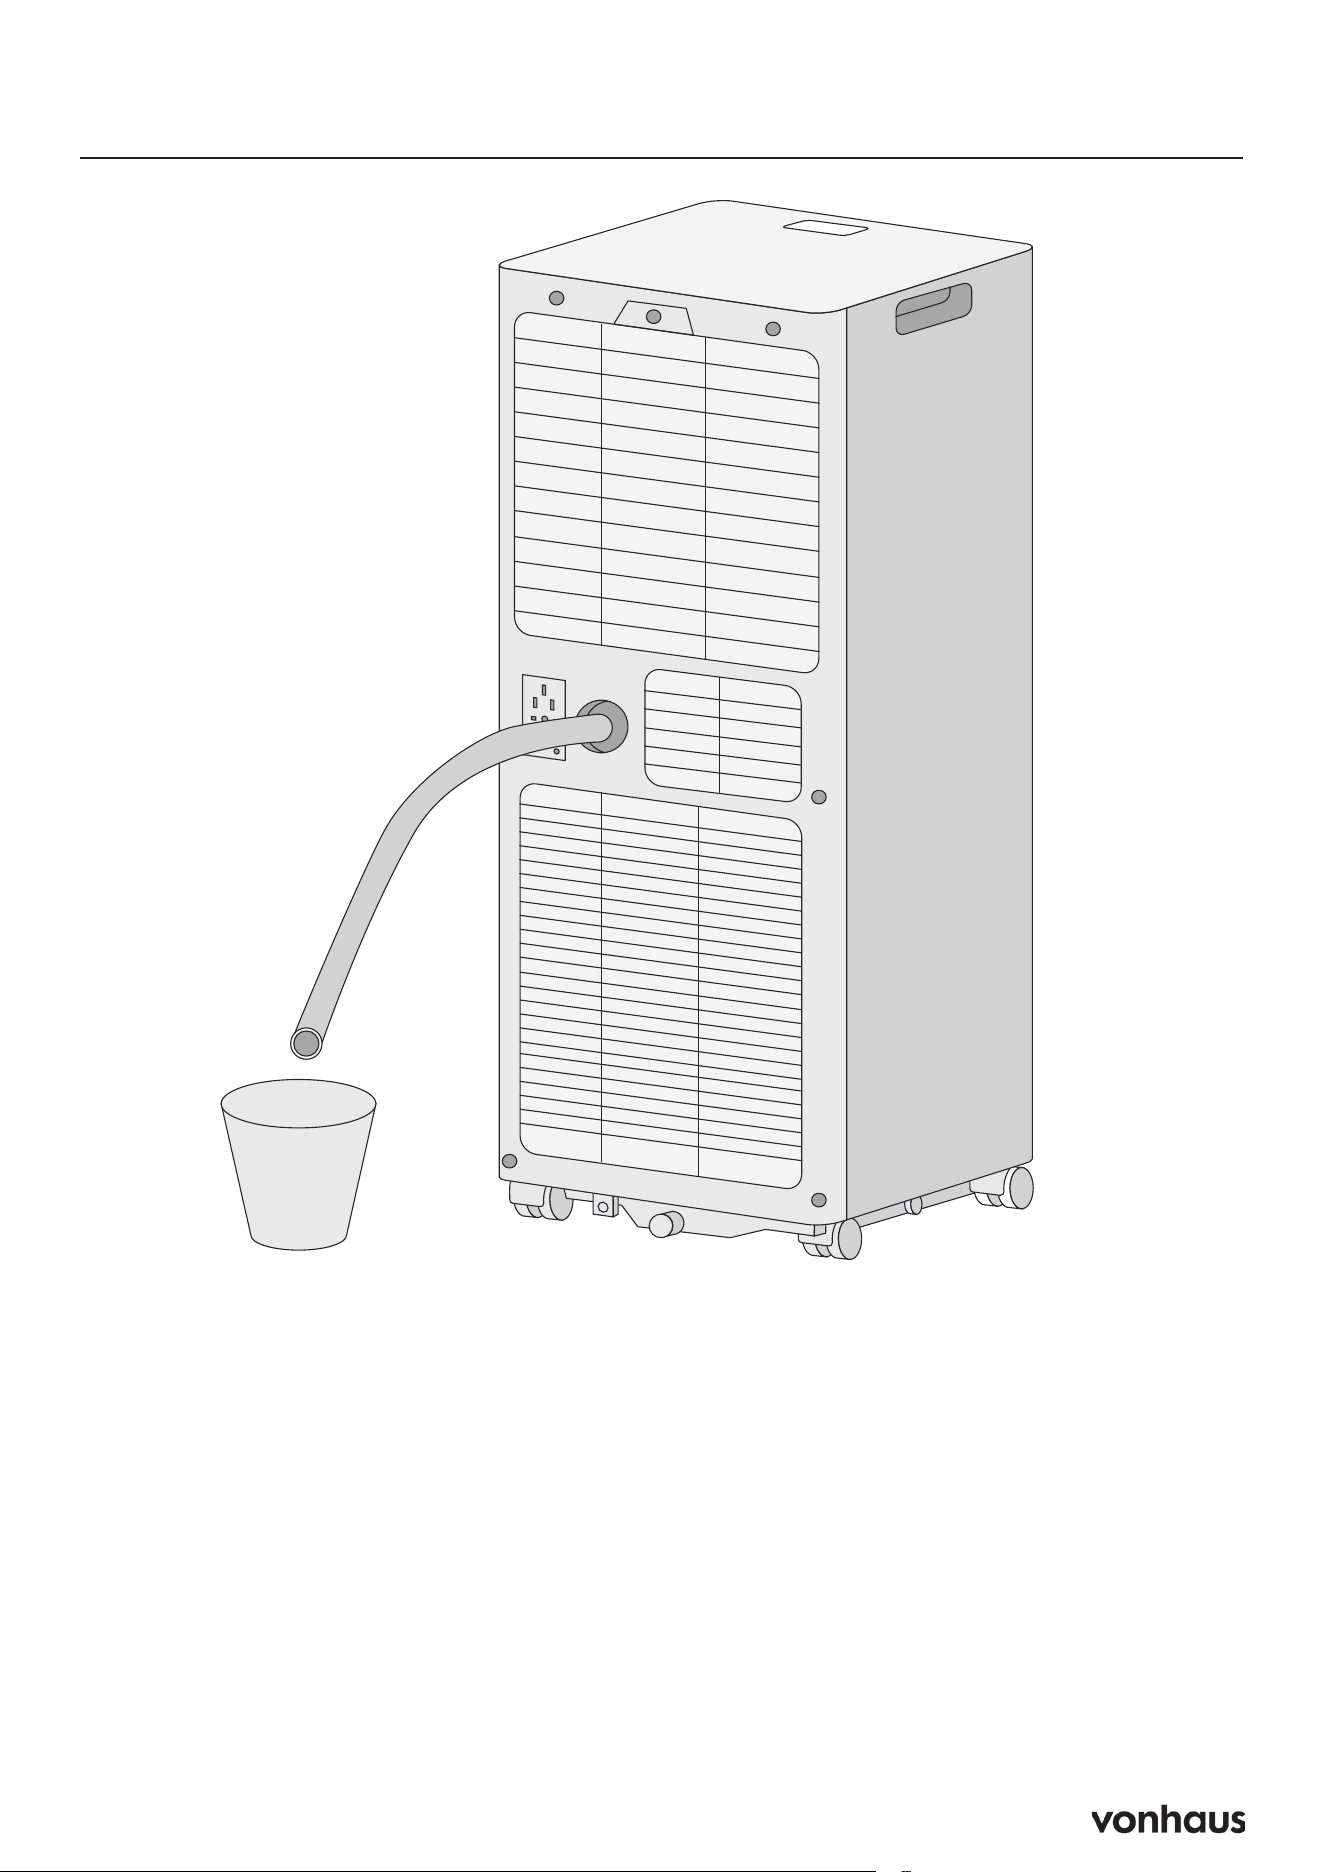
Draining
Quick Steps:
• Unplug unit when water is full
• Place container under water outlet
• Remove water plug to drain
• Replace plug when done
Important Notes:
1. Move unit carefully to avoid spills
2. Tilt unit slightly backward while draining
3. If container gets full, quickly replace plug
4. Ensure plug is secure before restarting
5. Always reinstall drainage cover
Warning: Improper drainage may cause
water damage to floor/carpet
21
Continuous Drainage Setup
Quick Steps:
1. Turn unit off
2. Remove water outlet plug
3. Connect drain hose
4. Position hose over drain/bucket
Important Notes:
Ensure hose is:
• Securely connected
• Not kinked
• Unobstructed
• Angled downward (>20°)
Don’t submerge hose end (prevents air lock)
Warning: Incorrect setup may cause water
spillage

22
Please read all instructions carefully before use
and retain for future reference.
Intended Use
Only operate the appliance for its intended
purpose and within the parameters specified
in this manual. This appliance is for domestic use
only. Do not use outdoors or on wet surfaces.
This appliance is not intended for use by
persons with reduced physical, sensory or
mental capabilities, or lack of experience
and knowledge, unless supervised or given
appropriate instruction concerning the product’s
use by a person responsible for their safety. The
appliance is not intended to be operated by
means
of an external timer or separate remote-control
system.
General Safety
Do not allow to be used as a toy. Children should
be supervised to ensure they do not play with
the appliance. If the appliance is not functioning
properly, has been dropped, damaged, left
outdoors, or immersed in liquid,
do not use, contact DOMU Brands Customer
Services.
Do not use the appliance if any parts appear to
be faulty, missing or damaged.
Ensure all parts are securely attached as
instructed by this instruction manual before use.
Cables & Plugs
Check to ensure your electricity supply matches
that shown on the rating plate. This product
should only be used as rated. Preferably, the
socket outlet should be protected by a Residual
Current Device RCD (UK/EU) Ground Fault
Indicator (US).
Do not use with a damaged cable or plug. If the
supply cable is damaged, it must be replaced
by a qualified engineer or authorised service
agent in order to avoid a hazard. The use of an
extension cable is not recom-
mended. Do not handle the plug or appliance
with wet hands. Keep the cable away from
heated surfaces.
Do not let the cable hang over the edge of the
table or countertop where it could be pulled on
inadvertently by children or pets.
Do not pull the cable around sharp edges or
corners. Do not leave unattended when plugged
in. Unplug from outlet when not in use.
Turn off all controls before unplugging.
Do not unplug by pulling on the cable. To
unplug, grasp the plug, not the cable.
Always unplug before performing user
maintenance, connecting or disconnecting
attachments, or changing accessories.
Ensure the cable is stored safely to prevent
hazards.
Risk of Injury
Always locate your appliance away from the
edge of any worktop, on a firm, flat, heat-
resistant surface with sufficient space around
all sides. Ensure that the appliance is at room
temperature before operating.
The appliance is not intended to be operated by
means of an external timer or separate remote-
control system.
When using for the first time, your appliance
may give off a ‘new’ smell. This will dissipate
after a few uses.
Keep hair, loose clothing, fingers, and all parts
of body away from openings and moving parts.
Information

23
Do not insert any object into openings or cover
the appliance. Do not obstruct the air inlets/
outlets of the appliance.
Do not use in the following locations:
• Next to a source of fire
• An area where oil is likely to splash
• An area exposed to direct sunlight
• An area where water is likely to splash
• Laundry or wet rooms where the humidity is
higher than 85% RH.
• Near a bath, shower or a swimming pool
• In a greenhouse
• An area where flammable gases or liquids
are present
Do not dry laundry above the unit to prevent
water entering the Air Conditioner.
Place laundry at least 1 meter away from the
Air Conditioner.
Do not lift or move the appliance whilst in use.
Do not leave the appliance unattended when
plugged in. Unplug from outlet when not in
use, and before performing user maintenance,
connecting or disconnecting attachments or
changing accessories.
Do not operate continuously for periods longer
than those marked on the product or indicated
in the instructions.
Do not lubricate any parts, or carry out any
maintenance
or repair work other than that shown in this
manual, or as advised by the DOMU Brands
Customer Services.
Use only as described in this manual.
Use only DOMU Brands recommended
attachments. Failure to follow these instructions
will invalidate any warranty.
Energy/Safety protection
Do not cover or restrict the air flow of the inlet/
outlet grills.
For maximum performance ensure the minimum
distance from walls or objects is be 20cm.
Keep filters and grills clean.
When in use do not open window or doors.
Place the unit of a hard/flat surface.
Specifications
• Rated Voltage 220-240V
• Rated Power
5000 BTU Air Conditioner: 560W
7000 BTU Air Conditioner: 780W
9000 BTU Air Conditioner: 1005W
Rated Frequency 50Hz
Long-Term Storage
Before Storage
• Unplug unit
• Remove exhaust hose/window kit
• Drain all water
• Clean and dry filter completely
• Reinstall filter
Storage Requirements
• Keep unit upright
• Store in dry, ventilated area
• Avoid corrosive gases
• Store indoors
Important: Drying Unit
Before storing the unit away, ensure to dry the
unit as this will prevent mould and component
damage.
Information

24
Troubleshooting
The unit is not operating
Check the power connection:
• Solution: Insert the power cord securely into
the wall outlet.
Check if the water level indicator lights
up:
• Solution: Empty the drain pan by removing
the rubber plug.
Check the room temperature:
• Solution: Ensure the operating temperature
is within 5–35°C.
The unit works with reduced
capacity
Check the air filter for dirt:
• Solution: Clean the air filter as necessary.
Check if the air duct is blocked:
• Solution: Clear any obstacles in the air duct.
Check if the room door or window is
open:
• Solution: Keep doors and windows closed.
Check if the desired operating mode and
temperature are set correctly:
• Solution: Set the mode and temperature as
per the manual.
Check if the exhaust hose is attached:
• Solution: Securely attach the exhaust hose.
Water leakage
Overflow while moving the unit:
• Solution: Empty the water tank before
transport.
Check if the drain hose is kinked or bent:
• Solution: Straighten the hose to avoid a trap.
Excessive noise
Check if the unit is securely positioned:
• Solution: Place the unit on a horizontal and
firm surface.
Check for loose or vibrating parts:
• Solution: Secure and tighten any loose parts.
Noise sounds like water flowing:
• Solution: This is normal, as it comes from
flowing refrigerant.
Error Codes
E0 (Communication faults between main
PCB and display PCB):
• Solution: Check the wire harness of the
display PCB for damage.
E1 (Ambient temperature sensor failure):
• Solution: Check or replace connections;
clean or replace the temperature sensor.
E2 (Coil temperature sensor failure):
• Solution: Check or replace connections;
clean or replace the temperature sensor.
Ft (Condensate water high-level alarm):
• Solution: Empty the drain pan by removing
the rubber plug.

25
Legal
DISPOSAL INFORMATION
Please recycle where facilities exist. Check with
your local authority for recycling advice.
CUSTOMER SERVICE
If you are having difficulty using this product
and require support, please contact
suppor[email protected]
WARRANTY
To register your product and find out if you
qualify for a free extended warranty please go
to www.vonhaus.com/warranty.
Please retain a proof of purchase receipt or
statement as proof of the purchase date.
The warranty only applies if the product is used
solely in the manner indicated in the warnings
page of this manual, and all other instructions
have been followed accurately.
Any abuse of the product or the manner in which
it is used will invalidate the warranty.
RETURNS
Returned goods will not be accepted unless
re-packaged in its original packaging and
accompanied by a relevant and completed
returns form. This does not affect your statutory
rights.
No rights are given under this warranty to a
person acquiring the appliance second-hand
or for commercial or communal use.
COPYRIGHT
All material in this instruction manual are
copyrighted by DOMU Brands.
Any unauthorised use may violate worldwide
copyright, trademark, and other laws.
THANK YOU
Thank you for purchasing your product/
appliance.
Should you require assistance with your
purchase, please contact us at
suppor[email protected]
VonHaus is a registered trademark of DOMU
Brands Ltd.
Made in China for DOMU Brands Ltd.
Unit 30, Stakehill Industrial Estate
Middleton, Manchester, M24 2RW
EU AUTHORISED REPRESENTATIVE
Authorised Representative Service
77 Camden Street Lower, Dublin
D02 XE80, Ireland
Product No. 2000270 / 2000271 / 2000272
Let’s get started!
Visit our product hub for
useful tips and tricks on
getting the most out of
your new product.
SCAN ME