Technical Support and E-Warranty Certificate
www.vevor.com/support
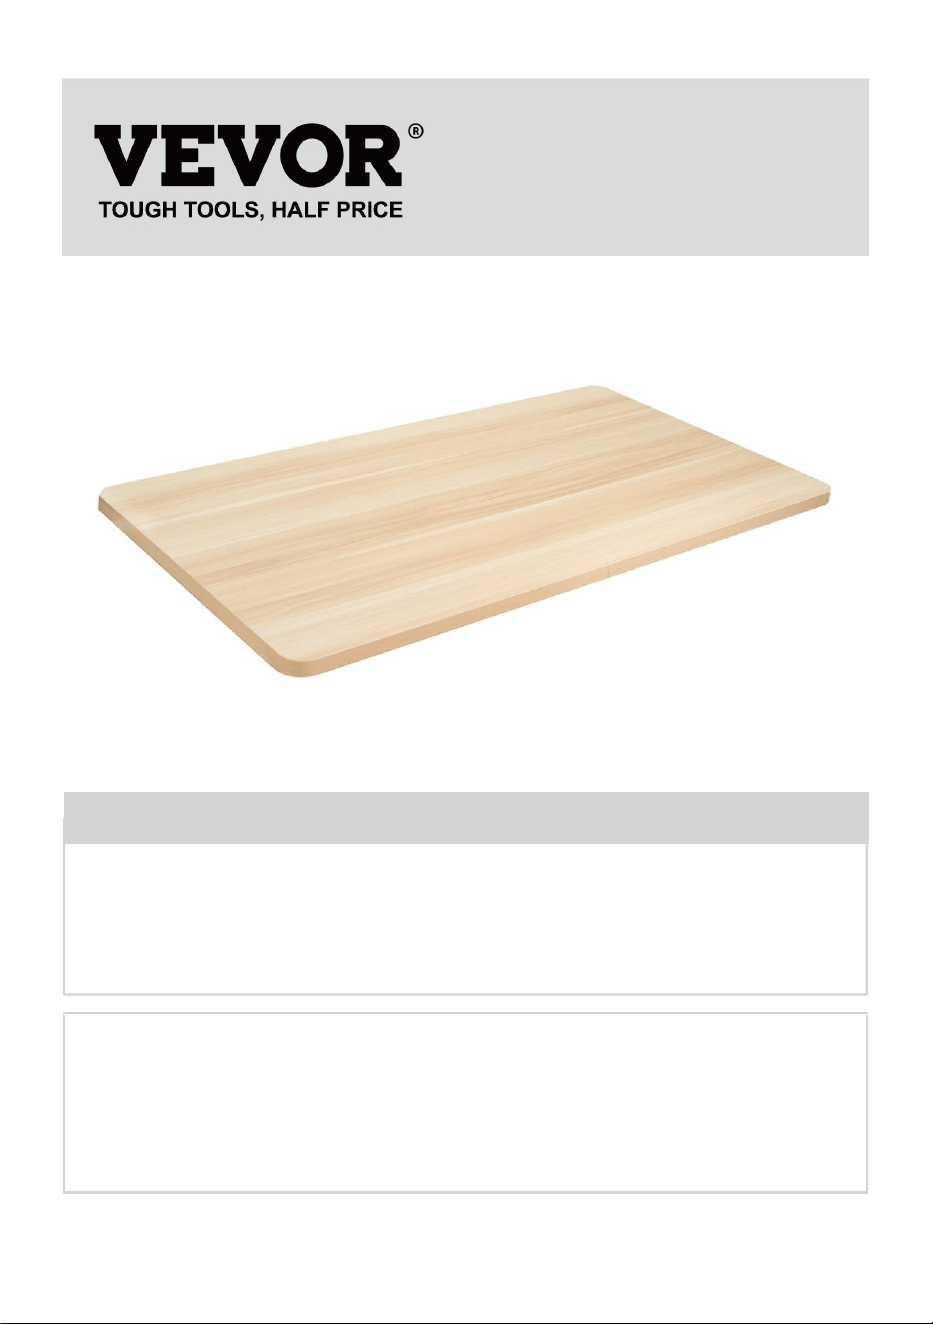
WORKBENCH TOP
USER'S MANUAL
Model: KLWT-01, KLWT-02, KLWT-03,
KLWT-04, KLWT-05, KLWT-06
We continue to be committed to provide you tools with competitive price.
"Save Half", "Half Price" or any other similar expressions used by us only represents an
estimate of savings you might benefit from buying certain tools with us compared to the major
top brands and does not necessarily mean to cover all categories of tools offered by us. You
are kindly reminded to verify carefully when you are placing an order with us if you are
actually saving half in comparison with the top major brands.
- 1 -
Have product questions? Need technical support? Please feel free to
contact us:
Technical Support and E-Warranty Certificate
www.vevor.com/support
NEED HELP? CONTACT US!
This is the original instruction, please read all manual instructions
carefully before operating. VEVOR reserves a clear interpretation of our
user manual. The appearance of the product shall be subject to the
product you received. Please forgive us that we won't inform you again if
there are any technology or software updates on our product.
WORKBENCH TOP

- 2 -
GENERAL SAFETY RULES
Please read this user manual carefully!
1. Do not stand or step on this product.You may fall which may cause
personal injury.
2. Please don't put the product beside a heating plant or fires, or pour hot
water on it in case of fires, burns and deformation dangers.
3. Please do not contact this product with corrosive chemicals and sharp
knives.
4. Do not expose this product to the sun for a long time.
5. Do not splash water or other liquids on the workbench top.
6. Do not pile hard-pointed objects on the workbench top to avoid
damaging it.
7. Do not exceed the maximum load capacity.
8. Do not alter this product in any manner.
CAUTION: Carefully read instructions and procedures for safe operations.
SAVE THESE INSTRUCTIONS
MODEL AND PARAMETERS
Model
KLWT-01
KLWT-02
KLWT-03
KLWT-04
KLWT-05
KLWT-06
Workbench Top
Size
55"
×
28"
60"
×
25"
55"
×
27.6"
63"
×
31.5"
70.9"
×
31.5"
78.7"
×
31.5"
Workbench Top
Thickness
1"
1"
1"
1"
1"
1"
Maximum Load
Capacity
220lbs
220lbs
220lbs
220lbs
220lbs
220lbs
Color(s)
White
White
Burly-wood
Burly-wood
Burly-wood
Burly-wood
Material
Chipboard
Chipboard
Chipboard
Chipboard
Chipboard
Chipboard

- 3 -
OPERATING INSTRUCTION
Installation Preparation:
1. Two or more people to move and assemble the workbench.
2. Please prepare a carpet or mat to protect your floor. You need to spread
out all the accessories.
3. Please prepare gloves to avoid being scratched by sharp parts that may
occur during installation.
4. Please open all the boxes to check that the accessories are complete
and in good condition.
5. If you need to use power tools to install this product, please set the
speed to low speed in advance.
6. When installing, please align all the holes and do not tighten all the
screws first ; otherwise, it may make the installation difficult.
Installation:
STEP 1: Install the Workbench Top frame first.
STEP 2: Adjust the size spacing of the frame.
STEP 3:Place the selected Workbench Top in the middle of the Workbench
Top frame.
STEP 4: Lock the table top with self-tapping nails.
NOTE:The length of the self-tapping nail should match the thickness of the
frame and the workbench top;Don't go through the workbench top.
- 4 -
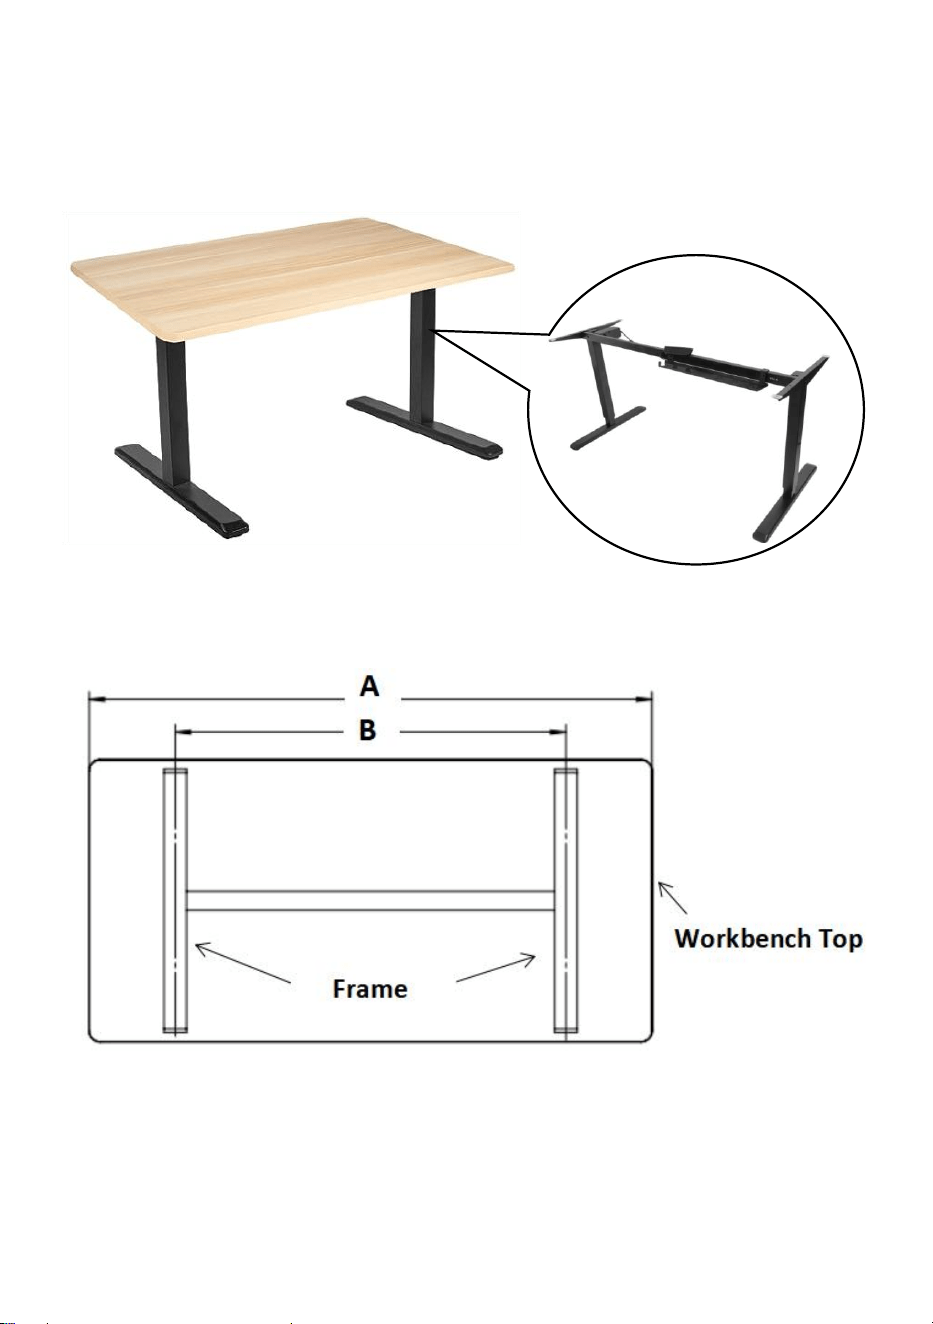
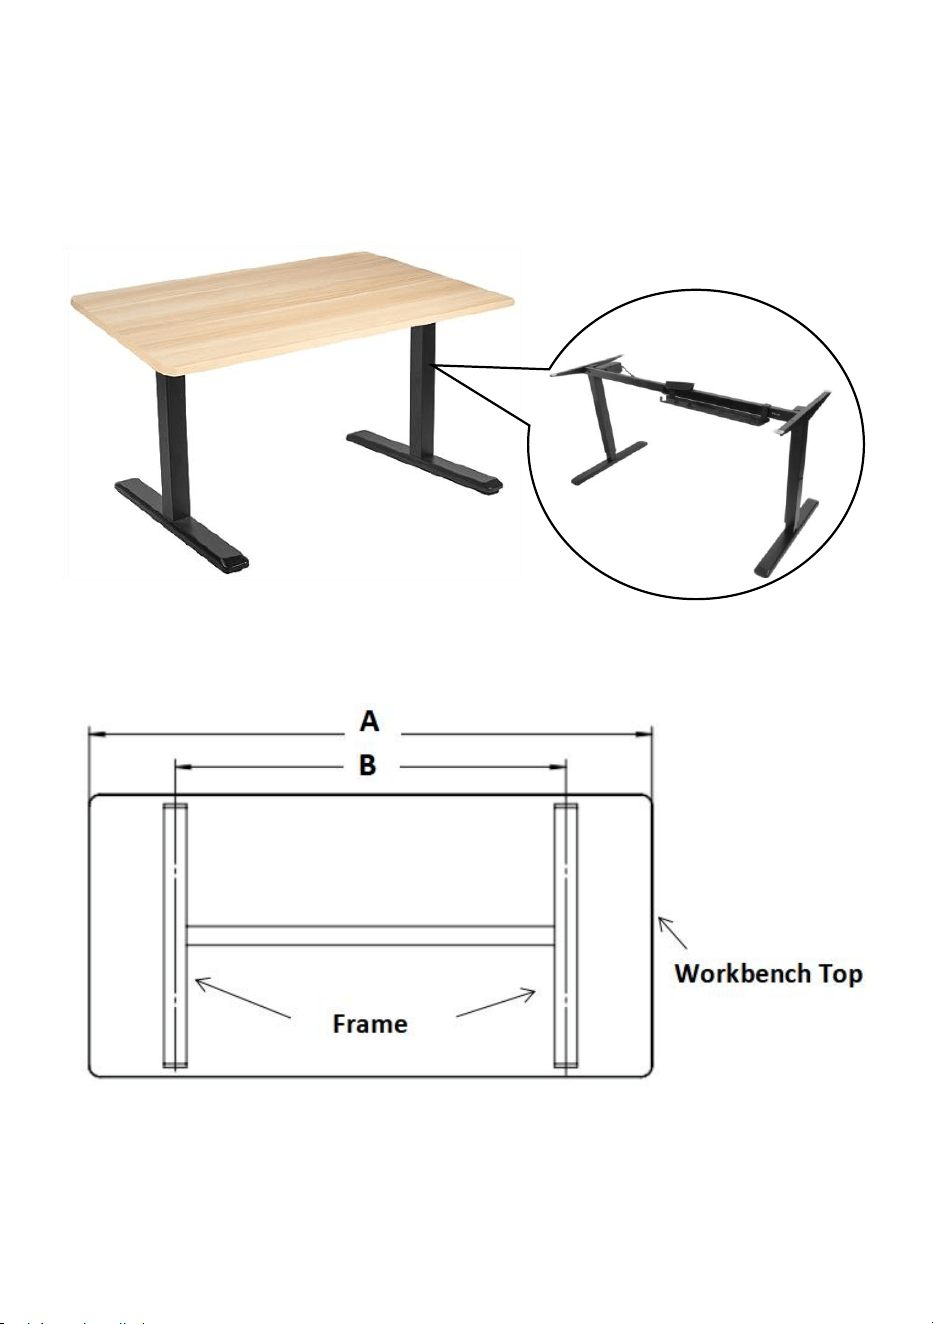
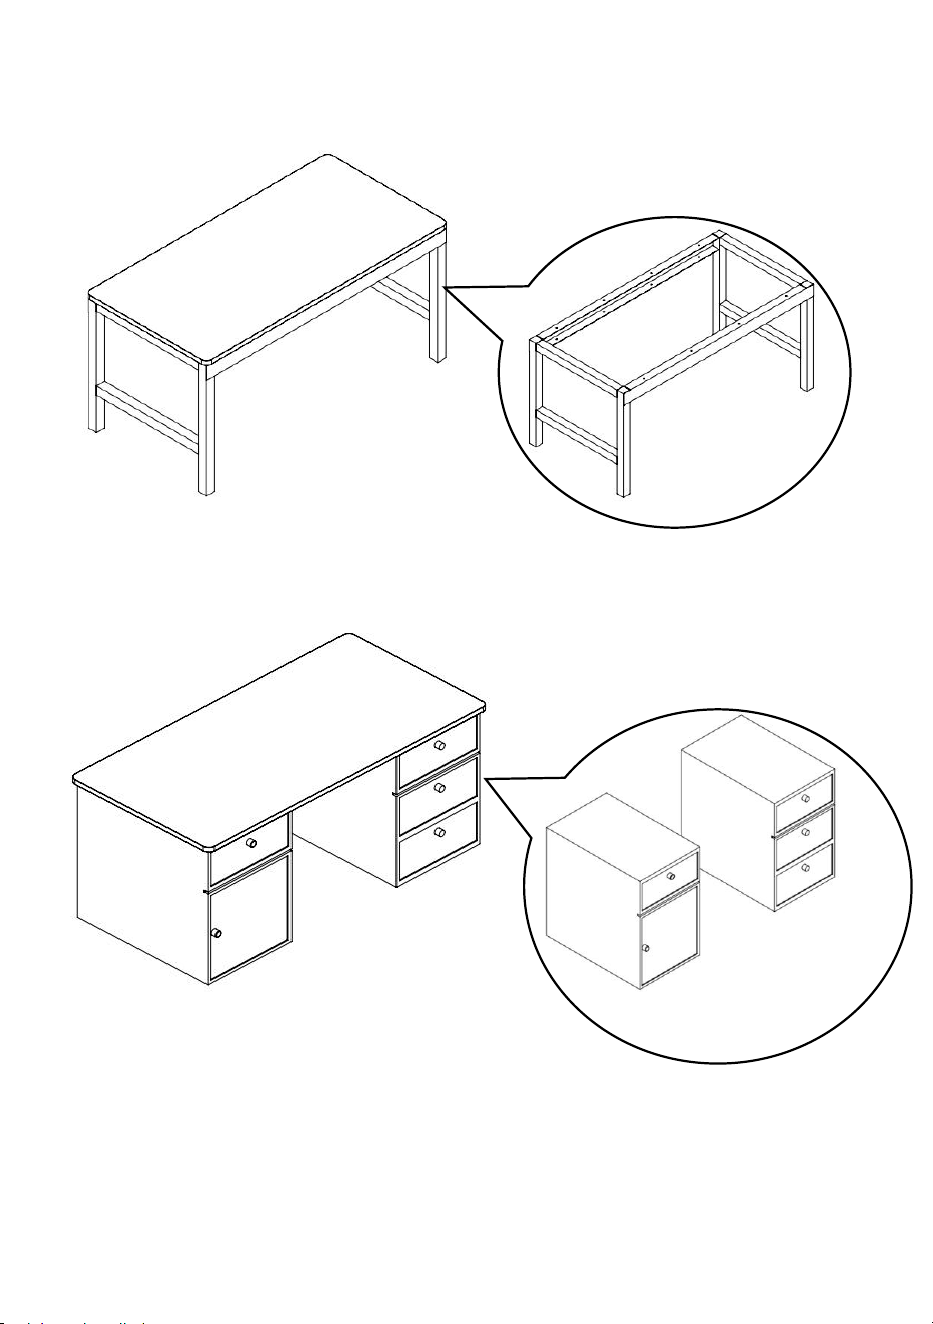
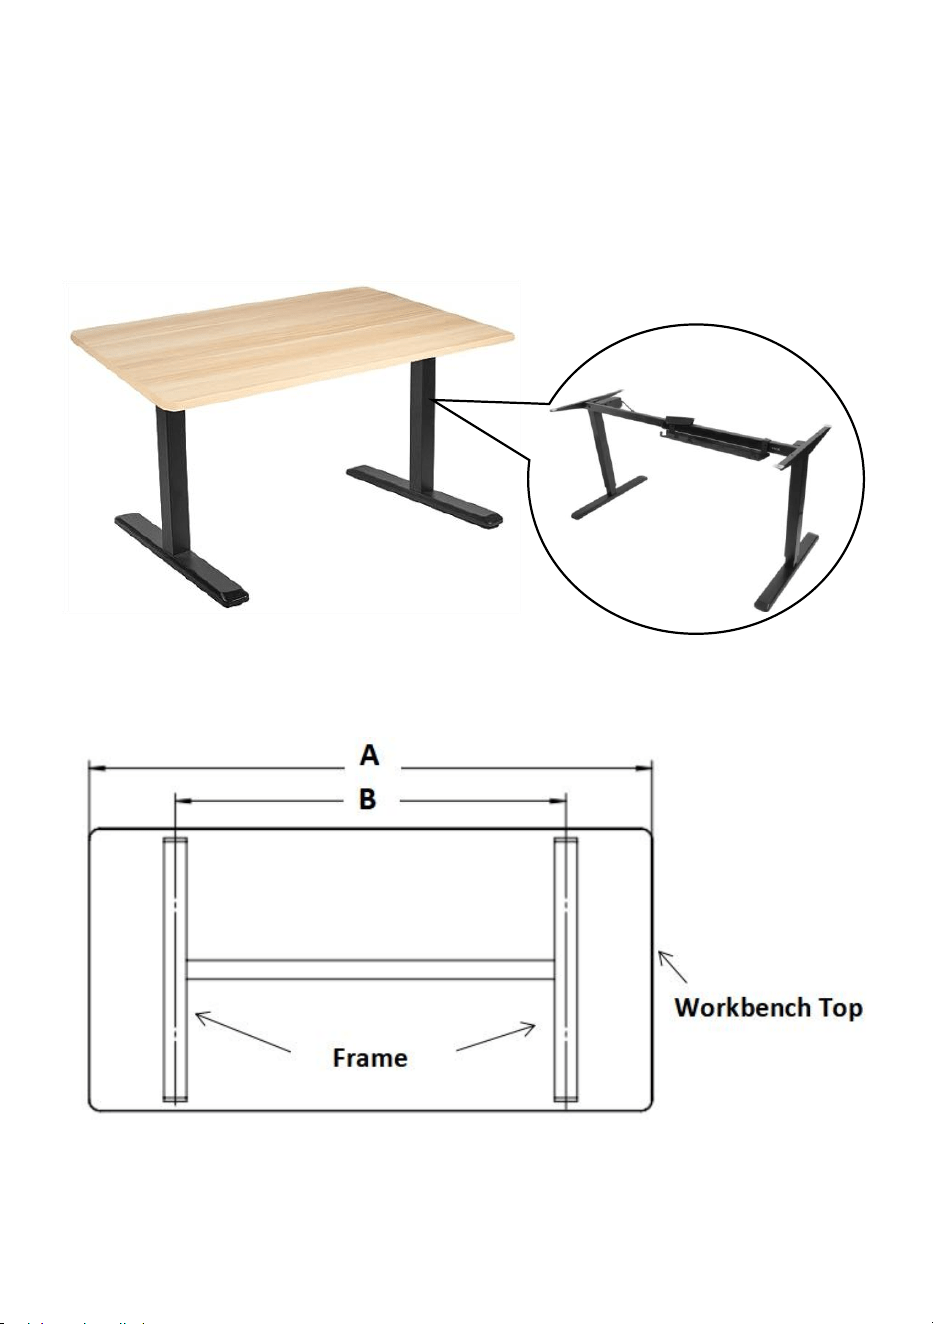
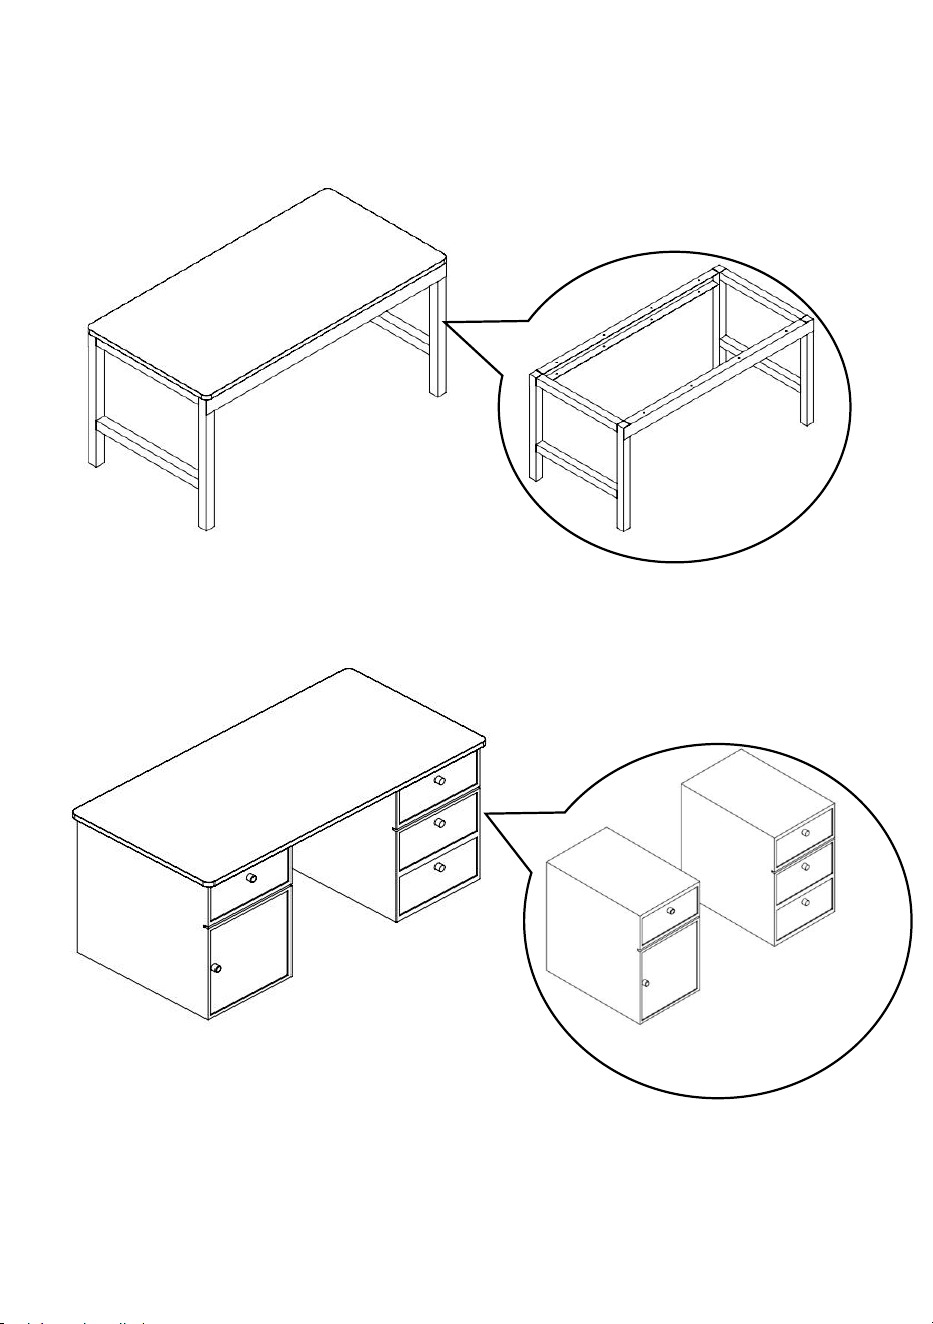
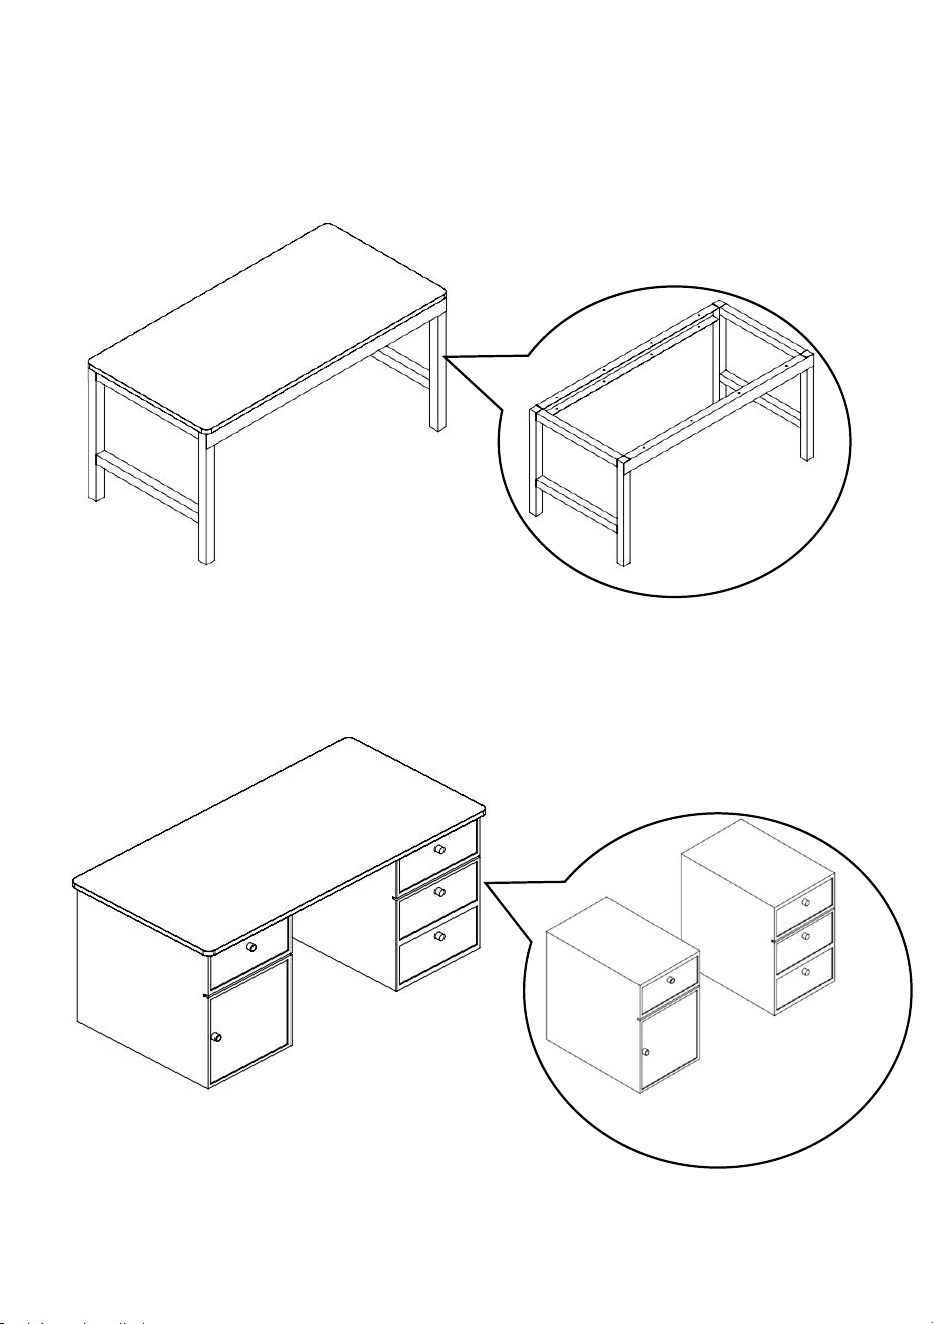
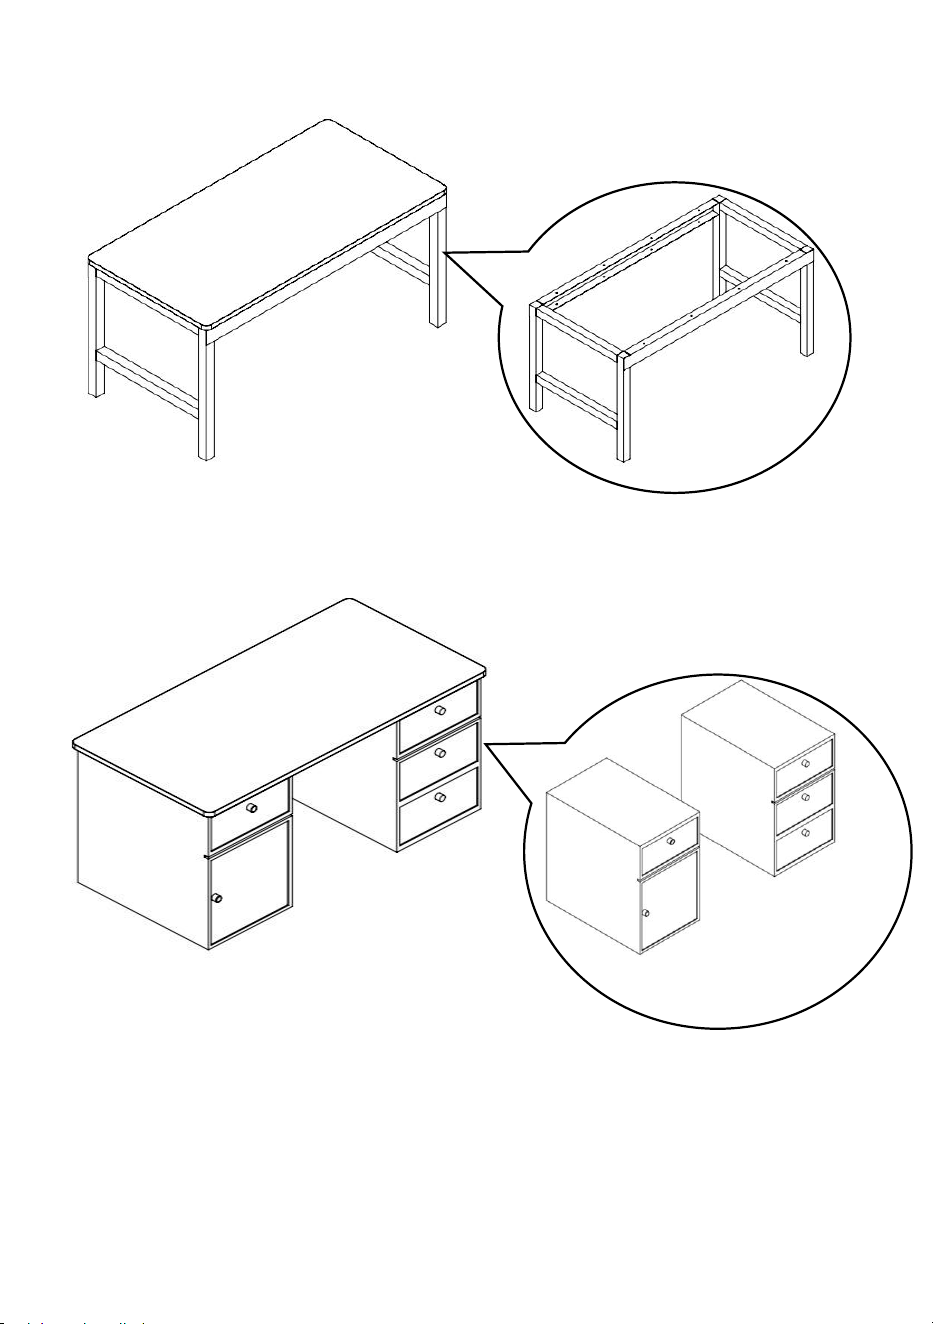
The following figure shows the common workbench top stands and
installation.(Note:The workbench top does not include the frame.)
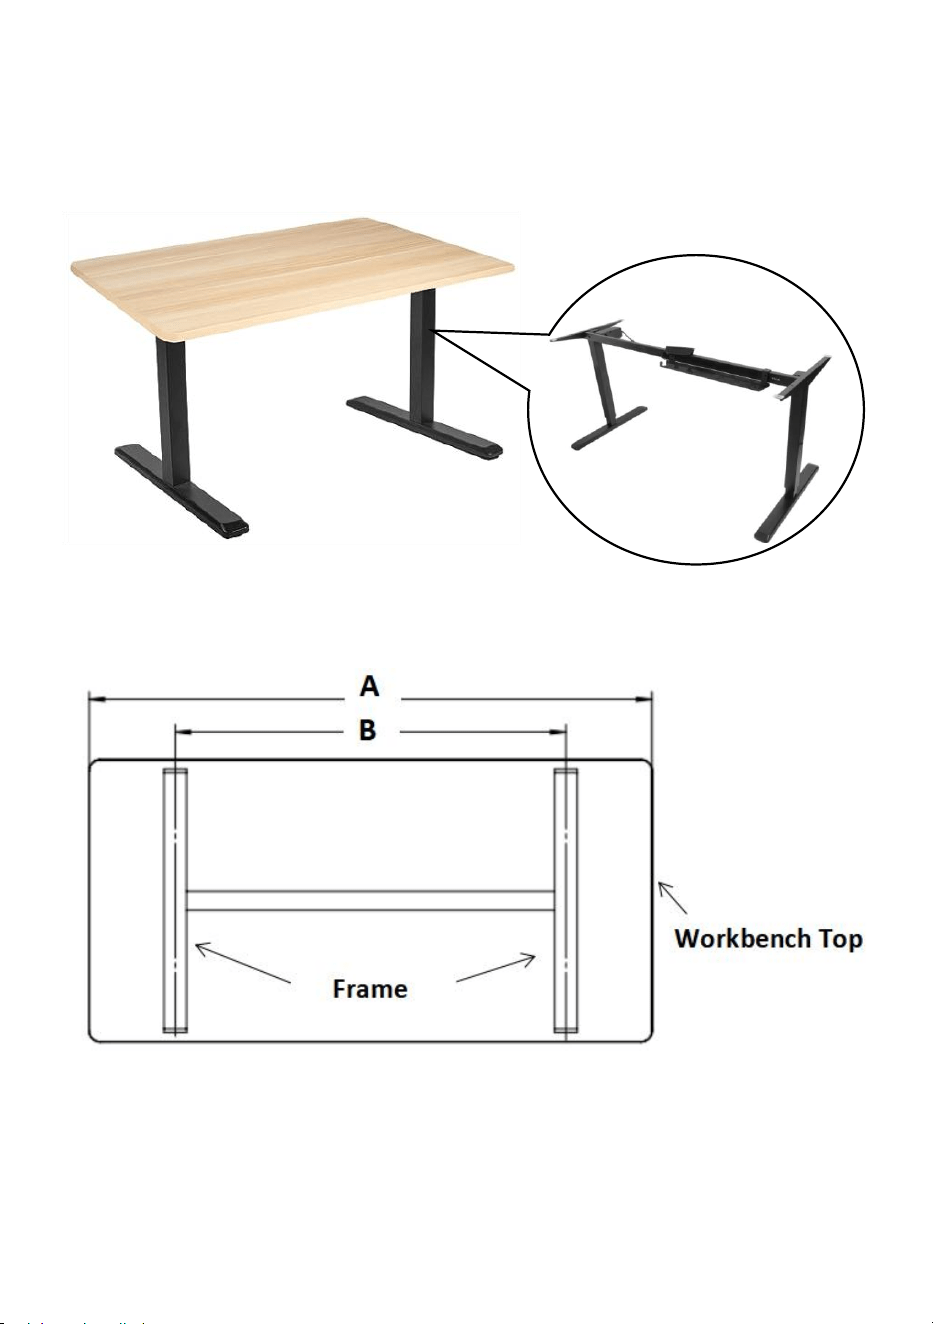
Style1:Install the workbench top on the electric stand-up desk frame.
Bottom view
Tips:It is suggested that B is equal to 75~85 percent of A.
Frame-01
- 5 -
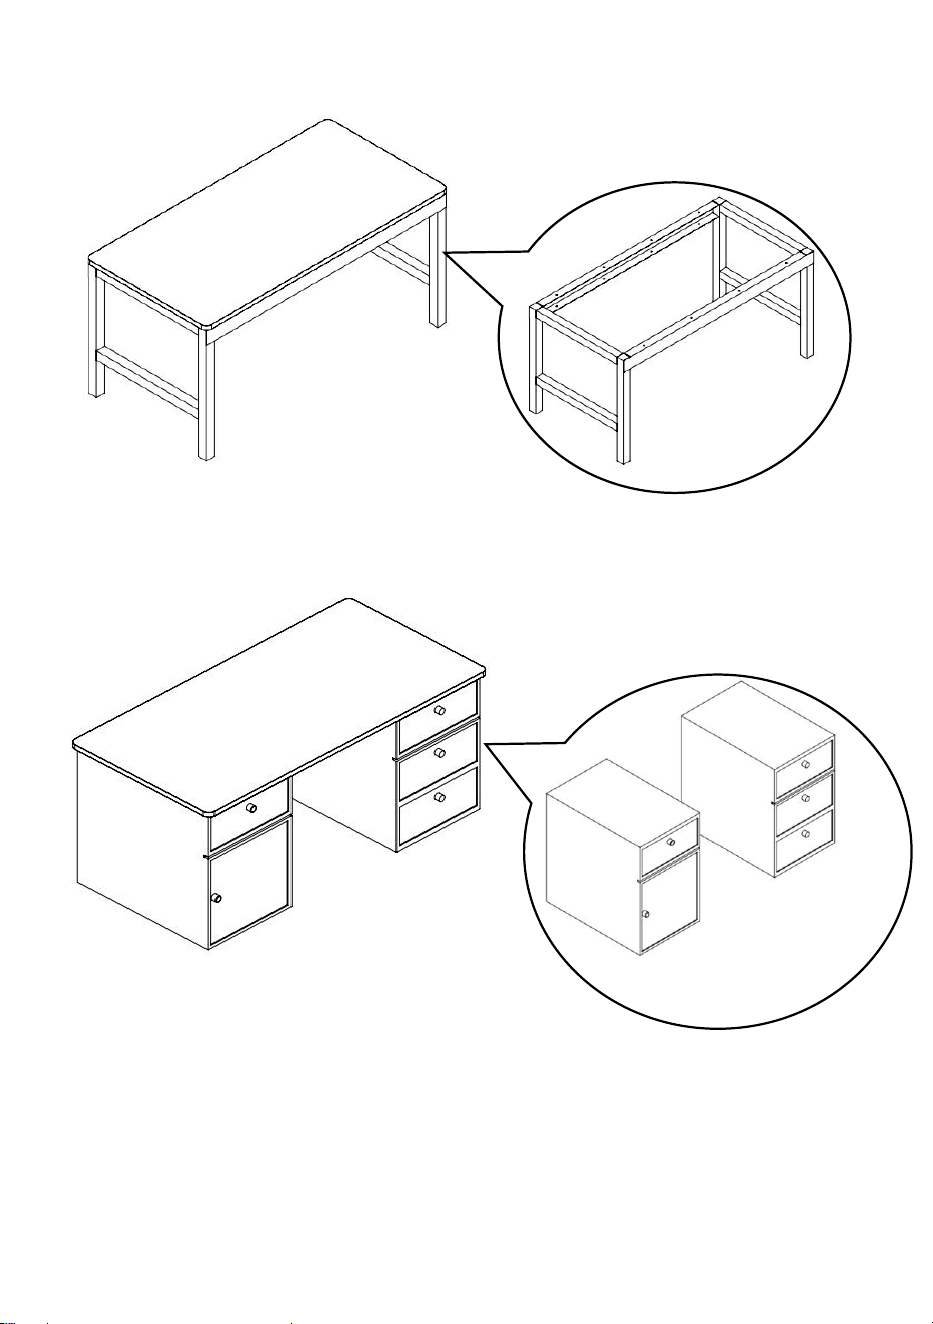
Style2:Install the workbench top on the fixed table stand.
Style3:Install the workbench top on the drawer stands.
Drawer Stand-03
Frame-02

- 6 -
MAINTENANCE
1. Please try to avoid putting wet items on the desktop.
2. Dust off regularly with a clean rag, and arrange items neatly on the
desktop.
3. Don't let it sit in the sun for too long.
4. Check the table regularly to prevent screws from loosening and falling
off.
5. Please store in a dry place; don't store in a damp place.
Address: Baoshanqu Shuangchenglu 803long 11hao 1602A-1609shi
Shanghai
Imported to AUS: SIHAO PTY LTD, 1 ROKEVA STREETEASTWOOD
NSW 2122 Australia
Imported to USA: Sanven Technology Ltd, Suite 250, 9166 Anaheim
Place, Rancho Cucamonga, CA 91730
REP
EC
SHUNSHUN GmbH
Römeräcker 9 Z2021, 76351
Linkenheim-Hochstetten, Germany
REP
UK
Pooledas Group Ltd
Unit 5 Albert Edward House, The
Pavilions Preston, United Kingdom
Made In China


- 8 -
Technique Assistance et certificat de garantie électronique
www.vevor.com/support
DESSUS D'ÉTABLI
MANUEL D'UTILISATION
Modèle: KLWT-01 , KLWT-02 , KLWT-03 ,
KLWT-04 , KLWT-05 , KLWT-06
We continue to be committed to provide you tools with competitive price.
"Save Half", "Half Price" or any other similar expressions used by us only represents an
estimate of savings you might benefit from buying certain tools with us compared to the major
top brands and does not necessarily mean to cover all categories of tools offered by us. You
are kindly reminded to verify carefully when you are placing an order with us if you are
actually saving half in comparison with the top major brands.

- 1 -
Have product questions? Need technical support? Please feel free to
contact us:
Technical Support and E-Warranty Certificate
www.vevor.com/support
NEED HELP? CONTACT US!
This is the original instruction, please read all manual instructions
carefully before operating. VEVOR reserves a clear interpretation of our
user manual. The appearance of the product shall be subject to the
product you received. Please forgive us that we won't inform you again if
there are any technology or software updates on our product.
WORKBENCH TOP

- 2 -
GENERAL SAFETY RULES
Veuillez lire attentivement ce manuel
d'utilisation !
9. Ne vous tenez pas debout et ne marchez pas sur ce produit. Vous
pourriez tomber, ce qui pourrait causer des blessures.
10. Veuillez ne pas placer le produit à côté d'une installation de chauffage
ou d'un incendie, ni verser de l'eau chaude dessus en cas de risque
d'incendie, de brûlure ou de déformation.
11. Veuillez ne pas mettre ce produit en contact avec des produits
chimiques corrosifs et des couteaux tranchants.
12. N'exposez pas ce produit au soleil pendant une longue période.
13. Ne projetez pas d'eau ou d'autres liquides sur le dessus de l'établi .
14. N'empilez pas d'objets durs et pointus sur le dessus de l'établi pour
éviter de l'endommager.
15. Ne dépassez pas la capacité de charge maximale.
16. Ne modifiez en aucun cas ce produit.
PRUDENCE: Lisez attentivement les instructions et les procédures pour
des opérations en toute sécurité.
CONSERVEZ CES INSTRUCTIONS
MODEL AND PARAMETERS
Modèle
KLWT-01
KLWT-02
KLWT-03
KLWT-04
KLWT-05
KLWT-06
Taille
supérieure
de l'établi
55 "
×
28 "
60 "
×
25 "
55 "
×
27,6
"
63 "
×
31,5
"
70,9 "
×
31,5 "
78,7 "
×
31,5 "
Épaisseur
supérieure
de l'établi
1 "
1 "
1 "
1 "
1 "
1 "
Capacité de
charge
maximale
220 livres
220 livres
220 livres
220 livres
220 livres
220 livres

- 3 -
Couleurs)
Blanc
Blanc
Bois bohu
Bois bohu
Bois bohu
Bois bohu
Matériel
Panneaux
de
particules
Panneaux
de
particules
Panneaux
de
particules
Panneaux
de
particules
Panneaux
de
particules
Panneaux
de
particules
OPERATING INSTRUCTION
Préparation de l'installation :
7. Deux personnes ou plus pour déplacer et assembler l'établi.
8. Veuillez préparer un tapis ou un tapis pour protéger votre sol . Vous
devez répartir tous les accessoires.
9. Veuillez préparer des gants pour éviter d'être rayé par des pièces
pointues qui pourraient survenir lors de l'installation.
10. Merci d'ouvrir tous les cartons pour vérifier que les accessoires sont
complets et en bon état.
11. Si vous devez utiliser des outils électriques pour installer ce produit,
veuillez régler la vitesse sur basse vitesse à l'avance.
12. Lors de l'installation , veuillez aligner tous les trous et ne serrez pas
toutes les vis en premier ; sinon, cela pourrait rendre l’installation difficile.
Installation:
ÉTAPE 1 : Installez d'abord le cadre supérieur du Workbench .
ÉTAPE 2 : Ajustez l’espacement des tailles du cadre.
ÉTAPE 3 : Placez le plan de travail sélectionné au milieu du cadre du plan
de travail .
ÉTAPE 4: Verrouillez le plateau de la table avec des clous autotaraudeurs.
REMARQUE : La longueur du clou autotaraudeur doit correspondre à
l'épaisseur du cadre et du dessus de l'établi ; Ne passez pas par le dessus
de l'établi.
- 4 -
La figure suivante montre les supports et l'installation courants de l'établi .
(Remarque : le dessus de l'établi n'inclut pas le cadre.)
Style 1 : installez le dessus de l' établi sur le cadre de bureau électrique
debout .
Vue de dessous
Conseils : Il est suggéré que B soit égal à 75 ~ 85 pour cent de A.
Frame-01
- 5 -
Style2 : installez le dessus de l'établi sur le support de table fixe.
Style3 : installez le dessus de l'établi sur les supports de tiroirs.
Drawer Stand-03
Frame-02

- 6 -
MAINTENANCE
6. Essayez d'éviter de placer des objets mouillés sur le bureau.
7. Dépoussiérez régulièrement avec un chiffon propre et disposez
soigneusement les éléments sur le bureau .
8. Ne le laissez pas trop longtemps au soleil.
9. Vérifiez régulièrement la table pour éviter que les vis ne se desserrent
et ne tombent.
désactivé.
10. Veuillez conserver dans un endroit sec ; ne pas stocker dans un
endroit humide.
Adresse : Baoshanqu Shuangchenglu 803long 11hao 1602A-1609shi
Shanghai
Importé en Australie : SIHAO PTY LTD, 1 ROKEVA STREETASTWOOD
NSW 2122 Australie
Importé aux États-Unis : Sanven Technology Ltd, Suite 250, 9166
Anaheim Place, Rancho Cucamonga, CA 91730
REP
EC
SHUNSHUN GmbH
Römeräcker 9 Z2021, 76351
Linkenheim-Hochstetten, Germany
REP
UK
Pooledas Group Ltd
Unit 5 Albert Edward House, The
Pavilions Preston, United Kingdom
Fabriqué en Chine


- 8 -
Technisch Support- und E-Garantiezertifikat
www.vevor.com/support
WERKBANKPLATTE
HANDBUCH
Modell: KLWT-01 , KLWT-02 , KLWT-03 ,
KLWT-04 , KLWT-05 , KLWT-06
We continue to be committed to provide you tools with competitive price.
"Save Half", "Half Price" or any other similar expressions used by us only represents an
estimate of savings you might benefit from buying certain tools with us compared to the major
top brands and does not necessarily mean to cover all categories of tools offered by us. You
are kindly reminded to verify carefully when you are placing an order with us if you are
actually saving half in comparison with the top major brands.

- 1 -
Have product questions? Need technical support? Please feel free to
contact us:
Technical Support and E-Warranty Certificate
www.vevor.com/support
NEED HELP? CONTACT US!
This is the original instruction, please read all manual instructions
carefully before operating. VEVOR reserves a clear interpretation of our
user manual. The appearance of the product shall be subject to the
product you received. Please forgive us that we won't inform you again if
there are any technology or software updates on our product.
WORKBENCH TOP

- 2 -
GENERAL SAFETY RULES
Bitte lesen Sie diese Bedienungsanleitung
sorgfältig durch !
17. Stellen Sie sich nicht auf dieses Produkt und treten Sie nicht darauf.
Es besteht die Gefahr eines Sturzes, der zu Verletzungen führen kann.
18. Bitte stellen Sie das Produkt nicht neben eine Heizungsanlage oder
Feuer und gießen Sie kein heißes Wasser darauf, da sonst die Gefahr
von Bränden, Verbrennungen und Verformungen besteht.
19. Bitte kontaktieren Sie dieses Produkt nicht mit ätzenden Chemikalien
und scharfen Messern.
20. Setzen Sie dieses Produkt nicht für längere Zeit der Sonne aus.
21. Spritzen Sie kein Wasser oder andere Flüssigkeiten auf die
Arbeitsplatte .
22. Stapeln Sie keine harten , spitzen Gegenstände auf der
Werkbankplatte, um eine Beschädigung zu vermeiden.
23. Überschreiten Sie nicht die maximale Tragfähigkeit.
24. Verändern Sie dieses Produkt in keiner Weise.
VORSICHT: Lesen Sie die Anweisungen und Verfahren für einen sicheren
Betrieb sorgfältig durch.
ANLEITUNG AUFBEWAHREN
MODEL AND PARAMETERS
Modell
KLWT-01
KLWT-02
KLWT-03
KLWT-04
KLWT-05
KLWT-06
Größe der
Werkbankplatte
55 "
×
28 "
60 "
×
25 "
55 "
×
27,6 "
63 "
×
31,5 "
70,9 "
×
31,5 "
78,7 "
×
31,5 "
Dicke der
Werkbankplatte
1 "
1 "
1 "
1 "
1 "
1 "
Maximale
Tragfähigkeit
220 Pfund
220 Pfund
220 Pfund
220 Pfund
220 Pfund
220 Pfund

- 3 -
Farben)
Weiß
Weiß
Kräftiges
Holz
Kräftiges
Holz
Kräftiges
Holz
Kräftiges
Holz
Material
Spanplatte
Spanplatte
Spanplatte
Spanplatte
Spanplatte
Spanplatte
OPERATING INSTRUCTION
Installationsvorbereitung:
13. Zwei oder mehr Personen zum Bewegen und Aufbauen der Werkbank.
14. Bitte bereiten Sie einen Teppich oder eine Matte vor, um Ihren Boden
zu schützen . Sie müssen das gesamte Zubehör verteilen.
15. Bitte halten Sie Handschuhe bereit, um Kratzer durch scharfe Teile zu
vermeiden, die während der Installation auftreten können.
16. Bitte öffnen Sie alle Kartons, um zu überprüfen, ob das Zubehör
vollständig und in gutem Zustand ist.
17. Wenn Sie für die Installation dieses Produkts Elektrowerkzeuge
verwenden müssen, stellen Sie die Geschwindigkeit bitte im Voraus auf
eine niedrige Geschwindigkeit ein.
18. bei der Installation bitte alle Löcher aus und ziehen Sie nicht alle
Schrauben zuerst fest. Andernfalls kann die Installation erschwert werden.
Installation:
SCHRITT 1: Installieren Sie zuerst den oberen Rahmen der Werkbank .
SCHRITT 2: Passen Sie den Größenabstand des Rahmens an.
SCHRITT 3: Platzieren Sie die ausgewählte Werkbankplatte in der Mitte
des Werkbankplattenrahmens .
SCHRITT 4: Befestigen Sie die Tischplatte mit selbstschneidenden
Nägeln.

- 4 -
HINWEIS: Die Länge des selbstschneidenden Nagels sollte der Dicke des
Rahmens und der Werkbankplatte entsprechen . Gehen Sie nicht durch
die Werkbankplatte.
- 5 -
Die folgende Abbildung zeigt die üblichen Ständer für Werkbankplatten und
deren Installation . (Hinweis: Der Rahmen ist nicht im Lieferumfang der
Werkbankplatte enthalten.)
Stil 1 : Installieren Sie die Werkbankplatte auf dem elektrischen
Stehpultgestell . _
Untersicht
Tipps: Es wird empfohlen, dass B 75 bis 85 Prozent von A beträgt.
Frame-01
- 6 -
Stil 2: Installieren Sie die Werkbankplatte auf dem festen Tischständer.
Stil 3: Installieren Sie die Werkbankplatte auf den Schubladenständern.
Drawer Stand-03
Frame-02

- 7 -
MAINTENANCE
11. Bitte vermeiden Sie, nasse Gegenstände auf den Schreibtisch zu
legen.
12. Entfernen Sie den Staub regelmäßig mit einem sauberen Lappen und
ordnen Sie die Gegenstände ordentlich auf dem Schreibtisch an .
13. Lassen Sie es nicht zu lange in der Sonne liegen.
14. Überprüfen Sie den Tisch regelmäßig, um zu verhindern, dass sich
Schrauben lösen und herunterfallen
aus.
15. Bitte an einem trockenen Ort aufbewahren ; Nicht an einem feuchten
Ort aufbewahren.
Adresse: Baoshanqu Shuangchenglu 803long 11hao 1602A-1609shi
Shanghai
Importiert nach AUS: SIHAO PTY LTD, 1 ROKEVA STREETEASTWOOD
NSW 2122 Australien
In die USA importiert: Sanven Technology Ltd, Suite 250, 9166 Anaheim
Place, Rancho Cucamonga, CA 91730
REP
EC
SHUNSHUN GmbH
Römeräcker 9 Z2021, 76351
Linkenheim-Hochstetten, Germany
REP
UK
Pooledas Group Ltd
Unit 5 Albert Edward House, The
Pavilions Preston, United Kingdom
In China hergestellt


- 9 -
Tecnico Supporto e certificato di garanzia elettronica
www.vevor.com/support
PIANO DEL BANCO DA LAVORO
MANUALE UTENTE
Modello: KLWT-01 , KLWT-02 , KLWT-03 ,
KLWT-04 , KLWT-05 , KLWT-06
We continue to be committed to provide you tools with competitive price.
"Save Half", "Half Price" or any other similar expressions used by us only represents an
estimate of savings you might benefit from buying certain tools with us compared to the major
top brands and does not necessarily mean to cover all categories of tools offered by us. You
are kindly reminded to verify carefully when you are placing an order with us if you are
actually saving half in comparison with the top major brands.

- 1 -
Have product questions? Need technical support? Please feel free to
contact us:
Technical Support and E-Warranty Certificate
www.vevor.com/support
NEED HELP? CONTACT US!
This is the original instruction, please read all manual instructions
carefully before operating. VEVOR reserves a clear interpretation of our
user manual. The appearance of the product shall be subject to the
product you received. Please forgive us that we won't inform you again if
there are any technology or software updates on our product.
WORKBENCH TOP
- 2 -
GENERAL SAFETY RULES
Si prega di leggere attentamente questo manuale
utente !
25. Non stare in piedi o calpestare questo prodotto. Potresti cadere e
causare lesioni personali.
26. Si prega di non posizionare il prodotto accanto a impianti di
riscaldamento o incendi, né versarvi sopra acqua calda in caso di
incendi, ustioni e pericoli di deformazione.
27. Si prega di non contattare questo prodotto con prodotti chimici
corrosivi e coltelli affilati.
28. Non esporre questo prodotto al sole per lungo tempo.
29. Non spruzzare acqua o altri liquidi sul piano del banco di lavoro .
30. Non accumulare oggetti duri e appuntiti sul piano del banco da lavoro
per evitare di danneggiarlo.
31. Non superare la capacità di carico massima.
32. Non alterare questo prodotto in alcun modo.
ATTENZIONE: Leggere attentamente le istruzioni e le procedure per
operare in sicurezza.
CONSERVA QUESTE ISTRUZIONI
MODEL AND PARAMETERS
Modello
KLWT-01
KLWT-02
KLWT-03
KLWT-04
KLWT-05
KLWT-06
Dimensioni
superiori del
banco da lavoro
55 "
×
28
"
60 "
×
25 "
55 "
×
27,6 "
63 "
×
31,5 "
70,9 "
×
31,5 "
78,7 "
×
31,5 "
Spessore
superiore del
banco da lavoro
1 "
1 "
1 "
1 "
1 "
1 "
Capacità di
carico massima
220 libbre
220 libbre
220 libbre
220 libbre
220 libbre
220 libbre

- 3 -
Colori)
Bianco
Bianco
Legno
corpulento
Legno
corpulento
Legno
corpulento
Legno
corpulento
Materiale
Truciolato
Truciolare
Truciolare
Truciolato
Truciolato
Truciolato
OPERATING INSTRUCTION
Preparazione all'installazione:
19. Due o più persone per spostare e montare il banco da lavoro.
20. Si prega di preparare un tappeto o un tappetino per proteggere il
pavimento . Devi distribuire tutti gli accessori.
21. Si prega di preparare i guanti per evitare di graffiarsi con parti taglienti
che potrebbero verificarsi durante l'installazione.
22. Si prega di aprire tutte le scatole per verificare che gli accessori siano
completi e in buone condizioni.
23. Se è necessario utilizzare utensili elettrici per installare questo
prodotto, impostare anticipatamente la velocità su bassa velocità.
24. Durante l'installazione , allineare tutti i fori e non serrare prima tutte le
viti; in caso contrario, potrebbe rendere difficile l'installazione.
Installazione:
PASSO 1: Installare prima il telaio superiore del banco di lavoro .
PASSO 2: Regola la spaziatura delle dimensioni della cornice.
PASSO 3: Posiziona il piano del banco da lavoro selezionato al centro del
telaio del piano del banco da lavoro .
PASSO 4: Bloccare il piano del tavolo con chiodi autofilettanti.
NOTA: la lunghezza del chiodo autofilettante deve corrispondere allo
spessore del telaio e del piano del banco di lavoro ; non passare attraverso
il piano del banco di lavoro.

- 4 -
La figura seguente mostra i comuni supporti del piano del banco da lavoro e
l'installazione . (Nota: il piano del banco da lavoro non include il telaio).
Stile 1 : installare il piano del banco da lavoro sulla struttura della scrivania
elettrica .
Vista dal basso
Suggerimenti: si suggerisce che B sia uguale al 75 ~ 85 % di A.
Frame-01

- 5 -
Stile 2: installare il piano del banco da lavoro sul supporto da tavolo fisso.
Stile 3: installare il piano del banco da lavoro sui supporti del cassetto.
Drawer Stand-03
Frame-02

- 6 -
MAINTENANCE
16. Si prega di cercare di evitare di mettere oggetti bagnati sulla scrivania .
17. Spolverare regolarmente con uno straccio pulito e disporre
ordinatamente gli oggetti sulla scrivania .
18. Non lasciarlo riposare troppo a lungo al sole.
19. Controllare regolarmente il tavolo per evitare che le viti si allentino e
cadano
spento.
20. Si prega di conservare in un luogo asciutto ; non conservare in un
luogo umido.
Indirizzo: Baoshanqu Shuangchenglu 803long 11hao 1602A-1609shi
Shanghai
Importato in AUS: SIHAO PTY LTD, 1 ROKEVA STREETEASTWOOD
NSW 2122 Australia
Importato negli Stati Uniti: Sanven Technology Ltd, Suite 250, 9166
Anaheim Place, Rancho Cucamonga, CA 91730
REP
EC
SHUNSHUN GmbH
Römeräcker 9 Z2021, 76351
Linkenheim-Hochstetten, Germany
REP
UK
Pooledas Group Ltd
Unit 5 Albert Edward House, The
Pavilions Preston, United Kingdom
Made in China


- 8 -
Técnico Certificado de soporte y garantía electrónica
www.vevor.com/support
MESA DE TRABAJO SUPERIOR
MANUAL DE USUARIO
Modelo: KLWT-01 , KLWT-02 , KLWT-03 ,
KLWT-04 , KLWT-05 , KLWT-06
We continue to be committed to provide you tools with competitive price.
"Save Half", "Half Price" or any other similar expressions used by us only represents an
estimate of savings you might benefit from buying certain tools with us compared to the major
top brands and does not necessarily mean to cover all categories of tools offered by us. You
are kindly reminded to verify carefully when you are placing an order with us if you are
actually saving half in comparison with the top major brands.

- 1 -
Have product questions? Need technical support? Please feel free to
contact us:
Technical Support and E-Warranty Certificate
www.vevor.com/support
NEED HELP? CONTACT US!
This is the original instruction, please read all manual instructions
carefully before operating. VEVOR reserves a clear interpretation of our
user manual. The appearance of the product shall be subject to the
product you received. Please forgive us that we won't inform you again if
there are any technology or software updates on our product.
WORKBENCH TOP

- 2 -
GENERAL SAFETY RULES
¡Lea atentamente este manual de usuario !
33. No se pare ni pise este producto. Podría caerse y provocar lesiones
personales.
34. No coloque el producto junto a una instalación de calefacción o fuegos,
ni vierta agua caliente sobre él en caso de incendio, quemaduras y
peligro de deformación.
35. No ponga en contacto este producto con productos químicos
corrosivos ni cuchillos afilados.
36. No exponga este producto al sol durante mucho tiempo.
37. No salpique agua u otros líquidos sobre la superficie del banco de
trabajo .
38. No apile objetos puntiagudos sobre la superficie del banco de trabajo
para evitar dañarlo.
39. No exceda la capacidad de carga máxima.
40. No altere este producto de ninguna manera.
PRECAUCIÓN: Lea atentamente las instrucciones y procedimientos para
operaciones seguras.
GUARDA ESTAS INSTRUCCIONES
MODEL AND PARAMETERS
Modelo
KLWT-01
KLWT-02
KLWT-03
KLWT-04
KLWT-05
KLWT-06
Tamaño
superior del
banco de
55 "
×
28 "
60 "
×
25 "
55 "
×
27,6 "
63 "
×
31,5 "
70,9 "
×
31,5 "
78,7 "
×
31,5 "
Grosor
superior del
banco de
1 "
1 "
1 "
1 "
1 "
1 "
Capacidad de
carga máxima
220 libras
220 libras
220 libras
220 libras
220 libras
220 libras

- 3 -
Colores)
Blanco
Blanco
madera
corpulenta
madera
corpulenta
madera
corpulenta
madera
corpulenta
Material
Cartón
madera
Cartón
madera
Cartón
madera
Cartón
madera
Cartón
madera
Cartón
madera
OPERATING INSTRUCTION
Preparación de la instalación:
25. Dos o más personas para mover y montar el banco de trabajo.
26. Prepare una alfombra o tapete para proteger su piso . Necesitas
distribuir todos los accesorios.
27. Prepare guantes para evitar rayarse con piezas afiladas que puedan
ocurrir durante la instalación.
28. Por favor abra todas las cajas para comprobar que los accesorios
están completos y en buen estado.
29. Si necesita utilizar herramientas eléctricas para instalar este producto,
configure la velocidad en baja de antemano.
30. Al realizar la instalación , alinee todos los orificios y no apriete todos
los tornillos primero; de lo contrario, podría dificultar la instalación.
Instalación:
PASO 1: Instale primero el marco superior del banco de trabajo .
PASO 2: Ajuste el espacio entre tamaños del marco.
PASO 3: Coloque la tapa del banco de trabajo seleccionada en el medio
del marco de la tapa del banco de trabajo .
ETAPA 4: Bloquee la mesa con clavos autorroscantes.
NOTA: La longitud del clavo autorroscante debe coincidir con el grosor del
marco y la superficie del banco de trabajo ; no atraviese la superficie del
banco de trabajo.

- 4 -
La siguiente figura muestra los soportes y la instalación de la parte superior
del banco de trabajo común . (Nota: la parte superior del banco de trabajo no
incluye el marco).
1 : Instale la parte superior del banco de trabajo en el marco del escritorio
eléctrico de pie .
Vista inferior
Consejos: Se sugiere que B sea igual al 75 ~ 85 por ciento de A.
Frame-01
- 5 -
Estilo 2: Instale la parte superior del banco de trabajo en el soporte de
mesa fijo.
Estilo 3: Instale la parte superior del banco de trabajo en los soportes del
cajón.
Drawer Stand-03
Frame-02

- 6 -
MAINTENANCE
21. Intente evitar colocar objetos mojados sobre el escritorio.
22. Quite el polvo periódicamente con un trapo limpio y coloque los
elementos ordenadamente sobre el escritorio .
23. No lo dejes reposar demasiado tiempo al sol.
24. Revise la mesa periódicamente para evitar que los tornillos se aflojen
y caigan.
apagado.
25. Guárdelo en un lugar seco ; no lo guarde en un lugar húmedo.
Dirección: Baoshanqu Shuangchenglu 803long 11hao 1602A-1609shi
Shanghai
Importado a AUS: SIHAO PTY LTD, 1 ROKEVA STREETEASTWOOD
NSW 2122 Australia
Importado a EE. UU.: Sanven Technology Ltd, Suite 250, 9166 Anaheim
Place, Rancho Cucamonga, CA 91730
REP
EC
SHUNSHUN GmbH
Römeräcker 9 Z2021, 76351
Linkenheim-Hochstetten, Germany
REP
UK
Pooledas Group Ltd
Unit 5 Albert Edward House, The
Pavilions Preston, United Kingdom
Hecho en china


- 8 -
Techniczny Certyfikat wsparcia i e-gwarancji
www.vevor.com/support
BLAT STOŁU WARSZTATOWEGO
INSTRUKCJA OBSŁUGI
Model: KLWT-01 , KLWT-02 , KLWT-03 ,
KLWT-04 , KLWT-05 , KLWT-06
We continue to be committed to provide you tools with competitive price.
"Save Half", "Half Price" or any other similar expressions used by us only represents an
estimate of savings you might benefit from buying certain tools with us compared to the major
top brands and does not necessarily mean to cover all categories of tools offered by us. You
are kindly reminded to verify carefully when you are placing an order with us if you are
actually saving half in comparison with the top major brands.

- 1 -
Have product questions? Need technical support? Please feel free to
contact us:
Technical Support and E-Warranty Certificate
www.vevor.com/support
NEED HELP? CONTACT US!
This is the original instruction, please read all manual instructions
carefully before operating. VEVOR reserves a clear interpretation of our
user manual. The appearance of the product shall be subject to the
product you received. Please forgive us that we won't inform you again if
there are any technology or software updates on our product.
WORKBENCH TOP

- 2 -
GENERAL SAFETY RULES
Przeczytaj uważnie niniejszą instrukcję obsługi !
41. Nie stawaj ani nie stawaj na tym produkcie. Możesz upaść, co może
spowodować obrażenia ciała.
42. Proszę nie stawiać produktu w pobliżu urządzeń grzewczych lub
ognisk, ani nie polewać go gorącą wodą w przypadku pożaru, oparzeń
lub niebezpieczeństwa odkształcenia.
43. Proszę nie kontaktować tego produktu z żrącymi chemikaliami i
ostrymi nożami.
44. Nie wystawiaj tego produktu na działanie słońca przez dłuższy czas.
45. Nie rozpryskuj wody ani innych płynów na blat stołu warsztatowego .
46. Nie układaj twardych , spiczastych przedmiotów na blacie stołu
warsztatowego, aby uniknąć jego uszkodzenia.
47. Nie przekraczaj maksymalnego obciążenia.
48. Nie modyfikuj tego produktu w żaden sposób.
OSTROŻNOŚĆ: Przeczytaj uważnie instrukcje i procedury dotyczące
bezpiecznej obsługi.
ZACHOWAJ TE INSTRUKCJE
MODEL AND PARAMETERS
Model
KLWT-0
1
KLWT-0
2
KLWT-03
KLWT-04
KLWT-05
KLWT-06
Najwyższy
rozmiar stołu
warsztatoweg
55 "
×
28
"
60 "
×
25
"
55 "
×
27,6 "
63 "
×
31,5 "
70,9 cala
×
31,5 cala
78,7 "
×
31,5
"
Grubość góry
stołu
warsztatoweg
1 "
1 "
1 "
1 "
1 "
1 "
Maksymalna
ładowność
220
funtów
220
funtów
220 funtów
220 funtów
220 funtów
220 funtów
Zabarwienie)
Biały
Biały
Burly-drewn
o
Burly-drewn
o
Burly-drewn
o
Burly-drewn
o

- 3 -
Materiał
Płyta
wiórowa
Płyta
wiórowa
Płyta
wiórowa
Płyta
wiórowa
Płyta
wiórowa
Płyta
wiórowa
OPERATING INSTRUCTION
Przygotowanie do instalacji:
31. Dwie lub więcej osób do przenoszenia i montażu stołu warsztatowego.
32. Przygotuj dywan lub matę, aby zabezpieczyć podłogę . Musisz
rozłożyć wszystkie akcesoria.
33. Należy przygotować rękawice, aby uniknąć zarysowania ostrymi
częściami, które mogą wystąpić podczas montażu.
34. Proszę otworzyć wszystkie pudełka, aby sprawdzić, czy akcesoria są
kompletne i w dobrym stanie.
35. Jeśli do zainstalowania tego produktu konieczne będzie użycie
elektronarzędzi, należy wcześniej ustawić prędkość na niską.
36. Podczas instalacji należy wyrównać wszystkie otwory i nie dokręcać
najpierw wszystkich śrub; w przeciwnym razie może to utrudnić instalację.
Instalacja:
KROK 1: Najpierw zainstaluj górną ramę stołu warsztatowego .
KROK 2: Dostosuj odstęp wielkości ramki.
KROK 3: Umieść wybrany blat stołu warsztatowego na środku ramy blatu
stołu warsztatowego .
KROK 4: Zablokuj blat stołu za pomocą gwoździ samogwintujących.
UWAGA: Długość gwoździa samogwintującego powinna odpowiadać
grubości ramy i blatu stołu warsztatowego . Nie przechodź przez blat stołu
warsztatowego.

- 4 -
Poniższy rysunek przedstawia typowe stojaki na blaty warsztatowe i
instalację . (Uwaga: Blat stołu warsztatowego nie obejmuje ramy.)
Styl 1 : Zamontuj blat stołu warsztatowego na elektrycznej ramie biurka
stojącego .
Widok z dołu
Wskazówki: Sugeruje się, że B jest równe 75 ~ 85 procent A.
Frame-01

- 5 -
Styl 2: Zainstaluj blat stołu warsztatowego na stałym stojaku stołowym.
Styl 3: Zainstaluj blat stołu warsztatowego na stojakach z szufladami.
Drawer Stand-03
Frame-02

- 6 -
MAINTENANCE
26. Staraj się unikać umieszczania mokrych przedmiotów na biurku .
27. Regularnie odkurzaj czystą szmatką i starannie układaj przedmioty na
biurku .
28. Nie zostawiaj go zbyt długo na słońcu.
29. Regularnie sprawdzaj stół, aby zapobiec poluzowaniu się i spadnięciu
śrub
wyłączony.
30. Proszę przechowywać w suchym miejscu ; nie przechowuj w
wilgotnym miejscu.
Adres: Baoshanqu Shuangchenglu 803long 11hao 1602A-1609shi
Szanghaj
Import do AUS: SIHAO PTY LTD, 1 ROKEVA STREETEASTWOOD NSW
2122 Australia
Import do USA: Sanven Technology Ltd, Suite 250, 9166 Anaheim Place,
Rancho Cucamonga, CA 91730
REP
EC
SHUNSHUN GmbH
Römeräcker 9 Z2021, 76351
Linkenheim-Hochstetten, Germany
REP
UK
Pooledas Group Ltd
Unit 5 Albert Edward House, The
Pavilions Preston, United Kingdom
Wyprodukowano w Chinach


- 8 -
Technisch Ondersteuning en e-garantiecertificaat
www.vevor.com/support
WERKBANK BOVEN
GEBRUIKERSHANDLEIDING
Model: KLWT-01 , KLWT-02 , KLWT-03 ,
KLWT-04 , KLWT-05 , KLWT-06
We continue to be committed to provide you tools with competitive price.
"Save Half", "Half Price" or any other similar expressions used by us only represents an
estimate of savings you might benefit from buying certain tools with us compared to the major
top brands and does not necessarily mean to cover all categories of tools offered by us. You
are kindly reminded to verify carefully when you are placing an order with us if you are
actually saving half in comparison with the top major brands.

- 1 -
Have product questions? Need technical support? Please feel free to
contact us:
Technical Support and E-Warranty Certificate
www.vevor.com/support
NEED HELP? CONTACT US!
This is the original instruction, please read all manual instructions
carefully before operating. VEVOR reserves a clear interpretation of our
user manual. The appearance of the product shall be subject to the
product you received. Please forgive us that we won't inform you again if
there are any technology or software updates on our product.
WORKBENCH TOP

- 2 -
GENERAL SAFETY RULES
Lees deze gebruikershandleiding zorgvuldig
door !
49. Ga niet op dit product staan of stappen. U kunt vallen en persoonlijk
letsel veroorzaken.
50. Plaats het product niet naast een verwarmingsinstallatie of vuur, en
giet er geen heet water op in geval van brand, brandwonden en
gevaar voor vervorming.
51. Gelieve dit product niet in contact te brengen met bijtende chemicaliën
en scherpe messen.
52. Stel dit product niet langdurig bloot aan de zon.
53. Spat geen water of andere vloeistoffen op het werkblad van de
werkbank .
54. Stapel geen harde , puntige voorwerpen op het werkblad van de
werkbank om beschadiging ervan te voorkomen.
55. Overschrijd het maximale draagvermogen niet.
56. Wijzig dit product op geen enkele manier.
VOORZICHTIGHEID: Lees zorgvuldig de instructies en procedures voor
veilig gebruik.
BEWAAR DEZE INSTRUCTIES
MODEL AND PARAMETERS
Model
KLWT-01
KLWT-02
KLWT-03
KLWT-04
KLWT-05
KLWT-06
Werkbank
topformaat
55 "
×
28 "
60 "
×
25 "
55 "
×
27,6
"
63 "
×
31,5
"
70,9 "
×
31,5 "
78,7 "
×
31,5 "
Dikte van de
werkbank
1 "
1 "
1 "
1 "
1 "
1 "
Maximaal
laadvermogen
220 pond
220 pond
220 pond
220 pond
220 pond
220 pond

- 3 -
Kleur(en)
Wit
Wit
Knoestig
hout
Knoestig
hout
Knoestig
hout
Knoestig
hout
Materiaal
Spaanplaat
Spaanplaat
Spaanplaat
Spaanplaat
Spaanplaat
Spaanplaat
OPERATING INSTRUCTION
Voorbereiding installatie:
37. Twee of meer personen om de werkbank te verplaatsen en in elkaar te
zetten.
38. Zorg voor een tapijt of mat om uw vloer te beschermen . Je moet alle
accessoires spreiden.
39. Zorg ervoor dat u handschoenen draagt om te voorkomen dat u
bekrast raakt door scherpe onderdelen die tijdens de installatie kunnen
ontstaan.
40. Open alle dozen om te controleren of de accessoires compleet en in
goede staat zijn.
41. Als u elektrisch gereedschap nodig heeft om dit product te installeren,
stel de snelheid dan vooraf in op een lage snelheid.
42. bij het installeren alle gaten uit en draai niet eerst alle schroeven vast;
anders kan dit de installatie bemoeilijken.
Installatie:
STAP 1: Installeer eerst het werkbankbovenframe .
STAP 2: Pas de maatafstand van het frame aan.
STAP 3: Plaats het geselecteerde Workbench Top in het midden van het
Workbench Top frame.
STAP 4: Vergrendel het tafelblad met zelftappende spijkers.

- 4 -
OPMERKING: De lengte van de zelftappende spijker moet overeenkomen
met de dikte van het frame en het werkblad van de werkbank . Ga niet door
het werkblad van de werkbank.
- 5 -
De volgende afbeelding toont de gebruikelijke werkbankstandaards en
installatie . (Opmerking: het werkbankblad is exclusief frame.)
Stijl 1 : Installeer het werkbankblad op het elektrische bureauframe . _ _
Onderaanzicht
Tips: Er wordt gesuggereerd dat B gelijk is aan 75 ~ 85 procent van A.
Frame-01
- 6 -
Stijl 2: Installeer het werkbankblad op de vaste tafelstandaard.
Stijl 3: Installeer het werkbankblad op de ladestandaarden.
Drawer Stand-03
Frame-02

- 7 -
MAINTENANCE
31. Probeer te voorkomen dat er natte voorwerpen op het bureaublad
worden geplaatst.
32. Stof regelmatig af met een schone doek en plaats de spullen netjes op
het bureaublad .
33. Laat hem niet te lang in de zon staan.
34. Controleer de tafel regelmatig om te voorkomen dat schroeven
losraken en vallen
uit.
35. Bewaar op een droge plaats ; niet op een vochtige plaats bewaren.
Adres: Baoshanqu Shuangchenglu 803long 11hao 1602A-1609shi
Shanghai
Geïmporteerd naar AUS: SIHAO PTY LTD, 1 ROKEVA
STREETEASTWOOD NSW 2122 Australië
Geïmporteerd naar de VS: Sanven Technology Ltd, Suite 250, 9166
Anaheim Place, Rancho Cucamonga, CA 91730
REP
EC
SHUNSHUN GmbH
Römeräcker 9 Z2021, 76351
Linkenheim-Hochstetten, Germany
REP
UK
Pooledas Group Ltd
Unit 5 Albert Edward House, The
Pavilions Preston, United Kingdom
Gemaakt in China


- 9 -
Teknisk Support och e-garanticertifikat
www.vevor.com/support
ARBETSBÄNKSSKIVA
ANVÄNDARMANUAL
Modell: KLWT-01 , KLWT-02 , KLWT-03 ,
KLWT-04 , KLWT-05 , KLWT-06
We continue to be committed to provide you tools with competitive price.
"Save Half", "Half Price" or any other similar expressions used by us only represents an
estimate of savings you might benefit from buying certain tools with us compared to the major
top brands and does not necessarily mean to cover all categories of tools offered by us. You
are kindly reminded to verify carefully when you are placing an order with us if you are
actually saving half in comparison with the top major brands.

- 1 -
Have product questions? Need technical support? Please feel free to
contact us:
Technical Support and E-Warranty Certificate
www.vevor.com/support
NEED HELP? CONTACT US!
This is the original instruction, please read all manual instructions
carefully before operating. VEVOR reserves a clear interpretation of our
user manual. The appearance of the product shall be subject to the
product you received. Please forgive us that we won't inform you again if
there are any technology or software updates on our product.
WORKBENCH TOP
- 2 -
GENERAL SAFETY RULES
Vänligen läs denna bruksanvisning noggrant !
57. Stå eller trampa inte på den här produkten. Du kan falla vilket kan
orsaka personskada.
58. Vänligen ställ inte produkten bredvid en värmeanläggning eller eld,
och häll inte varmt vatten på den i händelse av bränder, brännskador
och deformationsrisker.
59. Vänligen kontakta inte denna produkt med frätande kemikalier och
vassa knivar.
60. Utsätt inte denna produkt för solen under en längre tid.
61. Stänk inte vatten eller andra vätskor på arbetsbänkens ovansida .
62. Stapla inte hårda spetsiga föremål på arbetsbänkens ovansida för att
undvika att skada den.
63. Överskrid inte den maximala lastkapaciteten.
64. Ändra inte denna produkt på något sätt.
VARNING: Läs noggrant instruktionerna och procedurerna för säker drift.
SPARA DESSA INSTRUKTIONER
MODEL AND PARAMETERS
Modell
KLWT-01
KLWT-02
KLWT-03
KLWT-04
KLWT-05
KLWT-06
Arbetsbänk
Toppstorlek
55 "
×
28 "
60 "
×
25 "
55 "
×
27,6
"
63 "
×
31,5
"
70,9 "
×
31,5 "
78,7 "
×
31,5 "
Arbetsbänk
Topptjocklek
1 "
1 "
1 "
1 "
1 "
1 "
Maximal
lastkapacitet
220 lbs
220 lbs
220 lbs
220 lbs
220 lbs
220 lbs
Färger)
Vit
Vit
Burly-wood
Burly-wood
Burly-wood
Burly-wood

- 3 -
Material
Spånskiva
Spånskiva
Spånskiva
Spånskiva
Spånskiva
Spånskiva
OPERATING INSTRUCTION
Installationsförberedelser:
43. Två eller flera personer ska flytta och montera arbetsbänken.
44. Förbered en matta eller matta för att skydda ditt golv . Du måste sprida
ut alla tillbehör.
45. Förbered handskar för att undvika repor av vassa delar som kan
uppstå under installationen.
46. Öppna alla lådor för att kontrollera att tillbehören är kompletta och i
gott skick.
47. Om du behöver använda elverktyg för att installera den här produkten,
ställ in hastigheten på låg hastighet i förväg.
48. När du installerar , vänligen rikta in alla hål och dra inte åt alla skruvar
först. annars kan det försvåra installationen.
Installation:
STEG 1: Installera arbetsbänkens övre ram först .
STEG 2: Justera storleksavståndet på ramen.
STEG 3: Placera den valda Workbench Top i mitten av Workbench Top
-ramen.
STEG 4: Lås bordsskivan med självgängande spikar.
OBS: Längden på den självgängande spiken ska matcha tjockleken på
ramen och arbetsbänksskivan; Gå inte igenom arbetsbänksskivan.

- 4 -
Följande bild visar vanliga arbetsbänksstativ och installation .(Obs:
Arbetsbänksskivan inkluderar inte ramen.)
Stil1 : Installera arbetsbänksskivan på den elektriska
uppställningsbänksramen . _ _ _ _
Vy underifrån
Tips: Det föreslås att B i är lika med 75 ~ 85 procent av A.
Frame-01

- 5 -
Stil2: Installera arbetsbänksskivan på det fasta bordsstativet.
Stil 3: Installera arbetsbänksskivan på lådstativen.
Drawer Stand-03
Frame-02

- 6 -
MAINTENANCE
36. Försök att undvika att lägga blöta föremål på skrivbordet .
37. Damma av regelbundet med en ren trasa och ordna föremål snyggt på
skrivbordet .
38. Låt den inte sitta i solen för länge.
39. Kontrollera bordet regelbundet för att förhindra att skruvar lossnar och
faller
av.
40. Förvara på en torr plats ; förvara inte på en fuktig plats.
Adress: Baoshanqu Shuangchenglu 803long 11hao 1602A-1609shi
Shanghai
Importerad till AUS: SIHAO PTY LTD, 1 ROKEVA STREETEASTWOOD
NSW 2122 Australien
Importerad till USA: Sanven Technology Ltd, Suite 250, 9166 Anaheim
Place, Rancho Cucamonga, CA 91730
REP
EC
SHUNSHUN GmbH
Römeräcker 9 Z2021, 76351
Linkenheim-Hochstetten, Germany
REP
UK
Pooledas Group Ltd
Unit 5 Albert Edward House, The
Pavilions Preston, United Kingdom
Tillverkad i Kina