
Technical Support and E-Warranty Certificate www.vevor.com/support
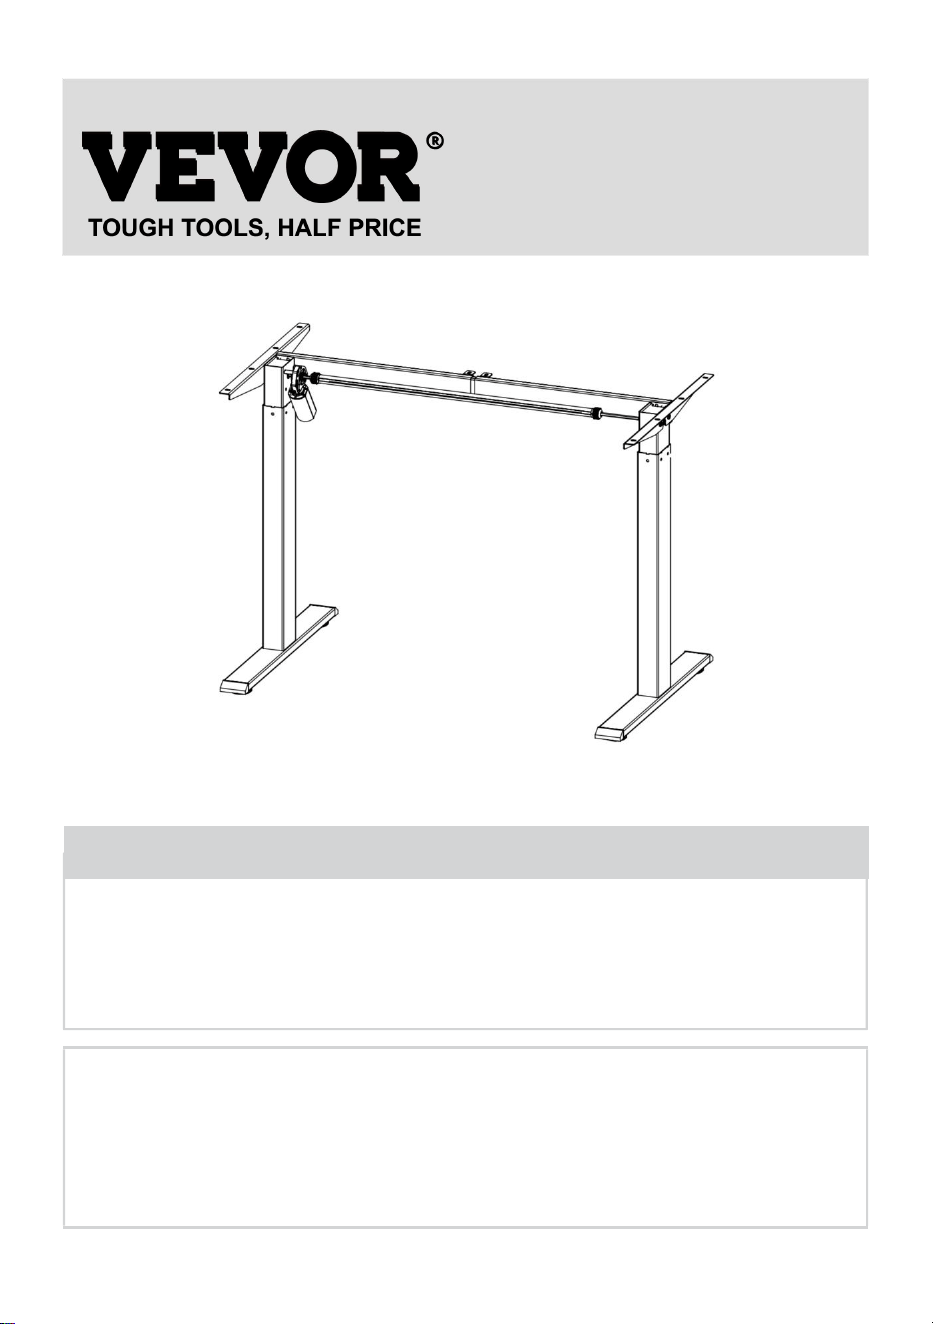
STANDING DESK FRAME
OPERATING INSTRUCTIONS
We continue to be committed to provide you tools with competitive price.
"Save Half", "Half Price" or any other similar expressions used by us only represents an
estimate of savings you might benefit from buying certain tools with us compared to the major
top brands and does not necessarily mean to cover all categories of tools offered by us. You
are kindly reminded to verify carefully when you are placing an order with us if you are
actually saving half in comparison with the top major brands.

- 1 -
Have product questions? Need technical support? Please feel free to
contact us:
Technical Support and E-Warranty Certificate
www.vevor.com/support
NEED HELP? CONTACT US!
This is the original instruction, please read all manual instructions
carefully before operating. VEVOR reserves a clear interpretation of our
user manual. The appearance of the product shall be subject to the
product you received. Please forgive us that we won't inform you again if
there are any technology or software updates on our product.
STANDING DESK FRAME

- 2 -
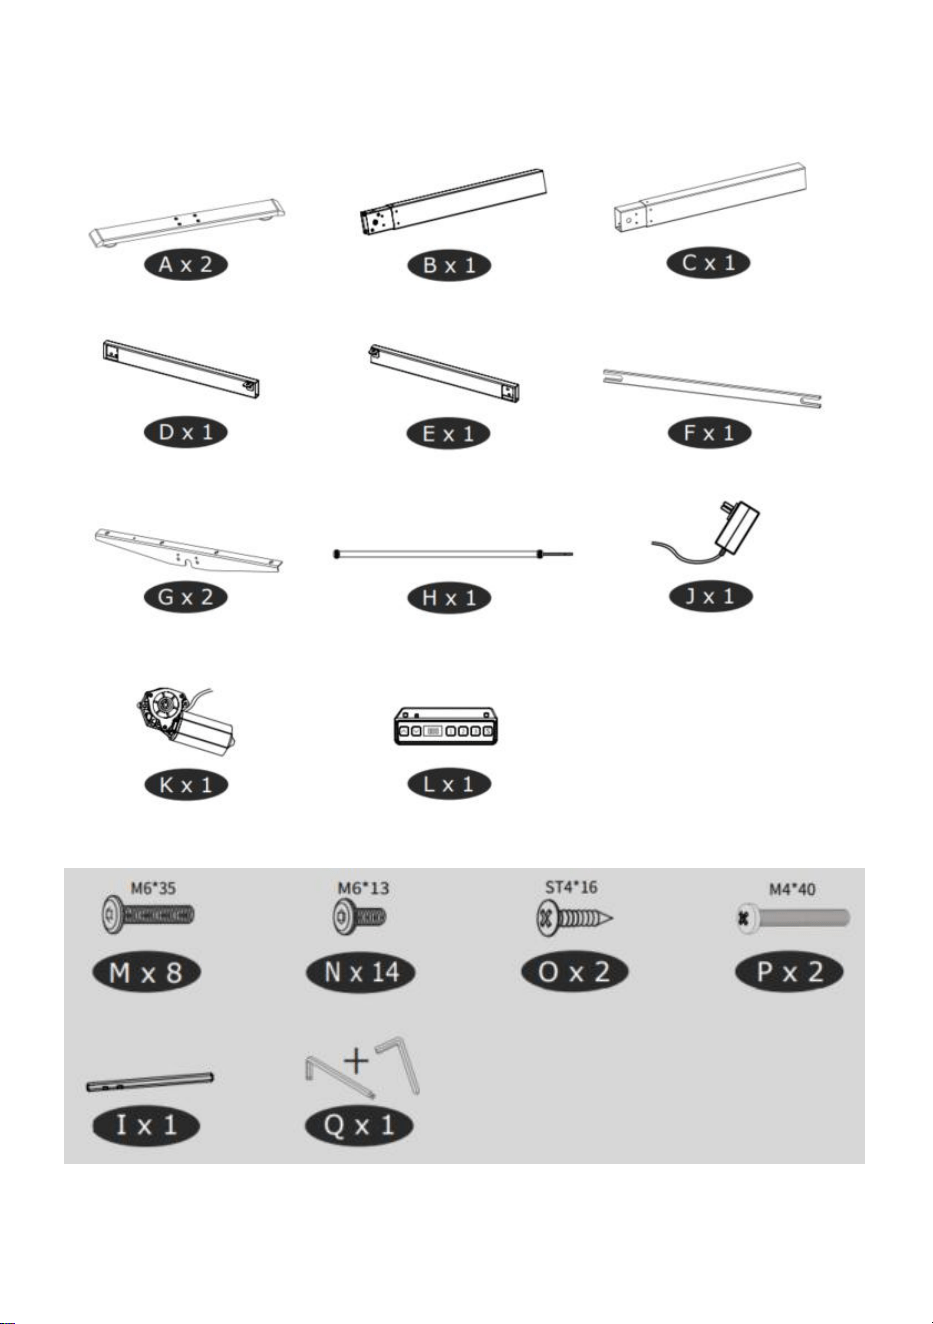
Parts List
- 3 -
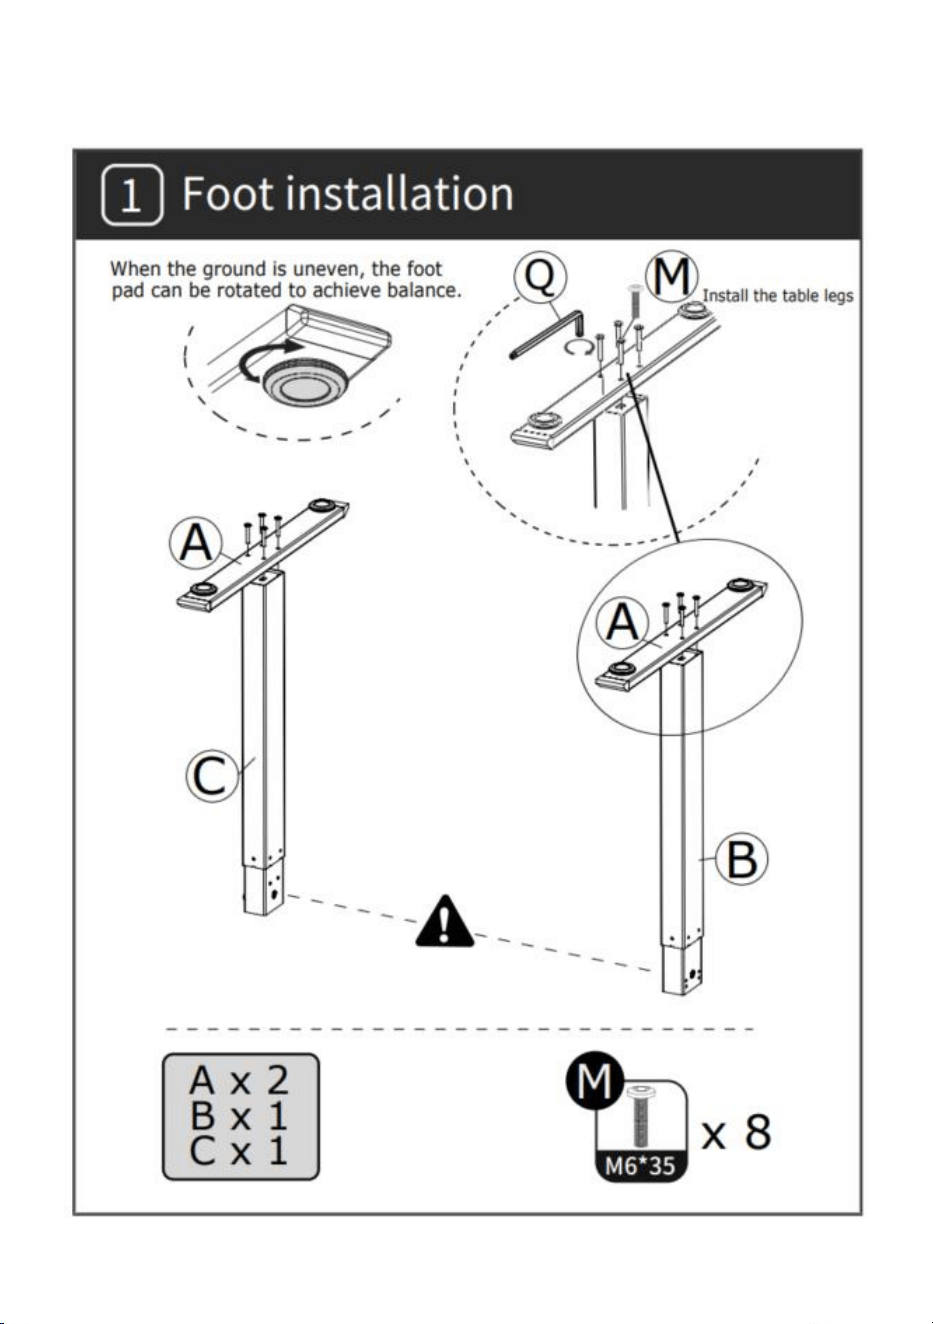
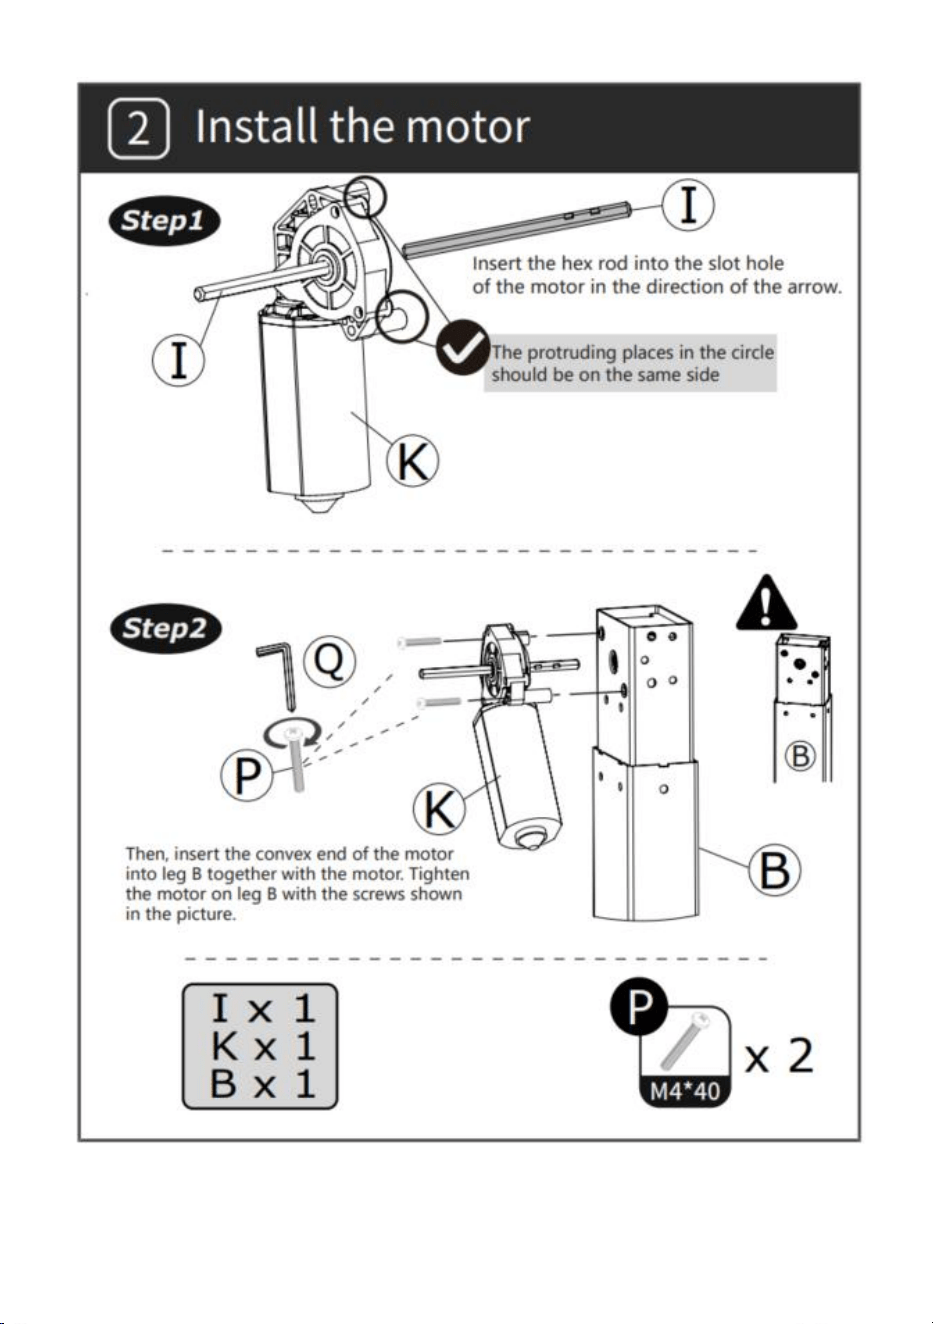
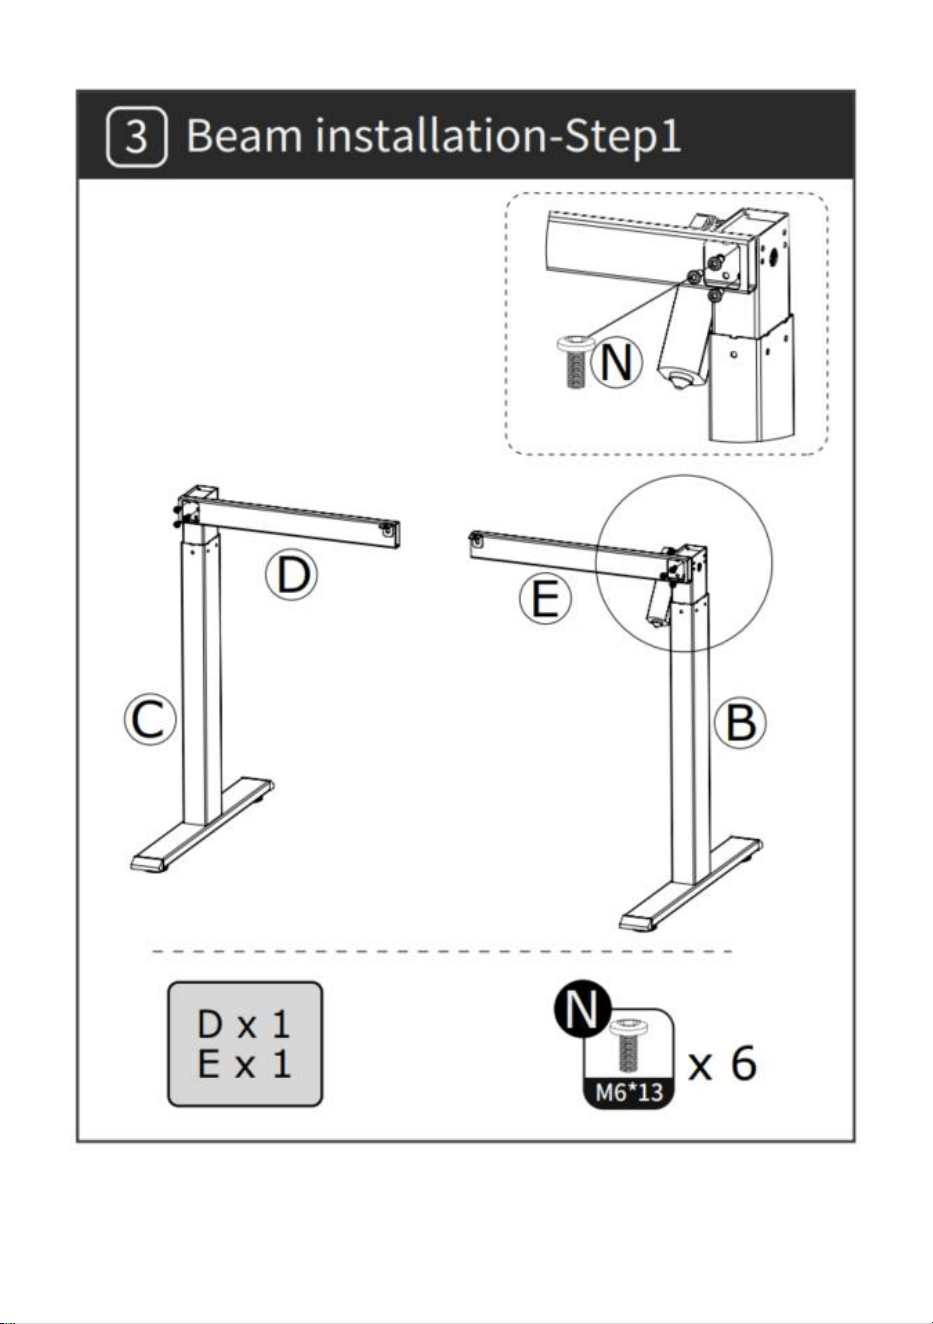
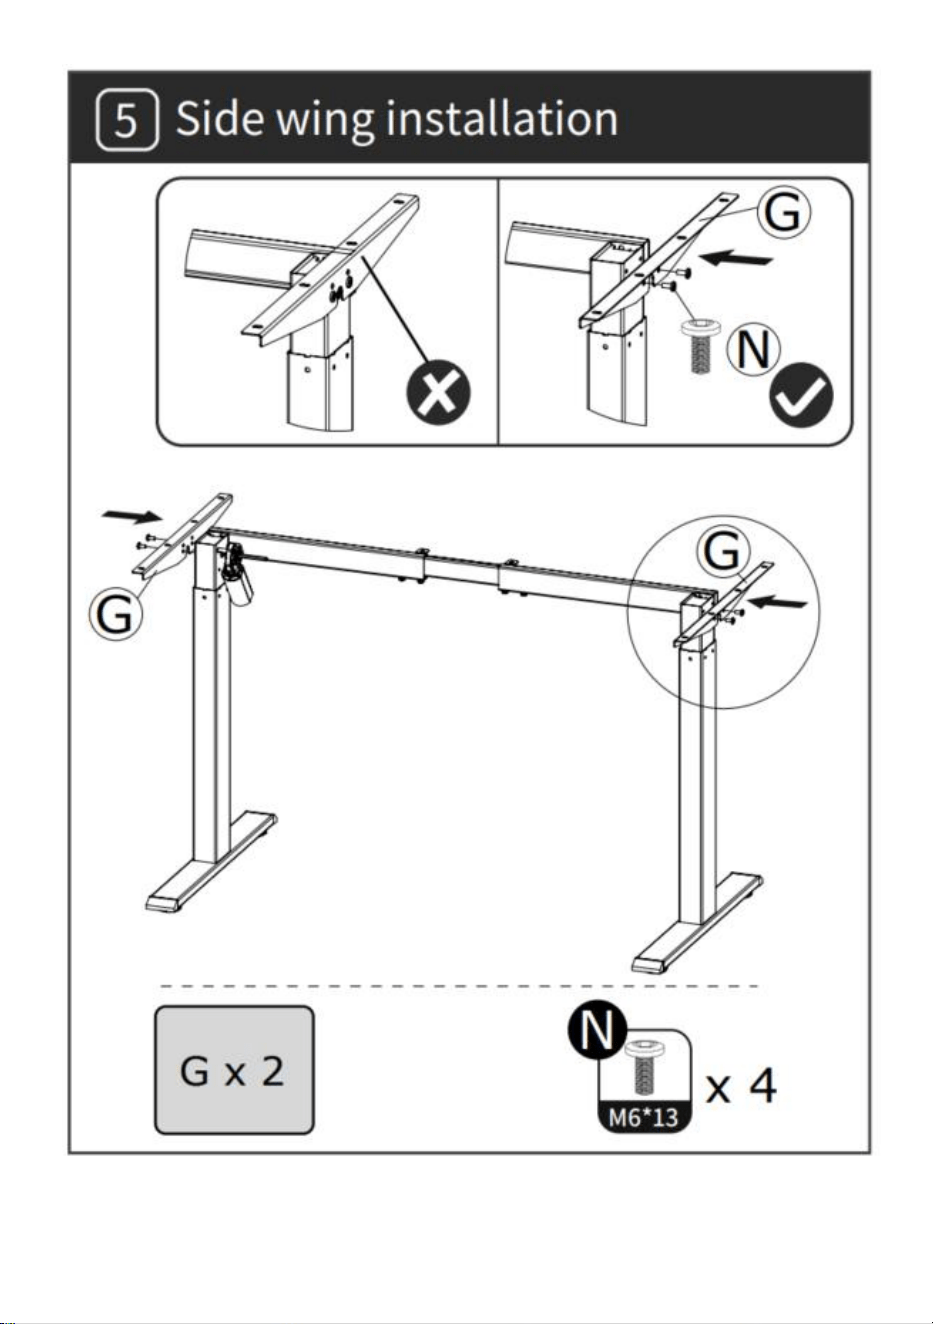
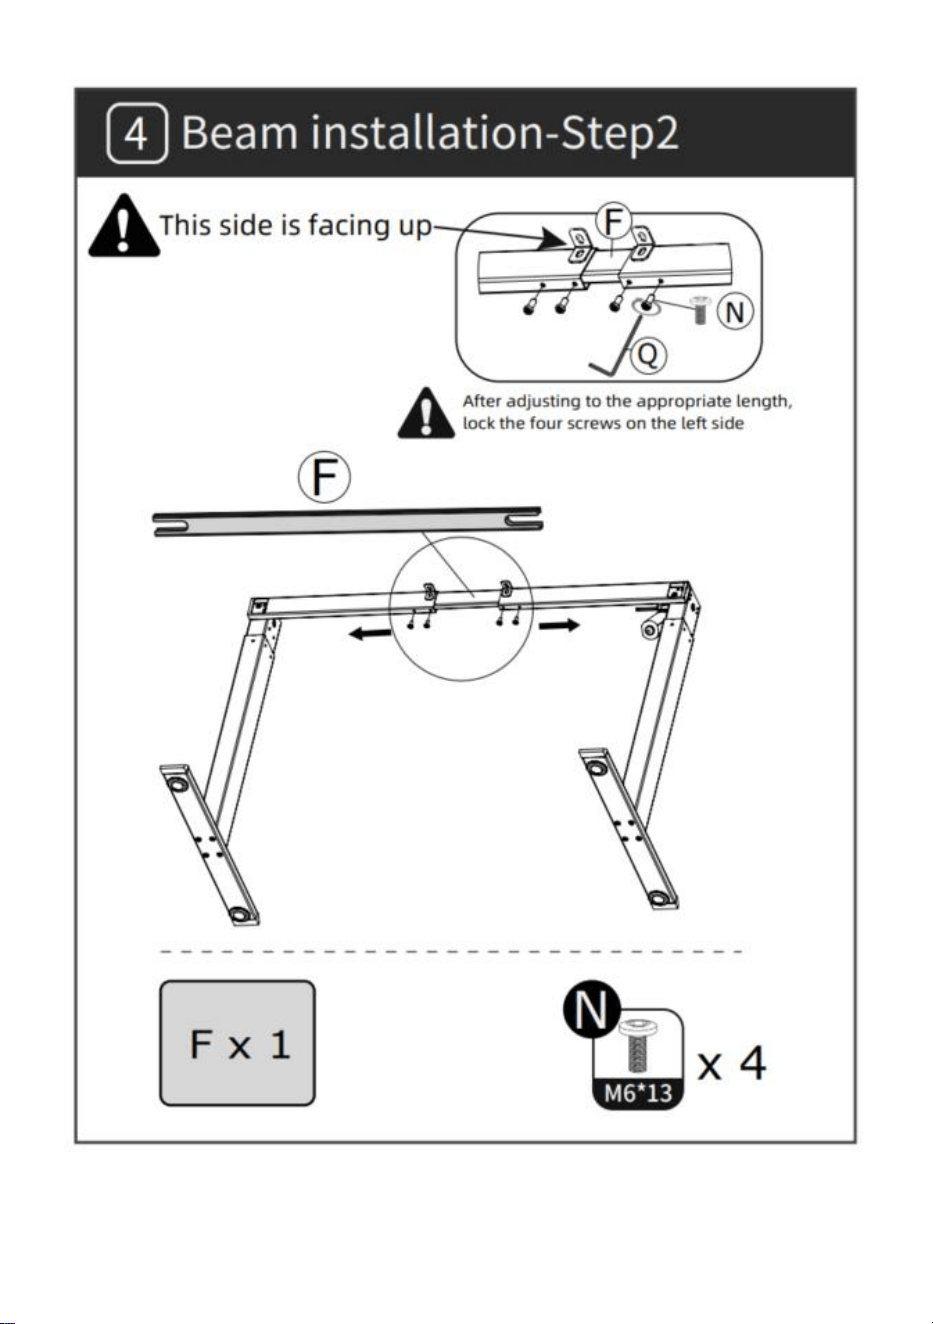
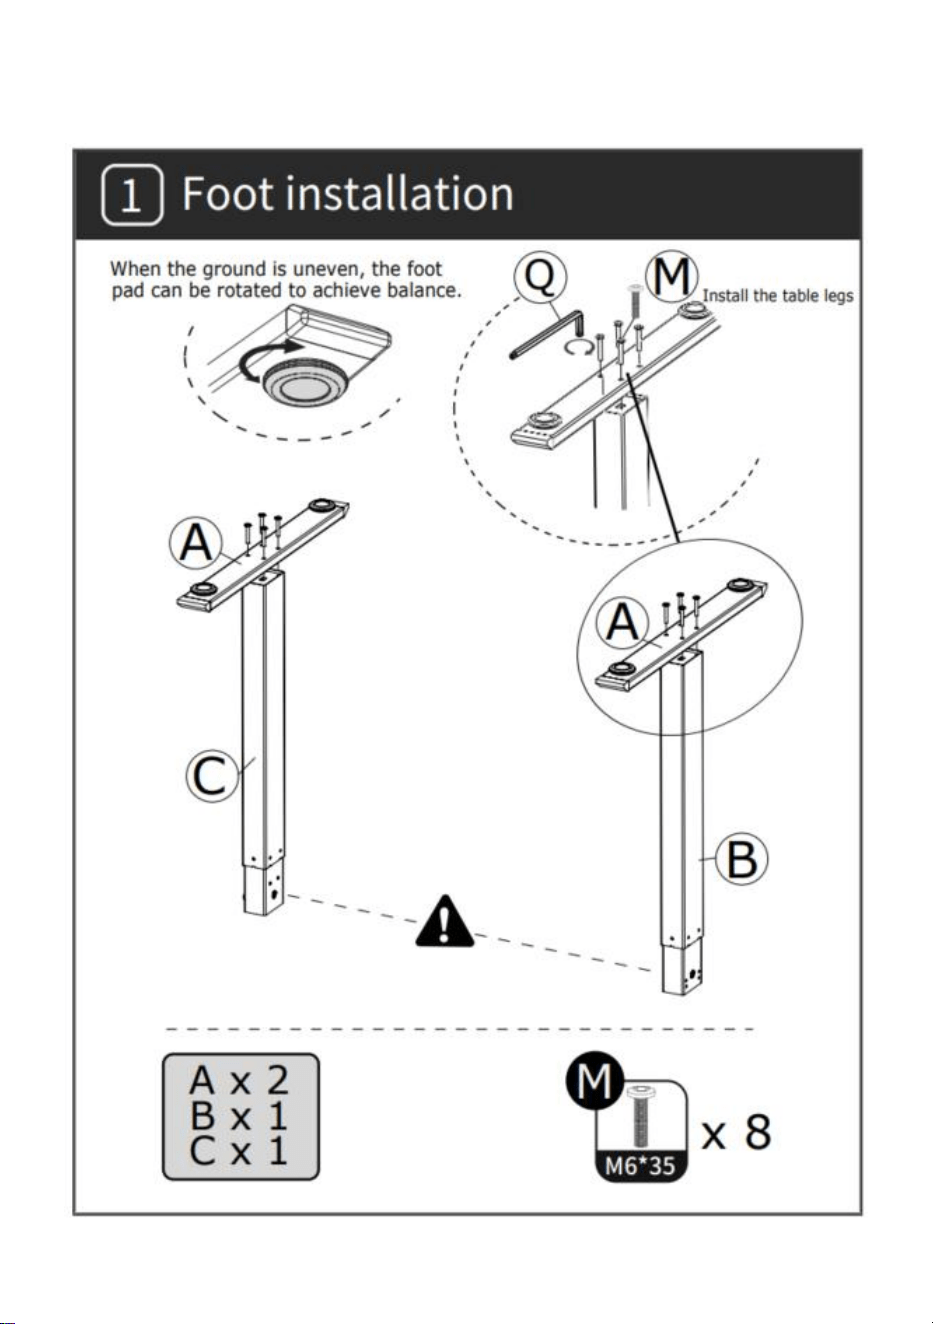
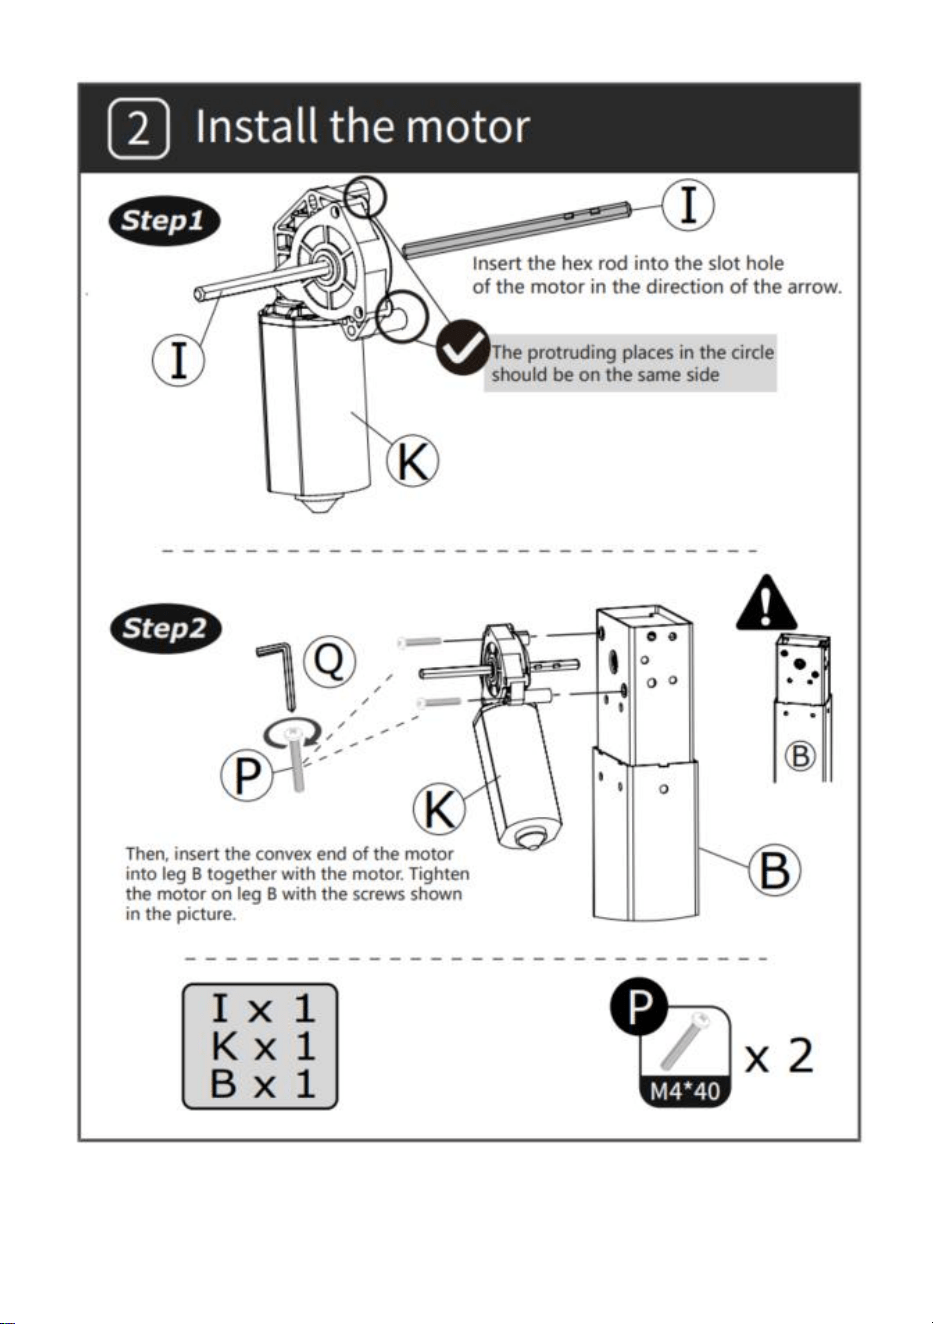
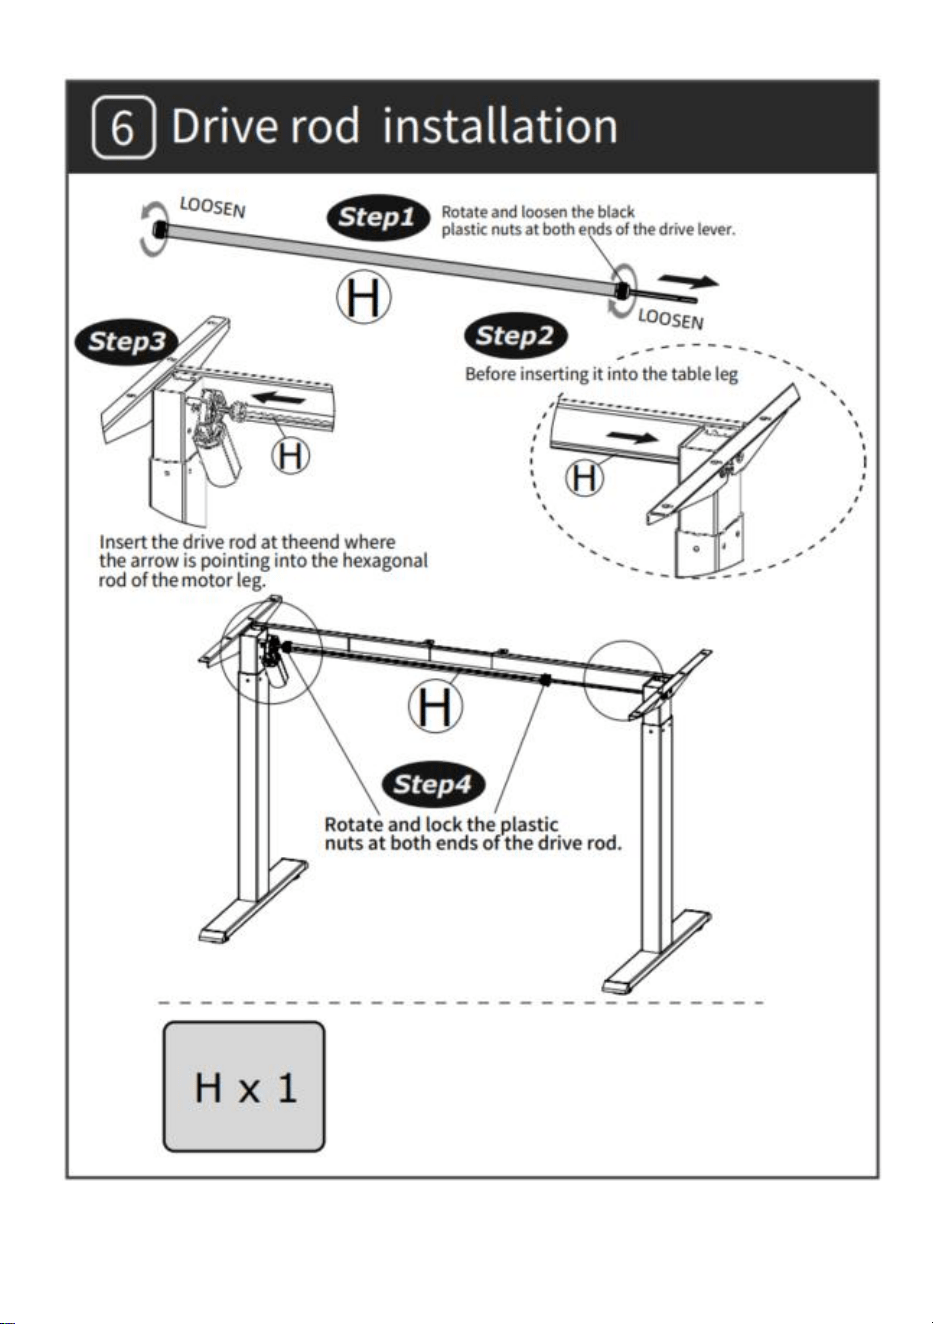
INSTALLATION
- 4 -

- 5 -

- 6 -

- 7 -

- 8 -

- 9 -
- 10 -
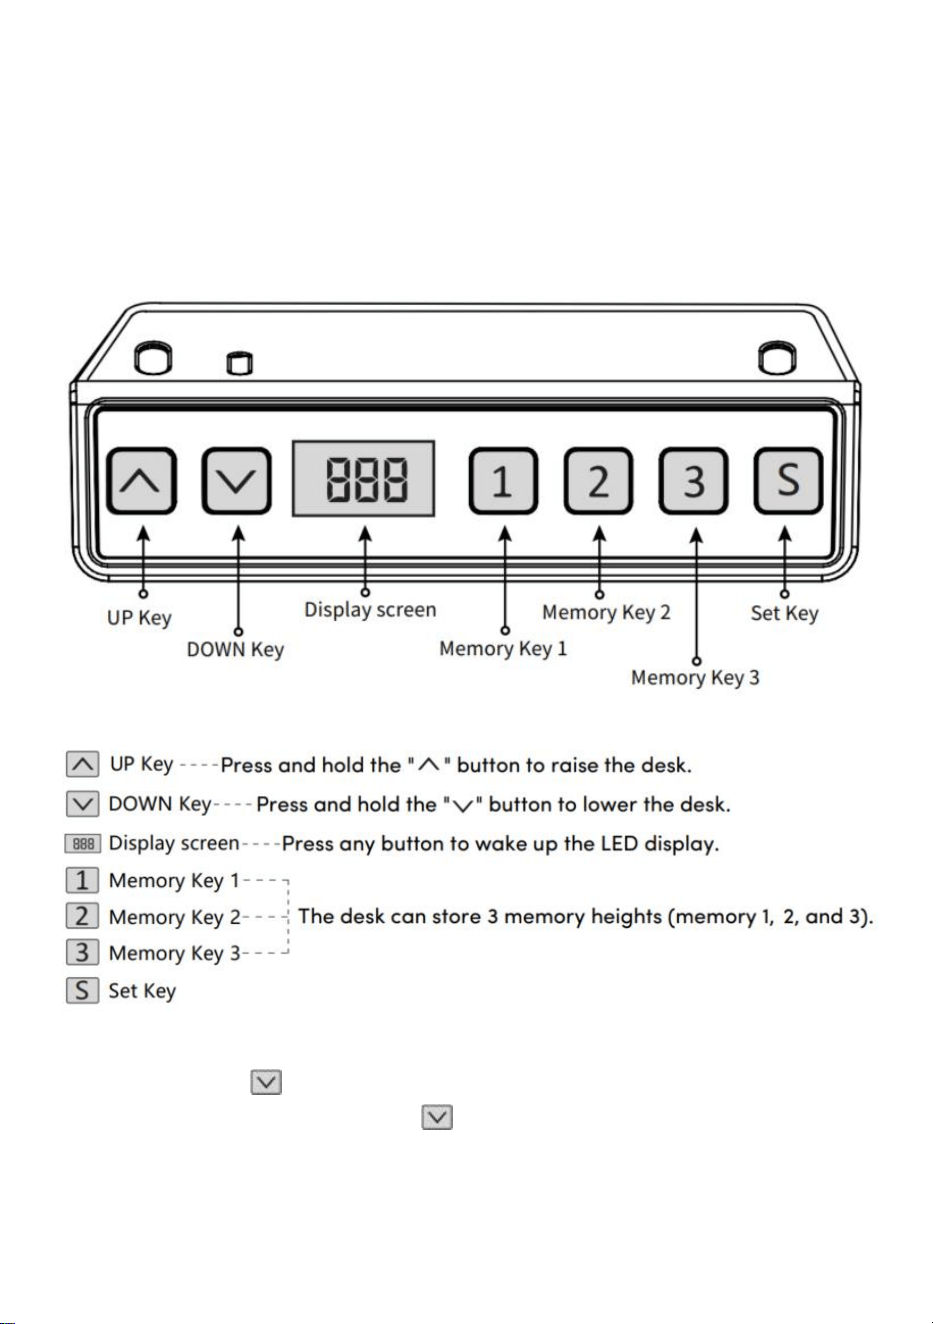
OPERATING INSTRUCTIONS
Note: Before using the height-adjustable desk, it’s recommended to
perform a reset to ensure that both lift columns are at the same height, as
they may have slight variations from the factory (see OPERATING
INSTRUCTIONS–Reset).
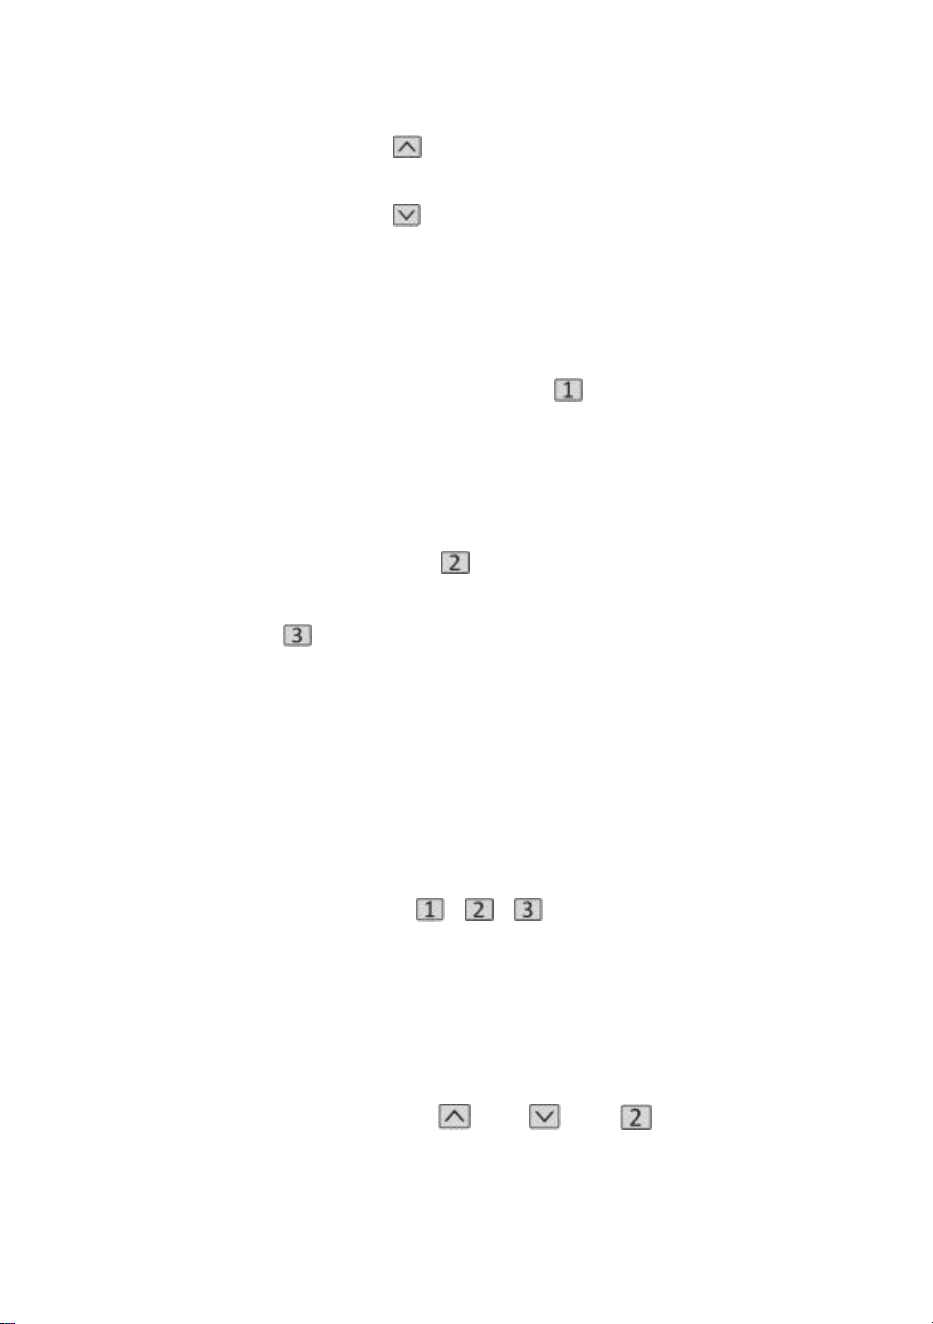
Reset
Long press the " " key, after running the desktop to the lowest point,
keep holding the " " key until the screen
flashes " --- " and the buzzer makes a "beep" sound, the screen displays
the lowest height value, and the reset operation is successful.

- 11 -
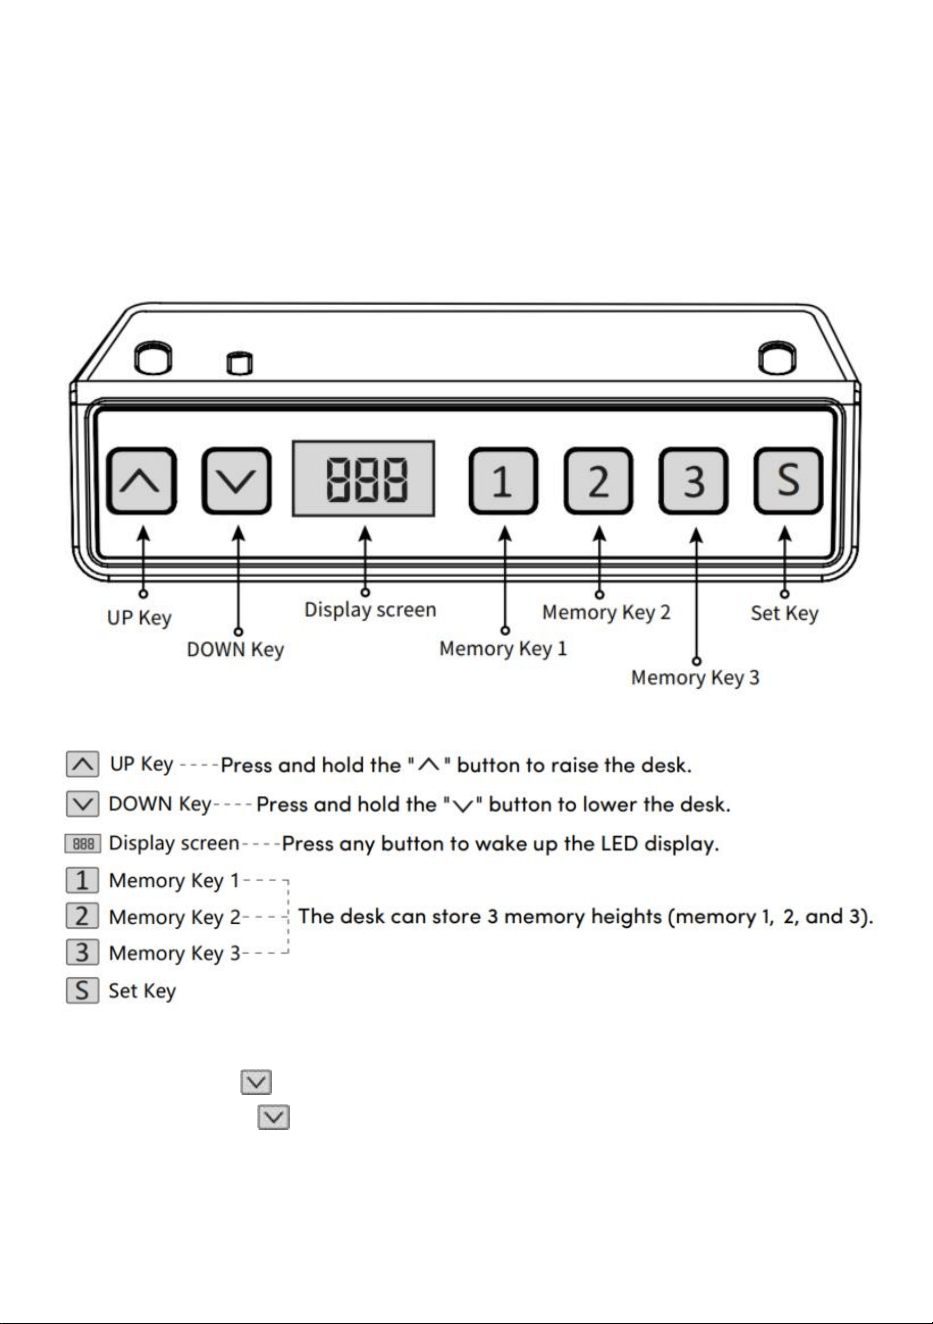
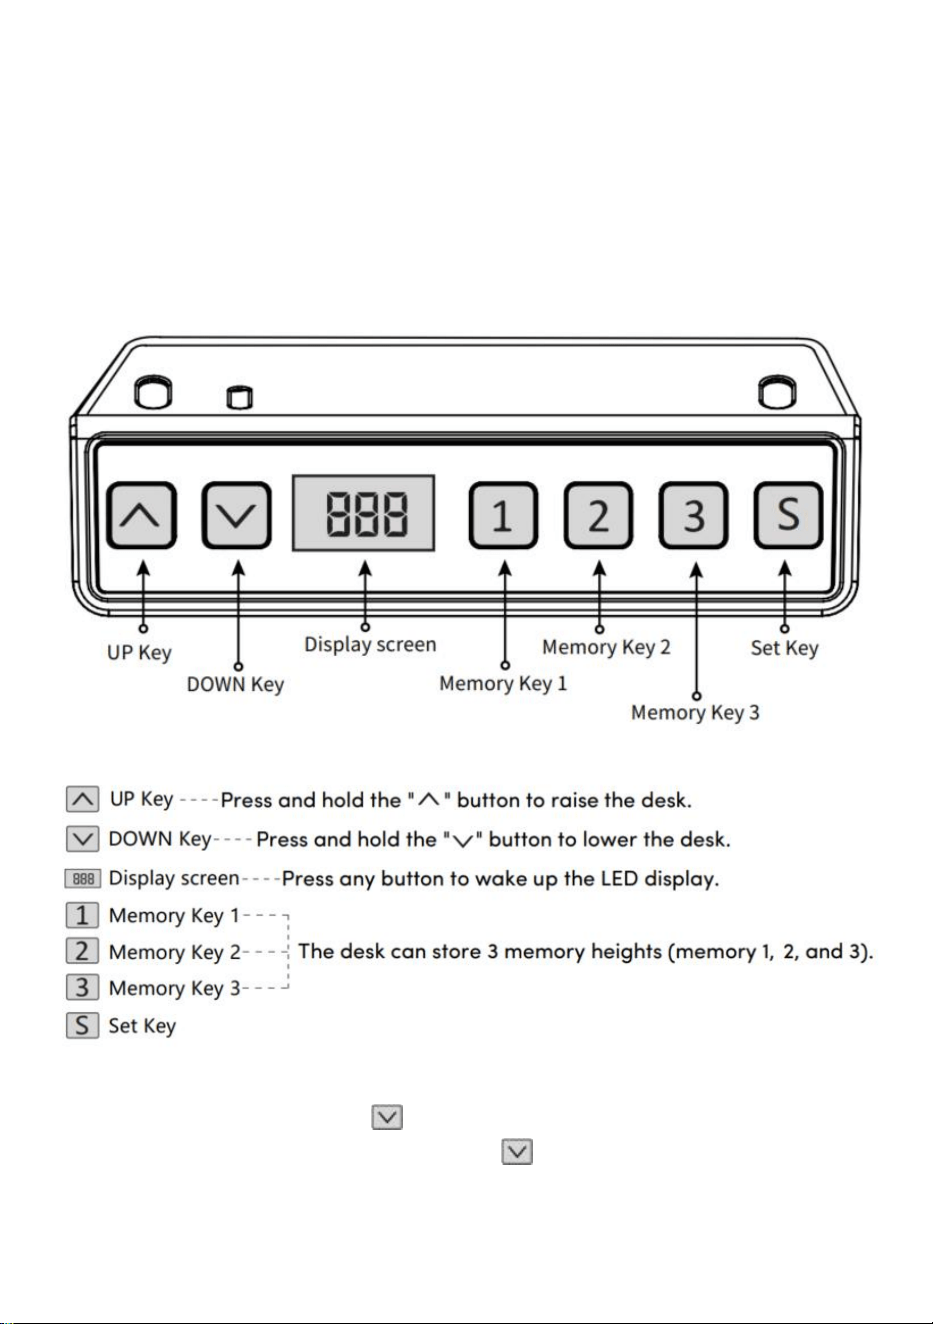
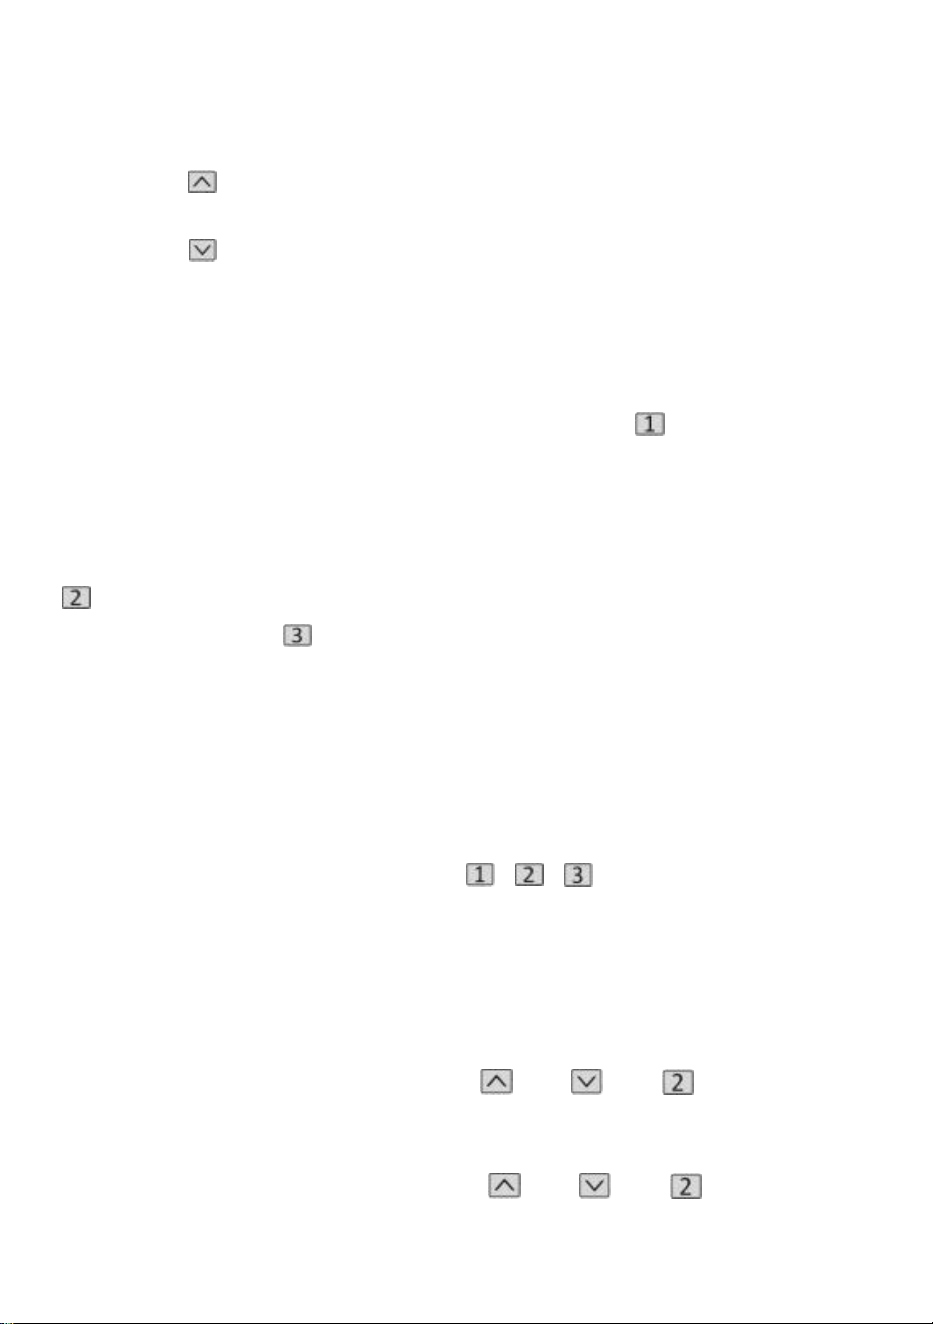
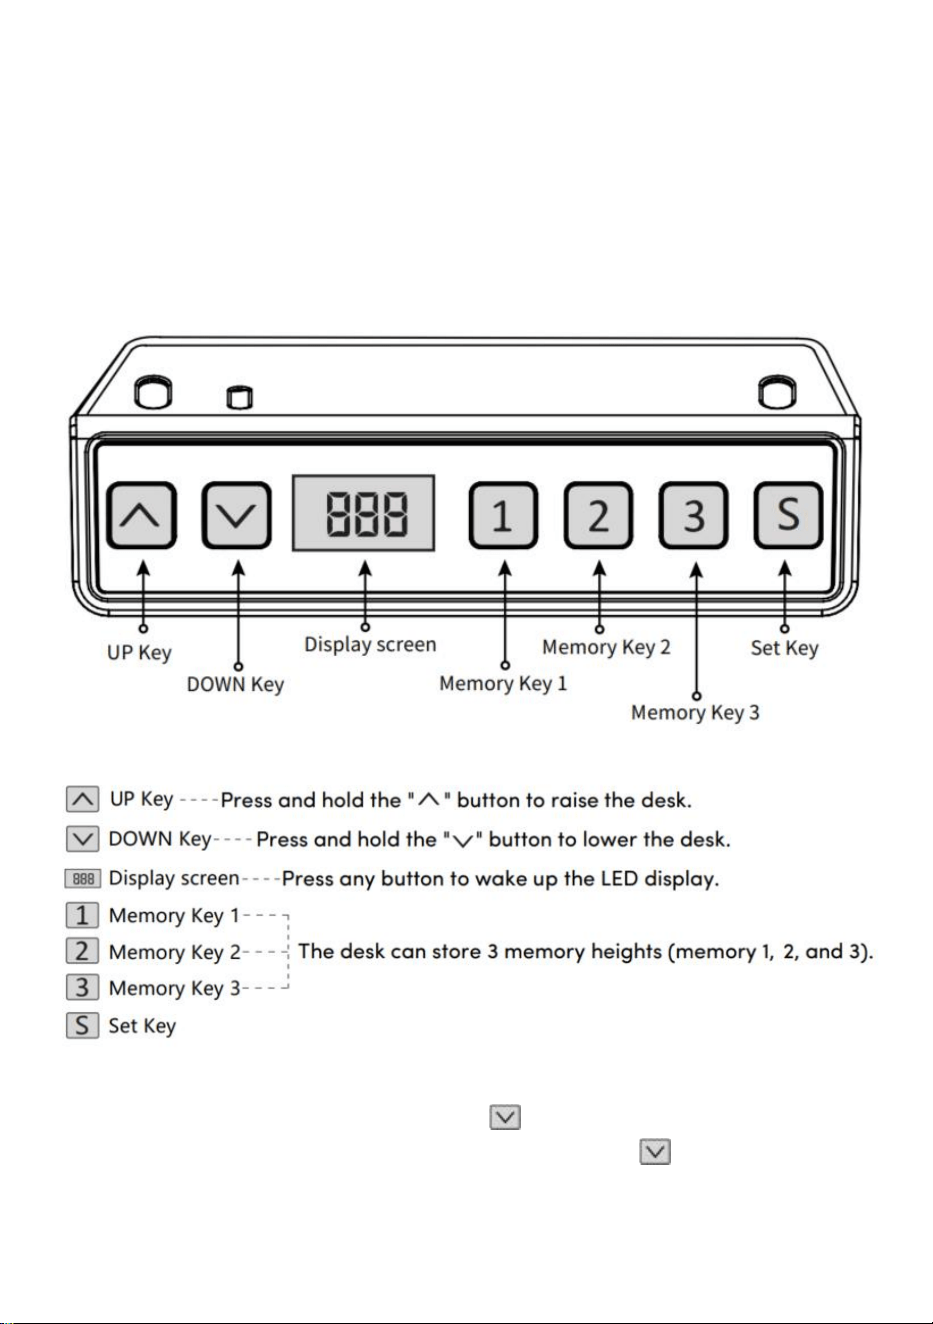
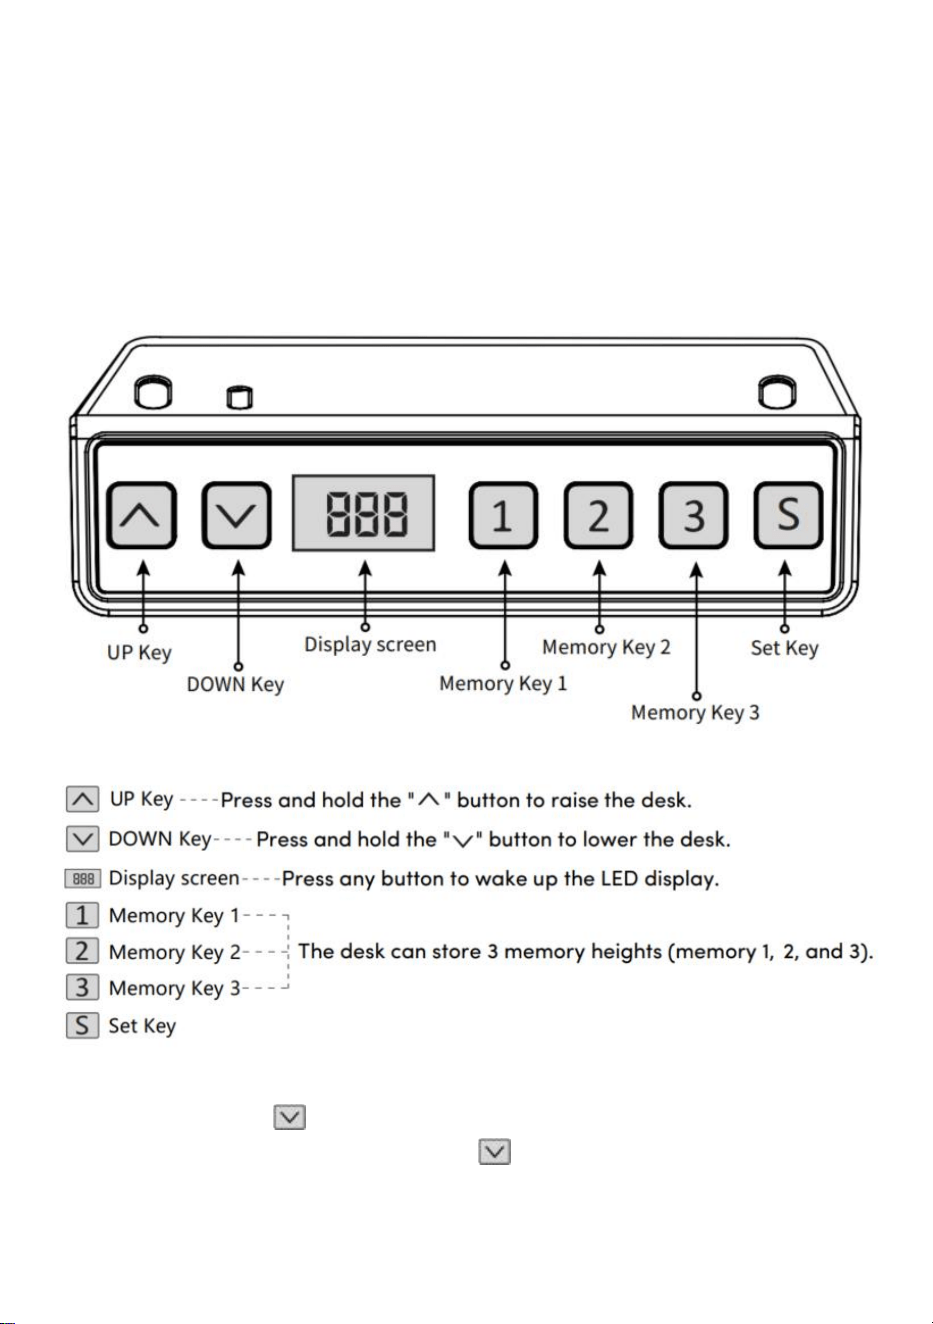
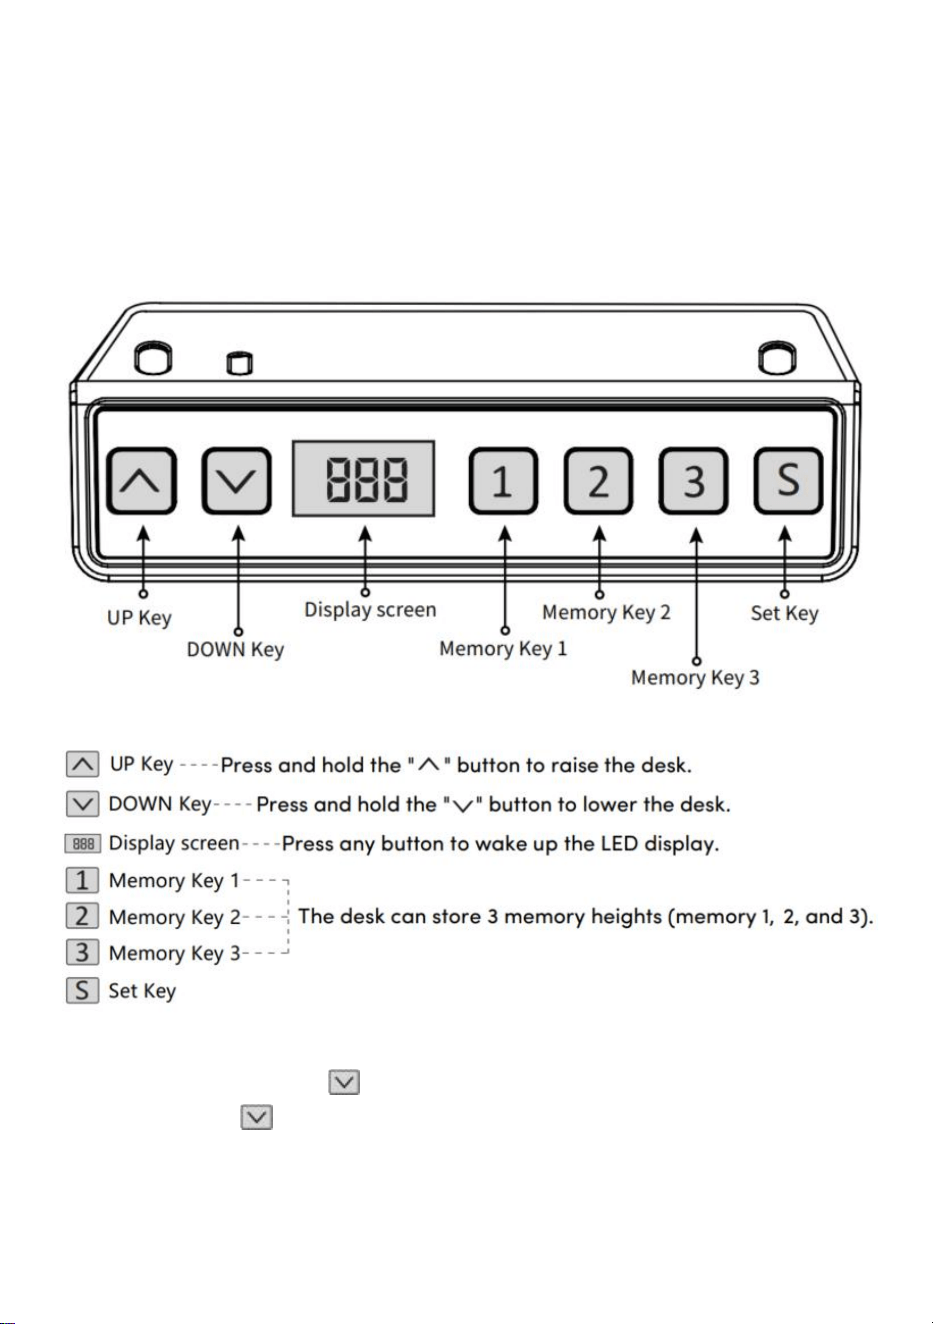
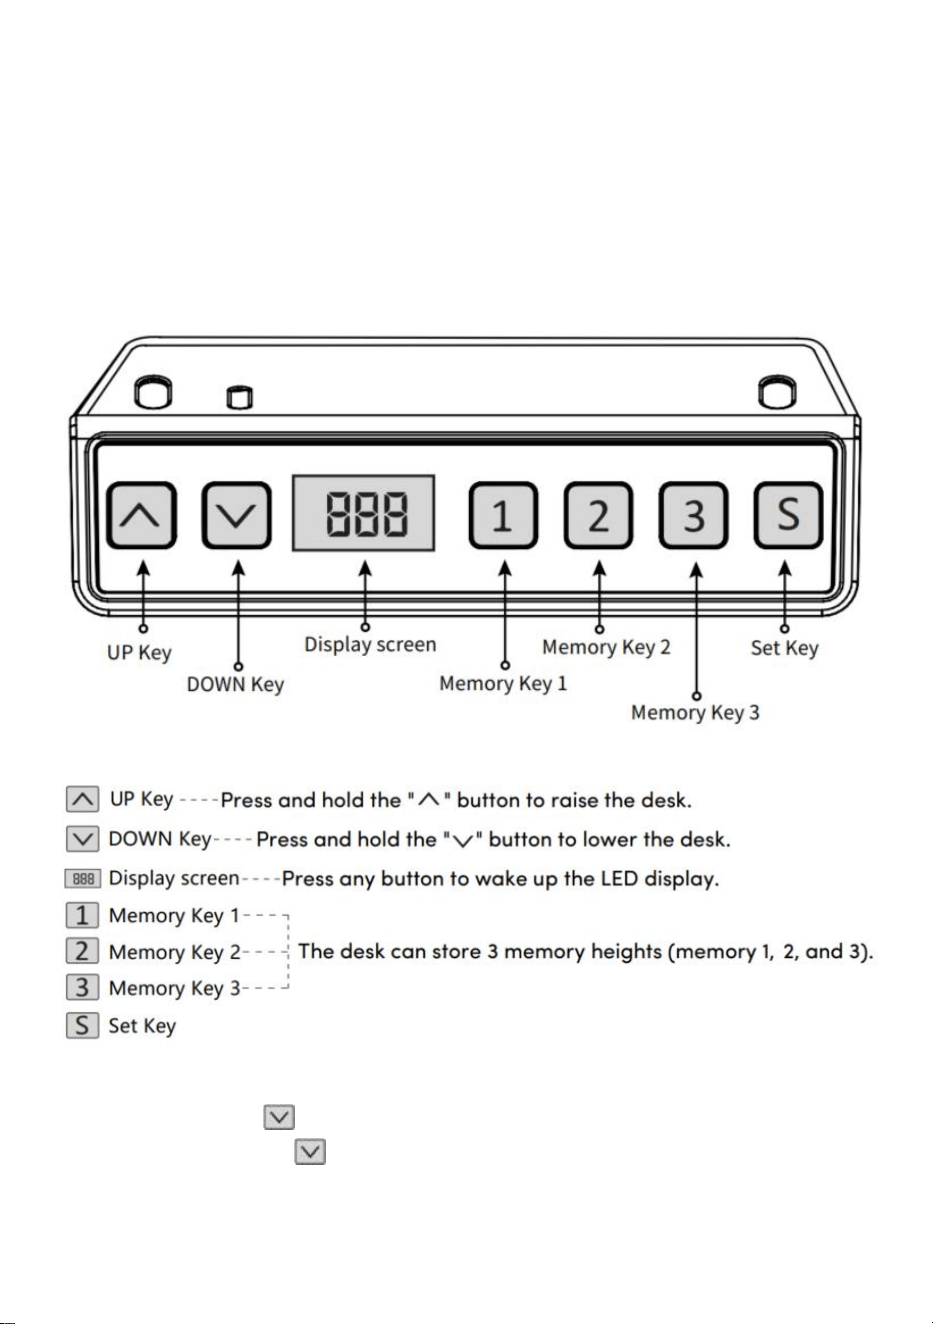
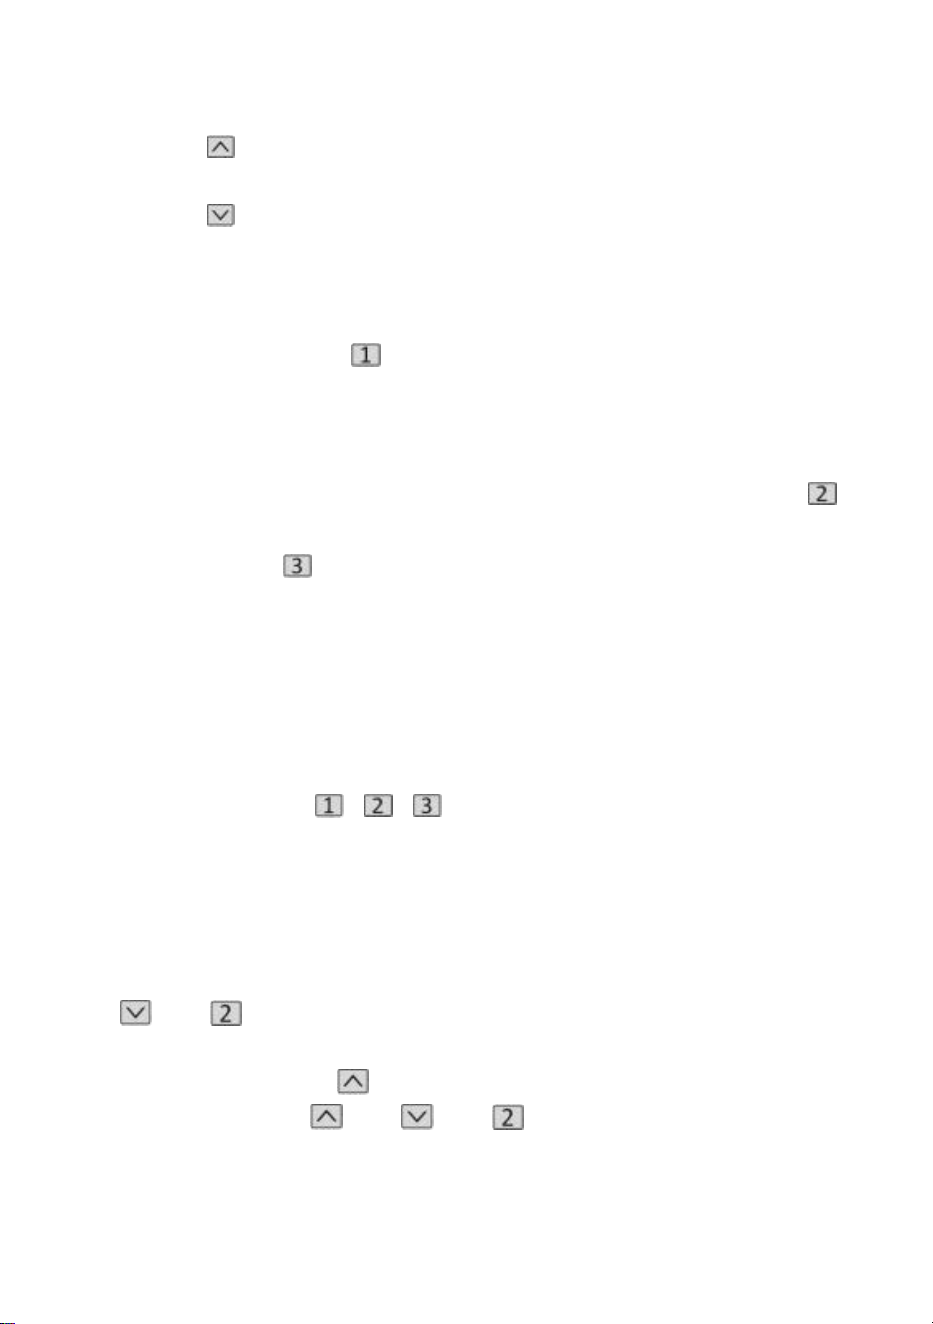
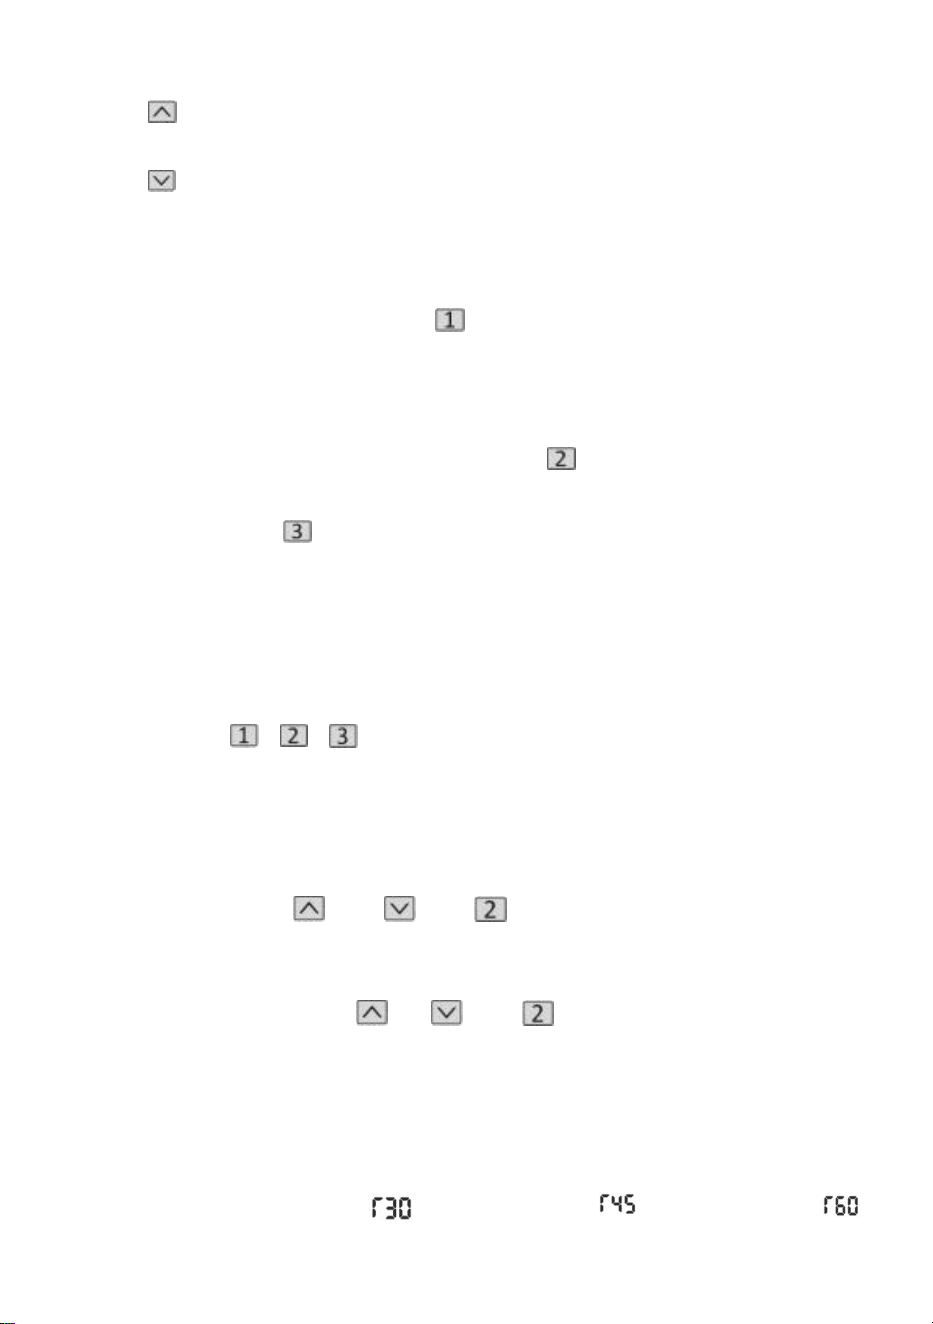
Lift function operation
When the " " key is pressed, the desktop runs upwards until it reaches
the highest point of the desktop.
When the " " key is pressed, the desktop runs down until it reaches the
lowest point of the desktop.
Memory Position Storage/Memory Location Run
1.Location storage
Press and hold the memory button " ", the buzzer will make a "beep"
sound, and the screen will flash "S-1" at the
same time, and the current altitude value will be displayed, and the
memory storage will be saved successfully. A total of 3heights can be
recorded at the same time (press and hold the memory button " ", the
screen flashes "S-2", press and
hold the memory
key " ", the screen flashes "S-3").
Note: If you set the memory location on the same number key again and
save it successfully, the record storage that was
previously set by the key will be overwritten.
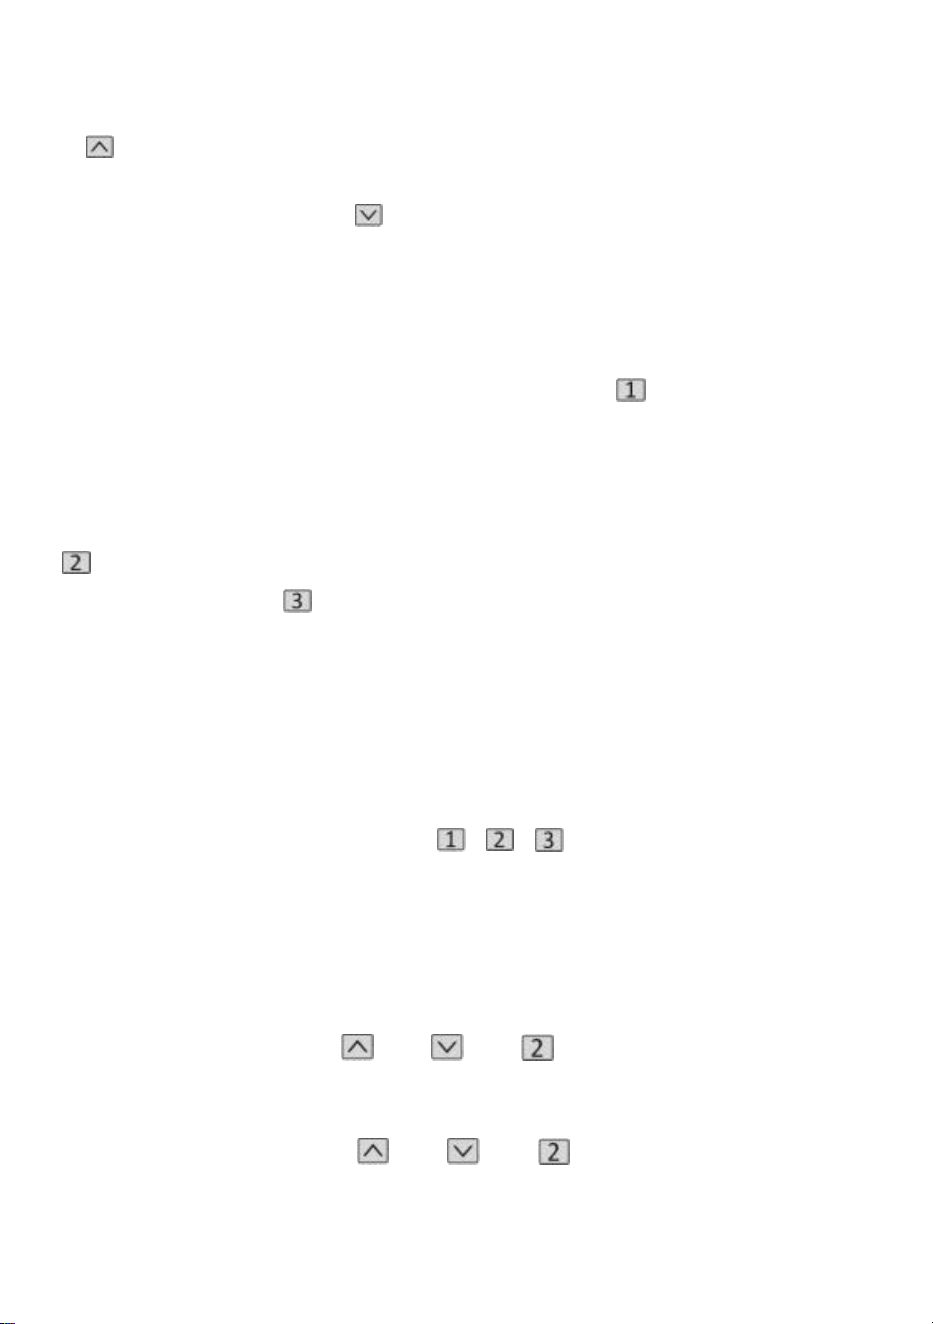
2.Memory position operation
Short press the " / / " button, the display flashes the memory position
height 2seconds, the desktop automatically runs to the height of the
memory position, and any key can stop running during operation.
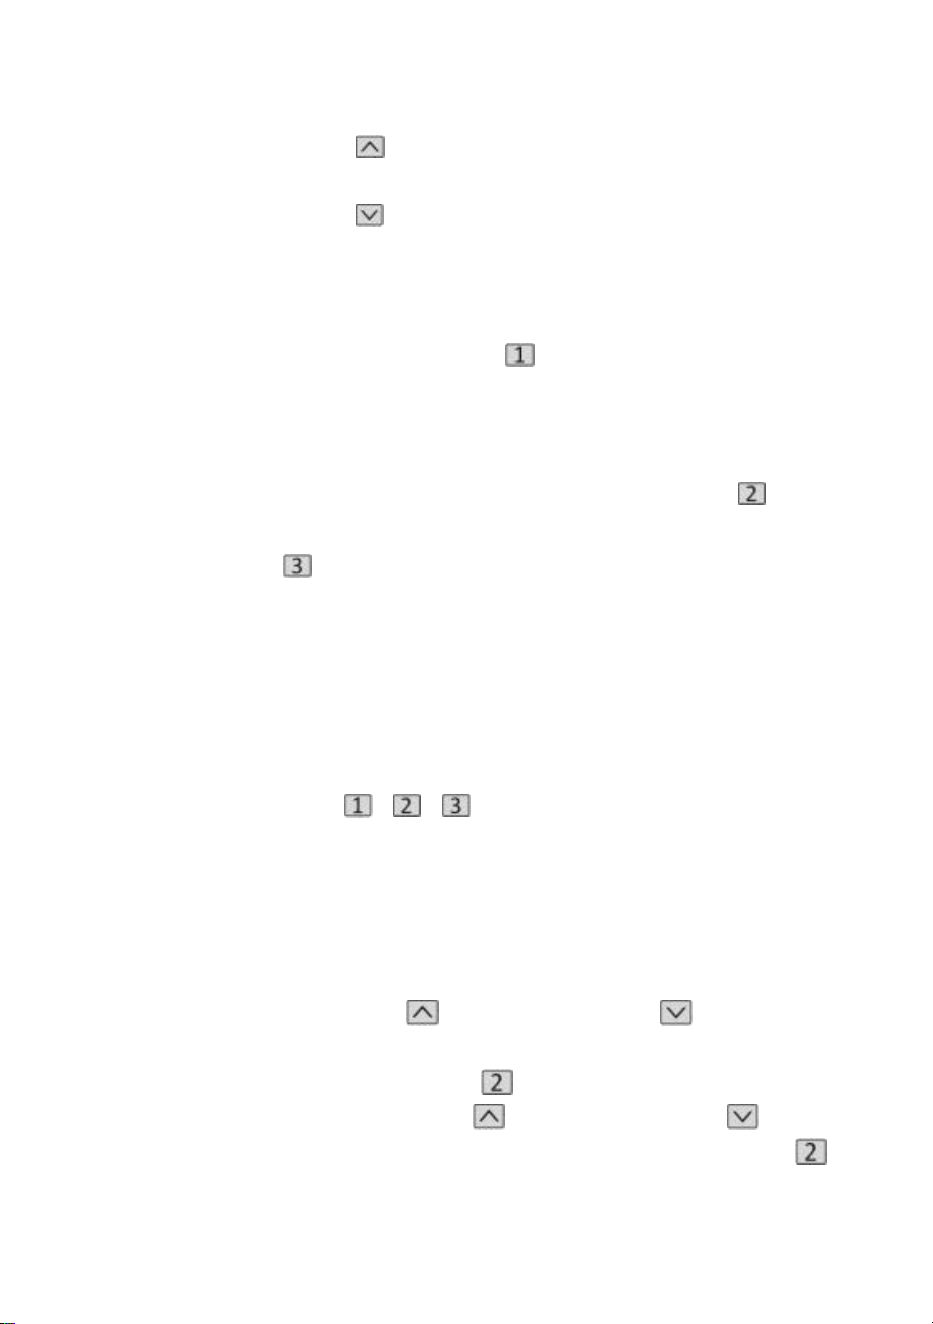
3.Lock and unlock
Lock: Press and hold " " + " " + " " at the same time for 5 seconds,
when the display shows " L ", it means that the system has been locked
and cannot lift the system.
Unlock: Press and hold " " + " " + " " at the same time for 5 seconds,
when the digital tube is displayed from "L" to the normal digital display, it
means that the system has been unlocked.
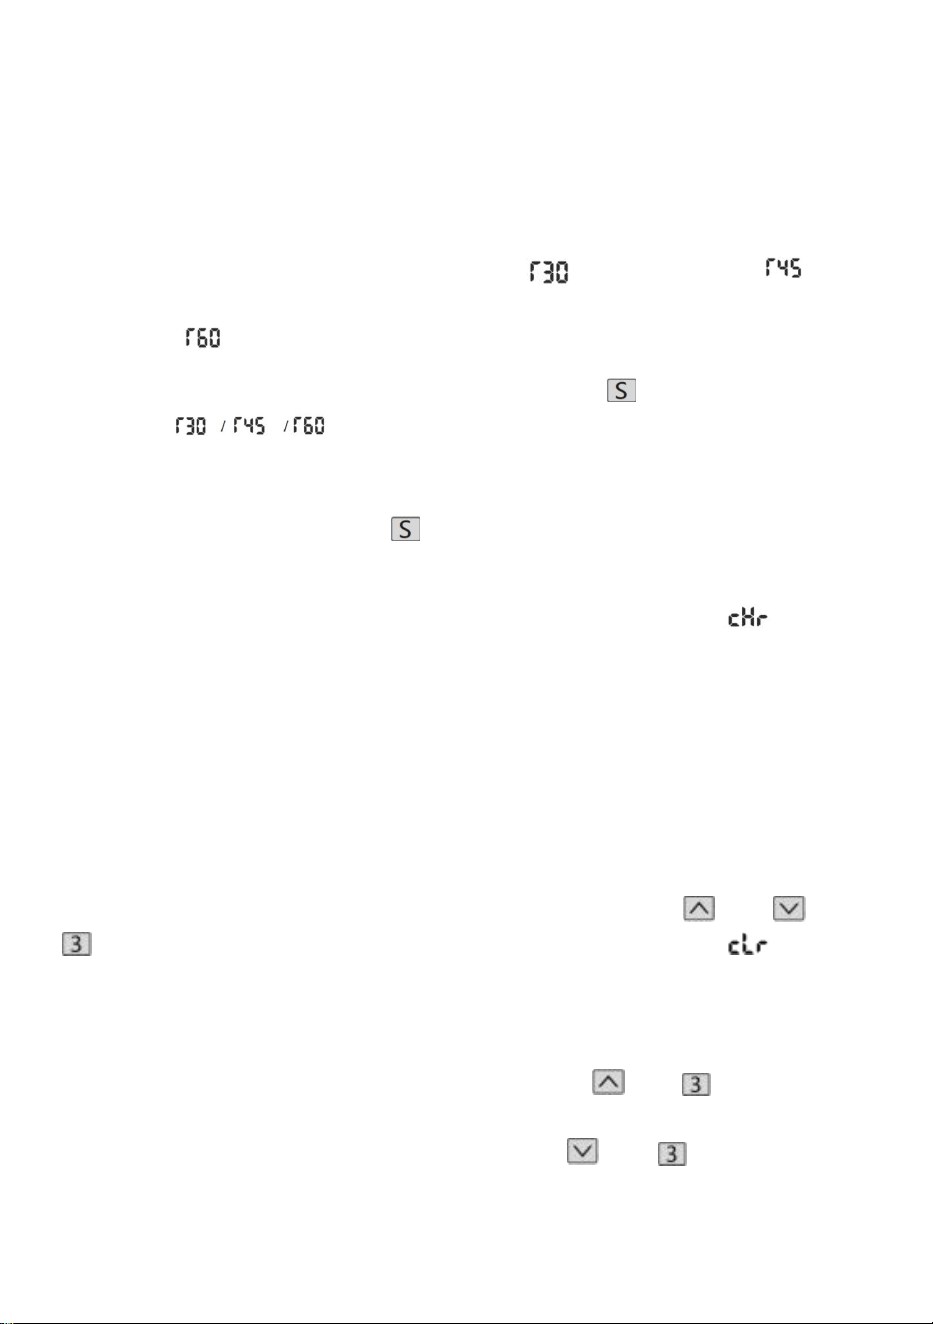
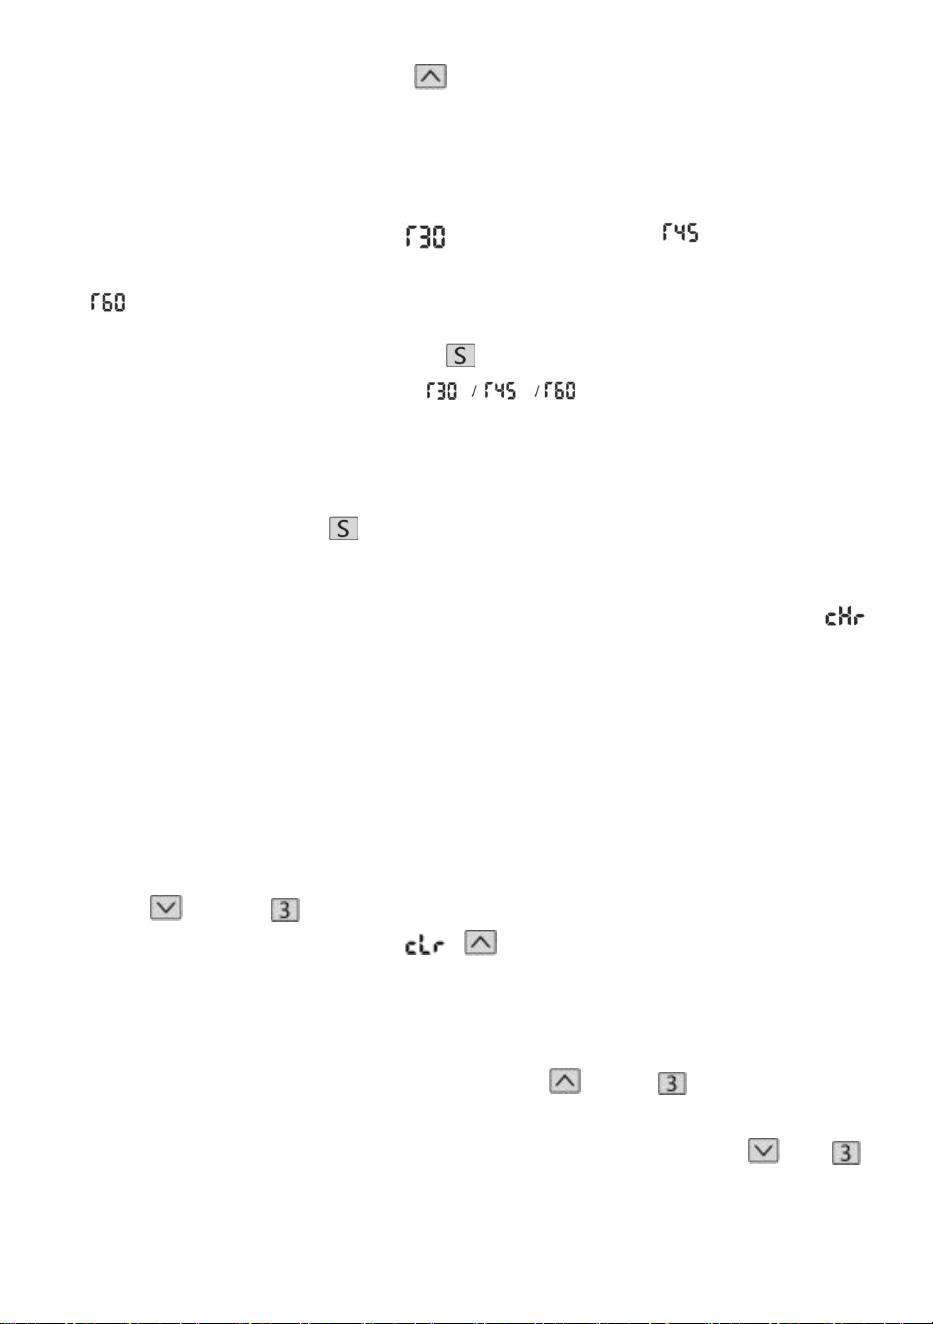
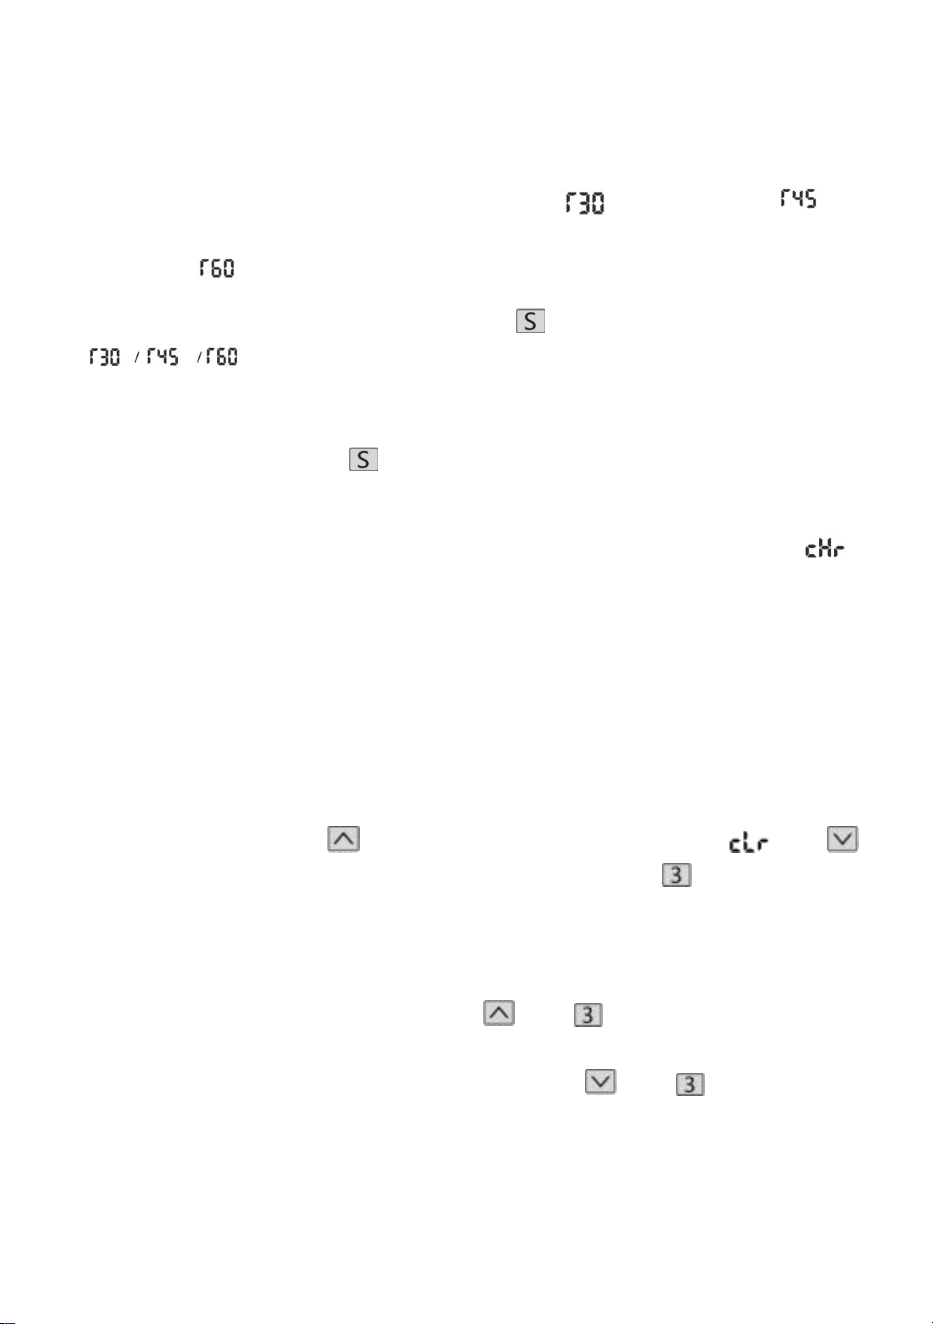
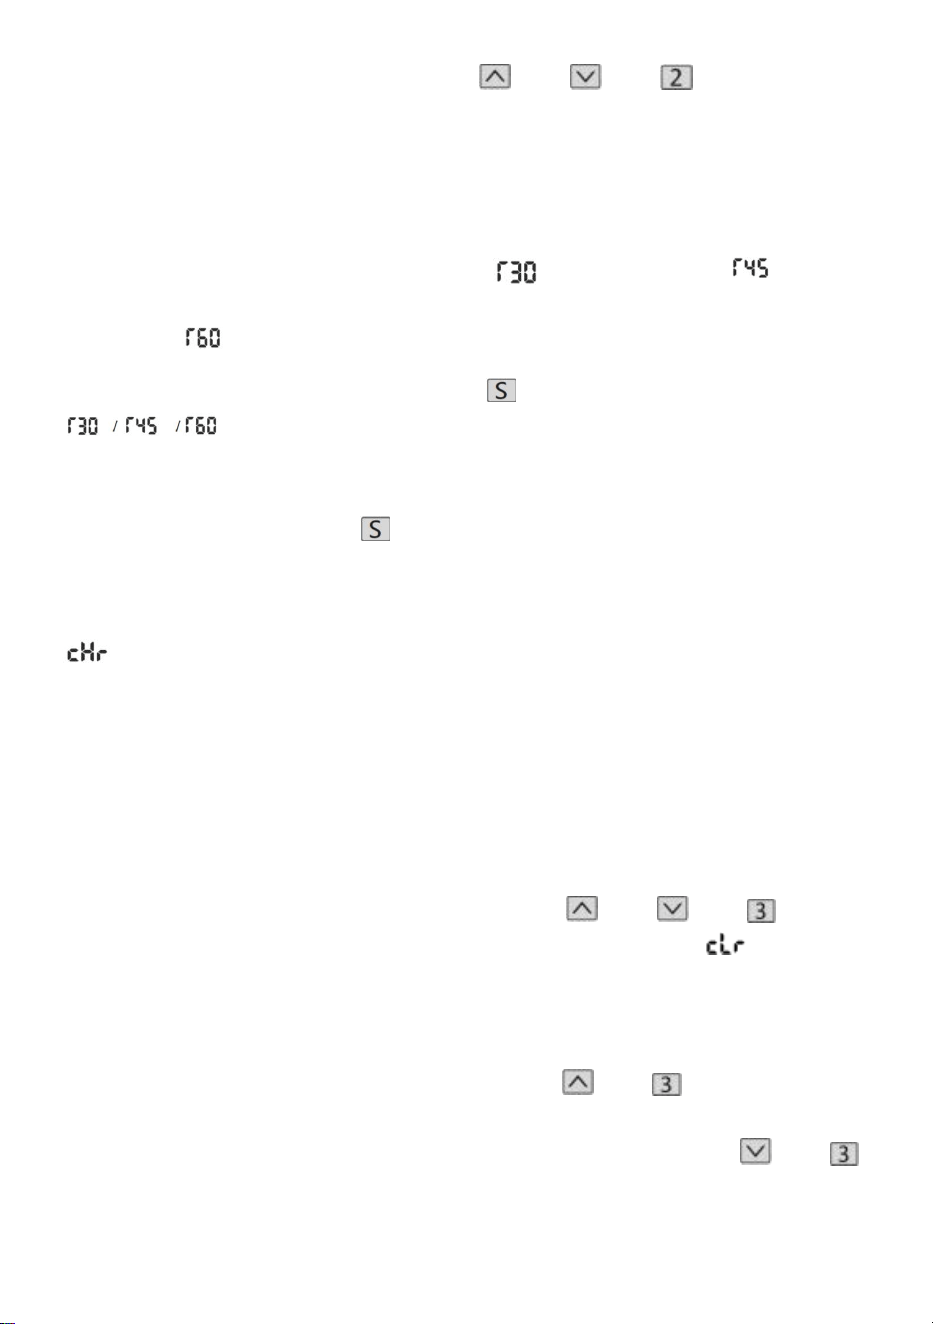
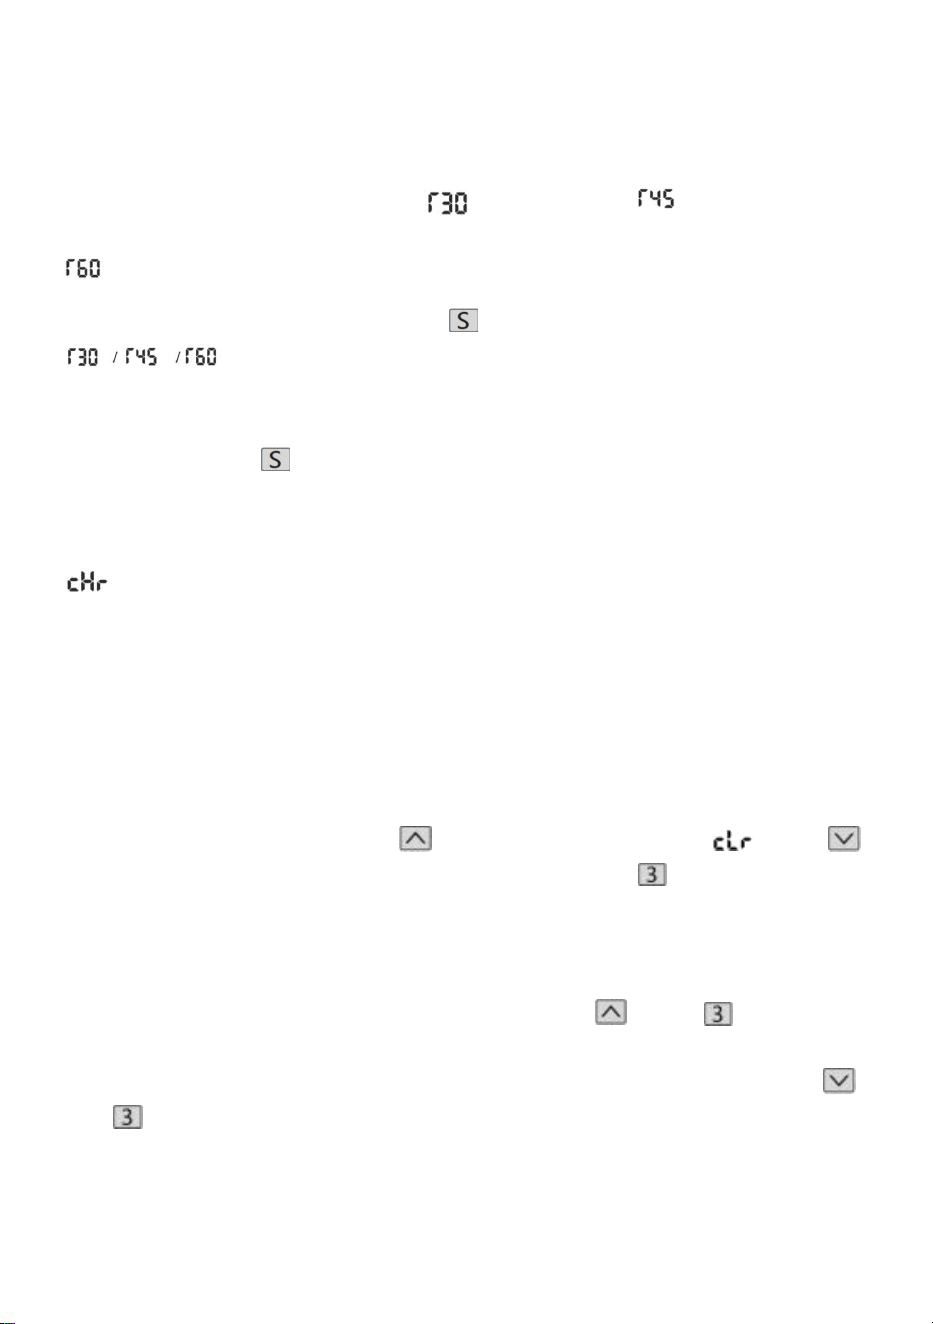
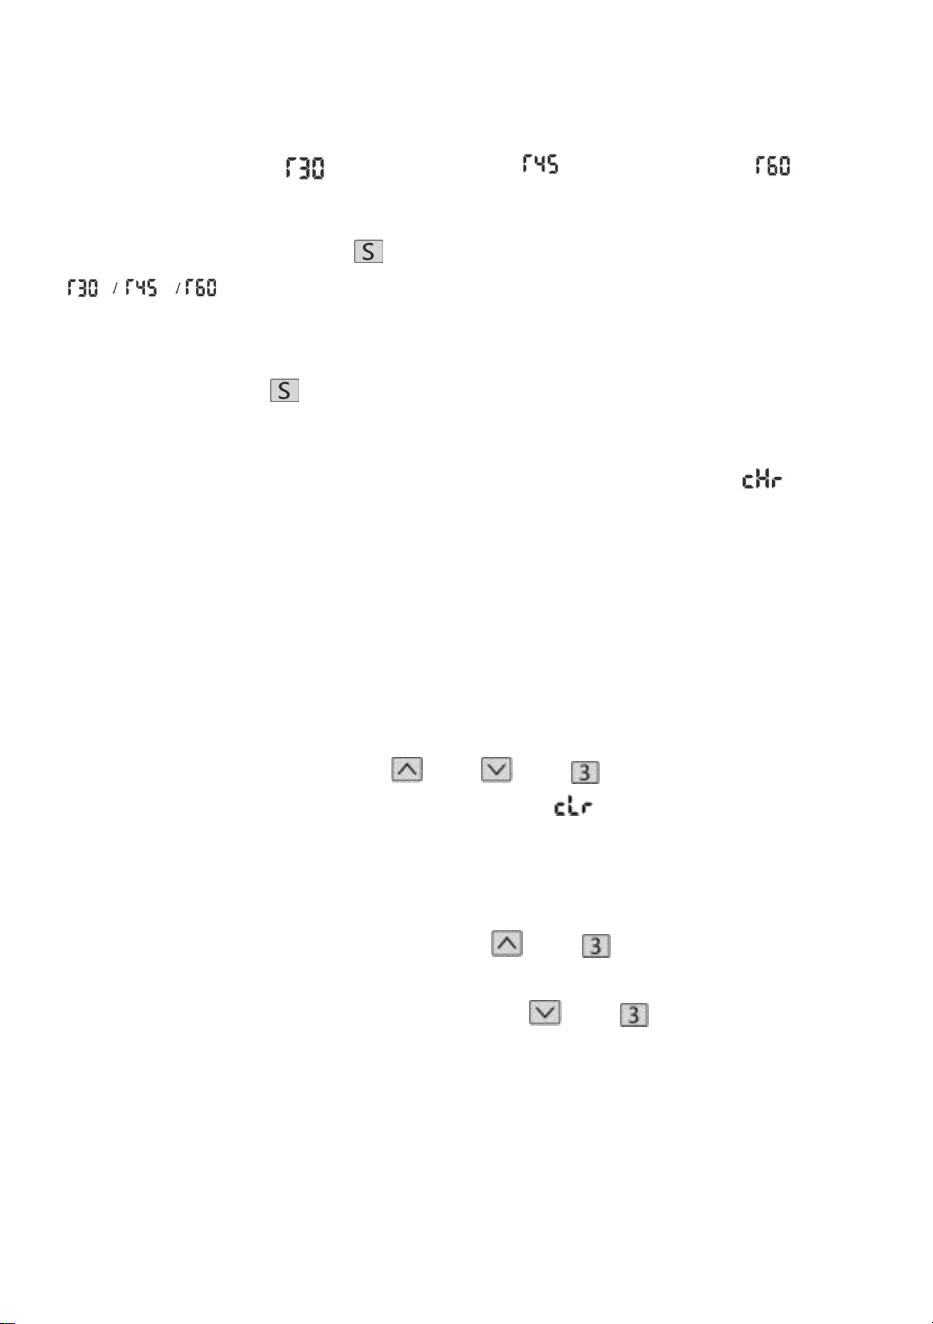
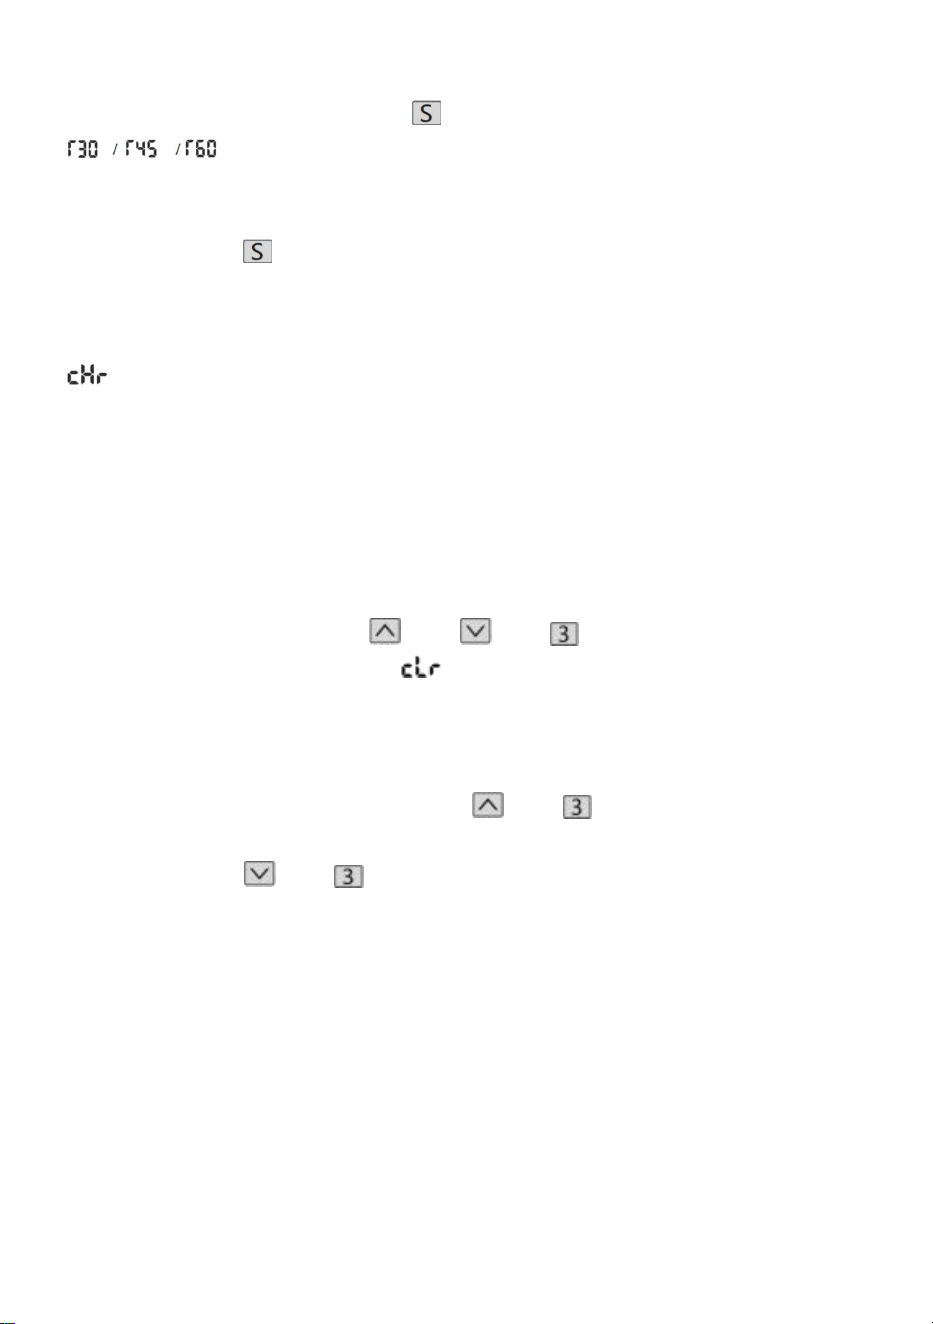
4.Sedentary reminder (countdown method)
Countdown time: 3 stops, " " = 30 minutes, " " = 45 minutes, " "
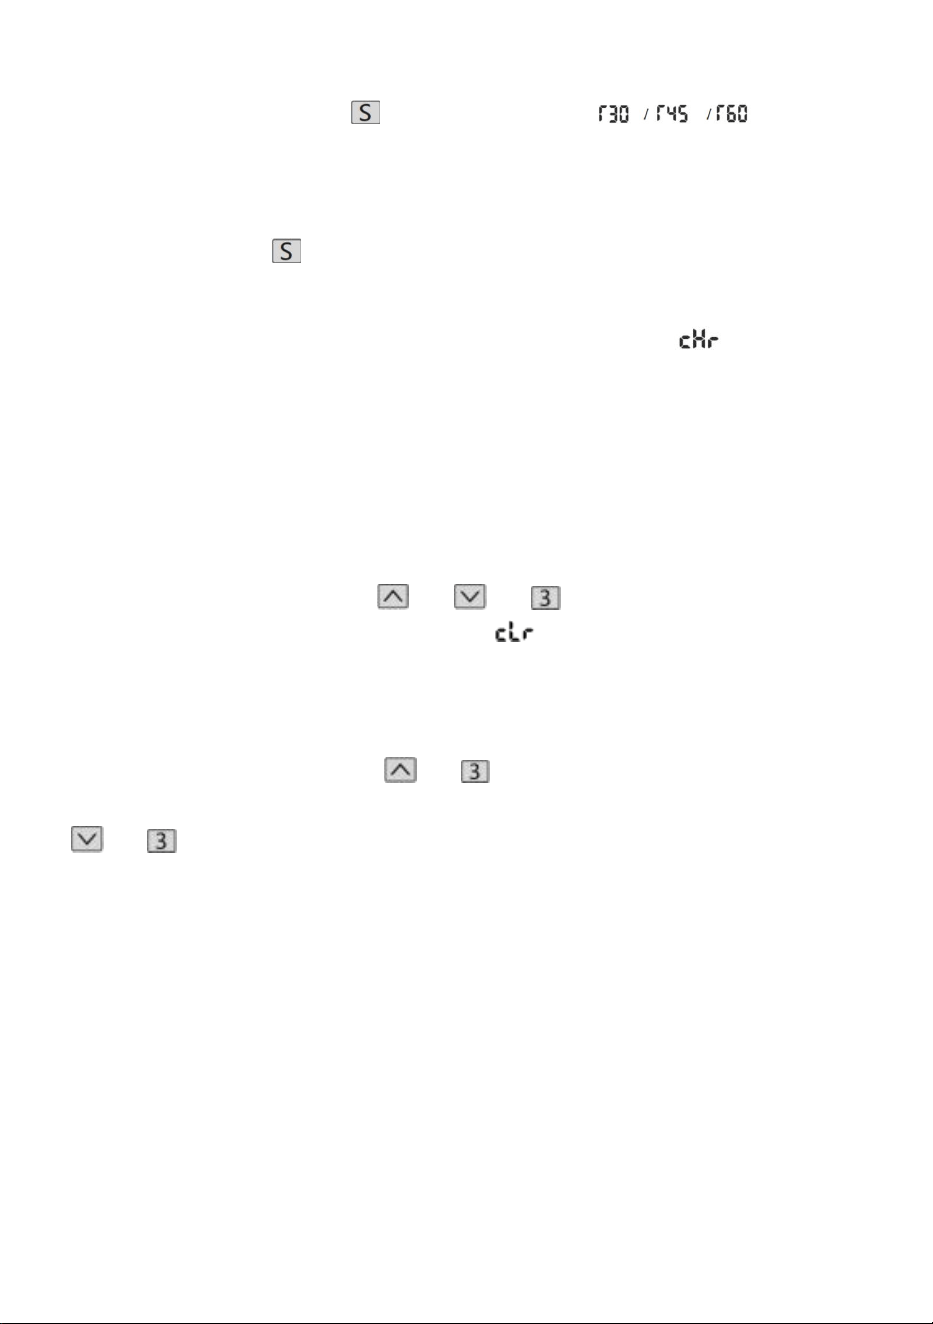
- 12 -
= 60 minutes.
Countdown start: Press " " screen to display " " in turn,
and the countdown will start.
Exit Countdown:
1. Short press the " " button, the display will display the number, and exit
the countdown.
2. When the countdown time is up, the display will flash " ", the flashing
time is 1 minute, press any button to stop the timer and exit.
3. After the countdown time is up, if there is no operation, it will
automatically exit the timer after reminding 3 times continuously every 5
minutes.
Restore factory settings
Method: Press and hold the " " + " " + " " buttons at the same time
for 5 seconds, and the screen displays " ", which means that the
parameter is successfully restored.
Metric Imperial switching
Metric (CM unit): Long press " " + " ", after the buzzer "tick", the screen
display will switch to the metric CM unit Imperial (inch as unit): Long press
" " + " ", after the buzzer "tick", the screen display will switch to imperial
inch units.

- 13 -
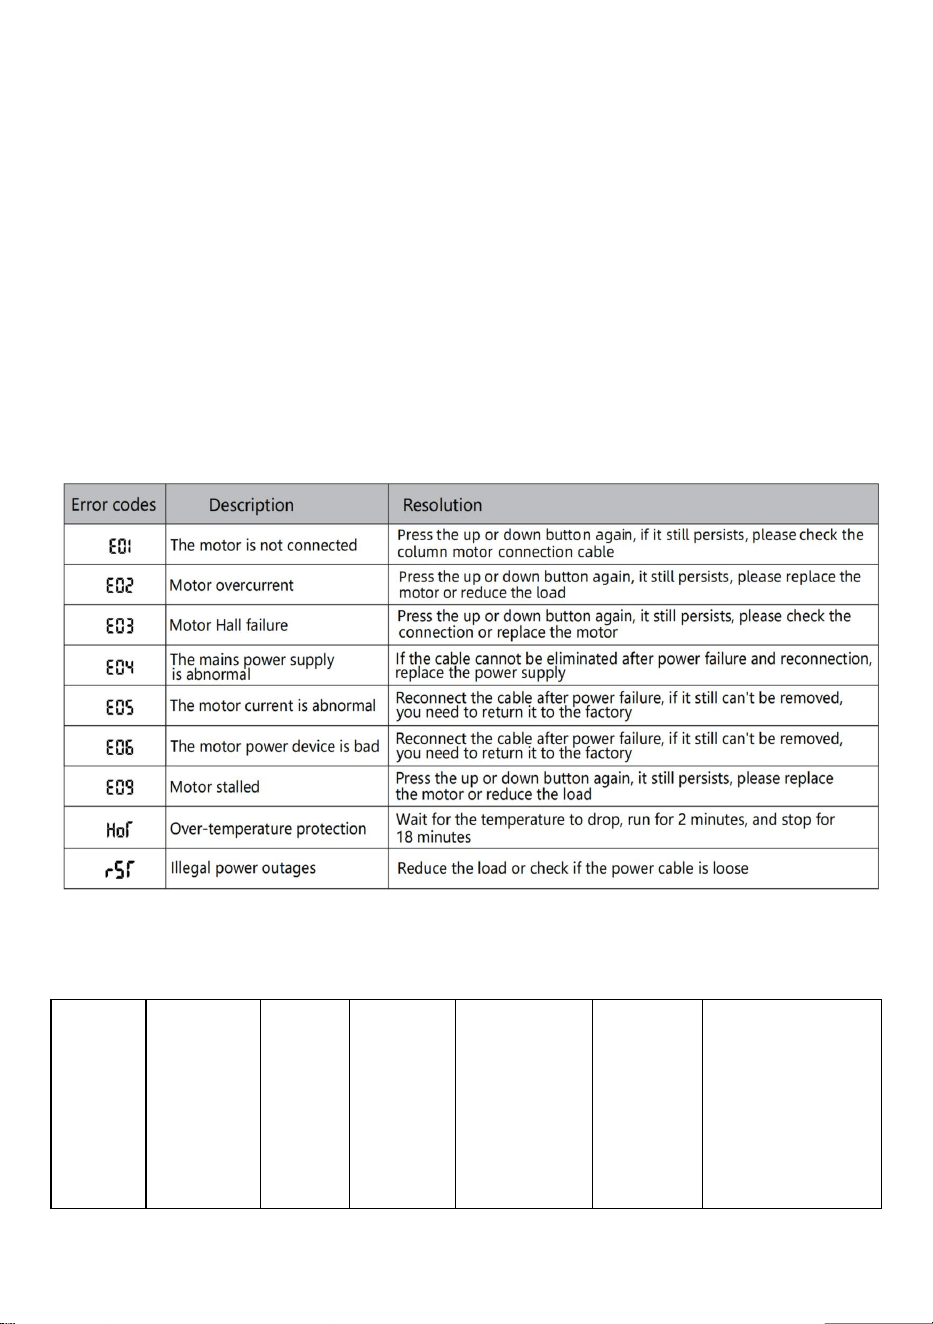
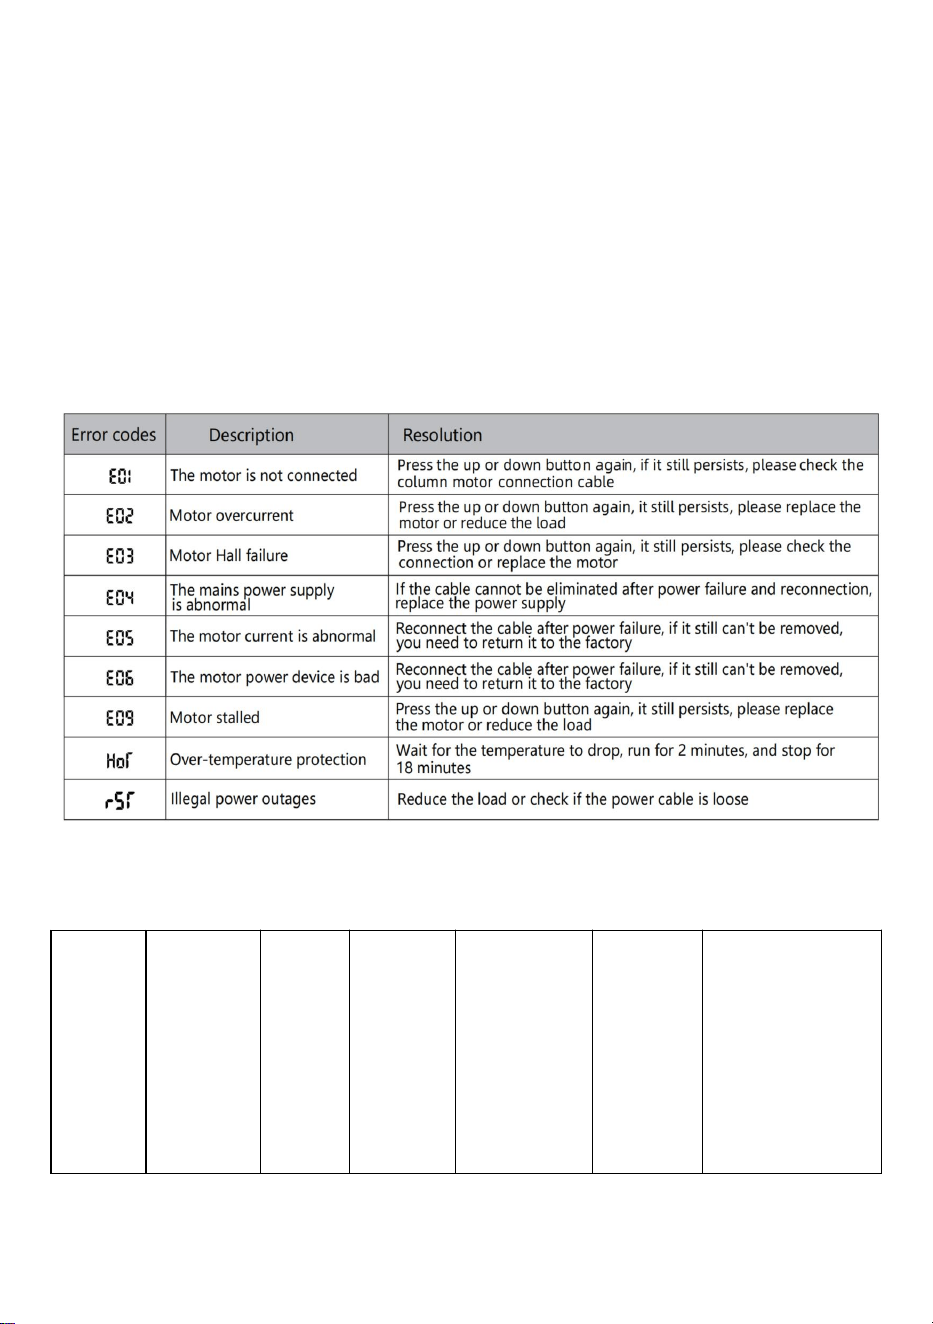
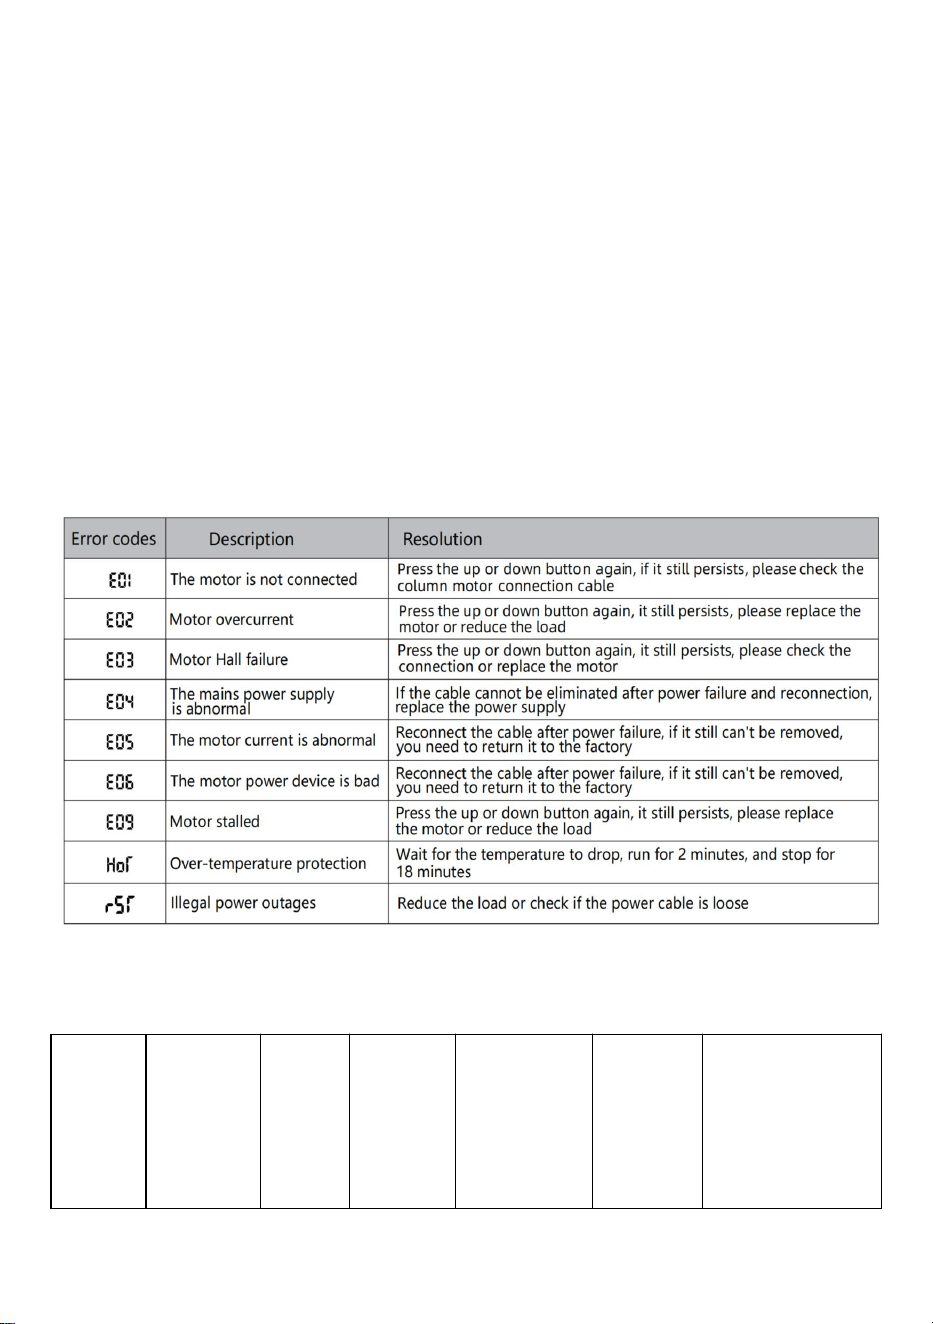
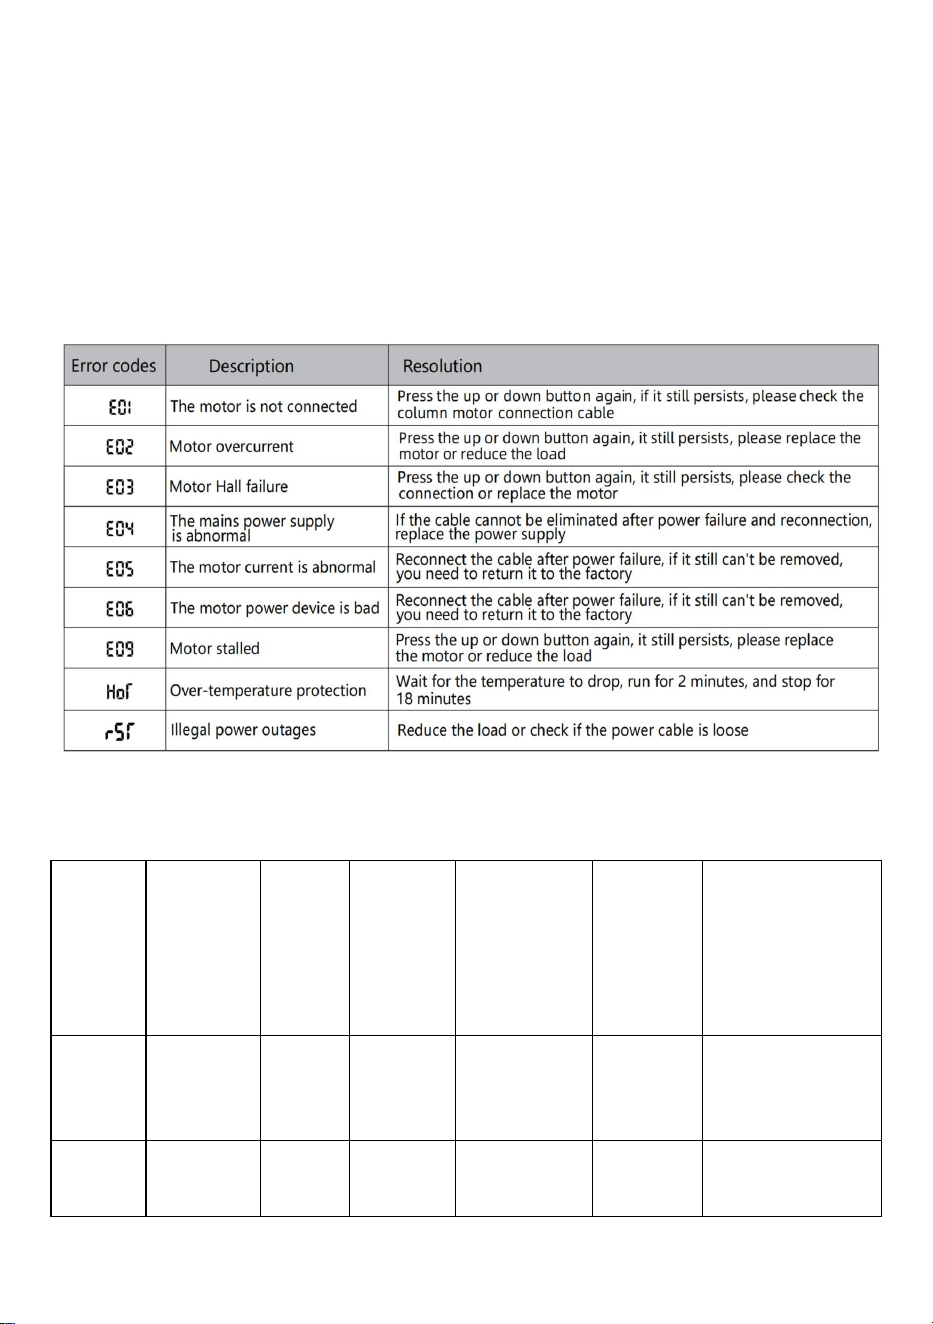
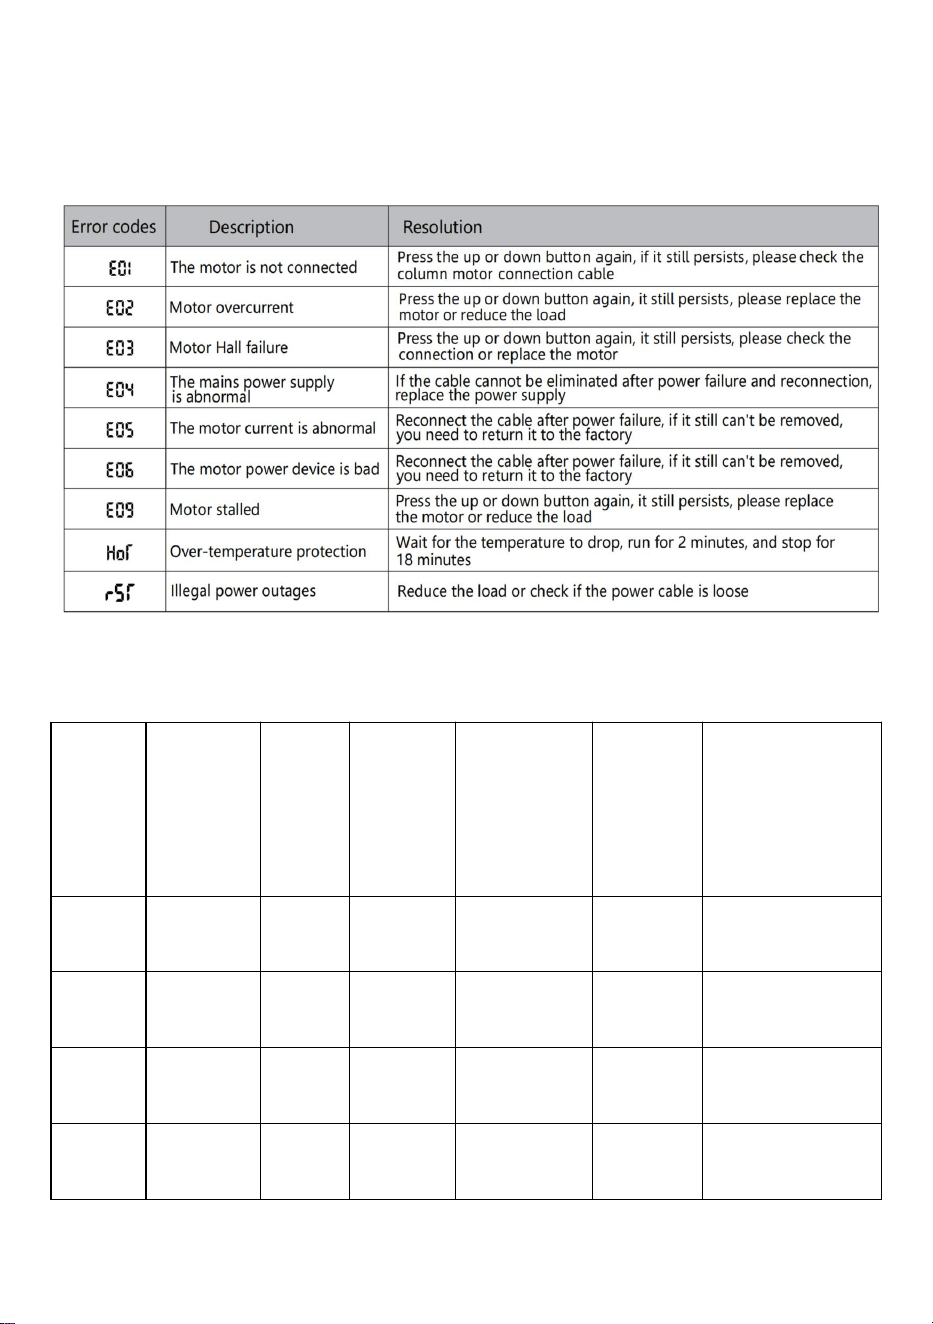
Error description
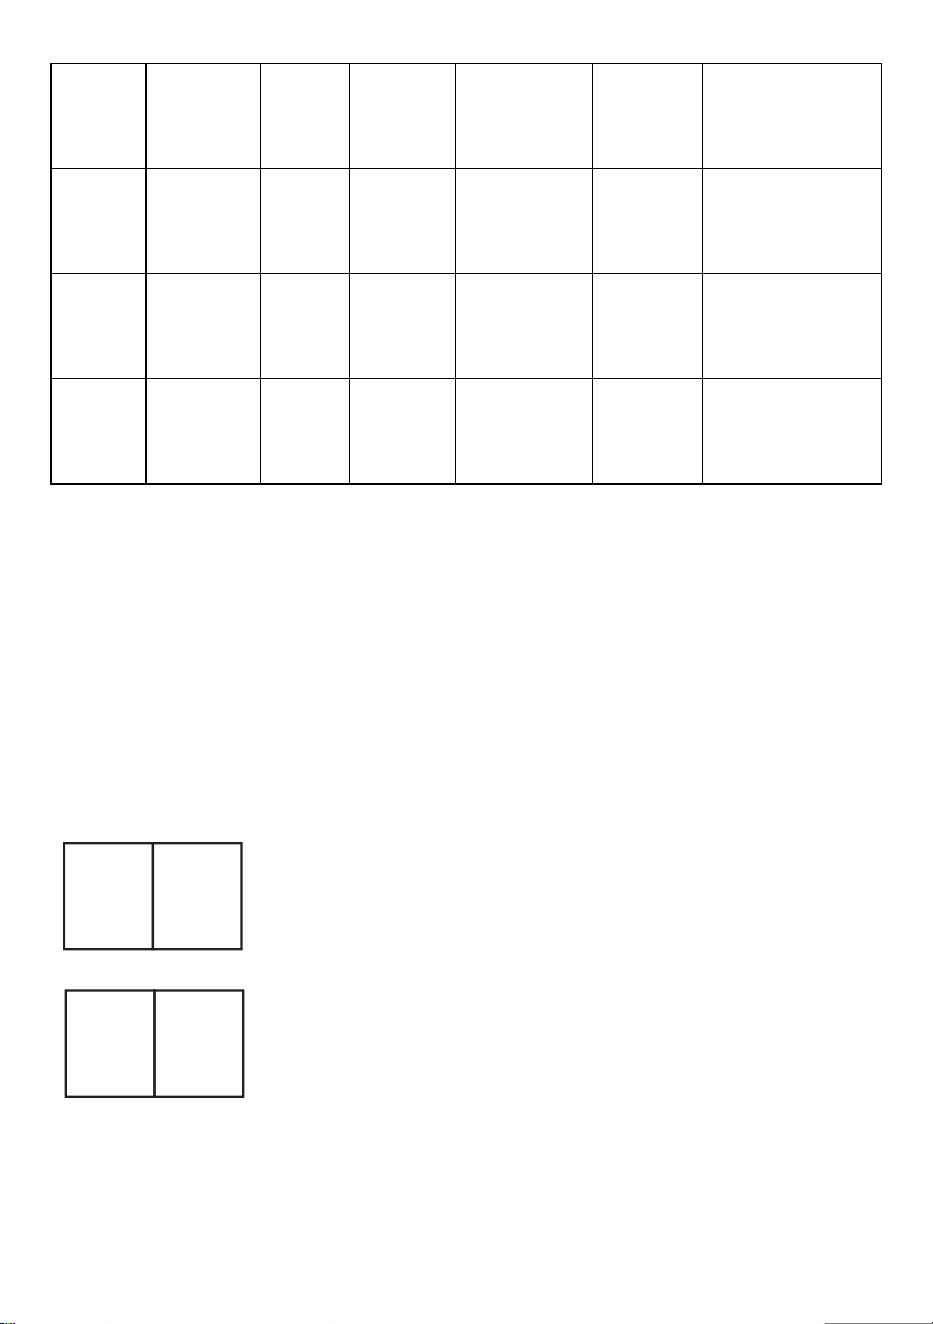
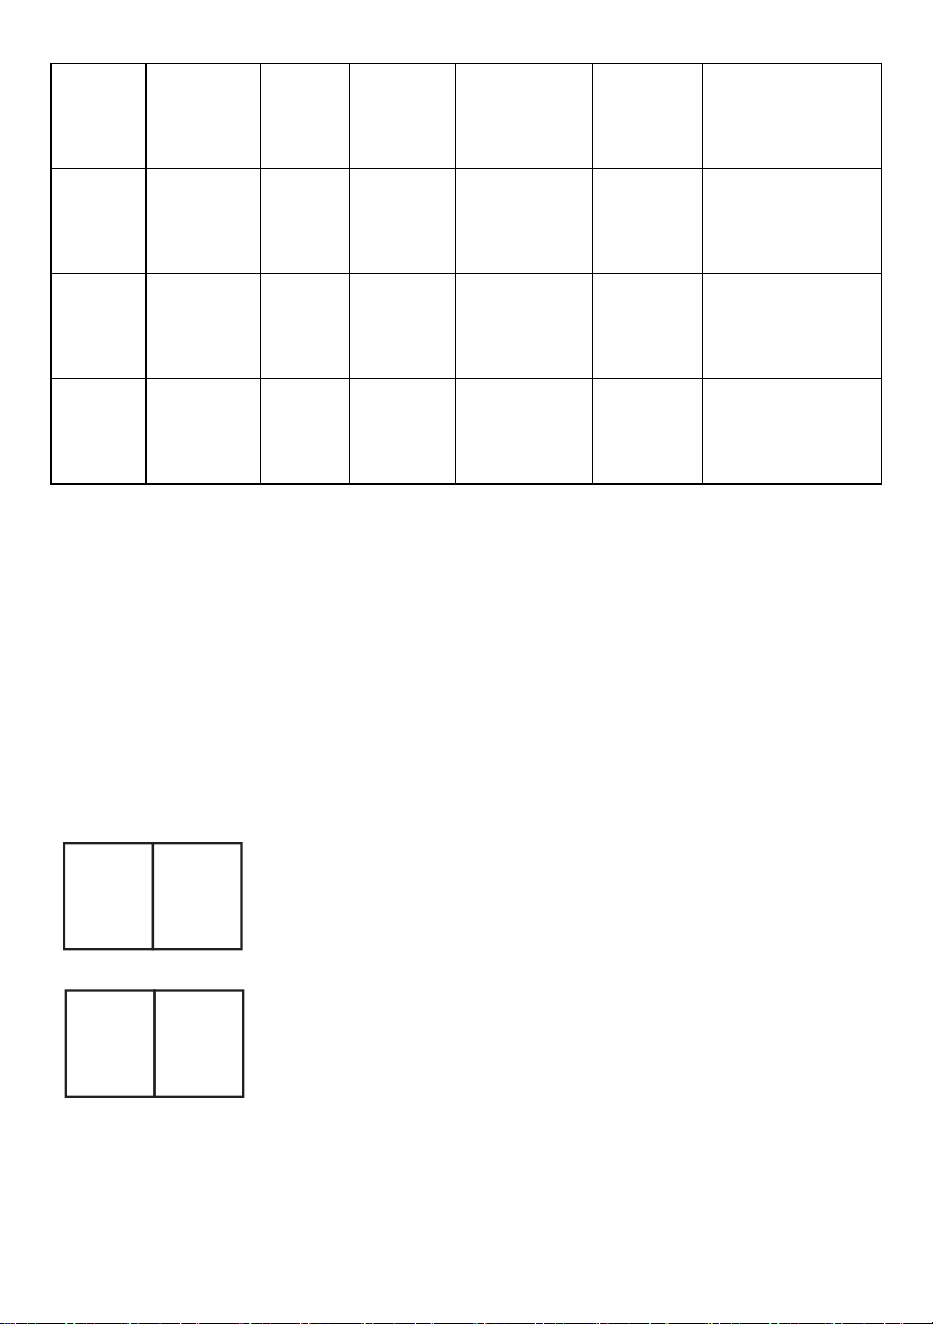
Parameter table
Model
Height
lifting
range
(cm)
Motor
Table
leg
level
Length
extension
range
(cm)
Size
(cm)
Table board
length(Sugge
sted size)
ZW-1
1
70-117
1pcs
two-sta
ge
90-135
90*58*
70
L:95-175cm
W:62-80cm
ZW-1
2
70-117
1pcs
two-sta
ge
90-135
90*58*
70
L:95-175cm
W:62-80cm
ZW-2
1
70-117
1pcs
two-sta
ge
95-158
95*58*
70
L:100-200cm
W:62-80cm
ZW-2
2
70-117
1pcs
two-sta
ge
95-158
95*58*
70
L:100-200cm
W:62-80cm
- 14 -
Address: Baoshanqu Shuangchenglu 803long 11hao 1602A-1609shi
Shanghai
Imported to AUS: SIHAO PTY LTD. 1 ROKEVA STREETEASTWOOD
NSW 2122 Australia
Imported to USA: Sanven Technology Ltd. Suite 250, 9166 Anaheim
Place, Rancho Cucamonga, CA 91730
REP
EC
SHUNSHUN GmbH
Römeräcker 9 Z2021,76351
Linkenheim-Hochstetten,Germany
REP
UK
Pooledas Group Ltd
Unit 5 Albert Edward House, The Pavilions
Preston, United Kingdom
Made In China


- 2 -
Technique Assistance et certificat de garantie électronique
www.vevor.com/support
STRUCTURE DE BUREAU DEBOUT
MODE D'EMPLOI
We continue to be committed to provide you tools with competitive price.
"Save Half", "Half Price" or any other similar expressions used by us only represents an
estimate of savings you might benefit from buying certain tools with us compared to the major
top brands and does not necessarily mean to cover all categories of tools offered by us. You
are kindly reminded to verify carefully when you are placing an order with us if you are
actually saving half in comparison with the top major brands.

- 1 -
Have product questions? Need technical support? Please feel free to
contact us:
Technical Support and E-Warranty Certificate
www.vevor.com/support
NEED HELP? CONTACT US!
This is the original instruction, please read all manual instructions
carefully before operating. VEVOR reserves a clear interpretation of our
user manual. The appearance of the product shall be subject to the
product you received. Please forgive us that we won't inform you again if
there are any technology or software updates on our product.
STANDING DESK FRAME

- 2 -
Liste des pieces

- 3 -
INSTALLATION

- 4 -

- 5 -

- 6 -

- 7 -

- 8 -

- 9 -
- 10 -
MODE D'EMPLOI
Remarque : Avant d'utiliser le bureau réglable en hauteur, il est
recommandé d'effectuer une réinitialisation pour s'assurer que les deux
colonnes de levage sont à la même hauteur, car elles peuvent avoir un
léger variations de l'usine (voir INSTRUCTIONS D'UTILISATION –
Réinitialisation).
Réinitialiser
Appuyez longuement sur la touche " ", après avoir exécuté le bureau
jusqu'au point le plus bas, maintenez la touche " " jusqu'à ce que
l'écran
- 11 -
clignote « --- » et le buzzer émet un « bip », l'écran affiche la valeur de
hauteur la plus basse et l'opération de réinitialisation est réussi.
Fonctionnement de la fonction de levage
Lorsque la touche " " est enfoncée, le bureau monte vers le haut jusqu'à
atteindre le point le plus élevé du bureau.
Lorsque la touche " " est enfoncée, le bureau s'exécute jusqu'à ce qu'il
atteigne le point le plus bas du bureau.
Stockage de la position mémoire/exécution de l'emplacement
mémoire
1 . Stockage de localisation
Appuyez et maintenez enfoncé le bouton mémoire " ", le buzzer
émettra un "bip" et l'écran fera clignoter "S-1" à la fin.
en même temps, la valeur d'altitude actuelle sera affichée et le stockage en
mémoire sera enregistré avec succès. Un total de 3 hauteurs peuvent être
enregistrées en même temps (appuyez et maintenez le bouton mémoire "
", l'écran clignote "S-2", appuyez et maintenez
maintenez la touche
mémoire " ", l'écran clignote "S-3").
Remarque : Si vous définissez à nouveau l'emplacement mémoire sur la
même touche numérique et que vous l'enregistrez avec succès, le
stockage d'enregistrement qui a été
précédemment défini par la touche sera écrasé.
2 . Fonctionnement de la position mémoire
Appuyez brièvement sur le bouton « / / », l'écran fait clignoter la
hauteur de la position mémoire pendant 2 secondes, le bureau fonctionne
automatiquement à la hauteur de la position mémoire et n'importe quelle
touche peut cesser de fonctionner pendant le fonctionnement.
3 . Verrouiller et déverrouiller
Verrouillage : Appuyez et maintenez " " + " " + " " en même
temps pendant 5 secondes, lorsque l'écran affiche " L ", cela signifie que le
système a été verrouillé et ne peut pas soulever le système.
Déverrouiller : appuyez et maintenez " " + " " + " " en même
- 12 -
temps pendant 5 secondes, lorsque le tube numérique s'affiche de " L " à
l'affichage numérique normal, cela signifie que le système a été
déverrouillé.
4. Rappel sédentaire (méthode de compte à rebours)
Temps de compte à rebours : 3 arrêts, " " = 30 minutes, " " = 45
minutes, " " = 60 minutes.
Démarrage du compte à rebours : appuyez sur l'écran " " pour
afficher " " tour à tour et le compte à rebours commencera.
Compte à rebours de sortie :
1. Appuyez brièvement sur le bouton « », l'écran affichera le numéro et
quittera le compte à rebours.
2. Lorsque le compte à rebours est écoulé, l'écran clignote " ", le
temps de clignotement est de 1 minute, appuyez sur n'importe quel bouton
pour arrêter le minuterie et sortie.
3. Une fois le compte à rebours écoulé, s'il n'y a aucune opération, il
quittera automatiquement la minuterie après avoir rappelé 3 fois en continu
toutes les 5 minutes.
Rétablir les paramètres d'usine
Méthode : appuyez et maintenez enfoncés les boutons " " + " " + "
" en même temps pendant 5 secondes, et l'écran affiche " ", ce qui
signifie que le paramètre est restauré avec succès .
Commutation métrique impériale
Métrique (unité CM) : appuyez longuement sur " " + " ", après le "tic"
du buzzer, l'affichage de l'écran passera à l'unité métrique CM Impérial
(pouces en unité) : appuyez longuement sur " " + " ", après le "tic"
du buzzer, l'affichage de l'écran passera aux unités en pouces impériaux .
- 13 -
Erreur de description
Tableau des paramètres
Modèl
e
Plage
de
levage
en
hauteur
(cm)
Mote
ur
Niveau
des
pieds
de
table
Plage
d'extensio
n de
longueur
(cm)
Taille
(cm)
Longueur du
tableau (taille
suggérée)
- 14 -
ZW-1
1
70-117
1
PCS
en
deux
étapes
90-135
90*58*
70
L:95-175 cm
L:62-80 cm
ZW-1
2
70-117
1
PCS
en
deux
étapes
90-135
90*58*
70
L:95-175 cm
L:62-80 cm
ZW-2
1
70-117
1
PCS
en
deux
étapes
95-158
95*58*
70
L:100-200 cm
L:62-80 cm
ZW-2
2
70-117
1
PCS
en
deux
étapes
95-158
95*58*
70
L:100-200 cm
L:62-80 cm
Adresse : Baoshanqu Shuangchenglu 803long 11hao 1602A-1609shi
Shanghai
Importé en Australie : SIHAO PTY LTD . 1 ROKEVA STREETASTWOOD
NSW 2122 Australie
Importé aux États-Unis : Sanven Technology Ltd. Suite 250, 9166
Anaheim Place, Rancho Cucamonga, CA 91730
REP
EC
SHUNSHUN GmbH
Römeräcker 9 Z2021,76351
Linkenheim-Hochstetten,Germany
REP
UK
Pooledas Group Ltd
Unit 5 Albert Edward House, The Pavilions
Preston, United Kingdom
Fabriqué en Chine

- 15 -


- 2 -
Technisch Support- und E-Garantie-Zertifikat www.vevor.com/support
STEHPULTGESTELL
BEDIENUNGSANLEITUNG
We continue to be committed to provide you tools with competitive price.
"Save Half", "Half Price" or any other similar expressions used by us only represents an
estimate of savings you might benefit from buying certain tools with us compared to the major
top brands and does not necessarily mean to cover all categories of tools offered by us. You
are kindly reminded to verify carefully when you are placing an order with us if you are
actually saving half in comparison with the top major brands.

- 1 -
Have product questions? Need technical support? Please feel free to
contact us:
Technical Support and E-Warranty Certificate
www.vevor.com/support
NEED HELP? CONTACT US!
This is the original instruction, please read all manual instructions
carefully before operating. VEVOR reserves a clear interpretation of our
user manual. The appearance of the product shall be subject to the
product you received. Please forgive us that we won't inform you again if
there are any technology or software updates on our product.
STANDING DESK FRAME

- 2 -
Liste der Einzelteile

- 3 -
INSTALLATION

- 4 -
- 5 -

- 6 -
- 7 -

- 8 -

- 9 -
- 10 -
BEDIENUNGSANLEITUNG
Hinweis: Bevor Sie den höhenverstellbaren Schreibtisch verwenden, wird
empfohlen, einen Reset durchzuführen Achten Sie darauf, dass sich beide
Hubsäulen auf gleicher Höhe befinden, da es zu leichten Abweichungen
kommen kann Abweichungen vom Werk (siehe
BEDIENUNGSANLEITUNG – Zurücksetzen).
Zurücksetzen
Halten Sie die Taste „ “ lange gedrückt . Nachdem Sie den Desktop
zum niedrigsten Punkt bewegt haben, halten Sie die Taste „ “ weiterhin
gedrückt, bis der Bildschirm erscheint
- 11 -
blinkt „---“ und der Summer gibt einen „Piepton“ von sich, der Bildschirm
zeigt den niedrigsten Höhenwert und den Reset-Vorgang an ist erfolgreich.
Bedienung der Hebefunktion
Durch Drücken der Taste „ “ fährt die Tischplatte nach oben, bis sie
den höchsten Punkt der Tischplatte erreicht.
Durch Drücken der Taste „ “ fährt die Tischplatte nach unten, bis sie
den tiefsten Punkt der Tischplatte erreicht.
Memory-Position-Speicherung/Memory-Location-Lauf
1 . Standortspeicherung
Halten Sie die Speichertaste „ “ gedrückt, der Summer gibt einen
„Piepton“ aus und auf dem Bildschirm blinkt „S-1“.
Gleichzeitig wird der aktuelle Höhenwert angezeigt und der Speicher
erfolgreich gespeichert. Insgesamt 3 Höhen können gleichzeitig
aufgezeichnet werden (halten Sie die Speichertaste „ “ gedrückt, auf
dem Bildschirm blinkt „S-2“, drücken Sie und
Halten Sie die
Speichertaste „ “ gedrückt, auf dem Bildschirm
blinkt „S-3“).
Hinweis: Wenn Sie den Speicherort auf derselben Zifferntaste erneut
festlegen und erfolgreich speichern, wird der bisherige
Datensatzspeicherort gelöscht
Der zuvor mit der Taste eingestellte Wert wird überschrieben.
2 . Speicherpositionsbetrieb
Drücken Sie kurz die Taste „ // “, das Display blinkt 2 Sekunden
lang die Höhe der Speicherposition, der Desktop fährt automatisch auf
die Höhe der Speicherposition und jede Taste kann während des Betriebs
angehalten werden.
3 . Sperren und Entsperren
„ + „ „ + „ „ gleichzeitig 5 Sekunden lang gedrückt . Wenn auf dem
Display „L“ angezeigt wird, bedeutet dies, dass das System gesperrt wurde
und nicht angehoben werden kann.
„ + „ „ + „ „ gleichzeitig 5 Sekunden lang gedrückt , wenn die digitale
- 12 -
Röhre von „L“ bis angezeigt wird Die normale Digitalanzeige bedeutet,
dass das System entsperrt wurde.
4.Sitzende Erinnerung (Countdown-Methode)
Countdown-Zeit: 3 Stopps, „ “ = 30 Minuten, „ “ = 45 Minuten,
„ “ = 60 Minuten.
Countdown-Start: Drücken Sie „ “ auf dem Bildschirm, um
nacheinander „ “ anzuzeigen , und der Countdown
beginnt.
Ausgangs-Countdown:
1. Drücken Sie kurz die Taste „ “. Das Display zeigt die Nummer an
und beendet den Countdown.
2. Wenn die Countdown-Zeit abgelaufen ist, blinkt auf dem Display „
“. Die Blinkzeit beträgt 1 Minute. Drücken Sie eine beliebige Taste, um
den Countdown zu stoppen Timer und Ausgang.
3. Wenn die Countdown-Zeit abgelaufen ist und keine Bedienung erfolgt,
wird der Timer automatisch beendet, nachdem alle 5 Minuten dreimal
ununterbrochen daran erinnert wird.
Werkseinstellungen wiederherstellen
“
+
„ “
+
„ “
gleichzeitig 5 Sekunden lang gedrückt. Auf dem
Bildschirm wird
„“
angezeigt , was bedeutet, dass der Parameter
erfolgreich wiederhergestellt wurde .
Metrische imperiale Umschaltung
Metrisch (CM-Einheit): Drücken Sie lange
„ „
+
„ „
, nachdem der
Summer „tickte“, wechselt die Bildschirmanzeige zur metrischen
CM-Einheit Imperial (Zoll als Einheit): Drücken Sie lange auf
„
+
“
,
nachdem der Summer „getickt“ hat, wechselt die Bildschirmanzeige zu

- 13 -
imperialen Zolleinheiten .
Fehlerbeschreibung
Parametertabelle
Model
l
Höhenh
ubberei
ch
(cm)
Motor
Tischb
einhöh
e
Längenve
rlängerun
gsbereich
(cm)
Größe
(cm)
Tischplattenlä
nge
(empfohlene
Größe)
- 14 -
ZW-1
1
70-117
1
Stück
zweistu
fig
90-135
90*58*
70
L: 95–175
cm
B: 62–80 cm
ZW-1
2
70-117
1
Stück
zweistu
fig
90-135
90*58*
70
L: 95–175
cm
B: 62–80 cm
ZW-2
1
70-117
1
Stück
zweistu
fig
95-158
95*58*
70
L: 100
–
200
cm
B: 62
–
80 cm
ZW-2
2
70-117
1
Stück
zweistu
fig
95-158
95*58*
70
L: 100
–
200
cm
B: 62
–
80 cm
Adresse: Baoshanqu Shuangchenglu 803long 11hao 1602A-1609shi
Shanghai
Importiert nach AUS: SIHAO PTY LTD . 1 ROKEVA
STREETEASTWOOD NSW 2122 Australien
In die USA importiert: Sanven Technology Ltd. Suite 250, 9166 Anaheim
Place, Rancho Cucamonga, CA 91730
REP
EC
SHUNSHUN GmbH
Römeräcker 9 Z2021,76351
Linkenheim-Hochstetten,Germany
REP
UK
Pooledas Group Ltd
Unit 5 Albert Edward House, The Pavilions
Preston, United Kingdom
In China hergestellt

- 15 -


- 2 -
Tecnico Supporto e certificato di garanzia elettronica www.vevor.com/support
STRUTTURA PER SCRIVANIA IN PIEDI
ISTRUZIONI PER L'USO
We continue to be committed to provide you tools with competitive price.
"Save Half", "Half Price" or any other similar expressions used by us only represents an
estimate of savings you might benefit from buying certain tools with us compared to the major
top brands and does not necessarily mean to cover all categories of tools offered by us. You
are kindly reminded to verify carefully when you are placing an order with us if you are
actually saving half in comparison with the top major brands.
- 1 -
Have product questions? Need technical support? Please feel free to
contact us:
Technical Support and E-Warranty Certificate
www.vevor.com/support
NEED HELP? CONTACT US!
This is the original instruction, please read all manual instructions
carefully before operating. VEVOR reserves a clear interpretation of our
user manual. The appearance of the product shall be subject to the
product you received. Please forgive us that we won't inform you again if
there are any technology or software updates on our product.
STANDING DESK FRAME

- 2 -
Elenco delle parti

- 3 -
INSTALLAZIONE

- 4 -

- 5 -

- 6 -

- 7 -

- 8 -
- 9 -
- 10 -
ISTRUZIONI PER L'USO
Nota: prima di utilizzare la scrivania regolabile in altezza, si consiglia di
eseguire un ripristino per garantire che entrambe le colonne di
sollevamento siano alla stessa altezza, poiché potrebbero avere una
leggera altezza variazioni rispetto alla fabbrica (vedi ISTRUZIONI PER
L'USO–Reset).
Ripristina
Premere a lungo il tasto " ", dopo aver portato il desktop al punto più
basso, continuare a tenere premuto il tasto " " fino allo schermo
lampeggia " --- " e il cicalino emette un "bip", lo schermo visualizza il valore
- 11 -
di altezza più basso e l'operazione di ripristino ha successo.
Funzionamento della funzione di sollevamento
il tasto " " il desktop scorre verso l'alto fino a raggiungere il punto più
alto del desktop.
Quando si preme il tasto " ", il desktop si abbassa fino a raggiungere il
punto più basso del desktop.
Memorizzazione della posizione di memoria/Posizione di
memoria Esegui
1 . Memorizzazione della posizione
Premere e tenere premuto il pulsante di memoria " ", il cicalino emetterà
un "bip" e sullo schermo lampeggerà "S-1"
allo stesso tempo, verrà visualizzato il valore dell'altitudine attuale e la
memoria verrà salvata con successo. Un totale di È possibile registrare 3
altezze contemporaneamente (tenere premuto il pulsante di memoria "
", sullo schermo lampeggia "S-2", premere e
tenere premuto il
tasto memoria " ", sullo schermo lampeggia "S-3").
Nota: se si imposta nuovamente la posizione di memoria sullo stesso tasto
numerico e la si salva con successo, la memorizzazione del record
precedente
precedentemente impostato tramite tasto verrà sovrascritto.
2 . Operazione di posizione di memoria
Premere brevemente il pulsante " / / ", il display lampeggia per 2
secondi con l'altezza della posizione di memoria, il desktop si sposta
automaticamente all'altezza della posizione di memoria e qualsiasi tasto
può smettere di funzionare durante il funzionamento.
3 . Blocca e sblocca
Blocco: tenere premuto " " + " " + " " contemporaneamente per 5
secondi, quando il display mostra " L ", significa che il sistema è stato
bloccato e non è possibile sollevarlo.
Sblocco: tenere premuto " " + " " + " " contemporaneamente per
5 secondi, quando il tubo digitale viene visualizzato da "L" a il normale
- 12 -
display digitale, significa che il sistema è stato sbloccato.
4. Promemoria sedentario (metodo del conto alla rovescia)
Durata del conto alla rovescia: 3 fermate, " " = 30 minuti, " " =
45 minuti, " " = 60 minuti.
Avvio del conto alla rovescia: Premere lo schermo " " per visualizzare
" " in successione e il conto alla rovescia avrà inizio.
Esci dal conto alla rovescia:
1. Premere brevemente il pulsante " ", il display visualizzerà il numero e
uscirà dal conto alla rovescia.
2. Una volta terminato il conto alla rovescia, il display lampeggerà " ",
il tempo lampeggiante è di 1 minuto, premere un pulsante qualsiasi per
interrompere il timer e uscire.
3. Al termine del conto alla rovescia, se non viene eseguita alcuna
operazione, il timer uscirà automaticamente dopo averlo ricordato 3 volte
consecutive ogni 5 minuti.
Ripristinare le impostazioni predefinite
Metodo: tenere premuti contemporaneamente i pulsanti " " + " "
+ " " per 5 secondi e sullo schermo verrà visualizzato " ", il che significa
che il parametro è stato ripristinato correttamente .
Commutazione metrica imperiale
Metrico (unità CM): premere a lungo " " + " ", dopo il "tick" del
cicalino, la visualizzazione sullo schermo passerà all'unità metrica CM
Imperiali (pollici come unità): premere a lungo " " + " ", dopo il "tick"
del cicalino, la visualizzazione sullo schermo passerà alle unità imperiali in
pollici .
- 13 -
Descrizione dell'errore
Tabella dei parametri
Model
lo
Gamma
di
solleva
mento
in
altezza
(cm)
Il
motor
e
Livello
della
gamba
del
tavolo
Gamma di
estension
e della
lunghezza
(cm)
Misurar
e
(cm)
Lunghezza
del piano del
tavolo
(dimensione
consigliata)

- 14 -
ZW-1
1
70-117
1 pz
due
stadi
90-135
90*58*
70
L:95-175 cm
L: 62-80 cm
ZW-1
2
70-117
1 pz
due
stadi
90-135
90*58*
70
L:95-175 cm
L: 62-80 cm
ZW-2
1
70-117
1 pz
due
stadi
95-158
95*58*
70
L:100-200 cm
L: 62-80 cm
ZW-2
2
70-117
1 pz
due
stadi
95-158
95*58*
70
L:100-200 cm
L: 62-80 cm
Indirizzo: Baoshanqu Shuangchenglu 803long 11hao 1602A-1609shi
Shanghai
Importato in AUS: SIHAO PTY LTD . 1 ROKEVA STREETEASTWOOD
NSW 2122 Australia
Importato negli Stati Uniti: Sanven Technology Ltd. Suite 250, 9166
Anaheim Place, Rancho Cucamonga, CA 91730
REP
EC
SHUNSHUN GmbH
Römeräcker 9 Z2021,76351
Linkenheim-Hochstetten,Germany
REP
UK
Pooledas Group Ltd
Unit 5 Albert Edward House, The Pavilions
Preston, United Kingdom
Made in China

- 15 -


- 2 -
Técnico Soporte y certificado de garantía electrónica www.vevor.com/support
ESTRUCTURA DE ESCRITORIO DE PIE
INSTRUCCIONES DE OPERACIÓN
We continue to be committed to provide you tools with competitive price.
"Save Half", "Half Price" or any other similar expressions used by us only represents an
estimate of savings you might benefit from buying certain tools with us compared to the major
top brands and does not necessarily mean to cover all categories of tools offered by us. You
are kindly reminded to verify carefully when you are placing an order with us if you are
actually saving half in comparison with the top major brands.
- 1 -
Have product questions? Need technical support? Please feel free to
contact us:
Technical Support and E-Warranty Certificate
www.vevor.com/support
NEED HELP? CONTACT US!
This is the original instruction, please read all manual instructions
carefully before operating. VEVOR reserves a clear interpretation of our
user manual. The appearance of the product shall be subject to the
product you received. Please forgive us that we won't inform you again if
there are any technology or software updates on our product.
STANDING DESK FRAME

- 2 -
Lista de partes

- 3 -
INSTALACIÓN

- 4 -

- 5 -

- 6 -

- 7 -

- 8 -

- 9 -

- 10 -
INSTRUCCIONES DE OPERACIÓN
Nota: Antes de usar el escritorio de altura ajustable, se recomienda
realizar un reinicio asegúrese de que ambas columnas de elevación estén
a la misma altura, ya que pueden tener ligeras variaciones respecto a la
fábrica (ver INSTRUCCIONES DE FUNCIONAMIENTO–Reinicio).
Reiniciar
Mantenga presionada la tecla " ", después de ejecutar el escritorio
hasta el punto más bajo, mantenga presionada la tecla " " hasta que
aparezca la pantalla.
parpadea " --- " y el zumbador emite un sonido de "bip", la pantalla
- 11 -
muestra el valor de altura más bajo y la operación de reinicio es exitoso.
Operación de la función de elevación
Cuando se presiona la tecla " ", el escritorio corre hacia arriba hasta
llegar al punto más alto del escritorio.
Cuando se presiona la tecla " ", el escritorio baja hasta llegar al punto
más bajo del escritorio.
Posición de memoria Almacenamiento/Ubicación de memoria
Ejecutar
1 . Almacenamiento de ubicación
Mantenga presionado el botón de memoria " ", el timbre emitirá un "bip"
y la pantalla parpadeará "S-1" en el
Al mismo tiempo, se mostrará el valor de altitud actual y el
almacenamiento de la memoria se guardará correctamente. Un total de Se
pueden grabar 3 alturas al mismo tiempo (presione y mantenga
presionado el botón de memoria " ", la pantalla parpadea "S-2",
presione y
mantenga
presionada la tecla de memoria " ", la pantalla
parpadea "S-3").
Nota: Si configura la ubicación de la memoria en la misma tecla numérica
nuevamente y la guarda exitosamente, el almacenamiento de registros
que se
Los datos previamente configurados con la tecla se sobrescribirán.
2 . Operación de posición de memoria
Presione brevemente el botón " / / ", la pantalla parpadea la
altura de la posición de la memoria durante 2 segundos, el escritorio se
ejecuta automáticamente hasta la altura de la posición de la memoria y
cualquier tecla puede dejar de funcionar durante la operación.
3 . Trabar y destrabar
Bloquear: Mantenga presionado " " + " " + " " al mismo tiempo
durante 5 segundos, cuando la pantalla muestre " L ", significa que el
sistema se ha bloqueado y no puede levantarlo.
- 12 -
Desbloquear: Mantenga presionado " " + " " + " " al mismo
tiempo durante 5 segundos, cuando el tubo digital se muestre de "L" a la
pantalla digital normal, significa que el sistema ha sido desbloqueado.
4.Recordatorio de sedentarismo (método de cuenta regresiva)
Tiempo de cuenta atrás: 3 paradas, " " = 30 minutos, " " = 45
minutos, " " = 60 minutos.
Inicio de cuenta regresiva: Presione la pantalla " " para mostrar "
" a su vez y comenzará la cuenta regresiva.
Salir de la cuenta regresiva:
1. Presione brevemente el botón " ", la pantalla mostrará el número y
saldrá de la cuenta regresiva.
2. Cuando finalice el tiempo de cuenta regresiva, la pantalla parpadeará "
", el tiempo de parpadeo es de 1 minuto, presione cualquier botón
para detener la temporizador y salida.
3. Una vez finalizado el tiempo de cuenta atrás, si no se realiza ninguna
operación, saldrá automáticamente del temporizador después de
recordarlo 3 veces seguidas cada 5 minutos.
Restaurar la configuración de fábrica
Método: Mantenga presionados los botones " " + " " + " " al
mismo tiempo durante 5 segundos y la pantalla mostrará " ", lo que
significa que el parámetro se restauró exitosamente .
Conmutación métrica imperial
Métrico (unidad CM): Mantenga presionado " " + " ", después del
"tic" del timbre, la visualización de la pantalla cambiará a la unidad métrica
CM Imperial (pulgadas como unidad): Mantenga presionado " " + " ",
después del "tic" del timbre, la pantalla cambiará a unidades de pulgadas
- 13 -
imperiales .
Error de descripción
tabla de parámetros
Model
o
Rango
de
elevació
n de
altura
Motor
Nivel
de las
patas
de la
mesa
Rango de
extensión
de
longitud
(cm)
Tamañ
o
(cm)
Longitud del
tablero de la
mesa
(tamaño
sugerido)

- 14 -
(cm)
ZW-1
1
70-117
PC 1
dos
etapas
90-135
90*58*
70
Largo:
95-175cm
Ancho: 62-80
cm
ZW-1
2
70-117
PC 1
dos
etapas
90-135
90*58*
70
Largo:
95-175cm
Ancho: 62-80
cm
ZW-2
1
70-117
PC 1
dos
etapas
95-158
95*58*
70
Largo:
100-200cm
Ancho: 62-80
cm
ZW-2
2
70-117
PC 1
dos
etapas
95-158
95*58*
70
Largo:
100-200cm
Ancho: 62-80
cm
Dirección: Baoshanqu Shuangchenglu 803long 11hao 1602A-1609shi
Shanghai
Importado a AUS: SIHAO PTY LTD . 1 ROKEVA STREET ASTWOOD
NSW 2122 Australia
Importado a EE. UU.: Sanven Technology Ltd. Suite 250, 9166 Anaheim
Place, Rancho Cucamonga, CA 91730

- 15 -
REP
EC
SHUNSHUN GmbH
Römeräcker 9 Z2021,76351
Linkenheim-Hochstetten,Germany
REP
UK
Pooledas Group Ltd
Unit 5 Albert Edward House, The Pavilions
Preston, United Kingdom
Hecho en china


- 2 -
Techniczny Certyfikat wsparcia i e-gwarancji www.vevor.com/support
STOJĄCA RAMA BIURKA
INSTRUKCJA OBSŁUGI
We continue to be committed to provide you tools with competitive price.
"Save Half", "Half Price" or any other similar expressions used by us only represents an
estimate of savings you might benefit from buying certain tools with us compared to the major
top brands and does not necessarily mean to cover all categories of tools offered by us. You
are kindly reminded to verify carefully when you are placing an order with us if you are
actually saving half in comparison with the top major brands.

- 1 -
Have product questions? Need technical support? Please feel free to
contact us:
Technical Support and E-Warranty Certificate
www.vevor.com/support
NEED HELP? CONTACT US!
This is the original instruction, please read all manual instructions
carefully before operating. VEVOR reserves a clear interpretation of our
user manual. The appearance of the product shall be subject to the
product you received. Please forgive us that we won't inform you again if
there are any technology or software updates on our product.
STANDING DESK FRAME

- 2 -
Lista części

- 3 -
INSTALACJA

- 4 -

- 5 -
- 6 -

- 7 -

- 8 -

- 9 -
- 10 -
INSTRUKCJA OBSŁUGI
Uwaga: Przed użyciem biurka z regulacją wysokości zaleca się wykonanie
resetu aby upewnić się, że obie kolumny podnoszące znajdują się na tej
samej wysokości, ponieważ mogą mieć niewielką wysokość różnią się od
fabrycznych (patrz INSTRUKCJA OBSŁUGI – Reset).
Resetowanie
Naciśnij długo klawisz „ ”, po przesunięciu pulpitu do najniższego
punktu, trzymaj klawisz „ ” aż do pojawienia się ekranu
miga „---” i brzęczyk wydaje sygnał dźwiękowy, na ekranie wyświetlana jest
najniższa wartość wysokości i następuje operacja resetowania
- 11 -
zakończony powodzeniem.
Działanie funkcji podnoszenia
Po naciśnięciu klawisza „ ” pulpit przesuwa się w górę, aż osiągnie
najwyższy punkt pulpitu.
Po naciśnięciu klawisza „ ” pulpit przesuwa się w dół, aż do
najniższego punktu pulpitu.
Pozycja pamięci Przechowywanie/Lokalizacja pamięci Uruchom
1 . Przechowywanie lokalizacji
Naciśnij i przytrzymaj przycisk pamięci „ ”, brzęczyk wyda sygnał
dźwiękowy, a na ekranie zacznie migać „S-1”
w tym samym czasie, zostanie wyświetlona aktualna wartość wysokości, a
pamięć zostanie pomyślnie zapisana. Łącznie Jednocześnie można
zapisać 3 wysokości (naciśnij i przytrzymaj przycisk pamięci „ ”, na
ekranie zacznie migać „S-2”, naciśnij i
przytrzymaj klawisz
pamięci „ ”, na ekranie zacznie migać „S-3”).
Uwaga: Jeśli ponownie ustawisz lokalizację pamięci na tym samym
klawiszu numerycznym i pomyślnie ją zapiszesz, dotychczasowa pamięć
rekordów
wcześniej ustawione za pomocą klawisza zostaną nadpisane.
2 . Operacja pozycji pamięci
Krótko naciśnij przycisk „ / / ”, wyświetlacz będzie migać przez 2
sekundy przez 2 sekundy wysokość pozycji pamięci, pulpit automatycznie
przejdzie do wysokości pozycji pamięci, a dowolny klawisz może przestać
działać podczas pracy.
3 . Zablokuj i odblokuj
Blokada: Naciśnij i przytrzymaj jednocześnie „ „ + „ „ + „ ” przez 5
sekund, gdy na wyświetlaczu pojawi się „ L ”, oznacza to, że system został
zablokowany i nie można go podnieść.
Odblokowanie: Naciśnij i przytrzymaj jednocześnie „ „ + „ „ + „ ”
przez 5 sekund, gdy cyfrowy w kształcie tuby wyświetli się od „L” do
normalnego wyświetlacza cyfrowego, oznacza to, że system został
- 12 -
odblokowany.
4. Przypomnienie o siedzeniu (metoda odliczania)
Czas odliczania: 3 przystanki, " " = 30 minut, " " = 45 minut, "
" = 60 minut.
Rozpoczęcie odliczania: Naciśnij ekran „ ”, aby wyświetlić „
” po kolei i rozpocznie się odliczanie.
Wyjdź z odliczania:
1. Krótko naciśnij przycisk „ ”, wyświetlacz wyświetli liczbę i zakończy
odliczanie.
2. Gdy czas odliczania dobiegnie końca, wyświetlacz zacznie migać „
”, czas migania wynosi 1 minutę. Naciśnij dowolny przycisk, aby
zatrzymać minutnik i wyjdź.
3. Jeśli po upływie czasu odliczania nie zostanie wykonana żadna operacja,
licznik czasu zostanie automatycznie wyłączony po 3-krotnym
przypomnieniu co 5 minut.
Przywrócić ustawienia fabryczne
Metoda: Naciśnij i przytrzymaj jednocześnie przyciski
„ „
+
„
„ + „ ” przez 5 sekund, a na ekranie pojawi się „ ”, co oznacza, że
parametr został pomyślnie przywrócony .
Przełączanie metryczne imperialne
Metryczne (jednostka CM): Długie naciśnięcie
„ „
+
„ ”
, po
„
tyknięciu” brzęczyka wyświetlacz ekranu przełączy się na jednostkę
metryczną CM Imperial (cale jako jednostka): Naciśnij i przytrzymaj
„ ”
+ „ ”, po „tyknięciu” sygnału dźwiękowego wyświetlacz ekranu
przełączy się na cale imperialne .

- 13 -
Opis błędu
Tabela parametrów
Model
Zakres
podnos
zenia
na
wysoko
ść
(cm)
Silnik
Poziom
nóg
stołu
Zakres
przedłuże
nia
długości
(cm)
Rozmia
r
(cm)
Długość blatu
(sugerowany
rozmiar)
- 14 -
ZW-1
1
70-117
1 szt
dwueta
powy
90-135
90*58*
70
Długość:
95-175 cm
Szer: 62-80
cm
ZW-1
2
70-117
1 szt
dwueta
powy
90-135
90*58*
70
Długość:
95-175 cm
Szer: 62-80
cm
ZW-2
1
70-117
1 szt
dwueta
powy
95-158
95*58*
70
Długość:
100-200 cm
Szer: 62-80
cm
ZW-2
2
70-117
1 szt
dwueta
powy
95-158
95*58*
70
Długość:
100-200 cm
Szer: 62-80
cm
Adres: Baoshanqu Shuangchenglu 803long 11hao 1602A-1609shi
Szanghaj
Import do AUS: SIHAO PTY LTD . 1 ROKEVA STREETEASTWOOD
NSW 2122 Australia
Import do USA: Sanven Technology Ltd. Suite 250, 9166 Anaheim Place,
Rancho Cucamonga, CA 91730

- 15 -
REP
EC
SHUNSHUN GmbH
Römeräcker 9 Z2021,76351
Linkenheim-Hochstetten,Germany
REP
UK
Pooledas Group Ltd
Unit 5 Albert Edward House, The Pavilions
Preston, United Kingdom
Wyprodukowano w Chinach


- 2 -
Technisch Ondersteuning en e-garantiecertificaat www.vevor.com/support
STAAND BUREAUFRAME
GEBRUIKSAANWIJZING
We continue to be committed to provide you tools with competitive price.
"Save Half", "Half Price" or any other similar expressions used by us only represents an
estimate of savings you might benefit from buying certain tools with us compared to the major
top brands and does not necessarily mean to cover all categories of tools offered by us. You
are kindly reminded to verify carefully when you are placing an order with us if you are
actually saving half in comparison with the top major brands.

- 1 -
Have product questions? Need technical support? Please feel free to
contact us:
Technical Support and E-Warranty Certificate
www.vevor.com/support
NEED HELP? CONTACT US!
This is the original instruction, please read all manual instructions
carefully before operating. VEVOR reserves a clear interpretation of our
user manual. The appearance of the product shall be subject to the
product you received. Please forgive us that we won't inform you again if
there are any technology or software updates on our product.
STANDING DESK FRAME

- 2 -
Onderdelen lijst
- 3 -
INSTALLATIE
- 4 -

- 5 -

- 6 -

- 7 -
- 8 -

- 9 -
- 10 -
GEBRUIKSAANWIJZING
Let op: Voordat u het in hoogte verstelbare bureau gebruikt, is het
raadzaam een reset uit te voeren om ervoor te zorgen dat beide
hefkolommen zich op dezelfde hoogte bevinden, aangezien deze licht
kunnen zijn afwijkingen ten opzichte van de fabriek (zie
GEBRUIKSAANWIJZING – Reset).
Opnieuw instellen
Druk lang op de " "-toets, nadat u het bureaublad naar het laagste punt
hebt geleid, blijf de " "-toets ingedrukt houden tot het scherm verschijnt
knippert " --- " en de zoemer maakt een "piep" -geluid, het scherm geeft de
- 11 -
laagste hoogtewaarde weer en de resetbewerking is succesvol.
Bediening heffunctie
Wanneer de toets " " wordt ingedrukt, loopt het bureaublad omhoog
totdat het het hoogste punt van het bureaublad bereikt.
Wanneer de toets " " wordt ingedrukt, loopt het bureaublad naar
beneden totdat het het laagste punt van het bureaublad bereikt.
Geheugenpositieopslag/geheugenlocatie uitvoeren
1 . Locatie opslag
Houd de geheugenknop " " ingedrukt, de zoemer maakt een
"piep"-geluid en op het scherm knippert "S-1".
Tegelijkertijd wordt de huidige hoogtewaarde weergegeven en wordt de
geheugenopslag met succes opgeslagen. Een totaal van Er kunnen 3
hoogtes tegelijkertijd worden opgenomen (houd de geheugenknop " "
ingedrukt, het scherm knippert "S-2", druk op en
houd de
geheugentoets " " ingedrukt, het scherm knippert
"S-3").
Opmerking: Als u de geheugenlocatie opnieuw op dezelfde cijfertoets
instelt en deze met succes opslaat, wordt de recordopslag gebruikt die was
die eerder met de sleutel is ingesteld, wordt overschreven.
2 . Werking van geheugenpositie
Druk kort op de knop " / / ", het display knippert de hoogte van de
geheugenpositie 2 seconden, het bureaublad loopt automatisch naar de
hoogte van de geheugenpositie en elke toets kan tijdens gebruik stoppen
met draaien.
3 . Vergrendelen en ontgrendelen
" + " " + " " tegelijkertijd gedurende 5 seconden ingedrukt . Wanneer
het display " L " toont, betekent dit dat het systeem is vergrendeld en het
systeem niet kan optillen.
Ontgrendelen: Houd " " + " " + " " tegelijkertijd gedurende 5
seconden ingedrukt, wanneer de digitale buis wordt weergegeven van "L"
tot het normale digitale display betekent dit dat het systeem is ontgrendeld.
- 12 -
4. Sedentaire herinnering (aftelmethode)
Afteltijd: 3 stops, " " = 30 minuten, " " = 45 minuten, " " = 60
minuten.
Aftellen starten: Druk op het scherm " " om achtereenvolgens "
" weer te geven en het aftellen begint.
Aftellen afsluiten:
1. Druk kort op de knop " ". Het display geeft het nummer weer en sluit
het aftellen af.
2. Wanneer de afteltijd is verstreken, knippert op het display " ", de
knipperende tijd is 1 minuut. Druk op een willekeurige knop om het stoppen
te stoppen. timer en afsluiten.
3. Nadat de afteltijd is verstreken en er geen handeling plaatsvindt, wordt
de timer automatisch afgesloten nadat er elke 5 minuten 3 keer continu
aan is herinnerd.
Herstel naar fabrieksinstellingen
Methode: Houd de knoppen " " + " " + " " tegelijkertijd gedurende
5 seconden ingedrukt, en het scherm geeft " " weer, wat betekent dat
de parameter succesvol is hersteld .
Metrische imperiale schakeling
Metrisch (CM-eenheid): Druk lang op " " + " ", na het "vinkje" van de
zoemer schakelt de schermweergave over naar de metrische CM-eenheid
Imperial (inch als eenheid): Druk lang op " " + " ", nadat de zoemer
"tikt", schakelt de schermweergave over naar imperiale inch-eenheden .
- 13 -
Foutbeschrijving
Parametertabel
Model
Hoogte
hefberei
k
(cm)
Motor
Niveau
tafelpo
ot
Lengte-uit
breidings
bereik
(cm)
Maat
(cm)
Lengte
tafelblad
(voorgestelde
maat)
ZW-1
1
70-117
1 stuk
tweetra
ps
90-135
90*58*
70
Lengte:
95-175 cm
B:62-80cm
ZW-1
2
70-117
1 stuk
tweetra
ps
90-135
90*58*
70
Lengte:
95-175 cm
- 14 -
B:62-80cm
ZW-2
1
70-117
1 stuk
tweetra
ps
95-158
95*58*
70
L:100-200 cm
B:62-80cm
ZW-2
2
70-117
1 stuk
tweetra
ps
95-158
95*58*
70
L:100-200 cm
B:62-80cm
Adres: Baoshanqu Shuangchenglu 803long 11hao 1602A-1609shi
Shanghai
Geïmporteerd naar AUS: SIHAO PTY LTD . 1 ROKEVA
STREETEASTWOOD NSW 2122 Australië
Geïmporteerd naar de VS: Sanven Technology Ltd. Suite 250, 9166
Anaheim Place, Rancho Cucamonga, CA 91730
REP
EC
SHUNSHUN GmbH
Römeräcker 9 Z2021,76351
Linkenheim-Hochstetten,Germany
REP
UK
Pooledas Group Ltd
Unit 5 Albert Edward House, The Pavilions
Preston, United Kingdom
Gemaakt in China

- 15 -


- 2 -
Teknisk Support och e-garanticertifikat www.vevor.com/support
STÅENDE SKRIVBORDSRAM
BRUKSANVISNINGAR
We continue to be committed to provide you tools with competitive price.
"Save Half", "Half Price" or any other similar expressions used by us only represents an
estimate of savings you might benefit from buying certain tools with us compared to the major
top brands and does not necessarily mean to cover all categories of tools offered by us. You
are kindly reminded to verify carefully when you are placing an order with us if you are
actually saving half in comparison with the top major brands.

- 1 -
Have product questions? Need technical support? Please feel free to
contact us:
Technical Support and E-Warranty Certificate
www.vevor.com/support
NEED HELP? CONTACT US!
This is the original instruction, please read all manual instructions
carefully before operating. VEVOR reserves a clear interpretation of our
user manual. The appearance of the product shall be subject to the
product you received. Please forgive us that we won't inform you again if
there are any technology or software updates on our product.
STANDING DESK FRAME
- 2 -
Delarlista

- 3 -
INSTALLATION

- 4 -

- 5 -

- 6 -

- 7 -

- 8 -

- 9 -
- 10 -
BRUKSANVISNINGAR
Obs: Innan du använder det höj- och sänkbara skrivbordet
rekommenderas det att utföra en återställning för att säkerställa att båda
lyftpelarna är på samma höjd, eftersom de kan ha svaga variationer från
fabriken (se DRIFTSINSTRUKTIONER–Återställ).
Återställa
Tryck länge på " "-tangenten, efter att ha kört skrivbordet till den lägsta
punkten, fortsätt att hålla ned " " -tangenten tills skärmen visas
blinkar " --- " och summern avger ett "pip"-ljud, skärmen visar det lägsta
höjdvärdet och återställningsoperationen är framgångsrik.
- 11 -
Lyftfunktionsdrift
När du trycker på " "-tangenten körs skrivbordet uppåt tills det når den
högsta punkten på skrivbordet.
När du trycker på " "-tangenten körs skrivbordet ner tills det når den
lägsta punkten på skrivbordet.
Minnesposition Lagring/minnesplats Kör
1 . Platslagring
Tryck och håll minnesknappen " " , summern avger ett "pip" ljud och
skärmen blinkar "S-1" vid
samtidigt, och det aktuella höjdvärdet kommer att visas och
minneslagringen kommer att sparas. En summa av 3 höjder kan spelas in
samtidigt (tryck och håll minnesknappen " ", skärmen blinkar "S-2",
tryck och
håll
minnestangenten " ", skärmen blinkar "S-3").
Obs: Om du ställer in minnesplatsen på samma sifferknapp igen och
sparar den framgångsrikt, kommer den postlagring som var
tidigare inställda av tangenten kommer att skrivas över.
2 . Minnespositionsdrift
Tryck kort på " / / "-knappen, displayen blinkar
minnespositionens höjd 2 sekunder, skrivbordet körs automatiskt till höjden
av minnespositionen, och valfri tangent kan sluta fungera under drift.
3 . Lås och lås upp
Lås: Tryck och håll " " + " " + " " samtidigt i 5 sekunder, när
displayen visar " L " betyder det att systemet är låst och inte kan lyfta
systemet.
Lås upp: Tryck och håll " " + " " + " " samtidigt i 5 sekunder, när
det digitala röret visas från "L" till den normala digitala displayen betyder
det att systemet har låsts upp.
4. Stillasittande påminnelse (nedräkningsmetod)
Nedräkningstid: 3 stopp, " " = 30 minuter, " " = 45 minuter, " "
- 12 -
= 60 minuter.
Start av nedräkning: Tryck på skärmen " " för att visa "
" i tur och ordning, så startar nedräkningen.
Avsluta Countdown:
1. Tryck kort på knappen " ", displayen visar numret och avslutar
nedräkningen.
2. När nedräkningstiden är slut kommer displayen att blinka " ",
blinktiden är 1 minut, tryck på valfri knapp för att stoppa timer och
avsluta.
3. Efter att nedräkningstiden är slut, om det inte görs någon åtgärd,
kommer den automatiskt att lämna timern efter att ha gjort en påminnelse 3
gånger kontinuerligt var 5:e minut.
Fabriksåterställ
Metod: Tryck och håll ned " " + " " + " "-knapparna samtidigt i 5
sekunder, och skärmen visar " ", vilket betyder att parametern har
återställts .
Metrisk imperial växling
Metrisk (CM-enhet): Tryck länge på " " + " ", efter summern "tick",
växlar skärmen till den metriska CM-enheten Imperial (tum som enhet):
Långt tryck på " " + " ", efter summern "tick", kommer skärmen att
växla till imperialistiska tumenheter .
- 13 -
Felbeskrivning
Parametertabell
Model
l
Höjdlyft
område
(centim
eter)
Motor
Bordsb
ensniv
å
Längdförl
ängnings
område
(centimet
er)
Storlek
(centim
eter)
Bordsskivans
längd
(föreslagen
storlek)
ZW-1
1
70-117
1 st
tvåsteg
90-135
90*58*
70
L:95-175cm
B: 62-80 cm
ZW-1
2
70-117
1 st
tvåsteg
90-135
90*58*
70
L:95-175cm
B: 62-80 cm
ZW-2
1
70-117
1 st
tvåsteg
95-158
95*58*
70
L:100-200cm
B: 62-80 cm
ZW-2
2
70-117
1 st
tvåsteg
95-158
95*58*
70
L:100-200cm
B: 62-80 cm
- 14 -
Adress: Baoshanqu Shuangchenglu 803long 11hao 1602A-1609shi
Shanghai
Importerad till AUS: SIHAO PTY LTD . 1 ROKEVA STREETEASTWOOD
NSW 2122 Australien
Importerad till USA: Sanven Technology Ltd. Suite 250, 9166 Anaheim
Place, Rancho Cucamonga, CA 91730
REP
EC
SHUNSHUN GmbH
Römeräcker 9 Z2021,76351
Linkenheim-Hochstetten,Germany
REP
UK
Pooledas Group Ltd
Unit 5 Albert Edward House, The Pavilions
Preston, United Kingdom
Tillverkad i Kina

- 15 -