
USER GUIDE UC Software 7.1.0 | June 2021 |3725-49791-006A
Poly CCX Business Media Phones with Skype for
Business
Getting Help
For more information about installing, configuring, and
administering Poly/Polycom products or services, go to
Polycom Support.
Plantronics, Inc. (Poly — formerly Plantronics and Polycom)
345 Encinal Street
Santa Cruz, California
95060
©
2021 Plantronics, Inc. All rights reserved. Poly, the propeller
design, and the Poly logo are trademarks of Plantronics, Inc.
All other trademarks are the property of their respective
owners.

Contents
Before You Begin................................................................................................6
Audience, Purpose, and Required Skills.............................................................................6
Related Poly and Partner Resources..................................................................................6
Privacy Policy......................................................................................................................7
Getting Started................................................................................................... 8
Product Overview of Poly CCX Business Media Phones....................................................8
CCX Phone Hardware Overview..............................................................................9
Navigating Poly CCX Phones.................................................................................14
Using a Phone as a Common Area Phone............................................................ 17
Enter Information Using the Onscreen Keyboard...................................................17
Logging In to and Locking Your Phone............................................................................. 17
Signing In to Skype for Business on Your Phone................................................... 17
Signing In to a Phone as a Guest...........................................................................19
Locking Your Phone............................................................................................... 21
Audio Calls........................................................................................................23
Placing Audio Calls........................................................................................................... 23
Place an Audio Call................................................................................................ 23
Place an International Call..................................................................................... 24
Place a Call from Recent Calls...............................................................................24
Place Calls to Skype for Business Contacts.......................................................... 24
Place a Call over Bluetooth.................................................................................... 25
Call a Favorite........................................................................................................ 25
Calling Contacts from Directories...........................................................................25
Place a Call from a Locked Phone......................................................................... 26
Placing Intercom Calls............................................................................................26
Redial a Number............................................................................................................... 27
Answering Audio Calls...................................................................................................... 27
Answer an Incoming Call........................................................................................27
Answer a Call When in a Call.................................................................................27
Answer Calls Automatically.................................................................................... 28
Answer a Call on a Locked Phone......................................................................... 28
Answer an Intercom Call........................................................................................ 28
Decline an Incoming Call.................................................................................................. 28
End an Audio Call............................................................................................................. 29
Holding and Resuming Calls.............................................................................................29
1

Hold a Call..............................................................................................................29
Resume a Call........................................................................................................29
Transfer a Call...................................................................................................................29
Rejecting Calls with Do Not Disturb.................................................................................. 30
Enable Do Not Disturb............................................................................................30
Disable Do Not Disturb...........................................................................................30
Forwarding Incoming Skype for Business Calls................................................................31
Simultaneously Ring a Group of Contacts............................................................. 31
Forward Skype for Business Calls to a Contact..................................................... 31
Forward a Call to Voicemail....................................................................................31
Managing Multiple Calls.................................................................................................... 32
Manage a Call from the Calls Screen.....................................................................32
Mute the Microphones.......................................................................................................32
Unmute the Microphones.................................................................................................. 32
Recording Audio Calls.......................................................................................................33
Guidelines When Recording Calls..........................................................................33
Record a Call..........................................................................................................33
Pause a Recording.................................................................................................33
Resume a Recording..............................................................................................34
Stop Recording.......................................................................................................34
Browse Recorded Calls..........................................................................................34
Play a Recorded Call..............................................................................................34
Pause and Resume Played Recordings.................................................................35
Stop Playing a Recording.......................................................................................35
Rename a Recording............................................................................................. 35
Delete a Recording.................................................................................................35
Conference Calls.............................................................................................. 36
Initiating a Skype for Business Conference Call............................................................... 36
Initiate a Skype for Business Conference.............................................................. 36
Initiate a Conference Call During a Call................................................................. 36
Initiate a Group Conference Call............................................................................ 37
Add Contacts to a Skype for Business Conference Call................................................... 37
Send Active Conference Information to a Contact............................................................ 37
Viewing a List of Skype for Business Conference Participants.........................................37
Exit the Participants List......................................................................................... 38
Return to the Participants List................................................................................ 38
Managing Skype for Business Conference Participants................................................... 38
Muting Conference Participants............................................................................. 38
Promote or Demote a Conference Participant....................................................... 39
Enable and Disable Conference Announcements..................................................39
Contents
2

Remove a Conference Participant......................................................................... 40
Lock and Unlock a Conference Call....................................................................... 40
Admit or Deny Participants to a Locked Conference Call...................................... 40
Boss-Admin for Skype for Business.............................................................. 41
Add Delegates...................................................................................................................41
Add Delegates from Skype for Business Client......................................................41
Add Delegates from Phone Local Interface............................................................42
View the Delegates Group................................................................................................ 42
Delete Delegates from Phone Local Interface.................................................................. 43
Maximum Number of Boss Lines...................................................................................... 43
View the Boss Group.........................................................................................................43
Set a Ringtone for Boss Calls........................................................................................... 43
Edit the Delegates Group..................................................................................................44
Sort Boss-Admin Lines......................................................................................................44
Managing Calls on the Boss's Line................................................................................... 45
Respond to Incoming Boss Calls........................................................................... 45
Viewing Call Status on the Boss's Line.................................................................. 45
View Held Boss Calls............................................................................................. 45
Resume Held Boss Calls........................................................................................45
Transferring Boss Calls.......................................................................................... 46
Place a Call on Behalf of a Boss............................................................................ 46
Join Conference Calls for a Boss......................................................................................47
Call Lists and Directories................................................................................ 48
Recent Calls......................................................................................................................48
View Recent Calls.................................................................................................. 48
Edit a Recent Call Entry......................................................................................... 48
Delete a Recent Call Entry..................................................................................... 49
Local Directory.................................................................................................................. 49
Search for a Local Directory Contact..................................................................... 49
Add a Contact to the Local Directory......................................................................49
View Contact Details.............................................................................................. 49
Update a Local Directory Contact’s Information.....................................................50
Delete a Local Directory Contact............................................................................50
Local Directory Favorites.................................................................................................. 50
Add Favorites......................................................................................................... 50
Remove a Favorite................................................................................................. 50
Skype for Business Contacts............................................................................................ 51
Managing Contacts Across Applications and Devices........................................... 51
View Skype for Business Contacts.........................................................................52
Contents
3

View Skype for Business Contact Information....................................................... 52
Update Skype for Business Contact Information....................................................52
View Skype for Business Contact Groups..............................................................53
Skype for Business Contact Presence Information................................................ 53
Search for a Skype for Business Contact...............................................................53
Add a Skype for Business Contact to the Contact List...........................................54
Voicemail and Pages........................................................................................55
Access Skype for Business Voicemail Messages............................................................. 55
Managing Skype for Business Voicemail Messages.........................................................55
Call a Contact from Voicemail................................................................................ 55
Delete Voicemail Messages................................................................................... 56
Mark Message as Read......................................................................................... 56
Receiving Messages with Group Paging.......................................................................... 56
Listen to a Page During an Active Call...................................................................56
Receiving Pages When Not in an Active Call.........................................................57
Settings, Applications, and Accessories....................................................... 58
Poly CCX Phone Settings................................................................................................. 58
Password Required to Access Basic Settings........................................................58
Set the System Language...................................................................................... 58
Time and Date Display........................................................................................... 58
Backlight Intensity and Timeout..............................................................................59
Customizing Line Keys...........................................................................................60
Power Saving Mode............................................................................................... 61
Changing Audio Settings........................................................................................62
Update Your Skype for Business Presence............................................................64
Adding a Profile Photo to Display on the Lock Screen...........................................64
Disable Hot Desking...............................................................................................64
Clear Call Logs and Contacts.................................................................................64
Restrict Call Log and Contact Uploads.................................................................. 64
Using BToE to Manage Calls on Your Phone and Skype for Business Client...................65
Answer BToE Calls.................................................................................................65
Place BToE Calls....................................................................................................65
Pause and Resume BToE Calls............................................................................. 65
Move Call Audio between Your Phone and Computer........................................... 66
Connecting Bluetooth Devices.......................................................................................... 66
Using Bluetooth Devices on Your Phone................................................................66
Connecting to a Wireless Network.................................................................................... 69
Connect to a Wireless Network.............................................................................. 69
Disconnect from a Wireless Network..................................................................... 70
Contents
4

Remove a Wireless Network.................................................................................. 70
Phone Applications........................................................................................................... 70
Using the Calendar.................................................................................................70
Phone Accessories and Computer Applications............................................................... 74
Using a Headset with Your Phone..........................................................................74
USB Audio Mode....................................................................................................76
Accessibility Features..................................................................................... 78
Users Who Are Deaf or Hard of Hearing...........................................................................78
Users with Limited Mobility................................................................................................79
Users Who Are Blind, Have Low Vision, or Have Limited Vision...................................... 79
Maintenance and Troubleshooting................................................................. 81
Maintaining Your Phone.................................................................................................... 81
Clean the Touchscreen...........................................................................................81
Restart Your Phone................................................................................................ 81
Update the Phone’s Configuration ........................................................................ 82
View Software Details.............................................................................................82
Updating Your Skype for Business Phone Software.............................................. 82
Reset the Phone to Factory Defaults..................................................................... 83
Troubleshooting.................................................................................................................83
Phone Can’t Connect to the Network or Repeatedly Restarts............................... 83
Warnings................................................................................................................ 83
Test the Hardware.................................................................................................. 84
Speakerphone........................................................................................................ 84
USB Port................................................................................................................ 84
Check the Status of the Calendar.......................................................................... 85
Troubleshoot Audio and Echo Issues.....................................................................85
Bluetooth Headset Issues...................................................................................... 85
Recording Issues and Solutions.............................................................................85
Better Together over Ethernet................................................................................ 86
Login Credentials................................................................................................... 87
Contents
5

Before You Begin
Topics:
▪ Audience, Purpose, and Required Skills
▪ Related Poly and Partner Resources
▪ Privacy Policy
This user guide helps you configure Poly settings available on your CCX when running Microsoft Skype
for Business.
This user guide supports the following Poly phones with Skype for Business:
▪ CCX 400 business media phones
▪ CCX 500 business media phones
▪ CCX 600 business media phones
Audience, Purpose, and Required Skills
This guide is intended for Poly phone users running Skype for Business. Administrators and users can
use this guide to configure Poly settings available on the phone’s local interface.
Related Poly and Partner Resources
See the following sites for information related to this product.
▪ The Poly Online Support Center is the entry point to online product, service, and solution support
information including Video Tutorials, Documents & Software, Knowledge Base, Community
Discussions, Poly University, and additional services.
▪ The Poly Document Library provides support documentation for active products, services, and
solutions. The documentation displays in responsive HTML5 format so that you can easily access
and view installation, configuration, or administration content from any online device.
▪ The Poly Community provides access to the latest developer and support information. Create an
account to access Poly support personnel and participate in developer and support forums. You can
find the latest information on hardware, software, and partner solutions topics, share ideas, and
solve problems with your colleagues.
▪ The Poly Partner Network is a program where resellers, distributors, solutions providers, and unified
communications providers deliver high-value business solutions that meet critical customer needs,
making it easy for you to communicate face-to-face using the applications and devices you use
every day.
▪ The Poly Services help your business succeed and get the most out of your investment through the
benefits of collaboration.
6


Getting Started
Topics:
▪ Product Overview of Poly CCX Business Media Phones
• Logging In to and Locking Your Phone
This section provides information on getting started with your Poly CCX business media phones running
Skype for Business.
Note: As you read this guide, remember that your system administrator configures certain features or
your network environment may determine them. As a result, some features may not be enabled or
may operate differently on your device. Additionally, the examples and graphics in this guide may
not directly reflect available options or what your device screen displays.
Product Overview of Poly CCX Business Media
Phones
Poly CCX business media phones with Skype for Business support audio-only conference calls.
The following features are available on CCX phones with Skype for Business:
▪ Placing, answering, and managing audio calls
▪ Initiating, joining, and managing audio conference calls
▪ Recording audio calls with USB flash drives
▪ Viewing and joining scheduled calendar meetings
▪ Managing contacts, call lists, and directories
▪ Adjusting call and phone settings
▪ Pairing with Bluetooth–enabled devices
▪ Checking voicemail messages
8
CCX Phone Hardware Overview
The following topics describe the hardware features for Poly CCX business media phones.
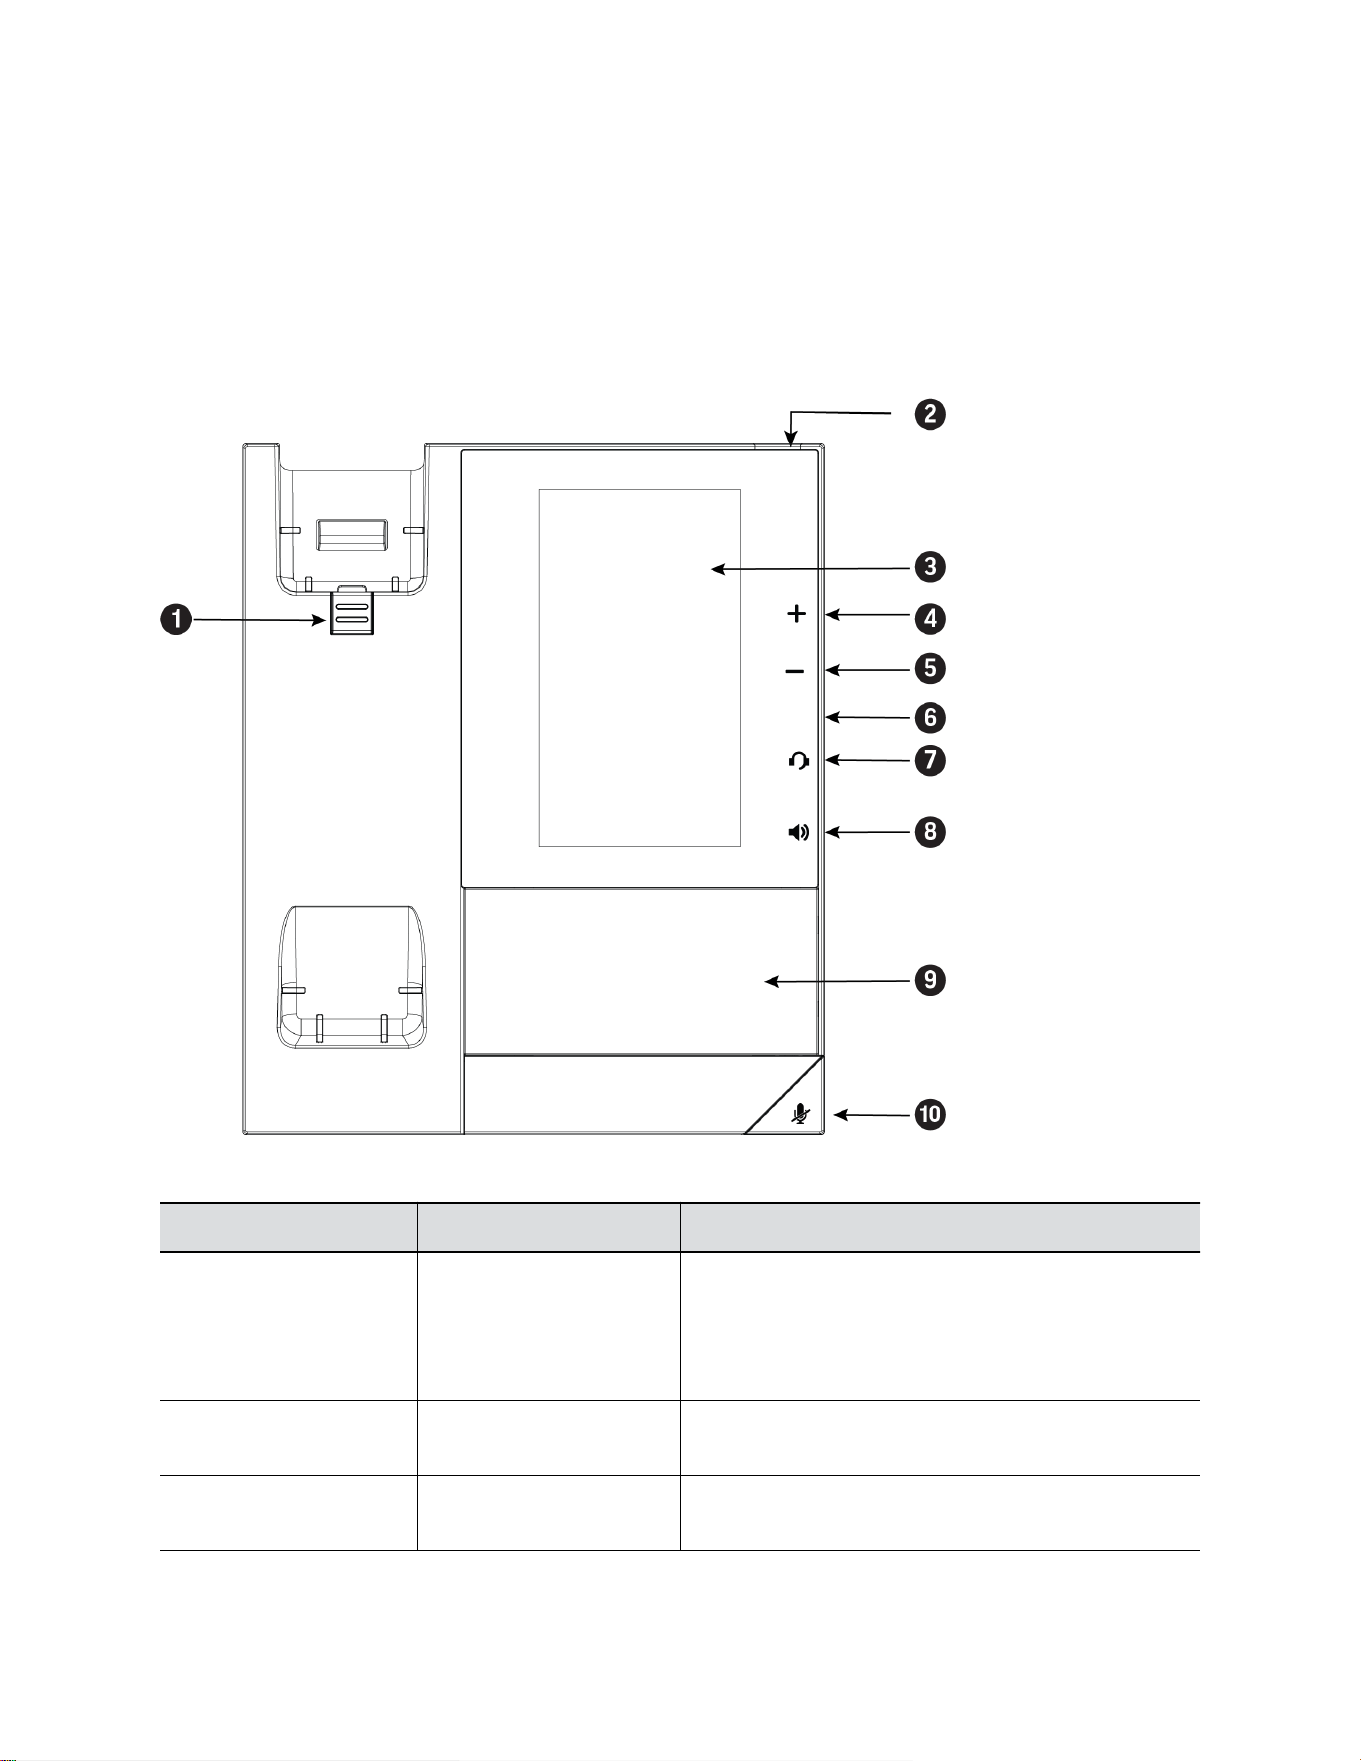
Poly CCX 400 Business Media Phones Hardware
The following figure displays the hardware features on Poly CCX 400 business media phones. The table
lists each feature numbered in the figure.
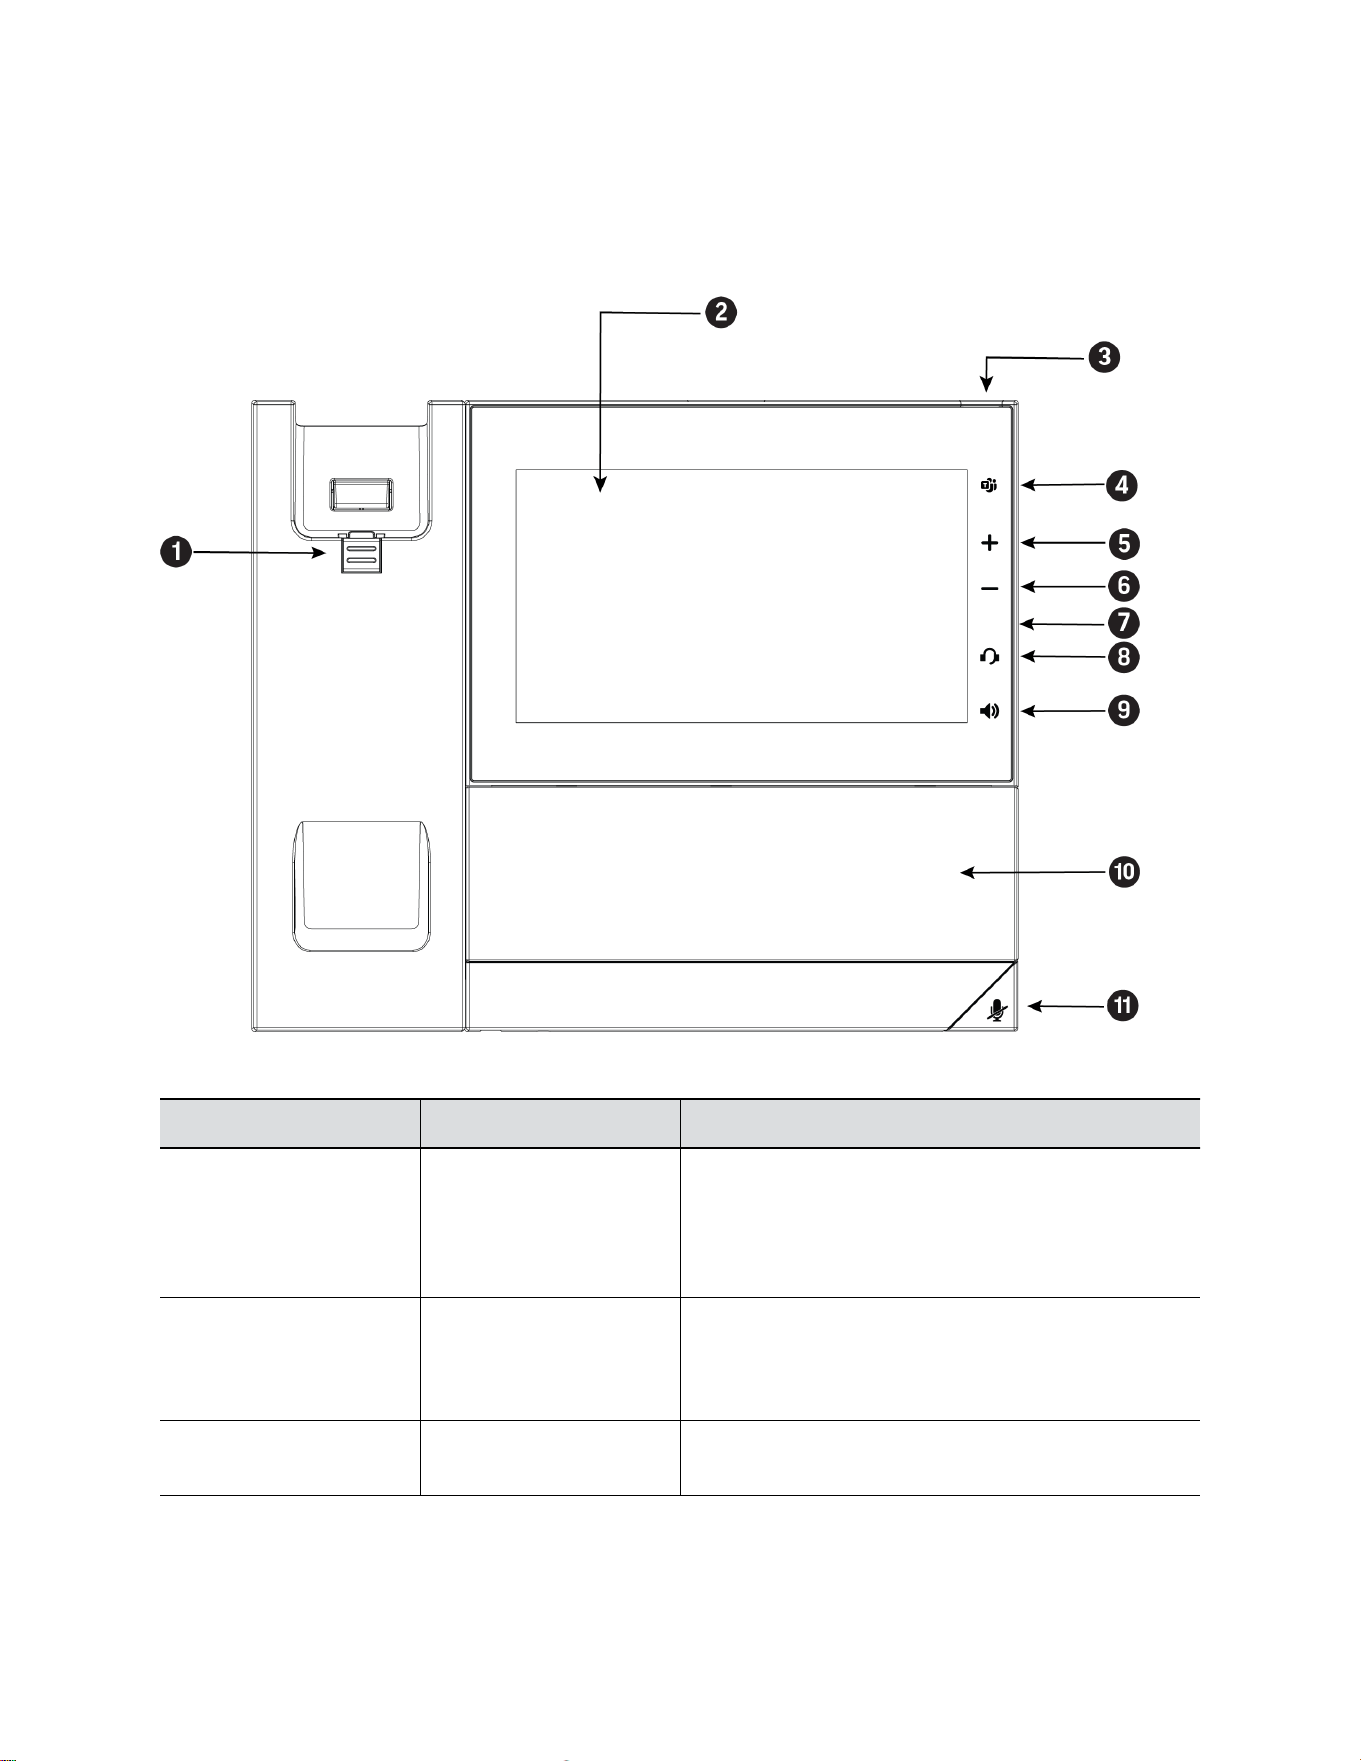
Figure 1: Poly CCX 400 phone hardware features
Poly CCX 400 Phone Hardware Feature Descriptions
Reference Number Feature Feature Description
1 Reversible tab Secures the handset in the cradle when you position
your phone stand at a high angle. To secure the
handset, remove the tab, reverse it so the protrusion
points up, and reinsert it. Position the handset so the
protrusion on the tab fits into the slot on the handset.
2 Message waiting indicator Flashes red to indicate you have an incoming call or a
new message.
3 Touchscreen Enables you to select items and navigate menus on the
touch-sensitive screen.
Getting Started
9
Reference Number Feature Feature Description
4, 5 Volume keys Adjusts the volume of the handset, headset, speaker,
and ringer.
6 USB port(s) CCX 400 phones contain one USB-A port.
Enables you to attach a USB flash drive or USB
headset.
7 Headset indicator Displays when the phone is powered on. The icon
glows green or blue when a headset is connected and
activated.
8 Speakerphone indicator Displays when the phone is powered on. The icon
glows green when activated.
9 Speaker Provides ringer and speakerphone audio output.
10 Mute key Mute or unmute the microphone during an active call.
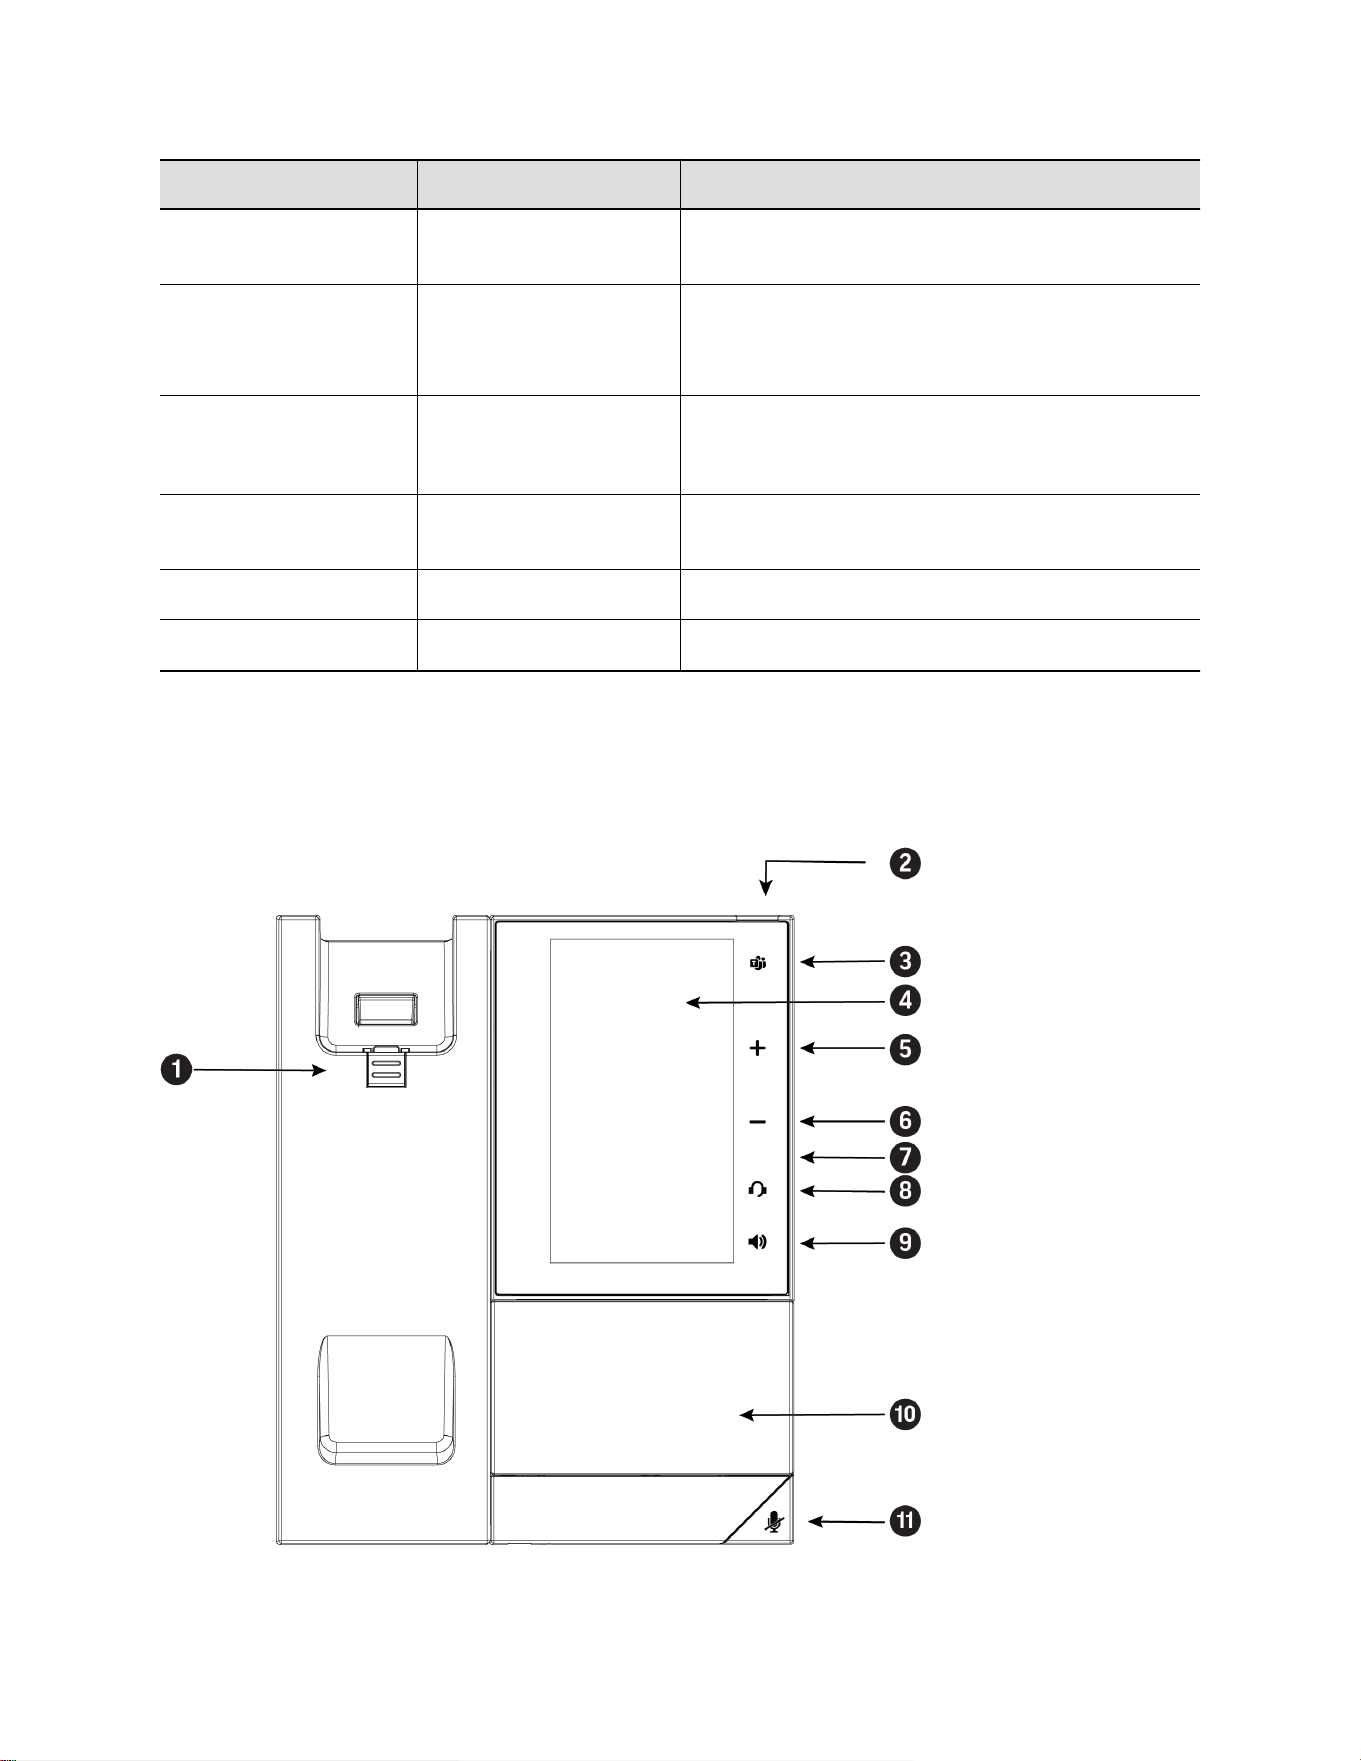
Poly CCX 500 Business Media Phone Hardware
The following figure displays the hardware features on Poly CCX 500 business media phones. The table
lists each feature numbered in the figure.
Figure 2: Poly CCX 500 phone hardware features
Getting Started
10

Poly CCX 500 Phone Hardware Feature Descriptions
Reference Number Feature Feature Description
1 Reversible tab Secures the handset in the cradle when you position
your phone stand at a high angle. To secure the
handset, remove the tab, reverse it so the protrusion
points up, and reinsert it. Position the handset so the
protrusion on the tab fits into the slot on the handset.
2 Message waiting indicator Flashes red to indicate you have an incoming call or
new messages.
3 Teams button Glows and is active when the phone is set to the Teams
base profile.
Navigates to the Home screen. If the Home screen is
disabled, the button navigates to the Calls screen.
4 Touchscreen Enables you to select items and navigate menus on the
touch-sensitive screen.
5, 6 Volume keys Adjusts the volume of the handset, headset, speaker,
and ringer.
7 USB port(s) Poly CCX 500 phones include one USB-A port and one
USB-C port.
8 Headset indicator Displays when the phone is powered on. The icon
glows green or blue when a headset is connected and
activated.
9 Speakerphone indicator Displays when the phone is powered on. The icon
glows green when activated.
10 Speaker Provides ringer and speakerphone audio output.
11 Mute key Mute or unmute the microphone during an active call.
Getting Started
11
Poly CCX 600 Business Media Phone Hardware
The following figure displays the hardware features on Poly CCX 600 business media phones. The table
lists each feature numbered in the figure.
Figure 3: Poly CCX 600 Phone Hardware Features
Poly CCX 600 Phone Hardware Feature Descriptions
Reference Number Feature Feature Description
1 Reversible tab Secures the handset in the cradle when you position
your phone stand at a high angle. To secure the
handset, remove the tab, reverse it so the protrusion
points up, and reinsert it. Position the handset so the
protrusion on the tab fits into the slot on the handset.
2 Touchscreen Enables you to select items and navigate menus on the
touch-sensitive screen. Tap the screen to select and
highlight screen items. To scroll, touch the screen, and
swipe your finger up, down, right, or left.
3 Message waiting indicator Flashes red to indicate you have an incoming call or
new messages.
Getting Started
12

Reference Number Feature Feature Description
4 Teams button Glows and is active when the phone is set to the Teams
base profile.
Navigates to the Home screen. If the Home screen is
disabled, the button navigates to the Calls screen.
5, 6 Volume keys Adjusts the volume of the handset, headset, speaker,
and ringer.
7 USB port(s) One USB-A port and one USB-C port.
8 Headset indicator Displays when the phone is powered on. The icon
glows green or blue when a headset is connected and
activated.
9 Speakerphone indicator Displays when the phone is powered on. The icon
glows green when activated.
10 Speaker Provides ringer and speakerphone audio output.
11 Mute key Mute or unmute the microphone during an active call.
LED Indicators on CCX Phones
The LEDs on Poly CCX phones indicate phone and accessory states.
CCX Phones LED Descriptions
LED Color State and Description
Speakerphone Off – Phone is in sleep mode.
White – Speakerphone is off, but the phone is active.
Green – Speakerphone is on.
Headset Off – Phone is in sleep mode.
White – No headset is active.
Green – An electronic hookswitch (EHS) headset is
connected and activated.
Blue – A USB or Bluetooth headset is connected and
activated.
Mute Off – No call is active.
Red – The phone microphone is muted.
Message Waiting Indicator (MWI) Off – No new messages are available.
Blinking Red – New or unread voicemails are available,
incoming call and missed call.
Getting Started
13
Navigating Poly CCX Phones
Your phone has icons, status indicators, and user screens to help you navigate and understand important
information on the state of your phone.
CCX Phone Screens
You can access various phone screens from the Home screen or from the Menu in the upper-left
corner of the display.
Access the Home Screen
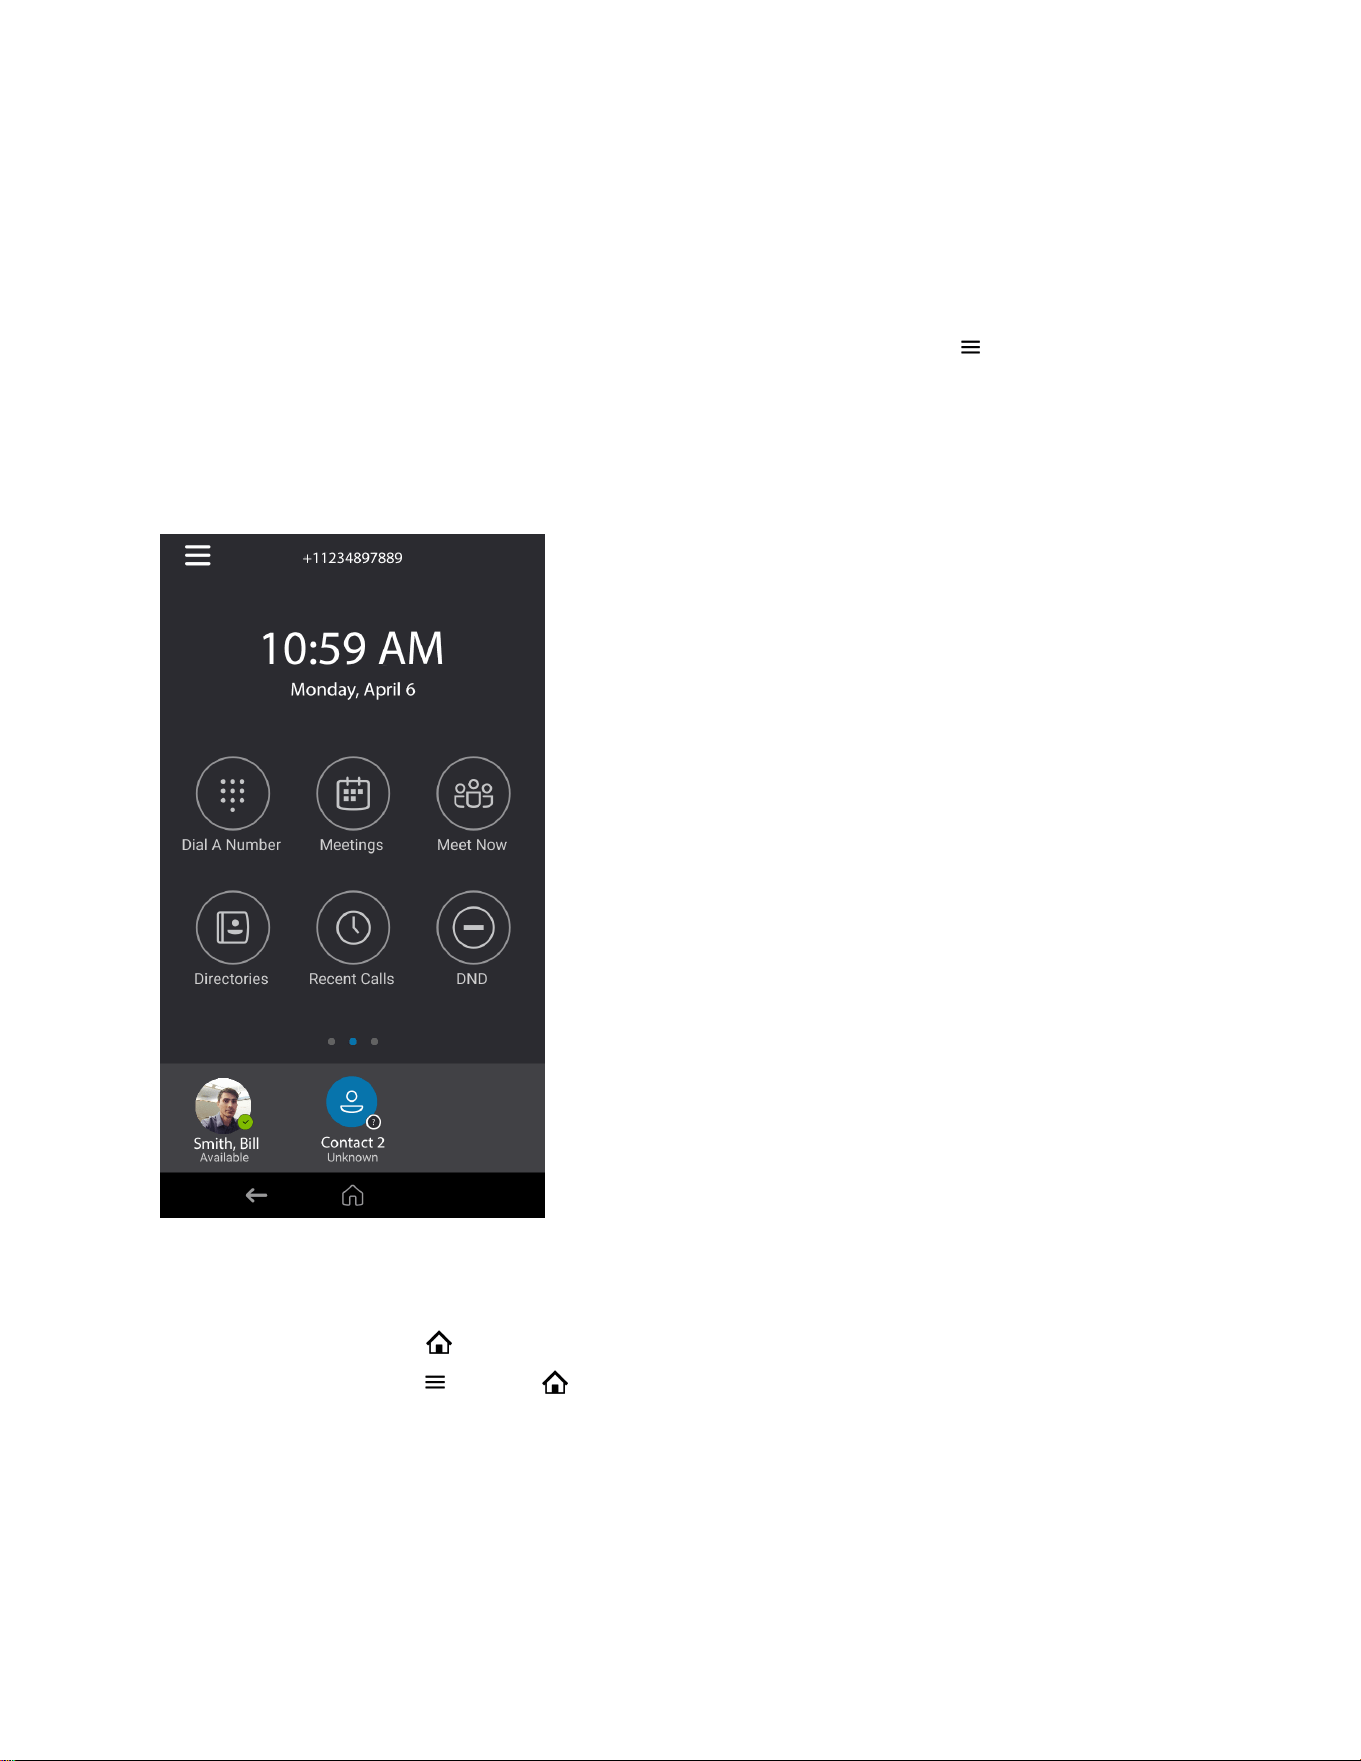
The Home screen displays phone status, soft keys, and registered lines.
Figure 4: CCX Phones Home Screen
Procedure
» Do one of the following:
• Select Home .
• Select Menu > Home .
Access the Dial a Number Screen
The Dial a Number screen provides access to the dialpad, directories, recent calls, and meetings.
When configured by your system administrator, your phone displays the Dial a Number screen when the
phone is idle.
Getting Started
14
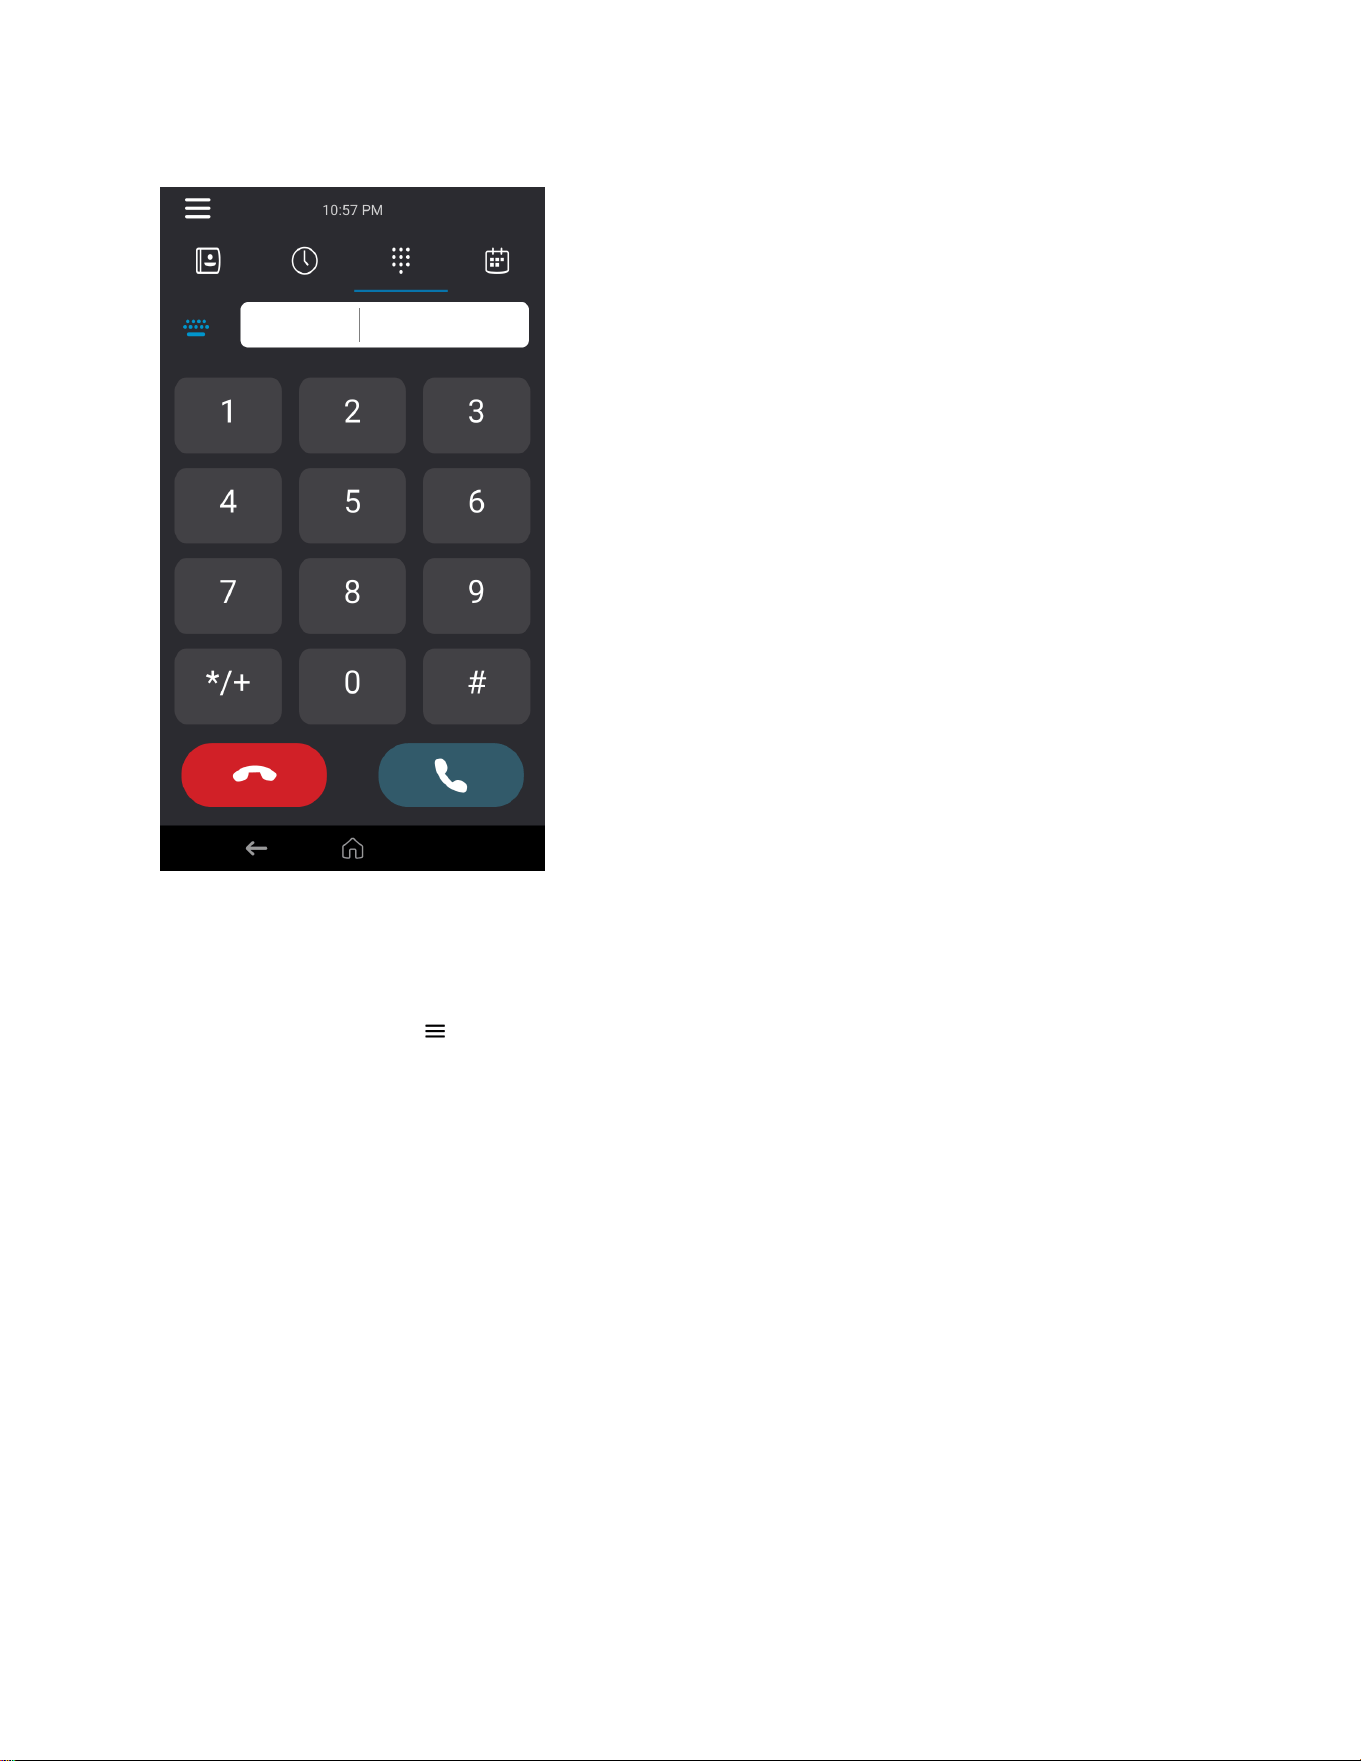
Figure 5: CCX Phones Dial a Number Screen
Procedure
» Do one of the following:
• On the Home screen, select Dial a Number.
• Select Menu > Dial a Number.
Accessing the Calls Screen
The Calls screen on CCX phones automatically displays when you place a call and you have an active
call in progress.
For active calls, the phone displays the contact's name, number and the call duration.
You can also view active and held calls on the phone. If the phone has multiple lines, active and held calls
display under the associated line.
Getting Started
15
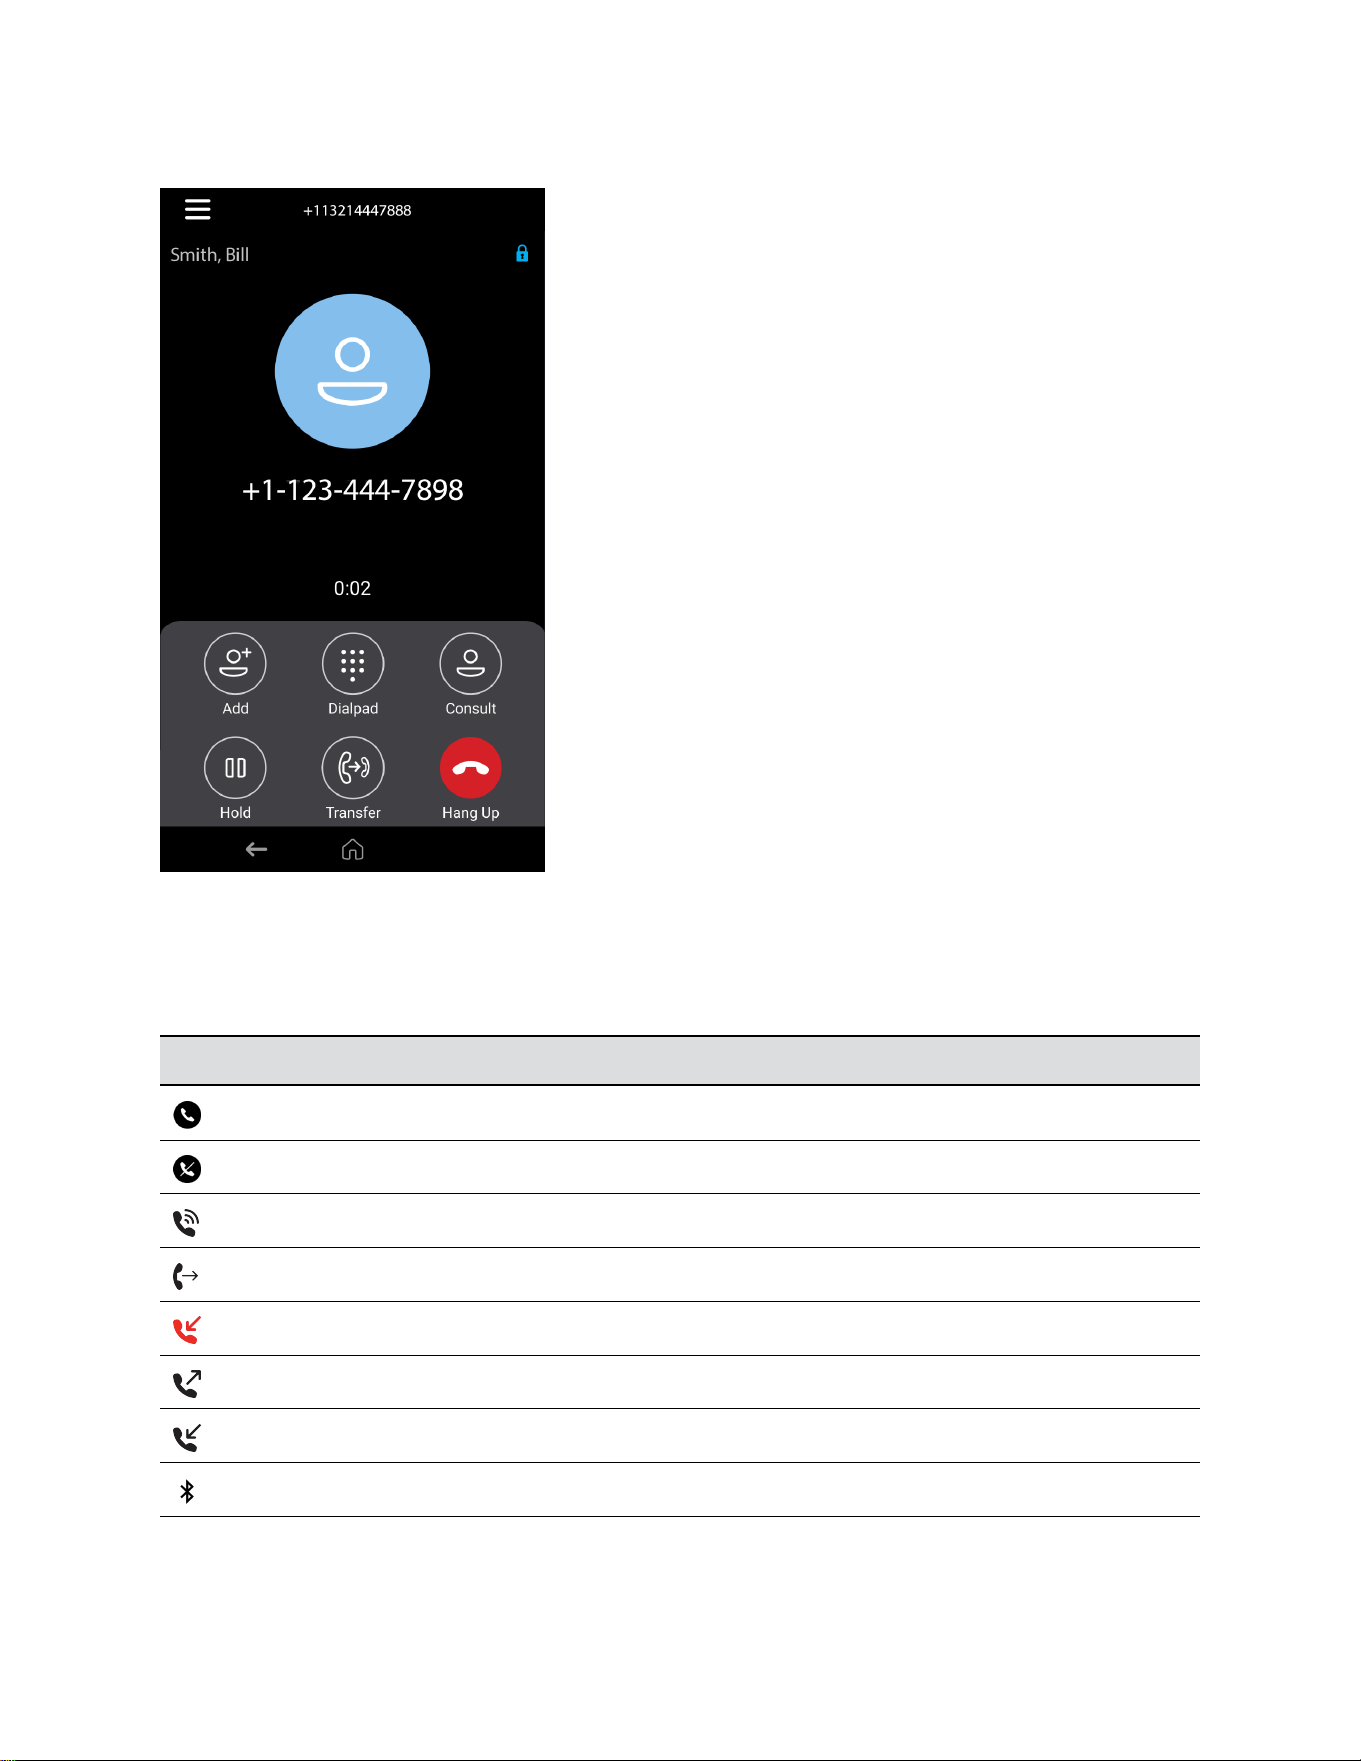
Figure 6: CCX Active Calls Screen
Icons and Status Indicators
The following table displays the icons and status indicators that display on the phone.
Icons and Status Indicators
Icon Description
Registered Line
Unregistered Line
Active Call
Call Forwarding enabled
Missed Call
Placed Call
Received Call
Bluetooth
Getting Started
16

Icon Description
USB attached
Do Not Disturb enabled
Configuration Warning message
Related Links
Users Who Are Deaf or Hard of Hearing on page 78
Using a Phone as a Common Area Phone
Your system administrator can set up phones in your environment as Common Area Phones (CAP) to
enable you to use the phone as a CAP user.
When your admin sets up a phone as a Common Area Phone, you can access only the following
features:
• Flexible Line Keys
• Better Together over Ethernet
• Address Book Service search
Enter Information Using the Onscreen Keyboard
The onscreen keyboard available on supported phones enables you to enter information into text fields
using the touchscreen.
The onscreen keyboard displays automatically at the bottom of the screen when you enter information in
a text field. When a text field requires only numbers, the onscreen keyboard displays only numbers.
Procedure
1. Select the text input field.
2. Enter your text characters.
3. Select Enter .
Logging In to and Locking Your Phone
Sign in to your phone with your Skype for Business credentials and lock your phone using a lock code.
Signing In to Skype for Business on Your Phone
Use one of the following methods to sign in to a Poly phone with your Skype for Business credentials:
• User ID: Enter your user credentials.
• PIN: Enter your PIN Authentication credentials, if enabled.
• Web Sign In: Sign in to your Skype for Business Online account on your computer using the web
address shown on the phone.
Getting Started
17

Sign In Using Your Skype for Business User Credentials
You can sign in to Skype for Business through the phone’s local interface.
Your system administrator provides you with your login credentials. Your login credentials include your
domain, email address, user name, and password.
Procedure
1. Do one of the following:
• Select Sign In.
• Go to Settings > Features > Skype for Business > Sign In.
2. Select User ID.
3. Enter your Skype for Business account user credentials and select Sign In.
A confirmation message displays when the phone successfully signs in to Skype for Business.
Note: If you input the wrong credentials and lock your account, contact your system administrator.
Sign In to Skype for Business on Your Computer Using BToE
Pairing your phone with BToE enables you to sign in to your phone using the Skype for Business desktop
client.
Procedure
1. Go to Menu > Sign In.
2. Select Via PC or Paired with Client.
3. In the Skype for Business client on your computer, enter your login credentials.
A confirmation message displays when the phone successfully signs in to Skype for Business.
Sign In Using Skype for Business PIN Authentication
Sign in to Skype for Business on your phone or common area phone with your PIN authentication
credentials.
Procedure
1. Do one of the following:
• Select Sign In.
• Go to Settings > Features > Skype for Business > Sign In.
2. Select PIN Authentication.
3. Enter the PIN authentication credentials for your Skype for Business account and select Sign In.
A confirmation message displays when the phone successfully signs in to Skype for Business.
Note: If you input the wrong credentials and lock your account, contact your system administrator.
Getting Started
18

Sign In to Skype for Business Using Web Sign In
Use a web browser to sign in to Skype for Business on your phone.
Procedure
1. Do one of the following:
• Select Sign In.
• Go to Settings > Features > Skype for Business > Sign In.
2. Select Web Sign In.
A web address displays.
3. Enter the URL into a web browser on your computer.
4. On the Skype for Business Authentication website, enter your email address and select Verify
Email.
5. Enter the PIN generated on the phone into the web browser.
A confirmation message displays when the phone successfully signs in to Skype for Business.
Sign Out of Skype for Business
If you sign in to Skype for Business on a public phone, make sure you sign out of your account after you
finish using it.
After you sign out of Skype for Business, you can’t call or view your Skype for Business contacts on the
phone. However, you can still use other available features.
Procedure
» Select Menu > My Status(Available) > Sign Out.
Signing In to a Phone as a Guest
The hot desking feature allows you to sign in to a phone as a guest. Sign in using your Skype for
Business credentials or PIN.
The following features are available when you’re signed in as a guest:
• Flexible Line Key (FLK)
• Device Lock
• Address Book Service search
• Do Not Disturb status
• Call Forward
• Basic Settings menu
• Advanced Settings menu
• Sign In/ Sign Out
• System web interface
• Exchange Calendar
• Exchange Contacts
• Exchange Applications
• Exchange Voicemail
Getting Started
19

• Better Together over Ethernet
These features maintain the default settings while you’re signed in as a guest. When you sign out, the
host user settings are restored.
Sign In as a Guest Using User Credentials
Sign in to Skype for Business on your phone or Common Area Phone (CAP) as a guest with your login
credentials.
Procedure
1. On the phone, select the Guest soft key.
2. Select Yes to sign out the host user.
3. Select User ID.
4. Enter your Skype for Business account user credentials and select Sign In.
A confirmation message displays when the phone successfully signs in to Skype for Business.
Sign In as a Guest Using PIN Authentication
Sign in to Skype for Business on your phone or common area phone as a guest with your PIN
Authentication credentials.
Procedure
1. On the phone, select the Guest soft key.
2. Select Yes to sign out the host user.
3. Select PIN Authentication.
4. Enter the PIN authentication credentials for your Skype for Business account and select Sign In.
A confirmation message displays when the phone successfully signs in to Skype for Business.
Sign In as a Guest Using Web Sign In
Use a web browser to sign in to Skype for Business on a phone as a guest user.
Procedure
1. On the phone, select the Guest soft key.
2. Select Yes to sign out the host user.
3. Select Web Sign In.
A web address displays.
4. Enter the URL into a web browser on your computer.
5. On the Skype for Business Authentication website, enter your email address and select Verify
Email.
6. Enter the PIN generated on the phone into the web browser.
A confirmation message displays when the phone successfully signs in to Skype for Business.
Getting Started
20

Sign In to Skype for Business as a Guest Using BToE on Your Computer
When you connect a phone to the computer and pair using Better Together over Ethernet, you can sign in
to the phone as a guest user using the Skype for Business client on your computer.
Procedure
1. Go to Menu > Guest.
2. Select Yes to sign out the host user.
3. Select Via PC or Paired with Client.
4. In the Skype for Business client on your computer, enter your login credentials.
A confirmation message displays when the phone successfully signs in to Skype for Business.
Locking Your Phone
Your system administrator provides you with a user password that you can use to unlock the phone.
Locking your phone prevents unauthorized people from placing or answering calls. It also prevents
anyone from viewing or modifying phone information, such as your directory, call lists, or favorites.
When you lock your phone, you can do the following:
• Place outgoing calls to emergency and authorized numbers only
• Place outgoing calls to a contact, unless your system administrator restricts your phone to placing
calls to emergency and authorized numbers only
• Enter a password to answer incoming calls
• Answer incoming calls, unless your administrator has set your phone to require a password to
answer calls
Related Links
Place a Call from a Locked Phone on page 26
Answer a Call on a Locked Phone on page 28
Set a Lock Code
When you sign in to Skype for Business on your phone, the phone prompts you to set a lock code. Use
the lock code to unlock your phone.
Note: You can’t dismiss the prompt to create a lock code. However, the prompt disappears if you don’t
create a lock code in a set amount of time. If you don’t create a lock code when prompted, you
can't sign in on the phone.
Procedure
1. At the Create a Lock Code prompt, enter a numerical lock code and select the Checkmark .
2. Confirm your lock code and select the Checkmark again.
The phone saves your lock code so you can use it to unlock your phone.
Getting Started
21

Lock Your Phone
After you create a lock code, lock your phone any time you leave your desk. Your phone automatically
locks after being idle for the amount of time your administrator defines.
Procedure
» Go to Menu > Lock.
Unlock the Phone
You can unlock the phone with your lock code.
Procedure
» Enter your lock code and select Unlock or tap .
Change Your Lock Code
You can change your lock code at any time while signed in to your Skype for Business account.
Procedure
1. Navigate to Menu > Settings > Basic > Device Lock.
2. Select Change Lock Code and enter your current lock code.
3. Enter a new lock code and confirm your new lock code.
4. Select Submit.
Reset Your Lock Code
If you forget your lock code, reset the code using your login password.
Procedure
1. On the Lock screen, select Forgot.
2. On the Forgot Lock Code screen, enter your login password or the PIN for your Skype for
Business account.
3. Enter and confirm your new lock code.
Disable Device Lock
Device Lock is enabled by default. However, if you don’t want to lock your phone, disable Device Lock.
Procedure
1. Navigate to Menu > Settings > Basic > Device Lock.
2. Select Device Lock: Enabled, and select Disabled.
Getting Started
22

Audio Calls
Topics:
• Placing Audio Calls
▪ Redial a Number
• Answering Audio Calls
▪ Decline an Incoming Call
▪ End an Audio Call
• Holding and Resuming Calls
▪ Transfer a Call
• Rejecting Calls with Do Not Disturb
• Forwarding Incoming Skype for Business Calls
▪ Managing Multiple Calls
▪ Mute the Microphones
▪ Unmute the Microphones
• Recording Audio Calls
By default, your phone has one registered line.
You can manage a maximum of 24 active, incoming, or held audio calls at a time on the line. However,
you can have only one active call in progress with numerous other incoming calls or calls on hold.
Placing Audio Calls
Poly phones enable you to place calls to local numbers, international numbers, and Skype for Business
contacts.
You can initiate calls from your favorites list, recent calls list, and your phone directory. From a locked
phone, you can place calls to numbers authorized by your system administrator.
Place an Audio Call
Call a contact using their phone number or IP address.
Procedure
1. Select Dial a Number.
2. Enter your contact's number or select the onscreen keyboard and enter an IP address.
3. Select Dial .
23

Place an International Call
You can place calls to international phone numbers on your phone.
Procedure
1. (REPLACE) Do one of the following:
• On the home screen, select Place a Call.
• Select Menu > Place a Call.
• Pick up the headset, press the headphone icon, or press the speakerphone icon.
2. On the dialpad, quickly press the star key (*) twice.
A plus sign (+) displays.
3. Enter the country code and phone number then select Dial .
The phone plays a tone and the contact’s phone answers the call automatically.
Place a Call from Recent Calls
You can place calls from the Recent Calls list, which contains calls that you recently placed, answered,
or missed.
Procedure
1. Do one of the following:
• From the Home screen, select Recent Calls .
• From the Place a Call screen, select Recent Calls .
2. Select a contact.
The call begins automatically after you select a contact.
Related Links
Call Lists and Directories on page 48
Place Calls to Skype for Business Contacts
When you sign in to Skype for Business, favorites in the Skype for Business client display on the phone in
the Contacts list. You can call your Skype for Business favorites from the Contacts list on the phone.
Procedure
1. Go to Directories > Contacts.
2. Choose a contact and select Dial.
Related Links
Skype for Business Contacts on page 51
Audio Calls
24

Place a Call over Bluetooth
You can pair and connect your phone with a Bluetooth–enabled mobile phone or tablet. Calls placed call
on your device and use the phone as a speakerphone for the call. These steps apply to most mobile
phones and tablets. For more information refer to your mobile phone or tablet's product documentation.
Procedure
1. Connect your device with the phone over Bluetooth.
2. On your device, place a call to a contact and select the CCX as the audio source.
Related Links
Using Bluetooth Devices on Your Phone on page 66
Call a Favorite
Contacts you add as favorites display at the bottom of the Home screen with an avatar. You can place a
call to favorites by selecting the favorite’s avatar.
Procedure
» On the Home screen, select a favorite.
Calling Contacts from Directories
You can search for and call contacts in your contact directory and the Skype for Business Directory. You
can also search for distribution lists and call a member of a distribution list.
Related Links
Call Lists and Directories on page 48
Call a Contact from a Directory
Place a call directly from your directory or select contacts in your directory to call on the Dial a Number
screen.
Procedure
1. Do one of the following:
• Navigate to Contacts and select a directory.
• Navigate to Place a Call, select Contacts , and select a directory.
2. Select a contact.
3. On the Details screen, select Call next to the number you want to call.
Call a Contact from a Directory Search
Search for and call contacts on the Search screen in your directory.
Procedure
1. Select Directories, then select Contacts and select a directory.
2. In the Search field, enter your contact’s name.
3. Select a contact.
Audio Calls
25

Place a Call from a Locked Phone
When the phone is locked, you can place outgoing calls to any contact unless your system administrator
restricts your phone to placing calls only to emergency numbers, such as 911, and authorized numbers
that your system administrator can set up.
Procedure
1. Do one of the following:
• On the home screen, select Dial A Number.
• Pick up the headset, press the headphone icon, or press the speakerphone icon.
2. From the Place an Authorized Call screen, choose a number and select Dial.
Related Links
Locking Your Phone on page 21
Placing Intercom Calls
Like a normal call, the intercom feature enables you to place a call to a contact.
An intercom call differs from a normal call in that the call recipient’s phone answers automatically when
not in an active call. Check with your system administrator to find out if this feature is available on your
phone.
If the call recipient has an active call, the recipient can choose to answer the intercom call. Otherwise, the
phone answers the intercom call automatically after their active call ends.
Related Links
Answer an Incoming Call on page 27
Place an Intercom Call
You can place an intercom call from your phone to quickly relay a message to a contact.
Tip: Your system administrator can set up your phone to automatically call a specific contact when you
select Intercom. If your phone is set up this way, select Intercom and wait for your contact to
answer before speaking your message.
Procedure
1. Select Intercom.
2. Enter a number or select a contact.
3. Select Dial .
The phone plays a tone and the contact’s phone answers the call automatically.
4. After your contact answers the call, speak your message and select End Call.
Place an Intercom Call During a Call
You can place an intercom call to another contact during an active call.
Procedure
1. Select Hold > Intercom.
Audio Calls
26

The active call goes on hold and the dialpad displays.
2. Enter a number or select a contact.
3. Select Dial .
The phone plays a tone and the contact’s phone answers the call automatically.
4. After your contact answers the call, speak your message and select End Call.
5. Select Resume.
Redial a Number
Your phone automatically keeps a record of all calls placed. Use Redial to contact the last contact you
called.
Procedure
» Select Menu > Redial.
Answering Audio Calls
When you receive an incoming call on your phone, you can choose to answer the call in a number of
different ways.
Answer an Incoming Call
When you receive an incoming call, the phone rings and the Incoming Call screen displays. On the
Incoming Call screen, you can choose to answer or reject the incoming call.
Note: Your system administrator can enable the screen to flash bright orange when you have an
incoming call. The screen continues to flash until the Home or Calls screen displays the incoming
call. For more information about this feature, contact your system administrator.
Procedure
» Select Answer .
If enabled, you can answer calls using the Mute button.
Related Links
Placing Intercom Calls on page 26
Decline an Incoming Call on page 28
Answer a Call When in a Call
When you’re in an active call and an incoming call arrives on the same or a different line, a call waiting
tone beeps and the Incoming Call screen displays.
Procedure
» Select Answer.
This places the active call on hold, and the incoming call becomes active.
Audio Calls
27

Answer Calls Automatically
You can set up your phone to automatically answer calls using Auto Answer.
When enabled, the phone automatically answers all incoming calls using the speakerphone. Your system
administrator sets how many times the phone rings before it automatically answers the call.
The phone doesn’t automatically answer a call until you place your current call on hold or end it.
Procedure
1. Go to Settings > Basic > Preferences.
2. Select Auto Answer.
3. Select Auto Answer SIP Calls and select Yes.
4. Select Microphone Muted and choose Yes (the default setting) to mute the microphone for auto-
answered calls.
5. Select Save.
Related Links
Users with Limited Mobility on page 79
Answer a Call on a Locked Phone
You can enable your phone to accept calls while it's locked. To answer calls on a locked phone, enter
your password.
Procedure
1. On the Incoming Call screen, select Answer.
2. Enter your password and select Enter.
The call connects.
Related Links
Locking Your Phone on page 21
Answer an Intercom Call
When you receive an intercom call, your phone answers the call automatically using the speakerphone as
long as you don't have an active call already.
If the phone answers an intercom call with your microphone muted, you must unmute your microphone
before responding to the call.
Decline an Incoming Call
You can decline an incoming call and send the call directly to voicemail.
Declined calls display in the Missed Calls list in Recent Calls. You can’t decline calls for shared lines.
Procedure
» In the Incoming Call screen, select Decline.
Related Links
Answer an Incoming Call on page 27
Audio Calls
28

End an Audio Call
You can end active calls at any time. To end a held call, resume the call and then end it.
Procedure
» Do one of the following:
▪ Select Hang Up .
▪ On the Calls screen, select the call and select Hang Up .
▪ On the Calls screen, select a held call, select Resume , and select Hang Up .
▪ If you’re using the handset, return the handset to the cradle.
Holding and Resuming Calls
When you are in a call, you can place an active audio call on hold and resume the call.
Hold a Call
Place an active call on hold.
Procedure
» During an active call, select Hold.
Resume a Call
View and resume a held call.
Procedure
» Do one of the following:
• Select Resume.
• From the Calls screen, select the call and select Resume.
Transfer a Call
Transfer a call that is active or on hold.
Procedure
1. Select Transfer.
2. Do one of the following:
▪ Enter a phone number and press .
▪ Select Directories > Contacts.
Select or search for a contact then select Dial.
Audio Calls
29

The call is transferred.
Rejecting Calls with Do Not Disturb
Do Not Disturb (DND) enables you to set your phone to automatically reject calls when you don’t want to
be interrupted.
When you enable DND, you see the following:
• The DND icon displays in the status bar.
• When the phone is idle, the DND icon displays next to your phone line.
• When the administrator enables hybrid line registration on the phone, you can choose All to enable
DND on all the registered lines.
• If you have new messages or you have enabled call forwarding, the messages or forwarding icon
display instead of the DND icon.
Note: When you set your presence status to Do Not Disturb and enable DND on your phone, a
message reflecting your Do Not Disturb status scrolls under the time display. The DND icon
doesn’t display in the status bar.
Enable Do Not Disturb
Enable DND to prevent your phone from ringing and to send all incoming calls to voicemail. The phone
logs all calls you receive while on DND in the Recent Calls list.
DND on shared lines disables ringing only. A visual notification of the call still displays, and you can
answer or ignore the call.
Procedure
» Do one of the following:
• Select DND on the Home screen, if enabled by your system administrator.
• Go to Settings > Features > Do Not Disturb and select Enable.
Disable Do Not Disturb
When you’re ready to receive calls, disable DND.
Procedure
» Go to Settings > Features > Do Not Disturb and select Disable.
Audio Calls
30

Forwarding Incoming Skype for Business Calls
You have several options when forwarding calls with a phone registered with the Skype for Business
Server. You can forward calls to contacts, to voicemail, or to a group of contacts.
Simultaneously Ring a Group of Contacts
In the Skype for Business client, you can choose to simultaneously ring a group of Skype for Business
contacts when you receive incoming calls.
If your line receives an incoming call, the phone rings for everyone in the team-call group.
Procedure
1. In the Skype for Business client, go to Settings > Tools > Call Forwarding Settings.
2. Select Simultaneously Ring > My Team-Call Group.
3. In the Call Forwarding - My Team-Call Group dialog box, select Add.
4. In the Choose a Team-Call Group Member dialog box, select the contacts you want to add, and
select OK.
The contacts you add as group members display in the Call Forwarding - Team-Call Group
dialog box.
5. Choose the option in the Ring your team-call group after this many seconds drop-down menu
to determine when your team-call group’s phones ring.
Forward Skype for Business Calls to a Contact
You can forward all calls to a Skype for Business contact.
Procedure
1. Go to Settings > Features > Forward.
2. Select Forward to Contact and do one of the following:
• Enter a contact’s number and select OK.
• Select Search, search for and choose a contact, and select Forward.
• Select Contacts, choose a contact, and select Forward.
Forward a Call to Voicemail
When you sign in to Skype for Business, you can forward all calls directly to your voicemail.
Note: You can access the Forward to Voicemail option when you enable voicemail.
Procedure
1. Go to Settings > Features > Forward.
2. Select Forward to Voicemail.
All incoming calls go directly to your voicemail.
Related Links
Voicemail and Pages on page 55
Audio Calls
31

Managing Multiple Calls
Manage multiple active, incoming, or held calls.
In the Calls screen, you can view active and held calls, including conference calls. The following figure
shows an active call and a held call.
Figure 7: Multiple calls on the Calls screen
Manage a Call from the Calls Screen
From the Calls screen, you can manage a call by holding, resuming, or transferring the call.
Procedure
1. Select a call.
2. Do one of the following:
• Select Hold to place an active call on hold.
• Select Resume to make a held call active.
• Select End Call to end a call with a contact. You can end active calls only, so resume the
held call first before ending it.
• Select Transfer to send the call to another contact.
Mute the Microphones
Mute the microphone so other parties can't hear you.
Procedure
» Do one of the following:
▪ Select Mute .
▪ Select the Mute key on the phone.
▪ Select the Mute key on the microphone.
Related Links
Unmute the Microphones on page 32
Unmute the Microphones
Unmute your audio when you’re ready to speak and let others on the call hear you.
Procedure
» Do one of the following:
▪ Select Unmute .
▪ Select the Mute key on the phone.
▪ Select the Mute key on the microphone.
Audio Calls
32

Related Links
Mute the Microphones on page 32
Recording Audio Calls
On CCX phones, you can record audio calls onto a USB flash drive connected to your phone.
Recordings save as .wav files on the USB flash drive, and you can record up to four hours in one .wav
file. You can replay recordings on the phone or on a computer.
For a list of supported USB flash drives to record phone audio, see Technical Bulletin 38084: Supported
USB Devices at Polycom Support.
Note: If your phone doesn’t detect the USB device when you insert it into the USB port, the USB port on
your phone may be disabled. Contact your system administrator for assistance using the USB
port.
Guidelines When Recording Calls
Use the following guidelines when recording audio calls on your phone.
• Inform contacts when you’re recording a call.
• Make sure to mute your audio when you’re placed on hold while recording the call.
• During an active call, pause your recording before answering incoming calls. All incoming calls you
answer after you start recording are also recorded in the same file. For example, on June 22, 2019,
at 11:22 a.m., you answer a call from person A. During your call with person A, you answer calls
from person B and person C. All three calls are recorded in the same file.
Record a Call
The phone allows you to record an active audio call. Make sure to inform your contacts on the call before
you begin recording.
Some things to note about recording:
• You can’t record when there are no connected calls, when you place a new call to transfer a call or
initiate a conference, or when you have an incoming call.
• Your phone records some tones that your contact’s phone makes.
• When you mute your microphone while recording, the phone doesn’t record your audio and records
only the other participants’ audio.
Procedure
Pause a Recording
During a call, you might need to pause a recording while the call is active.
Procedure
» Select Menu > Pause Recording.
The message Recording Paused displays in the status bar.
Audio Calls
33

Resume a Recording
After you pause and then resume recording, recording continues in the same file.
Procedure
» Select Menu > Resume Recording.
Stop Recording
You can stop recording a call before the call ends. The recording also stops when the active call ends, no
matter who ended the call.
Caution: Don’t remove the USB flash drive while recording. Doing so may corrupt the file, preventing
you from playing it back later. Removing the USB flash drive while recording can also damage
the flash drive.
Procedure
» Select Menu > Stop Recording or hang up the call.
Browse Recorded Calls
You can browse recorded files stored on the USB flash drive connected to supported phones.
Procedure
» Go to Settings > Features > Removable Storage Media > Browse Recordings.
A list of recordings displays.
Play a Recorded Call
Play back calls recorded on a USB flash drive connected to your phone.
Note: You can’t open and play recordings when you are in an active call or if you’re recording a call. If
you try to, the phone cancels the action. Place the call on hold before playing recordings. The
recording stops playing when you resume the call.
Procedure
1. Go to Settings > Features > Removable Storage Media > Browse Recordings.
A list of recordings displays.
2. Select a recording.
3. Select Open > Play.
The length of the recording and a progress bar displays as the recording plays.
Audio Calls
34

Pause and Resume Played Recordings
While playing a recording, you can pause the recording, perform another task on the phone, and resume
the recording at any time.
When you receive an incoming call while playing a recording, the phone automatically pauses the
recording playback. If you don’t answer or reject the incoming call, the recording remains paused until you
select Resume.
Procedure
1. To pause the recording, select Pause.
2. Select Resume to continue playing the recording.
Stop Playing a Recording
After you finish listening to a recording, you can stop playing it by exiting the recording.
Procedure
» Select Exit.
Rename a Recording
By default, recordings are labeled with the date of the recording. You can rename recordings to provide
them with more meaningful names.
Procedure
1. Go to Settings > Features > Removable Storage Media > Browse Recordings.
A list of recordings displays.
2. Select a recording.
3. Select Rename, update the file name, and select OK.
Delete a Recording
When you’ve played a recording or need additional space on your USB drive, delete recordings from the
phone.
Procedure
1. Go to Settings > Features > Removable Storage Media > Browse Recordings.
A list of recordings displays.
2. Select a recording.
3. Select Delete.
Audio Calls
35

Conference Calls
Topics:
• Initiating a Skype for Business Conference Call
• Add Contacts to a Skype for Business Conference Call
• Send Active Conference Information to a Contact
• Viewing a List of Skype for Business Conference Participants
• Managing Skype for Business Conference Participants
You can initiate and manage up to 24 Skype for Business conference calls on a Poly CCX system.
However, you can have only one active conference call in progress.
You can also manage individual participants, enable announcements, and lock a conference.
Initiating a Skype for Business Conference Call
You can initiate Skype for Business conference calls on supported Poly phones registered with Skype for
Business.
Initiate a Skype for Business Conference
You can initiate a Skype for Business conference call, add and invite contacts to the conference call, and
manage up to 24 conference calls.
You must add one contact at a time to the conference call.
Procedure
1. Select Meet Now > Add.
2. Do one of the following:
• Enter a contact's number.
• Select a contact from Contacts or Recent Calls and select Dial.
When the contact answers, the phone adds the contact to the conference call.
3. Select Add to add additional contacts to the conference call.
Initiate a Conference Call During a Call
During a Skype for Business call, add contacts to the call to initiate a conference call.
Procedure
1. Do one of the following:
• Select Add and enter a contact’s number.
• Select a contact from Contacts or Recent Calls.
2. Select Add Participants to add the contact to the conference call.
36

Initiate a Group Conference Call
Initiate a conference call with a group of Skype for Business contacts.
Procedure
1. Go to Directories > Groups.
2. On the Groups screen, select a group.
3. Select Dial All.
4. Select Yes to confirm that you want to dial all contacts in the group.
The phone calls each contact in the group one at a time and adds them to a conference call.
Add Contacts to a Skype for Business Conference
Call
During a conference call, any participant can invite additional contacts to the call.
Procedure
1. During a conference call, select .
2. Select a contact to join the meeting.
An alert tone is played when the contact has joined the conference.
Send Active Conference Information to a Contact
While in a conference call, you can send the conference dial-in number and conference ID to contacts
you want to join the call. Your contact can then join the conference using the conference dial-in number
and conference ID.
Contacts join the conference call immediately unless they try to join a locked conference call. Contacts
must wait for the conference presenter to admit them to a locked conference call.
Procedure
» Copy the information and send it to the contacts you want to join the conference.
Related Links
Lock and Unlock a Conference Call on page 40
Viewing a List of Skype for Business Conference
Participants
When you initiate or join a conference call, the conference participants automatically display in a
conference participant list.
The list only displays participants in the conference call; it does not display any calls on hold, as shown
next.
Conference Calls
37

Exit the Participants List
To view the Home screen or navigate to menu options, exit the Participants list.
Procedure
» Select Back .
If you need to return to the Participants list, select the Participants icon.
Return to the Participants List
To view participants, return to the Participants list at any time during an active conference on your
phone.
Procedure
» Select Participants .
Managing Skype for Business Conference
Participants
When you initiate a conference call, meeting presenters can manage the meeting presenters and
attendees.
Conference participants with the Presenter icon next to their name are presenters and can manage
other conference participants. For smaller conference calls consisting of no more than 10-15 people,
each participant can be a presenter. For larger conference calls, you can nominate certain participants as
presenters, and the rest are attendees. Presenters can share content, record the meeting, change
meeting options, and manage other participants, among other things.
As a presenter, you can manage call participants in the following ways:
• Mute all participants or individual participants
• Remove participants from the conference call
• Promote an attendee to presenter or demote a presenter to an attendee
• Enable or disable conference announcements
• Lock or unlock a conference
Muting Conference Participants
Only presenters can mute and unmute conference participants.
If a presenter mutes your audio, a notification displays on your device and a Mute icon displays next
to your name in the participants list. It takes 1 second for the mute icon to display on your device after a
presenter mutes your audio.
You must wait for the presenter to unmute your audio before you can speak in the conference again.
Conference Calls
38

Mute and Unmute All Conference Participants
Presenters can mute and unmute all conference participants at one time.
When you mute or unmute conference participants, the participants receive a notification on their phones.
Procedure
» Do one of the following:
• To mute all conference participants, select Mute All.
• To unmute all conference participants, select Unmute All.
Mute and Unmute an Individual Conference Participant
Presenters can choose to mute and unmute individual participants during conferences.
When you mute or unmute conference participants, the participants receive a notification on their phones.
Procedure
» Do one of the following:
• To mute a participant, choose the participant and select Mute.
• To unmute a participant, choose the muted participant and select Unmute.
Promote or Demote a Conference Participant
Presenters can promote conference participants from an attendee to a presenter or demote conference
participants from a presenter to an attendee.
Procedure
» Do one of the following:
• Select Host to promote an attendee to presenter.
• Select Attendee to demote a presenter to attendee.
Enable and Disable Conference Announcements
Presenters can choose to enable or disable announcements during a Skype for Business conference call,
if enabled.
When enabled, announcements play during the following situations:
• A presenter mutes or unmutes the audience.
• A presenter locks or unlocks the conference.
• A presenter removes a conference participant.
• A new participant joins the conference.
Procedure
» During a conference call, do one of the following:
• Select Ena.Anc to enable announcements.
• Select Dis.Anc to disable announcements.
Conference Calls
39

Remove a Conference Participant
Presenters can remove any participant (except the conference initiator) from the conference call.
When you remove conference participants, the participants receive a notification on their phones.
Procedure
» Choose a participant and select Remove.
Lock and Unlock a Conference Call
Presenters can lock a conference call to prevent people from joining the conference call without approval.
Anyone on the network can join an unlocked conference call automatically with the right conference dial-
in number and ID. With a locked conference call, people who want to attend the meeting must wait for the
main presenter (the person who initiated the conference call) to admit them to the meeting.
Procedure
1. During an active conference, select Lock.
The conference locks, and the main presenter must admit anyone that tries to join the call.
2. When you're ready to enable people to join the conference, select Unlock.
The conference unlocks, and anyone can join the conference call.
Related Links
Send Active Conference Information to a Contact on page 37
Admit or Deny Participants to a Locked Conference Call
When you lock a conference, you can decide whether to admit or deny new participants to the call.
Contacts that want to enter a locked conference call display in the Participants list. An alert icon also
displays on the main host’s phone .
Procedure
» Select the participant and do one of the following:
• To allow the participant to join the call, select Admit.
• To prevent the participant from joining the call, select Deny.
Conference Calls
40

Boss-Admin for Skype for Business
Topics:
• Add Delegates
• View the Delegates Group
• Delete Delegates from Phone Local Interface
• Maximum Number of Boss Lines
• View the Boss Group
• Set a Ringtone for Boss Calls
• Edit the Delegates Group
• Sort Boss-Admin Lines
• Managing Calls on the Boss's Line
• Join Conference Calls for a Boss
The Boss-Admin feature enables you to manage phones on your network and see when there is an
answered call, when a call is on hold, or when a call has ended on a boss or delegate line.
When your phone is registered with the Skype for Business server, use the Boss-Admin feature to
manage shared lines. A boss can assign delegates, and delegates can manage calls on behalf of the
boss's line.
Add Delegates
Add delegates from your phone local interface or from the Skype for Business client.
Add Delegates from Skype for Business Client
Using your Skype for Business client, assign up to 25 delegates to your line. You can’t assign yourself as
a delegate to a boss's line. You can have delegates and be a delegate for another boss's line, and you
can assign your bosses as delegates for your line.
Procedure
1. In your Skype for Business client, click Settings and select Tools > Call Forwarding
Settings.
2. Select Simultaneously Ring > My Delegates, as shown next.
41
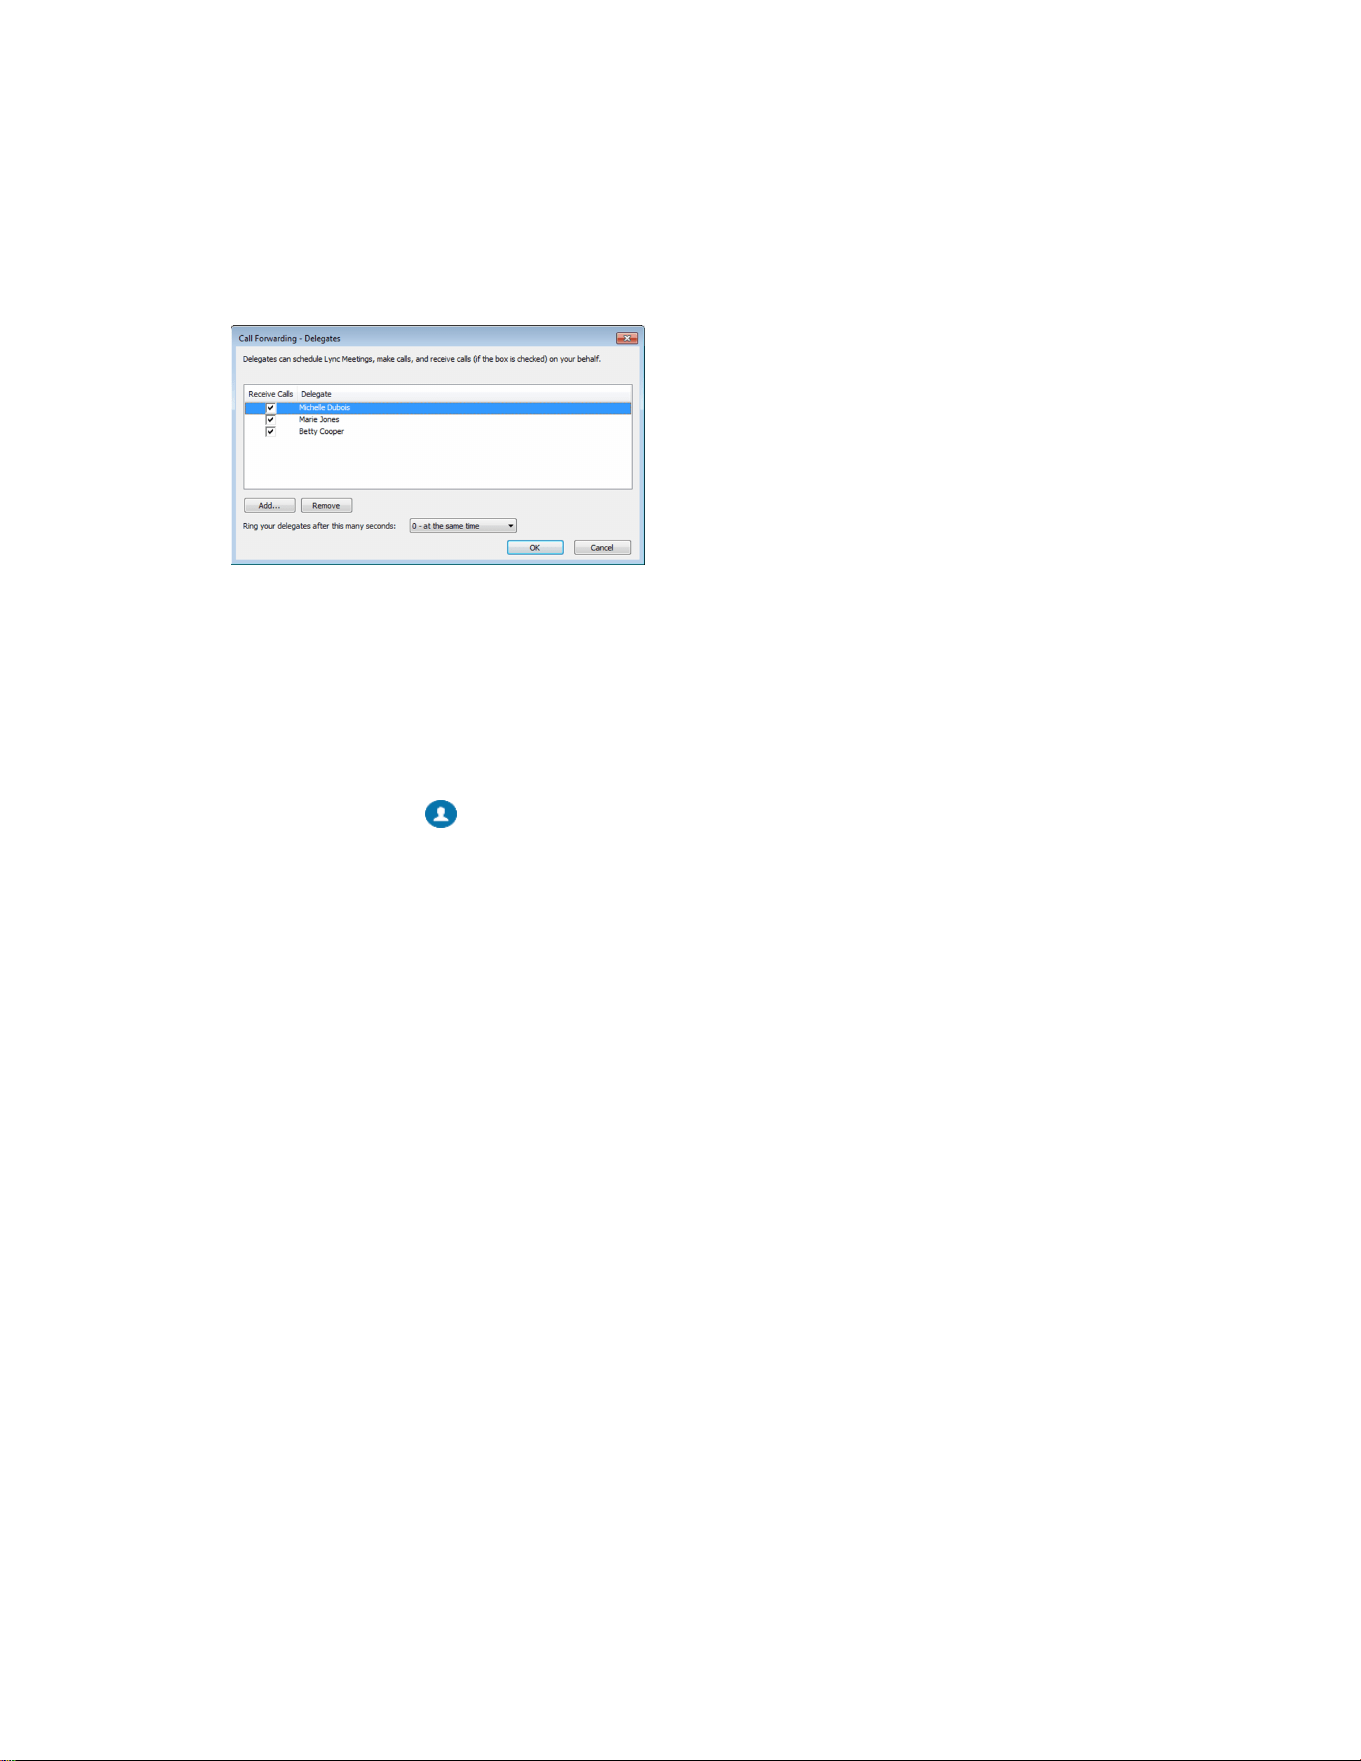
3. In the Call Forwarding - Delegates dialog box, click Add to add contacts as delegates for your
calls.
4. In the Choose a Delegate dialog box, select the contact you want to add as a delegate and click
Ok.
The contacts you add as delegates display in the Call Forwarding - Delegates dialog box, as
shown next.
5. Click OK when you have finished assigning contacts as delegates.
Simultaneous ringing is enabled for all assigned delegates. If the boss's line receives an incoming
call, both the boss and delegate's phones ring.
You can change when your delegates' phones ring in the Call Forwarding - Delegates dialog box.
When you assign delegates to your line, your phone displays a notification that a delegate has been
added. A scrolling message “Simultaneous Ringing is activated” displays in the status bar.
When someone adds you as a delegate, a notification displays on your phone and in the Skype for
Business client. The Boss icon displays on the boss’s line. The Boss icon changes color to reflect the
boss's presence status.
Add Delegates from Phone Local Interface
You can add delegates from the phone local interface.
Procedure
1. Select Menu > Forward > Edit Delegates
2. Select Edit Delegates.
3. Search for a contact of your choice in the search box and tap Select.
View the Delegates Group
Your delegates are automatically added to the Delegates group on your phone and in the Skype for
Business client.
Procedure
1. Go to Contacts > Groups.
2. Select Delegates.
All assigned delegates display in order by last name.
Boss-Admin for Skype for Business
42

Delete Delegates from Phone Local Interface
You can delete a delegate from phone local interface.
Procedure
1. From phone home screen, navigate to Forward > Forwarding Type Select.
2. Tap Edit Delegates.
3. Select delegates you want to delete.
4. Tap Remove.
Maximum Number of Boss Lines
The following table lists the maximum number of Boss lines that can be assigned to an Admin phone.
Maximum Number of Boss Lines Assigned to an Admin Phone
Phone Model Maximum Bosses Assigned
Poly CCX 400 business media phones 23 of 24 lines
Poly CCX 500 business media phones 23 of 24 lines
Poly CCX 600 business media phones 23 of 24 lines
View the Boss Group
You can view the contacts for which you are assigned as a delegate in the group People I Manage Calls
For on your phone and in the Skype for Business client.
Procedure
1. Go to Contacts > Groups.
2. Select People I Manage Calls For.
All assigned bosses are displayed in order by last name.
Set a Ringtone for Boss Calls
As a delegate, you can set a distinct ringtone for incoming calls on each of your assigned bosses' lines.
Procedure
1. Navigate to Settings > Basic > Ring Type > Boss Ring Type.
2. Select a boss and select a ring tone.
Boss-Admin for Skype for Business
43

Edit the Delegates Group
Add or remove delegates using your Skype for Business client. You cannot edit the Delegates group on
your phone.
Procedure
1. In your Skype for Business client, click Settings and select Tools > Call Forwarding
Settings.
2. Select Edit my delegate members, as shown next.
3. Do one of the following:
• Select Add to add delegates.
• Select a delegate and click Remove to delete the delegate from the group.
Delegates removed from the Delegates group can no longer monitor call activity on a boss's
line.
Sort Boss-Admin Lines
When a Boss assigns lines to three or more Admins or an Admin is assigned to three or more different
Bosses, a Sort icon displays on the Boss or Admin phone. Bosses can sort Admin lines and Admins can
sort Boss lines by activity and presence status.
Boss-Admin lines are sorted in the following priority order:
• Calls on hold
• Active calls
• Available
• Away
• Offline
• Status Unknown
Procedure
1. Press the Sort icon.
2. Select one of the following:
• Select Sort to sort lines.
• Select Fixed Position to leave lines as is.
Boss-Admin for Skype for Business
44

Managing Calls on the Boss's Line
A boss can monitor calls on the delegate's line, and delegates can place, answer, hold, transfer, and
monitor call status, set ringtones on the Boss line, and send a call to voicemail or intercom.
Respond to Incoming Boss Calls
When you place a call to the boss's line, the call displays on the boss and delegate's phones. As a
delegate, you can answer an incoming call on a boss's line, reject the call, or forward the call directly to
the boss's voicemail.
When a boss or delegate answers an incoming call, a notification displays on their phones.
Procedure
» Do one of the following:
• Select Answer.
• Select Dismiss or Ignore.
• Select Boss VM.
Viewing Call Status on the Boss's Line
A boss and delegate can both view the status of any call on each other's phone.
The boss sees when a delegate answers or holds a call, which delegate answered the call, and the call
information of the caller. Delegates see when a boss is in an active call or has placed a call on hold. The
boss and delegates can also resume calls held on each other's line.
Bosses and delegates can both view the count of inbound calls on the boss and delegate lines. The count
updates based on the boss's number of active calls.
View Held Boss Calls
Bosses and delegates can both view held calls on the boss's line.
A flashing red bar or LED light indicates that a call is on hold on a boss's line.
Procedure
» Press and hold the boss's line key.
Resume Held Boss Calls
Any assigned delegate can resume held calls on the boss's line.
Procedure
1. Press and hold the boss's line key.
2. Select the call and select Pickup.
Boss-Admin for Skype for Business
45

Transferring Boss Calls
After a delegate answers a delegation call, the delegate can transfer the call to the boss’s phone using
the Safe Transfer feature. If the boss is unavailable, they can choose to transfer the call directly to the
boss’s voicemail.
Transfer a Boss Call
After a delegate answers a delegation call, the delegate can transfer the call to the boss's phone using
Safe Transfer. Safe Transfer prevents the call from going to voicemail if the boss doesn’t answer the call.
Procedure
» During a delegation call, press More > Safe Xfer.
The call transfers to the boss's phone.
Resume a Transferred Boss Call
If the boss isn’t available to answer the transferred call, the call returns to the delegate’s phone.
When a boss doesn't answer a call transferred with Safe Transfer, the phone displays a missed call
notification. The delegate's phone plays a tone indicating the calls return.
The delegate can resume the returned call and try to transfer it again or send the call to the boss's
voicemail.
Procedure
» Select the returned call and select Resume.
Transfer a Call to a Boss’s Voicemail
If a boss is unavailable to take calls, delegates can transfer the calls directly to the voicemail of the boss.
Procedure
» During a delegation call, press Boss VM.
Place a Call on Behalf of a Boss
As a delegate, you can make calls on behalf of your assigned boss on their lines.
When a call is made on the boss's line, a solid red bar displays on the line key on the boss's phone.
Procedure
1. Press and hold the boss's line key.
2. Select On behalf.
3. Select a contact, then select Dial.
The delegate and third-party phones display a notification indicating that a delegate is calling on
behalf of a boss.
Boss-Admin for Skype for Business
46

Join Conference Calls for a Boss
Join an incoming conference call on behalf of a boss on their line and add the boss to the conference call.
Procedure
1. Press the Conference soft key.
2. Dial the boss's number or select the contact.
3. After the call is answered, press the Conference soft key.
4. After you have connected the boss's line to the conference call, press End Call to leave the
conference call.
Boss-Admin for Skype for Business
47

Call Lists and Directories
Topics:
• Recent Calls
▪ Local Directory
▪ Local Directory Favorites
▪ Skype for Business Contacts
Poly phones support a recent calls list and a local directory. Your phone can also support a Skype for
Business Directory, depending on your server and if enabled by your system administrator.
Note: Your phone may not support all of the features described in this section. Check with your system
administrator to find out which features are available.
Related Links
Place a Call from Recent Calls on page 24
Calling Contacts from Directories on page 25
Recent Calls
The Recent Calls list includes missed, received, and placed calls. Each list holds up to 100 entries.
Phones registered with Skype for Business Server display up to 99 Skype for Business calls in the
Recent Calls list. View recent calls in the Skype for Business client or in the Microsoft
®
Outlook
®
Conversation History folder.
Perform the following tasks from the Recent Calls list:
• Remove calls from the list.
• Select a call record to view call details.
• Select a call record to automatically call a contact.
View Recent Calls
In the Recent Calls list, view a list of up to 100 missed, received, and placed call entries.
Procedure
» On the Home screen, tap Recent Calls.
Edit a Recent Call Entry
Edit a contact's phone number stored in your Recent Calls list before returning the contact's call.
Procedure
1. Next to a call entry, select Info .
48

2. Select Edit .
3. Edit the number then select Dial.
Delete a Recent Call Entry
Delete any recent call entry from the Recent Calls list.
If you delete or move call entries on the phone, if enabled, the changes are made on the phone only. If
you delete call entries in the Skype for Business client, the changes are made on the phone and in the
Skype for Business client.
Procedure
1. Select Info next to a call record.
2. Select Delete.
Local Directory
Add and save contacts in the phone’s Local Directory, if allowed by your system administrator.
Your system administrator can set the Local Directory as read-only or require a password for access to
the directory. Contact your system administrator for assistance accessing or updating the Local Directory.
Search for a Local Directory Contact
In the Local Directory, enter a search criteria to find your desired contact.
Procedure
1. Go to Contacts > Local Directory.
2. In the Search field, enter your contact’s name.
Add a Contact to the Local Directory
When you add a contact to your local directory, you can choose how much information you want to enter
for your contact. You’re required to only enter a contact number for each new contact.
Procedure
1. Go to Local Directory > Add .
2. On the Add Contact screen, enter your contact's information in the available fields.
3. Select Save.
View Contact Details
From your local directory, you can view information for any contacts saved to the directory.
Procedure
1. Go to Contacts > Local Directory.
2. Choose a contact.
Call Lists and Directories
49

The Details screen displays with the contact’s name, number, and any additional information,
such as a job title or email address.
Update a Local Directory Contact’s Information
After you add a contact to your local directory, you can update the contact’s information.
Procedure
1. In the Local Directory, select a contact.
2. On the Details screen, select Edit .
3. On the Edit Contact screen, update the contact’s information.
4. Select Save.
Delete a Local Directory Contact
You can delete any contact from the local directory.
Procedure
1. In the Local Directory, select a contact.
2. On the Details screen, select Delete Contact.
3. Select Yes to delete the contact.
Local Directory Favorites
Favorites are the contacts in your local directory that you call most often.
Contacts that you add as favorites display on the Home screen. Only three favorites display onscreen at
a time, however, you can swipe the screen from right to left to display additional favorites. Favorites also
display at the top of the list of contacts in the Local Directory.
Add Favorites
Add any contact in the local directory as a favorite.
When you add a contact as a favorite, the contact displays on the Home screen.
Procedure
1. Go to Contacts > Local Directory.
2. Select a contact.
3. On the Details screen, select Favorite .
Remove a Favorite
Remove a favorite contact to make room for a new favorite.
Procedure
1. Go to Contacts > Local Directory.
2. Select a contact.
Call Lists and Directories
50

3. On the Details screen, select Favorite .
Skype for Business Contacts
When you sign in to Skype for Business on a Poly phone, your phone displays up to 3000 contacts and
groups from your Skype for Business client Contacts list.
You can perform the following actions for the contacts on your phone:
▪ View Skype for Business contacts
▪ Search for contacts
▪ Add additional contacts
▪ Call contacts
▪ View presence information for Skype for Business contacts
Related Links
Place Calls to Skype for Business Contacts on page 24
Managing Contacts Across Applications and Devices
After your administrator unifies your contacts on the Skype for Business Server, you can manage your
contacts from any application or device you sign in to with Skype for Business.
You can perform the following actions for your contacts:
▪ Add contacts
▪ Delete contacts
▪ Add distribution lists
▪ Delete distribution lists
▪ Copy and move contacts across groups
Note: You can’t copy or move contacts across groups on your phone. You can copy and move
contacts across groups only in the Skype for Business client. Any contacts you copy or
move across groups in the client automatically update on your phone.
Any changes you make to your contacts synchronize across all devices and applications. For example, if
you delete a contact from your phone, the Skype for Business client deletes it as well.
You can manage contacts using the following applications and devices:
▪ Poly phones
▪ Skype for Business client
▪ Outlook
▪ Outlook Web Application
Call Lists and Directories
51

View Skype for Business Contacts
View a list of up to 200 Skype for Business contacts in the Contacts list on your phone.
Note: During a network outage, the Contacts menu option doesn’t display, and you can view only the
local directory. If the system administrator disables the local directory or another server-based
directory, a message displays indicating that limited functionality is available during an outage
when you try to access the Contacts menu.
Procedure
» On the Home screen, go to Directories > Contacts.
View Skype for Business Contact Information
View contact information for the Skype for Business contacts on your phone. Make calls directly to any of
your contacts’ numbers or directly to their voicemail.
You can view the following details for Skype for Business contacts, depending on the privacy relationship:
▪ Name
▪ Presence status
▪ Organization
▪ Email address
▪ Work number
▪ Mobile number
▪ Home number
▪ Voicemail
Procedure
1. On the Home screen, go to Directories > Contacts.
2. In the Contacts list, select a contact.
3. Select Menu > Info.
Your contact’s presence status and information display.
Update Skype for Business Contact Information
Update a Skype for Business contact’s information from the phone, if enabled by your administrator.
Procedure
1. On the Home screen, go to Directories > Contacts.
2. In the Contacts list, select a contact.
3. Select Menu > Info.
Your contact’s presence status and information display.
4. Update the contact’s information.
5. Select Save.
Call Lists and Directories
52
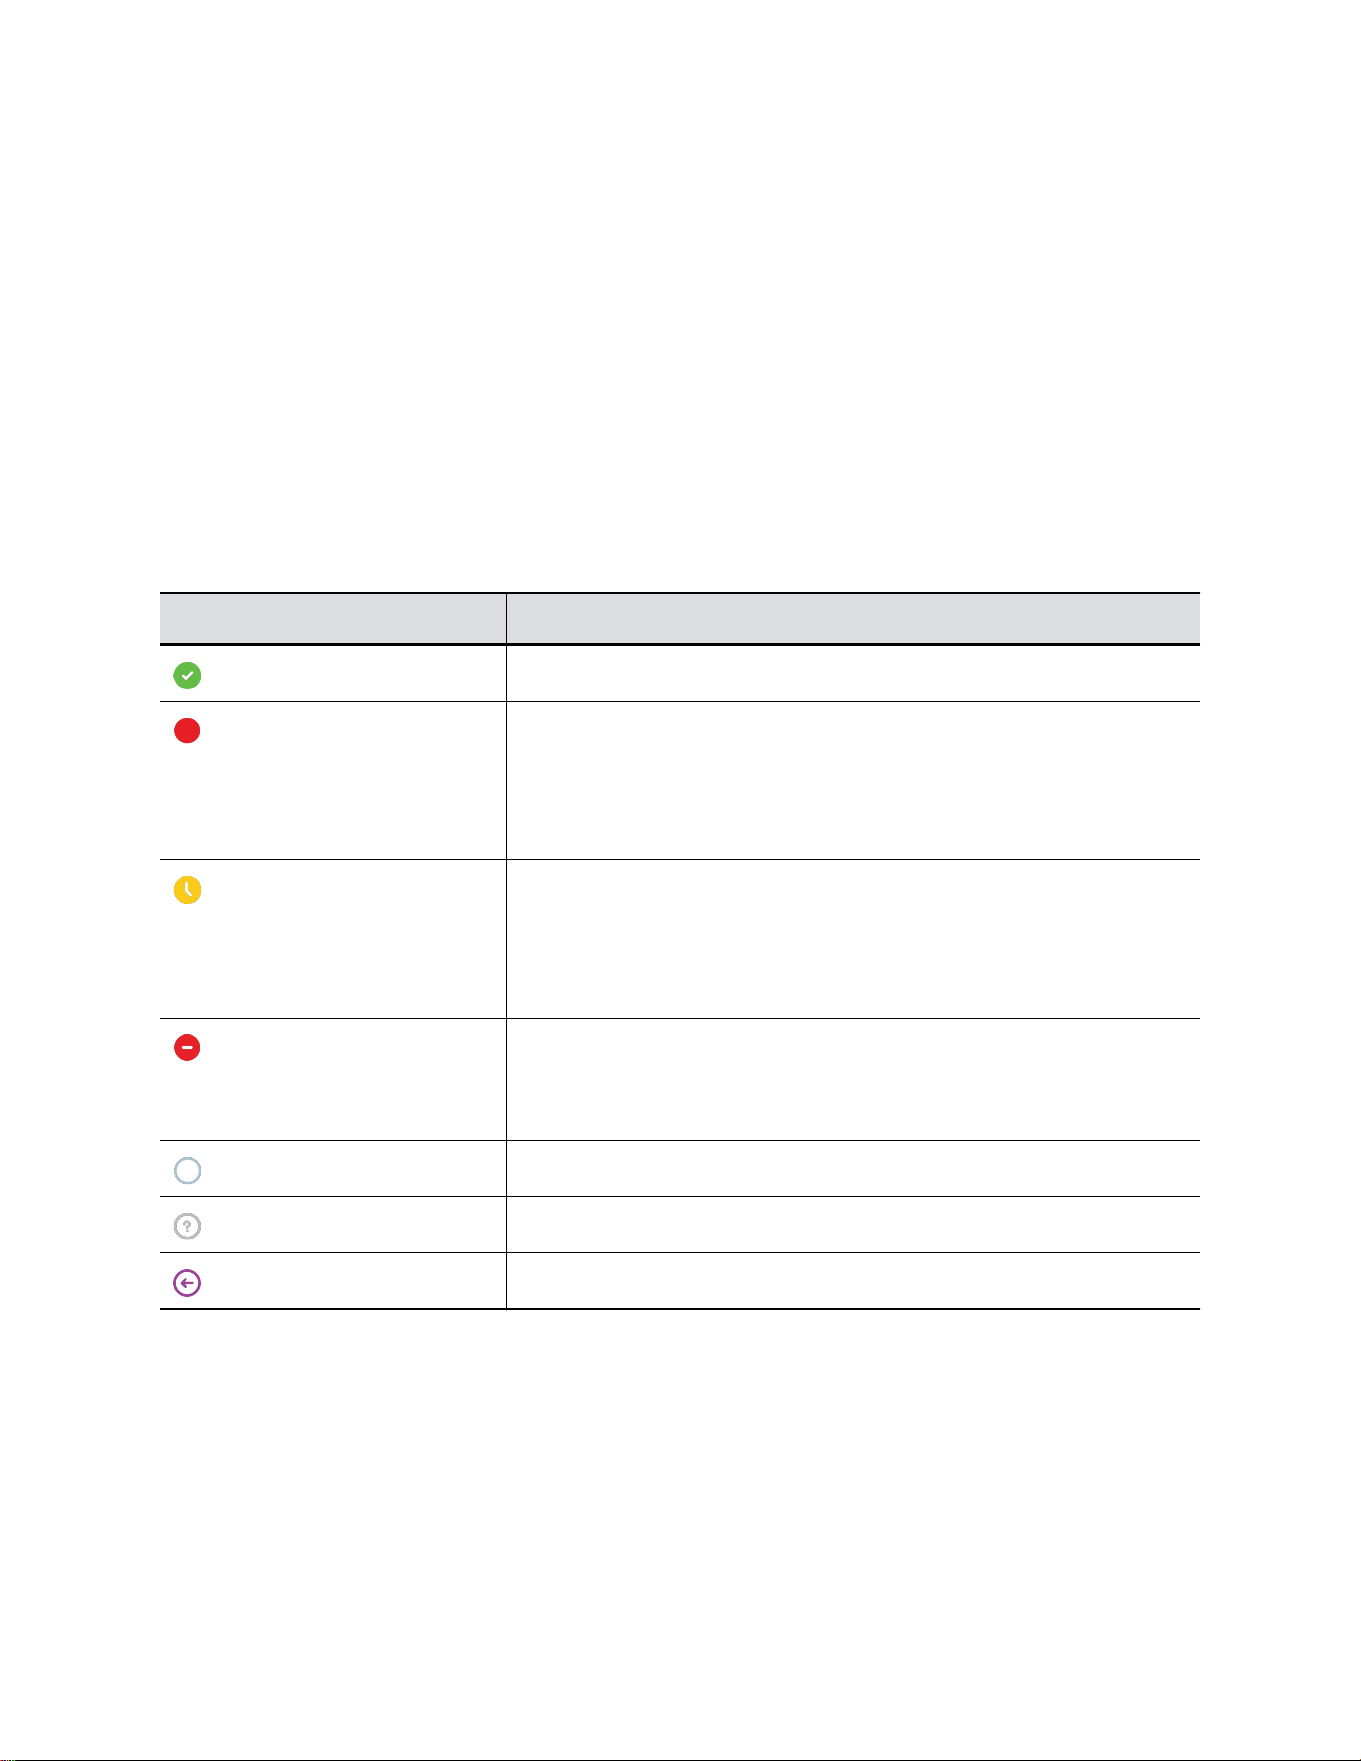
View Skype for Business Contact Groups
View groups that you create in your Skype for Business client on your phone.
Procedure
1. On the Home screen, go to Directories > Contacts.
2. Select Groups.
Skype for Business Contact Presence Information
The following table shows the presence icons and descriptions that display for Skype for Business
contacts on the Home screen or in the Contacts list on your phone.
Presence information includes your contact’s availability and an activity description.
Presence Icons
Icon Description
Available
▪ Busy
▪ In a Call
▪ In a Meeting
▪ In a Conference Call
▪ Away
▪ Be Right Back
▪ Inactive
▪ Off Work
▪ Do Not Disturb
▪ Presenting
▪ In Presentation
Offline
Unknown
Out of Office
Search for a Skype for Business Contact
The Skype for Business Address Book Service (ABS) enables you to search for Skype for Business and
Microsoft Outlook contacts in the Skype for Business Directory.
Procedure
1. Go to Contacts.
Call Lists and Directories
53

2. In the Search field, enter your contact’s name.
Add a Skype for Business Contact to the Contact List
Search for Skype for Business contacts on your phone and add those contacts to the Contacts list.
When you add a contact, you can view contact and presence information for that contact on the phone.
Procedure
1. Go to Contacts.
2. In the Search field, enter your contact’s name.
3. Choose the contact you want to add and select Add to Contacts.
Call Lists and Directories
54

Voicemail and Pages
Topics:
▪ Access Skype for Business Voicemail Messages
• Managing Skype for Business Voicemail Messages
▪ Receiving Messages with Group Paging
You can send, broadcast, and access a variety of audio messages on the phone.
Note: Your phone may not support all of the features described in this section. Check with your system
administrator to find out which features are available.
Related Links
Forward a Call to Voicemail on page 31
Access Skype for Business Voicemail Messages
View individual voicemail messages for Skype for Business calls on your phone. For each voicemail
message, you can view the contact who left the message, the contact’s presence status, and the status of
the voicemail message.
Procedure
1. Do one of the following:
▪ Go to Menu > Voicemail.
▪ Go to Settings > Features > Voicemail.
2. Select a message and select Play.
Managing Skype for Business Voicemail Messages
On the Skype for Business Voicemail screen, you can call a contact, delete voicemail messages, or mark
messages as read.
Call a Contact from Voicemail
After you listen to a voicemail, you can call the contact who left you the message from the Voicemail
screen.
Procedure
» Choose a voicemail message and select Call.
55

Delete Voicemail Messages
After you listen to a voicemail message, you can delete it.
Procedure
» Choose a message and select Delete.
Mark Message as Read
You can choose to mark unread messages that you don’t want to listen to as read. Marking a message as
read removes the message alert.
Procedure
» Choose a message and select Mark As Read.
Receiving Messages with Group Paging
You can receive pages from any paging groups you’re subscribed to. By default, you’re subscribed to
groups 1, 24 (priority pages and broadcasts), and 25 (emergency pages and broadcasts).
How and when you receive a page or broadcast depends on the priority, whether you are in an active call,
and if you enable Do Not Disturb. When you receive a page, the page always plays through the
speakerphone.
Note: Your system administrator must enable a phone to receive pages while in an active call.
Your system administrator can define up to 25 paging groups. Each group receives a label to identify it
from the others. Example group labels are All, HR Dept, Shipping Staff, and Executives.
Each group has one of the following broadcast priorities:
▪ Normal - Broadcasts sent to groups 1 to 23 are considered normal broadcasts. By default, all
phones can receive broadcasts sent to group 1.
▪ Priority - By default, broadcasts sent to group 24 are considered priority broadcasts. A priority
broadcast interrupts normal broadcasts or active calls. All phones receive priority broadcasts unless
you enable Do Not Disturb.
▪ Emergency - By default, broadcasts sent to group 25 are considered emergency broadcasts. An
emergency broadcast interrupts normal broadcasts, priority broadcasts, and active calls.
Emergency broadcasts play at near maximum volume, even if you enable Do Not Disturb.
Note: When you enable Do Not Disturb, you receive only emergency broadcasts, and non-emergency
broadcasts don’t play or display.
Listen to a Page During an Active Call
Pages received during an active call defer or automatically play depending on the page priority.
Pages received during an active call don't interrupt the call. The phone plays audio from both the call and
the page at the same time. When you receive a page during a call:
Voicemail and Pages
56

• If configured by your administrator, standard priority pages play during active calls. Otherwise, the
page displays on your phone as pending.
• Priority and emergency pages play immediately.
Note: If you adjust the volume of a normal, nonemergency page while it plays, the phone uses the
adjusted volume for all subsequent nonemergency pages. However, only your system
administrator can change the volume of an emergency page.
Procedure
» Do one of the following:
• For normal pages that play automatically during a call, hold the call to hear only the page.
• For pending pages, select Accept or hold the call to listen to the page.
Receiving Pages When Not in an Active Call
When you receive a page and you aren’t in an active call, the page immediately plays, regardless of the
paging priority.
While a page plays, you can do the following:
• Hold the page.
• End the page. This ends the page at your phone only.
• Place a new call.
Voicemail and Pages
57

Settings, Applications, and Accessories
Topics:
• Poly CCX Phone Settings
• Using BToE to Manage Calls on Your Phone and Skype for Business Client
▪ Connecting Bluetooth Devices
▪ Connecting to a Wireless Network
• Phone Applications
• Phone Accessories and Computer Applications
This section provides information on phone settings as well as applications and accessories you can use
with your phone.
Poly CCX Phone Settings
You can make some basic customizations on the phone, which includes changing the time and date
format, setting a language, and adjusting the screen brightness.
Password Required to Access Basic Settings
You may need a password to configure basic settings on your phone.
You can enable or customize your phone from the Basic settings menu. However, your system
administrator may require a password to access the settings menu. If your phone requires a password to
access the settings menu, contact your system administrator for assistance.
Set the System Language
Poly phones support several languages that you can choose to display on the phone.
Check with your system administrator to find out which languages your phone supports.
Procedure
1. Go to Settings > Basic > Preferences.
2. Select Language and select a language.
The language on the phone updates immediately.
Time and Date Display
The time and date display in the status bar.
When the phone can’t obtain a time and date, the time and date display flashes. If this happens, or if the
time and date are incorrect, contact your system administrator.
58

Set the Time and Date Format
After you sign in to your phone with your Skype for Business credentials, select your time zone and a time
and date format.
Procedure
1. Sign in to Skype for Business on your phone and select Next.
2. On the Customize Time Zone screen, choose your time zone and select Next.
3. On the Customize Time Format screen, choose a time format and select Next.
4. On the Customize Date Format screen, choose a date format and select Next.
Change the Time and Date Format
Customize the time and date by choosing between several time and date formats, including options to
display the day, month, or year.
Procedure
1. Go to Settings > Basic > Preferences.
2. Select Time and Date and choose one of the following:
• Select Clock Date to change the date format.
• Select Clock Time to change the time format.
Disable the Time and Date Display
If desired, turn off the time and date display.
Procedure
1. Go to Settings > Basic > Preferences.
2. Select Time and Date and select Disable.
Backlight Intensity and Timeout
If desired, change settings for the following backlight components:
• Backlight Intensity: The brightness of the screen during phone activity and inactivity.
• Backlight Timeout: The number of seconds the phone is inactive before the backlight dims to its
Backlight Idle intensity. The backlight timeout period begins after your last activity, such as an
incoming call.
Backlight Intensity includes the following settings you can choose from:
• Backlight On: The brightness of the screen when there’s activity.
• Backlight Idle: The brightness of the screen when there’s no activity.
• Maximum Intensity: The brightness scale that applies to both Backlight On and Backlight Idle
intensities.
Related Links
Users Who Are Blind, Have Low Vision, or Have Limited Vision on page 79
Settings, Applications, and Accessories
59

Set the Backlight Intensity
The screen's backlight intensity settings adjust how bright the screen illuminates while on and while idle.
Set the Backlight On intensity and the Backlight Idle intensity separately. Choose an intensity level or
turn off the backlight entirely. When you change the Maximum Intensity, you modify the entire backlight
intensity scale. For example, if you decrease the Maximum Intensity, the Low, Medium, and High levels
for both Backlight On and Backlight Idle intensities decrease.
Procedure
1. Go to Settings > Basic.
2. Select Backlight Intensity > Backlight On Intensity.
3. Select the intensity you want, and select Back.
4. From the Backlight Intensity screen, select Backlight Idle Intensity.
5. Select the intensity you want, and select Back.
6. From the Backlight Intensity screen, select Maximum Intensity.
7. Select Up or Down to increase or decrease the maximum intensity.
Set the Backlight Timeout
The backlight automatically turns on with any phone activity.
By setting the Backlight Timeout, you can determine how long the phone should sit idle before the
backlight dims to its Backlight Idle intensity. By default, the backlight dims after the phone is idle for 40
seconds.
Procedure
1. Go to Settings > Basic.
2. Select Backlight Timeout.
3. Choose the number of seconds the phone is idle before the backlight dims.
Customizing Line Keys
Customize the line keys that display on the Lines screen.
Enable Line Key Customization
When you are signed in to Skype for Business on your phone, you can enable the Line Key
Customization feature and choose which contacts are assigned to which line keys on the phone.
Procedure
1. Go to Settings > Features > Line Key Customization.
2. Select Customize Line Keys: Disabled and select Enabled.
Insert an Empty Line Key
By default, the phone inserts new or empty lines below previously added lines. If you want to place space
between line keys, you can insert an empty line key above or below other line keys on the phone.
When you insert an empty line, all following line keys are moved down a line and the last contact is
removed from the Lines screen.
Settings, Applications, and Accessories
60

Procedure
1. Go to Settings > Features > Line Key Customization.
2. Select a line and select Insert.
By default, the new line is inserted above the selected line.
3. Select Below to move the line below the selected line.
Clear a Line Key
Clear a contact from a line to make the line blank. Clearing a contact does not change the position of
other contacts.
Procedure
1. Go to Settings > Features > Line Key Customization.
2. Select a line and press Clear.
Delete a Line Key
Instead of clearing a line key, you can delete a contact and the assigned line key. When you delete a line
key, all line keys below move up one line.
When you delete a contact from your Skype for Business client, the contact deletes from the line key on
your phone. The phone doesn't delete the empty line key.
Procedure
1. Go to Settings > Features > Line Key Customization.
2. Select a line and press Delete.
Reset Customized Line Keys
If you need to remove all of the customized line keys you set, reset the line keys on your phone.
Procedure
1. Go to Settings > Features > Line Key Customization.
2. Select Reset Customization.
Power Saving Mode
By default, Poly phones enter power saving mode and turn off the screen after being idle for a certain
period of time to conserve energy.
You can determine the period of time that the phone is idle before the screen turns off, and you can set
different idle timeouts for office hours and off hours, such as evenings and weekends. The phone exits
power saving mode if an event occurs—for example, if there is an incoming call or message. If you
enable a screen saver, power saving mode still activates.
You can update the following power-saving settings:
• Office Hours: When you start work and how long you're in the office each day.
• Timeouts: The period of time the phone is idle before the screen turns off.
Settings, Applications, and Accessories
61

Change Your Office Hours for Power Saving Mode
When you update your office hours, you specify when you start and how long you work each day. After
your work hours, the phone is idle and goes into power saving mode.
Procedure
1. Go to Basic settings.
2. Select Power Saving > Office Hours and select Start Hour.
3. Select a day of the week, and using the 24-hour clock, enter a start time from 0 to 23.
4. Select Save.
5. On the Office Hours screen, select Duration.
6. Select a day of the week and enter a duration of 0 to 12 hours per day.
7. Select Save.
Change Idle Timeouts for Power Saving Mode
Update the period of time the phone is idle before the screen turns off.
You can specify different timeouts for office hours and nonoffice hours. By default, the setting for office
hours is much longer than the setting for nonoffice hours.
You can also specify the amount of time the phone waits to go idle after you press a key or tap the screen
(on touchscreen models). You can choose to set this time period longer than the other idle timeouts. This
prevents power saving mode initiating when you use the phone.
Tip: Once you press a key or tap the screen (on touchscreen models), the phone uses the idle timeout
period with the highest value.
Procedure
1. Go to Basic > Power Saving > Timeouts.
2. Configure the following options:
• Office Hours Idle Timeout: The number of minutes (1 to 600) the phone waits during office
hours before starting power saving mode.
• Off Hours Idle Timeout: The number of minutes (1 to 10) the phone waits during nonoffice
hours before starting power saving mode.
• User Input Idle Timeout: The number of minutes (1 to 10) the phone waits after you press a
key or tap the screen before starting power saving mode.
3. Select Save.
Changing Audio Settings
You control certain audio settings on your phone, including the ringtone for incoming calls from all
contacts or a specific contact, where call notifications play, and the volume of the ringtone or call audio.
Change Incoming Call Notifications
You can choose whether you hear sound effects—all phone sounds except call audio—from the handset,
headset, speaker, or the active audio device you set.
You can configure your phone to ring on your headset instead of the speaker. By default, you hear all
sound effects from the speaker.
Settings, Applications, and Accessories
62

Procedure
1. Go to Settings > Basic > Preferences.
2. Select Audible Ringer and select a location to hear sound effects.
Set a Ringtone for Incoming Calls
One way to personalize your phone is to change the ringtone. You can pick unique ringtones for the
different lines on the phone. The default ringtone is Low Trill.
Procedure
1. Go to Settings > Basic > Preferences.
2. Select Ring Type.
3. On the Ring Type screen, select a ringtone.
4. Optional: Select Play to hear the ringtone.
Related Links
Users Who Are Deaf or Hard of Hearing on page 78
Set a Ringtone for Individual Contacts
To help you quickly identify callers, select unique ringtones for contacts in your directory.
Procedure
1. Go to Directories > Contact Directory .
2. In the Contact Directory, select a contact.
3. On the Contact Information screen, select Edit .
4. From the Edit Contact screen, select Ring Type and select a ringtone.
5. Select Play to hear the ringtone.
6. Select Save.
Change the Volume
If necessary, increase the volume of your ringtone and the audio during a call.
Procedure
» Press one of the volume keys to increase or decrease the audio.
Enable Acoustic Fence
Acoustic Fence suppresses background noise while you are on a call, which enhances call audio quality
for call participants.
The Acoustic Fence setting does not display on the phone by default, so if your system administrator has
enabled the feature option to display on your phone, you can enable or disable Acoustic Fence.
Acoustic Fence works with handsets or headsets. However, only headsets connected to the RJ-9 port on
the phone support Acoustic Fence. Acoustic Fence is enabled by default on the handset, disabled by
default for a connected headset, and not supported with USB or Bluetooth headsets.
Procedure
1. Go to Settings > Basic > Preferences.
Settings, Applications, and Accessories
63

2. Select Acoustic Fence and select Enable.
Update Your Skype for Business Presence
As needed, update your Skype for Business presence status and presence information on the phone.
When you change your presence on any device, your status updates in the Skype for Business client.
Procedure
» Choose your desired presence status.
You can change your status to Available from any other status by pressing Reset Status.
Adding a Profile Photo to Display on the Lock Screen
If you do not have a profile photo set for your Skype for Business or Microsoft Exchange accounts, an
avatar displays on the Lock screen when you lock your phone. You can add a profile photo in the Skype
for Business client, and the photo will display on the phone.
For help with setting a profile photo, refer to the Set My Picture options in Skype for Business topic on
https://support.office.com/en-us/skype-for-business.
Disable Hot Desking
Hot Desking enables you to sign in as a guest on a phone using your Skype for Business credentials.
Hot Desking is enabled by default.
Procedure
1. Navigate to Settings > Features > Hot Desking.
2. Select Disable.
Clear Call Logs and Contacts
By default, the phone stores your call logs and saved contacts. As desired, clear your personal history of
stored call logs and contacts from the phone.
Procedure
1. On the phone, go to Settings > Basic > Clear Uploaded Calls/Directory.
2. Select Yes.
Restrict Call Log and Contact Uploads
By default, the phone stores your call logs and saved contacts. If desired, restrict the phone from
uploading your call logs and contacts to the server.
Procedure
1. On the phone, go to Settings > Basic > Preferences > Restrict Calls/Directory Upload.
2. Select Enable.
Settings, Applications, and Accessories
64

Using BToE to Manage Calls on Your Phone and
Skype for Business Client
After you pair your phone with your computer, you can manage audio with your Skype for Business
contacts on your phone and in the Skype for Business client on your computer.
Use BToE with your phone for all Skype for Business calls even if you are not signed in to your Skype for
Business account on the phone. When you connect a phone that is registered to another user to your
computer, the phone acts as a speakerphone for all audio and video calls initiated in the Skype for
Business client on your computer.
Note: If you want to route audio from media that uses the computer's speakers, such as web videos or
media players, you must manually change the computer's default audio speaker device to use
CCX.
Answer BToE Calls
You can sign in to different Skype for Business accounts on your phone and your computer. Answer
Skype for Business calls on the device signed in to the account receiving the call.
Procedure
» Do one of the following:
• If signed in with the same user account, press the Answer softkey on your phone or click
Answer in the Skype for Business client.
• If signed in with different user accounts and the incoming call is for the account signed in to
Skype for Business, click Answer in the Skype for Business client.
The call displays on the phone and Skype for Business client. On the phone, the PC audio
icon displays next to the Skype for Business call. The audio for the call plays through the
phone's speakerphone.
• If signed in with different user accounts and the incoming call is for the account signed in to
the phone, press the Answer softkey on the phone.
The call displays on the phone only.
Place BToE Calls
Place calls to Skype for Business contacts in the Skype for Business client and on your phone.
Procedure
» Choose a contact and select Call.
Pause and Resume BToE Calls
Pause active audio Skype for Business calls on your phone.
Pause active audio Skype for Business calls on your phone when you’re signed in to different user
accounts on your phone and the Skype for Business client. However, when you pause an audio call on
your phone, the call remains active in the Skype for Business client on your computer.
Settings, Applications, and Accessories
65

Procedure
1. On your phone, select Pause.
The audio call is paused on your phone but not in the Skype for Business client on your computer.
2. Press Resume on your phone.
Move Call Audio between Your Phone and Computer
During an active Skype for Business call, move call audio between your phone and your computer.
Procedure
1. During an active call in the Skype for Business client, click Audio Device Settings .
2. Click Devices and do one of the following:
• Click Handset to move the call audio from your computer to your phone.
• Click PC Mic and Speakers to move the call audio from your phone to your computer.
Connecting Bluetooth Devices
You can connect your Bluetooth–capable phone to a Bluetooth–capable headset or smartphone.
Note: CCX 500 and CCX 600 phones support Bluetooth connectivity.
Using Bluetooth Devices on Your Phone
Pair and connect compatible Bluetooth devices such as a mobile phone, tablet, laptop, or headsets with
your phone.
If your administrator enables Bluetooth on your phone, you can pair Bluetooth devices in host or device
mode. Connect a maximum of two Bluetooth devices at a time.
Host mode – Connect a Bluetooth headset to place and answer calls with a Bluetooth headset.
Device mode – Connect your smartphone to manage calls and user your Poly CCX phone as a Bluetooth
speaker.
When you pair your Bluetooth headset to the phone, you can use your headset to manage call audio.
When you pair the phone to your PC, tablet, or mobile phone, you can use the phone to answer a call,
end a call, or reject a call.
Related Links
Place a Call over Bluetooth on page 25
Using Bluetooth Headsets
If your system administrator has enabled Bluetooth capability for your phone, you can use a Bluetooth
headset to handle calls.
When a Bluetooth headset is connected and in use, the headset key glows blue. If you have multiple
types of headsets connected to your phone, the Bluetooth headset is used automatically for all calls.
Settings, Applications, and Accessories
66

This section provides you with information on how to enable Bluetooth, how to pair and connect your
Bluetooth headset, how to use your Bluetooth headset with your phones, and how to disconnect and
remove your headset.
Enable Bluetooth and Connect a Headset
To use a Bluetooth headset with your phone, you need to enable Bluetooth, pair your headset, and
connect your Bluetooth device to your phone. You can pair up to five Bluetooth headsets with your phone;
however, you can connect only one headset at a time.
The following instructions are intended as a guide and do not apply to all Bluetooth devices. You can
usually find instructions for your headset on the device manufacturer's web site.
Procedure
1. Go to Settings > Basic > Bluetooth.
2. Select Bluetooth then select On.
The Bluetooth icon displays in the status bar. After the icon displays, you can pair and connect
your Bluetooth-enabled device.
3. Turn your Bluetooth device on and place the device in Discovery mode.
Refer to your Bluetooth device's documentation for information on how to place your device in
discovery mode.
4. Return to Bluetooth Settings and select Manage Devices.
5. Tap Scan to find your Bluetooth device.
6. Select your headset in the scanned list in the Manage Devices screen.
7. Tap Pair in the Available Devices screen to begin the pairing process.
8. Select Connect to connect the paired device.
The Bluetooth icon along with a message that the device is connected displays in the Manage
Devices screen and in the status bar of the phone.
After you connect a Bluetooth device to your phone, the phone automatically connects to the last
connected Bluetooth device after a reboot or restart.
Managing Calls with Your Bluetooth Headset
When your Bluetooth headset is turned on, paired, and connected with your phone, you can perform the
following tasks:
• Use the headset to handle calls, including muting and adjusting the call volume.
• Initiate and end calls on your headset by pressing the headset key on your phone.
• Switch to handset or speakerphone mode during a headset call by picking up the handset or
pressing the Speakerphone key .
When you turn the headset off, the headset is no longer connected but remains paired to your phone.
When you turn the headset back on, the headset is reconnected.
Pairing a Smartphone to Your Phone
When your system administrator has enabled Bluetooth on your phone, you can pair your phone to a
Bluetooth-enabled smartphone.
After you pair a smartphone to your phone, you can use your phone to handle call controls for the
smartphone, including muting the microphone and adjusting call volume.
Settings, Applications, and Accessories
67

Enable Bluetooth and Connect a Smartphone
You can enable Bluetooth and connect a smartphone to your phone and select a smartphone to connect
with in the list of available devices.
You can pair up to five smartphones with your phone; however, you can connect only one smartphone at
a time.
Procedure
1. Go to Settings > Basic > Bluetooth.
2. Select Bluetooth then select On.
The Bluetooth icon displays in the status bar. After the icon displays, you can pair and connect
your Bluetooth-enabled device.
3. Turn your Bluetooth device on and place the device in Discovery mode.
Refer to your Bluetooth device's documentation for information on how to place your device in
discovery mode.
4. Return to Bluetooth Settings and select Manage Devices.
5. Tap Scan to find your Bluetooth device.
6. Select your smartphone in the scanned list in the Manage Devices screen.
7. Tap Pair in the Available Devices screen to begin the pairing process.
A pairing request with a pairing code displays on your phone and the smartphone.
8. Accept the pairing request on both your phone and smartphone.
After the smartphone pairs with the phone, the smartphone displays along with its icon on the
Manage Devices screen.
9. Select Connect to connect the paired device.
After you connect a Bluetooth device to your phone, the phone automatically connects to the last
connected Bluetooth device after a reboot or restart.
Managing Calls with Your Smartphone
Note: While you can answer, reject, and end smartphone calls using your CCX phone, you can’t place
smartphone calls from your CCX phone.
When you pair and connect your smartphone with your CCX phone, you can perform the following tasks:
• Use the CCX to handle calls, including muting the microphone and adjusting the call volume.
Volume control isn’t specific only to the active calls but to any audio played on the CCX phone.
• Answer an incoming call.
• Reject an incoming call.
• End an active call from your phone or a connected smartphone.
Disconnect and Remove Your Bluetooth Device
Disconnect your Bluetooth device from your phone and still keep it paired. When you disconnect a
Bluetooth device, it remains paired so that you can reconnect it to your phone.
Disconnect and remove your Bluetooth device from your phone. To reconnect your phone to your
Bluetooth device, scan for, add, and reconnect with the device from your phone.
Settings, Applications, and Accessories
68

Tip: You can quickly disconnect your Bluetooth device by turning off the device or turning off Bluetooth
on the phone. When you turn your device back on, it automatically reconnects to your phone.
Procedure
1. Go to Settings > Basic > Bluetooth.
2. On the Manage BT Devices screen, select the connected Bluetooth device and select
Disconnect.
3. Select your device and select Forget.
The phone removes your device from the list. Your device is no longer paired or connected with
your phone.
DTMF Dialing
After the phone is successfully connected to a smartphone, you can manage call controls for the paired
and connected smartphone, including entering DTMF tones.
During an active call, you can enter DTMF tones from the phone dialer to respond to computer-generated
prompts during calls. For example, you can enter DTMF tones to respond to prompts during calls with
customer service or technical support numbers.
Play Audio from a Bluetooth Device
Use your phone as a Bluetooth speaker for music or videos played on your mobile phone or tablet.
Procedure
1. Connect your mobile phone or tablet with the phone.
2. On your mobile phone or tablet, choose the music or video you want to hear.
3. Make sure that the phone is set as your audio device.
The audio plays through the phone's speakers.
Connecting to a Wireless Network
You can connect your Wi-Fi capable phone to a wireless network.
Connect to a Wireless Network
After you enable Wi-Fi on your phone, connect to a wireless network.
Make sure you have the login credentials for the network you want to connect to.
Procedure
1. Go to Menu > Settings > Basic > Wi-Fi > Launch Wi-Fi Settings.
2. Select a wireless network from the list.
3. Enter the required information for the chosen wireless network.
Note: The information required for a wireless network depends on the security settings of the
chosen wireless network.
4. Select Connect.
Settings, Applications, and Accessories
69

Disconnect from a Wireless Network
To change wireless connections or switch to an Ethernet connection, disconnect from the current wireless
network.
Procedure
1. Go to Settings > Basic.
2. Select Wi-Fi.
3. Select the connected wireless network SSID from the list.
4. Select Disconnect.
Remove a Wireless Network
Remove any saved wireless network that is no longer necessary.
Procedure
1. Go to Menu > Settings > Basic > Wi-Fi > Launch Wi-Fi Settings.
2. Select the connected wireless network SSID from the list.
3. Select Forget.
Phone Applications
Poly phones can support optional applications configured by your system administrator.
Ask your system administrator if your phone supports any of the applications discussed in this section.
Note: Some of the features described in this section require access to the Basic settings menu. If your
phone requires a password to access the Basic settings menu, contact your system administrator
for assistance.
Using the Calendar
When connected to Microsoft Exchange Server, you can view and join meetings scheduled in Microsoft
Outlook from your phone.
Open the Calendar
To view and join scheduled meetings, access the calendar on your phone.
View meetings for the current day and upcoming meetings. You cannot view meetings for previous days.
Procedure
» On the Home screen, select Meetings.
The calendar displays scheduled meetings for the day.
Settings, Applications, and Accessories
70

Display Meeting View on the Calendar
Meeting view displays the details for a chosen meeting.
From Meeting view, you can view the meeting's start and end time, location, organizer, required
attendees, and meeting description; view meeting numbers that you can call to join meetings; and join
meetings.
Procedure
» From the Home screen, select Meetings and select an upcoming meeting.
Meeting Reminders
When you have a scheduled meeting on the calendar, a meeting reminder displays and an alert tone
plays before a meeting starts.
From the meeting reminder, you can view meeting details and join the meeting.
Note: If you have enabled meeting reminders but the reminders don’t display before meetings, make
sure that your login credentials are correct.
Respond to Meeting Reminders
From the meeting reminder, you can join a meeting, view meeting details, snooze the reminder to
temporarily remove it from the screen, and dismiss the reminder to permanently remove it from the screen
and stop all future reminders for the meeting.
Procedure
» Do one of the following:
• Select Join to join the meeting.
• Select Detail to view information for the meeting.
• Select Snooze to temporarily remove the meeting reminder from your screen for one
minute.
• Select Dismiss to permanently remove the reminder for the meeting.
Choose a Meeting Reminder Type
Choose a meeting reminder type that determines if an alert tone plays each time a meeting reminder
displays.
The following options are available for meeting reminders:
• Silent—The meeting reminder displays without an alert tone.
• Audible Once—An alert tone plays the first time a meeting reminder displays but doesn’t play for
any additional reminders.
• Audible Always (default)—An alert tone plays each time a meeting reminder displays.
Procedure
1. Go to Settings > Basic > Preferences.
2. Select Calendar Settings > Reminder Settings.
3. Select Reminder Type and choose a meeting reminder type.
Settings, Applications, and Accessories
71

Choose a Meeting Alert Tone
Choose the alert tone that plays for meeting reminders.
Procedure
1. Go to Settings > Basic > Preferences.
2. Select Calendar Settings > Alert Tone.
3. Choose an alert tone and select Play to hear the tone.
Disable Meeting Reminders
Meeting reminders are enabled by default. The phone displays reminders for all meetings. You can
choose to disable meeting reminders on your phone.
Procedure
1. Go to Settings > Basic > Preferences.
2. Select Calendar Settings > Reminder Settings.
3. Select Reminder > Disable.
Joining Calendar Meetings
You can join any scheduled meeting from the calendar or from a meeting reminder.
Join Meetings from the Calendar
Join meetings on your phone from the Calendar in Meeting view.
Procedure
1. From Day view, select the meeting.
2. In Meeting view, select Join.
Join a Meeting from a Meeting Reminder
Join a meeting from the meeting reminder when it displays before a meeting, if enabled.
Procedure
1. On the meeting reminder, select Join.
The meeting details display.
2. Select Join to connect to the meeting.
Join Skype for Business Meetings from the Calendar
Join Skype for Business meetings from the Calendar either from meeting reminders or Meeting view.
Procedure
» In Meeting view, select Join.
Settings, Applications, and Accessories
72
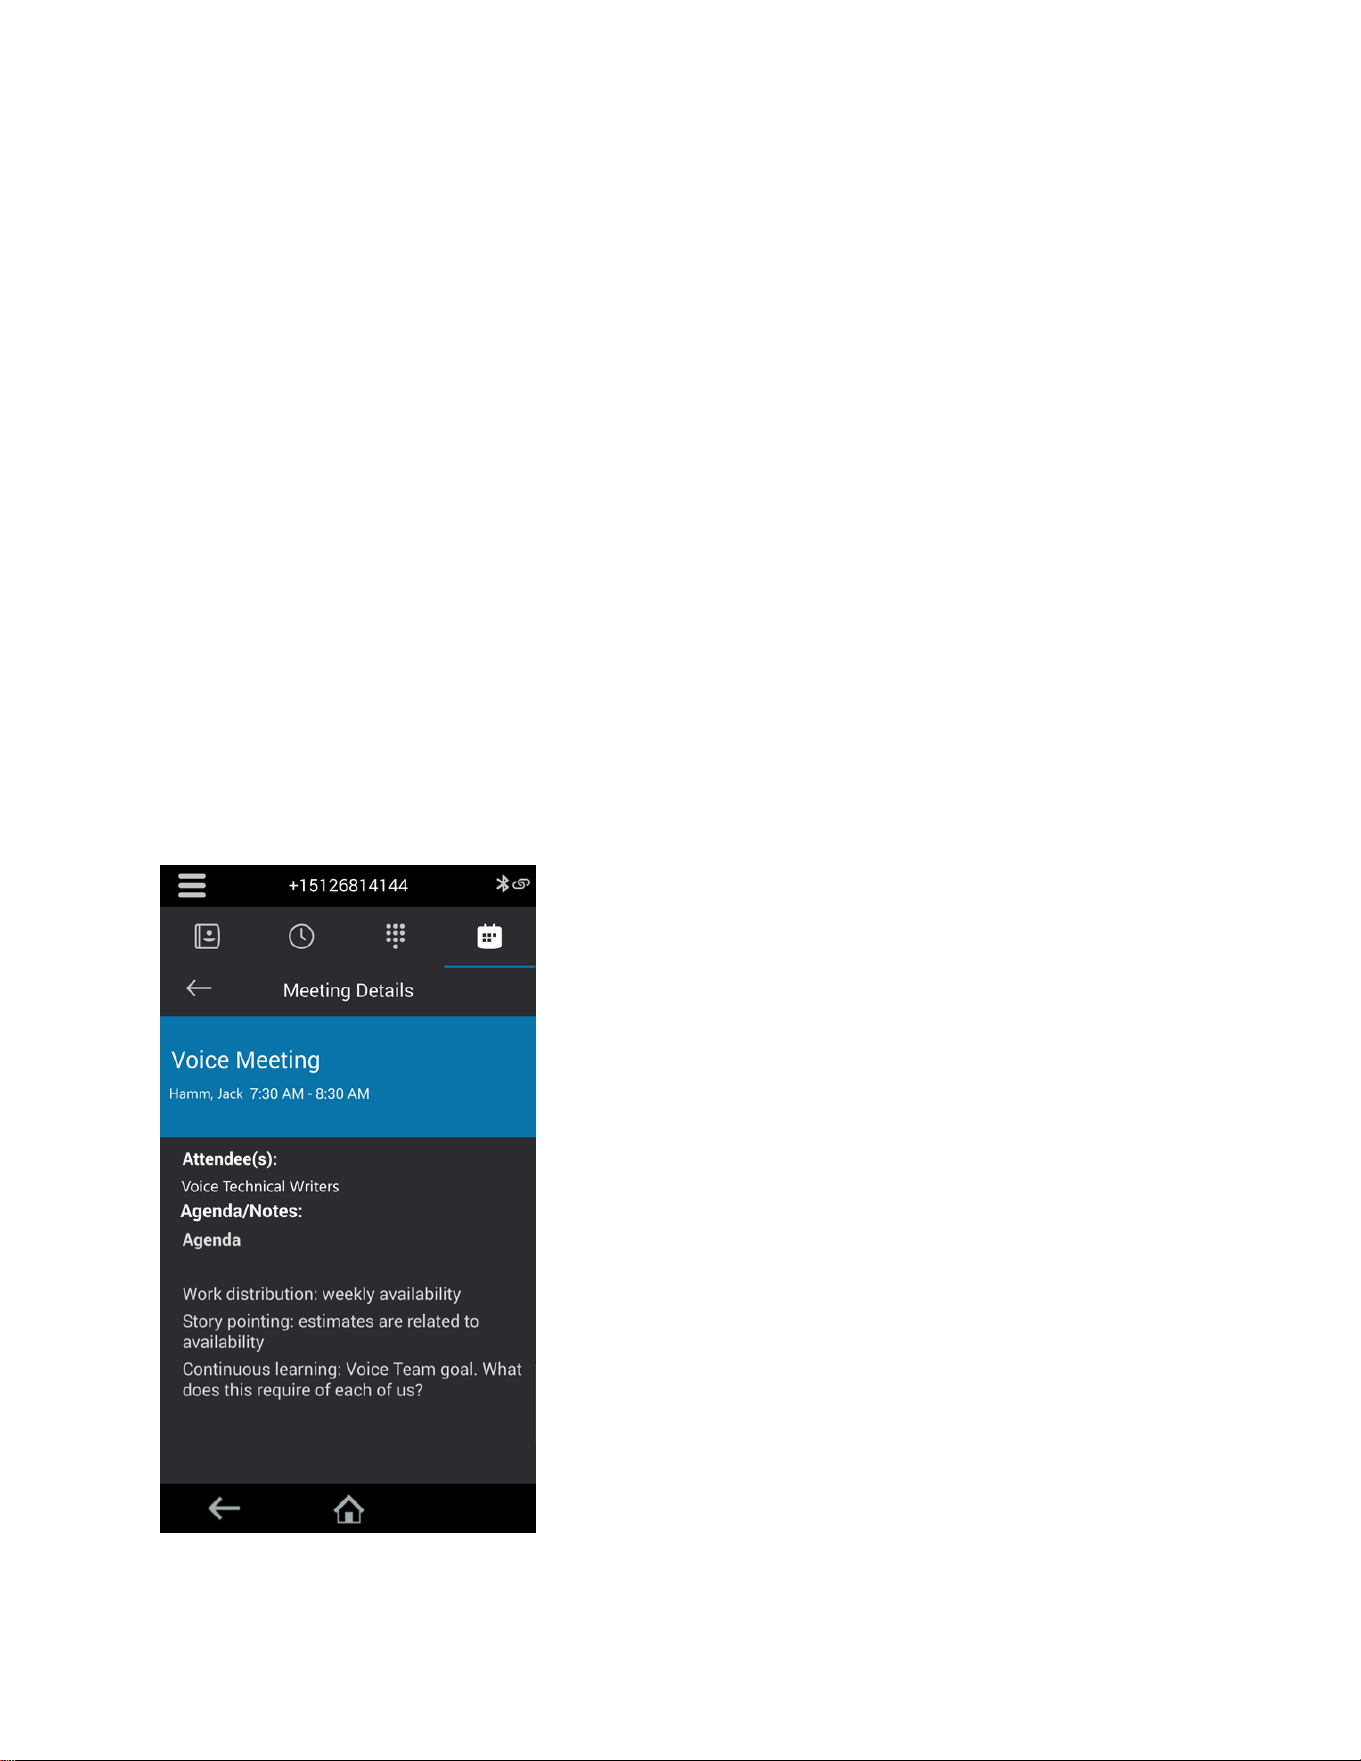
View a Different Exchange Calendar
If enabled by your system administrator, you can access a Microsoft Outlook calendar that isn’t
associated with the Skype for Business user account signed in to your phone.
To view scheduled meetings on another Outlook calendar, you can sign in to a second Exchange Server
account on the phone.
Procedure
1. Select Sign In then select User Credentials (if prompted).
2. Enter your Skype for Business login credentials or extension and PIN.
3. Select Advanced and complete the following fields:
• Exchange User
• Exchange Domain
• Exchange Password
4. Select OK.
5. Select Sign in.
After several minutes, the calendar information for the second Exchange Server account displays
on the phone instead of the Skype for Business account associated with the phone.
View Meeting Details
When you select a meeting on the calendar, you can view the meeting’s start and end time, location,
organizer, invitees, and meeting description.
Figure 8: Meeting details
Settings, Applications, and Accessories
73

Procedure
» On the calendar, select a meeting.
The meeting details screen displays.
Phone Accessories and Computer Applications
CCX phones support accessories and computer applications that you can use to extend your phone's
capabilities.
Your phone may not support all of the accessories or applications described in this section. Check with
your system administrator to find out which of these applications or accessories are available on your
phone.
Note: Some of the features described in this section require access to the Basic settings menu. If your
phone requires a password to access the Basic settings menu, contact your system administrator
for assistance.
Using a Headset with Your Phone
Connect a headset to your phone to place and answer calls and use electronic hookswitch (EHS).
Note: For information on your headset’s features, as well as how to sync your headset with your phone,
see your headset’s documentation.
Connecting a USB Headset
Your phone does the following when connected to analog and USB headsets:
• When an USB headset is connected and in use, the headset key glows blue.
• When both an analog and USB headset are connected, the USB headset is used automatically for
all calls.
• When two USB headsets are connected, the headset you connected first is used automatically for
all calls.
After you connect a headset to your phone, you can set up your phone to use the headset automatically
when answering and placing calls.
Note: If your phone does not detect the USB headset when you attach it to your phone, the USB port on
your phone may be disabled. Contact your system administrator.
Using Electronic Hookswitch
When you use a headset that supports electronic hookswitch (EHS), you can place, answer, and end
calls by using the controls on your headset.
To use EHS, you need a headset that includes a serial control interface in addition to the standard analog
headset jack (RJ-9) interface. The serial control interface requires an EHS adapter that you can purchase
from your headset manufacturer.
Settings, Applications, and Accessories
74

Headsets that support EHS include a base unit that connects to your phone. The headset connects to the
base unit wirelessly, which enables you to use your headset even if you're some distance away from your
phone. Typically, you can work wirelessly up to 300 feet (91 meters) from your phone and still use the
EHS controls. Check with your headset's user guide for the precise range restrictions.
See Feature Profile 37477: Using Headsets with Polycom Phones on Polycom Support for a list of
compatible headsets.
Setting the Headset Base Unit Options
Before you connect your headset to your phone and use EHS, you need to set the following options for
your specific headset model:
• For Jabra headsets, change the headset mode to DHSG on the headset base unit. For details, refer
to your headset documentation or contact Jabra support.
• For Plantronics headsets, change the coarse receive level to 3 and the transmit level to B on the
headset base unit. For details, refer to the guide that comes with your headset.
• For Sennheiser headsets, set the first DIP switch labeled 1 (DHSG) to the down position on the
back of the headset base unit. For additional details, see your headset's documentation or contact
Sennheiser support.
Enable Electronic Hookswitch
After you set the base unit options for your headset and connect your headset to your phone, you can
enable EHS.
Procedure
1. Connect your headset and EHS adapter to your phone.
See the Quick Start Guide for your phone on Polycom Voice Support for information on connecting
a headset to your phone.
2. Go to Settings > Basic > Preferences.
3. Select Headset > Hookswitch Mode.
Change the Headset Mode
To control your phone using your headset, the headset must be in soft phone mode.
Headsets that come with a docking station have two modes: soft phone and desk phone mode. If you
cannot operate the phone from your headset, it is possible your headset is in desk phone mode.
Procedure
» Press and hold the headset hookswitch until you hear a sound or message on the headset.
Controlling Calls with Electronic Hookswitch
After you have followed the procedures for connecting your headset and enabled EHS, you can use the
controls on your headset to answer, mute, and end calls. If supported on your headset, you can also
place calls on hold. See your headset's user documentation for information on controlling calls from your
headset.
When you are in an active call and you receive an incoming call, you cannot use the hookswitch control
on your headset to place the active call on hold and answer the incoming call. Pressing the hookswitch
control on the headset ends the active call and answers the incoming call. To place the existing call on
hold and answer the incoming call, answer the call on your phone.
Settings, Applications, and Accessories
75

Disconnect Your Headset
To disconnect or change your headset, properly detach your headset from your phone.
Procedure
1. Go to Settings > Basic > Preferences.
2. Select Headset > Hookswitch Mode.
3. Select Regular Mode.
4. Remove the EHS adapter from the serial port on the back of the phone.
USB Audio Mode
USB audio mode enables you to use your Poly CCX business media phone as a USB audio device on a
connected computer.
Note: Poly CCX 400 business media phones don’t support USB device mode.
USB audio mode enables you to use the CCX business media phone hardware to do the following:
• Take calls from your softphone clients on your computer
• Play computer audio through your phone’s speaker
• Record audio using your phone’s microphone
With your phone configured in the Skype for Business base profile, you can control calling features in
Skype for Business on your computer from the phone.
Computer and Cable Requirements
Your computer and cables must meet the following requirements to use USB audio mode with your Poly
CCX business media phones.
Note: Poly CCX 400 business media phones don’t support USB device mode.
Operating system requirements:
• Windows 10 1803 or later
• macOS 10.12 or later
USB cable requirements:
• USB-A to USB-C cable
• Supports USB 2.0 or USB 3.0
Note: Poly recommends USB 3.0 for the most reliable connection and optimal audio quality
• Self-powered USB booster extension cable for connections longer than 2 m (6.6 ft)
Note: Poly recommends that the USB cable you use for USB audio mode isn’t a cable meant only for
charging devices. Cables meant for charging devices may lack the necessary hardware to
support the data transmission needed for USB audio mode.
Settings, Applications, and Accessories
76

Connect Your Phone to Your Computer
Connect your Poly CCX business media phone to your computer in USB audio mode.
Procedure
1. Connect the USB-C end of the cable into the USB-C port on the right side of the phone.
2. Connect the USB-A end of the cable into an available USB 2.0 or USB 3.0 port on your computer.
3. Configure your computer’s input and output audio devices to the CCX business media phone
according to your system’s procedure.
This process may vary depending on your computer’s operating system.
Settings, Applications, and Accessories
77

Accessibility Features
Topics:
• Users Who Are Deaf or Hard of Hearing
• Users with Limited Mobility
• Users Who Are Blind, Have Low Vision, or Have Limited Vision
Poly products include a number of features to accommodate users with disabilities.
Users Who Are Deaf or Hard of Hearing
Your phone includes accessibility features for users who are deaf or hard of hearing to use the phone.
The following table lists the accessibility features for users who are deaf or hard of hearing.
Accessibility Features for Users Who Are Deaf or Hard of Hearing
Accessibility Feature Description
Visual message indicators An indicator light on the phone indicates that new messages
are waiting. Icons on the screen also indicate that the phone
has new messages.
Adjustable ring tone and volume You can choose from a variety of ring tones for the phone.
You can also change the volume of the ringer to suit your
needs and choose different ring tones for contacts.
Adjustable call volume While in a call, you can raise or lower the volume of the
device.
Visual notifications Status and icon indicators let you know when you have
incoming, outgoing, active, or held calls. Indicators also alert
you of the device’s status and when features are enabled.
Electronic hookswitch If you use a headset that supports electronic hookswitch
(EHS), you can use the controls on your headset to answer
and end calls. Additionally, you may be able to mute calls
and control volume from your headset.
Hearing aid compatible (HAC) handsets All phones are hearing aid compatible (HAC) and have
telecoils that magnetically couple to most forms of wearable
hearing aids per 47 CFR 68.317 & the Telecommunications
Telephone Terminal Equipment Magnetic Field and Acoustic
Gain Requirements of ANSI/TIA/EIA 504A Feb 1998. The
phones are also compliant to Rehabilitation Act Section 508
Recommendations: Subpart B 1194.23.
78

Accessibility Feature Description
TTY support The phones support commercial TTY devices such as
Ultratec Superprint. Additionally, the phones provide
acoustically coupled TTY support.
Related Links
Icons and Status Indicators on page 16
Set a Ringtone for Incoming Calls on page 63
Users with Limited Mobility
Your phone includes accessibility features to enable users with limited mobility to use various phone
features.
The following table lists the accessibility features for users with limited mobility.
Accessibility Features for Users with Limited Mobility
Accessibility Feature Description
Auto-answering You can enable the phone to auto-answer calls.
Touchscreen The large touchscreen enables you to select, swipe, and press the screen
to perform functions and activate features.
Built-in speakerphone
A built-in speakerphone enables you to hear audio on the device without
having to use a headset.
Related Links
Answer Calls Automatically on page 28
Users Who Are Blind, Have Low Vision, or Have
Limited Vision
Your phone includes accessibility features for users who are blind, have low vision, or have limited vision
to use the phone.
The following table lists the accessibility features for users who are blind, have low vision, or have limited
vision.
Accessibility Features for Users Who Are Blind, Have Low Vision, or Have Limited Vision
Accessibility Feature Description
Adjustable backlight settings You can change the brightness of the screen by adjusting
backlight intensity settings.
Accessibility Features
79


Maintenance and Troubleshooting
Topics:
• Maintaining Your Phone
• Troubleshooting
This section provides information on maintaining and troubleshooting your phone.
Maintaining Your Phone
When the phone isn’t operating properly, investigate or troubleshoot issues along with any other tasks
your administrator may ask you to perform.
Clean the Touchscreen
The phone screens require minor maintenance, but you may need to clean the screen periodically.
Before you clean the screen, disable it so you don’t activate phone functions while you wipe the
touchscreen.
Use a clean, dry, microfiber cloth—the kind you would use to clean glass surfaces—to wipe the screen.
Don’t use chemicals to clean the screen.
Procedure
1. Go to Settings > Basic.
2. Select Screen Clean.
3. Wipe the screen with the clean, dry, microfiber cloth.
Note: If the screen is still dirty after cleaning, dampen a soft, lint-free cloth with an isopropyl
alcohol and water solution of 50:50, then wipe the screen with the cloth. Always use the
dampened cloth to apply the solution; never apply the solution directly to the screen
because the solution could seep inside the screen or stain the phone. Do not use
chemicals to clean the screen.
4. To enable the touchscreen, follow the onscreen instructions.
Restart Your Phone
To assist with troubleshooting, your system administrator may ask you to restart your phone.
Caution: Before you restart the phone, contact your system administrator. If the phone is
malfunctioning, you may be able to restore normal operation without restarting it. Additionally,
your system administrator may want to troubleshoot the phone before you restart it. You do
not need to restart the phone to update its configuration.
Procedure
1. Go to Settings > Basic.
81

2. Select Restart Phone.
A confirmation message displays.
3. Select Yes.
The restart process begins, and the process ends when the Home screen displays.
Update the Phone’s Configuration
Your system administrator may ask you to update the configuration for your phone to apply any changes
to the phone settings, which you can do without rebooting it.
Procedure
1. Go to Settings > Basic.
2. Select Update Configuration.
A confirmation message displays.
3. Select Yes.
The configuration updates. The phone may reboot, depending on which settings you changed.
View Software Details
View the details for the software version on your phone, the latest software update available for your
phone, and the status of the latest update.
Procedure
» Go to Settings > Status > Platform > Software Update Status.
Updating Your Skype for Business Phone Software
When you sign in to Skype for Business on your phone, you can update your phone with the latest UC
Software and view the software update information.
View Software Update Information
View information about the software update before you update your phone.
Procedure
» When prompted to update software, press Details.
Update Your Skype for Business Phone Software
When a software update is available, a notification displays on your phone.
Procedure
» When prompted to update software, press Reboot to restart the phone and get the latest update.
Update Skype for Business Software Later
If you don’t want to update your phone software when prompted, update the software later. To update the
phone's software, press the Dev Updt soft key.
Maintenance and Troubleshooting
82

If your phone is inactive for a long period of time, the phone automatically reboots and updates the phone
software.
Procedure
1. When prompted to update software, press Cancel.
The Dev Updt soft key displays.
2. Press the Dev Updt soft key when you're ready to update your phone's software.
Reset the Phone to Factory Defaults
Access the phone reset option without having to enter an administrator password.
After the administrator configures this feature on the phone, you can reset the phone to factory default
settings.
Procedure
» Go to Settings > Basic > Reset to Factory.
Troubleshooting
If you’re having issues with your Poly phone, you can try the troubleshooting options and solutions in the
following topics to resolve certain issues.
Phone Can’t Connect to the Network or Repeatedly Restarts
Symptom:
Your phone has one or more of the following issues:
• The phone can’t connect to the network.
• The phone doesn’t start up properly or continues to restart.
Problem:
If you connect the wrong power supply to your phone, such as the power supply for a different or older
Polycom phone, you may experience problems. The wrong power supply can damage your phone, the
phone doesn’t work as expected, and it can void your warranty.
Workaround:
Only use the power supply designed for your phone or check with your system administrator about using
Power over Ethernet.
If you are using the correct power supply for your phone, you may need to factory reset your phone to
default settings.
Warnings
The warning icon lets you know that your phone has one or more important issues.
Maintenance and Troubleshooting
83

Investigate Warnings
When a phone can’t perform certain tasks, a Warning icon displays in the status bar.
View details about the issues from the Warnings screen.
Procedure
1. Go to Settings > Status > Diagnostics.
2. Select Warnings.
The Warnings screen displays, listing any issues.
Remove Warnings
After you view phone warnings, you can temporarily remove the warning icon from the status bar.
However, the warning displays in the Warnings list until the issue is resolved. The warning icon displays
each time your phone has a warning that you haven't viewed.
Procedure
» In the Warnings screen, select Clear Icon to remove the Warning icon from the status bar.
Test the Hardware
If you're experiencing issues with your phone, your system administrator may ask you to test the phone
hardware.
Test the display, microphones, and speaker. Contact your system administrator for instructions on how to
perform these tests.
Procedure
1. Go to Settings > Status > Diagnostics.
2. Select Test Hardware and select an option from the list.
Speakerphone
If your speakerphone doesn't work, your system administrator may have disabled it. If this is the case, a
message displays after you press the speakerphone key informing you that Handsfree mode is disabled.
In this case, use the handset or a headset to handle calls.
USB Port
If you attach a USB device to your phone, and the phone does not detect the attached USB device, your
system administrator may have disabled the USB port on your phone.
In this case, you cannot attach a USB device to your phone to use the following features:
• Call recording
• Picture frame
• USB headset
Contact your system administrator for help on enabling the USB port on your phone.
Maintenance and Troubleshooting
84

Check the Status of the Calendar
Issues with the phone’s connection to the Microsoft server may cause calendar problems. Without a
functioning connection, you may not see the Calendar icon on the Home screen or you may not receive
meeting reminders.
Procedure
1. Go to Settings > Calendar.
2. On the Calendar screen, select Connect.
Troubleshoot Audio and Echo Issues
In some cases when you are using your headset during a call, your contacts may experience audio or
echo issues, such as feedback of your voice or of their own voice. If your contacts hear an echo during a
call when using your headset, enable echo cancellation on your phone.
Procedure
1. Go to Settings > Basic > Preferences.
2. Select Headset > Echo Cancellation and select Enabled.
Bluetooth Headset Issues
If you encounter any issues using a Bluetooth headset, see the following table for possible solutions to
common problems.
Common Bluetooth Headset Issues and Solutions
Issue Corrective Action
The Bluetooth settings do not display on my phone Do one of the following:
• Check with your system administrator to see if the
Bluetooth feature is enabled on your phone.
• Make sure the Bluetooth Radio setting is on.
My headset doesn't pair automatically. If your headset is an older model, you may need to
enter a password before the headset can pair with your
phone. Refer to your headset documentation for more
information.
Recording Issues and Solutions
If you encounter any issues recording calls, see the following table for possible solutions to common
problems.
Maintenance and Troubleshooting
85

Common Recording Issues and Solutions
Issue Corrective Action
The message “USB device is full. Recording canceled”
displays when I pressed Start.
Check that there’s sufficient space on the USB flash
drive.
The recording stops during a call. If the USB flash drive becomes full during recording,
recording stops and the message “USB device is full.
Recording stopped” displays.
Delete previous recordings to make space on the USB
drive.
The message “USB device removed unsafely.
Recording canceled” displays when I remove my USB
flash drive during a call.
Don’t remove the USB flash drive while recording. If
you want to remove the drive during a call, press Stop,
and then remove the drive.
The message “Unsupported USB device attached”
displays.
Refer to Feature Profile 37477: Using Headsets with
Polycom Phones on Polycom Support for a list of USB
devices supported on Poly phones.
Better Together over Ethernet
Use the following solutions as a guide to resolve certain issues that might arise while installing the BToE
Connector or pairing your phone.
Troubleshoot the BToE Connector Installation
If the BToE Connector fails to install, download and reinstall the application from Polycom Voice Support
on your computer.
If the application installation continues to fail, find the log file for the installation error and call Polycom
Technical Support. The technical support representative needs the log file to understand why the
installation failed.
If you cannot access the log files, contact your system administrator for assistance.
Procedure
1. Open the Start menu and select your user name.
2. Select the folders AppData > Local > Temp > MSI*.LOG.
Troubleshoot BToE Connector Start Issues
If the BToE Connector successfully installs, but the application fails to start or you experience other
application-related failures, uninstall the BToE Connector and reinstall the application.
If the application still does not start or you experience other related issues, find the log file showing the
failed to start error and call Polycom Technical Support. The technical support representative needs the
log file to understand why the application failed to start.
If you cannot access the log files, contact your system administrator for assistance.
Maintenance and Troubleshooting
86

Procedure
1. Open the Start menu and select your user name
2. Select the folders AppData > Local > Polycom > Polycom BToE Connector.
3. Click the file polycom_BTOE_log.txt.
Troubleshoot Pairing Your Phone with Your Computer
If you’re having trouble pairing your phone with your computer, make sure that the Ethernet cable is
plugged into the PC port on the phone.
If an unable to pair message displays after checking the Ethernet cable, ensure that your computer
firewall allows the BToE Connector to communicate with your network.
Procedure
1. Go to Start > Control Panel > System and Security > Windows Firewall > Allow a program
through Windows Firewall.
2. Click Change Settings.
3. Search for Poly BToE Connector in the list of applications and click the check boxes for Domain,
Home/Work, and Public networks.
4. Click OK.
Regenerate a Pairing Code for Manual BToE Pairing
If you can’t clearly read the Better Together over Ethernet (BToE) pairing code, generate a new code.
Procedure
1. On the BToE PC Pairing screen, select Pairing Mode.
2. Select Auto then select Manual.
A new pairing code generates and displays on the BToE Pairing screen.
Login Credentials
If your phone has incorrect login credentials or you need to resubmit login credentials, one of the
following messages or icons displays on your phone:
• The message “Login Credentials have failed. Please update them if the information is correct”
displays on the screen.
• A lock icon is displays in the status bar.
Maintenance and Troubleshooting
87

• The message “Invalid login credentials” scrolls under the time in the status bar.
• The Calendar icon that displays on the Home screen isn’t available.
Maintenance and Troubleshooting
88