Quick Start Guide
for dishwashers
These short instructions are not a substitute for the
operating instructions supplied with the machine.
It is essential to familiarise yourself with the dishwasher
before using it for the first time. Take note of the Warning
and Safety instructions, as well as the full descriptions on
how to use your appliance.
en-AU, NZ
M.-Nr. 12 577 570 /
00

Guide to the appliance
Control panel
a
In-operation indicator light
For indicating an ongoing wash
programme when the door is closed.
b
Display
For further information, see “Guide to
the appliance - Display functions” in
the operating instructions.
c
buttons
For selecting “Further programmes”.
For changing the values displayed.
For scrolling to other menu pages.
d
Back button
For navigating back to the previous
menu or deleting values which have
been set previously.
e
OK button
For selecting menu options and
values displayed.
For confirming messages.
f
Timer button
For selecting a later programme start.
g
AutoDos button
For activating/deactivating AutoDos.
h
Extrasbutton
For selecting Extras.
i
Programme selection button
For programme selection.
j
Programme selection
ECO = ECO
Auto = Auto45–60°C
45°C = ComfortWash45°C
60°C = PowerWash60°C
75°C = Intensive75°C
= Further programmes/
Settings
k
On/Off button
For switching the dishwasher on and
off.
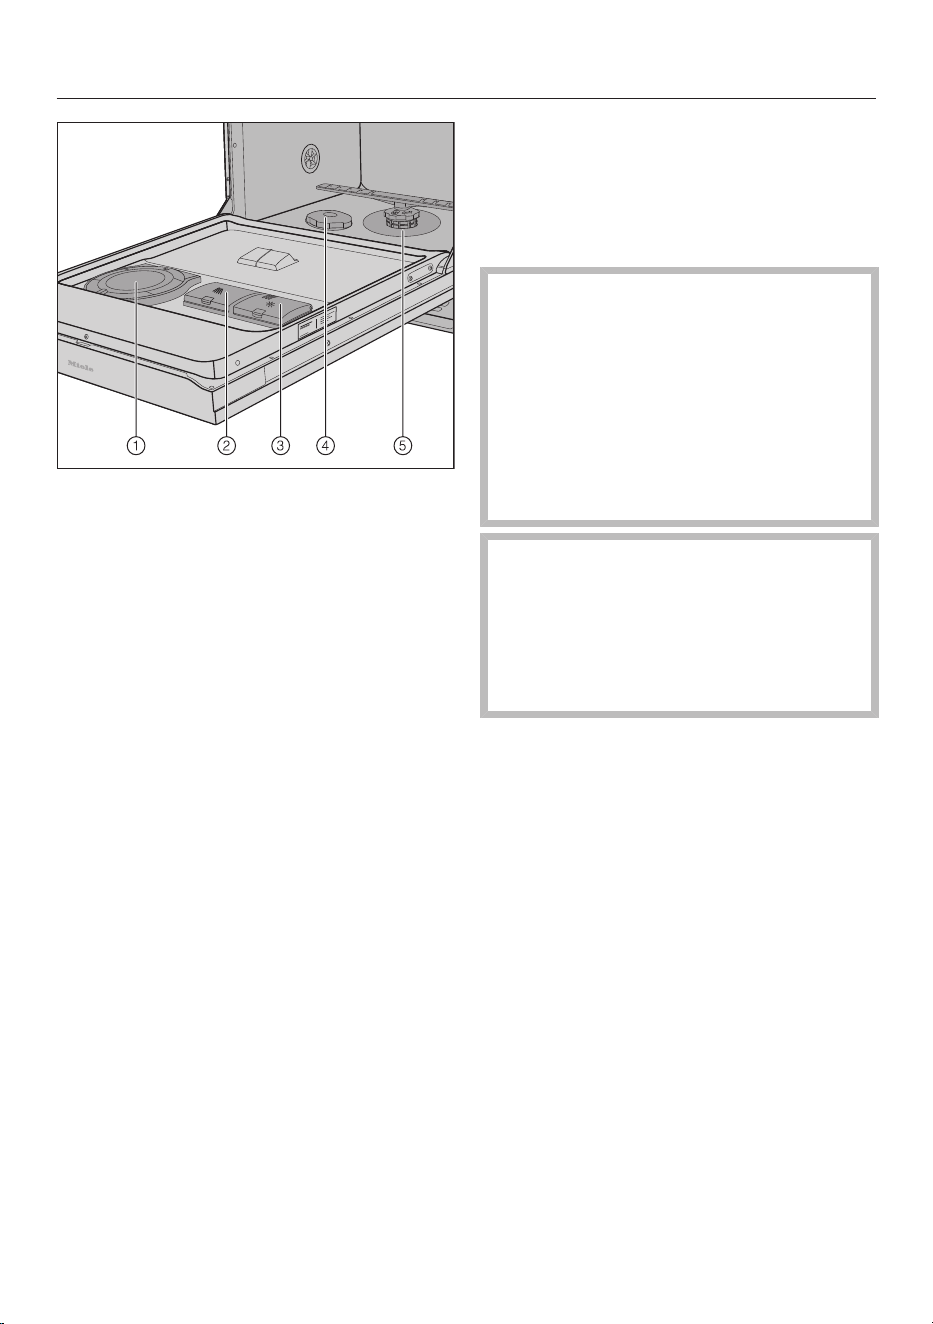
Brief instructions
a
AutoDos (automatic dispensing)
b
Detergent compartment
c
Rinse aid reservoir
d
Salt reservoir
e
Filter combination
Filling the salt reservoir
(depending on water hardness)
Remove the lower basket from the
wash cabinet and unscrew the salt
reservoir cap.
Risk of corrosion due to saline
solution.
Water or saline solution will run out
of the reservoir when the cap is
opened. Saline solution that runs out
can cause corrosion in the wash
cabinet and to the dishwasher load.
The salt reservoir should therefore
only be opened to replenish the salt.
Damage to the water softener
from detergents.
Dishwasher detergent will damage
the water softener.
Do not fill the salt reservoir with
powder or liquid detergent.
Fill the salt reservoir with approx.
1.5litres of water (first use only).
Place the funnel provided over the
salt reservoir and carefully fill with
dishwasher salt until the reservoir is
full.
Clean any excess salt from around the
reservoir opening and then screw the
salt reservoir cap on again firmly.
Run the Rinse salt programme
immediately without a load in order to
remove any traces of salt from the
cabinet.
Adding rinse aid
(if not using AutoDos or all-in-1 tabs)
Lift the yellow button on the lid of the
rinse aid container .
Only fill with rinse aid until the fill
level indicator turns dark when the
door is open horizontally.
Close the lid making sure it clicks into
place.
Wipe up any spilled rinse aid. This
prevents over-foaming occurring
during the next programme.
Loading the dishwasher
Detergent dispensing
There are two ways of dispensing the
detergent.
During automatic dispensing, the
AutoDos function will automatically
dispense the required amount of
detergent for each programme once a
PowerDisk has been inserted.
If you have deactivated automatic
dispensing, you can dispense detergent
manually.
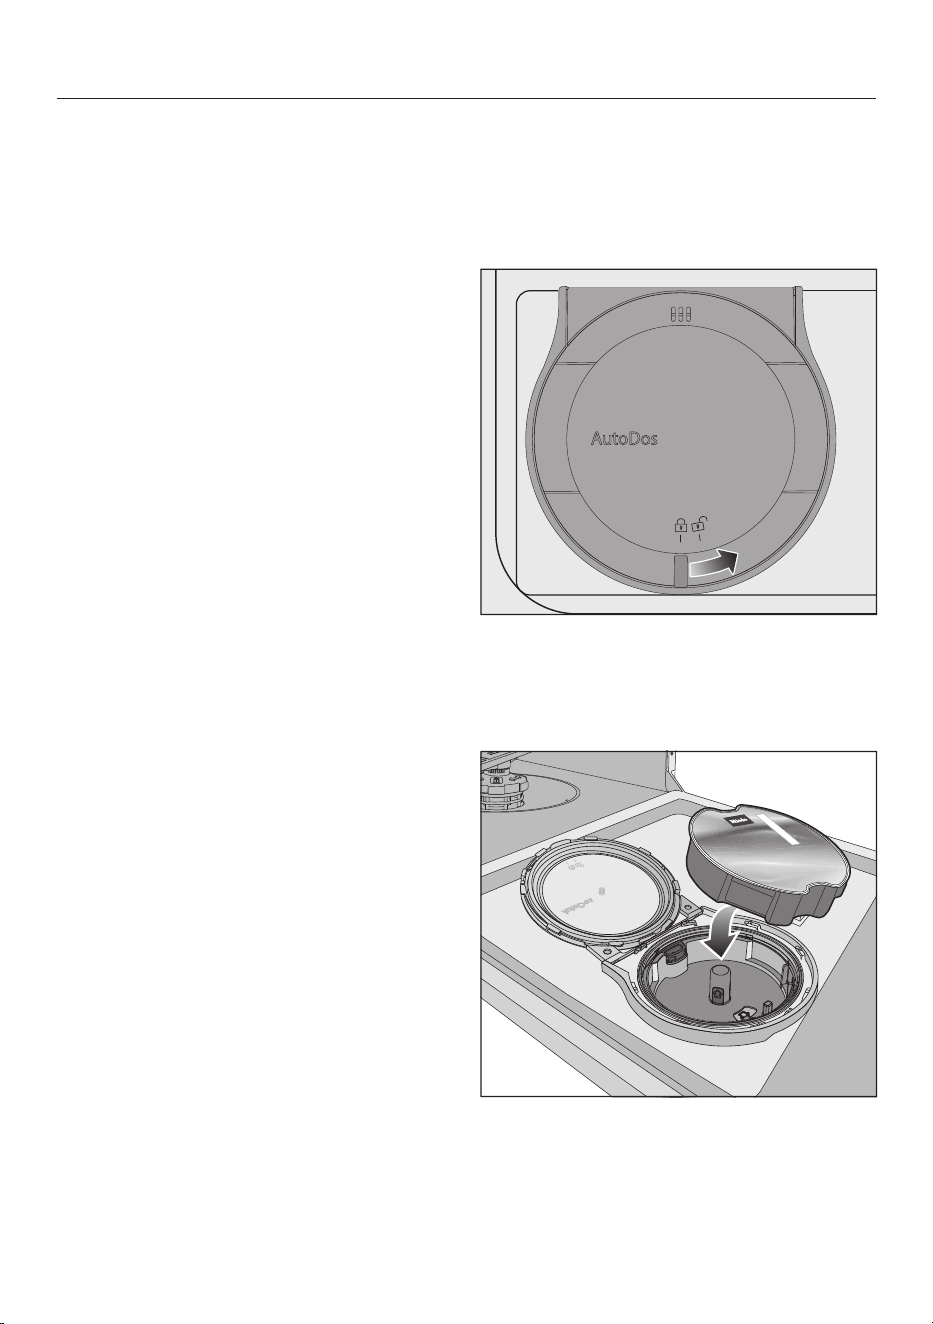
Automatic detergent dispensing
Before you can use AutoDos, you must
insert a PowerDisk containing powder
detergent into the PowerDisk
compartment.
Before you first use AutoDos, remove
the tab from the AutoDos lid.
Slide the yellow catch of the AutoDos
lid to and open it.
Insert the new PowerDisk and press it
evenly downwards until it sits flush.
Close the AutoDos lid and slide the
yellow catch until it is aligned with the
symbol.

This activates the AutoDos function.
If the PowerDisk is not in the correct
starting position, it will be rotated
automatically.
Wait until this process is finished before
you start a programme.
Manual detergent dispensing
Dispense detergent manually if you have
deactivated automatic dispensing.
Follow the detergent dosage
recommended by the manufacturer
on the packaging.
Unless directed otherwise, use one
detergent tab or add 20 to 30ml of
detergent to the detergent
compartment, depending on the
degree of soiling of the crockery.
Lift the yellow catch on the lid of the
detergent compartment .
The lid will be open at the end of the
programme.
Fill the detergent compartment with
detergent and push the lid shut until
you hear it click into place.

Switching on
Turn on the tap if it is turned off.
Open the door.
Press the button.
Selecting a programme
Use the programme selection button
to select the programme you want.
Further programmes can be selected
under .
Selecting Extras (if required)
You can select or deselect the Extras
before starting the selected programme.
Press the Quick or Extras
button.
Select the Extra you want and confirm
with OK.
You can set whether the selected Extras
are to remain permanently activated for
the respective programme (see
“Settings – Saving Extras” in the
operating instructions).
Activating the timer (if required)
Press the button.
Set the required time after which the
programme should start automatically
using the arrow buttons and
confirm with OK.
Starting a programme
Start the programme by closing the
door.
Programme end - Switching off
At the end of a programme, the optical
in-operation indicator light will flash
slowly with the door shut. The signal
tones might also sound.
The programme has finished when
Finished appears in the display and
the door has opened slightly (if
applicable).
The drying fan may continue to run for
a few minutes at the end of the
programme.
Open the door.
The dishwasher can be switched off
at any time using the button.
Switching the dishwasher off during a
programme cancels the programme.
Use the button to select the Switch
off option.
Confirm the query Switch off with OK.
Risk of damage due to steam.
Steam from the dishwasher could
damage the edges of delicate
worktops when you open the door at
the end of the programme if the fan is
no longer running.
If you have deactivated the automatic
door opening function but would still
like to open the door at the end of the
programme, make sure that you open
the door fully.
Unloading the dishwasher
Dishes tend to break and chip more
easily when they are hot. Allow the
dishes to cool until they are comfortable
enough to handle before unloading
them.
Cleaning and care
Cleaning the spray arms
Particles of food can get stuck in the
spray arm jets and bearings. The spray
arms should therefore be inspected
regularly (approx. every 2–4months).
Do not run a wash programme
without the lower spray arm or
without the filters fitted.
Switch the dishwasher off.
Take out the cutlery tray (if your
dishwasher is fitted with one).
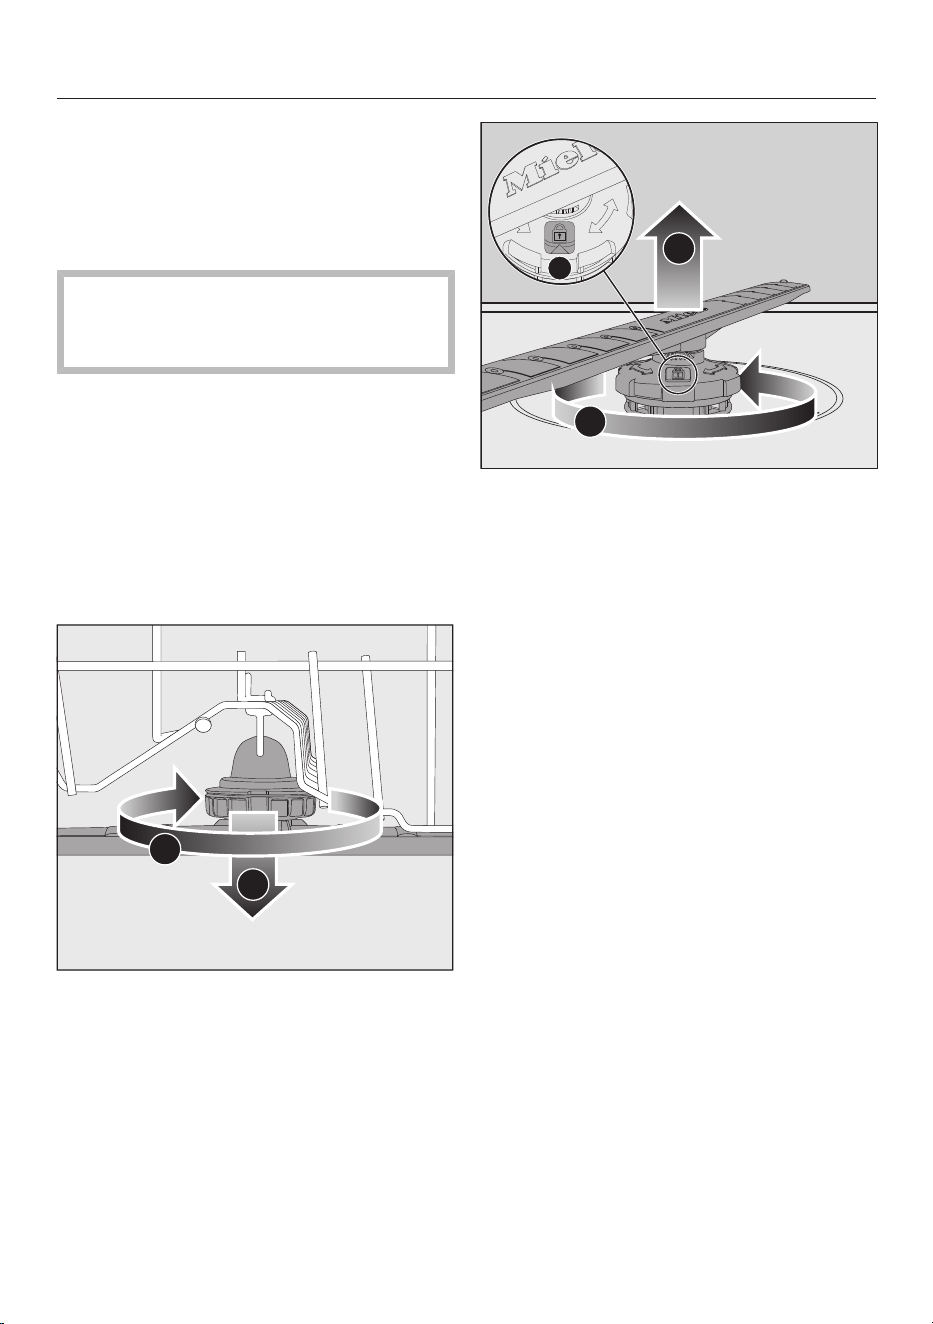
Push the upper spray arm upwards to
engage the inner ratchet. Then
unscrew the spray arm by rotating the
screw thread anti-clockwise (view
from below).
2
1
Rotate the screw thread of the middle
spray arm clockwise (view from
above) and remove the spray arm.
Remove the lower basket.
3
2
1
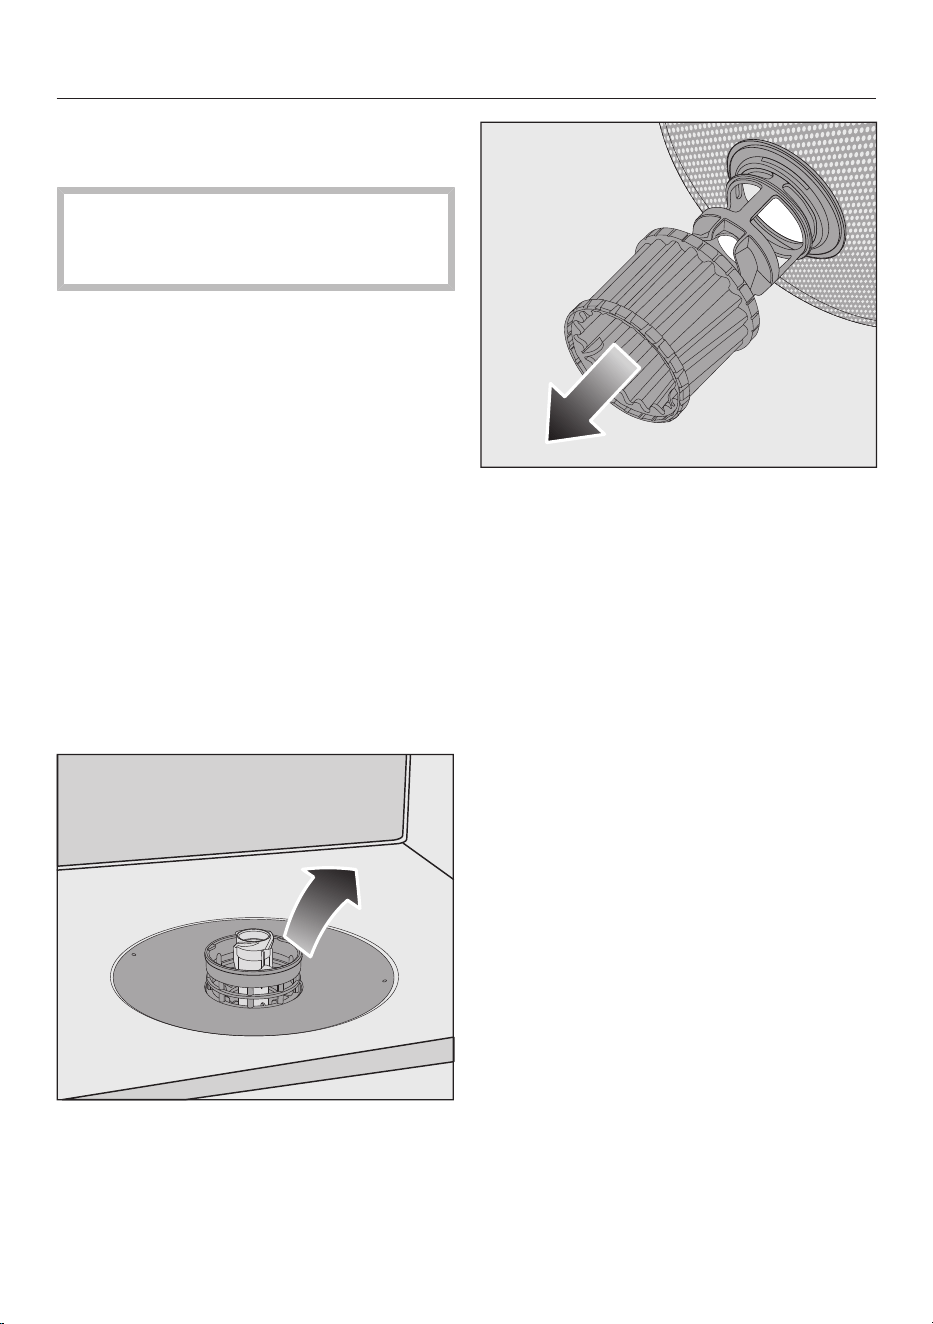
Rotate the screw thread of the lower
spray arm anti-clockwise (view
from above) and pull the spray arm
upwards to remove.
Use a pointed object to push food
particles stuck in the jets into the
spray arm.
Rinse the spray arm thoroughly under
running water.
Refit the upper and middle spray
arms.
Refit the lower spray arm and ensure
that the filter combination lies flat in
the base of the wash cabinet.
Rotate the screw thread of the lower
spray arm clockwise until the arrow in
the viewing window points to the
lock symbol.
Make sure the spray arms can rotate
freely.
Checking the filters in the wash
cabinet
Do not run a wash programme
without the filters or without the
lower spray arm fitted.
The message Check filters will appear in
the display after every 50 programme
sequences.
Monitor the condition of the filter
combination regularly and clean it if
necessary.
Confirm the message with OK.
Cleaning the filters
Switch the dishwasher off.
Remove the lower spray arm.
Before removing the filter
combination, remove any coarse
soiling to prevent it from entering the
circulation system.
Remove the filter combination.
In order to clean the inside of the
filter, pull the microfilter downwards
and away from the filter combination.
Rinse all the parts under running
water.
Push the microfilter back onto the
filter combination.
Refit the filter combination so that it
lies flat in the base of the wash
cabinet.
Refit the lower spray arm to the filter
combination using the screw thread.
Rotate the screw thread clockwise
until the arrow in the viewing window
points to the lock symbol.

Programme chart
1
Food such as potatoes, pasta, rice or stews can leave starchy deposits.
Depositscontainingproteincanbeleftbyfoodsuchasfriedmeatorsh.
Mixed crockery including
temperature-sensitive glasses
and plastics
Pots, pans, everyday porcelain
and cutlery
Lightly dried-on
food deposits
Lightly dried-on
food deposits
Stubborn dried-on, burnt-on
food deposits containing
starch or protein
1
Balanced and
gentle programme
Short programme
Maximum
cleaning performance
Crockery Food deposits Programme
features
Mixed crockery
Standard dried-on
normal food deposits
All food deposits
Variable,
sensor-controlled programme
Water and energy
saving programme
2
You can use “Extras” to adjust the programmes (see “Extras”).
You can also select the “2nd interim rinse” function (see “Settings”).
3
Recomended amount of detergent (see “Detergent”).
4
The estimated values may change due to the selected settings or Extras,
or the conditions in which the appliance is being used.
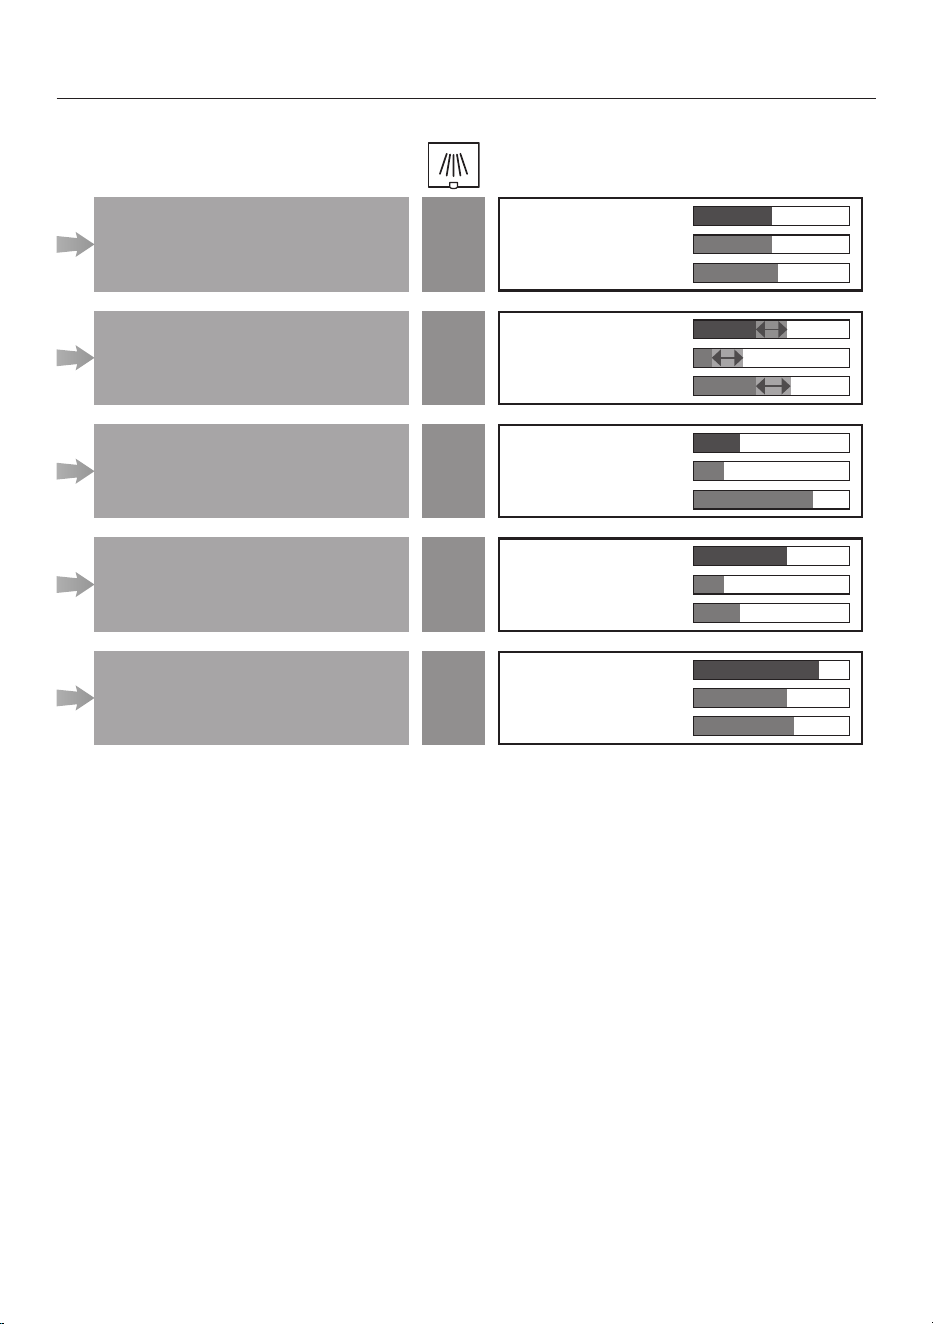
ComfortWash 45 °C
Auto
ECO
Programme
2
Consumption estimate
4
PowerWash 60 °C
Intensive 75 °C
Energy consumption
Water consumption
Programme duration
Energy consumption
Water consumption
Programme duration
Energy consumption
Water consumption
Programme duration
Energy consumption
Water consumption
Programme duration
Energy consumption
Water consumption
Programme duration
30 ml
30 ml
30 ml
30 ml
35 ml
3