
Technical Support and E-Warranty Certificate www.vevor.com/support
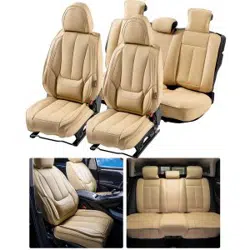
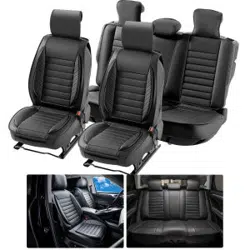
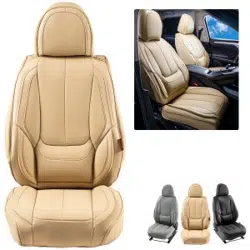
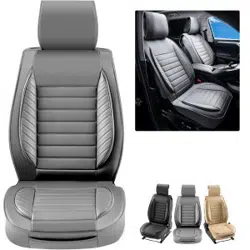
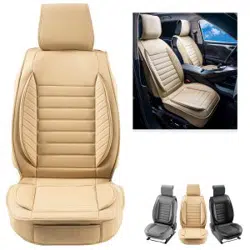
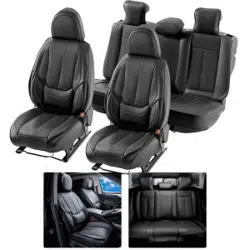
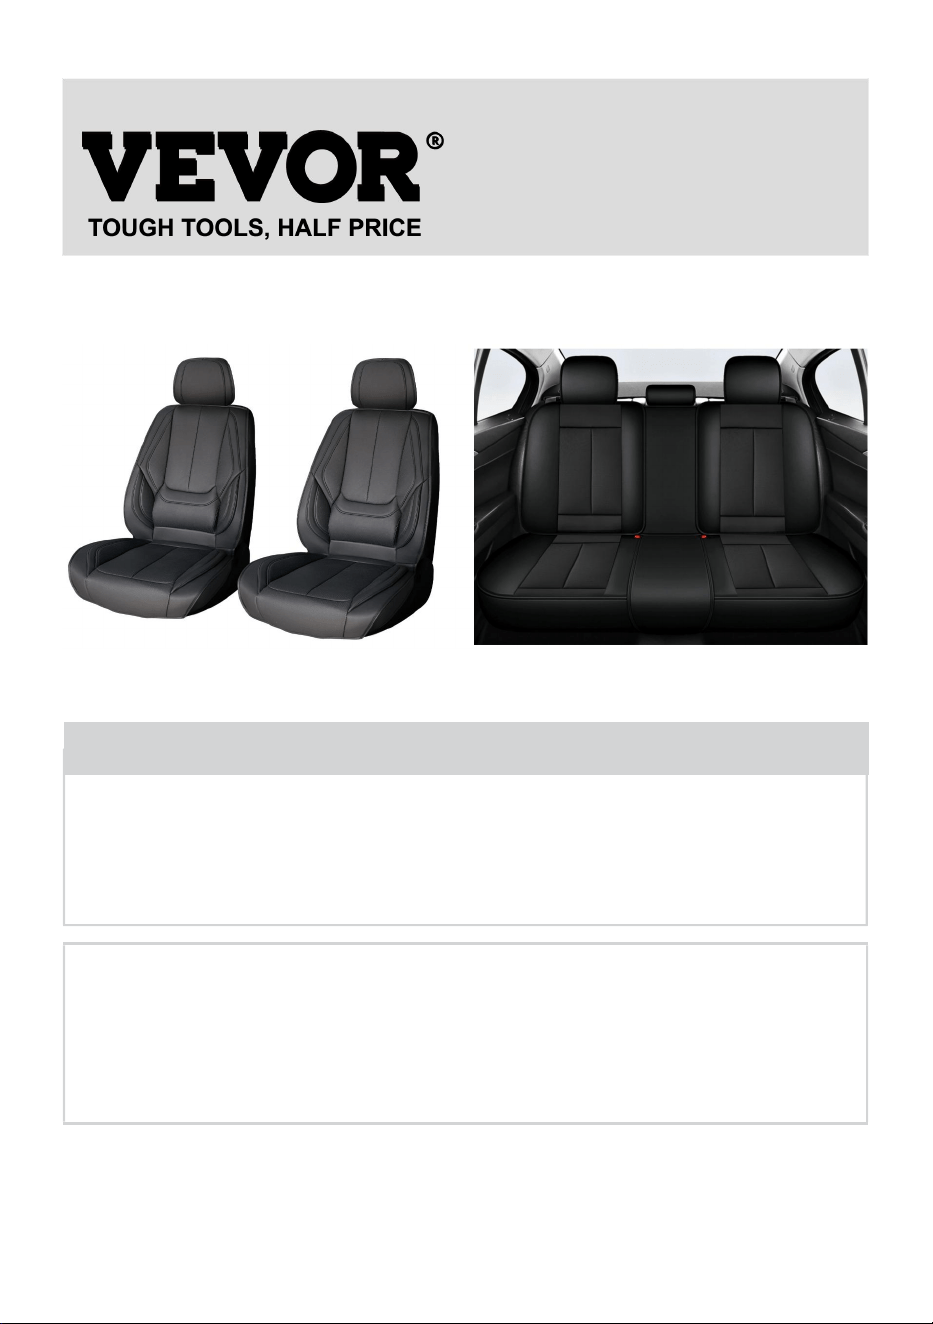
SEAT COVERS
We continue to be committed to provide you tools with competitive price.
"Save Half", "Half Price" or any other similar expressions used by us only represents an
estimate of savings you might benefit from buying certain tools with us compared to the major
top brands and does not necessarily mean to cover all categories of tools offered by us. You
are kindly reminded to verify carefully when you are placing an order with us if you are
actually saving half in comparison with the top major brands.
- 1 -
Have product questions? Need technical support? Please feel free to
contact us:
Technical Support and E-Warranty Certificate
www.vevor.com/support
NEED HELP? CONTACT US!
This is the original instruction, please read all manual instructions
carefully before operating. VEVOR reserves a clear interpretation of our
user manual. The appearance of the product shall be subject to the
product you received. Please forgive us that we won't inform you again if
there are any technology or software updates on our product.
SEAT COVERS

- 2 -
Warning-To reduce the risk of injury, the user must read the
instructions manual carefully.
WARNING:
1. Please read this manual carefully before using the product.
2. Flammable: Keep away from open flame. This product will ignite and burn if
brought into contact with an open flame.
3. Keep away from sharp points,blades and other items,so as not to scratch the
product.
4. This product is not a toy, Seat covers cannot be used as toys for children to play
with.
SPECIFICATION PARAMETERS
Model
SCU056FK
SCU056SK
SCU056SG
SCU056SG
SCU056FG
Colour
Black
Black
Grey
Beige
Beige
Number of seat
cushions(pcs)
6
13
13
13
6
Applicable front
seat type
Removable headrest
Applicable front
seat size
1. Seat width:<530mm,Seat depth: <520mm
2. Back height: <670mm,Back thickness: <225mm
3. Headrest width: <280mm, Headrest height: <225mm,
Headrest thickness: <120mm
Applicable rear
seat types
Removable rear center headrest
Applicable rear
seat size
1.Rear length:1200-1410mm
2.Back height: <600mm
3.Headrest width: <300mm
- 3 -
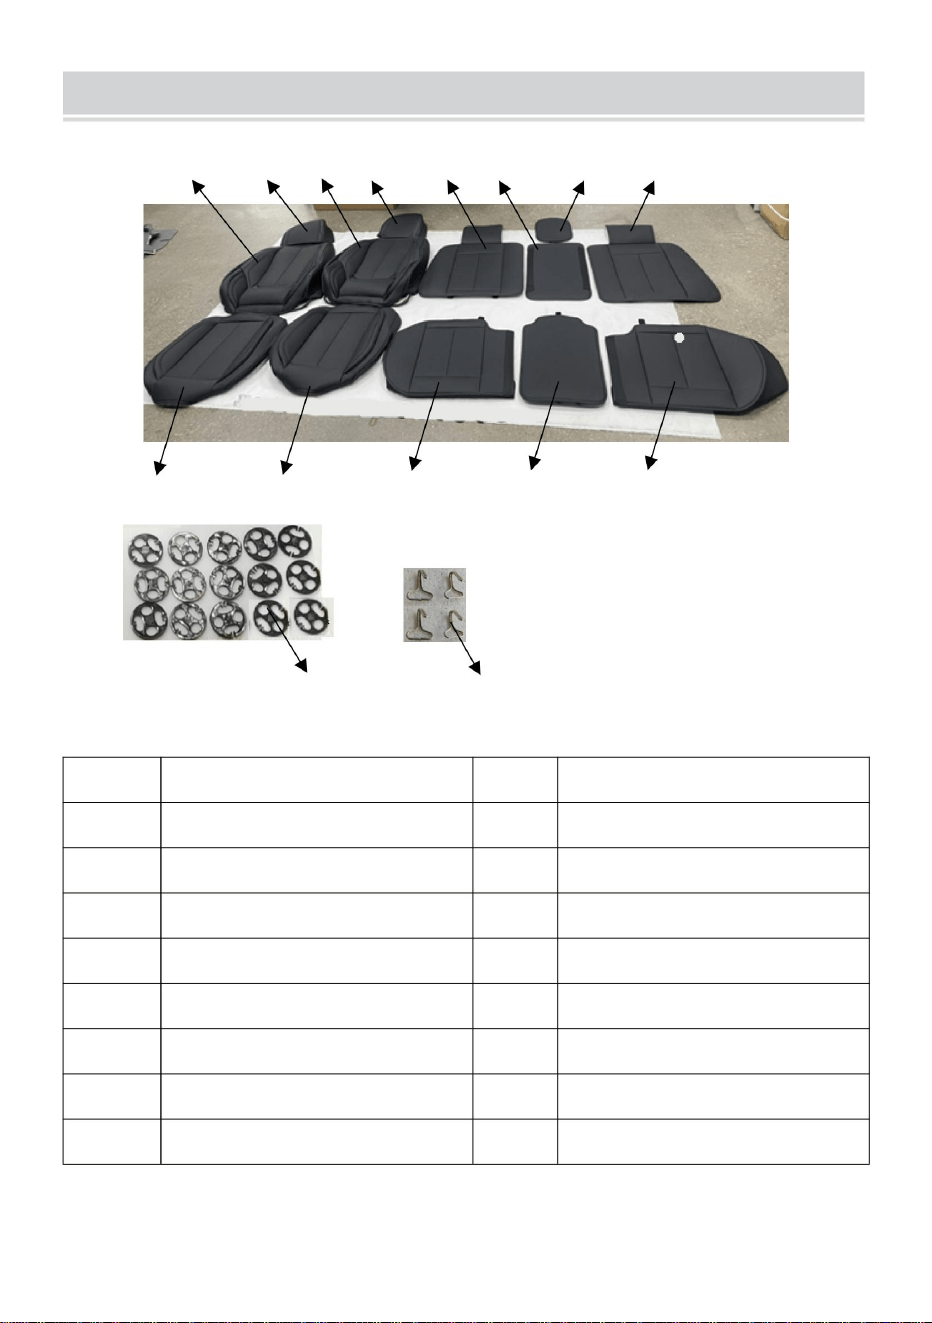
A
B
C
D
E
O
F
G
H
I
J
K
L
M
N
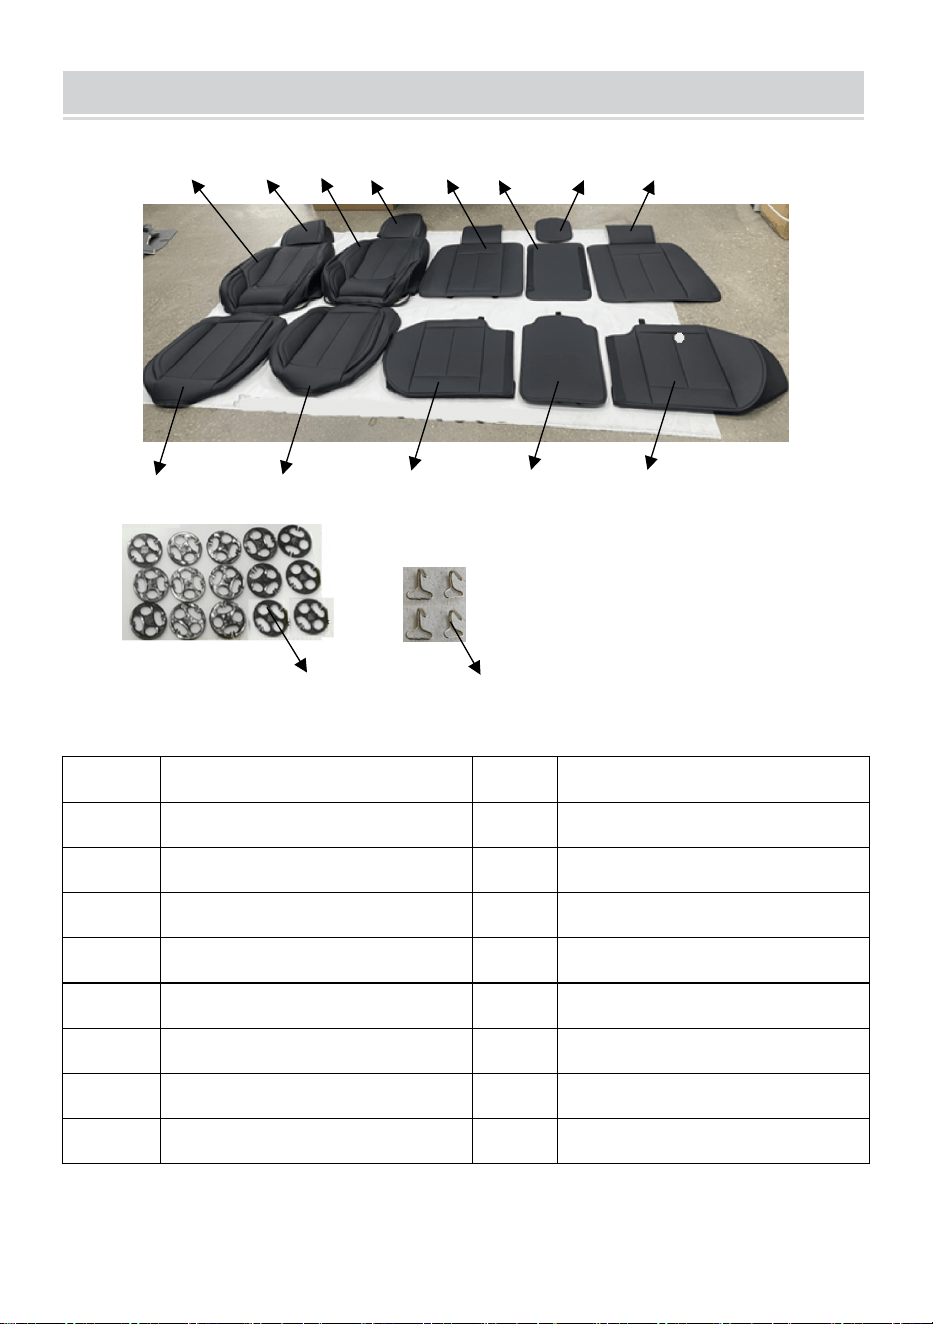
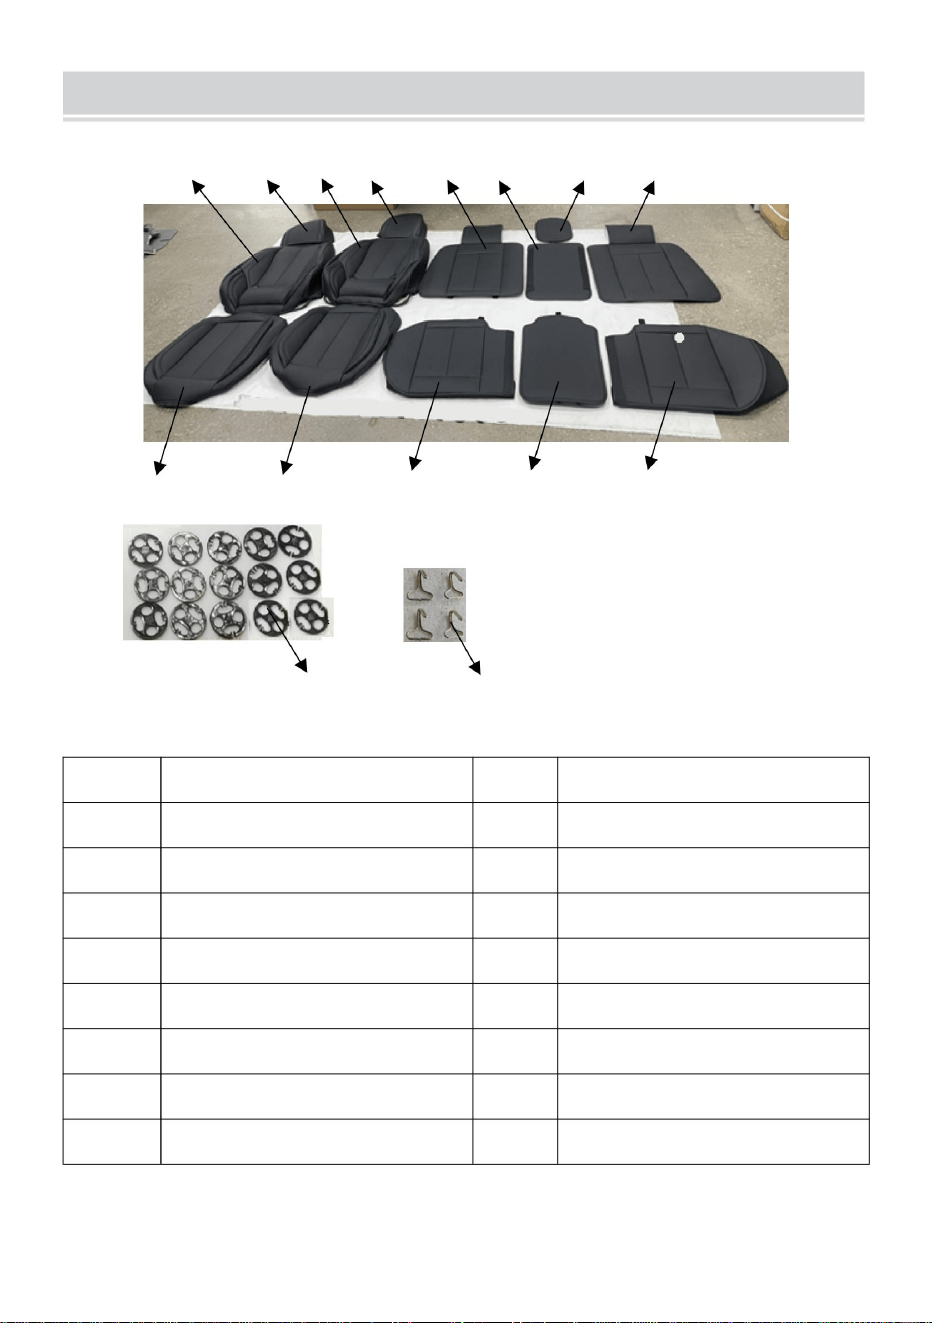
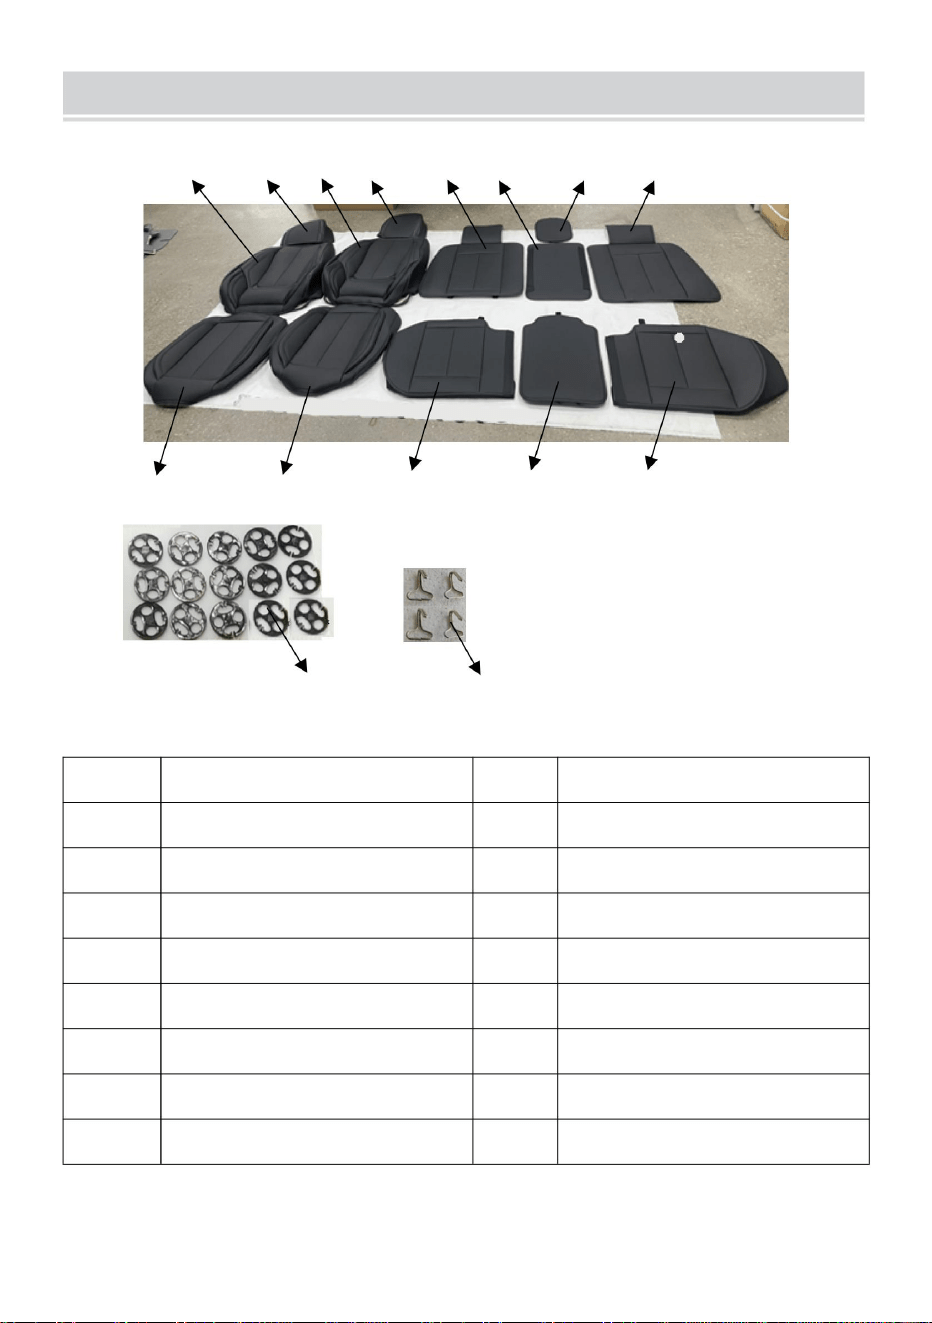
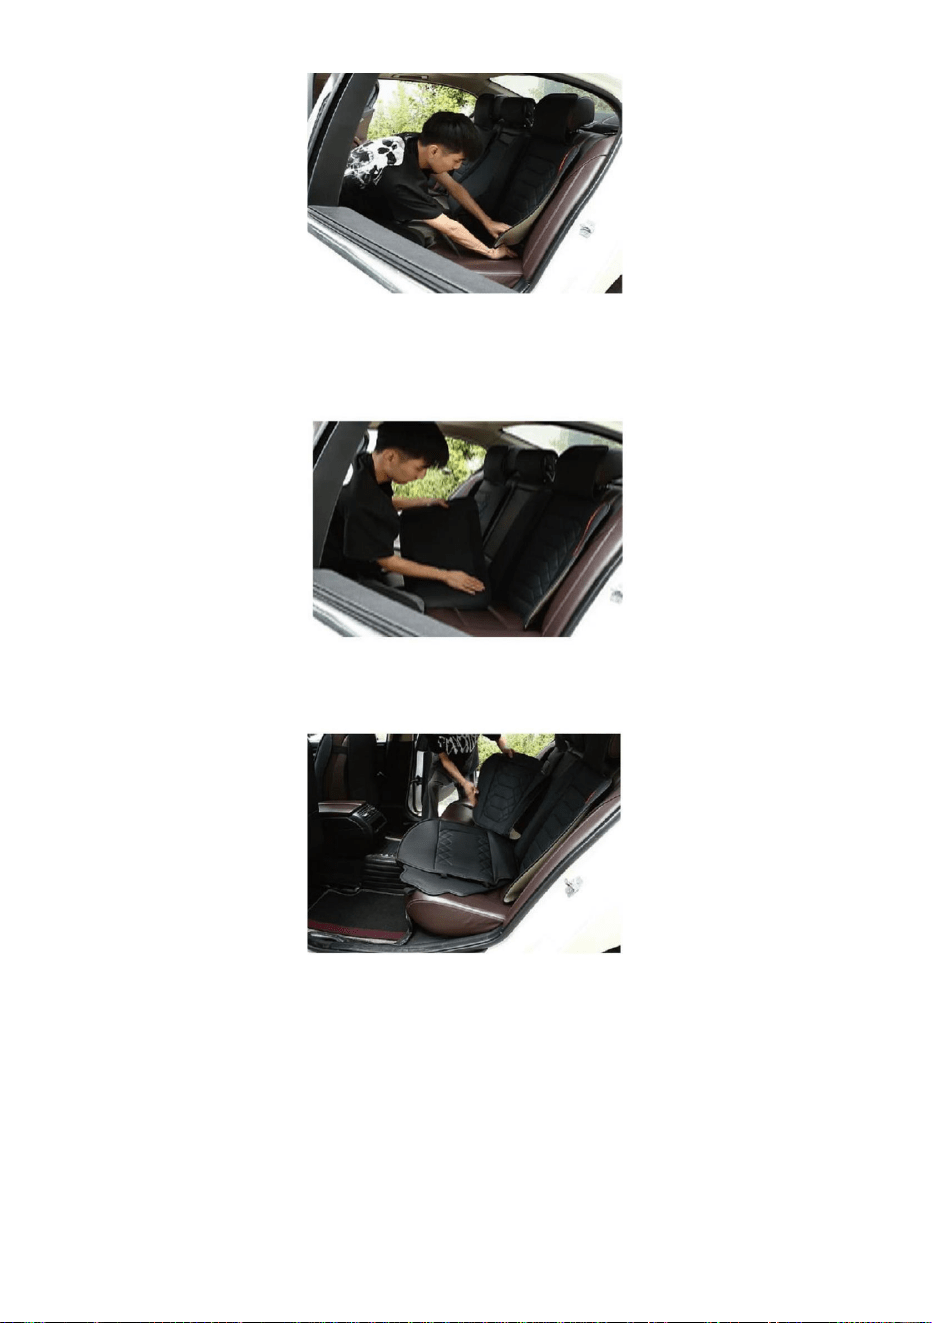
PARTS LIST
ITEM
DESCRIPTION
ITEM
DESCRIPTION
A
Left front seat cushion
I
Rear middle head cushion
B
Right front seat cushion
J
Right rear backrest cushion
C
Left front backrest cushion
K
Left rear seat cover
D
Right front cushion
L
Rear center seat cushion
E
Left front headrest
M
Right rear backrest cushion
F
Right front headrest
N
Circular buckle
G
Left rear backrest cushion
O
Pulling buckle
H
Rear middle back cushion
- 4 -
SCU056FK
(PCS)
SCU056SK
(PCS)
SCU056SG
(PCS)
SCU056SG
(PCS)
SCU056FG
(PCS)
A
1
1
1
1
1
B
1
1
1
1
1
C
1
1
1
1
1
D
1
1
1
1
1
E
1
1
1
1
1
F
1
1
1
1
1
G
╳
1
1
1
╳
H
╳
1
1
1
╳
I
╳
1
1
1
╳
J
╳
1
1
1
╳
K
╳
1
1
1
╳
L
╳
1
1
1
╳
M
╳
1
1
1
╳
N
6
15
15
15
6
O
4
4
4
4
4
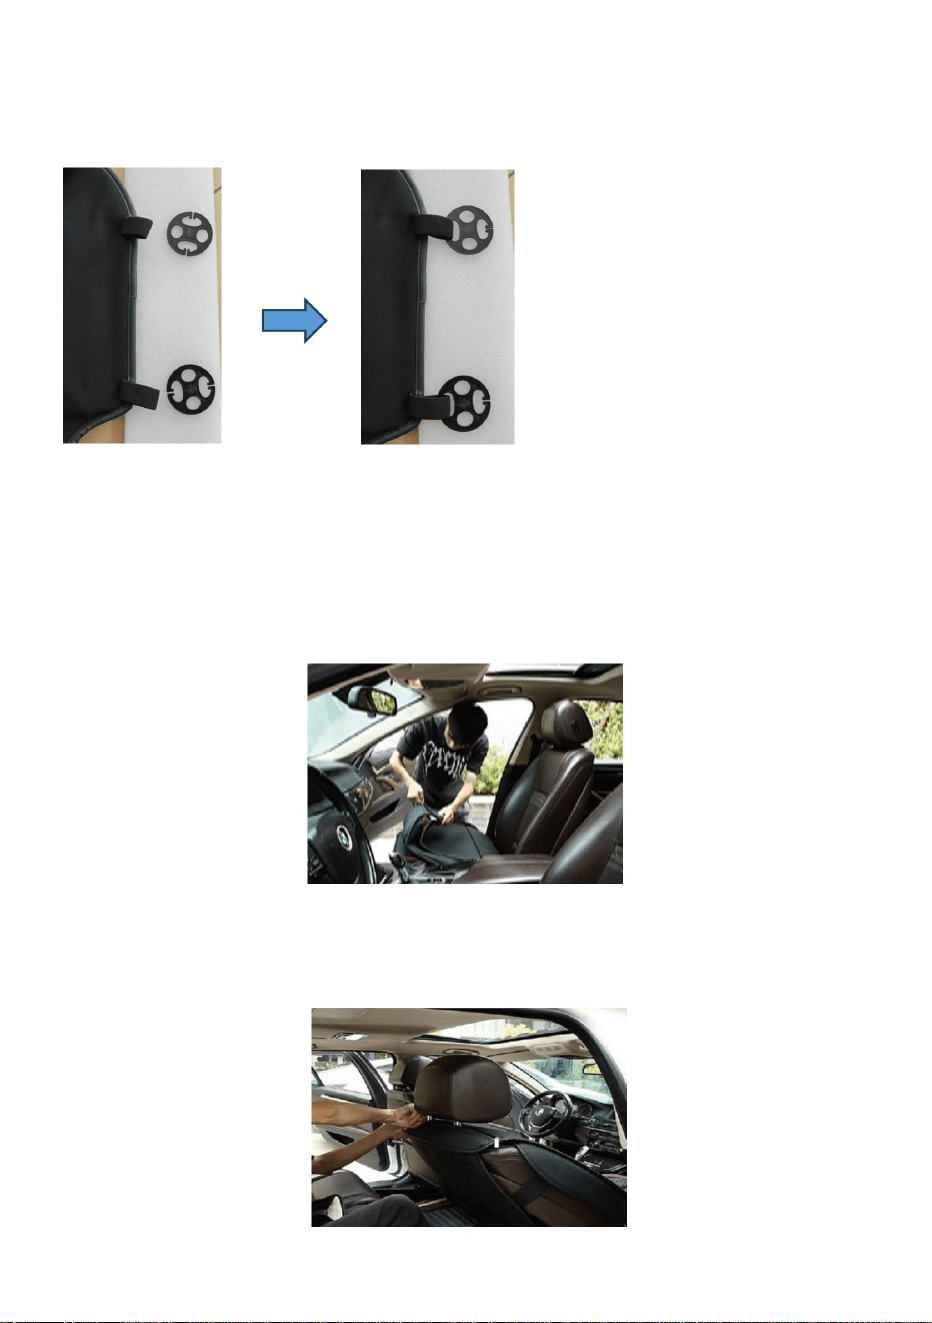
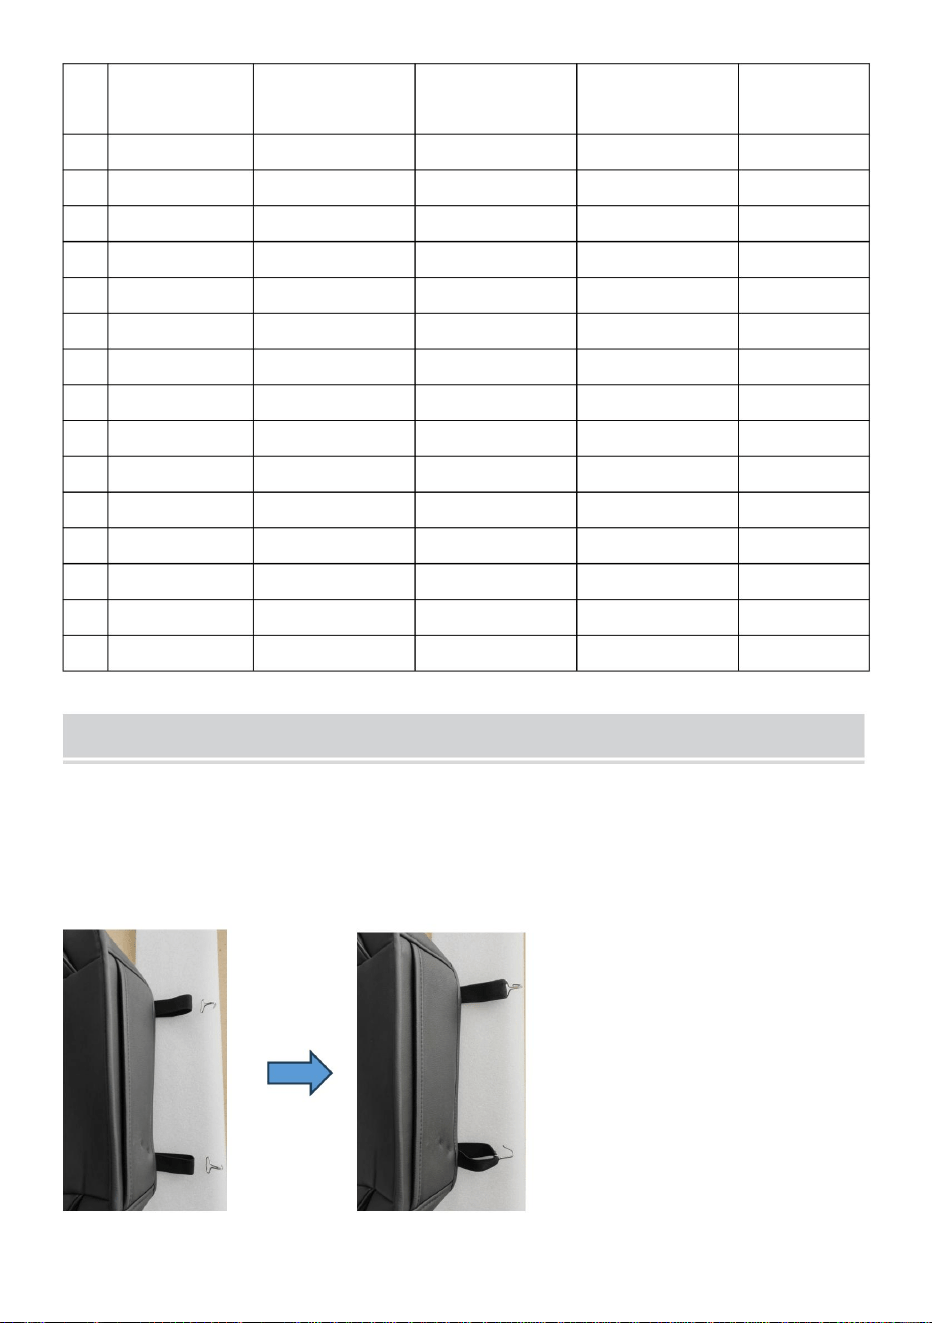
INSTALLATION
REP
Before installation
Check if the accessories are complete after unpacking the product。
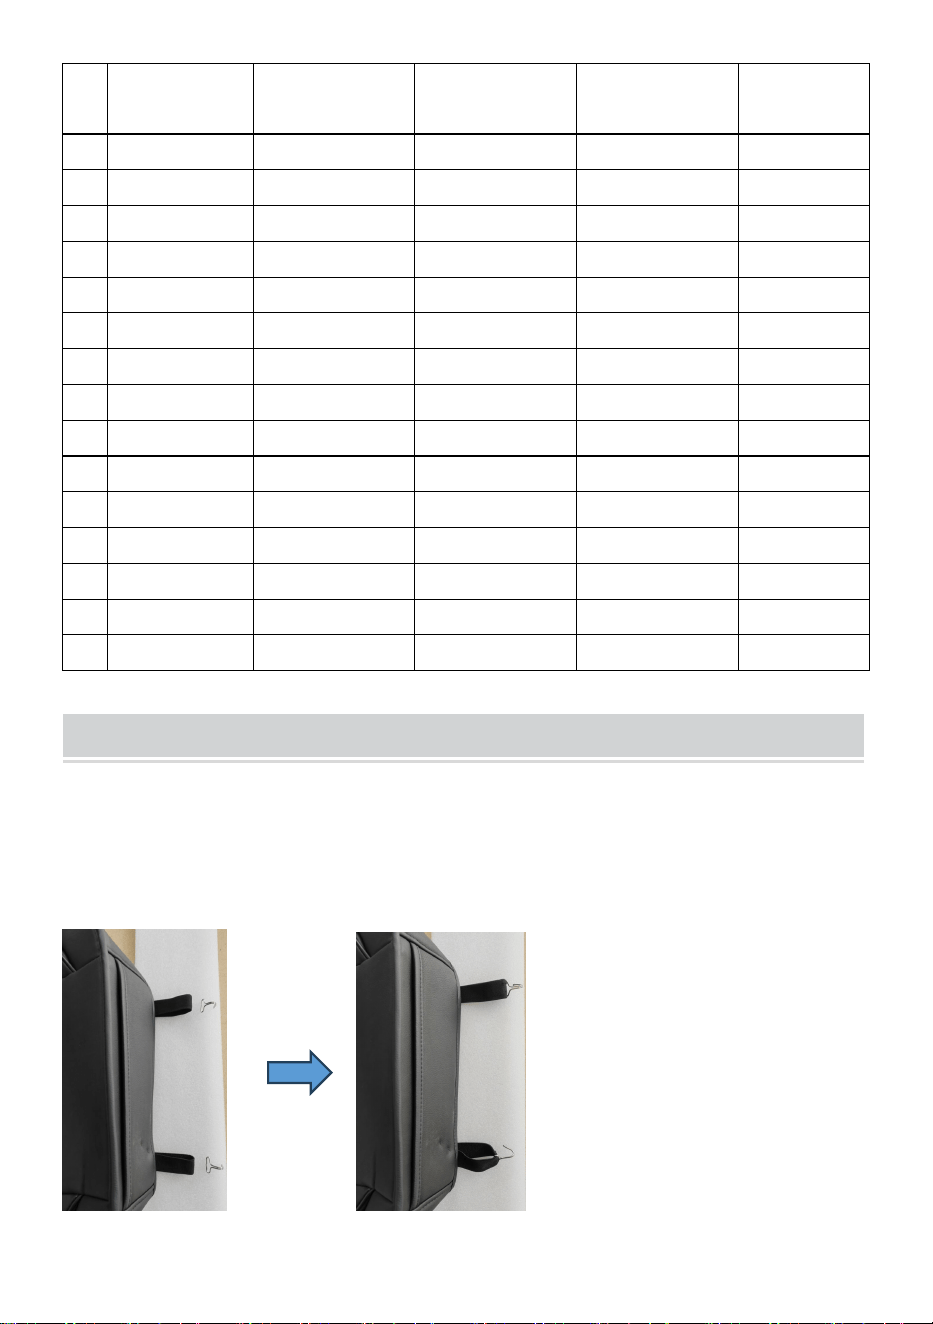
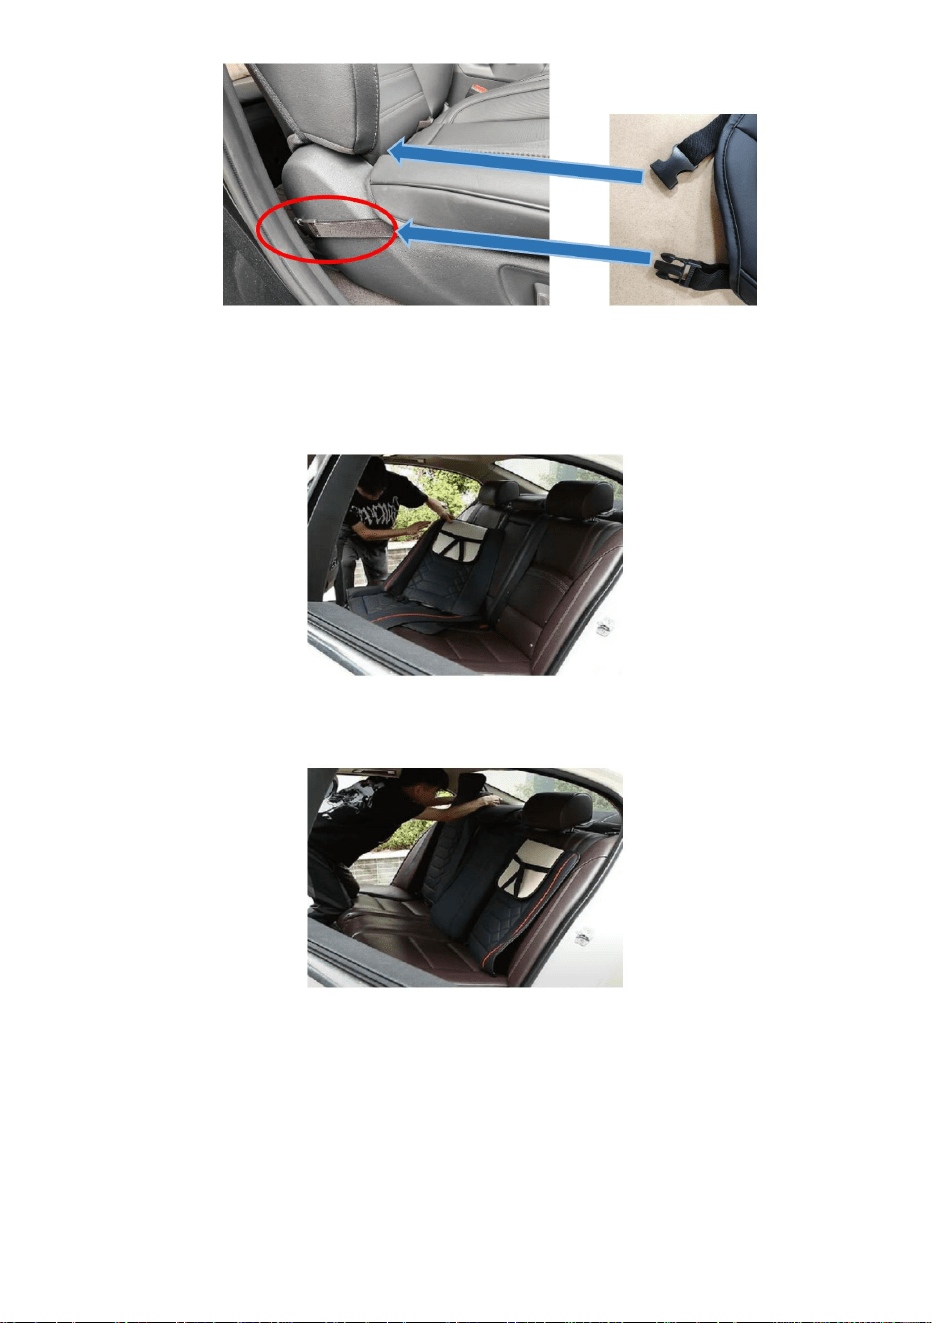
1.Buckle the four buckles(Number K) onto the pull straps at the front of
the left and right front seat covers.

- 5 -
2. Buckle the four circular plastic buckles(Number J) into the middle E of
the left and right front seat covers and onto all the seat cushion straps of
the rear generation.
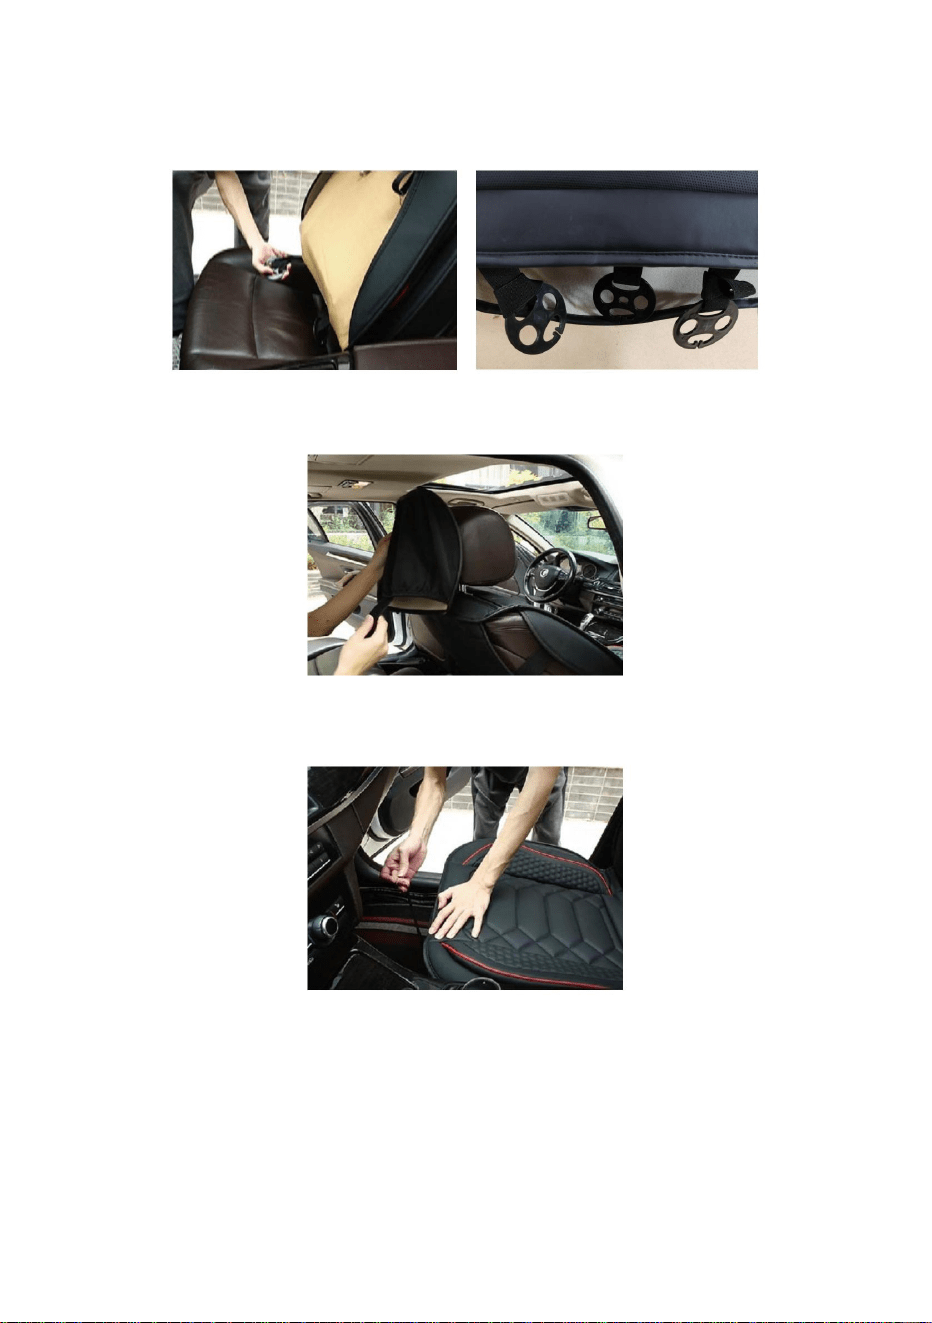
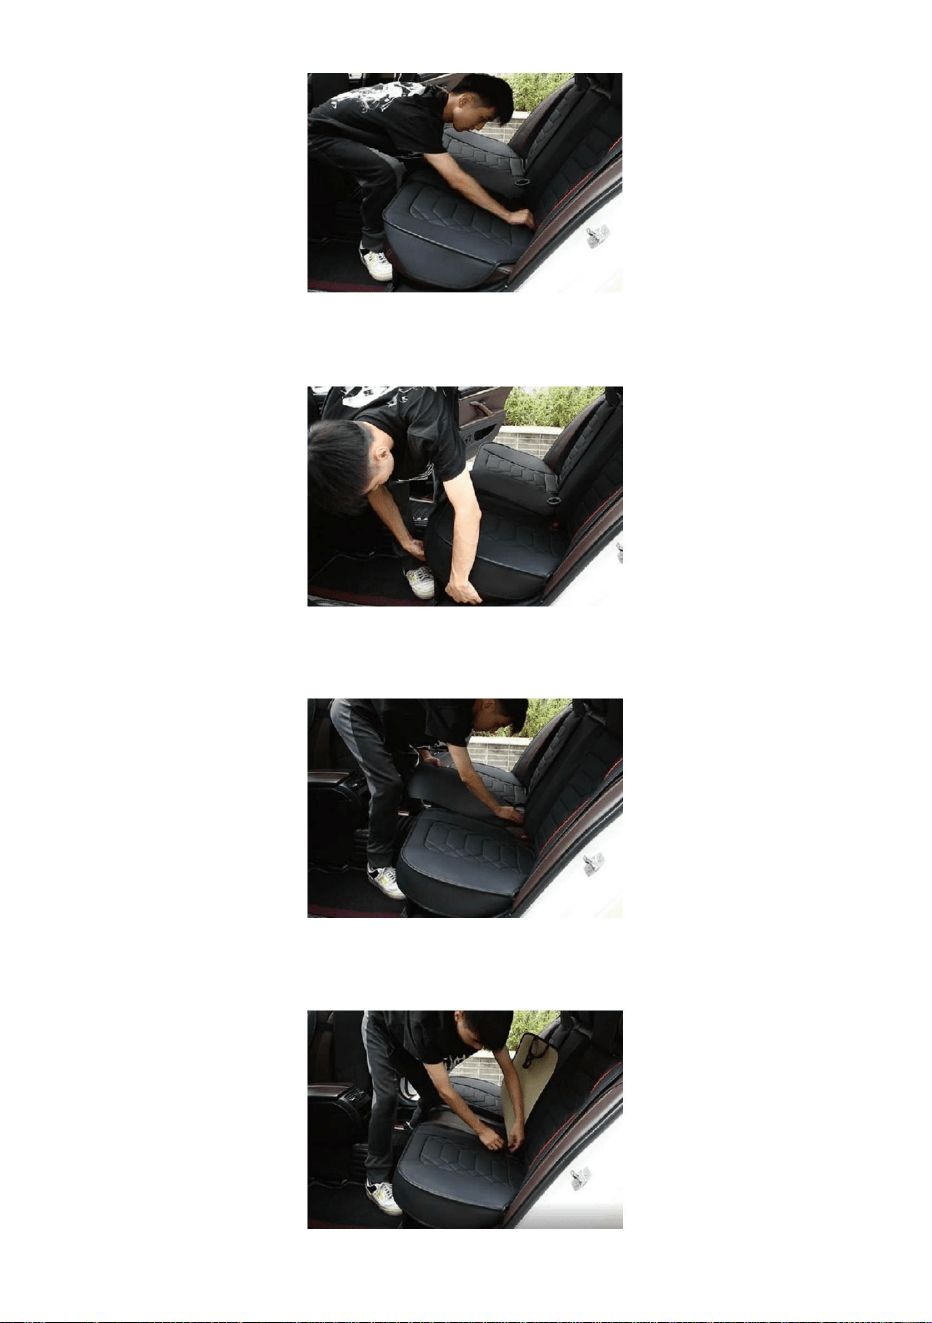
Front seat cover installation
1.Remove the original headrest, unzip the top of the front seat cushion
then install it on the front seat and make it fit well.
Pay attention to distinguishing between the left and right seat covers, align
the side with the airbag label with the seat airbag position.
2.Install the original headrest back into the front seat, stick the velcro and
zip up
.
- 6 -
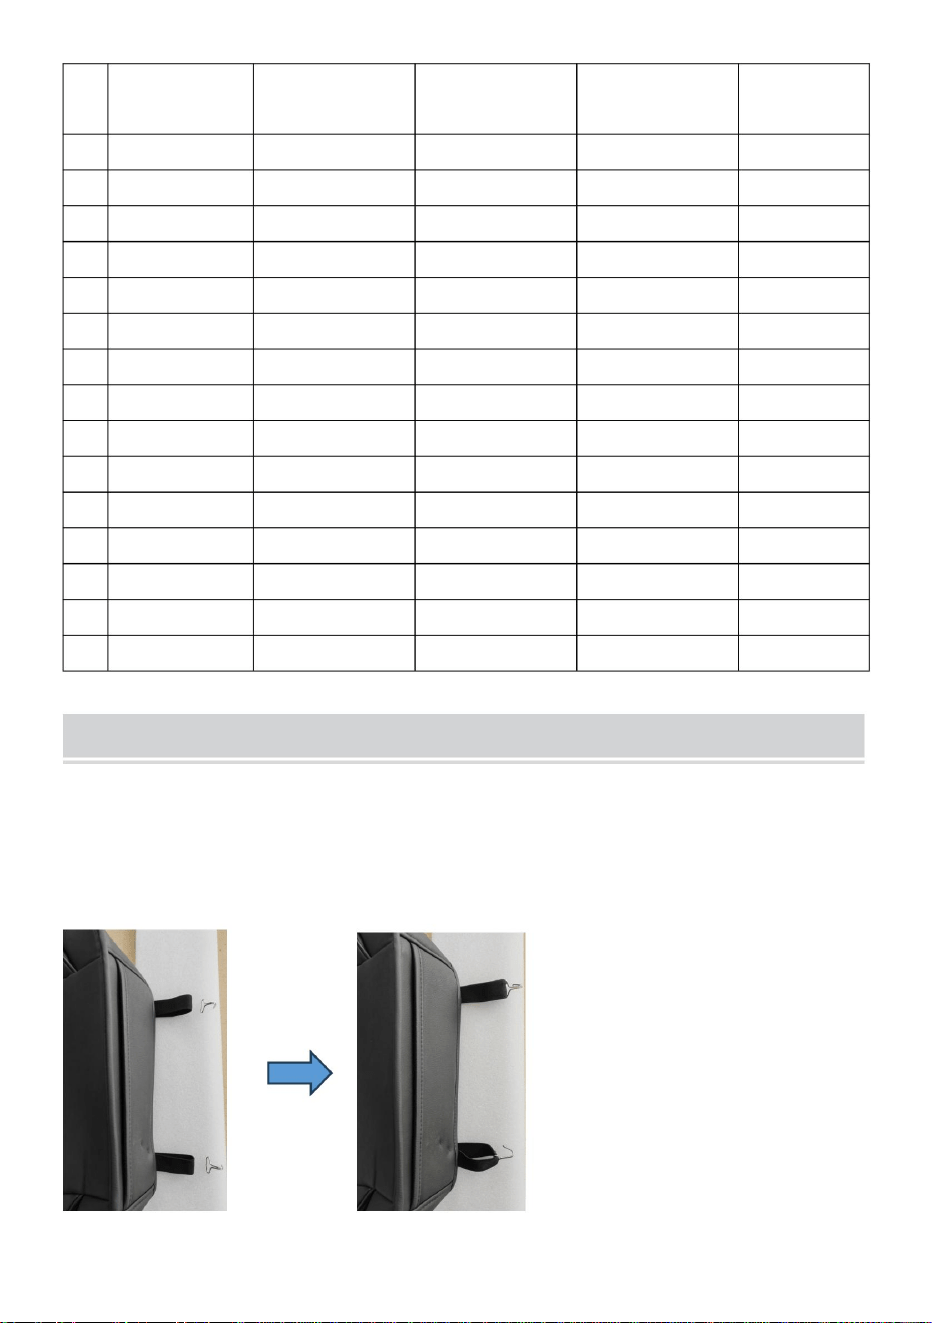
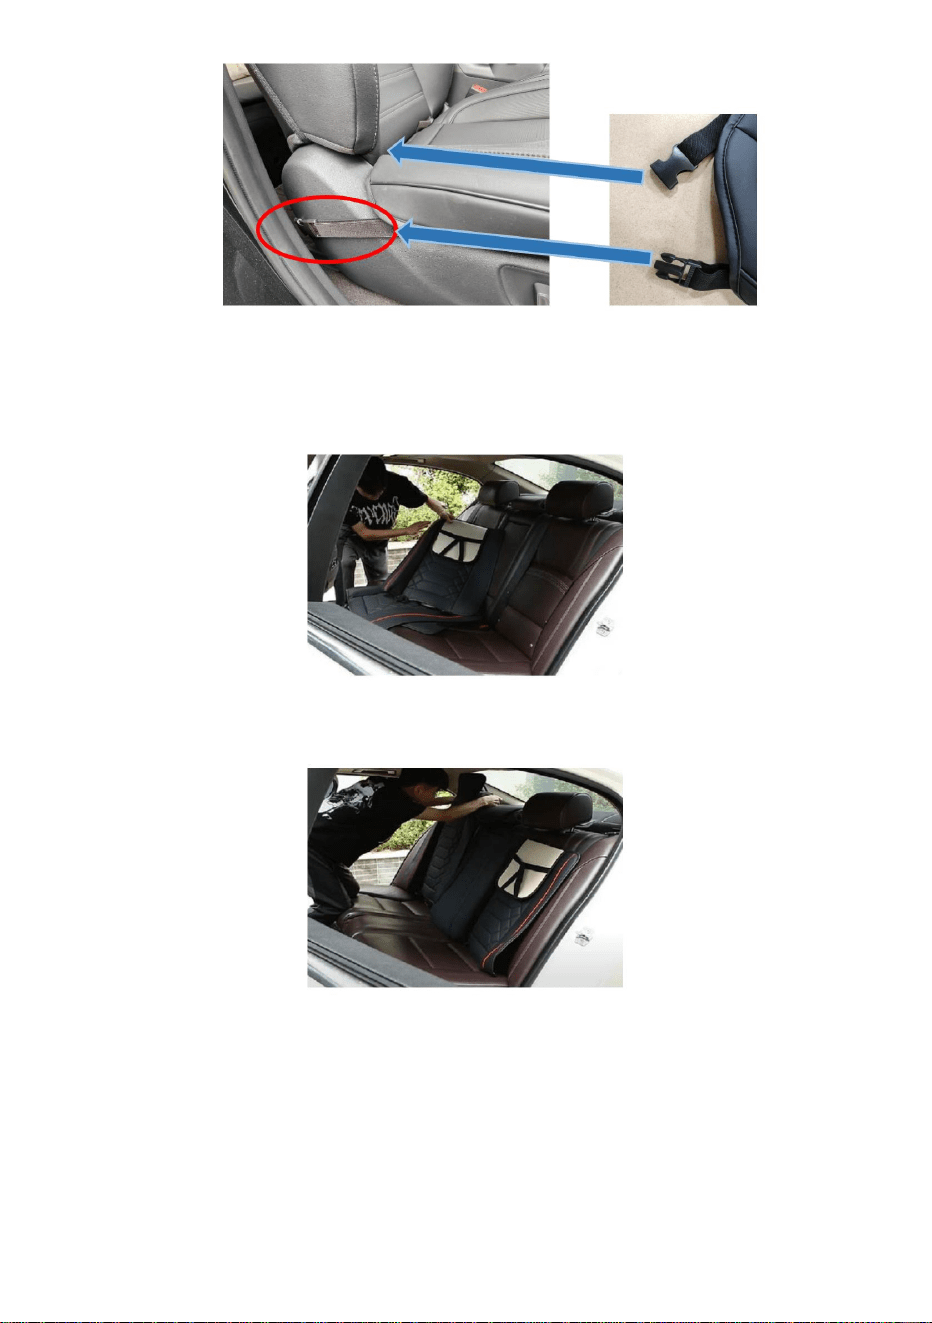
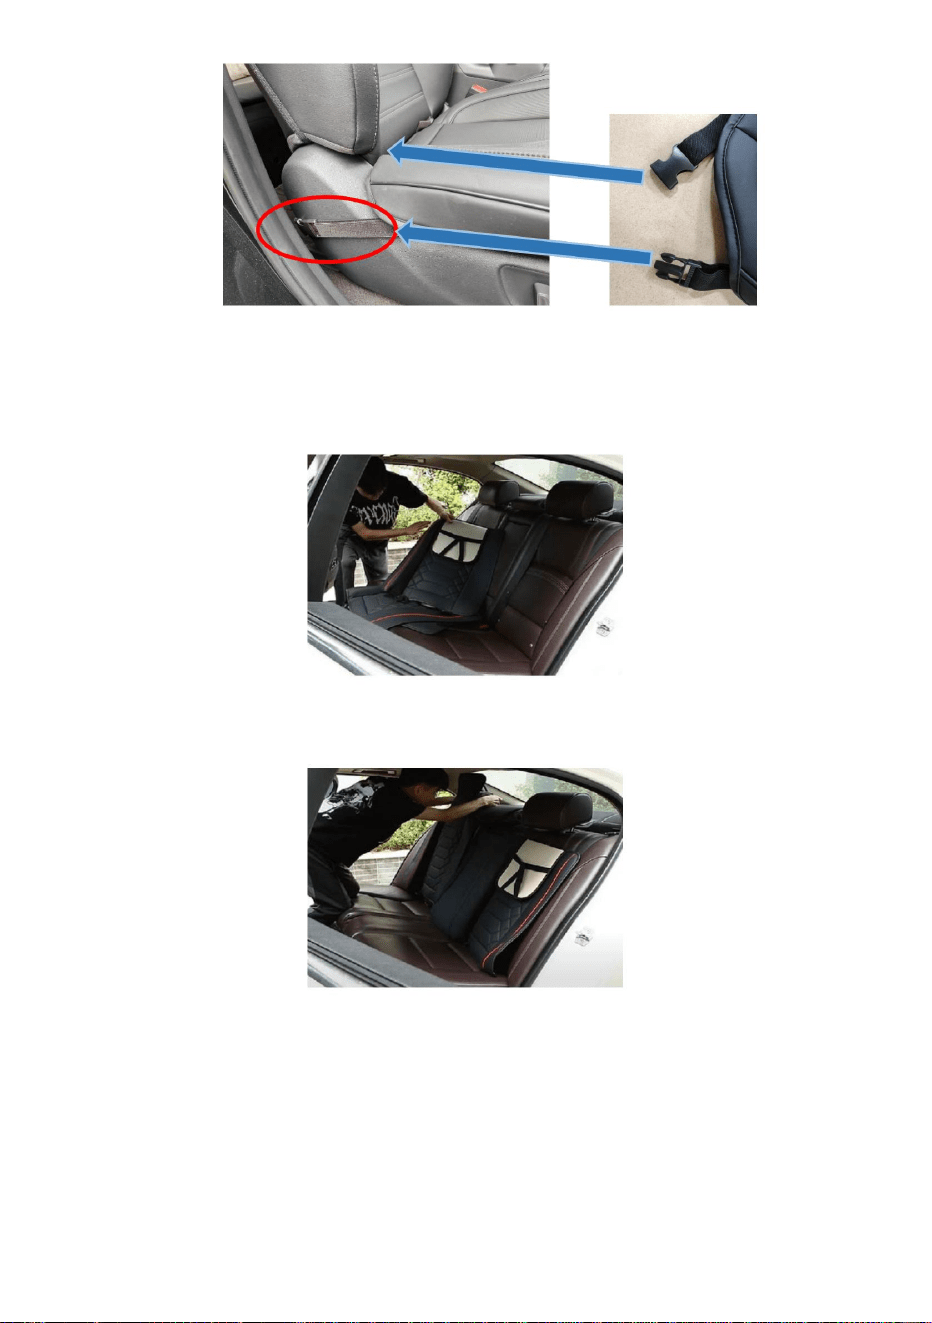
3.Push the circular buckle through the seat middle crevice and make them
perpendicular to the seat.
Buckle the two pull straps on the back onto the circular buckle
4.Put the headrest cover on and stick the velcro.
5. Install the front seat cushion on the front seat and make it fit well,
Hang the pulling buckle under the front seat.
Insert one side of the nylon buckle into the middle gap of the front seat to
the rear, and fasten the other side of the buckle to the side of the front seat
and the rear buckle.
- 7 -
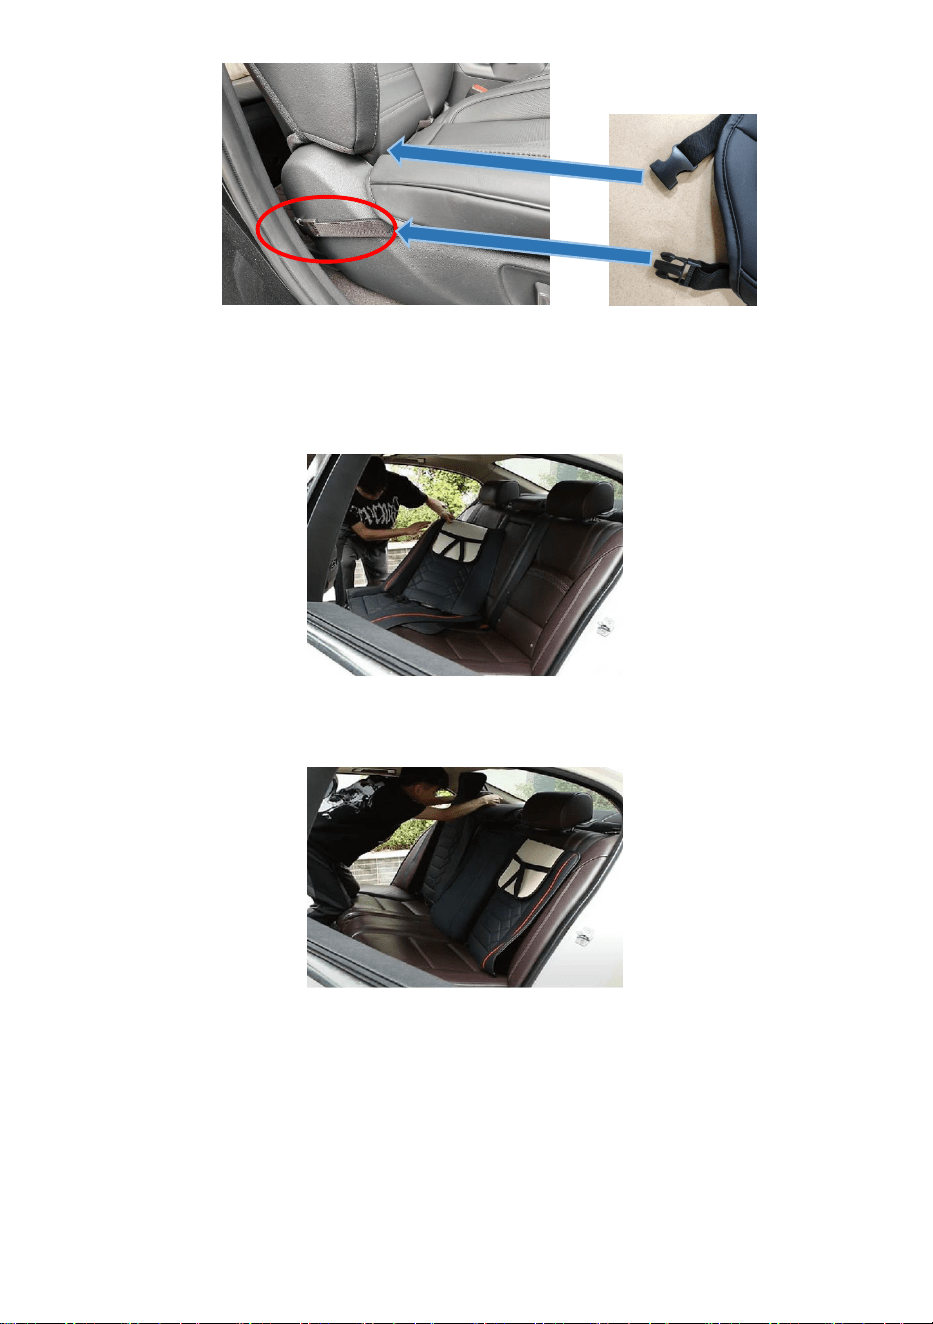
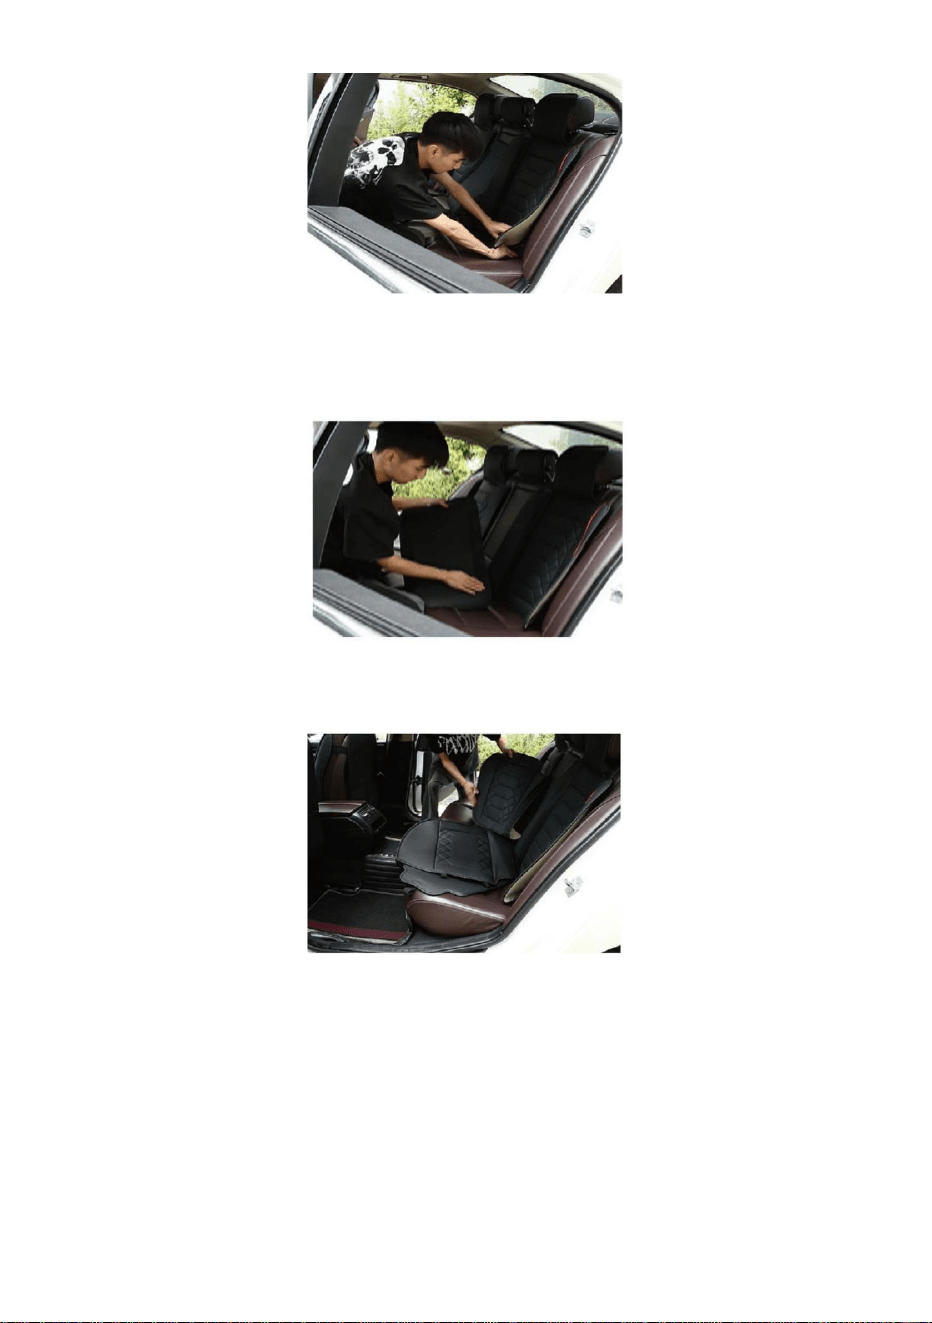
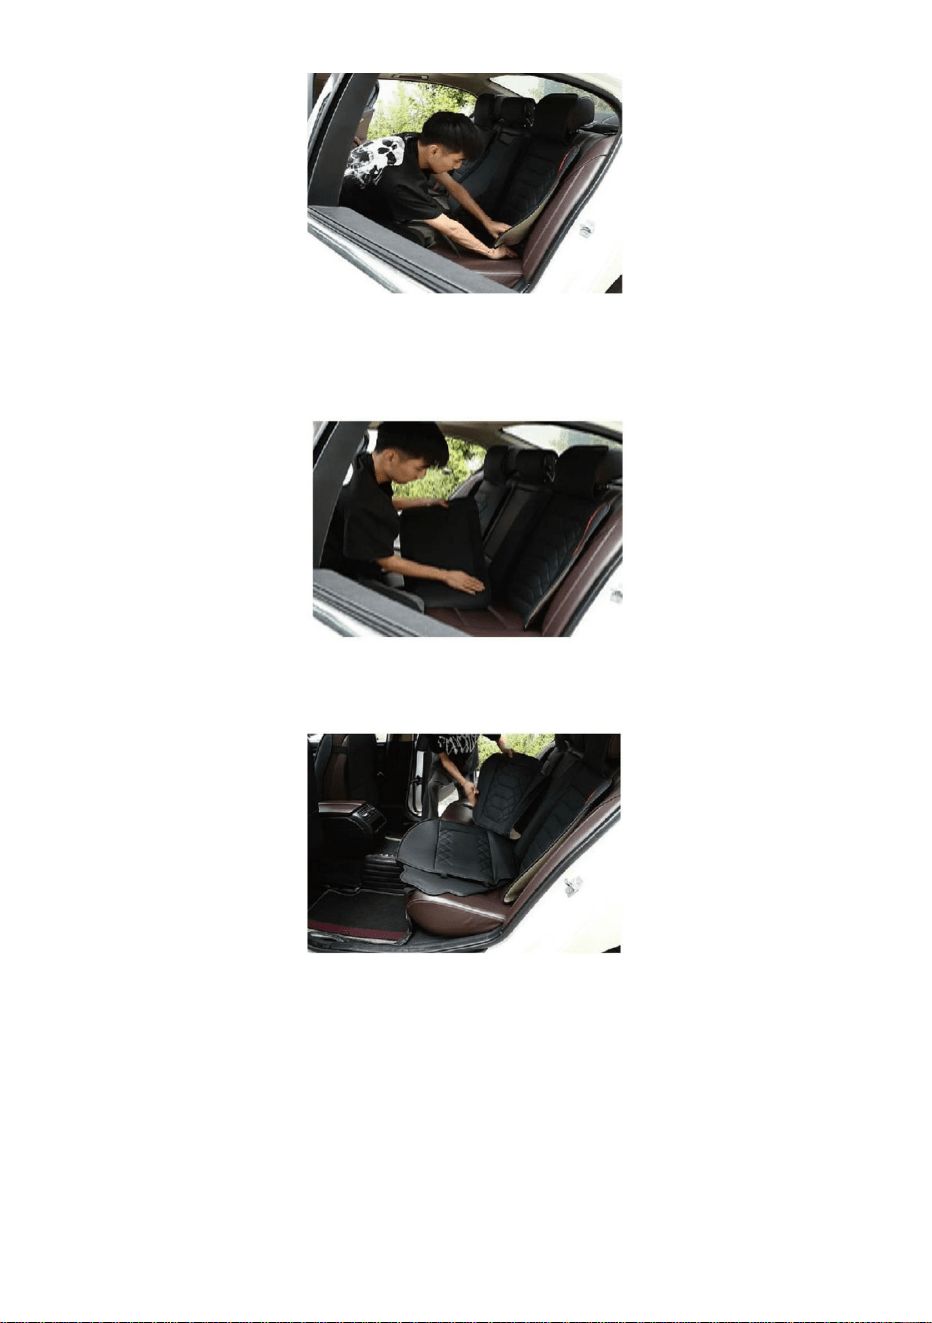
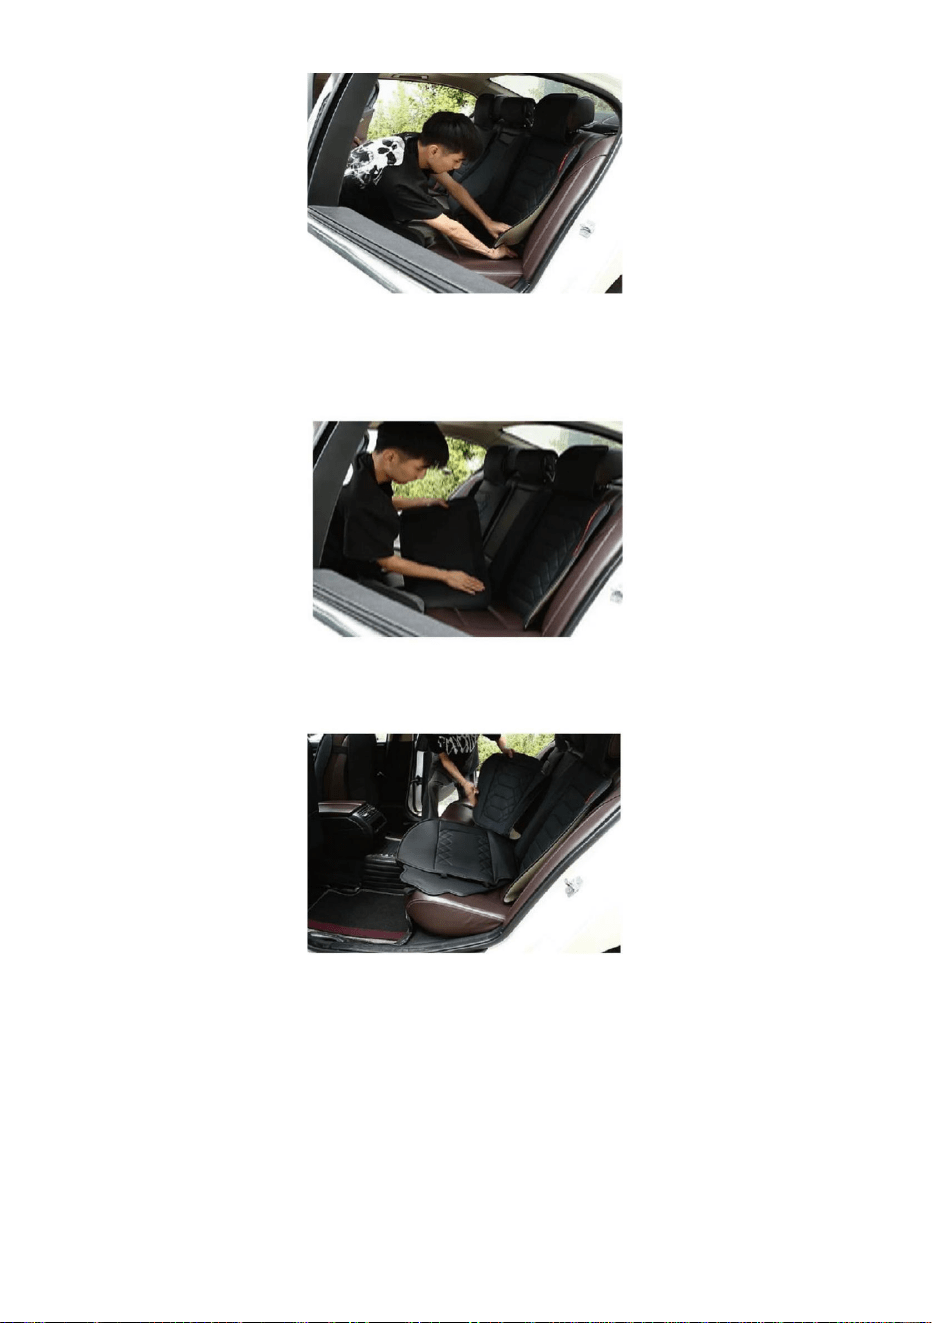
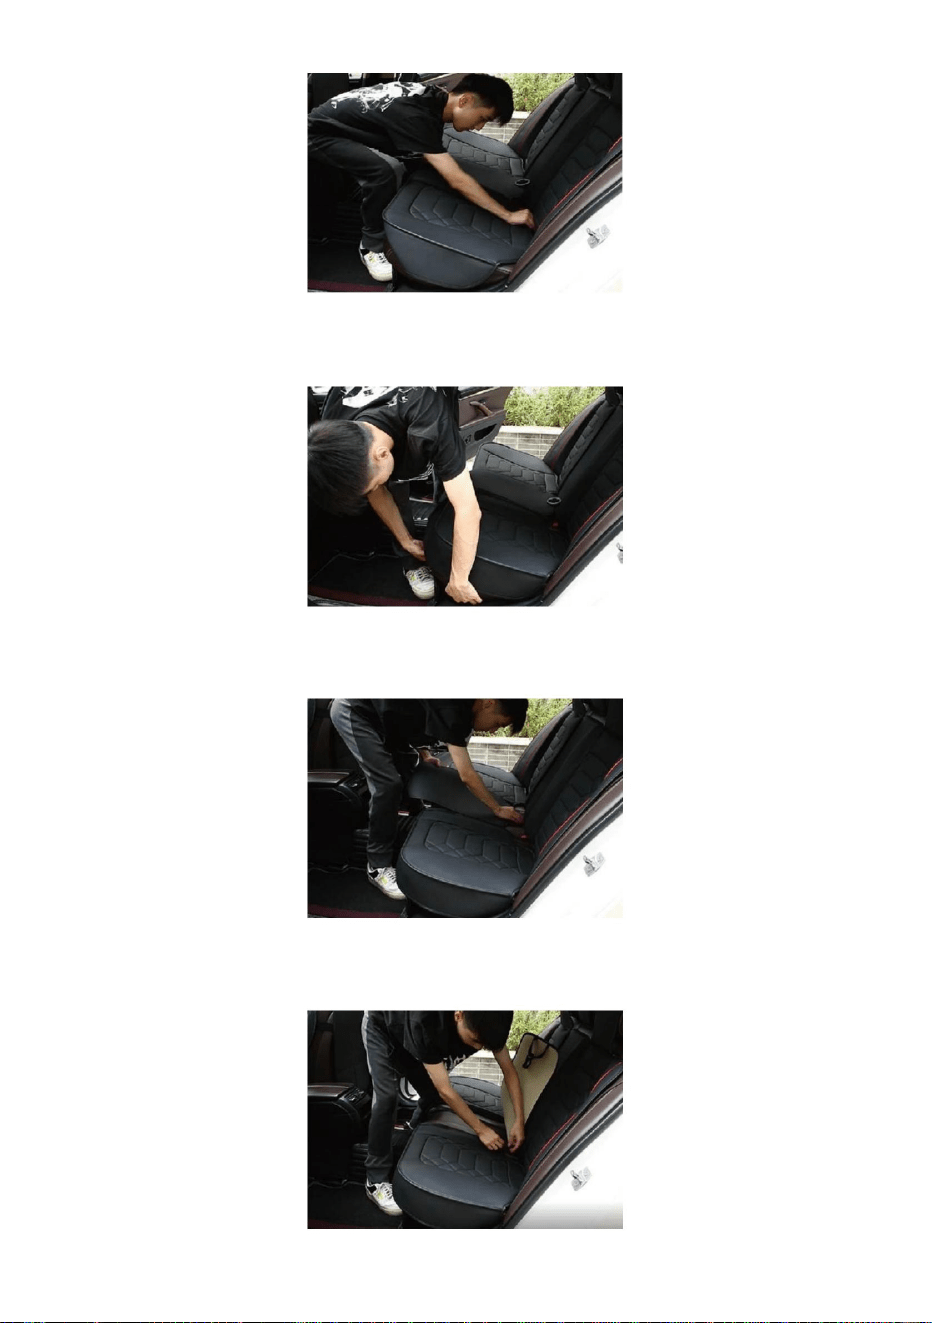
Rear seat covers installation
1.install another front seat in the same way.
2. Put the backseat backrest cover on the seat as shown in the picture.
3. Put the left rear backrest cushion cover on.
4. Push the chucks through the seat middle crevice.

- 8 -
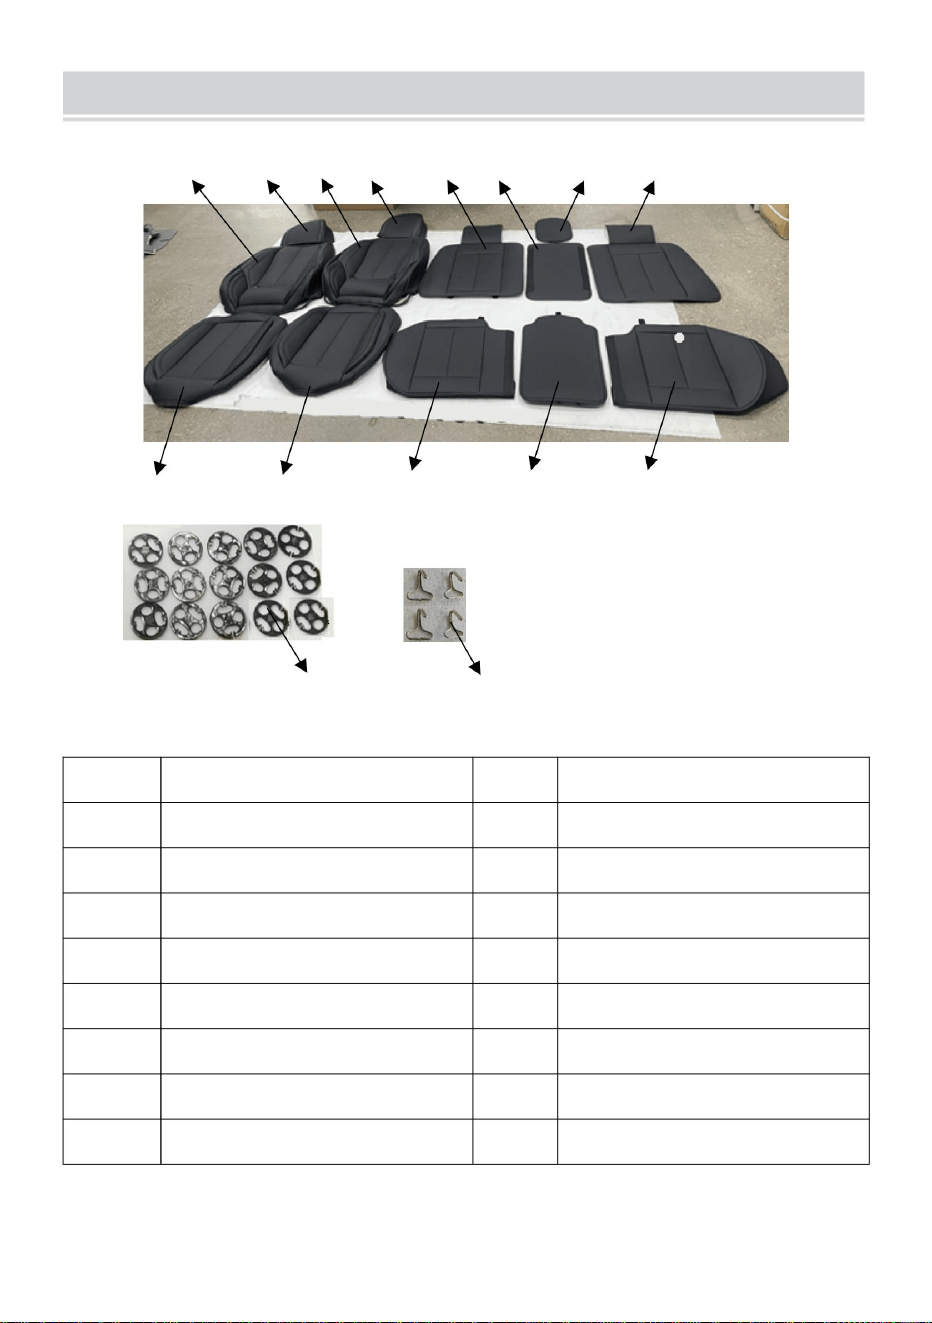
5. Make sure tear off the protection tape on the velcro before install the
rear middle back cushion.
6. Put the backseat cushion on the seat as shown in the picture.
7. Push the pulling buckle through the seat middle crevice.
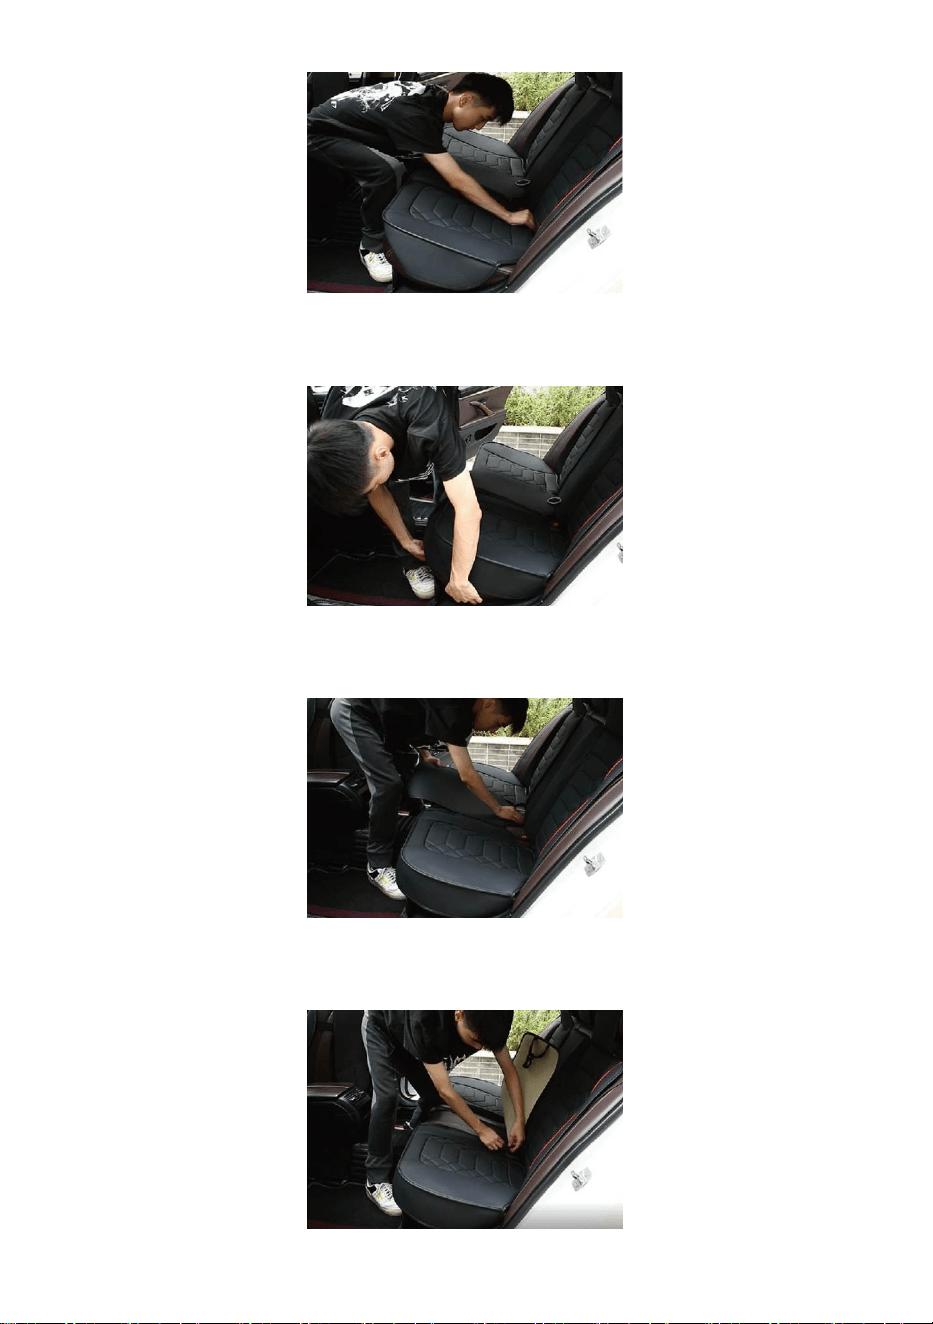
- 9 -
8. Put the elastic strap into the seat gap.
9. Install the rear center seat cushion, Push the pulling buckle through the
seat middle crevice.
10. Tear off the protection tape on the velcro.

- 10 -
11. insert the clip into the seat gap.
Made In China


"Économisezlamoitié","Moitiéprix"outouteautreexpressionsimilairequenousutilisonsnereprésente
qu'uneestimationdeséconomiesdontvouspourriezbénéficierenachetantcertainsoutilscheznousparrapport
auxgrandesmarquesetnesignifiepasnécessairementcouvrirtouteslescatégoriesd'outilsproposés.parnous.
Nousvousrappelonsdebienvouloirvérifierattentivementlorsquevouspassezunecommandechez
noussivouséconomisezréellementlamoitiéparrapportauxgrandesmarques.
Nouscontinuonsànousengageràvousfournirdesoutilsàdesprixcompétitifs.
Assistancetechniqueetcertificatdegarantieélectroniquewww.vevor.com/support
COUVRESIÈGE
Machine Translated by Google

BESOIND'AIDE?CONTACTEZNOUS!
1
Vousavezdesquestionssurlesproduits?Besoind'uneassistancetechnique?N'hésitez
pasànous
contacter:Supporttechniqueetcertificatdegarantieélectronique
www.vevor.com/support
Ils'agitdesinstructionsoriginales,veuillezlireattentivementtouteslesinstructions
dumanuelavantdel'utiliser.VEVORseréserveuneinterprétationclairedenotremanuel
d’utilisation.L'apparenceduproduitdépendduproduitquevousavezreçu.Veuillez
nouspardonnerquenousnevousinformeronspluss'ilyadesmisesàjourtechnologiquesou
logiciellessurnotreproduit.
COUVRESIÈGE
Machine Translated by Google

PARAMÈTRESDESPÉCIFICATION
tailledusiège
6
Noir
tailledusiège
Appuitêteamovible
Appuitêtecentralarrièreamovible
Frontapplicable
SCU056FKSCU056SKSCU056SGSCU056SGSCU056FG
Frontapplicable
Applicableàl'arrière
typesdesièges
Beige
6
2
Gris
13
Épaisseurdel'appuitête:<120mm
2.Hauteurdudossier:670mmÉpaisseurdudossier:225mm
Couleur
typedesiège
2Hauteurdudossier:600mm
Modèle
coussins(pièces)
1.Largeurdusiège:<530mm,Profondeurdusiège:<520mm.
1Longueurarrière12001410mm
13
Beige
Nombredesiège
Applicableàl'arrière
3.Largeurdel'appuitête:280mm,hauteurdel'appuitête:225mm,
Noir
13
3Largeurdel'appuitête:300mm
AVERTISSEMENT:
3.Teniràl'écartdespointestranchantes,deslamesetautresobjets,afindenepasrayerle
misencontactavecuneflammenue.
produit.
1.Veuillezlireattentivementcemanuelavantd'utiliserleproduit.
2.Inflammable:Teniràl’écartdesflammesnues.Ceproduits'enflammeraetbrûlerasi
attentivementlemanueld’instructions.
AvertissementPourréduirelerisquedeblessure,l'utilisateurdoitlirele
4.Ceproduitn'estpasunjouet,leshoussesdesiègenepeuventpasêtreutiliséescommejouetspourlesenfants.
avec.
Machine Translated by Google
CoussindedossierarrièredroitM
Coussindesiègeavantgauche
UN
DESCRIPTION
Appuietêteavantdroit
Houssedesiègearrièregauche
H
Coussindedossiercentralarrière
L
Coussindedossierarrièredroit
ET
Appuietêteavantgauche
Boucledetraction
Bouclecirculaire
C Coussindedossieravantgauche
Coussindetêtecentralarrière
ARTICLE
DESCRIPTION
ARTICLE
Coussindesiègearrièrecentral
g Coussindedossierarrièregauche
K
Coussinavantdroit
D
F
J.
Ô
je
B
Coussindesiègeavantdroit
N
3
L
je
M
K
FGH
J.
ED
C
UN
B
N
Ô
LISTEDESPIECES
Machine Translated by Google

Vérifiezsilesaccessoiressontcompletsaprèsledéballageduproduit.
1.Attachezlesquatreboucles(numéroK)surlessanglesdetractionàl'avantdu
Avantl'installation
leshoussesdesiègeavantgaucheetdroit.
REPRÉSENTANT
INSTALLATION
UN
J.
B
1
(pièces)
SCU056SG
1
SCU056FK
L
F
4
1
1
1
1
1
1
1
1
1
15
1
1
1
M
1
1
1
C
N
1
(pièces)
SCU056SK
(pièces)
1
1
1
1
H
1
1
15
1
1
4
1
1
1
(pièces)
D
Ô
1
1
1
G
1
1
1
1
6
je
1
1
4
15
1
SCU056FG
(pièces)
SCU056SG
1
4
1
1
1
1
ET
6
1
1
4
K
4
1
1
1
1
1
Machine Translated by Google

5
Installationdelahoussedesiègeavant
2.Installezl'appuitêted'originesurlesiègeavant,collezlevelcroetfermezlafermetureéclair.
1.Retirezl'appuitêted'origine,décompressezlehautducoussindusiègeavant,puisinstallez
lesurlesiègeavantetajustezlebien.
2.Attachezlesquatrebouclescirculairesenplastique(numéroJ)aumilieuEdeshoussesde
siègeavantgaucheetdroiteetsurtouteslessanglesdescoussinsdesiègedelagénération
arrière.
.
Faitesattentionàdistinguerleshoussesdesiègegaucheetdroite,alignezlecôtéavecl'étiquette
del'airbagaveclapositiondel'airbagdusiège.
Machine Translated by Google

6
4.Mettezlahoussedel'appuitêteetcollezlevelcro.
Insérezuncôtédelaboucleennylondansl'espacecentraldusiègeavantversl'arrièreet
fixezl'autrecôtédelabouclesurlecôtédusiègeavantetlabouclearrière.
Bouclezlesdeuxsanglesdetractionaudossurlabouclecirculaire
3.Poussezlabouclecirculaireàtraverslacrevassecentraledusiègeetplacezla
perpendiculairementausiège.
5.Installezlecoussindusiègeavantsurlesiègeavantetajustezlebien.Accrochez
laboucledetractionsouslesiègeavant.
Machine Translated by Google

2.Placezlahoussedudossierdelabanquettearrièresurlesiègecommeindiquésurl'image.
3.Mettezlahousseducoussindudossierarrièregauche.
1installezunautresiègeavantdelamêmemanière.
Installationdeshoussesdesiègearrière
4.Poussezlesmandrinsàtraverslafentecentraledusiège.
7
Machine Translated by Google

6.Placezlecoussindebanquettearrièresurlesiègecommeindiquésurl'image.
5.Assurezvousderetirerlabandedeprotectionsurlevelcroavantd'installerlecoussin
arrièredumilieududossier.
7.Poussezlaboucledetractionàtraverslafentecentraledusiège.
8
Machine Translated by Google

9.Installezlecoussindusiègecentralarrière.Poussezlaboucledetractionàtraverslacrevasse
centraledusiège.
8.Placezlasangleélastiquedansl'espacedusiège.
10.Retirezlabandedeprotectionduvelcro.
9
Machine Translated by Google

FabriquéenChine
11.Insérezleclipdansl'espacedusiège.
dix
Machine Translated by Google


Wir sind weiterhin bestrebt, Ihnen Werkzeuge zu wettbewerbsfähigen Preisen anzubieten.
„Sparen Sie die Hälfte“, „Halber Preis“ oder andere ähnliche von uns verwendete Ausdrücke stellen lediglich
eine Schätzung der Einsparungen dar, die Sie durch den Kauf bestimmter Werkzeuge bei uns im Vergleich zu den
großen Top-Marken erzielen könnten, und bedeuten nicht unbedingt, dass alle angebotenen Werkzeugkategorien
abgedeckt werden von uns. Bitte prüfen Sie bei Ihrer Bestellung sorgfältig, ob Sie im Vergleich zu den Top-
Marken tatsächlich die Hälfte sparen.
Technischer Support und E-Garantiezertifikat www.vevor.com/support
SITZBEZÜGE
Machine Translated by Google

BRAUCHEN SIE HILFE? KONTAKTIERE UNS!
- 1 -
Dies ist die Originalanleitung. Bitte lesen Sie alle Bedienungsanleitungen sorgfältig
durch, bevor Sie das Gerät in Betrieb nehmen. VEVOR behält sich eine klare Auslegung
unserer Bedienungsanleitung vor. Das Aussehen des Produkts hängt von dem Produkt
ab, das Sie erhalten haben. Bitte entschuldigen Sie, dass wir Sie nicht erneut informieren, wenn
es zu unserem Produkt technische oder Software-Updates gibt.
Haben Sie Fragen zum Produkt? Benötigen Sie technische Unterstützung? Bitte kontaktieren
Sie uns:
Technischer Support und E-Garantiezertifikat www.vevor.com/
support
SITZBEZÜGE
Machine Translated by Google

WARNUNG:
13
Dicke der Kopfstütze: <120 mm
Farbe
Sitztyp
2. Rückenhöhe: <670 mm, Rückenstärke: <225 mm
2.Höhe der Rückseite: <600 mm
Kissen (Stück)
Modell
1. Sitzbreite: <530 mm, Sitztiefe: <520 mm
1.Hintere Länge: 1200–1410 mm
13
Beige
Anzahl der Sitzplätze
Anwendbar hinten
3. Kopfstützenbreite: <280 mm, Kopfstützenhöhe: <225 mm,
3. Kopfstützenbreite: <300 mm
Schwarz
13
Sitzgröße
6
Schwarz
Sitzgröße
Abnehmbare Kopfstütze hinten in der Mitte
Abnehmbare Kopfstütze
Anwendbare Vorderseite
SCU056FK SCU056SK SCU056SG SCU056SG SCU056FG
Anwendbare Vorderseite
Anwendbar hinten
Beige
6
Sitzarten
- 2 -
Grau
SPEZIFIKATIONSPARAMETER
3. Halten Sie sich von scharfen Spitzen, Klingen und anderen Gegenständen fern, um das Gerät nicht zu zerkratzen
mit einer offenen Flamme in Kontakt gebracht werden.
Produkt.
1. Bitte lesen Sie dieses Handbuch sorgfältig durch, bevor Sie das Produkt verwenden.
2. Entzündlich: Von offenem Feuer fernhalten. Dieses Produkt entzündet sich und brennt, wenn
Lesen Sie die Bedienungsanleitung sorgfältig durch.
Warnung: Um das Verletzungsrisiko zu verringern, muss der Benutzer das lesen
4. Dieses Produkt ist kein Spielzeug. Sitzbezüge können nicht als Spielzeug für Kinder verwendet werden
mit.
Machine Translated by Google
L
ICH
M
A
FGH
J
ED
C
N
Ö
B
K
- 3 -
Rückenlehnenpolster vorne links
Sitzpolster hinten in der Mitte
Hinteres mittleres Kopfkissen
ARTIKEL
BESCHREIBUNG
ARTIKEL
G Rückenlehnenpolster hinten links
K
Rechtes vorderes Kissen
D
F
J
Ö
ICH
N
B
Sitzkissen vorne rechts
BESCHREIBUNG
Sitzkissen vorne links
A
M Rückenlehnenpolster hinten rechts
Linker Rücksitzbezug
Kopfstütze vorne rechts
H
Mittleres Rückenkissen hinten
L
UND
Kopfstütze vorne links
Rückenlehnenpolster hinten rechts
Schnalle ziehen
Runde Schnalle
C
LISTE DER EINZELTEILE
Machine Translated by Google
1.Schnallen Sie die vier Schnallen (Nummer K) an den Zuggurten vorne an
Überprüfen Sie nach dem Auspacken des Produkts, ob das Zubehör vollständig ist.
Vor der Installation
die linken und rechten Vordersitzbezüge.
REP
INSTALLATION
SCU056SK
1
1
1
G ÿ ÿ ÿ ÿ
6
1
1
15
1
4
SCU056FG
ICH
1
1
1
D
1
1
ÿ
1
ÿ
1
(STCK)
1
Ö
K ÿ ÿ
4
1
1
1
1
- 4 -
A
J
1
1
1
ÿ
SCU056SG
(STCK)
1
4
1
6
1
UND
1
1
1
1
1
ÿ
1
1
1
1
1
1
15
M ÿ
(STCK)
1
SCU056SG
1
B
L
F
4
1
SCU056FK
1
1
ÿ
H
1
1
1
1
4
ÿ
1
1
15
C
N
1
1
1
(STCK)
1
1
ÿ
(STCK)
Machine Translated by Google

- 5 -
1.Entfernen Sie die Original-Kopfstütze, öffnen Sie den Reißverschluss oben am Vordersitzkissen,
bringen Sie es dann am Vordersitz an und achten Sie darauf, dass es gut sitzt.
Achten Sie auf die Unterscheidung zwischen linkem und rechtem Sitzbezug und richten Sie die Seite mit
dem Airbag-Etikett an der Position des Sitzairbags aus.
Installation des Vordersitzbezugs
2. Befestigen Sie die vier runden Kunststoffschnallen (Nummer J) in der Mitte E der linken und rechten
Vordersitzbezüge und an allen Sitzpolstergurten der hinteren Generation.
2. Bringen Sie die Original-Kopfstütze wieder am Vordersitz an, kleben Sie den Klettverschluss fest und schließen Sie den
Reißverschluss
.
Machine Translated by Google

4. Setzen Sie den Kopfstützenbezug auf und kleben Sie den Klettverschluss fest.
Führen Sie eine Seite der Nylonschnalle in den mittleren Spalt des Vordersitzes nach hinten ein und befestigen Sie
die andere Seite der Schnalle an der Seite des Vordersitzes und der hinteren Schnalle.
Schnallen Sie die beiden Zuggurte auf der Rückseite an der kreisförmigen Schnalle an
3.Schieben Sie die kreisförmige Schnalle durch den mittleren Spalt des Sitzes und stellen Sie sie senkrecht zum Sitz.
5. Bringen Sie das Vordersitzkissen am Vordersitz an und achten Sie darauf, dass es gut sitzt. Hängen Sie
die Zugschnalle unter den Vordersitz.
- 6 -
Machine Translated by Google

1. Installieren Sie auf die gleiche Weise einen weiteren Vordersitz.
4. Schieben Sie die Spannfutter durch den mittleren Spalt des Sitzes.
2. Setzen Sie den Rücksitzlehnenbezug wie im Bild gezeigt auf den Sitz.
Einbau der Rücksitzbezüge
3. Befestigen Sie den Polsterbezug der linken hinteren Rückenlehne.
- 7 -
Machine Translated by Google

- 8 -
6. Legen Sie das Rücksitzkissen wie im Bild gezeigt auf den Sitz.
5. Stellen Sie sicher, dass Sie das Schutzband am Klettverschluss abreißen, bevor Sie das hintere
mittlere Rückenpolster anbringen.
7. Schieben Sie die Zugschnalle durch den mittleren Spalt des Sitzes.
Machine Translated by Google

- 9 -
10. Ziehen Sie das Schutzband am Klettverschluss ab.
8. Legen Sie das elastische Band in den Sitzspalt.
9. Bringen Sie das hintere mittlere Sitzpolster an. Schieben Sie die Zugschnalle durch den
mittleren Spalt des Sitzes.
Machine Translated by Google

- 10 -
In China hergestellt
11. Setzen Sie den Clip in den Sitzspalt ein.
Machine Translated by Google


COPRISEDILI
Supporto tecnico e certificato di garanzia elettronica www.vevor.com/support
"Risparmia la metà", "Metà prezzo" o qualsiasi altra espressione simile da noi utilizzata rappresenta
solo una stima del risparmio che potresti trarre dall'acquistare determinati strumenti con noi rispetto ai
principali marchi più importanti e non significa necessariamente coprire tutte le categorie di strumenti
offerti da noi. Ti ricordiamo gentilmente di verificare attentamente quando effettui un ordine con noi
se stai effettivamente risparmiando la metà rispetto ai migliori marchi principali.
Continuiamo a impegnarci per fornirvi strumenti a prezzi competitivi.
Machine Translated by Google

Hai domande sul prodotto? Hai bisogno di supporto tecnico? Non esitate a contattarci:
Supporto
tecnico e certificato di garanzia elettronica www.vevor.com/
support
Queste sono le istruzioni originali, leggere attentamente tutte le istruzioni del manuale
prima dell'uso. VEVOR si riserva una chiara interpretazione del nostro manuale d'uso. L'aspetto
del prodotto sarà soggetto al prodotto ricevuto. Ti preghiamo di perdonarci se non ti
informeremo più se sono presenti aggiornamenti tecnologici o software sul nostro prodotto.
- 1 -
HO BISOGNO DI AIUTO? CONTATTACI!
COPRISEDILI
Machine Translated by Google

PARAMETRI DI SPECIFICA
3. Larghezza poggiatesta: <280 mm, altezza poggiatesta: <225 mm,
Nero
dimensione del sedile
6
dimensione del sedile
3ÿLarghezza del poggiatesta: <300 mm
Frontale applicabile
SCU056FK SCU056SK SCU056SG SCU056SG SCU056FG
Frontale applicabile
Poggiatesta centrale posteriore rimovibile
Poggiatesta rimovibile
Posteriore applicabile
tipi di posti
Beige
6
Grigio
13
Spessore del poggiatesta: <120 mm
-2-
2. Altezza dello schienale: ÿ670 mm, Spessore dello schienale: ÿ225 mm
Colore
tipo di sedile
1ÿLunghezza posteriore: 1200-1410 mm
2ÿAltezza dello schienale: <600 mm
cuscini(pezzi)
1. Larghezza del sedile: <530 mm, Profondità del sedile: <520 mm
Modello
Numero di posti
13
Beige
Posteriore applicabile
Nero
13
AVVERTIMENTO:
portato a contatto con una fiamma libera.
3. Tenere lontano da punti taglienti, lame e altri oggetti, per non graffiarlo
Prodotto.
1. Leggere attentamente questo manuale prima di utilizzare il prodotto.
2. Infiammabile: tenere lontano da fiamme libere. Questo prodotto si accenderà e brucerà se
attentamente il manuale di istruzioni.
Avvertenza-Per ridurre il rischio di lesioni, l'utente deve leggere il
con.
4. Questo prodotto non è un giocattolo, i coprisedili non possono essere utilizzati come giocattoli per far giocare i bambini
Machine Translated by Google

IOUN
M Cuscino schienale posteriore destro
Cuscino del sedile anteriore sinistro
DESCRIZIONE
N
H
Cuscino schienale centrale posteriore
l
Coprisedile posteriore sinistro
Poggiatesta anteriore destro
Cuscino schienale posteriore destro
E
Poggiatesta anteriore sinistro
Tirando la fibbia
C Cuscino schienale anteriore sinistro
Cuscino per la testa centrale posteriore
Fibbia circolare
Cuscino del sedile centrale posteriore
ARTICOLOARTICOLO
DESCRIZIONE
K
Cuscino schienale posteriore sinistroG
F
Cuscino anteriore destro
D
J
O
B
Cuscino del sedile anteriore destro
- 3 -
IO
l M
K
FGH
J
ED
C
UN
B
N
O
ELENCO DELLE PARTI
Machine Translated by Google

1ÿAgganciare le quattro fibbieÿNumero Kÿ alle cinghie di trazione nella parte anteriore
i coprisedili anteriori sinistro e destro.
Controllare se gli accessori sono completi dopo aver disimballato il prodotto.
Prima dell'installazione
RAPPRESENTANTE
INSTALLAZIONE
15
1
1
1
SCU056FG
C
N
ÿPZÿ
SCU056SK
1
1
ÿ
ÿPZÿ
1
1
1
1
1
H
1
15
1
ÿ
4
l
B
SCU056SG
1
1
ÿPZÿ
ÿ
SCU056FK
1
1
1
F
1
1
1
ÿ
4
1
1
1
15
Mÿ
1
1
1
1
4
ÿPZÿ
SCU056SG
ÿ
1
1
E
1
6
1
-4-
1
1
1
1
4
Kÿÿ
1
1
1
UN
J
ÿ
1
1
D
1
O
ÿPZÿ
1
1
ÿ
1
1
1
SOL ÿ ÿ ÿ ÿ
6
1
1
1
1
IO
1
4
Machine Translated by Google

-5-
1ÿRimuovere il poggiatesta originale, aprire la cerniera della parte superiore del cuscino del sedile
anteriore, quindi installarlo sul sedile anteriore e adattarlo correttamente.
.
Installazione del rivestimento del sedile anteriore
2. Allacciare le quattro fibbie circolari in plasticaÿNumero Jÿ nella E centrale dei rivestimenti dei sedili
anteriori sinistro e destro e su tutte le cinghie del cuscino del sedile della generazione posteriore.
Prestare attenzione a distinguere tra i rivestimenti del sedile sinistro e destro, allineare il lato con
l'etichetta dell'airbag con la posizione dell'airbag del sedile.
2ÿRimontare il poggiatesta originale sul sedile anteriore, attaccare il velcro e chiudere la cerniera
Machine Translated by Google
-6-
4ÿMettere la copertura del poggiatesta e attaccare il velcro.
Allaccia le due cinghie sul retro alla fibbia circolare
3ÿSpingere la fibbia circolare attraverso la fessura centrale del sedile e renderla perpendicolare
al sedile.
5. Installare il cuscino del sedile anteriore sul sedile anteriore e adattarlo bene,
appendere la fibbia di trazione sotto il sedile anteriore.
Inserire un lato della fibbia in nylon nello spazio centrale del sedile anteriore verso quello
posteriore e fissare l'altro lato della fibbia al lato del sedile anteriore e alla fibbia posteriore.
Machine Translated by Google
-7-
2. Posizionare il rivestimento dello schienale del sedile posteriore sul sedile come mostrato in figura.
1ÿinstallare un altro sedile anteriore allo stesso modo.
Installazione coprisedili posteriori
3. Posizionare la fodera del cuscino dello schienale posteriore sinistro.
4. Spingere i mandrini attraverso la fessura centrale del sedile.
Machine Translated by Google

-8-
6. Posizionare il cuscino del sedile posteriore sul sedile come mostrato in figura.
5. Assicurarsi di strappare il nastro protettivo sul velcro prima di installare il cuscino
posteriore centrale.
7. Spingere la fibbia di trazione attraverso la fessura centrale del sedile.
Machine Translated by Google

-9-
10. Strappare il nastro di protezione sul velcro.
8. Mettere la cinghia elastica nella fessura del sedile.
9. Installare il cuscino del sedile centrale posteriore, spingere la fibbia di trazione attraverso la
fessura centrale del sedile.
Machine Translated by Google

- 10 -
Made in China
11. inserire la clip nella fessura del sedile.
Machine Translated by Google


"Ahorreamitaddeprecio","Amitaddeprecio"ocualquierotraexpresiónsimilarutilizadapornosotrossolo
representaunaestimacióndelosahorrosquepodríabeneficiarsealcomprarciertasherramientasconnosotrosen
comparaciónconlasprincipalesmarcasynosignificanecesariamentecubrirtodaslascategoríasdeherramientas
ofrecidas.pornosotros.Lerecordamosque,cuandorealiceunpedidoconnosotros,verifiquecuidadosamente
sirealmenteestáahorrandolamitadencomparaciónconlasprincipalesmarcas.
Seguimoscomprometidosaproporcionarleherramientasaprecioscompetitivos.
Soportetécnicoycertificadodegarantíaelectrónicawww.vevor.com/support
CUBREASIENTOS
Machine Translated by Google
¿NECESITASAYUDA?¡CONTÁCTENOS!
1
¿Tienepreguntassobreelproducto?¿Necesitasoportetécnico?Nodudeencontactarnos:
Soporte
técnicoycertificadodegarantíaelectrónicawww.vevor.com/support
Estassonlasinstruccionesoriginales;leaatentamentetodaslasinstruccionesdel
manualantesdeoperar.VEVORsereservaunainterpretaciónclaradenuestromanualde
usuario.Laaparienciadelproductoestarásujetaalproductoquerecibió.Perdoneque
noleinformaremosnuevamentesihayactualizacionesdetecnologíaosoftwareennuestro
producto.
CUBREASIENTOS
Machine Translated by Google

ADVERTENCIA:
13
Grosordelreposacabezas:<120mm
Color
tipodeasiento
2.Alturadelrespaldo:<670mm,espesordelrespaldo:<225mm
2Alturadelrespaldo:600mm
Modelo
cojines(piezas)
1.Anchodelasiento:<530mm,Profundidaddelasiento:<520mm
1.Longitudtrasera:12001410mm
13
Beige
Númerodeasiento
Partetraseraaplicable
3.Anchodelreposacabezas:<280mm,Alturadelreposacabezas:<225mm,
3.Anchodelreposacabezas:<300mm
Negro
13
tamañodelasiento
6
Negro
tamañodelasiento
Reposacabezascentraltraseroextraíble
Reposacabezasextraíble
Frenteaplicable
SCU056FKSCU056SKSCU056SGSCU056SGSCU056FG
Frenteaplicable
Partetraseraaplicable
Beige
6
tiposdeasientos
2
Gris
PARÁMETROSDEESPECIFICACIÓN
3.Manteneralejadodepuntasafiladas,cuchillasyotroselementosparanorayarel
puestoencontactoconunallamaabierta.
producto.
4.Esteproductonoesunjuguete.Lasfundasdelosasientosnosepuedenutilizarcomojuguetesparaquejueguenlosniños.
1.Leaatentamenteestemanualantesdeutilizarelproducto.
2.Inflamable:Manteneralejadodellamasabiertas.Esteproductoseencenderáyarderási
manualdeinstruccionesconatención.
Advertencia:parareducirelriesgodelesiones,elusuariodebeleerel
con.
Machine Translated by Google
Cojíndelrespaldodelanteroizquierdo
Cojíndelasientocentraltrasero
Cojíntraseromedioparalacabeza
DESCRIPCIÓN
ARTÍCULO ARTÍCULO
GRAMO Cojíndelrespaldotraseroizquierdo
k
Cojíndelanteroderecho
D
F
j
oh
I
norte
B
Cojíndelasientodelanteroderecho
DESCRIPCIÓN
Cojíndelasientodelanteroizquierdo
A
MCojíndelrespaldotraseroderecho
Fundaasientotraseroizquierdo
Reposacabezasdelanteroderecho
h
Cojíntraseromediodelrespaldo
l
Y
Reposacabezasdelanteroizquierdo
Cojíndelrespaldotraseroderecho
Tirandodelahebilla
Hebillacircular
C
3
l
I
METRO
k
DE
j
FGH
C
A
B
norte
oh
LISTADEPARTES
Machine Translated by Google

1.Abrochelascuatrohebillas(NúmeroK)enlascorreasdetiroenlapartedelanteradel
Compruebesilosaccesoriosestáncompletosdespuésdedesembalarelproducto.
Antesdelainstalación
lasfundasdelosasientosdelanterosizquierdoyderecho.
REPS
INSTALACIÓN
SCU056SK
1
1
1
G
6
1
1
15
1
4
SCU056FG
I
1
1
1
D
1
1
1
1
(UDS)
1
oh
K
4
1
1
1
1
4
A
j
1
1
1
SCU056SG
(UDS)
1
4
1
6
1
Y
1
1
1
1
1
1
1
1
1
1
1
15
M
(UDS)
1
SCU056SG
1
B
l
F
4
1
SCU056FK
1
1
h
1
1
1
1
4
1
1
15
C
norte
1
1
1
(UDS)
1
1
(UDS)
Machine Translated by Google

1Retireelreposacabezasoriginal,abralacremalleradelapartesuperiordelcojíndelasientodelantero,
luegoinstáleloenelasientodelanteroyajustebien.
2.Instaleelreposacabezasoriginalenelasientodelantero,pegueelvelcroycierrelacremallera.
Instalacióndelafundadelasientodelantero
2.Abrochelascuatrohebillascircularesdeplástico(NúmeroJ)enelcentroEdelasfundasdelosasientos
delanterosizquierdoyderechoyentodaslascorreasdeloscojinesdelosasientosdelageneración
trasera.
.
Presteatenciónadistinguirentrelasfundasdelosasientosizquierdoyderecho,alineeelladoconlaetiqueta
delabolsadeaireconlaposicióndelabolsadeairedelasiento.
5
Machine Translated by Google
6
4.Coloquelafundadelreposacabezasypegueelvelcro.
Inserteunladodelahebilladenailonenelespaciocentraldelasientodelanterohaciaatrás
yajusteelotroladodelahebillaalcostadodelasientodelanteroyalahebillatrasera.
Abrochelasdoscorreasdelaparteposterioralahebillacircular.
3.Empujelahebillacircularatravésdelahendiduracentraldelasientoycolóquela
perpendicularalasiento.
5.Instaleelcojíndelasientodelanteroenelasientodelanteroyhagaqueencaje
bien.Cuelguelahebilladebajodelasientodelantero.
Machine Translated by Google

7
2.Coloquelafundadelrespaldodelasientotraserocomosemuestraenlaimagen.
4.Empujelosmandrilesatravésdelahendiduracentraldelasiento.
1instaleotroasientodelanterodelamismamanera.
Instalacióndefundasparaasientostraseros
3.Coloquelafundadelcojíndelrespaldotraseroizquierdo.
Machine Translated by Google
8
6.Coloqueelcojíndelasientotraseroenelasientocomosemuestraenlaimagen.
5.Asegúresederetirarlacintaprotectoradelvelcroantesdeinstalarelcojíntraseromedio
delrespaldo.
7.Empujelahebilladetracciónatravésdelahendiduracentraldelasiento.
Machine Translated by Google

9
10.Retirelacintaprotectoradelvelcro.
8.Coloquelacorreaelásticaenelespaciodelasiento.
9.Instaleelcojíndelasientocentraltrasero.Empujelahebillaatravésdelahendiduracentraldel
asiento.
Machine Translated by Google

10
Hechoenchina
11.Inserteelclipenelespaciodelasiento.
Machine Translated by Google


POKROWCE NA SIEDZENIA
Wsparcie techniczne i certyfikat e-gwarancji www.vevor.com/support
„Zaoszczędź o połowę”, „o połowę ceny” lub inne podobne wyrażenia używane przez nas przedstawiają jedynie
szacunkową oszczędność, jaką możesz zyskać kupując u nas określone narzędzia w porównaniu z głównymi najlepszymi
markami i niekoniecznie oznaczają uwzględnienie wszystkich kategorii oferowanych narzędzi przez nas. Przypominamy,
aby podczas składania zamówienia u nas dokładnie sprawdzić, czy faktycznie oszczędzasz połowę w porównaniu
z czołowymi markami.
Nadal dokładamy wszelkich starań, aby zapewnić Państwu narzędzia w konkurencyjnej cenie.
Machine Translated by Google

Masz pytania dotyczące produktu? Potrzebujesz wsparcia technicznego? Prosimy o kontakt:
Wsparcie
techniczne i certyfikat e-gwarancji www.vevor.com/support
To jest oryginalna instrukcja. Przed przystąpieniem do obsługi prosimy o dokładne
zapoznanie się ze wszystkimi instrukcjami. VEVOR zastrzega sobie jasną interpretację naszej
instrukcji obsługi. Wygląd produktu zależy od produktu, który otrzymałeś. Proszę
wybaczyć nam, że nie będziemy ponownie informować Państwa, jeśli pojawią się jakieś
aktualizacje technologii lub oprogramowania naszego produktu.
POTRZEBUJĘ POMOCY? SKONTAKTUJ SIĘ Z NAMI!
POKROWCE NA SIEDZENIA
- 1 -
Machine Translated by Google

PARAMETRY SPECYFIKACJI
OSTRZEŻENIE:
2. Produkt łatwopalny: Trzymać z dala od otwartego ognia. Ten produkt zapali się i spali, jeśli
3. Trzymaj z dala od ostrych punktów, ostrzy i innych przedmiotów, aby ich nie zarysować
produkt.
4. Ten produkt nie jest zabawką. Pokrowce na siedzenia nie mogą być używane jako zabawki do zabawy dla dzieci
1. Przed użyciem produktu prosimy o dokładne zapoznanie się z niniejszą instrukcją.
zetknął się z otwartym płomieniem.
instrukcję obsługi.
Ostrzeżenie — aby zmniejszyć ryzyko obrażeń, użytkownik musi przeczytać
z.
1. Długość tylna: 1200-1410 mm
Model
poduszki (szt)
1. Szerokość siedziska: <530 mm, głębokość siedziska: <520 mm
Kolor
typ siedzenia
2. Wysokość oparcia: <670 mm, grubość oparcia: <225 mm
2. Wysokość oparcia: <600 mm
3. Szerokość zagłówka: <280 mm, wysokość zagłówka: <225 mm,
3. Szerokość zagłówka: <300 mm
Czarny
13
Liczba miejsc
Beżowy
13
Zastosowanie z tyłu
SCU056FK SCU056SK SCU056SG SCU056SG SCU056FG
Zastosowanie z przodu
Zastosowanie z przodu
Zastosowanie z tyłu
Zdejmowany zagłówek
Zdejmowany tylny środkowy zagłówek
6
rozmiar siedziska
rozmiar siedziska
Czarny
- 2 -
Szary
13
Grubość zagłówka: <120 mm
Beżowy
6
typy siedzeń
Machine Translated by Google
Prawy przedni zagłówek
Osłona tylnego lewego siedzenia
H
Poduszka tylnego, środkowego oparcia
L
Poduszka lewego przedniego siedzenia
OPIS
M Poduszka oparcia prawego tylnego siedzenia
A
Okrągła klamra
C Poduszka oparcia lewego przodu
Poduszka tylna środkowa pod głowę
I
Zagłówek lewy przedni
Poduszka oparcia prawego tylnego siedzenia
G Poduszka tylnego lewego oparcia
Ciągnąca klamra
K
PRZEDMIOT
OPIS
PRZEDMIOT
Poduszka tylnego środkowego siedzenia
I
N
B
Poduszka prawego przedniego siedzenia
D
Prawa przednia poduszka
J
F
O
J
L M
N
FGH
I
ED
C
O
A
K
B
LISTA CZĘŚCI
- 3 -
Machine Translated by Google
1. Zapnij cztery klamry (numer K) na paskach z przodu
pokrowce na lewe i prawe przednie siedzenia.
Po rozpakowaniu produktu sprawdź, czy akcesoria są kompletne.
Przed instalacją
INSTALACJA
1
1
15
4
1
SCU056FG
1
I
1
1
1
1
G
6
1
1
1
O
SZT
1
1
1
D
A
J
1
1
1
1
1
K
4
- 4 -
1
1
6
1
1
1
1
I
1
SCU056SG
4
SZT
1
1
1
15
M
1
1
1
1
1
1
1
1
1
F
4
SCU056FK
1
SCU056SG
SZT
1
B
L
4
1
1
15
1
1
H
1
1
1
SCU056SK
1
SZTSZT
1
C
N
1
1
REPREZENTANT
Machine Translated by Google
1. Wyjmij oryginalny zagłówek, rozepnij górną część poduszki przedniego siedzenia, a następnie
zamontuj ją na przednim siedzeniu i upewnij się, że dobrze pasuje.
Zwróć uwagę na rozróżnienie lewego i prawego pokrowca na siedzenie, zrównaj bok z naklejką
poduszki powietrznej z pozycją poduszki powietrznej siedzenia.
Montaż pokrowca na przednie siedzenie
2. Zapnij cztery okrągłe plastikowe klamry (numer J) w środku E pokrowców lewego i prawego
przedniego siedzenia oraz na wszystkich paskach poduszek siedzeń tylnej generacji.
2. Zamontuj oryginalny zagłówek z powrotem na przednim siedzeniu, przyklej rzep i zapnij zamek
.
- 5 -
Machine Translated by Google

4. Załóż osłonę zagłówka i przyklej rzep.
5. Zamontuj poduszkę przedniego siedzenia na przednim siedzeniu i dopasuj ją do
siebie. Zawieś klamrę do ciągnięcia pod przednim siedzeniem.
Zapnij dwa paski ściągające z tyłu na okrągłą klamrę
3Przepchnij okrągłą klamrę przez środkową szczelinę siedziska i ustaw je prostopadle do
siedziska.
Włóż jedną stronę nylonowej klamry w środkową szczelinę przedniego siedzenia z tyłu i
przymocuj drugą stronę klamry z boku przedniego siedzenia i tylnej klamry.
- 6 -
Machine Translated by Google
- 7 -
2. Załóż pokrycie oparcia tylnego siedzenia na siedzenie tak, jak pokazano na rysunku.
3. Załóż poszewkę poduszki tylnego lewego oparcia.
1. Zamontuj kolejne przednie siedzenie w ten sam sposób.
Montaż pokrowców na tylne siedzenia
4. Przepchnij uchwyty przez środkową szczelinę siedziska.
Machine Translated by Google
- 8 -
6. Połóż poduszkę tylnego siedzenia na siedzeniu, jak pokazano na rysunku.
5. Przed zamontowaniem tylnej środkowej poduszki oparcia pamiętaj o oderwaniu taśmy
zabezpieczającej z rzepu.
7. Przepchnij klamrę do ciągnięcia przez środkową szczelinę siedziska.
Machine Translated by Google

- 9 -
9. Zamontuj poduszkę tylnego środkowego siedzenia. Przepchnij klamrę przez środkową
szczelinę siedzenia.
8. Włóż elastyczny pasek w szczelinę siedziska.
10. Oderwij taśmę zabezpieczającą z rzepu.
Machine Translated by Google

- 10 -
11. włóż zacisk w szczelinę siedziska.
Wyprodukowano w Chinach
Machine Translated by Google


STOEL HOEZEN
Technische ondersteuning en e-garantiecertificaat www.vevor.com/support
We blijven ons inzetten om u gereedschap tegen een concurrerende prijs te bieden.
'Bespaar de helft', 'Halve prijs' of andere soortgelijke uitdrukkingen die door ons worden gebruikt vertegenwoordigen
slechts een schatting van de besparingen die u zou kunnen profiteren als u bepaalde gereedschappen bij ons koopt in
vergelijking met de grote topmerken en betekenen niet noodzakelijkerwijs dat ze alle categorieën van aangeboden
gereedschappen dekken. door ons. Wij verzoeken u vriendelijk om bij het plaatsen van een bestelling bij ons
goed na te gaan of u daadwerkelijk de helft bespaart in vergelijking met de grote topmerken.
Machine Translated by Google

Dit is de originele instructie. Lees alle instructies in de handleiding zorgvuldig door
voordat u ermee aan de slag gaat. VEVOR behoudt zich een duidelijke interpretatie van onze
gebruikershandleiding voor. Het uiterlijk van het product is afhankelijk van het product
dat u heeft ontvangen. Vergeef ons alstublieft dat we u niet opnieuw zullen informeren als er
technologie- of software-updates zijn voor ons product.
Heeft u productvragen? Technische ondersteuning nodig? Neem gerust contact met ons op:
Technische
ondersteuning en e-garantiecertificaat www.vevor.com/
support
HULP NODIG? NEEM CONTACT MET ONS OP!
STOEL HOEZEN
- 1 -
Machine Translated by Google

SPECIFICATIEPARAMETERS
WAARSCHUWING:
2. Ontvlambaar: Verwijderd houden van open vuur. Dit product zal ontbranden en verbranden als
3. Blijf uit de buurt van scherpe punten, messen en andere voorwerpen, om krassen te voorkomen
Product.
gebruiksaanwijzing zorgvuldig.
in contact gebracht met open vuur.
1. Lees deze handleiding zorgvuldig door voordat u het product gebruikt.
Waarschuwing-Om het risico op letsel te verminderen, moet de gebruiker de volgende instructies lezen
met.
4. Dit product is geen speelgoed. Stoelhoezen kunnen niet als speelgoed voor kinderen worden gebruikt
Afneembare hoofdsteun
Afneembare middenhoofdsteun achterin
SCU056FK SCU056SK SCU056SG SCU056SG SCU056FG
Toepasselijke voorkant
Toepasselijke voorkant
Toepasselijke achterkant
6
grootte van de stoel
grootte van de stoel
Zwart
- 2 -
Grijs
13
Dikte hoofdsteun: <120 mm
Beige
6
soorten stoelen
Model
kussens (stuks)
1. Zitbreedte: <530 mm, Zitdiepte: <520 mm
1. Achterlengte: 1200-1410 mm
Kleur
soort stoel
2. Rughoogte: <670 mm, Rugdikte: <225 mm
2. Rughoogte: <600 mm
3. Breedte hoofdsteun: <280 mm, Hoogte hoofdsteun: <225 mm,
3. Breedte hoofdsteun: <300 mm
Zwart
13
Beige
13
Toepasselijke achterkant
Aantal zitplaatsen
Machine Translated by Google
Hoofdsteun rechtsvoor
Linker achterbankbekleding
H
Middenachterkussen rugkussen
L
Zitkussen linksvoor
BESCHRIJVING
M Rugkussen rechter achterbank
A
Ronde gesp
C Kussen rugleuning linksvoor
Hoofdkussen middenachter
EN
Hoofdsteun linksvoor
Kussen rugleuning rechter achterbank
G Rugleuningkussen linksachter
Gesp trekken
K
BESCHRIJVING
ITEM ITEM
Zitkussen middenachter
I
N
B
Zitkussen rechtervoor
D
Kussen rechtsvoor
J
F
O
J
L M
K
ED
I
F G H
C
A
B
N
O
ONDERDELEN LIJST
- 3 -
Machine Translated by Google

1.Gesp de vier gespen (Nummer K) vast aan de trekriemen aan de voorkant van
de linker en rechter voorstoelhoezen.
Controleer of de accessoires compleet zijn na het uitpakken van het product.
Vóór installatie
INSTALLATIE
(PCS)
1
1
1
1
1
G ÿ ÿ ÿ ÿ
ÿ
6
1
15
4
1
SCU056FG
1
I
1
1
1
D
ÿ
1
1
1
ÿ
O
(PCS)
1
1
K ÿ ÿ
4
- 4 -
1
1
A
J
1
1
1
ÿ
1
SCU056SG
4
(PCS)
6
1
1
1
1
EN
1
1
1
1
1
1
ÿ
1
1
1
15
M ÿ
1
SCU056SG
(PCS)
1
B
L
1
1
1
F
ÿ
4
SCU056FK
1
1
H
1
1
4
ÿ
1
1
15
C
N
1
1
1
1
SCU056SK
1
(PCS)
REP
Machine Translated by Google

- 5 -
1.Verwijder de originele hoofdsteun, rits de bovenkant van het zitkussen van de voorstoel
open en installeer het op de voorstoel, zodat het goed past.
Let erop dat u onderscheid maakt tussen de linker- en rechterstoelhoezen, lijn de zijkant met
het airbaglabel uit met de positie van de stoelairbag.
Installatie van hoes voorstoel
2. Maak de vier ronde plastic gespen (nummer J) vast in de middelste E van de linker en
rechter voorstoelhoezen en op alle stoelkussenriemen van de achterste generatie.
2.Plaats de originele hoofdsteun terug op de voorstoel, plak het klittenband vast en rits hem
dicht
.
Machine Translated by Google

- 6 -
4.Plaats de hoes van de hoofdsteun en plak het klittenband vast.
5. Installeer het voorste zitkussen op de voorstoel en zorg ervoor dat het goed aansluit.
Hang de trekgesp onder de voorstoel.
Maak de twee trekriemen aan de achterkant vast op de ronde gesp
3. Duw de ronde gesp door de middelste spleet van de stoel en maak deze loodrecht op de stoel.
Steek één kant van de nylon gesp in de middelste opening van de voorstoel aan de achterkant
en maak de andere kant van de gesp vast aan de zijkant van de voorstoel en de achterste gesp.
Machine Translated by Google

- 7 -
2. Plaats de hoes van de rugleuning van de achterbank op de stoel, zoals weergegeven in de afbeelding.
3. Plaats de hoes van de rugleuning van de linker achterbank erop.
1.Installeer een andere voorstoel op dezelfde manier.
Installatie van achterbankhoezen
4. Duw de spantangen door de middelste spleet van de zitting.
Machine Translated by Google
- 8 -
6. Plaats het achterbankkussen op de stoel zoals weergegeven in de afbeelding.
5. Zorg ervoor dat u de beschermtape op het klittenband afscheurt voordat u het achterste
middenrugkussen installeert.
7. Duw de trekgesp door de middelste spleet van de stoel.
Machine Translated by Google
- 9 -
9. Installeer het middelste zitkussen achterin, duw de trekgesp door de middelste spleet van
de stoel.
8. Plaats de elastische band in de zitopening.
10. Scheur de beschermingstape op het klittenband af.
Machine Translated by Google

- 10 -
Gemaakt in China
11. Steek de clip in de zittingopening.
Machine Translated by Google


STOLSÖVERDRAG
Teknisk support och e-garanticertifikat www.vevor.com/support
"Spara hälften", "halva priset" eller andra liknande uttryck som används av oss representerar
bara en uppskattning av besparingar du kan dra nytta av att köpa vissa verktyg hos oss jämfört med
de stora toppmärkena och betyder inte nödvändigtvis att täcka alla kategorier av verktyg som erbjuds
av oss. Du påminns vänligen om att noggrant kontrollera när du gör en beställning hos oss om
du faktiskt sparar hälften i jämförelse med de främsta stora varumärkena.
Vi fortsätter att vara engagerade i att ge dig verktyg till konkurrenskraftiga priser.
Machine Translated by Google

Har du produktfrågor? Behöver du teknisk support? Kontakta oss gärna: Teknisk support och
e-
garanticertifikat www.vevor.com/support
Detta är den ursprungliga instruktionen, läs alla instruktioner noggrant innan du
använder den. VEVOR reserverar sig för en tydlig tolkning av vår användarmanual. Utseendet
på produkten är beroende av den produkt du fått. Ursäkta oss att vi inte kommer att
informera dig igen om det finns någon teknik eller mjukvaruuppdateringar på vår produkt.
- 1 -
BEHÖVS HJÄLP? KONTAKTA OSS!
STOLSÖVERDRAG
Machine Translated by Google

SPECIFIKATIONSPARAMETRAR
3. Nackstödsbredd: ÿ280mm, Nackstödshöjd: ÿ225mm,
Svart
sitsstorlek
6
sitsstorlek
3. Nackstödsbredd: ÿ300 mm
Tillämplig framsida
SCU056FK SCU056SK SCU056SG SCU056SG SCU056FG
Tillämplig framsida
Avtagbart nackstöd
Avtagbart nackstöd i mitten bak
Gäller bak
sätestyper
Beige
6
Grå
13
Nackstödstjocklek: ÿ120mm
- 2 -
2. Rygghöjd: ÿ670 mmÿ Ryggtjocklek: ÿ225 mm
Färg
sätestyp
1ÿLängd bak: 1200-1410 mm
2. Rygghöjd: ÿ600mm
Modell
kuddar (st)
1. Sitsbredd: ÿ530 mmÿSitsdjup: ÿ520 mm
Antal sittplatser
13
Beige
Gäller bak
Svart
13
VARNING:
komma i kontakt med öppen låga.
3. Håll dig borta från vassa spetsar, knivar och andra föremål för att inte repa
produkt.
4. Denna produkt är inte en leksak, stolsöverdrag kan inte användas som leksaker för barn att leka
bruksanvisningen noggrant.
2. Brandfarligt: Förvaras åtskilt från öppen låga. Denna produkt kommer att antändas och brinna om
1. Läs denna bruksanvisning noggrant innan du använder produkten.
Varning - För att minska risken för skador måste användaren läsa igenom
med.
Machine Translated by Google

jagA
M Höger ryggstödsdyna bak
Vänster sittdyna fram
BESKRIVNING
N
Bakkudde mitt bak
L
H
Höger främre nackstöd
Vänster baksätesöverdrag
Höger ryggdyna bak
OCH
Vänster främre nackstöd
Dragspänne
C Vänster ryggdyna fram
Bakre mitthuvudkudde
Cirkulärt spänne
ARTIKELARTIKEL
BESKRIVNING
Mittsätesdyna bak
K
G Vänster ryggdyna bak
F
Höger kudde fram
D
J
O
B
Höger sittdyna fram
- 3 -
jag
L M
K
FGH
J
ED
C
B
N
O
A
DELLISTA
Machine Translated by Google
1ÿSpänn fast de fyra spännena (Nummer K) på dragremmarna framtill på
vänster och höger framsätesöverdrag.
Kontrollera om tillbehören är kompletta efter uppackning av produkten.
Före installation
REP
INSTALLATION
ÿ
1
ÿPCSÿ
SCU056SK
ÿPCSÿ
1
1
1
1
1
C
15
1
1
N
ÿ
4
1
1
H
1
1
SCU056FK
ÿ
4
F
1
1
1
L
B
1
ÿPCSÿ
SCU056SG
1
M ÿ
15
1
1
1
ÿ
1
1
1
1
1
1
OCH
1
1
1
1
6
ÿPCSÿ
SCU056SG
1
4
ÿ
1
1
1
J
A
1
1
- 4 -
K ÿ ÿ
1
1
ÿPCSÿ
4
O
ÿ
1
1
1
ÿ
D
1
1
1
jag
1
1
4
15
1
SCU056FG
6
G ÿ ÿ ÿ ÿ
1
1
1
1
Machine Translated by Google

- 5 -
1ÿTa bort det ursprungliga nackstödet, öppna den övre delen av framsätesdynan och
montera den sedan på framsätet och se till att den sitter bra.
Var uppmärksam på att skilja mellan vänster och höger sätesöverdrag, rikta in sidan med
krockkuddens etikett med sätskrockkuddens position.
Montering av framsätesöverdrag
2. Spänn fast de fyra cirkulära plastspännena (Nummer J) i mitten E på vänster och höger
framstolsöverdrag och på alla sittdynornas remmar i den bakre generationen.
2ÿSätt tillbaka det ursprungliga nackstödet i framsätet, fäst kardborrbandet och dra upp
dragkedjan
.
Machine Translated by Google

- 6 -
Spänn fast de två dragremmarna på baksidan på det cirkulära spännet
5. Montera framsätesdynan på framsätet och se till att den sitter bra. Häng upp
dragspännet under framsätet.
4. Sätt på nackstödsskyddet och fäst kardborrbandet.
3. Skjut det cirkulära spännet genom sätets mittskåra och gör dem vinkelräta mot sätet.
Sätt in ena sidan av nylonspännet i mittenavståndet på framsätet bakåt och fäst den andra
sidan av spännet vid sidan av framsätet och det bakre spännet.
Machine Translated by Google
- 7 -
2. Sätt på baksätets ryggstödsskydd på sätet enligt bilden.
3. Sätt på det vänstra bakre ryggstödsskyddet.
1ÿinstallera ett annat framsäte på samma sätt.
Montering av baksätesöverdrag
4. Tryck chuckarna genom sätets mittspalta.
Machine Translated by Google
- 8 -
6. Sätt baksätesdynan på sätet enligt bilden.
5. Se till att dra av skyddstejpen på kardborrbandet innan du installerar den bakre mittkudden.
7. Skjut dragspännet genom sätets mittskåra.
Machine Translated by Google
- 9 -
9. Montera den bakre mittsätesdynan, Skjut dragspännet genom sätets mittspalta.
8. Sätt in den elastiska remmen i sätesspringan.
10. Riv av skyddstejpen på kardborren.
Machine Translated by Google

- 10 -
Tillverkad i Kina
11. sätt in klämman i sätesspringan.
Machine Translated by Google