Technical Support and E-Warranty Certificate
www.vevor.com/support
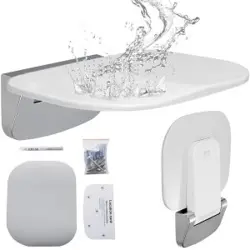
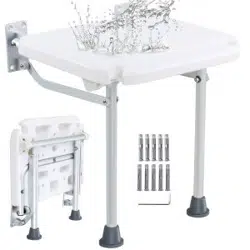
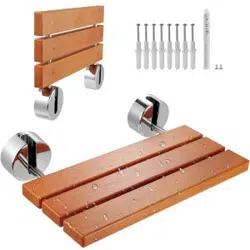
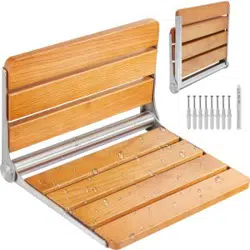
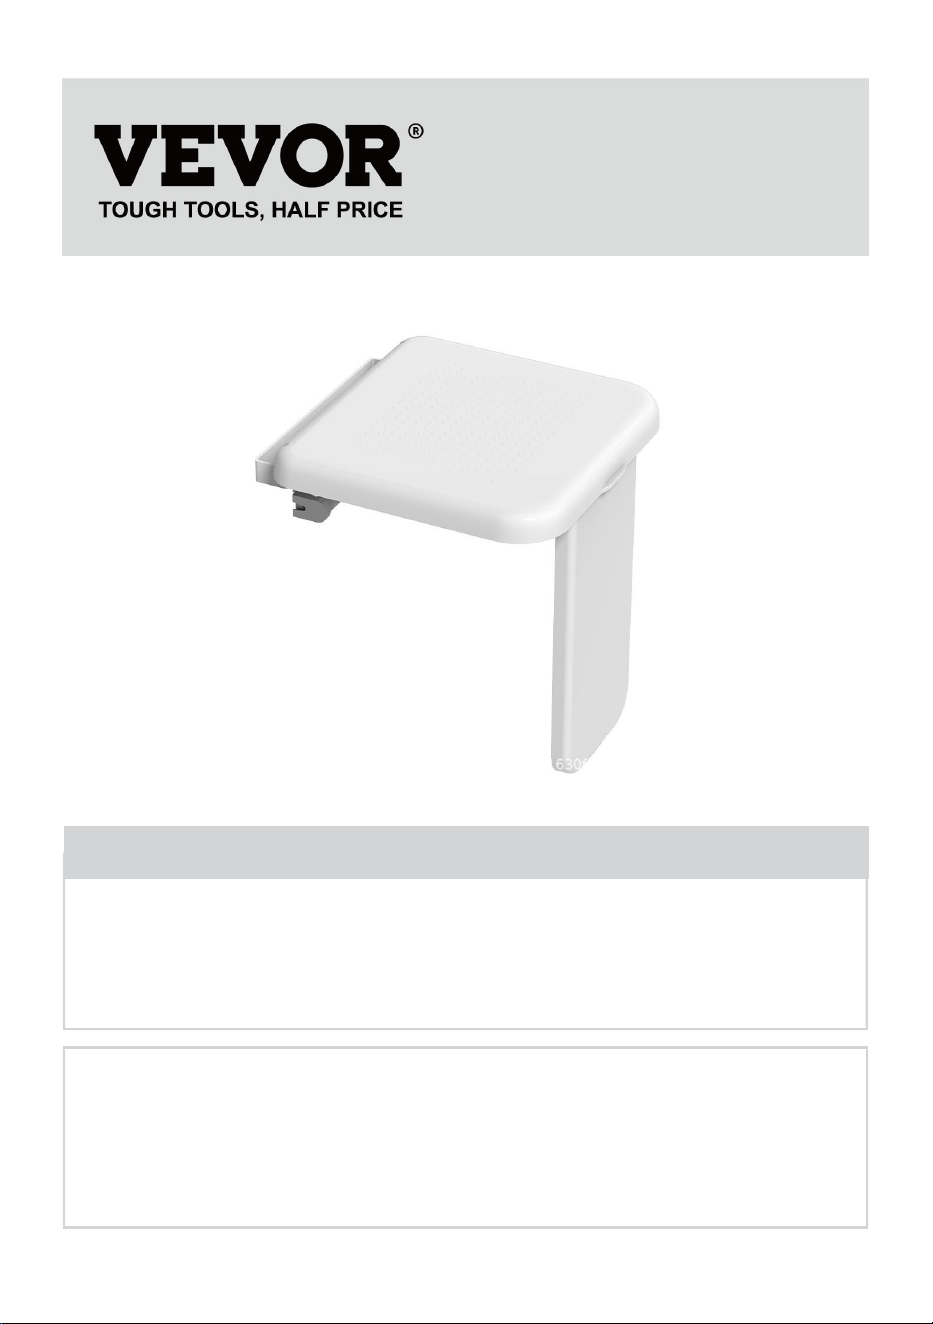
Fold Down Shower Seat
MODEL: LY001
We continue to be committed to provide you tools with competitive price.
"Save Half", "Half Price" or any other similar expressions used by us only represents an
estimate of savings you might benefit from buying certain tools with us compared to the major
top brands and does not necessarily mean to cover all categories of tools offered by us. You
are kindly reminded to verify carefully when you are placing an order with us if you are
actually saving half in comparison with the top major brands.
- 1 -
MODEL: LY001
Have product questions? Need technical support? Please feel free to
contact us:
Technical Support and E-Warranty Certificate
www.vevor.com/support
NEED HELP? CONTACT US!
This is the original instruction, please read all manual instructions
carefully before operating. VEVOR reserves a clear interpretation of our
user manual. The appearance of the product shall be subject to the
product you received. Please forgive us that we won't inform you again if
there are any technology or software updates on our product.
Fold Down Shower Seat
- 2 -
Cautions
1: Please confirm whether the wall is a load-bearing pond before drilling;
2: Before drilling, please confirm whether there is a water pipe at the hole position;
3: Check whether the product accessories are complete before installation;
4: Make sure the drill bit is 8.5mm in size.
5: Make sure the hole depth is 6.5cm
6: The recommended height between the seat and ground is about 40-48cm.
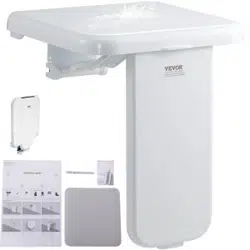
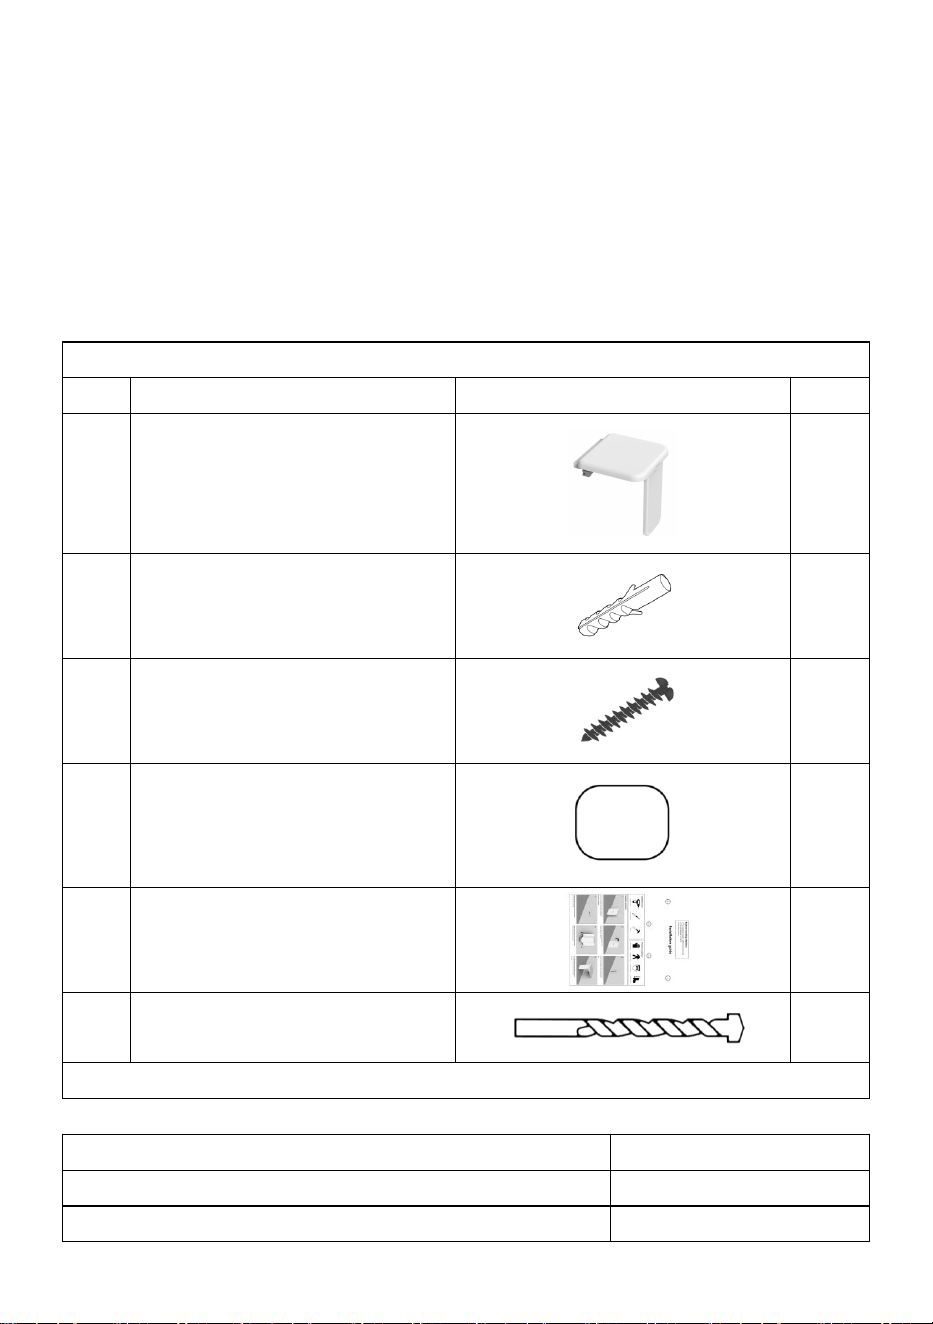
Part List
NO.
Name
Pictures
QTY.
1
Main Body
1
2
Nylon Bolt Cap
4+2
3
Screw ST8*70mm
4+2
4
Soft mud mat
1
5
Mounting Hole Guiding Sticker
1
6
Drill Bit
φ8.5*150
1
Tip:“+”is extra spare parts.
Model
LY001
Specification(inch)
15.7*15.3
Max. Load (lbs/kg)
440/200

- 3 -
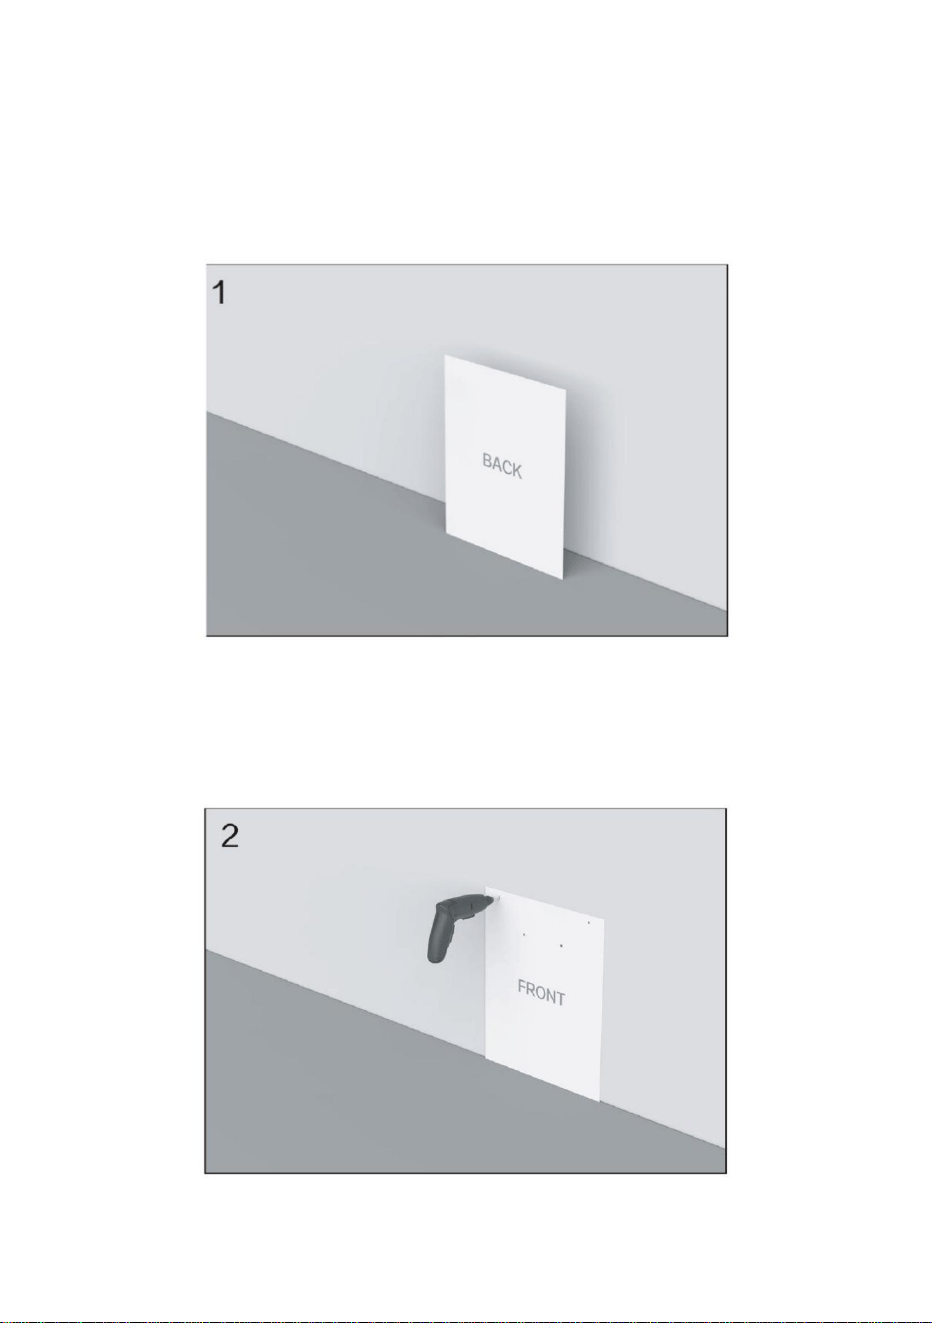
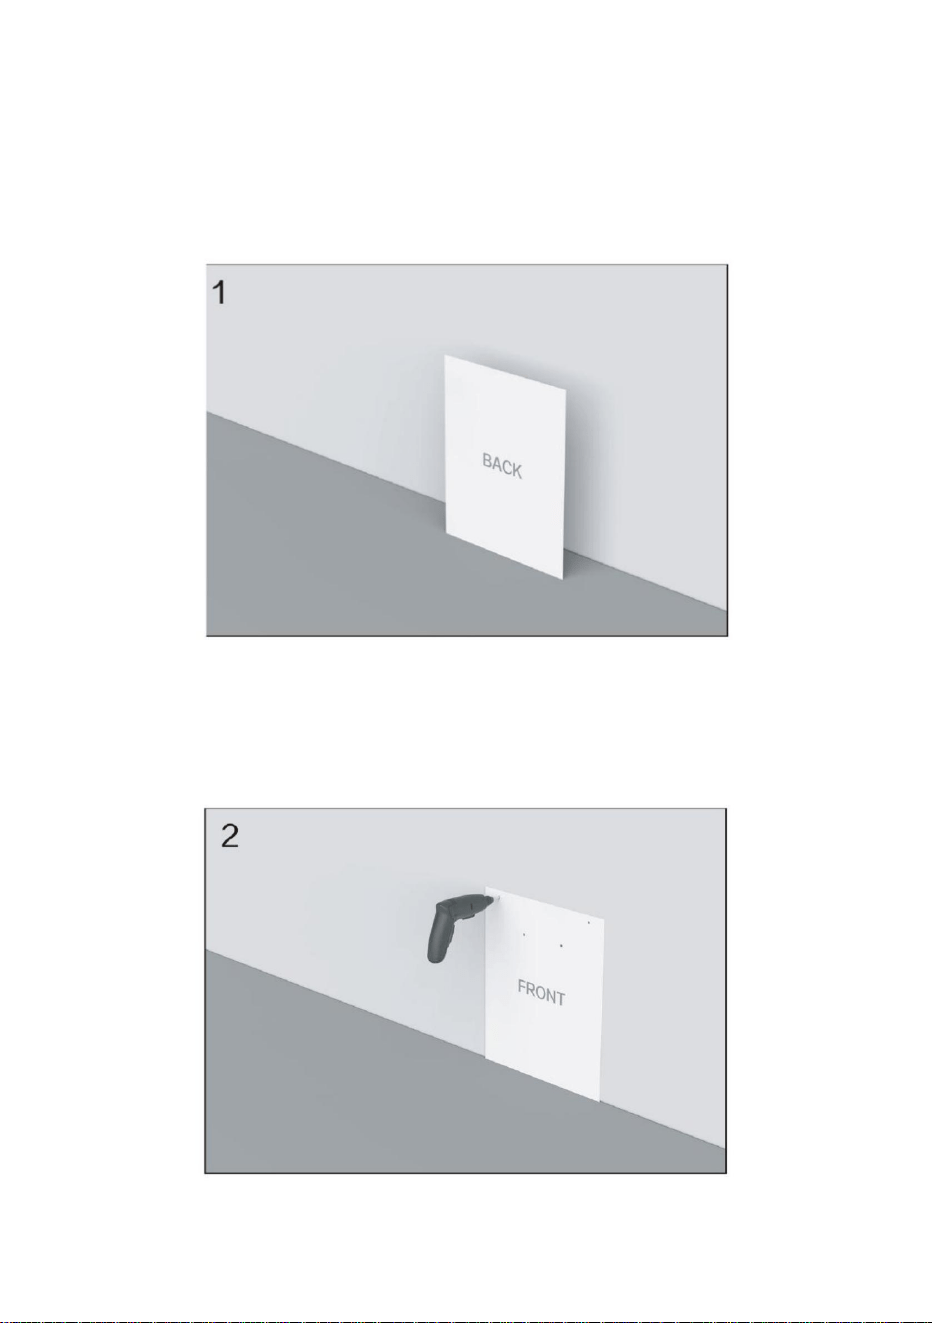
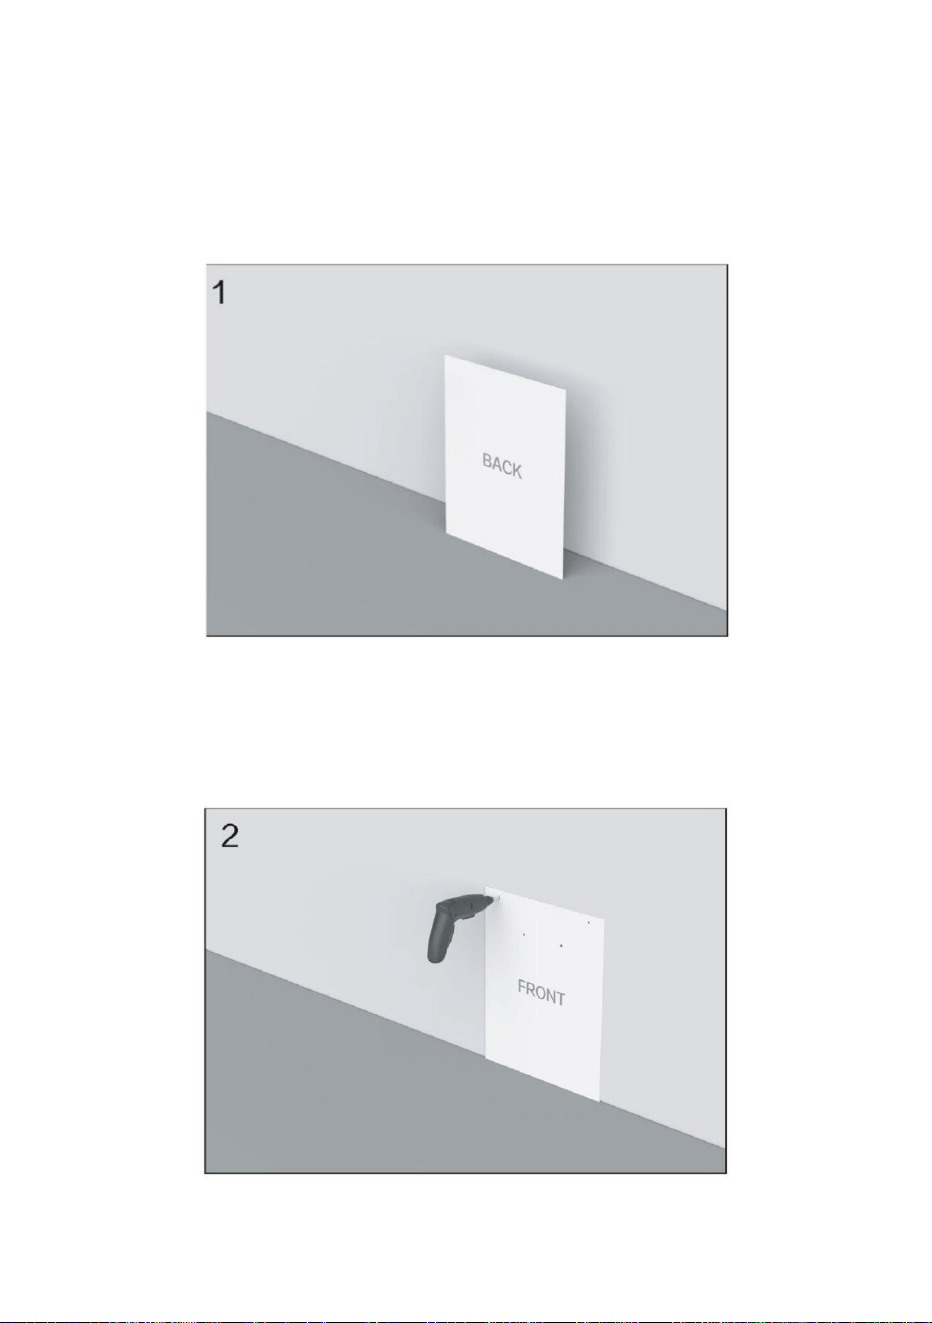
INSTALLATION
STEP1:
Firstly, attach the mounting plate to the wall where you are about to
install.
STEP2:
Punch holes in alignment with the anchor points on the template.
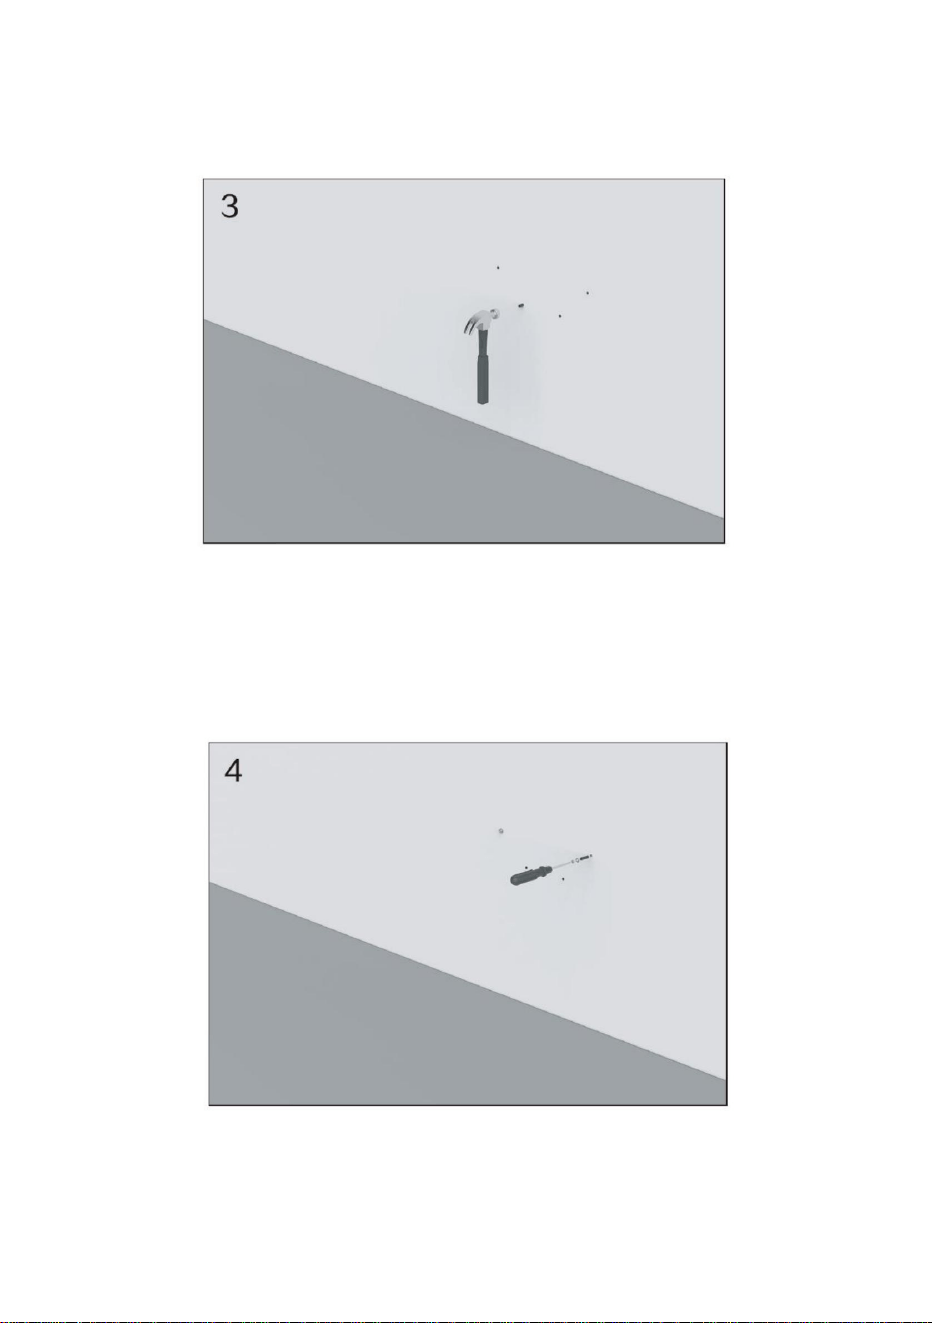
(Drill bit is 8.5mm, punching depth is 65mm)
- 4 -
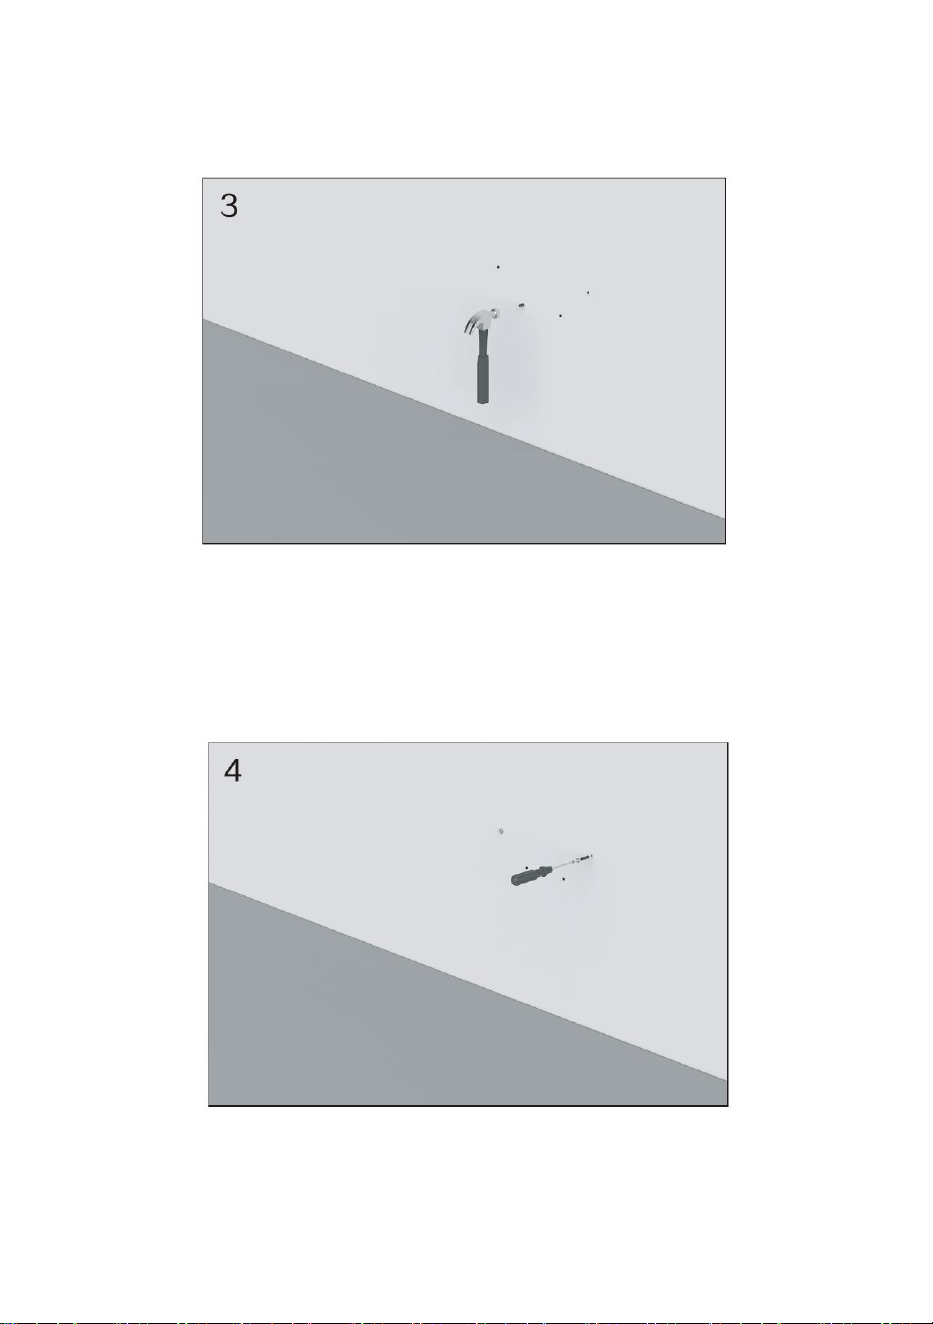
STEP3:
Remove the template, insert the expansion bolt and tap it with a
hammer until it is flush with the wall.
STEP4:
Screw the upper two holes into the screw about 10mm higher than
the wall.

- 5 -
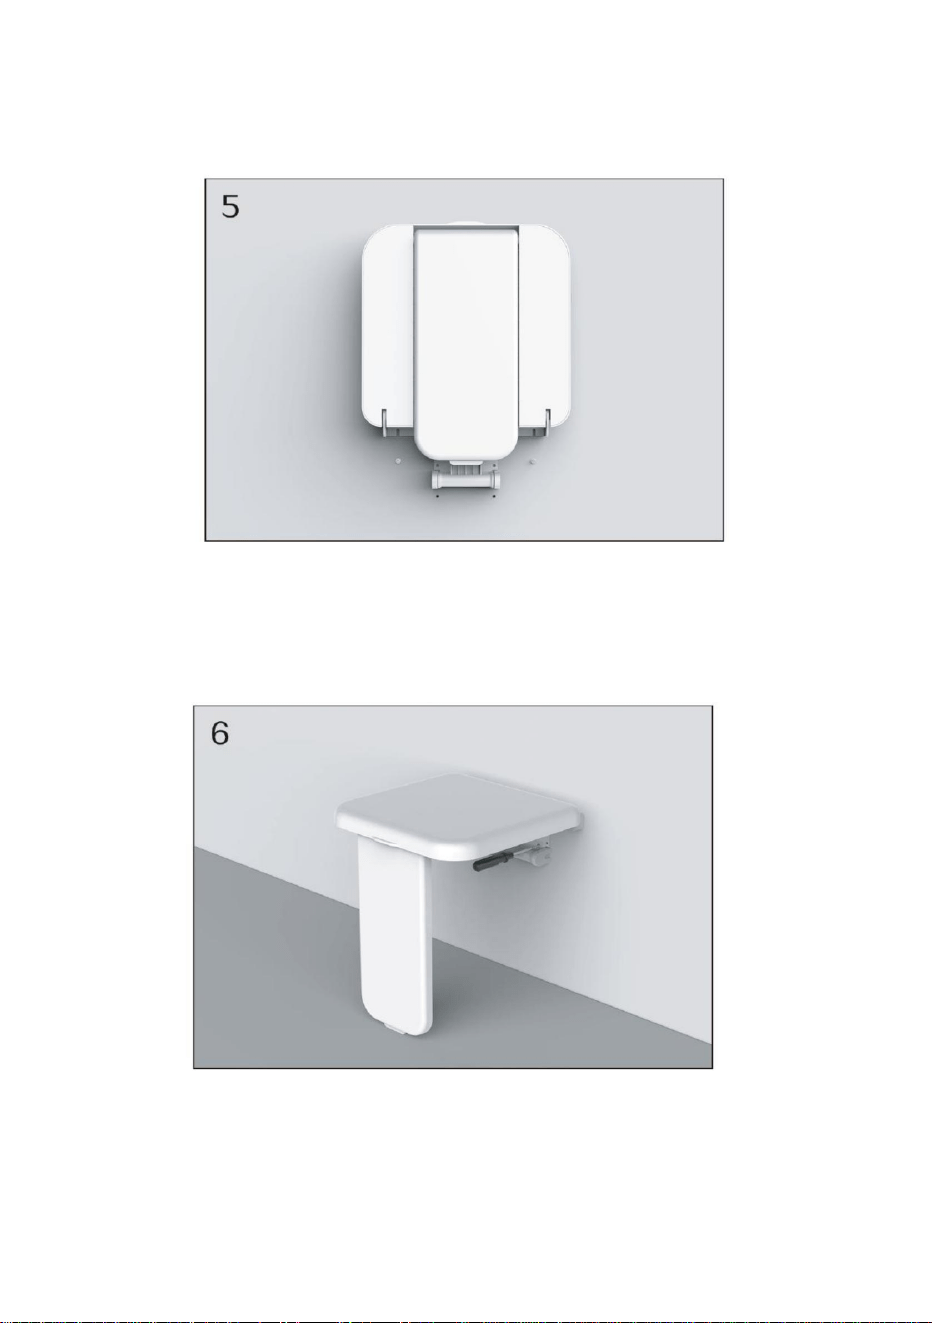
STEP5:
Align the slot on the stool mounting bracket with the screw position
and lock it.
STEP6:
Turn the stool to a proper position, screw the two holes in the lower
part into screws and lock them.
Made In China
Manufacturer: Shanghaimuxinmuyeyouxiangongsi
Address: Shuangchenglu 803nong11hao1602A-1609shi, baoshanqu,
shanghai 200000 CN.
Imported to AUS: SIHAO PTY LTD. 1 ROKEVA STREETEASTWOOD
NSW 2122 Australia
Imported to USA: Sanven Technology Ltd. Suite 250, 9166 Anaheim
Place, Rancho Cucamonga, CA 91730
REP
UK
YH CONSULTING LIMITED.
C/O YH Consulting Limited Office 147,
Centurion House, London Road,
Staines-upon-Thames, Surrey, TW18 4AX
REP
EC
E-CrossStu GmbH
Mainzer Landstr.69,
60329 Frankfurt am Main.


Siègededoucherabattable
"Économisezlamoitié","Moitiéprix"outouteautreexpressionsimilairequenousutilisonsnereprésente
qu'uneestimationdeséconomiesdontvouspourriezbénéficierenachetantcertainsoutilscheznouspar
rapportauxgrandesmarquesetnesignifiepasnécessairementcouvrirtouteslescatégoriesd'outilsproposés.
parnous.Nousvousrappelonsdevérifierattentivementlorsquevouspassezunecommandechez
noussivouséconomisezréellementlamoitiéparrapportauxgrandesmarques.
Nouscontinuonsànousengageràvousfournirdesoutilsàdesprixcompétitifs.
MODÈLE:LY001
Assistancetechniqueetcertificatdegarantie
électroniquewww.vevor.com/support
Machine Translated by Google
Vousavezdesquestionssurlesproduits?Besoind'uneassistancetechnique?N'hésitez
pasànous
contacter:Supporttechniqueetcertificatdegarantieélectronique
www.vevor.com/support
MODÈLE:LY001
Ils'agitdesinstructionsoriginales,veuillezlireattentivementtouteslesinstructions
dumanuelavantdel'utiliser.VEVORseréserveuneinterprétationclairedenotremanuel
d'utilisation.L'apparenceduproduitdépendduproduitquevousavezreçu.Veuillez
nouspardonnerquenousnevousinformeronspluss'ilyadesmisesàjourtechnologiquesou
logiciellessurnotreproduit.
BESOIND'AIDE?CONTACTEZNOUS!
Siègededoucherabattable
1
Machine Translated by Google

NON. Nom
Listedespièces
QTÉ.
Desphotos
Astuce:«+»correspondàdespiècesderechangesupplémentaires.
5
15,7*15,3
Corpsprincipal
4:Assurezvousqueleforetmesure8,5mm.
Tapisdebouesouple
4+2
2:Avantdepercer,veuillezconfirmers’ilyauneconduited’eauàl’emplacementdutrou;
6
1
4+2
1:Veuillezconfirmersilemurestunbassinporteuravantdepercer;
3
440/200
LY001
6:Lahauteurrecommandéeentrelesiègeetlesolestd'environ40à48cm.
2
Autocollantdeguidagedutroudemontage
Modèle
1
5:Assurezvousquelaprofondeurdutrouestde6,5cm
1
φ8,5*150
4
1
3:Vérifiezsilesaccessoiresduproduitsontcompletsavantl'installation;
1
VisST8*70mm
Foret
Spécification(pouces)Max.
Charge(lb/kg)
Capuchondeboulonennylon
Précautions
2
Machine Translated by Google
(Leforetmesure8,5mm,laprofondeurdepoinçonnageestde65mm)
3
ÉTAPE1:
Toutd’abord,fixezlaplaquedemontageaumuroùvousêtessurlepointd’installer.
ÉTAPE2:
Percezdestrousenalignementaveclespointsd'ancragesurlegabarit.
INSTALLATION
Machine Translated by Google

ÉTAPE4:
Vissezlesdeuxtroussupérieursdanslavisenviron10mmplushautquelemur.
ÉTAPE3:
Retirezlegabarit,insérezleboulond'expansionettapezdessusavecunmarteaujusqu'àce
qu'ilaffleurelemur.
4
Machine Translated by Google

5
ÉTAPE6:
Tournezletabouretdansunepositionappropriée,vissezlesdeuxtrousdelapartieinférieuredans
lesvisetverrouillezles.
ÉTAPE5:
Alignezlafentedusupportdemontagedutabouretaveclapositiondelavisetverrouillezla.
FabriquéenChine
Machine Translated by Google

REPRÉSENTANTCE
REPRÉSENTANTDUROYAUMEUNI
ImportéauxÉtatsUnis:SanvenTechnologyLtd.Suite250,9166Anaheim
Lieu,RanchoCucamonga,CA91730
YHCONSULTINGLIMITÉE.
ImportéenAustralie:SIHAOPTYLTD.1RUEROKEVAASTWOOD
NSW2122Australie
Adresse:Shuangchenglu803nong11hao1602A1609shi,baoshanqu,Shanghai
200000CN.
Fabricant:Shanghaimuxinmuyeyouxiangongsi
C/OYHConsultingLimitedBureau147,
CenturionHouse,LondonRoad,
StainesuponThames,Surrey,TW184AX
ECrossStuGmbH
MainzerLandstr.69,
60329FrancfortsurleMain.
Machine Translated by Google


MODELL: LY001
Herunterklappbarer Duschsitz
Technischer Support und E-Garantiezertifikat
www.vevor.com/support
„Sparen Sie die Hälfte“, „Halber Preis“ oder andere ähnliche von uns verwendete Ausdrücke stellen lediglich
eine Schätzung der Einsparungen dar, die Sie durch den Kauf bestimmter Werkzeuge bei uns im Vergleich zu den
großen Top-Marken erzielen könnten, und bedeuten nicht unbedingt, dass alle angebotenen Werkzeugkategorien
abgedeckt werden von uns. Bitte prüfen Sie bei Ihrer Bestellung sorgfältig, ob Sie im Vergleich zu den Top-
Marken tatsächlich die Hälfte sparen.
Wir sind weiterhin bestrebt, Ihnen Werkzeuge zu wettbewerbsfähigen Preisen anzubieten.
Machine Translated by Google

Haben Sie Fragen zum Produkt? Benötigen Sie technische Unterstützung? Bitte kontaktieren
Sie uns:
Technischer Support und E-Garantiezertifikat www.vevor.com/
support
MODELL: LY001
Dies ist die Originalanleitung. Bitte lesen Sie alle Bedienungsanleitungen sorgfältig
durch, bevor Sie das Gerät in Betrieb nehmen. VEVOR behält sich eine klare Auslegung
unserer Bedienungsanleitung vor. Das Aussehen des Produkts hängt von dem Produkt
ab, das Sie erhalten haben. Bitte entschuldigen Sie, dass wir Sie nicht erneut informieren, wenn
es zu unserem Produkt technische oder Software-Updates gibt.
BRAUCHEN SIE HILFE? KONTAKTIERE UNS!
Herunterklappbarer Duschsitz
- 1 -
Machine Translated by Google

NEIN. BilderName
Stückliste
MENGE.
6: Die empfohlene Höhe zwischen Sitz und Boden beträgt etwa 40–48 cm.
LY001
2
Montageloch-Führungsaufkleber
1: Bitte bestätigen Sie vor dem Bohren, ob es sich bei der Wand um einen tragenden Teich handelt.
4+2
1
3
440/200
2: Bitte prüfen Sie vor dem Bohren, ob an der Lochposition eine Wasserleitung vorhanden ist.
6
4+2
4: Stellen Sie sicher, dass der Bohrer eine Größe von 8,5 mm hat.
Hauptkörper
Weiche Schlammmatte
Nylon-Bolzenkappe
5
15,7*15,3
Schraube ST8*70mm
Bohrer
Spezifikation (Zoll) Max.
Belastung (lbs/kg)
1
1
ÿ8,5*150
3: Überprüfen Sie vor der Installation, ob das Produktzubehör vollständig ist.
4
5: Stellen Sie sicher, dass die Lochtiefe 6,5 cm beträgt
1
Modell
1
Vorsichtsmaßnahmen
Tipp: „+“ steht für zusätzliche Ersatzteile.
- 2 -
Machine Translated by Google

(Bohrer ist 8,5 mm, Stanztiefe beträgt 65 mm)
SCHRITT
2: Stanzen Sie Löcher entsprechend den Ankerpunkten auf der Schablone.
SCHRITT
1: Befestigen Sie zunächst die Montageplatte an der Wand, an der Sie sie installieren
möchten.
INSTALLATION
- 3 -
Machine Translated by Google
- 4 -
SCHRITT 4:
Schrauben Sie die oberen beiden Löcher in die Schraube, etwa 10 mm höher als die Wand.
SCHRITT 3:
Entfernen Sie die Schablone, setzen Sie den Spreizdübel ein und klopfen Sie mit einem
Hammer darauf, bis er bündig mit der Wand abschließt.
Machine Translated by Google

In China hergestellt
SCHRITT 6:
Drehen Sie den Hocker in die richtige Position, schrauben Sie die beiden Löcher im unteren Teil
in Schrauben und verriegeln Sie sie.
SCHRITT 5:
Richten Sie den Schlitz an der Hockermontagehalterung an der Schraubenposition aus und
verriegeln Sie ihn.
- 5 -
Machine Translated by Google

UK REP
EG-REP
Place, Rancho Cucamonga, CA 91730
In die USA importiert: Sanven Technology Ltd. Suite 250, 9166 Anaheim
YH CONSULTING LIMITED.
C/O YH Consulting Limited Büro 147,
Centurion House, London Road,
Staines-upon-Thames, Surrey, TW18 4AX
Importiert nach AUS: SIHAO PTY LTD. 1 ROKEVA STREETEASTWOOD
NSW 2122 Australien
Adresse: Shuangchenglu 803nong11hao1602A-1609shi, baoshanqu, Shanghai
200000 CN.
Hersteller: Shanghaimuxinmuyeyouxiangongsi
E-CrossStu GmbH
Mainzer Landstr.69,
60329 Frankfurt am Main.
Machine Translated by Google


MODELLO: LY001
Sedile per doccia ribaltabile
Supporto tecnico e certificato di garanzia
elettronica www.vevor.com/support
"Risparmia la metà", "Metà prezzo" o qualsiasi altra espressione simile da noi utilizzata rappresenta
solo una stima del risparmio che potresti trarre dall'acquistare determinati strumenti con noi rispetto ai
principali marchi più importanti e non significa necessariamente coprire tutte le categorie di strumenti
offerti da noi. Ti ricordiamo gentilmente di verificare attentamente quando effettui un ordine con noi
se stai effettivamente risparmiando la metà rispetto ai migliori marchi principali.
Continuiamo a impegnarci per fornirvi strumenti a prezzi competitivi.
Machine Translated by Google

Hai domande sul prodotto? Hai bisogno di supporto tecnico? Non esitate a contattarci:
Supporto
tecnico e certificato di garanzia elettronica www.vevor.com/
support
MODELLO: LY001
Queste sono le istruzioni originali, leggere attentamente tutte le istruzioni del manuale
prima dell'uso. VEVOR si riserva una chiara interpretazione del nostro manuale d'uso. L'aspetto
del prodotto sarà soggetto al prodotto ricevuto. Ti preghiamo di perdonarci se non ti
informeremo più se sono presenti aggiornamenti tecnologici o software sul nostro prodotto.
HO BISOGNO DI AIUTO? CONTATTACI!
Sedile per doccia ribaltabile
- 1 -
Machine Translated by Google

NO. ImmaginiNome
Elenco delle parti
QUANTITÀ.
Tappo per bullone in nylon
5
15,7*15,3
Punta da trapano
Vite ST8*70mm
Specifica (pollici) Max.
Carico (libbre/kg)
ÿ8,5*150
1
3: verificare se gli accessori del prodotto sono completi prima dell'installazione;
4
1
1
Modello
5: assicurarsi che la profondità del foro sia 6,5 cm
1
LY001
6: L'altezza consigliata tra il sedile e il suolo è di circa 40-48 cm.
2
Adesivo guida foro di montaggio
4+2
1
440/200
3
1: Si prega di verificare se il muro è uno stagno portante prima di forare;
2: Prima di forare, verificare se è presente un tubo dell'acqua nella posizione del foro;
4+2
6
Corpo principale
Tappetino in fango morbido
4: assicurarsi che la punta del trapano abbia una dimensione di 8,5 mm.
Avvertenze
Suggerimento: "+" indica pezzi di ricambio extra.
-2-
Machine Translated by Google

PASSO 1:
Innanzitutto, fissa la piastra di montaggio alla parete su cui stai per installare.
PASSO 2:
Praticare i fori in allineamento con i punti di ancoraggio sul modello.
(La punta da trapano è 8,5 mm, la profondità di punzonatura è 65 mm)
INSTALLAZIONE
- 3 -
Machine Translated by Google

-4-
PASSO 4:
Avvitare i due fori superiori nella vite a circa 10 mm più in alto rispetto al muro.
FASE 3:
Rimuovere la sagoma, inserire il bullone ad espansione e picchiettarlo con un
martello fino a quando non è a filo con il muro.
Machine Translated by Google
Made in China
PASSO 5:
Allineare la fessura sulla staffa di montaggio dello sgabello con la posizione della vite
e bloccarla.
FASE 6:
Ruotare lo sgabello in una posizione corretta, avvitare i due fori nella parte inferiore
nelle viti e bloccarli.
-5-
Machine Translated by Google

Luogo, Rancho Cucamonga, CA 91730
Importato negli Stati Uniti: Sanven Technology Ltd. Suite 250, 9166 Anaheim
YH CONSULENZA LIMITATA.
Importato in AUS: SIHAO PTY LTD. 1 ROKEVA STREETEASTWOOD
NSW 2122Australia
Indirizzo: Shuangchenglu 803nong11hao1602A-1609shi, baoshanqu, shanghai
200000 CN.
Produttore: Shanghaimuxinmuyeyouxiangongsi
E-CrossStu GmbH
C/O YH Consulting Limited Office 147,
Centurion House, London Road,
Staines-upon-Thames, Surrey, TW18 4AX
Mainzer Landstr.69,
60329 Francoforte sul Meno.
REP. DEL REGNO UNITO
REP.CE
Machine Translated by Google


MODELO:LY001
Asientodeduchaplegable
Soportetécnicoycertificadodegarantía
electrónicawww.vevor.com/support
"Ahorreamitaddeprecio","Amitaddeprecio"ocualquierotraexpresiónsimilarutilizadapornosotrossolo
representaunaestimacióndelosahorrosquepodríabeneficiarsealcomprarciertasherramientasconnosotrosen
comparaciónconlasprincipalesmarcasynosignificanecesariamentecubrirtodaslascategoríasdeherramientas
ofrecidas.pornosotros.Lerecordamosque,cuandorealiceunpedidoconnosotros,verifiquecuidadosamente
sirealmenteestáahorrandolamitadencomparaciónconlasprincipalesmarcas.
Seguimoscomprometidosaproporcionarleherramientasaprecioscompetitivos.
Machine Translated by Google

¿Tienepreguntassobreelproducto?¿Necesitasoportetécnico?Nodudeencontactarnos:
Soporte
técnicoycertificadodegarantíaelectrónicawww.vevor.com/support
MODELO:LY001
Estassonlasinstruccionesoriginales;leaatentamentetodaslasinstruccionesdel
manualantesdeoperar.VEVORsereservaunainterpretaciónclaradenuestromanualde
usuario.Laaparienciadelproductoestarásujetaalproductoquerecibió.Perdoneque
noleinformaremosnuevamentesihayactualizacionesdetecnologíaosoftwareennuestro
producto.
¿NECESITASAYUDA?¡CONTÁCTENOS!
Asientodeduchaplegable
1
Machine Translated by Google
Nombre FotosNO.
Listade
CANT.
6:Laalturarecomendadaentreelasientoyelsueloesdeunos4048cm.
LY001
2
Adhesivoguíaparaorificiosdemontaje
1:Confirmesilaparedesunestanquedecargaantesdeperforar;
4+2
1
3
440/200
2:Antesdeperforar,confirmesihayunatuberíadeaguaenlaposicióndelorificio;
6
4+2
4:Asegúresedequelabrocatengauntamañode8,5mm.
Cuerpoprincipal
Esteradebarrosuave
Tapadepernodenailon
5
15,7*15,3
TornilloST8*70mm
Broca
Especificación(pulgadas)
Máx.Carga(libras/kg)
1
1
φ8.5*150
3:Verifiquesilosaccesoriosdelproductoestáncompletosantesdelainstalación;
4
5:Asegúratedequelaprofundidaddelagujeroseade6,5cm.
1
Modelo
1
Precauciones
Consejo:“+”sonrepuestosadicionales.
2
Machine Translated by Google

(Labrocaesde8,5mm,laprofundidaddeperforaciónesde65mm)
PASO2:
Hagaagujerosalineadosconlospuntosdeanclajedelaplantilla.
PASO1:
Enprimerlugar,fijelaplacademontajealapareddondeestáapuntodeinstalarla.
INSTALACIÓN
3
Machine Translated by Google

4
PASO4:
Atornillelosdosorificiossuperioreseneltornillounos10mmmásaltoquelapared.
PASO3:
Retirelaplantilla,inserteelpernodeexpansiónygolpéeloconunmartillohasta
quequedealrasdelapared.
Machine Translated by Google

Hechoenchina
PASO6:
Gireeltabureteaunaposiciónadecuada,atornillelosdosorificiosdelaparteinferior
entornillosyasegúrelos.
PASO5:
Alineelaranuradelsoportedemontajedeltabureteconlaposicióndeltornilloy
asegúrelo.
5
Machine Translated by Google
REPRESENTANTEDELACE
REPRESENTANTEDELREINOUNIDO
Lugar,RanchoCucamonga,CA91730
ImportadoaEE.UU.:SanvenTechnologyLtd.Suite250,9166Anaheim
YHCONSULTINGLIMITADO.
C/OYHConsultingLimitedOficina147,
CenturionHouse,LondonRoad,
StainesuponThames,Surrey,TW184AX
ImportadoaAUS:SIHAOPTYLTD.1ROKEVACALLEASTWOOD
NuevaGalesdelSur2122Australia
Dirección:Shuangchenglu803nong11hao1602A1609shi,baoshanqu,shanghai
200000CN.
Fabricante:Shanghaimuxinmuyeyouxiangongsi
ECrossStuGmbH
MainzerLandstr.69,
60329FráncfortdelMeno.
Machine Translated by Google


Składane siedzisko prysznicowe
Nadal dokładamy wszelkich starań, aby zapewnić Państwu narzędzia w konkurencyjnej cenie.
„Zaoszczędź o połowę”, „o połowę ceny” lub inne podobne wyrażenia używane przez nas przedstawiają jedynie
szacunkową oszczędność, jaką możesz zyskać kupując u nas określone narzędzia w porównaniu z głównymi najlepszymi
markami i niekoniecznie oznaczają uwzględnienie wszystkich kategorii oferowanych narzędzi przez nas. Przypominamy,
aby podczas składania zamówienia u nas dokładnie sprawdzić, czy faktycznie oszczędzasz połowę w porównaniu
z czołowymi markami.
MODEL: LY001
Wsparcie techniczne i certyfikat e-gwarancji
www.vevor.com/support
Machine Translated by Google

Masz pytania dotyczące produktu? Potrzebujesz wsparcia technicznego? Prosimy o kontakt:
Wsparcie
techniczne i certyfikat e-gwarancji www.vevor.com/support
MODEL: LY001
To jest oryginalna instrukcja. Przed przystąpieniem do obsługi prosimy o dokładne
zapoznanie się ze wszystkimi instrukcjami. VEVOR zastrzega sobie jasną interpretację naszej
instrukcji obsługi. Wygląd produktu zależy od produktu, który otrzymałeś. Proszę
wybaczyć nam, że nie będziemy ponownie informować Państwa, jeśli pojawią się jakieś
aktualizacje technologii lub oprogramowania naszego produktu.
POTRZEBUJĘ POMOCY? SKONTAKTUJ SIĘ Z NAMI!
Składane siedzisko prysznicowe
- 1 -
Machine Translated by Google

NazwaNIE.
Lista części
ILOŚĆ.
Kino
Wskazówka: „+” to dodatkowe części zamienne.
5
15,7*15,3
Główny korpus
4: Upewnij się, że wiertło ma rozmiar 8,5 mm.
Miękka mata błotna
4+2
2: Przed wierceniem sprawdź, czy w miejscu otworu znajduje się rura wodna;
6
1
4+2
1: Przed wierceniem sprawdź, czy ściana jest stawem nośnym;
3
440/200
LY001
6: Zalecana wysokość między siedziskiem a podłożem wynosi około 40-48 cm.
2
Naklejka prowadząca do otworu montażowego
Model
1
5: Upewnij się, że głębokość otworu wynosi 6,5 cm
1
φ8,5*150
4
1
3: Przed instalacją sprawdź, czy akcesoria produktu są kompletne;
1
Śruba ST8*70mm
Wiertło
Specyfikacja (cale) Maks.
Obciążenie (funty/kg)
Nylonowa nasadka na śrubę
Przestrogi
- 2 -
Machine Translated by Google
(Wiertło ma średnicę 8,5 mm, głębokość dziurkowania wynosi 65 mm)
- 3 -
KROK 2:
Wykonaj otwory w jednej linii z punktami kontrolnymi szablonu.
KROK 1:
Najpierw przymocuj płytę montażową do ściany, w której chcesz zainstalować.
INSTALACJA
Machine Translated by Google

KROK 4:
Wkręć dwa górne otwory w śrubę około 10 mm wyżej od ściany.
KROK 3:
Usuń szablon, włóż kołek rozporowy i uderzaj młotkiem, aż zrówna się ze ścianą.
- 4 -
Machine Translated by Google

- 5 -
KROK 5:
Wyrównaj szczelinę we wsporniku montażowym stołka z pozycją śruby i zablokuj ją.
KROK 6:
Obróć stołek do właściwej pozycji, wkręć dwa otwory w dolnej części w śruby i zablokuj
je.
Wyprodukowano w Chinach
Machine Translated by Google

REPREZENT KE
REPUBLIKA Wielkiej Brytanii
Import do USA: Sanven Technology Ltd. Suite 250, 9166 Anaheim
Place, Rancho Cucamonga, Kalifornia 91730
YH CONSULTING SPÓŁKA Z OGRANICZONĄ ODPOWIEDZIALNOŚCIĄ.
Import do AUS: SIHAO PTY LTD. 1 ROKEVA STREETEASTWOOD
Nowa Południowa Walia 2122 Australia
Adres: Shuangchenglu 803nong11hao1602A-1609shi, baoshanqu, szanghaj
200000 CN.
Producent: Shanghaimuxinmuyeyouxiangongsi
C/O YH Consulting Limited Office 147,
Centurion House, London Road,
Staines-upon-Thames, Surrey, TW18 4AX
E-CrossStu GmbH
Mainzer Landstr.69,
60329 Frankfurt nad Menem.
Machine Translated by Google


Neerklapbare douchestoel
We blijven ons inzetten om u gereedschap tegen een concurrerende prijs te bieden.
"Bespaar de helft", "Halve prijs" of andere soortgelijke uitdrukkingen die door ons worden gebruikt vertegenwoordigt
slechts een schatting van de besparingen die u zou kunnen profiteren als u bepaalde gereedschappen bij ons koopt in
vergelijking met de grote topmerken en betekent niet noodzakelijkerwijs dat deze alle categorieën van aangeboden
gereedschappen omvatten door ons. Wij verzoeken u vriendelijk om bij het plaatsen van een bestelling bij ons
goed na te gaan of u daadwerkelijk de helft bespaart in vergelijking met de grote topmerken.
MODEL: LY001
Technische ondersteuning en e-garantiecertificaat
www.vevor.com/support
Machine Translated by Google

Heeft u productvragen? Technische ondersteuning nodig? Neem gerust contact met ons op:
Technische
ondersteuning en e-garantiecertificaat www.vevor.com/
support
MODEL: LY001
Dit is de originele instructie. Lees alle instructies in de handleiding zorgvuldig door
voordat u ermee aan de slag gaat. VEVOR behoudt zich een duidelijke interpretatie van onze
gebruikershandleiding voor. Het uiterlijk van het product is afhankelijk van het product
dat u heeft ontvangen. Vergeef ons alstublieft dat we u niet opnieuw zullen informeren als er
technologie- of software-updates zijn voor ons product.
HULP NODIG? NEEM CONTACT MET ONS OP!
Neerklapbare douchestoel
- 1 -
Machine Translated by Google

NEE. Naam
Onderdelen lijst
AANTAL.
Afbeeldingen
Tip: “+” is extra reserveonderdelen.
5
15,7*15,3
Centrale gedeelte
4: Zorg ervoor dat de boor een afmeting van 8,5 mm heeft.
Zachte moddermat
4+2
2: Controleer vóór het boren of er een waterleiding op de gatpositie aanwezig is;
6
1
4+2
1: Bevestig vóór het boren of de muur een dragende vijver is;
3
440/200
LY001
6: De aanbevolen hoogte tussen de zitting en de grond is ongeveer 40-48 cm.
2
Geleidingssticker voor montagegat
Model
1
5: Zorg ervoor dat de gatdiepte 6,5 cm is
1
ÿ8,5*150
4
1
3: Controleer vóór installatie of de productaccessoires compleet zijn;
1
Schroef ST8*70mm
Boor
Specificatie (inch) Max.
Belasting (lbs/kg)
Nylon boutdop
Waarschuwingen
- 2 -
Machine Translated by Google
(Boor is 8,5 mm, ponsdiepte is 65 mm)
- 3 -
STAP2:
Maak gaten in lijn met de ankerpunten op de sjabloon.
STAP1:
Bevestig eerst de montageplaat aan de muur waar u deze gaat installeren.
INSTALLATIE
Machine Translated by Google

STAP4:
Schroef de bovenste twee gaten in de schroef, ongeveer 10 mm hoger dan de muur.
STAP3:
Verwijder de sjabloon, plaats de expansiebout en tik erop met een hamer totdat
deze gelijk ligt met de muur.
- 4 -
Machine Translated by Google

- 5 -
STAP6:
Draai de kruk in de juiste positie, schroef de twee gaten in het onderste deel in
schroeven en vergrendel ze.
STAP5:
Lijn de gleuf op de montagebeugel van de kruk uit met de schroefpositie en vergrendel
deze.
Gemaakt in China
Machine Translated by Google

Britse REP
EG REP
Geïmporteerd in de VS: Sanven Technology Ltd. Suite 250, 9166 Anaheim
Plaats, Rancho Cucamonga, CA 91730
YH CONSULTING LIMITED.
C/O YH Consulting Limited Office 147,
Centurion House, London Road,
Staines-upon-Thames, Surrey, TW18 4AX
Geïmporteerd naar AUS: SIHAO PTY LTD. 1 ROKEVA STREETEASTWOOD
NSW 2122 Australië
Adres: Shuangchenglu 803nong11hao1602A-1609shi, baoshanqu, shanghai
200000 CN.
Fabrikant: Shanghaimuxinmuyeyouxiangongsi
E-CrossStu GmbH
Mainzer Landstr.69,
60329 Frankfurt am Main.
Machine Translated by Google


MODELL: LY001
Nedfällbar duschsits
Teknisk support och e-garanticertifikat
www.vevor.com/support
"Spara hälften", "halva priset" eller andra liknande uttryck som används av oss representerar
bara en uppskattning av besparingar du kan dra nytta av att köpa vissa verktyg hos oss jämfört med
de stora toppmärkena och betyder inte nödvändigtvis att täcka alla kategorier av verktyg som erbjuds
av oss. Du påminns vänligen om att noggrant kontrollera när du gör en beställning hos oss om
du faktiskt sparar hälften i jämförelse med de främsta stora varumärkena.
Vi fortsätter att vara engagerade i att ge dig verktyg till konkurrenskraftiga priser.
Machine Translated by Google

Har du produktfrågor? Behöver du teknisk support? Kontakta oss gärna: Teknisk support och
e-
garanticertifikat www.vevor.com/support
MODELL: LY001
Detta är den ursprungliga instruktionen, läs alla instruktioner noggrant innan du
använder den. VEVOR reserverar sig för en tydlig tolkning av vår användarmanual. Utseendet
på produkten är beroende av den produkt du fått. Ursäkta oss att vi inte kommer att
informera dig igen om det finns någon teknik eller mjukvaruuppdateringar på vår produkt.
BEHÖVS HJÄLP? KONTAKTA OSS!
Nedfällbar duschsits
- 1 -
Machine Translated by Google

namn BilderNEJ.
Dellista
ANTAL.
ÿ8,5*150
1
3: Kontrollera om produktens tillbehör är kompletta före installation;
4
1
1
Modell
5: Se till att håldjupet är 6,5 cm
1
Nylon Bult Cap
5
15,7*15,3
Skruv ST8*70mm
Borr
2: Innan du borrar, vänligen bekräfta om det finns ett vattenrör vid hålpositionen;
4+2
6
Specifikation (tum) Max.
Belastning (lbs/kg)
Huvudkropp
Mjuk lermatta
4: Se till att borrkronan är 8,5 mm stor.
LY001
6: Den rekommenderade höjden mellan sitsen och marken är ca 40-48cm.
2
Monteringshål Guidande klistermärke
4+2
1
440/200
1: Kontrollera om väggen är en bärande damm innan du borrar;
3
Varningar
Tips: "+" är extra reservdelar.
- 2 -
Machine Translated by Google

(Bor är 8,5 mm, stansdjup är 65 mm)
STEG 2:
Slå hål i linje med förankringspunkterna på mallen.
STEG 1:
Fäst först monteringsplattan på väggen där du ska installera.
INSTALLATION
- 3 -
Machine Translated by Google

- 4 -
STEG 3:
Ta bort mallen, sätt i expansionsbulten och knacka på den med en hammare tills
den är jämn med väggen.
STEG 4:
Skruva fast de två övre hålen i skruven ca 10 mm högre än väggen.
Machine Translated by Google

Tillverkad i Kina
STEG 6:
Vrid pallen till rätt läge, skruva fast de två hålen i den nedre delen i skruvar och lås dem.
STEG 5:
Rikta in spåret på pallens monteringsfäste med skruvläget och lås det.
- 5 -
Machine Translated by Google

EC REP
UK REP
Place, Rancho Cucamonga, CA 91730
Importerad till USA: Sanven Technology Ltd. Suite 250, 9166 Anaheim
YH CONSULTING LIMITED.
C/O YH Consulting Limited Office 147,
Centurion House, London Road,
Staines-upon-Thames, Surrey, TW18 4AX
Importerad till AUS: SIHAO PTY LTD. 1 ROKEVA STREETEASTWOOD
NSW 2122 Australien
Adress: Shuangchenglu 803nong11hao1602A-1609shi, baoshanqu, shanghai
200000 CN.
Tillverkare: Shanghaimuxinmuyeyouxiangongsi
Mainzer Landstr.69,
60329 Frankfurt am Main.
E-CrossStu GmbH
Machine Translated by Google