
USER MANUAL
Digital Level Box
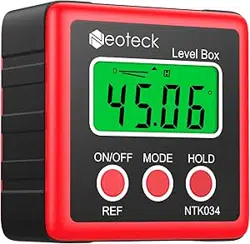
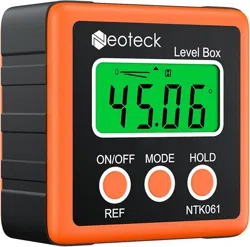
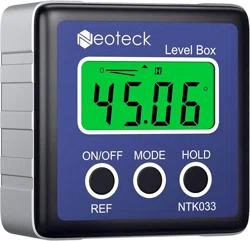
Model:NTK033/NTK034/NTK061

Contents
1. English Manual......................................................1
2. German Manual.....................................................8
3. French Manual.....................................................16
4. Spanish Manual....................................................24
5. Italian Manual.......................................................31
6. Japanese Manual.................................................38

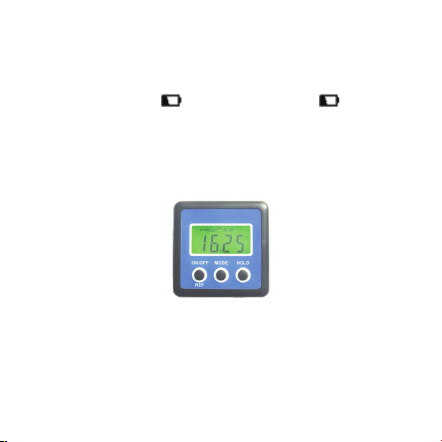
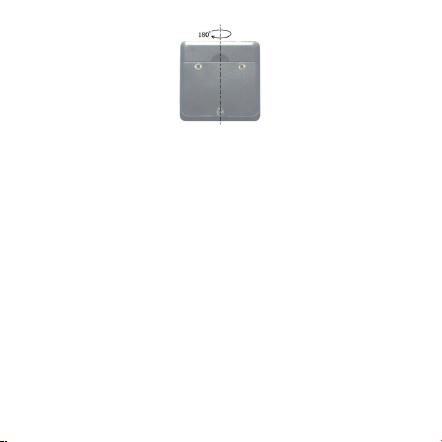
Digital Level Box
DESCRIPTION
This digital level is a highly versatile leveling tool designed
for fast, easy operation
● Measuring range of digital display: 4×90°
● Resolution of Digital Display : ±0.01°
● Precision of Digital Display : ±0.1° at 0° and 90°
±0.2° at other angles
● Unit of measurement (°degrees / % / mm/m / IN/FT)
● Backlight
● Hold function
● 0°calibration
● Battery type : 2x1.5V “AAA” batteries
● Working temperature: 0℃ ~ 40℃
●Storage temperature: -10℃ ~ 50℃
●Dimensions: 58*58*32mm
●Weight: 74g (without battery)
1

2. ON/OFF
Press ON/OFF button to turn the equipment on. And it
shows the last mode before shutdown. Hold ON/OFF button
not to put to turn it off.
After about 3 minutes not using the equipment, it will switch
off automatically.
3.Turn on the equipment and put it to the level position for
measuring.
2
Operation instructions
1. Battery replacement
Remove the rear battery cover of the receiver by
unscrewing the battery cover retaining screw. The cover
will now lift off. Open the battery case. Put two “AAA”
batteries and close the case. Your electronic level is now
ready to use.
3
4. Unit of measurement selection (°degrees / % / mm/m
IN/FT)
After switching on, the screen always shows the last mode
before shutdown. By pressing the MODE button you can
change the angles unit display units from degrees (°) to
percent (%), to (mm/m) to pitch (in/ft). Pitch readings are
in 1/8-inch/fee increments.
The icon indicates the current angle’s position,
either up or down away from the horizontal or vertical
position.
5. Angle measure
If the equipment isn’t in level, it will display values on the
screen. Press REF button to set current angle to be zero,
LCD backlight will stay on for approximately 20 seconds
with no movement of the level, then it will be turned off
automatically.
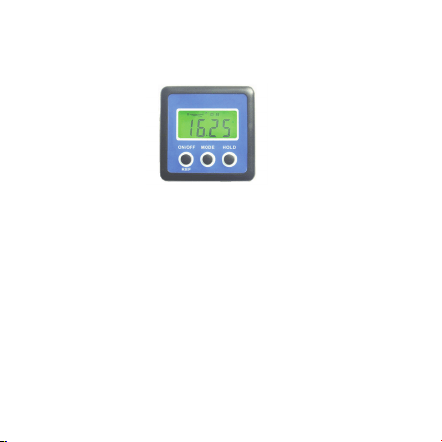
7. Hold
In positions where the display might not be readable, the
actual measured value can then be saved by pressing the
HOLD button, then a saved measured value is displayed
and the icon will show on the screen. By pressing the
HOLD button another time, the measuring mode will get
reactivated.
8. Low battery indicator
Recommend to replace two new “AAA” batteries, when the
low Battery indicator “ ” shows on the screen.
4
enter relative angle measurement mode. The icon will
show on the screen. Press REF button again to cancel the
function.
6. Backlight function
Press any button, backlight of the screen will turn on. The
9. User’s calibration
5
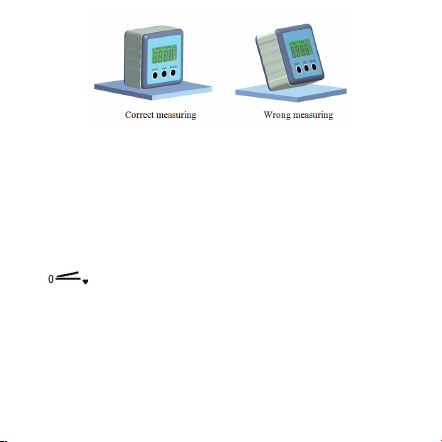
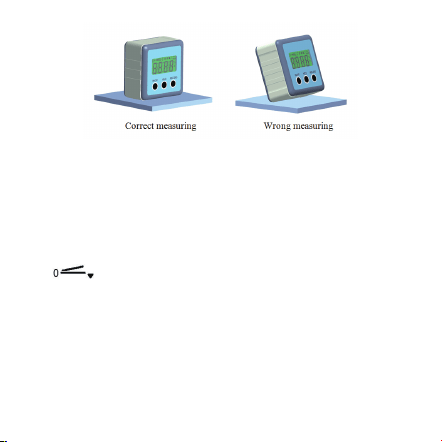
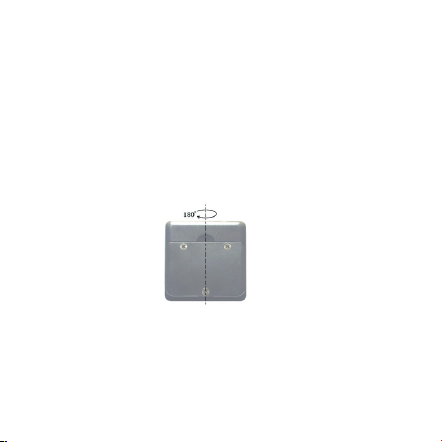
a. Turn off the equipment. Put the equipment on a flat and
smooth solid surface. (see the following figure).
b. In the shutdown status, press and hold HOLD button
first, then press ON/OFF button, until the LCD display
reads “CAL”.
c. Keep the equipment still for a period of time and then
press the HOLD button, display reads “CAL1”.
d. In the same location, rotate the equipment 180°
(see the following figure), then press the HOLD button,
display reads “CAL2”. After the “CAL2” disappears, the
calibration is completed and then the LCD will show the
current angle in high-accuracy-display.

NOTE:
6
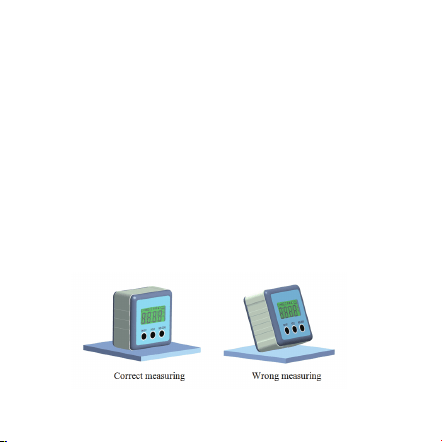
● The calibration must be performed on a flat and smooth
surface with the tilt no more than 5°. If it exceeds 5°,
display reads “Err”, that indicates the user can’t proceed
to do the calibration.
● During calibrating, the level also can not be beveled or
moved.
● After completed calibration, the equipment
automatically replaces from original factory data to
consumer’s data, so it must be careful to use this
function.

7
Caution
Please turn off the item when it is not in use in order to
prolong its working life.
Warranty
Thanks for using neoteck product,all neoteck product
comes with warranty of 18 months from the day of
purchase, if you need any support, please feel free to
contact us.
Contact
Email: [email protected]

Digitaler Neigungsmesser
Beschreibung
Dieser digitale Neigungsmesser ist ein hochwertiges
Messinstrument zum Messen der Steigung, leicht und
schnell zu verwenden.
●Messbereich des digitalen Displays: 4 x 90°
●Auflösung des digitalen Displays: ±0.01°
●Genauigkeit des digitalen Displays: ±0.1° at 0° and 90°
±0.2° bei anderen Winkeln
●Maßeinheiten (°degrees / % / mm/m / IN/FT)
●Hintergrundbeleuchtung
●Hold-Funktion
●0 ° Kalibrierung
●Batterietyp: 2 x 1.5V AAA Batterien
● Arbeitstemperatur: 0℃ ~ 40℃
●Lagertemperatur: -10℃ ~ 50℃
●Dimensions: 58*58*32mm
●Gewicht: 74g (ohne Batterien)
8

Bedienungsanleitungen
1.Batterieersatz
Entfernen Sie die rückseitige Batterieabdeckung, indem
Sie die Schraube herausdrehen. Die Abdeckung hebt ab.
Öffnen Sie das Batteriefach. Setzen Sie zwei "AAA"
Batterien und schließen Sie den Fall. Ihr Inklinometer ist
einsatzbereit.
2.ON/OFF
Zur Einschaltung des Neigungsmessers drücken Sie
ON/OFF Taste. Vor Ausschalten wird das Gerät das letzte
Modus zeigen. Halten Sie die ON / OFF -Taste gedrückt,
um sie nicht auszuschalten.
Wenn das Gerät nach etwa 3 Minuten nicht benutzt wird,
wird es automatisch abgeschaltet.
3.Schalten Sie das Gerät ein und stellen Sie es auf die
flächige Position zum Messen.
9
4.Wahl der Maßeinheiten(°degrees / % / mm/m IN/FT)
Nach der Anschaltung wird das Gerät das letzte Modus
vor Ausschalten zeigen. Drücken Sie MODE-Taste, um
die Winkeleinheiten von Grad (°) bis Prozent (%),
bis (mm / m) bis Neigung (in / ft) ändern. Der Ablesewert
der Niegung ist in 1/8-inch/ft Inkrement.
Das Symbol zeigt die Position des aktuellen Winkels
an, bewegen entweder nach oben oder unten von der
horizontalen oder vertikalen Position.
5.Winkelmaß
Wenn das Neigungsmesser nicht auf der flächigen
Position ist, wird es einen Wert auf dem Display zeigen.
Drücken Sie REF-Taste, um den aktuellen Winkel auf
10
null zu setzen und relativen Winkelmessmodus zu
erreichen.
Das Symbol zeigt auf dem Display an. Drücken Sie
REF-Taste wieder, um die Funktion abzubrechen.
6.Hintergrundbeleuchtung
Drücken Sie irgendeine Taste, die Hintergrundbeleuchtung
des Displays wird eingeschaltet. Die LCD-
Hintergrundbeleuchtung bleibt für etwa 20 Sekunden.
Ohne Bewegung wird das Gerät automatisch
ausgeschaltet.
7.Hold-Funktion
In Positionen, in denen die Anzeige nicht lesbar ist, kann
der aktuelle Messwert dann durch Drücken der HOLD-
Taste gespeichert werden, dann wird ein gespeicherter
Messwert angezeigt und das Symbol wird auf dem
Bildschirm angezeigt. Durch erneutes Drücken der HOLD-
Taste wird der Messmodus wieder aktiviert.
11
8.Anzeiger der niedrigen Batterie
Wenn die niedrige Batterieanzeige " " auf dem
Bildschirm erscheint, ersetzen Sie zwei neue "AAA"
Batterien.
9.Kalibrierung
a. Das Gerät ausschalten. Dann das Gerät auf eine flache
harte Oberfläche sanft stellen. (wie das Photo)
12
b. Wenn das Gerät ausgeschaltet ist,halten Sie zuerst die
‘HOLD’Taste,dann drücken Sie‘ON/OFF’Taste bis zum der
LCD-Bildschirm‘CAL’anzeigt.
c. lassen das Gerät läuft,dann drücken Sie die ‘HOLD’
Taste bis zum der LCD-Bildschirm’CAL1’anzeigt.
d. drehen Sie das Gerät 180° an derselben Stelle
(wie das Photo), dann drücken Sie die ‘HOLD’Taste,der
13
LCD-Bildschirm wird‘CAL2’anzeigen. Nach Ausblenden
des "CAL2" ist die Kalibrierung abgeschlossen und das
LCD wird den aktuellen Winkel genau anzeigen.

Hinweise:
● Die Kalibrierung muss auf einer flachen und glatten
Oberfläche stellen.Die Neigung der Oberfläche darf nicht
mehr als 5 ° sein. Wenn es mehr als 5 ° ist,wird auf dem
Display "Err" anzeigen. Das bedeutet, dass der Benutzer
die Kalibrierung nicht führen kann.
● Während des Kalibrierens kann die Neigung auch nicht
verändert werden.
● Nach Abschluss der Kalibrierung wird die aktuelle
Daten von der ursprünglichen Fabrikdaten automatisch
ersetzt. Deshalb muss diese Funktion sorgfältig
verwendet werden.
14

Vorsicht
Bitte schalten Sie das Produkt aus, wenn es nicht
verwendet wird, um die Lebensdauer zu verlängern.
Garantie
Danke für Ihre Wahl des NEOTECK Produkts, alle
Produkte NEOTECKs kommen mit einer 18 Monaten
Garantie ab dem Tag des Kaufs. Wenn Sie Hilfen
benötigen, wenden Sie sich bitte an uns.
Kontakt
E-mail: [email protected]
15

Niveau à Bulle Numérique
DESCRIPTION
Ce Rapporteur d'angle numérique est un outil de
nivellement très polyvalent conçu pour un fonctionnement
rapide et facile
● Gamme de mesure de l'affichage numérique : 4×90°
● Résolution de l'affichage numérique : ±0.01°
● Précision de l'affichage numérique : ±0.1° at 0° and 90°
±0.2° à d'autres angles
● Unité de mesure : (°degrés / % / mm/m / IN/FT)
● Rétro-éclairage
● Fonction de hold
● 0° étalonnage
● Type de batterie : 2x Batteries "AAA" 1.5V
Température de fonctionnement : 0℃ ~ 40℃
Température de stockage : -10℃ ~ 50℃
Dimensions: 58*58*32mm
Poids: 74g (sans batterie)
16

Instructions d'utilisation :
1.Remplacement de la batterie
Retirez le couvercle de la batterie arrière du récepteur par
dévisser la vis de retenue du couvercle de la batterie. La
couverture va s'élever.Ouvrez le couvercle de la batterie.
Mettez deux
piles "AAA" et fermez le couvercle.
2.ON/OFF
Appuyez sur la touche ON / OFF pour allumer
l'équipement. Et il montre le dernier mode avant l'arrêt.
Tenez le bouton ON / OFF pour ne pas l'éteindre.
Après environ 3 minutes sans utiliser l'équipement, il
s'éteint automatique.
3.Allumez l'équipement et placez-le à la position de
niveau pour la mesure.
17
4. Choix de l'unité de mesure(°degrés / % / mm/
m IN/FT)Après l'allumage, l'écran affiche toujours le dernier
mode avant l'arrêt. En appuyant sur le bouton MODE,
vous pouvez modifier les unités d'affichage de l'unité
angulaire de degrés (°) à pourcentage (%),à (mm / m) au
pitch (in / ft). Les lectures de hauteur sont comprises
dans des incréments de
1/8-inch / fee.
L'icône indique la position de l'angle actuel,
en haut ou en bas, en position horizontale ou
verticale.
18

5. Mesure d'angle
Si l'équipement n'est pas au niveau, Il affiche les valeurs
sur l'écran. Appuyez sur le bouton REF pour régler l'angle
actuel à zéro, entrez le mode de mesure de l'angle relatif.
L'icône apparaîtra à l'écran. Appuyez sur le bouton
REF de nouveau fois pour annuler la fonction.
6.Fonction rétroéclairage
Appuyer sur un bouton, le rétroéclairage de l'écran
s'allume. Le rétro-éclairage de l'écran LCD reste allumé
pendant environ 20 secondes sans mouvement du
niveau, puis il sera éteint automatique.
7.HOLD
Dans les positions où l'affichage peut ne pas être lisible,
la valeur réelle mesurée peut alors être enregistrée en
appuyant sur le bouton HOLD, et puis une valeur mesurée
enregistrée s'affiche et l'icône apparaîtra à l'écran. En
appuyant sur le bouton HOLD de nouveau temps,
19
le mode de mesure sera réactivé.
8. Indicateur de batterie faible
Recommander de remplacer deux nouvelles piles "AAA",
lorsque l'indicateur de batterie faible " " s'affiche
à l'écran.
9. Calibration de l'utilisateur
a.A.Éteignez l'équipement. Placez l'équipement sur une
surface solide plane et lisse. (voir la figure suivante).
20
b.En arrêt du système,appuyez d'abord sur le bouton
HOLD et maintenez-le enfoncé, puis appuyez sur le
bouton ON / OFF jusqu'à ce que l'écran LCD affiche
"CAL".
c.Garder l'appareil immobile pendant un certain temps,
puis appuyez sur le bouton HOLD, l'affichage indique
"CAL1".
d.Au même endroit, faites pivoter l'équipement de 180 °
(voir la figure suivante), puis appuyez sur le bouton
HOLD, l'affichage indique "CAL2". Après la disparition de
"CAL2", l'étalonnage est terminé, puis l'écran LCD affiche
l'angle actuel dans l'affichage haute précision.
21

REMARQUE :
● L'étalonnage doit être effectué sur une surface plane et
lisse avec une inclinaison maximale de 5 °. Si elle
dépasse 5 °, l'écran affiche "Err" indiquant que l'utilisateur
ne peut pas continuer l'étalonnage.
● Le niveau de liquide ne doit pas être incliné ou déplacé
pendant l'étalonnage.
● Une fois l'étalonnage terminé, l'appareil remplace
automatiquement les données de l'installation d'origine
par les données de l'utilisateur. Vous devez donc utiliser
cette fonction avec précaution.
22

Caution
Veuillez éteindre l’appareil si vous ne l’utilisez pas pour
avoir prolonger sa durée de service.
Garantie
Tous les produits Neoteck sont sous une garantie de 18
mois à compter de la date d’achat. Si vous avez des
questions pendant l’utilisation, n’hésitez à nous contacter.
Contact
Mail: [email protected]
23

24
Nivel Digital
DESCRIPCIÓN
Este nivel digital es una herramienta de nivelación muy
versátil diseñada para una operación rápida y fácil
● Rango de medición de la pantalla digital: 4 × 90 °
● Resolución de la pantalla digital: ± 0.01 °
● Precisión de la pantalla digital: ±0.1° at 0° and 90°
±0.2° en otros ángulos
● Unidad de medida(°degrees / % / mm/m / IN/FT)
● Retroiluminación
● Función de retención
● 0°calibración
● Tipo de batería: 2x1.5V “AAA” Baterías
● Temperatura de trabajo: 0 ℃ ~ 40 ℃
●Temperatura de almacenamiento: -10 ℃ ~ 50 ℃
●Dimensiones: 58 * 58 * 32mm
●Peso: 74g (sin la batería)
Instrucciones de operación
1. Cambio de batería
25
Retire la cubierta posterior de la batería del receptor
desenroscando el tornillo de retención de la tapa de la
batería. La cubierta se levantará ahora.
Abra la caja de la batería. Ponga dos pilas "AAA" y cierre
la carcasa. Su nivel electrónico ya está listo para usar.
2. ON/OFF
Presione el botón ON / OFF para encender el equipo. Y
muestra el último modo antes del apagado. Mantenga
pulsado el botón ON / OFF para no apagarlo.
Después de unos 3 minutos sin utilizar el equipo, éste se
apagará automáticamente.
3.Encienda el equipo y póngalo en la posición de nivel
para medir.
26
4. Seleccionar la unidad de medida (°degrees / % / mm/m
IN/FT)
Después de encender, la pantalla siempre muestra el
último modo antes del apagado.Presionando el botón
MODE puede cambiar las unidades de visualización de la
unidad de ángulos de grados (°) a porcentaje (%), a
(mm / m) a tono (in / ft). Las lecturas de tono están en
incrementos de 1/8 de pulgada / cuota.
El icono indica la posición del ángulo actual, tanto
hacia arriba como hacia abajo, lejos de la posición
horizontal o vertical.
5. Medida de ángulo
Si el equipo no está en nivel, mostrará valores en la
pantalla. Presione el botón REF para ajustar el ángulo
actual a cero, ingrese el modo de medición de ángulo
relativo.El icono aparecerá en la pantalla. Pulse de
nuevo el botón REF para cancelar la función.
6. Función de retroiluminación
Pulse cualquier botón, la luz de fondo de la pantalla se
encenderá.La luz de fondo de la pantalla LCD
27
permanecerá encendida durante aproximadamente 20
segundos sin movimiento del nivel, entonces se apagará
automáticamente.
7. Hold
En posiciones en las que la pantalla puede no ser legible,
el valor real medido se puede guardar pulsando el botón
HOLD,Entonces se mostrará un valor medido guardado y
el incono aparecerá en la pantalla. Al pulsar otra vez el
botón HOLD, el modo de medición se reactiva.
8.Indicador de batería baja
Se recomienda reemplazar dos nuevas pilas "AAA",
cuando el indicador de batería baja “ ” aparezca en la
pantalla.
9. Calibración del usuario
a. Apaga el equipo. Coloque el equipo en una superficie
sólida lisa y plana. (ver la siguiente figura).
28
b. En el estado de apagado, promer presione y
mantenga el botón HOLD, luego presione el botón
ON / OFF, hasta que la pantalla LCD muestre "CAL".
c. Mantenga el equipo inmóvil durante un período de
tiempo y luego presione el botón HOLD, la pantalla
muestra "CAL1".
d. En la misma ubicación, gire el equipo 180 ° (vea la
siguiente figura), luego presione el botón HOLD, la
pantalla muestra "CAL2". Después de que desaparece
"CAL2", la calibración se completa y luego la pantalla
LCD mostrará el ángulo actual en la pantalla de alta
precisión.

29
NOTA:
● La calibración debe realizarse en una superficie plana
y lisa con la inclinación no más de 5 °. Si supera los 5 °,
la pantalla muestra "Err", que indica que el usuario no
puede proceder a realizar la calibración.
● Durante la calibración, el nivel tampoco se puede
biselar ni mover.
● Después de la calibración completa, el equipo
reemplaza automáticamente los datos originales de
fábrica por los datos del consumidor, por lo que debe
tener cuidado de usar esta función.

30
Precaución
Por favor apague el artículo cuando no esté en uso para
prolongar su vida útil.
Garantía
Gracias por utilizar el producto neoteck, todo producto
neoteck viene con garantía de 18 meses a partir del día
de la compra, si necesita cualquier soporte, no dude en
contactar con nosotros.
Contacto
correo: [email protected]

31
Livello Digitale
DESCRIZIONE
Questo livello digitale è uno strumento di livellamento
altamente versatile progettato per un funzionamento rapido
e facile
● Gamma di Misurazione di Display Digitale: 4×90°
● Risoluzione di Display Digitale: ±0.01°
● Precisione di Display Digitale: ±0.1° a 0° e 90°
±0.2°ad altri angoli
● Unità di Misurazione (°gradi / % / mm/m / IN / FT)
● Retroilluminazione
● Funzione di Conservazione
● 0° Calibrazione
● Tipo della Batteria : 2x1.5V “AAA” batterie
●Temperatura Operativa: 0°C ~ 40°C
●Temperatura Stoccaggio: -10°C ~ 50°C
●Dimensione: 58*58*32mm
Istruzioni di Operazione
1. Sostituzione della Batteria
32
Rimuovere il coperchio posteriore del ricevitore svitando la
vite di fissaggio del coperchio della batteria. Ora il
coperchio sarà rimosso.
Aprire il vano batterie. Mettere due “AAA” batterie e
chiudere il coperchio. Il livello elettronico è ora pronto per
l'uso.
2. ON/OFF
Premere il tasto ON/OFF per accendere l’apparecchio. E si
vede l’ultima modalità prima dello spegnimento. Tenere il
tasto ON/OFF per spegnere l’unità.
Dopo circa 3 minuti non si utilizza l’apparecchio, si spegne
automaticamente.
3.Accendere l’apparecchio e metterlo nella posizione nel
livello per la misurazione.
33
4. Scelta di Unità di Misurazione (°gradi / % / mm/m IN/
FT)
Dopo l’accensione, lo schermo mostra sempre l’ultima
modalità prima dello spegnimento. Premere il tasto
MODE è possibile modificare le unità di visualizzazione di
unità di angoli da gradi (°) a percento (%), a (mm/m) a
inclicazione (in/ft). Letture di inclinazione sono in
incrementi 1/8-pollice / piedi.
L’icona indica la posizione dell’angolo attuale, sia
verso l’alto che verso il basso dalla posizione orizzontale o
verticale.
5. Misurazione dell’Angolo
Se l’apparecchio non si livella, verranno visualizzati i
valori sullo schermo. Premere il tasto REF per impostare
l’angolo attuale ad essere zero, attivare la modalità di
misurazione dell’angolo relativa. L’icona visualizzerà
sullo schermo. Premere il tasto REF di nuovo per
cancellare la funzione.
6. Funzione Retroilluminazione
Premere qualsiasi tasto, retroilluminazione dello schermo
34
si accenderà. La retroilluminazione LCD rimane accesa
per circa 20 secondi con nessun movimento del livello, poi
sarà spenta automaticamente.
7. Hold
Nelle posizioni dove il display potrebbe non essere l
eggibile, il valore effettivo misurato può essere salvato
premendo il tasto HOLD, quindi un valore misurato salvato
viene visualizzato e l’icona mostrerà sullo schermo.
Premendo il tasto HOLD un'altra volta, la modalità di
misurazione sarà riattivata.
8. Indicatore della Batteria Scarica
Consigliare di sostituire due nuove batterie “AAA”, quando
l’indicatore della batteria scarica“ ” visualizza su LCD.
9. Calibrazione dell'utente
a. Spegnare l'attrezzatura. Mettere l'attrezzatura su una
superficie solida piatta e liscia. (vedere la figura seguente).
35
b. Nello stato di arresto, premere e tenere il tasto HOLD
prima, poi premere il tasto ON/OFF, fino a quando il
display LCD legge “CAL”.
c. Tenere l'attrezzatura ferma per un periodo di tempo e
poi premere il tasto HOLD, display legge “CAL1”.
d. Nella stessa posizione, ruotare l'attrezzatura 180°
(vedere la figura seguente), poi premere il tasto HOLD,
display legge “CAL2”. Dopo che il “CAL2” scompare,
la calibrazione è completata e poi il display LCD mostrerà
l'angolo corrente sul display ad alta precisione.

36
NOTA:
● La calibrazione deve essere eseguita su una superficie
piana e liscia con inclinazione non superiore a 5°. Se
supera 5°, viene visualizzato il display “Err”, che indica
che l'utente non può procedere alla calibrazione.
● Durante la calibrazione, neanche il livello non può
essere smussato o spostato.
● Dopo aver completato la calibrazione, l'apparecchiatura
sostituisce automaticamente dai dati di fabbrica originali
ai dati del cliente, quindi deve fare attenzione a utilizzare
questa funzione.

37
Attenzione
Si prega di spegnere il prodotto quando non è in uso al
fine di prolungare la sua vita operativa.
Garanzia
Grazie per aver utilizzato prodotti Neoteck, tutti i prodotti
Neoteck sono forniti con la garanzia di 18 mesi dalla data
di acquisto, se abbia bisogno di supporto, non esiti a
contattarci
Contatto
Email: [email protected]

38
デジタルレベル
取説
本製品は高汎用性高精度水平測定デバイスであります。
● 画面の測定範囲: 4×90°
● 画面の解像度: ±0.01°
● データー精確度 : ±0.1° 0° と90°
±0.2°上記以外の角度範囲内
● 測量単位 (° / % / mm/m / IN/FT)
● バックライト
● ホールドモード
● 0°校正
● 電池: 2x1.5V “AAA”
●使用温度: 0℃ ~ 40℃
●保存温度: -10℃ ~ 50℃
●サイズ: 58*58*32mm
●重量: 74g (電池は含めません)
操作指導
1. 電池の交換
39
まず電池カバーのネジを外して、そして電池カバーを外し
て中の電池を交換します。
2. オン/オフ
オン/オフ ポタンでこのデバイスを起動させます。
三分以上操作しない場合、自動的にオフモードに入りま
す。
3.本製品を起動して、水平の位置で置きて、その後測定す
るこたが出来ます。
4. 計量単位を選択する (°degrees / % / mm/m IN/
FT)
本製品を起動した後、オフする前のモードを保持します.
MODEポタンを押すことによってモードを変更出来ます。
このアイコンは現時本製品は上又は下へ偏移し
ているという意味です.

40
5.角度の測定
本製品は水平状態なら、画面に0という数値を表示しま
す、もし上/下に偏移している状態なら、画面相応に正/負
の数値を表示します。
REF を押して、画面に が表示します、そして相対 角
度測定モードに入ります、REF ポタンでこの機能をキャ
ンセルします。
6. バックライト
どのポタンを押してでもバックライトは起動します、バッ
クライトは20秒程維持します。
7. ホールドモード
HOLD ポタンでホールドモードに入ります
その時 がは画面に表示します、ホールドモードの状態
はポタンを押したその一瞬の測量値を保持することがで
きます。
8. 電量不足
“ ”
電量不足の場合、上記のアイコンは画面に表示します、測
定に影響をしないように直ちに電池を交換してください。
41
9. ユーザー校正
a. 製品の電源を切って平らで滑らかな固体表面に置きま
す。 (次の図を参照してください)。
b. 電源を切った状態で、まずHOLDボタンを押してから
ON / OFFボタンを押し、しばらくして LCDディスプレ
イに "CAL"が表示されます。
c. 一定の時間を空いてからHOLDボタンを押します。
"CAL1"と表示されます。
d. 同じ場所で、装置を180°回転させ(次の図を参照)、
HOLDボタンを押すと、ディスプレイに "CAL2"が表示さ
れます。 "CAL2"が消えると校正が完了し、LCDは現在
のアングルを高精度ディスプレイに表示します。
42
注意:
● 校正は傾きが5°以下の平らで滑らかな表面で行う必要
があります。 5°を超えると、 "Err"と表示されます。こ
の場合校正を続行できないことを示します。
●校正の時には、レベルが傾きになったり移動したりす
ることは禁じられます。
● 校正完了後、製品がデータを消して初期設定に戻りま
す。ご注意ください。
日�:
NEOTECK製品を買い求め頂いて、誠にありがとうござい
ます。本製品は18ヶ月保証期間があります。なにかご不
明な点がございましたら、ぜひお気軽にご連絡ください。
メールアドレス: [email protected].jp