Operating instructions
for washing machines
To avoid the risk of accidents or damage to the machine, it is essential
to read these instructions before it is installed and used for the first
time.
en-GB M.-Nr. 12 702 870

Contents
2
Warnings and safety notes ......................................................................................... 6
Sustainability and environmental protection.......................................................... 12
Perfect use of energy and water ..................................................................................
13
Drying in the tumble dryer ............................................................................................
13
Sound reduction .............................................................................................................
13
Using detergents ............................................................................................................
13
Familiarisation................................................................................................................ 14
Your washing machine...................................................................................................
14
Control panel...................................................................................................................
15
Main menu in display.....................................................................................................
15
Symbols in the display...................................................................................................
16
Operation.........................................................................................................................
16
Network connection ......................................................................................................
17
Movement sensor/MotionReact .................................................................................
17
ComfortOpen..................................................................................................................
18
AmbientLight...................................................................................................................
18
CapDosing.......................................................................................................................
18
TwinDos...........................................................................................................................
19
TwinDos cartridge detection................................................................................... 19
PowerWash .....................................................................................................................
19
FlexLoad...........................................................................................................................
19
Optional accessories .....................................................................................................
19
Commissioning.............................................................................................................. 20
Requirements for networking ......................................................................................
20
Commissioning ..............................................................................................................
20
Operation........................................................................................................................ 21
Operating sequence.......................................................................................................
21
On the washing machine......................................................................................... 21
Via the app................................................................................................................. 21
Preparing the laundry.....................................................................................................
22
Switching on the washing machine .............................................................................
22
Loading the laundry........................................................................................................
22
Selecting a programme .................................................................................................
23
Setting programme parameters...................................................................................
23
Starting a programme....................................................................................................
23
End of the programme...................................................................................................
24
Special features for operation via app.........................................................................
25
Loading the laundry .................................................................................................. 25
Selecting and starting a programme via the app ................................................. 25
Delay start .......................................................................................................................
25
Add laundry (AddLoad)..................................................................................................
25

Contents
3
Programme modifications after starting the programme.........................................
26
Cancelling a programme.......................................................................................... 26
Interrupting a programme........................................................................................ 26
Favourites ...................................................................................................................
26
Using TwinDos................................................................................................................
27
Detergent dispensed quantity entered for TwinDos ........................................... 27
Replacing the TwinDos cartridge ........................................................................... 28
Using the detergent drawer..........................................................................................
29
CapDosing.......................................................................................................................
30
Programmes................................................................................................................... 31
Programme overview .....................................................................................................
31
Programme sequence....................................................................................................
41
Extras................................................................................................................................
42
Short........................................................................................................................... 42
Pre-ironing ................................................................................................................ 42
SingleWash................................................................................................................ 42
Stains.......................................................................................................................... 42
Save energy ............................................................................................................... 42
Rinse plus................................................................................................................... 42
Extra quiet.................................................................................................................. 42
Hygiene plus.............................................................................................................. 42
Pre-wash.................................................................................................................... 42
Soak ............................................................................................................................ 42
Rinse hold .................................................................................................................. 42
Detergent recommendations (according to Ecodesign no. 2019/2023) .............
43
Consumption data..........................................................................................................
44
Good to know................................................................................................................. 45
Preparing the laundry for washing ...............................................................................
45
Care label.........................................................................................................................
46
Detergent.........................................................................................................................
47
Spinning...........................................................................................................................
48
Adjusting settings ......................................................................................................... 49
Settings: Overview ...................................................................................................
49
General.............................................................................................................................
51
Software update ....................................................................................................... 51
Security ...................................................................................................................... 51
Movement sensor..................................................................................................... 51
Networking......................................................................................................................
51
WiFi............................................................................................................................. 51
Connection ................................................................................................................ 51
Remote control ......................................................................................................... 52

Contents
4
Appliance functions .......................................................................................................
52
TwinDos ..................................................................................................................... 52
Water inlet ................................................................................................................. 52
Memory...................................................................................................................... 52
ComfortOpen ............................................................................................................ 53
Degree of soiling ....................................................................................................... 53
Allergy......................................................................................................................... 53
Soak ............................................................................................................................ 53
Rinse plus................................................................................................................... 53
Temperature reduction............................................................................................. 53
Suds cooling .............................................................................................................. 53
Low water pressure .................................................................................................. 53
Anti-crease ................................................................................................................ 54
Water hardness......................................................................................................... 54
Lighting....................................................................................................................... 54
Information......................................................................................................................
54
Software..................................................................................................................... 54
Legal Information...................................................................................................... 54
Consumption............................................................................................................. 54
Operating hours ........................................................................................................ 54
Service........................................................................................................................ 54
Cleaning and care ......................................................................................................... 55
Cleaning the casing, drum and control panel.............................................................
55
Cleaning the detergent drawer.....................................................................................
55
Cleaning the water intake filter.....................................................................................
57
Cleaning the TwinDos system......................................................................................
58
Cleaning the drum/hygiene in the washing machine................................................
58
Troubleshooting............................................................................................................. 59
The display does not switch on automatically – it is not possible to select a
programme......................................................................................................................
59
Door does not open or close ........................................................................................
59
Water intake or drainage ...............................................................................................
60
Fault messages and information on the display.........................................................
61
Fault messages and problems with TwinDos.............................................................
62
Hygiene in the washing machine .................................................................................
62
Problems with the detergent drawer...........................................................................
63
Poor wash results...........................................................................................................
64
Noises and various other problems.............................................................................
65
Draining the suds solution in the event of a fault ......................................................
66
Removing the plinth flap................................................................................................
66
Draining the suds solution ............................................................................................
66
Cleaning the pumps and drain filters...........................................................................
68

Contents
5
Fitting the plinth flap......................................................................................................
70
Cleaning the nozzle at the top of the sealing ring......................................................
70
Operating the emergency release................................................................................
71
Customer Service Department.................................................................................. 72
Contact in the event of a fault......................................................................................
72
EPREL database .............................................................................................................
72
Warranty ..........................................................................................................................
72
Installation...................................................................................................................... 73
Rear view .........................................................................................................................
73
Transporting the washing machine..............................................................................
74
Transporting the washing machine to its installation surface .................................
74
Requirements for the installation surface for the washing machine ......................
74
Removing the transport safety device ........................................................................
75
Refitting the transport safety devices .........................................................................
76
Aligning the washing machine......................................................................................
77
Additional installation requirements............................................................................
78
The water protection system........................................................................................
79
Water inlet.......................................................................................................................
80
Hot water ................................................................................................................... 81
Connecting water inlet hoses ................................................................................. 81
Drainage...........................................................................................................................
81
Electrical connection ....................................................................................................
84
Technical data .................................................................................................................
85
EU Conformity declaration...................................................................................... 85
UK Conformity declaration...................................................................................... 86

Warnings and safety notes
6
This washing machine complies with all current local and national
safety requirements. However, inappropriate use can lead to per-
sonal injury and damage to property.
Read the operating instructions carefully before using the washing
machine. They contain important information on safety, installation,
use and maintenance. This prevents both personal injury and dam-
age to the washing machine.
In accordance with standard IEC60335-1, Miele expressly and
strongly advises that you read and follow the instructions in the
chapter on installing the washing machine as well as the safety in-
structions and warnings.
Miele cannot be held liable for damage caused by non-compliance
with these instructions.
Keep these operating instructions in a safe place and pass them on
to any future owner.
Correct application
This washing machine is intended for use in domestic households
and similar working and residential environments.
The washing machine is not intended for outdoor use.
It must be used only as a domestic appliance to wash items which
are specified by the manufacturer as being washable on the wash
care label. Miele cannot be held liable for damage resulting from in-
correct or improper use or operation.
The washing machine can only be used by people with reduced
physical, sensory or mental capabilities, or lack of experience or
knowledge, if they are supervised whilst using it or have been shown
how to use it safely and recognise and understand the consequences
of incorrect operation.
This washing machine is intended for use at altitudes of up to
4000m above sea level.
Safety with children
Children under 8 years of age must be kept away from the washing
machine unless they are constantly supervised.
Children must not be allowed to clean or maintain the washing
machine unsupervised.

Warnings and safety notes
7
Children 8 years and older may only use the washing machine un-
supervised if they have been shown how to use it safely and recog-
nise and understand the consequences of incorrect operation.
Please supervise children in the vicinity of the washing machine
and do not let them play with it.
Technical safety
Follow the instructions in “Installation”.
Before setting up the washing machine, check it for any externally
visible damage. Do not install or use a damaged machine.
Before connecting the washing machine, ensure that the connec-
tion data on the data plate (fuse rating, voltage and frequency) match
the mains electricity supply. If in any doubt, consult a qualified elec-
trician.
The electrical safety of this washing machine can only be guaran-
teed when correctly earthed.
It is essential that this standard safety requirement is met. If in any
doubt, please have the wiring system of the building tested by a qual-
ified electrician.
Miele cannot be held liable for the consequences of an inadequate
earthing system (e.g. electric shock).
Do not connect the washing machine to the mains electricity sup-
ply by a multi-socket adapter, extension lead or similar. These do not
guarantee the required safety of the machine (fire hazard due to the
risk of overheating).
Faulty components must only be replaced by genuine Miele ori-
ginal spare parts. Only when these parts are fitted can Miele guaran-
tee the safety standards of the machine.
The electrical socket must be easily accessible after installation so
that the machine can be disconnected from the electricity supply if
necessary.
If the electrical connection cable is faulty it must only be replaced
by a Miele authorised service technician to protect the user from
danger.
While the washing machine is under warranty, repairs should only
be undertaken by a Miele authorised service technician. Otherwise
the warranty will be invalidated.

Warnings and safety notes
8
Unauthorised repairs could result in unforeseen dangers for the
user, for which the manufacturer cannot accept liability. Repairs
should only be undertaken by a Miele authorised service technician,
otherwise any subsequent damage will not be covered by the war-
ranty.
In areas which may be subject to infestation by cockroaches or
other vermin, pay particular attention to keeping the machine and its
surroundings in a clean condition at all times. Any damage which may
be caused by cockroaches or other vermin will not be covered by the
warranty.
The machine must not be used in a non-stationary location (e.g. on
a ship).
Do not make any alterations to the machine, unless authorised to
do so by Miele.
The machine must be isolated from the electricity supply when
cleaning and maintaining the machine and in the event of a fault.
The Miele “Water protection system” protects from water damage
provided the following conditions are met:
- the machine is correctly plumbed in and connected to the electri-
city supply.
- if a fault or damage has been identified, the machine must be ex-
amined by a competent person before further use, and repaired if
necessary.
The water flow pressure must be at least 100kPa and should not
exceed 1000kPa.
Temporary or permanent operation on an autonomous power sup-
ply system or a power supply system that is not synchronised with
the mains power supply (e.g. island networks, back-up systems) is
possible. A prerequisite for operation is that the power supply system
complies with the specifications of EN50160 or an equivalent stand-
ard.
The function and operation of the protective measures provided in
the domestic electrical installation and in this Miele product must
also be maintained in isolated operation or in operation that is not
synchronised with the mains power supply, or these measures must
be replaced by equivalent measures in the installation. As described,
for example, in the current version of BS OHSAS 18001–2 ISO
45001.

Warnings and safety notes
9
This washing machine is supplied with a special lamp to cope with
particular conditions (e.g. temperature, moisture, chemical resist-
ance, abrasion resistance and vibration). This lamp must only be used
for the purpose for which it is intended. The lamp is not suitable for
room lighting. Replacement lamps may only be fitted by a Miele au-
thorised technician or by the Miele Customer Service Department.
This washing machine contains 1 light source corresponding to en-
ergy efficiency rating E.
Correct use
Do not install the washing machine in a room where there is a risk
of frost. Frozen hoses may burst or split. The reliability of the elec-
tronic control unit may be impaired at temperatures below freezing
point.
Before using the machine for the first time, check that the transit
bars at the rear of the machine have been removed (see “Installation
- Removing the transit bars”). During spinning, a transit bar which is
still in place may result in damage to both the machine and adjacent
furniture or appliances.
Turn off the stopcock if the machine is to be left for any length of
time (e.g. holiday), especially if there is no floor drain (gully) in the im-
mediate vicinity.
Flooding danger.
If hooking the drain hose into a wash basin, check that the water can
drain off quickly enough to prevent the sink from overflowing. Make
sure the drain hose is secure, so that the force of the water flowing
out of the hose does not dislodge it.
Take care to ensure that foreign objects (e.g. nails, pins, coins, pa-
per clips) do not find their way into the machine with the laundry.
These may damage components of the machine (e.g. suds container,
drum), which in turn can result in damage to the laundry.
Take care when opening the drum door after using the steam func-
tion. Danger of burning due to escaping steam and the high temper-
ature of the surface of the drum as well as the porthole glass. Stand
back away from the machine and wait until the steam has dissipated.
The maximum load for this washing machine is 9,0 kg (dry weight).
See the “Programme chart” for the maximum recommended loads
for individual programmes.

Warnings and safety notes
10
Do not use solvent based cleaning agents, e.g. those containing
benzine, in this machine, as this may result in damage to component
parts and create toxic fumes. Such agents also pose a fire and explo-
sion hazard.
Textiles which have been pre-treated in solvent based cleaning
agents must be thoroughly rinsed in clean water before being washed
in the machine.
If the correct amount of detergent is dispensed, the machine
should not need to be descaled. If, however, you do wish to descale
it, only use a proprietary natural citric acid based descaling agent.
Miele recommends using Miele descaling agent which is available to
order online at www.miele.co.uk or from Miele. Strictly observe the
instructions on the packaging.
Do not use solvent based cleaning agents, e.g. those containing
benzine, to clean the surfaces of the machine. They can cause dam-
age to plastic surfaces.
Only use dyes specified by the manufacturer as being suitable for
use in a domestic washing machine. Always observe the manufac-
turer's instructions carefully.
Colour run and dye removers contain sulphur compounds which
can cause damage such as corrosion. Do not use these products in
this machine.
If detergent comes into contact with the eyes, rinse them thor-
oughly with lukewarm water immediately. If swallowed, seek medical
assistance immediately and retain the packaging or label for refer-
ence. Those with skin problems or sensitive skin should avoid their
skin coming into contact with detergent.

Warnings and safety notes
11
Accessories and spare parts
Only use original Miele accessories. If other parts are used, war-
ranty, performance and product liability claims will be invalidated.
A Miele tumble dryer can be stacked on top of a Miele washing
machine using the appropriate stacking kit (available as an optional
accessory). Please make sure you order the correct one for the Miele
washing machine and Miele tumble dryer.
If installing the machine on a Miele plinth, (available as an optional
accessory, depending on country), please make sure you order the
correct one for this washing machine.
Miele will guarantee to supply functional spare parts for a min-
imum of 10years and up to 15years following the discontinuation of
your washing machine.
Miele cannot be held liable for damage caused by non-compliance
with these Warning and Safety instructions.
Sustainability and environmental protection
12
Disposing of the packaging ma-
terial
The packaging material is used for hand-
ling and protects the appliance from
transport damage. The packaging ma-
terial used is selected from materials
which are environmentally friendly for
disposal and can generally be recycled.
Recycling the packaging material re-
duces the use of raw materials. Use ma-
terial-specific collection points for valu-
able materials and take advantage of re-
turn options. Your Miele dealer will take
the packaging material away.
Disposing of your old appliance
Electrical and electronic appliances con-
tain many valuable materials. They also
contain certain materials, compounds
and components which were essential
for their correct functioning and safety.
These could be hazardous to human
health and to the environment if dis-
posed of with household waste or if
handled incorrectly. Please do not,
therefore, dispose of your old appliance
with household waste.
Instead, please make use of officially
designated collection and disposal
points to dispose of and recycle elec-
trical and electronic appliances in your
local community, with your dealer or
with Miele, free of charge. By law, you
are solely responsible for deleting any
personal data from the old appliance
prior to disposal. You are legally obliged
to remove any old batteries which are
not securely enclosed by the appliance
and to remove any lamps without des-
troying them, where this is possible.
These must be taken to a suitable col-
lection point where they can be handed
in free of charge. Please ensure that
your old appliance poses no risk to chil-
dren while being stored for disposal.

Sustainability and environmental protection
13
Perfect use of energy and water
Wash with the maximum load size for
the programme in question. Energy and
electricity consumption is then lowest
in relation to the load size.
Programmes that are more efficient with
regard to energy and water consump-
tion generally have a longer programme
running time. By extending the pro-
gramme running time, the wash temper-
ature can be reduced while still provid-
ing the same wash results.
If, for example, the ECO 40-60 and
Cottons 40°C or 60°C programmes
are compared with each other, the ECO
40-60 programme is more efficient in
terms of energy and water consump-
tion. However, the programme running
time of the ECO 40-60 programme is
longer than that of the Cottons 40°C or
60°C programme.
Modern detergents make it possible to
wash at lower temperatures (e.g.
20°C). Using lower temperature set-
tings will save energy.
Use the Express 20programme for
small, lightly soiled loads.
Drying in the tumble dryer
The spin speed selected affects the re-
sidual moisture in the laundry and the
sound emissions of the washing ma-
chine. The higher the spin speed, the
lower the residual moisture in the laun-
dry.
Select the highest possible spin speed
for the programme to save energy in the
subsequent tumble dryer cycle.
Sound reduction
The spin speed selected affects the
sound emissions of the washing ma-
chine. The higher the spin speed, the
greater the sound emissions of the
washing machine.
Move the final spin of the washing ma-
chine outside of quiet periods and/or
use the Extra quiet Extra.
Using detergents
Use the TwinDos system for exact dis-
pensing.
Adjust the dispensing to the degree of
soiling of the laundry.
Do not exceed the amounts of deter-
gent recommended by the manufacturer
on the packaging.
Familiarisation
14
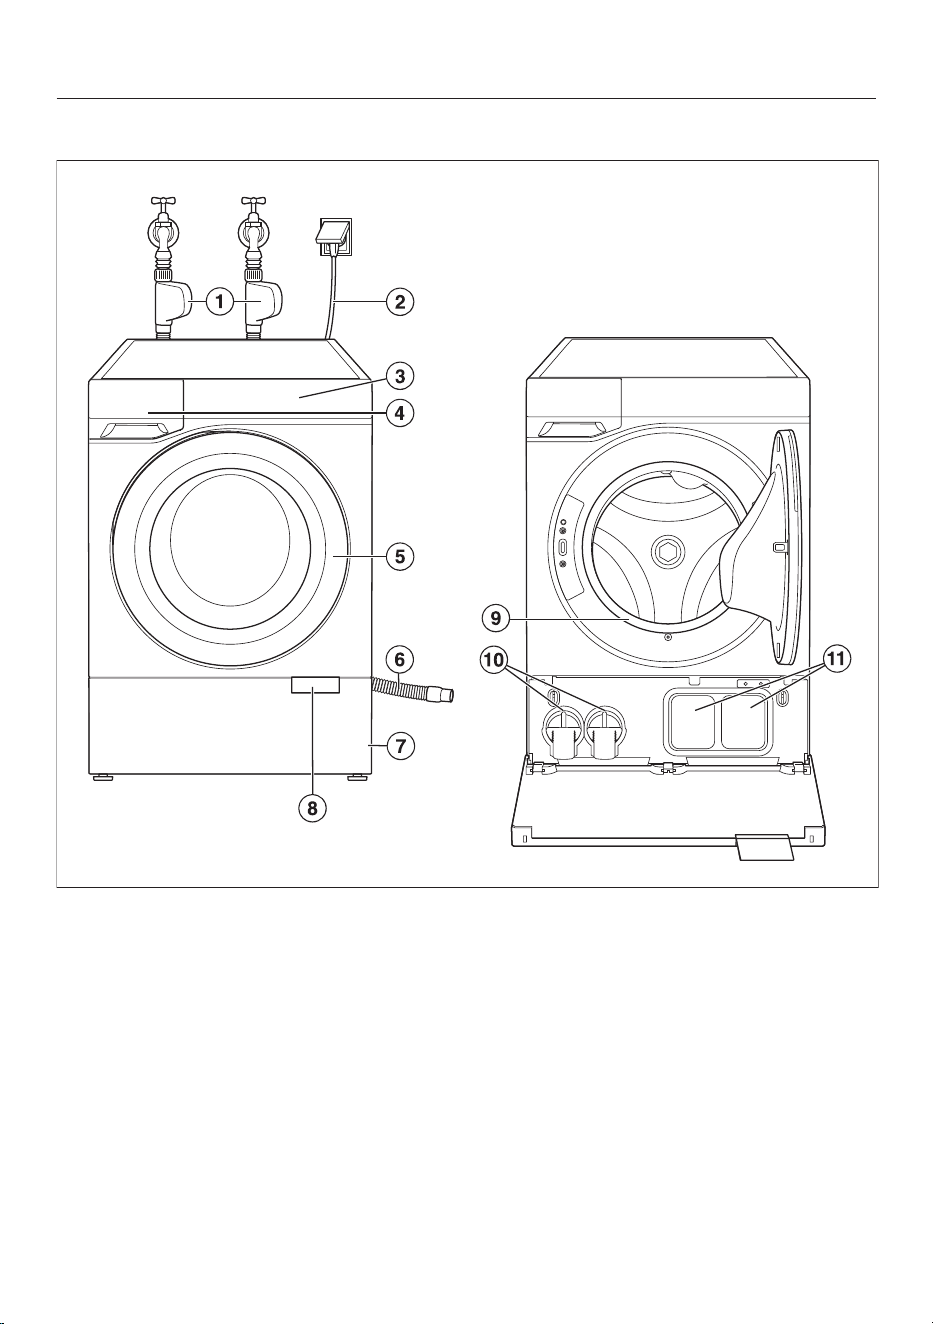
Your washing machine
a
Inlet hoses with Waterproof system
for cold water (drinking water) and
hot water
b
Mains connection cable
c
Control panel
d
Detergent dispenser drawer
e
Door
f
Drain hose
g
Plinth flap
h
Opening tag
i
Sealing ring
j
Drain filter
k
TwinDos
Familiarisation
15
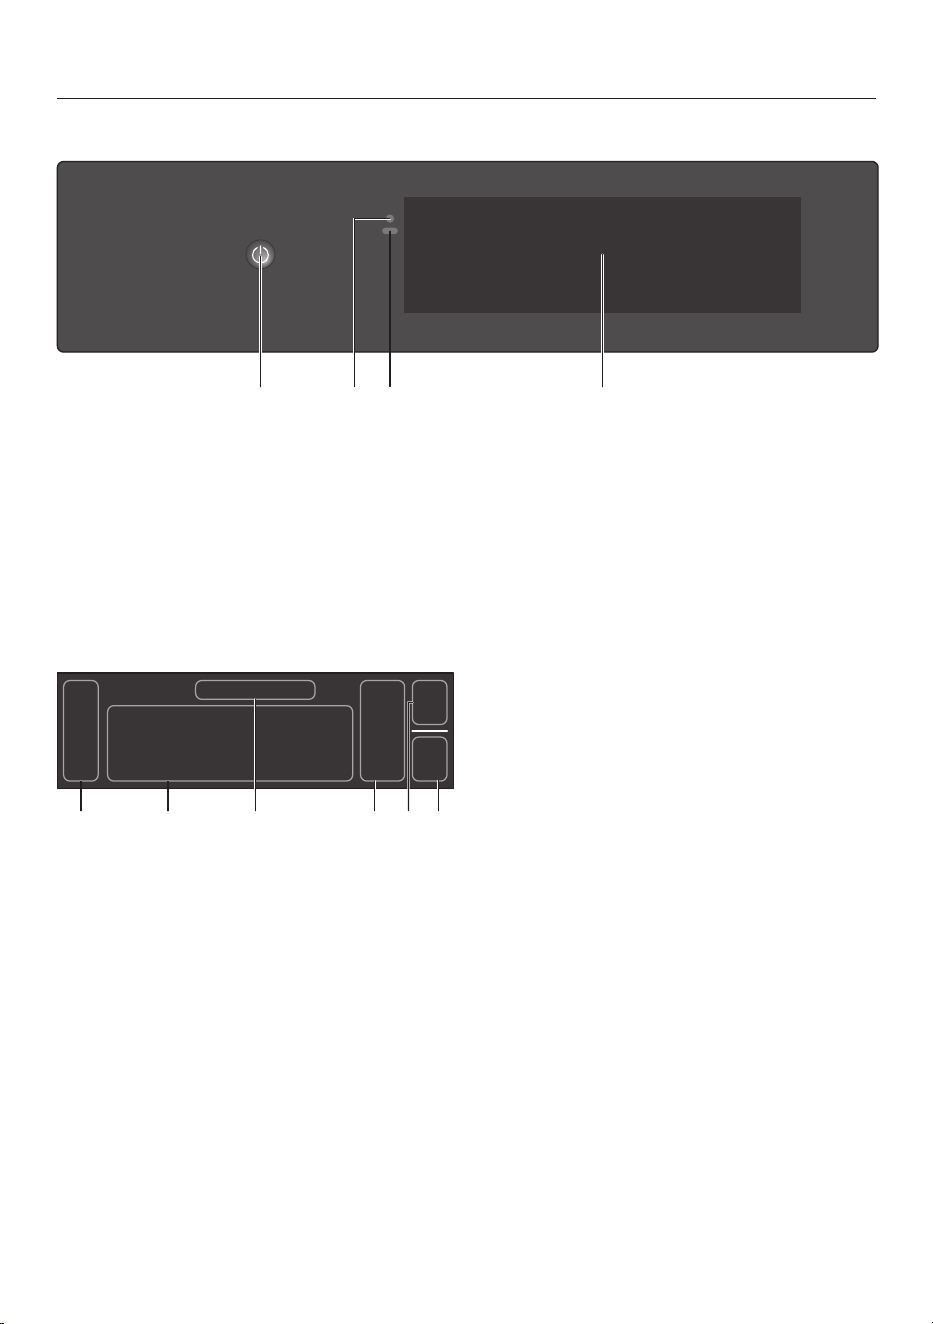
Control panel
a
On/Off switch
b
Optical interface
(for Customer Service)
c
Movement sensor (MotionReact)
d
Display
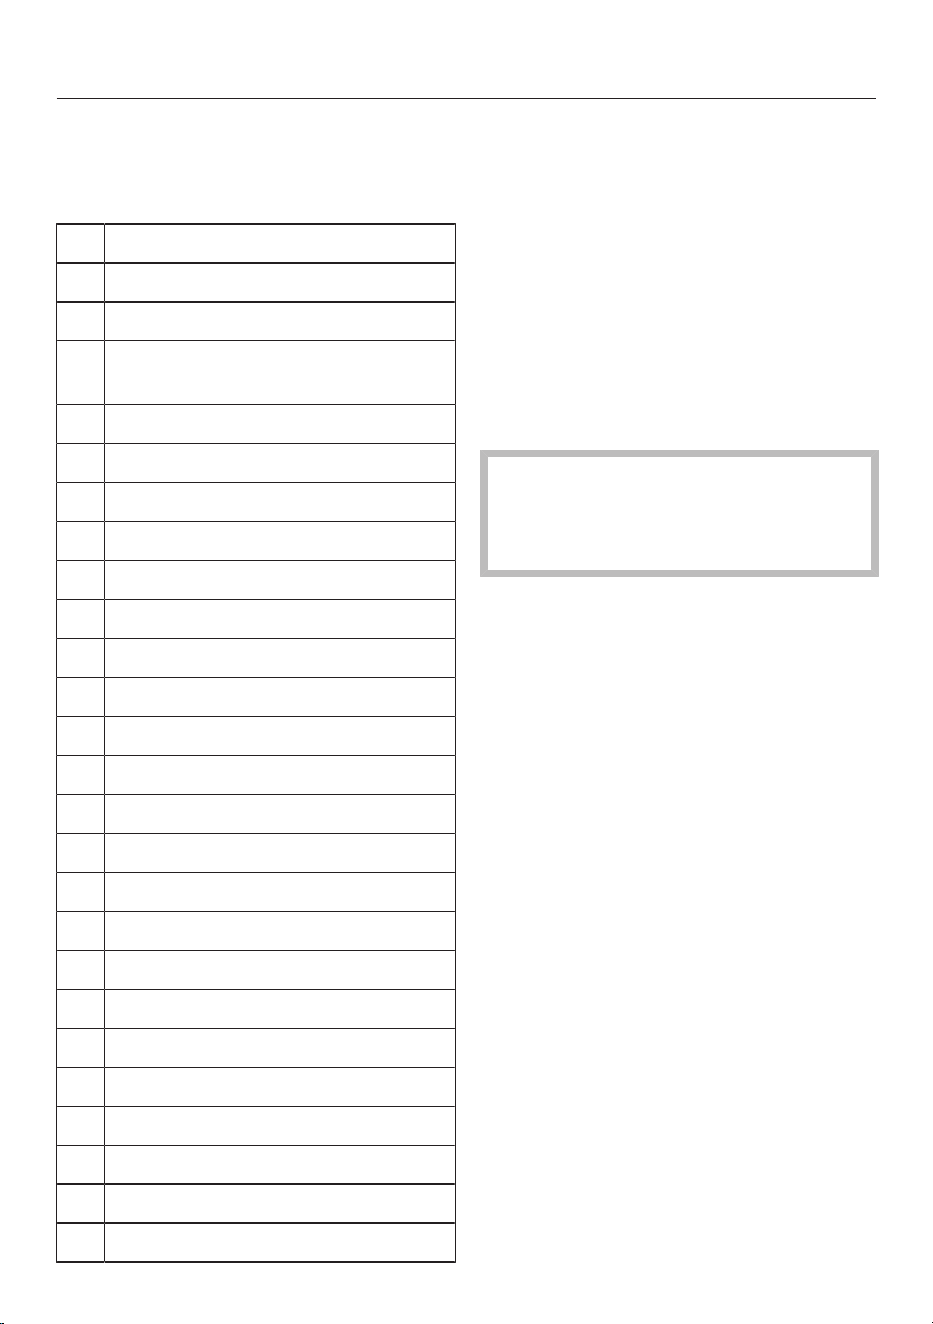
Main menu in display
a
Side trim
b
Programmes
c
Name of the highlighted programme
d
Parameters for the programme
e
Other parameters
f
Start
Familiarisation
16
Symbols in the display
Various different symbols are used on
the display.
Menu
Programmes
Favourites
Remote control
Networking
Other parameters
Information
Close window
Back
Settings
Next step
Start
Stop
Pause
Sounds
System lock
Maintenance
Download
Delete
WiFi
Search
Note
TwinDos compartment 1
TwinDos compartment 2
Caps with detergent
Caps with care products
Caps with additive
Operation
Switching the washing machine on or
off
The On/Off switch is recessed.
Press On/Off until the washing ma-
chine switches on or off.
Tip: With MotionReact, the washing
machine is automatically switched on
when you approach it.
Navigating the display
The display can be scratched by
pointed or sharp objects, e.g. pens.
Only touch the display with your fin-
gertips.
Swipe your finger in the required dir-
ection on the display.
To select a menu option, press the re-
quired menu option or symbol.
The menu option is highlighted.
Exiting a menu level
You are in a menu.
Depending on the menu, select
Close window or Back.
The higher-level menu is displayed.
Selecting a programme
You are in the main menu.
Swipe your finger on the display until
the required programme is high-
lighted.
If you want to start the programme
with the parameters displayed, select
Start.
Tip: If you want to change the paramet-
ers, select the icon of the programme or
Other parameters.

Familiarisation
17
Adjusting parameters
You can switch parameters on or off
(e.g. extras) or adjust them on a scale
(e.g. the temperature).
Switching parameters on or off
Activated parameters are highlighted in
colour.
Select the parameter you want to
switch on or off.
TouchOK to confirm.
The parameter is saved.
Changing parameters on a scale
Select the parameter you want to
change.
Move the scale to the left or right until
the required value is highlighted.
Confirm withOK or wait for the
change to be applied automatically.
The value is saved.
Displaying the context menu
When you are in certain menus, a con-
text menu can be displayed. This allows
you to move Favourites, for example.
To open the context menu, press and
hold a Favourite or select Context
menu.
Make the change you want.
To close the context menu, select
Close window.
Network connection
The washing machine is equipped with
an integrated WiFi module. The WiFi
module makes it possible to connect to
your home network and to use the Miele
app on a mobile device.
Networking the washing machine allows
you to do the following, among other
things:
- Receive information on the pro-
gramme sequence and operating
status
- Operate your washing machine re-
motely
- Download additional programmes
- Keep your washing machine up to
date with the latest Miele develop-
ments via software updates
Connecting your washing machine to
your WiFi network will increase energy
consumption, even when the washing
machine is switched off.
Movement sensor/MotionReact
The washing machine has a movement
sensor. The movement sensor reacts to
movement and detects when you ap-
proach the washing machine.
Depending on the operating status of
the washing machine, you can trigger
various actions using the movement
sensor such as switching on the wash-
ing machine.
Under Settings General
Movement sensor, you can adjust the
settings for the movement sensor to
suit your personal requirements.

Familiarisation
18
ComfortOpen
A motorised door opener opens the
door when a hand approaches the door
handle sensor.
The door opens a little automatically at
the end of the programme.
Drum lighting
The drum lighting illuminates the drum
and the area in front of the washing ma-
chine. The drum lighting comes on auto-
matically when the door is opened. The
drum lighting will go out again automat-
ically after a few minutes.
Defective drum lighting can only be re-
placed by the Miele Customer Service
Department.
AmbientLight
The door and the TwinDos cartridges
are illuminated.
Door lighting
The door lighting indicates when and
whether the door can be opened.
TwinDos lighting
The TwinDos unit lighting indicates
when a TwinDos cartridge needs to be
replaced. It also shows which TwinDos
cartridge needs to be replaced.
CapDosing
CapDos is a system for dispensing spe-
cial-purpose detergents, fabric condi-
tioners and boosters using portioned
capsules.
The portioned capsules are available
with 3 different labels:
= Fabric care product (e.g. fabric
conditioner, proofing agent)
= Additives (e.g. detergent en-
hancer)
= Special-purpose detergents
(for the main wash only)
Each capsule contains the correct
amount for one wash cycle.
The capsules are available from the
Miele online shop or from your Miele
dealer.
Capsules pose a health risk.
The ingredients of capsules can be
hazardous to health if they are swal-
lowed or come into contact with skin.
Keep capsules out of the reach of
children.

Familiarisation
19
TwinDos
TwinDos is a system for the automatic
dispensing of detergents.
TwinDos can be operated with Miele
UltraPhase 1 and UltraPhase 2 or with
commercially available liquid detergents
and fabric conditioners.
Refill containers are required for the use
of commercially available liquid deter-
gent. The refill containers are available
from the Miele online shop or from your
Miele dealer.
UltraPhase1 and UltraPhase2
UltraPhase 1 and 2 are a liquid deter-
gent system and together they make a
complete detergent for white and col-
oured laundry.
UltraPhase1 is a liquid detergent which
dissolves dirt and removes the most
common stains. UltraPhase2 is a
bleaching agent and removes stubborn
stains. For the best wash results, these
two agents are dispensed at separate
times during the wash process.
UltraPhase 1 and 2 are available from
the Miele online shop or from your
Miele dealer.
TwinDos cartridge detection
The TwinDos cartridges have a barcode.
The washing machine uses this barcode
to identify the detergent contained in
the cartridge and automatically sets the
corresponding parameters.
PowerWash
The PowerWash technique uses less
water than conventional washing tech-
niques. Energy consumption is reduced
because less water needs to be heated.
This results in some special features in
the programme sequence.
- At the start of the wash programme,
the washing machine spins a few
times.
- If necessary, the washing machine will
pump water away and take in a little
more fresh water.
- Noise when heating the water on the
heater elements (bubbling noises).
FlexLoad
The washing machine measures the
amount of laundry in the drum after the
programme has started. Once the
measurement is complete, the load de-
termined is displayed at Information.
The time left, energy consumption and
water consumption of the wash pro-
gramme are adjusted to the determined
load size.
The time left that is initially displayed
can be significantly reduced.
Optional accessories
Products specially tailored to your
washing machine – such as detergent,
fabric care products, additives, appli-
ance care products and accessories –
are available from the Miele online shop,
from Miele Customer Service or from
your Miele dealer.
You can access the Miele online shop
via the following QR code:
Commissioning
20
Damage resulting from incorrect
installation and connection.
Installing and connecting the wash-
ing machine incorrectly will cause
serious material damage.
Please follow the instructions in “In-
stallation”.
This washing machine has undergone
a complete functional test at the fact-
ory. Some residual water will therefore
remain in the drum from this process.
Removing the detergent cart-
ridges and drain hose swivel el-
bow from the drum
Two detergent cartridges for TwinDos
dispensing and a swivel elbow for the
drain hose are stored in the drum.
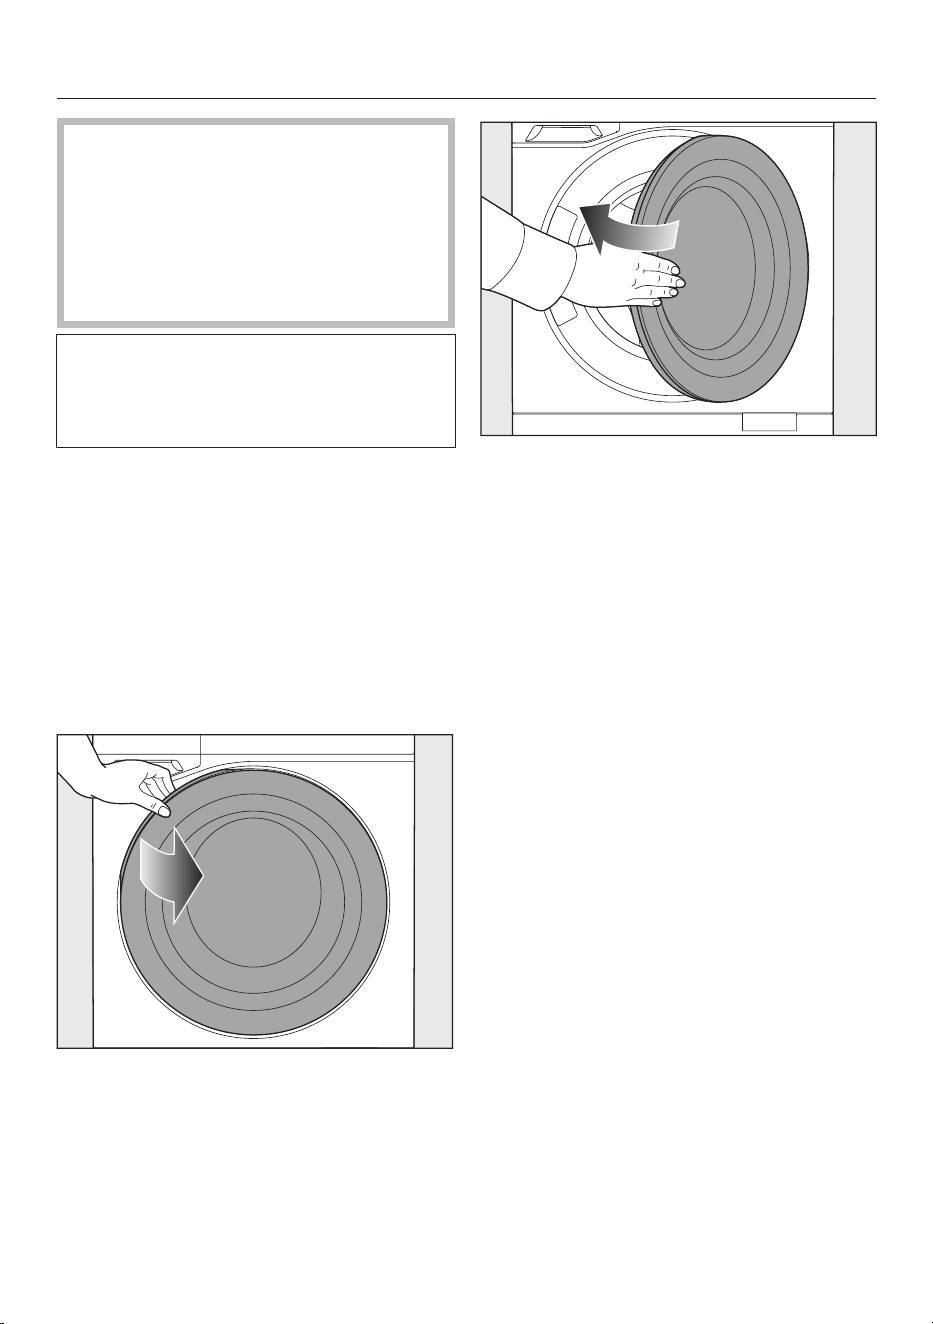
Switch on the washing machine. Ap-
proach the washing machine or touch
On/Off.
Touch the door.
The ComfortOpen function opens the
door a little.
Open the door fully.
Take the two cartridges and the
swivel elbow out of the drum.
Shut the door gently.
Requirements for networking
Note the following requirements for net-
working:
1. A home network is available at the
installation site.
Have the WiFi password ready.
2. The Miele app is available on a mo-
bile device.
3. You have a user account in the Miele
app.
You can also carry out the networking at
a later date. Skip the “Networking menu
option during commissioning.
Commissioning
Approach the washing machine or
touch On/Off.
The display shows the first step for
commissioning.
Follow the steps on the display.
Commissioning is not complete until
the commissioning programme has
been completed. If the process is can-
celled beforehand, the entire commis-
sioning process must be repeated.

Operation
21
Operating sequence
We recommend the operating se-
quence listed below. This is custom-
ised to match your washing machine
controls. This allows you to perfectly
use all the special features.
You will find useful information and tips
on the individual operational steps in
“Operation”.
On the washing machine
1. Preparing the laundry
2. Switching on the washing machine
3. Loading the laundry
4. Closing the door
5. Selecting a programme
6. Setting programme parameters
7. If detergent is to be added via the
detergent drawer, fill with detergent
8. Start with Start
The washing machine door is locked.
9. End of the programme
Further operating options:
- Delay start
- AddLoad (Add laundry)
Via the app
1. Preparing the laundry
2. Switching on the washing machine
3. Loading the laundry
4. Closing the door
5. Select Remote control on the
washing machine
6. Start the washing machine with
Start
The washing machine door is locked.
7. If detergent is to be added via the
detergent drawer, fill with detergent
8. Select a programme via the app
9. Start a programme via the app
10.End of the programme
Operation
22
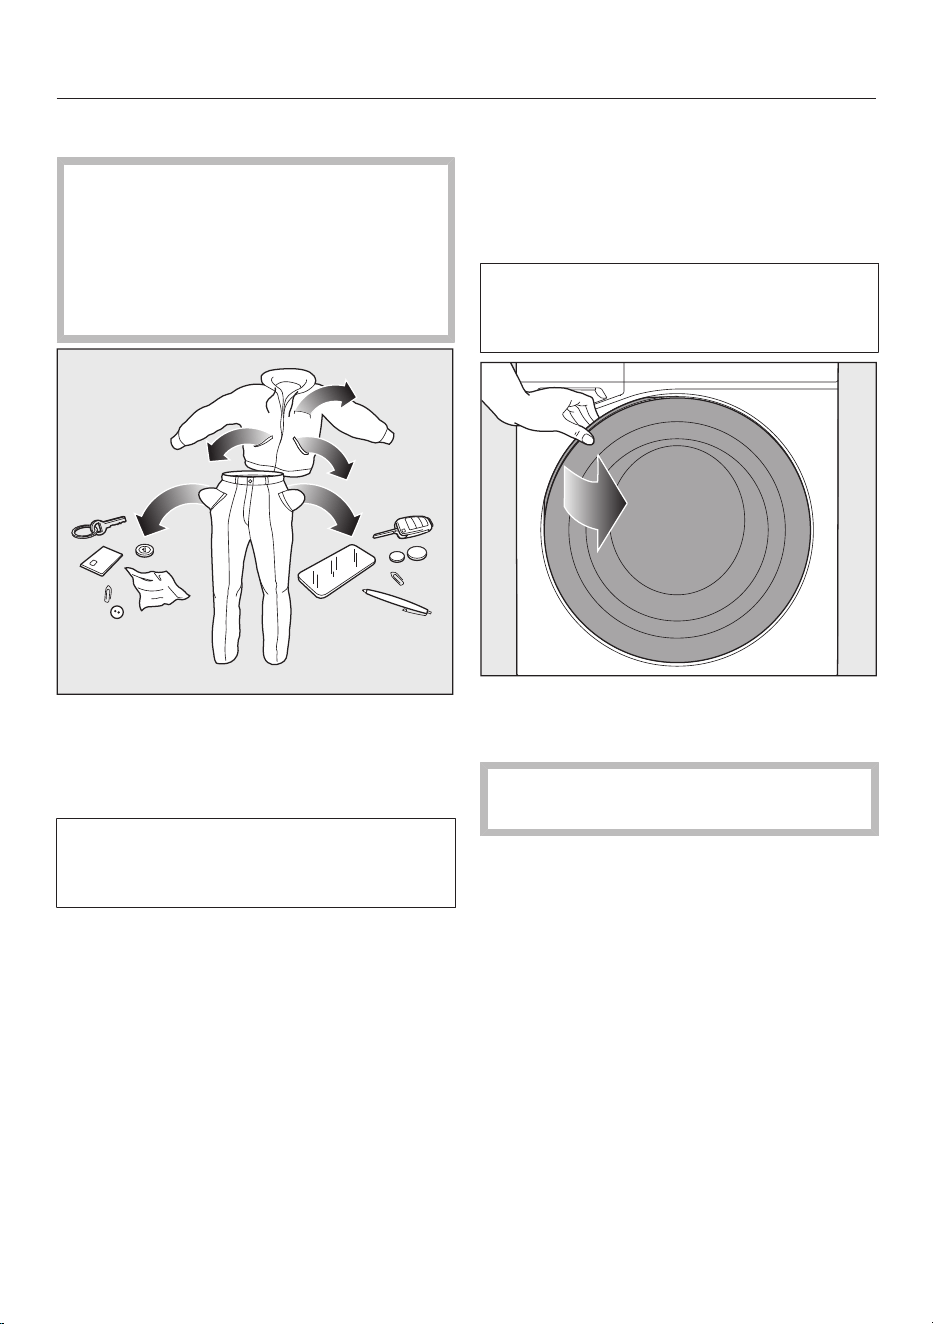
Preparing the laundry
Damage due to foreign objects.
Nails, coins, paper clips, and so on
can cause damage to garments and
components in the machine.
Check the laundry before washing
and remove any foreign objects.
Empty all pockets.
Switching on the washing ma-
chine
When the movement sensor is activ-
ated, the washing machine switches
on automatically.
TouchOn/Off.
Loading the laundry
Prepare the laundry as described in
“Good to know”.
Opening the door
The door handle sensor registers when
a hand touches the door and opens
the door a little.
Open the door fully.
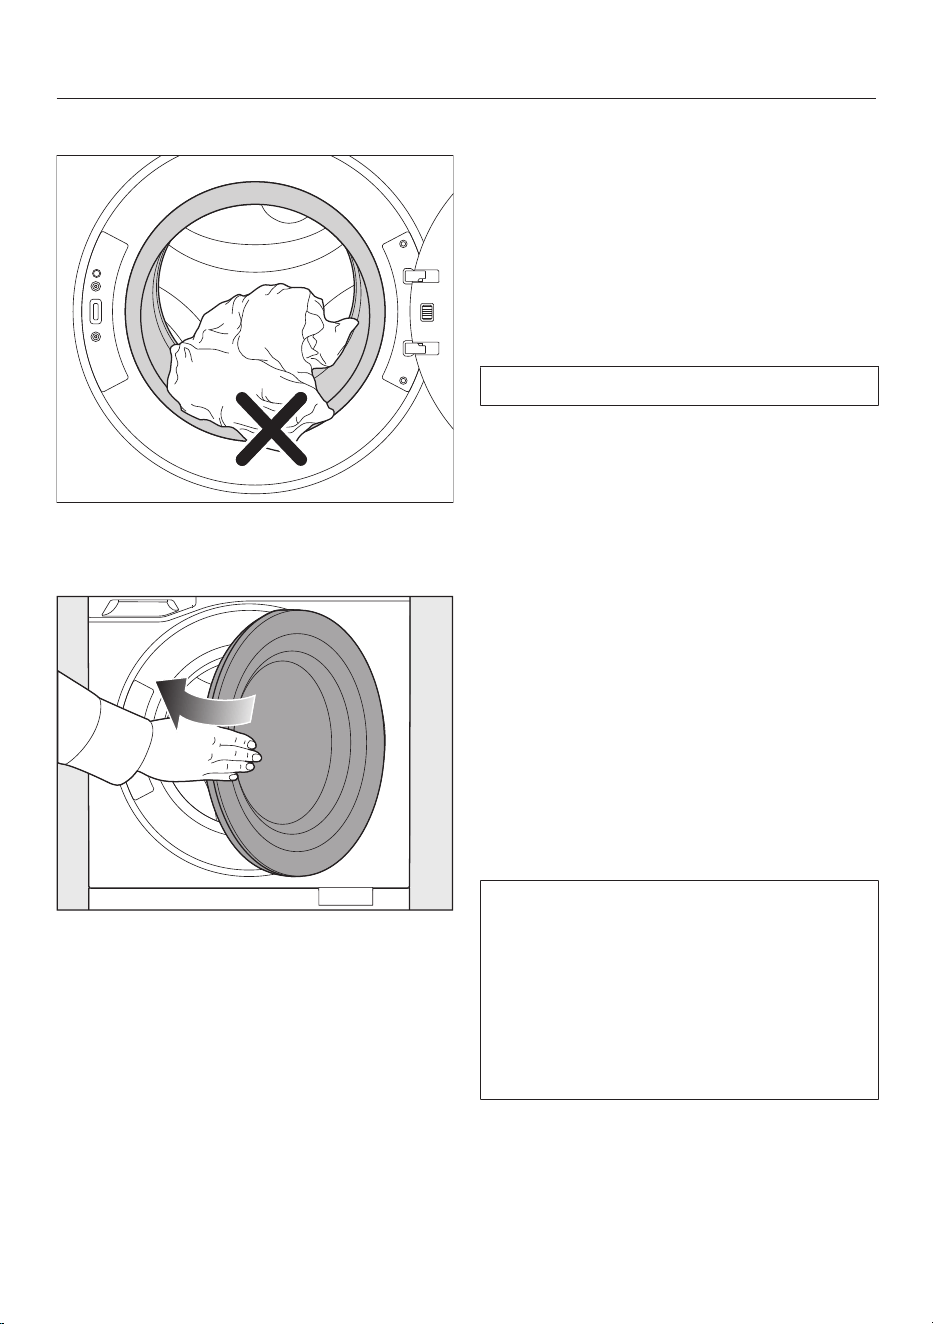
Loading laundry in the drum
Check the drum for pets or foreign
objects before loading it with laundry.
Unfold the laundry and load loosely
into the drum.
Tips
- Mixing both large and small items
gives better wash results and also
helps to distribute the load evenly
during spinning.
- Always ensure that the maximum load
size is not exceeded for the different
programmes. The relevant load size is
always shown in the display.
Operation
23
Closing the door
Make sure that no items are caught
between the door and the sealing
ring.
Shut the door with a gentle swing.
Selecting a programme
Tip: To view programme information, se-
lect Information.
Swipe your finger on the display until
the required programme is high-
lighted.
Setting programme parameters
Selecting a temperature
You can alter the pre-set temperature of
most programmes.
Select Temperature using the slide
control within the specified range.
Selecting TwinDos/Caps
TwinDos must be set up.
Tip: TwinDos is automatically activated
in all programmes in which dispensing is
possible and recommended.
Select TwinDos/Cap.
Selecting a spin speed
You can alter the pre-set maximum spin
speed for the programmes
Select Spin speed using the slide
control within the specified range.
Selecting Extras
Select Other parameters.
All parameters are displayed.
Select Extras.
Switch on the required Extra.
The list only shows the Extras that can
be activated for the selected pro-
gramme.
Certain combinations of extra options
are not possible, e.g. Short and Save
energy. After selecting the first Extra,
options that cannot be combined are
no longer available for selection.
Starting a programme
Select Start.
The door is locked and the programme
starts running.
Operation
24
End of the programme
Unlocking the door during the Anti-
crease phase
The door is locked in the Anti-crease
phase. The door can be unlocked at any
time.
Select Confirm.
The door unlocks and can be opened.
Tips
- After the Anti-crease phase, the door
will unlock automatically.
- When ComfortOpen is activated, the
door opens a little automatically after
the Anti-crease phase.
Opening the door
The door handle sensor registers when
a hand touches the door and opens
the door a little.
Open the door fully.
Removing the laundry
Remove the damp laundry from the
drum.
To remove all items of laundry, turn
the drum by hand.
Items left in the drum could discolour
other items in the next wash or be-
come discoloured themselves.
Remove all items from the drum.
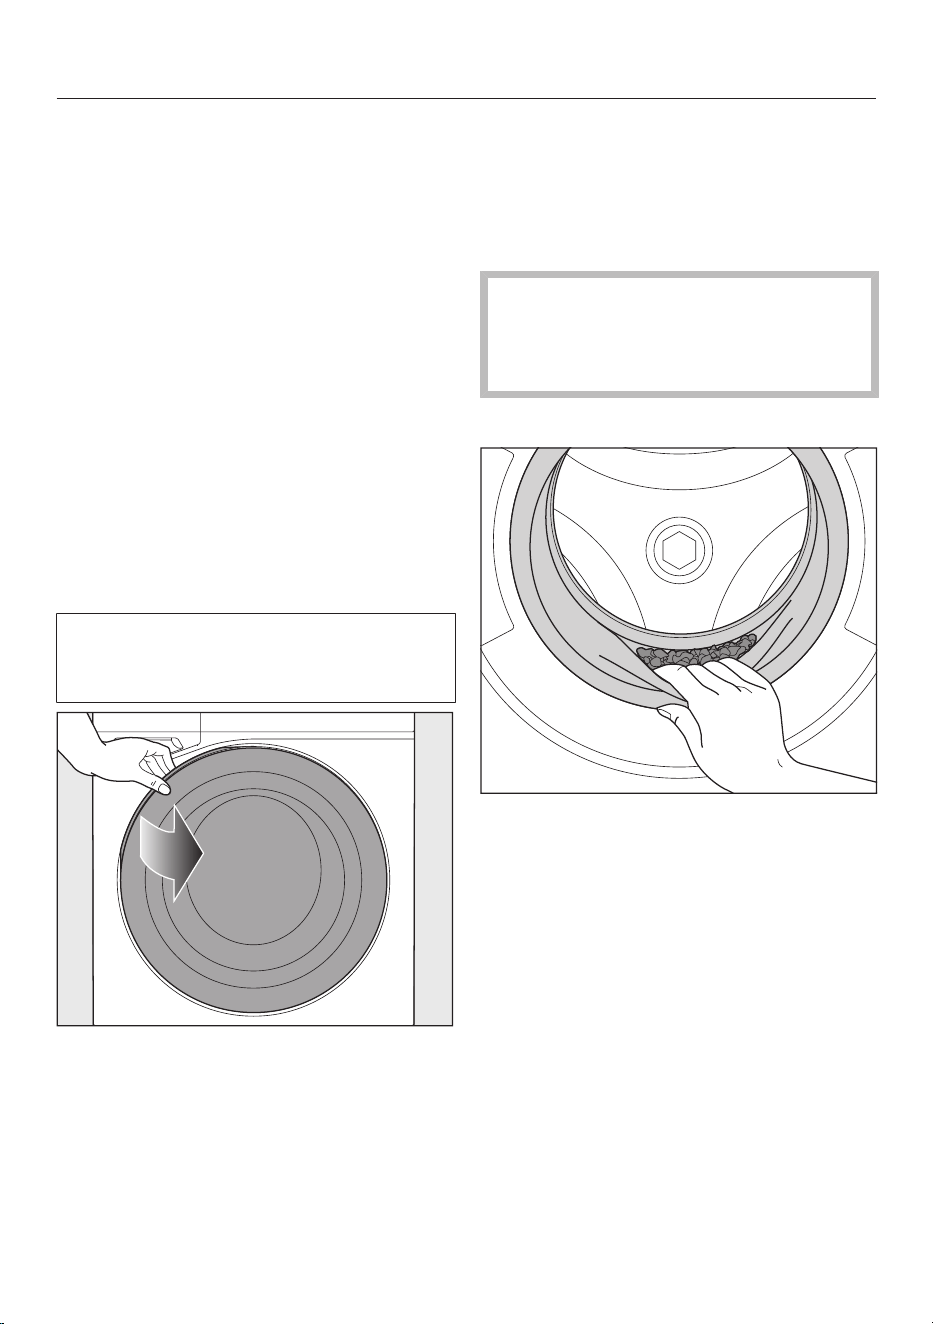
What to do after removing laundry
Check the door sealing ring for any
foreign objects.
If you used a cap, remove it from the
detergent drawer.
Tips
- Leave the detergent drawer slightly
open to allow it to dry.
- Leave the door slightly open to allow
the drum to dry.

Operation
25
Special features for operation
via app
Loading the laundry
Open the door.
Load the laundry.
Close the door.
Activating operation via app
Select Remote control.
Locking the washing machine door
Select Start.
The washing machine door is locked.
Selecting and starting a programme
via the app
Select the programme you want to
use.
Select the programme parameters
you want.
Start the programme.
Delay start
Setting delay start
You can use the delay start to either
delay the start of the wash programme
or the end of a wash programme. The
delay start function is possible in a 24-
hour period.
Select the Further pro-
grammessymbol.
Select Start.
Set the time you want (Start or Fin-
ish).
To start the wash programme with
delay start, select Start.
To return to the programme selection,
select Confirm.
Changing delay start
You can change the selected delay start.
Select the Other parameterssym-
bol.
Change the delay start and select
Confirm.
Deleting delay start
A delay start that has been started can
be deleted.
Select Stop.
You have the choice between:
- Start immediately programme
- Cancel programme
Add laundry (AddLoad)
Laundry can be added or removed if the
display shows “Add laundry”.
Touch the display.
Touch the Add laundry sensor control.
The wash programme is interrupted and
the door will open a little.
Open the door fully.
Add or remove laundry.
Close the door.
Select Start.
The programme continues.

Operation
26
Programme modifications after
starting the programme
Once the programme has started,
neither the programme nor the para-
meters can be changed. To make a
change, you must cancel the pro-
gramme.
Cancelling a programme
Select Stop.
The display will ask whether you want to
cancel the programme.
Select Yes.
The programme is cancelled and the
door is opened.
Interrupting a programme
Switch off the washing machine.
Switch the washing machine on again
to continue the programme.
Favourites
You can save up to 12programmes as
favourites. You can change the pro-
gramme name and certain parameters
for your Favourite programmes.
Saving Favourites
You are in the main menu.
Select a programme.
Select the parameters you want.
Select Favourites.
A keyboard is displayed.
Enter the name for the Favourite.
Select Confirm.
The programme has been saved as a
Favourite. The programme can be
started immediately via Start.
Tip: To save a programme directly as a
Favourite, you can also selectFa-
vourites at the end of the programme.
Moving Favourites
You are now in the Favourites menu.
You have saved a programme as a Fa-
vourite and want to sort the list.
Touch and hold the Favourite you
want to move.
A context menu is displayed.
Select Move.
Move the Favourite to the required
position.
Touch OK to confirm.
The change will be saved.
Editing Favourites
You are now in the Favourites menu.
You have saved a programme as a Fa-
vourite and want to edit the parameters.
Move your finger on the display until
the required Favourite lights up.
Touch the Other parameters sym-
bol.
The parameters are displayed.
Change the parameters you want.
The changes are saved.
Removing Favourites
You are now in the Favourites menu.
You have saved a programme as a Fa-
vourite and want to remove it from the
list.
Select the Favourite you want to re-
move.
Select Favourites.
The Favourite has been removed from
the list.

Operation
27
Using TwinDos
TwinDos must be set up.
TwinDos is automatically activated for
all programmes in which dispensing is
possible.
Tip: The detergent dispensing quantities
are preset. If too much foam builds up,
the dispensing quantity can be reduced
via Settings TwinDos Dispensing
quantity.
Detergent dispensed quantity entered
for TwinDos
The UltraPhase 1 and 2 TwinDos cart-
ridges have a barcode that is read by
the washing machine. Therefore, you
do not need to enter any dispensing
quantities when using UltraPhase 1
and 2.
You must specify the dispensing quan-
tities in the following cases:
- The barcode is defective.
- You are using a detergent from an-
other manufacturer.
Select Settings Appliance
functionsTwinDos.
Select the TwinDos cartridge com-
partment for which you want to enter
or change the dispensing quantity.
Select Dispensing quantity.
Enter the dispensing quantity spe-
cified on the detergent packaging for
water hardness level 2 (medium),
normally soiled laundry and a load
size of 4.5kg.
Tip: This information can be found in a
printed table on detergent packages.
The washing machine automatically cal-
culates the amount of detergent re-
quired.
Using stain removers for TwinDos
The following options are available when
using stain removers:
- Using the Booster cap and activating
CapDosing
- Adding stain remover via the deter-
gent drawer compartment
Operation
28
Replacing the TwinDos cartridge
A message will appear in your washing
machine display if a TwinDos cartridge
is empty.
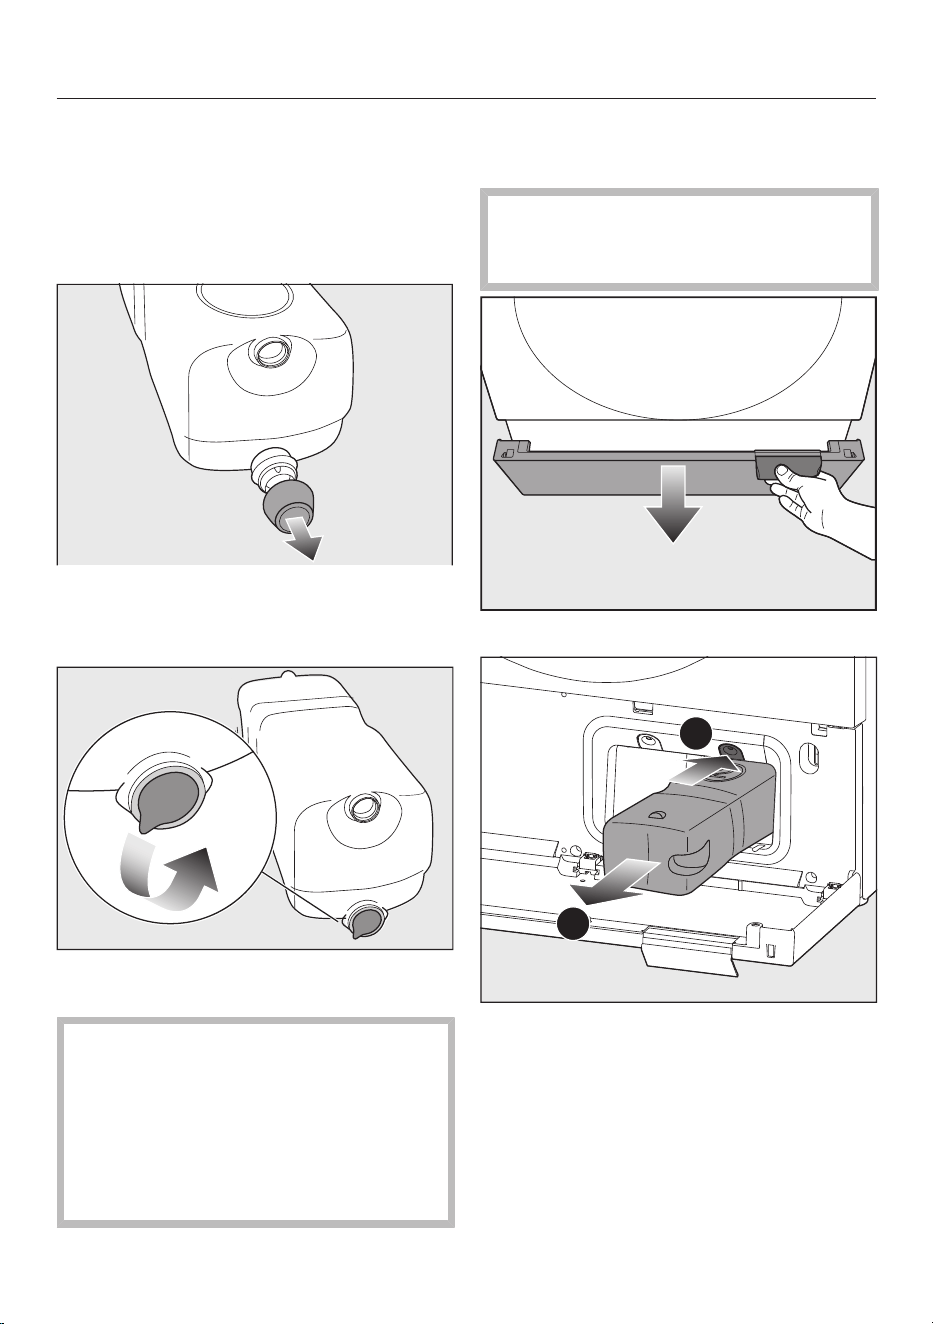
Preparing the TwinDos cartridge
Remove the cover cap from the
TwinDos cartridge.
or
Remove the film seal from the cart-
ridge completely.
Risk of damage from film seal
If the film seal is not removed com-
pletely, leaks can occur in the
TwinDos system.
Remove the film seal from the suc-
tion port on the cartridge completely
before inserting the new cartridge.
Replacing the TwinDos cartridge
Switch on the washing machine.
The plinth flap can break off.
Do not place anything on the plinth
flap when it is open.
Open the plinth flap.
2
1
Press the lock to release it.
Pull out the empty TwinDos cart-
ridge.
Insert a new TwinDos cartridge.
Operation
29
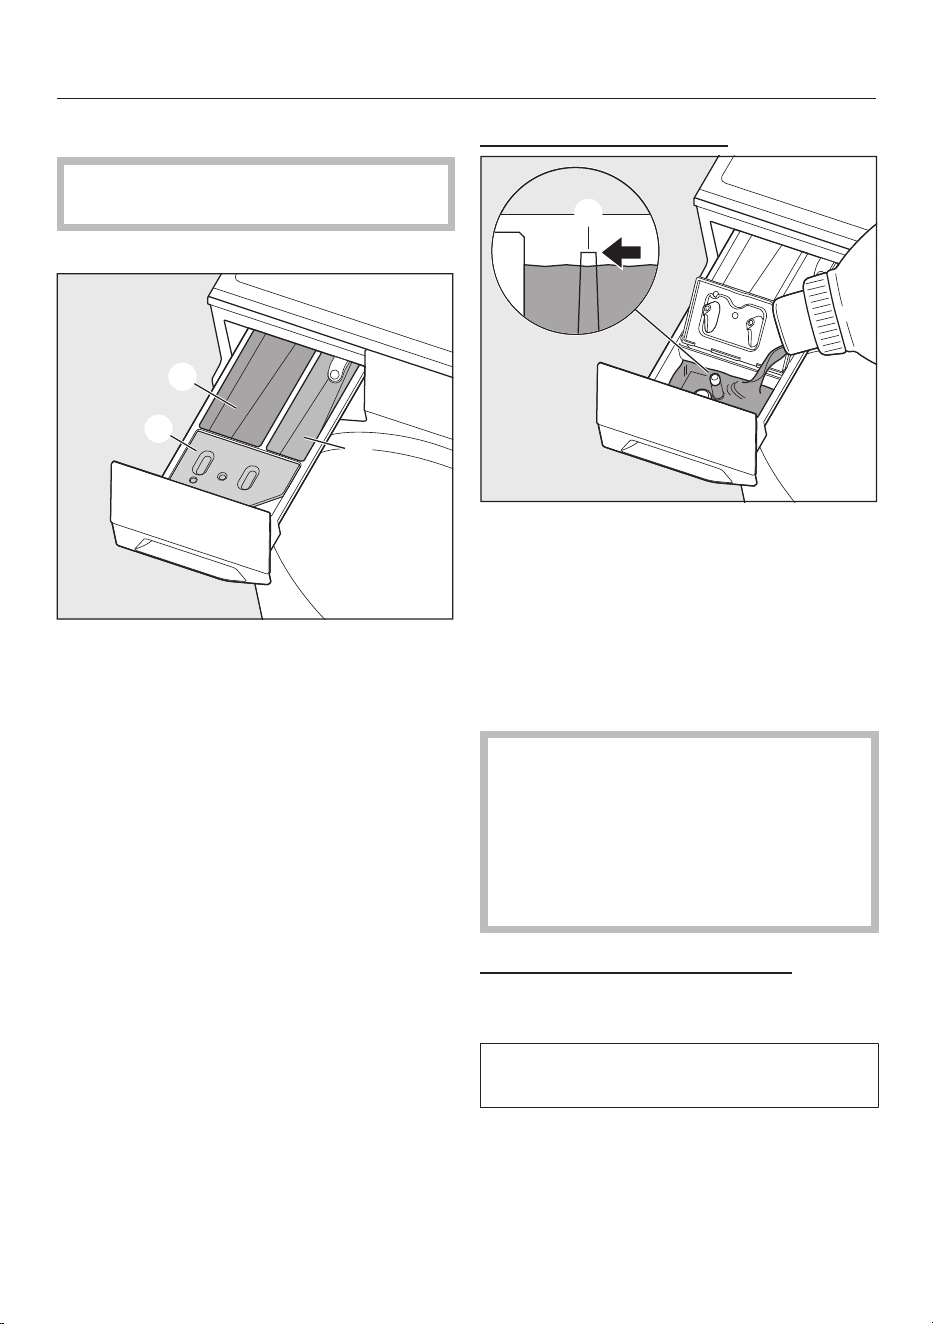
Using the detergent drawer
Ensure that TwinDos dispensing is
deactivated.
Pull out the detergent drawer.
a
Compartment
Detergent for the main wash and
soaking
b
Compartment
Detergent for the pre-wash
c
Compartment/
Fabric conditioner, form conditioner
or Caps
Pour the detergent into the appropri-
ate compartment.
Adding fabric conditioner
Add fabric conditioner or liquid starch
to the compartment. Do not ex-
ceed the maximum level mark.
The agent will be automatically dis-
pensed in the final rinse cycle. At the
end of the programme, a small amount
of water remains in the compart-
ment.
Liquid starch results in clogging. If
clogged, the siphon in the /
compartment will not work and the
compartment can overflow.
Clean the siphon particularly thor-
oughly after using liquid starch a few
times.
Using detergent tablets or pods
Always put detergent tablets or pods
directly in the drum with the laundry.
They cannot be added via the deter-
gent drawer.
Operation
30
CapDosing
Capsules pose a health risk.
The ingredients of capsules can be
hazardous to health if they are swal-
lowed or come into contact with skin.
Keep capsules out of the reach of
children.
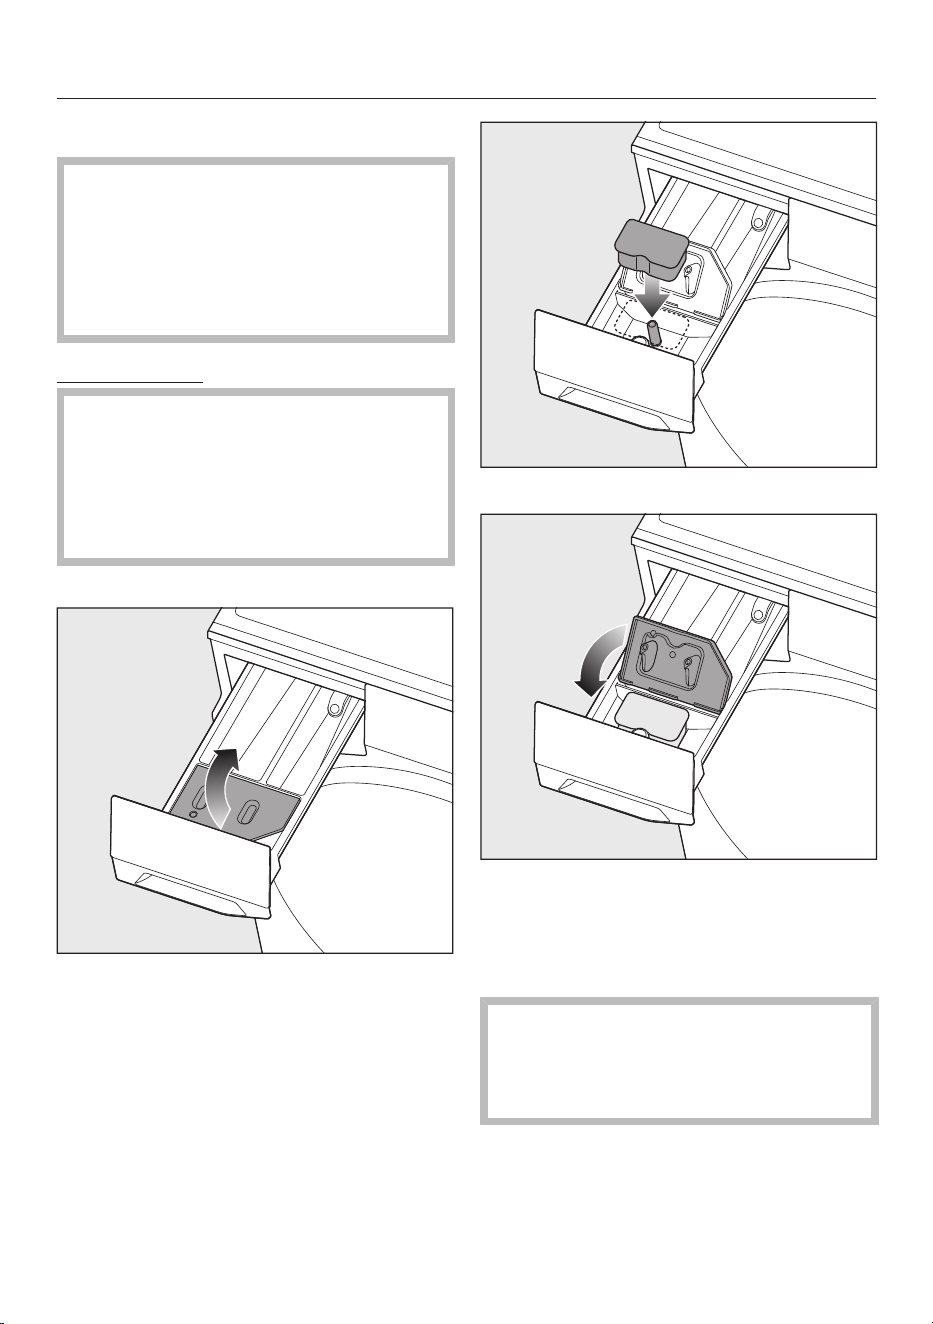
Inserting a cap
The capsule is opened by the act of
inserting it in the detergent dispenser
drawer. The contents can run out of
the capsule if you then remove it
from the drawer before it is used.
Dispose of opened capsules.
Pull out the detergent drawer.
Open the lid of the compartment/
.
Press the cap in firmly.
Close the lid and press it firmly shut.
Close the detergent drawer.
The programme will dispense the con-
tents of the cap at the correct time.
Water intake to the compartment
is solely via the capsule.
Do not add any additional fabric con-
ditioner to the compartment.

Programmes
31
Programme overview
Cottons
Temperature 90°C to cold
Load 9,0kg
Spinning 1600rpm
Use for Cotton, linen or mixed fibre fabric, e.g. T-shirts, underwear, table
linen
Tip Where particularly high levels of hygiene are required, please se-
lect a temperature of 60°C or higher.
Note for test institutes:
Cottons 20°C: programme for lightly soiled cotton garments
Test programme for compliance with EU legislation regarding ecodesign No.
2019/2023.
ECO 40-60
Temperature Cannot be selected, temperature is automatically controlled by the
programme.
Load 9,0kg
Spinning 1600rpm
Use for Normally soiled cotton garments
Tip A laundry load consisting of mixed cottons that are intended for
washing at 40°C or 60°C can be washed in the same wash cycle.
This programme is the most efficient in terms of energy and water
consumption for washing cottons.
Note for test institutes:
Test programme for compliance with EU legislation regarding ecodesign No.
2019/2023 and energy labelling in accordance with Regulation No. 2019/2014.
TwinDos dispensing must be deactivated when carrying out comparison tests.
Programmes
32
Minimum iron
Temperature 60°C to cold
Load 4,0kg
Spinning 1200rpm
Use for Synthetic and mixed fibre textiles as well as easy care cotton e.g.
jumpers, dresses, trousers and socks/tights
Tip Reduce the final spin speed for fabric that creases easily.
QuickPowerWash
Temperature 60°C and 40°C
Load 4,0kg
Spinning 1600rpm
Use for Lightly or normally soiled cottons, linen or mixed fibres that are
also suitable for the Cottonsprogramme
Tip - Fast and thorough cleaning of laundry with increased energy and
water consumption.
- Observe the load size.
SmartMatic
Temperature Cannot be selected, temperature is automatically controlled by the
programme.
Load 4.0kg
Spinning 1400rpm
Use for Cottons and synthetic fibre or mixed fibre textiles which can be
washed at a temperature of 30°C and higher
Tip - Whether it is used for washing 4x1kg or 1x4kg, the pro-
gramme offers consistently high wash results with the same wa-
ter and energy consumption.
- You can optimise detergent consumption by using TwinDos.
Programmes
33
Woollens
Temperature 40°C to cold
Load 3.0kg
Spinning 1000rpm
Use for Wool or wool blend fabric e.g. jumpers, cardigans, socks/tights
Tip Reduce the final spin speed for fabric that creases easily.
Shirts/Blouses
Temperature 60°C to cold
Load 1.0kg
Spinning 1000rpm
Use for Shirts and blouses made of cotton and mixed fibre
Tip - Pre-treat collars and cuffs depending on the level of soiling.
- The Pre-ironing Extra is activated automatically.
- Wash silk shirts and blouses in the Silksprogramme.
Delicates
Temperature 40°C to cold
Load 3,0kg
Spinning 1000rpm
Use for Delicate garments made from synthetic fibre, mixed fibre and vis-
cose e.g. lingerie and appliquéd garments
Tip For items which crease easily, select the Pre-ironing Extra.
Programmes
34
PowerFresh
Temperature Steam
Load 1.0kg
Spinning No final spin
Use for Dry and clean cotton, linen or mixed fibre textiles which are slightly
creased
The textiles must be suitable for drying in a tumble dryer and
suitable for ironing .
Tip - Smaller load sizes give a better result.
- Selecting TwinDos ensures a fresh fragrance.
- Remove garments immediately after the end of the programme
and hang them up on a coat hanger.
- The programme is not suitable for garments made of wool or
wool blend fabric.
Dark garments/Denim
Temperature 60°C to cold
Load 4.0kg
Spinning 1200rpm
Use for Black and dark cotton or mixed fibre textiles and denim e.g. jack-
ets, trousers, shirts, skirts
Tip - Wash inside out.
- Denim often contains excess dye and may run during the first
few washes. Therefore, wash light and coloured denim items
separately.
Programmes
35
Outerwear
Temperature 40°C to cold
Load 3.0kg
Spinning 800rpm
Use for Functional textiles, e.g. jackets and trousers made from membrane
fabrics such as Gore-Tex®, SYMPATEX® and WINDSTOPPER®
Tip - Zip up or close any jackets with velcro fasteners before washing.
- Do not use fabric conditioner.
- If required, outdoor clothing can be re-proofed in the Proofing
programme. Proofing after each wash cycle is not recommen-
ded.
Sportswear
Temperature 60°C to cold
Load 3.0kg
Spinning 1200rpm
Use for Sportswear such as singlets and leggings as well as microfibre and
fleece garments
Tip - Do not use fabric conditioner.
- Follow the instructions on the care label.
Programmes
36
Trainers
Use for Trainers without leather
Temperature 40°C to cold
Load 2 pairs of shoes
Spinning No final spin
Tip - Coarse soiling should be brushed off first before washing.
- A small additional load of towelling or cleaning cloths increases
the cleaning performance and reduces noise.
- Close Velcro fasteners.
- Do not use fabric conditioner.
- Follow the instructions on the care label.
- Use the dryer basket for tumble drying.
Express 20
Temperature 40°C to cold
Load 3,0kg
Spinning 1200rpm
Use for Cotton garments that have hardly been worn or are only very
lightly soiled
Tip The Short Extra is activated automatically.
Down filled items/Duvets
Temperature 60°C to cold
Load 2.0kg
Spinning 1200rpm
Use for - Items with down filling e.g.: Jackets, vests and sleeping bags
- Pillows and duvets with down, feather or synthetic filling
Tip - Remove air from the textiles before washing to prevent an ex-
cessive build-up of foam.
- Follow the instructions on the care label.
Programmes
37
Bed linen
Temperature 90°C to cold
Load 8.0kg
Spinning 1600rpm
Use for Bed linen, pillowcases
Tip Close any zips or do up buttons.
Curtains
Temperature 40°C to cold
Load 3.0kg
Spinning 600rpm
Use for Curtains and drapes specified as machine-washable by the manu-
facturer
Tip - To remove dust, select the Pre-wash Extra.
- For curtains which crease easily, deselect the final spin function.
- Remove curtain rollers.
Silks
Temperature 30°C to cold
Load 1.0kg
Spinning 600rpm
Use for Silks and other hand-washable fabrics with no wool content, e.g.
satin, lace and silk
Tip When using a laundry bag (e.g. for bras or tights), always include
other loose textiles in the load.
First wash
Temperature 40°C to cold
Load 2.0kg
Spinning 1200rpm
Use for New clothes made of cotton, synthetic fibres and towelling
Tip Use this programme to wash any manufacturing residues out of
new items.
Programmes
38
Proofing
Temperature 40°C
Load 2.0kg
Spinning 1000rpm
Use for Items made of microfibre and mainly synthetic fibres e.g. outer-
wear, skiwear and rainwear, table linen
Tip - Requires the use of a special-purpose detergent, e.g. ImpraPro-
tect from Miele.
- Proofing creates a water and dirt-repellent effect on the textiles.
- The items must be freshly laundered and spun or dried before
proofing.
- The thermal fixation of the Proofing programme takes place
automatically at the end of the process.
Pre-ironing only
Temperature Steam
Load 2.0kg (spun laundry)
Spinning No final spin
Use for Damp, freshly washed and spun textiles that are suitable for drying
in a tumble dryer and ironing
Tip - Reduces creasing after washing and minimises the ironing effort.
- 5–6shirts make up a load of approx. 2.0kg.
- Smaller load sizes give a better result.
- Remove garments immediately after the end of the programme
and then put them in the tumble dryer or hang them on a coat
hanger to smooth them out.
- Not suitable for garments made of wool or wool blend fabric
Programmes
39
Separate rinse
Temperature No heating
Load 8.0kg
Spinning 1600rpm
Use for Textiles that are to be rinsed or for separate fabric conditioners
Tip Reduce the final spin speed for fabric that creases easily.
Spin only
Temperature No heating
Load 9,0kg
Spinning 1600rpm
Use for Items which only need to be spun
Tip - Drain: set the spin speed to 0rpm
- Reduce the final spin speed for fabric that creases easily.
Clean TwinDos
Temperature No heating
Load 0.0kg
Spinning No final spin
Use for Do not load any laundry
The drum must be empty for the maintenance wash programme.
Tip - Clean the washing machine before switching off for longer peri-
ods of time (more than 2months).
- Use the Miele TwinDos Care cleaning cartridge for cleaning.
Programmes
40
Clean machine
Temperature Cannot be selected, temperature is automatically controlled by the
programme.
Load 0.0kg
Spinning No final spin
Use for Do not load any laundry
The drum must be empty for the maintenance wash programme.
Tip - Optimum results can be achieved by using Miele’s IntenseClean
washing machine cleaner. Alternatively, a multi-purpose deter-
gent can be used.
- Dispense the machine cleaner or multi-purpose detergent dir-
ectly into the drum.
- The Short Extra is activated automatically.
Clean drum
Temperature No heating
Load 0.0kg
Spinning No final spin
Use for Do not load any laundry
The drum must be empty for the maintenance wash programme.
Tip Soiling such as sand or fluff is rinsed out of the drum.

Programmes
41
Programme sequence
Wash rhythm Rinse cycles Water level during
rinsing
Cottons Intensive 3 Medium
ECO 40-60 Intensive 2 Medium
Minimum iron Normal 3 High
QuickPowerWash Intensive 2 Low
SmartMatic Normal 3 Medium
Woollens Hand wash 3 High
Shirts/Blouses Sensitive 3 High
Delicates Sensitive 3 Very high
PowerFresh Rocking – –
Dark garments/Denim Normal 3 Medium
Outerwear Sensitive 3 High
Sportswear Sensitive 2 High
Trainers Rocking 2 Medium
Express 20 Intensive 1 Low
Down filled items/
Duvets
Normal 2 High
Bed linen Intensive 2 High
Curtains Sensitive 4 Medium
Silks Hand wash 2 High
First wash Normal 2 Medium
Proofing Normal 1 Medium
- The information in the table always refers to the maximum load size of the pro-
gramme.
- The washing machine determines the amount of water and energy required de-
pending on the amount of laundry and its absorbency.
- During the main wash, the suds are sprayed continuously into the laundry. This
means that the water level cannot be detected.
Number of rinse cycles
The number of rinse cycles depends on a number of factors:
- Selected final spin speed
- Foam build-up during the main wash cycle
- Selected extra options

Programmes
42
Extras
Short
For textiles with light soiling with no vis-
ible stains.
The programme sequence is reduced.
Mechanical action and energy usage are
increased.
Pre-ironing
The laundry undergoes a smoothing pro-
cess with steam at the end of the pro-
gramme. Reducing the maximum load
size by 50% will achieve a better res-
ult. Small load sizes achieve a better
result.
The garments must be suitable for dry-
ing in a tumble dryer and suitable
for ironing .
SingleWash
For efficiently washing a very small load
size (<1kg) in a normal wash pro-
gramme. The wash duration is reduced.
Please note the following advice:
- Use liquid detergent.
- Reduce the dosage to a maximum of
50% of the amount quoted for a
½load.
Stains
For cleaning stained laundry. The wash
programme sequence is altered with
this option.
Save energy
The wash temperature is reduced and
the wash duration is increased in return.
The wash programme continues to
provide excellent results.
Rinse plus
Activate 1 to 3 extra rinses for excellent
results.
The number of rinse cycles can be set
under SettingsAppliance func-
tionsRinse plus.
Extra quiet
This option reduces noise levels during
the wash programme. Use this if you
want to wash during quiet periods (for in-
stance when children are sleeping). The
Rinse hold Extra is switched on automat-
ically, deactivating the final spin. The pro-
gramme running time is longer.
Hygiene plus
The hygiene requirements for laundry
are increased. The temperature holding
time is extended in the main wash to
improve the rinsing efficiency. This will
increase the water and energy con-
sumption for the programme. The laun-
dry must be suitable for drying in a
tumble dryer and suitable for iron-
ing .
Pre-wash
For laundry with large amounts of dirt,
e.g. dust and sand.
Soak
For heavily soiled and stained items
with protein stains.
The soak duration can be set to
between 30minutes and 6hours via
SettingsAppliance func-
tionsSoak.
Rinse hold
The laundry is not spun after the final
rinse cycle and remains in the rinse wa-
ter. This helps to prevent creasing if the
laundry is not going to be removed from
the washing machine immediately after
the end of the programme.
Programmes
43
Detergent recommendations (according to Ecodesign no.
2019/2023)
The recommendations apply across the entire temperature range of the wash pro-
grammes.
Miele UltraPhase
1 and 2
Miele Caps
Miele Caps
Miele Caps
Multi-purpose
detergent
Colour detergent
Detergent for
delicates and
woollens
Special-purpose
detergent
Cottons
ECO 40-60
Minimum iron
QuickPowerWash
SmartMatic
Woollens
Shirts/Blouses
Delicates
PowerFresh
Dark garments/Denim
Outerwear
Sportswear
Trainers
Express 20
1
Down filled items/Duvets
Bed linen
Curtains
Silks
First wash
Proofing
Clean machine
2
Recommendation Specialist detergents (e.g. WoolCare)
– No recommendation Fabric care (e.g. fabric conditioner)
Additive (e.g. booster)

Programmes
44
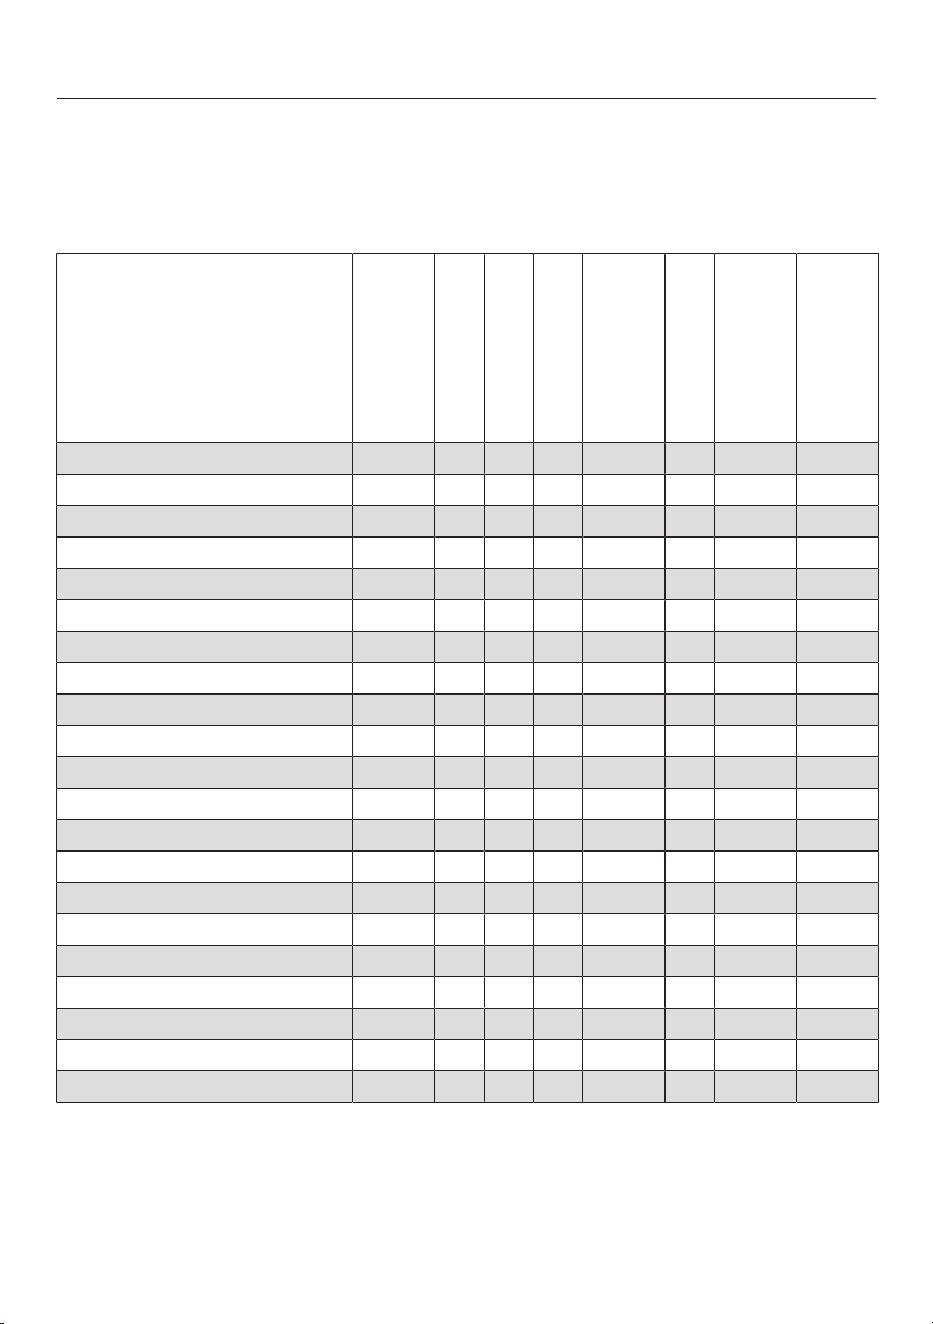
Consumption data
Programmes Load Energy Water
Running
time Temperature
1
Residual
moisture Spin speed
kg kWh Litres h:min °C % rpm
ECO 40-60* 9,0 0,806 70,60 3:49 37 44,90 1600
4,5 0,461 57,60 2:54 32 44,70 1600
2,5 0,251 27,60 2:54 26 45,10 1600
Cottons 60 9,0 2,000 65,00 3:19 60 45,00 1600
20
3
9,0 0,600 70,00 3:19 20 50,00 1600
Minimum iron 30 4,0 0,450 40,00 2:29 30 30,00 1200
Express 20
2
40 3,0 0,200 20,00 0:20 30 60,00 1200
Woollens 30 3,0 0,250 25,00 0:40 30 40,00 800
QuickPowerWash 40 4,0 0,700 40,00 0:49 40 60,00 1600
*
Test programme for compliance with EU legislation regarding ecodesign 2019/2023 and energy labelling in accordance with Regulation
No. 2019/2014
1
Maximum laundry temperature reached in main wash.
2
Short Extra activated
3
20°C programme for lightly soiled cotton garments
TwinDos dispensing must be deactivated when carrying out comparison tests.
Information for customers
Consumption data can vary from the nominal values given depending on water pressure, water hardness, water intake temperature, room tem-
perature, type and volume of load, fluctuations in the mains voltage and any extra options selected.

Good to know
45
Preparing the laundry for wash-
ing
Sorting laundry
Sort the laundry according to colour
and fabric.
- Dark textiles often contain excess dye
which is released in the first few
washes. Therefore, wash light and
coloured items separately.
- Information on the fabric and wash
programme can be found on the care
label. Most garments have a care la-
bel in the collar or side seam.
- Do not wash garments with the
symbol on the care label in the
washing machine.
For curtains, remove the rollers and/
or lead weights or tie both in a bag.
Make sure that the bra underwires are
sewn in. Remove any loose under-
wires before washing.
Close any zips and velcro fasteners
before washing.
Close the buttons of duvet covers and
pillowcases. This prevents other laun-
dry from getting trapped inside the
covers.
Pre-treating stains
Pre-treat stains quickly, preferably while
the stains are fresh. Dried stains or
stains that have penetrated the fabric
are difficult to remove.
Dab the stains off using a soft, colour-
fast cloth. Do not rub.
Tip: Stains (e.g. blood, egg, coffee, tea)
can be pre-treated using some handy
tricks. You can find these tricks in Tips
for stain removal on the Miele website.
Damage due to solvent-based
cleaning agents
Cleaning agents containing benzine,
stain remover, etc., can damage
plastic parts.
When pre-treating textiles, make sure
that any plastic parts (e.g. buttons)
do not come into contact with clean-
ing agent.
Risk of explosion due to solvent-
based cleaning agents.
When using solvent-based cleaning
agents, an explosive mixture may de-
velop.
Never use solvent-based cleaning
agents in the washing machine.
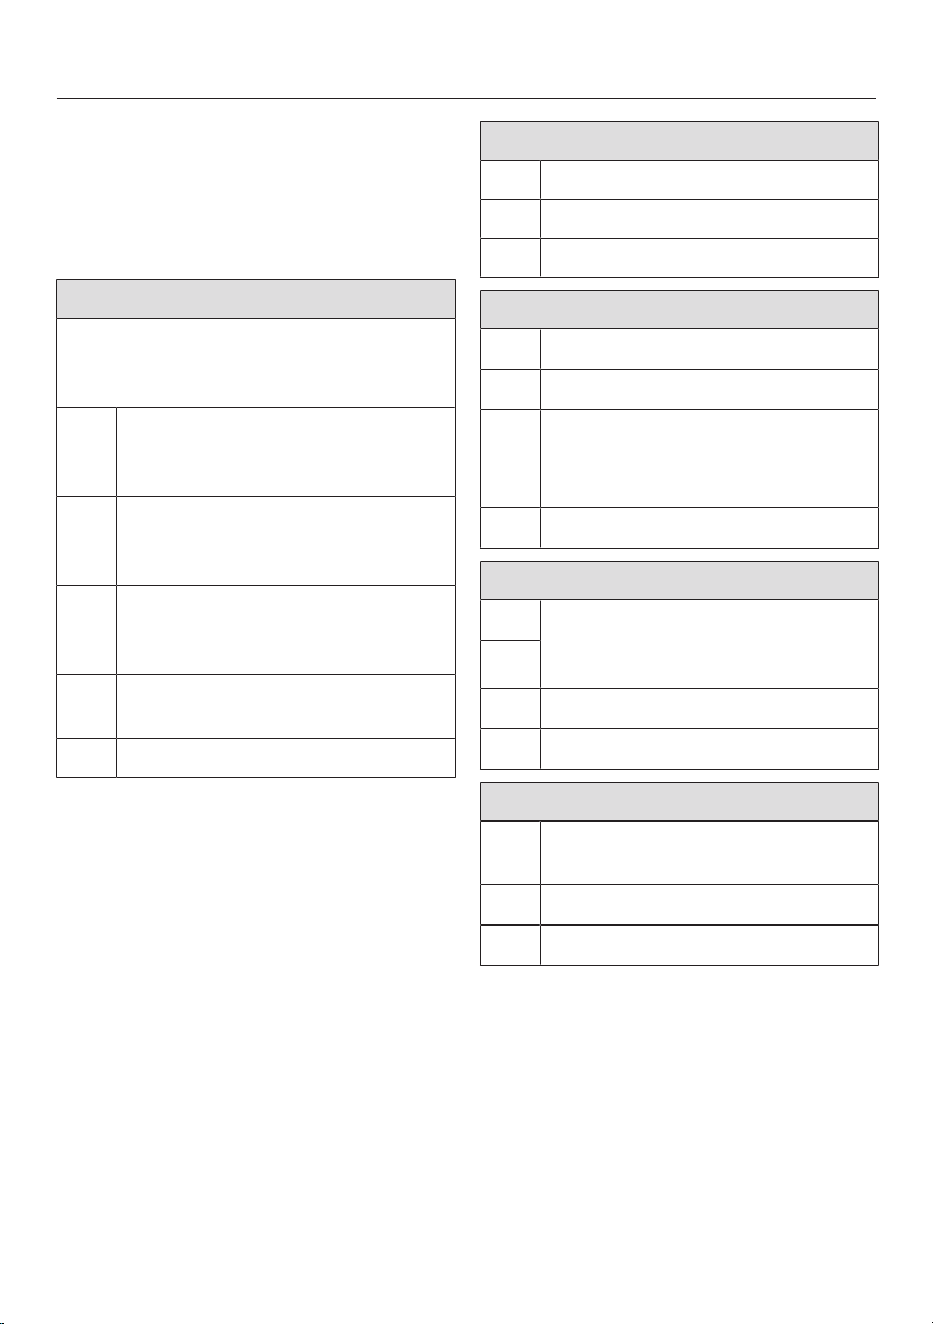
Good to know
46
Care label
The care label contains symbols for the
perfect cleaning and care of garments.
The symbols can be divided into the fol-
lowing categories:
Washing
The figure quoted in the bucket is the
maximum temperature at which the
garment can be washed.
–
Normal agitation e.g. the ECO
40-60, Cottons programmes
–
Reduced agitation e.g. the Min-
imum iron programme
–
Much reduced agitation e.g. the
Delicates programme
Hand wash e.g. the Woollens
programme
Do not wash
Drying
Normal or higher temperature
Low temperature
Do not tumble dry
Ironing
Approx. 200°C
Approx. 150°C
Approx. 110°C
Ironing with steam can cause ir-
reversible damage.
Do not iron
Professional cleaning
Dry clean only. The letters indic-
ate the type of cleaning agent
required.
Wet cleaning
Do not dry clean
Bleaching
Any oxidation bleach can be
used
Use oxygen bleach only
Do not bleach

Good to know
47
Detergent
Any detergent suitable for domestic
washing machines can be used. Please
observe the instructions for use and
dosage on the detergent packaging.
Using dispensing aids
Use dispensing aids (e.g. dispenser
balls) if these are supplied with the de-
tergent, particularly when using liquid
detergent.
Using refill packs
When purchasing detergent, buy refill
packs wherever possible. This helps re-
duce the amount of waste packaging.
Correct dispensing of detergent
The dispensing quantity of detergent
depends on various factors:
- Degree of soiling of the laundry
- Laundry volume
- Water hardness Check with your local
water supplier if you do not know the
water hardness level in your area.
Effects of dispensing more or less
than required
Dispensing more than required does
not improve the wash results but:
- Poorer wash results due to too much
foam in the drum and reduced mech-
anical action
- Cleaning results are impaired
- Higher water consumption due to an
extra rinse (switched on automatically
if too much foam is sensed in the
drum).
- Higher costs due to increased water
and detergent consumption
- Pollution of the environment
Dispensing too little detergent has the
following effects:
- The laundry does not get clean and
turns grey over time (greying of the
laundry)
- Increased limescale on the heater ele-
ments (energy consumption in-
creases, heater element service life is
reduced)
- Unpleasant odours in the washing
machine (due to the formation of a
biofilm)
- Unpleasant odours in the laundry (due
to residual sebum)
Water hardness levels
When dispensing detergent, it is im-
portant to observe the water hardness
levels.
The local water supplier can supply de-
tails of the on-site water hardness level.
Water hard-
ness level
Total hard-
ness in
mmol/l
German scale
°dH
I (soft) 0–1.5 0–8.4
II (medium) 1.5–2.5 8.4–14
III (hard) above 2.5 above 14
Water softener
Using water softeners is recommended
from water hardness levels II and III.
Using water softener can save deter-
gent. Dispense according to the amount
specified on the water softener pack-
aging. Observe the following sequence
when adding water softener and powder
detergent into the detergent drawer.
1. Add powder detergent.
2. Add water softener.

Good to know
48
Any other order will cause the deter-
gent to stick to the detergent drawer.
Tip: For liquid detergents: pour the de-
tergent into the detergent drawer and
the water softener directly into the drum
using a dispensing aid.
Then dispense the recommended
amount of detergent for water hardness
level I.
Colour run and dye removers/dyes
- Dyes suitable for use in domestic
washing machines can be used. How-
ever, please note that the salt used in
the dyeing process can cause corro-
sion to stainless steel components in
the machine if you use dye frequently.
Always follow the dye manufacturer’s
instructions carefully.
After dyeing, run the Clean drum pro-
gramme. This rinses out any salt and
colour residues.
- It is prohibited to use dye removers in
the washing machine.
Damage due to colour run/dye
removers.
Colour run and dye removers can
cause corrosion in the washing ma-
chine.
Do not use colour run or dye re-
movers in this washing machine.
Spinning
Spinning the laundry is used for dewa-
tering. There is a spin cycle after the
main wash and between the rinse
cycles in the final spin.
The perfect final spin speed is pre-set
for each programme and is limited to a
maximum value depending on the pro-
gramme. The maximum final spin speed
for the programme can be found in the
programme overview.
Rinse-spin
There is a rinse-spin cycle after the main
wash and the rinse cycles.
It is important to drain the water out of
the laundry to improve the cleaning res-
ults. The maximum set spin speed is not
reached.
If the final spin speed is reduced, the
rinse-spin speed is adjusted.
If the final spin speed is less than
700rpm, an extra rinse is activated in
the Cottons programme to ensure effi-
cient cleaning results.
Omitting the final spin or rinse-spin
Deselecting the final spin
Switch on the Rinse hold Extra.
The laundry is not spun after the final
rinse cycle and remains in the rinse wa-
ter. This helps to prevent creasing if the
laundry is not going to be removed from
the washing machine immediately after
the end of the programme.
Omitting the rinse-spin and the final
spin
Set the final spin speed to 0rpm.
Tip: It is only possible to deselect the
rinse spin when deselecting the final
spin.

Adjusting settings
49
Settings: Overview
* Follow the instructions on the
display.
General
Software update
Update
Language *
Date & Time *
Clock format
24 hours
12 hours
Set the time
Set date
Brightness *
Sounds *
Buzzer tones
End of prog. tone
Security
System lock
Set up
Edit
Delete
PIN code
Movement sensor
Off
Near
Far
Factory default settings
Reset appliance
Networking
WiFi
Connection
Signal strength
Home network
IP address
Reset
Remote control
Appliance functions
TwinDos
Compartment 1
Detergent
UltraPhase 1
UltraPhase 2
Colour detergent
Multi-purp. detergent
Delicates detergent
Wool detergent
Fabric conditioner
No detergent
Dispensing quantity
Adjust fill level
Compartment 2
Detergent
...
Dispensing quantity
Adjust fill level

Adjusting settings
50
Water inlet
Cold water
Hot water main wash
Hot water mw + rinse
Memory
ComfortOpen
Degree of soiling
Light
Normal
Heavy
Allergy
Soak
0:30 6:00 h
Rinse plus
1 rinse cycle
2 rinse cycles
3 rinse cycles
Rinse sealing ring
Temperature reduction
Suds cooling
Low water pressure
Anti-crease
Anti-crease
Duration
0:30 2:00 h
Water hardness
Lighting *
Door handle
Information
Software *
Legal Information
Consumption
Previous programme
Total consumption
Operating hours
Information
Factory default settings

Adjusting settings
51
General
You are now under Settings
General.
Software update
You are now under Settings
General Software update.
To receive updates, you must success-
fully connect to your home network.
You can switch on this function to keep
the software up to date with the latest
Miele developments. A message will ap-
pear on the display as soon as a new
update is available.
Security
System lock
You are now under Settings
General Security System lock.
The system lock prevents the washing
machine from being used unintention-
ally.
- Set up
You are prompted to select an input
method for the system lock. You must
unlock the display every time you
switch it on.
- Edit
This menu option is only displayed if
you have already set up the system
lock. You can change the selected PIN
code.
- Delete
This menu option is only displayed if
you have already set up the system
lock. You can delete the system lock.
There is no longer any protection
against the machine being used inad-
vertently.
Tip: Make a note of the PIN code. If you
have forgotten the PIN code, Miele
Customer Service will have to reset the
PIN code.
Movement sensor
You are now under Settings
General Movement sensor.
The movement sensor detects move-
ments within a certain range. You can
deactivate the movement sensor or ad-
just its range (Near or Far).
Networking
You are now under Settings
Networking.
Networking allows you to operate your
appliance using the Miele app or ex-
ternal voice assistant, as well as to up-
date the software.
WiFi
You are now under Settings
Networking.
You can only connect to your home net-
work if the WiFi setting is activated.
Connection
You are now under Settings
Networking Connection.
You can view information about your
home network.
- Signal strength
The signal strength of the WiFi signal
received is displayed.
- Home network
You can view the quality of the con-
nection to your home network.
- IP address
The IP address is displayed.

Adjusting settings
52
- Reset
If you reset the network data, you will
no longer be able to operate your ap-
pliance via the Miele app or external
voice assistant or update the soft-
ware. You will need to reconnect to
your home network.
Remote control
You are now under Settings
Networking.
You are only able to operate your appli-
ance via the Miele app or external voice
assistants if the Remote control setting
is switched on.
Appliance functions
Here you can make various settings for
the wash process.
TwinDos
You are now under Settings
Appliance functionsTwinDos.
You can select detergents, set the dis-
pensing quantities and check and cor-
rect the fill level of the detergent cart-
ridges.
This setting is only necessary if the de-
tergent cartridges are not automatically
detected by the washing machine.
If you wish to use your own detergent
with the TwinDos function instead of
UltraPhase 1 and 2, you will need the re-
fill containers (optional accessories).
UltraPhase1 and 2 can only be dis-
pensed as a package. If a different de-
tergent is selected for one compart-
ment, the setting for the other compart-
ment is automatically deleted.
Tip: If you select No detergent the re-
spective TwinDos compartment will be
deactivated.
Water inlet
You are now underSettingsAp-
pliance functionsWater inlet.
You can programme 3 options for the
water intake.
- Cold water
When using cold drinking water. The
water enters via the cold water hose.
- Hot water main wash
When using cold and hot drinking wa-
ter. The water enters via both water
inlet hoses. Hot drinking water is only
used in the main wash if a temperat-
ure of over 30°C is selected.
- Hot water mw + rinse
When using cold and hot drinking wa-
ter. The water enters via both water
inlet hoses. Hot drinking water is
used in the main wash and for rinsing.
Memory
You are now under Settings
Appliance functionsMemory.
The washing machine will save the last
parameters (temperature, spin speed
and some of the extras) selected for a
wash programme after the programme
has started.
When the wash programme is chosen
again, the saved parameters will appear
on the washing machine’s display.

Adjusting settings
53
ComfortOpen
You are now under Set-
tingsAppliance functionsComfor-
tOpen.
The washing machine door opens auto-
matically at the end of the Anti-crease
function or after a programme is can-
celled.
Degree of soiling
You are now under Set-
tingsAppliance functionsDegree of
soiling.
You can specify the default setting for
the degree of soiling when using
TwinDos.
Allergy
You are now under Set-
tingsAppliance functionsAllergy.
Increased demand on the rinsing effi-
ciency of the washing machine. An extra
rinse is always carried out.
Soak
You are now under Set-
tingsAppliance functionsSoak.
You can set a duration for the soak dura-
tion of between 30minutes and
6hours.
Rinse plus
You are now under Set-
tingsAppliance functionsRinse plus.
You can select how many extra rinses
are to be carried out. This setting is im-
portant for allergy sufferers. The wash-
ing machine’s water consumption in-
creases.
Temperature reduction
You are now under Set-
tingsAppliance functionsTemperat-
ure reduction.
At an altitude of the installation site
above 1000m, water has a lower boil-
ing point. Miele recommends activating
the reduced temperature setting at alti-
tudes of the installation site of 2000m
or above to prevent water from boiling.
The maximum temperature is reduced
to 80°C even if a higher temperature is
selected.
Suds cooling
You are now under Settings
Appliance functionsSuds cooling.
Additional water flows into the drum at
the end of the main wash to cool the
suds down.
Suds cooling takes place when a Cot-
tons programme with a temperature of
70°C or higher is selected.
Switch on the suds cooling in the fol-
lowing cases:
- To prevent the danger of scalding if
the drain hose is hooked over the
edge of a sink or slops basin
- In buildings where the drainage pipes
do not comply with DIN1986
Low water pressure
You are now under Set-
tingsAppliance functionsLow water
pressure.
If the water pressure is below 100kPa
(1bar), the washing machine cancels
the programme and the Fault F10 • Wa-
ter inlet fault message appears.

Adjusting settings
54
If the on-site water pressure cannot be
increased, activating this function will
prevent the programme from being can-
celled.
Anti-crease
You are now under Set-
tingsAppliance functionsAnti-
crease.
The Anti-crease function reduces creas-
ing after the end of the programme.
At the end of the programme, the drum
continues to turn at intervals for up to
2hours. The washing machine door can
be opened at any time.
Water hardness
You are now under Set-
tingsAppliance functionsWater
hardness.
Set the exact water hardness for the
water in your home. The water hardness
is required to correctly dispense
TwinDos.
Lighting
You are now under Set-
tingsAppliance functionsLighting.
The door handle lighting can be
switched off or on.
Information
You are now under Settings In-
formation.
Software
You are now under Settings In-
formation Data plate.
Here you can find information from your
data plate.
Legal Information
You are now under Settings In-
formation Legal Information.
You can query which integrated open
source components are used in the
software.
Consumption
You are now under Settings
Consumption.
You can display the energy and water
consumption of the washing machine.
Operating hours
You are now under Settings In-
formation.
You can query the number of operating
hours.
Service
You are now under Settings
Service.
You can set whether Miele Customer
Service should gain access to the soft-
ware for servicing purposes.
Remote Access
Miele Customer Service can access the
software remotely.
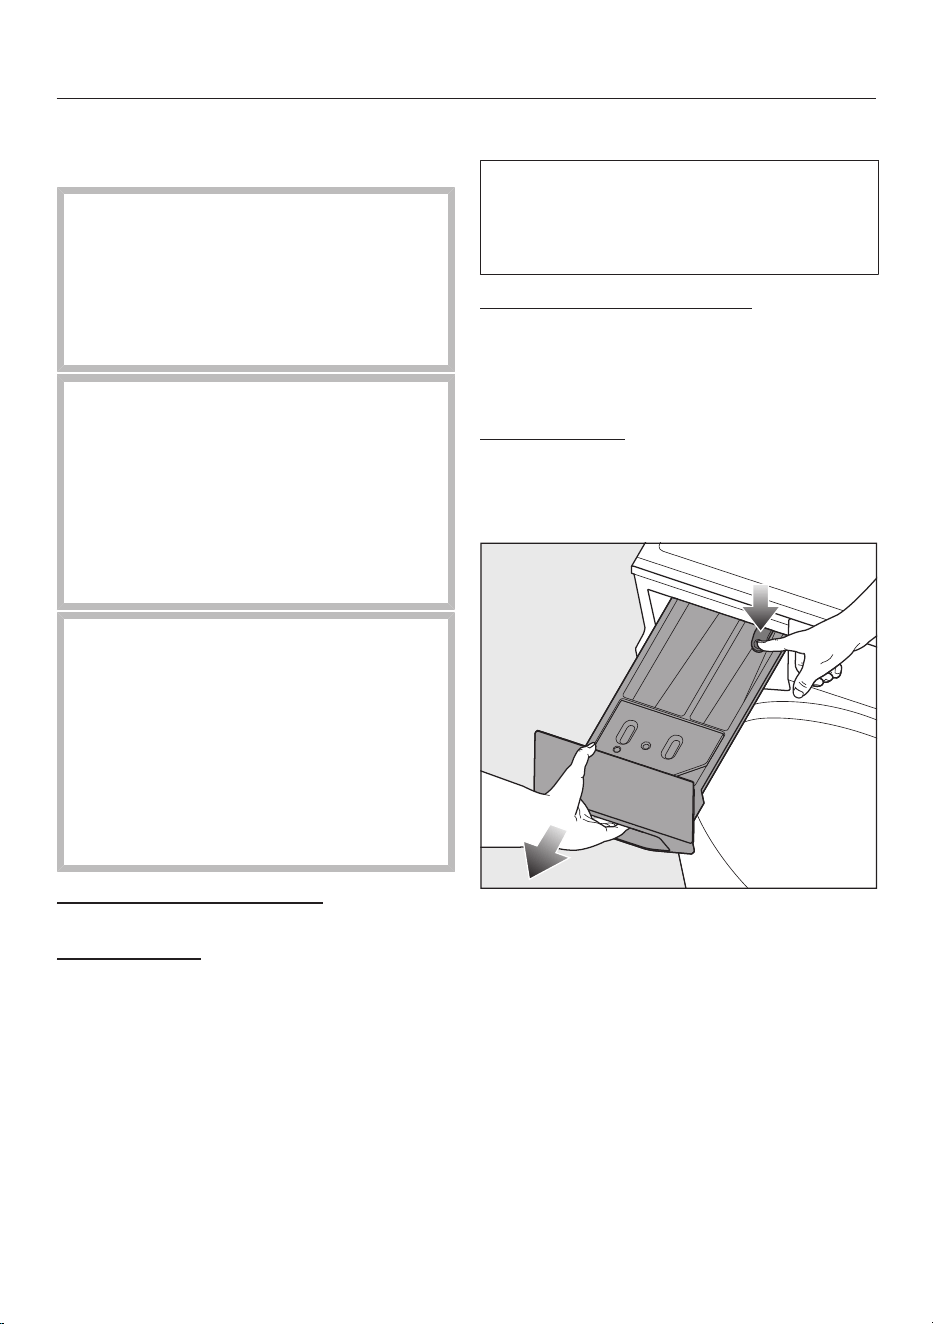
Cleaning and care
55
Cleaning the casing, drum and
control panel
Risk of electric shock!
Mains voltage is present when the
washing machine is switched off
Disconnect the machine from the
electricity supply before cleaning or
maintenance.
Risk of damage due to ingress of
water.
The pressure of a water jet can cause
water to get into the washing ma-
chine, resulting in damage to com-
ponents.
Do not spray the washing machine
with a water jet.
Damage caused by cleaning
agents.
Solvent based cleaning agents, ab-
rasive cleaners, glass cleaners or
multi-purpose cleaning agents can
cause damage to plastic surfaces and
other parts.
Do not use any of these cleaning
agents.
Cleaning recommendation:
As required
Tools required:
soft cloth
Clean the casing and control panel
with a mild cleaning agent or soapy
water and dry both with a soft cloth.
The drum can be cleaned using a suit-
able stainless steel cleaner.
Cleaning the detergent drawer
Washing at low temperatures and the
use of liquid detergent can lead to a
build-up of mould and germs in the de-
tergent drawer.
Cleaning recommendation:
Every 4 weeks at the beginning, even if
you only use TwinDos. If there is no
heavy soiling, you can extend the inter-
vals.
Tools required:
Bottle brush
Removing and cleaning the detergent
drawer
Pull out the detergent drawer until
resistance is felt. Press down the re-
lease button and at the same time
pull the drawer right out of the appli-
ance.
Clean the detergent drawer with
warm water.
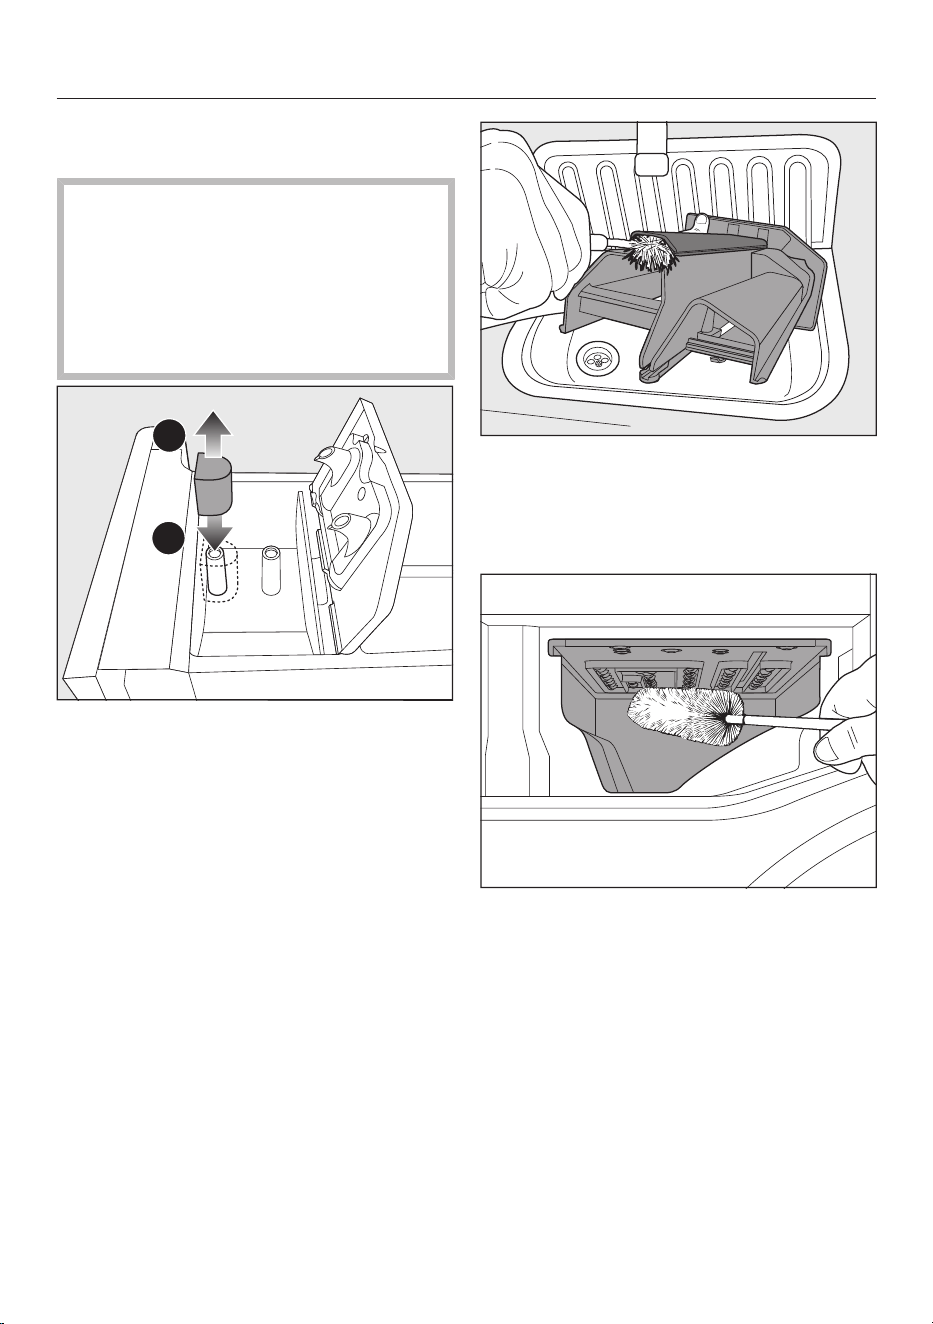
Cleaning and care
56
Cleaning the siphon and the /
compartment channel
Liquid starch results in clogging. If
clogged, the siphon in the /
compartment will not work and the
compartment can overflow.
Clean the siphon particularly thor-
oughly after using liquid starch a few
times.
1
2
Pull the siphon out of the com-
partment.
Clean the siphon under warm running
water.
Clean the siphon tube in the same
way.
Refit the siphon.
Clean the fabric conditioner channel
using a bottle brush and warm water.
Cleaning the detergent drawer com-
partment
Use a bottle brush to remove deter-
gent residues and limescale from the
jets inside the detergent drawer.
Refit the detergent drawer.
Tip: To assist drying, leave the detergent
drawer slightly open.
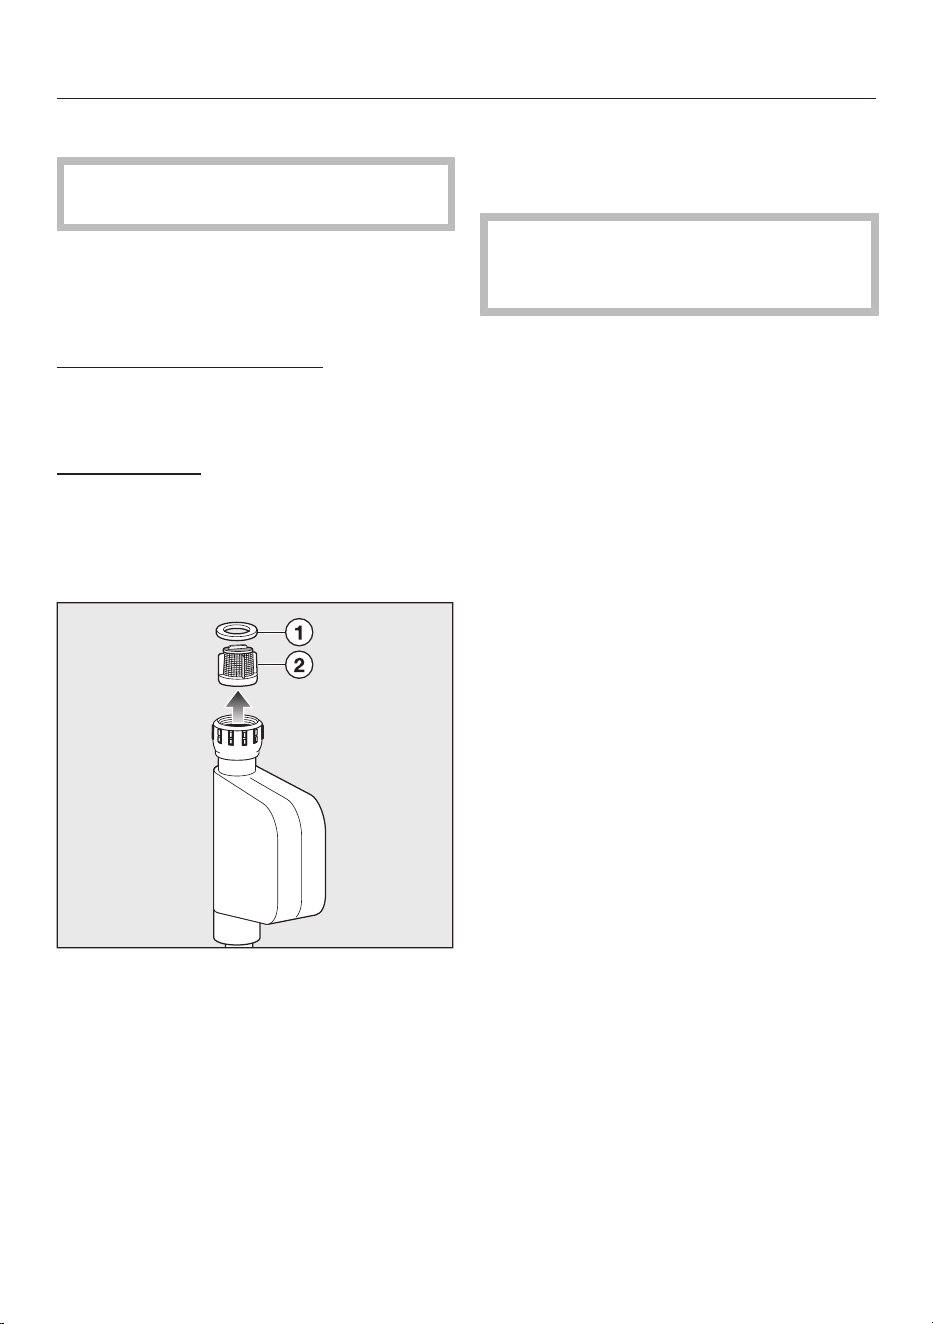
Cleaning and care
57
Cleaning the water intake filter
The filter must be put back in place
after cleaning.
The washing machine has a filter to pro-
tect the water intake valve. You can
check the filter for soiling and clean it
yourself in just a few simple steps.
Cleaning recommendation:
Every 6months. Perform this check
more often if there are frequent inter-
ruptions to the external water supply.
Tools required:
Screwdriver, pointed pliers
First turn off the stopcock.
Unscrew the water inlet hose from
the stopcock.
Use a screwdriver to remove the
black rubber seal from the screw
thread.
Using pointed pliers, take hold of the
plastic filter bar and remove the
plastic filter.
Clean the filter.
First insert the filter and then the rub-
ber seal back into the screw thread.
Screw the screw thread securely back
onto the stopcock by hand.
Slowly open the stopcock.
Make sure there is no water leaking
from the threaded union.
Tighten the threaded union.
Cleaning and care
58
Cleaning the TwinDos system
Damage resulting from dried
laundry detergent.
If the system has not been used for a
long time (more than two months),
detergent in the hoses can become
viscous or dry out. The hoses can be-
come blocked and would then need
to be cleaned by a service technician.
Clean the TwinDos system.
The washing machine has the TwinDos
maintenance cleaning programme for
the TwinDos system. Running the clean-
ing programme will rinse and clean the
hoses inside the washing machine.
To run the cleaning programme, you
will need the “TwinDos Care” cleaning
cartridge or a refill container, available
from the Miele online shop or from
your Miele dealer.
Cleaning the compartment
Detergent residue can cause clogging.
Cleaning recommendation:
Each time the cartridges are changed.
Tools required:
Damp cloth
Use a damp cloth to clean the com-
partment interior.
Starting the cleaning programme
Cleaning interval:
Longer downtime of more than
2months or when changing the deter-
gent
Tool required:
“TwinDos Care” cleaning cartridge or
refill container
Follow the instructions on the display.
Cleaning the drum/hygiene in
the washing machine
The washing machine has 2 cleaning
programmes:
- Clean drum
- Clean machine
Clean drum
Soiling such as sand and fluff is rinsed
out of the drum.
Cleaning recommendation:
As required
Start the Clean drum programme.
Maintenancewash
Washing at low temperatures and/or us-
ing liquid detergents can cause germs
and odours to build up in the washing
machine.
Cleaning recommendation:
Message on the display
Tools required:
Miele machine cleaner or a powder
multi-purpose detergent
Start the Clean machineprogramme.
Troubleshooting
59
Many malfunctions and faults that can occur in daily operation can be easily
remedied. You can save time and money in many cases, as you do not need to call
the Miele Customer Service Department.
Information to help you remedy faults yourself can be found at www.miele.com/
service.
The following tables are designed to help you to find the cause of a malfunction or a
fault and to resolve it.
The display does not switch on automatically – it is not possible to
select a programme
Problem Cause and remedy
Washing machine does
not switch on. The dis-
play remains dark.
There is no power to the washing machine.
Check whether the mains plug is plugged in.
Check whether the fuse has tripped.
The movement sensor is switched off. The movement
sensor does not respond.
Touch On/Off and switch on the washing ma-
chine.
Check the Movement sensor setting in Settings.
Check the movement sensor by approaching the
washing machine from the front.
Door does not open or close
Problem Cause and remedy
Fault F34 The door is not closed properly. The door lock could
not engage.
Close the door again.
Start the programme again.
If the fault message appears again, contact the
Miele Customer Service Department.
Fault F35 The door lock has jammed.
Switch the washing machine off and on again.
If the fault occurs again, contact the Miele Cus-
tomer Service Department.
The door cannot be
opened during the wash
process.
During the wash process, the door is locked and the
door sensor is switched off.
You can interrupt the wash process and cancel the
door lock via “Add laundry”.

Troubleshooting
60
Water intake or drainage
Problem Cause and remedy
Fault F10 • Water inlet The washing machine could not draw in enough water.
Check whether the stopcock has been opened or
properly opened.
Check whether the water inlet hose is kinked.
Check that the water connection pressure is suffi-
cient. The minimum pressure is 100kPa (1bar). If
the water connection pressure is permanently below
the minimum value, the “Low water pressure” set-
ting can be activated.
Fault F11 • Water drain-
age
The drain pumps are dirty or blocked.
Clean the drain filters and drain pumps (see
“Troubleshooting – Draining the suds solution in the
event of a fault”).
The drain hose has been fixed too high.
Observe the maximum delivery head of 1.0m.
Fault F138 The Waterproof system has been activated.
Close the stopcock.
Contact the Miele Customer Service Department.
Fault F373 • Leak on
drain filter
The washing machine has detected a leak in the drain
filter.
Check the drain filter and tighten it again.
Switch the washing machine off and on again.
If the fault occurs again, contact the Miele Cus-
tomer Service Department.

Troubleshooting
61
Fault messages and information on the display
Problem Cause and remedy
Fault FXXX
Switch the appliance off
and on again. If the fault
persists, call Customer
Service.
The washing machine has detected a fault.
Disconnect the washing machine from the mains.
Switch off at the wall and withdraw the mains plug
from the socket, or disconnect the fuse.
Disconnect the washing machine from the mains sup-
ply for at least 2minutes.
Reconnect the washing machine to the electricity
supply.
Switch the washing machine on again.
Restart the programme.
If the fault occurs again, contact the Miele Customer
Service Department.
Select a programme at
60 °C or higher or run
the 'Clean machine' pro-
gramme. “Clean ma-
chine” now?
When washing, a wash programme using a temperat-
ure above 60°C has not been run for a long time. This
can lead to a build-up of germs and odours in the
washing machine.
Start the Clean machine programme by adding
either Miele machine cleaner or a powder multi-pur-
pose detergent.
Check dosage Excessive foam has built up during washing.
Check the amount of detergent dispensed.
With automatic detergent dispensing, check the dis-
pensing quantity set.
Observe the instructions on the detergent packaging
and the degree of soiling of the laundry.
If necessary, reduce the basic dispensing quantity
by increments of 10%.
Fault F210 • Circulation The drain pumps and the nozzle in the door sealing
ring are dirty.
Clean the drain pumps and the nozzle in the door
sealing ring (see “Troubleshooting – Draining the
suds solution in the event of a fault”).
Start a wash programme again after cleaning.
If the fault occurs again, contact the Miele Customer
Service Department.

Troubleshooting
62
Fault messages and problems with TwinDos
Problem Cause and remedy
TwinDos empty sensor
defective
The fill level of the TwinDos cartridges cannot be de-
tected. The empty sensing is defective.
TwinDos can continue to be used.
Check the fill level of the TwinDos cartridges.
Contact the Miele Customer Service Department to
remedy the defect.
Use TwinDos TwinDos has not been used for a long time. As a res-
ult, there is a risk of the hoses becoming blocked.
Use TwinDos for one of your next wash loads.
Clean TwinDos TwinDos must be cleaned. TwinDos has not been
used for too long a time.
Carry out TwinDos cleaning immediately.
Hygiene in the washing machine
Problem Cause and remedy
The washing machine
smells unpleasant.
Germs and/or a biofilm have formed in the washing
machine.
When washing, a wash programme using a temperat-
ure above 60°C has not been run for a long time.
Start the Clean machine programme by adding
either Miele machine cleaner or a powder multi-pur-
pose detergent.
The door and the detergent drawer were closed after
washing.
Leave the door and the detergent drawer slightly
open to allow them to dry.

Troubleshooting
63
Problems with the detergent drawer
Problem Cause and remedy
Large amounts of deter-
gent residue remain in
the detergent drawer.
The water connection pressure is too low.
Check the water connection pressure (at least
100kPa (1bar)).
Check the filter in the water inlet hose for dirt and
clean the filter.
Powder detergent used in conjunction with water
softeners tends to become sticky.
Clean the detergent drawer.
In future, observe the following dispensing se-
quence:
1. Add powder detergent.
2. Add the softener to the powder detergent.
The fabric conditioner is
not completely dis-
pensed. A large amount
of water remains in the
compartment.
The siphon is not correctly positioned or is clogged.
Clean the siphon.
For technical reasons, a small amount of water will re-
main in the compartment.
There is still liquid in the
cap at the end of the
programme.
There is a blockage in the small pipe in the detergent
drawer onto which the cap is placed.
Clean the detergent drawer.
For technical reasons, a small amount of water will re-
main in the cap.
There is water next to
the cap in the com-
partment.
CapDosing was not activated.
Remove the caps and dispose of them.
Switch on CapDosing the next time a cap is used.
Empty caps were not removed after the last wash pro-
gramme.
Remove the caps.
There is a blockage in the small pipe in the detergent
drawer onto which the cap is placed.
Clean the detergent drawer.

Troubleshooting
64
Poor wash results
Problem Cause and remedy
Liquid detergent is not
achieving the required
results.
Off-the-shelf liquid detergents do not usually contain
bleaching agents. Stains from fruit, coffee or tea, for
example, are difficult to remove without bleaching
agent.
Use TwinDos with UltraPhase 1 and 2. The targeted
addition of UltraPhase 2 (bleaching agent) during
the wash process removes stains effectively.
Add a powder detergent containing bleach.
White residues which
look like powder deter-
gent are seen on dark
fabrics after washing.
Powder detergents contain compounds (zeolites) to
aid water softening which are not soluble in water. The
zeolites have ended up on the laundry.
Try and brush off the residues with a soft brush once
the laundry is dry.
In future, wash dark textiles using a liquid detergent.
Liquid detergents do not usually contain zeolites.
Wash dark textiles in the special programme offered
for this purpose.
Grey, greasy particles
cling to washed laundry.
There are greasy particles on the textiles. Greasy
particles can form on textiles soiled with grease (oils,
ointments) and if not enough detergent has been dis-
pensed.
Before the next wash, clean the washing machine
with the Clean machine programme to remove
residues from the washing machine.
Then wash the textiles again, if possible using a li-
quid detergent. Liquid detergents have a better
cleaning effect on grease stains.
The textiles are unusu-
ally wet after the wash
process.
The machine detected a high level of imbalance during
the final spin and reduced the spin speed.
A low final spin speed was selected when selecting
the programme.
Always place large and small textiles together in the
drum for a wash process. This ensures better distri-
bution of the textiles during the final spin and re-
duces the chance of imbalance.

Troubleshooting
65
Noises and various other problems
Problem Cause and remedy
The washing machine
shakes during the spin
cycle.
The washing machine is not standing evenly on all 4
adjustable feet.
The feet are not secured.
Level the washing machine and lock the feet.
Strange pump noises
can be heard.
Not a fault.
These slurping noises occur at the start and end of a
pump sequence as a normal part of the operation.
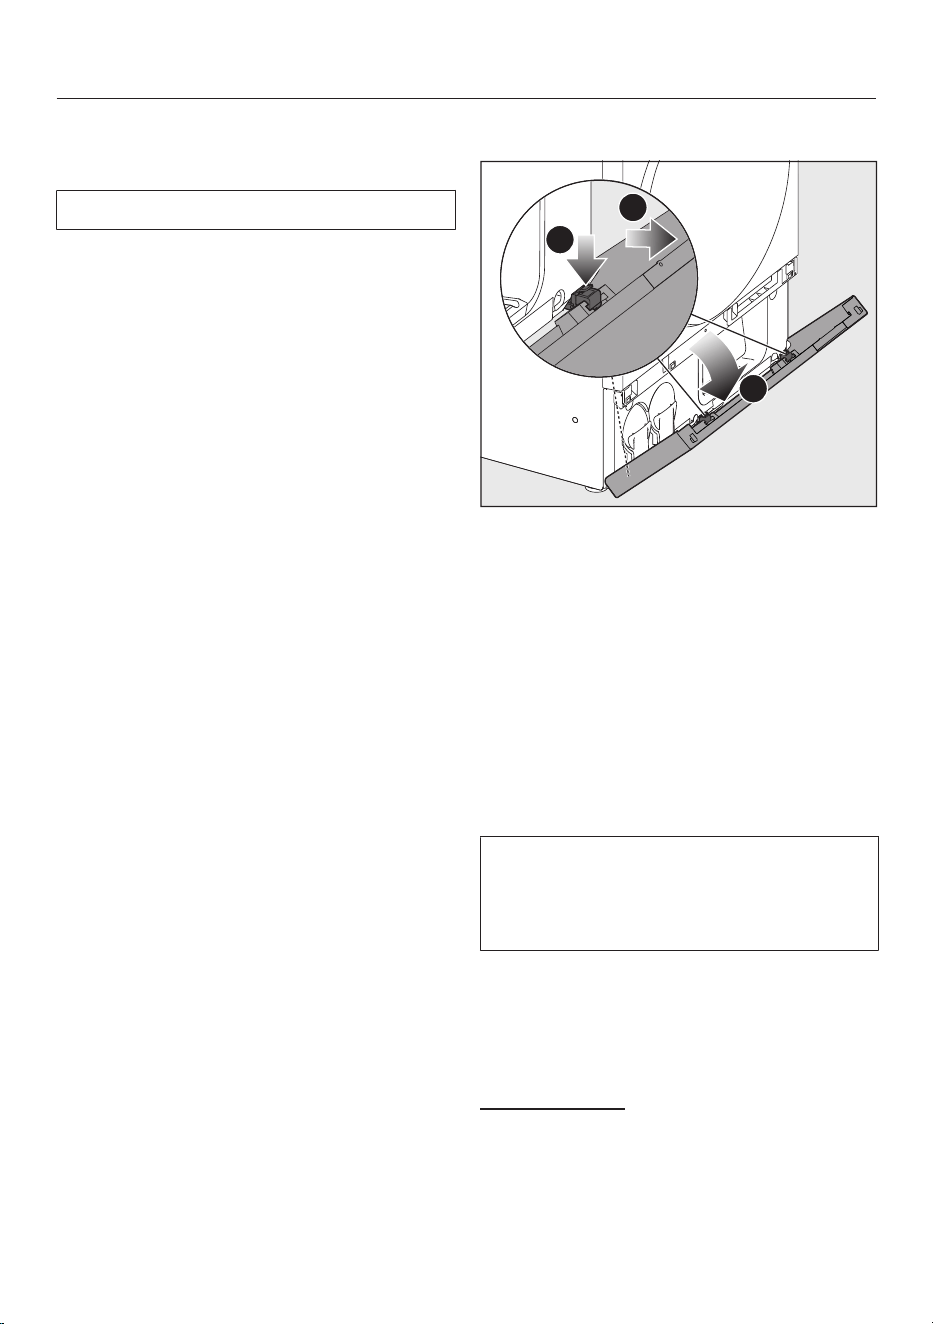
Troubleshooting
66
Draining the suds solution in
the event of a fault
Follow the operating sequences listed.
The individual operational steps can be
found in “Troubleshooting”.
Draining the suds solution and open-
ing the door in the event of a power
cut
1. Removing the plinth flap
2. Draining the suds solution
3. Fitting the plinth cap
4. Operating the emergency release
Draining the suds solution if the drain
filter is clogged
1. Removing the plinth flap
2. Draining the suds solution
3. Cleaning the pump and drain filter
4. Fitting the plinth flap
Drain the suds solution and cleaning
the pump and nozzle for Fault F210 •
Circulation
1. Removing the plinth flap
2. Draining the suds solution
3. Cleaning the pump and drain filter
4. Cleaning the nozzle at the top of the
door sealing ring
5. Fitting the plinth flap
Removing the plinth flap
1
2
3
Open the plinth flap by approx. 45°.
Release the 3 retainers one after the
other.
Remove the plinth flap by pulling it
forwards.
Tip: To avoid damaging the plinth flap,
put it to one side.
Draining the suds solution
Requirement: the plinth flap has been
removed.
Depending on the wash programme
and the progress of the wash cycle,
there may be a large quantity of suds
solution in the washing machine.
Emptying into a shallow container
This draining method is recommended if
the washing machine is placed directly
on the floor.
Tools required:
Container max. 3cm high and ideally
with a capacity of 2litres, e.g. a univer-
sal tray from the oven.
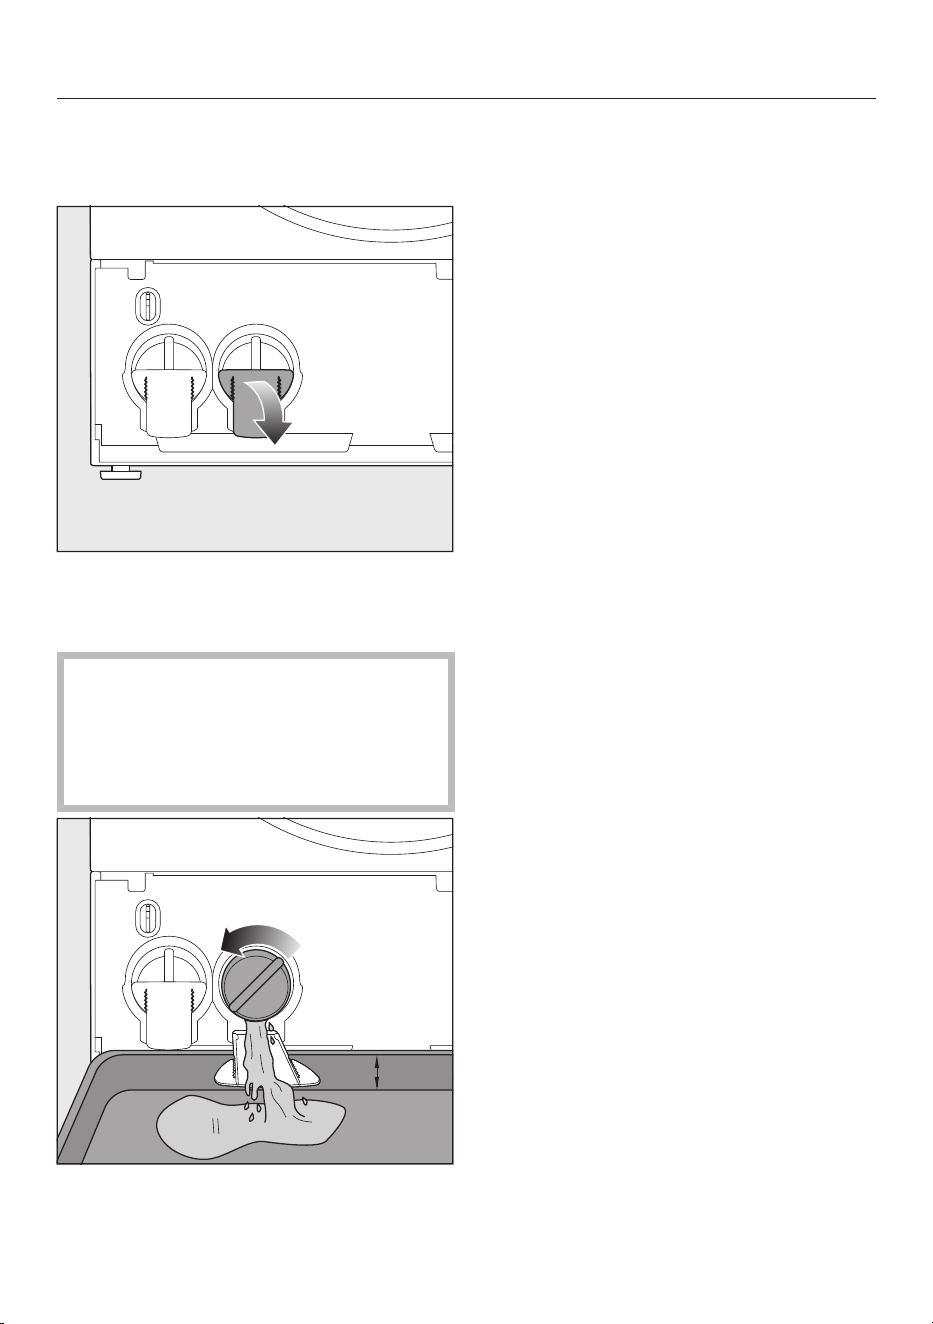
Troubleshooting
67
If the floor is sensitive, place a towel
under the machine to protect the
floor.
Fold down the right-hand pouring aid.
Press the pouring aid all the way
down until you feel it click into place.
Risk of scalding due to hot suds.
Escaping suds will be hot if laundry
has been washed at high temperat-
ures!
Carefully allow all suds to drain off.
< 3 cm
Slide a flat container under the pour-
ing aids.
Slowly turn on the right-hand drain fil-
ter until the suds solution drains out.
To interrupt the suds drainage (e.g. to
empty the container), tighten the
drain filter again.
The process is complete when no more
suds solution runs out.
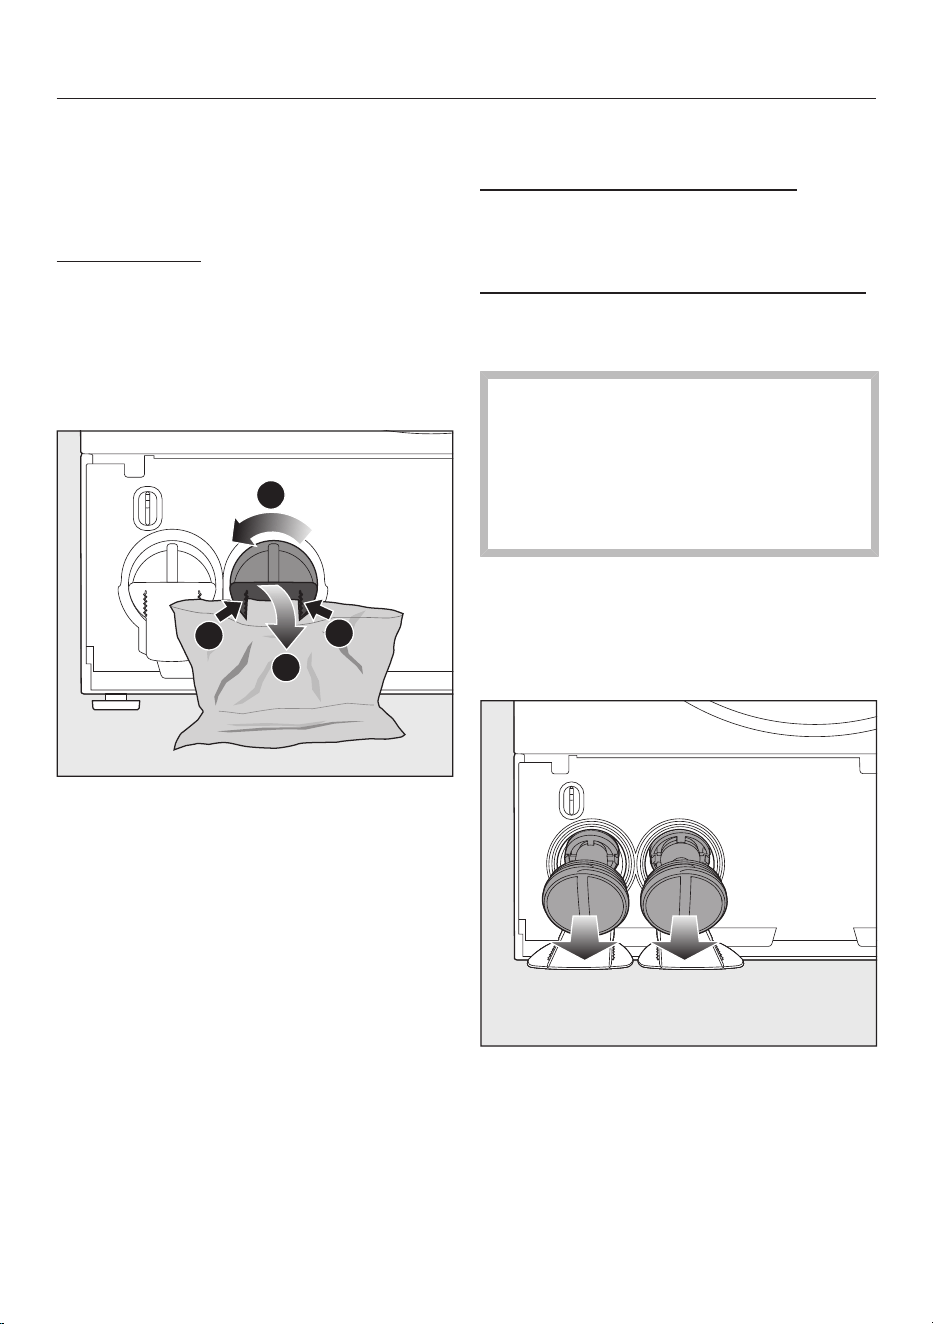
Troubleshooting
68
Emptying into a plastic bag
This draining method is recommended if
the washing machine is slightly elev-
ated, e.g. on a plinth.
Tools required:
1 plastic bag (freezer bag) with a volume
of at least 3litres and a towel for sensit-
ive floors.
If the floor is sensitive, place a towel
under the machine to protect the
floor.
1
1
2
3
Attach the plastic bag to both slots
of the right-hand pouring aid.
Fold down the pouring aid.
Slowly turn on the right-hand drain
filter until the suds solution drains
out.
To interrupt the drain (e.g. to empty
the bag), tighten the drain filter again.
The process is complete when no more
suds solution runs out.
Next steps
You want to clean the drain filter
Read “Cleaning the pumps and drain
filters”.
You do not want to clean the drain filter
Tighten the drain filter back up again.
Fold the pouring aid up again.
Risk of water damage
Make sure the drain filter is securely
tightened. Otherwise there is a risk of
water leakage during use.
Replace the drain filter correctly and
tighten it securely.
Cleaning the pumps and drain
filters
Requirement: suds solution has been
drained
Unscrew the drain filters completely
and remove the drain filters.
Clean the drain filters thoroughly.
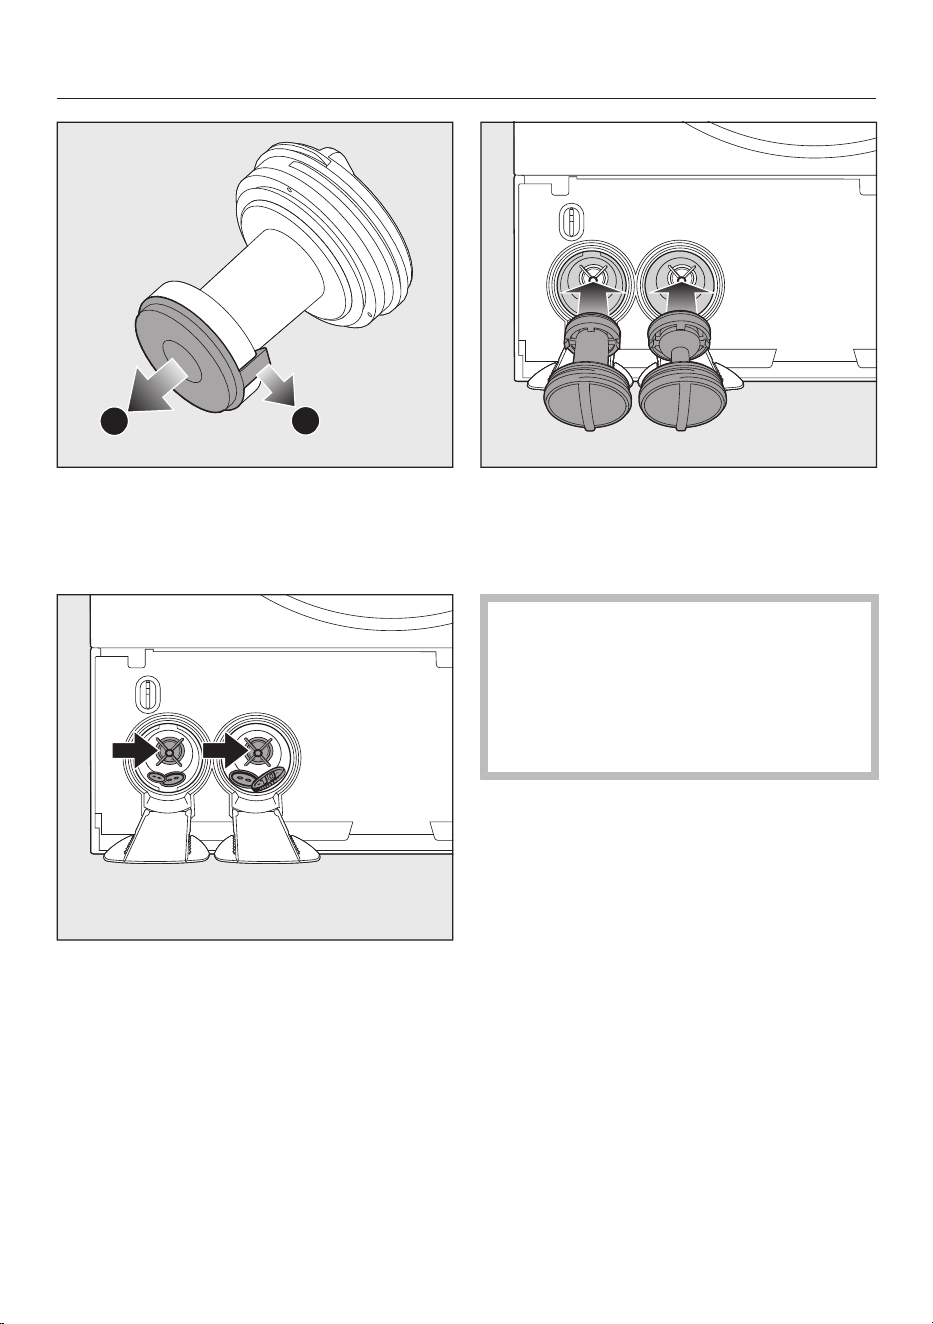
Troubleshooting
69
1
2
Loosen the retainers on the drain fil-
ter lids.
Remove the lids and clean the inside
of the drain filters.
Check whether the pump impellers
can rotate freely.
Remove any foreign objects (e.g. but-
tons, coins).
Clean the inside thoroughly.
Replace the drain filters correctly (on
the right and left) and tighten them
securely.
Fold the pouring aids up again.
Risk of water damage
Make sure the drain filters are se-
curely tightened. Otherwise there is a
risk of water leakage during use.
Replace the drain filters correctly and
tighten them securely.

Troubleshooting
70
Fitting the plinth flap
1
3
2
Snap the 3 retainers back into place
after use.
Press the outer edge of the plinth
flap slightly outwards.
Close the plinth flap.
Cleaning the nozzle at the top of
the sealing ring
Remove the fluff with your finger. Do
not use any sharp or pointed tools to
do this.
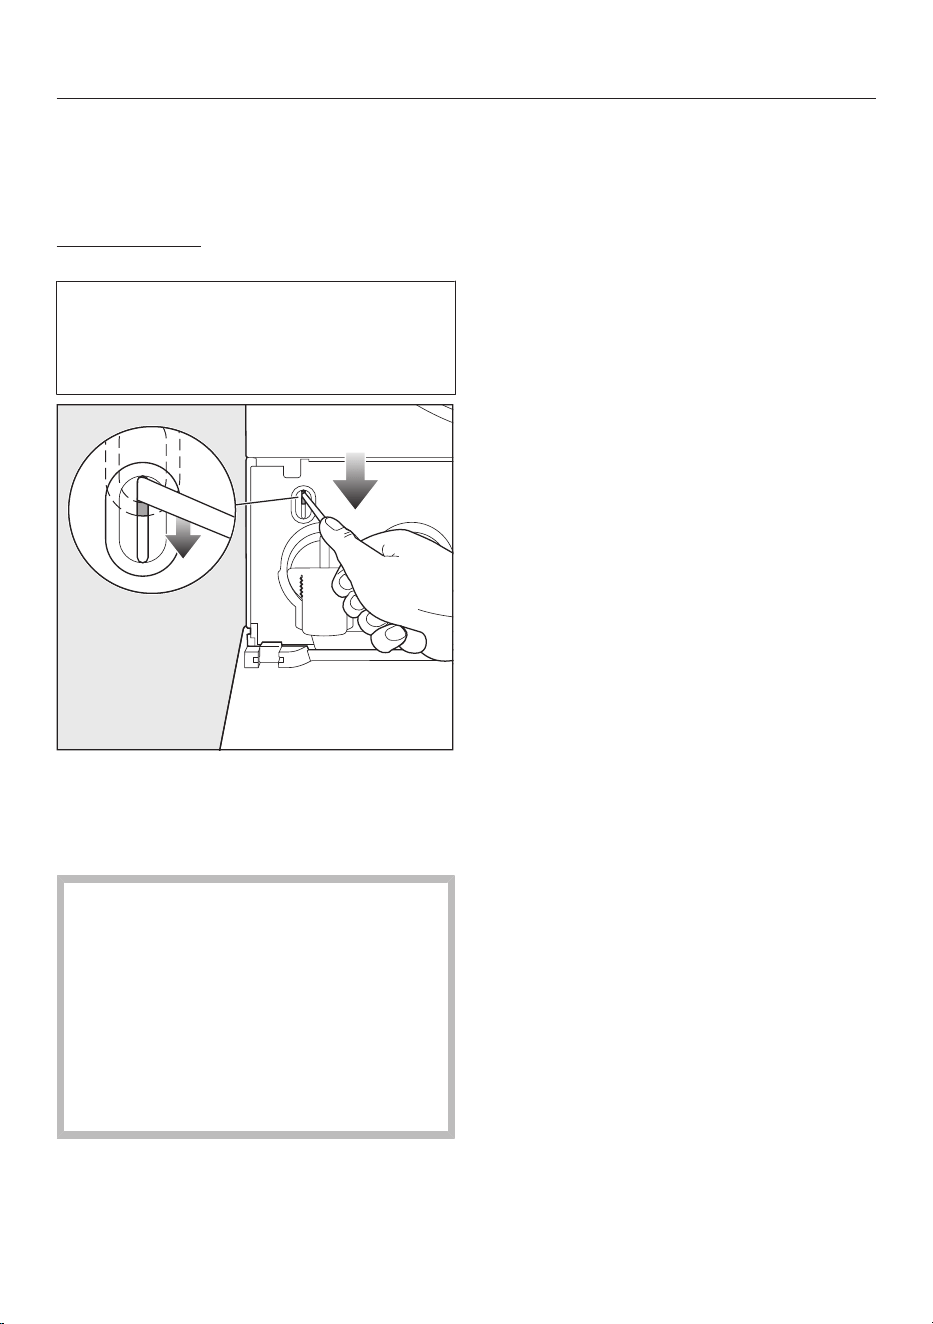
Troubleshooting
71
Operating the emergency re-
lease
Requirement: suds have been drained.
Tools required:
Long thin screwdriver
In the event of a power cut during the
wash process, the door remains
locked. The door can be unlocked
manually.
1. Use a screwdriver to push the door
release mechanism all the way down
without touching or opening the door.
2. Then pull the door open.
Danger of injury due to rotating
drum.
Reaching into a moving drum is ex-
tremely dangerous.
Always make sure that the drum is
stationary before reaching in to re-
move laundry.
Keep children away from the washing
machine.
3. Close the door.
4. Open the door again.
If the door is locked, repeat steps 1 to 4
to avoid potential safety risks.
5. Remove the laundry.
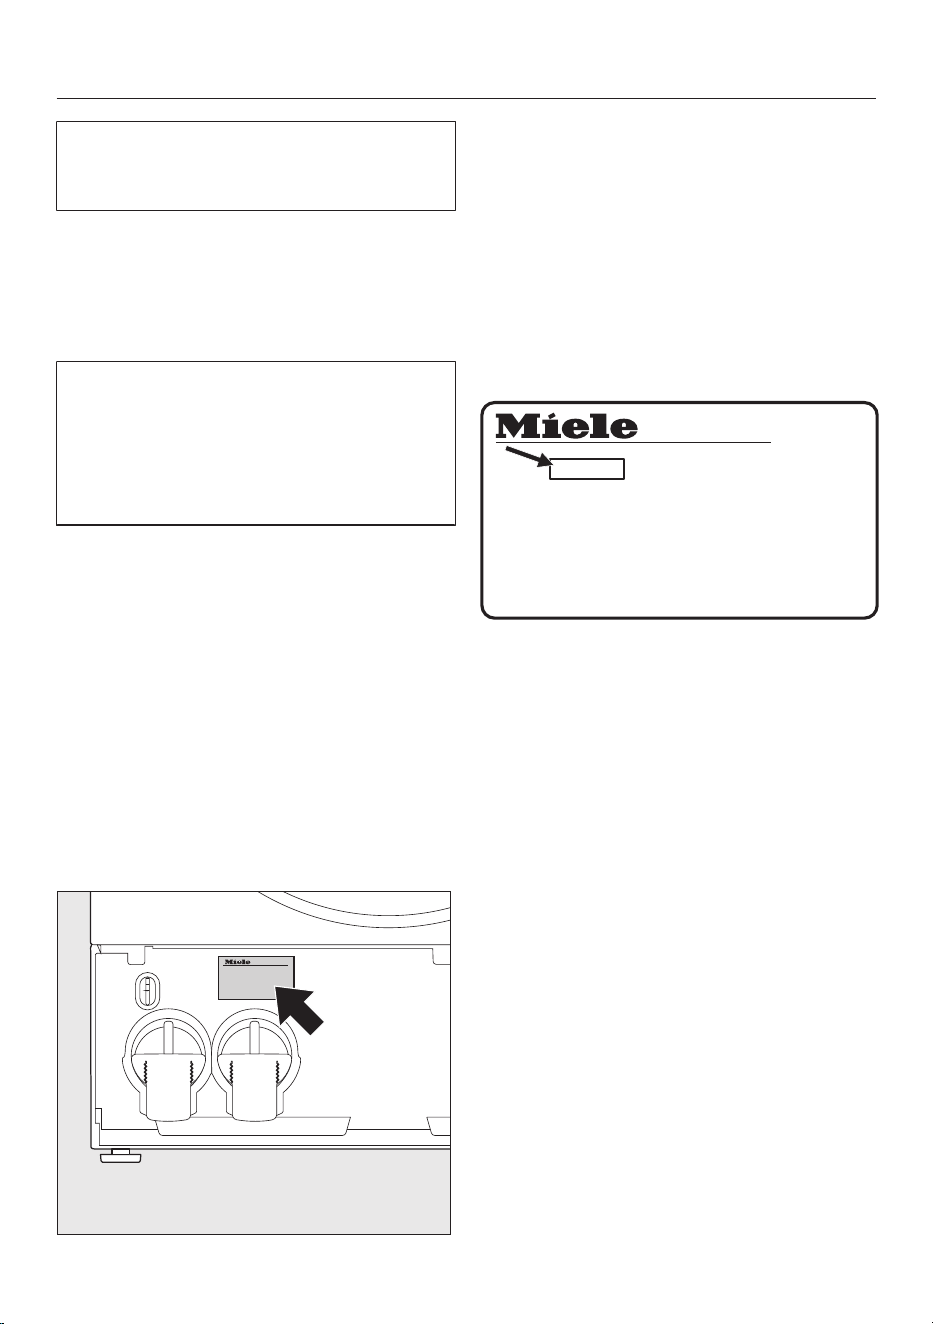
Customer Service Department
72
Information to help you rectify faults
yourself and about Miele spare parts can
be found at www.miele.com/service.
Contact in the event of a fault
In the event of any faults which you can-
not remedy yourself, please contact
your Miele dealer or the Miele Cus-
tomer Service Department.
You can book a Miele Customer Ser-
vice Department call-out online at
www.miele.com/service.
Contact information for the Miele Cus-
tomer Service Department can be
found at the end of this document.
Please quote the model identifier and
serial number of your appliance (Fabr./
SN/Nr.) when contacting the Miele Cus-
tomer Service Department. This informa-
tion can be found on the data plate.
Please note that telephone calls may be
monitored and recorded for training pur-
poses and that a call-out charge will be
applied to service visits where the prob-
lem could have been resolved as de-
scribed in this booklet.
The data plate can be found above the
right-hand drain pump when the plinth
flap is open.
EPREL database
From 1 March 2021, information on en-
ergy labelling and ecodesign require-
ments will be available in the European
Product Database (EPREL). You can find
the product database at the following
link https://eprel.ec.europa.eu/. You will
be asked to enter the model identifier.
The model identifier can be found on the
data plate.
Made in xxx
Mod.: XXXxxx
Miele Service
www.miele.com/service
M-Nr.: xxxxxxxx
Type: XXxx-X
Nr.:/ xxxxxxxxx
Warranty
For information on the appliance war-
ranty specific to your country please
contact Miele. See back cover for ad-
dress.
In the UK, your appliance warranty is
valid for 2 years from the date of pur-
chase. However, you must activate your
cover by calling 0330 160 6640 or re-
gistering online at www.miele.co.uk.
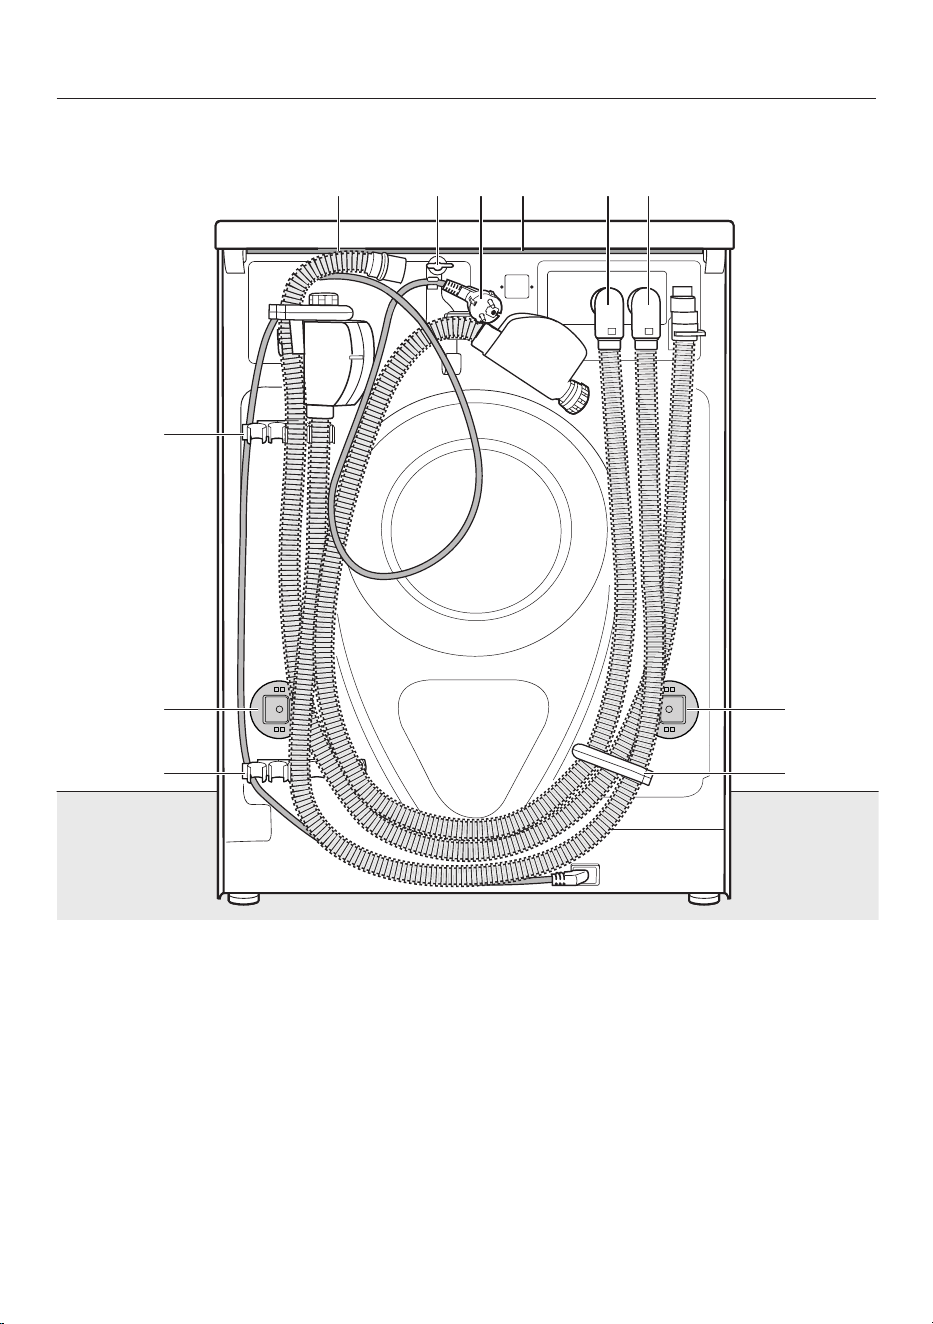
Installation
73
Rear view
a
Drain hose
b
Transport clips for inlet and drain
hoses and mains connection cable
c
Mains connection cable
d
Protruding lid for holding when mov-
ing the appliance
e
Inlet hose with Waterproof system
for cold water (drinking water)
f
Inlet hose with Waterproof system
for hot water
g
Safety caps for transit bars
h
Transport clips for inlet and drain
hoses and for storing transit bars
when not in use
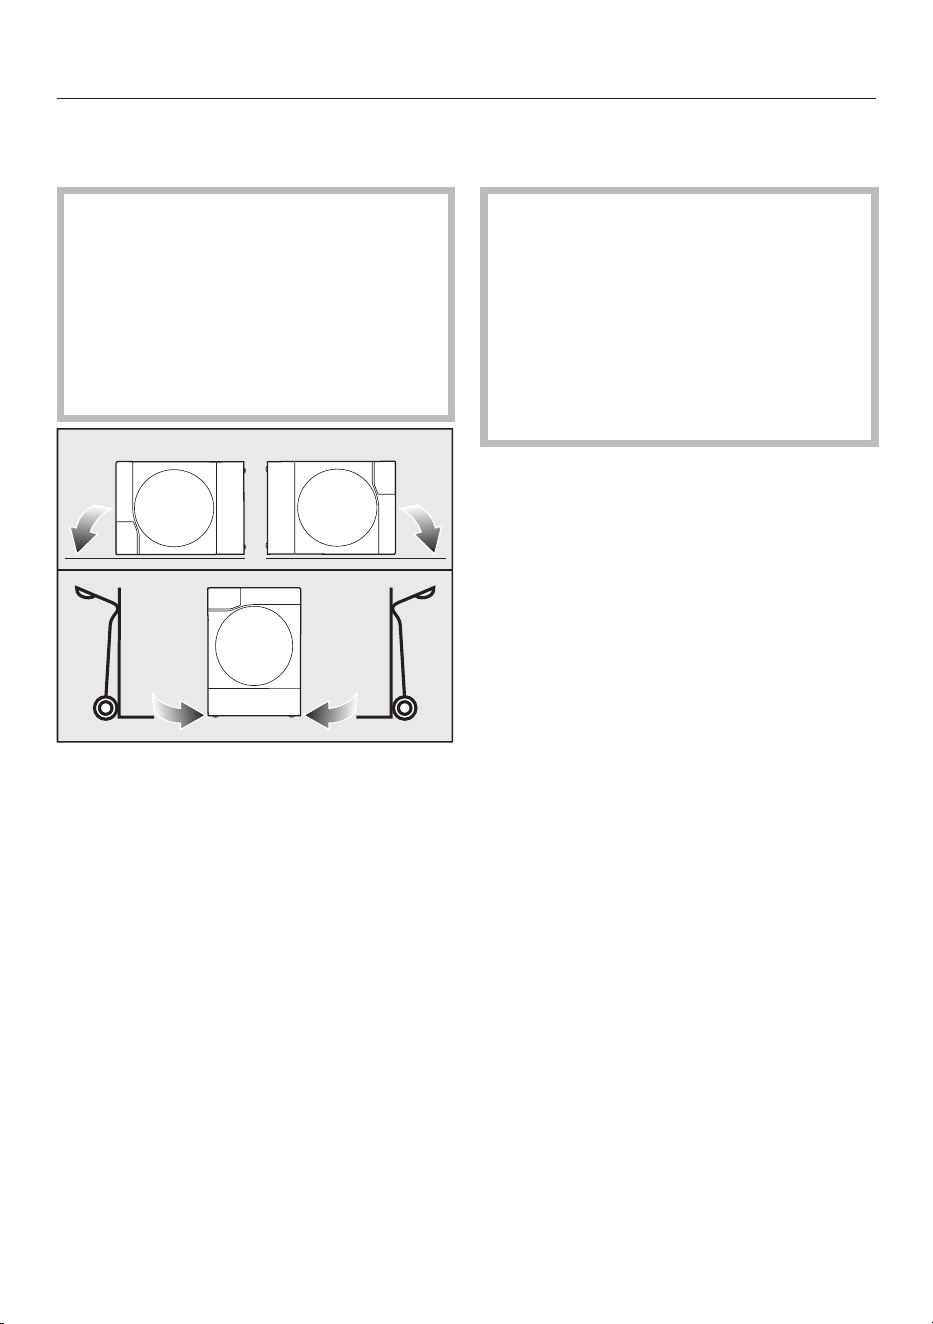
Installation
74
Transporting the washing ma-
chine
Danger of injury to people and
damage to property caused by mov-
ing the appliance incorrectly
If the washing machine tips up there
is a danger of injury to people and
damage to property.
Make sure the washing machine is
stable during transportation.
If transporting the washing machine,
make sure its left or right side panel
is:
- Horizontally (e.g. in a car) or
- Upright on a sack truck
Transporting the washing ma-
chine to its installation surface
Danger of injury due to unsecure
lid.
Make sure the fixings at the back of
the lid are secure. Otherwise there is
a danger of the lid being pulled off
when carrying the machine.
Before carrying the machine check
that the lid is secure where it pro-
trudes at the back of the machine.
Carry the washing machine by the
front adjustable feet and by the lid
where it protrudes at the back of the
machine.
Requirements for the installa-
tion surface for the washing
machine
- Connections for electricity, water and
drainage should be installed in such a
way that they remain accessible when
the washing machine is in its final po-
sition.
- The best base is a concrete floor.
- When installing on wooden beam
flooring, the base should be reinforced
with a plywood base (minimum size:
59x52x3cm). The base should span
several joists and be bolted to the
joists and not only to the floorboards.
Check for the presence of pipes and
cables first.
- Do not place on soft flooring (e.g. car-
pet).
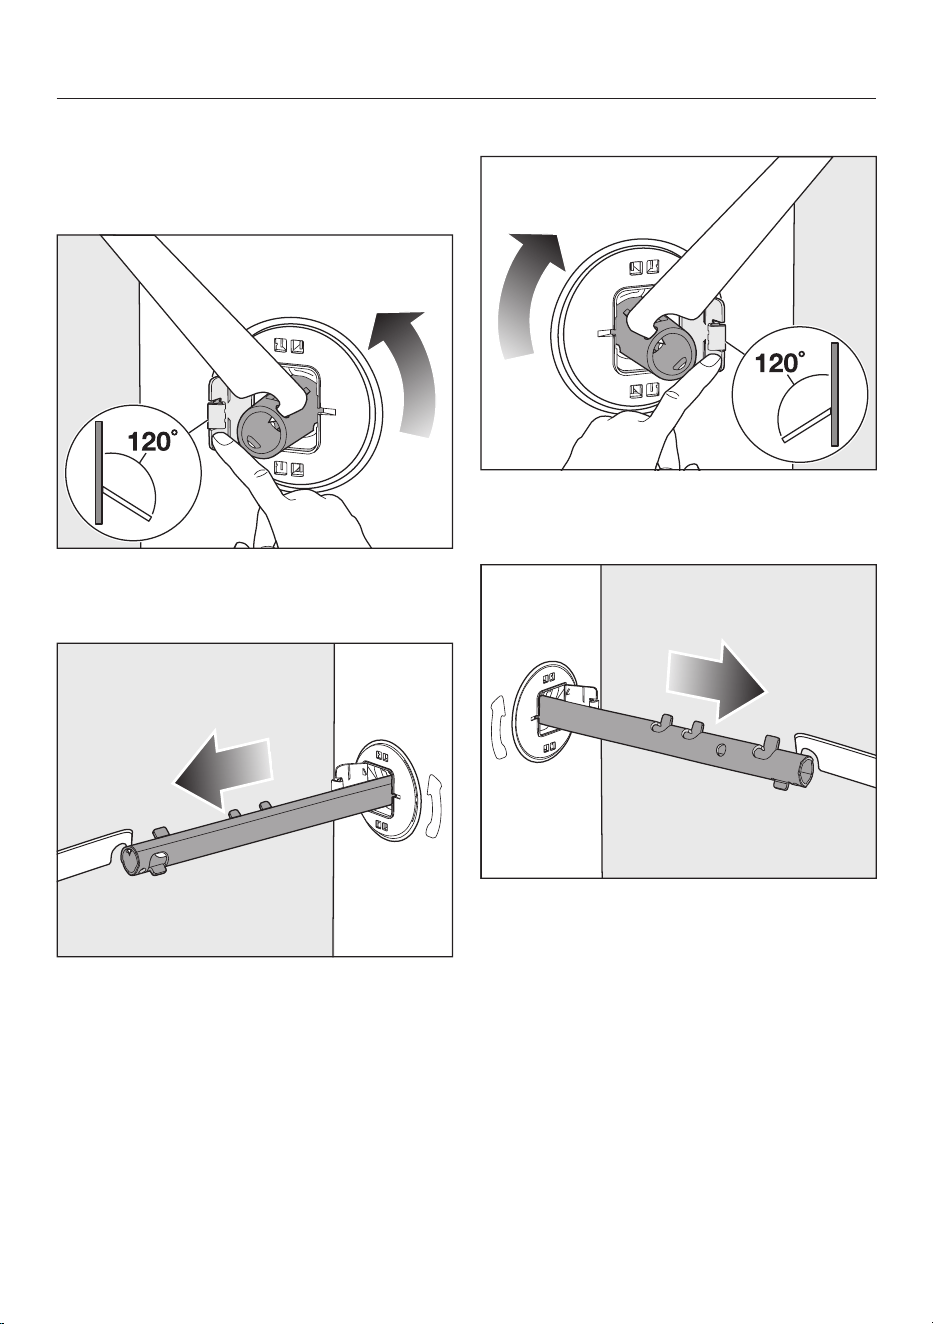
Installation
75
Removing the transport safety
device
Removing the left-hand transit bar
Push the safety cap cover out by 120°
and turn the transit bar 90° using the
open spanner supplied.
Pull out the transit bar.
Removing the right-hand transit bar
Push the safety cap cover out by 120°
and turn the transit bar 90° using the
open spanner supplied.
Pull out the transit bar.
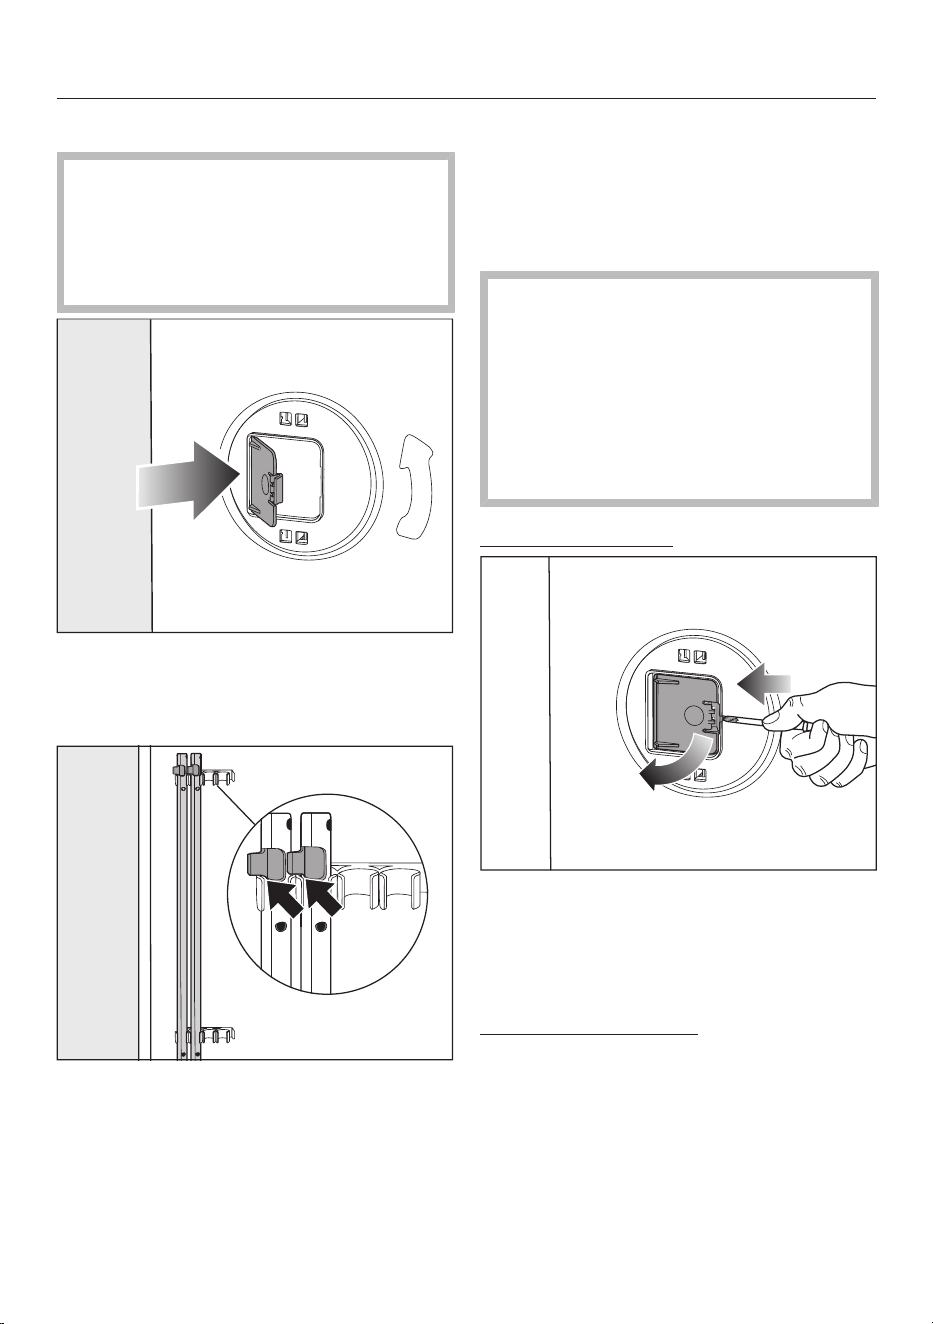
Installation
76
Closing the safety cap cover
Risk of injury from sharp edges.
There is a risk of injury from reaching
into holes that are not covered.
Cover the holes for the transit bars
after they have been removed.
Push the covers of the safety caps in
firmly until they engage in position.
Securing the transit bars
Secure the transit bars to the rear
panel of the washing machine. Make
sure that the top retainer is located
above the holder.
Refitting the transport safety
devices
The transport safety device must be in-
stalled before transport, e.g. when mov-
ing house.
Risk of damage from incorrect
transport.
The washing machine may become
damaged if moved without the transit
bars in place.
Keep the transit bars in a safe place.
Fit them again if the machine is to be
moved (e.g. when moving house).
Opening the covers
Press against the retainer with a
sharp object (a narrow screwdriver,
for example).
The cover will open.
Fitting the transit bars
Lift the drum slightly from the inside
and hold the drum in this position.
Push the transit bars back into the
openings.
Turn the transit bars inwards by 90°C
using the open spanner provided.

Installation
77
Aligning the washing machine
Risk of damage due to incorrectly
aligned washing machine.
There is a danger of the washing ma-
chine moving about if the feet are not
secured.
Turn all four counter nuts for the feet
until they sit firmly up against the
housing. Please also check this for
the feet which did not need adjust-
ment.
The washing machine must stand per-
fectly level on all 4 feet. This is the only
way to ensure safe and proper opera-
tion.
Incorrect installation may increase wa-
ter and energy consumption. The wash-
ing machine can also move around dur-
ing spinning.
Unscrewing the feet and positioning the
washing machine vertically
The appliance is supplied with all feet
screwed in.
Using the open spanner supplied, turn
the counter nut in a clockwise dir-
ection.
Then turn the counter nut together
with the foot to unscrew.
Use a spirit level to check the wash-
ing machine is standing level.
If the washing machine is vertical, the
feet still need to be secured.
Securing the feet
Hold the foot securely with water
pump pliers.
Use the open spanner again to screw
the counter nut tight against the
housing.
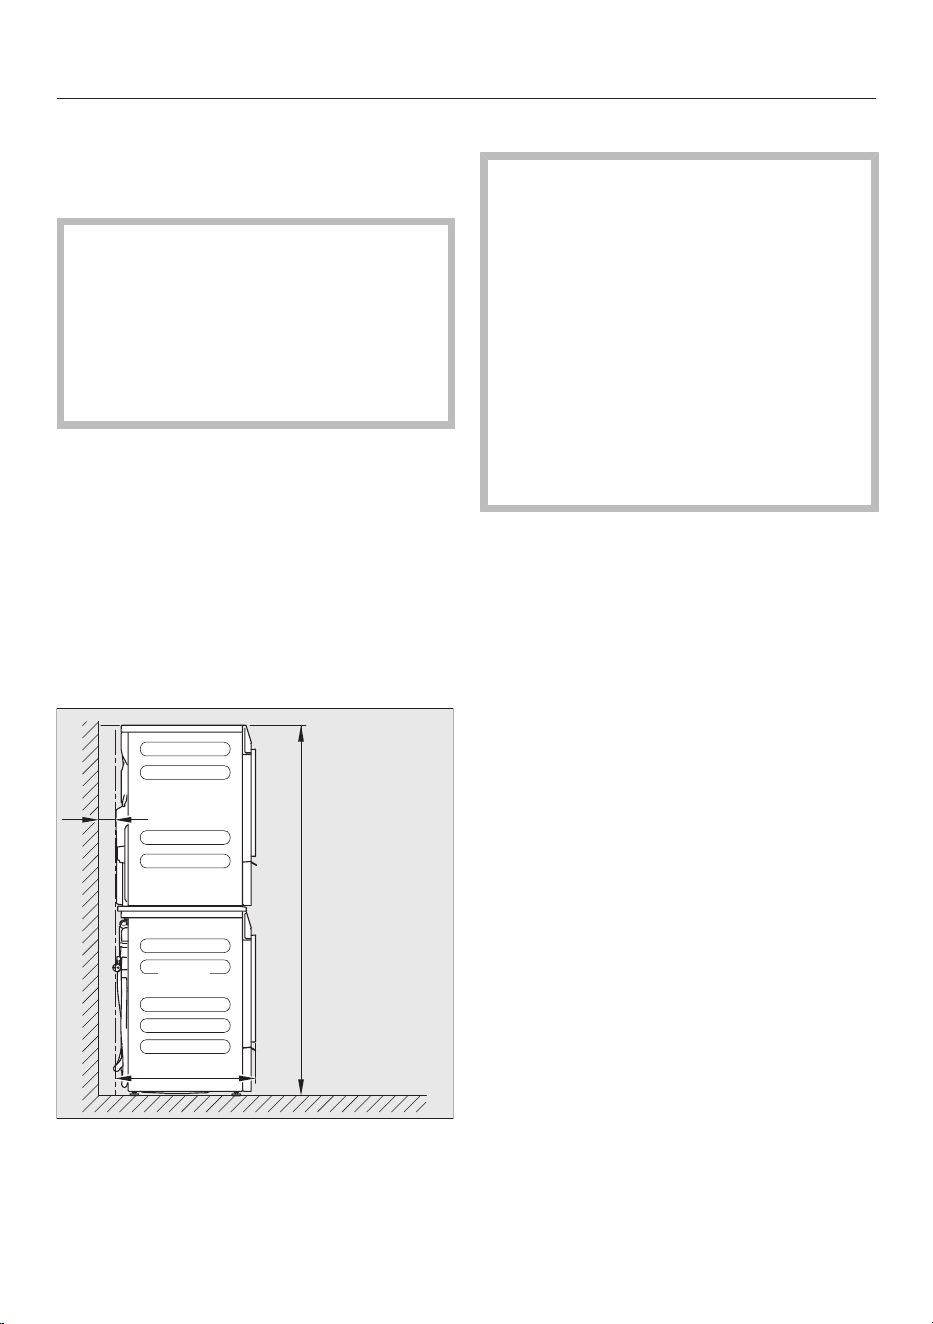
Installation
78
Additional installation require-
ments
Installing under a worktop
Risk of electric shock due to ex-
posed cables
There is a risk of coming into contact
with live parts while the lid is re-
moved.
Do not remove the washing machine
lid.
This washing machine (with lid intact)
can be pushed under a worktop (min.
850mm) if there is space to do so.
Washer-dryer stack
The washing machine can be installed
as a washer-dryer stack together with a
Miele tumble dryer. A WTV stacking kit
is required for this.
You can obtain an stacking kit from your
Miele dealer or Miele Customer Service.
T2
W2
a
b
c
a = at least 2cm
b = WTV601: 172cm
WTV611: 181cm
c = 65cm
Installation on a plinth
Injury can occur if the washing
machine has not been adequately se-
cured.
During installation, the washing ma-
chine must be secured on a plinth to
be made available on site (concrete
or brick), in order to ensure it cannot
fall or slip.
Secure the washing machine using a
clamp/fastening bracket (MTS floor
mounting kit – available from your
Miele dealer or Miele spare parts de-
partment).
The washing machine can either be in-
stalled on an existing plinth (concrete
plinth or brick plinth) or placed on a
plinth. To prevent the washing machine
from moving around, the washing ma-
chine must be securely mounted onto
the plinth.
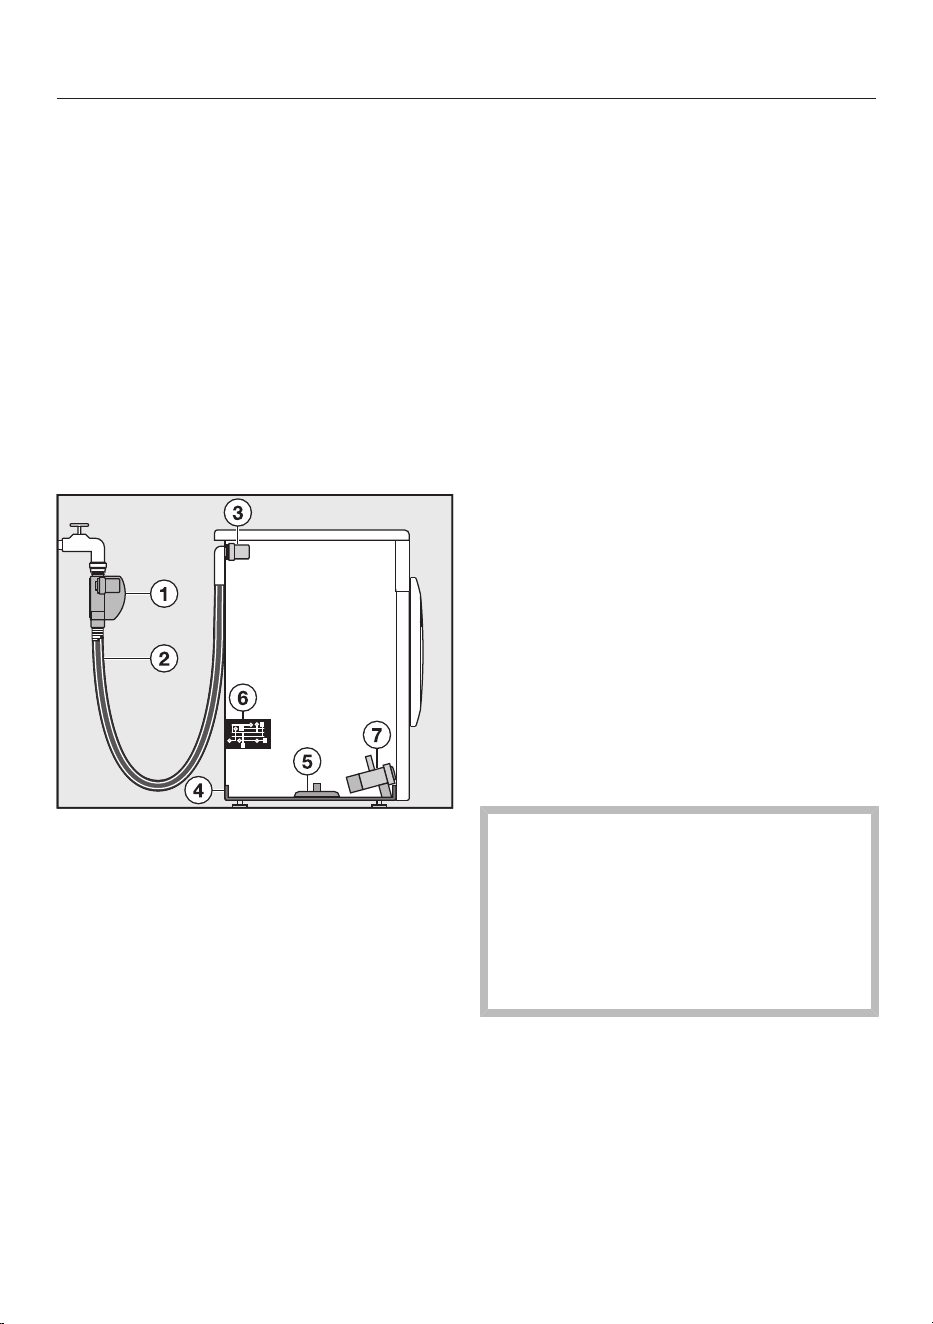
Installation
79
The water protection system
The Miele water protection system pro-
tects all parts of the washing machine
from water damage.
The system mainly consists of the fol-
lowing components:
- Water inlet hose
- Electronic module and drainage and
overflow protection
- Drain hose
The Waterproof system (WPS) from
Miele
a
Solenoid valve inside the casing of
the water inlet hose
b
Sheathed inlet hose with pressure-
resistant inner hose
c
Solenoid valve for water intake con-
trol
d
Floor tray
e
Float switch
f
Electronic module
g
Drain pump
The water inlet hoses
- A solenoid valve that shuts off the
water inlet directly at the stopcock is
located in the casing of the water inlet
hoses. If the solenoid valve is faulty,
the pressure-resistant inner hose
and the solenoid valve for water inlet
control will provide additional pro-
tection.
- The inner hose and the solenoid
valves have a burst pressure of at
least 6000kPa (60bar).
- The sheathed inlet hose consists of
a pressure-resistant inner hose and an
outer sleeve. If water leaks from the
inner hose, it is guided through the
outer sleeve and into the floor tray.
The float switch closes the solen-
oid valvesand. This shuts off the
water intake and prevents any more
water from flowing into the appliance.
Water in the suds container is
pumped away.
Special features of the water inlet
hose
Risk of electric shock from mains
voltage.
There are live electrical components
in the water inlet hose.
The water inlet hose must never be
connected in an area subject to spray
water, e.g. from a bath or shower.
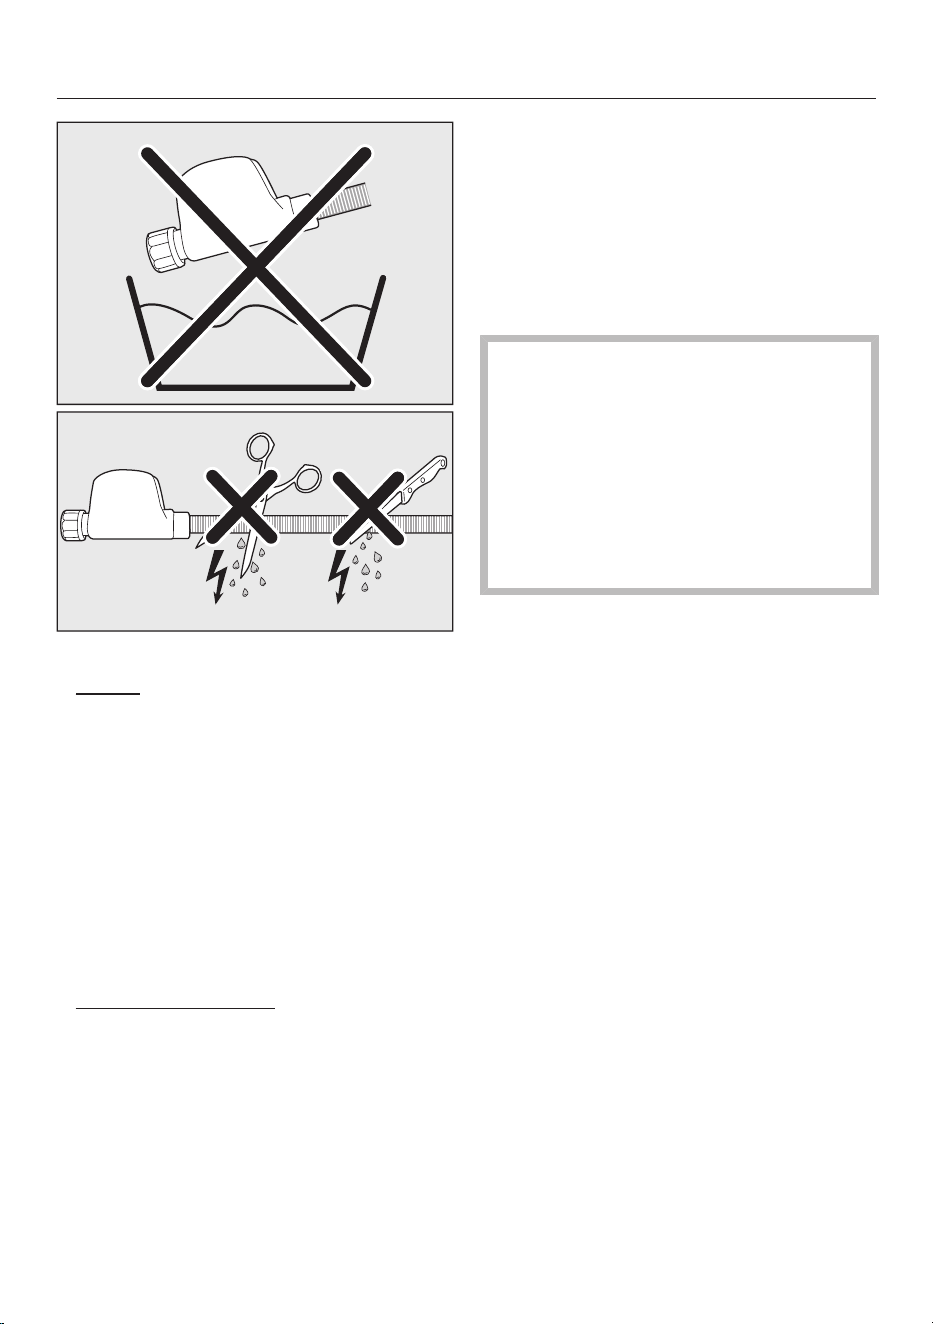
Installation
80
Electronic module and housing
- Sump:
Any leaking water from the washing
machine is collected in the floor
tray in the base of the machine. The
float switch signals the water in the
floor tray to the electronic module.
The electronic module closes the
solenoid valves and. The further
water inlet is blocked. In addition, the
electronic module activates the
drain pump and the water in the
suds container is pumped away.
-
Overflow protection:
The electronic module constantly mon-
itors the water level in the washing ma-
chine. If the water level exceeds a cer-
tain level, the drain pump switches
on and pumps the excess water away.
If the water level rises out of control re-
peatedly, the drain pump is activ-
ated permanently and the washing ma-
chine indicates a fault, which is accom-
panied by a buzzer.
Drain hose
The drain hose is protected by a ventila-
tion system which prevents the machine
from being emptied completely. Here,
an uncontrolled complete emptying of
the washing machine is prevented.
Water inlet
Health risk and risk of damage
due to contaminated incoming water.
The quality of the incoming water
must correspond to the drinking wa-
ter specification of the country in
which the washing machine is being
operated.
Always connect the washing machine
to the mains water supply.
The water connection pressure needs to
be between 100 and 1000kPa. If the
water connection pressure exceeds
1000kPa, a pressure reducing valve
must be installed.
Connection to the water supply should
incorporate a stopcock with a ¾"
threaded union. If a stopcock is not
available, only a qualified installer may
connect the washing machine to the
mains water supply.

Installation
81
Hot water
The preferred temperature is 55°C. The
temperature must not not exceed
60°C. Consult a qualified plumber if the
temperature exceeds 60°C.
Connecting water inlet hoses
Screw the water inlet hoses onto the
thread of the water inlet with the nut.
To prevent damage to the inner hose,
keep a tight hold of the valve housing
and only turn the nut.
Slowly open the stopcocks and check
the connection for leaks.
Correct the position of the seal and
screw thread if necessary.
Maintenance
Only use a Miele Waterproof system
hose should you need a replacement.
Damage caused by dirty water.
This washing machine has a filter in
the hose connection to the casing to
protect the solenoid valve.
This filter must not be removed.
Hose extension
A 1.5m long (metal) extension hose is
available from your Miele dealer or the
Miele Customer Service Department as
an accessory.
This metal extension hose is tested to
withstand burst pressures of up to
14,000kPa and can be used as a flex-
ible extension to the water supply pipe.
Drainage
The suds are drained through a drain
pump with a 1m high delivery head. For
the water to drain freely, the hose must
be free of kinks.
If required, the hose can be extended to a
length of up to 5m. Accessories are avail-
able from your Miele dealer or from the
Miele Customer Service Department.
For drain heights of more than 1m (up
to a maximum delivery head of 1.8m), a
replacement drain pump will need to be
fitted. Please contact your Miele dealer
or Miele Customer Service for advice.
For a drain height of 1.8m, the hose can
be extended to a length of up to 2.5m.
Accessories are available from your
Miele dealer or from the Miele Cus-
tomer Service Department.
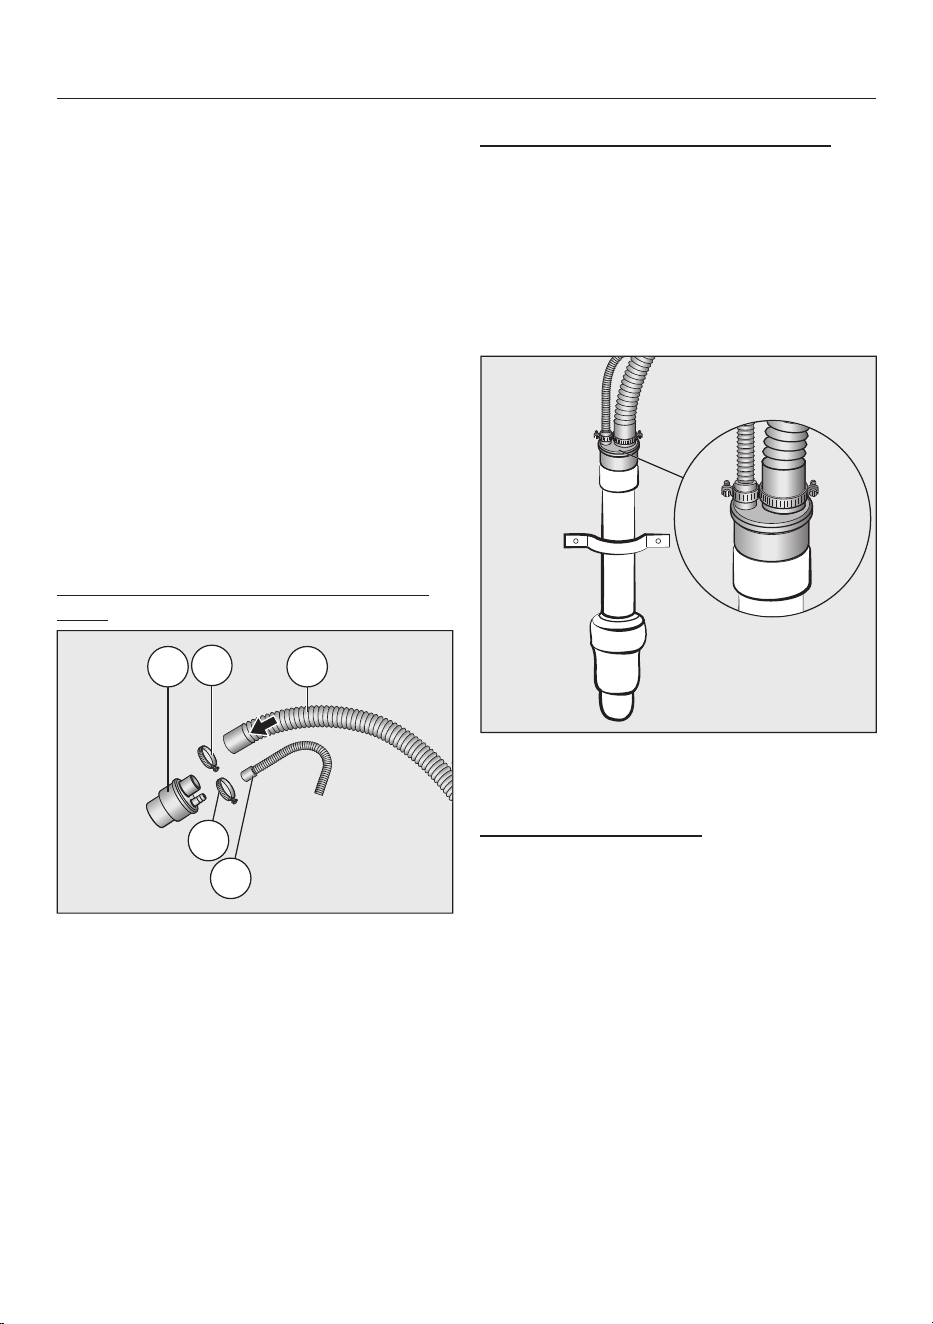
Installation
82
Drainage options
1. Connecting the drain hose to the
plastic drain pipe
2. Connecting a drain hose to a sink
3. Routing the drain hose to a floor
drain (gully)
4. Hanging the drain hose in the sink or
slops basin
Drain adapter
Miele offers a drain adapter for connec-
tion to a plastic drain pipe or sink as an
optional accessory. The drain adapter
offers the option of connecting only the
washing machine or the washing ma-
chine together with the tumble dryer.
Connecting the hoses to the drain ad-
apter
5
4
3
2
1
a
Drain adapter
b
Hose clip
c
Washing machine drain hose
d
Hose clip
e
Tumble dryer drain hose
Connect the hoses to the drain ad-
apter as shown in the image.
Secure the hoses with hose clips.
Connecting to the plastic drain pipe
The drain adapter fits onto a standpipe
with a diameter of DN40 or DN50.
The maximum delivery head of the
washing machine is 1m. The length of
the drain hose must not exceed 2.5m.
Tip: The sealing ring supplied with the
drain adapter must not be used.
Insert the drain adapter into the
plastic drain pipe.
Connecting to the sink
It is possible to connect to a sink drain
outlet using a 1¹/₂" thread.
Tip: Ensure that the seal is inserted in
the adapter.
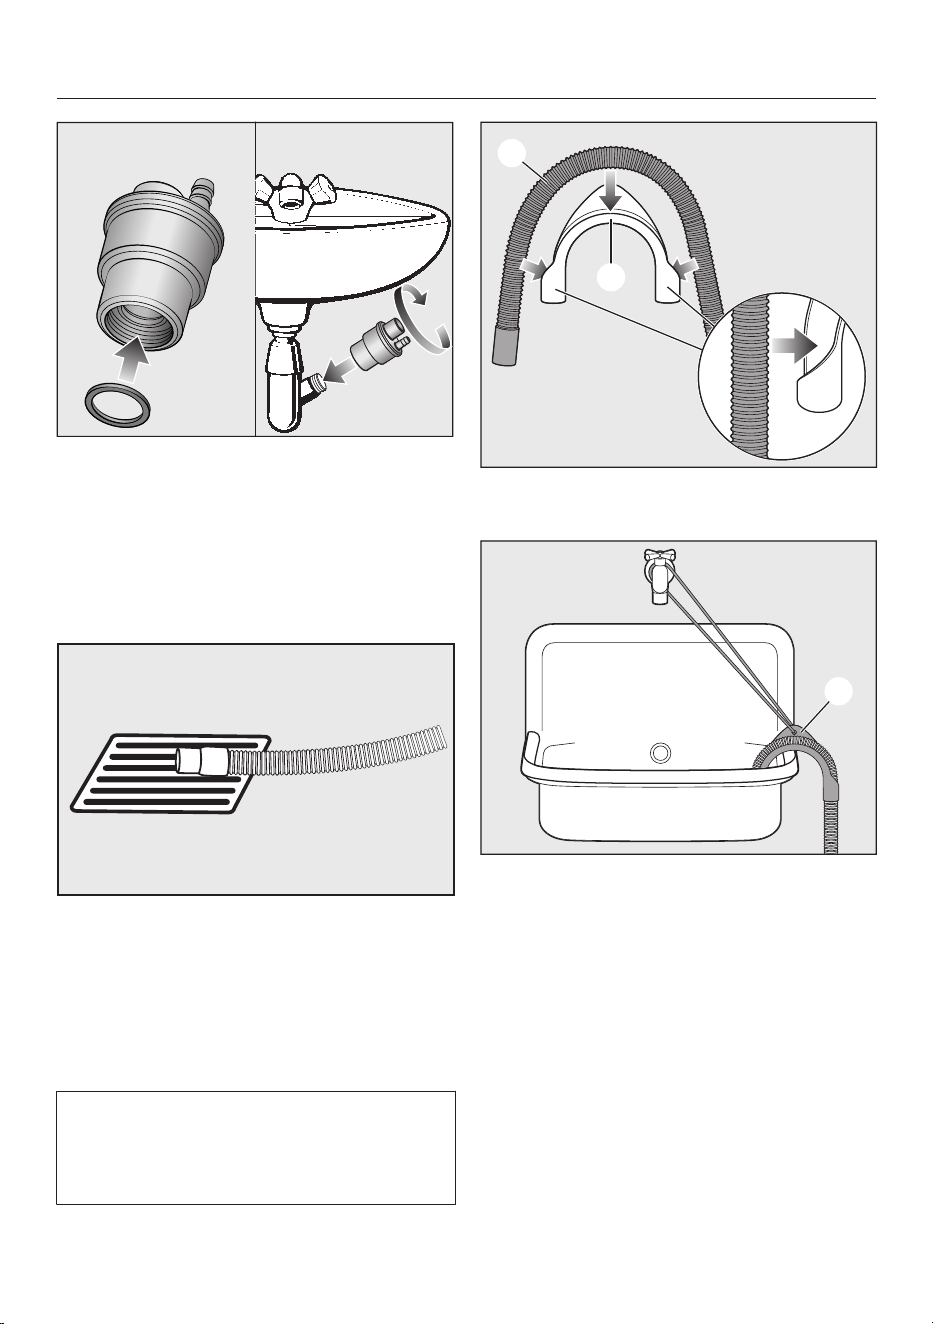
Installation
83
1. 2.
Insert the seal into the drain adapter.
Screw the adapter onto the sink drain
outlet.
Routing the drain hose to a floor drain
(gully)
Tip: The maximum drain length is 5m.
Place the drain hose on the floor
drain.
If necessary, secure the hose to pre-
vent it from slipping.
Hanging the drain hose in the sink or
slops basin
If drainage is via the sink, rapid drain-
age must be guaranteed. Otherwise
there is a risk of flooding or backsi-
phonage into the washing machine.
Tip: Use the swivel elbow supplied to
stop the drain hose from slipping.
Insert the drain hose into the
swivel elbow.
Place the end of the drain hose in a
sink.
Use a strap and the eye to stop the
swivel elbow from slipping.

Installation
84
Electrical connection
The washing machine is supplied with
an electrical connection cable with
moulded plug ready for connection to a
switched socket.
The socket must be easily accessible
after the washing machine has been in-
stalled. If that is not possible, ensure
that a suitable means of disconnection
is provided on the installation side for
each pole.
Risk of fire from overheating.
Connecting the washing machine to
a multi-socket plug adapter or to an
extension lead can overload the
cable.
Do not use an extension lead or
multi-socket plug adapter.
The electrical system must comply with
local and national safety regulations
(BS7671 in the UK). We recommend
the use of a suitable RCD .
If the connection cable is damaged, it
must only be replaced with a specific
connection cable of the same type
(available from the Miele Customer Ser-
vice Department). For safety reasons,
such replacement may only be carried
out by a qualified technician or the
Miele Customer Service Department.
The data plate indicates the nominal
power consumption and the appropriate
fuse rating. Compare the specifications
on the data plate with those of the elec-
tricity supply and make sure that they
match.
If in any doubt, consult a qualified elec-
trician.
Temporary or permanent operation on
an autonomous power supply system or
a power supply system that is not syn-
chronised with the mains power supply
(e.g. island networks, back-up systems)
is possible. A prerequisite for operation
is that the power supply system com-
plies with the specifications of
EN50160 or an equivalent standard.
The function and operation of the pro-
tective measures provided in the do-
mestic electrical installation and in this
Miele product must also be maintained
in isolated operation or in operation that
is not synchronised with the mains
power supply, or these measures must
be replaced by equivalent measures in
the installation. As described, for ex-
ample, in the current version of BS OH-
SAS 18001–2 ISO 45001.

Installation
85
Technical data
Height
850mm
Width
596mm
Depth
620mm
Depth with door open
1087mm
Height for building under
850mm
Width for building under
600mm
Depth for building under
600mm
Weight
Approx. 95kg
Capacity
9,0kg dry laundry
Supply voltage See data plate
Rated load See data plate
Fuse rating See data plate
Consumption data See “Programmes”
Minimum water connection pressure 100kPa (1bar)
Maximum water connection pressure 1000kPa (10bar)
Water inlet hose length 1.60m
Drain hose length 1.50m
Length of mains connection cable 2.00m
Maximum delivery head 1.00m
Maximum drainage length 5.00m
LEDs Class 1
Test certifications awarded See data plate
Power rating in off mode
0,50W
Networked standby
2,00W
Frequency range 2.4000–2.4835GHz
Maximum transmission power <100mW
EU Conformity declaration
Miele hereby declares that this washing machine complies with Directive 2014/53/
EU.
The complete text of the EU declaration of conformity is available from one of the
following internet addresses:
- Products, Download from www.miele.ie
- For service, information, operating instructions etc: go to
https://miele.co.uk/manuals and enter the name of the product or the serial num-
ber
Installation
86
UK Conformity declaration
Miele hereby declares that this washing machine complies with UK Radio Equip-
ment Regulations 2017, as amended.
The complete text of the UK declaration of conformity is available from one of the
following internet addresses:
- Products, Download from www.miele.co.uk
- For service, information, operating instructions etc: go to https://miele.co.uk/
manuals and enter the name of the product or the serial number
ThisStatement of Compliance confirms this Miele product fully complies with the
Product Security and Telecommunications Infrastructure (Security Requirements
for Relevant Connectable Products) Regulations 2023.
1) Household Appliance –
2)
Manufactured by: Miele & Cie KG,
Carl Miele Street 29, 33332 Gutersloh Germany
Imported by and contact point: Miele Company Ltd, Fairacres, Marcham Road,
Abingdon, Oxon, OX14 ITW Great Britain
The defined support period at the time of first supply is 10 years
3)
To report vulnerabilities and cybersecurity issues please contact: [email protected]4)
5) Signature
Name: Paul Wright
Company Position: Head of Technical Management
Date of signature: 19th March 2024
Place of signature:
Abingdon, Oxfordshire
Washing Machine HW20-W

United Kingdom
Miele Co. Ltd., Fairacres, Marcham Road, Abingdon, Oxon, OX14 1TW
Tel: 0330 160 6600, Internet: www.miele.co.uk, E-mail: [email protected]
Australia
Miele Australia Pty. Ltd.
ACN 005 635 398
ABN 96 005 635 398
Level 4, 141 Camberwell Road
Hawthorn East, VIC 3123
Tel: 1300 464 353
E-mail: [email protected]
Internet: www.miele.com.au
Miele Electrical Appliances Co. Ltd.
No. 82, Shimenyi Road, JingAn District
Shanghai, China, P.R.C
Post Code: 200040
Phone: +86 21 6157 3500
Fax: +86 21 6157 3511
E-mail: info@miele.cn
Internet: www.miele.cn
China Mainland
Miele (Hong Kong) Ltd.
41/F - 4101, Manhattan Place
23 Wang Tai Road
Kowloon Bay, Hong Kong
Tel: (852) 2610 1025
Fax: (852) 3579 1404
E-mail:
Website: www.miele.hk
Hong Kong, China
Miele India Pvt. Ltd.
1st Floor, Copia Corporate Suites,
Commercial Plot 9, Mathura Road,
Jasola, New Delhi - 110025
E-mail: customercare@miele.in
Website: www.miele.in
India
Miele Ireland Ltd.
2024 Bianconi Avenue
Citywest Business Campus
Dublin 24
Tel: (01) 461 07 10
Fax: (01) 461 07 97
E-mail: [email protected]
Internet: www.miele.ie
Ireland
Malaysia
Miele Sdn Bhd
Suite 12-2, Level 12
Menara Sapura Kencana
Petroleum
Solaris Dutamas No. 1
Jalan Dutamas 1
50480 Kuala Lumpur, Malaysia
Phone: +603-6209-0288
Fax: +603-6205-3768
Miele New Zealand Limited
IRD 98 463 631
8 College Hill
Freemans Bay, Auckland 1011
Tel: 0800 464 353
Internet: www.miele.co.nz
New Zealand
Miele Pte. Ltd.
29 Media Circle
#11-04 ALICE@Mediapolis
Singapore 138565
Tel: +65 6735 1191
Fax: +65 6735 1161
E-mail: [email protected]
Internet: www.miele.sg
Singapore
Miele (Pty) Ltd.
63 Peter Place, Bryanston 2194
Tel: (011) 875 9000
Fax: (011) 875 9035
E-mail: [email protected]
Internet: www.miele.co.za
South Africa
Miele Appliances Ltd.
Showroom 1, Eiffel 1 Building
P.O. Box 114782 - Dubai
Tel. +971 4 3044 999
Fax. +971 4 3418 852
800-MIELE (64353)
E-mail: [email protected]
Website: www.miele.ae
United Arab Emirates
Manufacturer: Miele & Cie. KG, Carl-Miele-Straße 29, 33332 Gütersloh, Germany
Thailand
Miele Appliances Ltd.
BHIRAJ TOWER at EmQuartier
43rd Floor Unit 4301-4303
689 Sukhumvit Road
North Klongton Sub-District
Vadhana District
Bangkok 10110, Thailand
Sheikh Zayed Road, Umm Al Sheif
E-mail: customercare@miele.co.nz
P.O. Box 69434, Bryanston 2021

M.-Nr. 12 702 870 / 01en-GB
WQ 1000 WPS