
Palm Vein Recognition
Wi-Fi Smart Lock
KD10

Online Instructions
Scan the QR code below for Installation Video, Feature
Introduction Video, and more. If you have any questions,
feel free to reach out!
Online Customer Service
After-sale Service Tel: 1-844-394-5218
PST 9am - 5pm (Monday-Friday)
Email: service@ghomesmart.com

The products, accessories, user interfaces, etc. in this manual are schematic diagrams for reference
only. Due to product updates and upgrades, the actual product and the schematic diagram may differ
slightly. Please refer to the actual product.
CONTENTS
Product
Introduction
Specifications
Parts List
Installation Overview
Product Installation
Programming Instructions
How to Use
Other Product Features
Disclaimer
01
03
04
05
07
18
28
32
33
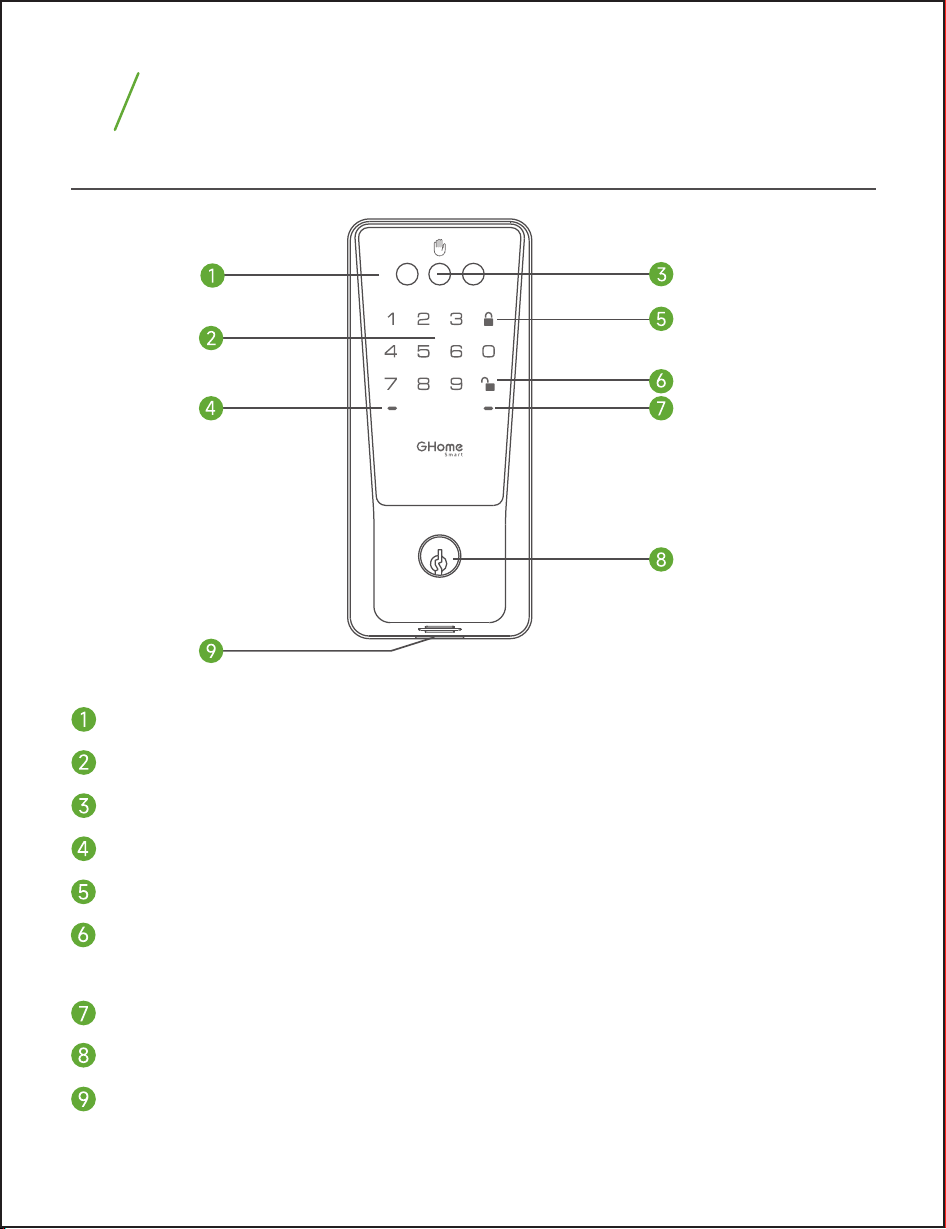
Overview
Product
Introduction
1
IǣǼǼnǣǕǝɎيáǝƺȇɎǝƺȵƏǼȅɮƺǣȇǣɀƏƬɎǣɮƏɎƺƳًɎǝƺˡǼǼǼǣǕǝɎǼǣǕǝɎɀɖȵِ
Touch Keypad
Palm ID Reader
Red Status Light: Abnormal status detected.
Lock Button: Press this button to lock the door.
Unlock Button: After inputting the right password,
press this button to unlock the door.
Green Status Light: Succeed(Door Unlock).
Keyhole
USB Type-C/Emergency Power Supply Port: When the battery runs out, use this
port to connect an external 5V/ 1A power supply for temporary operation.
Note: The USB port is for charging only and does not support data transfer.
01
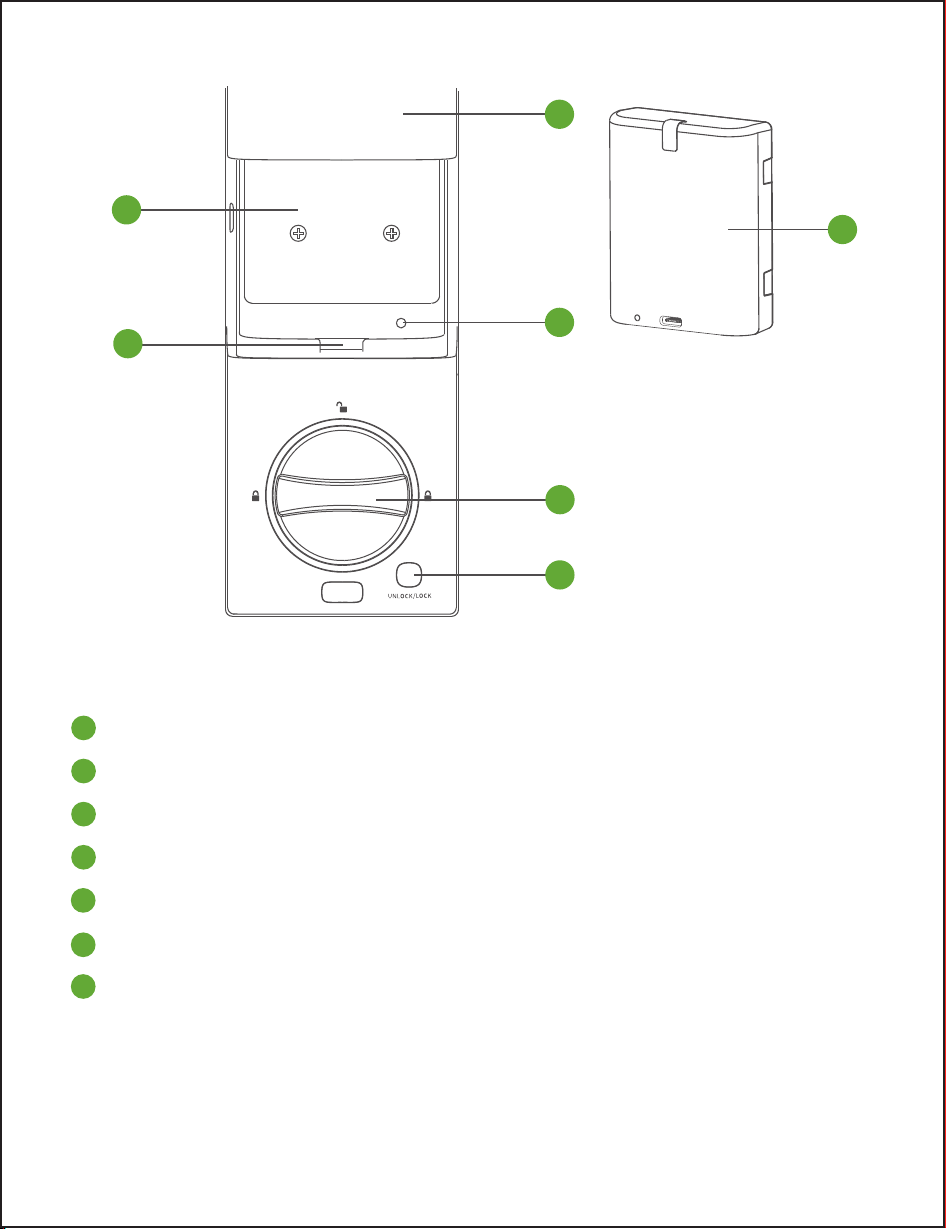
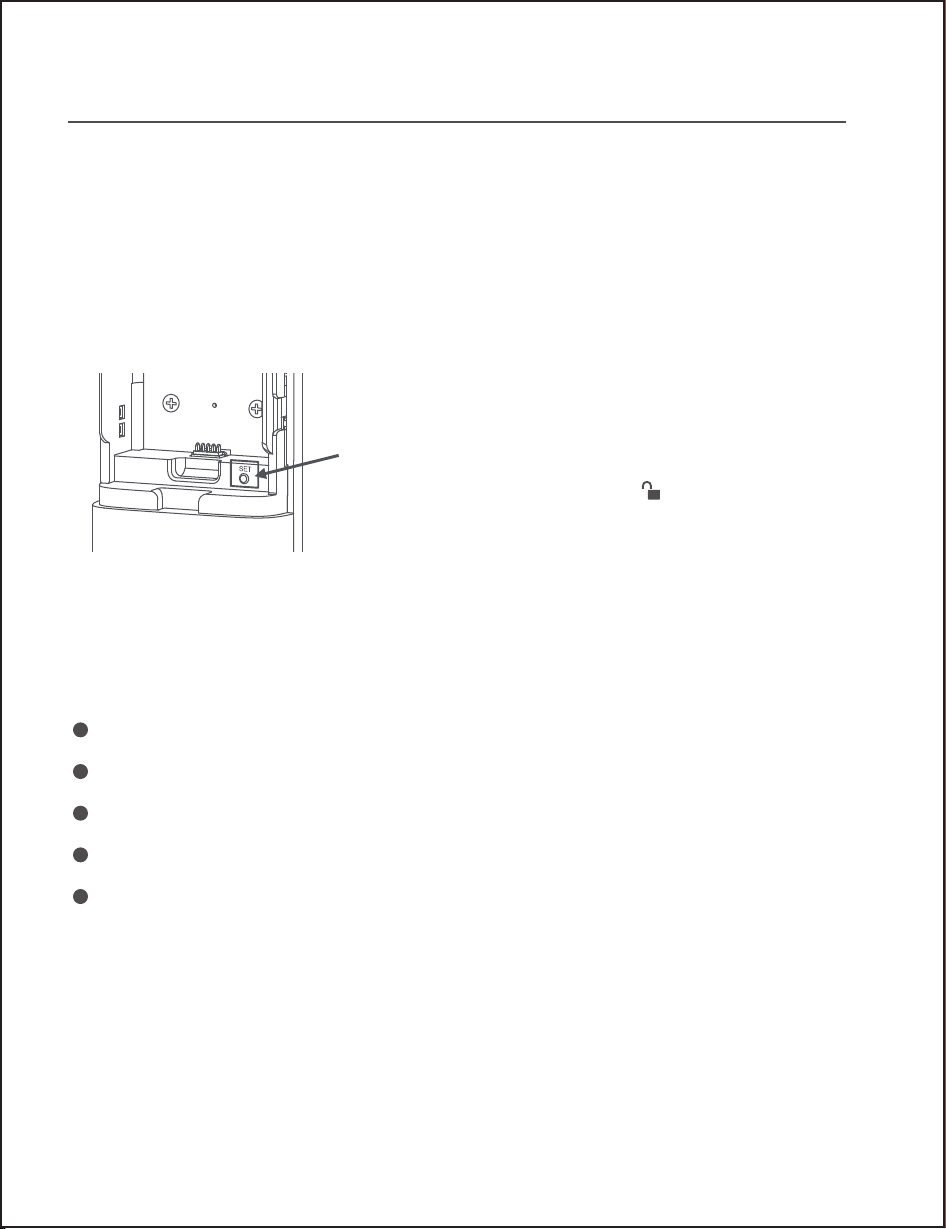
Lithium Battery Box
Battery Interface
Battery Cover
SET Button
Manual Lock/Unlock Knob
Unlock/Lock Button
Rechargeable Lithium Battery
02
SET
1
2
3
4
5
6
7
1
2
3
7
4
5
6
KD10
Palm Vein, Permanent Password, Temporary Password,
APP, Mechanical Key, Alexa & Google Assistant
50 pcs
50 pcs
6~8 digits
Rechargeable lithium battery [email protected]
USB Type-C (5V,1A)
802.11/b/g/n, 2.4 GHz (only)
-20°C ~ 60°C (Exterior Assembly)
-20°C ~ 50°C (Interior Assembly)
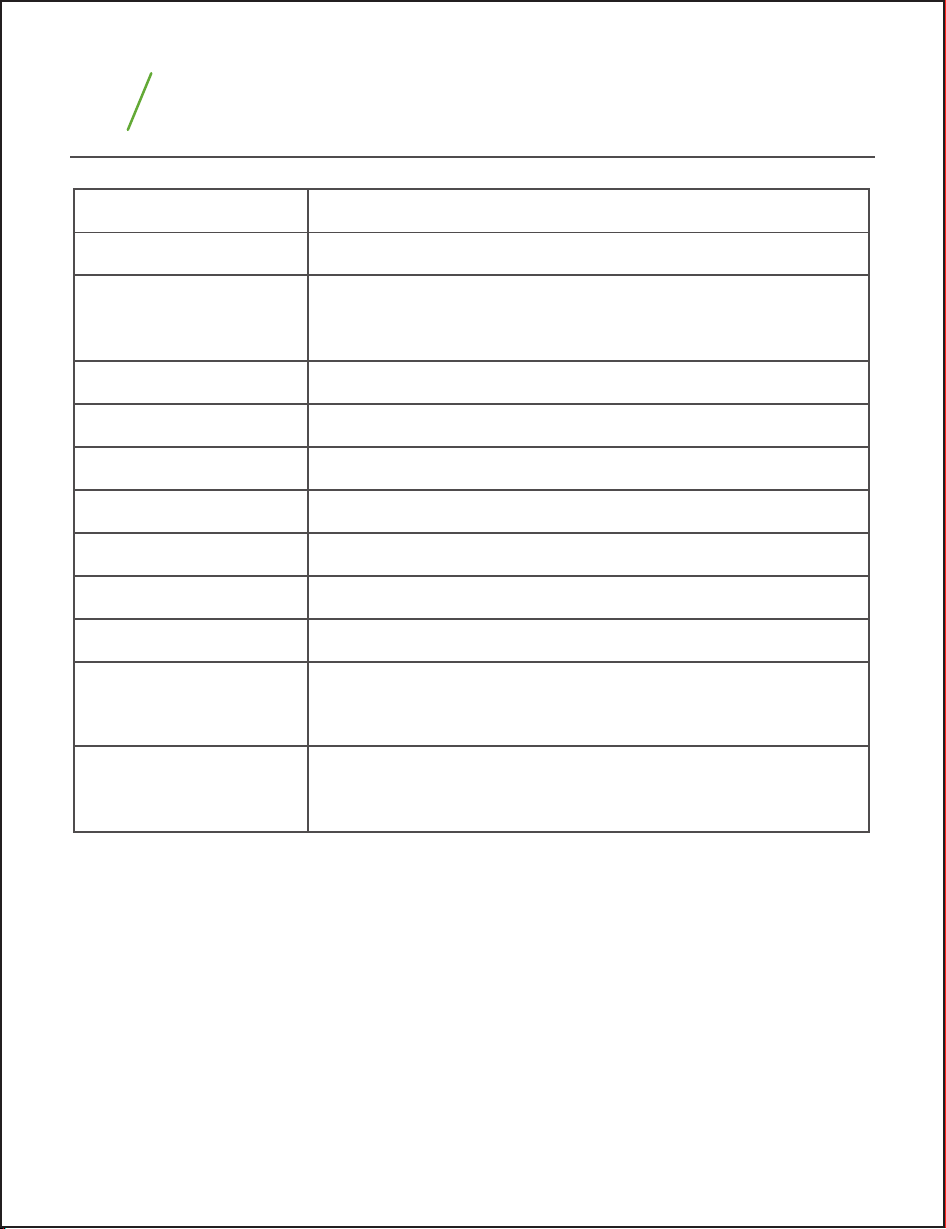
Product Model
Unlock Method
Palm Vein Capacity
Password Capacity
Password Length
Power Supply
Backup Power Supply
Wi-Fi
Count down, default 10s
Auto Lock
IP54
Waterproof Level
(Exterior Assembly)
Working Temperature
Name Parameter
Specifications
2
03
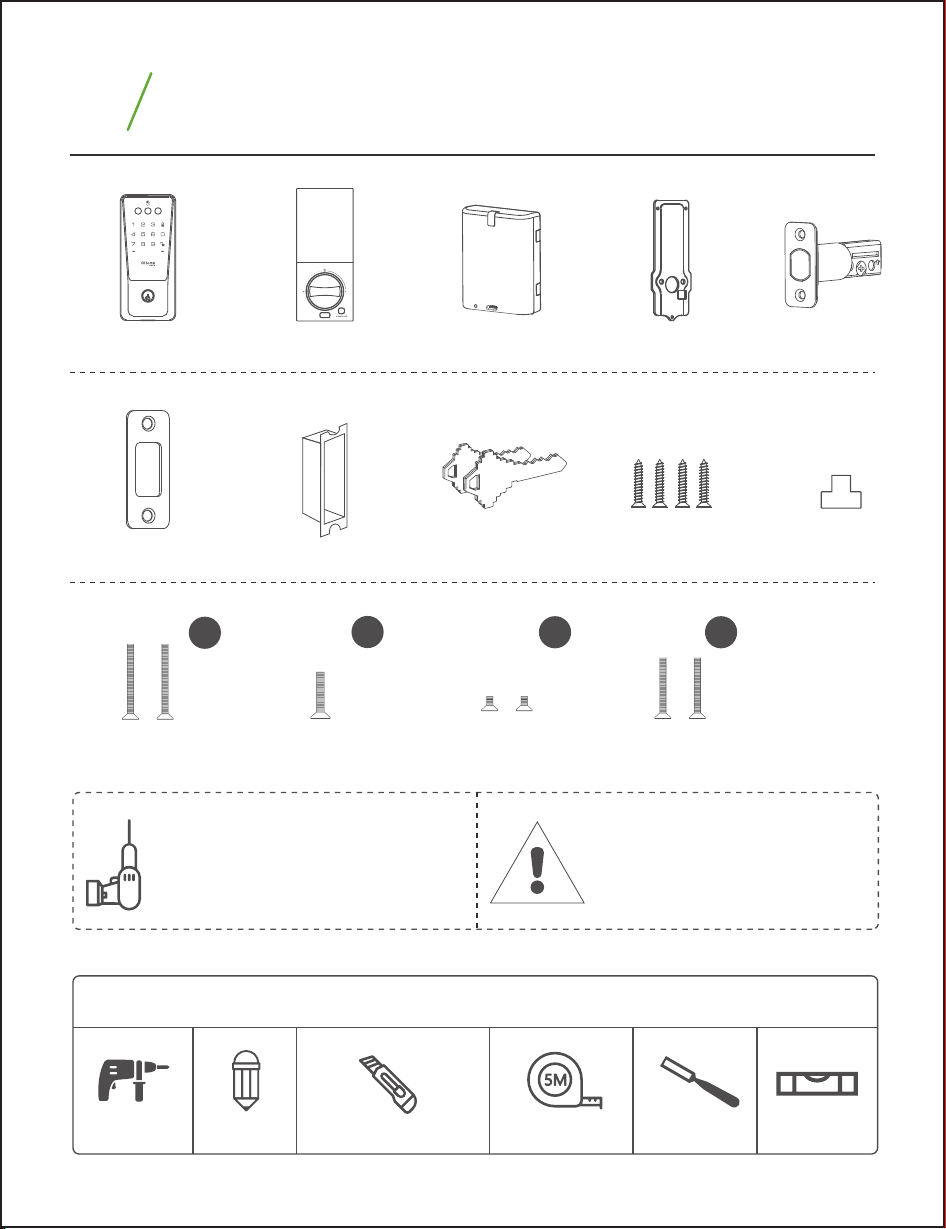
A
B
C D
Exterior Assembly Interior Assembly Deadbolt
Strike Box
Strike Screws
(x4) 25mm
Interior Assembly
Screws (x1) 18mm
Silicone Plug
(x1)
Mounting Plate
Screws (x2) 35mm
Mounting Plate
Screws (x2) 28mm
Mounting Plate
Keys (x2)Strike Plate
Battery
TOOL REQUIRED (Not Provided) IMPORTANT
All you need is a manual
Phillips screwdriver or an
electric Phillips screwdriver.
Do not load batteries until
the lock is completely
installed.
Interior Assembly
Screws (x2) 5mm
UP
3
Parts List
04
Drill Pencil
Tools necessary only for new doors or adjusting existing preparation.(Not Provided)
Wood Mortise Chisel Tape Measure Utility Knife Level
*45-55mm door thickness use
*35-45mm door thickness use
D
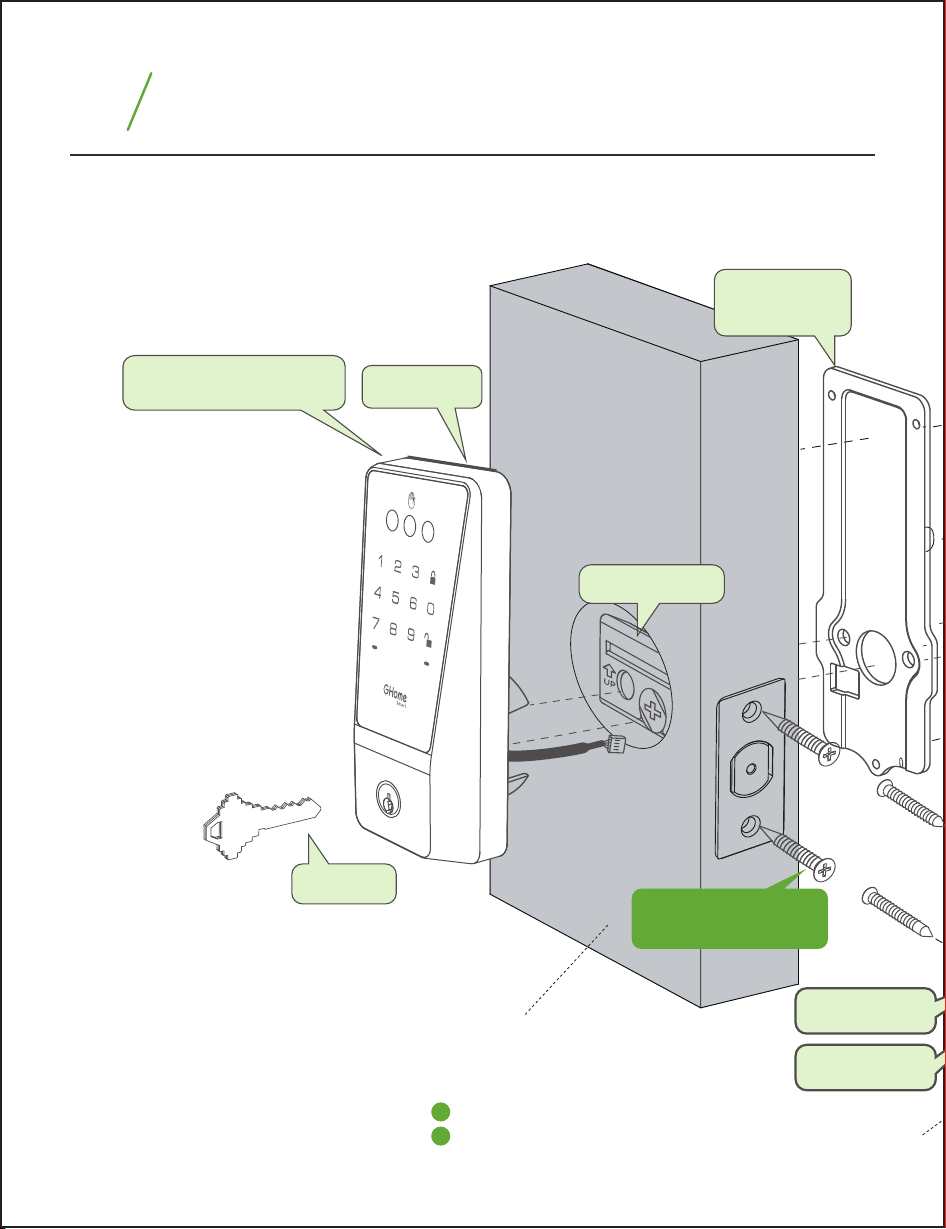
A
Mounting
Plate
Washer
Deadbolt
Exterior Assembly
Door
Key
4
Installation Overview
05
Strike Plate
Strike Screws
25mm
Door Frame
Strike Box
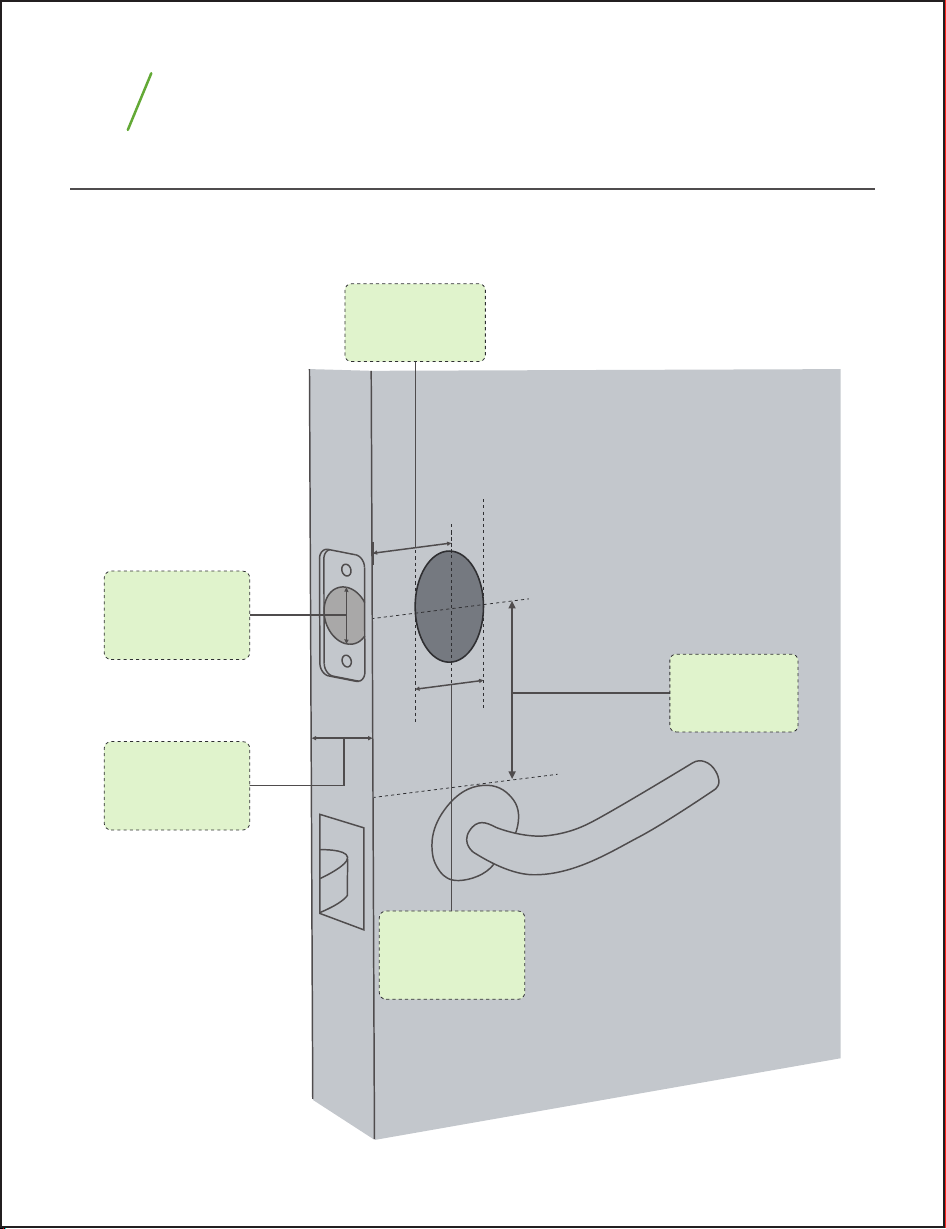
Compatible Doors
Product Installation
Prepare the door and check dimensions. If the hole size isn't correct, you can
drill holes in the door based on the installation template included in the
package.
5
Door Hole
Diameter
1” / 25mm
Minimum
Distance
2 / 55mm
Cross Bore
Diameter
1 / 38mm
2 / 54mm
/ ”
1
2
/ ”
1
8
/ ”
1
8
Backset
2 / 60mm or
2 / 70mm
3
8
/ ”
3
4
/ ”
Door
Thickness
35mm-55mm
1-2
3
8
/ ”
1
/ ”
8
07
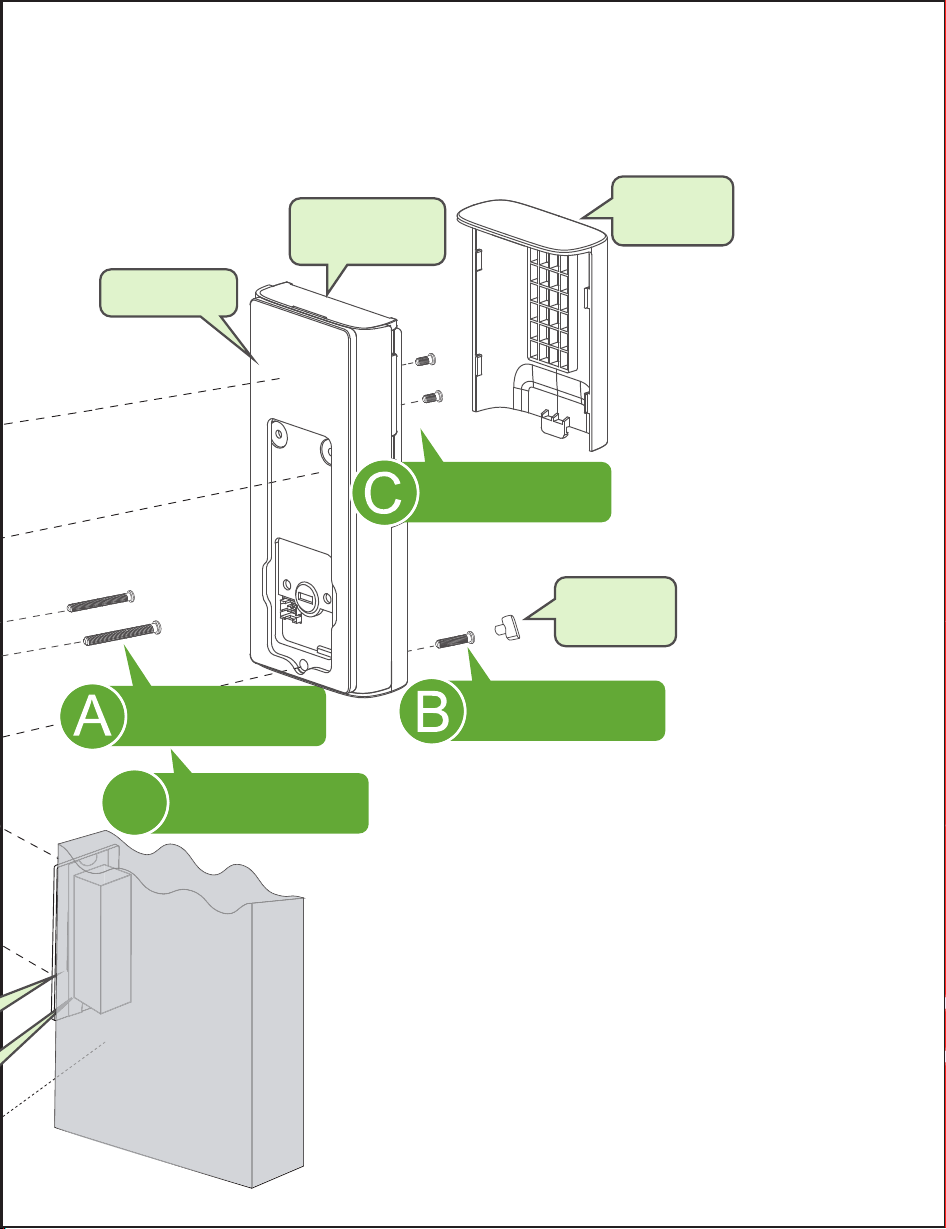
Mounting Plate
Screws 35mm
Mounting Plate
Screws 28mm
OR
Mounting Plate
Screws 18mm
Mounting Plate
Screws 5mm
Battery
Cover
Interior
Assembly
Washer
D
06
Silicone
Plug
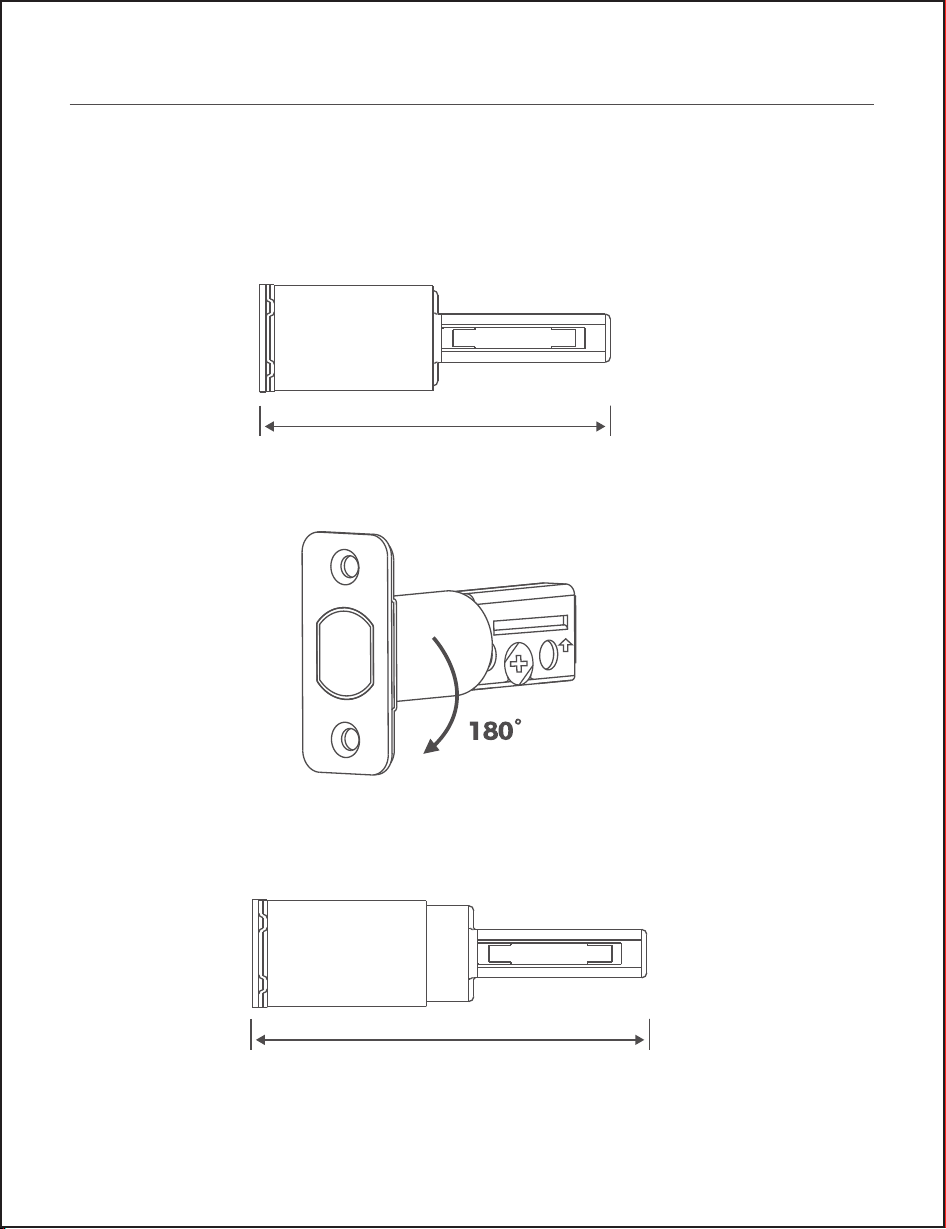
Step 1. Install Deadbolt
1. Check your door to see if the deadbolt requires adjustment.
If the backset is 70mm, turn the faceplate 180° to extend the length.
2 /60 mm
3
/ ”
8
2 / 70mm
/ ”
3
4
08
UP
UP
UP
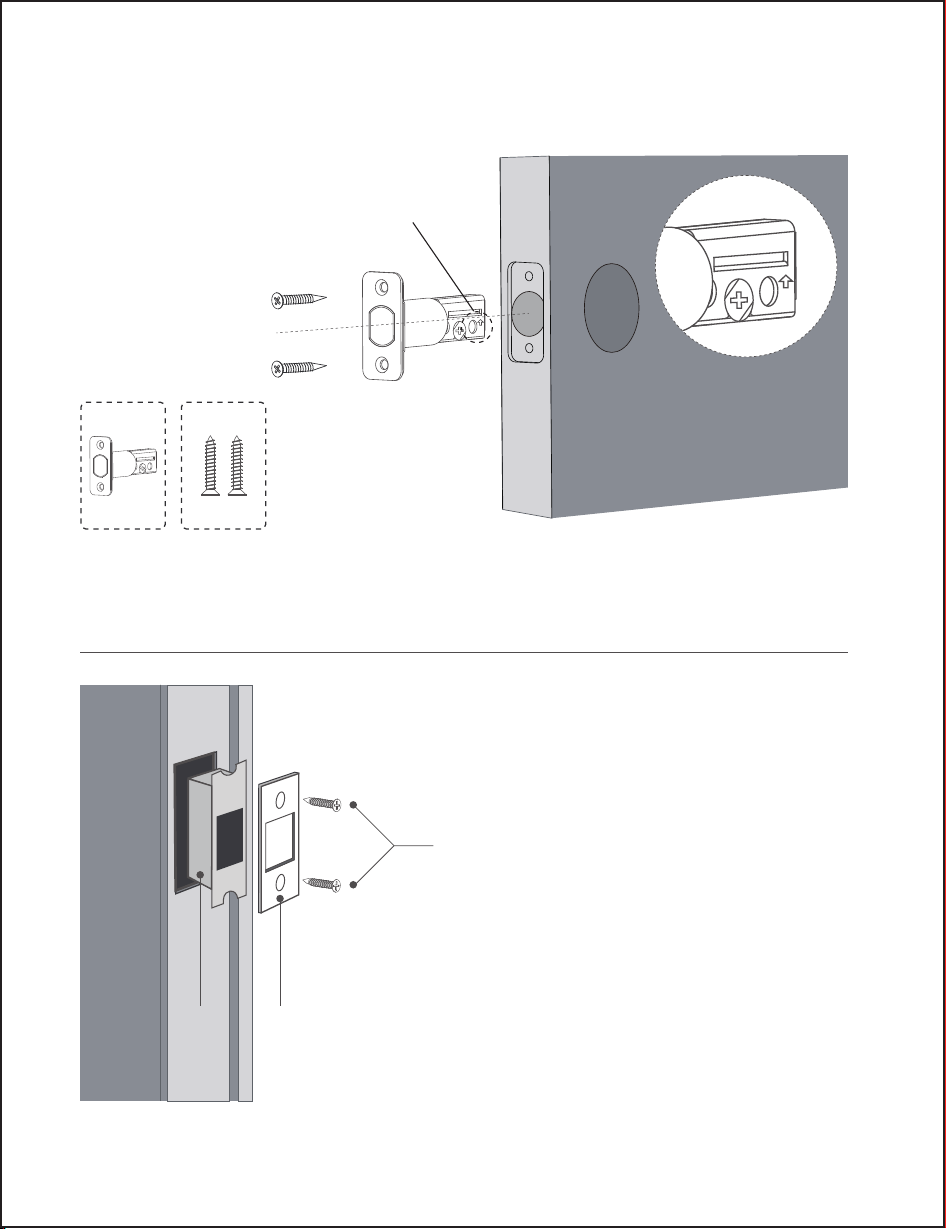
Step 2. Install Strike Plate
2. Insert and screw the deadbolt into the door hole.
Make sure the word "UP" on the deadbolt faces up.
Strike
Plate
Strike
Box
09
TOP
Strike Screws
“UP” face up
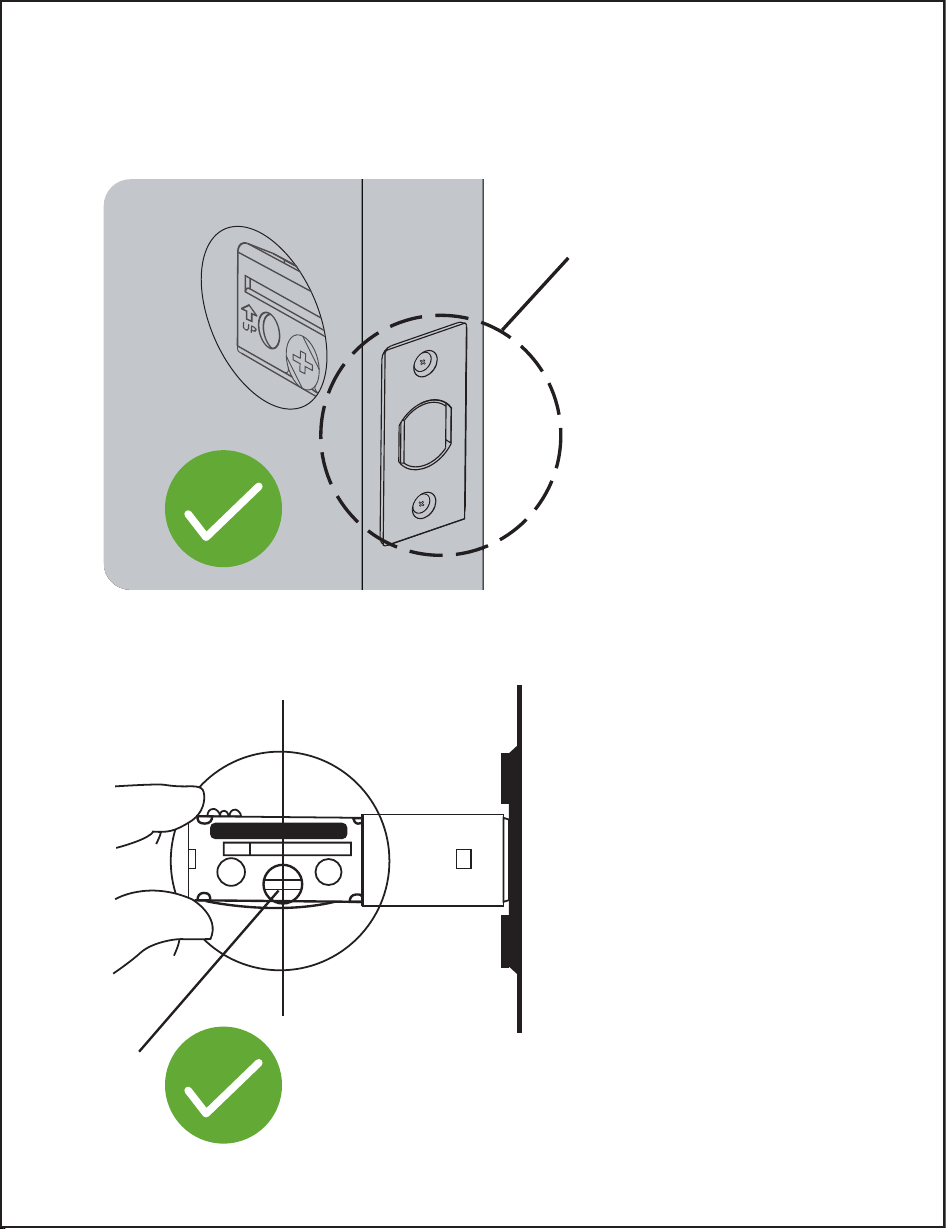
After the bolt installation is complete, keep the bolt in unlocked position,
and keep the slotted hole centered in the door hole.
Unlocked
10
Cross Bore
Diameter
1 / 38 mm
2 / 54 mm
1
2
/ ”
1
8
/ ”
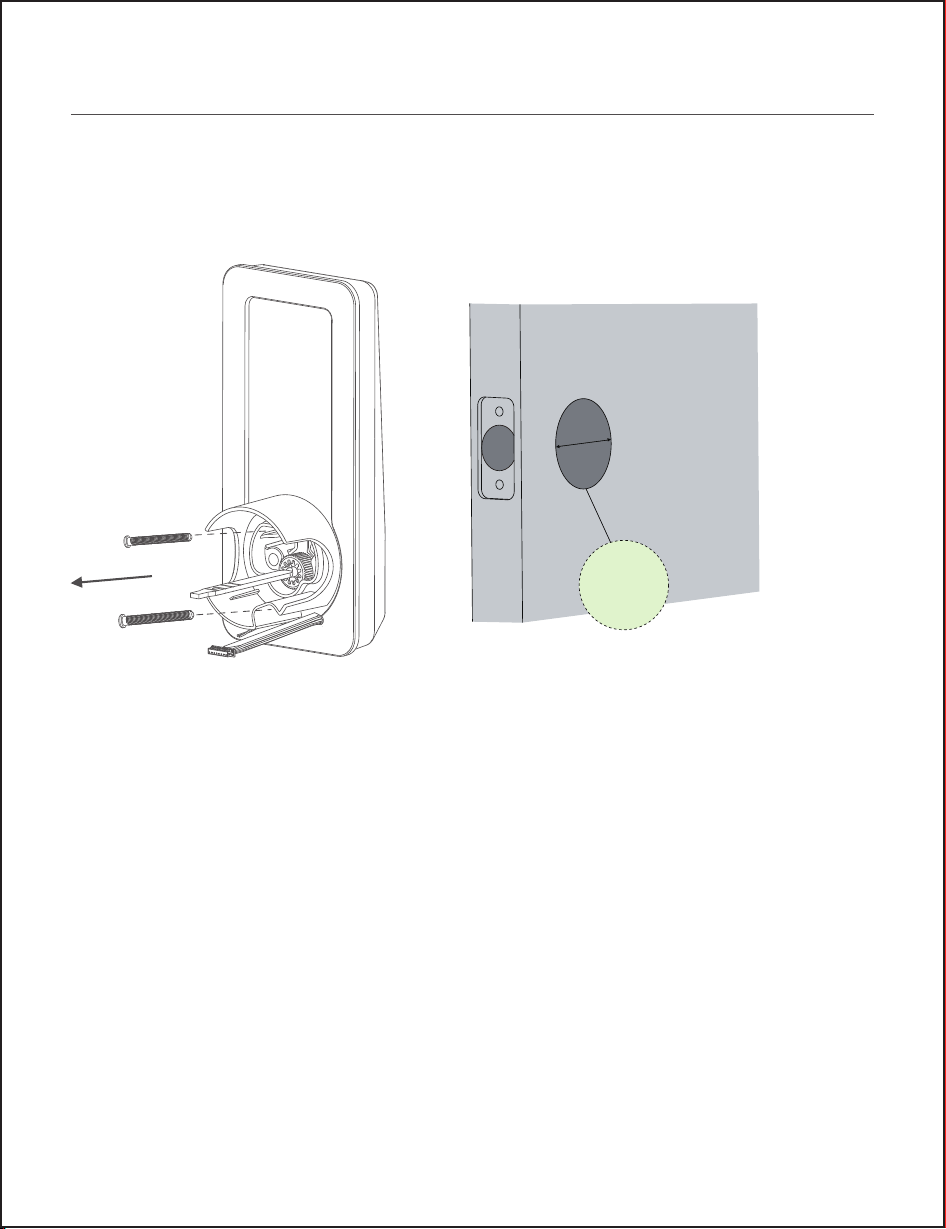
Step 3. Prepare Exterior Assembly
If you have a 38mm cross bore, please remove the screw and remove the
positioner before installation.
If you have a 54mm cross bore, please install it directly.
11
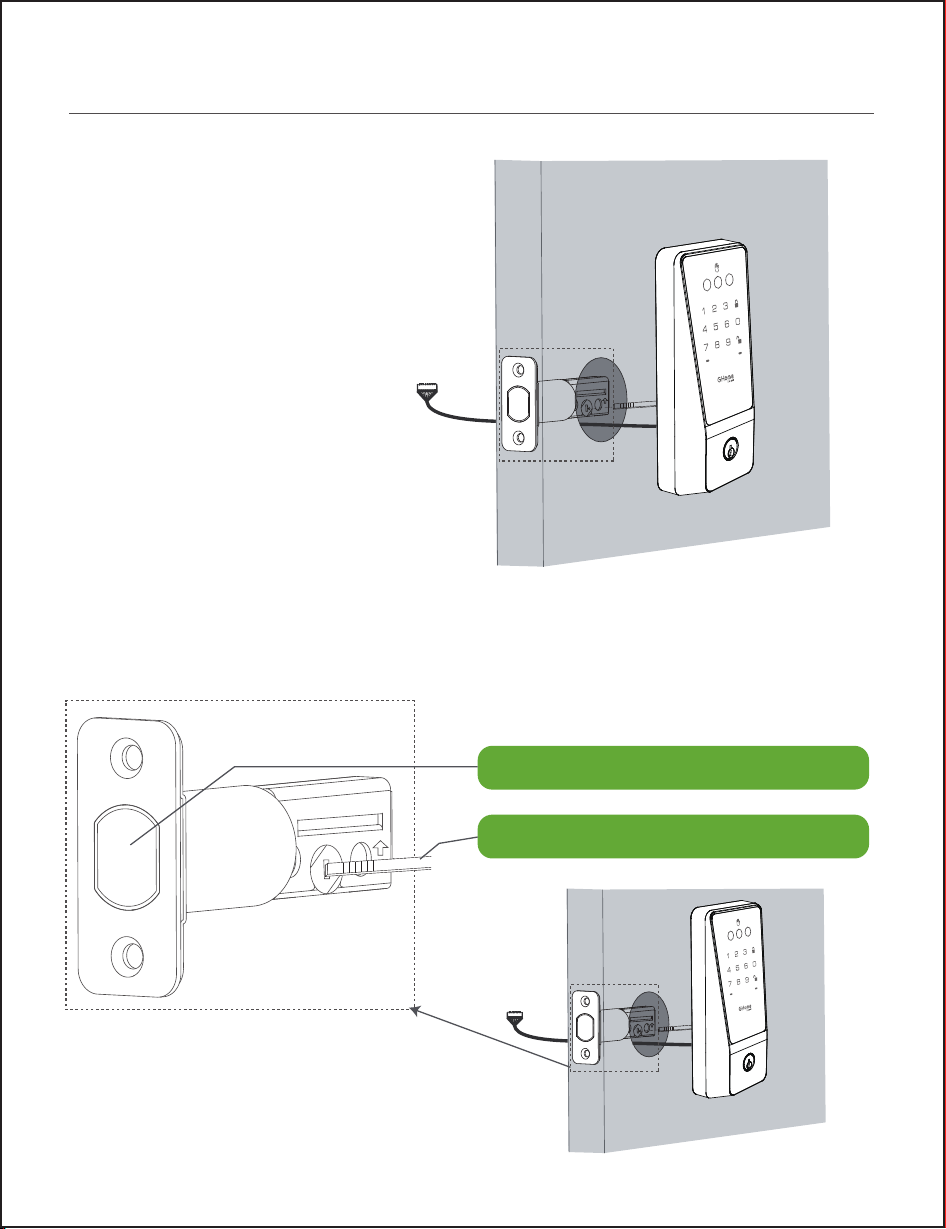
Step 4. Install Exterior Assembly
1. Route the cable below the
deadbolt.
12
UP
2. Put the exterior assembly into the corresponding position of the deadbolt
and press it against the door.
UP
UP
Deadbolt Must Be in Unlock Position
Vertical Orientation of Tourque Blace
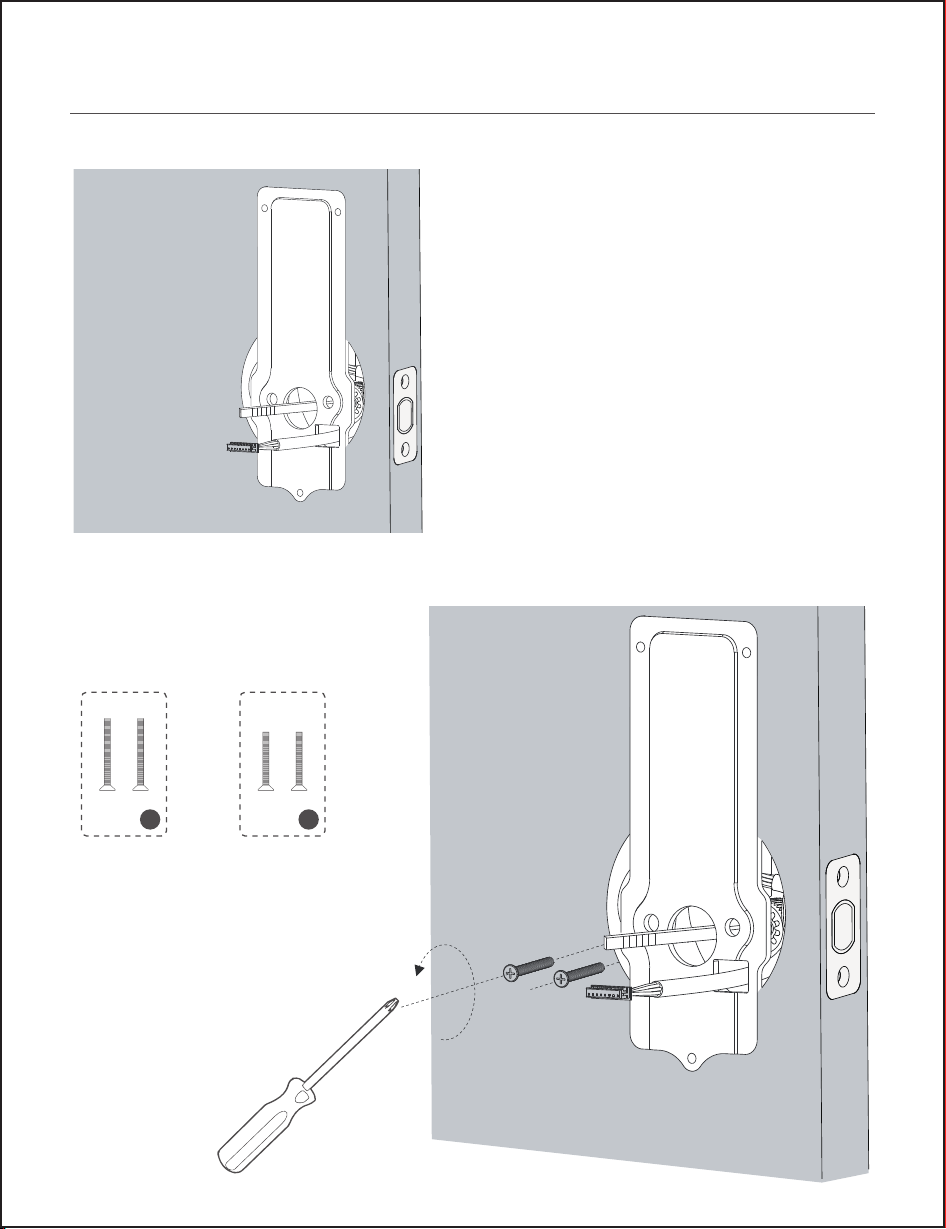
Step 5. Install Mounting Plate
1. Run the wires through the
mounting plate.
A
D
45~55mm door
thickness use A
35~45mm door
thickness use D
2. Secure the mounting plate
with corresponding screws.
13
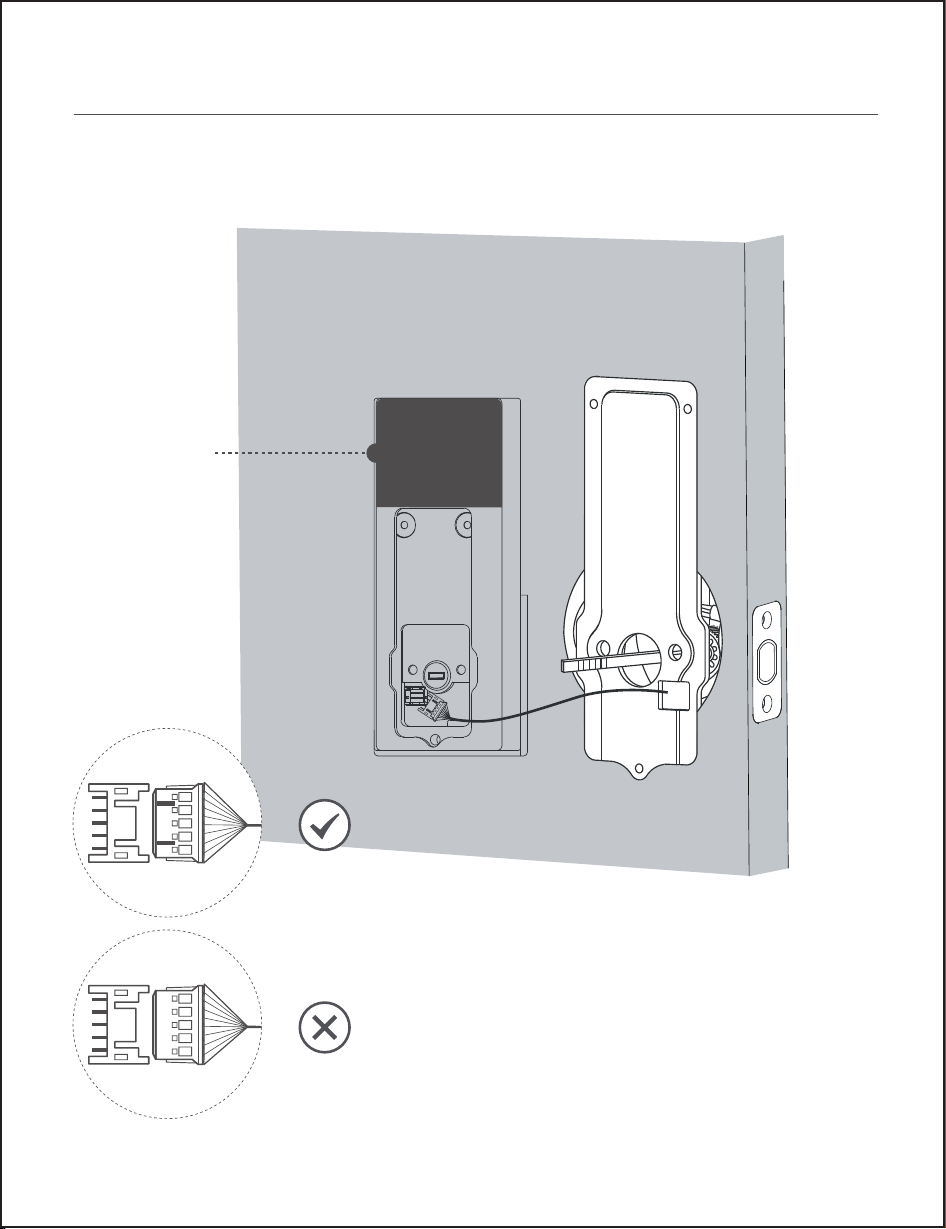
Step 6. Install Interior Assembly
1. Wire to the interior assembly.
Remove the
double-sided
tape.
Upside Down
14
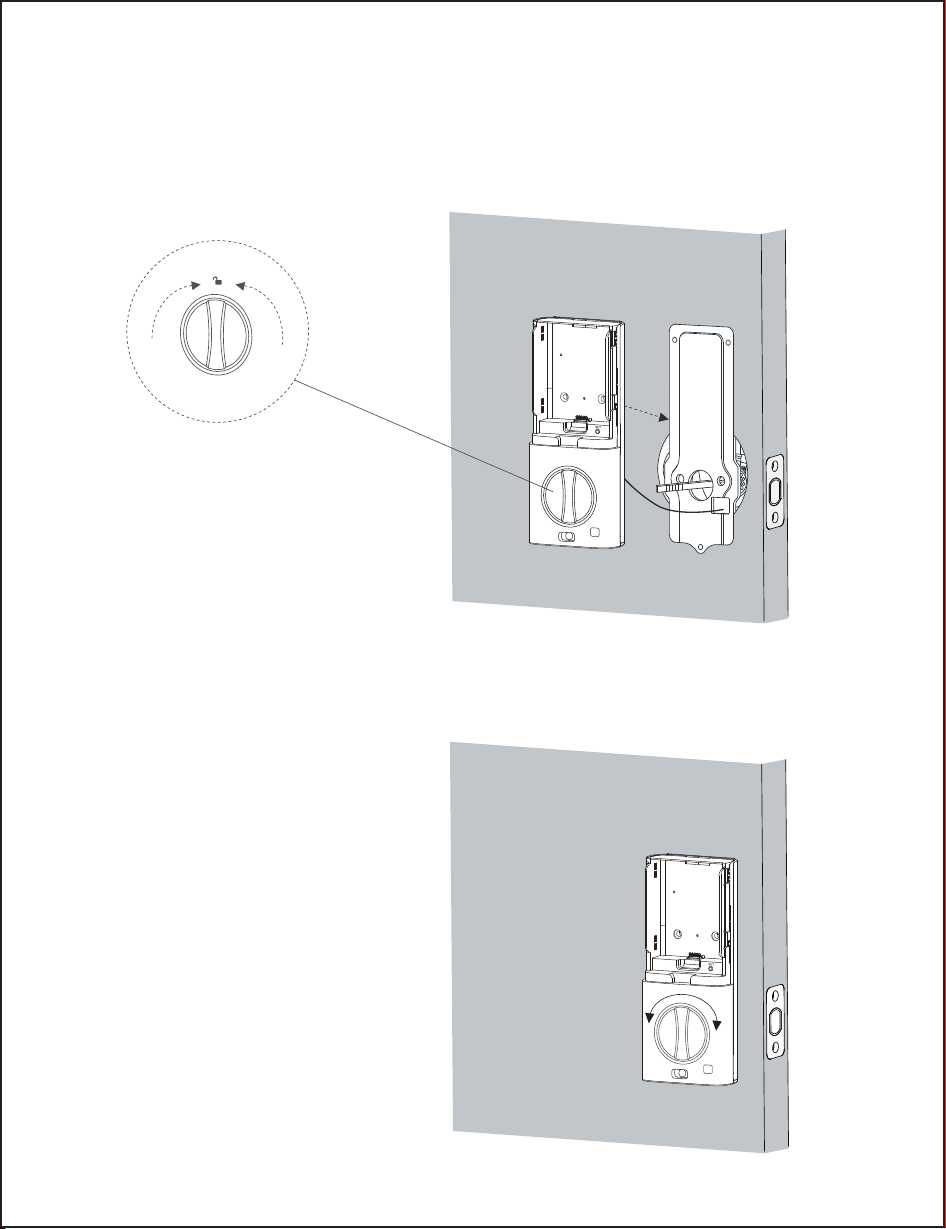
3. Check if the deadbolt retracts
by turning the thumbturn.
2. Mount the interior assembly. Make sure both wires are tucked into the
cabin on the back of the interior assembly.
Note: keep the thumb
turn on the unlock
position.
15
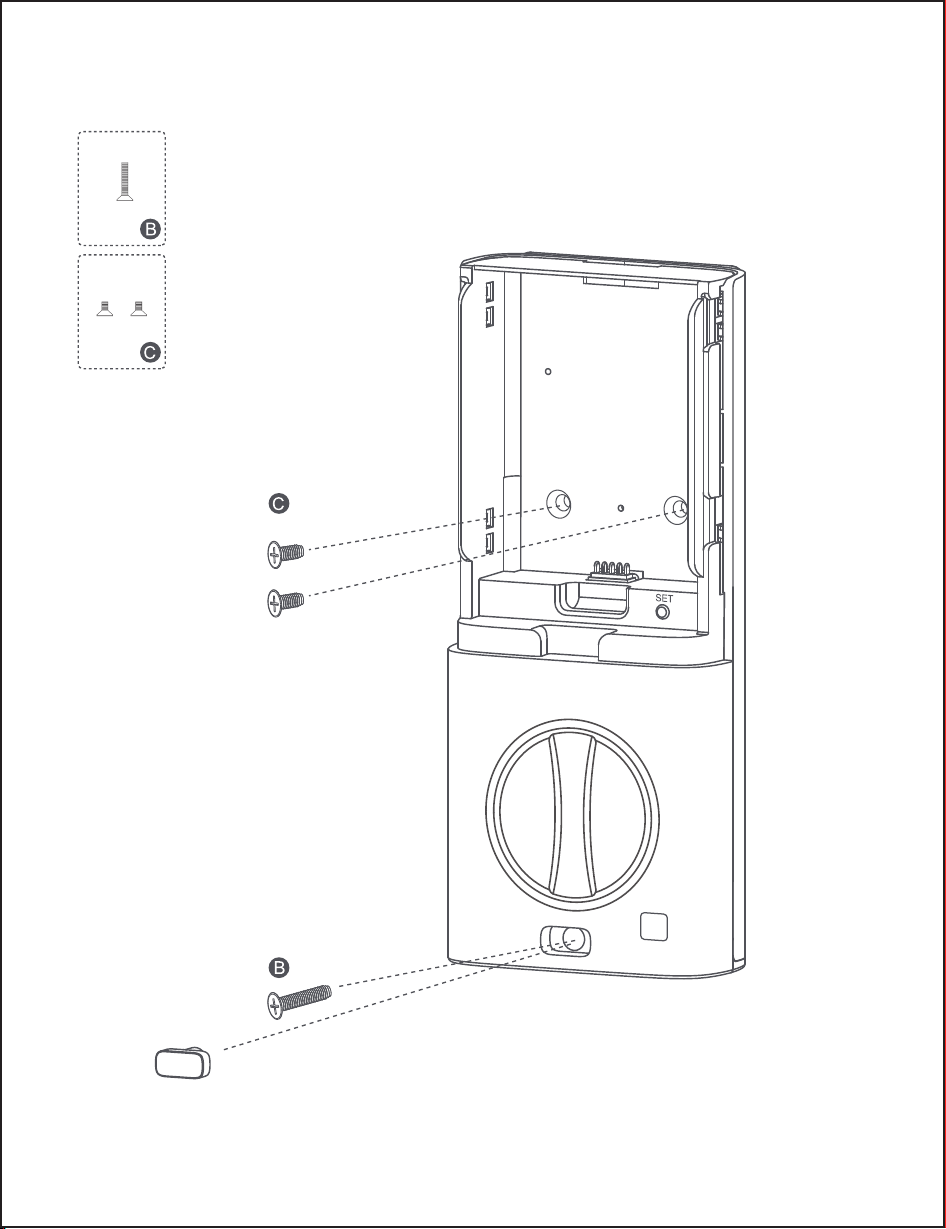
Silicone plug
4. Tightly fasten the screws in place, install the silicone plug.
16
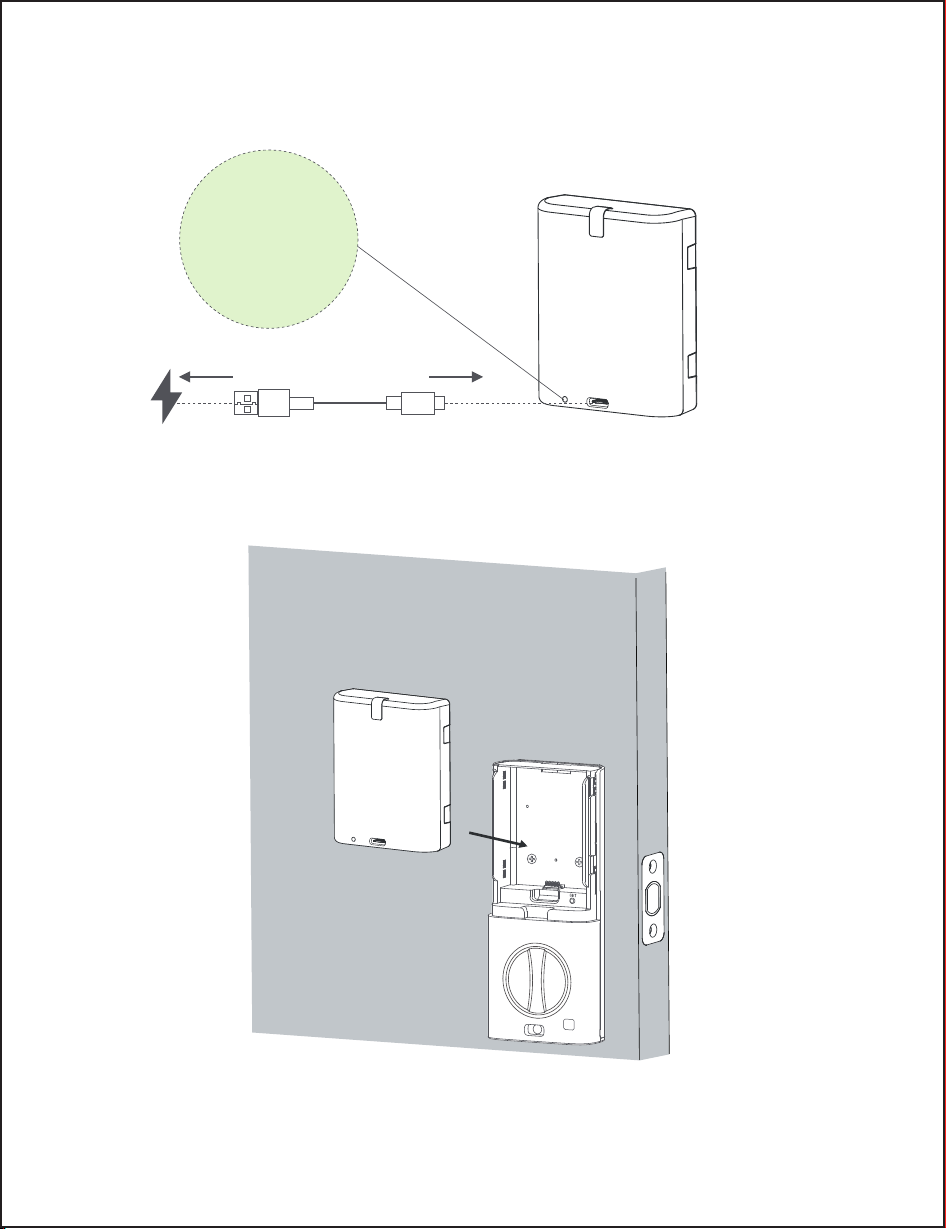
While the door is open and unlocked, load the battery into the interior
assemble.
Note: Remove the battery cover when setting up the smart door lock,
and install the battery cover after the setup is complete.
LED Indicator
Red: Charging
Green: Fully Charged
USB Type-A USB Type-C
דِIɖǼǼɵƬǝƏȸǕƺɎǝƺƫƏɎɎƺȸɵƫƺǔȒȸƺˡȸɀɎɖɀƺِXɎȅǣǕǝɎɎƏǸƺƏƫȒɖɎהǝȒɖȸɀِ
17
“ ”
Programming Instructions
6
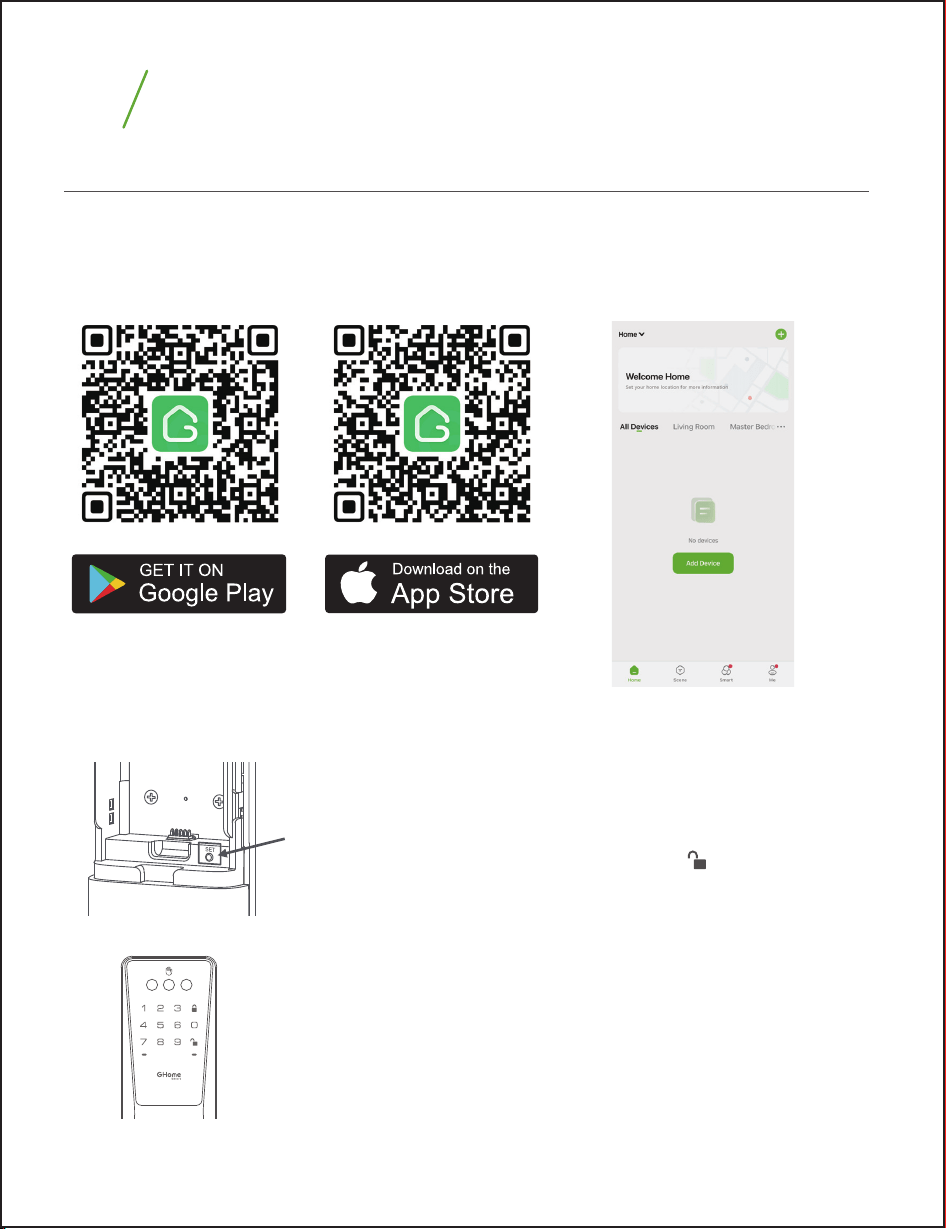
App Connection Guide
Connect your phone to the Wi-Fi router (supports 2.4G Wi-Fi only), scan the QR
code below to download and install the app, then sign up for an account.
18
2. Restore Factory Settings
1. APP Download
Step1: Press and hold “SET” button, and after 4 seconds,
the lock will start emitting a “beep” sound (7 times) .
Step2: Hold the button until you hear the voice prompt:
To confirm, Please press the unlock
Step3: Press the unlock button within 4 seconds, you
will hear the voice prompt: Factory reset succeeded.
Note: After the door lock is restored to factory settings:
1) Any 6-8 digits password or palm vein can be used to
unlock it, unless an administrator password is set.
2) You can short press the "SET" button and follow the
voice prompts to set an administrator password.
button.
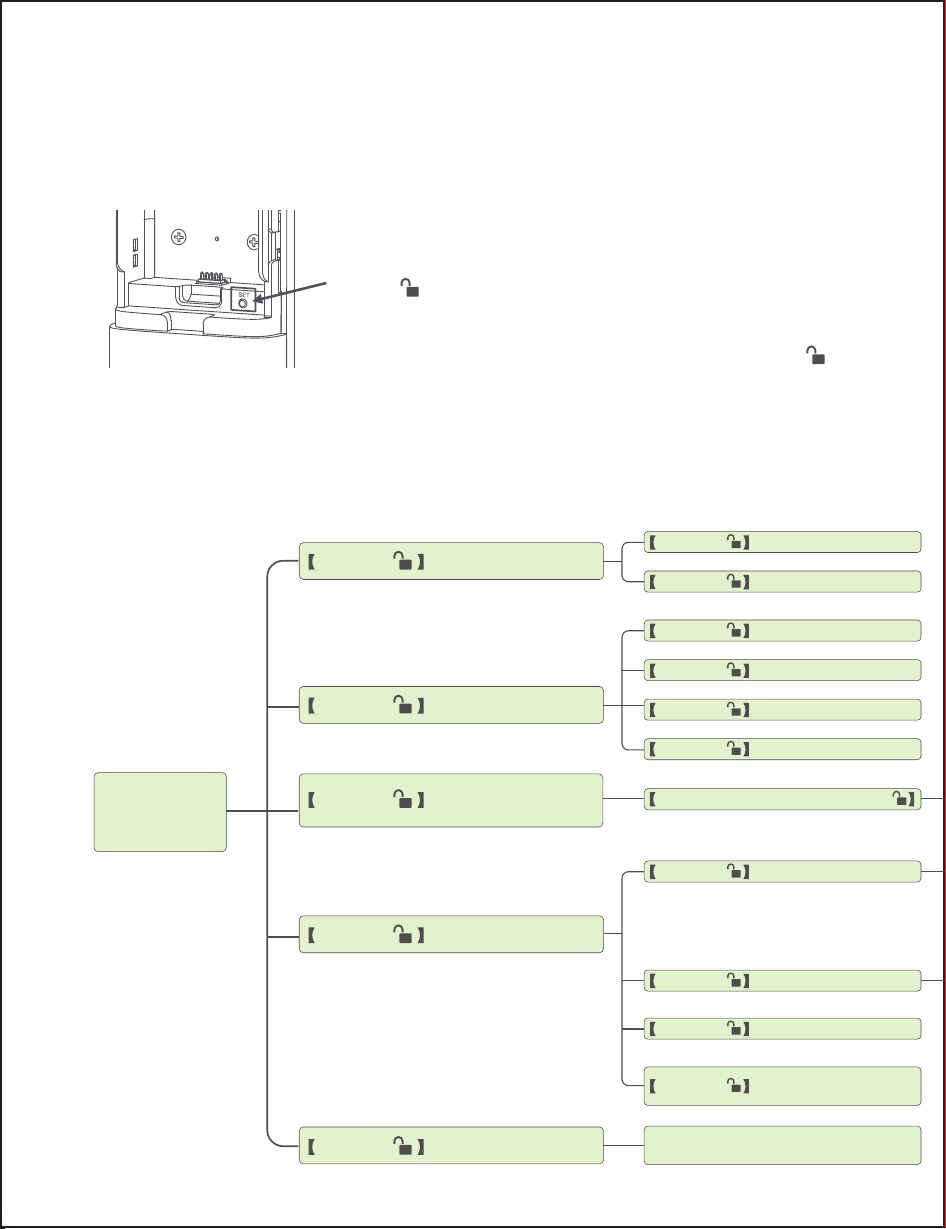
Add Keypad Password
Add Credentials
Delete Credentials
Modify Administrator's
Password
Settings
Network Setting
Add Palm Vein
Delete Password
Delete by Number
Input the Administrator Password+
Delete Palm Vein
Delete All Credentials
Automatic Locked
Function
Setting
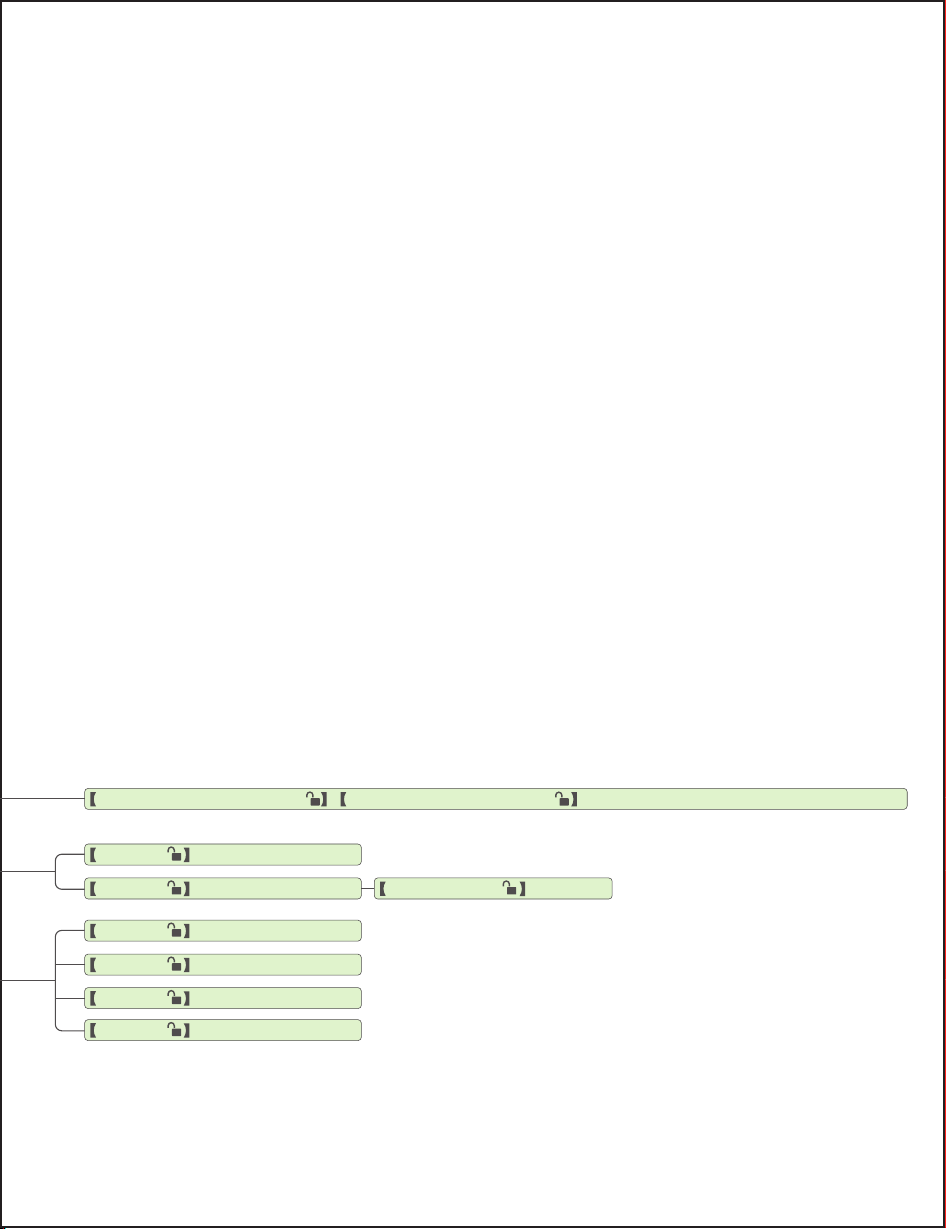
For reference: Function list of function setting mode
19
Press 1+
Press 2+
Press 4+
Press 5+
Press 3+
Press 1+
Press 1+
Press 2+
Press 3+
Press 4+
Press 1+
Voice Prompt Volume
Press 2+
Language Settings
Press 3+
Broadcast Firmware
Version Number
Please Follow The App Prompts to
Complete the Wi-Fi Connection
Press 4+
Press 2+
3. Set Administrator Password
Step1: Short press the “SET” button on interior assembly
for one second. If no administrator password has been
set before, you will hear a voice prompt: Please set the
administrator password.
Step2: After inputting the administrator password, press
the button to confirm.
Step3: Follow the voice prompt instructions, enter the
administrator password again, and press the button
to confirm.
Note: The first time you set the administrator password,
you will directly enter the function setting mode.
“ ”
“ ”
If you are not in function setting mode, and the administrator password has been
set, short press the set button, enter the correct administrator password according
to the voice and confirm to enter.
If you have entered function setting mode, press "5" +unlock key, and the voice
prompt "Network configuration in progress" will be heard. At this time, the red
indicator light starts flashing, which means the door lock has entered the network
configuration state.
20
New Administrator Password+ + Modify the Administrator Password Is Complete
Turn off Auto Lock
Press 1+
Turn on Auto Lock
Mute
Low
Press 2+
Press 1+
Press 2+
Medium
Press 3+
High
Press 4+
Setup Time
Press 5-1800+
New Administrator Password+
4. Enter Network Configuration
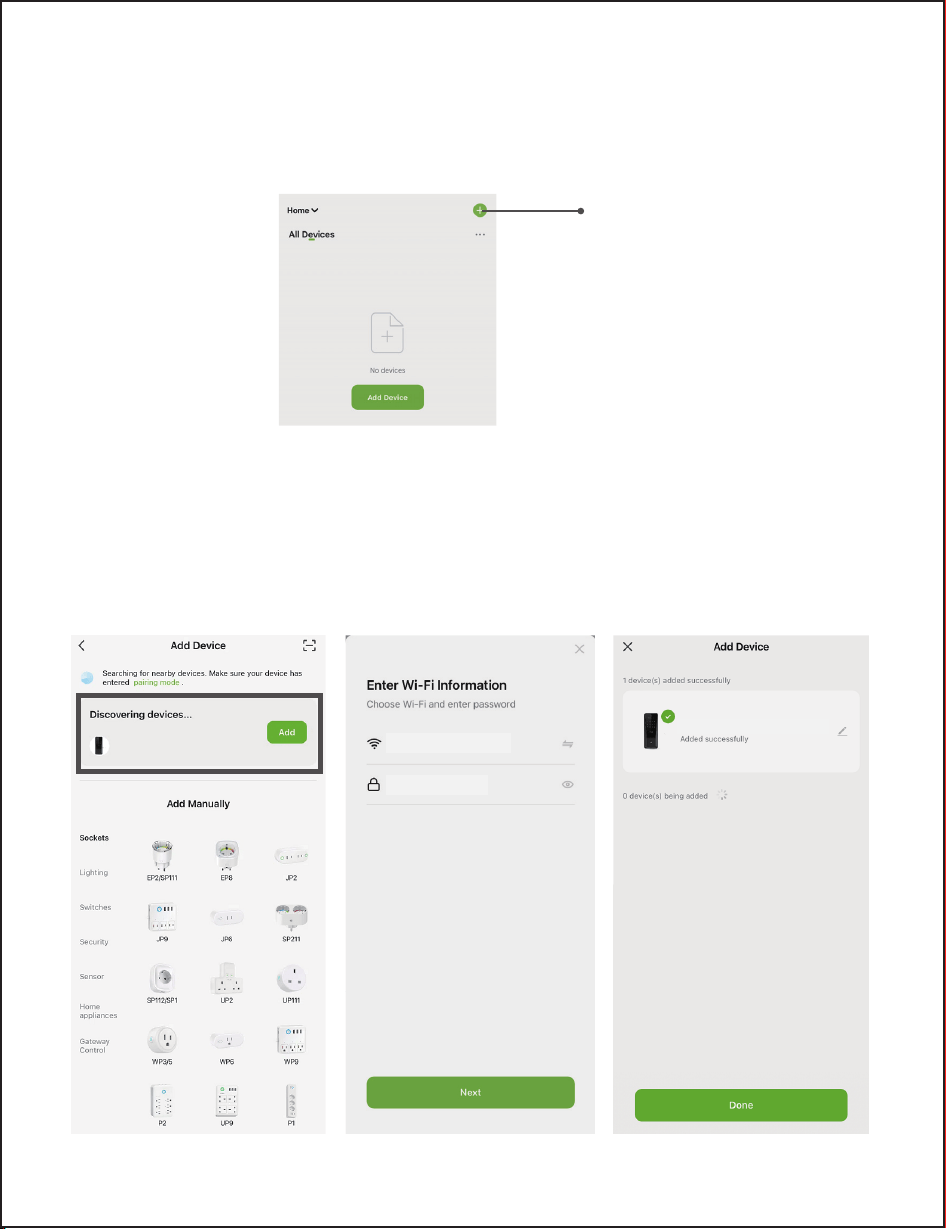
When the door lock is in the network configuration state, tap the "+" at the top
right corner of the homepage to add a device.
You can add a device in two ways.
1) Bluetooth Auto-Discovery Mode (Recommended)
The app will suggest you turn on Bluetooth and Wi-Fi on your phone, and then
select the device you want to add. Enter your Wi-Fi name and Wi-Fi password
(supports 2.4G Wi-Fi only), and it will automatically connect to the network.
21
5. Add Device
Add Device
cucosmart.com
Palm Vein Smart Lock KD10
********
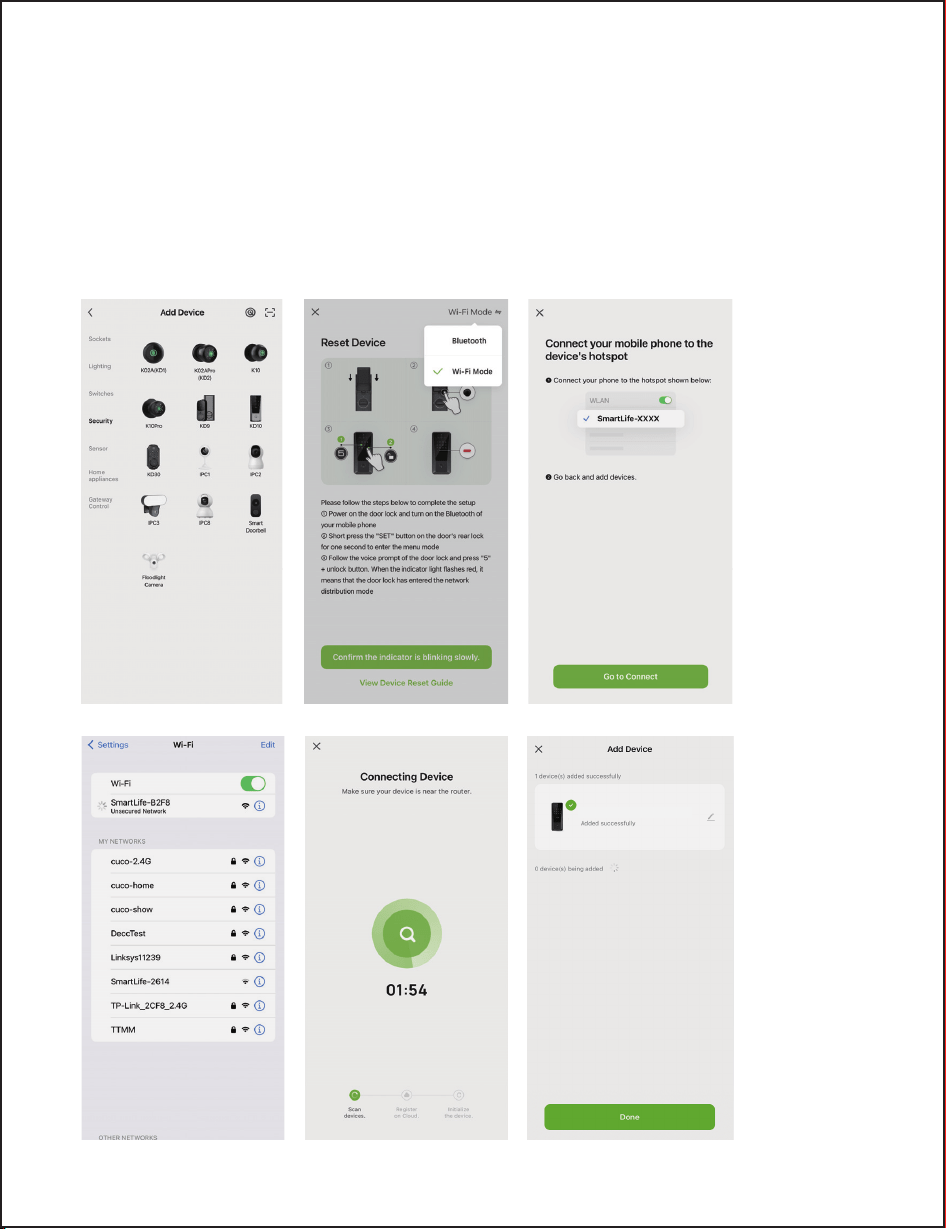
2) Wi-Fi Mode
If Bluetooth networking fails, you can try Wi-Fi networking mode. Select "KD10"
under "Security", enter your Wi-Fi name and Wi-Fi password ( supports 2.4G Wi-Fi
only), choose "Wi-Fi Mode" to ensure the KD10 red indicator light is flashing,
connect your phone to the device hotspot: "SmartLife-XXXX", then return to the
app interface, it will automatically connect to the router, completing the
configuration.
22
Palm Vein Smart Lock KD10
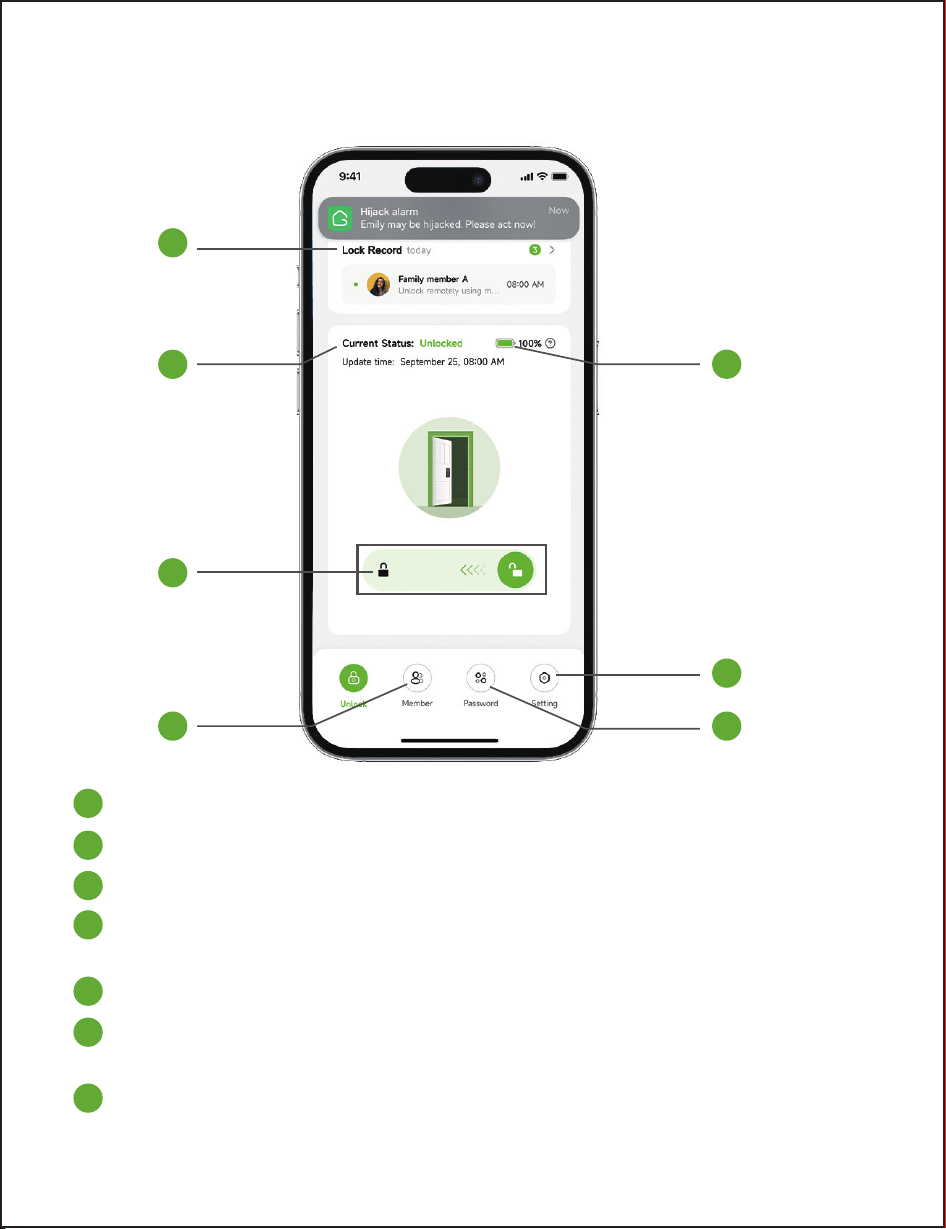
APP Introduction
23
1
1
2
3
4
5
6
7
2
5
6
7
3
4
Lock Record: Door opening record, alarm record
Current Lock Status
Lock / Unlock: Slide to lock / unlock the door
Member: Member management, unlocking method management (palm
vein, password)
Battery Power
Setting: Remote switch, auto lock, silent mode, navigation volume, smart
scenes
ÁƺȅȵȒȸƏȸɵ¨ƏɀɀɯȒȸƳيXȇƬǼɖƳƺɀȒǔˢǣȇƺɎƺȅȵȒȸƏȸɵȵƏɀɀɯȒȸƳƏȇƳȒȇǼǣȇƺ
temporary password
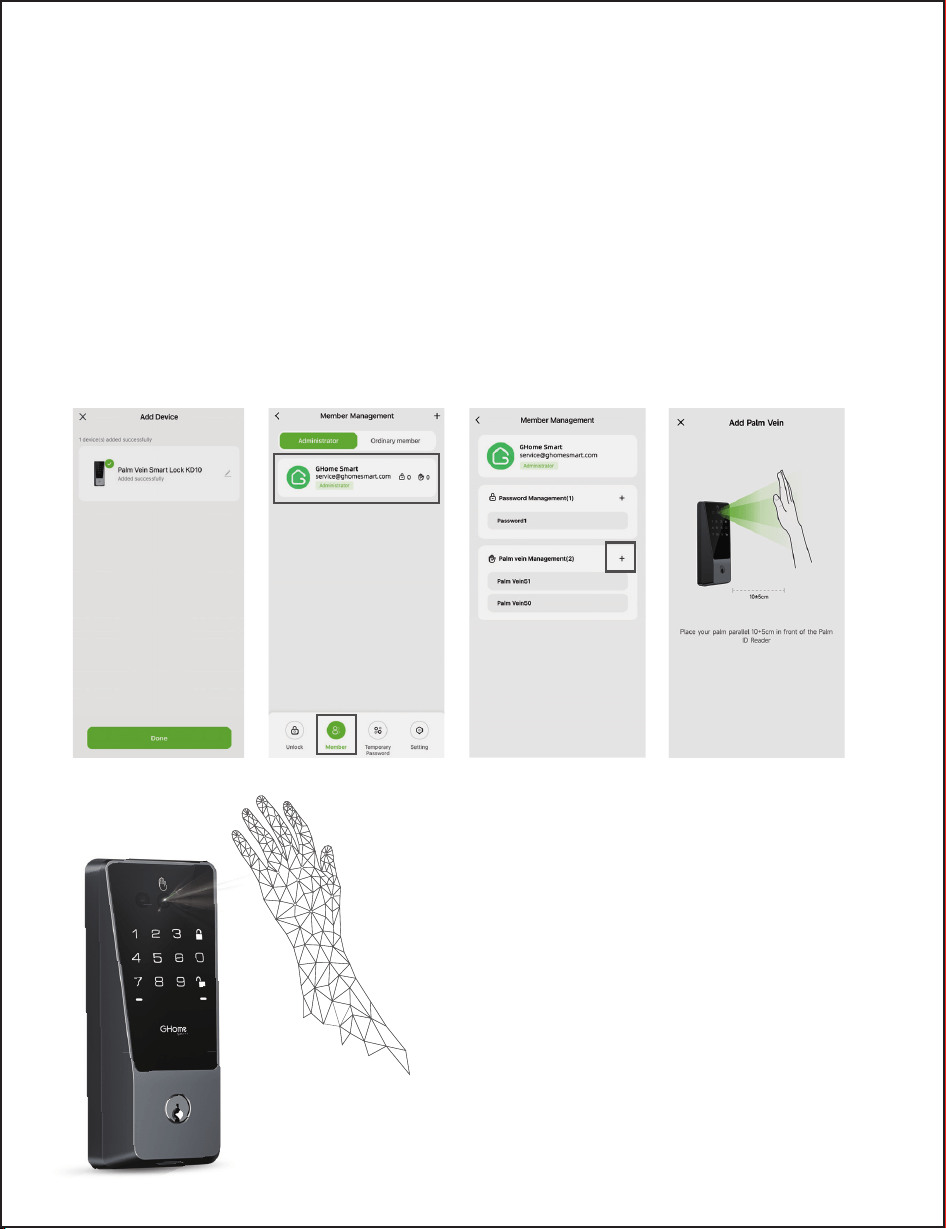
1. Before enrolling your palm vein ID, ensure that the lock has been added
successfully.
2. Tap [Member] and select your corresponding account, then tap “+” to add
palm vein.
3. Follow the on-screen image guide to enroll your palm vein.
4. Once successful, you'll hear a voice prompt, and the page will display [Palm
Vein Added Successfully].
Of course, you can also enter the
function setting mode by short press
the set button for 1 second, and add
the palm vein based on the voice
prompts.
How to Add a Palm Vein lD?
24
Tips:
Ensure your palm is about 2"-6" (10±5cm) from the Palm lD Reader. Ensure that
nothing covers the Palm lD Reader or your palm. Hold your hand still during the
Palm lD enrollment process.
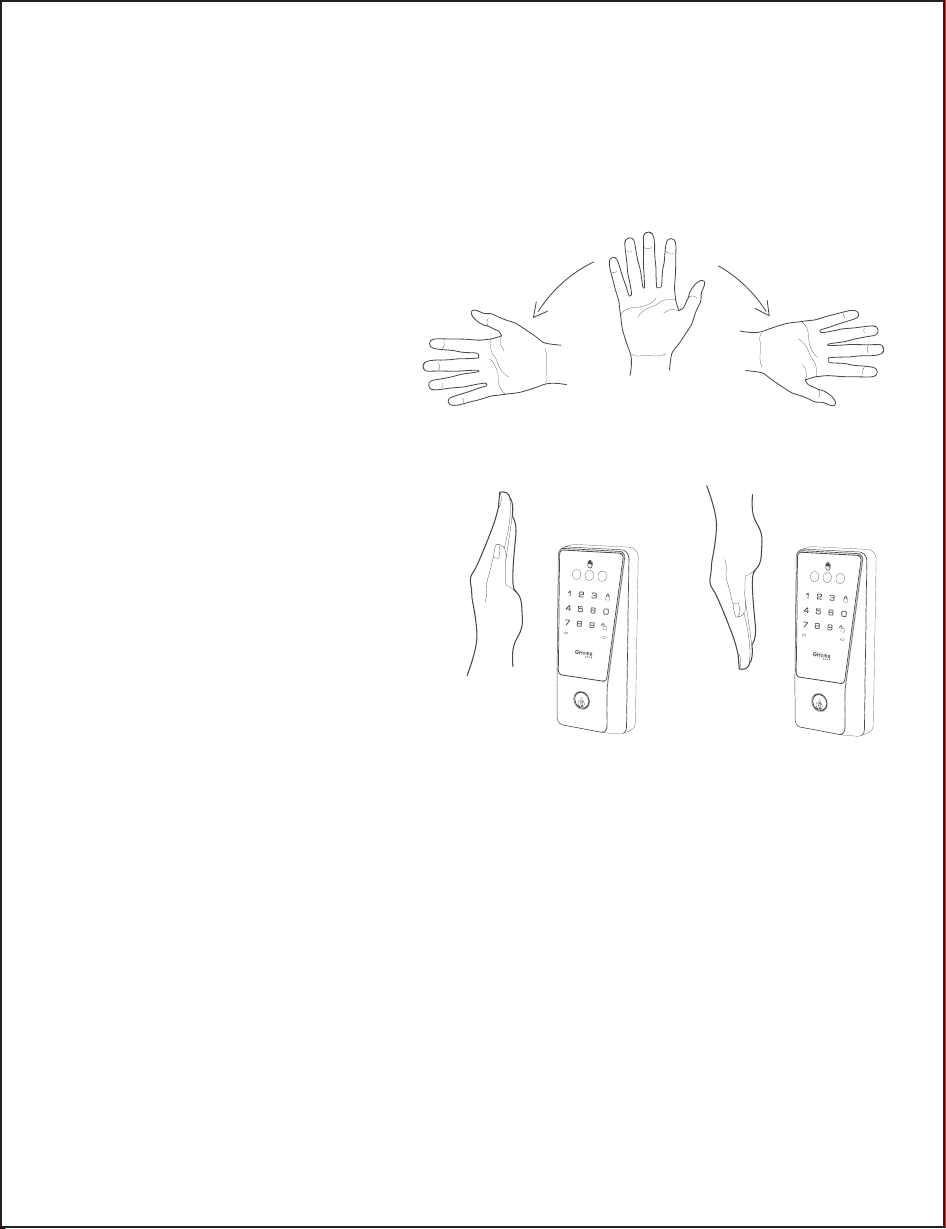
After adding a Palm lD, the Palm lD
reader can recognize any palm
direction within a 180-degree range
centered on the palm.
It is recommended to add two Palm
lDs for each palm. Place your palm
upward to add the first Palm lD, and
place the same palm downward to
add the second Palm lD. This way, you
will be able to unlock the lock regard-
less of the position of your palm.
25
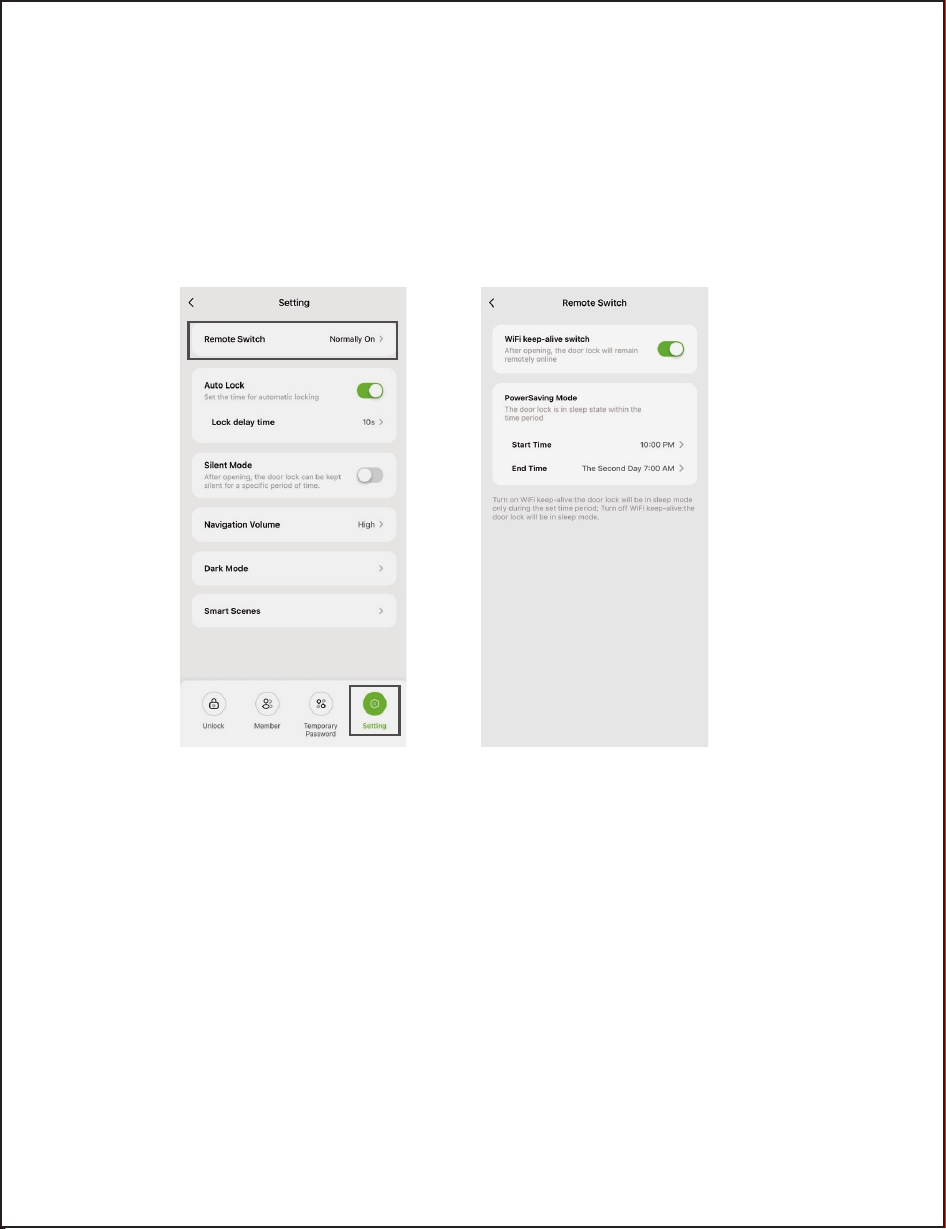
App Usage Precautions
1. Enter PowerSaving Mode
The "Remote Switch" function in the “Settings” is "Normally on" by default. when
the "Remote Switch" is turned off or the door lock is in "PowerSaving Mode" time
period,
the door lock will enter the "PowerSaving Mode" to conserve power.
1) The functions of controlling the door lock via the app will no longer be
available, including unlocking, managing palm vein data, or passwords through
the app.
2) At this time, you can only view the “Lock Record” through the app. To unlock,
add passwords, or register palm veins, you must operate using the door lock
keypad.
2. Exit PowerSaving Mode
To exit "PowerSaving Mode", you must manually wake the door lock using the
keypad, wait for the app to reconnect with the lock, and then turn on the
"Remote Switch" or reset the "PowerSaving Mode" time period.
26
Set Up Door Lock Locally
After setting the administrator password on the local door lock, apart from
being able to configure your door lock through the app, you can also directly
set the relevant settings on the local door lock following the instructions
below.
Short press the "SET" button. You will hear a
voice prompt saying, "Please input the admin-
istrator password, Press the unlock button to
confirm". Enter the correct administrator
password, then press the button to
confirm. If the password verification is success-
ful, you will enter the function setting mode.
Referring to the previous list of function setting mode, you can directly:
Add/Delete Credentials
Modify Administrator's Password
Voice Prompt Volume
Language Settings
Networking Setting
1. Enter the Function Settings Mode
2. Function List of Local Door Lock
27
“ ”
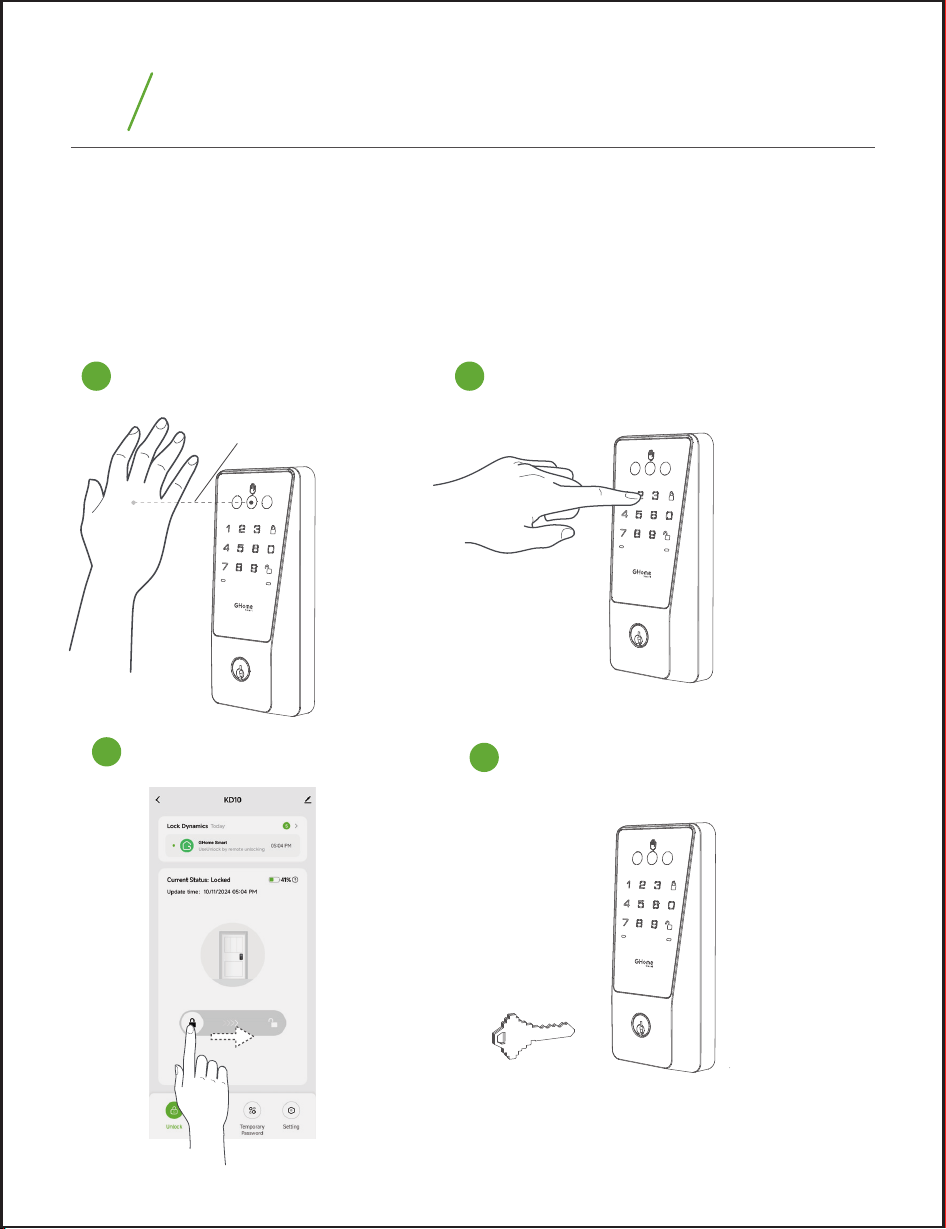
Unlock from Outside
--The unlocking is successful, the green indicator light is on, and there is a voice prompt for
successful unlocking in non-silent mode.
--The unlocking fails, the red indicator light is on, and there will be a voice prompt for
unlocking failure in non-silent mode.
Palm Vein
10±5cm
Permanent Password
Temporary Password
APP
How to Use?
7
28
1 2
3
Mechanical Key
4
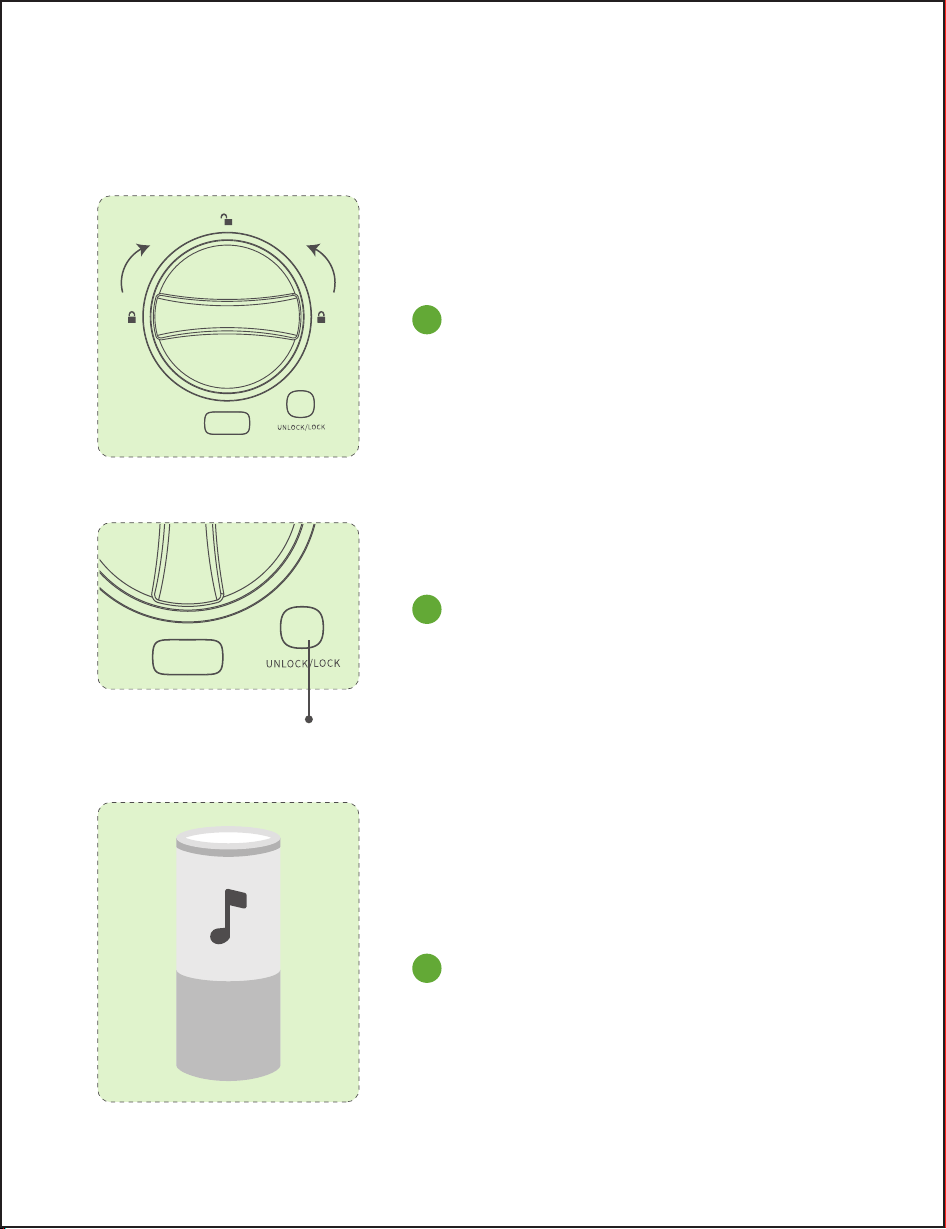
Unlock from Inside
Rotate the thumb turn to unlock position.
(Note: Turn right or left according to the actual situation)
Short press the UNLOCK button.
UNLOCK button
29
1
2
3
Alexa & Google Assistant
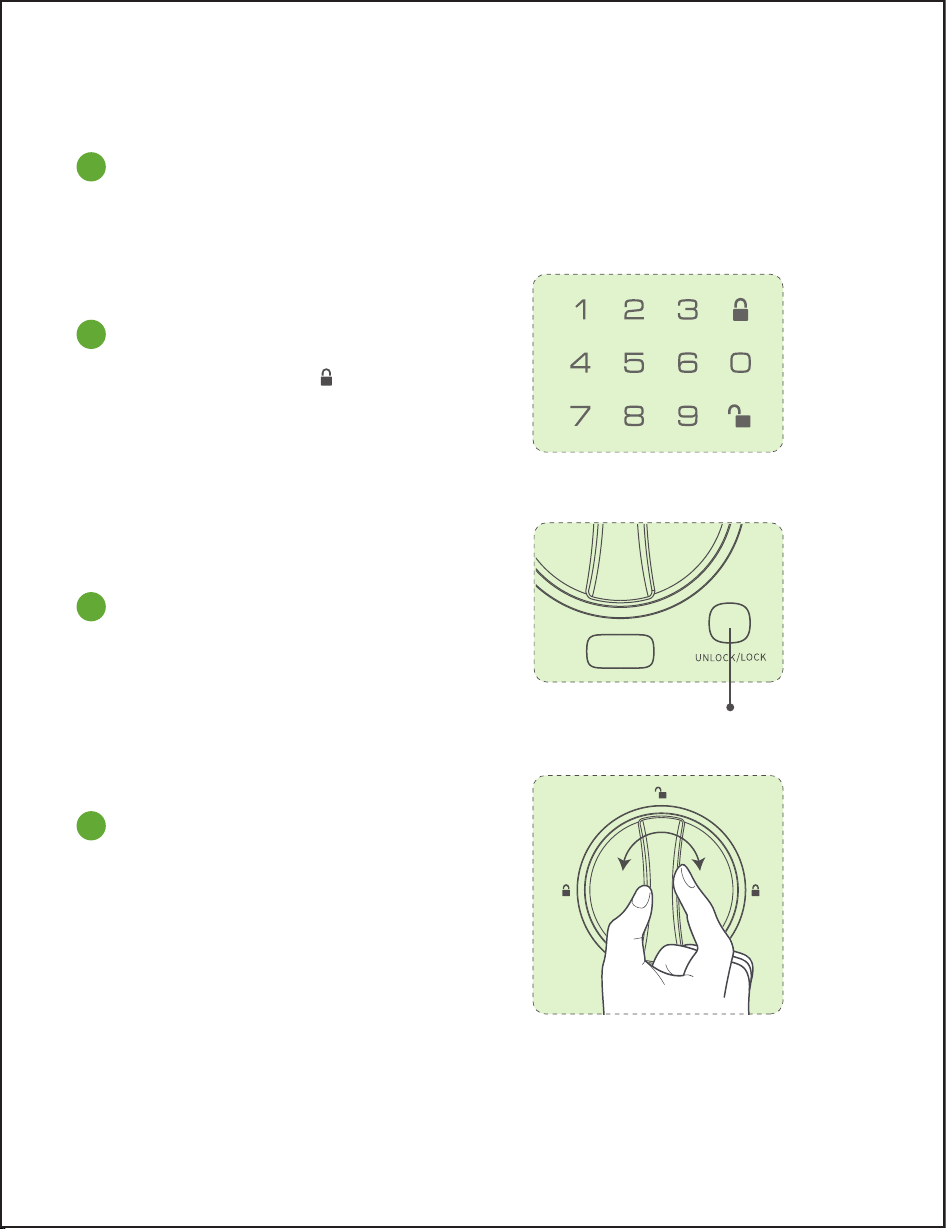
Lock from Outside
Lock from Inside
Auto lock mode
The deadbolt will extend out automatically within the time set by the APP, the
default is 10s.
Manual mode
Press the lock button “ ” on keypad.
Short press the LOCK button.
Rotate the thumb turn to lock position.
(Note: Turn right or left according to the actual situation)
30
1
2
1
2
LOCK button
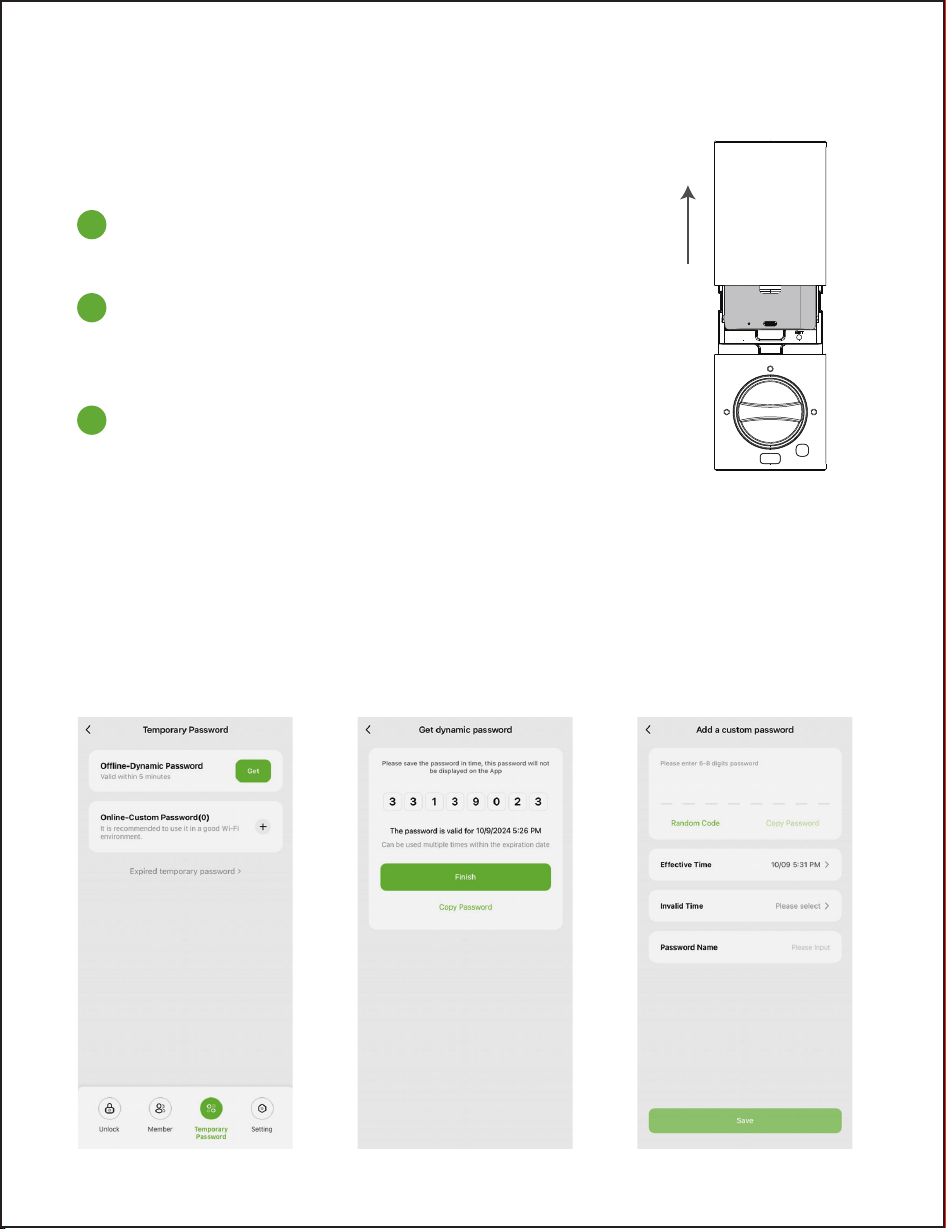
Battery Charging
Temporary Password:
When the door lock battery is low, charge it as soon as possible.
Oine dynamic password is 8 digits, valid for 5 minutes, and can be used multiple times
before expiration.
Online-Custom password can customize password and validity period.
Note: Online-Custom password is only valid when the door lock is connected to the Internet.
Remove the battery cover and take out the
battery.
Connect the charging cable, the LED will turn
red to indicate charging, and green to indicate
full charge.
Put the battery back into the door lock and
cover the battery cover.
31
1
2
3

1. Multiple unlocking failure alarm: The password and fingerprint have 5 consecu-
tive trial and error opportunities within 5 minutes. If exceeded, the system will be
locked for 60 seconds, and a local reminder will be given that multiple trials have
been locked for 60s + APP reminder.
2. Low battery alarm: When the battery is lower than 20%, the lock will give a
voice prompt, a red light will flash, and the APP will push a [Low Battery Remind-
er]. The low battery reminder and message push will also be given every time the
lock is unlocked.
3. Anti-peeping password: Password length 6-8 digits, support virtual password
(support up to 20 digits).
4. Silent Mode: Set the silent mode in a specific time period in the APP. During
the silent mode, except for the alarm sound, the door lock prompt sound will be
muted, so you don’t disturb your family when you return home late at night.
5. Volume adjustment: The volume supports APP settings and local settings, with
four settings: high/medium/low/mute.
6. Anti-hijacking alarm function: When the user unlocks the lock with the pre-set
[Coerced Palm] or [Coerced Password], a reminder will be pushed to the pre-set
emergency contact on the APP: "The user administrator unlocks the phone with
[Coerced Palm] or [Coerced Password]. A hijacking incident may occur. Please
handle it in time!".
Note: [Coerced Palm] or [Coerced Password] is marked on the cloud server when
adding a password or palm vein in the app and does not need to be specially
marked locally. "
Other Product Features
8
7. Auto Lock: lock the deadbolt automatically with the preset time after unlock-
ing, the function is turned on by default, with a preset delay of 10s, which can be
adjusted via the APP or locally. If the function is turned off, door lock will enter
the normally open mode, The door lock will only close after manual locking or
press the lock button lock it.
32
25814 157369 14728
PASSWORD
RANDOM DIGITS

9
Disclaimer
1. Your biometric information is stored locally on the device rather than in the
cloud, ensuring your personal information is safe and private.
2. IoT services are provided by Tuya, a third-party company. For information on
how Tuya processes data, please refer to Tuya’s privacy policy.
3. Do not use the device in the environment at too high or too low temperatures,
never expose the device to strong sunlight or very wet environments. The suitable
temperature for the product is -20°C to 50°C for the interior lock (Charging mode
is 0-45°C), and -20°C to 60°C for the exterior lock.
Warning
Replacement of a battery with an incorrect type that can defeat a safeguard;
Disposal of a battery into fire or a hot oven, or mechanically crushing or cutting
of a battery, that can result in an explosion;
Leaving a battery in an extremely high temperature surrounding environment
that can result in an explosion or the leakage of flammable liquid or gas;
A battery subjected to extremely low air pressure that may result in an explosion
or the leakage of flammable liquid or gas.
33

Warning: Changes or modifications to this unit not expressly approved by the
party responsible for compliance could void the user’s authority to operate the
equipment.
This device complies with Part 15 of the FCC Rules. Operation is subject to the
following two conditions: (1) this device may not cause harmful interference, and
(2) this device must accept any interference received, including interference that
may cause undesired operation.
Note: This equipment has been tested and found to comply with the limits for a
Class B digital device, pursuant to part 15 of the FCC Rules. These limits are
designed to provide reasonable protection against harmful interference in a
residential installation. This equipment generates, uses and can radiate radio
frequency energy and, if not installed and used in accordance with the instruc-
tions, may cause harmful interference to radio communications. However, there is
no guarantee that interference will not occur in a particular installation. If this
equipment does cause harmful interference to radio or television reception, which
can be determined by turning the equipment off and on, the user is encouraged
to try to correct the interference by one or more of the following measures:
-- Reorient or relocate the receiving antenna.
-- Increase the separation between the equipment and receiver.
-- Connect the equipment into an outlet on a circuit different from that to which
the receiver is connected.
-- Consult the dealer or an experienced radio/TV technician for help.
To maintain compliance with FCC's RF exposure guidelines, the distance must be
at least 20cm between the radiator and your body, and fully supported by the
operating and installation configurations of the transmitter and its antenna(s).
34

This device contains license-exempt transmitter(s)/receiver(s) that comply with
Innovation, Science and Economic Development Canada’s license-exempt RSS(s).
Operation is subject to the following two conditions:
1. This device may not cause interference.
2. This device must accept any interference, including interference that may
cause undesired operation of the device.
Cet appareil contient un ou des émetteurs/récepteurs exempts de licence qui
sont conformes au(x) RSS exempts de licence d'Innovation, Science et Dévelop-
pement économique Canada. Le fonctionnement est soumis aux deux condi-
tions suivantes :
1. Cet appareil ne doit pas causer d'interférences.
2. Cet appareil doit accepter toute interférence, y compris les interférences qui
peuvent causer un fonctionnement non désiré de l'appareil.
The device has been evaluated to meet general RF exposure requirement. To
maintain compliance with RSS-102 - Radio Frequency (RF) Exposure guidelines,
this equipment should be installed and operated with a minimum distance of
20cm between the radiator and your body.
le dispositif de a été évalué à répondre général rf exposition exigence.pour
maintenir la conformité avec les directives d'exposition du RSS-102-Radio
Fréquence (RF). ce matériel doit être installé et exploité à une distance minimale
de 20 cm entre le radiateur et votre corps.
35
IC

Manufacturer: Shenzhen Cuco Smart Technology Co., Ltd.
Address: Room 201, 301, Building A, No.12 Difu Road, Guxing Community,
Xixiang Street, Bao'an District, Shenzhen,518000,Guangdong, P. R. China
After-sale Service Tel: 1-844-394-5218
PST 9am - 5pm (Monday-Friday)
Email: ser[email protected]om
4.02.000.1200 V1.0
36

Wi-Fi Palm Vein
Smart Lock Manual
KD10