Please make sure to read this User Guide prior to using your unit.
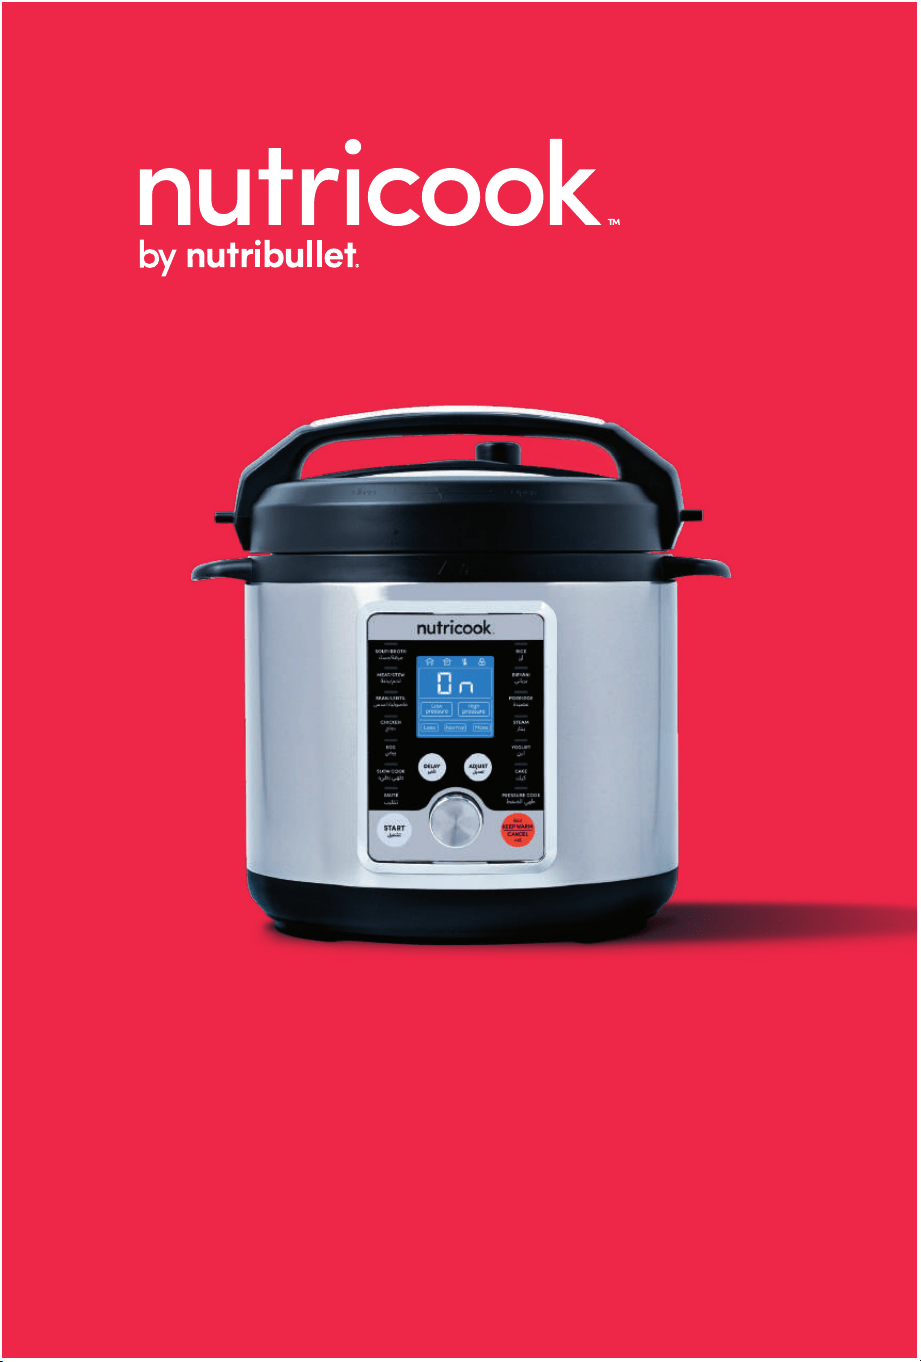
SMART POT PRO+
User guide.


Find delicious recipes online at:
nutricookworld.com nutricookworld
2
2

Contents.
Welcome.
Before you begin.
Important safeguards &
cautionary information.
What's included.
Cooker parts overview.
Getting started.
Venting methods.
How to use.
Initial test run.
Smart programs.
Care & maintenance.
Troubleshooting.
Warranty.
05
07
09
14
16
19
26
29
33
35
38
40
43
Thank you for purchasing the NutriCook.
3
3

Find delicious recipes online at:
nutricookworld.com nutricookworld
4

Welcome to team
NutriCook
™
Life is complicated. Eating
healthy doesn’t have to be.
There’s really no easier way to
streamline your healthy lifestyle
than with this mighty appliance.
We are constantly working to
create recipes that are
EASY. DELICIOUS. NUTRITIOUS.
You can nd these recipes online at
nutricookworld.com
We can’t wait to see how you make
NutriCook
™
part of your everyday.
Get social with us.
nutricookworld
5
Find delicious recipes online at:
nutricookworld.com nutricookworld
6

Before you begin.
• Remove all packaging materials from in
and around the cooker and verify that all
parts are accounted for.
• Place the cooker on a stable, level surface,
away from external heat sources.
• Read all Important safeguards and
cautionary information in this User guide.
Failure to do so may result in property
damage and/or personal injury.
• Follow Care & maintenance instructions in
this User guide to clean the cooker before
cooking.
• Do not remove safety warning stickers or
rating label.
*CAUTION: NEVER use the cooker on a stovetop. Do not place
appliance on or in close proximity to a hot gas or electric burner, or a
heated oven; heat from an external source will damage appliance.
7
Building a smoothie.
Find delicious recipes online at:
nutricookworld.com nutricookworld
8

Important safeguards &
cautionary information.
Warning! This appliance cooks with pressure. To avoid the risk of serious injury,
carefully read all instructions before operating this appliance.
When using any electrical appliance, basic safety precautions should always be
observed, including the following critical information.
GENERAL SAFETY
• DO NOT touch hot surfaces of pressure cooker. Use side handles
only.
• Caution: To protect against electrical shock, DO NOT immerse
cord, plugs, or the unit in water or other liquid.
• Caution: DO NOT place the pressure cooker on or in close
proximity to a hot gas or electric burner, or heated oven; heat
from an external source will damage the appliance.
• Caution: DO NOT use appliance near water or ame.
• Caution: Extreme caution must be used when moving a
pressure cooker containing hot liquids. DO NOT move the
appliance while in use or when it is under pressure.
• DO NOT use pressure cooker for other than intended use.
• This appliance cooks under pressure. Always ensure there is a
minimum of 1 measuring cup of liquid for the cooker to pressurize.
Improper use may result in scalding injuries. Make certain the unit
is properly closed before operating.
*WARNING: Read this User guide carefully and completely, and retain for future
reference. Failure to adhere to safety instructions may result in serious injury.
9

• For all pressure cooking programs, do not ll the unit over 4/5
full. When cooking foods that expand during cooking such as rice
and dried vegetables, do not ll the unit over 2/5 full. Overlling
may cause a risk of clogging the pressure release hole and
developing excess pressure.
• Be aware that certain foods, such as applesauce, cranberries,
pearl barley, oatmeal and other cereals, split peas, noodles,
macaroni, rhubarb, and spaghetti can foam, froth, spatter, and
clog the pressure release hole. These food items should not be
cooked in a pressure cooker.
• WARNING: Spilled food can cause serious burns. Keep
appliance and cord away from children.
• Close supervision is necessary when any appliances are used by
or near children.
• This appliance is not intended for use by persons (including
children) with reduced physical, sensory or mental capabilities,
or lack of experience and knowledge, unless they have
been given supervision or instruction concerning use of the
appliance by a person responsible for their safety.
• Children should be supervised to ensure that they do not play
with the appliance.
• Always disconnect the appliance from the power supply if it
is not in use and before cleaning. Allow the unit to cool before
putting on or taking o parts, and before cleaning and storing.
To disconnect, press Keep Warm/Cancel button, then remove
plug from the wall outlet.
• Always check the pressure release hole, pressure release valve
and oat valve for clogging before use.
• Make sure the pressure release valve is in the Sealing position for
all pressure cooking programs.
• CAUTION: DO NOT open the pressure cooker until the unit has
cooled and all internal pressure has been released. If the handles
are dicult to push apart, this indicates that the cooker is still
pressurized – do not force it open. Any pressure in the cooker can
be hazardous.
10

• WARNING: Never deep fry or pressure fry in the unit with oil.
• DO NOT lean over or place hands or face over the pressure
release valve or oat valve when the appliance is in operation or
has residual pressure. Do not touch the metal portion of the lid
when the appliance is in operation as this could result in serious
injury and burns.
• DO NOT cover or obstruct the pressure release valve and oat
valve with cloth or any other objects as this can cause issue and
injury.
• Turn the appliance o if steam escapes from the pressure release
valve or oat valve steadily for longer than 3 minutes. There
may be residual pressure in the appliance. Allow the appliance
to depressurize naturally or release all excess pressure before
opening.
• Turn the appliance o if steam escapes from the sides of the lid
and ensure sealing ring is properly installed. See Troubleshooting
section of this User guide.
• Always use the unit on a clean, at and dry surface. Ensure
that the unit is positioned in a stable situation with the handles
positioned to avoid spillage of hot liquids. Keep the appliance on
stable heat-resistant platform.
• DO NOT place your cooker on anything that may block the vents
on the bottom of the appliance.
• CAUTION: Before inserting the inner pot into the appliance,
wipe the outer surface of the inner pot and heating element to
ensure they are dry and free of food debris. Refer to Care and
maintenance instructions.
• Only use accessories authorized by NutriCook
™
to reduce the risk
of any damage and injury.
• Do not tamper with any of the safety mechanisms of this
appliance as doing so may void the warranty.
• This appliance is not intended to be operated by means of an
external timer or separate remote-control system.
11

• This appliance is intended to be used in household and similar
applications such as:
- Sta kitchen areas in shops, oces and other working
environments;
- Farm houses;
- By clients in hotels, motels, and other residential type
environments;
- Bed and breakfast type environments.
ELECTRICAL SAFETY
CAUTION: To avoid risk of electric shock, never immerse the cord,
plug, or cooker base of this unit in water or other liquids.
• DO NOT use this product in locations with dierent electrical
specications or plug types. Do not operate with any type of
plug adapter or voltage converter device, as these may cause
electrical shorting, re, electric shock, personal injury or product
damage.
• DO NOT modify the plug in any way, as doing so will void the
warranty.
• DO NOT pull, twist or mistreat the power cord.
• The use of attachments or parts not recommended and sold by
the manufacturer may cause re, electric shock, personal injury,
or product damage and will void the warranty.
• If the supply cord is damaged, it must be replaced by its service
agent or similarly qualied persons in order to avoid a hazard.
• Always POWER OFF and UNPLUG the appliance when it is not in
use or BEFORE cleaning.
• DO NOT allow the cord to hang over the edge of the table or
counter. Do not pull, twist, or damage the power cord. Do not
allow cord to touch hot surfaces, including the stove.
12

• DO NOT let cord hang over edge of table or counter, or touch
hot surfaces. The cord can get tangled or cause the appliance to
fall. Bring it to a qualied technician for examination, repair or
electrical and mechanical adjustment.
• DO NOT operate this appliance with a damaged cord or plug or
if the appliance malfunctions, or is dropped or damaged in any
manner including any damage to the inner pot’s rim or bottom
part.
• Use of adapters and converters is considered an unauthorized
modication of the product and as such voids the warranty. Use
of this product in locations with dierent electrical specications
may result in damage to the product.
ELECTRICAL INFORMATION:
For safety reasons, the cord length of this appliance was selected to
reduce Safety Hazards that may occur with a long cord. Extension
cords are available and may be used if care is exercised in their use.
If an extension cord is used: (1) the marked electrical rating of the
extension cord should be at least as great as the electrical rating of
the appliance, and (2) the longer cord should be arranged so that
it does not drape over the counter or table top where it could be
accidentally pulled o the counter or table or tripped over.
Save these instructions!
FOR HOUSEHOLD USE ONLY
13

14
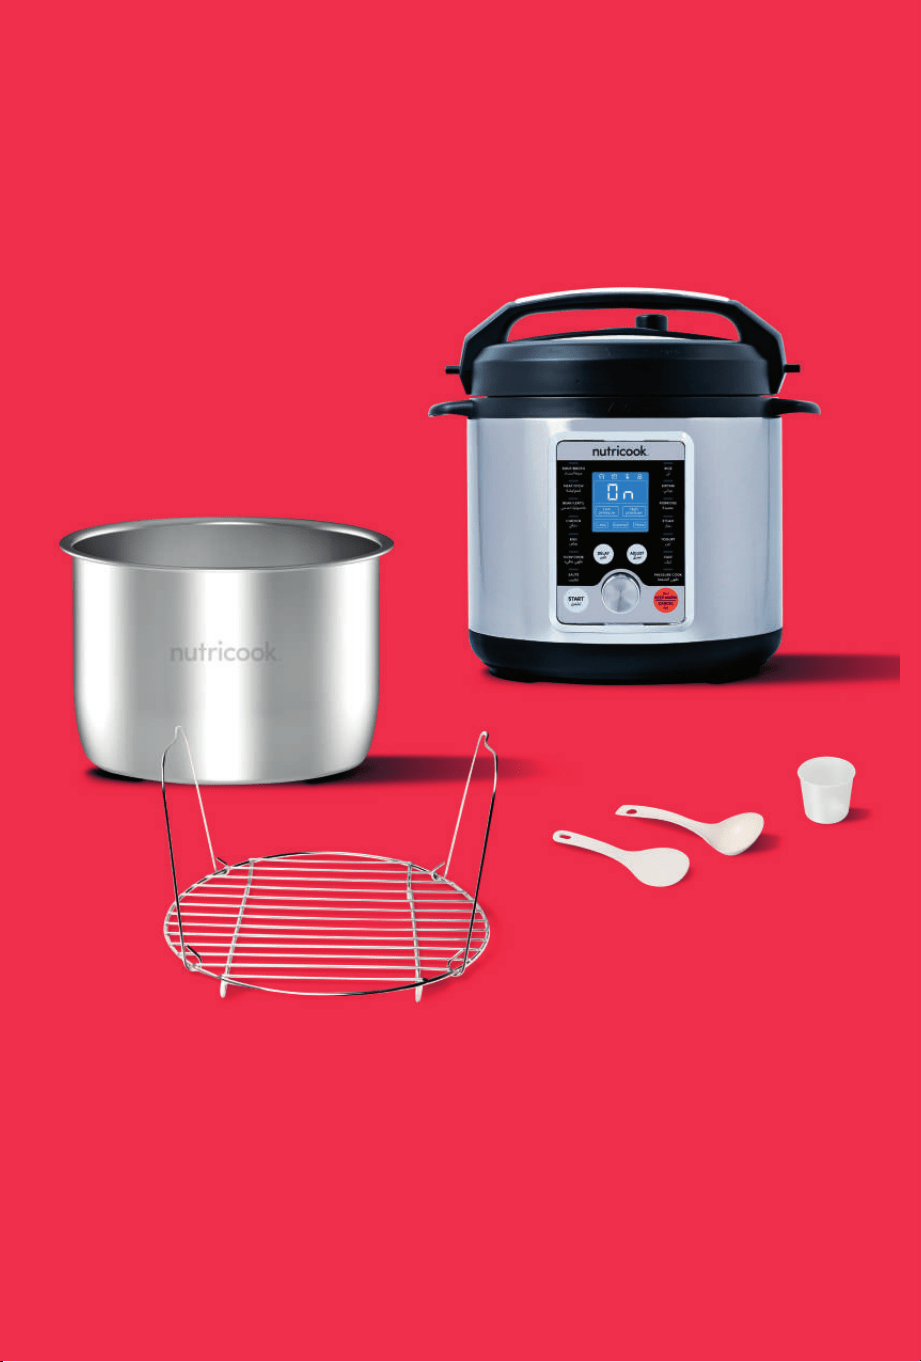
What's included.
• COOKER BASE
• STAINLESS STEEL COOKING POT
• STEAM RACK
• SOUP SPOON
• RICE PADDLE
• MEASURING CUP
• USER GUIDE
Product Specication:
MODEL CAPACITY POWER VOLTAGE WEIGHT DIMENSION
SMART POT
PRO+
M-60F3
6 L 1000 watts
220-240 V
50/60 Hz
6 kg 33.8x33.8x37.35 cm
SMART POT
PRO+
M-80F3
8 L 1300 watts
220-240 V
50/60 Hz
7 kg 37.6x33.8x36 cm
15
*NOTE: Images are for visual representations only. Always refer to actual product.
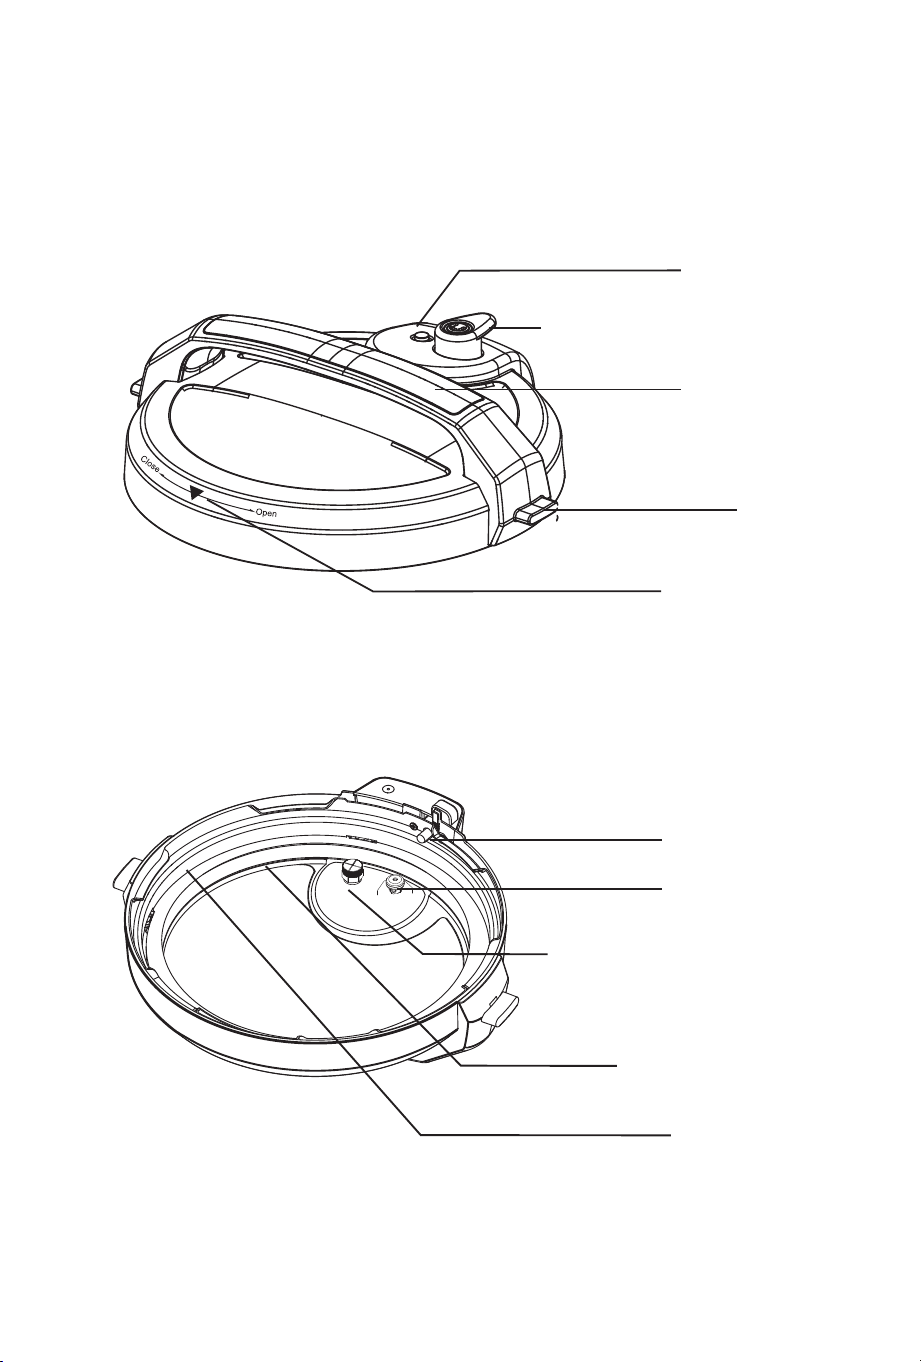
Cooker parts overview.
top of lid
bottom of lid
oat valve
lid handle
lid n
lid marker
locking pin
silicone cap
pressure release hole
sealing ring rack
sealing ring
pressure release valve
16
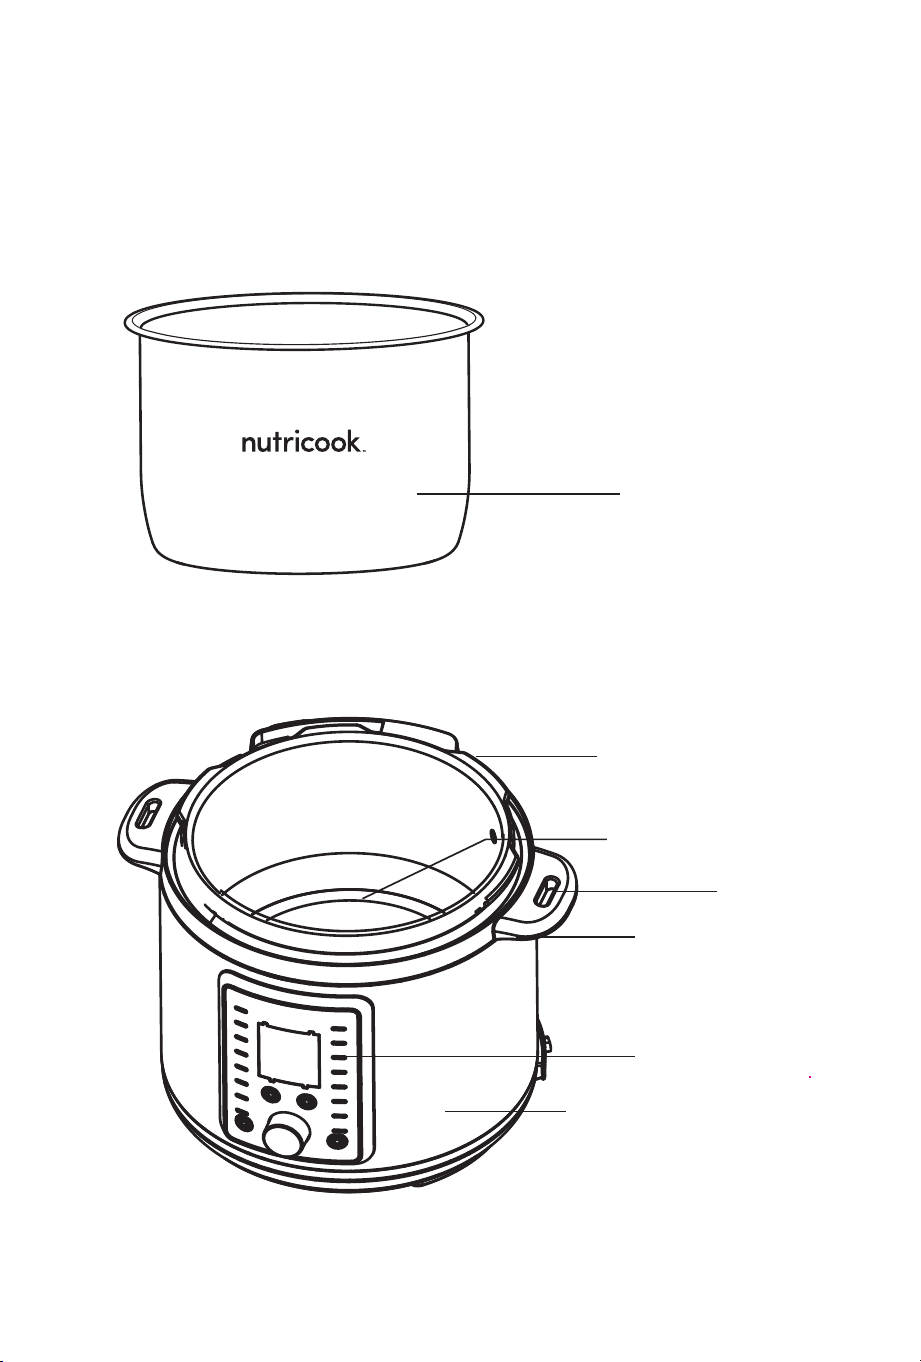
*NOTE: Images are for visual representations only. Always refer to actual product.
inner pot
cooker base
cooker base rim
heating element
lid rest
cooker handle
control panel
stainless steel body
stainless steel
inner pot
17
17

Find delicious recipes online at:
nutricookworld.com nutricookworld
18

Getting
started.
19
*CAUTION:
Inspect the lid to make sure that it is free from any damage
prior to using your pressure cooker.
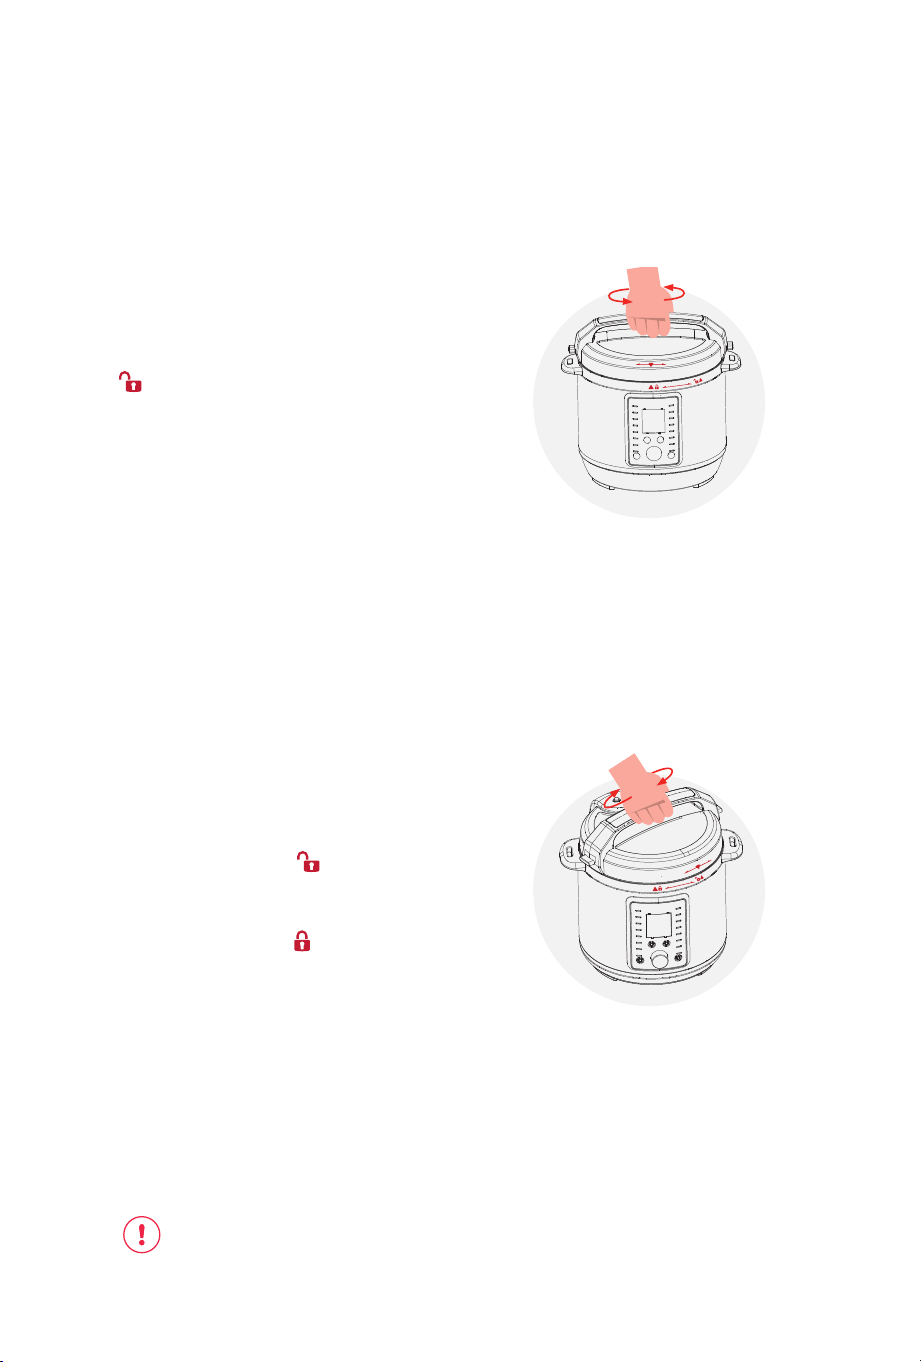
Open and close lid.
Open
Close
open
Open: Grip handle and turn lid
in counter-clockwise until (▼)
symbol on lid is aligned with
( ▲) symbol on cooker base
rim. Lift the lid vertically from the
cooker base. It can stand on the
lid rest.
close
Open
Close
Close: Grip handle and lower
down the lid to cooker base
rim. Ensure that (▼) symbol on
lid aligns with ( ▲) symbol
on cooker base rim and rotate
clockwise until (▼) symbol on lid
is aligned with (▲ ) symbol on
cooker base rim.
*
NOTE: If you encounter any diculty
in opening and closing the lid, refer
to the Troubleshooting section of the
user manual. Always check the cooker
base rim and remove any food debris/
residue to ensure lid will lock properly.
*NOTE: Make sure that locking
pin located at the back of lid is fully
retracted into the lid. This indicates that
lid is closed correctly.
20
20

Lid safety lock system.
*Note: This unit has a built-in safety feature that prevents all functions from
activating if the Lid is not properly locked/secured into place.
A cooking function cannot start if the Lid is not properly locked/
secured into place. The display will show Lid and continuously beep
until the Lid is properly closed. You will not be able to select a cooking
function.
This is to prevent the unit from cooking without the lid being properly
secured. The Sauté function must be used without the lid.
21
21
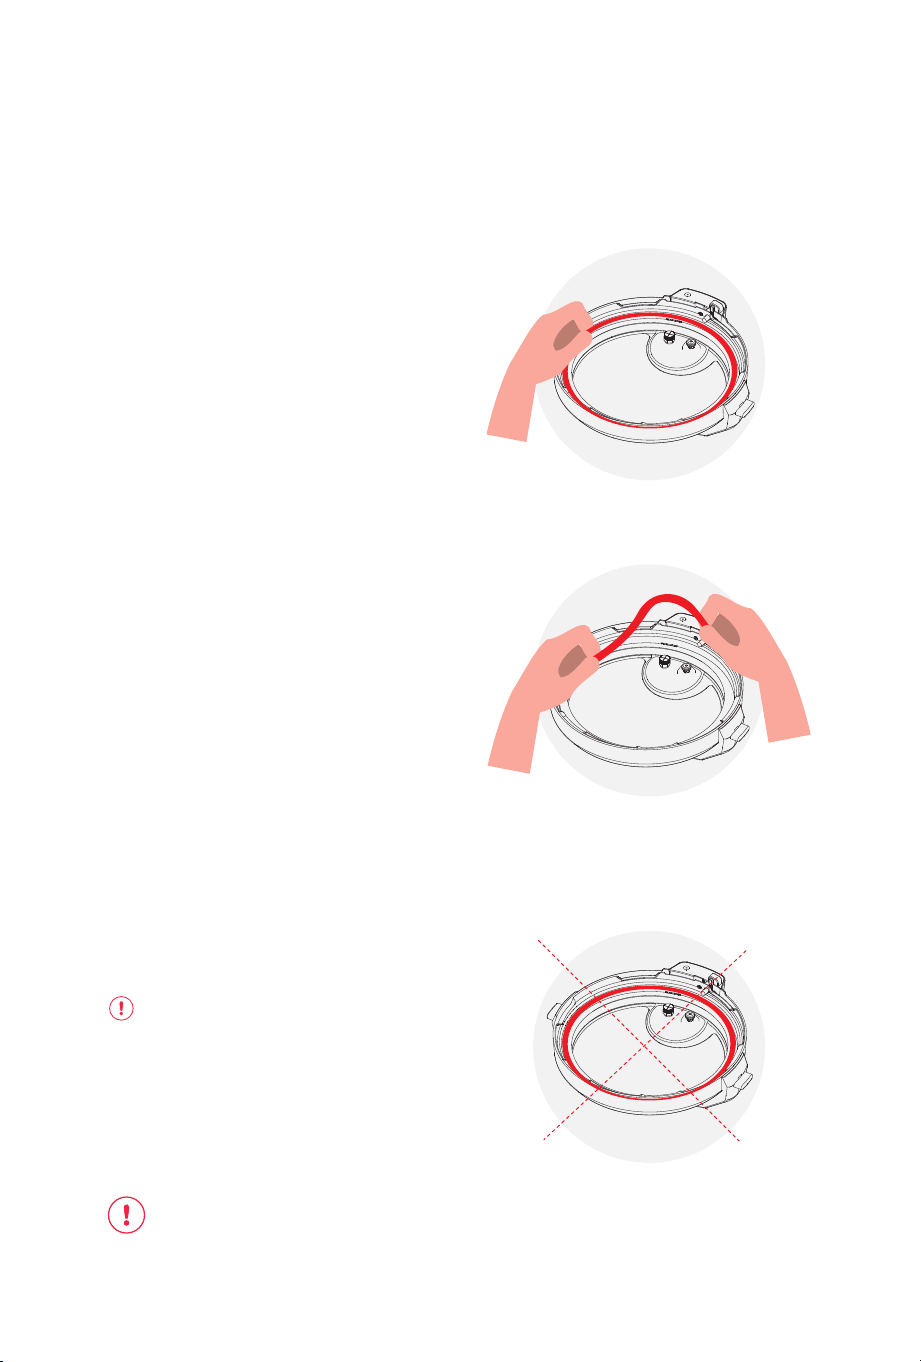
Install and remove
sealing ring.
Install: Place the sealing ring
inside the sealing ring rack and
press into place. Ensure entire
sealing is snug behind sealing
ring rack. Sealing ring must be
installed before use.
After closing lid, the sealing ring
creates an airtight seal between
lid and cooker base.
Remove: Gently pull sealing
ring out from sealing ring rack
and clean after every use.
*NOTE: It is recommended to have
more than one sealing ring. The sealing
ring is an integral part of product safety.
Only use authorized NutriCook
™
sealing
ring or Replace your sealing ring every
12-18 months or when deformation or
damage is noticed.
CAUTION: Always check for cuts or deformations in sealing ring prior to cooking.
Failure to follow these instructions may cause food to discharge, which may lead
to personal injury or property damage.
install
remove
*CAUTION: Regularly inspect your
sealing ring for any damage as this will
aect the product safety. Sealing ring
may stretch over time. Do not use a
stretched or damaged sealing ring. If
puckering occurs, replace sealing ring.
22

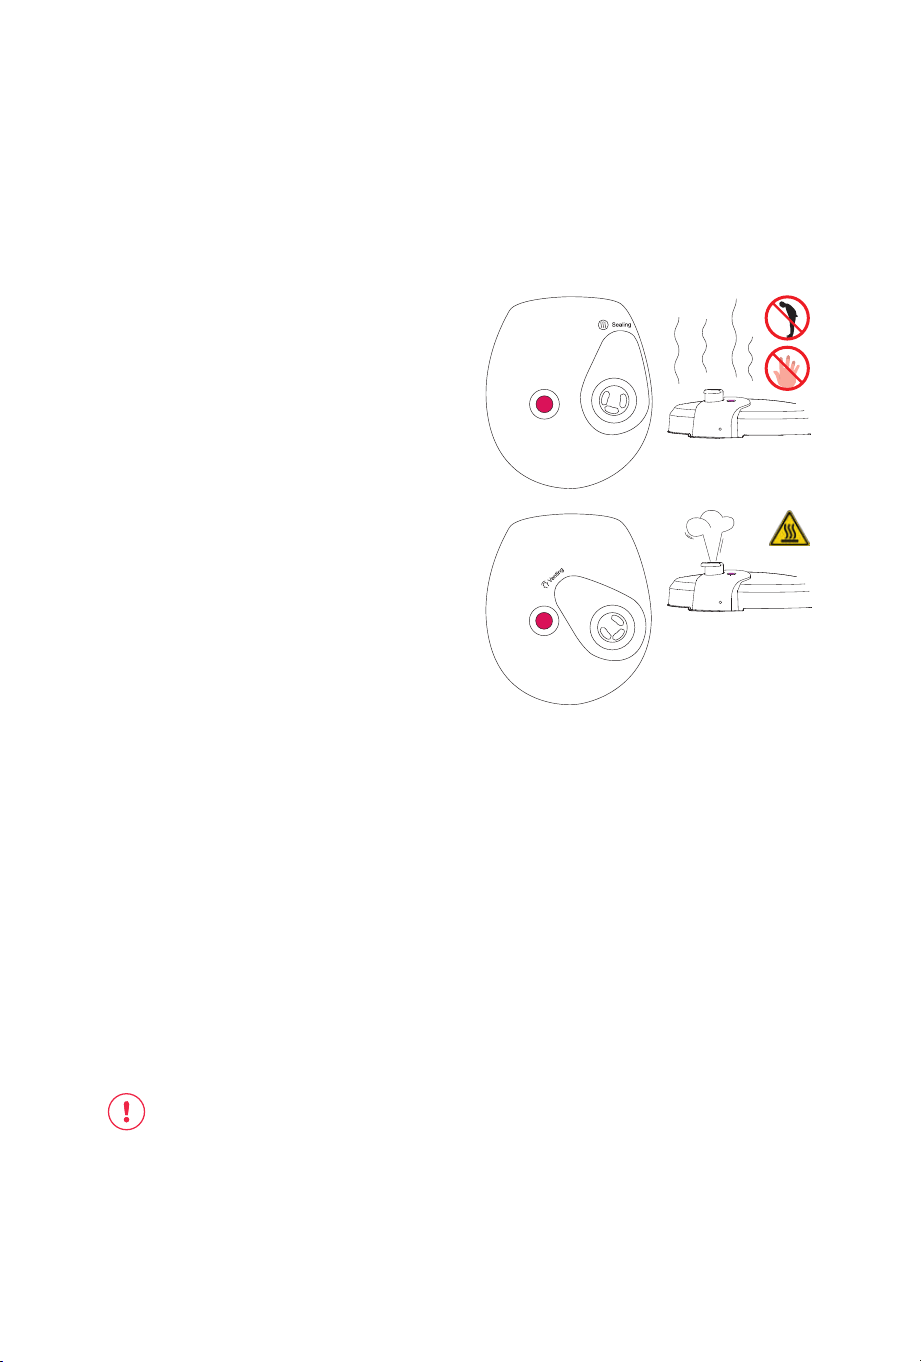
NOTE: Always ensure that pressure release valve is in Sealing position for all
pressure cooking programs - Soup/Broth, Meat/Stew, Bean/Lentil, Chicken,
Egg, Rice, Biryani, Porridge, Steam, Cake and Pressure Cook including Yogurt.
When using Slow Cook and Keep Warm functions, pressure release valve must be
in Venting position.
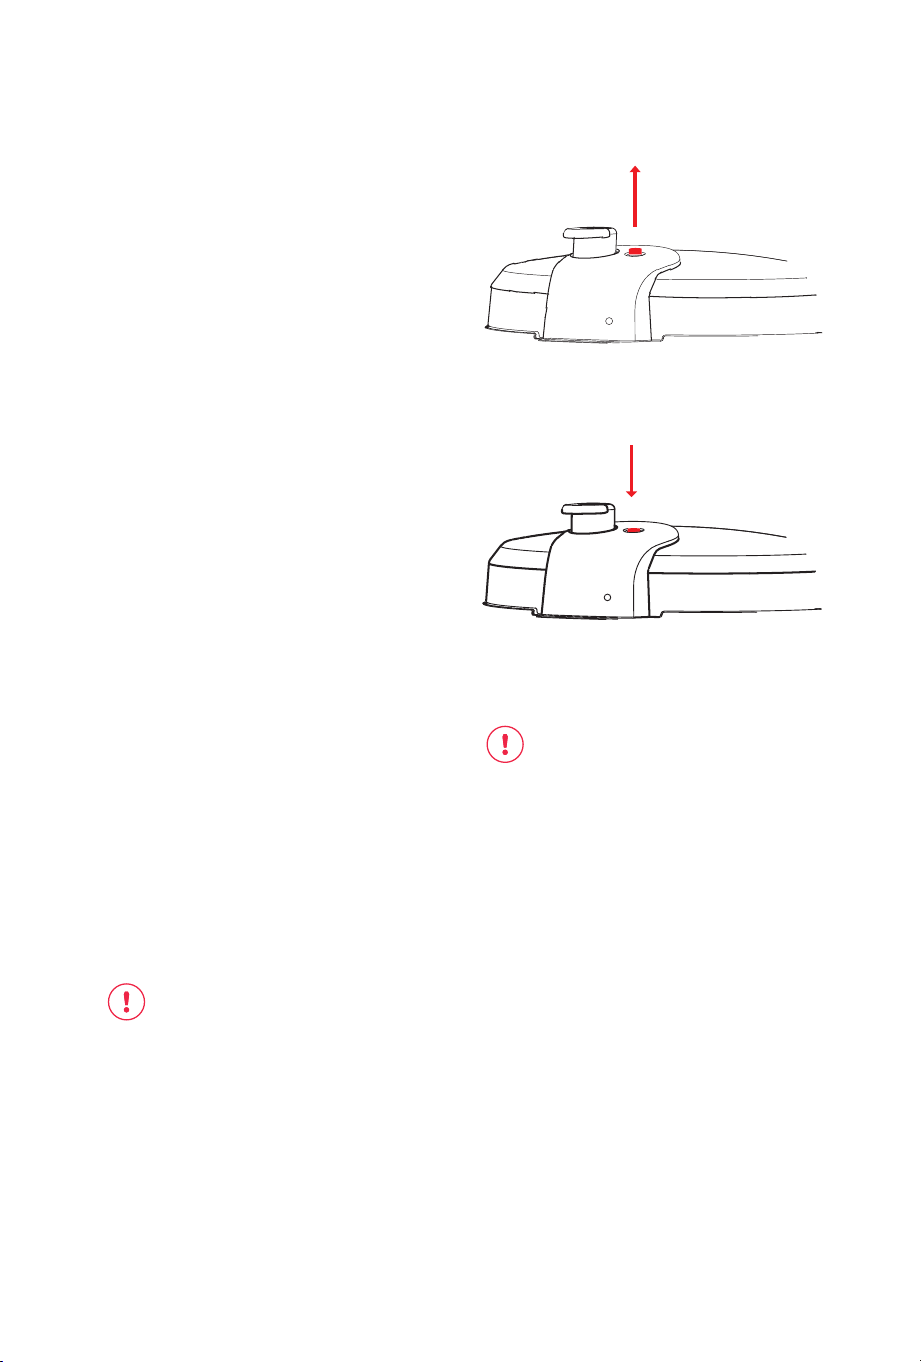
Install and remove
pressure release valve.
Install: Position pressure
release valve on pressure
release hole and press down.
Remove: Pull pressure release
valve up from pressure release
hole.
Pressure release valve must be
installed before use and cleaned
frequently.
*NOTE: Be aware that pressure
release valve ts loosely when properly
installed. It will safely remain in place
even if lid is ipped over.
remove
(pull vertically)
install
23
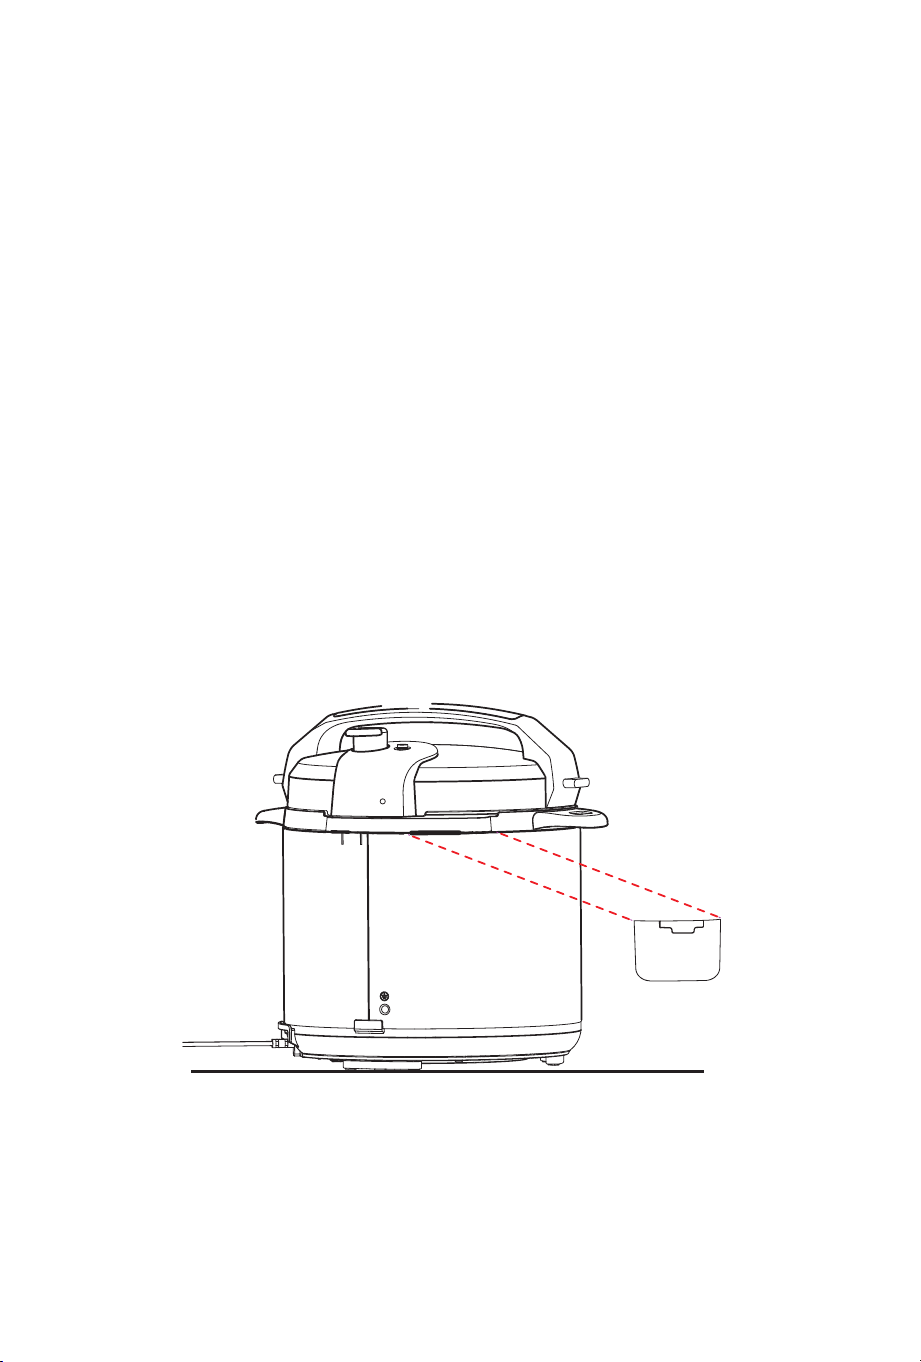
Install condensation
collector.
Install: On back of cooker base , align grooves of the condensation
collector over tabs and push condensation collector until it locks into
place.
The condensation collector collects excess water in the cooker rim
produced during the cooking process to prevent from interfering with
other protection features. It must be installed before cooking and
cleaned after every use.
Remove: Pull condensation collector away from cooker base.
Do not pull down to avoid any damage.
24
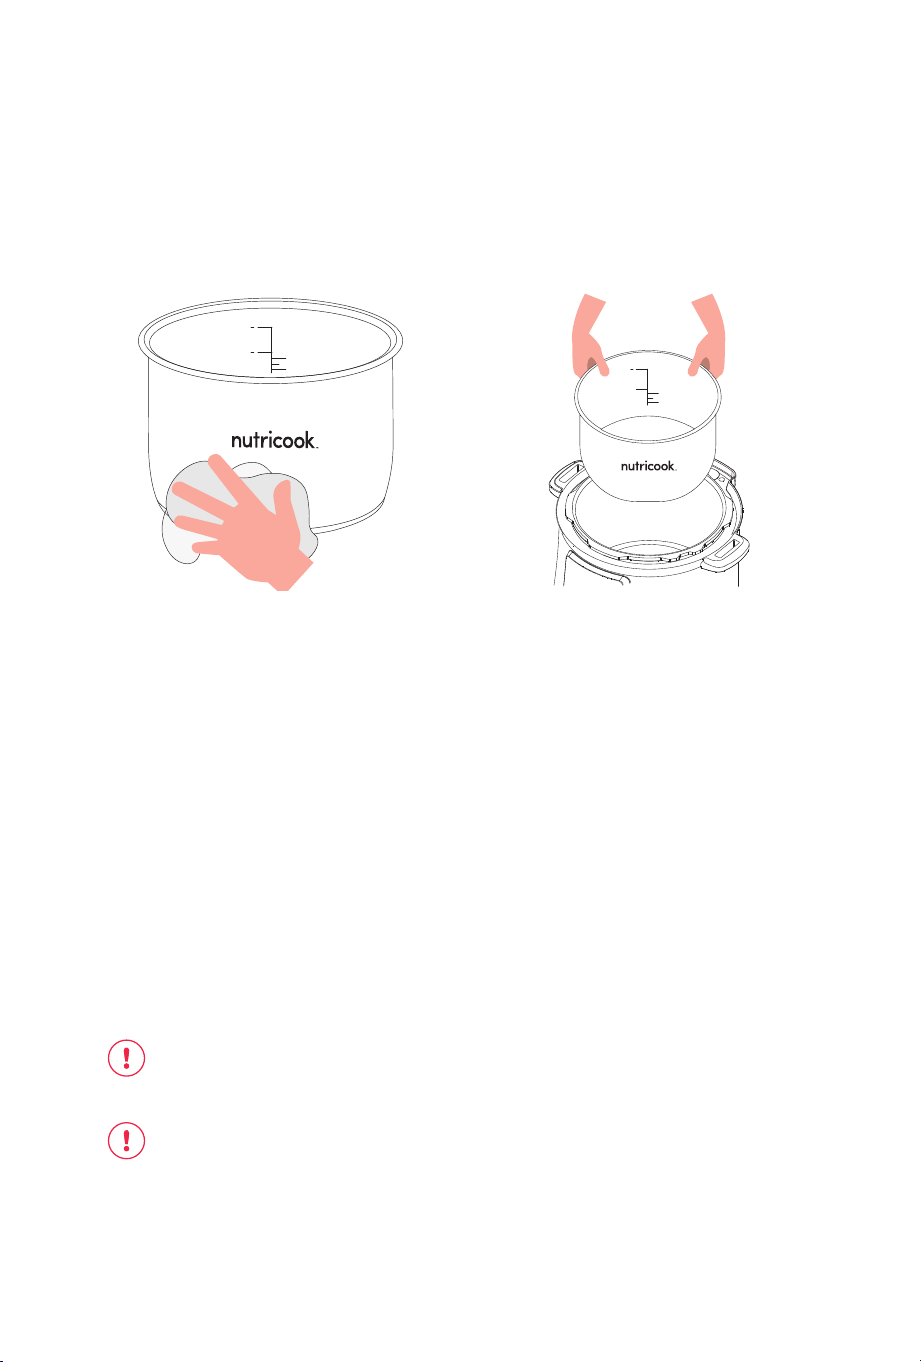
Remove & clean
inner pot.
Remove inner pot from cooker base and wash with hot water and dish
soap before rst use.
Wipe outer surfaces of inner pot and heating element to ensure they
are dry and free of food debris. Failure to do so may damage the
cooker.
Place inner pot into cooker base before cooking. Food must be placed
only in the inner pot, not cooker base.
The inner pot is an integral part of product safety. Always use an
authorized NutriCook
™
inner pot made for this model when cooking.
Failure to do so may cause personal injury or property damage.
5
3
4
FULL CUP
12
10
5
4
FULL CUP
12
10
WARNING: Do not ll the inner pot higher than the FULL CUP — 4/5 line (Pressure
Cooking Maximum), as indicated on the inner pot. Exercise extreme caution
when cooking and venting food such as applesauce, cranberries, pearl barley,
oatmeal, split peas, noodles, etc., as these foods may foam, froth, or spatter, and
may clog the pressure release hole and/or pressure release valve. Do not ll the
inner pot higher than the — 2/5 line when cooking these foods.
CAUTION: To avoid risk of personal injury and/or property damage, do not
pour food or liquid into cooker base.
*Note: Always check inner pot for dents or deformations prior to cooking.
25
Venting methods.
Once cooking completes,
there are 2 methods to release
pressure:
Quick Release (QR):
Turn pressure release valve from
Sealing to Venting position, after
cooking program is completed
or stopped by using mitt/long
utensil to let out pressure/steam
until the float valve drops into
the lid.
If the food contents inside
spatters during this process,
turn the pressure release valve
back to Sealing position using
mitt/long utensil, and try again
after a few minutes. If spatter
still occurs, use Natural Release
method to let out remaining
pressure.
NOTE: The Quick Release method is
recommended for steamed vegetables
and seafood to avoid overcooking.
Be aware that the Quick Release
is not suitable for food with large
liquid volume or high starch content
(e.g. porridge, stews, sticky liquids,
soup, etc.). Food content may spatter
out from the pressure release valve.
Use Natural Release instead.
WARNING:
• Always keep hands and face away from the opening on the top of the
pressure release valve when using Quick Release. The escaping steam is
hot and can cause scalds, burns and serious injury.
• Do not lean over or touch the pressure release valve to avoid injury.
• Never pull out the pressure release valve when it is letting out steam.
• Do not cover the pressure release valve with a rag or cloth while steam is
being released.
hot surface
sealing
venting
26
Natural Release (NR):
1. Leave the pressure release
valve in the Sealing
position.
2. The cooker dissipates
heat so pressure releases
naturally overtime.
3. Allow cooker to cool down
naturally until t he float
valve drops down.
This may take 10 to 15 minutes
or even longer, depending on
the amount of food inside your
cooker. After cooking is finished,
cooker will be in Keep Warm
mode.
Safe Lid Opening
Open the lid: To avoid vacuum
suction on the lid, turn the
pressure release valve to
Venting position to let in air
when lifting the lid. Hold the
lid handle, turn the lid counter-
clockwise to the open position,
and lift the lid up to open.
WARNING:
• DO NOT lean over or touch
the pressure release valve.
• DO NOT force open the lid.
• DO NOT place unprotected
skin over pressure release
valve.
• DO NOT cover pressure
release valve.
CAUTION:
Do not open the lid until pressure inside the pot is completely released. As a
safety feature, the lid is locked and won’t open until the float valve drops down.
If the float valve is stuck due to food debris or sticky liquid, you can push it down
with a long utensil after you are certain that the pressure has been released
completely by moving the pressure release valve to the Venting position.
To avoid personal injuries, never attempt to force down the float valve to open
the lid. DO NOT open the lid until after the pressure is completely released
naturally or manually.
oat valve popped-out
indicates the cooker is still pressurized
oat valve dropped-down
indicates the cooker is depressurized
27
Find delicious recipes online at:
nutricookworld.com nutricookworld
28

How to use.
Selecting a Function
Turn the control knob either
clockwise or counterclockwise
to select the desired cooking
program.
Setting Pressure Level,
Cooking Mode and Time
PRESSURE LEVEL:
Your Smart Pot has two
pressure levels – High Pressure
and Low Pressure. All pressure
cooking programs which
include Soup/Broth, Meat/
Stew, Bean/Lentil, Chicken,
Egg, Biryani, Porridge, Steam,
and Pressure Cook default to
High Pressure while Rice and
Cake default to Low Pressure.
The Low pressure level is
used to avoid overcooking
tender food materials such
as vegetables and for certain
recipes that may require using
low pressure setting.
To set the desired pressure level
according to your recipe after
each program selection, press
Adjust and turn the control
knob to switch between High
and Low Pressure.
NOTE: The pressure level has no effect on Slow Cook, Sauté and Yogurt functions.
29
How to use.
COOKING MODE – LESS/NORMAL/MORE:
Your Smart Pot has three cooking modes with default timings for
each except for Sauté and Pressure Cook. Refer to the Smart
Programs Table for the description of each mode under the different
cooking programs.
After selecting the desired cooking function, press Adjust twice until
the display flashes the Normal mode. Turn the control knob to switch
between Less/Normal/More mode which is displayed in the LCD
screen.
NOTE: Press Adjust button only once for Slow Cook and Yogurt to switch
between Less/Normal/More.
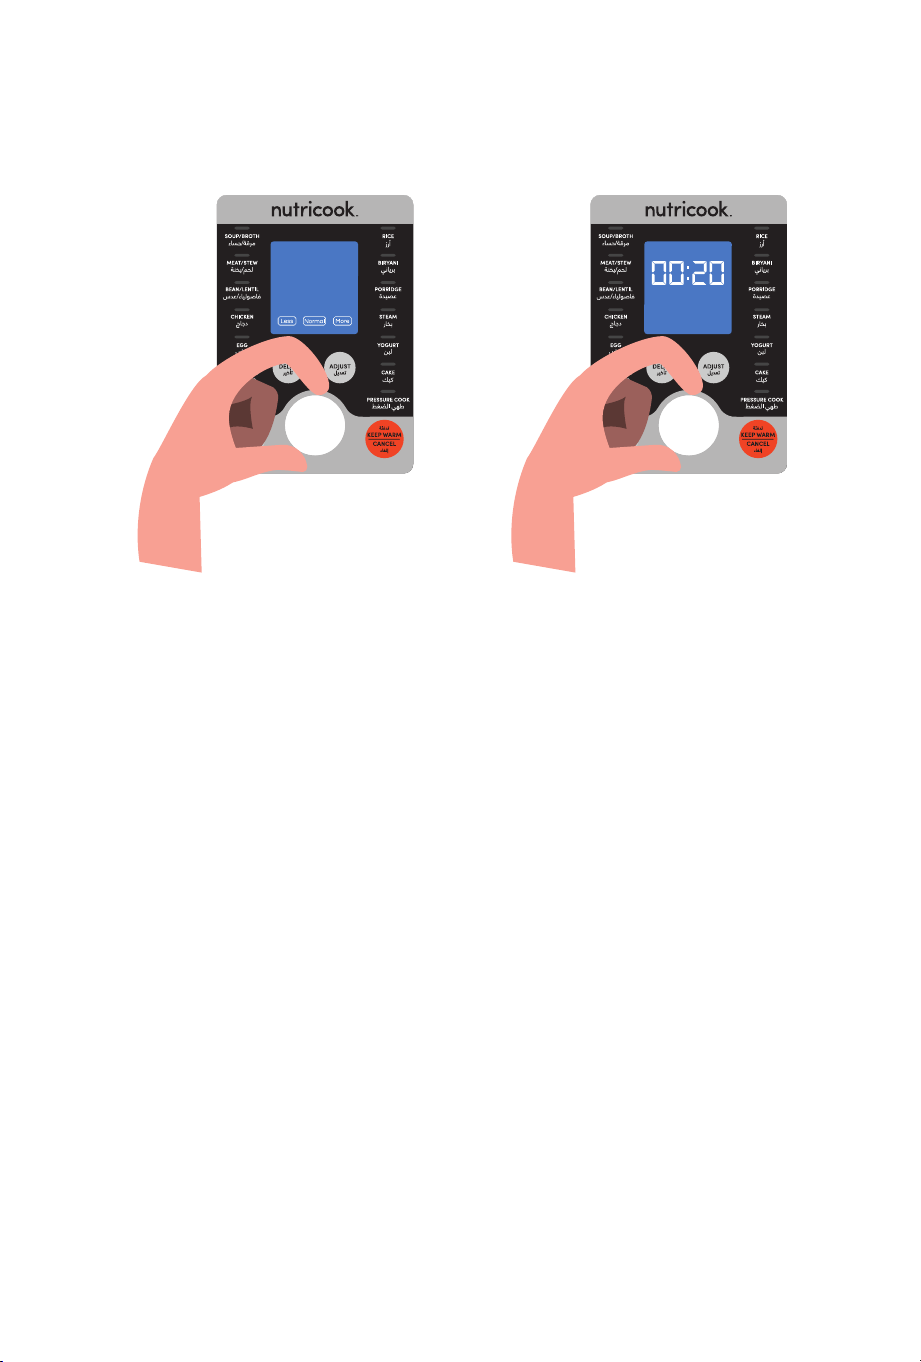
COOKING TIME
Although your Smart Pot has pre-programmed cooking time for
each cooking mode, you can still manually adjust the time depending
on your recipe except for Rice function which is fully automatic and
Sauté. After selecting the desired cooking function, press the Adjust
button three times until the LCD display flashes the time. Turn the
control knob clockwise to increase or counter clockwise to decrease
the cooking time.
NOTE: Press Adjust button only twice for Slow Cook, Yogurt and Pressure
Cook to adjust time.
30
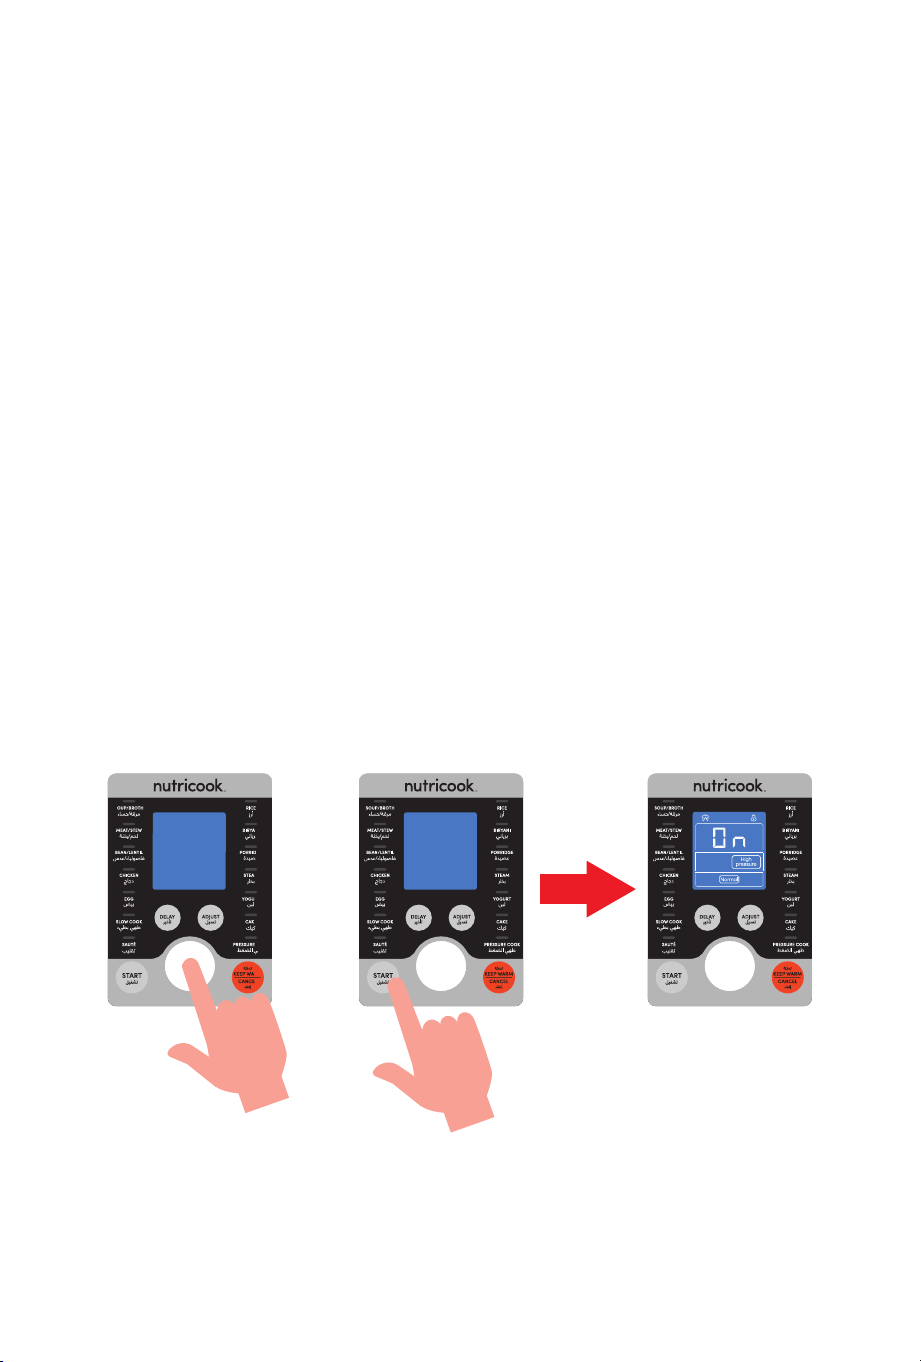
Starting a function
After selecting the desired cooking function and setting the required
pressure level, cooking mode and cooking time according to your
recipe, you can now start cooking by either pressing the control
knob or by pressing the start button.
Your Smart Pot will sound three audible beeps to indicate the cooking
cycle has started. Display shows On.
NOTE: If an error is made during cooking set up, you can press the Keep Warm/
Cancel button and start again.
31

More Controls
KEEP WARM/CANCEL
Press the Keep Warm/Cancel button to stop Smart Program at any
time. Your cooker will return to Standby mode and LCD display shows
OFF. When cooker is in standby mode, pressing this button will activate
the Keep Warm function which will count up the time in minutes.
DELAY
Your Smart Pot has a Delay function to postpone cooking for up to 24
hours. Delay function does not apply to the Yogurt and Sauté functions.
Turn the knob to select a Smart Program then press the Delay button
to turn this setting on. Turn control knob either clockwise to increase or
counter clockwise to decrease the delay time. The time you are setting
is the number of hours/minutes before cooking will begin.
32

Initial test run.
In order to familiarize yourself with the Smart Pot and start
cooking with your favorite recipe, it is highly recommended for
first time users to do a test run. This optional, but recommended, test
run will complete in about 15 minutes.
1. Add 3 cups (750 mL) water to inner pot.
2. Insert inner pot into cooker base.
3. Connect power cord to a power source.
Display indicates OFF.
4. Align (▼) on lid with ( ▲) on cooker base.
Lower lid into track, then turn lid clockwise.
5. Turn pressure release valve to Sealing position.
6. Select Smart Program: Pressure Cook.
7. Press Adjust button twice and turn control knob counter
clockwise to adjust cook time to 00:05 minutes.
After pressing either the knob or Start button, cooker displays On
to indicate that it has begun Pre-heating.
8. Float valve rises when cooker has pressurized.
Once pressurized, Cooking begins and display changes from On
to cook time countdown.
33

9. When the Smart Program completes, cooker begins Keep Warm.
10. Turn pressure release valve to Venting position.
Steam will release through top of pressure release valve.
Float valve will drop when pressure has been fully released.
11. To open, turn the lid counter-clockwise.
12. Discard water and dry inner pot.
13. Start cooking!
34

Smart programs.
Cooking
Programs
Cooking
Modes
Suggested Use Notes
Soup/ Broth
Less Soup without meat
Liquid remains clear due to lack of boiling motion.
If you need the food content to be fully broken
down, stir and mix the soup before serving.
Always use Natural Release method to release
pressure when cooking soup with a high starch
content.
Normal Soup with meat
More Rich bone broth
Meat/ Stew
Less Soft texture
Choose setting based on meat texture desired, or
adjust cook time manually.
Allow meat to rest for 5-30 minutes, depending
on size. It will retain cooking juices for tender,
succulent meat.
When cooking meat or stew, always use Natural
Release method to release pressure. Do not use
Quick Release as food contents may spatter
from the pressure release valve which can cause
serious injury.
Normal Very soft texture
More
Fall-of-the-bone
texture
Bean/ Lentil
Less Firmer texture
Choose setting based on bean/lentil texture
desired, or adjust cook time manually.
When cooking beans/lentils or legumes, always
use Natural Release method to release pressure.
Ensure dry beans/lentils are completely
submerged in water.
Normal Soft texture
More Very soft texture
Chicken
Less Soft texture
Choose setting based on poultry texture desired
or adjust cook time manually.
Allow meat to rest for 5-30 minutes, depending
on size. It will retain cooking juices for tender,
succulent meat.
Normal Very soft texture
More
Fall-of-the-bone
texture
Egg
Less Soft boiled egg
Use the steam rack provided to put the eggs in
the pot
For soft boiled eggs, we recommend using the
Quick Release method for venting to retain the
soft texture.
Cooking time may vary depending on the size of
the eggs.
Normal Medium boiled egg
More Hard boiled egg
35

Cooking
Programs
Cooking
Modes
Suggested Use Notes
Rice
Less Tender but rm to bite
When using the Rice program, you cannot
manually adjust the time settings.
Use Quick Release method to vent out pressure
after cooking cycle is completed to avoid over
cooking.
It is not recommended to leave cooked rice in
Keep Warm state for too long as it may aect the
texture.
Normal
Normal texture white
rice
More
Softer texture white
rice
Biryani
Less Rice with vegetables
Use Quick Release method for Vegetable Biryani
and Natural Release method for Biryani with
meat.
Normal
Rice with chicken,
lamb and any other
meat
More Brown rice with meat
Porridge
Less
Oatmeal - steel cut
or rolled
Adjust time as directed in recipe.
Always use Natural Release method to release
pressure when cooking foods that expand.
Normal
White rice, porridge/
congee
More
Rice porridge/congee
with a mixture of
various grains
Steam
Less Vegetables
Use steam rack provided to elevate food above
the cooking liquid.
Use Quick Release method to release pressure to
prevent food from overcooking.
Normal Fish and Seafoods
More Meat
Pressure cook N/A Manual programming
Using Adjust button and control knob, manually
set the time and pressure according to recipe for
desired results.
Cake
Less Moist cake
Use Adjust button and control knob to set the time
according to recipe for desired results.
Normal Denser moist cake
More
New York style
cheesecake
Smart programs.
36

Cooking
Programs
Cooking
Modes
Suggested Use Notes
Slow Cook
Less
Corresponds to Low
on common slow
cookers.
The Slow Cook function can operate with the lid
either open or close.
When the lid is closed while initiating the Slow
Cook program, the pressure release valve must
be in the Venting position. Optionally, use a glass
lid for slow cooking.
Normal
Corresponds to
Medium on common
slow cookers.
More
Corresponds to High
on common slow
cookers.
Yogurt
Less
Lower temperature
fermentation.
Milk must reach a minimum of 72°C for
pasteurization to occur.
Allow pasteurized milk to cool to below 43°C.
8 hours is standard for fermentation, but a longer
period will result in tangier yogurt.
Normal
Fermeting milk after
culture has been
added.
More Pasteurizing milk.
Sauté N/A
For open lid
sautéing, browning
or simmering inside
the inner pot.
For safety reasons, the maximum operation time
of one Sauté cycle is 30 minutes (if you need
more time, select Sauté key again).
Do not use the lid on Sauté. Partially closing the
lid during sautéing could cause pressure to build
up in the cooker which can be hazardous.
Do not leave your cooker unattended when using
the Sauté function.
Note:
Working Pressure
High Pressure: 10.2 - 11.6 psi (70 - 80kPa)
Low Pressure: 5.8 - 7.2 psi (40 - 50kPa)
37

Care & maintenance.
WARNING: To avoid electric shock or damage to your cooker, always press the
Keep Warm/Cancel button and unplug the power cord from the power supply
outlet before cleaning. Make sure that all parts of your cooker have cooled
down completely
CAUTION: Do not immerse the power cord or your cooker in water or any
other liquids.
• Do not use abrasive cleaners, steel wool, or scouring pads.
• Dry all parts thoroughly after cleaning, before using, or before storing your
cooker.
• Make sure that no water enters your cooker’s housing or the control panel.
• Make sure that all parts and surfaces are completely dry before connecting
your cooker to a power outlet. Wet parts can cause electric shock.
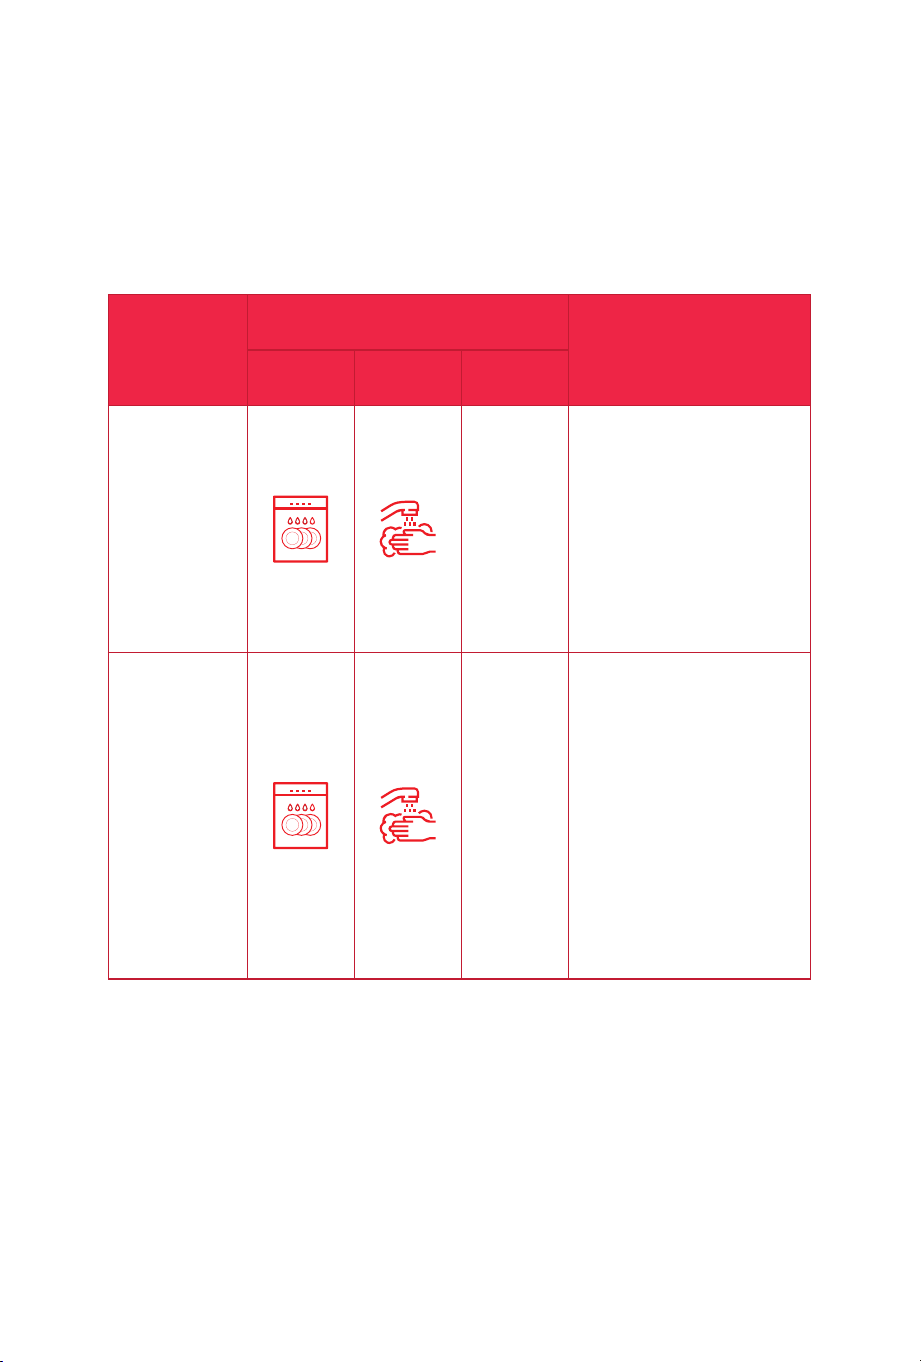
Part
Cleaning Methods
Cleaning Tip
Dishwasher
Safe
Hand Wash
(submerged)
Wipe Clean
(damp cloth)
Stainless
steel
inner pot.
• Wash the inner pot with hot soapy
water. For tough and burned
food residue, soak the inner pot
in hot water for a few hours for
easy cleaning.
• Rinse and dry completely. Ensure
that the exterior surface of the
pot is dry before placing in the
cooker base.
Cooker base
& power
cord.
• Wipe the inner and outer
surfaces, control panel and
condensation rim with a soft,
barely damp cloth.
• Take extra care when cleaning
near the heating element and
control panel. Water can damage
them.
• Wipe the power cord with dry
cloth.
38
Part
Cleaning Methods
Cleaning Tip
Dishwasher
Safe
Hand Wash
(submerged)
Wipe Clean
(damp cloth)
Accessories.
• Soup Spoon
• Rice Paddle
• Steam Rack
• Measuring Cup
• Condensation
Collector
• These items are all top rack
dishwasher safe. We recommend
rinsing them and giving them a
quick brush using a dish brush
to remove any dried food debris
before washing them in the
dishwasher.
• Do not use harsh chemical
detergents, powders or scouring
pads to clean these accessories.
• Ensure to empty any water from
the condensation collector before
cleaning.
• Ensure these accessories are dry
before storing them.
Lid & parts.
• Sealing Ring
• Pressure Release
Valve
• Float Valve
• Turn the lid upside down and
put it on a clean, at, and stable
surface.
• Remove the sealing ring and
pressure release valve by
carefully pulling it away from
the lid.
• Wash the sealing ring and
pressure release valve with hot
soapy water or place on the top
rack of dishwasher. Store sealing
ring in a properly ventilated
area to decrease residual odors
of food.
• IMPORTANT TIP: To eliminate
odors, soak the sealing ring in
vinegar for 10-20 minutes and
wash thoroughly after soaking.
• After cleaning, store the lid
upside down on the cooker base.
39

Troubleshooting.
Issue Possible Cause Solution
Diculty closing lid.
The sealing ring is not properly
installed
Check the position of the sealing ring and ensure
it is properly installed in the sealing ring rack.
The oat valve is in the popped-up
position.
Gently press the oat valve downward using a
long utensil.
Diculty opening
lid.
There is still pressure inside the
cooker.
Release pressure by turning the pressure release
valve in Venting position. Ensure that the oat
valve dropped down before opening the lid.
WARNING: Contents inside the pot under pressure
can cause scalding injury, do not attempt to force
lid open. Always follow the Safe Lid Opening
instructions in this user guide.
The oat valve is stuck in the
popped-up position due to food
debris or residue.
Ensure steam is completely released by quick
releasing pressure, then press oat valve gently
using a long utensil. Open lid cautiously and
thoroughly clean oat valve, surrounding area,
and lid before next use.
Inner pot sticks
with the lid when
opening.
The inner pot may create suction
while cooling, causing it to stick
to the lid.
Turn pressure release valve to Venting position to
completely release pressure.
Steam leaks from
side of lid.
There is no sealing ring in lid. Install sealing ring properly.
The sealing ring is damaged or not
properly installed.
Replace sealing ring. Contact Customer Service
to replace damaged sealing ring.
Food debris attached to sealing
ring.
Remove sealing ring and clean thoroughly.
The lid is not properly closed. Reposition lid and lock properly.
The oat valve does
not rise
There is food debris on oat valve. Clean oat valve thoroughly.
Too little liquid in the inner pot.
Add thin, water-based liquid to inner pot based
on size:
6L - 350 ml | 8L - 475 ml
Minor steam is
leaking from the
pressure release
valve
The pressure release valve is
not properly pointed to Sealing
position.
Make sure pressure release valve is properly in
Sealing position.
The cooker is regulating excess
pressure.
This is completely normal. No action required.
40

Issue Possible Cause Solution
Steam escapes from
the pressure release
valve while it is in
Sealing position
The pressure release valve is not
properly seated
Turn the pressure release valve properly to
Sealing position.
Pressure sensor control is not
working
Contact Customer Service.
Clicking or light
cracking sounds is
produced
The power switching and
expanding pressure while
changing temperature can
produce this sound
This is completely normal. No action required.
Exterior bottom of the inner pot
is wet.
Ensure to wipe the exterior surface of the inner
pot before inserting to the heating element.
41

Issue
Error
code
Possible cause Solution
LCD display
ashes error
codes and
cooker beeps
continuously
E1
Temperature sensor open circuit
WARNING:
Stop working after
these errors appear.
Press Keep Warm/
Cancel button
immediately. Contact
customer service.
E2
Temperature sensor short circuit
E3
Pressure switch open
E4
Pressure switch burning/leakage
E7
High pressure switch open
E8
High pressure switch to burn/leak
burn
Over temperature protection
Turn the cooker o,
release pressure
according to recipe and
inspect the bottom of the
inner pot.
Lid
The lid is not in correct position
while using the selected program.
Reposition the lid and
ensure it is properly
locked for all pressure
cooking programs.
NOTE: Do not lock the lid
when using the SAUTÉ
function.
Troubleshooting.
42

LIMITED WARRANTY FOR NUTRICOOK
Nutricook’s limited warranty obligations are conned to the terms set
forth below:
Nutricook warrants this product against defects in materials and
workmanship for a period of two years from the date of original
retail purchase. This limited warranty is valid only in the country in
which the product is purchased and comes with the product at no
extra charge, however shipping and processing fees will be incurred
for returns, replacements and or refunds.
OBTAINING WARRANTY SERVICE
For limited warranty service, simply visit www.nutricookworld.com
for Customer Service details of your respective territory or contact
our customer service department at info@nutricookworld.com
and we will be glad to help you. When you contact our customer
service department you will be asked for your name, address,
telephone number and to provide proof of the original purchase
(receipt) containing a description of the product(s), purchase date,
and the appropriate Nutricook bar code(s). Before you send your
product for limited warranty service please make sure to keep a
copy of all relevant documents for your les (receipt, etc.). It is always
recommended to purchase product insurance and tracking services
when sending your product for service. Remember, shipping and
processing fees will be incurred and are not covered by the two-year
limited warranty.
EXCLUSIONS AND LIMITATIONS
This Nutricook Two-Year Limited Warranty applies only to Nutricook
products distributed by or for Nutricook that can be identied by the
“Nutricook” trademark, trade name, logo and bar code. Nutricook’s
Two-Year Limited Warranty does not apply to any other products
that may appear to be authentic, but were not distributed/sold by
Nutricook.
Warranty.
43

Normal wear and tear is not covered by this limited warranty.
This limited warranty applies to consumer use only, and is void when
the product is used in a commercial or institutional setting.
This limited warranty extends only to the original consumer purchaser
and is not transferable. In addition, proof of purchase must be
demonstrated.
Repair or replacement of the product (or, if repair or replacement is
not feasible, a refund of the purchase price) is the exclusive remedy
of the consumer under this limited warranty. Nutricook shall not be
liable for any incidental or consequential damages for breach of this
limited warranty or any implied warranty on this product.
This limited warranty does not apply: (a) to damage caused by
accident, abuse, misuse, or misapplication; (b) to damage caused
by improper maintenance (including unauthorized parts service); (c)
to a product or a part that has been modied in any way; (d) if any
Nutricook bar code or trademark has been removed or defaced; and
or (e) if the product has been used with an adapter/converter.
THIS LIMITED WARRANTY AND THE REMEDIES SET FORTH ABOVE
ARE EXCLUSIVE AND IN LIEU OF ALL OTHER WARRANTIES, REMEDIES
AND CONDITIONS, WHETHER ORAL OR WRITTEN, EXPRESS OR
IMPLIED. NUTRICOOK SPECIFICALLY DISCLAIMS ANY
AND ALL IMPLIED WARRANTIES, INCLUDING, WITHOUT
LIMITATION, WARRANTIES OF MERCHANTABILITY AND FITNESS
FOR A PARTICULAR PURPOSE. IF NUTRICOOK CANNOT
LAWFULLY DISCLAIM IMPLIED WARRANTIES UNDER THIS LIMITED
WARRANTY, ALL SUCH WARRANTIES, INCLUDING WARRANTIES OF
MERCHANTABILITY AND FITNESS FOR A PARTICULAR PURPOSE
ARE LIMITED IN DURATION TO THE DURATION OF THIS LIMITED
WARRANTY. No Nutricook reseller, agent, or employee is authorized
to make any modication to this warranty.
Warranty.
44

NUTRICOOK IS NOT RESPONSIBLE FOR DIRECT, SPECIAL, INCIDENTAL
OR CONSEQUENTIAL DAMAGES RESULTING FROM ANY BREACH OF
WARRANTY OR CONDITION, OR UNDER ANY OTHER LEGAL THEORY,
INCLUDING BUT NOT LIMITED TO LOST PROFITS, DOWNTIME,
GOODWILL, DAMAGE TO OR REPLACEMENT OF EQUIPMENT AND
PROPERTY. NUTRICOOK SPECIFICALLY DOES NOT REPRESENT THAT
IT WILL BE ABLE TO REPAIR ANY PRODUCT UNDER THIS LIMITED
WARRANTY.
45


NutriCook | www.nutricookworld.com | All rights reserved.
Illustrations may dier from the actual product. We are constantly
striving to improve our products, therefore the specications
contained herein are subject to change without notice.