使用說明書
RAD-DIA17HK
變頻二合一空氣淨化抽濕機
重要提示:
在使用本產品前,請仔細閱讀本手冊,
並妥善保管以備日後參考。
設計和規格如有更改,恕不另行通知。

頁面2
目錄
各部分名稱
產品簡介...................................................................................................5
安全注意事項.........................................................................................3
放置設備位置
使用產品時
控制面板
顯示
電氣工作
功能簡介...................................................................................................8
取出水箱倒水
連續排水
倒掉餘水................................................................................................10
清潔格柵和機身
清潔水箱
清潔空氣過濾網
保養與維護............................................................................................12
規格
淨化數據
規格與淨化數據..................................................................................15
故障排除................................................................................................16

頁面3
安全注意事項
安全注意事項
符號說明
必須閱讀警告資訊。
操作和安裝前請閱讀安全註意事項。為了使用者或他人安全及財產保障不受損害,
請仔細閱讀並遵守以下內容。因無視說明而導致的不正確操作可能導致人員傷亡或機器損壞。
警告 表示中等風險,如果未能避免,可能導致死亡或重傷。
表示較低風險,如果未能避免,可能導致輕度或中度傷害。
注意
• 請勿超過電源插座或連接設備的額定值。
• 請勿通過接上或斷開總電源來操作或停止設備。
• 請勿損壞或使用非提供電源線。
• 請勿自行修改電源線長度或與其他電器共用插座。
• 請勿用濕手插、拔插頭。
• 請勿將設備放置在熱源附近。
• 如果發現奇怪的聲音、氣味或冒煙,請立即斷開電源。
• 切勿自行拆卸或修理設備。
• 清潔前,必須關閉電源並拔下設備插頭。
• 請勿在汽油、苯、稀釋劑等易燃氣體或可燃物附近使用設備。
• 請勿飲用或使用設備排出的水。
• 操作時請勿取出水箱。
• 請勿在狹小空間內使用設備。
• 請勿將設備放在可能會濺濕的地方。
• 請將設備放置在水平、堅固的地板上。
• 請勿用其他物品遮蓋進、排氣口。
• 在有嬰兒、兒童、老年人和對濕度不敏感的人的房間內使用設備時,應小心謹慎。
• 請勿在處理化學品的區域使用設備。
• 請勿將手指或其他異物插入格柵或開口。
• 特別注意並警告兒童上述危險。
• 請勿在電源線上放置重物,注意不要壓迫電源線。
• 請勿攀爬或坐在設備上。
• 務必牢固地裝上過濾網。建議每兩周清洗一次過濾網。如果設備入水, 請關閉設備並拔除插座,
並聯繫原廠的維修技術人員進行維修。
• 請勿使用延長線。
警告
頁面4
• 8歲及以上的兒童,以及身體、感官或精神有缺陷或缺乏經驗和知識的人在獲得有關安全使用
設備的監督或指導,並瞭解所涉及的危險時,可以使用設備。兒童不得玩耍設備,且不得在
無人監督的情況下清潔和維護設備(適用於歐洲國家)。
• 該設備不適合身體、感官或精神有缺陷或缺乏經驗和知識的人(包括兒童)使用,除非負責其
安全的人員對他們的使用進行了監督或指導。(適用於除歐洲國家以外的其他國家)。
• 如果電源線受到損壞,必須由製造商、其服務代理商或類似合格人員更換,以免發生危險。
• 在清潔或其他維護之前,必須斷開設備與供電主電路的連接。
• 請勿將設備安裝在可能接觸可燃氣體的位置。如果可燃氣體在設備周圍積聚,可能引發火災。
• 如果設備在使用過程中被撞倒,請關閉設備並拔下主電源插頭,檢查設備,確保無損壞。
如果懷疑設備損壞,請聯繫技術人員或客戶服務部尋求幫助。雷雨天氣必須切斷電源,以免雷
擊損壞設備。
• 請勿用地毛毯、滑槽或類似覆蓋物覆蓋電線。
• 請勿在家具或電器下方鋪設電線。將電線佈置在遠離交通區域且不會絆倒的地方。
• 請勿在電線或插頭損壞的情況下操作設備,並報廢設備或返回授權服務機構進行檢查和/或維修。
• 為降低火災或觸電風險,請勿將本設備與任何固態調速設備一起使用。
• 必須按照國家佈線規則安裝設備;
• 請聯繫授權維修技師維修或保養設備。
• 不使用設備時請關閉電源。
注意
• 製造商銘牌位於設備背面, 已寫上設備的電力和其他技術資料。
• 為了減少觸電和火災危險, 請確保設備接地正確。電源線配有三腳接地插頭,以防觸電危險。
• 設備應使用正確接上的牆壁插座。如果打算使用的牆壁插座沒有充分接地或受到延時保險絲
或斷路器的保護(電氣資料請參見銘牌),請讓合格電工安裝適當的插座。
• 請勿在浴室或洗衣房等潮濕房間運行設備。
• 電器電路板(PCB)設計有保險絲,提供過電流保護。
• 電路板給出了保險絲規格,如:T3.15A/250V(或350V)等。
注意
• 含氟溫室氣體包含在密封設備中。有關含氟溫室氣體的類型、數量和二氧化碳當量(噸)的具
體信息(在某些型號上),請參考設備本身的相關標籤。
• 設備安裝、保養、維護和維修必須由經認證的技術人員進行。
• 設備拆卸和回收必須由經認證的技術人員進行。
關於氟化氣體的說明(不適用於使用R290製冷劑的設備)
安全注意事項

頁面5
為確保公司產品的最佳性能,設備設計規範如有更改,恕不另行通知。
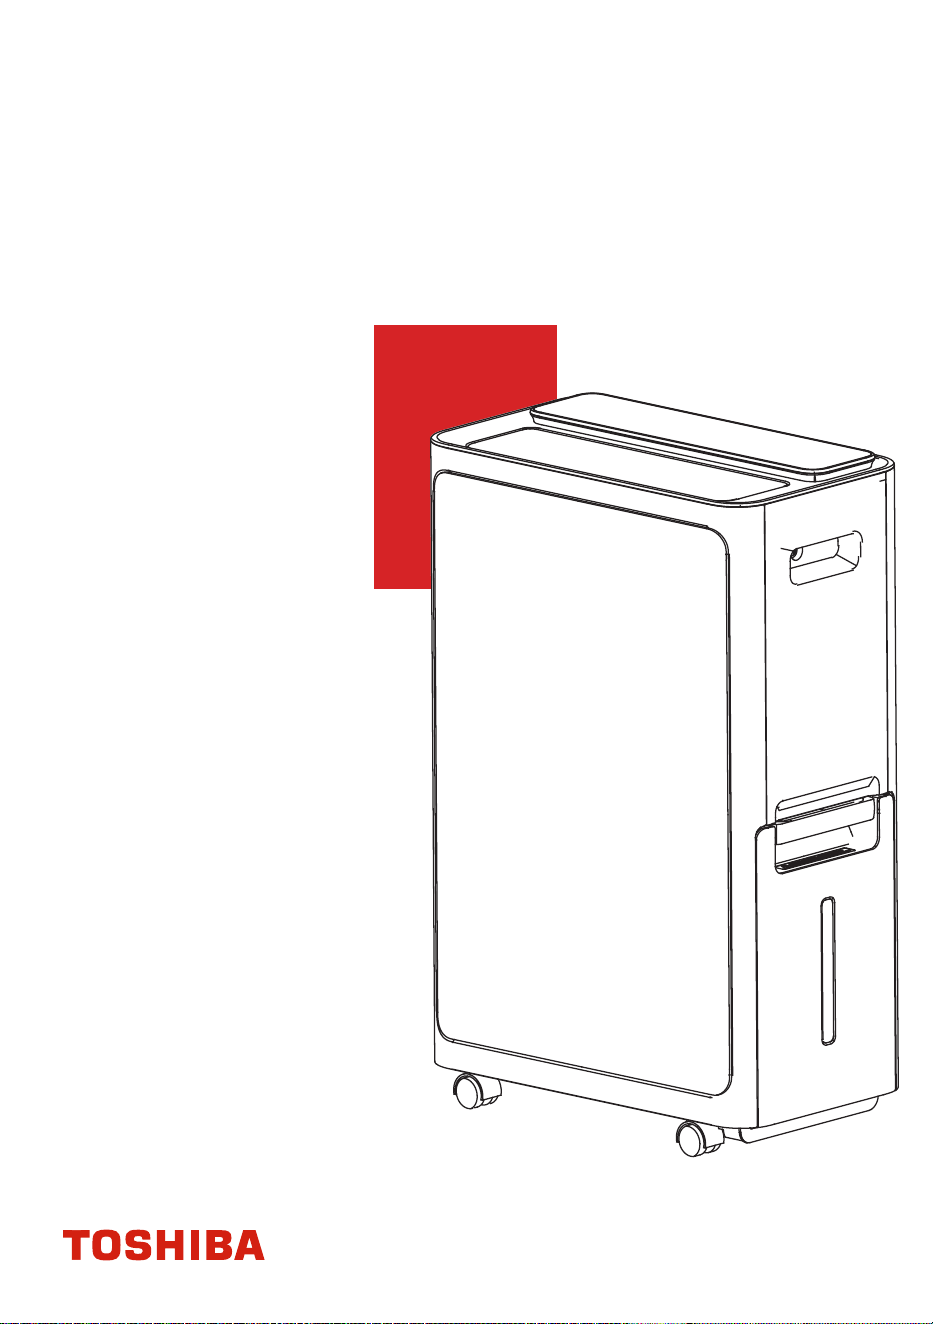
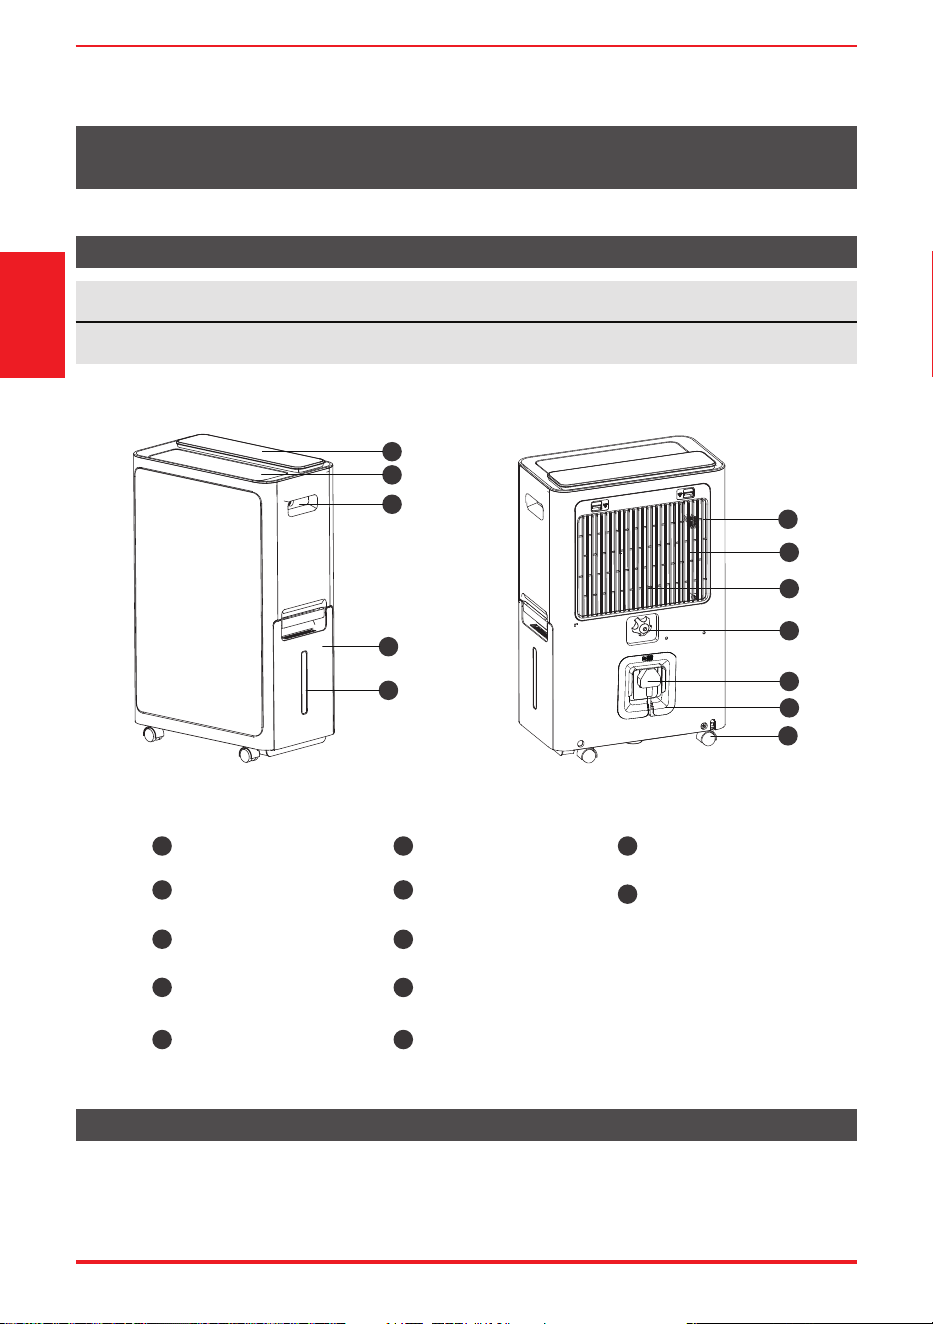
產品各部件名稱
產品概述
產品簡介
各部件名稱
設計通知
注
說明書中的秉有插圖僅適用於解釋用途, 真實情況以機器為準
前視圖 後視圖
1
2
3
4
5
10
9
8
7
11
12
6
1
2
3
4
5
6
7
8
9
控制面板
導風葉
水箱
把手(兩側)
水位窗口
HEPA空氣過濾網
進氣格柵
排水口
前置濾網
10
11
12
電源線收納裝置
腳輪
電源線及插頭
產品簡介
頁面6
腳輪(位於設備底部四個點的位置)
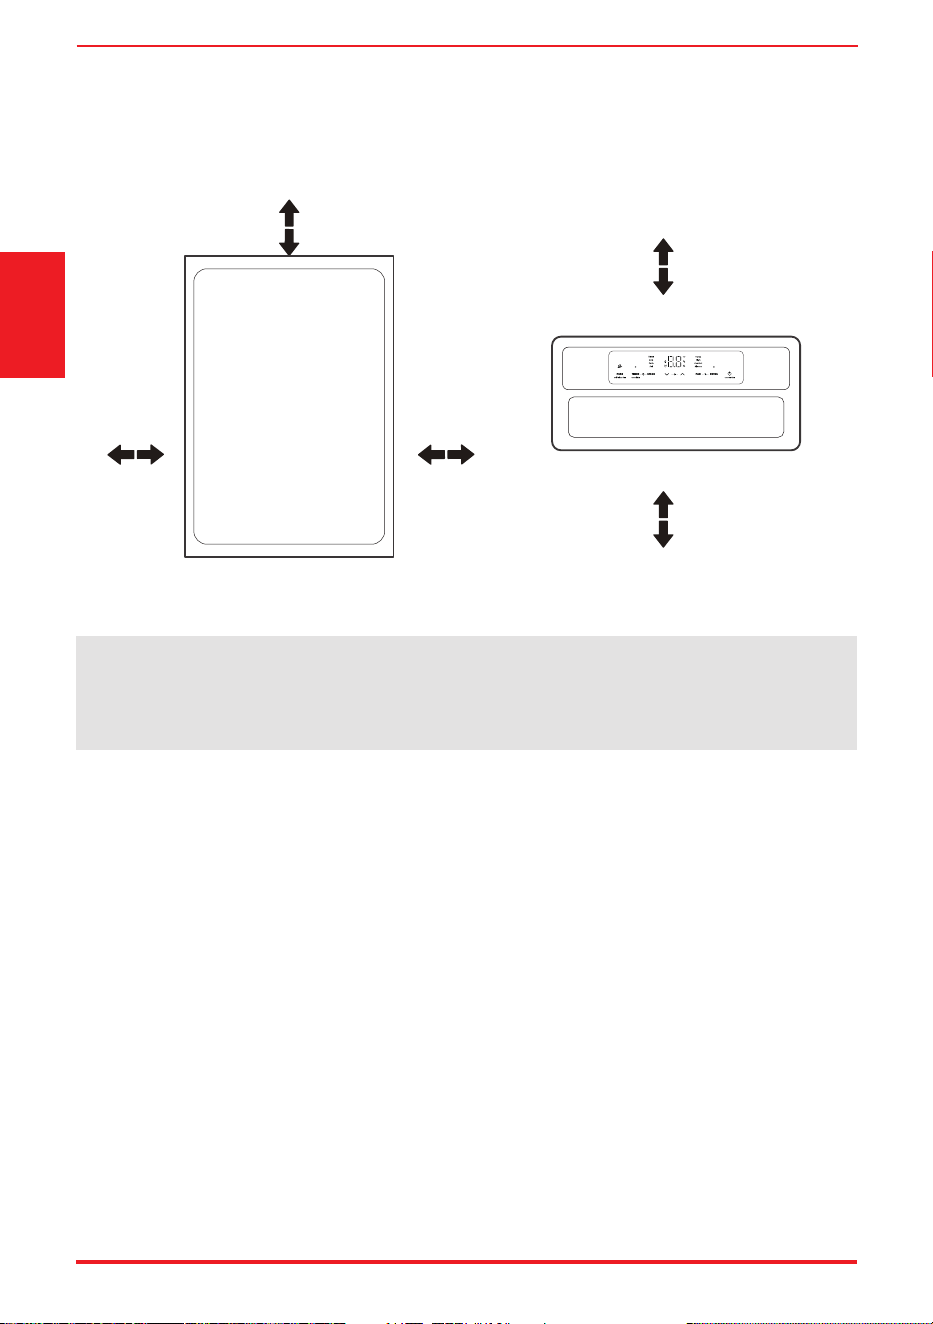
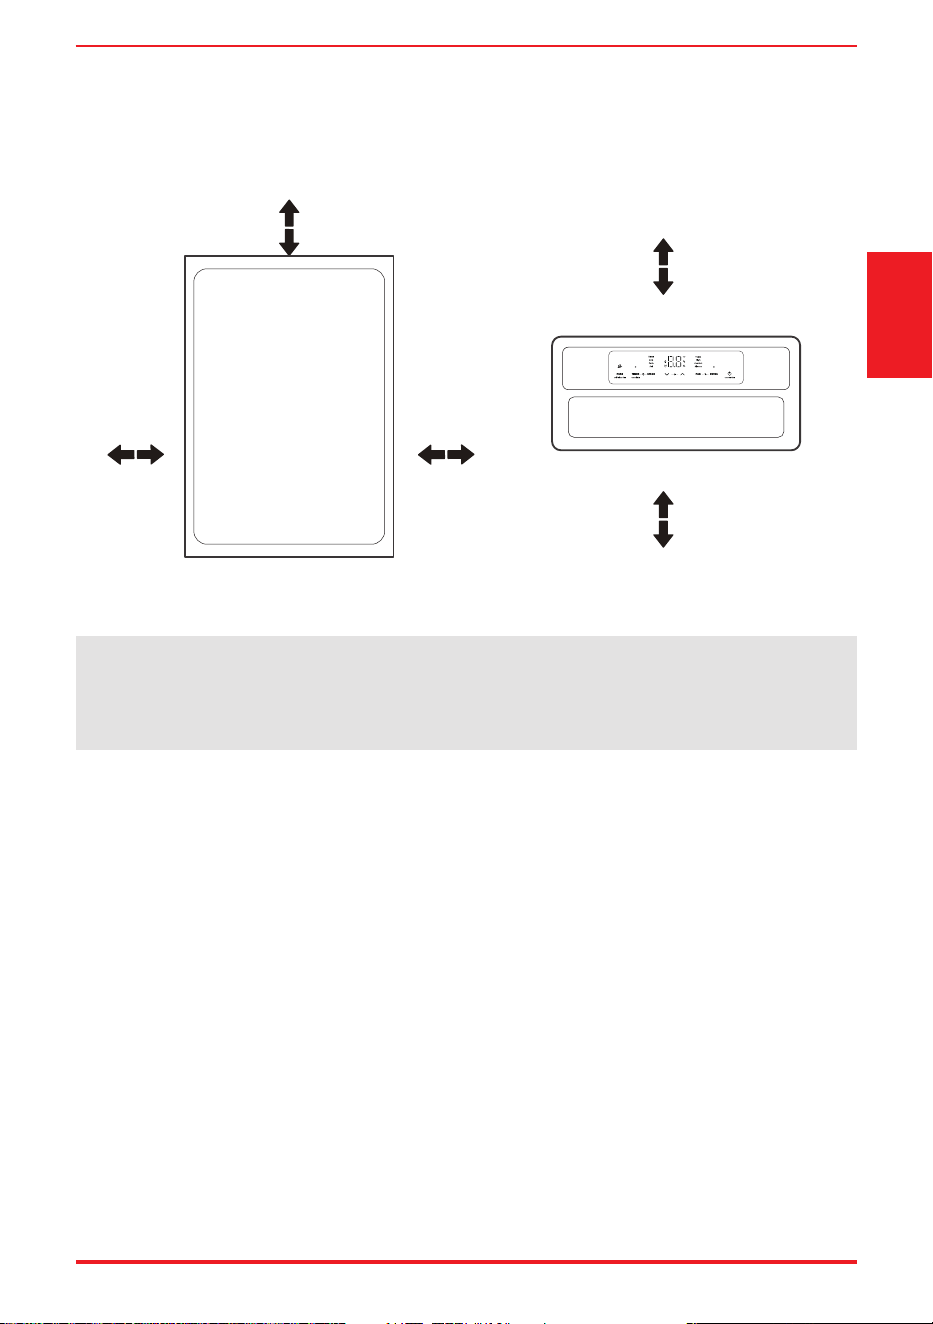
放置設備位置
安全距離要求
20cm或以上20cm或以上
20cm或以上
40cm或以上
40cm或以上
正面檢視 俯視
• 腳輪可自由移動
• 請勿強行將腳輪移動到地毯上,也不得在水箱中有水的情況下移動設備(否則設備可能翻倒,
導致水溢出)。
在地下室運行的除濕機對相鄰封閉儲存區域(如壁櫥)的乾燥作用很小或沒有影響,除非該區域有足
夠的空氣循環進出。
• 請勿在室外使用設備。
• 該除濕機僅適用於室內住宅,請勿在商業或工業環境中應用。
• 將除濕機放置在光滑、水平的地板上,地板應足夠堅固,以便在水箱水滿時也能支撐設備。
• 裝置四周至少留有20cm的空間,以保持良好的空氣循環(出風口上至少留有40cm的空氣空間)。
• 將裝置放置在溫度不低於5℃(41℉)的區域。當溫度低於5℃(41℉)時,線圈可能會結霜,從
而降低性能。
• 裝置應置於遠離乾衣機、加熱器或散熱器處。
• 存放書籍或貴重物品時,可使用本裝置防止受潮損壞。
• 在地下室使用除濕機,以防受潮損壞。
• 除濕機必須在封閉區域操作才能達到最佳效果。使用時請關閉房間的所有門、窗和其他外部開口。
產品簡介
附件
注
水箱中的水達到一定水平時,請小心移動設備,以免設備翻倒。
頁面7
使用產品時
產品使用前準備。
本裝置的設計工作環境為5℃/41℉至32℃/90℉,相對濕度為30%(RH)至80%(RH)之間。
• 如果裝置已經關閉,需要快速重新打開,請等待大約三分鐘以恢復正確操作。
• 請勿將除濕機連接到也用於其他電器的多孔插座上。
• 選擇合適的位置,確保可以方便地使用電源插座。
• 將裝置插入帶接地連接的電源插座。
• 確保水箱安裝正確,否則裝置將無法正常運行。
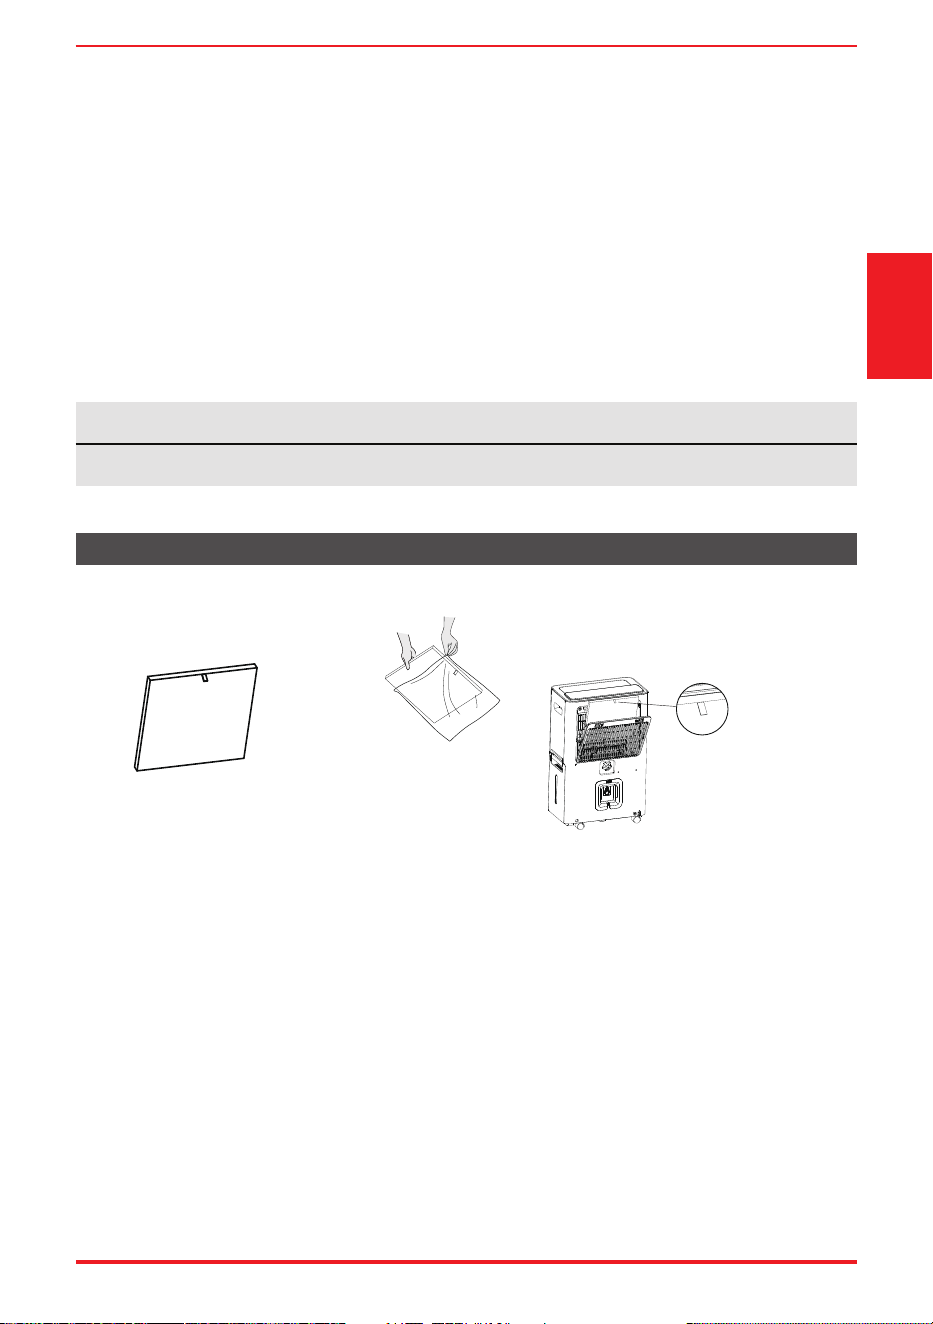
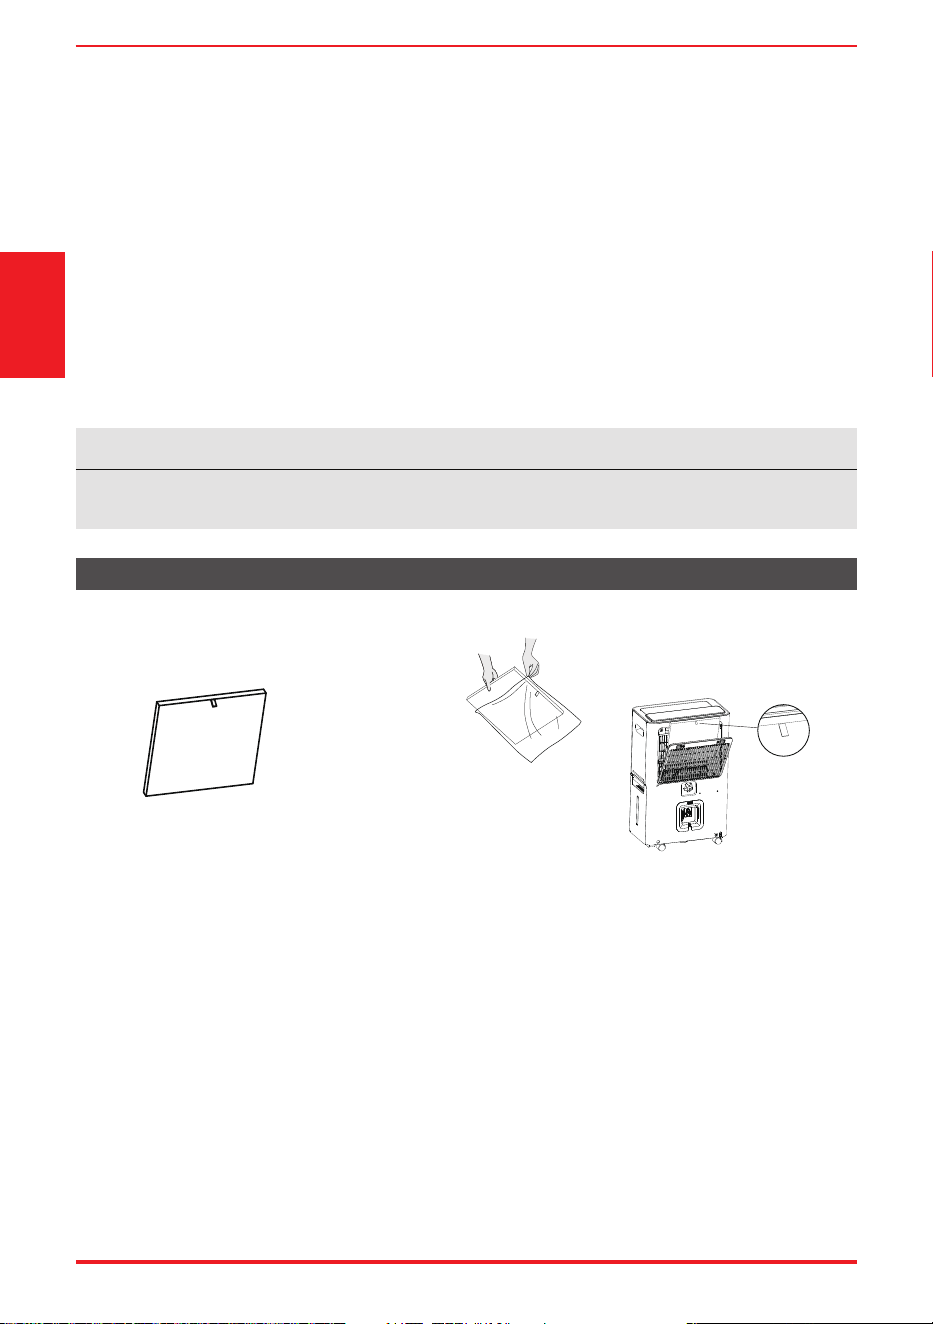
HEPA空氣過濾網(1個)
產品簡介
注意:在使用HEPA
空氣過濾網前,必須
去除塑膠密封膜。
注意:安裝過濾網時
拉柄應置於外側的上端。
頁面8
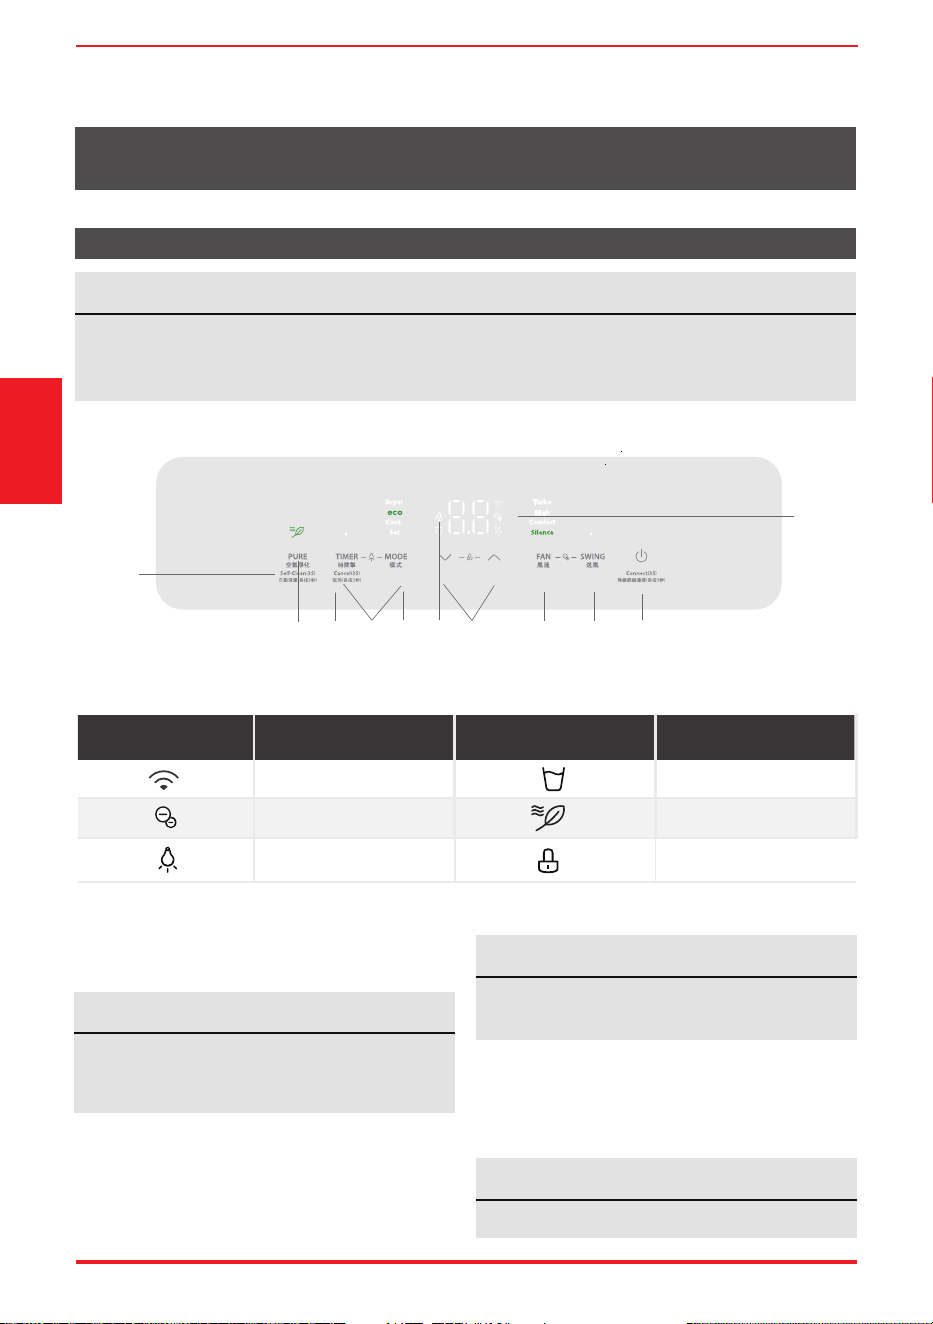
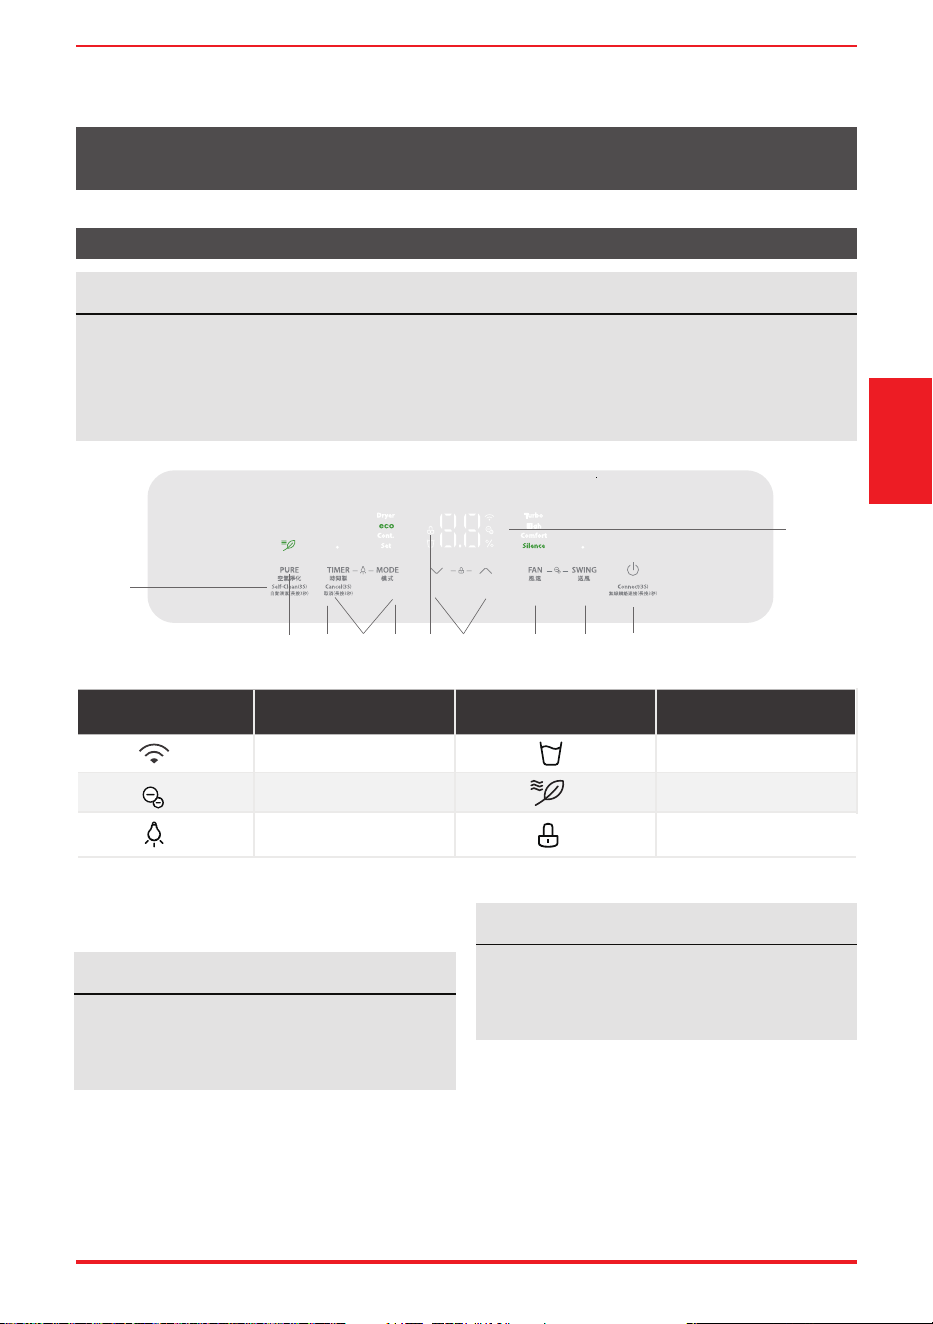
功能簡介
操作顯示
控制面板
注
以下控制面板僅供說明。真實情況以機器為準。
設備開機或關機,或者模式切換時,因為壓縮機頻率增減,會有輕微明顯的壓縮機運轉聲音。
這屬於正常現象。
功能 指示器 功能
離子燈
水滿提示燈
淨化模式燈
指示器
顯示器開/關燈
童鎖燈
1. 啟動/關閉按鈕
按鍵打開或關閉除濕機。
2. 模式功能
每按一次模式鍵,可在節能模式 – 連續 – 設置
– 乾衣 – 節能模式之間循環。
節能模式
按下模式按鈕,選擇節能模式。在智慧除濕模式下,
可通過上、下按鍵調節濕度。
濕度範圍為35%至85%。預設值為60%。
當壓縮機啟動或停止運行時,裝置可能會發出
很大的聲音,屬正常現象。每次開機後,默認
開啟負離子功能。
注
切換模式或啟動時,將顯示設定濕度5秒。
5秒後切換回環境濕度顯示。
注
選擇此功能時,風速調節不可用。
注
功能簡介
1
2
11
4
5
3
10
6 7
8
9
無線燈
頁面9
3. 上、下鍵
濕度設定控制按鈕
在設置除濕模式下,可設置的濕度水準範圍為
35%RH(相對濕度)至85%RH(相對濕度),
以5%的增量進行設置。長按按鈕 ,濕度持續下降。
長按按鈕 ,濕度持續上升。
8. 離子功能
同時按下送風和擺動鍵並持續3秒,開啟/關閉
負離子功能。
9. 清潔功能
按下淨化鍵並持續3秒,打開/關閉此功能。
10. 顯示
按定時鍵和模式鍵並持續3秒可開啟/關閉數字
顯示功能。
11. 兒童鎖功能
長按上、下鍵3秒,可鎖定或解鎖控制面板。
顯示
顯示錯誤代碼和保護代碼:裝置可能停止運行或
繼續安全運行。如果出現錯誤代碼,請等待10分
鐘左右。問題可能會自行解決。如果沒有,斷開
電源,然後重新連接。打開裝置。如果問題仍然
存在,請斷開電源並聯繫最近的客戶服務中心。
室內機視窗顯示錯誤碼,錯誤碼以以下字母開頭:
EH(xx)、EL(xx)、EC(xx)、PH(xx)、
PL(xx)、PC(xx)
更多功能
無線操作(部分機型):
•
首次使用Wi功能時,長按POWER鍵3秒,啟動
WiFi連接模式。LED顯示幕顯示“AP”,表示您
可以設置Wi連接。如果在8分鐘內連接(路由
器)成功,裝置將自動退出Wi連接模式,無線
指示燈點亮。如果在8分鐘內連接失敗,裝置將
自動退出Wi連接模式。( 詳細Wi功能請參閲
Smart Kit 説明書)
電氣工作
5. 空氣淨化功能
啟動/關閉時,按此鍵進入淨化功能。該功能開啟
後,將顯示3秒鐘的“開啟空氣”。
6. 送風功能
按此鍵在風速模式間切換→高→舒適→ 靜音→
強勁設置風速。
7. 擺動功能
按下此按鍵可開啟或關閉擺動功能。
4. 定時功能
•
按下計時器按鈕,計時器指示燈亮起。表示自
動啟動或自動停止程式已啟動。
對於某些裝置,繼續按下計時器按鈕將取消計
時器設置。
•
長按上或下按鈕,以0.5小時為增量更改自動時
間,最多可更改10小時,然後以1小時為增量更
改自動時間,最多可更改24小時。控制系統將
倒計時直到啟動為止的剩餘時間。
•
所選時間將在5秒後顯示,裝置開機時系統將自
動恢復顯示之前的濕度設置或房間濕度。
裝置關閉時,無顯示。
•
在任何時間開啟或關閉本裝置,或者將計時器
設置調整為0.0,則自動啟動/停止定時程式將
會取消。
選擇此模式時,開啟連續除濕功能並伴有高速
送風模式。在此模式下,無法調節設定濕度和
風速。
注
打開淨化功能時,可以開啟/關閉該功能。
注
設置模式
按下模式按鈕,選擇設置模式。
選擇此模式時,將顯示設定濕度5秒。
5秒後切換回環境濕度顯示。
連續運行模式
按下模式按鈕並選擇連續運行模式。
警告:
在進行任何電氣或接線工作之前,請關
閉系統的主電源。
注:圖表僅作說明之用。您的機器可能略有不同。
以實際形狀為凖。
顯示
主控 電源線
功能簡介
頁面10
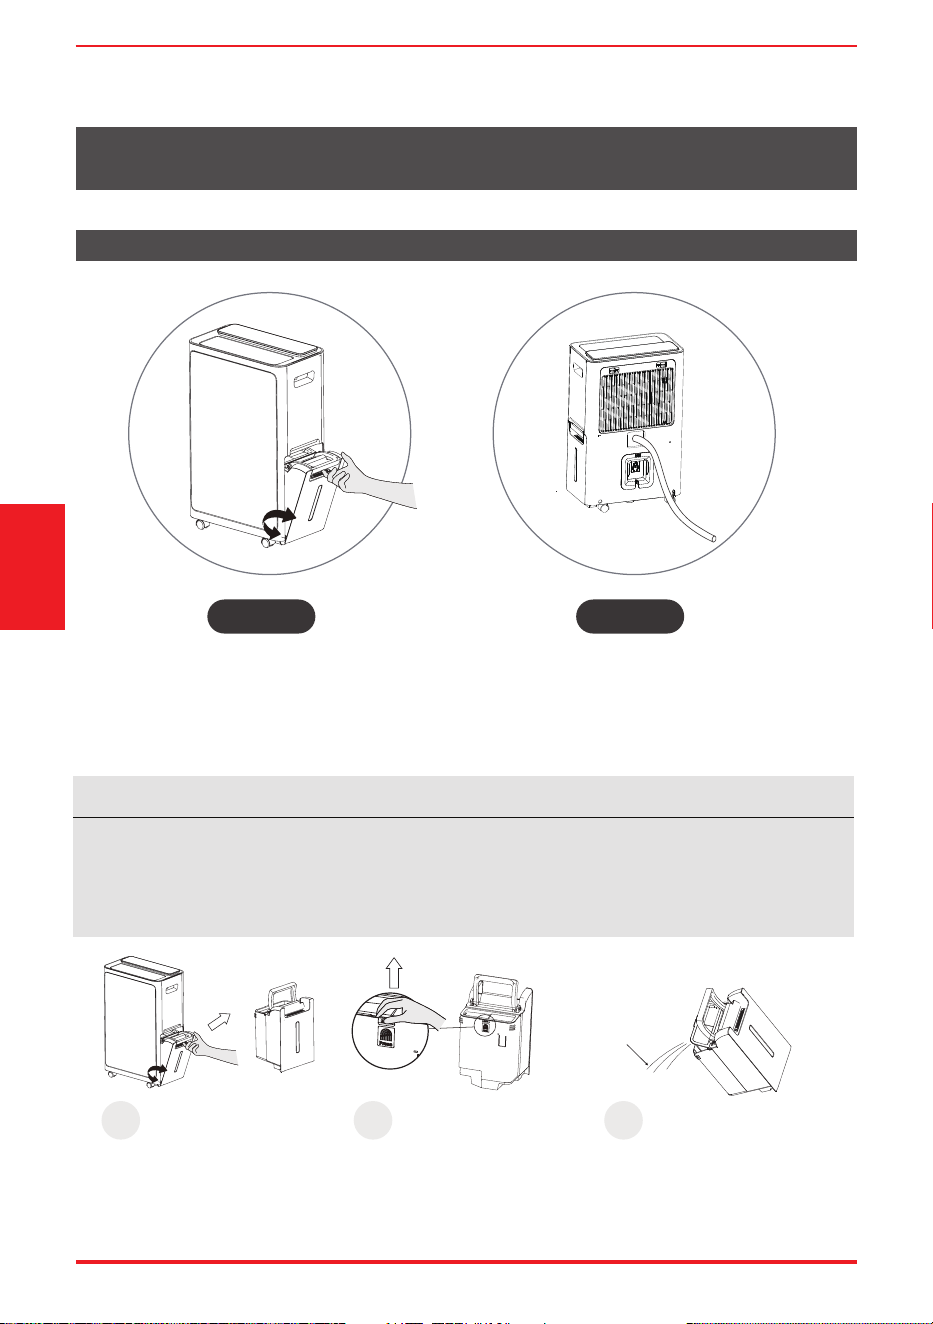
倒掉餘水
當您的產品已經使用一段時間時。
清除餘水有兩種方法。
注
• 將取出水箱時,請勿將設備放置在任何電氣部件上,因為底部可能潮濕。
• 取下設備水箱後,請勿將設備放置在不平整的表面上。
• 裝上水箱後,請確保設備正確就位。
• 如在操作過程中取下水箱,顯示幕上的空水箱圖示將閃爍,且設備停止工作,直至水箱放回原位。
取出水箱, 倒掉餘水
類型1: 類型2:
取出水箱, 倒掉餘水
1
打開蓋子。
2
拉出水箱。
抓住手柄,拉出水箱。
抓住扣環往上拉。
3
從出水口倒水。
倒水。
出水口
倒掉餘水
連續排水
註: 排水管需另外購買
(内直徑13.5mm,外直徑16.5mm)

注
• 確保軟管牢固,無灑出。
• 將軟管末端放入排水口,確保軟管末端處於水平或向下狀態,使水流暢通。
頁面11
連續排水
1
逆時針轉動連續出口蓋,將其拆下。 連接排水管 (需自行購買)
拆下橡膠塞。 連接排水軟管。
(需自行購買)
2
拆下橡膠塞
倒掉餘水
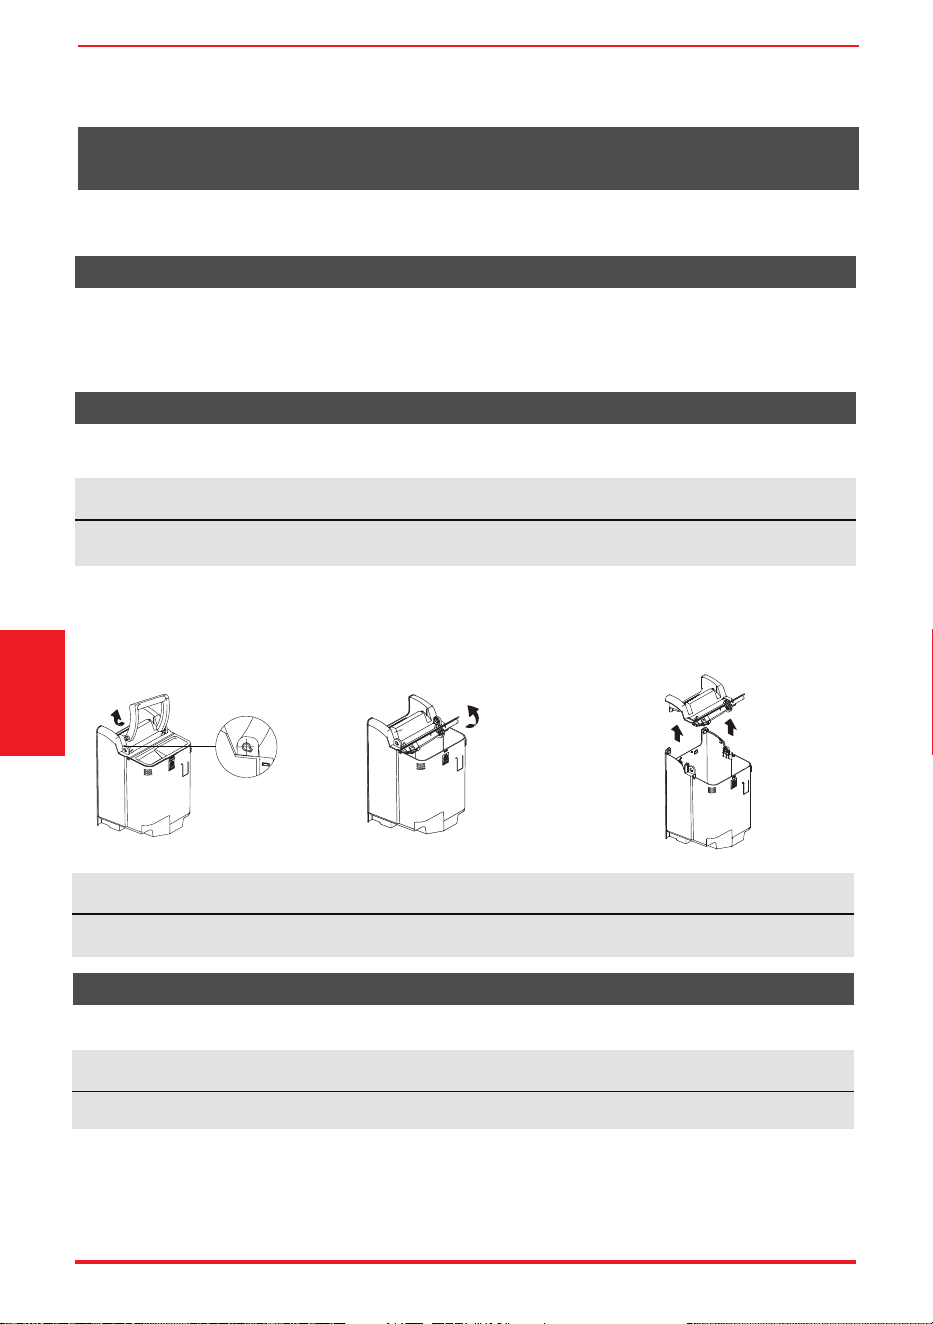
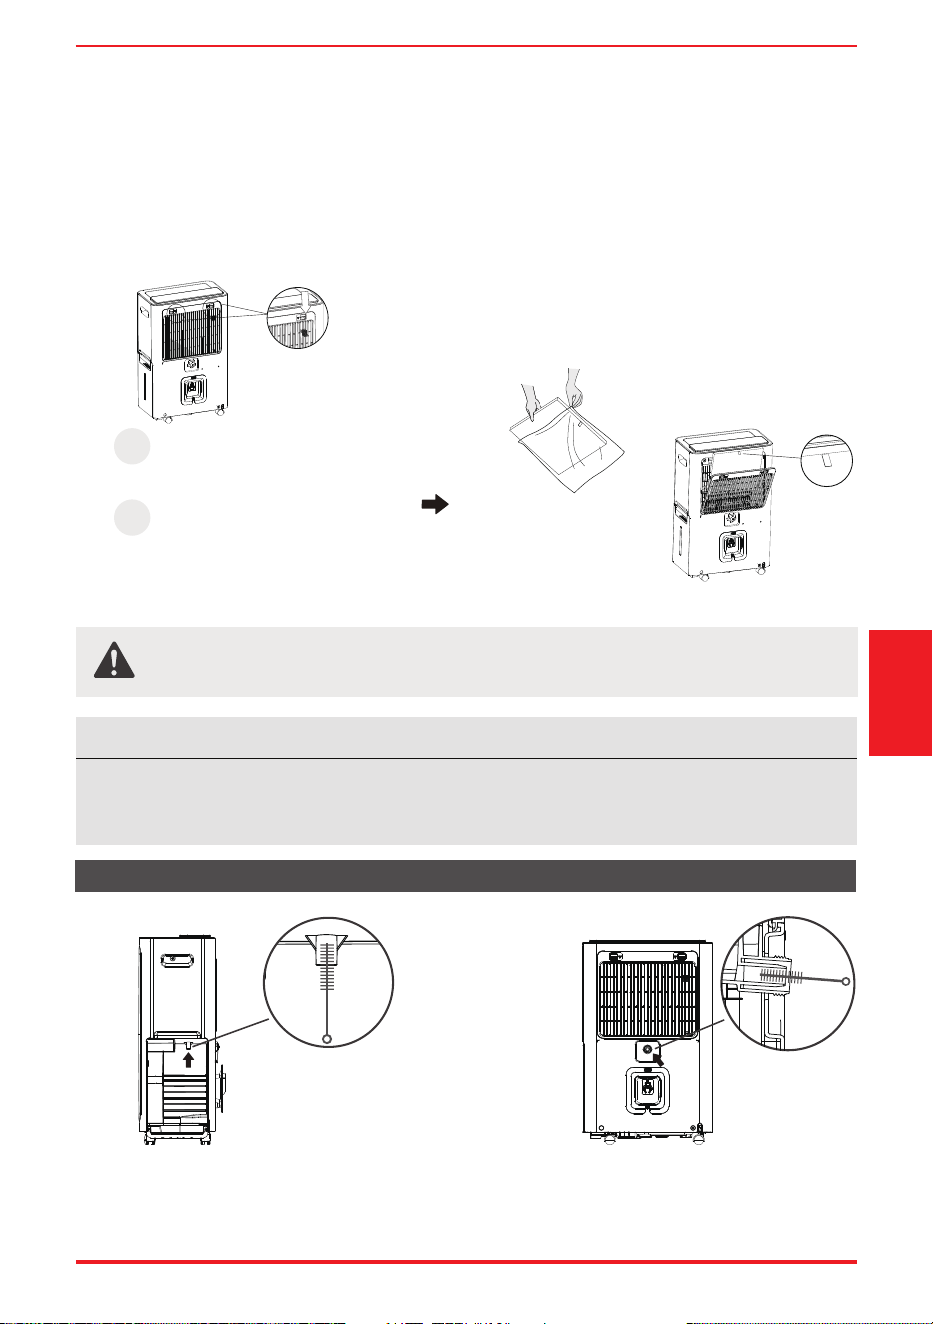
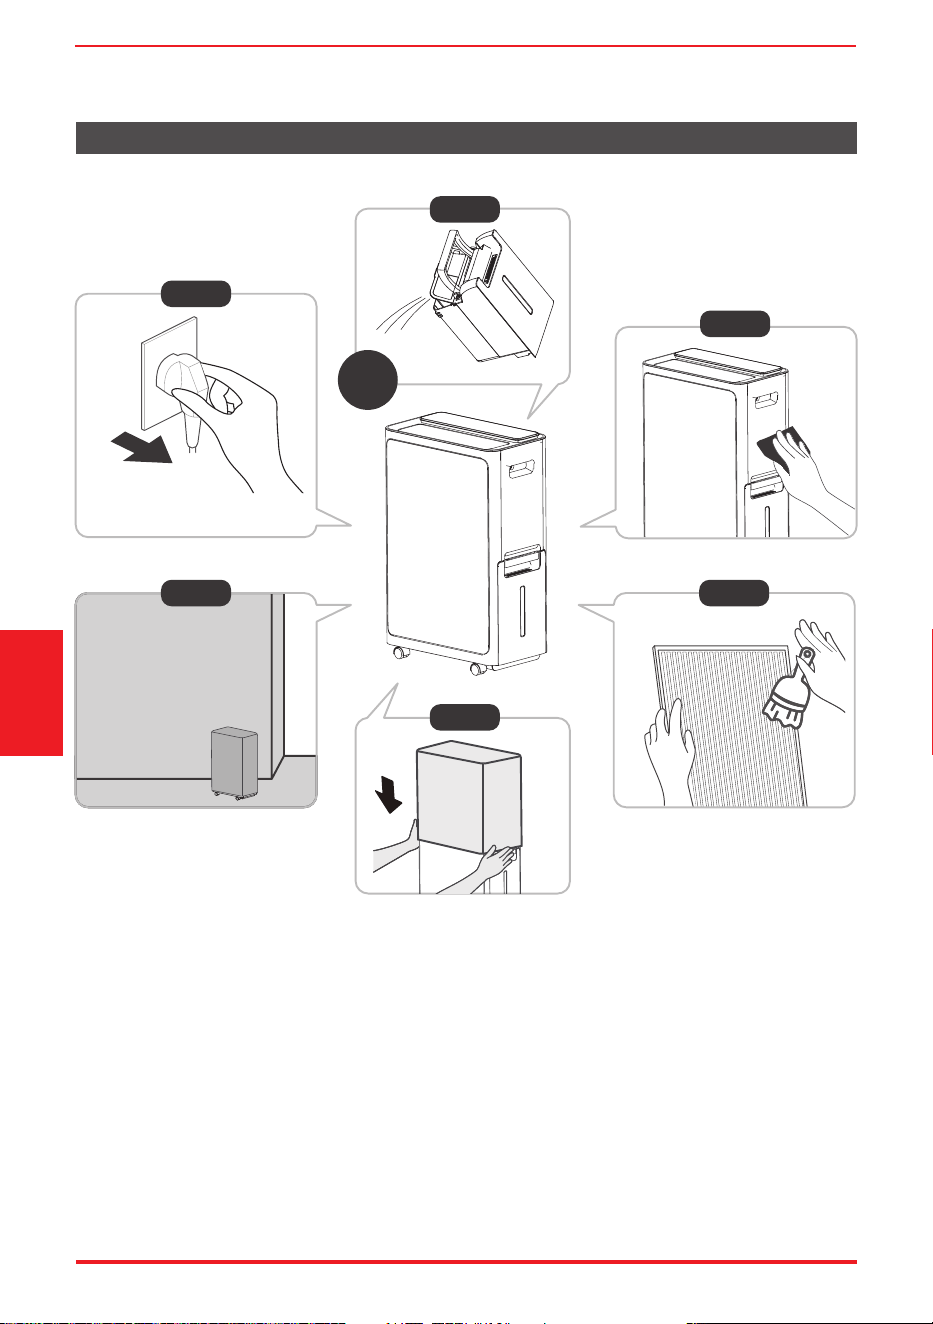
保養與維護
清潔前,務必關掉設備並從電源插座拔掉插座。
注
請勿使用洗碗機清洗水箱。清潔後,水箱必須放置到位並牢固固定,以便除濕機運行。
注
安裝手柄時,請在手柄兩側對應安裝孔上安裝卡扣。否則,手柄無法正確安裝和復位。
注
請勿將過濾網放進洗碗碟機進行清洗。
• 使用水和溫和的清潔劑進行清潔。請勿使用漂白劑或磨料。
• 請勿將水直接濺到主機上。否則可能會導致觸電、絕緣退化或裝置生銹。
• 進氣格柵和出氣格柵容易弄髒,請使用真空附件或刷子進行清潔。
頁面12
如何清潔和維護您的產品。
清潔格柵和主機殼
應至少每兩週檢查和清潔一次前格柵後面的空氣過濾網,也可因自身需要更頻繁地進行清潔。
清潔空氣過濾網
• 建議每隔幾周, 清潔水箱一次。用清水和溫和的清潔劑將桶部分注滿。倒空沖洗乾淨。
清潔水桶
1. 向內按壓手柄一側,
向上抬起。
2. 按下水箱中間的指紋位置,
蓋上水箱蓋。
3. 握住水箱蓋內側,向上提起整個箱蓋。
將水箱各部件清洗乾淨,自然晾乾後按
上述步驟重新安裝。
保養與維護
注
可以用無油布擦拭機櫃和正面,或者用經過温水和中性液態餐具清潔劑浸泡過的布進行清洗。徹底
沖洗並擦乾。切勿在機櫃正面使用具有刺激性的清潔劑、蠟或抛光劑。擦拭控制裝置周圍之前,務
必扭乾抹布上多餘的水。控制裝置内或周圍的水過多可能會損壞裝置。
注意
請勿在沒有過濾網的情況下操作除濕機,因為污垢和絨毛會堵塞除濕機並降低其性能。
頁面13
拆卸:
• 按下過濾網上的扣子,向外拉,然後取出。
• 用溫水清洗過濾網。更換過濾網前,沖洗並晾乾。
安裝:
• 將空氣濾清網和高效空氣過濾網從下往上插入裝置。
• 建議每6個月更換一次高效空氣過濾網。
• 用直徑小於10mm的吸管刷插入排水管,上下刮擦,防止污垢在孔內堆積。
• 排水管外部可用棉布擦拭。
排水管清潔
1
拆卸後格柵。
注:在使用HEPA
空氣過濾網前,
必須去除塑膠密封膜。
使用HEPA空氣過濾網。
朝外安裝,以便更換。
2
清潔水箱排水管 清理永久排水管
保養與維護
頁面14
• 第1步:關機後拔掉產品插頭。
• 第2步:拔掉電源24小時後將水桶清空。
• 第3、4步:清潔主機、水桶和空氣過濾網。
• 第5步:用塑膠袋蓋住裝置。
• 第6步:將裝置直立存放於乾燥、通風良好的地方。
長時間不使用本裝置時
第6步
第3步
第4步
第1步
第2步
*請以實際插頭為凖,
圖例僅供參考。
24
第5步
小時後
保養與維護

規格與淨化數據
頁面15
規格與
淨化數據
型號
顏色
產品尺寸(寬*深*高)(mm)
抽濕量
電源
能源效率
白色
420*265*662
能源效益標準: 17升/天 (26.7℃ 60%)
廠方標準: 28升/天 (30℃ 80%)
AC 220V/50Hz
13A/250V
RAD-DIA17HK
規格
檢測實驗室
檢測方法
抑制方法
抑制目標
檢測結果
報告編號
項目
檢測實驗室
檢測方法
抑制方法
抑制目標
檢測結果
報告編號
項目
檢測實驗室
檢測方法
抑制方法
抑制目標
檢測結果
報告編號
項目
净化
殺菌
消毒
淨化數據
深圳天祥質量技術服務有限公司廣州分公司
符合ANSI/AHAM AC-1-2020
產生的負離子比正離子多,能吸附灰塵和細菌
煙、粉塵、花粉、細顆粒物(PM2.5)
煙淨化率(每分鐘立方英尺):51
粉塵淨化率(每分鐘立方英尺):64.2
花粉淨化率(每分鐘立方英尺):97.1
細顆粒物2.5淨化率(每分鐘立方英尺):57.2
230921139GZU-001
深圳天祥質量技術服務有限公司廣州分公司
符合GB/T 18801-2022和GB 21551.3-2010
消毒技術規範(2002年版,中華人民共和國衞生部)-2.1.3
正負離子結合產生新的正負離子,正負離子中和放電具有一定的殺菌能力
白色葡萄球菌8032、金黃色葡萄球菌ATCC 6538和大腸埃希氏菌8099
白色葡萄球菌8032殺滅率:99.95%
金黃色葡萄球菌ATCC 6538殺滅率:99.95%
大腸埃希氏菌8099殺滅率:99.95%
深圳天祥質量技術服務有限公司廣州深圳天祥質量技術服務有限公司廣州分公司
符合GB/T 18801-2022和GB 21551.3-2010
消毒技術規範(2002年版,中華人民共和國衞生部)-2.1.3
正負離子結合產生新的正負離子,正負離子中和放電具有一定的殺菌能力
甲型流感病毒A/PR/8/34株
甲型流感病毒A/PR/8/34株殺滅率:99.99%
230921139GZU-002
230921139GZU-002

故障排除
在呼叫服務之前,請先自行查看下面的情況。
頁面16
問題
檢查內容
裝置未啟動
確保除濕機插頭完全插入插座。
檢查廠用保險絲/斷路器箱。
水箱位置不對。
空氣過濾網堵塞。
裝置傾斜,而非正常的直立。
地板表面不平整。
軟管與連接器的連接或軟管連接可能鬆動。
除濕機具有自動除霜功能。屬正常現象。
這些是錯誤代碼和保護代碼。參見“控制面板功能”一節。
未能留出足夠的時間去除水分。
確保沒有窗簾、百葉窗或傢俱擋住除濕機的正面或背面。
濕度控制可能設置得不夠低。
檢查所有門、窗和其他開口是否牢固關閉。
室溫過低,低於5℃(41℉)。
房間裡有煤油加熱器或散發水蒸氣的東西。
除濕機未按要求乾燥空氣
裝置運行時噪音大
線圈結霜
地板上有水
顯示幕上出現EH(xx)、
EL(xx)、EC(xx)、
PH(xx)、PL(xx)、PC(xx)
故障排除


# MatterDetails
USER MANUAL
RAD-DIA17HK
Inverter Compressor 2 in 1
Warning notices: Before using this product,
please read this manual carefully and keep
it for future reference.

Page 2
Directory
Identication of parts
GET TO KNOW YOUR PRODUCT.........................................6
SAFETY PRECAUTIONS.......................................................3
Positioning the unit
Accessories
Control Panel
GET TO KNOW THE FEATURES...........................................9
TROUBLESHOOTING.........................................................18
Bucket drainage
DUMP THE COLLECTED WATER.......................................12
Clean the Grill and Case
CARE AND MAINTENANCE...............................................14
Clean the bucket
Clean the air filter
Continuous drainage
Specications
SPECIFICATIONS AND PURIFICATION DATA..................17
Purication data
Page 3
Safety
Precautions
SAFETY PRECAUTIONS
Explanation of Symbols
Must read the warning message.
Read Safety Precautions Before Operation and Installation To prevent death or injury to the user or other
people and property damage,the following instructions must be followed. Incorrect operation due to
ignoring of instructions may cause death, harm or damage.
WARNING
The signal word indicates a hazard with a medium level of risk which,
if not avoided, may result in death or serious injury.
CAUTION
The signal word indicates a hazard with a low degree of risk which,
if not avoided, may result in minor or moderate injury.
• Do not exceed the rating of the power outlet orconnection device.
• Do not operate or stop the unit by switching on or of the power.
• Do not damage or use an unspecied power cord.
• Do not modify power cord length or share the outlet with other appliances.
• Do not insert or pull out plug with wet hands.
• Do not place the unit near a heat source.
• Disconnect the power if strange sounds, smell, or smokecomes from it.
• You should never try to take apart or repair the unit by yourself.
• Do not use the machine near ammable gas or combustibles, such as gasoline, benzene,
thinner, etc.
• Do not drink or use the water drained from the unit.
• Do not take the water bucket out during operation.
• Do not use the unit in small spaces.
• Do not put in places where water may splash onto the unit.
• Place the unit on a level, sturdy section of the oor.
• Do not cover the intake or exhaust openings with cloths or towels.
• Care should be taken when using the unit in a room with the following persons: infants, children,
elderly people, and people not senstive to humidity.
• Do not use in areas where chemicals are handled.
• Never insert your nger or other foreign objects into grills or openings.
• Take special care to warn children of these dangers.
• Do not place heavy object on the power cord and take care so that thecord is not compressed.
• Do not climb up on or sit on the unit.
• Always insert the lters securely. Clean lter once every two weeks.If water enters the unit, turn
the unit of and disconnect the power , contact a qualied service technician.
• Do not use extension cords.
WARNING

Page 4
Safety
Precautions
CAUTION
• This appliance can be used by children aged from 8 years and above and person with reduced
physical, sensory or mental capabilities or lack of experience and knowledge if they have been
given supervision or instruction concerning use of the appliance in a safe way and understand
the hazards involved. Children shall not play with the appliance. Cleaning and user maintenance
shall not be made by children without supervision. (be applicable for the European Countries)
• This appliance is not intended for use by persons (including childern) with reduced physical,
sensory or mental capabilities or lack of experience and knowledge, unless they have been given
supervision or instruction concerning use of the appliance by a person responsible for their safety.
(be applicable for other countries except the European Countries )
• If the supply cord is damaged, it must be replaced by the manufacturer,its service agent or
similarly qualied persons in order to avoid a hazard.
• Prior to cleaning or other maintenance, the appliance must be disconnected from the supply
mains.
• Do not install the appliance in a location that may be exposed to combustible gas. If combustible
gas accumulates around the unit, it may cause re.
• If the appliance is knocked over during use, turn of the unit and unplug it from the main power
supply immediately. Visually inspect the unit to ensure there is no damage. If you suspect the unit
has been damaged, contact a technician or customer service for assistance.In a thunderstorm,
the power must be cut of to avoid damage to the machine due to lightning.
• Do not run cord under carpeting. Do not cover cord with throw rugs, runners, or similar coverings.
• Do not route cord under furniture or appliances.
Arrange cord away from trafc area and where it will not be tripped over.
• Do not operate unit with a damaged cord or plug. Discard unit or return to an authorized service
facility for examination and/or repair.
• To reduce the risk of re or electric shock, do not use this fan with any solid-state speed control
device.
• The appliance shall be installed in accordance with national wiring regulations.
• Contact the authorised service technician for repair or maintenance of this unit.
• Turn of the product when not in use.
Note about Fluorinated Gasses(Not applicable to the unit using R290 Refrigerant)
• Fluorinated greenhouse gases are contained in hermetically sealed equipment. For specic
information on the type, the amount and the CO2 equivalent in tonnes of the uorinated
greenhouse gas(on some models), please refer to the relevant label on the unit itself.
• Installation, service, maintenance and repair of this unit must be performed by a certied
technician.
• Product uninstallation and recycling must be performed by a certied technician.

Page 5
Safety
Precautions
CAUTION
• The manufactures nameplate is located on the rear panel of the unit and contains electrical and
other technical data specic to this unit.
• Be sure the unit is properly grounded. To minimize shock and re hazards, proper grounding is
important. The power cord is equipped with a three-prong grounding plug for protection against
shock hazards.
• Your unit must be used in a properly grounded wall receptacle. If the wall receptacle you intend
to use is not adequately grounded or protected by a time delay fuse or circuit breaker(please
refer to the nameplate for the electrical data), have a qualied electrician install the proper
receptacle.
• Do not operate your appliance in a wet room such as a bathroom or laundry room.
• The unit s circuit board(PCB) is designed with a fuse to provide overcurrent protection.
• The specications of the fuse are printed on the circuit board, such as: T3.15A/250V (or 350V), etc.
Page 6
Get To Know
Your Product
In order to ensure the optimal performance of our products, the design specications of the unit are subject
to change without prior notice.
Name of each component of the product
Product overview
GET TO KNOW YOUR PRODUCT
Identication of parts
Design Notice
NOTE
All the illustrations in the manual are for explanation purpose only. Your machine may be slightly diferent.
Front View Back View
1
2
3
4
5
1
2
3
4
5
6
7
8
9
control panel
air outlet louver
water tank
handle (both sides)
water level window
HEPA lter
rear grille
continuous outlet
11
12
hook for power cord
caster
air lter
10
power cord and plug
10
9
8
7
11
12
6
Casters(At four points on the bottom of unit)
Page 7
Get To Know
Your Product
Positioning the unit
Safe distance requirements
20cm
or more
20cm
or more
20cm
or more
40cm
or more
40cm
or more
Front View Top View
• Casters can move freely.
• Do not force casters to move over carpet, nor move the unit with water in the bucket.
(The unit may tip over and spill water.)
A dehumidier operating in a basement will have little or no efect in drying an adjacent enclosed storage area,
such as a closet, unless there is adequate circulation of air in and out of the area.
• Do not use outdoors.
• This dehumidifer is intended for indoor residential applications only. This dehumidifer should not be
used for commercial or industrial applications.
• Place the dehumidier on a smooth, level oor strong enough to support the unit with a full bucket
of water.
• Allow at least 20cm of air space on all sides of the unit for good air circulation (at least 40cm of air
space on air outlet).
• Place the unit in an area where the temperature will not fall below 5° C(41° F). The coils can become
covered with frost at temperatures below 5° C(41° F), which may reduce performance.
• Place the unit away from the clothes dryer, heater or radiator.
• Use the unit to prevent moisture damage anywhere books or valuables are stored.
• Use the dehumidier in a basement to help prevent moisture damage.
• The dehumidier must be operated in an enclosed area to be most efective.
• Close all doors, windows and other outside openings to the room.
Accessories
NOTE
When the water in the bucket reaches to a certain level,please be careful to move the machine to avoid it
falling down.
When using your product
Preparations for product use.
Page 8
Get To Know
Your Product
• This unit is designed to operate with a working environment between 5°C/41°F and 32°C/90°F,and
between 30%(RH) and 80%(RH).
• If the unit has been switched of and needs to be switched on again quickly , allow approximately three
minutes for the correct operation to resume.
• Do not connect the dehumidier to a multiple socket outlet, which is also being used for other electrical
appliances.
• Select a suitable location, making sure you have easy access to an electrical outlet.
• Plug the unit into a electrical socket-outlet with earth connection.
• Make sure the Water bucket is correctly tted otherwise the unit will not operate properly.
HEPA filter(1 pc)
NOTE: Be sure to
remove the plastic
sealing film before
using HEPA filter.
Page 9
Get To Know
The Features
GET TO KNOW THE FEATURES
Operation Display
Control Panel
NOTE
The following control panels are for explanation purpose only. The control panel of the unit you purchased
may be slightly diferent according to the models.
When the machine is turned on or of, or when the mode is switched on, there will be a slightly obvious sound
of compressor operation, because the compressor frequency is increased or decreased, it is normal.
1
2
11
4
5
3
10
6 7
8
9
Function Indicator Function
Fresh light
Wireless light Water filled lamp light
Purification mode light
Indicator
Display ON /OFF light
Child lock light
1.POWER ON/OFF button
Press to turn the dehumidier on or of.
2.MODE Function
Each time you press the MODE button, you can
cycle between:
ECO -Set-Cont.-Dryer-ECO mode.
ECO MODE
Press the Mode button and select ECO mode.
In Smart dehumidication mode, you can press the
UP and DOWN buttons to adjust the humidity.
The humidity range is 35% to 85%. The default
value is 60%.
When the compressor startups or stops running,
the unit may make a loud voice, it is normal.
After each turn on, The negative ion function is
enabled by default.
NOTE
When switching mode or power on, it will
display the setting humidity for 5 seconds.
After 5 seconds, it will switch back to the
ambient humidity display.
NOTE

Page 10
Get To Know
The Features
3.Up and Down buttons
Humidity Set Control buttons
In Setting dehumidifying mode, The humidity level
can be set within a range of 35%RH(Relative
Humidity) to 85%RH(Relative Humidity) in 5%
increments. Press and hold the button the
humidity drop continuously. Press and hold the
button the humidity rise conti-nuously.
5.PURIFY Function
Power ON/OFF, press this button to enter the PURIFY
function.
After the function is on, 3 seconds 'On' will be
displayed.
6.FAN Function
Press this button to switch between Turbo→High→
Comfort→Silence→Turbo Sets the FAN speed.
7.SWING Function
Press this button to turn on or of the SWING function.
8.ION Function
Press the FAN and SWING buttons at the same time
and continue for 3 seconds to enable/disable the
negative ion function.
9.Self-clean- Function
Turn this function ON/OFF by press the PURIFY
button for 3 seconds.
10.DISPLAY
In the startup state, press TIMER and MODE keys
and continue for3 seconds to turn on/of the
digital display function.
11.Child Lock Function
Press Up and DOWN buttons for 3 seconds to lock
or unlock the control panel.
4.TIMER Function
• Press Timer button, the TIMER indicator light
illuminates. lt indicates the Auto Start or Auto
Stop program is initiated. For some units,
continuing to press the Timer button will cancel
the timer settings.
• The selected time will register in 5 seconds, and
the system will automatically revert back to
display the previous humidity setting or room
humidity when the unit is on. When the unit is of,
there is no display.
• Turning the unit ON or OFF at any time or
adjusting the timer setting to 0.0 will cancel the
Auto Start/Stop timed program.
• Press or hold the UP or DOWN button to change
the Auto time by 0.5 hour increments, up to 10
hours, then at 1 hour increments up to 24 hours.
The control will count down the time remaining
until start.
When this function is selected, FAN speed
regulation is not available.
SET MODE
Press the Mode button and select Set mode.
When this mode is selected, it will display the
setting humidity for 5 seconds. After 5 seconds,
it will switch back to the ambient humidity
display.
CONT. MODE
Press the Mode button and select Cont. mode.
DRYER MODE
Press the Mode button and select Dryer mode.
NOTE
When this function is selected, the setting
humidity will not be displayed. In this mode, the
setting humidity cannot be adjusted.
NOTE
When this mode is selected, the continuous
dehumidication function is enabled and the
high speed FAN mode is accompanied. Setting
humidity and FAN speed cannot be adjusted in
this mode.
NOTE
When you open the PURIFY Function, you can
switch this function ON/OFF.
NOTE
Page 11
Get To Know
The Features
Display
Shows Error codes and protection code: The unit
may stop operation or continue to run safely. If the
error codes appear, wait for about 10 minutes. The
problem may resolve itself. If not, disconnect the
power, then connect it again. Turn the unit on. If
the problem persists, disconnect the power and
contact your nearest customer service center.
Error code appears and begins with the letters as
the following in the window display of indoor
unit: EH(xx), EL(xx), EC(xx), PH(xx), PL(xx), PC(xx)
More features
Wireless operation(on some models):
• For the rst time to use Wi function, press the
POWER button for 3 seconds to initiate the Wi
connection mode. The LED DISPLAY shows 'AP'
to indicate you can set Wi connection. If
connection (router) is successful within 8
minutes, the unit will exit Wi connection mode
automatically and the Wireless indicator
illuminates. If connection is failure within 8
minutes, the unit exits Wi connection mode
automatically.
WARNING:
BEFORE PERFORMING ANY ELECTRICAL
OR WIRING WORK, TURN OFF THE MAIN
POWER TO THE SYSTEM.
DISPLAY
MAIN
CONTROL
POWER
SUPPLY
CORD
NOTE: The cographs are for
explanation purpose only.
Your machine may be
slightly diferent.
The actual shape shall
prevail.
Electronic Work
Page 12
Dump The
Collected Water
DUMP THE COLLECTED WATER
When your product has been in use for a while.
There are two ways to remove collected water.
NOTE
· When you remove the bucket from the unit do not set the unit on any electrical components as the bottom
may be wet.
· Do not set the unit on an uneven surface afterremoving it from the bucket.
· Ensure the unit is seated properly after returning into the bucket.
· If the bucket is removed during operation, empty bucket icon on the display will blink and stop working
until the bucket is seated.
Bucket drainage
Type 1: Type 2:
Continuous drainage
Note: The drainage hose is optional
(Inner diameter) φ 13.5mm)
(Outer diameter) φ 16.5mm)
Bucket drainage
1
Open the cover.
2
Pull out the bucket.
Grab the handle and pull out
the tank.
Grab the clasp and pull up.
3
Pour the water out.
(from water outlet)
Pour the water out.
Water outlet

Page 13
Dump The
Collected Water
NOTE
· Make sure the hose is secure so there are no leaks.
· Place the end of the hose into the drain outlet and make sure the end of the hose is level or downwards to
let the water ow smoothly .
Continuous drainage
1
Remove the continuous outlet cover by
turning it counterclockwise
Connect drainpipes (not included)
Remove the rubber plug. Attach the drain hose.
(not include)
2
Remove the
rubber plug.
Page 14
Care And
Maintenance
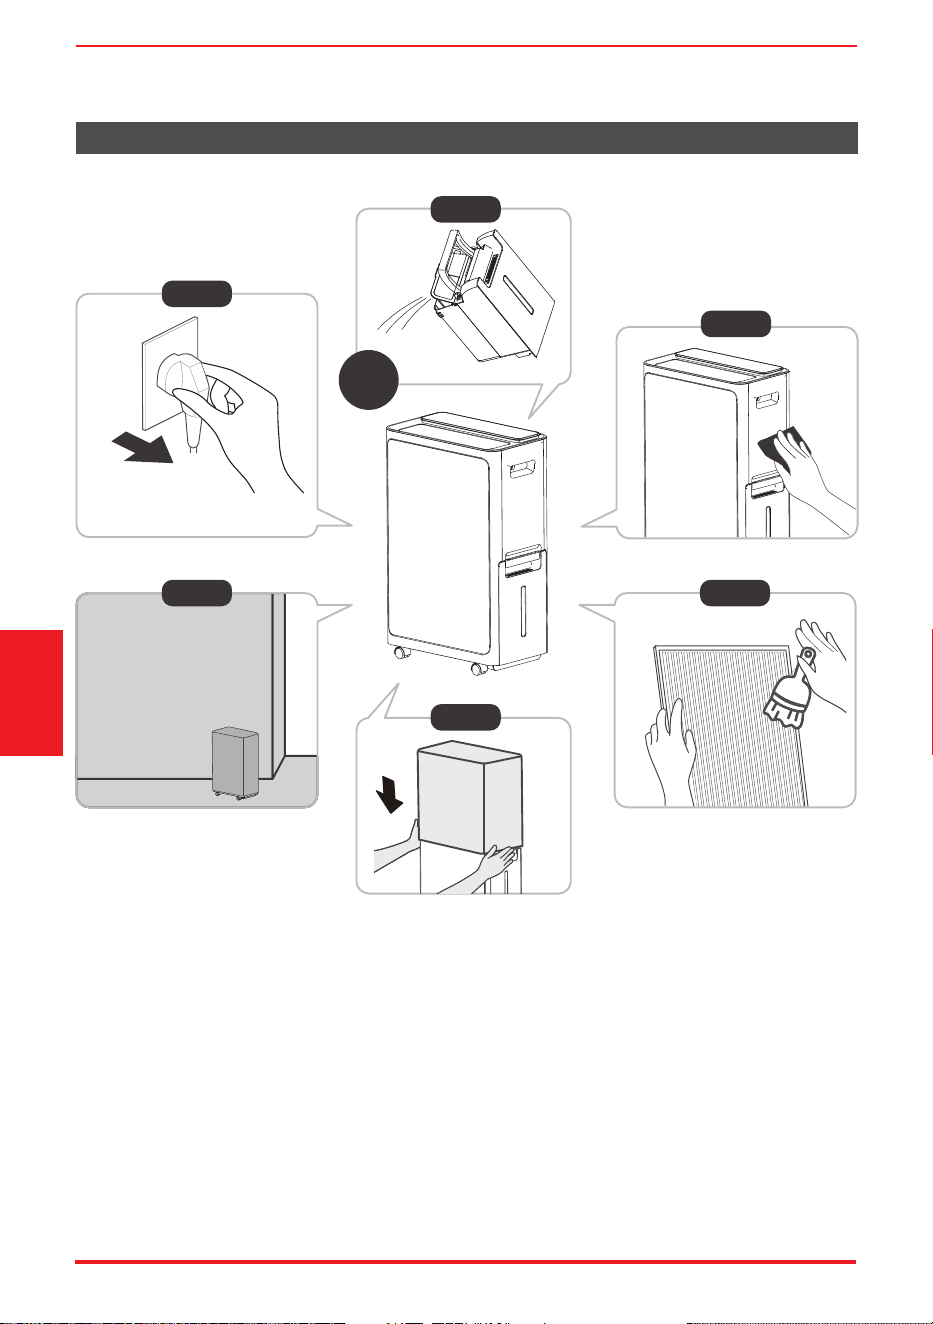
Turn o the dehumidier of and disconnect the plug from the power source before cleaning.
NOTE
Do not use a dishwasher to clean the bucket. After clean, the bucket must be in place and securely seated for
the dehumidier to operate.
NOTE
When installing the handle, install the clasps on both sides of the handle corresponding to the mounting holes.
Otherwise, the handle cannot be properly installed and reset.
NOTE
DO NOT CLEAN THE FILTER IN A DISHWASHER.
· Use water and a mild detergent. Do not use bleach or abrasives.
· Do not splash water directly onto the main unit. Doing so may cause an electrical shock, cause the insulation
to deteriorate, or cause the unit to rust.
· The air intake and outlet grilles get soiled easily, so use a vacuum attachment or brush to clean.
CARE AND MAINTENANCE
How to clean & maintenance your product.
Clean the Grill and Case
The air lter behind the front grille should be checked and cleaned at least every two weeks or more often if
necessary.
Clean the air lter
· Suggest to clean the bucket thoroughly every few weeks. Partially ll the bucket with clean water and mild
detergent.
Swish it around in the bucket, empty and rinse.
Clean the bucket
1. Press one side of the handle
inward and lift it up.
2. Press the ngerprint in the
middle of the water tank to
make the water tank cover
up.
3. Hold the inside of the tank cover and lift
the whole tank cover upward. Clean the
components of the tank, dry them
naturally, and then reinstall them
according to the above steps.
· Insert a straw brush with a diameter smaller than 10mm into the drain, scrape up and down to prevent dirt
from accumulating inside the hole.
· The outside of the drain can be wiped with a cotton cloth.
Clean the bucket drain Clean the permanent drain
To remove:
· Press down the tab on the lter and pull it outward, then take it out.
· Clean the lter with warm, soapy water. Rinse and let the lter dry before replacing it. Do not clean the lter in
a dishwasher.
To attach:
· Insert the air lter and HEPA lter into the unit from underside to upside.
· HEPA lter is recommended to be replaced once every 6 months.
Page 15
Dump The
Collected Water
Care And
Maintenance
NOTE
The cabinet and front may be dusted with an oil-free cloth or washed with a cloth dampened in a solution of
warm water and mildliquid dishwashing detergent. Rinse thoroughly and wipe dry. Never use harsh cleansers,
wax or polish on the cabinet front. Be sure to wring excess water from the cloth before wiping around the
controls.
Excess water in or around the controls may cause damage to the unit.
CAUTION
DO NOT operate the dehumidier without a lter because dirt and lint will clog it and reduce
performance.
Drain clean
1
Remove the rear grille.
NOTE: Be sure to
remove the plastic
sealing film before
using HEPA filter.
Install HEPA filter with
handle strap. Mount
outwards for replacement.
2
Page 16
· Step 1: Unplug the product, after turning of the unit.
· Step 2: Empty the bucket after 24 hours of unplugging.
· Step 3&4: Clean the main unit, water bucket and air lter.
· Step 5: Cover the unit with a plastic bag.
· Step 6: Store the unit upright in a dry, well-ventilated place.
When not using the unit for long time periods
Step6
Step 3
Step 4
Step 1
Step 2
*Please refer to the actual
plug, and the legend is for
reference only.
24 h
After
Step 5
Care And
Maintenance

Test laboratory Intertek Testing Services Shenzhen Ltd. Guangzhou Branch
Based on:GB/T 18801-2022 GB 21551.3-2010
Technical Standard For Disinfection (2002 Ministry of Health P.R.China)-2.1.3
Positive and negative ions produce positive and negative ions, positive and negative ion neutralization
discharge has a certain bactericidal ability
H1N1(A/PR/8/34)
H1N1(A/PR/8/34) Killing Rate:99.99%
230921139GZU-002
test method
suppression method
suppression target
test results
report number
ITEM
Test laboratory Intertek Testing Services Shenzhen Ltd. Guangzhou Branch
Based on:GB/T 18801-2022 GB 21551.3-2010
Technical Standard For Disinfection (2002 Ministry of Health P.R.China)-2.1.3
Positive and negative ions produce positive and negative ions, positive and negative ion neutralization
discharge has a certain bactericidal ability
Staphylococcus albicans 8032、Staphylococcus aureusATCC 6538、Escherichia coli 8099
Staphylococcus albicans 8032 Killing Rate:99.95%
Staphylococcus aureusATCC 6538 Killing Rate:99.95%
Escherichia coli 8099 Killing Rate:99.95%
230921139GZU-002
test method
suppression method
suppression target
test results
report number
ITEM
Test laboratory Intertek Testing Services Shenzhen Ltd. Guangzhou Branch
Based on ANSI/AHAM AC-1-2020
More negative ions are produced than positive ones, which can trap dust and bacteria
Smoke、Dust、Pollen、PM2.5
Smoke CADR(FT3/Min):51
Dust CADR(FT3/Min):64.2
Pollen CADR(FT3/Min):97.1
PM2.5 CADR(FT3/Min):57.2
230921139GZU-001
test method
suppression method
suppression target
test results
report number
ITEM
Color
Product Dimensions(W*D*H)(mm)
White
420*265*662
MEELS Standard – 17L/Day (26.7℃ 60%)
Manufactory’s Standard – 28L/Day (30℃ 80%)
AC 220V/50Hz
13A/250V
Dehumidifying Capacity
Power
Plug Type
Model RAD-DIA17HK
SPECIFICATIONS AND PURIFICATION DATA
Specifications and
purification data
Page 17
Specications
Purication data
Disinfection
Sterilisation
Purication

Page 18
TROUBLESHOOTING
TROUBLESHOOTING
Before calling for service, review the situation below rst yourself.
Problem
What to check
o
o
Unit does not start
Make sure the dehumidifiers plug is pushed completely into the outlet.
Check the house fuse/circuit breaker box.
Dehumidifier has reached its preset level or bucket is full.
Water bucket is not in the proper position.
The air filter is clogged.
The unit is tilted instead of upright as it should be.
The floor surface is not level.
Hose to connector or hose connection may be loose.
This is normal. The dehumidifier has Auto defrost feature.
These are error codes and protection codes. See the CONTROL PANEL
FEATURES section.
Do not allow enough time to remove the moisture.
Make sure there are no curtains, blinds or furniture blocking the front
or back of the dehumidifier.
The humidity control may n
ot be set low enough.
Check that all doors, windows and other openings are securely closed.
Room temperature is too low , below 5 C (41 F ).
Dehumidifier does not
dry the air as it should
The unit makes a loud
noise when operating
Frost appears on the coils
Water on floor
EH(xx), EL(xx), EC(xx),
PH(xx), PL(xx), PC(xx)
appear in the display


# MatterDetails