
Technical Support and E-Warranty Certificate www.vevor.com/support
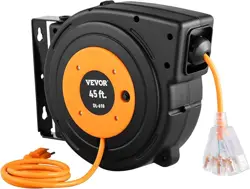
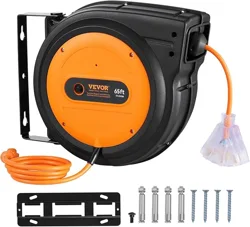
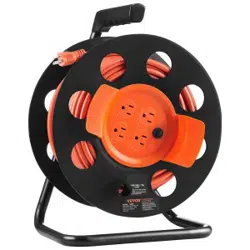
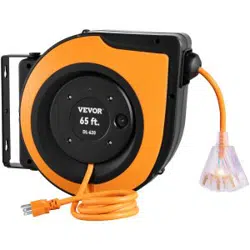
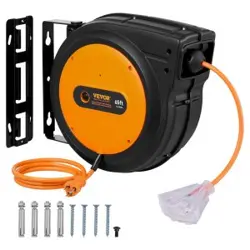
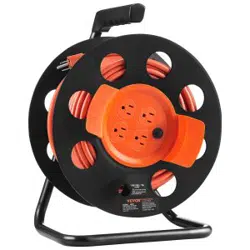
CORD REEL
MODEL:LA057F
We continue to be committed to provide you tools with competitive price.
"Save Half", "Half Price" or any other similar expressions used by us only represents an
estimate of savings you might benefit from buying certain tools with us compared to the major
top brands and does not necessarily mean to cover all categories of tools offered by us. You
are kindly reminded to verify carefully when you are placing an order with us if you are
actually saving half in comparison with the top major brands.


- 1 -
MODEL:LA057F
Have product questions? Need technical support? Please feel free to
contact us:
Technical Support and E-Warranty Certificate
www.vevor.com/support
NEED HELP? CONTACT US!
This is the original instruction, please read all manual instructions
carefully before operating. VEVOR reserves a clear interpretation of our
user manual. The appearance of the product shall be subject to the
product you received. Please forgive us that we won't inform you again if
there are any technology or software updates on our product.
CORD REEL

- 2 -
INSTRUCTIONS
SPECIFICATIONS:
FEATURES INCLUDE:
• Comfortable Handle
• 4 AC Ground Outlets
• Circuit Breaker
• High-Quality Durable Case
WARNING: DO NOT OVERLOAD!
Check the amperage of the tools or appliances to be plugged into the
outlets of the extension cord reel. Listed above are the maximum
amperage ratings.
OPERATION
Plug power cord into any 110-125V standard wall outlet. Plug up to four
(4)electrical appliances into the outlet. Pull cord out to desired length and
stop.To retract, guide the cord slowly back into the reel,and fix the plug with
a clip on the cord reel.
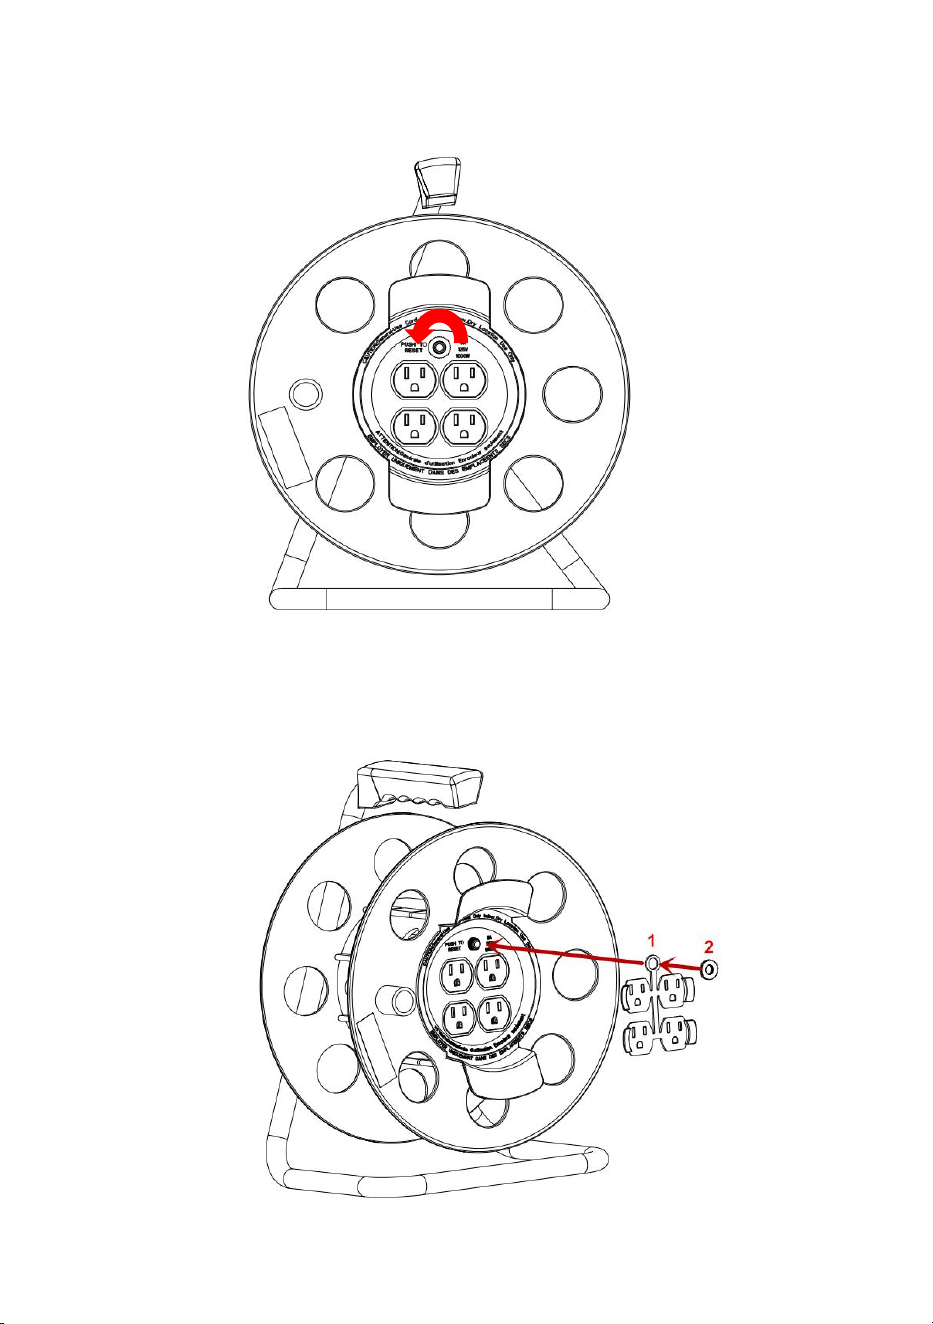
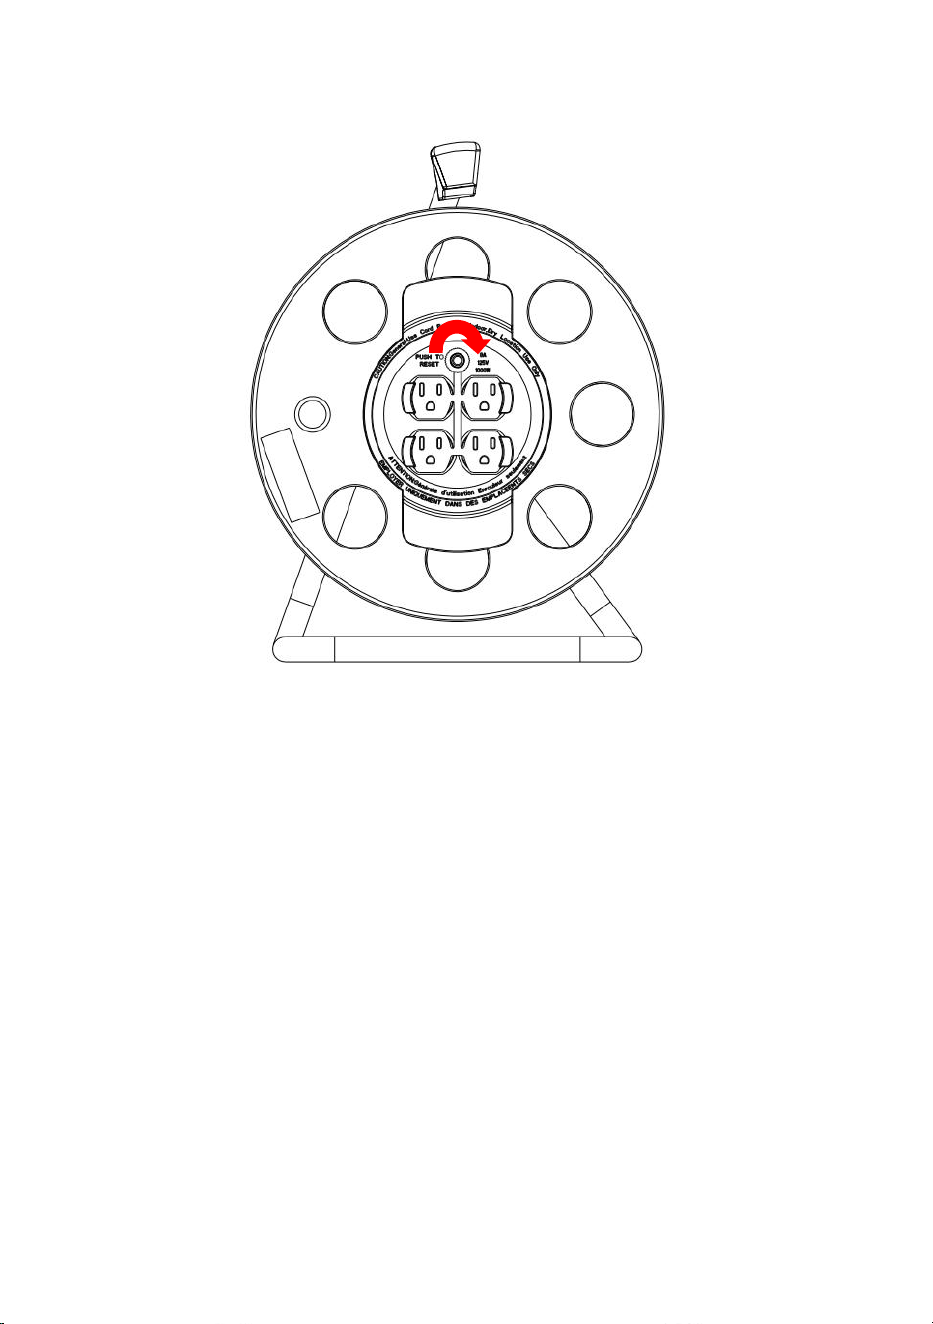
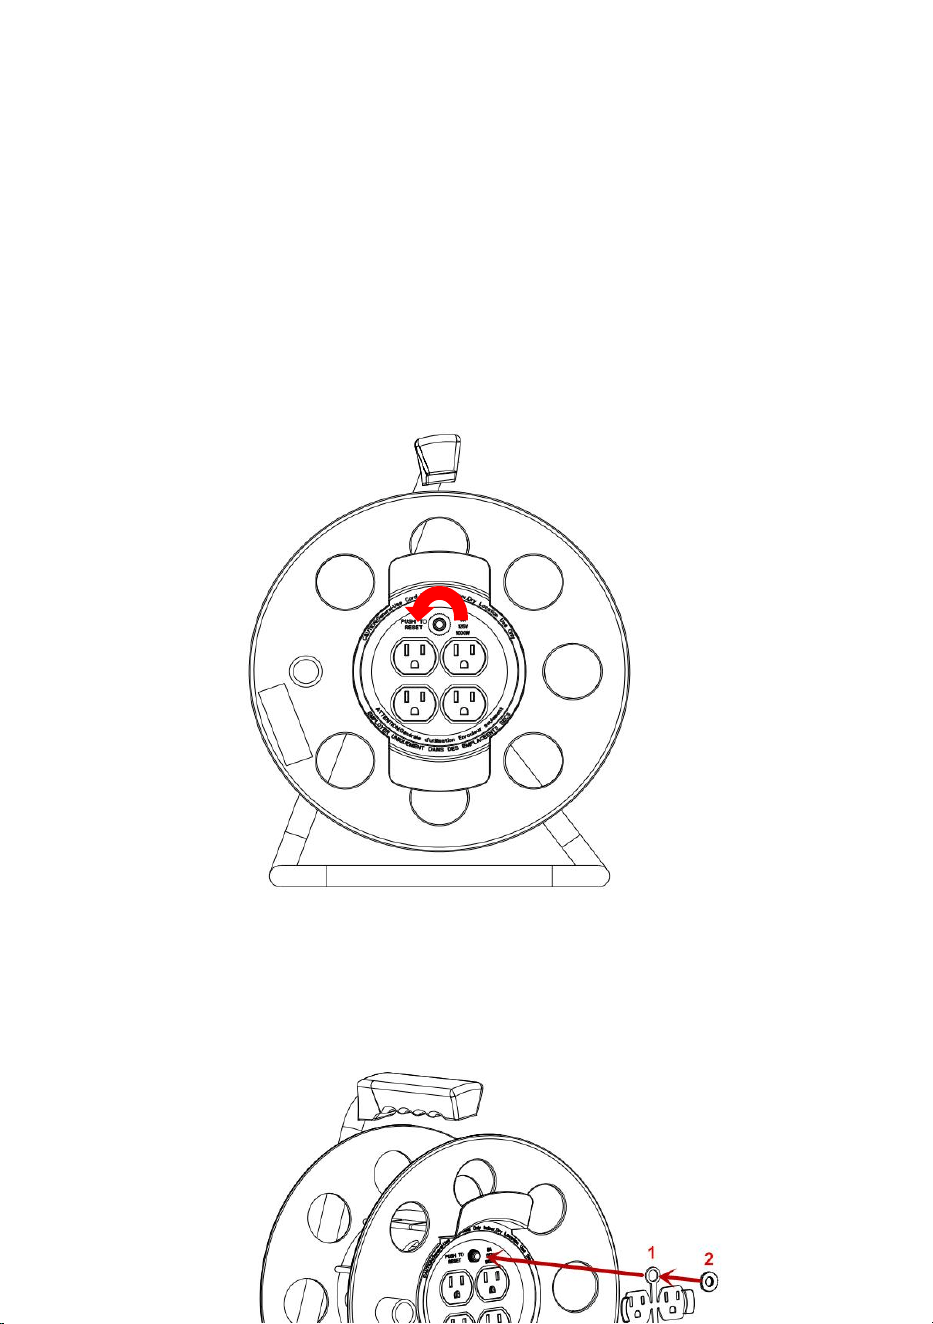
CIRCUIT BREAKER OVERLOAD PROTECTION
The reset button for the circuit breaker s located on the cord reel.lf unit is
overloaded circuit breaker will trip(black reset button will pop out).Remove
overload, wait two minutes, then reset by pressing black button.
Model
LA057F
Current(max)
11A
Voltage
125V
Watts(max)
1375W
Cord
SJTOW 14/3
Cord Length
100FT

- 3 -
SAFETY INSTRUCTION
WARNING To avoid serious injury or death from electrical shock or
fire
·DO NOT handle this fixture or try to plug it in when your hands are wet or
damp or when you are standing on a wet or damp surface or in water.
·This fixture MUST ALWAYS BE USED in accordance with all electrical and
safety codes and ordinances,including the most recent National Electric
Code(NEC) and with the Occupational Safety and Health Act (OSHA)
Volume 1 on General Industry Standards and Interpretations.
·ALWAYS make certain that the power source conforms to the
requirements on the fixture.
·ALWAYS disconnect the power before servicing or inspecting the fixture
for any reason
·This fixture IS ONLY USED FOR ON 110-125V and is equipped with an
approved 3 conductor cord with a 3-prong,grounded plug. TO REDUCE
THE RISK OF ELECTRICAL SHOCK,it should only be plugged into a
properly grounded 3-prong outlet.
·FIXTURE IS NOT WATERPROOF and is not intended for use in showers,
saunas or in potentially wet locations.ALWAYS keep this fixture away from
sinks, tubs, showers,etc. NEVER attempt to pick up plugged-in power tools
or appliances should they fall into standing water. Fatal Electrocution could
result ! This fixture comes equipped with a 3-prong grounded plug. DO
NOT remove the 3rd prong or otherwise try to modify the plug. If it does not
fit the outlet, have the proper outlet installed by a qualified electrician.
Improper connection of the grounding conductor can result in a risk of
electrical shock.
·NEVER attempt to plug the fixture into a non-grounded outlet or extension
cord and ALWAYS be sure that the extension cord is in good electrical
condition.
·This fixture is intended for use as a general indoor power source.Use only
in dry locations.DO NOT use in potentially dangerous locations, such as n
flammable or explosive atmospheres.
·Keep away from heating vents,radiators, or other sources of heat.
·KEEP OUT OF REACH OF CHILDREN.
- 4 -
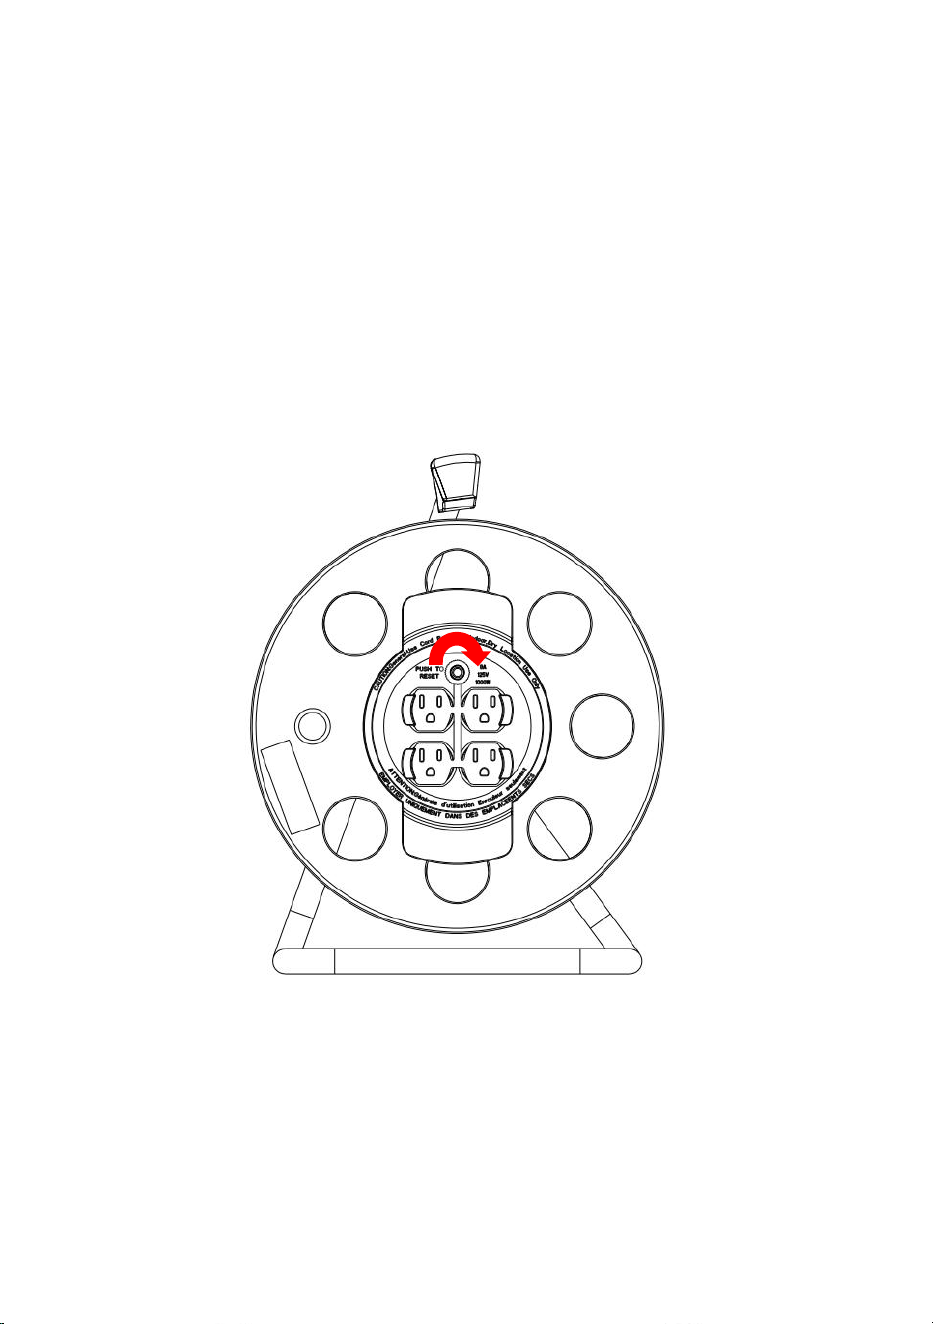
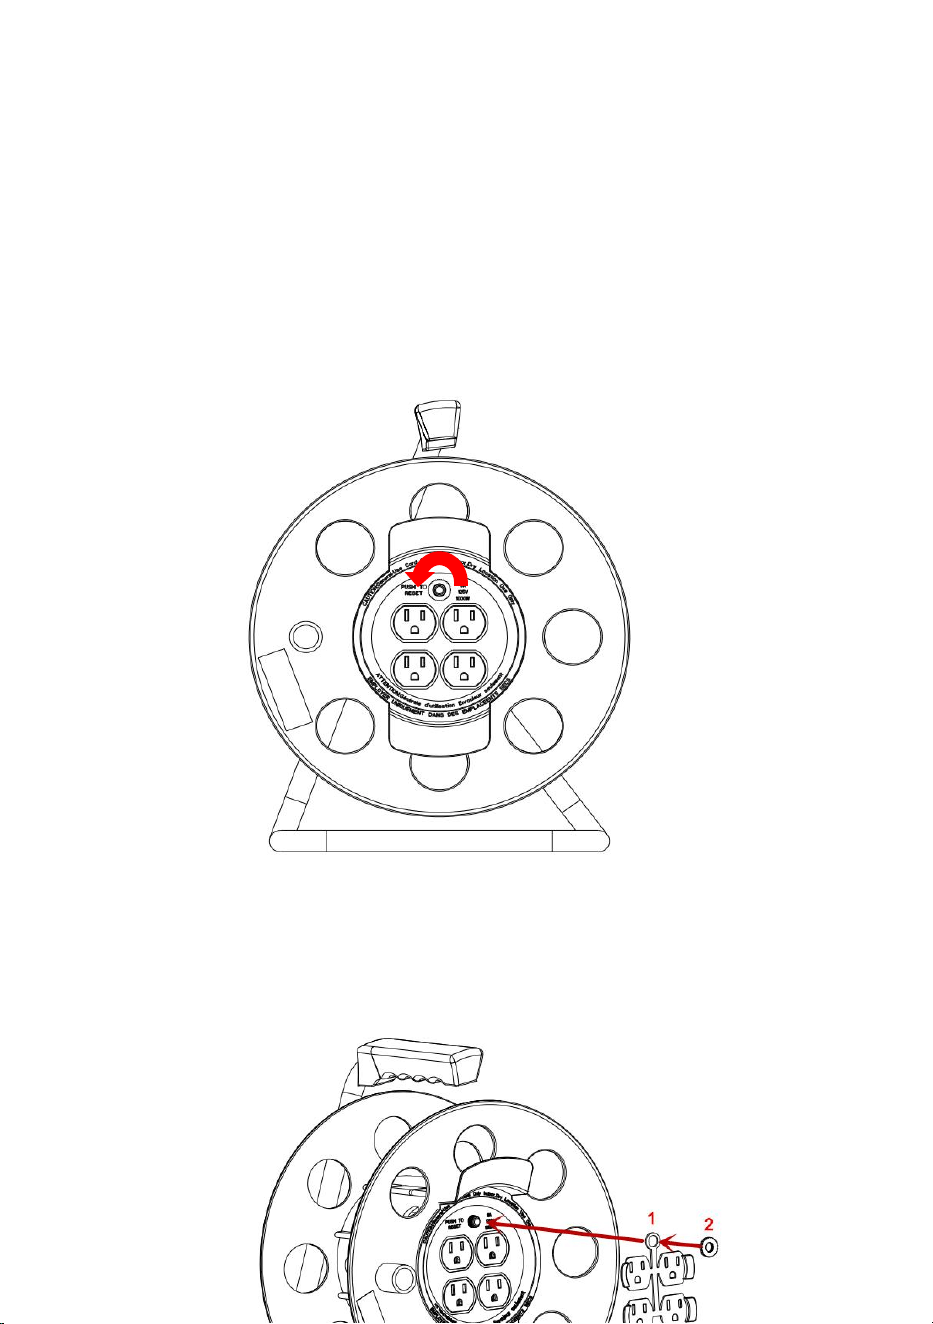
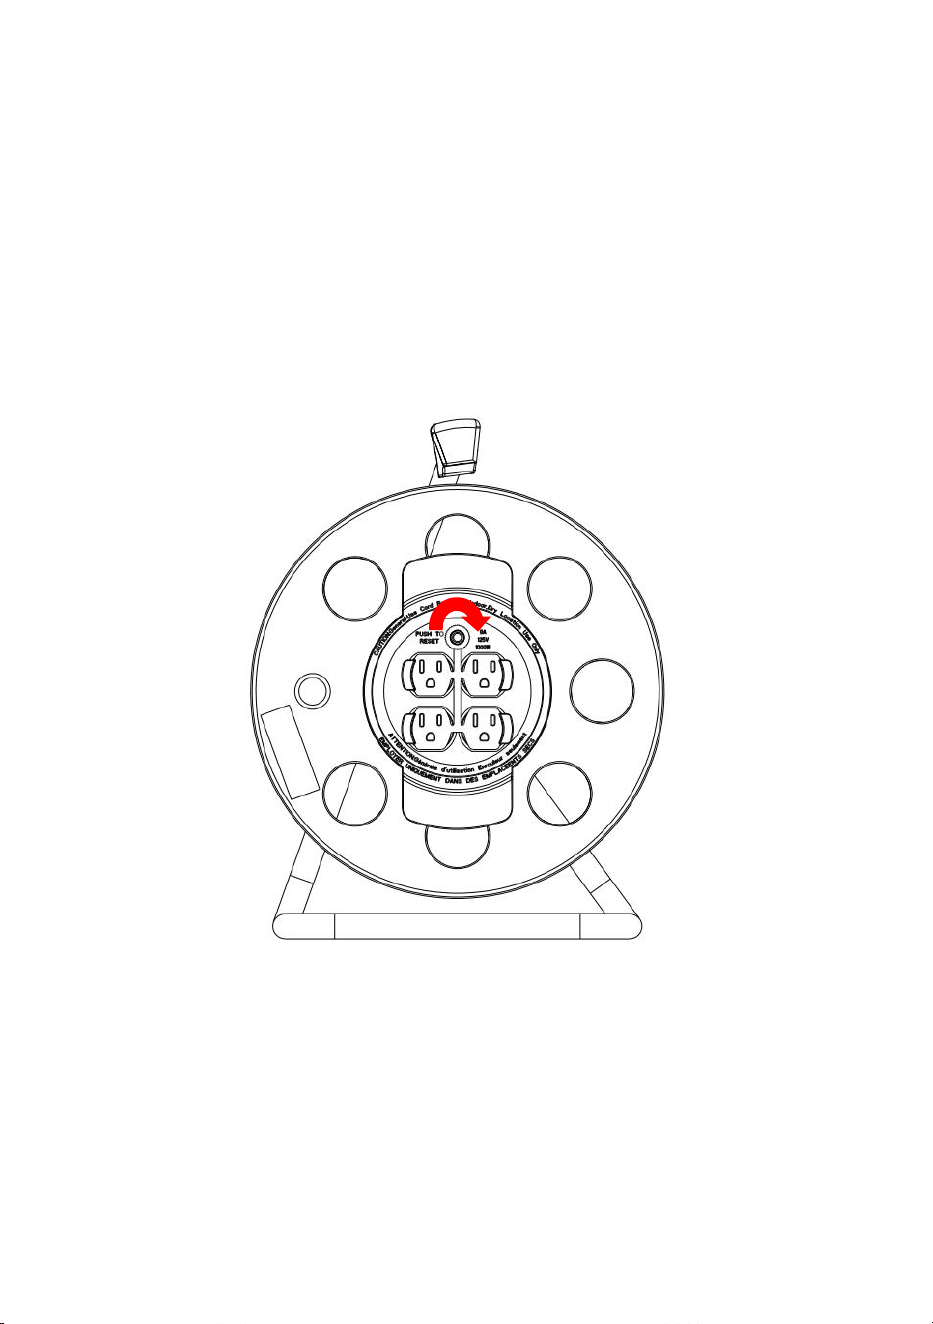
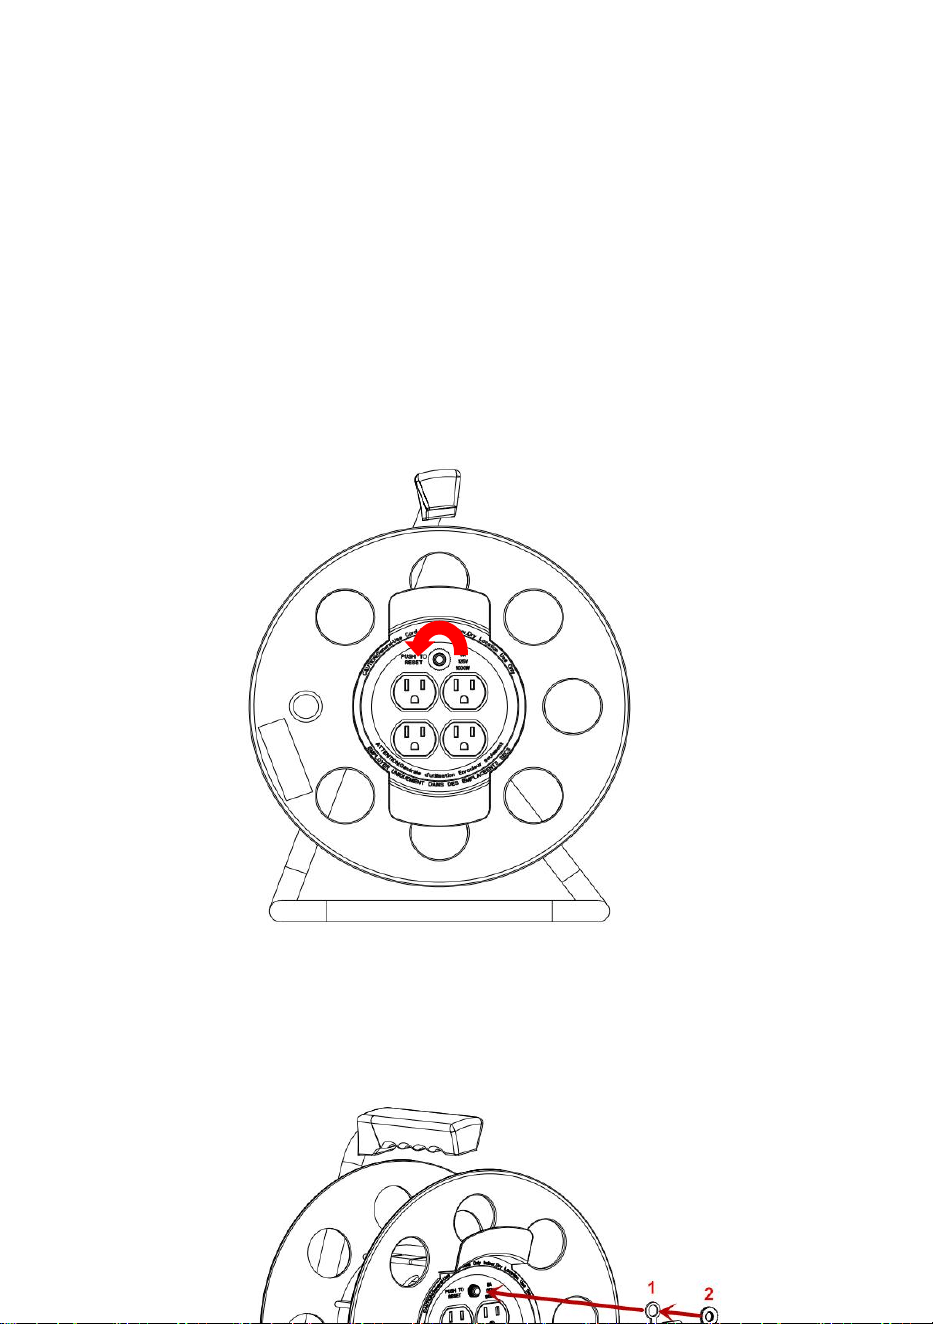
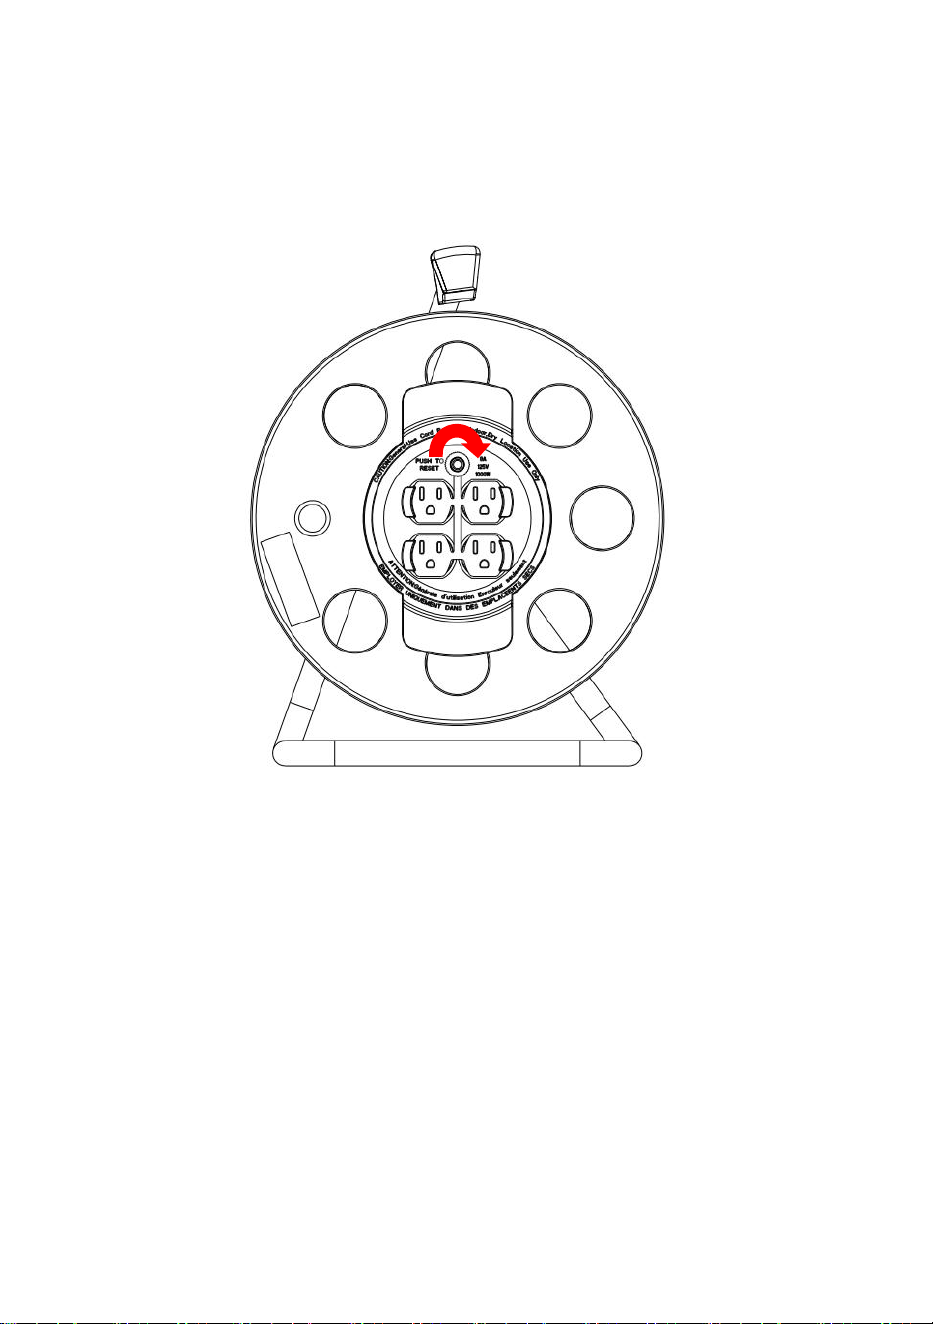
OPERATION OF DUST COVER
Step 1: Rotate the nut counterclockwise
Step2:As shown in the figure, install the cover first and then the nut
- 5 -
Step3:Tighten the nut in a clockwise direction


- 7 -
Technique Certificat d'assistance et de garantie électronique
www.vevor.com/support
ENROULEUR DE CORDON
MODÈLE: LA057F
We continue to be committed to provide you tools with competitive price.
"Save Half", "Half Price" or any other similar expressions used by us only represents an
estimate of savings you might benefit from buying certain tools with us compared to the major
top brands and does not necessarily mean to cover all categories of tools offered by us. You
are kindly reminded to verify carefully when you are placing an order with us if you are
actually saving half in comparison with the top major brands.

- 8 -

- 1 -
MODÈLE : L A057F
Have product questions? Need technical support? Please feel free to
contact us:
Technical Support and E-Warranty Certificate
www.vevor.com/support
NEED HELP? CONTACT US!
This is the original instruction, please read all manual instructions
carefully before operating. VEVOR reserves a clear interpretation of our
user manual. The appearance of the product shall be subject to the
product you received. Please forgive us that we won't inform you again if
there are any technology or software updates on our product.
CORD REEL

- 2 -
INSTRUCTIONS
CARACTÉRISTIQUES:
LES CARACTÉRISTIQUES INCLUENT :
• Poignée confortable
• 4 prises de terre CA
• Disjoncteur
• Étui durable de haute
qualité
ATTENTION : NE PAS SURCHARGER !
Vérifiez l'ampérage des outils ou appareils à brancher le
points de vente de l'enrouleur de rallonge. Ci-dessus sont énumérés les
maximums
ampérages nominaux.
OPÉRATION
Branchez le cordon d'alimentation sur n'importe quelle prise 110-125 V
Prise murale standard. Branchez jusqu'à quatre (4) appareils électriques
dans la prise. Tirez le cordon jusqu'à la longueur souhaitée et arrêtez-le .
Pour rétracter, guidez lentement le cordon dans l'enrouleur et fixez la fiche
avec un clip sur l'enrouleur de cordon.
DISJONCTEUR DE PROTECTION CONTRE LES SURCHARGES
Le bouton de réinitialisation du disjoncteur est situé sur l'enrouleur de
Modèle
L A057F
Courant (max)
11A
Tension
12,5 V
Puissance (max.)
1375W
Corde
SJTOW 14/3
Longueur du cordon
100 pieds

- 3 -
cordon. Si l'appareil est surchargé, le disjoncteur voyage (le bouton de
réinitialisation noir apparaîtra). Retirez la surcharge, attendez deux
minutes, puis réinitialisez en appuyant sur le bouton noir.

- 4 -
CONSIGNES DE SÉCURITÉ
AVERTISSEMENT Pour éviter des blessures graves ou la mort par
choc électrique ou incendie
·NE manipulez PAS cet appareil et n'essayez pas de le brancher lorsque
vos mains sont mouillées ou humides ou lorsque vous êtes se tenir debout
sur une surface mouillée ou humide ou dans l'eau.
·Cet appareil DOIT TOUJOURS ÊTRE UTILISÉ conformément à tous les
codes et ordonnances électriques et de sécurité, y compris le Code
national de l'électricité (NEC) le plus récent et à la Loi sur la sécurité et la
santé au travail (OSHA)
Volume 1 sur les normes générales de l'industrie et leurs interprétations.
·Assurez-vous TOUJOURS que la source d'alimentation est conforme le
exigences relatives au luminaire.
·Débranchez TOUJOURS l'alimentation avant d'entretenir ou d'inspecter
l'appareil pour quelque raison que ce soit
·Ce luminaire est UNIQUEMENT UTILISÉ SUR 110-125V et est équipé
d'un
cordon à 3 conducteurs approuvé avec un Fiche à 3 broches avec mise à
la terre. POUR RÉDUIRE LE RISQUE DE CHOC ÉLECTRIQUE, il ne doit
être branché que sur une prise à 3 broches correctement reliée à la terre.
·LE LUMINAIRE N'EST PAS ÉTANCHE et n'est pas destiné à être utilisé
dans les douches, les saunas ou dans des endroits potentiellement
humides. emplacements. Gardez TOUJOURS cet appareil loin des éviers,
baignoires, douches, etc. N'essayez JAMAIS de le ramasser des outils ou
appareils électriques branchés s'ils tombent dans l'eau stagnante. Une
électrocution mortelle pourrait en résulter ! Ce luminaire est équipé d'une
fiche de mise à la terre à 3 broches. NE retirez PAS la 3ème broche ou
Essayez de modifier la fiche. Si elle ne s'adapte pas à la prise, faites
installer une prise adaptée par un électricien qualifié.
Une connexion incorrecte du conducteur de mise à la terre peut entraîner
un risque de choc électrique.
·N'essayez JAMAIS de brancher l'appareil sur une prise ou une rallonge
non reliée à la terre et assurez-vous TOUJOURS que la rallonge est en
bon état électrique.
- 5 -
·Ce luminaire est destiné à être utilisé comme source d'alimentation
générale à l'intérieur . À utiliser uniquement dans des endroits secs. NE
PAS utiliser dans des endroits potentiellement dangereux des
emplacements tels que des atmosphères inflammables ou explosives.
·Tenir à l’écart des bouches de chauffage, des radiateurs ou d’autres
sources de chaleur.
· TENIR HORS DE PORTÉE DES ENFANTS.
FONCTIONNEMENT DU COUVERCLE ANTI-POUSSIÈRE
Étape 1 : Faites tourner l'écrou dans le sens inverse des aiguilles d'une
montre
Étape 2 : Comme indiqué sur la figure, installez d'abord le couvercle, puis
l'écrou
- 6 -
Étape 3 : Serrez l'écrou dans le sens des aiguilles d'une montre

- 7 -


- 9 -
Technisch Support und E-Garantie-Zertifikat www.vevor.com/support
KABELTROMMEL
MODELL: LA057F
We continue to be committed to provide you tools with competitive price.
"Save Half", "Half Price" or any other similar expressions used by us only represents an
estimate of savings you might benefit from buying certain tools with us compared to the major
top brands and does not necessarily mean to cover all categories of tools offered by us. You
are kindly reminded to verify carefully when you are placing an order with us if you are
actually saving half in comparison with the top major brands.

- 10 -

- 1 -
MODELL:L A057F
Have product questions? Need technical support? Please feel free to
contact us:
Technical Support and E-Warranty Certificate
www.vevor.com/support
NEED HELP? CONTACT US!
This is the original instruction, please read all manual instructions
carefully before operating. VEVOR reserves a clear interpretation of our
user manual. The appearance of the product shall be subject to the
product you received. Please forgive us that we won't inform you again if
there are any technology or software updates on our product.
CORD REEL
- 2 -
INSTRUCTIONS
SPEZIFIKATIONEN:
FUNKTIONEN:
• Bequemer Griff
• 4 AC-Erdungssteckdosen
• Leistungsschalter
• Hochwertiges, langlebiges
Gehäuse
ACHTUNG: NICHT ÜBERLADEN!
Überprüfen Sie die Stromstärke der Werkzeuge oder Geräte, die an die
Steckdose angeschlossen werden sollen. Die
Verkaufsstellen der Verlängerungskabeltrommel. Oben aufgeführt sind die
maximalen
Amperezahlen.
BETRIEB
Stecken Sie das Netzkabel in eine beliebige 110-125V Standardsteckdose.
Schließen Sie bis zu vier (4) Elektrogeräte an die Steckdose an. Ziehen
Sie das Kabel auf die gewünschte Länge heraus und stoppen Sie es . Zum
Einrollen führen Sie das Kabel langsam zurück in die Rolle und befestigen
Sie den Stecker mit einem Clip an der Kabelrolle.
Leistungsschalter-Überlastschutz
Modell
L A057F
Strom (max)
11A
Stromspannung
12,5 V
Watt (max.)
1375 W
Kabel
SJTOW 14/3
Kabellänge
100 Fuß

- 3 -
Der Reset-Knopf für den Leistungsschalter befindet sich auf der
Kabeltrommel. Wenn das Gerät überlastet ist, wird der Leistungsschalter
Auslösung (schwarzer Reset-Knopf springt heraus). Überlastung
beseitigen, zwei Minuten warten und dann durch Drücken des schwarzen
Knopfs zurücksetzen.

- 4 -
SICHERHEITSHINWEISE
WARNUNG Um schwere Verletzungen oder Tod durch Stromschlag
oder Feuer zu vermeiden
Gerät NICHT an und versuchen Sie NICHT, es einzustecken, wenn Ihre
Hände nass oder feucht sind oder wenn Sie auf einer nassen oder
feuchten Oberfläche oder im Wasser stehen.
· Diese Vorrichtung MUSS IMMER in Übereinstimmung mit allen Elektro-
und Sicherheitsvorschriften und -verordnungen verwendet werden ,
einschließlich des neuesten National Electric Code (NEC) und des
Arbeitsschutzgesetzes. (Arbeitsschutzbehörde)
Band 1 zu allgemeinen Industriestandards und Interpretationen .
· Stellen Sie IMMER sicher, dass die Stromquelle den Die
Anforderungen an die Vorrichtung.
· Trennen Sie IMMER die Stromversorgung, bevor Sie das Gerät aus
irgendeinem Grund warten oder überprüfen
·Diese Leuchte ist nur für 110-125 V geeignet. und ist ausgestattet mit
einem
zugelassenes 3-adriges Kabel mit einer 3-poliger, geerdeter Stecker. UM
DAS RISIKO EINES ELEKTRISCHEN SCHLAGS ZU VERRINGERN,
sollte er nur an eine ordnungsgemäß geerdete dreipolige Steckdose.
· DIE LEUCHTE IST NICHT WASSERDICHT und ist nicht für den Einsatz
in Duschen, Saunen oder in potenziell nassen Standorte.Halten Sie dieses
Gerät IMMER von Waschbecken, Badewannen, Duschen usw. fern.
Versuchen Sie NIEMALS, eingesteckte Elektrowerkzeuge oder Geräte,
falls sie in stehendes Wasser fallen. Ein tödlicher Stromschlag kann die
Folge sein ! Dieses Gerät ist mit einem 3-poligen geerdeten Stecker
ausgestattet. Entfernen Sie NICHT den 3. Stift oder Versuchen Sie, den
Stecker zu modifizieren. Wenn er nicht in die Steckdose passt , lassen Sie
die richtige Steckdose von einem qualifizierten Elektriker installieren.
Bei unsachgemäßem Anschluss des Erdungsleiters besteht die Gefahr
eines Stromschlags.
·Versuchen Sie NIEMALS, das Gerät an eine nicht geerdete Steckdose
oder ein Verlängerungskabel anzuschließen und achten Sie IMMER darauf
dass das Verlängerungskabel in einem guten elektrischen Zustand ist.
- 5 -
·Dieses Gerät ist für den Einsatz als allgemeine Stromquelle im
Innenbereich vorgesehen. Nur an trockenen Orten verwenden. NICHT in
potenziell gefährlichen Orte, wie zum Beispiel in entzündlichen oder
explosiven Atmosphären.
· Von Heizungsöffnungen, Heizkörpern oder anderen Wärmequellen
fernhalten.
· Außerhalb der Reichweite von Kindern aufbewahren.
BEDIENUNG DER STAUBSCHUTZABDECKUNG
Schritt 1: Drehen Sie die Mutter gegen den Uhrzeigersinn
Schritt 2: Installieren Sie wie in der Abbildung gezeigt zuerst die
Abdeckung und dann die Mutter
- 6 -
Schritt 3: Die Mutter im Uhrzeigersinn festziehen

- 7 -


- 9 -
Tecnico Supporto e certificato di garanzia elettronica www.vevor.com/support
AVVOLGICAVO
MODELLO: LA057F
We continue to be committed to provide you tools with competitive price.
"Save Half", "Half Price" or any other similar expressions used by us only represents an
estimate of savings you might benefit from buying certain tools with us compared to the major
top brands and does not necessarily mean to cover all categories of tools offered by us. You
are kindly reminded to verify carefully when you are placing an order with us if you are
actually saving half in comparison with the top major brands.

- 10 -

- 1 -
MODELLO: L A057F
Have product questions? Need technical support? Please feel free to
contact us:
Technical Support and E-Warranty Certificate
www.vevor.com/support
NEED HELP? CONTACT US!
This is the original instruction, please read all manual instructions
carefully before operating. VEVOR reserves a clear interpretation of our
user manual. The appearance of the product shall be subject to the
product you received. Please forgive us that we won't inform you again if
there are any technology or software updates on our product.
CORD REEL

- 2 -
INSTRUCTIONS
SPECIFICHE:
LE CARATTERISTICHE INCLUDONO:
• Maniglia comoda
• 4 prese di terra CA
• Interruttore automatico
• Custodia durevole di alta
qualità
ATTENZIONE: NON SOVRACCARICARE!
Controllare l'amperaggio degli utensili o degli elettrodomestici da collegare
IL
punti vendita della bobina della prolunga. Sopra sono elencati i valori
massimi
amperaggio nominale.
OPERAZIONE
Collegare il cavo di alimentazione a qualsiasi presa da 110-125 V presa a
muro standard. Collegare fino a quattro (4) apparecchi elettrici alla presa.
Estrarre il cavo fino alla lunghezza desiderata e fermarlo . Per ritrarlo,
guidare lentamente il cavo nella bobina e fissare la spina con una clip sulla
bobina del cavo.
PROTEZIONE DA SOVRACCARICO DELL'INTERRUTTORE
Modello
L' A057F
Corrente (max)
11A
Voltaggio
12 5 Volt
Watt (massimo)
1375W
Cavo
SJTOW 14/3
Lunghezza del cavo
100 PIEDI

- 3 -
AUTOMATICO
Il pulsante di reset per l'interruttore automatico si trova sull'avvolgicavo. Se
l'unità è sovraccarica, l'interruttore automatico si spegnerà. viaggio (il
pulsante nero di reset salterà fuori). Rimuovere il sovraccarico, attendere
due minuti, quindi resettare premendo il pulsante nero.

- 4 -
ISTRUZIONI DI SICUREZZA
ATTENZIONE Per evitare lesioni gravi o morte causate da scosse
elettriche o incendi
·NON maneggiare questo apparecchio o tentare di collegarlo quando le
mani sono bagnate o umide o quando si è stare in piedi su una superficie
bagnata o umida oppure in acqua.
·Questo apparecchio DEVE ESSERE SEMPRE UTILIZZATO in conformità
con tutti i codici e le ordinanze elettriche e di sicurezza, incluso il più
recente National Electric Code (NEC) e con l'Occupational Safety and
Health Act (OSHA)
Volume 1 sugli standard e le interpretazioni generali del settore.
·Assicurarsi SEMPRE che la fonte di alimentazione sia conforme a IL
requisiti dell'apparecchio.
·Scollegare SEMPRE l'alimentazione prima di effettuare la manutenzione o
l'ispezione dell'apparecchio per qualsiasi motivo
·Questo apparecchio è UTILIZZATO SOLO PER 110-125 V ed è dotato di
un
Cavo a 3 conduttori approvato con un Spina a 3 poli con messa a terra.
PER RIDURRE IL RISCHIO DI SCOSSE ELETTRICHE, deve essere
collegata solo a una presa elettrica a tre poli correttamente collegata a
terra.
·L'APPARECCHIO NON È IMPERMEABILE e non è destinato all'uso in
docce, saune o in luoghi potenzialmente umidi posizioni.Tenere SEMPRE
questo apparecchio lontano da lavandini, vasche, docce, ecc. NON tentare
MAI di raccogliere utensili elettrici o elettrodomestici collegati alla presa
elettrica se dovessero cadere in acqua stagnante. Potrebbe verificarsi una
folgorazione mortale ! Questo apparecchio è dotato di una spina con
messa a terra a 3 poli. NON rimuovere il 3° polo o altrimenti provare a
modificare la spina. Se non si adatta alla presa , far installare la presa
corretta da un elettricista qualificato.
Un collegamento improprio del conduttore di messa a terra può
comportare il rischio di scosse elettriche.
·NON tentare MAI di collegare l'apparecchio a una presa non messa a
terra o a una prolunga e assicurarsi SEMPRE che la prolunga sia in buone

- 5 -
condizioni elettriche.
·Questo apparecchio è destinato all'uso come fonte di alimentazione
generale per interni. Utilizzare solo in luoghi asciutti. NON utilizzare in
luoghi potenzialmente pericolosi . luoghi, come atmosfere infiammabili o
esplosive.
·Tenere lontano da bocchette di riscaldamento, termosifoni o altre fonti di
calore.
· TENERE FUORI DALLA PORTATA DEI BAMBINI.
FUNZIONAMENTO DELLA COPERTURA ANTIPOLVERE
Fase 1: ruotare il dado in senso antiorario
Fase 2: come mostrato nella figura, installare prima il coperchio e poi il
dado

- 6 -
Fase 3: serrare il dado in senso orario

- 7 -


- 9 -
Técnico Soporte y certificado de garantía electrónica www.vevor.com/support
CARRETE DE CABLE
MODELO: LA057F
We continue to be committed to provide you tools with competitive price.
"Save Half", "Half Price" or any other similar expressions used by us only represents an
estimate of savings you might benefit from buying certain tools with us compared to the major
top brands and does not necessarily mean to cover all categories of tools offered by us. You
are kindly reminded to verify carefully when you are placing an order with us if you are
actually saving half in comparison with the top major brands.

- 10 -

- 1 -
MODELO:L A057F
Have product questions? Need technical support? Please feel free to
contact us:
Technical Support and E-Warranty Certificate
www.vevor.com/support
NEED HELP? CONTACT US!
This is the original instruction, please read all manual instructions
carefully before operating. VEVOR reserves a clear interpretation of our
user manual. The appearance of the product shall be subject to the
product you received. Please forgive us that we won't inform you again if
there are any technology or software updates on our product.
CORD REEL

- 2 -
INSTRUCTIONS
PRESUPUESTO:
LAS CARACTERÍSTICAS INCLUYEN:
• Mango cómodo
• 4 tomas de corriente
alterna con conexión a tierra
• Disyuntor
• Estuche duradero de alta
calidad
ADVERTENCIA: ¡NO SOBRECARGAR!
Verifique el amperaje de las herramientas o aparatos que se van a
enchufar. el
salidas del carrete del cable de extensión. Arriba se enumeran los cables
de extensión máximos .
clasificaciones de amperaje.
OPERACIÓN
Enchufe el cable de alimentación a cualquier toma de 110-125 V. Toma de
corriente estándar de pared. Conecte hasta cuatro (4) aparatos eléctricos
en la toma. Tire del cable hasta la longitud deseada y deténgalo . Para
retraerlo, guíe el cable lentamente hacia el interior del carrete y fije el
enchufe con un clip en el carrete.
Modelo
La057F
Corriente (máxima)
11A
Voltaje
12,5 V
Vatios (máximo)
1375W
Cable
14 de marzo de 2014
Longitud del cable
100 pies

- 3 -
PROTECCIÓN CONTRA SOBRECARGA DEL DISYUNTOR
El botón de reinicio del disyuntor se encuentra en el carrete del cable. Si la
unidad está sobrecargada, el disyuntor se reiniciará. viaje (el botón de
reinicio negro saltará). Elimine la sobrecarga, espere dos minutos y luego
reinicie presionando el botón negro.

- 4 -
INSTRUCCIONES DE SEGURIDAD
ADVERTENCIA Para evitar lesiones graves o la muerte por descarga
eléctrica o incendio
·NO manipule este aparato ni intente enchufarlo cuando tenga las manos
mojadas o húmedas o cuando esté de pie sobre una superficie mojada o
húmeda o en el agua.
·Este artefacto DEBE UTILIZARSE SIEMPRE de acuerdo con todos los
códigos y ordenanzas eléctricos y de seguridad, incluido el Código
Eléctrico Nacional (NEC) más reciente y la Ley de Seguridad y Salud
Ocupacional. (OSHA)
Volumen 1 sobre normas e interpretaciones de la industria general .
·SIEMPRE asegúrese de que la fuente de alimentación cumpla con el
Requisitos del accesorio.
·SIEMPRE desconecte la energía antes de realizar mantenimiento o
inspeccionar el artefacto por cualquier motivo.
·Este accesorio SÓLO SE UTILIZA PARA 110-125 V y está equipado con
un
Cable de 3 conductores homologado con un Enchufe de 3 clavijas con
conexión a tierra. PARA REDUCIR EL RIESGO DE DESCARGA
ELÉCTRICA, solo debe enchufarse un tomacorriente de tres clavijas
debidamente conectado a tierra.
·EL ACCESORIO NO ES IMPERMEABLE y no está diseñado para usarse
en duchas, saunas o en lugares potencialmente húmedos. Ubicaciones.
SIEMPRE mantenga este artefacto alejado de lavabos, bañeras, duchas,
etc. NUNCA intente levantarlo. herramientas o aparatos eléctricos
enchufados en caso de que caigan en agua estancada. Podría producirse
una electrocución fatal. ! Este artefacto viene equipado con un enchufe de
3 clavijas con conexión a tierra. NO retire la tercera clavija ni lo coloque de
otra manera. Intente modificar el enchufe. Si no encaja en la toma de
corriente, solicite a un electricista calificado que instale la toma de
corriente adecuada.
La conexión incorrecta del conductor de tierra puede provocar riesgo de
descarga eléctrica.
·NUNCA intente enchufar el artefacto en un tomacorriente o cable de

- 5 -
extensión sin conexión a tierra y SIEMPRE asegúrese que el cable de
extensión esté en buenas condiciones eléctricas.
· Este dispositivo está diseñado para usarse como fuente de energía
general en interiores. Utilícelo únicamente en lugares secos. NO lo use en
áreas potencialmente peligrosas . lugares como atmósferas inflamables o
explosivas.
·Mantener alejado de rejillas de calefacción, radiadores u otras fuentes de
calor.
· MANTENER FUERA DEL ALCANCE DE LOS NIÑOS.
FUNCIONAMIENTO DE LA CUBIERTA ANTIPOLVO
Paso 1: Gire la tuerca en sentido antihorario.
Paso 2: Como se muestra en la figura, instale primero la cubierta y luego la
tuerca.

- 6 -
Paso 3: Apriete la tuerca en el sentido de las agujas del reloj.

- 7 -


- 9 -
Techniczny Wsparcie i certyfikat gwarancji elektronicznej www.vevor.com/support
BĘBEN NA PRZEWÓD
MODEL: LA057F
We continue to be committed to provide you tools with competitive price.
"Save Half", "Half Price" or any other similar expressions used by us only represents an
estimate of savings you might benefit from buying certain tools with us compared to the major
top brands and does not necessarily mean to cover all categories of tools offered by us. You
are kindly reminded to verify carefully when you are placing an order with us if you are
actually saving half in comparison with the top major brands.

- 10 -

- 1 -
MODEL:L A057F
Have product questions? Need technical support? Please feel free to
contact us:
Technical Support and E-Warranty Certificate
www.vevor.com/support
NEED HELP? CONTACT US!
This is the original instruction, please read all manual instructions
carefully before operating. VEVOR reserves a clear interpretation of our
user manual. The appearance of the product shall be subject to the
product you received. Please forgive us that we won't inform you again if
there are any technology or software updates on our product.
CORD REEL
- 2 -
INSTRUCTIONS
DANE TECHNICZNE:
CECHY OBEJMUJĄ:
• Wygodny uchwyt
• 4 gniazda uziemiające AC
• Wyłącznik automatyczny
• Wysokiej jakości, trwała
obudowa
UWAGA: NIE PRZECIĄŻAĆ!
Sprawdź natężenie prądu narzędzi lub urządze ń , do których chcesz
podłączyć prąd. ten
wyloty bębna przedłużacza. Powyżej podano maksymalne
natężenie prądu.
DZIAŁANIE
Podłącz przewód zasilający do dowolnego źródła zasilania 110 – 125 V
standardowe gniazdko ścienne. Podłącz do gniazdka maksymalnie cztery
(4) urządzenia elektryczne. Rozciągnij przewód na żądaną długość i
zatrzymaj . Aby zwinąć, powoli wprowadź przewód z powrotem do bębna i
zamocuj wtyczkę za pomocą klipsa na bębnie przewodu.
Model
L A057F
Prąd (maks.)
11A
Woltaż
12 5 V
Waty (maks.)
1375 W
Sznur
SJTOW 14/3
Długość przewodu
100 stóp

- 3 -
OCHRONA PRZECIĄŻENIOWA WYŁĄCZNIKA
Przycisk resetowania wyłącznika obwodu znajduje się na bębnie przewodu.
Jeżeli urządzenie jest przeciążone, wyłącznik obwodu zostanie wyłączony.
zadziałanie (wyskoczy czarny przycisk resetowania). Usuń przeciążenie,
odczekaj dwie minuty, a następnie zresetuj, naciskając czarny przycisk.

- 4 -
INSTRUKCJA BEZPIECZEŃSTWA
OSTRZEŻENIE Aby uniknąć poważnych obrażeń lub śmierci na
skutek porażenia prądem elektrycznym lub pożaru
· NIE dotykaj tego urządzenia ani nie próbuj go podłączać, gdy masz
mokre lub wilgotne ręce albo gdy jesteś stojąc na mokrej lub wilgotnej
powierzchni lub w wodzie.
·Niniejsze urządzenie MUSI BYĆ ZAWSZE UŻYWANE zgodnie ze
wszystkimi przepisami i rozporządzeniami dotyczącymi elektryczności i
bezpieczeństwa, w tym najnowszym Krajowym Kodeksem Elektrycznym
(NEC) oraz Ustawą o Bezpieczeństwie i Higienie Pracy (OSHA)
Tom 1: Ogólne standardy branżowe i ich interpretacje.
·ZAWSZE upewnij się, że źródło zasilania jest zgodne z ten
wymagania dotyczące osprzętu.
· ZAWSZE odłączaj zasilanie przed serwisowaniem lub kontrolą
urządzenia z jakiegokolwiek powodu
·To urządzenie jest przeznaczone TYLKO do urządzeń zasilanych
napięciem 110–125 V. i jest wyposażony w
zatwierdzony przewód 3-żyłowy z Wtyczka 3-bolcowa z uziemieniem. ABY
ZMNIEJSZYĆ RYZYKO PORAŻENIA PRĄDEM, należy podłączać ją
wyłącznie do prawidłowo uziemionego gniazdka trójbolcowego.
· OPRAWA NIE JEST WODOODPORNA i nie jest przeznaczona do
stosowania pod prysznicem, w saunach lub w miejscach, w których może
wystąpić wilgoć. lokalizacje. ZAWSZE trzymaj tę armaturę z dala od
zlewów, wanien, pryszniców itp. NIGDY nie próbuj podnosić podłączone
elektronarzędzia lub urządzenia, jeśli wpadną do stojącej wody. Może to
spowodować śmiertelne porażenie prądem ! Ta oprawa jest wyposażona w
uziemioną wtyczkę z trzema bolcami. NIE usuwaj trzeciego bolca ani
żadnego innego spróbuj zmodyfikować wtyczkę. Jeśli nie pasuje do
gniazdka, zleć instalację właściwego gniazdka wykwalifikowanemu
elektrykowi.
Nieprawidłowe podłączenie przewodu uziemiającego może skutkować
ryzykiem porażenia prądem elektrycznym.
· NIGDY nie próbuj podłączać urządzenia do nieuziemionego gniazdka lub
przedłużacza i ZAWSZE upewnij się, że przedłużacz jest w dobrym stanie
- 5 -
technicznym.
·To urządzenie jest przeznaczone do użytku jako ogólne źródło zasilania w
pomieszczeniach. Używać wyłącznie w suchych miejscach. NIE używać w
miejscach potencjalnie niebezpiecznych . miejscach, takich jak atmosfery
łatwopalne lub wybuchowe.
·Trzymaj się z dala od otworów wentylacyjnych, kaloryferów i innych źródeł
ciepła.
· PRZECHOWYWAĆ W MIEJSCU NIEDOSTĘPNYM DLA DZIECI.
OBSŁUGA OSŁONY PRZECIWPYŁOWEJ
Krok 1: Obróć nakrętkę w kierunku przeciwnym do ruchu wskazówek
zegara
Krok 2: Jak pokazano na rysunku, najpierw zamontuj pokrywę, a następnie
nakrętkę

- 6 -
Krok 3: Dokręć nakrętkę zgodnie z ruchem wskazówek zegara

- 7 -


- 9 -
Technisch Ondersteuning en E-garantiecertificaat www.vevor.com/support
SNOERHASPEL
MODEL: LA057F
We continue to be committed to provide you tools with competitive price.
"Save Half", "Half Price" or any other similar expressions used by us only represents an
estimate of savings you might benefit from buying certain tools with us compared to the major
top brands and does not necessarily mean to cover all categories of tools offered by us. You
are kindly reminded to verify carefully when you are placing an order with us if you are
actually saving half in comparison with the top major brands.

- 10 -

- 1 -
MODEL:L A057F
Have product questions? Need technical support? Please feel free to
contact us:
Technical Support and E-Warranty Certificate
www.vevor.com/support
NEED HELP? CONTACT US!
This is the original instruction, please read all manual instructions
carefully before operating. VEVOR reserves a clear interpretation of our
user manual. The appearance of the product shall be subject to the
product you received. Please forgive us that we won't inform you again if
there are any technology or software updates on our product.
CORD REEL

- 2 -
INSTRUCTIONS
SPECIFICATIES:
KENMERKEN ZIJN ONDER MEER:
• Comfortabele handgreep
• 4 AC-aardestopcontacten
• Stroomonderbreker
• Hoogwaardige, duurzame
behuizing
WAARSCHUWING: NIET OVERBELASTEN!
Controleer de ampère van de gereedschappen of apparaten die u wilt
aansluiten de
stopcontacten van de verlengsnoerhaspel. Hierboven staan de maximale
Ampèrewaarden.
WERKING
Sluit het netsnoer aan op een 110-125V-stopcontact standaard stopcontact.
Sluit maximaal vier (4) elektrische apparaten aan op het stopcontact. Trek
het snoer uit tot de gewenste lengte en stop . Om het op te rollen, leidt u
het snoer langzaam terug in de haspel en bevestigt u de stekker met een
clip op de haspel.
OVERBELASTINGSBEVEILIGING VAN DE CIRCUIT ONDERBREKER
De resetknop voor de stroomonderbreker bevindt zich op de snoerhaspel.
Model
L A057F
Stroom (max)
11A
Spanning
12 5V
Watt (max)
1375W
Koord
SJTOW 14/3
Snoerlengte
100FT

- 3 -
Als het apparaat overbelast is, zal de stroomonderbreker trip (de zwarte
resetknop springt eruit). Verwijder de overbelasting, wacht twee minuten
en reset vervolgens door op de zwarte knop te drukken.

- 4 -
VEILIGHEIDSINSTRUCTIES
WAARSCHUWING Om ernstig letsel of de dood door een elektrische
schok of brand te voorkomen
apparaat NIET aan en probeer het niet aan te sluiten als uw handen nat of
vochtig zijn of als u staand op een nat of vochtig oppervlak of in water.
·Dit armatuur MOET ALTIJD WORDEN GEBRUIKT in overeenstemming
met alle elektrische en veiligheidscodes en -verordeningen, inclusief de
meest recente National Electric Code (NEC) en met de Occupational
Safety and Health Act (OSHA-richtlijn)
Deel 1 over algemene industrienormen en interpretaties .
·Zorg er ALTIJD voor dat de stroombron voldoet aan de de
eisen aan het armatuur.
·Schakel ALTIJD de stroom uit voordat u om welke reden dan ook
onderhoud pleegt aan het armatuur of het inspecteert.
·Dit armatuur wordt ALLEEN GEBRUIKT VOOR 110-125V en is uitgerust
met een
goedgekeurd 3-aderig snoer met een 3-polige, geaarde stekker. OM HET
RISICO OP ELEKTRISCHE SCHOKKEN TE VERMINDEREN, mag deze
alleen in een stopcontact worden gestoken een goed geaard stopcontact
met drie pinnen.
·HET ARMATUUR IS NIET WATERDICHT en is niet bedoeld voor gebruik
in douches, sauna's of in mogelijk natte ruimtes. locaties.Houd dit armatuur
ALTIJD uit de buurt van gootstenen, badkuipen, douches, enz. Probeer
NOOIT het op te pakken aangesloten elektrische gereedschappen of
apparaten als ze in stilstaand water vallen. Dodelijke elektrocutie kan het
gevolg zijn ! Dit armatuur is uitgerust met een geaarde stekker met 3
pennen. Verwijder de 3e pen NIET of op een andere manier Probeer de
stekker aan te passen. Als deze niet in het stopcontact past , laat dan een
gekwalificeerde elektricien het juiste stopcontact installeren.
Als de aardgeleider niet goed is aangesloten, bestaat het risico op een
elektrische schok.
·Probeer NOOIT het armatuur aan te sluiten op een niet-geaard
stopcontact of verlengsnoer en zorg ALTIJD dat dat het verlengsnoer in
goede elektrische staat verkeert.

- 5 -
·Dit armatuur is bedoeld voor gebruik als algemene stroombron
binnenshuis . Gebruik alleen op droge locaties. NIET gebruiken in
potentieel gevaarlijke locaties, zoals in een ontvlambare of explosieve
atmosfeer.
·Houd het product uit de buurt van verwarmingsroosters, radiatoren en
andere warmtebronnen.
· BUITEN BEREIK VAN KINDEREN HOUDEN.
BEDIENING VAN DE STOFKAP
Stap 1: Draai de moer tegen de klok in
Stap 2: Zoals in de afbeelding is weergegeven, installeert u eerst de
afdekking en vervolgens de moer

- 6 -
Stap 3: Draai de moer met de klok mee vast

- 7 -


- 9 -
Teknisk Support och e-garanticertifikat www.vevor.com/support
SLADSRULLE
MODELL: LA057F
We continue to be committed to provide you tools with competitive price.
"Save Half", "Half Price" or any other similar expressions used by us only represents an
estimate of savings you might benefit from buying certain tools with us compared to the major
top brands and does not necessarily mean to cover all categories of tools offered by us. You
are kindly reminded to verify carefully when you are placing an order with us if you are
actually saving half in comparison with the top major brands.

- 10 -

- 1 -
MODELL: L A057F
Have product questions? Need technical support? Please feel free to
contact us:
Technical Support and E-Warranty Certificate
www.vevor.com/support
NEED HELP? CONTACT US!
This is the original instruction, please read all manual instructions
carefully before operating. VEVOR reserves a clear interpretation of our
user manual. The appearance of the product shall be subject to the
product you received. Please forgive us that we won't inform you again if
there are any technology or software updates on our product.
CORD REEL

- 2 -
INSTRUCTIONS
SPECIFIKATIONER:
FUNKTIONER INGÅR:
• Bekvämt handtag
• 4 AC-jorduttag
• Strömbrytare
• Slitstarkt fodral av hög
kvalitet
VARNING: ÖVERBELASTNING INTE!
Kontrollera strömstyrkan för de verktyg eller apparater som ska anslutas
de
uttag av förlängningssladdsrullen. Angivna ovan är max
strömstyrka.
DRIFT
Anslut nätsladden till valfri 110-125V standard vägguttag. Anslut upp till
fyra (4) elektriska apparater i uttaget. Dra ut sladden till önskad längd och
stanna . För att dra tillbaka sladden sakta tillbaka in i rullen och fäst
kontakten med en klämma på sladdupprullaren.
KRETSBRYTARE ÖVERBELASTNINGSSKYDD
Återställningsknappen för strömbrytaren på sladdupprullaren. Om enheten
är överbelastad kommer strömbrytaren att trip (svart återställningsknapp
Modell
L A057F
Aktuell (max)
11A
Spänning
12 5 V
Watt (max)
1375W
Sladd
SJTOW 14/3
Sladdlängd
100FT

- 3 -
kommer ut). Ta bort överbelastningen, vänta två minuter och återställ
sedan genom att trycka på den svarta knappen.

- 4 -
SÄKERHETSINSTRUKTION
VARNING För att undvika allvarliga skador eller dödsfall på grund av
elektriska stötar eller brand
·Hantera INTE den här apparaten eller försök att koppla in den när dina
händer är våta eller fuktiga eller när du är det stående på en våt eller fuktig
yta eller i vatten.
·Denna utrustning MÅSTE ALLTID ANVÄNDAS i enlighet med alla
elektriska och säkerhetsföreskrifter och förordningar, inklusive den senaste
National Electric Code (NEC) och med Occupational Safety and Health Act
(OSHA)
Volym 1 om allmänna industristandarder och tolkningar .
· Kontrollera ALLTID att strömkällan överensstämmer med de
krav på armaturen.
· Koppla ALLTID från strömmen innan du servar eller inspekterar fixturen
av någon anledning
·Denna armatur ANVÄNDS ENDAST FÖR PÅ 110-125V och är utrustad
med en
godkänd 3-ledarsladd med en 3-stift, jordad kontakt. FÖR ATT MINSKA
RISKEN FÖR ELEKTRISK STÖT bör den endast anslutas till ett korrekt
jordat 3-stiftsuttag.
· Armaturen ÄR INTE VATTENTÄT och är inte avsedd för användning i
duschar, bastur eller i potentiellt våta platser. Håll ALLTID denna armatur
borta från handfat, badkar, duschar, etc. Försök ALDRIG att plocka upp
inkopplade elverktyg eller apparater om de skulle falla i stående vatten.
Dödlig elstöt kan bli följden ! Denna armatur är utrustad med en 3-stifts
jordad kontakt. Ta INTE bort det tredje stiftet eller på annat sätt försök att
modifiera kontakten. Om det inte passar i uttaget, låt en kvalificerad
elektriker installera rätt uttag.
Felaktig anslutning av jordledaren kan leda till risk för elektriska stötar.
·Försök ALDRIG att ansluta armaturen till ett icke-jordat uttag eller
förlängningssladd och var ALLTID säker att förlängningssladden är i gott
elektriskt skick.
·Denna armatur är avsedd att användas som en allmän strömkälla
inomhus . Använd endast på torra platser. ANVÄND INTE i potentiellt
- 5 -
farliga platser, som n brandfarlig eller explosiv atmosfär.
· Håll dig borta från värmeventiler, radiatorer eller andra värmekällor.
· FÖRVARAS UTOM RÄCKHÅLL FÖR BARN.
O ANVÄNDNING AV DAMMSKYDD
Steg 1: Vrid muttern moturs
Steg 2:Som visas i figuren, installera först kåpan och sedan muttern
- 6 -
Steg 3: Dra åt muttern medurs

- 7 -