
OWNER'S
MANUAL
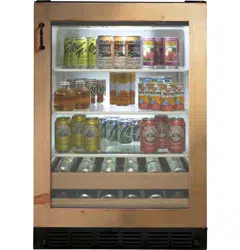
Undercounter Beverage Center
MONOGRAM.COM
ENGLISH/FRANÇAIS/ESPAÑOL

2 49-1000777 Rev. 2
WRITE DOWN THE MODEL AND SERIAL NUMBERS
These will be on a label located on the side wall of
your appliance beside the right pan in the refrigerator
compartment.
Use these numbers in any correspondence or service calls
concerning your appliance.
Please write these numbers here:
Model Number
Serial Number
MODEL INFORMATION
MODEL NUMBERS
ZIBC24PW**
TABLE OF CONTENTS
Monogram Under Counter Accessories List
Below kits are sold separately
Handles
Statement: ZXGP1H1PWSS
Minimalist: ZXGP1H1CPSS
Monogram Custom Handle Stud Kit
ZKPN
Stainless Steel Door Panel and Toe Kick
ZK1GC240WSS
48" wide Stainless Steel Toe Kick:
ZKN48W
8QL¿FDWLRQNLW
ZKAW
MODEL INFORMATION .................................................................................... 2
CONSUMER SUPPORT .....................................................................................3
IMPORTANT SAFETY INFORMATION .........................................................................4
USING THE BEVERAGE CENTER ..........................................................................13
CARE AND CLEANING ...................................................................................17
INSTALLATION INSTRUCTIONS ...........................................................................18
TROUBLESHOOTING .....................................................................................33
LIMITED WARRANTY .....................................................................................34

49-1000777 Rev. 2 3
CONSUMER SUPPORT
MONOGRAM WEBSITE
Have a question or need assistance with your appliance? Try the Monogram website 24 hours a day, any day of the year! You can
also shop for more great Monogram products and take advantage of all our on-line support services designed for your convenience.
In the US: monogram.com
In Canada: monogram.ca
REGISTER YOUR APPLIANCE
Register your new appliance on-line at your convenience! Timely product registration will allow for enhanced communication and
prompt service under the terms of your warranty, should the need arise. You may also mail in the pre-printed registration card included
in the packing material. In the US: monogram.com/register
In Canada: Prodsupport.mabe.ca/crm/Products/ProductRegistration.aspx
SCHEDULE SERVICE
Expert Monogram repair service is only one step away from your door. Get on-line and schedule your service at your convenience any
day of the year.
In the US: monogram.com or call 800.444.1845
In Canada: monogram.ca or call 800.561.3344
REMOTE CONNECTIVITY
For assistance with wireless network connectivity (for models with remote enable),
visit our website at monogram.com/connect in the US only.
PARTS AND ACCESSORIES
Individuals qualified to service their own appliances can have parts or accessories sent directly to their homes
(VISA, MasterCard and Discover cards are accepted). Order on-line today 24 hours every day.
In the US: monogram.com/use-and-care/parts or call 800.444.1845
Instructions contained in this manual cover procedures to be performed by any user. Other servicing generally should be
referred to qualified service personnel. Caution must be exercised, since improper servicing may cause unsafe operation.
Customers in Canada should consult the nearest MC Commercial service center or visit our website at monogram.ca or call
800.661.1616.
CONTACT US
If you are not satisfied with the service you receive from Monogram, contact us on our website with all the details including your phone
number, or write to:
In the US: General Manager, Customer Relations | Monogram Appliances, Appliance Park | Louisville, KY 40225
monogram.com/contact or call 800.444.1845. In Canada: monogram.ca or call 800.561.3344.
4 49-1000777 Rev. 2
READ AND SAVE THESE INSTRUCTIONS
IMPORTANT SAFETY INFORMATION
READ ALL INSTRUCTIONS BEFORE USING THE APPLIANCE
CAUTION
To reduce the risk of injury when using your refrigerator, follow these basic safety precautions.
Ŷ .HHSILQJHUVRXWRIWKH³SLQFKSRLQW´DUHDVFOHDUDQFHV
between the doors and cabinet are necessarily small.
Be careful closing doors when children are in the area.
WARNING
FIRE OR EXPLOSION HAZARD
Keep flammable materials and vapors away from appliance. Failure to do so can result in fire, explosion, or death.
WARNING
To reduce the risk associated with choking, do not allow children under 3 years of age to have
access to small parts during the installation of this product.
WARNING
EXCESS WEIGHT HAZARD
Use two or more people to move and install beverage center.
Failure to do so can result in back or other injury.
WARNING
To reduce the risk of fire, explosion, electric shock, or injury when using your refrigerator, follow
these basic safety precautions:
Ŷ 8VHWKLVDSSOLDQFHRQO\IRULWVLQWHQGHGSXUSRVHDV
described in this Owner’s Manual.
Ŷ 7KLVDSSOLDQFHPXVWEHSURSHUO\LQVWDOOHGDQGORFDWHG
in accordance with the Installation Instructions before it
is used.
Ŷ 8QSOXJWKHDSSOLDQFHEHIRUHPDNLQJUHSDLUVUHSODFLQJ
a light bulb, or cleaning.
NOTE: Power to the appliance cannot be disconnected
by any setting on the control panel.
NOTE: Repairs must be performed by a qualified
Service Professional.
Ŷ 5HSODFHDOOSDUWVDQGSDQHOVEHIRUHRSHUDWLQJ
Ŷ 'RQRWXVHDQH[WHQVLRQFRUG
Ŷ .HHSIODPPDEOHPDWHULDOVDQGYDSRUVDZD\IURPWKH
refrigerator.
Ŷ 'RQRWVWRUHH[SORVLYHVXEVWDQFHVVXFKDVDHURVRO
cans with a flammable propellant in this appliance.
Ŷ 7RSUHYHQWVXIIRFDWLRQDQGHQWUDSPHQWKD]DUGVWR
children, remove the doors from any appliance before
disposing of it or discontinuing its use.
Ŷ 7RDYRLGVHULRXVLQMXU\RUGHDWKFKLOGUHQVKRXOGQRW
stand on, or play in or with the appliance.
Ŷ &KLOGUHQDQGSHUVRQVZLWKUHGXFHGSK\VLFDOVHQVRU\
or mental capabilities or lack of experience and
knowledge can use this appliance only if they are
supervised or have been given instructions on safe
XVHDQGXQGHUVWDQGWKHKD]DUGVLQYROYHG
Ŷ 7KLVDSSOLDQFHLVLQWHQGHGWREHXVHGLQKRXVHKROG
and similar applications such as: staff kitchen areas in
VKRSVRIILFHVDQGRWKHUZRUNLQJHQYLURQPHQWVIDUP
KRXVHVE\FOLHQWVLQKRWHOVPRWHOVEHG
EUHDNIDVWDQGRWKHUUHVLGHQWLDOHQYLURQPHQWV
catering and similar non-retail applications.
Ŷ 'RQRWDSSO\KDUVKFOHDQHUVWRWKHDSSOLDQFH&HUWDLQ
cleaners will damage plastic which may cause
parts such as the door or door handles to detach
unexpectedly. See the Care and Cleaning section for
detailed instructions.
Ŷ 'RQRWVWRUHRUXVHJDVROLQHRURWKHUIODPPDEOH
vapors and liquids in the vicinity of this or any other
appliance.
CAUTION
CUT AND PINCH HAZARD
Contact with sheet metal or other exposed material edges can result in personal injury. Installing product may create
pinch points.
Wear gloves and protective clothing when installing this product.
49-1000777 Rev. 2 5
READ AND SAVE THESE INSTRUCTIONS
IMPORTANT SAFETY INFORMATION
READ ALL INSTRUCTIONS BEFORE USING THE APPLIANCE
Do not, under any circumstances, cut or remove the third (ground) prong from the power cord. For personal
safety, this appliance must be properly grounded.
The power cord of this appliance is equipped with a
3-prong (grounding) plug which mates with a standard
SURQJJURXQGLQJZDOORXWOHWWRPLQLPL]HWKHSRVVLELOLW\
RIHOHFWULFVKRFNKD]DUGIURPWKLVDSSOLDQFH
Have the wall outlet and circuit checked by a qualified
electrician to make sure the outlet is properly grounded.
Where a standard 2-prong wall outlet is encountered, it
is your personal responsibility and obligation to have it
replaced with a properly grounded 3-prong wall outlet.
Do not use an adapter.
The refrigerator should always be plugged into its own
individual electrical outlet which has a voltage rating that
matches the rating plate.
$9ROW$&+]RUDPSIXVHGJURXQGHG
electrical supply is required. This provides the best
performance and also prevents overloading house wiring
FLUFXLWVZKLFKFRXOGFDXVHDILUHKD]DUGIURPRYHUKHDWHG
wires.
Never unplug your Beverage center by pulling on the
power cord. Always grip plug firmly and pull straight out
from the outlet.
Immediately discontinue use of a damaged supply cord.
If the supply cord is damaged, it must be replaced by a
TXDOLILHGVHUYLFHSURIHVVLRQDOZLWKDQDXWKRUL]HGVHUYLFH
part from the manufacturer.
When moving the Beverage center away from the wall,
be careful not to roll over or damage the power cord.
CONNECTING ELECTRICITY
WARNING
ELECTRICAL SHOCK HAZARD
Plug into a grounded 3-prong outlet
Do not remove the ground prong
Do not use an adapter
Do not use an extension cord.
Failure to follow these instructions can result in death, fire, or electrical shock.
PROPER DISPOSAL OF YOUR OLD APPLIANCE
WARNING
SUFFOCATION AND ENTRAPMENT HAZARD
Failure to follow these disposal instructions can result in death or serious injury
IMPORTANT: Child entrapment and suffocation are not
problems of the past. Junked or abandoned appliances
DUHVWLOOGDQJHURXVHYHQLIWKH\ZLOOVLWIRU³MXVWDIHZ
GD\V´,I\RXDUHJHWWLQJULGRI\RXUROGUHIULJHUDWRUSOHDVH
follow the instructions below to help prevent accidents.
Before You Throw Away Your Old Appliance
Ŷ7DNHRIIWKHGRRUV
Ŷ Leave the drawers in place so that children may not
easily climb inside.
Refrigerant and Foam Disposal:
Dispose of appliance in accordance with Federal and Local Regulations. Flammable refrigerant and insulation
material used requires special disposal procedures. Contact your local authorities for the environmentally safe
disposal of your appliance.
6 49-1000777 Rev. 2
IMPORTANT SAFETY INFORMATION
READ ALL INSTRUCTIONS BEFORE USING THE APPLIANCE
READ AND SAVE THESE INSTRUCTIONS
WARNING
FIRE OR EXPLOSION HAZARD Flammable Refrigerant
This appliance contains isobutane refrigerant, also known as R600a, a natural gas with high environmental
compatibility. However, it is also combustible. Adhere to the warnings below to reduce the risk of injury or
property damage.
1.
When handling, installing and operating the appliance,
care should be taken to avoid damage to the refrigerant
tubing.
2. 6HUYLFHVKDOORQO\EHSHUIRUPHGE\DXWKRUL]HGVHUYLFH
SHUVRQQHO8VHRQO\PDQXIDFWXUHUDXWKRUL]HGVHUYLFH
parts.
3. Dispose of appliance in accordance with Federal and
Local Regulations. Flammable refrigerant and insulation
material used require special disposal procedures.
Contact your local authorities for the environmentally
safe disposal of your appliance.
4. Keep ventilation openings in the appliance enclosures
or in the built-in structure clear of obstruction.
5. To remove frost, scrape with a plastic or wood spatula
or scraper. Do not use an ice pick, metal, or sharp-
edged instrument as it may puncture the beverage
center liner and then the flammable refrigerant tubing
behind it.
6. Do not use electrical appliances inside the food storage
compartment of the appliance.
7.
Do not use any electrical device in defrosting your
beverage
center.
Attention: This is a built in appliance and must be installed in a cabinet. This appliance is not meant to be installed
as standalone appliance.
49-1000777 Rev. 2 7
ATTENTION
3RXUUpGXLUHOHULVTXHGHEOHVVXUHVORUVTXHYRXVXWLOLVH]YRWUHUpIULJpUDWHXUGHYHXLOOH]VXLYUHFHV
consignes de sécurité.
Ŷ eORLJQH]OHVGRLJWVGHVSDUWLHVGXFRQJpODWHXURO¶RQSHXWIDFLOHPHQWVHSLQFHUOHVHVSDFHVHQWUHOHVSRUWHVHWOHVSODFDUGV
VRQWWRXMRXUVpWURLWV6R\H]SUXGHQWORUVTXHYRXVIHUPH]OHVSRUWHVHQSUpVHQFHG¶HQIDQWV
AVERTISSEMENT
RISQUE DU POIDS EXCESSIF
Le déplacement ou l'installation du centre pour boissons doit être effectué par deux personnes ou plus.
Le non-respect de cette instruction peut causer une blessure au dos ou d’autre blessure.
LIRE ET CONSERVER CES INSTRUCTIONS
INFORMATION DE SÉCURITÉ IMPORTANTES
LISEZ TOUTES LES DIRECTIVES AVANT D'UTILISER L'APPAREIL
AVERTISSEMENT
3RXUUpGXLUHOHULVTXHG¶LQFHQGLHG¶H[SORVLRQGHFKRFpOHFWULTXHRXGHEOHVVXUHVORUVTXHYRXVXWLOLVH]
YRWUHUpIULJpUDWHXUGHYHXLOOH]VXLYUHFHVFRQVLJQHVGHVpFXULWp
Ŷ 8WLOLVH]FHWpOHFWURPpQDJHUXQLTXHPHQWDX[ILQVTXLVRQW
décrites dans ce manuel d’utilisation.
Ŷ &Hélectroménager doit être correctement installé
conformément aux Consignes d’Installation avant toute
utilisation.
Ŷ 'pEUDQFKH]OH
électroménager avant d’effectuer une
réparation, de remplacer une ampoule ou de le nettoyer.
Remarque : L’alimentation du
électroménager ne peut être
déconnectée par aucune des fonctions sur le panneau de
commande.
Remarque : Les réparations doivent être effectuées par un
professionnel qualifié.
Ŷ 5HPHWWH]WRXWHVOHVSLqFHVHWSDQQHDX[HQSODFHDYDQW
d’utiliser l’appareil.
Ŷ
1¶XWLOLVH]SDVXQFRUGRQGHUDOORQJH
Ŷ*DUGH]OHVPDWpULDX[HWYDSHXUVLQIODPPDEOHVORLQGX
réfrigérateur.
Ŷ1¶HQWUHSRVH]SDVGDQVFHWpOHFWURPpQDJHUGHVVXEVWDQFHV
explosives telles que des bombes aérosols qui contiennent
XQJD]SURSXOVHXU
Ŷ 3RXUpYLWHUOHVULVTXHVG¶DVSK\[LHHWG¶HQIHUPHPHQWSRXUOHV
HQIDQWV'pPRQWH]OHVSRUWHVDYDQWGHOHPHWWUHDXUHEXWRX
d’interrompre son utilisation.
Ŷ $ILQGHSUpYHQLUOHVDFFLGHQWVJUDYHVRXODPRUWOHVHQIDQWV
ne doivent pas se tenir ni jouer dans ou sur l’électroménager.
Ŷ/HVHQIDQWVHWOHVSHUVRQQHVGRQWOHVFDSDFLWpVVRQWUpGXLWHV
sur le plan physique, sensoriel ou mental, ou qui manquent
d’expérience ou de connaissances, peuvent utiliser cet
électroménager seulement si elles sont surveillées ou ont
reçues des consignes de sécurité sur son usage et les
risques y sont associés.
Ŷ&HWpOHFWURPpQDJHUHVWFRQoXSRXUXQHXWLOLVDWLRQ
domestique et applications similaires : salle du personnel
GDQVXQHXVLQHXQEXUHDXRXG¶DXWUHVOLHX[GHWUDYDLO
PDLVRQGHIHUPHFOLHQWVGDQVXQK{WHOXQPRWHOXQJvWH
WRXULVWLTXHHWG¶DXWUHVOLHX[UpVLGHQWLHOVDSSURYLVLRQQHPHQW
et applications similaires non reliées au commerce de détail.
Ŷ 1¶DSSOLTXH]SDVGHQHWWR\DQWVFRUURVLIVVXUOH
électroménager. Certains nettoyants endommagent le
plastique et peuvent ainsi causer le détachement inopiné
GHSLqFHVWHOOHVTXHSRUWHRXSRLJQpHVGHSRUWH9R\H]
la section Entretien et nettoyage pour des instructions
détaillées.
Ŷ 1HQWUHSRVH]SDVHWQXWLOLVH]SDVGHVVHQFHRXGDXWUHV
vapeurs ou liquides inflammables à proximité de cet appareil
ou de tout autre électroménager.
AVERTISSEMENT
RISQUE D’INCENDIE OU D’EXPLOSION
*DUGH]OHVPDWLqUHVHWOHVYDSHXUVLQIODPPDEOHVjGLVWDQFHGHO¶pOHFWURPpQDJHU/¶RPLVVLRQGHSUHQGUHFHWWHSUpFDXWLRQSHXW
HQWUDvQHUXQLQFHQGLHXQHH[SORVLRQRXODPRUW
AVERTISSEMENT
3RXUUpGXLUHOHULVTXHG¶pWRXIIHPHQWSHQGDQWO¶LQVWDOODWLRQGHFHSURGXLWQHSDVODLVVHUOHVSHWLWHVSLqFHV
à la portée des enfants âgés de moins de 3 ans.
ATTENTION
RISQUE DE COUPURE ET DE PINCEMENT
7RXWFRQWDFWDYHFOHERUGH[SRVpG¶XQHW{OHRXG¶XQDXWUHPDWpULDXSHXWHQWUDvQHUGHVEOHVVXUHV/LQVWDOODWLRQGXSURGXLWSHXWFUpHU
des points de pincement.
3RUWH]GHVJDQWVHWGHVYrWHPHQWVGHSURWHFWLRQORUVGHOLQVWDOODWLRQGHFHSURGXLW
8 49-1000777 Rev. 2
LIRE ET CONSERVER CES INSTRUCTIONS
MISE AU REBUT APPROPRIÉE DE VOTRE ANCIEN RÉFRIGÉRATEUR
AVERTISSEMENT
RISQUE DE SUFFOQUER OU D’Y ÊTRE EMPRISONNÉ
/HQRQUHVSHFWGHFHVLQVWUXFWLRQVG¶pOLPLQDWLRQSHXWHQWUDvQHUODPRUWRXGHVEOHVVXUHVJUDYHV
IMPORTANT: /HVHQIDQWVSULVDXSLqJHRXPRUWVG¶DVSK\[LH
sont toujours d’actualité. Les réfrigérateurs et congélateurs
abandonnés sont toujours aussi dangereux, même si on
n’attend que «quelques jours» pour s’en débarrasser. Si vous
QHJDUGH]SDVYRWUHDQFLHQUpIULJpUDWHXURXFRQJpODWHXU
YHXLOOH]VXLYUHOHVGLUHFWLYHVFLGHVVRXVDILQGHSUpYHQLUOHV
accidents.
Avant de vous débarrasser de votre ancien appareil :
ŶÐWHUOHVSRUWH
Ŷ/DLVVHUOHVWLURLUVHQSODFHGHVRUWHTXHOHVHQIDQWVQH
puissent pas y pénétrer facilement.
INFORMATION DE SÉCURITÉ IMPORTANTES
LISEZ TOUTES LES DIRECTIVES AVANT D'UTILISER L'APPAREIL
Ne coupez pas ou n’enlevez pas, sous aucun prétexte, la troisième broche de mise à la terre du cordon
d’alimentation. Pour des raisons de sécurité, cet appareil doit être correctement mis à la terre.
Le cordon d’alimentation de cet appareil est équipé d’une
fiche à trois broches (pour une mise à la terre) qui s’adapte à
la prise de courant standard à 3 broches (pour une mise à la
terre) pour minimiser les risques de chocs électriques par cet
appareil.
Faites vérifier la prise murale et le circuit électrique par
XQpOHFWULFLHQTXDOLILpSRXUV¶DVVXUHUTXHOHV\VWqPHHVW
correctement mis à la terre.
Dans le cas d’une prise biphasée, l’installateur a la
responsabilité et l’obligation de la remplacer par une prise
WULSKDVpHFRUUHFWHPHQWPLVHjODWHUUH1¶XWLOLVH]SDV
d’adaptateur.
Le réfrigérateur doit toujours être branché à sa propre prise
électrique d’une tension nominale correspondant à celle
indiquée sur sa plaque signalétique.
8QHDOLPHQWDWLRQpOHFWULTXHjYROWV&$+]DYHF
XQIXVLEOHGHRXDPSqUHVHWXQHPLVHjODWHUUHHVW
nécessaire. Ceci permet d’obtenir un meilleur rendement et
évite de surcharger les circuits électriques du domicile qui
risque d’occasionner un incendie en surchauffant.
1HGpEUDQFKH]MDPDLVOHrefroidisseur de vin en tirant sur le
FRUGRQG¶DOLPHQWDWLRQ3UHQH]WRXMRXUVIHUPHPHQWODILFKHHQ
PDLQHWWLUH]SRXUODVRUWLUGHODSULVH
5pSDUH]RXUHPSODFH]LPPpGLDWHPHQWWRXWFRUGRQpOHFWULTXH
XVpRXHQGRPPDJp1¶XWLOLVH]SDVXQFRUGRQILVVXUpRX
présentant des dommages dus aux frottements soit sur sa
longueur ou aux extrémités.
/RUVTXHYRXVpORLJQH]YRWUH
refroidisseur de vin du mur, faites
attention à ne pas le faire rouler sur le cordon d’alimentation
afin de ne pas l’endommager.
BRANCHEMENTS ÉLECTRIQUES
AVERTISSEMENT
RISQUE DE CHOC ÉLECTRIQUE
%UDQFKH]O¶DSSDUHLOGDQVXQHSULVHWULSOHDYHFWHUUH
1HUHWLUH]SDVODEURFKHGHWHUUH
1¶XWLOLVH]SDVG¶DGDSWDWHXU
1¶XWLOLVH]SDVXQFRUGRQGHUDOORQJH
/HQRQUHVSHFWGHFHVLQVWUXFWLRQVSHXWHQWUDvQHUGHVULVTXHVG¶LQFHQGLHVGHVFKRFVpOHFWULTXHVRXODPRUW
Mise au rebut des produits réfrigérants et en mousse
0HWWH]O¶pOHFWURPpQDJHUDXUHEXWFRQIRUPpPHQWjODUpJOHPHQWDWLRQIpGpUDOHHWORFDOH Le réfrigérant inflammable ainsi que le
PDWpULDXG¶LVRODWLRQXWLOLVpVH[LJHQWGHVSURFpGXUHVG¶pOLPLQDWLRQSDUWLFXOLqUHV.&RPPXQLTXH]DYHFOHVDXWRULWpVORFDOHVSRXU
FRQQDvWUHODIDoRQGHPHWWUHYRWUHpOHFWURPpQDJHUDXUHEXWTXLVRLWUHVSHFWXHXVHGHO¶HQYLURQQHPHQW
49-1000777 Rev. 2 9
LIRE ET CONSERVER CES INSTRUCTIONS
INFORMATION DE SÉCURITÉ IMPORTANTES
LISEZ TOUTES LES DIRECTIVES AVANT D'UTILISER L'APPAREIL
AVERTISSEMENT
RISQUE D’INCENDIE OU D’EXPLOSION
Fluide frigorigène inflammable
Cet électroménager contient le réfrigérant isobutane, aussi connu comme R600a, un gaz naturel à compatibilité élevée
avec l’environnement. Il s’agit cependant d’un combustible. Observez les consignes de sécurité ci-dessous afin de réduire
le risque de blessure ou de dommage à la propriété.
1. Lors de la manipulation, de l’installation et de l’utilisation de
FHWDSSDUHLOSUHQH]VRLQGHQHSDVHQGRPPDJHUOHVWXEHV
GHFLUFXODWLRQGXIOXLGHIULJRULJqQH
2. L’entretien ou la réparation doivent être effectués par un
SHUVRQQHOGHVHUYLFHDXWRULVp8WLOLVH]VHXOHPHQWGHVSLqFHV
de rechange autorisées par le fabricant.
3. 0HWWH]O¶DSSDUHLODXUHEXWFRQIRUPpPHQWDX[UpJOHPHQWDWLRQV
IpGpUDOHVHWORFDOHV/HIOXLGHIULJRULJqQHLQIODPPDEOHHWOH
matériel isolant utilisés nécessitent des procédures de mise
au rebut spéciales. &RPPXQLTXH]DYHFOHVDXWRULWpVORFDOHV
pour la mise au rebut sans danger pour l’environnement de
votre électroménager.
4. 1¶REVWUXH]SDVOHVpYHQWVGDQVO¶HQFHLQWHSUpYXHSRXU
l’appareil.
5.3RXUUHWLUHUOHJLYUHJUDWWH]jO¶DLGHG¶XQJUDWWRLURXG¶XQH
spatule en plastique ou en bois. 1XWLOLVH]SDVGHSLFjJODFH
ou d'instrument en métal à bord tranchant, car il pourrait
transpercer le revêtement du centre pour boissons, puis la
WX\DXWHULHGHIULJRULJqQHLQIODPPDEOHTXLVHWURXYHGHUULqUH
6. 1¶XWLOLVH]SDVG¶DSSDUHLOVpOHFWULTXHVGDQVOHFRPSDUWLPHQW
réfrigérateur de cet appareil.
7. 1¶XWLOLVH]DXFXQDSSDUHLOpOHFWULTXHSRXUGpJLYUHUYRWUH
l’appareil
Attention : Il s’agit d’un électroménager à encastrer qui doit être installé dans une armoire. Il ne faut pas l’installer en tant
qu'appareil autonome.
10 49-1000777 Rev. 2
PRECAUCIÓN
A fin de reducir el riesgo de lesiones al usar el electrodoméstico, siga estas precauciones básicas.
Ŷ 0DQWHQJDORVGHGRVIXHUDGHORVHVSDFLRVGH³ULHVJRGHODVWLPDGXUDV´ORVGHVSHMHVHQWUHODVSXHUWDV\HQWUHODVSXHUWDV\HO
gabinete son necesariamente pequeños. Tenga el cuidado de cerrar las puertas cuando los niños se encuentren en el área.
ADVERTENCIA
RIESGO DE INCENDIO O EXPLOSIÓN
Mantenga cualquier material y vapores inflamables alejados del electrodoméstico. Si no se cumple con esto, se podrá producir
una explosión, incendio o la muerte.
ADVERTENCIA
A fin de reducir el riesgo asociado con descargas, no permita que los niños menores de 3 años de
edad tengan acceso a las partes pequeñas durante la instalación de este producto.
ADVERTENCIA
PELIGRO DE PESO EXCESIVO
Cuente con la ayuda de dos o más personas para mover e instalar el centro de bebidas.
No seguir esta instrucción puede ocasionar una lesión en la espalda u otro tipo de lesiones.
ADVERTENCIA
A fin de reducir el riesgo de incendio, explosión, descargas eléctricas o lesiones al usar su
refrigerador, siga estas precauciones básicas de seguridad:
Ŷ 8VHHVWHHOHFWURGRPpVWLFRVyORSDUDVXSURSyVLWRRULJLQDO
como se describe en el Manual del Propietario.
Ŷ (VWHHOHFWURGRPpVWLFRVHGHEHUiLQVWDODU\XELFDU
adecuadamente de acuerdo con las Instrucciones de
Instalación antes de ser usado.
Ŷ 'HVHQFKXIHHOHOHFWURGRPpVWLFRDQWHVGHKDFHU
UHSDUDFLRQHVUHHPSOD]DUXQDOiPSDUDGHOX]RKDFHUXQD
OLPSLH]D
NOTA: La corriente que va al electrodoméstico no puede
ser desconectada por ninguna configuración del panel de
control.
NOTA:/DVUHSDUDFLRQHVGHEHUiQVHUUHDOL]DGDVSRUXQ
Profesional del Servicio Técnico calificado.
Ŷ 5HHPSODFHWRGDVODVSLH]DV\SDQHOHVDQWHVGHOXVR
Ŷ 1RXVHXQSURORQJDGRU
Ŷ 0DQWHQJDFXDOTXLHUPDWHULDO\YDSRUHVLQIODPDEOHVDOHMDGRV
del electrodoméstico.
Ŷ 1RJXDUGHVXVWDQFLDVH[SORVLYDVWDOHVFRPRODWDV
de aerosoles con propelentes inflamables en este
electrodoméstico.
Ŷ
A fin de evitar riesgos de que los niños sufran asfixia
o queden atrapados, retire las puertas de cualquier
electrodoméstico antes de deshacerse o dejar de usar el
mismo.
Ŷ $ILQGHHYLWDUULHVJRVGHTXHORVQLxRVVXIUDQDVIL[LDR
queden atrapados, retire las puertas refrigerador antes de
deshacerse o dejar de usar el mismo.
Ŷ /RVQLxRV\ODVSHUVRQDVFRQFDSDFLGDGItVLFDVHQVRULDOR
mental reducida o con falta de experiencia y conocimiento
podrán usar este electrodoméstico sólo si son supervisados
o les fueron dadas instrucciones sobre un uso seguro y
entienden los riesgos involucrados.
Ŷ (VWHHOHFWURGRPpVWLFRIXHGLVHxDGRSDUDXVRKRJDUHxR\
para aplicaciones similares tales como: áreas de personal de
FRFLQDHQWLHQGDVRILFLQDV\RWURVHVSDFLRVODERUDOHVFDVDV
GHFDPSRSRUFOLHQWHVHQKRWHOHVPRWHOHVKRVWDOHV\RWURV
espacios residenciales, catering y aplicaciones no minoristas
similares.
Ŷ 1RDSOLTXHOLPSLDGRUHViVSHURVVREUHHOHOHFWURGRPpVWLFR
Ciertos limpiadores dañarán el plástico, lo cual podrá hacer
TXHFLHUWDVSLH]DVWDOHVFRPRODSXHUWDRODVPDQLMDVGH
las puertas se separen de forma inesperada. Para acceder
a instrucciones detalladas, lea la sección de Cuidado y
/LPSLH]D
Ŷ 1RJXDUGHQLXVHJDVROLQDXRWURVYDSRUHV\OtTXLGRV
inflamables cerca de éste o de otros electrodomésticos.
INFORMACIÓN IMPORTANTE DE SEGURIDAD
LEA TODAS LAS INSTRUCCIONES ANTES DE USAR
LEA Y GUARDE ESTAS INSTRUCCIONES
PRECAUCIÓN
RIESGO DE CORTES Y PELLIZCOS
El contacto con la hoja metálica o con extremos expuestos de otros materiales podrá generar lesiones personales. La instalación
GHOSURGXFWRSRGUiFUHDUSXQWRVGHSHOOL]FRV
Use guantes y ropa de protección al instalar este producto.

49-1000777 Rev. 2 11
INFORMACIÓN IMPORTANTE DE SEGURIDAD
LEA TODAS LAS INSTRUCCIONES ANTES DE USAR
CONEXIÓN DE LA ELECTRICIDAD
Nunca, bajo ninguna circunstancia, corte o elimine el tercer cable (tierra) del cable de corriente. Para su seguridad
personal, este electrodoméstico debe estar adecuadamente conectado a tierra.
El cable de corriente de este electrodoméstico contiene un
enchufe de 3 cables (conexión a tierra) que se conecta a un
tomacorriente de pared estándar de 3 cables (conexión a
WLHUUDSDUDPLQLPL]DUODSRVLELOLGDGGHULHVJRVGHGHVFDUJDV
eléctricas por parte del mismo.
Contrate a un electricista calificado para que controle el
tomacorriente y el circuito eléctrico, a fin de asegurar que el
enchufe esté correctamente conectado a tierra.
En caso de contar con un tomacorriente de pared de 2 cables,
HVVXUHVSRQVDELOLGDG\REOLJDFLyQUHHPSOD]DUORSRUXQ
tomacorriente de pared de 3 cables correctamente conectado a
tierra. No use un adaptador.
(OUHIULJHUDGRUGHEHUtDHVWDUVLHPSUHFRQHFWDGRDXQHQFKXIH
HVSHFtILFRFRQXQtQGLFHGHYROWDMHHTXLYDOHQWHDOTXHILJXUDHQ
VXHWLTXHWDGHFDUDFWHUtVWLFDVWpFQLFDV
Se requiere un suministro eléctrico con fusible y conexión a
WLHUUDGHYROWLRVGH&$+]RDPSHUHV(VWR
JDUDQWL]DHOPHMRUIXQFLRQDPLHQWR\DGHPiVSUHYLHQHOD
VREUHFDUJDGHORVFLUFXLWRVGHOKRJDUORFXDOSRGUtDRFDVLRQDU
riesgos de incendio debido al recalentamiento de cables.
Nunca desenchufe el
centro de vinos tirando del cable de
corriente. Siempre tome su enchufe firmemente y empuje el
mismo hacia afuera para retirarlo.
Repare o reemplace de inmediato todos los cables de corriente
pelados o con cualquier tipo de daño. No use un cable con
cortaduras o abrasión sobre su extensión o extremos.
Al alejar el refrigerador de la pared, se deberá tener cuidado de
que no ruede sobre ni dañe el cable de corriente.
ADVERTENCIA
RIESGO DE DESCARGA ELÉCTRICA
Enchufe en un tomacorriente con conexión a tierra de 3 cables.
No elimine el cable de conexión a tierra.
No use un adaptador.
No use un prolongador.
Si no se siguen estas instrucciones se podrá producir a muerte, incendios o descargas eléctricas.
ADVERTENCIA
PELIGRO DE SUFFOCATION Y ENTRAPMENT
El incumplimiento de estas instrucciones de eliminación puede causar la muerte o lesiones graves.
IMPORTANTE: Que un niño quede atrapado o que sufra
una asfixia no son problemas del pasado. Los appliances
antiguos o abandonados aún son peligrosos, incluso aunque
VHFRQVHUYHQSRU³VyORXQRVSRFRVGtDV´6LVHGHVKDUiGHVX
antiguo aparato, siga las siguientes instrucciones a fin de evitar
accidentes.
Antes de Descartar su Antiguo Aparato:
Ŷ4XLWHODSXHUWD
Ŷ'HMHORVFDMRQHVHQVXOXJDUDVtORVQLxRVQRSXHGHQPHWHUVH
adentro con facilidad.
Cómo Eliminar Refrigerantes y Gomaespumas:
Descarte el electrodoméstico de acuerdo con las Regulaciones Federales y Locales. El material aislante inflamable usado requiere
SURFHGLPLHQWRVGHGHVFDUWHHVSHFLDOHV&RPXQtTXHVHFRQODVDXWRULGDGHVORFDOHVSDUDGHVFDUWDUVXHOHFWURGRPpVWLFRGHIRUPD
ambiental mente segura.
FORMA ADECUADA DE DESCARTAR SU ANTIGÜO ELECTRODOMÉSTICO
12 49-1000777 Rev. 2
INFORMACIÓN IMPORTANTE DE SEGURIDAD
LEA TODAS LAS INSTRUCCIONES ANTES DE USAR
ADVERTENCIA
RIESGO DE INCENDIO O EXPLOSIÓN Refrigerantes Inflamables
Este electrodoméstico cuenta con refrigerante isobutano, también conocido como R600a, un gas natural con alto
nivel de compatibilidad medioambiental. Sin embargo, también es combustible. Siga las advertencias que figuran a
continuación, a fin de reducir el riesgo de lesiones o daños sobre la propiedad.
1. Al mover, instalar y operar el electrodoméstico, se deberá
WHQHUFXLGDGRGHQRGDxDUODWXEHUtDGHOUHIULJHUDQWH
2. (OVHUYLFLRWpFQLFRVyORGHEHVHUUHDOL]DGRSRUSHUVRQDO
DXWRUL]DGRGHOVHUYLFLR8VHVyORSLH]DVGHOVHUYLFLR
DXWRUL]DGDVSRUHOIDEULFDQWH
3. Descarte el electrodoméstico de acuerdo con las
Regulaciones Federales y Locales. El refrigerante
inflamable y el material aislante inflamable usados requieren
procedimientos de descarte especiales. &RPXQtTXHVHFRQ
las autoridades locales para descartar su electrodoméstico de
forma ambientalmente segura.
4. Mantenga las aberturas de ventilación en el espacio
de protección del electrodoméstico o en la estructura
incorporada libres de obstrucción.
5
. A fin de eliminar la escarcha, raspe con una espátula o
raspador de plástico o madera. No use un picahielos ni un
instrumento metálico o de punta filosa, ya que esto podrá
perforar el revestimiento del centro de bebidas y luego la
WXEHUtDLQIODPDEOHGHOUHIULJHUDGRUTXHVHHQFXHQWUDGHWUiV
6. No use dispositivos eléctricos dentro del compartimiento de
almacenamiento de comida del electrodoméstico.
7. No use ningún dispositivo eléctrico para descongelar su
electrodoméstico.
Atención: eVWHHVXQHOHFWURGRPpVWLFRSDUDHPSRWUDU\VHGHEHUiLQVWDODUHQXQJDELQHWH(VWHHOHFWURGRPpVWLFRQRIXHGLVHxDGR
para el tipo de instalación autónoma.

49-1000777 Rev. 2 13
USING THE BEVERAGE CENTER
Temperature Setting
The temperature range of the beverage center is 34°F
(1°C) to 45°F (7°C).
Use theࡍࡉ and ࡍࡉ buttons to increase or decrease the
temperature settings.
°C and °F Conversion
Press and hold ࡍࡉ and DISPLAY for 3 seconds. The
temperature display will change from degrees Fahrenheit to
degrees Celsius. Press and hold ࡍࡉ and DISPLAY for 3
seconds again to switch back to Fahrenheit.
Turbo Cool
TurboCool ™ rapidly cools the beverage center in order
to more quickly cools drinks. Use TurboCool ™ when
adding a large amount of drinks to your beverage center.
Press TURBO COOL to activate the feature. NOTE: The
beverage center temperature cannot be changed during
TurboCool™.
Turn On/Off Cooling
Press and hold POWER for 3 seconds to turn off cooling
and lighting. This does not disconnect power to the
beverage center.
Door Alarm
Sounds an alert when the door has been left open. The
DOHUWVWRSVZKHQWKHGRRULVFORVHG6QRR]HWKHDOHUWE\
pressing the ALARM button. Disable the door alarm by
pressing and holding ࡍࡉ and ALARM for 3 seconds. Press
and hold ࡍࡉ and ALARM for 3 seconds, to reactivate the
feature.
High Temperature Alert
Sounds an alert when the temperature is outside of the
QRUPDOUDQJH6QRR]HWKHDOHUWE\SUHVVLQJWKHALARM
button. Disable the High Temperature Alert by pressing
and holding DISPLAY and ALARM for 3 seconds.
Press and hold DISPLAY and ALARM for 3 seconds, to
reactivate the feature.
Child Control Lockout
This child control lockout feature prevents unwanted
changes to the settings of your beverage center.
To lock, press and hold CONTROL LOCK for 3 seconds.
To unlock, press and hold CONTROL LOCK for 3
seconds.
Proximity Lighting
The interior lighting is activated when someone approaches
the beverage center. To turn off this feature, press and hold
ALARM, DISPLAY and CONTROL LOCK for 3 seconds.
Press and hold ALARM, DISPLAY and CONTROL LOCK
for 3 seconds again to reactivate the feature.
Display Mode
The interior light enhances the display of your collection.
Press the DISPLAY button to activate display mode. In
display mode the interior lighting will remain on even when
the door is closed and proximity lighting is off. Press the
Display button again to exit display mode.
Sabbath Mode
The Sabbath Mode was designed for use on the Jewish
Sabbath and Holidays. The Sabbath Mode feature makes
it possible for observant Jews to use the beverage center
during the duration of the holiday.
The Sabbath Mode feature can be set to override typical
reactions caused by your interaction with the beverage
center. While in the Sabbath Mode, your appliance will still
operate. However, it will not respond to your actions.
While in the Sabbath Mode, you may notice the fan
running when the door is opened, however, this is not a
result of your actions. The compressor and fan will operate
at predetermined times.
ON/OFF - To activate the Sabbath Mode, press and hold
down the ࡍࡉ and DISPLAY for 5 seconds. SA will be
displayed on the control. SA will remain in the display and
DOOWKHFRQWUROVHWWLQJVZLOOEHIUR]HQDQGVWD\RQWKHODVW
mode before entering Sabbath Mode.
Controls and lights will not work until the
ࡍࡉ and DISPLAY are held again for 5
seconds to exit Sabbath Mode.
Lockout Mode
For when you are away and don’t want others opening your
beverage center. As soon as the door is opened the door
alarm will sound. The interior lighting will remain off. If the
beverage center is connected to wifi, a notification can be
received through the app that the door has been opened.
This feature can be enabled / disabled using the app. If
your connected device is not available the feature can
be enabled with a press and hold of ࡍࡉ and CONTROL
LOCK for 3 seconds. Press and hold ࡍࡉ and CONTROL
LOCK again for 3 seconds to disable the feature.
LOCKED
DISPLAY
TURBO
COOL
DOOR
HIGH
TEMP
ALARM
HOLD 3 SEC
CONTROL
LOCK
DISPLAY
TURBO
COOL
WIFI
CONNECT
POWER
HOLD 3 SEC

14 49-1000777 Rev. 2
USING THE BEVERAGE CENTER
APPLIANCE COMMUNICATION
WiFi (for customers in the United States, its territories, and Canada)
REGULATORY INFORMATION
FCC/IC Compliance Statement:
This device complies with Part 15 of the FCC Rules. Operation is subject to the following two conditions:
1. This device may not cause harmful interference, and
2. This device must accept any interference received, including interference that may cause undesired operation.
This equipment has been tested and found to comply with the limits for a Class B digital device, pursuant to Part 15 of
the FCC Rules. These limits are designed to provide reasonable protection against harmful interference in a residential
installation. This equipment generates uses and can radiate radio frequency energy and, if not installed and used
in accordance with the instructions, may cause harmful interference to radio communications. However, there is no
guarantee that interference will not occur in a particular installation. If this equipment does cause harmful interference to
radio or television reception, which can be determined by turning the equipment off and on, the user is encouraged to try
to correct the interference by one or more of the following measures:
• Reorient or relocate the receiving antenna.
• Increase the separation between the equipment and receiver.
• Connect the equipment into an outlet on a circuit different from that to which the receiver is connected.
• Consult the dealer or an experienced radio/television technician for help.
Labelling: Changes or modifications to this unit not expressly approved by the manufacturer could void the user’s
authority to operate the equipment.
Ŷ Download the SmartHQ app.
• Available for iPhone from the Apple Store.
• Available for Android from Google Play.
Ŷ Select Create Account on app.
• Enter information, and select Register. An email will
be sent to you.
• When you receive the email, select Verify Account.
• Sign in with your credentials and select Authorize
to allow the app to communicate with your Beverage
center.
Ŷ Open SmartHQ App.
Method 1
1. The app should detect your appliance and show a
pop-up screen with your appliance.
2. Press “CONNECT” on the pop-up screen. If there
are multiple appliances nearby, the App will navigate
to the ADD APPLIANCE screen.
3. Under NEARBY section, press “CONNECT” on
the Beverage Center card. If the App did not find a
nearby Appliance, press “RESCAN”.
4. After rescanning, check if your appliance appears on
the NEARBY section, and press “CONNECT” on the
Beverage Center card.
5. Select UNDERCOUNTER from the SELECT
APPLINACE Screen.
6. The App will navigate to the “LET’S GET STARTED”
screen.
7. Follow the SmartHQ instructions to complete Wi-Fi
setup.
Method 2
1. If the app does not show a pop-up screen, press the
³´ button at the top right of the screen.
2. Under NEARBY section, press “CONNECT” on
the Beverage Center card. If the App did not find a
QHDUE\$SSOLDQFHSUHVV³5(6&$1´
3. After rescanning, check if your appliance appears on
the NEARBY section, and press “CONNECT” on the
Beverage Center card.
4. Select UNDERCOUNTER from the SELECT
APPLINACE Screen.
5. The App will navigate to the “LET’S GET STARTED”
screen
6. Follow the SmartHQ instructions to complete Wi-Fi
setup.
Method 3
1. If the NEARBY appliance is not found, scroll down to
the “MANUAL CONNECTION SETUP” card.
2. Select REFRGERATION > MONOGRAM >
Beverage CENTER > UNDERCOUNTER.
3. The App will navigate to the “LET’S GET
STARTED”.
4. Follow the SmartHQ instructions to complete Wi-Fi
setup.
49-1000777 Rev. 2 15
USING THE BEVERAGE CENTER
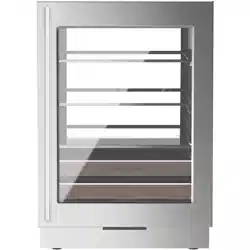
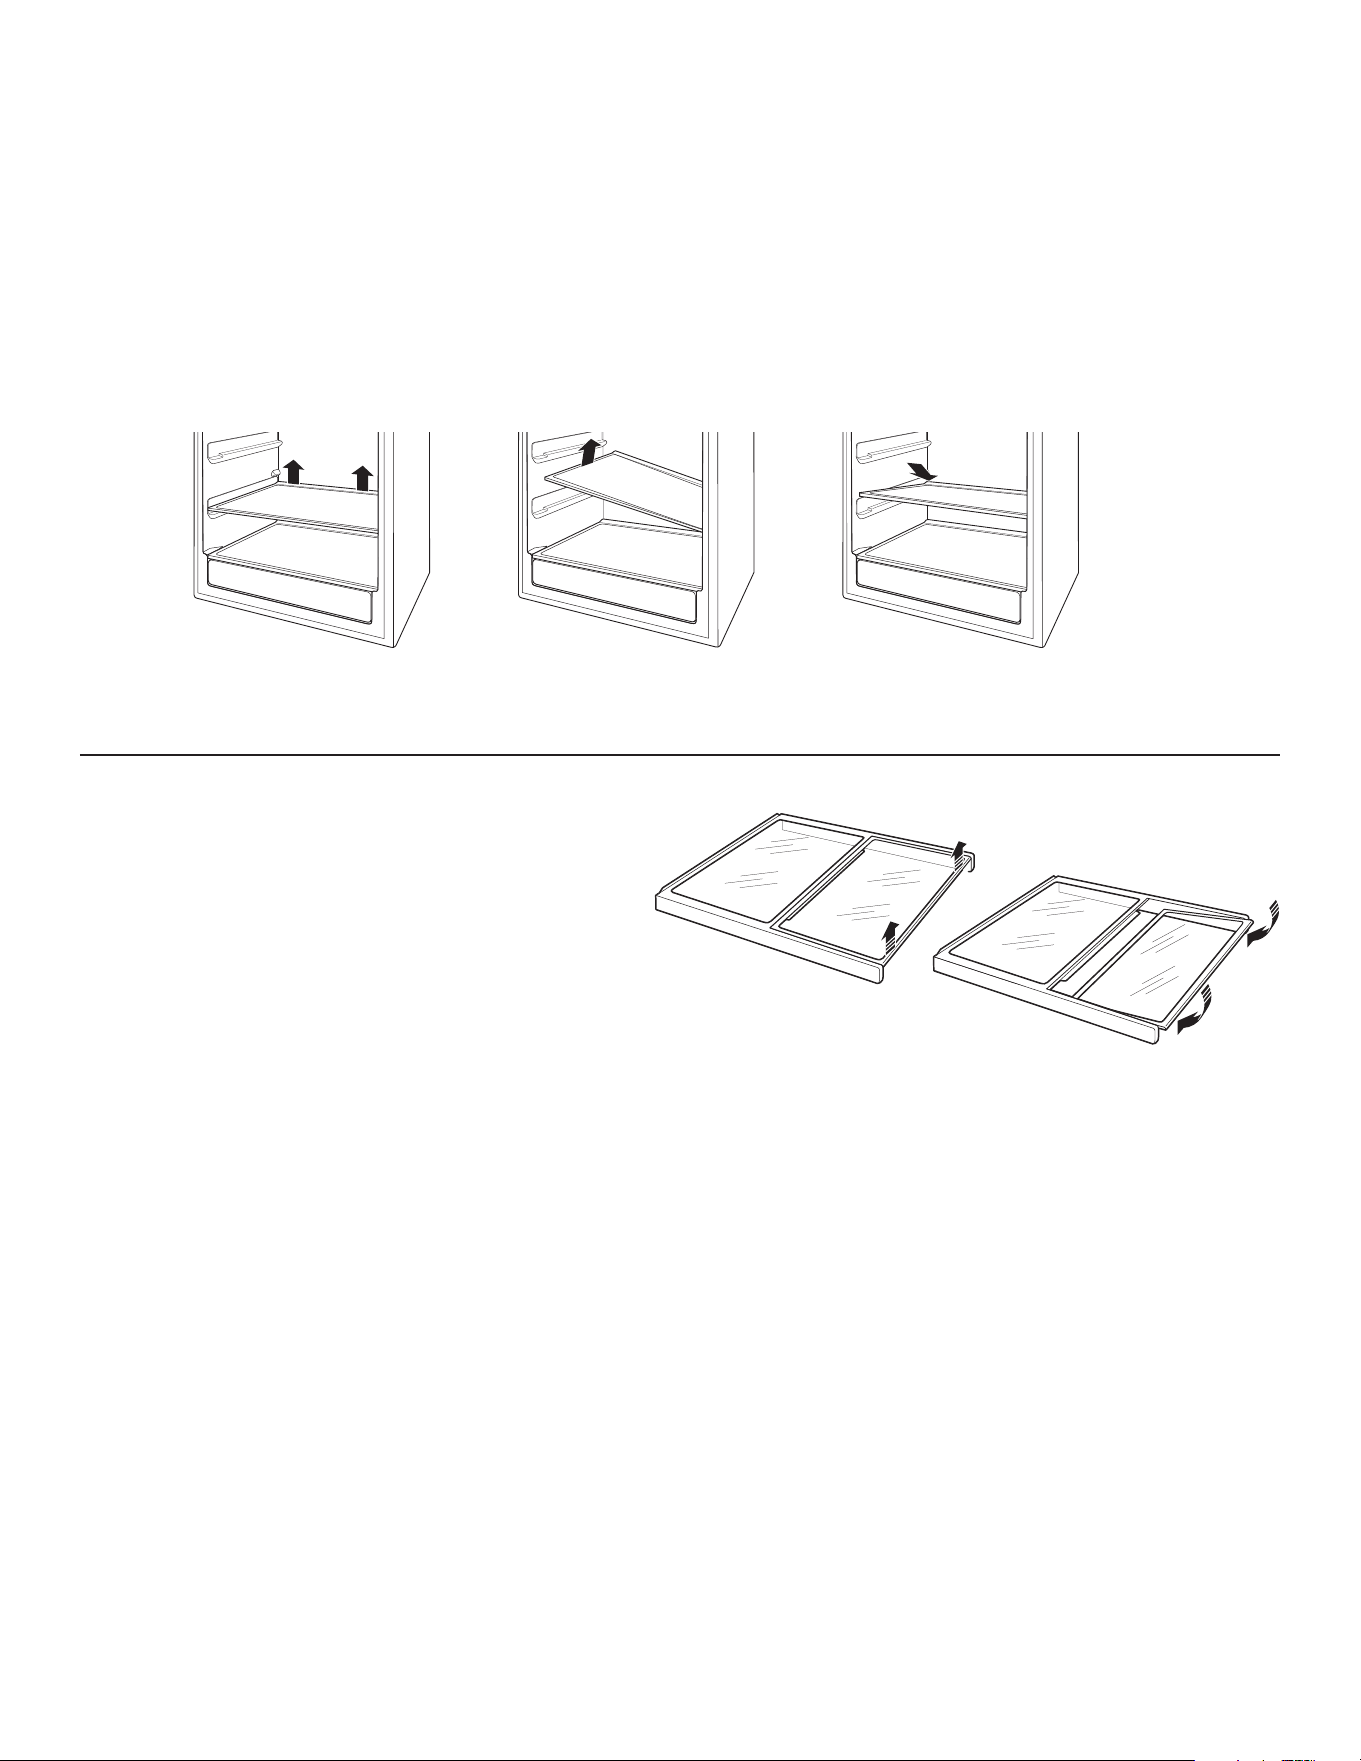
GLASS SHELVES
Tempered glass shelves in the beverage center unit are
removable for easy cleaning or for storing larger items.
To remove a shelf, open the door completely to avoid
potential damage to the gasket. Lift up on the back of the
shelf slightly. Tilt the shelf to one side at an angle while
pulling forward.
Appearance may vary
To replace a shelf, open the door completely to avoid
potential damage to the gasket. Tilt the shelf to one side
at an angle and slide toward the back wall, placing one
side onto the shelf support. Place the other side onto
the opposite shelf support. Ensure rear locking tabs are
engaged. When installed properly, the shelf will not slide
forward when gently pulled.
To remove, lift up on the back of
the shelf
Tilt the shelf at an angle while
removing or replacing
Place in slots when replacing the
shelf
QUICKSPACE
™
SHELF
This shelf splits in half and slides under itself for storage
of tall items on the shelf below.
Step 1: Lift the front edge of the front half of the shelf.
Step 2: Lower the back edge of the front half of the shelf
while sliding it underneath the back half.
The entire Quick Space shelf can be removed and
replaced (see Glass Shelves section).
Step 2
Step 1

16 49-1000777 Rev. 2
USING THE BEVERAGE CENTER
FULL EXTENSION DRAWERS
All of the full extension drawers pull out so bottles can be
conveniently added or removed.
Any of the full extension drawers can be removed to store
larger bottles.
To remove:
1. Pull the full extension drawer out to the STOP position.
2. Push the tab on right drawer guide down while pulling
the tab on left guide up, and pull the drawer out.
To replace:
1. Push the drawer slide arm back into the unit.
2. Pull the small slide sub-assembly completely forward.
3. Insert the sides of the drawer back into the guides.
4. Push until the tabs lock into place.
NOTE: Make sure the tabs on the full extension drawer
guides are fully engaged before loading any bottles. Pull
the drawers out all the way to the STOP position and
push back in several times to make sure locking tabs are
properly engaged.
Soft closure
This product is designed with a soft closing door system.
7KLVV\VWHPPLQLPL]HVWKHLPSDFWRQ\RXUEHYHUDJHDVLW
softens the closing force of the door. As the door nears
closure a dampening mechanism is engaged to soften
the impact. This hinge system is designed to keep the
door open until it reaches the dampening, self closing
mechanism.
Appearance may vary
Sub-assembly
To replace, push drawer
slide arm back into unit
Pull small slide sub-
assembly completely
forward
Sub-assembly
Tab (push tab down
on right drawer
guide, pull tab up on
left drawer guide)

49-1000777 Rev. 2 17
CARE AND CLEANING
CLEANING THE INSIDE
WARNING
Electrical Shock Hazard
Unplug the appliance before cleaning. If the unit is in a
built-in location, remove power at the circuit breaker.
WARNING
Risk of Fire or Explosion.
Flammable Refrigerant
To remove frost, scrape with a plastic or wood spatula
or scraper. Do not use an ice pick or a metal or sharp-
edged instrument as it may puncture the appliance
liner and then the refrigerator tubing behind it.
Do not use any electrical device to defrost your
appliance.
If this is not practical, wring excess moisture out of sponge
or cloth when cleaning around switches, lights or controls.
Use warm water and baking soda solution—about a
tablespoon (15 ml) of baking soda to a quart (1 liter) of
ZDWHU7KLVERWKFOHDQVDQGQHXWUDOL]HVRGRUV5LQVHDQG
wipe dry.
CAUTION
Do not clean glass shelves or
covers with warm water when they are cold. Glass
shelves and covers may break if exposed to sudden
temperature changes or impact such as bumping or
dropping. Tempered glass is designed to shatter into
many small pieces if it breaks.
Do not wash any plastic Beverage center parts in the
dishwasher.
VACATION AND MOVING
Vacation
If you will be away for an extended period of time and do
not want to leave the appliance on while you are gone,
prepare it for your absence.
1. Remove all items.
2. Press and hold POWER on the control panel for 3
seconds to turn off cooling.
3. Unplug or disconnect power.
&OHDQWKHLQWHULRU6HH³&OHDQLQJ´
5. Prop door open, so air can circulate inside.
Preparing to Move
Secure all loose items such as shelves and drawers by
taping them securely in place to prevent damage. Be sure
the Beverage center stays in an upright position during
moving.
DO USE DO NOT USE
Soft, clean cloth or sponge
Microfiber cloth
Abrasive cloths, paper towels, scrubbing sponges (with or without soap),
scouring or steel wool pads
Mild detergent mixed with warm
water
Abrasive powders, liquids, or sprays
Window sprays, ammonia, or bleach
Citrus or plant oil-based cleaners
Acidic or vinegar-based cleaners
Oven cleaners
Alkaline cleaners
Stainless steel cleaners
Ɣ&OHDQLQWHULRUH[WHULRUVXUIDFHVZLWKZDUPZDWHUPLOGVRDSRUGHWHUJHQWDQGDVRIWRUPLFURILEHUFORWKWRDYRLG
damage.
Ɣ:LSHWKHDSSOLDQFHVXUIDFHGU\ZLWKDVRIWFOHDQFORWKRUPLFURILEHUWRZHOWRDYRLGVWUHDNLQJRUZDWHUVSRWWLQJ
CLEANING THE OUTSIDE
*Easily wipe away smudges and fingerprints.

18 49-1000777 Rev. 2
Installation Instructions
BEFORE YOU BEGIN
Read these instructions completely and carefully.
•
IMPORTANT — Observe all governing codes
and ordinances. Save these instructions for local
inspector’s use.
• Note to Installer – Be sure to leave these
instructions with the Consumer.
• Note to Consumer – Keep these instructions for
future reference.
• Skill level – Installation of this appliance requires
basic mechanical skills.
• Completion time – Beverage center Installation
can vary
• Proper installation is the responsibility of the installer.
• Product failure due to improper installation is not
covered under the Warranty.
LOCATION REQUIREMENTS
IMPORTANT: Before use, this beverage center must
be installed properly.
NOTE: Allow the beverage center to sit upright on its
base for at least one hour before installation.
• Do not install the beverage center where the
temperature will go below 55°F (13°C) because
it will not run often enough to maintain proper
temperatures.
• Do not install the beverage center where the
temperature will go above 110°F (43°C) because it
will not perform properly.
• Install it on a floor strong enough to support it fully
loaded.
• Do not install the beverage center in a location
exposed to water (rain, etc.) or direct sunlight.
IMPORTANT: Handle with care when moving beverage
center to avoid either damaging the refrigerant tubing or
increasing the risk of a leak.
IMPORTANT: If the beverage center has been placed in
DKRUL]RQWDOSRVLWLRQIRUDQ\SHULRGRIWLPHZDLWRQHKRXU
before plugging in to allow the refrigerant to settle.
WARNING
EXCESS WEIGHT HAZARD
Use two or more people to move and install beverage
center. Failure to do so can result in back or other injury.
Item Tools 6SHFL¿FDWLRQV Image Where used
1 Right angle drive 6mm (1/4’’)
Front leveling leg
adjustment
2 Wrench 24mm
Front leveling leg
adjustment
3 Allen wrench 4mm
Toe kick supporting bracket adjustment
Top door adjustment
4 Wrench 13mm Top door adjustment
5 Hex drive 6mm (1/4’’) Rear Roller adjustment
6 Electric screwdriver / Installation of fasteners
7 Tape measure / Measuring cabinet distance and clearances
8 Ruler / Measuring distance of toe kick and levelness
CAUTION
CUT AND Pinch Hazard
Contact with sheet metal or other exposed material edges can result in personal injury. Installing product may create
pinch points.
Wear gloves and protective clothing when installing this product.
49-1000777 Rev. 2 19
Installation Instructions
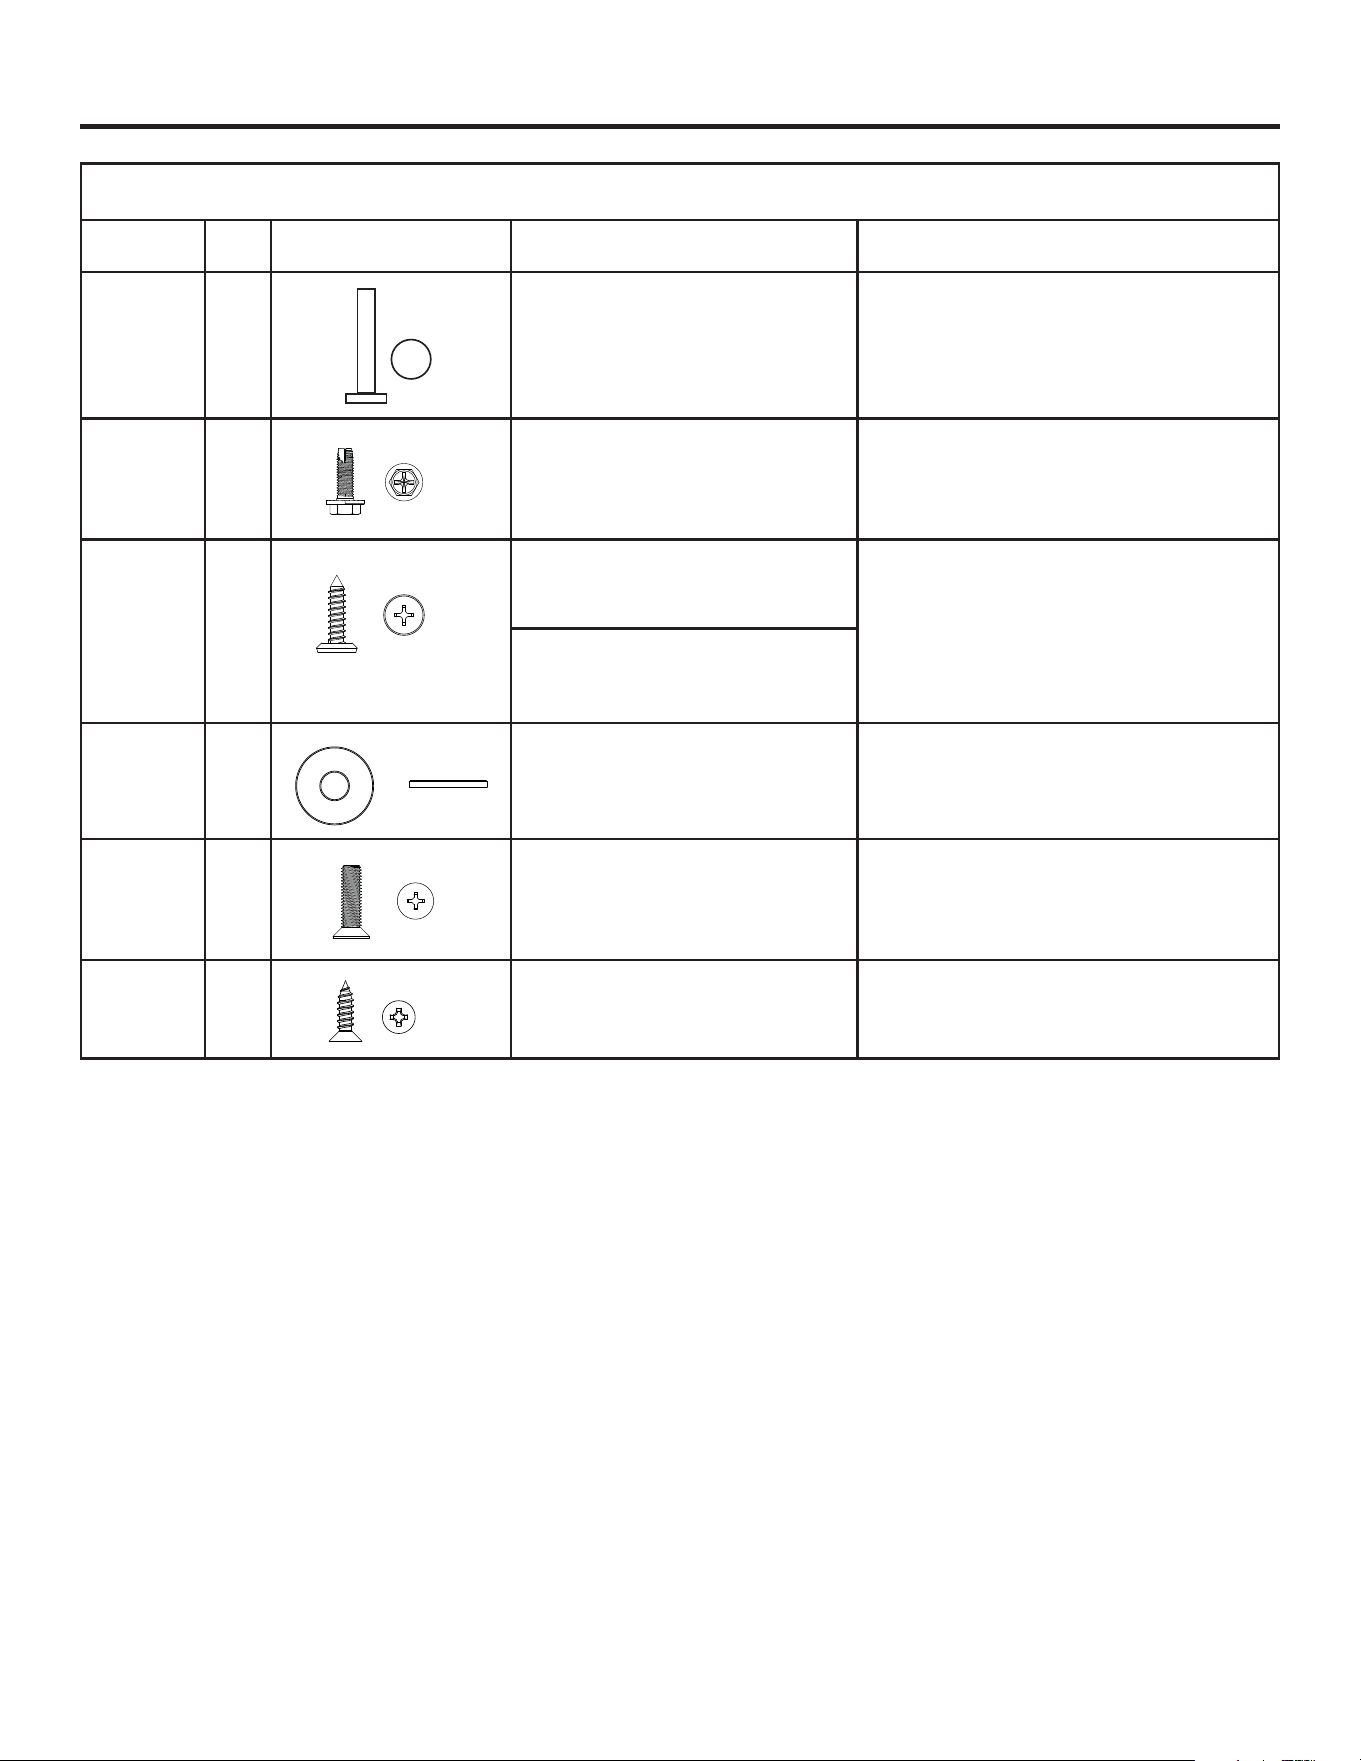
Fasteners (included in accessory bag)
Fastener ID QTY Part Image Location - Function
"Fastener Description
in (mm)"
A
1
In Bottom Hinge - Stops hinge opening
at 90 degrees.
Pin with blunt end
Length: 1 3/8in
30 mm
B
8
At top of Door Panel and Door Panel
Mounting Bracket - Attaches Stainless
Steel Door Panel to product.
Flanged Phillips Hex Head with taper screw end
Length: 5/8 in
16 mm"
C
8
At top of Door Panel and Door Panel
Mounting Bracket - Attaches Custom
Wood Door Panel to product.
Phillips head with pointed end
Length: 5/8 in
16 mm"
At top and bottom of front decorative con-
nector located between two units - Holds
decorative connector in place.
D
4
At bottom of Door Panel - Attaches to four
screws at bottom door panel mounting
brackets and allows adjustment.
"External diameter
19/32 in (15mm)
Internal diameter
3/16 in (5mm)"
E
4
At top of Anti-Tip Brackets both sides -
Attaches into top of product.
"Phillips head with blunt tip
Length: 5/8 in
16 mm"
F
4
At side of Anti-Tip Bracket both sides -
Attaches product to adjacent cabinets.
"Phillips head with pointed end
Length: 1/2 in
13 mm"
20 49-1000777 Rev. 2
Installation Instructions
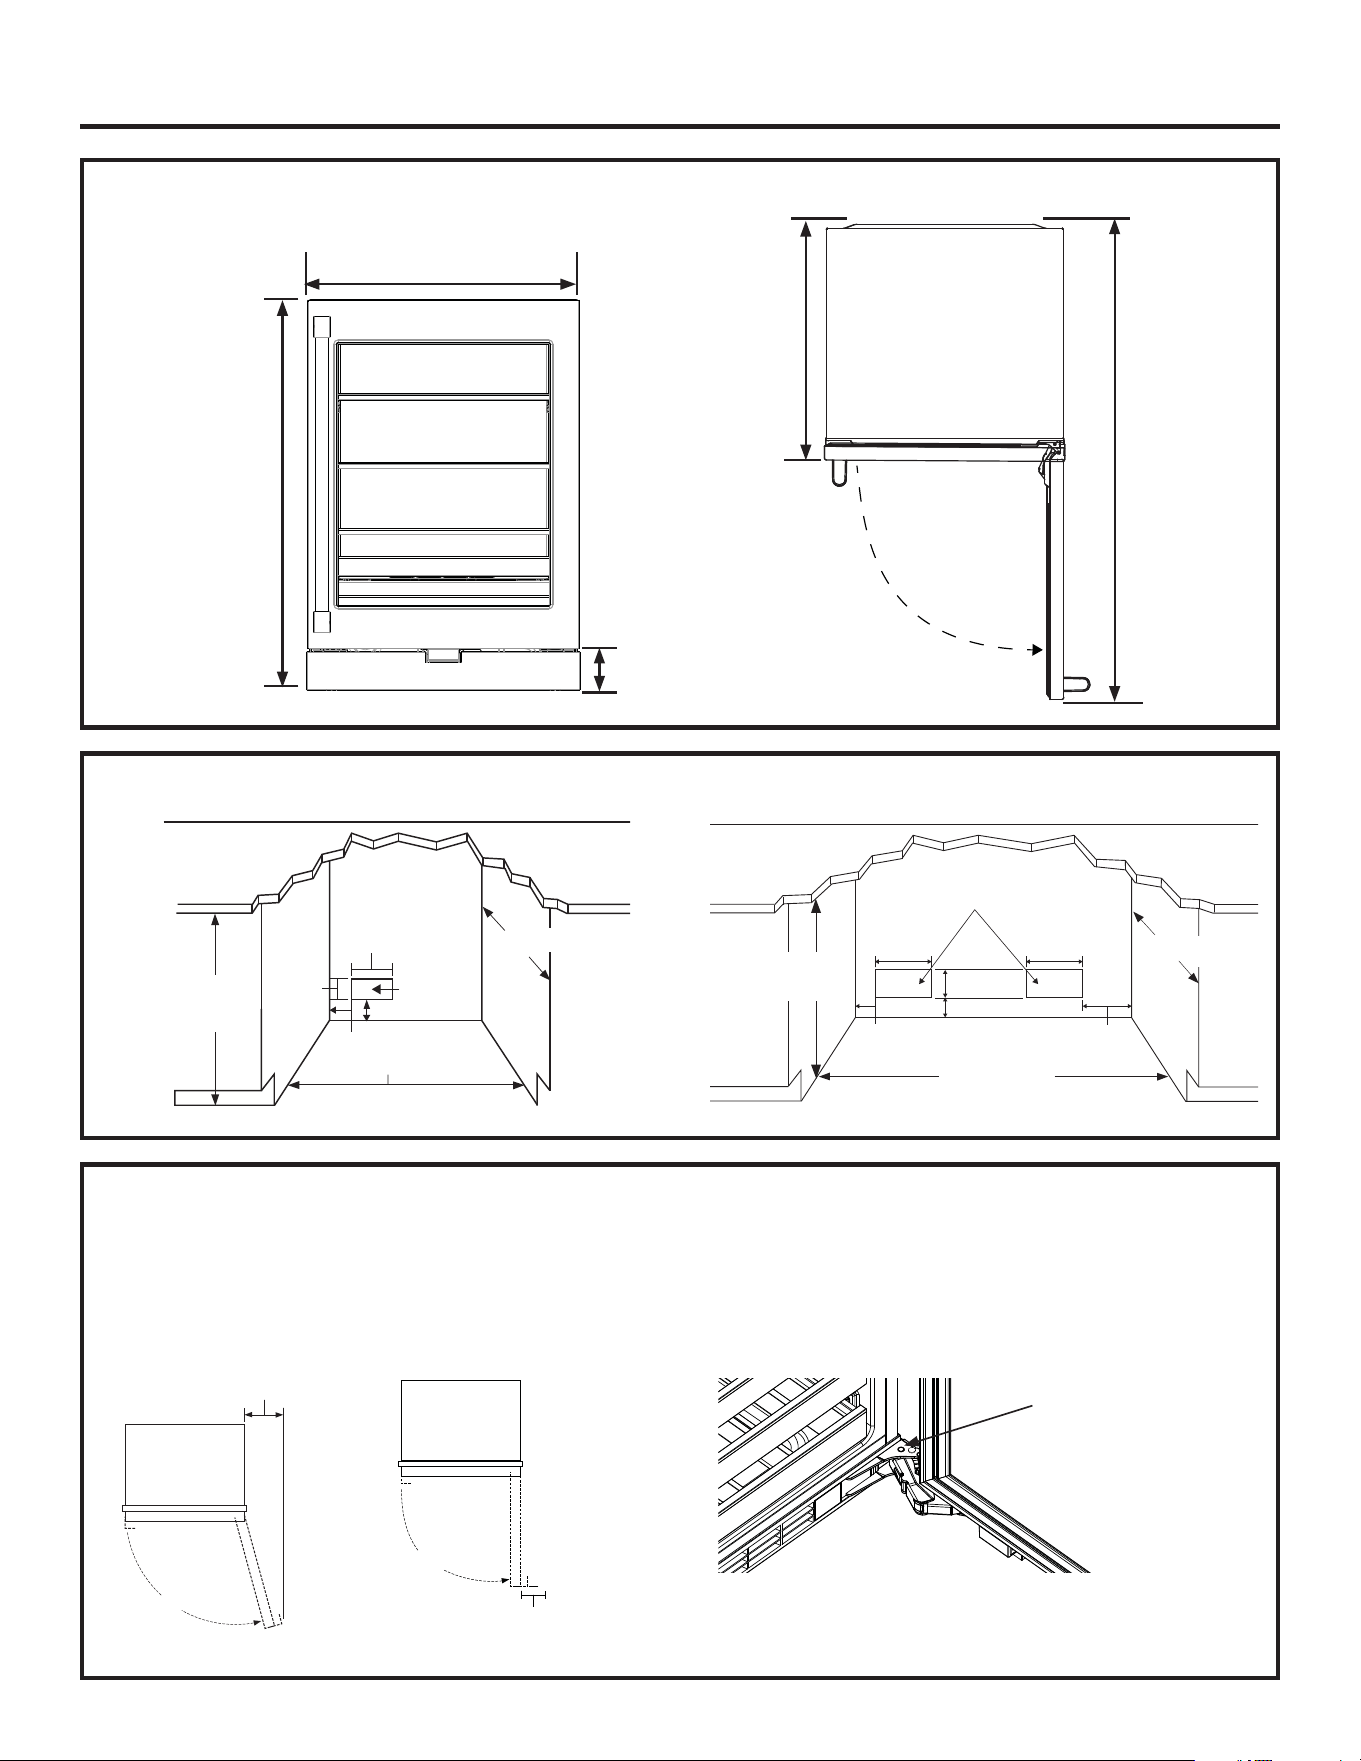
BEVERAGE CENTER DIMENSIONS
THE INSTALLATION SPACE
Outlet
location
34-1/2" - 35"
(876.3 - 889mm)
24" (610 mm)
24" (610mm)
(52mm)
10"
(254mm)
(131mm)
5-3/16"
2"
5/8"
(41mm)
PRODUCT CLEARANCES
When installed in a corner:
• Allow 4" (100 mm) min. clearance on the hinge side for
the 90° door swing and to allow racks to slide out.
• Allow 13" (330 mm) minimum clearance on the hinge
side for a full 115° door swing.
To prevent door from opening more than 90 degrees,
insert hinge pin A from accessory bag into the bottom
hinge pin hole. Make sure the pin sits all the way down
and the door can be closed smoothly.
13" Minimum
to Wall
115°
90° Door Swing
4" Minimum
to Wall
90°
Ǝ
(606 mm)
Ǝ
(866-891 mm)
´RIDGMXVWPHQW
with leveling legs
and rollers
Ǝ
(606 mm)
Ǝ
(1216 mm)
Outlet
location
10"
(254mm)
10"
(254mm)
34 1/2"-35"
(876.3 - 889mm)
24" (610mm)
5/8" (41mm)
2" (52mm)
12-3/8" (315mm)
(131mm)
48" (1220mm)
5-3/16"
SIDE BY SIDE PRODUCT INSTALLATION
Toe Kick Height 4"
from floor to bottom
of door.
Note:
Toe Kick height range
is 3 1/2" to 4 1/2"
IURPÀRRUWRERWWRP
of door. Adjust height
with front leveling
legs and rear leveling
rollers.
Hinge pin hole
49-1000777 Rev. 2 21
Installation Instructions
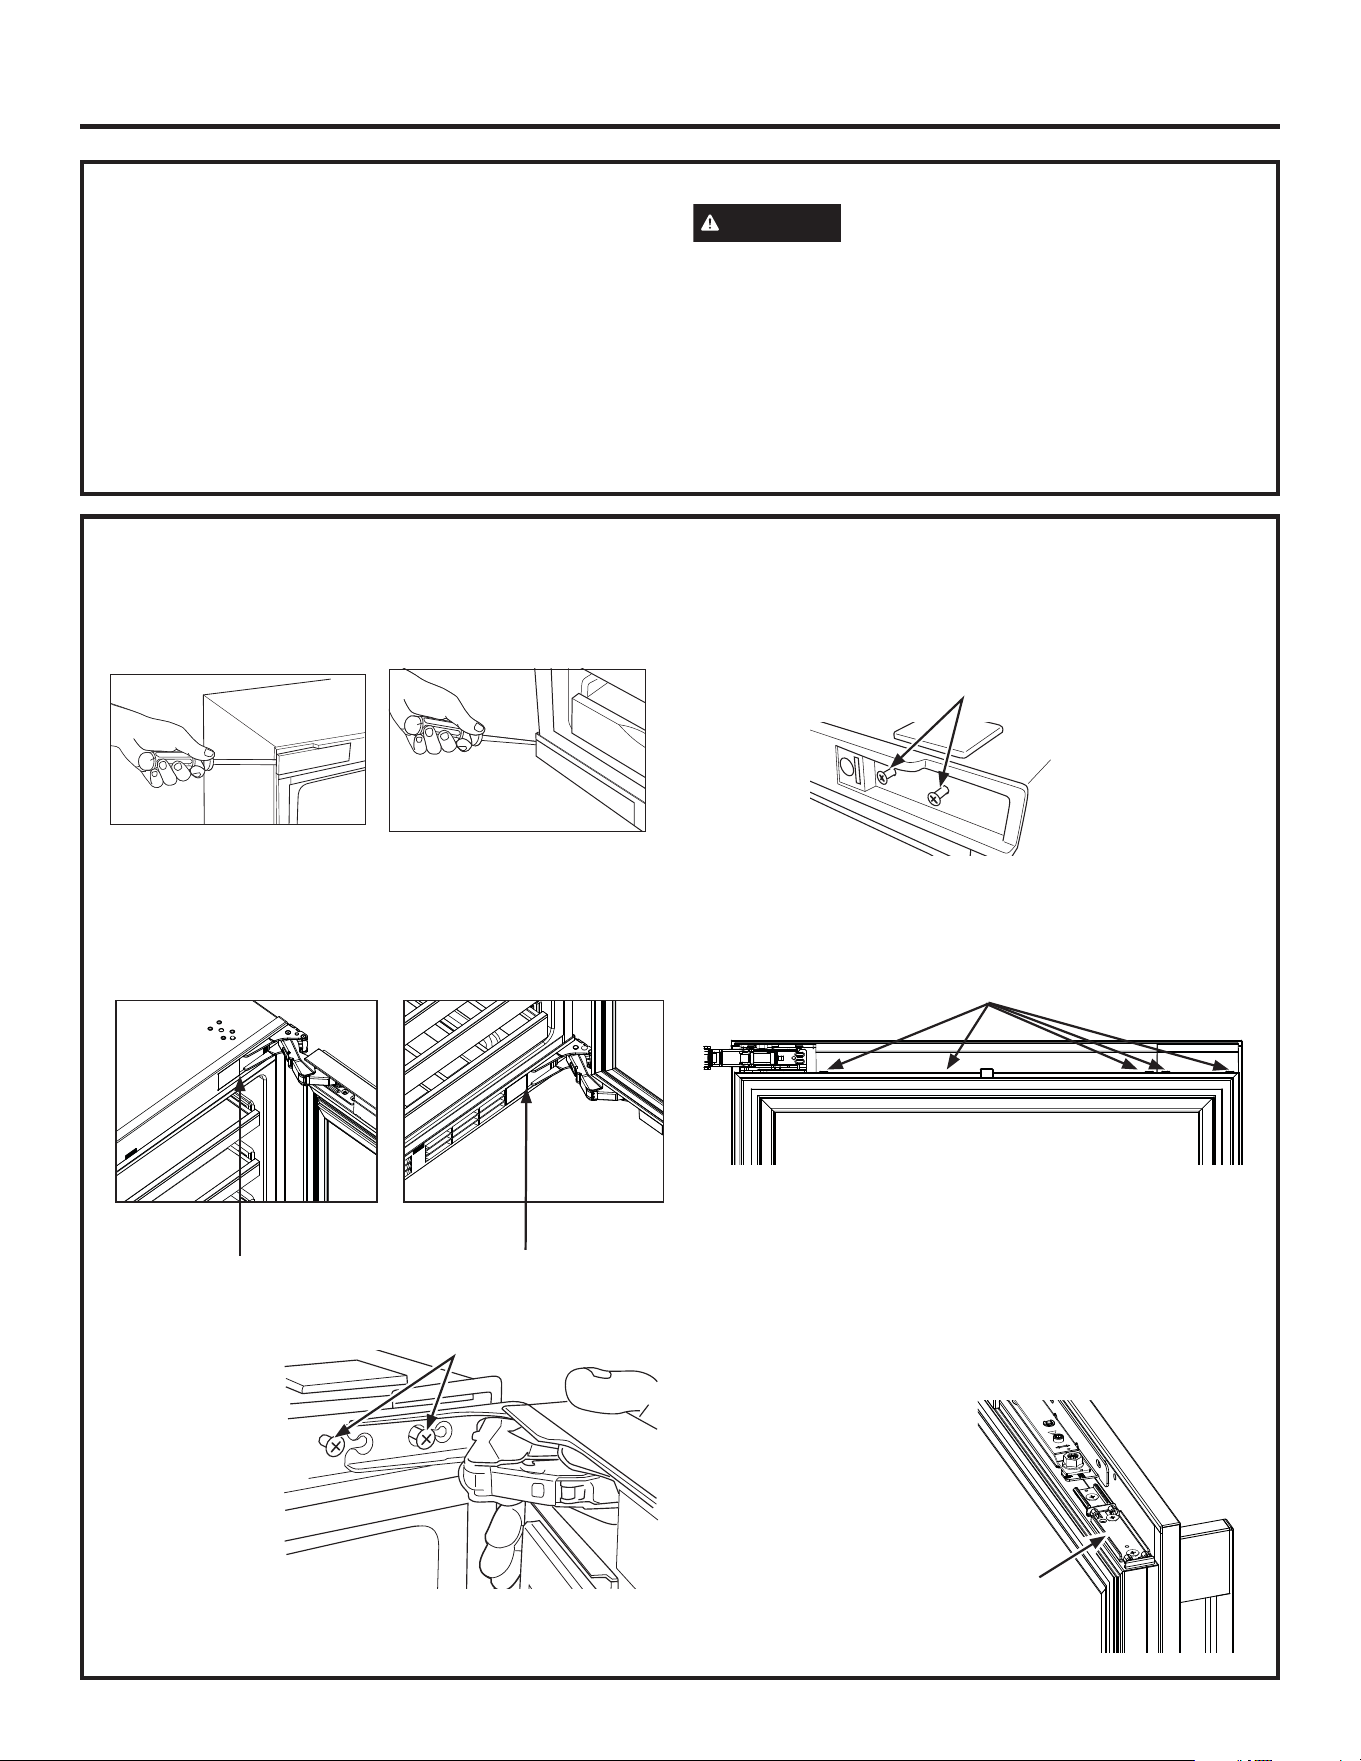
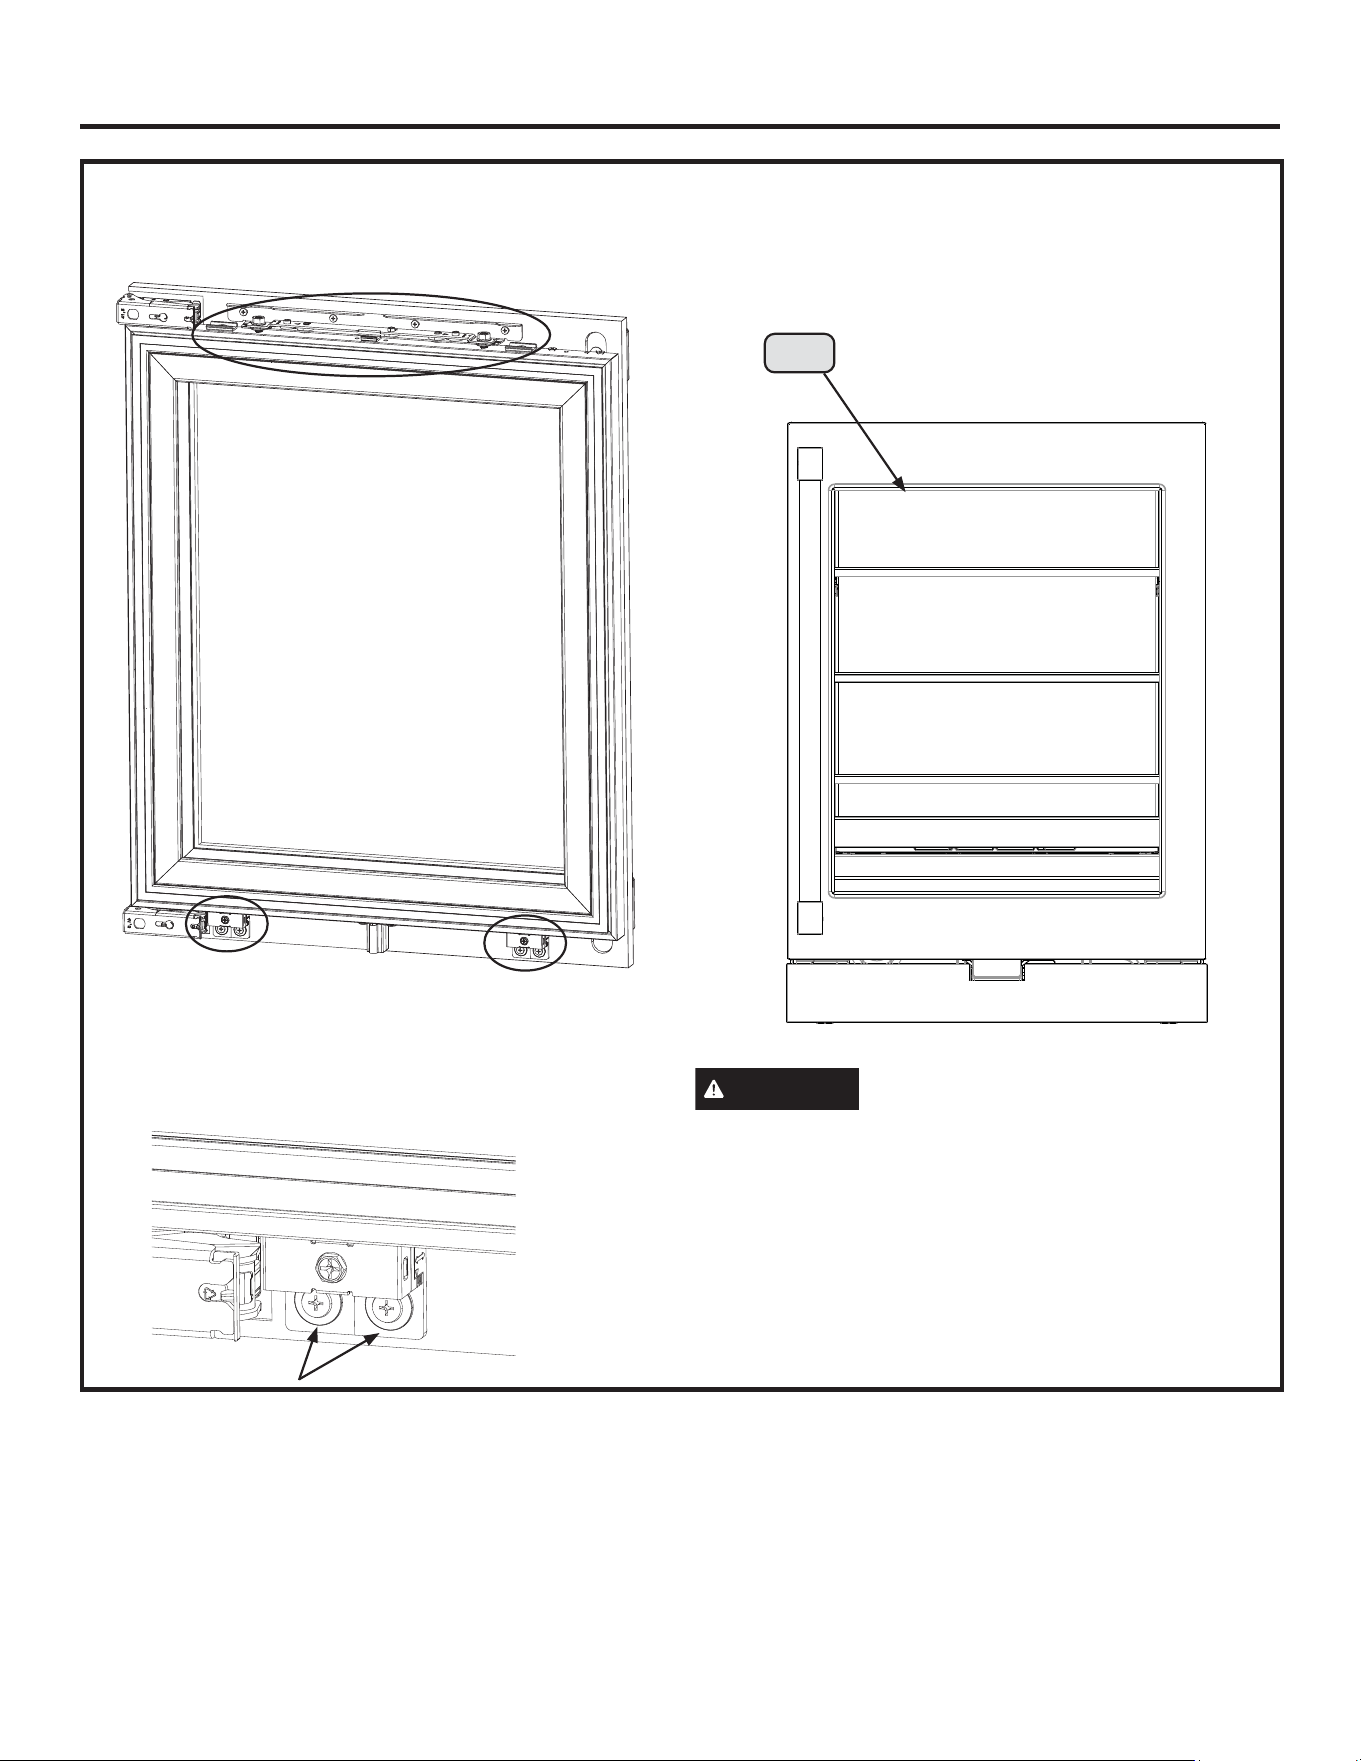
REVERSING THE DOOR SWING
1. Open the door, insert the flat head screw driver into
the notch on the side of the rectangular plastic cover at
the opposite side of the hinge to remove both top and
bottom covers.
At hinge side, insert flat head screw driver under the T
shape hinge cover to pop the cover off for both top and
bottom hinge. Remove the square cover next to them
with same screw driver.
2. Completely
loosen the
screw to
detach the
door from
cabinet.
3. Remove the
door and leave the hinges open.
4. Remove hinge screws form cabinet and install them on
the opposite side. Recommend to screw halfway in for
the top two screws so that you can slide the hinge on
them to have some support during the installation.
5. If the door has top trim installed, then remove the top
plastic trim from door by insert a flat head screw driver
to slots under the trim (suggest to start from handle
side) and pop it open. Otherwise go to next step.
6. Remove hinges from door. Move the trim support
bracket from left side top of the door to right side top of
the door. Place hinges on the other side with top hinge
at bottom and bottom hinge at top.
There is a washer on the bottom hinge. When you
move the bottom hinge to the other side as top hinge,
be sure you remove the washer and place it on the
new bottom hinge, which
is the original top hinge
on the other side.
Screws
Screws
REMOVE PACKAGING
• Remove tape and glue residue from surfaces before
turning on the beverage center. Rub a small amount
of liquid dish soap over the adhesive with your fingers.
Wipe with warm water and dry.
NOTE: Do not use sharp instruments, rubbing alcohol,
flammable fluids, or abrasive cleaners to remove
tape or glue. These products can damage the surface
of your beverage center. For more information, see
³%HYHUDJH&HQWHU6DIHW\´
• Dispose of/recycle all packaging materials.
WARNING
Small objects are a choke hazard for
children. Remove and discard any parts not used.
CLEAN BEFORE USING
After you remove all of the packaging materials, clean
the inside of the beverage center before using it. See the
cleaning instructions in "Care and Clean".
Slots
Trim
support
bracket
Insert screw driver from
this side to pop the square
cover open.
Insert screw driver under
T shape hinge cover.
22 49-1000777 Rev. 2
Installation Instructions
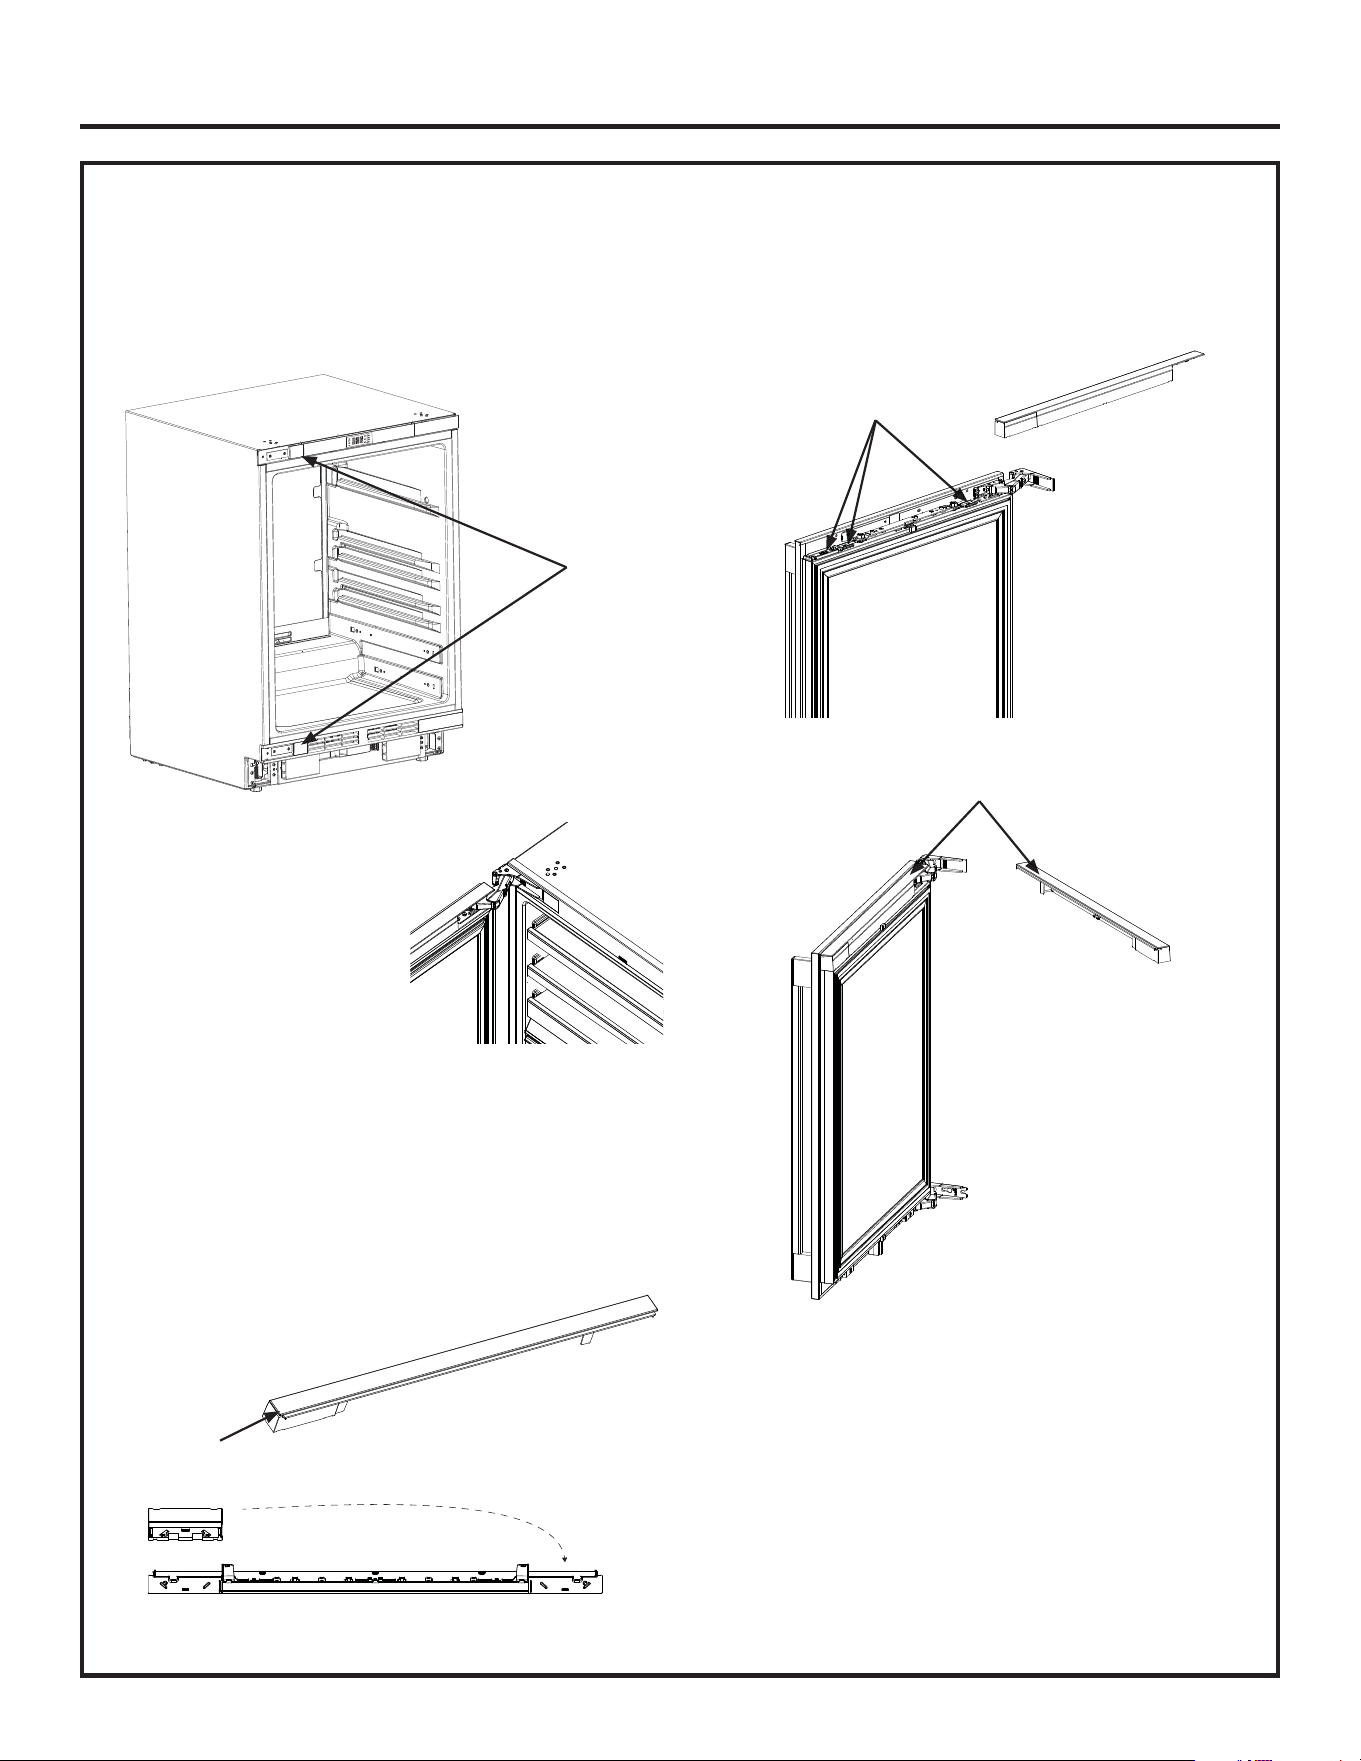
REVERSING THE DOOR SWING (CONT.)
7. Install square covers from step 1 to the new hinge
location at top and bottom of cabinet. Install the
rectangular cover from step 1 to the new non hinge
side at top and bottom of the front cabinet.
8. Slide the top hinge to top 2
screws on the cabinet. Install
the bottom hinge screw,
do not tighten them. Level
the door then tighten all 4
screws. Install the T shape
hinge cover from step 2 to
the cabinet.
9. If your product does not have top plastic trim installed,
you can find it inside of unit on the top shelf. Separate
the end cover block from top trim by inserting the flat
head screw driver in the slot under the trim at the end
of trim.
Place it on the other side of the trim. The trim is ready
to be installed.
10. Perform this step only after you complete the door
panel installation and adjustment. Press the spring
strip in while you install the trim on top of the door.
Press down the trim to engage the clip of the trim to
the brackets on the door.
Square
covers
Slot
Brackets for trim
Spring strip
49-1000777 Rev. 2 23
Installation Instructions
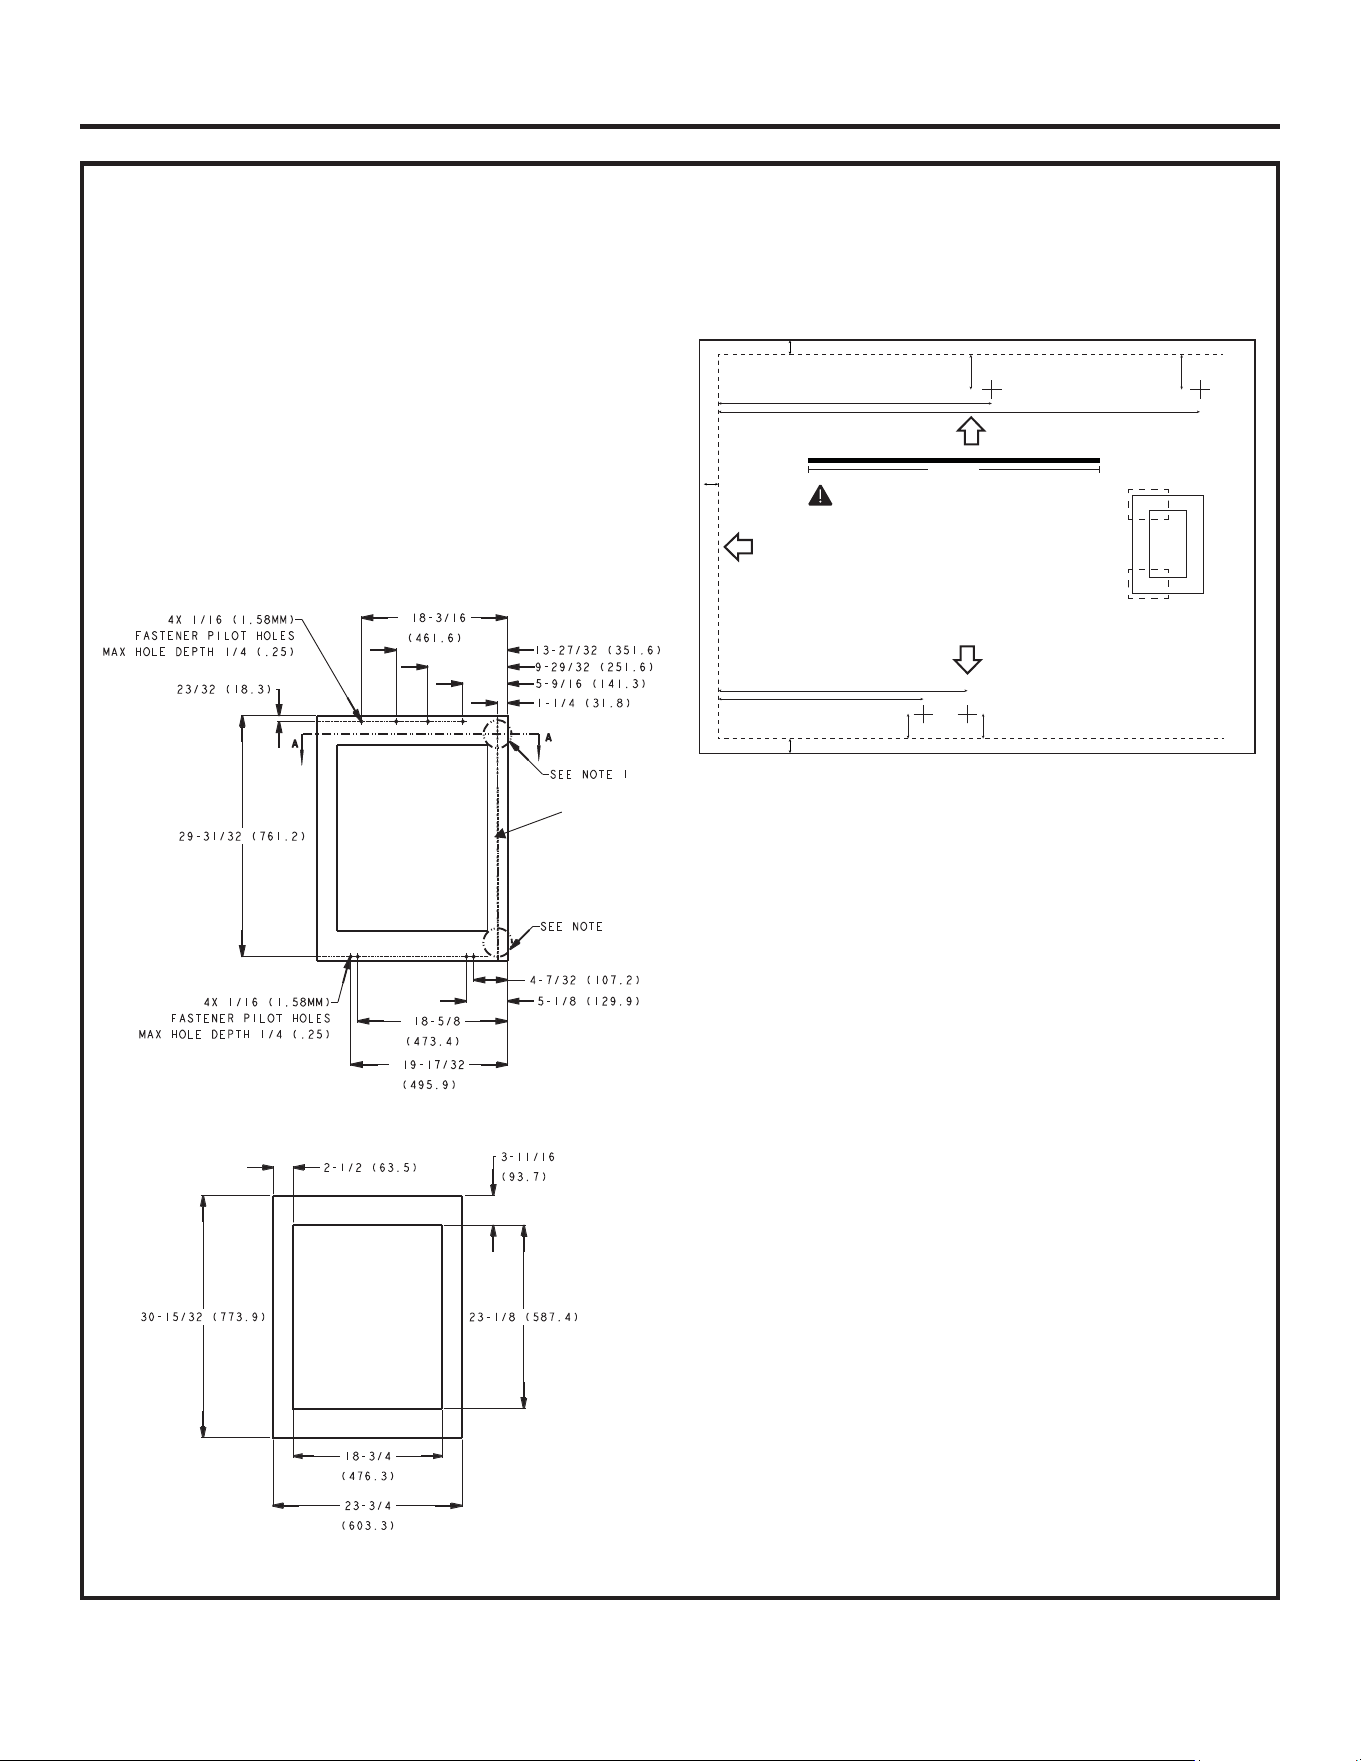
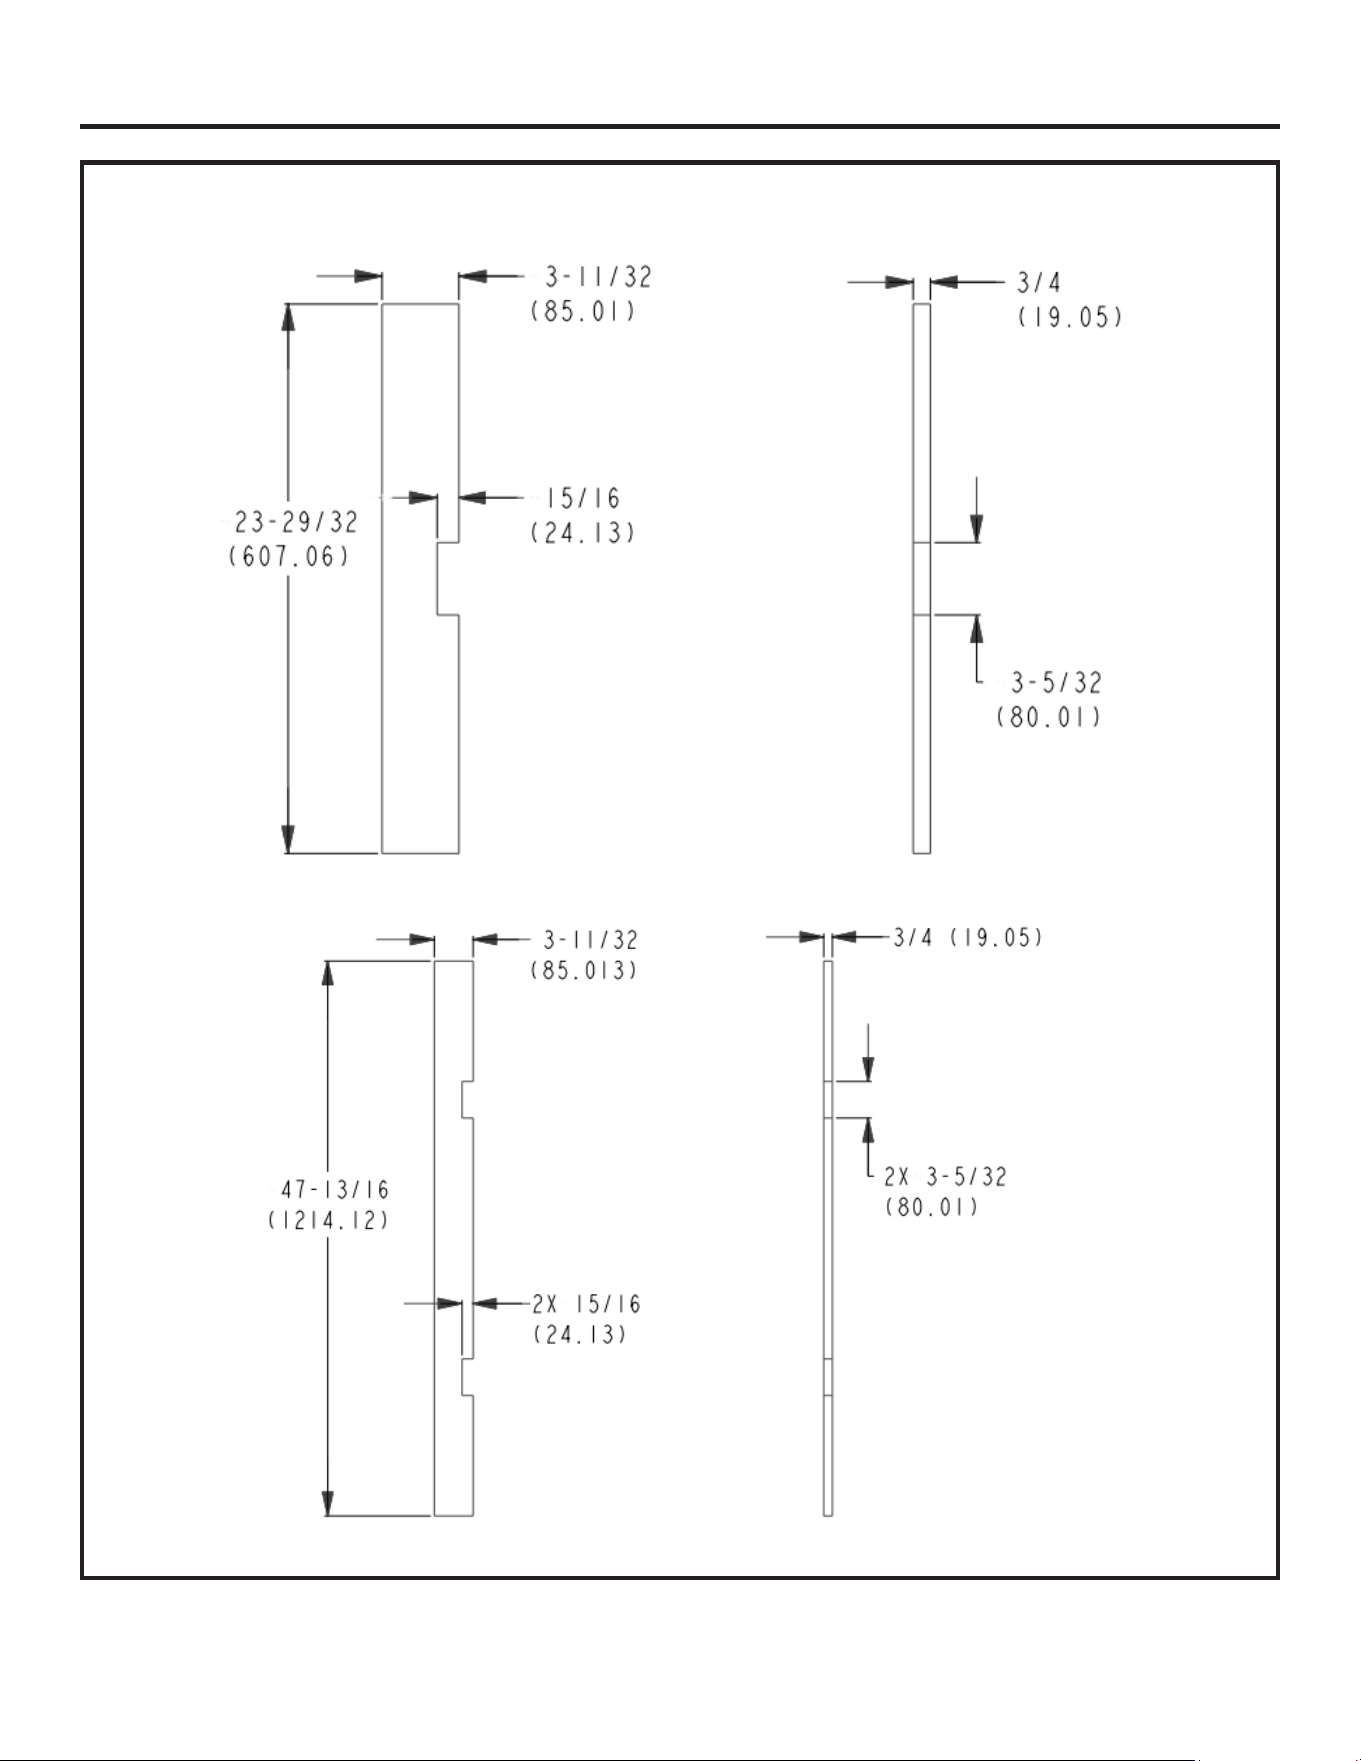
BUILD CUSTOM DOOR PANEL
7KHFXVWRPSDQHOPXVWEH´PPWKLFN%UDFNHWV
are included with the refrigerator to provide mounting to
the appliance door.
NOTE: We recommend that decorative panels have inside
corners and edges rounded or beveled by cabinet maker
to avoid sharp edges on the panels. Edges to be treated
should include the top, bottom and hinge side edges.
NOTE: The back side of the panel is recommended to
be finished. Portions of the back side of the panel will be
visible when the door is open.
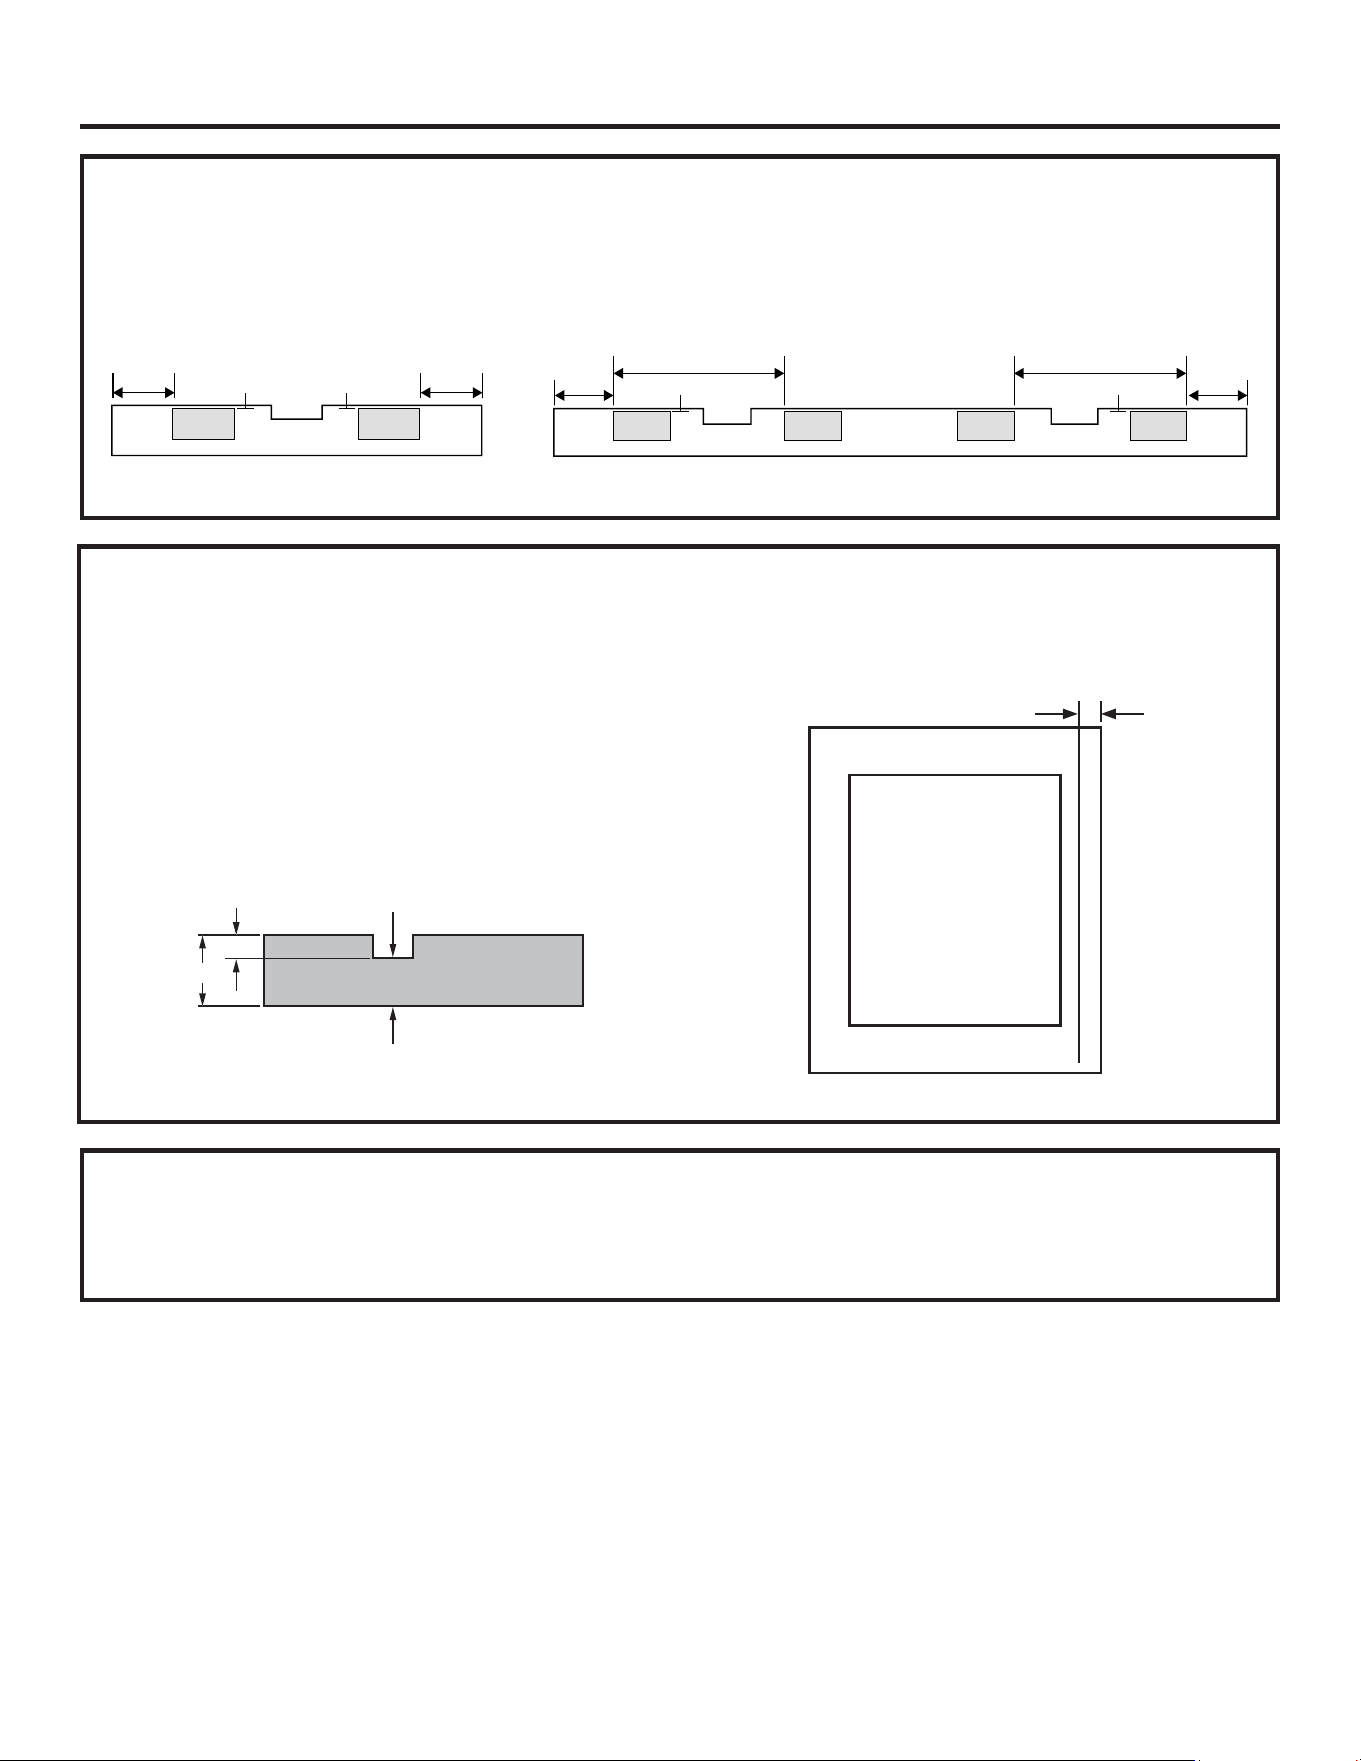
Steps
1. Verify overall panel dimension match below panel
drawing.
2. A template for pilot hole is provided with the unit in the
accessory bag to assist in drilling the pilot holes in the
correct location. Follow the instruction on the template
to complete pilots.
3. Install the thread bracket, handle mounting fastener,
spacer by following the installation manual coming with
ZKPN kit
Front view of Custom Door Panel
Back view of Custom Door Panel
Handle side
Handle
mounting
centerline
LEFT
6" (15.24 CM)
yPRINT TEMPLATE ON 8.5" X 11" (21.59 CM X 27.94 CM) PAPER ONLY.
yPRINT ACTUAL SIZE (100% SCALE). DO NOT SCALE TO FIT.
NO MARGINS OR HEADERS/FOOTERS.
yVERIFY LINE MEASURES 6" (15.24 CM) LONG BEFORE DRILLING PILOT HOLES.
*PILOT HOLES TO BE 7/64" AND NOT EXCEED 1/2" DEEP.
BOTTOM
T1
T1
T1
5-1/8
"
.3
"
.3
"
4-7/32
"
5-9/16
"
23/32
"
23/32
"
9-29/32
"
.3
"

24 49-1000777 Rev. 2
Installation Instructions
BUILD CUSTOM DOOR PANEL (CONT.)
4. Install Custom Wood Door Panel
Gasket Kit (Optional)
• Unit includes 4 gaskets, 2 long and 2 short.
• These gaskets fill the gap between the custom wood
door panel and the glass.
• Install the two long gaskets first. Leave a small gap in
the corners for the short gaskets. (Figure 1)
• Remove the paper strip from the adhesive and discard.
• Install the long gasket hard edge approximately 1/16
(1 mm) from the customer facing window edge.
(Figure 2 and 2B)
• The hard gasket edge holds the gasket flat against the
door with adhesive.
• The soft gasket edge closes the gap between the door
and the glass.
5. Install handles according to instructions for handle type
and kits listed.
Hard edge
(adhesive backed)
Figure 1
Soft edge
Figure 2
Install two long
JDVNHWV¿UVW
Note: Leave
small gap in
corners for
short gaskets.
Figure 2B
Install two short
gaskets to
complete the kit
assembly.
49-1000777 Rev. 2 25
Installation Instructions
BUILD CUSTOM TOE KICK
Custom Toe Kick 24"
For dual unit installation, follow below drawing to make 48'' width toe kick
26 49-1000777 Rev. 2
Installation Instructions
INSTALL HANDLE
To install handle on a Stainless Door Panel. Place the
handle ends over the handle mounting fasteners and
tighten the set screws using the Allen wrench provided.
To Install handle on a Custom Door Panel, Review the
handle assembly instructions included in the ZKPN
Handle Mounting Fastener Kit for Custom Panels.
BUILD CUSTOM TOE KICK (CONT.)
Custom toe kick magnet install
Peel the adhesive backing from magnetic pads which come with the unit accessory bag. Place them on the back of
the toe kicks as shown below:
Picture for both 24" and 48" toe kick see following page.
3-15/16"
(100mm)
1/4"
(5mm)
1/4"
(5mm)
3-15/16"
(100mm)
3-15/16"
(104.1mm)
11-7/8" (301.6mm)
1/4" (5mm)
3-15/16"
(104.1mm)
11-7/8" (301.6mm)
1/4" (5mm)
HANDLE DESIGN GUIDE (CUSTOM PANEL MODELS ONLY)
Custom Panels require a custom handle from a cabinet
maker or the use of the ZKPN - Handle Mounting
Kit (sold separately) if you are using the Monogram
Statement or Minimalist handles (sold separately).
For custom handle installation, counter-bore holes in
UHDURIGHFRUDWLYHSDQHOV(QVXUH´PPPDWHULDO
thickness remains for handle support.
NOTE:7KHFRXQWHUERUHPXVWQRWH[FHHG´PP
in diameter.
Minimum distance from panel side edge to handle center
should be 1-1/4'' (31.8 mm) as shown.
1/4"
(6.4mm)
1/2"
(12.7mm)
3/4"
(19.1mm)
Hinge Side Handle Side
1-1/4'' (31.8mm)
24" toe kick 48" toe kick
49-1000777 Rev. 2 27
Installation Instructions
INSTALL THE STAINLESS OR CUSTOM WOOD DOOR PANEL
1. Attach the Door Panel to the Top Adjustment Bracket with
the 4 screws, B or C.
2. Attach the Door Panel to the bottom of the door with the
4 screws, B or C and washers D.
Note: Don't tighten the bottom screws to facilitate
adjusting the panel later.
3. If there are wrinkles or folds in the gasket between the
door panel and glass, move a thin plastic card along the
edge between the soft edge of the gasket and the glass
to smooth wrinkles and align gasket. (Figure 3)
CAUTION
If you need to switch door panels,
DOZD\VXQVFUHZWKHERWWRPVFUHZ¿UVWWKHQXQVFUHZ
the top screw to prevent from breaking bottom door
panel mounting brackets.
Figure 3
Front of door
28 49-1000777 Rev. 2
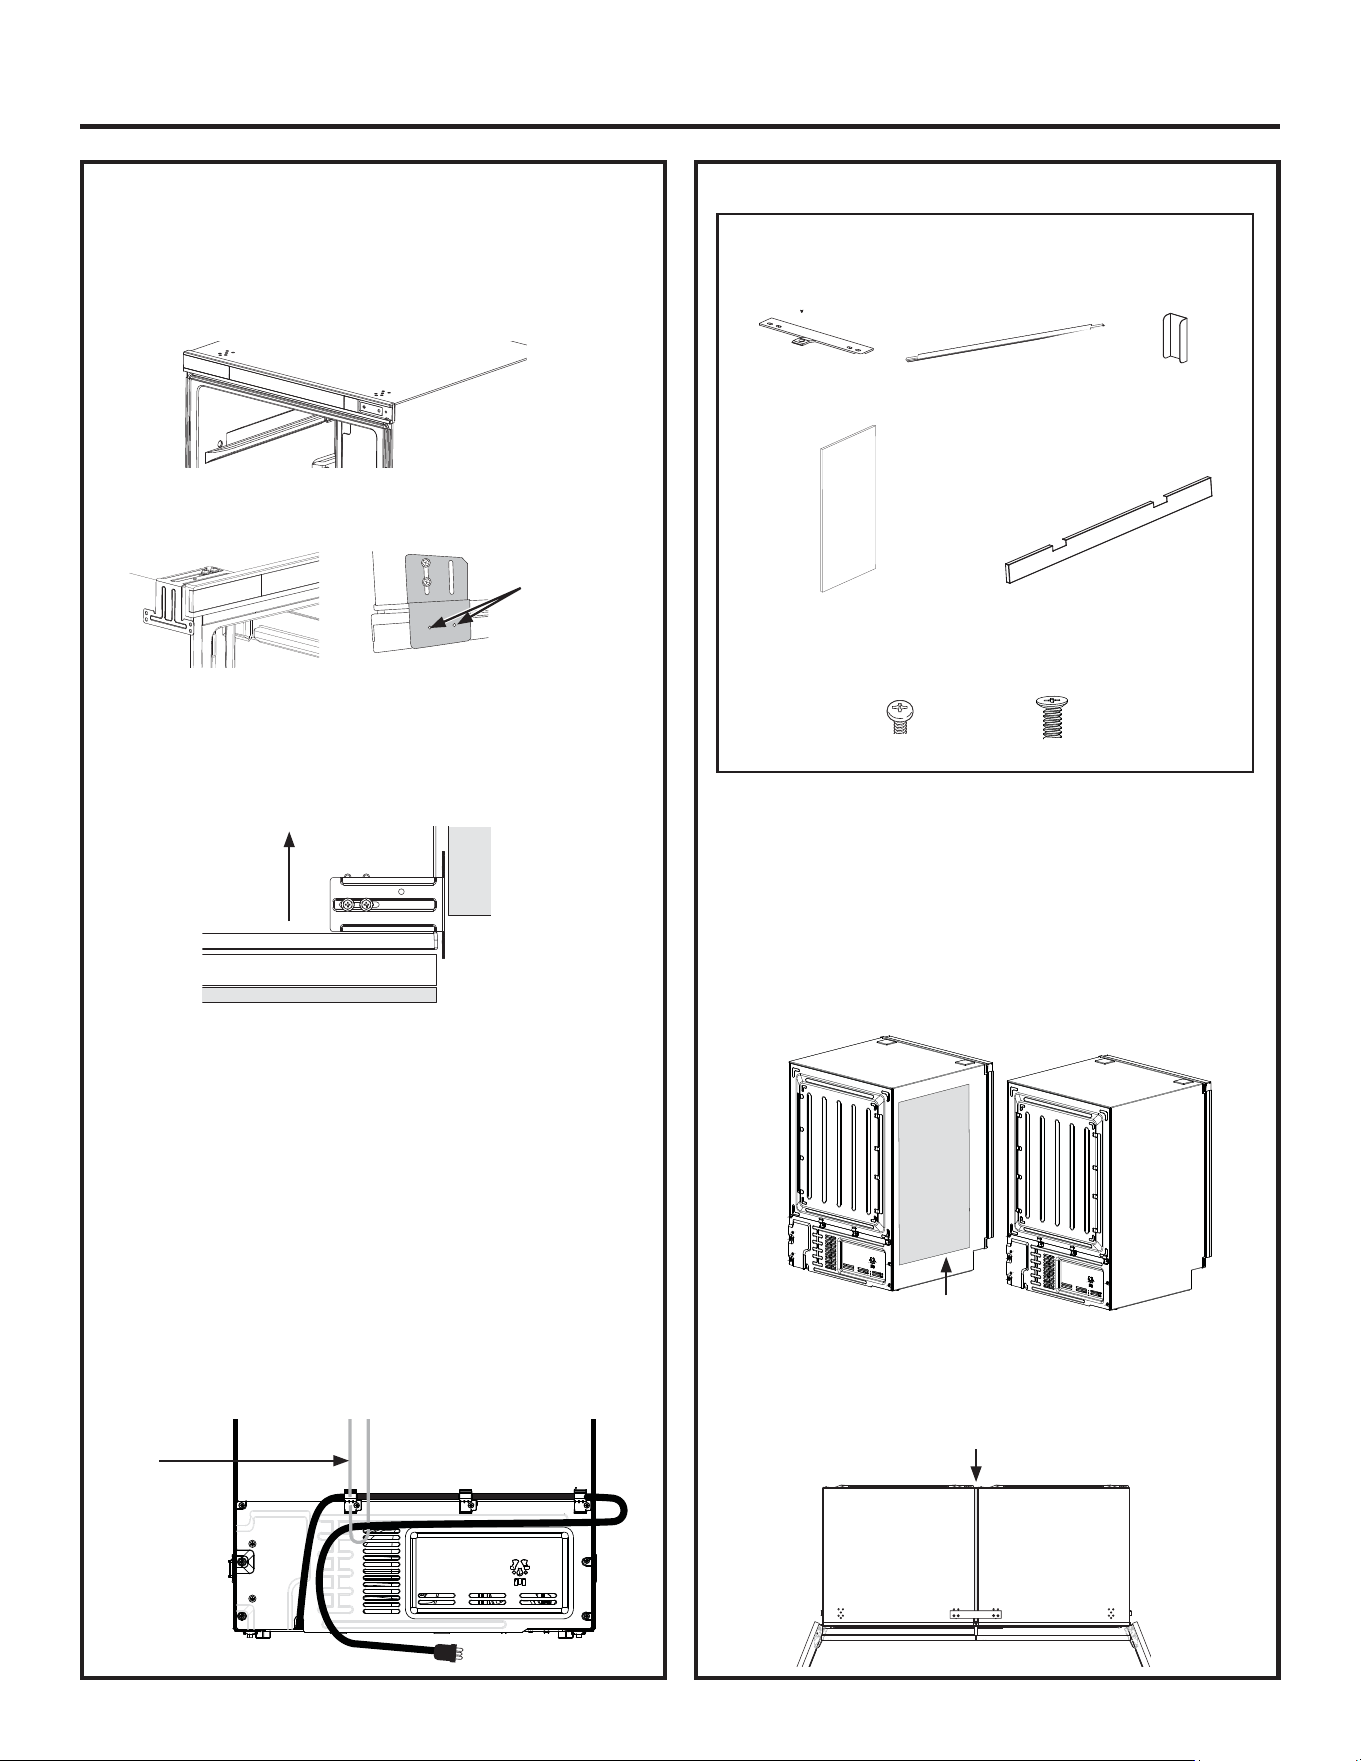
Installation Instructions
FOR SINGLE INSTALL:
INSTALL ANTI-TIP DEVICES
$QWLWLSEUDFNHWFDQVWDELOL]HWKHXQLWLQGDLO\RSHUDWLRQ
1. Remove hole covers from the top of product.
2. Install the anti tip brackets to the top of the product
with screws E from accessory bag. Make sure backets
are lined up.
3. Align the brackets with the cabinetry and gently push the
product into the cabinet opening to the desired depth.
Note: If you have trouble to push the unit all the way
into the cabinet hole, you may have tangled power cord
at the back. To avoid it, remove 3 plastic clips from
accessory bag and install them on to the top 3 screws
location of access cover with the original access cover
screw. Put cord into 3 clips. Plug the cord into outlet
and tie a string or a wire in the middle of cord between
plug and last clip where a white mark is. You can either
use the wire from accessory bag or any string you have.
Thread the string or wire through the 1st clip then pull
the string or wire over the unit while you push the unit
into the cabinet hole. Adjust the string releasing position
and make sure the appliance will be completely nested
in cabinet hole. Then release the string.
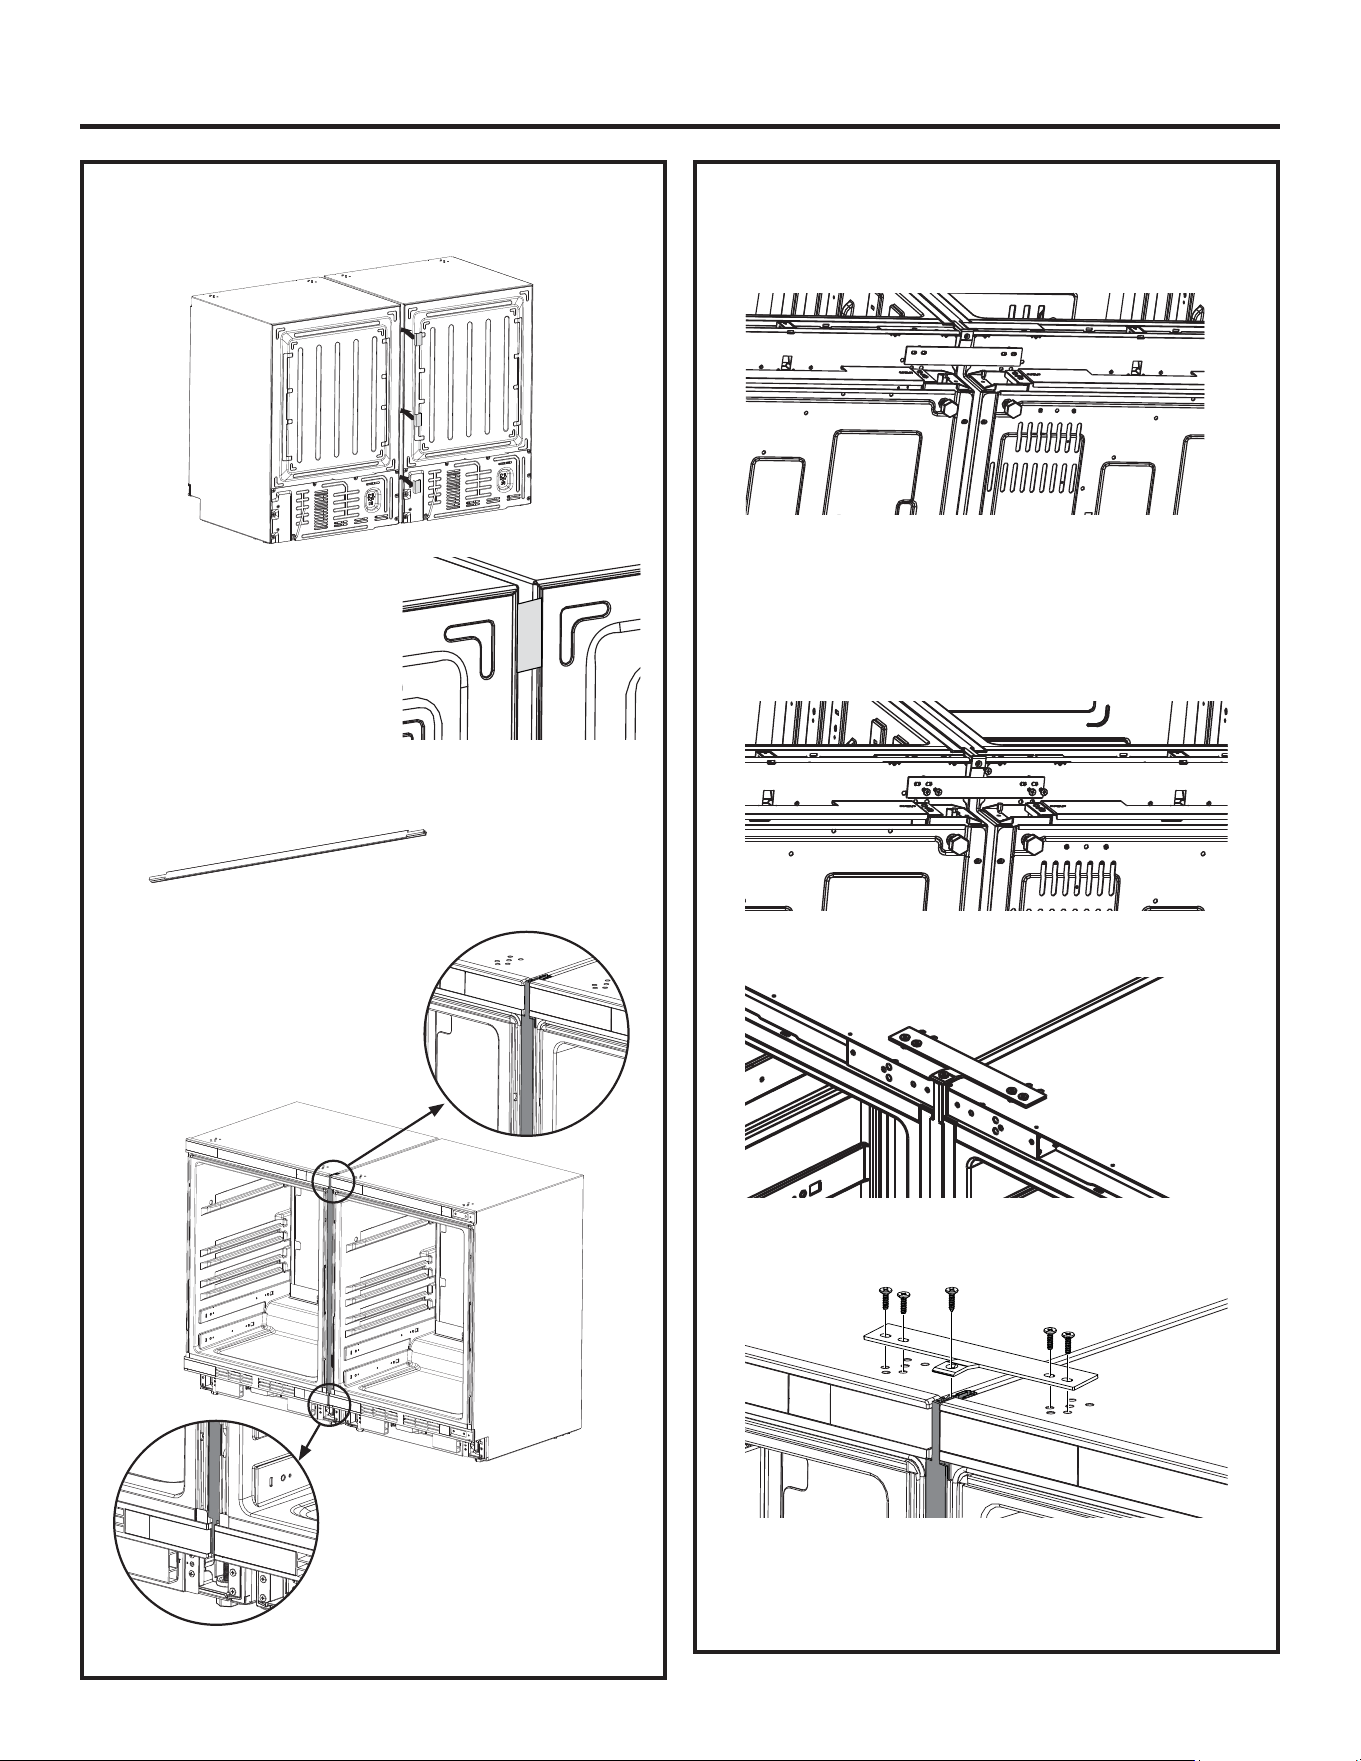
JOIN DUAL INSTALL
1. Make sure the two products to be unified have the door
swings adjusted to have both handles in the middle and
doors opening outward away from each other.
2. Remove paper from adhesive strip on the anti-sweat
foam piece and install on the product case side of one
of the unified products. Either product is acceptable.
Make sure you place the foam at least 10mm from
appliance cabinet front.
3. Align the two cases to a gap of approximately 1/2"
(13 mm). This will leave a gap of approximately 5/32"
(3.75 mm) between the door panels.
Included installation materials and parts in
Unification Kits ZKAW and ZKN48W. Kits are
sold separately.
Top/bottom
connectors×2
Back
connector×3
Front Trim Piece
(Front Connector) x 1
Anti-sweat foam ×1
Dimension:
18-1/8" x 1-5/16" x 9/16"
(460mm x 846mm x 15mm)
Toe Kick x 1
Fastener C Fastener E
Anti-sweat foam
String
Anti-sweat foam
Screw
holes for
countertop
attachment
If attaching the anti-tip bracket to
the adjacent cabinet follow above
illustration.
If attaching the anti-tip
bracket to the countertop
follow above illustration.
49-1000777 Rev. 2 29
Installation Instructions
JOIN DUAL INSTALL (cont.)
4. Install 3 back connectors.
5. Install front trim piece (front connector).
Front Trim Piece (Front Connector)
JOIN DUAL UNITS (cont.)
6. Install Bottom Connector.
A. Place the bottom connector as shown.
B. Install one Fastener C screw and four Fastener E
screws.
Note: Fastener C screw attaches the bottom connector
to the front trim (front connector) piece. The Fastener
E screws attach the bottom connector to the bottom of
both boxes.
7. Install Top Connector.
A. Place the top connector as shown.
B. Install one Fastener C screw and four Fastener E
screws.
Note: Fastener C screw attaches the top connector
to the front trim (front connector) piece. The Fastener
E screws attach the top connector to the top of both
boxes.
30 49-1000777 Rev. 2
Installation Instructions
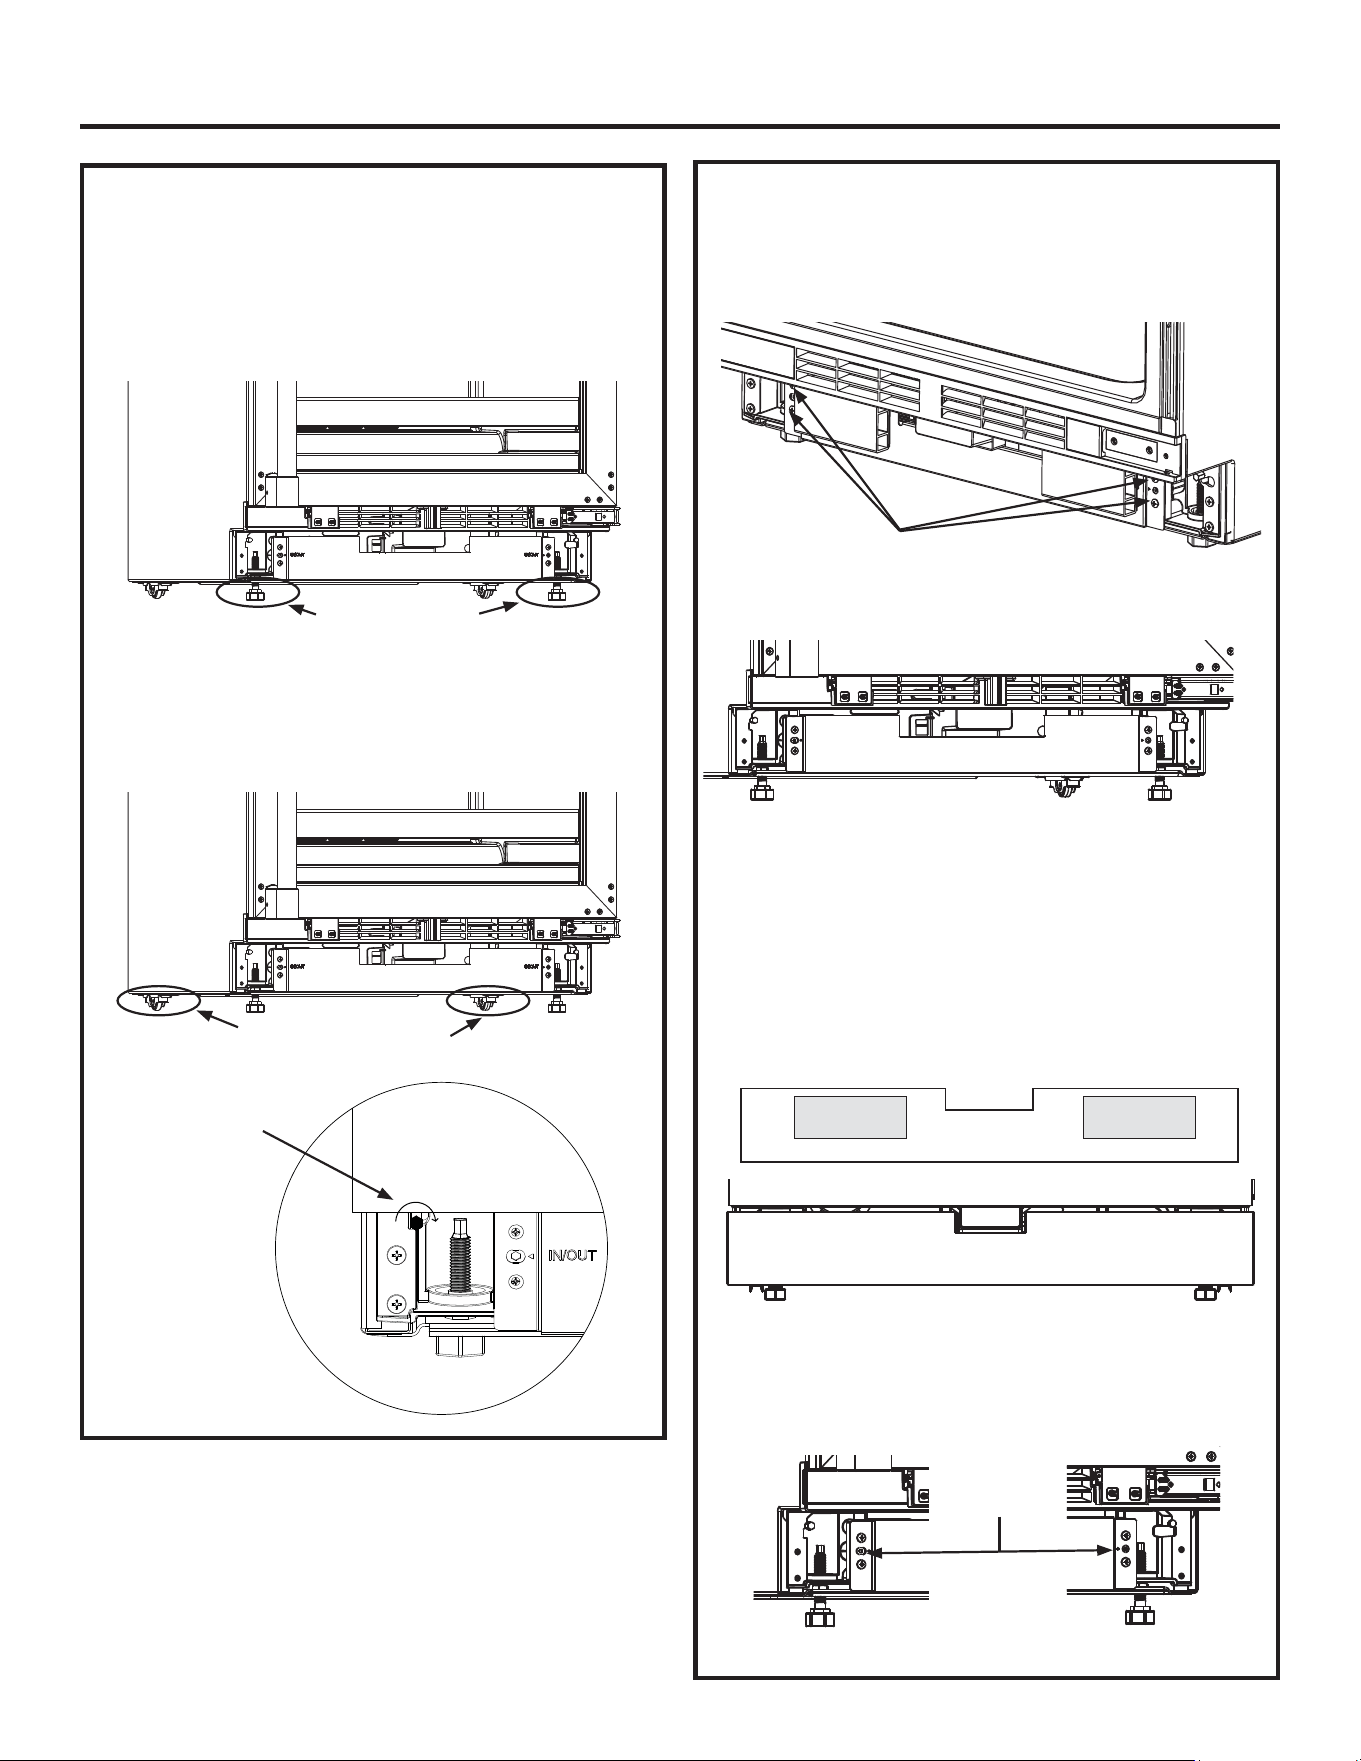
INSTALL TOE KICK SUPPORTING PLATE
AND TOE KICK
1. Install toe kick supporting plate
1a. Unscrew 4 screws at bottom front of the unit
1b. Install the supporting plate which comes with the
unit with same screws.
2. Install the Toe Kick.
2a. If using a stainless steel toe kick, attach it to the
supporting plate by using magnetic backing on
the toe kick.
2b. If using a custom toe kick, make sure you
FRPSOHWHGWKHVWHSRQSDJH³0DJQHW
,QVWDOODWLRQ´$WWDFKLWWRWKHVXSSRUWLQJSODWHE\
using magnetic backing.
3. Adjust the toe kick. Using the adjustment fasteners
located below, adjust the toe kick supporting plate
forward or backward for proper cabinet alignment.
Adjustment
fastener
ADJUST THE LEVELING LEG
(TO FIT CUT OUT)
Adjust the front levelling legs
1. Adjust the height of two front leveling legs. Use either
a right angle driver at top of each leg or a 1"
(2.54 mm) wrench at foot of each leg.
2. Adjust the rear leveling rollers. Use the 1/4"
(6 mm) hex head driver bit. Turn the left screw
clockwise to raise the left back of the unit. Turn the
right screw counter-clockwise to raise the right back
of the unit
Front levelling legs
Rear leveling rollers
Unscrew 4 screws
Rear leveling roller
adjustment screw
49-1000777 Rev. 2 31
Installation Instructions
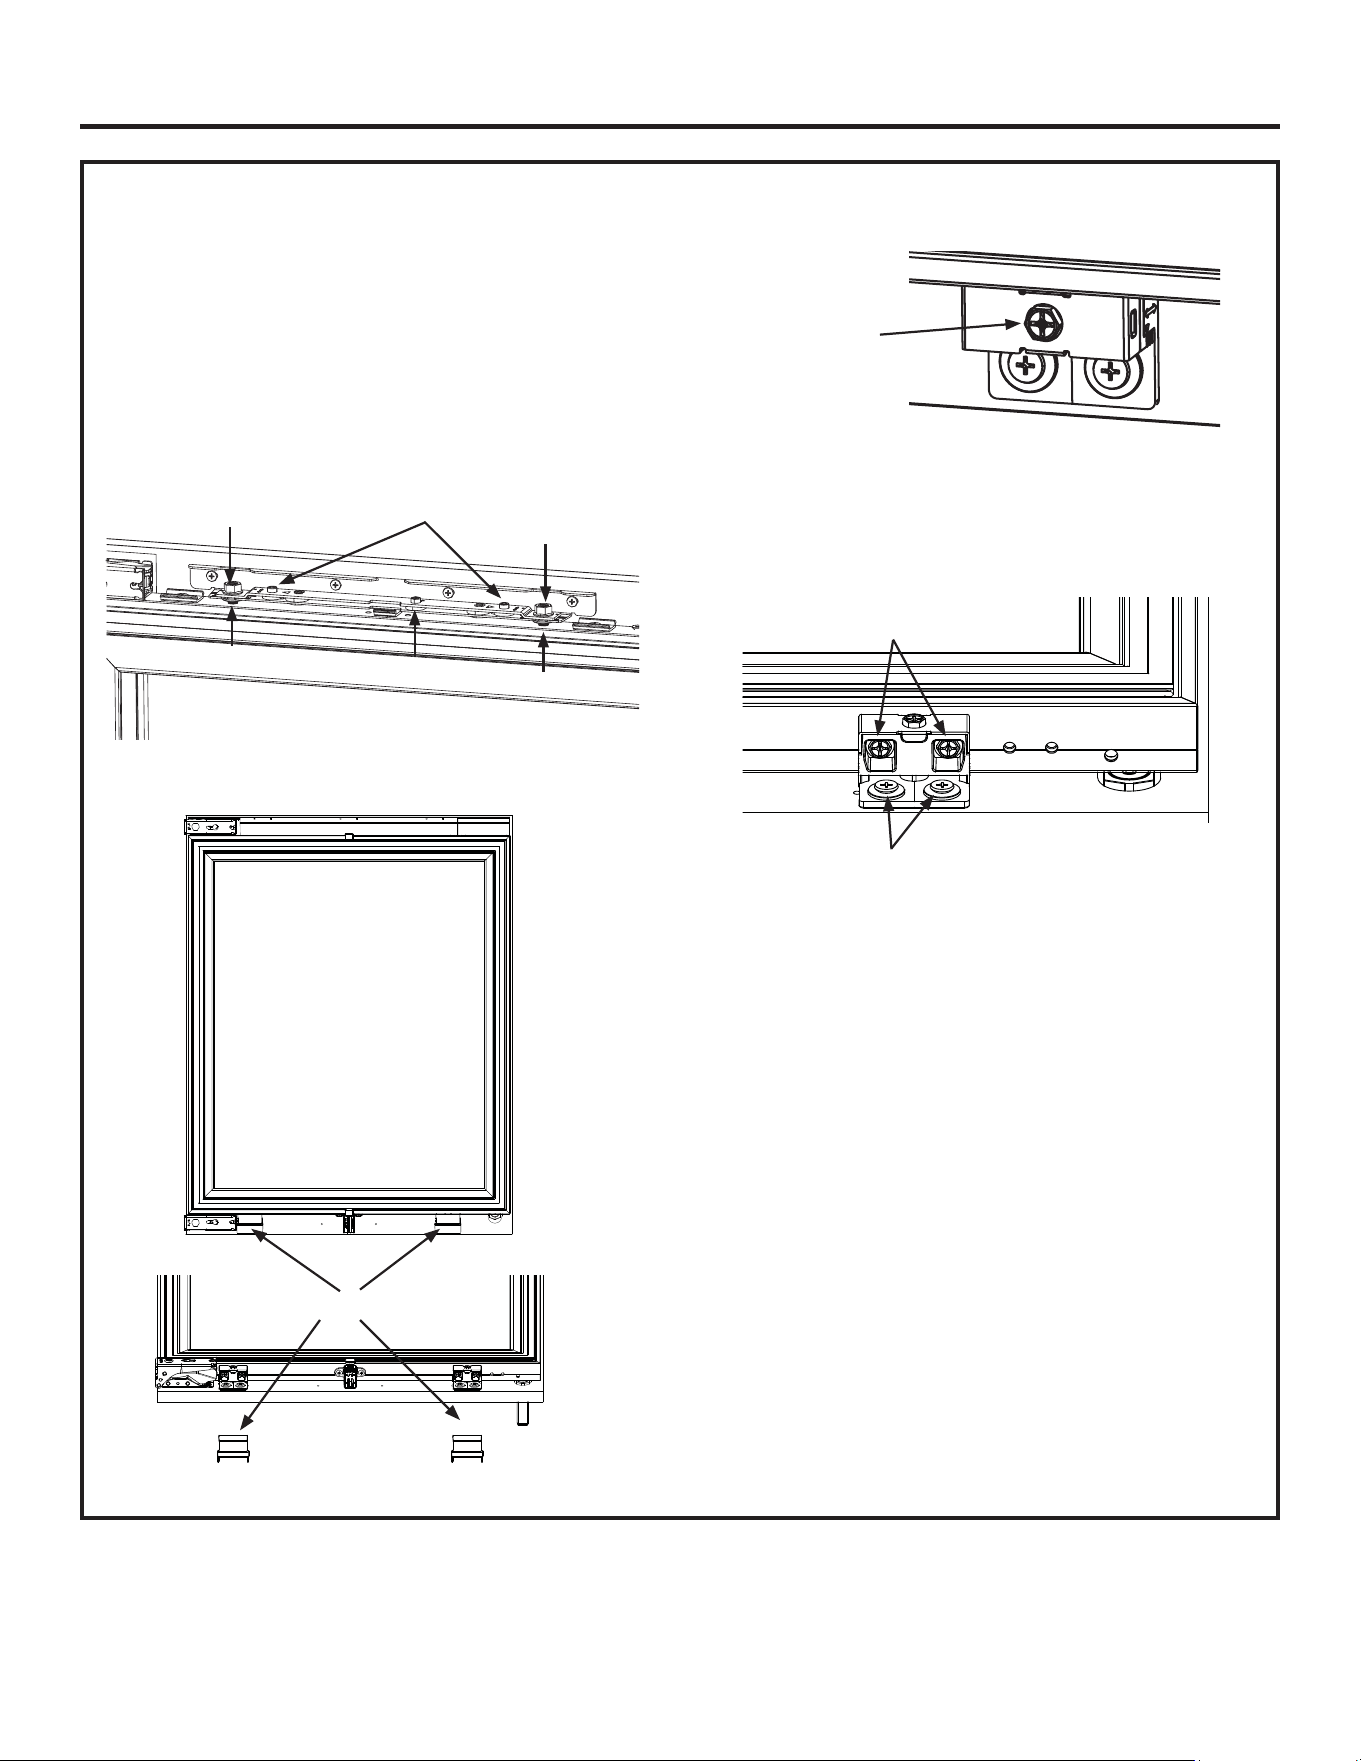
ADJUST AND ALIGN THE DOOR PANEL
Tools needed
Allen wrench, adjustable wrench, phillips screwdriver, hex
head driver.
1. Upper adjustable mechanism:9HUWLFDOKRUL]RQWDO
and depth alignment.
1.1 Vertical (up/down) adjustment (Cam J, Nut K).
1.2 Depth (Front/Back) adjustment (Cam L).
1.3 +RUL]RQWDO/HIW5LJKWDGMXVWPHQW&DP0
2. Lower Adjustment Brackets: Depth alignment.
2.1 Remove the bracket cover.
2.2 Depth (In/Out) adjustment (Fastener N)
3. Make Door Panel Adjustments
3.1 Prepare door panel adjustment: Loosen 8 screws
at the bottom of the door in 2 locations.
N
Depth (Front/Back)
adjustment
(Fastener N - 2 places).
1.1 J
Nut K, Cam J
1.3 M
1.1 J
1.2 L
Nut K, Cam J
Bracket cover
Loosen screws
Loosen screws
32 49-1000777 Rev. 2
Installation Instructions
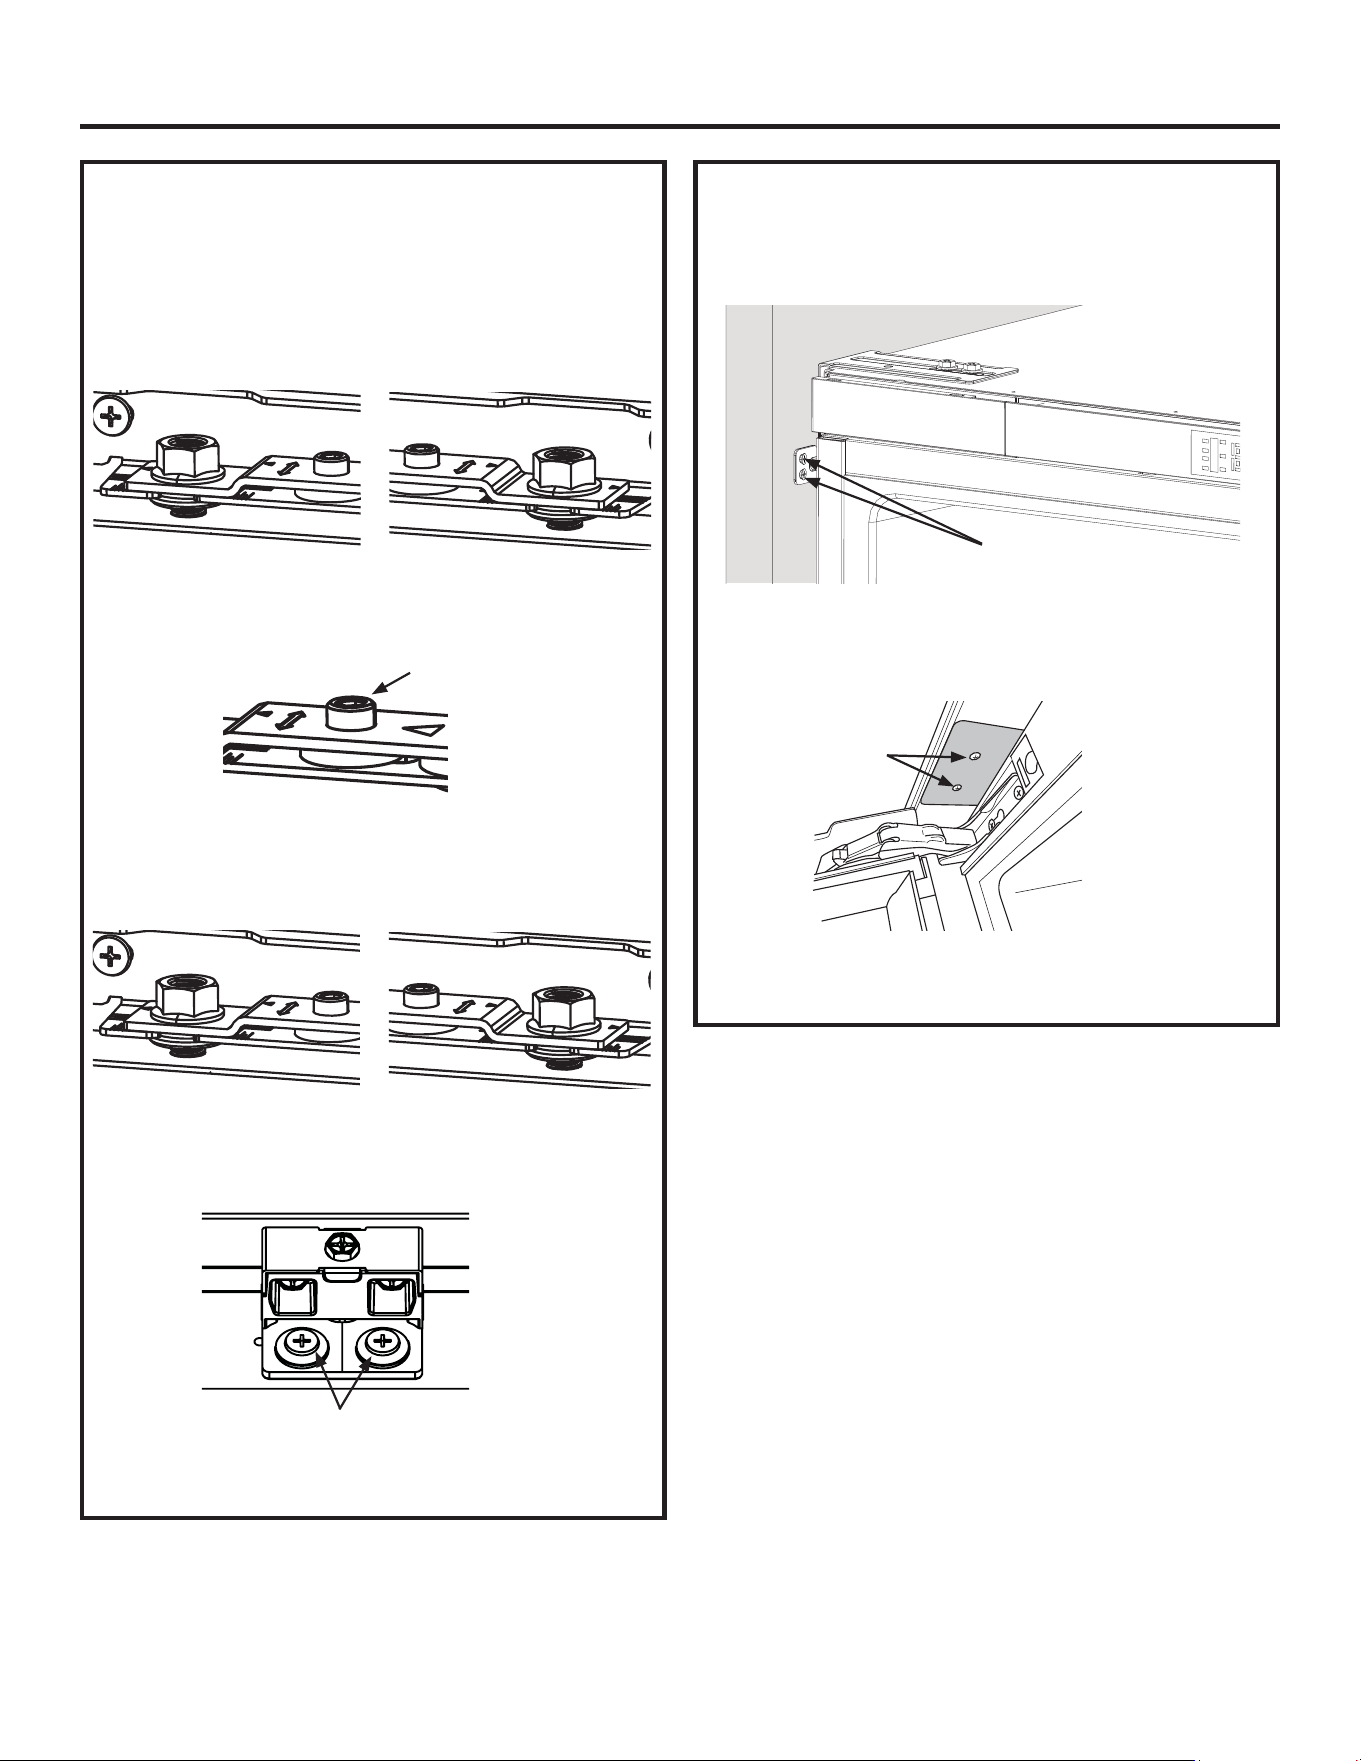
ADJUST AND ALIGN THE DOOR
PANEL
(CONT.)
3.2 Vertical adjustment
At the top of the door panel, loosen 2K nuts with 13mm
wrench. Turn the Cam J (two locations) to adjust the
door up and down with 4mm Allen wrench.
3.3. Horizontal adjustment
Top of panel: Use an Allen wrench to turn Cam M
adjusting panel left/right. One location
3.4 Depth Adjustment
To adjust the upper part of the door: Use Allen wrench to
turn Cam L at two locations to move door panel in/out.
To adjust the lower part of the door, tighten the 4 door
panel screws in 2 places, adjust fasteners N using a
phillips screw driver to move the door panel in/out.
Tighten all the screws and nuts at the bottom and at the
top of the door.
COMPLETE INSTALLATION
1. Secure the brackets to the adjacent cabinetry with
the fasteners provided. Fastener F on the Fastener
Reference Chart.
Or secure the bracket to the countertop with fasteners
provided, fastener F on the Fastener Reference Chart
2. Complete the installation of top door trim. See details
in Reversing Door section step 10.
M
Cam L
Cam L
Nut K, Cam J
Nut K, Cam J
Secure the left and right brackets
to the adjacent cabinetry.
Tighten screws
N
Screws

49-1000777 Rev. 2 33
Troubleshooting Tips... Before you schedule service
Problem Possible Causes What to Do
Beverage center does not
run
Beverage center is unplugged. Plug power cord into power source.
Breaker is tripped or turned off/Fuse
is blown.
Reset/Turn on breaker or replace fuse.
Beverage center compressor
runs frequently or for long
periods of time
Normal when first plugged in Allow 24 hours for the beverage center to cool
completely
Warm or large amounts of bottles
added
This is normal
Door is left ajar Ensure that door is not being held open by an item
Hot weather or frequent openings This is normal to maintain constant temperature during
hot and humid days
Gasket is not sealing properly Clean the gasket
Beverage center has an odor Interior needs to be cleaned &OHDQWKHLQWHULRU6HH³&OHDQLQJ´
Light does not come on Beverage center is unplugged. Plug into power source.
LED light is burned out. Contact a qualified technician to replace the burned out
LED.
Vibration or rattling Beverage center is not resting firmly
on floor
6HH³/HYHOLQJ´
Normal Sounds It sounds like water is flowing from
the Beverage center
Refrigerant flowing in the lines will make this sound
when the compressor starts and stops.
Humming or buzzing sounds The compressor and fans can make this sound. If the
beverage center is not level, the sound will be louder.
Cracking or clicking sounds The interior parts will make this sound as they contract
and expand in response to temperature changes.
TEMPERATURE AND MOISTURE
Beverage center is too warm Temperature control is not set low
enough
$GMXVWWKHWHPSHUDWXUHWRDFROGHUVHWWLQJDOORZ
hours for the temperature to adjust
Doors opened frequently or left open Keep door closed / Check that a package is not
preventing door from closing
Warm bottles added recently Allow time for bottles and beverage center to cool
Gasket is not sealing properly. Clean the gasket
Beverage center is too cold Temperature control is set too low Adjust temperature in the compartment to the next
ZDUPHUVHWWLQJDOORZKRXUVWRDGMXVW
Moisture on exterior/interior
of the beverage center
High humidity This is normal. Dry surface and adjust temperature to
slightly colder setting
Doors opened frequently or left open Keep door closed. Check that a package is not
preventing door from closing
Gasket is not sealing properly Clean the gasket
Save time and money! Review the charts on the following pages first and you may not need to schedule service.
34 49-1000777 Rev. 2
MONOGRAM LIMITED WARRANTY
Monogram.com
$OOZDUUDQW\VHUYLFHLVSURYLGHGE\RXU)DFWRU\6HUYLFH&HQWHUVRUDQDXWKRUL]HG&XVWRPHU&DUH
®
technician. To schedule
service online, visit us at monogram.com/contact. In Canada, visit monogram.ca.
EXCLUSION OF IMPLIED WARRANTIES
Your sole and exclusive remedy is product repair as provided in this Limited Warranty. Any implied warranties, including the
implied warranties of merchantability or fitness for a particular purpose, are limited to one year or the shortest period allowed
by law.
This limited warranty is extended to the original purchaser and any succeeding owner for products purchased for home
XVHZLWKLQWKH86$,IWKHSURGXFWLVORFDWHGLQDQDUHDZKHUHVHUYLFHE\D0RQRJUDP$SSOLDQFHV$XWKRUL]HG6HUYLFHU
LVQRWDYDLODEOH\RXPD\EHUHVSRQVLEOHIRUDWULSFKDUJHRU\RXPD\EHUHTXLUHGWREULQJWKHSURGXFWWRDQ$XWKRUL]HG
Monogram Appliances Service location for service. In Alaska, the limited warranty excludes the cost of shipping or
service calls to your home.
Some states do not allow the exclusion or limitation of incidental or consequential damages. This limited warranty
gives you specific legal rights, and you may also have other rights which vary from state to state. To know what your
legal rights are, consult your local or state consumer affairs office or your state’s Attorney General.
Warrantor: GE Appliances, a Haier company, Louisville KY,40225
Warrantor in Canada: MC Commercial, Burlington, ON, L7R 5B6
For the period of Monogram Appliances will replace
Limited two-year
warranty
For two years from date of original purchase, we will provide, free of charge, parts and service
ODERULQ\RXUKRPHWRUHSDLURUUHSODFHDQ\SDUWRIWKHUHIULJHUDWRURUIUHH]HUWKDWIDLOVEHFDXVH
of a manufacturing defect.
Limited five-year
warranty
For five years from date of original purchase, we will provide, free of charge, parts and
service labor in your home to repair or replace any part of the sealed refrigerating system
(the compressor, condenser, evaporator and all connecting tubing) that fails because of a
manufacturing defect.
Limited additional
sixth- through
twelfth-year warranty
on the sealed system
For the sixth through twelfth year from the date of the original purchase, we will provide, free
of charge, replacement parts for any part of the sealed refrigerating system (the compressor,
condenser, evaporator and all connecting tubing) that fails because of a manufacturing defect.
You pay for the service trip to your home and for service labor charges.
Limited thirty-day
warranty on water
filter cartridge (Water
filter, if included)
From the date of the original purchase we will provide, free of charge, replacement parts for
any part of the water filter cartridge that fails because of a manufacturing defect. During this
limited thirty-day warranty, we will also provide, free of charge, a replacement water filter
cartridge.
What Monogram will not cover:
Staple your receipt here. Proof of the original purchase
date is needed to obtain service under the warranty.
Servicing your refrigerator may require the use of the onboard data port for diagnostics. This gives a Monogram
Factory Service technician the ability to quickly diagnose any issues with your appliance and helps Monogram
improve its products by providing Monogram with information on your appliance. If you do not want your
appliance data to be sent to Monogram, please advise your technician NOT to submit the data to Monogram at
the time of service.
Ŷ Service trips to your home to teach you how
to use the product.
Ŷ Replacement of house fuses or resetting of circuit breakers.
Ŷ Damage to the product caused by accident, fire, floods or
acts of God.
Ŷ Failure of the product if it is used for other than
its intended purpose or used commercially.
Ŷ Damage caused after delivery.
Ŷ Improper installation, delivery or maintenance.
If you have an installation problem, contact your dealer
or installer. You are responsible for providing adequate
electrical, plumbing and other connecting facilities.
Ŷ Replacement of the light bulbs, if included, or water filter
cartridge, if included, other than as noted above.
Ŷ Replacement of the water filter cartridge,
if included, due to water pressure that is outside the
specified operating range or due to excessive sediment in
the water supply.
Ŷ Loss of food due to spoilage (in the USA only).
Ŷ Incidental or consequential damage caused
by possible defects with this appliance.
Ŷ Product not accessible to provide required service.
Ŷ Damage caused by a non-GE Appliances brand water filter.

49-1000777 Rev. 2 35
NOTES

NOTE: While performing installations described in this
book, safety glasses or goggles should be worn.
NOTE: Product improvement is a continuing endeavor
at Monogram. Therefore, materials, appearance and
specifications are subject to change without notice.
49-1000777 Rev. 2
12-24
Monogram.com
Printed in United States

OWNER'S
MANUAL
Refroidisseur de boissons sous comptoir
MONOGRAM.COM
FRANÇAIS

2 49-1000777 Rev. 2
NUMÉROS DE MODÈLES
ZIBC24PW**
INFORMATIONS SUR LE MODÈLE… .........................................................................2
SOUTIEN AU CONSOMMATEUR…… .........................................................................3
CONSIGNES DE SÉCURITÉ IMPORTANTES… ..................................................................4
UTILISATION DU REFROIDISSEUR DE BOISSONS… ............................................................7
ENTRETIEN ET NETTOYAGE… ..............................................................................7
INSTRUCTIONS D'INSTALLATION… .........................................................................12
DÉPANNAGE… ..........................................................................................27
GARANTIE LIMITÉE… .....................................................................................28
TABLE DES MATIÈRES
RENSEIGNEMENTS CONCERNANT LE MODÈLE
ÉCRIVEZ LES NUMÉROS DE MODÈLE ET DE SÉRIE
Ils se trouvent sur une étiquette située sur la paroi latérale
de votre électroménager, à côté du bac de droite dans le
compartiment réfrigérateur.
Utilisez ces numéros dans toute correspondance ou dans tous
vos appels de service relatifs à votre réfrigérateur/congélateur.
Veuillez écrire ces numéros ici :
Numéro du modèle
Numéro de série
Liste des accessoires sous comptoir Monogram
Poignées
Statement : ZXGP1H1PWSS
Minimalist : ZXGP1H1CPSS
Les trousses ci-dessous sont vendues séparément
Trousse de goujon pour poignée personnalisée Monogram
ZKPN
Panneau de porte et coup-de-pied en acier inoxydable
ZK1GC240WSS
Coup-de-pied en acier inoxydable de 48 po de largeur :
ZKN48W
Trousse d’union :
ZKAW

49-1000777 Rev. 2 3
SOUTIEN AU CONSOMMATEUR
SITE WEB DE MONOGRAM
Vous avez des questions ou besoin d’aide avec votre réfrigérateur? Essayez le site Web de Monogram. Ce site est disponible 24
heures par jour, et tous les jours de l’année! Vous pouvez aussi magasiner d’autres magnifiques produits Monogram et profiter de
tous les services de soutien en ligne conçus pour votre commodité.
Aux É.-U. : monogram.com. Au Canada : monogram.ca
ENREGISTREZ VOTRE ÉLECTROMÉNAGER
Enregistrez votre nouvel appareil en ligne au moment qui vous convient le mieux! L’enregistrement de votre produit dans les délais
prescrits permet une meilleure communication et un service rapide, selon les modalités de votre garantie, si besoin est. Vous pouvez
également envoyer par courrier la carte d’enregistrement pré-imprimée qui se trouve dans l’emballage de votre appareil.
Aux États-Unis : monogram.com/register
Au Canada: Prodsupport.mabe.ca/crm/Products/ProductRegistration.aspx
SERVICE DE RÉPARATION
Un service de réparation expert GE Appliances se trouve à quelques pas de chez vous. Rendez-vous sur notre site et programmez, à
votre convenance, une visite de réparation à n’importe quel jour de l’année.
Aux États-Unis monogram.com ou composez le 800.444.1845
Au Canada : monogram.ca ou composez le 800.561.3344
CONNEXION À DISTANCE
Pour de l’assistance concernant la connexion à un réseau sans fil (modèles équipés de cette fonction), visitez notre site sur
monogram.com/connect aux États-Unis seulement.
PIÈCES ET ACCESSOIRES
Les personnes qualifiées pour réparer leurs propres appareils peuvent commander des pièces détachées et des accessoires et les
faire envoyer directement à leur domicile (les cartes VISA, MasterCard et Discover sont acceptées). Commandez en ligne 24 heures
par jour.
Aux États-Unis : monogram.com/use-and-care/parts ou composez le 800.561.3344
Les instructions contenues dans le présent manuel comportent des procédures que tout utilisateur peut effectuer. Les
autres types de réparation doivent généralement être confiés à un technicien qualifié. Usez de prudence : une réparation ou
un entretien mal effectués peuvent rendre l’utilisation de l’appareil dangereuse.
Les consommateurs au Canada doivent consulter le centre de service Mabe le plus proche, visiter notre site Web sur Monogram.ca
ou composez le 800.561.3344
COMMUNIQUEZ AVEC NOUS
Si vous êtes insatisfait du service reçu par Monogram, communiquez avec nous par l’entremise de notre site Web en mentionnant
tous les détails y compris votre numéro de téléphone, ou écrivez :
Aux États-Unis : General Manager, Customer Relations | Monogram Appliances, Appliance Park | Louisville, KY 40225
monogram.ca ou composez le 800.561.3344. Au Canada, composez le 800.561.3344

4 49-1000777 Rev. 2
ATTENTION
Pour réduire le risque de blessures lorsque vous utilisez votre réfrigérateurde , veuillez suivre ces consignes
de sécurité.
Ŷ eORLJQH]OHVGRLJWVGHVSDUWLHVGXFRQJpODWHXURO¶RQSHXWIDFLOHPHQWVHSLQFHUOHVHVSDFHVHQWUHOHVSRUWHVHWOHVSODFDUGV
sont toujours étroits. Soyez prudent lorsque vous fermez les portes en présence d’enfants.
AVERTISSEMENT
RISQUE DU POIDS EXCESSIF
La participation de deux personnes ou plus est nécessaire pour déplacer et installer le refroidisseur de boissons.
Le non-respect de cette instruction peut causer une blessure au dos ou d’autre blessure.
LIRE ET CONSERVER CES INSTRUCTIONS
INFORMATION DE SÉCURITÉ IMPORTANTES
LISEZ TOUTES LES DIRECTIVES AVANT D'UTILISER L'APPAREIL
AVERTISSEMENT
Pour réduire le risque d’incendie, d’explosion, de choc électrique ou de blessures lorsque vous utilisez
votre réfrigérateurde , veuillez suivre ces consignes de sécurité :
Ŷ 8WLOLVH]FHWpOHFWURPpQDJHUXQLTXHPHQWDX[ILQVTXLVRQW
décrites dans ce manuel d’utilisation.
Ŷ &Hélectroménager doit être correctement installé
conformément aux Consignes d’Installation avant toute
utilisation.
Ŷ 'pEUDQFKH]OH
électroménager avant d’effectuer une
réparation, de remplacer une ampoule ou de le nettoyer.
Remarque : L’alimentation du
électroménager ne peut être
déconnectée par aucune des fonctions sur le panneau de
commande.
Remarque : Les réparations doivent être effectuées par un
professionnel qualifié.
Ŷ 5HPHWWH]WRXWHVOHVSLqFHVHWSDQQHDX[HQSODFHDYDQW
d’utiliser l’appareil.
Ŷ
N’utilisez pas un cordon de rallonge.
Ŷ*DUGH]OHVPDWpULDX[HWYDSHXUVLQIODPPDEOHVORLQGX
réfrigérateur.
Ŷ1¶HQWUHSRVH]SDVGDQVFHWpOHFWURPpQDJHUGHVVXEVWDQFHV
explosives telles que des bombes aérosols qui contiennent
un gaz propulseur.
Ŷ 3RXUpYLWHUOHVULVTXHVG¶DVSK\[LHHWG¶HQIHUPHPHQWSRXUOHV
enfants. Démontez les portes avant de le mettre au rebut ou
d’interrompre son utilisation.
Ŷ $ILQGHSUpYHQLUOHVDFFLGHQWVJUDYHVRXODPRUWOHVHQIDQWV
ne doivent pas se tenir ni jouer dans ou sur l’électroménager.
Ŷ/HVHQIDQWVHWOHVSHUVRQQHVGRQWOHVFDSDFLWpVVRQWUpGXLWHV
sur le plan physique, sensoriel ou mental, ou qui manquent
d’expérience ou de connaissances, peuvent utiliser cet
électroménager seulement si elles sont surveillées ou ont
reçues des consignes de sécurité sur son usage et les
risques y sont associés.
Ŷ&HWpOHFWURPpQDJHUHVWFRQoXSRXUXQHXWLOLVDWLRQ
domestique et applications similaires : salle du personnel
dans une usine, un bureau ou d’autres lieux de travail;
maison de ferme; clients dans un hôtel, un motel, un gîte
touristique et d’autres lieux résidentiels; approvisionnement
et applications similaires non reliées au commerce de détail.
Ŷ 1¶DSSOLTXH]SDVGHQHWWR\DQWVFRUURVLIVVXUOH
électroménager. Certains nettoyants endommagent le
plastique et peuvent ainsi causer le détachement inopiné
de pièces telles que porte ou poignées de porte. Voyez
la section Entretien et nettoyage pour des instructions
détaillées.
Ŷ 1HQWUHSRVH]SDVHWQXWLOLVH]SDVGHVVHQFHRXGDXWUHV
vapeurs ou liquides inflammables à proximité de cet appareil
ou de tout autre électroménager.
AVERTISSEMENT
RISQUE D’INCENDIE OU D’EXPLOSION
Gardez les matières et les vapeurs inflammables à distance de l’électroménager. L’omission de prendre cette précaution peut
entraîner un incendie, une explosion ou la mort.
AVERTISSEMENT
Pour réduire le risque d’étouffement pendant l’installation de ce produit, ne pas laisser les petites pièces
à la portée des enfants âgés de moins de 3 ans.
ATTENTION
RISQUE DE COUPURE ET DE PINCEMENT
7RXWFRQWDFWDYHFOHERUGH[SRVpG¶XQHW{OHRXG¶XQDXWUHPDWpULDXSHXWHQWUDvQHUGHVEOHVVXUHV/LQVWDOODWLRQGXSURGXLWSHXWFUpHU
des points de pincement.
3RUWH]GHVJDQWVHWGHVYrWHPHQWVGHSURWHFWLRQORUVGHOLQVWDOODWLRQGHFHSURGXLW
49-1000777 Rev. 2 5
LIRE ET CONSERVER CES INSTRUCTIONS
MISE AU REBUT APPROPRIÉE DE VOTRE ANCIEN RÉFRIGÉRATEUR
AVERTISSEMENT
RISQUE DE SUFFOQUER OU D’Y ÊTRE EMPRISONNÉ
Le non-respect de ces instructions d’élimination peut entraîner la mort ou des blessures graves.
IMPORTANT: Les enfants pris au piège ou morts d’asphyxie
sont toujours d’actualité. Les réfrigérateurs et congélateurs
abandonnés sont toujours aussi dangereux, même si on
n’attend que «quelques jours» pour s’en débarrasser. Si vous
ne gardez pas votre ancien réfrigérateur ou congélateur,
veuillez suivre les directives ci-dessous afin de prévenir les
accidents.
Avant de vous débarrasser de votre ancien appareil :
ŶÐWHUOHVSRUWH
Ŷ/DLVVHUOHVWLURLUVHQSODFHGHVRUWHTXHOHVHQIDQWVQH
puissent pas y pénétrer facilement.
INFORMATION DE SÉCURITÉ IMPORTANTES
LISEZ TOUTES LES DIRECTIVES AVANT D'UTILISER L'APPAREIL
Ne coupez pas ou n’enlevez pas, sous aucun prétexte, la troisième broche de mise à la terre du cordon
d’alimentation. Pour des raisons de sécurité, cet appareil doit être correctement mis à la terre.
Le cordon d’alimentation de cet appareil est équipé d’une
fiche à trois broches (pour une mise à la terre) qui s’adapte à
la prise de courant standard à 3 broches (pour une mise à la
terre) pour minimiser les risques de chocs électriques par cet
appareil.
Faites vérifier la prise murale et le circuit électrique par
un électricien qualifié pour s’assurer que le système est
correctement mis à la terre.
Dans le cas d’une prise biphasée, l’installateur a la
responsabilité et l’obligation de la remplacer par une prise
triphasée correctement mise à la terre. N’utilisez pas
d’adaptateur.
Le réfrigérateur doit toujours être branché à sa propre prise
électrique d’une tension nominale correspondant à celle
indiquée sur sa plaque signalétique.
Une alimentation électrique à 115 volts CA, 60 Hz, avec
un fusible de 15 ou 20 ampères et une mise à la terre est
nécessaire. Ceci permet d’obtenir un meilleur rendement et
évite de surcharger les circuits électriques du domicile qui
risque d’occasionner un incendie en surchauffant.
Ne débranchez jamais le refroidisseur de vin en tirant sur le
cordon d’alimentation. Prenez toujours fermement la fiche en
main et tirez pour la sortir de la prise.
Réparez ou remplacez immédiatement tout cordon électrique
usé ou endommagé. N’utilisez pas un cordon fissuré ou
présentant des dommages dus aux frottements soit sur sa
longueur ou aux extrémités.
Lorsque vous éloignez votre
refroidisseur de vin du mur, faites
attention à ne pas le faire rouler sur le cordon d’alimentation
afin de ne pas l’endommager.
BRANCHEMENTS ÉLECTRIQUES
AVERTISSEMENT
RISQUE DE CHOC ÉLECTRIQUE
Branchez l’appareil dans une prise triple avec terre.
Ne retirez pas la broche de terre.
N’utilisez pas d’adaptateur.
N’utilisez pas un cordon de rallonge.
Le non-respect de ces instructions peut entraîner des risques d’incendies, des chocs électriques ou la mort.
Mise au rebut des produits réfrigérants et en mousse
Mettez l’électroménager au rebut conformément à la réglementation fédérale et locale. Le réfrigérant inflammable ainsi que le
matériau d’isolation utilisés exigent des procédures d’élimination particulières.. Communiquez avec les autorités locales pour
connaître la façon de mettre votre électroménager au rebut qui soit respectueuse de l’environnement.

6 49-1000777 Rev. 2
LIRE ET CONSERVER CES INSTRUCTIONS
INFORMATION DE SÉCURITÉ IMPORTANTES
LISEZ TOUTES LES DIRECTIVES AVANT D'UTILISER L'APPAREIL
AVERTISSEMENT
RISQUE D’INCENDIE OU D’EXPLOSION
Fluide frigorigène inflammable
Cet électroménager contient le réfrigérant isobutane, aussi connu comme R600a, un gaz naturel à compatibilité élevée
avec l’environnement. Il s’agit cependant d’un combustible. Observez les consignes de sécurité ci-dessous afin de réduire
le risque de blessure ou de dommage à la propriété.
1. Lors de la manipulation, de l’installation et de l’utilisation de
cet appareil, prenez soin de ne pas endommager les tubes
de circulation du fluide frigorigène.
2. L’entretien ou la réparation doivent être effectués par un
personnel de service autorisé. Utilisez seulement des pièces
de rechange autorisées par le fabricant.
3. Mettez l’appareil au rebut conformément aux réglementations
fédérales et locales. Le fluide frigorigène inflammable et le
matériel isolant utilisés nécessitent des procédures de mise
au rebut spéciales. Communiquez avec les autorités locales
pour la mise au rebut sans danger pour l’environnement de
votre électroménager.
4. N’obstruez pas les évents dans l’enceinte prévue pour
l’appareil.
5. Pour retirer le givre, grattez à l’aide d’un grattoir ou d’une
spatule en plastique ou en bois. 1XWLOLVH]SDVGHSLFjJODFH
GHPpWDORXGLQVWUXPHQWVjERUGVWUDQFKDQWVFDULOVSRXUUDLHQW
percer le revêtement intérieur du refroidisseur de boissons et
le tuyau de réfrigérant inflammable derrière.
6. N’utilisez pas d’appareils électriques dans le compartiment
réfrigérateur de cet appareil.
7. N’utilisez aucun appareil électrique pour dégivrer votre
l’appareil
Attention : Il s’agit d’un électroménager à encastrer qui doit être installé dans une armoire. Il ne faut pas l’installer en tant
TXDSSDUHLODXWRQRPH

49-1000777 Rev. 2 7
UTILISATION DU REFROIDISSEUR DE BOISSON
Réglage de la température
La plage de températures du refroidisseur de boissons s’étend de
34 °F (1 °C) à 45 °F (7 °C).
Utiliser les boutons « + » et « - » pour augmenter ou diminuer le
réglage de température.
Conversion °C et °F
$SSX\H]VXU©ªHW',63/$<GXUDQWVHFRQGHV/DIILFKDJHGH
la température passe des degrés Fahrenheit aux degrés Celsius.
Appuyez, durant 3 secondes, sur les touches « + » et DISPLAY
pour revenir en Fahrenheit.
Turbo Cool
La fonction TurboCool™ refroidit rapidement le refroidisseur
de boissons afin de refroidir les boissons plus rapidement.
Utilisez TurboCool™ au moment d’ajouter un grand nombre de
boissons dans le refroidisseur. Appuyez sur TURBO COOL pour
activer la fonction. REMARQUE : Il est impossible de changer la
température du refroidisseur de boissons lorsque TurboCool™ est
activé.
Activation/désactivation du refroidissement
Appuyez sur POWER durant 3 secondes pour désactiver
le refroidissement et l'éclairage. Cela ne coupe pas
l’alimentation électrique au refroidisseur.
Alarme de porte
Sonne l’alarme lorsque la porte est restée ouverte. L’alarme
s’arrête dès la fermeture de la porte. Activez un rappel d’alarme
HQDSSX\DQWVXUOHERXWRQ$/$50'pVDFWLYH]ODODUPHGHSRUWH
en appuyant sur « - » et ALARM durant 3 secondes. Appuyez sur
« - » et ALARM durant 3 secondes pour réactiver la fonction.
Alarme de température élevée
Sonne l’alarme lorsque la température se situe à l’extérieur de
sa plage normale. Activez un rappel d’alarme en appuyant sur
OHERXWRQ$/$50'pVDFWLYH]ODOHUWHGHWHPSpUDWXUHpOHYpHHQ
appuyant sur DISPLAY et ALARM durant 3 secondes. Appuyez
sur les touches DISPLAY et ALARM durant 3 secondes pour
réactiver la fonction.
Verrouillage à l’épreuve des enfants
La fonction de verrouillage des réglages pour les enfants prévient
les modifications non prévues des réglages du refroidisseur de
boissons.
Pour verrouiller, appuyez sur CONTROL LOCK durant 3
secondes. Pour déverrouiller, appuyez sur CONTROL LOCK
durant 3 secondes.
Éclairage de proximité
L’éclairage intérieur est activé lorsqu’une personne s’approche du
refroidisseur de boissons. Pour désactiver cette fonction, appuyez
sur les touches ALARM, DISPLAY et CONTROL LOCK durant
3 secondes. Pour réactiver la fonction, appuyez de nouveau sur
les touches ALARM, DISPLAY et CONTROL LOCK durant 3
secondes.
Mode de présentation
L’éclairage intérieur améliore la présentation de votre collection.
Appuyez sur le bouton DISPLAY pour activer le mode
présentation. Dans le mode de présentation, l’éclairage intérieur
reste allumé même si la porte est fermée et l’éclairage de
proximité est désactivé. Presser le bouton Display de nouveau
pour quitter le mode de présentation. .
Mode Sabbat
Le mode Sabbat est destiné au sabbat et autres fêtes des juifs. Le
mode Sabbat permet aux juifs pratiquants d’utiliser le refroidisseur
de boissons au cours de la fête.
On peut régler le mode Sabbat pour annuler les réactions
habituelles causées par vos actions sur le refroidisseur. En mode
Sabbat, votre appareil fonctionnera toujours. Cependant, il ne
répondra pas à vos actions.
Dans ce mode, vous remarquerez peut-être que le ventilateur
IRQFWLRQQHORUVTXHODSRUWHHVWRXYHUWHPDLVFHQHVWSDV
le résultat de vos actions. Le compresseur et le ventilateur
fonctionneront à des moments prédéterminés.
ON/OFF - Pour activer le mode Sabbat, appuyez sur les touches
« - » et DISPLAY durant 5 secondes. « SA » s’affiche sur le
panneau de commande. « SA » demeure
affiché et tous les réglages sont gelés et
restent sur le dernier mode avant d’entrer en
mode Sabbat. Les commandes et l’éclairage
ne fonctionneront que lorsque vous appuierez
à nouveau sur « - » et DISPLAY durant 5 secondes pour quitter le
mode Sabbat.
Mode de verrouillage
Verrouille le refroidisseur pour en interdire l’accès à d’autres
personnes lorsque vous vous absentez. L’alarme de porte
retentira dès l’ouverture de la porte. L’éclairage intérieur restera
éteint. Si le refroidisseur de boissons est connecté au Wi-Fi, un
avis de porte ouverte peut être reçu dans l’application.
L’application permet d’activer ou de désactiver cette fonction. Si
votre appareil connecté n’est pas disponible, cette fonction peut
être activée en appuyant sur « + » et CONTROL LOCK durant
3 secondes. Appuyez à nouveau sur «+ » et CONTROL LOCK
durant 3 secondes pour réactiver la fonction.
LOCKED
DISPLAY
TURBO
COOL
DOOR
HIGH
TEMP
ALARM
HOLD 3 SEC
CONTROL
LOCK
DISPLAY
TURBO
COOL
WIFI
CONNECT
POWER
HOLD 3 SEC

8 49-1000777 Rev. 2
UTILISATION DU REFROIDISSEUR DE BOISSON
COMMUNICATION AVEC LES ÉLECTROMÉNAGERS
Wi-Fi (pour les clients aux États-Unis, ses territoires et au Canada)
Ŷ Téléchargez l’application SmartHQ.
• Disponible pour iPhone sur Apple Store.
• Disponible pour Android sur Google Play.
Ŷ 6pOHFWLRQQH]&UHDWH$FFRXQWFUpHUXQFRPSWHVXU
l’application.
• Entrez les informations, puis sélectionnez Register
(s’enregistrer). Un courriel vous parviendra.
• Lorsque vous recevez le courriel, sélectionnez Verify
Account (vérifier le compte).
Ɣ&RQQHFWH]YRXVDYHFYRWUHLGHQWLILDQWHWVpOHFWLRQQH]
Authorize (autoriser) pour permettre à l’application de
communiquer avec refroidisseur de boissons.
Ŷ 2XYUH]O¶DSSOLFDWLRQ6PDUW+4
Méthode 1
1. L’application devrait détecter votre électroménager et
afficher celui-ci dans un écran contextuel.
2. Appuyez sur « CONNECT » (connecter) dans l’écran
contextuel. Si plusieurs électroménagers se trouvent
à proximité, l’application navigue jusqu’à l’écran ADD
APPLIANCE (ajouter un électroménager).
3. Sous la section NEARBY, appuyez sur « CONNECT » sur
la carte Beverage Center (refroidisseur de boissons). Si
l’application ne trouve pas l’électroménager à proximité,
appuyez sur « RESCAN » (balayer à nouveau).
4. Après le balayage, vérifiez si votre électroménager apparaît
dans la section NEARBY (à proximité), et appuyez sur «
CONNECT » sur la carte Beverage Center.
5. Sélectionnez UNDERCOUNTER (sous comptoir)
dans l’écran SELECT APPLIANCE (sélectionner
l’électroménager).
6. L’application navigue jusqu’à l’écran « LET’S GET
STARTED » (commençons).
7. Suivez les instructions de SmartHQ pour terminer la
configuration Wi-Fi.
Méthode 2
1. Si l’application n’apparaît pas dans un écran contextuel,
appuyez sur le bouton « + » dans la partie supérieure droite
de l’écran.
2. Sous la section NEARBY, appuyez sur « CONNECT » sur
la carte Beverage Center (refroidisseur de boissons). Si
l’application ne trouve pas l’électroménager à proximité,
appuyez sur « RESCAN » (balayer à nouveau).
3. Après le balayage, vérifiez si votre électroménager apparaît
dans la section NEARBY (à proximité), et appuyez sur «
CONNECT » sur la carte Beverage Center.
4. Sélectionnez UNDERCOUNTER (sous comptoir)
dans l’écran SELECT APPLIANCE (sélectionner
l’électroménager).
5. L’application navigue jusqu’à l’écran « LET’S GET
STARTED » (commençons).
6. Suivez les instructions de SmartHQ pour terminer la
configuration Wi-Fi
Méthode 3
1. Si l’électroménager à proximité n’est pas trouvé,
faites défiler vers le bas jusqu’à la carte « MANUAL
CONNECTION SETUP » (configuration manuelle de la
connexion).
2. Sélectionnez REFRIGERATION > MONOGRAM >
Beverage CENTER> UNDERCOUNTER.
3. L’application navigue jusqu’à « LET’S GET STARTED ».
4. Suivez les instructions de SmartHQ pour terminer la
configuration Wi-Fi.
RENSEIGNEMENTS RÉGLEMENTAIRES
Déclaration de conformité de la FCC/IC :
Cet appareil est conforme aux prescriptions de la Partie 15 des règles de la FCC. L’utilisation de cet équipement est assujettie aux
deux conditions suivantes :
1. Cet appareil ne doit pas causer de brouillage préjudiciable, et
2. Cet appareil doit accepter tout brouillage qu’il reçoit, y compris celui pouvant entraîner un fonctionnement indésirable.
Cet équipement a été testé et déclaré conforme aux limites imposées pour un appareil numérique de Classe B, conformément à
OD3DUWLHGHVUqJOHVGHOD)&&&HVOLPLWHVVRQWGpILQLHVDILQGDVVXUHUXQHSURWHFWLRQUDLVRQQDEOHFRQWUHOHEURXLOODJHQXLVLEOH
GDQVXQHLQVWDOODWLRQUpVLGHQWLHOOH&HWpTXLSHPHQWJpQqUHXWLOLVHHWpPHWGHVIUpTXHQFHVUDGLRTXLHQFDVGLQVWDOODWLRQHUURQpHRX
GXWLOLVDWLRQQRQFRQIRUPHDX[LQVWUXFWLRQVGHFHPDQXHOGXWLOLVDWLRQSHXYHQWFDXVHUXQEURXLOODJHQXLVLEOHDX[FRPPXQLFDWLRQVUDGLR
&HSHQGDQWLOQ\DDXFXQHJDUDQWLHTXXQEURXLOODJHQXLVLEOHQHVHSURGXLUDSDVGDQVXQHLQVWDOODWLRQSDUWLFXOLqUH6LFHWpTXLSHPHQW
cause un brouillage nuisible sur votre poste radio ou de télévision, ce que vous pouvez déterminer en éteignant et en rallumant votre
pTXLSHPHQWLOHVWFRQVHLOOpjOXWLOLVDWHXUGHVVD\HUGHSDOOLHUFHEURXLOODJHQXLVLEOHHQSUHQDQWOXQHRXODXWUHGHVPHVXUHVVXLYDQWHV
• Reorient or relocate the receiving antenna.
$XJPHQWHUODGLVWDQFHHQWUHOpTXLSHPHQWHWOHUpFHSWHXU
%UDQFKHUOpTXLSHPHQWGDQVXQHSULVHGXQFLUFXLWTXLGLIIqUHGHFHOXLDXTXHOOHUpFHSWHXUHVWEUDQFKp
&RQVXOWHUOHUHYHQGHXURXXQWHFKQLFLHQHQUDGLRWpOpYLVLRQSRXUREWHQLUGHODLGH
Étiquetage : /HVPRGLILFDWLRQVQRQH[SOLFLWHPHQWDSSURXYpHVSDUOHIDEULFDQWSHXYHQWDQQXOHUOHGURLWGHOXWLOLVDWHXUGHVHVHUYLUGH
cet équipement.
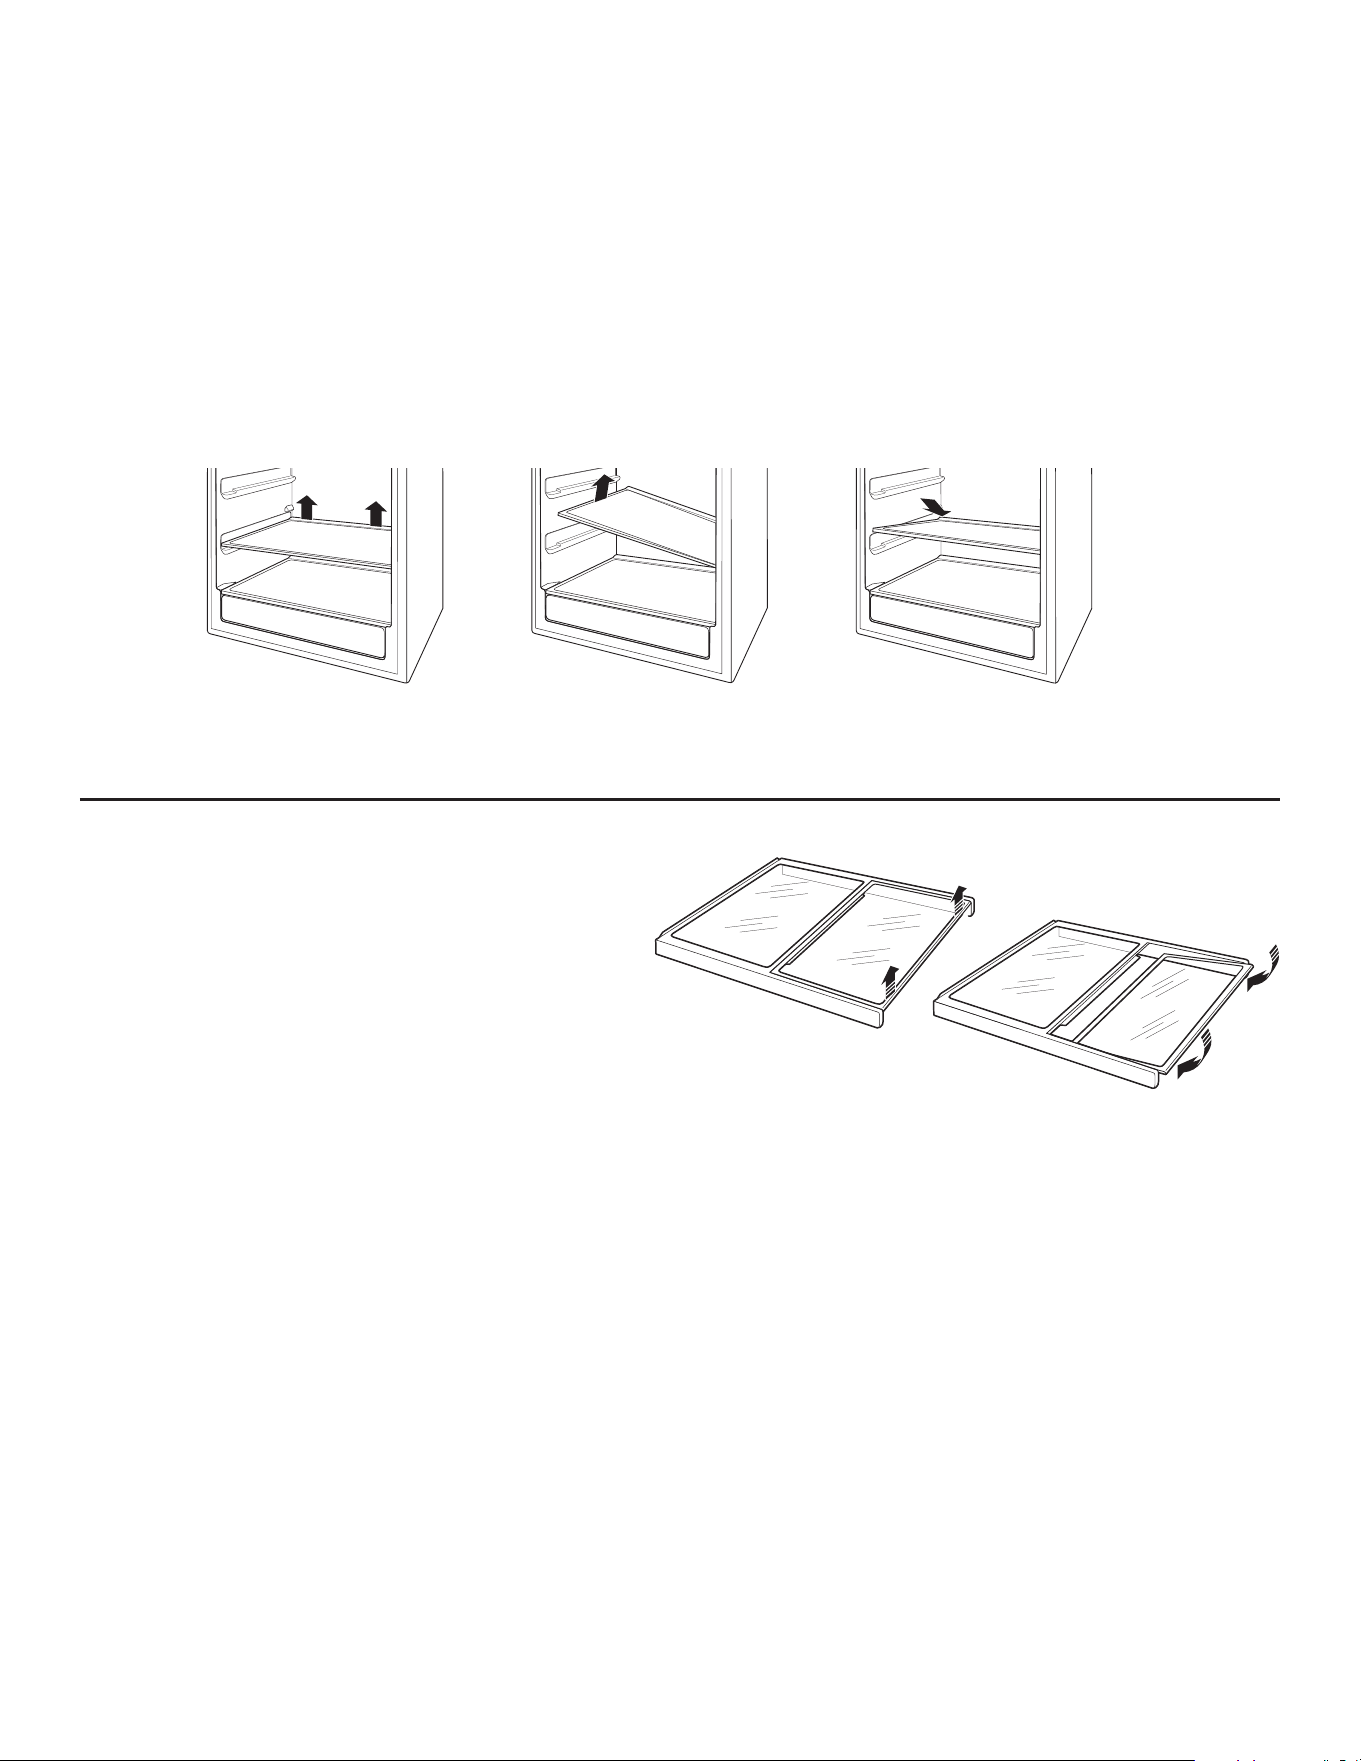
49-1000777 Rev. 2 9
UTILISATION DU REFROIDISSEUR DE BOISSON
TABLETTES EN VERRE
Les tablettes en verre trempé dans le refroidisseur de
boissons sont amovibles pour faciliter le nettoyage ou
ranger des articles plus volumineux.
Pour retirer une tablette, ouvrez la porte complètement
pour éviter d’endommager le joint d’étanchéité. Soulevez
l’arrière de la tablette légèrement. Inclinez la tablette sur
XQF{WpWRXWHQWLUDQWYHUVODYDQW
/DSSDUHQFHSHXWYDULHU
Pour replacer une tablette, ouvrez la porte complètement
pour éviter d’endommager le joint d’étanchéité. Inclinez
la tablette sur un côté et glissez-la vers la paroi arrière en
plaçant un côté sur le support. Placez l’autre côté sur le
support du côté opposé. Assurez-vous que les languettes
de verrouillage arrière sont bien insérées. Si elles sont
bien installées, les tablettes ne glisseront pas vers l’avant
quand on les tire légèrement.
Pour retirer, soulevez l’arrière
de la tablette
Inclinez la table selon un angle
tout en retirant ou replaçant.
Placez dans les fentes pour
replacer la tablette.
ÉTAGÈRE QUICKSPACE™
Cette tablette se divise en deux et glisse sous elle-même
pour permettre le rangement d’articles en hauteur placés
sur la tablette du dessous.
Étape 1 : Soulevez le bord avant de la moitié avant de la
tablette.
Étape 2 : Abaissez le bord arrière de la moitié frontale
de la tablette tout en la glissant en dessous de
la moitié arrière.
Il est possible de retirer ou replacer la tablette
Quickspace en entier (voir la section Tablettes en verre).
Étape 2
Étape 1
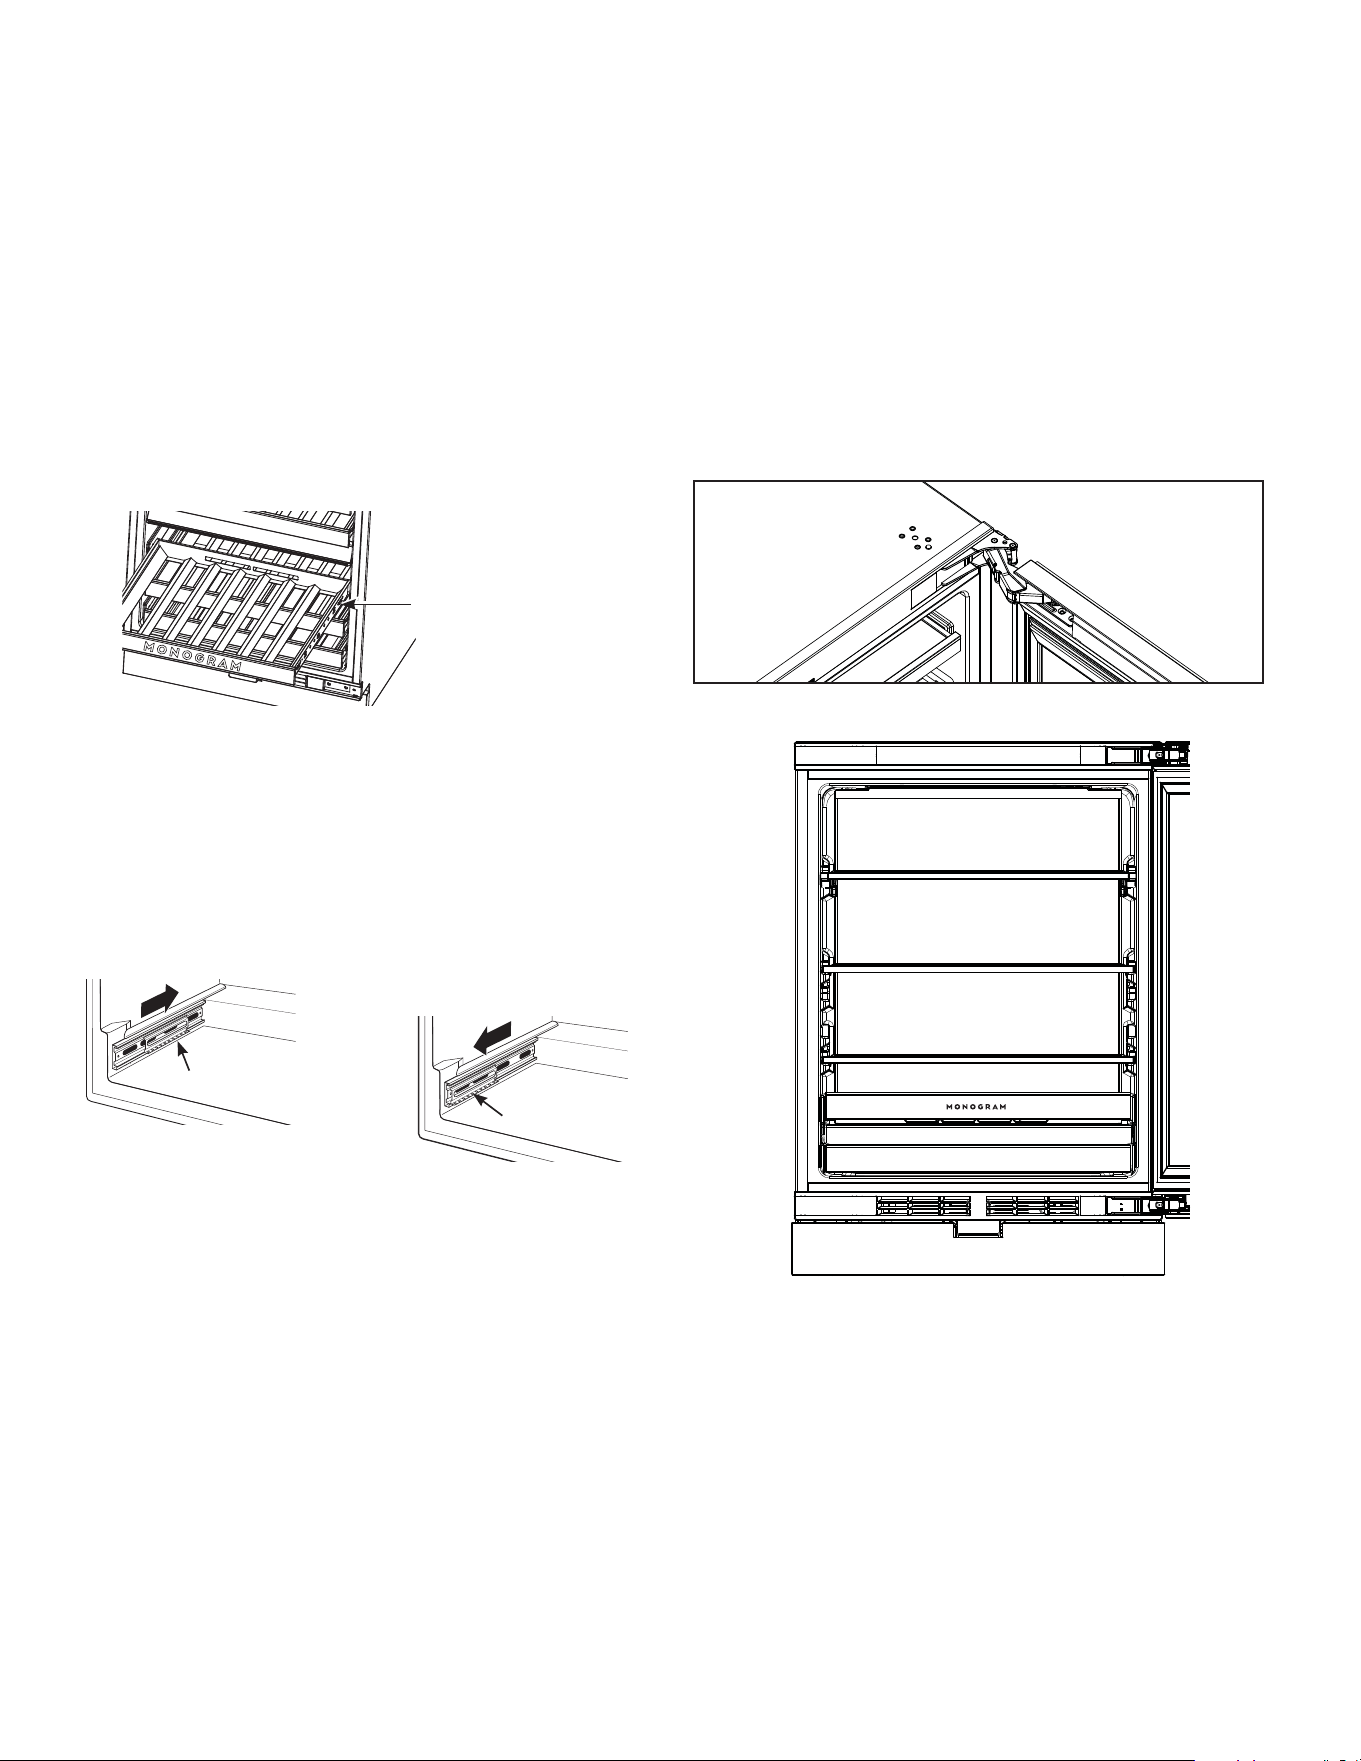
10 49-1000777 Rev. 2
UTILISATION DU REFROIDISSEUR DE BOISSON
TIROIRS PLEINE EXTENSION
Tous les tiroirs pleine extension sont amovibles afin
d’ajouter ou de retirer facilement les bouteilles.
Tous les tiroirs pleine extension peuvent être retirés pour
ranger des bouteilles de plus grande taille.
Pour retirer :
1. Tirez le tiroir pleine extension vers l’extérieur jusqu’à la
position STOP.
2. Poussez la languette du guide de tiroir droit vers le bas
tout en tirant la languette du guide gauche vers le haut,
puis tirez le tiroir vers l’extérieur.
Pour replacer :
1. Poussez le bras coulissant du tiroir dans l’appareil.
2. Tirez le petit sous-ensemble coulissant complètement vers
ODYDQW
3. Insérez les côtés du tiroir dans les guides.
4. Poussez jusqu’à ce que les languettes se verrouillent en
place.
REMARQUE : Assurez-vous que les languettes des
guides de tiroir pleine extension sont complètement
insérées avant de charger des bouteilles. Tirez les tiroirs
complètement jusqu’à la position STOP et repoussez
plusieurs fois vers l’arrière pour vous assurer que les
languettes de verrouillage sont correctement insérées.
Fermeture progressive
Ce produit est conçu avec un système de porte à
IHUPHWXUHSURJUHVVLYH&HV\VWqPHPLQLPLVHOLPSDFWVXU
votre boisson car il adoucit la force de fermeture de la
porte. Lorsque la porte s’approche de la fermeture, un
PpFDQLVPHGDPRUWLVVHPHQWHVWHQJDJpSRXUDGRXFLU
OLPSDFW&HV\VWqPHGHFKDUQLqUHHVWFRQoXSRXU
PDLQWHQLUODSRUWHRXYHUWHMXVTXjFHTXHOOHDWWHLJQHOH
PpFDQLVPHGDPRUWLVVHPHQWHWGHIHUPHWXUHDXWRPDWLTXH
/DSSDUHQFHSHXWYDULHU
Sous-assemblage
Pour replacer, pousser le
bras coulissant du tiroir
dans l’appareil.
Tirez le petit sous-
assemblage coulissant
complètement vers l’avant.
Sub-assembly
Languette (pousser la
languette du guide de
tiroir droit vers le bas,
tirer la languette du
guide de tiroir gauche
vers le haut)
49-1000777 Rev. 2 11
ENTRETIEN ET NETTOYAGE
Ɣ$ILQGHSUpYHQLUOHXUGpWpULRUDWLRQQHWWR\H]OHVVXUIDFHVLQWpULHXUHH[WpULHXUHDYHFGHO¶HDXWLqGHXQVDYRQRXXQGpWHUJHQWGRX[HW
un linge doux ou en microfibres.
Ɣ$ILQGHSUpYHQLUOHVUD\XUHVHWOHVWDFKHVG¶HDXVpFKH]OHVVXUIDFHVGHO¶pOHFWURPpQDJHUHQOHVHVVX\DQWDYHFXQFKLIIRQGRX[
propre ou un linge en microfibres.
NETTOYAGE DE L’EXTÉRIEUR
NETTOYAGE DE L’INTÉRIEUR
AVERTISSEMENT
Risque de décharge
électrique Débrancher l’appareil avant le nettoyage. Si
l’appareil est encastré, couper l’alimentation électrique au
disjoncteur.
AVERTISSEMENT
Risque d’incendie ou
d’explosion. Réfrigérant inflammable
Pour retirer le givre, gratter à l’aide d’un grattoir ou d’une
spatule en plastique ou en bois. Ne pas utiliser un pic à
glace ni un instrument métallique ou aux arêtes coupantes
car il y a risque de percer la doublure de l’appareil et la
tubulure de réfrigérant derrière elle.
N’utiliser aucun appareil électrique pour dégivrer le
congélateur.
S’il est trop difficile de débrancher l’appareil, essorez bien votre
chiffon ou votre éponge pour enlever l’excès d’eau lorsque
vous nettoyez autour des interrupteurs, des lampes ou des
commandes.
Utilisez une solution d’eau tiède et de bicarbonate de soude
(environ une cuillère à soupe (15 ml) de bicarbonate de soude
dans un litre d’eau) afin de nettoyer tout en neutralisant les
odeurs. Rincez et séchez.
ATTENTION
Ne nettoyez pas les clayettes ou les
couvercles en verre avec de l’eau tiède quand ceux-ci sont
froids. Les clayettes et couvercles en verre peuvent se
casser s’ils sont exposés à des changements soudains de
température ou si vous les cognez ou les faites tomber. Le
verre trempé est conçu pour se briser en petits morceaux
en cas de casse.
Ne laver aucune pièce en plastique du refroidisseur de
boissons au lave-vaisselle.
VACANCES ET DÉMÉNAGEMENT
Vacances
En cas d’absence prolongée sans laisser l’appareil en
marche, une préparation de celui-ci est nécessaire.
1. Retirer tous les articles.
2. Maintenir une pression sur POWER (alimentation) sur
le panneau de commande durant 3 secondes pour
désactiver le refroidissement.
3. Débrancher ou couper l’alimentation électrique.
4. Nettoyer l’intérieur. Voir la section Nettoyage.
5. Laisser la porte ouverte pour faire circuler l’air à
l’intérieur.
Préparation pour un déménagement
Attacher avec du ruban adhésif tous les articles lâches
tels que tablettes et tiroirs pour éviter de les endommager.
S’assurer de maintenir le refroidisseur de boissons en
position droite pendant le déménagement.
UTILISER NE PAS UTILISER
Linge ou éponge doux et propres
Chiffon en microfibres
Linges abrasifs, essuie-tout, éponges à récurer (avec ou sans savon), tampons à récurer
ou en laine d’acier.
Détergent doux dans eau chaude. Poudres, liquides, ou vaporisateurs abrasifs.
Vaporisateurs pour fenêtres, ammoniac ou javel
Nettoyants à base d’agrumes ou de plantes.
Nettoyants acides ou à base de vinaigre.
Nettoyants pour le four.
Nettoyants alcalins
Nettoyants pour acier inoxydable
*Nettoie facilement les taches et les empreintes de doigt.
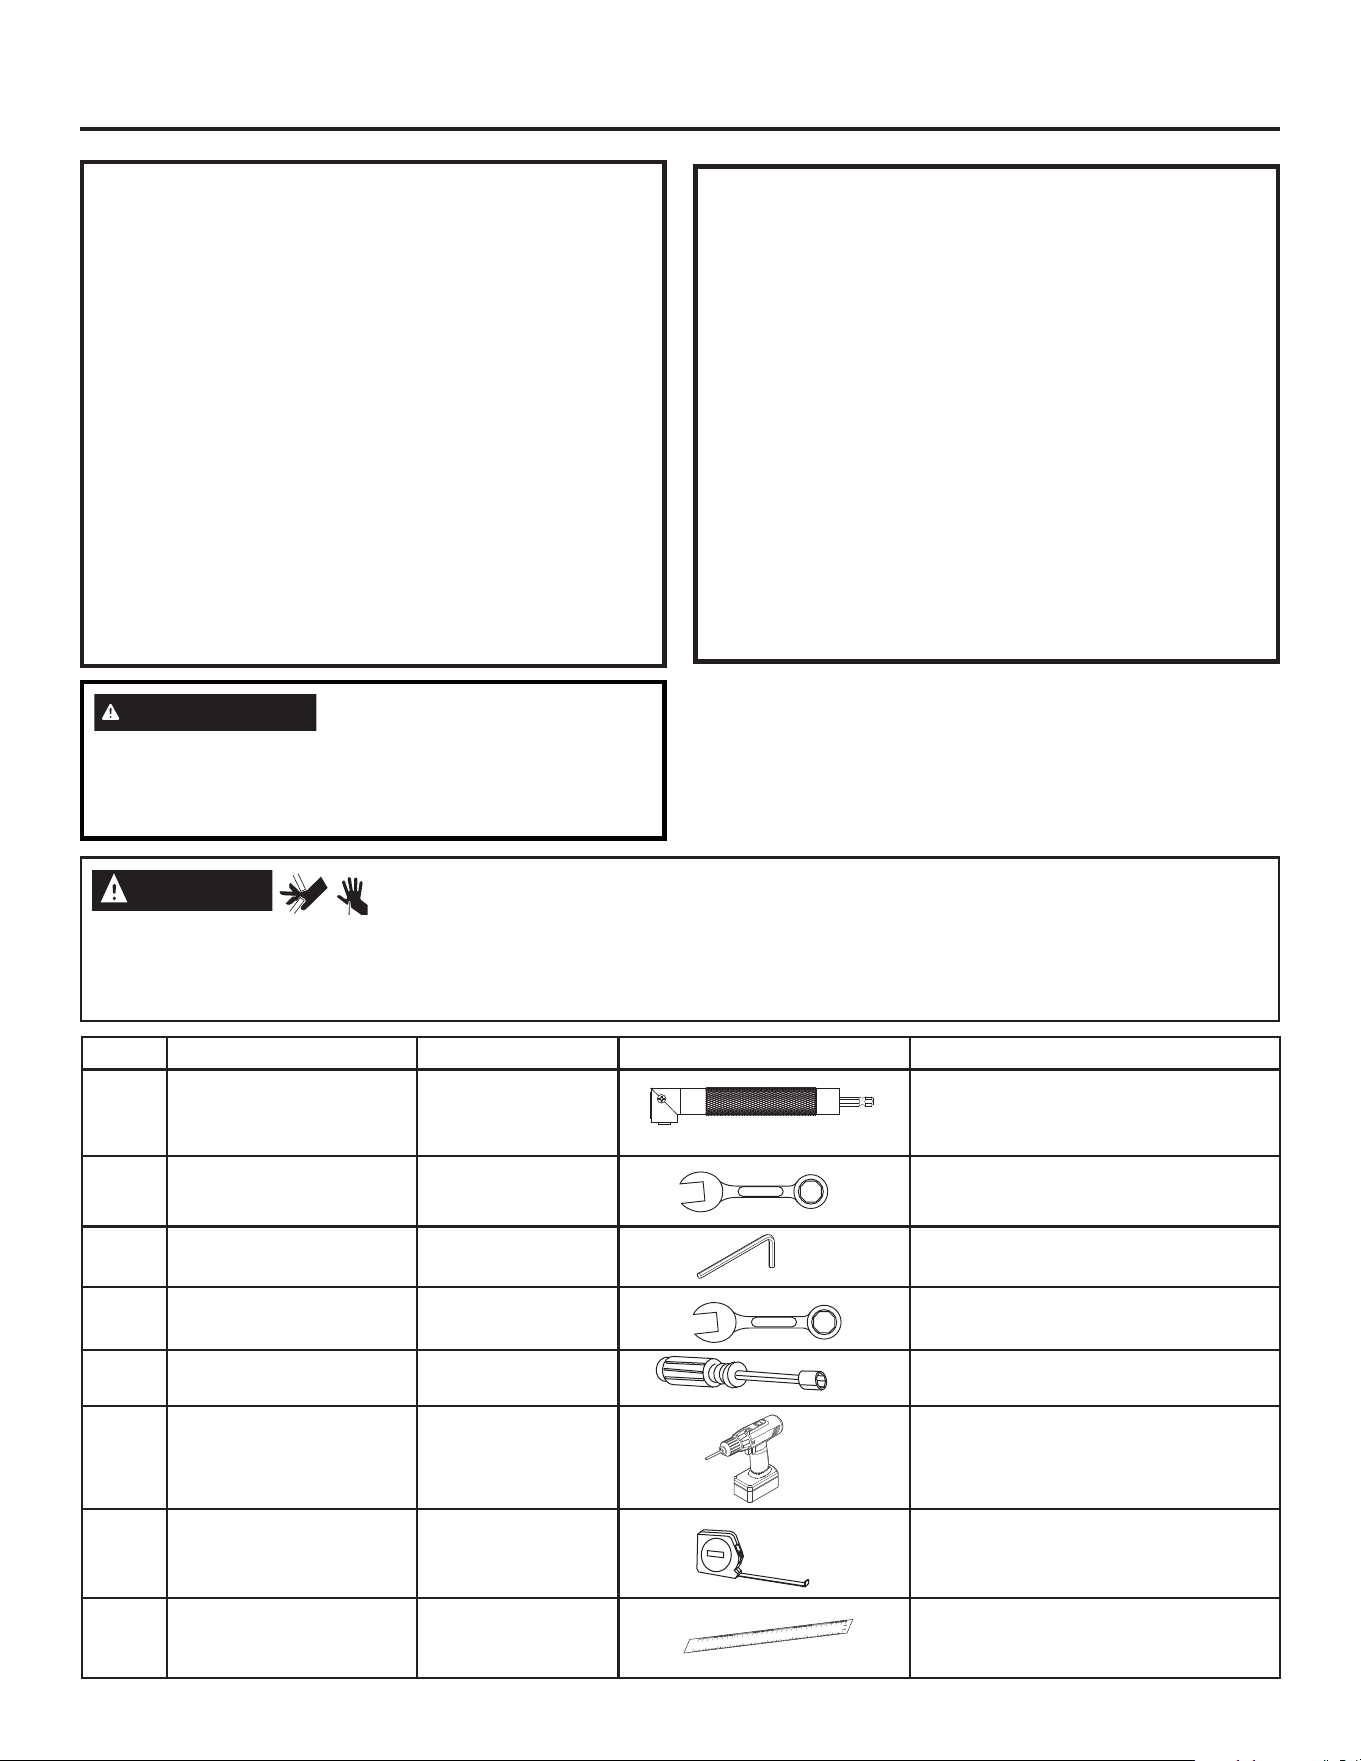
12 49-1000777 Rev. 2
Installation Instructions
AVANT DE COMMENCER
Lisez ces instructions entièrement et attentivement.
•
IMPORTANT — Respectez tous les codes et
règlements en vigueur. Conservez ces instructions pour
l’inspecteur local.
• Remarque pour l’Installateur – Assurez-vous de remettre
ces instructions à l’utilisateur.
• Remarque pour l’utilisateur- Conservez ces instructions
pour toute référence future.
• Niveau de compétence - L’installation de cet appareil
demande des connaissances de base en mécanique.
• Délai d’exécution
– L’installation du refroidisseur de vin
peut varier
• L’installateur est responsable de l’installation correcte de
l’appareil.
• La panne de l’appareil due à une mauvaise installation
n’est pas couverte par la garantie.
IMPORTANT : Manipulez le refroidisseur de vin avec soin lorsque
vous le déplacez afin de prévenir les dommages à la tubulure de
réfrigérant et le risque de fuites.
IMPORTANT : Manipuler le refroidisseur de vin avec soin
lorsqu’on le déplace afin de prévenir les dommages à la tubulure
de réfrigérant et le risque de fuites.
ATTENTION
RISQUE DE COUPURE ET DE PINCEMENT
7RXWFRQWDFWDYHFOHERUGH[SRVpG¶XQHW{OHRXG¶XQDXWUHPDWpULDXSHXWHQWUDvQHUGHVEOHVVXUHV/LQVWDOODWLRQGXSURGXLWSHXWFUpHU
des points de pincement.
3RUWH]GHVJDQWVHWGHVYrWHPHQWVGHSURWHFWLRQORUVGHOLQVWDOODWLRQGHFHSURGXLW
Article Outils 6SpFL¿FDWLRQV Image Cas d'emploi
1 Entraînement à angle droit 6 mm (1/4 po) Réglage du pied de nivellement avant
2 Clé (24 mm) Réglage du pied de nivellement avant
3 Clé Allen (4mm)
Réglage du support du coup-de-pied
Réglage de la porte supérieure
4 Clé (13mm) Réglage de la porte supérieure
5
Tournevis à douille
hexagonale
6 mm (1/4 po) Réglage du rouleau arrière
6 Visseuse électrique / Pose de la visserie
7 Ruban à mesurer / 'LVWDQFHVHWGpJDJHPHQWVGHODUPRLUH
8 Règle / Distances du coup-de-pied et nivellement
AVERTISSEMENT
RISQUE D'EXCÈS DE POIDS
La participation de deux personnes ou plus est nécessaire
pour déplacer et installer le refroidisseur de boissons.
L’omission de procéder ainsi peut occasionner des blessures
au dos ou ailleurs.
EXIGENCES POUR
L’EMPLACEMENT
IMPORTANT: Avant l’utilisation, ce refroidisseur de boissons
doit être installé correctement.
REMARQUE : Laissez le refroidisseur de boissons reposer
sur sa base en position droite durant au moins une heure
avant l’installation.
• N’installez pas le refroidisseur de boissons dans un endroit
RODWHPSpUDWXUHVHUDLQIpULHXUHj)&FDULO
ne fonctionnera pas assez souvent pour maintenir des
températures convenables.
1¶LQVWDOOH]SDVOHUHIURLGLVVHXUGDQVXQHQGURLWROD
température sera supérieure à 110 °F (43 °C) car il ne
fonctionnera pas correctement.
• Installez le réfrigérateur sur un plancher suffisamment solide
pour supporter son poids pleinement chargé.
• N’installez pas le refroidisseur dans un endroit exposé à
l’eau (pluie, etc.) ou aux rayons directs du soleil.
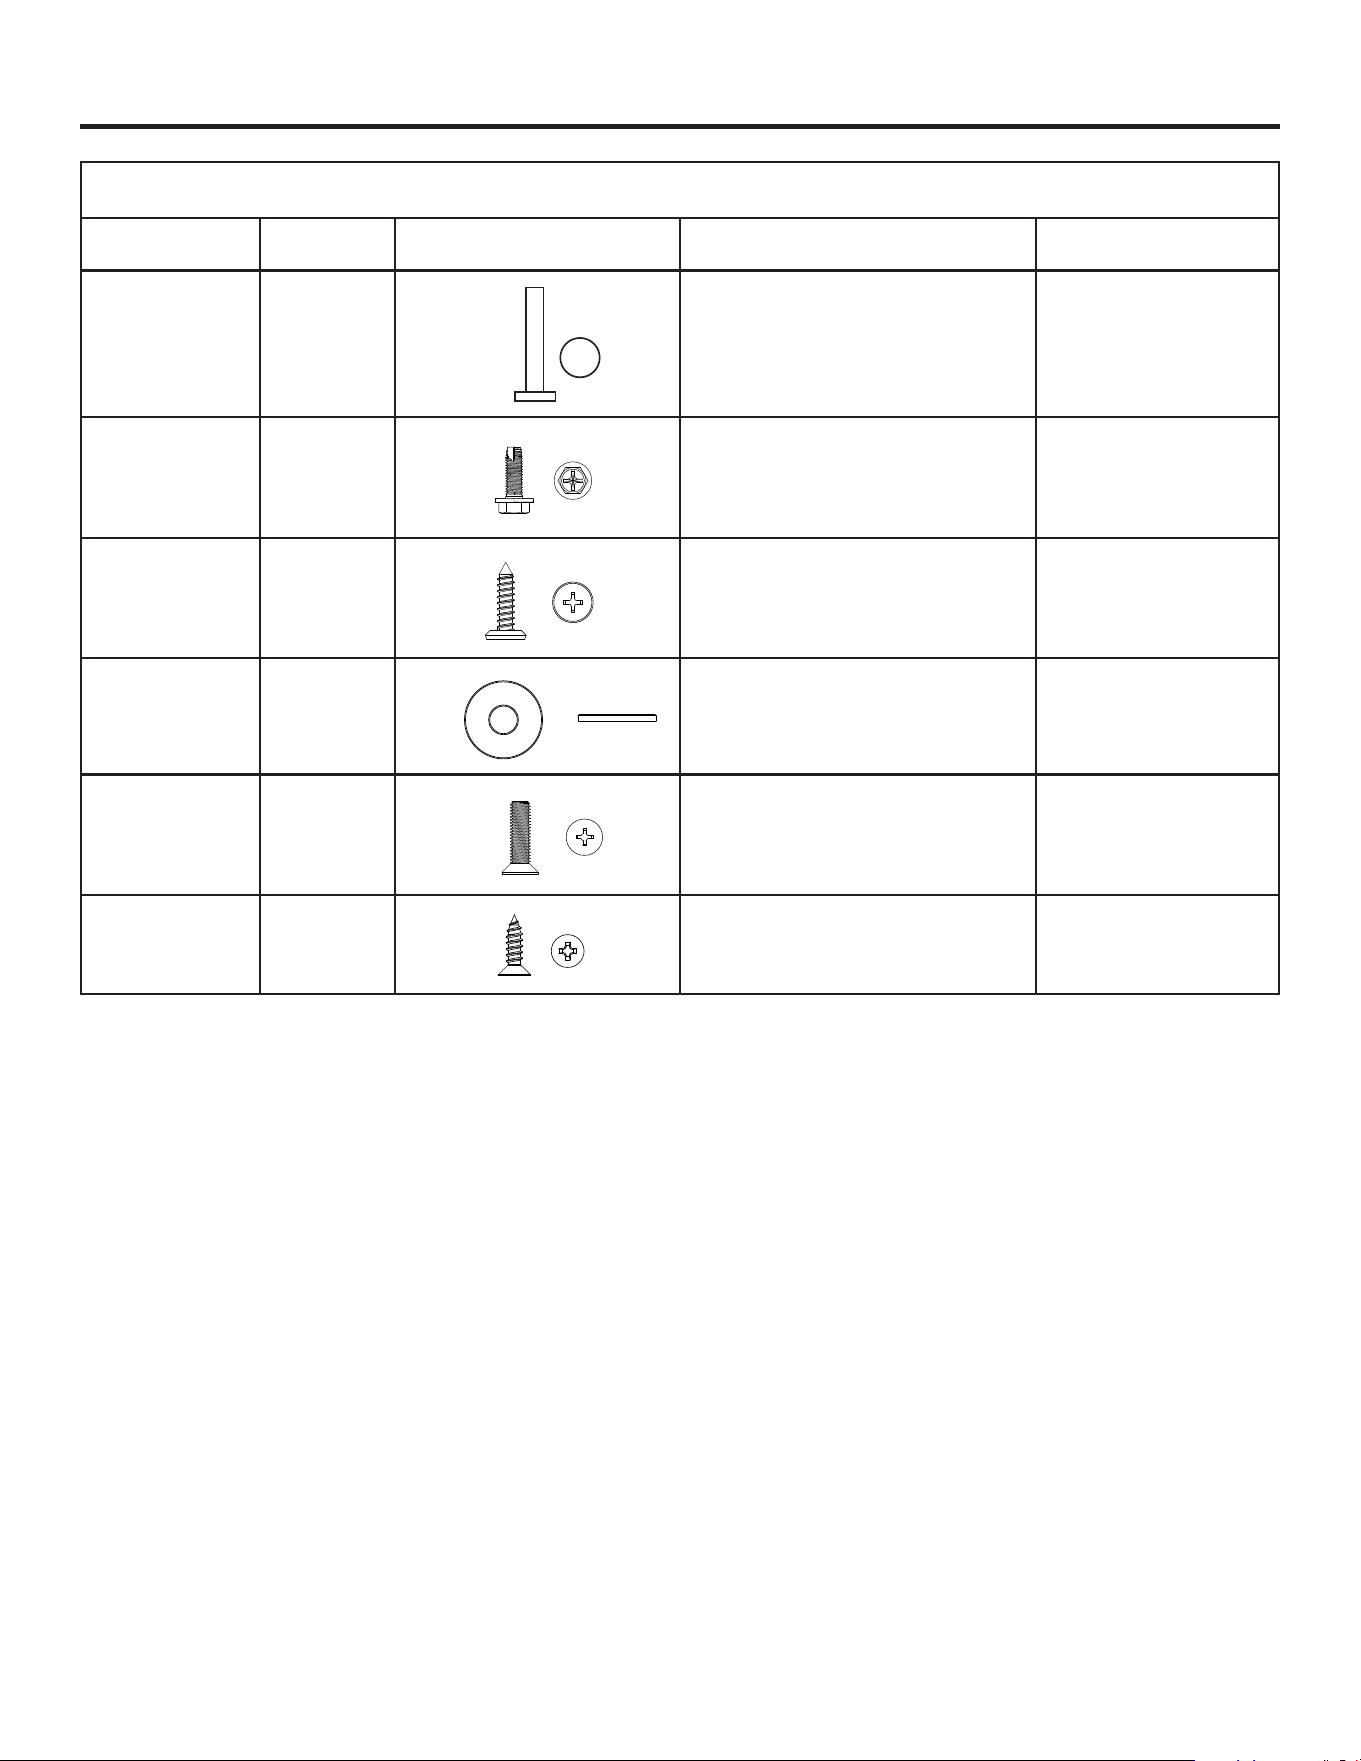
49-1000777 Rev. 2 13
Installation Instructions
Visserie (incluse dans le sac d'accessoires)
,GHQWL¿FDWLRQ QTÉ Image de la pièce Emplacement – fonction
Description de la pièce
po (mm)
A
1
Dans la charnière inférieure – Arrête
ORXYHUWXUHGHODFKDUQLqUHjGHJUpV
Cheville à extrémité plate
Longueur : 1 3/8 po
(30 mm)
B
8
Haut du panneau de porte et du support
de montage du panneau de porte – Fixe le
panneau de porte en acier inoxydable au
produit.
Vis à tête hexagonale à em-
base et extrémité biseautée
Longueur : 5/8 po
16 mm
C
8
Haut du panneau de porte et du support
de montage du panneau de porte – Fixe
le panneau de porte personnalisé en bois
au produit.
Tête cruciforme, extrémité
pointue
Longueur : 5/8 po
16 mm
D
4
%DVGXSDQQHDXGHSRUWH±6H¿[HDYHF
quatre vis aux supports de montage du
panneau de porte inférieur et permet
l’ajustement.
Diamètre extérieur 19/32 po
(15 mm)
Diamètre intérieur 3/16 po
(5 mm)
E
4
Haut des supports antibasculement, deux
F{WpV±6H¿[HVXUGDQVOHKDXWGXSURGXLW
Tête cruciforme, extrémité
plate
Longueur : 5/8 po
16 mm
F
4
Côté du support antibasculement, deux
côtés – Fixe le produit aux armoires
adjacentes.
Tête cruciforme, extrémité
pointue
Longueur : 5/8 po
13 mm
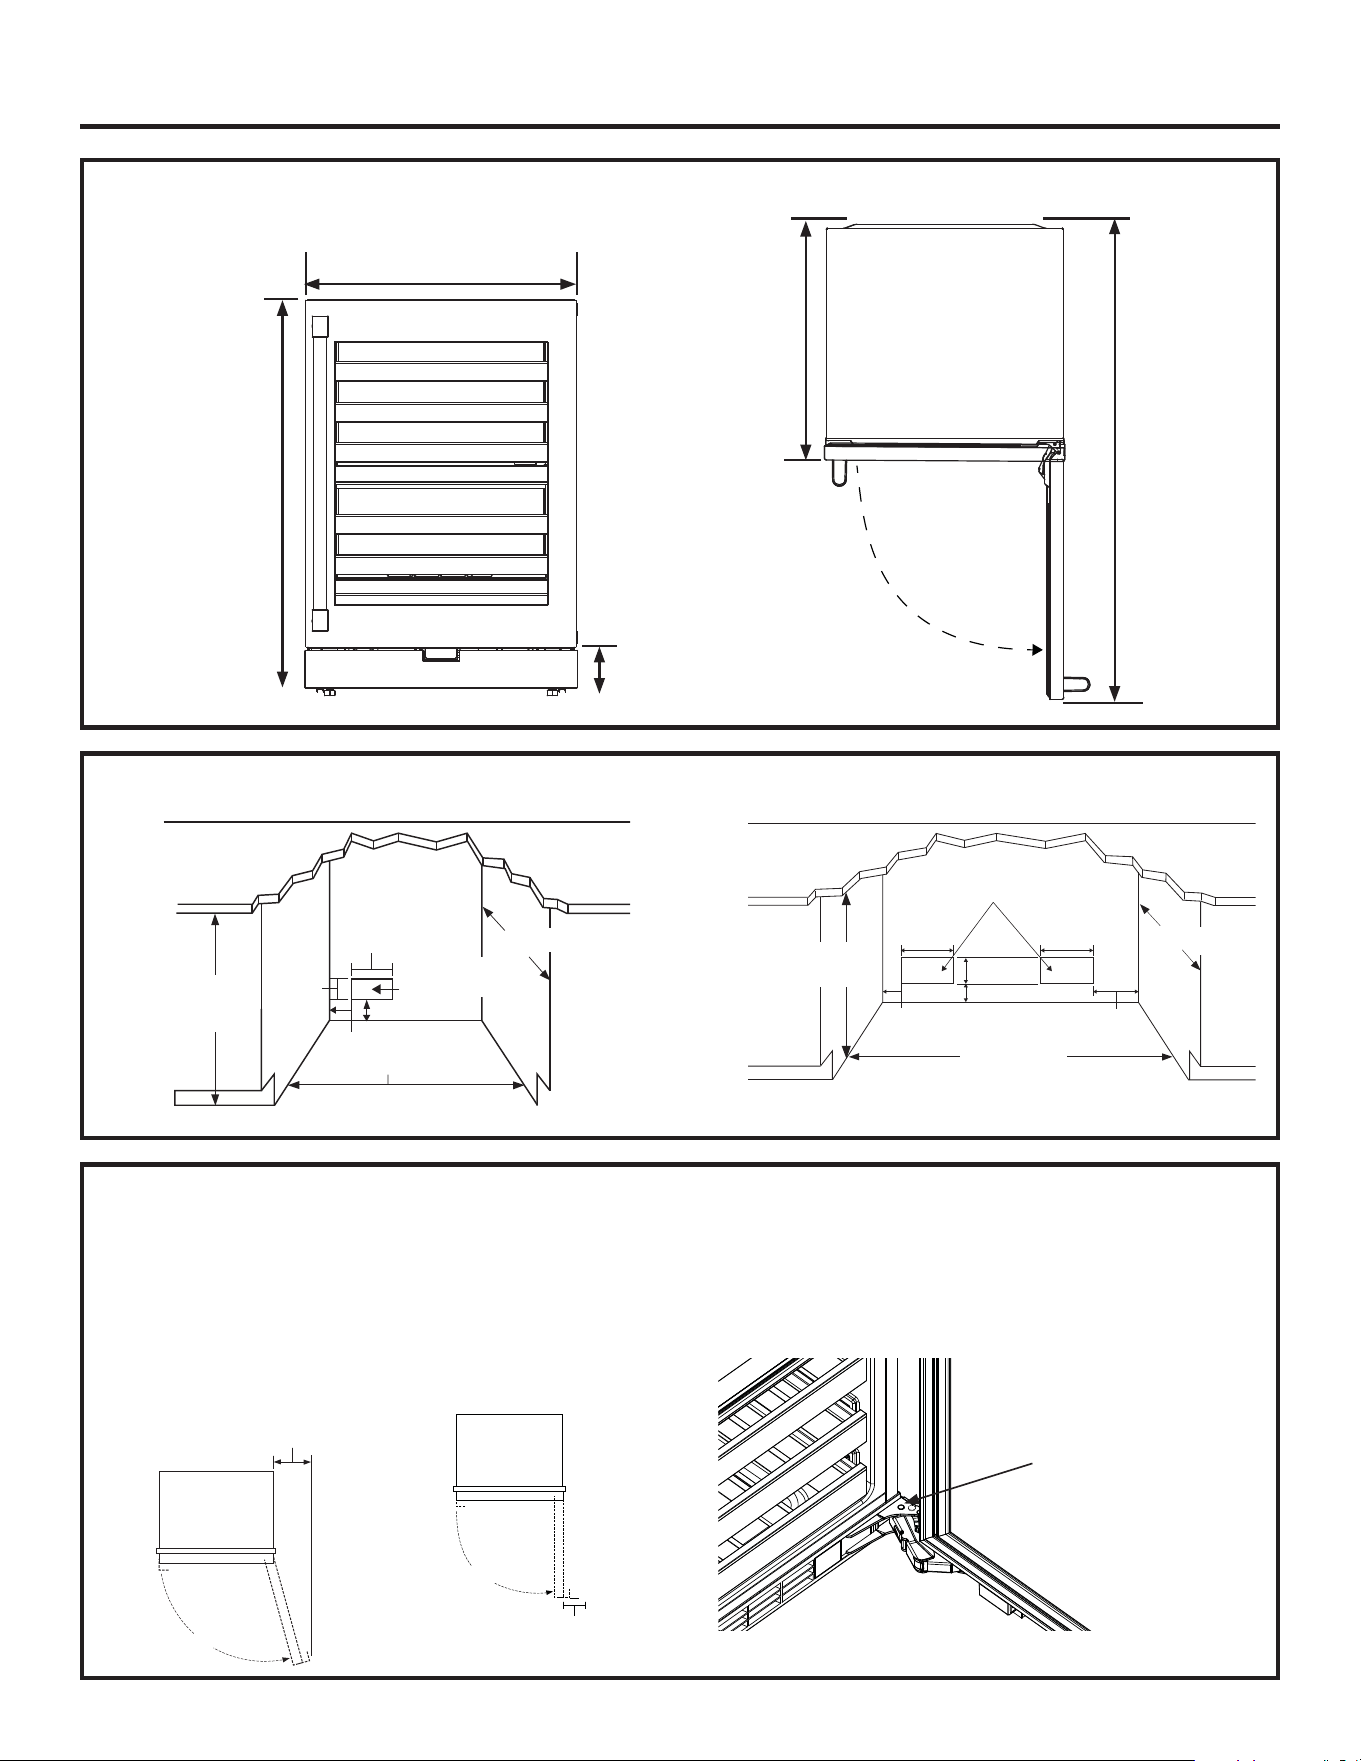
14 49-1000777 Rev. 2
Instructions d’installation
DIMENSIONS DU REFROIDISSEUR DE BOISSONS
23 7/8 po
(606 mm)
34,1-35,1 po*
(866-891 mm)
*1 po pour
l’ajustement
avec des pieds
et rouleaux de
mise à niveau
Ǝ
(606 mm)
Ǝ
(1216 mm)
Hauteur de coup-de-
pied de 4 po du planch-
er au bas de la porte.
Remarque :
La hauteur du coup-de-
pied est de 3 1/2 à 4 1/2
po du plancher au bas de
la porte. Ajuster la hauteur
avec les pieds avant et
les rouleaux arrière.
ESPACE D’INSTALLATION
34-1/2" - 35"
(876.3 - 889mm)
24" (610 mm)
24" (610mm)
(52mm)
10"
(254mm)
(131mm)
5-3/16"
2"
5/8"
(41mm)
Emplacement
de la sortie
Emplacement
de la sortie
10"
(254mm)
10"
(254mm)
34 1/2"-35"
(876.3 - 889mm)
24" (610mm)
5/8" (41mm)
2" (52mm)
12-3/8" (315mm)
(131mm)
48" (1220mm)
5-3/16"
INSTALLATION CÔTE À CÔTE DU PRODUIT
DÉGAGEMENTS DU PRODUIT
Installation dans un coin :
• Laissez un dégagement minimal de 4 po (100 mm) du côté
charnière pour permettre une ouverture de porte à 90° et
l’extension des glissières.
• Laissez un dégagement minimal de 13 po (330 mm) du
côté charnière pour une complète ouverture de porte à
115°.
3RXUHPSrFKHUODSRUWHGHVRXYULUGHSOXVGHGHJUpV
LQVpUH]OD[HGHFKDUQLqUH$GXVDFGDFFHVVRLUHVGDQV
OHWURXLQIpULHXUGHOD[HGHFKDUQLqUH$VVXUH]YRXVTXH
l’axe est complètement abaissé et que la porte peut être
fermée en douceur.
13" Minimum
au mur
115°
Ouverture de porte à 90°
4" Minimum
au mur
90°
7URXGD[HGHFKDUQLqUH
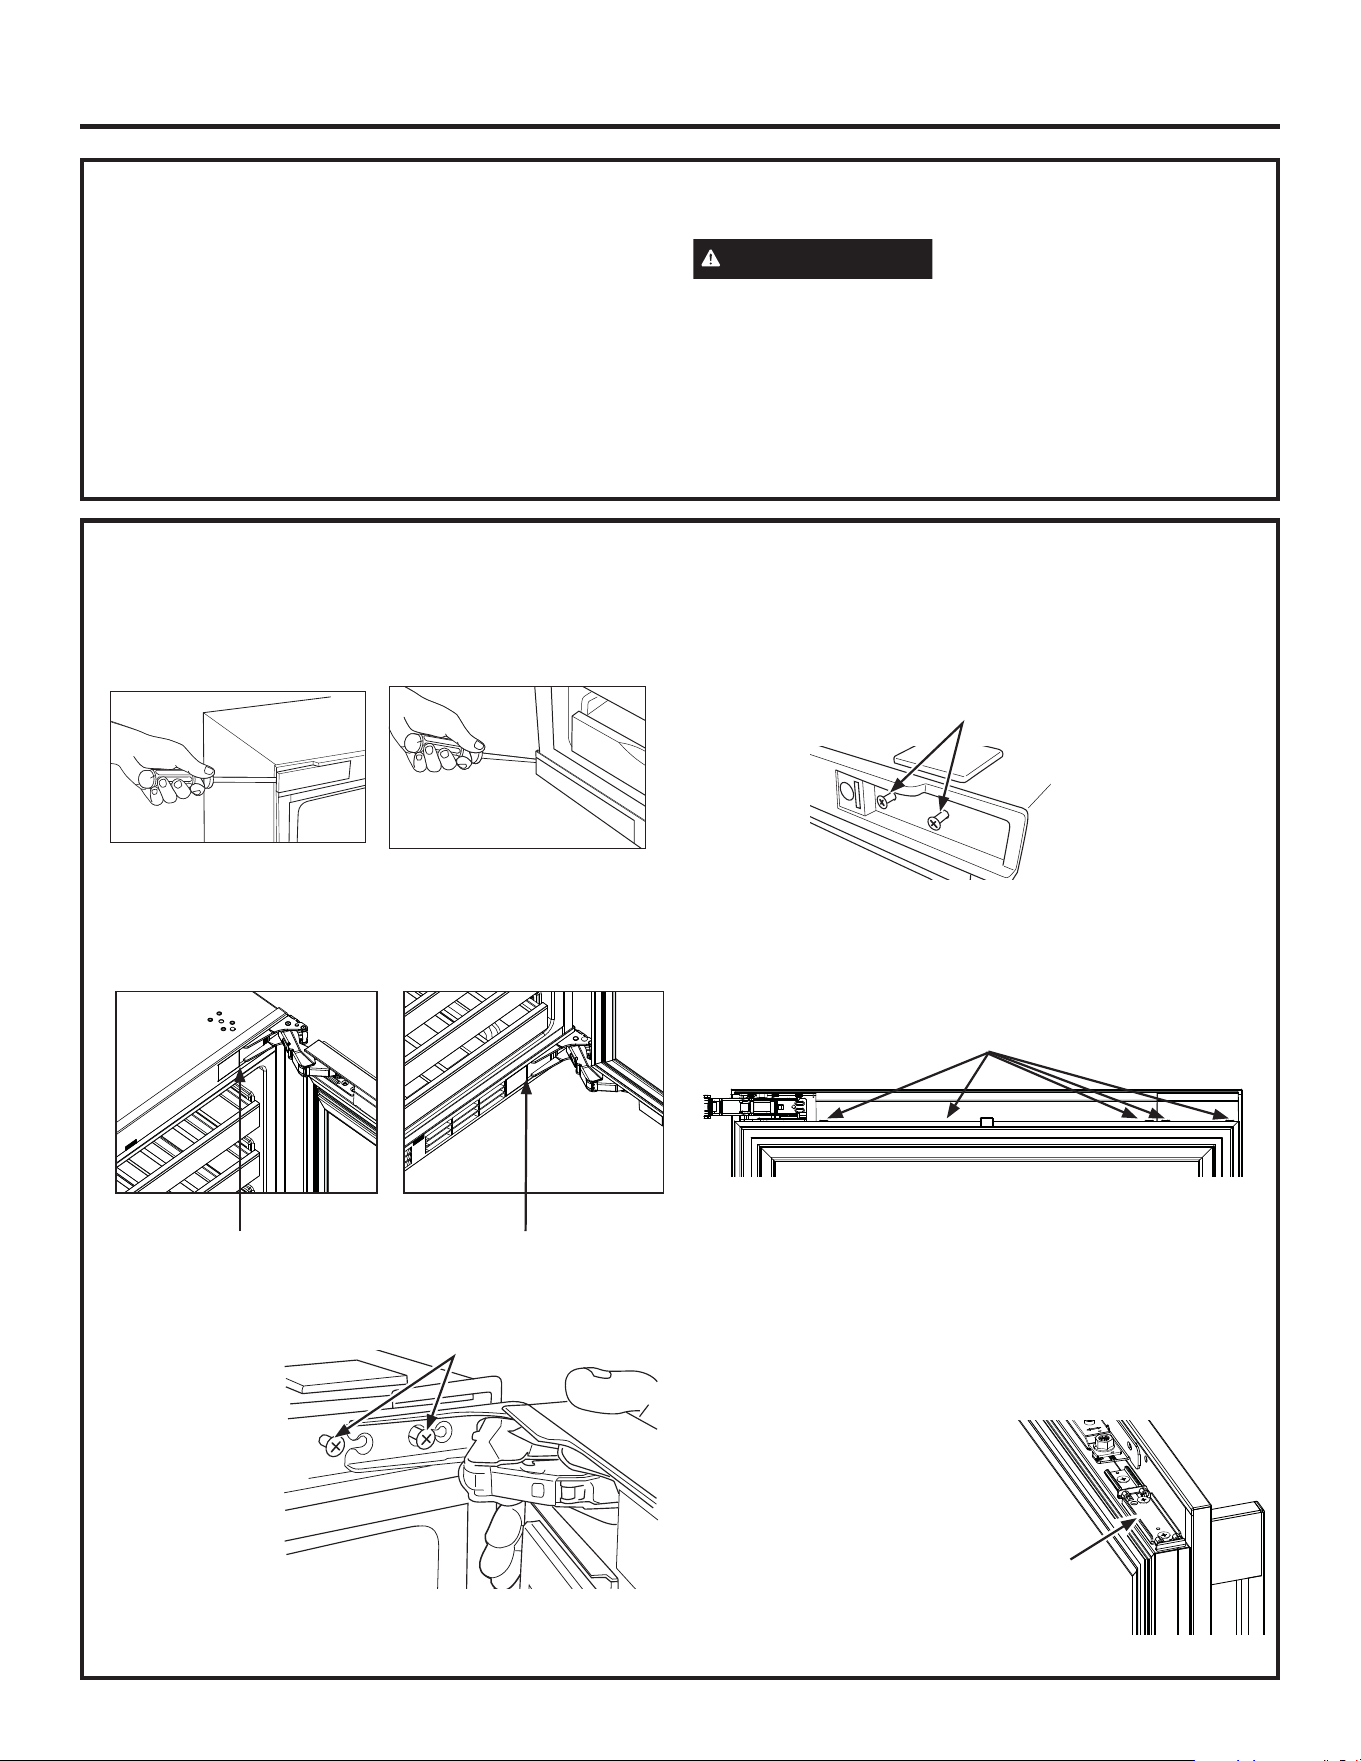
49-1000777 Rev. 2 15
Instructions d’installation
RETRAIT DE L’EMBALLAGE
• Retirez le ruban et les résidus de colle des surfaces
avant de mettre le refroidisseur de boissons en marche.
Frottez une petite quantité de savon à vaisselle liquide sur
ODGKpVLIDYHFYRVGRLJWV(VVX\H]jOHDXWLqGHHWVpFKH]
REMARQUE : 1XWLOLVH]SDVGLQVWUXPHQWVWUDQFKDQWV
GDOFRROjIULFWLRQGHOLTXLGHVLQIODPPDEOHVRXGH
nettoyants abrasifs pour retirer le ruban adhésif ou la
colle. Ces éléments peuvent endommager la surface de
votre refroidisseur de boissons. Pour plus d’informations,
voyez la section sur les consignes de sécurité.
•-HWH]RXUHF\FOH]OHPDWpULHOGHPEDOODJH
AVERTISSEMENT
Les petits objets présentent
un risque d'étouffement pour les enfants. Retirez et
jetez toutes les pièces non utilisées. Retirez et jetez
proprement toute pièce non utilisée.
NETTOYAGE AVANT L’UTILISATION
Une fois tout le matériel d’emballage retiré, nettoyer
l’intérieur du refroidisseur de boissons avant de l’utiliser.
Voir la section sur l’entretien et le nettoyage.
INVERSION DU SENS D’OUVERTURE DE PORTE
1. Ouvrez la porte, insérez le tournevis à tête plate dans
OHQFRFKHVLWXpHVXUOHF{WpGXFRXYHUFOHUHFWDQJXODLUH
HQSODVWLTXHjORSSRVpGHODFKDUQLqUHSRXUUHWLUHUOHV
couvercles supérieur et inférieur.
Du côté de la charnière, insérez le tournevis à
tête plate sous les couvercles en T des charnières
supérieure et inférieure pour les extraire. Retirez le
FRXYHUFOHFDUUpjF{WpGHX[DYHFOHPrPHWRXUQHYLV
2. Desserrez
complètement
la vis pour
retirer la porte
GHODUPRLUH
3. Retirer la
porte et laisser
les charnières ouvertes.
4. 5HWLUH]OHVYLVGHFKDUQLqUHGHODUPRLUHHWLQVWDOOH]
les sur le côté opposé. Pour faire glisser la charnière
sur les deux vis supérieures, vissez-les à mi-chemin,
vous obtiendrez ainsi un certain soutien pendant
l’installation.
5. 6LODSRUWHHVWPXQLHGXQHJDUQLWXUHVXSpULHXUHHQ
plastique, retirez celle-ci en insérant et écartant un
tournevis à tête plate dans les fentes sous la garniture
(préférable de commencer par le côté de la poignée).
6LQRQSDVVH]jOpWDSHVXLYDQWH
6. Retirez les charnières de la porte. Déplacez le support
de garniture situé sur le côté supérieur gauche de la
porte vers le côté supérieur droit de la porte. Placez
OHVFKDUQLqUHVGHODXWUHF{WpFKDUQLqUHVXSpULHXUHHQ
bas et charnière inférieure en haut.
Il y a une rondelle sur la charnière inférieure. Lorsque
YRXVGpSODFH]ODFKDUQLqUHLQIpULHXUHGHODXWUH
côté comme charnière
supérieure, veillez à
retirer la rondelle et à
la placer sur la nouvelle
charnière inférieure,
qui était la charnière
supérieure de
ODXWUHF{Wp
Vis
Vis
Fentes
Support
de garniture
Insérer le tournevis de
ce côté pour ouvrir le
couvercle carré.
Insérer un tournevis sous
le couvercle en T de la
charnière.

16 49-1000777 Rev. 2
Instructions d’installation
INVERSION DU SENS D’OUVERTURE DE PORTE (SUITE)
7. ,QVWDOOH]OHVFRXYHUFOHVFDUUpVGHOpWDSHVXUOH
nouvel emplacement de charnière en haut et en bas
GHODUPRLUH,QVWDOOH]OHFRXYHUFOHUHFWDQJXODLUHGH
OpWDSHVXUOHQRXYHDXF{WpVDQVFKDUQLqUHHQKDXWHW
HQEDVGHODUPRLUHDYDQW
8. Faites glisser la charnière
supérieure sur les 2 vis
VXSpULHXUHVGHODUPRLUH
Installez les vis de la charnière
inférieure, sans les serrer.
Mettez la porte de niveau, puis
serrez les 4 vis. Installez le
couvercle de charnière en T de
OpWDSHVXUODUPRLUH
9. Si la garniture supérieure en plastique n’est pas
déjà installée sur votre produit, vous la trouverez à
OLQWpULHXUVXUODWDEOHWWHVXSpULHXUH6pSDUH]OHEORF
GHFRXYHUFOHGH[WUpPLWpGHODJDUQLWXUHVXSpULHXUHHQ
insérant le tournevis à tête plate dans la fente sous la
garniture à son extrémité.
3ODFH]OHGHODXWUHF{WpGHODJDUQLWXUH/DJDUQLWXUH
est prête à être installée.
10. (ႇHFWXH]FHWWHpWDSHVHXOHPHQWDSUqVDYRLUWHUPLQp
OLQVWDOODWLRQHWOHUpJODJHGXSDQQHDXGHSRUWH
Enfoncez la bande à ressort lors de l’installation de
la garniture sur le dessus de la porte. Appuyez sur la
garniture pour engager son attache dans les supports
de la porte.
Couvercles
carrés
Fente
Supports pour garniture
Bande à ressort
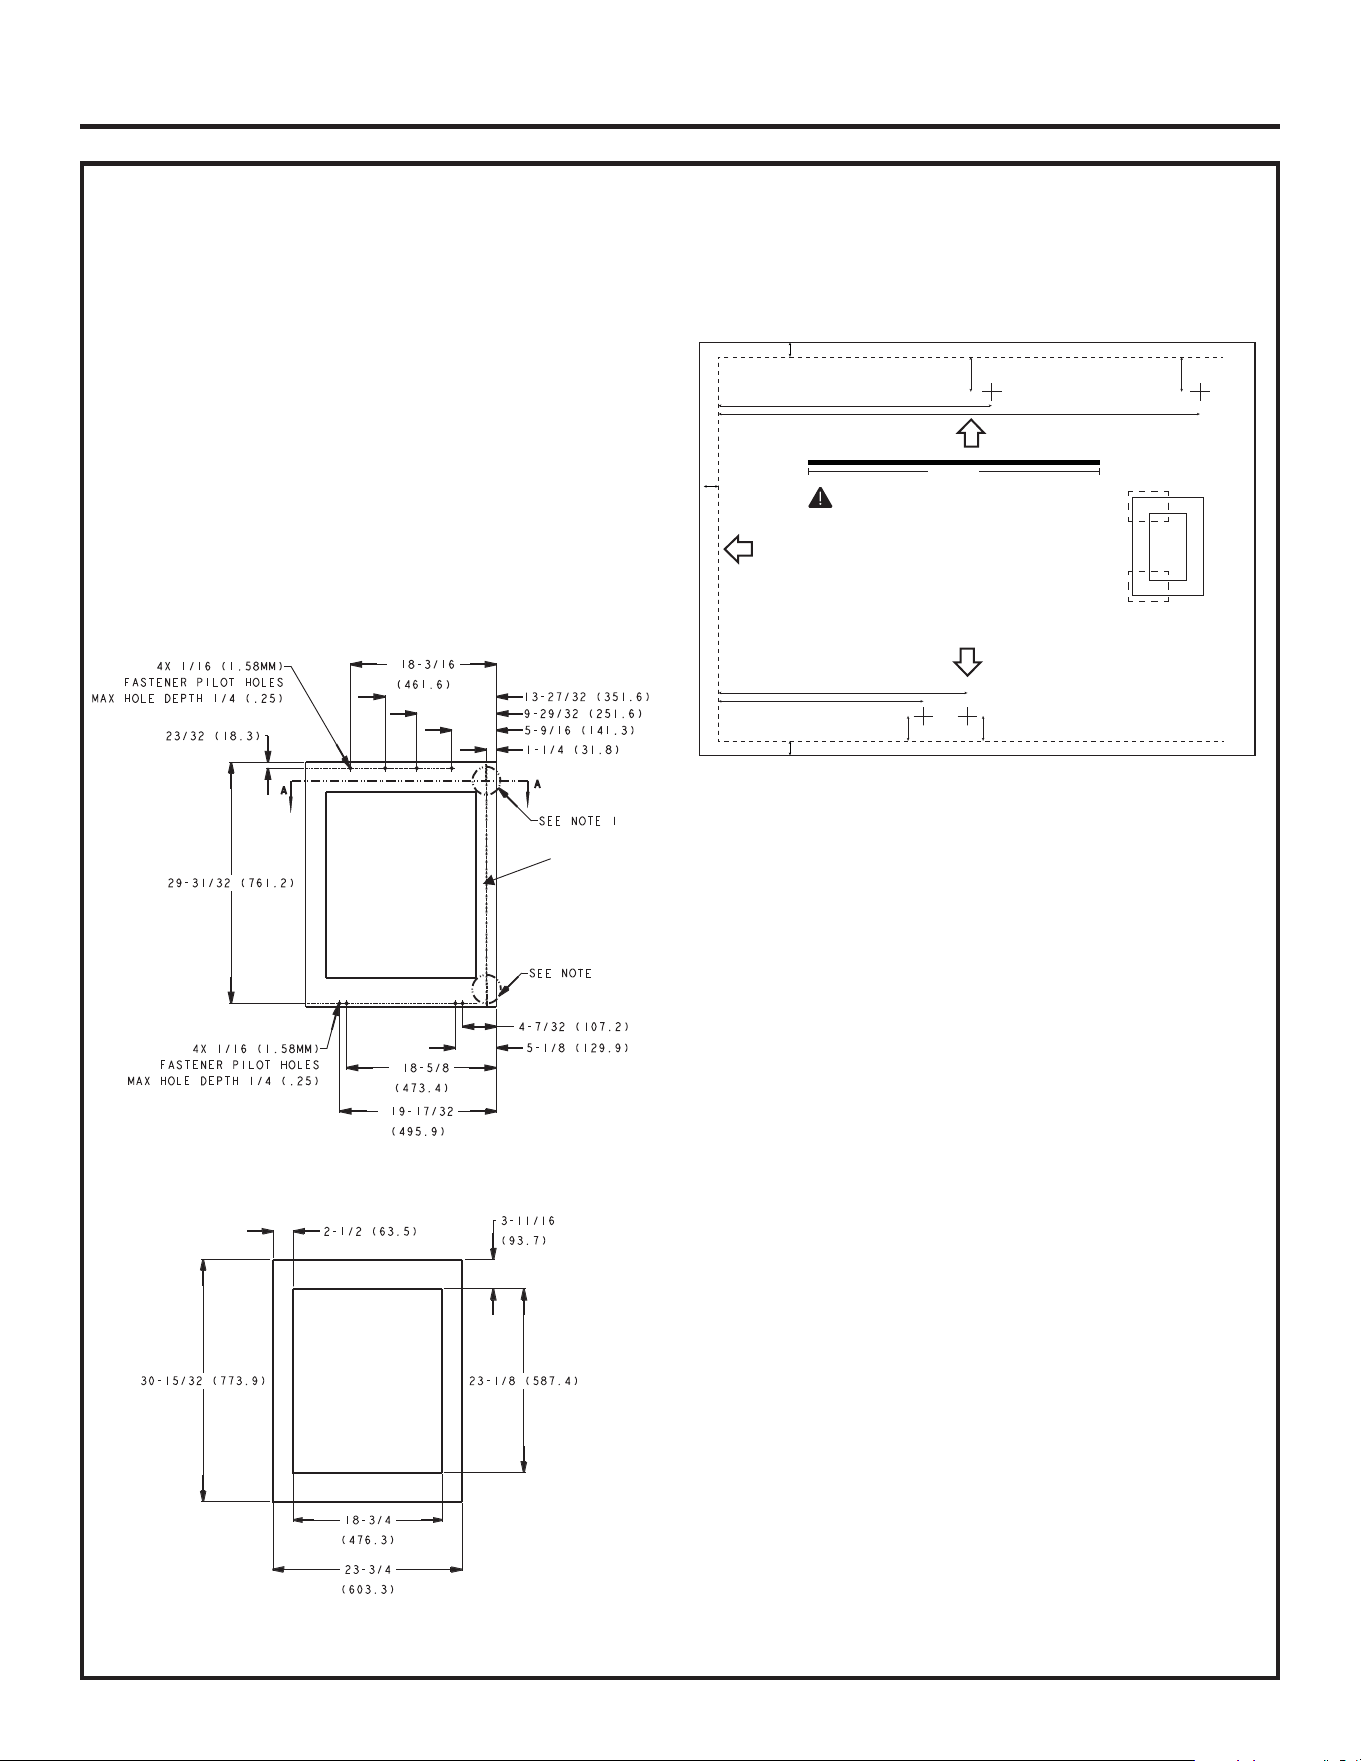
49-1000777 Rev. 2 17
Instructions d’installation
CONSTRUCTION D’UN PANNEAU DE PORTE PERSONNALISÉ
L’épaisseur du panneau personnalisé doit être de 3/4 po
(19,1 mm). Des supports sont fournis avec le réfrigérateur
SRXUSHUPHWWUHOHPRQWDJHVXUODSRUWHGHODSSDUHLO
REMARQUE : Nous recommandons que les panneaux
décoratifs soient arrondis ou biseautés aux coins et
ERUGVLQWpULHXUVSDUXQPHQXLVLHUD¿QG¶DGRXFLUOHVERUGV
coupants des panneaux. Les bords à traiter doivent in-
clure les bords supérieur, inférieur et côté charnière.
REMARQUE :,OHVWUHFRPPDQGpGH¿QLUODIDFHDUULqUH
du panneau. Des parties de la face arrière du panneau
seront visibles lorsque la porte est ouverte.
Étapes
9pUL¿H]TXHOHVGLPHQVLRQVJOREDOHVGXSDQQHDX
correspondent au dessin du panneau ci-dessous.
8QJDEDULWHVWIRXUQLGDQVOHVDFGDFFHVVRLUHVGH
l’appareil pour faciliter le perçage des trous de guidage
au bon endroit. Suivez les instructions sur le gabarit
pour terminer les trous de guidage.
,QVWDOOH]OHVXSSRUW¿OHWpOD¿[DWLRQGHODSRLJQpH
HWOHVSDFHXUHQVXLYDQWOHVLQVWUXFWLRQVGXPDQXHO
GLQVWDOODWLRQIRXUQLDYHFODWURXVVH=.31
Vue avant du panneau de porte
personnalisé
Vue arrière du panneau de porte
personnalisé
Côté poignée
Montage de la
poignée
ligne médiane
LEFT
6" (15.24 CM)
yPRINT TEMPLATE ON 8.5" X 11" (21.59 CM X 27.94 CM) PAPER ONLY.
yPRINT ACTUAL SIZE (100% SCALE). DO NOT SCALE TO FIT.
NO MARGINS OR HEADERS/FOOTERS.
yVERIFY LINE MEASURES 6" (15.24 CM) LONG BEFORE DRILLING PILOT HOLES.
*PILOT HOLES TO BE 7/64" AND NOT EXCEED 1/2" DEEP.
BOTTOM
T1
T1
T1
5-1/8
"
.3
"
.3
"
4-7/32
"
5-9/16
"
23/32
"
23/32
"
9-29/32
"
.3
"
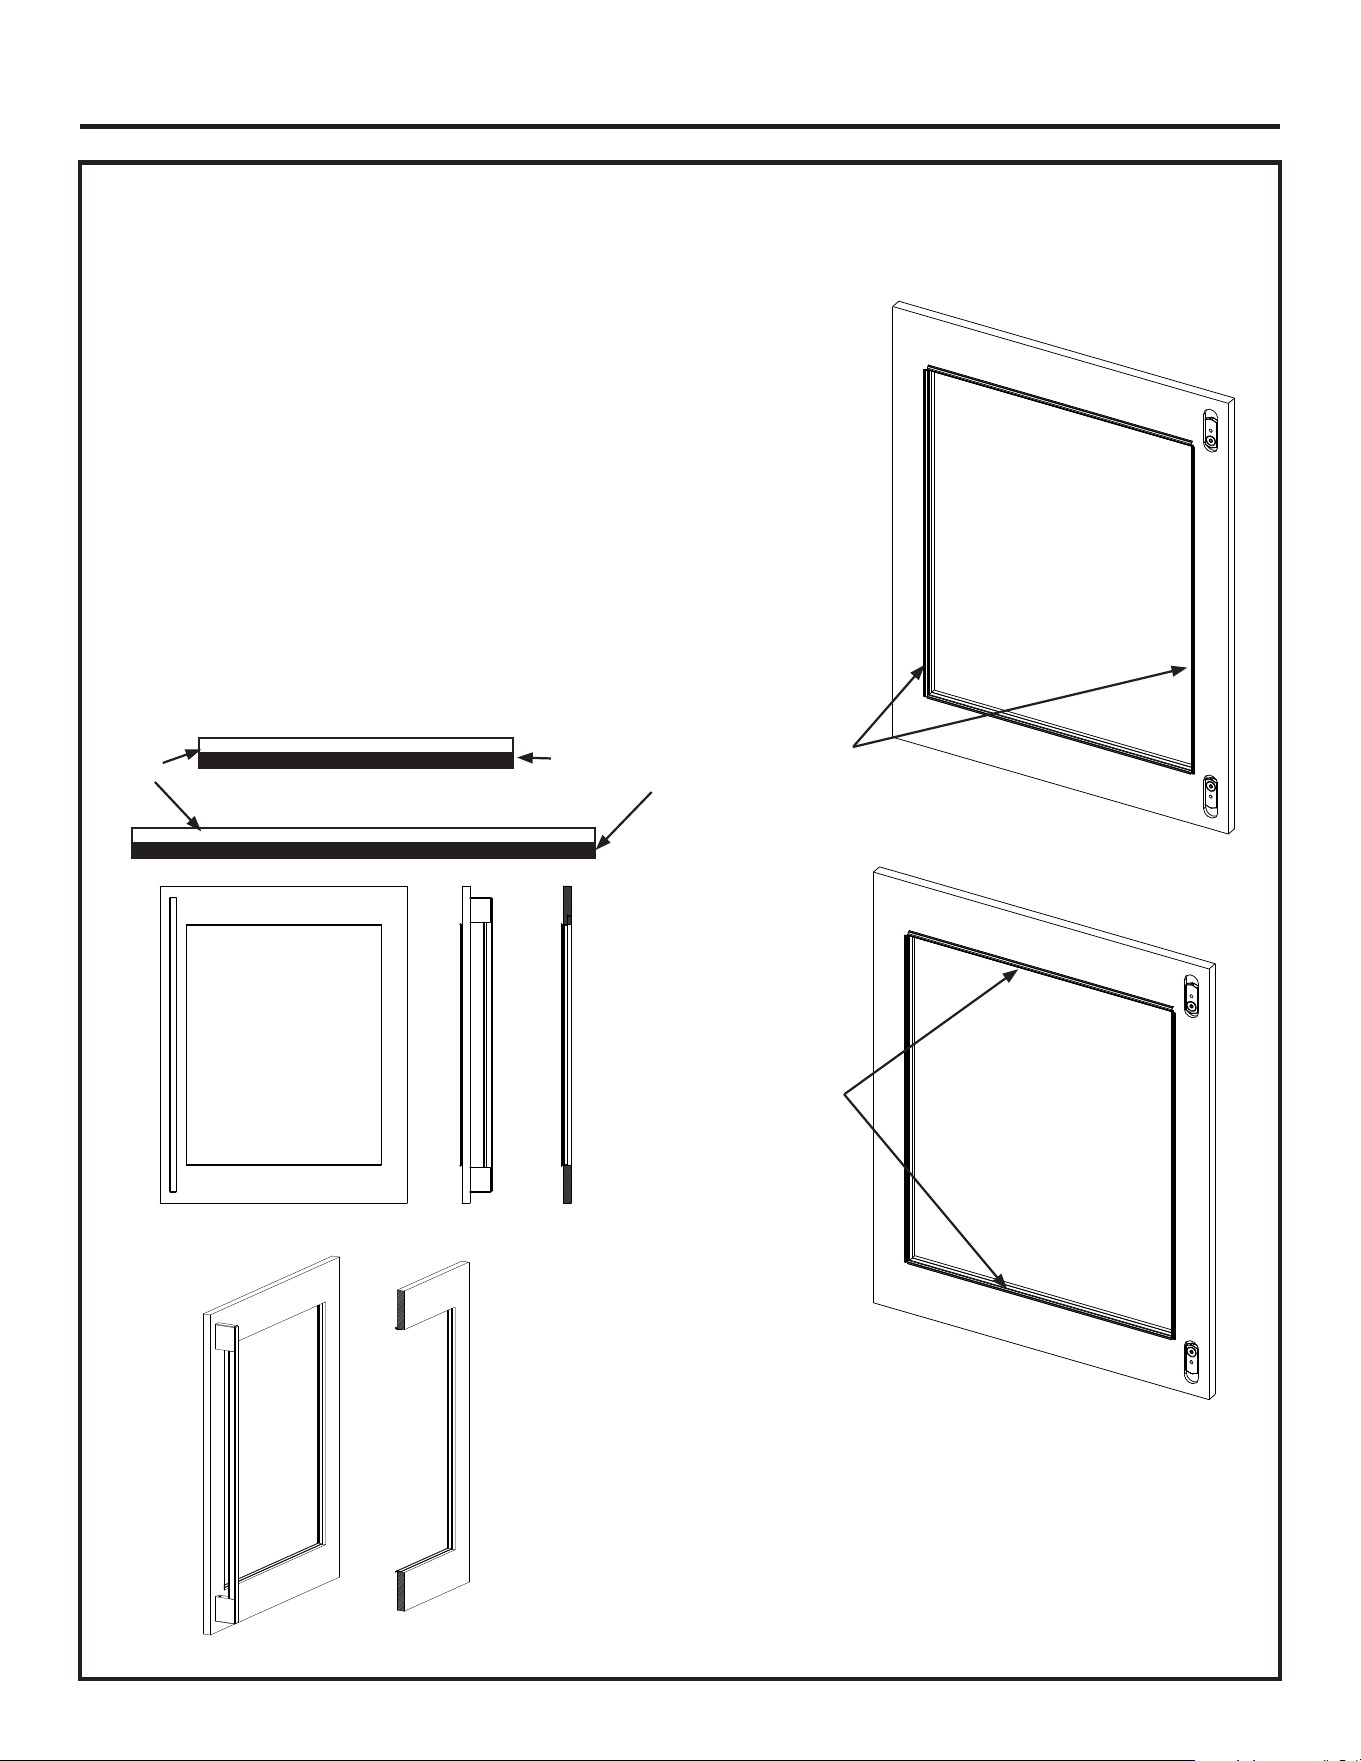
18 49-1000777 Rev. 2
Instructions d’installation
CONSTRUCTION D’UN PANNEAU DE PORTE PERSONNALISÉ (suite)
4. IQVWDOOH]ODWURXVVHGHMRLQWVGpWDQFKpLWpSRXUSDQQHDX
de porte en bois personnalisé (facultatif)
• La trousse comprend 4 joints, 2 longs et 2 courts.
&HVMRLQWVUHPSOLVVHQWOHVSDFHHQWUHOHSDQQHDXGH
porte en bois personnalisé et la vitre.
,QVWDOOH]GDERUGOHVGHX[MRLQWVORQJV/DLVVH]XQ
petit espace dans les coins pour les joints courts.
(Figure 1)
5HWLUH]ODEDQGHGHSDSLHUGHODGKpVLIHWMHWH]OD
• Installez le bord rigide du joint long à environ 1/16 po
(1 mm) du bord de la fenêtre orienté vers vous. (Fig.
2 et 2B)
• Le bord rigide du joint maintient le joint à plat contre
ODSRUWHDYHFGHODGKpVLI
/HERUGVRXSOHGXMRLQWIHUPHOHVSDFHHQWUHODSRUWH
et la vitre.
5. Installez les poignées selon les instructions relatives au
type de poignées et aux trousses mentionnés.
Bord rigide (avec
dos adhésif)
Figure 1
Bord souple
Figure 2
,QVWDOOH]GDERUG
deux joints longs.
Remarque :
Laissez un petit
espace dans les
coins pour les
joints courts.
Figure 2B
Installez deux
joints courts
pour terminer
ODVVHPEODJHGH
la trousse.
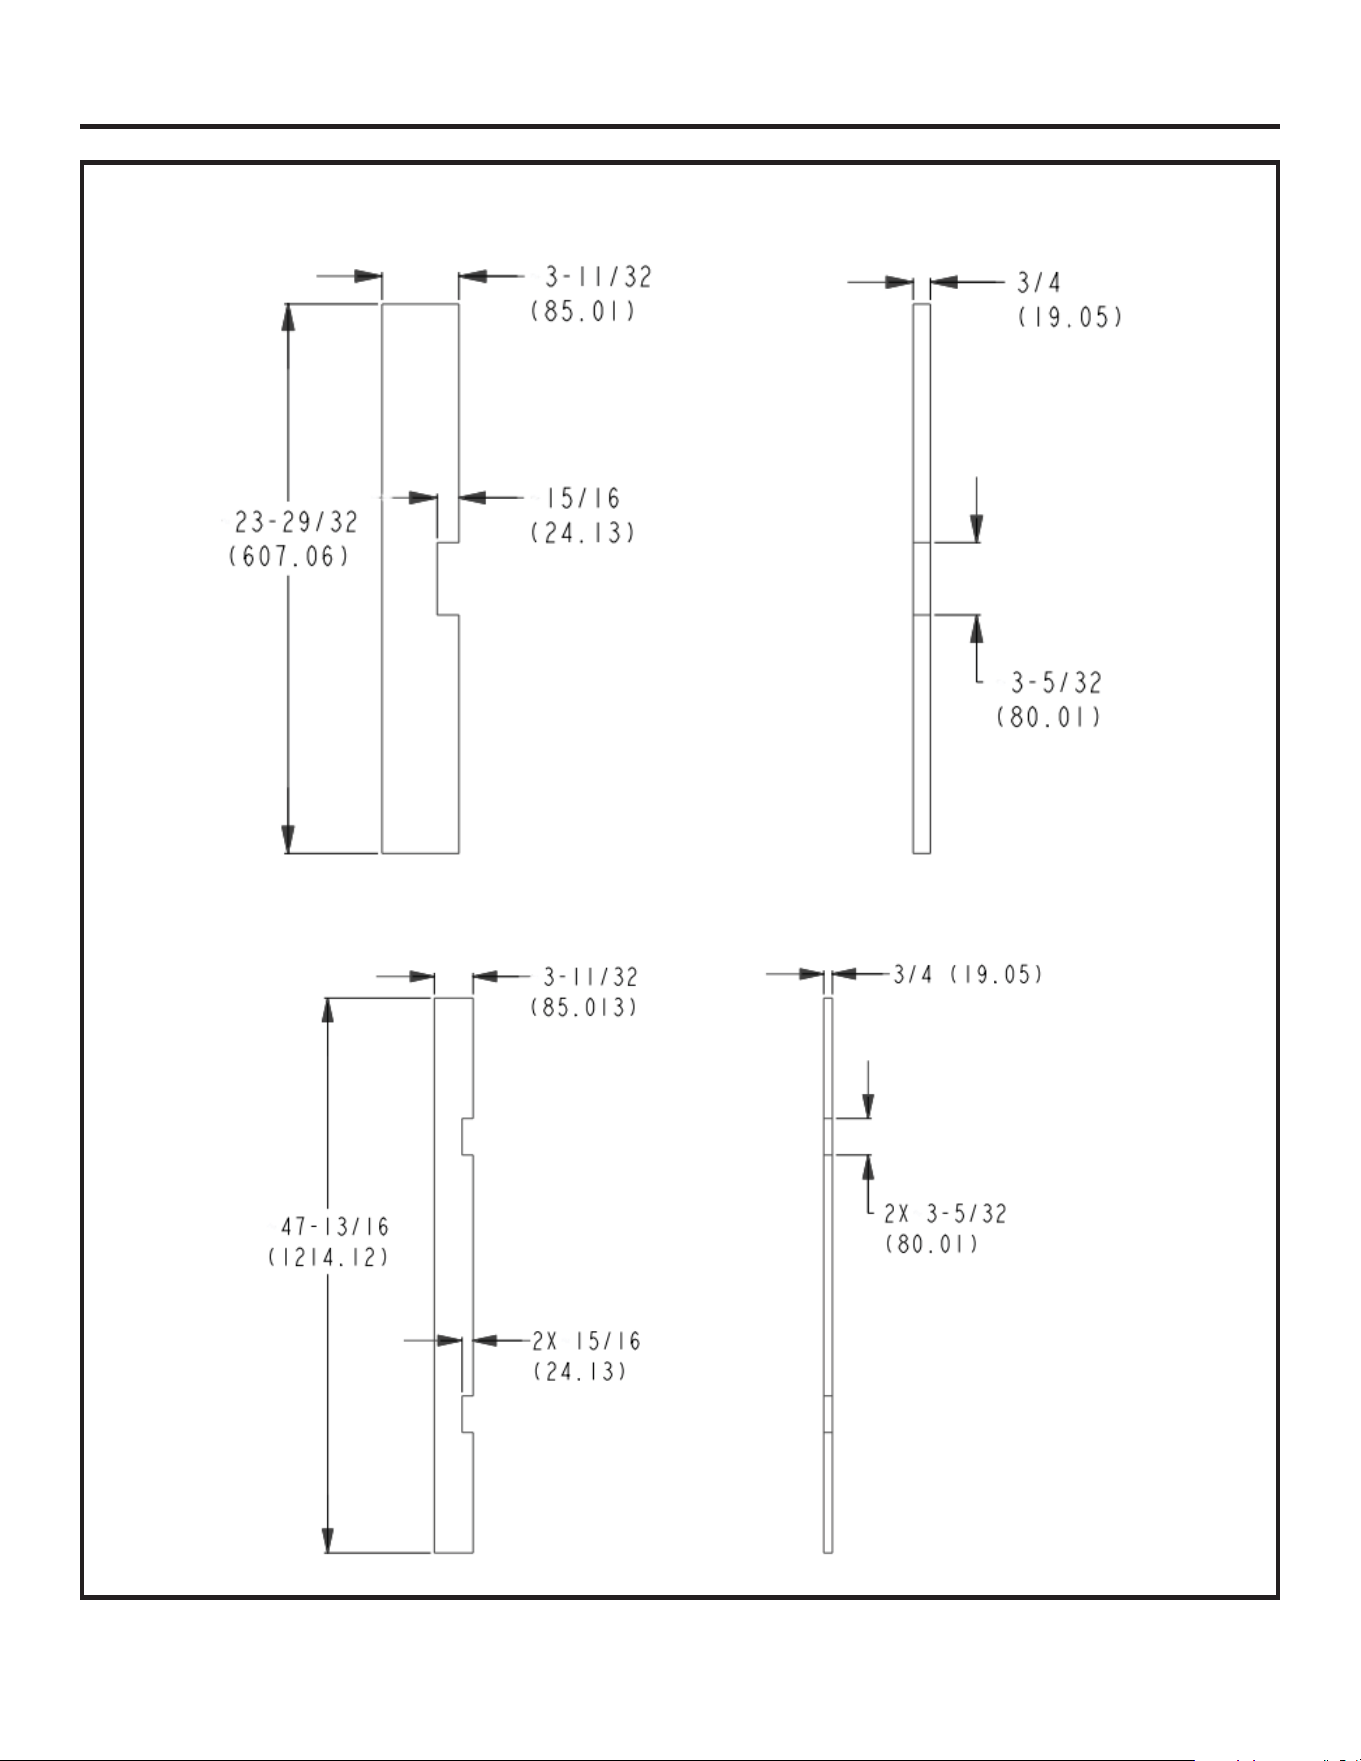
49-1000777 Rev. 2 19
Instructions d’installation
CONSTRUCTION D’UN COUP-DE-PIED PERSONNALISÉ
Coup-de-pied personnalisé de 24 po
Pour l'installation de deux refroidisseurs jumelés, suivez le dessin ci-dessous pour faire un
coup-de-pied de 48 po de largeur
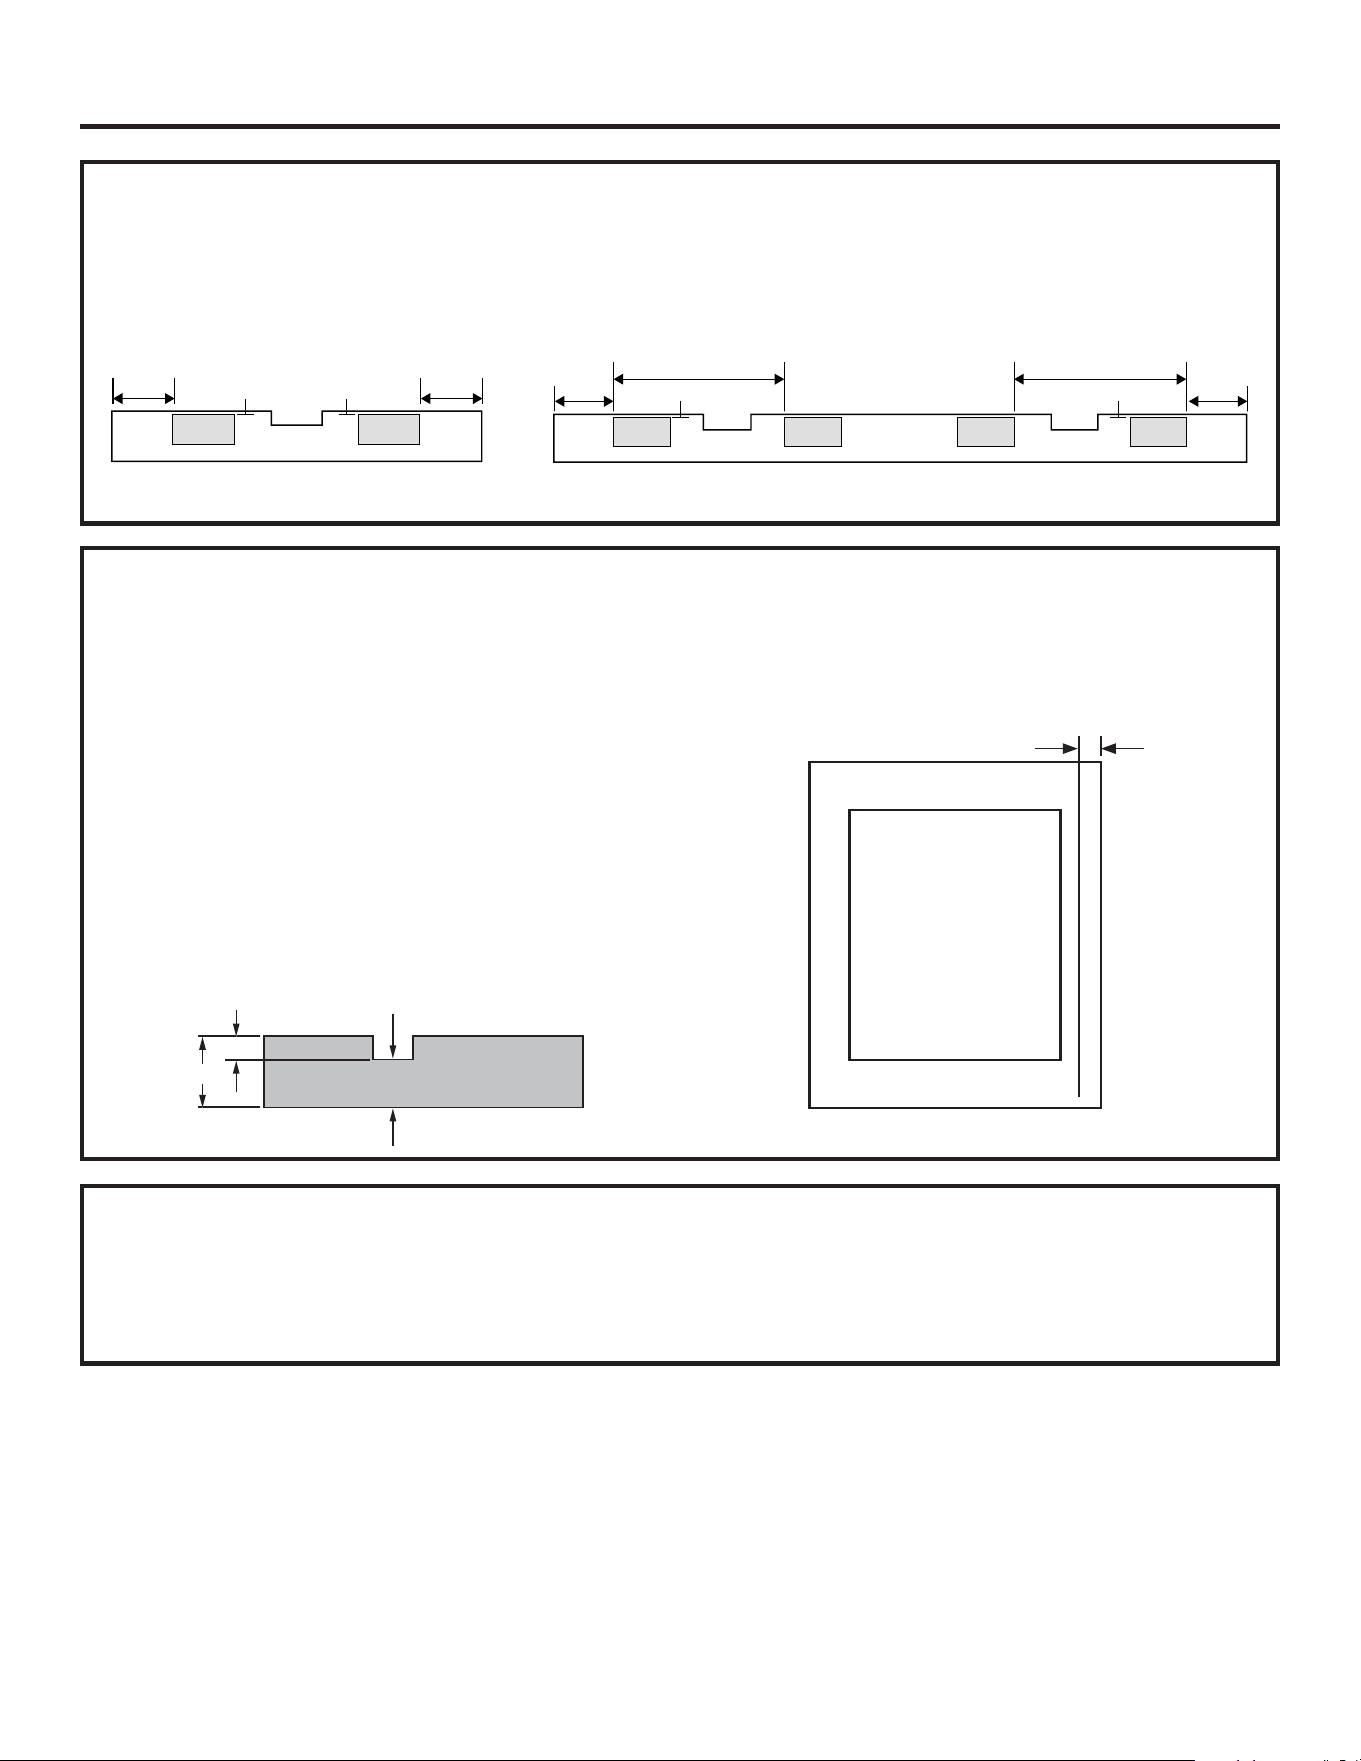
20 49-1000777 Rev. 2
Instructions d’installation
INSTALLATION DE LA POIGNÉE
Pour installer la poignée sur un panneau de porte en acier
inoxydable. Placez les extrémités de la poignée sur les
¿[DWLRQVGHPRQWDJHGHODSRLJQpHHWVHUUH]OHVYLVGH
UpJODJHjODLGHGHODFOp$OOHQIRXUQLH
Pour installer la poignée sur un panneau de porte
SHUVRQQDOLVpFRQVXOWH]OHVLQVWUXFWLRQVGDVVHPEODJH
de la poignée incluses dans la trousse de visserie de la
poignée ZKPN pour panneaux personnalisés.
CONSTRUCTION D’UN COUP-DE-PIED PERSONNALISÉ (SUITE)
Installation de l'aimant du coup-de-pied personnalisé
'pFROOH]OHGRVDGKpVLIGHVWDPSRQVPDJQpWLTXHVIRXUQLVDYHFOHVDFGDFFHVVRLUHVGXSURGXLW3ODFH]OHVWDPSRQV
VXUODUULqUHGHVFRXSVGHSLHGFRPPHLQGLTXpFLGHVVRXV
Illustration des coups-de-pied 24 po et 48 po.
3-15/16"
(100mm)
1/4"
(5mm)
1/4"
(5mm)
3-15/16"
(100mm)
3-15/16"
(104.1mm)
11-7/8" (301.6mm)
1/4" (5mm)
3-15/16"
(104.1mm)
11-7/8" (301.6mm)
1/4" (5mm)
GUIDE DE CONCEPTION DE LA POIGNÉE
(MODÈLES À PANNEAU PERSONNALISÉ SEULEMENT)
Les panneaux personnalisés nécessitent une poignée
SHUVRQQDOLVpHGXQIDEULFDQWGDUPRLUHVRXOXWLOLVDWLRQ
de la trousse de montage de poignée ZKPN (vendu
séparément) si vous utilisez les poignées Monogram,
Statement ou Minimalist (vendues séparément).
Pour l’installation d’une poignée personnalisée, pratiquez
GHVFRQWUHWURXVjODUULqUHGHVSDQQHDX[GpFRUDWLIV
$VVXUH]YRXVTXLOUHVWHXQHpSDLVVHXUGHPDWpULDXGH
1/2 po (12,7 mm) pour le support de la poignée.
REMARQUE : Le diamètre du contre-trou ne doit pas
dépasser 1 po (25,4 mm).
La distance minimale du bord latéral du panneau jusqu’au
centre de la poignée doit être de 1 1/4 po (31,8 mm)
comme illustré.
.
1/4"
(6.4mm)
1/2"
(12.7mm)
3/4"
(19.1mm)
Côté charnière Côté poignée
PP
Coup-de-pied 24 po Coup-de-pied 48 po
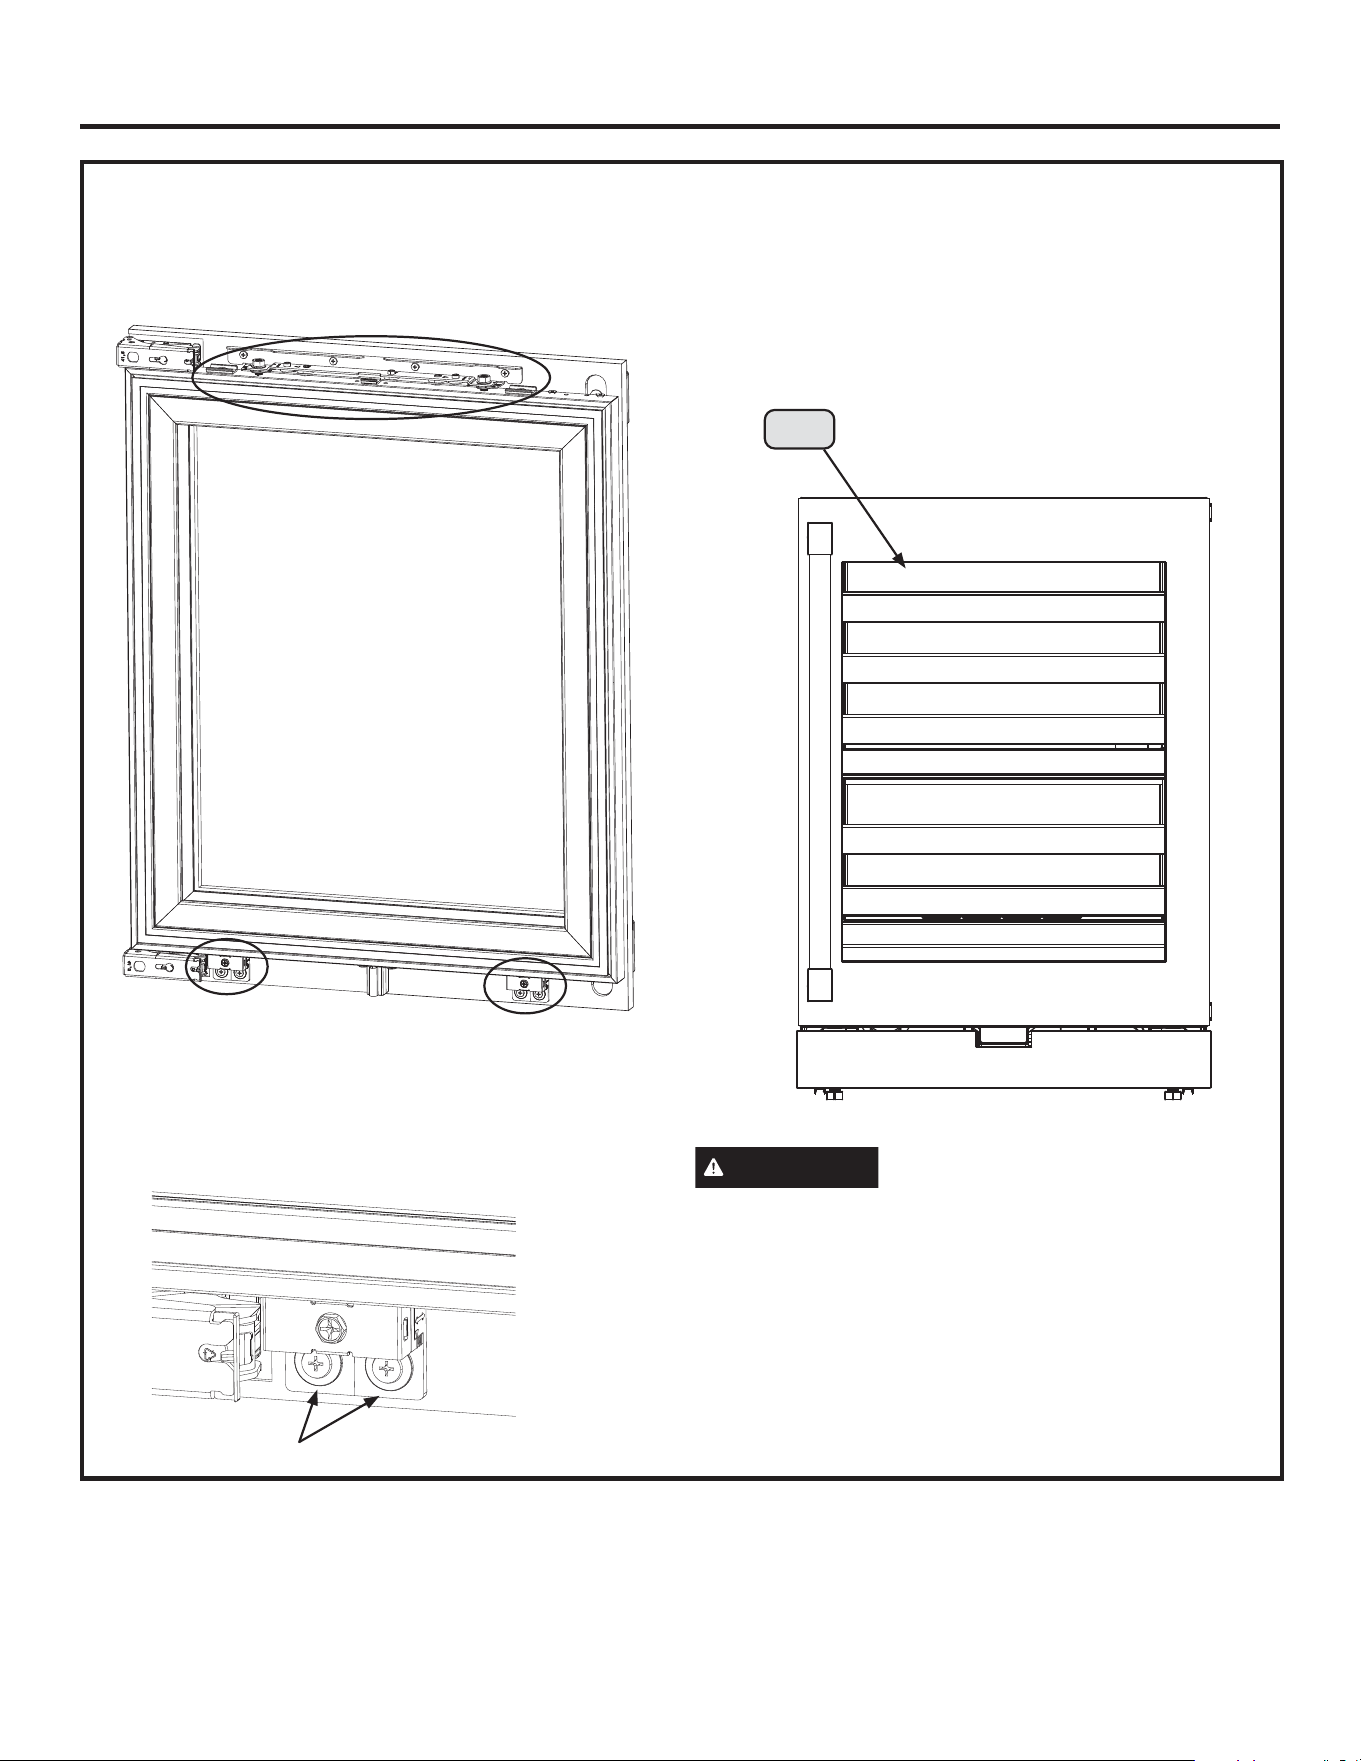
49-1000777 Rev. 2 21
Instructions d’installation
INSTALLATION DU PANNEAU DE PORTE EN BOIS PERSONNALISÉ OU EN
ACIER INOXYDABLE
1. Fixez le panneau de porte au support de réglage
VXSpULHXUjODLGHGHVYLV%RX&
)L[H]OHSDQQHDXGHSRUWHGDQVOHEDVjODLGHGHV
vis, B ou C et des rondelles D.
Remarque : Ne serrez pas les vis inférieures pour faciliter
le réglage du panneau plus tard.
3. Si le joint entre le panneau de porte et la vitre présente
des rides ou des plis, déplacez une mince carte en
plastique le long du bord entre le bord souple du joint
et la vitre pour lisser les rides et aligner le joint.
(Figure 3)
ATTENTION
Si vous devez intervertir les
panneaux de porte, dévissez toujours la vis inférieure
en premier, puis dévissez la vis supérieure pour
éviter de casser les supports de montage du panneau
de porte inférieur.
Figure 3
Avant de la porte
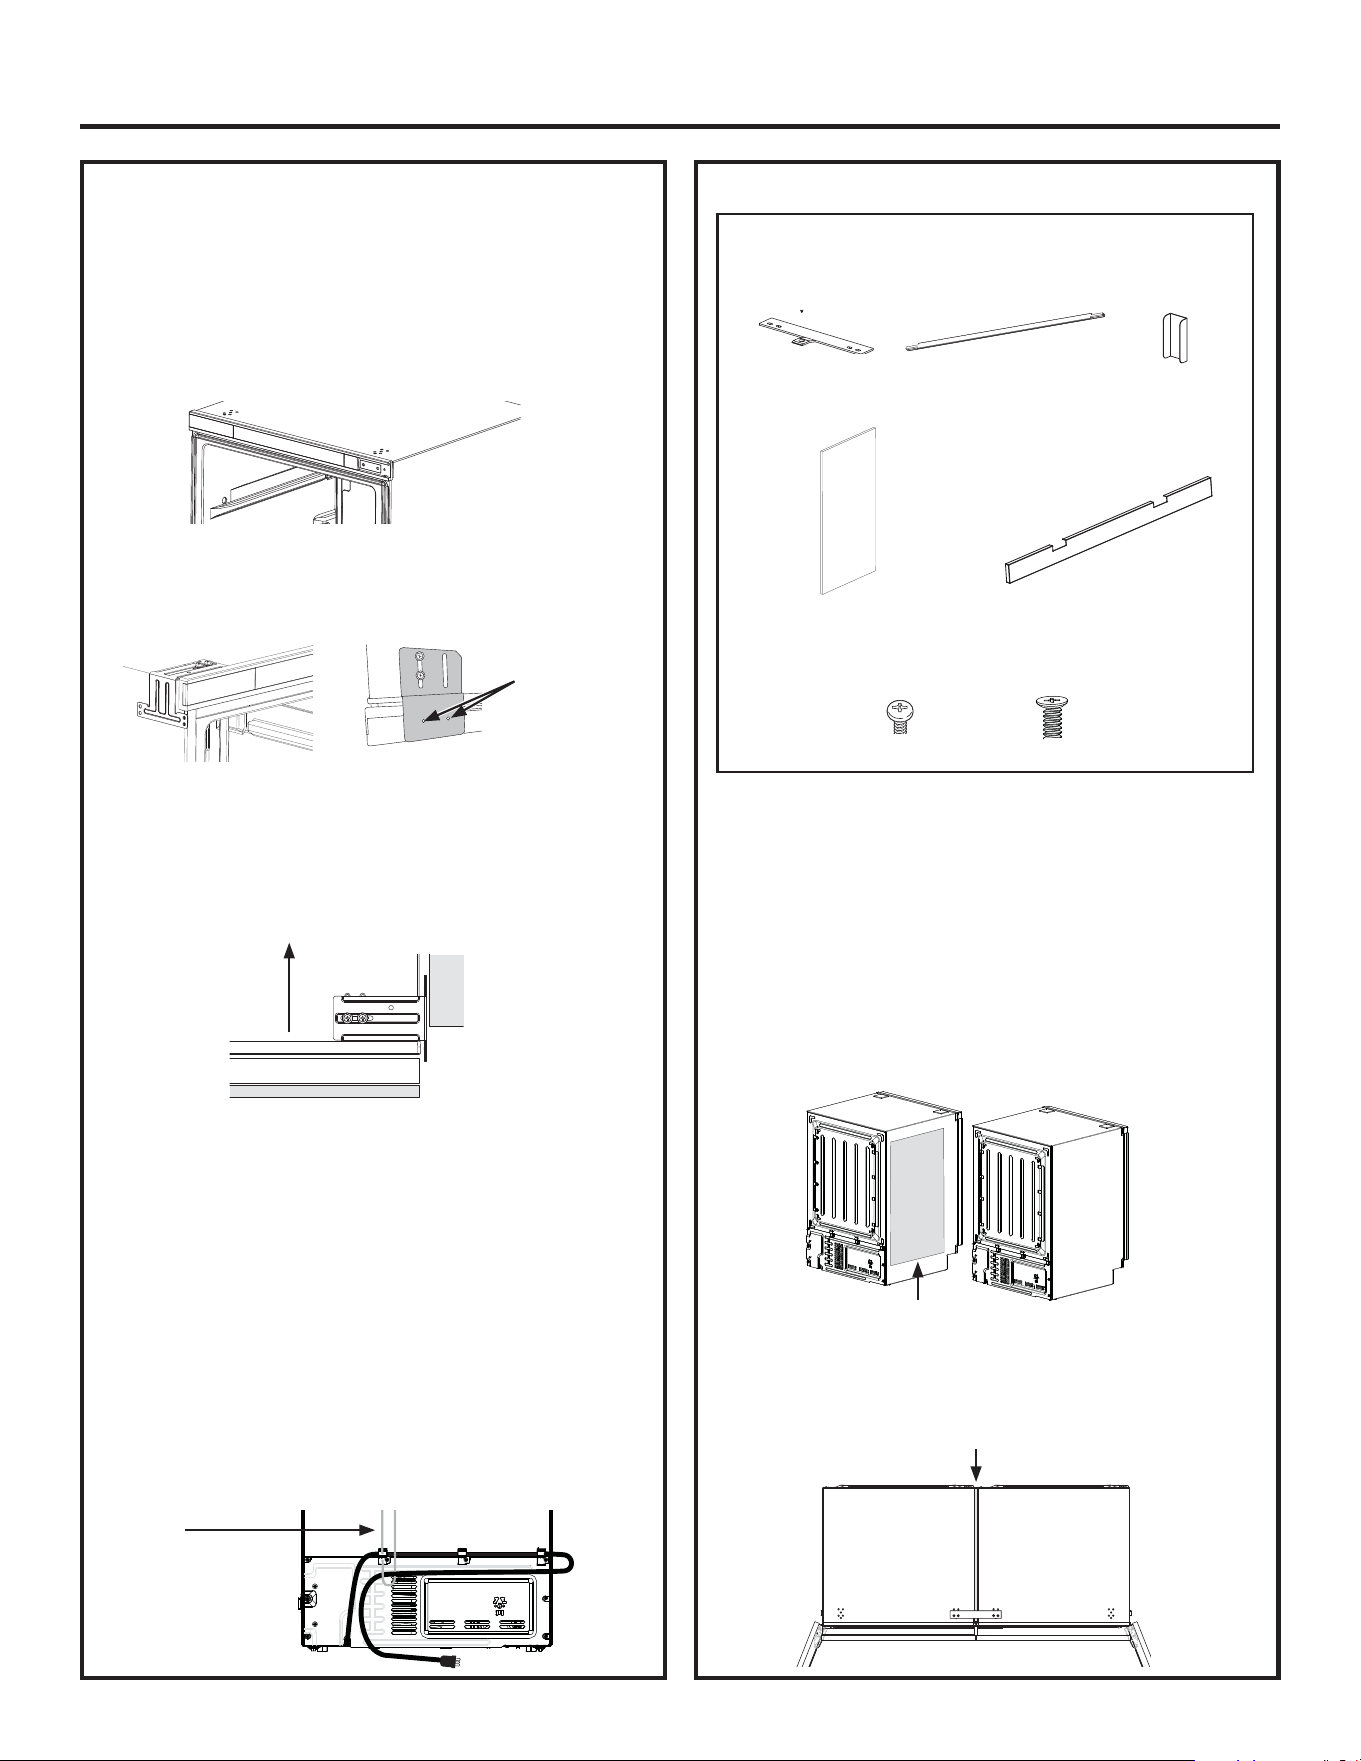
22 49-1000777 Rev. 2
Instructions d’installation
INSTALLATION SIMPLE :
INSTALLATION DES SUPPORTS
ANTIBASCULEMENT
Le support antibasculement peut stabiliser le
refroidisseur dans le fonctionnement quotidien.
1. Retirez les couvercles des trous du dessus du produit.
2. Installez les supports antibasculement sur le dessus
GXSURGXLWjODLGHGHVYLV(IRXUQLHVGDQVOHVDF
GDFFHVVRLUHV$VVXUH]YRXVTXHOHVVXSSRUWVVRQW
alignés.
3. $OLJQH]OHVVXSSRUWVDYHFODUPRLUHHWSRXVVH]
GRXFHPHQWOHSURGXLWGDQVORXYHUWXUHGHODUPRLUH
MXVTXjODSURIRQGHXUVRXKDLWpH
Remarque : Si vous avez du mal à pousser le produit au
IRQGGHODUPRLUHYRXVDYH]SHXWrWUHHPPrOpOHFRUGRQ
GDOLPHQWDWLRQjODUULqUH3RXUpYLWHUFHODUHWLUH]DWWDFKHV
HQSODVWLTXHGXVDFGDFFHVVRLUHVHWLQVWDOOH]OHVVXUOHVYLV
VXSpULHXUHVGXFRXYHUFOHGDFFqVjODLGHGHODYLVGRULJLQH
GXFRXYHUFOHGDFFqV3ODFH]OHFRUGRQGDQVOHVDWWDFKHV
%UDQFKH]OHFRUGRQGDQVODSULVHHWDWWDFKH]XQH¿FHOOHRX
XQ¿ODXPLOLHXGXFRUGRQHQWUHOD¿FKHHWODGHUQLqUHDWWDFKH
jOHQGURLWRVHWURXYHXQHPDUTXHEODQFKH9RXVSRXYH]
XWLOLVHUOH¿OGXVDFG¶DFFHVVRLUHVRXQLPSRUWHTXHOOH¿FHOOH
TXHYRXVDYH](Q¿OH]OD¿FHOOHRXOH¿OjWUDYHUVODUH
DWWDFKHSXLVWLUH]OD¿FHOOHRXOH¿ODXGHVVXVGHO¶DSSDUHLO
SHQGDQWTXHYRXVSRXVVH]ODSSDUHLOGDQVOHWURXGHODUPRLUH
$MXVWH]ODSRVLWLRQGHOLEpUDWLRQGHOD¿FHOOHHWDVVXUH]YRXV
TXHODSSDUHLOVHUDFRPSOqWHPHQWHPERvWpGDQVOHWURXGH
ODUPRLUH5HOkFKH]HQVXLWHOD¿FHOOH
UNION DE L’INSTALLATION DOUBLE
1. Assurez-vous que les ouvertures de porte des deux
produits à unir sont réglées de manière que les deux
SRLJQpHVVRLHQWDXPLOLHXHWTXHOHVSRUWHVVRXYUHQW
YHUVOH[WpULHXUjOpFDUWOXQHGHODXWUH
2. Retirez le papier de la bande adhésive sur la mousse
anticondensation et installez la mousse sur le côté
GHODFDUURVVHULHGHOXQGHVSURGXLWVXQL¿pV/XQRX
ODXWUHGHVSURGXLWVHVWDFFHSWDEOH9HLOOH]jSODFHUOD
PRXVVHjDXPRLQVPPGHODYDQWGHODUPRLUHGH
ODSSDUHLO
3. $OLJQH]OHVGHX[FDUURVVHULHVDYHFXQHVSDFHGHQYLURQ
SRPP&HODODLVVHUDXQHVSDFHGHQYLURQ
po (3,75 mm) entre les panneaux de porte.
Les matériaux d'installation et les pièces sont
inclus dans les trousses d’union ZKAW et
ZKN48W. Les trousses sont vendues séparément.
Connecteurs
supérieur/inférieur ×2
Connecteur
arrière ×3
Pièce de garniture
avant (connecteur
avant) x 1
Mousse anticondensation ×1
Dimensions : 18 1/8 po x 1
5/16 po x 9/16 po
(460 mm x 846 mm x 15 mm)
Coup-de-pied x 1
Vis C Vis E
Mousse anticondensation
Ficelleg
Mousse anticondensation
6LYRXV¿[H]OHVXSSRUW
antibasculement à
ODUPRLUHDGMDFHQWHVXLYH]
OLOOXVWUDWLRQFLGHVVXV
6LYRXV¿[H]OHVXSSRUW
antibasculement
au comptoir, suivez
OLOOXVWUDWLRQFLGHVVXV
Trous de
vis pour
fixation sur
comptoir
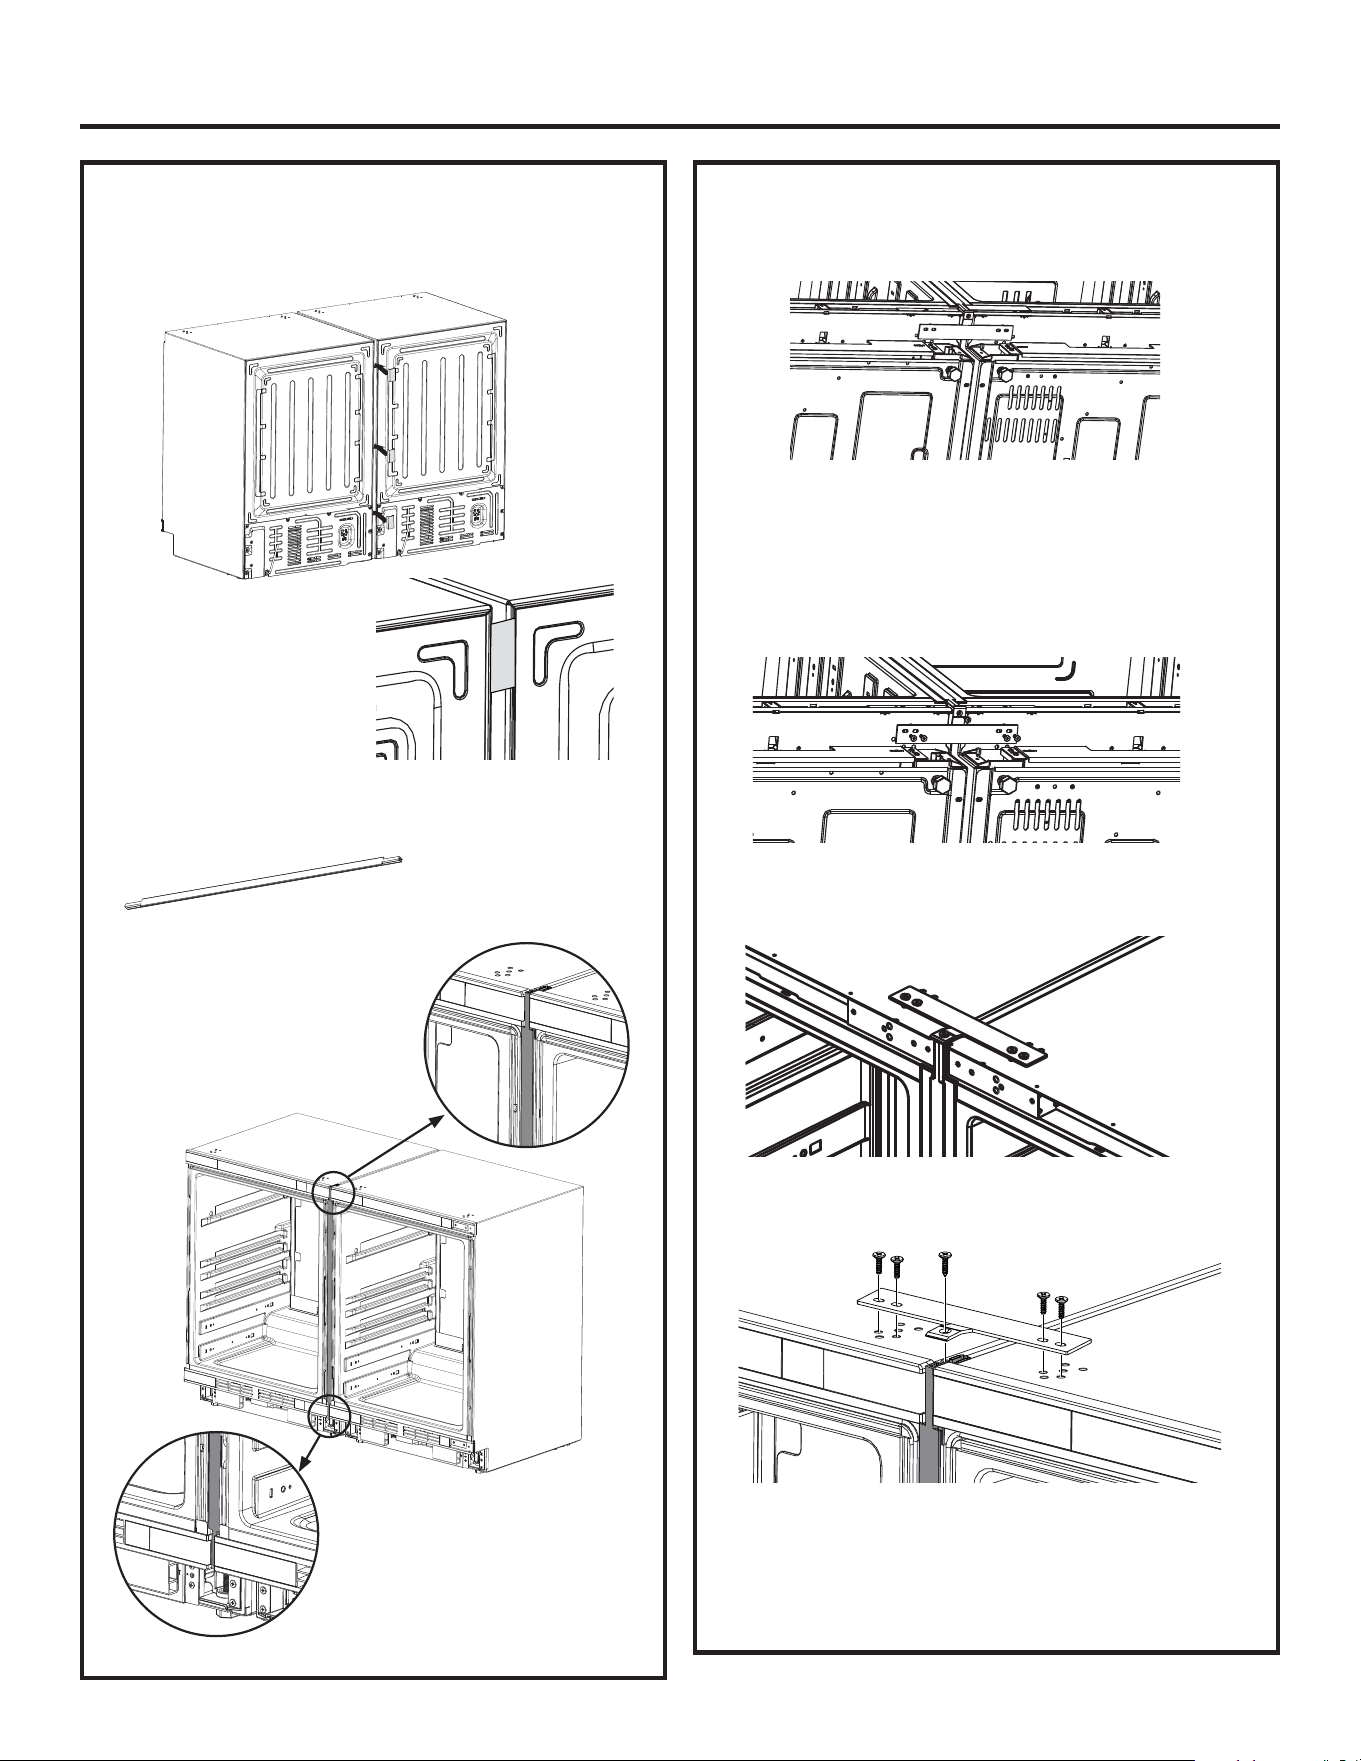
49-1000777 Rev. 2 23
Instructions d’installation
UNION DE L’INSTALLATION DOUBLE
(suite)
4. Installez les 3 connecteurs arrière.
5. Installez la garniture avant (connecteur avant).
Pièce de garniture avant
(connecteur avant)
UNION DE L’INSTALLATION DOUBLE
(suite)
6. Installez le connecteur inférieur.
A. Placez le connecteur inférieur comme illustré.
B. Installez une vis C et quatre vis E.
Remarque : La vis C fixe le connecteur inférieur à
la pièce de garniture avant (connecteur avant). Les
vis E fixent le connecteur inférieur au bas des deux
carrosseries.
7. Installez le connecteur supérieur.
A. Place the top connector as shown.
B. Install one Fastener C screw and four Fastener E
screws.
Remarque :/DYLV&¿[HOHFRQQHFWHXUVXSpULHXUj
la pièce de garniture avant (connecteur avant). Les
YLV(¿[HQWOHFRQQHFWHXUVXSpULHXUDXKDXWGHVGHX[
carrosseries.

24 49-1000777 Rev. 2
Instructions d’installation
INSTALLATION DU COUP-DE-PIED
ET DE SA PLAQUE DE SUPPORT
1. Installez la plaque de support du coup-de-pied.
1D'pYLVVH]OHVYLVVLWXpHVDXEDVDYDQWGHODSSDUHLO.
1b. ,QVWDOOH]ODSODTXHGHVXSSRUWIRXUQLHDYHFODSSDUHLO
avec les mêmes vis.
2. Installez le coup-de-pied.
2a. Si vous utilisez un coup-de-pied en acier inoxy-
dable, fixez-le à la plaque de support en utilisant
un support magnétique au dos du coup-de-pied.
2b. Si vous utilisez un coup-de-pied personnalisé,
DVVXUH]YRXVGDYRLUVXLYLOpWDSH©,QVWDOODWLRQGH
ODLPDQWªGHODSDJH)L[H]OHjODSODTXHGH
VXSSRUWjODLGHGXVXSSRUWPDJQpWLTXH
5pJOH]OHFRXSGHSLHG¬ODLGHGHVYLVGHUpJODJH
situées ci-dessous, réglez la plaque de support
GXFRXSGHSLHGYHUVODYDQWRXODUULqUHSRXUXQ
DOLJQHPHQWFRUUHFWDYHFODUPRLUH
Vis de
réglage
RÉGLAGE DES PIEDS DE
NIVELLEMENT
(POUR S’AJUSTER À LA
DÉCOUPE)
Réglage des pieds de nivellement avant
1. Réglez la hauteur des deux pieds de nivellement
avant. Utilisez un entraînement à angle droit en haut
de chaque pied ou une clé de 1 po (2,54 mm) en bas
de chaque pied.
2. Réglez les rouleaux de nivellement arrière. Utilisez
le tournevis à douille hexagonale de 1/4" (6 mm).
Tournez la vis gauche dans le sens des aiguilles
GXQHPRQWUHSRXUVRXOHYHUODUULqUHJDXFKHGH
ODSSDUHLO7RXUQH]ODYLVGURLWHGDQVOHVHQVFRQWUDLUH
GHVDLJXLOOHVGXQHPRQWUHSRXUVRXOHYHUODUULqUHGURLW
GHODSSDUHLO
Pieds de nivellement avant
Rouleaux de nivellement arrière
Dévisser 4 vis
Vis de réglage du rouleau
de nivellement arrière
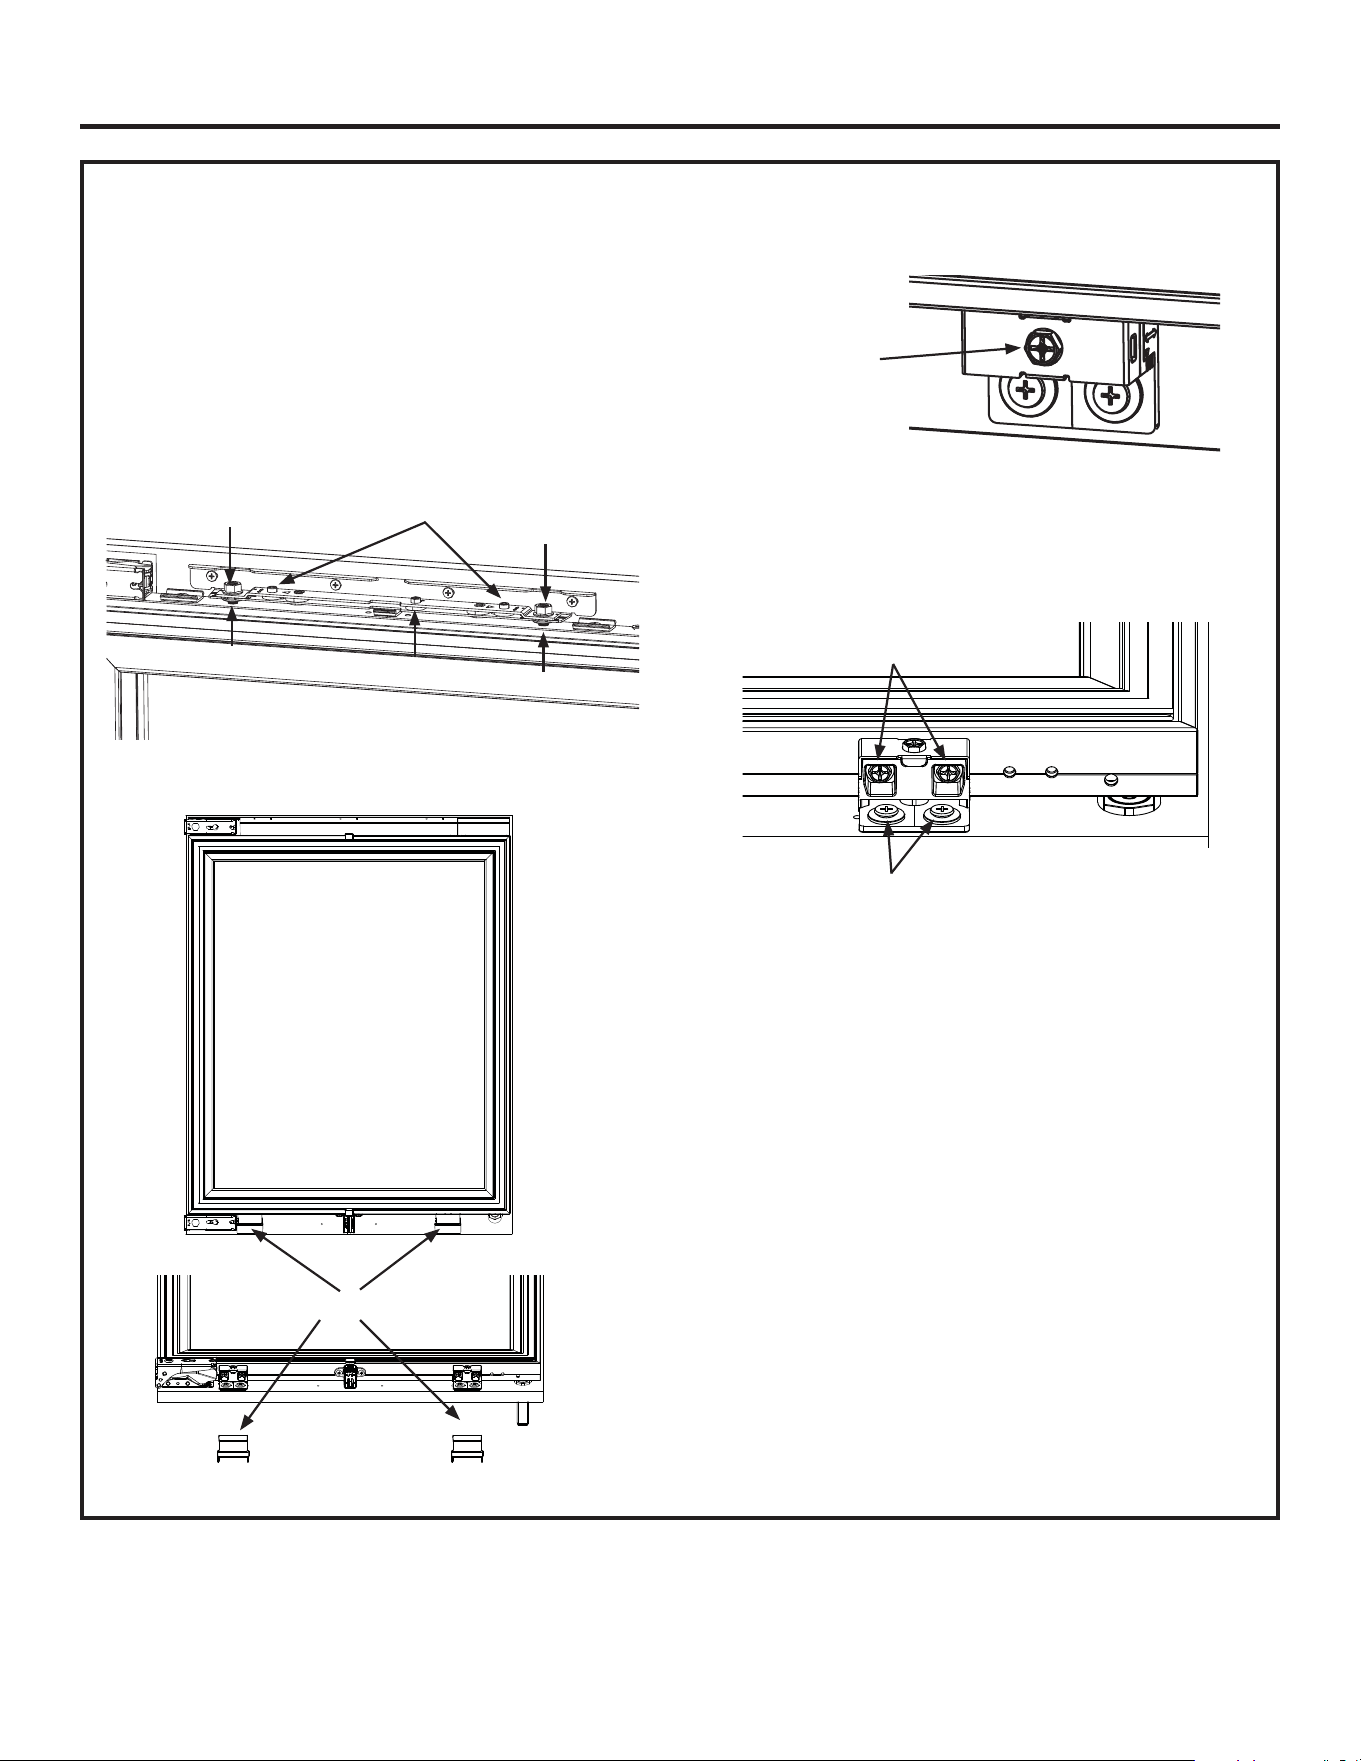
49-1000777 Rev. 2 25
Instructions d’installation
RÉGLAGES ET ALIGNEMENT DU PANNEAU DE PORTE
Outils requis
Clé Allen, clé réglable, tournevis à pointe cruciforme,
tournevis à tête hexagonale.
1. Mécanisme réglable supérieur : Alignement vertical,
horizontal et en profondeur.
1.1 Réglage vertical (haut/bas) (came J, écrou K).
1.2 Réglage de la profondeur (avant/arrière) (came L).
1.3 Réglage horizontal (gauche/droit) (came M).
2. Supports de réglage inférieurs : Alignement en
profondeur.
2.1 Retirez le couvercle du support.
2.2 Réglage de la profondeur (intérieur/extérieur) (vis
de réglage N)
3. Méglages du panneau de porte
3.1 Préparation des réglages du panneau de porte
: Desserrez les 8 vis au bas de la porte à 2
endroits.
N
Réglage de la
profondeur (avant/
arrière) (vis de réglage
N - 2 endroits).
1.1 J
Écrou K, came J
1.3 M
1.1 J
1.2 L
Écrou K, came J
couvercle du support
Desserrer les vis
Desserrer les vis
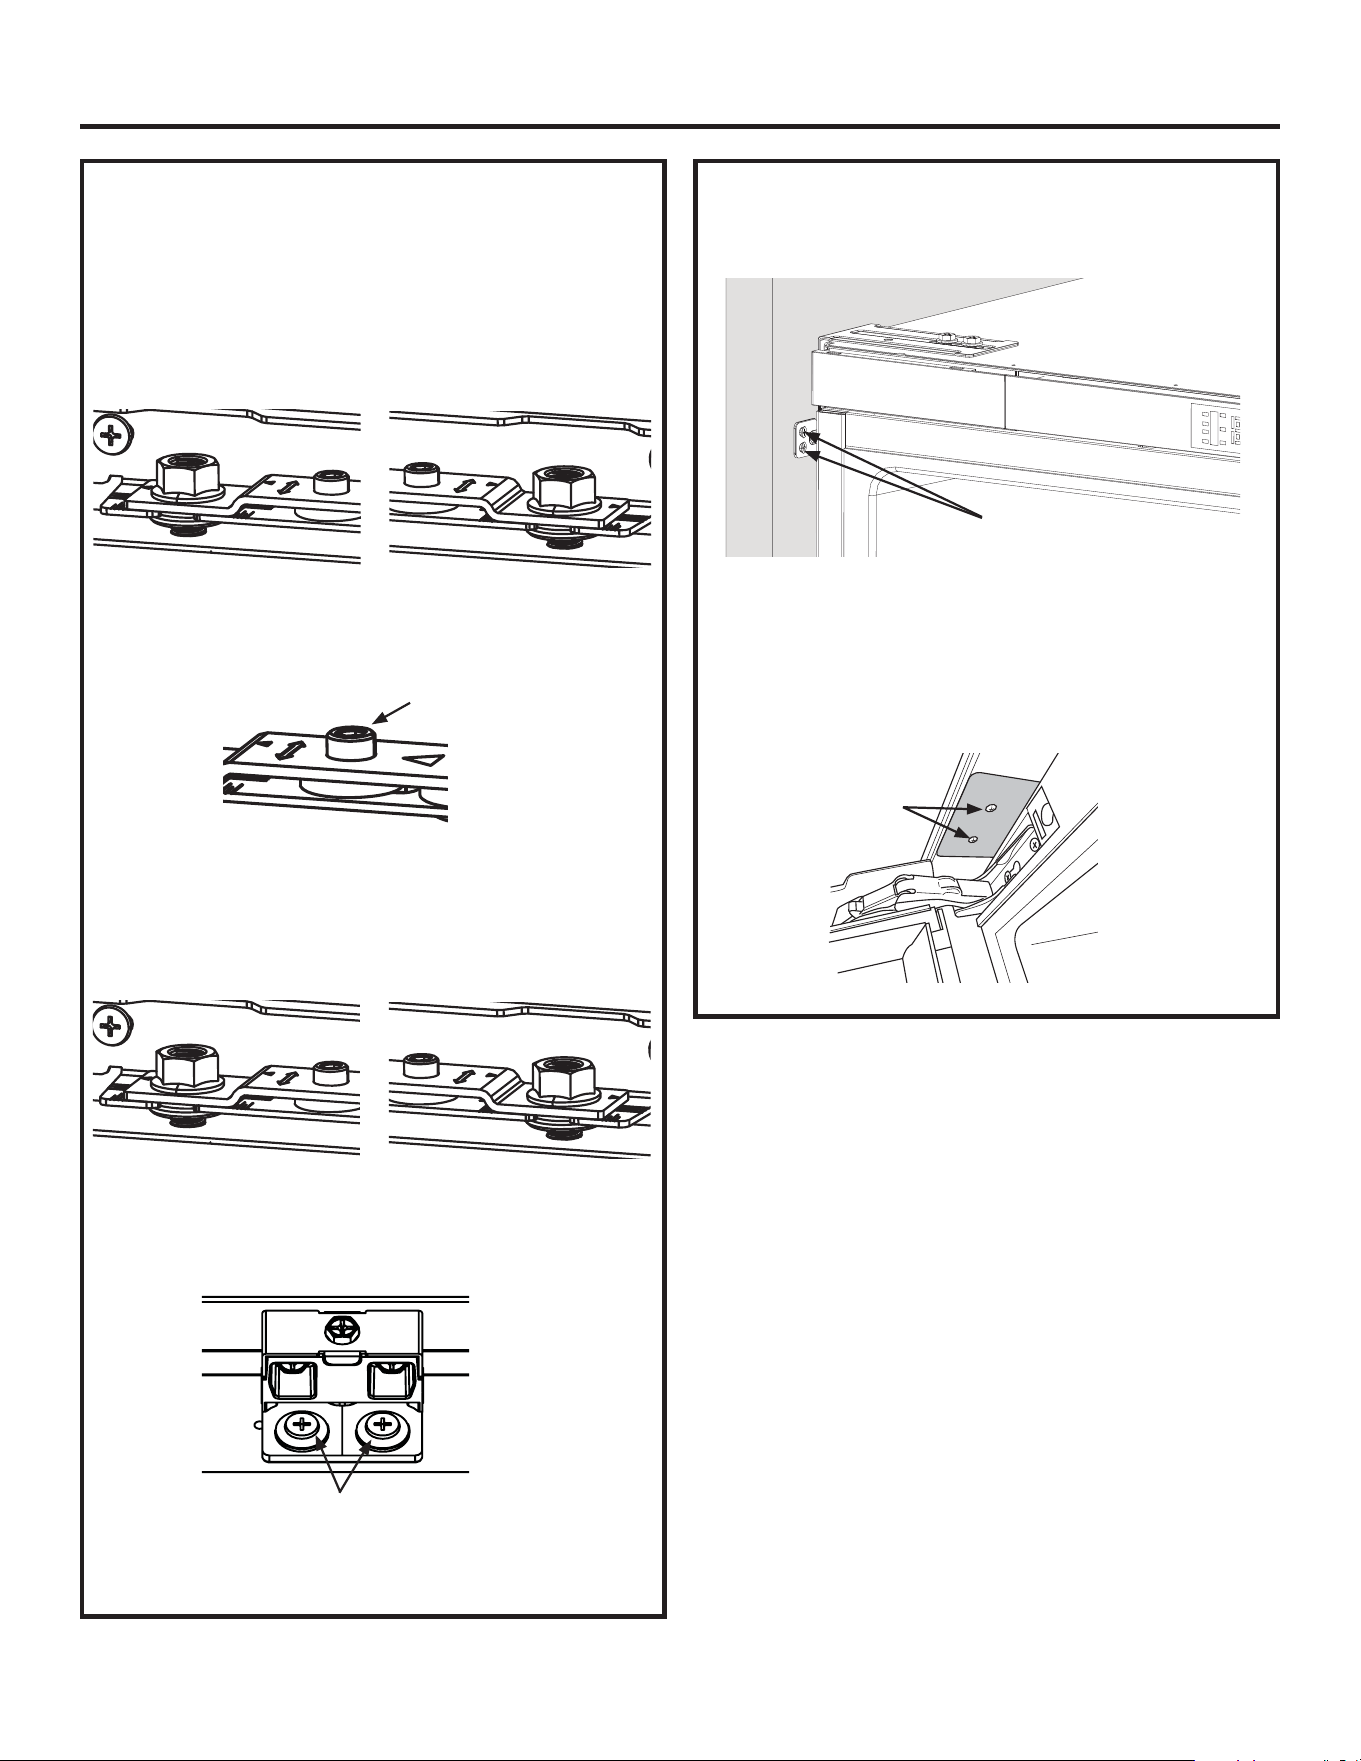
26 49-1000777 Rev. 2
Instructions d’installation
RÉGLAGES ET ALIGNEMENT DU
PANNEAU DE PORTE (suite)
3.2 Réglage vertical
Dans le haut du panneau de porte, desserrez les 2
écrous K avec une clé de 13 mm. Tournez la came J
(deux endroits) pour régler la porte vers le haut et vers
OHEDVjODLGHGXQHFOp$OOHQGHPP
3.3. Réglage horizontal
Haut du panneau : Utilisez une clé Allen pour tourner la
came M afin de régler le panneau vers la gauche ou la
droite. Un seul endroit
3.4 Réglage de la profondeur
Pour régler la partie supérieure de la porte : Utilisez
une clé Allen pour tourner la came L à deux endroits
DILQGHGpSODFHUOHSDQQHDXGHSRUWHYHUVOLQWpULHXURX
OH[WpULHXU
Pour régler la partie inférieure de la porte, serrez les
4 vis du panneau de porte à 2 endroits, réglez les vis
GHUpJODJH1jODLGHGXQWRXUQHYLVFUXFLIRUPHSRXU
GpSODFHUOHSDQQHDXGHSRUWHYHUVOLQWpULHXUOH[WpULHXU
Serrez toutes les vis et tous les écrous en bas et en
haut de la porte.
ACHÈVEMENT DE L’INSTALLATION
1. )L[H]OHVVXSSRUWVDX[DUPRLUHVDGMDFHQWHVjODLGH
de la visserie fournie, vis F du tableau de la visserie.
2XIL[H]OHVXSSRUWDXFRPSWRLUjODLGHGHODYLVVHULH
fournie, vis F du tableau de la visserie.
2. 7HUPLQH]OLQVWDOODWLRQGHODJDUQLWXUHGHSRUWH
supérieure. Voyez les détails dans la section «
Inversion du sens d’ouverture de porte », étape 10.
M
came L
came L
Écrou K, came J
Écrou K, came J
Fixez les supports gauche et
droit aux armoires adjacentes.
Serrer les vis
N
Vis

49-1000777 Rev. 2 27
Conseils de dépannage...Avant de faire un appel d’assistance
Gagnez du temps et économisez de l’argent! Lisez les tableaux des pages suivantes, vous pourriez éviter
un appel d’assistance.
Problème Causes possibles Correctifs Correctifs
Le refroidisseur de bois-
sons ne fonctionne pas.
Le refroidisseur de boissons est
débranché.
Branchez le cordon dans une prise électrique.
Le disjoncteur est déclenché ou un
fusible est grillé.
Réenclenchez le disjoncteur ou remplacez le fusible.
Le compresseur du
refroidisseur fonctionne
fréquemment ou durant
longtemps.
Normal lorsque l’appareil est branché
la première fois.
Allouez 24 heures pour le refroidissement complet du
refroidisseur de boissons.
Des bouteilles chaudes ou
nombreuses ont été ajoutées.
Cela est normal.
La porte a été laissée ouverte. $VVXUH]YRXVTXHODSRUWHQHVWSDVPDLQWHQXHRXYHUWH
par un élémen
Temps chaud ou fréquentes ouver-
tures de porte.
Ceci est normal pour maintenir une température con-
stante pendant les jours chauds et humides.
Le joint d’étanchéité n’est pas
étanche.
Nettoyez le joint d’étanchéité.
Une odeur émane du refroi-
disseur de boissons.
/LQWpULHXUGRLWrWUHQHWWR\p Nettoyez l’intérieur. Voyez la section « Nettoyage ».
La lampe ne s’allume pas. Le refroidisseur de boissons est
débranché.
Branchez l’appareil dans une prise électrique.
La lampe DEL est grillée. &RQWDFWHUXQWHFKQLFLHQTXDOL¿pSRXUUHPSODFHUOD
lampe grillée.
Vibrations ou cliquetis Le refroidisseur de vin ne repose pas
solidement sur le plancher.
Voyez la section « Mise à niveau ».
Sons normaux Un son d’eau qui s’écoule provient du
refroidisseur de boissons.
Le réfrigérant qui circule dans la tubulure émet ce son
lorsque le compresseur démarre ou s’arrête.
Sons de vrombissement ou de
bourdonnement.
Le compresseur et les ventilateurs émettent ce son.
Si le refroidisseur n’est pas de niveau, le son sera
plus fort.
Sons de craquement ou de
claquement.
Les pièces internes émettent ce son lorsqu’elles se
contractent ou se dilatent à la suite de changements de
température.
TEMPÉRATURE ET HUMIDITÉ
Le refroidisseur de bois-
sons est trop chaud.
Le réglage de température n’est pas
VXႈVDPPHQWEDV
Réglez la température à un réglage plus froid ;
DWWHQGH]KHXUHVSRXUTXHODWHPSpUDWXUHVDMXVWH
Porte ouverte fréquemment ou laissée
ouverte.
*DUGH]ODSRUWHIHUPpHYpUL¿H]TX¶DXFXQREMHW
n’empêche la porte de fermer.
Des bouteilles chaudes ont été
ajoutées récemment.
Laissez du temps pour refroidir l’appareil et le vin.
Le joint d’étanchéité n’est pas
étanche.
Nettoyez le joint d’étanchéité.
Le refroidisseur de bois-
sons est trop froid.
Le réglage de température est trop
bas.
Réglez la température dans le compartiment à la
température plus chaude suivante; attendez 24 heures
avant de régler à nouveau.
Humidité sur l’extérieur ou
l’intérieur du refroidisseur
de boissons.
Humidité élevée. Ce phénomène est normal. Séchez la surface et réglez
la température à un degré légèrement plus froid.
Porte ouverte fréquemment ou laissée
ouverte.
*DUGH]ODSRUWHIHUPpH9pUL¿H]TX¶DXFXQREMHW
n’empêche la porte de fermer.
Le joint d’étanchéité n’est pas
étanche.
Nettoyez le joint d’étanchéité.
28 49-1000777 Rev. 2
GARANTIE LIMITÉE DE MONOGRAM
Ŷ/HVGpSODFHPHQWVjYRWUHGRPLFLOHSRXUYRXVH[SOLTXHU
l’utilisation de ce produit
Ŷ/HUHPSODFHPHQWGHVIXVLEOHVRXOHUpHQFOHQFKHPHQWGX
disjoncteur du domicile.
Ŷ7RXWGRPPDJHFDXVpSDUDFFLGHQWLQFHQGLHLQRQGDWLRQRX
catastrophe naturelle.
Ŷ8QHSDQQHGXSURGXLWV¶LODpWpXWLOLVpGDQVXQEXWDXWUH
que celui pour lequel il a été fabriqué ou s’il a été utilisé
commercialement.
Ŷ/HVGRPPDJHVFDXVpVDSUqVODOLYUDLVRQ
Ŷ8QHLQVWDOODWLRQOLYUDLVRQRXPDLQWHQDQFHGpIHFWXHXVH
En cas de problème d’installation, contactez votre revendeur
ou votre installateur. Vous êtes responsable de la provision
d’un système électrique, d’une plomberie et d’autres
connexions appropriés.
Ŷ/HUHPSODFHPHQWGHVDPSRXOHVRXODFDUWRXFKHGXILOWUH
à eau, si inclus, et dans des conditions autres que celles
susmentionnées.
Ŷ/HUHPSODFHPHQWGHODFDUWRXFKHGXILOWUHjHDXVL
inclus, à cause d’une pression d’eau en dehors de la
gamme de fonctionnement recommandée ou à cause
d’une concentration excessive de sédiment dans l’eau
d’alimentation.
Ŷ'pWpULRUDWLRQGHVDOLPHQWV
Ŷ7RXWGRPPDJHIRUWXLWRXLQGLUHFWFDXVpSDUGHVGpIDXWV
éventuels de cet appareil.
Ŷ/HVHUYLFHV¶LOHVWLPSRVVLEOHG¶DYRLUDFFqVDXSURGXLW
Ŷ/HVGRPPDJHVjODILQLWLRQWHOVTXHURXLOOHGHVXUIDFH
ternissement ou petites taches, non signalés dans un délai
de 48 heures suivant la livraison.
Monogram.ca
Tous les services au titre de la garantie sont fournis par nos centres de service ou par un technicien agréé Custom CareMD. Demandez un
rendez-vous en ligne pour votre réparation ou rendez-vous sur monogram.com/contact.
Au Canada, visitez le site monogram.ca.
EXCLUSION DES GARANTIES TACITES
Votre recours exclusif est l’échange du produit suivant les modalités de la Garantie Limitée. Toutes garanties tacites, y
compris les garanties de valeurs marchandes ou d’adéquation à des fins particulières, sont limitées à une durée d’un an ou à
la durée la plus courte autorisée par la loi.
Cette garantie limitée est étendue à l’acheteur d’origine et aux propriétaires suivants pour tout produit acheté pour une utilisation
GRPHVWLTXHDX[eWDWV8QLV6LOHSURGXLWHVWLQVWDOOpGDQVXQHUpJLRQRQHVHWURXYHDXFXQUpSDUDWHXUDXWRULVp0RQRJUDPYRXV
devrez peut-être assumer les frais de transport ou apporter l’appareil à un centre de service autorisé Monogram. En Alaska, cette
garantie limitée exclut le coût d’expédition ou de dépannage à votre domicile.
Certaines provinces n’acceptent pas d’exclusion ou de limites aux dommages indirects ou accessoires, cette exclusion ou
restriction pourrait ne pas s’appliquer à vous. Certains droits particuliers vous sont dévolus en vertu de la présente garantie et
peuvent s’accompagner d’autres droits qui varient selon votre lieu de résidence. Pour connaître vos droits juridiques, veuillez
consulter le bureau local ou d’état des affaires aux consommateurs ou le Procureur Général de votre état.
Garant: GE Appliances, a Haier company, Louisville KY,40225
Au Canada,Garant: MC Commercial, Burlington, ON, L7R 5B6
Pour la période de Monogram Appliances remplacera
Garantie limitee de
deux ans
Pendant deux ans à compter de la date d’achat initial, nous fournirons, gratuitement, les pièces et la
main d’œuvre à domicile pour remplacer ou réparer toute pièce du réfrigérateur ou du congélateur qui se
révèle défectueuse en raison d’un vice de fabrication.
Garantie limitee de cinq
ans
Pendant cinq ans à compter de la date d’achat initial, nous fournirons, gratuitement, les pièces et
la main d’œuvre à domicile pour remplacer ou réparer toute pièce provenant du circuit fermé de
réfrigération (compresseur, condenseur, évaporateur et tout autre tuyau de branchement) qui se révèle
défectueuse en raison d’un vice de fabrication.
Garantie limitée
supplémentaire de six
à douze ans pour le
circuit fermé
De la sixième à la douzième année à compter de la date d’achat initial, nous fournirons, gratuitement,
les pièces pour remplacer ou réparer toute pièce provenant du circuit fermé de réfrigération
(compresseur, condenseur, évaporateur et tout autre tuyau de branchement) qui se révèle défectueuse
en raison d’un vice de fabrication. Les déplacements à votre domicile pour le dépannage ainsi que la
main d’œuvre à domicile restent à votre charge.
Garantie limitée de
trente jours pour la
cartouche du filtre à eau
(Filtre à eau, si inclus)
A compter de la date d’achat initial, nous fournirons, gratuitement, les pièces pour remplacer toute pièce
de la cartouche du filtre à eau qui se révèle défectueuse en raison d’un vice de fabrication. Pendant la
validité de la présente garantie limitée de 30 jours, nous fournirons gratuitement une cartouche de filtre
à eau.
Ce que Monogram ne couvre pas :
Pour le diagnostic, la réparation de votre réfrigérateur peut nécessiter l’utilisation du port de données embarqué. Celui-ci
permet au technicien de réparation Monogram de diagnostiquer rapidement des problèmes avec votre appareil. Il permet
également à Monogram d’améliorer ses produits en fournissant à ces derniers des informations sur votre appareil. Si vous
ne voulez pas que les données de votre appareil soient envoyées à Monogram, veuillez demander à votre technicien de NE
PAS soumettre les données à Monogram pendant la réparation.
Pour bénéficier du service de réparation sous garantie,
une preuve de la date d’achat initial est nécessaire.

49-1000777 Rev. 2 29
NOTES

REMARQUE : Des lunettes de protection doivent être
portées lors de la réalisation des installations décrites dans
ce manuel.
REMARQUE : L’amélioration des produits fait l’objet d’un
HႇRUWFRQVWDQWFKH]0RQRJUDP3DUFRQVpTXHQWOHPDWpULHO
l’aspect et les caractéristiques des produits sont suscepti-
EOHVG¶rWUHPRGL¿pVVDQVSUpDYLV
49-1000777 Rev. 2
12-24
Monogram.com
Imprimé aux États-Unis

OWNER'S
MANUAL
Centro de Bebidas en Bajo Mesada
MONOGRAM.COM
ESPAÑOL

2 49-1000777 Rev. 2
INFORMACIÓN DEL MODELO
NÚMEROS DE MODELO
ZIBC24PW**
ÍNDICE
INFORMACIÓN DEL MODELO ...............................................................................2
SOPORTE AL CONSUMIDOR ................................................................................3
INFORMACIÓN IMPORTANTE DE SEGURIDAD. ................................................................4
USO DEL CENTRO DE BEBIDAS .............................................................................7
CUIDADO Y LIMPIEZA ....................................................................................16
INSTRUCCIONES DE INSTALACIÓN .........................................................................12
SOLUCIÓN DE PROBLEMAS ...............................................................................27
GARANTÍA LIMITADA .....................................................................................28
ESCRIBA LOS NÚMEROS DE MODELO Y SERIE
Estos se encuentran en la etiqueta ubicada sobre la pared
lateral de su electrodoméstico, junto a la charola derecha en el
compartimiento del refrigerador.
Use estos números en cualquier correspondencia o llamadas al
servicio técnico relacionadas con su electrodoméstico.
Por favor escriba estos números aquí:
Número de Modelo
Número de Serie
Listado de Accesorios Bajo la Encimera de Monogram
Manijas
Statement: ZXGP1H1PWSS
Minimalist: ZXGP1H1CPSS
/RVNLWVTXH¿JXUDQDFRQWLQXDFLyQVHYHQGHQSRUVHSDUDGR
Kit de Montaje de Manija a Medida de Monogram
ZKPN
3DQHOGH3XHUWD\=yFDORGH$FHUR,QR[LGDEOH
ZK1GC240WSS
=yFDORGH$FHUR,QR[LGDEOHGHGHDQFKR
ZKN48W
.LWGH8QL¿FDFLyQ
ZKAW

49-1000777 Rev. 2 3
SOPORTE AL CLIENTE
SITIO WEB DE MONOGRAM
¿Desea realizar una consulta o necesita ayuda con su electrodoméstico? ¡Intente a través del sitio Web de Monogram las 24 horas
del día, cualquier día del año! También puede comprar más grandiosos productos de Monogram y sacar ventaja de todos nuestros
servicios de soporte a través de Internet, diseñados para su conveniencia.
En EE.UU.: monogram.com o en Canadá: monogram.ca
REGISTRE SU ELECTRODOMÉSTICO
¡Registre su electrodoméstico nuevo a través de Internet, según su conveniencia! Un registro puntual de su producto permitirá una
mejor comunicación y un servicio más puntual de acuerdo con los términos de su garantía, en caso de surgir la necesidad. También
puede enviar una carta en la tarjeta de inscripción pre impresa que se incluye con el material embalado.
En EE.UU.: monogram.com.
En Canadá:3URGVXSSRUWPDEHFDFUP3URGXFWV3URGXFW5HJLVWUDWLRQDVS[
SERVICIO PROGRAMADO
El servicio de reparación de expertos de Monogram está a sólo un paso de su puerta. Conéctese a través de Internet y programe el
servicio a su conveniencia cualquier día del año.
En EE.UU.: Monogram.com o llame al 800.444.1845
En Canadá: Monogram.ca o llame al 800.561.3344
CONECTIVIDAD REMOTA
Para recibir asistencia en relación a la conectividad de su red inalámbrica (para modelos con activación remota), visite nuestro sitio
web en PRQRJUDPFRPFRQQHFW
PIEZAS Y ACCESORIOS
Individuos calificados para realizar el servicio técnico de sus propios electrodomésticos podrán solicitar el envío de piezas o
accesorios directamente a sus hogares (se aceptan las tarjetas VISA, MasterCard y Discover). Ordene a través de Internet durante
las 24 horas del día.
En EE.UU.: PRQRJUDPFRPXVHDQGFDUHSDUWVo llame al 800.444.1845
/DVLQVWUXFFLRQHVTXHILJXUDQHQHVWHPDQXDOFXEUHQORVSURFHGLPLHQWRVTXHVHUiQUHDOL]DGRVSRUFXDOTXLHUXVXDULR2WURV
VHUYLFLRVWpFQLFRVJHQHUDOPHQWHGHEHUiQVHUGHULYDGRVDSHUVRQDOFDOLILFDGRGHOVHUYLFLRWpFQLFR6HGHEHUiWHQHUFXLGDGR
\DTXHXQDUHSDUDFLyQLQGHELGDSRGUiKDFHUTXHHOIXQFLRQDPLHQWRQRVHDVHJXUR
Los clientes de Canadá deberán consultar en el centro de servicio Mabe, visitar nuestro sitio web en monogram.ca o llame al
800.661.1616.
CONTÁCTENOS
Si no se encuentra satisfecho con el servicio que recibió de Monogram, comuníquese con nosotros a través de nuestro sitio Web con
todos los detalles, incluyendo su número telefónico, o escriba a :
En EE.UU.: General Manager, Customer Relations | Monogram Appliances, Appliance Park | Louisville, KY 40225
PRQRJUDPFRPFRQWDFWor call 800.444.1845.
En Canadá: PRQRJUDPFDFRQWDFWo llame al 800.561.3344
4 49-1000777 Rev. 2
PRECAUCIÓN
A fin de reducir el riesgo de lesiones al usar el electrodoméstico, siga estas precauciones básicas.
Ŷ 0DQWHQJDORVGHGRVIXHUDGHORVHVSDFLRVGH³ULHVJRGHODVWLPDGXUDV´ORVGHVSHMHVHQWUHODVSXHUWDV\HQWUHODVSXHUWDV\HO
gabinete son necesariamente pequeños. Tenga el cuidado de cerrar las puertas cuando los niños se encuentren en el área.
ADVERTENCIA
RIESGO DE INCENDIO O EXPLOSIÓN
Mantenga cualquier material y vapores inflamables alejados del electrodoméstico. Si no se cumple con esto, se podrá producir
una explosión, incendio o la muerte.
ADVERTENCIA
A fin de reducir el riesgo asociado con descargas, no permita que los niños menores de 3 años de
edad tengan acceso a las partes pequeñas durante la instalación de este producto.
ADVERTENCIA
3HOLJURGH3HVR([FHVLYR
Cuente con la ayuda de dos o más personas para mover e instalar el centro de bebidas.
No seguir esta instrucción puede ocasionar una lesión en la espalda u otro tipo de lesiones.
ADVERTENCIA
A fin de reducir el riesgo de incendio, explosión, descargas eléctricas o lesiones al usar su
refrigerador, siga estas precauciones básicas de seguridad:
Ŷ 8VHHVWHHOHFWURGRPpVWLFRVyORSDUDVXSURSyVLWRRULJLQDO
como se describe en el Manual del Propietario.
Ŷ (VWHHOHFWURGRPpVWLFRVHGHEHUiLQVWDODU\XELFDU
adecuadamente de acuerdo con las Instrucciones de
Instalación antes de ser usado.
Ŷ 'HVHQFKXIHHOHOHFWURGRPpVWLFRDQWHVGHKDFHU
reparaciones, reemplazar una lámpara de luz o hacer una
limpieza.
NOTA: La corriente que va al electrodoméstico no puede
ser desconectada por ninguna configuración del panel de
control.
NOTA: Las reparaciones deberán ser realizadas por un
Profesional del Servicio Técnico calificado.
Ŷ 5HHPSODFHWRGDVODVSLH]DV\SDQHOHVDQWHVGHOXVR
Ŷ 1RXVHXQSURORQJDGRU
Ŷ 0DQWHQJDFXDOTXLHUPDWHULDO\YDSRUHVLQIODPDEOHVDOHMDGRV
del electrodoméstico.
Ŷ 1RJXDUGHVXVWDQFLDVH[SORVLYDVWDOHVFRPRODWDV
de aerosoles con propelentes inflamables en este
electrodoméstico.
Ŷ
A fin de evitar riesgos de que los niños sufran asfixia
o queden atrapados, retire las puertas de cualquier
electrodoméstico antes de deshacerse o dejar de usar el
mismo.
Ŷ $ILQGHHYLWDUULHVJRVGHTXHORVQLxRVVXIUDQDVIL[LDR
queden atrapados, retire las puertas refrigerador antes de
deshacerse o dejar de usar el mismo.
Ŷ /RVQLxRV\ODVSHUVRQDVFRQFDSDFLGDGItVLFDVHQVRULDOR
mental reducida o con falta de experiencia y conocimiento
podrán usar este electrodoméstico sólo si son supervisados
o les fueron dadas instrucciones sobre un uso seguro y
entienden los riesgos involucrados.
Ŷ (VWHHOHFWURGRPpVWLFRIXHGLVHxDGRSDUDXVRKRJDUHxR\
para aplicaciones similares tales como: áreas de personal de
FRFLQDHQWLHQGDVRILFLQDV\RWURVHVSDFLRVODERUDOHVFDVDV
GHFDPSRSRUFOLHQWHVHQKRWHOHVPRWHOHVKRVWDOHV\RWURV
espacios residenciales, catering y aplicaciones no minoristas
similares.
Ŷ 1RDSOLTXHOLPSLDGRUHViVSHURVVREUHHOHOHFWURGRPpVWLFR
Ciertos limpiadores dañarán el plástico, lo cual podrá hacer
que ciertas piezas tales como la puerta o las manijas de
las puertas se separen de forma inesperada. Para acceder
a instrucciones detalladas, lea la sección de Cuidado y
Limpieza.
Ŷ 1RJXDUGHQLXVHJDVROLQDXRWURVYDSRUHV\OtTXLGRV
inflamables cerca de éste o de otros electrodomésticos.
INFORMACIÓN IMPORTANTE DE SEGURIDAD
LEA TODAS LAS INSTRUCCIONES ANTES DE USAR
LEA Y GUARDE ESTAS INSTRUCCIONES
PRECAUCIÓN
RIESGO DE CORTES Y PELLIZCOS
El contacto con la hoja metálica o con extremos expuestos de otros materiales podrá generar lesiones personales. La instalación
del producto podrá crear puntos de pellizcos.
Use guantes y ropa de protección al instalar este producto.
49-1000777 Rev. 2 5
INFORMACIÓN IMPORTANTE DE SEGURIDAD
LEA TODAS LAS INSTRUCCIONES ANTES DE USAR
CONEXIÓN DE LA ELECTRICIDAD
1XQFDEDMRQLQJXQDFLUFXQVWDQFLDFRUWHRHOLPLQHHOWHUFHUFDEOHWLHUUDGHOFDEOHGHFRUULHQWH3DUDVXVHJXULGDG
SHUVRQDOHVWHHOHFWURGRPpVWLFRGHEHHVWDUDGHFXDGDPHQWHFRQHFWDGRDWLHUUD
El cable de corriente de este electrodoméstico contiene un
enchufe de 3 cables (conexión a tierra) que se conecta a un
tomacorriente de pared estándar de 3 cables (conexión a
tierra) para minimizar la posibilidad de riesgos de descargas
eléctricas por parte del mismo.
Contrate a un electricista calificado para que controle el
tomacorriente y el circuito eléctrico, a fin de asegurar que el
enchufe esté correctamente conectado a tierra.
En caso de contar con un tomacorriente de pared de 2 cables,
es su responsabilidad y obligación reemplazarlo por un
tomacorriente de pared de 3 cables correctamente conectado a
tierra. No use un adaptador.
El refrigerador debería estar siempre conectado a un enchufe
específico con un índice de voltaje equivalente al que figura en
su etiqueta de características técnicas.
Se requiere un suministro eléctrico con fusible y conexión a
tierra de 115 voltios de CA, 60 Hz, 15 o 20 amperes. Esto
garantiza el mejor funcionamiento y además previene la
sobrecarga de los circuitos del hogar, lo cual podría ocasionar
riesgos de incendio debido al recalentamiento de cables.
Nunca desenchufe el
centro de vinos tirando del cable de
corriente. Siempre tome su enchufe firmemente y empuje el
mismo hacia afuera para retirarlo.
Repare o reemplace de inmediato todos los cables de corriente
pelados o con cualquier tipo de daño. No use un cable con
cortaduras o abrasión sobre su extensión o extremos.
Al alejar el refrigerador de la pared, se deberá tener cuidado de
que no ruede sobre ni dañe el cable de corriente.
ADVERTENCIA
RIESGO DE DESCARGA ELÉCTRICA
Enchufe en un tomacorriente con conexión a tierra de 3 cables.
No elimine el cable de conexión a tierra.
No use un adaptador.
No use un prolongador.
Si no se siguen estas instrucciones se podrá producir a muerte, incendios o descargas eléctricas.
ADVERTENCIA
PELIGRO DE SUFFOCATION Y ENTRAPMENT
El incumplimiento de estas instrucciones de eliminación puede causar la muerte o lesiones graves.
IMPORTANTE: Que un niño quede atrapado o que sufra
una asfixia no son problemas del pasado. Los appliances
antiguos o abandonados aún son peligrosos, incluso aunque
VHFRQVHUYHQSRU³VyORXQRVSRFRVGtDV´6LVHGHVKDUiGHVX
antiguo aparato, siga las siguientes instrucciones a fin de evitar
accidentes.
$QWHVGH'HVFDUWDUVX$QWLJXR$SDUDWR
Ŷ4XLWHODSXHUWD
Ŷ'HMHORVFDMRQHVHQVXOXJDUDVtORVQLxRVQRSXHGHQPHWHUVH
adentro con facilidad.
&yPR(OLPLQDU5HIULJHUDQWHV\*RPDHVSXPDV
Descarte el electrodoméstico de acuerdo con las Regulaciones Federales y Locales. El material aislante inflamable usado requiere
procedimientos de descarte especiales. Comuníquese con las autoridades locales para descartar su electrodoméstico de forma
ambiental mente segura.
FORMA ADECUADA DE DESCARTAR SU ANTIGÜO ELECTRODOMÉSTICO
6 49-1000777 Rev. 2
INFORMACIÓN IMPORTANTE DE SEGURIDAD
LEA TODAS LAS INSTRUCCIONES ANTES DE USAR
ADVERTENCIA
RIESGO DE INCENDIO O EXPLOSIÓN Refrigerantes Inflamables
(VWHHOHFWURGRPpVWLFRFXHQWDFRQUHIULJHUDQWHLVREXWDQRWDPELpQFRQRFLGRFRPR5DXQJDVQDWXUDOFRQDOWR
QLYHOGHFRPSDWLELOLGDGPHGLRDPELHQWDO6LQHPEDUJRWDPELpQHVFRPEXVWLEOH6LJDODVDGYHUWHQFLDVTXHILJXUDQD
FRQWLQXDFLyQDILQGHUHGXFLUHOULHVJRGHOHVLRQHVRGDxRVVREUHODSURSLHGDG
1. Al mover, instalar y operar el electrodoméstico, se deberá
tener cuidado de no dañar la tubería del refrigerante.
2. El servicio técnico sólo debe ser realizado por personal
autorizado del servicio. Use sólo piezas del servicio
autorizadas por el fabricante
3. Descarte el electrodoméstico de acuerdo con las
Regulaciones Federales y Locales. El refrigerante
inflamable y el material aislante inflamable usados requieren
procedimientos de descarte especiales. Comuníquese con
las autoridades locales para descartar su refrigerador de
forma ambientalmente segura.
4. Mantenga las aberturas de ventilación en el espacio
de protección del electrodoméstico o en la estructura
incorporada libres de obstrucción.
5
. A fin de eliminar la escarcha, raspe con una espátula o
raspador de plástico o madera. No use un picahielos ni un
instrumento metálico o de punta filosa, ya que esto podrá
perforar el revestimiento del centro de bebidas y luego la
tubería inflamable del refrigerador que se encuentra detrás.
6. No use dispositivos eléctricos dentro del compartimiento de
almacenamiento de comida del electrodoméstico.
7. No use ningún dispositivo eléctrico para descongelar su
electrodoméstico.
$WHQFLyQÉste es un electrodoméstico para empotrar y se deberá instalar en un gabinete. Este electrodoméstico no fue diseñado
para el tipo de instalación autónoma.
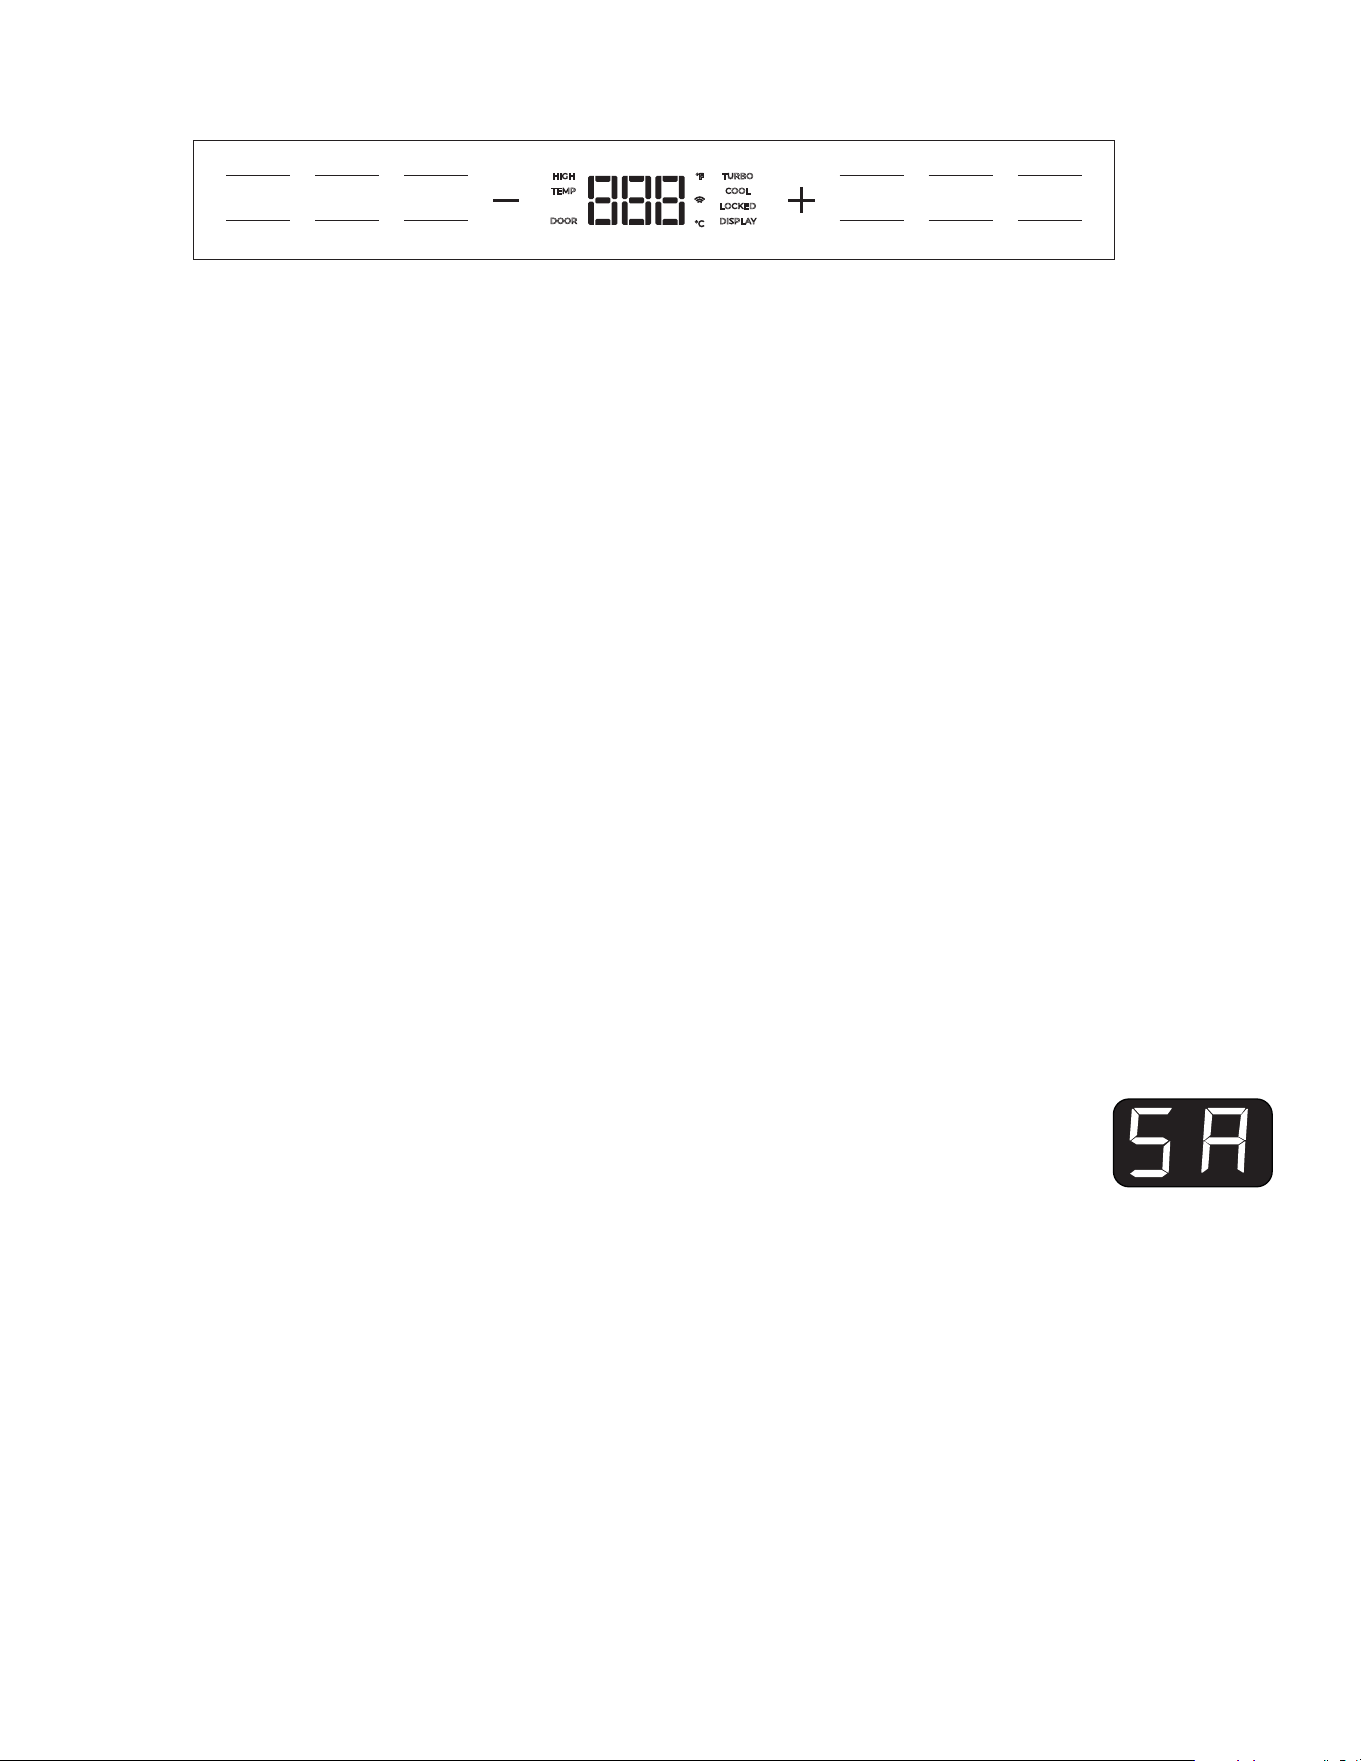
49-1000777 Rev. 2 7
USO DEL CENTRO DE BEBIDAS
&RQILJXUDFLyQGH7HPSHUDWXUD
El rango de temperatura del Centro de Bebidas es de entre 34°F
(1°C) y 45°F (7°C).
8VHORVERWRQHV³´\³±´SDUDLQFUHPHQWDURUHGXFLUODV
configuraciones de temperatura.
&RQYHUVLyQHQWUH&\)
0DQWHQJDSUHVLRQDGR³´\',63/$<3DQWDOODGXUDQWH
segundos. La pantalla de temperatura pasará de grados
)DKUHQKHLWDJUDGRV&HOVLXV0DQWHQJDSUHVLRQDGR³´\
DISPLAY (Pantalla) durante 3 segundos nuevamente para volver
a pasar a Fahrenheit.
Frío Turbo
La función TurboCool™ (Frío Turbo) rápidamente enfría el centro
de bebidas para enfriar las bebidas de forma más rápida. Use
TurboCool™ al agregar una gran cantidad de bebidas a su centro
de bebidas. Presione TURBO COOL™ para activar esta función.
NOTA: La temperatura del centro de bebidas no podrá ser
modificada durante el uso de TurboCool™.
(QFHQGHU$SDJDUOD5HIULJHUDFLyQ
Mantenga presionado POWER (Encendido) durante 3 segundos
para apagar la refrigeración e iluminación. Esto no desconecta la
corriente del centro de bebidas.
Alarma de la Puerta
Sonará una alerta si se deja la puerta abierta. La alerta
se detendrá cuando se cierre la puerta. Detenga la alerta
presionando el botón ALARM (Alarma). Desactive la alarma de la
SXHUWDPDQWHQLHQGRSUHVLRQDGR³±´\$/$50$ODUPDGXUDQWH
VHJXQGRV0DQWHQJDSUHVLRQDGRV³±´\$ODUP$ODUPDGXUDQWH
segundos para reactivar la función.
$OHUWDGH7HPSHUDWXUD$OWD
Suena una alerta cuando la temperatura se encuentra fuera
del rango normal. Detenga la alerta presionando el botón
ALARM (Alarma). Desactive High Temperature Alert (Alerta de
Temperatura Alta) manteniendo presionados DISPLAY (Pantalla)
y ALARM (Alarma) durante 3 segundos. Mantenga presionados
DISPLAY (Pantalla) y ALARM (Alarma) durante 3 segundos para
reiniciar la función.
Bloqueo del Control Infantil
La función de bloqueo del control infantil previene cambios no
deseados en las configuraciones del centro de bebidas.
Para desbloquearlo, mantenga presionado CONTROL LOCK
(Bloqueo del Control) durante 3 segundos.
,OXPLQDFLyQGH3UR[LPLGDG
La luz interior se activa cuando alguien se acerca al centro de
bebidas. Para desactivar esta función, mantenga presionados
ALARM (Alarma), DISPLAY (Pantalla) y CONTROL (Control)
durante 3 segundos. Mantenga presionados ALARM (Alarma),
DISPLAY (Pantalla) y CONTROL LOCK (Bloqueo del Control)
nuevamente durante 3 segundos para reactivar esta función.
Modo de Pantalla
La luz interior mejora la exhibición de su colección. Presione el
botón DISPLAY (Pantalla) para activar el modo de pantalla. En el
modo de pantalla, la iluminación interior permanecerá encendida
incluso cuando la puerta se cierre y la luz de proximidad esté
apagada. Presione el botón Display (Pantalla) nuevamente para
salir el modo de pantalla.
0RGR6DEiWLFR
Sabbath Mode (Modo Sabático) fue diseñado para el Día de
Descanso Judío y Feriados. La función Sabbath Mode (Modo
Sabático) hace posible para aquellos judíos que siguen esta
celebración usar el centro de bebidas durante todo el feriado.
La función Sabbath Mode (Modo Sabático) se puede configurar
para anular reacciones típicas ocasionadas por su interacción
con el centro de bebidas. Mientras se encuentre en Sabbath
Mode (Modo Sabático), el electrodoméstico continuará
funcionando. Sin embargo, éste no responderá a sus acciones.
Mientras se encuentre en Sabbath Mode (Modo Sabático), es
posible que observe que el ventilador está funcionando cuando
VHDEUHODSXHUWDVLQHPEDUJRHVWRQRHVHOUHVXOWDGRGHVXV
acciones. El compresor y el ventilador funcionarán en horarios
predeterminados.
212))(QFHQGLGR$SDJDGR±3DUDDFWLYDU6DEEDWK0RGH
0RGR6DEiWLFRPDQWHQJDSUHVLRQDGRV³±´\',63/$<
(Pantalla) durante 5 segundos. SA se visualizará en el control.
SA permanecerá en la pantalla y todas
las configuraciones del control quedarán
congeladas y permanecerán en el último
modo antes de entrar en Sabbath Mode
(Modo Sabático). Los controles y las luces
QRIXQFLRQDUiQKDVWDTXH³±´\',63/$<3DQWDOODVHSUHVLRQHQ
nuevamente durante 5 segundos para salir de Sabbath Mode
(Modo Sabático).
Modo de Bloqueo
Se usa cuando usted no está y no desea que otras personas
abran el centro de bebidas. Tan pronto como la puerta se
abra, sonará la alarma de la puerta. La iluminación interior
permanecerá apagada. Si el centro de bebidas se encuentra
conectado al WiFi, se podrá recibir a través de la aplicación una
notificación de que la puerta ha sido abierta.
Esta función se podrá activar/ desactivar usando la aplicación.
Si su dispositivo conectado no está disponible, la función se
SRGUiDFWLYDUPDQWHQLHQGRSUHVLRQDGRV³´\&21752//2&.
(Bloqueo del Control) durante 3 segundos. Mantenga presionados
³´\&21752//2&.%ORTXHRGHO&RQWUROQXHYDPHQWHGXUDQWH
3 segundos para desactivar la función.
LOCKED
DISPLAY
TURBO
COOL
DOOR
HIGH
TEMP
ALARM
HOLD 3 SEC
CONTROL
LOCK
DISPLAY
TURBO
COOL
WIFI
CONNECT
POWER
HOLD 3 SEC

8 49-1000777 Rev. 2
USO DEL CENTRO DE BEBIDAS
COMUNICACIÓN CON EL ELECTRODOMÉSTICO
:L)LSDUD&OLHQWHVGH(VWDGRV8QLGRVVXVWHUULWRULRV\&DQDGi
Ŷ Descargue la aplicación SmartHQ.
• Disponible para iPhone desde Apple Store.
• Disponible para Android desde Google Play.
Ŷ 6HOHFFLRQH&UHDWH$FFRXQW&UHDU&XHQWDHQODDSOLFDFLyQ
• Ingrese la información y seleccione Register (Registro). Se
le enviará un correo electrónico.
• Al recibir el correo electrónico, seleccione Verify Account
(Verificar Cuenta).
• Firme con sus credenciales y seleccione Authorize
(Autorizar) para permitir que la aplicación tenga
comunicación con el centro de bebidas.
Ŷ$EUDODDSOLFDFLyQ6PDUW+4
Método 1
1. La aplicación debería detectar el electrodoméstico y
mostrar la pantalla emergente con el electrodoméstico.
3UHVLRQH³&211(&7´&RQHFWDUVREUHODSDQWDOOD
emergente. En caso de haber múltiples electrodomésticos
en la cercanía, la Aplicación navegará hasta la pantalla
ADD APPLIANCE (Agregar Dispositivo).
(QODVHFFLyQ1($5%<&HUFDQtDSUHVLRQH³&211(&7´
(Conectar) sobre la tarjeta del Centro de Bebidas. Si
la Aplicación no encuentra un Electrodoméstico en la
FHUFDQtDSUHVLRQH³5(6&$1´9ROYHUD(VFDQHDU
4. Luego de volver a escanear, controle que el
electrodoméstico aparezca en la sección NEARBY
&HUFDQtD\SUHVLRQH³&211(&7´&RQHFWDUVREUHOD
tarjeta del Centro de Bebidas.
5. Seleccione UNDERCOUNTER (Bajo Encimera)
desde la Pantalla SELECT APPLIANCE (Seleccionar
Electrodoméstico).
/D$SOLFDFLyQQDYHJDUiKDVWDODSDQWDOOD³/(7¶6*(7
67$57('´&RPHQFHPRV
7. Siga las instrucciones de SmartHQ para completar la
configuración del Wi-Fi.
Método 2
1. Si la aplicación no muestra una pantalla emergente,
SUHVLRQHHOERWyQ³´HQODSDUWHVXSHULRUGHUHFKDGHOD
pantalla.
(QODVHFFLyQ1($5%<&HUFDQtDSUHVLRQH³&211(&7´
(Conectar) sobre la tarjeta del Centro de Bebidas. Si
la Aplicación no encuentra un Electrodoméstico en la
FHUFDQtDSUHVLRQH³5(6&$1´9ROYHUD(VFDQHDU
3. Luego de volver a escanear, controle que el
electrodoméstico aparezca en la sección NEARBY
&HUFDQtD\SUHVLRQH³&211(&7´&RQHFWDUVREUHOD
tarjeta del Centro de Bebidas.
4. Seleccione UNDERCOUNTER (Bajo Encimera)
desde la Pantalla SELECT APPLIANCE (Seleccionar
Electrodoméstico).
/D$SOLFDFLyQQDYHJDUiKDVWDODSDQWDOOD³/(7¶6*(7
67$57('´&RPHQFHPRV
6. Siga las instrucciones de SmartHQ para completar la
configuración del Wi-Fi.
Método 3
1. Si no se encuentra el electrodoméstico en la cercanía,
YD\DKDVWDODWDUMHWD³0$18$/&211(&7,216(783´
(Configuración de la Conexión Manual).
2. Seleccione REFRIGERATION> MONOGRAM> Beverage
CENTER> UNDERCOUNTER (Refrigeración> Monogram>
Centro de Bebidas> Encimera).
/D$SOLFDFLyQQDYHJDUiKDVWDODSDQWDOOD³/(7¶6*(7
67$57('´&RPHQFHPRV
4. Siga las instrucciones de SmartHQ para completar la
configuración del Wi-Fi.
INFORMACIÓN REGULATORIA
'HFODUDFLyQGH&XPSOLPLHQWRGHOD)&&,&
Este dispositivo cumple con la Parte 15 de la Normativa de la FCC. Su funcionamiento está sujeto a las dos condiciones siguientes:
1. Este dispositivo no puede ocasionar interferencias perjudiciales, y
2. Este dispositivo tolera cualquier interferencia recibida, incluidas las interferencias que puedan provocar un funcionamiento
no deseado.
Este equipo ha sido probado y cumple con los límites establecidos para un dispositivo digital de clase B, según la Parte 15 de la
Normativa de la FCC. Estos límites han sido diseñados para ofrecer una protección razonable contra interferencias perjudiciales en
la instalación residencial. Este equipo genera, usa y puede emitir energía de radiofrecuencia y, si no se instala y utiliza de acuerdo
con las instrucciones, puede ocasionar interferencias perjudiciales en las comunicaciones de radio. Sin embargo, no se garantiza
que no se presenten interferencias en una instalación en particular. Si este equipo provoca interferencias perjudiciales sobre la
recepción de radio o televisión, lo cual puede comprobar encendiendo y apagando el equipo, se aconseja al usuario intentar corregir
la interferencia a través de una de las siguientes medidas:
• Reoriente o reubique la antena receptora.
• Aumente la separación entre el equipo y el receptor.
• Conecte el equipo a un tomacorriente de un circuito diferente del tomacorriente al que se encuentra conectado el receptor.
• Consulte al proveedor minorista o a un técnico experimentado de radio/ TV.
(WLTXHWDGH&ODVLILFDFLyQLos cambios o modificaciones sobre esta unidad no aprobados expresamente por el fabricante podrán
anular la autoridad del usuario para utilizar el equipo.
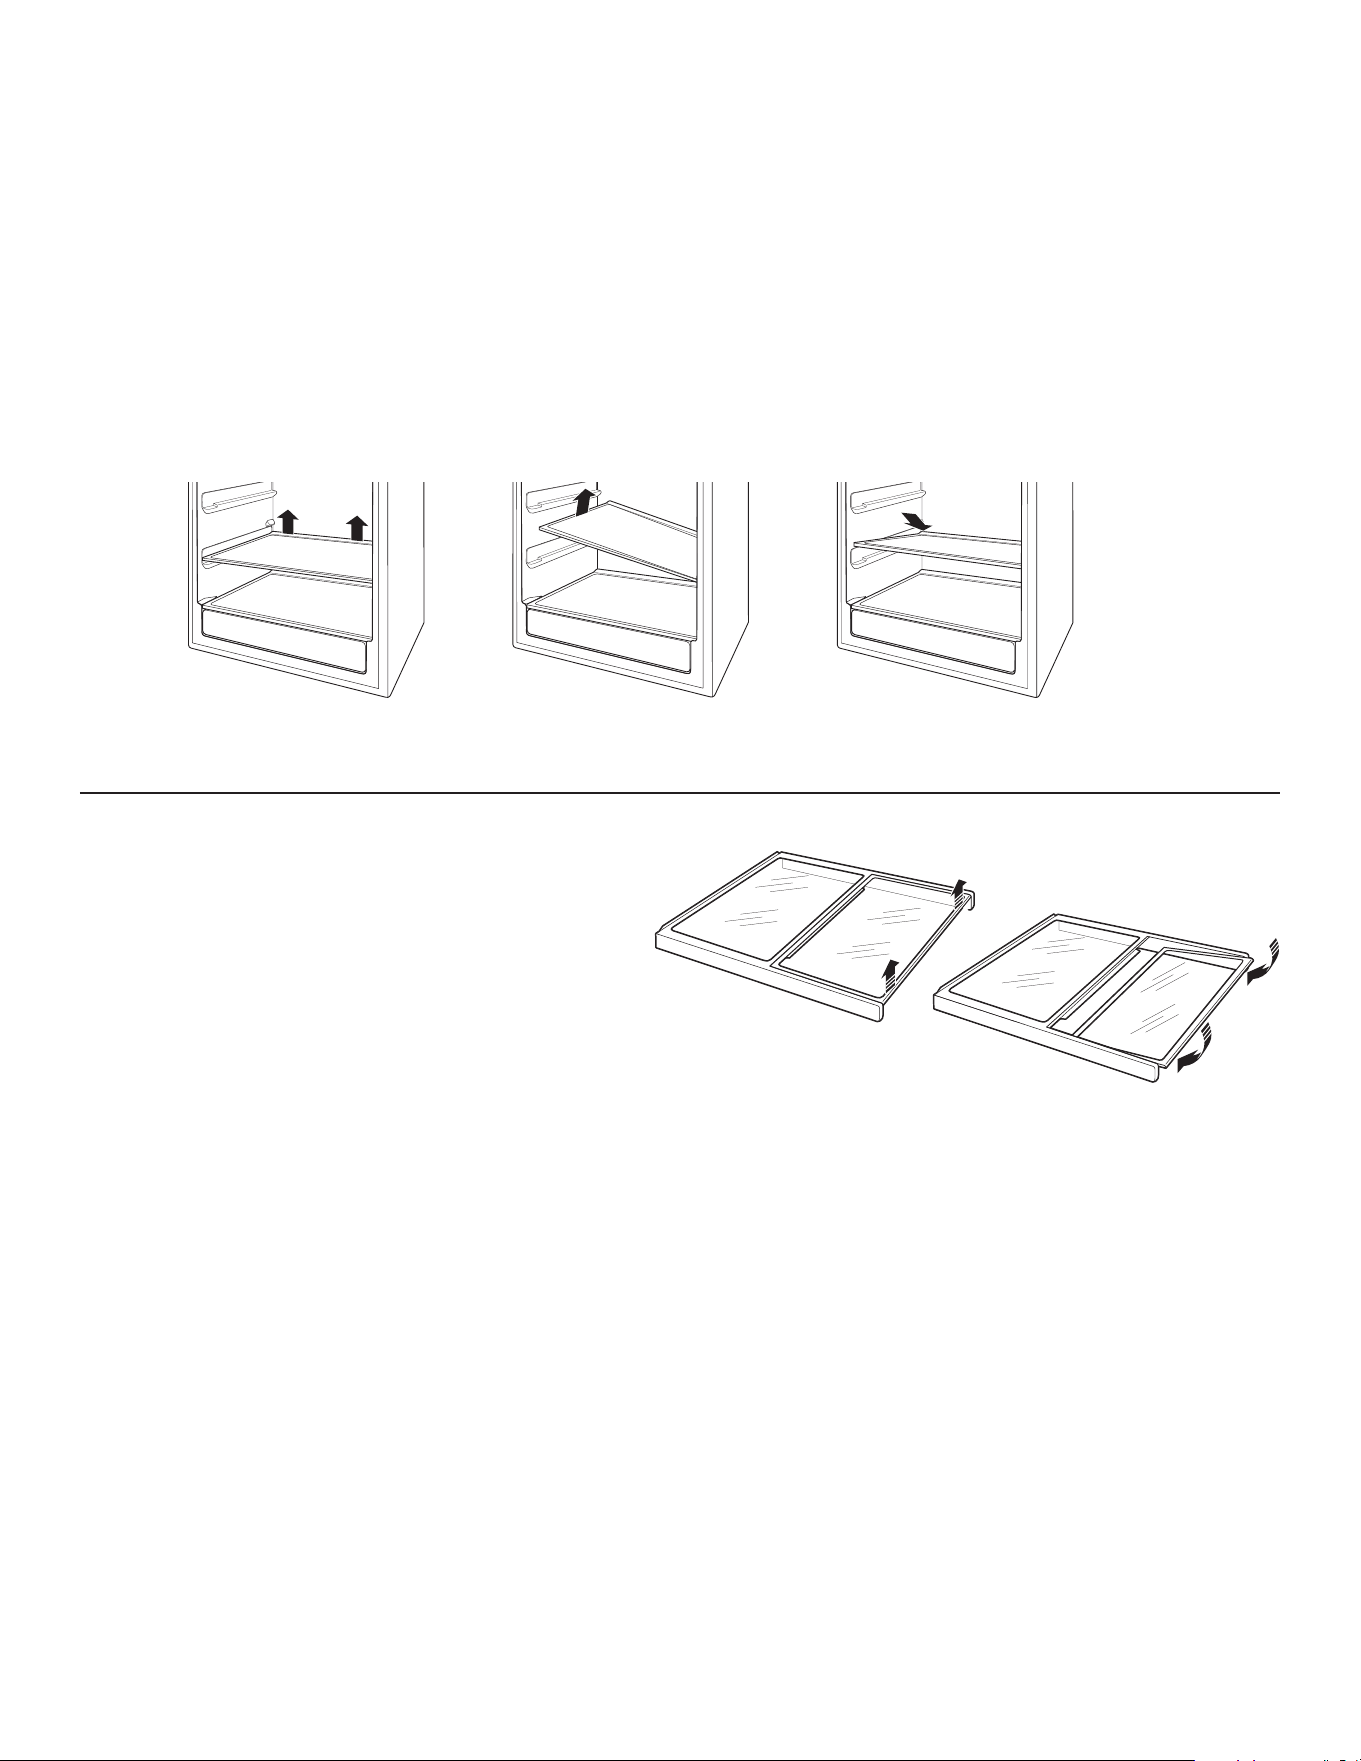
49-1000777 Rev. 2 9
USO DEL CENTRO DE BEBIDAS
ESTANTE DE VIDRIO
Los estantes de vidrio templado de la unidad del centro
de bebidas son extraíbles para una fácil limpieza o para
guardar artículos más grandes.
3DUDUHWLUDUXQHVWDQWH abra la puerta completamente
para evitar posibles daños sobre la canasta. Levante
levemente desde la parte trasera del estante. Incline el
estante sobre un lado en ángulo mientras empuja hacia
adelante.
La apariencia puede variar.
3DUDUHWLUDUXQHVWDQWHabra la puerta completamente
para evitar posibles daños sobre la junta. Incline el estante
hacia un lado en ángulo y deslice el mismo hacia la pared
trasera, colocando un lado sobre el soporte del estante.
Coloque el otro lado sobre el soporte opuesto del estante.
Asegúrese de que las lengüetas de bloqueo traseras estén
adheridas. Cuando se haya instalado de forma apropiada,
el estante no se deslizará hacia adelante cuando se
empuje levemente.
Para su retiro, levante desde la
parte trasera del estante.
Incline el estante en ángulo mientras
realiza el retiro o reemplazo.
Realice la colocación en las ranuras
al reemplazar el estante.
ESTANTE QUICKSPACE™
Este estante se divide a la mitad y se desliza por debajo
de sí mismo para almacenar productos altos en el
estante de abajo.
Paso 1: Levante el extremo frontal de la mitad frontal del
estante.
Paso 2: Baje el extremo trasero de la mitad frontal del
estante mientras la desliza por debajo de la mitad
trasera.
Todo el estante Quick Space se podrá retirar y reemplazar
(consulte la sección de Estantes de Vidrio).
Paso 2
Paso 1
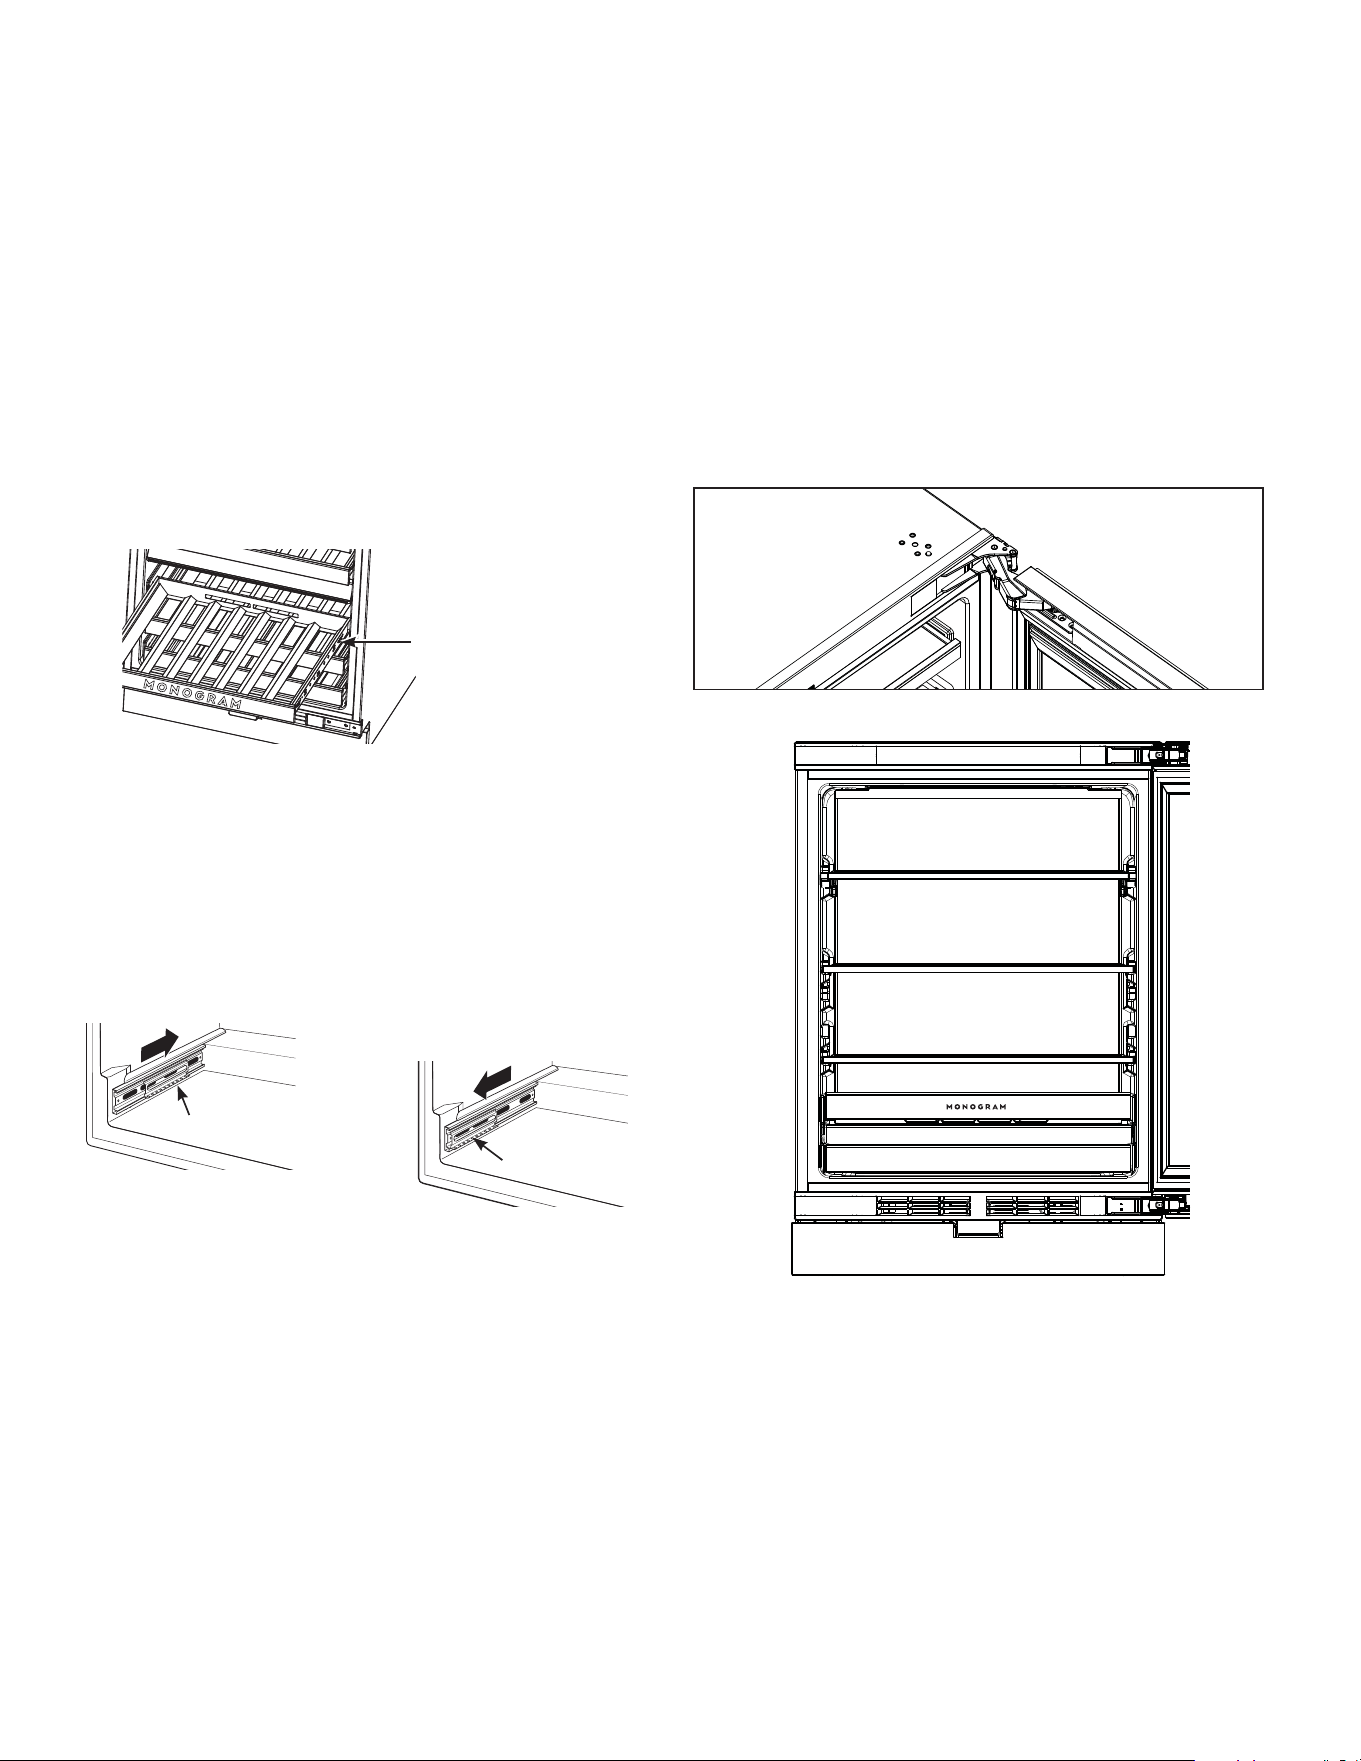
10 49-1000777 Rev. 2
USO DEL CENTRO DE BEBIDAS
CAJONES CON EXTENSIÓN COMPLETA
Todos los cajones con extensión completa sobresalen
de modo que se puedan agregar o retirar de modo
conveniente.
Cualquiera de los cajones de extensión completa se
podrán retirar para guardar botellas más grandes.
Para retirar:
1. Empuje el cajón de extensión completa hacia afuera
hasta la posición de DETENCIÓN.
2. Empuje la lengüeta de la guía del cajón derecho hacia
abajo, mientras empuja la lengüeta de la guía izquierda
hacia arriba, y empuje el cajón hacia afuera.
Para volver a colocar:
1. Vuelva a empujar la corredera del cajón en la unidad.
2. Empuje el pequeño subensamble de la corredera
completamente hacia adelante.
3. Vuelva a insertar los laterales del cajón sobre las guías.
4. Empuje hasta que las lengüetas se bloqueen en sus
posiciones.
NOTA: Asegúrese de que las lengüetas sobre las
guías del cajón de extensión completa estén totalmente
adheridas antes de cargar las botellas. Empuje los
cajones hacia afuera completamente hasta la posición
STOP (Detención) y empuje hacia atrás varias veces
para asegurarse de que las lengüetas de bloqueo estén
correctamente adheridas.
Cierre suave
Este producto fue diseñado con un sistema de cierre de
puerta suave. Este sistema minimiza el impacto sobre la
bebida, ya que suaviza la fuerza de cierre de la puerta. A
medida que la puerta se acerca a su cierre, se activa un
mecanismo de amortiguación para suavizar el impacto.
Este sistema de bisagras fue diseñado para mantener la
puerta abierta hasta que alcance el mecanismo de cierre
automático con amortiguación.
La apariencia puede variar.
Subensamble
Para realizar el reemplazo,
vuelva a empujar la
corredera en la unidad.
Empuje el pequeño
subensamble de la
corredera completamente
hacia adelante.
Sub-assembly
Lengüeta (empuje
la lengüeta hacia
abajo sobre la guía
del cajón derecho,
empuje la guía hacia
arriba sobre la guía
del cajón izquierdo)
49-1000777 Rev. 2 11
CUIDADO Y LIMPIEZA
Ɣ/LPSLHODVVXSHUILFLHVLQWHULRUHVH[WHULRUHVFRQDJXDFDOLHQWHMDEyQVXDYHRGHWHUJHQWH\XQDWHODVXDYHRGHPLFURILEUDDILQGH
evitar daños.
Ɣ6HTXHODVVXSHUILFLHVGHOHOHFWURGRPpVWLFRFRQXQDWHODVXDYH\OLPSLDRFRQXQDWRDOODGHPLFURILEUDSDUDHYLWDUUD\DGXUDVR
manchas de agua.
VACACIONES Y MUDANZAS
Vacaciones
Si estará fuera por un período de tiempo prolongado y no
desea dejar el electrodoméstico encendido mientras no está,
prepare el mismo para su ausencia.
1. Retire todos los ítems.
2. Mantenga presionada la tecla POWER (Encendido) sobre
el panel de control durante 3 segundos para apagar la
refrigeración.
3. Desenchufe o desconecte la corriente.
/LPSLHHOLQWHULRU&RQVXOWHODVHFFLyQGH³/LPSLH]D´
5. Deje la puerta abierta con un soporte, de modo que pueda
circular aire dentro.
3UHSDUDFLyQSDUDOD0XGDQ]D
Asegure todos los ítems tales como estantes y cajones, pegando
los mismos de forma segura en sus respectivos lugares a fin de
evitar daños. Asegúrese de que el centro de bebidas permanezca
en una posición erguida durante el movimiento.
USE NO NOT
Soft, clean cloth or sponge
Microfiber cloth
Telas adherentes, toallas de papel, esponjas abrasivas (con o sin jabón),
almohadillas de estropajo o lana de acero
Detergente suave mezclado con agua
caliente
Polvos, líquidos o espráis abrasivos
Espráis, amoníacos o blanqueadores para
ventanas
Limpiadores a base de cítrico o aceite vegetal
Limpiadores ácidos o a base de vinagre
Limpiadores de horno
Limpiadores alcalinos
Limpiadores para acero
inoxidable
LIMPIEZA DE LA PARTE EXTERIOR
*Elimine fácilmente manchas y huellas dactilares.
LIMPIEZA DE LA PARTE INTERIOR
ADVERTENCIA
Riesgo de Descarga
Eléctrica
'HVHQFKXIHHOHOHFWURGRPpVWLFRDQWHVGHOLPSLDU6LOD
XQLGDGVHHQFXHQWUDHQXQDXELFDFLyQHQFRQVWUXFFLyQ
desconecte del disyuntor.
ADVERTENCIA
Riesgo de incendio o
([SORVLyQ5HIULJHUDQWH,QIODPDEOH
3DUDHOLPLQDUODHVFDUFKDUDVSHFRQXQDHVSiWXODR
UDVSDGRUGHSOiVWLFRRPDGHUD1RXVHXQSLFDKLHORVQLXQ
LQVWUXPHQWRPHWiOLFRRGHSXQWDILQD\DTXHHVWRSRGUi
SHUIRUDUHOUHYHVWLPLHQWRGHOHOHFWURGRPpVWLFR\OXHJROD
WXEHUtDGHOUHIULJHUDGRUTXHVHHQFXHQWUDGHWUiV
1RXVHQLQJ~QGLVSRVLWLYRHOpFWULFRSDUDGHVFRQJHODUVX
electrodoméstico.
Si esto no resulta práctico, estruje el exceso de humedad
para eliminarlo de la esponja o tela al limpiar alrededor
de los interruptores, luces o controles.
Use agua caliente y solución de bicarbonato de sodio
— aproximadamente una cuchara sopera (15 ml) de
bicarbonato de sodio para un cuarto de galón (1 litro)
de agua. Esto limpia y neutraliza los olores. Enjuague y
seque.
PRECAUCIÓN
No limpie los estantes de
vidrio ni tapas con agua caliente cuando estén fríos.
Los estantes de vidrio y las tapas se pueden romper si
son expuestos a cambios de temperatura repentinos
o impactos tales como sacudones o caídas. El vidrio
templado está diseñado para destruirse en pequeñas
piezas en caso de rotura.
No lave ninguna parte plástica del centro de bebidas en
el lavavajillas.
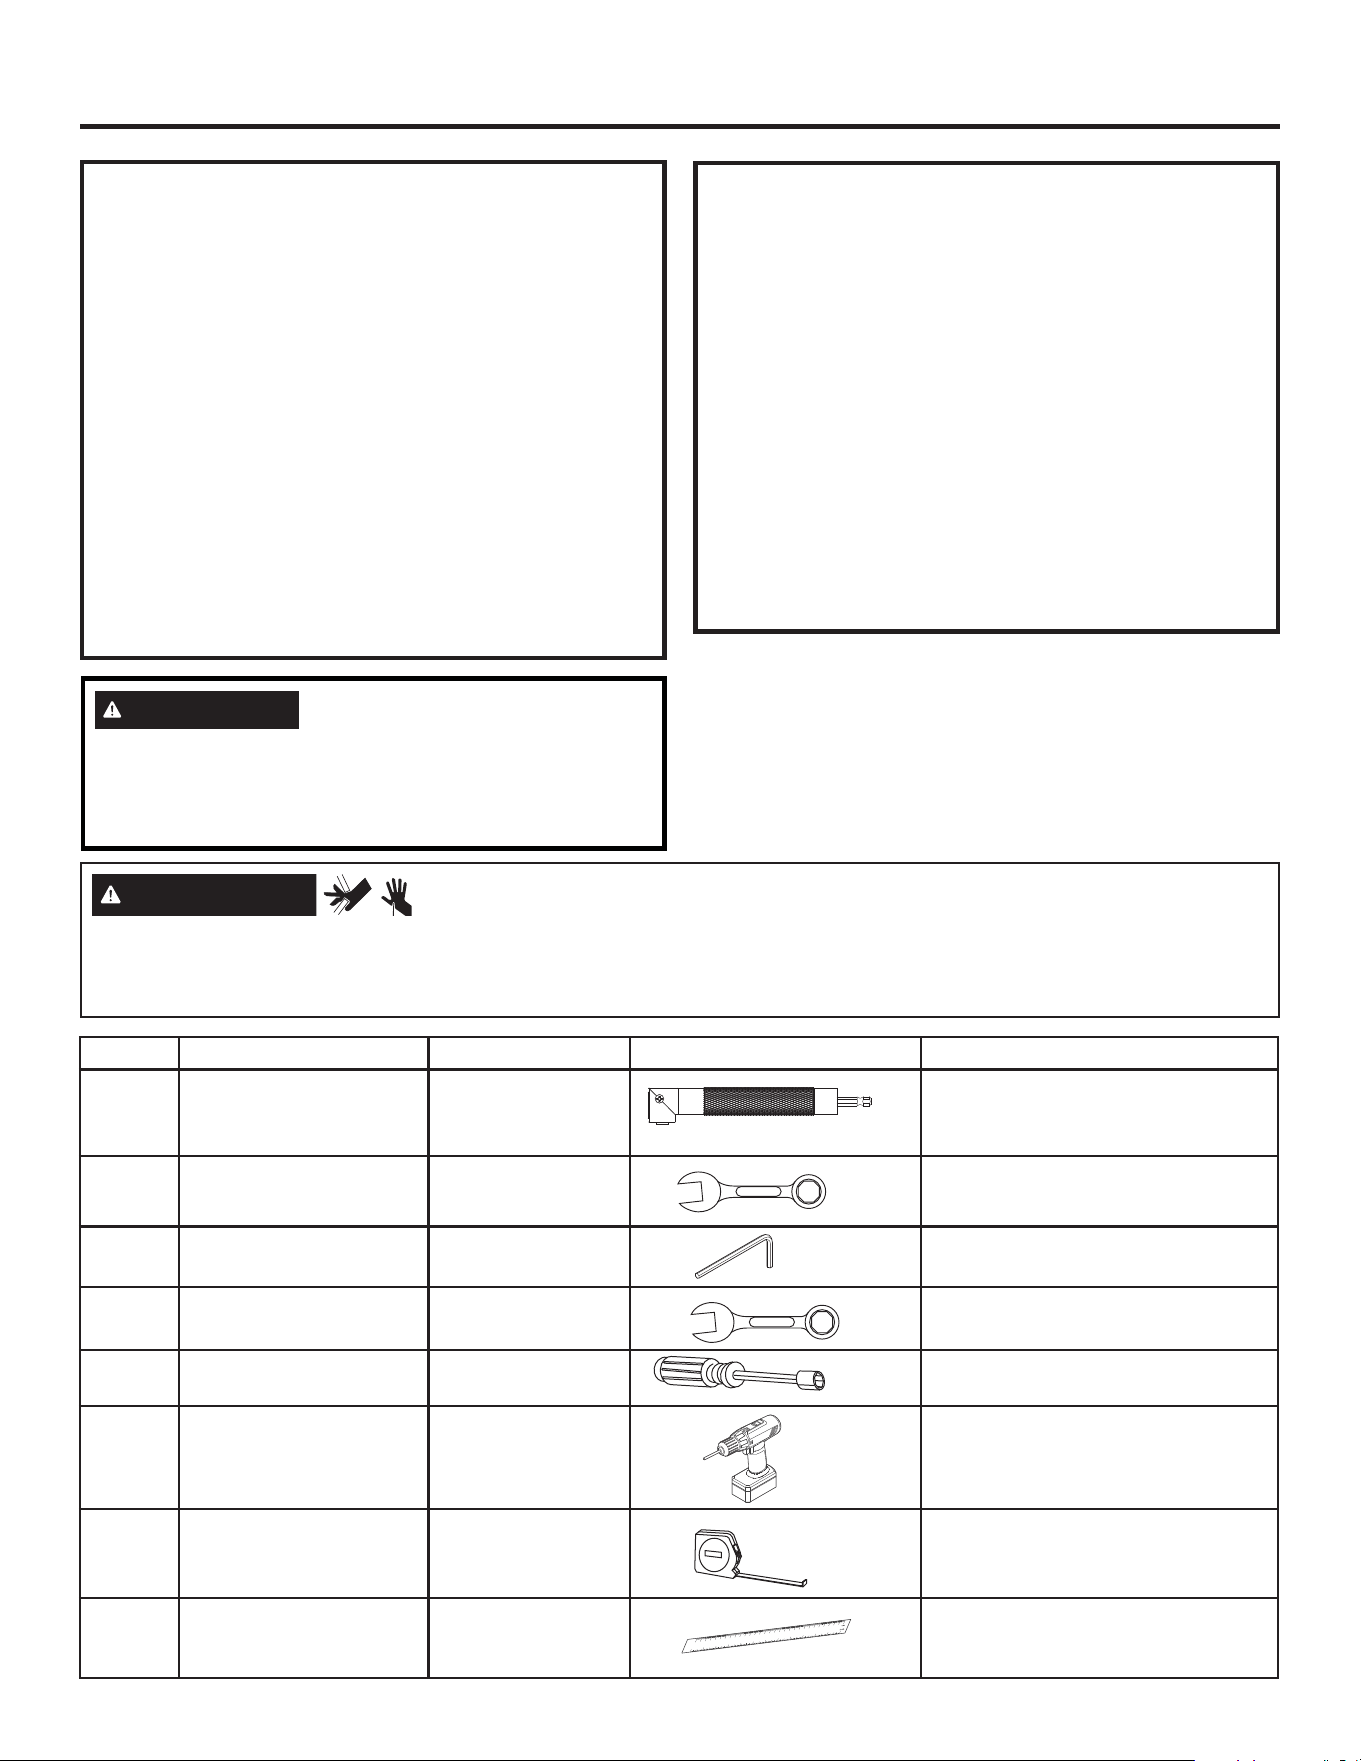
12 49-1000777 Rev. 2
,QVWUXFFLRQHVGH,QVWDODFLyQ
REQUISITOS DE UBICACIÓN
IMPORTANTE: Antes del uso, este centro de bebidas se
deberá instalar de forma correcta.
NOTA: Permita que el centro de bebidas se apoye de forma
erguida sobre su base durante por lo menos una hora antes
de la instalación.
• No instale el centro de bebidas donde la temperatura
llegue a ser inferior a los 55°F (13°C), ya que no
funcionará con la frecuencia necesaria para mantener las
temperaturas apropiadas.
• No instale el centro de bebidas donde la temperatura sea
superior a los 110°F (43°C), ya que no funcionará de forma
correcta.
• Instale el mismo en un piso lo suficientemente fuerte como
para soportarlo completamente cargado.
• No instale el centro de bebidas en una ubicación expuesta
al agua (lluvia, etc.) o en contacto directo con la luz solar.
ADVERTENCIA
RIESGO DE PESO EXCESIVO
&XHQWHFRQODD\XGDGHGRVRPiVSHUVRQDVSDUD
mover e instalar el centro de bebidas. Si esto no
VHKDFHVHSRGUiQSURGXFLUOHVLRQHVGHHVSDOGDX
otras lesiones.
IMPORTANTE: Sostenga con cuidado el centro de vinos al
moverlo, a fin de evitar dañar la tubería de refrigerante o de
incrementar el riesgo de pérdidas.
IMPORTANTE: Si el centro de vinos se ubicó en posición
horizontal durante cualquier período de tiempo, espere una hora
antes de enchufar el mismo, a fin de permitir que el refrigerante
se asiente.
ANTES DE COMENZAR
Lea estas instrucciones en su totalidad y atentamente.
•
IMPORTANTE — Cumpla con todos los códigos
y ordenanzas gubernamentales. Conserve estas
instrucciones para uso del inspector local.
• 1RWDSDUDHO,QVWDODGRU±$VHJ~UHVHGHTXHHO
Consumidor conserve estas instrucciones.
• 1RWDSDUDHO&RPSUDGRU±&RQVHUYHHVWDVLQVWUXFFLRQHV
para referencia futura.
• 1LYHOGHKDELOLGDG± La instalación de este
electrodoméstico requiere un nivel básico de habilidades
mecánicas.
• 7LHPSRGH,QVWDODFLyQ±/DLQVWDODFLyQGHOUHIULJHUDGRU
puede variar
• La correcta instalación del producto es responsabilidad del
instalador.
• Si se producen fallas en el producto debido a una
instalación inadecuada la Garantía no cubrirá las mismas.
PRECAUCIÓN
RIESGO DE CORTES Y PELLIZCOS
El contacto con la hoja metálica o con extremos expuestos de otros materiales podrá generar lesiones personales. La instalación
del producto podrá crear puntos de pellizcos.
Use guantes y ropa de protección al instalar este producto.
Artículo Herramientas (VSHFLILFDFLRQHV Imagen Donde se usa
1
Destornillador de ángulo
derecho
PP¶¶ Ajuste de la pata niveladora frontal
2 Llave francesa 24mm Ajuste de la pata niveladora frontal
3 Llave Allen 4mm
Ajuste del soporte del zócalo
Ajuste de la puerta superio
4 Llave francesa 13mm Ajuste de la puerta superior
5 Destornillador hexagonal PP¶¶ Ajuste de la ruedecilla trasera
6 Destornillador eléctrico / Instalación de los tornillos pasadores
7 Cinta métrica /
Medición de distancia y espacios libres
entre gabinetes
8 Regla /
Medición de distancia del zócalo
y nivelación
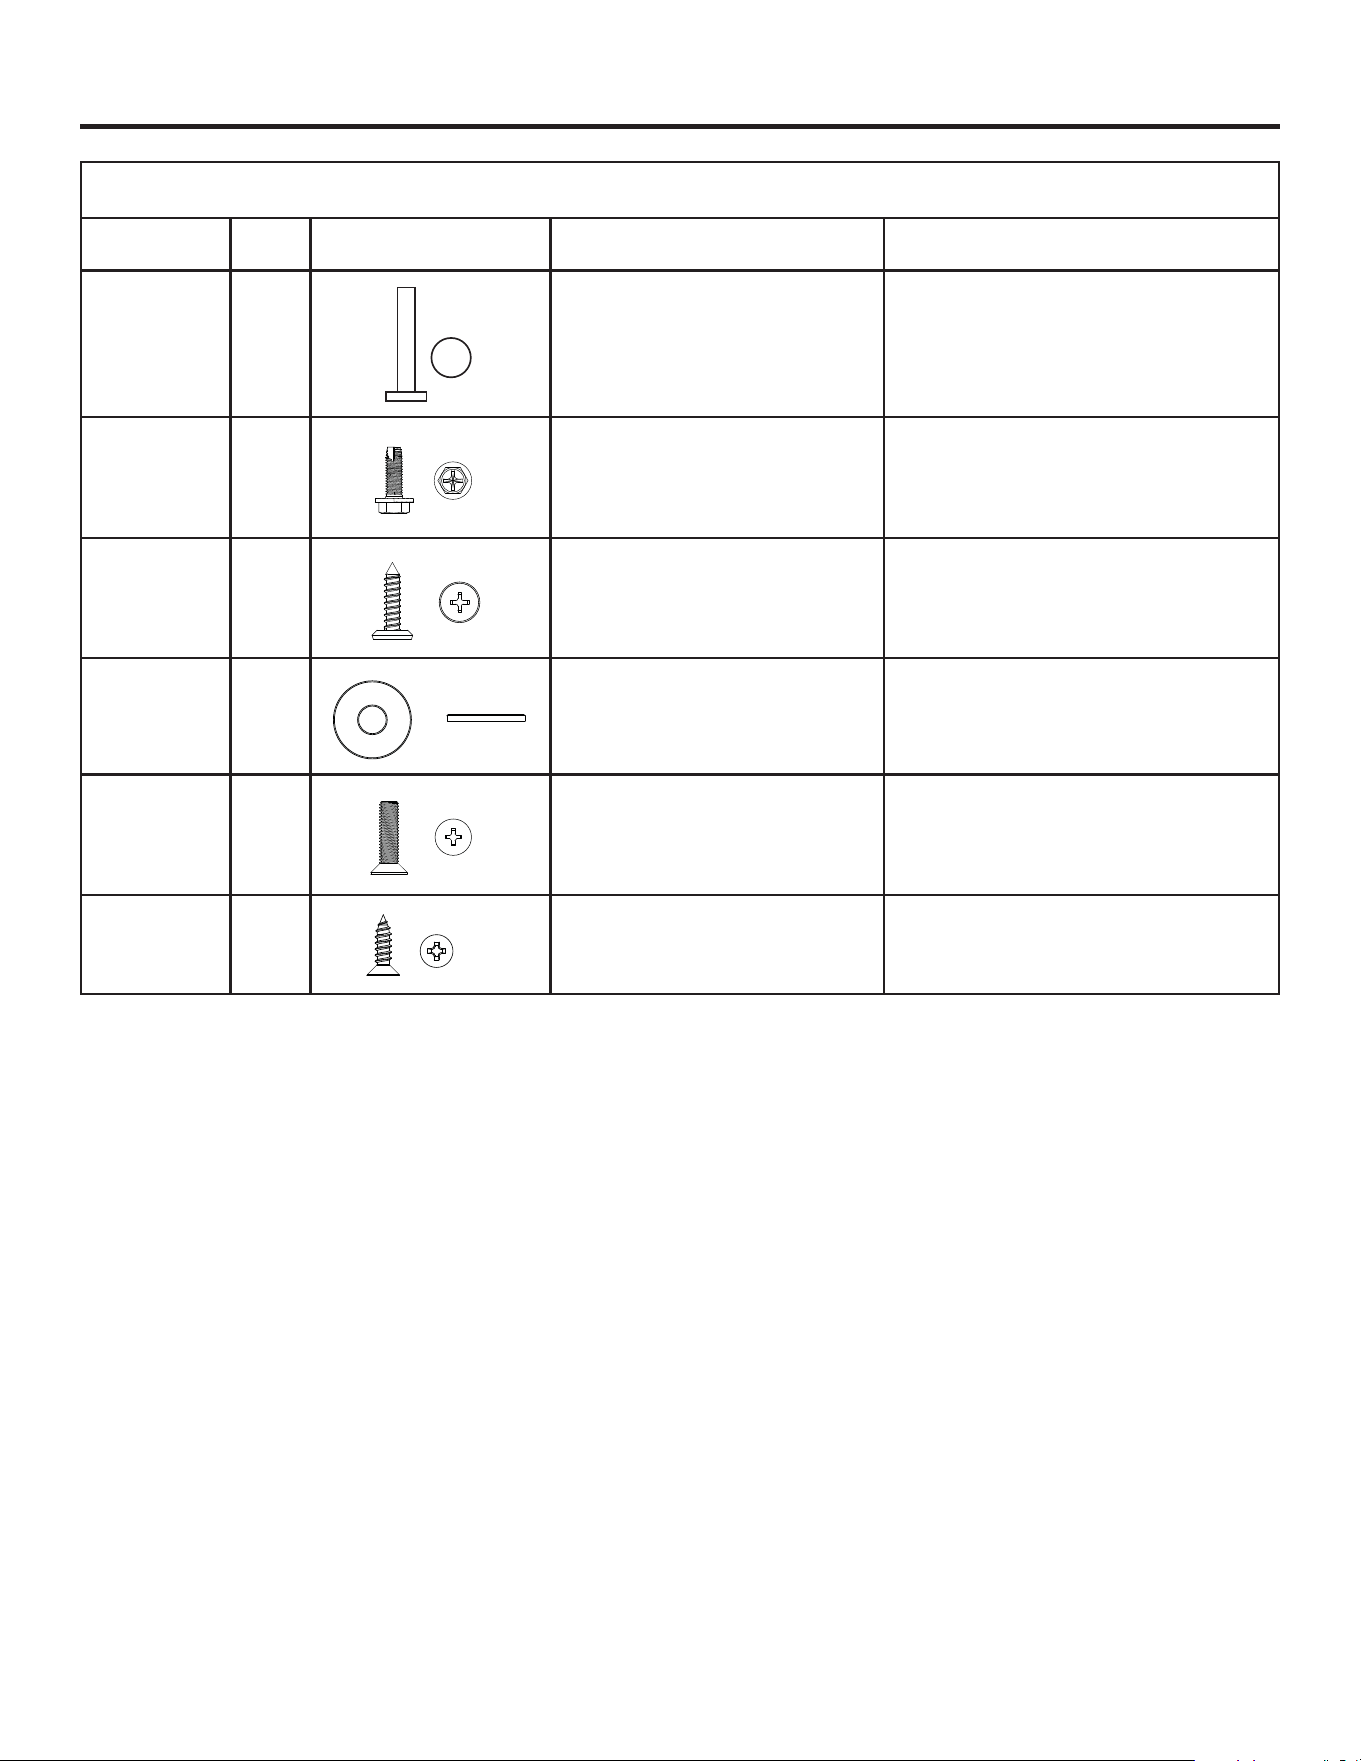
49-1000777 Rev. 2 13
,QVWUXFFLRQHVGH,QVWDODFLyQ
7RUQLOORVSDVDGRUHVLQFOXLGRVHQODEROVDGHDFFHVRULRV
Id. del tornillo
SDVDGRU
CANT. Imagen de la Parte 8ELFDFLyQ)XQFLyQ
'HVFULSFLyQGHO7RUQLOOR3DVDGRU
HQSXOJDGDVPP
A
1
(QOD%LVDJUD,QIHULRU±'HWLHQHOD
abertura de la bisagra en 90 grados.
Perno con extremo romo
Duración: 1 3/8 pulgadas
30 mm
B
8
En la parte superior del Panel de la
Puerta y del Soporte de Montaje del
Panel de la Puerta - Adhiere el Panel
de la Puerta de Acero Inoxidable al
producto.
Tornillo Hexagonal Phillips Bridado con punta
estrechada
/RQJLWXG´SXOJDGDV
PP´
C
8
En la parte superior del Panel de la
Puerta y del Soporte de Montaje del
Panel de la Puerta - Adhiere el Panel
de la Puerta de Madera a Medida al
producto.
Cabeza Phillips con extremo puntiagudo
Longitud: 5/8 pulgadas
PP´
D
4
En la Parte Inferior del Panel de la
3XHUWD±6HDGKLHUHDORVFXDWUR
tornillos en los soportes de montaje del
panel de la puerta inferior y permite el
ajuste.
Diámetro exterior de 19/32 pulgadas (15 mm)
Diámetro interior de 3/16 pulgadas (5mm)
E
4
En la parte superior de los Soportes
$QWLYROFDGXUDVDDPERVODGRV±6H
adhiere a la parte superior del producto.
Cabeza Phillips con punta roma
Longitud: 5/8 pulgadas
16 mm
F
4
En el lateral del Soporte Antivolcaduras
DDPERVODGRV±$GKLHUHHOSURGXFWRD
los gabinetes adyacentes.
Cabeza Phillips con extremo puntiagudo
Longitud: 5/8 pulgadas
13 mm
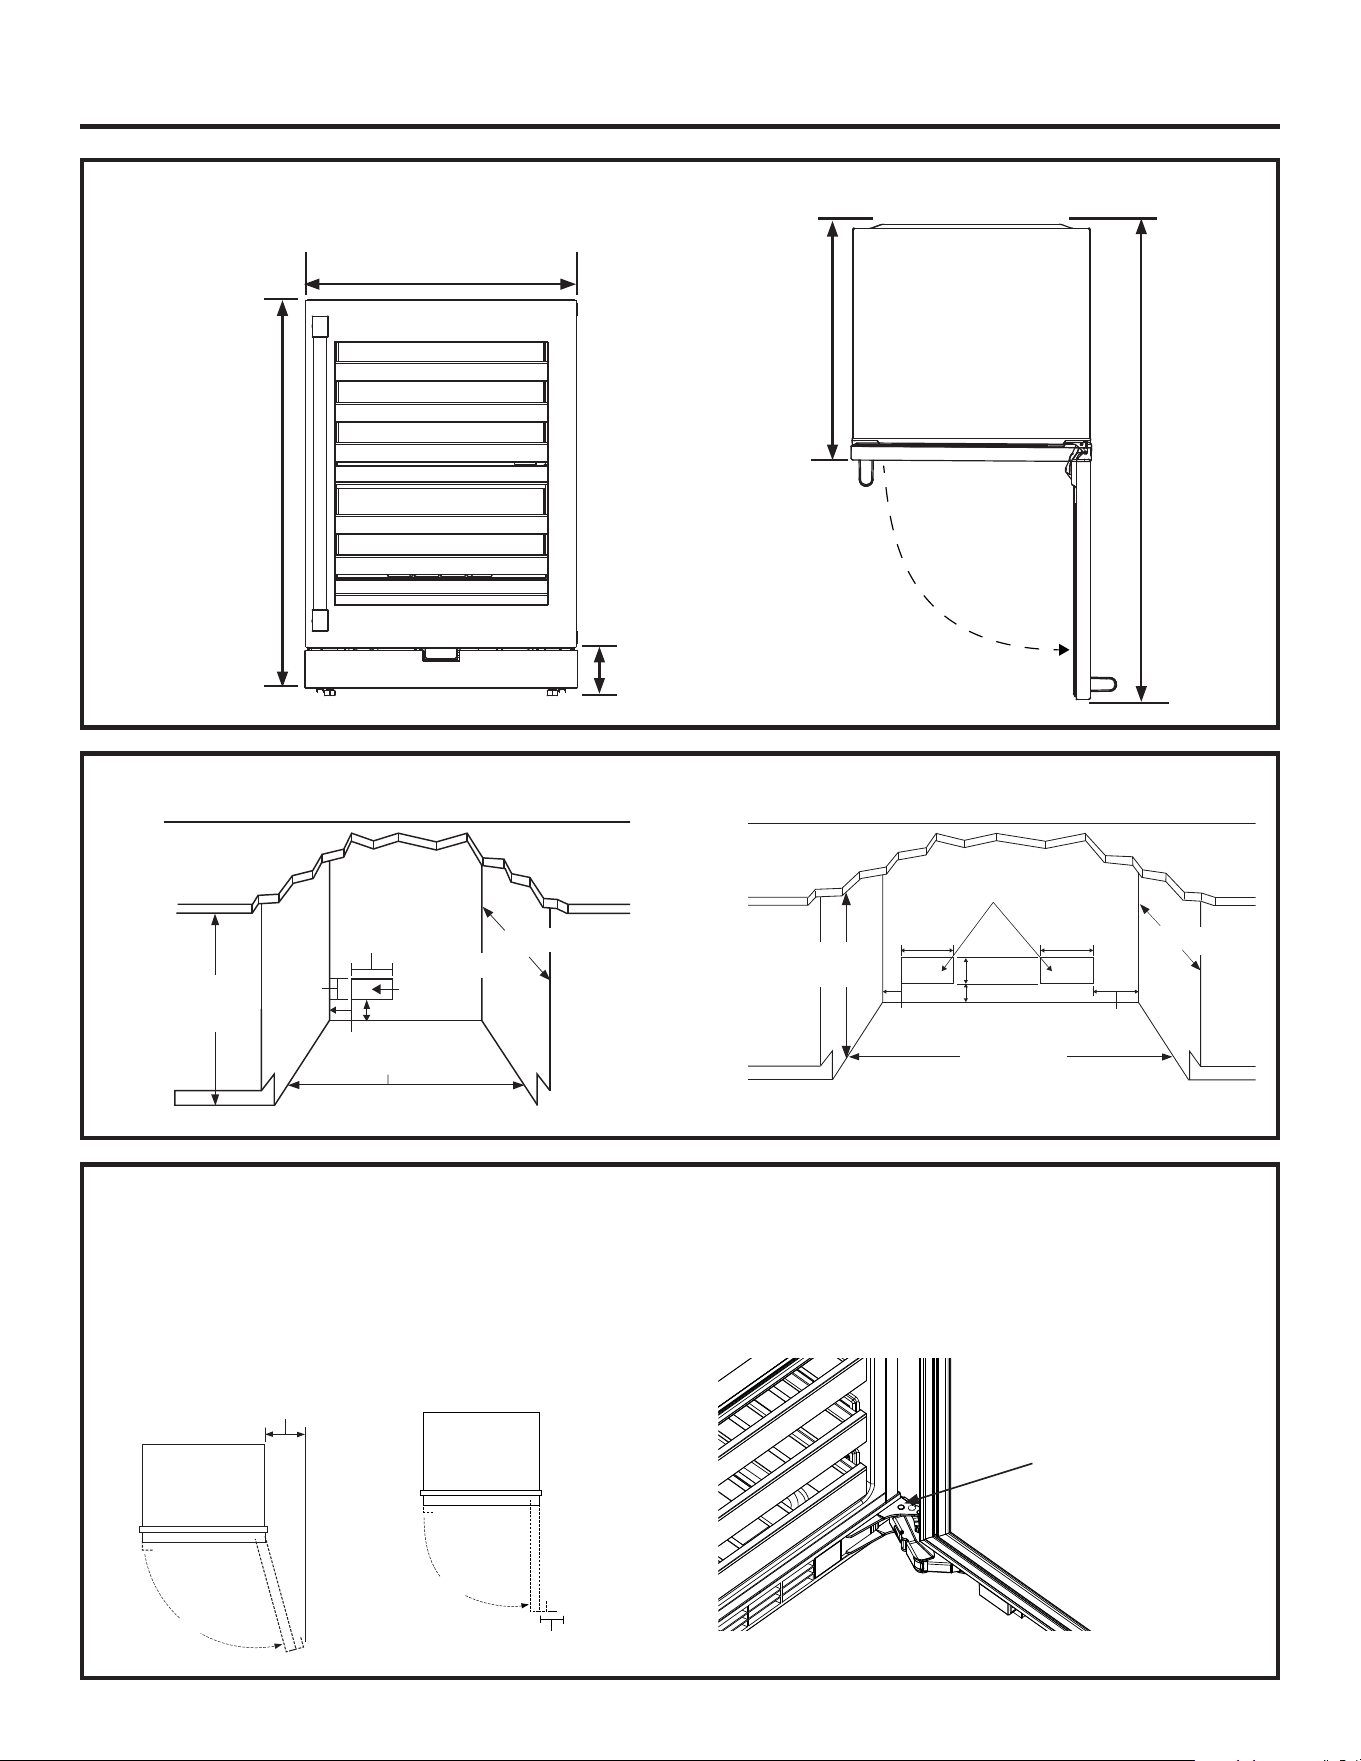
14 49-1000777 Rev. 2
,QVWUXFFLRQHVGH,QVWDODFLyQ
EL ESPACIO DE INSTALACIÓN
34-1/2" - 35"
(876.3 - 889mm)
24" (610 mm)
24" (610mm)
(52mm)
10"
(254mm)
(131mm)
5-3/16"
2"
5/8"
(41mm)
Ubicación
exterior
Ubicación exterior
10"
(254mm)
10"
(254mm)
34 1/2"-35"
(876.3 - 889mm)
24" (610mm)
5/8" (41mm)
2" (52mm)
12-3/8" (315mm)
(131mm)
48" (1220mm)
5-3/16"
INSTALACIÓN DEL PRODUCTO DE LADO A LADO
ESPACIOS LIBRES DEL PRODUCTO
&XDQGRODLQVWDODFLyQVHUHDOLFHHQXQDHVTXLQD
'HMHXQHVSDFLROLEUHPtQGH´PPVREUHHOODWHUDO
de la bisagra para una apertura de puerta de 90° y para
permitir el deslizamiento hacia afuera de los estantes.
'HMHXQHVSDFLROLEUHPtQLPRGH´PPGHOODGRGH
las bisagras para una apertura de puerta completa de 115°.
Para impedir que la puerta se abra a más de 90 grados,
inserte el perno de bisagra A de la bolsa de accesorios
en el agujero del perno de la bisagra inferior. Asegúrese
de que el perno pase completamente y que la puerta se
pueda cerrar sin problemas.
13" Mínimo
hasta la Pared
115°
Balanceo de Puerta de 90°
4" Mínimo
hasta la Pared
90°
Agujero del
perno de la
bisagra
DIMENSIONES DEL CENTRO DE BEBIDAS
Ǝ
(606 mm)
Ǝ
(866-891 mm)
´GHDMXVWHFRQODV
patas niveladoras
y ruedas
Ǝ
(606 mm)
Ǝ
(1216 mm)
$OWXUDGHO=yFDORGH´
desde el piso hasta la
parte inferior de la puerta.
Nota: El rango de altura
del zócalo es de entre
ò´\ò´GHVGHHOSLVR
hasta la parte inferior de
la puerta. Ajuste la altura
con las patas niveladoras
frontales y las ruedas
niveladoras traseras.
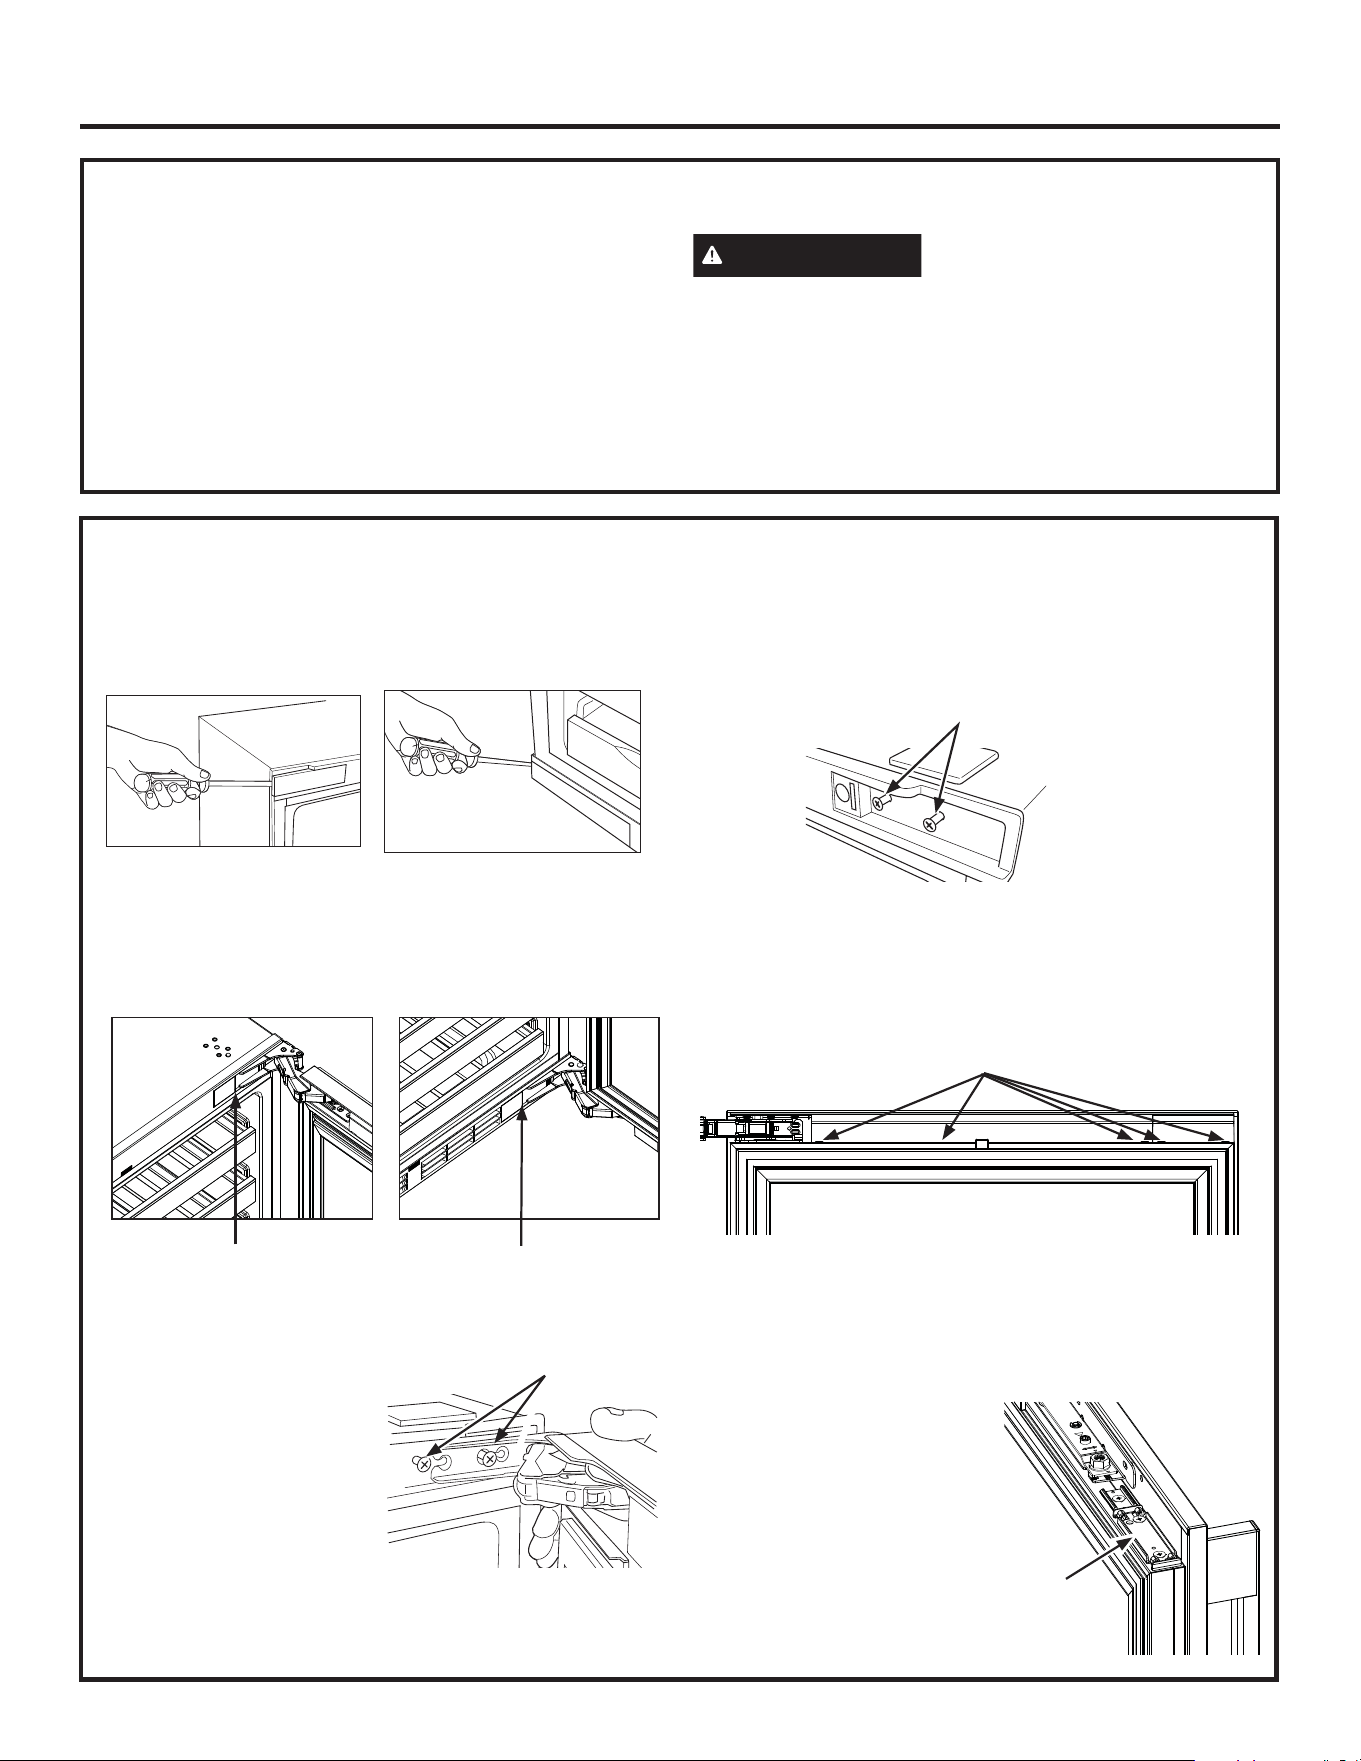
49-1000777 Rev. 2 15
RETIRE EL EMBALAJE
• Retire la cinta y los residuos de pegamento de las
superficies antes de encender el centro de bebidas.
Frote una pequeña cantidad de detergente líquido sobre
el adhesivo con los dedos. Limpie con agua caliente y
seque.
NOTA: No use instrumentos puntiagudos, no frote alcohol,
no use líquidos inflamables, ni limpiadores abrasivos para
retirar cinta o pegamento. Estos productos pueden dañar
la superficie del centro de bebidas. Para más información,
OHDODVHFFLyQGH³6HJXULGDGGHO&HQWURGH%HELGDV´
• Descarte/ recicle todos los materiales del embalaje.
ADVERTENCIA
/RVREMHWRVSHTXHxRV
UHSUHVHQWDQXQULHVJRGHDVIL[LDSDUDORVQLxRV
5HWLUH\GHVFDUWHFXDOTXLHUSLH]DTXHQRVHXVH
LIMPIEZA ANTES DEL USO
Luego de retirar todos los materiales del embalaje, limpie
la parte interior del centro de bebidas antes del uso.
Consulte las instrucciones de limpieza en la sección de
³&XLGDGRGHO&HQWURGH%HELGDV´
,QVWUXFFLRQHVGH,QVWDODFLyQ
INVERSION DE LA APERTURA DE LA PUERTA
1. Abra la puerta, inserte un destornillador de cabeza
plana en la muesca sobre el lado de la tapa plástica
rectangular del lado opuesto de la bisagra para retirar
tanto la tapa superior como la inferior.
Del lado de las bisagras, inserte el destornillador de
cabeza plana debajo de la tapa de la bisagra en forma
de T para quitar la tapa tanto de la bisagra superior
como de la inferior. Retire la tapa cuadrada que se
encuentra próxima a éstas con el mismo destornillador.
2. Afloje completamente
el tornillo para retirar la
puerta del gabinete.
3. Haga el retiro de la
puerta y deje las bisagras
abiertas.
4. Retire los tornillos de las bisagras del gabinete e
instale los mismos del lado opuesto. Se recomienda
atornillar hasta la mitad los dos tornillos superiores,
de modo que pueda deslizar la bisagra sobre estos y
tener cierto soporte durante la instalación.
5. Si la puerta tiene un marco superior instalado,
entonces retire el marco plástico superior de la puerta
insertando un destornillador de cabeza plana sobre
las ranuras debajo del marco (se sugiere comenzar
del lado de la manija) y abrirlo. Caso contrario, vaya al
siguiente paso.
6. Retire las bisagras de la puerta. Mueva el soporte del
marco desde el lado superior izquierdo de la puerta
hasta el lado superior derecho de la puerta. Coloque
las bisagras del otro con la bisagra superior en la parte
inferior y con la bisagra inferior en la parte superior.
La bisagra inferior posee
una arandela. Al mover
la bisagra inferior al
otro lado como bisagra
superior, asegúrese de
retirar la arandela y de
colocarla en la nueva
bisagra inferior, que es la
bisagra superior original
del otro lado.
Tornillos
Tornillos
Ranuras
Soporte
del marco
Inserte el destornillador
desde este lado para abrir
la tapa cuadrada.
Inserte el destornillador
debajo de la tapa de
bisagra en forma de T.
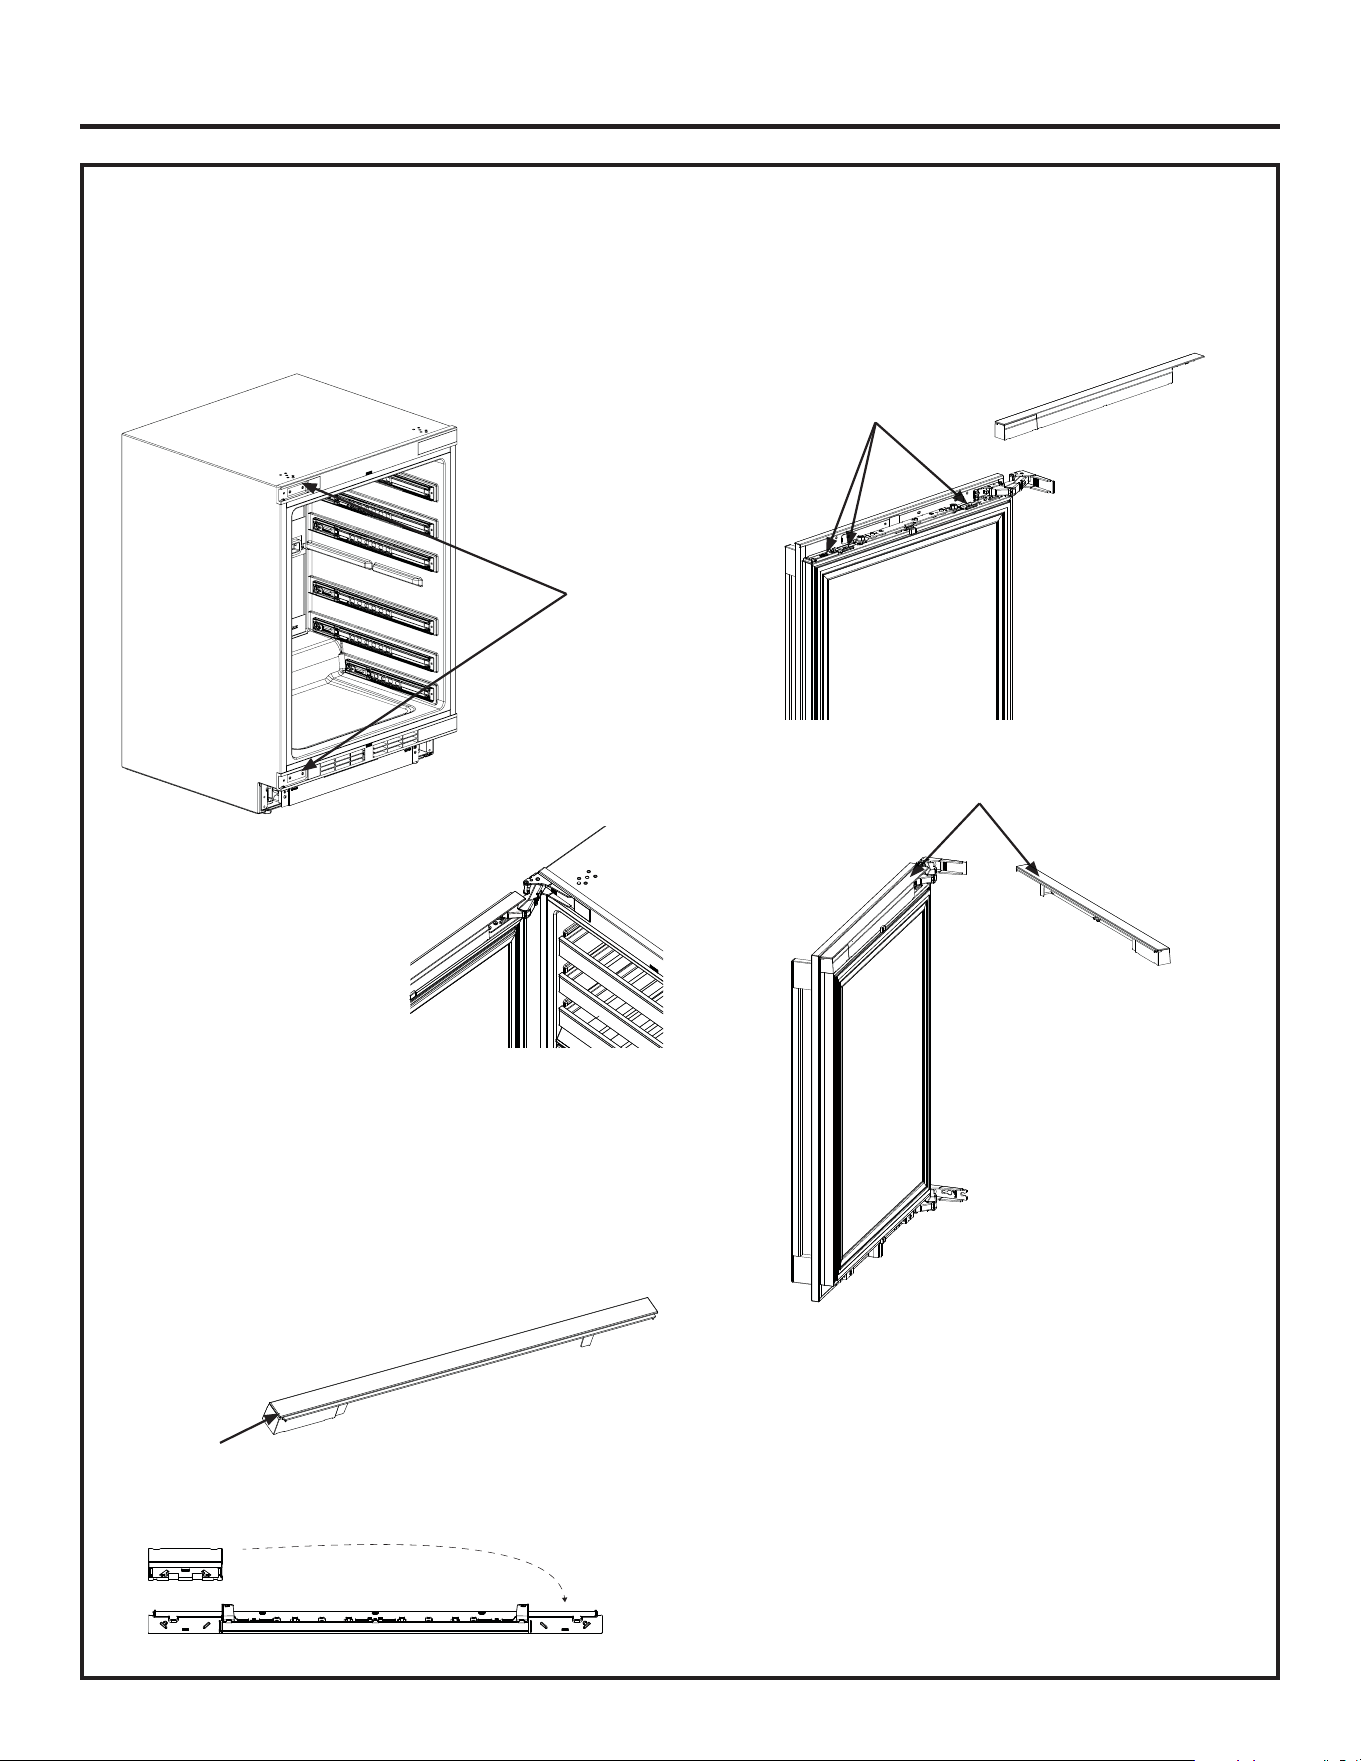
16 49-1000777 Rev. 2
,QVWUXFFLRQHVGH,QVWDODFLyQ
INVERSIÓN DE LA APERTURA DE LA PUERTA &217
7. Instale las tapas cuadradas del paso 1 en la nueva
ubicación de la bisagra en la parte superior e inferior
del gabinete. Instale la tapa rectangular del paso 1 en
el nuevo lado sin bisagra, sobre la parte superior e
inferior del gabinete frontal.
8. Deslice la bisagra superior
sobre los 2 tornillos
superiores sobre el
gabinete. Instale el tornillo
de la bisagra inferior, no los
ajuste. Nivele la puerta y
luego ajuste los 4 tornillos.
Instale la tapa de la bisagra
en forma de T del paso 2 al
gabinete.
9. Si el producto no posee un marco de plástico superior
instalado, podrá encontrarlo dentro de la unidad sobre
el estante superior de bebidas. Separe el bloque
de la tapa final del marco superior, insertando el
destornillador de cabeza plana en la ranura debajo del
marco sobre el extremo de este último.
Place it on the other side of the trim. The trim is ready
to be installed.
10. Realice este paso sólo luego de completar la
instalación y el ajuste del panel de la puerta.
Presione la tira de resorte mientras instala el marco
sobre la puerta. Presione el marco para adherir el
gancho del marco a los soportes de la puerta.
Tapas
cuadradas
Ranura
Soporte al marco
Tira de resorte
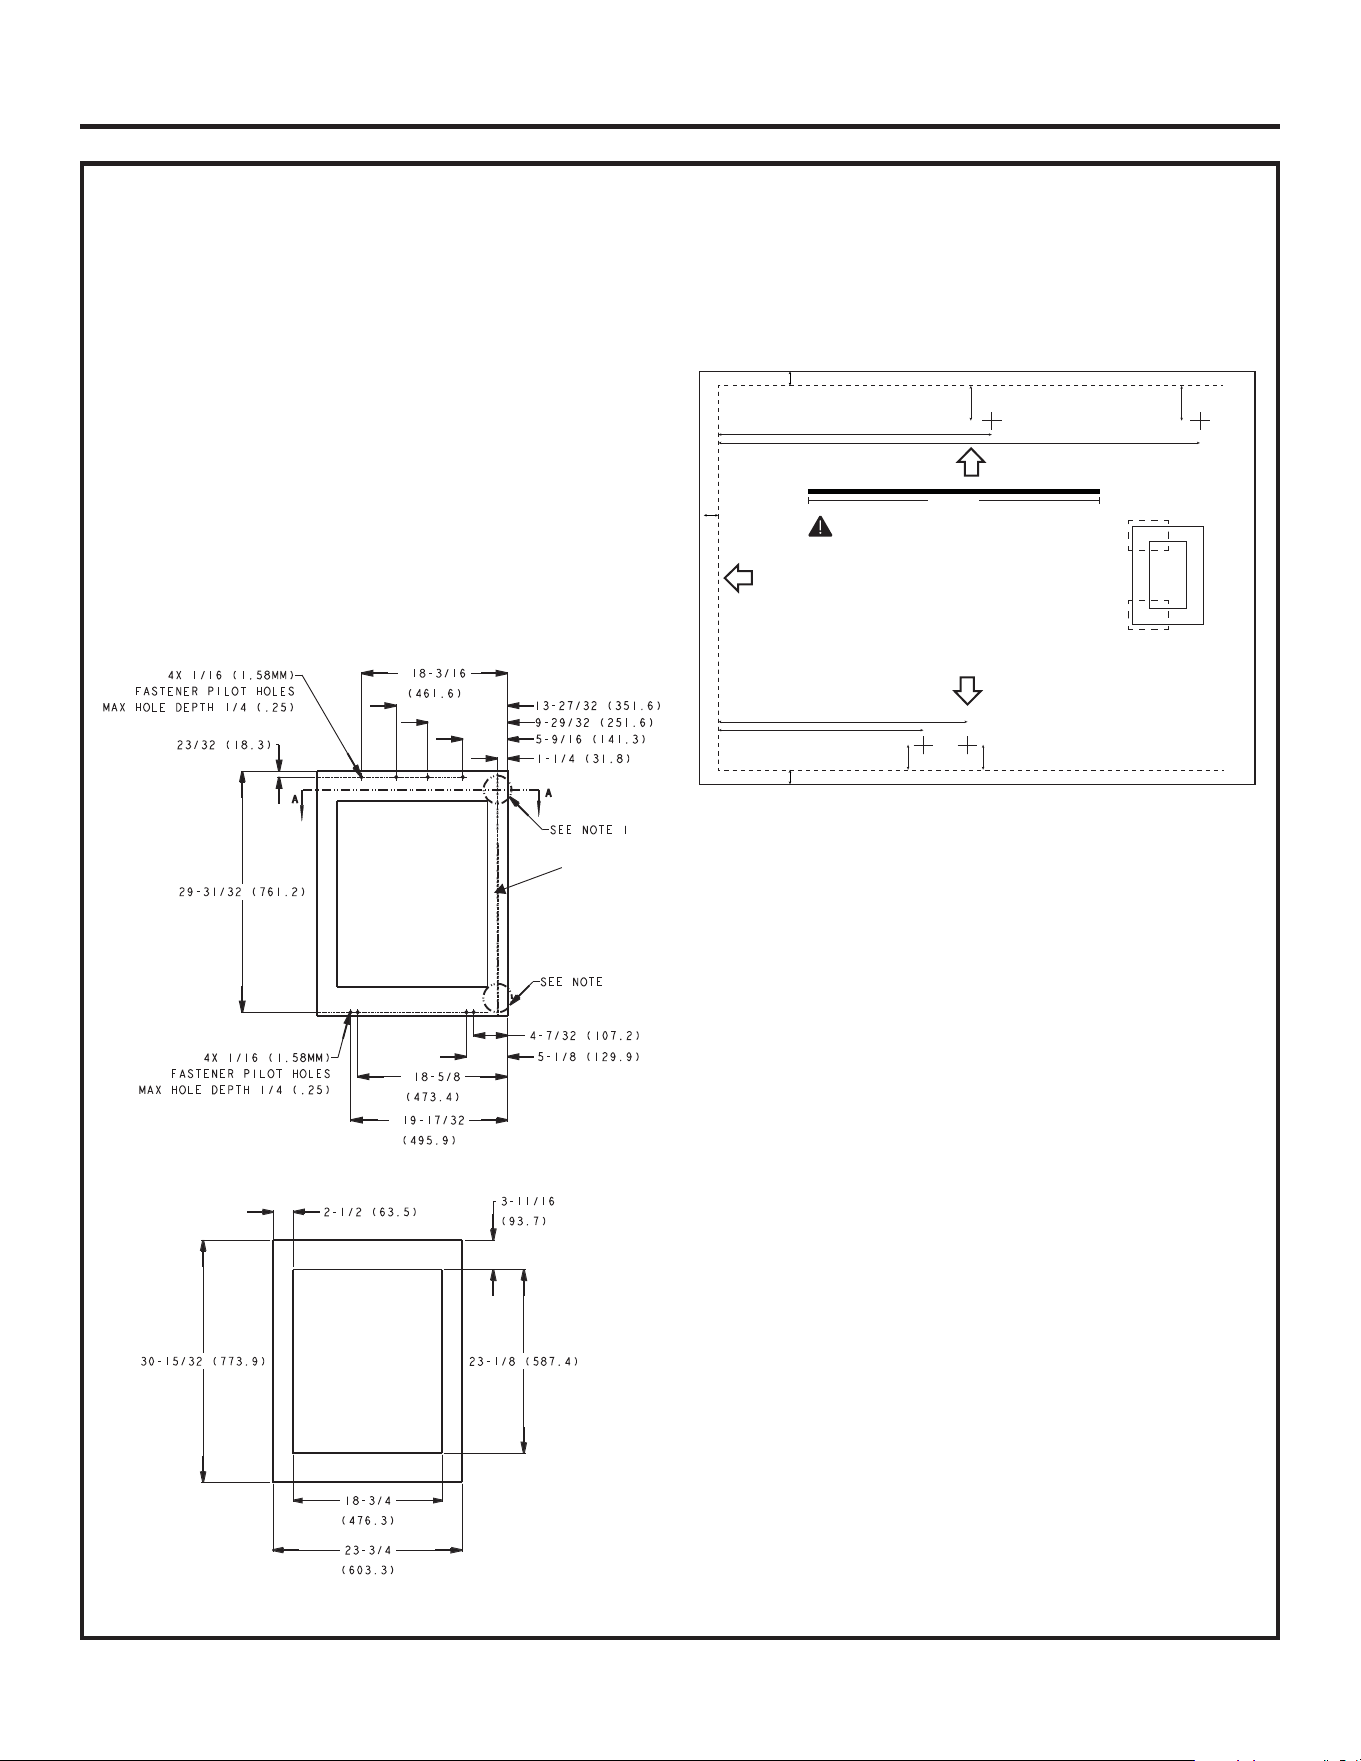
49-1000777 Rev. 2 17
,QVWUXFFLRQHVGH,QVWDODFLyQ
ARMADO DEL PANEL DE LA PUERTA A MEDIDA
(OSDQHODPHGLGDGHEHUiSRVHHUXQJURVRUGHô´
(1.91mm). Los soportes están incluidos con el refrigerador
para brindar el montaje en la puerta del electrodoméstico.
NOTA: Recomendamos que los paneles decorativos
posean esquinas internas y extremos redondeados o
biselados por el fabricante de gabinetes, para evitar
extremos puntiagudos en los paneles. Los extremos a ser
tratados deberán incluir el extremo superior, el inferior y los
laterales de las bisagras.
NOTA: Se recomienda realizar el acabado del lado trasero
del panel. Las partes del lado trasero del panel estarán
visibles cuando se abra la puerta.
Pasos
9HUL¿TXHTXHODGLPHQVLyQWRWDOGHOSDQHOFRLQFLGDFRQ
el dibujo del panel que aparece debajo.
2. Se brinda una plantilla de los agujeros piloto con la uni-
dad en la bolsa de accesorios para ayudarle a perforar
los agujeros piloto en la ubicación correcta. Siga las
instrucciones de la plantilla para completar los agujeros
piloto.
3. Instale el soporte roscado, el tornillo pasador para
el montaje de la manija, y el espaciador siguiendo el
manual de instalación incluido con el kit ZKPN.
Vista frontal del Panel de la Puerta a Medida
Vista trasera del Panel de la Puerta a Medida
Handle side
Handle
mounting
centerline
LEFT
6" (15.24 CM)
yPRINT TEMPLATE ON 8.5" X 11" (21.59 CM X 27.94 CM) PAPER ONLY.
yPRINT ACTUAL SIZE (100% SCALE). DO NOT SCALE TO FIT.
NO MARGINS OR HEADERS/FOOTERS.
yVERIFY LINE MEASURES 6" (15.24 CM) LONG BEFORE DRILLING PILOT HOLES.
*PILOT HOLES TO BE 7/64" AND NOT EXCEED 1/2" DEEP.
BOTTOM
T1
T1
T1
5-1/8
"
.3
"
.3
"
4-7/32
"
5-9/16
"
23/32
"
23/32
"
9-29/32
"
.3
"

18 49-1000777 Rev. 2
,QVWUXFFLRQHVGH,QVWDODFLyQ
ARMADO DEL PANEL DE LA PUERTA A MEDIDA &217
4. Instale el Kit de la Junta del Panel de la Puerta de
Madera a Medida (Opcional)
• La unidad incluye 4 juntas, 2 largas y 2 cortas.
• Las juntas llenan la brecha entre el panel de la puerta
de madera a medida y el vidrio.
• Instale las dos juntas largas primero. Deje una pequeña
brecha en las esquinas para las juntas cortas. (Figura 1)
• Retire la tira de papel del adhesivo y descártela.
• Instale el extremo duro de la junta larga a
aproximadamente 1/16 (1 mm) del extremo de la
ventana que mira hacia el cliente. (Figura 2 y 2B)
• El extremo de la junta dura sostiene la junta de forma
plana contra la puerta con el adhesivo.
• El extremo de la junta suave cierra la brecha entre la
puerta y el vidrio.
5. Instale las manijas de acuerdo con las instrucciones
para el tipo de manija y los kits de las listas.
Extremo duro
(adhesivo
apoyado)
Figura 1
Extremo
suave
Figura 2
Instale las dos
juntas largas
primero.
Nota: Deje
una pequeña
brecha en
las esquinas
para las juntas
cortas.
Figura 2B
Instale las dos
juntas cortas
para completar
el ensamble
del kit.

49-1000777 Rev. 2 19
,QVWUXFFLRQHVGH,QVWDODFLyQ
ARMADO DEL ZÓCALO A MEDIDA
=yFDORD0HGLGDGH
3DUDODLQVWDODFLyQHQXQDXQLGDGGREOHVLJDHOVLJXLHQWHGLEXMRSDUDKDFHUXQ]yFDORGH
´GHDQFKR
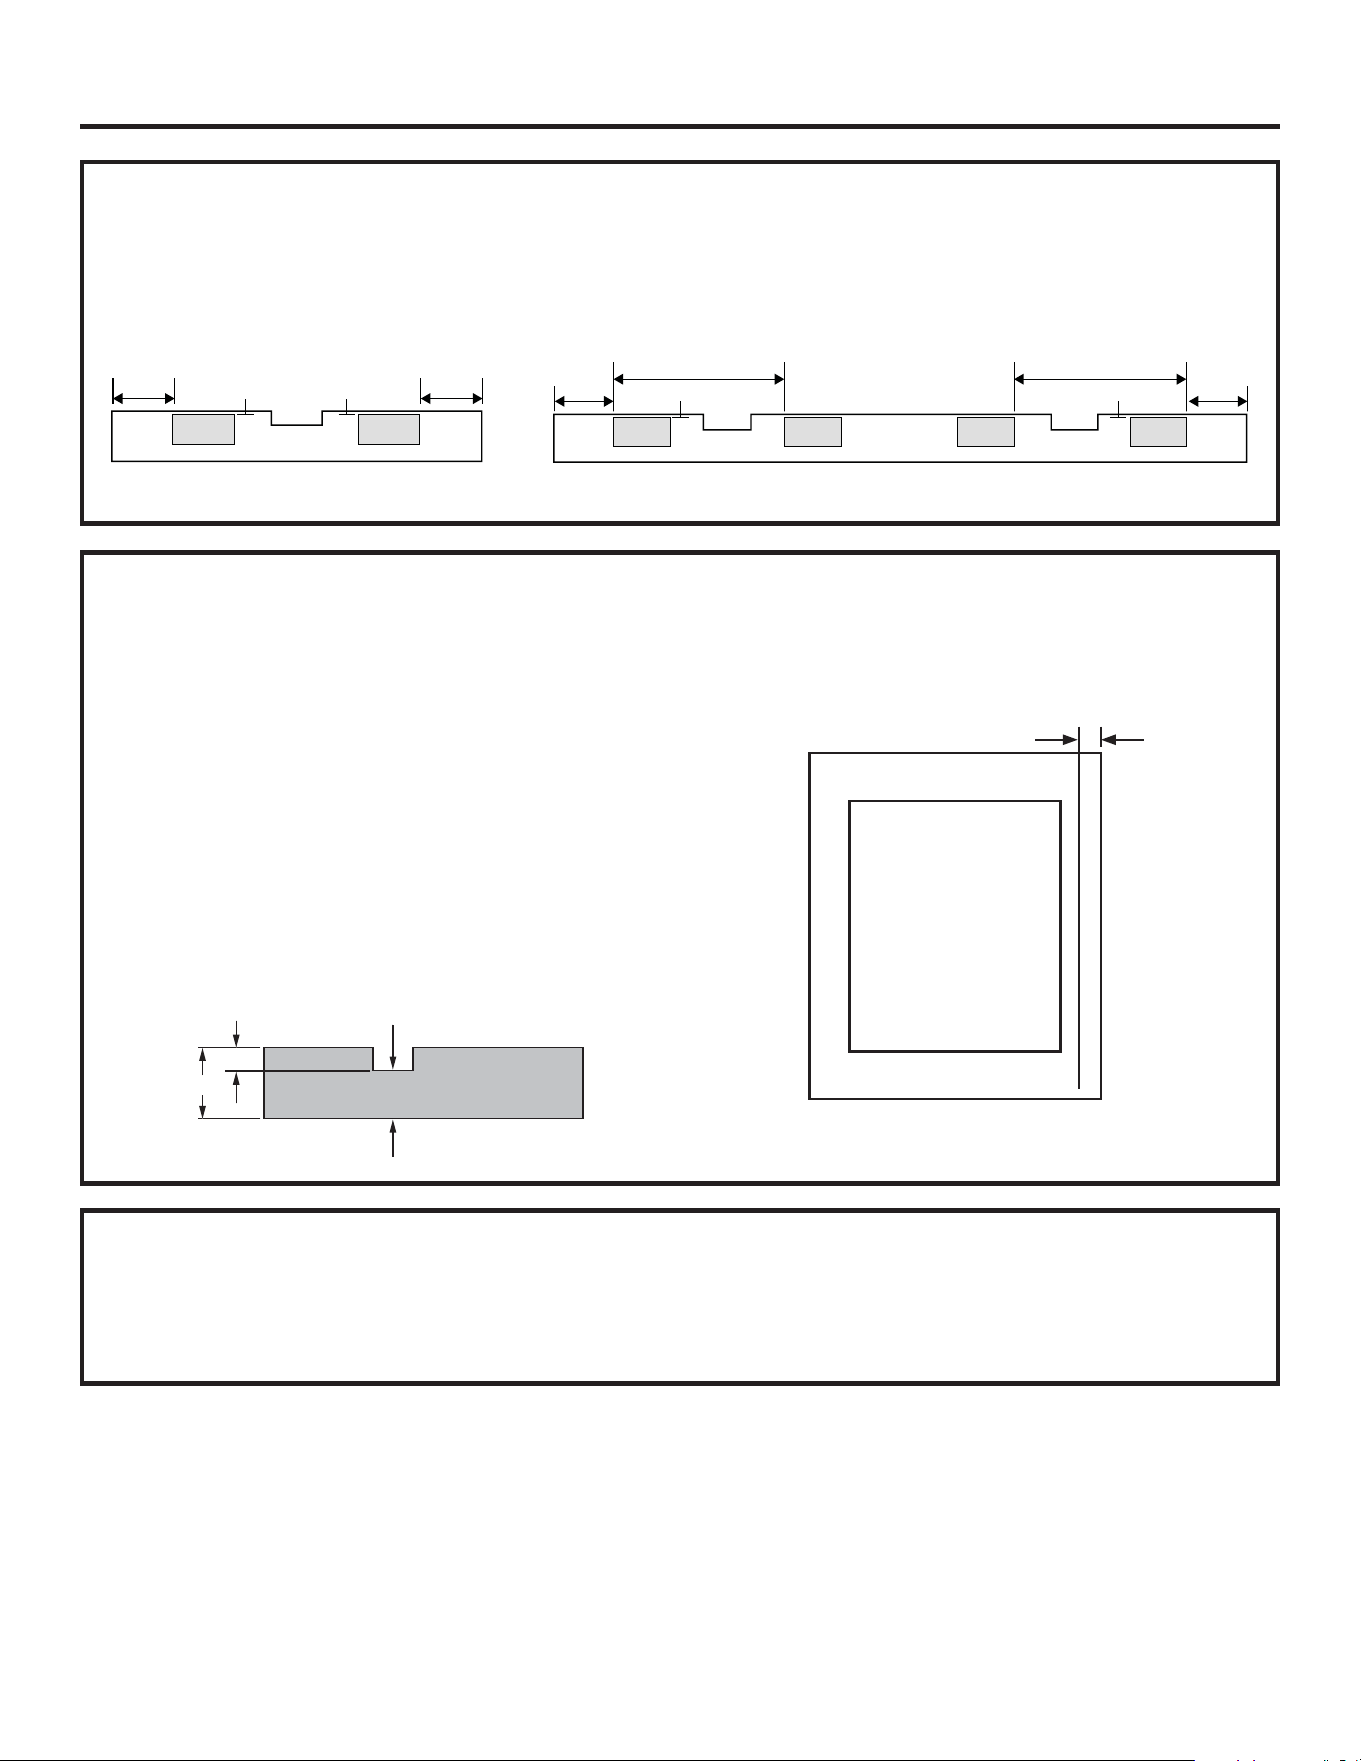
20 49-1000777 Rev. 2
,QVWUXFFLRQHVGH,QVWDODFLyQ
INSTALE LA MANIJA
Para instalar la manija en un Panel de Puerta de Acero
Inoxidable. Coloque los extremos de la manija sobre
los tornillos pasadores de la manija y ajuste los tornillos
colocados usando la llave Allen provista.
Para instalar la manija en un Panel de Puerta a Medida,
revise las instrucciones de ensamble de la manija
incluidas en el Kit del Tornillo Pasador de Montaje de la
Manija ZKPN para Paneles a Medida.
ARMADO DEL ZÓCALO A MEDIDA &217
,QVWDODFLyQGHOLPiQGHO]yFDORDPHGLGD
Pele el apoyo adhesivo desde las almohadillas imantadas incluidas con la bolsa de accesorios de la unidad. Coloque
las mismas sobre la parte trasera de los zócalos como se muestra a continuación:
9HDHQODVLJXLHQWHSiJLQDODLPDJHQGHDPERV]yFDORVGH´\´
3-15/16"
(100mm)
1/4"
(5mm)
1/4"
(5mm)
3-15/16"
(100mm)
3-15/16"
(104.1mm)
11-7/8" (301.6mm)
1/4" (5mm)
3-15/16"
(104.1mm)
11-7/8" (301.6mm)
1/4" (5mm)
*8Ë$'(',6(f2'(0$1,-$02'(/26'(/3$1(/$0(','$Ò1,&$0(17(
Los Paneles a Medida requieren una manija a medida
del fabricante de gabinetes o el uso del Kit de Montaje
GH0DQLMD±=.31VHYHQGHSRUVHSDUDGRVLXVDUiQ
las manijas Statement o Minimalist de Monogram (se
venden por separado).
Para la instalación de manijas a medida, taladre
agujeros en la parte trasera de los paneles decorativos.
$VHJ~UHVHGHTXH´PPGHOJURVRUGHOPDWHULDO
permanezca para el soporte de la manija.
NOTA: El agujero taladrado no deberá superar 1"
(25.4 mm) de diámetro.
La distancia mínima desde el extremo lateral del panel
KDVWDHOFHQWURGHODPDQLMDGHEHUiVHUGHó´
mm) como se muestra.
1/4"
(6.4mm)
1/2"
(12.7mm)
3/4"
(19.1mm)
Lado de la bisagra Lado de la manijas
1-1/4'' (31.8mm)
=yFDORGH´ =yFDORGH
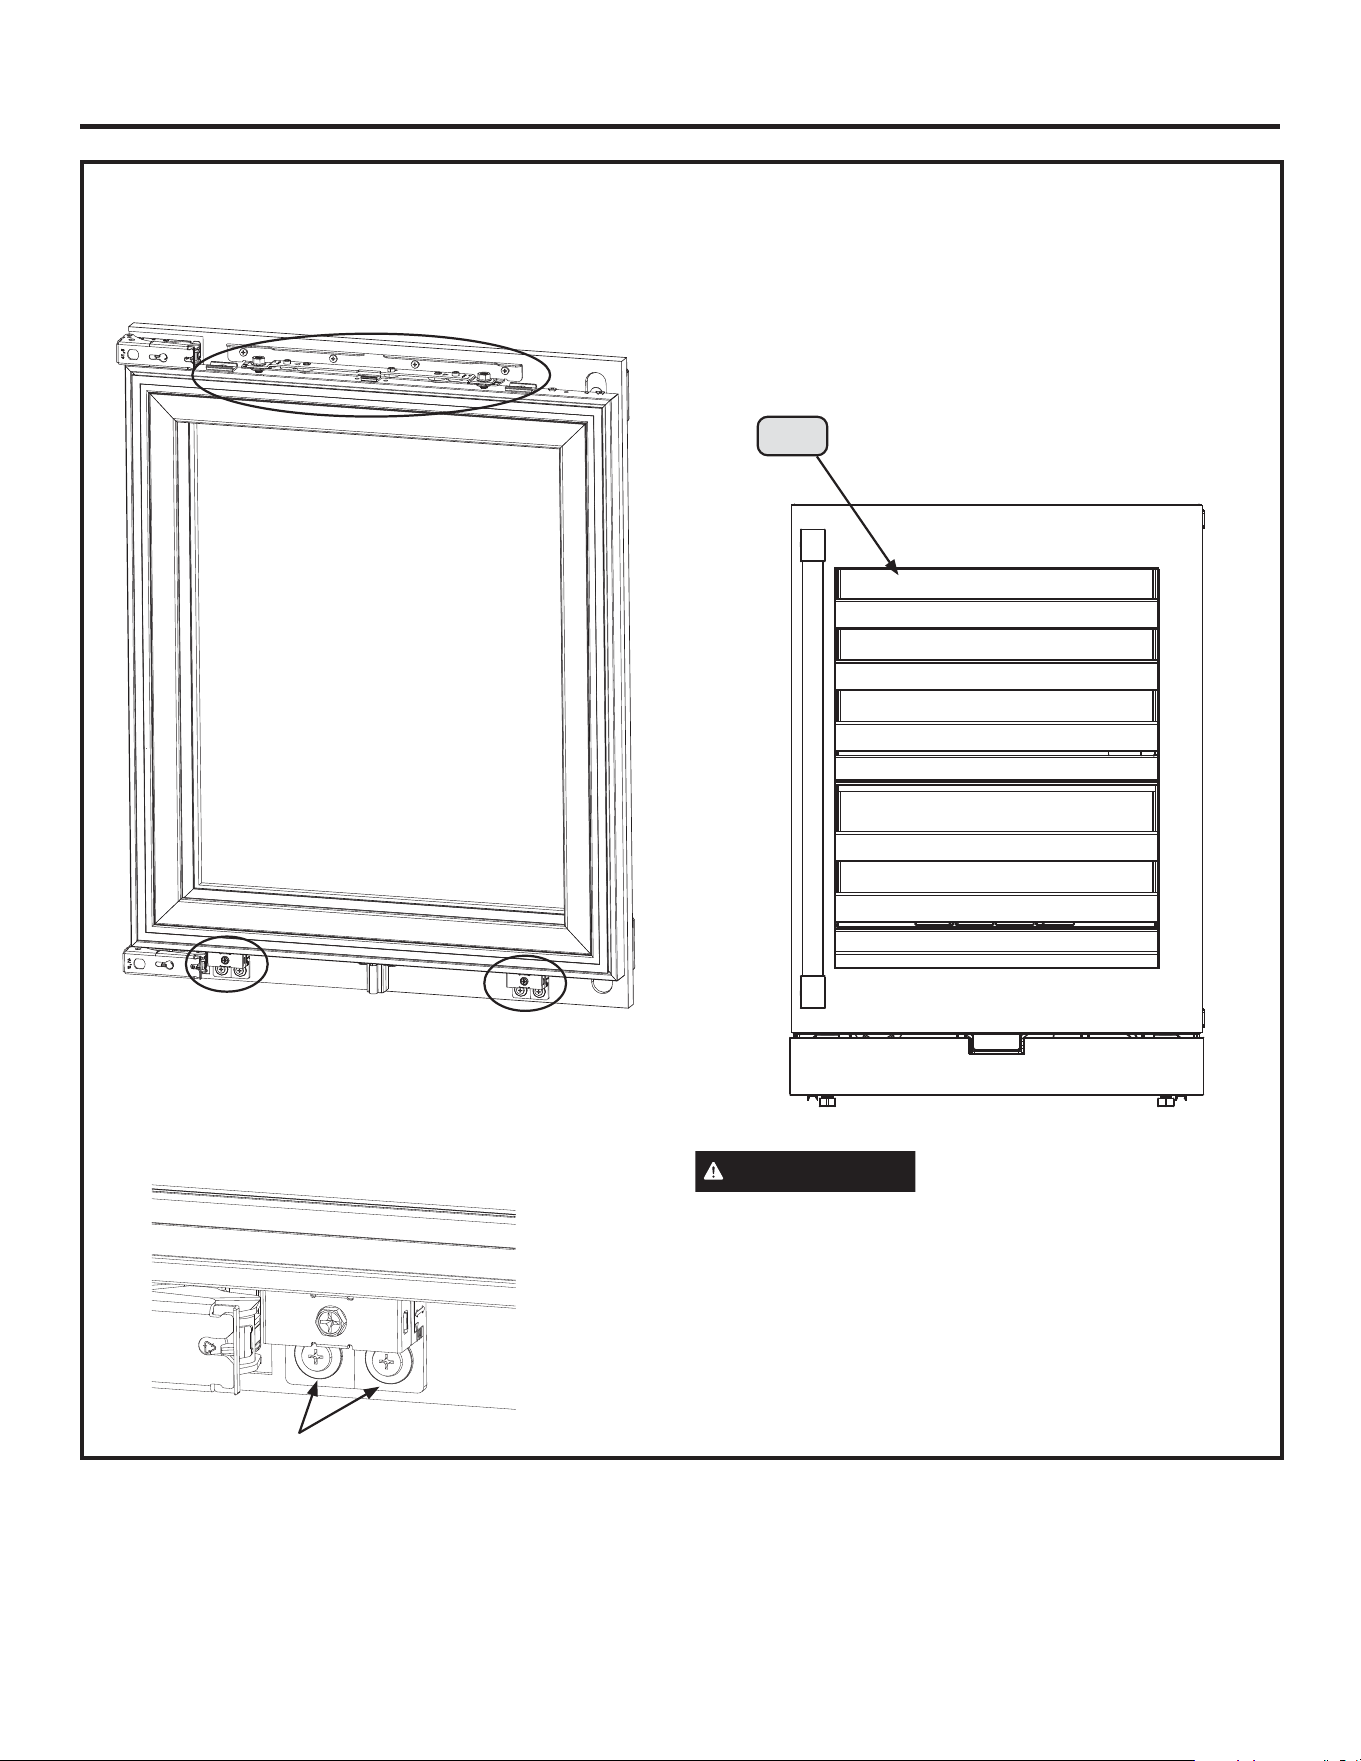
49-1000777 Rev. 2 21
,QVWUXFFLRQHVGH,QVWDODFLyQ
INSTALE EL PANEL DE PUERTA DE ACERO INOXIDABLE O DE MADERA
A MEDIDA
1. Adhiera el Panel de la Puerta al Soporte de Ajuste
Superior con los 4 tornillos, B o C.
2. Adhiera el Panel de la Puerta a la parte inferior de la
puerta con los 4 tornillos, B o C y las arandelas D.
Nota: No ajuste los tornillos inferiores para facilitar el
ajuste del panel más tarde.
3. En caso de haber arrugas o pliegues en la junta entre el
panel de la puerta y el vidrio, mueva una tarjeta plástica
delgada a lo largo del extremo entre el extremo suave de
la junta y el vidrio para emparejar las arrugas y alinear la
junta. (Figura 3)
PRECAUCIÓN
Si usted necesita alternar los
SDQHOHVGHODVSXHUWDVVLHPSUHGHVHQURVTXHHO
WRUQLOORLQIHULRUSULPHUR\OXHJRHOWRUQLOORVXSHULRU
FRQHO¿QGHHYLWDUODURWXUDGHORVVRSRUWHVGH
PRQWDMHGHOSDQHOGHODSXHUWDLQIHULRU
Figura 3
Frente de la puerta
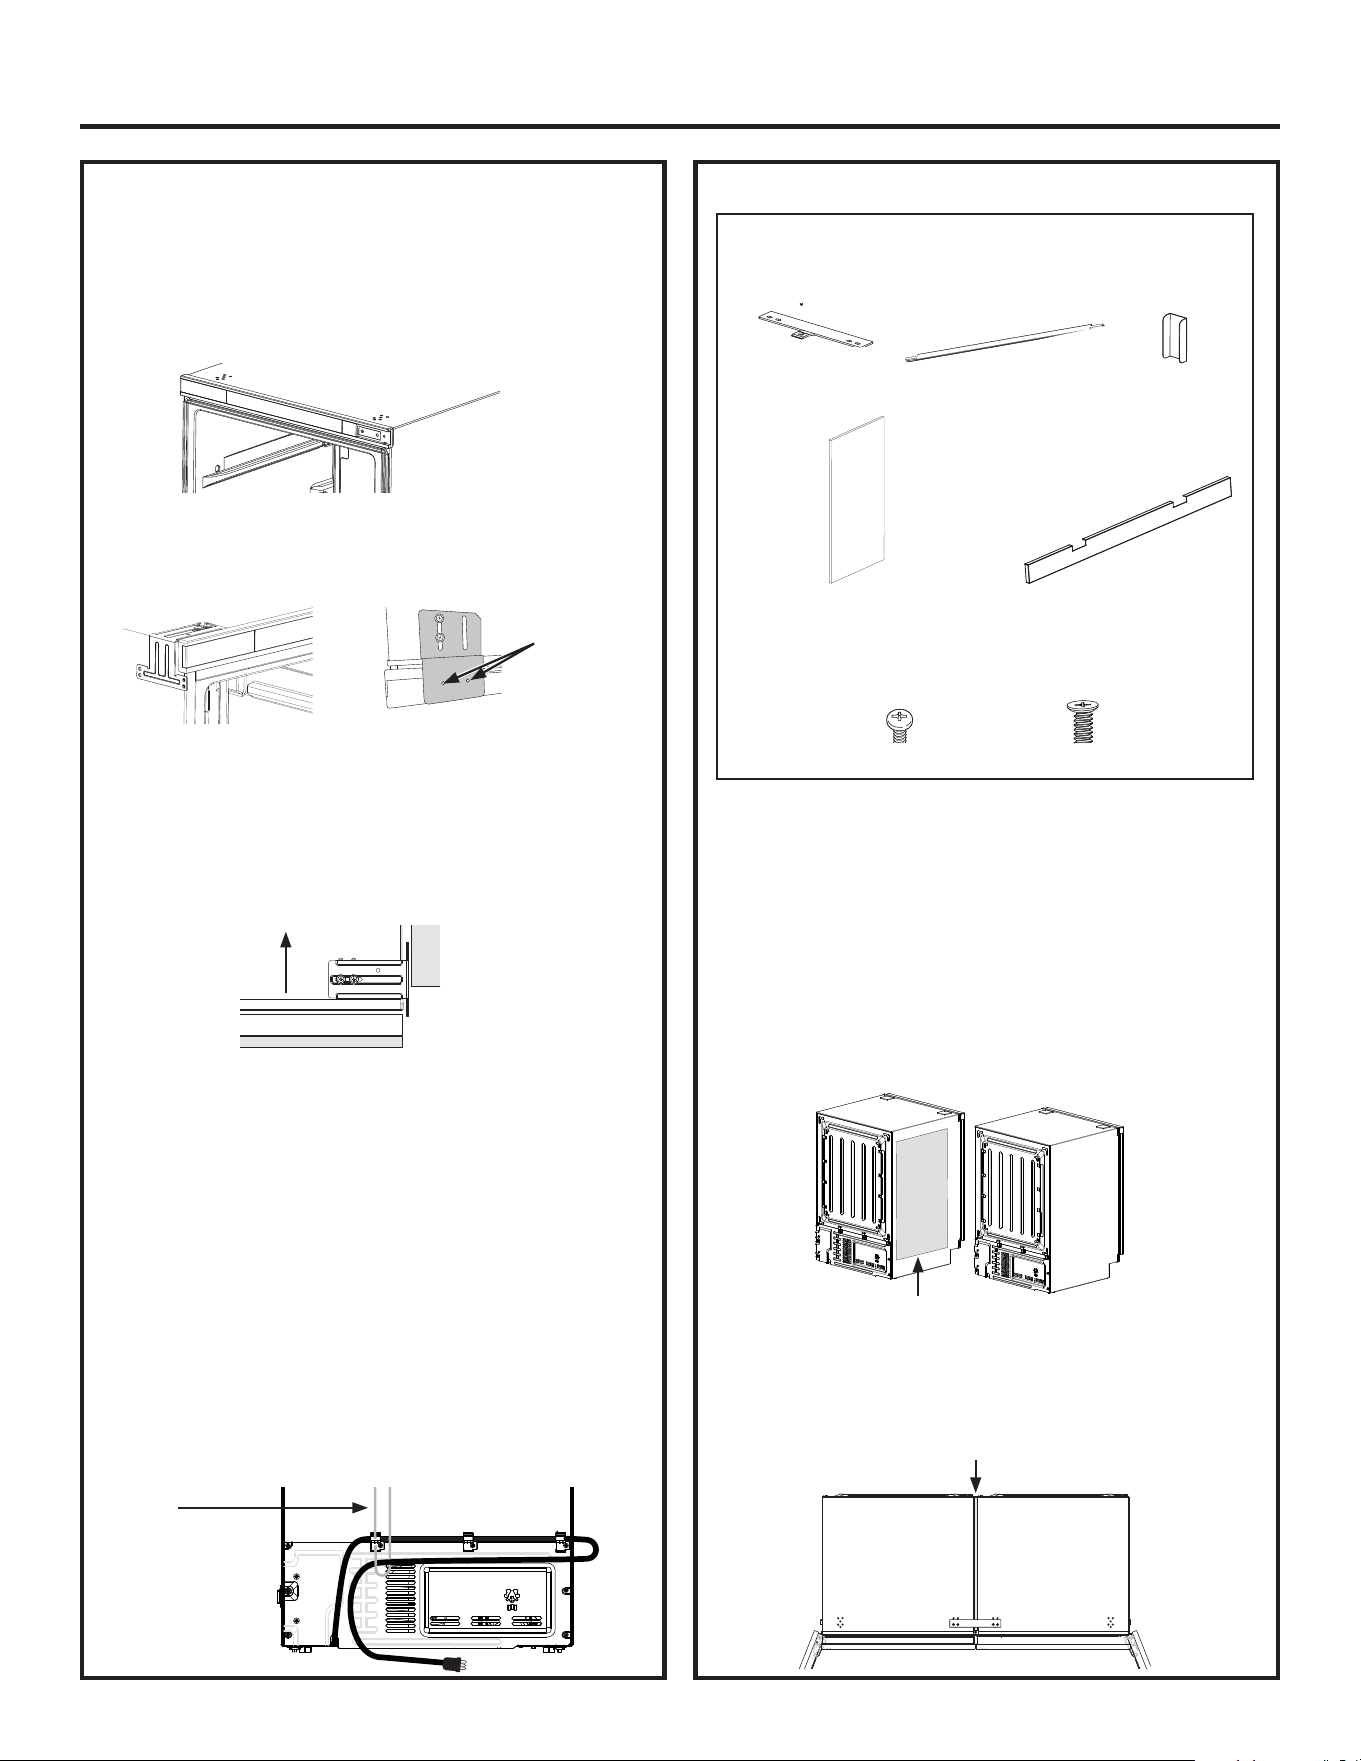
22 49-1000777 Rev. 2
,QVWUXFFLRQHVGH,QVWDODFLyQ
INSTALACIÓN CON UNIÓN DOBLE
1. Asegúrese de que los dos productos que se unificarán
tengan los balanceos de las puertas ajustados para que
ambas manijas queden en el medio y que las puertas se
abran hacia afuera en dirección alejada una de la otra.
2. Retire el panel de la tira adhesiva de la pieza de
gomaespuma antitranspirante e instale la misma del
lado de la carcasa de uno de los productos unificados.
Cualquiera de los productos es aceptable. Asegúrese de
colocar la gomaespuma a por lo menos 10mm desde el
frente del gabinete del electrodoméstico.
3. Alinee las dos carcasas hasta una brecha de
DSUR[LPDGDPHQWHò´PP(VWRGHMDUiXQD
EUHFKDGHDSUR[LPDGDPHQWH´PPHQWUH
los paneles de las puertas.
0DWHULDOHV\SLH]DVGHLQVWDODFLyQLQFOXLGRVHQ
ORV.LWVGH8QLILFDFLyQ=.$:\=.1:/RV
NLWVVHYHQGHQSRUVHSDUDGR
Conectores
superior/ inferior
x 2
Conector
trasero x 3
Parte del Marco Frontal
(Conector Frontal) x 1
Gomaespuma
antitranspirante x 1
Dimensión:
18-1/8" x 1-5/16" x 9/16"
(460mm x 846mm x 15mm)
Zócalo x 1
Tornillo Pasador C Tornillo Pasador E
Gomaespuma antitranspirante
Gomaespuma antitranspirante
PARA UNA INSTALACIÓN SIMPLE:
INSTALE LOS DISPOSITIVOS ANTIVOLCADURAS
El soporte antivolcaduras puede estabilizar la unidad en el
funcionamiento diario.
1. Retire las tapas de los agujeros desde la parte superior
del producto.
2. Instale los soportes antivolcaduras sobre la parte
superior del producto con los tornillos E desde la bolsa
de accesorios. Asegúrese de que los soportes estén
alineados.
3. Alinee los soportes con el gabinete y empuje de forma
suave el producto dentro de la abertura del gabinete
hasta la profundidad deseada.
Nota: En caso de haber problemas para empujar la unidad
WRWDOPHQWHGHQWURGHORUL¿FLRGHOJDELQHWHHVSRVLEOHTXHHO
cable de corriente esté enredado en la parte trasera. Para
evitar esto, retire los 3 sujetadores plásticos de la bolsa de
accesorios e instálelos en las 3 ubicaciones más altas de los
tornillos de la tapa de acceso junto con el tornillo de la tapa
de acceso original. Coloque el cable en los 3 sujetadores.
Enchufe el cable en el tomacorriente y ajuste una cuerda o
cable sobre la mitad del cable, entre el enchufe y el último
sujetador donde hay una marca blanca. Usted puede usar
el cable de la bolsa de accesorios o cualquier cuerda que
posea. Pase la cuerda o cable a través del primer sujetador,
y luego empuje la cuerda o cable sobre la unidad mientras
HPSXMDODXQLGDGGHQWURGHORUL¿FLRGHOJDELQHWH$MXVWHOD
posición de liberación de la cuerda y asegúrese de que el
electrodoméstico quede completamente apoyado dentro del
RUL¿FLRGHOJDELQHWH/XHJROLEHUHODFXHUGD
Cuerda
Si realizará la adhesión del
soporte antivolcaduras al gabinete
adyacente, siga la ilustración que
aparece más arriba.
Si realizará la adhesión del
soporte antivolcaduras a la
encimera, siga la ilustración
que aparece más arriba.
Trous de
vis pour
fixation sur
comptoir
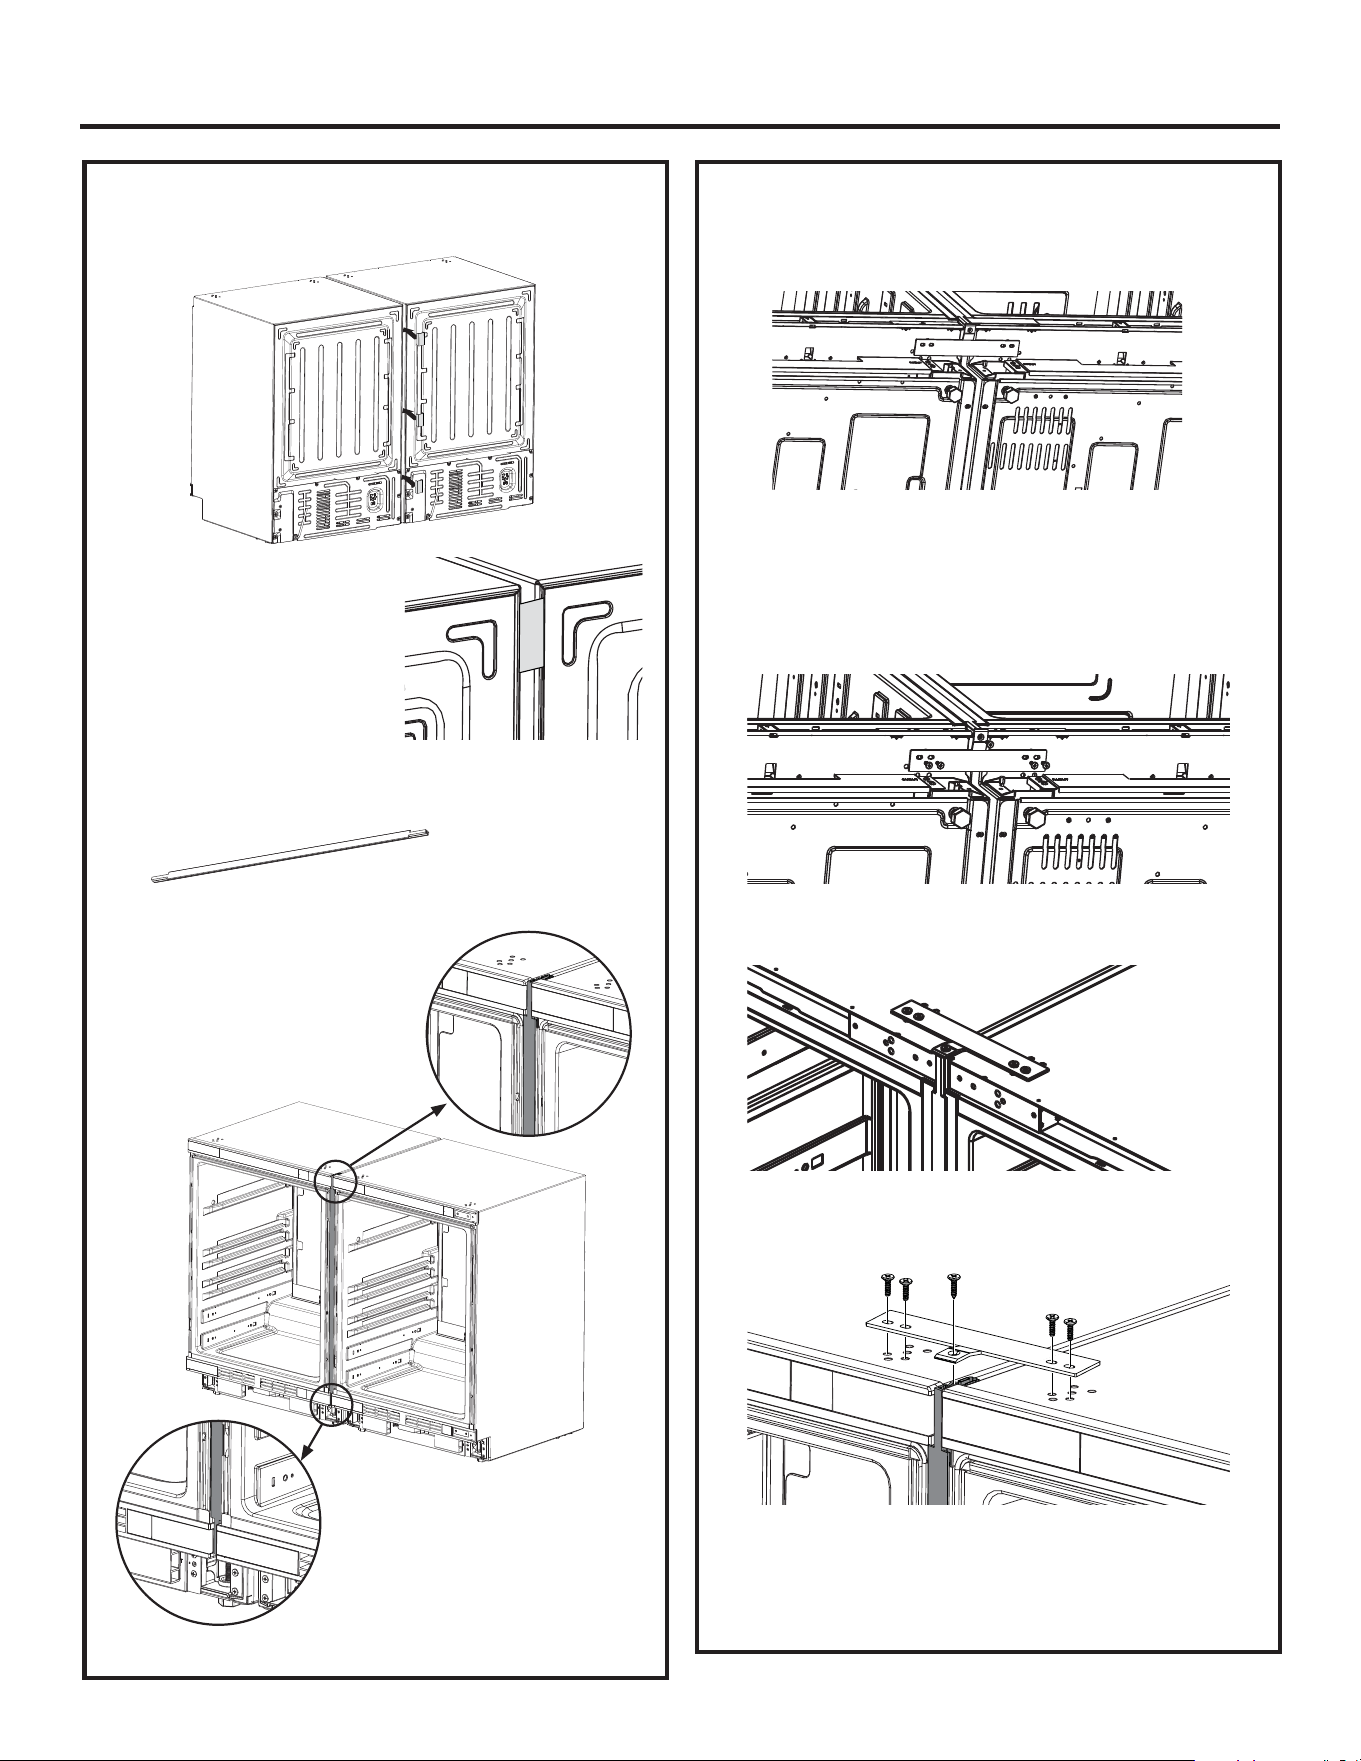
49-1000777 Rev. 2 23
,QVWUXFFLRQHVGH,QVWDODFLyQ
INSTALACIÓN CON UNIÓN FRQW
4. Instale los 3 conectores traseros.
5. Instale la parte del marco frontal (conector frontal).
Parte del Marco Frontal (Conector Frontal)
UNIDADES CON UNIÓN DOBLE FRQW
6. Instale el Conector Inferior.
A. Coloque el conector inferior como se muestra.
B. Instale un Tornillo Pasador C y cuatro Tornillos
Pasadores E.
Nota: El tornillo pasador C adhiere el conector inferior
a la parte del marco frontal (conector frontal). El Tornillo
Pasador E adhiere el conector inferior a la parte inferior
de ambas carcasas.
7. Instale el Conector Superior.
A. Coloque el conector superior como se muestra.
B. Instale un Tornillo Pasador C y cuatro Tornillos
Pasadores E.
Nota: El Tornillo Pasador C adhiere al conector
superior a la parte del marco frontal (conector frontal).
El Tornillo Pasador E adhiere el conector superior a la
parte superior de ambas carcasas.
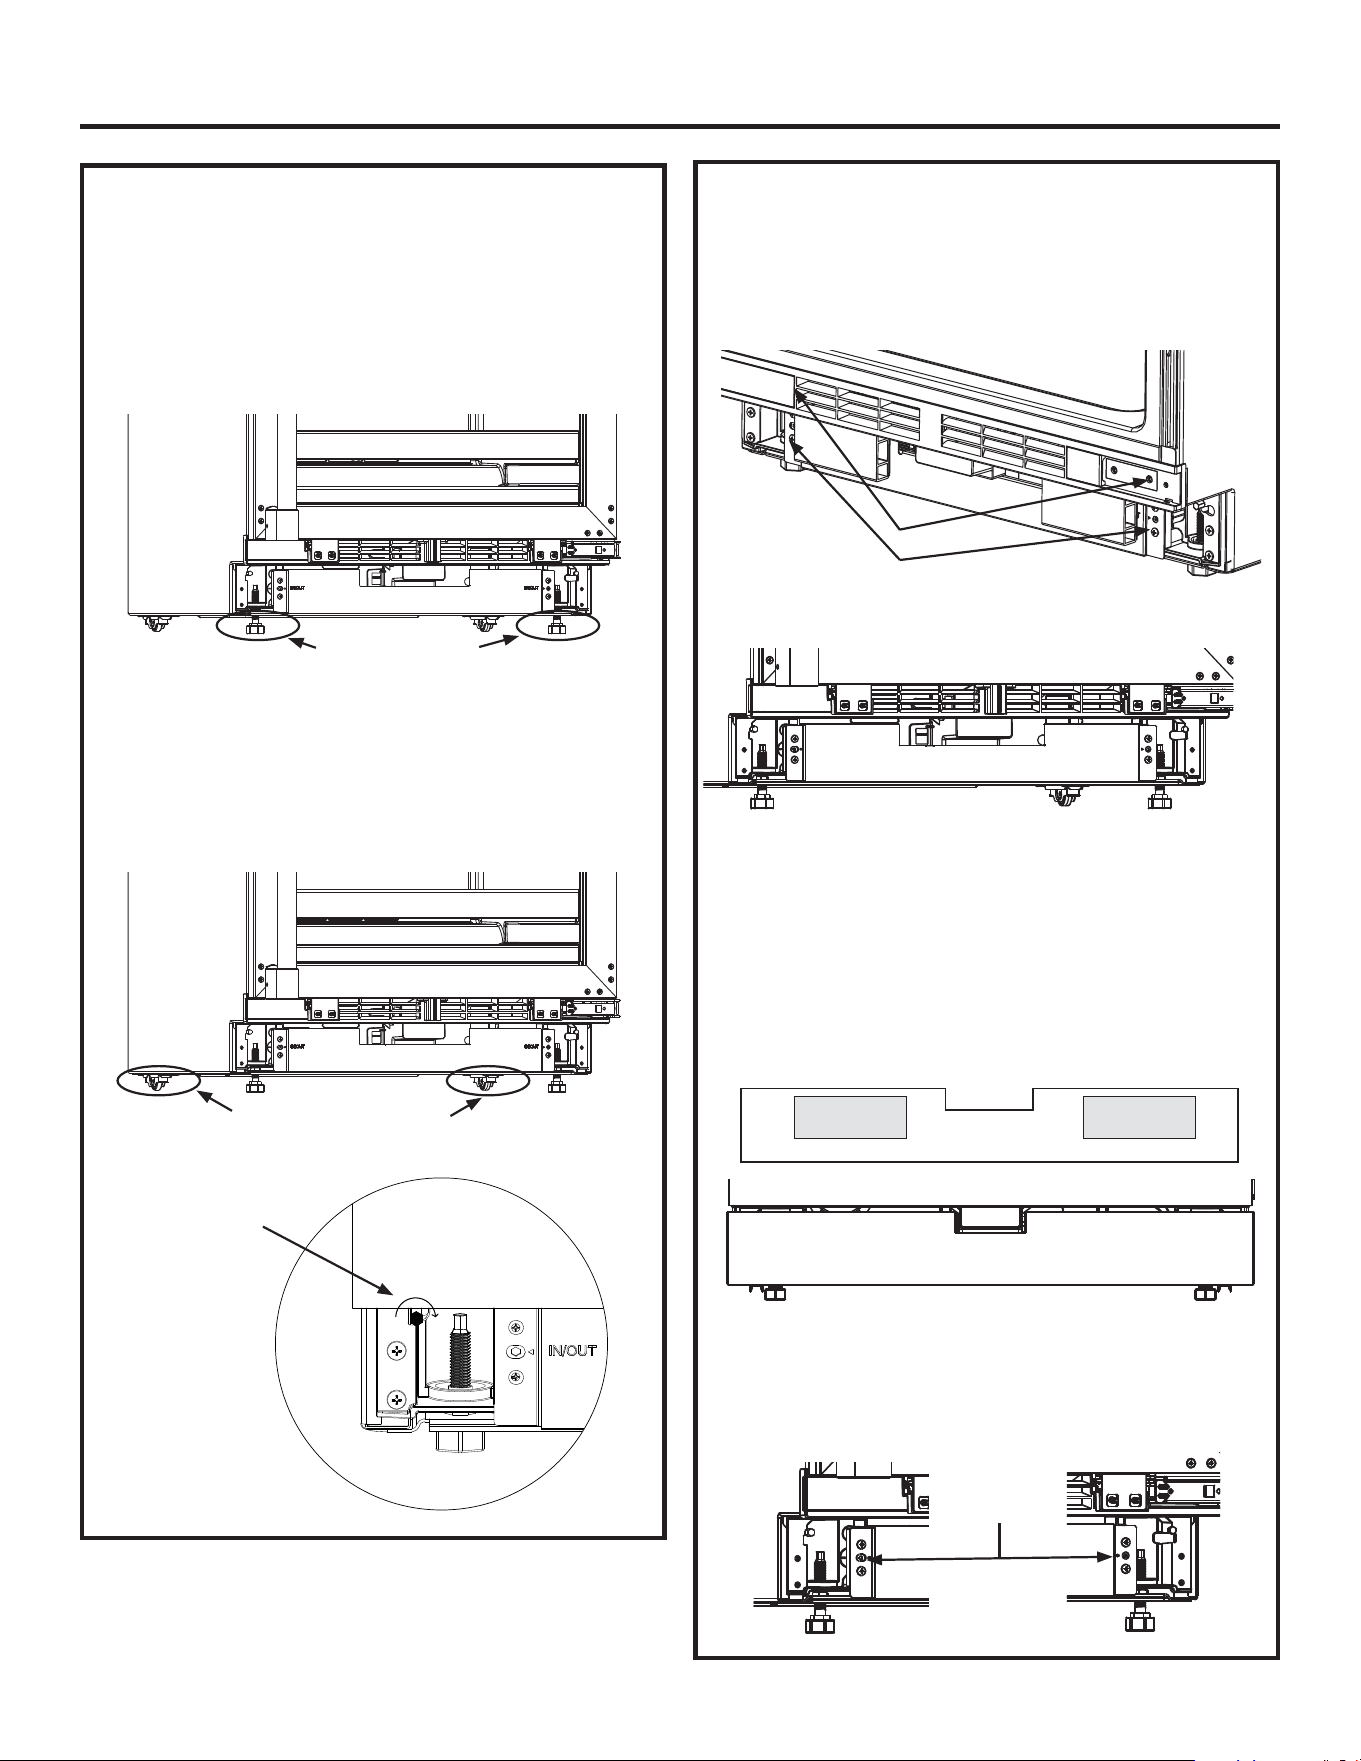
24 49-1000777 Rev. 2
,QVWUXFFLRQHVGH,QVWDODFLyQ
INSTALE LA PLACA DE SOPORTE
DEL ZÓCALO Y EL ZÓCALO
1. Instale la placa de soporte del zócalo.
1a. Desenrosque los 4 tornillos en la parte frontal
inferior de la unidad.
1b. Instale la placa de soporte incluida con la unidad
con los mismos tornillos.
2. Instale el Zócalo
2a. Si usará un zócalo de acero inoxidable, adhiera
el mismo a la placa de soporte usando un apoyo
imantado sobre el zócalo.
2b. Si usará un zócalo a medida, asegúrese de
FRPSOHWDUHOSDVRTXH¿JXUDHQODSiJLQD
GH³,QVWDODFLyQGHO,PiQ´$GKLHUDHOPLVPRDOD
placa de soporte usando el apoyo imantado.
3. Ajuste el zócalo. Usando los tornillos pasadores de
ajuste ubicados debajo, ajuste la placa de soporte
del zócalo en la parte delantera o trasera para una
alineación apropiada del gabinete.
Tornillo
pasador
de ajuste
$-867(/$3$7$1,9(/$'25$3$5$
$-867$56($/5(&257(
$MXVWHODVSDWDVQLYHODGRUDVIURQWDOHV
1. Ajuste la altura de las dos patas niveladoras
frontales. Use un destornillador para ángulo derecho
HQODSDUWHVXSHULRUGHFDGDSDWDRXQDOODYHGH´
(2.54 mm) al pie de cada pata.
2. Ajuste las ruedecillas niveladoras traseras. Use una
SXQWDGHGHVWRUQLOODGRUGHFDEH]DKH[DJRQDOGH´
(6 mm). Gire el tornillo izquierdo en sentido horario
para elevar la parte trasera izquierda de la unidad.
Gire el tornillo derecho en sentido antihorario para
elevar la parte trasera derecha de la unidad.
Patas niveladoras frontales
Ruedecillas niveladoras traseras
Desenrosque los 4 tornillos
Tornillo de ajuste
de las ruedecillas
niveladoras
traseras

49-1000777 Rev. 2 25
,QVWUXFFLRQHVGH,QVWDODFLyQ
AJUSTE Y ALINEE EL PANEL DE LA PUERTA
Herramientas necesarias
Llave Allen, llave ajustable, destornillador Phillips, destor-
nillador con cabeza hexagonal.
0HFDQLVPRVXSHULRUDMXVWDEOHalineación vertical,
horizontal y de profundidad.
1.1 Ajuste vertical (arriba/abajo) (Leva J, Tuerca K).
1.2 Ajuste de Profundidad (Frente/Parte Trasera)
(Leva L).
1.3 Ajuste horizontal (Izquierdo/Derecho) (Leva M).
2. 6RSRUWHVGH$MXVWH,QIHULRUAlineación de la
profundidad.
2.1 Retire la tapa del soporte.
2.2 Ajuste de profundidad (Dentro/Fuera) (Tornillo
Pasador N).
3. Haga Ajustes sobre el Panel de la Puerta
3.1 Prepare el ajuste del panel de la puerta: Afloje
los 8 tornillos en la parte inferior de la puerta en
2 ubicaciones. at the bottom of the door in 2
locations.
N
Ajuste de profundidad
(Frente/Parte Trasera)
(Tornillo Pasador
1±OXJDUHV
1.1 J
7XHUFD./HYD-
1.3 M
1.1 J
1.2 L
7XHUFD./HYD-
tapa del soporte
$ÀRMHORVWRUQLOORV
$ÀRMHORVWRUQLOORV
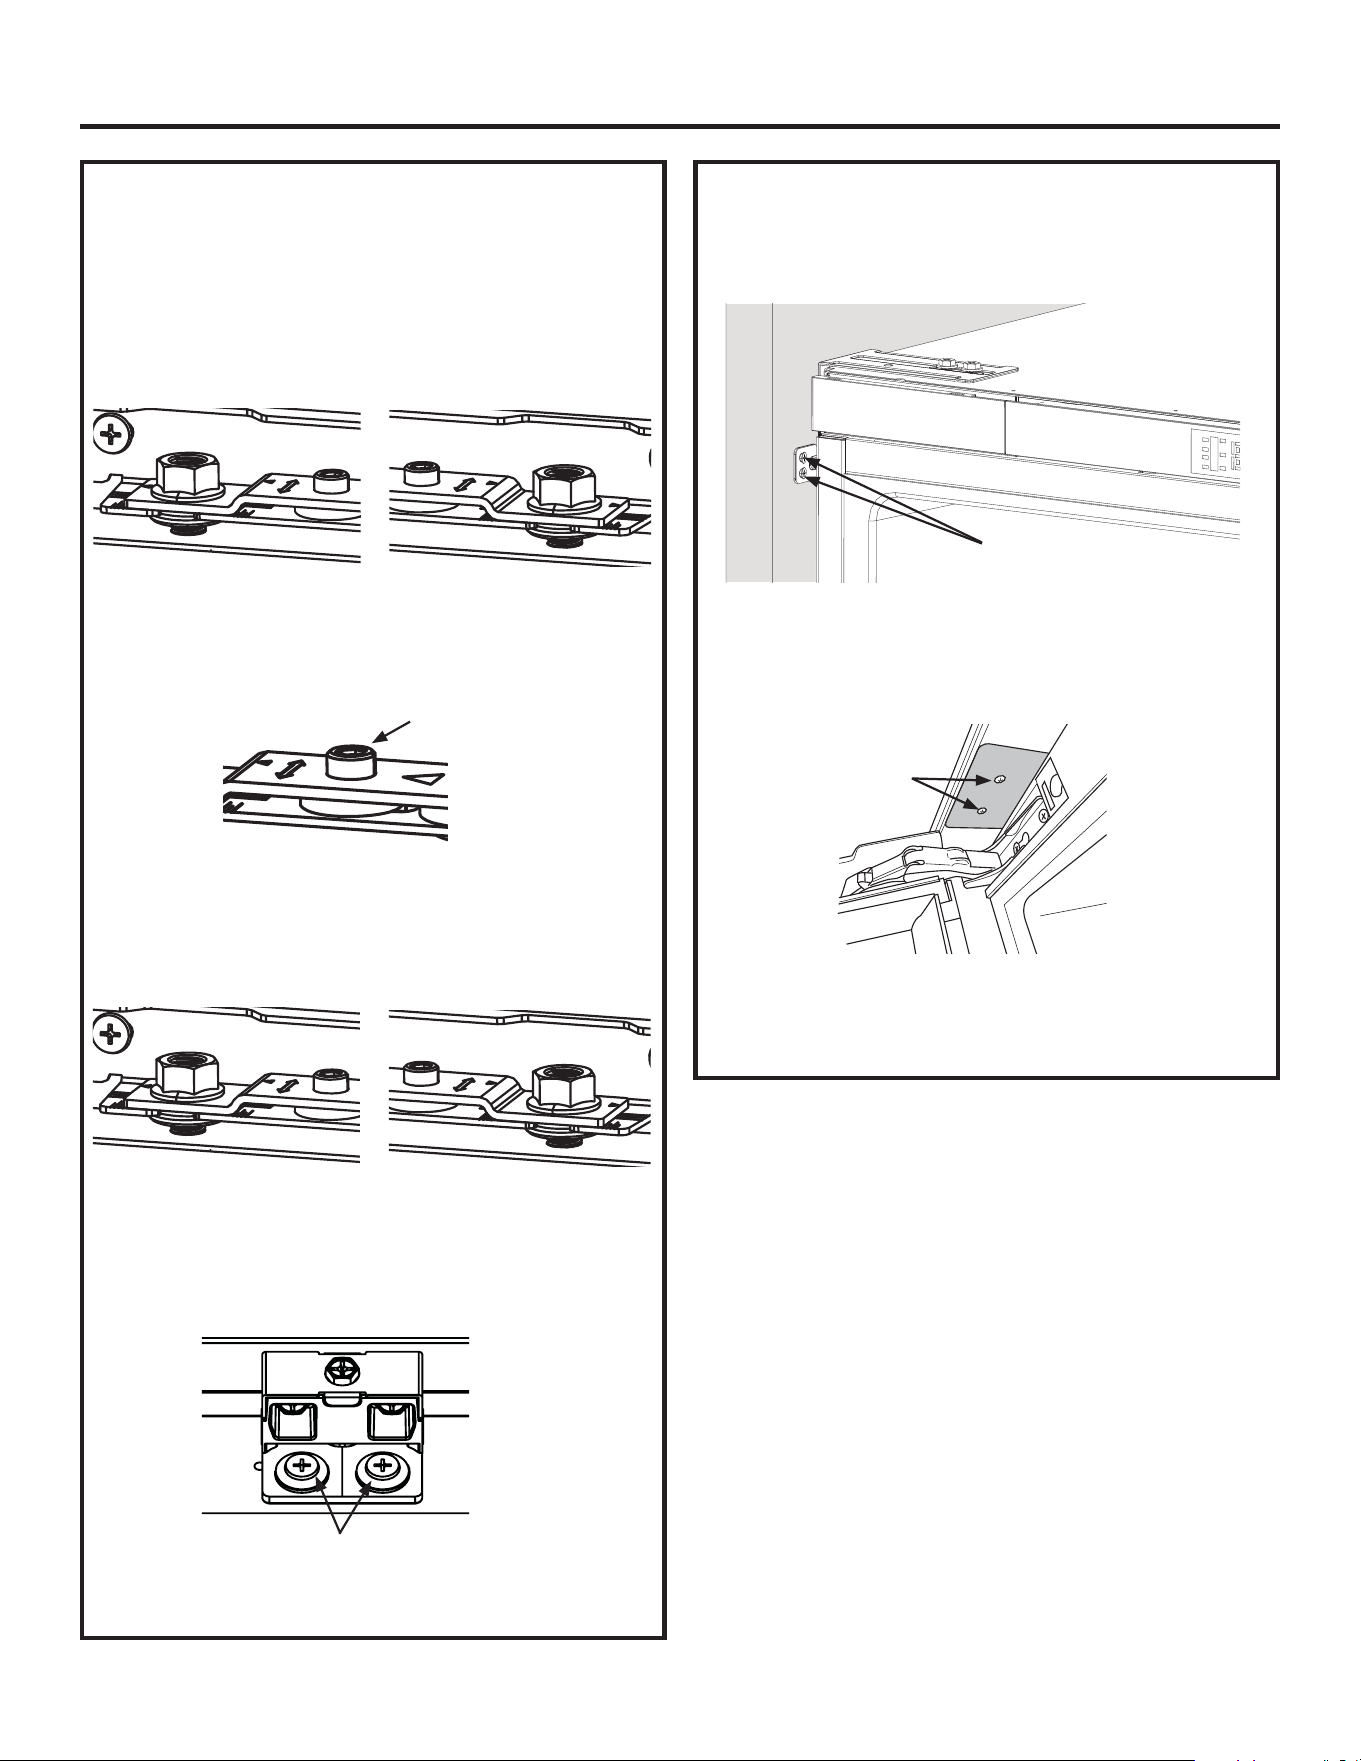
26 49-1000777 Rev. 2
,QVWUXFFLRQHVGH,QVWDODFLyQ
AJUSTE Y ALINEE EL PANEL DE
LA PUERTA
&217
3.2 Ajuste vertical
En la parte superior del panel de la puerta, afloje las
tuercas 2K con la llave de 13mm. Gire la Leva J (dos
ubicaciones) para ajustar la puerta hacia arriba y abajo
con la llave Allen de 4mm.
$MXVWHKRUL]RQWDO
3DUWHVXSHULRUGHOSDQHOUse una llave Allen para
girar la Leva M ajustando el panel izquierdo/ derecho.
Una ubicación.
3.4 Ajuste de la Profundidad
3DUDDMXVWDUODSDUWHVXSHULRUGHODSXHUWDUse la
llave Allen para girar la Leva L en dos ubicaciones para
mover el panel de la puerta hacia adentro/ afuera.
Para ajustar la parte inferior de la puerta, ajuste los 4
tornillos del panel de la puerta en 2 ubicaciones, ajuste
los tornillos pasadores N usando un destornillador
Phillips para mover el panel de la puerta hacia adentro/
afuera.
Ajuste todos los tornillos y tuercas en la parte inferior y
superior de la puerta.
COMPLETE LA INSTALACIÓN
1. Asegure los soportes al gabinete adyacente con los
tornillos pasadores provistos, el tornillo pasador F en el
Cuadro de Referencia del Tornillo Pasador.
O asegure los soportes a la encimera con los tornillos
pasadores provistos, el tornillo pasador F en el Cuadro de
Referencia del Tornillo Pasador.
2. Complete la instalación del marco superior de la puerta.
Consulte los detalles en la sección de Inversión de la
Puerta en el paso 10.
M
Leva J
Leva J
7XHUFD./HYD-
7XHUFD./HYD-
Asegure los soportes izquierdo y
derecho a los gabinetes adyacentes.
Ajuste los tornillos
N
Tornillos

49-1000777 Rev. 2 27
&RQVHMRVSDUD6ROXFLRQDU3UREOHPDV«Antes de solicitar el servicios técnico
¡Ahorre tiempo y dinero! Revise primero los cuadros que aparecen en las siguientes páginas y es posible que
no necesite programar el servicio técnico.
Problema Causas Posibles Qué Hacer
El centro de bebidas no
funciona
(OFHQWURGHEHELGDVHVWi
GHVHQFKXIDGR
Enchufe el cable de corriente en el tomacorriente.
(OGLV\XQWRUVHGHVFRQHFWyRDSDJy
6HTXHPyHOIXVLEOH
Reinicie/ Active el disyuntor o reemplace el fusible.
(OFRPSUHVRUGHOFHQWURGH
bebidas funciona de forma
IUHFXHQWHRSRUSHUtRGRVGH
WLHPSRSURORQJDGRV
1RUPDOFXDQGRVHHQFKXIDSRU
SULPHUDYH]
Espere 24 horas hasta que el centro de bebidas se
enfríe completamente.
Botellas calientes o grandes
cantidades agregadas
Esto es normal.
/DSXHUWDVHGHMyHQWUHDELHUWD Asegúrese de que ningún producto haya impedido el
cierre de la puerta.
&OLPDFiOLGRRDSHUWXUDVIUHFXHQWHV Esto es normal para mantener la temperatura
constante durante los días cálidos y húmedos.
/DMXQWDQRHVWiFRUUHFWDPHQWH
sellada.
Limpie la junta.
(OFHQWURGHEHELGDVSURGXFH
olor.
6HGHEHUiOLPSLDUHOLQWHULRU /LPSLHHOLQWHULRU&RQVXOWHODVHFFLyQGH³/LPSLH]D´
/DOX]QRVHHQFLHQGH (OFHQWURGHEHELGDVHVWi
GHVHQFKXIDGR
Enchufe éste en el tomacorriente.
/DOX]/('HVWiTXHPDGD Comuníquese con un técnico calificado para
reemplazar la luz LED que se quemó.
9LEUDFLyQRWUDTXHWHR (OFHQWURGHEHELGDVQRVHDSR\DGH
PDQHUDILUPHHQHOSLVR
&RQVXOWHODVHFFLyQGH³1LYHODFLyQ´
Sonidos Normales 6HHVFXFKDHOVRQLGRGHDJXDTXH
fluye desde el centro de bebidas
El refrigerante que circula por las tuberías producirá
este sonido cuando el compresor se inicie y se
detenga.
6RQLGRVGH]XPELGR\URQURQHR Es posible que el compresor y los ventiladores
produzcan este sonido. Si el centro de vinos no está
nivelado, el sonido será más fuerte.
Sonidos de crujido y clic Las piezas interiores realizarán este sonido al
contraerse y expandirse en respuesta a los cambios de
temperatura.
TEMPERATURA Y HUMEDAD
(OFHQWURGHEHELGDVHVWi
demasiado caliente.
(OFRQWUROGHWHPSHUDWXUDQR
VHFRQ¿JXUyHQXQQLYHOOR
VX¿FLHQWHPHQWHIUtR
Ajuste la temperatura del compartimiento en la
VLJXLHQWHFRQ¿JXUDFLyQPiVFDOLHQWHHVSHUHKRUDV
hasta que se realice el ajuste.
/DVSXHUWDVVHDEUHQFRQIUHFXHQFLDR
se dejan abiertas.
Mantenga la puerta cerrada / Controle que no haya
paquetes que impidan el cierre de la puerta.
Se agregaron botellas calientes de
forma reciente.
Espere hasta que las botellas y el centro de bebidas se
enfríen.
/DMXQWDQRHVWiFRUUHFWDPHQWH
sellada.
Limpie la junta.
(OFHQWURGHYLQRVHVWi
demasiado frío.
(OFRQWUROGHWHPSHUDWXUDHVWi
FRQ¿JXUDGRHQXQDWHPSHUDWXUD
demasiado baja.
Ajuste la temperatura del compartimiento en la
VLJXLHQWHFRQ¿JXUDFLyQPiVFDOLHQWHHVSHUHKRUDV
hasta que se realice el ajuste.
+XPHGDGHQHOH[WHULRU
interior del centro de bebidas
1LYHODOWRGHKXPHGDG (VWRHVQRUPDO6HTXHODVXSHU¿FLH\DMXVWHOD
WHPSHUDWXUDHQXQDFRQ¿JXUDFLyQOHYHPHQWHPiVIUtD
/DSXHUWDVHDEUHFRQIUHFXHQFLDRVH
deja abierta.
Mantenga la puerta cerrada. Controle que no haya
paquetes que impidan el cierre de la puerta.
/DMXQWDQRHVWiFRUUHFWDPHQWH
sellada.
Limpie la junta.
28 49-1000777 Rev. 2
Ŷ Viajes del técnico del servicio a su hogar para enseñarle
sobre cómo usar el producto.
Ŷ Reemplazo de fusibles en el hogar o reinicio de disyuntores.
Ŷ Daños ocasionados sobre el producto por accidente,
incendio, inundaciones o catástrofes naturales.
Ŷ Fallas del producto si su uso es para propósitos diferentes
al original o uso comercial.
Ŷ Daño causado después de la entrega.
Ŷ Instalación, entrega o mantenimiento inadecuados.
Si tiene un problema con la instalación, comuníquese con
su vendedor o instalador. Usted es responsable de brindar
instalaciones adecuadas de conexión eléctrica, plomería u
otras instalaciones de conexión.
Ŷ Reemplazo de bombillas de luz, si se incluyen, o el cartucho
del filtro de agua, si se incluye, a diferencia de lo detallado
anteriormente.
Ŷ Reemplazo del cartucho del filtro de agua, si se incluye,
debido a la presión del agua que está fuera del rango de
funcionamiento específico o debido a exceso de sedimentos
en el suministro de agua.
Ŷ Pérdida de comida debido a descomposición (en EE.UU.
únicamente).
Ŷ Daños consecuentes o incidentales causados por posibles
defectos sobre este electrodoméstico.
Ŷ Producto no accesible para que se brinde el servicio
requerido.
Ŷ Daño ocasionado por un filtro de agua de una marca que no
sea GE Appliances.
GARANTÍA LIMITADA DE MONOGRAM
Monogram.com
Todo el servicio de garantía es provisto por nuestros Centros de Servicio de Fábrica, o por un técnico autorizado de Customer Care®
(Servicio al Cliente). Para programar el servicio a través de Internet, visítenos en monogram.com/contact.
En Canadá, visite monogram.ca.
(;&/86,Ï1'(*$5$17Ë$6,03/Ë&,7$6²6X~QLFD\H[FOXVLYDDOWHUQDWLYDHVODUHSDUDFLyQGHOSURGXFWRFRPR
VHLQGLFDHQHVWD*DUDQWtD/LPLWDGD/DVJDUDQWtDVLPSOtFLWDVLQFOX\HQGRJDUDQWtDVLPSOtFLWDVGHFRPHUFLDELOLGDGR
FRQYHQLHQFLDVREUHXQSURSyVLWRSDUWLFXODUVHOLPLWDQDXQDxRRDOSHUtRGRPiVFRUWRSHUPLWLGRSRUODOH\
Esta garantía limitada se extiende al comprador original y a cualquier dueño subsiguiente de productos comprados para uso
hogareño dentro de EE.UU. Si el producto está en un área donde no se encuentra disponible un Proveedor Autorizado del
Servicio Técnico de Monogram, usted será responsable por el costo de un viaje o se podrá requerir que traiga el producto a una
ubicación del Servicio Técnico de Monogram Autorizado para recibir el servicio. En Alaska, la garantía limitada excluye el costo
de envío o llamadas del servicio a su hogar.
Algunos estados/ provincias no permiten la exclusión o limitación de daños incidentales o consecuentes, de modo que es posible
que dicha limitación o exclusión no se aplique en su caso. Esta garantía le da derechos legales específicos, y es posible que
usted tenga otros derechos que varían entre un estado y otro, o entre una provincia y otra. Para conocer cuáles son sus derechos
legales en su estado/ provincia, consulte a la oficina de asuntos del consumidor local o estatal o al Fiscal de su Estado.
*DUDQWH*($SSOLDQFHVa Haier company, Louisville KY,40225
*DUDQWHHQ&DQDGi MC Commercial, Burlington, ON, L7R 5B6
Por el Período de 0RQRJUDP$SSOLDQFHVUHHPSOD]DUi
*DUDQWtDOLPLWDGDSRU
GRVDxRV
Por dos años desde la fecha original de compra, le brindaremos, sin costo, piezas y trabajos del servicio
técnico en su hogar para la reparación o reemplazo de cualquier pieza del refrigerador o del freezer que
presente fallas debido a defectos de fabricación.
*DUDQWtDOLPLWDGDSRU
FLQFRDxRV
Por cinco años desde la fecha original de compra, le brindaremos, sin costo, piezas y trabajos del
servicio técnico en su hogar para la reparación o reemplazo de cualquier pieza del sistema de
refrigeración sellado (el compresor, condensador, evaporador y todas las tuberías de conexión) que
presente fallas debido a defectos de fabricación.
Garantía limitada
DGLFLRQDOGHOVH[WRDO
GRFHDYRDxRVREUHHO
sistema de sellado
Desde el sexto al doceavo año desde la fecha original de compra, le brindaremos, sin costo,
el reemplazo de partes de cualquier pieza del sistema de refrigeración sellado (el compresor,
condensador, evaporador y todas las tuberías de conexión) que presenten fallas debido a defectos de
fabricación. Usted paga por el viaje del profesional del servicio técnico a su hogar y por los costos del
trabajo del servicio técnico.
Garantía limitada
de treinta días del
FDUWXFKRGHOILOWURGH
DJXDILOWURGHDJXDVL
VHLQFOX\H
Desde la fecha de compra original le brindaremos, sin costo, el reemplazo de partes de cualquier pieza
del cartucho del filtro de agua que falle debido a defectos de fabricación. Durante la garantía limitada de
treinta días, también le brindaremos, sin costo, el reemplazo de un cartucho del filtro de agua.
4XpQRFXEULUi0RQRJUDP
3DUDUHDOL]DUHOVHUYLFLRWpFQLFRGHVXUHIULJHUDGRUVHSRGUiUHTXHULUHOXVRGHGDWRVGHOSXHUWRGHDERUGDMHSDUDVX
GLDJQyVWLFR(VWRGDDOWpFQLFRGHO6HUYLFLRGH)iEULFDGH0RQRJUDPODKDELOLGDGGHGLDJQRVWLFDUGHIRUPDUiSLGD
FXDOTXLHUSUREOHPDFRQVXHOHFWURGRPpVWLFR\GHD\XGDUD0RQRJUDPDPHMRUDUVXVSURGXFWRVDOEULQGDUOHD0RQRJUDP
ODLQIRUPDFLyQVREUHVXHOHFWURGRPpVWLFR6LQRGHVHDTXHORVGDWRVGHVXHOHFWURGRPpVWLFRVHDQHQYLDGRVD0RQRJUDP
solicitamos que le indique a su técnico NO entregar los datos a Monogram en el momento del servicio.
Abroche su recibo aquí. Para acceder al servicio técnico de acuerdo con
la garantía deberá contar con la prueba de la fecha original de compra.

49-1000777 Rev. 2 29
NOTAS

NOTA: Al realizar las instalaciones descriptas en este libro,
se deberán usar anteojos o gafas de seguridad.
NOTA: Monogram se esfuerza de forma constante para
mejorar sus productos. Por lo tanto, los materiales, el
aspecto y las especificaciones estarán sujetos a cambios
sin aviso previo.
49-1000777 Rev. 2
12-24
Monogram.com
Impreso en Estados Unidos