
!
!
!
!
!
INSTALLATION!INSTRUCTIONS!&!HOME!OWNERS!MANUAL!
!
!
!
PRO!SERI ES!
!
IMPORTANT!SAFETY!INFORMATION!!
When%installing%or%using%any%high%voltage%electrical%appliance,%basic%safety%precautions%should%always%be%
followed.%Under%no%circumstances%should%you%attempt%to%clean,%install,%inspect,%repair,%disassemble%or%
otherwise%service%this%water%heater,%without%first%shutting%off%all%power%to%the%unit%directly%at%the%breaker%
box.%
SERIOUS!BODILY!INJURY!OR!DEATH!COULD!OCCUR!IF!YOU!IGNORE!THIS!WARNING.
%
THIS!PRODUCT!SHOULD!BE!I NSTALLED!BY!A!QUALIFIED!ELECTRICIAN!OR!PLUMBER!IN!ACCORDANCE!
WITH!ALL!NATIONAL,!STATE,!PROVINCIAL!AND!LOCAL!ELECTRICAL!&!PLUMBING!CODES.!
PLEASE!READ!THESE !INSTRUCTI ONS!THOROUGHLY!AND!COMPLETELY!PRIOR! TO!INSTALLATI ON!&!USE.!
FAILURE!TO!DO!SO!COULD!CAUSE!PROPERTY!DAMAGE,!SERIOUS!INJURY,!OR ! DEAT H. ! !
!
This!manual!should! be!given! to!the! homeowner!after!ins tall ation! and!should! be!retai ned!for !future!reference.!
!
Tested and certified by the Water Quality Association against NSF/ANSI 372 for lead free
compliance.


ABOUT!YOUR!TANKLESS!WATER!HEATER!
Congratulations%on%the%purchase%of%your%Electric%Tankless%Water%Heater!%You%have%purchased%the%
most%technologically-advanced%electric%tankless%water%heater%on%the%market%today.%%
Your%new%electric%tankless%water%heater%features%advance d%water%flow%rate%and%tem perature%sensors%d esigned%
to%modulate%power%to%the%heating%elements%to%maintain%a%precise%user-selected%output%water%temperature%
between%80°F%and%140°F%(subject%to%incoming%water%temperature%and%power%of%the%selected%model).%
To%get%the%best%performance%and%energy%savings%from%your%electric%tan kless%water%heater,%it%is%impo rtant%that%it%
be%installed%in%acc orda nce%w ith%ou r%instru ctions %and%th e%elect rical%an d%plum bin g%cod es%ap plicab le%to%yo ur%area ,%
and%that%you%read%this%manu al%tho rou ghly %for%imp orta nt%op eratin g%instru ction s%and %tips.%
At%any%time,%if%you%have%any%questions,%please%contact%us%directly%at:%
Eemax!Inc.!
400!Captain!Neville!Drive,!Waterbury,!CT!06705!
Toll! Free:! 1-800-543-6163, !or! 203-267-7890!Fa x:!203-267 -7975!inf o@eemaxinc.c om!
CONTENTS!
1. BEFORE%INSTALLAT ION%
2. SELECTING%A%LOCATION%TO%INSTALL%
3. MOUNTING%YOUR%WATER%HEATER%
4. PLUMBING%INSTALLATION%
5. %%%ELECTRICAL%INSTALLATION%
6. %%%SIZING%GUIDE%
7. %%%GENERAL%OPERATING%INSTRUCTIONS%
8. %%%MAINTENANCE%
9. %%%TROUBLE%SHOOTING%GUIDE%
10. %%%USER%INTERFACE%
%
1-!BEFORE!INSTALLATION!
PLEASE!READ!THESE!INSTRUCTIONS!THOROUGH LY!AND!COMPLETELY!PRIOR!TO!INSTALLATION!&!US E. !
FAILURE!TO!FOLLOW!INSTRUCTIONS!COULD!CAUSE!PROPERTY! DAMAGE,!SERIOUS!PERSONAL!INJURY,!OR!
DEATH.!!
By%installing%this%p roduct,%you %acknowled ge%the%term s%of%the%ma nufacturer’s%w arranty. %Once%the%heater%is%
installed,%do%not%return%product%to%the%place%of%purchase.%If%you%have%any%question s%regard ing%the %warran ty%or%
product%return%policies,%please%contact%Eemax%at%800-543-6163.
!
Inspect%all%c o mponen ts .%T h e%c o n te n ts %o f%y o u r%b o x%s h o u ld %in c lu d e%one%of%the%following% units:%
• PR008240%
• PR011240%
• PR013240%
• PR018240%
• PR024240%
• PR027240%
• PR036240%

2-
SELECTING!A!LOCATION!TO!INSTALL!
This%product%is%designed%to%be%installed%indoors%only.%You%may%be%able%to%install%your%unit%in%an%outdoor%
location%a s%long%as%it%is%mou nted%in%a%suitab le%enclosure%th at%protects%it%from %rain,%splashed %water,%direct%
sunlight,%debris,%and%insects.%%
DO%NOT%install%this%product%in%a%locat ion%where%it %may%be%su bject%to%freezing%tem peratures.%If%the%water%
inside%you r%tankless%water%hea ter%freezes,%it%can%cause %severe%and%permanent%damage%that%is%not%covered%
under%your%warranty.%
DO%NOT%locate%the%water%heater%in%a%locatio n%that%is%diffic ult%to%access.%%
Make%sure%that%the%water%heater%and% hot%water%outlet%pipe%are%out%of%the%reach%of%children%so%they%cannot%
tamper%with%the %temperatu re%contro ls%or%injure%them selves%by%tou ching%the %hot%water%ou tlet%pipe.%The%outlet%
water%pipe%can%get%very%hot.%
This%product%does%NOT%require%venting.%
Avoid%installing%your%tankless%water%heater%in%a%location%prone%to%excessive%humidity,%moisture,%or%dust,%or%in%an%
area%where%it%may%be%splashed%with%water%or%other%liquids.%DO%NOT%install%under%water%pipes%or%air%conditioning%lines%
that%might%leak%or%con dense%moistu re%that%could%then%d rip%onto%the%heater.%D O% NO T%install%above%electrical%
boxes%or%junctions.%
If%you%plan %to%in sta ll%you r%w ate r%he ate r%on %a%se co nd %floo r%or%in %a%h ea ted%a ttic%s pace,%make%sure%that%you%follow%all%
code%requirements%for%such%installations%as%required%for%your%area.%We%recommend%that%you%install%a%drip%pan%
(connected %to%a%safe %drain)%b elow %the%w ater%he ater%to %avoid %prope rty%dam ag e%in%the %unlike ly%even t%of%a%leak .%
Alternatively,%you%can%install%an%active %water%leak%detector%an d%shutoff%valve%de signed%to%turn%off%yo ur%water%
supply%in%the%event%that%a%leak%is%ever%detected.%
%
%
3-
MOUNTING!YOUR!WATER!HEATER!
Your%tankless%water%heater%should%be%secured%to%the%mounting%surface%with%4%screws%(minimum%1%inch%long)%
using%the%built-in%moun tin g%b r ac k ets %o n %ea c h%s id e%o f %th e%h e a ter .%M a k e%s u re %th at %th e%mountin g%s ur fa ce %is%s o lid%a n d %
secure,%and%ensure%that%the%unit%is%level%prior%to%securing%the%screws.%For%ease%of%installation%and%servicing,%we%
recomme nd%that%this%pro duct%be%installed %in%an%upright%po sition%with%the%in let%and%outlet%w ater%connectio ns%at%
the%bottom%of%the%un it%for%the%18 ,%24,%27,%an d%36%kW%mode ls,%and%with%the%inlet%and%outlet%water%connections%on%the%
left%and%righ t%s id es%o f %th e%u n it%f o r%th e %8,%1 1 ,%an d %1 3%kW %m odels.%%
Recommended!Clearanc es:
%%%%%%%%%%%%%%%12%i nches%above%and%below%the%heater%
6%inches%in%fr ont%of% and%to%t he%sides %of% the%heate r
!
CAUTION:!Combusti ble!materia ls!shoul d!be!kept! at!leas t!24!inc hes!away!from!your!water!heater!and!the!hot!
water!outlet!pipe.

4-!PLUMBING!INSTALLATION!
%
Please%follow%all%plumbing%instructions%carefully.%We%recommend%that%this%product%be%installed%by%a%licensed%
and%qualified%plumber%in%accordance%with%all%applicable%national,%state,%provincial,%and%local%plumbing%codes.%
!
Installation!Instructions!
!
STEP!1:!
C
onnect%the%HOT%WATER%line%to%the%water%heater%marked%HOT%WATER%OUTLET%located%on%the%left%side%of%the%
heater%when%facing%unit.%Connect%the%COLD%WATER%line%to%the%water%heater%marked%COLD%WATER%INLET%on%the%right%
side%when%facing%unit.%!
STEP!2
:!
After%tightening%both%fittings%at%the%water%heater,%open%several%hot%water%faucets%and%allow%water%to%
run%though%th e%water%heater%for%at%least%2 %to%3%minutes.%This%pro cess%purges%all%the%air%from %the%water%lines%an d%
MUST%be%performed%prior%to%turning%on%the%power%at%the%unit.%FAILURE%TO%FOLLOW%THIS%STEP%CAN%CAUSE%
PERMANENT%DAMAGE%TO%THE%HEATING%ELEMENTS.%If%any%maintenance%is%performed%on%the%water%heater%or%
the%home’s%plum bing%sys tem%that%m ay%introdu ce%air%into%the%plu mbing %pipes,%it%is%importan t%to%turn%the%p ower%off%
to%the%water%heater%an d%pu rge%the%air%ou t%of%the%lines %before%allo wing%the%unit%to%power%up.%
STEP!3
:!
Carefully%inspect%all%connections,%unions,%and%the%pressure%relief%valve%(if%installed)%for%leaks.%
%
!IMPORTANT!NOTES:!
1.
Do%not% sol der %any %pi pes %wi th% uni t% connec ted% to %pi pes% –%heat%fr om%solder ing%may % da ma ge % t he % f l ow%
sensor.%Doing%so%will%also%void%the%warranty.%%
%
2. This%Eemax%tankless%water%heater%is%equipped%with%both%computer-controlled%and%electro-mechanical%auto%
resetting%thermo stat%switches %for%high-limited%te mpe rature %protec tion.%S ince%th is%prod uct%d oes%no t%use%a %
storage%tank,%the%use%of%a%temperature%pressure%relief%valve%(T&P)%is%not%required%for%most%installations.%
UL%Standard%499%does%NOT%require%that%a%pressure%relief%valve%be%used.%However,%a%T&P%valve%may%be%
required%to%meet%installation%codes%in%your%area.%If%one%is%required,%inst all%the%p ressu re%relie f%valve %in%
accordance%with%local%codes%and%ensure%that%it%operates%correctly%and%that%air%is%purged%from%the%valve%
prior%to%installing%the%water%heater.%When%connecting%to%Flex%or%High%Temperature%CPVC%pipe,%we%
recommen d%that%a%T& P%valve%be %used%for%added%safety.%%
Please!note:!Installations!in!the!Commonwealth!of!Massachusetts!and!State!of!Kentucky!require!a!
pressure!relief!valve.!Please!check!your!local!installation!codes!for!any!special!requirements.!!
%
3. The%maximum%operating%water%pressure%is%150%PSI.%If%the%water%pre ssure%is%high er,%a%pressure%reducing%
valve%must%be%installed%on%the%main%incoming%water%supply%line%prior%to%installing%the%electric%tankless%
water%heater.%
!
4. Flexible%water%heater%hoses%can%and%are%recommended%to%be%used%with%your%water%heater%as%part%of%
the%installation.%When%connecting%the%inlet%water%pipe%to%the%unit,%make%sure%to%use%a%wrench%to%
hold%the%units%connection,%and%another%wrench%to%tighten,%so%the%flow%sensor%on%the%unit%is%not%
loosened%or%damaged.%Serious%internal%damage%to%the%water%heater%can%occur%if%the%inlet%or%
outlet%connections%are%over%tightened%or%if%solder%connections%were%made.%%
%
5. We%recommend%that%a%manual%shut-off%valve%(ball%valve)%be%installed%on%the%inlet%and%outlet%of%the%
water%heater%so%there%is%a%convenient%shut-off%point%available%in%the%event%that%future%maintenance%
or%servicing%is%required.%Before%connecting%pipes%to%the%water%heater,%it%is%extrem ely%im portan t%to%
flush%the%lines%to%eliminate%all%plum bing%paste %or%residue%in%the%lines%ca used%by%any%w elding%or%soldering.%%
%
%
We%recommend%that%all%the%water%pipes%or%hoses%within%3%feet%of%the%inlet%and%outlet%connectio ns%be%rated%for%
high%temperature%applications%with%a%150°F%minimum.
!!
%

5-!ELECTRICAL!INSTALLATION!
%
Eemax%recommen ds%tha t%this%prod uct%be%installed%by%a%licensed%and%qualified%electrician%in%accordance%with%all%
applicable%national,%state,%provincial,%and%local%electrical%codes.%As%with%all%electrical%appliances,%under%no%
circumstances%should%you%attempt%to%insta ll,%repair%o r%disas semb le%this%water%heater%w ithout%first%shu tting%off%all%
power%to%the%unit%directly%at%the%fuse%or%breaker%box.%Make%sure%to%shut%off%all%breakers.%SERIOUS%BODILY%INJURY%OR%
DEATH%COULD%OCCUR%IF%YOU%IGNORE%THIS%WARNING.%
%
All%wiring%(wire%gauge)%and%circuit%protection%(breakers)%must%comply%with%the%U.S.%National%Electrical%Code%(NEC)%
in%the%U.S.A .,%or%the%Ca nadian %Electrica l%Code%(C EC)%in%C anada .%Failure%to %do%so%co uld%result%in%pro perty%dam age%
and/or%personal%injury,%and%void%your%warranty.%Note:%the%Canadian%Electrical%Code%generally%requires%that%all%
supply%wires%and%corresponding%circuit%protection%used%for%domestic%hot%water%heating%and%hydronic%heating%
applications%be%sized%to%a%minimum%of%125%%of%the%maximum%current%rating%of%the%heater%(see%m odel%sp ecification s%
below%for%details).%
%
Before%installing%this%product,%ensure%that%the%home%has%sufficient%electrical%power%available%to%handle%the%
maximum%amperage%load%of%the%applicable%model.%
%
!
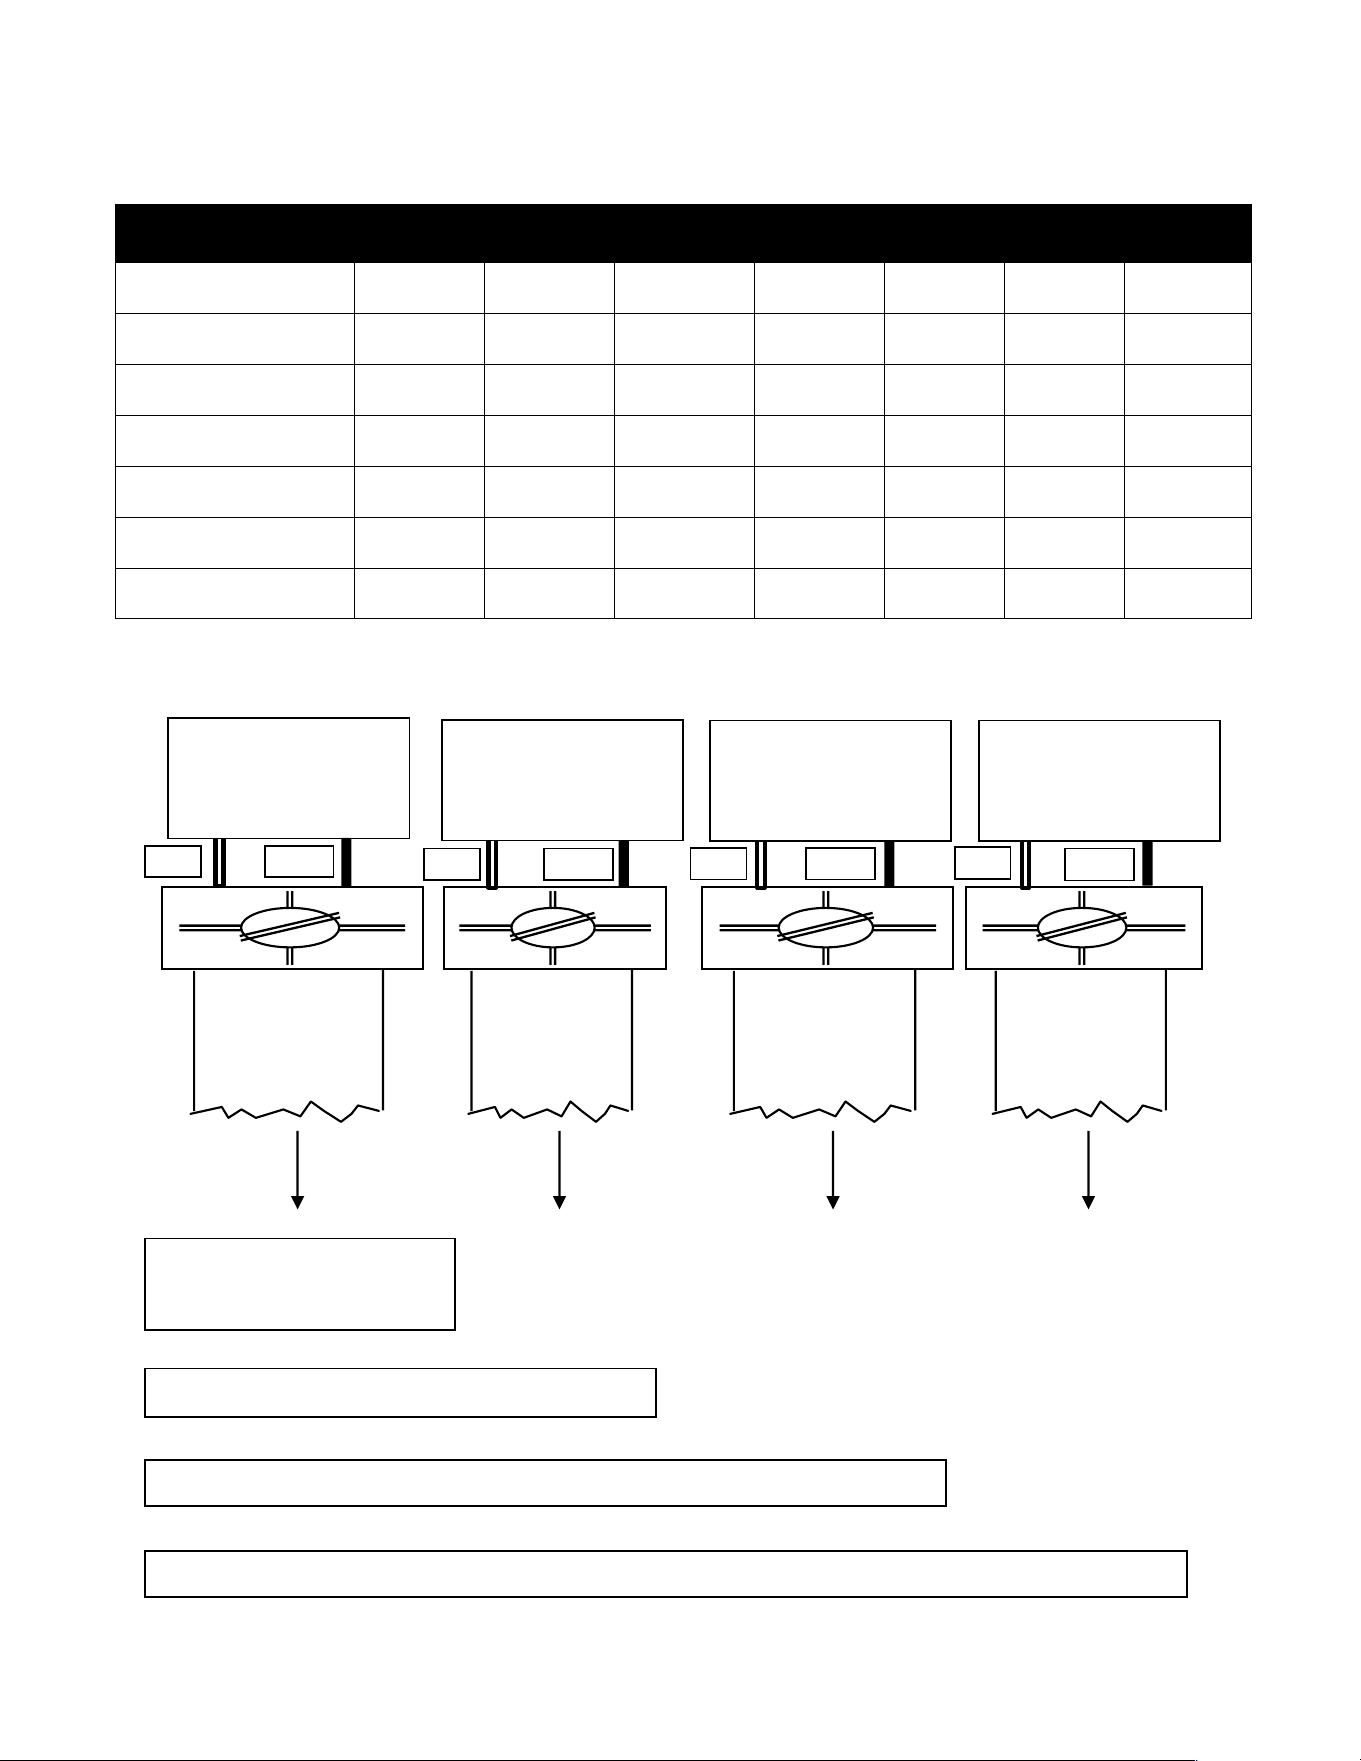
IMPORTANT!NOTES:!
Model %PR008240,%PR011240,%and%PR013240%require%1%set %of%wires% and%ground%
(see!wiring!diagram)
%
Model %PR018240%requires%2%sets%of%wires%and%ground%
(see!wiring!diagram)!
Model % PR024240%and%PR027240%require%3%sets%of%wires% and%ground%
(see!wiring!diagram)!
Model %PR036240%requires%4%sets%of%wires%and%ground%
(see!wiring!diagram)!
Please!see!req uired!wire!gauge!on! the!next!page!
Each!set!of!wires!must!be! connect ed!to !its !own!i ndivi dual! doubl e!pol e!brea ker!
!
!
Installation!Instructions!
!
STEP!1:!
Take%each%wir e%pair%and%connect%t hem%to%one%breaker%(s ee%wiring%diagram).%Ma ke%sure%that%each%breaker%is%
connected%with%one%black%wire%and%one%red%wire
!
STEP!2
:!
Using%a%suitable%wire%gauge%that%meets%all%applicable%electrical%codes%for%the%size%of%the%breakers%used,%run%the%
correct%sets%of%wire%from%the%home’s%main%breaker%panel%to%the%tankless%water%heater.%%
!
STEP!3:!A%separate%ground%conductor%for%each%incoming%circuit%is%required.%
STEP!4:!DOUBLE%CHECK%the%electrical%connections%to%make%sure%they%are%correct%and%that%all%wire%connections%are%tight%
and%secure.%Also%confirm%that%the%correct%breaker%size%and%wire%gauge%has%been%used%and%confirm%that%the%unit%has%been%
connected%to%a%ground%in%accordance%with%applicable%codes.%
STEP!5:!Confirm%that%all%the%air%has%been%purged%from%the%water%lines%prior%to %turnin g%on%p ow er%to%the %unit.%Re fer%to%
STEP%2%in%the%p lu mbing%insta lla tio n %se ctio n .%
!
!
!
CAUTION
:%Ensure%that%you%have%made%the%correct%connections.%You%must%follow%the%wire%connection%as%shown%
to%ensure%proper%operat ion%of%the%unit .%If%you%mi x% up% one %s et %of % wir es% wi th% an oth er,%the%unit%will%not%operate%
correctly%even%though%it%turns%on%and%otherwise%appears%to% function%properly.%
%
The%water%heater%is%now%installed%and%ready%to%use!%Follow%the%General%Operating%Instructions%to%complete%th e%set%
up.%We%highly%recommend%that%this%is%done%with%the%homeowner%present.%
%
%
%
Electri cal! Specif icati ons!by! Model!
!
!
!
MODELS!
PR008240!
PR011240!
PR013240!
PR018240!
PR024240!
PR027240!
PR036240!
ELEMENTS!
1%
2%
2%
2%
3%
3%
4%
VOLTAGE!
240%V%
240%V%
240%V%
240%V%
240%V%
240%V%
240%V%
MAX!kW!
8%kW%
11%kW%
13%kW%
18%kW%
24%kW%
27%kW%
36%kW%
kW!PER!ELEMENT!
8%kW%
5.5%kW%
6.5%kW%
9%kW%
8%kW%
9%kW%
9%KW%
MAX!AMPERAGE!DRAW!
33%AMPS%
46%AMPS%
54%AMPS%
75%AMPS%
100%AMPS%
112.5%AMPS%
150%AMPS%
REQUIRED!BREAKERS!
1%x%40%AMP%
1%x%50%AMP%
1%X%60%AMP%
2%X%40%AMP%
3%x%40%AMP%
3%X%40%AMP%
4%X%40%AMP%
REQUIRED!WIRE!GAUGE!
1%x%8%AWG%
1%X%6%AWG%
1%X%6%AWG%
2%X%8%AWG%
3%x%8%AWG%
3%X%8%AWG%
4%X%8%AWG%
Circuit Breaker #1
L1 L1
PR018240 requires 2 sets of breakers and wires
PR024240-PR027240 require 3 sets of breakers and wires
PR036240 requires 4 sets of breakers and wires
PR008240-PR011240-
PR013240 require 1 set of
breakers and wires
Circuit Breaker #2
L2 L2
Circuit Breaker #3
L3 L3
Circuit Breaker #4
L4 L4
Black
Red
Bla
Black
Red
Bla
Black
Red
Bla
Black
Red
Bla
6-!SIZING!GUIDE
!
%
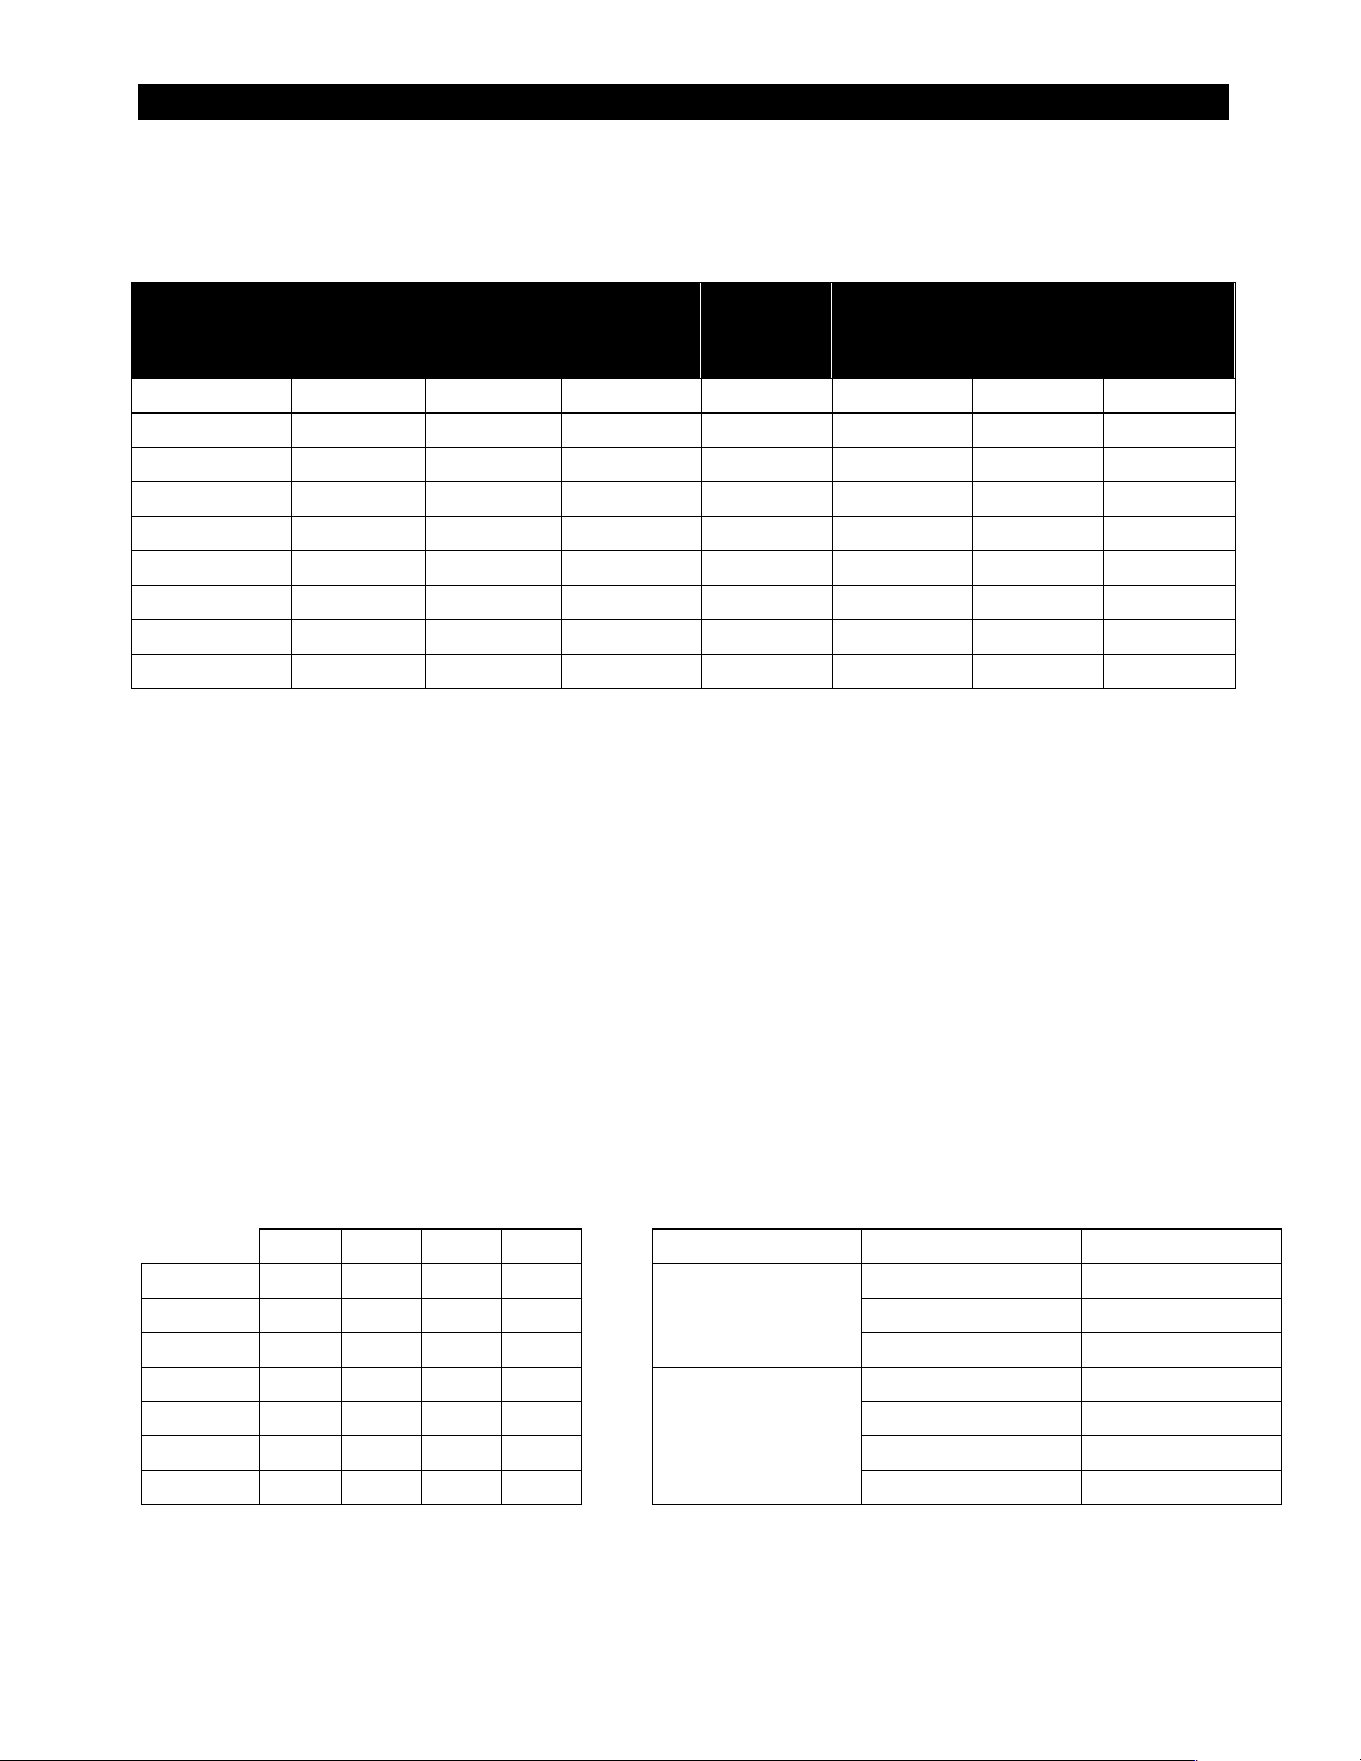
Please%use%the%chart%below%to%see%how%many%gallons%per%minute%your%tankless%water%heater%can%produce%with%your%
incomin g%water%temp e ra tu re .%T h e%g allo n s %p er %m inute%is%calculated%assuming%105°F%outlet%temperature.% %
% % % % %
Incom in g!
Water!
Temperature!
PR008240!
PR011240!
PR013240!
PR018240!
PR024240!
PR027240!
PR036240!
40°F%
0.8%
1.2%
1.4%
1.9%
2.5%
2.8%
3.8%
45°F%
0.9%
1.3%
1.5%
2.0%
2.7%
3.1%
4.1%
50°F%
1.0%
1.4%
1.6%
2.2%
3.0%
3.4%
4.5%
55°F%
1.1%
1.5%
1.8%
2.5%
3.3%
3.7%
4.9%
60°F%
1.2%
1.7%
2.0%
2.7%
3.6%
4.1%
5.5%
65°F%
1.4%
1.9%
2.2%
3.1%
4.1%
4.6%
6.1%
70°F%
1.6%
2.2%
2.5%
3.5%
4.7%
5.3%
7.0%
75°F%
1.8%
2.5%
3.0%
4.1%
5.5%
6.1%
8.2%
80°F%
2.2%
3.0%
3.6%
4.9%
6.6%
7.4%
9.8%
(Gallons%per%Minute)%
%
%
!
FLOW!RESTRICTOR!–!OPTIONAL!
In%order%to%ensure%the%optimal%temperature%output%and%overall%performance%of%y our%tankless%water%heater %you%may%
require%a%flow%restrictor.%These%flow%r estrictors% are%instal led%on%the%outl et%connection%of %your%tankless%water%heater%and%
limit%the%maximum%volume%coming%out%of%your%unit%to%a%specified%flow%rate%to%pr event%the% exit%t emperature%f rom%
becoming%too%c ool.%To%l earn%more%about%fl ow%restrictor s%or%find% out%how%to%purchase%one% for%your%tankl ess%water%heat er%
visit%us%online%at% Eemax.com%or%contact%us%at%1-800-543-6163.%%
!
Steps!for!Choosing!a!Flow!Restrictor!
1.
Find%your%model%in%the%chart %on%the%left %
2.
Choose%the%col umn%with%the% inlet% water%temperatur e%closest %to%your% geographical %locati on%
3.
Take%the%GPM%or%gal lons%per%minut e%you%fi nd%and%match% it%wit h%the%cor responding%f low%rest rictor% on%the%ri ght%
!
%
%
*Selection%based%on%inlet%temperature%above%and%outlet%temperature%of%105°F
Eemax!Part!Number!
Maximum!Flow!Rate!
Connection!Size!
IFR%1-2 %
1.0%GPM%
1/2"%Compression%
1.5%GPM%
1/2"%Compression%
2.0%GPM%
1/2"%Compression%
IFR%3-4 %
2.0%GPM%
3/4"%NPT%
3.0%GPM%
3/4"%NPT%
4.0%GPM%
3/4"%NPT%
5.0%GPM%
3/4"%NPT%
Inlet!Wat e r!T e mperatur e !
%%
40°F!
50°F!
60°F!
70°F!
PR008240%
1.0!
1.0!
1.0!
1.5!
PR011240%
1.0!
1.0!
1.5!
2.0!
PR013240%
1.0!
1.5!
2.0!
2.0!
PR018240%
2.0!
2.0!
2.0!
3.0!
PR024240%
2.0!
2.0!
3.0!
4.0!
PR027240%
2.0!
3.0!
4.0!
5.0!
PR036240%
3.0!
4.0!
5.0!
5.0!

7-
GENERAL!OPERATING!INSTRUCTIONS!
%
Operating%your%new%tankless%water%heater%is%very%similar%to%using%any%traditional%water%heating%system.%
However,%it%is%very%important%that%you%carefully%read%all%of%the%set-up%procedures%and%operating%instructions%and%tips%to%
ensure%the%maximum%performance%and%energy%savings%from%your%new%water%heater.%We%recommend%that%all%members%
of%the%household%read%these%Genera l%Op era ting%In struc tion s.%
6-
!
How!your!new!water!heater!works:!
Your%tankless%water%heater%does%not%store%hot%water%like%a%conventional%
tank-type%water%h eater.%It%contains%very%high%po wered%heating%elem ents%that%are%capable%of%h eating%water%on-
demand.%As%soon%as%you%turn%on%a%hot%water%faucet,%a%sophisticated%flow%sensor%recognizes%that%you %have%turn ed%
on%the%water.%This%sensor%measures%flow%rate%while%another%sensor%measures%the%incoming%water%temperature.%This%
informat ion%is%tran smitted %continually%to %the%compu ter%logic%controls%w hich%decide%ho w%much %power%to%sen d%to%the%
heating%elements%to%heat%the%water%to%your%desired%temperature.%On ce%the %wate r%fauce t%is%turned %off%you r%w ater%
heater%will%turn%off%as%well.%
7-
%
8-
%
8-
MAINTENANCE!
To%ensure%maximum%performance%of%your%water%heater%and%to%reduce%the%risk%of%a%water%leak,%w e%recommen d%the%
following%ma inten ance :%
You%should%inspect%the%connections%on%the%inlet%and%outlet%of%the%water%heater%at%least%on%an%annual%basis%for%any%
signs%of%damage%or%failure.%Any%signs%of%damage,%cracks,%leakage%or%weakness%should%be%addressed.%Take%care%
not%to%over-tighten%the%connectio ns.%Serious%intern al%damage %to%your%water%he ater%can%occur%if%you %over-%tigh ten%
the%water%heater%con nection s%at%the%unit.%
IMPORTANT!NOTES:!
As%with% all% electr ical% appliance s,%under %no%ci rcumstance s%shoul d%you%at tempt%to% instal l,%r epair%or %disassembl e%this%
water %hea ter %wi thou t%f ir st% shu tti ng% off %al l% power %t o%t he% uni t%d ire ctl y% at% the% fu se% or% brea ker% box .%S ERI OUS% BODILY%
INJURY%OR%DEATH%COULD%OCCUR%I F%YOU%IGNORE%T HIS%WARNING.%
When% a ny %m ai nt en anc e% i s %p er fo rme d% o n% th e% wa te r% he at er % or % th e% ho me’ s %p lu mbi ng % sy st em %t ha t% ma y% i nt ro du ce %air%
into%the%plumbing%pipes,%it%is%important%to%turn%the%power%off%to%the%water%heater%and%purge%the%air%out%of%the%
lines%before%allowing%the%unit%to%power%up.%FAILURE%TO%DO%SO%COULD%CAUSE%PERMANENT%DAMAGE%TO%THE%HEATING%
ELEMENT%AND%VOID%YOUR%WARRANTY.%%
If%you%have%a%water%supply%with%a%high%level%of%mineralization%(hard%water),%you%should%increase%the%frequency%of%your%
maint enan ce.%
%
9-
TROUBLE!SHOOTING!GUIDE!
Are!y ou!having !problems! with!your !water!he ater?!
Please%call%or%email%our%customer%service%and%technical%support%team %for%an y%help%yo u%ma y%need%
TOLL!FREE!1-800-543-6163!
info@eem axin c.co m

The%following%t able%represents%some%of%the%most%c ommon%techni cal%support%questions%we%receive .%Before%call i ng % us,%
please%read% t hor oug hl y%to%see%i f % your%question%or% problem%is% addressed.
PROBLEM
!
POSSIBLE!CAUSE
!
SOLUTION
!
Water!heater!is!not!heating!at!all!(water!is!flowing!
but! the! unit! is! not! heating! at! all! —the! outgoing!
water! temperature! is! the! same! as! my! cold! water!
supply)!-!the!digital!display!does!NOT!light!up.!
No!power!or!incorrect!wiring.!
Make!sure!the! b reakers!at!main !electrical!pa nel!are!ON.!You !
may!have!a!faulty!breaker!or!unit!may!be!wired!incorrect.!
Flow!rate!is!too!low!/!water!pressure!is!too!
low.!
Your!water!heater!has!an!activation!flow!rate!of!
approximately!0.3!GPM.!If!your!water!f l ow! r at e ! i s ! less!than!
this!level,!your!unit!will!not!activate.!Increase!the!flow!rate.!
Water!heater!is!not!heating!at!all!(water!is!flowing!
but! the! unit! is! not! heating! at! all! -! the! outgoing! water!
temperature!is!the!same!as!my!cold!wa ter!supply)!
The!digital!display!DOES!light!up.!
Internal!part!failure.!
Please!call!us!for!technical!assistance.!
Water!heater!is!heating!but!the!water!
temperature!is!not!hot!enough.!
User!temperature!setting!too!low.!
Turn!up!the!temperature!setting!on!the!unit.!
Flow!rate!is!too!high.!
Depending!on!your!incoming!water!temperature!and!the!
power!output!of!your!model,!your!water!flow!rate!may!
exceed!the!physical!heating!capacity !o f! you r! water !heater.!
Reduce!the!flow!rate!by!installing!an!Eemax!Flow!Restrictor.!
Use!the!chart!in!section!6!to!find!out!which!flow!restrictor!
works!best!for!your!particular!model.!!
Crossed!wires.!
If!it’s!a!new!installation,!have!your!electrician!double!check!
the!wiring.!Is!possible!that!the!wiring!is!incorrect.!
Voltage!less!than!240!volts.!
The!heating!elements!on!your!water!heater!are!design!for!
240! volts.! When! use! with! a! lower! voltage,! they! produce! less!
heating!power.!You!may!need!to!upgrade!to!a!larger!model.!!
Mixing!too!much!cold!water.!
You!do!not!need!to!mix!as!much!cold!water!with!your!
tankless!water!heater!compared!to!wh en!you!use !a!
conventional!water!heater.!You!may!also!have!an!anti-scald!
feature!on!your!faucet!that!is!mixing!cold!water.!These!
types!of!faucets!can!usually!be!adjusted!to!reduce!the!
amount!of!cold!water!mixed.!!
The!water!temperature!at!my!faucet!is!less!than!the!
temperature!setting!of!my!water!heate r.!
Voltage!less!than!240!volts.!
The!computer!chips!in!your!tankless!water!heater!are!
programmed!with!the!expectation!that!your!incoming!line!
voltage!is!240!volts.!If!you!have!less!than!240!volts,!it!may!
affect!the!reading!on!your!water!heater’s!digital!display!and!
cause!it!to!read!slightly!higher!than!the!actual!output!
temperature.!To!compensate!for!this,!increase!the!setting!
on!your!water!heater!if!you!need!/!want!hotter!water.!
Anti-Scald!pressure/balancing!valve!or!
tempering!valve.!
Your! faucet! may! have! an! anti-scald! feature! or! a! tempering!
valve! that! automatically! mixes! cold! water! even! when! you!
turn!your!control!lever!or!handle!to!full!hot.!Thes e!devices!
are! usually! adjustable! so! you! can! turn! off! the! cold! mix!
completely.! You! can! compensate! for! this! by! increasing! the!
setting!on!your!water!heater!if!you!need/want!hotter!water.!
Thermal!loss!due!to!long!pipe!run!
As!the!hot!water!from!the!heater!runs!through!the!hot!
water!delivery!sys tem!to!yo u!faucet ,!some!h eat!wil l!be!lo st!
especially!if!it!has!long!distance!to!travel!or!the!pipes!are!
cold.!This!is!normal.!You!can!compensate!for!this!by!
increasing!the!setting!on!you r!water!if!you!need/ want!
hotter!water.!
10-
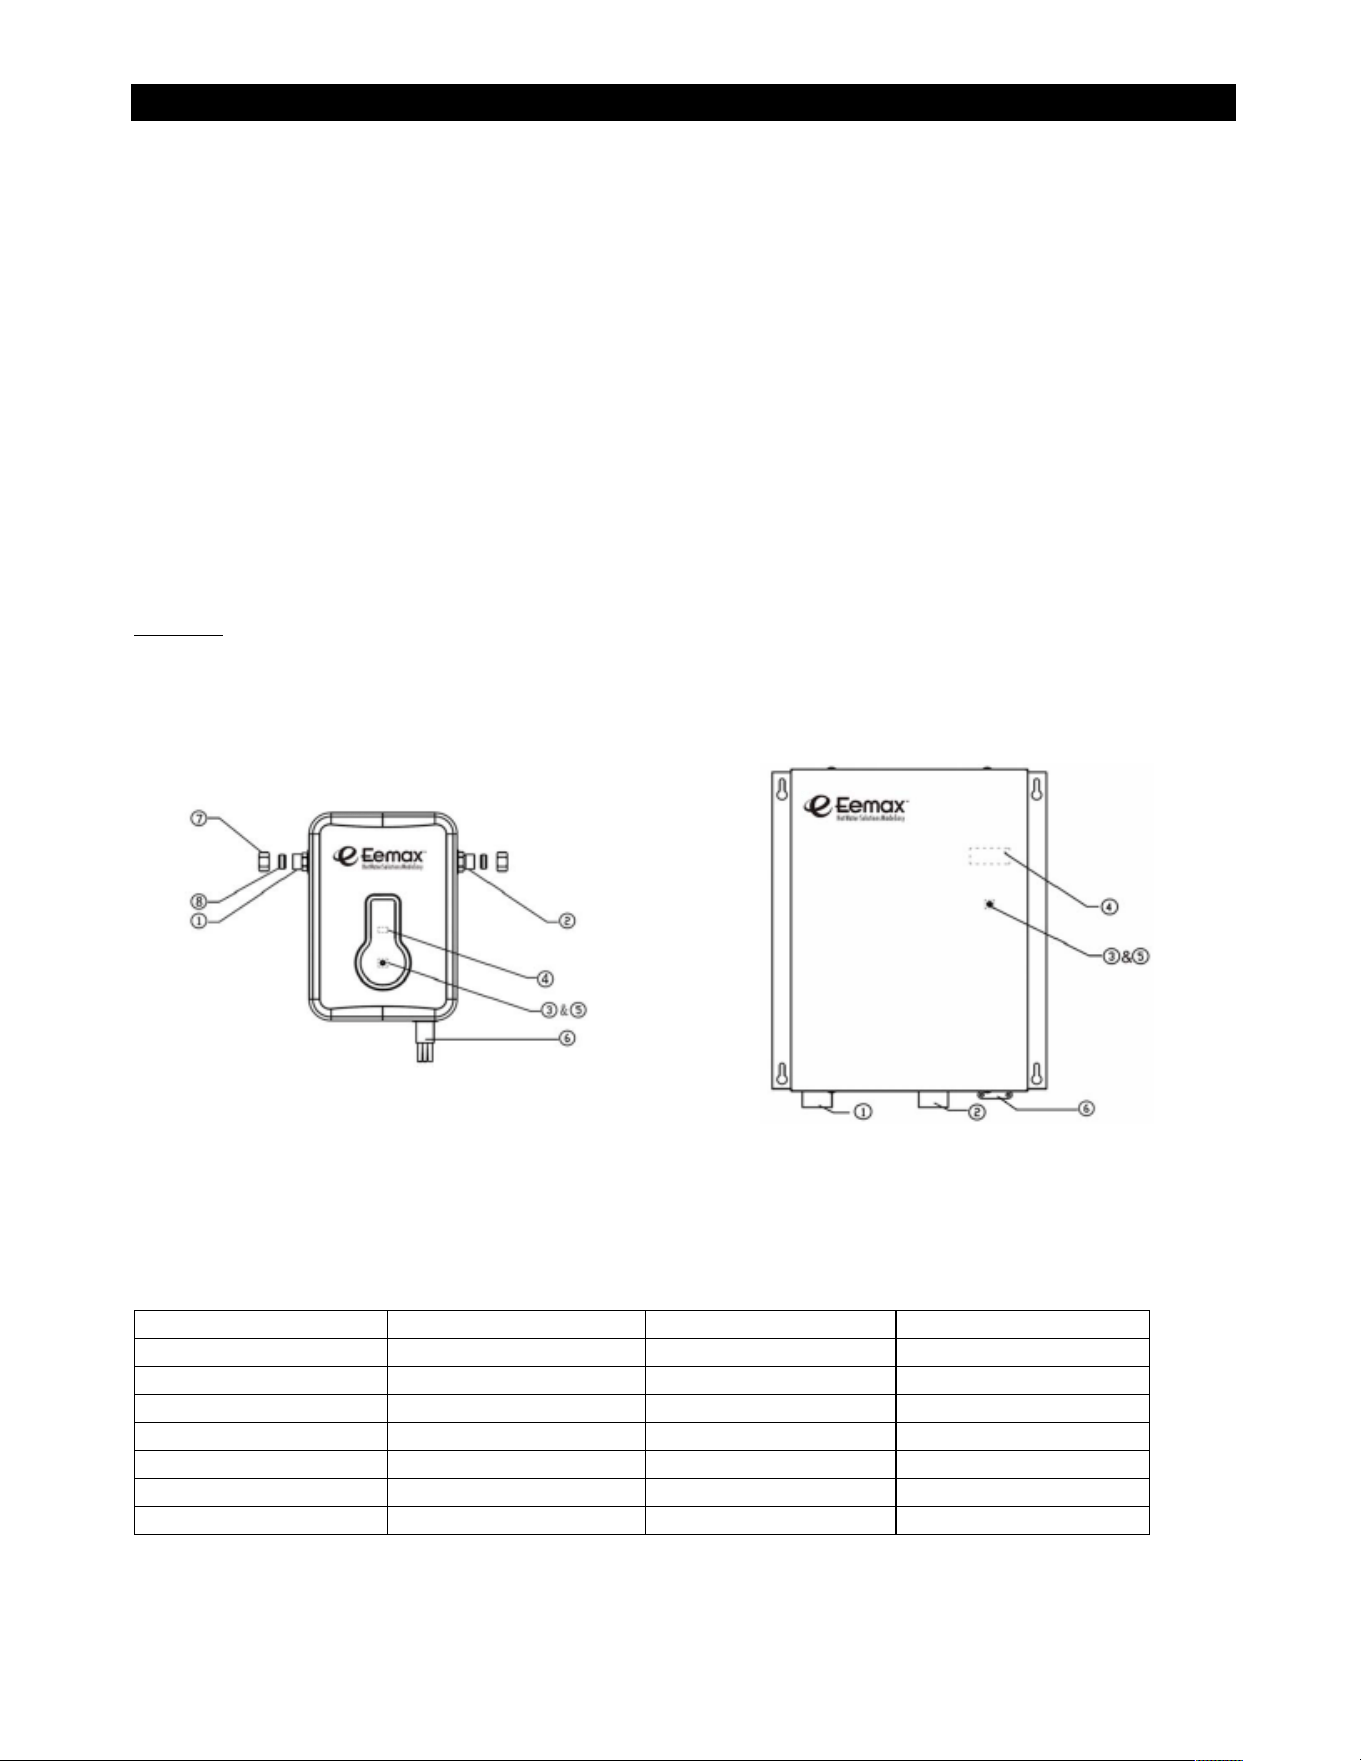
USER!INTERFACE!
Power!
• Click%adjustment%stem,%the%display%will%turn%on%
• Click%the%adjustment%stem%again,%the%display%will%turn%off%
C/F!Conversion! !
• Press%the%stem%for %3%seconds,%the%display%will%change%from%Fahrenheit%to%Celsius%or%vice%versa%
Temperature!Control!
• Turning%the%stem%c lockwise%increases %the%set%output%water%temperature%
• Turning%the%stem%c ounte r%clockwise%decr eases%the%set%output%water%temperature%
• You%can%set%or%adjust%your%temperature%at %any%time%between%80°F%–%140°F%(4°C%–%60°C).%The%temperature%can%
be%changed%to%your%desired%setting.%The%display% will%only% stay%on%when%the%unit%is%in%use%or%when%you%are%setting%
the%temperature.%%
CAUTION%–%removing%the%cover%to%change%the%temperature%set%point%exposes%electrical%shock%and%burn%hazards,%which%can%
cause%INJURY%or%DEATH.%Adjustment%should%only%be%done%by%a%licensed%plumber%or%electrician.%
PR008240!–!PR011240!–!PR013240%%% % %%PR018240!–!PR024240!–!PR027240!–!PR036240!%
%
%
%
%
%
%
%
%
%
1. Hot%Water% Outl et% % % % 4.%Temperature%Set%Point%Display% % % 6.%Wire%Connection% %
2. Cold%Water%Inlet% % % % (Remove%Cover%to%Access)%% % % 7.%Brass%Compression%Nut%
3. Celsius/Fahrenhe it% Conver si on% % % 5.%Adjustment% Stem%&%Te mperature %Contr ol% % 8.%Brass%Compression%Ferrule% %%%
(Remove%Cover%to%Access%-%Press%&%Hold%3%sec.)%% (Remove%Cover%to%Access)% % % %
% % %
%%
%
%
%
%
%
%
Model Number
Depth
Width
Height
PR008240
3.75 inches
9.75 inches
12 inches
PR011240
3.75 inches
9.75 inches
12 inches
PR013240
3.75 inches
9.75 inches
12 inches
PR018240
4.5 inches
14 inches
17.75 inches
PR024240
4.5 inches
17 inches
17.75 inches
PR027240
4.5 inches
17 inches
17.75 inches
PR036240
4.5 inches
21 inches
17.75 inches

%
%
%
%
%
%
%
%
%
%
%
%
%
%
%
%
%
%
%
%
%
%
%
%
%
%
%
%
%
%
%
%
%
%
%
%
%
%
!
Eemax!Inc.!
400!Captain!Neville!Drive,!Waterbury,!CT!06705!
