Washing - Machine
User Manual
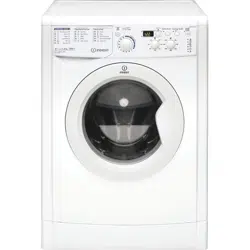
IMA 762 MY TIME UK
869991722400

2
TABLE OF CONTENTS
1 Safety Instructions ��������������������������������������� 4
1.1 Intended Use ............................................................4
1.2 Safety of Children, Vulnerable Persons
andPets .....................................................................4
1.3 Electrical safety .......................................................5
1.4 Handling safety .......................................................6
1.5 Installation safety ...................................................6
1.6 Operational safety ..................................................8
1.7 Maintenance and cleaning safety ....................9
2 Important Instructions relating to the
Environment ��������������������������������������������������10
2.1 Compliance with WEEE Directive .................. 10
2.2 Packaging information ...................................... 10
3 Technical Specications �����������������������������11
4 Installation ��������������������������������������������������12
4.1 Appropriate installation location .................. 12
4.2 Removing transportation safety bolts .......... 13
4.3 Connecting to water supply .............................13
4.4 Connecting the drain hose to the drain
outlet ........................................................................14
4.5 Adjusting the stands ........................................... 14
4.6 Electrical connection ........................................... 14
4.7 Handling the product ......................................... 15
5 Preliminary Preparation�����������������������������16
5.1 Sorting laundry .................................................... 16
5.2 Preparing laundry for washing .......................16
5.3 Tips for energy and water saving ...................16
5.4 Start-up ................................................................... 17
5.5 Loading laundry ................................................... 17
5.6 Correct load capacity ......................................... 17
5.7 Using detergent and softener ........................18
5.8 Tips for ecient washing ..................................20
5.9 Displayed program duration ...........................20
6 Operating the Product �������������������������������21
6.1 Control panel ........................................................21
6.2 Symbols on the display ..................................... 22
6.3 Preparing the laundry ........................................ 23
6.4 Sorting the laundry by coloranddegree
ofsoiling .................................................................. 23
6.5 Degree of soiling ..................................................23
6.6 Sorting the laundry by carelabel
specications ........................................................ 24
6.7 Table of wash cycles ...........................................25
6.8 Programs ................................................................25
6.9 Special wash cycles ............................................. 26
6.10 Various functions ..............................................26
6.11 How to use the appliance .............................. 27
6.12 Canceling a program ....................................... 29
6.13 Program End ....................................................... 29
7 Maintenance and Cleaning ������������������������31
7.1 Cleaning the detergent drawer ......................31
7.2 Cleaning the loading door and the drum ..31
7.3 Cleaning the outer cabinet and control panel
............................................................................................31
7.4 Cleaning the water intake lters .................... 31
7.5 Draining remaining water and cleaning
thepump lter .....................................................32
8 Troubleshooting �����������������������������������������33
9 DISCLAIMER/ WARNING �����������������������������38
3
PLEASE READ THIS USER MANUAL FIRST!
Dear Customer,
Thank you for choosing this Indesit product. We hope that you get the best results from your prod-
uct, which has been manufactured with high quality and state-of-the-art technology. Please read
this entire user manual and all other accompanying documents carefully before using the product.
Follow all warnings and information in the user manual. You can thus protect yourself and your
product against possible hazards.
Keep the user manual. If you hand over the product to someone else, provide the user manual as
well. Warranty terms, product usage and troubleshooting methods are shown in the user guide.
Symbols and denitions
The following symbols are used in the user guide:
Danger that could result in death or injury.
Important information or useful hints about usage.
Read the user manual.
Recyclable materials.
Hot surface warning.
WARNING Danger that may result in property damage to the product or its environment.
4
This section includes the safety
instructions necessary to prevent
the risk of personal injury or material
damage.
Our company shall not be held
responsible for damage that may
occur if these instructions are not
observed.
• Installation and repair operations
must always be performed by
Authorized Service.
• Use original spare parts and
accessories only.
• Do not repair or replace any
component of the product unless it
is clearly specied in the operation
manual.
• Do not modify the product.
1�1 INTENDED USE
• The service life of your product is 10
years. During this period, original
spare parts will be available to allow
proper operation of the appliance.
• This product has been designed for
domestic use. It is not intended for
commercial purposes and should
not be used beyond its intended
use.
• Use only for washing and drying
textile products that are marked
accordingly.
• The manufacturer accepts no
liability for any damage due to
misuse or mishandling.
• This appliance is intended to be
used in household and similar
applications. For example:
- Sta kitchens of stores, oces and
other work environments
- Ranches
- Customers of hotels, motels and
other accommodation facilities
- Bed and breakfasts, hostel-like
environments
- Common areas of apartment
blocks or laundries.
1�2 SAFETY OF CHILDREN,
VULNERABLE PERSONS AND
PETS
• This product may be used by
children aged 8 years and older
and persons with underdeveloped
physical, sensory or mental
capabilities or lack of experience
and knowledge if they have been
given supervision or instruction
concerning the safe use of the
appliance or product and the
hazards involved in its use.
• Children under the age of 3 should
be kept away from the appliance
unless continuously supervised.
• Electrical products can be
dangerous for children and pets.
Children or pets should not
play with, climb on or inside the
product. Check inside the product
before use.
1 SAFETY INSTRUCTIONS

5
• Use the child lock to prevent
children from interfering with the
product.
• Do not forget to close the loading
door when leaving the room where
the product is located. Children
and pets may get locked inside and
drown.
• Children should not perform
cleaning and user maintenance
procedures without an adult’s
supervision.
• Keep the packaging materials away
from children. Risk of injury and
suocation.
• Keep all detergents and additives
used on the product out of
children’s reach.
• For children’s safety, cut the power
cable and break and deactivate the
locking mechanism of the loading
door before disposing of the
product.
1�3 ELECTRICAL SAFETY
• The product should be unplugged
during installation, maintenance,
cleaning and repair procedures.
• Damaged power cables should
be replaced by the authorized
service in order to prevent possible
hazards.
• The product should not be
powered via an external switching
device such as a timer or connected
to a circuit that is regularly
switched on and o by a device.
• Do not tuck the power cable under
the product or to the rear of the
product. Do not put heavy items
on the power cable. Do not overly
bend or crush the power cable or
place it close to sources of heat.
• Do not use an extension cable,
multi-plug or adapter to operate
your product.
• The plug should be easily
accessible. If this is not possible, a
mechanism that meets electrical
regulations and that disconnects
all terminals from the mains (fuse,
switch, main switch, etc.) should
be available on the electrical
installation.
• Do not touch the plug with wet
hands.
• When unplugging the appliance,
hold the plug and not the power
cable.
• Make sure the plug is not wet, dirty
or dusty.

6
1�4 HANDLING SAFETY
• Unplug the product before moving
it. Remove the water outlet and
water mains connections. Drain any
water left inside the product.
• This product is heavy. Do not at-
tempt to handle it by yourself. Do
not hold extruding parts, such as
the laundry loading door, to lift or
move the product. The upper tray
should be closed tightly before
moving it.
• This product is heavy; it should be
carried carefully by two people if a
staircase is involved. The product
may cause injury if it falls on you.
Do not hit or drop the product
while carrying it.
• Carry the product in an upright
position.
• Make sure that the hoses and
the power cable are not folded,
pinched or crushed after the
product has been tted into
place after installation or cleaning
procedures.
1�5 INSTALLATION SAFETY
• Check the information on
the manual and installation
instructions to prepare the product
for installation and make sure the
electrical mains, the clean water
mains and water outlet are suitable.
If not, call a qualied electrician
and plumber to have them make
the necessary arrangements. These
operations are the customer’s
responsibility.
• Check for any damage to the
product before installing it. Do not
install the product if it is damaged.
• Injuries may occur if hands are put
into uncovered slots. Use plastic
plugs to close the holes of the
transportation safety bolts.
• Do not install or leave the product
in locations where it may be
exposed to external environment
conditions.
• Do not install the product in
locations where the temperature
drops below 0°C.
• Do not place the product on a
carpet or similar surface. It may
create a re hazard since it cannot
receive air from underneath.
• Place the product on a hard, level
surface and balance it with the
adjustable feet.

7
• Connect the product to a
grounding plug protected by
a fuse suitable for the current
ratings on the type label. Make
sure the grounding is carried out
by an expert electrician. Do not
use the product without suitable
grounding in compliance with
local/national regulations.
• Plug the product into a socket
with voltage and frequency ratings
suitable to those indicated on the
type label.
• Do not plug the product into loose,
broken, dirty, greasy sockets or
sockets that have come out of their
housing or sockets with a risk of
water contact.
• Use the new hose set provided with
the product. Do not re-use old hose
sets. Do not modify the hoses.
• Connect the water inlet hose
directly to the water tap. The
pressure from the tap should be
minimum 0.1 MPa (1 bar) and
maximum 1 MPa (10 bars). 10 to 80
liters of water per minute should
run from the tap in order for the
product to function properly. If the
water pressure is above 1 MPa (10
bars), a pressure-reducing valve
should be tted. The maximum
permissible temperature is25°C.
• Fit the end of the water discharge
hose to the dirty water discharge
drain, the sink or the bathtub.
• Place the power cable and
housings in locations that pose no
risk of tripping.
• Do not install the product behind
a door, a sliding door or in another
location that will prevent the door
from opening completely.
• If a drier is to be placed on the
product, secure it with a suitable
mounting apparatus obtained from
the authorized service.
• There is a risk of contact with
electrical parts when the upper tray
is removed. Do not dismantle the
upper tray of the product.
• Place the product at least 1 cm
away from the edges of furniture.
• Make sure the room in which
the installation is performed is
adequately ventilated, as there
may be a risk of undesirable gases
emitted by the device, which
could ignite other combustible
substances in the room or interact
with an open ame.

8
1�6 OPERATIONAL SAFETY
• When you are using the appliance,
use only detergents, softeners and
supplements suitable for washing
machines.
• Do not use chemical solvents
on the product. These materials
present an explosion risk.
• Do not operate defective or
damaged products. Unplug the
product (or turn o the fuse it is
connected to), turn o the water
tap and call the authorized service.
• Do not place sources of ignition
(burning candles, cigarettes, etc.)
or sources of heat (irons, furnaces,
ovens, etc.) on top of or near the
product. Do not place inammable/
explosive materials near the
product.
• Do not get onto the product.
• Unplug the product and turn o
the tap if you will not be using the
product for long periods.
• Detergent/maintenance materials
may splash out of the detergent
drawer if it is opened while the
machine is in operation. Detergent
coming into contact with your skin
and eyes can be dangerous.
• Make sure pets do not climb inside
the product. Check inside the
product before use.
• Do not force open the locked
loading door. The door will open
once the washing is completed.
If the door does not open, use
the solutions for the “loading
door does not open” error in the
Troubleshooting section.
• Do not wash articles contaminated
with gasoline, kerosene, benzene,
reducers, alcohol or other
inammable or explosive materials
and industrial chemicals.
• Do not directly use dry cleaning
detergent and do not wash, rinse,
spin or dry laundry contaminated
with dry cleaning detergent.
• Do not place your hands into the
rotating drum. Wait until the drum
has stopped rotating.
• Do not place your hand or metal
objects under the washing
machine.
• When washing laundry at high
temperatures, the discharged
washing water may burn your skin
upon contact, e.g. when the drain
hose is connected to the sink. Do
not touch the discharge water.
• Take the following precautions to
prevent the formation of biolm
and unpleasant smell:
- Make sure the room where the
washing machine is placed is well
ventilated.
- Wipe the door gasket and loading
door glass with a dry and clean
cloth at the end of the program.

9
• The glass of the loading door will
heat up when washing or drying at
high temperatures. Therefore, do
not allow (especially) children to
touch the loading door glass while
washing or drying.
1�7 MAINTENANCE AND
CLEANING SAFETY
• Do not wash the product with
pressure washers, by spraying vapor
or water or by pouring water.
• Do not use sharp or abrasive tools
to clean the product. Do not use
household cleaners, soap, detergent,
gas, gasoline, thinner, alcohol,
varnish, etc. while cleaning.
• Cleaning agents containing solvents
might emit noxious fumes (e.g.
cleaning solvent). Do not use
cleaning products containing
solvents.
• There may be detergent residues
in the detergent drawer when you
open it for cleaning.
• Do not dismantle the lter of the
discharge pump while the product is
in operation.
• The temperature in the machine may
rise up to 90°C. Clean the lter only
after the water in the machine has
cooled down, in order to avoid risk of
burns.

10
2 IMPORTANT INSTRUCTIONS RELATING TO THE ENVIRONMENT
2�1 Compliance with WEEE Directive
This product complies with the EU WEEE
Directive (2012/19/EU). This product
bears a classication symbol for waste
from electrical and electronic equipment
(WEEE).
This product has been manufactured with
high quality parts and materials which can be
reused and are suitable for recycling. At the
end of its service life, do not dispose of the
decommissioned product with normal domestic
and other waste. Take it to a collection center
for the recycling of electrical and electronic
equipment. Please consult your local authorities
to nd out about these collection centers.
Compliance with RoHS Directive:
The product you have purchased complies
with EU RoHS Directive (2011/65/EU). It does
not contain any of the harmful or prohibited
materials specied in the Directive.
2�2 Packaging Information
The product packaging materials are
manufactured from recyclable materials in
accordance with our National Environment
Regulations. Do not dispose of the packaging
materials with domestic or other waste. Take
them to packaging material collection centers
designated by local authorities.
11
3 TECHNICAL SPECIFICATIONS
Supplier’s name or commercial brand Indesit
Model name IMA 762 MY TIME UK
Washing capacity (cotton) (kg) 7
Drying capacity (cotton) (kg) /
Maximum spin speed (cycle/min) 1200
Built-in No
Height (cm)
85
Width (cm)
60
Depth (cm)
47,4
Single Water inlet/Double Water inlet + / -
Electrical connection (V/Hz) 220 V / 50Hz
Total current (A) 10
Total power (W) 2000
Main model code F172240
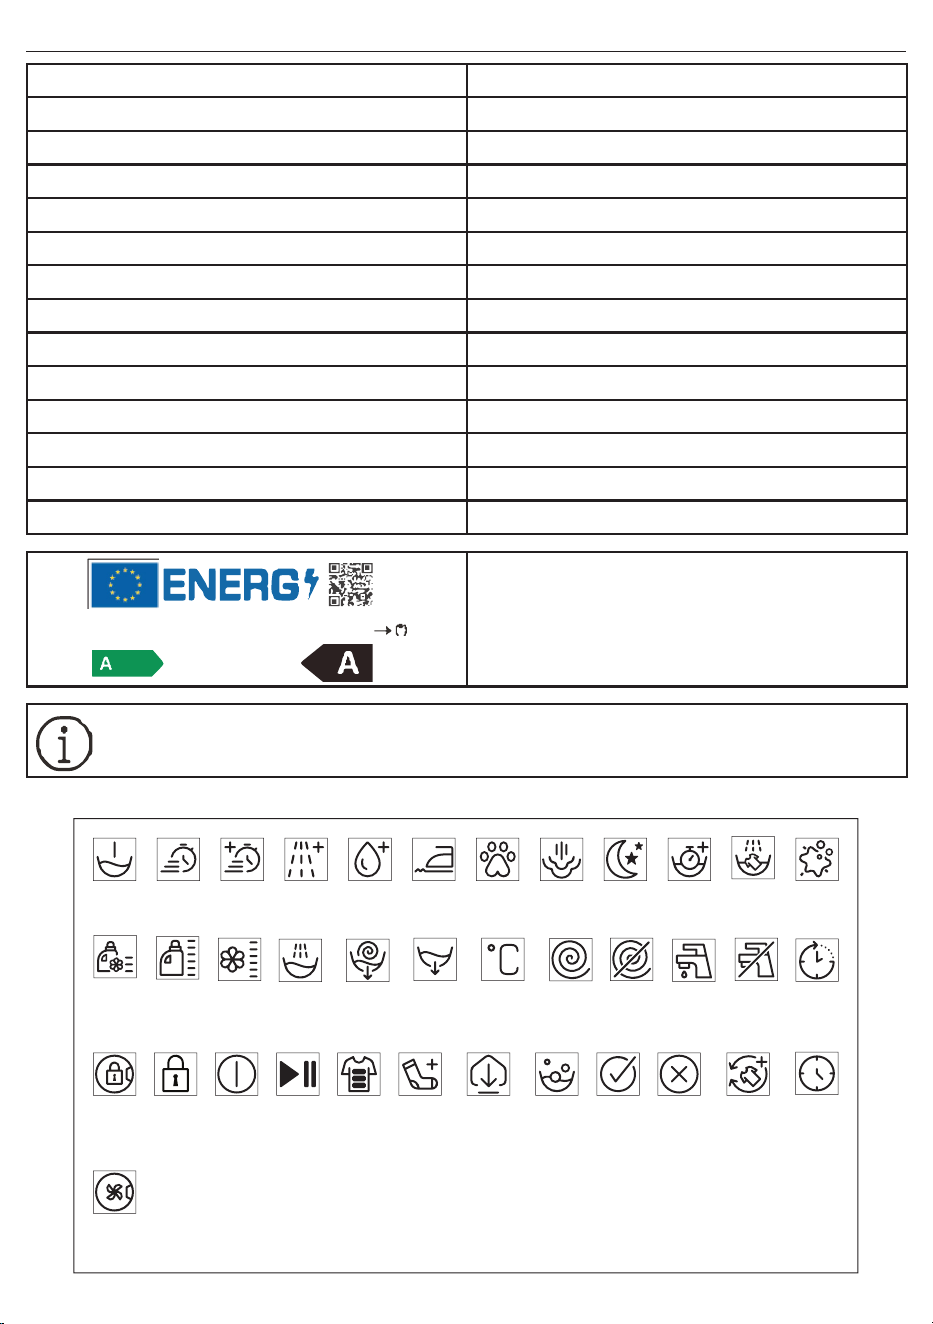
The model information as stored in the product
database can be found by visiting the following
website and searching for your model identier
(*) as displayed on the energy label.
https://eprel.ec.europa.eu/
The consumption values apply when the wireless network connection is turned o.
Symbols Table
Prewash
Fast
Fast
+
Extra
Rinse
Extra
Water
Anti
Crease
Pet Hair
Removal
Steam Night Soaking Rinse
Hold
Steeping
Autodose
Liquid
Detergent
Selection
Softener
Selection
Spin
No SpinRinse Drain
Spin + Drain Tap Water
(Cold)
No Water
Temperature
Time
Delay
Door
Lock
Child
Lock
On / Off
Start/
Pause
Soil
Level
Add
Garment
Downloaded
Program
Wash
Ok
(End)
Cancel
Anti Crease+
Full
Time
Clean&
Wear
Prewash Fast Fast + Extra Rinse
Extra
Water
Anti Crease
Pet Hair
Removal
Steam Night Soaking Rinse Hold
Stain
Removal
Door Lock Child Lock On / O
Start/
Pause
Soiling
Level
Add
Garment
Downloaded
Program
Wash OK (End) Cancel Anti Crease+ Full Time
Autodose
Liquid
Detergent
Selection
Softener
Selection
Rinse Spin + Drain Drain Temperature Spin No Spin
Tap Water
(Cold)
No Water Time Delay
Clean &
Wear
SUPPLIER’S NAME MODEL IDENTIFIER
12
4 INSTALLATION
Please read the “Safety Instructions”
section rst!
Your washing machine automatically
detects the amount of laundry when
you select a program.
While installing the product, calibra-
tion should be carried out before the
rst use to ensure that the laundry
amount is detected with maximum
accuracy.
To do this, select the Drum Cleaning*
program and cancel the spin function.
Start the program without laundry.
Wait for the program to nish, which
will take about 15 minutes.
*The program name may vary depend-
ing on the model. For appropriate
program selection, review the program
description section.
• Please contact the nearest Authorized Service
for the installation of the appliance.
• Make sure that the installation and electrical
connections of the product are performed by
an authorized service agent. The Manufactur-
er shall not be held responsible for damages
caused by operations performed by unautho-
rized persons.
• Preparation of the premises and electrical,
tap water and waste water installations at the
place of installation is the customer’s responsi-
bility.
• Make sure that the water inlet and discharge
hoses and the power cable are not folded,
pinched or crushed while pushing the product
into place during installation or cleaning pro-
cedures.
• Prior to installation, visually check to see if the
product has any defects. Do not install the
product if it is damaged. Damaged products
cause risks to your safety.
4� 1 Appropriate Installation Location
Before carrying out any work on the
machine, make sure to wear work
gloves.
• Place the product on a hard, level oor. Do
not place it on a carpet with high pile or other
similar surfaces. Placing it on an improper oor
can cause noise and vibration problems.
• Do not place the product on the power cable.
• Do not install the product in places where tem-
perature may fall below 0°C. Freezing might
damage your product.
• Leave a minimum space of 1 cm between the
product and surrounding furniture.
• If you will install the product on a surface with
steps, do not place it close to the edge.
• Do not place the product on a platform.
• Ensure there are no locked, sliding or hinged
doors that may prevent the loading door from
opening completely.
• Do not place heat sources such as cookers,
irons, ovens, heaters etc. on the appliance and
do not use them on the product.
13
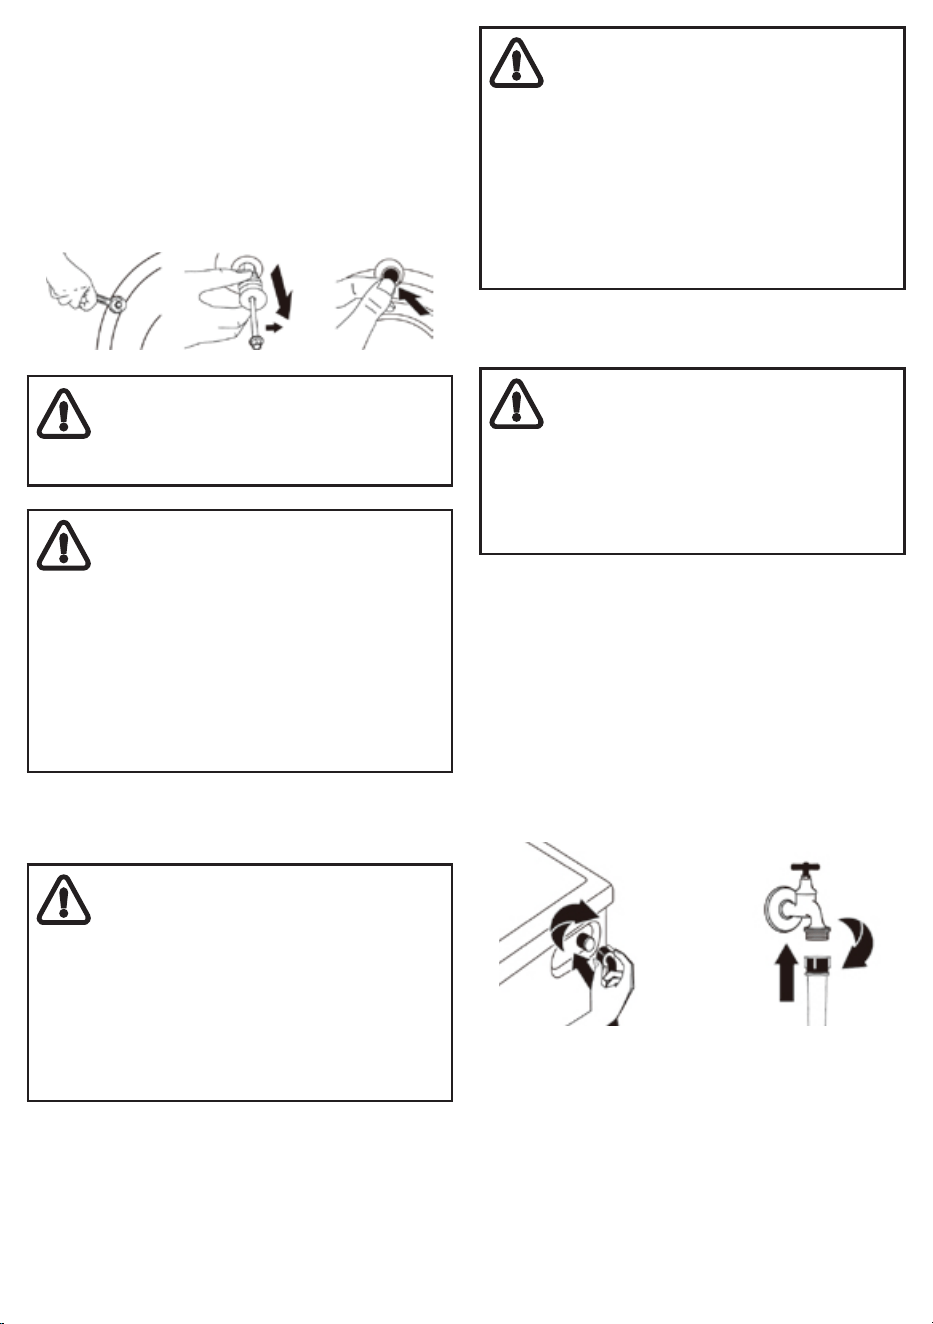
4� 2 Removing Transportation Safety Bolts
1. Loosen all transportation safety bolts with an
appropriate wrench until they turn freely.
2. Bend the inner part by pressing it at the grip
areas and pull the part out.
3. Insert the plastic covers supplied in the User
Manual bag into the holes on the rear panel.
WARNING
Remove the transportation safety bolts
before operating the product. Other-
wise, the product will get damaged.
WARNING
Keep the transportation safety bolts in
a safe place to reuse when the product
needs to be moved again in the future.
Install the transportation safety bolts
following the disassembly instructions
in reverse order.
Never move the product without the
transportation safety bolts properly
xed in place.
4� 3 Connecting to Water Supply
WARNING
The water pressure required for the
operation of the product is between
1-10 bars (0.1-1 MPa). To ensure the
smooth operation of the machine, 10
- 80 liters of water per minute should
be supplied from a fully opened tap. If
the water pressure is higher, install a
pressure reducing valve.
WARNING
Models with a single water inlet must
not be connected to the hot water
tap. In such a case the laundry will get
damaged or the product will switch to
protection mode and will not operate.
Do not use old or used water inlet hos-
es on a new product. They may cause
water leakage from your machine and
stain your laundry.
1. Connect the special hose supplied with the
product to the water inlet on the product.
WARNING
Make sure that the cold water connec-
tion is performed correctly during the
installation of the product. Otherwise,
your laundry may come out hot at the
end of the wash cycle and may suer
wear.
2. Tighten all hose nuts by hand. Never use a
tool when tightening the nuts.
3. Open the taps completely after making the
hose connection to check for water leaks at
the connection points. If any leak occurs, turn
o the tap and remove the nut. Check the
gasket and tighten the nut carefully again.
In order to prevent water leaks and resultant
damage, keep the taps closed when you do
not use the product.
14
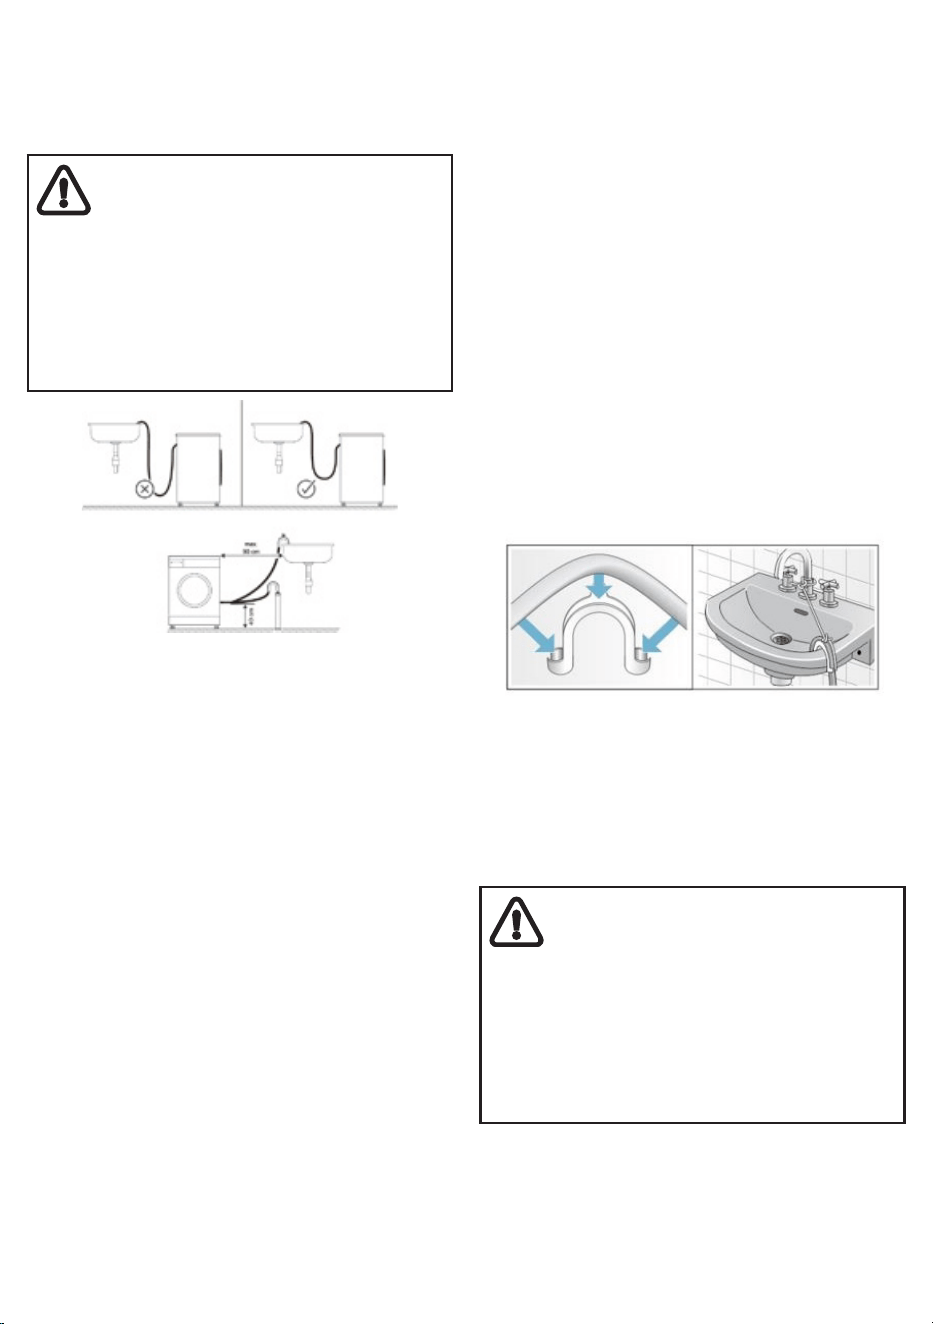
4� 4 Connecting the Drain Hose to the Drain
Outlet
1. Attach the end of the drain hose directly to
waste water drain outlet, washbasin or bathtub.
Your house may be ooded if the water
draining hose is disconnected during
water draining. There is also a risk of
burns due to the high washing
temperatures. In order to prevent such
situations and make sure that the prod-
uct performs water intake and draining
processes correctly, x the drain hose
securely.
2. Connect the hose to a minimum height of 40
cm and a maximum height of 90 cm.
3. If the hose is placed on the oor (or at a maxi-
mum height of 40 cm from the oor) and then
its height is increased, the discharging of water
becomes dicult and laundry may come out
very wet from the machine. You should therefore
comply with the heights provided in the gure.
4. To prevent the waste water from going back
into the product and to ensure easy drainage,
do not immerse the end of the hose in the
waste water and do not insert it more than 15
cm into the drain outlet. If it is too long, cut it.
5. The end of the hose should not be bent or
stepped on and the hose must not be pinched
between the drain and the product. Other-
wise, water discharge issues may emerge.
6. If the hose is too short, extend it by adding
an original extension hose. The overall length
of the hose should not be greater than 3.2 m.
To prevent water leaks, always use a suitable
clamp to secure the connection between the
extension hose and the product drain hose so
that it does not come o and cause leaks.
Notice: Appliance damage/damage to textiles.
If the end of the drain hose comes into contact
with discharge water (water drained from the
washing machine), this water can be sucked
back into the washing machine and may dam-
age the appliance or textiles.
Make sure that:
• There is no stopper in the sink drain.
• The end of the drain hose does not come into
contact with discharge water.
• The sink drain is not partially clogged and
there is a free ow of water.
• The drain hose is securely attached to the
washbasin.
1. Do not twist, pull out or bend the drain hose.
2. Secure the drain hose to the drain pipe, wash-
basin, etc. by using a cable tie, to prevent it from
being pushed out by the force of the water.
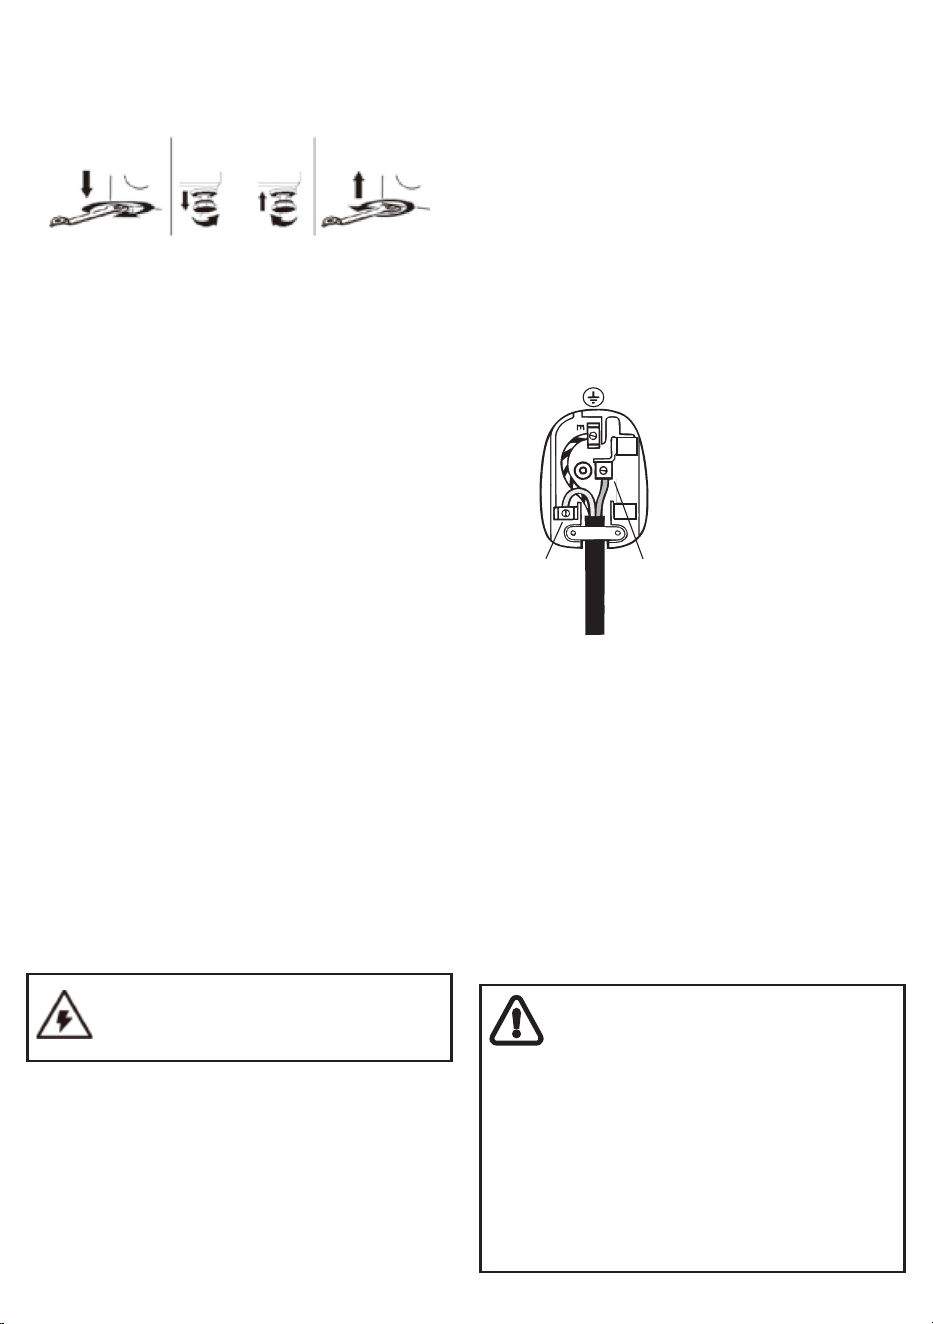
4� 5 Adjusting the Stands
WARNING
In order to ensure that the product
operates silently and without vibration,
it must stand level and be balanced on
its feet. Ensure that the product is bal-
anced by adjusting the feet. Otherwise,
the product may move from its place
and cause noise and vibration prob-
lems or cause damage by crushing.
1. Use the tool in the user manual bag to loosen
the nuts on the feet in the direction of the arrow.
2. Adjust the feet until the product stands level
and balanced. You can move the feet up by
turning them counterclockwise and down by
turning them clockwise.
15
3. Re-tighten all lock nuts with the tool in the
direction of the arrow. You can move the nuts
down by turning them counterclockwise and
up by turning them clockwise.
4� 6 Electrical Connection
Connect the product to a grounded outlet
protected by a 13 A fuse. Our company shall not
be liable for any damage caused by using the
product without grounding according to local
regulations.
• The connection must comply with national
regulations.
• The electrical connection cable infrastructure
of the product must be adequate and suitable
for product requirements. It is recommended
that you use a Ground Fault Circuit Breaker
(GFCI).
• The power cable plug must be within easy
reach after installation.
• If the current supply to the fuse or breaker in
the house is less than 13 amps, have a quali-
ed electrician install a 13 amp supply.
• The voltage specied in the “Technical speci-
cations” section must be equal to your mains
voltage.
• Do not make connections via extension cables
or multi-plugs. Overheating and burning may
occur due to the connecting cable.
Damaged power cables should be
replaced by the authorized service in
order to prevent hazards.
Important
Fitting a dierent plug:
As the colors of the wires in the mains lead of
this appliance may not correspond with the
colored markings identifying the terminals on
your plug, proceed as follows:
a b c
1. Connect the green-yellow or green (earth)
wire to the terminal in the plug marked ‘E’ or
with the symbol f or colored green and yellow
or green.
2. Connect the blue (neutral) wire to the termi-
nal in the plug marked ‘N’ or colored black.
3. Connect the brown (live) wire to the terminal
in the plug marked ‘L’ or colored red.
With alternative plugs a 13 A fuse must be tted
either in the plug or adapter or in the main fuse
box. If in doubt contact a qualied electrician.
Green and yellow Green and yellow
or green
or green
N
N
Blue or black
Blue or black
L
L
Brown or
Brown or
red
red
4�7 Handling the Product
1. Unplug the product before handling it.
2. Disconnect the water outlet and water mains
connections.
3. Drain any water that remains in the product.
See Draining Remaining Water and Cleaning
the Pump Filter.
4. Install the transportation safety bolts following
the disassembly instructions in reverse order.
See Removing the Transportation Safety Bolts.
Never carry the product without the
transportation safety bolts properly
attached! Your product is too heavy to
be carried by one person. Your product
should be carried by two people and
care needs to be taken on the stairs as
it is a heavy product. The product may
cause injury if it falls on you. The
packaging materials are dangerous for
children. Keep packaging materials in a
safe place out of the reach of children.
Clean &
Wear

16
5 PRELIMINARY PREPARATION
Please read the “Safety Instructions”
section rst.
5�1 Sorting Laundry
• Sort laundry according to type of fabric, color
and degree of soiling and allowable water
temperature.
• Always follow the instructions on the garment
care labels.
5�2 Preparing Laundry for Washing
• Laundry items with metal attachments such as
underwires, belt buckles or metal buttons will
damage the product. Remove the metal pieces
or wash the clothes after putting them in a
laundry bag or pillow case.
• Empty all pockets, removing objects such as
coins, pens and paper clips. Turn pockets in-
side out and brush. Such objects may damage
the product or cause noise problems.
• Put small-sized garments such as baby socks
and nylon stockings in a laundry bag or pillow
case.
• Put curtains in without compressing them.
Remove curtain attachment items. Curtain at-
tachment items may cause pulling and tearing
on the curtain.
• Fasten zippers, sew loose buttons and mend
rips and tears.
• Wash “Machine washable” or “Hand washable”
labeled products only with the appropriate
program. Dry these types of clothes by hang-
ing them or laying them at. Do not dry them
in the machine.
• Do not wash colors and whites together. New,
dark-colored cottons release a lot of dye. Wash
them separately.
• Only use dyes / color changing agents and
descalers suitable for washing machines. Al-
ways follow the instructions on the packaging.
• Tough stains must be treated properly before
washing. If you are not sure, check with a dry
cleaner.
• Wash trousers and delicate laundry turned
inside out.
• Laundry that is highly soiled with materials
such as our, lime dust, milk powder, etc. must
be shaken and supercially cleaned before the
laundry is placed inside the product. Such dust
and powder on the laundry may build up on
the inner parts of the product in time and can
cause damage.
• Before washing angora wool articles, place
them in the freezer section of the refrigerator
for a few hours. This will reduce pilling.
5�3 Tips for Energy and Water Saving
The following information will help you use the
product in an ecological and energy/water-e-
cient manner.
• Operate the product with the highest load
capacity allowed for the program you have
selected, but do not overload it. See “Table of
wash cycles”.
• Follow the temperature instructions on the
detergent packaging.
• Wash lightly soiled laundry at low tempera-
tures.
• Use faster programs for small quantities of
lightly soiled laundry.
• Do not use prewash and high temperatures for
laundry that is not heavily soiled or stained.
• If you plan to dry your laundry in a dryer, select
the highest spin speed recommended during
the washing process.
• Do not use more detergent than the amount
recommended on the detergent packaging.
17
5�4 Start-up
Before starting to use the product, make sure
you follow the instructions described in sections
“Important Instructions Relating to the Environ-
ment” and “Installation”. To prepare the product
for washing laundry, rst run the Drum Cleaning
program.
If this program is not available in your product,
apply the method which is described in section
“Cleaning the loading door and the drum”.
Use an anti-limescale product suitable
for washing machines. Some water
remains in the product due to the
quality control processes in the
production. It is not harmful for the
product.
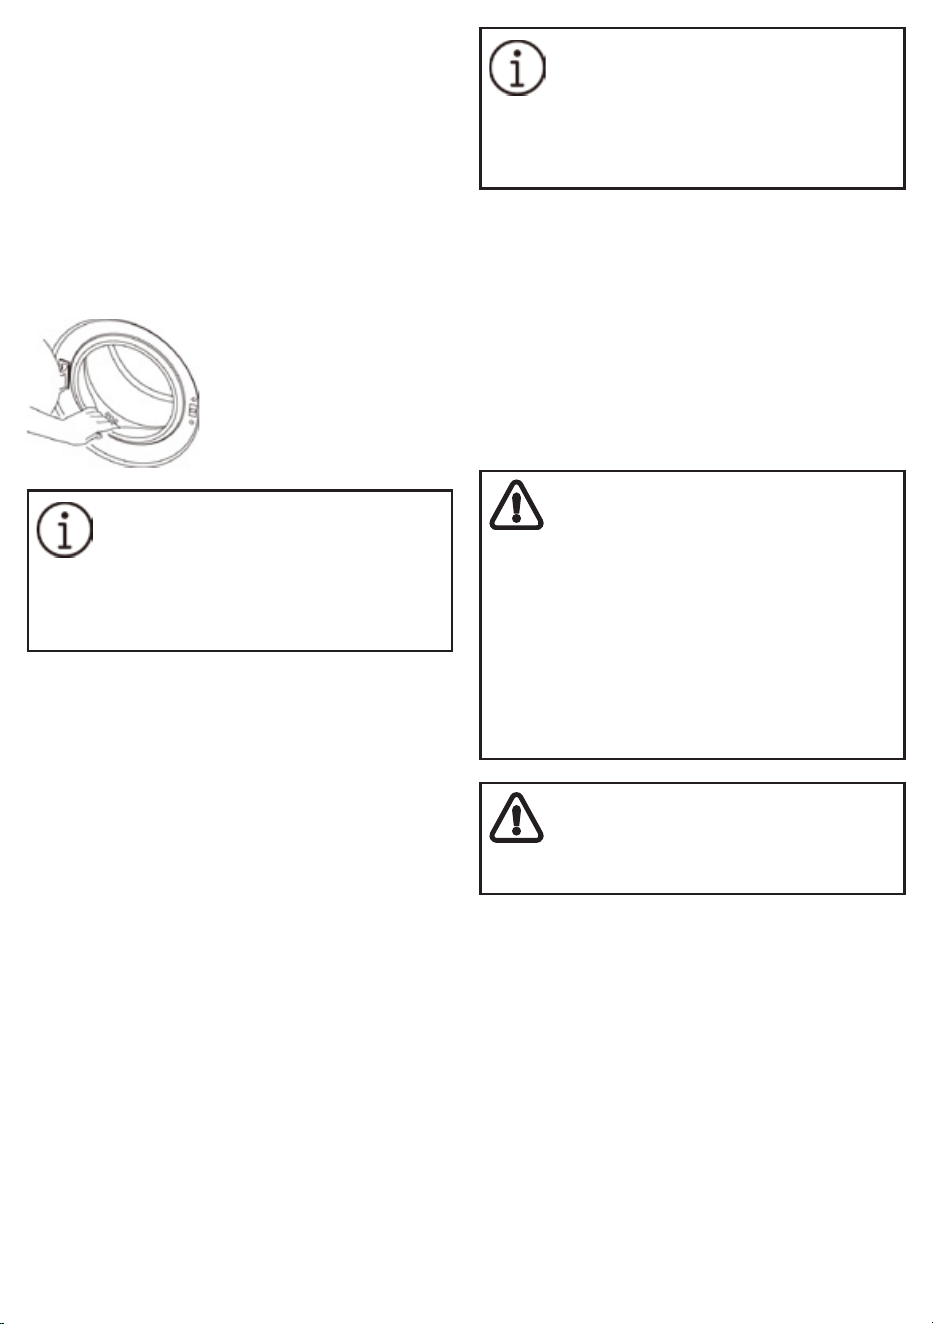
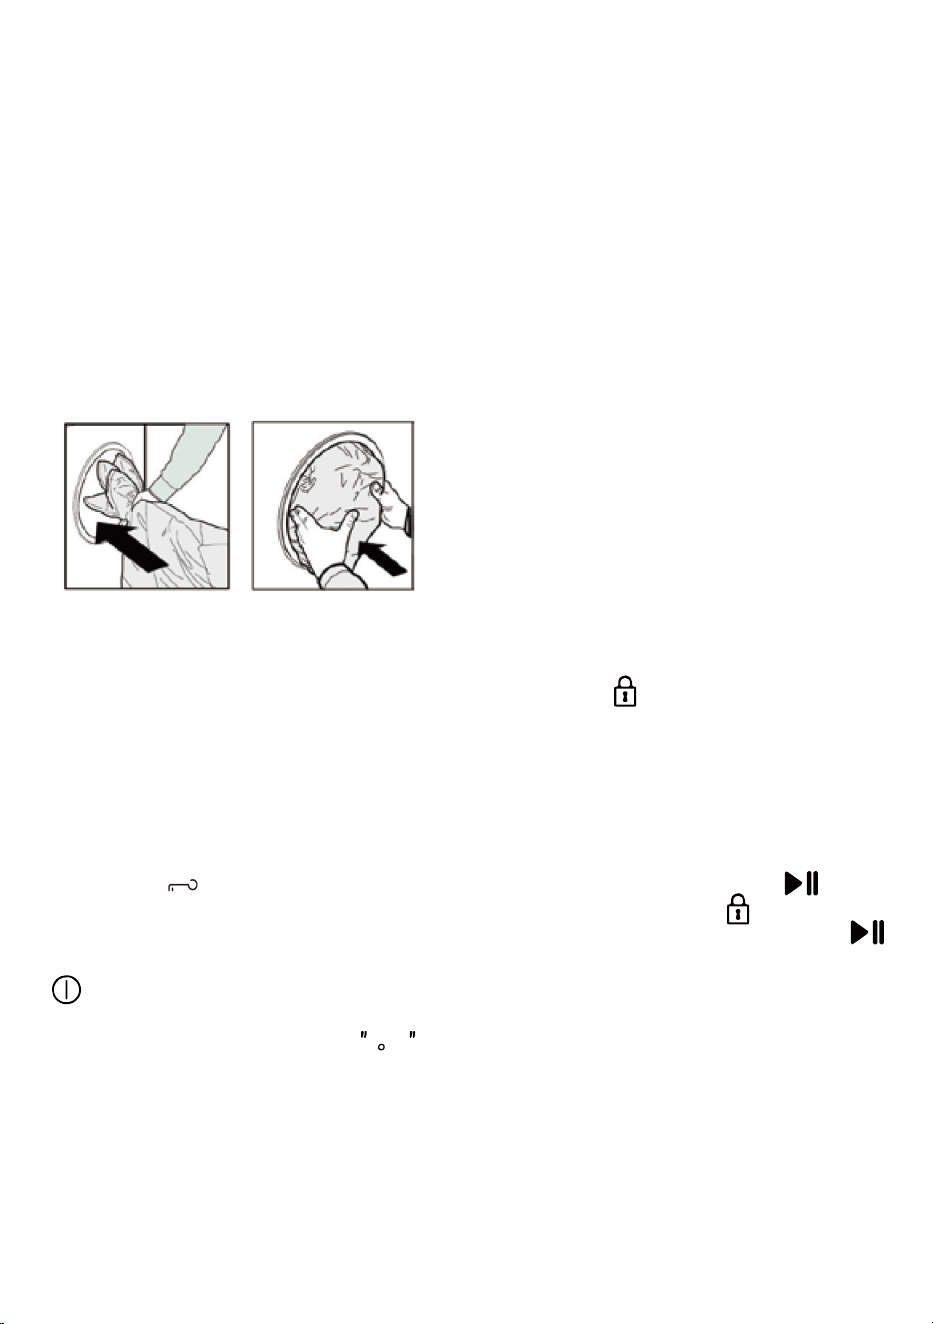
5�5 Loading the Laundry
1. Open the loading door.
2. Loosely place the laundry items inside the
product.
3. Close the loading door by pushing it until you
hear a locking sound. Ensure that no items
are caught in the door. The loading door stays
locked while a program is running. The door
lock will open a few minutes after the wash
program has ended. Then you can open the
loading door. If the door does not open, apply
the solutions provided for the “Loading door
cannot be opened” error in the Troubleshoot-
ing section.
5�6 Correct Load Capacity
The maximum load capacity depends on the
type of laundry, the degree of soiling and the
desired wash program. The product automati-
cally adjusts the water amount according to the
weight of the laundry placed inside it.
Follow the instructions in “Table of
wash cycles”.
If the appliance is overloaded, the
product’s washing performance
will diminish. Noise and vibration
problems may also occur.
Bathrobe: 1200 g
Bedding: 700 g
Sheet: 500 g
Pillow Case: 200 g
Tablecloth: 250 g
Negligee/Pyjamas: 200 g
Lingerie: 100 g
Shirts: 200 g
Blouse: 100 g
Towel: 200 g
The loading door stays locked while a
program is running. The door lock will
open once the program is completed.
If the inner part of the machine is very
hot at the end of the program, the
loading door will not open until the
temperature drops. If the door does
not open, apply the solutions provided
for the “Loading door cannot be
opened” error in the Troubleshooting
section.
WARNING
If the laundry is placed incorrectly,
noise and vibration problems may
occur in the machine.
18
5� 7 Using Detergent and Softener
WARNING
Read the manufacturer instructions on
the packaging when using detergents,
softeners, starch, bleach, decolorants
and anti-limescale products and follow
the dosage information provided. Use
a measuring cup, if any.
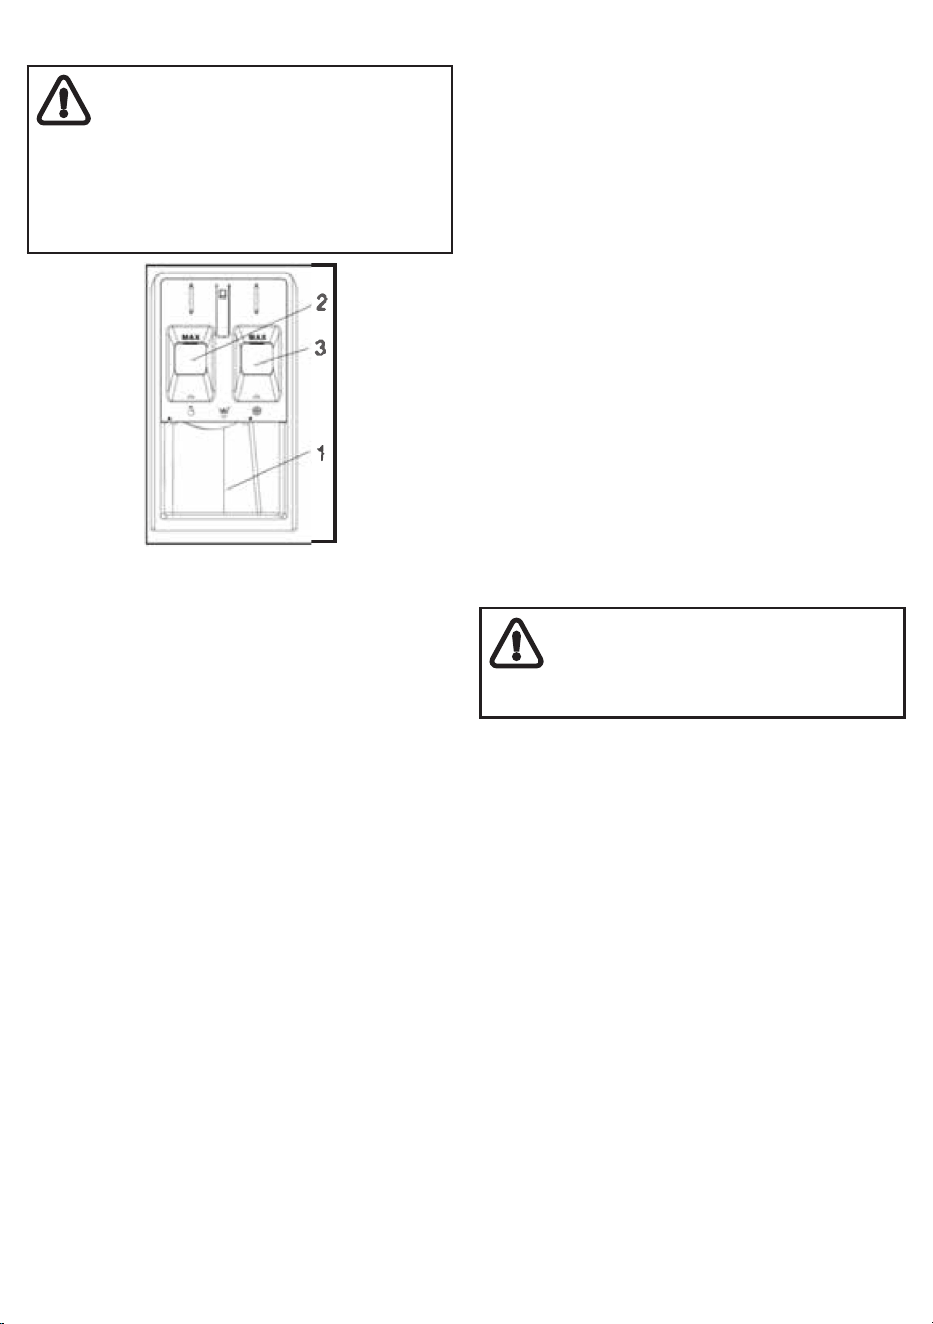
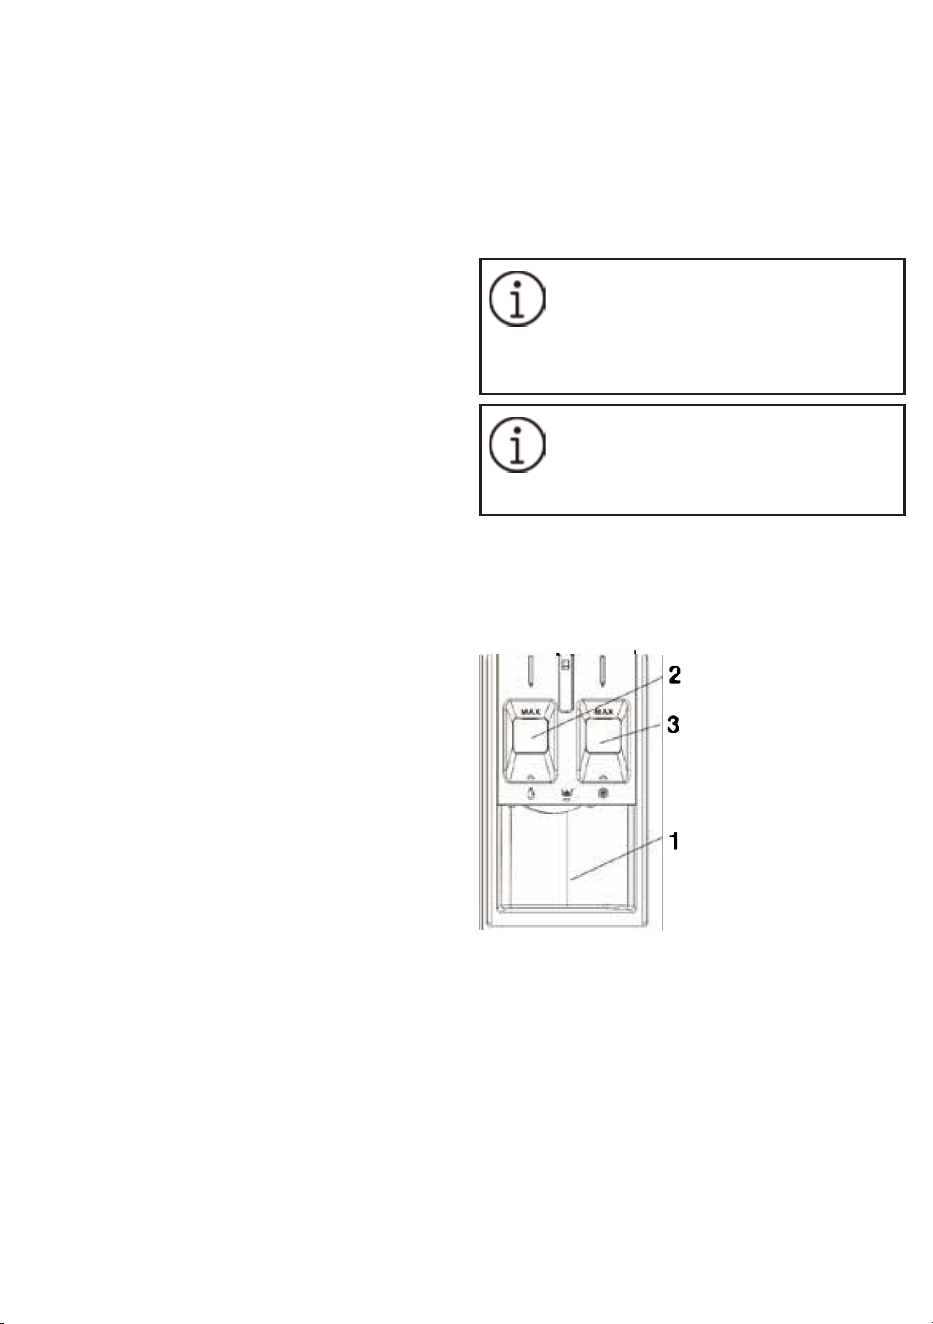
The detergent drawer comprises three compart-
ments:
(1) Powder detergent
(2) Liquid detergent
Liquid detergent must not exceed the “MAX”
level.
(3) Additives (softener. etc.)
Fabric softener must not exceed the “MAX” level.
Detergent, Softener and Other Cleaning
Agents
• Add detergent and softener before starting the
wash program.
• Do not leave the detergent drawer open when
the wash program is on.
Choosing the Detergent Type
The detergent type to be used depends on the
wash program, fabric type and color.
• Use dierent detergents for colored and white
laundry.
• Wash delicate garments only with special
detergents (liquid detergent, wool shampoo,
etc.) intended solely for delicate clothes and at
recommended programs.
• When washing dark-colored clothes and quilts,
it is recommended that you use liquid deter-
gent.
• Wash woolens using recommended programs
with special detergent made specically for
woolens.
• Please review the program descriptions for
programs recommended for dierent textiles.
• All recommendations on detergents are valid
for selectable program temperature ranges.
Only detergents, softeners and
additives suitable for washing
machines should be used. Do not use
hand-washing powder.
Adjusting the Detergent Amount
The amount of detergent depends on the
amount of laundry, how soiled it is and the hard-
ness of the water.
• Do not exceed the recommended dosages on
the detergent packaging in order to eliminate
excessive foam and poor rinsing problems, to
save money and protect the environment.
• Use smaller amounts of detergent for fewer
articles or less soiled laundry.
Using Softeners
Put the softener in the softener compartment of
the detergent drawer.
• Do not exceed the (>max<) level sign in the
softener compartment.
• If the softener is not uid, dilute with water
before placing it in the softener compartment.

19
WARNING
Do not use liquid detergents or other
materials with cleaning properties
unless they are intended for use in
washing machines for softening
laundry.
Using Gel and Tablet Detergents
• If the detergent is liquid and there is no liquid
detergent compartment in your product,
place the gel detergent in the main washing
detergent compartment before the rst water
intake. If your product has a liquid detergent
compartment, ll the compartment with deter-
gent before starting the program.
• If the gel detergent is not uid or is in a liquid
capsule tablet, place it directly inside the drum
before washing.
• When you use tablet or gel detergents, do not
select the prewash function.
Using Starch
• Put the liquid starch, powder starch or fabric
dye in the softener compartment.
• Do not use softener and starch in the same
wash program simultaneously.
• Wipe the inside of the product with a clean,
damp cloth after using starch.
Using Anti-Limescale Products
• When their use is necessary, use only anti-li-
mescale products for washing machines.
Using Anti-Limescale Products
• Select a program with prewashing and add
bleach at the start of prewash. Do not put
detergent in the pre-wash compartment. As an
alternative, select a program with additional
rinsing and add the bleach while the product
is channeling water to the detergent compart-
ment in the rst rinsing step.
• Do not mix bleach and detergent together.
• As bleach may cause skin irritation, use only
small amounts (1/2 tea cups - approximately
50 ml) and rinse the laundry well.
• Do not pour bleach directly onto the laundry.
• Do not use bleach for colored clothes.
• Select a low-temperature program when using
oxygen-based decolorants.
• Oxygen-based decolorants can be used
together with detergents. However, if the
product does not have the same viscosity as
the detergent, rst place the detergent in com-
partment no. “2” of the detergent drawer and
wait for the product to rinse away the deter-
gent during water intake. Add the decolorant
to the same compartment while the machine
continues taking in water.

20
5� 8 Tips for Ecient Washing
Clothes
Light Colors and Whites Colors
Black/
Dark Colors
Delicates/
Woolens/Silks
(Recommended tem-
perature range based on
soiling level: 40-90°C)
(Recommended tem-
perature range based on
soiling level: cool - 40°C)
(Recommend-
ed tempera-
ture range
based on
soiling level:
cool - 40°C)
(Recommended
temperature
range based
on soiling level:
cool - 30°C)
Soiling Level
Heavily
Soiled
(dicult stains
such as grass,
coee, fruit
and blood)
It may be necessary to
pre-treat the stains or do a
prewash.
Powder and liquid deter-
gents suitable for whites
can be used at dosag-
es recommended for
heavily soiled clothes. It
is recommended that you
use powder detergents to
clean clay and soil stains
and bleach-sensitive
stains.
Powder and liquid deter-
gents suitable for colors
can be used at dosages
recommended for heavi-
ly soiled clothes. It is rec-
ommended that you use
powder detergents to
clean clay and soil stains
and bleach-sensitive
stains. Detergents that
do not contain decolo-
rants should be used.
Liquid deter-
gents suitable
for colors and
black/dark
colors can
be used at
dosages rec-
ommended for
heavily soiled
clothes.
It is preferable
to use liquid
detergents
suitable for
delicate clothes.
Woolen and silk
clothes must
be washed with
special woolen
detergents.
Normally
Soiled
(for example,
stains caused
by body con-
tact on collars
and cus)
Powder and liquid deter-
gents suitable for whites
can be used at dosages
recommended for nor-
mally soiled clothes.
Powder and liquid deter-
gents suitable for colors
can be used at dosages
recommended for
normally soiled clothes.
Detergents that do not
contain decolorants
should be used.
Liquid deter-
gents suitable
for colors and
black/dark
colors can be
used at doses
recommended
for moderately
soiled clothes.
It is preferable
to use liquid
detergents
suitable for
delicate clothes.
Woolen and silk
clothes must
be washed with
special woolen
detergents.
Lightly Soiled
(no visible
stains)
Powder and liquid deter-
gents suitable for whites
can be used at dosages
recommended for lightly
soiled clothes.
Powder and liquid
detergents suitable for
colors can be used at
dosages recommended
for lightly soiled clothes.
Detergents that do not
contain decolorants
should be used.
Liquid deter-
gents suitable
for colors and
black/dark
colors can be
used at doses
recommend-
ed for lightly
soiled clothes.
It is preferable
to use liquid
detergents
suitable for
delicate clothes.
Woolen and silk
clothes must
be washed with
special woolen
detergents.
5�9 Displayed Program Duration
You can view the program duration on the
display of your machine while selecting a
program. While the program is running, its
duration is automatically adjusted depending
on factors such as the amount of laundry in the
machine, foaming, unbalanced load conditions,
power supply uctuations, water pressure and
program settings.
SPECIAL CASE: At the start of the Cotton and
Eco Cotton programs, the display shows the
duration for half load, the most common use
case. Once the program starts, after 20-25
minutes the actual load is detected by the
machine. If the detected load is heavier than
half load, the wash cycle will be adjusted
accordingly and program duration will increase
automatically. The new program duration will
be shown on the display.

21
Please read the “Safety Instructions”
section rst!
6�1 Control Panel
6 OPERATING THE PRODUCT
A---WASH CYCLE SELECTOR knob: Used to
set the desired wash cycle (see "Table of wash
cycles").
• OFF position
: Turn the wash cycle selector
knob to the " " symbol to switch the machine
o. If the machine is switched o during a wash
cycle, the wash cycle will be canceled.
B---TEMPERATURE button: Press to change the
water temperature for the current cycle. There
are ve temperature values on the display. When
a temperature value is selected, the correspond-
ing temperature value appears on the digital
display.
C---SPIN button: Press to change the spin speed
for the current cycle. There are ve spin speed
values on display. When a spin speed is selected,
the corresponding spin speed value appears on
the digital display.
• CHILD LOCK
function: When the cycle is
running, long press the SPIN button for 3 sec-
onds to set or cancel the Child lock function.
For a detailed description, see
Various
functions.
• Canceling the buzzer:
Press and hold the SPIN button and PUSH & GO
button together at the same time for at least 3
seconds, you can turn o the buzzer that sounds
during the washing cycle running.
For a detailed description, see Various
functions.
D---RINSE button: Press to change the rinse
count for the current cycle. The changed rinse
count appears on the digital display.
DELAY END function: Press and hold the RINSE
button for 3 seconds before the program runs to
set the “DELAY END” function. The “DELAY END”
function of some programs is limited.
For a detailed description, see
Various
functions.
Q
U
I
C
K
PUSH &
A E D C B
M
F
F
G
G
22
E-STEAM button: Press to set the STEAM Wash
cycle.
For a detailed description, see Various
functions.
F---PUSH & GO button: Press to set the PUSH &
GO wash cycle.
For a detailed description, see Various
functions.
G-START/PAUSE button: Long press the
button to start or pause a wash cycle.
• Adding clothes when the program is
running:
When the cycle has begun, you can pause the
wash cycle by long pressing the button again.
If the DOOR LOCK indicator light is o, the
door may be opened. You can add or take out
laundry. To start the wash cycle from the point at
which it was interrupted, press the button again.
For a detailed description, see Various cycles
and functions.
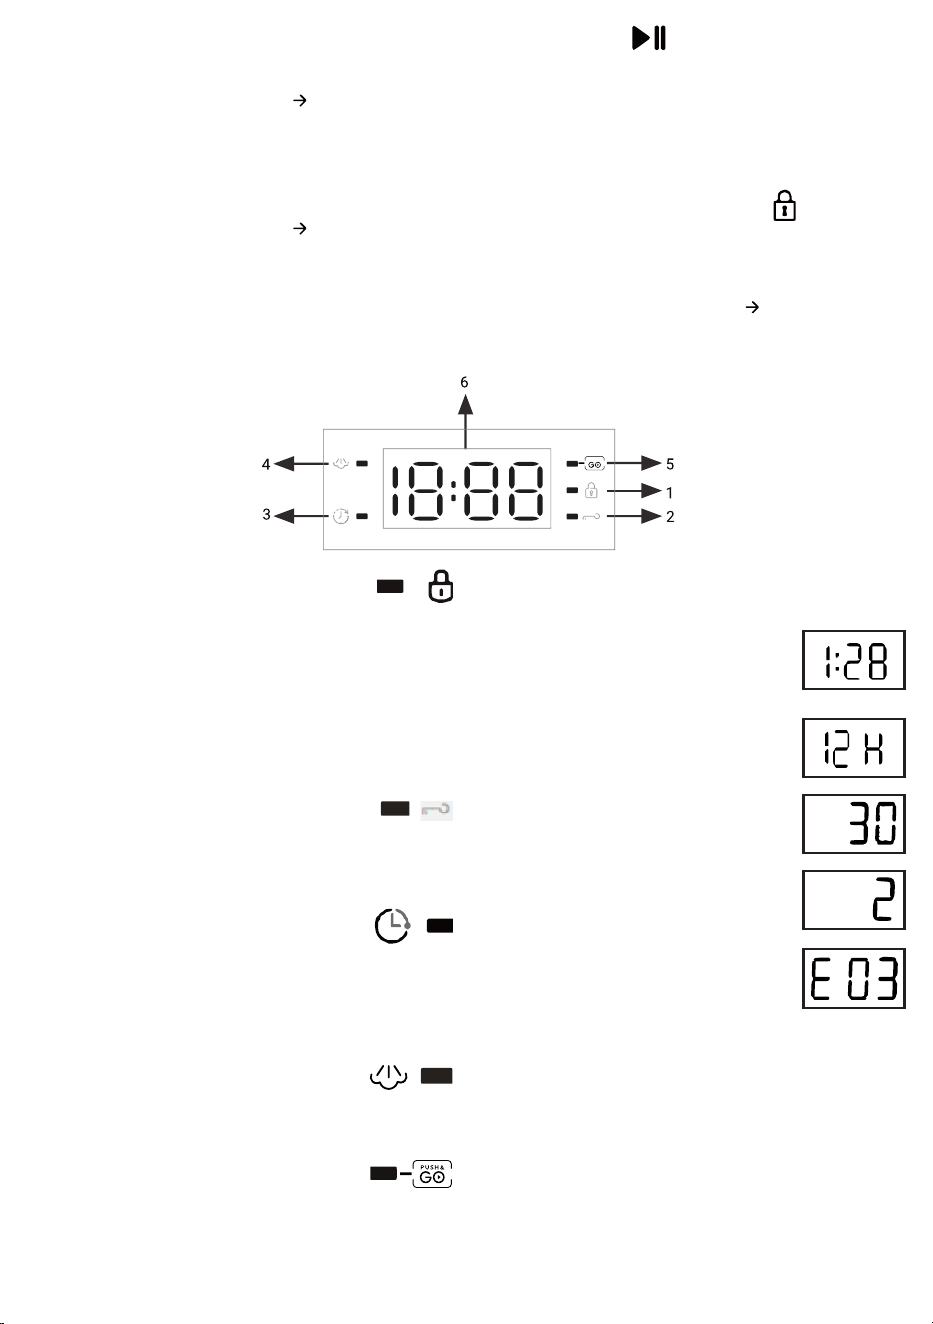
6�2 Symbols on the Display
1-DOOR LOCK indicator
The lit indicator light indicates that
the door is locked.
To prevent damage, wait until the indicator light
turns o before opening the door.
To open the door while a cycle is in progress, press
the START/PAUSE II button. If the DOOR LOCK indi-
cator light is o, the door may be opened.
2-CHILD LOCK indicator
The lit indicator light indicates that the
CHILD LOCK function is activated. The control
panel is locked.
3---DELAY END indicator
The lit indicator light indicates that
the DELAYENDfunction is activated.
Thecountdown to the end of the selected
washcycle will appear on the digital display.
4 STEAM indicator
The lit indicator light indicates that the
STEAMfunction is activated.
5. PUSH & GO indicator
The lit indicator light indicates that the
PUSH & GO wash program is selected. There are
three ways to set the PUSH & GO wash program.
6-DIGITAL DISPLAY
1) Remaining time of the wash
cycle
2) Delay end time
3) Wash temperature
4) Rinse count
5) Fault code
PUSH &
23
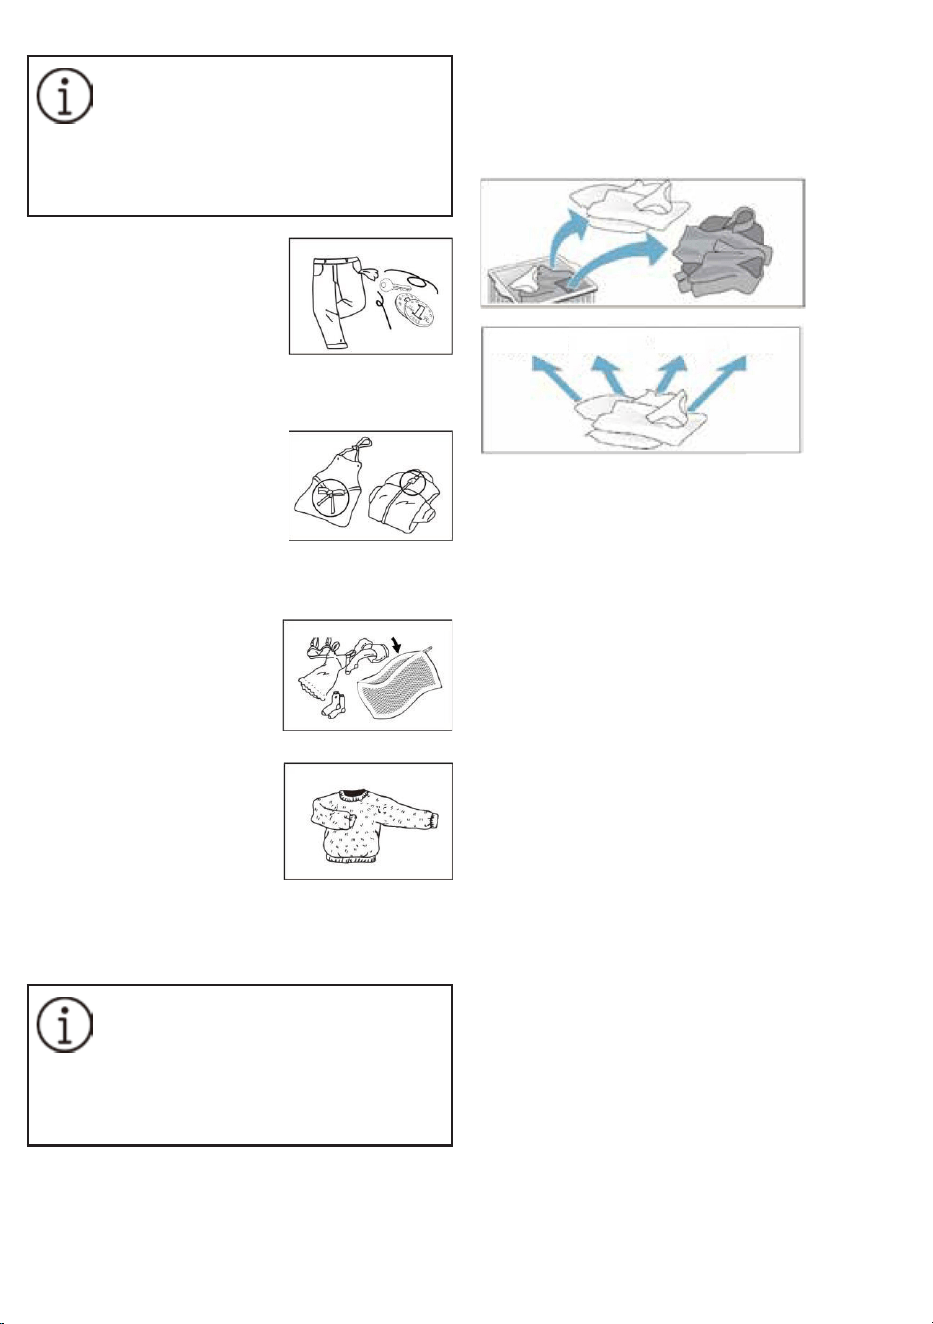
6�3 Preparing the laundry
Damage to the appliance/fabric:
foreign objects (e.g. coins, paper-clips,
needles or nails) may damage your
laundry or components in the appli-
ance. Therefore, follow these tips when
preparing your laundry.
• Remove any loose items
or metal objects such as
safety pins, paper clips, etc.
from the laundry.
• Brush sand, coins, etc. out of pocket and cus.
• Close zips and button up
cushion covers, duvet cov-
ers, etc.
• Remove curtain runners, or secure them in a
net bag.
• Particularly delicate items
or smaller items, such
as baby socks or hand-
kerchiefs should only be
washed in a net bag or
pillow case.
• Some items are best
turned inside out. These
included knitwear, trou-
sers, T-shirts and sweat-
shirts.
• Make sure that wire-cup bras are machine
washable.
Make sure you put wire-cup bras in a
pillow case that can be securely closed
with a zip or button. If the wire works
its way out of the cup it may fall
through the holes of the drum and
cause extensive damage.
6�4 Sorting the laundry by color and degree
of soiling
Sort laundry items according to color, degree of
soiling and recommended wash temperature
range.
• Clothing items can become discolored.
• Never wash new multi-colored items together
with other items.
• Wash white items separately from colored
items, otherwise the white items may become
gray.
6�5 Degree of soiling
• Light soiling
No visible soiling or stains, but may have
absorbed some odor. This could include light-
weight summer clothes such as T-shirts, shirts,
or blouses worn only once. Also to freshen bed
linen or guest towels.
• Normal soiling
Visible soiling and/or a few light stains. This
could include clothing such as T-shirts, shirts,
or blouses that have been sweated in or worn
several times. Also tea towels, hand towels or
bed linen used for up to one week or more,
or curtains without stains that have not been
washed for up to a half year.
• Heavy soiling
Visible soiling and stains. This could include
kitchen towels, fabric napkins, baby bibs,
children’s outer clothing or football jerseys and
shirts stained with grass or dirt. It could also
include working clothes such as overalls and
jeans or other clothing worn for outside work
and activities.
extra hot hot warm cold
24
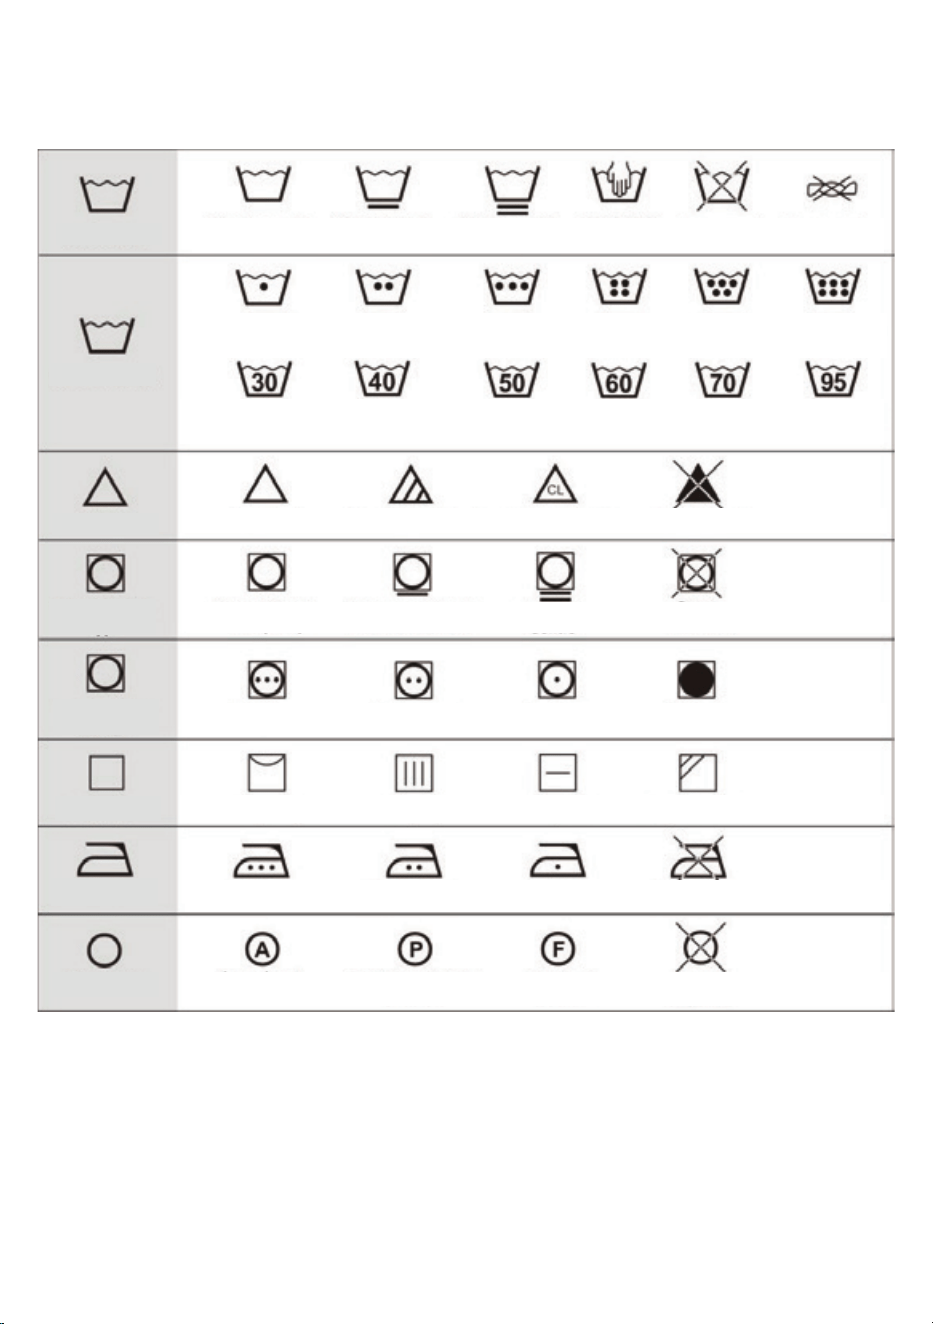
6� 6 Sorting laundry according to their care label specications
The symbols on the labels of your garments will help you choose the most suitable wash program
and the right temperature, wash cycles and ironing methods. Don’t forget to have a look at these
useful indications!
Wash Type
Machine wash,
normal/cotton
Machine wash,
permanent press
Machine wash,
delicate/gentle
Hand wash
only
Do not wash Do not wring
Water
temperature 30°C
Water
temperature 30°C
Water
temperature 40°C
Water
temperature 40°C
Water
temperature 50°C
Water
temperature 50°C
Water
temperature 60°C
Water
temperature 60°C
Water
temperature 70°C
Water
temperature 70°C
Water
temperature 95°C
Water
temperature 95°C
Water Temp.
Bleach
Any bleach
Chlorine blench
Do not blench
Tumble Dry
Type
Normal / Cotton
Heavy duty
Permanent Press /
Wrinkle resistant
Delicate /
Gentle
Do not
tumble dry
Non-chlorine bleach
Medium heat
Low heat No heat
Tumble Dry
Temp.
High heat
Dry Type
Hang to dry
Drip dry
Dry at
Dry in the
shade
Iron
Medium heat
Low heatDo not ironHigh heat
Dry Clean
Perchloroethylene
solvent
Petroleum
solvent
Do not
dry clean
Any solvent
25
• When using liquid detergent, it is not recommended that you activate the time delay.
• We recommend using: Washing powder 20°C to 80°C
Wool detergent 20°C to 40°C
• Please follow the dosage recommendation on the powder or liquid detergent package.
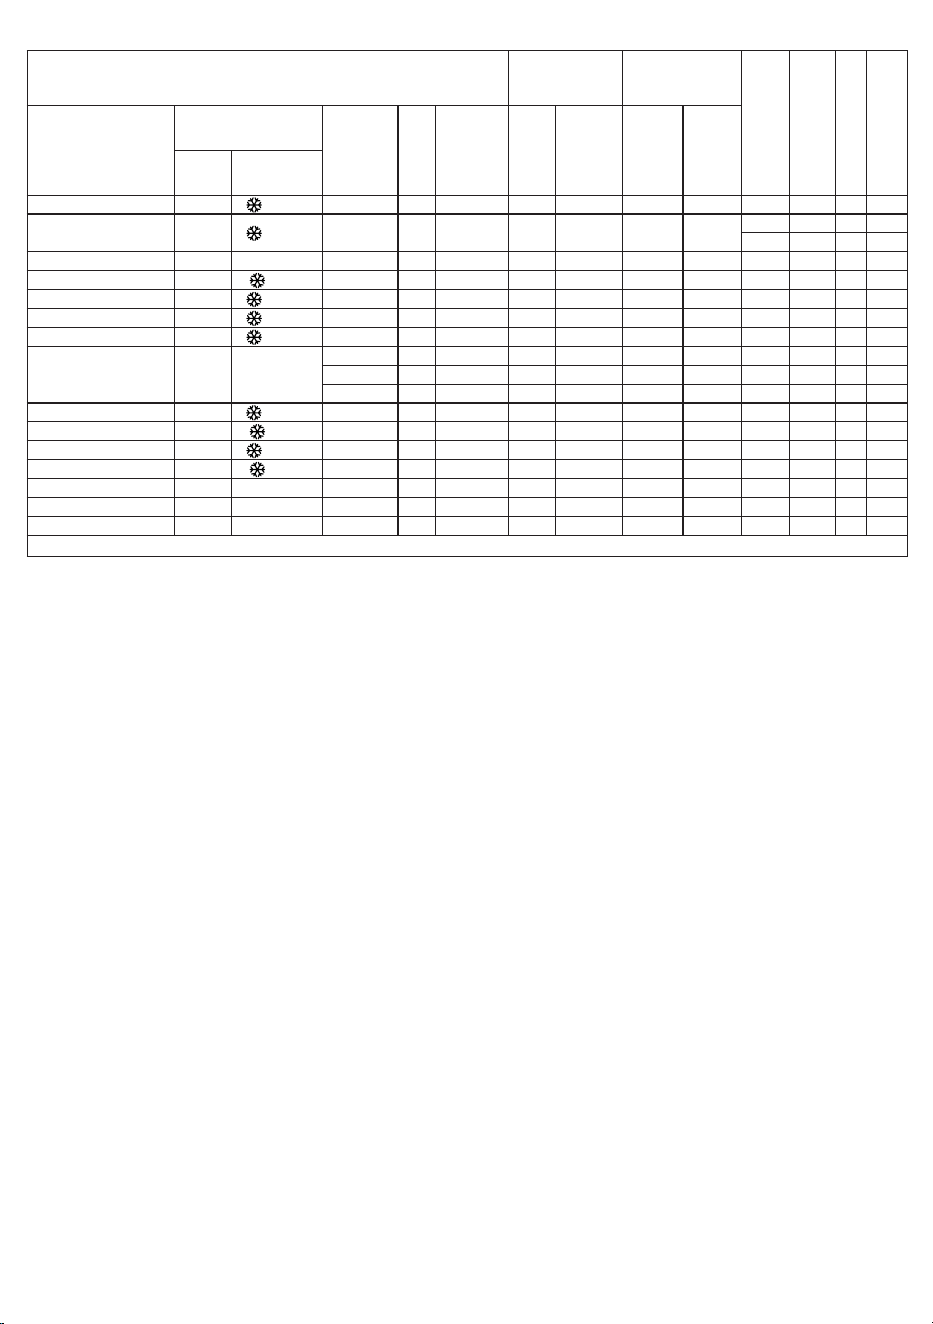
6�7 Table of wash cycles
Max load 7 Kg
Power consumption in o-mode 0.5 W / in left-on mode 8.0 W
Detergents and
additives
Recommended
detergent
Residual dampness
% (*)
Energy
consumption kWh
Total water lt
Laundry
temperature °C
Program
Temperatures
Max. spin
speed
(rpm)
Max
load
(kg)
Duration
(h : m)
Main
wash
Softener Powder Liquid
Setting Range
Mixed Full Load 60 °C
-
60 °C
1200 7.0 00:52
--- --- --- ---
Cotton Full Load
60 °C
-
60 °C
1200 7.0 00:57
79,88 0,380 57,7 21
21,84 0,468 53,1 20
Intensive 85 °C 60 °C- 85°C 1200 3.0 01:57
--- --- --- ---
Wool
40° C
- 40°C
700 1.0 00:50
---
--- --- --- ---
Baby 85 °C
-
85 °C
1200 5.0 01:23
--- --- --- ---
Shirts 60 °C
-
60 °C
900
3.0
00:55
---
--- ---
---
Bed Linen 60 °C
-
60 °C
1200 6.0 01:19
--- --- --- ---
Eco 40-60 40 °C 40°C
1151 7.0 03:12
63,66 0,675 55 35
1151 3.5 02:23
64,25 0,380 40 30
1151 2.0 02:27
63,71 0,195 30 25
20°C 20 °C
- 20 °C
900 2.0 00:39
83,13 0,040 36,3 23
Express 15’
40 °C
- 40°C
900 1.0 00:15
103,76 0,032 29,2 23
Underwear 60 °C
-
60 °C
900 5.0 01:17
--- --- --- ---
Down Jacket
40 °C
- 40°C
900 2.0 01:43
--- --- --- ---
Rinse --- --- 1200 7.0 00:13 --- --- --- --- --- --- --- ---
Spin+Drain --- --- 1200 7.0 00:08 --- --- --- --- --- --- --- ---
Drum Cleaning 85 °C 85 °C 700 --- 02:15 --- --- --- --- --- --- --- ---
= gel/liquid detergent = powder detergent = dosing optional --- = NO = dosing required
This data may dier in your home due to changing conditions in inlet water temperature, water pressure etc. Approximate program
duration values refer to the default setting of the programs, without options.
The values given for programs other than the Eco 40-60
program are indicative only.
Eco 40-60 - Test wash cycle in compliance with EU Ecodesign regulation 2019/2014. The most ecient program in terms of energy and
water consumption for washing normally soiled cotton laundry.
Note: spin speeds shown on the display can dier slightly from the speeds stated in the table.
For all Test Institutes
Long wash cycle for cotton: set the Cotton Full Load wash cycle with a temperature of 40°C.
Synthetics program: set the Cotton Full Load wash cycle with a temperature of 40°C.
* After program end and spin with maximum selectable spin speed, in default program setting.
Mixed Full Load
For washing lightly to normally soiled mixed loads
of cotton and synthetic fabrics, white and colored
items together.
Cotton Full Load
For everyday items of cotton, linen and cotton
blends.
Intensive
For clothes that need removal of mites and allergens.
Wool
For machine washable wool and wool blend clothes.
Baby
A cycle designed for dirt typical of children’s
garments; eectively removes any traces of
residual detergent.
Shirts
For shirts and women’s blouses.
Bed Linen
For large items such as blankets, curtains and
bedspreads.
Eco 40-60
For washing normally soiled cotton garments
washable at 40°C or 60°C, together in the same cycle.
6�8 Programs
This is the standard cotton program and the
most ecient in terms of water and energy
consumption.
20°C
For washing lightly soiled cotton garments, at a
temperature of 20°C.
Express 15’
For a small amount or lightly soiled garments that
you want to wash quickly.
Underwear
For washing underwear items.
Down Jacket
For machine washable down jackets.
Rinse
Combines a rinse and spin for loads requiring an
additional rinse cycle. Also used for loads that
require rinsing only.
Spin+Drain
This cycle uses a spin to shorten drying times for
heavy fabrics or special-care items washed by hand.
Drum Cleaning
Cleans the drum by removing dirt and bacteria.
Make sure the drum is empty.
26
6�9 Special wash cycles
Baby care: a cycle designed for dirt typical of
children’s garments; it eectively removes any
traces of residual detergent.
Down jackets: a cycle for washing single downs
(weighing no more than 2 kg), cushions or
clothes padded with goose down such as puer
jackets. When using this special wash cycle we
recommend that the down items be placed in
the drum with their edges folded inwards (see
gure) and that no more than 3/4 of the total
volume of the drum is used. To achieve the
best results we recommend a liquid detergent,
placed inside the detergent dispenser drawer.
6�10 Various functions
Child lock
1. Setting the child lock function can avoid
misoperation by children and external
interference in the wash procedure.
2. During operation, long press the SPIN button for
3 seconds to set or cancel the child lock function.
3. After the child lock function is set, the child lock
indicator light comes on. The door cannot
be opened, the control panel is locked and all
buttons are deactivated, as is the wash cycle
selector knob (unless it is turned to the symbol
“ “). You can only turn o the machine by
turning the wash cycle selector knob. When the
wash cycle selector knob is under the
symbol, the machine will switch o and stop
running. If the machine is switched o, the child
lock function will be canceled.
4. After the child lock function is set, you can
switch o the machine by turning the wash
cycle selector knob. When the machine is
turned on again, the machine directly runs the
program before turning o the machine.
Push&Go
How to use the PUSH&GO function:
1. If the washing machine is o, press and hold
the PUSH&GO button for 3 seconds to start
the program immediately, and the M area will
light up.
PUSH&GO can be activated only within a certain
period of time after switching o the appliance,
depending on the previous conditions.
2. If the washing machine is on, press and hold
the PUSH&GO button for 3 seconds to run
the program directly, and the M area will light
up. PUSH&GO always starts by executing a
detection routine: at the beginning of the
program, the machine calculates the weight of
the laundry to guarantee the right performance.
How does it work?
1. Load the laundry (cotton and/or synthetic
garments) and close the door.
2. Pour the detergent and any additives.
3. Start the cycle by pressing and holding the
PUSH & GO button for 3 seconds. The relevant
indicator light will turn green and the door
will lock (the symbol lights up).
N.B.: starting the wash cycle with the PUSH
& GO button activates an automatic non-
customisable cycle recommended for cotton
and synthetic garments. This cycle does not
allow for setting any additional options.
To open the door while an automatic cycle is
running, press the START/PAUSE button;
if the locked door symbol is o, the door
may be opened. Press the START/PAUSE
button again to restart the cycle from the
point at which it was interrupted.
4. At the end of the wash cycle, the word END
will appear on the display.
Steam
This option enhances washing performance
by generating steam during the wash cycle to
remove any bacteria from the bers, which are
treated at the same time. Place the laundry in
the drum, choose a compatible program and
select Steam. ! The steam generated while the
washing machine is running may cause the door
to become fog.
27
Adding clothes when the program is running
When the program is running, long press the
START/PAUSE button to pause the machine.
When the DOOR lock indicator light goes out,
the door can be opened and you can add or take
out laundry. After the operation is completed,
close the door, long press the START/PAUSE
button again. The machine will resume
running from the point at which the cycle was
interrupted.
NOTICE
If the water level or water temperature
in the drum is too high, the door lock
indicator light comes on, the door
cannot be opened and you cannot add
or take out clothes when the program
is running.
Canceling the buzzer
Press and hold the SPIN button and PUSH & GO
button together at the same time for at least 3
seconds. You can turn o the buzzer that sounds
when the wash cycle is running.
• To activate the buzzer setting, perform the
same operation as for canceling. The buzzer
setting is activated after one beep.
Load balancing system
The appliance has an automatic detection
system for uneven loads. If the clothes are
unevenly distributed at the start of the spin
cycle, the appliance will level out and adjust
the clothes until they are evenly distributed
before spinning. If the clothes cannot be evenly
distributed within the specied time, the
appliance will not spin in order to avoid severe
vibration of the machine. Check to see if the
clothes are knotted or entangled, and select
the “spin” program again after rearranging the
clothes. When washing a small load, such as a
pair of jeans, a sweater, a bath towel, etc., the
machine may not perform the spin process due
to the balance protection. Please wash large
and small garments together when possible, to
make it easier for the clothes to untangle and to
complete the spin process smoothly.
NOTICE
Due to the dierent laundry types and
materials, the automatic adjustment
and balance feature may adjust the
clothes several times, thus prolonging
the spin time. This is a normal phe-
nomenon, not a machine failure.
Downlight
• The downlight is always on during program or
function setting.
• When the program is suspended, the downlight
can be lit by opening the machine door.
• When the program is running, the downlight
will automatically light up with every change
of washing stage.
• Touching any button other than the power
button can also illuminate the downlight.
6�11 How to use the appliance
Before loading your rst laundry load
Your new appliance has been tested before
leaving the factory. This process involves
running various wash cycles. As a result, a small
amount of water may remain in the tub and
drainage system. Run a Drum Cleaning cycle
with no laundry and no detergent to clean the
system before your rst laundry load.
Daily use
Preparing the laundry
EMPTY POCKETS
• Coins, paper clips, etc. could damage the load
and the washing machine components.
• Tissues will break down during the wash
cycle and the fragments will have to be
subsequently removed by hand.
CLOSE ALL ZIPPERS, BUTTONS AND HOOKS�
TIE UP ALL RIBBONS OR BELTS
• Insert the smaller garments (e.g. nylon hosiery,
belts, etc.) and garments with hooks (e.g. bras)
into a fabric bag or a pillowcase with zipper.
Remove any rings from curtains, or else place
the curtains inside a fabric bag together with
the rings.
28
FABRIC TYPE/SYMBOL ON THE WASH LABEL
• Cottons, mixed bers, easy care/synthetics,
wool, hand wash items.
• Color
Separate colored and white items. Wash new
colored articles separately.
• Size
Wash items of dierent sizes in the same
wash load, to improve washing eciency and
distribution of the articles in the drum.
• Delicates
Wash delicate items separately; they require
gentle treatment.
How to use the appliance
1. Loading laundry
Open the door and load the laundry. Load the
articles one at a time loosely into the drum,
without overlling it. Observe the load sizes
given in the “Table of wash cycles”. Overloading
the machine will yield unsatisfactory washing
results and creased laundry.
2. Closing the door
Make sure that no laundry gets stuck between
the door glass and the rubber seal. The door
will click shut when closed correctly.
3. Opening the tap
Make sure that the appliance is connected to
the water mains. Open the tap.
4. Setting the desired program
Select the desired program with the WASH
CYCLE SELECTOR knob. The duration of the
wash cycle is shown on the display. The
washing machine automatically displays the
default temperature and spin speed settings
possible for the selected program. You can
adjust the temperature and/or spin speed
setting with the relevant buttons.
• Changing temperature
Press the TEMP button to progressively lower
the temperature setting until cold wash has
been set (all temperature value indicator lights
go out on the display). Pressing the button
again sets the highest possible setting.
• Changing spin speed
Press the SPEED button to progressively
decrease the spin speed until the spin cycle is
turned o (all spin speed value indicator lights
go out on the display). Pressing the button
again sets the highest possible setting.
• Selecting options
Press the button(s) to select the desired
option; the corresponding option indicator
light comes on. Press the button(s) again to
cancel the option. The corresponding option
indicator light goes out.
If the selected option is incompatible
with the program set, the incompati-
bility will be signaled by a buzzer and
the corresponding option indicator
light will ash.
If the selected option is incompatible
with another previously set option,
only the most recent selection will
remain active.
5. Adding detergent
Pull out the detergent (and additives/softener)
dispenser. The compartments are as described
below.
Compartment 1:
Powder detergent.
Compartment 2:
Liquid detergent
The liquid detergent
must not exceed the
“MAX” level.
Compartment 3:
Additives
(softener etc.)
The fabric softener must not exceed the “MAX”
level.
Observe the dosing recommendations on
the detergent pack. Correct dosing of
detergent/additives is important, because:
• It optimizes the cleaning result.
• It prevents irritating residues of surplus
detergent in your laundry.
29
• It saves money by preventing the waste of
surplus detergent.
• It protects the washing machine by preventing
calcication of components.
• It protects the environment by avoiding
unnecessary environmental burdens.
Do not use hand washing detergents
because these create too much foam.
Use powder detergents for white
cotton garments, for pre-washing and
for washing at temperatures over 60°C.
Follow the instructions on the deter-
gent packaging.
6. Delaying the end of a program
• To set a program to end at a later time, see the
section “control panel/DELAY END”.
7. Starting a program
• Press the START/PAUSE button. The relative
indicator light comes on, the door locks and
the DOOR LOCK indicator light comes on.
• To avoid overow, do not open the detergent
dispenser while a program is running.
• The remaining program duration can vary.
Factors such as an unbalanced wash load or
foam formation can inuence the program
duration.
8. Changing the settings of a program while it
is running. You can change the settings while
a program is still running. The changes will
be applied, provided the respective program
phase has not nished yet.
To change the settings of a program while it is
running:
• Press the START/PAUSE button to put the
active program on pause.
• Change the settings as desired.
• Press the START/PAUSE button again to
continue the program.
If you change the program, do not add
detergent for the new program.
To prevent an active program from being
changed by accident (for instance by children),
use the CHILD lock function (see section “control
panel / SPIN”).
To pause a running program and open the door,
press the START/PAUSE button. If the water
level and/or temperature in the drum are/is
not too high, the DOOR LOCK indicator light
turns o. You can open the door, for example to
add more laundry, or to remove laundry loaded
by mistake. Press the START/PAUSE button
again to proceed with the program.
9. Canceling a program while it is running:
• Turn the wash cycle selector knob to the “ ”
symbol to turn o the appliance.
• If the water level and/or temperature are/is
low enough, the door is unlocked and can be
opened.
• The door remains locked if the water level in
the drum is too high. To unlock the door, rst
turn the wash cycle selector knob to select
the spin program, then press the SPIN button
to turn the spin program o (all spin speed
indicator lights go out on the display).
• Press the START/PAUSE button to run the
spin program. The water is pumped out from
the drum during the cycle. The door unlocks at
the end of the program.
10. Switch o the appliance at the end of the
program.
• At the end of the cycle, the message “End” is
shown on the digital display.
• The door can only be opened when the DOOR
LOCK indicator light goes out.
30
• Check that the DOOR LOCK indicator light
is o, then open the door and take out the
laundry.
• Turn the wash cycle selector knob to the “ ”
symbol to turn o the appliance.
• Turn o the tap.
Leave the door ajar to let the interior of the
appliance dry.
6�12 Canceling a Program
The program is canceled when the wash cycle
selector knob is turned to a dierent program or
the machine is turned o and on again using the
wash cycle selector knob.
If you turn the wash cycle selector
knob when the Child Lock is enabled,
the program will not be canceled. You
should cancel the Child Lock rst.
If you want to open the loading door
after canceling the program but you
cannot do so because the water level
in the machine is above the loading
door baseline, turn the wash cycle
selector knob to Spin+Drain program
and drain the water in the machine.
6�13 Program End
The End symbol appears on the display when
the program is completed.
The completed program steps will be displayed
if you press any button.
Standby Mode
Your machine has a “Standby Mode” feature.
After turning the machine on with the On/O
button, if no program is started or no other
action is taken during the selection phase, or
if no action is performed within approximately
10 minutes after the selected program is over,
the machine automatically switches to energy
saving mode. In addition, if your product has
a display that shows the program time, this
display is completely turned o. If you turn
the wash cycle selector knob, the lights are
illuminated and the screen will turn on again.
Program settings made before the machine
entered standby mode may have been cleared.
Make sure program settings are correct before
starting the washing cycle. Adjust your settings
again if necessary. This is not an error.
31
7 MAINTENANCE AND CLEANING
Please read the “Safety Instructions”
section rst!
Cleaning your product at regular intervals
extends its service life and reduces commonly
experienced problems.
7�1 Cleaning the Detergent Drawer
Clean the detergent drawer at regular intervals
(once every 4 to 5 washes) as mentioned below
to prevent accumulation of powder detergent.
If there is a buildup of residual detergent or
additives, or if the softener compartment is not
rinsed out well enough, it may be helpful to
clean the dispenser.
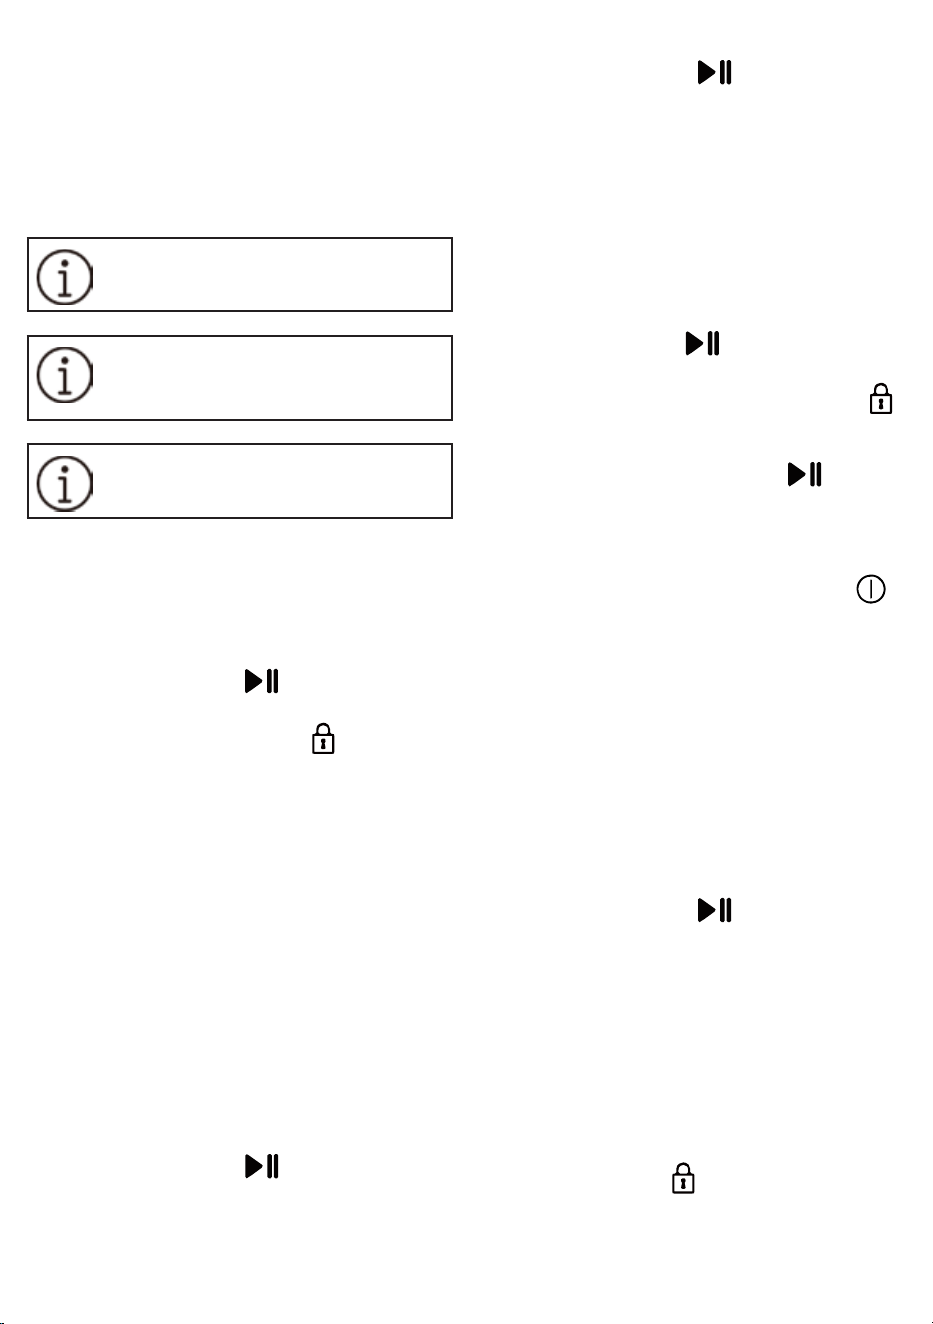
1. Open the detergent dispenser tray fully. Press
down on the drawer catch (1) and pull the tray
(2) from the appliance housing.
2. Remove the liquid detergent cover (3) by
grasping it and pulling it upwards from the
detergent dispenser tray.
3. Clean the liquid detergent cover and the
detergent dispenser tray by holding it under
running water. Lightly wipe away any remain-
ing detergent residue.
4. Attach the liquid detergent cover and slide
the detergent dispenser tray back into place
and close the tray securely.
Tip: Do not operate the appliance without the
detergent dispenser tray in place. Always keep
the tray completely closed.
7�2 Cleaning the Loading Door and the Drum
For products with a drum cleaning program,
please see the Operating the Product section.
Perform the drum cleaning process
every 2 months.
NOTICE: Use an anti-limescale product
suitable for washing machines.
After every cleaning operation, make sure that
no foreign substance is left in the product.
If the holes on the door gasket shown in the
gure are blocked, open them using a toothpick.
Foreign metallic objects may cause rust stains in
the drum. Clean the stains on the drum surface
with cleaning agents for stainless steel.
Never use steel wool or wire wool. These will
damage the painted, chrome coated and plastic
surfaces.
We recommend that you wipe the door gasket
with a clean, dry cloth at the end of the pro-
gram. This will remove residues on the door gas-
ket of your machine and prevent the formation
of unpleasant smell.
7�3 Cleaning the Outer Cabinet and Control
Panel
Wipe the outer cabinet of the product with
soapy water or non-corrosive mild gel detergent
as necessary, and dry with a soft cloth. Use only
a soft, damp cloth to clean the control panel. Do
not use cleaning products that contain bleach.
7�4 Cleaning the Water Intake Filters
There is a lter at the end of each water intake
valve at the rear of the product and also at
the end of each water intake hose where they
connect to the tap. These lters prevent foreign
substances and dirt in the water from entering
the product. Filters should be cleaned if they are
dirty.
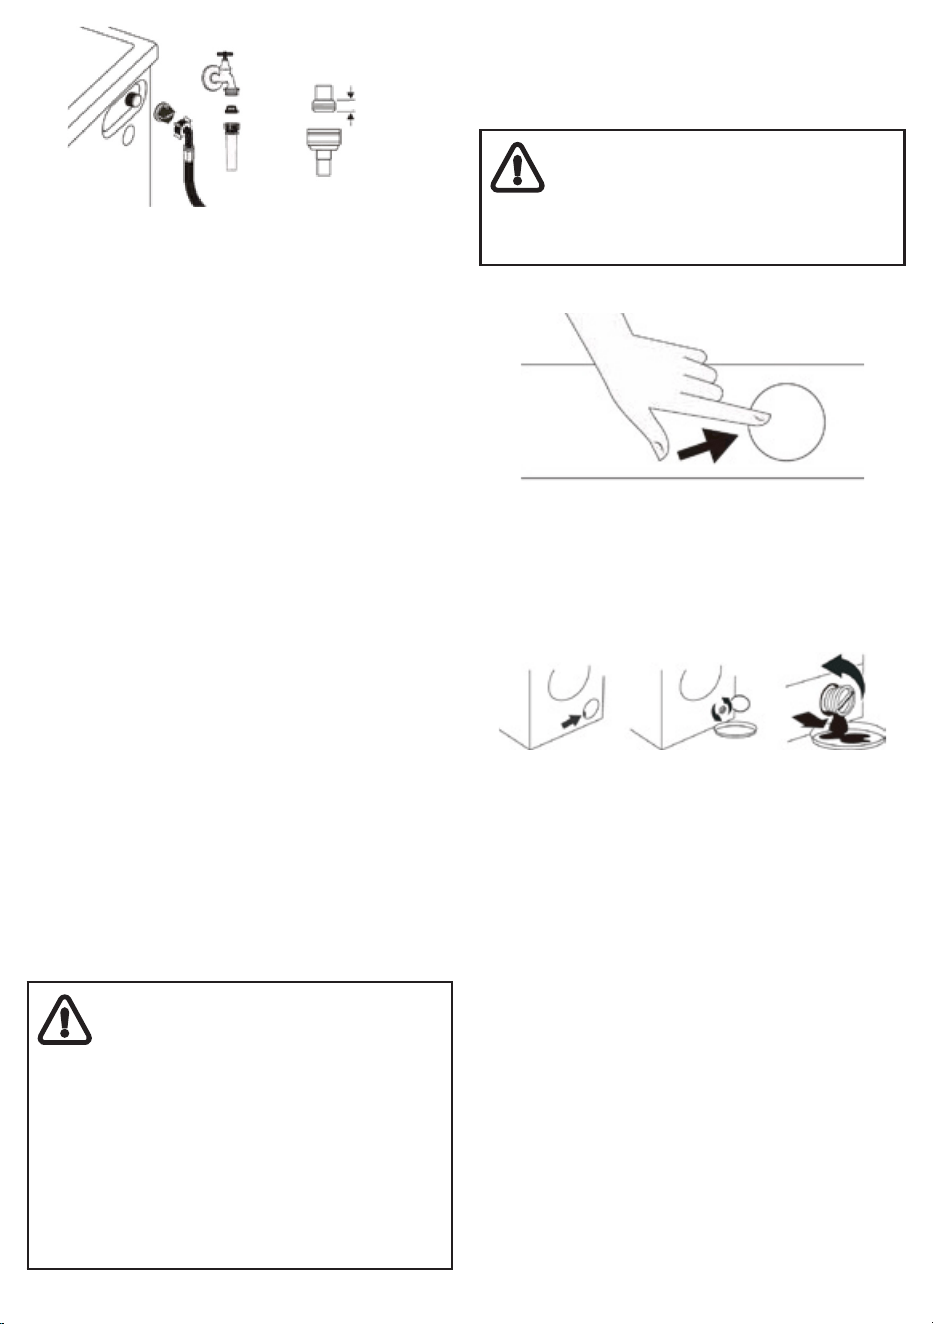
32
1. Close the taps.
2. Remove the nuts of the water intake hoses to
access the lters on the water intake valves
and clean them with a suitable brush. If the
lters are dirty, remove them from their hous-
ings with pliers and clean as described.
3. Remove the lters on the at ends of the wa-
ter intake hoses together with the gaskets and
clean thoroughly under running water.
4. Replace the gaskets and lters carefully and
tighten the nuts by hand.
7�5 Draining Remaining Water and Cleaning
the Pump Filter
The lter system in your product prevents
solid items such as buttons, coins and fabric
bers from clogging the pump impeller during
draining of washing water. The water can thus
be drained without problems and the service life
of the pump is extended. If the product fails to
drain water inside it, the pump lter is probably
clogged. The lter must be cleaned whenever
it is clogged or every 3 months. Water must be
drained o before cleaning the pump lter. In
addition, prior to transporting the product (e.g.,
when moving to another house) water should
be drained completely.
NOTICE
Foreign objects left in the pump lter
may damage the product or cause
noise problems.
In regions where freezing is possible,
the tap must be closed, the system
hose must be removed and the water
inside the product must be drained
when the product is not in use.
After each use, turn o the tap to
which the mains hose is connected.
min 10
3/4”
To clean the dirty lter and drain the water:
1. Unplug the product to cut o the supply
power.
The temperature of the water inside
the product may rise to 90°C. To avoid
the risk of scalding, clean the lter
only when the water inside the
product has cooled down.
2. Open the lter cover.
3. To drain the water, follow the procedures
shown below.
If the product does not have an emergency
water draining hose, proceed as follows to
drain the water:
• Place a large container at the end of the hose
to collect the water from the lter.
• When the pump lter starts leaking water,
loosen it by turning (counterclockwise).
Dispense the water into the container you
have placed in front of the lter. Keep a cloth
ready to clean any water that may spill.
• Completely turn and remove the pump lter
when the water in the product has drained
out.
1. Clean any residues inside the lter as well as
bers, if any, around the pump impeller.
2. Replace the lter.
3. If the lter cap comprises two pieces, close it
by pressing on the tab. If it is one piece, seat
the tabs in the lower part into their slots rst,
and then press the upper part to close.
33
Anomalies: Possible causes / Solution:
Programs do not start
after the loading door is
closed�
• The Start/Pause button is not pressed. >>> Press the Start/Pause
button.
• It may be dicult to close the loading door in the case of excessive
loading. >>> Reduce the amount of laundry and make sure that the
loading door can close properly.
Program cannot be
started or selected�
• The product has switched to self-protection mode due to a supply
problem (line voltage, water pressure, etc.). >>> Depending on the
product model, select another program by turning the wash cycle
selector knob or pressing and holding the On/O button for 3 sec-
onds to cancel the program. The previous program will be canceled.
See Canceling a Program
]
29]
Water inside the prod-
uct�
• Some water remains in the product due to the quality control
processes during production. >>> This is not a fault; water is not
harmful to the product.
The product does not
take water in�
• The tap is turned o. >>> Turn on the tap.
• The water inlet hose is bent. >>> Straighten the hose.
• The water inlet lter is clogged. >>> Clean the lter.
• The loading door is not closed. >>> Close the door.
The product does not
drain water�
• The water drain hose is clogged or twisted. >>> Clean or straighten
the hose.
• The pump lter is clogged. >>> Clean the pump lter.
The product vibrates or
makes noise�
• The product is unbalanced on the oor. >>> Adjust the stands to
balance the product.
• There is a foreign object in the pump lter. >>> Clean the pump
lter.
• The transportation safety bolts are not removed. >>> Remove the
transportation safety bolts.
• The laundry amount in the product is insucient. >>> Add more
laundry to the product.
• Excessive laundry is loaded in the product. >>> Take out some of the
laundry from the product or distribute the load by hand to balance it
evenly in the drum.
• The product is leaning against a hard object. >>> Make sure that the
product is not leaning against anything.
There is water leaking
from the bottom of the
product�
• The water drain hose is clogged or twisted. >>> Clean or straighten
the hose.
• The pump lter is clogged. >>> Clean the pump lter.
The product stopped
shortly after the pro-
gram started�
• The machine has stopped temporarily due to low voltage. >>> The
product will resume running when the voltage is restored to the
normal level.
The product directly
drains the water it takes
in�
• The drain hose is not at an adequate height. >>> Connect the water
drain hose as described in the user manual.
No water can be seen
in the product during
washing�
• The water is in the non-visible part of the product. >>> This is not a
fault.
8 TROUBLESHOOTING
Please read the “Safety Instructions” section rst!

34
The loading door can-
not be opened�
• The loading door lock is activated because of the water level in the
product. >>> Drain the water by running the Drain or Spin program.
• The product is heating up the water or it is on the spin cycle. >>>
Wait until the program nishes.
• The loading door may be stuck because of the pressure it is subject-
ed to. >>> Grab the handle and push and pull the loading door to
release and open it.
Washing takes longer
than specied in the
user manual� (*)
• Water pressure is low. >>> The product waits until an adequate
amount of water has been taken in, so as to prevent poor wash qual-
ity due to insucient water. The washing time is therefore extended.
• Voltage is low. >>> The washing time is prolonged to avoid poor
wash results when the supply voltage is low.
• The input water temperature is low. >>> The time required to heat
up the water is longer in cold seasons. Also, the washing time can be
lengthened to avoid poor washing results.
• The number of rinses and/or amount of rinse water have increased.
>>> The product increases the amount of rinse water when good
rinsing is needed and adds an extra rinse step if necessary.
• Excessive foam has occurred and the automatic foam absorption
system has been activated due to excessive detergent usage. >>>
Use the recommended amount of detergent.
The program dura-
tion countdown is not
shown� (On models with
display) (*)
• The timer may stop during water intake. >>> The timer indicator will
not start until the product takes in an adequate amount of water.
The product will wait until there is enough water to avoid poor
washing results due to lack of water. The timer indicator will resume
after this.
• The timer may stop during the heating phase. >>> The timer indica-
tor will not start until the product reaches the selected temperature.
• The timer may stop during the spin cycle. >>> The automatic unbal-
anced load detection system is activated due to the uneven distribu-
tion of the laundry in the drum.
The program dura-
tion countdown is not
shown� (*)
• The load inside is the product is unbalanced. >>> The automatic
unbalanced load detection system is activated due to the uneven
distribution of the laundry in the drum.
The product does not
switch to spin cycle� (*)
• The load inside is the product is unbalanced. >>> The automatic
unbalanced load detection system is activated due to the uneven
distribution of the laundry in the drum.
• The spin cycle will not start if water is not drained completely. >>>
Check the lter and the drain hose.
• Excessive foam has built up and the automatic foam absorption
system has been activated due to too much detergent usage. >>>
Use the recommended amount of detergent.
Wash performance is
poor: Laundry turns
gray� (**)
• Insucient amounts of detergent have been used over a long
period of time. >>> Use the recommended amount of detergent
depending on water hardness and laundry type.
• Washing has been done at low temperatures for a long time. >>>
Select the proper temperature for the laundry to be washed.
• Insucient amounts of detergent have been used with hard water.
>>> Using an insucient amount of detergent with hard water
causes the soiling to stay on the fabric and this turns it gray over
time. It is dicult to eliminate graying once it happens. Use the
recommended amount of detergent depending on water hardness
and laundry type.
• An excessive amount of detergent has been used. >>> Use the
recommended amount of detergent depending on water hardness
and laundry type.

35
Wash performance is
poor: Stains persist or
the laundry is not whit-
ened� (**)
• Insucient amount of detergent is used. >>> Use the recommend-
ed amount of detergent depending on water hardness and laundry
type.
• An excessive amount of laundry has been loaded. >>> Do not over-
load the drum. Do not exceed the amounts recommended in the
“Table of wash cycles”.
• The wrong program and temperature have been selected. >>>
Select the proper program and temperature for the laundry to be
washed.
• The wrong type of detergent has been used. >>> Use the original
detergent appropriate for the product.
• Detergent has been put in the wrong compartment. >>> Put the
detergent in the correct compartment. Do not mix the bleaching
agent and the detergent with each other.
Wash performance is
poor: Oily stains appear
on the laundry� (**)
• Regular drum cleaning is not carried out. >>> Clean the drum regu-
larly. For this procedure, see https://parts-selfservice.europeanappli-
ances.com/
Wash performance is
poor: Clothes have an
unpleasant smell� (**)
• Repeatedly washing at low temperatures and/or using short pro-
grams may cause unpleasant smells or the proliferation of bacteria.
>>> Leave the detergent drawer and the loading door of the prod-
uct ajar after each wash to allow it to dry and avoid the proliferation
of bacteria inside the machine.
Fabric colors have fad-
ed� (**)
• Excessive laundry has been loaded. >>> Do not overload the drum.
• The detergent in use is damp. >>> Keep detergents securely closed
in an environment free of humidity and do not expose them to
excessive temperatures.
• The temperature selected is too high. >>> Select the proper pro-
gram and temperature according to the laundry type and degree of
soiling.
The washing machine
does not rinse well�
• The amount, brand and storage conditions of the detergent used
are inappropriate. >>> Use a detergent suitable for the washing
machine and your laundry. Keep detergents securely closed in an
environment free of humidity and do not expose them to excessive
temperatures.
• The detergent was put in the wrong compartment. >>> If deter-
gent is put in the prewash compartment and a prewash cycle is not
selected, the product may use this detergent during the rinse or
softener phase. Put the detergent in the correct compartment.
• The pump lter is clogged. >>> Check the lter.
• The drain hose is folded. >>> Check the drain hose.
Laundry is sti after
washing� (**)
• An insucient amount of detergent has been used. >>> Using an
insucient detergent amount for the water hardness can cause the
laundry to become sti over time. Use an appropriate amount of
detergent according to the water hardness.
• Detergent has been put in the wrong compartment. >>> If deter-
gent is put in the prewash compartment and the prewash cycle is
not selected, the product may use this detergent during the rinse or
softener phase. Put the detergent in the correct compartment.
• Detergent has been mixed with softener. >>> Do not mix the soften-
er with the detergent. Wash the drawer with hot water.

36
Laundry does not smell
like the softener� (**)
• Detergent has been put in the wrong compartment. >>> If deter-
gent is put in the prewash compartment and the prewash cycle is
not selected, the product may use this detergent during the rinse or
softener phase. Wash the drawer with hot water. Put the detergent
in the correct compartment.
• Detergent has been mixed with the softener >>> Do not mix soften-
er with detergent. Wash the drawer with hot water.
Detergent residue in the
detergent drawer� (**)
• Detergent has been put in a wet drawer. >>> Dry the detergent
drawer before putting in detergent.
• Detergent has become damp. >>> Keep detergents securely closed
in an environment free of humidity and do not expose them to
excessive temperatures.
• Water pressure is low. >>> Check the water pressure.
• The detergent in the main wash compartment has got wet during
prewash water take-in. The holes in the detergent compartment are
blocked. >>> Check the holes and clean them if they are clogged.
• There is a problem with the detergent drawer valves. >>> Call the
Authorized Service Agent.
• Detergent has been mixed with softener. >>> Do not mix the soften-
er with the detergent. Wash the drawer with hot water.
Detergent residue on
the clothes�
• The machine might have been overloaded. >>> Do not overload the
machine.
• The wrong program and temperature have been selected. >>>
Select the proper program and temperature for the laundry to be
washed.
• The wrong type of detergent might have been used. >>> Select the
proper detergent for the laundry to be washed.
Too much foam forms
inside the product� (**)
• Detergents unsuitable for the washing machine have been used.
>>> Use detergents appropriate for the washing machine.
• An excessive amount of detergent has been used. >>> Use only a
sucient amount of detergent.
• Detergent has been stored under improper conditions. >>> Store
detergent in a closed, dry location. Do not store in excessively hot
places.
• Some meshed laundry such as tulle may create excess foam because
of their texture. >>> Use smaller amounts of detergent for this type
of item.
• Detergent has been put in the wrong compartment. >>> Make sure
you place the detergent in the appropriate compartment.
• Softener is being used too early by the product. >>> There may be
a problem with the valves or the detergent drawer. Call the Autho-
rized Service Agent.
Foam is overowing
from the detergent
drawer�
• Too much detergent is being used. >>> Mix 1 tablespoonful of soft-
ener and ½ liter of water and pour it into the main wash compart-
ment of the detergent drawer. >>> Use detergent suitable for the
programs and do not exceed maximum loads indicated in the “Table
of wash cycles”. When you use additional chemicals (stain removers,
bleaches and etc.), reduce the amount of detergent.
Laundry is wet at the
end of the program� (*)
Excessive foam has occurred and the automatic foam absorption sys-
tem has been activated due to too much detergent usage. >>> Use
the recommended amount of detergent.
37
The machine does not
start or a program can-
not be started�
• The power cable is unplugged. >>> Make sure that the power cable
is plugged in.
• No program has been set or the Start/Pause button has not been
pressed. >>> Make sure the program is set and the machine is not in
Standby mode.
• The child lock is activated. >>> Disable the Child Lock.
Laundry shrinks, fades,
tarnishes or gets dam-
aged�
• The program selected might not be suitable for the type of laundry.
>>> Check the care labels on clothes and select a program accord-
ingly, or select timed programs.
(*) The product does not switch to the spin cycle when the laundry
is unevenly distributed in the drum so as to prevent damage to the
product and its surrounding environment. Laundry should be rear-
ranged and re-spun.
(**) Regular drum cleaning has not been carried out. Clean the drum
regularly. See https://parts-selfservice.europeanappliances.com/en/
landing.
If you cannot eliminate the problem
after following the instructions in this
section, consult your dealer or the
Authorized Service Agent.
Never try to repair a nonfunctional prod-
uct yourself.
See also 2 Cleaning the Loading Door and the Drum
]
31].

38
Code Fault Description Possible Causes
E02 Abnormal water inow
1. Check that the water tap is open;
2. Check that the inlet hose is not bent;
3. Clean the lter of the inlet water connection at the
back of the appliance. It could be blocked with limes-
cale or any other debris;
4. Water pressure is too low or the water tap is not fully
open;
5. The appliance is not properly installed, causing a sy-
phon eect. Connect the drain hose as indicated in the
instructions for use;
6. The drain hose does not respect the height required
(please check the value in the instructions for use.
E03 Abnormal drainage Clean the drain pump lter
E05 Water temperature NTC failure
Power o
E11
Condenser NTC or dryer NTC
failure
EE0 Water heating pipe open circuit
EE1
Heating pipe short circuit (water
heating or dryer heating)
U4 Door lock failure
EA2 Water level abnormally high
EA1 Water level switch failure
Eb02 Supply voltage too low
Disconnect the appliance, wait 10 minutes and plug it
back in.
Eb04 Supply voltage too high
Eb08 Abnormal motor operation
Reduce the laundry load following the instructions for
use.
Eb20
IPM anomaly or IPM and motor
overtemperature
Reduce the laundry load following the instructions for
use.
Eb90 Reset timeout
EC1
Abnormal communication be-
tween display and inverter
Disconnect the appliance, wait 2 minutes and plug it
back in.
EC2
Abnormal communication be-
tween display and main control
H High temperature Decrease temperature

39
9 DISCLAIMER / WARNING
Some (simple) failures can be adequately
handled by the end-user without causing safety
issues or unsafe use, provided that they are
carried out within the limits of and in accor-
dance with the following instructions (see the
“Self-Repair” section). Therefore, unless oth-
erwise authorized in the “Self-Repair” section
below, repairs shall be addressed to registered
professional repairers in order to avoid safety
issues. A registered professional repairer is a
professional repairer who has been granted
access to the instructions and spare parts list
of this product by the manufacturer, according
to the methods described in legislation under
Directive 2009/125/EC.
However, only the service agent (i�e� autho-
rized professional repairers) contactable
through the phone number in the user manu-
al/warranty card or through your authorized
dealer may provide service under the guaran-
tee terms� Therefore, please be advised that
repairs by professional repairers (who are not
authorized by Beko) shall void the guarantee�
Self-Repair
Self-repair can be done by the end-user with
regard to the following spare parts: door, door
hinge and seals, other seals, door locking assem-
bly and plastic peripherals such as detergent
dispensers (an updated list is also available at
support.beko.com as of March 1, 2021). More-
over, to ensure product safety and to prevent
risk of serious injury, self-repairs must be done
following the instructions which are available in
the self-repair user manual or at parts-selfser-
vice.europeanappliances.com.
For your safety, unplug the product before
attempting any self-repair.
Repairs and repair attempts by end-users for
parts not included in the list and/or not follow-
ing the instructions available in the self-repair
user manuals or at support.beko.com might
give raise to safety issues not attributable to
support.beko.com and will void the product
warranty. Therefore, it is highly recommended
that end-users refrain from attempting to carry
out repairs falling outside the above-mentioned
list of spare parts, and should instead contact
authorized professional repairers or registered
professional repairers. Any such attempts made
by end-users may cause safety issues and may
damage the product and subsequently cause
re, ood, electrocution and serious personal
injury to occur. By way of example, the follow-
ing repairs must be carried out by authorized
professional repairers or registered professional
repairers: motor, pump assembly, main board,
motor board, display board, heaters etc. The
manufacturer/seller cannot be held liable in any
case where end-users do not comply with the
above.
The spare part availability of the washing
machine you have purchased runs for 10 years.
During this period, original spare parts will be
available for your washing machine.

40