Contact Caple on 0117 938 7420 for spare parts or www.caple.co.uk
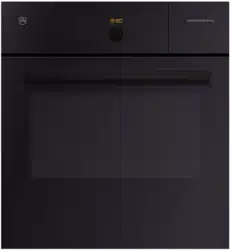
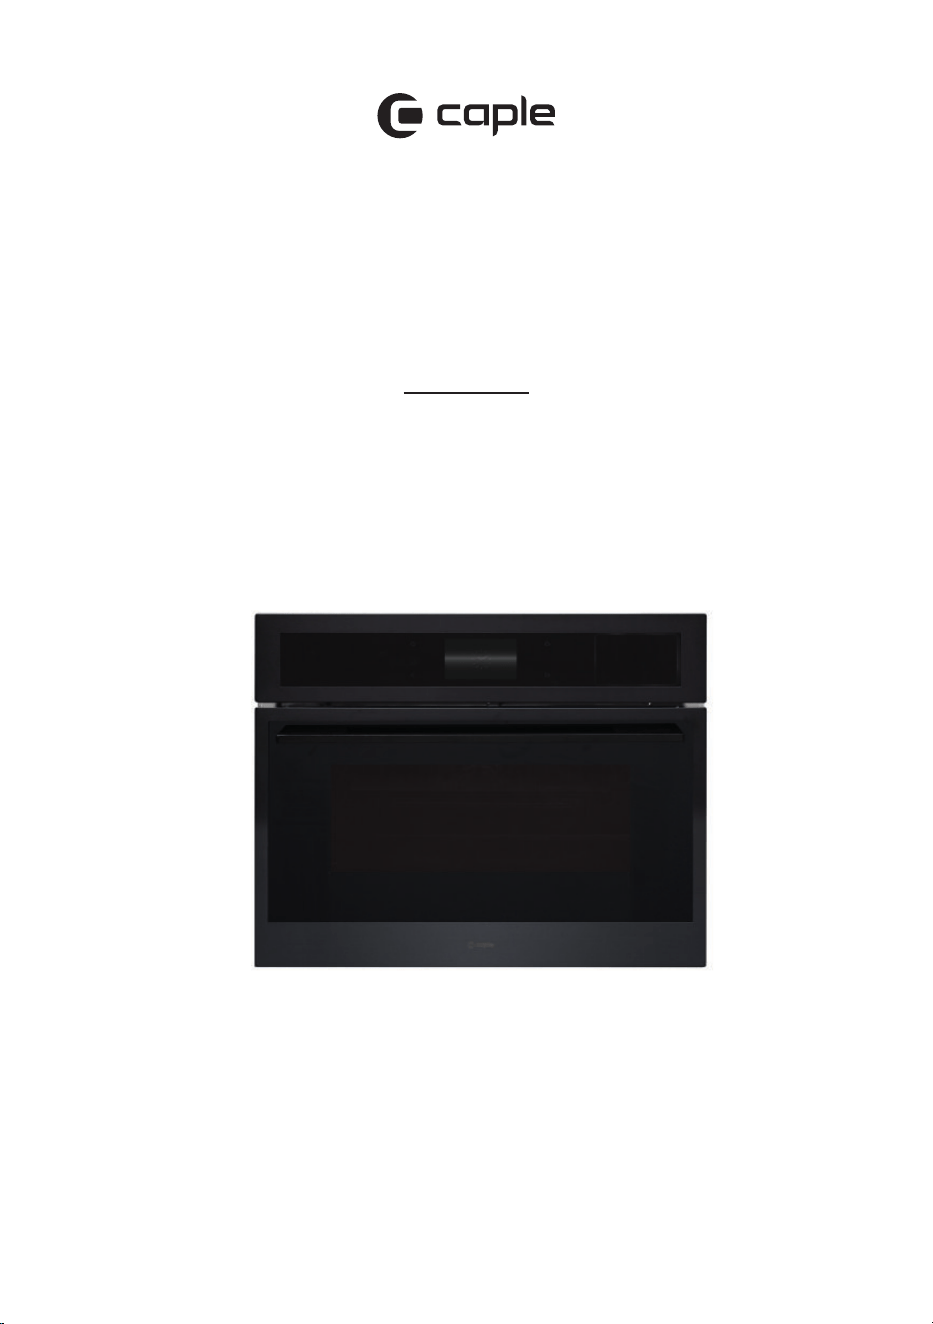
Sense Premium, Combination
Microwave with Steam
Instruction Manual
CMS260

2
Instruction manual CMS260
Please keep this instruction manual for future reference
CONTENTS
Safety Warnings 4
Environmental Protection 15
Warranty 16
Installation 17
Dimensions 20
Electrical Connection 21
Control Panel and Display 23
Operation 24
Settings Menu 49
Functions 54
Special Functions 56
Care and Maintenance 64
Accessories 66
CapleHome App 70
Troubleshooting 77
Error Codes 79
Caple Contact Details 80

3Instruction manual CMS260Please keep this instruction manual for future reference
Welcome to your new Sense Premium Combination
Microwave with Steam.
Featuring our new CapleTouch+ Technology, you’ll
be able to save your family favourites, set multi-stage
cooking timers and customise with ease.
To control your appliance from your smart phone or
tablet, download the CapleHome App from
www.caple.co.uk or the relevant app store for
your device.
p fro
de:
QR

4
Instruction manual CMS260
Please keep this instruction manual for future reference
SAFETY INSTRUCTIONS:
Read these instructions carefully and completely before
using your appliance. They provide you with important
information regarding the safe installation, use and
maintenance of the appliance as well as useful advice
for getting the best out of your microwave oven. Keep
this booklet in a safe place for future reference and pass
on to any future owner.
INSTALLATION WARNINGS:
- This appliance is produced in accordance with all
applicable local and international standards
and regulations.
- The microwave oven is intended for heating food and
beverages. Drying of food or clothing and heating
of warming pads, slippers, sponges, damp cloth and
similar may lead to risk of injury, ignition or re.
- The microwave oven is not intended for outdoor use.
- This appliance is intended to be used in household and
similar applications such as:
› Staff kitchen areas in shops, ofces and other
working environments.
› Farm Houses.
› By clients in hotels, motels and other residential
type environments.
› Bed and breakfast type environments.
- Do not try to lift or move the appliance by pulling the
door handle.

5Instruction manual CMS260Please keep this instruction manual for future reference
- This appliance may only be used by persons (including
children) with reduced physical, sensory or mental
capabilities, or lack of experience and knowledge, if
they are supervised whilst using it. They may only use
it unsupervised if they have been shown how to use it
in a safe manner. They must be able to recognise and
understand the dangers of misuse.
SAFETY WITH CHILDREN:
- This appliance can be used by children aged from 8
years and above and persons with reduced physical,
sensory or mental capabilities or lack of experience
and knowledge if they have been given supervision or
instruction concerning use of the appliance in a safe
way and understand the hazards involved.
- Children less than 8 years of age should be kept away
unless continuously supervised or they have been
shown how to use it in a safe manner. Children must
be able to understand and recognise the possible
dangers caused by incorrect operation.
- Children should be supervised in the vicinity of the
appliance. Never allow children to play with
the appliance.
- Cleaning and user maintenance should not be carried
out by children without supervision.
- External parts of the oven such as the door glass,
control panel and the vent become hot. Do not let
children touch the oven when it is in operation,
particularly when the grill is in use.

6
Instruction manual CMS260
Please keep this instruction manual for future reference
- Materials used for packaging (plastic sheeting, nylon,
staplers, Styrofoam etc.) may cause harmful effects to
children, they should be disposed of immediately.
- Children can injure themselves on an open door. Do
not let children sit on the open door, lean against it or
swing on it.
TECHNICAL SAFETY:
- Maintenance and repair work must be made only
by authorised Caple service technicians. Installation
and repair work that is carried out by unauthorised
technicians may endanger you.
- It is hazardous for anyone other than a competent
person to carry out any service or repair operation that
involves the removal of a cover which gives protection
against exposure to microwave energy.
- While the oven is under warranty, repairs should
only be undertaken by a Caple authorised service
technician, otherwise the warranty will be invalidated
- It is dangerous to alter or modify the specications of
the appliance in any way. The requirements for this
appliance are stated on the rating label.
- Risk of injury due to electric shock. Any contact with
live connections or tampering with the electrical
or mechanical components of the appliance will
endanger your safety and may lead to the appliance
malfunctioning. Do not open the appliance housing
under any circumstances.

7Instruction manual CMS260Please keep this instruction manual for future reference
- To maintain the efciency and safety of your appliance,
we recommend you always use original spare parts
and to call only our authorised Caple Service agents in
case of need.
- Multi-socket adapters and extension leads should
not be used to connect the appliance to the mains
electricity supply.
- The electrical system of this appliance may be used
safely only when it is correctly connected to an
efcient earthing system in compliance with the safety
standards currently in effect.
INSTALLATION WARNINGS:
- Prior to installation, ensure that the local distribution
conditions (electricity voltage and frequency) and the
requirements of the appliance are compatible.
- During installation the oven must be completely
disconnected from the mains electricity supply.
- Do not operate the appliance before it is fully installed.
- The appliance must be installed by an
authorised technician.
- Caple is not responsible for any damage that may
be caused by defective placement and installation by
unauthorised persons.
- Before use, remove all plastic lms protecting some
parts of the appliance (fascia - panel, parts in stainless
steel, etc.).

8
Instruction manual CMS260
Please keep this instruction manual for future reference
- To reduce the risk of burns, electric shock, re, injury
to persons or exposure to excessive microwave energy,
make sure that all the packing materials are removed
from the inside of the door.
- When unpacking the appliance, make sure that it is not
damaged during transportation.
- Check the appliance for any damage, such as
misaligned or bent door, damaged door seals and
sealing surface, broken or loose door hinges and
latches and dents inside the cavity or on the door.
- In the case of any defect; do not use the appliance and
contact your retailer or Caple Service immediately.
- Ensure that the supply cord is not wedged during
the installation.
- Do not operate this appliance if it has a damaged cord
or plug, if it is not working properly or if it has been
damaged or dropped. If the supply cord is damaged,
it must be replaced by a Caple service technician or
similarly qualied persons in order to prevent a hazard.
- Protect your appliance against atmospheric effects. Do
not expose it to effects such as sun, rain, snow etc.
- This microwave oven must be placed on a at, stable
surface to hold its weight and the heaviest food likely
to be cooked in the oven.
- Do not place the microwave oven where heat,
moisture, or high humidity are generated, or near
combustible materials.

9Instruction manual CMS260Please keep this instruction manual for future reference
- The surrounding materials of the appliance (i.e. kitchen
cabinet or furniture) must be able to withstand a
minimum temperature of 120°C.
DURING USE:
- Before using for the rst time, heat the empty
appliance at max. temperature for 1 hour on Fan Heat-
removing any unpleasant smells and smoke caused by
working residues and thermal insulation. Make sure
you do this in a well-ventilated area.
- Do not operate the appliance on any microwave
function when empty.
- Do not open the oven door immediately after cooking
end to avoid scald by the steam.
- While opening the appliance door, step back to avoid
the hot steam coming out of the cavity as there may be
a risk of burns.
- Do not put ammable or combustible materials in or
near the appliance when it is operating.
- During use, handles can get hot.
- The appliance and its accessible parts become hot
during use. Care should be taken to avoid touching
heating elements.
- Always use oven gloves to remove and replace food
in the oven, or to adjust oven shelves if the oven
compartment is hot.

10
Instruction manual CMS260
Please keep this instruction manual for future reference
- Liquids and other foods must not be heated in sealed
containers since they are liable to explode. Only
use plastic containers that are suitable for use in
microwave ovens.
- Only use utensils that are suitable for use in
microwave ovens.
- When heating food in plastic or paper containers,
check the oven frequently for the possibility of ignition.
- Pay close attention to the appliance while cooking with
solid or liquid oils as they could potentially catch re
when oven is hot.
- Microwave heating of liquids can result in delayed
eruptive boiling, therefore care has to be taken when
handling the container.
- Do not fry food in the microwave oven. Hot oil can
damage oven parts and utensils and even result in
skin burns.
- Eggs in their shell and whole hard-boiled eggs should
not be heated in microwave ovens since they may
explode even after microwave heating has ended.
- Pierce foods with heavy skins such as potatoes, whole
squashes, apples and chestnuts before cooking.
- The contents of feeding bottles and baby jars should
be stirred or shaken and the temperature should be
checked before serving in order to avoid burns.
- Never pour water on ames that are caused by oil.
Cover the saucepan or frying pan with its lid in order to
choke the ame and turn the oven off.
- Never roast or bake on the oven base.

11Instruction manual CMS260Please keep this instruction manual for future reference
- If you know you will not be using the appliance for a
while, switch it off and isolate it from the
electrical supply.
- The appliance shelves and trays incline when pulled
out. Be careful not to let hot liquid spill over.
- When the door of the appliance is open, do not leave
anything on it. It may unbalance your appliance or
damage the door.
- Make sure that nothing gets trapped between the door
and the appliance compartment.
- Do not put anything heavy, ammable or ignitable
(nylon, plastic bag, paper or cloth etc) into the
microwave oven. This includes cookware with plastic
accessories (e.g. handles).
- Remove wire ties from paper or plastic bags before
placing bag in microwave oven.
- Do not hang towels, dishcloths or clothes from the
appliance or its handles.
- To avoid re hazards, do not use the oven for
storage purposes.
- Do not leave paper products, cooking utensils or food
in the cavity when not in use.
- Do not touch the appliance with wet hands.
- Do not obstruct the ventilation openings.
- Do not allow supply cords from other small appliances
to come into contact with the oven.
- Do not use the appliance to heat a room.

12
Instruction manual CMS260
Please keep this instruction manual for future reference
- Do not place magnets on the oven door. Magnets can
scratch the surface as well as damage your oven.
- The oven compartment oor can become damaged
by items being pushed around. Ensure pots, pans and
crockery are carefully placed in the oven.
- If smoke is observed. Switch off or unplug the
appliance and keep the door closed in order to stie
any ames.
- When the appliance is not in use, we recommend you
turn it off, and isolate it from the electrical supply.
- The appliance is not intended to be operated by means
of an external timer or separate remote-control system.
- The manufacturer will not be held liable for any
damages that might arise out of incorrect or improper
use of the appliance.
CLEANING AND MAINTENANCE:
- Always switch off the appliance from the mains
isolating the electrical supply before any cleaning
or maintenance.
- The oven should be cleaned regularly and any food
deposits removed.
- All possible security measures have been taken to
ensure your safety. Since the glass may break, you
should be careful while cleaning to avoid scratching.
- Do not use harsh abrasive cleaners or sharp metal
scrapers to clean the oven door glass or any other

13Instruction manual CMS260Please keep this instruction manual for future reference
surface of the appliance as it can scratch the surface
which may result in the glass shattering or permanent
damage to the surface.
- Do not use steam cleaners for cleaning the appliance.
- Ensure the appliance is switched off before replacing
the lamp to avoid the possibility of electric shock.
- Failure to maintain the oven in a clean condition could
lead to deterioration of the surface that could adversely
affect the life of the appliance and possibly result in a
hazardous situation.

14
Instruction manual CMS260
Please keep this instruction manual for future reference
ACCESSORIES:
- Avoid hitting or knocking the door glass
with accessories.
- Do not use the wire shelf with any microwave function.
This could damage the shelf or even your microwave
oven. The wire shelf is for normal convection/Fan
cooking or grilling only.
- Do not use the glass tray on or under a ame or other
direct heat source.
- Do not drop or hit the tray against hard objects or
strike utensils against it.
- Handle the glass tray with care to prevent breakage,
chipping, cracking or severe scratching. Do not use
or repair the tray if it is chipped, cracked or severely
scratched.
- Avoid sudden changes in temperature to the glass tray.
- Do not use the Grill Rack supplied with the glass tray
with any microwave function. This could damage the
rack or even your microwave oven. The wire rack is for
normal convection/Fan cooking or grilling only.

15Instruction manual CMS260Please keep this instruction manual for future reference
ENVIRONMENTAL PROTECTION
Waste electrical products should not be disposed of with household waste. Please recycle
where facilities exist. Check with your Local Authority or retailer for recycling advice. This
appliance is marked according to the European directive on Waste Electrical and Electronic
Equipment (WEEE).
By ensuring this product is disposed of correctly, you will help prevent potential negative
consequences for the environment and human health, which could otherwise be caused
by inappropriate waste handling of this product. The symbol on the product indicates that
this product may not be treated as household waste. Instead it shall be handed over to the
applicable collection point for the recycling of electrical and electronic equipment. Disposal
must be carried out in accordance with local environmental regulations for waste disposal.
For more detailed information about treatment, recovery and recycling of this product, please
contact your local council, your household waste disposal service or the retailer where you
purchased the product.
CE DECLARATIONS OF CONFORMITY
Radio Equipment Directive (RED) 2014/53/EU
This Declaration is issued under the sole responsibility of the manufacturer.
Hereby, Caple declares that the radio equipment included in the product is in compliance with
the RED directive 2014/53/EU.
The full text of the EU Declaration of Conformity is available on our
website www.caple.co.uk.
UKCA DECLARATIONS OF CONFORMITY
This appliance has been manufactured to the strictest standards and complies with all
applicable legislation.

16
Instruction manual CMS260
Please keep this instruction manual for future reference
TECHNICAL FICHE
This appliance conforms to all current and applicable energy regulations. To view the Technical
Fiche that supports the energy labelling data, please visit the product page on our website
www.caple.co.uk
WARRANTY:
Your new appliance is covered by warranty. The warranty card is enclosed - if it is missing, you
must provide the following information to your retailer in order to receive a replacement: date
of purchase, model and serial number (found inside the door opening). Registration can also be
completed online by visiting www.caple.co.uk.
Ensure you keep your warranty card safe, you may need to show it to Caple Service together
with proof of purchase.
If you fail to show your warranty card you will incur all repair charges.
Spare parts are only available from Caple Service and spare parts authorised centres.
TECHNICAL
Rated Voltage 220-240V
Rated frequency 50Hz
Power 3050W
WiFi Band 2.4Ghz
Microwave Power 1000W
17Instruction manual CMS260Please keep this instruction manual for future reference
INSTALLATION
IMPORTANT:
Isolate your appliance from the electrical supply before performing installation or maintenance.
› Installation should be carried out according to the instructions by a professionally qualied
person only.
› The manufacturer declines all responsibility for any damage to persons, animals or materials
due to incorrect installation.
› The appliance requires a sufcient supply of cool air for efcient operation. Make sure that
the supply of cool air is not hindered in any way (e.g. by tting heat insulation strips in
the cabinet carcase). Furthermore, the required supply of cool air must not be excessively
heated by other heat sources.
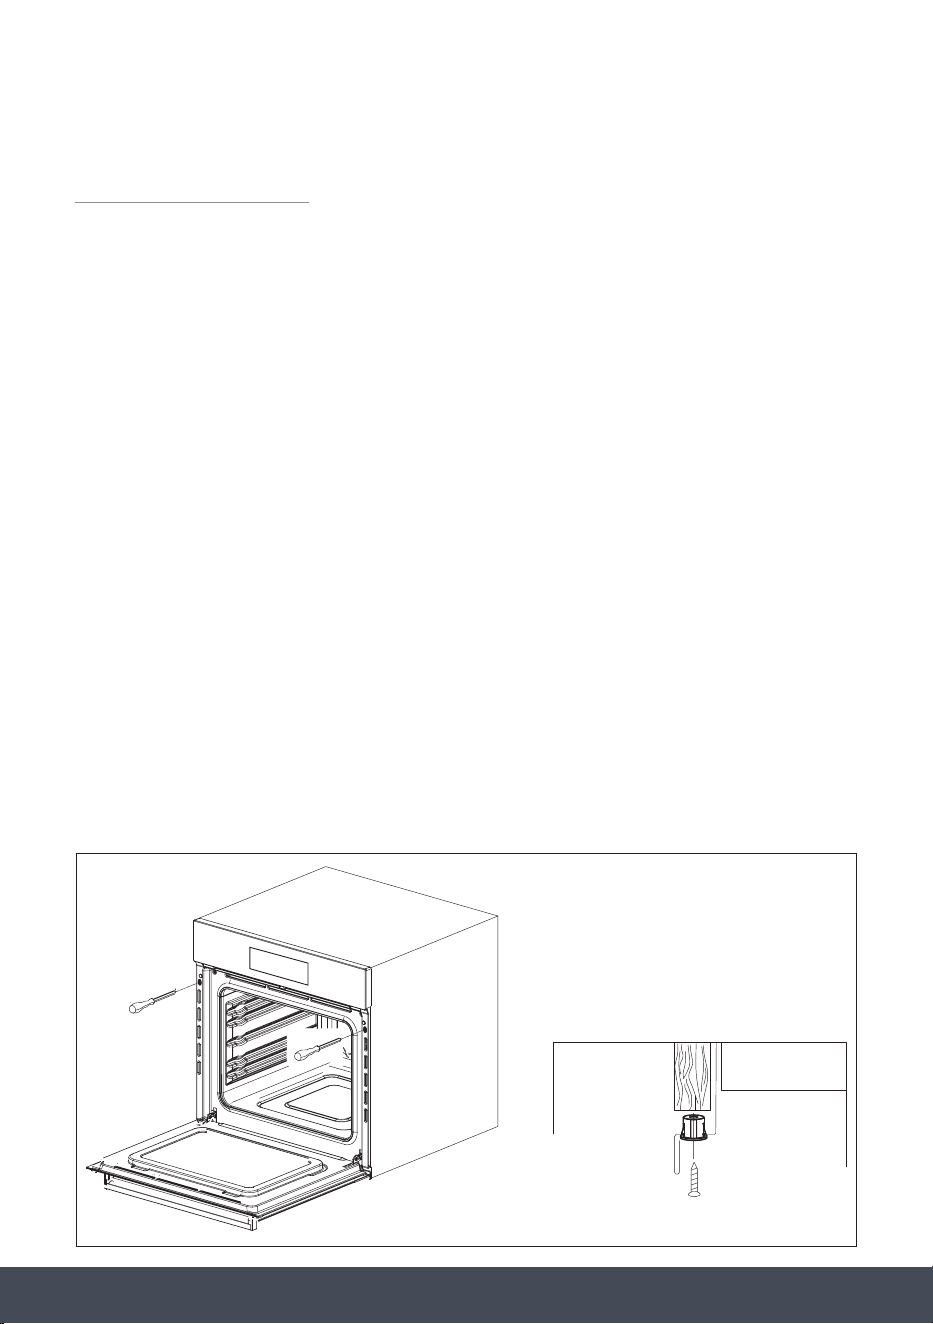
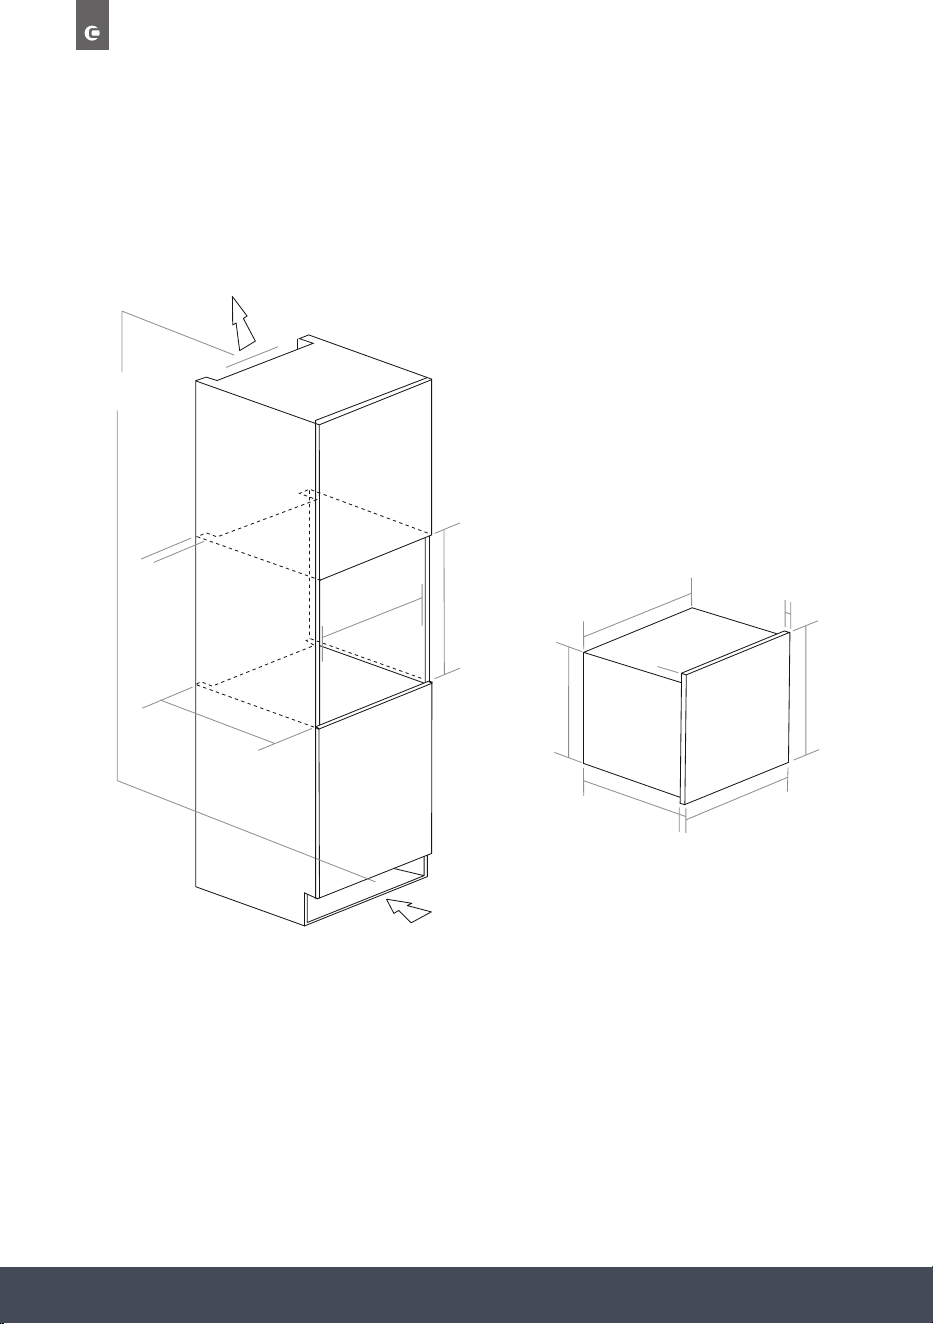
FITTING THE APPLIANCE
Fit the appliance into its surround (beneath a worktop or in an appliance tall housing) by
inserting screws and plastic covers into the 2 holes (A – g.1) that can be seen in the frame of
the appliance when the door is open. The screws should then be xed into the
kitchen carcass.
A
A
A
Plastic cover
Fig 1
18
Instruction manual CMS260
Please keep this instruction manual for future reference
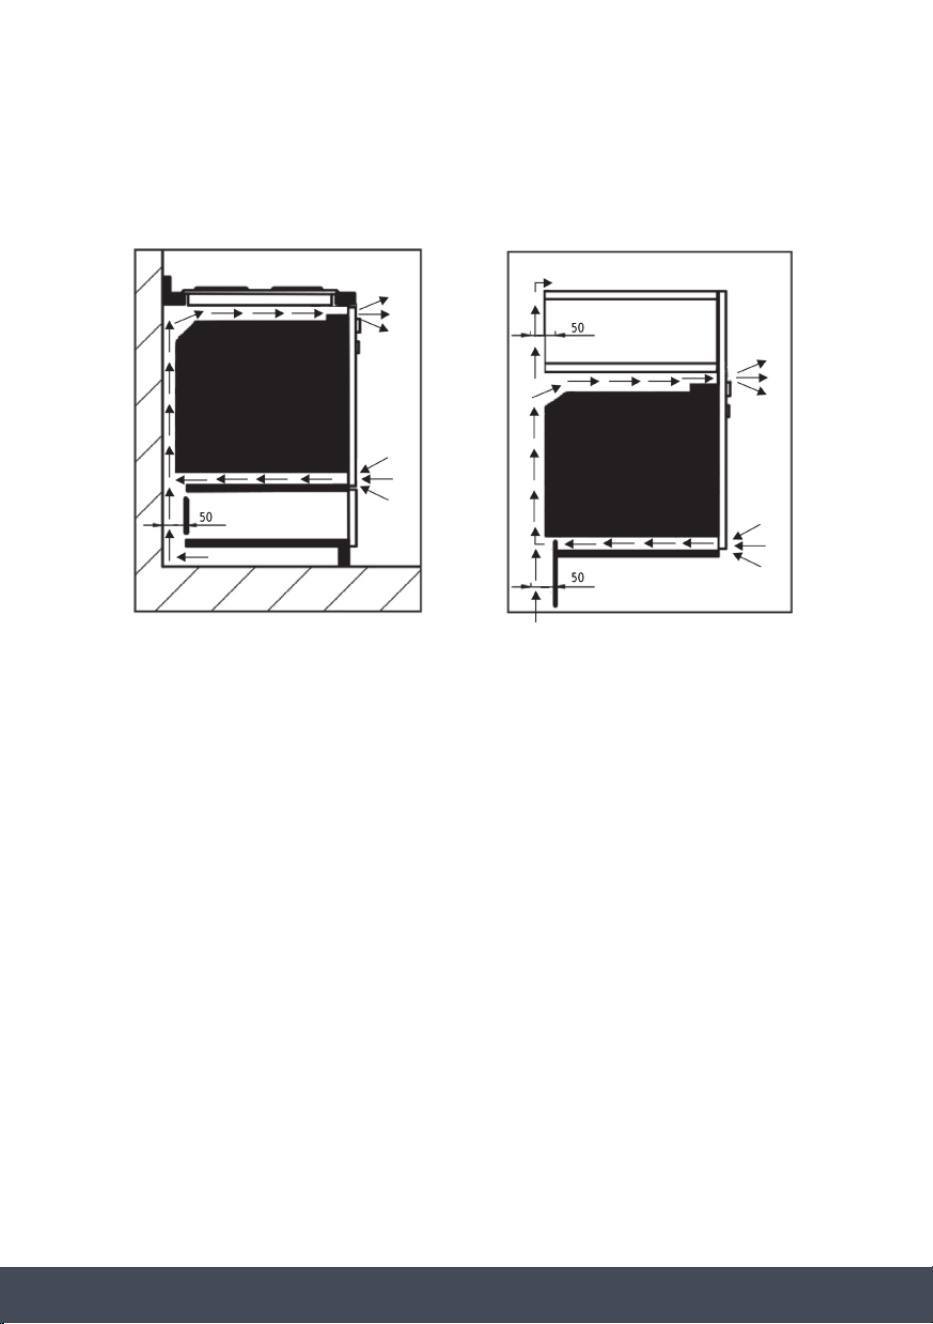
For the most efcient air circulation, the oven should be tted according to the dimensions
shown below:
min. 550
mm
565mm
450mm
50mm
Ventilation Slot
50
mm
547.4mm
22mm
8.6mm
453.6mm
441mm
21.6mm
595mm
540mm
NOTE:
To aid ventilation, we suggest leaving a small gap of around 3mm between the top of the
plinth and underside of the cabinet to allow fresh air to circulate around the oven.
19Instruction manual CMS260Please keep this instruction manual for future reference
The rear panel of the cabinet must be removed so that air can circulate freely. The panel to
which the oven is tted should have a gap of at least 50mm at the rear for ventilation:
See page 20 for full dimensional drawings of your oven to help with installation.
For a built-in microwave oven to work well, the cabinet must be of the right type.
The panels of the adjoining furniture should be heat resistant. Particularly when the adjoining
furniture is made of veneered wood, the adhesives should be able to withstand a temperature
of 120˚C. Plastic materials or adhesive which cannot withstand this temperature may become
deformed or unstuck.
To comply with safety regulations, once the appliance has been tted it should not be possible
to make contact with the electrical parts.
All parts which offer protection should be xed in such a way that they cannot be removed with
the use of a tool.
20
Instruction manual CMS260
Please keep this instruction manual for future reference
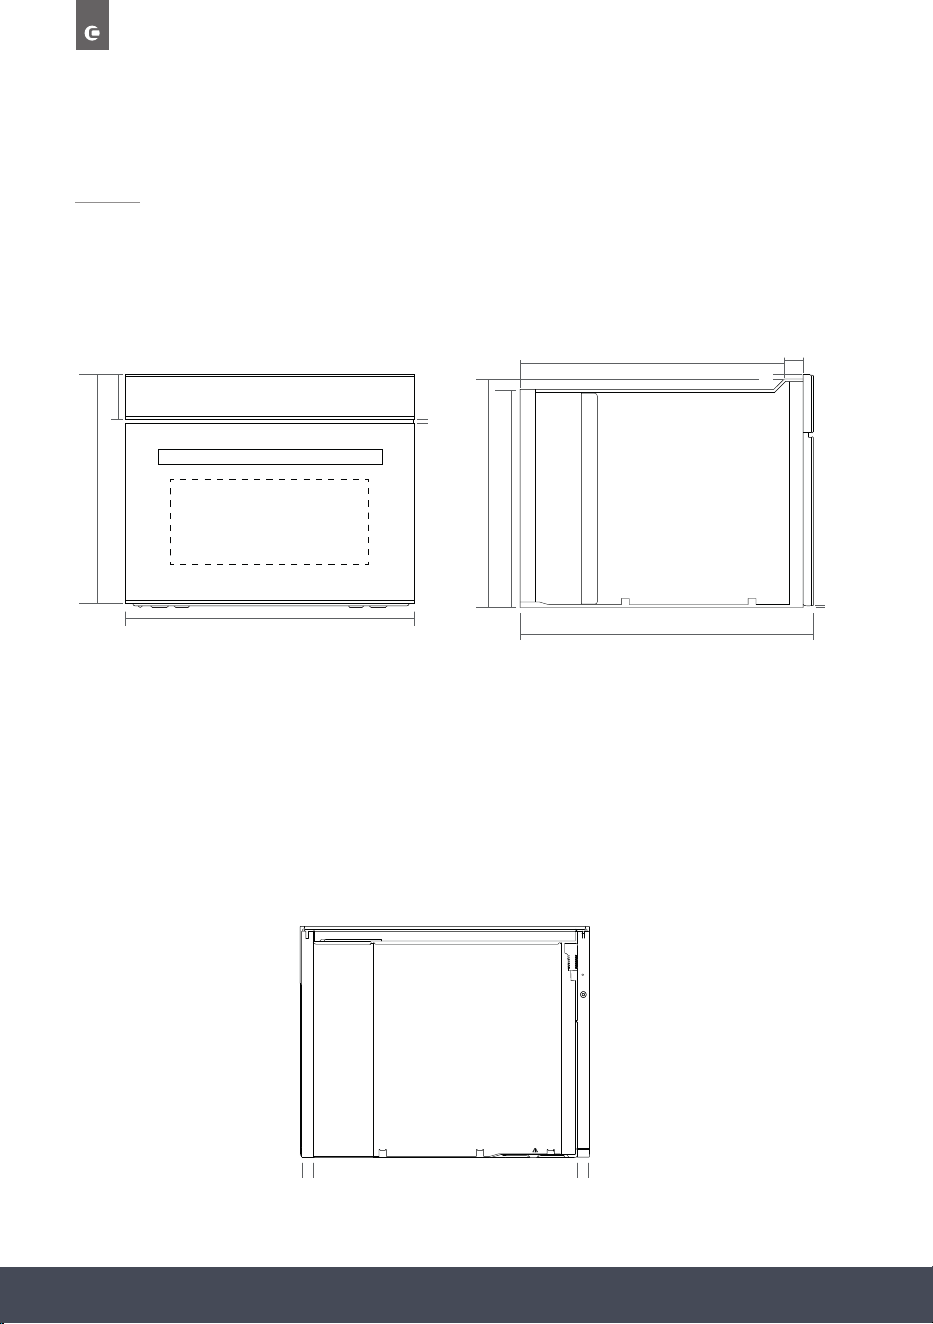
DIMENSIONS
453.6mm
116mm
595mm
8mm
FRONT
SIDE
BACK
26.4mm 26.4mm
439.3mm
515.6mm
569mm
31.8mm
2.8mm
446.3mm
8.6mm

21Instruction manual CMS260Please keep this instruction manual for future reference
ELECTRICAL CONNECTION
WARNING:
This appliance must be earthed.
Check that the power rating of the mains supply is suitable for the maximum power of the
appliance as indicated on the rating label. The fuse rating for this appliance is 16amp. The
appliance is supplied with a mains lead it should be “Hard wired” as follows:
› The “yellow/green” earth wire, which must be connected to a terminal, and has to be about
10mm longer than the other wire.
› The neutral wire has to be connected to the terminal marked with a letter N.
› The Live wire should only be connected to the terminal marked L.
Mains connection can also be made by tting a double pole switch with a minimum gap
between the contacts of 3mm, proportionate to the load and complying with the regulations
in force.
WARNING:
The yellow/green earth wire should not be controlled by the switch.
When a double pole switch is used for mains supply connection it should be easily accessed,
once the appliance is in position.
IMPORTANT:
The mains supply cable should be positioned so that it is never subjected to temperatures
which are more than 50ºC above ambient temperature.
The electrical safety of the appliance can only be guaranteed when it has been correctly
connected to a properly earthed mains electrical supply, as laid down in the current regulations
for electrical safety.

22
Instruction manual CMS260
Please keep this instruction manual for future reference
The manufacturer cannot be held responsible for any damage to persons or objects due to lack
of an earth connection.
The ovens are designed to operate with a mono-phase alternating current of 220-240V, 50Hz.
BEFORE THE INSTALLATION OF THE APPLIANCE, CHECK THE
SPECIFICATIONS ON THE RATING LABEL.
23Instruction manual CMS260Please keep this instruction manual for future reference
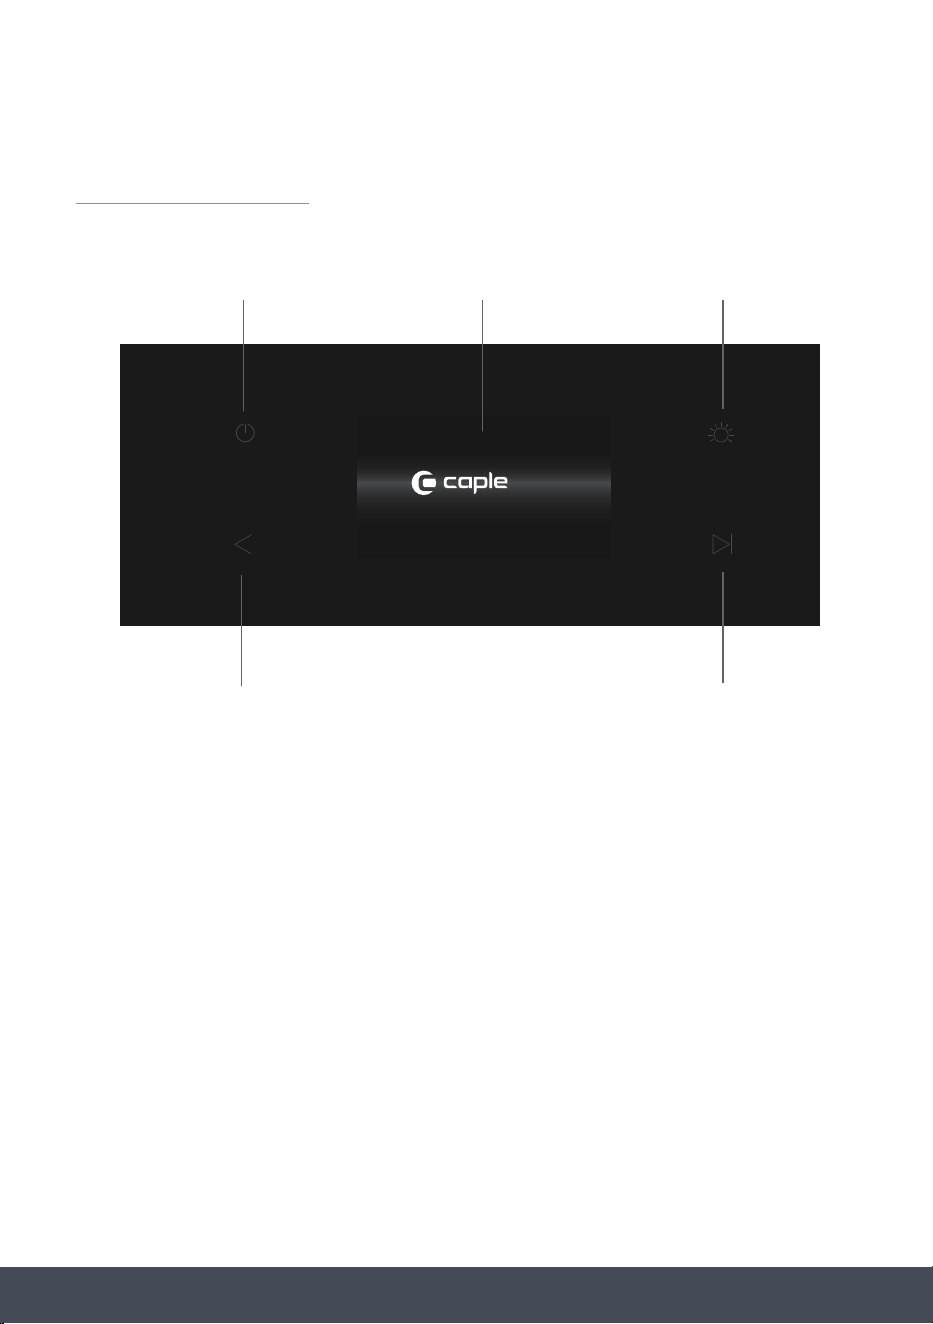
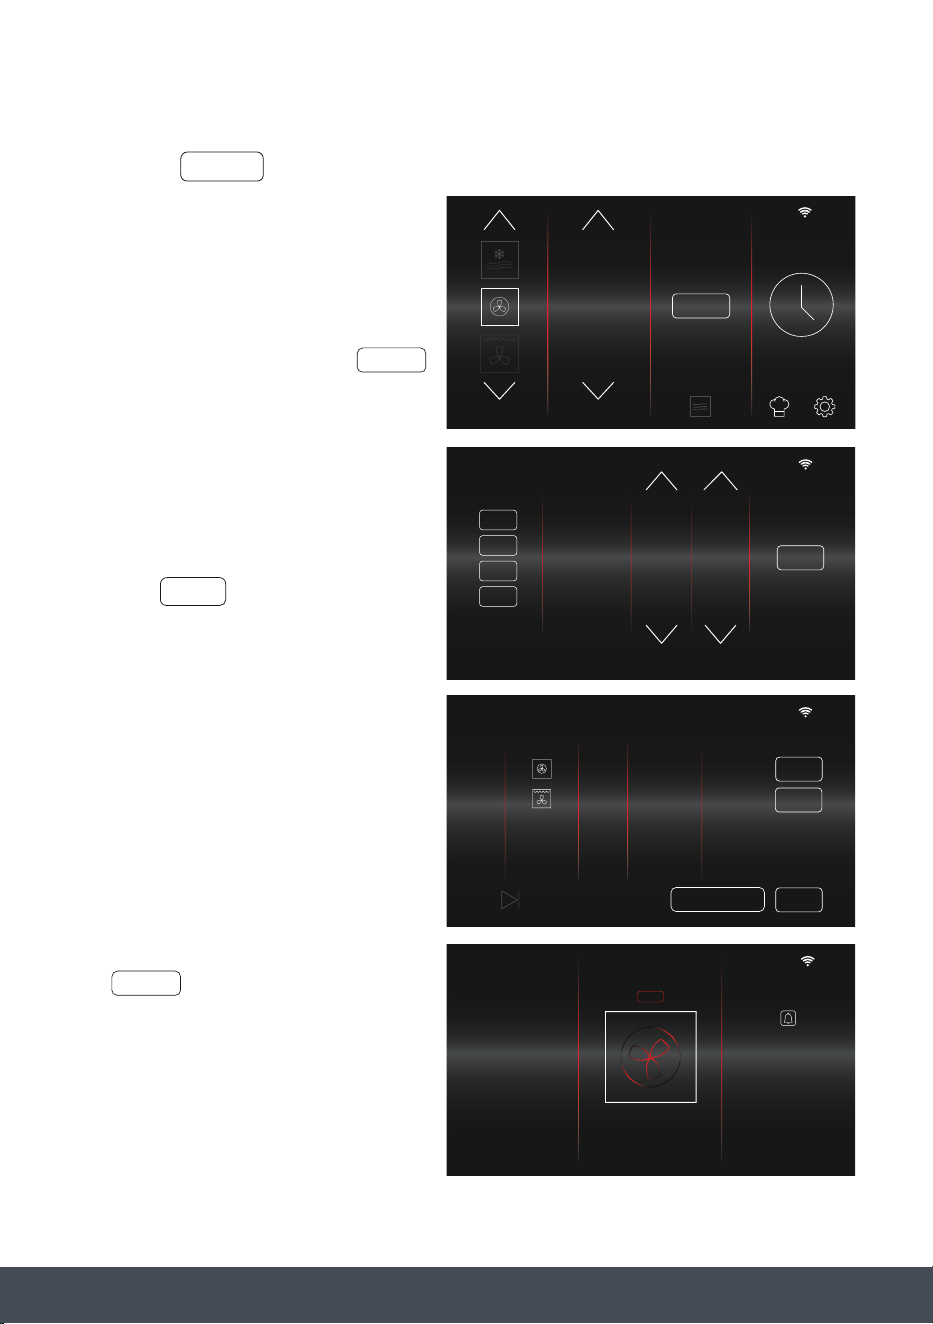
SENSE PREMIUM
CONTROL PANEL AND DISPLAY
ACCESSORIES
2 x Side Racks
1 x Safety Stop Shelf
1 x Glass Tray
1 x Grill Rack for Glass Tray
1 x Glass Base Plate
1 x Steam Tray
1 x Cleaning Sponge
1 x Water Absorber
To purchase additional or replacement accessories, please visit www.caple.co.uk
POWER ON/OFF BUTTON DISPLAY SCREEN LIGHT ON/OFF
BACK BUTTON
START/PAUSE BUTTON
PRESS + HOLD
FOR WATER TANK
24
Instruction manual CMS260
Please keep this instruction manual for future reference
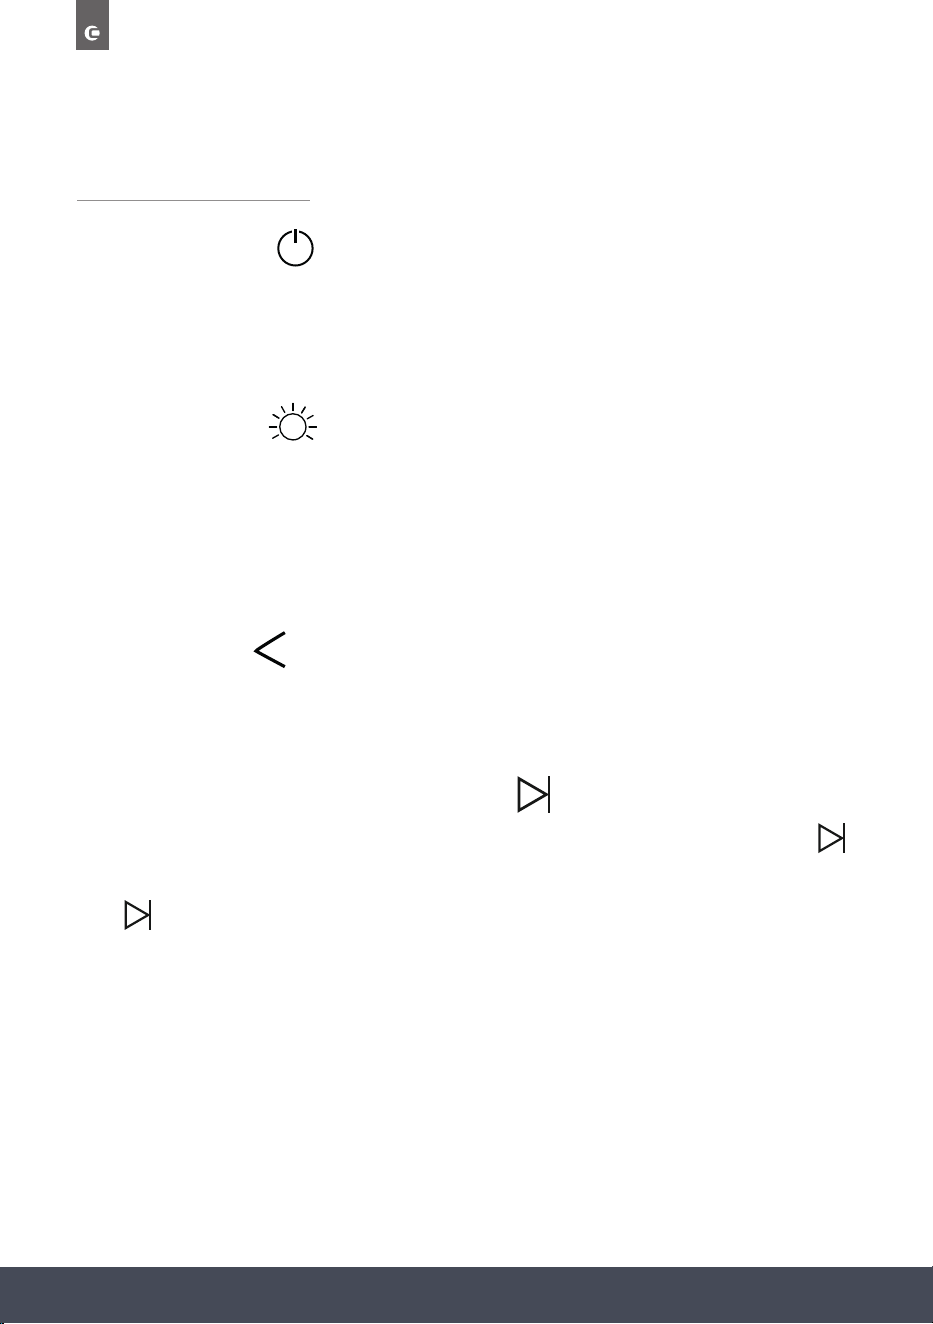
OPERATION
POWER BUTTON:
To turn the display screen On and Off.
NOTE:
Turning Off will take you to the standby screen.
LIGHT BUTTON:
Press this button to switch the internal oven lights on and off.
Press and hold for 5 seconds to activate/deactivate Child Safety Lock.
NOTE:
The light will turn itself off after 10 minutes of inactivity.
BACK BUTTON:
Press to return to the previous screen on the display.
Press to cancel cooking.
START/PAUSE / WATER TANK BUTTON:
After turning the oven on, select your desired cooking programme and duration and press
to start cooking.
Press while the appliance is in operation to pause cooking.
NOTE:
Pause feature only available during Single Stage Cooking, multi-stage cooking cannot
be paused.
Press and hold this button to access the Water Tank.
/
25Instruction manual CMS260Please keep this instruction manual for future reference
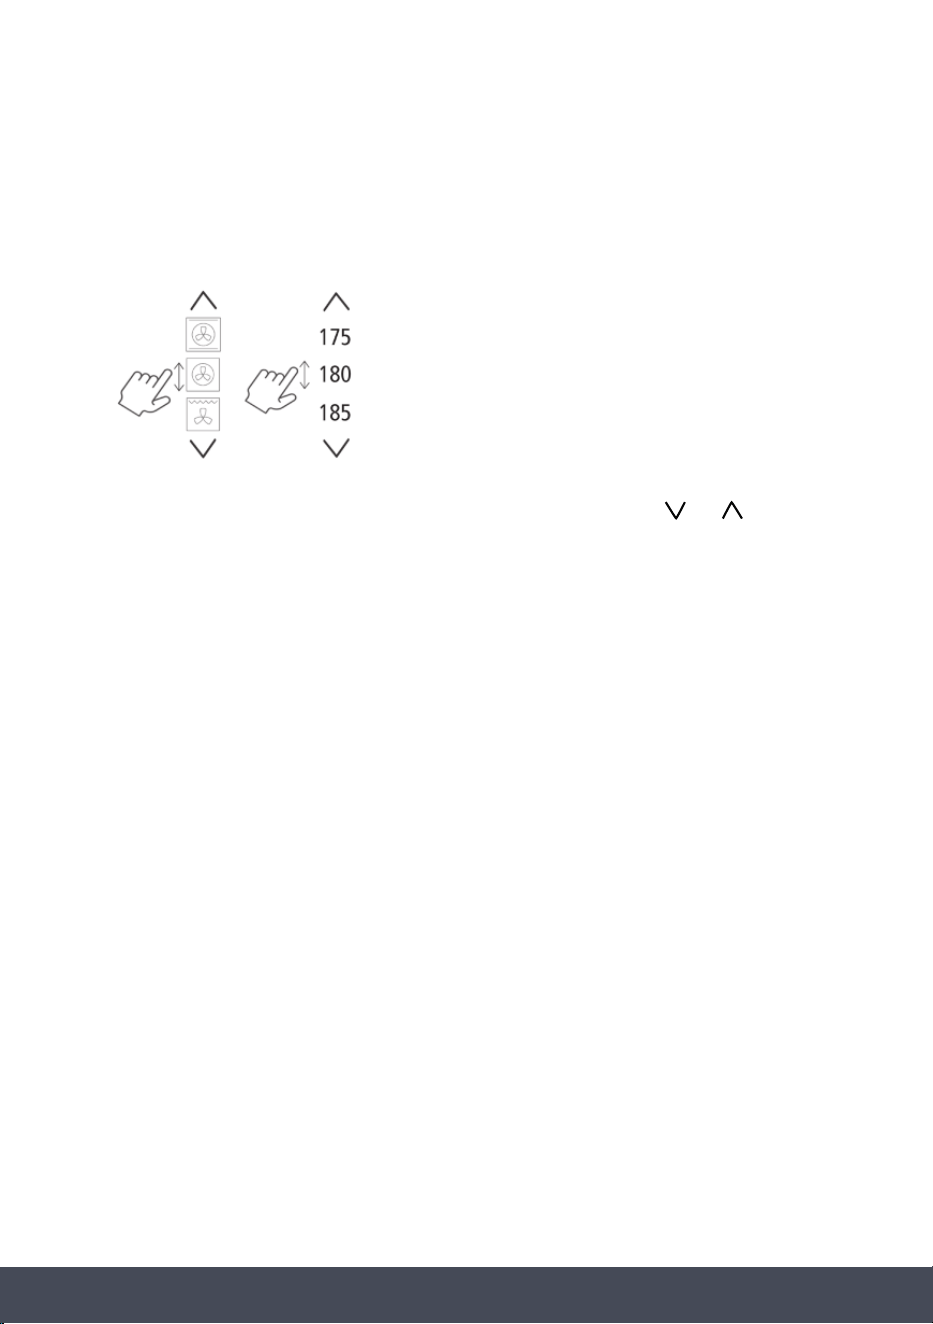
TIP: When adjusting temperatures and times, press and press and hold or to
scroll quickly.
NAVIGATING THE TOUCH CONTROL DISPLAY:
To adjust Times, Dates, Temperatures and Functions etc., press the up and down arrow controls
or scroll by pressing and dragging up and down.
26
Instruction manual CMS260
Please keep this instruction manual for future reference
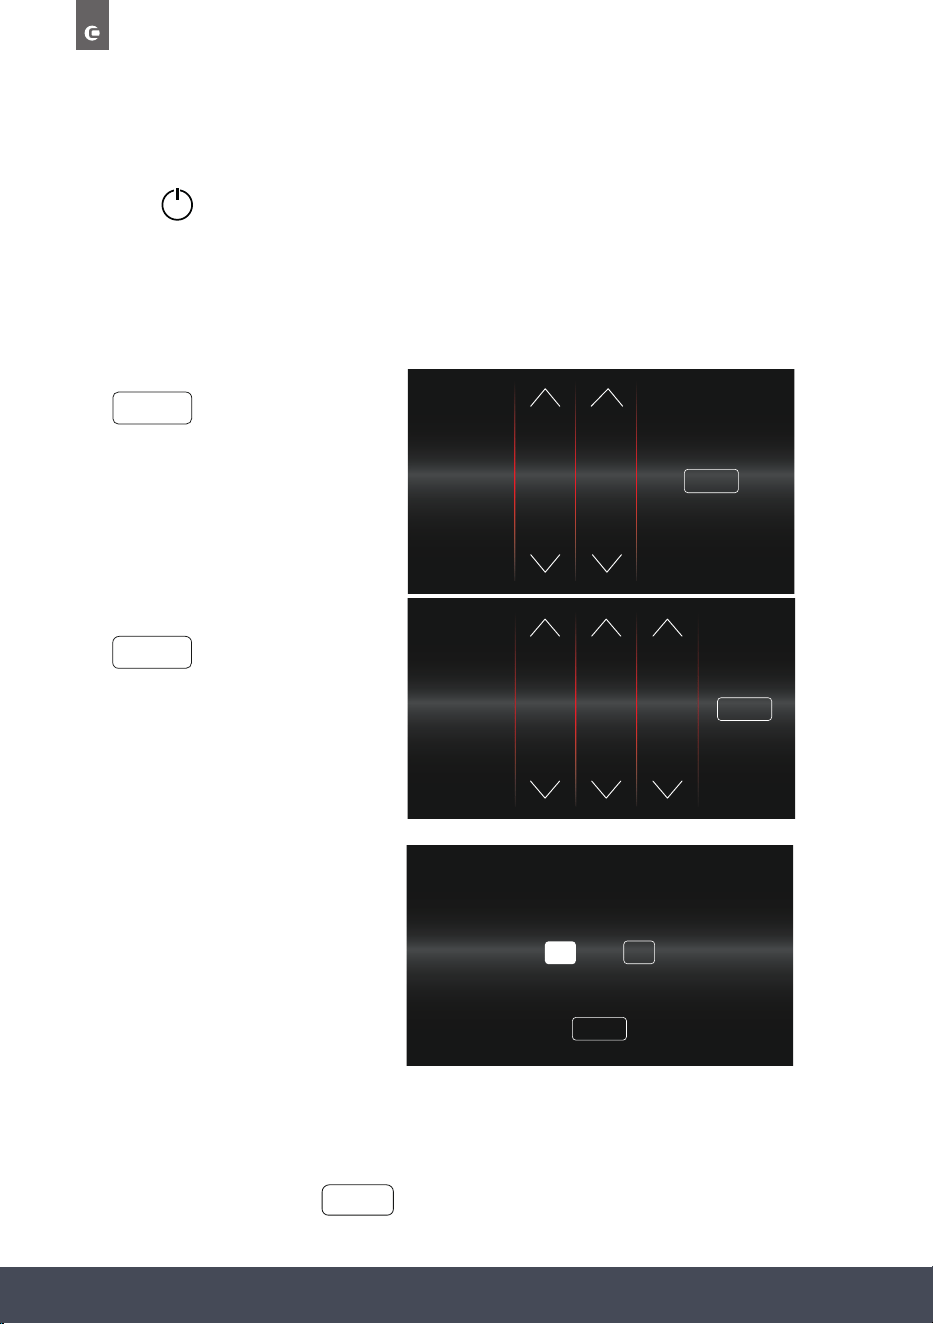
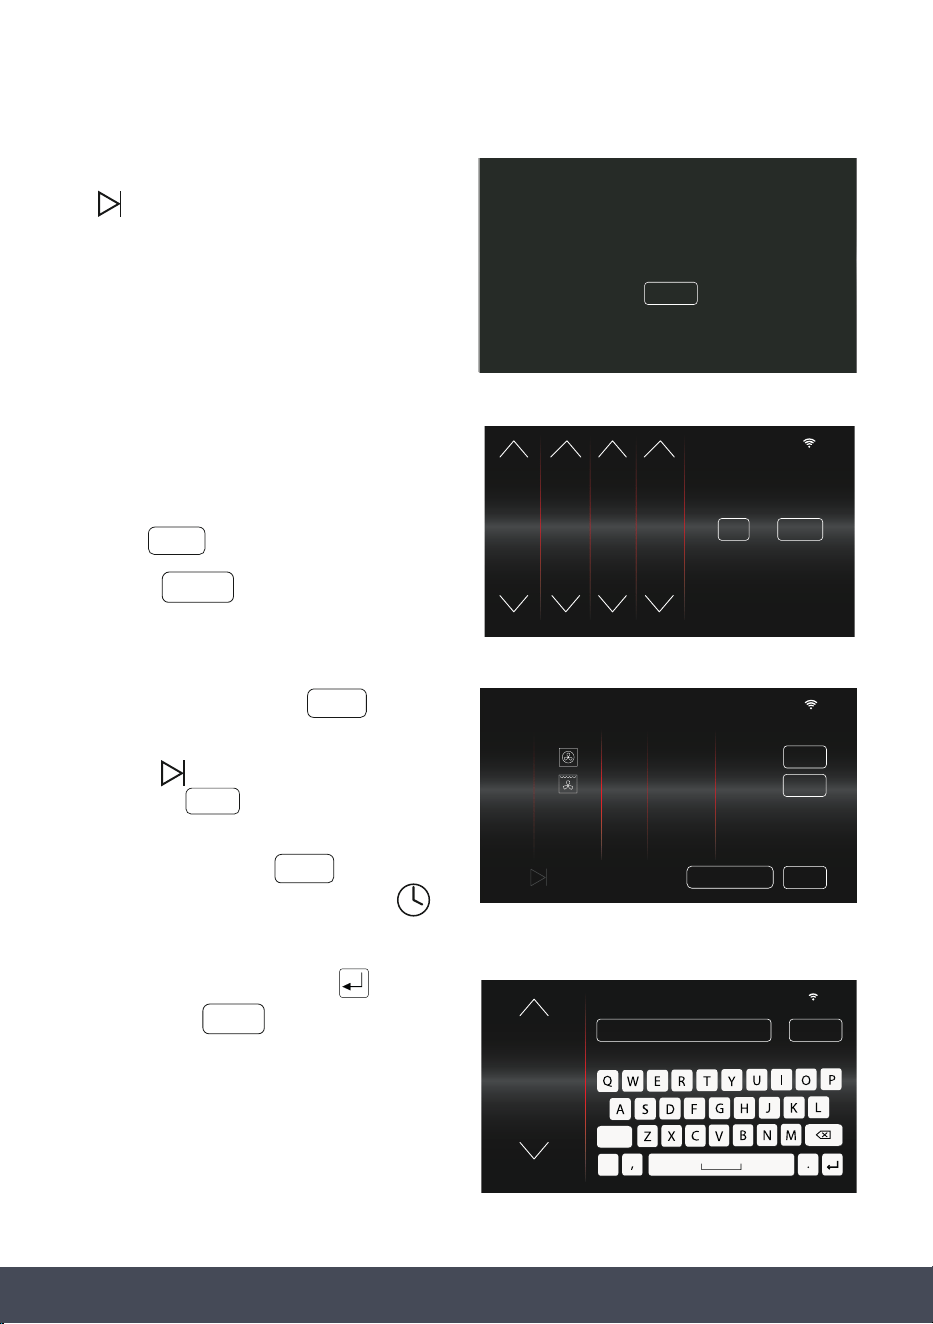
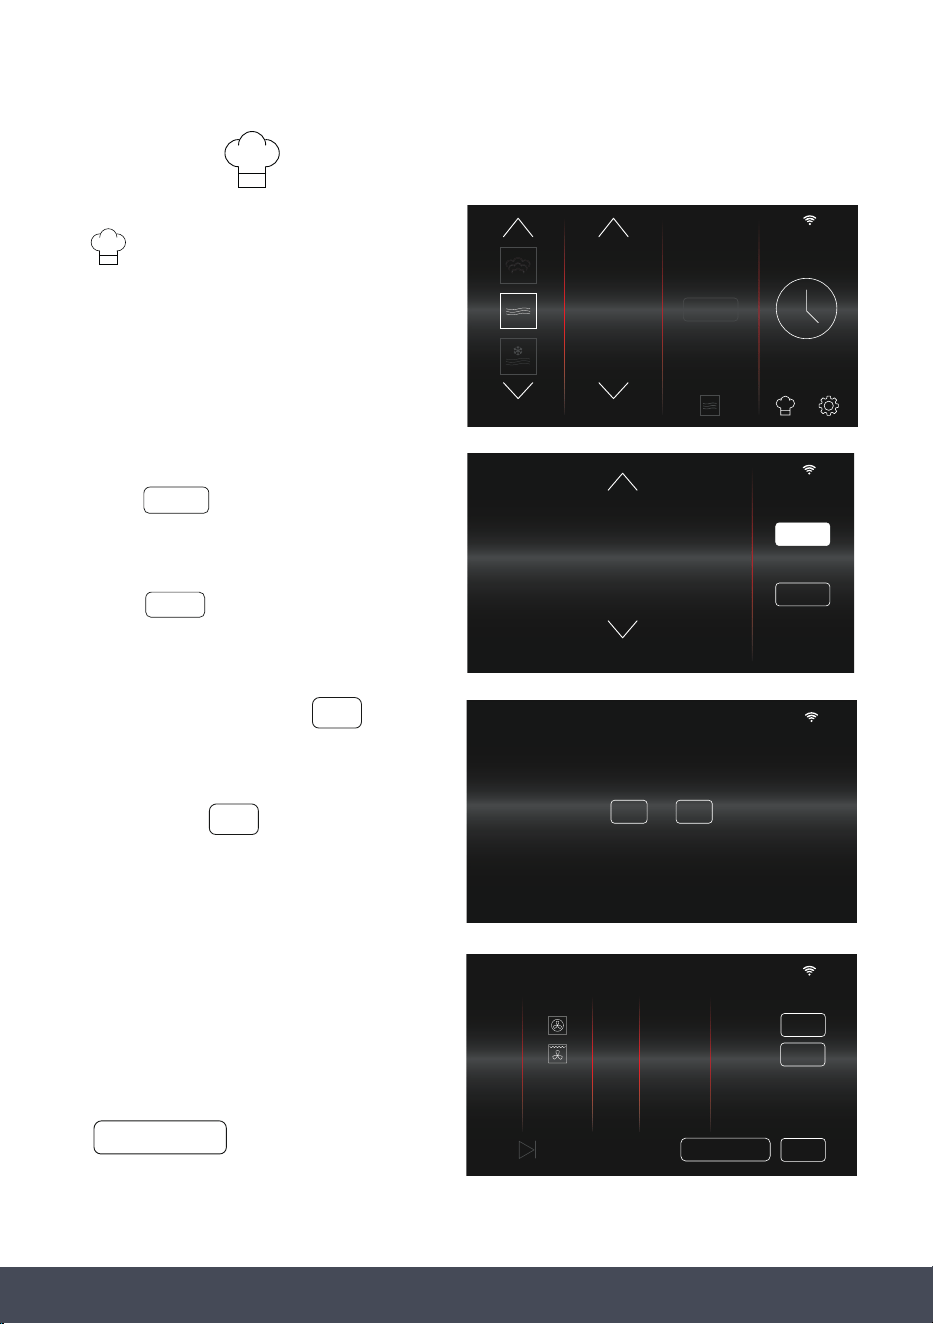
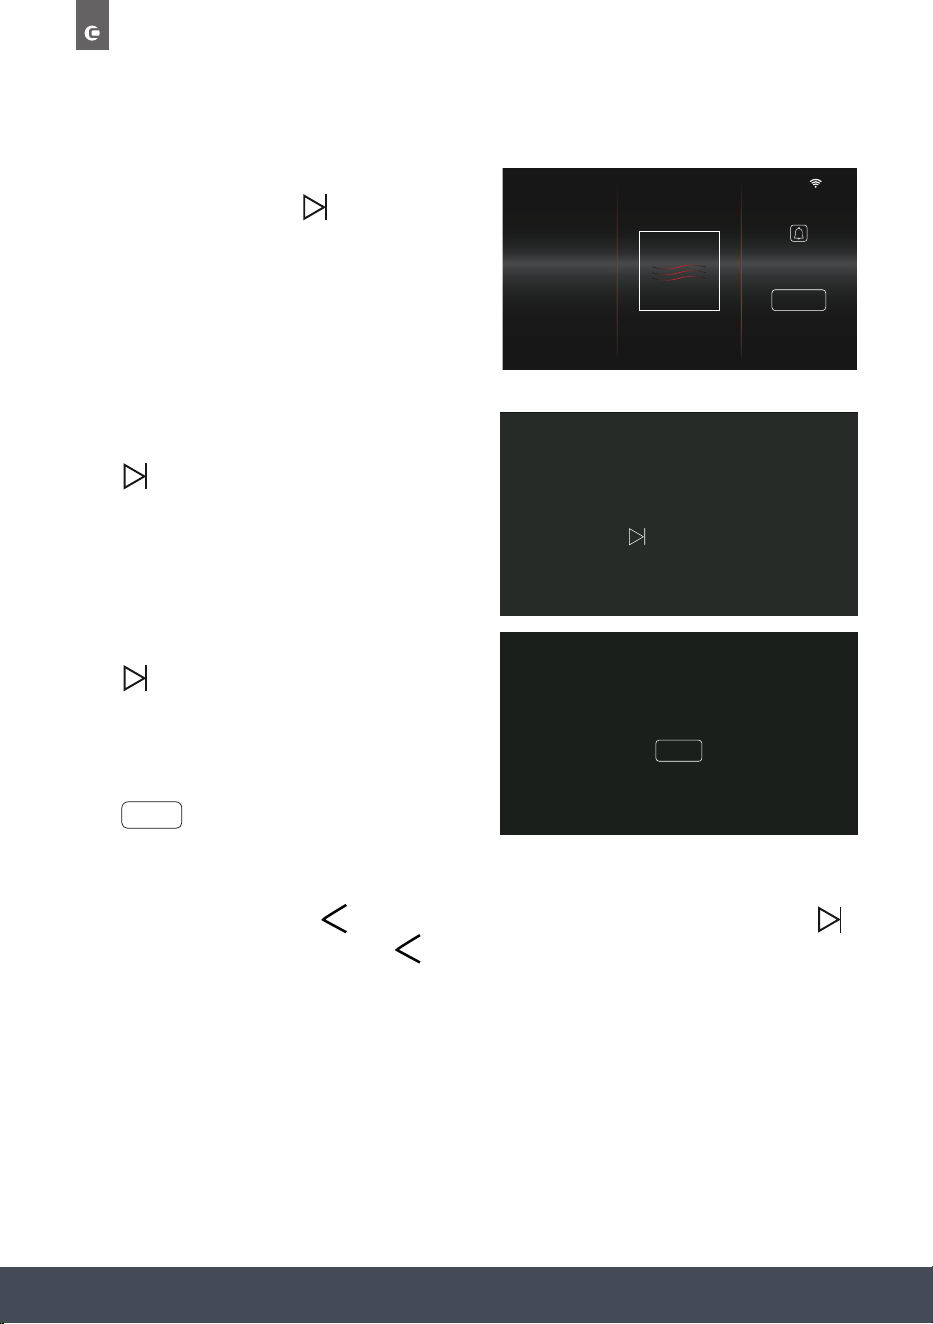
USING FOR THE FIRST TIME
1. Press to turn the appliance on.
When turning the appliance on for the rst time you will be asked to set the date and time.
NOTE:
All other menu items cannot be selected at this point.
2. Adjust the Time before pressing
3. Adjust the Date before pressing
4. Select whether you want the
Time and Date to display on the
Standby Screen.
PLEASE NOTE:
Selecting to have the clock on permanently in standby mode will increase Energy consumption.
If Yes is selected, the default clock display will be analogue mode. This can be changed later in
the Settings Menu.
5. To complete setup, press
SET TIME
00
:
00
TIME & DATE SET TIME
9
10
0
1
2
8
9
10
11
12
FINISH
NO
OR
DISPLAY TIME & DATE ON STANDBY SCREEN
PLEASE NOTE: SELECTING THE CLOCK TO BE ON PERMANENTLY IN
STANDBY MODE WILL INCREASE ENERGY CONSUMPTION
YES
FINISH
SET DATE
10
:
10
TIME & DATE
SET DATE
1
2
3
4
5
DEC
JAN
FEB
MAR
APR
2019
2020
2021
2022
2023
27Instruction manual CMS260Please keep this instruction manual for future reference
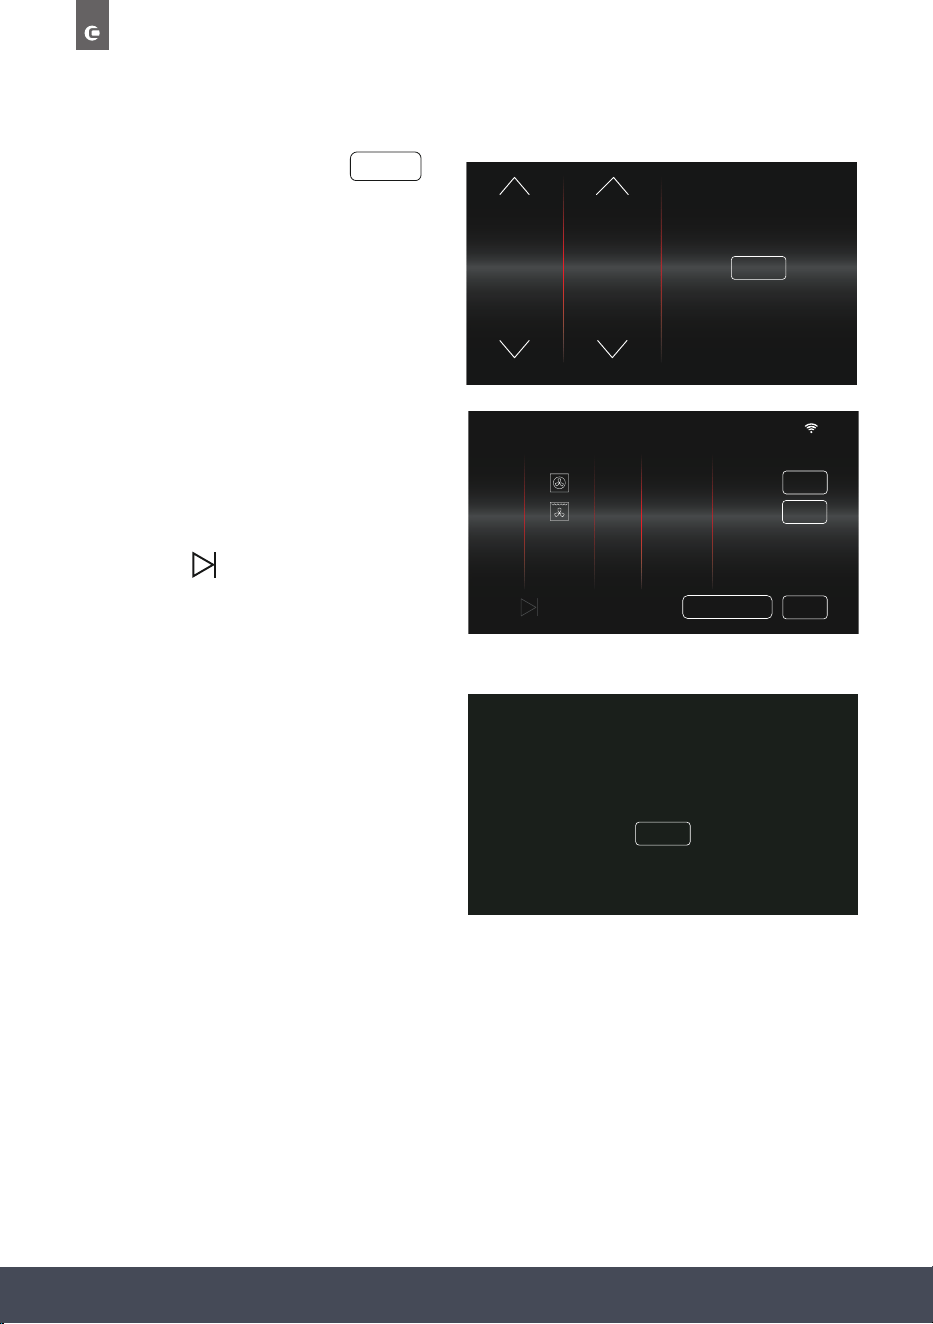
QUICKSTART MICROWAVE COOKING GUIDE
To quickly start cooking without setting a timer and cooking stage or saving to favourites,
proceed as follows:
1. Press to turn the appliance on. The
home screen will appear.
The microwave oven is automatically set
to Microwave Function at 100%.
To start cooking press
2. The timer will automatically count down
from 30 seconds.
Each press of adds an
additional 30 seconds to the timer.
The timer will count down from the
new set time.
10
:
10
FUNCTION POWER %
STEAM
+
90
100
10
+30 SECS
10
:
10
100 00
:
29
FUNCTIONPOWER % TIMER
+ 30 SECS
28
Instruction manual CMS260
Please keep this instruction manual for future reference
SETTING COOKING STAGES AND SAVING TO FAVOURITES
ONE COOKING STAGE:
1. Press to turn the appliance on.
2. Select desired Function, Temperature/Power,
Steam+ (if required).
Then press
3. Select a Cooking Duration and End Time.
NOTE:
Microwave Function cooking duration is
shown in minutes and seconds ‘mins:secs’.
End Time will automatically adjust once
Duration is set.
If only one cooking stage is
required press
4. Review selection, press to change
selection. Press to begin cooking
without saving or press to store in
your favourite’s menu.
5. If saving to favourites, name your selection
and press
If required, press to amend your
selection name, or press to store
in your favourites.
NOTE:
Selection names are limited to 14 characters.
10
:
10
FUNCTION TEMP. ˚C
STEAM
+
195
190
185
10
:
10
DURATION END TIME
0
1
2
3
4
58
59
00
01
02
16
17
18
19
20
28
29
30
0
1
ADDITIONAL
COOKING STAGE
OR FINISHADD
EDIT
SAVE
10
:
10
COOKING STAGES
PRESS
STAGE FUNCTION TEMP. DURATION END TIME
1
02.00
hr/min190˚18.30
EDIT
SAVE
TO START COOKING
ADJ. END TIME
10
:
10
ROASTED VEG.
LEMON DRIZZLE
BEEF CASSEROLE
CRISPY CHICKEN
PIZZA
DRIED BANANAS
SAVE
SAVED FAVOURITES
-
EDIT
FINISH
EDIT
SAVE
29Instruction manual CMS260Please keep this instruction manual for future reference
6. Press to begin cooking.
7. Cooking will begin and the main cooking
screen will display.
8. When cooking has completed.
‘COOKING FINISHED’ will appear.
If a timer has been set, turn off the end of
cooking alarm by pressing either
or button.
Pressing the button will cancel the
alarm and turn the light on.
10
:
10
PRESS TO START COOKING
SAVED TO FAVOURITES
10
:
10
190 01
:
59
FUNCTION
TEMP. ˚C
ACTUAL TEMP
189
TIMER
10
:
10
190 00
:
00
FUNCTIONTEMP. ˚C TIMER
COOKING
FINISHED
30
Instruction manual CMS260
Please keep this instruction manual for future reference
MULTI-STAGE COOKING
1. Press to turn the appliance on.
2. Select desired Function, Temperature/Power, Steam+ (if required).
Then press
NOTE:
Microwave and Microwave Combi Functions
cannot be used for Multi-Stage cooking. If one
of these Functions is selected when adding
an Additional Cooking stage, ‘MICROWAVE
FUNCTIONS ARE NOT AVAILABLE FOR
MULTI-STAGE COOKING’ message will appear.
3. Select a Cooking Duration.
To add additional cooking
stages press
4. Select desired Function, Temperature/Power,
Steam+ (if required).
Then press
10
:
10
FUNCTION TEMP. ˚C
STEAM
+
195
190
185
10
:
10
FUNCTION TEMP. ˚C
STEAM
+
205
200
195
ADD
10
:
10
DURATION END TIME
0
1
2
3
4
58
59
00
01
02
16
17
18
19
20
28
29
30
0
1
ADDITIONAL
COOKING STAGE
OR FINISHADD
MICROWAVE FUNCTIONS ARE NOT AVAILABLE
FOR MULTI-STAGE COOKING
CLOSE
31Instruction manual CMS260Please keep this instruction manual for future reference
NOTE:
If is pressed before a 2nd stage timer has
been selected, ‘PLEASE SELECT COOKING
TIME’ message will appear.
Select a cooking Duration and/or End Time
to continue.
5. Select 2nd cooking stage Duration.
Further Cooking Stages (maximum of 4
in total) can be added by repeating
the process.
Press to go to overview screen.
6. Review selection, press to
change selection.
Press to begin cooking without saving
or press to store in the
favourite’s menu.
NOTE: If you press on multi-stage
cooking, the timer will reset. Press
to reset time before proceeding.
7. Name your selection, press and
then press to store to favourites.
NOTE:
Selection names are limited to
14 characters.
PLEASE SELECT
COOKING TIME
CLOSE
10
:
10
COOKING STAGES
PRESS
STAGE FUNCTION TEMP. DURATION END TIME
1
190˚ 02.00
hr/min
00.20hr/min
18.30
EDIT
SAVE
TO START COOKING
2
200
˚
18.50
EDIT
ADJ. END TIME
FINISH
EDIT
SAVE
SAVE
ADD
EDIT
DURATION END TIME
58
59
0
1
2
18
19
20
21
22
16
17
18
19
20
48
49
50
51
52
OR FINISHADD
10
:
10
COOKING STAGE 2
10
:
10
ROASTED VEG.
LEMON DRIZZLE
BEEF CASSEROLE
CRISPY CHICKEN
PIZZA
DRIED BANANAS
SAVE
SAVED FAVOURITES
-
EDIT

32
Instruction manual CMS260
Please keep this instruction manual for future reference
8. Press to begin cooking.
9. Cooking will begin and the main cooking
screen will display.
10
:
10
PRESS TO START COOKING
SAVED TO FAVOURITES
33Instruction manual CMS260Please keep this instruction manual for future reference
EDITING STAGES BEFORE COOKING
1. To Edit a cooking stage before
cooking has begun, press next
to the relevant stage on the Cooking
Review screen.
2. The Cooking Selection Screen will
appear for the chosen cooking stage.
Make the necessary amends and then
press to continue.
NOTE:
When multi-stage cooking, pressing
will reset the timer for that cooking stage.
If is pressed before a timer has
been selected, ‘PLEASE SELECT
COOKING TIME’ message will appear.
Press , select a cooking duration
and/or End Time to continue.
EDIT
10
:
10
FUNCTION TEMP. ˚C
STEAM
+
205
200
195
EDIT
PLEASE SELECT
COOKING TIME
CLOSE
10
:
10
COOKING STAGES
PRESS
STAGE FUNCTION TEMP. DURATION END TIME
1
190˚ 02.00
hr/min
00.20hr/min
18.30
EDIT
SAVE
TO START COOKING
2
200
˚
18.50
EDIT
ADJ. END TIME

34
Instruction manual CMS260
Please keep this instruction manual for future reference
If you no longer want to Edit the selected
cooking stage press the button.
‘WOULD YOU LIKE TO CONTINUE
EDITING OR REVIEW COOKING’
message with appear.
Press to return to the cooking
review screen.
Press to continue editing.
NOTE:
Please refer to bottom of page 42 for more
information on Adjusting the End Time
before cooking.
EDIT
REVIEW
WOULD YOU LIKE TO CONTINUE
EDITING OR REVIEW COOKING?
EDIT REVIEW
CANCELLING STAGES BEFORE COOKING
To Cancel your cooking stage(s) before
cooking has begun, press the button
when in the Cooking Review screen.
The Homescreen will appear and any
previous cooking stage(s) will have
been cancelled.
NOTE:
During multi-stage cooking, all cooking
stages will be cancelled.
10
:
10
COOKING STAGES
PRESS
STAGE FUNCTION TEMP. DURATION END TIME
1
190˚ 02.00
hr/min
00.20hr/min
18.30
EDIT
SAVE
TO START COOKING
2
200
˚
18.50
EDIT
ADJ. END TIME

35Instruction manual CMS260Please keep this instruction manual for future reference
AUTOMATIC COOKING
After selecting a Cooking Duration, you can adjust the End Time so that your cooking
automatically starts later in the day.
Oven Start Time = End Time – Duration
For example: If you select a Duration of 2 hours
and an End Time of 6:30pm, your cooking
Start Time will be 4:30pm.
After selecting desired cooking Duration and
End Time, press to begin cooking. The
standby screen will appear with
‘COOKING WILL START AT…’ message.
At the Start Time, the oven will automatically
turn on and begin cooking.
NOTE:
To set automatic cooking for multi-stage cooking, do not adjust the end times in the timer
section. Use the button in the review screen, as this will edit the end time of all
cooking stages.
NOTE:
An End Time cannot be set for the Microwave only Function and Microwave with
Steam Function.
3rd Feb
COOKING WILL START AT 11.00 AM
10
:
10
DURATION END TIME
0
1
2
3
4
58
59
0
1
2
16
17
18
19
20
28
29
30
0
1
ADDITIONAL
COOKING STAGE
OR FINISHADD
ADJ. END TIME
36
Instruction manual CMS260
Please keep this instruction manual for future reference
END TIME ERROR:
ADJUST END TIME SO THAT IT IS EQUAL TO
OR GREATER THAN ‘CURRENT TIME + DURATION TIME”
CLOSE
END TIME ERROR
If an End Time is selected that is sooner than the
‘Current Time + Duration Time’, an Error
message will display.
For example: If the current time is 10:10am, you
select a Duration of 2 hours and an End Time
12:00pm, the Error message will appear.
I.E. 10:10 + 02:00 = 12:10
Adjust the end time accordingly, so ‘IT
IS EQUAL TO OR GREATER THAN THE
CURRENT TIME + DURATION TIME’
to proceed.
10
:
10
DURATION END TIME
0
1
2
3
4
58
59
0
1
2
16
17
18
19
20
28
29
30
0
1
ADDITIONAL
COOKING STAGE
OR FINISHADD
AUTO-TIME
If no Timer is set, when you press to begin
cooking, the Timer will count up from 00:00, so
you can see how long you have been cooking.
NOTE:
Auto-Time excludes all Microwave
cooking functions.
10
:
10
00
:
01
TIMER
180
FUNCTION
TEMP. ˚C
ACTUAL TEMP
177
37Instruction manual CMS260Please keep this instruction manual for future reference
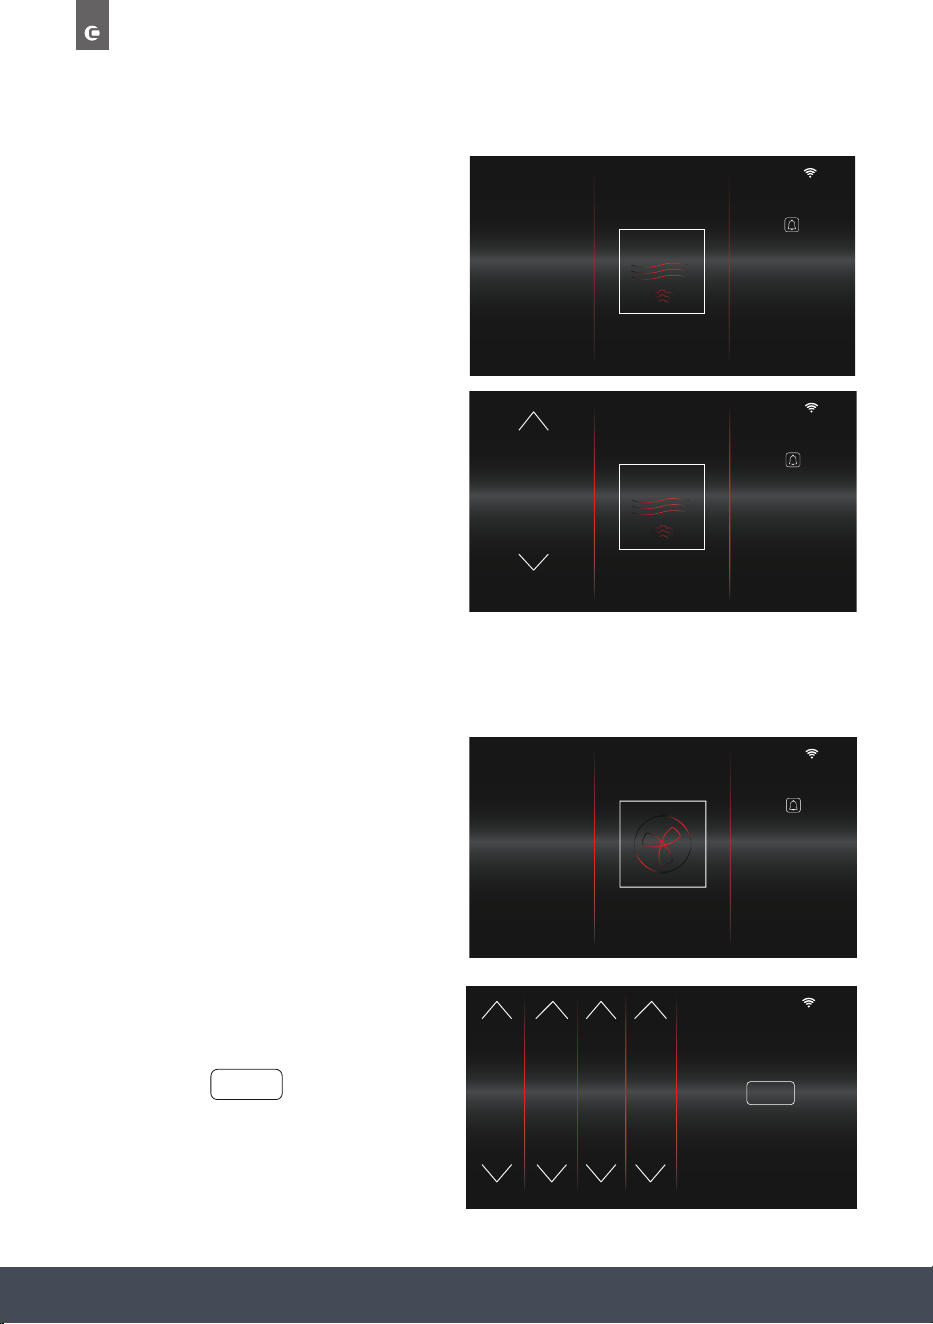
ADJUSTING COOKING TEMPERATURE, POWER AND TIMER
DURING COOKING
It is simple to make adjustments to the Cooking Temperature, Power and Timer from the main
cooking screen.
ADJUST TEMPERATURE
Touch the Temperature (‘180’) to adjust.
The left column appears as shown to
allow adjustment.
Once the new temperature is selected, wait 3
seconds for it to conrm. Once conrmed it
will return to the normal cooking screen and
display the new temperature.
10
:
10
01
:
49
FUNCTION
TIMER
TEMP. ˚C
185
180
175
10
:
10
180 01
:
49
FUNCTION
TEMP. ˚C
ACTUAL TEMP
177
TIMER
38
Instruction manual CMS260
Please keep this instruction manual for future reference
ADJUST TIMER
Touch the Timer Display (’01:49’) to amend
cooking time.
The Time Adjustment screen will appear.
Use controls to adjust the Duration and End
Time, then press to return to Main
Cooking Screen.
FINISH
10
:
10
DURATION END TIME
0
1
2
3
4
58
59
0
1
2
16
17
18
19
20
28
29
30
0
1
EDIT COOKING TIME
FINISH
01
:
49
10
:
10
180 01
:
49
FUNCTION
TEMP. ˚C
ACTUAL TEMP
177
TIMER
ADJUST POWER
Touch the Power (70) to adjust.
The left column appears as shown to allow
adjustment.
Once the power is chosen, touch the power
again to conrm. This will then return to the
Main Cooking Screen.
10
:
10
00
:
30
FUNCTIONPOWER % TIMER
60
10
:
10
00
:
30
FUNCTION TIMER
POWER %
10
60
50
39Instruction manual CMS260Please keep this instruction manual for future reference
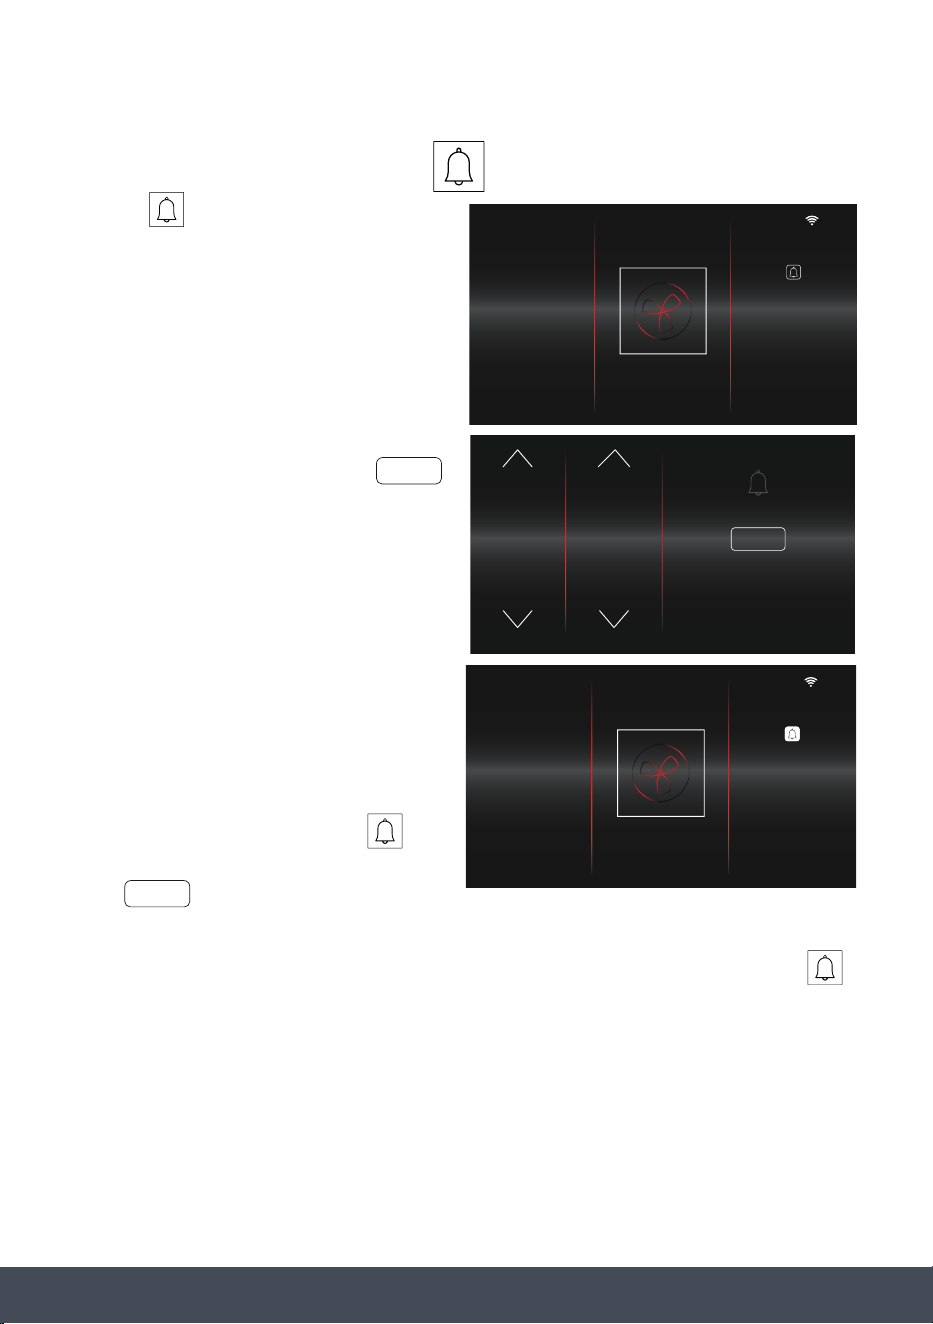
The Minute Minder Symbol will now appear
white. Press the Minute Minder symbol again
to view the time remaining before the audible
alarm sounds.
NOTE:
To cancel the Minute Minder, press ,
reduce the Duration to 00:00, then
press .
When the alarm sounds, the Minute Minder symbol will ash. To turn the alarm off, press
10
:
10
180 01
:
49
FUNCTION
TEMP. ˚C
ACTUAL TEMP
177
TIMER
SELECT
SETTING THE MINUTE MINDER
Pressing on the main cooking screen
takes you to the Minute Minder screen. Here
you can set an alarm separate to the timer,
to sound after a pre-set duration.
Use the controls to set the Minute Minder
for your desired duration, then press .
If no adjustments are made, the main cooking
screen will display after 3 seconds.
SELECT
DURATION
28
29
30
31
32
58
59
0
1
2
MINUTE MINDER
TIME REMAINING
SELECT
01
:
50
10
:
10
180 01
:
49
FUNCTION
TEMP. ˚C
ACTUAL TEMP
177
TIMER
40
Instruction manual CMS260
Please keep this instruction manual for future reference
ADJUSTING MICROWAVE POWER
For adjusting Microwave Power for Combi-Microwave functions before cooking.
Select a Combi Microwave function from
the function selection screen
and press
Select a power level and press
If necessary, select Duration, add addition
Cooking Stages and/or save to Favourites.
Press to start cooking.
Main cooking screen displays set Power
underneath set Temperature.
10
:
10
FUNCTION
STEAM
+
TEMP. ˚C
205
195
200
10
:
10
POWER %
60
50
40
ADJUST MICROWAVE POWER LEVEL
FINISH
10
:
10
00
:
59
FUNCTIONTEMP. ˚C TIMER
200
ACTUAL TEMP
187
P50%
10
:
10
FUNCTION
STEAM
+
TEMP. ˚C
205
195
200
FINISH

41Instruction manual CMS260Please keep this instruction manual for future reference
RESIDUAL HEAT
When cooking has completed, the oven’s
RESIDUAL HEAT will display on the
Standby screen.
If you decide to make a new cooking
selection and the Residual Temperature is
greater than the Set Temperature,
‘WARNING! Residual temperature is
higher than set temperature’
message will appear.
Press to remove the warning and
proceed with cooking. You will still be able
to proceed with your chosen temperature,
this is just to warn you that the high residual
temperature may effect your cooking results.
6th Mar
RESIDUAL HEAT 290˚C
WARNING!
Residual temperature is higher
than set temperature
CLOSE
CLOSE
42
Instruction manual CMS260
Please keep this instruction manual for future reference
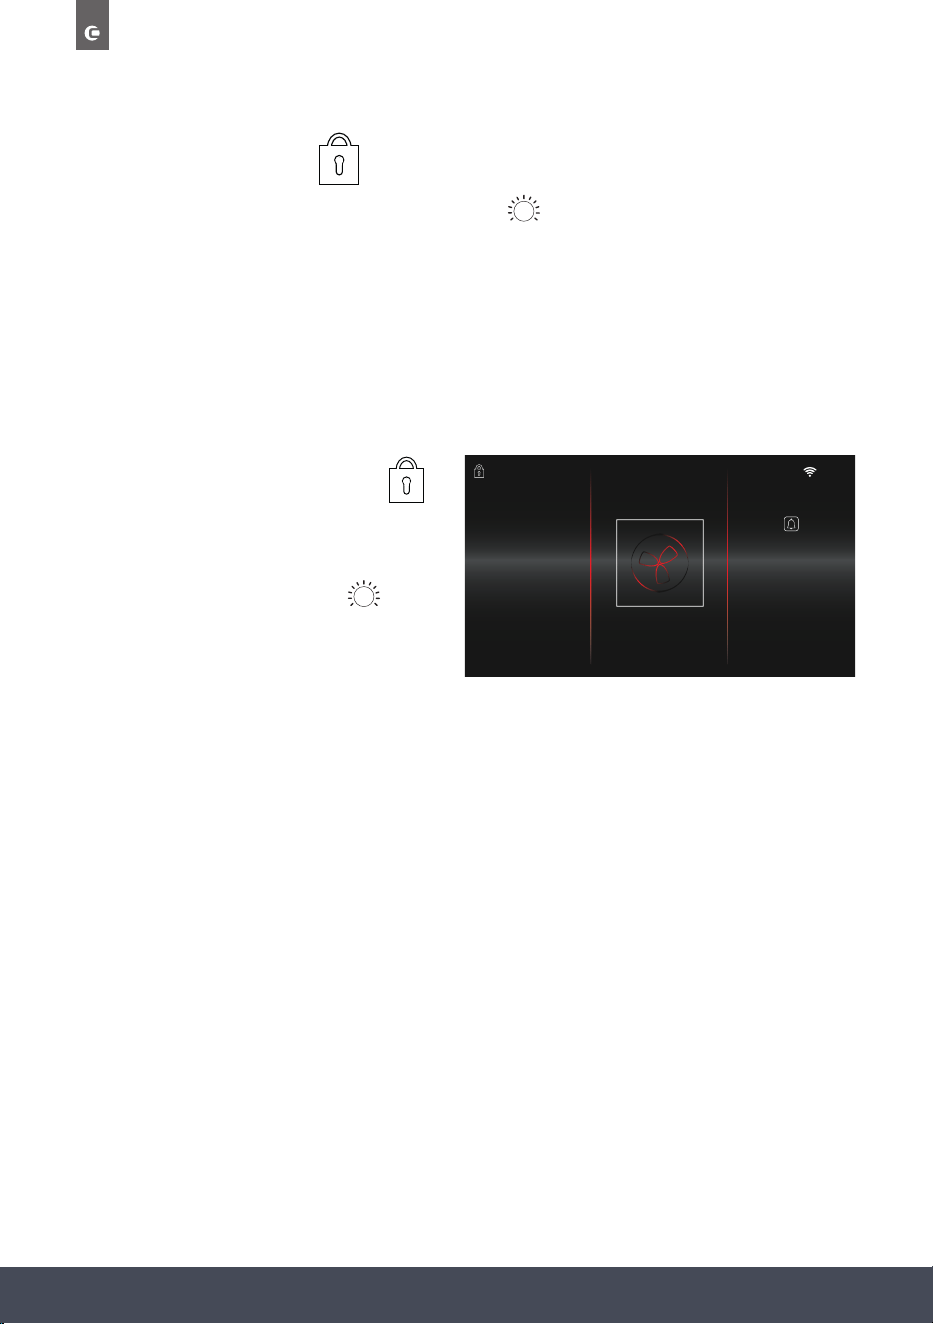
CHILD SAFETY LOCK
To activate the Child Safety Lock, press and hold the button for 3 seconds.
COOKING: When the Child Safety Lock is turned ON during cooking, both the touch screen
display and control panel (ON/OFF, LIGHT, BACK, START/PAUSE buttons) will
be disabled.
NOT COOKING: When the Child Safety Lock is turned ON when you are not cooking, only the
control panel (ON/OFF, LIGHT, BACK, START/PAUSE buttons) will be disabled.
When the lock is activated the symbol
will appear in the top left corner of the
display screen.
To deactivate, press and hold the button
for 3 seconds.
10
:
10
180 01
:
49
FUNCTION
TEMP. ˚C
ACTUAL TEMP
177
TIMER
43Instruction manual CMS260Please keep this instruction manual for future reference
STEAM +
STEAM+
If STEAM+ is available, you can select this
option to inject steam at preset points
during cooking.
Each steam injection lasts for 60 seconds.
Select relevant function and press
Steam can be injected at up to 4
preset points.
Press the STAGE buttons in the left column
to activate. Set the timings as desired
and press to return to the
Home Screen.
When activated, ‘+’ will appear next to the
function on the Cooking Stages Screen.
The symbol will also appear
above the function symbol on the cooking
overview screen.
NOTE:
Only available on certain functions
(see ‘FUNCTIONS’).
Before selecting the STEAM+ function,
ensure the water tank has been lled.
STEAM +
10
:
10
FUNCTION TEMP. ˚C
STEAM
+
195
190
185
10
:
10
STEAM INJECTION PRESETS
STAGE TIME
00.10
00.20
00.30
00.40
1st
2nd
3rd
4th
FINISH
HOURS MINS.
9
10
0
1
2
8
9
10
11
12
10
:
10
190 00
:
06
FUNCTION
TEMP. ˚C TIMER
ACTUAL TEMP
177
STEAM
+
10
:
10
COOKING STAGES
PRESS
STAGE FUNCTION TEMP. DURATION END TIME
1
190˚ 18.30
EDIT
SAVE
TO START COOKING
2
210
˚
18.40
EDIT
+
01.00hr/min
00.10hr/min
ADJ. END TIME
FINISH
STEAM +

44
Instruction manual CMS260
Please keep this instruction manual for future reference
NOTE:
When using the STEAM+ feature, the End
Time must be later than the last STEAM+
stage. If not, an END TIME ERROR message
will display.
Adjust the end time accordingly, so ‘IT IS
AT LEAST 1 MINUTE LATER THAN THE LAST
STEAM+ STAGE’ to proceed.
END TIME ERROR:
END TIME MUST BE AT LEAST 1 MINUTE
LATER THAN THE LAST STEAM+ STAGE
CLOSE
45Instruction manual CMS260Please keep this instruction manual for future reference
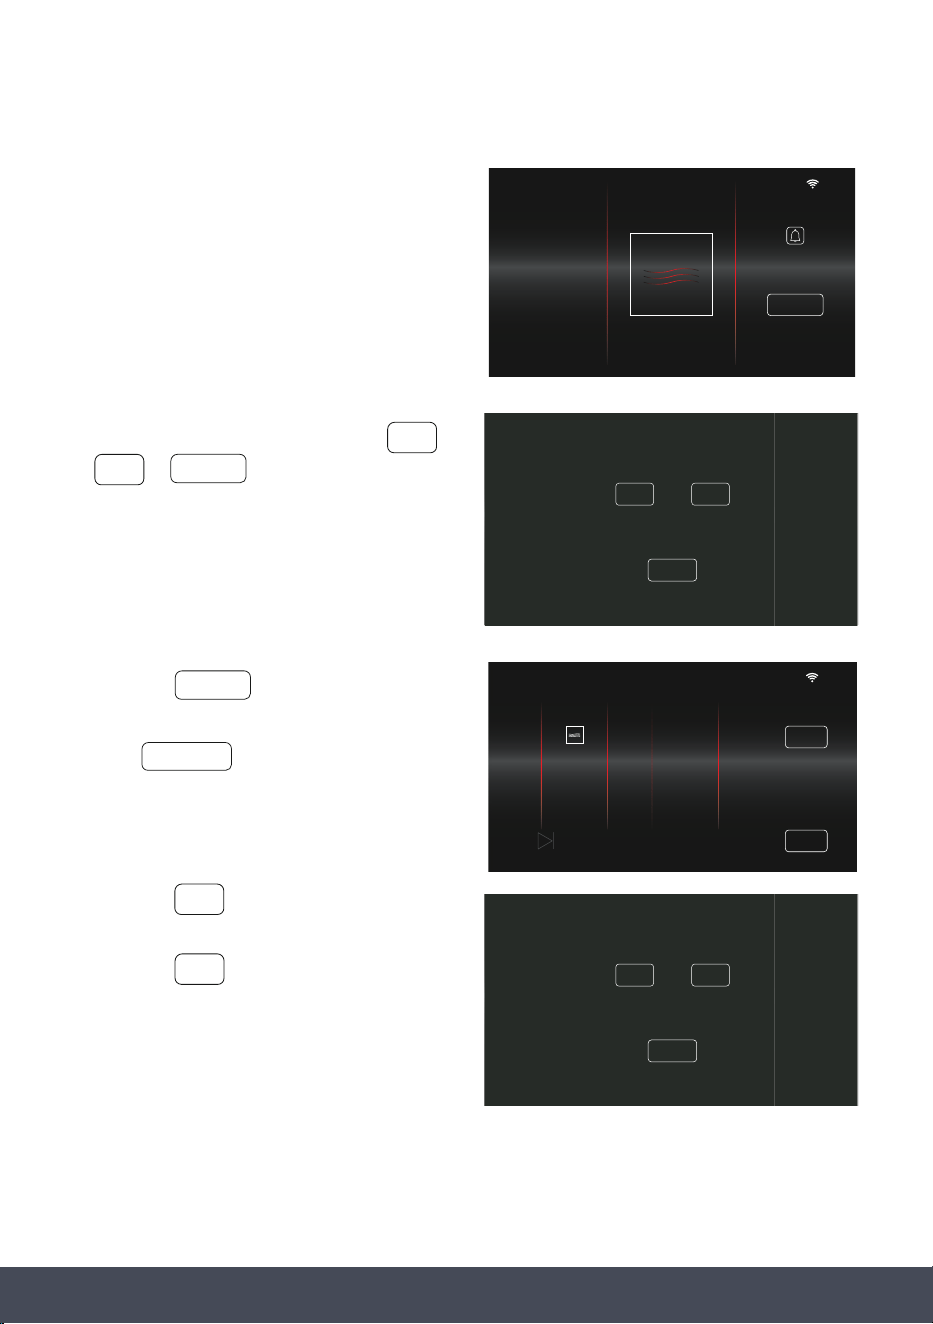
FAVOURITES
› To view your saved favourites, press
on the Function Selection Screen.
› Choose from your favourites:
Press to view relevant cooking
stages, edit stages if necessary and
begin cooking.
Press to remove a saved favourite.
› To conrm deletion, press
› To cancel and return to previous
screen, press
› When a favourite cooking programme has
been selected, the end time will reset based
on the current time.
› To start cooking later in the day press
10
:
10
FUNCTION POWER %
STEAM
+
90
100
10
DELETE
10
:
10
SUNDAY ROAST CHICKEN
ARE YOU SURE YOU WANT TO DELETE?
YES
NO
SELECT
NO
YES
10
:
10
Roasted Veg.
Lemon Drizzle
Sunday Roast Chicken
Beef Casserole
Crispy Chicken
SELECT
DELETE
SAVED FAVOURITES
ADJ. END TIME
10
:
10
COOKING STAGES
PRESS
STAGE FUNCTION TEMP. DURATION END TIME
1
190˚ 2.00
hr/min
0.20hr/min
18.00
EDIT
SAVE
TO START COOKING
2
200
˚
18.20
EDIT
ADJ. END TIME
46
Instruction manual CMS260
Please keep this instruction manual for future reference
› Adjust the End Time and press
SELECT
HOUR MIN
18
19
20
21
22
16
17
18
19
20
END TIME
SELECT
18
:
20
HOUR MIN
18
19
20
21
22
16
17
18
19
20
END TIME
SELECT
18
:
20
› The Cooking Review Screen will now show
the new End Time.
› Edit or Save cooking selection if necessary,
then press to begin cooking.
NOTE:
If an End Time is selected that is sooner than
the ‘Current Time + Duration Time’, the
END TIME ERROR message will display.
Adjust the end time accordingly, so ‘IT
IS EQUAL TO OR GREATER THAN THE
CURRENT TIME + DURATION TIME’ to
proceed.
END TIME ERROR:
ADJUST END TIME SO THAT IT IS EQUAL TO
OR GREATER THAN ‘CURRENT TIME + DURATION TIME”
CLOSE
10
:
10
COOKING STAGES
PRESS
STAGE FUNCTION TEMP. DURATION END TIME
1
190˚ 2.00
hr/min
0.20hr/min
18.00
EDIT
SAVE
TO START COOKING
2
200
˚
18.20
EDIT
ADJ. END TIME
47Instruction manual CMS260Please keep this instruction manual for future reference
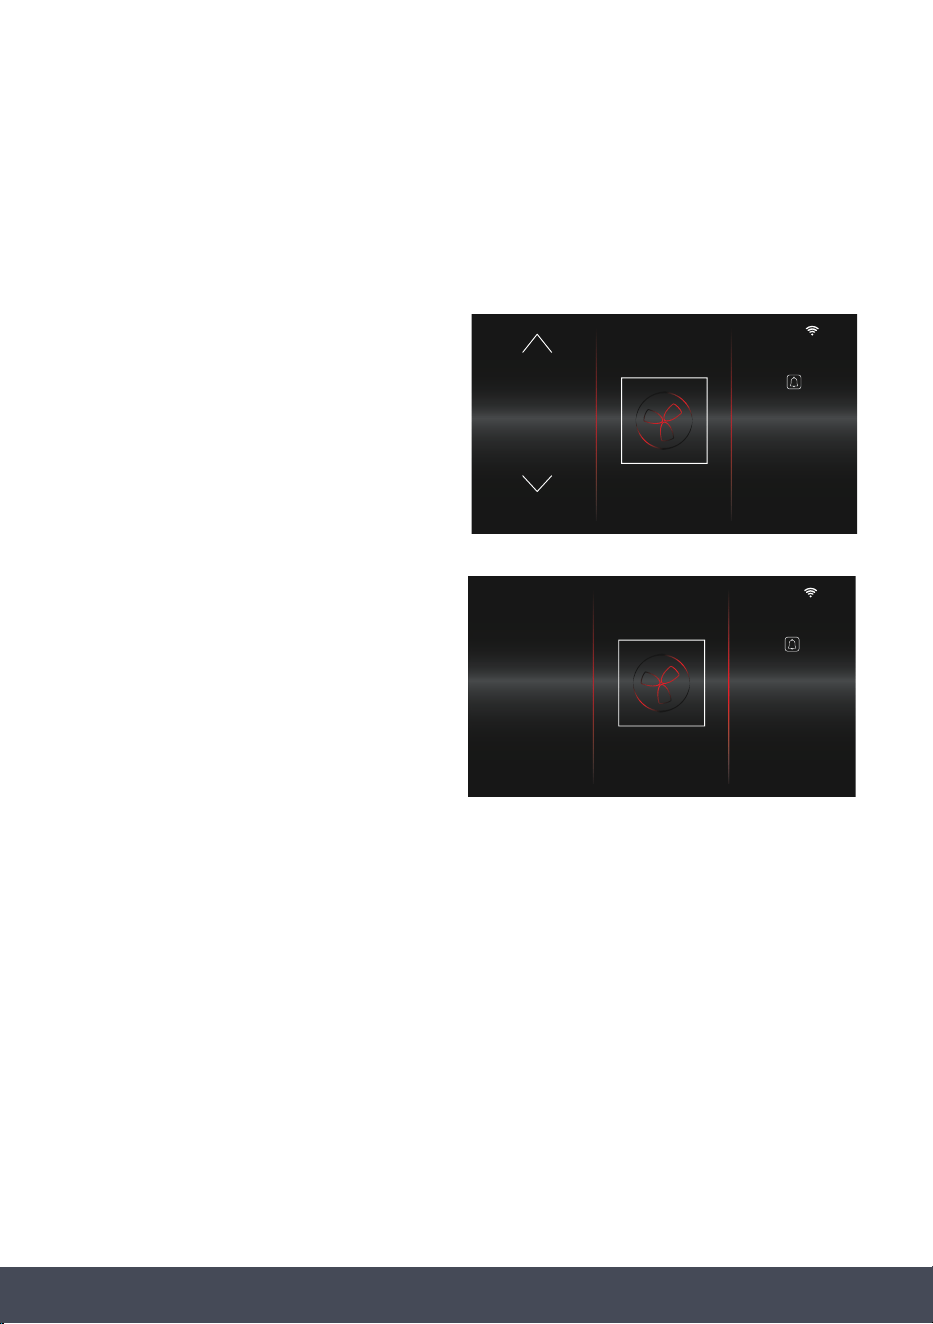
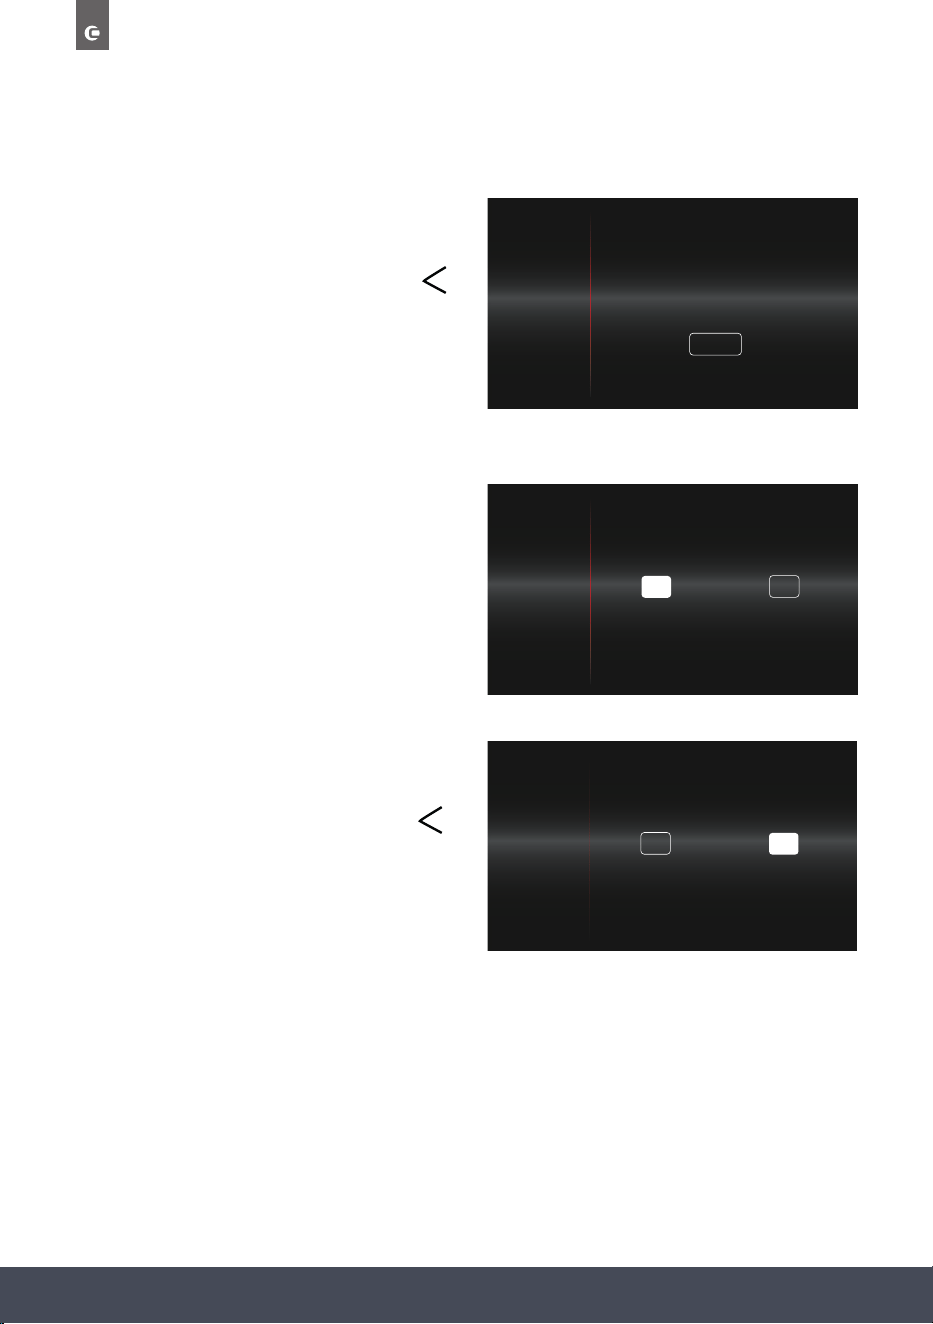
REVIEW AND CANCEL COOKING
To review and/or cancel your selection after
cooking has begun, press the button.
› From here, proceed to select either
› Selecting will display the cooking
stages screen.
Press to resume cooking.
› Selecting will end cooking and display
the home screen.
› Selecting will return to the main
cooking screen.
UTTON:
<
CANCEL COOKING
REVIEW COOKING
YESOR
REVIEW
NO
CANCEL COOKING
REVIEW COOKING
YESOR
REVIEW
NO
or
CONTINUE
REVIEW
YES
NO
YES
NO
REVIEW
18
:
30
100 3
:
29
FUNCTIONPOWER % TIMER
+30 SECS
10
:
10
COOKING STAGES
PRESS
STAGE FUNCTION TEMP. DURATION END TIME
1
3.30
min/sec100% --:--
EDIT
SAVE
TO START COOKING
48
Instruction manual CMS260
Please keep this instruction manual for future reference
PAUSE COOKING
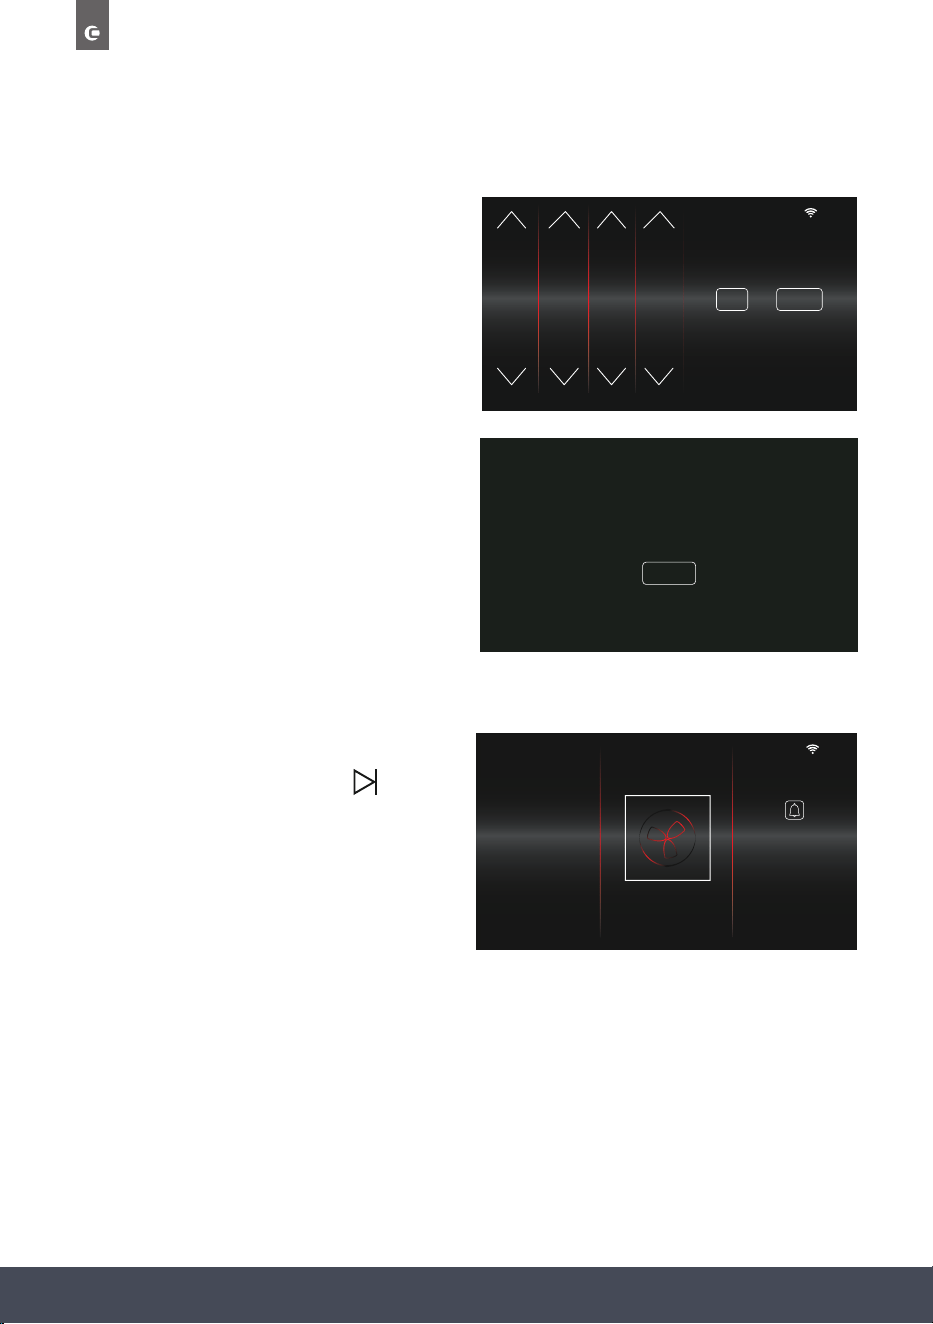
To pause cooking press the button.
‘COOKING PAUSED…’ message will display.
Press to continue cooking.
NOTE:
Pause will only work when one cooking stage has
been set.
If the button is selected during
Multi-Stage Cooking,
‘PAUSE FUNCTION NOT AVAILABLE…’
message will display.
Press to return to the main cooking screen.
18
:
30
100 3
:
29
FUNCTIONPOWER % TIMER
+30 SECS
COOKING PAUSED
PRESSTO CONTINUE COOKING
PAUSE FUNCTION NOT AVAILABLE
DURING MULT I-STAGE COOKING
CLOSE
CLOSE
NOTE:
When cooking is paused, the will not work. If you would like to cancel cooking, press
to resume cooking, and then press the button to cancel cooking.

49Instruction manual CMS260Please keep this instruction manual for future reference
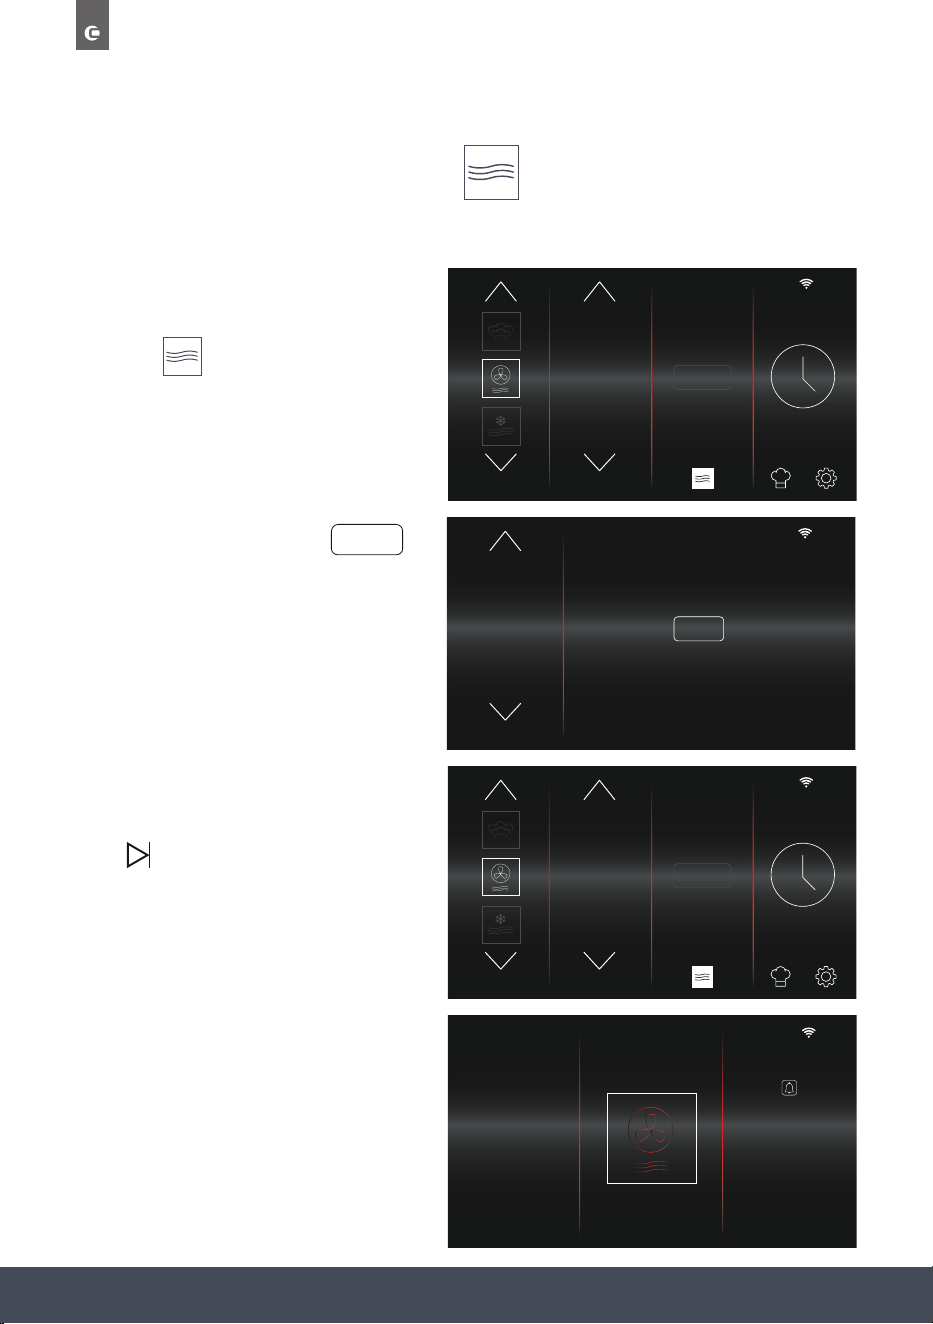
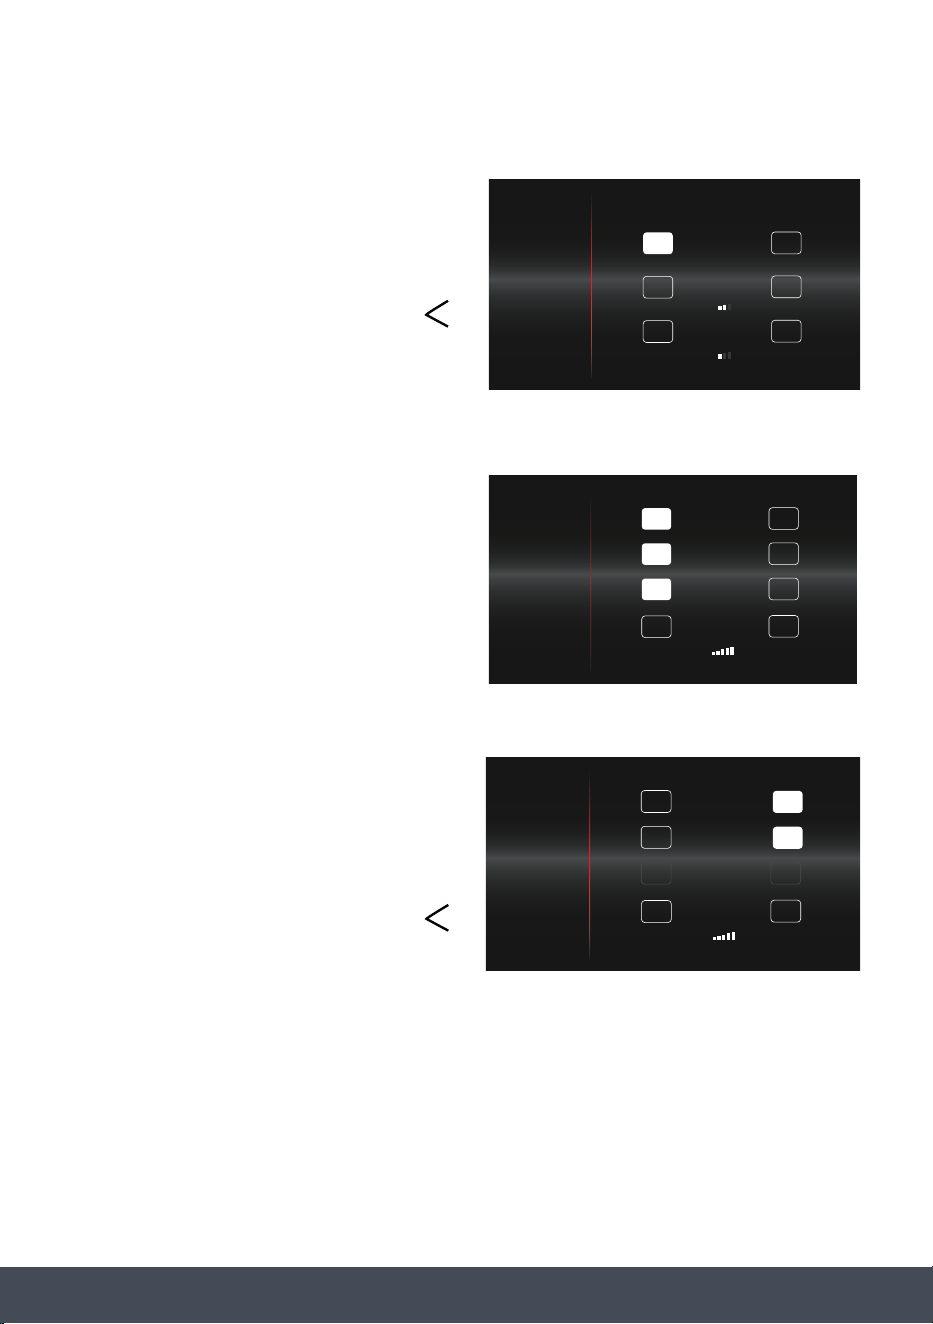
SETTINGS MENU
The settings menu is accessed by pressing
the symbol on the home screen.
From here you will be able to customise the
following options for your oven:
10
:
10
FUNCTION POWER %
STEAM
+
90
100
10
SENSE PREMIUM
TIME & DATE
SOUND
DISPLAY
SERVICE
DEMO MODE
CONNECTIVITY

50
Instruction manual CMS260
Please keep this instruction manual for future reference
TIME AND DATE
Adjust the Time using the controls before
pressing
Press underneath Analogue or Digital.
If Digital is selected, choose either a 24- or 12-
hour clock, by pressing underneath your
desired option.
Adjust Date using the controls before
pressing to return to the
Settings Menu.
Press the button to return to the
home screen.
SET TIME
FINISH
SELECT
SELECT
10
:
10
TIME & DATE
SOUND
DISPLAY
SERVICE
DEMO MODE
CONNECTIVITY
SET TIME
12
13
14
15
16
8
9
10
11
12
10
10
:
10
SELECT SELECT
10 :10
ANALOGUE DIGITAL
TIME & DATE
SOUND
DISPLAY
SERVICE
DEMO MODE
CONNECTIVITY
10
10
:
10
SELECT
SELECT
10 :1022:10
24 HOUR 12 HOUR
TIME & DATE
SOUND
DISPLAY
SERVICE
DEMO MODE
CONNECTIVITY
10
:
10
FINISH
1
2
3
4
5
DEC
JAN
FEB
MAR
APR
2019
2020
2021
2022
2023
TIME & DATE
SOUND
DISPLAY
SERVICE
DEMO MODE
CONNECTIVITY
51Instruction manual CMS260Please keep this instruction manual for future reference
SOUND
Set Key Tone, Key Volume and Alarm
Volume levels.
After making your adjustments, select a different
setting option from the menu or press the
button to return to the home screen.
DISPLAY
Choose whether to display Date and Time as
well as adjust the screen brightness.
If ON is selected for ‘Display Date’ or
‘Display Time’, the Night Mode option becomes
available.
If OFF is selected, then this option will
be unavailable.
Night mode is an Energy Saving option where
between the hours of 11pm and 6am, the
brightness of the display is reduced to
the minimum.
After making your adjustments, select a different
setting option from the menu or press the
button to return to the home screen.
10
:
10
OFF
KEY TONE
_
+KEY VOLUME
_
+ALARM VOLUME
ON
TIME & DATE
SOUND
DISPLAY
SERVICE
DEMO MODE
CONNECTIVITY
10
:
10
OFF
DISPLAY DATE
_
+
BRIGHTNESS
ON
OFF
NIGHT MODEON
OFF
DISPLAY TIMEON
TIME & DATE
SOUND
DISPLAY
SERVICE
DEMO MODE
CONNECTIVITY
10
:
10
ON
ON
DISPLAY DATE
_
+BRIGHTNESS
OFF
NIGHT MODE
ON
DISPLAY TIME OFF
OFF
TIME & DATE
SOUND
DISPLAY
SERVICE
DEMO MODE
CONNECTIVITY
52
Instruction manual CMS260
Please keep this instruction manual for future reference
SERVICE
View Error codes and reset the appliance.
After making your adjustments, select a different
setting option from the menu or press the
button to return to the home screen.
DEMO MODE
In Demo Mode, the normal operation of the
cooling fan, circulation fan and lighting work
normally, however all heating elements and other
functions are disabled.
If the oven is turned off, it will remain in Demo
Mode when the oven is turned back on.
When Demo Mode is turned on ‘DEMO’ is shown
at the top of all screens.
After making your adjustments, select a different
setting option from the menu or press the
button to return to the home screen.
10
:
10
SERVICE LOG
HOLD FOR 3 SECONDS
CODE: 101
30/1/19
RESET
TIME & DATE
SOUND
DISPLAY
SERVICE
DEMO MODE
CONNECTIVITY
10
:
10DEMO
OFF
DEMO MODEON
TIME & DATE
SOUND
DISPLAY
SERVICE
DEMO MODE
CONNECTIVITY
10
:
10
ON
DEMO MODE OFF
TIME & DATE
SOUND
DISPLAY
SERVICE
DEMO MODE
CONNECTIVITY
53Instruction manual CMS260Please keep this instruction manual for future reference
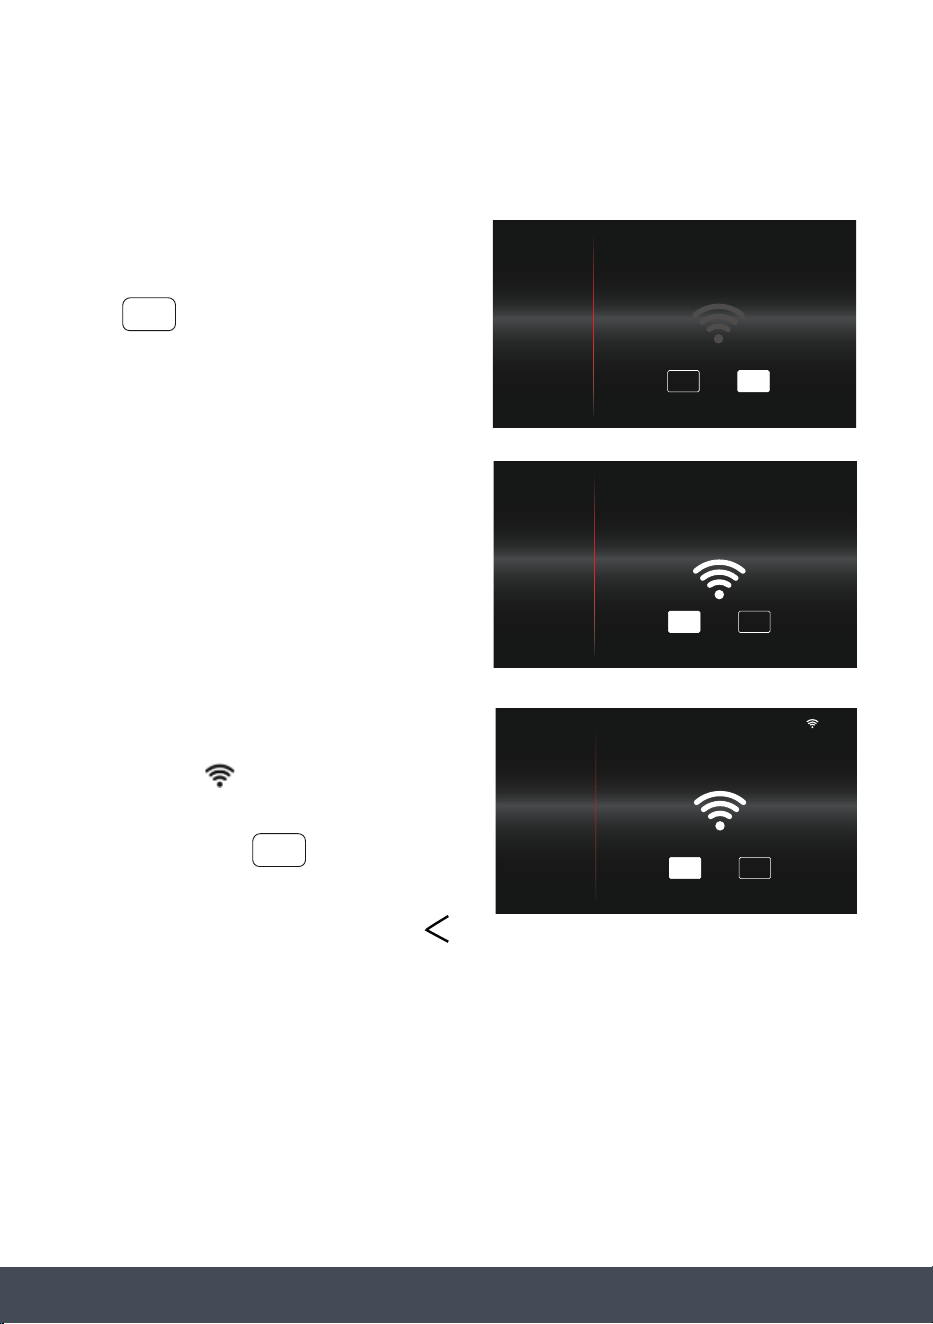
CONNECTIVITY
NOTE:
Download the CapleHome App to your mobile
device/tablet, prior to connection setup.
Press to enable WIFI.
Follow the on-screen prompt to open the
CapleHome App and follow instructions on your
device to connect to WIFI.
Once the appliance is connected to your mobile
device/tablet, ‘connected to…’ message will
display and the symbol will appear in the top
right corner next to the time.
To disable WIFI press
After making your adjustments, select a different
setting option from the menu or press the
button to return to the home screen.
NOTE:
By connecting the appliance to the Caple Home App, you are allowing the appliance to be
controlled by the App.
WiFi frequency: 2.4Ghz
10
:
10
ON OFF
TIME & DATE
SOUND
DISPLAY
SERVICE
DEMO MODE
CONNECTIVITY
ON
e s
OFF
10
:
10
OFF
SSID: CapleHome-XXXX
KEY: See rating label or user manual
OPEN APP AND FOLLOW INSTRUCTIONS
TO CONNECT TO WIFI
ON
TIME & DATE
SOUND
DISPLAY
SERVICE
DEMO MODE
CONNECTIVITY
10
:
10
TIME & DATE
SOUND
DISPLAY
SERVICE
DEMO MODE
CONNECTIVITY
OFF
CONNECTED TO CAPLEHOME-XXXX
ON
54
Instruction manual CMS260
Please keep this instruction manual for future reference
APPLIANCE FUNCTIONS
MICROWAVE
Standard microwave cooking function. Ideal for
reheating leftovers.
FAN HEAT
Both the fan and circular heating element operate
together for the most even air distribution. This is the
ideal cooking method for several types of food (meat &
sh, pastries etc.).
GRILL
Full width grill, for even and consistent grilling of dishes
such as large pieces of meat and sh.
TURBO GRILL
The heat which is produced by the top element and grill
is circulated by the fan for faster and more even cooking.
Perfect for quick browning foods such as potato gratin
or lasagne.
MICROWAVE &
FAN HEAT
Microwave and fan heat element reduces cooking times
with the addition of even cooking. Perfect for cooking
uffy jacket potatoes in a quarter of the time.
MICROWAVE &
TURBO GRILL
Uses microwave, fan and grill for quick browning. Ideal
for cooking meat and keeping all the juices.
STEAM
One of the healthiest cooking methods retains moisture
and locks in nutrients. Perfect for cooking multiple food
types on one way tray with no transfer of avours. Its
low cooking temperatures are ideal for reheating foods.
TURBO GRILL
WITH STEAM
A combination of the Turbo Grill function with added
Steam to help preserve moisture and avours in food.
GRILL WITH
STEAM
Both the top heating element and grill element operate
together to grill larger quantities of food. Combined with
Steam to help preserve moisture and avours in food.
STEAM +
STEAM +
STEAM +
55Instruction manual CMS260Please keep this instruction manual for future reference
FAN HEAT
WITH STEAM
Uses normal fan heat for even heat distribution with the
added benet of the steam injecting moisture into the
cavity. Perfect for retaining moisture in meat.
MICROWAVE
WITH STEAM
Microwave and Steam elements operate alternatively to
cook your food quickly and healthily. Ideal for reheating
food without drying it out.
DEFROST
Microwave function works at reduced power to carefully
defrost food.
DESCALING
This function is used for descaling the water system.
Ideal for prolonging the life of your oven.
DESCALE
56
Instruction manual CMS260
Please keep this instruction manual for future reference
SPECIAL FUNCTIONS
MICROWAVE
Microwave Function has a default power setting
of P100. If necessary, choose a cooking Duration
and/or save to favourites.
Press to start cooking.
NOTE:
Microwave Function uses minutes and seconds
instead of hours and minutes.
MICROWAVE AND FAN HEAT
Microwave and Fan Heat Function has a default temperature of 200°C and default power
of P50.
› Turn on the oven by pressing the button.
› Select from the Function
Selection screen.
› Press to adjust power level.
› If necessary, choose a cooking Duration and/or
save to favourites.
› Press to start cooking.
10
:
10
FUNCTION POWER %
STEAM
+
90
100
10
10
:
10
FUNCTION TEMP. ˚C
205
195
200
STEAM
+
57Instruction manual CMS260Please keep this instruction manual for future reference
STEAM
Steam Function has a default temperature of
100°C and default duration of 20 minutes.
› Turn on the oven by pressing the button.
› Select from the Function
Selection screen.
› If necessary, select a cooking Temperature
and Duration and/or save to favourites.
Pressing takes you to the
PREHEATING screen. A 5 minute countdown will
begin to achieve the desired temperature.
NOTE:
Preheating will only happen during single
stage cooking.
When the 5 minute countdown reaches ‘00:00’,
the main cooking screen will display and the
cooking sequence will begin.
10
:
10
FUNCTION TEMP. ˚C
10
90
100
STEAM
+
10
:
10
00
:
05
FUNCTIONTEMP. °C TIMER
PREHEATING
10
:
10
00
:
30
FUNCTIONTEMP. ˚C TIMER
100
ACTUAL TEMP
88

58
Instruction manual CMS260
Please keep this instruction manual for future reference
‘Rell water tank’ warning message will
appear when the water tank level is too low.
REFILL WATER TANK
CLOSE

59Instruction manual CMS260Please keep this instruction manual for future reference
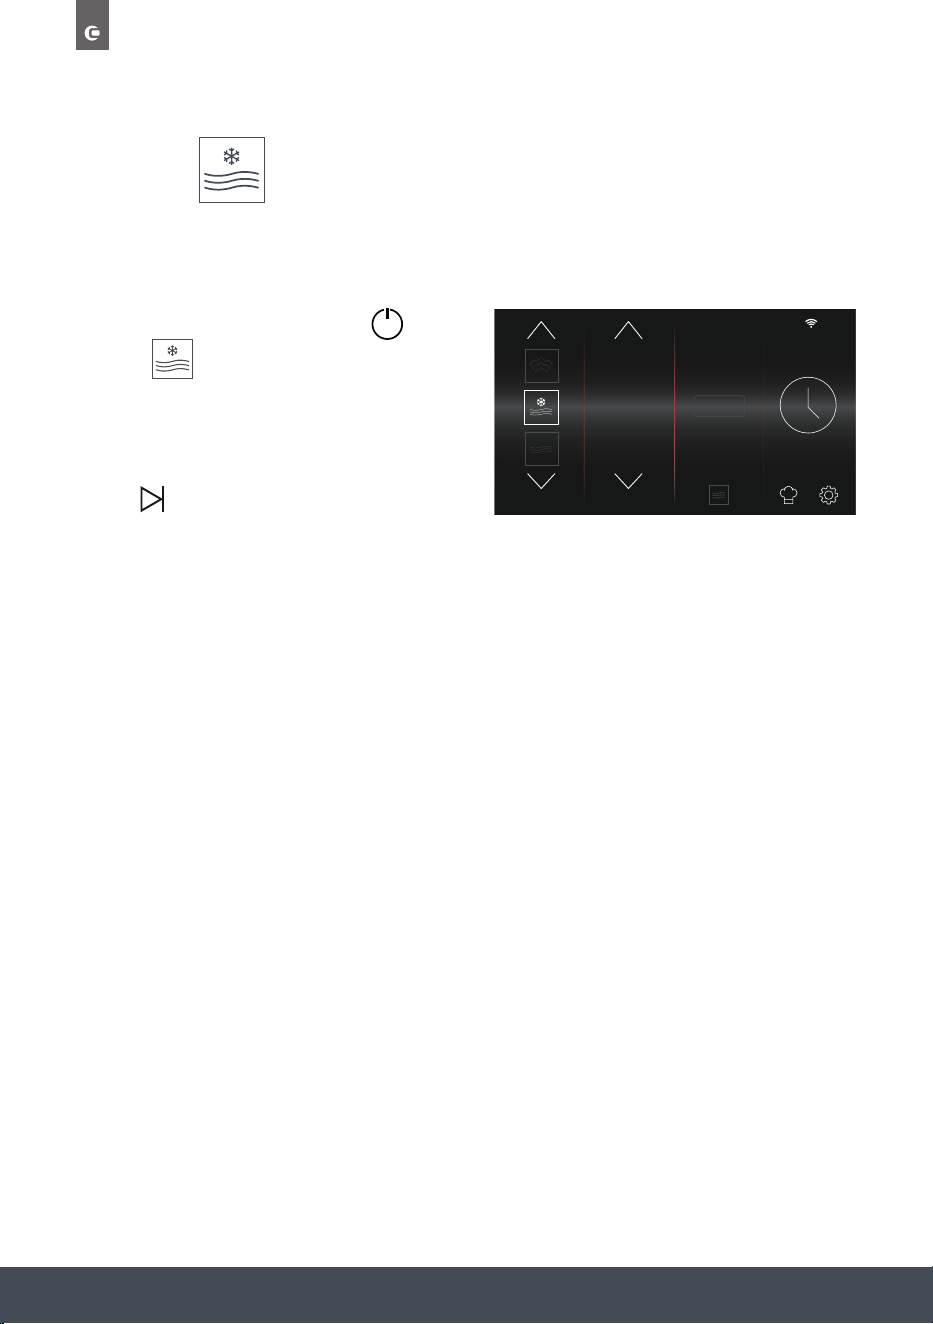
MICROWAVE WITH STEAM
This function starts with the Steam Function until the temperature reaches 100°C. The
Microwave and Steam Functions then operate alternatively to cook the food.
› Turn on the oven by pressing the button.
› Select from the Function
Selection screen.
› If necessary, select a cooking Power and
Duration and/or save to favourites.
› Press to start cooking.
› Pressing takes you to the
PREHEATING screen.
› A 5 minute countdown will begin to achieve
the desired temperature.
› When the 5 minute countdown reaches
‘00:00’, the main cooking screen will display
and the cooking sequence will begin.
NOTE:
Microwave with Steam Function uses minutes
and seconds instead of hours and minutes.
10
:
10
FUNCTION POWER %
10
50
60
STEAM
+
10
:
10
00
:
05
FUNCTIONPOWER % TIMER
PREHEATING
10
:
10
00
:
30
FUNCTIONPOWER % TIMER
60
60
Instruction manual CMS260
Please keep this instruction manual for future reference
DEFROST
Weight is default to 1000g. Adjusting the weight will automatically adjust the operation time.
Time can also be adjusted manually.
› Turn on the oven by pressing the button.
› Select from the Function
Selection screen.
› If necessary, select a Weight and Duration and/
or save to favourites.
› Press to start Defrosting.
10
:
10
FUNCTION WEIGHT g.
STEAM
+
1100
1000
900
61Instruction manual CMS260Please keep this instruction manual for future reference
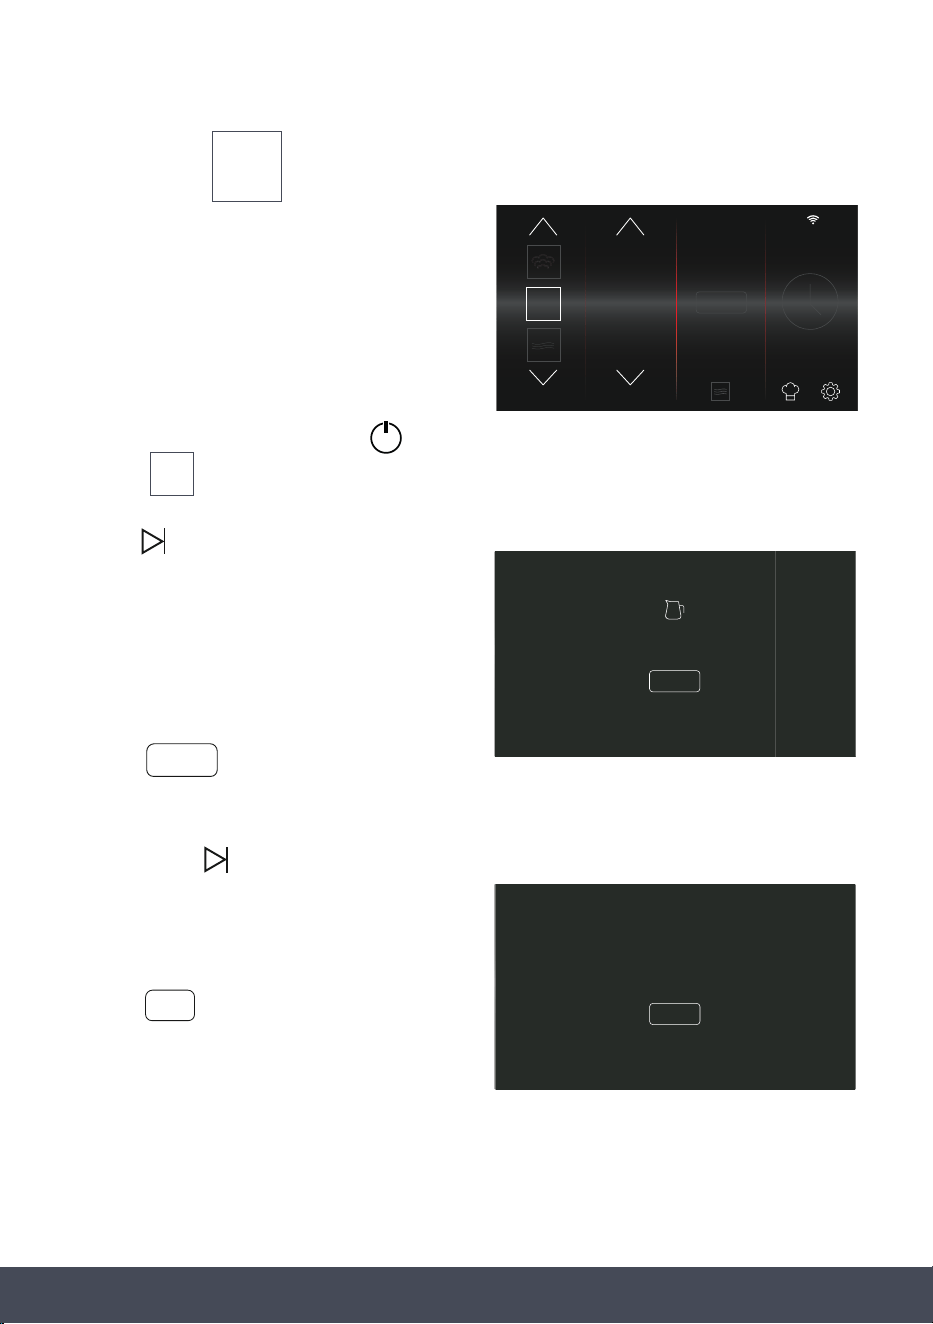
DESACALE
Descaling is important to ensure the correct
functioning of your appliance and should be
carried out at least every 6 months. This should be
carried out sooner if the Steam Function is used
more often or if you live in an exceptionally high
hard water area.
› Turn on the oven by pressing the button.
› Select from the Function
Selection screen.
› Press to start Descaling.
› ‘FILL WATER TANK AND ADD
DESCALER TO WATER’ message will appear.
Follow the on-screen instruction and
press to continue.
NOTE:
Press and hold to remove the water tank.
› ‘START DESCALE PROCESS’ will appear.
› Press to start Descaling.
DESCALE
DESCALE
10
:
10
FUNCTION WEIGHT Gr.
STEAM
+
DESCALE
FILL WATER TANK AND
ADD DESCALER TO WATER
DONE
DONE
START DESCALE PROCESS
YES
YES
62
Instruction manual CMS260
Please keep this instruction manual for future reference
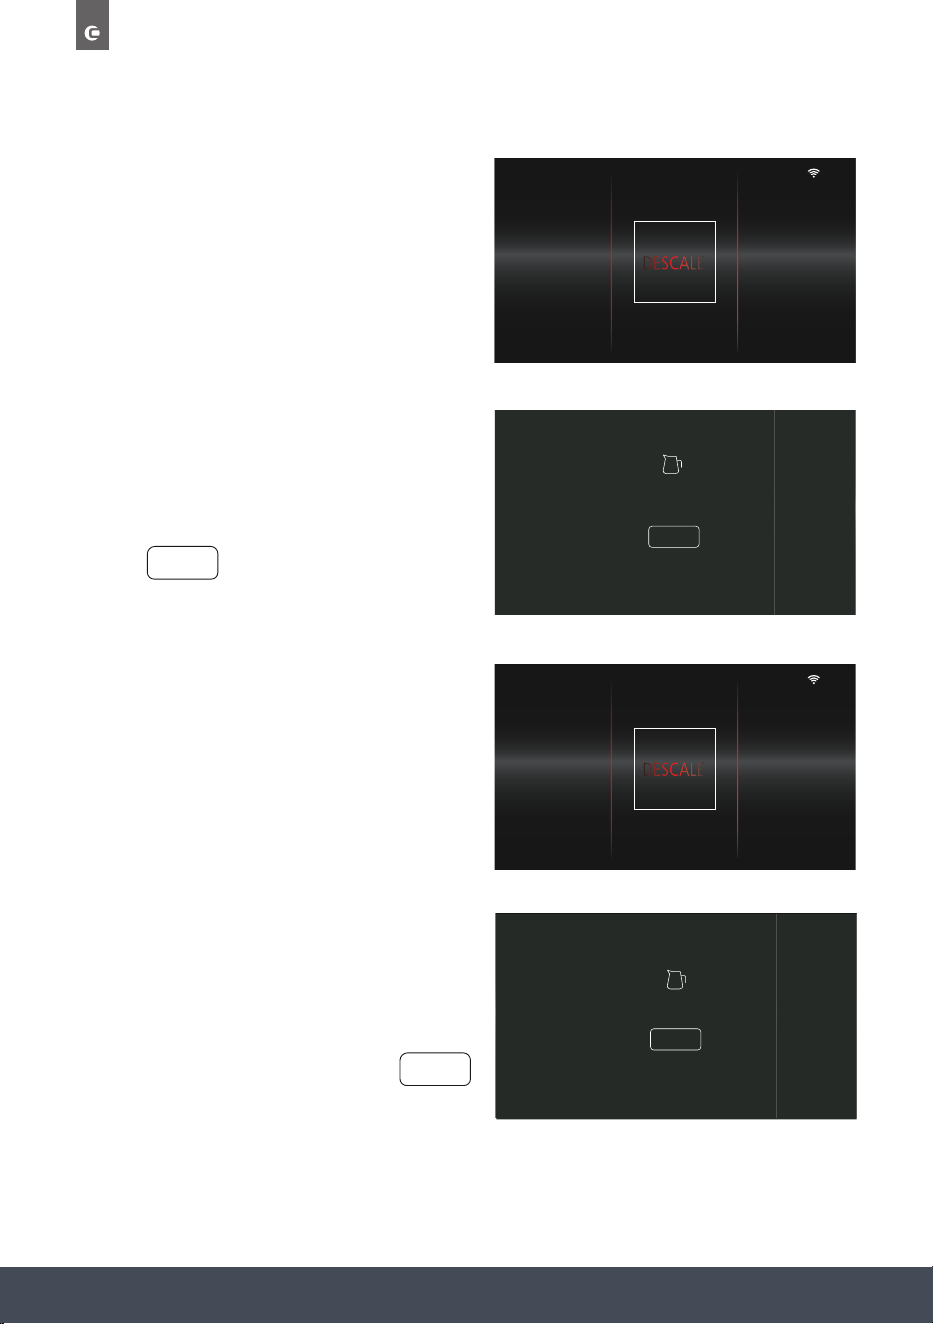
› Stage 1 of 2 will begin. This stage will last
26 minutes.
› When stage 1 is complete, ‘EMPTY &
RINSE WATERTANK ADD CLEAN WATER’ will
appear.
› Follow the on-screen instruction.
› Press to continue.
› Stage 2 of 2 will begin. This stage will last
4 minutes.
10
:
10
1 OF 3
30
:
00
FUNCTIONSTAGE TIMER
10
:
10
1 OF 2
30
:
00
FUNCTIONSTAGE TIMER
EMPTY & RINSE WATER TANK
ADD CLEAN WATER
DONE
DONE
10
:
10
4
:
00
FUNCTION TIMER
2 OF 2
STAGE
› ‘DESCALE COMPLETE’ will appear
when the process has nished.
› Follow the on-screen instruction.
› To return to the home screen, press
DESCALE COMPLETE
DONE
DONE

63Instruction manual CMS260Please keep this instruction manual for future reference
DONE
WATER TANK EMPTY
PLEASE ADD WATER
DONE
› NOTE:
A warning message will appear and alarm will
sound when the water tank is empty.
To continue the descaling process, ll tank with
water and press to continue.
Descaler kits can be purchased directly
from www.caple.co.uk

64
Instruction manual CMS260
Please keep this instruction manual for future reference
CARE AND MAINTENANCE
Your appliance has been designed to give years of trouble-free use provided it is installed and
maintained correctly. Please disconnect the power supply before cleaning or maintenance is
performed.
Do not pull the cable to disconnect power.
When cleaning the cavity, please remove everything in the cavity including the shelves and use
a clean cloth to clean it.
Do not spray water directly on the unit. Do not use abrasive material.
The cavity must be cleaned after every use, wait until the cavity has fully cooled down, use a dry
cloth to clean the cavity, or keep the oven door open to let the cavity dry out.
It is recommended to descale the steam oven once every three months. For details you can refer
to the descaling function section.
Please clean the water tank regularly. When you clean the water tank, please remove the cover
and use a dry cloth to wipe it.
REPLACING THE LIGHTS
Should the lighting need replacing, please contact Caple Service for further information;
Phone: 0117 938 7420
Email: service@caple.co.uk
65Instruction manual CMS260Please keep this instruction manual for future reference
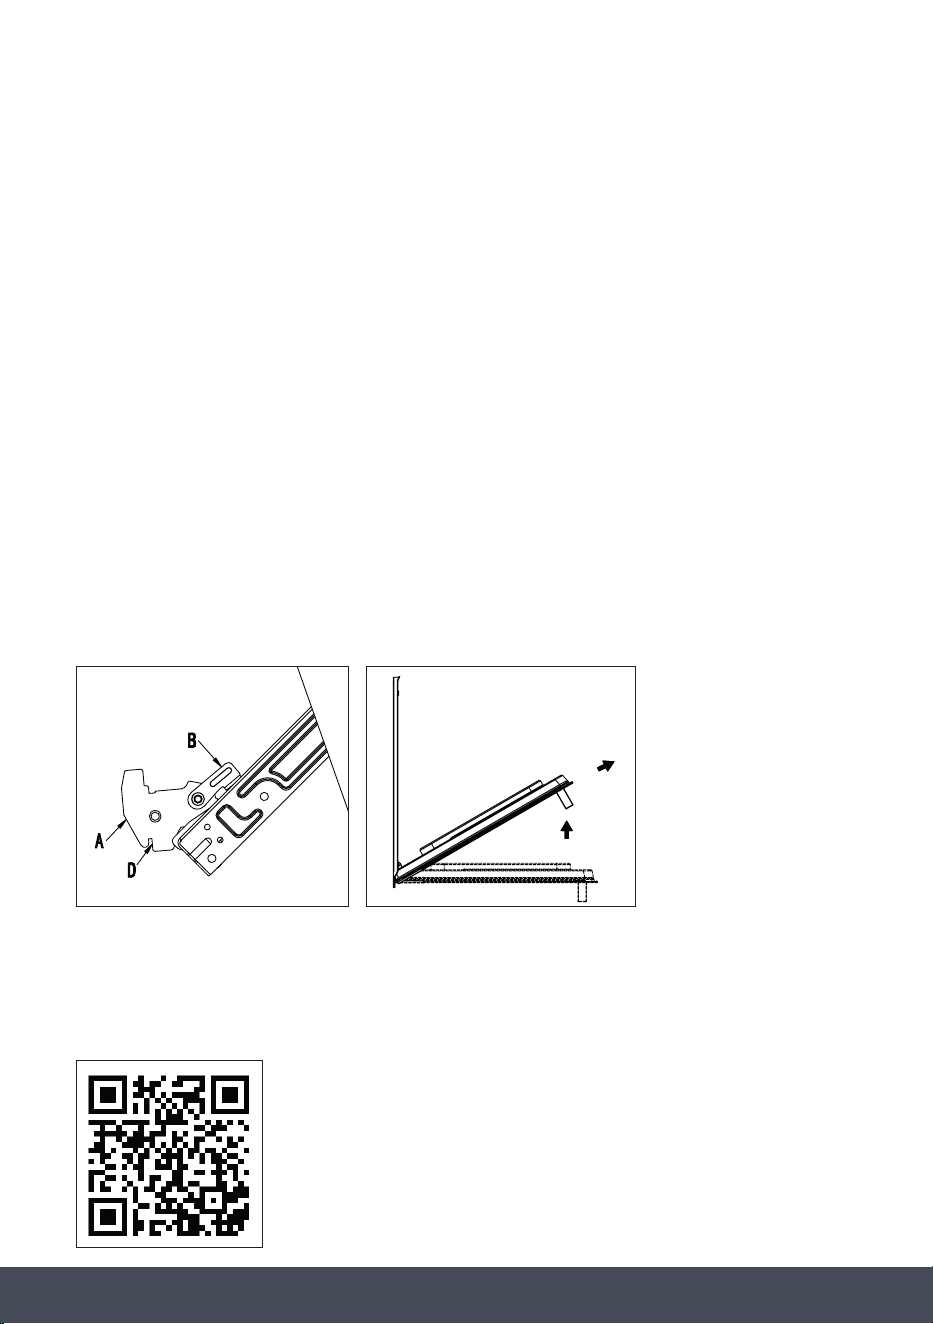
REMOVING THE DOOR
To make it easier to clean the inside of your oven, the oven door can be removed by proceeding
as follows (Fig. 1-2):
› Open the door completely and lift the 2 levers “B” (Fig.1);
› Now, shutting the door slightly, you can lift it out by pulling out the hooks “A” as shown in
gure 2.
TO REASSEMBLE THE DOOR
› With the door in a vertical position, insert the two hooks “A” into the slots;
› Ensure that seat “D” is hooked perfectly onto the edge of the slot (move the oven door
backwards and forward slightly).
› Keep the oven door open fully, unhook the 2 levers “B” downwards and then shut the
door again.
Scan the QR code below to access the
‘How to video’.
Fig.11-1 Fig.11-2
Fig 1 Fig 2

66
Instruction manual CMS260
Please keep this instruction manual for future reference
ACCESSORIES
WIRE SHELF (FIG.1)
The wire shelf allows you to brown or grill food. The shelf can be
used for normal fan heat, conventional cooking and grilling functions
only. It must not be used for any microwave function.
If a microwave function is selected, ensure the wire shelf has been
removed before the start.
WARNING:
Do not use the wire shelf with any microwave function. This could damage the shelf or even
your microwave oven. The wire shelf is for normal convection/Fan cooking or grilling only.
GLASS TRAY (FIG.2)
The glass tray allows you to cook foods on normal fan heat, conventional
cooking, grilling functions and combi-microwave functions only.
WARNING:
› Do not use the glass tray on or under a ame or other direct heat source.
› Do not drop or hit the tray against hard objects or strike utensils against it.
› Handle the glass tray with care to prevent breakage, chipping, cracking or severe scratching.
Do not use or repair the tray if it is chipped, cracked or severely scratched.
› Avoid sudden changes in temperature to the glass tray.
› Do not use the Grill Rack supplied with the glass tray with any microwave function.
This could damage the rack or even your microwave oven. The wire rack is for normal
convection/Fan cooking or grilling only.
› Do not use the glass tray on the bottom of the appliance cavity. The glass tray should be
used on the side shelf supports only.
› Do not use the glass tray with microwave only function.
AACCCCEESSSSOORRIIEESS
W
Wiirree sshheellff ((FFiigg..11))
The wire shelf allows you to brown or grill food. The shelf should not, under any
circumstances, be used with other metal cookware when using any microwave
function. However, you can heat food in an aluminum tray providing it is separated
from the shelf by a plate.
E
Ennaammeelleedd ttrraayy ((FFiigg..22))
The enameled tray allows you to cook foods on normal fan heat, conventional
cooking, and grilling functions.
W
WAARRNNIINNGG: Do not use the enameled tray with any microwave function. This could
damage the enamel tray or even your microwave oven. The enameled tray is for
normal convection/Fan cooking or grilling only.
T
Thhee ssiiddee sshheellff ssuuppppoorrttss ((FFiigg..33))
2 hook-on shelf supports allow you to use the accessories on three levels.
Three cooking levels are available, depending on the method used and the type of
food.
With the Grill or Grill + Microwave setting, the accessories (shelf or tray) are placed
on the first level for thick foods like roasts and on the third level for thinner foods
like sausages.
In normal cooking modes, or microwave functions, the shelf should be used on the
first or second levels depending on the item(s) being cooked.
N
NOOTTEE: Always remove the enameled tray when using microwave functions, as this
could damage the oven.
Fig.1
Fig.2
Fig.3
Fig. 1
Fig. 2

67Instruction manual CMS260Please keep this instruction manual for future reference
STEAM TRAY
The perforated stainless steel tray allows the steam to circulate around the food and
cook evenly.
WARNING:
Do not use the Steam Tray with any microwave function. This could damage the tray or even
your microwave oven. The Steam Tray is for Steam cooking only.
THE SIDE SHELF SUPPORTS (FIG.3)
2 hook-on shelf supports allow you to use the accessories on three
levels. Three cooking levels are available, depending on the method
used and the type of food. With the Grill setting, the accessories (shelf
or tray) are place on the rst level for thick foods like roasts and on
the third level for thinner foods like sausages. In normal cooking
modes, the shelf or tray should be used on the rst or second levels
depending on the item(s) being cooked.
GLASS BASE PLATE (FIG.4)
When microwaving, foods and beverages can be placed on the Glass
base plate. The Glass base plate protects the bottom of the microwave
cavity from any scratches, marks or spillages. It can also be easily
removed for cleaning by either hand or in the dishwasher.
NOTE:
Always remove the wire shelf when using microwave functions,
as this could damage the oven.
ACCESSORIES
Wireshelf (Fig.1)
The wire shelf allows you to brown or grill food. The shelf should not, under any
circumstances, be used with other metal cookware when using any microwave
function. However, you can heat food in an aluminum tray providing it is separated
from the shelf by a plate.
Enameledtray (Fig.2)
The enameled tray allows you to cook foods on normal fan heat, conventional
cooking, and grilling functions.
WARNING: Do not use the enameled tray with any microwave function. This could
damage the enamel tray or even your microwave oven. The enameled tray is for
normal convection/Fan cooking or grilling only.
Theside shelf supports(Fig.3)
2 hook-on shelf supports allow you to use the accessories on three levels.
Three cooking levels are available, depending on the method used and the type of
food.
With the Grill or Grill +Microwave setting, theaccessories (shelf or tray) are placed
on the first level for thick foods like roasts and on the third level for thinner foods
like sausages.
In normal cooking modes, or microwave functions, the shelf should be used on the
first or second levels depending on the item(s) being cooked.
NO
TE: Always remove the enameled tray when using microwave functions, as this
could damage the oven.
Fig.2
Fig.3
ACCESSORIES
Wireshelf(Fig.1)
The wire shelf allows you to brown or grill food. The shelf should not, under any
circumstances, be used with other metal cookware when using any microwave
function. However, you can heat food in an aluminum tray providing it is separated
from the shelf by a plate.
Enameledtray (Fig.2)
The enameled tray allows you to cook foods on normal fan hea
t, conventional
cooking, and grilling functions.
WARNING: Do not use the enamel
ed tray
with any microwave function. This could
damage the enamel tray or even your microwave oven.
The enameled tray is for
normal convection/Fan cooking or grilling only.
Theside shelf supports (Fig.3)
2 hook-on shelf supports allow you to use the accessories on three levels.
Three cooking levels are available, depending on the method used and the type of
food.
With the Grill or Grill + Microwave setting, the accessories (shelf or tray) are placed
on the first level for thick foods like roasts and on the third level for thinner foods
like sausages.
In normal cooking modes, or microwave functions, the shelf should be used on the
first or second levels depending on the item(s) being cooked.
NO
TE: Always remove the enameled tray when using microwave functions, as this
could damage the oven.
Fig.1
Fig.2
Fig.3
Turbo grill - t 200°C (Temperature r 220°C).
To adjust the temperature press °C/W/g followed by / . Press SELECT
to confirm.
The default time is 1.00hr. To Adjust the time, press the button followed by
the / and SELECT to confirm.
Finally press to start the programme.
Microwave & Fan heat
Microwave default power P50 (Power range P10-P50).
Fan heat d 200°C ( °C).
Press °C/W/g once to enter the Microwave power mode, and then again to
enter the fan heat temperature mode. These can both then be adjusted using the
/ keys followed by SELECT to confirm.
The default time is 1.00hr. To Adjust the time, press the button followed
by the / and SELECT to confirm.
Finally press to start the programme.
MICROWAVE OVEN FUNCTIONS
s:
p
Microwave & Turbo grill
Microwave default power P50 (Power range P10-P50).
Turbo grill default temperature 200°C (Temperature range 50-220°C).
Press °C/W/g once to enter the Microwave power mode, and then again to
enter the Turbo grill temperature mode. These can both then be adjusted using
the / keys followed by SELECT to confirm.
The default time is 1.00hr. To Adjust the time, press the button followed
by the / and SELECT to confirm.
Finally press to start the programme.
Microwave & Turbo conventional heat
Microwave default power P50 (Power range P10-P50).
Turbo grill default temperature 200°C (Temperature range 50-220°C).
Press °C/W/g once to enter the Microwave power mode, and then again to
enter the Turbo conventional temperature mode. These can both then be
adjusted using the / keys followed by SELECT to confirm.
The default time is 1.00hr. To Adjust the time, press the button followed by
the / and SELECT to confirm.
Finally press to start the programme.
Microwave – Default power P100 (power range P10-P100).
To adjust the power, press /until the correct power is reached followed by
SELECT.
Default time is 1 minute. To Adjust the time, press the button followed by
the / and SELECT to confirm.
Finally press to start the programme.
Defrost - Default weight 1000g (weight range 100-2000g).
To adjust the weight press the °C/W/g button followed by the / and
SELECT to confirm.
Finally press to start the programme. The default time will be adjusted
according to the set weight (See the 'Defrost time table' for more info).
Fan heat - Default temperature 200°C
To adjust the temperature press °C/W/g followed by / . Press SELECT to
confirm.
The default time is 1.00hr. To Adjust the time, press the button followed by
the / and SELECT to confirm.
Finally press to start the programme.
Turbo conventional - t 200°C (Temperature r 220°C).
To adjust the temperature press °C/W/g followed by / . Press SELECT to
confirm.
The default time is 1.00hr. To Adjust the time, press the button followed by
the / and SELECT to confirm.
Finally press to start the programme.
ACCESSORIES
Wireshelf(Fig.1)
The
wire shelf allows you to brown or grill food. The shelf should not, under any
circumstances, be used with other metal cookware when using any microwave
function. However, you can heat food in an aluminum tray providing it is separated
from the shelf by a plate.
Enameled tray (Fig.2)
The enameled tray allows you to cook foods on normal fan heat, conventional
cooking, and grilling functions.
WARNING: Do not use the enameled tray with any microwave function. This could
damage the enamel tray or even your microwave oven. The enameled tray is for
normal convection/Fan cooking or grilling only.
Thesideshelfsupports(Fig.3)
2 hook-on shelf supports allow you to use the accessories on three levels.
Three cooking levels are available, depending on the method used and the type of
food.
With the Grill or Grill +Microwave setting, theaccessories (shelf or tray) are placed
on the first level for thick foods like roasts and on the third level for thinner foods
like sausages.
In normal cooking modes, or microwave functions, the shelf should be used on the
first or second levels depending on the item(s) being cooked.
NO
TE: Always remove the enameled tray when using microwave functions, as this
could damage the oven.
Fig.1
Fig.2
Fig. 3
Fig. 4

68
Instruction manual CMS260
Please keep this instruction manual for future reference
STEAM COOKING - IMPORTANT INFORMATION
1. If you want to remove food from the oven immediately after cooking, please use oven
gloves or other tools to avoid burning yourself.
2. Water droplets will form on the unit when it is in use, please wipe them away during
cooking being careful on the glass which may be hot.
3. Do not open the oven door immediately after cooking to avoid scalds or burns by
the steam.
4. Always clean or descale the cavity and food tray or racks.
5. If the power socket is damaged, to avoid hazard, please Caple service to replace.
6. If the product will not be used for a long period of time, please clean away the water in
the oven, and disconnect with power supply.
7. Do not put excess food in the oven, to avoid uneven steam circulation in the cavity.
8. The yellow/green earth wire should not be controlled by the switch.
9. To prevent water overowing from the tank, the water suction tool can be used to remove
excess water. After steam cooking, please empty the remaining water in the tank and
remove any excess water in the base of the oven using the suction tool supplied.
10. Fill the tank with water. The water level must not be higher than the ‘MAX’ mark on the
water tank. A full tank of water will last you up to 2 hour and 30 mins.
11. During steam cooking, do not cover the food, as this will prevent steam from cooking
the food.
12. If the water tank is empty when a steam programme is started, the warning will appear on
the display, the tank will eject, an alarm will sound and the steam function will not start.
13. When the water tank is removed, wait for at least 10 seconds before reinserting it.
14. When inserting the water tank, ensure it is fully pushed in, otherwise the cooking
programme will not start.

69Instruction manual CMS260Please keep this instruction manual for future reference
USEFUL TIPS
When using the steam oven, always start with the oven cold. Using steam in a hot oven
(immediately after traditional cooking) is not recommended because the benets of cooking
with steam will be cancelled out.
For steam cooking try to use the perforated stainless-steel tray together with the lower
glass tray as much as possible.
The perforated tray, resting with its support on the at grill, allows the steam to fully cook the
food while draining everything released by the food during cooking through the holes.
The second, lower tray, slid under the grill on its guides, will collect the drippings and keep the
oven chamber cleaner.
SUGGESTED STEAMING TIMES
FOOD TYPE WEIGHT TIME
FISH 650g 15 minutes
CRAB 500g 25 minutes
SHRIMP 500g 12 minutes
CHICKEN LEG 5pcs around 650g 30 minutes
CHICKEN 1100g 35 minutes
BEEF 350g 40 minutes
PORK 400g 20 minutes
SOUP 450g 15 minutes
EGG 10pcs around 650g 15 minutes
PUMPKIN 850g 20 minutes
TOMATO 550g 30 minutes
CORN 550g 30 minutes
BREAD 100g 18 minutes
RICE 400g 30 minutes
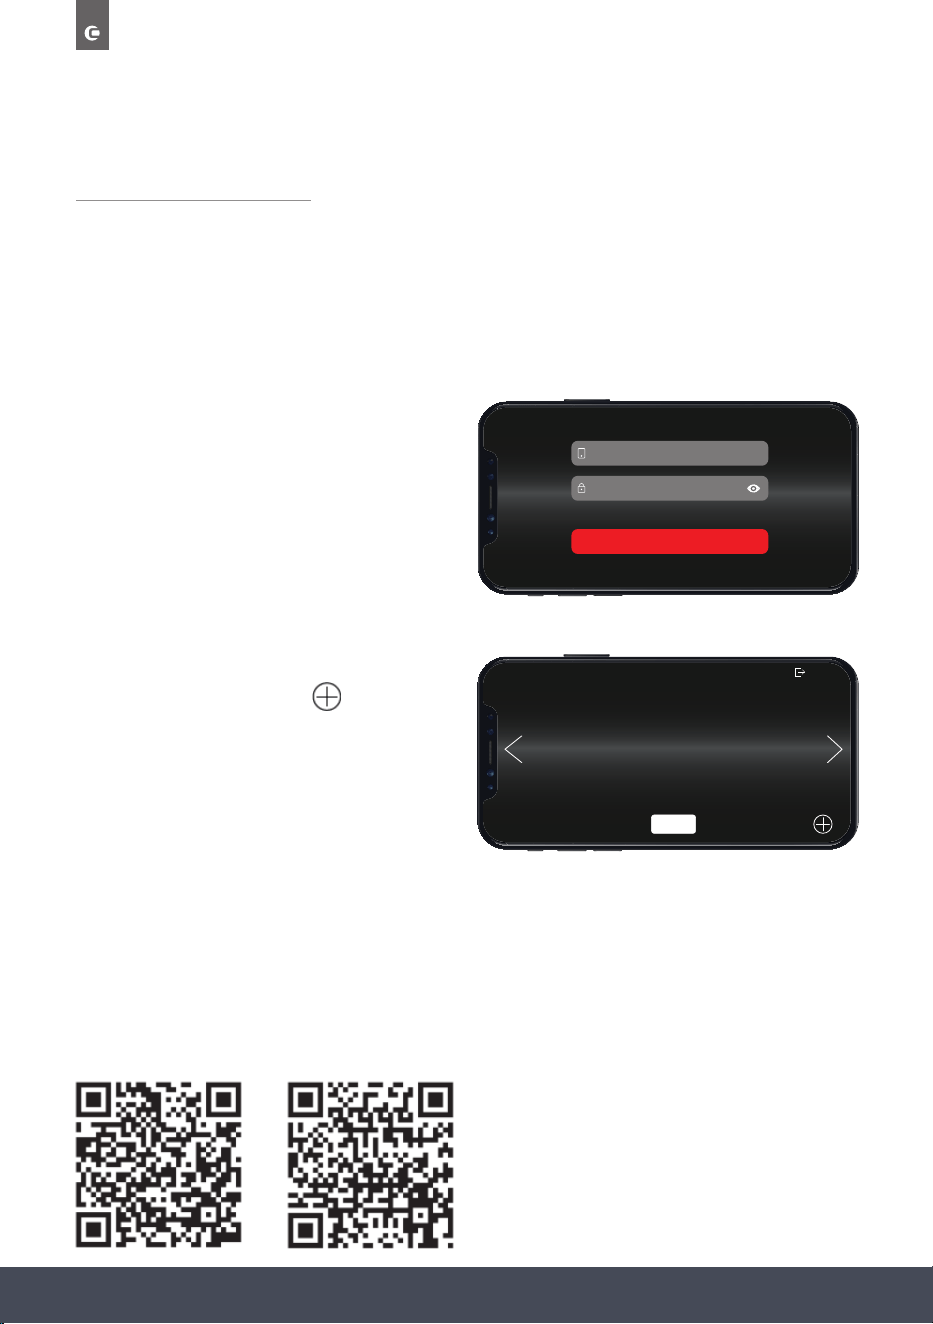
70
Instruction manual CMS260
Please keep this instruction manual for future reference
CAPLEHOME APP
Please read carefully through this section to make sure you understand how the App functions.
CONNECTING YOUR OVEN
Download the CapleHome App from www.caple.co.uk or the relevant app store for
your device.
When the App is opened for the rst time, the
LOGIN/SIGN UP Screen will appear. Use your
details to Sign Up and/or Login.
The App Home Screen will display. To begin
appliance connection, press
NOTE:
Make sure WIFI is turned On in your appliance
settings (page 53). Also make sure your
phone or device is connected to your home
WIFI network.
Further instructions on how to connect your appliance to the CapleHome App are available
from www.caple.co.uk or, scan the QR Codes to access the video ‘How to guides’.
ss
MOBILE NUMBER OR E-MAIL
PASSWORD
LOGIN
SIGN UP FORGOT PASSWORD
CONNECT APPLIANCE
SELECT
IOS
Android
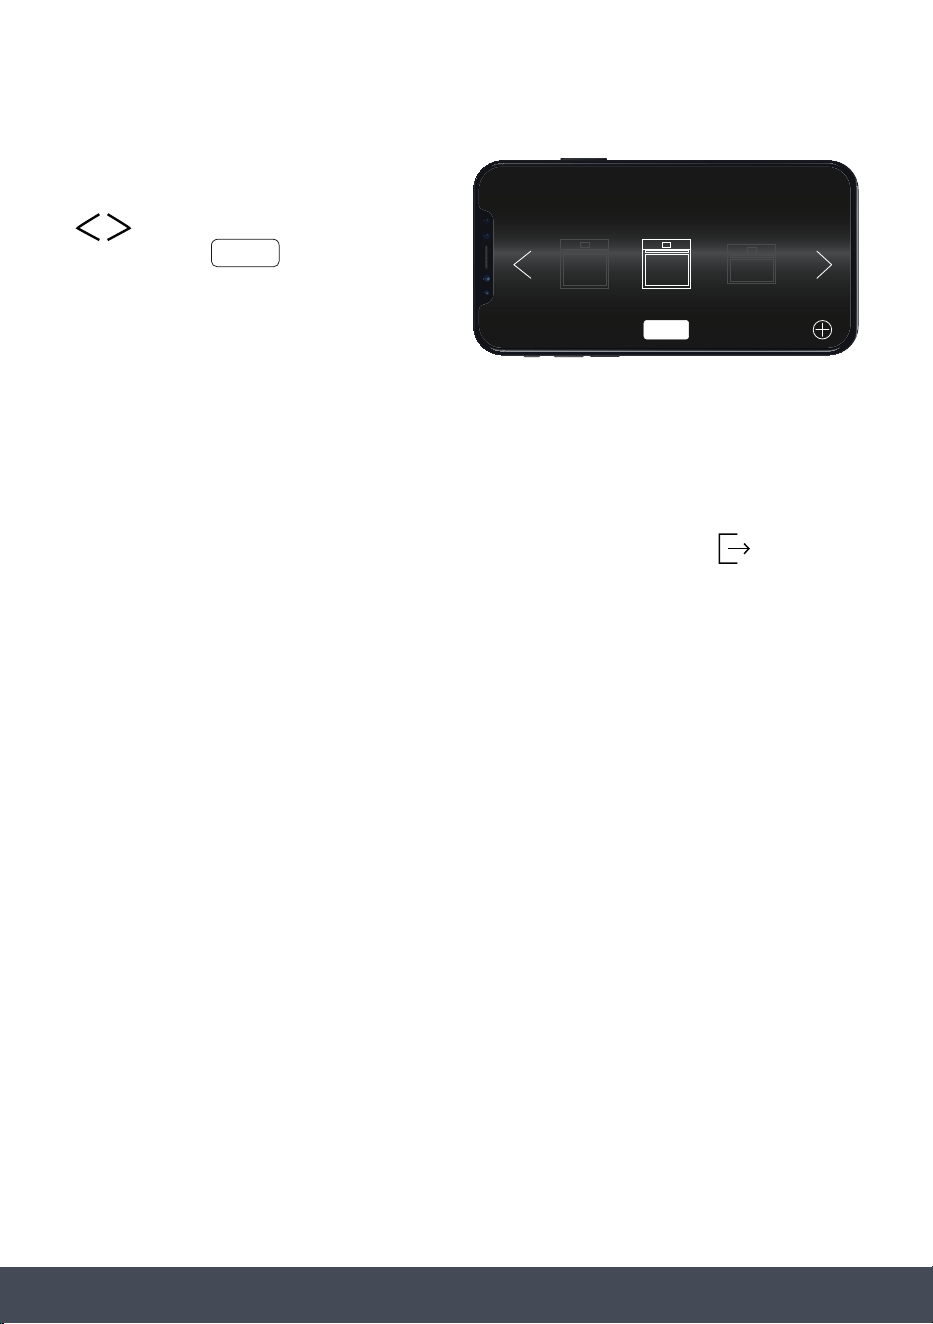
71Instruction manual CMS260Please keep this instruction manual for future reference
Choose to add an additional appliance by
repeating previous steps or use the arrows
to choose the appliance you wish
to control. Press
SELECT
to display the
appliance’s Function Selection Screen.
IMPORTANT:
If the Oven WIFI is turned Off, you will need to go through the connection process again.
HOW TO LOG OUT
To Log Out of your CapleHome account go to the App Home screen and press
‘ARE YOU SURE YOU WANT TO LOG OUT...’ message will appear. Press ‘LOGOUT’ to proceed.
The login screen will appear.
SELECT APPLIANCE
OVEN 2
OVEN 1
MICROWAVE
SELECT
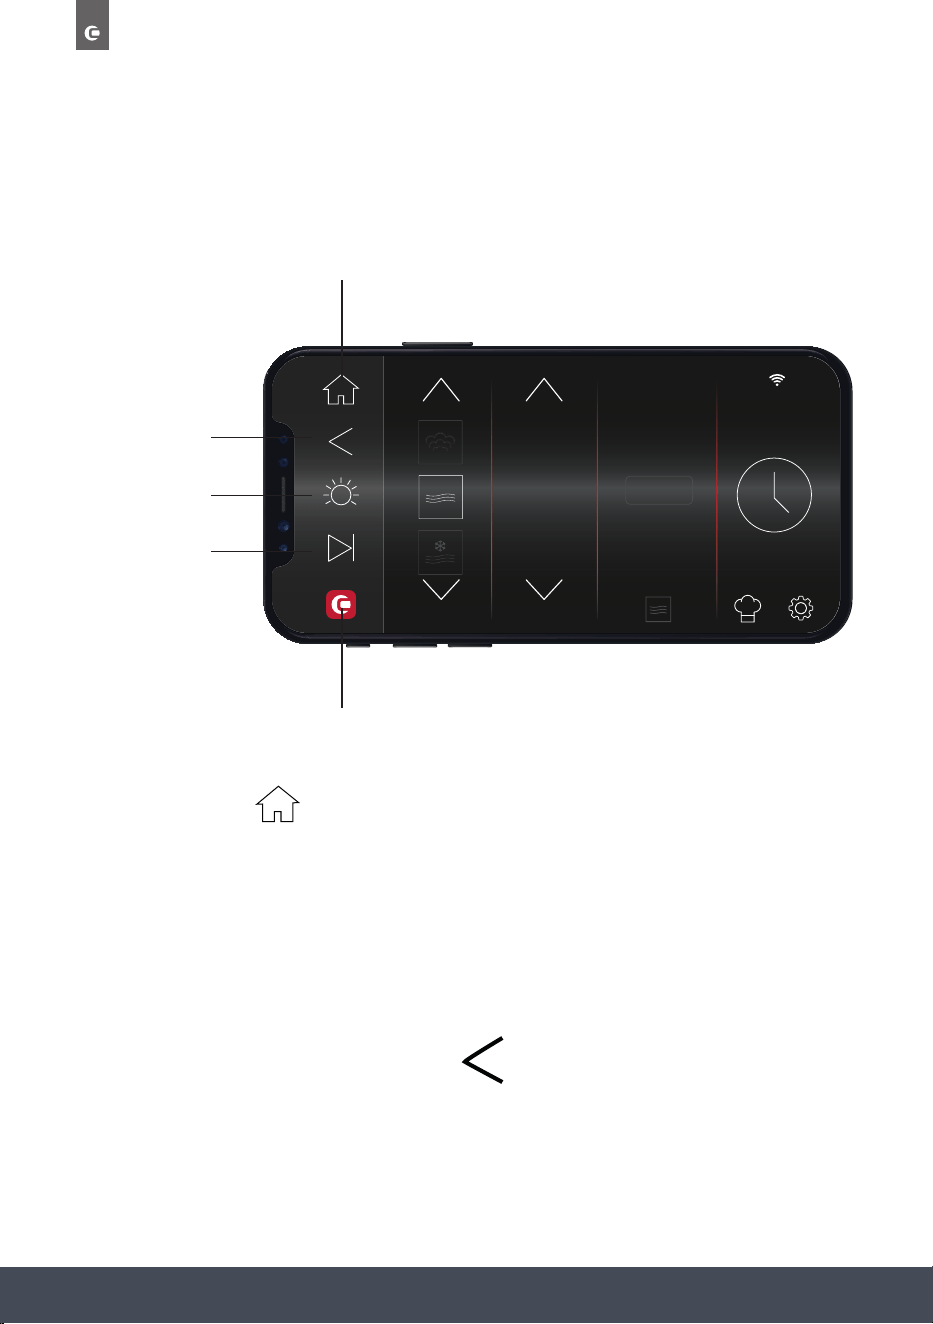
72
Instruction manual CMS260
Please keep this instruction manual for future reference
10
:
10
FUNCTION POWER %
90
100
10
STEAM
+
HOME SCREEN
The CapleHome App is designed to mirror your appliance display:
HOME BUTTON
BACK BUTTON/
CANCEL COOKING
LIGHT ON / OFF
START / PAUSE
CAPLE WEBSITE BUTTON
HOME BUTTON
Press to return to the ‘SELECT APPLIANCE’ screen. From here you can select another appliance you wish
to control.
NOTE
:
Pressing this button will not cancel cooking.
BACK BUTTON/CANCEL COOKING
Press to return to the previous screen on the display.
Press to cancel cooking.
73Instruction manual CMS260Please keep this instruction manual for future reference
LIGHT BUTTON
This will appear ‘grey’ when the internal light is Off. The button will illuminate when the
internal light is On.
START/PAUSE BUTTON
After turning the appliance on, select your desired cooking programme and duration and press
to start cooking.
NOTE :
A duration time must be set in order to start cooking via the App. If is pressed before a
duration is set, the appliance will not start cooking.
This is a safety measure to ensure the appliance is not accidentally started via the App,
especially if children are playing with it.
CAPLE WEBSITE BUTTON
Takes you to the Caple website where you can also review the Instruction Manual and
CapleHome App Connection Guide in digital form if preferred.
p fro
de:
QR
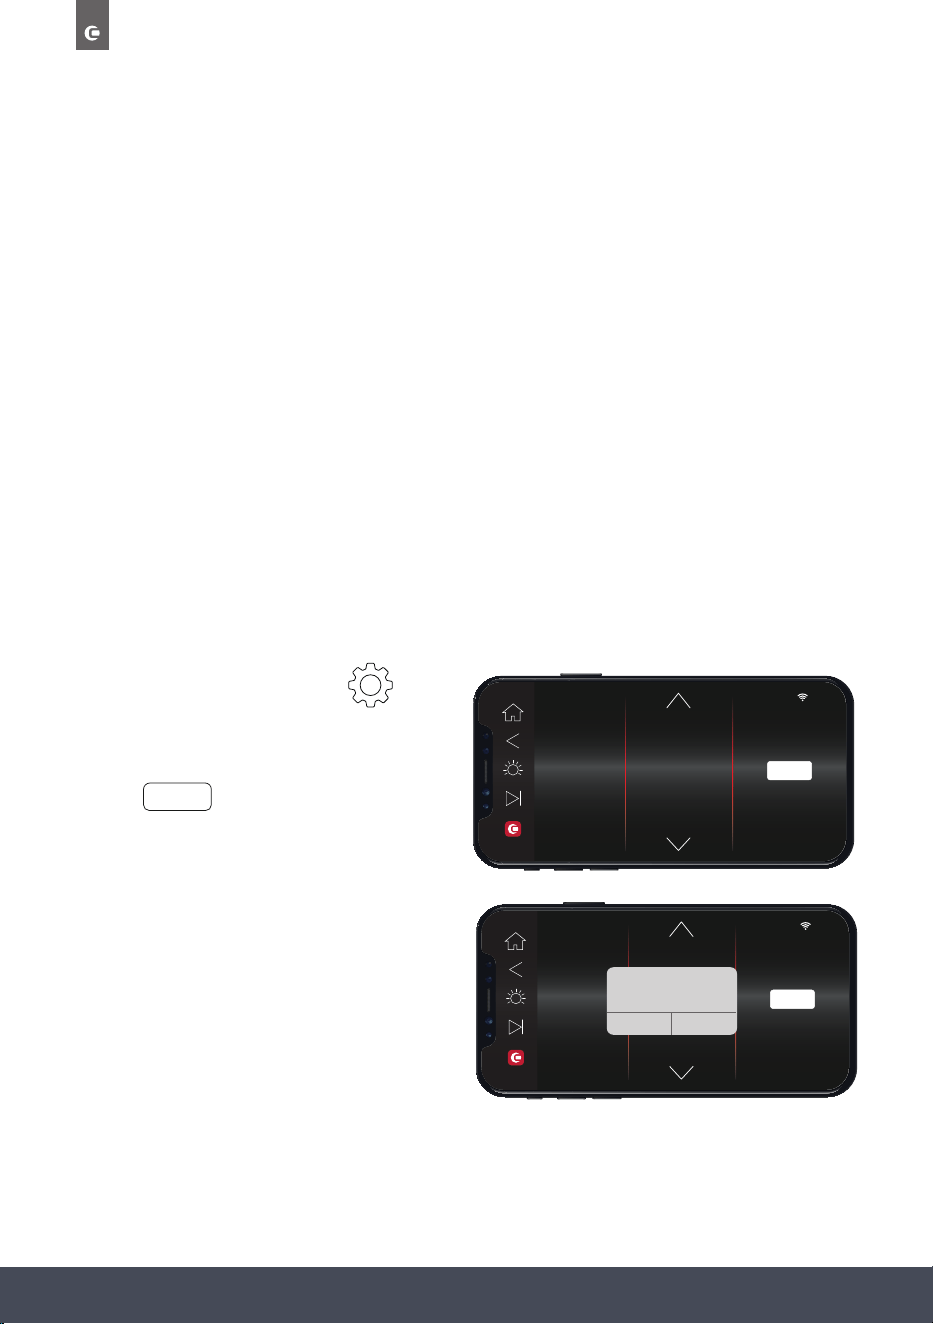
74
Instruction manual CMS260
Please keep this instruction manual for future reference
FAVOURITES
Cooking selections can be saved to your appliance, the CapleHome App on your chosen
device,or both.
To save to Favourites, open the CapleHome App on your device and follow the instructions as
detailed in ‘SETTING COOKING STAGES AND SAVING TO FAVOURITES’.
NOTE:
When saving a favourite cooking selection on the CapleHome App or appliance, they do not
copy over to the other. For example, if you save a favourite to the App, it will only save there,
and not onto the appliance, and vice versa.
If you wish to save the same favourite to your appliance and the App they will have to be
entered separately.
LANGUAGE
Several languages are available to choose from whilst operating the CapleHome App.
› To change the language go to
,
LANGUAGE.
› Scroll through the options and then
press
SELECT
› ‘SET LANGUAGE APP WILL RESART...’
message will appear. Press ‘OK’ to continue.
The CapleHome App will close, simply open
the App again to continue using with the
new language.
10
:
10
TIME & DATE
SOUND
DISPLAY
NOTIFICATIONS
DEMO MODE
LANGUAGE
RENAME & DELETE
ESPAÑOL
ENGLISH
DEUTSCH
SELECT
10
:
10
TIME & DATE
SOUND
DISPLAY
NOTIFICATIONS
DEMO MODE
LANGUAGE
RENAME & DELETE
FRANCAIS
ENGLISH
ENGLSIH
SELECT
SET LANGUAGE
APP WILL RESTART TO ADJUST TO
NEW LANGUAGE
CANCEL OK
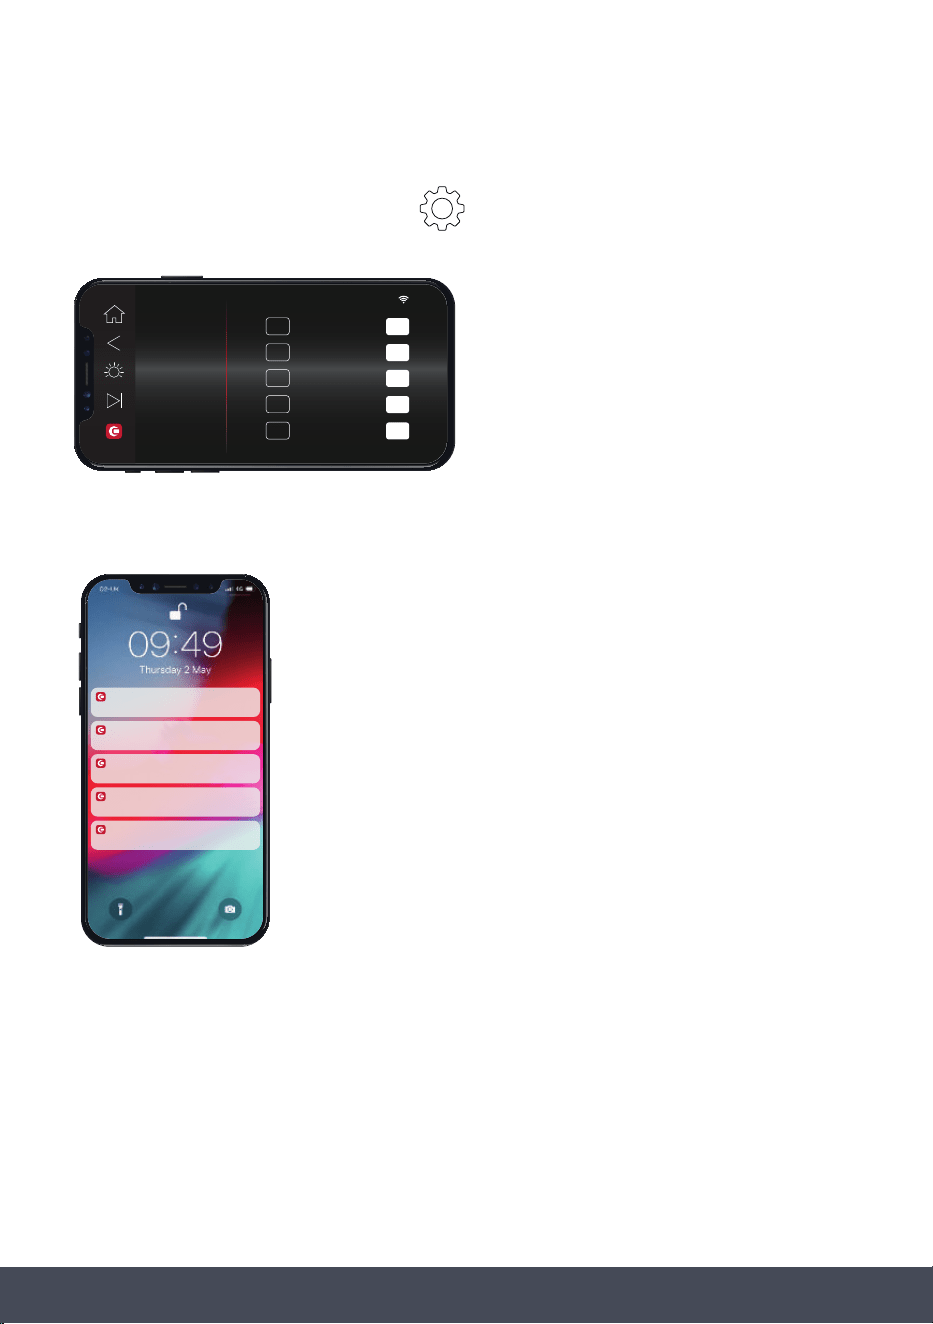
75Instruction manual CMS260Please keep this instruction manual for future reference
NOTIFICATIONS
From the Function Selection Screen, go to
, NOTIFICATIONS to turn notications On
or Off.
When turned On, notications will appear outside of the App, on your mobile or smart device.
NOTE:
By connecting the appliance to the Caple Home App, you are allowing the appliance to be
controlled by the App.
10
:
10
TIME & DATE
SOUND
DISPLAY
NOTIFICATIONS
DEMO MODE
LANGUAGE
RENAME & DELETE
ON
10 MIN. WARNING
1 MIN. WARNING
OFF
ON
TEMP. REACHED OFF
ON
5 MIN. WARNING OFF
ON
OFF
ON
NOTIFICATIONS OFF
Lorem ipsum
CAPLEHOME
59m ago
OVEN TEMP. REACHED
CAPLEHOME
10m ago
TEN MINUTE WARNING
CAPLEHOME
5m ago
FIVE MINUTE WARNING
CAPLEHOME
1m ago
ONE MINUTE WARNING
CAPLEHOME
Now
COOKING FINISHED
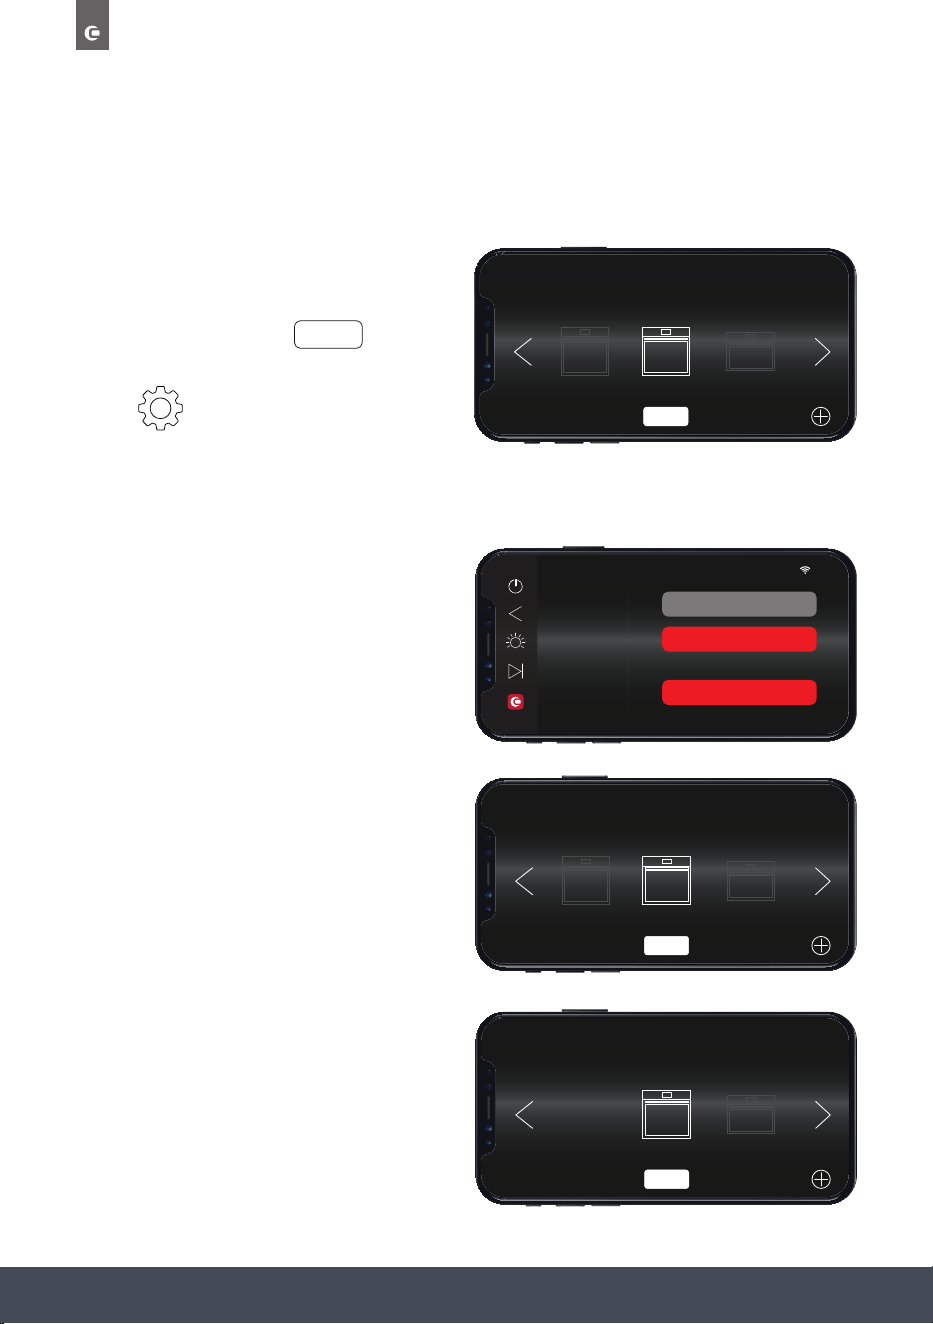
76
Instruction manual CMS260
Please keep this instruction manual for future reference
RENAME & DELETE
To rename or delete an appliance from the CapleHome App, proceed as follows:
› Choose the appliance you want to
Rename or Delete from the App
Home screen and press
› Go to
, RENAME & DELETE.
TO RENAME AN APPLIANCE
› Click on the existing appliance name (for
example ‘OVEN 2’) and enter a new name.
› Press ‘RENAME’
› The new appliance name will appear on
on the App Home screen.
TO DELETE AN APPLIANCE:
› Press ‘DELETE DEVICE’
› The deleted appliance will no longer show
on the App Home screen.
SELECT
10
:
10
TIME & DATE
SOUND
DISPLAY
NOTIFICATIONS
DEMO MODE
LANGUAGE
RENAME & DELETE
OVEN 2
RENAME
DELETE DEVICE
OR
SELECT APPLIANCE
RIGHT OVEN
OVEN 1
MICROWAVE
SELECT
SELECT APPLIANCE
OVEN 1
MICROWAVE
SELECT
SELECT APPLIANCE
OVEN 2
OVEN 1
MICROWAVE
SELECT

77Instruction manual CMS260Please keep this instruction manual for future reference
TROUBLESHOOTING
TROUBLE SOLUTION
Control panel is not working
Check to see if the child lock is on. If so, unlock
the appliance
Food is not cooked after steaming. The food is sealed with a cover. Remove the cover.
The interior light does not illuminate. Contact Caple Service.
The oven is not heating. The thermostat is not turned to a temperature.
The oven does not operate.
Check it is switched on at the mains. There has
been a power cut. The time is not set.
Lack of water pop-up screen.
No water in water tank/bad pumps. Rell tank
with water. Replace water pump - contact
Caple Service.
If the problem still persists, please contact Caple service for assistance:
Phone: 0117 938 7420
Email: service@caple.co.uk

78
Instruction manual CMS260
Please keep this instruction manual for future reference
FAULTS CAUSES REMEDIES
The upper crust is dark and the
lower part too pale
Not enough heat from the bottom
» Use the natural convection position
» Use deeper side tins
» Lower the temperature
» Put the cake on a lower shelf
The lower part is dark and the
upper crust too pale
Excessive heat from the bottom
» Use the natural convection position
» Use lower side tins
» Lower the temperature
» Put the cake on a higher shelf
The outside is too cooked and the
inside not cooked enough
Too high temperature
Lower the temperature and increase the
cooking time
The outside is too dry even though
it is the right colour
Too low temperature
Increase the temperature and reduce
the cooking time.
USEFUL NOTES FOR COOKING
In the following table, some indicative hints for cooking:

79Instruction manual CMS260Please keep this instruction manual for future reference
ERROR CODES
ERROR CODE ERROR REASON
ER02 Cavity Thermostat open/short circuit.
PCB detects an open or short circuit in
the thermostat.
ER04 Steamer Thermostat open/short circuit. PCB detects open or short circuit in the thermostat.
ER05
Steamer temperature detected by the
Steamer thermostat is 165°C.
The steamer could not pump water or too much scale.
ER08 Water tank motor error. The water tank motor could not resume.
If the problem still persists, please contact Caple service for assistance:
Phone: 0117 938 7420
Email: service@caple.co.uk

Caple Service
Fourth Way
Avonmouth
Bristol
BS11 8DW
T: 0117 938 1900
E: service@caple.co.uk
www.caple.co.uk