Technical Support and E-Warranty Certificate www.vevor.com/support
FIRE PIT FLAME GUARD
MODEL:ffb18#/FFB16#/FFB17#/FFB11#/FFB12#/FFB13#/
FFB14#/FFB15#
We continue to be committed to provide you tools with competitive price.
"Save Half", "Half Price" or any other similar expressions used by us only represents an
estimate of savings you might benefit from buying certain tools with us compared to the major
top brands and does not necessarily mean to cover all categories of tools offered by us. You
are kindly reminded to verify carefully when you are placing an order with us if you are
actually saving half in comparison with the top major brands.


- 1 -
MODEL:ffb18#/FFB16#/FFB17#/FFB11#/FFB12#/FFB13#/FFB14#/
FFB15#
Have product questions? Need technical support? Please feel free to
contact us:
Technical Support and E-Warranty Certificate
www.vevor.com/support
NEED HELP? CONTACT US!
This is the original instruction, please read all manual instructions
carefully before operating. VEVOR reserves a clear interpretation of our
user manual. The appearance of the product shall be subject to the
product you received. Please forgive us that we won't inform you again if
there are any technology or software updates on our product.
FIRE PIT FLAME GUARD

- 2 -
IMPORTANT SAFEGUARDS
WARNING: Read and understand this entire manual before
operating or servicing this product. Failure to follow these
warnings and instructions can cause personal injury or
damage to valuable property.
• Avoid children using boat trailer guides. And this product is not a toy. Do
not allow children to play.
• Keep away from sharp points,blades and other items.
• Assembly precautions.
Assemble only according to these instructions. Improper assembly can
create hazards.
2. Wear ANSI-approved safety goggles and heavy-duty work gloves during
assembly.
3.Keep assembly area clean and well-lit.
4.Keep bystanders out of the area during assembly.
5.Do not assemble when tired or when under the influence of alcohol,
drugs or medication.
6.Product capabilities apply to properly and completely assembled product
only.
7. For additional information regarding the parts listed in the following
pages, please refer to the Assembly Diagram of this manual. Unwrap and
separate all parts in a clean work area. Please keep small spare parts out
of children's reach.
SAVE THESE INSTRUCTIONS
PRODUCT INTRODUCTION
• Tempered glass wind guard fence is made of tempered heat resistant
glass.Aluminum linking clips offer firm connection and steady support.
• Fit around your fire table and assist to block breeze to compromise your
fire and enjoy a steady flame! A must-have fire pit supply to blend in your
patio and garden.
- 3 -
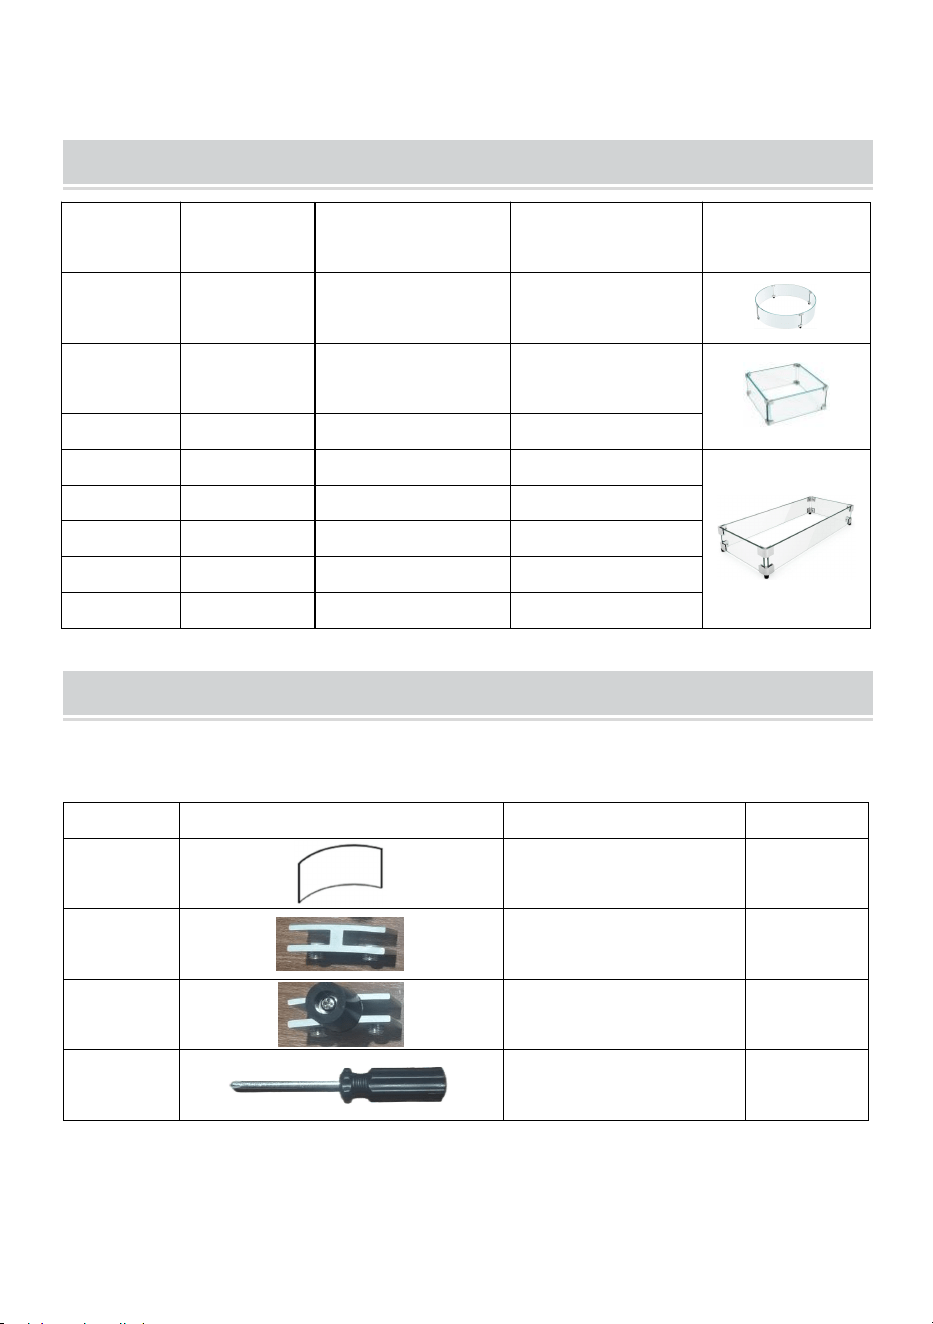
PRODUCT PAREMETERS
Model
Shape
Dimensions
LxWxH(mm)
board
thickness(mm)
Picture
ffb18#
round
740*740*214
6
FFB16#
square
493*493*191
8
FFB17#
square
543*543*191
8
FFB11#
rectangle
748*340*165
8
FFB12#
rectangle
773*367*191
8
FFB13#
rectangle
798*317*165
8
FFB14#
rectangle
924*417*191
8
FFB15#
rectangle
1128*367*191
8
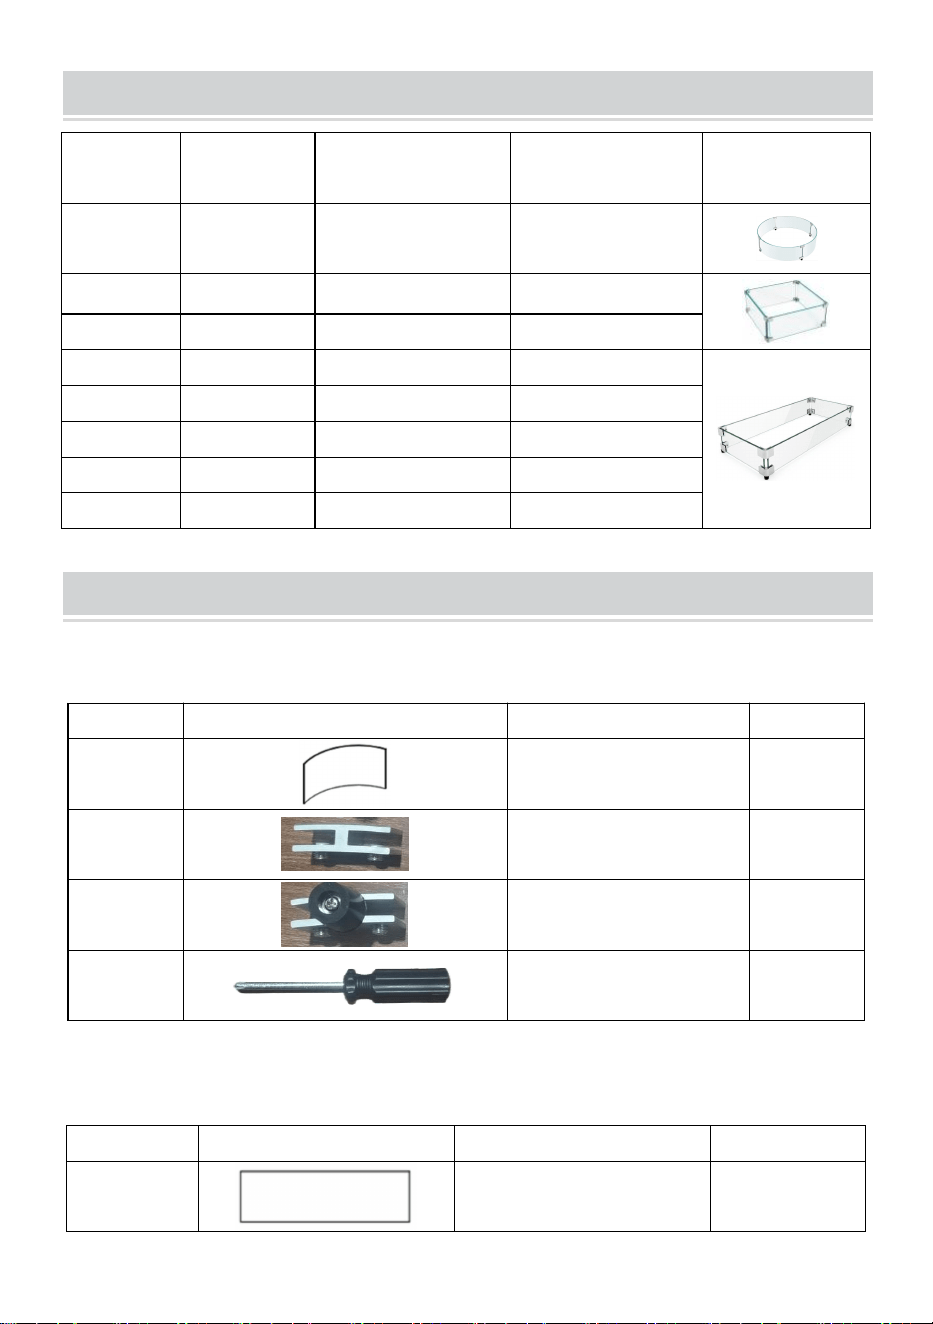
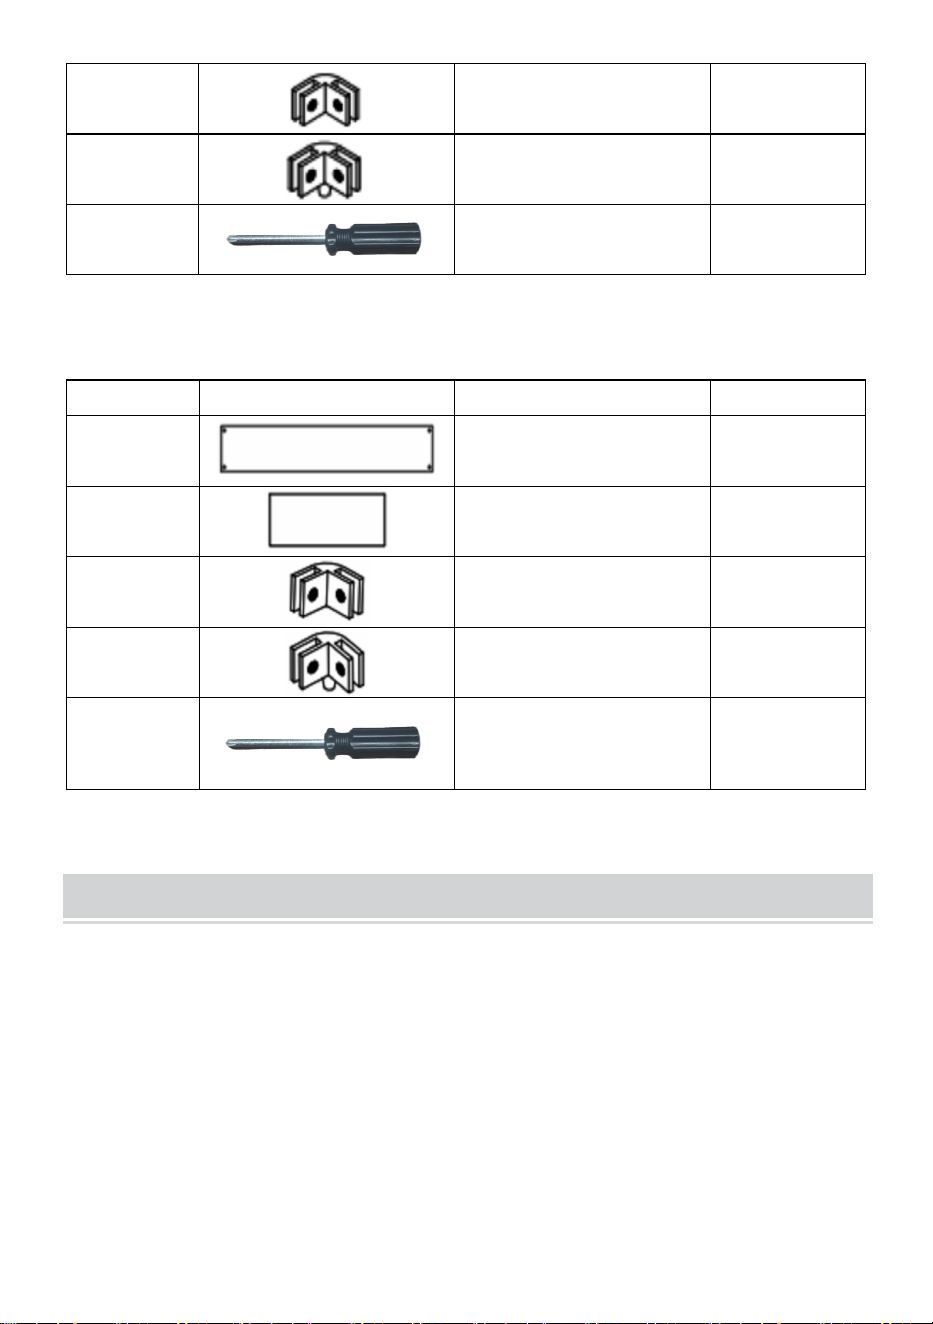
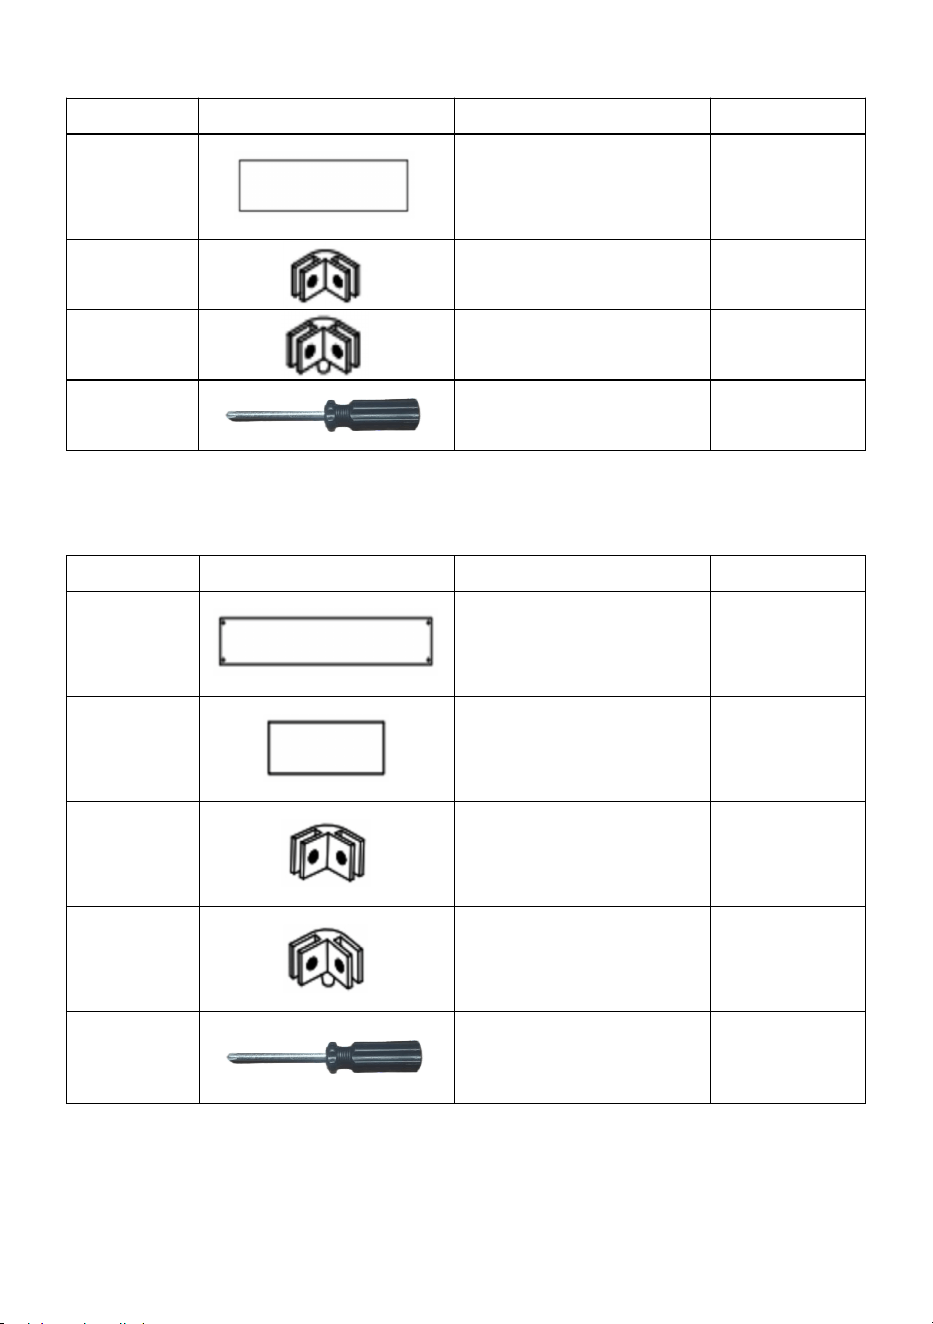
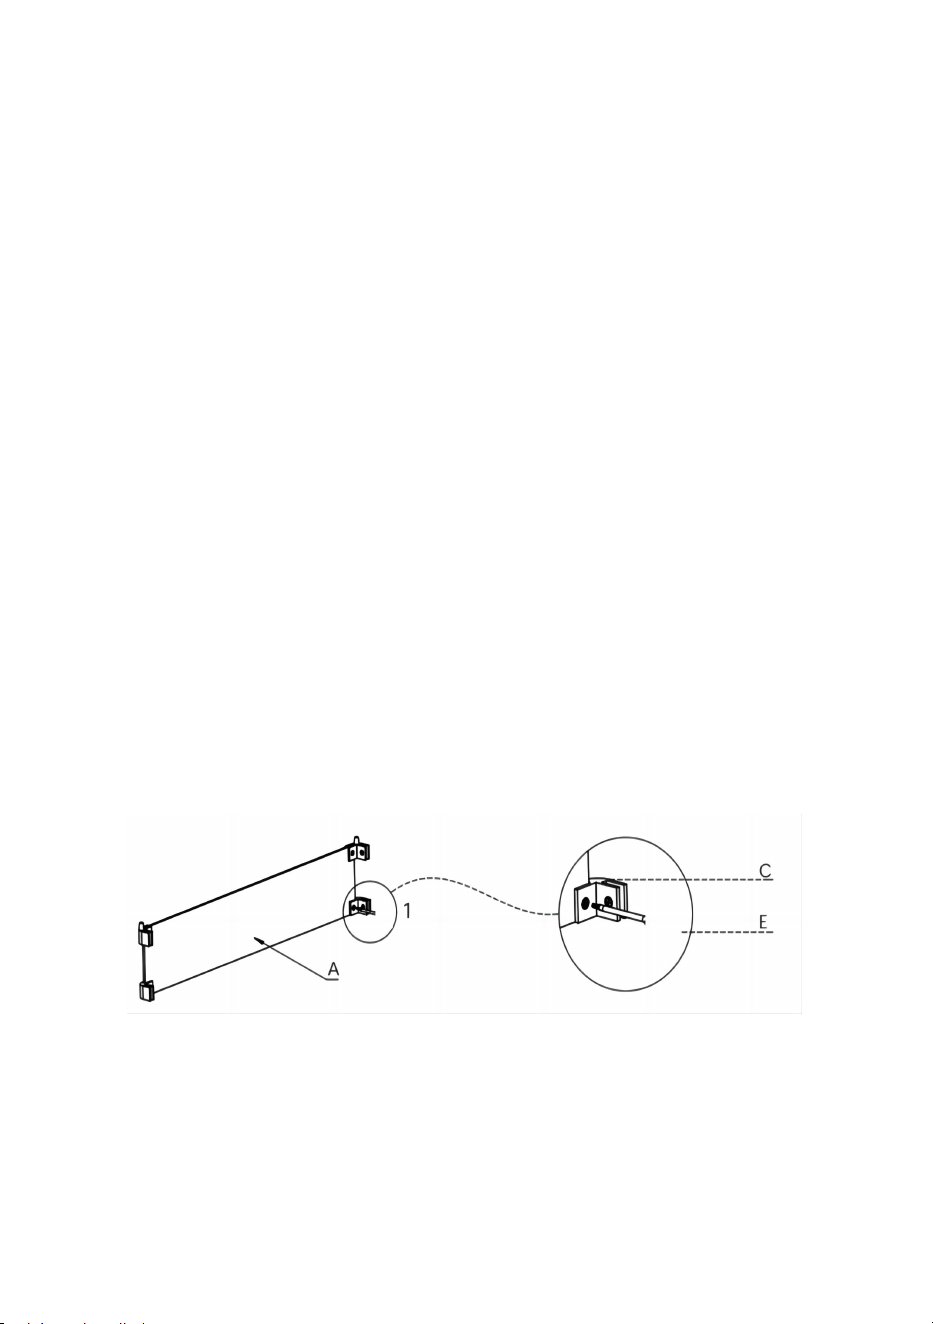
PACKAGE INCLUDE
Model:ffb18#
NO
PIC
DESC
QTY
A
Glass Panel
4 pcs
B
Glass Top Holder
4 pcs
C
Glass Bottom
Holder
4 pcs
D
Screwdriver
1 pcs
Model:FFB16#/FFB17#
NO.
PIC
DESC
QTY
A
Glass Panel
4 pcs
- 4 -
B
Glass Top Holder
4 pcs
C
Glass Bottom Holder
4 pcs
D
Screwdriver
1 pcs
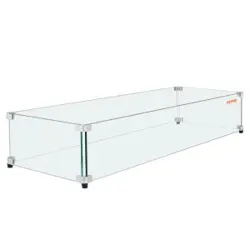
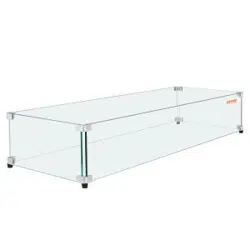
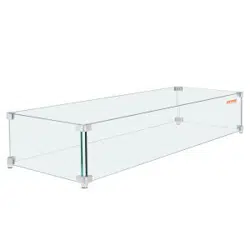
Model:FFB11#/FFB12#/FFB13#/FFB14#/ FFB15#
NO.
PIC
DESC
QTY
A
Long Glass Panel
2 pcs
B
Short Glass Panel
2 pcs
C
Glass Top Holder
4 pcs
D
Glass Bottom Holder
4 pcs
E
Screwdriver
1 pcs
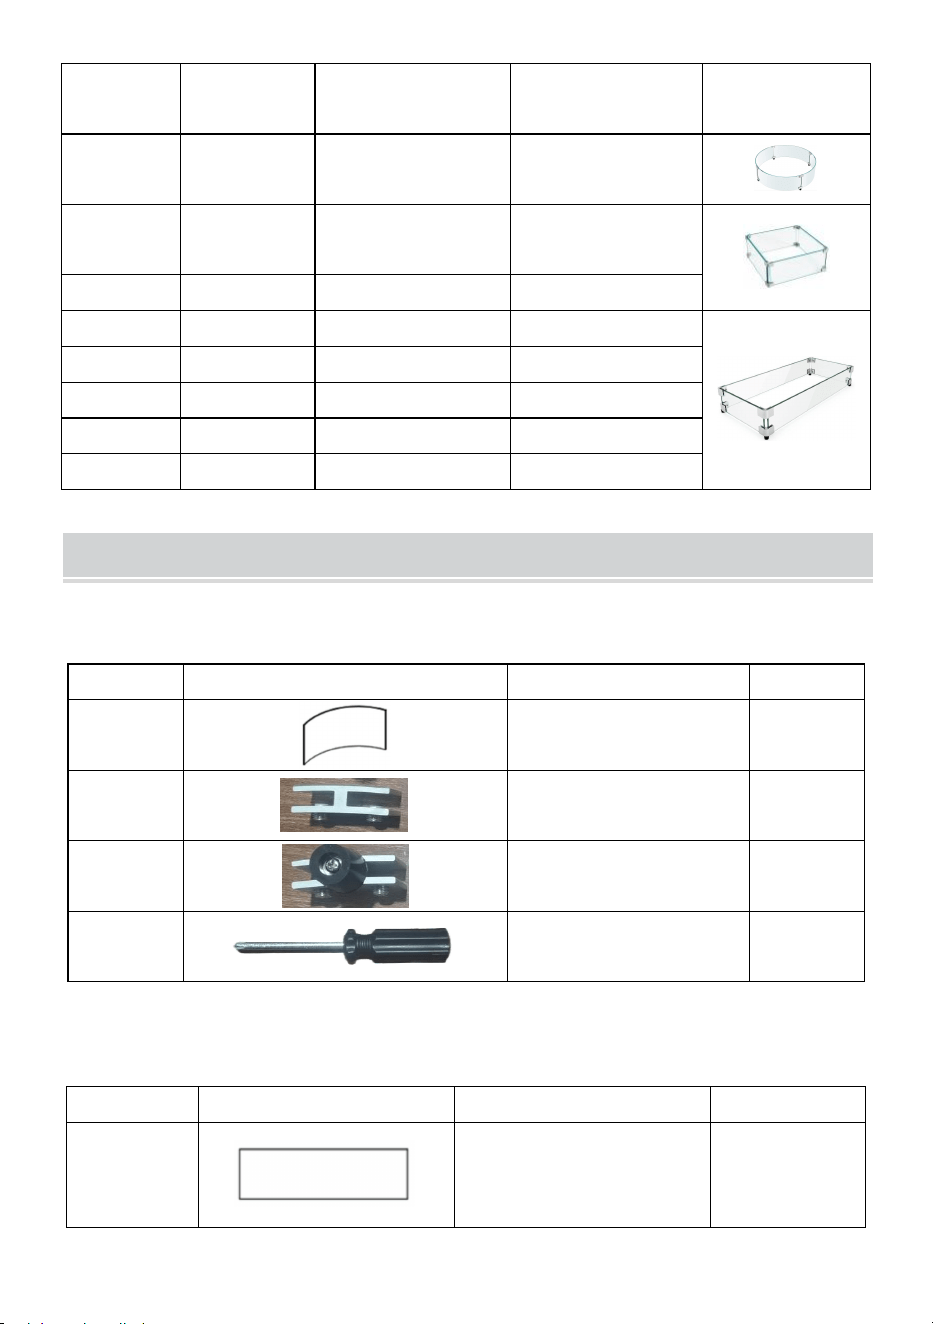
ASSEMBLY INSTRUCTIONS
Thanks for purchasing this quality product. Be sure to check all packing
materials carefully for small parts, which may have come loose inside the
carton during shipment. Identify and count all parts and compare with the
Hardware List above.
Easy to install, with several pieces of glass and corresponding fasteners.
Please keep the glass inserted into the firmware at the correct angle.
Properly tighten the screw to the glass can not shake can not be too tight to
cause damage to the glass.

- 5 -
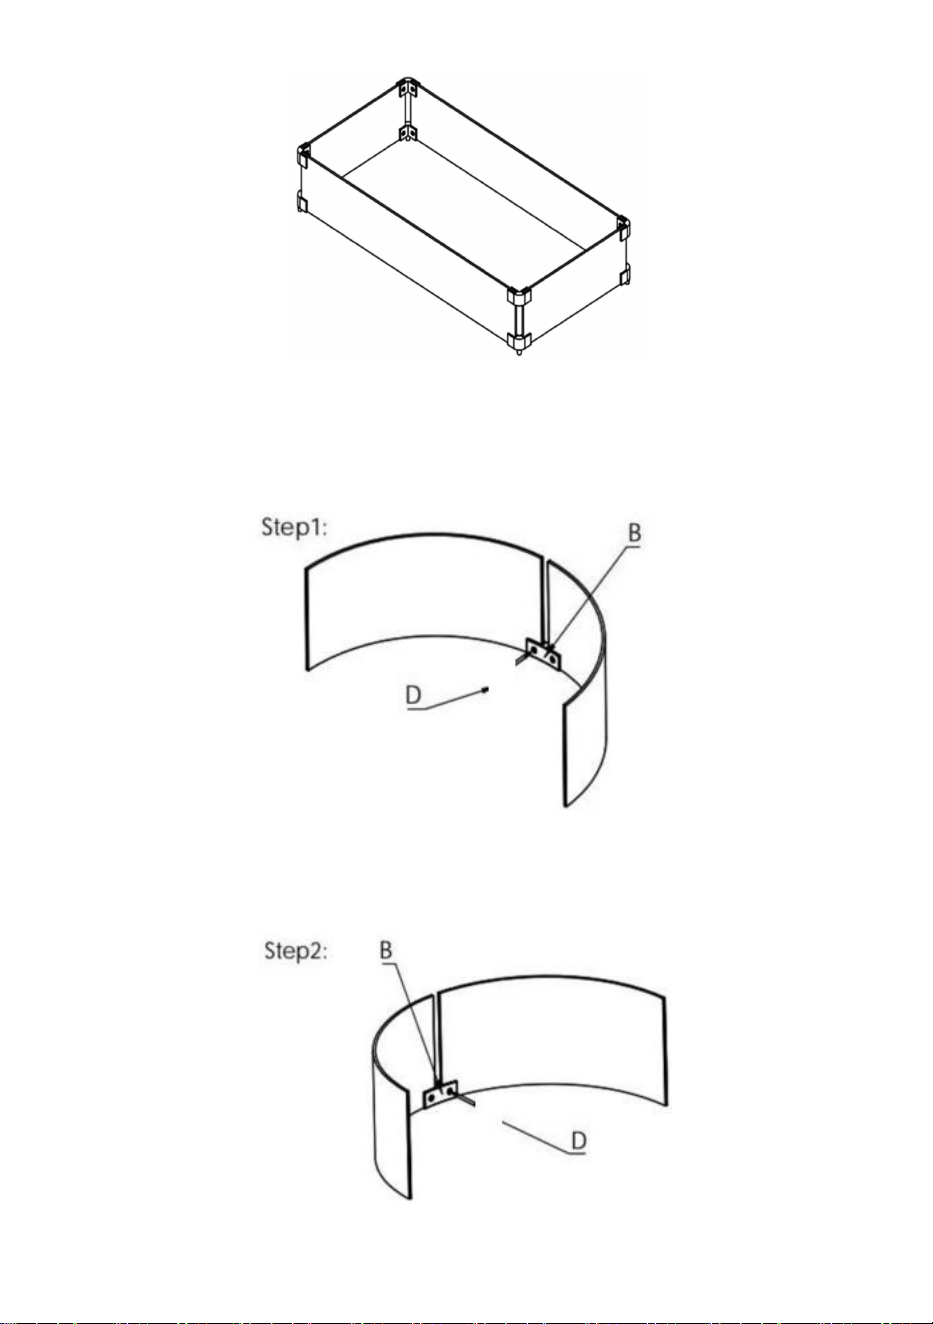
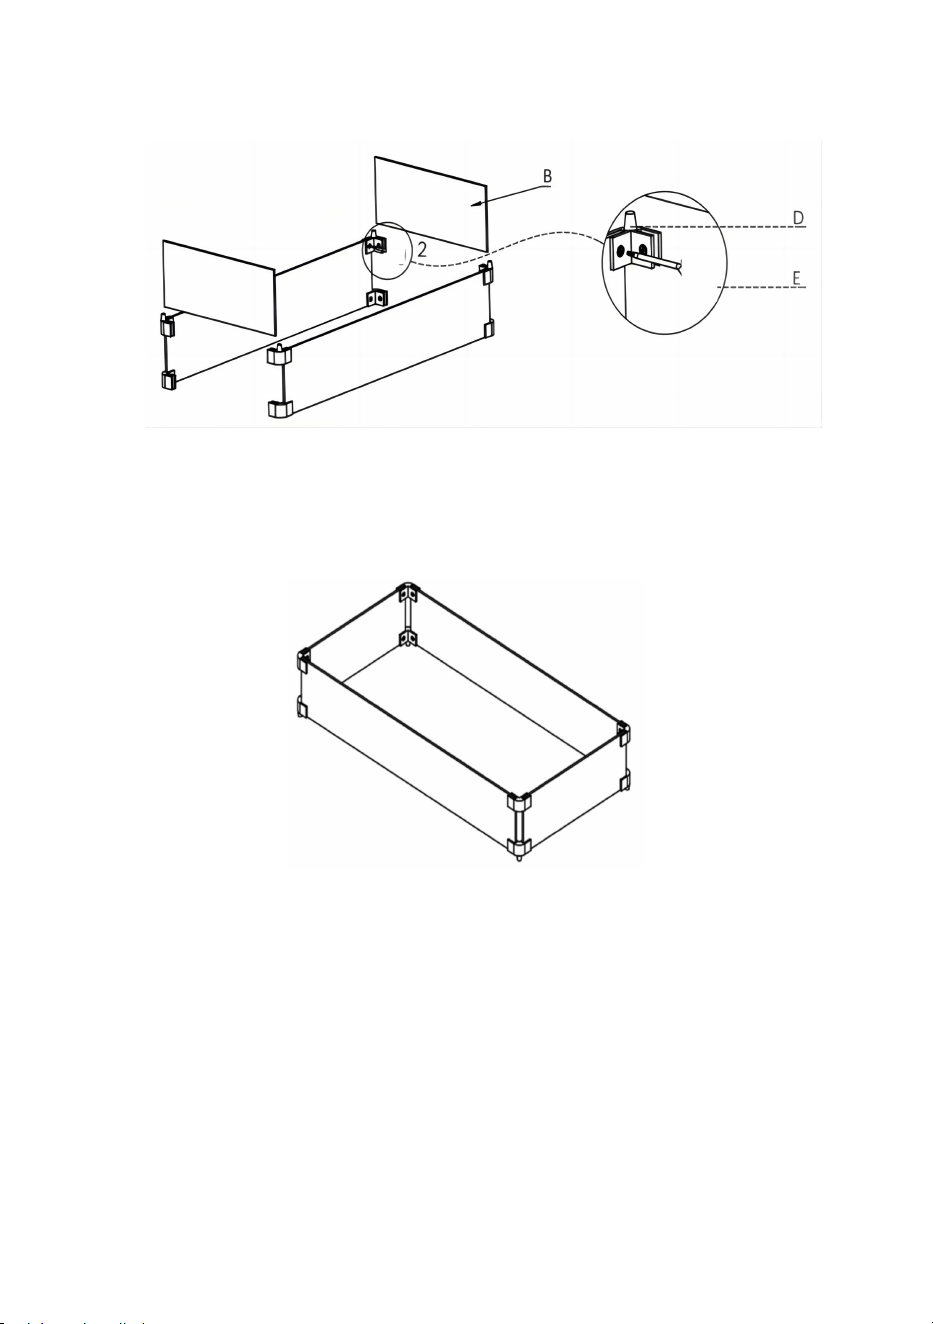
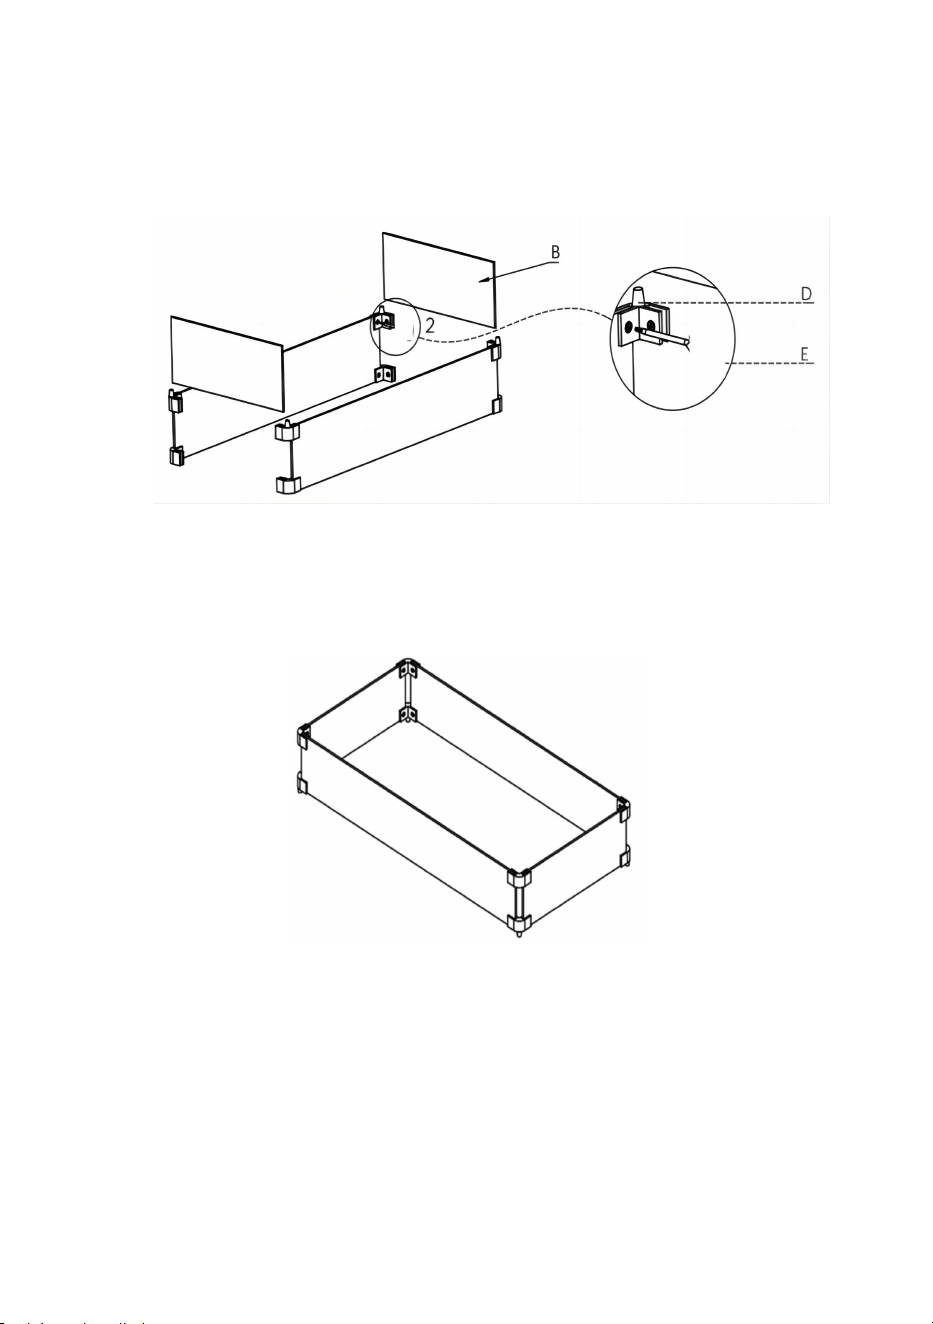
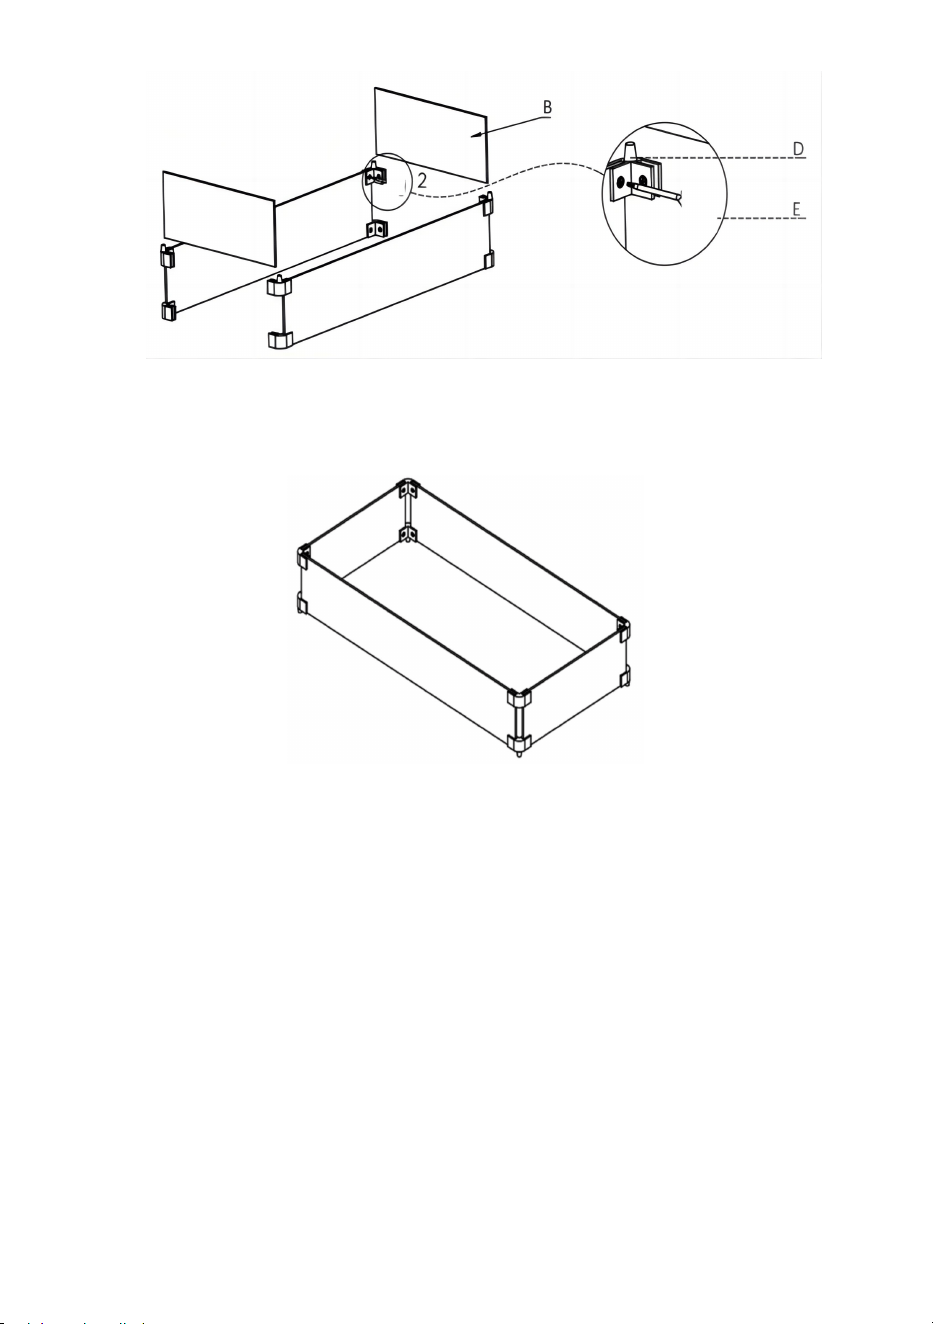
The assembly procedures of the three shape products are similar. Here we
take the rectangular one as an example. You can follow the same steps to
finish the assembly for the other products.
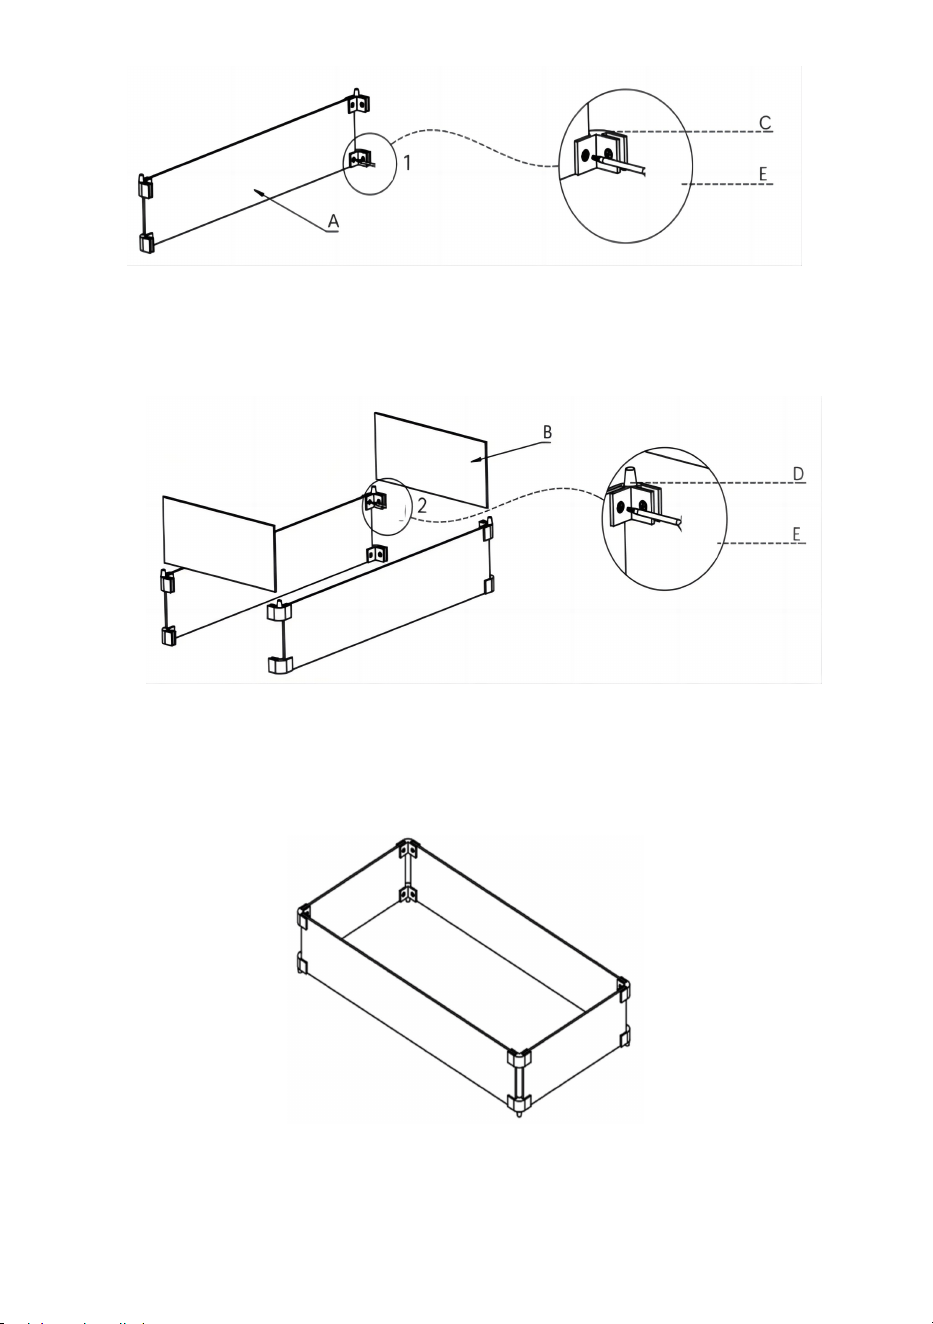
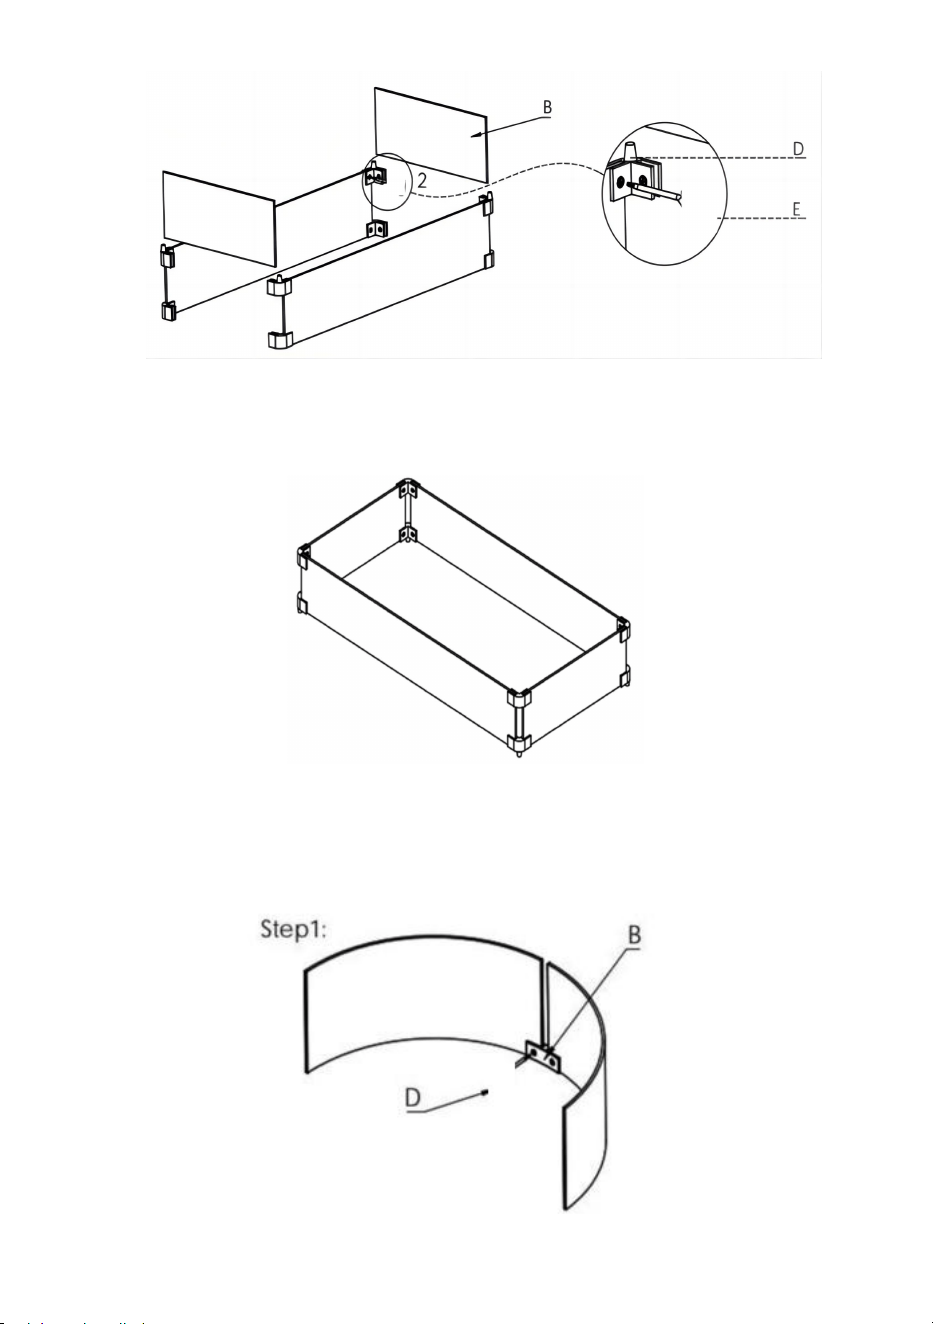
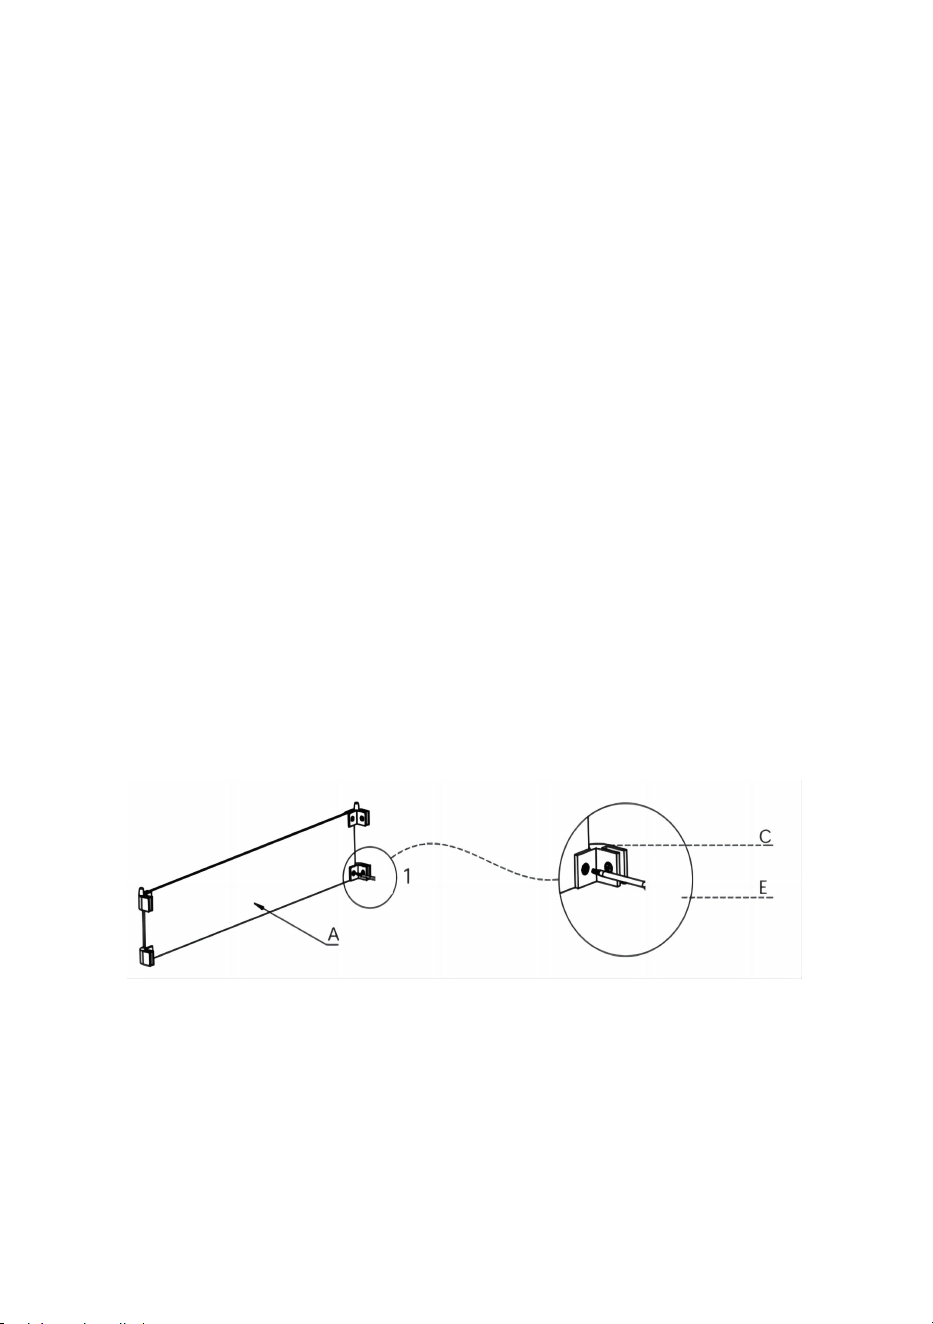
INSTALLTION
Step 1: Place the Long Glass panels(Part A) on a clean and soft surface as
a blanket or carpet. Assemble 2 Class Bottom Holders(Part D)and 2 Glass
Top Holders(Part C)to Long Glass Panels(Part A) by bolts and loosely
tighten with Screwdriver (Part E).
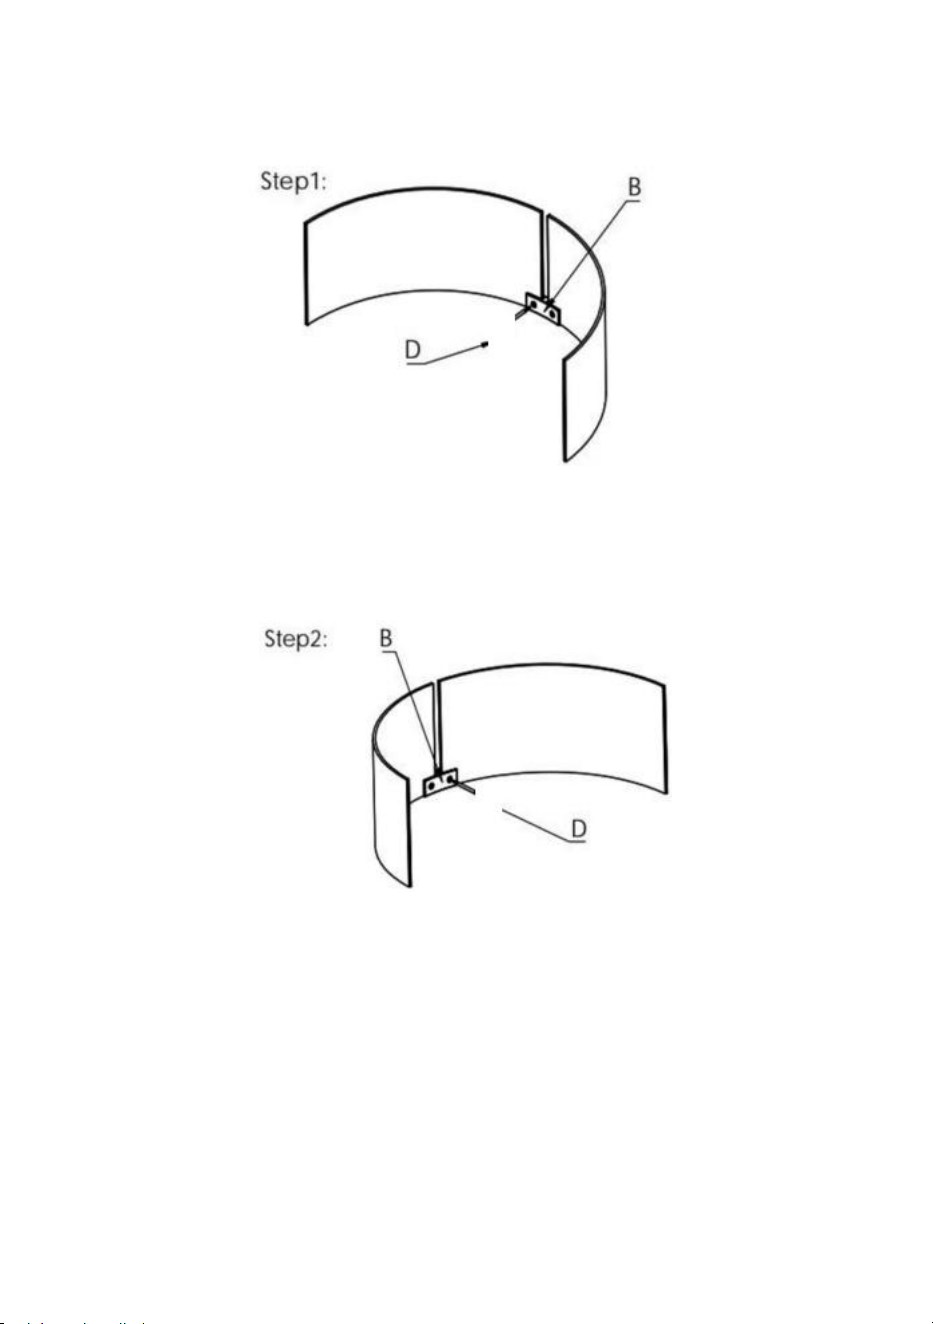
Step 2: Assemble the Short Glass Panels(Part B) to Long Glass Panels by
bolts and tighten with Screwdriver (Part
E).
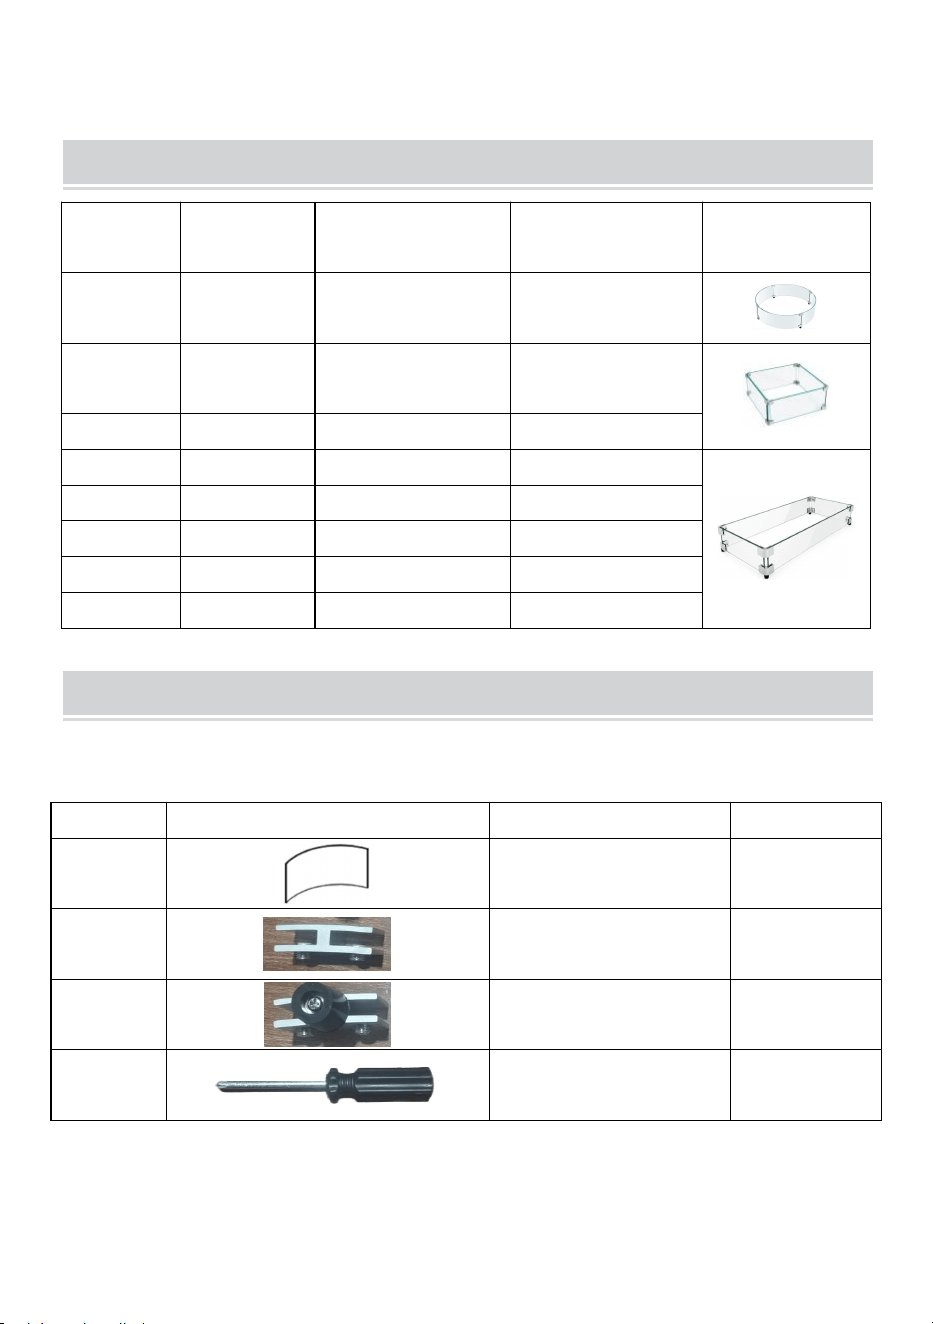
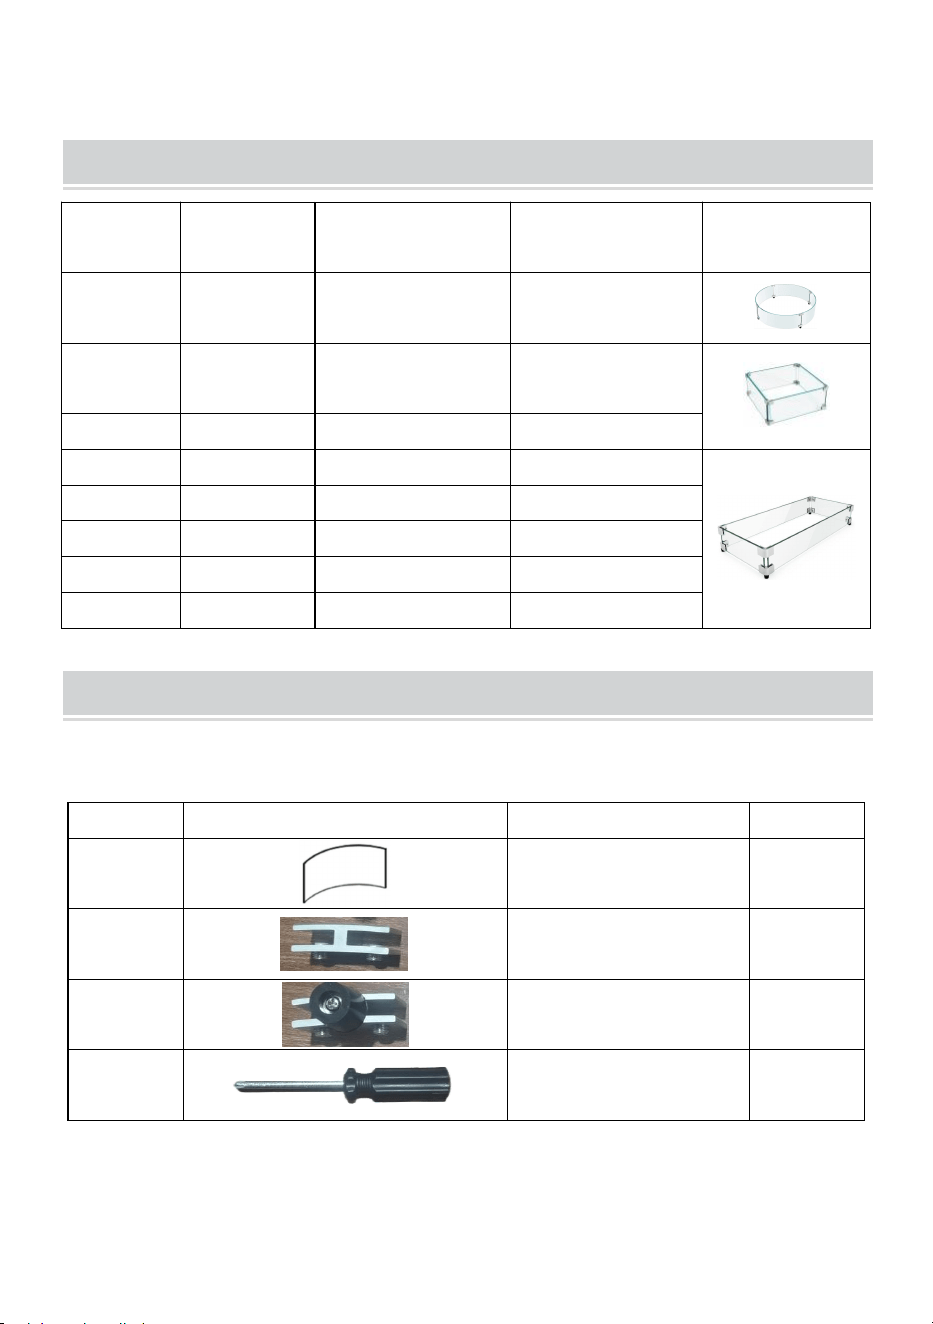
Step 3: After tightening all bolts, your product is ready for use.
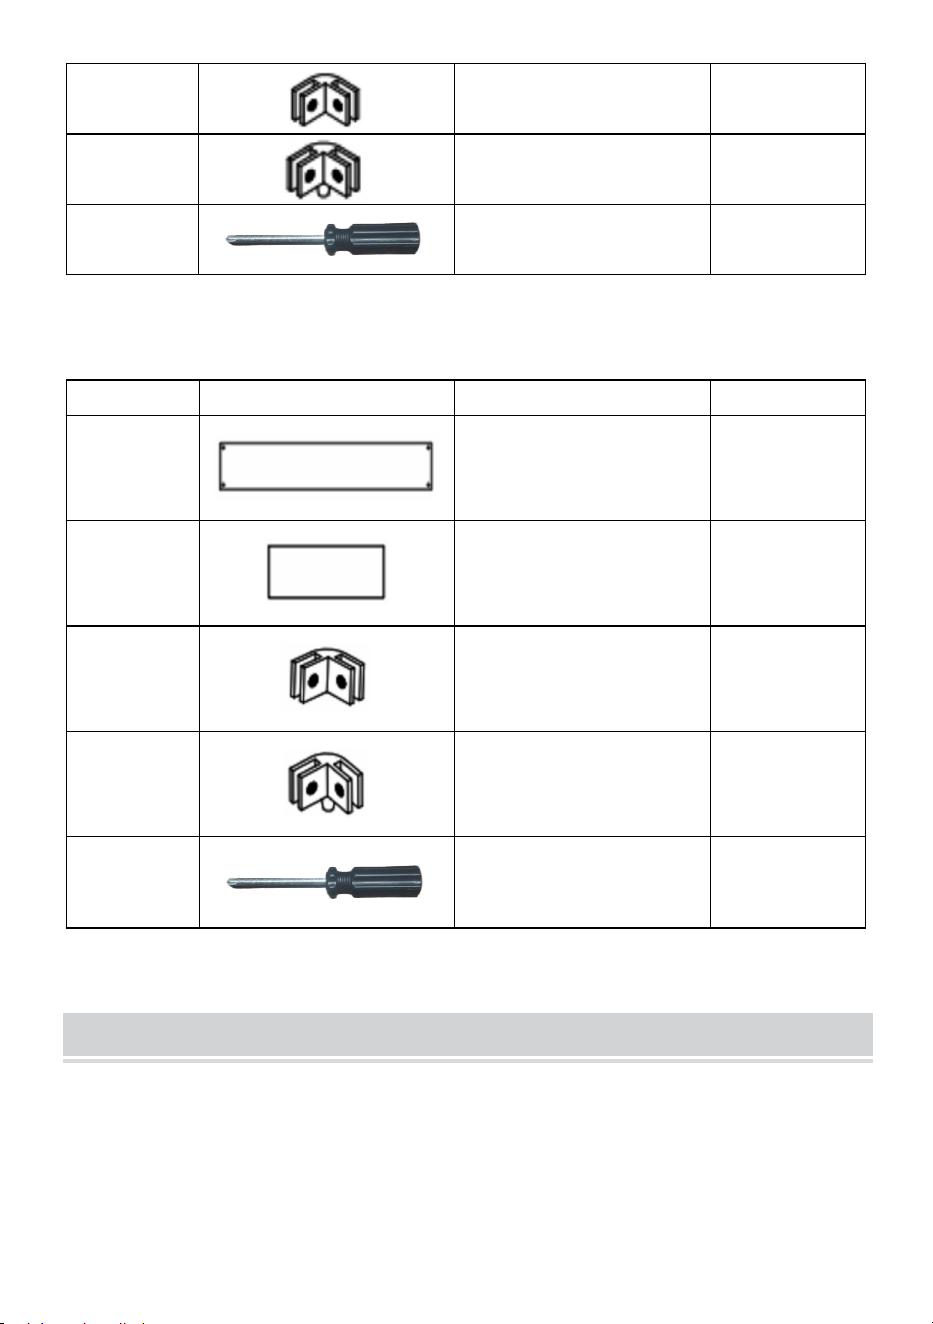
- 6 -
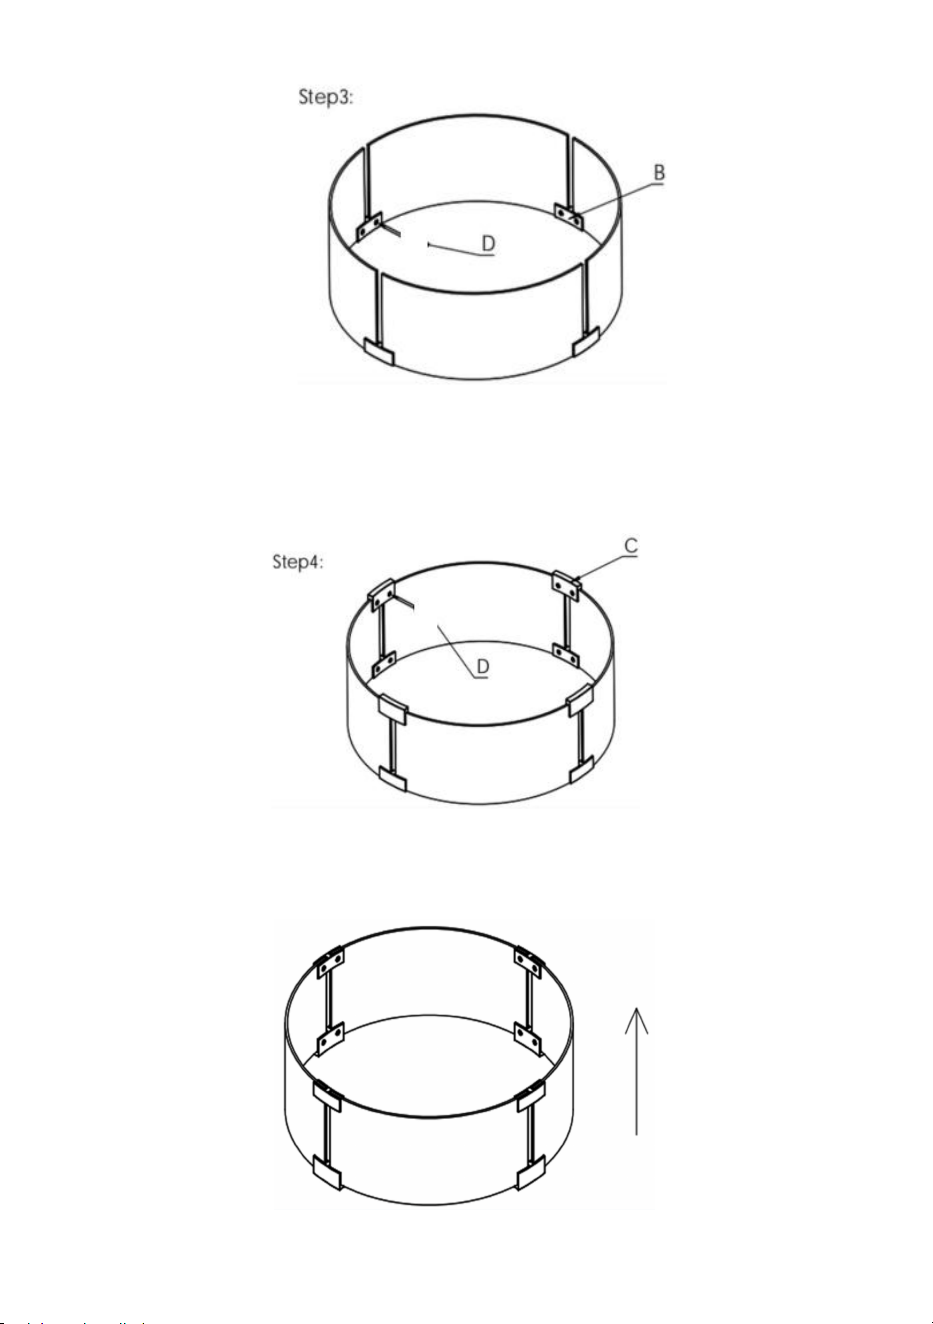
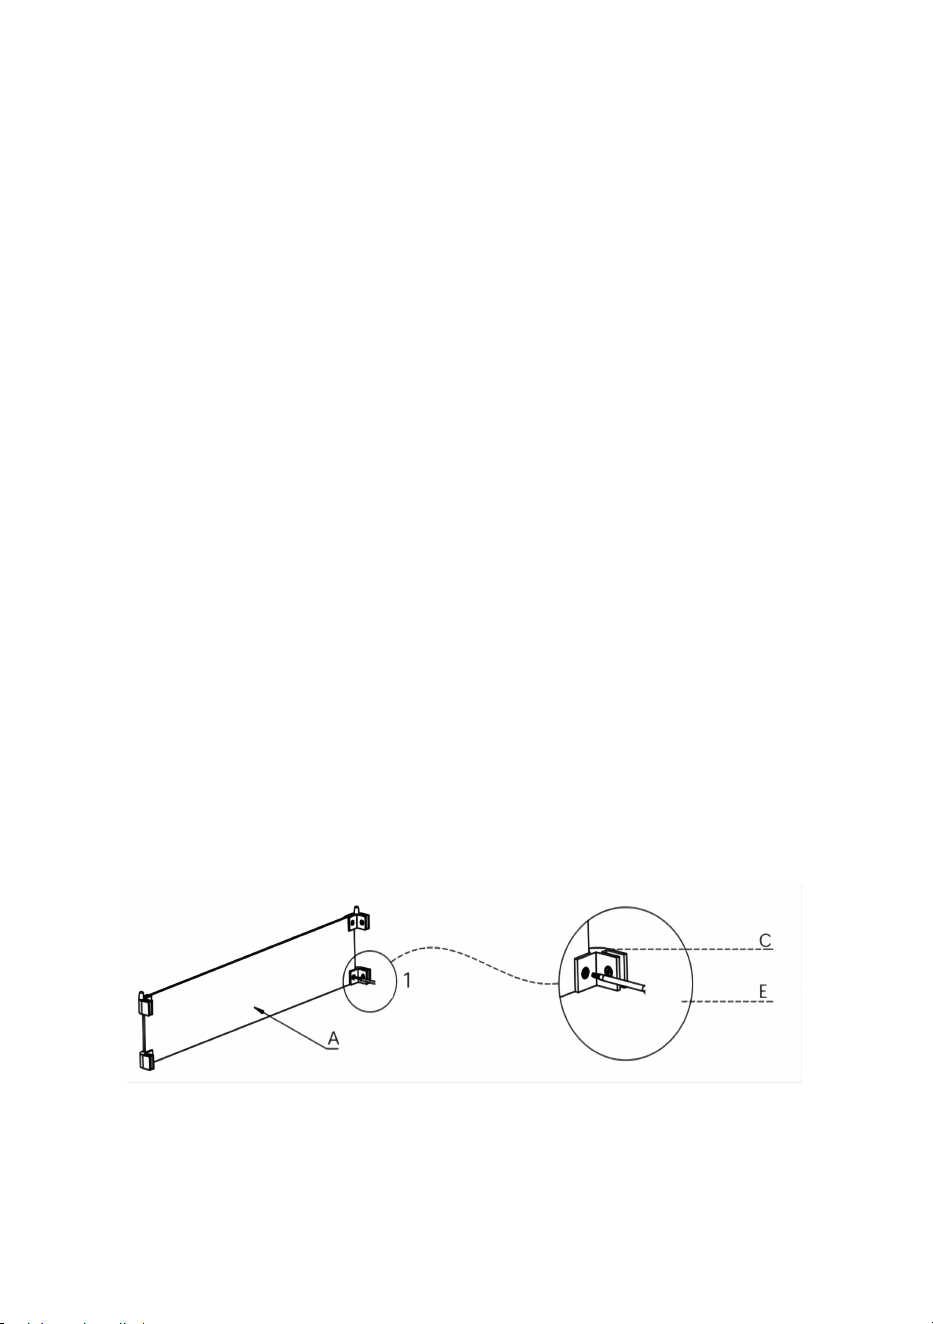
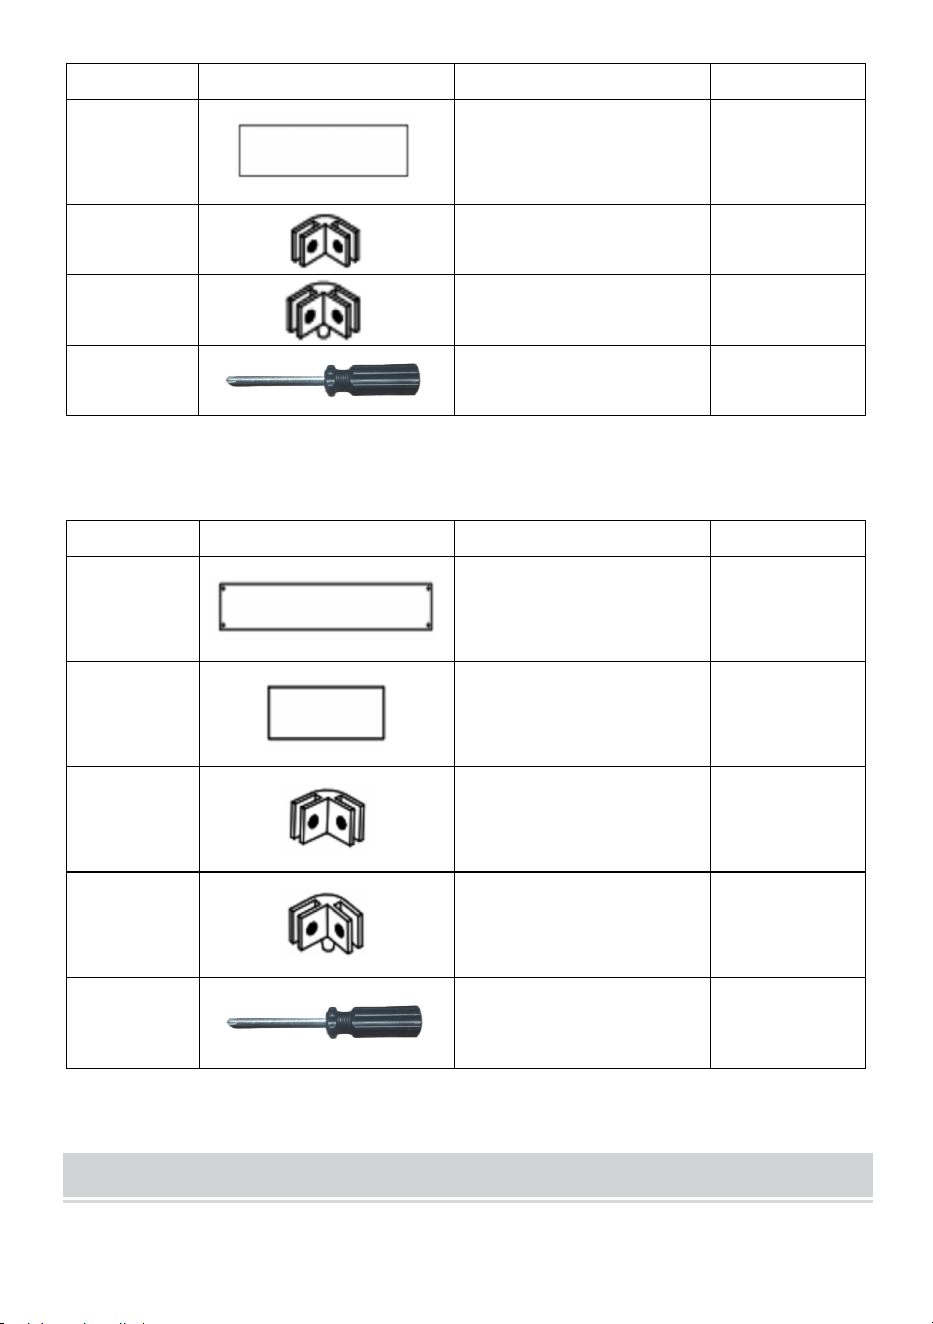
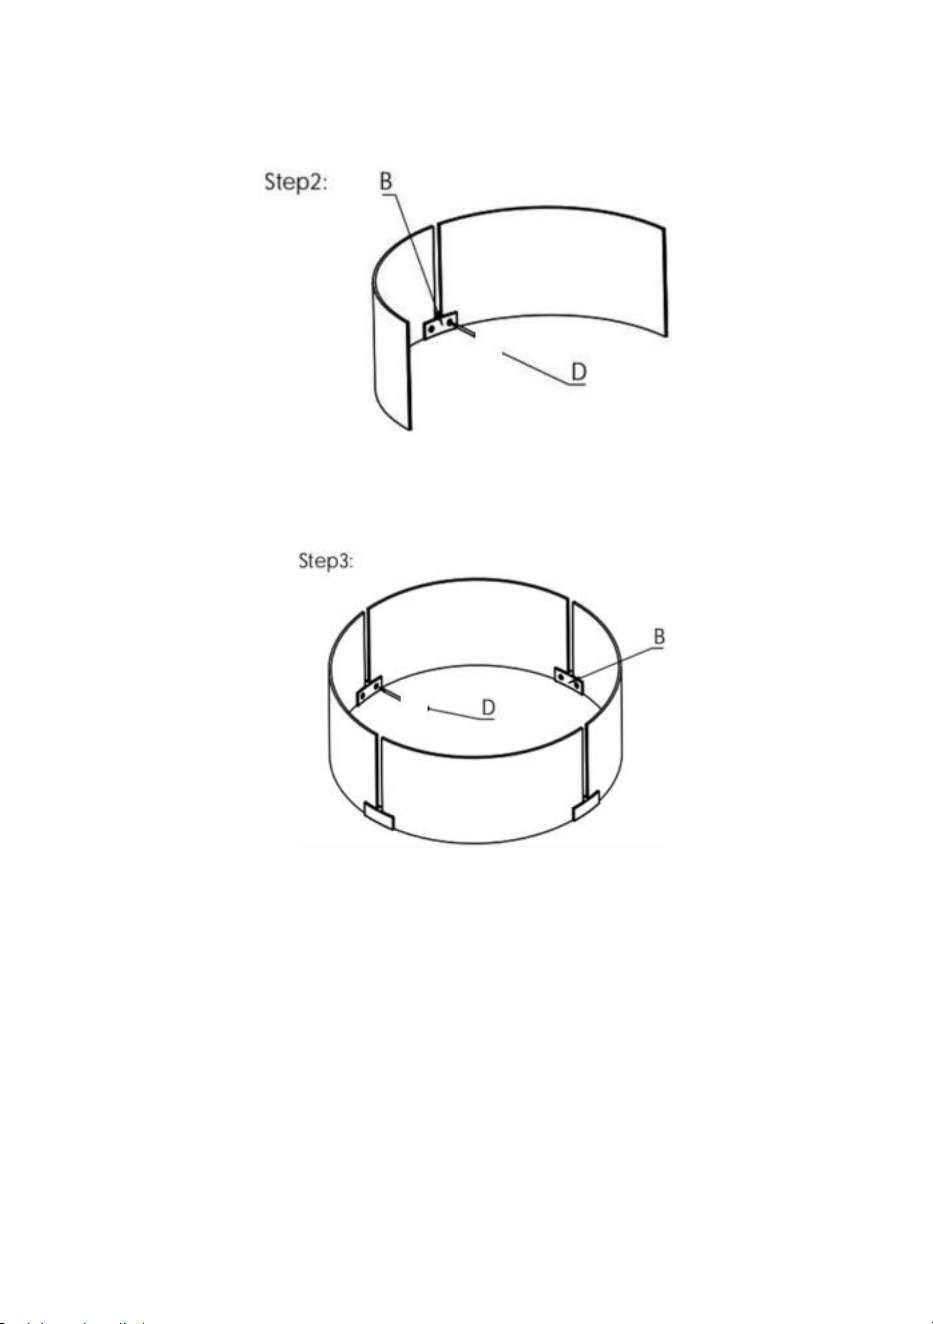
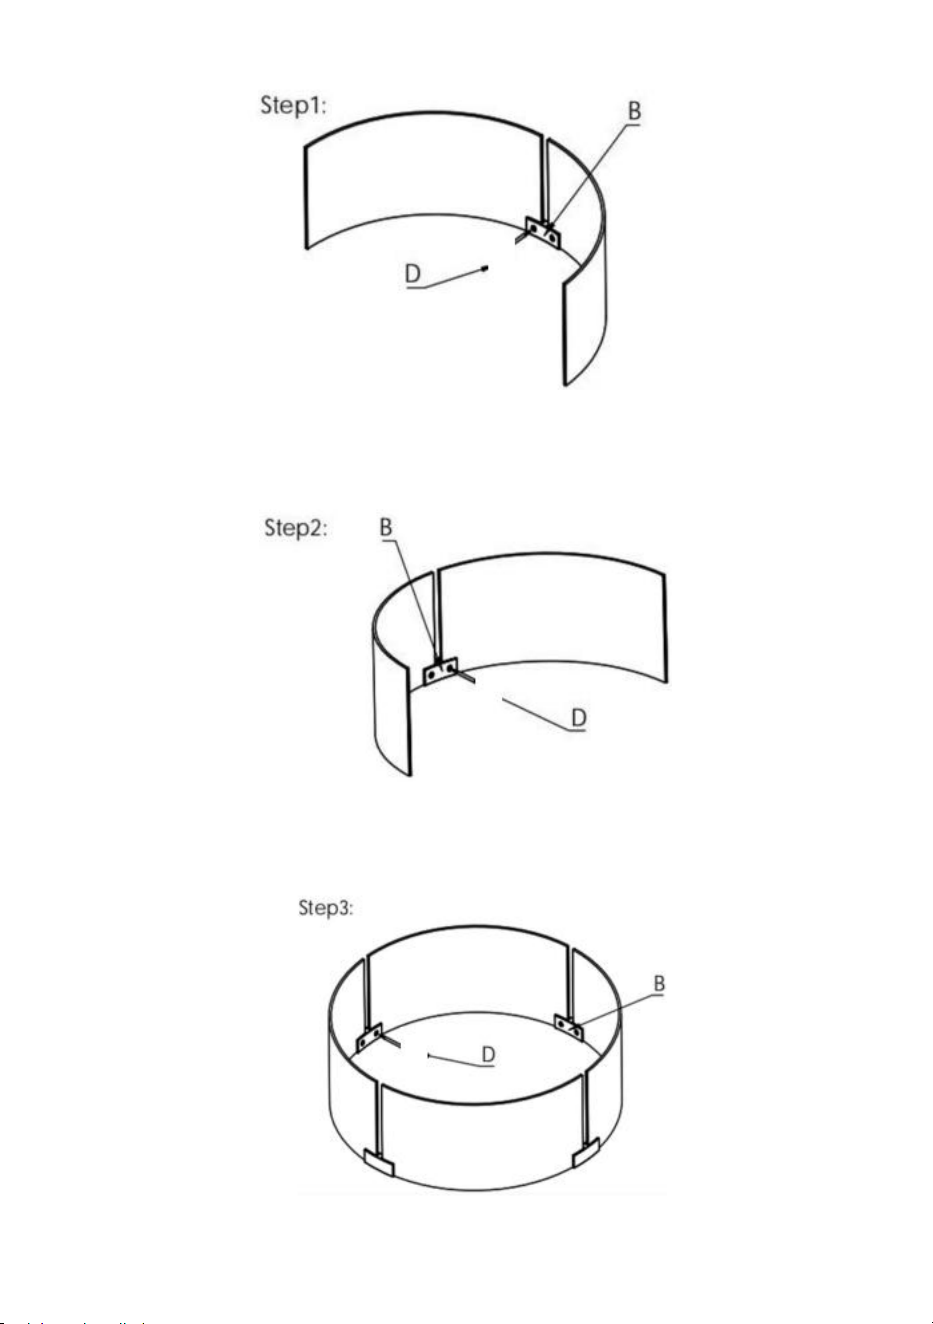
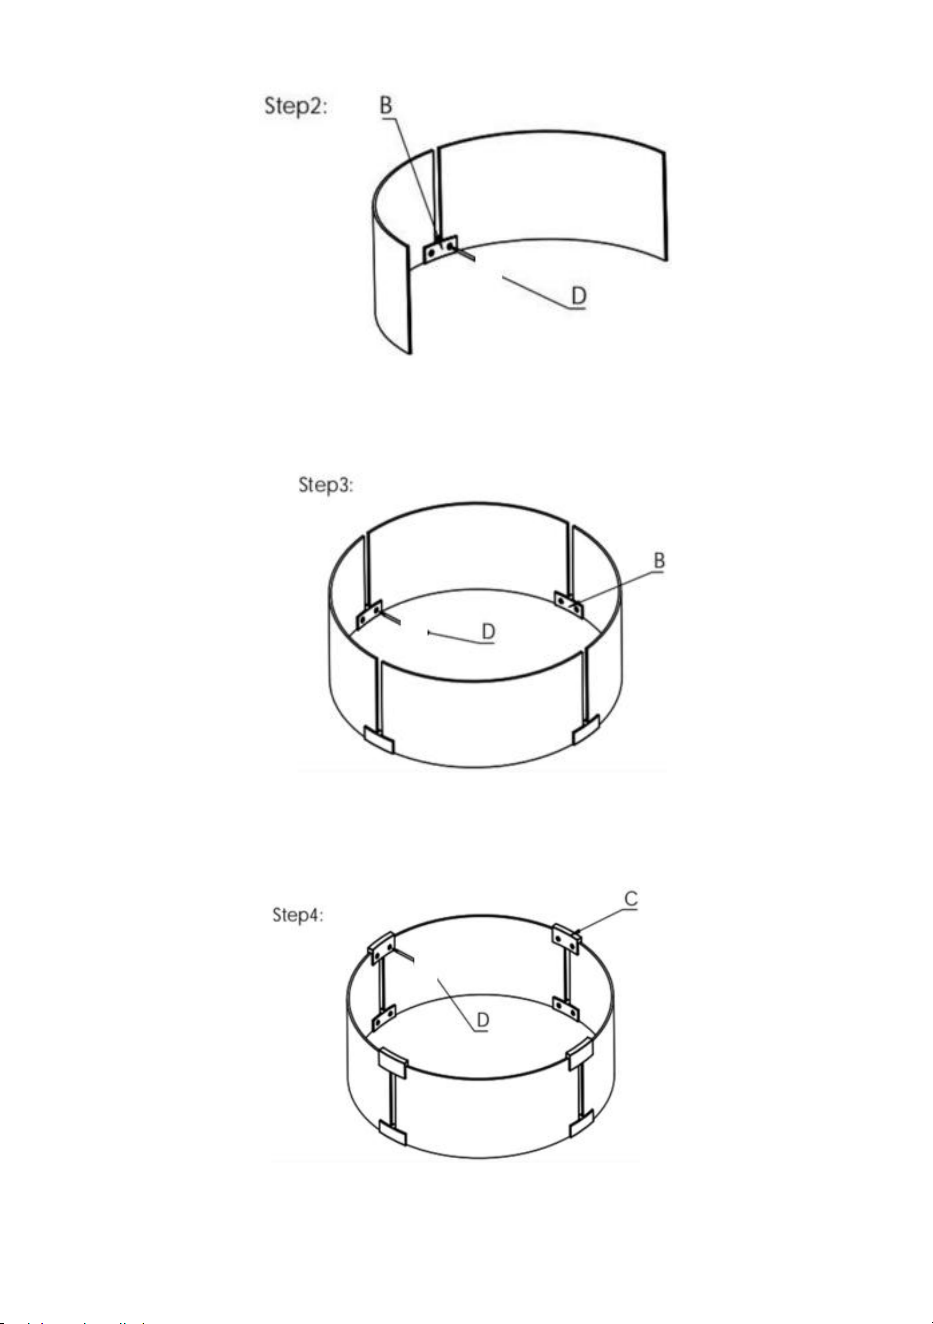
Step 1: Place the Glass Panels(Part A) on a clean and soft surface as a
blanket or carpet. Assemble the Glass Top Holder(Part B) to 2 Glass
Panels by bolts and loosely tighten with Screwdriver (Part D).
Step 2: Assemble the Glass Top Holder(Part B) to the remaining 2 Glass
Panels by bolts and loosely tighten with Screwdriver (Part D).
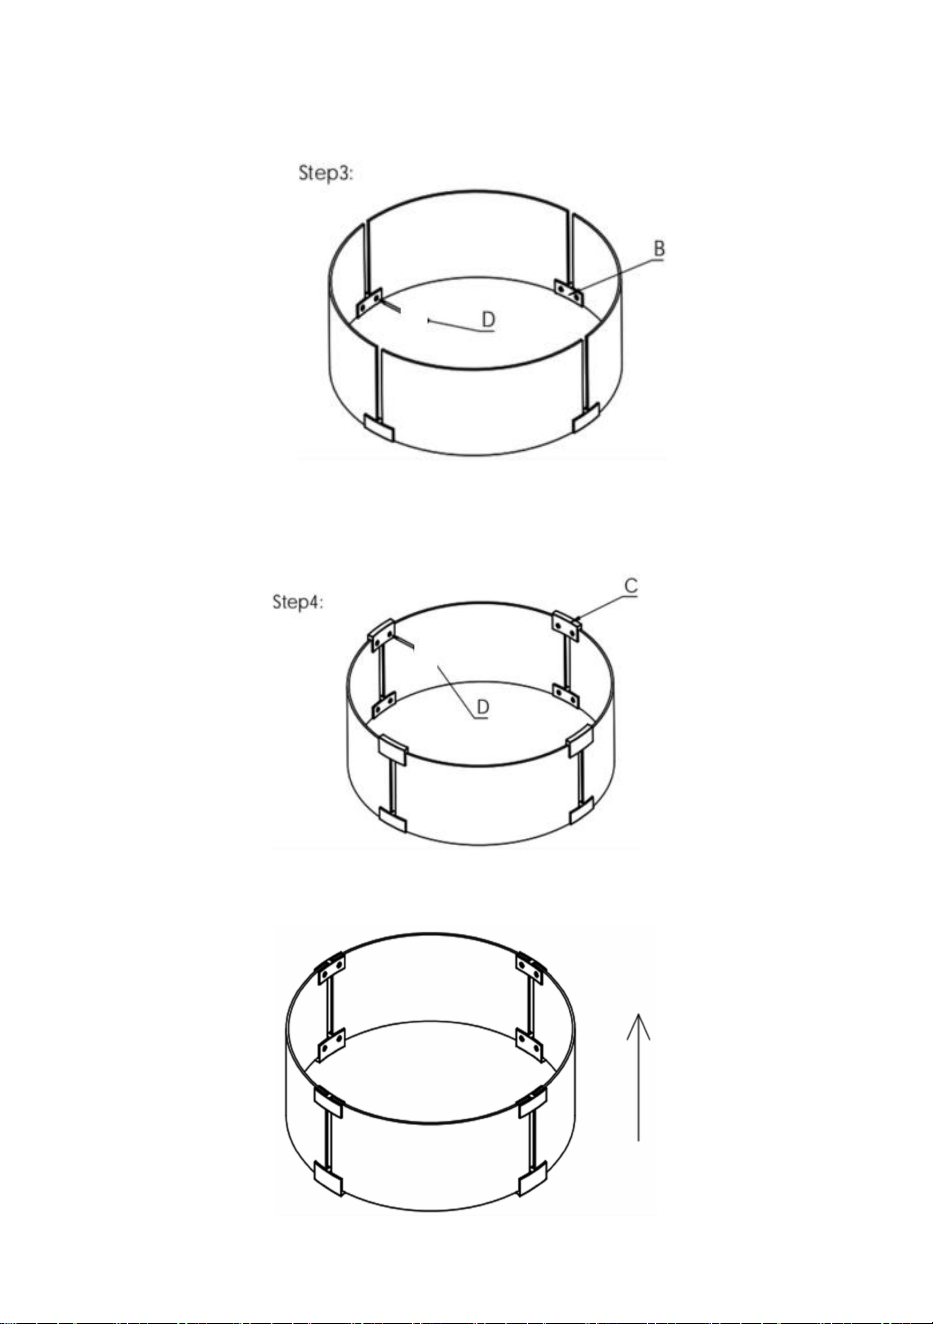
- 7 -
Step 3: Assemble 4 Glass Panels together by bolts and tighten with
Screwdriver (Part D).
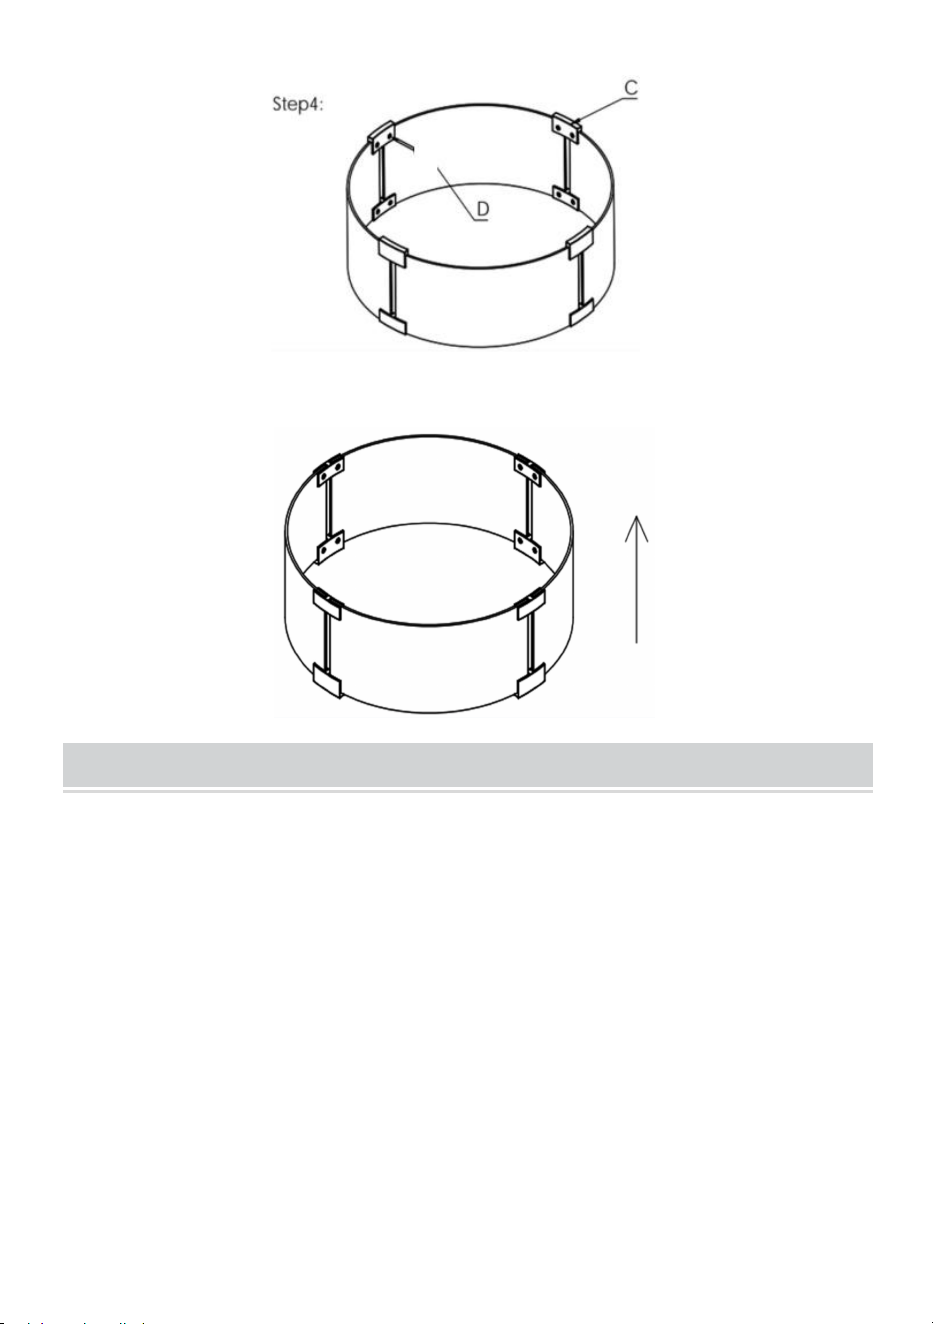
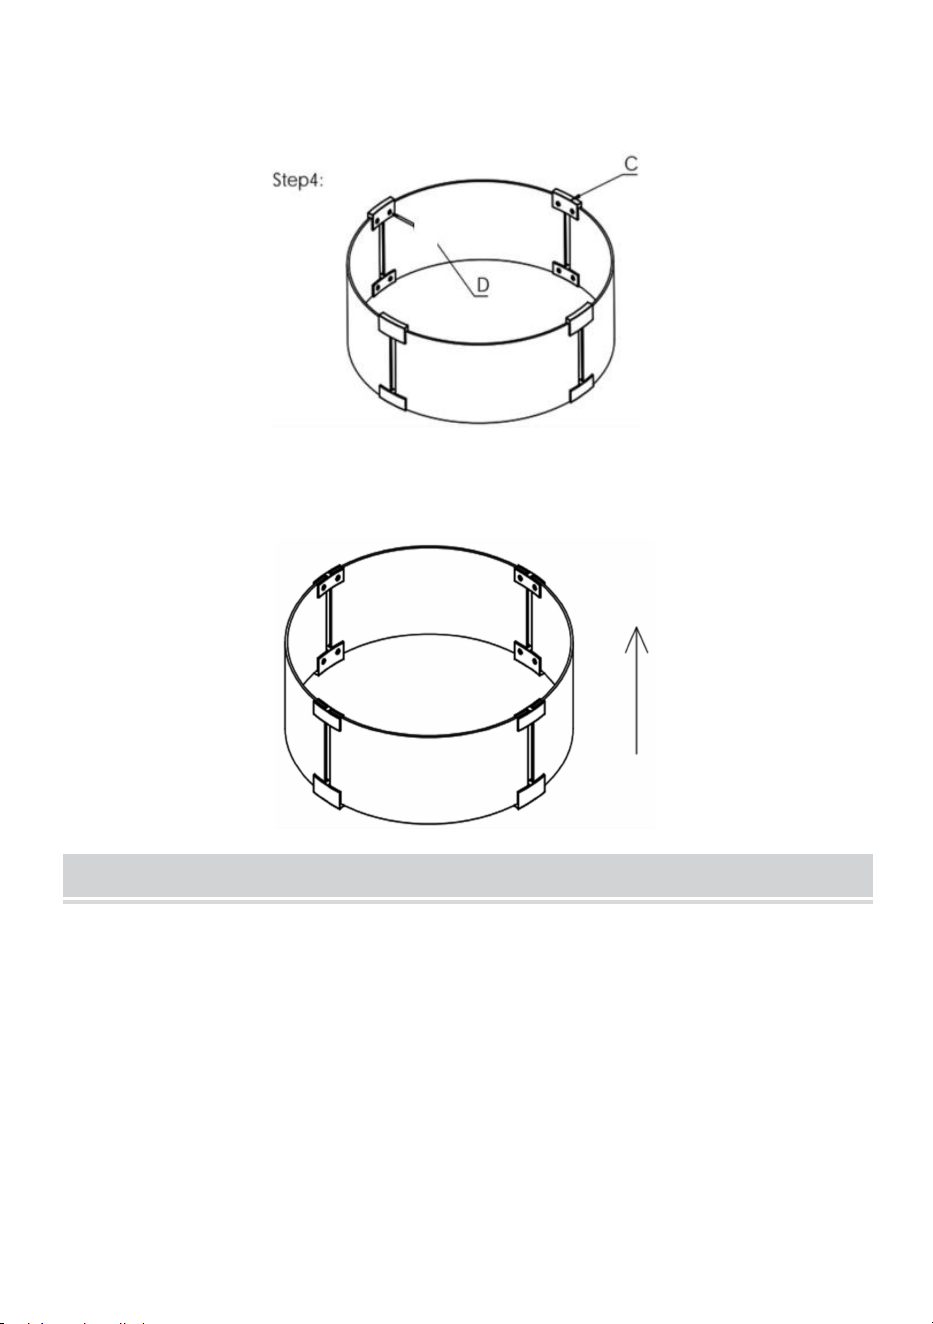
Step 4: Assemble the Glass Botom Holders(Part C) to the Glass Panels by
bolts and tighten with Screwdriver (Part D).
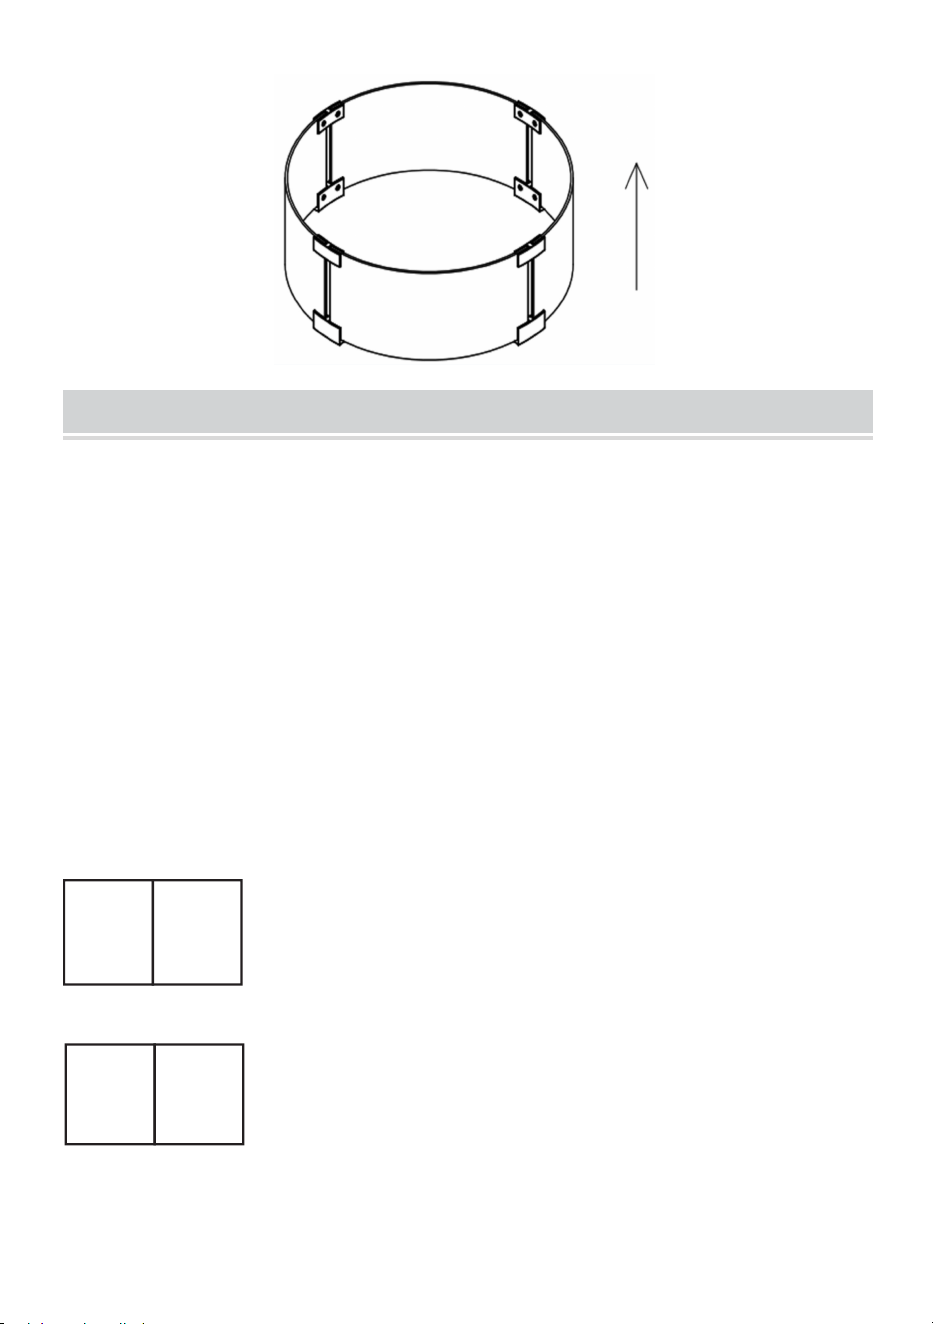
Step 5: After tightening all bolts, your product is ready for use.

- 8 -
CARE INSTRUCTIONS
Don't put the Flame Guard on an uneven surface.
Don’t cover with flammable materials.
Don’t touch during use to prevent burns.
Periodically check and make sure all bolts are fully tightened.
Address:Baoshanqu Shuangchenglu 803long 11hao 1602A-1609shi
Shanghai
Imported to AUS: SIHAO PTY LTD, 1 ROKEVA STREETEASTWOOD
NSW 2122 Australia
Imported to USA: Sanven Technology Ltd., Suite 250, 9166 Anaheim
Place, Rancho Cucamonga, CA 91730
REP
UK
Pooledas Group Ltd
Unit 5 Albert Edward House, The Pavilions
Preston, United Kingdom
REP
EC
SHUNSHUN GmbH
Römeräcker 9 Z2021, 76351
Linkenheim-Hochstetten, Germany
Made In China


Technique Assistance et certificat de garantie électronique
www.vevor.com/support
GARDE-FLAMME POUR FOYER
MODÈLE: ffb 18 # /FFB16 # /FFB17 #/FFB11 #/FFB12 #/FFB13 #/
FFB14#/FFB15#
We continue to be committed to provide you tools with competitive price.
"Save Half", "Half Price" or any other similar expressions used by us only represents an
estimate of savings you might benefit from buying certain tools with us compared to the major
top brands and does not necessarily mean to cover all categories of tools offered by us. You
are kindly reminded to verify carefully when you are placing an order with us if you are
actually saving half in comparison with the top major brands.


- 1 -
MODÈLE : FFB 18# /FFB16
#/FFB17#/FFB11#/FFB12#/FFB13#/FFB14#/FFB15#.
Have product questions? Need technical support? Please feel free to
contact us:
Technical Support and E-Warranty Certificate
www.vevor.com/support
NEED HELP? CONTACT US!
This is the original instruction, please read all manual instructions
carefully before operating. VEVOR reserves a clear interpretation of our
user manual. The appearance of the product shall be subject to the
product you received. Please forgive us that we won't inform you again if
there are any technology or software updates on our product.
FIRE PIT FLAME GUARD

- 2 -
GARANTIES IMPORTANTES
AVERTISSEMENT : Lisez et comprenez l'intégralité de ce
manuel avant d'utiliser ou d'entretenir ce produit. Le
non-respect de ces avertissements et instructions peut
entraîner des blessures corporelles ou des dommages à des
biens de valeur.
• Évitez que les enfants utilisent des guides de remorque de bateau . Et ce
produit n’est pas un jouet. Ne laissez pas les enfants jouer .
• Tenir à l'écart des pointes tranchantes, des lames et autres objets .
• Précautions de montage .
Assemblez uniquement selon ces instructions. Un assemblage incorrect
peut créer des dangers.
2. Portez des lunettes de sécurité approuvées par l'ANSI et des gants de
travail robustes pendant l'assemblage.
3. Gardez la zone de montage propre et bien éclairée.
4. Gardez les spectateurs hors de la zone pendant l'assemblage.
5. Ne vous rassemblez pas lorsque vous êtes fatigué ou sous l'influence
de l'alcool, de drogues ou de médicaments.
6. Les capacités du produit s'appliquent uniquement au produit
correctement et complètement assemblé.
7. Pour plus d'informations concernant les pièces répertoriées dans les
pages suivantes, veuillez vous référer au schéma d'assemblage de ce
manuel. Déballez et séparez toutes les pièces dans une zone de travail
propre. Veuillez conserver les petites pièces de rechange hors de portée
des enfants.
CONSERVEZ CES INSTRUCTIONS
PRODUCT INTRODUCTION
• La clôture pare-vent en verre trempé est fabriquée en verre trempé
résistant à la chaleur. Les clips de liaison en aluminium offrent une
connexion ferme et un support stable.
- 3 -
• Installez-le autour de votre table de feu et aidez à bloquer la brise pour
compromettre votre feu et profiter d'une flamme constante ! Un foyer
indispensable pour se fondre dans votre terrasse et votre jardin.
PRODUCT PAREMETERS
Modèle
Forme
Dimensions
LxlxH(mm)
épaisseur du
panneau (mm)
Image _
ffb 18#
rond
740*740*214
6
FFB16#
carré
4 9 3*4 9 3*1
91
8
FFB17#
carré
543*543*191
8
FFB11#
rectangle
748*340*165
8
FFB12#
rectangle
773*367*191
8
FFB13#
rectangle
798*317*165
8
FFB14#
rectangle
924*417*191
8
FFB15#
rectangle
1128*367*191
8
PACKAGE INCLUDE
Modèle : ffb 18#
NON
PIC
DESC
QTÉ
UN
Panneau de verre
4
pièces
B
Support supérieur
en verre
4
pièces
C
Support de fond en
verre
4
pièces
D
Tournevis
1 PCS
Modèle: FFB16 #/FFB17 #
- 4 -
NON.
PIC
DESC
QTÉ
UN
Panneau de verre
4 pièces
B
Support supérieur en
verre
4 pièces
C
Support de fond en
verre
4 pièces
D
Tournevis
1 PCS
Modèle : FFB11#/FFB12#/FFB13#/FFB14#/FFB15#
NON.
PIC
DESC
QTÉ
UN
Panneau de verre
long
2 pièces
B
Panneau de verre
court
2 pièces
C
Support supérieur en
verre
4 pièces
D
Support de fond en
verre
4 pièces
E
Tournevis
1 PCS

- 5 -
ASSEMBLY INSTRUCTIONS
Merci d'avoir acheté ce produit de qualité. Assurez-vous de vérifier
soigneusement tous les matériaux d'emballage pour détecter les petites
pièces qui pourraient s'être détachées à l'intérieur du carton pendant le
transport. Identifiez et comptez toutes les pièces et comparez-les avec la
liste du matériel ci-dessus.
Facile à installer, avec plusieurs morceaux de verre et fixations
correspondantes .
Veuillez maintenir le verre inséré dans le firmware dans le bon angle .
Serrez correctement la vis pour que le verre ne puisse pas trembler et ne
puisse pas être trop serré pour endommager le verre .
Les procédures d'assemblage des trois Les produits de forme sont
similaires . Ici, nous prenons le modèle rectangulaire comme exemple. Tu
peux suivez les mêmes étapes pour terminer l'assemblage des autres
produits .
INSTALLATION
Étape 1 : placez les panneaux de verre longs (partie A) sur une surface
propre et douce comme une couverture ou un tapis. Assemblez les
supports inférieurs de 2 classes (partie D) et les supports supérieurs en
verre (partie C) sur les panneaux de verre longs (partie A) à l'aide de
boulons et serrez sans serrer avec un tournevis (partie E).
- 6 -
Étape 2 : Assemblez les panneaux de verre courts (partie B) aux panneaux
de verre longs à l'aide de boulons et serrez avec un tournevis (partie
E) .
Étape 3 : Après avoir serré tous les boulons, votre produit est prêt à
l'emploi .
Étape 1 : placez les panneaux de verre (partie A) sur une surface propre et
douce comme une couverture ou un tapis. Assemblez le support supérieur
en verre (partie B) aux 2 panneaux de verre à l'aide de boulons et serrez
sans serrer avec un tournevis (partie D).

- 7 -
Étape 2 : Assemblez le support supérieur en verre (partie B) aux 2
panneaux de verre restants à l'aide de boulons et serrez sans serrer avec
un tournevis (partie D).
Étape 3 : Assemblez les 4 panneaux de verre ensemble à l'aide de
boulons et serrez avec un tournevis (pièce D) .
- 8 -
Étape 4 : Assemblez les supports inférieurs en verre (partie C) aux
panneaux de verre à l'aide de boulons et serrez avec un tournevis (partie
D) .
Étape 5 : Après avoir serré tous les boulons, votre produit est prêt à
l'emploi.

- 9 -
CARE INSTRUCTIONS
Ne placez pas le pare-flammes sur une surface inégale .
Ne couvrez pas avec des matériaux inflammables.
Ne touchez pas pendant l'utilisation pour éviter les brûlures .
Vérifiez périodiquement et assurez-vous que tous les boulons sont
complètement serrés.
Adresse : Baoshanqu Shuangchenglu 803long 11hao 1602A-1609shi
Shanghai
Importé en Australie : SIHAO PTY LTD, 1 ROKEVA STREETASTWOOD
NSW 2122 Australie
Importé aux États-Unis : Sanven Technology Ltd., Suite 250, 9166
Anaheim Place, Rancho Cucamonga, CA 91730
REP
UK
Pooledas Group Ltd
Unit 5 Albert Edward House, The Pavilions
Preston, United Kingdom
REP
EC
SHUNSHUN GmbH
Römeräcker 9 Z2021, 76351
Linkenheim-Hochstetten, Germany
Fabriqué en Chine


Technisch Support- und E-Garantie-Zertifikat www.vevor.com/support
FEUERSTELLEN-FLAMMENSCHUTZ
MODELL: ffb 18# /FFB16 # /FFB17#/FFB11#/FFB12#/FFB13#/
FFB14#/FFB15#
We continue to be committed to provide you tools with competitive price.
"Save Half", "Half Price" or any other similar expressions used by us only represents an
estimate of savings you might benefit from buying certain tools with us compared to the major
top brands and does not necessarily mean to cover all categories of tools offered by us. You
are kindly reminded to verify carefully when you are placing an order with us if you are
actually saving half in comparison with the top major brands.


- 1 -
MODELL: ffb 18# /FFB16# /FFB17#/FFB11#/FFB12#/FFB13#/FFB14#/
FFB15#
Have product questions? Need technical support? Please feel free to
contact us:
Technical Support and E-Warranty Certificate
www.vevor.com/support
NEED HELP? CONTACT US!
This is the original instruction, please read all manual instructions
carefully before operating. VEVOR reserves a clear interpretation of our
user manual. The appearance of the product shall be subject to the
product you received. Please forgive us that we won't inform you again if
there are any technology or software updates on our product.
FIRE PIT FLAME GUARD

- 2 -
WICHTIGE SICHERHEITSMASSNAHMEN
WARNUNG: Lesen und verstehen Sie dieses gesamte
Handbuch, bevor Sie dieses Produkt in Betrieb nehmen oder
warten. Die Nichtbeachtung dieser Warnungen und
Anweisungen kann zu Verletzungen oder Sachschäden
führen.
• Vermeiden Sie, dass Kinder Bootsanhängerführer benutzen . Und dieses
Produkt ist kein Spielzeug. Lassen Sie Kinder nicht spielen .
• Von scharfen Spitzen, Klingen und anderen Gegenständen fernhalten .
• Vorsichtsmaßnahmen bei der Montage .
Montieren Sie es nur gemäß dieser Anleitung. Durch unsachgemäße
Montage können Gefahren entstehen.
2. Tragen Sie während der Montage eine ANSI-zugelassene Schutzbrille
und strapazierfähige Arbeitshandschuhe.
3. Halten Sie den Montagebereich sauber und gut beleuchtet.
4. Halten Sie während der Montage unbeteiligte Personen aus dem
Bereich fern.
5. Bauen Sie das Gerät nicht auf, wenn Sie müde sind oder unter dem
Einfluss von Alkohol, Drogen oder Medikamenten stehen.
6. Die Produkteigenschaften gelten nur für ordnungsgemäß und
vollständig montierte Produkte.
7. Weitere Informationen zu den auf den folgenden Seiten aufgeführten
Teilen finden Sie im Montagediagramm dieser Anleitung. Packen Sie alle
Teile aus und trennen Sie sie an einem sauberen Arbeitsplatz. Bitte
bewahren Sie kleine Ersatzteile außerhalb der Reichweite von Kindern auf.
ANLEITUNG AUFBEWAHREN
PRODUCT INTRODUCTION
• Der Windschutzzaun aus gehärtetem Glas besteht aus gehärtetem,
hitzebeständigem Glas. Verbindungsklammern aus Aluminium bieten eine
feste Verbindung und stabilen Halt.
- 3 -
• Platzieren Sie ihn rund um Ihren Feuertisch und helfen Sie dabei, die
Brise zu blockieren, um Ihr Feuer zu beeinträchtigen und eine
gleichmäßige Flamme zu genießen! Ein unverzichtbares
Feuerstellenzubehör, das sich harmonisch in Ihre Terrasse und Ihren
Garten einfügt.
PRODUCT PAREMETERS
Modell
Form
Maße
LxBxH(mm)
Plattenstärke
(mm)
Bild _
ffb 18#
runden
740*740*214
6
FFB16#
Quadrat
4 9 3*4 9 3*1
91
8
FFB17#
Quadrat
543*543*191
8
FFB11#
Rechteck
748*340*165
8
FFB12#
Rechteck
773*367*191
8
FFB13#
Rechteck
798*317*165
8
FFB14#
Rechteck
924*417*191
8
FFB15#
Rechteck
1128*367*191
8
PACKAGE INCLUDE
Modell: ffb 18#
NEIN
Bild
BESCHREIBUNG
MENGE
A
Glasscheibe
4 Stück
B
Glasplattenhalter
4 Stück
C
Glasbodenhalter
4 Stück
D
Schraubendreher
1 Stück

- 4 -
Modell:FFB16#/FFB17#
NEIN.
Bild
BESCHREIBUNG
MENGE
A
Glasscheibe
4 Stück
B
Glasplattenhalter
4 Stück
C
Glasbodenhalter
4 Stück
D
Schraubendreher
1 Stück
Modell: FFB11#/FFB12#/FFB13#/FFB14#/FFB15#
NEIN.
Bild
BESCHREIBUNG
MENGE
A
Lange Glasscheibe
2 Stk
B
Kurze Glasscheibe
2 Stk
C
Glasplattenhalter
4 Stück
D
Glasbodenhalter
4 Stück
E
Schraubendreher
1 Stück

- 5 -
ASSEMBLY INSTRUCTIONS
Vielen Dank, dass Sie sich für dieses Qualitätsprodukt entschieden haben.
Überprüfen Sie unbedingt alle Verpackungsmaterialien sorgfältig auf
Kleinteile, die sich während des Versands im Karton gelöst haben könnten.
Identifizieren und zählen Sie alle Teile und vergleichen Sie sie mit der
Hardware-Liste oben.
Einfach zu installieren, mit mehreren Glasstücken und entsprechenden
Befestigungselementen .
Bitte achten Sie darauf, dass das Glas im richtigen Winkel in die Firmware
eingesetzt wird .
Ziehen Sie die Schraube richtig fest, damit das Glas nicht wackelt. Sie darf
nicht zu fest angezogen werden, um Schäden am Glas zu verursachen .
Die Montageabläufe der drei Formprodukte sind ähnlich . Hier nehmen wir
als Beispiel den rechteckigen . Du kannst Befolgen Sie die gleichen
Schritte, um die Montage für die anderen Produkte abzuschließen .
INSTALLATION
Schritt 1: Legen Sie die langen Glasscheiben (Teil A) auf eine saubere und
weiche Oberfläche wie eine Decke oder einen Teppich. Montieren Sie 2
Klassen-Unterhalter (Teil D) und 2 Glasoberhalter (Teil C) mit Schrauben
an langen Glasplatten (Teil A) und ziehen Sie sie mit einem
Schraubendreher (Teil E) locker fest.
- 6 -
Schritt 2: Montieren Sie die kurzen Glasscheiben (Teil B) mit Schrauben an
den langen Glasscheiben und ziehen Sie sie mit einem Schraubendreher
(Teil E)
fest .
Schritt 3: Nachdem Sie alle Schrauben festgezogen haben, ist Ihr Produkt
betriebsbereit .
Schritt 1: Legen Sie die Glasscheiben (Teil A) auf eine saubere und weiche
Oberfläche wie eine Decke oder einen Teppich. Montieren Sie den
Glasplattenhalter (Teil B) mit Schrauben an zwei Glasscheiben und ziehen
Sie ihn mit einem Schraubendreher (Teil D) locker fest.

- 7 -
Schritt 2: Befestigen Sie den Glasplattenhalter (Teil B) mit Schrauben an
den verbleibenden 2 Glasplatten und ziehen Sie ihn mit einem
Schraubendreher (Teil D) locker fest .
Schritt 3: Montieren Sie die 4 Glasscheiben mit Schrauben zusammen und
ziehen Sie sie mit einem Schraubendreher (Teil D) fest .

- 8 -
Schritt 4: Montieren Sie die Glasbodenhalter (Teil C) mit Schrauben an den
Glasplatten und ziehen Sie sie mit einem Schraubendreher (Teil D) fest .
Schritt 5: Nachdem Sie alle Schrauben festgezogen haben, ist Ihr Produkt
betriebsbereit.

- 9 -
CARE INSTRUCTIONS
Stellen Sie den Flammenschutz nicht auf eine unebene Oberfläche .
Nicht mit brennbaren Materialien abdecken .
Während des Gebrauchs nicht berühren , um Verbrennungen zu
vermeiden .
Überprüfen Sie regelmäßig, ob alle Schrauben fest angezogen sind.
Adresse: Baoshanqu Shuangchenglu 803long 11hao 1602A-1609shi
Shanghai
Importiert nach AUS: SIHAO PTY LTD, 1 ROKEVA STREETEASTWOOD
NSW 2122 Australien
In die USA importiert: Sanven Technology Ltd., Suite 250, 9166 Anaheim
Place, Rancho Cucamonga, CA 91730
REP
UK
Pooledas Group Ltd
Unit 5 Albert Edward House, The Pavilions
Preston, United Kingdom
REP
EC
SHUNSHUN GmbH
Römeräcker 9 Z2021, 76351
Linkenheim-Hochstetten, Germany
In China hergestellt


Tecnico Supporto e certificato di garanzia elettronica www.vevor.com/support
PROTEZIONE FIAMMA PER POZZETTO
BRACIERE
MODELLO: ffb18 # /FFB16 # /FFB17#/FFB11#/FFB12#/FFB13#/
FFB14#/FFB15#
We continue to be committed to provide you tools with competitive price.
"Save Half", "Half Price" or any other similar expressions used by us only represents an
estimate of savings you might benefit from buying certain tools with us compared to the major
top brands and does not necessarily mean to cover all categories of tools offered by us. You
are kindly reminded to verify carefully when you are placing an order with us if you are
actually saving half in comparison with the top major brands.


- 1 -
MODELLO: ffb 18# /FFB16# /FFB17#/FFB11#/FFB12#/FFB13#/FFB14#/
FFB15#
Have product questions? Need technical support? Please feel free to
contact us:
Technical Support and E-Warranty Certificate
www.vevor.com/support
NEED HELP? CONTACT US!
This is the original instruction, please read all manual instructions
carefully before operating. VEVOR reserves a clear interpretation of our
user manual. The appearance of the product shall be subject to the
product you received. Please forgive us that we won't inform you again if
there are any technology or software updates on our product.
FIRE PIT FLAME GUARD

- 2 -
TUTELA IMPORTANTE
AVVERTENZA: leggere e comprendere l'intero manuale
prima di utilizzare o sottoporre a manutenzione questo
prodotto. La mancata osservanza di queste avvertenze e
istruzioni può causare lesioni personali o danni a beni di
valore.
• Evitare che i bambini utilizzino le guide del rimorchio della barca . E
questo prodotto non è un giocattolo. Non permettere ai bambini di giocare .
• Tenere lontano da punti taglienti, lame e altri oggetti .
• Precauzioni per il montaggio .
Assemblare solo secondo queste istruzioni. Un montaggio improprio può
creare pericoli.
2. Indossare occhiali di sicurezza approvati ANSI e guanti da lavoro
pesanti durante il montaggio.
3.Mantenere l'area di assemblaggio pulita e ben illuminata.
4.Tenere gli astanti lontani dall'area durante il montaggio.
5.Non montare in caso di stanchezza o sotto l'effetto di alcol, droghe o
farmaci.
6. Le funzionalità del prodotto si applicano solo al prodotto correttamente e
completamente assemblato.
7. Per ulteriori informazioni riguardanti le parti elencate nelle pagine
seguenti, fare riferimento allo Schema di Montaggio di questo manuale.
Scartare e separare tutte le parti in un'area di lavoro pulita. Si prega di
tenere i piccoli pezzi di ricambio fuori dalla portata dei bambini.
CONSERVA QUESTE ISTRUZIONI
PRODUCT INTRODUCTION
• La recinzione antivento in vetro temperato è realizzata in vetro
temperato resistente al calore. Le clip di collegamento in alluminio offrono
una connessione salda e un supporto stabile.
• Si adatta al tuo tavolo da fuoco e aiuta a bloccare la brezza per
- 3 -
compromettere il fuoco e goderti una fiamma costante! Una fornitura
indispensabile per il braciere da integrare nel patio e nel giardino.
PRODUCT PAREMETERS
Modello
Forma
Dimensioni
LxLxA(mm)
spessore del
pannello (mm)
Immagine _
ffb 18#
girare
740*740*214
6
FFB16#
piazza
4 9 3*4 9 3*1
91
8
FFB17#
piazza
543*543*191
8
FFB11#
rettangolo
748*340*165
8
FFB12#
rettangolo
773*367*191
8
FFB13#
rettangolo
798*317*165
8
FFB14#
rettangolo
924*417*191
8
FFB15#
rettangolo
1128*367*191
8
PACKAGE INCLUDE
Modello: ffb 18#
NO
FOTO
DESC
QUANTITÀ
UN
Pannello di vetro
4 pezzi
B
Supporto superiore
in vetro
4 pezzi
C
Supporto inferiore
in vetro
4 pezzi
D
Cacciavite
1 pz
Modello:FFB16#/FFB17#

- 4 -
NO.
FOTO
DESC
QUANTITÀ
UN
Pannello di vetro
4 pezzi
B
Supporto superiore
in vetro
4 pezzi
C
Supporto inferiore in
vetro
4 pezzi
D
Cacciavite
1 pz
Modello:FFB11#/FFB12#/FFB13#/FFB14#/FFB15#
NO.
FOTO
DESC
QUANTITÀ
UN
Pannello in vetro
lungo
2 pezzi
B
Pannello in vetro
corto
2 pezzi
C
Supporto superiore
in vetro
4 pezzi
D
Supporto inferiore in
vetro
4 pezzi
E
Cacciavite
1 pz
ASSEMBLY INSTRUCTIONS
- 5 -
Grazie per aver acquistato questo prodotto di qualità. Assicurarsi di
controllare attentamente tutti i materiali di imballaggio per verificare la
presenza di piccole parti che potrebbero essersi allentate all'interno del
cartone durante la spedizione. Identificare e contare tutte le parti e
confrontarle con l'elenco dell'hardware riportato sopra.
Facile da installare, con diversi pezzi di vetro e relativi elementi di
fissaggio .
Si prega di mantenere il vetro inserito nel firmware con l'angolazione
corretta .
Stringere correttamente la vite sul vetro in modo che non si muova e non
sia troppo stretta per causare danni al vetro .
Le procedure di assemblaggio dei tre i prodotti di forma sono simili . Qui
prendiamo come esempio quello rettangolare . Puoi seguire gli stessi
passaggi per completare l'assemblaggio degli altri prodotti .
INSTALLAZIONE
Passaggio 1: posizionare i pannelli in vetro lungo (parte A) su una
superficie pulita e morbida come una coperta o un tappeto. Assemblare i
supporti inferiori di 2 classi (parte D) e i 2 supporti superiori in vetro (parte
C) ai pannelli in vetro lunghi (parte A) mediante bulloni e serrare
leggermente con il cacciavite (parte E).
Passaggio 2: assemblare i pannelli di vetro corti (parte B) sui pannelli di
vetro lunghi mediante bulloni e serrarli con un cacciavite (parte
- 6 -
E) .
Passaggio 3: dopo aver serrato tutti i bulloni, il prodotto è pronto per l'uso .
Passaggio 1: posizionare i pannelli di vetro (parte A) su una superficie
pulita e morbida come una coperta o un tappeto. Assemblare il supporto
superiore in vetro (parte B) ai 2 pannelli in vetro mediante bulloni e serrare
leggermente con il cacciavite (parte D).
- 7 -
Passaggio 2: assemblare il supporto superiore in vetro (parte B) sui
restanti 2 pannelli di vetro mediante bulloni e serrare leggermente con un
cacciavite (parte D).
Passaggio 3: assemblare insieme 4 pannelli di vetro mediante bulloni e
serrarli con un cacciavite (parte D) .
- 8 -
Passaggio 4: assemblare i supporti inferiori in vetro (parte C) ai pannelli di
vetro mediante bulloni e serrarli con un cacciavite (parte D) .
Passaggio 5: dopo aver serrato tutti i bulloni, il prodotto è pronto per l'uso.
CARE INSTRUCTIONS

- 9 -
Non posizionare il Flame Guard su una superficie irregolare .
Non coprire con materiali infiammabili.
Non toccare durante l' uso per evitare ustioni .
Controllare periodicamente e assicurarsi che tutti i bulloni siano
completamente serrati.
Indirizzo: Baoshanqu Shuangchenglu 803long 11hao 1602A-1609shi
Shanghai
Importato in AUS: SIHAO PTY LTD, 1 ROKEVA STREETEASTWOOD
NSW 2122 Australia
Importato negli Stati Uniti: Sanven Technology Ltd., Suite 250, 9166
Anaheim Place, Rancho Cucamonga, CA 91730
REP
UK
Pooledas Group Ltd
Unit 5 Albert Edward House, The Pavilions
Preston, United Kingdom
REP
EC
SHUNSHUN GmbH
Römeräcker 9 Z2021, 76351
Linkenheim-Hochstetten, Germany
Made in China


Técnico Soporte y certificado de garantía electrónica www.vevor.com/support
PROTECCIÓN DE LLAMA PARA FUEGO
MODELO: ffb 18# /FFB16 # /FFB17#/FFB11#/FFB12#/FFB13#/
FFB14#/FFB15#
We continue to be committed to provide you tools with competitive price.
"Save Half", "Half Price" or any other similar expressions used by us only represents an
estimate of savings you might benefit from buying certain tools with us compared to the major
top brands and does not necessarily mean to cover all categories of tools offered by us. You
are kindly reminded to verify carefully when you are placing an order with us if you are
actually saving half in comparison with the top major brands.

- 1 -
MODELO: ffb 18# /FFB16# /FFB17#/FFB11#/FFB12#/FFB13#/FFB14#/
FFB15#
Have product questions? Need technical support? Please feel free to
contact us:
Technical Support and E-Warranty Certificate
www.vevor.com/support
NEED HELP? CONTACT US!
This is the original instruction, please read all manual instructions
carefully before operating. VEVOR reserves a clear interpretation of our
user manual. The appearance of the product shall be subject to the
product you received. Please forgive us that we won't inform you again if
there are any technology or software updates on our product.
FIRE PIT FLAME GUARD

- 2 -
CONSIDERACIONES IMPORTANTES
ADVERTENCIA: Lea y comprenda este manual completo
antes de operar o reparar este producto. El incumplimiento de
estas advertencias e instrucciones puede provocar lesiones
personales o daños a bienes valiosos.
• Evite que los niños utilicen guías para remolques de barcos . Y este
producto no es un juguete. No permita que los niños jueguen .
• Manténgase alejado de puntas afiladas, cuchillas y otros elementos .
• Precauciones de montaje .
Ensamble únicamente de acuerdo con estas instrucciones. Un montaje
inadecuado puede crear peligros.
2. Utilice gafas de seguridad aprobadas por ANSI y guantes de trabajo
resistentes durante el montaje.
3. Mantenga el área de reunión limpia y bien iluminada.
4.Mantenga a los transeúntes fuera del área durante el montaje.
5. No se reúna cuando esté cansado o bajo la influencia de alcohol,
drogas o medicamentos.
6. Las capacidades del producto se aplican únicamente al producto
ensamblado de manera adecuada y completa.
7. Para obtener información adicional sobre las piezas enumeradas en las
siguientes páginas, consulte el diagrama de montaje de este manual.
Desenvuelva y separe todas las piezas en un área de trabajo limpia.
Mantenga las piezas de repuesto pequeñas fuera del alcance de los niños.
GUARDA ESTAS INSTRUCCIONES
PRODUCT INTRODUCTION
• La valla protectora contra el viento de vidrio templado está hecha de
vidrio templado resistente al calor. Los clips de unión de aluminio ofrecen
una conexión firme y un soporte estable.
• Colóquelo alrededor de su mesa de fuego y ayude a bloquear la brisa
para comprometer su fuego y disfrutar de una llama constante. Un
- 3 -
suministro imprescindible para fogatas que se integrará en su patio y
jardín.
PRODUCT PAREMETERS
Modelo
Forma
Dimensiones
Largo x ancho
x alto (mm)
espesor del
tablero (mm)
Imagen _
ffb 18#
redondo
740*740*214
6
FFB16#
cuadrado
4 9 3*4 9 3*1
91
8
FFB17#
cuadrado
543*543*191
8
FFB11#
rectángul
o
748*340*165
8
FFB12#
rectángul
o
773*367*191
8
FFB13#
rectángul
o
798*317*165
8
FFB14#
rectángul
o
924*417*191
8
FFB15#
rectángul
o
1128*367*191
8
PACKAGE INCLUDE
Modelo: ffb 18#
NO
FOTO
DESC
CANTIDAD
A
Panel de vidrio
4 piezas
B
Soporte superior de
vidrio
4 piezas

- 4 -
C
Soporte de fondo
de vidrio
4 piezas
D
Destornillador
PC 1
Modelo: FFB16#/FFB17#
NO.
FOTO
DESC
CANTIDAD
A
Panel de vidrio
4 piezas
B
Soporte superior de
vidrio
4 piezas
C
Soporte de fondo de
vidrio
4 piezas
D
Destornillador
PC 1
Modelo: FFB11#/FFB12#/FFB13#/FFB14#/ FFB15#
NO.
FOTO
DESC
CANTIDAD
A
Panel de vidrio largo
2 piezas
B
Panel de vidrio corto
2 piezas
C
Soporte superior de
vidrio
4 piezas
D
Soporte de fondo de
vidrio
4 piezas

- 5 -
mi
Destornillador
PC 1
ASSEMBLY INSTRUCTIONS
Gracias por comprar este producto de calidad. Asegúrese de revisar
cuidadosamente todos los materiales de embalaje en busca de piezas
pequeñas que puedan haberse soltado dentro de la caja durante el envío.
Identifique y cuente todas las piezas y compárelas con la lista de hardware
anterior.
Fácil de instalar, con varias piezas de cristal y sus correspondientes
fijaciones .
Mantenga el cristal insertado en el firmware en el ángulo correcto .
Apriete correctamente el tornillo para que el vidrio no se pueda sacudir. No
puede estar demasiado apretado para causar daños al vidrio .
Los procedimientos de montaje de los tres. Los productos de forma son
similares . Aquí tomamos el rectangular como ejemplo. Puede Siga los
mismos pasos para finalizar el montaje de los demás productos .
INSTALACIÓN
Paso 1: Coloque los paneles de vidrio largo (Parte A) sobre una superficie
limpia y suave como una manta o alfombra. Ensamble 2 soportes
inferiores de clase (Parte D) y 2 soportes superiores de vidrio (Parte C) a
los paneles de vidrio largos (Parte A) con pernos y apriételos sin apretar
con un destornillador (Parte E).
- 6 -
Paso 2: Ensamble los paneles de vidrio cortos (Parte B) a los paneles de
vidrio largos mediante pernos y apriételos con un destornillador (Parte
E) .
Paso 3: Después de apretar todos los pernos, su producto estará listo para
usar .
Paso 1: Coloque los paneles de vidrio (Parte A) sobre una superficie limpia
y suave como una manta o alfombra. Ensamble el soporte superior de
- 7 -
vidrio (Parte B) a 2 paneles de vidrio con pernos y apriételos sin apretar
con un destornillador (Parte D).
Paso 2: Ensamble el soporte superior de vidrio (Parte B) a los 2 paneles
de vidrio restantes mediante pernos y apriételos sin apretar con un
destornillador (Parte D).
Paso 3: Ensamble 4 paneles de vidrio con pernos y apriételos con un
destornillador (Parte D) .

- 8 -
Paso 4: Ensamble los soportes inferiores de vidrio (Parte C) a los paneles
de vidrio mediante pernos y apriételos con un destornillador (Parte D) .
Paso 5: Después de apretar todos los pernos, su producto estará listo para
usar.

- 9 -
CARE INSTRUCTIONS
No coloque el Flame Guard sobre una superficie irregular .
No cubrir con materiales inflamables.
No lo toque durante el uso para evitar quemaduras .
Verifique periódicamente y asegúrese de que todos los pernos estén
completamente apretados.
Dirección: Baoshanqu Shuangchenglu 803long 11hao 1602A-1609shi
Shanghai
Importado a AUS: SIHAO PTY LTD, 1 ROKEVA STREETEASTWOOD
NSW 2122 Australia
Importado a EE. UU.: Sanven Technology Ltd., Suite 250, 9166 Anaheim
Place, Rancho Cucamonga, CA 91730
REP
UK
Pooledas Group Ltd
Unit 5 Albert Edward House, The Pavilions
Preston, United Kingdom
REP
EC
SHUNSHUN GmbH
Römeräcker 9 Z2021, 76351
Linkenheim-Hochstetten, Germany
Hecho en china


Techniczny Certyfikat wsparcia i e-gwarancji www.vevor.com/support
OSŁONA PŁOMIENIA OGNIA
MODELU: ffb 18# /FFB16# /FFB17#/FFB11#/FFB12#/FFB13#/
FFB14#/FFB15#
We continue to be committed to provide you tools with competitive price.
"Save Half", "Half Price" or any other similar expressions used by us only represents an
estimate of savings you might benefit from buying certain tools with us compared to the major
top brands and does not necessarily mean to cover all categories of tools offered by us. You
are kindly reminded to verify carefully when you are placing an order with us if you are
actually saving half in comparison with the top major brands.


- 1 -
MODELU: ffb 18# /FFB16#
/FFB17#/FFB11#/FFB12#/FFB13#/FFB14#/FFB15#
Have product questions? Need technical support? Please feel free to
contact us:
Technical Support and E-Warranty Certificate
www.vevor.com/support
NEED HELP? CONTACT US!
This is the original instruction, please read all manual instructions
carefully before operating. VEVOR reserves a clear interpretation of our
user manual. The appearance of the product shall be subject to the
product you received. Please forgive us that we won't inform you again if
there are any technology or software updates on our product.
FIRE PIT FLAME GUARD

- 2 -
WAŻNI OCHRONIARZE
OSTRZEŻENIE: Przed przystąpieniem do obsługi lub
serwisowania tego produktu należy przeczytać i zrozumieć
całą niniejszą instrukcję. Niezastosowanie się do tych
ostrzeżeń i instrukcji może spowodować obrażenia ciała lub
uszkodzenie cennego mienia.
• Unikaj dzieci korzystających z przewodników do przyczep łodziowych . A
jego produkt nie jest zabawką. Nie pozwalaj dzieciom bawić się .
• Trzymaj z dala od ostrych punktów, ostrzy i innych przedmiotów .
• Środki ostrożności przy montażu .
Montaż wyłącznie zgodnie z niniejszą instrukcją. Nieprawidłowy montaż
może stworzyć zagrożenie.
2. Podczas montażu nosić zatwierdzone przez ANSI okulary ochronne i
wytrzymałe rękawice robocze.
3. Utrzymuj miejsce montażu w czystości i dobrze oświetlone.
4. Podczas montażu nie dopuszczaj osób postronnych do obszaru.
5. Nie montuj, gdy jesteś zmęczony lub pod wpływem alkoholu,
narkotyków lub leków.
6. Możliwości produktu dotyczą wyłącznie prawidłowo i całkowicie
zmontowanego produktu.
7. Dodatkowe informacje dotyczące części wymienionych na kolejnych
stronach można znaleźć na schemacie montażu w niniejszej instrukcji.
Rozpakuj i oddziel wszystkie części w czystym miejscu pracy. Małe części
zamienne należy przechowywać poza zasięgiem dzieci.
ZACHOWAJ TE INSTRUKCJE
PRODUCT INTRODUCTION
• Ogrodzenie przeciwwiatrowe ze szkła hartowanego wykonane jest z
hartowanego szkła żaroodpornego. Aluminiowe zaciski łączące
zapewniają pewne połączenie i stabilne podparcie.
• Dopasuj się do stołu kominkowego i pomóż blokować bryzę, która
- 3 -
zagrozi Twojemu ogniu i ciesz się stałym płomieniem! Niezbędne źródło
paleniska, które pasuje do Twojego patio i ogrodu.
PRODUCT PAREMETERS
Model
Kształt
Wymiary
DxSxW (mm)
grubość płyty
(mm)
Zdjęcie _
ffb 18#
okrągły
740*740*214
6
FFB16#
kwadrat
4 9 3*4 9 3*1
91
8
FFB17#
kwadrat
543*543*191
8
FFB11#
prostokąt
748*340*165
8
FFB12#
prostokąt
773*367*191
8
FFB13#
prostokąt
798*317*165
8
FFB14#
prostokąt
924*417*191
8
FFB15#
prostokąt
1128*367*191
8
PACKAGE INCLUDE
Model: ffb 18#
NIE
FOTKA
OPIS
ILOŚĆ
A
Szklany panel
4 szt
B
Szklany uchwyt
górny
4 szt
C
Szklany dolny
uchwyt
4 szt
D
Śrubokręt
1 szt
Modelu:FFB16#/FFB17#
- 4 -
NIE.
FOTKA
OPIS
ILOŚĆ
A
Szklany panel
4 szt
B
Szklany uchwyt
górny
4 szt
C
Szklany dolny
uchwyt
4 szt
D
Śrubokręt
1 szt
Modelu:FFB11#/FFB12#/FFB13#/FFB14#/FFB15#
NIE.
FOTKA
OPIS
ILOŚĆ
A
Długi szklany panel
2 szt
B
Krótki szklany panel
2 szt
C
Szklany uchwyt
górny
4 szt
D
Szklany dolny
uchwyt
4 szt
mi
Śrubokręt
1 szt
ASSEMBLY INSTRUCTIONS
- 5 -
Dziękujemy za zakup tego produktu wysokiej jakości. Należy dokładnie
sprawdzić wszystkie materiały opakowaniowe pod kątem małych części,
które mogły poluzować się w kartonie podczas transportu. Zidentyfikuj i
policz wszystkie części i porównaj z powyższą listą sprzętu.
Łatwy w montażu, z kilkoma kawałkami szkła i odpowiednimi elementami
mocującymi .
Trzymaj szybkę włożoną do oprogramowania sprzętowego pod
odpowiednim kątem .
Prawidłowo dokręć śrubę do szyby, nie może się ona poruszyć, nie może
być zbyt mocno dokręcona, aby spowodować uszkodzenie szyby .
Procedury montażu trzech Produkty Shape są podobne . Tutaj bierzemy
jako przykład prostokątny . Możesz wykonaj te same czynności, aby
zakończyć montaż pozostałych produktów .
INSTALACJA
Krok 1: Umieść długie szklane panele (część A) na czystej i miękkiej
powierzchni, takiej jak koc lub dywan. Zamontuj 2 dolne uchwyty klasy
(część D) i 2 szklane uchwyty górne (część C) do długich szklanych paneli
(część A) za pomocą śrub i luźno dokręć śrubokrętem (część E).
Krok 2: Zamontuj krótkie panele szklane (część B) do długich paneli
szklanych za pomocą śrub i dokręć śrubokrętem (część
- 6 -
E) .
Krok 3: Po dokręceniu wszystkich śrub produkt jest gotowy do użycia .
Krok 1: Umieść panele szklane (część A) na czystej i miękkiej powierzchni,
takiej jak koc lub dywan. Zamontuj szklany uchwyt górny (część B) do 2
szklanych paneli za pomocą śrub i luźno dokręć śrubokrętem (część D).
- 7 -
Krok 2: Zamontuj szklany uchwyt górny (część B) do pozostałych 2
szklanych paneli za pomocą śrub i luźno dokręć śrubokrętem (część D).
Krok 3: Zmontuj 4 panele szklane razem za pomocą śrub i dokręć
śrubokrętem (część D) .
Krok 4: Zamontuj dolne uchwyty szklane (część C) do paneli szklanych za
pomocą śrub i dokręć śrubokrętem (część D) .
- 8 -
Krok 5: Po dokręceniu wszystkich śrub produkt jest gotowy do użycia.
CARE INSTRUCTIONS
Nie kładź Flame Guard na nierównej powierzchni .
Nie przykrywać materiałami łatwopalnymi.
Nie dotykaj podczas użytkowania , aby zapobiec poparzeniom .
Okresowo sprawdzaj i upewnij się, że wszystkie śruby są całkowicie
dokręcone.
Adres: Baoshanqu Shuangchenglu 803long 11hao 1602A-1609shi
Szanghaj
Import do AUS: SIHAO PTY LTD, 1 ROKEVA STREETEASTWOOD NSW
2122 Australia
Import do USA: Sanven Technology Ltd., Suite 250, 9166 Anaheim Place,
Rancho Cucamonga, CA 91730

- 9 -
REP
UK
Pooledas Group Ltd
Unit 5 Albert Edward House, The Pavilions
Preston, United Kingdom
REP
EC
SHUNSHUN GmbH
Römeräcker 9 Z2021, 76351
Linkenheim-Hochstetten, Germany
Wyprodukowano w Chinach


Technisch Ondersteuning en e-garantiecertificaat www.vevor.com/support
VUURPLAATS VLAMBESCHERMING
MODEL: ffb 18# /FFB16 # /FFB17#/FFB11#/FFB12#/FFB13#/
FFB14#/FFB15#
We continue to be committed to provide you tools with competitive price.
"Save Half", "Half Price" or any other similar expressions used by us only represents an
estimate of savings you might benefit from buying certain tools with us compared to the major
top brands and does not necessarily mean to cover all categories of tools offered by us. You
are kindly reminded to verify carefully when you are placing an order with us if you are
actually saving half in comparison with the top major brands.


- 1 -
MODEL: ffb 18# /FFB16# /FFB17#/FFB11#/FFB12#/FFB13#/FFB14#/
FFB15#
Have product questions? Need technical support? Please feel free to
contact us:
Technical Support and E-Warranty Certificate
www.vevor.com/support
NEED HELP? CONTACT US!
This is the original instruction, please read all manual instructions
carefully before operating. VEVOR reserves a clear interpretation of our
user manual. The appearance of the product shall be subject to the
product you received. Please forgive us that we won't inform you again if
there are any technology or software updates on our product.
FIRE PIT FLAME GUARD

- 2 -
BELANGRIJKE VEILIGHEIDSMAATREGELEN
WAARSCHUWING: Lees en begrijp deze gehele handleiding
voordat u dit product bedient of onderhoudt. Het niet opvolgen
van deze waarschuwingen en instructies kan persoonlijk letsel
of schade aan waardevolle eigendommen veroorzaken.
• Vermijd dat kinderen de boottrailergeleiders gebruiken . En dit product is
geen speelgoed. Laat kinderen niet spelen .
• Blijf uit de buurt van scherpe punten, messen en andere voorwerpen .
• Voorzorgsmaatregelen bij montage .
Monteer uitsluitend volgens deze instructies. Onjuiste montage kan
gevaren veroorzaken.
2. Draag tijdens de montage een ANSI-goedgekeurde veiligheidsbril en
stevige werkhandschoenen.
3. Houd de verzamelplaats schoon en goed verlicht.
4.Houd omstanders tijdens de montage uit de buurt.
5. Niet monteren als u moe bent of onder invloed bent van alcohol, drugs of
medicijnen.
6.Productmogelijkheden zijn alleen van toepassing op correct en volledig
gemonteerde producten.
7. Voor aanvullende informatie over de onderdelen die op de volgende
pagina's worden vermeld, verwijzen wij u naar het montageschema van
deze handleiding. Pak alle onderdelen uit en scheid ze van elkaar op een
schone werkplek. Bewaar kleine reserveonderdelen buiten het bereik van
kinderen.
BEWAAR DEZE INSTRUCTIES
PRODUCT INTRODUCTION
• Het windscherm van gehard glas is gemaakt van gehard hittebestendig
glas. Aluminium verbindingsclips bieden een stevige verbinding en stabiele
ondersteuning.
• Past rond uw vuurtafel en helpt de wind te blokkeren om uw vuur in
- 3 -
gevaar te brengen en te genieten van een constante vlam! Een onmisbare
vuurplaats die opgaat in uw terras en tuin.
PRODUCT PAREMETERS
Model
Vorm
Dimensies
LxBxH(mm)
plaatdikte (mm)
Afbeelding _
ffb 18#
ronde
740*740*214
6
FFB16#
vierkant
4 9 3*4 9 3*1
91
8
FFB17#
vierkant
543*543*191
8
FFB11#
rechthoek
748*340*165
8
FFB12#
rechthoek
773*367*191
8
FFB13#
rechthoek
798*317*165
8
FFB14#
rechthoek
924*417*191
8
FFB15#
rechthoek
1128*367*191
8
PACKAGE INCLUDE
Model: ffb 18 #
NEE
FOTO
OMSCHRIJVING
AANTAL
A
Glazen paneel
4 stuks
B
Glazen
bovenhouder
4 stuks
C
Glazen
bodemhouder
4 stuks
D
Schroevendraaier
1 stuk
Model:FFB16#/FFB17#

- 4 -
NEE.
FOTO
OMSCHRIJVING
AANTAL
A
Glazen paneel
4 stuks
B
Glazen bovenhouder
4 stuks
C
Glazen
bodemhouder
4 stuks
D
Schroevendraaier
1 stuk
Model:FFB11#/FFB12#/FFB13#/FFB14#/FFB15#
NEE.
FOTO
OMSCHRIJVING
AANTAL
A
Lang glazen paneel
2 stuks
B
Kort glazen paneel
2 stuks
C
Glazen bovenhouder
4 stuks
D
Glazen
bodemhouder
4 stuks
E
Schroevendraaier
1 stuk
ASSEMBLY INSTRUCTIONS
- 5 -
Bedankt voor het kopen van dit kwaliteitsproduct. Zorg ervoor dat u al het
verpakkingsmateriaal zorgvuldig controleert op kleine onderdelen, die
tijdens de verzending mogelijk in de doos zijn losgeraakt. Identificeer en tel
alle onderdelen en vergelijk ze met de hardwarelijst hierboven.
Eenvoudig te installeren, met meerdere stukjes glas en bijbehorende
bevestigingsmiddelen .
Zorg ervoor dat het glas in de juiste hoek in de firmware wordt geplaatst .
Draai de schroef goed vast op het glas. Schud niet en mag niet te strak zijn
om schade aan het glas te veroorzaken .
De montageprocedures van de drie vormproducten zijn vergelijkbaar . Hier
nemen we de rechthoekige als voorbeeld. Jij kan volg dezelfde stappen
om de montage voor de andere producten te voltooien .
INSTALLATIE
Stap 1: Plaats de lange glaspanelen (deel A) op een schoon en zacht
oppervlak als deken of tapijt. Monteer 2 klasse onderhouders (deel D) en 2
glazen bovenhouders (deel C) op lange glaspanelen (deel A) met bouten
en draai ze losjes vast met een schroevendraaier (deel E).
Stap 2: Monteer de korte glaspanelen (deel B) op de lange glaspanelen
met bouten en draai ze vast met een schroevendraaier (deel

- 6 -
E) .
Stap 3: Nadat u alle bouten heeft vastgedraaid, is uw product klaar voor
gebruik .
Stap 1: Plaats de glazen panelen (deel A) op een schoon en zacht
oppervlak als deken of tapijt. Monteer de glasplaathouder (deel B) op 2
glaspanelen met bouten en draai ze losjes vast met een schroevendraaier
(deel D).
- 7 -
Stap 2: Monteer de glasplaathouder (deel B) met bouten aan de overige 2
glaspanelen en draai deze losjes vast met een schroevendraaier (deel D).
Stap 3: Monteer 4 glaspanelen met bouten en draai ze vast met een
schroevendraaier (onderdeel D) .
- 8 -
Stap 4: Monteer de glazen bodemhouders (deel C) aan de glaspanelen
met bouten en draai ze vast met een schroevendraaier (deel D) .
Stap 5: Nadat u alle bouten heeft vastgedraaid, is uw product klaar voor
gebruik.
CARE INSTRUCTIONS
Plaats de Flame Guard niet op een oneffen ondergrond .
Niet bedekken met brandbare materialen.
Niet aanraken tijdens gebruik om brandwonden te voorkomen .
Controleer regelmatig of alle bouten goed zijn vastgedraaid.
Adres: Baoshanqu Shuangchenglu 803long 11hao 1602A-1609shi
Shanghai
Geïmporteerd naar AUS: SIHAO PTY LTD, 1 ROKEVA
STREETEASTWOOD NSW 2122 Australië

- 9 -
Geïmporteerd naar de VS: Sanven Technology Ltd., Suite 250, 9166
Anaheim Place, Rancho Cucamonga, CA 91730
REP
UK
Pooledas Group Ltd
Unit 5 Albert Edward House, The Pavilions
Preston, United Kingdom
REP
EC
SHUNSHUN GmbH
Römeräcker 9 Z2021, 76351
Linkenheim-Hochstetten, Germany
Gemaakt in China


Teknisk Support och e-garanticertifikat www.vevor.com/support
BRANDGRÖP FLAMVAKT
MODELL: ffb 18# /FFB16 # /FFB17#/FFB11#/FFB12#/FFB13#/
FFB14#/FFB15#
We continue to be committed to provide you tools with competitive price.
"Save Half", "Half Price" or any other similar expressions used by us only represents an
estimate of savings you might benefit from buying certain tools with us compared to the major
top brands and does not necessarily mean to cover all categories of tools offered by us. You
are kindly reminded to verify carefully when you are placing an order with us if you are
actually saving half in comparison with the top major brands.


- 1 -
MODELL: ffb 18# /FFB16 # /FFB17#/FFB11#/FFB12#/FFB13#/FFB14#/
FFB15#
Have product questions? Need technical support? Please feel free to
contact us:
Technical Support and E-Warranty Certificate
www.vevor.com/support
NEED HELP? CONTACT US!
This is the original instruction, please read all manual instructions
carefully before operating. VEVOR reserves a clear interpretation of our
user manual. The appearance of the product shall be subject to the
product you received. Please forgive us that we won't inform you again if
there are any technology or software updates on our product.
FIRE PIT FLAME GUARD

- 2 -
VIKTIGA SÄKERHETSÅTGÄRDER
VARNING: Läs och förstå hela denna manual innan du
använder eller servar denna produkt. Underlåtenhet att följa
dessa varningar och instruktioner kan orsaka personskada
eller skada på värdefull egendom.
• Undvik att barn använder båttrailerguider . Och hans produkt är inte en
leksak. Låt inte barn leka .
• Håll dig borta från vassa spetsar, knivar och andra föremål .
• Försiktighetsåtgärder vid montering .
Montera endast enligt dessa instruktioner. Felaktig montering kan skapa
faror.
2. Bär ANSI-godkända skyddsglasögon och kraftiga arbetshandskar vid
montering.
3. Håll monteringsområdet rent och väl upplyst.
4. Håll åskådare borta från området under monteringen.
5. Sätt dig inte ihop när du är trött eller påverkad av alkohol, droger eller
medicin.
6. Produktegenskaper gäller endast för korrekt och färdigmonterad
produkt.
7. För ytterligare information om delarna som listas på följande sidor, se
monteringsdiagrammet i denna manual. Packa upp och separera alla delar
på ett rent arbetsområde. Förvara små reservdelar utom räckhåll för barn.
SPARA DESSA INSTRUKTIONER
PRODUCT INTRODUCTION
• Vindskyddsstängsel i härdat glas är tillverkat av härdat värmebeständigt
glas. Länkklämmor i aluminium ger fast anslutning och stadigt stöd.
• Passa runt ditt eldbord och hjälp till att blockera vinden för att äventyra
din eld och njuta av en stadig låga! Ett måste för eldstaden för att smälta in
i din uteplats och trädgård.
PRODUCT PAREMETERS
- 3 -
Modell
Form
Mått
LxBxH(mm)
skivans
tjocklek (mm)
Bild _
ffb 18#
runda
740*740*214
6
FFB16#
fyrkant
4 9 3*4 9 3*1
91
8
FFB17#
fyrkant
543*543*191
8
FFB11#
rektangel
748*340*165
8
FFB12#
rektangel
773*367*191
8
FFB13#
rektangel
798*317*165
8
FFB14#
rektangel
924*417*191
8
FFB15#
rektangel
1128*367*191
8
PACKAGE INCLUDE
Modell: ffb 18#
NEJ
BILD
DESC
ANTAL
A
Glas panel
4 st
B
Topphållare i glas
4 st
C
Glasbottenhållare
4 st
D
Skruvmejsel
1 st
Modell: FFB16#/FFB17#
NEJ.
BILD
DESC
ANTAL
A
Glas panel
4 st
- 4 -
B
Topphållare i glas
4 st
C
Glasbottenhållare
4 st
D
Skruvmejsel
1 st
Modell: FFB11#/FFB12#/FFB13#/FFB14#/ FFB15#
NEJ.
BILD
DESC
ANTAL
A
Lång glaspanel
2 st
B
Kort glaspanel
2 st
C
Topphållare i glas
4 st
D
Glasbottenhållare
4 st
E
Skruvmejsel
1 st
ASSEMBLY INSTRUCTIONS
Tack för att du köpte denna kvalitetsprodukt. Var noga med att kontrollera
allt förpackningsmaterial noggrant för små delar som kan ha lossnat inuti
kartongen under transporten. Identifiera och räkna alla delar och jämför
med hårdvarulistan ovan.
- 5 -
Enkel att installera, med flera glasbitar och motsvarande fästelement .
Vänligen håll glaset insatt i den fasta programvaran i rätt vinkel .
Dra åt skruven ordentligt till glaset kan inte skaka kan inte vara för hårt för
att orsaka skada på glaset .
Monteringsprocedurerna för de tre formprodukter är liknande . Här tar vi
den rektangulära som exempel . Du kan följ samma steg för att avsluta
monteringen för de andra produkterna .
INSTALLATION
Steg 1: Placera de långa glaspanelerna (del A) på en ren och mjuk yta som
en filt eller matta. Montera 2 klass bottenhållare (del D) och 2 hållare i glas
(del C) till långa glaspaneler (del A) med bultar och dra åt löst med en
skruvmejsel (del E).
Steg 2: Montera de korta glaspanelerna (del B) till långa glaspaneler med
bultar och dra åt med en skruvmejsel (del
E) .
- 6 -
Steg 3: Efter att ha dragit åt alla bultar är din produkt redo att användas .
Steg 1: Placera glaspanelerna (del A) på en ren och mjuk yta som en filt
eller matta. Montera hållaren för glastopp (del B) till 2 glaspaneler med
bultar och dra åt löst med en skruvmejsel (del D).
Steg 2: Sätt ihop glastopphållaren (del B) på de återstående 2
glaspanelerna med bultar och dra åt löst med en skruvmejsel (del D).
- 7 -
Steg 3: Sätt ihop 4 glaspaneler med bultar och dra åt med en skruvmejsel
(del D) .
Steg 4: Montera glasbottenhållarna (del C) på glaspanelerna med bultar
och dra åt med en skruvmejsel (del D) .
Steg 5: Efter att ha dragit åt alla bultar är din produkt redo att användas.
- 8 -
CARE INSTRUCTIONS
Placera inte Flame Guard på ett ojämnt underlag .
Täck inte med brandfarliga material.
Rör inte under användning för att förhindra brännskador .
Kontrollera regelbundet och se till att alla bultar är helt åtdragna.
Adress: Baoshanqu Shuangchenglu 803long 11hao 1602A-1609shi
Shanghai
Importerad till AUS: SIHAO PTY LTD, 1 ROKEVA STREETEASTWOOD
NSW 2122 Australien
Importerad till USA: Sanven Technology Ltd., Suite 250, 9166 Anaheim
Place, Rancho Cucamonga, CA 91730
REP
UK
Pooledas Group Ltd
Unit 5 Albert Edward House, The Pavilions
Preston, United Kingdom
REP
EC
SHUNSHUN GmbH
Römeräcker 9 Z2021, 76351
Linkenheim-Hochstetten, Germany
Tillverkad i Kina