
March 2024
QSG1_A_EN
Apply to: PoE NVR System/PoE NVR
Quick Start Guide
@ReolinkTech https://reolink.com
58.03.001.0445
English English1 2
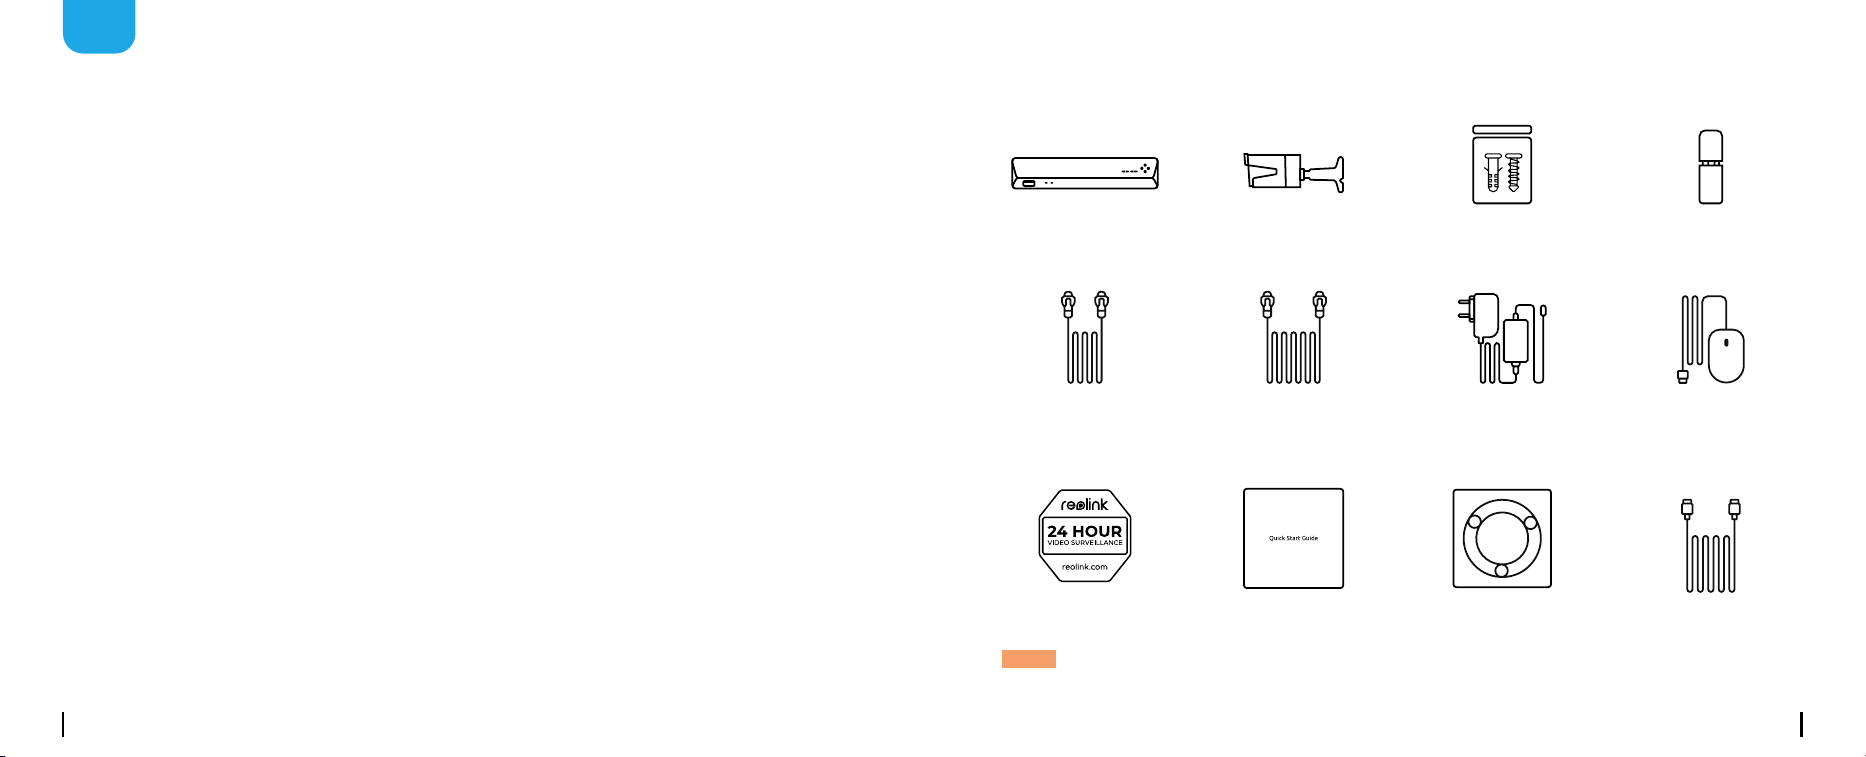
What’s in the Box (PoE System)
USB Mouse
HDMI Cable
Waterproof
Lid
NVR
Power Adapter
Mounting
Hole Template
Pack of Screws
18m
Network Cable
Quick Start Guide
Camera
1m
Network Cable
Surveillance Card
NOTE: Quantity and appearance of devices and accessories vary by dierent models that you
purchase.
NVR
EN
Content
What’s in the Box (PoE System) ····························································· 2
What’s in the Box (NVR System) ···························································· 3
NVR Introduction ··········································································· 4
Connection Diagram ······································································· 6
Set up PoE NVR System ···································································· 8
Network Topology Diagram ································································ 9
Mount the Camera ········································································· 10
Troubleshooting ············································································ 10
Specications ·············································································· 12
Notication of Compliance ································································· 13
English English3 4
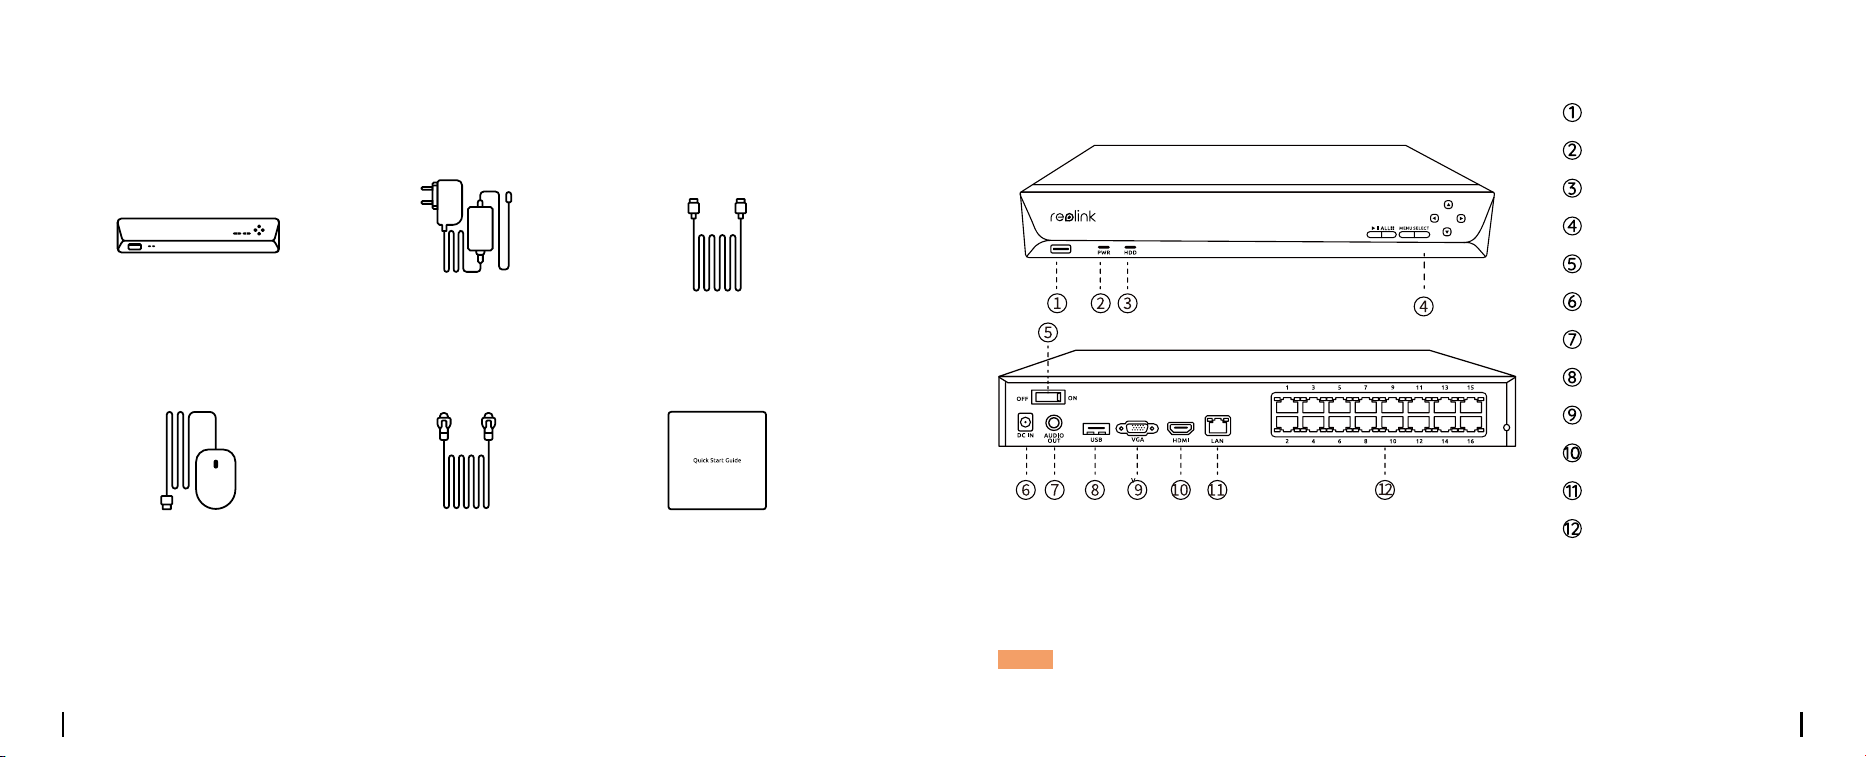
NVR IntroductionWhat’s in the Box (NVR System)
HDMI Cable
Quick Start Guide
NVR Power Adapter
1M Network Cable
NVR
USB Mouse
Power LED: Solid green to indicate the NVR is powered on.
HDD LED: Flashing red to indicate the hard drive is operating properly.
USB Port
Power LED
HDD LED
Control Panel
Power Switch
Power Input
Audio out
USB Port
VGA Port
HDMI Port
LAN Port
PoE Interface
NOTE: Quantity and appearance of devices and accessories vary by dierent models that you purchase.
Mount the Camera to the Ceiling
English English5 6
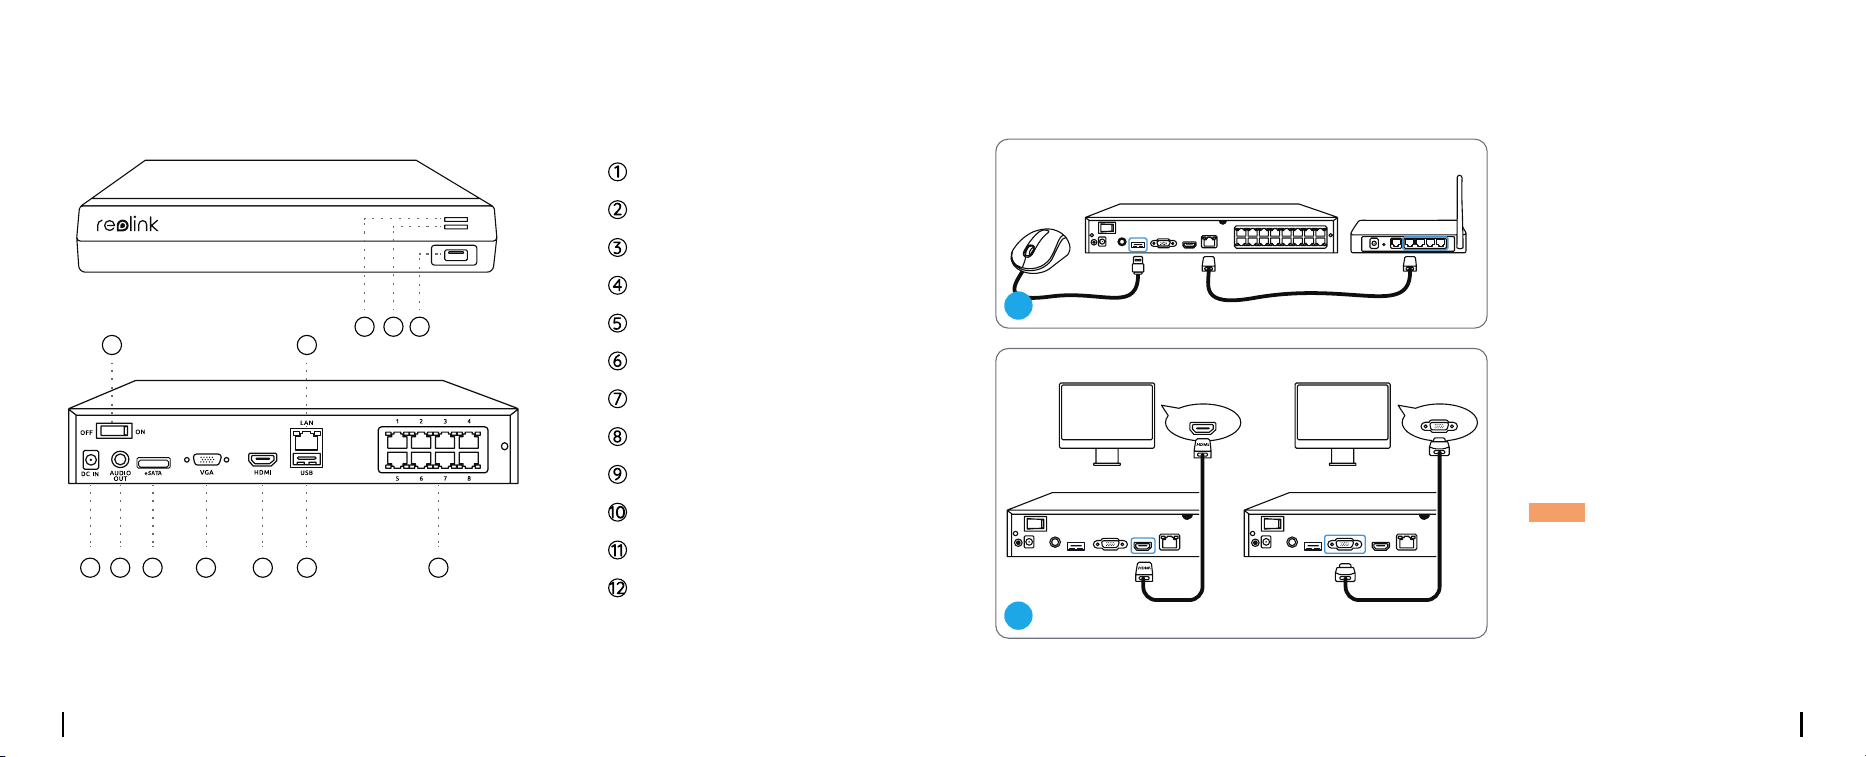
Connection Diagram
Connect the NVR (LAN port)
to your router with an Ethernet
cable. Next, connect the mouse
to the USB port of the NVR.
Connect the NVR to the monitor
with a VGA or HDMI cable.
3
6 7 8 9 10
11
12
1 2
5
4
Power LED
HDD LED
USB Port
Power Switch
LAN Port
Power Input
Audio out
eSATA Port
VGA Port
HDMI Port
USB Port
PoE Interface
2
1
VGAHDMI
NOTE: There is no VGA cable
included in the package.
English English7 8
NOTE: Some Reolink WiFi cameras also work with Reolink PoE NVR. For more information, visit
https://support.reolink.com and search Make Reolink WiFi Cameras Work with Reolink PoE-NVRs.
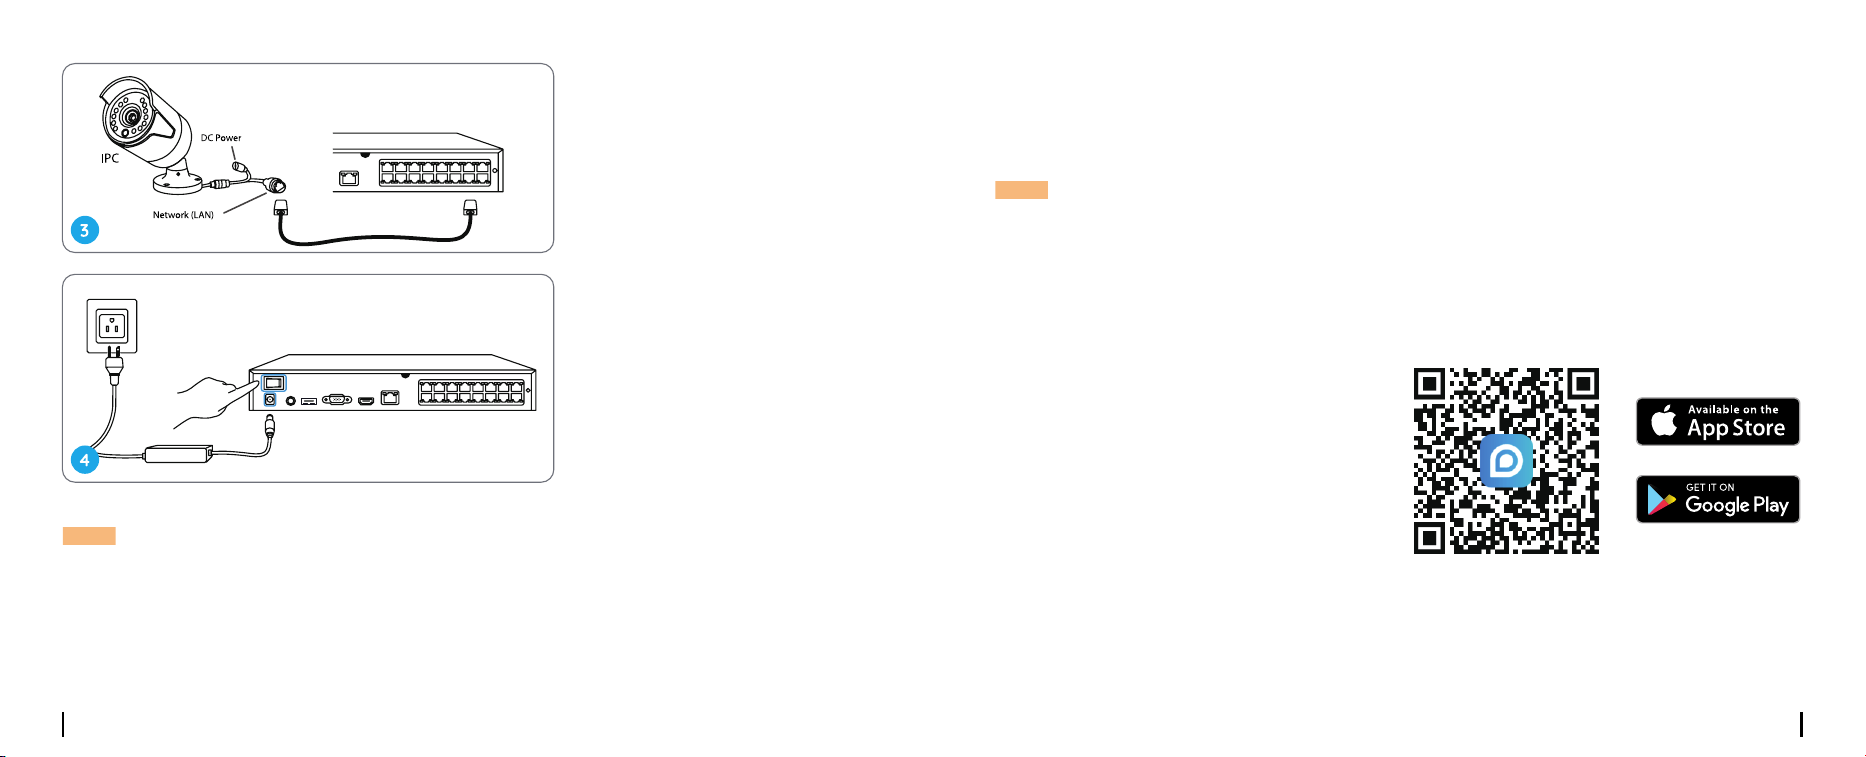
Connect cameras to PoE ports on
the NVR.
Connect the NVR to a power
outlet and turn on power switch.
Set up PoE NVR System
A setup wizard will guide you through the NVR system conguration process. Please set a
password for your NVR (for the initial access) and follow the wizard to congure the system.
NOTE: The password should be at least 6 characters. It is recommended that you note down the
password and keep it in a secure place.
Download and launch the Reolink App or Client software and follow the instructions to access the
NVR.
Scan to download the Reolink App.
Download path: Go to https://reolink.com > Support > App & Client.
• On Smartphone
• On PC
Access the NVR via Smartphone or PC
English English9 10
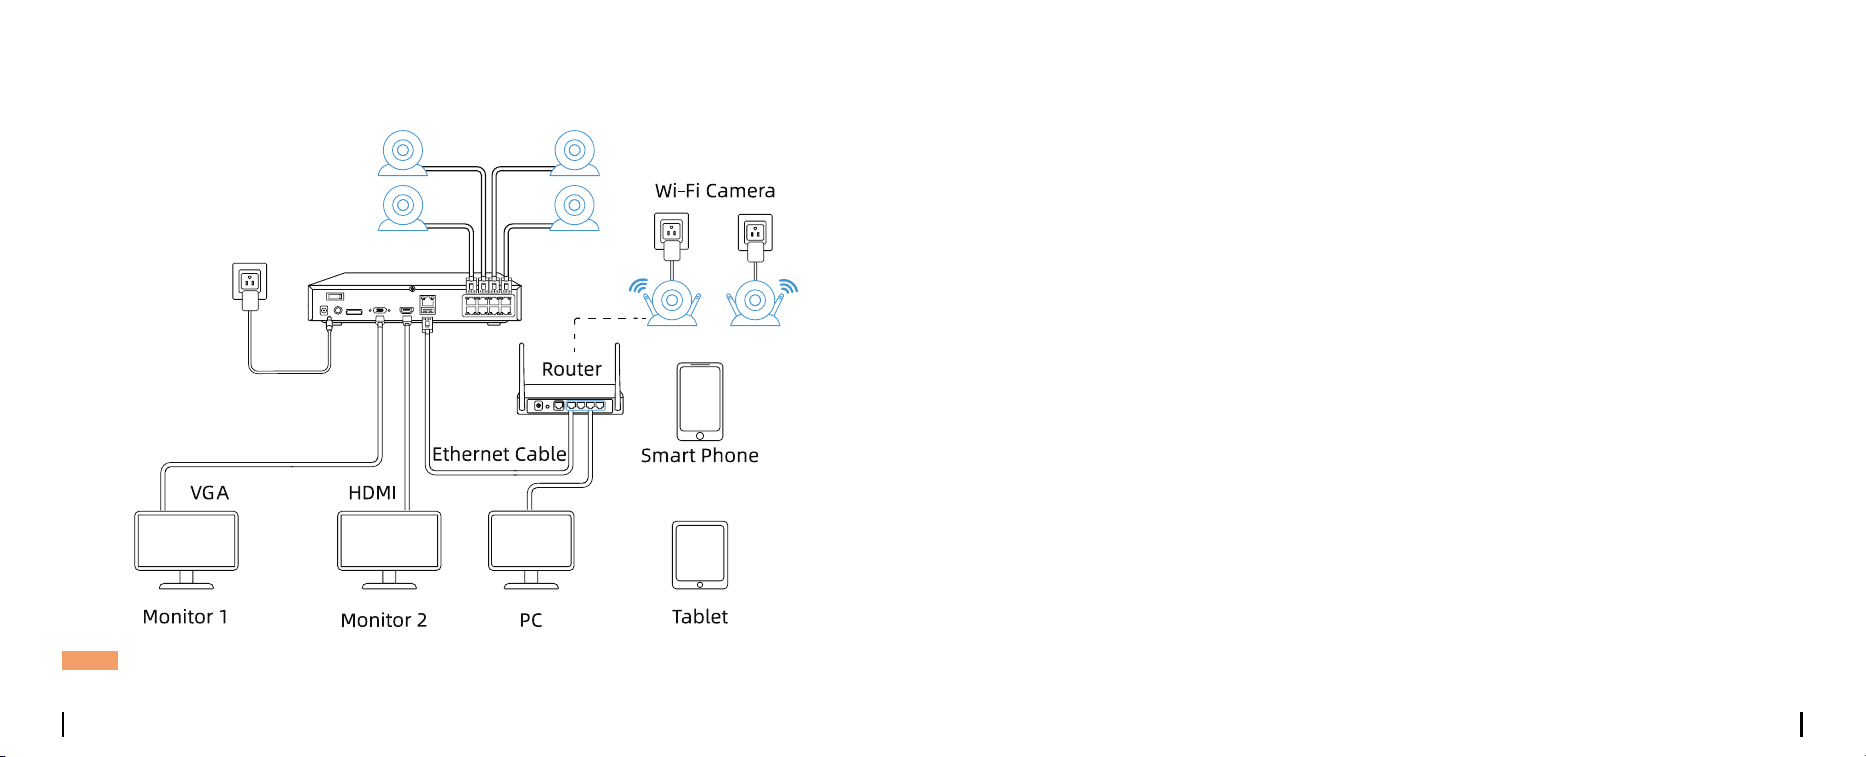
Network Topology Diagram Mount the Camera
Troubleshooting
PoE Camera
NOTE: The NVR is compatible with both PoE and Wi-Fi cameras and allows the connection of up to
8 cameras(RLN8-410) or 16 cameras(RLN16-410).
• Do not face the camera towards any light sources.
• Do not point the camera towards a glass window. Or, it may result in poor image quality because
of the window glare by infrared LEDs,ambi-ent lights or status lights.
• Do not place the camera in a shaded area and point it towards a welllit area. Or, it may result in
poor image quality. To ensure the best image quality, the lighting condition for both the camera
and the capture object shall be the same.
• Make sure the power ports are not directly exposed to water or mois-ture and not blocked by dirt
or other elements.
• With IP waterproof ratings, the camera can work properly under condi-tions like rain and snow.
However, it doesn’t mean the camera can work underwater.
If there’s no video output on the monitor from
Reolink NVR, please try the following solutions:
• TV/monitor resolution should be at least 720p or above.
• Make sure your NVR is powered on.
• Double check the HDMI/VGA connection,
or swap another cable or monitor to test.
If it still doesn’t work, please contact Reolink Support https://support.reolink.com
Installation Tips
No Video Output on the Monitor

English English11 12
If you failed to access the PoE NVR locally via mobile phone or PC, please try the following solutions:
• Connect the NVR (LAN port) to your router with a network cable.
• Swap another Ethernet cable or plug the NVR to other ports on the router.
• Go to Menu -> System -> Maintenance and restore all settings.
If it still doesn’t work, please contact Reolink Support https://support.reolink.com
If you failed to access the PoE NVR remotely via mobile phone or PC, please try
the following:
• Make sure you can locally access this NVR system.
• Go to NVR Menu -> Network -> Network
Advanced and make sure that UID Enable is selected.
• Please connect your phone or PC under the same network (LAN) of your NVR and see if you can
visit any website to verify whether there is Internet access available.
• Please reboot your NVR and home router and try again.
• If it still doesn’t work, please contact Reolink Support https://support.reolink.com
Failed to Access the PoE NVR Locally
Failed to Access the PoE NVR Remotely
Specications
HDMI Output: Up to 8MP
VGA Output: Up to 2MP
Audio output: 1CH RCA
Video/Audio Output
Decoding Resolution: 16MP/12MP/8MP/5MP/4MP/3MP/1080p/720p
Video Format: H.264,H.265
Synchronous Playback: Up to 4 Channels
Decoding
Operating Temperature: -10°C to 45°C
NVR
Operating Temperature: -10C to 55°C (14°F to 131°F)
Camera

English English13 14
Notication of Compliance
Reolink declares that this device is in compliance with the essential requirements and other relevant
provisions of EMC Directive 2014/30/EU and LVD 2014/35/EU.
This device complies with Part 15 of the FCC Rules. Operation is subject to the following two
conditions: (1) this device may not cause harmful interference, and (2) this device must accept any
interference received, including interference that may cause undesired operation.
NOTE: This equipment has been tested and found to comply with the limits for a Class B digital
device, pursuant to Part 15 of the FCC Rules. These limits are designed to provide reasonable
protection against harmful interference in a residential installation. This equipment generates,
uses and can radiate radio frequency energy and, if not installed and used in accordance with
the instructions, may cause harmful interference to radio communications. However, there is no
guarantee that interference will not occur in a particular installation. If this equipment does cause
harmful interference to radio or television reception, which can be determined by turning the
equipment o and on, the user is encouraged to try to correct the interference by one or more of
the following measures:
• Reorient or relocate the receiving antenna.
• Increase the separation between the equipment and receiver.
• Connect the equipment into an outlet on a circuit dierent from that to which the receiver is
connected.
• Consult the dealer or an experienced radio/TV technician for help.
This Class B digital apparatus complies with Canadian ICES-003. Cet appareil numérique de la
classe B est conforme à la norme NMB-003 du Canada.
This marking indicates that this product should not be disposed with other household wastes.
throughout the EU. To prevent possible harm to the environment or human health from
uncontrolled waste disposal, recycle it responsibly to promote the sustainable reuse of material
resources. To return your used device, please use the return and collection systems or contact the
retailer where the product was purchased. They can take this product for environmentally safe
recycling.
CE Declaration of Conformity
FCC Compliance Statement
ISED Compliance Statements
Correct Disposal of This Product
This product comes with a 2-year limited warranty that is valid only if purchased from Reolink
Ocial Store or a Reolink authorized reseller. Learn more:
https://reolink.com/warranty-and-return/.
Use of the product is subject to your agreement to the Terms of Service and Privacy Policy at
reolink.com. Keep out of reach of children.
Limited Warranty
Terms and Privacy
Caution: Changes or modications not expressly approved by the party responsible for compliance
could void the user’s authority to operate the equipment.