NexImage 20
USER’S MANUAL
Model
#
93707
ENGLISH

2 | ENGLISH
Table of Contents
Welcome to your NexImage 20 ................................................3
How NexImage 20 Works ................................................................3
What’s in the Box .........................................................................4
Recommended Minimum System Requirements ...........................................4
Install and Connect ...........................................................5
Start Imaging ................................................................6
Define a Region of Interest ....................................................8
Explore More Features in ICAP .................................................9
Process and Stack your Video .................................................9
Advanced Use ...............................................................10
Additional Software Options ..............................................................10
Autoguiding with NexImage 20 . . . . . . . . . . . . . . . . . . . . . . . . . . . . . . . . . . . . . . . . . . . . . . . . . . . . . . . . . . . 10
Technical Specifications ......................................................11

ENGLISH | 3
Welcome to Your NexImage 20
Congratulations on your purchase of the Celestron NexImage 20—a high-resolution Solar
System imaging camera designed to bring out incredible detail in the Moon, planets, and other
bright celestial objects.
NexImage 20 captures streaming video using a light-sensitive CMOS imaging sensor. Instead of
snapping just one photo, you record a short video of your target, like the Moon or a planet. Then,
using free third-party software, you extract hundreds of individual frames from the video and
digitally “stack” them.
This stacking process significantly reduces the grainy electronic “noise” that can obscure fine
details in your image. That’s because the signal-to-noise ratio of the final image improves with
the square root of the number of frames combined. In simple terms:
• Stacking 16 frames can reduce noise by a factor of 4
• Stacking 900 frames can improve your image quality by about 30 times
That’s why NexImage 20 can produce such sharp, detailed results—even under average seeing
conditions.
How NexImage 20 Works
4 | ENGLISH
Recommended Minimum System Requirements
NexImage 20 is compatible with a wide range of PCs. At a minimum, your computer should
have:
• Pentium IV, 2.0 GHz processor or better
• 1 GB RAM
• Graphics card with 24- or 32-bit color support
• Operating system: Windows XP, Windows Vista, or Windows 7 (32- or 64-bit)
While NexImage 20 supports older systems, it also performs well on modern Windows 10 and
11 machines. A USB 3.0 port is recommended for faster data transfer.
Mac Compatibility
Although the NexImage 20 is primarily supported on Windows, it can also work with macOS
via compatible third-party applications. Please note: The instructions in this manual apply to
Windows only. Additionally, Mac users may need to supply their own USB-C to USB-C cable to
connect the camera to their computer.
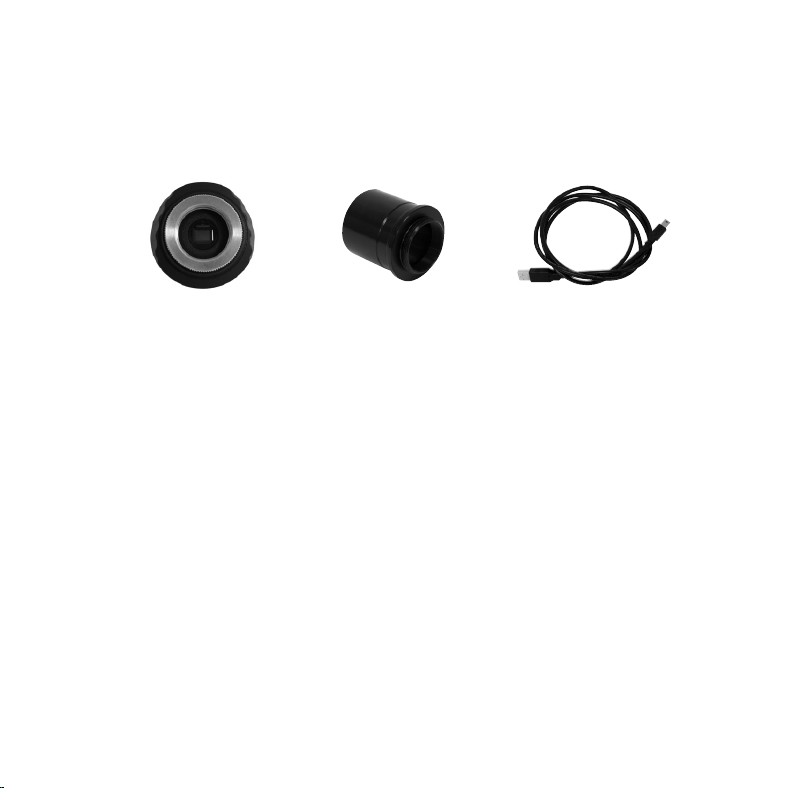
1.25” Nose Piece USB CableNexImage Camera
Fig. 1
What’s in the Box
Your NexImage 20 camera package includes:
• NexImage 20 Camera
• 1.25” Nosepiece
• USB-A to USB-C Cable
ENGLISH | 5
Install and Connect
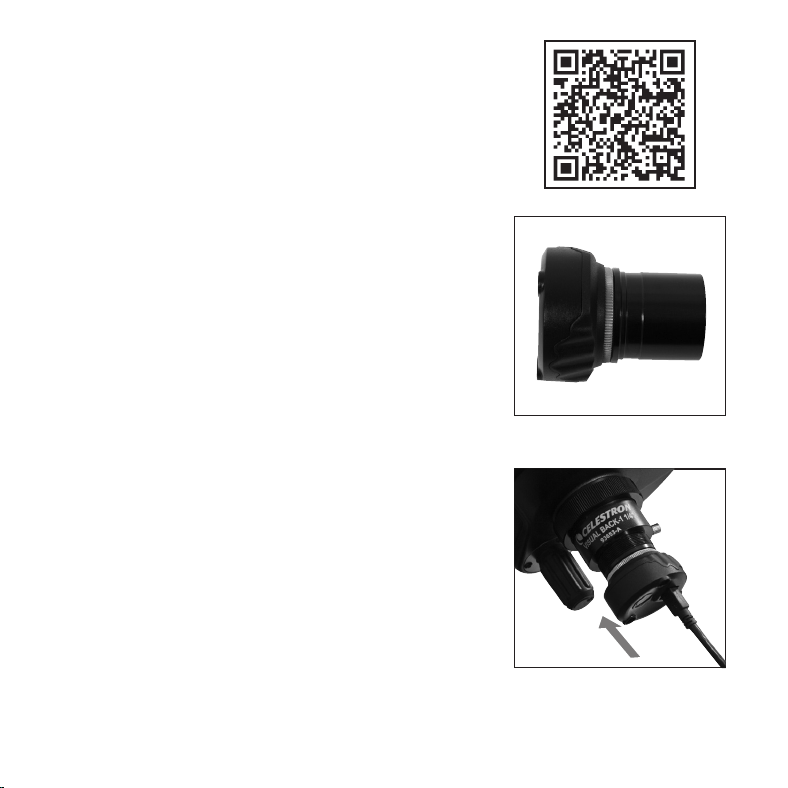
1. Go to the NexImage 20 Downloads Page
• Visit celestron.com/NexImage20Downloads
(or scan the QR code) to access everything you
need in one place.
• Download the camera driver and NexImage
iCap software.
2. Install the Driver
• Before connecting your camera, run the driver
installer and follow the onscreen instructions.
3. Install NexImage iCap
• Click the NexImage iCap installer and follow
the prompts.
4. Assemble the Camera
• Unthread the cap from the NexImage 20 and
thread on the included 1.25” nosepiece. (Fig. 2)
5. Insert into Your Telescope
• Slide the camera into your telescope’s eyepiece
barrel. (Fig. 3)
6. Connect the Cable
• Plug the USB-C end of the included cable into
the NexImage 20.
• Plug the USB-A end into an available USB-A
port on your PC.
7. Ready to Image
• Windows will detect and install the camera.
You’re ready to start capturing!
Fig. 2
Fig. 3
6 | ENGLISH
Start Imaging
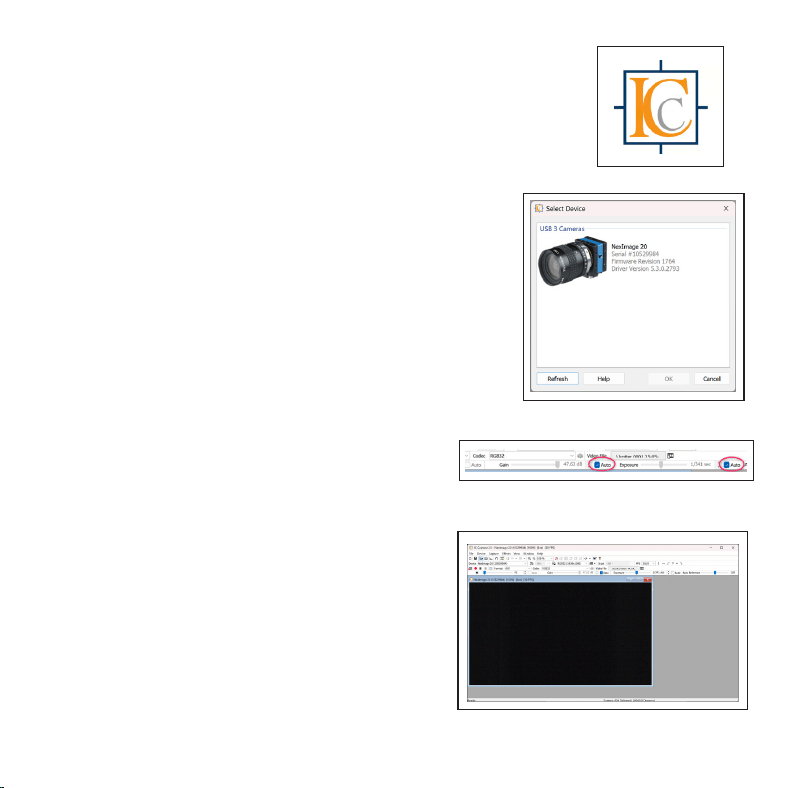
1. Launch the NexImage iCap Software
• Double-click the NexImage iCap icon on your
desktop to open the program. (Fig. 4)
• If the NexImage camera is not detected auto-
matically, select it and click OK. (Fig. 5)
2. Choose Your Target and Focus
• Start with a bright, easy target like the Moon.
• Center and focus your telescope on the object.
• Ensure the Auto boxes for Gain and Exposure
are checked. You should now see a live image
in the Preview window. (Fig. 6)
• Use your telescope’s focuser to fine-tune the
image until it appears crisp and sharp. (Fig. 7)
3. Adjust Gain and Exposure (Optional)
If you want more control over your image quality:
• Uncheck the Auto boxes to manually adjust
Gain and Exposure with the sliders.
- Gain determines the camera’s sensitivity
to light. Higher gain produces a brighter
image but more digital noise.
- Exposure sets the shutter speed. Faster
speeds reduce motion blur but may
require higher Gain.
• Aim for a balance. In unstable seeing
conditions, use a faster shutter speed and
increase gain to compensate.
Fig. 4
Fig. 5
Fig. 6
Fig. 7
ENGLISH | 7
Fig. 8
Fig. 9
Fig. 10
Fig. 11
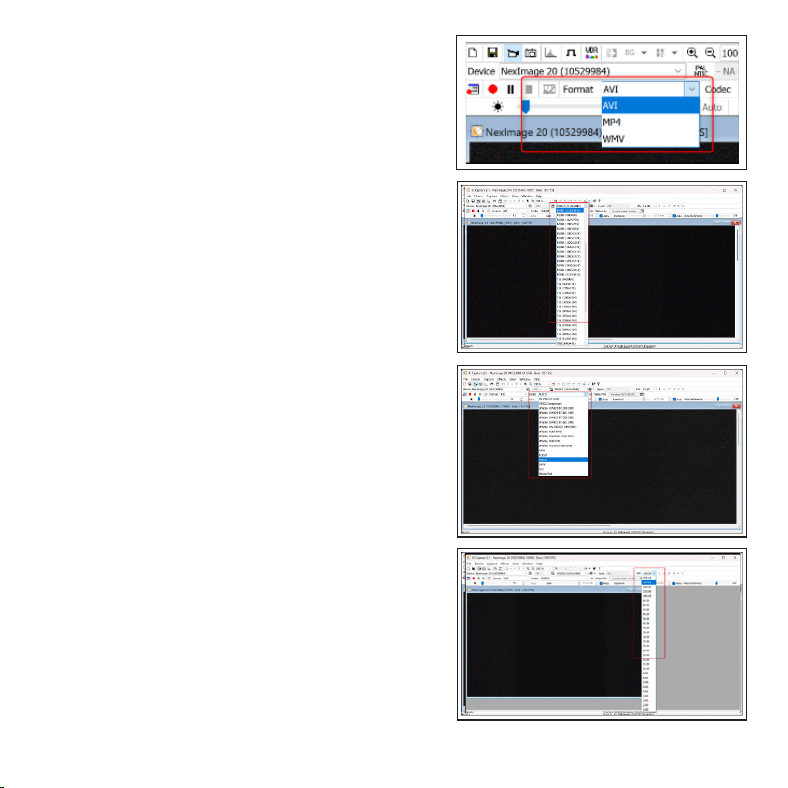
4. Select Video Settings
• Video Format: Choose from AVI, MP4,
or WMV. (Fig. 8)
- AVI has the least compression (best
quality), but results in larger files
• Resolution: Higher resolutions will
lower your frame rate. (Fig. 9)
- Maximum resolution: 5120 x 3840
at 19 fps
- Minimum resolution: 640 x 480
at 432 fps
- Each resolution includes bit
depth options for color (RGB32,
RGB64) and monochrome (Y800,
Y16). If you're not sure what to
pick, start with RGB32.
• Codec: Select the appropriate video
codec. (Fig. 10)
- For AVI format, choose the codec
that matches your resolution and
bit depth.
• Frame Rate: Select your desired frame
rate in frames per second (FPS). (Fig. 11)
- The software automatically dis-
plays the maximum FPS based on
your chosen resolution.

8 | ENGLISH
5. Record Your Video
• Click the Video File button (Fig. 12) to open the
recording settings.
- Define your save location and file naming
format. (Fig. 13)
• Click the Clock icon to set the recording
length, either by number of seconds or number
of frames.
• Click the Record button to begin. Record-
ing will stop automatically when your limit is
reached, or you can pause or stop it manually.
(Fig. 14)
Define a Region of Interest
If your target is small (like a planet), it will not take
up the NexImage 20 sensor’s full frame. Defining a
region of interest (ROI) crops the image and only cap-
tures the intended target. When you use ROI, you can:
• Increase your frame rate for smoother video
• Reduce file size and save disk space
• Improve processing speed when stacking your
images
To use ROI:
1. Click the ROI icon in the iCap toolbar. (Fig. 15)
2. Draw a box around the area you want to capture in
the live view.
3. Click once inside the box you just drew to confirm.
Fig. 12
Fig. 13
Fig. 14
Fig. 15
ENGLISH | 9
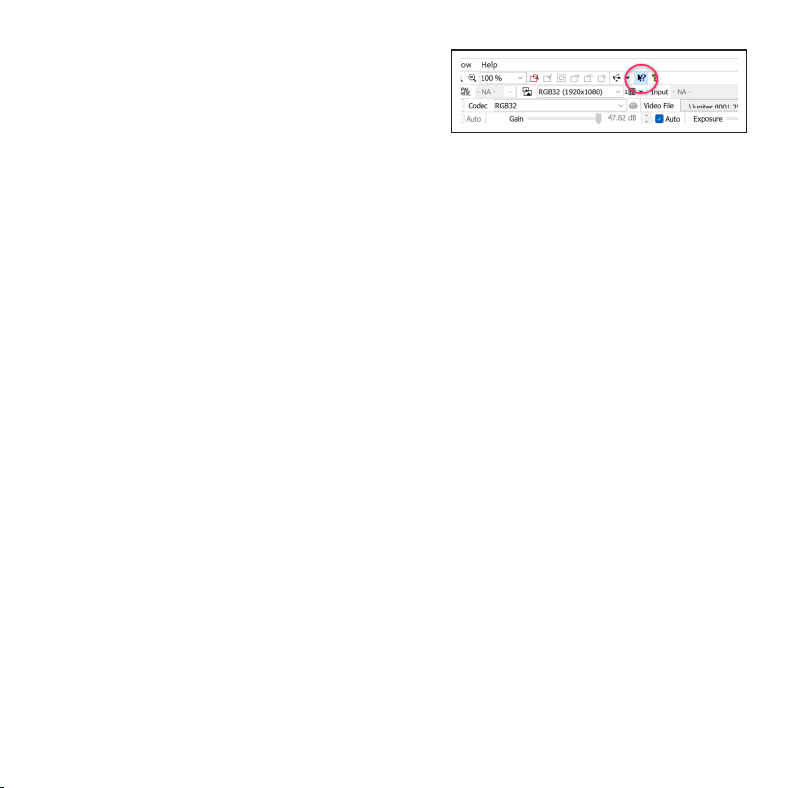
Explore More Features in iCap
Looking to go beyond the basics?
Click the Help icon in the iCap toolbar (Fig. 16) to learn
about the software’s advanced features. You can
select any button in the interface to view detailed
information about how it works.
Process and Stack Your Video
Taking a video of your target is only the first step to
making a highly detailed still image. To create a sharp,
detailed final image, you’ll need to:
1. Import your video file into a stacking program.
2. Break the video into individual frames.
3. Align and stack the best frames to reduce noise
and enhance detail.
Fig. 16
We recommend two popular (and free) stacking tools:
• AutoStakkert! 4
www.autostakkert.com/wp/download/
• RegiStax 6
www.astronomie.be/registax/download.html
These programs are trusted by planetary imagers
and make it easy to get great results, even if you’re
just starting out.

10 | ENGLISH
Advanced Use
Additional Software Options
In addition to iCap, the NexImage 20 is compatible with several popular third-party image cap-
ture programs. These tools provide expanded control and advanced imaging features for users
who want more flexibility or prefer a different workflow.
Depending on your operating system, here are some options to explore:
For macOS:
• oaCapture (for image capture)
• Lynkeos (for image stacking)
For Windows:
• FireCapture
• SharpCap
Autoguiding with NexImage 20
In addition to capturing images of Solar System objects, NexImage 20 also works as an
autoguiding camera—a tool that helps your telescope stay precisely locked on a target during
long-exposure astrophotography.
This setup is intended for advanced users and requires additional equipment not included with
your NexImage 20.
To use the NexImage 20 for autoguiding, you’ll need:
• An off-axis guider or a piggybacked guidescope
• Autoguiding software such as MetaGuide
• A guide port interface, like the GPUSB from Shoestring Astronomy

ENGLISH | 11
Technical Specifications
Sensor ............................................ AR2020 Back-Illuminated CMOS
Camera Resolution................................ 20 MP (5240 x 3840)
Sensor Size ....................................... 7.3mm x 5.4mm (9mm diagonal)
Pixel Size.......................................... 1.4 µm square
Sensitivity ......................................... 8.7 ke-/lux-sec
USB Cable ........................................ Super-Speed USB 3.0
Back Focus with Nose Piece...................... 13.1 mm
Back Focus from Threads......................... 10.6 mm
FCC Note: This equipment has been tested and found to comply with the limits
for a Class B digital device, pursuant to part 15 of the FCC Rules. These limits
are designed to provide reasonable protection against harmful interference in
a residential installation. This equipment generates, uses, and can radiate radio
frequency energy and, if not installed and used in accordance with the instructions,
may cause harmful interference to radio communications. However, there is
no guarantee that interference will not occur in a particular installation. If this
equipment does cause harmful interference to radio or television reception, which
can be determined by turning the equipment off and on, the user is encouraged to
try to correct the interference by one or more of the following measures:
• Reorient or relocate the receiving antenna.
• Increase the separation between the equipment and receiver.
• Connect the equipment into an outlet on a circuit different from that to which
the receiver is connected.
• Consult the dealer or an experienced radio/TV technician for help.
©2025 Celestron. • Celestron and Symbol are trademarks of Celestron, • LLC.
All rights reserved. • Celestron.com
US: 2835 Columbia Street, Torrance, CA 90503 USA
UK: Unit 2 Transigo, Gables Way, Thatcham RG19 4JZ, United Kingdom
This product is designed and intended for use by those 14 years of age and older.
Made in China 05-25
celestron.com/pages/warranty