CAR PORT SHELTER, 4 X 6 X 3.05M, HEAVY
DUTY COVER
Thank you for purchasing a Sealey product. Manufactured to a high standard, this product will, if used according to these instructions,
and properly maintained, give you years of trouble free performance.
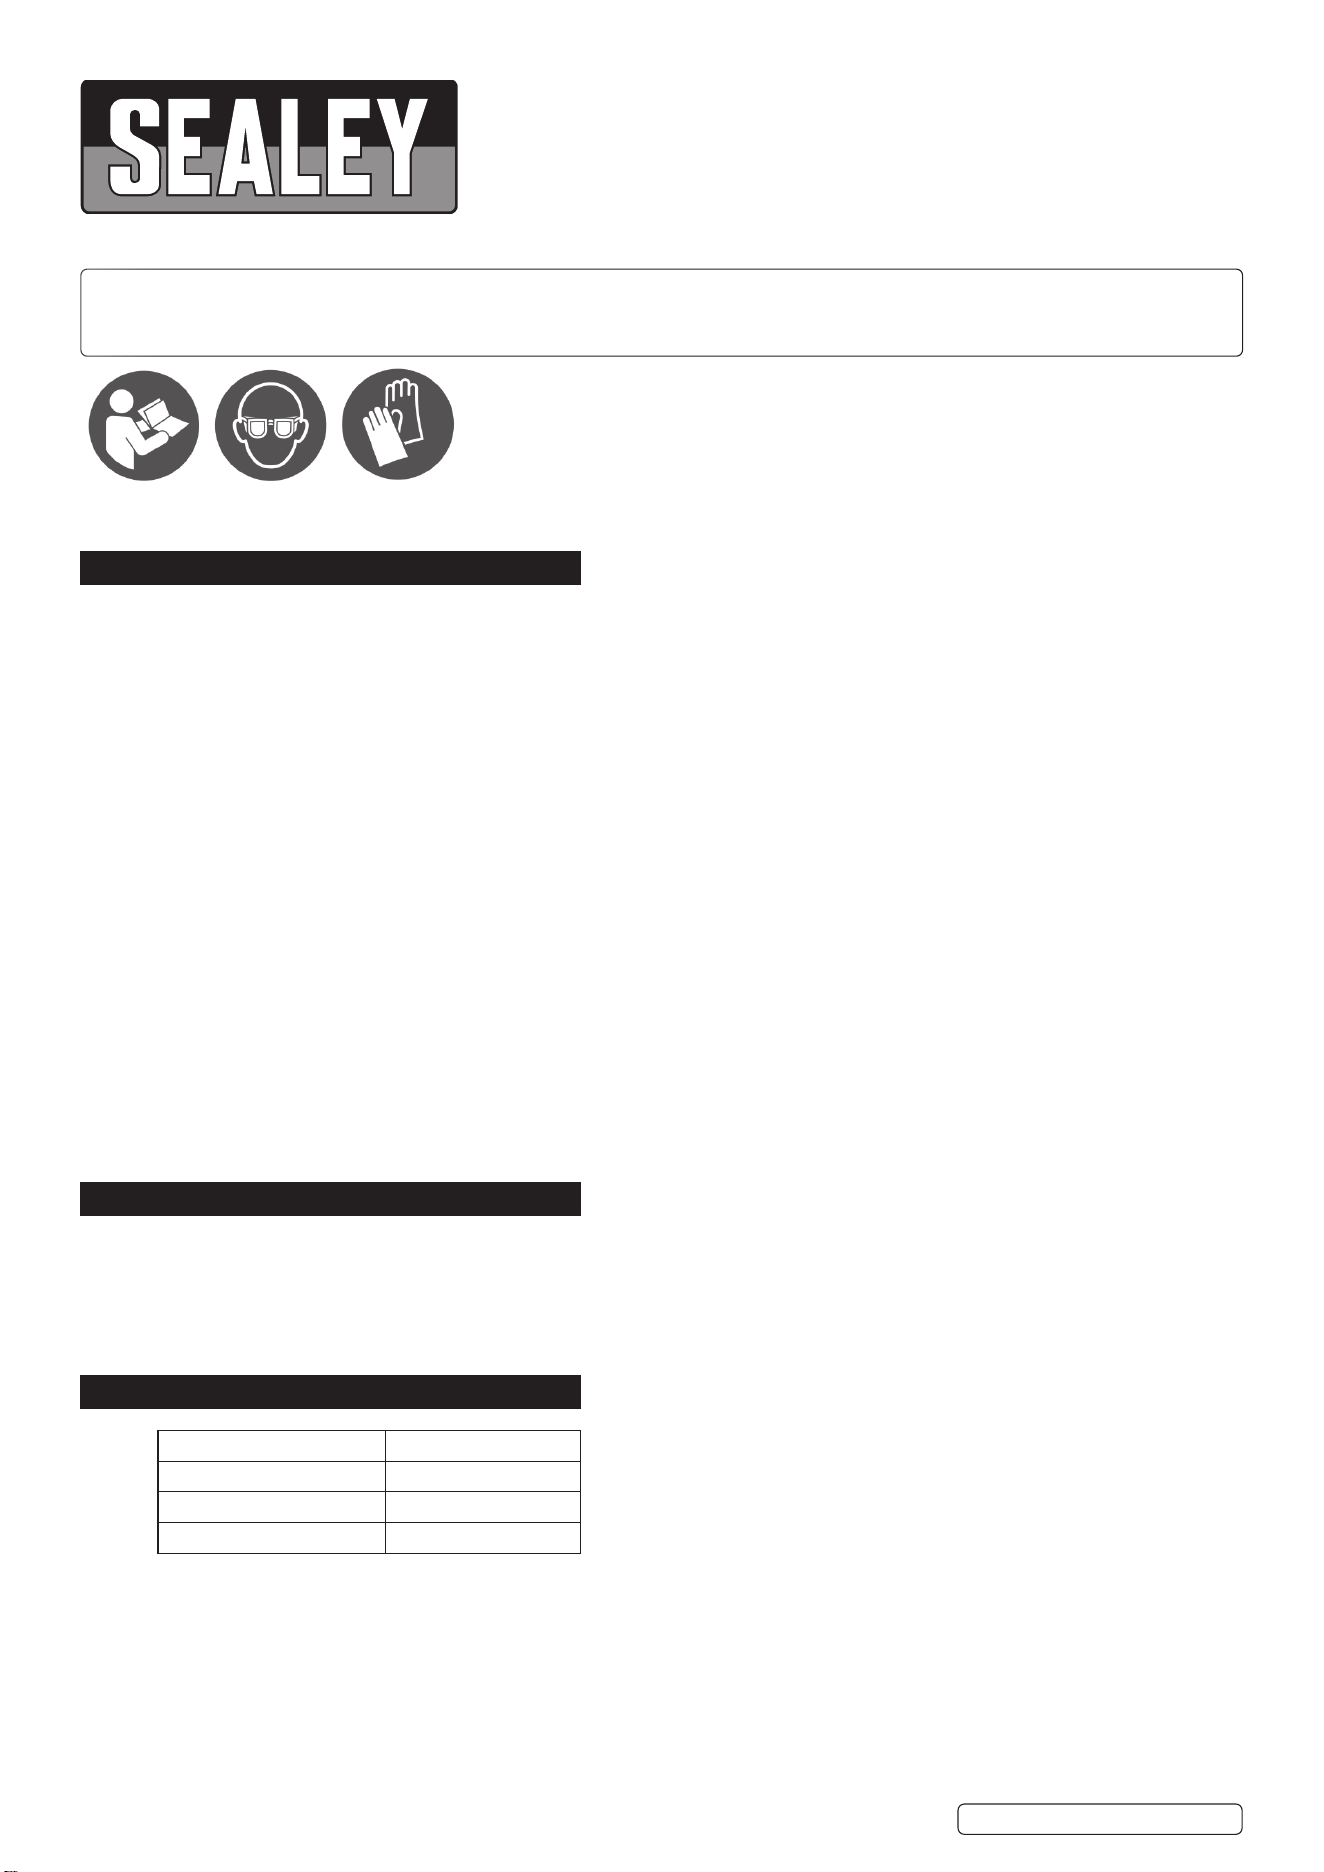
IMPORTANT: PLEASE READ THESE INSTRUCTIONS CAREFULLY. NOTE THE SAFE OPERATIONAL REQUIREMENTS, WARNINGS & CAUTIONS. USE
THE PRODUCT CORRECTLY AND WITH CARE FOR THE PURPOSE FOR WHICH IT IS INTENDED. FAILURE TO DO SO MAY CAUSE DAMAGE AND/OR
PERSONAL INJURY AND WILL INVALIDATE THE WARRANTY. KEEP THESE INSTRUCTIONS SAFE FOR FUTURE USE.
1. SAFETY
8 This is a temporary structure and is not recommended as a permanent structure.
9 Choose your shelter’s location carefully. Check for overhead utility lines, branches, etc. DO NOT install near roofs or other structures that
may shed snow, ice or excessive run-off onto your shelter. Keep away from electrical wires!
9 Have an overview of all parts before attempting installation. Make sure all components are available.
8 DO NOT use this product in environments for which it is not intended (i.e. extreme cold, high winds, extreme heat, heavy rainfall, etc).
8 Always wear safety glasses when assembling this product. Wear gloves when working with tubing to prevent cuts or abrasions.
WARNING! Anchors must be used with alI shelters. Covers should NOT be installed until it has been properly anchored to the ground.
9 Proper anchoring and keeping cover tight and free of snow and debris, is the responsibility of the consumer. Damages caused by
improper anchoring are not covered under warranty.
WARNING! Keep all ame and heat sources away from the shelter fabric. The fabric will burn if left in continuous contact with a ame
source.
8 DO NOT use open ames or cooking or heating devices inside or in close proximity to the product, including all types of stoves, gas
heaters, gas lanterns, citronella torches, mosquito coils, etc.
WARNING! In order to reduce risk of burning and avoid damage, DO NOT cook, smoke, refuel or use any open flame devices in or
around the shelter.- store flammable liquids (gasoline, kerosene, propane, etc.) in the shelter.- operate gas powered equipment in or
around the shelter.
9 Keep open ames a safe distance away from the shelter.
8 DO NOT use hard-edged tools or instruments, such as rakes or shovels, to remove snow. These can cause punctures to the cover.
8 NEVER start the engine of any vehicle or machine inside a closed shelter. Ensure that there is adequate ventilation for starting engines
and for any work with paints, cleaners, etc.
8 DO NOT use bleach, alkaline or harsh detergents for cleaning. Doing so will damage the polycarbonate material. Soap and warm water
are recommended.
9 This temporary shelter is intended to oer protection from damages caused by the sun, light rain, light snow, tree sap, bird and animal
excrement. DO NOT use it to shield goods from high winds, heavy snow or ice storms. Only use it for its intended use.
8 DO NOT assemble in high winds.
2. INTRODUCTION
Tarpaulin cover is made of a PE (polyethylene) material of a 3-layer construction with rip-stop to help prevent tears. UV resistant and
oers long-life and protection to stored items. Cover extends to the oor to further protect from against crosswinds. Includes ratchets
on each corner ensuring the tarpaulin cover is always under tension and secured to the frame which helps protect the car port during
wind and rain. Features a full width roll down door that makes accessibility easy. Zips keep the door shut securely and toggles can hold
the door up and out of the way. Zinc plated steel tubing provides protection from rust and corrosion. Push-t tubing makes assembly
simple. The tarpaulin cover ties onto the frame and ratchets in place, so the cover remains taught.
3. SPECIFICATION
Refer to
instruction
manual
GCP02 Issue:3 13/11/24
Original Language Version
© Jack Sealey Limited
Wear eye
protection
Wear
protective
gloves
MODEL NO: GCP02
Model No: GCP02
Door Size: 2.7m x 2.15m
Nett Weight: 73kg
Overall Size (W x D x H): 4 x 6 x 3.05m
Original Language Version
© Jack Sealey Limited
Recommended tools:
10m measuring tape
Step ladder
Rope
GCP02 Issue:3 13/11/24
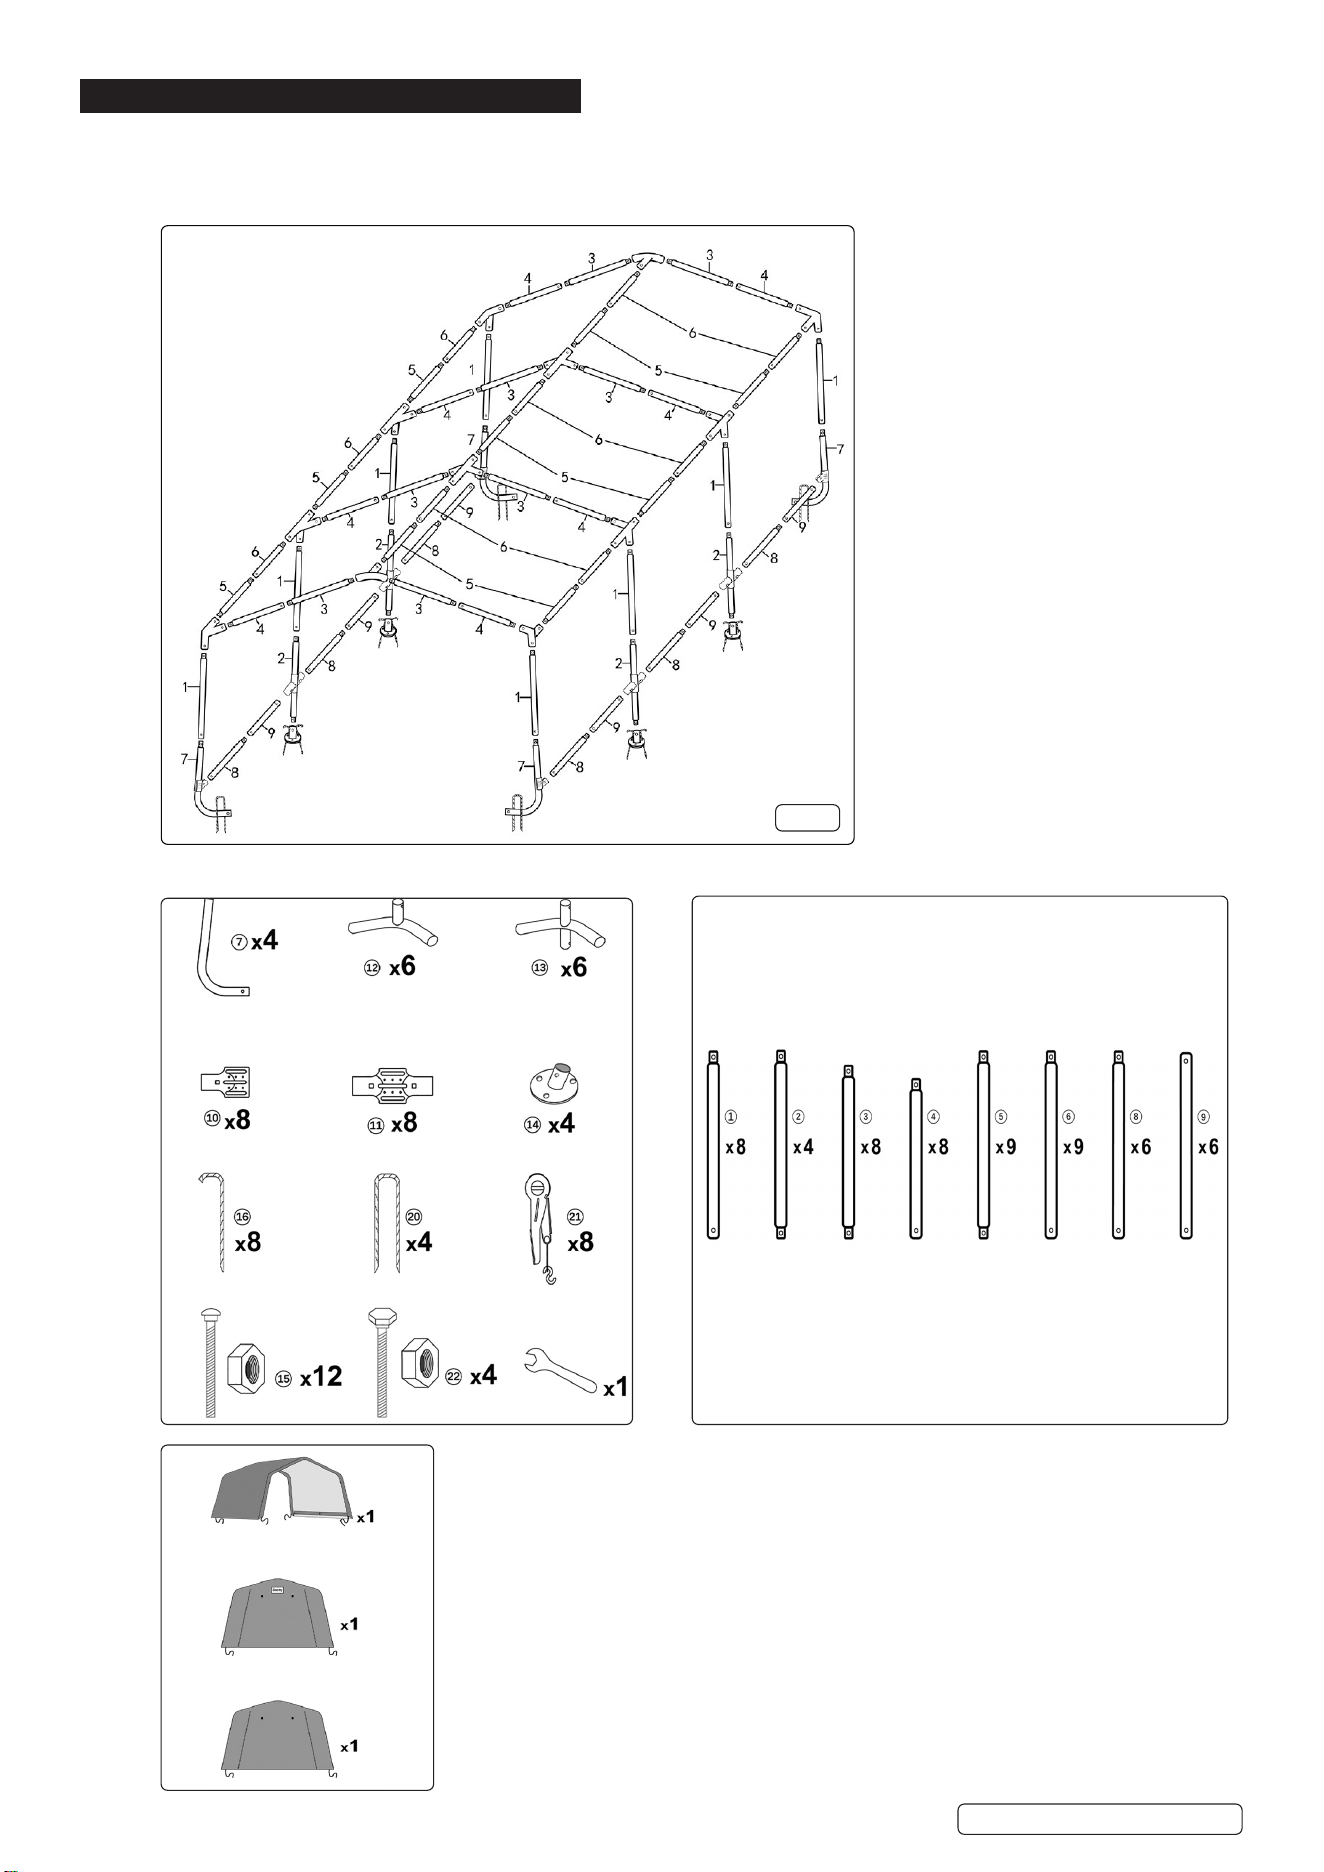
4. CONTENTS
NOTE: Review all parts before attempting assembly. Make sure all components are available and usable.
NOTE: Frame elements are marked with part numbers which are used in assembly directions.
NOTE: It is recommended that two people working together build this item to avoid any damages due to over-twisting of frames.
4.1. FULL ASSEMBLY
4.2. PARTS
fig.
1
5. CONTENTS
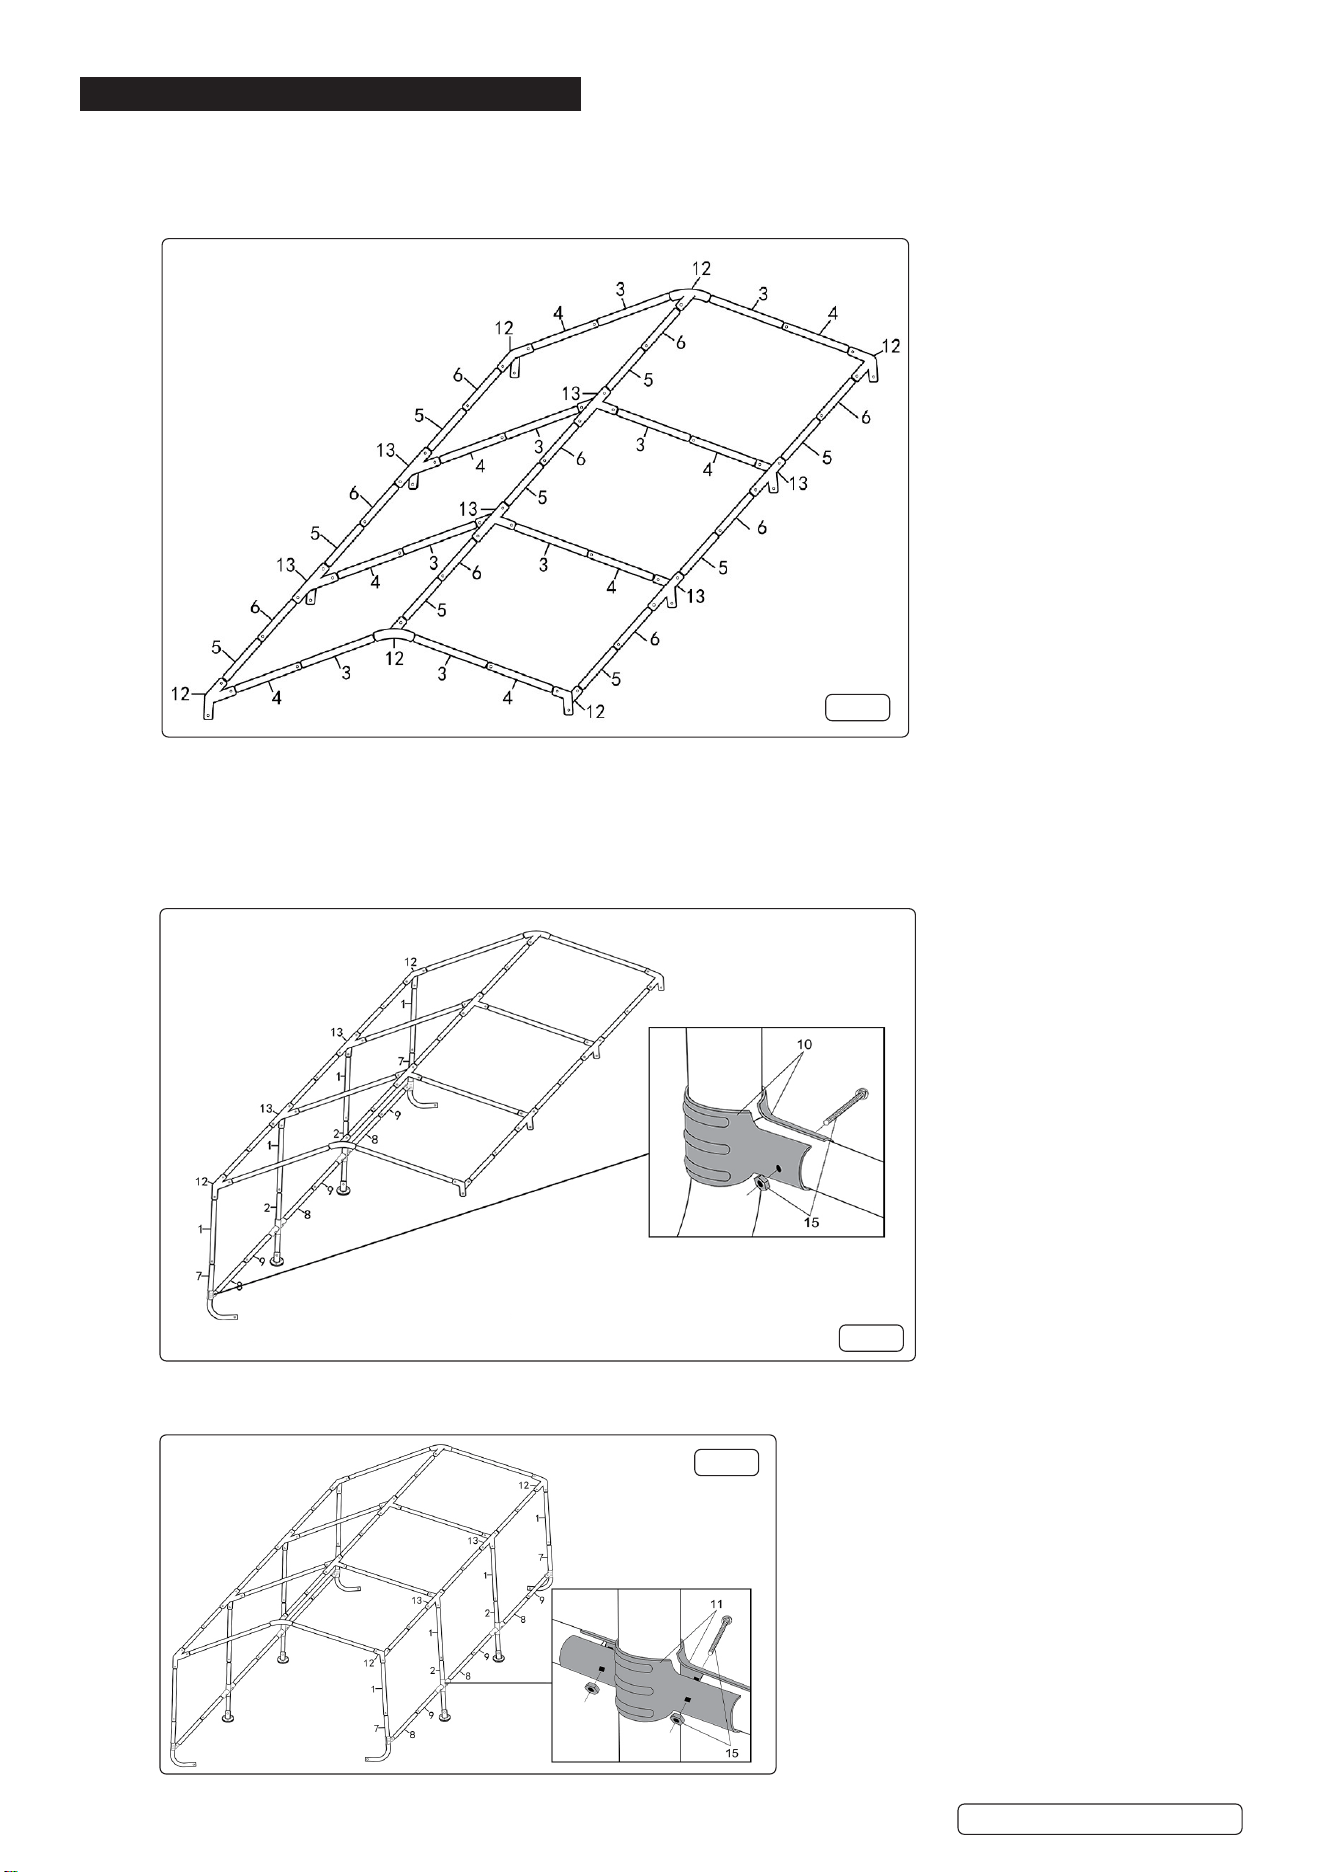
5.2.1. Connect pole items 5 and items 6 together to create 9 longitudinal members.
5.2.2. Connect 4 Way connectors (item 13) to assembled items 5 and 6 (see section 4.3.1) in locations shown below.
5.2.3. Connect 3 Way Ridge Connector (item 12) to all 3 Rails in locations shown below.
5.2.4. Connect 8 rafters (item 3) to items 12 and 13 tted to the three roof rails in locations shown below.
5.1. SIDE ASSEMBLY (g.3, g.4)
5.1.1. Connect items 8 and items 9 together to create lower 6 longitudinal members.
5.1.2. Connect upright poles (item 1) to items 12 and items 13 in roof assembly.
5.1.3. Connect items 7 (curved feet) to item 1 and also to item 8 using clamps (item 10) and xings (item 15) in locations shown below.
NOTE: DO NOT tighten xings at this stage.
5.1.4. Repeat the process for the other side.
5.1.5. Connect items 2 to items 8 and items 9 (see diagram) using clamps (item 11) and xings (item 15) in locations shown below.
NOTE: DO NOT tighten xings at this stage.
Original Language Version
© Jack Sealey Limited
fig.
2
GCP02 Issue:3 13/11/24
fig.
3
fig.
4
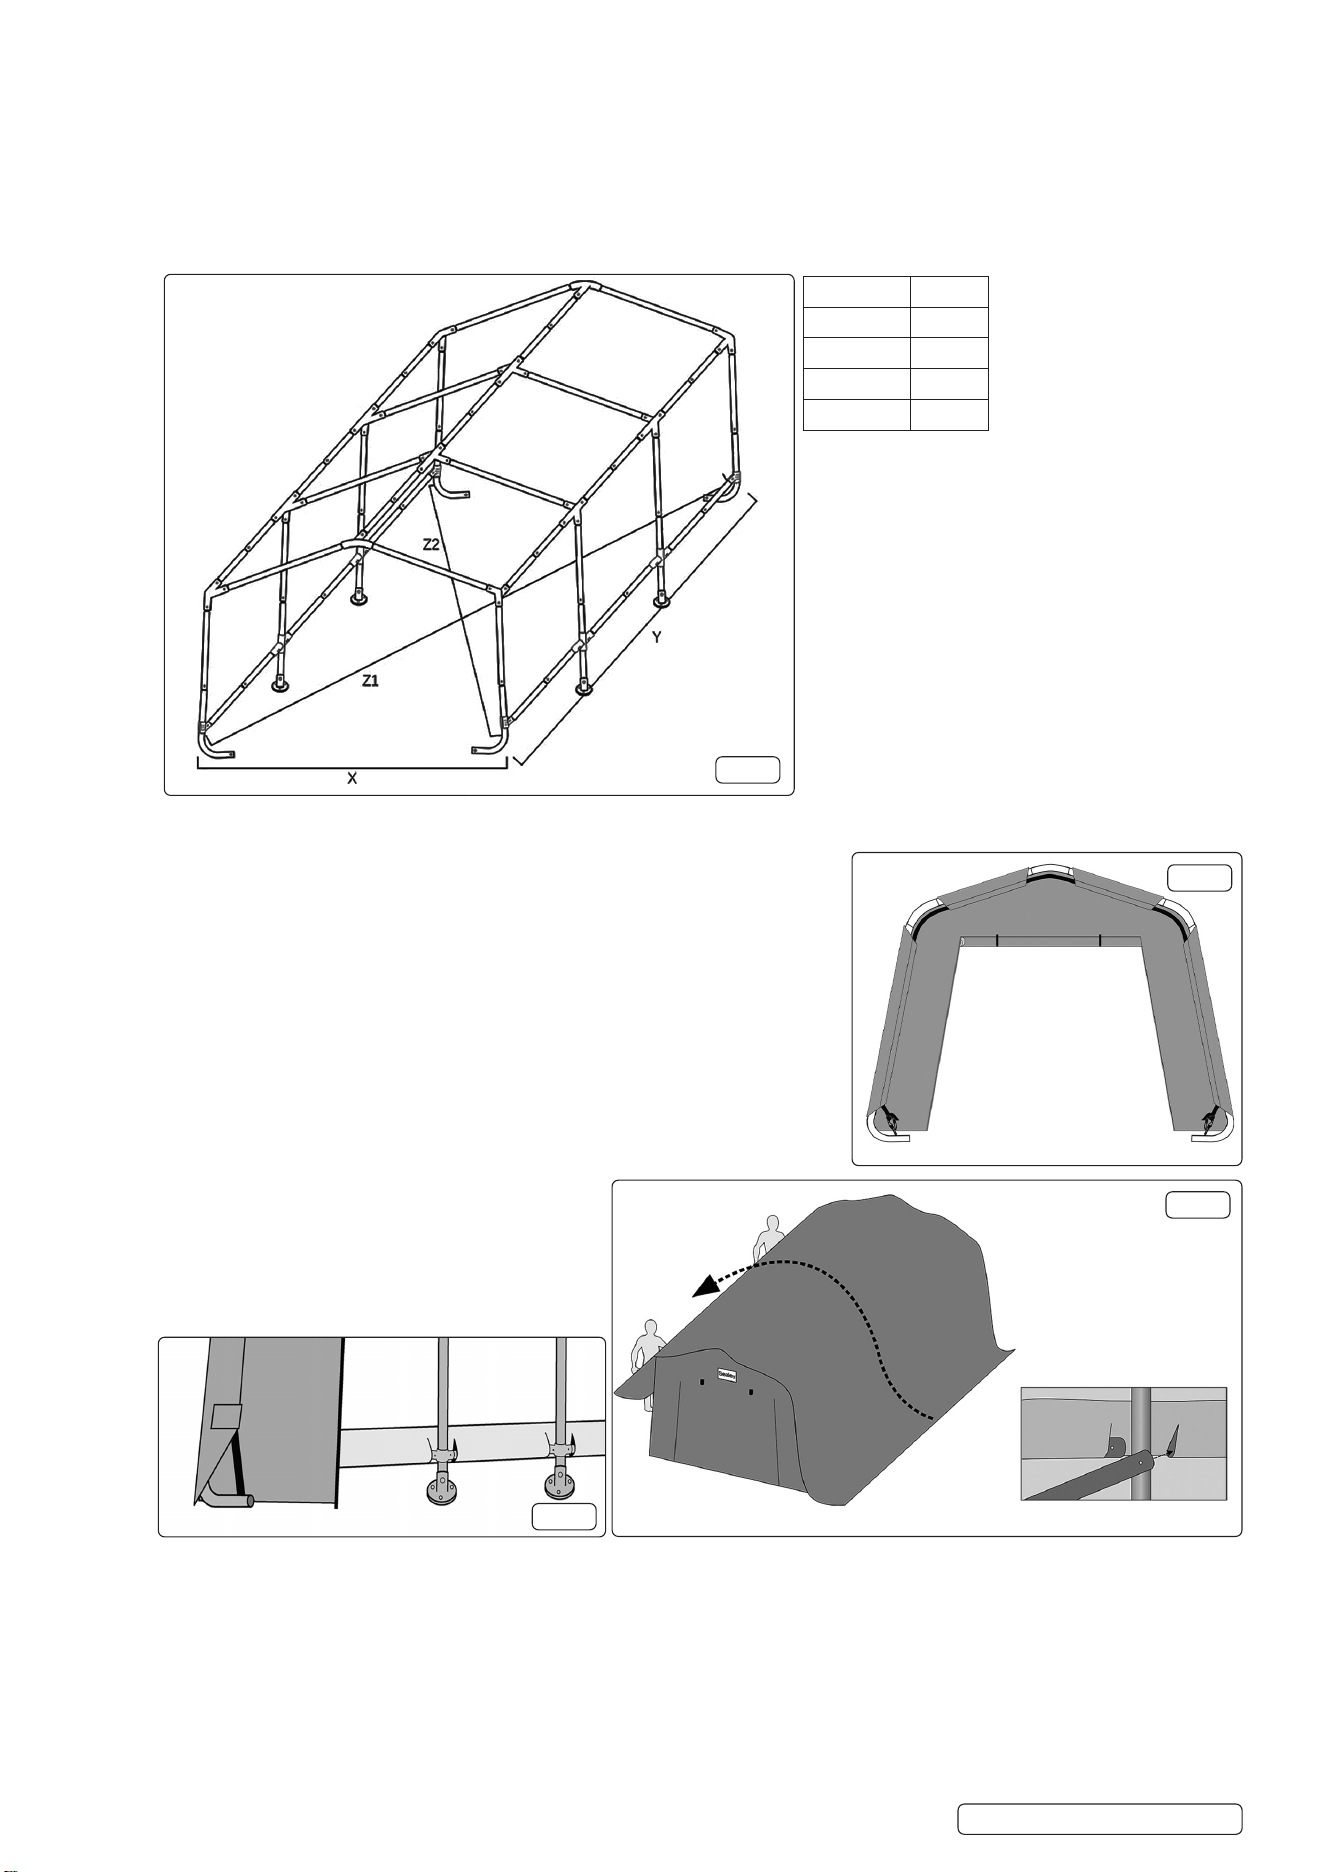
5.2. SURVEY FOR SQUARENESS (g.5)
NOTE: When the assembled shelter is in correct position for intended use, perform squareness check.
NOTE: It is essential to check the assembly for squareness. If the unit is mis-shapen, it may not be possible to t the covers.
5.2.1. Accurately measure the dimensions illustrated below. If dimensions dier (see table), recheck assembly and adjust standing shape to
achieve the correct values.
5.2.2. When the shelters squareness is conrmed, tighten all xings to hold the frame in position.
5.2.3. Fix the shelters feet (item 14) in position using the supplied stakes (item 16).
5.2.4. Fix the shelters corners (item 7) in position using the supplied stakes (item 20).
5.3. FITTING COVERS
5.3.1. FRONT AND REAR DOORS (g.6)
5.3.1.1. Locate end covers over the frame and clip the hook of the ratchet (item 21) at one end
of the mounting cord into the hole in the foot (item 7).
5.3.1.2. Pull the cord tight on the other end so the cover is rmly held over the frame and clip
the hook of the ratchet (item 21) into the hole in the foot (item 7).
5.3.2. TOP COVER (g.7, g.8)
NOTE: It is recommended that at least two people are
used for this operation.
5.3.2.1. Drag and drop the cover over the roof making sure that
the cover is equally disposed.
5.3.2.2. Separate frame members (item 8, item 9) and insert into
the pockets in the cover.
Dimension Value
X 4m
Y 6m
Z1 7.2m
Z2 7.2m
fig.
5
fig.
6
Original Language Version
© Jack Sealey Limited
GCP02 Issue:3 13/11/24
fig.
7
fig.
8
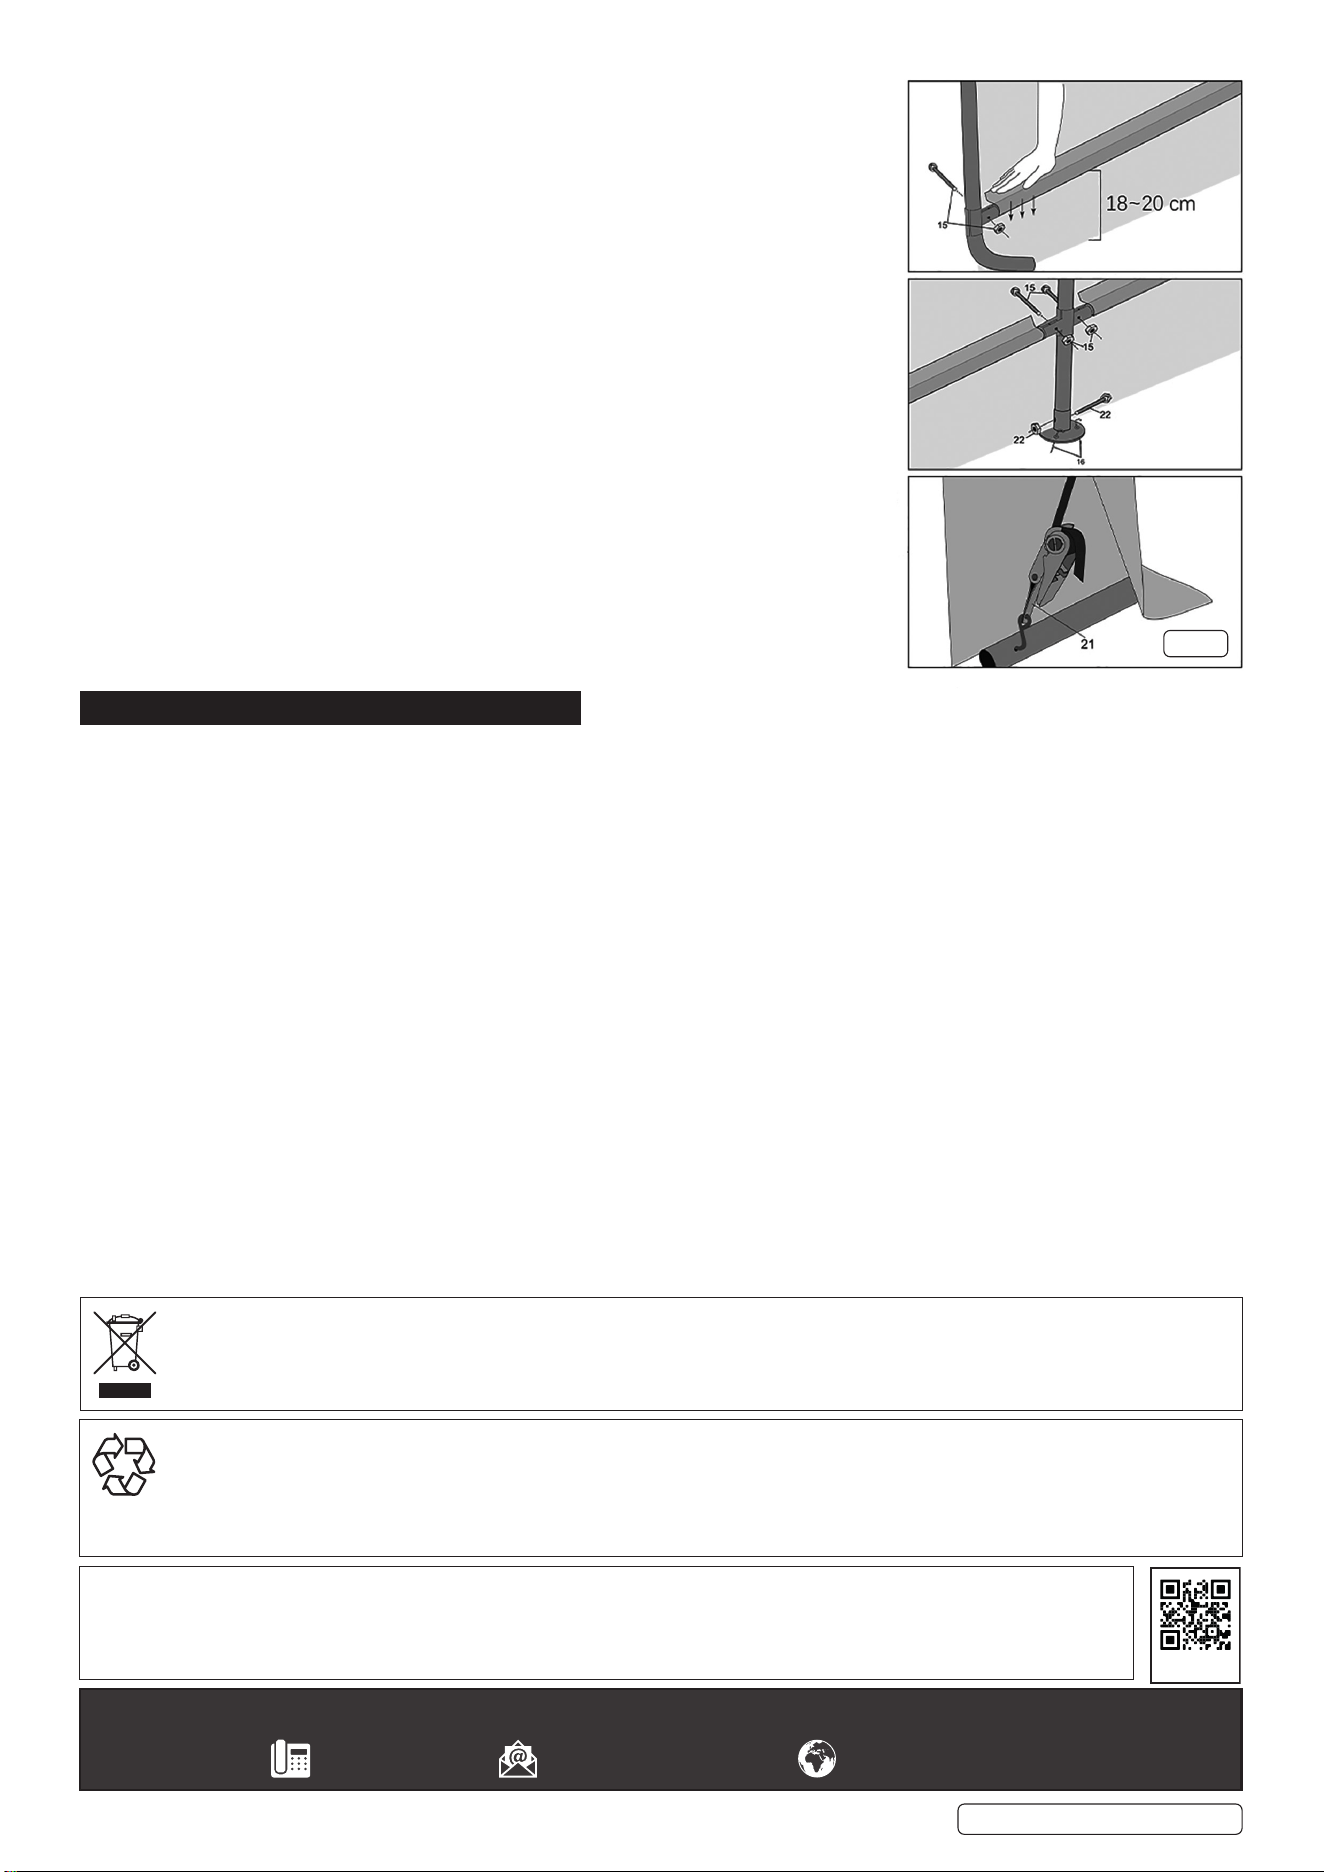
5.3.3. FINAL FITTING (g.9)
To enable a secure t of the roof cover to the frame, press down on the frame members to
tension the cover and tighten screws.
Secure all four top cover corners to the outside of the corner legs using the hook on the
ratchet.
6. MAINTENANCE.
6.1. Regularly check all xings are secure and anchors well embedded especially after bad weather periods.
8 DO NOT use bleach, alkaline or harsh detergents for cleaning. Doing so will damage the polycarbonate material. Soap and warm water
are recommended.
Sealey Group, Kempson Way, Suffolk Business Park, Bury St Edmunds, Suffolk. IP32 7AR
01284 757500 sales@sealey.co.uk www.sealey.co.uk
ENVIRONMENT PROTECTION
Recycle unwanted materials instead of disposing of them as waste. All tools, accessories and packaging should be sorted, taken to
a recycling centre and disposed of in a manner which is compatible with the environment. When the product becomes completely
unserviceable and requires disposal, drain any fluids (if applicable) into approved containers and dispose of the product and fluids
according to local regulations.
Note: It is our policy to continually improve products and as such we reserve the right to alter data, specifications and component parts
without prior notice.
Important: No Liability is accepted for incorrect use of this product.
Warranty: Guarantee is 12 months from purchase date, proof of which is required for any claim.
WEEE REGULATIONS
Dispose of this product at the end of its working life in compliance with the EU Directive on Waste Electrical and Electronic Equipment
(WEEE). When the product is no longer required, it must be disposed of in an environmentally protective way. Contact your local solid
waste authority for recycling information.
REGISTER YOUR
PURCHASE HERE
fig.
9
Original Language Version
© Jack Sealey Limited
GCP02 Issue:3 13/11/24