

Technical Support and E-Warranty Certificate www.vevor.com/support
LIVESTOCK TRIMMING STAND
USER MANUAL
We continue to be committed to provide you tools with competitive price.
"Save Half","Half Price" or any other similar expressions used by us only represents an
estimate of savings you might benefit from buying certain tools with us compared to the major
top brands and does not necessarily mean to cover all categories of tools offered by us. You
are kindly reminded to verify carefully when you are placing an order with us if you are
actually saving half in comparison with the top major brands.

1
SCJ002-W /SCJ003-W /SCJ002-B /SCJ003-B
Have product questions? Need technical support? Please feel free to
contact us:
Technical Support and E-Warranty Certificate
www.vevor.com/support
NEED HELP? CONTACT US!
This is the original instruction,please read all manual instructions carefully
before operating. VEVOR reserves a clear interpretation of our user
manual. The appearance of the product shall be subject to the product
you received. Please forgive us that we won't inform you again if there
are any technology or software updates on our product.
LIVESTOCK TRIMMING
STAND

2
Safety precautions
WARNING:
Read this instructions before using this product. Failure to do so can result in
serious injury. the basic precautions should always be followed,including the
following:
1. The livestock trimming stand may not be used or stored in hazardous areas. It
is not allowed to use the appliance in hazardous locations.
2. The livestock trimming stand must be checked to ensure that it is in proper
working order and is operating safely prior to use. Otherwise,the appliance must
not be used.
3. Use as intended only. The Livestock Trimming Stand needs to be placed on
level ground for use. If necessary, the four feet can be secured with ground nails.
4. The operator must use the livestock trimming stand properly. He must consider
the local conditions and must pay attention to third parties,in particular
children,when working with the livestock trimming stand.
5. This livestock trimming stand is not intended for use by persons (including
children) with reduced physical,sensory or mental abilities or lacking experience
and/or knowledge,unless they are super- vised by a person responsible for their
safety or are instructed by these persons on the use of the device. Children should
be supervised,to ensure that they do not play with the livestock trimming stand.
SAVE THESE INSTRUCTIONS
3
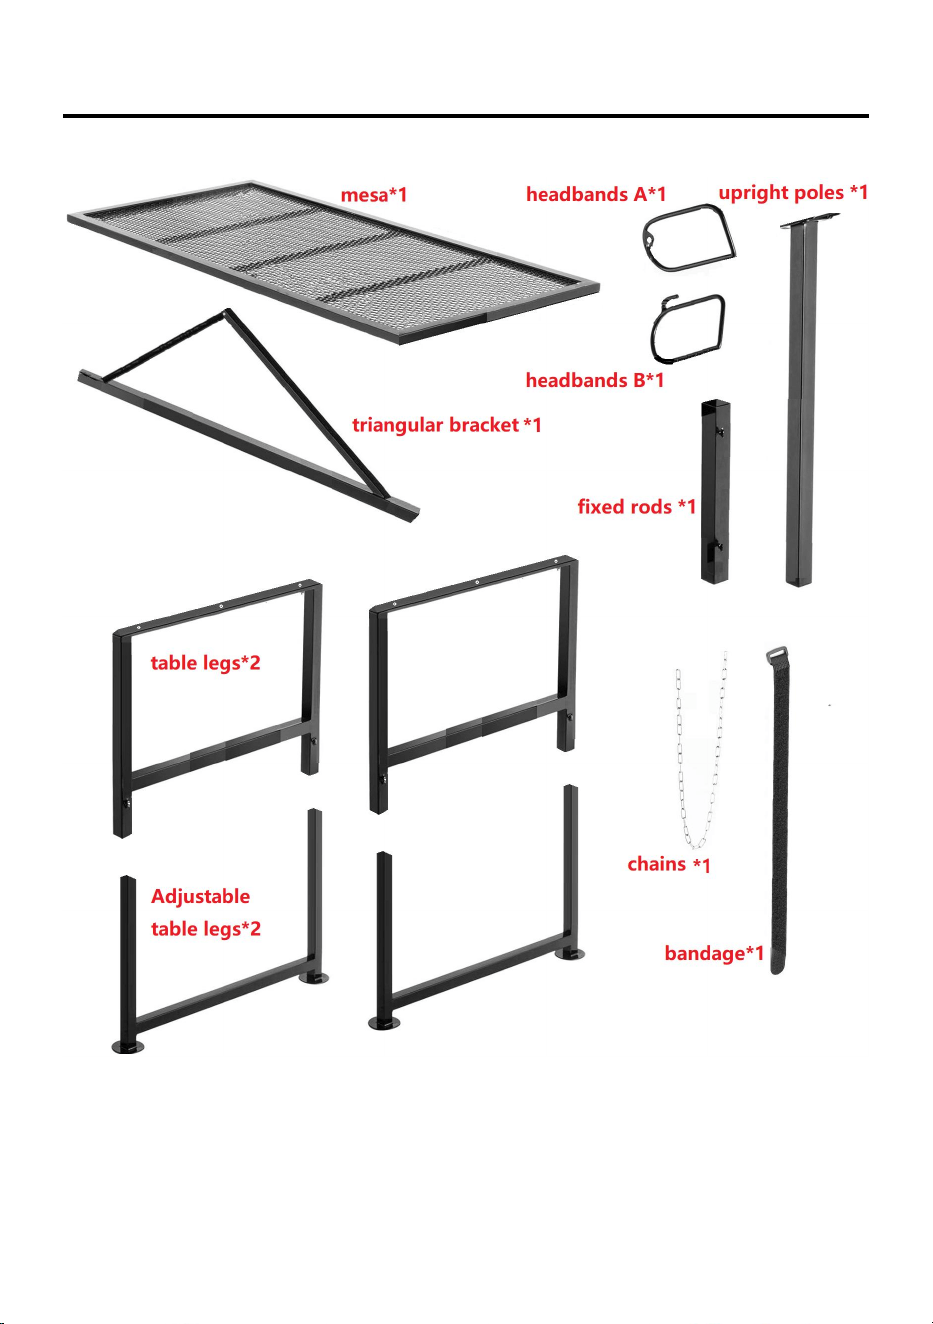
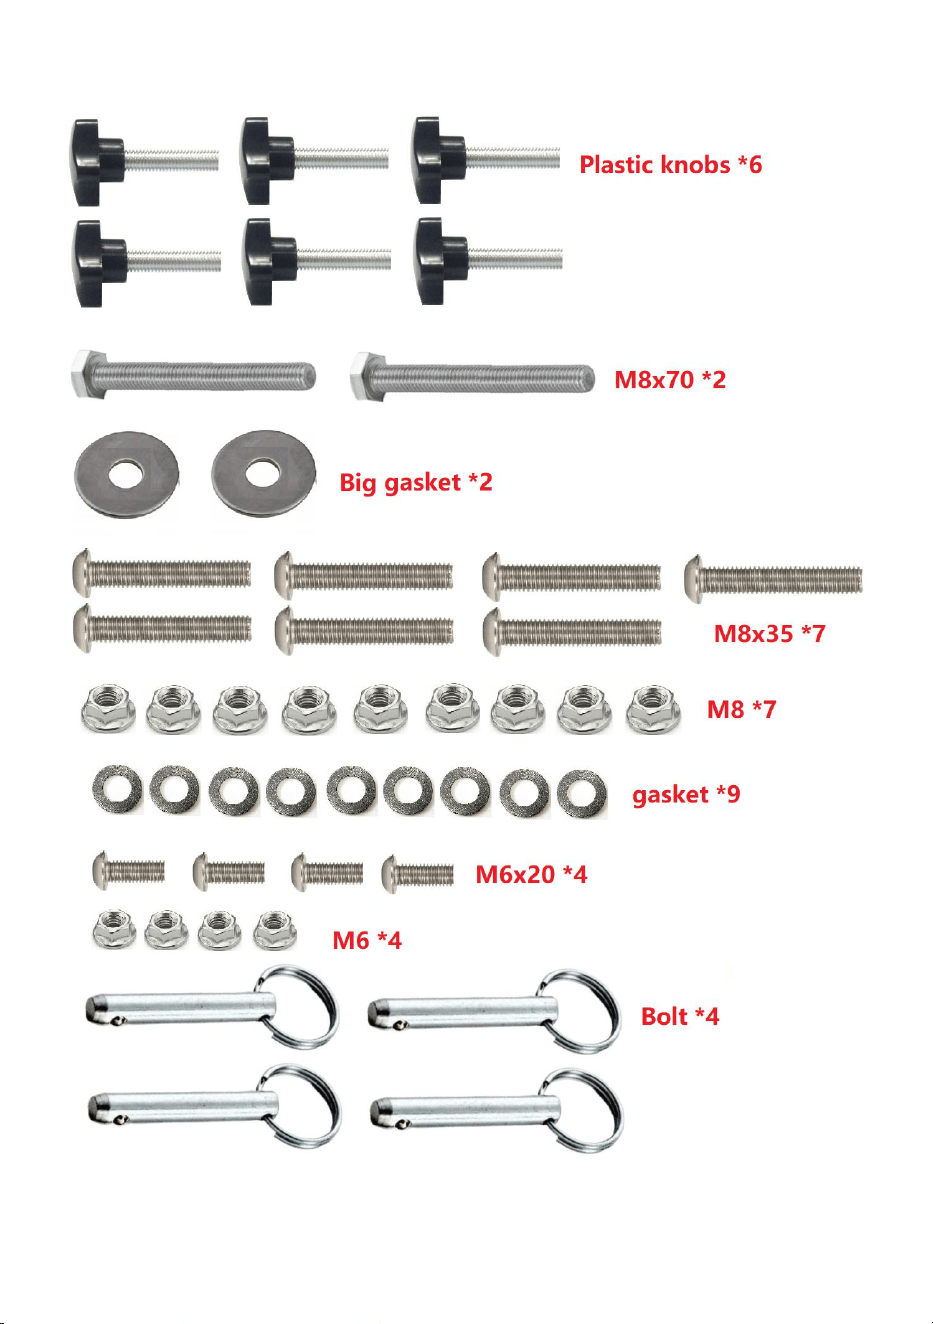
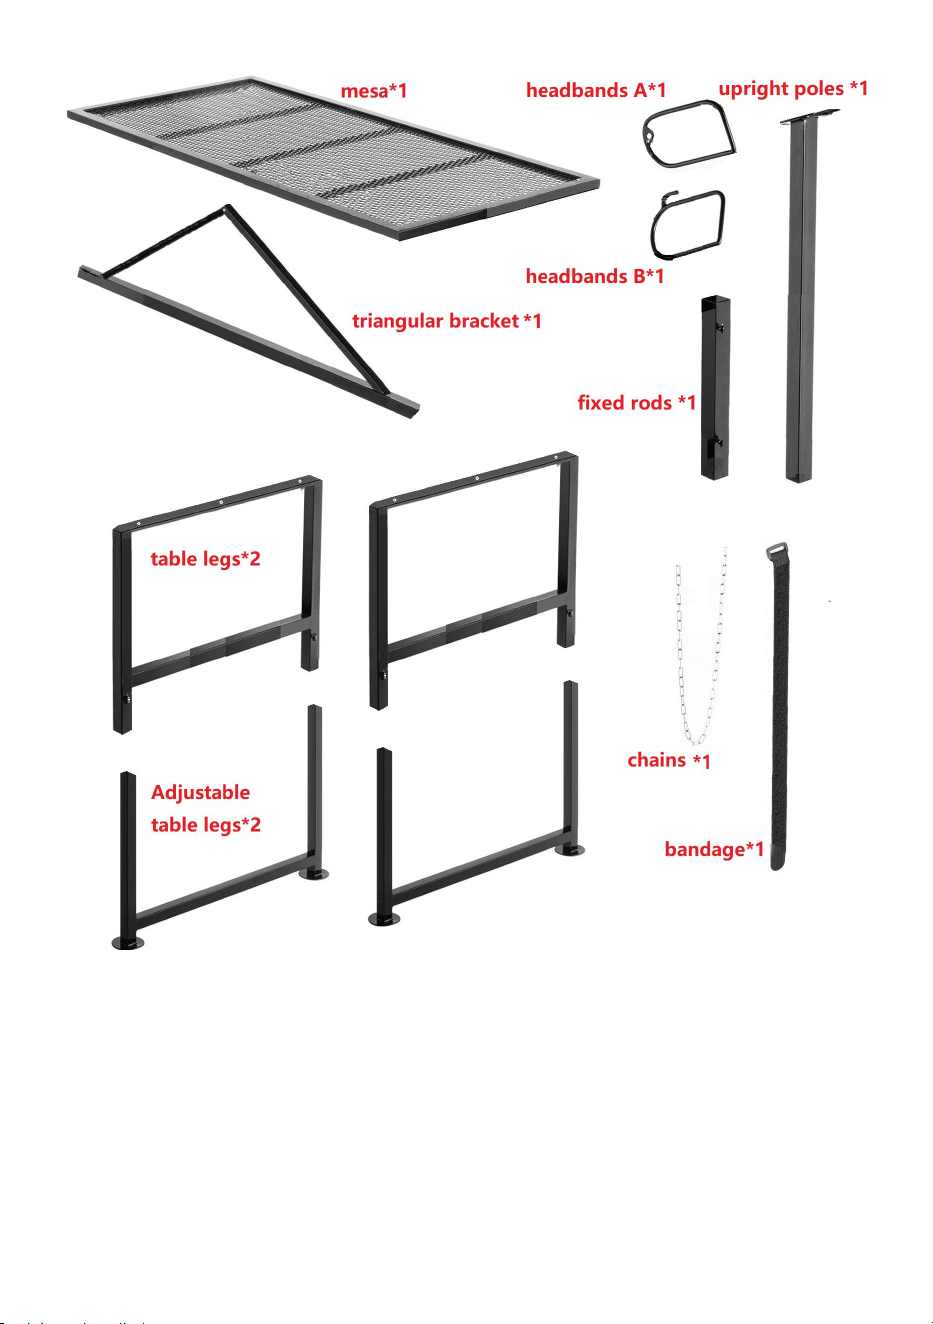
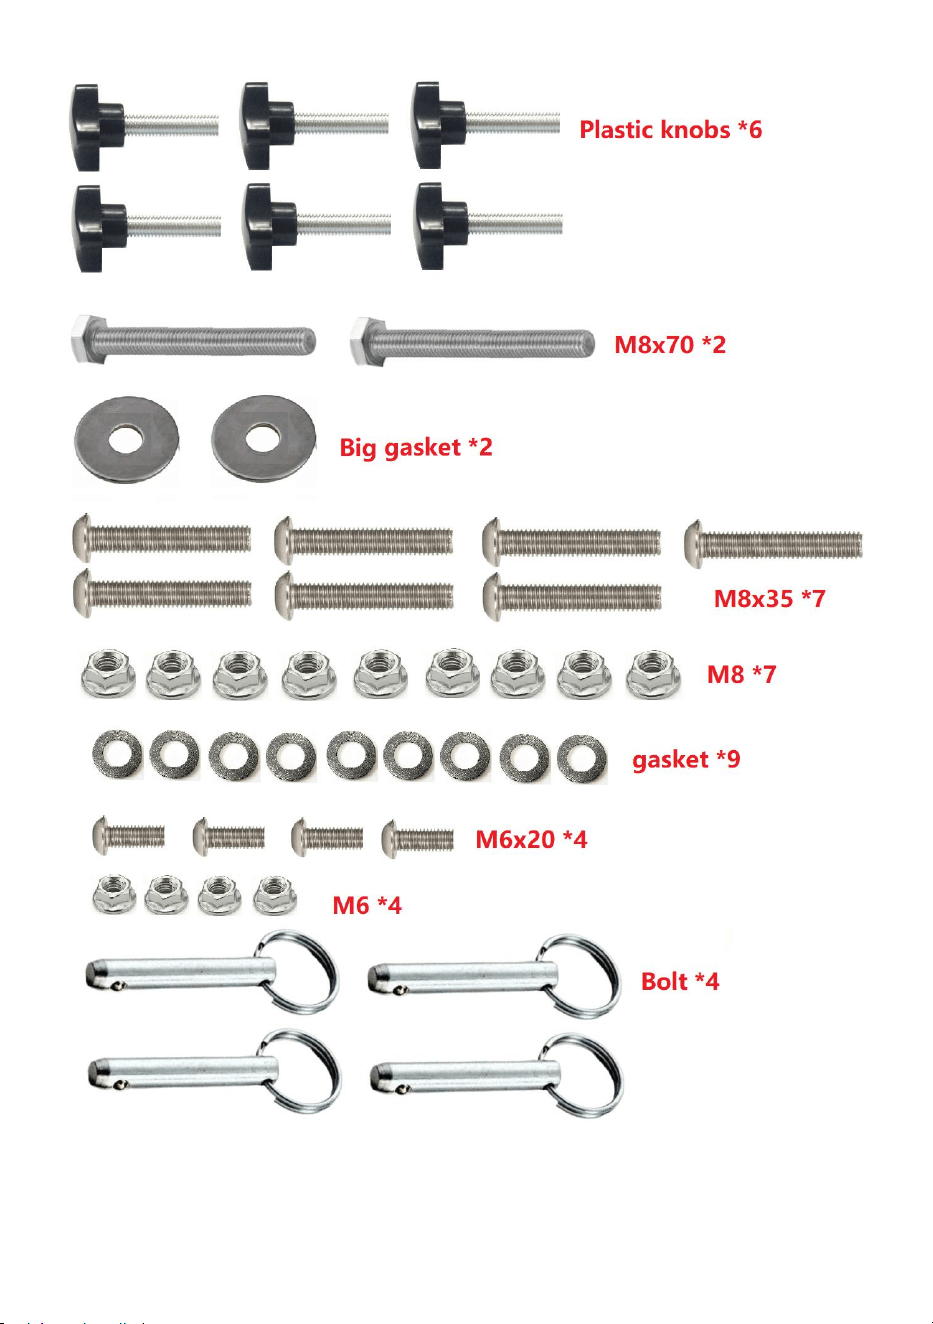
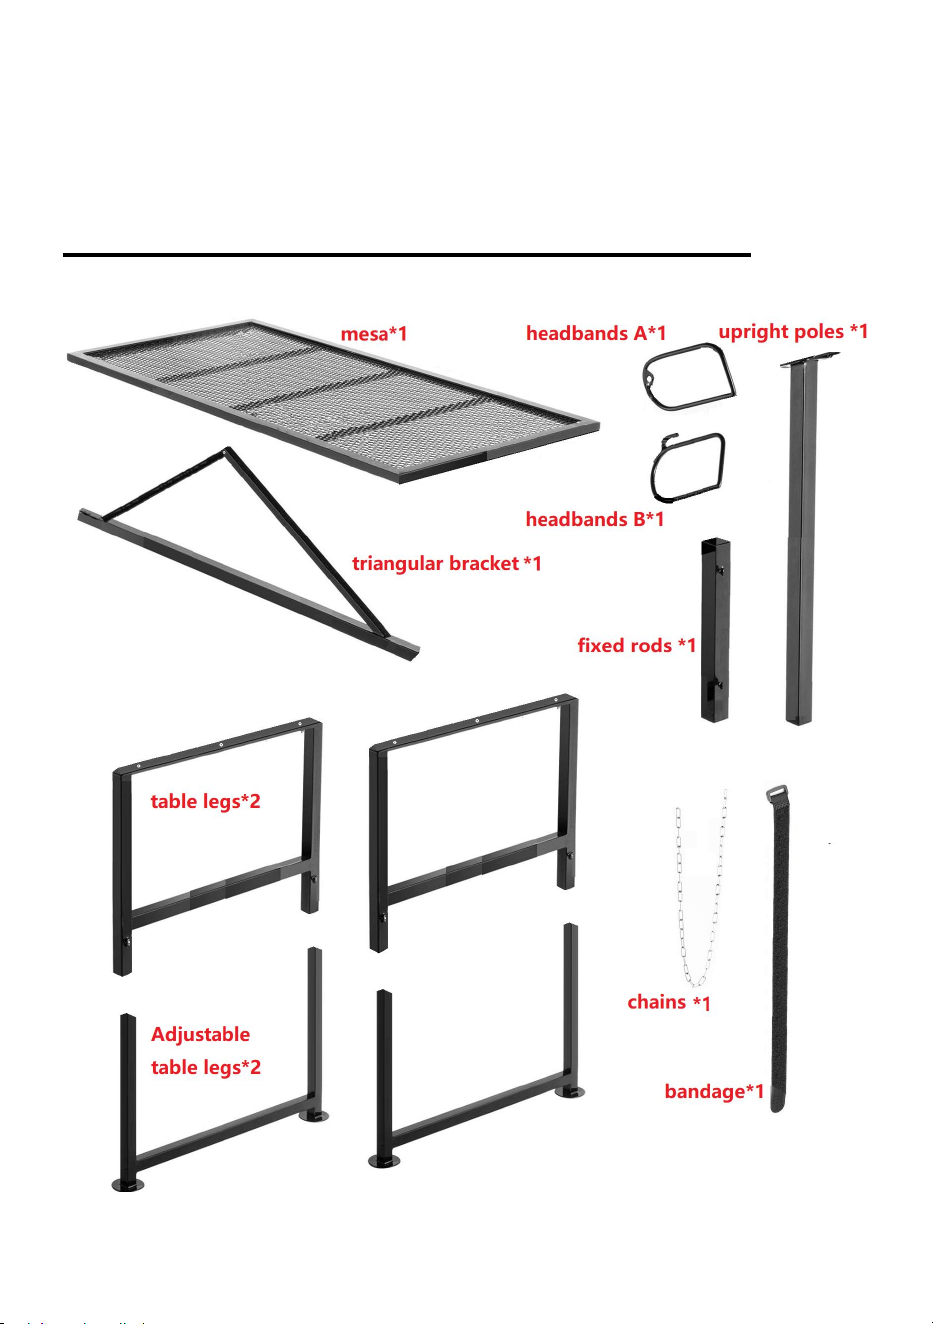
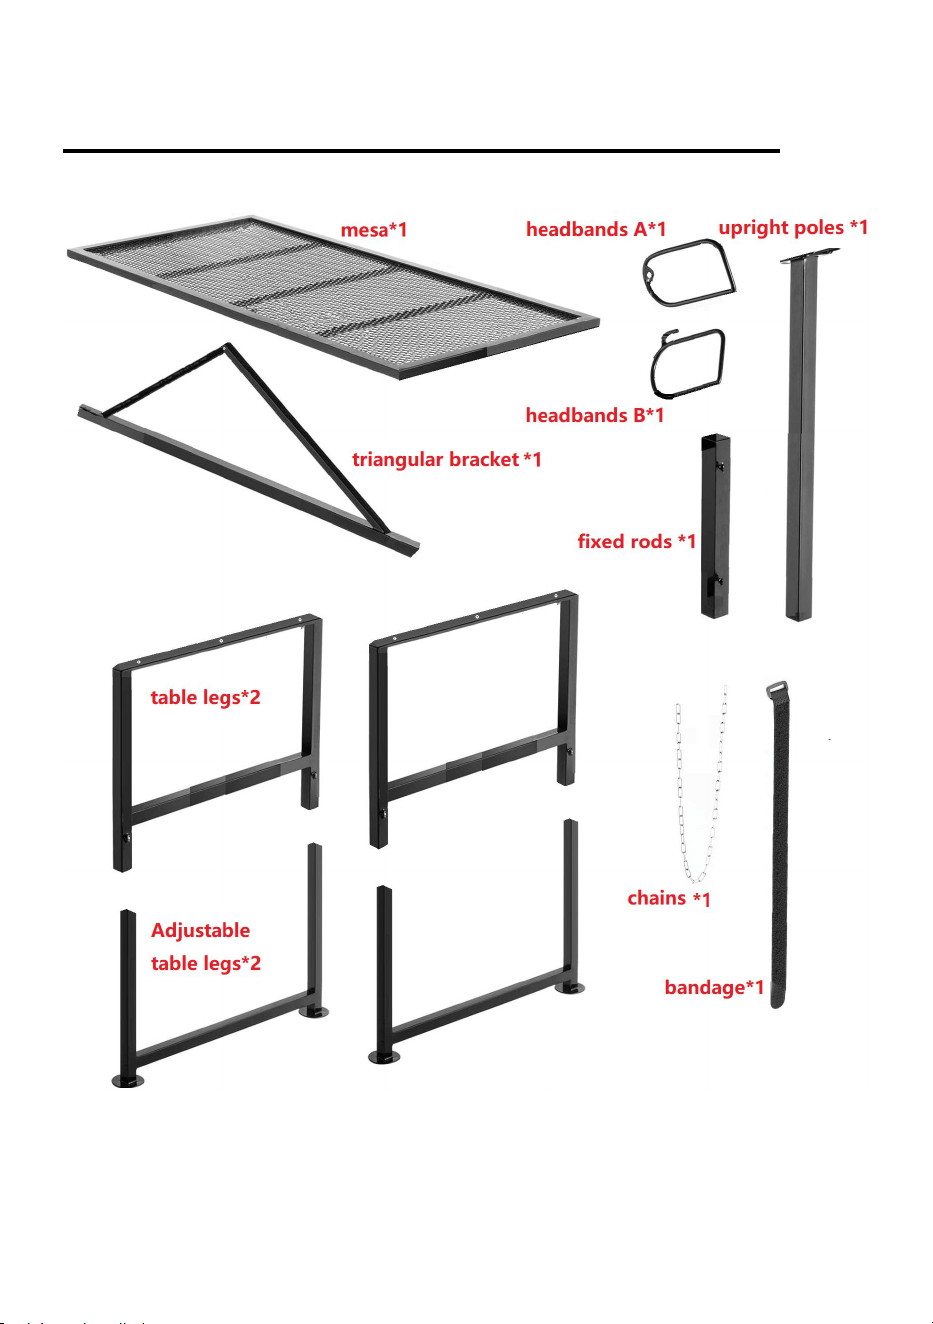
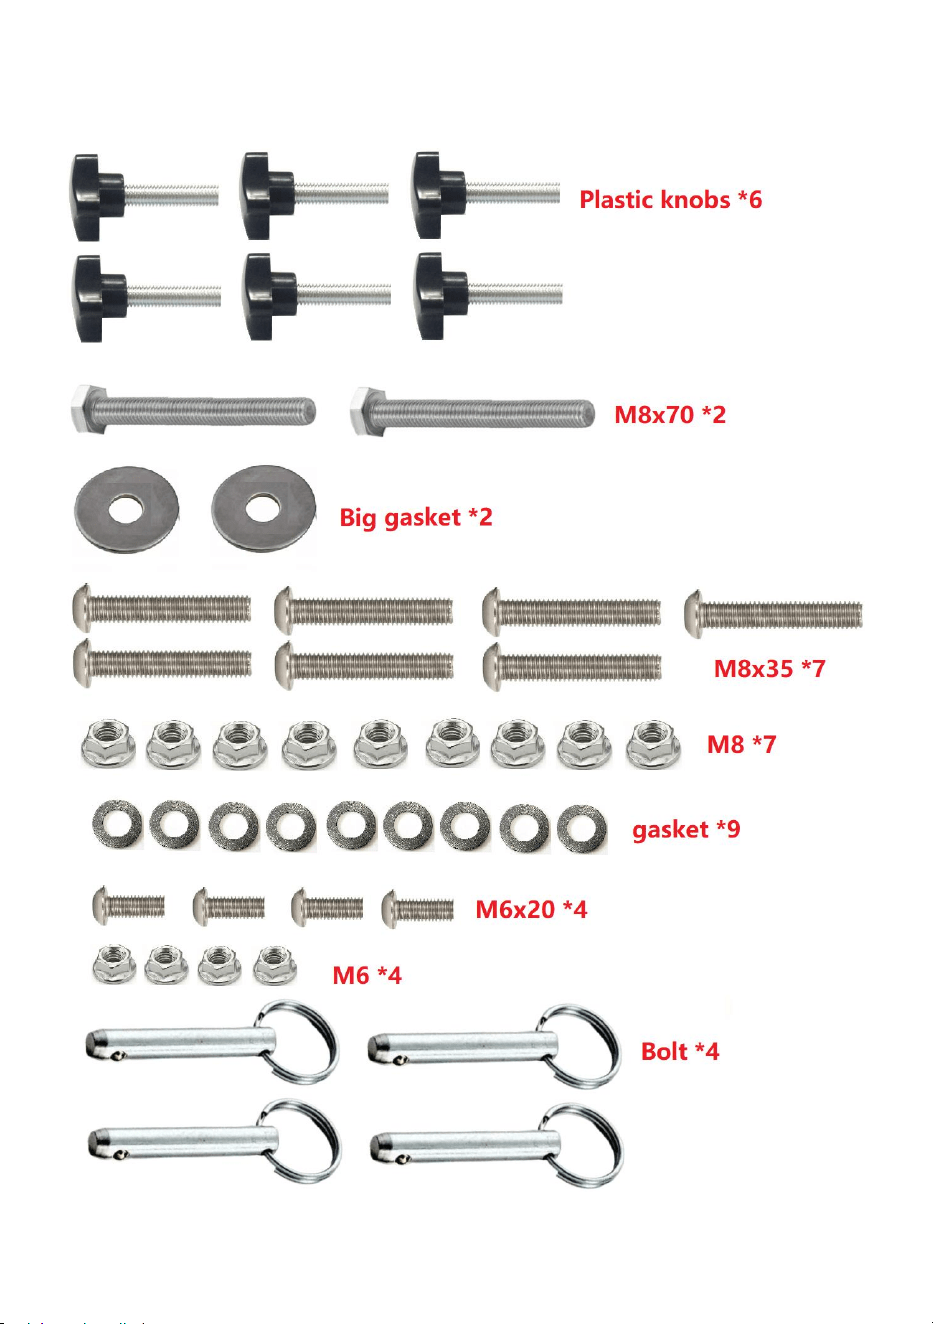
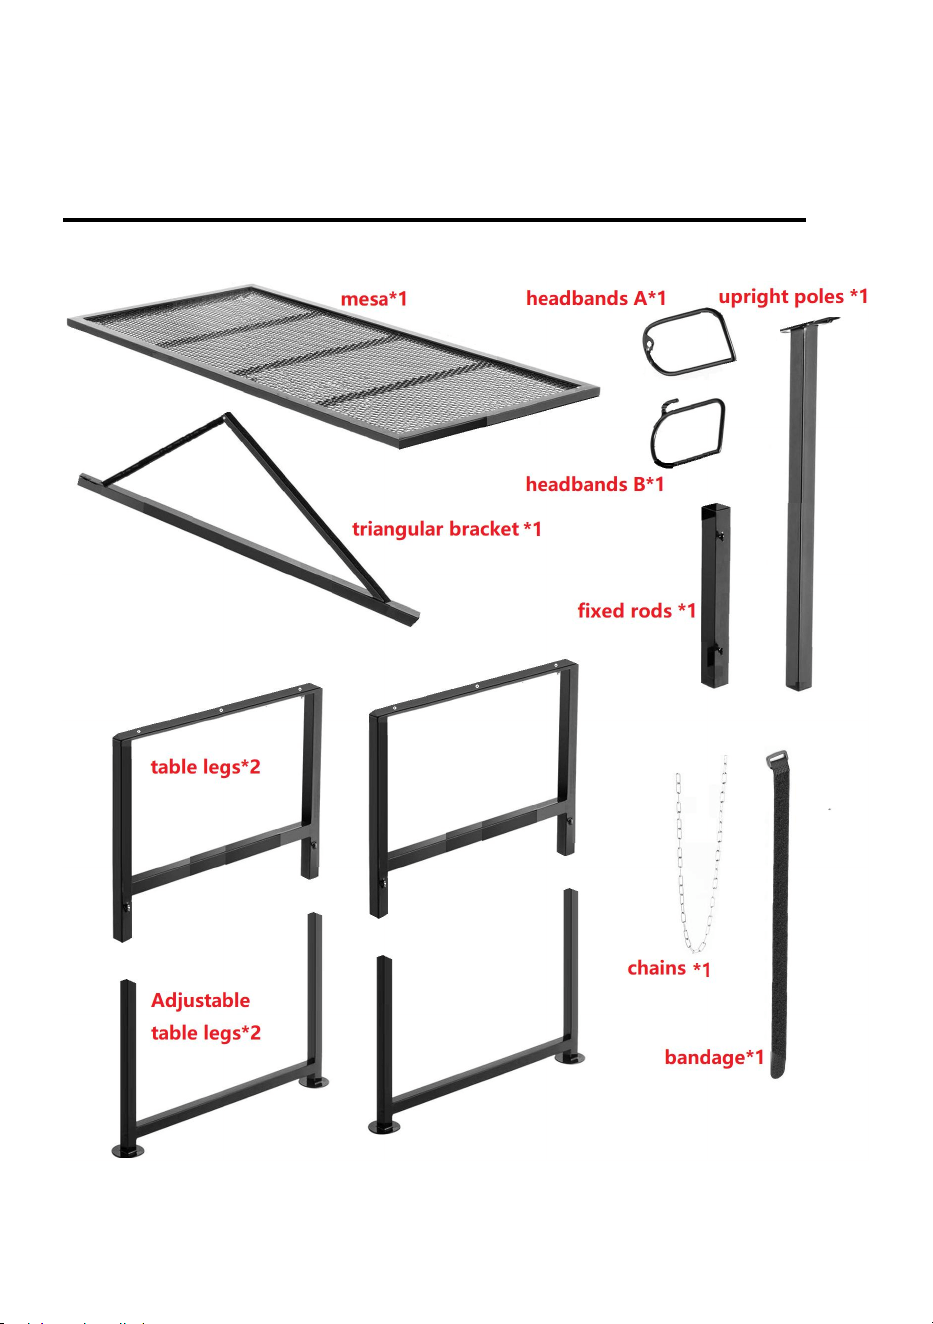
Product List
4
(Spare parts *1)
(Spare parts *1)
(Spare parts *1)
6
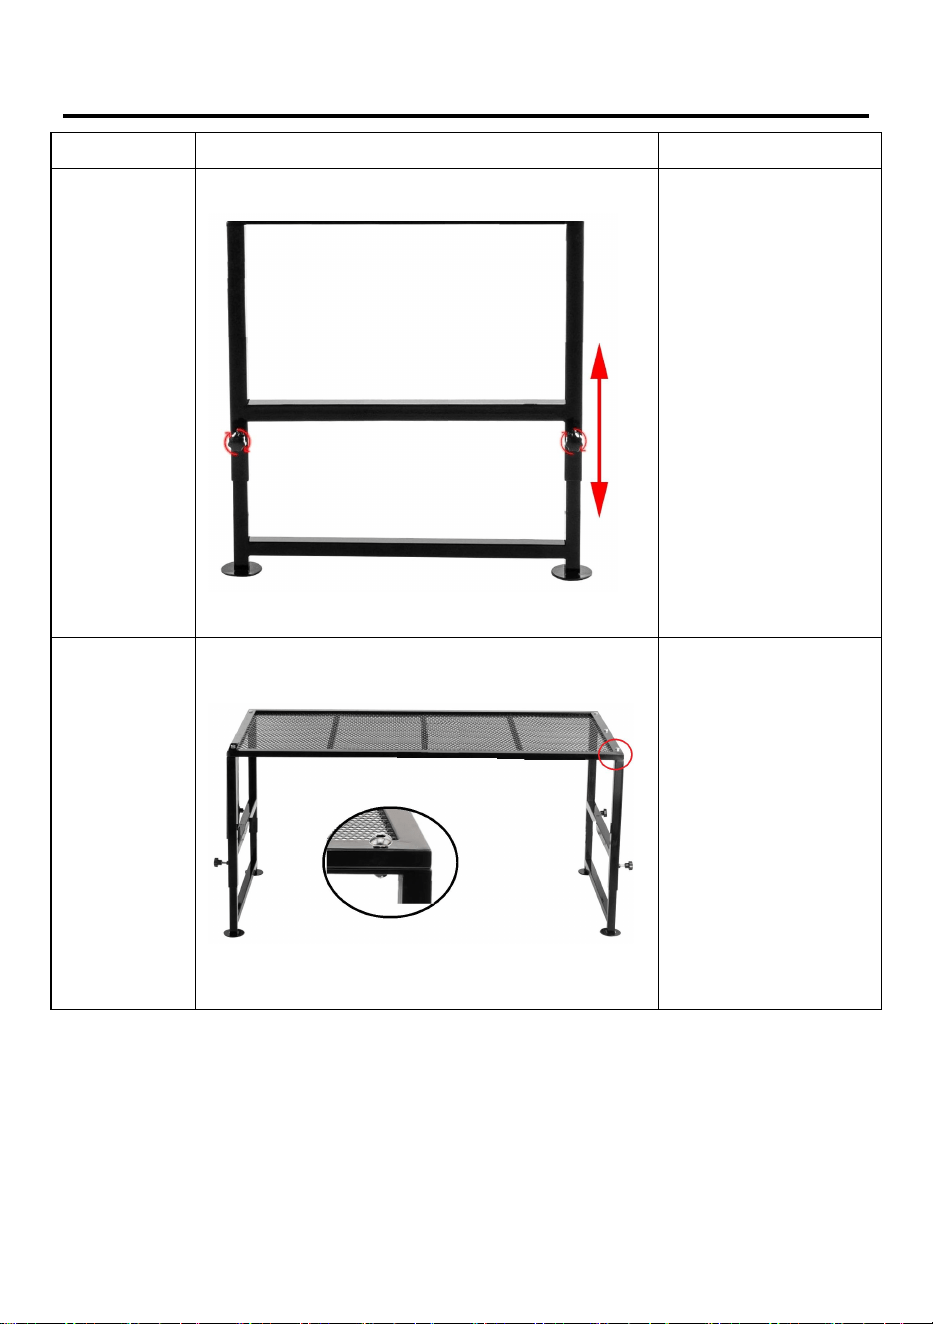
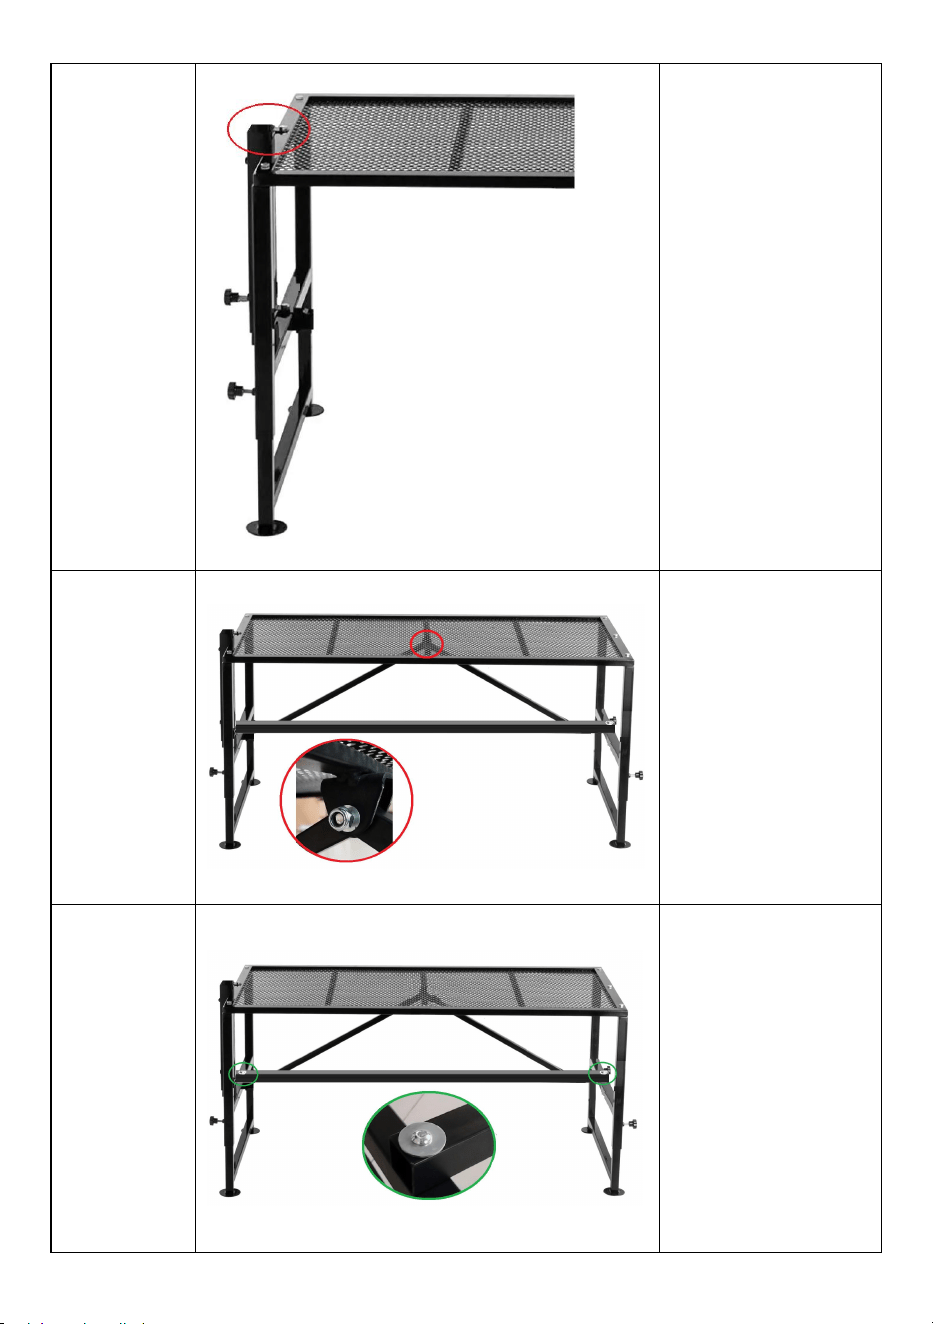
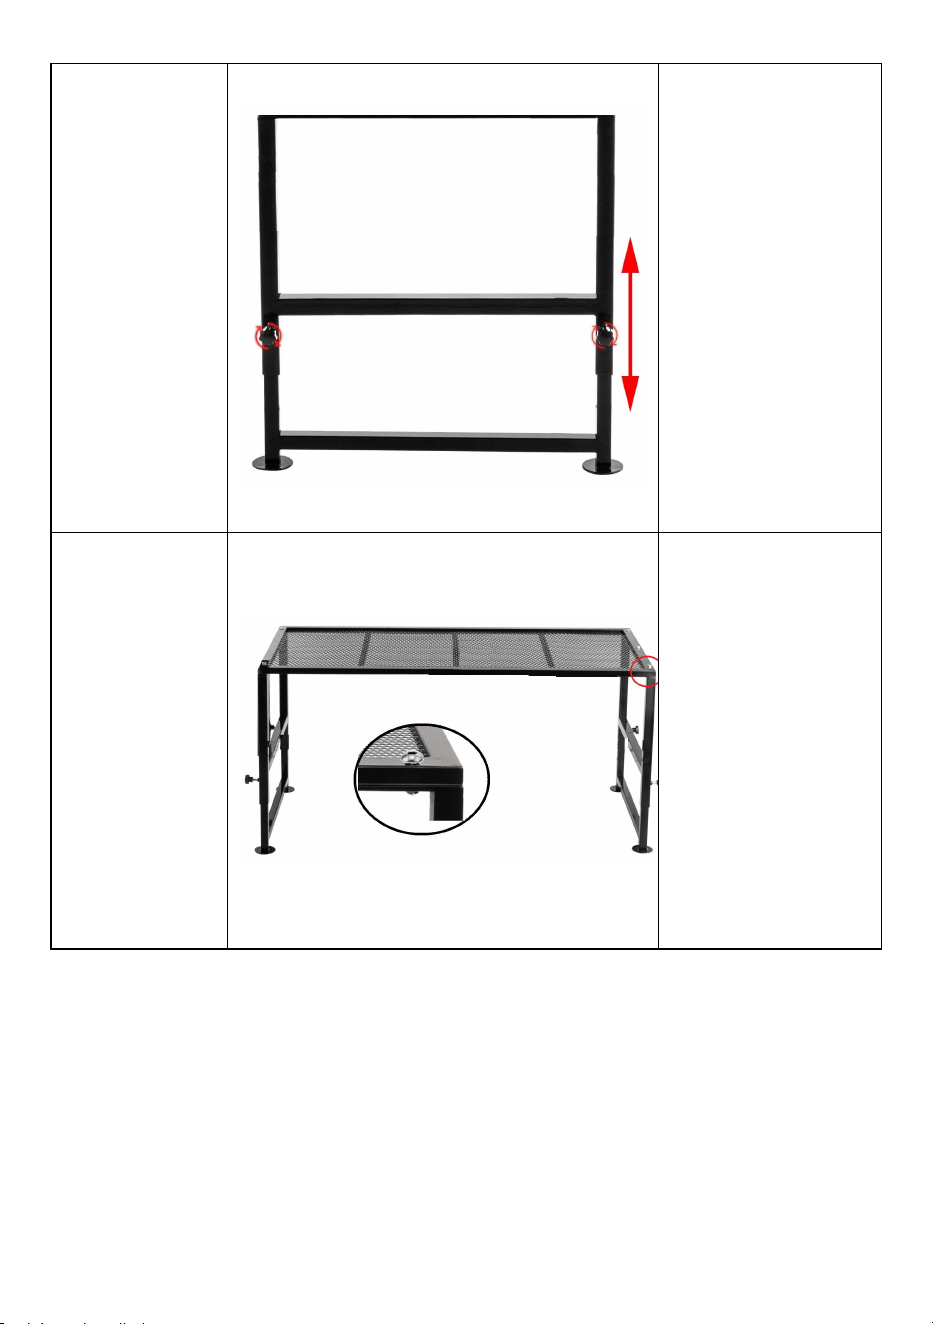
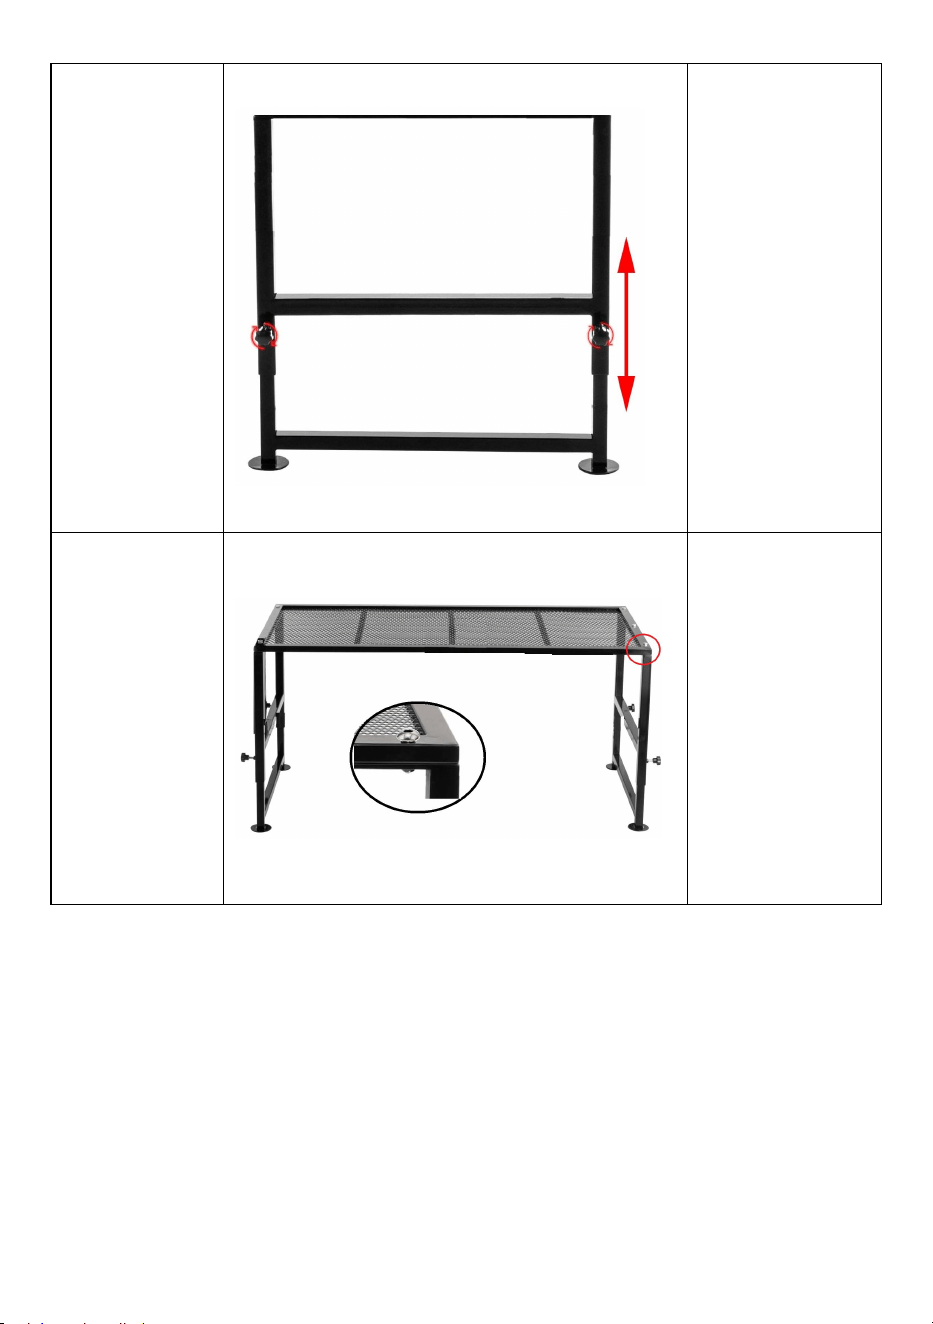
Installation Steps
Parts
Explanatory Chart
Explain
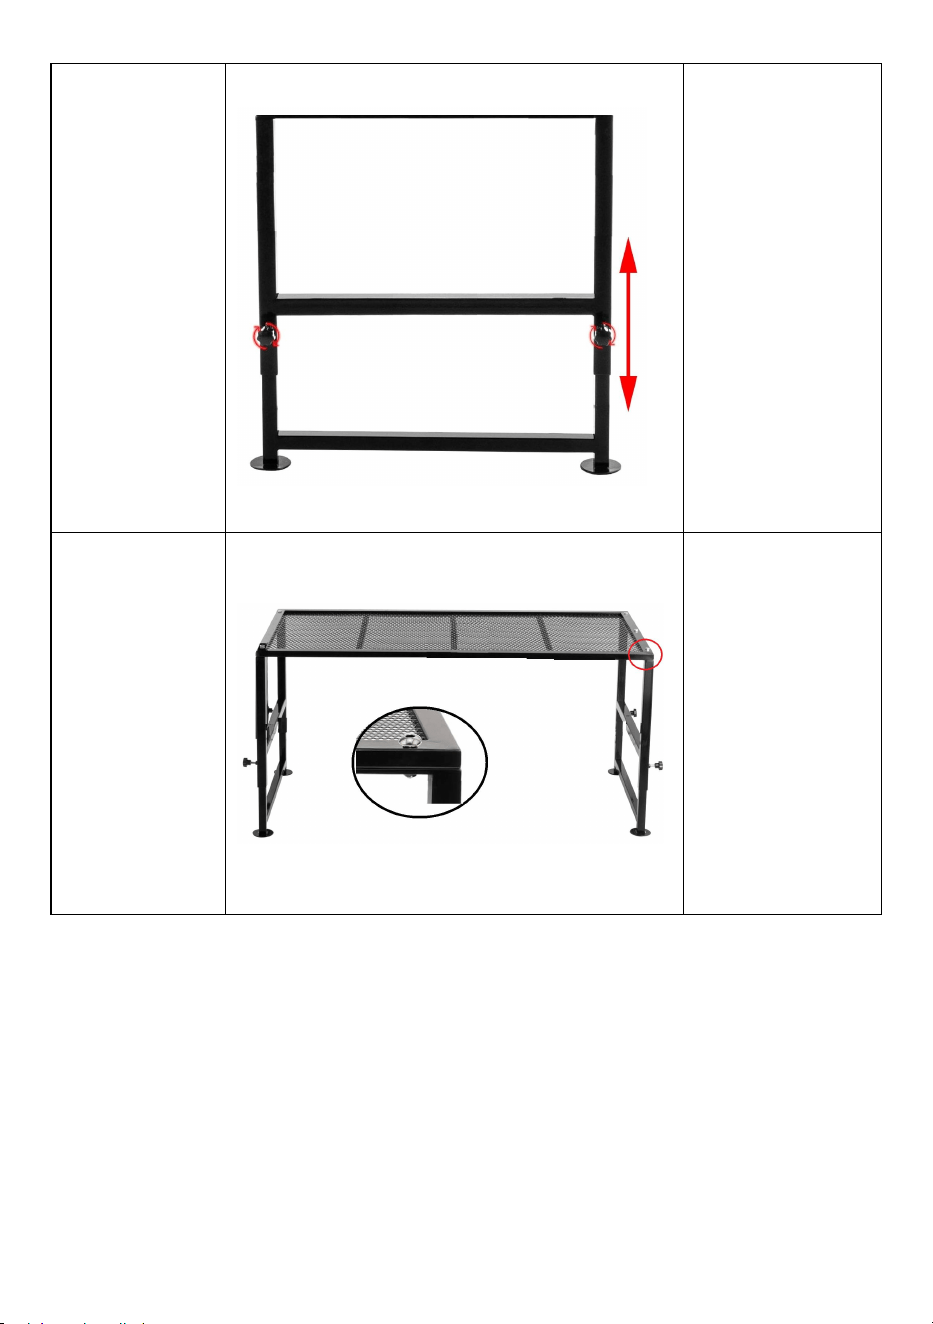
table legs
*2
adjustable
table legs
*2
plastic
knobs *2
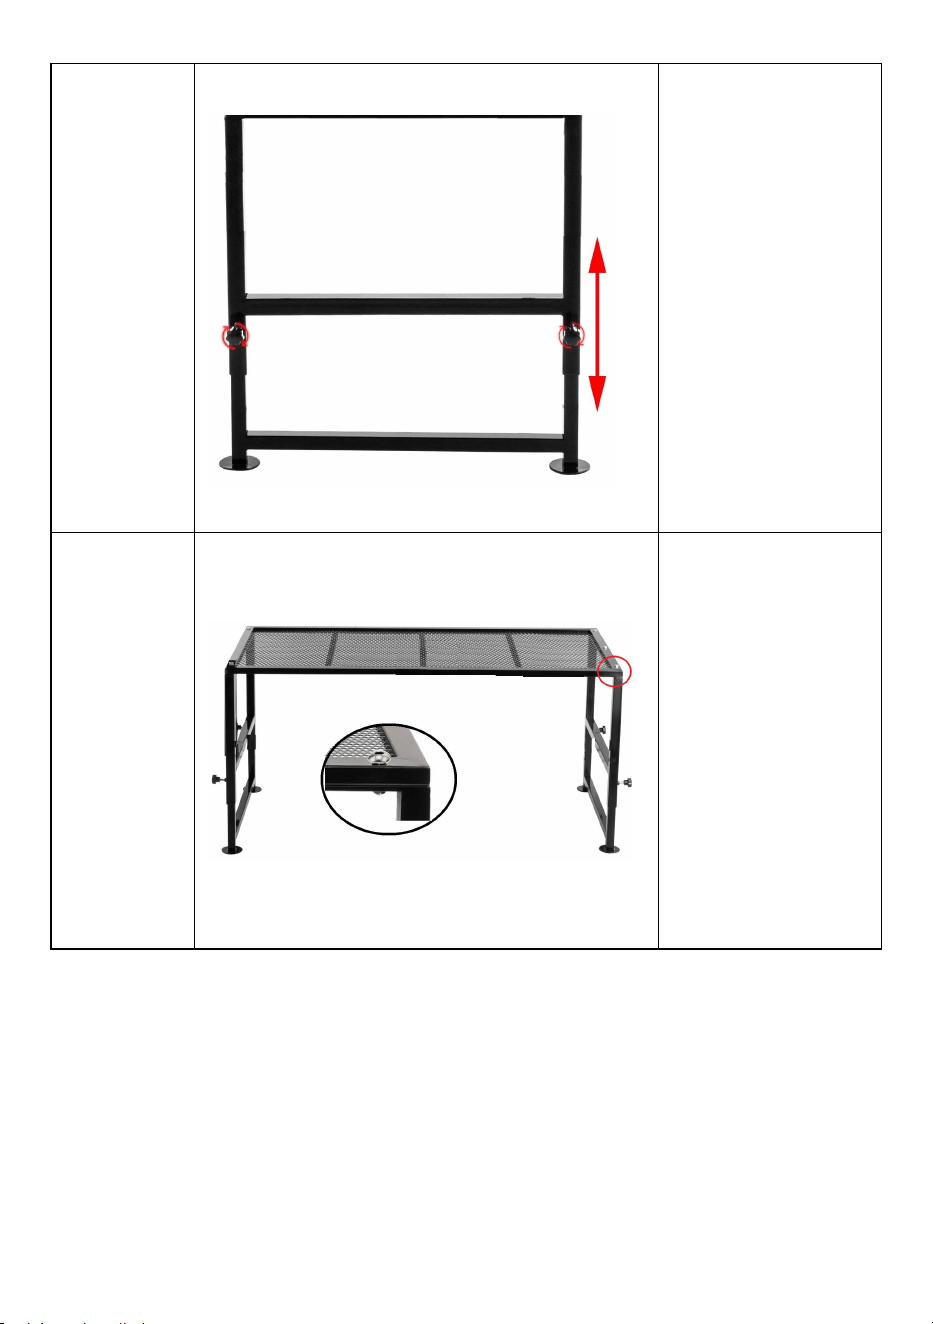
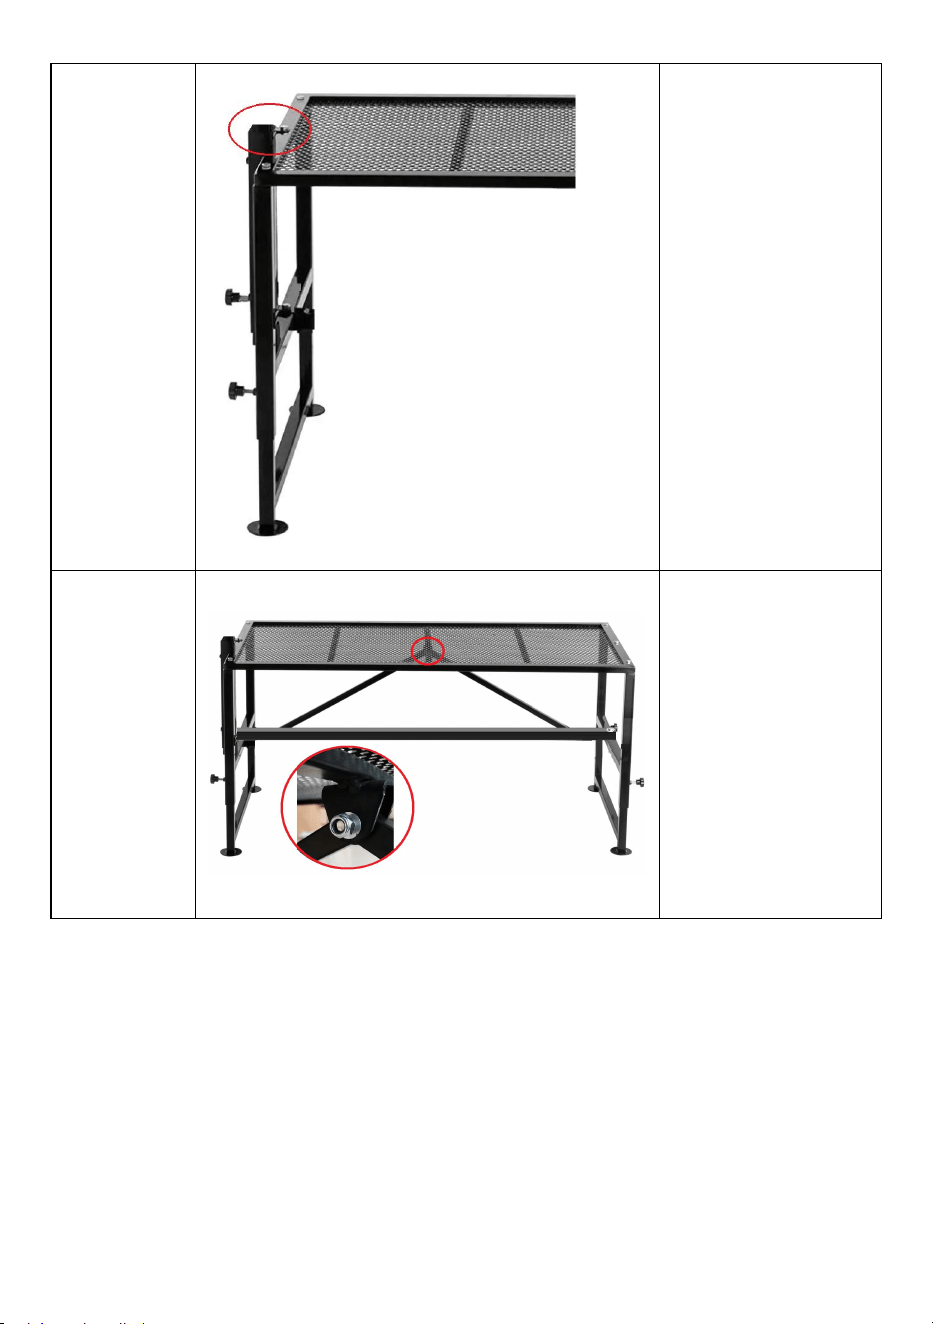
1. Insert the
adjustable table leg
into the table leg.
2. Secure the table
leg with a plastic
knob.
M8x35 *5
gasket *5
M8 *5
1. Support the
countertop with
assembled table
legs.
2. Thread 5 M8x35
holes through the
table top, attach
small spacers, and
secure them with
nuts.

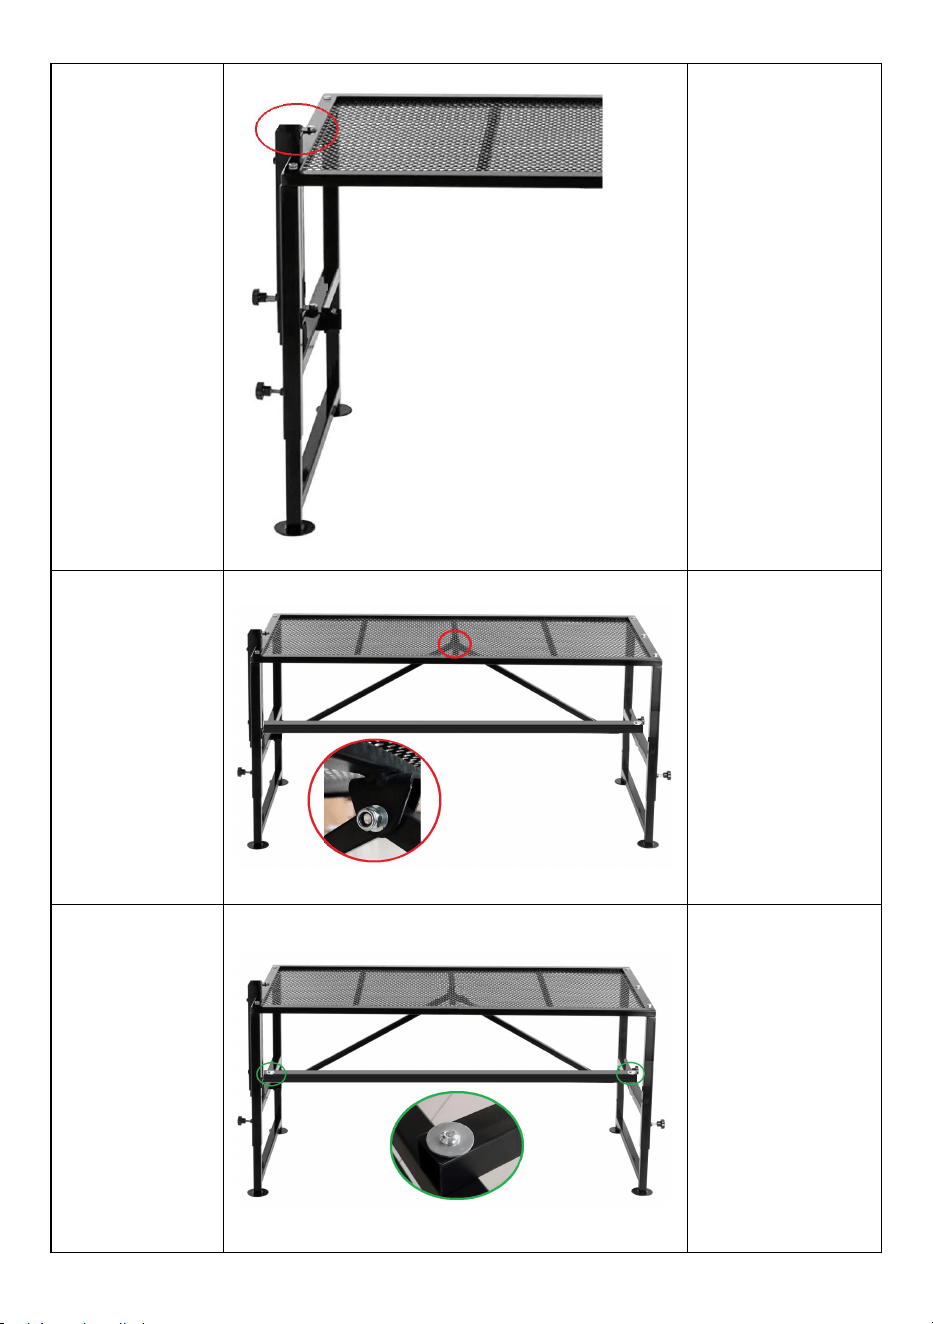
7
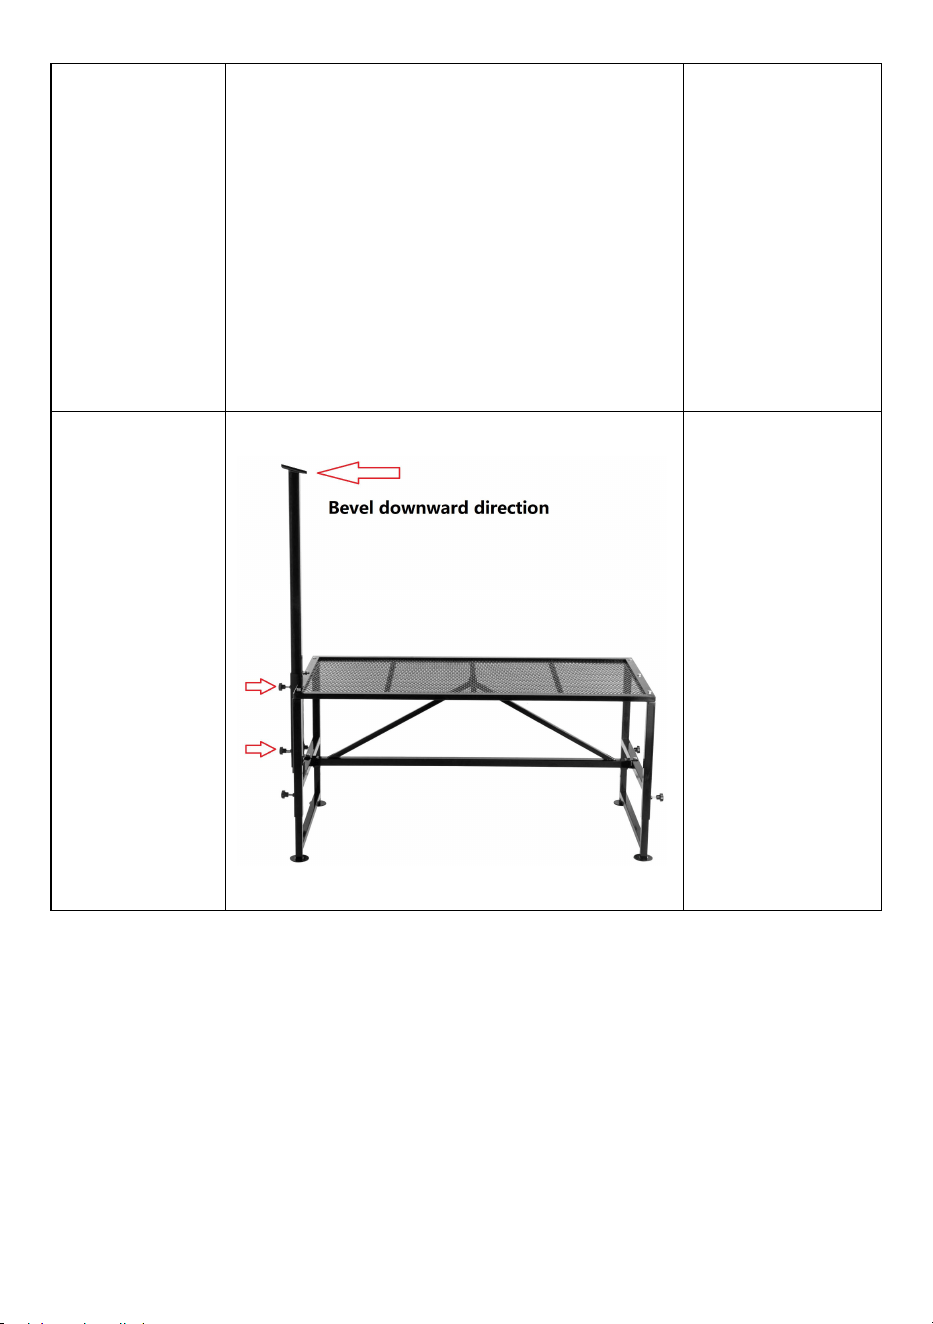
fixed rods
*1
M8x35 *1
gasket *1
M8 *1
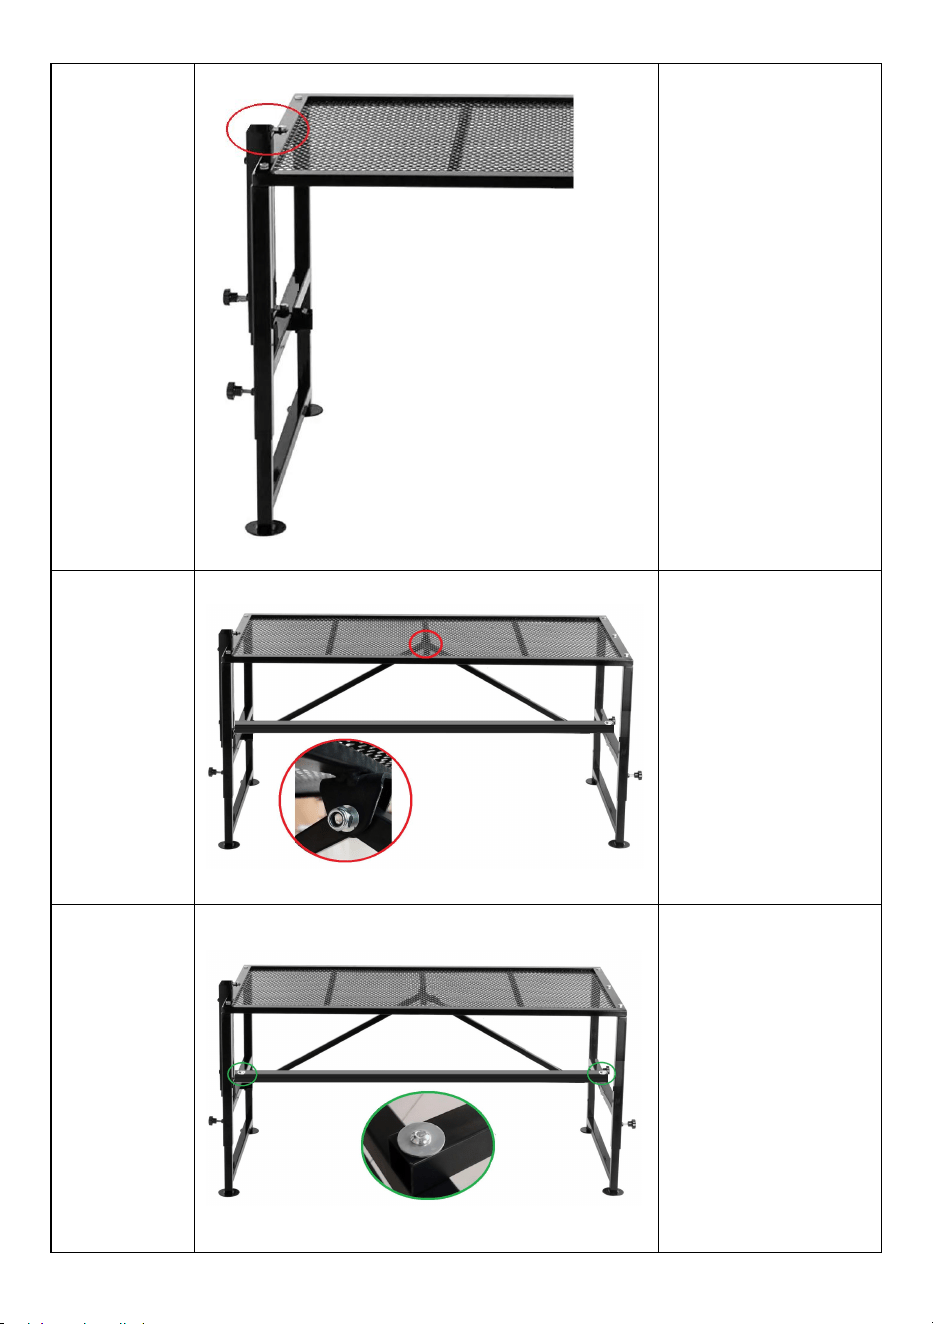
1. Jam the
countertop with
fixed rods and align
the holes.
2. Thread 1 M8x35
through the hole of
the fixed rods,
attach the small
spacer, and secure
it with a nut.
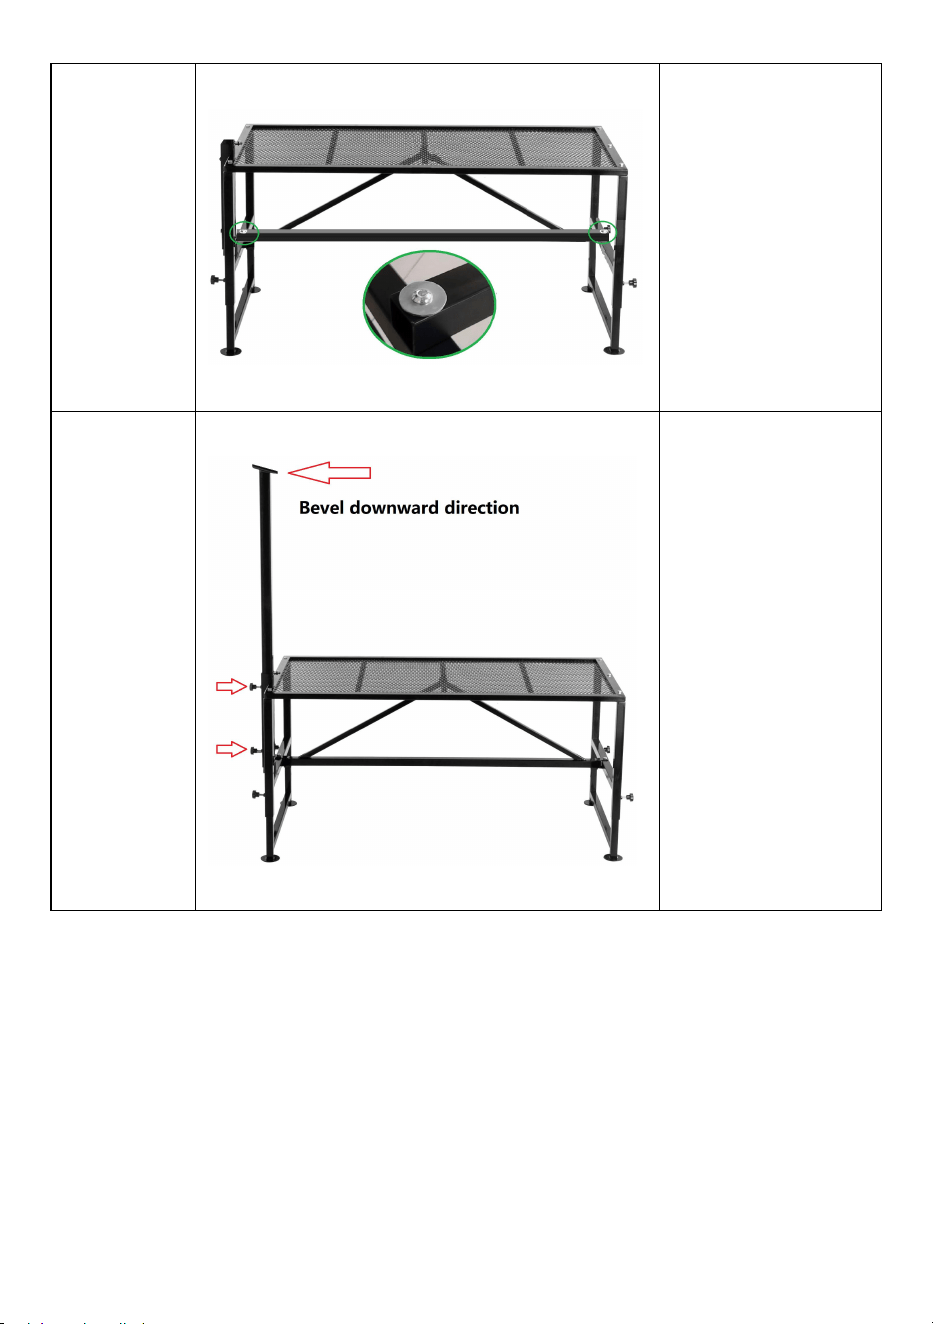
triangular
bracket *1
M8x35 *1
gasket *1
M8 *1
Thread 1 M8x35
screw through the
middle hole of the
triangle bracket and
secure with spacers
and nuts.
M8x70 *2
big gasket
*2
M8 *2
gasket *2
Thread 2 M8x70
screws through the
large spacer, then
through the holes
on both sides of the
triangle bracket and
secure with the
spacer and nut.
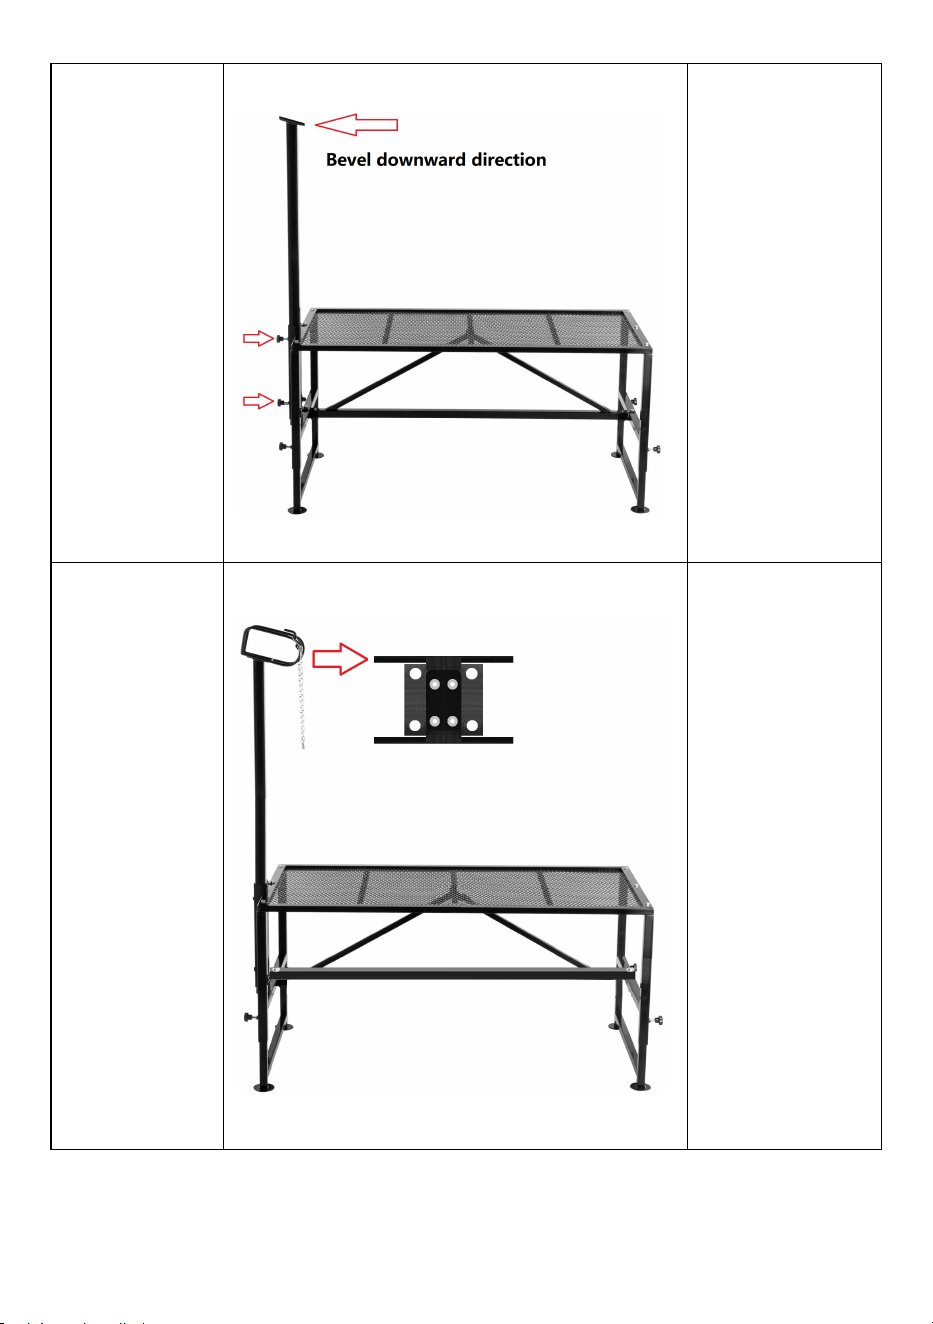
8
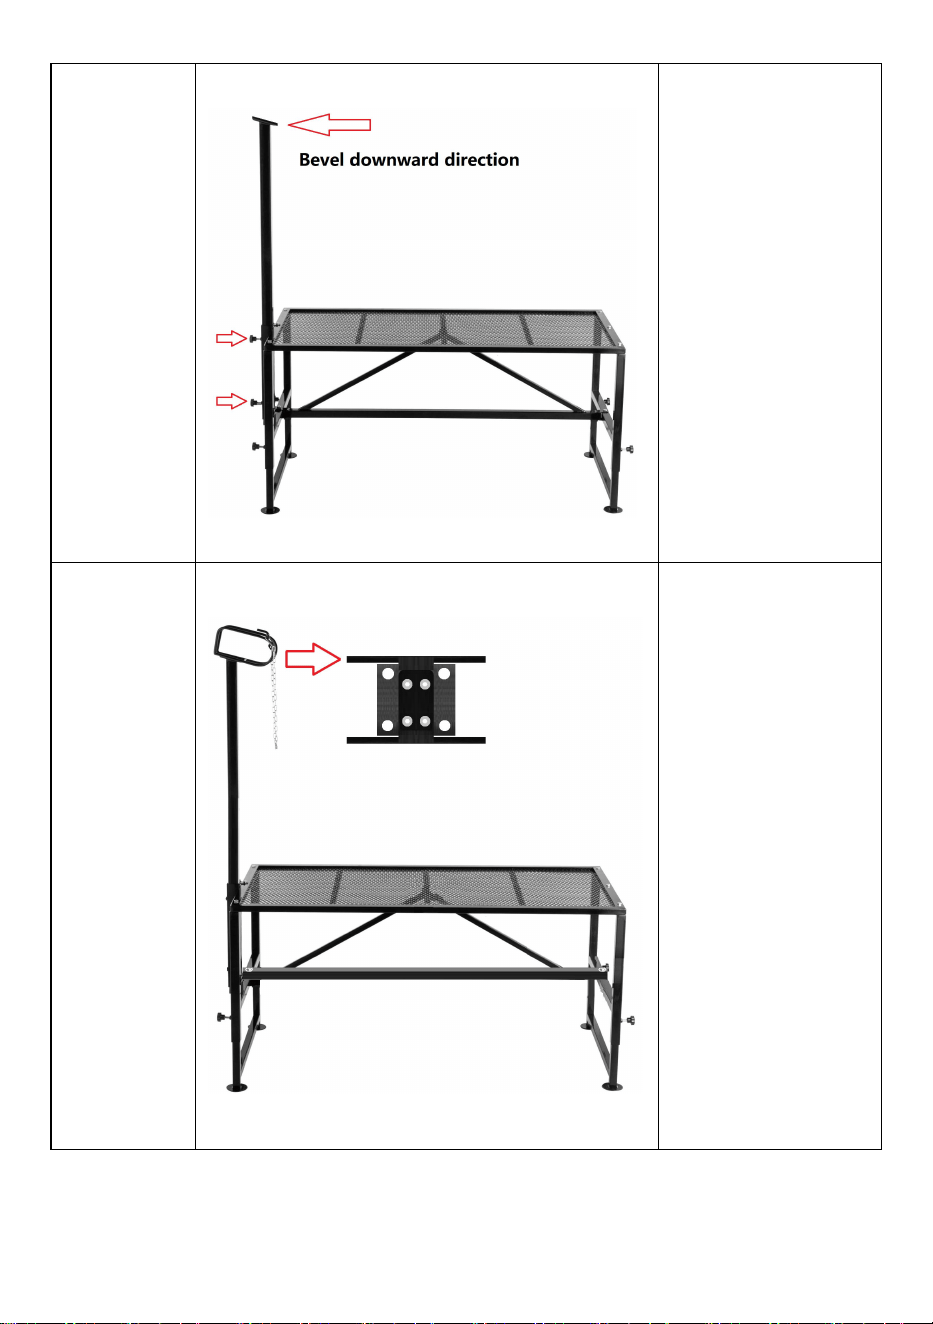
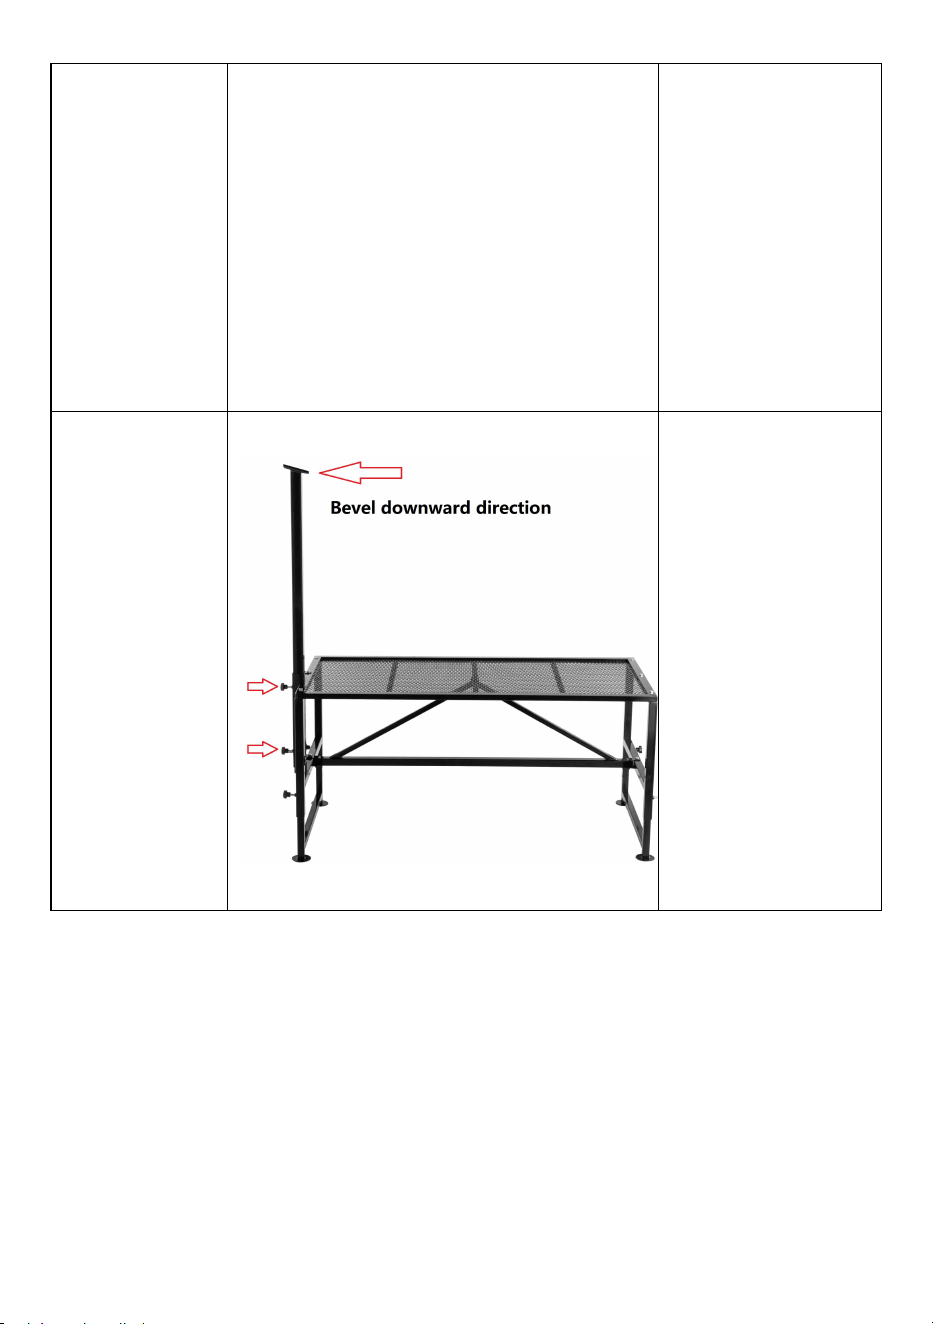
upright
poles *1
plastic
knobs *2
1. Insert the upright
poles into the fixed
rods square hole in
the downward
direction of the
bevel.
2. Secure the
upright poles with 2
plastic knobs.
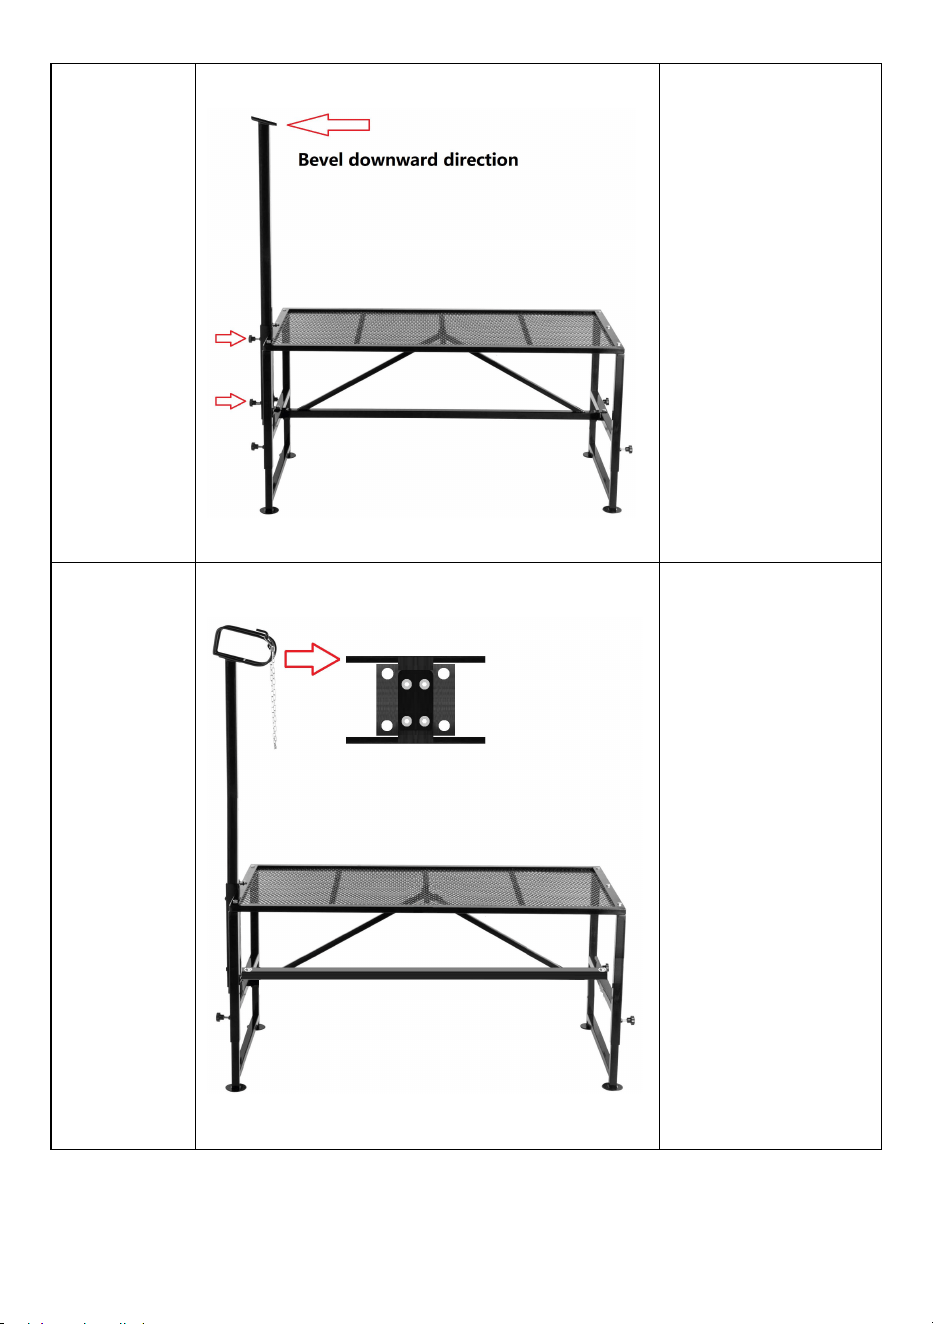
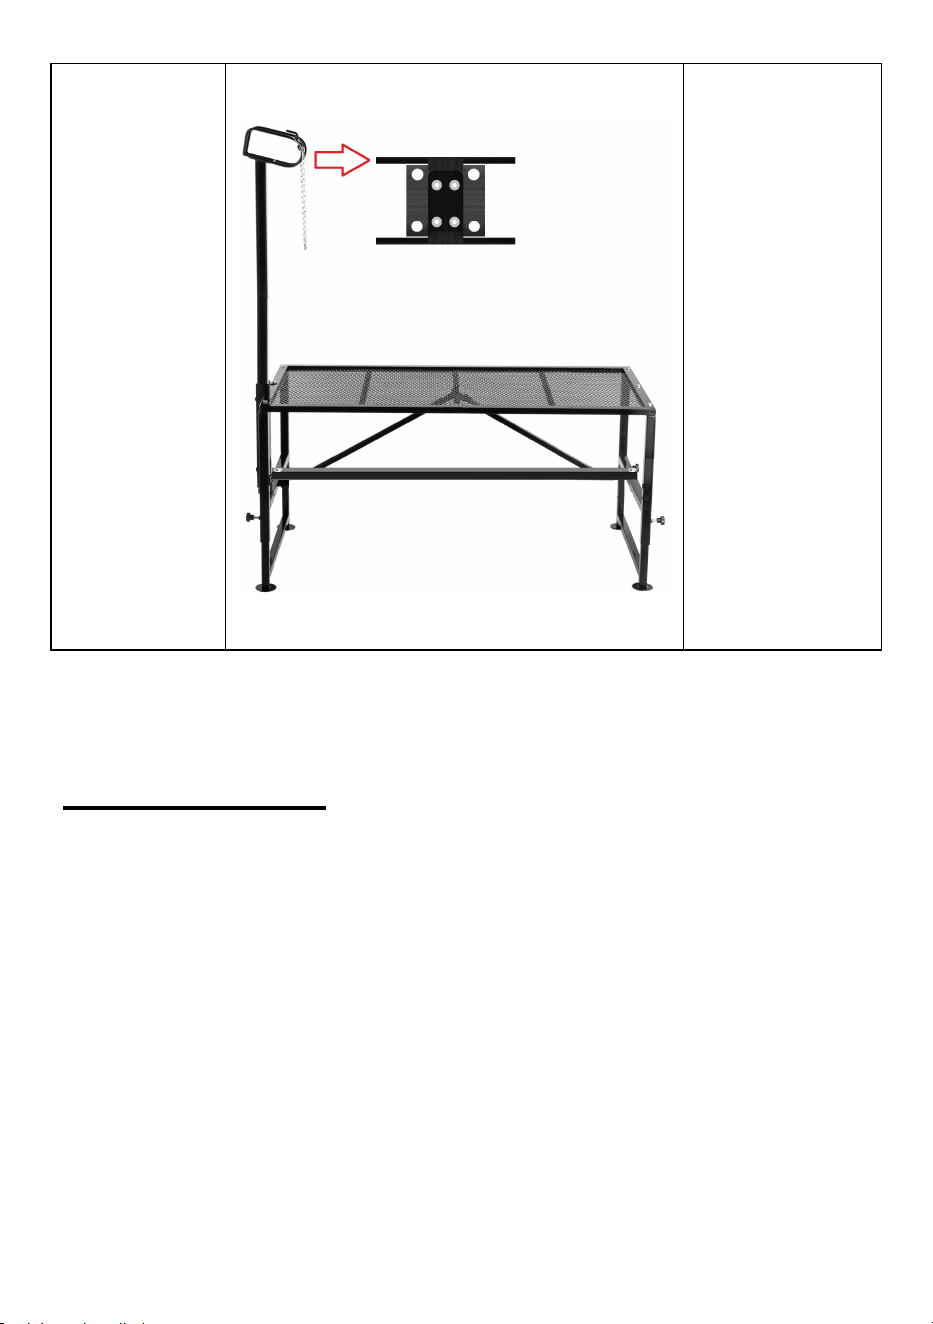
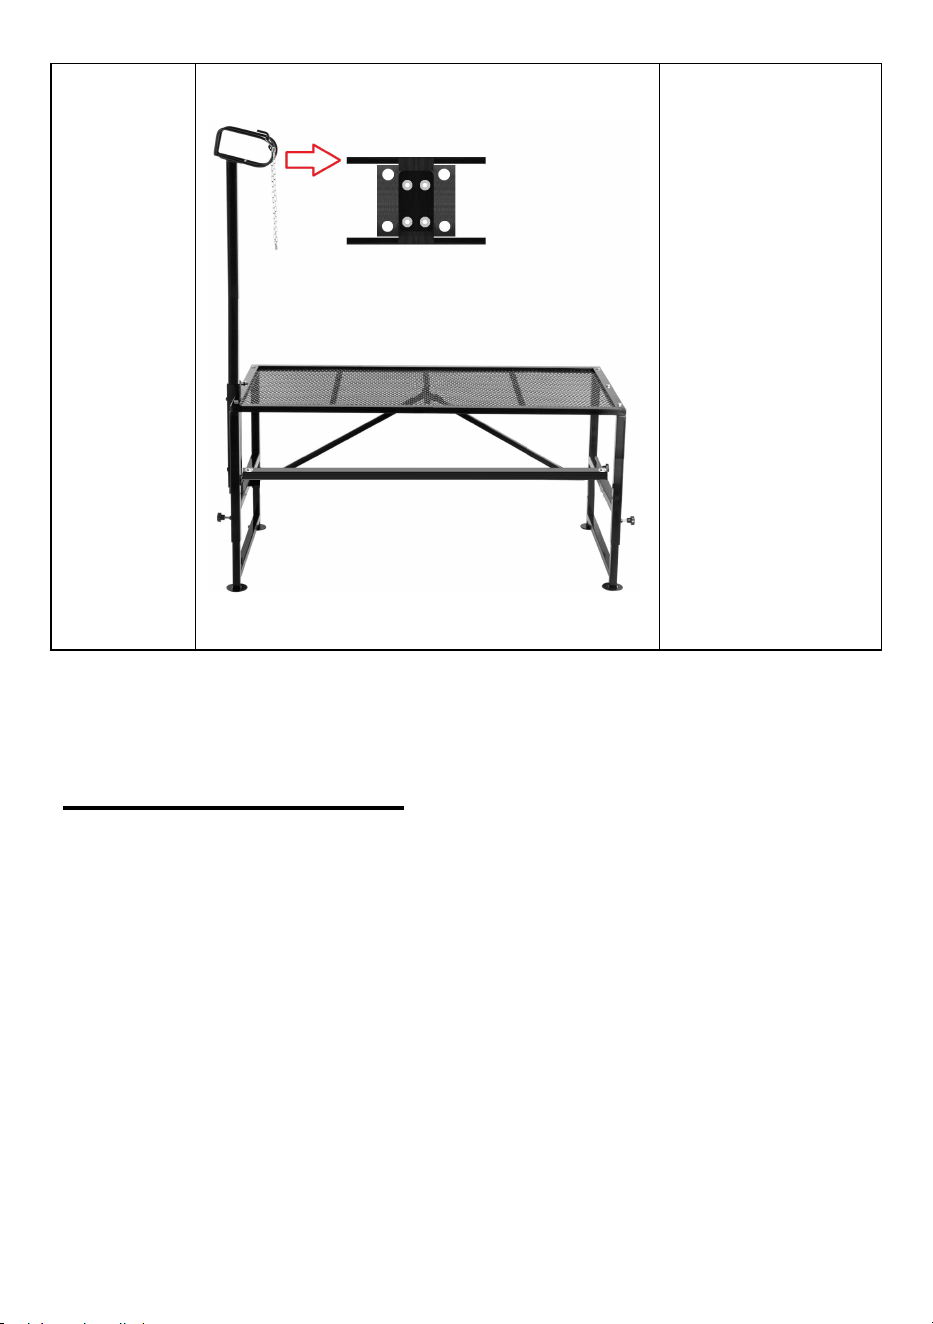
headbands
A *1
headbands
B *1
M6x20 *4
M6 *4
1. Put the
headbands B first.
2. Then put the
headbands A.
3. Fix the
headbands with 4
M6x20 screws.
4. Tighten the
locking screws with
4 M6 nuts.
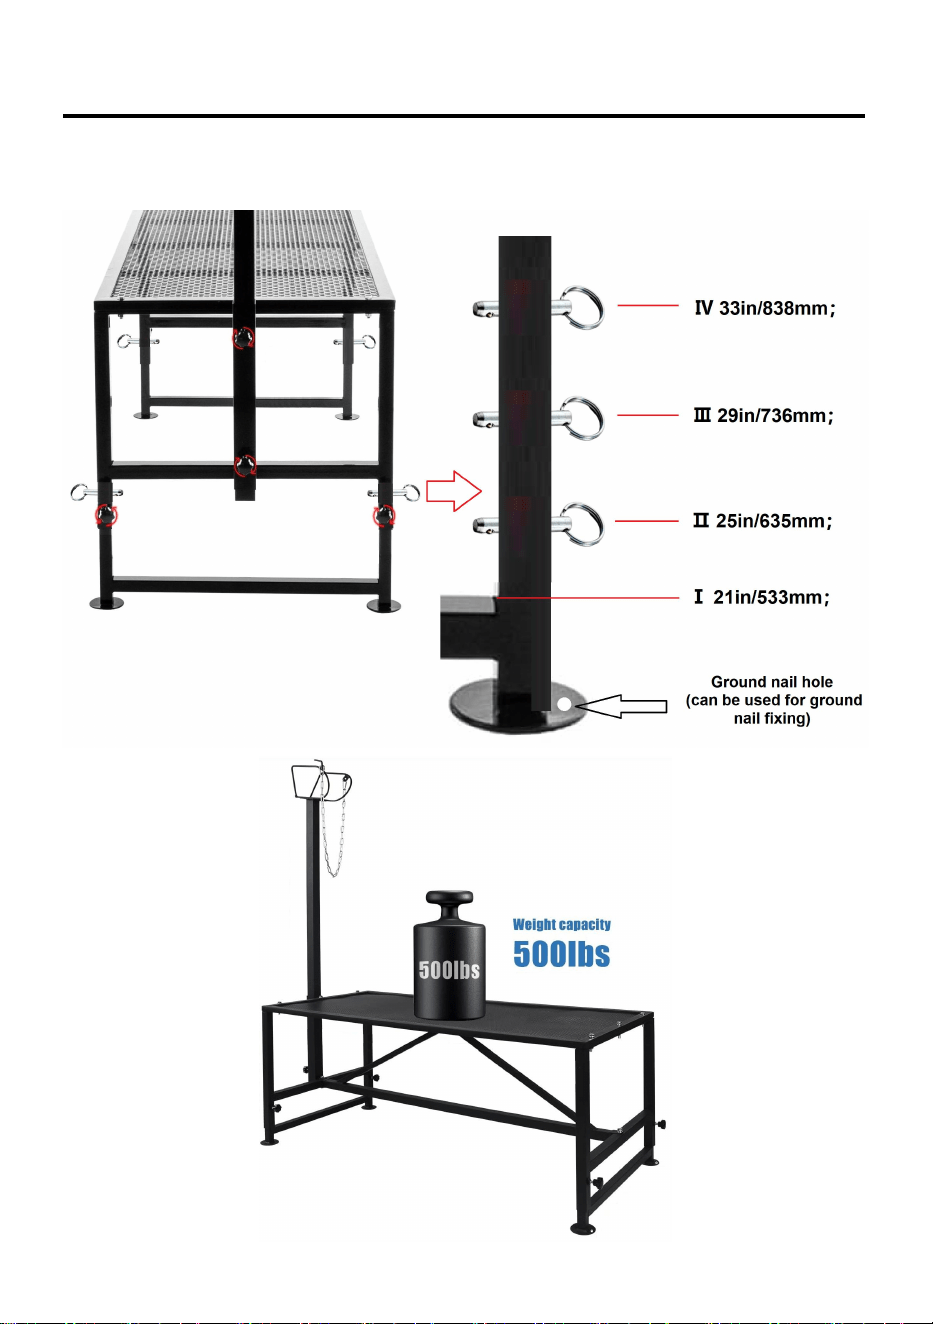
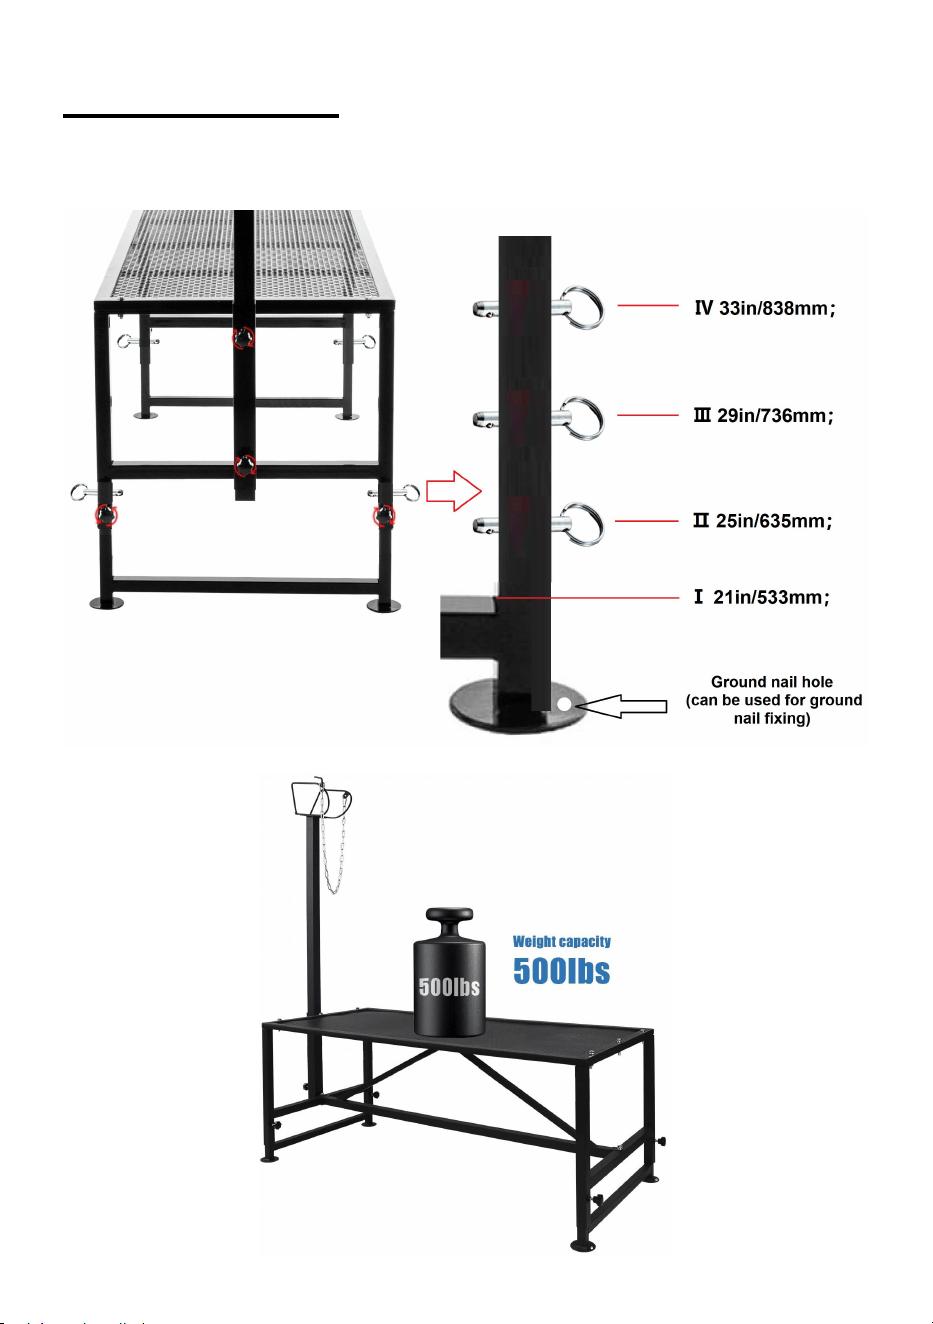
9
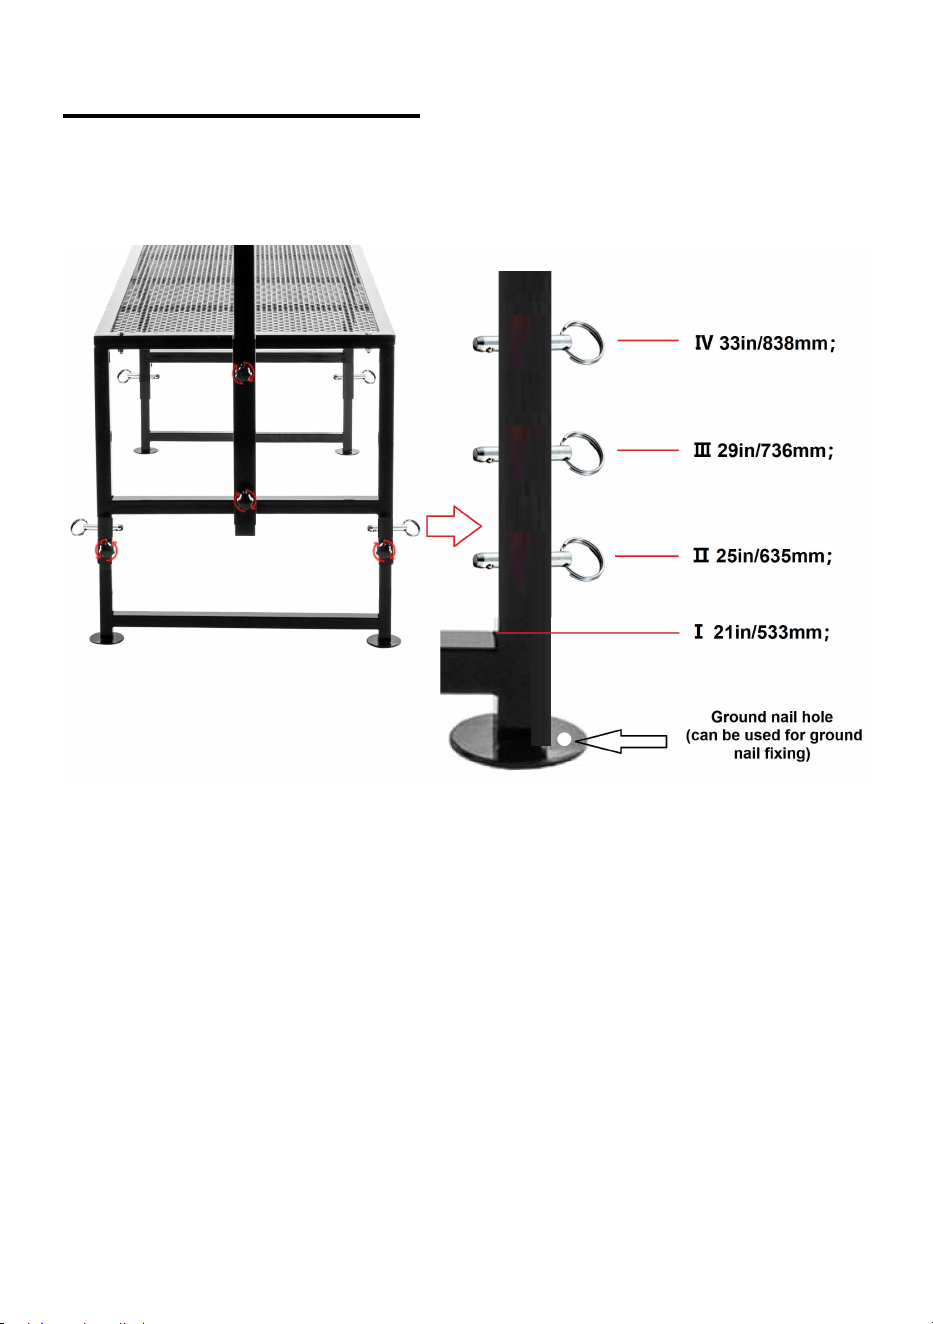
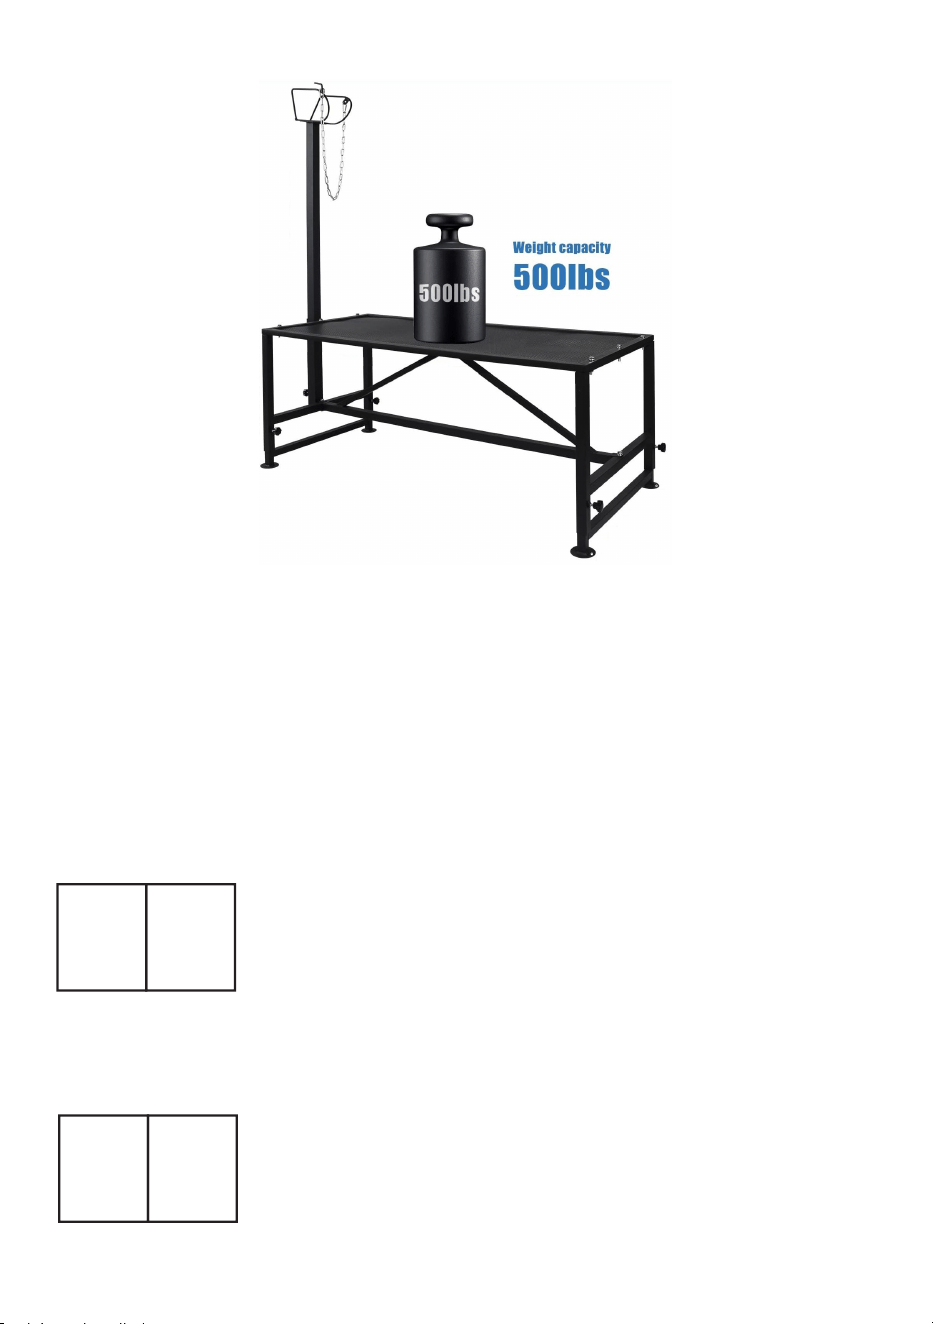
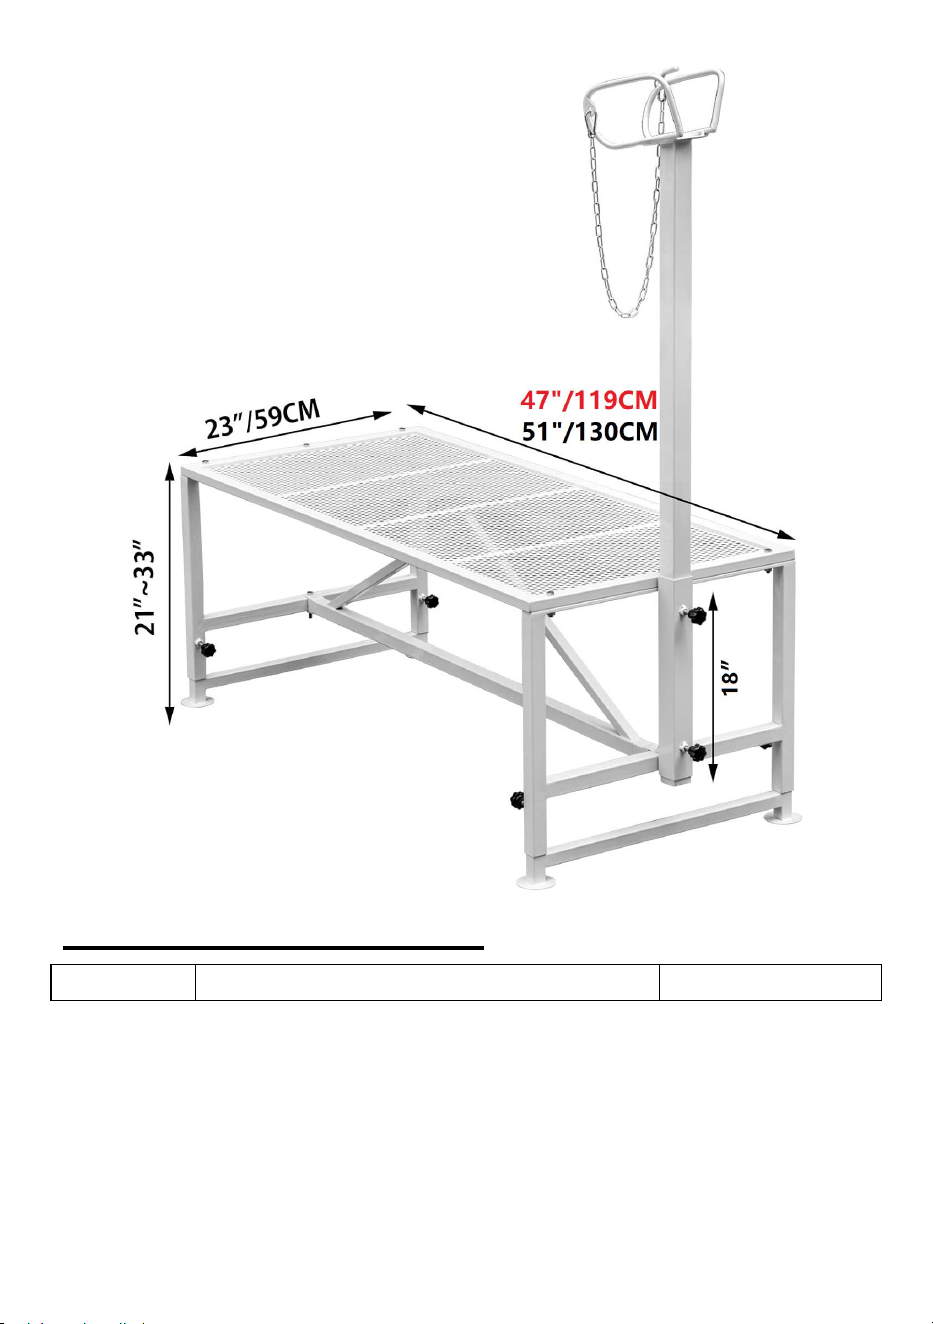
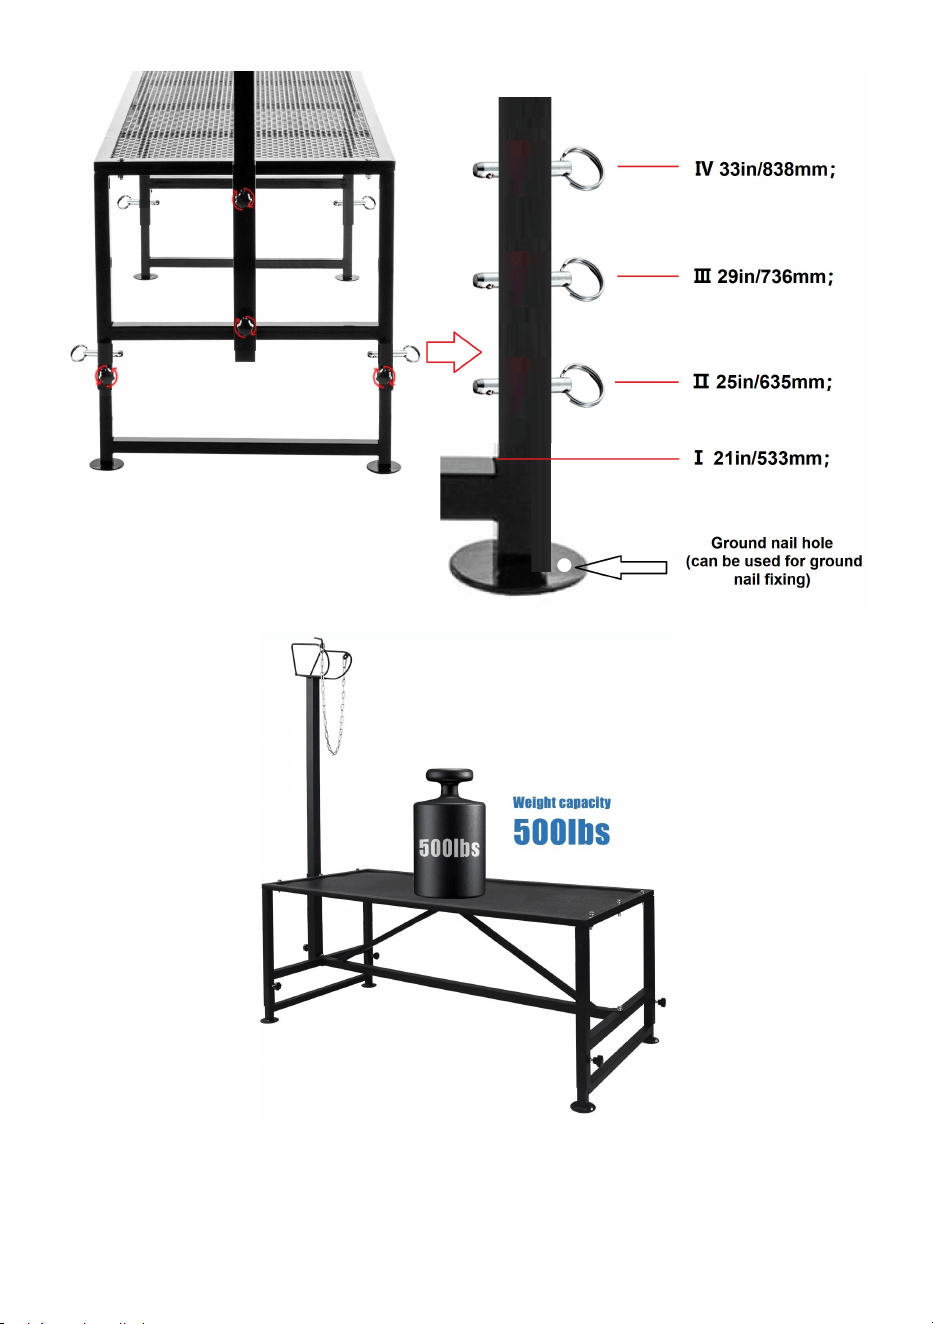
Product Usage
The height of the table corresponding to the four bolt hole
gears.

10
Manufacturer: Shanghaimuxinmuyeyouxiangongsi
Address:Baoshanqu Shuangchenglu 803long 11hao 1602A-1609shi
Shanghai
Imported to AUS: SIHAO PTY LTD, 1 ROKEVA STREETEASTWOOD
NSW 2122 Australia
Imported to USA: Sanven Technology Ltd., Suite 250, 9166 Anaheim
Place, Rancho Cucamonga, CA 91730
Made In China
REP
EC
SHUNSHUN GmbH
Römeräcker 9 Z2021,76351
Linkenheim-Hochstetten,Germany
euvertreter@gmail.com
+49 1727041930
REP
UK
Pooledas Group Ltd
Unit 5 Albert Edward House, The
Pavilions Preston, United Kingdom
pooledas12[email protected]
Tel: 01772418127


2
Techniczny Certyfikat wsparcia i e-gwarancji www.vevor.com/support
STANOWISKO DO PRZYCINANIA BYDŁA
INSTRUKCJA OBSŁUGI
We continue to be committed to provide you tools with competitive price.
"Save Half","Half Price" or any other similar expressions used by us only represents an
estimate of savings you might benefit from buying certain tools with us compared to the major
top brands and does not necessarily mean to cover all categories of tools offered by us. You
are kindly reminded to verify carefully when you are placing an order with us if you are
actually saving half in comparison with the top major brands.
1
SCJ002-W /SCJ003-W /SCJ002-B /SCJ003-B
Have product questions? Need technical support? Please feel free to
contact us:
Technical Support and E-Warranty Certificate
www.vevor.com/support
NEED HELP? CONTACT US!
This is the original instruction,please read all manual instructions carefully
before operating. VEVOR reserves a clear interpretation of our user
manual. The appearance of the product shall be subject to the product
you received. Please forgive us that we won't inform you again if there
are any technology or software updates on our product.
LIVESTOCK TRIMMING
STAND

2
Środki ostrożności
OSTRZEŻENIE:
Przeczytaj tę instrukcję przed użyciem tego produktu. Niezastosowanie się do
tego może spowodować poważne obrażenia. należy zawsze przestrzegać
podstawowych środków ostrożności , w tym:
6. Stanowisko do przycinania bydła nie wolno używać ani przechowywać w
obszarach niebezpiecznych. Nie wolno używać urządzenia w miejscach
niebezpiecznych.
7. Stanowisko do przycinania bydła przed użyciem należy sprawdzić, czy jest w
dobrym stanie i czy działa bezpiecznie. W przeciwnym razie nie wolno używać
urządzenia.
8. Używaj wyłącznie zgodnie z przeznaczeniem. Przed użyciem stojak do
przycinania zwierząt gospodarskich należy ustawić na równym podłożu. W razie
potrzeby cztery nóżki można zabezpieczyć szlifowanymi gwoździami.
9. Operator musi korzystać ze stanowiska do przycinania zwierząt gospodarskich
odpowiednio. Podczas pracy ze stanowiskiem do strzyżenia zwierząt
gospodarskich musi on wziąć pod uwagę lokalne warunki i zwracać uwagę na
osoby trzecie , w szczególności na dzieci .
10. To stanowisko do przycinania bydła nie jest przeznaczony do użytku przez
osoby (w tym dzieci) o ograniczonych zdolnościach fizycznych , sensorycznych
lub umysłowych lub nieposiadające doświadczenia i/lub wiedzy , chyba że
znajdują się pod nadzorem osoby odpowiedzialnej za ich bezpieczeństwo lub
zostaną przez te osoby poinstruowane w zakresie obsługi urządzenie. Dzieci
powinny być nadzorowane , aby mieć pewność, że nie bawią się stanowiskiem do
przycinania bydła .

3
ZACHOWAJ TE INSTRUKCJE
Lista produktów
4

5
(Spare parts *1)
(Spare parts *1)
(Spare parts *1)


8
nogi do
stołu *2
regulowane
nogi stołu
*2
plastikowe
gałki *2
3. Włóż
regulowaną nogę
stołu do nogi stołu.
4. Zabezpiecz
nogę stołu
plastikową gałką.
M8x35 *5
uszczelka
*5
M8*5
3. Podeprzyj blat
za pomocą
zmontowanych nóg
stołu.
4. Przewlecz 5
otworów M8x35
przez blat stołu,
przymocuj małe
elementy
dystansowe i
zabezpiecz je
nakrętkami.
9
stałe pręty
*1
M8x35 *1
uszczelka
*1
M8*1
3. Zablokuj blat za
pomocą stałych
prętów i wyrównaj
otwory.
4. Przewlecz 1
M8x35 przez otwór
w prętach stałych,
zamocuj małą
podkładkę i
zabezpiecz ją
nakrętką.
wspornik
trójkątny *1
M8x35 *1
uszczelka
*1
M8*1
Wkręć 1 śrubę
M8x35 przez
środkowy otwór
wspornika
trójkątnego i
zabezpiecz
przekładkami i
nakrętkami.
M8x70 *2
duża
uszczelka
*2
M8*2
uszczelka
*2
Przewlecz 2 śruby
M8x70 przez dużą
przekładkę,
następnie przez
otwory po obu
stronach wspornika
trójkątnego i
zabezpiecz
przekładką i
nakrętką.

10
słupki
pionowe *1
plastikowe
gałki *2
3. Włóż pionowe
słupki do
kwadratowych
otworów stałych
prętów w kierunku
skosu w dół.
4. Zabezpiecz
słupki pionowe za
pomocą 2
plastikowych
pokręteł.
opaski na
głowę A *1
opaski na
głowę B *1
M6x20 *4
M6*4
5. Najpierw załóż
opaski B.
6. Następnie załóż
opaski A.
7. Przymocuj
opaski za pomocą 4
śrub M6x20.
8. Dokręcić śruby
zabezpieczające za
pomocą 4 nakrętek
M6.
11
Użycie produktu
Wysokość stołu odpowiadająca czterem otworom na śruby koła
zębate.

12
Producent: Shanghaimuxinmuyeyouxiangongsi
Adres: Baoshanqu Shuangchenglu 803long 11hao 1602A-1609shi
Szanghaj
Import do AUS: SIHAO PTY LTD, 1 ROKEVA STREETEASTWOOD NSW
2122 Australia
Import do USA: Sanven Technology Ltd., Suite 250, 9166 Anaheim Place,
Rancho Cucamonga, CA 91730
Wyprodukowano w Chinach
REP
EC
SHUNSHUN GmbH
Römeräcker 9 Z2021,76351
Linkenheim-Hochstetten,Germany
euvertreter@gmail.com
+49 1727041930
REP
UK
Pooledas Group Ltd
Unit 5 Albert Edward House, The
Pavilions Preston, United Kingdom
pooledas12[email protected]
Tel: 01772418127


2
Technisch Support- und E-Garantie-Zertifikat www.vevor.com/support
VIEHTRIMMSTAND
BENUTZERHANDBUCH
We continue to be committed to provide you tools with competitive price.
"Save Half","Half Price" or any other similar expressions used by us only represents an
estimate of savings you might benefit from buying certain tools with us compared to the major
top brands and does not necessarily mean to cover all categories of tools offered by us. You
are kindly reminded to verify carefully when you are placing an order with us if you are
actually saving half in comparison with the top major brands.

1
SCJ002-W /SCJ003-W /SCJ002-B /SCJ003-B
Have product questions? Need technical support? Please feel free to
contact us:
Technical Support and E-Warranty Certificate
www.vevor.com/support
NEED HELP? CONTACT US!
This is the original instruction,please read all manual instructions carefully
before operating. VEVOR reserves a clear interpretation of our user
manual. The appearance of the product shall be subject to the product
you received. Please forgive us that we won't inform you again if there
are any technology or software updates on our product.
LIVESTOCK TRIMMING
STAND

2
Sicherheitsvorkehrungen
WARNUNG:
Lesen Sie diese Anweisungen, bevor Sie dieses Produkt verwenden.
Andernfalls kann es zu schweren Verletzungen kommen. Die grundlegenden
Vorsichtsmaßnahmen sollten immer befolgt werden , einschließlich der folgenden:
11. Der Viehtrimmstand dürfen nicht in explosionsgefährdeten Bereichen
verwendet oder gelagert werden. Es ist nicht gestattet, das Gerät in
explosionsgefährdeten Bereichen zu verwenden.
12. Der Viehtrimmstand Vor der Verwendung muss überprüft werden, ob es
ordnungsgemäß funktioniert und sicher funktioniert. Andernfalls darf das Gerät
nicht verwendet werden.
13. Nur bestimmungsgemäß verwenden. Der Viehtrimmstand muss zur
Verwendung auf einem ebenen Boden aufgestellt werden. Bei Bedarf können die
vier Füße mit Erdnägeln befestigt werden.
14. Viehtrimmstand benutzen richtig. Er hat die örtlichen Gegebenheiten zu
berücksichtigen und bei der Arbeit am Viehschneidestand Rücksicht auf Dritte ,
insbesondere Kinder , zu nehmen .
15. Dieser Viehtrimmstand ist nicht für den Gebrauch durch Personen
(einschließlich Kinder) mit eingeschränkten körperlichen , sensorischen oder
geistigen Fähigkeiten oder mangels Erfahrung und/oder mangels Wissen
bestimmt , es sei denn, sie werden durch eine für ihre Sicherheit zuständige
Person beaufsichtigt oder erhielten von dieser Person Anweisungen zum
Gebrauch das Gerät. Kinder sollten beaufsichtigt werden , um sicherzustellen,
dass sie nicht mit dem Viehtrimmstand spielen .
ANLEITUNG AUFBEWAHREN

3
Produktliste _

4
5
(Spare parts *1)
(Spare parts *1)
(Spare parts *1)

6
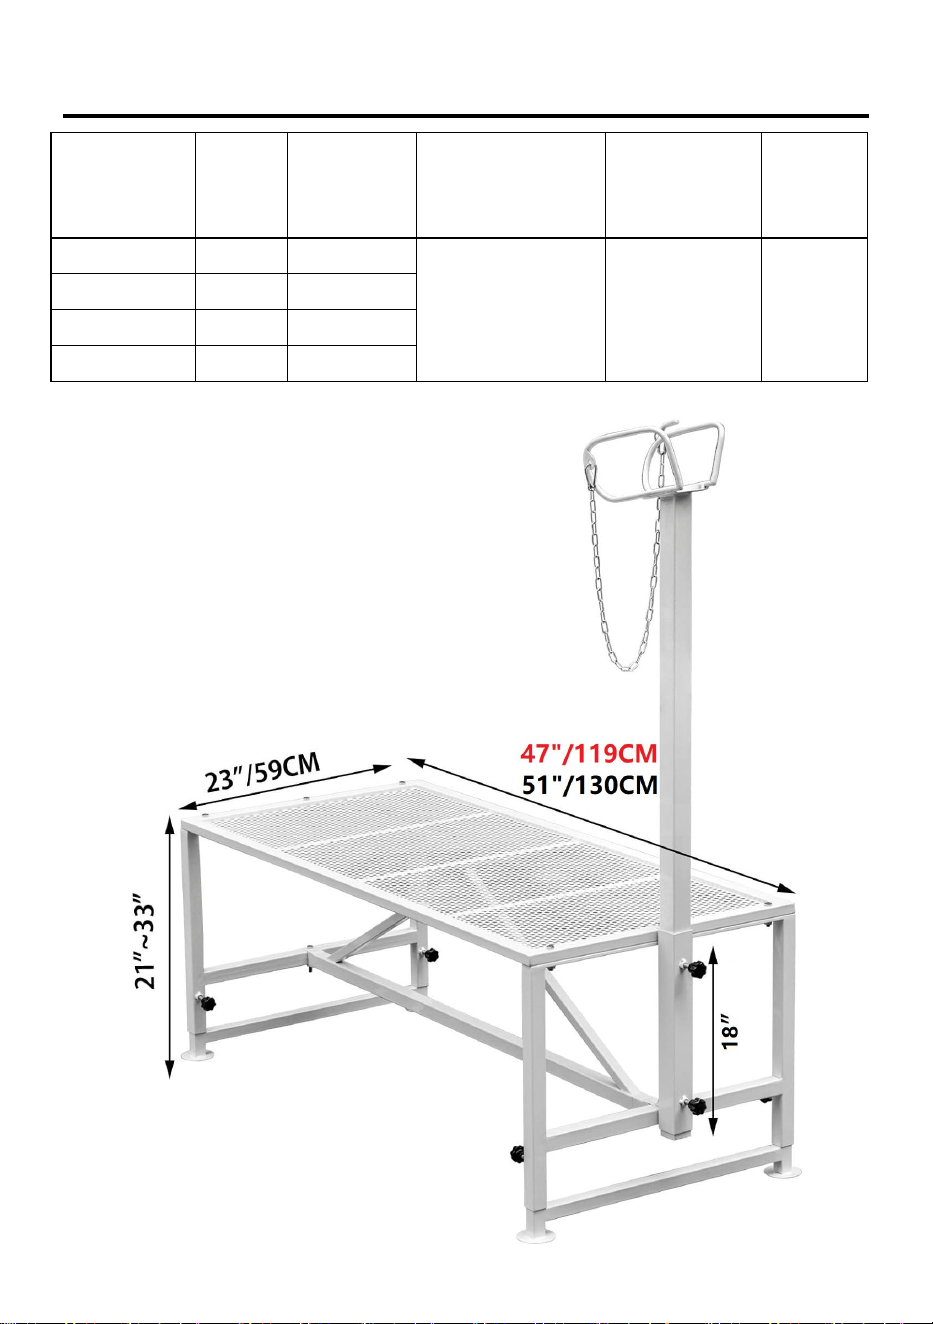
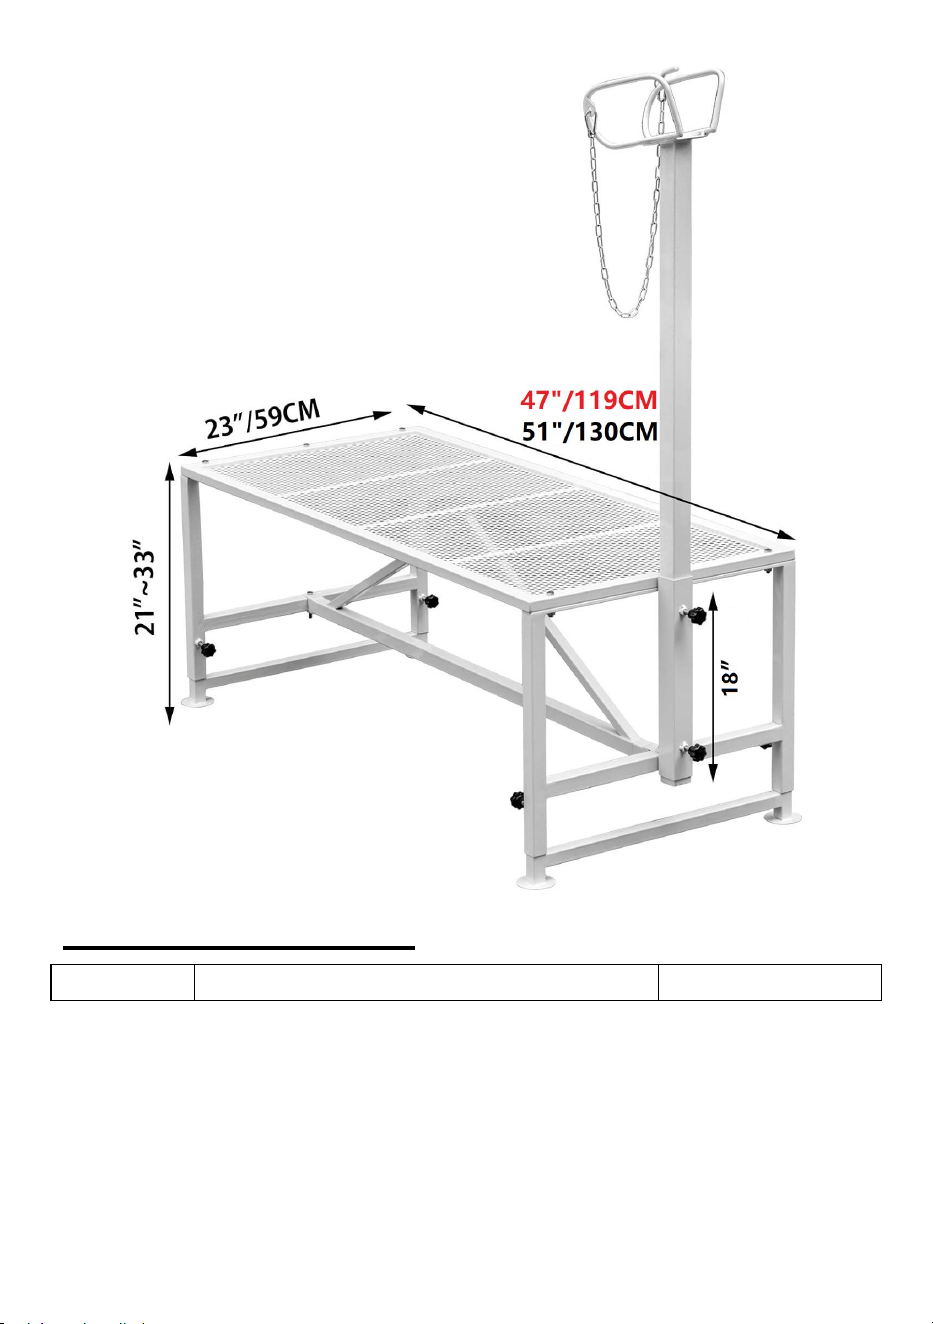
Produktbeschreibung
Modell
Farbe
Tischgröß
e
Höhenverstellba
re Arbeitsplatte
Die aufrechte
Stange
verstellt die
Höhe
Gewicht
skapazit
ät
SCJ002-W
Weiß
47 * 23
Zoll
Ⅰ 21 Zoll/533
mm;
Ⅱ 25 Zoll/635
mm;
Ⅲ 29 Zoll/736
mm;
Ⅳ 33 Zoll/838
mm;
18 Zoll/457
mm
500
Pfund
SCJ003-W
Weiß
51*23 Zoll
SCJ002-B
Schwa
rz
47 * 23
Zoll
SCJ003-B
Schwa
rz
51*23 Zoll

8
Tischbeine *2
verstellbare
Tischbeine *2
Kunststoffknöp
fe *2
5. Stecken Sie das
verstellbare
Tischbein in das
Tischbein.
6. Befestigen Sie
das Tischbein mit
einem
Kunststoffknopf.
M8x35 *5
Dichtung *5
M8 *5
5. Stützen Sie die
Arbeitsplatte mit
montierten
Tischbeinen.
6. Schrauben Sie 5
M8x35-Löcher
durch die
Tischplatte, bringen
Sie kleine
Abstandshalter an
und befestigen Sie
diese mit Muttern.

9
feste Stangen
*1
M8x35 *1
Dichtung *1
M8 *1
5. Klemmen Sie
die Arbeitsplatte mit
festen Stangen fest
und richten Sie die
Löcher aus.
6. Fädeln Sie 1
M8x35 durch das
Loch der festen
Stangen, bringen
Sie das kleine
Distanzstück an
und sichern Sie es
mit einer Mutter.
Dreieckige
Halterung *1
M8x35 *1
Dichtung *1
M8 *1
Führen Sie eine
M8x35-Schraube
durch das mittlere
Loch der
Dreieckshalterung
und befestigen Sie
sie mit
Distanzstücken und
Muttern.
M8x70 *2
große Dichtung
*2
M8 *2
Dichtung *2
Führen Sie zwei
M8x70-Schrauben
durch den großen
Abstandshalter,
dann durch die
Löcher auf beiden
Seiten der
Dreieckshalterung
und befestigen Sie
sie mit dem
10
Abstandshalter und
der Mutter.
aufrechte
Stangen *1
Kunststoffknöp
fe *2
5. Führen Sie die
aufrechten Stangen
in der
Abwärtsrichtung der
Abschrägung in das
quadratische Loch
der festen Stangen
ein.
6. Sichern Sie die
aufrechten Stangen
mit 2
Kunststoffknöpfen.

11
Stirnbänder A
*1
Stirnbänder B
*1
M6x20 *4
M6 *4
9. Legen Sie
zuerst die
Stirnbänder B.
10. Dann legen Sie
die Stirnbänder A.
11. Befestigen Sie
die Stirnbänder mit
4 Schrauben
M6x20.
12. Ziehen Sie die
Sicherungsschraub
en mit 4 M6-Muttern
fest.
Produktnutzung
Die Höhe des Tisches entspricht den vier Schraubenlöchern
Getriebe.

12
Hersteller: Shanghaimuxinmuyeyouxiangongsi
Adresse: Baoshanqu Shuangchenglu 803long 11hao 1602A-1609shi
Shanghai

13
Importiert nach AUS: SIHAO PTY LTD, 1 ROKEVA STREETEASTWOOD
NSW 2122 Australien
In die USA importiert: Sanven Technology Ltd., Suite 250, 9166 Anaheim
Place, Rancho Cucamonga, CA 91730
In China hergestellt
REP
EC
SHUNSHUN GmbH
Römeräcker 9 Z2021,76351
Linkenheim-Hochstetten,Germany
euvertreter@gmail.com
+49 1727041930
REP
UK
Pooledas Group Ltd
Unit 5 Albert Edward House, The
Pavilions Preston, United Kingdom
pooledas12[email protected]
Tel: 01772418127


2
Technique Assistance et certificat de garantie électronique
www.vevor.com/support
SUPPORT DE PARAGE DU BÉTAIL
MANUEL DE L'UTILISATEUR
We continue to be committed to provide you tools with competitive price.
"Save Half","Half Price" or any other similar expressions used by us only represents an
estimate of savings you might benefit from buying certain tools with us compared to the major
top brands and does not necessarily mean to cover all categories of tools offered by us. You
are kindly reminded to verify carefully when you are placing an order with us if you are
actually saving half in comparison with the top major brands.

1
SCJ002-W /SCJ003-W /SCJ002-B /SCJ003-B
Have product questions? Need technical support? Please feel free to
contact us:
Technical Support and E-Warranty Certificate
www.vevor.com/support
NEED HELP? CONTACT US!
This is the original instruction,please read all manual instructions carefully
before operating. VEVOR reserves a clear interpretation of our user
manual. The appearance of the product shall be subject to the product
you received. Please forgive us that we won't inform you again if there
are any technology or software updates on our product.
LIVESTOCK TRIMMING
STAND

2
Précautions de sécurité
AVERTISSEMENT:
Lisez ces instructions avant d'utiliser ce produit. Ne pas le faire peut entraîner
des blessures graves. les précautions de base doivent toujours être suivies ,
notamment les suivantes :
16. Le stand de parage du bétail ne peut pas être utilisé ou stocké dans des
zones dangereuses. Il est interdit d'utiliser l'appareil dans des endroits dangereux.
17. Le stand de parage du bétail doit être vérifié pour s’assurer qu’il est en bon
état de fonctionnement et qu’il fonctionne en toute sécurité avant utilisation. Dans
le cas contraire , l'appareil ne doit pas être utilisé.
18. Utiliser uniquement comme prévu. Le support de parage du bétail doit être
placé sur un sol plat pour être utilisé. Si nécessaire, les quatre pieds peuvent être
fixés avec des clous de sol.
19. L'opérateur doit utiliser le support de parage du bétail correctement. Il doit
tenir compte des conditions locales et faire attention aux tiers , en particulier aux
enfants , lorsqu'il travaille avec le stand de parage du bétail .
20. Ce support de parage de bétail n'est pas destiné à être utilisé par des
personnes (y compris des enfants) ayant des capacités physiques , sensorielles
ou mentales réduites ou manquant d'expérience et/ou de connaissances , à moins
qu'elles ne soient supervisées par une personne responsable de leur sécurité ou
qu'elles ne soient instruites par ces personnes sur l'utilisation de le dispositif. Les
enfants doivent être surveillés pour s'assurer qu'ils ne jouent pas avec le support
de parage du bétail .
CONSERVEZ CES INSTRUCTIONS

3
Liste de produits

4

5
(Spare parts *1)
(Spare parts *1)
(Spare parts *1)

6
Description du produit
Modèle
Coule
ur
Taille du
tableau
Hauteur du
comptoir
réglable
La tige
verticale
ajuste la
hauteur
capacit
é de
poids
SCJ002-W
blanc
47*23
pouces
Ⅰ 21
pouces/533
mm ;
Ⅱ 25
pouces/635
mm ;
Ⅲ 29
pouces/736
mm ;
Ⅳ 33
pouces/838
mm ;
18
pouces/457
mm
500
livres
SCJ003-W
blanc
51*23
pouces
SCJ002-B
noir
47*23
pouces
SCJ003-B
noir
51*23
pouces


8
pieds de
table * 2
pieds de
table
réglables *
2
boutons en
plastique *
2
7. Insérez le pied
de table réglable
dans le pied de
table.
8. Fixez le pied de
table avec un
bouton en
plastique.
M8x35 *5
joint *5
M8 *5
7. Soutenez le
comptoir avec les
pieds de table
assemblés.
8. Vissez 5 trous
M8x35 à travers le
plateau de table,
fixez de petites
entretoises et
fixez-les avec des
écrous.

9
tiges fixes *
1
M8x35 *1
joint *1
M8 *1
7. Bloquez le
comptoir avec des
tiges fixes et
alignez les trous.
8. Enfilez 1 M8x35
dans le trou des
tiges fixes, fixez la
petite entretoise et
fixez-la avec un
écrou.
support
triangulaire
* 1
M8x35 *1
joint *1
M8 *1
Enfilez 1 vis M8x35
dans le trou central
du support
triangulaire et
fixez-la avec des
entretoises et des
écrous.
M8x70 *2
gros joint *2
M8 *2
joint *2
Enfilez 2 vis M8x70
dans la grande
entretoise, puis
dans les trous des
deux côtés du
support triangulaire
et fixez-les avec
l'entretoise et
l'écrou.
10
poteaux
verticaux *1
boutons en
plastique *
2
7. Insérez les
poteaux verticaux
dans le trou carré
des tiges fixes dans
la direction vers le
bas du biseau.
8. Fixez les
poteaux verticaux
avec 2 boutons en
plastique.
bandeaux A
* 1
bandeaux B
* 1
M6x20 *4
M6 *4
13. Mettez les
bandeaux B en
premier.
14. Mettez ensuite
les bandeaux A.
15. Fixez les
bandeaux avec 4
vis M6x20.
16. Serrez les vis de
verrouillage avec 4
écrous M6.
11
Utilisation du produit
La hauteur de la table correspondant au trou des quatre
boulons
engrenages.

12
Fabricant : Shanghaimuxinmuyeyouxiangongsi
Adresse : Baoshanqu Shuangchenglu 803long 11hao 1602A-1609shi
Shanghai
Importé en Australie : SIHAO PTY LTD, 1 ROKEVA STREETASTWOOD
NSW 2122 Australie
Importé aux États-Unis : Sanven Technology Ltd., Suite 250, 9166
Anaheim Place, Rancho Cucamonga, CA 91730
REP
EC
SHUNSHUN GmbH
Römeräcker 9 Z2021,76351
Linkenheim-Hochstetten,Germany
euvertreter@gmail.com
+49 1727041930
REP
UK
Pooledas Group Ltd
Unit 5 Albert Edward House, The
Pavilions Preston, United Kingdom
pooledas12[email protected]
Tel: 01772418127

13
Fabriqué en Chine


2
Technisch Ondersteuning en e-garantiecertificaat www.vevor.com/support
STAND VOOR HET TRIMMEN VAN VEE
HANDLEIDING
We continue to be committed to provide you tools with competitive price.
"Save Half","Half Price" or any other similar expressions used by us only represents an
estimate of savings you might benefit from buying certain tools with us compared to the major
top brands and does not necessarily mean to cover all categories of tools offered by us. You
are kindly reminded to verify carefully when you are placing an order with us if you are
actually saving half in comparison with the top major brands.

1
SCJ002-W /SCJ003-W /SCJ002-B /SCJ003-B
Have product questions? Need technical support? Please feel free to
contact us:
Technical Support and E-Warranty Certificate
www.vevor.com/support
NEED HELP? CONTACT US!
This is the original instruction,please read all manual instructions carefully
before operating. VEVOR reserves a clear interpretation of our user
manual. The appearance of the product shall be subject to the product
you received. Please forgive us that we won't inform you again if there
are any technology or software updates on our product.
LIVESTOCK TRIMMING
STAND

2
Veiligheidsmaatregelen
WAARSCHUWING:
Lees deze instructies voordat u dit product gebruikt. Als u dit niet doet, kan dit
leiden tot ernstig letsel. de basisvoorzorgsmaatregelen moeten altijd worden
gevolgd , waaronder de volgende:
21. De stand voor het trimmen van vee mag niet worden gebruikt of opgeslagen in
gevaarlijke gebieden. Het is niet toegestaan het apparaat op gevaarlijke locaties te
gebruiken.
22. De stand voor het trimmen van vee moet vóór gebruik worden gecontroleerd
om er zeker van te zijn dat deze in goede staat verkeert en veilig werkt. Anders
mag het apparaat niet worden gebruikt.
23. Alleen gebruiken zoals bedoeld. De Livestock Trimming Stand moet voor
gebruik op een vlakke ondergrond worden geplaatst. Indien nodig kunnen de vier
poten vastgezet worden met grondspijkers.
24. De operator moet de veesnijstandaard gebruiken op de juiste manier. Hij moet
rekening houden met de plaatselijke omstandigheden en moet bij het werken met
de veesnijstand rekening houden met derden , in het bijzonder kinderen .
25. Deze stand voor het trimmen van vee is niet bedoeld voor gebruik door
personen (inclusief kinderen) met verminderde lichamelijke , zintuiglijke of
geestelijke vermogens of gebrek aan ervaring en/of kennis , tenzij zij onder
toezicht staan van een persoon die verantwoordelijk is voor hun veiligheid of door
deze personen zijn geïnstrueerd over het gebruik van het apparaat. Op kinderen
moet toezicht worden gehouden , om er zeker van te zijn dat ze niet met de
veetrimstandaard spelen .
BEWAAR DEZE INSTRUCTIES
3
Product lijst

4

5
(Spare parts *1)
(Spare parts *1)
(Spare parts *1)


8
tafelpoten *2
verstelbare
tafelpoten *2
kunststof
knoppen *2
9. Steek de
verstelbare
tafelpoot in de
tafelpoot.
10. Zet de
tafelpoot vast
met een plastic
knop.
M8x35 *5
pakking *5
M8 *5
9. Ondersteun
het aanrecht met
gemonteerde
tafelpoten.
10. Rijg 5 M8x35
gaten door het
tafelblad,
bevestig kleine
afstandshouders
en zet ze vast
met moeren.

9
vaste staven *1
M8x35 *1
pakking *1
M8 *1
9. Zet het
aanrecht vast
met vaste
stangen en lijn de
gaten uit.
10. Steek 1
M8x35 door het
gat van de vaste
stangen, bevestig
het kleine
afstandsstuk en
zet het vast met
een moer.
driehoekige
beugel *1
M8x35 *1
pakking *1
M8 *1
Draai 1
M8x35-schroef
door het
middelste gat van
de driehoekige
beugel en zet
deze vast met
afstandshouders
en moeren.
M8x70 *2
grote pakking
*2
M8 *2
pakking *2
Steek 2
M8x70-schroeve
n door het grote
afstandsstuk en
vervolgens door
de gaten aan
beide zijden van
de driehoekige
beugel en zet het
vast met het
10
afstandsstuk en
de moer.
rechtopstaand
e palen *1
kunststof
knoppen *2
9. Steek de
rechtopstaande
palen in het
vierkante gat van
de vaste stangen
in de
neerwaartse
richting van de
afschuining.
10. Zet de
rechtopstaande
palen vast met 2
plastic knoppen.
11
hoofdbanden A
*1
hoofdbanden B
*1
M6x20 *4
M6 *4
17. Plaats eerst
de hoofdbanden
B.
18. Plaats
vervolgens de
hoofdbanden A.
19. Bevestig de
hoofdbanden met
4 M6x20
schroeven.
20. Draai de
borgschroeven
vast met 4
M6-moeren.
Productgebruik
De hoogte van de tafel komt overeen met het vier boutgat
versnellingen.

12
Fabrikant: Shanghaimuxinmuyeyouxiangongsi
Adres: Baoshanqu Shuangchenglu 803long 11hao 1602A-1609shi
Shanghai

13
Geïmporteerd naar AUS: SIHAO PTY LTD, 1 ROKEVA
STREETEASTWOOD NSW 2122 Australië
Geïmporteerd naar de VS: Sanven Technology Ltd., Suite 250, 9166
Anaheim Place, Rancho Cucamonga, CA 91730
Gemaakt in China
REP
EC
SHUNSHUN GmbH
Römeräcker 9 Z2021,76351
Linkenheim-Hochstetten,Germany
euvertreter@gmail.com
+49 1727041930
REP
UK
Pooledas Group Ltd
Unit 5 Albert Edward House, The
Pavilions Preston, United Kingdom
pooledas12[email protected]
Tel: 01772418127


2
Teknisk Support och e-garanticertifikat www.vevor.com/support
TRIMSTÄLL FÖR BOSKAP
ANVÄNDARMANUAL
We continue to be committed to provide you tools with competitive price.
"Save Half","Half Price" or any other similar expressions used by us only represents an
estimate of savings you might benefit from buying certain tools with us compared to the major
top brands and does not necessarily mean to cover all categories of tools offered by us. You
are kindly reminded to verify carefully when you are placing an order with us if you are
actually saving half in comparison with the top major brands.

1
SCJ002-W /SCJ003-W /SCJ002-B /SCJ003-B
Have product questions? Need technical support? Please feel free to
contact us:
Technical Support and E-Warranty Certificate
www.vevor.com/support
NEED HELP? CONTACT US!
This is the original instruction,please read all manual instructions carefully
before operating. VEVOR reserves a clear interpretation of our user
manual. The appearance of the product shall be subject to the product
you received. Please forgive us that we won't inform you again if there
are any technology or software updates on our product.
LIVESTOCK TRIMMING
STAND

2
Säkerhetsåtgärder
VARNING:
Läs dessa instruktioner innan du använder denna produkt. Underlåtenhet att
göra det kan resultera i allvarliga skador. de grundläggande
försiktighetsåtgärderna bör alltid följas, inklusive följande:
26. Boskapsklippningsstället _ får inte användas eller förvaras i farliga områden.
Det är inte tillåtet att använda apparaten på farliga platser.
27. Boskapsklippningsstället _ måste kontrolleras för att säkerställa att den är i
korrekt fungerande skick och fungerar säkert före användning. I annat fall får
apparaten inte användas .
28. Använd endast som avsett. Boskapsklippningsstället måste placeras på plan
mark för användning. Vid behov kan de fyra fötterna säkras med markspikar.
29. Operatören måste använda boskapsklippningsstället ordentligt. Han måste ta
hänsyn till de lokala förhållandena och vara uppmärksam på tredje part, särskilt
barn , när han arbetar med boskapsklippningsstället .
30. Detta boskapsklippningsställ är inte avsedd att användas av personer
(inklusive barn) med nedsatta fysiska, sensoriska eller mentala förmågor eller som
saknar erfarenhet och/eller kunskap , såvida de inte övervakas av en person som
ansvarar för deras säkerhet eller instrueras av dessa personer om användningen
av enheten. Barn bör övervakas för att säkerställa att de inte leker med
boskapsklippningsstället .
SPARA DESSA INSTRUKTIONER
3
Produktlista _
4
(Spare parts *1)
(Spare parts *1)
(Spare parts *1)


7
bordsben *2
justerbara
bordsben *2
plastknoppar
*2
11. Sätt in det
justerbara
bordsbenet i
bordsbenet.
12. Fäst
bordsbenet med
en plastknopp.
M8x35 *5
packning *5
M8 *5
11. Stöd
bänkskivan med
monterade
bordsben.
12. Trä 5 M8x35
hål genom
bordsskivan, fäst
små distanser
och fäst dem
med muttrar.
8
fasta stavar *1
M8x35 *1
packning *1
M8 *1
11. Kläm fast
bänkskivan med
fasta stavar och
rikta in hålen.
12. Trä 1 M8x35
genom hålet på
de fasta
stängerna, fäst
den lilla
distansen och
fäst den med en
mutter.
triangulärt
fäste *1
M8x35 *1
packning *1
M8 *1
Trä 1
M8x35-skruv
genom det
mittersta hålet på
triangelfästet och
fäst med
distanser och
muttrar.
M8x70 *2
stor packning
*2
M8 *2
packning *2
Trä 2 M8x70
skruvar genom
den stora
distansen, sedan
genom hålen på
båda sidor av
triangelfästet och
fäst med
distansen och
muttern.
9
upprättstående
stolpar *1
plastknoppar
*2
11. Sätt in de
upprättstående
stängerna i det
fyrkantiga hålet
för fasta
stängerna i
riktningen nedåt
mot avfasningen.
12. Fäst de
upprättstående
stolparna med 2
plastknoppar.
pannband A *1
pannband B *1
M6x20 *4
M6 *4
21. Sätt
pannbanden B
först.
22. Sätt sedan
på pannbanden
A.
23. Fäst
pannbanden
med 4 M6x20
skruvar.
24. Dra åt
låsskruvarna
med 4 M6
muttrar.

10
Produktanvändning
Höjden på bordet som motsvarar hålet med fyra bultar
växlar.

11
Tillverkare: Shanghaimuxinmuyeyouxiangongsi
Adress: Baoshanqu Shuangchenglu 803long 11hao 1602A-1609shi
Shanghai
Importerad till AUS: SIHAO PTY LTD, 1 ROKEVA STREETEASTWOOD
NSW 2122 Australien
Importerad till USA: Sanven Technology Ltd., Suite 250, 9166 Anaheim
Place, Rancho Cucamonga, CA 91730
Tillverkad i Kina
REP
EC
SHUNSHUN GmbH
Römeräcker 9 Z2021,76351
Linkenheim-Hochstetten,Germany
euvertreter@gmail.com
+49 1727041930
REP
UK
Pooledas Group Ltd
Unit 5 Albert Edward House, The
Pavilions Preston, United Kingdom
pooledas12[email protected]
Tel: 01772418127


2
Técnico Soporte y certificado de garantía electrónica www.vevor.com/support
PUESTO DE RECORTE DE GANADO
MANUAL DE USUARIO
We continue to be committed to provide you tools with competitive price.
"Save Half","Half Price" or any other similar expressions used by us only represents an
estimate of savings you might benefit from buying certain tools with us compared to the major
top brands and does not necessarily mean to cover all categories of tools offered by us. You
are kindly reminded to verify carefully when you are placing an order with us if you are
actually saving half in comparison with the top major brands.

1
SCJ002-W /SCJ003-W /SCJ002-B /SCJ003-B
Have product questions? Need technical support? Please feel free to
contact us:
Technical Support and E-Warranty Certificate
www.vevor.com/support
NEED HELP? CONTACT US!
This is the original instruction,please read all manual instructions carefully
before operating. VEVOR reserves a clear interpretation of our user
manual. The appearance of the product shall be subject to the product
you received. Please forgive us that we won't inform you again if there
are any technology or software updates on our product.
LIVESTOCK TRIMMING
STAND

2
Precauciones de seguridad
ADVERTENCIA:
Lea estas instrucciones antes de usar este producto. De lo contrario, se pueden
producir lesiones graves. Siempre se deben seguir las precauciones básicas ,
incluidas las siguientes:
31. El puesto de recorte de ganado No se puede utilizar ni almacenar en zonas
peligrosas. No está permitido utilizar el aparato en lugares peligrosos.
32. El puesto de recorte de ganado Se debe verificar para garantizar que esté en
buenas condiciones de funcionamiento y que funcione de manera segura antes de
su uso. De lo contrario , no se debe utilizar el aparato.
33. Úselo únicamente según lo previsto. El puesto de recorte de ganado debe
colocarse en un terreno nivelado para su uso. Si es necesario, los cuatro pies se
pueden asegurar con clavos rectificados.
34. El operador debe utilizar el puesto de recorte de ganado. adecuadamente.
Debe tener en cuenta las condiciones locales y prestar atención a terceros , en
particular a los niños , cuando trabaje con el puesto de pastoreo .
35. Este puesto de recorte de ganado no está destinado a ser utilizado por
personas (incluidos niños) con capacidades físicas , sensoriales o mentales
reducidas o que carezcan de experiencia y/o conocimientos , a menos que estén
supervisados por una persona responsable de su seguridad o sean instruidos por
estas personas sobre el uso de el dispositivo. Se debe supervisar a los niños para
asegurarse de que no jueguen con el puesto de recorte de ganado .
GUARDA ESTAS INSTRUCCIONES

3
Lista de productos

4

5
(Spare parts *1)
(Spare parts *1)
(Spare parts *1)

6
Descripción del Producto
Modelo
Color
Tamaño
de la
mesa
Altura ajustable
de la encimera.
La varilla
vertical
ajusta la
altura.
capacid
ad de
peso
SCJ002-W
blanco
47*23
pulgadas
Ⅰ 21
pulgadas/533
mm;
Ⅱ 25
pulgadas/635
mm;
Ⅲ 29
pulgadas/736
mm;
Ⅳ 33
pulgadas/838
mm;
18 pulg./457
mm
500
libras
SCJ003-W
blanco
51*23
pulgadas
SCJ002-B
negro
47*23
pulgadas
SCJ003-B
negro
51*23
pulgadas
8
patas de
mesa *2
patas de
mesa
ajustables *
2
perillas de
plástico * 2
13. Inserte la pata
de la mesa
ajustable en la pata
de la mesa.
14. Asegure la pata
de la mesa con una
perilla de plástico.
M8x35 *5
junta *5
M8 *5
13. Apoye la
encimera con las
patas de la mesa
ensambladas.
14. Pase 5 orificios
M8x35 a través de
la superficie de la
mesa, coloque
pequeños
espaciadores y
asegúrelos con
tuercas.
9
varillas fijas
*1
M8x35 *1
junta * 1
M8 *1
13. Bloquee la
encimera con
varillas fijas y alinee
los agujeros.
14. Pase 1 M8x35
por el orificio de las
varillas fijas,
coloque el
espaciador
pequeño y
asegúrelo con una
tuerca.
soporte
triangular *
1
M8x35 *1
junta * 1
M8 *1
Pase 1 tornillo
M8x35 a través del
orificio central del
soporte triangular y
asegúrelo con
espaciadores y
tuercas.
M8x70 *2
junta
grande * 2
M8 *2
junta *2
Pase 2 tornillos
M8x70 a través del
espaciador grande,
luego a través de
los orificios en
ambos lados del
soporte triangular y
asegúrelos con el
espaciador y la
tuerca.

10
postes
verticales *
1
perillas de
plástico * 2
13. Inserte los
postes verticales en
el orificio cuadrado
de las varillas fijas
en la dirección
hacia abajo del
bisel.
14. Asegure los
postes verticales
con 2 perillas de
plástico.
diademas A
* 1
diademas B
* 1
M6x20 *4
M6 *4
25. Pon las cintas
para la cabeza B
primero.
26. Luego pon las
diademas A.
27. Fijar las
diademas con 4
tornillos M6x20.
28. Apriete los
tornillos de bloqueo
con 4 tuercas M6.

11
Uso del producto
La altura de la mesa correspondiente al orificio de los cuatro
pernos.
engranajes.
12
Fabricante: Shanghaimuxinmuyeyouxiangongsi
Dirección: Baoshanqu Shuangchenglu 803long 11hao 1602A-1609shi
Shanghai
Importado a AUS: SIHAO PTY LTD, 1 ROKEVA STREETEASTWOOD
NSW 2122 Australia
Importado a EE. UU.: Sanven Technology Ltd., Suite 250, 9166 Anaheim
Place, Rancho Cucamonga, CA 91730
REP
EC
SHUNSHUN GmbH
Römeräcker 9 Z2021,76351
Linkenheim-Hochstetten,Germany
euvertreter@gmail.com
+49 1727041930
REP
UK
Pooledas Group Ltd
Unit 5 Albert Edward House, The
Pavilions Preston, United Kingdom
pooledas12[email protected]
Tel: 01772418127

13
Hecho en china


2
Tecnico Supporto e certificato di garanzia elettronica www.vevor.com/support
SUPPORTO PER LA RIFINITURA DEL
BESTIAME
MANUALE D'USO
We continue to be committed to provide you tools with competitive price.
"Save Half","Half Price" or any other similar expressions used by us only represents an
estimate of savings you might benefit from buying certain tools with us compared to the major
top brands and does not necessarily mean to cover all categories of tools offered by us. You
are kindly reminded to verify carefully when you are placing an order with us if you are
actually saving half in comparison with the top major brands.

1
SCJ002-W /SCJ003-W /SCJ002-B /SCJ003-B
Have product questions? Need technical support? Please feel free to
contact us:
Technical Support and E-Warranty Certificate
www.vevor.com/support
NEED HELP? CONTACT US!
This is the original instruction,please read all manual instructions carefully
before operating. VEVOR reserves a clear interpretation of our user
manual. The appearance of the product shall be subject to the product
you received. Please forgive us that we won't inform you again if there
are any technology or software updates on our product.
LIVESTOCK TRIMMING
STAND

2
Misure di sicurezza
AVVERTIMENTO:
Leggere queste istruzioni prima di utilizzare questo prodotto. In caso contrario si
potrebbero causare lesioni gravi. È necessario seguire sempre le precauzioni di
base , incluse le seguenti:
36. Il banco di rifinitura del bestiame non può essere utilizzato o conservato in
aree pericolose. Non è consentito utilizzare l'apparecchio in luoghi pericolosi.
37. Il banco di rifinitura del bestiame deve essere controllato per garantire che sia
in buone condizioni di funzionamento e funzioni in sicurezza prima dell'uso. In
caso contrario l'apparecchio non deve essere utilizzato.
38. Utilizzare solo come previsto. Per l'uso, il supporto per la rifinitura del
bestiame deve essere posizionato su un terreno pianeggiante. Se necessario, i
quattro piedi possono essere fissati con chiodi a terra.
39. L'operatore deve utilizzare il supporto di rifinitura del bestiame correttamente.
Durante il lavoro con il banco di tosatura deve tenere conto delle condizioni locali e
prestare attenzione a terzi , in particolare ai bambini .
40. Questo supporto per la rifinitura del bestiame non è destinato all'uso da parte
di persone (compresi i bambini) con ridotte capacità fisiche , sensoriali o mentali o
prive di esperienza e/o conoscenza , a meno che non siano supervisionate da una
persona responsabile della loro sicurezza o siano istruite da queste persone
sull'uso di il dispositivo. I bambini devono essere sorvegliati per assicurarsi che
non giochino con il banco di rifinitura del bestiame .
CONSERVA QUESTE ISTRUZIONI
3
Elenco prodotti

4

5
(Spare parts *1)
(Spare parts *1)
(Spare parts *1)

6
Descrizione del prodotto
Modello
Colore
Dimensio
ni della
tavola
Altezza del
piano di lavoro
regolabile
L'asta
verticale
regola
l'altezza
capacit
à di
peso
SCJ002-W
bianco
47*23
pollici
Ⅰ 21 pollici/533
mm;
Ⅱ 25 pollici/635
mm;
Ⅲ 29 pollici/736
mm;
Ⅳ 33 pollici/838
mm;
18 pollici/457
mm
500
libbre
SCJ003-W
bianco
51*23
pollici
SCJ002-B
nero
47*23
pollici
SCJ003-B
nero
51*23
pollici

8
gambe del
tavolo *2
gambe del
tavolo
regolabili *2
manopole in
plastica *2
15. Inserire la
gamba del tavolo
regolabile nella
gamba del tavolo.
16. Fissare la
gamba del tavolo
con una manopola
di plastica.
M8x35*5
guarnizione
*5
M8*5
15. Sostenere il
piano di lavoro con
le gambe del tavolo
assemblate.
16. Infila 5 fori
M8x35 attraverso il
piano del tavolo,
attacca piccoli
distanziatori e
fissali con i dadi.
9
aste fisse *1
M8x35*1
guarnizione
*1
M8*1
15. Blocca il piano
di lavoro con aste
fisse e allinea i fori.
16. Infilare 1 M8x35
attraverso il foro
delle aste fisse,
collegare il piccolo
distanziale e
fissarlo con un
dado.
staffa
triangolare
*1
M8x35*1
guarnizione
*1
M8*1
Avvitare 1 vite
M8x35 attraverso il
foro centrale della
staffa triangolare e
fissarla con
distanziatori e dadi.
10
M8x70*2
guarnizione
grande *2
M8*2
guarnizione
*2
Avvita 2 viti M8x70
attraverso il
distanziale grande,
quindi attraverso i
fori su entrambi i lati
della staffa
triangolare e fissale
con il distanziale e il
dado.
pali verticali
*1
manopole in
plastica *2
15. Inserire i pali
verticali nel foro
quadrato dell'asta
fissa nella direzione
verso il basso della
smussatura.
16. Fissare i pali
verticali con 2
pomelli in plastica.
11
fasce per
capelli A *1
fasce B *1
M6x20*4
M6*4
29. Metti prima le
fasce B.
30. Poi metti le
fasce A.
31. Fissare le fasce
con 4 viti M6x20.
32. Stringere le viti
di bloccaggio con 4
dadi M6.
Utilizzo del prodotto
L'altezza del tavolo corrisponde ai quattro fori per i bulloni
ingranaggi.
12
Produttore: Shanghaimuxinmuyeyouxiangongsi
Indirizzo: Baoshanqu Shuangchenglu 803long 11hao 1602A-1609shi
Shanghai

13
Importato in AUS: SIHAO PTY LTD, 1 ROKEVA STREETEASTWOOD
NSW 2122 Australia
Importato negli Stati Uniti: Sanven Technology Ltd., Suite 250, 9166
Anaheim Place, Rancho Cucamonga, CA 91730
Made in China
REP
EC
SHUNSHUN GmbH
Römeräcker 9 Z2021,76351
Linkenheim-Hochstetten,Germany
euvertreter@gmail.com
+49 1727041930
REP
UK
Pooledas Group Ltd
Unit 5 Albert Edward House, The
Pavilions Preston, United Kingdom
pooledas12[email protected]
Tel: 01772418127