
Technical Support and E-Warranty Certificate
www.vevor.com/support
CEILING SPEAKER MANUAL
MODEL: 645, 645-BT, 549, 638
We continue to be committed to provide you tools with competitive price.
"Save Half", "Half Price" or any other similar expressions used by us only represents an
estimate of savings you might benefit from buying certain tools with us compared to the major
top brands and does not necessarily mean to cover all categories of tools offered by us. You
are kindly reminded to verify carefully when you are placing an order with us if you are
actually saving half in comparison with the top major brands.


- 1 -
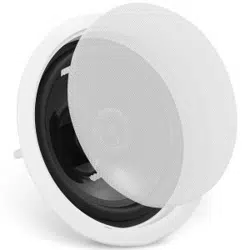
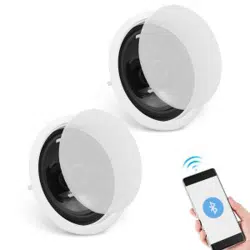
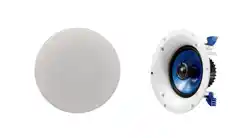
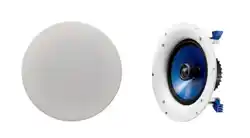
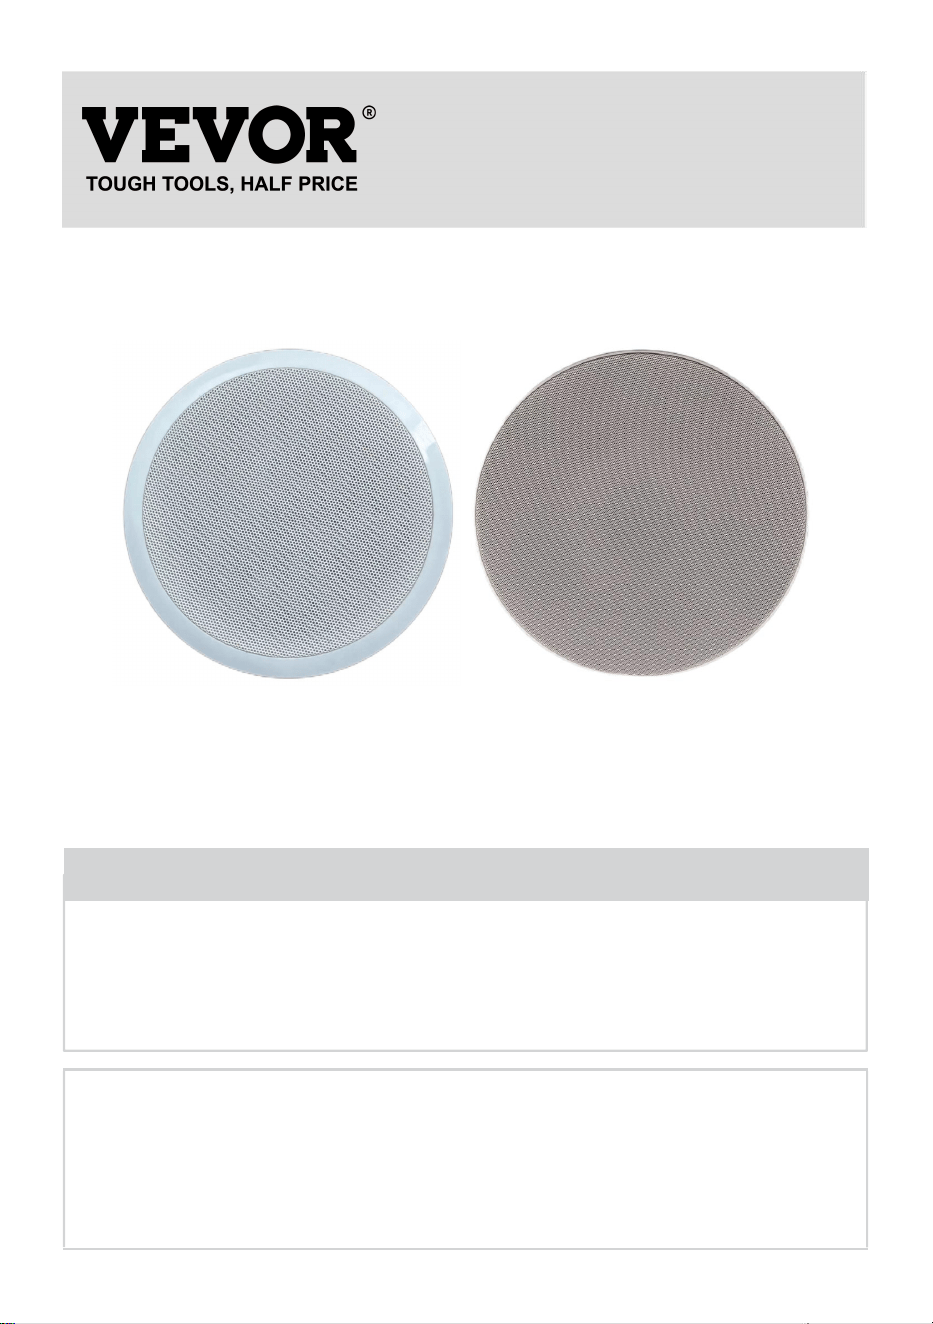
MODEL: 645, 645-BT, 549, 638
(The picture is for reference only, please refer to the actual object)
Have product questions? Need technical support? Please feel free to
contact us:
Technical Support and E-Warranty Certificate
www.vevor.com/support
NEED HELP? CONTACT US!
This is the original instruction, please read all manual instructions
carefully before operating. VEVOR reserves a clear interpretation of our
user manual. The appearance of the product shall be subject to the
product you received. Please forgive us that we won't inform you again if
there are any technology or software updates on our product.
CEILING SPEAKER
- 2 -
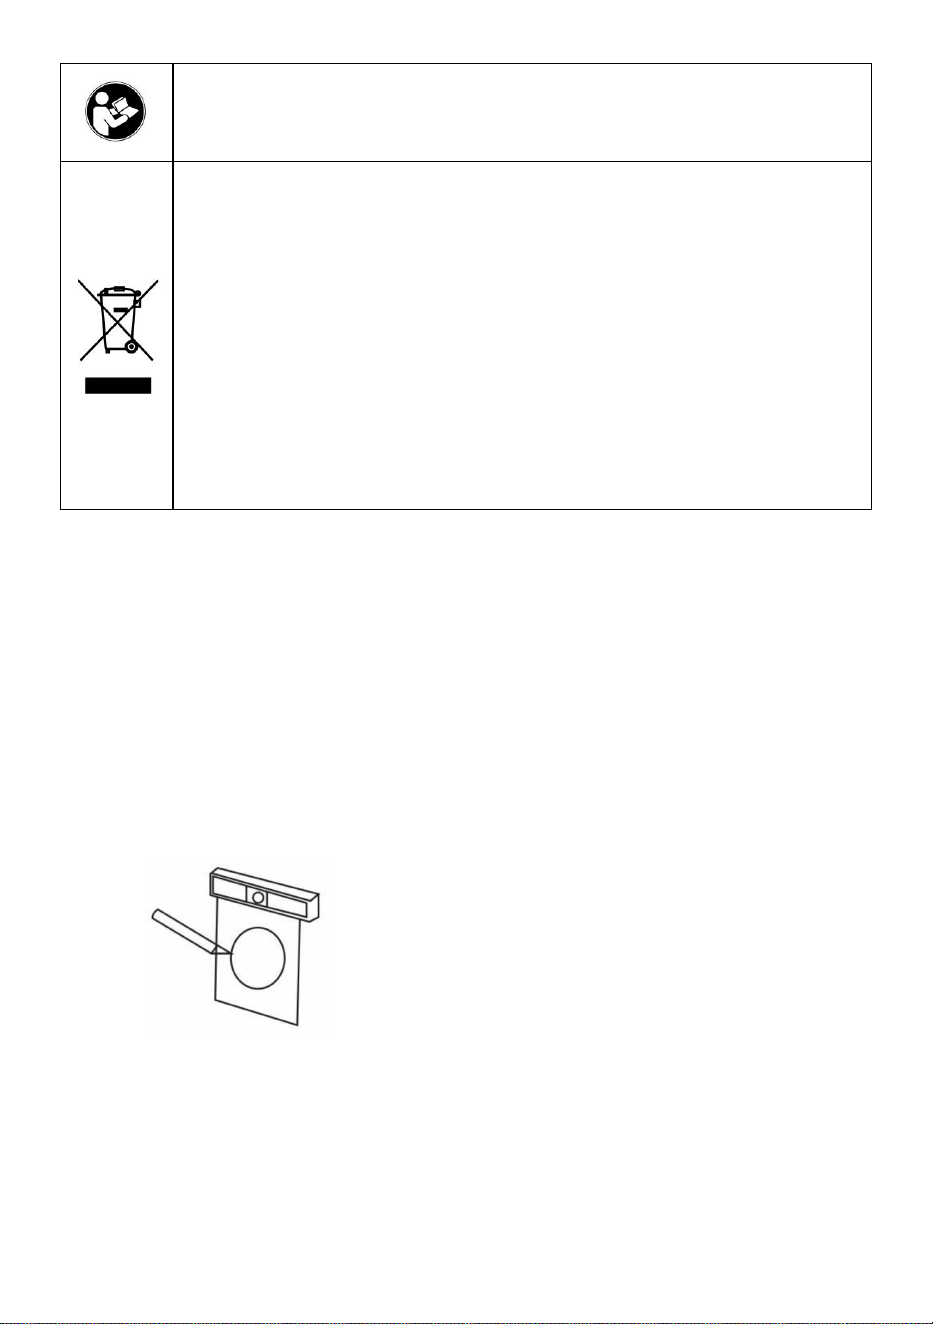
Warning-To reduce the risk of injury, user must read instructions
manual carefully.
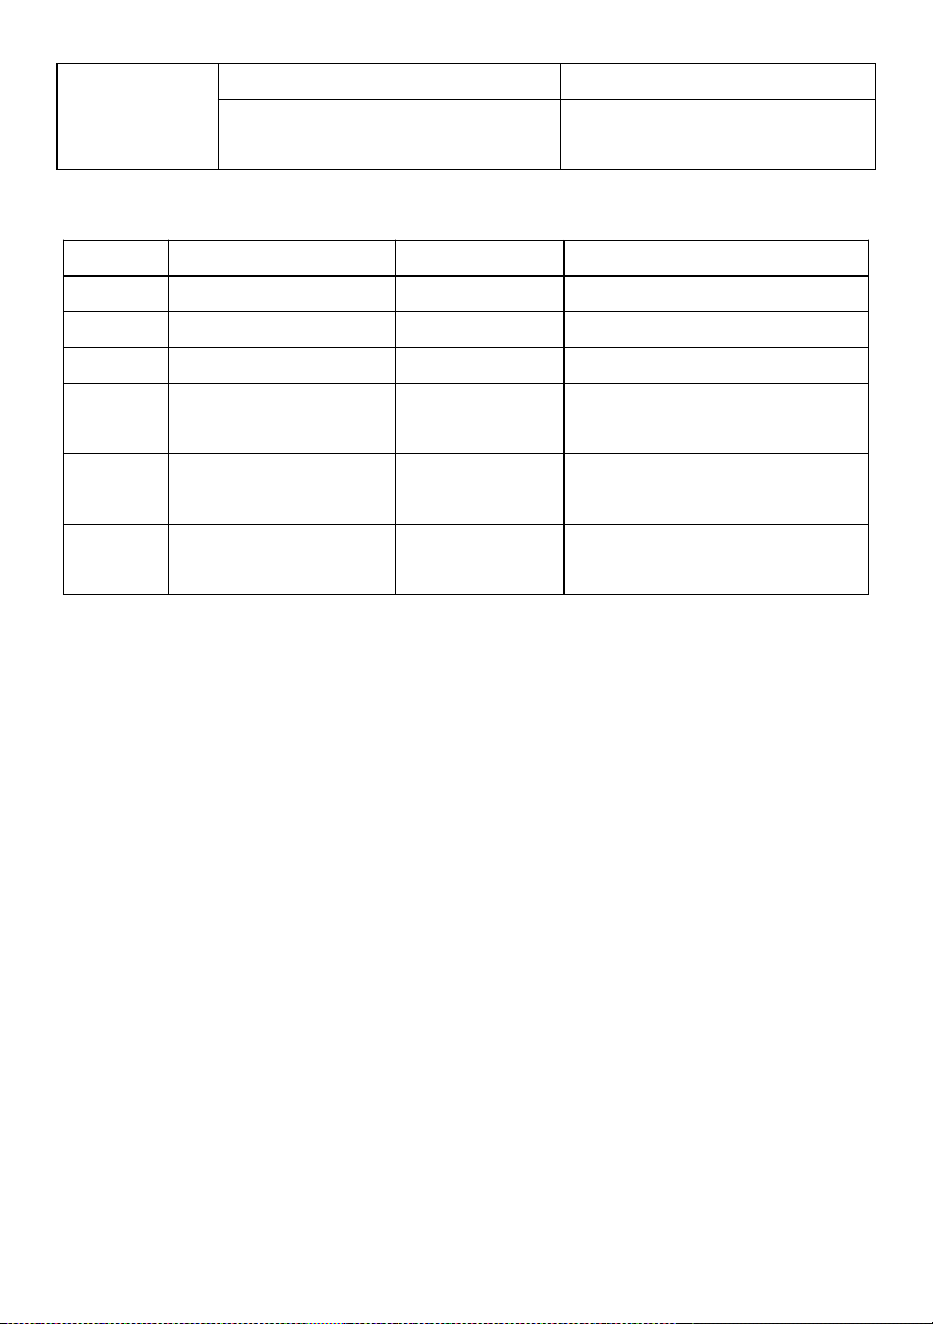
Correct Disposal
This product is subject to the provision of European Directive
2012/19/EC. The symbol showing a wheelie bin crossed through
indicates that the product requires separate refuse collection in the
European Union. This applies to the product and all accessories
marked with this symbol. Products marked as such may not be
discarded with normal domestic waste, but must be taken to a
collection point for recycling electrical and electronic devices
Ceiling speaker manual
i.The main purpose
Ceiling speakers are mainly used to amplify and transmit sound.
ii.Installation and debugging
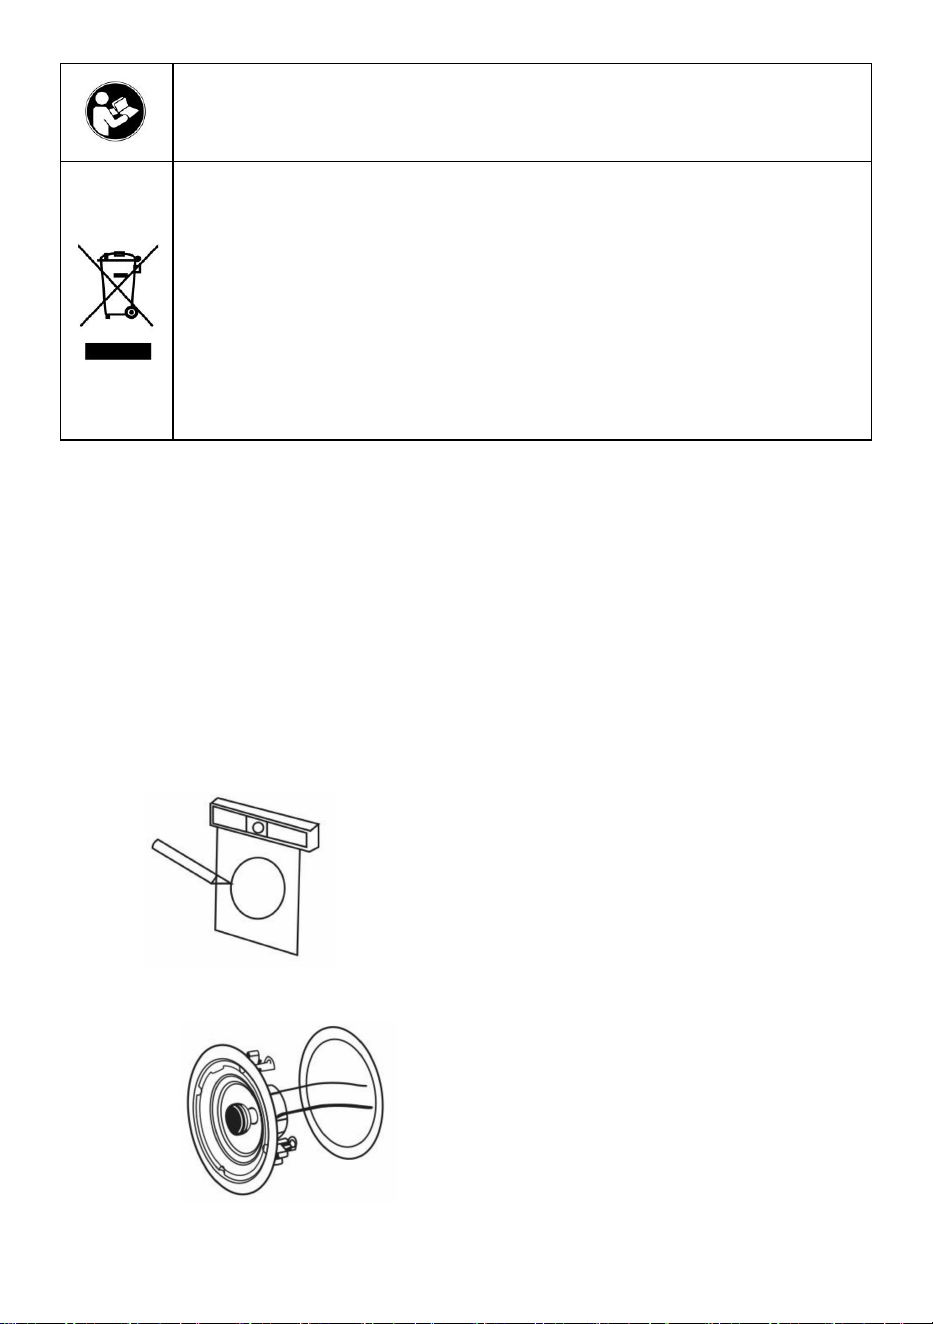
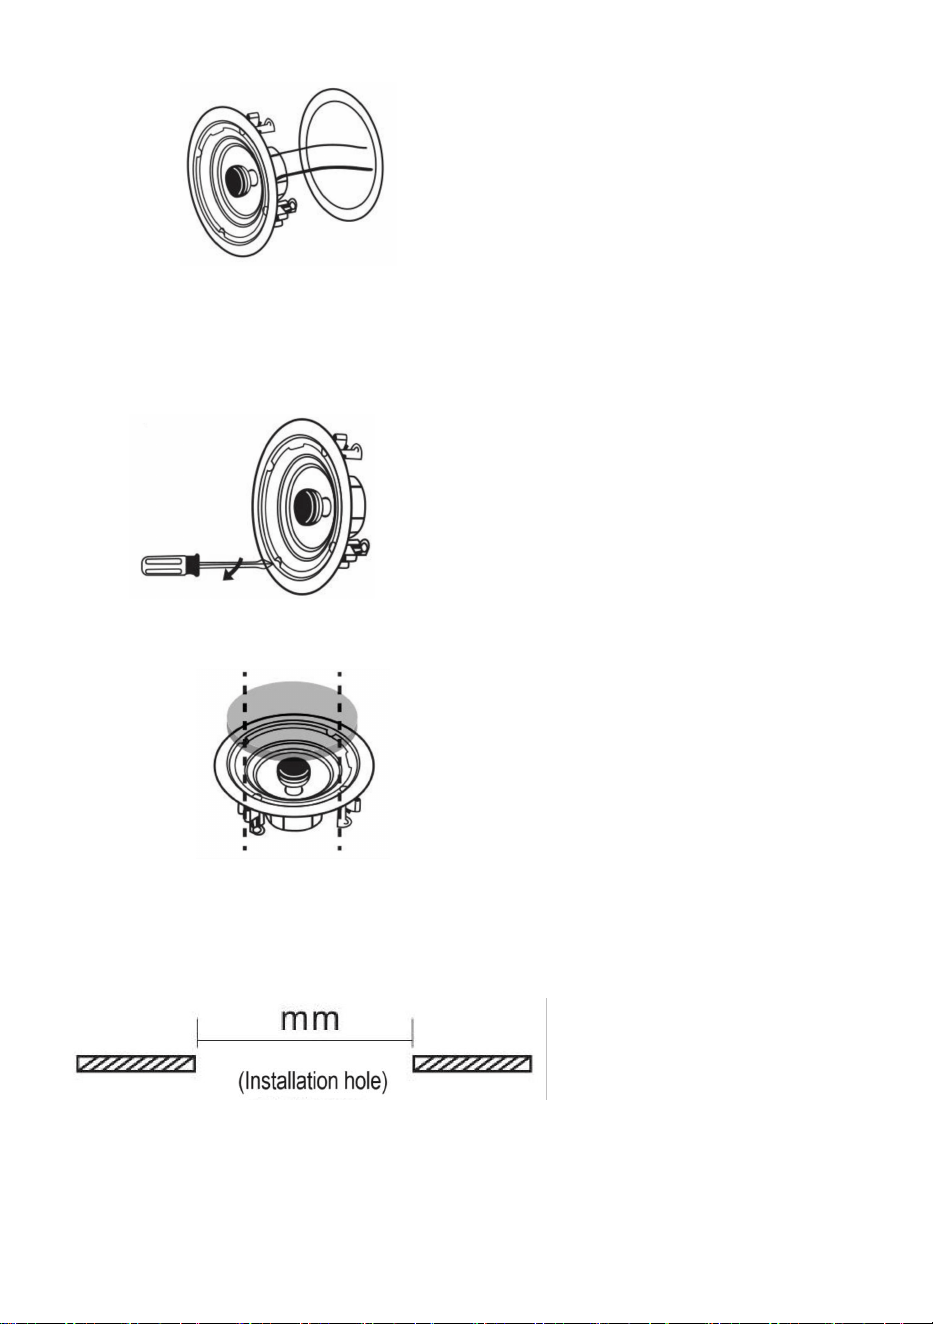
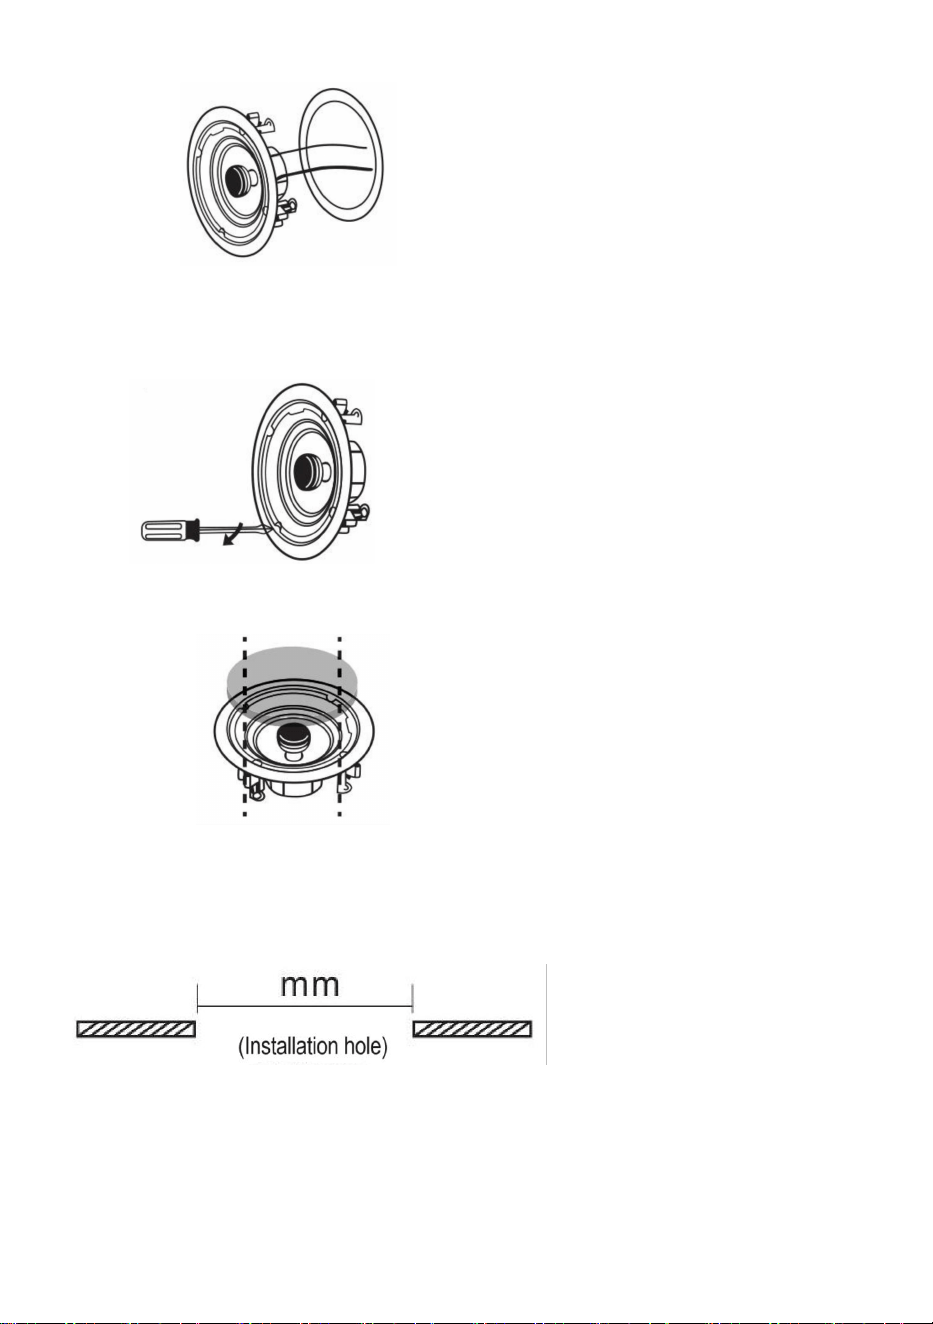
Installation guide(for 549)
1. Refer to the round paper card,cut a hole in the ceiling according to the
diameter of the horn installation, and connect the horn wire to the horn.
2.
Connectthe speakerwirestothespeaker
.
- 3 -
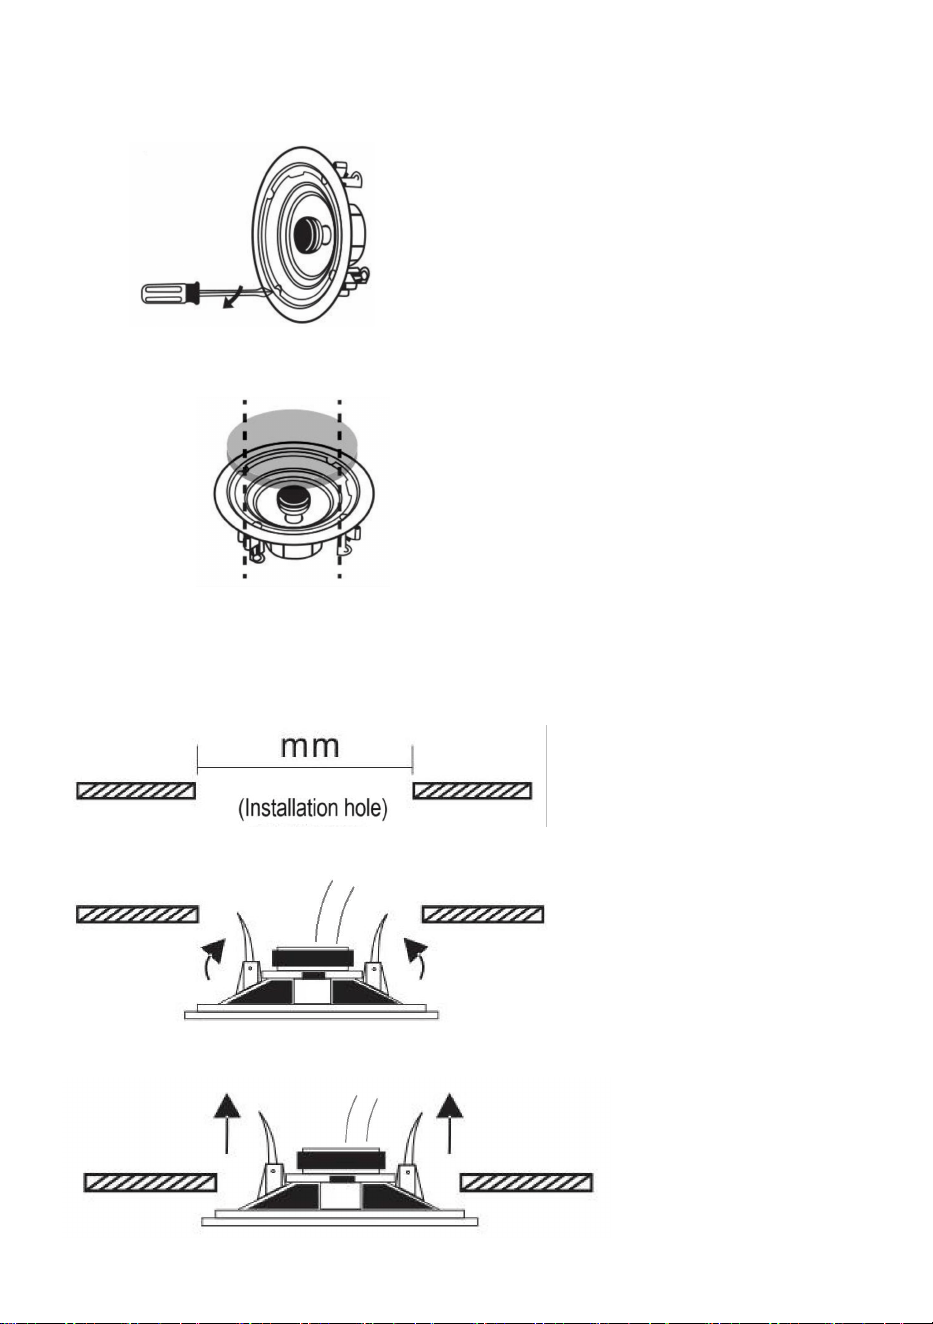
3. Tighten the four cross screws then lock the bracket rotation and secure
the device to the rear surface of the ceiling panel.
4. Install the speaker wire mesh cover.
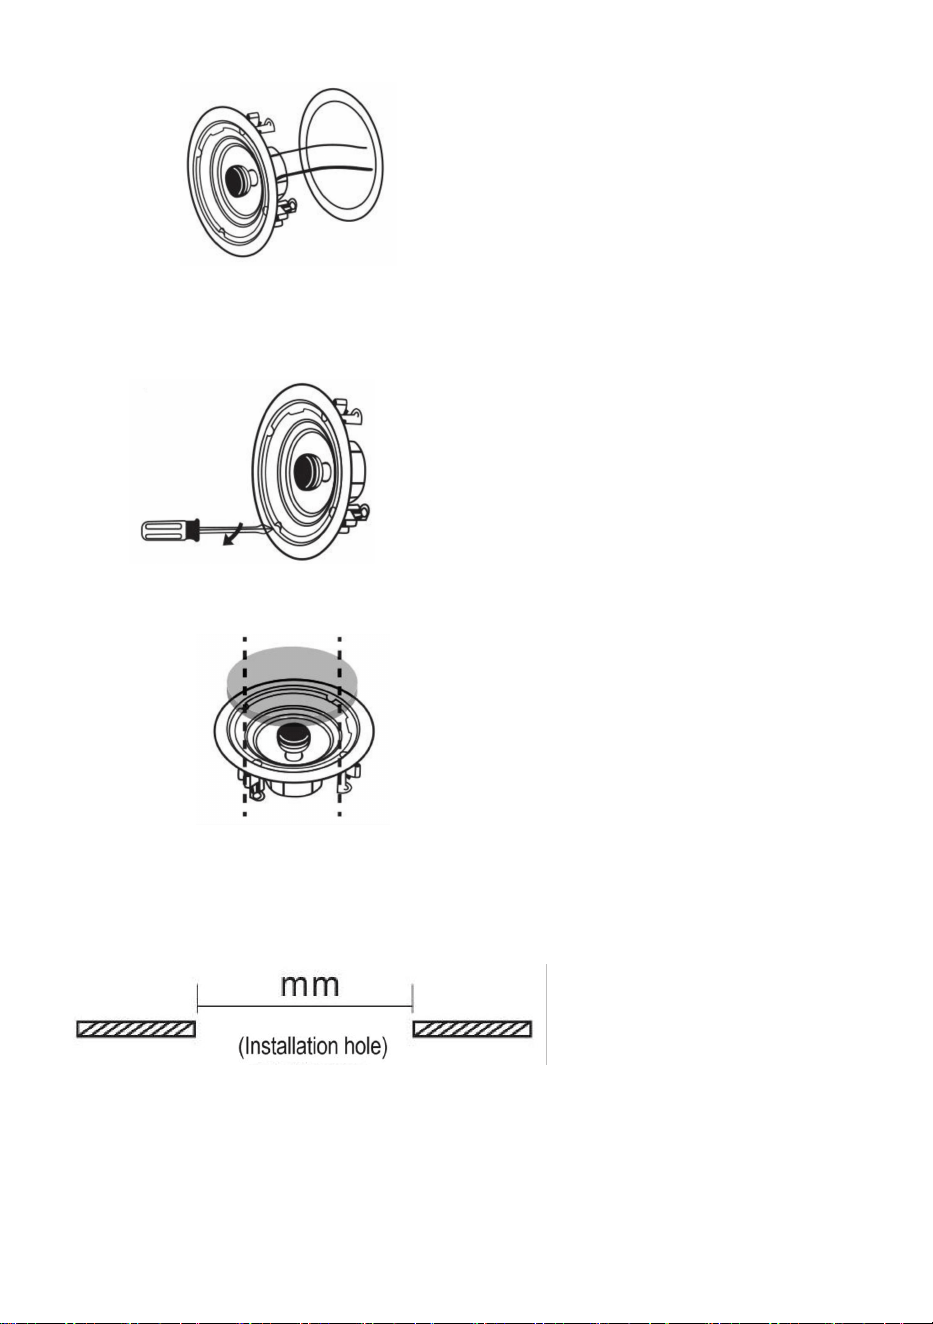
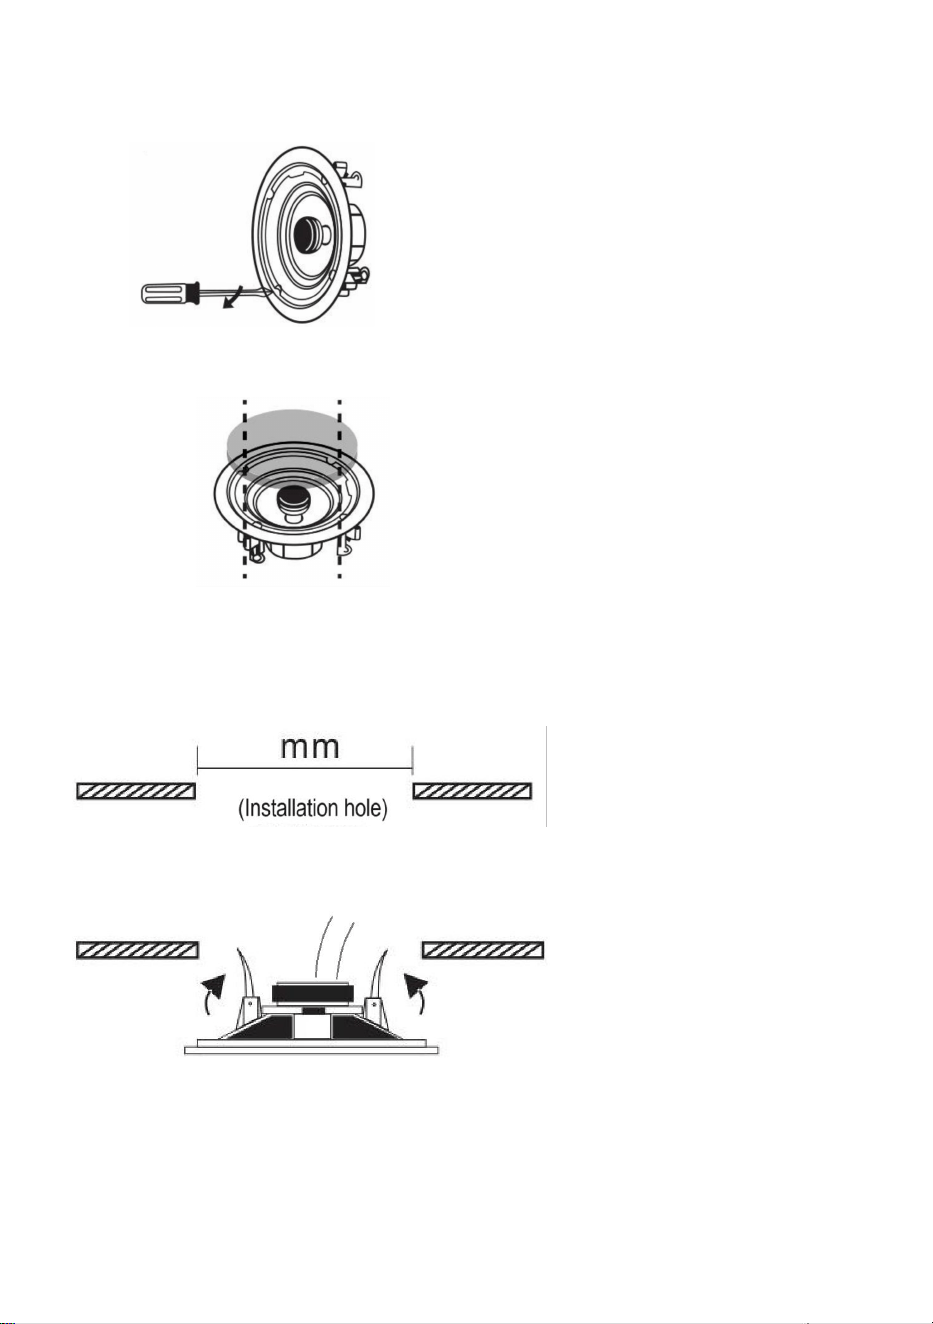
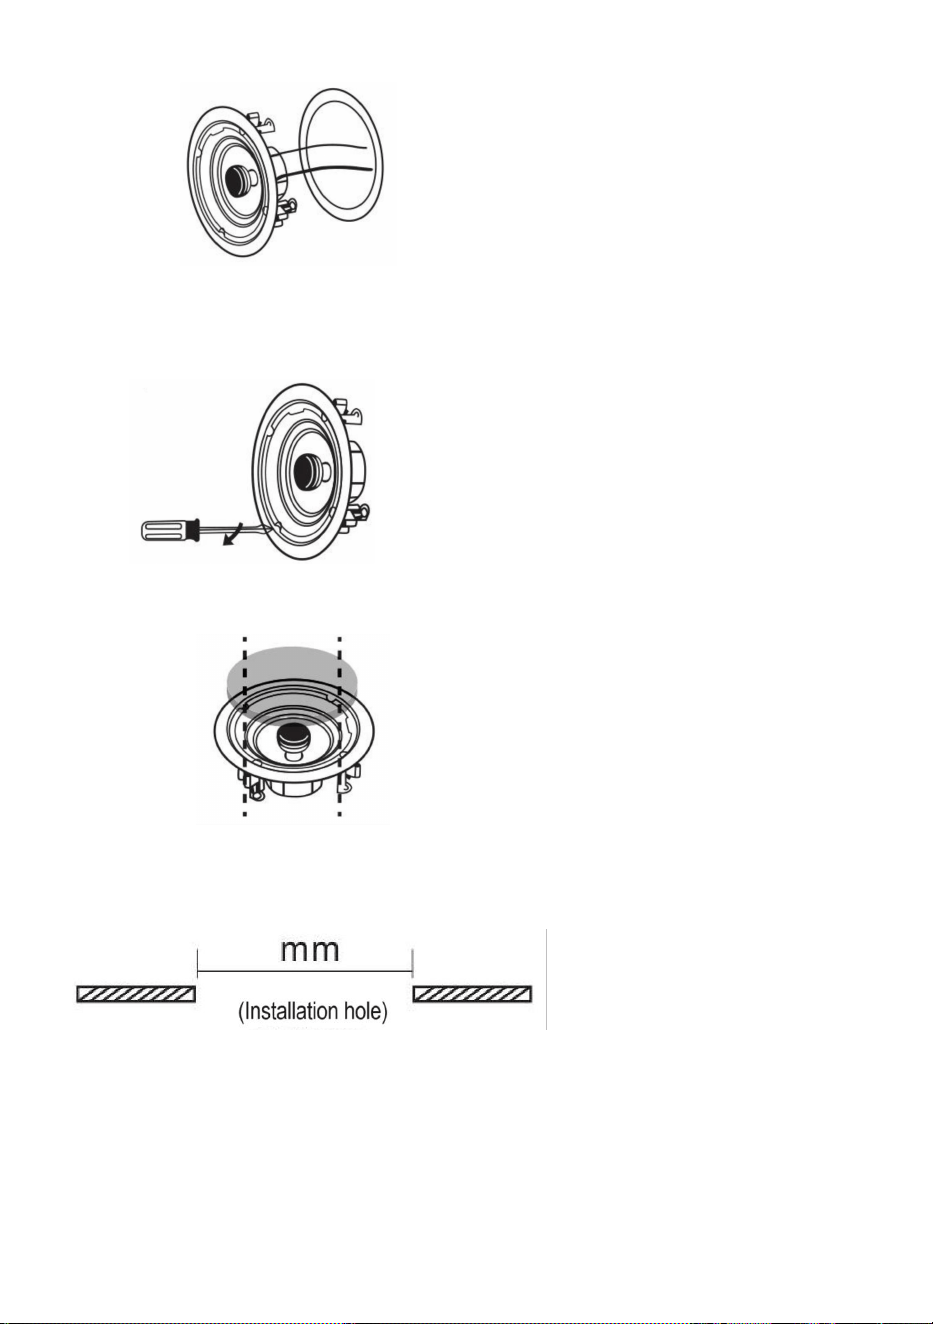
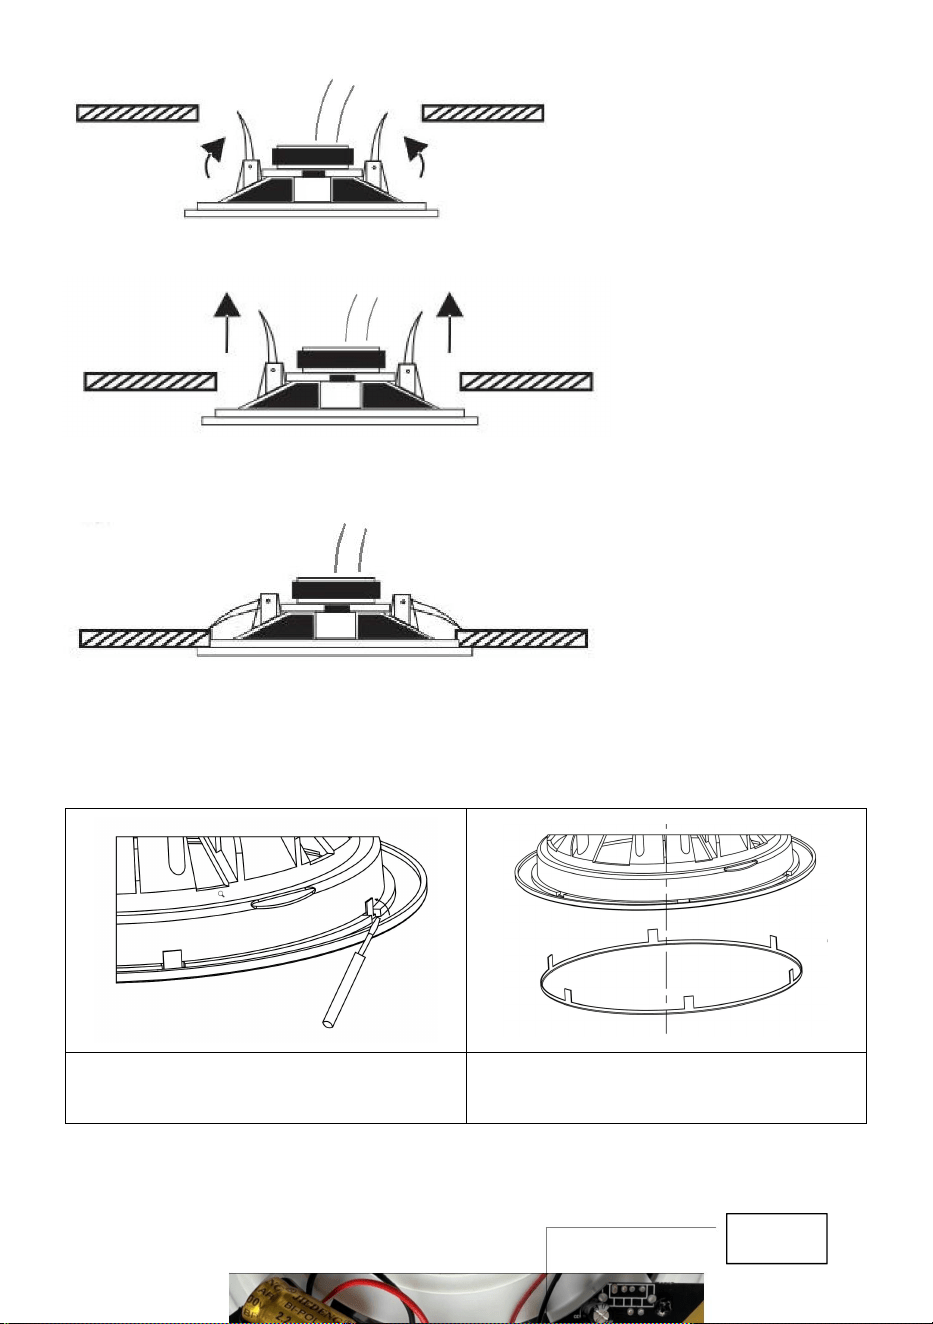
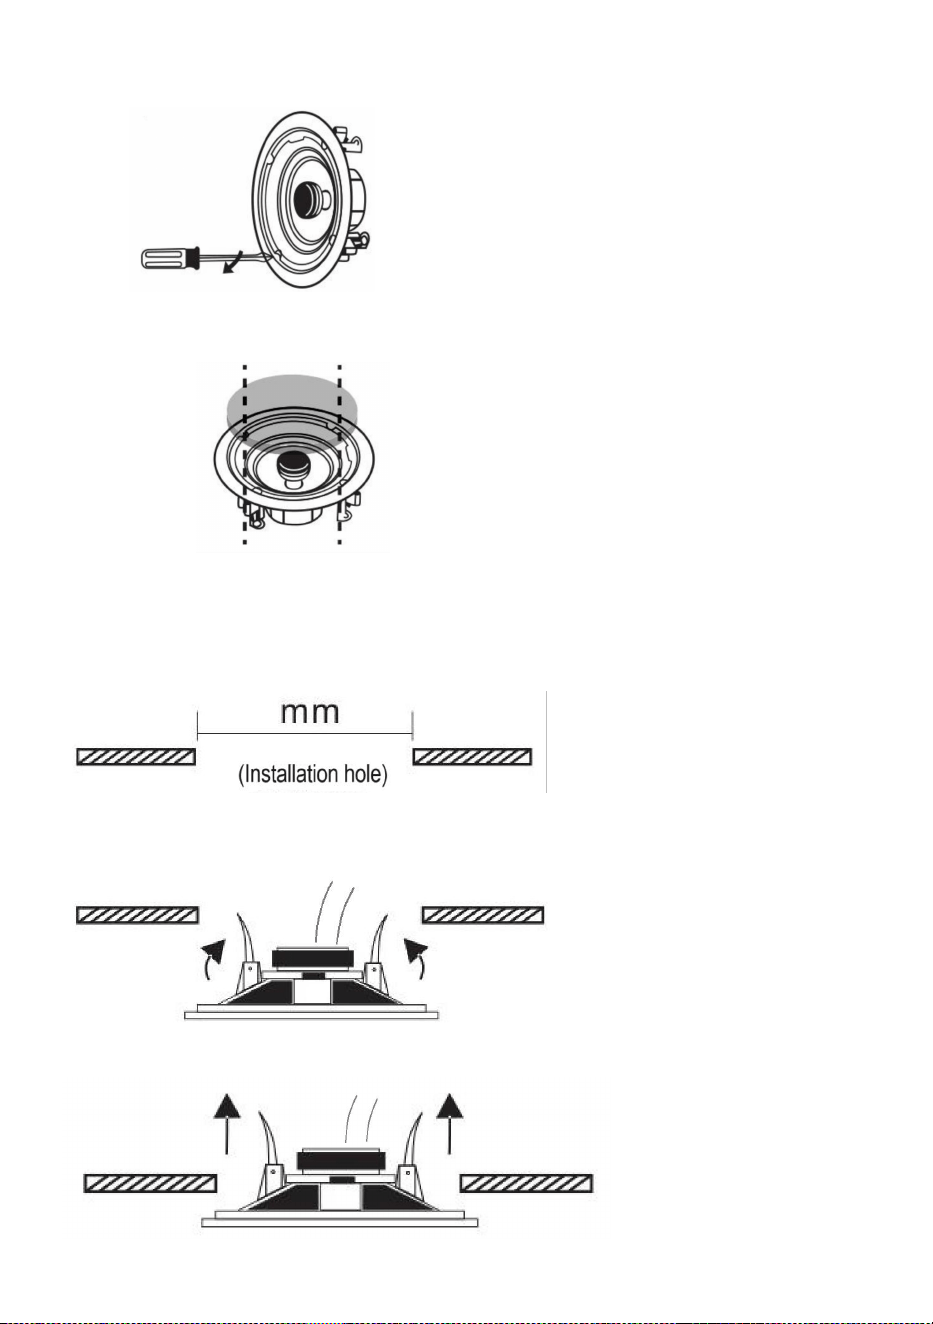
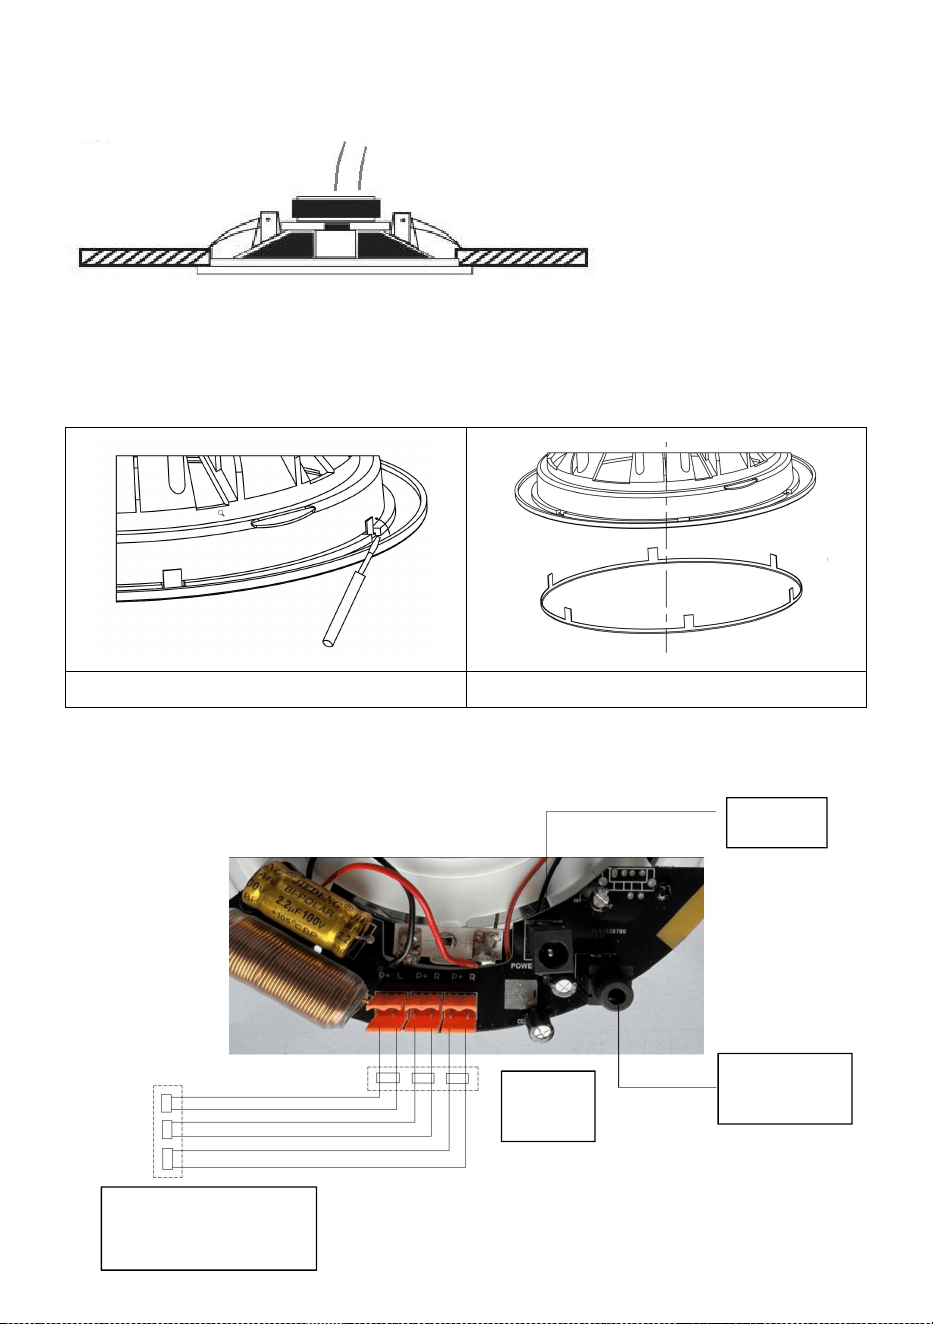
Installation guide(for 645/645-BT/638)
1.
Refer to the round paper card,cut an installation hole over the ceiling;
2.
Connect the speakerwirestothespeaker,flip up the Speaker Mounting buckle;
3. Put the speakers up into the ceiling mounting hole;
- 4 -
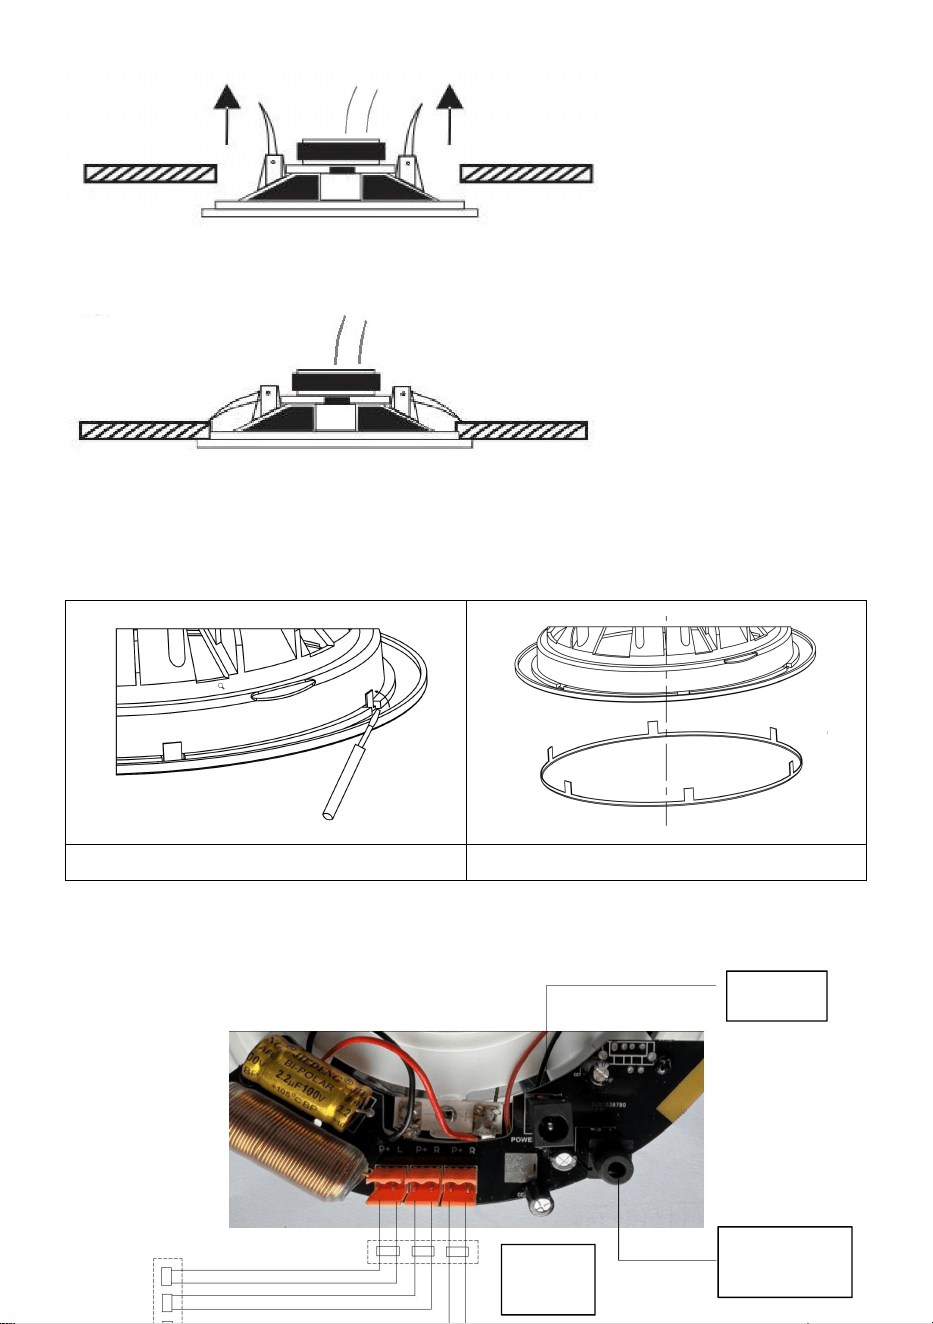
4. The mounting buckle will automatically go down and get the speakers
fastened into the ceiling.
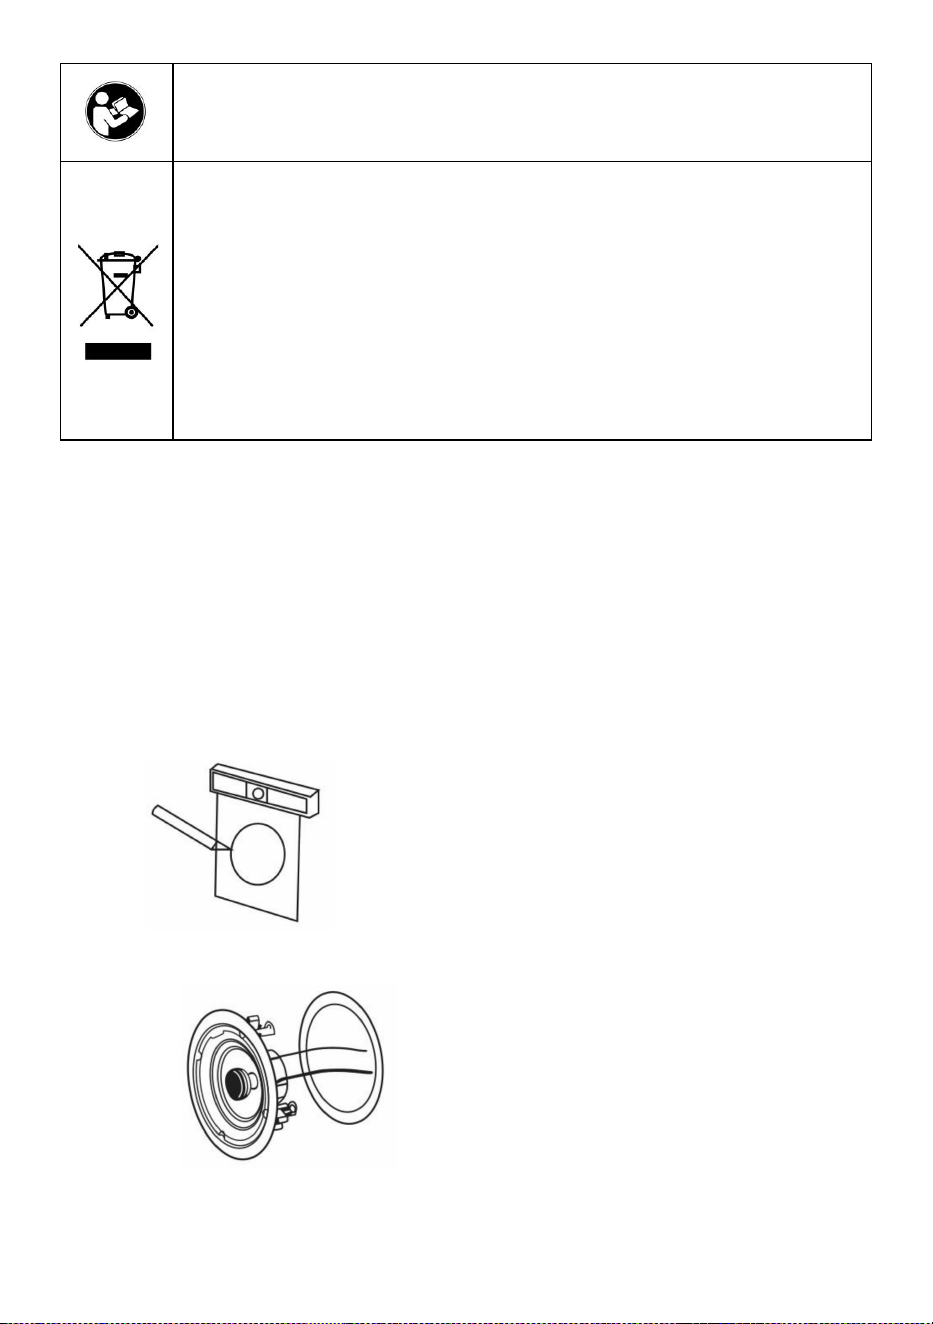
Metal grille removal instructions(Only for 645/645-BT/638)
1. Turn the buckle up 90 degrees.
2. Remove the metal grille.
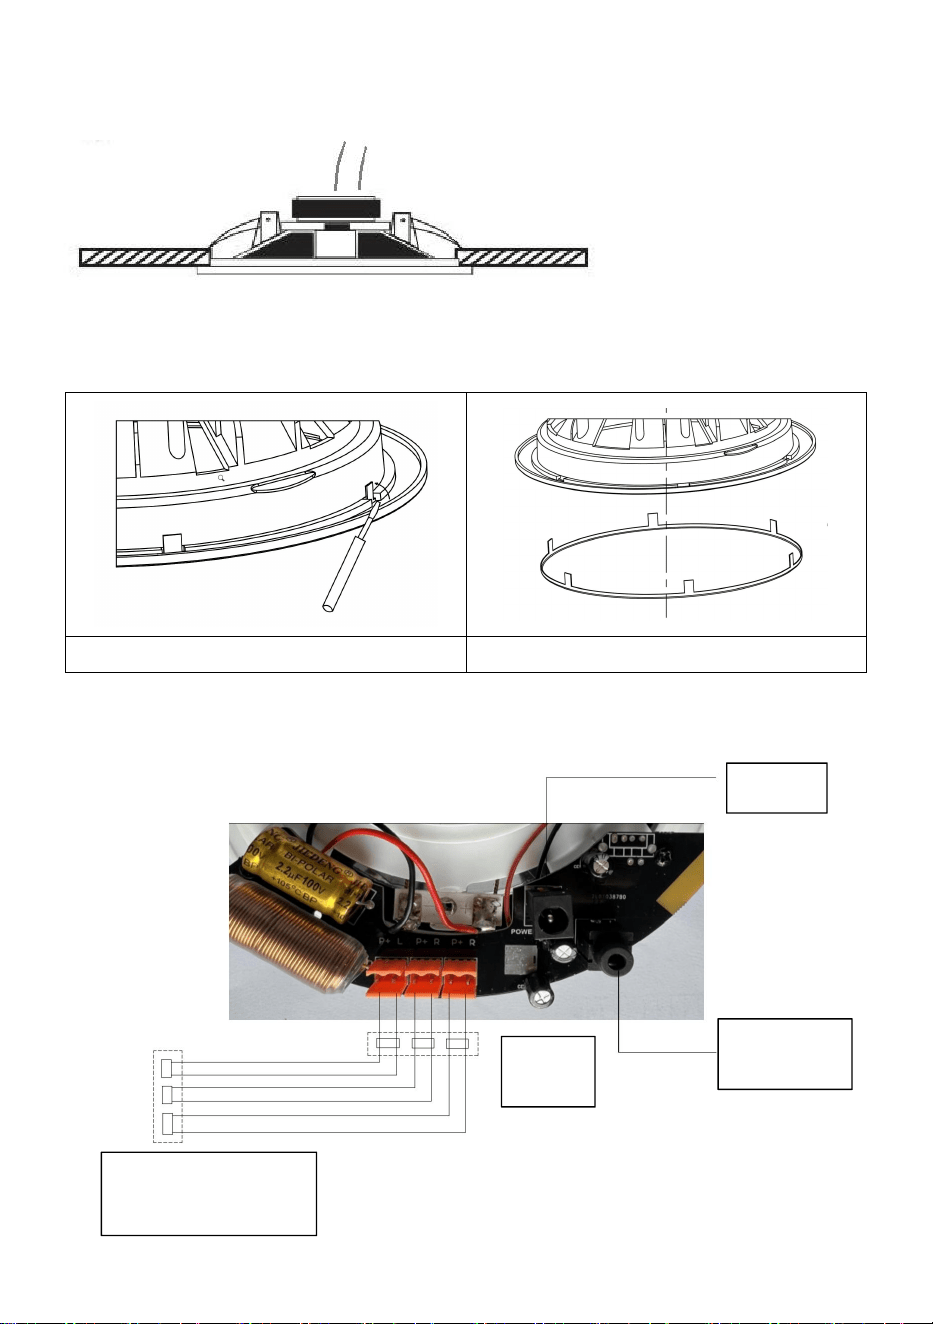
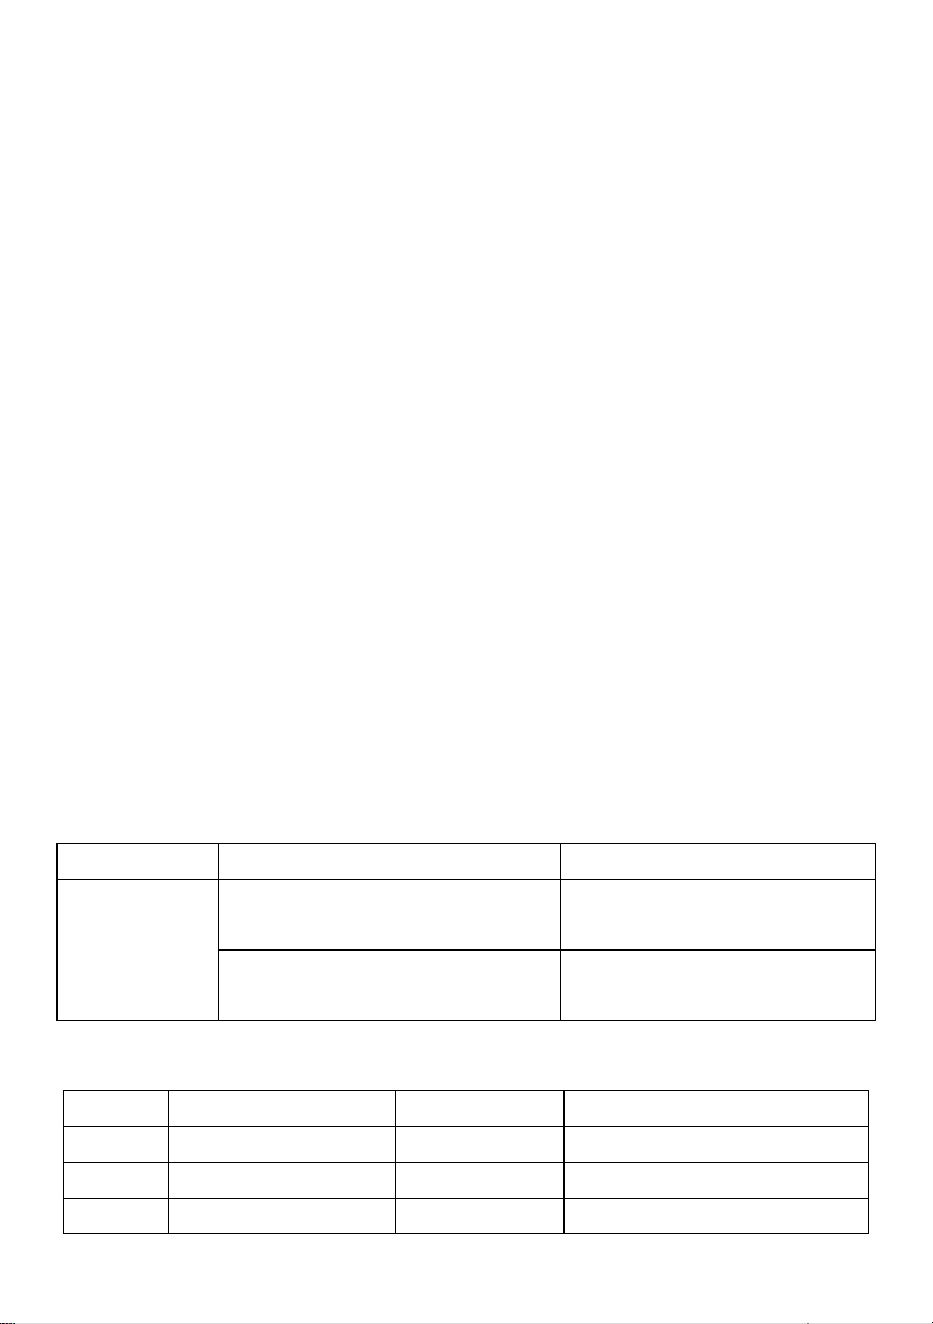
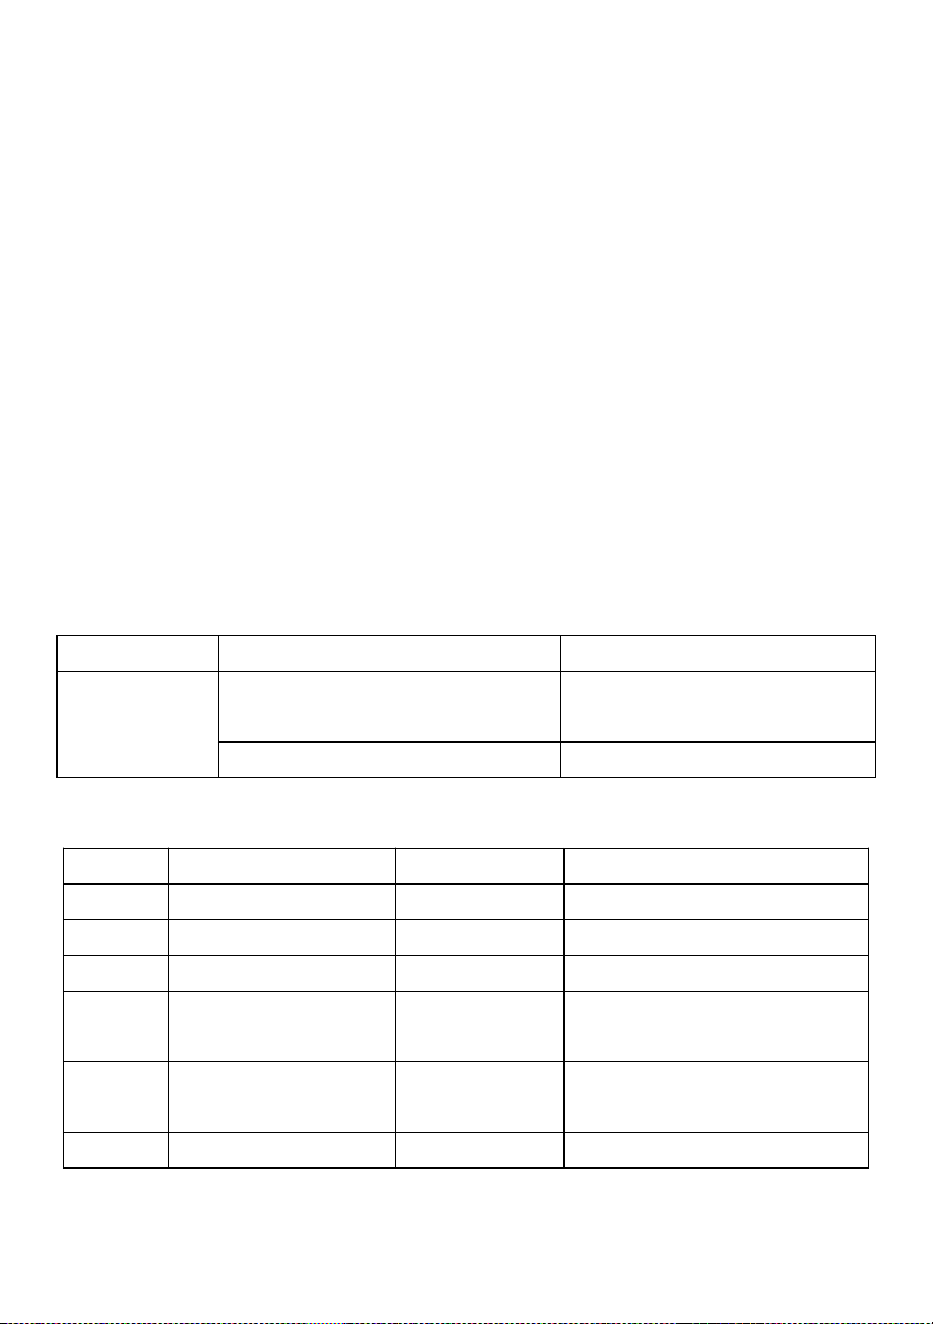
Diagram of port connection(Only for Bluetooth speakers)
AC adapter
External sound
input port(3.5mm)
Connecting
terminal
Constant resistance speakers
or non-Bluetooth speakers
- 5 -
iii.Use and operation
Bluetooth connectivity(Only for Bluetooth version):
1)Make sure the Bluetooth ceiling speaker system is properly connected to
the power,source and speaker wires are connected correctly.
2)Power on the speaker system,and you shall hear a tone indicating the
Bluetooth system is ready for pairing.
3)Then,open your Smart device's Bluetooth network settings,The
Bluetooth network name will appear as '645-BT' on your device list. and
click for connection.No password is required to connect but if you are
prompted enter '6688' .
4)You shall hear another indication tone when a successful Bluetooth
connection is established, then you are ready to enjoy the music.
iv.Common faults and troubleshooting methods
Fault
reason
Method of exclusion
The machine
does not work
The control board connection
cable fell off
Check the line and restore it
Circuit board damage
Professional maintenance is
required
v.Packing List
No.
Item
Qty
Remark
1
Ceiling Speakers
1 set
2
Manual
1 pc
3
AC adapter
1 set
For Bluetooth version
4
Connecting line
1 root
For two/four Bluetooth
speakers
5
Connecting terminal
1 set
For two/four Bluetooth
speakers
6
round paper card
1 pc

- 6 -
* WARNING
1)It is recommended that you keep this manual for future reference when
installing audio.
2)Never expose the speaker to rain and any wet or rainy place, which may
cause electric shock or fire.
3)Limit the voltage specified on the stereo, such as the use of higher
voltage may cause electric shock or fire. Never trim, twist, destroy or
replace wires.
4)Avoid installing or setting up audio in unstable places, such as shaking
tables or uneven surfaces, which can avoid personal injury or property
damage caused by audio falling.
5)Never plug or pull out the plug with wet hands, which may cause electric
shock.
6)When pulling out the plug, make sure you are pulling the plug, not the
wire. Using machines with broken appliances can cause a fire or electric
shock.
7)When moving the speaker, please pull out the plug in advance. Moving
the speaker with the plug may cause a fire or electric shock. When pulling
out the plug, make sure you hold the plug and pull it out.
8)do not cover the vent on the speaker. May cause fire due to internal
heating.
9)Avoid installing the sound in wet or dusty, direct contact with sunlight,
close to the electric heater, or black smoke or steam, which may cause fire
or electric shock.

- 7 -
10)Do not immerse in any liquid.
11)To avoid damage to the device or unit, do not hit or squeeze the device.
The equipment is installed in a position sufficient to bear the weight of the
equipment and mounting brackets. In addition, if it is installed in other
locations, it may cause fall, and cause personal injury or property damage.
If the horn is distorted, do not use it for a long time, because this condition
indicates that the horn is faulty. If it continues to be used for a long time, it
may produce high temperature and lead to fire.
FCC Information
CAUTION: Changes or modifications not expressly approved by the party
responsible for compliance could void the user's authority to operate the
equipment!
This device complies with Part 15 of the FCC Rules. Operation is subject to
the following two conditions:
1) This product may cause harmful interference.
2)This product must accept any interference received, including
interference that may cause undesired operation.
WARNING: Changes or modifications to this product not expressly
approved by the party.responsible for compliance could void the user's
authority to operate the product.
Note: This product has been tested and found to comply with the limits for
a Class B digital device pursuant to Part 15 of the FCC Rules. These limits
are designed to provide reasonable protection against harmful interference
in a residential installation.
This product generates, uses and can radiate radio frequency energy, and
if not installed and used in accordance with the instructions, may cause
harmful interference to radio communications. However, there is no
guarantee that interference will not occur in a particular installation. If this
- 8 -
product does cause harmful interference to radio or television
reception,which can be determined by turning the product off and on, the
user is encouraged to try to correct the interference by one or more of the
following measures.
· Reorient or relocate the receiving antenna.
· Increase the distance between the product and receiver.
· Connect the product to an outlet on a circuit different from that to which
the receiver is connected.
· Consult the dealer or an experienced radio/TV technician for assistance.
Manufacturer: Shanghaimuxinmuyeyouxiangongsi
Address: Shuangchenglu 803nong11hao1602A-1609shi, baoshanqu,
shanghai 200000 CN.
Imported to AUS: SIHAO PTY LTD, 1 ROKEVA STREETEASTWOOD NSW
2122 Australia
Imported to USA: Sanven Technology Ltd., Suite 250, 9166 Anaheim Place,
Rancho Cucamonga, CA 91730
REP
EC
E-CrossStu GmbH
Mainzer Landstr.69, 60329 Frankfurt am Main.
REP
UK
YH CONSULTING LIMITED.
C/O YH Consulting Limited Office 147, Centurion House,
London Road, Staines-upon-Thames, Surrey, TW18 4AX


Assistance technique et certificat de garantie électronique
www.vevor.com/support
PLAFOND MANUEL D'ENTRETIEN DES
HAUT-PARLEURS
MODÈLE : 645 , 645-BT, 549, 638
We continue to be committed to provide you tools with competitive price.
"Save Half", "Half Price" or any other similar expressions used by us only represents an
estimate of savings you might benefit from buying certain tools with us compared to the major
top brands and does not necessarily mean to cover all categories of tools offered by us. You
are kindly reminded to verify carefully when you are placing an order with us if you are
actually saving half in comparison with the top major brands.


- 1 -
MODÈLE : 645, 645-BT, 549, 638
(L'image est à titre de référence uniquement, veuillez vous référer à l'objet
réel)
Have product questions? Need technical support? Please feel free to
contact us:
Technical Support and E-Warranty Certificate
www.vevor.com/support
NEED HELP? CONTACT US!
This is the original instruction, please read all manual instructions
carefully before operating. VEVOR reserves a clear interpretation of our
user manual. The appearance of the product shall be subject to the
product you received. Please forgive us that we won't inform you again if
there are any technology or software updates on our product.
CEILING SPEAKER
- 2 -
Avertissement - Pour réduire le risque de blessure, l'utilisateur doit
lire attentivement le manuel d'instructions.
Élimination correcte
Ce produit est soumis aux dispositions de la directive européenne
2012/19/CE. Le symbole représentant une poubelle à roulettes
barrée indique que le produit doit faire l'objet d'une collecte sélective
des déchets dans l'Union européenne. Cela s'applique au produit et
à tous les accessoires marqués de ce symbole. Les produits
marqués comme tels ne peuvent pas être jetés avec les déchets
ménagers normaux, mais doivent être déposés dans un point de
collecte pour le recyclage des appareils électriques et électroniques.
Plafond manuel du haut-parleur
i. Le but principal
Les haut-parleurs de plafond sont principalement utilisés pour amplifier et
transmettre le son.
ii. Installation et débogage
Guide d'installation (pour 549)
5. Reportez-vous à la carte en papier ronde, découpez un trou dans le
plafond en fonction du diamètre de l'installation du klaxon et connectez le
fil du klaxon au klaxon.
6.
Connectezlesfilsdes haut-parleursà l'orateur
.
- 3 -
7. Serrez les quatre vis cruciformes puis verrouillez la rotation du support
et fixez l'appareil à la surface arrière du panneau de plafond.
8. Installez le couvercle en treillis métallique du haut-parleur .
Guide d'installation (pour 645/645-BT/638)
1.
Reportez-vous à la carte en papier ronde, découpez un trou d'installation
sur le plafond ;
2.
Connectez lesfilsdeshaut-parleurs auhaut-parleur,relevez le haut- parleur
Montage boucle ;

- 4 -
3. Mettre le s haut-parleurs en haut dans le plafond montage trou ;
4. La boucle de montage descendra automatiquement et fixera les
haut-parleurs au plafond.
Instructions de retrait de la grille métallique ( uniquement pour
645/645-BT /638)
1. Tournez la boucle à 90 degrés .
2. Retirez la grille métallique .
Schéma de connexion du port (uniquement pour les enceintes
Bluetooth)
AC adapter

- 5 -
iii.Utilisation et fonctionnement
Connectivité Bluetooth ( uniquement pour Version Bluetooth ) :
1 ) Assurez-vous que le système de haut-parleurs de plafond Bluetooth est
correctement connecté à l' alimentation, à la source et au haut-parleur. les
fils sont correctement connectés.
2 ) Allumez le système de haut-parleurs et vous entendrez une tonalité
indiquant que le système Bluetooth est prêt pour le couplage .
3 ) Ensuite, ouvrez les paramètres du réseau Bluetooth de votre appareil
intelligent . Le nom du réseau Bluetooth apparaîtra comme « 645-BT » sur
votre liste d'appareils. et cliquez pour la connexion. Aucun mot de passe
n'est requis pour se connecter, mais si vous y êtes invité, entrez « 6688 ».
4 ) Vous entendrez une autre tonalité d'indication lorsqu'une connexion
Bluetooth réussie est établie, vous êtes alors prêt à profiter de la musique .
iv. Défauts courants et méthodes de dépannage
Faute
raison
Méthode d'exclusion
La machine
ne fonctionne
pas
Le câble de connexion de la
carte de commande est tombé
Vérifiez la ligne et
restaurez-la
Dommage sur la carte de circuit
Un entretien professionnel
- 6 -
imprimé
est nécessaire
v.Liste de colisage
Non.
Article
Quantité
Remarque
1
Haut-parleurs de
plafond
1 ensemble
2
Manuel
1 pièce
3
Adaptateur secteur
1
ensemble
Pour la version Bluetooth
4
Ligne de connexion
1 racine
Pour deux/quatre
haut-parleurs Bluetooth
5
Borne de connexion
1 ensemble
Pour deux/quatre
haut-parleurs Bluetooth
6
carte en papier
ronde
1 pièce
* AVERTISSEMENT
1 ) Il est recommandé de conserver ce manuel pour référence ultérieure
lors de l'installation audio.
2 ) N'exposez jamais l'enceinte à la pluie et à tout environnement humide
ou pluvieux. endroit susceptible de provoquer un choc électrique ou un
incendie.
3 ) Limitez la tension spécifiée sur la chaîne stéréo, car l'utilisation d'une
tension plus élevée peut provoquer un choc électrique ou un incendie. Ne
jamais couper, tordre, détruire ou remplacer les fils.
4 ) Évitez d'installer ou de configurer l'audio dans des endroits instables,
tels que des tables tremblantes ou des surfaces inégales, ce qui peut
éviter des blessures corporelles ou des dommages matériels causés par la
chute de l'audio.
5 ) Ne branchez ou ne débranchez jamais la prise avec les mains
mouillées, car cela pourrait provoquer un choc électrique.
6 ) Lorsque vous débranchez la prise, assurez-vous de tirer sur la prise et
non sur le fil. L'utilisation de machines dont les composants sont

- 7 -
défectueux peut provoquer un incendie ou une électrocution.
7 ) Lorsque vous déplacez l'enceinte, débranchez-la au préalable. Le fait
de déplacer l'enceinte avec la fiche peut provoquer un incendie ou une
décharge électrique. Lorsque vous débranchez la fiche, veillez à la tenir
fermement et à la retirer.
8 ) Ne couvrez pas les évents du haut-parleur. Cela peut provoquer un
incendie en raison d'un échauffement interne.
9 ) Évitez d'installer le son dans un endroit humide ou poussiéreux, en
contact direct avec la lumière du soleil, à proximité d'un radiateur
électrique, ou de fumée noire ou de vapeur, ce qui peut provoquer un
incendie ou un choc électrique.
10) Ne pas immerger dans un liquide.
11) Pour éviter d'endommager l'appareil ou l'unité, ne pas frapper ou
presser l'appareil. L'équipement est installé dans une position suffisante
pour supporter le poids de l'équipement et des supports de montage. De
plus, s'il est installé dans d'autres emplacements, il peut tomber et
provoquer des blessures corporelles ou des dommages matériels. Si le
klaxon est déformé, ne l'utilisez pas pendant une longue période, car cette
condition indique que le klaxon est défectueux. S'il continue à être utilisé
pendant une longue période, il peut produire une température élevée et
provoquer un incendie.
Informations de la FCC
ATTENTION : Les changements ou modifications non expressément
approuvés par la partie responsable de la conformité peuvent annuler le
droit de l'utilisateur à utiliser l'équipement !
Cet appareil est conforme à la partie 15 des règles de la FCC. Son
fonctionnement est soumis aux deux conditions suivantes :
1) Ce produit peut provoquer des interférences nuisibles.
2) Ce produit doit accepter toute interférence reçue, y compris celles qui
peuvent provoquer un fonctionnement indésirable.

- 8 -
AVERTISSEMENT : Les changements ou modifications apportés à ce
produit non expressément approuvés par la partie responsable de la
conformité pourraient annuler l'autorité de l'utilisateur à utiliser le produit .
Remarque : ce produit a été testé et jugé conforme aux limites imposées
aux appareils numériques de classe B conformément à la partie 15 des
règles de la FCC . Ces limites sont conçues pour offrir une protection
raisonnable contre les interférences nuisibles dans une installation
résidentielle.
Ce produit génère, utilise et peut émettre de l'énergie radioélectrique. S'il
n'est pas installé et utilisé conformément aux instructions, il peut provoquer
des interférences nuisibles aux communications radio. Cependant, il
n'existe aucune garantie que des interférences ne se produiront pas dans
une installation particulière. Si ce produit provoque des interférences
nuisibles à la réception radio ou télévision, ce qui peut être déterminé en
éteignant et en rallumant le produit, l'utilisateur est encouragé à essayer de
corriger les interférences en prenant une ou plusieurs des mesures
suivantes.
· Réorienter ou déplacer l’antenne de réception.
· Augmenter la distance entre le produit et le récepteur.
· Brancher le produit sur une prise d’un circuit différent de celui sur lequel
le récepteur est branché.
· Consultez le revendeur ou un technicien radio/TV expérimenté pour
obtenir de l’aide.
Fabricant : Shanghaimuxinmuyeyouxiangongsi
Adresse : Shuangchenglu 803nong11hao1602A-1609shi, baoshanqu,
Shanghai 200000 CN.
Importé en Australie : SIHAO PTY LTD, 1 ROKEVA STREET, ASTWOOD
NSW 2122 Australie
Importé aux États-Unis : Sanven Technology Ltd., Suite 250, 9166 Anaheim
Place, Rancho Cucamonga, CA 91730

- 9 -
REP
EC
E-CrossStu GmbH
Mainzer Landstr.69, 60329 Frankfurt am Main.
REP
UK
YH CONSULTING LIMITED.
C/O YH Consulting Limited Office 147, Centurion House,
London Road, Staines-upon-Thames, Surrey, TW18 4AX


Technischer Support und E-Garantie-Zertifikat
www.vevor.com/support
DECKE LAUTSPRECHERHANDBUCH
MODELL: 645 , 645-BT, 549, 638
We continue to be committed to provide you tools with competitive price.
"Save Half", "Half Price" or any other similar expressions used by us only represents an
estimate of savings you might benefit from buying certain tools with us compared to the major
top brands and does not necessarily mean to cover all categories of tools offered by us. You
are kindly reminded to verify carefully when you are placing an order with us if you are
actually saving half in comparison with the top major brands.


- 1 -
MODELL: 645, 645-BT, 549, 638
(Das Bild dient nur als Referenz, bitte beziehen Sie sich auf das
tatsächliche Objekt)
Have product questions? Need technical support? Please feel free to
contact us:
Technical Support and E-Warranty Certificate
www.vevor.com/support
NEED HELP? CONTACT US!
This is the original instruction, please read all manual instructions
carefully before operating. VEVOR reserves a clear interpretation of our
user manual. The appearance of the product shall be subject to the
product you received. Please forgive us that we won't inform you again if
there are any technology or software updates on our product.
CEILING SPEAKER
- 2 -
Warnung: Um das Verletzungsrisiko zu verringern, muss der
Benutzer die Bedienungsanleitung sorgfältig lesen.
Richtige Entsorgung
Dieses Produkt unterliegt den Bestimmungen der europäischen
Richtlinie 2012/19/EU. Das Symbol einer durchgestrichenen
Mülltonne weist darauf hin, dass das Produkt in der Europäischen
Union einer getrennten Müllentsorgung unterliegt. Dies gilt für das
Produkt und alle mit diesem Symbol gekennzeichneten Zubehörteile.
So gekennzeichnete Produkte dürfen nicht im normalen Hausmüll
entsorgt werden, sondern müssen an einer Sammelstelle für das
Recycling von elektrischen und elektronischen Geräten abgegeben
werden.
Decke Lautsprecherhandbuch
i. Der Hauptzweck
Deckenlautsprecher dienen hauptsächlich zur Verstärkung und
Übertragung von Schall.
ii. Installation und Fehlerbehebung
Installationsanleitung (für 549)
9. Schneiden Sie anhand der runden Papierkarte ein Loch in die Decke,
das dem Durchmesser der Hupeninstallation entspricht, und verbinden Sie
das Hupenkabel mit der Hupe.
10.
SchließenSiedie Lautsprecherkabel an
zum
Sprecher.
- 3 -
11.Ziehen Sie die vier Kreuzschrauben fest, verriegeln Sie dann die
Drehung der Halterung und befestigen Sie das Gerät an der Rückseite der
Deckenplatte.
12.Installieren Sie die Lautsprecher-Kabelnetzabdeckung .
Installationsanleitung (für 645/645-BT/638)
1. Schneiden Sie
mithilfe der runden Papierkarte ein Installationsloch über
die Decke .
2.
SchließenSiedieLautsprecherkabelanumzumLautsprecherzugelangen,
klappen Sie den Lautsprecher Montage Schnalle ;

- 4 -
3. Setzen Die s- peaker hoch hinein Die Decke Montage Loch ;
4. Die Montageschnalle senkt sich automatisch und befestigt die
Lautsprecher an der Decke.
Anleitung zum Entfernen des Metallgitters ( nur für 645/645-BT /638)
1. Drehen Sie die Schnalle um 90
Grad nach oben .
2. Entfernen Sie das Metallgitter .
Diagramm der Port-Verbindung (Nur für Bluetooth-Lautsprecher)
AC adapter

- 5 -
iii.Nutzung und Betrieb
Bluetooth- Konnektivität ( Nur für Bluetooth -Version):
1 ) Stellen Sie sicher, dass das Bluetooth- Deckenlautsprechersystem
ordnungsgemäß an die Stromversorgung , die Quelle und den
Lautsprecher angeschlossen ist die Drähte sind richtig angeschlossen.
2 ) Schalten Sie das Lautsprechersystem ein . Sie hören einen Ton, der
anzeigt, dass das Bluetooth-System zur Kopplung bereit ist .
3 ) Öffnen Sie dann die Bluetooth - Netzwerkeinstellungen Ihres Smart-
Geräts . Der Bluetooth - Netzwerkname wird als „ 645-BT “ angezeigt. in
Ihrer Geräteliste und klicken Sie zum Verbinden. Zum Verbinden ist kein
Passwort erforderlich, aber wenn Sie dazu aufgefordert werden, geben Sie
„ 6688 “ ein.
4 ) Wenn eine erfolgreiche Bluetooth-Verbindung hergestellt wurde, hören
Sie einen weiteren Hinweiston. Dann können Sie die Musik genießen .
iv. Häufige Fehler und Methoden zur Fehlerbehebung
Fehler
Grund
Ausschlussmethode
Die Maschine
funktioniert
nicht
Das Anschlusskabel der
Steuerplatine ist abgefallen
Überprüfen Sie die Leitung
und stellen Sie sie wieder her
Beschädigung der Leiterplatte
Professionelle Wartung ist
- 6 -
erforderlich
v.Packliste
NEIN.
Artikel
Menge
Bemerkung
1
Deckenlautsprecher
1 Satz
2
Handbuch
1 Stck.
3
Netzteil
1 Satz
Für die Bluetooth-Version
4
Verbindungsleitung
1 Wurzel
Für zwei/vier
Bluetooth-Lautsprecher
5
Anschlussklemme
1 Satz
Für zwei/vier
Bluetooth-Lautsprecher
6
runde Papierkarte
1 Stck.
* WARNUNG
1 ) Es wird empfohlen, dieses Handbuch zum späteren Nachschlagen bei
der Audioinstallation aufzubewahren.
2 ) Setzen Sie den Lautsprecher niemals Regen oder anderen nassen
oder Ort, da dies zu einem Stromschlag oder Brand führen kann.
3 ) Begrenzen Sie die auf der Stereoanlage angegebene Spannung, da die
Verwendung höherer Spannungen zu Stromschlägen oder Bränden führen
kann. Schneiden, verdrehen, zerstören oder ersetzen Sie niemals Kabel.
4 ) Vermeiden Sie die Installation oder Einrichtung von Audiogeräten an
instabilen Orten, wie z. B. auf wackligen Tischen oder unebenen
Oberflächen, um Personen- oder Sachschäden durch herabfallende
Audiogeräte zu vermeiden.
5 ) Stecken Sie den Stecker niemals mit nassen Händen ein oder ziehen
Sie ihn heraus. Dies kann zu einem Stromschlag führen.
6 ) Achten Sie beim Herausziehen des Steckers darauf, dass Sie am
Stecker ziehen und nicht am Kabel. Der Betrieb von Maschinen mit
defekten Geräten kann zu Bränden oder Stromschlägen führen.

- 7 -
7 ) Wenn Sie den Lautsprecher bewegen, ziehen Sie bitte vorher den
Stecker heraus. Wenn Sie den Lautsprecher mit Stecker bewegen, kann
dies zu einem Brand oder Stromschlag führen. Achten Sie beim
Herausziehen des Steckers darauf, dass Sie ihn festhalten und
herausziehen.
8 ) Decken Sie die Entlüftungsöffnungen am Lautsprecher nicht ab. Durch
interne Erhitzung kann es zu einem Brand kommen.
9 ) Vermeiden Sie die Installation des Geräts an nassen oder staubigen
Orten, in direktem Kontakt mit Sonnenlicht, in der Nähe von elektrischen
Heizgeräten oder in der Nähe von schwarzem Rauch oder Dampf, da dies
zu Feuer oder Stromschlägen führen kann.
10) Nicht in Flüssigkeiten eintauchen.
11) Um Schäden am Gerät oder der Einheit zu vermeiden, schlagen oder
quetschen Sie das Gerät nicht. Das Gerät ist an einer Position installiert,
die das Gewicht des Geräts und der Montagehalterungen tragen kann.
Wenn es an anderen Orten installiert wird, kann es außerdem
herunterfallen und Personen- oder Sachschäden verursachen. Wenn die
Hupe verformt ist, verwenden Sie sie nicht für längere Zeit, da dies darauf
hinweist, dass die Hupe defekt ist. Wenn sie für längere Zeit weiter
verwendet wird, kann sie hohe Temperaturen erzeugen und einen Brand
verursachen.
FCC-Informationen
ACHTUNG: Durch Änderungen oder Modifikationen, die nicht ausdrücklich
von der für die Konformität verantwortlichen Partei genehmigt wurden,
kann die Berechtigung des Benutzers zum Betrieb des Geräts erlöschen!
Dieses Gerät entspricht Teil 15 der FCC-Bestimmungen. Der Betrieb
unterliegt den folgenden zwei Bedingungen:
1) Dieses Produkt kann schädliche Störungen verursachen.

- 8 -
2) Dieses Produkt muss alle empfangenen Störungen tolerieren,
einschließlich Störungen, die einen unerwünschten Betrieb verursachen
können.
WARNUNG: Änderungen oder Modifikationen an diesem Produkt, die
nicht ausdrücklich von der für die Konformität verantwortlichen Partei
genehmigt wurden, können zum Erlöschen der Berechtigung des
Benutzers zum Betrieb des Produkts führen .
Hinweis: Dieses Produkt wurde getestet und entspricht den Grenzwerten
für digitale Geräte der Klasse B gemäß Teil 15 der FCC-Vorschriften .
Diese Grenzwerte sollen einen angemessenen Schutz gegen schädliche
Störungen bei der Installation in Wohngebieten bieten.
Dieses Produkt erzeugt und verwendet Hochfrequenzenergie und kann
diese auch ausstrahlen. Wenn es nicht gemäß den Anweisungen installiert
und verwendet wird, kann es zu Störungen des Funkverkehrs kommen. Es
gibt jedoch keine Garantie dafür, dass bei einer bestimmten Installation
keine Störungen auftreten. Wenn dieses Produkt Störungen des Radio-
oder Fernsehempfangs verursacht (was durch Ein- und Ausschalten des
Produkts festgestellt werden kann), wird dem Benutzer empfohlen, die
Störungen durch eine oder mehrere der folgenden Maßnahmen zu
beheben.
· Empfangsantenne neu ausrichten oder verlegen.
· Vergrößern Sie den Abstand zwischen Produkt und Empfänger.
· Schließen Sie das Produkt an eine Steckdose eines anderen
Stromkreises an als den, an den der Empfänger angeschlossen ist.
· Wenden Sie sich an den Händler oder einen erfahrenen
Radio-/Fernsehtechniker.
Hersteller: Shanghaimuxinmuyeyouxiangongsi
Adresse : Shuangchenglu 803nong11hao1602A-1609shi, Baoshanqu,
Shanghai 200000 CN.
Nach AUS importiert: SIHAO PTY LTD, 1 ROKEVA STREETEASTWOOD

- 9 -
NSW 2122 Australien
Importiert in die USA: Sanven Technology Ltd., Suite 250, 9166 Anaheim
Place, Rancho Cucamonga, CA 91730
REP
EC
E-CrossStu GmbH
Mainzer Landstr.69, 60329 Frankfurt am Main.
REP
UK
YH CONSULTING LIMITED.
C/O YH Consulting Limited Office 147, Centurion House,
London Road, Staines-upon-Thames, Surrey, TW18 4AX


Supporto tecnico e certificato di garanzia elettronica
www.vevor.com/support
SOFFITTO MANUALE
DELL'ALTOPARLANTE
MODELLO: 645 , 645-BT, 549, 638
We continue to be committed to provide you tools with competitive price.
"Save Half", "Half Price" or any other similar expressions used by us only represents an
estimate of savings you might benefit from buying certain tools with us compared to the major
top brands and does not necessarily mean to cover all categories of tools offered by us. You
are kindly reminded to verify carefully when you are placing an order with us if you are
actually saving half in comparison with the top major brands.


- 1 -
MODELLO: 645, 645-BT, 549, 638
(L'immagine è solo di riferimento, fare riferimento all'oggetto reale)
Have product questions? Need technical support? Please feel free to
contact us:
Technical Support and E-Warranty Certificate
www.vevor.com/support
NEED HELP? CONTACT US!
This is the original instruction, please read all manual instructions
carefully before operating. VEVOR reserves a clear interpretation of our
user manual. The appearance of the product shall be subject to the
product you received. Please forgive us that we won't inform you again if
there are any technology or software updates on our product.
CEILING SPEAKER

- 2 -
Attenzione: per ridurre il rischio di lesioni, l'utente deve leggere
attentamente il manuale di istruzioni.
Smaltimento corretto
Questo prodotto è soggetto alle disposizioni della Direttiva Europea
2012/19/CE. Il simbolo raffigurante un bidone della spazzatura
barrato indica che il prodotto richiede la raccolta differenziata dei
rifiuti nell'Unione Europea. Ciò si applica al prodotto e a tutti gli
accessori contrassegnati con questo simbolo. I prodotti
contrassegnati come tali non possono essere smaltiti con i normali
rifiuti domestici, ma devono essere portati in un punto di raccolta per
il riciclaggio di dispositivi elettrici ed elettronici
Soffitto manuale dell'altoparlante
i. Lo scopo principale
Gli altoparlanti da soffitto vengono utilizzati principalmente per amplificare
e trasmettere il suono.
ii. Installazione e debug
Guida all'installazione (per 549)
13.Fare riferimento al cartoncino rotondo, tagliare un foro nel soffitto in
base al diametro dell'installazione del clacson e collegare il filo del clacson
al clacson.
14.
Collegarei cavideglialtoparlantiall'oratore
.
- 3 -
15.Stringere le quattro viti a croce, quindi bloccare la rotazione della staffa
e fissare il dispositivo alla superficie posteriore del pannello del soffitto.
16.Installare la copertura in rete metallica dell'altoparlante .
Guida all'installazione (per 645/645-BT/638)
1.
Fare riferimento alla scheda di carta rotonda, tagliare un foro di
installazione sul soffitto ;
2.
Collegarei cavi deglialtoparlantiall'oratore, alza il tono dell'oratore Montaggio
fibbia ;

- 4 -
3. Mettere IL gli altoparlanti su in IL soffitto montaggio buco ;
4. La fibbia di montaggio si abbasserà automaticamente e gli altoparlanti
saranno fissati al soffitto.
Istruzioni per la rimozione della griglia metallica ( solo per 645/645-BT
/638)
1. Ruotare la fibbia di 90 gradi
verso l'alto .
2. Rimuovere la griglia metallica .
Schema di collegamento delle porte (solo per altoparlanti Bluetooth)
AC adapter

- 5 -
iii.Uso e funzionamento
Connettività Bluetooth ( Solo per Versione Bluetooth ):
1 ) Assicurarsi che il sistema di altoparlanti da soffitto Bluetooth sia
correttamente collegato all'alimentazione , alla sorgente e all'altoparlante i
fili sono collegati correttamente.
2 ) Accendi il sistema di altoparlanti : dovresti sentire un tono che indica
che il sistema Bluetooth è pronto per l'associazione .
3 ) Quindi, apri le impostazioni di rete Bluetooth del tuo dispositivo Smart ,
L Il nome della rete Bluetooth apparirà come ' 645-BT ' nell'elenco dei
dispositivi e fai clic per la connessione. Non è richiesta alcuna password
per la connessione, ma se richiesto, inserisci ' 6688 '.
4 ) Quando viene stabilita una connessione Bluetooth, sentirai un altro
tono di indicazione, dopodiché sarai pronto per goderti la musica .
iv. Errori comuni e metodi di risoluzione dei problemi
Colpa
motivo
Metodo di esclusione
La macchina
non funziona
Il cavo di collegamento della
scheda di controllo è caduto
Controllare la linea e
ripristinarla
Danni al circuito stampato
È richiesta una

- 6 -
manutenzione professionale
v.Elenco di imballaggio
NO.
Articolo
Quantità
Osservazione
1
Altoparlanti da
soffitto
1 set
2
Manuale
1 pz.
3
Adattatore CA
1 set
Per la versione Bluetooth
4
Linea di
collegamento
1 radice
Per due/quattro altoparlanti
Bluetooth
5
Terminale di
collegamento
1 set
Per due/quattro altoparlanti
Bluetooth
6
carta rotonda
1 pz.
* AVVERTIMENTO
1 ) Si consiglia di conservare questo manuale per riferimento futuro
durante l'installazione dell'audio.
2 ) Non esporre mai l'altoparlante alla pioggia e a qualsiasi ambiente
umido o piovoso luogo in cui potrebbero verificarsi scosse elettriche o
incendi.
3 ) Limitare la tensione specificata sullo stereo, ad esempio l'uso di una
tensione più alta potrebbe causare scosse elettriche o incendi. Non
tagliare, torcere, distruggere o sostituire mai i fili.
4 ) Evitare di installare o installare l'audio in luoghi instabili, come tavoli
vibranti o superfici irregolari, per evitare lesioni personali o danni alla
proprietà causati dalla caduta dell'audio.
5 ) Non collegare o scollegare mai la spina con le mani bagnate, poiché ciò
potrebbe causare scosse elettriche.
6 ) Quando si stacca la spina, assicurarsi di tirare la spina, non il filo.
L'uso di macchine con elettrodomestici rotti può causare un incendio o una

- 7 -
scossa elettrica.
7 )Quando si sposta l'altoparlante, staccare la spina in anticipo. Spostare
l'altoparlante con la spina potrebbe causare un incendio o una scossa
elettrica. Quando si stacca la spina, assicurarsi di tenere la spina e di
tirarla fuori.
8 ) non coprire la presa d'aria dell'altoparlante. Potrebbe causare un
incendio a causa del riscaldamento interno.
9 ) Evitare di installare il dispositivo in luoghi umidi o polverosi, a diretto
contatto con la luce solare, vicino a un riscaldatore elettrico o in presenza
di fumo nero o vapore, che potrebbero causare incendi o scosse elettriche.
10) Non immergere in alcun liquido.
11) Per evitare danni al dispositivo o all'unità, non colpire o schiacciare il
dispositivo. L'apparecchiatura è installata in una posizione sufficiente a
sostenere il peso dell'apparecchiatura e delle staffe di montaggio. Inoltre,
se è installata in altre posizioni, potrebbe causare cadute e lesioni
personali o danni alla proprietà. Se il clacson è distorto, non utilizzarlo per
un lungo periodo, perché questa condizione indica che il clacson è
difettoso. Se continua a essere utilizzato per un lungo periodo, potrebbe
produrre alte temperature e provocare un incendio.
Informazioni FCC
ATTENZIONE: cambiamenti o modifiche non espressamente approvati
dalla parte responsabile della conformità potrebbero invalidare il diritto
dell'utente a utilizzare l'apparecchiatura!
Questo dispositivo è conforme alla Parte 15 delle Norme FCC. Il
funzionamento è soggetto alle seguenti due condizioni:
1) Questo prodotto può causare interferenze dannose.
2) Questo prodotto deve accettare qualsiasi interferenza ricevuta,

- 8 -
comprese quelle che potrebbero causare un funzionamento indesiderato.
ATTENZIONE: cambiamenti o modifiche al prodotto non espressamente
approvati dalla parte responsabile della conformità potrebbero invalidare
l'autorità dell'utente a utilizzare il prodotto .
Nota: questo prodotto è stato testato e ritenuto conforme ai limiti per un
dispositivo digitale di Classe B ai sensi della Parte 15 delle Norme FCC .
Questi limiti sono concepiti per fornire una protezione ragionevole contro
interferenze dannose in un'installazione residenziale.
Questo prodotto genera, utilizza e può irradiare energia a radiofrequenza e,
se non installato e utilizzato in conformità alle istruzioni, può causare
interferenze dannose alle comunicazioni radio. Tuttavia, non vi è alcuna
garanzia che non si verifichino interferenze in una particolare installazione.
Se questo prodotto causa interferenze dannose alla ricezione radiofonica o
televisiva, il che può essere determinato accendendo e spegnendo il
prodotto, si consiglia all'utente di provare a correggere l'interferenza
tramite una o più delle seguenti misure.
· Riorientare o riposizionare l'antenna ricevente.
· Aumentare la distanza tra il prodotto e il ricevitore.
· Collegare il prodotto a una presa di corrente su un circuito diverso da
quello a cui è collegato il ricevitore.
· Per assistenza, consultare il rivenditore o un tecnico radio/TV esperto.
Produttore: Shanghaimuxinmuyeyouxiangongsi
Indirizzo : Shuangchenglu 803nong11hao1602A-1609shi, baoshanqu,
shanghai 200000 CN.
Importato in AUS: SIHAO PTY LTD, 1 ROKEVA STREETEASTWOOD NSW
2122 Australia
Importato negli USA: Sanven Technology Ltd., Suite 250, 9166 Anaheim
Place, Rancho Cucamonga, CA 91730

- 9 -
REP
EC
E-CrossStu GmbH
Mainzer Landstr.69, 60329 Frankfurt am Main.
REP
UK
YH CONSULTING LIMITED.
C/O YH Consulting Limited Office 147, Centurion House,
London Road, Staines-upon-Thames, Surrey, TW18 4AX


Soporte técnico y certificado de garantía electrónica
www.vevor.com/support
TECHO MANUAL DEL ALTAVOZ
MODELO: 645 , 645-BT, 549, 638
We continue to be committed to provide you tools with competitive price.
"Save Half", "Half Price" or any other similar expressions used by us only represents an
estimate of savings you might benefit from buying certain tools with us compared to the major
top brands and does not necessarily mean to cover all categories of tools offered by us. You
are kindly reminded to verify carefully when you are placing an order with us if you are
actually saving half in comparison with the top major brands.

- 1 -
MODELO: 645, 645-BT, 549, 638
(La imagen es solo de referencia, consulte el objeto real)
Have product questions? Need technical support? Please feel free to
contact us:
Technical Support and E-Warranty Certificate
www.vevor.com/support
NEED HELP? CONTACT US!
This is the original instruction, please read all manual instructions
carefully before operating. VEVOR reserves a clear interpretation of our
user manual. The appearance of the product shall be subject to the
product you received. Please forgive us that we won't inform you again if
there are any technology or software updates on our product.
CEILING SPEAKER

- 2 -
Advertencia: Para reducir el riesgo de lesiones, el usuario debe leer
atentamente el manual de instrucciones.
Eliminación correcta
Este producto está sujeto a las disposiciones de la Directiva Europea
2012/19/CE. El símbolo que muestra un contenedor de basura
tachado indica que el producto requiere una recogida selectiva de
residuos en la Unión Europea. Esto se aplica al producto y a todos
los accesorios marcados con este símbolo. Los productos marcados
como tales no pueden desecharse con los residuos domésticos
normales, sino que deben llevarse a un punto de recogida para
reciclar dispositivos eléctricos y electrónicos.
Techo manual del altavoz
i. El propósito principal
Los altavoces de techo se utilizan principalmente para amplificar y
transmitir el sonido.
ii. Instalación y depuración
Guía de instalación (para 549)
17.Consulte la tarjeta de papel redonda, corte un agujero en el techo de
acuerdo con el diámetro de la instalación de la bocina y conecte el cable
de la bocina a la bocina.
18.
Conecteloscablesdel altavozalhablante
.

- 3 -
19.Apriete los cuatro tornillos transversales, luego bloquee la rotación del
soporte y asegure el dispositivo a la superficie trasera del panel del techo.
20.Instale la cubierta de malla de alambre del altavoz .
Guía de instalación (para 645/645-BT/638)
1.
Consulte la tarjeta de papel redonda, corte un orificio de instalación
sobre el techo ;
2.
Conecteloscablesdel altavozAlaltavoz, levante el altavoz . Montaje hebilla ;

- 4 -
3. Poner el Altavoces s arriba en el techo montaje agujero ;
4. La hebilla de montaje bajará automáticamente y fijará los altavoces al
techo.
Instrucciones para quitar la rejilla metálica ( solo para 645/645-BT
/638)
1. Gire la hebilla 90 grados hacia
arriba .
2. Retire la rejilla metálica .
Diagrama de conexión de puertos (Solo para altavoces Bluetooth)
AC adapter

- 5 -
iii.Uso y funcionamiento
Conectividad Bluetooth ( Solo para Versión Bluetooth ):
1 ) Asegúrese de que el sistema de altavoces de techo Bluetooth esté
conectado correctamente a la alimentación, la fuente y el altavoz. Los
cables están conectados correctamente.
2 ) Encienda el sistema de altavoces y escuchará un tono que indica que
el sistema Bluetooth está listo para el emparejamiento .
3 ) Luego, abra la configuración de red Bluetooth de su dispositivo
inteligente . El nombre de la red Bluetooth aparecerá como " 645-BT " en
la lista de su dispositivo y haga clic para conectarse. No se requiere
contraseña para conectarse, pero si se le solicita, ingrese ' 6688 '.
4 ) Escuchará otro tono de indicación cuando se establezca una conexión
Bluetooth exitosa; entonces estará listo para disfrutar de la música .
iv. Fallos comunes y métodos de solución de problemas
Falla
razón
Método de exclusión
La máquina
no funciona
Se cayó el cable de conexión de
la placa de control.
Comprueba la línea y
restáurala.
Daño en la placa de circuito
Se requiere mantenimiento
- 6 -
profesional
v.Lista de embalaje
No.
Artículo
Cantidad
Observación
1
Altavoces de techo
1 juego
2
Manual
1 pieza
3
Adaptador de CA
1 juego
Para la versión Bluetooth
4
Línea de conexión
1 raíz
Para dos o cuatro altavoces
Bluetooth
5
Terminal de
conexión
1 juego
Para dos o cuatro altavoces
Bluetooth
6
Tarjeta de papel
redonda
1 pieza
* ADVERTENCIA
1 ) Se recomienda que conserve este manual para futuras consultas al
instalar el audio.
2 ) Nunca exponga el altavoz a la lluvia ni a ningún material húmedo o
lluvioso. lugar, lo que podría provocar una descarga eléctrica o un
incendio.
3 )Limite el voltaje especificado en el estéreo, ya que el uso de un voltaje
más alto puede provocar descargas eléctricas o incendios. Nunca corte,
tuerza, destruya ni reemplace los cables.
4 ) Evite instalar o configurar el audio en lugares inestables, como mesas
vibratorias o superficies irregulares, lo que puede evitar lesiones
personales o daños a la propiedad causados por la caída del audio.
5 ) Nunca enchufe ni desenchufe el aparato con las manos mojadas, ya
que podría provocar una descarga eléctrica.

- 7 -
6 ) Al desconectar el enchufe, asegúrese de tirar del enchufe, no del
cable. El uso de máquinas con aparatos rotos puede provocar un incendio
o una descarga eléctrica.
7 )Al mover el altavoz, desconecte el enchufe con anticipación. Si mueve
el altavoz con el enchufe, puede provocar un incendio o una descarga
eléctrica. Al desconectar el enchufe, asegúrese de sujetarlo y
desconectarlo.
8 ) No cubra la ventilación del altavoz. Podría provocar un incendio
debido al calentamiento interno.
9 ) Evite instalar el sonido en lugares húmedos o polvorientos, en
contacto directo con la luz solar, cerca de calentadores eléctricos o con
humo negro o vapor, ya que pueden provocar incendios o descargas
eléctricas.
10)No sumerja en ningún líquido.
11) Para evitar dañar el dispositivo o la unidad, no golpee ni apriete el
dispositivo. El equipo está instalado en una posición suficiente para
soportar el peso del equipo y los soportes de montaje. Además, si se
instala en otras ubicaciones, puede provocar una caída y causar lesiones
personales o daños a la propiedad. Si la bocina está deformada, no la use
durante mucho tiempo, ya que esta condición indica que la bocina está
defectuosa. Si continúa usándose durante mucho tiempo, puede producir
altas temperaturas y provocar un incendio.
Información de la FCC
PRECAUCIÓN: ¡ Los cambios o modificaciones no aprobados

- 8 -
expresamente por la parte responsable del cumplimiento podrían anular la
autoridad del usuario para operar el equipo!
Este dispositivo cumple con la Parte 15 de las Normas de la FCC. Su
funcionamiento está sujeto a las dos condiciones siguientes:
1) Este producto puede causar interferencias dañinas.
2) Este producto debe aceptar cualquier interferencia recibida, incluida
aquella que pueda provocar un funcionamiento no deseado.
ADVERTENCIA: Los cambios o modificaciones a este producto no
aprobados expresamente por la parte responsable del cumplimiento
podrían anular la autoridad del usuario para operar el producto .
Nota: Este producto ha sido probado y cumple con los límites establecidos
para dispositivos digitales de Clase B de conformidad con la Parte 15 de
las Normas de la FCC . Estos límites están diseñados para brindar una
protección razonable contra interferencias dañinas en una instalación
residencial.
Este producto genera, utiliza y puede emitir energía de radiofrecuencia y,
si no se instala y utiliza de acuerdo con las instrucciones, puede causar
interferencias perjudiciales en las comunicaciones por radio. Sin embargo,
no existe garantía de que no se produzcan interferencias en una
instalación determinada. Si este producto causa interferencias
perjudiciales en la recepción de radio o televisión, lo que se puede
determinar encendiendo y apagando el producto, se recomienda al
usuario que intente corregir la interferencia mediante una o más de las
siguientes medidas.
· Reorientar o reubicar la antena receptora.
· Aumentar la distancia entre el producto y el receptor.
· Conecte el producto a una toma de corriente de un circuito diferente al
que está conectado el receptor.
· Consulte al distribuidor o a un técnico de radio/TV experimentado para
obtener ayuda.
- 9 -
Fabricante: Shanghaimuxinmuyeyouxiangongsi
Dirección : Shuangchenglu 803nong11hao1602A-1609shi, baoshanqu,
shanghai 200000 CN.
Importado a AUS: SIHAO PTY LTD, 1 ROKEVA STREETEASTWOOD NSW
2122 Australia
Importado a EE. UU.: Sanven Technology Ltd., Suite 250, 9166 Anaheim
Place, Rancho Cucamonga, CA 91730
REP
EC
E-CrossStu GmbH
Mainzer Landstr.69, 60329 Frankfurt am Main.
REP
UK
YH CONSULTING LIMITED.
C/O YH Consulting Limited Office 147, Centurion House,
London Road, Staines-upon-Thames, Surrey, TW18 4AX


Wsparcie techniczne i certyfikat e-gwarancji
www.vevor.com/support
SUFIT INSTRUKCJA OBSŁUGI
GŁOŚNIKA
MODELE: 645 , 645-BT, 549, 638
We continue to be committed to provide you tools with competitive price.
"Save Half", "Half Price" or any other similar expressions used by us only represents an
estimate of savings you might benefit from buying certain tools with us compared to the major
top brands and does not necessarily mean to cover all categories of tools offered by us. You
are kindly reminded to verify carefully when you are placing an order with us if you are
actually saving half in comparison with the top major brands.

- 1 -
MODELE: 645, 645-BT, 549, 638
(Zdjęcie ma charakter poglądowy, proszę odnieść się do rzeczywistego
obiektu)
Have product questions? Need technical support? Please feel free to
contact us:
Technical Support and E-Warranty Certificate
www.vevor.com/support
NEED HELP? CONTACT US!
This is the original instruction, please read all manual instructions
carefully before operating. VEVOR reserves a clear interpretation of our
user manual. The appearance of the product shall be subject to the
product you received. Please forgive us that we won't inform you again if
there are any technology or software updates on our product.
CEILING SPEAKER

- 2 -
Ostrzeżenie: Aby zminimalizować ryzyko obrażeń, użytkownik
powinien uważnie przeczytać instrukcję obsługi.
Prawidłowa utylizacja
Ten produkt podlega postanowieniom Dyrektywy Europejskiej
2012/19/WE. Symbol przedstawiający przekreślony kosz na śmieci
na kółkach oznacza, że produkt wymaga oddzielnej zbiórki odpadów
w Unii Europejskiej. Dotyczy to produktu i wszystkich akcesoriów
oznaczonych tym symbolem. Produktów oznaczonych w ten sposób
nie można wyrzucać razem ze zwykłymi odpadami domowymi, ale
należy je oddać do punktu zbiórki w celu recyklingu urządzeń
elektrycznych i elektronicznych.
Sufit instrukcja obsługi głośnika
i. Główny cel
Głośniki sufitowe służą głównie do wzmacniania i przesyłania dźwięku.
ii. Instalacja i debugowanie
Instrukcja instalacji (dla 549)
21.Korzystając z okrągłej karty papieru, wytnij otwór w suficie zgodnie ze
średnicą instalacji klaksonu i podłącz do niego przewód klaksonu.
22.
Podłączprzewody głośnikowedomówcy er
.
- 3 -
23.Dokręć cztery śruby poprzeczne, a następnie zablokuj obrót wspornika i
zamocuj urządzenie do tylnej powierzchni panelu sufitowego.
24.Zamontuj osłonę siatki głośnikowej .
Instrukcja instalacji (dla 645/645-BT/638)
1.
Korzystając z okrągłej karty papierowej wytnij otwór montażowy nad
sufitem ;
2.
Podłączprzewody głośnikowedo mówcy, podnieś głośnik Montowanie
klamra ;
3. Połóż ten s szczyty w górę do ten sufit montowanie otwór ;
- 4 -
4. Klamra montażowa automatycznie opadnie, a głośniki zostaną
zamocowane w suficie.
Instrukcje demontażu metalowej kratki ( tylko dla modeli 645/645-BT
/638)
1. Obróć klamrę o 90 stopni .
2. Zdejmij metalową kratkę .
Schemat podłączenia portu (tylko dla głośników Bluetooth)
AC adapter
External sound
input port(3.5mm)
Connecting
terminal
- 5 -
iii.Używanie i eksploatacja
Łączność Bluetooth ( tylko Do Wersja Bluetooth ):
1 ) Upewnij się , że system głośników sufitowych Bluetooth jest prawidłowo
podłączony do zasilania , źródła i głośnika. przewody są podłączone
prawidłowo.
2 ) Włącz system głośników. Powinieneś usłyszeć dźwięk informujący, że
system Bluetooth jest gotowy do sparowania .
3 ) Następnie otwórz ustawienia sieciowe Bluetooth swojego
inteligentnego urządzenia . Nazwa sieci Bluetooth będzie wyświetlana jako
„ 645-BT ” na liście urządzeń. i kliknij, aby się połączyć. Do połączenia nie
jest wymagane hasło, ale jeśli zostaniesz o to poproszony, wpisz „ 6688 ”.
4 ) Po nawiązaniu połączenia Bluetooth usłyszysz kolejny sygnał
dźwiękowy i będziesz mógł cieszyć się muzyką .
iv. Częste usterki i metody rozwiązywania problemów
Wada
powód
Metoda wykluczenia
Maszyna nie
działa
Odpadł kabel łączący płytę
sterowniczą
Sprawdź linię i przywróć ją
Uszkodzenie płytki drukowanej
Wymagana jest
profesjonalna konserwacja
v.Lista rzeczy do spakowania
NIE.
Przedmiot
Ilość
Uwaga
1
Głośniki sufitowe
1 zestaw
2
Podręcznik
1 szt.
3
Zasilacz sieciowy
1 zestaw
Dla wersji Bluetooth
- 6 -
4
Linia łącząca
1 korzeń
Dla dwóch/czterech
głośników Bluetooth
5
Zacisk łączący
1 zestaw
Dla dwóch/czterech
głośników Bluetooth
6
okrągła kartka
papierowa
1 szt.
* OSTRZEŻENIE
1 ) Zaleca się zachowanie tej instrukcji na przyszłość, podczas instalacji
dźwięku.
2 ) Nigdy nie wystawiaj głośnika na działanie deszczu ani wilgoci. miejscu,
w którym może dojść do porażenia prądem lub pożaru.
3 ) Ogranicz napięcie określone na stereo, ponieważ użycie wyższego
napięcia może spowodować porażenie prądem lub pożar. Nigdy nie
przycinaj, nie skręcaj, nie niszcz ani nie wymieniaj przewodów.
4 ) Unikaj instalowania i ustawiania sprzętu audio w niestabilnych
miejscach, takich jak trzęsące się stoły lub nierówne powierzchnie,
ponieważ może to zapobiec obrażeniom ciała lub uszkodzeniu mienia w
wyniku upadku sprzętu audio.
5 ) Nigdy nie podłączaj ani nie odłączaj wtyczki mokrymi rękami, ponieważ
może to spowodować porażenie prądem.
6 ) Podczas wyciągania wtyczki upewnij się, że ciągniesz za wtyczkę, a
nie za przewód. Używanie maszyn z uszkodzonymi urządzeniami może
spowodować pożar lub porażenie prądem.
7 ) Podczas przenoszenia głośnika, należy najpierw wyciągnąć wtyczkę.
Przenoszenie głośnika z wtyczką może spowodować pożar lub porażenie
prądem. Podczas wyciągania wtyczki, należy trzymać wtyczkę i wyciągnąć
ją.
8 ) nie zakrywaj otworu wentylacyjnego głośnika. Może to spowodować

- 7 -
pożar z powodu wewnętrznego nagrzania.
9 ) Unikaj instalowania urządzenia nagłośnieniowego w miejscu wilgotnym
lub zakurzonym, w miejscu narażonym na bezpośredni kontakt z
promieniami słonecznymi, w pobliżu grzejnika elektrycznego lub w
otoczeniu czarnego dymu lub pary, ponieważ może to spowodować pożar
lub porażenie prądem.
10) Nie zanurzać w żadnym płynie.
11) Aby uniknąć uszkodzenia urządzenia lub jednostki, nie uderzaj ani nie
ściskaj urządzenia. Sprzęt jest zainstalowany w pozycji wystarczającej do
udźwignięcia ciężaru sprzętu i uchwytów montażowych. Ponadto, jeśli jest
zainstalowany w innych miejscach, może spowodować upadek i obrażenia
ciała lub uszkodzenie mienia. Jeśli klakson jest zniekształcony, nie używaj
go przez długi czas, ponieważ taki stan wskazuje, że klakson jest
uszkodzony. Jeśli będzie używany przez długi czas, może wytworzyć
wysoką temperaturę i doprowadzić do pożaru.
Informacje FCC
UWAGA: Zmiany lub modyfikacje wykonane bez wyraźnej zgody strony
odpowiedzialnej za zgodność mogą spowodować unieważnienie prawa
użytkownika do korzystania ze sprzętu!
To urządzenie jest zgodne z częścią 15 przepisów FCC. Jego działanie
podlega następującym dwóm warunkom:
1) Produkt ten może powodować szkodliwe zakłócenia.
2) Produkt ten musi być odporny na wszelkie zakłócenia, w tym zakłócenia
mogące powodować niepożądane działanie.
OSTRZEŻENIE: Wszelkie zmiany lub modyfikacje tego produktu, które nie
zostały wyraźnie zatwierdzone przez stronę odpowiedzialną za zgodność,
mogą spowodować unieważnienie prawa użytkownika do korzystania z
produktu .
Uwaga: Ten produkt został przetestowany i uznany za zgodny z limitami

- 8 -
dla urządzeń cyfrowych klasy B zgodnie z częścią 15 przepisów FCC .
Limity te mają na celu zapewnienie rozsądnej ochrony przed szkodliwymi
zakłóceniami w instalacjach domowych.
Ten produkt generuje, wykorzystuje i może emitować energię o
częstotliwości radiowej i jeśli nie zostanie zainstalowany i używany
zgodnie z instrukcją, może powodować szkodliwe zakłócenia w
komunikacji radiowej. Nie ma jednak gwarancji, że zakłócenia nie wystąpią
w konkretnej instalacji. Jeśli ten produkt powoduje szkodliwe zakłócenia w
odbiorze radia lub telewizji, co można ustalić, wyłączając i włączając
produkt, zachęca się użytkownika do podjęcia próby skorygowania
zakłóceń za pomocą jednego lub kilku z następujących środków.
· Zmiana orientacji lub położenia anteny odbiorczej.
· Zwiększ odległość między produktem a odbiornikiem.
· Podłączyć produkt do gniazdka w innym obwodzie niż ten, do którego
podłączony jest odbiornik.
· Aby uzyskać pomoc, należy zwrócić się do sprzedawcy lub
doświadczonego technika radiowo-telewizyjnego.
Producent: Shanghaimuxinmuyeyouxiangongsi
Adres : Shuangchenglu 803nong11hao1602A-1609shi, baoshanqu, szanghaj
200000 CN.
Importowane do AUS: SIHAO PTY LTD, 1 ROKEVA STREETEASTWOOD
NSW 2122 Australia
Importowane do USA: Sanven Technology Ltd., Suite 250, 9166 Anaheim
Place, Rancho Cucamonga, CA 91730
- 9 -
REP
EC
E-CrossStu GmbH
Mainzer Landstr.69, 60329 Frankfurt am Main.
REP
UK
YH CONSULTING LIMITED.
C/O YH Consulting Limited Office 147, Centurion House,
London Road, Staines-upon-Thames, Surrey, TW18 4AX


Technische ondersteuning en e-garantiecertificaat
www.vevor.com/support
PLAFOND
LUIDSPREKERHANDLEIDING
MODEL: 645 , 645-BT, 549, 638
We continue to be committed to provide you tools with competitive price.
"Save Half", "Half Price" or any other similar expressions used by us only represents an
estimate of savings you might benefit from buying certain tools with us compared to the major
top brands and does not necessarily mean to cover all categories of tools offered by us. You
are kindly reminded to verify carefully when you are placing an order with us if you are
actually saving half in comparison with the top major brands.


- 1 -
MODEL: 645, 645-BT, 549, 638
(De afbeelding is alleen ter referentie, kijk naar het daadwerkelijke object)
Have product questions? Need technical support? Please feel free to
contact us:
Technical Support and E-Warranty Certificate
www.vevor.com/support
NEED HELP? CONTACT US!
This is the original instruction, please read all manual instructions
carefully before operating. VEVOR reserves a clear interpretation of our
user manual. The appearance of the product shall be subject to the
product you received. Please forgive us that we won't inform you again if
there are any technology or software updates on our product.
CEILING SPEAKER
- 2 -
Waarschuwing: om het risico op letsel te verkleinen, moet de
gebruiker de gebruiksaanwijzing zorgvuldig lezen.
Correcte verwijdering
Dit product is onderworpen aan de bepalingen van de Europese
richtlijn 2012/19/EG. Het symbool met een doorgestreepte afvalbak
geeft aan dat het product in de Europese Unie gescheiden
afvalinzameling vereist. Dit geldt voor het product en alle
accessoires die met dit symbool zijn gemarkeerd. Producten die als
zodanig zijn gemarkeerd, mogen niet met het normale huishoudelijke
afval worden weggegooid, maar moeten worden ingeleverd bij een
inzamelpunt voor recycling van elektrische en elektronische
apparaten.
Plafond luidspreker handleiding
i. Het hoofddoel
Plafondluidsprekers worden voornamelijk gebruikt om geluid te versterken
en over te brengen.
ii. Installatie en debuggen
Installatiehandleiding (voor 549)
25.Gebruik het ronde papieren kaartje, knip een gat in het plafond met de
diameter van de hoorninstallatie en sluit de hoorndraad aan op de hoorn.
26.
Sluitdeluidsprekerkabelsaanaandespreker
.
- 3 -
27.Draai de vier kruiskopschroeven vast, vergrendel de rotatie van de
beugel en bevestig het apparaat aan de achterkant van het plafondpaneel.
28.Plaats de luidsprekerkabelafdekking .
Installatiehandleiding (voor 645/645-BT/638)
1.
Knip op de ronde papieren kaart een installatiegat boven het plafond ;
2.
Sluitdeluidsprekerkabelsaannaar despreker, klap de spreker omhoog
Montage gesp ;
- 4 -
3. Zet de s- sprekers omhoog naar binnen de plafond montage gat ;
4. De bevestigingsgesp gaat automatisch naar beneden en bevestigt de
luidsprekers aan het plafond.
Instructies voor het verwijderen van het metalen rooster ( alleen voor
645/645-BT /638)
1. Draai de gesp 90 graden
omhoog .
2. Verwijder het metalen rooster .
Diagram van poortverbinding (alleen voor Bluetooth-luidsprekers)
AC adapter

- 5 -
iii.Gebruik en bediening
Bluetooth- connectiviteit ( Alleen voor Bluetooth -versie):
1 ) Zorg ervoor dat het Bluetooth- plafondluidsprekersysteem correct is
aangesloten op de stroomvoorziening, de bron en de luidspreker Draden
zijn correct aangesloten.
2 ) Schakel het luidsprekersysteem in . U hoort een toon die aangeeft dat
het Bluetooth-systeem klaar is om te koppelen .
3 ) Open vervolgens de Bluetooth - netwerkinstellingen van uw slimme
apparaat . Bluetooth - netwerknaam wordt weergegeven als ' 645- BT ' in
uw apparatenlijst en klik om verbinding te maken. Er is geen wachtwoord
vereist om verbinding te maken, maar als u hierom wordt gevraagd, voert u
' 6688 ' in.
4 ) U hoort nog een signaaltoon wanneer de Bluetooth-verbinding tot stand
is gebracht. U kunt dan van de muziek genieten .
iv. Veelvoorkomende fouten en methoden voor probleemoplossing
Schuld
reden
Uitsluitingsmethode
De machine
werkt niet
De verbindingskabel van het
bedieningspaneel is eraf
Controleer de lijn en herstel
deze
- 6 -
gevallen
Schade aan printplaat
Professioneel onderhoud is
vereist
v.Paklijst
Nee.
Item
Hoeveelheid
Opmerking
1
Plafondluidsprekers
1 set
2
Handmatig
1 stuk
3
AC- adapter
1 set
Voor Bluetooth-versie
4
Verbindingslijn
1 wortel
Voor twee/vier
Bluetooth-luidsprekers
5
Aansluitklem
1 set
Voor twee/vier
Bluetooth-luidsprekers
6
ronde papieren
kaart
1 stuk
* WAARSCHUWING
1 ) Wij raden u aan deze handleiding te bewaren voor toekomstig gebruik
bij het installeren van audio.
2 ) Stel de luidspreker nooit bloot aan regen en natte of regenachtige
omstandigheden. plaats, wat een elektrische schok of brand kan
veroorzaken.
3 ) Beperk de spanning die op de stereo is aangegeven, omdat het
gebruik van een hogere spanning elektrische schokken of brand kan
veroorzaken. Knip, draai, vernietig of vervang nooit draden.
4 ) Vermijd het installeren of instellen van audioapparatuur op onstabiele
plaatsen, zoals schuddende tafels of oneffen oppervlakken. Dit voorkomt
persoonlijk letsel of schade aan eigendommen door vallende
audioapparatuur.
5 ) Steek de stekker nooit in het stopcontact en trek de stekker er nooit uit
met natte handen. Dit kan een elektrische schok veroorzaken.

- 7 -
6 ) Wanneer u de stekker eruit trekt, zorg er dan voor dat u aan de
stekker trekt, niet aan de draad. Het gebruiken van machines met kapotte
apparaten kan brand of een elektrische schok veroorzaken.
7 ) Wanneer u de speaker verplaatst, trek dan eerst de stekker eruit. Het
verplaatsen van de speaker met de stekker kan brand of een elektrische
schok veroorzaken. Wanneer u de stekker eruit trekt, zorg er dan voor dat
u de stekker vasthoudt en eruit trekt.
8 ) Bedek de ventilatieopening van de speaker niet. Kan brand
veroorzaken door interne verhitting.
9 ) Installeer het apparaat niet op een vochtige of stoffige plek, vermijd
direct contact met zonlicht, in de buurt van een elektrische verwarming of
in de buurt van zwarte rook of stoom, omdat dit brand of een elektrische
schok kan veroorzaken.
10) Niet onderdompelen in een vloeistof.
11) Om schade aan het apparaat of de unit te voorkomen, mag u het
apparaat niet slaan of knijpen. De apparatuur is geïnstalleerd op een
positie die voldoende is om het gewicht van de apparatuur en
montagebeugels te dragen. Als het op andere locaties wordt geïnstalleerd,
kan het bovendien vallen en persoonlijk letsel of schade aan
eigendommen veroorzaken. Als de hoorn vervormd is, mag u deze niet
langdurig gebruiken, omdat deze toestand aangeeft dat de hoorn defect is.
Als het apparaat gedurende lange tijd wordt gebruikt, kan het een hoge
temperatuur produceren en tot brand leiden.
FCC-informatie
LET OP: Wijzigingen of aanpassingen die niet uitdrukkelijk zijn
goedgekeurd door de partij die verantwoordelijk is voor de naleving,
kunnen de bevoegdheid van de gebruiker om het apparaat te bedienen
ongeldig maken!

- 8 -
Dit apparaat voldoet aan Deel 15 van de FCC-regels. De werking is
onderworpen aan de volgende twee voorwaarden:
1) Dit product kan schadelijke interferentie veroorzaken.
2) Dit product moet alle ontvangen interferentie accepteren, inclusief
interferentie die ongewenste werking kan veroorzaken.
WAARSCHUWING: Wijzigingen of aanpassingen aan dit product die niet
uitdrukkelijk zijn goedgekeurd door de partij die verantwoordelijk is voor
naleving, kunnen de bevoegdheid van de gebruiker om het product te
bedienen ongeldig maken .
Let op: Dit product is getest en voldoet aan de limieten voor een digitaal
apparaat van klasse B volgens Deel 15 van de FCC-regels . Deze limieten
zijn ontworpen om redelijke bescherming te bieden tegen schadelijke
interferentie in een residentiële installatie.
Dit product genereert, gebruikt en kan radiofrequentie-energie uitstralen en
kan, indien niet geïnstalleerd en gebruikt in overeenstemming met de
instructies, schadelijke interferentie veroorzaken in radiocommunicatie. Er
is echter geen garantie dat er geen interferentie zal optreden in een
bepaalde installatie. Als dit product schadelijke interferentie veroorzaakt in
radio- of televisieontvangst, wat kan worden vastgesteld door het product
uit en aan te zetten, wordt de gebruiker aangemoedigd om te proberen de
interferentie te corrigeren door een of meer van de volgende maatregelen.
· Heroriënteer of verplaats de ontvangstantenne.
· Vergroot de afstand tussen het product en de ontvanger.
· Sluit het product aan op een stopcontact van een ander circuit dan
waarop de ontvanger is aangesloten.
· Raadpleeg de dealer of een ervaren radio-/tv-technicus voor hulp.
Fabrikant: Shanghaimuxinmuyeyouxiangongsi
Adres : Shuangchenglu 803nong11hao1602A-1609shi, baoshanqu, shanghai
200000 CN.
Geïmporteerd naar AUS: SIHAO PTY LTD, 1 ROKEVA

- 9 -
STREETEASTWOOD NSW 2122 Australië
Geïmporteerd naar de VS: Sanven Technology Ltd., Suite 250, 9166
Anaheim Place, Rancho Cucamonga, CA 91730
REP
EC
E-CrossStu GmbH
Mainzer Landstr.69, 60329 Frankfurt am Main.
REP
UK
YH CONSULTING LIMITED.
C/O YH Consulting Limited Office 147, Centurion House,
London Road, Staines-upon-Thames, Surrey, TW18 4AX


Teknisk support och e-garanticertifikat
www.vevor.com/support
C EILING HÖGTALARMANUAL
MODELL: 645 , 645-BT, 549, 638
We continue to be committed to provide you tools with competitive price.
"Save Half", "Half Price" or any other similar expressions used by us only represents an
estimate of savings you might benefit from buying certain tools with us compared to the major
top brands and does not necessarily mean to cover all categories of tools offered by us. You
are kindly reminded to verify carefully when you are placing an order with us if you are
actually saving half in comparison with the top major brands.


- 1 -
MODELL: 645, 645-BT, 549, 638
(Bilden är endast för referens, se det faktiska objektet)
Have product questions? Need technical support? Please feel free to
contact us:
Technical Support and E-Warranty Certificate
www.vevor.com/support
NEED HELP? CONTACT US!
This is the original instruction, please read all manual instructions
carefully before operating. VEVOR reserves a clear interpretation of our
user manual. The appearance of the product shall be subject to the
product you received. Please forgive us that we won't inform you again if
there are any technology or software updates on our product.
CEILING SPEAKER
- 2 -
Varning - För att minska risken för skada måste användaren läsa
instruktionerna noggrant.
Korrekt avfallshantering
Denna produkt omfattas av bestämmelserna i det europeiska
direktivet 2012/19/EC. Symbolen som visar en soptunna korsad
anger att produkten kräver separat sophämtning i EU. Detta gäller för
produkten och alla tillbehör märkta med denna symbol. Produkter
märkta som sådana får inte slängas tillsammans med vanligt
hushållsavfall, utan måste lämnas till en insamlingsplats för
återvinning av elektriska och elektroniska apparater
Tak högtalarmanual
i. Huvudsyftet
Takhögtalare används främst för att förstärka och överföra ljud.
ii. Installation och felsökning
Installationsguide (för 549)
29.Se det runda papperskortet, skär ett hål i taket enligt diametern på
horninstallationen och anslut horntråden till hornet.
30.
Ansluthögtalarkablarna tilltalarener
.
31.Dra åt de fyra tvärskruvarna och lås sedan fästets rotation och fäst
- 3 -
enheten på den bakre ytan av takpanelen.
32.Installera högtalarens trådnätsskydd .
Installationsguide (för 645/645-BT/638)
1.
Se det runda papperskortet, skär ett installationshål över taket ;
2.
Ansluthögtalarkablarna tillhögtalaren,vrid upp högtalaren Montering
spänne ;
3. Sätt de s högtalare upp till de tak montering hål ;
- 4 -
4. Monteringsspännet kommer automatiskt att gå ner och få högtalarna fast
i taket.
Instruktioner för borttagning av metallgaller ( endast för 645/645-BT
/638)
1. Vrid upp spännet 90 grader .
2. Ta bort metallgallret .
Diagram över portanslutningen (endast för Bluetooth-högtalare)
AC adapter
External sound
input port(3.5mm)
Connecting
terminal
Constant resistance speakers
or non-Bluetooth speakers
- 5 -
iii.Användning och drift
Bluetooth- anslutning ( endast för B luetooth version):
1 ) Se till att Bluetooth- takets högtalarsystem är korrekt anslutet till
strömmen , källan och högtalaren ledningarna är korrekt anslutna.
2 ) Slå på högtalarsystemet och du kommer att höra en ton som indikerar
att Bluetooth-systemet är redo för ihopparning .
3 ) Öppna sedan din smarta enhets Bluetooth - nätverksinställningar
Bluetooth - nätverkets namn kommer att visas som " 645-BT " på din
enhetslista. och klicka för anslutning. Inget lösenord krävs för att ansluta
men om du uppmanas anger du " 6688 ".
4 ) Du kommer att höra en annan indikeringston när en framgångsrik
Bluetooth-anslutning upprättats, då är du redo att njuta av musiken .
iv. Vanliga fel och felsökningsmetoder
Fel
resonera
Metod för uteslutning
Maskinen
fungerar inte
Styrkortets anslutningskabel
gick av
Kontrollera linjen och återställ
den
Skada på kretskortet
Professionellt underhåll krävs
v. Packlista
Inga.
Punkt
Antal
Anmärkning
1
Takhögtalare
1 set
2
Manuell
1 st
3
AC- adapter
1 set
För Bluetooth-version
4
Anslutningsledning
1 rot
För två/fyra
Bluetooth-högtalare
5
Anslutningsterminal
1 set
För två/fyra
Bluetooth-högtalare
6
runt papperskort
1 st

- 6 -
* VARNING
1 ) Det rekommenderas att du sparar denna handbok för framtida
referens när du installerar ljud.
2 ) Utsätt aldrig högtalaren för regn och väta eller regn plats, vilket kan
orsaka elektriska stötar eller brand.
3 ) Begränsa spänningen som anges på stereon, t.ex. användning av
högre spänning kan orsaka elektriska stötar eller brand. Trimma, vrid,
förstör eller byt aldrig ut kablar.
4 ) Undvik att installera eller ställa in ljud på instabila platser, såsom
skakande bord eller ojämna ytor, vilket kan undvika personskador eller
egendomsskador orsakade av att ljudet faller.
5 ) Sätt aldrig i eller dra ur kontakten med våta händer, vilket kan orsaka
elektriska stötar.
6 ) När du drar ut kontakten, se till att du drar i kontakten, inte i sladden.
Användning av maskiner med trasiga apparater kan orsaka brand eller
elektriska stötar.
7 ) Dra ut kontakten i förväg när du flyttar högtalaren. Att flytta högtalaren
med kontakten kan orsaka brand eller elektrisk stöt. När du drar ut
kontakten, se till att du håller i kontakten och drar ut den.
8 ) täck inte ventilen på högtalaren. Kan orsaka brand på grund av intern
uppvärmning.
9 ) Undvik att installera ljudet i vått eller dammigt, direkt kontakt med
solljus, nära elvärmaren eller svart rök eller ånga, vilket kan orsaka brand
eller elektriska stötar.

- 7 -
10)Sänk inte ned i någon vätska.
11) För att undvika skador på enheten eller enheten ska du inte slå eller
klämma enheten. Utrustningen installeras i ett läge som är tillräckligt för att
bära vikten av utrustningen och monteringsfästen. Dessutom, om den
installeras på andra platser kan den orsaka fall och orsaka person- eller
egendomsskador. Om hornet är förvrängt, använd det inte under en längre
tid, eftersom detta tillstånd indikerar att hornet är felaktigt. Om den
fortsätter att användas under en längre tid kan den producera hög
temperatur och leda till brand.
FCC-information
FÖRSIKTIGHET: Ändringar eller modifieringar som inte uttryckligen
godkänts av den part som ansvarar för efterlevnaden kan upphäva
användarens behörighet att använda utrustningen!
Denna enhet uppfyller del 15 av FCC-reglerna. Driften är föremål för
följande två villkor:
1) Denna produkt kan orsaka skadliga störningar.
2) Denna produkt måste acceptera alla mottagna störningar, inklusive
störningar som kan orsaka oönskad funktion.
VARNING: Ändringar eller modifieringar av denna produkt som inte
uttryckligen godkänts av den part som ansvarar för efterlevnaden kan
ogiltigförklara användarens behörighet att använda produkten .
Obs: Denna produkt har testats och befunnits följa gränserna för en digital
enhet av klass B enligt del 15 av FCC-reglerna . Dessa gränser är
utformade för att ge rimligt skydd mot skadliga störningar i en
bostadsinstallation.
Denna produkt genererar, använder och kan utstråla radiofrekvensenergi,
och om den inte installeras och används i enlighet med instruktionerna kan
den orsaka skadliga störningar på radiokommunikation. Det finns dock

- 8 -
ingen garanti för att störningar inte kommer att inträffa i en viss installation.
Om denna produkt orsakar skadliga störningar på radio- eller
tv-mottagning, vilket kan fastställas genom att stänga av och på produkten,
uppmanas användaren att försöka korrigera störningen med en eller flera
av följande åtgärder.
· Rikta om eller flytta mottagningsantennen.
· Öka avståndet mellan produkten och mottagaren.
· Anslut produkten till ett uttag på en annan krets än den som mottagaren
är ansluten till.
· Kontakta återförsäljaren eller en erfaren radio/TV-tekniker för hjälp.
Tillverkare: Shanghaimuxinmuyeyouxiangongsi
Adress : Shuangchenglu 803nong11hao1602A-1609shi, baoshanqu,
shanghai 200000 CN.
Importerad till AUS: SIHAO PTY LTD, 1 ROKEVA STREETEASTWOOD
NSW 2122 Australien
Importerad till USA: Sanven Technology Ltd., Suite 250, 9166 Anaheim
Place, Rancho Cucamonga, CA 91730
REP
EC
E-CrossStu GmbH
Mainzer Landstr.69, 60329 Frankfurt am Main.
REP
UK
YH CONSULTING LIMITED.
C/O YH Consulting Limited Office 147, Centurion House,
London Road, Staines-upon-Thames, Surrey, TW18 4AX