User Manual
Bedienungsanleitung
de
en
High Definition Bluetooth® audio streaming
module for Audiotec Fischer DSP devices
CARD 2.0
EXTENSION

2
Herzlichen Glückwunsch
Sehr geehrter Kunde,
wir gratulieren Ihnen zum Kauf der Extension Card 2.0 – BT HD, einem hochwertigen High Denition Bluetooth
®
Audio
Streaming Modul zur Erweiterung Ihres DSP-Systems um zusätzliche Schnittstellen und Funktionen.
Die Extension Card 2.0 wurde von uns nach neuesten technischen Erkenntnissen entwickelt und überzeugt durch ihre
hervorragende Verarbeitung sowie den Einsatz ausgereifter Technologien.
Viel Freude an diesem Produkt wünscht Ihnen das
Team von
AUDIOTEC FISCHER
Allgemeine Informationen
Um alle Funktionen der Extension Card 2.0 optimal nutzen zu können, lesen Sie bitte diese Bedienungsanleitung
sorgfältig durch. Wir garantieren, dass jedes Gerät vor Versand auf seinen einwandfreien Zustand überprüft wurde.
Vor Beginn der Installation unterbrechen Sie den Minusanschluss der Autobatterie und entfernen alle ange-
schlossenen Kabel vom Gerät.
Wir empfehlen Ihnen, die Installation von einem Einbauspezialisten vornehmen zu lassen, da der Nachweis eines fach-
gerechten Einbaus und Anschlusses des Gerätes Voraussetzung für die Garantieleistungen sind.
Verwenden Sie die Extension Card 2.0 nur in dem dafür vorgesehenen Gerät und entsprechenden Steckplatz. Die Ver-
wendung des Moduls in anderen Geräten oder Steckplätzen kann zu Schäden am Modul, dem DSP-Produkt, der Head
Unit / dem Radio oder anderen angeschlossenen Geräten führen!
1 x BT HD Modul
1 x Modulspezische Abdeckblende
1 x Antenne
1 x Befestigungsschrauben
Lieferumfang
3
de
Anschluss und Bedienelemente
SCP
OPTICAL
INPUT
USB
HIGHLEVEL
INPUT
HIGHLEVEL
INPUT
REM
OUT
STATUS
CONTROL
1
3
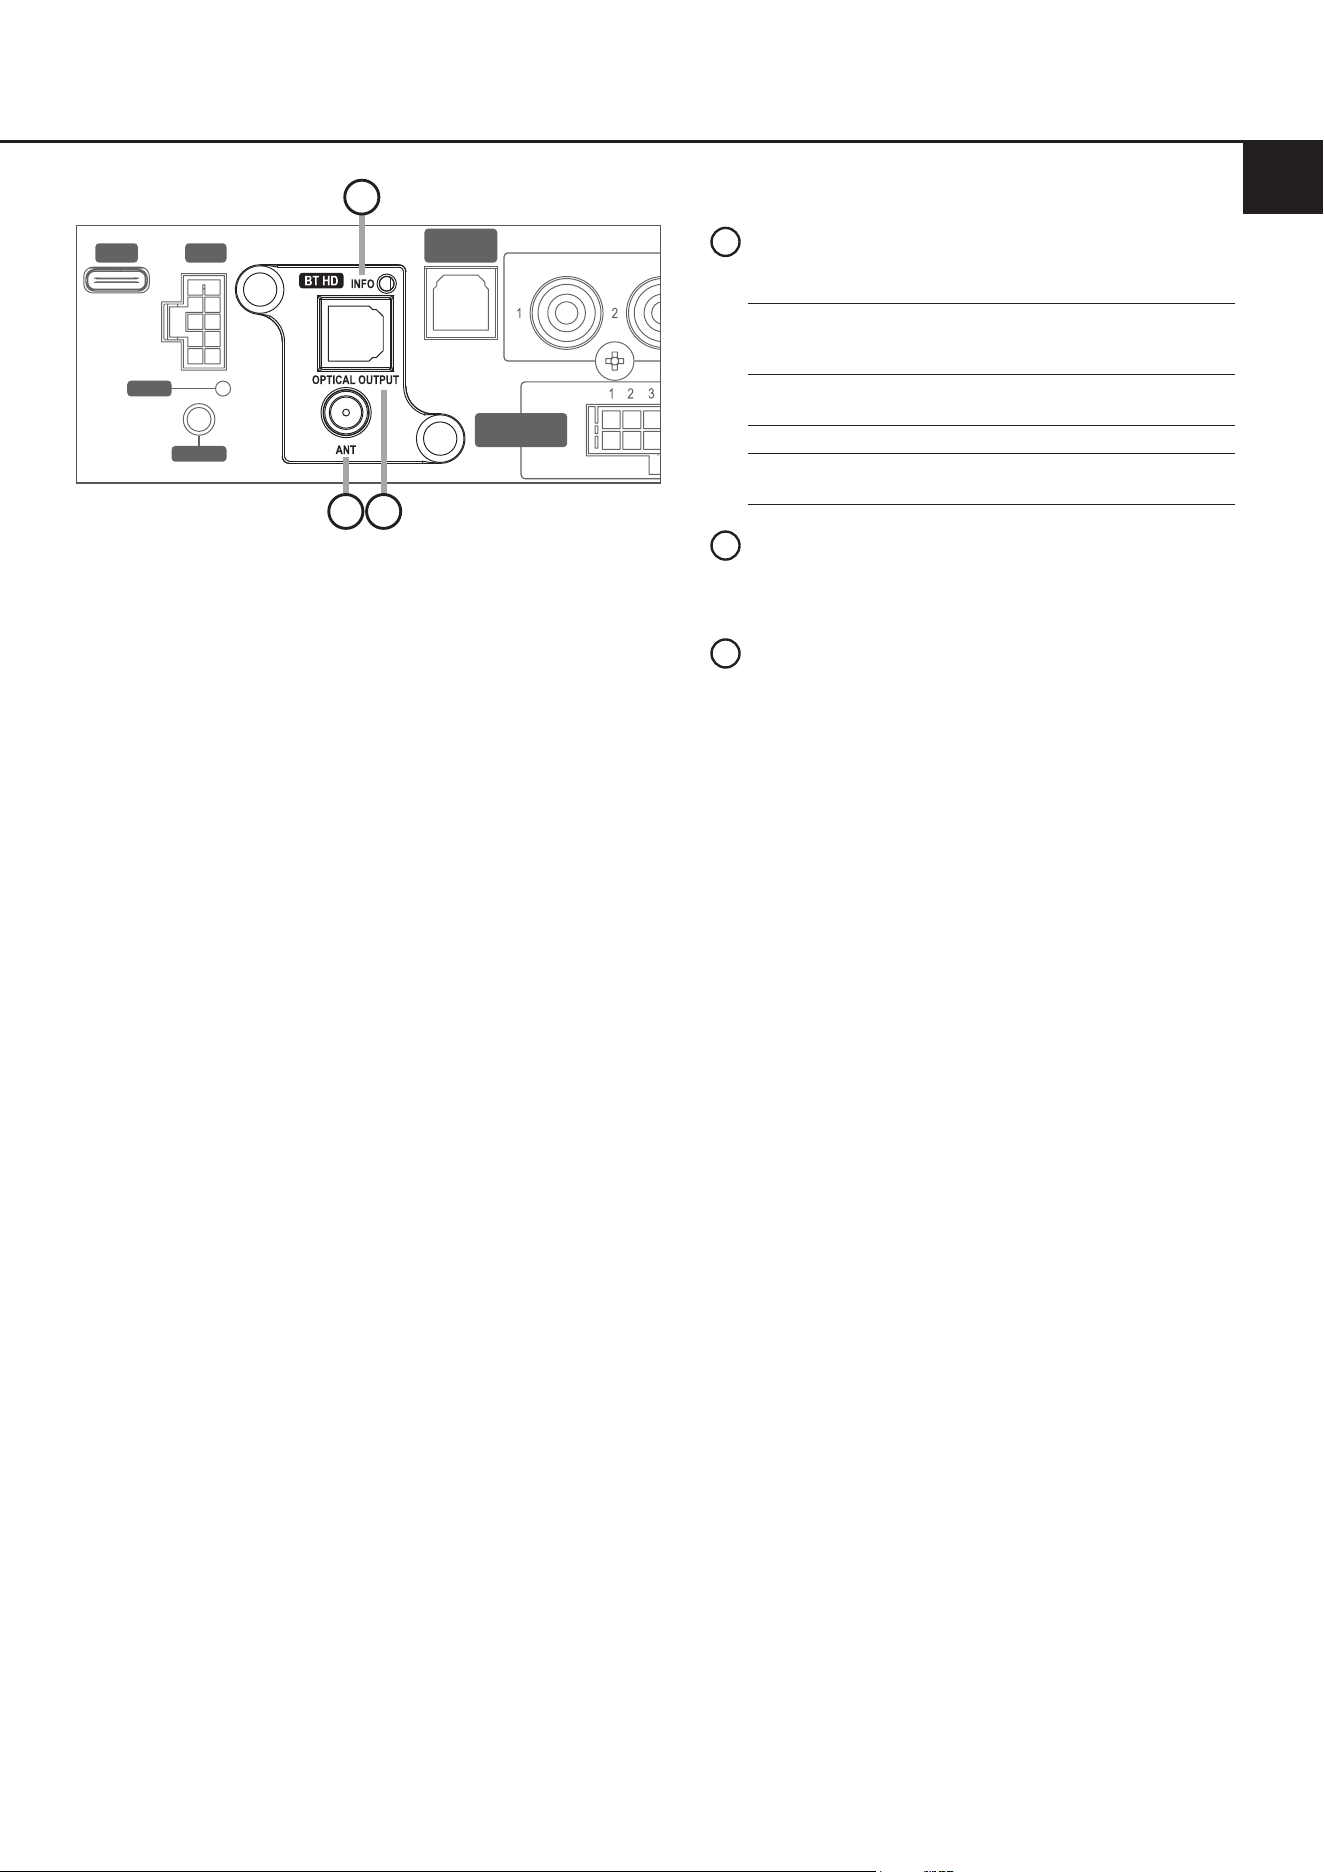
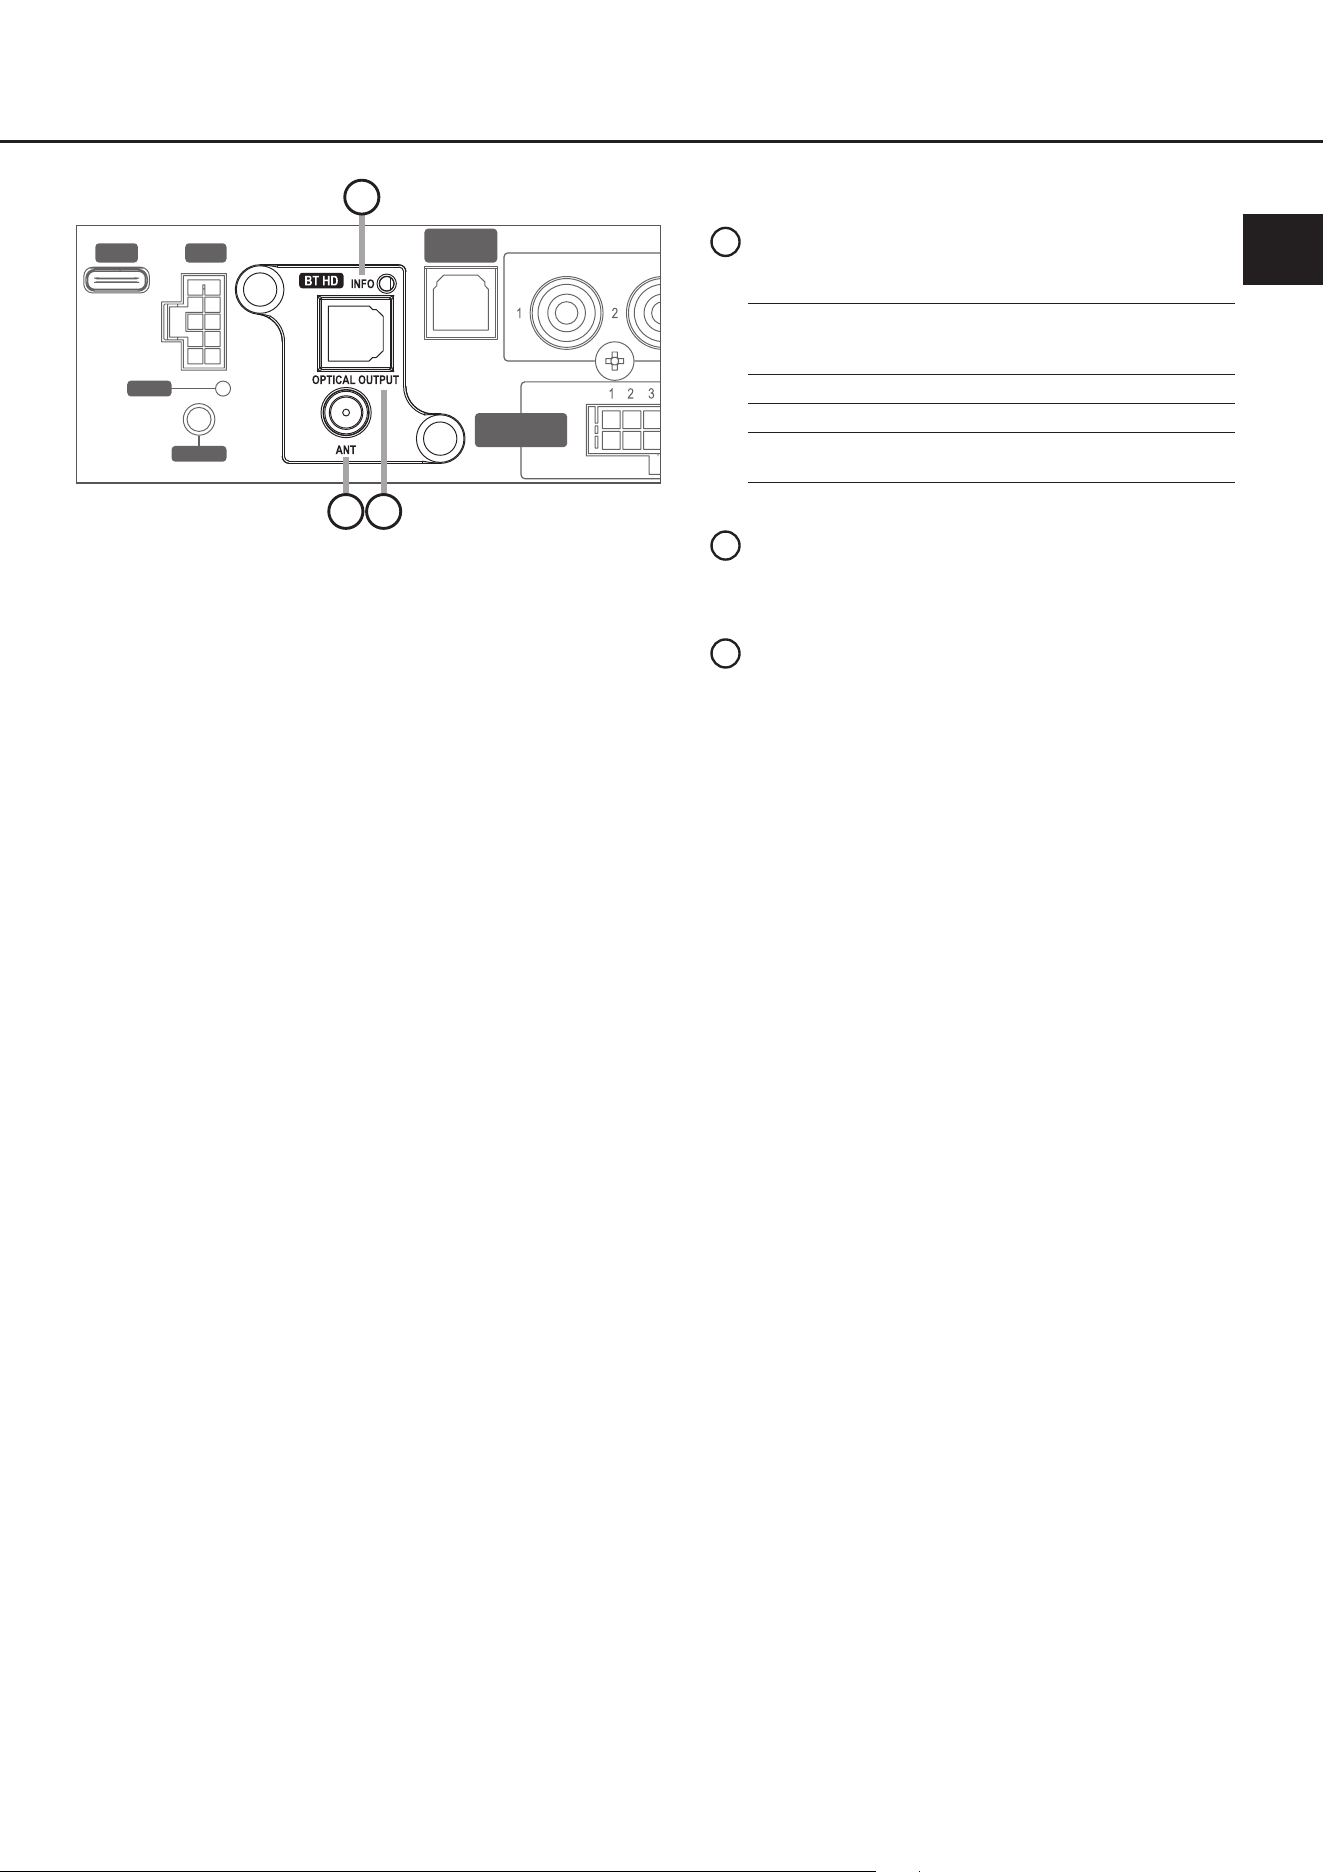
ANT
Schraubanschluss für die beiliegende Hoch-
leistungsantenne
2
Info LED
Zeigt den Status des BT HD Moduls an:
1
Optical Output
Optischer Digitalausgang im SPDIF Format,
welcher die Übertragung unprozessierter
oder DSP-prozessierter Ausgangssignale an
andere Geräte ermöglicht
3
2
Blaue LED an: 1 Sek.,
aus: 2 Sek.,
Wiederholung
Alle Profile im Standby-Mo-
dus, aber nicht mit einem
Bluetooth
®
-Gerät verbunden
Blaue & rote LED blinken
abwechselnd
Pairing-Modus aktiviert
Blaue LED blinkt all 2 Sek. Gerät verbunden
Blaue LED blinkt alle 2 Sek.
zwei mal
Gerät streamt
4
Im folgenden Abschnitt wird beschrieben, wie die Extension Card 2.0 (EC 2.0) installiert und in Betrieb genommen wird:
1. Kabelverbindungen trennen
Trennen Sie alle Kabelverbindungen vom Gerät.
2. DSP/DSP-Verstärkerönen
Önen Sie das Gerät, indem Sie das Seitenblech mit dem Extension Card 2.0-Eingang sowie das Bodenblech ge-
mäß der Beschreibung in der gerätespezischen Bedienungsanleitung entfernen.
3. Seitenblech vorbereiten
Entfernen Sie die Abdeckblende der EC 2.0 vom zuvor demontierten Seitenblech, indem Sie die zwei Inbusschrau-
ben auf der Rückseite lösen. Montieren Sie nun die neue, der EC 2.0 beiliegende Abdeckblende. Achten Sie auf
korrekte Ausrichtung und ziehen Sie die Schrauben nur handfest an.
4. EC 2.0 vorbereiten
Entfernen Sie die Mutter und Unterlegscheibe vom Schraubanschluss der Antenne (Seite 3, Punkt 2).
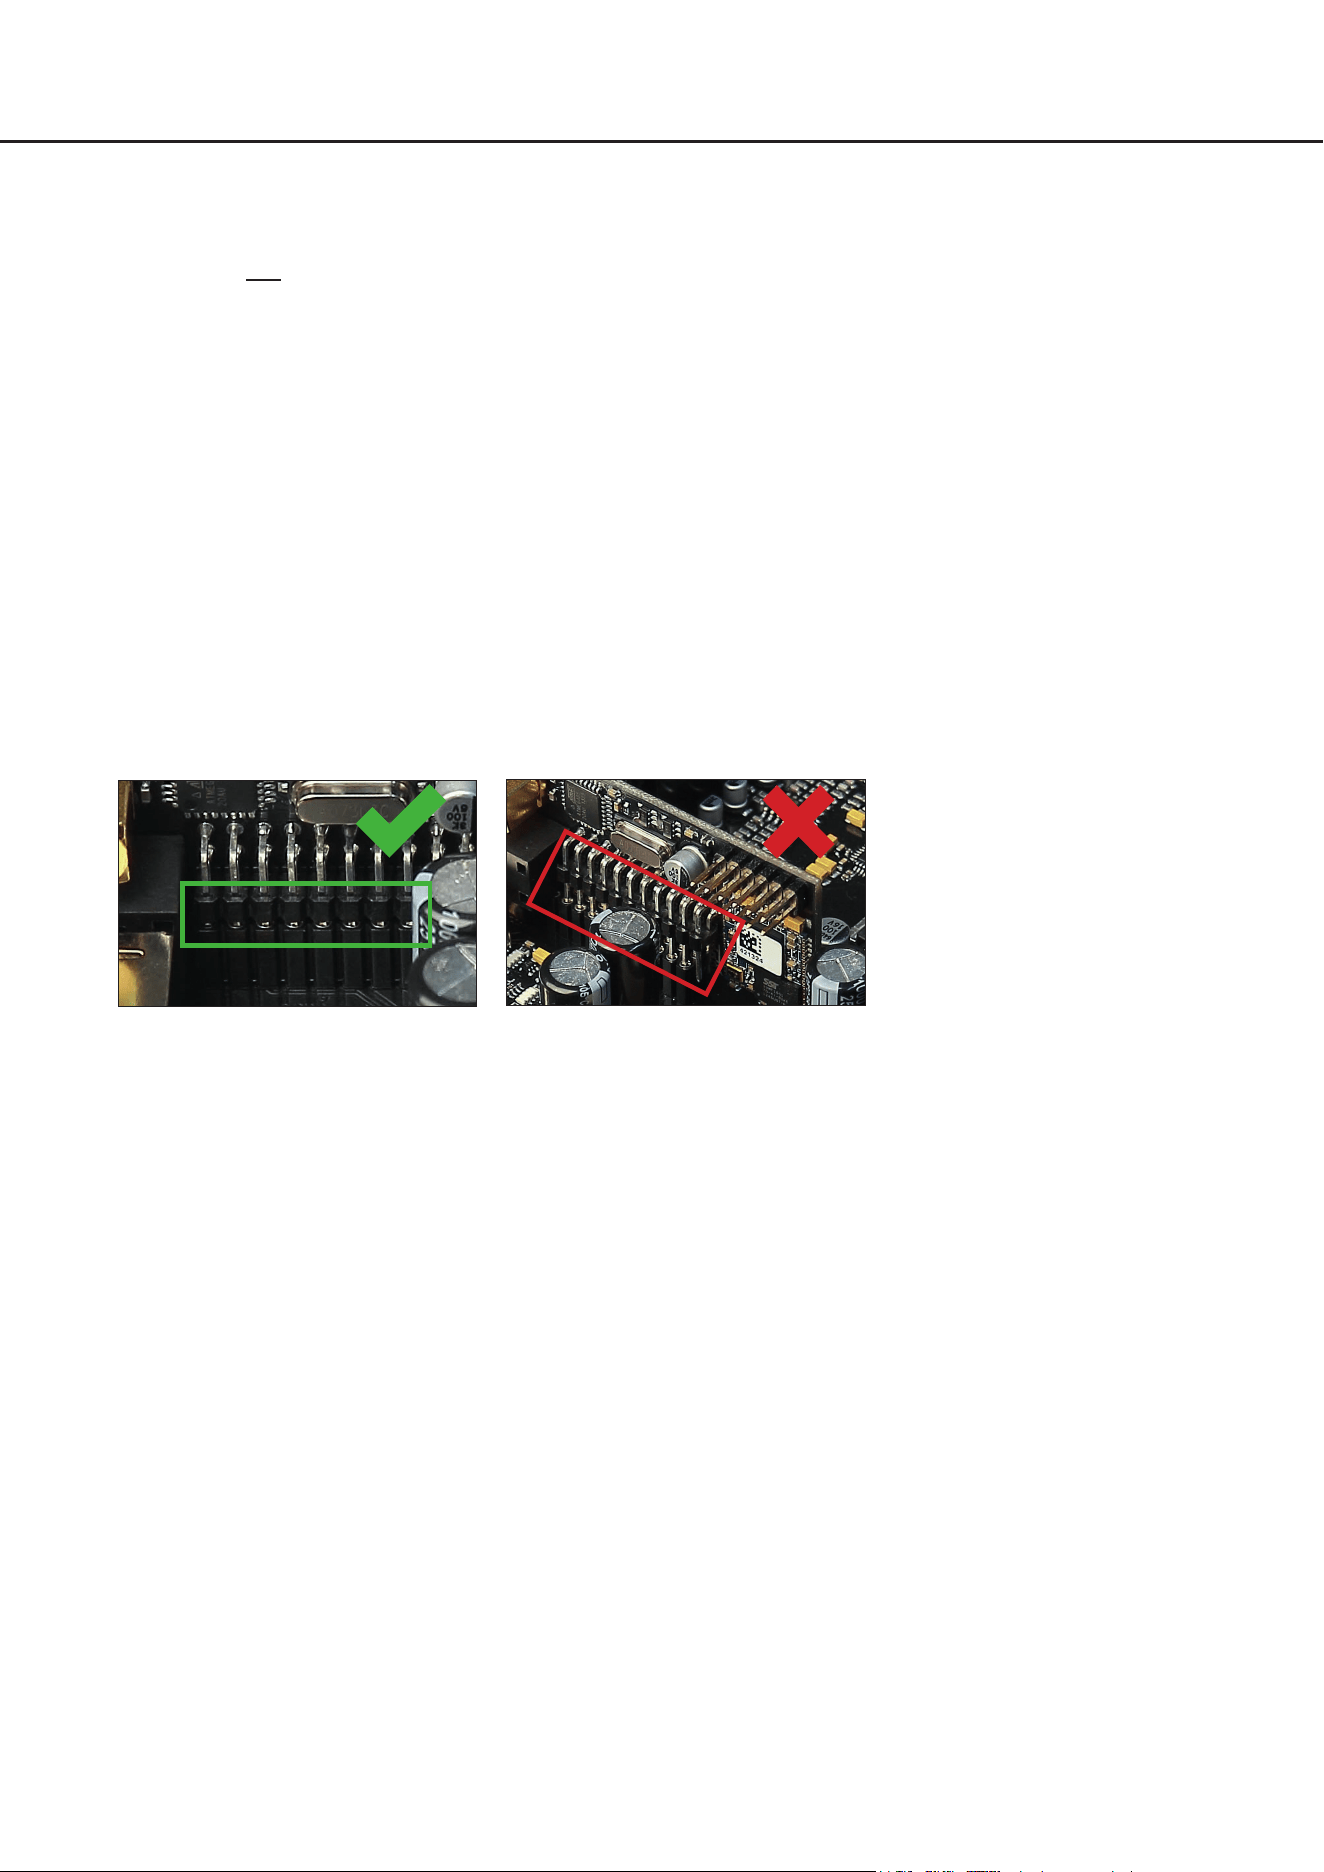
5. EC 2.0 in DSP / DSP-Verstärker einsetzen
Stecken Sie das Modul in den im Gerät vorgesehenen Sockel. Informationen zur Position des Sockels nden Sie in
der Bedienungsanleitung des jeweiligen DSP-Produkts.
Achten Sie auf korrekten Sitz und vollständigen Kontakt der Pins.
6. DSP / DSP-Verstärker wieder zusammensetzen
Setzen Sie das Gerät gemäß der Beschreibung in der gerätespezischen Bedienungsanleitung wieder zusammen.
7. EC2.0xieren
Setzen Sie die Unterlegscheibe und die Mutter auf die Antennenbuchse und verschrauben diese mit dem Seiten-
blech. Ziehen Sie die Schrauben nur handfest an, um Beschädigungen zu vermeiden.
8. Inbetriebnahme
Schließen Sie alle Kabel wieder an und schalten Sie das Gerät ein. Die EC 2.0 wird vom Gerät automatisch erkannt,
und die Info-LED (Seite 3, Punkt 1) des Moduls blinkt blau.
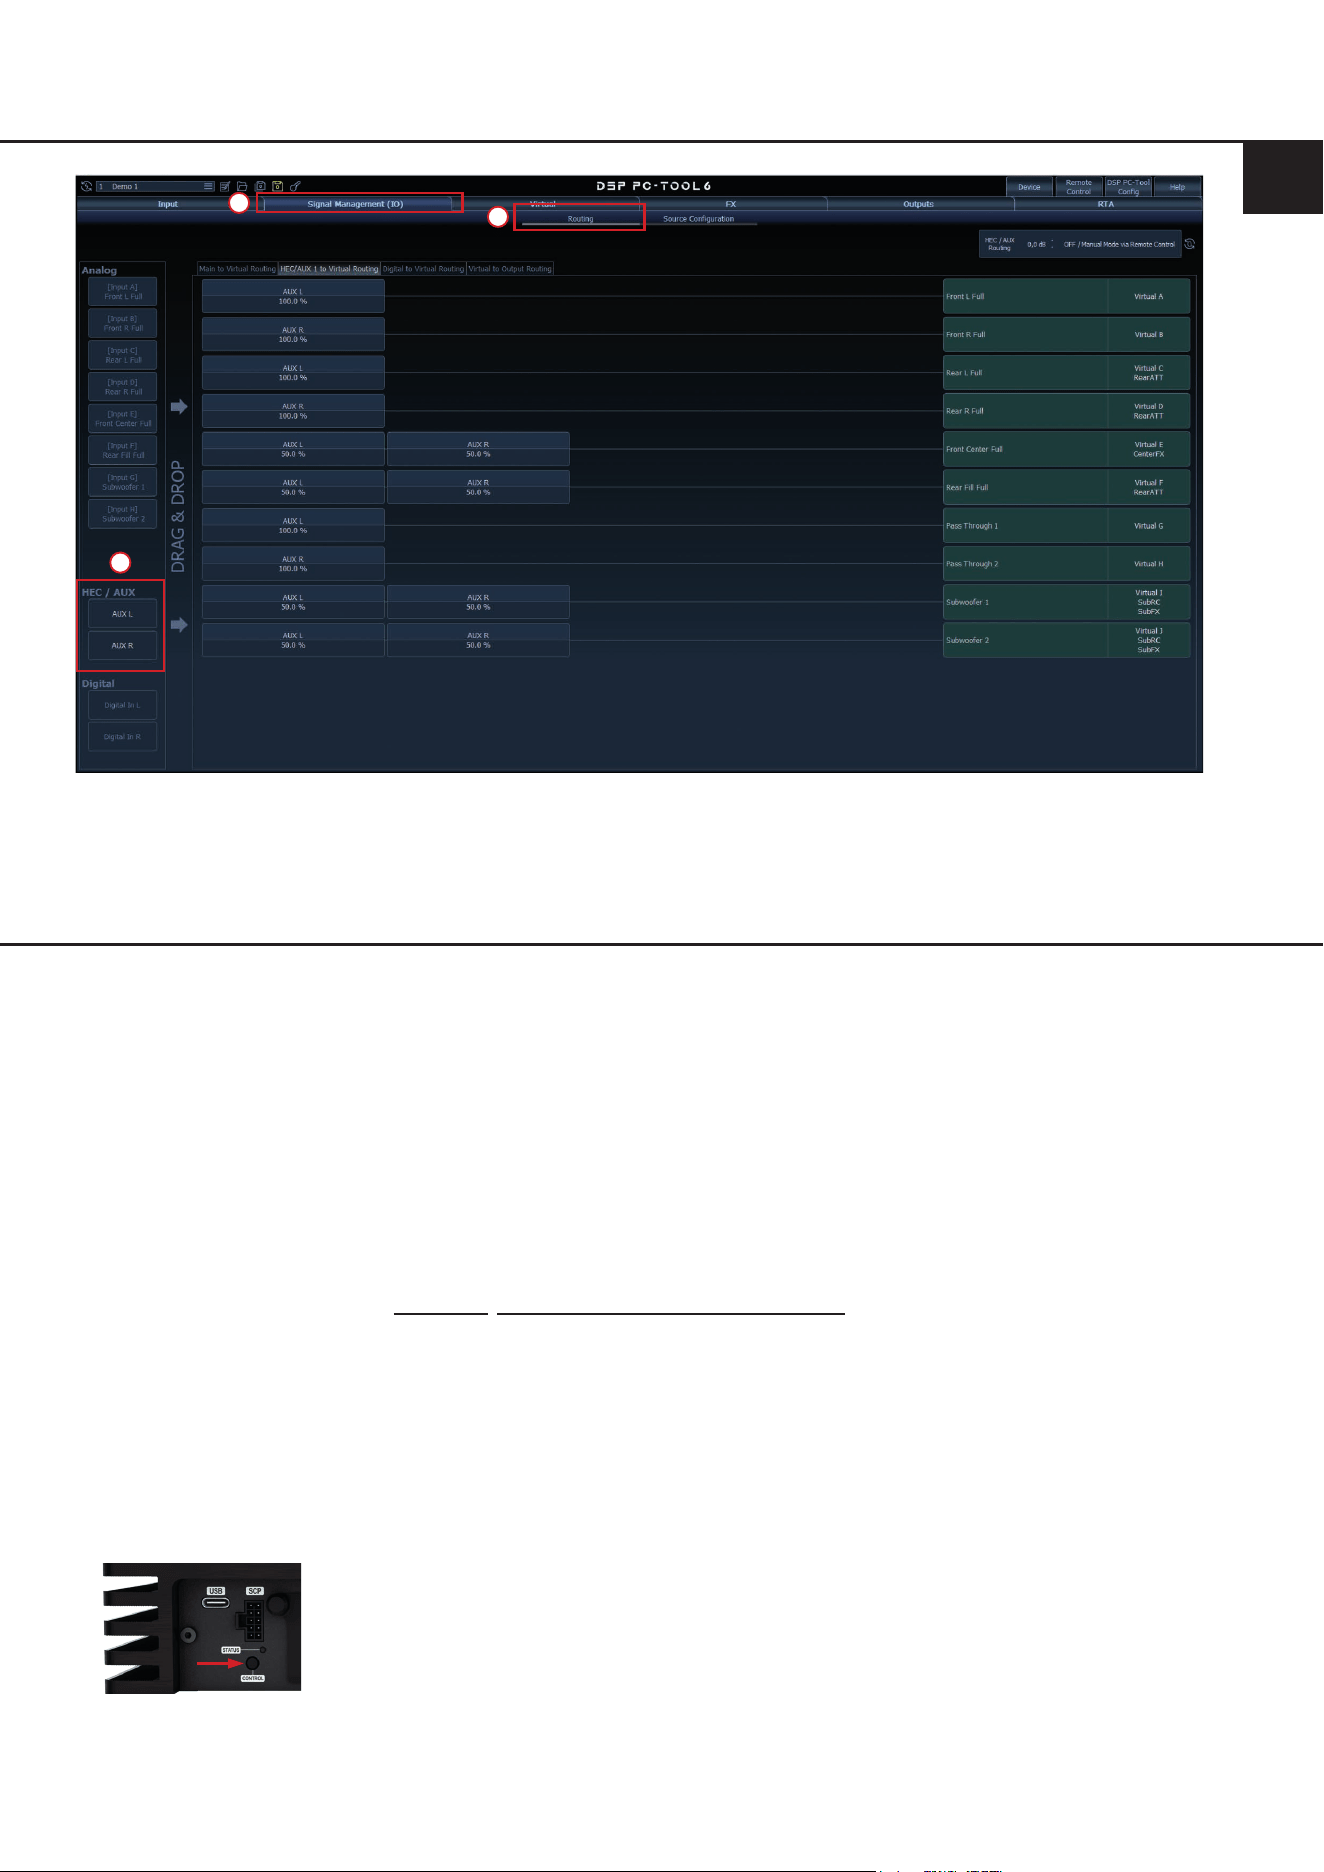
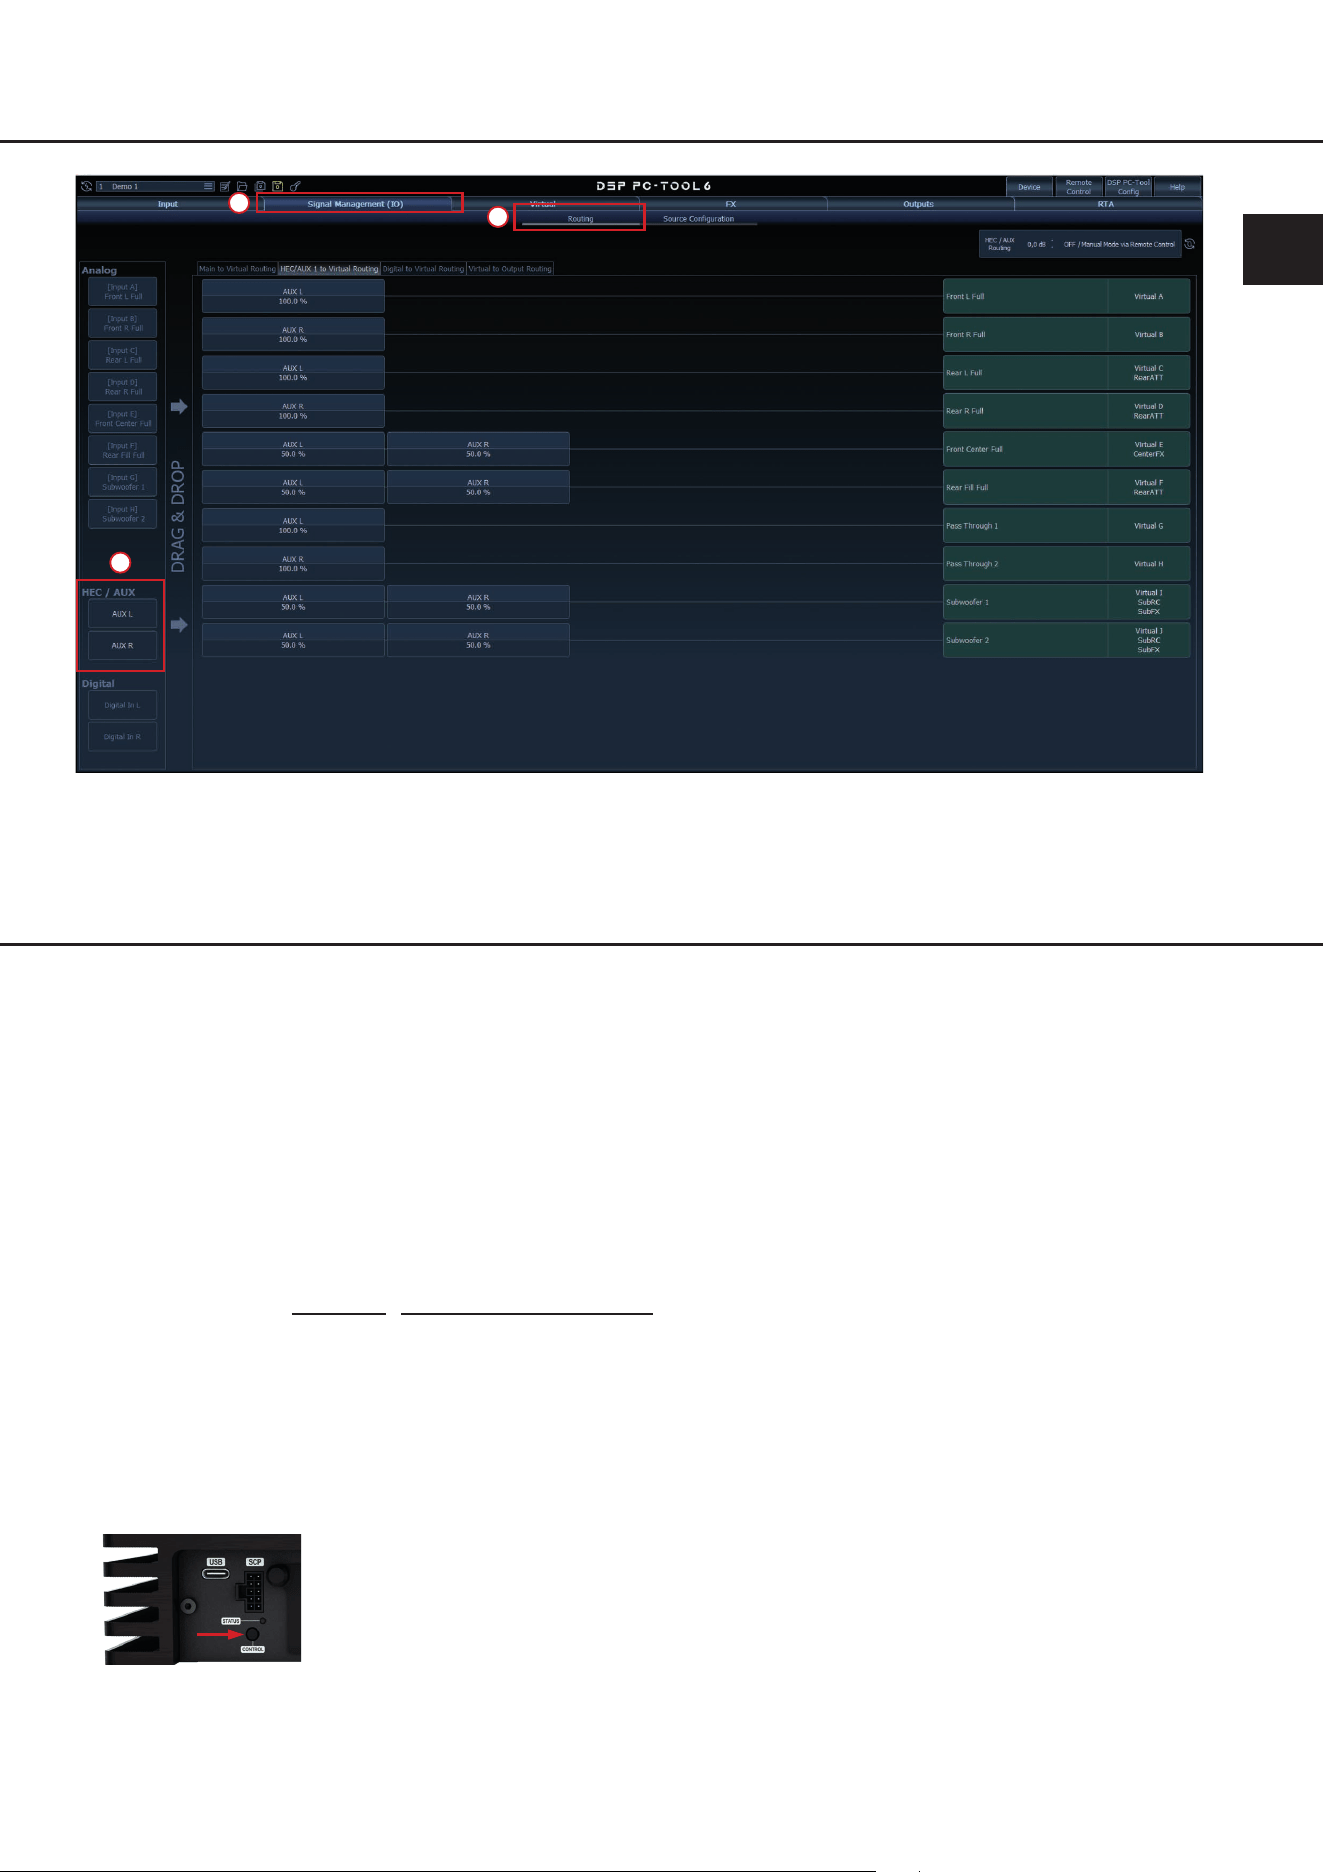
9. Signalrouting im DSP PC-Tool
In der DSP PC-Tool Software können Sie nun die Eingänge als zusätzliche „Main“-Eingänge oder als „AUX“-Quelle
frei kongurieren.
Verbinden Sie dazu den DSP / DSP-Verstärker mit Ihrem PC und starten anschließend die DSP PC-Tool Software.
Das Routing kann dann im Reiter „Signal Management (IO)“ des „Routing“-Tabs vorgenommen werden.
Installation&Konguration
5
de
1
2
3
Pairing-Prozess
Für die Verbindung zwischen dem Audiotec Fischer DSP-Gerät und deinem Endgerät mit Bluetooth Wireless Techno-
logie ist ein einmaliger Pairing-Vorgang erforderlich.
Das Pairing kann auf drei verschiedene Arten durchgeführt werden:
Option a: über den Control-Taster am DSP-Gerät
Option b: über die DSP PC-Tool Software
Option c: über eine angeschlossene Fernbedienung wie DIRECTOR oder CONDUCTOR
Das BT HD Modul kann mit bis zu acht Bluetooth
®
-Geräten gekoppelt werden. Sobald ein neuntes Gerät gekoppelt
wird, wird das zuerst verbundene Gerät automatisch aus der Liste entfernt.
Hinweis: Stelle sicher, dass die Bluetooth
®
-Funktion deines Geräts aktiviert ist, bevor du den Pairing-Prozess startest.
Wichtig: Die Info-LED (Seite 3, Punkt 1) der Extension Card 2.0 blinkt während des Pairing-Modus abwechselnd blau
und rot. Wenn innerhalb von drei Minuten keine Verbindung hergestellt wird, wird der Pairing-Modus automatisch be-
endet.
Option a: über den Control-Taster am DSP-Gerät
1. Schalten Sie das DSP-Gerät ein und drücke die „Control“-Taste für weniger als 1 Sekunde, um den Pairing-Modus
zu starten (Info-LED blinkt abwechselnd blau und rot).
Die Abbildung zeigt stellvertretend den Control-Taster der
HELIX V EIGHT DSP ULTIMATE
2. Önen Sie die Bluetooth
®
-Einstellungen des Endgeräts auf und verbinden Sie sich mit dem Netzwerk „ATF BT HD“.
Eine erfolgreiche Kopplung wird durch eine alle zwei Sekunden blau blinkende Info-LED angezeigt.
6
Pairing-Prozess
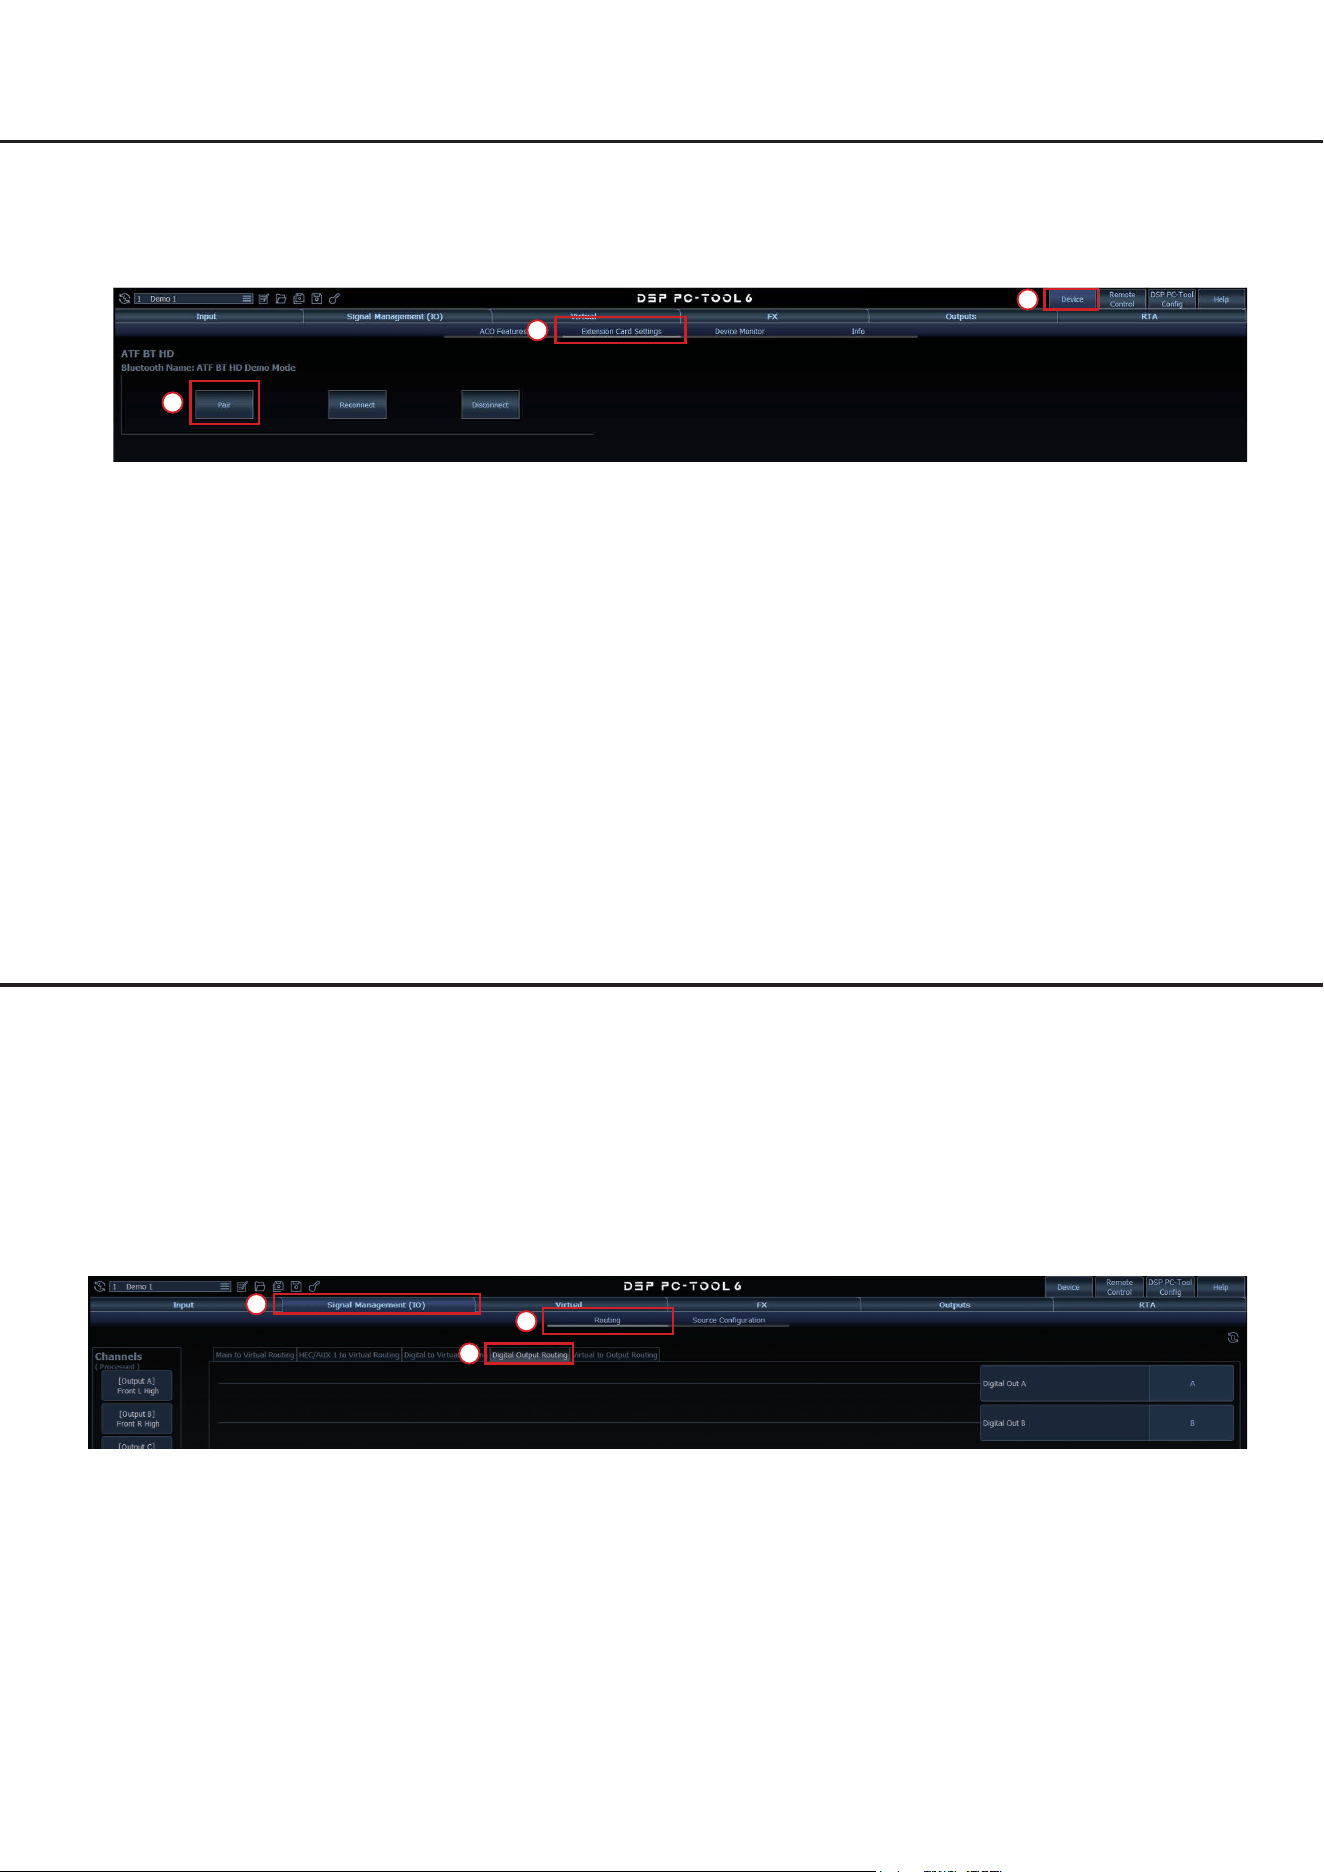
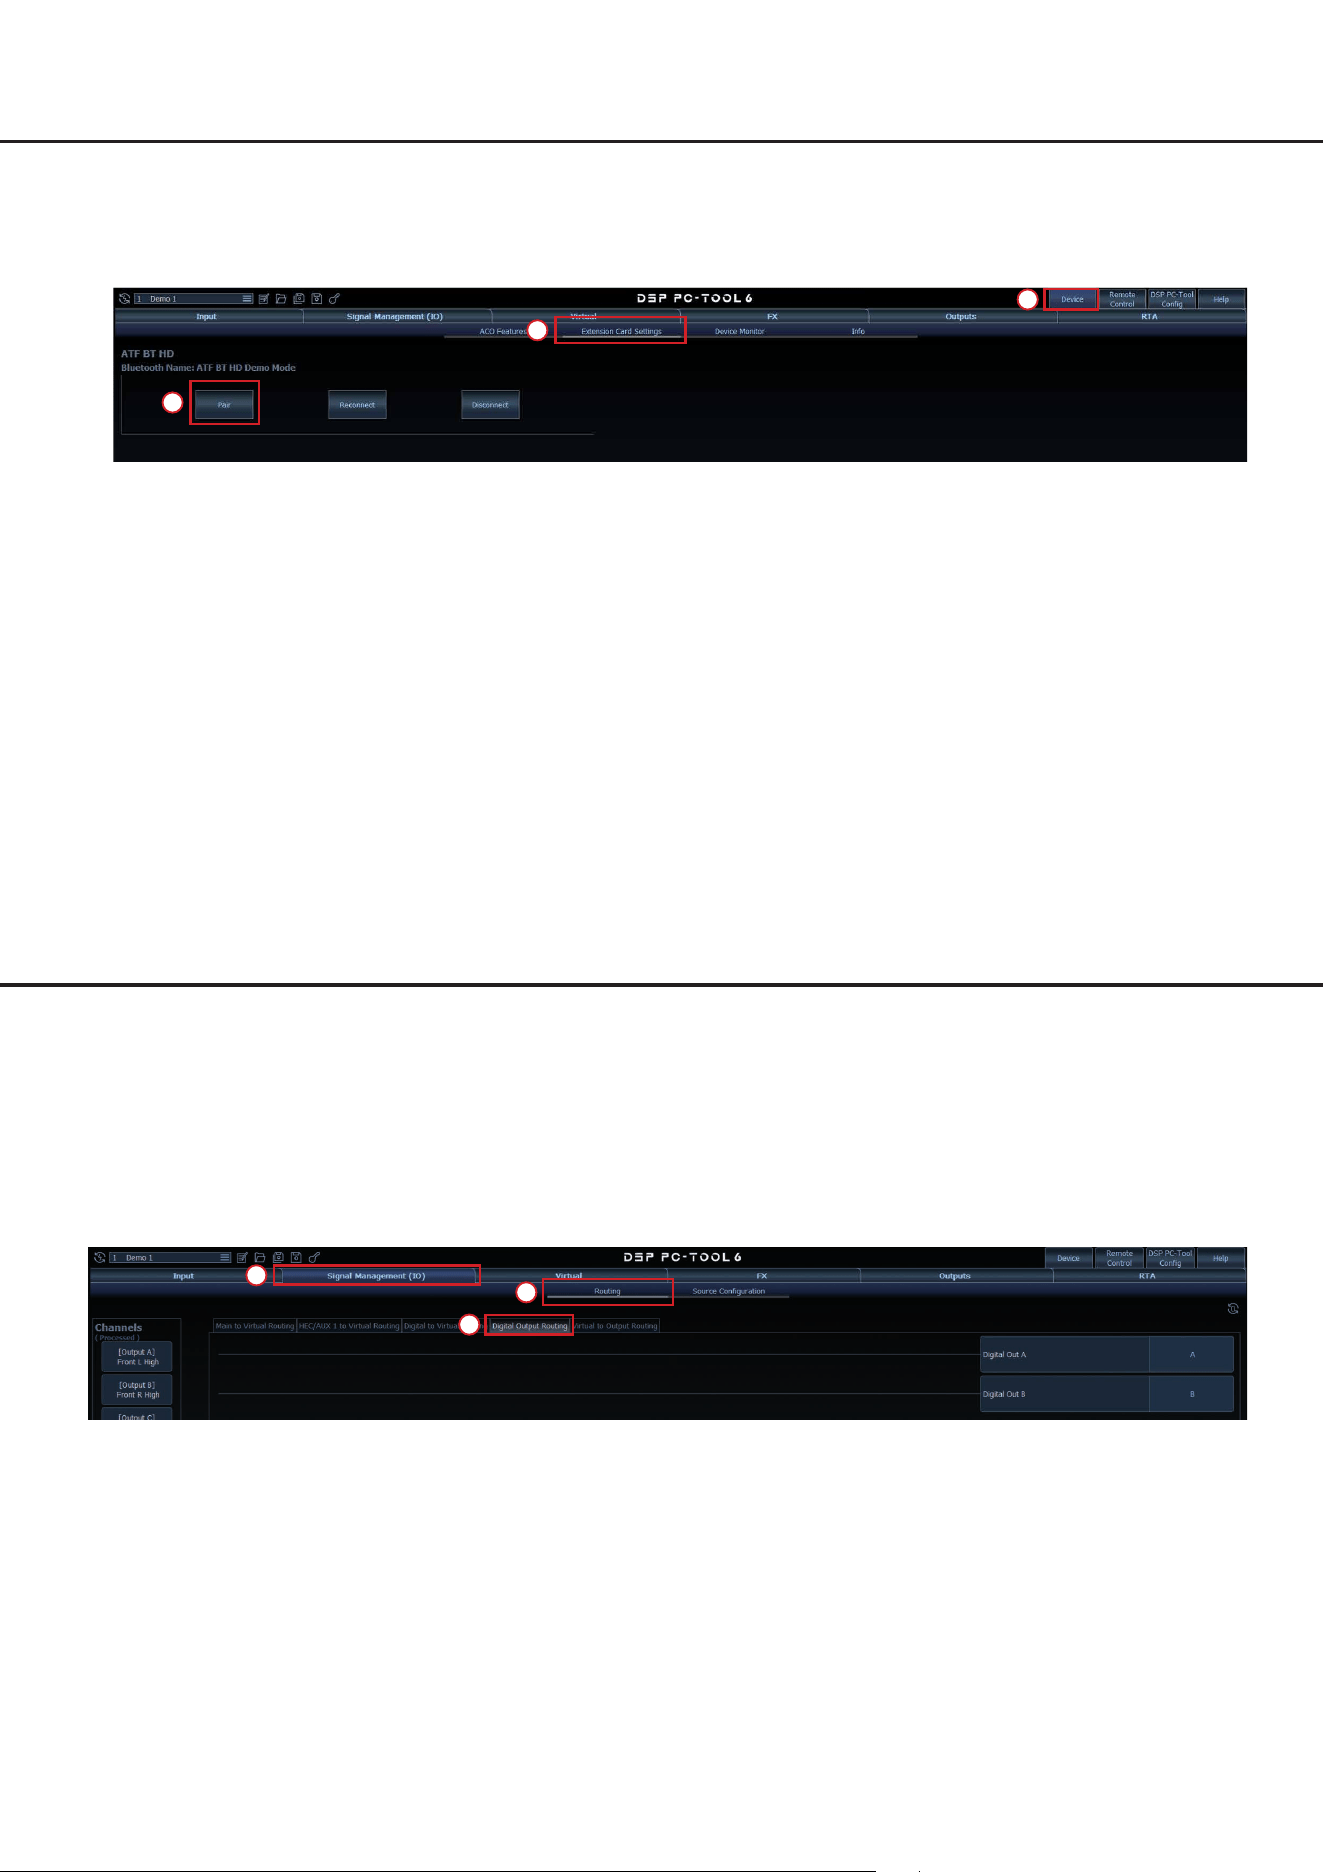
Option b: über die DSP PC-Tool Software
1. Verbinden Sie den DSP / DSP-Verstärker mit Ihrem PC und starten die DSP PC-Tool Software.
2. Navigieren Sie im „Device“-Menü zum „Extension Card Settings“-Tab und klicken auf „Pair“. Die Info-LED der Exten-
sion Card 2.0 blinkt nun abwechselnd blau und rot.
1
2
3
3. Önen Sie die Bluetooth
®
-Einstellungen des Endgeräts auf und verbinden Sie sich mit dem Netzwerk „ATF BT HD“.
Eine erfolgreiche Kopplung wird durch eine alle zwei Sekunden blau blinkende Info-LED angezeigt.
Option c: über eine angeschlossene Fernbedienung
Der Pairing Modus kann ebenfalls über eine am DSP-Produkt angeschlossenen Fernbedienung, wie beispielsweise
dem CONDUCTOR oder dem DIRECTOR gestartet werden.
1. Starten Sie den Pairing-Vorgang über die Fernbedienung:
- DIRECTOR: Rufen Sie das „Bluetooth
®
Connect“-Menü auf und drücken Sie die „Pair“-Taste.
- CONDUCTOR: Wechseln Sie in ein Menü zur Lautstärkeregelung oder Bluetooth
®
-Wiedergabe und drücken den
Drehregler länger als 5 Sekunden.
Weitere Informationen zur Pairing-Funktion der Fernbedienung nden Sie in der jeweiligen Bedienungsanleitung.
2. Önen Sie die Bluetooth
®
-Einstellungen des Endgeräts auf und verbinden Sie sich mit dem Netzwerk „ATF BT HD“.
Eine erfolgreiche Kopplung wird durch eine alle zwei Sekunden blau blinkende Info-LED angezeigt.
OptischerDigitalausgangderExtensionCard2.0–BTHD
Durch den Einbau der Extension Card 2.0 wird das DSP-Gerät um einen digitalen, optischen SPDIF-Ausgang erweitert.
Über diesen Ausgang können sowohl unprozessierte Eingangssignale als auch DSP-prozessierte Ausgangssignale an
andere Geräte übertragen werden.
Der digitale Ausgang liefert ein unkodiertes Stereo-PCM-Signal mit entweder 96 kHz / 24 Bit oder 48 kHz / 24 Bit, ab-
hängig von der Abtastrate DSP-Geräts.
Das Routing kann ebenfalls in der DSP PC-Tool Software im Reiter „Signal Management (IO)“ des „Routing“-Tabs unter
„Digital Output Routing“ vorgenommen werden.
1
2
3

7
de
Wireless DSP-Tuning
Die Extension Card 2.0 – BT HD ermöglicht für alle DSP-Geräte mit ACO-Plattform die kabellose Konguration des
DSPs mit Hilfe der DSP PC-Tool Software (min. DSP PC-Tool 6) und einem PC mit Bluetooth
®
Wireless Technologie.
Gehen Sie dazu wie folgt vor:
1. Koppeln Sie die Extension Card 2.0 – BT HD mit Ihrem PC wie im Abschnitt „Pairing-Prozess“ auf Seite 5 f. beschrie-
ben.
2. Starten Sie die DSP PC-Tool Software. Schalten Sie den Verbindungstyp oben in der Navigation des Launchers auf
Bluetooth
®
.
1
2
3. Wählen Sie das gewünschte Gerät zur Konguration aus und klicken Sie auf „Connect“. Sie können die Konguration
nun beginnen.

8
Technische Daten
Bluetooth
®
-Standard 5.0 + EDR
Bluetooth
®
-Prol A2DP, AVRCP, SPP
Bluetooth
®
-Codec SBC, AAC, Qualcomm
®
aptX™ und Qualcomm
®
aptX™ HD
Anzahl gekoppelter Geräte 8
Drahtlose Frequenz-Bandbreite 2402 ~ 2480 MHz
Reichweite Bis zu 10 m
Optischer Digitalausgang In Abhängigkeit der gerätespezischen Abtastrate SPDIF mit 96 kHz / 24
Bit oder 48 kHz / 24 Bit
Kompatibilität Alle HELIX und MATCH DSP-Produkte mit Extension Card 2.0 Steckplatz
9
de
Rechtliche Hinweise
Garantiehinweise
Die Garantieleistung entspricht der gesetzlichen Regelung. Von der Garantieleistung ausgeschlossen sind Defekte
und Schäden, die durch Überlastung oder unsachgemäße Behandlung entstanden sind. Eine Rücksendung kann
nur nach vorheriger Absprache in der Originalverpackung, einer detaillierten Fehlerbeschreibung und einem gültigen
Kaufbeleg erfolgen. Technische Änderungen, Druckfehler und Irrtümer vorbehalten! Für Schäden am Fahrzeug oder
Gerätedefekte, hervorgerufen durch Bedienungsfehler des Gerätes, können wir keine Haftung übernehmen.
Markenzeichen
Die Bluetooth
®
Wortmarke und die Logos sind eingetragene Warenzeichen der Bluetooth SIG,
Inc. und jegliche Nutzung dieser Marken durch die Audiotec Fischer GmbH geschieht unter
Lizenz.
Qualcomm ist eine Handelsmarke der Qualcomm Incorporated, die in den Vereinigten Staa-
ten und anderen Ländern eingetragen ist. Die Nutzung erfolgt mit Genehmigung des Eigentü-
mers. aptX ist eine Handelsmarke der Qualcomm Technologies International, Ltd., die in den
Vereinigten Staaten und anderen Ländern eingetragen ist. Die Nutzung erfolgt mit Genehmi-
gung des Eigentümers.
Andere Handelsmarken und Handelsnamen gehören den jeweiligen Inhabern.
Hinweise zur Entsorgung
Dieses Symbol bedeutet, dass das Produkt nicht über den Hausmüll entsorgt werden darf, sondern bei
einer entsprechenden Sammelstelle zum Recycling abgegeben werden muss. Befolgen Sie die ört-
lichen Vorschriften und entsorgen Sie das Produkt niemals mit dem normalen Hausmüll. Die ordnungs-
gemäße Entsorgung von Altgeräten trägt zur Vermeidung von Umwelt- und Gesundheitsschäden bei.
Regulatorische Hinweise
Dieses Produkt ist mit einer CE-Kennzeichnung versehen. Damit ist das Gerät für den Betrieb in Fahr-
zeugen innerhalb der Europäischen Union (EU) zertiziert.
Dieses Produkt ist mit einer UKCA-Kennzeichnung versehen. Damit ist das Gerät für den Betrieb in Fahr-
zeugen innerhalb des Vereinigten Königreichs zertiziert.
Dieses Produkt ist mit einer EAC-Kennzeichnung versehen. Damit ist das Gerät für den Betrieb in Fahr-
zeugen innerhalb der Eurasian Customs Union zertiziert.

10
Congratulations
Dear Customer,
Congratulations on purchasing the Extension Card 2.0 – BT HD, a high-quality High Denition Bluetooth
®
audio stream-
ing module designed to expand your DSP system with additional interfaces and functionality.
We developed the Extension Card 2.0 based on state-of-the-art engineering which is reected in its exceptional quality
and the impressive use of sophisticated technologies.
We hope you enjoy this product.
The
AUDIOTEC FISCHER Team
General information
To prevent damage to the unit / module and possible injury, read this manual carefully and follow all installation in-
structions. This product has been checked for proper function prior to shipping and is guaranteed against manufac-
turing defects.
Before starting your installation, disconnect the battery’s negative terminal and all cables from the device to
preventdamagetotheunit/module,reand/orriskofinjury.
For a proper performance and to ensure full warranty coverage, we strongly recommend to get this product installed
by an authorized Audiotec Fischer dealer.
Install the Extension Card only in the designated device and its specic slot. Using the module in other devices or
slots can result in damage of the Extension Card 2.0, the device, the head unit / radio or other connected devices!
1 x BT HD module
1 x Module-specic cover panel
1 x Antenna
1 x Mounting screws
Scope of delivery
11
en
Connectors and control units
SCP
OPTICAL
INPUT
USB
HIGHLEVEL
INPUT
HIGHLEVEL
INPUT
REM
OUT
STATUS
CONTROL
1
3
ANT
Screw connection for the enclosed high-per-
formance antenna
2
Info LED
Indicates the status of the BT HD module:
1
Optical output
Digital optical output in SPDIF format that
allows to transmit any unprocessed input
or DSP-processed output signals to other
devices
3
2
Blue LED on: 1 sec.,
o: 2 sec.,
repeat
All profiles are in standby
but not connected with any
Bluetooth
®
device yet
Blue & red LED ash alternate Enter pairing mode
Blue LED ash every 2 sec. Device is connected
Blue LED ash twice every
2 sec
Device is streaming

12
This section describes how to install and commission the Extension Card 2.0 (EC 2.0):
1. Disconnect connections
Disconnect all cable connections from the device.
2. OpenDSP/DSPamplier
Open the device by removing the side panel with the Extension Card 2.0 input and the bottom plate, as described in
the user manual of your specic DSP model.
3. Prepare the side panel
Remove the cover panel of the EC 2.0 from the previously removed side panel by loosening the two Allen screws
on the back. Now t the new cover panel supplied with the EC 2.0. Ensure correct alignment and tighten the screws
hand-tight only.
4. Prepare EC 2.0
Remove the nut and the washer from the antenna socket (page 11, point 2) of the module.
5. InsertEC2.0intotheDSP/DSPamplier
Insert the module into the designated socket inside the device. Information about the socket position can be found
in the user manual of the respective DSP product.
Make sure that the module is installed properly and all pins are fully inserted into the socket.
6. ReassembletheDSP/DSPamplier
Reassemble the device as described in the user manual of your specic model.
7. FixEC2.0
Put the washer and the nut on the antenna socket and bolt it to the side panel. Do not overtighten the nut to avoid
damage.
8. Commissioning
Reconnect all cables and power on the device. The EC 2.0 will be automatically recognized, and the module’s Info
LED (page 11, point 1) will ash blue.
9. Signal routing in DSP PC-Tool
In the DSP PC-Tool software, the inputs can be freely congured either as additional “Main” inputs or as an “AUX”
source.
To do this, connect the DSP / DSP amplier to your PC and launch the DSP PC-Tool software.
The routing can be congured in the “Signal Management (IO)” section of the “Routing” tab.
Installation&conguration
13
en
1
2
3
Pairing process
To establish a connection between the Audiotec Fischer DSP device and your Bluetooth
®
device with wireless technol-
ogy, a one-time pairing process is required.
Pairing can be carried out in three dierent ways:
Option a: via the control button on the DSP device
Option b: via the DSP PC-Tool Software
Option c: via a connected remote control such as the DIRECTOR or CONDUCTOR
The BT HD module can be paired with up to eight Bluetooth
®
devices. As soon as you try to pair a ninth device, the rst
one will be erased automatically from the pairing list.
Note: Make sure that Bluetooth
®
is enabled on your device before starting the pairing process.
Important: During pairing mode, the Info LED of the Extension Card 2.0 (page 11, point 1) ashes alternately blue and
red. After three minutes the pairing mode is left automatically if the connection has not been established.
Option A: via the control button on the DSP device
1. Turn on the DSP device and push the “Control“ pushbutton for less than 1 second in order to start the pairing mode
(Info-LED ashes alternately blue and red).
The image shows the Control pushbutton of the
HELIX V EIGHT DSP ULTIMATE as an example
2. Open the Bluetooth
®
settings on your device and connect to the “ATF BT HD” network. A successful pairing is indicat-
ed by the Info LED ashing blue once every two seconds.
14
Pairing-Prozess
Option B: via the DSP PC-Tool software
1. Connect the DSP / DSP amplier to your PC and launch the DSP PC-Tool software.
2. Go to the “Extension Card Settings” tab in the “Device” menu and click “Pair”. The Info LED of the Extension Card 2.0
will now ash alternately blue and red.
1
2
3
3. Open the Bluetooth
®
settings on your device and connect to the “ATF BT HD” network. A successful pairing is indicat-
ed by the Info LED ashing blue once every two seconds.
Option C: via a connected remote control
Pairing mode can also be started via a remote control connected to the DSP device, such as the CONDUCTOR or
DIRECTOR.
1. Start the pairing process via the remote control:
- DIRECTOR: Go to the “Bluetooth
®
Connect” menu and push the “Pair” button.
- CONDUCTOR: Switch to a “Volume Control” or “Bluetooth
®
Playback” control menu and press the rotary knob for
more than 5 seconds.
Further information on the pairing function of the remote control can be found in the corresponding user manual.
2. Open the Bluetooth
®
settings on your device and connect to the “ATF BT HD” network. A successful pairing is indicat-
ed by the Info LED ashing blue once every two seconds.
DigitalopticaloutputoftheExtensionCard2.0–BTHD
The installation of the Extension Card 2.0 adds as well an additional digital optical SPDIF output to your device. This
output allows to transmit any unprocessed input or DSP-processed output signals to other devices.
The digital output delivers an uncoded stereo PCM signal with either 96 kHz / 24 bit or 48 kHz / 24 bit, depending on the
sampling rate of the designated DSP device.
The routing can also be congured in the DSP PC-Tool software under “Digital Output Routing” in the “Signal Manage-
ment (IO)” section of the “Routing” tab.
1
2
3

15
en
Wireless DSP tuning
The Extension Card 2.0 – BT HD also oers a wireless conguration of the DSP via the DSP PC-Tool software (from
DSP PC-Tool 6) and a PC with Bluetooth
®
wireless technology for all DSP devices equipped with ACO platform.
Therefore follow the subsequent steps:
1. Pair the Extension Card 2.0 – BT HD with your PC as described in the “Pairing Process” section on page 13 f.
2. Launch the DSP PC-Tool software. In the launcher navigation at the top, set the connection type to Bluetooth
®
.
1
2
3. Select the device which should be congured and click the “Connect” button. You can now start your conguration.

16
Technical data
Bluetooth
®
standard 5.0 + EDR
Bluetooth
®
prole A2DP, AVRCP, SPP
Bluetooth
®
codec SBC, AAC, Qualcomm
®
aptX™ and Qualcomm
®
aptX™ HD
Number of paired devices 8
Wireless frequency range 2402 ~ 2480 MHz
Range Up to 10 m
Digital optical output SPDIF with either 96 kHz / 24 Bit or 48 kHz / 24 Bit depending on sampling
rate of the device
Compatibility All HELIX and MATCH DSP devices with Extension Card 2.0 slot
17
en
Legal information
Warranty disclaimer
The warranty service is based on the statutory regulations. Defects and damage caused by overload or improper han-
dling are excluded from the warranty service. Any return can only take place following prior consultation, in the original
packaging together with a detailed description of the error and a valid proof of purchase.
Technical modications, misprints and errors excepted! For damages on the vehicle and the device, caused by han-
dling errors of the device, we can’t assume liability.
Trademarks
The Bluetooth
®
word mark and logos are registered trademarks owned by Bluetooth SIG, Inc.
and any use of such marks by Audiotec Fischer GmbH is under license.
Qualcomm is a trademark of Qualcomm Incorporated, registered in the United States and other
countries, used with permission. aptX is a trademark of Qualcomm Technologies International,
Ltd., registered in the United States and other countries, used with permission.
Other trademarks and trade names are those of their respective owners.
Correct disposal of this product
This symbol means the product must not be discarded as household waste, and should be delivered to
an appropriate collection facility for recycling. Follow local rules and never dispose of the product with
normal household waste. Correct disposal of old products helps prevent negative consequences for the
environment and human health.
Regular notes
This product has been issued a CE marking. This means that the device is certied for use in vehicles
within the European Union (EU).
This product has been issued an UKCA marking. This means that the device is certied for use in vehi-
cles within the United Kingdom.
This product has been issued an EAC marking. This means that the device is certied for use in vehicles
within the Eurasian Customs Union.

Audiotec Fischer GmbH
Hünegräben 26 - 28 · 57392 Schmallenberg · Germany
Tel.: +49 2972 9788 0 · Fax: +49 2972 9788 88
E-mail: contact@audiotec-scher.com · Internet: www.audiotec-scher.com
Made in Germany

