

M.-Nr. 12 471 430
HS23
en-US
Operating Instructions
Cordless Stick Vacuum Cleaner
Operating instructions
Battery-powered stick vacuum cleaner
en-CA
fr-CA
Mode d’emploi
Aspirateur-balai sans fil

en-US - Contents
2
IMPORTANT SAFETY INSTRUCTIONS................................................................... 4
IMPORTANT SAFETY INSTRUCTIONS for AP10/AP11 battery, LG02 charger,
LS10 SpeedLock wall bracket (depending on the model)........................................
9
Sustainability and environmental protection.......................................................... 15
Appliance description .................................................................................................. 16
References to illustrations .......................................................................................... 18
Commissioning.............................................................................................................. 18
Assembling the vacuum cleaner .................................................................................
18
Connecting the PowerUnit and the suction wand ...................................................
18
Connecting the suction wand and the electrobrush ................................................
18
General battery information..........................................................................................
18
Charging the battery (without wall mounting) ..........................................................
18
Charging the battery (with wall mounting).................................................................
18
Screwing the wall bracket to the wall .........................................................................
19
Attaching the charging cable to the standard wall bracket .....................................
19
Attaching the charging cable to the SpeedLock wall bracket .................................
19
Battery charging state indicator (while charging) .....................................................
19
Battery charging state indicator (while in use) .........................................................
20
Using the accessories supplied ................................................................................ 20
Accessories holder for the suction wand ...................................................................
20
MultiFloor electrobrush (HX-EB20) ..........................................................................
20
Electro Compact handheld brush (HX-EC20) .........................................................
21
AllFloor floorbrush (HX-AF20) ...................................................................................
21
Universal brush (HX-UB) ..............................................................................................
21
Extendable flexible XL crevice nozzle (HX-CNXL) ....................................................
21
Hose extension (HX-FSH20) .....................................................................................
21
Operation........................................................................................................................ 21
Removing the vacuum cleaner from the standard wall bracket .............................
21
Removing the vacuum cleaner from the SpeedLock wall bracket .........................
21
Switching on and off .....................................................................................................
22
Increasing the suction power ......................................................................................
22
Using the PowerUnit solo ............................................................................................
22
Cleaning and care ......................................................................................................... 22
Filter system ...................................................................................................................
22
Activating the ComfortClean self-cleaning function ................................................
22
Emptying the dust container .......................................................................................
22
Cleaning the dust container and pre-filter .................................................................
23
Cleaning the fine dust filter ..........................................................................................
23

en-US - Contents
3
Cleaning the electrobrush/handheld brush (depending on the model) ................
24
Removing the roller brush from the electrobrush .....................................................
24
Removing the roller brush from the handheld brush (depending on the model) .
24
Replacing the battery ....................................................................................................
25
Caring for the vacuum cleaner and accessories ........................................................
25
Frequently asked questions........................................................................................ 26
Customer Service ......................................................................................................... 29
Contact in case of fault..................................................................................................
29
Warranty ..........................................................................................................................
29
Optional accessories.................................................................................................... 29
LIMITED WARRANTY - Vacuum Cleaners USA..................................................... 31

en-US - IMPORTANT SAFETY INSTRUCTIONS
4
READ ALL INSTRUCTIONS BEFORE USING
This vacuum cleaner complies with all current local and
national safety requirements. Improper use can lead to
personal injury and damage to property.
Please read the operating instructions before using the
vacuum cleaner for the first time. They contain important
information on the safety, use, and maintenance of the
vacuum cleaner. This prevents both personal injury and
damage to the appliance.
In accordance with standard IEC60335-1, Miele ex-
pressly and strongly advises that you read and follow the
instructions in the “Commissioning” section as well as
the IMPORTANT SAFETY INSTRUCTIONS.
Miele cannot be held liable for injury or damage caused
by non-compliance with these instructions.
Keep these operating instructions in a safe place and
pass them on to any future user.
Always disconnect the vacuum cleaner from the power
supply when you have finished using it, before changing
any accessories, as well as for maintenance work, clean-
ing, and troubleshooting. Use the On/Off switch on the
handle to do this.
Correct use
This vacuum cleaner is intended for cleaning flooring in
domestic households and similar residential environments.
This vacuum cleaner is not suitable for use on construction
sites.
This vacuum cleaner is not intended for outdoor use.

en-US - IMPORTANT SAFETY INSTRUCTIONS
5
This vacuum cleaner can be used for all normal cleaning
of carpets, rugs and hard flooring.
This vacuum cleaner is intended for use at altitudes of up
to 13,000ft (4000m) above sea level.
The vacuum cleaner must only be used to vacuum dry
floor surfaces. Do not vacuum people or animals. Any other
types of use, impermissible modifications, or alterations are
not permitted.
People with reduced physical, sensory, or mental capa-
bilities, or lack of experience or knowledge, who are unable
to use the vacuum cleaner safely, may only use the vacuum
cleaner if they are supervised while using it or have been
shown how to use it in a safe way and understand and rec-
ognize the consequences of incorrect operation.
Use only as described in this manual.
Use only manufacturer's recommended attachments.
Safety with children
Children must be kept away from the vacuum cleaner un-
less they are constantly supervised.
Children aged 8 and older may only use the vacuum
cleaner without supervision if they have been shown how
to use it in a safe manner. Children must be able to under-
stand and recognize the possible dangers caused by incor-
rect operation.
Children must not be allowed to clean or maintain the
vacuum cleaner unsupervised.
Do not allow the vacuum cleaner to be used as a toy.
Close attention is necessary when used near children.
en-US - IMPORTANT SAFETY INSTRUCTIONS
6
Danger of suffocation! Ensure that any plastic wrappings,
bags, etc. are disposed of safely and kept out of the reach
of children.
WARNING
To reduce the risk of fire, electric shock or injury:
Check the voltage rating of the vacuum cleaner before
connecting the power cord to an electrical outlet. Your
power source should correspond with the voltage rating
plate located on the underside of the vacuum. Use only
household AC outlets. Never use DC power sources. If you
are not sure of your home’s voltage supply, consult a quali-
fied electrician. Connecting the vacuum cleaner to a higher
voltage than indicated in these instructions may result in
damage to the vacuum cleaner or injury.
To reduce the risk of electric shock, this appliance has a
polarized plug (one blade is wider than the other.) This plug
will fit in a polarized outlet only one way. If the plug does
not fit fully in the outlet, reverse the plug. If it still does not
fit, contact a qualified electrician to install the proper out-
let. Do not alter the plug in any way.
Technical safety
The vacuum cleaner operates at 25.2V/25.69V.
It is classified as a class III appliance .
This appliance is supplied by a safety extra-low voltage
(SELV) power source where the voltage is low enough to
protect users from the risk of electrical shock. A Class II
charger is used for supplying power to charge the vacuum
cleaner .

en-US - IMPORTANT SAFETY INSTRUCTIONS
7
Compare the connection data on the data plate of the
charger (voltage and frequency) with that of the electricity
supply. This data must match exactly. Without modifica-
tions, the charger is suitable for 50Hz and 60Hz.
The electrical outlet must be rated at 15Amps.
Check both the vacuum cleaner and all accessories sup-
plied with it for any visible signs of damage before use. Do
not use a damaged vacuum cleaner or damaged accessory.
The MieleMultiFloorelectrobrush and the MieleElectro
Compacthandheldbrush (depending on the model) are ad-
ditional motor-driven devices designed specially for this
Miele vacuum cleaner. For safety reasons, the vacuum
cleaner must not be used with a different Mieleelectro-
brush/handheld brush or an electrobrush/handheld brush
produced by another manufacturer.
Before and during use, make sure that no coarse dirt or
debris is/gets trapped in the bottom of the MultiFloorelec-
trobrush or in the bottom of the ElectroCompacthand-
heldbrush (supplied depending on the model).
Store the vacuum cleaner and all accessories at an ambi-
ent temperature between 32°F and 113°F (0°C and 45°C).
Only store the vacuum cleaner in a horizontal position or
place it into the wall bracket.
Repairs should be performed by an authorized service
agent in accordance with national and local safety regula-
tions. Unauthorized repairs could cause injury or machine
damage. Otherwise the warranty may be void.

en-US - IMPORTANT SAFETY INSTRUCTIONS
8
Repairs should be carried out by a Miele-authorized ser-
vice technician. Repairs and other work by unqualified per-
sons can cause considerable danger to users.
Proper use
Do not use the vacuum cleaner without the pre-filter and
fine dust filter installed.
Do not use with damaged cord or plug.
If appliance is not working as it should, has been dropped,
damaged, left outdoors, or dropped into water, return it to a
service center.
Do not put any object into openings. Do not use with any
opening blocked; keep free of dust, lint, hair, and anything
that may reduce air flow.
Keep the vacuum cleaner away from naked flames or
other heat sources. Do not heat the vacuum cleaner. Do
not expose the vacuum cleaner to direct sunlight.
Do not vacuum up anything which has been burning or
smoking, e.g., cigarettes, ashes or hot ash, whether glowing
or apparently extinguished.
Do not vacuum up liquid. Allow steam-cleaned or sham-
pooed carpets and rugs to dry out completely before vacu-
uming.
Do not use the vacuum cleaner to vacuum toner dust.
Toner, such as that used in printers and photocopiers, can
conduct electricity.
Do not vacuum up any flammable or combustible liquids
or gases and do not vacuum in areas where such sub-
stances are stored.

en-US - IMPORTANT SAFETY INSTRUCTIONS
9
Never touch the roller brush of the MultiFloor electro-
brush or Electro Compact handheld brush (depending on
the model) while it is rotating.
Do not use the MultiFloor electrobrush or the Electro
Compact handheld brush (depending on the model) at
head height.
Do not vacuum at head height and do not let the suction
get anywhere near a person's head.
Keep hair, loose clothing, fingers, and all part of body
away from openings and moving parts.
Use extra care when cleaning on stairs.
IMPORTANT SAFETY INSTRUCTIONS for AP10/AP11
battery, LG02 charger, LS10 SpeedLock wall bracket (de-
pending on the model)
Safety with children
People (including children) with reduced physical, sen-
sory, or mental capabilities, or lack of experience or knowl-
edge, who are unable to use the LG02charger or LS10
SpeedLock wall bracket safely, may only use this vacuum
cleaner if they are supervised while using it or have been
shown how to use it in a safe way and understand and rec-
ognize the consequences of incorrect operation.
Keep the AP10/AP11battery out of the reach of children.
Children must be kept away from the LG02 charger and
the LS10 SpeedLock wall bracket unless they are con-
stantly supervised.
en-US - IMPORTANT SAFETY INSTRUCTIONS
10
Technical safety
The AP10/AP11 battery, the LG02 charger and the stan-
dard or LS10 SpeedLock wall brackets are designed for use
with the MieleHS23 vacuum cleaner. For safety reasons,
the vacuum cleaner must not be used with another battery,
charger, or wall bracket produced by another manufacturer.
If you are using a plug adapter, make sure that it is ap-
proved for continuous operation.
Only use the LG02/xx charger supplied for charging the
AP10/AP11 battery.
xx stands for 01, 02, 03, 04, 05, 06, or 07 and therefore
the version of your LG02 charger:
xx
01 AT, BE, BG, CH, CL, CZ, DE, DK, EE, ES, FI, FR, GR, HR, HU, IT, KZ, LT,
LU, LV, NL, NO, PL, PT, RO, RS, RU, SE, SI, SK, TR, UA, ZA
02 AE, HK, MY, SG
03 BR, CA, JP, MX, US
04 AU, NZ
05 CN
06 KR
07 IE, UK

en-US - IMPORTANT SAFETY INSTRUCTIONS
11
Temporary or permanent operation on an autonomous
power supply system or a power supply system that is not
synchronized with the grid power supply (e.g., island net-
works, back-up systems) is possible. A prerequisite for op-
eration is that the power supply system complies with na-
tional and local codes.
The function and operation of the protective measures pro-
vided in the domestic electrical installation and in this
Miele product must also be maintained in isolated opera-
tion or in operation that is not synchronized with the grid
power supply, or these measures must be replaced by
equivalent measures in the installation.
Charge the AP10/AP11 battery at an ambient tempera-
ture between 50°F and 105°F (10°C and 40°C).
Use the AP10/AP11 battery at an ambient temperature
between 32°F and 113°F (0°C and 45°C).
Using the AP10/AP11 battery outside of this ambient tem-
perature range will limit its performance.
Stop using the AP10/AP11 battery immediately if you no-
tice an unusual smell from it, if liquid is leaking from it, if it
is significantly overheating, or if it is discolored or de-
formed. Dispose of the AP10/AP11 battery immediately
(see safety note “Disposing of the AP10/AP11 battery” at
the end of the following section “Correct use”, as well as
“Sustainability and environmental protection” – “Disposing
of old batteries”).
Batteries will deplete over time. They can then leak cor-
rosive fluids. Avoid contact with the eyes and skin. In the
event of contact, rinse thoroughly with water and seek
medical advice.

en-US - IMPORTANT SAFETY INSTRUCTIONS
12
The AP10/AP11 lithium-ion battery is subject to the dan-
gerous goods legislation. The user is permitted to transport
the AP10/AP11 battery by road without having to observe
any further requirements. Please contact Customer Service
before sending the AP10/AP11 battery. Only send AP10/
AP11 batteries that are undamaged and have been fully run
down. Insulate the metal contacts with adhesive tape to
prevent short circuits. Pack the AP10/AP11 battery in such
a way that it is not able to move around inside the packag-
ing.
Proper use
Do not drop or throw the AP10/AP11 battery. For safety
reasons, do not continue to use an AP10/AP11 battery
which has been damaged.
Keep the AP10/AP11 battery away from naked flames or
other heat sources. Do not heat the AP10/AP11 battery. Do
not expose the rechargeable battery to direct sunlight.
Do not dismantle the AP10/AP11 battery.
Do not cause a short circuit by bridging the contacts of
the AP10/AP11 battery, either unintentionally or deliber-
ately.
Do not allow the AP10/AP11 battery to come into con-
tact with liquids.
Disposing of the AP10/AP11 battery: remove the AP10/
AP11 battery from the vacuum cleaner. Insulate the metal
contacts with adhesive tape to prevent short circuits. Dis-
pose of the AP10/AP11 battery in a municipal recycling fa-
cility. Do not dispose of the AP10/AP11 battery with your
household waste.

en-US - IMPORTANT SAFETY INSTRUCTIONS
13
Cleaning
Do not immerse the vacuum cleaner or any accessories
supplied with it in water. Clean the vacuum cleaner and ac-
cessories only with a dry or slightly damp cloth when dis-
connected from the power supply.
The MultiFloor electrobrush and the Electro Compact
handheld brush (depending on the model), the PowerUnit,
and the suction wand contain electrical wires. The plug
connectors must not come into contact with water. Danger
of electric shock. They should only be cleaned with a dry
cloth.
Accessories and parts
Only use genuine accessories with the Miele logo on the
packaging. The manufacturer cannot otherwise guarantee
the safety of the product.
Miele may only guarantee the safety of the appliance
when genuine Miele replacement parts are used. Faulty
components should only be replaced with genuine Miele
parts.
Transport
The packaging material protects the vacuum cleaner
from transport damage. We recommend you keep the
packaging for transport purposes.
en-US - Sustainability and environmental protection
15
Disposing of packaging
The packaging material protects the
vacuum cleaner from transport damage.
We recommend you keep the packaging
for transport purposes.
The packaging materials used are se-
lected from materials which are environ-
mentally friendly for disposal and can
therefore be recycled. Recycling the
packaging material reduces the use of
raw materials in the manufacturing
process and also reduces the amount of
waste in landfill sites. Make sure the
packaging is disposed of in the proper
manner for your area.
Disposal of your old appliance
Before disposing of your old appliance,
remove the fine dust filter and dispose
of it with your household waste.
Electrical and electronic appliances con-
tain valuable materials. They also con-
tain certain substances, compounds
and components which are essential for
the proper functioning and safe use of
the equipment. Handling these materi-
als improperly by disposing of them in
your household waste can be harmful to
your health and the environment. There-
fore, please do not dispose of your old
appliance with your regular household
waste.
Instead, use the official collection and
disposal points provided by local au-
thorities, dealers or Miele, in order to
dispose of and recycle electrical and
electronic appliances. You are legally re-
sponsible for deleting any personal data
on the old appliance you wish to dis-
pose of. Please ensure that your old ap-
pliance is kept away from children until
removal.
Disposal of old batteries and
power packs
Electrical and electronic appliances of-
ten contain batteries and power packs
which must not go into household
waste after use. Please remove all ac-
cessible batteries and take them to a
suitable collection site where they can
be collected free of charge. Batteries
and power packs may contain sub-
stances which are harmful to your
health and the environment.
The labeling on the battery or power
pack gives further information. The
crossed-out trash can means that bat-
teries and power packs must not be dis-
posed of with the household waste. If
the crossed-out has one or more of the
listed chemical symbols, it contains lead
(Pb), cadmium (Cd) and/or mercury
(Hg).
3E&G+J
Old batteries and power packs contain
important raw materials and can be re-
cycled. Separately collecting old batter-
ies and power packs facilitates handling
and recycling.

en-US - Appliance description
16

en-US - Appliance description
17
a
Screw cap for the ComfortClean self-cleaning function
b
Release catch for removing the fine dust filter
c
Fine dust filter
d
Battery charging state indicator
e
Battery compartment
f
Charging socket (at the bottom)
g
Attachment device for wall bracket
h
Dust container
i
Pre-filter
j
Release catch for dust container flap
k
Dust container flap
l
PowerUnit connector
m
Sliding ring for releasing the PowerUnit
n
Suction wand
o
Suction wand connector
p
Sliding ring for releasing the electrobrush
q
Release button for opening the electrobrush
r
Removable roller brush
s
MultiFloor electrobrush
t
Cleaning tool
u
PowerUnit
v
Suction power selector
w
On/Off switch
x
Handle
y
Standard wall bracket
z
SpeedLock wall bracket
en-US
18
References to illustrations
The illustrations referred to in the text
are shown on the fold-out pages at the
end of these Operating Instructions.
Commissioning
Assembling the vacuum cleaner
(Fig.01)
Assemble the vacuum cleaner.
Connecting the PowerUnit and the
suction wand (Figs. 02 + 03)
Push the PowerUnit connector into
position in the suction wand until it
audibly clicks into place (Fig.02).
Slide the sliding ring on the suction
wand down to separate the individual
sections from each other (Fig.03).
Connecting the suction wand and the
electrobrush (Figs. 04 + 05)
Push the suction wand connector into
the electrobrush from above until it
audibly clicks into place (Fig.04).
Slide the sliding ring on the electro-
brush down to separate the individual
sections from each other (Fig.05).
General battery information
The rechargeable battery is supplied not
fully charged.
Charge the battery completely before
using it for the first time. Allow approxi-
mately 3.5hours for this.
Once the battery is fully charged, the
battery charging state indicator at the
top of the PowerUnit switches off to
conserve energy.
The maximum charging capacity is
only achieved once the battery has
been charged and run down approx.
five times.
A full charge provides enough power for
17minutes if the vacuum cleaner is used
in its fully assembled state.
However, if you use the PowerUnit solo
(see “Operation” – “Using the
PowerUnit solo”), you can vacuum for
up to 55minutes at a time.
The runtime depends on the selected
power level, the flooring, and how the
vacuum cleaner is used, as well as on
the degree of soiling of the filter sys-
tem.
Charging the battery (without wall
mounting) (Fig.06)
You can charge the battery directly.
Before charging the battery for the first
time, you must read the information in
“Commissioning” – “General battery
information”.
Plug the charging plug of the supplied
charging cable into the charging
socket on the bottom at the rear of
the PowerUnit.
Plug the charger into a power socket.
The charging process will start.
You can read more about this in “Bat-
tery charging state indicator (while
charging)”.
Charging the battery (with wall mount-
ing)
You will need a suitable location near a
free power socket for mounting the ap-
pliance on the wall.
en-US
19
Depending on the model, the scope of
delivery of your vacuum cleaner in-
cludes one of the following wall brack-
ets.
Standard wall bracket (Fig.07)
SpeedLock wall bracket (Fig.08)
Before charging the battery for the first
time, you must read the information in
“Commissioning” – “General battery
information”.
Screwing the wall bracket to the wall
(Figs. 09, 10, + 11)
2 plugs and 2 T20TORX screws are
supplied for attaching the wall bracket.
You will also need a battery-operated
screwdriver or a drill (with a drilling di-
ameter of 6mm).
Depending on the wall bracket, select a
distance of 41 3/4" (106cm) (standard
wall bracket) or 37 3/4" (96cm)
(SpeedLock wall bracket) between the
bottom edge of the wall bracket and the
floor (Fig.09).
You will need a suitable location near a
free power socket for mounting the ap-
pliance on the wall.
Be careful not to damage any electrical
in the wall.
Attach the standard wall bracket
(Fig.10) or the mounting plate of the
SpeedLock wall bracket (Fig.11) to the
wall.
Attaching the charging cable to the
standard wall bracket (Figs. 12 + 13)
Push the charging plug of the charg-
ing cable through the wall bracket
from below.
Plug the charging plug into the plug
holder and press it in firmly (Fig.12).
Slide the cover down into the wall
bracket from above until it audibly
clicks into place (Fig.13).
The charging cable is held securely in
the wall bracket.
Place the vacuum cleaner into the
wall bracket from above (Fig.07).
Plug the charger into the power
socket.
The charging process will start.
Attaching the charging cable to the
SpeedLock wall bracket
(Figs. 14, 15, + 16)
A cable guide is located on the rear of
the wall bracket.
Plug the charging plug of the charging
cable firmly into the socket (left part
of the image).
Lay the charging cable in its guide
(right part of the image) (Fig.14).
Push the wall bracket down into the
mounting plate from above until it au-
dibly clicks into place (Fig.15).
The charging cable is held securely in
the wall bracket.
Place the vacuum cleaner into the
wall bracket making sure it fits prop-
erly (Fig.16).
Plug the charger into the power
socket.
The charging process will start.
Battery charging state indicator (while
charging) (Fig.17)
The battery charging state is displayed
on the top of the PowerUnit.
en-US
20
Battery life Display
Minimum battery
life
Left indicator
lights up
Increasing battery
life
Left indicator
lights up; middle
indicator flashes
Battery life in-
creasing further
Left and middle
indicators light up;
right indicator
flashes
Charged capacity
approx. 91–99%
Left, middle, and
right indicators
light up
100% Switches off
Once the battery is fully charged, the
battery charging state indicator
switches off to conserve energy.
If the battery has not been used for a
long time and has run down, it will go
into safe mode. As a result, the battery
charging state indicator will only re-
spond after approximately 30–
60minutes.
Battery charging state indicator (while
in use) (Fig.17)
The battery charging state is displayed
on the top of the PowerUnit.
Battery life Display
Maximum battery
life
All indicators
light up
Decreasing battery
life
Two indicators
light up
Battery life decreas-
ing further
One indicator
lights up
Minimum battery
life
One indicator
flashes
Using the accessories supplied
(Fig.18)
Miele offers a range of suitable acces-
sories for many Special Modes (see
“Optional accessories”).
Dust brush
Accessory for vacuuming skirting
boards, carved furniture, or orna-
ments.
Crevice nozzle
Accessory for cleaning in folds,
crevices, or corners.
Upholstery nozzle
Accessory for cleaning upholstery,
mattresses, and cushions.
Accessories holder for the suction
wand (Fig.19)
This accessories holder allows you to
carry around 2 accessories from the
three-piece accessory set while you
vacuum.
MultiFloor electrobrush (HX-EB20)
(Fig.20)
Follow the flooring manufacturer’s
cleaning and care instructions.
Damage caused by trapped ma-
terial.
Risk of the flooring getting scratched.
Make sure that there is no coarse dirt
or debris trapped in the bottom of
the electrobrush, e.g., shards or
stones.
The electrobrush can be used for daily
cleaning of carpets, rugs, and hard
floors.
en-US
21
Tip: The suction wand is not a conve-
nient option for cleaning carpeted stairs.
Tip: If you ever need to vacuum up sub-
stantial amounts of coarse dirt or de-
bris, use the PowerUnit solo design
concept (see “Operation” – “Using the
PowerUnit solo”).
Electro Compact handheld brush (HX-
EC20) (Fig.21)
(depending on the model)
Follow the flooring manufacturer’s
cleaning and care instructions.
Damage caused by trapped ma-
terial.
Risk of the flooring getting scratched.
Make sure that there is no coarse dirt
or debris trapped in the bottom of
the handheld brush, e.g., shards or
stones.
The handheld brush is particularly suit-
able for intensive cleaning of upholstery
and car seats.
For optimum cleaning results on up-
holstery, use the upholstery nozzle.
Tip: The suction wand is not a conve-
nient option for cleaning upholstery or
car seats.
AllFloor floorbrush (HX-AF20)
(Fig.22)
(depending on the model)
Follow the flooring manufacturer’s
cleaning and care instructions.
This flat and light floorbrush is particu-
larly suitable for cleaning underneath
very low furniture.
Universal brush (HX-UB) (Fig.23)
(depending on the model)
For gentle vacuuming of books, shelves,
or similar.
Extendable flexible XL crevice nozzle
(HX-CNXL) (Fig.24)
(depending on the model)
Can reach 60cm for cleaning hard-to-
reach areas.
Hose extension (HX-FSH20) (Fig.25)
(depending on the model)
The hose extension can be extended to
a maximum length of 120cm. It can be
extended further using the extendable
flexible crevice nozzle.
Operation
Removing the vacuum cleaner from
the standard wall bracket (Fig.26)
Remove the vacuum cleaner from the
wall bracket by pulling it upward.
Removing the vacuum cleaner from
the SpeedLock wall bracket
(Figs. 27 + 28)
Remove the vacuum cleaner from the
wall bracket by pulling it forward
(Fig.27).
The SpeedLock wall bracket offers the
option of using the PowerUnit conve-
niently as a PowerUnit solo, without
having to release it manually from the
suction wand.
Pull the PowerUnit upward out of the
wall bracket guide (Fig.28).
The suction wand and the electrobrush
stay in the wall bracket.

en-US
22
Switching on and off (Fig.29)
If you have charged the battery di-
rectly, pull the charging plug out of the
charging socket on the bottom on the
rear of the PowerUnit.
For the best possible cleaning results,
always start the ComfortClean self-
cleaning function before switching on
the vacuum cleaner (see “Cleaning and
care” – “Activating the ComfortClean
self-cleaning function”).
Press the upper button on the han-
dle.
The vacuum cleaner will switch on using
the lowest power level.
Increasing the suction power (Fig.30)
Press the lower button on the handle.
The higher power level is selected and
the LED lights up.
Press the button again to return to the
lower power level.
Using the PowerUnit solo (Fig.31)
The PowerUnit can be used on its own
without the suction wand and electro-
brush as a quick way of vacuuming up
crumbs and lint in specific areas.
Tip: This configuration is particularly
suitable when using the three-piece ac-
cessory set (see “Using the accessories
supplied”).
Cleaning and care
Risk of injury caused by rotating
roller brush.
You can injure yourself on the rotating
roller brush.
Always switch the vacuum cleaner
off before cleaning and caring for it.
Use the On/Off switch on the handle
to do this.
Filter system (Fig.32)
Screw cap
Fine dust filter
Dust container
d Pre-filter
e Dust container flap
Activating the ComfortClean self-
cleaning function (Fig.33)
Always run the interim cleaning function
for the fine dust filter before emptying
the dust container. You should also run
it whenever the suction power begins to
drop.
This enables the vacuum cleaner to
achieve the very best cleaning perfor-
mance again right away.
Turn the screw cap 3times by 180°.
When turning the cap, you will hear a
noise, which is a normal part of how the
ComfortClean self-cleaning function
works.
Emptying the dust container (Fig.34)
Empty the dust container at the latest
when the dust has reached the Max.
marking on the dust container.
en-US
23
Provided that no prohibited sub-
stances are present, the contents of
the dust container can be disposed of
with normal household waste.
Hold the dust container close to the
trash can so that as little dust billows
out as possible.
Press the release button on the bot-
tom of the dust container.
The flap will open and the dust will fall
out.
If dust balls, hair, or coarse debris do
not fall out, remove the pre-filter by
pulling it downward (see the following
section: “Cleaning the dust container
and pre-filter”).
Close the dust container flap, making
sure it clicks into place.
Cleaning the dust container and pre-
filter (Figs. 35, 36, + 37)
Clean the dust container and pre-filter
as required.
Empty the dust container over a
garbage can.
Remove the pre-filter by pulling it
downward (Fig.35).
Risk of damage caused by incor-
rect cleaning.
The pre-filter can become damaged
and be less effective as a result.
Do not clean the pre-filter with water.
Do not use pointed or sharp-edged
objects to clean the filter.
Clean the dust container and pre-filter
with a dry cloth or with a cleaning tool
which is located on the side of the
PowerUnit (Fig.36).
Reinsert the cleaned pre-filter into the
cleaned dust container as far as it will
go (Fig.37).
Close the dust container flap, making
sure it clicks into place.
Cleaning the fine dust filter
(Figs. 33 + 38)
Clean the fine dust filter thoroughly at
least once every 3months outside the
PowerUnit.
Risk of damage caused by incor-
rect cleaning.
The fine dust filter can become dam-
aged and be less effective as a result.
Do not clean the fine dust filter with
water and avoid cleaning the inside.
Do not use pointed or sharp-edged
objects to clean the filter. Do not
brush the fine dust filter (not even
with the cleaning tool supplied).
Press both release buttons at the side
of the fine dust filter lid and remove
the fine dust filter by pulling it upward
(Fig.38).
Hold the fine dust filter over a trash
can.
Hold the black section of the fine dust
filter underneath the screw cap and
turn the screw cap 180° – 10times
(Fig.33).
When turning the cap, you will hear a
noise, which is a normal part of how the
ComfortClean self-cleaning function
works.
Empty the fine dust filter by carefully
tapping the lower edge.
Turn the fine dust filter slightly while
you do this to free the dirt from all of
the crevices.
en-US
24
Reinsert the cleaned fine dust filter
into the PowerUnit, making sure it
clicks into position.
To continue achieving the best possi-
ble cleaning results, replace the fine
dust filter (HX-FDF20) with a new one
after approx. 3years.
Cleaning the electrobrush/handheld
brush (depending on the model)
(Fig.39)
Disconnect the electrobrush/hand-
held brush from the vacuum cleaner
(Fig.05).
Place the electrobrush/handheld
brush upside down on a level, clean
surface.
Use a pair of scissors to cut any
threads or hairs that have wound
themselves around the roller brush. To
guide the scissors, there are two
guide tracks on the roller brush
(Fig.39).
Then run the vacuum cleaner to vacuum
up the cut threads and hairs.
If the small running wheels are very
heavily soiled or blocked, you can re-
move them for easier cleaning (not
possible in the case of the handheld
brush). To remove them, use a flat-
head screwdriver.
Removing the roller brush from the
electrobrush (Fig.40)
You can take the roller brush out of the
electrobrush in order to remove stub-
born soiling and clean the inside of the
electrobrush.
A Turn the arrow on the handle on the
side of the electrobrush to the
symbol.
The roller brush is released.
B Remove the roller brush.
Clean the roller brush and remove any
stubborn dirt inside the electrobrush.
If there is heavy soiling between the
handle and the roller brush, you can re-
lease the handle.
C Pull lightly on the handle until it is re-
leased.
Remove the soiling.
Lock the cleaned handle back into the
roller brush.
Push the roller brush as far as it will
go into the electrobrush until it is in
position.
Lock the roller brush.
Removing the roller brush from the
handheld brush (depending on the
model) (Fig.41)
You can take the roller brush out of the
handheld brush in order to remove stub-
born soiling and clean the inside of the
handheld brush.
A Release the roller brush using a coin.
B Remove the roller brush.
Clean the roller brush and remove any
stubborn dirt inside the handheld
brush.
Reassemble the handheld brush in re-
verse order.
en-US
25
Replacing the battery (Figs. 42 + 43)
An original Miele AP10/AP11 lithium-ion
rechargeable battery is required.
Follow the instructions regarding the
handling and disposal of rechargeable
batteries found in the following sec-
tions: “IMPORTANT SAFETY IN-
STRUCTIONS”, “Sustainability and
environmental protection”, and “Com-
missioning” (“General battery informa-
tion”).
Remove the fine dust filter from the
PowerUnit (Fig.38).
Use a flat-head screwdriver to care-
fully release the battery compartment
cover (Fig.42).
Carefully release the plug and replace
the battery (Fig.43).
Reinsert the plug, making sure that it
fits properly.
Close the battery compartment and
reinsert the fine dust filter into the
PowerUnit, making sure it clicks into
position.
Caring for the vacuum cleaner and ac-
cessories
Risk of injury caused by rotating
roller brush.
You can injure yourself on the rotating
roller brush.
Always switch the vacuum cleaner
off before caring for it. Use the On/
Off switch on the handle to do this.
Risk of electric shock from volt-
age.
If moisture gets into the charger,
there is a risk of electric shock.
Do not let the charger get wet.
Follow the special cleaning instruc-
tions for the pre-filter, fine dust filter,
and dust container in the “Cleaning
and care” section.
The vacuum cleaner and all plastic ac-
cessories can be cleaned with a com-
mercially available cleaner suitable for
plastic.
Damage due to unsuitable clean-
ing agents.
All surfaces are susceptible to
scratching. Contact with unsuitable
cleaning agents can alter or discolor
the external surfaces.
Do not use abrasive cleaning agents,
glass cleaning agents, all-purpose
cleaners, or oil-based care products.

en-US
26
Frequently asked questions
Many malfunctions and faults that can occur in daily operation can be easily reme-
died. You can save time and money in many cases, as you do not need to contact
Miele Customer Service.
Information to help you rectify faults yourself can be found at www.miele.com/ser-
vice.
The following tables are designed to help you to find the cause of a malfunction or
an error and to resolve it.
Risk of injury caused by rotating roller brush.
You can injure yourself on the rotating roller brush.
Switch the vacuum cleaner off before dealing with any problems. Use the On/
Off switch on the handle to do this.
Problem Possible cause and solution
Battery charging state
indicator when switch-
ing on: left and middle
indicators flash rapidly
Temperature fault
Wait for approximately 30minutes before switch-
ing the vacuum cleaner back on again.
Battery charging state
indicator when charging:
right and middle indica-
tors flash rapidly
Battery fault
If you are charging the battery without a wall
mounting, pull the charging plug out of the charg-
ing socket on the rear of the PowerUnit.
Remove the vacuum cleaner from the wall bracket
if you are charging the battery in the wall bracket.
(Fig. 26 + 28).
Wait approx. 5minutes before continuing to charge
the battery.
It is essential to take prescribed ambient tempera-
tures into account when charging and changing the
battery; see “IMPORTANT SAFETY INSTRUC-
TIONS”.

en-US
27
Problem Possible cause and solution
LED on the handle is
flashing
“Battery is discharged” fault
Charge the battery (see “Commissioning” – “Gen-
eral battery information” and “Charging the bat-
tery”).
Internal system fault
Check the vacuum cleaner airways for any block-
ages.
Clean the dust container, pre-filter, and fine dust
filter (see “Cleaning and care”).
Wait for approximately 30minutes before switch-
ing the vacuum cleaner back on again.
The vacuum cleaner
does not start when it is
switched on.
The rechargeable battery is not sufficiently charged.
Charge the battery (see “Commissioning” – “Gen-
eral battery information” and “Charging the bat-
tery”).
An original Miele battery has not been inserted.
Insert an original Miele AP10/AP11 lithium-ion
rechargeable battery.
The charging plug is still plugged in.
If you are charging the battery without a wall
mounting, pull the charging plug out of the charg-
ing socket on the rear of the PowerUnit.
Remove the vacuum cleaner from the wall bracket
if you are charging the battery in the wall bracket.
The cleaning perfor-
mance is poor.
The battery life is de-
creasing.
The dust container is full.
Empty the dust container (see “Cleaning and care”
– “Emptying the dust container”).
The dust container/pre-filter is dirty.
Clean the dust container and the pre-filter (see
“Cleaning and care” – “Cleaning the dust container
and pre-filter”).
The fine dust filter is dirty.
Run the interim cleaning function for the fine dust
filter (see “Cleaning and care” – “Activating the
ComfortClean self-cleaning function”).
Clean the fine dust filter (see “Cleaning and care” –
“Cleaning the fine dust filter”).
The electrobrush is dirty/blocked.

en-US
28
Problem Possible cause and solution
Clean the electrobrush (see “Cleaning and care” –
“Cleaning the electrobrush” and “Removing the
roller brush from the electrobrush”).
The airways are blocked.
Clean all the airways.
The fine dust filter is worn.
Insert a new fine dust filter.
The operating noise is
changing during vacu-
uming.
The airways are soiled.
Clean all the airways.
The electrobrush power rating is automatically set to
the optimum level based on the type of flooring.
The noise is not unusual – the vacuum cleaner is
functioning normally.
The electrobrush
switches itself off.
The electrobrush is overloaded – this can happen on
surfaces like deep-pile carpet.
Switch the vacuum cleaner off and on again. Use
the On/Off switch on the handle to do this.
The roller brush is not
rotating.
The roller brush is dirty.
Clean the roller brush (see “Cleaning and care” –
“Cleaning the electrobrush” and “Removing the
roller brush from the electrobrush”).

en-US
29
Customer Service
Information to help you rectify faults
yourself and about Miele spare parts
can be found at www.miele.com/ser-
vice.
Contact in case of fault
In the event of a fault which you cannot
remedy yourself, please contact your
Miele dealer or Miele Service.
Contact information for Miele Service
can be found at the end of this docu-
ment.
Warranty
For more information about warranty
conditions, please contact Miele Ser-
vice.
Optional accessories
Follow the flooring manufacturer’s
cleaning and care instructions.
It is recommended to use only genuine
Miele accessories bearing the Miele
logo on the packaging. Only these will
guarantee the optimum performance
of your vacuum cleaner and the best
possible cleaning results.
Please note that faults and damage
caused by use of accessories which do
not bear the Miele logo on the packag-
ing are not covered by the vacuum
cleaner warranty.
Optional accessories
Original Miele accessories are available
from the Miele Webshop, Miele Cus-
tomer Service, and your Miele dealer.
Original Miele accessories are identified
by the Miele logo on the packaging.
With 3D4U, Miele also offers free ac-
cessories to download from your 3D
printer (www.miele.com, Service,
3D4U).
Certain models are supplied as standard
with one or more of the following acces-
sories.
Electro Compact handheld brush
(HX-EC20)
For intensive cleaning of car seats and
carpeted stairs.

en-US
30
Hardfloor Care Tool
(HX-HCT 20)
For cleaning delicate hard floors.
Insert the Hardfloor Care Tool into the
electrobrush instead of the roller brush
fitted as standard (see “Cleaning and
care” – “Removing the roller brush from
the electrobrush”).
AllFloor floorbrush (HX-AF20)
Flat floorbrush for cleaning underneath
very low furniture. It is also quiet, light,
and stands out due to its very good
pick-up of coarse dirt.
Universal brush (HX-UB)
For gentle vacuuming of books, shelves,
or similar.
Extendable flexible XL crevice nozzle
(HX-CNXL)
The flexible crevice nozzle can reach
24" (60cm) for cleaning hard-to-reach
areas.
Hose extension (HX-FSH20)
For increasing the vacuuming radius by
maximum 59" (120cm).
en-US - LIMITED WARRANTY - Vacuum Cleaners USA
31
What This Warranty Covers and For What Period The Coverage Extends
Miele, Inc. (hereinafter "Miele") warrants to the original purchaser of this product, living in the United States of
America, who purchased their vacuum from a Miele Authorized Dealer:
a. That this product, including all of its Miele authorized parts is free of defects in material and workmanship.
b. That this product, if found to be defective within the stated warranty period, will be repaired free of charge to the
consumer (both parts and labor) by an authorized Miele service agent.
c. The warranty period for vacuum cleaners, with the exception of “HomeCare” sub-models, is as follows:
Vacuum Series Term
Classic Series Canister Vacuums 1 year
Swing Series H1 Vacuums 1 year
Compact Series Canister Vacuums 2 years
Scout Robotic Vacuums 2 years
Triflex HX1 Series Cordless Vacuums 2 years
Complete Series Canister Vacuums 3 years
Dynamic Series Upright Vacuums 3 years
Blizzard Bagless Series Canister Vacuums 3 years
Boost CX1 Bagless Series Canister Vacuums 3 years
d. The warranty period for all “HomeCare” sub-model types is 5 (five) full years from the date of purchase, while the
Triflex HX1 HomeCare is 3 (three) full years from the date of purchase.
e. This warranty only applies while the product remains within the United States, and is null and void in any other US
territories, possessions, or foreign countries.
Commercial Use
Vacuum cleaners other than the Scout RX1 and Scout RX2 used for commercial purposes will be warranted for a
period of six (6) months from the date of purchase. There is no warranty for the Scout RX1 or Scout RX2 used for
commercial purposes. Thereafter this Limited Warranty shall be null and void.
What is not covered by this Warranty
This warranty does not cover damage or defects caused by or resulting from repairs, service or alterations to the
product or any of its parts or accessories which have been performed by service centers or repairmen not authorized
by Miele, or damage or defects caused by negligence, accident, abuse, misuse, improper or abnormal usage or
maintenance of the product, its parts or accessories, or damages caused by the use or installation of non-genuine
Miele parts Ordinary wear and tear or cosmetic damage (scuffs, scratches, gouges, dents, etc.) shall not be
considered a defect in materials or workmanship.
Exclusion of Other Warranties
Except for the limited warranty provided herein, Miele disclaims any and all other express warranties with respect to
the product. Any warranty of merchantability or fitness for a particular purpose is limited in its duration to the term of
the limited warranty provided herein.
Some states do not allow limitations on how long an implied warranty lasts, so the above limitation may not apply to
you.
Some states do not allow limitations on how long an implied warranty lasts, so the above limitation may not apply to
you.
Limitation of Liability for Special, Incidental or Consequential Damages
Miele will assume no liability, or other obligation with respect to any personal injury or property damage resulting
from the use of a vacuum cleaner, or its accessories, replacement parts, etc., which has not been purchased from,
or serviced by an Authorized Miele Dealer. Any purchaser who obtains a vacuum cleaner, accessories, replacement
parts, etc., from someone other than an Authorized Miele dealer proceeds at their own risk.
Miele specifically disclaims any and all liability, whether directly or by way of indemnity, for special incidental,
consequential or other damages, whether based on breach of contract, tort, strict or product liability, or any other
legal theory.
Some states do not allow the exclusion or limitation of incidental or consequential damages, so the above limitation
may not apply to you.
Special State Laws
This Limited Warranty gives you specific legal rights; you may have other rights, which vary, from state to state.
Service
For service under this Limited Warranty, or to find an Authorized Miele Dealer in your area, please visit the “Find a
Miele Partner Near You” section at mieleusa.com.
Effective Date: August 1, 2023
©2020 Miele, Inc.

en-CA - Contents
32
Warning and Safety instructions ............................................................................... 34
Safety notes and warnings for AP10/AP11 battery, LG02 charger, LS10
SpeedLock wall bracket (depending on the model)..................................................
40
Sustainability and environmental protection.......................................................... 45
Guide to the appliance................................................................................................. 46
References to figures ................................................................................................... 48
Commissioning.............................................................................................................. 48
Assembling the vacuum cleaner .................................................................................
48
Connecting the PowerUnit and the suction tube .....................................................
48
Connecting the suction tube and the electrobrush .................................................
48
General battery information..........................................................................................
48
Charging the battery (without wall mounting) ..........................................................
48
Charging the battery (with wall mounting).................................................................
48
Screwing the wall bracket to the wall .........................................................................
49
Attaching the charging cable to the standard wall bracket .....................................
49
Attaching the charging cable to the SpeedLock wall bracket .................................
49
Battery charging state indicator (while charging) .....................................................
49
Battery charging state indicator (while in use) .........................................................
50
Using the supplied accessories ................................................................................ 50
Accessories holder for the suction tube ....................................................................
50
MultiFloor electrobrush (HX-EB20) ..........................................................................
50
Electro Compact handheld brush (HX-EC20) .........................................................
51
AllFloor floorbrush (HX-AF20) ...................................................................................
51
Universal brush (HX-UB) ..............................................................................................
51
Extendable flexible XL crevice nozzle (HX-CNXL) ....................................................
51
Hose extension (HX-FSH20) .....................................................................................
51
Operation........................................................................................................................ 51
Removing the vacuum cleaner from the standard wall bracket .............................
51
Removing the vacuum cleaner from the SpeedLock wall bracket .........................
51
Switching on and off .....................................................................................................
52
Increasing the suction power ......................................................................................
52
PowerUnit Solo ..............................................................................................................
52
Cleaning and care ......................................................................................................... 52
Filter system ...................................................................................................................
52
Activating the ComfortClean function .......................................................................
52
Emptying the dust container .......................................................................................
52
Cleaning the dust container and prefilter ..................................................................
53
Cleaning the fine dust filter ..........................................................................................
53

en-CA - Contents
33
Cleaning the electrobrush/handheld brush (depending on model) .....................
54
Removing the roller brush from the electrobrush .....................................................
54
Removing the roller brush from the handheld brush (depending on the model) .
54
Replacing the battery ....................................................................................................
54
Caring for the vacuum cleaner and accessories ........................................................
55
Troubleshooting............................................................................................................. 56
Technical Service .......................................................................................................... 59
Contact in case of a fault ..............................................................................................
59
Warranty ..........................................................................................................................
59
Optional accessories.................................................................................................... 59
Purchasing accessories.................................................................................................
59
Limited Warranty - Vacuums Canada....................................................................... 61
en-CA - Warning and Safety instructions
34
READ ALL INSTRUCTIONS BEFORE USING THIS
APPLIANCE
This vacuum cleaner complies with all current local and
national safety requirements. Improper use can lead to
personal injury and damage to property.
Please read the user manual before using the vacuum
cleaner for the first time. It contains important
information on the safety, use, and maintenance of the
vacuum cleaner. This prevents both personal injury and
damage to the appliance.
In accordance with standard IEC60335-1, Miele
expressly and strongly advises that you read and follow
the instructions in the “Commissioning” section as well
as the “Safety notes and warnings”.
Miele cannot be held liable for injury or damage caused
by non-compliance with these instructions.
Keep this user manual in a safe place and pass it on to
any future owner.
Always disconnect the vacuum cleaner from the power
supply when you have finished using it, before changing
any accessories, as well as for maintenance work,
cleaning, and troubleshooting. Use the On/Off switch on
the handle to do this.
Correct use
This vacuum cleaner is intended for cleaning flooring in
domestic households and similar residential environments.
This vacuum cleaner is not suitable for use on construction
sites.

en-CA - Warning and Safety instructions
35
This vacuum cleaner is not intended for outdoor use.
This vacuum cleaner can be used for daily cleaning of
carpets, rugs, and robust hard floors.
This vacuum cleaner is intended for use at altitudes of up
to 4,000m above sea level.
The vacuum cleaner must only be used to vacuum dry
floor surfaces. Do not vacuum people or animals. Any other
types of use, impermissible modifications, or alterations are
not permitted.
People (including children) with reduced physical,
sensory, or mental capabilities, or lack of experience or
knowledge, who are unable to use the vacuum cleaner
safely, may only use the vacuum cleaner if they are
supervised while using it or have been shown how to use it
in a safe way and understand and recognize the
consequences of incorrect operation.
Use only as described in this manual.
Use only manufacturer's recommended attachments.
Safety with children
Children under 8 years of age must be kept away from
the vacuum cleaner unless they are constantly supervised.
Children aged 8 and older may only use the vacuum
cleaner without supervision if they have been shown how
to use it in a safe manner. Children must be able to
understand and recognize the possible dangers caused by
incorrect operation.
Children must not be allowed to clean or maintain the
vacuum cleaner unsupervised.

en-CA - Warning and Safety instructions
36
Children should be supervised in the vicinity of the
vacuum cleaner. Never allow children to play with the
vacuum cleaner.
Danger of suffocation! Ensure that any plastic wrappings,
bags, etc. are disposed of safely and kept out of the reach
of children.
WARNING
To reduce the risk of fire, electric shock or injury:
Check the voltage rating of the vacuum cleaner before
connecting the power cord to an electrical outlet. Your
power source should correspond with the voltage rating
plate located on the underside of the vacuum. Use only
household AC outlets. Never use DC power sources. If you
are not sure of your home’s voltage supply, consult a
qualified electrician. Connecting the vacuum cleaner to a
higher voltage than indicated in these instructions may
result in damage to the vacuum cleaner or injury.
To reduce the risk of electric shock, this appliance has a
polarized plug (one blade is wider than the other.) This plug
will fit in a polarized outlet only one way. If the plug does
not fit fully in the outlet, reverse the plug. If it still does not
fit, contact a qualified electrician to install the proper
outlet. Do not alter the plug in any way.
en-CA - Warning and Safety instructions
37
Technical safety
The vacuum cleaner operates at 25.2V/25.69V.
It is classified as a class III appliance .
This appliance is supplied by a safety extra-low voltage
(SELV) power source where the voltage is low enough to
protect users from the risk of electrical shock. A Class II
charger is used for supplying power to charge the vacuum
cleaner .
Compare the connection data on the data plate of the
charger (voltage and frequency) with that of the electricity
supply. This data must match exactly. Without
modifications, the charger is suitable for 50Hz and 60Hz.
The electrical outlet must be fitted with a 16A or 10A
slow-blow fuse.
Check both the vacuum cleaner and all accessories
supplied with it for any visible signs of damage before use.
Do not use a damaged vacuum cleaner or damaged
accessory.
The MieleMultiFloorelectrobrush and the MieleElectro
Compacthandheldbrush (depending on the model) are
additional motor-driven devices designed specially for this
Miele vacuum cleaner. For safety reasons, the vacuum
cleaner must not be used with a different
Mieleelectrobrush/handheld brush or an
electrobrush/handheld brush produced by another
manufacturer.

en-CA - Warning and Safety instructions
38
Before and during use, make sure that no coarse dirt or
debris is/gets trapped in the bottom of the
MultiFloorelectrobrush or in the bottom of the
ElectroCompacthandheldbrush (supplied depending on
the model).
Store the vacuum cleaner and all accessories at an
ambient temperature between 32°F and 113°F (0°C and
45°C).
Only store the vacuum cleaner in a horizontal position or
place it into the wall bracket.
While the vacuum cleaner is under warranty, repairs
should only be undertaken by a service technician
authorized by Miele. Otherwise the warranty will be
invalidated.
Repairs should only be carried out by a Miele-authorized
service technician. Repairs and other work by unqualified
persons can cause considerable danger to users.
Proper use
Do not use the vacuum cleaner without the prefilter and
fine dust filter installed.
Do not use with damaged cord or plug.
If appliance is not working as it should, has been dropped,
damaged, left outdoors, or dropped into water, return it to a
service center.
Do not put any object into openings. Do not use with any
opening blocked; keep free of dust, lint, hair, and anything
that may reduce air flow.

en-CA - Warning and Safety instructions
39
Keep the vacuum cleaner away from naked flames or
other heat sources. Do not heat the vacuum cleaner. Do
not expose the vacuum cleaner to direct sunlight.
Do not vacuum up anything which has been burning or
smoking, e.g., cigarettes, ashes or hot ash, whether glowing
or apparently extinguished.
Do not vacuum up liquid. Allow steam-cleaned or
shampooed carpets and rugs to dry out completely before
vacuuming.
Do not vacuum any toner dust. Toner used in printers or
copiers, for example, can be electrically conductive.
Do not vacuum up any flammable or combustible liquids
or gases and do not vacuum in areas where such
substances are stored.
Never touch the roller brush of the MultiFloor
electrobrush or Electro Compact handheld brush
(depending on the model) while it is rotating.
Do not use the MultiFloor electrobrush or the Electro
Compact handheld brush (depending on the model) at
head height.
Do not vacuum at head height and do not let the suction
get anywhere near a person’s head.
Keep hair, loose clothing, fingers, and all part of body
away from openings and moving parts.
Use extra care when cleaning on stairs.

en-CA - Warning and Safety instructions
40
Safety notes and warnings for AP10/AP11 battery, LG02
charger, LS10 SpeedLock wall bracket (depending on the
model)
Safety with children
People (including children) with reduced physical,
sensory, or mental capabilities, or lack of experience or
knowledge, who are unable to use the LG02charger or
LS10 SpeedLock wall bracket safely, may only use this
vacuum cleaner if they are supervised while using it or have
been shown how to use it in a safe way and understand
and recognize the consequences of incorrect operation.
Keep the AP10/AP11battery out of the reach of children.
Children must be kept away from the LG02 charger and
the LS10 SpeedLock wall bracket unless they are
constantly supervised.
Technical safety
The AP10/AP11 battery, the LG02 charger, and the
standard or LS10 SpeedLock wall brackets are designed for
use with the MieleHS23 vacuum cleaner. For safety
reasons, the vacuum cleaner must not be used with
another battery, charger, or wall bracket produced by
another manufacturer.
If you are using a plug adapter, make sure that it is
approved for continuous operation.
en-CA - Warning and Safety instructions
41
Only use the LG02/xx charger supplied for charging the
AP10/AP11 battery.
xx stands for 01, 02, 03, 04, 05, 06, or 07 and therefore
the version of your LG02 charger:
xx
01 AT, BE, BG, CH, CL, CZ, DE, DK, EE, ES, FI, FR, GR, HR, HU, IT, KZ, LT,
LU, LV, NL, NO, PL, PT, RO, RS, RU, SE, SI, SK, TR, UA, ZA
02 AE, HK, MY, SG
03 BR, CA, JP, MX, US
04 AU, NZ
05 CN
06 KR
07 IE, UK
Temporary or permanent operation on an autonomous
power supply system or a power supply system that is not
synchronized with the grid power supply (e.g., island
networks, back-up systems) is possible. A prerequisite for
operation is that the power supply system complies with
the specifications of EN50160 or an equivalent local
standard.
The function and operation of the protective measures
provided in the domestic electrical installation and in this
Miele product must also be maintained in isolated
operation or in operation that is not synchronized with the
grid power supply, or these measures must be replaced by
equivalent measures in the installation. As described, for
example, in the current version of VDE-AR-E 2510-2 or an
equivalent local standard.

en-CA - Warning and Safety instructions
42
Charge the AP10/AP11 battery at an ambient
temperature between 10°C and 40°C.
Use the AP10/AP11 battery at an ambient temperature
between 0°C and 45°C.
Using the AP10/AP11 battery outside of this ambient
temperature range will limit its performance.
Stop using the AP10/AP11 battery immediately if you
notice an unusual smell from it, if liquid is leaking from it, if
it is significantly overheating, or if it is discoloured or
deformed. Dispose of the AP10/AP11 battery immediately
(see safety note “Disposing of the AP10/AP11 battery” at
the end of the following section “Correct use”, as well as
“Sustainability and environmental protection” – “Disposing
of old batteries”).
Batteries will deplete over time. They can then leak
corrosive fluids. Avoid contact with the eyes and skin. In
the event of contact, rinse thoroughly with water and seek
medical advice.
The AP10/AP11 lithium-ion battery is subject to the
dangerous goods legislation. The user is permitted to
transport the AP10/AP11 battery by road without having to
observe any further requirements. Please contact
Customer Service before sending the AP10/AP11 battery.
Only send AP10/AP11 batteries that are undamaged and
have been fully run down. Insulate the metal contacts with
adhesive tape to prevent short circuits. Pack the AP10/
AP11 battery in such a way that it is not able to move
around inside the packaging.

en-CA - Warning and Safety instructions
43
Proper use
Do not drop or throw the AP10/AP11 battery. For safety
reasons, do not continue to use an AP10/AP11 battery
which has been damaged.
Keep the AP10/AP11 battery away from naked flames or
other heat sources. Do not heat the AP10/AP11 battery. Do
not expose the rechargeable battery to direct sunlight.
Do not dismantle the AP10/AP11 battery.
Do not cause a short circuit by bridging the contacts of
the AP10/AP11 battery, either unintentionally or
deliberately.
Do not allow the AP10/AP11 battery to come into
contact with liquids.
Disposing of the AP10/AP11 battery: Remove the AP10/
AP11 battery from the vacuum cleaner. Insulate the metal
contacts with adhesive tape to prevent short circuits.
Dispose of the AP10/AP11 battery in a municipal recycling
facility. Do not dispose of the AP10/AP11 battery with your
household waste.

en-CA - Warning and Safety instructions
44
Cleaning
Do not immerse the vacuum cleaner or any accessories
supplied with it in water. Clean the vacuum cleaner and
accessories only with a dry or slightly damp cloth when
disconnected from the power supply.
The MultiFloor electrobrush and the Electro Compact
handheld brush (depending on the model), the PowerUnit,
and the suction tube contain electrical wires. The plug
connectors must not come into contact with water – damp
cleaning of these items is therefore not permitted.
Accessories and spare parts
Only use genuine accessories with the Miele logo on the
packaging. The manufacturer cannot otherwise guarantee
the safety of the product.
Miele can only guarantee the
safety of the appliance
when genuine Miele replacement parts are used. Faulty
components should only be replaced
with
genuine Miele
parts.
The packaging material protects the vacuum cleaner
from transport damage. We recommend you keep the
packaging for transport purposes.
SAVE THESE INSTRUCTIONS
en-CA - Sustainability and environmental protection
45
Disposing of sales packaging
The packaging material protects the
vacuum cleaner from transport damage.
We recommend you keep the packaging
for transport purposes.
The packaging materials used are
selected from materials which are
environmentally friendly for disposal and
can therefore be recycled. Recycling the
packaging material reduces the use of
raw materials in the manufacturing
process and also reduces the amount of
waste in landfill sites. Make sure the
packaging is disposed of in the proper
manner for your area.
Disposal of your old appliance
Before disposing of your old appliance,
remove the fine dust filter and dispose
of it with your household waste.
Electrical and electronic appliances
contain valuable materials. They also
contain certain substances, compounds
and components which are essential for
the proper functioning and safe use of
the equipment. Handling these
materials improperly by disposing of
them in your household waste can be
harmful to your health and the
environment. Therefore, please do not
dispose of your old appliance with your
regular household waste.
Instead, use the official collection and
disposal points provided by local
authorities, dealers or Miele, in order to
dispose of and recycle electrical and
electronic appliances. You are legally
responsible for deleting any personal
data on the old appliance you wish to
dispose of. Please ensure that your old
appliance is kept away from children
until removal.
Disposal of old batteries
Many electrical and electronic
appliances contain batteries which must
not be disposed of with household
waste after use. You are legally obliged
to remove any old batteries which are
not securely enclosed by the appliance
and take them to a suitable collection
site (e.g., retailer) where they can be
handed in free of charge. Insulate the
metal contacts with adhesive tape to
prevent short circuits. Batteries may
contain substances which can be
hazardous to human health and the
environment.
The labeling on the battery will provide
further information. For example,
batteries containing lithium are marked
“Li-ion”. The bin symbol with a cross
through it means that the batteries
must not be disposed of in household
waste. We are also required to inform
you that a bin with a cross through it
which also has one or more chemical
symbols on it indicates that the battery
contains lead (Pb), cadmium (Cd), and/
or mercury (Hg).
3E&G+J
Old batteries contain important raw
materials and can be recycled.
Disposing of batteries separately makes
them easier to handle and recycle.

en-CA - Guide to the appliance
46

en-CA - Guide to the appliance
47
a
Screw cap for the ComfortClean self-cleaning function
b
Release catch for removing the fine dust filter
c
Fine dust filter
d
Battery charging state indicator
e
Battery compartment
f
Charging socket (at the bottom)
g
Attachment device for wall bracket
h
Dust container
i
Prefilter
j
Release catch for dust container flap
k
Dust container flap
l
PowerUnit connector
m
Sliding ring for releasing the PowerUnit
n
Suction tube
o
Suction tube connector
p
Sliding ring for releasing the electrobrush
q
Release catch for opening the electrobrush
r
Removable roller brush
s
MultiFloor electrobrush
t
Cleaning tool
u
PowerUnit
v
Suction power selector
w
On/Off switch
x
Handle
y
Standard wall bracket
z
SpeedLock wall bracket

en-CA
48
References to figures
The figures referred to in the sections
are on the fold-out pages at the end of
these operating instructions.
Commissioning
Assembling the vacuum cleaner
(Fig. 01)
Assemble the vacuum cleaner.
Connecting the PowerUnit and the
suction tube (Figs.02+03)
Push the PowerUnit connector into
position in the suction tube until it
audibly clicks into place (Fig. 02).
Slide the sliding ring on the suction
tube down to separate the individual
sections from each other (Fig. 03).
Connecting the suction tube and the
electrobrush (Figs.04+05)
Push the suction tube connector into
position in the electrobrush until it
audibly clicks into place (Fig. 04).
Slide the sliding ring on the
electrobrush down to separate the
individual sections from each other
(Fig. 05).
General battery information
The rechargeable battery is supplied not
fully charged.
Charge the battery completely before
using it for the first time. Allow
approximately 3.5hours for this.
Once the battery is fully charged, the
battery charging state indicator at the
top of the PowerUnit switches off to
conserve energy.
The maximum charging capacity is
only achieved once the battery has
been charged and run down approx.
five times.
A full charge provides enough power for
17minutes if the vacuum cleaner is used
in its fully assembled state.
However, if you use the PowerUnit Solo
(see “Operation” – “Using the
PowerUnit Solo”), you can vacuum for
up to 55minutes at a time.
The cycle time depends on the
selected power level, the flooring, and
how the vacuum cleaner is used, as
well as on the degree of soiling of the
filter system.
Charging the battery (without wall
mounting) (Fig. 06)
You can charge the battery directly.
Before charging the battery for the first
time, you must read the information in
“Commissioning” – “General battery
information”.
Plug the charger plug of the supplied
charging cable into the charging
socket on the bottom at the rear of
the PowerUnit.
Plug the charger into a power socket.
The charging process will start.
You can read more about this in
“Battery charging state indicator (while
charging)”.
Charging the battery (with wall
mounting)
You will need a suitable location near a
free power socket for mounting the
appliance on the wall.
en-CA
49
Depending on the model, the scope of
delivery of your vacuum cleaner
includes one of the following wall
brackets.
Standard wall bracket (Fig. 07)
SpeedLock wall bracket (Fig. 08)
Before charging the battery for the first
time, you must read the information in
“Commissioning” – “General battery
information”.
Screwing the wall bracket to the wall
(Figs. 09, 10+11)
2 plugs and 2 T20TORX screws are
supplied for attaching the wall bracket.
You will also need a battery-operated
screwdriver or a drill (with a drilling
diameter of 1/4" (6mm)).
Depending on the wall bracket, select a
distance of 106cm (standard wall
bracket) or 96cm (SpeedLock wall
bracket) between the bottom edge of
the wall bracket and the floor (Fig. 09).
You will need a suitable location near a
free power socket for mounting the
appliance on the wall.
Be careful not to damage any cables
laid in the wall.
Attach the standard wall bracket (Fig.
10) or the mounting plate of the
SpeedLock wall bracket (Fig. 11) to the
wall.
Attaching the charging cable to the
standard wall bracket (Figs.12+13)
Push the charger plug of the charging
cable through the wall bracket from
below.
Plug the charger plug into the plug
holder and press it in firmly (Fig. 12).
Slide the cover down into the wall
bracket from above until it audibly
clicks into place (Fig. 13).
The charging cable is held securely in
the wall bracket.
Place the vacuum cleaner into the
wall bracket from above (Fig. 07).
Plug the charger into the power
socket.
The charging process will start.
Attaching the charging cable to the
SpeedLock wall bracket
(Figs. 14, 15+16)
A cable guide is located on the rear of
the wall bracket.
Plug the charger plug of the charging
cable firmly into the socket (left part
of the image).
Lay the charging cable in its guide
(right part of the image) (Fig. 14).
Push the wall bracket down into the
mounting plate from above until it
audibly clicks into place (Fig. 15).
The charging cable is held securely in
the wall bracket.
Place the vacuum cleaner into the
wall bracket making sure it fits
properly (Fig. 16).
Plug the charger into the power
socket.
The charging process will start.
Battery charging state indicator (while
charging) (Fig. 17)
The battery charging state is displayed
on the top of the PowerUnit.

en-CA
50
Battery life Display
Minimum battery
life
Left indicator
lights up
Increasing battery
life
Left indicator
lights up; middle
indicator flashes
Battery life
increasing further
Left and middle
indicators light up;
right indicator
flashes
Charged capacity
approx. 91–99%
Left, middle, and
right indicators
light up
100% Switches off
Once the battery is fully charged, the
battery charging state indicator
switches off to conserve energy.
If the battery has not been used for a
long time and has run down, it will go
into safe mode. As a result, the battery
charging state indicator will only
respond after approximately 30–
60minutes.
Battery charging state indicator (while
in use) (Fig. 17)
The battery charging state is displayed
on the top of the PowerUnit.
Battery life Display
Maximum battery
life
All indicators
light up
Decreasing battery
life
Two indicators
light up
Battery life
decreasing further
One indicator
lights up
Minimum battery
life
One indicator
flashes
Using the supplied accessories
(Fig. 18)
Miele offers a range of suitable
accessories for many special modes
(see “Optional accessories”).
Dusting brush
Accessory for vacuuming
baseboards, carved furniture, or
ornaments.
Crevice nozzle
Accessory for cleaning in folds,
crevices, or corners.
Upholstery nozzle
Accessory for cleaning upholstery,
mattresses, and cushions.
Accessories holder for the suction
tube (Fig. 19)
This accessories holder allows you to
carry around 2accessories from the
three-piece accessory set while you
vacuum.
MultiFloor electrobrush (HX-EB20)
(Fig. 20)
Follow the flooring manufacturer’s
cleaning and care instructions.
Damage caused by trapped
material.
Risk of the flooring getting scratched.
Make sure that there is no coarse dirt
or debris trapped in the bottom of
the electrobrush, e.g., shards or
stones.
The electrobrush can be used for daily
cleaning of carpets, rugs, and hard
floors.
en-CA
51
Useful tip: The suction tube is not a
convenient option for cleaning carpeted
stairs.
Useful tip: If you ever need to vacuum
up substantial amounts of coarse dirt or
debris, use the PowerUnit Solo design
concept (see “Operation” – “Using the
PowerUnit Solo”).
Electro Compact handheld brush (HX-
EC20) (Fig. 21)
(depending on model)
Follow the flooring manufacturer’s
cleaning and care instructions.
Damage caused by trapped
material.
Risk of the flooring getting scratched.
Make sure that there is no coarse dirt
or debris trapped in the bottom of
the handheld brush, e.g. shards or
stones.
The handheld brush is particularly
suitable for intensive cleaning of
upholstery and car seats.
For optimum cleaning results on
upholstery, use the upholstery nozzle.
Useful tip: The suction tube is not a
convenient option for cleaning
upholstery or car seats.
AllFloor floorbrush (HX-AF20)
(Fig. 22)
(depending on country)
Follow the flooring manufacturer’s
cleaning and care instructions.
This flat and light floorbrush is
particularly suitable for cleaning
underneath very low furniture.
Universal brush (HX-UB) (Fig. 23)
(depending on model)
For gentle vacuuming of books, shelves,
or similar.
Extendable flexible XL crevice nozzle
(HX-CNXL) (Fig. 24)
(depending on model)
Can reach 60cm for cleaning hard-to-
reach areas.
Hose extension (HX-FSH20) (Fig. 25)
(depending on model)
The hose extension can be extended to
a maximum length of 120cm. It can be
extended further using the extendable
flexible crevice nozzle.
Operation
Removing the vacuum cleaner from
the standard wall bracket (Fig. 26)
Remove the vacuum cleaner from the
wall bracket by pulling it upward.
Removing the vacuum cleaner from
the SpeedLock wall bracket
(Figs.27+28)
Remove the vacuum cleaner from the
wall bracket by pulling it forward (Fig.
27).
The SpeedLock wall bracket offers the
option of using the PowerUnit
conveniently as a PowerUnit Solo,
without having to release it manually
from the suction tube.
Pull the PowerUnit upward out of the
wall bracket guide (Fig. 28).
The suction tube and the electrobrush
stay in the wall bracket.
en-CA
52
Switching on and off (Fig. 29)
When you have charged the battery,
pull the charger plug out of the
charging socket on the bottom at the
rear of the PowerUnit.
For the best possible cleaning results,
always start the ComfortClean
function before switching on the
vacuum cleaner (see “Cleaning and
care” – “Activating the ComfortClean
function”).
Press the upper button on the handle
.
The vacuum cleaner will switch on using
the lowest power level.
Increasing the suction power (Fig. 30)
Press the lower button on the handle.
The higher power level is selected and
the LED lights up.
Press the button again to return to the
lower power level.
PowerUnit Solo (Fig. 31)
The PowerUnit can be used on its own
without the suction tube and
electrobrush as a quick way of
vacuuming up crumbs and lint in
specific areas.
Useful tip: This configuration is
particularly suitable when using the
three-piece accessory set (see “Using
the accessories supplied”).
Cleaning and care
Risk of injury caused by rotating
roller brush.
You can injure yourself on the rotating
roller brush.
Always switch the vacuum cleaner
off before cleaning and caring for it.
Use the On/Off switch on the handle
to do this.
Filter system (Fig. 32)
Screw cap
Fine dust filter
Dust container
d Prefilter
e Dust container flap
Activating the ComfortClean function
(Fig. 33)
Always run the interim cleaning function
for the fine dust filter before emptying
the dust container. You should also run
it whenever the suction power begins to
drop.
This enables the vacuum cleaner to
achieve the very best cleaning
performance again right away.
Turn the screw cap 3times by 180°.
When turning the cap, you will hear a
noise, which is a normal part of how the
ComfortClean self-cleaning function
works.
Emptying the dust container (Fig. 34)
Empty the dust container at the latest
when the dust has reached the Max.
marking on the dust container.
en-CA
53
Provided that no prohibited
substances are present, the contents
of the dust container can be disposed
of with normal household waste.
Hold the dust container close to the
trash can so that as little dust billows
out as possible.
Press the release button on the
bottom of the dust container.
The flap will open and the dust will fall
out.
If dust bunnies, hair, or coarse debris
do not fall out, remove the prefilter by
pulling it downward (see the following
section: “Cleaning the dust container
and prefilter”).
Close the dust container flap, making
sure it clicks into place.
Cleaning the dust container and
prefilter (Figs. 35, 36+37)
Clean the dust container and prefilter as
required.
Empty the dust container over a bin.
Remove the prefilter by pulling it
downward (Fig. 35).
Risk of damage caused by
incorrect cleaning.
The prefilter can become damaged
and be less effective as a result.
Do not clean the prefilter with water.
Do not use pointed or sharp-edged
objects to clean the filter.
Clean the dust container and prefilter
with a dry cloth or with a cleaning tool
which is located on the side of the
PowerUnit (Fig. 36).
Reinsert the cleaned prefilter into the
cleaned dust container as far as it will
go (Fig. 37).
Close the dust container flap, making
sure it clicks into place.
Cleaning the fine dust filter
(Figs.33+38)
Clean the fine dust filter thoroughly at
least once every 3months outside the
PowerUnit.
Risk of damage caused by
incorrect cleaning.
The fine dust filter can become
damaged and be less effective as a
result.
Do not clean the fine dust filter with
water and avoid cleaning the inside.
Do not use pointed or sharp-edged
objects to clean the filter. Do not
brush the fine dust filter (not even
with the cleaning tool supplied).
Press both release buttons at the side
of the fine dust filter lid and remove
the fine dust filter by pulling it upward
(Fig. 38).
Hold the fine dust filter over a bin.
Take hold of the black section of the
fine dust filter underneath the screw
cap and turn the screw cap 10times
through 180° (Fig. 33).
When turning the cap, you will hear a
noise, which is a normal part of how the
ComfortClean self-cleaning function
works.
Empty the fine dust filter by carefully
tapping the lower edge.
Turn the fine dust filter slightly while
you do this to free the dirt from all of
the crevices.
en-CA
54
Reinsert the cleaned fine dust filter
into the PowerUnit, making sure it
clicks into position.
To continue achieving the best
possible cleaning results, replace the
fine dust filter (HX-FDF20) with a new
one after approx. 3years.
Cleaning the electrobrush/handheld
brush (depending on model) (Fig. 39)
Disconnect the
electrobrush/handheld brush from
the vacuum cleaner (Fig. 05).
Place the electrobrush/handheld
brush upside down on a level, clean
surface.
Use a pair of scissors to cut any
threads or hairs that have wound
themselves around the roller brush. To
guide the scissors, there are two
guide tracks on the roller brush (Fig.
39).
Then run the vacuum cleaner to vacuum
up the cut threads and hairs.
If the small running wheels are very
heavily soiled or blocked, you can
remove them for easier cleaning (not
possible in the case of the handheld
brush). To remove them, use a flat-
head screwdriver.
Removing the roller brush from the
electrobrush (Fig. 40)
You can take the roller brush out of the
electrobrush in order to remove
stubborn soiling and clean the inside of
the electrobrush.
A Turn the arrow on the handle on the
side of the electrobrush to the
symbol.
The roller brush is released.
B Remove the roller brush.
Clean the roller brush and remove any
stubborn dirt inside the electrobrush.
If there is heavy soiling between the
handle and the roller brush, you can
release the handle.
C Pull lightly on the handle until it is
released.
Remove the soiling.
Lock the cleaned handle back into the
roller brush.
Push the roller brush as far as it will
go into the electrobrush until it is in
position.
Lock the roller brush.
Removing the roller brush from the
handheld brush (depending on the
model) (Fig. 41)
You can take the roller brush out of the
handheld brush in order to remove
stubborn soiling and clean the inside of
the handheld brush.
A Release the roller brush using a coin.
B Remove the roller brush.
Clean the roller brush and remove any
stubborn dirt inside the handheld
brush.
Reassemble the handheld brush in
reverse order.
Replacing the battery (Figs.42+43)
An original Miele AP10/AP11 lithium-ion
rechargeable battery is required.
en-CA
55
Follow the instructions regarding the
handling and disposal of rechargeable
batteries found in the following
sections: “Safety notes and warnings”,
“Sustainability and environmental
protection”, and “Commissioning”
(“General battery information”).
Remove the fine dust filter from the
PowerUnit (Fig. 38).
Use a flat-head screwdriver to
carefully release the battery
compartment cover (Fig. 42).
Carefully release the plug and replace
the battery (Fig. 43).
Reinsert the plug, making sure that it
fits properly.
Close the battery compartment and
reinsert the fine dust filter into the
PowerUnit, making sure it clicks into
position.
Caring for the vacuum cleaner and
accessories
Risk of injury caused by rotating
roller brush.
You can injure yourself on the rotating
roller brush.
Always switch the vacuum cleaner
off before caring for it. Use the On/
Off switch on the handle to do this.
Risk of electric shock from
supply voltage.
If moisture gets into the charger,
there is a risk of electric shock.
Do not let the charger get wet.
Follow the special cleaning
instructions for the prefilter, fine dust
filter, and dust container in the
“Cleaning and care” section.
The vacuum cleaner and all plastic
accessories can be cleaned with a
commercially available cleaner suitable
for plastic.
Damage due to unsuitable
cleaning agents.
All surfaces are susceptible to
scratching. Contact with unsuitable
cleaning agents can alter or discolour
the external surfaces.
Do not use abrasive cleaning agents,
glass cleaning agents, all-purpose
cleaners, or oil-based care products.
en-CA
56
Troubleshooting
Many malfunctions and errors that can occur in daily operation can be easily
remedied. You can save time and money in many cases, as you do not need to
contact Miele Customer Service.
Information to help you rectify malfunctions yourself can be found at
www.miele.com/service.
The following tables are designed to help you find the cause of a malfunction or an
error and to resolve it.
Risk of injury caused by rotating roller brush.
You can injure yourself on the rotating roller brush.
Switch the vacuum cleaner off before dealing with any problems. Use the On/
Off switch on the handle to do this.
Problem Possible cause and solution
Battery charging status
display when switching
on: left and middle
indicators flash rapidly
Temperature error
Wait for approximately 30minutes before
switching the vacuum cleaner back on again.
Battery charging state
indicator when charging:
right and middle
indicators flash rapidly
Battery fault
If you are charging the battery without wall
mounting, pull the charger plug out of the charging
socket on the rear of the PowerUnit.
Remove the vacuum cleaner from the wall bracket
if you are charging the battery in the wall bracket.
(Fig. 26 + 28).
Wait approx. 5minutes before continuing to charge
the battery.
It is essential to take prescribed ambient
temperatures into account when charging and
changing the battery; see “IMPORTANT SAFETY
INSTRUCTIONS”.
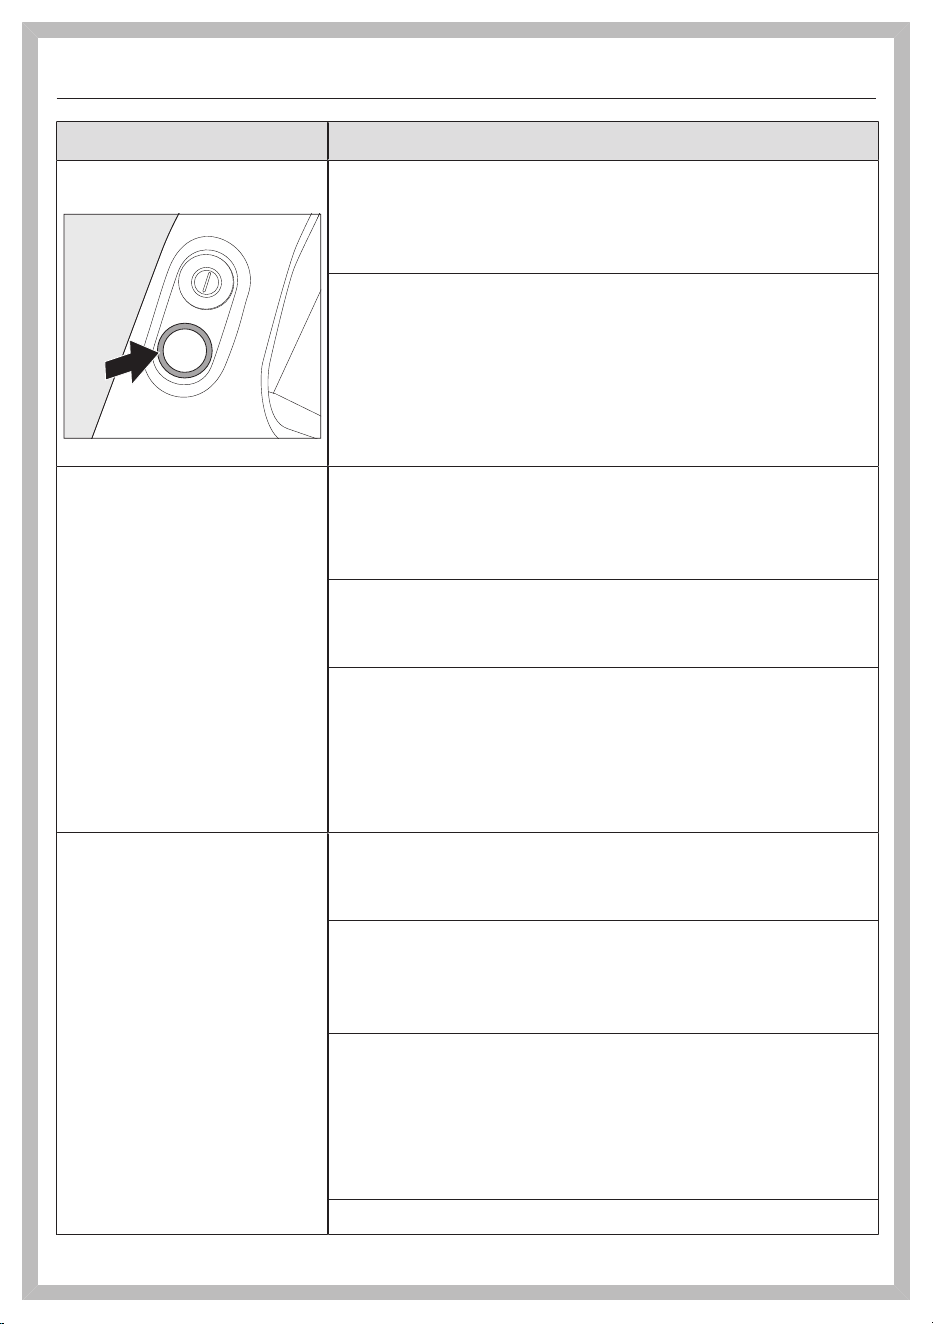
en-CA
57
Problem Possible cause and solution
LED on the handle is
flashing
“Battery is discharged” error
Charge the battery (see “Commissioning” –
“General battery information” and “Charging the
battery”).
Internal system error
Check the vacuum cleaner airways for any
blockages.
Clean the dust container, prefilter, and fine dust
filter (see “Cleaning and care”).
Wait for approximately 30minutes before
switching the vacuum cleaner back on again.
The vacuum cleaner
does not start when it is
switched on.
The rechargeable battery is not sufficiently charged.
Charge the battery (see “Commissioning” –
“General battery information” and “Charging the
battery”).
An original Miele battery has not been inserted.
Insert an original Miele AP10/AP11 lithium-ion
rechargeable battery.
The charger plug is still plugged in.
If you are charging the battery without wall
mounting, pull the charger plug out of the charging
socket on the rear of the PowerUnit.
Remove the vacuum cleaner from the wall bracket
if you are charging the battery in the wall bracket.
The cleaning
performance is poor.
The battery life is
decreasing.
The dust container is full.
Empty the dust container (see “Cleaning and care”
– “Emptying the dust container”).
The dust container/prefilter is dirty.
Clean the dust container and the prefilter (see
“Cleaning and care” – “Cleaning the dust container
and prefilter”).
The fine dust filter is soiled.
Run the interim cleaning function for the fine dust
filter (see “Cleaning and care” – “Activating the
ComfortClean self-cleaning function”).
Clean the fine dust filter (see “Cleaning and care” –
“Cleaning the fine dust filter”).
The electrobrush is dirty/blocked.
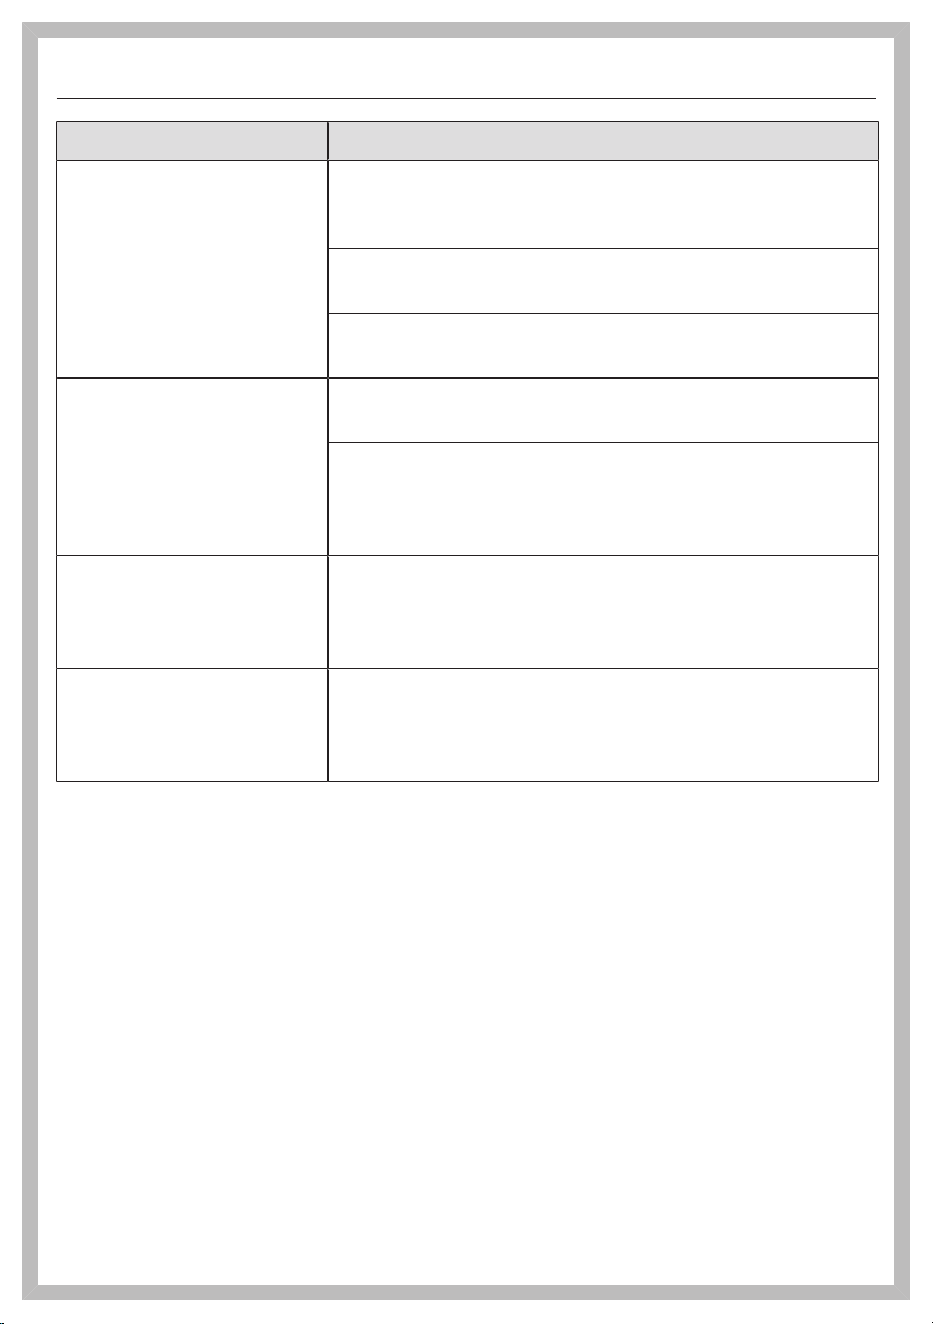
en-CA
58
Problem Possible cause and solution
Clean the electrobrush (see “Cleaning and care” –
“Cleaning the electrobrush” and “Removing the
roller brush from the electrobrush”).
The airways are blocked.
Clean all the airways.
The fine dust filter is worn.
Insert a new fine dust filter.
The operating noise is
changing during
vacuuming.
The airways are soiled.
Clean all the airways.
The electrobrush power rating is automatically set to
the optimum level based on the type of flooring.
The noise is not unusual – the vacuum cleaner is
functioning normally.
The electrobrush
switches itself off.
The electrobrush is overloaded – this can happen on
surfaces like deep-pile carpet.
Switch the vacuum cleaner off and on again. Use
the On/Off switch on the handle to do this.
The roller brush is not
rotating.
The roller brush is dirty.
Clean the roller brush (see “Cleaning and care” –
“Cleaning the electrobrush” and “Removing the
roller brush from the electrobrush”).

en-CA
59
Technical Service
Information to help you rectify
malfunctions yourself and about Miele
spare parts can be found at
www.miele.com/service.
Contact in case of a fault
In the event of any faults which you
cannot remedy yourself, please contact
your Miele Dealer or the Miele Service
Department.
Contact information for Miele Service
can be found at the end of this
document.
Warranty
For more information on country-
specific warranty terms and conditions,
please contact Miele Customer Service.
Optional accessories
Follow the flooring manufacturer’s
cleaning and care instructions.
It is recommended to use only genuine
Miele accessories bearing the Miele
logo on the packaging. Only these will
guarantee the optimum performance
of your vacuum cleaner and the best
possible cleaning results.
Please note that faults and damage
caused by use of accessories which do
not bear the Miele logo on the
packaging are not covered by the
vacuum cleaner warranty.
Purchasing accessories
Original Miele accessories are available
from the Miele web store, Miele
Service, and your Miele dealer.
Original Miele accessories are identified
by the Miele logo on the packaging.
With 3D4U, Miele also offers free
accessories to download for your 3D
printer (www.miele.ca > Customer
Support > Spare parts & accessories >
3D4U – 3D printing instructions).
Certain models are supplied as standard
with one or more of the following
accessories.

en-CA
60
Electro Compact handheld brush
(HX-EC20)
For intensive cleaning of car seats and
carpeted stairs.
Hardfloor Care Tool
(HX-HCT20)
For cleaning delicate hard floors.
Insert the Hardfloor Care Tool into the
electrobrush instead of the roller brush
fitted as standard (see “Cleaning and
care” – “Removing the roller brush from
the electrobrush”).
Universal brush (HX-UB)
For gentle vacuuming of books, shelves,
or similar.
Extendable flexible XL crevice nozzle
(HX-CNXL)
The flexible crevice nozzle can reach
60cm for cleaning hard-to-reach areas.
Hose extension (HX-FSH20)
For increasing the vacuuming radius by
maximum 120cm.

en-CA - Limited Warranty - Vacuums Canada
61
The following warranty conditions are valid in Canada only.
Miele Limited, (hereinafter "Miele") warrants to the original purchaser that this product, including all of it’s Miele
authorized parts and accessories, is free of defects in material and workmanship.
1. Duration of Warranty
This warranty is valid during the following time periods:
a) Domestic appliances in normal, non-commercial, household use:
– One (1) year. Parts and labour.
– RemoteVision® Modules: Please refer to Miele's "Limited Warranty - RemoteVision® Module - Canada".
– Additional 5 and 10 Year Limited Warranty on Sealed Refrigeration Systems: The Warranty for the Sealed
Refrigeration System includes all original compressors, condensers, evaporators, driers, the original
refrigerant and the original connecting tubing.
– Five (5) Year Warranty - If a claim regarding a defect in material or workmanship relating to the Sealed
Refrigeration Systems used in Miele Refrigerators, Wine Coolers, and Freezers is received by Miele within
five (5) years from the date of purchase, then any warranted failures of the Sealed Refrigeration System
shall be repaired at no cost to you (including parts & labour).
– Ten (10) Year Warranty - If a claim of such a defect is received at any time during the period starting from
the sixth (6th) year and ending on the last day of the tenth (10th) year after the date of purchase, this
Warranty shall cover the replacement or repair of all parts of the Sealed Refrigeration System covered by
the Warranty that is found to be defective in material or workmanship but shall not include labour. Upon
request, such labour shall be provided by Miele and at the customary charge to the Miele Customer.
b) Domestic appliances in commercial use:
– Six (6) months, for parts and labour.
c) Vacuums in normal, non-commercial, household use:
– One (1) year, upright, cordless stick and canister vacuums. Parts and labour.
– Two (2) years, motor for S170 - S189 upright units. Parts and labour.
– Two (2) years, Varta or Huizhou Blueway battery on cordless stick vacuums. Parts and labour.
– Seven (7) years, Vortex
TM
motor for canister, cordless stick and upright units, except S170 - S189 upright
units for which the motor warranty is two (2) years. Parts and labour.
d) Vacuums in commercial use:
– Six (6) months, for products used commercially. Parts and labour.
– One (1) year for motor for canister and upright models. Parts and labour.
e) Commercial appliances:
– One (1) year, parts and labour within Miele Direct Service Area (MDSA).
– One (1) year, parts only outside Miele Direct Service Area (MDSA).
Contact Miele Professional to determine if you are within a MDSA.
f) Commercial appliances in Domestic use:
– Two (2) years, Little Giant Washer, Little Giant Dryer, Profi Dishwashers. Parts and labour.
2. Commencement Date
Warranty coverage begins on the day of delivery. If a product under warranty is replaced by Miele, the original
warranty period is not extended but continues from the date of original delivery.
3. Warranty Preconditions
3.1 Miele assumes warranty responsibility subject to the following preconditions having been fulfilled:
a) You are the original purchaser and did not obtain the product through resale;
b) The product was purchased from Miele or an authorized Miele dealer in Canada;
c) If applicable, the product was installed by a person designated by Miele as qualified to do so and in
accordance with applicable installation instructions; and
d) The product is located in Canada.
3.2 Warranty claims will only be honoured provided that any failure to conform to this warranty is reported in
writing and the product is returned together with proof of purchase date to Miele or to a Miele authorized
dealer, as applicable, within the time period stated in Section 1 above.
4. Extent of Warranty
In the event of defect in material or workmanship occurring within the time period stated in I. above, Miele will
repair, or at its option replace, within a reasonable period of time, the product or any Miele authorized part or
accessory discovered to be defective in workmanship or materials. Defective products and parts become the
property of Miele upon replacement.

en-CA - Limited Warranty - Vacuums Canada
62
5. Exclusions
Warranty coverage excludes any product, including its parts and accessories, that:
a) was not installed according to Miele's installation instruction;
b) was damaged by negligence, accident, abuse, misuse, improper or abnormal usage, maintenance or
transportation;
c) contains non-authentic Miele accessories or replacement parts, including filters, dust bags and other non-
Miele products; and
d) was repaired, serviced, altered or modified by someone other than a Miele authorized service centre or
technician.
6. Ordinary Wear and Tear
Ordinary wear and tear shall not be considered a defect in workmanship or materials.
7. Limitation of Liability
7.1 Unless you purchase extended warranty coverage from Miele prior to the expiry of this warranty, this warranty
is the sole warranty offered by Miele to you. Miele disclaims any and all other warranties to the fullest extent
permitted by law, whether express or implied, including any warranty of merchantability or fitness for a
particular except as provided herein.
7.2 Your sole remedies under this warranty are those described herein. Unless otherwise stated, Miele's liability for
actual damage from any cause whatsoever is limited to the amount paid by you for the product. Miele disclaims
any and all liability and consequential or other damage whether based on breach of contract, tort (including
negligence), product liability or any other legal theory. In no event will either party be responsible for any lost profits
or savings, incidental damage or other economic damages.
8. Special Provincial Laws
This warranty gives the purchaser specific legal rights. The purchaser may also have other rights which may vary
from Province to Province in Canada. Some provinces do not allow limitation or exclusion of implied warranties,
therefore, certain limitations and exclusions may not apply.
9. Customer Care
9.1 For service under this warranty or for further information please contact Miele at:
Miele Limited Toll free: 1-800-565-6435
Vaughan, Ontario
Canada L4K 4V8
9.2 Service may require that the appliance be removed and taken, by authorized Miele personnel, to an
authorized Miele Service Centre. If service is requested by you in a remote geographical area, as determined
by Miele in its sole discretion from time to time, you will, at Miele's option, be responsible for either:
a) the travel expenses incurred by Miele to attend your premises; or
b) the cost of removal and shipment of the appliance from your premises to the nearest authorized Miele
Service Centre.
Miele Limited
Headquarter and Miele Centre
161 Four Valley Drive
Vaughan, ON L4K 4V8
miele.ca
customercar[email protected]
[email protected] (commercial enquiries)
Customer Care Centre
Phone: 1-800-565-6435
customercar[email protected] (general and technical enquiries)

fr-CA - Table des matières
63
CONSIGNES DE SÉCURITÉ IMPORTANTES........................................................ 65
Consignes de sécurité et mises en garde pour la batterieAP10/AP11, char-
geurLG02, support muralLS10SpeedLock (selon le modèle) ..............................
72
Développement durable et protection de l’environnement................................. 78
Description de l’appareil.............................................................................................. 80
Références aux illustrations ....................................................................................... 82
Mise en service ............................................................................................................. 82
Assemblage de l’aspirateur ..........................................................................................
82
Raccordement du PowerUnit et du tube d’aspiration..............................................
82
Raccordement du tube d’aspiration et de l’électrobrosse.......................................
82
Renseignements généraux sur la batterie...................................................................
82
Recharge de la batterie (sans fixation murale)..........................................................
82
Recharge de la batterie (avec fixation murale)...........................................................
83
Vissage du support mural au mur ...............................................................................
83
Fixation du câble de charge au support mural standard..........................................
83
Fixation du câble de charge au support muralSpeedLock .....................................
83
Indicateur du niveau de charge de la batterie (pendant le chargement) ...............
84
Indicateur du niveau de charge de la batterie (pendant l’utilisation) .....................
84
Porte-accessoires du tube d’aspiration .....................................................................
85
Électrobrosse MultiFloor (HX-EB 20) ........................................................................
85
Brosse manuelleElectroCompact (HX-EC20) .......................................................
85
BrosseAllFloor (HX-AF20) .........................................................................................
85
Brosse universelle (HX-UB).........................................................................................
86
Suceur platXL flexible et télescopique (HX-CNXL).................................................
86
Rallonge de tuyau (HX-FSH 20) .................................................................................
86
Fonctionnement ............................................................................................................ 86
Retrait de l’aspirateur du support mural standard....................................................
86
Retrait de l’aspirateur du support mural SpeedLock................................................
86
Mise en marche et arrêt ...............................................................................................
86
Augmentation de la puissance d’aspiration...............................................................
86
PowerUnitSolo..............................................................................................................
86
Nettoyage et entretien................................................................................................. 87
Système de filtration.....................................................................................................
87
Activation de la fonction ComfortClean .....................................................................
87
Vidage du réservoir à poussière ..................................................................................
87
Nettoyage du réservoir à poussière et du préfiltre ...................................................
87
Nettoyage du filtre à poussières fines........................................................................
88
Nettoyage de l’électrobrosse/la brosse manuelle (selon le modèle) ...................
88
Retrait de la brosse cylindrique de l’électrobrosse...................................................
89

fr-CA - Table des matières
64
Retrait de la brosse cylindrique de la brosse manuelle (selon le modèle) ............
89
Remplacement de la batterie ......................................................................................
90
Entretien de l’aspirateur et des accessoires...............................................................
90
Correction des anomalies ........................................................................................... 91
Service technique ......................................................................................................... 94
Contact en cas d'anomalies .........................................................................................
94
Garantie ...........................................................................................................................
94
Accessoires en option.................................................................................................. 94
Achat d’accessoires .......................................................................................................
94
Garantie restreinte – Aspirateurs Canada............................................................... 96
fr-CA - CONSIGNES DE SÉCURITÉ IMPORTANTES
65
LISEZ ATTENTIVEMENT TOUTES LES INSTRUCTIONS
AVANT D'UTILISER L'APPAREIL
Cet aspirateur est conforme à l’ensemble des réglemen-
tations de sécurité locales et nationales. Une utilisation
inappropriée de l’appareil peut entraîner des blessures
corporelles et des dommages matériels.
Veuillez lire le mode d’emploi avant d’utiliser l’aspirateur
pour la première fois. Il contient des renseignements im-
portants sur la sécurité, l’utilisation et la maintenance de
l’aspirateur. Vous éviterez ainsi de vous blesser et d’en-
dommager l’appareil.
Conformément à la normeCEI60335-1, Miele vous
conseille expressément et vivement de lire et de suivre
les instructions de la section «Mise en service», ainsi
que celles contenues dans les «Consignes de sécurité et
mises en garde».
Miele ne peut pas être tenue responsable des blessures
et des dommages causés par le non-respect de ces ins-
tructions.
Conservez ce mode d’emploi en lieu sûr et transmettez-le
au futur propriétaire de l’appareil, le cas échéant.
Débranchez toujours l’aspirateur de l’alimentation élec-
trique après utilisation, avant de changer les accessoires,
ainsi que pour toute intervention de maintenance, de net-
toyage et de réparation. Pour ce faire, utilisez l’interrup-
teur Marche/Arrêt situé sur la poignée.

fr-CA - CONSIGNES DE SÉCURITÉ IMPORTANTES
66
Utilisation conforme
Conçu pour nettoyer les planchers, cet aspirateur est
prévu pour un usage domestique ou dans un environne-
ment similaire. Cet aspirateur n’est pas adapté à une utili-
sation sur les chantiers de construction.
Cet aspirateur n’est pas conçu pour être utilisé à l’exté-
rieur.
Cet aspirateur peut être utilisé pour le nettoyage normal
de la moquette, des tapis et des surfaces dures.
Cet aspirateur est conçu pour une utilisation jusqu'à
4000m (13000pi) d'altitude au-dessus du niveau de la
mer.
L’aspirateur ne doit être utilisé que sur les sols secs. Ne
passez pas l’aspirateur sur les personnes ou les animaux.
Toute autre utilisation, modification non autorisée ou altéra-
tion est interdite.
Les personnes (y compris les enfants) dont les capacités
physiques, sensorielles ou mentales sont réduites, ou qui
manquent d’expérience ou de connaissances, et qui ne
sont pas en mesure d’utiliser l’aspirateur en toute sécurité
ne peuvent utiliser cet aspirateur que si elles sont surveil-
lées pendant son utilisation ou si on leur a montré com-
ment l’utiliser en toute sécurité et qu’elles comprennent et
reconnaissent les conséquences d’une utilisation incor-
recte.
Utilisez-le uniquement comme décrit dans ce mode
d’emploi.
Utilisez exclusivement les accessoires recommandés par le
fabricant.

fr-CA - CONSIGNES DE SÉCURITÉ IMPORTANTES
67
Sécurité des enfants
Ne laissez pas les enfants s’approcher de l’aspirateur à
moins d’être supervisés en permanence.
Les enfants de 8ans et plus peuvent utiliser l’aspirateur
sans surveillance uniquement s’ils ont appris à l’utiliser en
toute sécurité. Les enfants doivent être capables de com-
prendre et de reconnaître les dangers potentiels liés à une
utilisation inadéquate.
Les enfants ne doivent pas procéder au nettoyage ou à
l’entretien de l’aspirateur sans surveillance.
Assurez-vous que l’aspirateur n’est pas utilisé comme un
jouet. La vigilance s’impose lorsque l’aspirateur est utilisé
en présence d’enfants.
Risque de suffocation! Jetez les emballages, sacs et
autres produits en plastique et gardez-les en tout temps
hors de la portée des enfants.

fr-CA - CONSIGNES DE SÉCURITÉ IMPORTANTES
68
AVERTISSEMENT
Pour diminuer le risque d'incendie, de décharge élec-
trique ou de blessure, respectez les instructions ci-
après:
Vérifiez la tension nominale de l’aspirateur avant de bran-
cher le cordon d’alimentation dans une prise électrique.
Votre source d’alimentation doit correspondre à la tension
indiquée sur la plaque signalétique située en dessous de
l’aspirateur. N’utilisez que les prises de courant domes-
tiques. N’utilisez jamais de sources d’alimentation en cou-
rant continu. Consultez un électricien professionnel si vous
avez des doutes sur votre source d’alimentation. Le bran-
chement de l’aspirateur à une tension supérieure à celle in-
diquée dans ces instructions peut endommager l’appareil
ou causer des blessures.
Pour réduire le risque de décharge électrique, cet appa-
reil est équipé d’une fiche polarisée (une lame est plus
large que l’autre.) Cette fiche ne s’insère dans une prise po-
larisée que dans un seul sens. Si elle ne s’insère pas com-
plètement dans la prise de courant, inversez la fiche. Si elle
ne s’insère toujours pas, appelez un électricien profession-
nel pour installer la prise appropriée. Ne modifiez en aucun
cas la fiche.
fr-CA - CONSIGNES DE SÉCURITÉ IMPORTANTES
69
Sécurité technique
L’aspirateur fonctionne sur 25,2V / 25,69V.
Il s’agit d’un appareil électroménager de la classe de pro-
tectionIII .
Doté d’une source d’alimentation à très basse tension de
sécurité (TBTS), cet appareil protège les utilisateurs des
risques de décharge électrique. Un chargeur de classeII
est utilisé pour recharger l’aspirateur .
Comparez les données de raccordement indiquées sur la
plaque signalétique du chargeur (tension et fréquence ré-
seau) avec celles du réseau électrique. Elles doivent abso-
lument être les mêmes. Sans modification, le chargeur
convient à une fréquence de 50Hz et 60Hz.
L’intensité nominale de la prise électrique doit être 15A.
Avant chaque utilisation, vérifiez que ni l’aspirateur ni
tous les accessoires fournis ne présentent de signes vi-
sibles de dommages. N’utilisez pas un aspirateur ou un ac-
cessoire endommagé.
L’électrobrosseMieleMultiFloor et la brosse ma-
nuelleMieleElectroCompact (selon le modèle) sont des
dispositifs motorisés supplémentaires conçus spéciale-
ment pour cet aspirateurMiele. Pour des raisons de sécu-
rité, l’aspirateur ne doit pas être utilisé avec une autre élec-
trobrosse/brosse manuelleMiele, ni avec une élec-
trobrosse/brosse manuelle d’une autre marque.
Avant et pendant l’utilisation, vérifiez qu’aucune salissure
de gros calibre ni débris ne soient coincés/ne se coincent
sous l’électrobrosseMultiFloor ou sous la brosse ma-
nuelleElectroCompact (fournie selon le modèle).

fr-CA - CONSIGNES DE SÉCURITÉ IMPORTANTES
70
Rangez l’aspirateur et tous ses accessoires à une tempé-
rature ambiante comprise entre 0°C (32°F) et 45°C
(113°F).
Rangez l’aspirateur uniquement en position horizontale
ou placez-le sur le support mural.
Les réparations ne doivent être effectuées que par un
technicien autorisé, conformément aux normes de sécurité
nationales et locales. Les réparations non autorisées
peuvent causer des blessures ou endommager l’appareil.
Autrement, la garantie peut être annulée.
Les réparations doivent être effectuées exclusivement
par des techniciens autorisés par Miele. Une réparation ou
des travaux réalisés par une personne non compétente
peut mettre les utilisateurs en danger.
Utilisation correcte
N’utilisez pas l’aspirateur sans le préfiltre et le filtre à
poussières fines.
N’utilisez pas si le cordon d’alimentation ou la fiche sont
endommagés.
Si l’appareil ne fonctionne pas comme prévu, s’il a été
échappé, endommagé, laissé à l’extérieur ou submergé
dans l’eau, retournez-le à un centre de réparation.
Ne mettez aucun objet dans les ouvertures. N’utilisez
pas lorsqu’une ouverture est bloquée; gardez à l’abri de la
poussière, des peluches, des cheveux et de tout objet qui
peut réduire l’écoulement de l’air.

fr-CA - CONSIGNES DE SÉCURITÉ IMPORTANTES
71
Gardez l’aspirateur à l’abri d’une flamme nue ou de toute
autre source de chaleur. Assurez-vous de pas faire chauffer
l’aspirateur. N’exposez pas l’aspirateur aux rayons directs
du soleil.
N’aspirez rien qui a brûlé ou qui fume, qu’il soit incandes-
cent ou apparemment éteint (cigarettes, cendres ou
cendres chaudes, etc.).
N’aspirez pas de liquide. Laissez complètement sécher
les tapis et moquettes nettoyés à la vapeur ou shampoui-
nés avant de les aspirer.
N’utilisez pas l’aspirateur pour aspirer les particules
d’encre en poudre. L’encre utilisée dans les imprimantes et
les photocopieurs est conductrice d’électricité.
N’aspirez pas de liquides ou de gaz inflammables ou
combustibles et ne passez pas l’aspirateur dans les zones
où ces substances sont stockées.
Ne touchez jamais la brosse cylindrique de l’élec-
trobrosseMultiFloor ou la brosse manuelleElectroCom-
pact (selon le modèle) lorsqu’elle tourne.
N’utilisez pas l’électrobrosseMultiFloor ou la brosse ma-
nuelleElectroCompact (selon le modèle) à hauteur de tête.
N’aspirez pas à hauteur de tête et n’approchez pas le
tuyau d’aspiration de la tête d’une personne.
Tenez les cheveux, les vêtements amples, les doigts et
toutes les parties du corps à l’écart des ouvertures et des
parties mobiles.
Soyez particulièrement vigilant lorsque vous nettoyez les
escaliers.

fr-CA - CONSIGNES DE SÉCURITÉ IMPORTANTES
72
Consignes de sécurité et mises en garde pour la batte-
rieAP10/AP11, chargeurLG02, support mu-
ralLS10SpeedLock (selon le modèle)
Sécurité des enfants
Les personnes (y compris les enfants) dont les capacités
physiques, sensorielles ou mentales sont réduites, ou qui
manquent d’expérience ou de connaissances, et qui ne
sont pas en mesure d’utiliser le chargeurLG02 ou le sup-
port muralLS10SpeedLock en toute sécurité ne peuvent
utiliser cet aspirateur que si elles sont surveillées pendant
son utilisation ou s’il leur a été montré comment l’utiliser en
toute sécurité et qu’elles comprennent et reconnaissent les
conséquences d’une utilisation incorrecte.
Gardez la batterieAP10/AP11 hors de la portée des en-
fants.
Ne laissez pas les enfants s’approcher du chargeurLG02
ou du support muralLS10SpeedLock à moins qu’ils ne
soient surveillés en permanence.
fr-CA - CONSIGNES DE SÉCURITÉ IMPORTANTES
73
Sécurité technique
La batterieAP10/AP11, le chargeurLG02 et les supports
muraux standard ou LS10SpeedLock sont conçus pour
être utilisés avec l’aspirateurHS23 de Miele. L’utilisation de
l’aspirateur avec une batterie, un chargeur ou un support
mural d’une autre marque n’est pas autorisée pour des rai-
sons de sécurité.
Si vous utilisez un adaptateur de prise, assurez-vous qu’il
est approuvé pour un fonctionnement continu.
Utilisez uniquement le chargeurLG02/xx fourni pour re-
charger la batterieAP10/AP11.
xx représente 01, 02, 03, 04, 05, 06 ou 07 et donc la ver-
sion de votre chargeurLG02:
xx
01 AT, BE, BG, CH, CL, CZ, DE, DK, EE, ES, FI, FR, GR, HR, HU, IT, KZ, LT,
LU, LV, NL, NO, PL, PT, RO, RS, RU, SE, SI, SK, TR, UA, ZA
02 AE, HK, MY, SG
03 BR, CA, JP, MX, US
04 AU, NZ
05 CN
06 KR
07 IE, UK

fr-CA - CONSIGNES DE SÉCURITÉ IMPORTANTES
74
Un fonctionnement permanent ou temporaire est pos-
sible sur un système d’alimentation électrique autonome ou
un système d’alimentation qui n’est pas synchronisé avec
l’alimentation électrique du réseau (parex. réseaux insu-
laires, systèmes auxiliaire). Pour faire fonctionner l’appareil,
le système d’alimentation électrique doit être conforme aux
spécifications de la norme EN50160 ou d’une norme lo-
cale équivalente.
La fonction et le fonctionnement des mesures préventives
fournies dans l’installation électrique domestique et dans
ce produit Miele doivent être conservés en fonctionnement
ponctuel ou en fonctionnement non synchronisé avec l’ali-
mentation électrique du réseau, ou alors les mesures
doivent être remplacées par des mesures équivalentes
dans l’installation. Comme le décrit par exemple la version
actuelle de la norme VDE-AR-E 2510-2 ou une norme lo-
cale équivalente.
Chargez la batterieAP10/AP11 à une température am-
biante comprise entre 10 et 40°C.
Utilisez la batterieAP10/AP11 à une température am-
biante comprise entre 0 et 45°C.
L’utilisation de la batterieAP10/AP11 à une température si-
tuée en dehors de cette plage limite son efficacité.

fr-CA - CONSIGNES DE SÉCURITÉ IMPORTANTES
75
Cessez immédiatement d’utiliser la batterieAP10/AP11
si vous sentez une odeur inhabituelle, si du liquide s’en
échappe, si elle surchauffe considérablement, ou si elle est
décolorée ou déformée. Éliminez immédiatement la batte-
rieAP10/AP11 (voir la consigne de sécurité «Élimination
de la batterieAP10/AP11» à la fin de la section «Utilisa-
tion conforme», ainsi que «Développement durable et
protection de l’environnement–Mise au rebut des batte-
ries usagées»).
Les batteries s’épuisent au fil du temps. Le liquide corro-
sif qui s’y trouve est alors susceptible de fuir. Évitez tout
contact de ce liquide avec les yeux et la peau. En cas de
contact avec les yeux, rincez immédiatement à grande eau
et consultez un médecin.
La batterie au lithium-ionAP10/AP11 est soumise à la lé-
gislation relative aux marchandises dangereuses. L’utilisa-
teur est autorisé à transporter la batterieAP10/AP11 par la
route sans avoir à respecter d’autres exigences. Veuillez
contacter le service à la clientèle avant d’envoyer la batte-
rieAP10/AP11. Envoyez uniquement des batteriesAP10/
AP11 non endommagées et complètement déchargées.
Isolez les contacts métalliques avec du ruban adhésif pour
éviter tout court-circuit. Emballez la batterieAP10/AP11 de
sorte qu’elle ne puisse pas se déplacer à l’intérieur de l’em-
ballage.

fr-CA - CONSIGNES DE SÉCURITÉ IMPORTANTES
76
Utilisation correcte
Ne laissez pas tomber ou ne jetez pas la batterieAP10/
AP11. Pour des raisons de sécurité, cessez d’utiliser une
batterieAP10/AP11 qui a été endommagée.
Gardez la batterieAP10/AP11 à l’abri d’une flamme nue
ou de toute autre source de chaleur. Ne réchauffez pas la
batterieAP10/AP11. N’exposez pas la batterie de rechange
aux rayons directs du soleil.
Ne démontez pas la batterieAP10/AP11.
Ne causez pas de court-circuit en faisant le pontage des
contacts de la batterieAP10/AP11 de façon accidentelle ou
délibérée.
Ne laissez pas la batterieAP10/AP11 entrer en contact
avec des liquides.
Mise au rebut de la batterieAP10/AP11: retirez la batte-
rieAP10/AP11 de l’aspirateur. Isolez les contacts métal-
liques avec du ruban adhésif pour éviter tout court-circuit.
Déposez la batterieAP10/AP11 dans un centre de recy-
clage municipal. Ne jetez pas la batterieAP10/AP11 dans
vos ordures ménagères.

fr-CA - CONSIGNES DE SÉCURITÉ IMPORTANTES
77
Nettoyage
Ne plongez pas l’aspirateur ou ses accessoires dans
l’eau. Utilisez uniquement un chiffon sec ou légèrement hu-
mide pour nettoyer l’aspirateur une fois qu’il est débranché,
ainsi que ses accessoires.
L’électrobrosseMultiFloor et la brosse manuelleElec-
troCompact (selon le modèle), le PowerUnit et le tube
d’aspiration comportent des fils électriques. Les fiches de
connexion ne doivent pas entrer en contact avec de l’eau. Il
est donc interdit de nettoyer ces éléments avec un chiffon
humide.
Accessoires et pièces de rechange
Utilisez uniquement des accessoires d’origine portant le
logo Miele sur l’emballage. Sinon, le fabricant ne peut pas
garantir la sécurité de ce produit.
Miele ne peut garantir la
sécurité de l’appareil
que si des
pièces de rechange d’origine Miele sont utilisées. Les com-
posants défectueux ne doivent être remplacés que
par
des
pièces d’origine Miele.
Transport
L’emballage protège l’aspirateur contre d’éventuels dé-
gâts pendant le transport. Il est conseillé de le conserver
pour le transport futur.
CONSERVEZ CES INSTRUCTIONS
78
Élimination de l’emballage
L’emballage protège l’aspirateur contre
d’éventuels dégâts pendant le transport.
Nous vous recommandons de le
conserver pour l’utiliser lors d’un éven-
tuel transport.
Les matériaux d’emballage utilisés sont
sélectionnés en fonction de critères
écologiques pour en faciliter le recy-
clage. Le recyclage de l’emballage per-
met d’économiser les matières pre-
mières lors de la fabrication et de ré-
duire le volume des déchets dans les
sites d’enfouissement. Assurez-vous
que l’emballage est éliminé conformé-
ment à la réglementation de votre ré-
gion.
Mise au rebut de votre ancien
appareil
Avant de mettre au rebut votre ancien
appareil, retirez le filtre à poussières
fines et jetez-le avec les ordures ména-
gères.
Les appareils électriques et électro-
niques contiennent des matériaux pré-
cieux. Cependant, ils contiennent aussi
des substances, des composés et des
éléments nécessaires au bon fonction-
nement et à la sécurité des appareils. La
manipulation inadéquate de ces maté-
riaux, si vous mettez votre appareil à re-
but avec vos ordures ménagères, peut
poser un risque pour votre santé et l'en-
vironnement. Donc, il est important de
ne pas jeter vos anciens appareils avec
vos ordures ménagères.
Utilisez plutôt les points de collecte mis
en place par votre localité, votre reven-
deur ou Miele pour jeter ou recycler les
appareils électriques ou électroniques.
Vous êtes tenu, par la loi, de supprimer
toutes vos données personnelles figu-
rant sur l'ancien appareil à éliminer.
Jusqu'à son enlèvement, veillez à ce que
votre ancien appareil ne présente aucun
danger pour les enfants.
Développement durable et protection de l’environnement
79
Mise au rebut des batteries
usagées
De nombreux appareils électriques et
électroniques contiennent des batteries
qui ne doivent pas être jetées avec les
ordures ménagères après utilisation.
Vous êtes légalement tenu d’enlever les
batteries usagées qui ne sont pas scel-
lées dans l’appareil et de les remettre
gratuitement à un point de collecte ap-
proprié (détaillant, etc.). Isolez les
contacts métalliques avec du ruban ad-
hésif pour éviter tout court-circuit. Les
batteries peuvent contenir des substan-
ces qui peuvent être dangereuses pour
la santé et l’environnement.
L’étiquetage de la batterie fournira de
plus amples renseignements. Par
exemple, des batteries contenant du
lithium portent l’inscription «Li-ion».
Le symbole de la poubelle barrée signi-
fie que les batteries ne doivent pas être
jetées avec les ordures ménagères.
Nous sommes également tenus de vous
informer qu’une poubelle barrée d’une
croix qui porte également un ou plu-
sieurs symboles chimiques indique que
la batterie contient du plomb (Pb), du
cadmium (Cd) et/ou du mercure (Hg).
3E&G+J
Les batteries usagées contiennent des
matières premières importantes qui
peuvent être recyclées. L’élimination des
batteries de façon séparée facilite leur
manipulation et leur recyclage.
Développement durable et protection de l’environnement
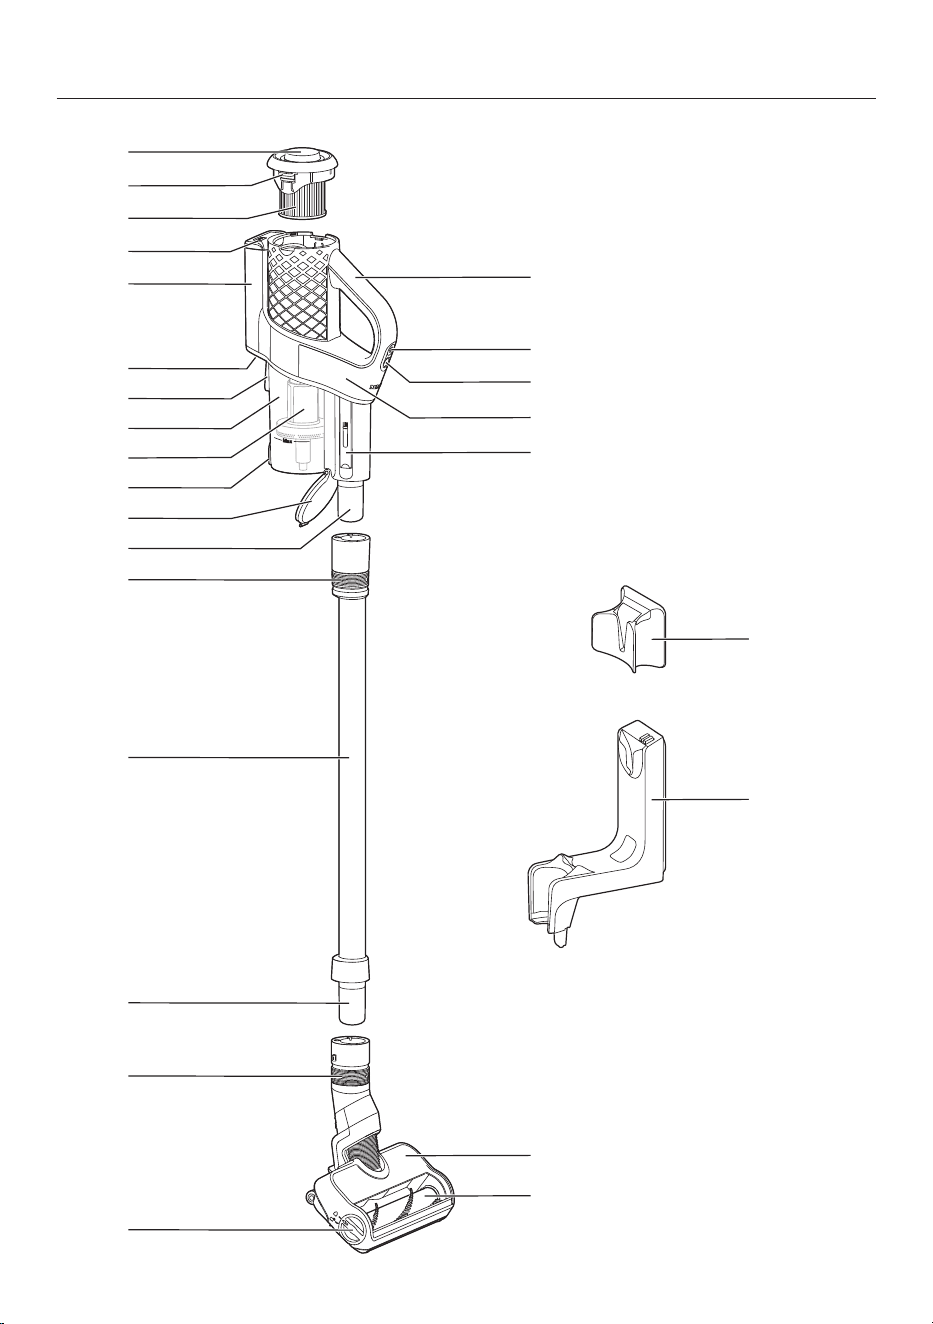
fr-CA - Description de l’appareil
80

fr-CA - Description de l’appareil
81
a
Couvercle fileté pour la fonction d’auto-nettoyageComfortClean
b
Touche de déverrouillage pour retirer le filtre à poussières fines
c
Filtre à poussières fines
d
Indicateur du niveau de charge de la batterie
e
Compartiment de la batterie
f
Prise de chargement (en bas)
g
Dispositif de fixation pour support mural
h
Réservoir à poussière
i
Préfiltre
j
Touche de déverrouillage du rabat du réservoir à poussière
k
Rabat du réservoir à poussière
l
Raccord du PowerUnit
m
Verrou de blocage pour libérer le PowerUnit
n
Tube d’aspiration
o
Raccord du tube d’aspiration
p
Verrou de blocage pour libérer l’électrobrosse
q
Touche de déverrouillage pour ouvrir l’électrobrosse
r
Brosse cylindrique amovible
s
ÉlectrobrosseMultiFloor
t
Accessoire de nettoyage
u
PowerUnit
v
Sélecteur de puissance d’aspiration
w
Interrupteur Marche/Arrêt
x
Poignée
y
Support mural standard
z
Support muralSpeedLock
fr-CA
82
Références aux illustrations
Les illustrations mentionnées dans le
texte figurent sur les pages dépliantes
à la fin de ce mode d’emploi.
Mise en service
Assemblage de l’aspirateur(figure 01)
Assemblez l’aspirateur.
Raccordement du PowerUnit et du
tube d’aspiration(figures 02 + 03)
Poussez le raccord du PowerUnit
dans sa position sur le tube d’aspira-
tion jusqu’à ce qu’il s’enclenche avec
un déclic(figure 02).
Faites glisser vers le bas le verrou de
blocage sur le tube d’aspiration pour
séparer les différentes parties l’une de
l’autre(figure 03).
Raccordement du tube d’aspiration et
de l’électrobrosse(figures 04 + 05)
Poussez le raccord du tube d’aspira-
tion dans sa position sur l’élec-
trobrosse jusqu’à ce qu’il s’enclenche
avec un déclic(figure 04).
Faites glisser vers le bas le verrou de
blocage sur l’électrobrosse pour sépa-
rer les différentes parties l’une de
l’autre(figure 05).
Renseignements généraux sur la bat-
terie
À la livraison, la batterie de rechange
n’est pas complètement chargée.
Chargez complètement la batterie avant
sa première utilisation. Prévoyez environ
3,5heures pour qu’elle soit complète-
ment chargée.
Une fois la batterie complètement char-
gée, l’indicateur de son niveau de
charge dans la partie supérieure du
PowerUnit s’éteint pour économiser
l’énergie.
La capacité de charge maximale n’est
atteinte qu’une fois que la batterie a
été chargée et déchargée environ
cinqfois.
Une charge complète fournit suffisam-
ment d’énergie pour 17minutes si l’aspi-
rateur est utilisé dans son état entière-
ment assemblé.
Cependant, si vous utilisez le
PowerUnitSolo (voir «Fonctionne-
ment»–«PowerUnitSolo»), vous
pouvez passer l’aspirateur pendant
55minutes sans interruption.
La durée du programme dépend du ni-
veau de puissance sélectionné, du re-
vêtement de sol, du mode d’utilisation
de l’aspirateur, ainsi que du degré de
salissure du système de filtration.
Recharge de la batterie (sans fixation
murale)(figure 06)
Vous pouvez charger directement la bat-
terie.
Avant de charger la batterie pour la
première fois, vous devez lire les infor-
mations figurant dans la section
«Mise en service»–«Renseigne-
ments généraux sur la batterie».
Branchez la fiche de chargeur du
câble de charge fourni dans la prise
de charge située dans la partie infé-
rieure à l’arrière du PowerUnit.
Branchez le chargeur sur une prise de
courant.
La recharge commence.
fr-CA
83
Pour de plus amples informations à ce
sujet, consultez la section «Indicateur
du niveau de charge de la batterie
(pendant le chargement)».
Recharge de la batterie (avec fixation
murale)
Vous aurez besoin d’un endroit appro-
prié près d’une prise électrique libre
pour le montage mural de l’appareil.
Selon le modèle, votre aspirateur est li-
vré avec l’un des supports muraux sui-
vants.
Support mural standard(figure 07)
Support muralSpeedLock(figure 08)
Avant de charger la batterie pour la
première fois, vous devez lire les infor-
mations figurant dans la section
«Mise en service»–«Renseigne-
ments généraux sur la batterie».
Vissage du support mural au mur
(figures 9, 10 + 11)
2chevilles et 2visT20TORX sont four-
nies pour fixer le support mural.
Vous aurez également besoin d’un
tournevis électrique à batterie ou d’une
perceuse (avec une mèche de 6mm
(1/4po)).
Selon le support mural, choisissez une
distance de 106cm (support mural
standard) ou de 96cm (support mu-
ralSpeedLock) entre le bord inférieur du
support mural et le sol(figure 09).
Vous aurez besoin d’un endroit appro-
prié près d’une prise électrique libre
pour le montage mural de l’appareil.
Faites attention à ne pas percer un
câble passant dans le mur.
Fixez le support mural standard(fi-
gure 10) ou la plaque de montage du
support muralSpeedLock(figure 11)
au mur.
Fixation du câble de charge au support
mural standard(figures 12 + 13)
Poussez la fiche de chargeur du câble
de charge dans le support mural par
le bas.
Branchez la fiche de chargeur dans le
support de fiche et enfoncez-la
bien(figure 12).
Faites glisser le cache vers le bas
dans le support mural jusqu’à ce qu’il
s’enclenche avec un déclic(figure 13).
Le câble de charge est solidement
maintenu dans le support mural.
Insérez par le haut l’aspirateur dans le
support mural(figure 07).
Branchez le chargeur sur la prise de
courant.
La recharge commence.
Fixation du câble de charge au support
muralSpeedLock(figures 14, 15 + 16)
Un guide-câble se trouve à l’arrière du
support mural.
Branchez la fiche de chargeur du
câble de charge dans la prise de
charge (partie gauche de l’image).
Faites passer le câble de charge dans
son guide (partie droite de l’image)(fi-
gure 14).
Enfoncez par le haut le support mural
dans la plaque de montage jusqu’à ce
qu’il s’enclenche avec un déclic(fi-
gure 15).
Le câble de charge est solidement
maintenu dans le support mural.
fr-CA
84
Insérez l’aspirateur dans le support
mural en vérifiant qu’il s’adapte parfai-
tement(figure 16).
Branchez le chargeur sur la prise de
courant.
La recharge commence.
Indicateur du niveau de charge de la
batterie (pendant le chargement)
(figure 17)
Le niveau de charge de la batterie est in-
diqué sur la partie supérieure du
PowerUnit.
Autonomie de la
batterie
Écran
Autonomie mini-
male de la batterie
L’indicateur
gauche s’allume
Augmentation de
l’autonomie de la
batterie
L’indicateur
gauche s’allume;
l’indicateur central
clignote
Augmentation su-
périeure de l’auto-
nomie de la batte-
rie
L’indicateur
gauche et l’indica-
teur central s’allu-
ment; l’indicateur
droit clignote
Capacité de
charge d’environ
91 à 99%
L’indicateur
gauche, l’indica-
teur central et l’in-
dicateur droit s’al-
lument
100% Éteint
Une fois la batterie complètement char-
gée, l’indicateur du niveau de charge de
la batterie s’éteint pour économiser
l’énergie.
Si la batterie n’a pas été utilisée pen-
dant longtemps et qu’elle est déchar-
gée, elle passe en mode de sécurité.
L’indicateur du niveau de charge de la
batterie ne réagit alors qu’après envi-
ron 30 à 60minutes.
Indicateur du niveau de charge de la
batterie (pendant l’utilisation)
(figure 17)
Le niveau de charge de la batterie est in-
diqué sur la partie supérieure du
PowerUnit.
Autonomie de la
batterie
Écran
Autonomie maxi-
male de la batterie
Tous les indica-
teurs s’allument
Diminution de I’au-
tonomie de la batte-
rie
Deux indica-
teurs s’allument
Diminution supé-
rieure de l’autono-
mie de la batterie
Un indicateur
s’allume
Autonomie mini-
male de la batterie
Un indicateur
clignote
Utilisation des accessoires four-
nis (figure 18)
Miele propose une gamme d’acces-
soires adaptés à de nombreuses fonc-
tions spéciales (voir «Accessoires en
option»).
fr-CA
85
Brosse à meubles
Accessoire permettant d’aspirer
les plinthes, les meubles sculptés
ou les objets de décoration.
Suceur plat
Accessoire permettant de net-
toyer dans les plis, les fentes ou
les coins.
Suceur à coussins
Accessoire permettant de net-
toyer les tissus d’ameublement,
les matelas et les coussins.
Porte-accessoires du tube d’aspiration
(figure 19)
Ce porte-accessoires vous permet de
transporter avec vous deuxaccessoires
du jeu de troisaccessoires pendant que
vous passez l’aspirateur.
Électrobrosse MultiFloor (HX-EB 20)
(figure 20)
Veuillez suivre les consignes de net-
toyage et d’entretien du fabricant du
revêtement de sol.
Dommages causés par des ob-
jets coincés.
Risque de rayures sur le revêtement
de sol.
Vérifiez qu’il n’y a pas de salissures
de gros calibre ni de débris coincés
sous l’électrobrosse, parex.des
éclats de verre ou des pierres.
L’électrobrosse peut être utilisée pour le
nettoyage quotidien des moquettes, des
tapis et des sols durs.
Conseil : Le tube d’aspiration n’est pas
une option pratique pour nettoyer les
escaliers recouverts de moquette.
Conseil : Si vous avez besoin d’aspirer
des quantités importantes de salissures
de gros calibre ou de débris, utilisez le
concept modulairePowerUnitSolo (voir
«Fonctionnement»–«PowerUnitSo-
lo»).
Brosse manuelleElectroCompact
(HX-EC20)(figure 21)
(selon le modèle)
Veuillez suivre les consignes de net-
toyage et d’entretien du fabricant du
revêtement de sol.
Dommages causés par des ob-
jets coincés.
Risque de rayures sur le revêtement
de sol.
Vérifiez qu’il n’y a pas de salissures
de gros calibre ni de débris coincés
sous la brosse manuelle, parex.des
éclats de verre ou des pierres.
La brosse manuelle est particulièrement
adaptée au nettoyage intensif des tissus
d’ameublement et des sièges de voiture.
Pour des résultats de nettoyage opti-
maux sur les tissus d’ameublement,
utilisez le suceur à coussins.
Conseil : Le tube d’aspiration n’est pas
une option pratique pour nettoyer les
tissus d’ameublement et les sièges de
voiture.
BrosseAllFloor (HX-AF20)(figure 22)
(selon le pays)
Veuillez suivre les consignes de net-
toyage et d’entretien du fabricant du
revêtement de sol.
fr-CA
86
Cette brosse plate et légère est particu-
lièrement adaptée au nettoyage sous les
meubles très bas.
Brosse universelle (HX-UB)(figure 23)
(selon le modèle)
Pour aspirer en douceur les livres, les
étagères, etc.
Suceur platXL flexible et télescopique
(HX-CNXL)(figure 24)
(selon le modèle)
Il peut atteindre 60cm pour nettoyer
les zones difficiles d’accès.
Rallonge de tuyau (HX-FSH 20)
(figure 25)
(selon le modèle)
La rallonge de tuyau peut être déployée
jusqu’à une longueur maximale de
120cm. Elle peut être rallongée à l’aide
du suceur plat flexible et télescopique.
Fonctionnement
Retrait de l’aspirateur du support mu-
ral standard(figure 26)
Retirez l’aspirateur du support mural
en le tirant vers le haut.
Retrait de l’aspirateur du support mu-
ral SpeedLock(figures 27 + 28)
Retirez l’aspirateur du support mural
en le tirant vers l’avant(figure 27).
Le support mural SpeedLock permet
d’utiliser le PowerUnit comme un
PowerUnitSolo, sans avoir à le déta-
cher manuellement du tube d’aspira-
tion.
Tirez le PowerUnit vers le haut pour le
sortir du guide du support mural(fi-
gure 28).
Le tube d’aspiration et l’électrobrosse
restent sur le support mural.
Mise en marche et arrêt(figure 29)
Une fois la batterie chargée, retirez la
fiche de chargeur de la prise de
charge située en bas à l’arrière du
PowerUnit.
Pour obtenir les meilleurs résultats de
nettoyage possibles, activez toujours
la fonctionComfortClean avant de
mettre en marche l’aspirateur (voir
«Nettoyage et entretien»–«Activa-
tion de la fonctionComfortClean»).
Appuyez sur le bouton supérieur pré-
sent sur la poignée.
L’aspirateur se met en marche en utili-
sant le niveau de puissance le plus bas.
Augmentation de la puissance
d’aspiration(figure 30)
Appuyez sur le bouton inférieur pré-
sent sur la poignée.
Le niveau de puissance le plus élevé est
sélectionné et le voyant DEL s’allume.
Appuyez à nouveau sur le bouton pour
revenir au niveau de puissance inférieur.
PowerUnitSolo(figure 31)
Le PowerUnit peut être utilisé seul, sans
le tube d’aspiration et l’électrobrosse,
pour aspirer rapidement les miettes et
la poussière dans des endroits particu-
liers.
Conseil : Ce mode est particulièrement
adapté à l’utilisation du jeu de trois ac-
cessoires (voir «Utilisation des acces-
soires fournis»).

fr-CA
87
Nettoyage et entretien
Risque de blessures dues à la ro-
tation de la brosse cylindrique.
Vous pouvez vous blesser sur la
brosse cylindrique lorsqu’elle tourne.
Éteignez toujours l’aspirateur avant
de le nettoyer et de l’entretenir. Pour
ce faire, utilisez l’interrupteur
Marche/Arrêt situé sur la poignée.
Système de filtration(figure 32)
Couvercle fileté
Filtre à poussières fines
Réservoir à poussière
d Préfiltre
e Rabat du réservoir à poussière
Activation de la fonction Com-
fortClean (figure 33)
Exécutez toujours la fonction de net-
toyage intermédiaire pour le filtre à
poussières fines avant de vider le réser-
voir à poussière. Vous devez également
l’exécuter chaque fois que la puissance
d’aspiration commence à baisser.
Cela permet à l’aspirateur de retrouver
immédiatement ses meilleures perfor-
mances de nettoyage.
Tournez 3 fois le couvercle fileté de
180°.
Lorsque vous tournez le couvercle fileté,
vous pouvez entendre un bruit, ce qui
est normal et fait partie de la façon dont
la fonction d’auto-nettoyage Com-
fortClean marche.
Vidage du réservoir à poussière
(figure 34)
Videz le réservoir à poussière au plus
tard lorsque la poussière a atteint le re-
père Max sur le réservoir à poussière.
Le contenu du réservoir à poussière
peut être jeté avec les ordures ména-
gères normales, tant qu’il ne contient
pas de substances interdites.
Tenez le réservoir à poussière au-des-
sus de la poubelle de sorte à réduire
les nuages de poussière autant que
possible.
Appuyez sur la touche de déverrouil-
lage située sous le réservoir à pous-
sière.
Le rabat s’ouvre et la poussière tombe.
Si des moutons de poussière, des che-
veux ou des débris de gros calibre
restent dans le réservoir, retirez le pré-
filtre en le tirant vers le bas (voir la
section suivante: «Nettoyage du ré-
servoir à poussière et du préfiltre»).
Refermez le rabat du réservoir à pous-
sière en vous assurant qu’il s’en-
clenche.
Nettoyage du réservoir à poussière et
du préfiltre(figures 35, 36 + 37)
Nettoyez le réservoir à poussière et le
préfiltre, selon les besoins.
Videz le réservoir à poussière au-des-
sus d’une poubelle.
Retirez le préfiltre en le tirant vers le
bas(figure 35).
fr-CA
88
Risque de dommages dus à un
nettoyage incorrect.
Le préfiltre peut être endommagé et
donc moins efficace.
Ne nettoyez pas le préfiltre à l’eau.
N’utilisez pas d’objets pointus ou
tranchants pour nettoyer le filtre.
Nettoyez le réservoir à poussière et le
préfiltre à l’aide d’un chiffon sec ou
d’un accessoire de nettoyage situé
sur le côté du PowerUnit(figure 36).
Insérez à nouveau le préfiltre nettoyé
dans le réservoir à poussière propre
jusqu’à la butée(figure 37).
Refermez le rabat du réservoir à pous-
sière en vous assurant qu’il s’en-
clenche.
Nettoyage du filtre à poussières
fines(figure 33 + 38)
Nettoyez le filtre à poussières fines soi-
gneusement au moins tous les 3mois
en l’extrayant du PowerUnit.
Risque de dommages dus à un
nettoyage incorrect.
Le filtre à poussières fines peut être
endommagé et donc moins efficace.
Ne nettoyez pas le filtre à poussières
fines à l’eau et évitez d’en nettoyer
l’intérieur. N’utilisez pas d’objets
pointus ou tranchants pour nettoyer
le filtre. Ne nettoyez pas le filtre à
poussières fines à l’aide d’une brosse
(même avec l’accessoire de net-
toyage fourni).
Appuyez sur les deux touches de dé-
verrouillage situées sur le côté du
couvercle du filtre à poussières fines
et retirez ce dernier en le tirant vers le
haut(figure 38).
Tenez le filtre à poussières fines au-
dessus d’une poubelle.
Saisissez la partie noire du filtre à
poussières fines sous le couvercle fi-
leté et tournez le couvercle fileté
10fois à 180°(figure 33).
Lorsque vous tournez le couvercle fileté,
vous pouvez entendre un bruit, ce qui
est normal et fait partie de la façon dont
la fonction d’auto-nettoyageCom-
fortClean marche.
Tapez délicatement le bord inférieur
du filtre à poussières fines pour le vi-
der.
Tournez légèrement le filtre à pous-
sières fines pendant cette opération
afin de déloger les poussières de tous
les recoins.
Insérez à nouveau le filtre à pous-
sières fines propre dans le PowerUnit
en vous assurant qu’il s’enclenche.
Pour des résultats de nettoyage opti-
maux, remplacez le filtre à poussières
fines (HX-FDF20) par un neuf au bout
de 3ans environ.
Nettoyage de l’électrobrosse/la
brosse manuelle (selon le modèle)
(figure 39)
Séparez l’électrobrosse/la brosse
manuelle de l’aspirateur(figure 05).
Placez l’électrobrosse/la brosse ma-
nuelle à l’envers sur une surface plane
et propre.
À l’aide d’une paire de ciseaux, cou-
pez les fils ou les cheveux qui se sont
enroulés autour de la brosse cylin-
drique. Les deuxrainures sur la brosse
cylindrique permettent de guider les
ciseaux(figure 39).
fr-CA
89
Utilisez ensuite l’aspirateur pour aspirer
les fils et cheveux coupés.
Si les roulettes sont très sales ou blo-
quées, vous pouvez les retirer pour les
nettoyer plus facilement (cela n’est
pas possible en cas d’utilisation de la
brosse manuelle). Pour les retirer, utili-
sez un tournevis plat.
Retrait de la brosse cylindrique de
l’électrobrosse(figure 40)
Vous pouvez retirer la brosse cylindrique
de l’électrobrosse pour éliminer les sa-
lissures tenaces et nettoyer l’intérieur
de l’électrobrosse.
A Tournez la flèche présente sur la poi-
gnée latérale de l’électrobrosse vers
le symbole.
La brosse cylindrique se détache.
B Retirez la brosse cylindrique.
Nettoyez la brosse cylindrique et en-
levez toutes les saletés tenaces à
l’intérieur de l’électrobrosse.
En cas de salissures importantes entre
la poignée et la brosse cylindrique,
vous pouvez débloquer la poignée.
C Tirez légèrement sur la poignée
jusqu’à ce qu’elle se débloque.
Retirez les salissures.
Rebloquez la poignée nettoyée dans
la brosse cylindrique.
Enfoncez la brosse cylindrique au
maximum dans l’électrobrosse jusqu’à
ce qu’elle soit en place.
Verrouillez la brosse cylindrique.
Retrait de la brosse cylindrique de la
brosse manuelle (selon le modèle)
(figure 41)
Vous pouvez retirer la brosse cylindrique
de la brosse manuelle pour éliminer les
salissures tenaces et nettoyer l’intérieur
de la brosse manuelle.
A Libérez la brosse cylindrique à l’aide
d’une pièce de monnaie.
B Retirez la brosse cylindrique.
Nettoyez la brosse cylindrique et en-
levez toutes les saletés tenaces à
l’intérieur de la brosse manuelle.
Remontez la brosse manuelle dans
l’ordre inverse.
fr-CA
90
Remplacement de la batterie
(figures 42 + 43)
Il est nécessaire d’utiliser une batterie
de rechange au lithium-ionAP10/AP11
Miele d’origine.
Suivez les consignes concernant la
manipulation et l’élimination des batte-
ries de rechange, qui figurent dans les
sections suivantes: «Consignes de
sécurité et mises en garde», «Déve-
loppement durable et protection de
l’environnement» et «Mise en ser-
vice» («Renseignements généraux
sur la batterie»).
Retirez le filtre à poussières fines du
PowerUnit(figure 38).
Utilisez un tournevis plat pour ouvrir
avec précaution le couvercle du com-
partiment de la batterie(figure 42).
Retirez soigneusement la fiche et
remplacez la batterie(figure 43).
Insérez à nouveau la fiche, en vous
assurant qu’elle s’adapte parfaite-
ment.
Fermez le compartiment de la batterie
et insérez à nouveau le filtre à pous-
sières fines dans le PowerUnit en
vous assurant qu’il s’enclenche.
Entretien de l’aspirateur et des acces-
soires
Risque de blessures dues à la ro-
tation de la brosse cylindrique.
Vous pouvez vous blesser sur la
brosse cylindrique lorsqu’elle tourne.
Éteignez toujours l’aspirateur avant
de l’entretenir. Pour ce faire, utilisez
l’interrupteur Marche/Arrêt situé sur
la poignée.
Risque de décharge électrique
due à la tension réseau.
La présence d’humidité dans le char-
geur peut provoquer des décharges
électriques.
Assurez-vous de ne pas mouiller le
chargeur.
Respectez les consignes de nettoyage
spéciales du préfiltre, du filtre à pous-
sières fines et du réservoir à poussière
figurant dans la section «Nettoyage et
entretien».
L’aspirateur et tous les accessoires en
plastique peuvent être nettoyés à l’aide
d’un produit nettoyant pour le plastique
disponible dans le commerce.
Dommages dus à des produits
de lavage inappropriés.
Toutes les surfaces de l’appareil
peuvent se rayer. Le contact avec des
produits de lavage inappropriés peut
altérer ou décolorer les surfaces ex-
térieures.
N’utilisez pas de produits de lavage
abrasifs, de produits pour vitres, de
nettoyants multi-usages ni de pro-
duits d’entretien à base d’huile.
fr-CA
91
Correction des anomalies
De nombreux dysfonctionnements et anomalies survenant au quotidien peuvent
être facilement résolus. Dans bon nombre de cas, cela permet d’économiser du
temps et de l’argent, car il est alors inutile de faire appel au service à la clientèle
Miele.
Vous pouvez trouver des informations vous aidant à résoudre des dysfonctionne-
ments sur www.miele.com/service.
Les tableaux suivants sont destinés à vous aider à déceler la cause d’un dysfonc-
tionnement ou d’une anomalie, puis à y remédier.
Risque de blessures dues à la rotation de la brosse cylindrique.
Vous pouvez vous blesser sur la brosse cylindrique lorsqu’elle tourne.
Éteignez l’aspirateur avant de résoudre une anomalie quelconque. Pour ce faire,
utilisez l’interrupteur Marche/Arrêt situé sur la poignée.
Problème Cause et solution possibles
Écran d’état de la charge
de la batterie lors de sa
mise en marche: les in-
dicateurs gauche et droit
clignotent rapidement
Anomalie de température
Attendez environ 30minutes avant de remettre
l’aspirateur en marche.
Indicateur d’état de l’au-
tonomie de la batterie
pendant le chargement:
les indicateurs de droite
et au centre clignotent
rapidement
Défaut de la batterie
Si vous chargez la batterie sans montage mural, re-
tirez la fiche de chargeur de la prise de charge si-
tuée à l’arrière du PowerUnit.
Retirez l’aspirateur du support mural si vous char-
gez la batterie dans le support mural (figures 26 +
28).
Attendez environ 5minutes avant de poursuivre
avec la charge de la batterie.
Il est essentiel de prendre en compte les tempéra-
tures ambiantes prescrites lors de la charge et du
remplacement de la batterie; voir «CONSIGNES
DE SÉCURITÉ IMPORTANTES».
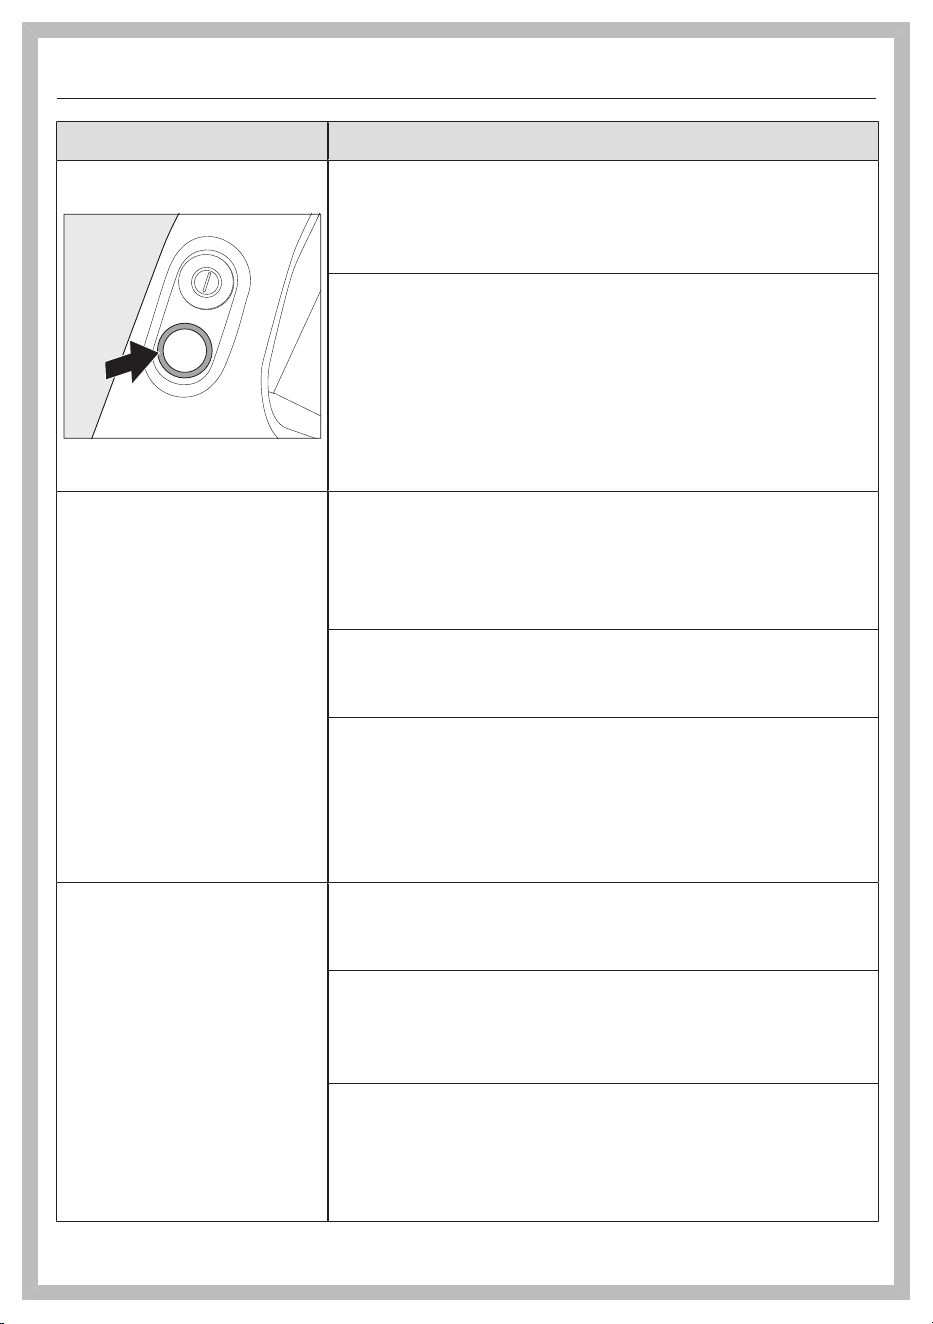
fr-CA
92
Problème Cause et solution possibles
Le voyant DEL sur la poi-
gnée clignote
Erreur «Batterie déchargée»
Rechargez la batterie (voir «Mise en service»–
«Renseignements généraux sur la batterie» et
«Recharge de la batterie»).
Erreur système interne
Vérifiez si les conduits d’air de l’aspirateur ne sont
pas obstrués.
Nettoyez le réservoir à poussière, le préfiltre et le
filtre à poussières fines (voir «Nettoyage et entre-
tien»).
Attendez environ 30minutes avant de remettre
l’aspirateur en marche.
L’aspirateur ne démarre
pas lorsqu’il est allumé.
La batterie de rechange n’est pas suffisamment char-
gée.
Rechargez la batterie (voir «Mise en service»–
«Renseignements généraux sur la batterie» et
«Recharge de la batterie»).
La batterie utilisée n’est pas d’origine Miele.
Insérez une batterie de rechange au lithium-
ionAP10/AP11 Miele d’origine.
La fiche de chargeur est toujours branchée.
Si vous chargez la batterie sans montage mural, re-
tirez la fiche de chargeur de la prise de charge si-
tuée à l’arrière du PowerUnit.
Retirez l’aspirateur du support mural si vous char-
gez la batterie dans le support mural.
L’efficacité du nettoyage
est médiocre.
L’autonomie de la batte-
rie diminue.
Le réservoir à poussière est plein.
Videz le réservoir à poussière (voir «Nettoyage et
entretien»–«Vidage du réservoir à poussière»).
Le réservoir à poussière/préfiltre est sale.
Nettoyez le réservoir à poussière et le préfiltre (voir
«Nettoyage et entretien»–«Nettoyage du réser-
voir à poussière et du préfiltre»).
Le filtre à poussières fines est sale.
Exécutez la fonction de nettoyage intermédiaire
pour le filtre à poussières fines (voir «Nettoyage et
entretien»–«Activation de la fonctionCom-
fortClean»).

fr-CA
93
Problème Cause et solution possibles
Nettoyez le filtre à poussières fines (voir «Net-
toyage et entretien–Nettoyage du filtre à pous-
sières fines»).
L’électrobrosse est sale/bloquée.
Nettoyez l’électrobrosse (voir «Nettoyage et en-
tretien»–«Nettoyage de l’électrobrosse» et
«Retrait de la brosse cylindrique de l’élec-
trobrosse»).
Les conduits d’air sont obstrués.
Nettoyez tous les conduits d’air.
Le filtre à poussières fines est usé.
Insérez un filtre à poussières fines neuf.
Le bruit de fonctionne-
ment change pendant
l’aspiration.
Les conduits d’air sont encrassés.
Nettoyez tous les conduits d’air.
La puissance de l’électrobrosse se règle automatique-
ment sur le niveau optimal en fonction du type de re-
vêtement de sol.
Le bruit n’est pas inhabituel, l’aspirateur fonctionne
normalement.
L’électrobrosse s’arrête. L’électrobrosse est surchargée. Cela peut arriver sur
certains revêtements, comme les tapis à poils longs.
Éteignez l’aspirateur, puis rallumez-le. Pour ce faire,
utilisez l’interrupteur Marche/Arrêt situé sur la poi-
gnée.
La brosse cylindrique ne
tourne pas.
La brosse cylindrique est sale.
Nettoyez la brosse cylindrique (voir «Nettoyage et
entretien»–«Nettoyage de l’électrobrosse» et
«Retrait de la brosse cylindrique de l’élec-
trobrosse»).
fr-CA
94
Service technique
Vous pouvez trouver des informations
sur les pièces de rechange Miele et
des informations vous aidant à ré-
soudre des dysfonctionnements sur
www.miele.com/service.
Contact en cas d'anomalies
Vous n'arrivez pas à résoudre la panne
par vous même? Contactez le service
après-vente Miele ou votre revendeur
Miele.
Les coordonnées du service après-
vente Miele figurent en fin de notice.
Garantie
Pour plus d'informations reportez-vous
aux conditions de garantie fournies au-
près du service après-vente Miele.
Accessoires en option
Veuillez suivre les consignes de net-
toyage et d’entretien du fabricant du
revêtement de sol.
Nous recommandons d’utiliser exclusi-
vement des accessoires d’origine por-
tant le logo Miele sur l’emballage.
Seuls ces accessoires garantissent
l’efficacité optimale de votre aspirateur
et les meilleurs résultats de nettoyage
possibles.
Veuillez noter que les erreurs et dom-
mages résultant de l’utilisation d’ac-
cessoires qui ne portent pas le logo
Miele ne seront pas couverts par la ga-
rantie de l’aspirateur.
Achat d’accessoires
Les accessoires Miele d’origine sont
disponibles sur la boutique en ligne
Miele, auprès du service technique
Miele et chez votre revendeur Miele.
Les accessoires Miele d’origine sont re-
connaissables par le logo Miele sur
l’emballage.
Avec 3D4U, Miele propose également
des accessoires à télécharger gratuite-
ment pour votre imprimante 3D
(www.miele.ca/fr > Support > Produits
d'entretien et pièces détachées >
3D4U – instructions d’impression en
3D).

fr-CA
95
Certains modèles sont équipés en série
d’un ou plusieurs des accessoires sui-
vants.
Brosse manuelleElectroCompact
(HX-EC20)
Pour le nettoyage intensif des sièges de
voiture et des escaliers recouverts de
moquette.
Rouleau doux pour sols durs
(HX-HCT20)
Pour nettoyer les sols durs délicats.
Insérez le rouleau doux pour sols durs
dans l’électrobrosse au lieu de la brosse
cylindrique standard (voir «Nettoyage
et entretien»–«Retrait de la brosse
cylindrique de l’électrobrosse»).
Brosse universelle (HX-UB)
Pour aspirer en douceur les livres, les
étagères, etc.
Suceur platXL flexible et télescopique
(HX-CNXL)
Le suceur plat flexible peut atteindre
60cm pour nettoyer les zones difficiles
d’accès.
Rallonge de tuyau (HX-FSH20)
Pour augmenter le rayon d’aspiration de
120cm au maximum.

fr-CA - Garantie restreinte – Aspirateurs Canada
96
Les conditions de la garantie suivante sont valides au Canada seulement.
Miele limitée, (ci-après nommée «Miele») garantit à l’acheteur original que ce produit, y compris tous ses accessoires
et pièces autorisés par Miele, est libre de tout défaut de matériel et de fabrication.
1. Entrée en vigueur et durée de la garantie
Cette garantie est valide durant la période de temps suivante :
a) Appareils électroménagers aux fins d’utilisation domestique normale et non commerciale :
– Un (1) an, pièces et main-d’œuvre.
– Modules RemoteVision® : veuillez vous reporter à la «Garantie restreinte - Module RemoteVision® -
Canada» de Miele.
– Garantie supplémentaire de 5 et 10 ans sur les systèmes scellés de réfrigération : la garantie sur le
système scellé de réfrigération couvre tous les compresseurs, les condensateurs, les évaporateurs et les
déshydrateurs-filtres d'origine, ainsi que le fluide frigorigène et les tuyaux de raccordement d'origine.
– Garantie de cinq (5) ans - Si une plainte concernant un matériau défectueux ou un défaut de fabrication lié
au système scellé de réfrigération utilisé dans les réfrigérateurs, les caves à vin et les congélateurs Miele est
adressée à Miele dans les cinq (5) ans suivant la date d'achat de l'appareil, les défauts du système scellé de
réfrigération couverts par la garantie seront réparés gratuitement (pièces et main-d'œuvre comprises).
– Garantie de dix (10) ans - Si une plainte concernant les défauts susmentionnés est adressée à Miele à
partir de la sixième (6
e
) année et jusqu'au dernier jour de la dixième (10
e
) année suivant la date d'achat
de l'appareil, la garantie couvrira le remplacement ou la réparation de tous les éléments du système
scellé de réfrigération présentant un défaut matériel ou un défaut de fabrication couvert par la garantie,
excepté les frais de main-d'œuvre. Si le client en fait la demande, Miele se chargera de la réparation ou du
remplacement des pièces, mais aux frais du client.
b) Appareils électroménagers aux fins d’utilisation commerciale :
– Six (6) mois, pour pièces et main-d’œuvre.
c) Aspirateurs destinés à une utilisation domestique, non commerciale dans des conditions normales :
– Un (1) an, pour les aspirateurs verticaux, aspirateurs-balais sans fil et aspirateurs-chariots. Pièces et main
d'œuvre.
– Deux (2) ans, pour le moteur des aspirateurs verticaux S170 - S189. Pièces et main d'œuvre.
– Deux (2) ans, pour la batterie Varta ou Huizhou Blueway des aspirateurs-balais sans fil. Pièces et main
d'œuvre.
– Sept (7) ans, pour le moteur Vortex
TM
des aspirateurs-chariots, aspirateurs verticaux et aspirateurs-balais
sans fil, excepté pour les modèles d’aspirateurs verticaux S170-S189 dont le moteur est garanti deux (2)
ans. Pièces et main d'œuvre.
d) Aspirateurs aux fins d’utilisation commerciale :
– Six (6) mois, pour les produits à utilisation commerciale. Pièces et main-d’œuvre.
– Un (1) an, pour le moteur des aspirateurs verticaux et des aspirateurs-chariots. Pièces et main-d’œuvre.
e) Appareils commerciaux:
– Un (1) an, pièces et main d’œuvre dans la zone de service direct Miele.
– Un (1) an, pièces uniquement en dehors de la zone de service direct Miele.
Contactez Miele Professional pour déterminer si vous êtes dans la zone de service direct Miele.
f) Appareils commerciaux à usage domestique:
– Deux (2) ans, laveuse Petits géants, sécheuse Petits géants, lave-vaisselle Profi. Pièces et main d'oeuvre.
2. Date d’entrée en vigueur
La garantie entre en vigeur à la date de livraison. En cas de remplacement par Miele d'un produit couvert par une
garantie, la période de garantie initiale n'est pas prolongée; sa date d'entrée en vigueur correspond à la date de la
livraison initiale.
3. Conditions préalables liées à la garantie
3.1 Miele assume la responsabilité en vertu de la garantie à la condition que les conditions suivantes aient été
respectées :
a) vous êtes l'acheteur initial et votre produit ne provient pas d'une revente;
b) le produit a été acheté auprès de Miele ou auprès d'un détaillant Miele autorisé au Canada;
c) le cas échéant, le produit a été installé par une personne compétente, autorisée par Miele, conformément
aux instructions d'installation en vigueur;
d) le produit se trouve au Canada.
3.2 Les réclamations en vertu de la garantie seront honorées uniquement si la non-conformité aux dispositions
de la garantie est signalée par écrit et si le produit est retourné à Miele ou à un détaillant Miele autorisé
accompagné d'une preuve de la date d'achat, pendant la période prévue à l'article 1 ci-dessus.

fr-CA - Garantie restreinte – Aspirateurs Canada
97
4. Étendue de la garantie
En cas de matériaux défectueux ou de défaut de fabrication pendant la période prévue à l'article 1 ci-dessus, Miele
réparera ou, à son choix, remplacera dans un délai raisonnable le produit ou toute pièce ou tout accessoire Miele
dont la fabrication ou les matériaux sont défectueux. Les produits ou les pièces défectueux deviennent la propriété de
Miele lorsqu'ils sont remplacés.
5. Exclusions de la garantie
La garantie ne couvre pas les produits, y compris les pièces et les accessoires de ces produits, qui :
a) n'ont pas été installés conformément aux instructions d'installation de Miele;
b) ont été endommagés par négligence, à la suite d'un accident ou d'une utilisation mauvaise, inappropriée ou
anormale, ou encore en raison de l'entretien ou du transport inapproprié ou anormal;
c) contiennent des accessoires ou des pièces de rechange non fabriqués par Miele, y compris les filtres, les
sacs à poussière et tout autre produit non fabriqué par Miele;
d) ont été réparés, entretenus ou modifiés par une personne autre qu'une personne du centre de services ou un
technicien autorisé par Miele.
6. Usure normale
L'usure normale ne constitue pas un défaut de fabrication ni un défaut de matériaux.
7. Limitation de responsabilité
7.1 À moins d'acheter une garantie prolongée auprès de Miele avant l'échéance de la présente garantie, celle-ci
est la seule garantie que vous offre Miele. Miele se désiste de toute autre garantie maximale permise par la
loi, expresse ou implicite, y compris toute garantie de qualité marchande ou d'usage à une fin particulière, à
l'exception de la présente garantie.
7.2 Les recours décrits dans le présent document constituent vos seuls recours en vertu de la présente garantie. À
moins d'une autre mention, la responsabilité de Miele pour les dommages réels, quelle que soit leur nature, est
limitée au montant que vous avez payé pour le produit. Miele se dégage de toute responsabilité, de tout dommage
indirect ou de tout autre dommage, qu'il soit attribuable à la violation du contrat, à la responsabilité délictuelle (y
compris la négligence), à la responsabilité du fait du produit ou à toute autre théorie juridique. En aucun cas les deux
parties ne seront tenues responsables de toute perte de bénéfices ou d'économies, de dommage consécutif ou de
tout autre dommage financier.
8. Lois provinciales particulières
La présente garantie accorde à l'acheteur des droits légaux particuliers. L'acheteur peut également exercer d'autres
droits qui peuvent varier d'une province à l'autre au Canada. Certaines provinces interdisent la restriction ou l'exclusion
des garanties implicites. Par conséquent, il est possible que certaines restrictions et exclusions ne s'appliquent pas.
9. Service à la clientèle
9.1 Pour faire exécuter des travaux d'entretien couverts en vertu de la présente garantie ou pour obtenir de plus
amples renseignements, veuillez communiquer avec Miele à l'adresse ou aux numéros suivants :
Miele limitée N° sans frais: 1-800-565-6435
Vaughan (Ontario)
Canada L4K 4V8
9.2 Si des travaux d'entretien sont nécessaires, l'appareil devra peut-être être déplacé par une personne
autorisée par Miele et emporté à un centre de services Miele autorisé. Si vous demandez un entretien et que
vous habitez une région éloignée, tel qu'il a été déterminé par Miele, à sa seule discrétion, à l'occasion, vous
devrez, selon le choix de Miele, assumer certains frais :
a) soit les frais de déplacement qu'engage Miele pour se présenter à votre lieu de résidence;
b) soit les frais de déplacement et d'envoi de l'appareil, de votre lieu de résidence au centre de services
Miele autorisé le plus près.
Miele limitée
Siège social au Canada et Centre Miele
161 Four Valley Drive
Vaughan, ON L4K 4V8
miele.ca
customercar[email protected]
[email protected] (questions commerciales)
Service à la clientèle
Téléphone: 1-800-565-6435
customercar[email protected] (questions générales et service technique)


Importateur
Miele limitée
Siège social au Canada et Centre Miele
161 Four Valley Drive
Vaughan, ON L4K 4V8
www.miele.ca
Service à la clientèle
Téléphone : 1-800-565-6435
Canada
Veuillez indiquer le modèle et le numéro
de série de votre appareil lorsque vous
contactez le service à la clientèle.
Allemagne
Fabricant
Miele & Cie. KG
Carl-Miele-Straße 29
33332 Gütersloh
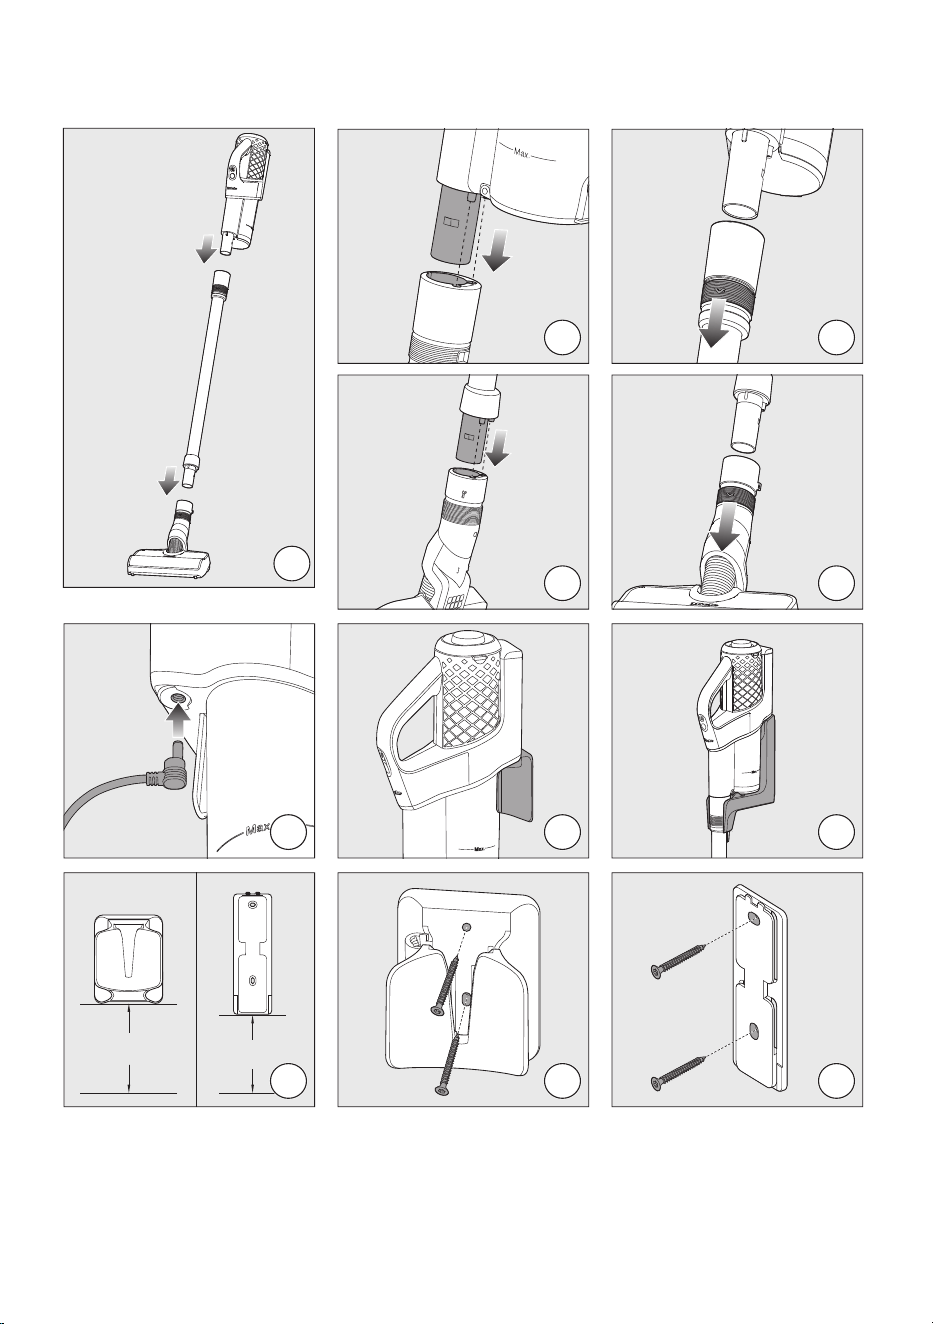
01
02
04
03
05
06
07
08
106 cm
42 in
96 cm
38 in
09
10
11

12
13
14
15
16
17
18
19
20
21
22
23
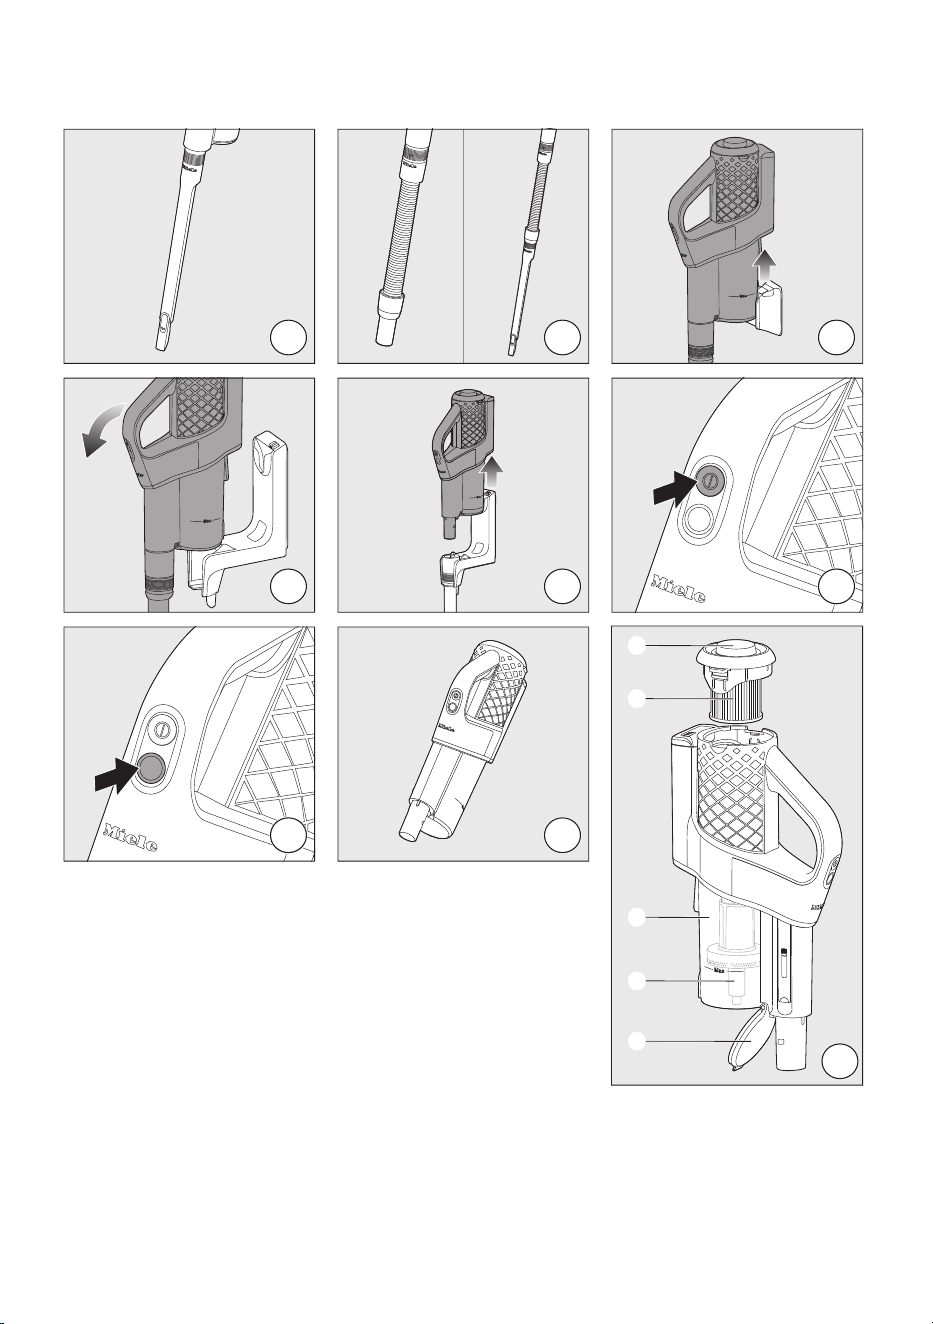
24
25
26
27
28
29
30
31
32
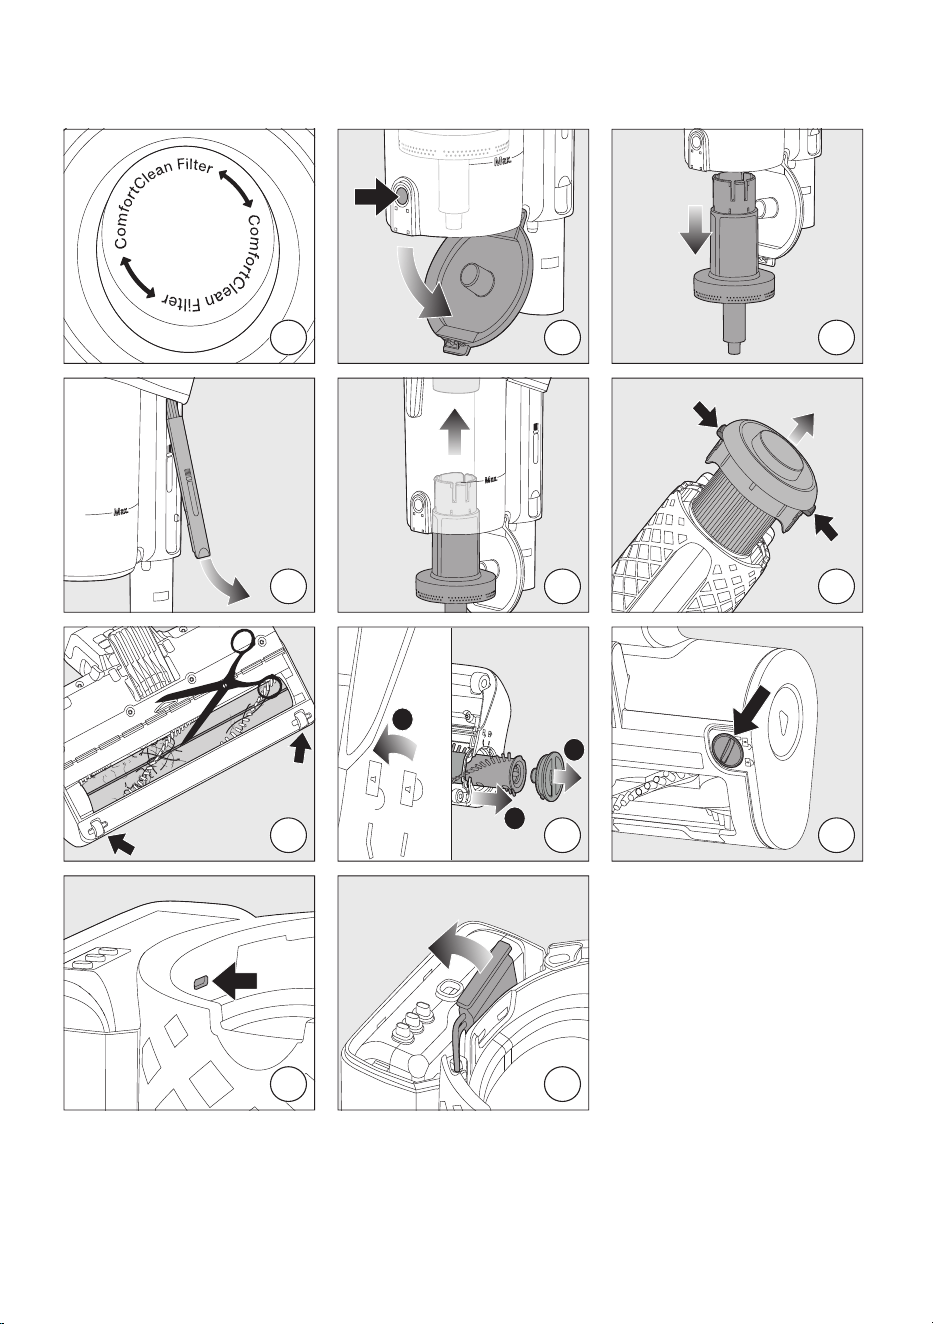
33
34
35
36
37
38
39
1
3
2
40
41
42
43

9 Independence Way
Princeton, NJ 08540
www.mieleusa.com
U.S.A.
Miele, Inc.
National Headquarters
Please have the model and serial number
of your appliance available when
contacting Customer Service.
Canada
Importer
Miele Limited
Headquarters and Miele Centre
Customer Support
Phone: 888-99-MIELE (64353)
161 Four Valley Drive
Vaughan, ON L4K 4V8
www.miele.ca
Customer Care Centre
Phone:
1-800-565-6435
905-532-2272
International Headquarters
Miele & Cie. KG
Carl-Miele-Straße 29
33332 Gütersloh
Germany
SQxxx - 0924 M.-Nr. 12 471 430 / 00
