日本語
EnglishDeutschFrançaisEspañol
简体中文
Русский
한국어
ク ラ リ ネ ット
取扱説明書
Clarinet
Owner’s Manual
Klarinette
Benutzerhandbuch
Clarinette
Mode d’emploi
Clarinete
Manual de instrucciones
Clarinete
Manual de instruções
单簧管
使用说明书
Кларнет
Руководство пользователя
클라리넷
사 용 설명서
單簧管
使用說明書
Português
繁體中文
JA EN DE FR ES PT ZH-CH RU KO ZH-TW

2
このたびは、ヤマハ管楽器をお買い上げいただき、まことにありがとうございます。
楽器を正しく組み立て性能をフルに発揮させるため、また永く良い状態で楽器を
お使いいただくために、この取扱説明書をよくお読みください。
P. 3
You are now the owner of a high quality musical instrument. ank you for choosing Yamaha.
For instructions on the proper assembly of the instrument, and how to keep the instrument in optimum
condition for as long as possible, we urge you to read this Owner’s Manual thoroughly.
P. 3
Sie sind nun der stolze Besitzer eines hochwertigen Musikinstruments. Vielen Dank, dass Sie sich für ein
Instrument der Marke Yamaha entschiedenen haben. Um mit den Handgri en zum Zusammensetzen
und Zerlegen des Instruments vertraut zu werden und dieses über Jahre hinweg in optimalem Zustand
halten zu können, raten wir Ihnen, diese Anleitung aufmerksam durchzulesen.
P. 3
Vous êtes dès à présent le propriétaire d’un instrument de musique de haute qualité.
Nous vous remercions d’avoir choisi Yamaha. En ce qui concerne les instructions relatives à un assem-
blage adéquat de l’instrument et sur la façon de garder l’instrument dans des conditions optimales aussi
longtemps que possible, nous vous conseillons vivement de lire entièrement le présent Mode d’emploi.
P. 3
P. 3
Usted es ahora propietario de un instrumento musical de alta calidad. Le agradecemos su elección de un
instrumento Yamaha. Le aconsejamos que lea todo este manual de instrucciones para ver las instruc-
ciones para el montaje correcto del instrumento y para aprender a conservar el instrumento en óptimas
condiciones durante tanto tiempo como sea posible.
Agora você é o proprietário de um instrumento musical de alta qualidade. Obrigado por escolher a marca
Yamaha. Aconselhamos que leia cuidadosamente todo o manual do proprietário para ver as instruções de
montagem adequada do instrumento, bem como manter em ótimas condições de uso pelo máximo de
tempo possível.
P. 3
现在您已经是高品质乐器的主人了 ! 在此 , 我们衷心感谢您选择雅马哈乐器 ,
同时也恳请您完整阅读该使用说明书 , 从而可以充分了解有关乐器正确组装
及如何使您的乐器尽可能长久地处于最佳状况的使用说明。
P. 3
P. 3
야마하 악기를 구입해 주셔서 감사합니다 . 악기의 알맞은 조립 방법 및 보관을 위해
본 사용설명서를 반드시 읽어주시기 바랍니다 .
P. 3
Вы стали обладателем высококачественного музыкального инструмента. Благодарим Вас
за выбор продукции Yamaha. Для получения инструкций по правильной сборке данного
инструмента и его длительном хранении в оптимальных условиях мы настоятельно
рекомендуем Вам внимательно прочитать настоящее руководство.
P. 3
您現在擁有高品質的樂器。感謝您選擇 Yamaha。
我們強烈建議您完整閱讀本使用說明書,以便了解如何正確組裝樂器,並且
使樂器盡可能長時間保持在最佳狀態。
3
Clarinet
Owner’s Manual
Precautions
Please read before using
The precautions given below concern the proper
and safe use of the instrument, and are to protect
you and others from any damage or injuries.
Please follow and obey these precautions.
If children are using the instrument, a guardian should
clearly explain these precautions to the child and make sure
they are fully understood and obeyed. After reading this
manual, please keep it in a safe place for future reference.
About the Icons
:
This icon indicates points which should be paid attention to.
: This icon indicates actions that are prohibited.
Caution
Disobeying the points indicated with
this mark may lead to damage or injury.
Do not throw or swing the instrument when others
are close by.
The mouthpiece or other parts may fall off hitting other
people. Always treat the instrument gently.
Keep the oil, polish, etc., out of children’s mouths.
Keep the oil, polish, etc., out of children’s reach and do
maintenance when children are not present.
Be careful not to touch the pin springs during
maintenance, etc.
The end of the pin springs found on high-end models is
sharpened to provide greater key action.
Be aware of climatic conditions such as tempera-
ture, humidity, etc.
Keep the instrument away from heat sources such as
heaters, etc. Also, do not use or store the instrument in
any extreme conditions of temperature or humidity. Do-
ing so may result in damage to key balance, linkage, or
pads, resulting in problems during performance.
Never use benzene or thinner for maintenance on
instruments.
Doing so can cause damage to the instrument.
Take care not to dis gure the instrument.
Placing the instrument where it is unstable may cause
the instrument to fall or drop resulting in dis gurement.
Take care as to where and how you place the instrument.
Do not modify the instrument.
Besides voiding the warranty, modi cation of the instru-
ment may make repairs impossible.
Keep small parts out of the reach of infants.
Your children may accidentally swallow them.
In regards to brass instruments with a plate nish, the
color of the nish may change over time however, it
should be of no concern in regards to the instrument’s
performance. Discoloration in its early stage can easily
be removed with maintenance. (As discoloration pro-
gresses, it may be dif cult to remove.)
* Please use the accessories that are specified for use
with the particular type of nish found on the instrument.
Also, metal polishes remove a thin layer of the nish’s
top coat which will make the nish thinner. Please be
aware of this before using polish.
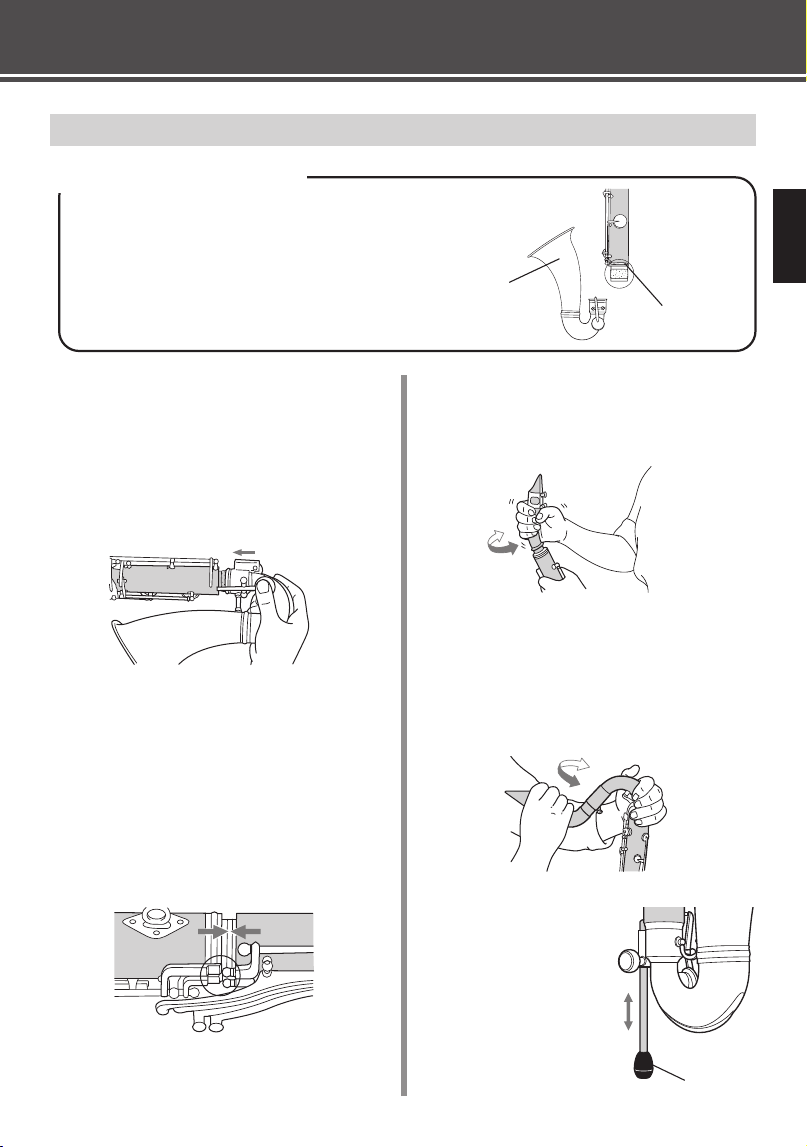
Caution—Movable Thumb Rest
Adjusting the Thumb Rest
1. Loosen the stopper screw and adjust the
thumb rest to the desired position.
* Removing the stopper screw can result in los-
ing the screw so only loosen the screw enough
to adjust the thumb rest.
2. Secure the thumb rest in place by tightening
the stopper screw with a screwdriver or a
coin.
Caution—When Using the Strap Ring
(Only for instruments equipped with a strap ring on
the thumb rest.)
• Use with the strap around your neck and the strap’s
hook inserted through the strap ring.
• When inserting the strap hook into the instrument’s
strap ring, or while playing, always hold onto the
instrument with your hands. Letting the instrument
hang from the hook without any support places ex-
cessive weight on the ring, which can cause damage.
Moreover, if the strap ring were to come off of the
hook, the instrument could drop. Please use caution.
Strap Ring
Stopper Screw
umb Rest

4
Precautions
e wooden clarinet’s body is made of natural Grenadilla (other models are made of ABS
resin which is extremely weather resistant). For this reason, sudden changes in temperature
or humidity may result in cracking of the body or di culty when connecting the body sec-
tions together at the joint. Please take into consideration, the place that the instrument will
be used and the manner in which it is used.
During the winter season before using it. wait until the entire instrument has adjusted to room
temperature.
When the instrument is new, do not use it for long periods of time. Play it for only about 20 to 30
minutes a day for the rst two weeks.
Whenever possible, use a cleaning swab to remove moisture or dirt from the instrument.
e wooden clarinet is a very delicate instrument. Do not use it under the following condi-
tions. Doing so may result in damage to the body.
Do not expose it to direct sunlight for any extended period of time.
Do not expose it to rain or excessive humidity.
Do not expose it to heat sources such as a stove, heater.
Do not expose it to cool air such as that from an air-conditioner.
NOTICE
About plastic (ABS resin) models:
•
Keep away from hot objects as there is a risk of deformation.
•
Avoid contact with a plant-based oil (bore oil, etc. used for the inside of wooden instruments) as there
is a risk of deterioration.
•
Use the same Yamaha cork grease as the accessories for the joints.
To keep your instrument in optimum condition, please observe the following precautions.
After playing it, use a cleaning swab to remove moisture or dirt. (See the “Instrument Maintenance”
section on page 9.)
When setting the instrument down for a short period of time, use a cleaning swab to remove mois-
ture and dirt from it, then place it on a stable surface with the keys facing up.
After use, always store the instrument in its case. Do not store it in places of high temperature or
humidity.
Never leave a damp gauze or cloth in the case.
When transporting the instrument, make sure that the mouthpiece cap is attached.
5
Nomenclature
q
q
Mouthpiece
w
Ligature
e
Barrel
r
Upper Joint
t
Key
y
Main Body
u
Lower Joint
i
Bell
o
Register Key
!0
Neck
!1
Upper Neck
!2
Lower Neck
!3
Fastening Screw
!4
Peg
o
Accessories
Mouthpiece Cap
Cork Grease
Polishing Cloth
*
Improvements may change the design and speci cations without notice.
w
e
t
y
i
E
b
Clarinet B
b
/A Clarinet Alto Clarinet Bass Clarinet
Reverse
Side
q
w
r
u
t
i
!2
!4
!1
!3
q
w
e
r
t
u
i
q
w
r
u
t
i
!0
!4
6
Assembly
Before assembling the instrument, please observe the following.
e clarinet is made of natural wood and precision metal parts. When holding and assembling
the instrument, take care not to place any excessive force on the keys.
Also, if you have di culty attaching the joints together when assembling the instrument, apply a
thin coat of cork grease to the joints and try to put the joints together again. When applying cork
grease, be careful not to apply too much. If the joints still do not go together smoothly, apply a
thin coat of cork grease to the receiver side as well.
Assembly
B
b
/A Clarinet
1.
Attach the barrel to the upper joint and the
bell to the lower joint.
2.
To link the upper and lower joint bridge keys
together, hold the upper joint in your left hand
as shown in the illustration and press the upper
keys to raise the bridge key.
3.
Hold the lower joint in your right hand and
check the position of the bridge key. Slide the
lower joint onto the upper joint by rotating
the lower joint.
* Make sure the upper and lower bridge keys do not
come into contact with each other.
4.
After connecting the upper and lower joints
together, attach the mouthpiece.
E
b
Clarinet
1.
Attach the barrel and bell to the main body.
2.
Attach the mouthpiece to the barrel.
bridge key
7
Assembly
Alto Clarinet / Bass Clarinet
Caution When Assembling
As bridge keys protrude from the neck, upper joint,
lower joint, and bell on the alto and bass clarinets, be
careful not to damage or bend these parts when assem-
bling the instrument. e bell section and tone hole
on the alto clarinet is thin so please use extra caution
when assembling these parts.
Bell
bridge key
1.
Attaching the bell to the lower joint.
Holding the bottom of the bell in your right
hand, slide the bell section partially onto the
joint.
2.
Hold down the pad plate on the bell with your
right thumb then slide the bell all the way
onto the joint.
When assembling, insert the peg at this point
to provide stability when standing the instru-
ment on the oor.
3.
Assemble the upper and lower joints.
While checking the position of the bridge keys,
align the upper and lower bridge keys and slide
the upper and lower joints together without
twisting.
* Make sure the upper and lower bridge keys do not
come into contact with each other.
4.
Attach the neck to the upper joint.
On the alto clarinet
After attaching the mouthpiece to the
neck, insert the neck into the upper joint.
On the bass clarinet
Attach the lower and upper neck sections
and secure them with the fastening screw.
Next, attach the mouthpiece onto the
upper neck and then the mouthpiece/neck
assembly into the upper joint.
5.
Adjust the length of
the peg according to
your posture.
Peg
8
Assembly
Attaching the Reed
1.
Soak the reed in your mouth or in some water.
From the tip end of the mouthpiece, slide on
the ligature as shown in the illustration.
Mouthpiece
Ligature
Reed
2.
Attach the reed to the mouthpiece.
First, place the reed so that the tip of the
mouthpiece is seen over the end of the reed
then tighten the ligature screws to secure the
reed.
Reed
Ligature Screws
* After playing, use a piece of gauze to dry the reed,
then store the reed in a reed case.
As the reed and mouthpiece are easily dam-
aged, always keep the mouthpiece covered
with its cap when the instrument is not being
played.
Cap
Tuning
Since the temperature of the instrument e ects
its pitch, the instrument should rst be warmed
up before tuning by blowing air through it.
A, B
b
, & E
b
Clarinets
Push in or pull out on the barrel to tune
the clarinet.
When the pitch is high.
When the pitch is low.
Barrel
Alto Clarinet
Push in or pull out the neck to tune the
alto clarinet.
When the
pitch is high.
When the pitch
is low.
Neck
Bass Clarinet
After loosening the fastening screw, push
in or pull out the neck to tune the bass
clarinet. After tuning is complete, retighten
the fastening screw to secure the neck.
When the
pitch is
high.
When the
pitch is
low.
Upper
Neck
Fastening Screw

9
Instrument Maintenance
Instrument Maintenance After Playing
After playing your clarinet, use the following procedures to remove moisture and dirt from
the inside of the instrument.
After playing, remove the reed from the
mouthpiece and use a piece of gauze, to dry
the reed, then store the reed in a reed case.
After removing the reed, use the supplied
cleaning swab to clean the inside of the
mouthpiece.
Also, use the swab to clean the inside of the
main body and neck.
* To prevent damage to the end of the mouthpiece,
do not pull the swab all the way through.
* Always keep the cleaning swab clean and dry.
e joint sections especially collect moisture,
which can cause cracking, so dry the joints
carefully with gauze.
* Even during playing sessions, remove moisture
from the body interior as often as possible.
When the pads are wet, place a cleaning paper
(sold separately) between the pad and the tone
hole and press the pads lightly to completely
remove the moisture.
Use a soft cloth to remove dirt and oil from the
body surface, taking care not to damage parts
such as the keys.

10
Once or Twice a Month Mainte-
nance
Use a tone hole cleaner (sold separately) to
remove any dirt from inside the tone holes or
the spaces between the keys.
Instrument Maintenance
* Be careful not to bend any parts.
* Be careful not to damage the pads.
Apply a small amount of key oil (sold sepa-
rately) to the mechanism then move the keys
to allow the oil to spread evenly.
* Do not apply too much oil.
* Completely remove any oil on key surfaces.
11
Troubleshooting
e tone is not clear, or the instrument
plays out of tune.
If pads are deformed and air is leaking from
the instrument, take the instrument to your
dealer for repair.
Never apply excessive pressure to the keys.
Also, when placing the instrument in the
case, make sure that nothing is placed on
top of the instrument.
If the body cracks, take the instrument to
your dealer for repair.
Sudden changes in temperature or humidity
can cause cracking. Do not directly expose
the instrument to hot or cold air.
The keys are stiff. The keys do not
move.
If a spring has become dislodged, returning
it to its proper position may correct the
problem.
When hooking the spring in position, be
careful not to bend the spring. Springs may
become dislodged when performing main-
tenance on the instrument or when wiping
the instrument with a cloth. Please use cau-
tion.
If keys are bent, take the instrument to
your dealer for repair.
Do not apply excessive force to the instru-
ment such as dropping the instrument, clos-
ing the case when an object is placed on top
of the instrument, etc. Also, when you are
nished playing, place the instrument in the
case. At this time, make sure that there is
nothing in the case that will apply pressure
on the keys. When assembling the instru-
ment, be careful not to apply unnecessary
pressure to the keys. Hold on to the instru-
ment in the intervals between performance
and during breaks between practice.
e joint is too tight or loose.
If the joint is tight, apply a small amount of
cork grease to the joints. If the joint is still
tight, apply some cork grease to the receiver
side as well.
Changes in temperature and/or humidity
can cause the joints to shrink or expand. Af-
ter you are nished playing, make sure you
store the instrument in its case, rather than
leave it out.
If the joints are torn, take the instrument
to your dealer for repair.
Proper application of cork grease offers
some protection against tearing of the cork.
However, if the cork becomes torn, take the
instrument to your dealer for repair.
e keys are noisy.
Apply key oil if the keys lack oil and are
dry, and tighten screws that have become
loose.
Apply key oil once a month (1-2 drops per
location) to prevent abrasion. Also, since
woodwind instruments have many small
screws, check for loose screws and tighten if
necessary.
e cork or felt on the keys has fallen o or
torn. e instrument may have received a
shock causing the keys to come in contact
with the body or other keys. In this case,
take the instrument to your dealer for re-
pair.
Take proper care of the instrument to pre-
vent the corks or felts from falling o . After
playing the instrument keep the instrument
in its case. Also, hold on to the instrument
in the intervals between performance and
during breaks between practice to prevent
excessive pressure being placed on the in-
strument or keys.

12

13
MEMO
14
YCL-622
アルトクラリネット / バスクラリネット
Alto Clarinet/Bass Clarinet
Altklarinette/Bassklarinette
Clarinette Alto/Clarinette Basse
Clarinete alto/Clarinete bajo
Clarinete Alto / Clarinete Baixo
中音单簧管 / 低音单簧管
Альтовый кларнет/Бас-кларнет
알토클라리넷 / 베이스클라리넷
中音單簧管 / 低音單簧管
放す
Open
O en
Ouvert
Abierto
Aberto
开启
Открытый
열기
開孔
押さえる
Close
Geschlossen
Ferm
Cerrado
Fechado
关闭
Закрытый
닫기
閉孔
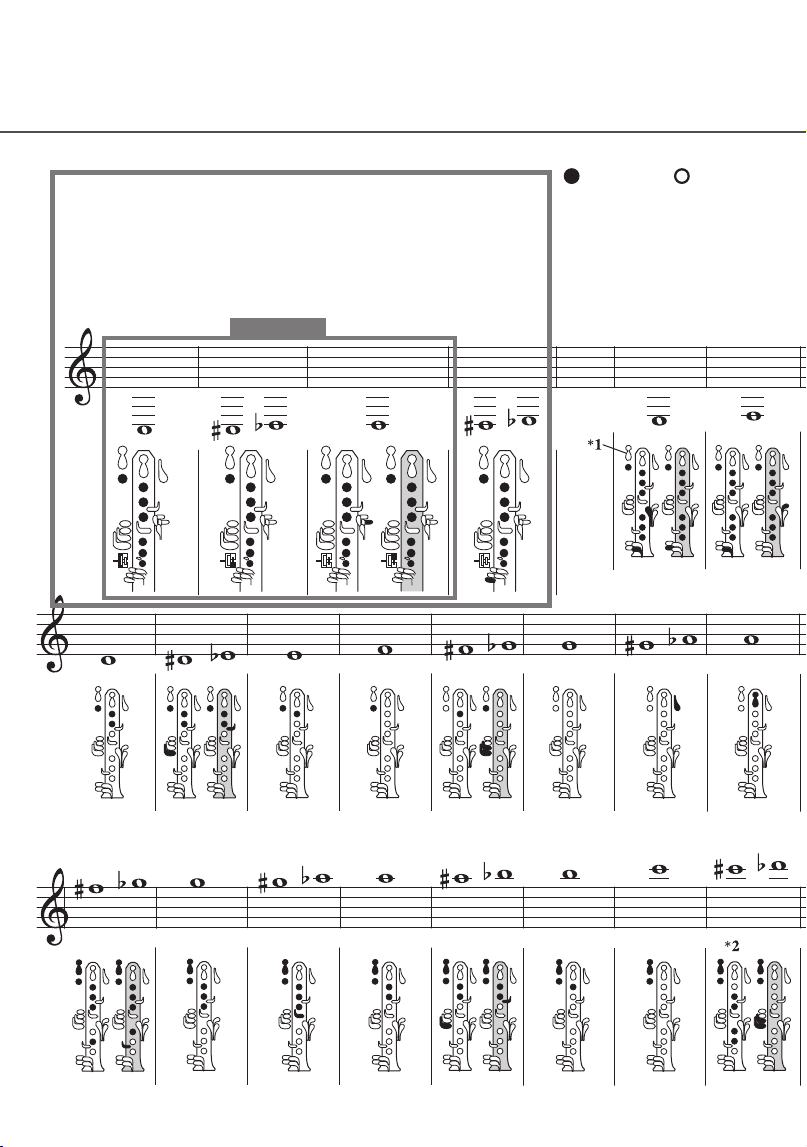
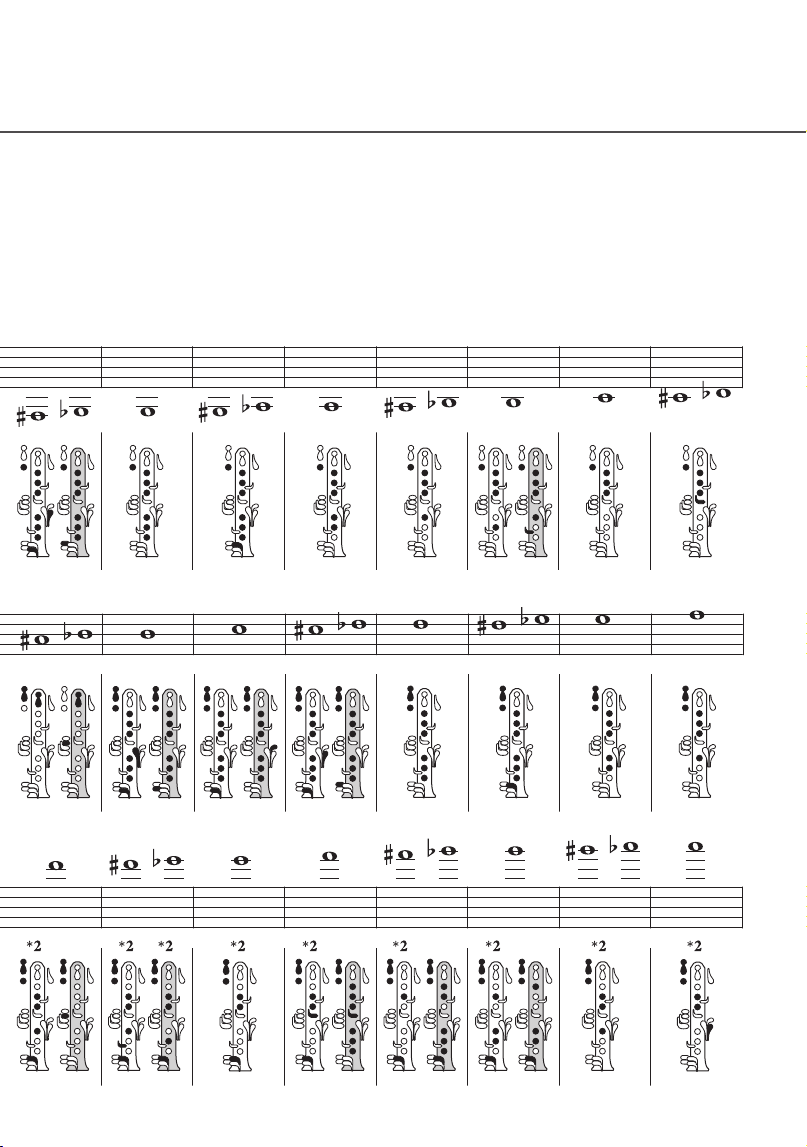
フィンガリング チャート
/Fingering Chart/Gri tabelle/
Gra co de digitação/
单簧管指法表
/
Диаграмма
15
Tableau des doigtés/Grá co de digitado/
аппликатуры
/
운지법
/
指法表

16
このチャートはベーム式です。( アミがけ ) はかえ指です。
*1
レジスターキイ
*2
アルトクラリネット / バスクラリネットの場合:
左手人差指を下にずらしてキイを押さえ、中央の穴を開けた状態にする。
is chart uses the Boehm ngering system. Alternate ngerings are shown on the shaded illustrations.
*1 Register Key
*2 Alto Clarinet/Bass Clarinet:
Slide the left fore nger down and hold the key so that the center hole is open.
Die abgebildete Übersicht basiert auf dem Boehm-Gri system. Schattierte Instrumente zeigen alternative
Gri e.
*1 Registerklappe
*2 Altklarinette/Bassklarinette:
Mit dem linken Zeige nger nach unten fahren und die Klappe gedrückt halten, so dass das mittlere Loch
geö net ist.
Ce tableau utilise le doigté système Boehm. Les autres doigtés de remplacement sont indiqués par les illus-
trations ombrées.
*1 Clé de registre
*2 Clarinette Alto/Clarinette Basse:
Faites glisser l’index gauche vers le bas et tenez la clé de façon que le trou central soit ouvert.
Este grá co emplea el sistema de digitación Bohem. En las ilustraciones sombreadas se muestran digitacio-
nes alternativas.
*1 Llave de registro
*2 Clarinete alto/Clarinete bajo:
Deslice hacia abajo el dedo índice de la mano izquierda y retenga la llave de modo que el ori cio central esté
abierto.
Este grá co utiliza o sistema de digitação Boehm. Dedilhados alternativos são mostrados nas guras sombreadas .
*1 Chave de registro
*2 Clarinete Alto/Clarinete Baixo:
Deslize o dedo posterior esquerdo e segure a chave de modo que o orifício central esteja aberto.
本表采用贝姆式指法系统。记录阴影部分表示也可以用此指法。
*1
高音键
*2
中音单簧管/低音单簧管
:
向下滑动左手食指,按住按键,使中心孔打开。
Эта диаграмма показывает систему аппликатуры Бёма. Дополнительная аппликатура показана
на затененных иллюстрациях.
*1 Октавный клапан
*2 Альтовый кларнет/Басовый кларнет:
Двигайте четвертый левый палец вниз, зажимая клавишу так, чтобы центральное отверстие
открылось.
이 표에서는 Boehm 운지 방식을 사용합니다. 다른 운지법은 어두운 색 그림으로 표시하고 있습니다.
*1
등록 키
*2
알토클라리넷/ 베이스클라리넷:
집게 손가락으로 키를 눌러 센터홀이 열리게 합니다.
此指法表採用貝姆式指法系統。灰色圖示為替換指法。
*1
高音鍵
*2
中音單簧管/低音單簧管:向下滑動左手食指,按住按鍵,讓中間音孔打開。
フィンガリングチャート
/Fingering Chart /Gri tabelle/Tableau des doigtés/
Grá co de digitado/Gra co de digitação/
单簧管指法表 /
Диаграмма
аппликатуры
/
운지법
/
指法表

MEMO

Manual Development Group
© 2013 Yamaha Corporation
Published 01/2022
2022
年
1
月
发行
POCP-B0
VDE1620
〒430-8650 静岡県浜松市中区中沢町 10-1